Macromedia Flash 8 For Dummies (Nov 2005).pdf - X-Files
409
TEAM LinG
-
Upload
khangminh22 -
Category
Documents
-
view
4 -
download
0
Transcript of Macromedia Flash 8 For Dummies (Nov 2005).pdf - X-Files
TEAM LinG
Ellen Finkelstein and Gurdy Leete
Macromedia®
Flash® 8FOR
DUMmIES‰
01_596918 ffirs.qxd 10/7/05 7:07 PM Page i
Macromedia® Flash® 8 For Dummies®
Published byWiley Publishing, Inc.111 River StreetHoboken, NJ 07030-5774
www.wiley.com
Copyright © 2006 by Wiley Publishing, Inc., Indianapolis, Indiana
Published by Wiley Publishing, Inc., Indianapolis, Indiana
Published simultaneously in Canada
No part of this publication may be reproduced, stored in a retrieval system or transmitted in any form orby any means, electronic, mechanical, photocopying, recording, scanning or otherwise, except as permit-ted under Sections 107 or 108 of the 1976 United States Copyright Act, without either the prior writtenpermission of the Publisher, or authorization through payment of the appropriate per-copy fee to theCopyright Clearance Center, 222 Rosewood Drive, Danvers, MA 01923, (978) 750-8400, fax (978) 646-8600.Requests to the Publisher for permission should be addressed to the Legal Department, Wiley Publishing,Inc., 10475 Crosspoint Blvd., Indianapolis, IN 46256, (317) 572-3447, fax (317) 572-4355, or online athttp://www.wiley.com/go/permissions.
Trademarks: Wiley, the Wiley Publishing logo, For Dummies, the Dummies Man logo, A Reference for theRest of Us!, The Dummies Way, Dummies Daily, The Fun and Easy Way, Dummies.com, and related tradedress are trademarks or registered trademarks of John Wiley & Sons, Inc. and/or its affiliates in the UnitedStates and other countries, and may not be used without written permission. Macromedia and Flash areregistered trademarks of Macromedia, Inc. in the United States and/or other countries. All other trade-marks are the property of their respective owners. Wiley Publishing, Inc., is not associated with any prod-uct or vendor mentioned in this book.
LIMIT OF LIABILITY/DISCLAIMER OF WARRANTY: THE PUBLISHER AND THE AUTHOR MAKE NO REP-RESENTATIONS OR WARRANTIES WITH RESPECT TO THE ACCURACY OR COMPLETENESS OF THE CON-TENTS OF THIS WORK AND SPECIFICALLY DISCLAIM ALL WARRANTIES, INCLUDING WITHOUTLIMITATION WARRANTIES OF FITNESS FOR A PARTICULAR PURPOSE. NO WARRANTY MAY BE CRE-ATED OR EXTENDED BY SALES OR PROMOTIONAL MATERIALS. THE ADVICE AND STRATEGIES CON-TAINED HEREIN MAY NOT BE SUITABLE FOR EVERY SITUATION. THIS WORK IS SOLD WITH THEUNDERSTANDING THAT THE PUBLISHER IS NOT ENGAGED IN RENDERING LEGAL, ACCOUNTING, OROTHER PROFESSIONAL SERVICES. IF PROFESSIONAL ASSISTANCE IS REQUIRED, THE SERVICES OF ACOMPETENT PROFESSIONAL PERSON SHOULD BE SOUGHT. NEITHER THE PUBLISHER NOR THEAUTHOR SHALL BE LIABLE FOR DAMAGES ARISING HEREFROM. THE FACT THAT AN ORGANIZATIONOR WEBSITE IS REFERRED TO IN THIS WORK AS A CITATION AND/OR A POTENTIAL SOURCE OF FUR-THER INFORMATION DOES NOT MEAN THAT THE AUTHOR OR THE PUBLISHER ENDORSES THE INFOR-MATION THE ORGANIZATION OR WEBSITE MAY PROVIDE OR RECOMMENDATIONS IT MAY MAKE.FURTHER, READERS SHOULD BE AWARE THAT INTERNET WEBSITES LISTED IN THIS WORK MAY HAVECHANGED OR DISAPPEARED BETWEEN WHEN THIS WORK WAS WRITTEN AND WHEN IT IS READ.
For general information on our other products and services, please contact our Customer CareDepartment within the U.S. at 800-762-2974, outside the U.S. at 317-572-3993, or fax 317-572-4002.
For technical support, please visit www.wiley.com/techsupport.
Wiley also publishes its books in a variety of electronic formats. Some content that appears in print maynot be available in electronic books.
Library of Congress Control Number: 2005932587
ISBN-13: 978-0-7645-9691-9
ISBN-10: 0-7645-9691-8
Manufactured in the United States of America
10 9 8 7 6 5 4 3 2 1
1B/SW/RQ/QV/IN
01_596918 ffirs.qxd 10/7/05 7:07 PM Page ii

About the AuthorsEllen Finkelstein has written numerous bestselling computer books onAutoCAD, PowerPoint, and Flash. She also writes articles on these programsfor Web sites, e-zines, and magazines. The five editions of her AutoCad Biblehave sold more than 80,000 copies in the United States and abroad. As anAdjunct Instructor of Management, she teaches eBusiness and HumanResource Management courses. Her latest book is Syndicating Web Sites withRSS Feeds For Dummies. She writes at home so that she can take the breadout of the oven on time.
Gurdy Leete has been working as a computer animator, computer animationsoftware engineer, and teacher of computer animation since 1981. He hasbeen teaching Flash and other computer animation programs for 14 years atMaharishi University of Management, where he is an Assistant Professor ofDigital Media. You can see his art on the Web atwww.infinityeverywhere.net.
01_596918 ffirs.qxd 10/7/05 7:07 PM Page iii

01_596918 ffirs.qxd 10/7/05 7:07 PM Page iv

DedicationTo MMY, for explaining that life is meant to be lived in happiness and teach-ing us how to realize that reality in daily life.
Authors’ AcknowledgmentsThis book was very much a group effort. First, I’d like to thank my coauthor,Gurdy Leete, without whom I could not have completed this book nor eventhought of writing it. Gurdy was always a pleasure to work with, always in agood mood, and helpful. He’s a brilliant artist and something of a program-mer, too, while I am neither. I’ve been quite impressed.
At Wiley, I’d like to thank Steve Hayes, our acquisitions editor, for trusting uswith this book. Great kudos go to Kim Darosett, our project editor, for doingsuch a tremendous job.
Personally, I’d like to thank my husband, Evan, and my kids, Yeshayah andEliyah, who helped out and managed without me as I wrote every day,evening, and weekend. I love you all.
Thanks to Macromedia, for creating Flash and supporting Flash authorsduring the beta period while we were learning all the new features of Flash 8,testing Flash, and writing, all at the same time.
Finally, I’d like to thank the Flash community and specifically all the Flashdesigners who contributed Flash movies to make this book and its compan-ion Web site more valuable. Most computer books use dummy files, and wemade up a few of our own to illustrate the point, but the real-world files wereceived for this book will help open up new vistas for our readers. And now,a few comments from Gurdy:
I’d like to echo all of Ellen’s words and thank her for being such a great col-laborator. She has such a talent for explaining things with the simplicity, pre-cision, and humor that are so characteristic of the deeper workings of thecosmos. I’d also like to thank my brilliant students Alek Lisefski(www.bluesheepstudios.com) and Benek Lisefski (www.exhibit52.com),and my intrepid research assistants, Nutthawut Chandhaketh, of Thailand;Radim Schreiber, of the Czech Republic; Burcu Cenberci, of Turkey; andPraveen Mishra, of Nepal, whose research activities on the Internet were sohelpful in the writing of this book. Thanks to my omnitalented M.A. inAnimation student Mike Zak, for the wonderful collection of clip art drawingshe created in Flash for the companion Web site. And thanks to my adorablewife, Mary, and my children, Porter and Jackie, for being so supportiveduring the many hours I spent working on this book.
01_596918 ffirs.qxd 10/7/05 7:07 PM Page v

Publisher’s AcknowledgmentsWe’re proud of this book; please send us your comments through our online registration formlocated at www.dummies.com/register/.
Some of the people who helped bring this book to market include the following:
Acquisitions, Editorial, and Media Development
Project Editor: Kim Darosett
Senior Acquisitions Editor: Steven Hayes
Copy Editor: Virginia Sanders
Technical Editor: Sally Cruikshank
Editorial Manager: Leah Cameron
Media Development Manager:Laura VanWinkle
Media Development Supervisor:Richard Graves
Editorial Assistant: Amanda Foxworth
Cartoons: Rich Tennant(www.the5thwave.com)
Composition Services
Project Coordinator: Adrienne Martinez
Layout and Graphics: Carl Byers, Andrea Dahl, Barry Offringa
Proofreaders: Leeann Harney, Jessica Kramer,TECHBOOKS Production Services
Indexer: TECHBOOKS Production Services
Publishing and Editorial for Technology Dummies
Richard Swadley, Vice President and Executive Group Publisher
Andy Cummings, Vice President and Publisher
Mary Bednarek, Executive Acquisitions Director
Mary C. Corder, Editorial Director
Publishing for Consumer Dummies
Diane Graves Steele, Vice President and Publisher
Joyce Pepple, Acquisitions Director
Composition Services
Gerry Fahey, Vice President of Production Services
Debbie Stailey, Director of Composition Services
01_596918 ffirs.qxd 10/7/05 7:07 PM Page vi
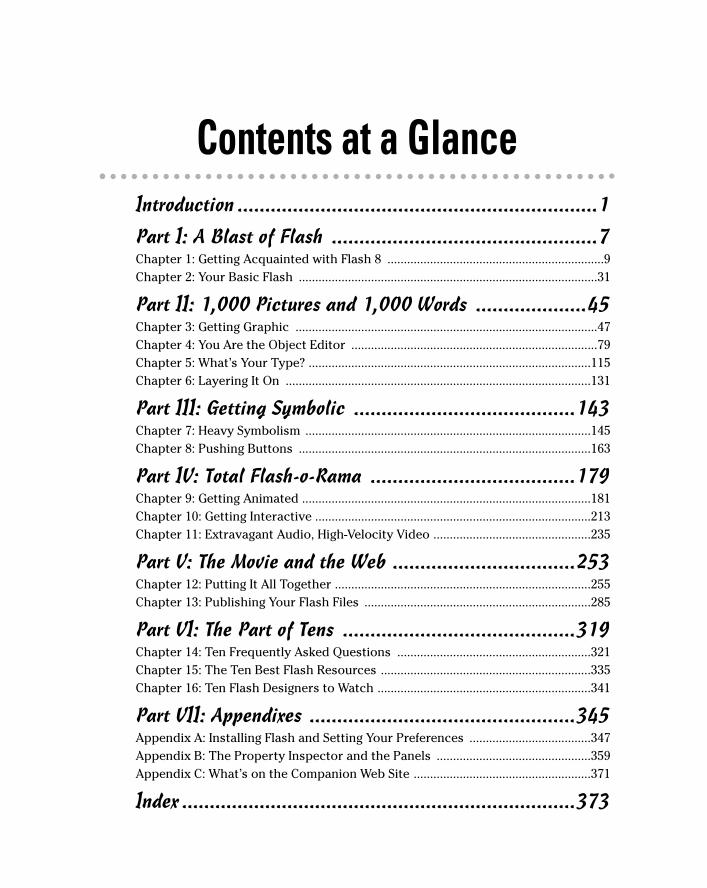
Contents at a GlanceIntroduction .................................................................1
Part I: A Blast of Flash ................................................7Chapter 1: Getting Acquainted with Flash 8 ..................................................................9Chapter 2: Your Basic Flash ...........................................................................................31
Part II: 1,000 Pictures and 1,000 Words ....................45Chapter 3: Getting Graphic ............................................................................................47Chapter 4: You Are the Object Editor ...........................................................................79Chapter 5: What’s Your Type? ......................................................................................115Chapter 6: Layering It On .............................................................................................131
Part III: Getting Symbolic ........................................143Chapter 7: Heavy Symbolism .......................................................................................145Chapter 8: Pushing Buttons .........................................................................................163
Part IV: Total Flash-o-Rama .....................................179Chapter 9: Getting Animated ........................................................................................181Chapter 10: Getting Interactive ....................................................................................213Chapter 11: Extravagant Audio, High-Velocity Video ................................................235
Part V: The Movie and the Web .................................253Chapter 12: Putting It All Together ..............................................................................255Chapter 13: Publishing Your Flash Files .....................................................................285
Part VI: The Part of Tens ..........................................319Chapter 14: Ten Frequently Asked Questions ...........................................................321Chapter 15: The Ten Best Flash Resources ................................................................335Chapter 16: Ten Flash Designers to Watch .................................................................341
Part VII: Appendixes ................................................345Appendix A: Installing Flash and Setting Your Preferences .....................................347Appendix B: The Property Inspector and the Panels ...............................................359Appendix C: What’s on the Companion Web Site ......................................................371
Index .......................................................................373
02_596918 ftoc.qxd 10/7/05 7:14 PM Page vii

02_596918 ftoc.qxd 10/7/05 7:14 PM Page viii
Table of ContentsIntroduction..................................................................1
About This Book ...............................................................................................1How to Use This Book ......................................................................................2Foolish Assumptions ........................................................................................2Conventions Used in This Book .....................................................................2How This Book Is Organized ...........................................................................3
Part I: A Blast of Flash ............................................................................3Part II: 1,000 Pictures and 1,000 Words ................................................3Part III: Getting Symbolic .......................................................................4Part IV: Total Flash-o-Rama ...................................................................4Part V: The Movie and the Web ............................................................4Part VI: The Part of Tens ........................................................................5Part VII: Appendixes ...............................................................................5
Icons Used in This Book ..................................................................................5Where to Go from Here ....................................................................................6
Part I: A Blast of Flash ..................................................7
Chapter 1: Getting Acquainted with Flash 8 . . . . . . . . . . . . . . . . . . . . . . .9Discovering Flash ...........................................................................................10Understanding What You Can Create with Flash 8 ....................................11Determining When Not to Use Flash 8 .........................................................12Getting the Right Start ...................................................................................12
Starting Flash on a PC ..........................................................................13Starting Flash on a Mac ........................................................................13Creating a new movie ...........................................................................13Opening an existing movie ..................................................................13
Taking a Look Around ....................................................................................14Tooling around the toolbars ...............................................................15Using panels ..........................................................................................15Discovering the Flash menus ..............................................................16Staging your movies .............................................................................18Following a timeline .............................................................................19
Getting Help in a Flash ...................................................................................20Multiple Help manuals .........................................................................20Finding more help on the Web ............................................................21
Try It; You’ll Like It .........................................................................................21Conceiving your first animation .........................................................21Creating flashy drawings .....................................................................22Making graphics move .........................................................................25
02_596918 ftoc.qxd 10/7/05 7:14 PM Page ix

Publishing your first animation for posterity ...................................27Exiting Flash ..........................................................................................28
Chapter 2: Your Basic Flash . . . . . . . . . . . . . . . . . . . . . . . . . . . . . . . . . . . .31Looking at the Big Picture .............................................................................31Setting the Stage .............................................................................................33
Choosing the Stage color .....................................................................33Specifying the frame rate .....................................................................34Setting the Stage size and adding metadata ......................................34
Grabbing a Graphic ........................................................................................35Understanding vectors and bitmaps ..................................................36Finding graphics ...................................................................................37Going to the Library .............................................................................37
Using a Template ............................................................................................41Printing Your Movie .......................................................................................42
Part II: 1,000 Pictures and 1,000 Words ......................45
Chapter 3: Getting Graphic . . . . . . . . . . . . . . . . . . . . . . . . . . . . . . . . . . . . .47Sharpening Your Pencil .................................................................................47
Setting the Pencil modifier ..................................................................48Setting the stroke type .........................................................................49Setting the color ...................................................................................52
Creating Shapely Shapes ...............................................................................52Line up ...................................................................................................52Be square ...............................................................................................53Be an egg ................................................................................................54
Mixing and Matching Shapes ........................................................................54Cutting up shapes .................................................................................55Placing objects on top of each other .................................................55Keeping objects safe and secure ........................................................56
Creating Curves with the Pen .......................................................................57Drawing straight lines ..........................................................................57Drawing curves .....................................................................................58
Getting Artistic with the Brush .....................................................................59Brush Mode modifier ...........................................................................60Brush Size drop-down list ....................................................................60Brush Shape drop-down list ................................................................60Pressure and Tilt modifiers .................................................................62Brush smoothing ..................................................................................63
Pouring on the Paint ......................................................................................63Strokes, Ink ......................................................................................................64
Macromedia Flash 8 For Dummies x
02_596918 ftoc.qxd 10/7/05 7:14 PM Page x

A Rainbow of Colors .......................................................................................65Solid citizens .........................................................................................65Gradient colors .....................................................................................67Bitmap fills .............................................................................................69Locking a fill ..........................................................................................71
Drawing Precisely ...........................................................................................71The ruler rules ......................................................................................71Using guides ..........................................................................................72Working with the grid ...........................................................................73Snapping turtle .....................................................................................73Pixel, pixel on the wall .........................................................................74
The Import Business — Using Outside Graphics .......................................75Importing graphics ...............................................................................75Using imported graphics .....................................................................76
Chapter 4: You Are the Object Editor . . . . . . . . . . . . . . . . . . . . . . . . . . . .79Selecting Objects ............................................................................................79
Selecting with the Selection tool ........................................................80Lassoing your objects ..........................................................................81Selecting everything in one fell swoop ..............................................82
Moving, Copying, and Deleting .....................................................................82Movin’ on down the road .....................................................................83Aligning objects with the Align panel ................................................86Copying objects ....................................................................................86Makin’ objects go away ........................................................................87
Making Shapes More Shapely .......................................................................87Reshaping shapes and outlines ..........................................................88Using the Subselect tool ......................................................................88Freely transforming and distorting shapes .......................................89Straightening lines and curving curves .............................................92Modifying line endings .........................................................................92Optimizing curves ................................................................................93Expanding and contracting filled shapes ..........................................93Softening edges .....................................................................................94Converting lines to fills ........................................................................95
Transforming Fills ..........................................................................................96Transferring Properties .................................................................................99Finding and Replacing Objects .....................................................................99Transforming Objects ..................................................................................100
Scaling, scaling . . . ..............................................................................101’Round and ’round and ’round we rotate ........................................102Getting skewy ......................................................................................103Flippety, floppety ................................................................................104
Combining Objects .......................................................................................105Getting Grouped ...........................................................................................105
xiTable of Contents
02_596918 ftoc.qxd 10/7/05 7:14 PM Page xi
Changing the Transformation Point ...........................................................106Breaking Apart Objects ...............................................................................108Establishing Order on the Stage .................................................................108Undoing, Redoing, and Reusing ..................................................................110
Undoing actions ..................................................................................110Redoing actions ..................................................................................110Using object-level undo and redo .....................................................110Reusing actions with the History panel ...........................................111
Chapter 5: What’s Your Type? . . . . . . . . . . . . . . . . . . . . . . . . . . . . . . . . . .115Presenting Your Text ....................................................................................115
Creating text ........................................................................................116Editing text ..........................................................................................117Setting character attributes ..............................................................121Hyperlinking text ................................................................................124Getting the best text appearance .....................................................124Setting up paragraph formats ...........................................................125Creating input and dynamic text ......................................................127
Creating Cool Text Effects ...........................................................................128
Chapter 6: Layering It On . . . . . . . . . . . . . . . . . . . . . . . . . . . . . . . . . . . . .131Creating Layers .............................................................................................132
Using layers .........................................................................................132Changing layer states .........................................................................133
Getting Those Layers Right .........................................................................134Deleting layers ....................................................................................135Copying layers ....................................................................................135Renaming layers .................................................................................136Reordering layers ...............................................................................136Organizing layers ................................................................................137Modifying layer properties ................................................................138
Creating Guide Layers ..................................................................................139Opening Windows with Mask Layers .........................................................140
Creating a mask layer .........................................................................141Editing mask layers ............................................................................141Animating mask layers .......................................................................142
Part III: Getting Symbolic ..........................................143
Chapter 7: Heavy Symbolism . . . . . . . . . . . . . . . . . . . . . . . . . . . . . . . . . .145Understanding Symbol Types .....................................................................145
Using graphic symbols .......................................................................146Using movie clip symbols ..................................................................147Using button symbols ........................................................................147Using font symbols .............................................................................147
Macromedia Flash 8 For Dummies xii
02_596918 ftoc.qxd 10/7/05 7:14 PM Page xii
Creating Symbols ..........................................................................................148Creating symbols from existing objects ..........................................148Creating empty symbols ....................................................................149Converting an animation to a movie clip symbol ...........................149Creating a symbol by duplicating a symbol ....................................150
Modifying Symbols .......................................................................................151Changing the properties of a symbol ...............................................151Editing symbols ..................................................................................151
Using Symbols from Other Movies .............................................................153Using the Flash Library ......................................................................155Using the Flash For Dummies Library ..............................................155
Working with Instances, for Instance .........................................................156Inserting instances .............................................................................156Editing instances ................................................................................157
Chapter 8: Pushing Buttons . . . . . . . . . . . . . . . . . . . . . . . . . . . . . . . . . . .163Creating Simple Buttons ..............................................................................163
Understanding button states ............................................................164Making a basic button ........................................................................165
Putting Buttons to the Test .........................................................................166Creating Complex Buttons ..........................................................................167
Adding a sound to a button ...............................................................167Adding a movie clip to a button .......................................................169Adding an action to a button ............................................................171Creating a button that acts on text input ........................................176
Part IV: Total Flash-o-Rama .......................................179
Chapter 9: Getting Animated . . . . . . . . . . . . . . . . . . . . . . . . . . . . . . . . . .181Who Framed the Animation? ......................................................................181Preparing to Animate ...................................................................................182
Master of the Timeline .......................................................................183Turtle or hare? ....................................................................................185
Creating Animations Instantly with Timeline Effects ...............................185Animating with Keyframes ..........................................................................187
Frame after frame after frame ...........................................................188Stillness in the night ...........................................................................190
The Animation Tween ..................................................................................190From here to there — motion tweening ...........................................191Tweening shapes ................................................................................198
Editing Animation .........................................................................................203Adding labels and comments ............................................................203Selecting frames ..................................................................................204Copying and pasting frames ..............................................................204
xiiiTable of Contents
02_596918 ftoc.qxd 10/7/05 7:14 PM Page xiii
Moving frames .....................................................................................205Adding frames .....................................................................................205Deleting frames ...................................................................................205Turning keyframes back into regular frames ..................................206Reversing your animation .................................................................206Changing speed ...................................................................................206Changing the animation settings ......................................................207Using onion skins ................................................................................207Moving everything around the Stage at once .................................209
Making the Scene ..........................................................................................209Breaking your movie into scenes .....................................................210Manipulating that scene ....................................................................210
Chapter 10: Getting Interactive . . . . . . . . . . . . . . . . . . . . . . . . . . . . . . . .213Understanding Actions ................................................................................213Using Behaviors ............................................................................................214Adding Actions to Frames ...........................................................................217
Adding a basic action to a frame ......................................................218Stopping the movie before it starts ..................................................218
Adding Actions to Buttons ..........................................................................219Adding an Action to a Movie Clip ...............................................................222Using Actions ................................................................................................224
Timeline Control actions ...................................................................224Browser/Network actions ..................................................................227
Making Objects Work for You .....................................................................229Method acting .....................................................................................229Creating animated masks with movie clips .....................................230
Exploring Advanced ActionScript ..............................................................231Programming constructs ...................................................................231Start-and-stop drag .............................................................................232Making comments ..............................................................................233ActionScript 2.0 ...................................................................................233External scripting ...............................................................................234Discovering more about ActionScript ..............................................234
Chapter 11: Extravagant Audio, High-Velocity Video . . . . . . . . . . . . .235Acquiring Amazing Audio ............................................................................235
Importing sounds ...............................................................................236Placing sounds into a movie .............................................................236
Editing Sounds ..............................................................................................238Deleting parts of a sound ...................................................................240Changing the volume .........................................................................240
Managing Sound ...........................................................................................240Video Magic ...................................................................................................242
Four cool ways to use video in Flash ...............................................243Preparing to embed video in Flash ...................................................244Embedding and editing a video ........................................................245Streaming a video ...............................................................................249
Macromedia Flash 8 For Dummies xiv
02_596918 ftoc.qxd 10/7/05 7:14 PM Page xiv

Part V: The Movie and the Web ..................................253
Chapter 12: Putting It All Together . . . . . . . . . . . . . . . . . . . . . . . . . . . . .255Using Named Anchors .................................................................................255Adding the Power of Components .............................................................257
Using radio buttons in a Flash movie ...............................................258Using check boxes in a Flash movie .................................................261Using combo boxes in a Flash movie ...............................................262Using list boxes in a Flash movie ......................................................265Using scroll panes in a Flash movie .................................................266Using windows in a Flash movie .......................................................268
Creating a Preloader ....................................................................................269Adding Web Search Information to Your Flash Movie .............................270Creating an Entire Web Site with Flash ......................................................270
Creating navigation with getURL ......................................................272Using the Timeline to store Web content ........................................272
Testing for the Flash Player ........................................................................275Letting the user decide ......................................................................276Detecting the Flash Player version ...................................................276Creating alternative sites ...................................................................277
Using the Movie Explorer ............................................................................277Making Your Site More Accessible .............................................................279Sharing Libraries on the Run ......................................................................281
Creating a shared library ...................................................................281Using a shared library ........................................................................283
Chapter 13: Publishing Your Flash Files . . . . . . . . . . . . . . . . . . . . . . . .285Optimizing Your Movies for Fast Download .............................................286
Simplifying artwork ............................................................................286Optimizing text ...................................................................................287Using shared libraries ........................................................................287Compressing sound ............................................................................287Animating efficiently ..........................................................................288
Testing Movies ..............................................................................................288Using the Test Movie command .......................................................288Testing a movie in a Web browser ....................................................290
Saving Your Work in Flash MX 2004 Format ..............................................291Publishing Flash Movies ..............................................................................292Publishing to SWF .........................................................................................293Publishing to HTML .....................................................................................296
Understanding the HTML code for a movie ....................................297Specifying Flash Player detection and other HTML settings ........299
Publishing to Other Formats .......................................................................305Creating PNG graphic files .................................................................305Creating self-playing movies .............................................................307
xvTable of Contents
02_596918 ftoc.qxd 10/7/05 7:14 PM Page xv
Using Publish Profiles ..................................................................................308Creating a publish profile ..................................................................308Duplicating a publish profile .............................................................309Modifying a publish profile ...............................................................309Deleting a publish profile ..................................................................309Exporting and importing publish profiles .......................................310
Using Publish Preview .................................................................................311Posting Your Movie to Your Web Site ........................................................311Exporting Movies and Images .....................................................................312Creating Printable Movies ...........................................................................314
Preparing your movie for printing ....................................................315Specifying printable frames ...............................................................315Specifying the print area ....................................................................316Printing movies from the Flash Player .............................................317
Part VI: The Part of Tens ............................................319
Chapter 14: Ten Frequently Asked Questions . . . . . . . . . . . . . . . . . . . .321How Do I Combine Two Flash Movies into One? ............................321Why Is Motion Tweening not Working? ...........................................322How Can I Sync Sound with Motion? ................................................323What Is the Best Way to Import Bitmaps? .......................................323How Do I Rescale My Movie’s Size? ..................................................325What Are the Best Movie-Creating Tips? .........................................326Can Flash Do 3-D? ...............................................................................327How Do I Center a Flash Movie in a Web Page? ..............................331What Are the Size Limits for a Flash Movie? ...................................332How Do I Dynamically Load Music from the Web? .........................333
Chapter 15: The Ten Best Flash Resources . . . . . . . . . . . . . . . . . . . . . .335Play Around with the Samples ..........................................................335Visit Our Site .......................................................................................335Take a Course ......................................................................................336Look on the Flash Web Page ..............................................................336Join a Flash Discussion Group ..........................................................336Check Out the Flash Resource Sites .................................................337Check Out Sites That Use Flash ........................................................339Attend a Flash Conference ................................................................339Collect Flash Movies ..........................................................................339Reuse Your Best Stuff .........................................................................340
Chapter 16: Ten Flash Designers to Watch . . . . . . . . . . . . . . . . . . . . . .341Ola Berger ............................................................................................341Hillman Curtis .....................................................................................341Joshua Davis ........................................................................................342
Macromedia Flash 8 For Dummies xvi
02_596918 ftoc.qxd 10/7/05 7:14 PM Page xvi

Anthony Eden ......................................................................................342Ben Hantoot .........................................................................................342Shane Mielke .......................................................................................342Keith Peters .........................................................................................343Ellen Pronk ...........................................................................................343Micaël Reynaud ...................................................................................343Craig Swann .........................................................................................343
Part VII: Appendixes ..................................................345
Appendix A: Installing Flash and Setting Your Preferences . . . . . . .347Installing Flash ..............................................................................................347
Installing Flash onto a PC from a CD ................................................348Installing Flash by downloading it to your PC ................................348Installing Flash onto a Mac from a CD .............................................349Installing Flash by downloading it to your Mac ..............................350
Setting Your Preferences .............................................................................350General category ................................................................................351ActionScript category ........................................................................353Auto Format category ........................................................................354Clipboard category .............................................................................354Drawing category ...............................................................................355Text category ......................................................................................355Warnings category ..............................................................................355
Customizing Keyboard Shortcuts ..............................................................355
Appendix B: The Property Inspector and the Panels . . . . . . . . . . . . .359The Tools Panel ............................................................................................359The Property Inspector Gadget ..................................................................360
Property inspector with no selection ..............................................360Property inspector with a shape selected ......................................361Property inspector with keyframe selected ....................................361Property inspector with a symbol instance selected ....................361
The Align Panel .............................................................................................362The Color Mixer Panel .................................................................................362The Color Swatches Panel ...........................................................................363The Info Panel ...............................................................................................363The Scene Panel ............................................................................................364The Transform Panel ...................................................................................364The Actions Panel ........................................................................................365The Debugger Panel .....................................................................................366The Movie Explorer Panel ...........................................................................366The Output Tab of the Property Inspector ...............................................367The Accessibility Panel ...............................................................................368
xviiTable of Contents
02_596918 ftoc.qxd 10/7/05 7:14 PM Page xvii
The Components Panel ................................................................................368The Component Inspector ..........................................................................369The History Panel .........................................................................................369The Strings Panel ..........................................................................................370The Behaviors Panel ....................................................................................370
Appendix C: What’s on the Companion Web Site . . . . . . . . . . . . . . . .371Your Own Personal Library of Vector Graphics .......................................371Flash Movies Galore .....................................................................................372Bonus Chapter ..............................................................................................372
Index ........................................................................373
Macromedia Flash 8 For Dummies xviii
02_596918 ftoc.qxd 10/7/05 7:14 PM Page xviii
Introduction
Welcome to Macromedia Flash 8 For Dummies, your friendly Web-animation companion. In this book, we explain in plain English how to
make the most of Flash to create stunning Web site animations. MacromediaFlash 8 For Dummies aims to give you all the information you need to startusing Flash right away — with no hassle.
About This BookAs though you hadn’t guessed, Macromedia Flash 8 For Dummies covers thepowerful animation product Flash 8, from Macromedia. (The preceding ver-sion was Flash MX 2004.) Flash 8 is the latest version of the popular softwareused on some of the coolest Web sites on the Internet.
Flash comes in two versions: Flash 8 Basic and Flash 8 Professional (Pro). Inaddition to including all the features of Flash 8 Basic, the Pro version of Flashhas powerful features for programmers and production teams, such as pro-ject file management, version control of Flash files, and the ability to connectFlash to live external data sources and Web services. In addition, Flash 8 Prooffers special graphics effects, custom animation controls, better handling ofbitmap scaling, and improvements in the way video content is handled. Inthis book, we focus on the features of Flash 8 Basic rather than Flash 8 Probecause they’re much more useful to people who are new to Flash. However,we do sometimes describe the Flash 8 Pro features. We comprehensivelyexplain the Flash features, including
� Working with the Flash screen, toolbars, and menus
� Creating graphics and text in Flash
� Adding sound and video
� Using layers to organize your animation
� Creating symbols, which are objects that you save for repeated use
� Animating graphics (the key to Flash)
� Creating interactive Web sites
� Publishing Flash movies to your Web site
03_596918 intro.qxd 10/7/05 7:08 PM Page 1

How to Use This BookYou don’t have to read this book from cover to cover. We provide just theinformation you need, when you need it. Start with the first three chapters.Then play around with graphics until you create what you need for your Website. You might want to check out Chapter 6, on layers, to help you organize itall, and Chapter 7, which covers symbols. Then feel free to jump right toChapter 9, on animation, to create your first real Flash movie. Chapter 13 tellsyou how to get your movie on your Web site. Then fire up your browser, sitback, and marvel.
Of course, you’ll want to check out other chapters when you need them sothat you can create text and buttons, add sound and video, and create aninteractive Web site. Chapter 12 provides some ideas for putting all the Flashfeatures together for your best Web site ever.
Keep Macromedia Flash 8 For Dummies by your computer while you work.You’ll find it to be a loyal helper.
Foolish AssumptionsWe assume that you’re not already a master Flash developer. If you want touse Flash to create high-quality Web sites and you’re not an expert animatoralready, you’ll find this book to be a great reference. Macromedia Flash 8 ForDummies is ideal for beginners who are just starting to use Flash or for cur-rent Flash users who want to further hone their skills.
Because people usually add Flash movies to Web sites, we also assume thatyou know some of the basics of Web site creation. You should know whatHyperText Markup Language (HTML) is and understand the process of creat-ing and structuring HTML pages as well as uploading them to a Web site.
If you want some help on the topic of Web sites, you might want to take alook at Web Design For Dummies, by Lisa Lopuck (Wiley Publishing, Inc.).
Conventions Used in This BookSometimes it helps to know why some text is bold and other is italic so that youcan figure out what we’re talking about. (A typographic convention is not a con-vention of typographers meeting to discuss the latest typography techniques.)
2 Macromedia Flash 8 For Dummies
03_596918 intro.qxd 10/7/05 7:08 PM Page 2

New terms are in italics to let you know that they’re new. When we suggest thatyou type something, we show you we want you to type in bold. Messages andother text that come from Flash, including programming code, are in a specialtypeface, like this.
When we say something like “Choose File➪Save As,” it means to click the Filemenu at the top of your screen and then choose Save As from the menu thatopens. When we want you to use a toolbar or toolbox button (or tool), we tellyou to click it.
How This Book Is OrganizedWe start by presenting an overview of the Flash universe and then continuein the general order that you would use to create a Flash animation. Morebasic material is at the beginning of the book, and more advanced material(but not too advanced!) comes later on. You might never use all the materialin this book in one Flash movie.
To be more specific, this book is divided into seven parts (to represent theseven states of consciousness — okay, we don’t have to get too cosmic here).Each part contains two or more chapters that relate to that part. Each chap-ter thoroughly covers one topic so that you don’t have to go searching allover creation to get the information you need.
Part I: A Blast of FlashPart I contains important introductory information about Flash. In Chapter 1,we tell you what Flash is all about, show you what the Flash screen looks like, and explain how to get help when you need it most. You can also findinstructions for starting Flash, starting a new movie, and opening an existingmovie, and we give you a short list of steps for creating your first animation.Chapter 2 explains in more detail the steps for creating a Flash movie. Wealso explain some basic concepts that all Flash users need to know.
Part II: 1,000 Pictures and 1,000 WordsPart II explains all the tools available for creating graphics in Flash. Chapter 3explains the unique drawing tools included in Flash. Of course, we also explainhow to import graphics if you don’t feel like creating your own. Chapter 4shows you how to edit and manipulate graphic objects, and Chapter 5 is all
3Introduction
03_596918 intro.qxd 10/7/05 7:08 PM Page 3
about creating text. Chapter 6 explains layers, which help you organize yourgraphics so that they don’t interfere with each other.
Part III: Getting SymbolicSymbols are graphical objects that you save to use again and again. Wheneveryou want to place an object on a Web page more than once, you can save theobject as a symbol. You can also group together many individual objects,making them useful when you want to manipulate, edit, or animate them all atone time. Chapter 7 explains creating and editing symbols. Chapter 8 describeshow to create buttons — not the kind that you sew, but rather the kind thatyou click with your mouse. Buttons are a kind of symbol, but on a Web pagethey execute an action when clicked.
Part IV: Total Flash-o-RamaPart IV explains how to put all your graphics together and make them move.Chapter 9 covers animation in detail — from frame-by-frame animation totweening, where Flash calculates the animation between your first and lastframes. Tween movement to make your objects move or morph into newshapes. You can also tween color and transparency.
Chapter 10 shows how to create interactive Web sites that react to your view-ers. For example, when a viewer clicks a button, Flash can jump to a differentpart of a movie or go to a different Web page entirely. To create interactivity,you use ActionScript, Flash’s JavaScript-like programming language. We tellyou how to put ActionScript to work.
Chapter 11 is about adding multimedia — sound, music, and video — to yourFlash movies and buttons.
Part V: The Movie and the WebThis part helps you put all your animated graphics and cool buttons togetherand publish your work on the Web. Chapter 12 outlines the various tech-niques that you can use to create a great Web site using only Flash.
Chapter 13 explains how to test your animation for speed and suitability forall browsers and systems. Then we cover all the details of publishing moviesas well as the other available formats, such as HTML and GIF. You can alsocreate projectors — movies that play themselves.
4 Macromedia Flash 8 For Dummies
03_596918 intro.qxd 10/7/05 7:08 PM Page 4
Part VI: The Part of TensWhat’s a For Dummies book without The Part of Tens? Chapter 14 answerssome frequently asked questions about Flash and introduces some fun tech-niques, such as creating drag-and-drop objects and simulating 3-D effects.Chapter 15 provides you with the ten best resources for learning about Flash(besides this book, of course). Chapter 16 lists our winners for ten greatFlash Web designers, although new ones emerge all the time.
Part VII: AppendixesLast, but not least, we come to the appendixes. They add some valuableinformation to the end of this book. Appendix A adds instructions oninstalling Flash as well as setting preferences and options, illustrations of allthe tools and panels in Flash 8. In Appendix B, we show you what’s what onthe Property inspector and on the various panels.
Appendix C tells you what’s on the companion Web site (www.dummies.com/go/flash8). We provide Flash movies that we illustrate in the book and othersthat you can just play with to see how they work. We also add our own libraryof graphics that you can add to your own movies. In addition, we provide abonus chapter, which is a glossary of obscure terms.
Icons Used in This BookIcons help point out special information. For example, sometimes they tell youthat you don’t care about this information and can skip over it without fear.
This icon flags new features in Flash 8. If you have been using Flash MX 2004or even an earlier version, you may want to skim through this book and lookfor this icon to help you quickly get up to speed in the new version.
Look for this icon to find all the goodies on the companion Web site, atwww.dummies.com/go/flash8.
This icon alerts you to information that you need to keep in mind to avoidwasting time or falling on your face.
5Introduction
03_596918 intro.qxd 10/7/05 7:08 PM Page 5
Flash has some advanced features you might want to know about — or skipover entirely. This icon lets you know when we throw the heavier stuff at you.
Tips help you finish your work more easily, quickly, or effectively. Don’t missout on these.
Uh-oh! “Watch out here!” is what this icon is telling you. If you skip these, younever know what might happen.
Where to Go from HereIf you haven’t already installed Flash, check out the complete instructions forinstalling Flash in Appendix A. Then open Flash, open this book, and plunge in.
We would love to hear your comments about this book. You can contact GurdyLeete at [email protected] and Ellen Finkelstein at [email protected] note that we can’t provide technical support on Flash. (If you needtechnical support, check out the resources we list in Chapter 16.)
Enough of all this talk. It’s time to move into the real part of this book andstart creating cool movies! Enjoy!
6 Macromedia Flash 8 For Dummies
03_596918 intro.qxd 10/7/05 7:08 PM Page 6

Part IA Blast of Flash
04_596918 pt01.qxd 10/7/05 7:07 PM Page 7

In this part . . .
In this part, you discover what Flash can and can’t doand start to make your way around the Flash world. In
Chapter 1, we introduce you to Flash, show you what itlooks like, and explain how to use its toolbars and menus.You find out about the Stage and the Timeline, two centralFlash concepts. Play your way through your first anima-tion to get firsthand experience in the power of Flash.
In Chapter 2, you get an overview of the entire process ofcreating a Flash animated movie, from developing yourconcept to publishing your movie in the format a browsercan display. We explain how to set properties that affectyour movie as a whole and how Flash works with variouskinds of graphics. We close with the steps for printingyour movie on paper. This part provides the foundationfor future success.
04_596918 pt01.qxd 10/7/05 7:07 PM Page 8

Chapter 1
Getting Acquainted with Flash 8In This Chapter� Introducing Flash
� Figuring out what you can create with Flash 8
� Knowing when not to use Flash 8
� Perusing the screen
� Using Help
� Creating your first animation
� Closing Flash
Once upon a time in a galaxy that seems far, far away by now, there wasthe Internet, which contained only plain, unformatted text. Then came
the Web, and we gained text formatting and graphics. Then the Web grew upa little, and Web page graphics got fancier with things like small animations inbanner ads. But people, being used to movies and TV, wanted an even moreanimated and interactive Web experience. Along came Flash.
Flash, from Macromedia, Inc., is the software that runs some of the coolestWeb sites around. When you surf the Web and see sites that contain anima-tion across the entire page or buttons that do spectacular stunts when youclick them, you’re probably seeing some Flash magic. If you create a Web site,you can use Flash to rev up the basics and actively respond to users’ choicesso that your viewers will say, “Wow!”
In this chapter, you find out what Flash is all about, what the Flash screenlooks like, and how to use Help. Then you create your first, simple animationso that all the rest of this book makes sense.
05_596918 ch01.qxd 10/7/05 7:09 PM Page 9

Discovering FlashFlash offers a powerful system for creating animation for the Web. In a nut-shell, here’s an overview of how you use the system:
1. Create a Flash movie by creating graphics and animating them overthe duration of the movie.
2. Use the Publish command within Flash to publish the movie into aFlash Player file that a browser can display.
At the same time, Flash creates the appropriate HyperText MarkupLanguage (HTML) code that you need for your Web page.
3. Insert HTML code into your HTML document that references the FlashPlayer file.
It’s similar to adding a graphic to a Web page. Or, you can use the HTMLcode alone as a new Web page for a fully Flashed page.
4. Upload the new or edited HTML document and the Flash Player file tothe location where you keep other files for your Web pages.
5. Open your browser, navigate to your Web page, and presto! — there’syour cool animation on your Web page.
You need the Flash Player to see the effects that Flash creates. These days,the Flash Player comes installed with most computer systems and browsers,so most people can view Flash-driven Web sites immediately without any spe-cial download or preparation. When you display a Web site that containsFlash effects, your system uses the Flash Player to play the animation. Userswho don’t have a Flash Player can download it for free from Macromedia atwww.macromedia.com/go/getflash.
Web sites are getting more and more sophisticated. By using animation, spe-cial effects, and interactive techniques, you can distinguish your Web sitefrom the also-rans. Creating animation isn’t hard, and you don’t have to be aprofessional graphic artist, either. Anyone can create simple animations toenhance a Web site; it just takes a little time.
To find the most up-to-date Web sites that use Flash, check out theMacromedia site at www.macromedia.com/software/flash/flashpro andclick the Showcase button. Don’t get discouraged by seeing some of the trulyprofessional results at these sites. You can start with a simple, animated siteand go from there. (Chapter 16 lists ten great Flash designers and where youcan find their work.)
10 Part I: A Blast of Flash
05_596918 ch01.qxd 10/7/05 7:09 PM Page 10
Understanding What You Can Create with Flash 8
You can use Flash 8 to create simple animation to add to your Web page. Or,you can create an entire Web page or site using Flash and incorporate text,graphics, interactive buttons, and animation. You can even program applica-tions in Flash.
This book helps you use Flash to create a simple or complex Web site. Thefollowing list describes some ways that you can manipulate text, graphics,and sound by using Flash 8:
� Create still or animated text on your Web page. You can choose to stopthe animation after a few seconds or repeat it while your viewers viewthe page.
� Use Flash tools to create your own graphics for your Web page or toimport graphics. You can lay out an entire Web page graphically or addgraphics to only a part of a Web page.
� Animate graphics and make objects appear and disappear by usingthe transparency feature. Objects can move, get bigger or smaller, orrotate. Flash also lets you morph — that is, transform — shapes into newshapes.
� Fill shapes and text with gradients, which are colors that graduallychange into new colors. You can even fill shapes and text with bitmapimages that you import into Flash. For example, you could fill the lettersof your name with dozens of flowers. (You aren’t a flower child any more?)
� Create Web page buttons that not only lead your viewers whereveryou want them to go but also change shape or color at the same time.You can make buttons change when you pass your mouse over them.People who view your page can click a button to display a movie (anima-tion) or start a small application.
� Add sound or video to your movie. It’s easy to add sound effects inFlash. You can control how long the sound or music plays and whetherit loops to play continuously. You can play video files as well.
� Create menus that viewers can use to navigate your site. You can createnavigation tools as well as forms, check boxes, and other interface ele-ments that look a lot more stylish than plain HTML ones.
As you can see, you can go far with Flash if you want. And why not? It’sgreat fun!
11Chapter 1: Getting Aquainted with Flash 8
05_596918 ch01.qxd 10/7/05 7:09 PM Page 11
Determining When Not to Use Flash 8If Flash 8 is so wonderful, why doesn’t every Web site designer use it? Whyaren’t most Web sites created completely with Flash?
Here’s the other side of the story.
Although the vector graphics and animation of Flash load quickly, they don’tload as quickly as plain text and simple graphics. Adding a movie to yourWeb page creates some overhead. There’s no point in using Flash if you wantsimple pages consisting of mostly text and a few graphics that you want tostay put and not move.
You can create certain graphic effects more easily by using bitmap graphics.Painted brushstroke and textured effects are examples. Artists create thesetypes of graphics by using graphics editing software, and the results arebitmaps. Similarly, to add photographs to your Web page, you need to scanthe photographs as bitmaps. Flash creates vector graphics (defined mathe-matically), which are different from bitmap graphics (defined by lots of dots).You can find out more about bitmap and vector graphics in Chapter 2.
If you want simple animation, such as a few blinking dots or a marquee effect,animated GIFs (the animated bitmap graphics that you often see on the Web)might be smaller than Flash movies, so they load faster. You can create ani-mated GIFs by using animated GIF editing software.
Some sites don’t lend themselves to animation. Animation can distract fromyour content, and overdoing animation can make a serious site seem silly.Animation is great, but it has its place. Also, although Flash has some fea-tures that allow accessibility for people with disabilities, it still isn’t as acces-sible as plain HTML. You need to determine whether animation is right foryour Web site.
Flash provides little in the way of 3-D graphics or animation. For those, youneed to go to more sophisticated software, such as Poser or 3D Studio Max.(See Chapter 14 for more 3-D possibilities in Flash.)
Getting the Right StartWell begun is half done, as the saying goes. The easiest way to begin usingFlash 8 is with a shortcut or alias right on your desktop. Double-click theFlash icon, and you’re on your way. (See Appendix A for information oninstalling Flash.)
12 Part I: A Blast of Flash
05_596918 ch01.qxd 10/7/05 7:09 PM Page 12

Starting Flash on a PCWhether you installed Flash from the CD or by downloading it from theMacromedia Web site onto your PC, you might or might not have a shortcuton your desktop. To create one, choose Start➪Programs➪Macromedia➪Macromedia Flash 8. Right-click the Macromedia Flash 8 item and chooseCreate Shortcut from the pop-up menu that appears. The new shortcutappears on the menu. Drag that shortcut to your desktop.
To rename the shortcut, click the shortcut on your desktop. Then click thetext beneath the icon. Type Flash 8 (or whatever you want) and press Enter.Just double-click the icon to open Flash.
Starting Flash on a MacYou might find it handy to add the Flash 8 icon to your Dock for easy launch-ing. To do this, click the Finder icon on the extreme left of the Dock to bringup a new Finder window. Navigate in the Finder window to the Applicationsfolder, and in the Applications folder, double-click the Macromedia Flash 8folder to open it. Click and drag the Flash 8 application icon to the Dock. Acopy of the Flash 8 application icon appears on the Dock.
Creating a new movieFiles that you create by using Flash are commonly called movies. When youstart Flash, the startup screen appears (by default). In the Create New sec-tion, click Flash Document. If you have already opened a movie and have themenus available, choose File➪New. In the New Document dialog box, selectFlash Document on the General tab and then click OK. You usually start bycreating or importing some graphics. (To find out more about working withgraphics, see Chapter 3.)
Opening an existing movieIf you want to work on a movie you’ve already created, when you first openFlash, choose the movie from the Open a Recent Item section or choose Opento find the file. If you’ve already opened a movie and have the menus avail-able, press Ctrl+O (Windows) or Ô+O (Mac) or choose File➪Open; thendouble-click the movie to open it. The first frame appears on your screen,and you can edit the movie any way that you want.
13Chapter 1: Getting Aquainted with Flash 8
05_596918 ch01.qxd 10/7/05 7:09 PM Page 13

When you open more than one movie, you see a tab at the top for each movie.You can click the tabs to move from movie to movie. The tabs appear in theorder you created or opened the movies.
Taking a Look AroundIf you’ve never created animation, the Flash screen is different from thescreens in other programs that you might be used to, so take the time to getto know it. You can also customize the Flash screen. Figure 1-1 shows onepossible display.
If your screen opens with several rectangular panels strewn about the screenor docked on various sides, don’t worry about them now. We explain how toopen and use these panels throughout this book, but you don’t need them forthis chapter. If they drive you crazy, right-click (Windows) or Control+click(Mac) each panel’s title bar and choose Close Panel Group from the menuthat appears.
See Appendix B for a full layout of each panel and toolbar.
Menu barTimeline More panelsTools panel
StageProperty inspector
Figure 1-1:The Flash
screen.
14 Part I: A Blast of Flash
05_596918 ch01.qxd 10/7/05 7:09 PM Page 14

Tooling around the toolbarsFlash contains two toolbars in the Mac version: the Edit bar and the Controller.In Windows, Flash also offers the Main toolbar. To display or hide these tool-bars, choose Window➪Toolbars and click the toolbar that you want to displayor hide. Here is a description of the toolbars:
� Main toolbar (Windows only): Contains commonly used commands.Many of these are familiar from the Standard toolbar in other Windowsprograms. By default, Flash does not display the Main toolbar.
� Controller: Lets you control the playback of movies. For more informa-tion, see Chapter 9.
� Edit bar: Helps you work with the Timeline and appears at the top of theTimeline. It includes a toggle to display and hide the Timeline, a buttonfor editing scenes, and a zoom control. We discuss the Timeline brieflylater in the chapter. For more information about the Timeline andscenes, see Chapter 9.
Using panelsPanels give you access to the many Flash settings. You access the panelsfrom the Window menu. We discuss the specific panels throughout this book.In this section, we explain how to keep control over your panels.
Most panels are dockable, which means that they can sit at the side orbottom of your Flash window without covering up your work. You can alsostack them on top of each other. You control panels by doing the following:
� To dock a panel: Drag it to the side or bottom of your screen.
� To undock a panel: Drag it from its grabber, which is at the left edge ofits title bar.
� To open or close a panel: Choose it from the Window menu.
� To close an undocked panel: Click its Close button.
� To close a docked panel: Right-click (Windows)/Control+click (Mac) itstitle bar and choose Close Panel.
You can stack panels just like you stack plastic containers in your refrigera-tor. Drag a panel (by its grabber) beneath another panel to stack it. You canalso collapse or expand panels: A collapsed panel displays only its title bar,so it doesn’t take up much space. Use the arrow on the left side of the titlebar to collapse or expand a panel or click its title bar.
15Chapter 1: Getting Aquainted with Flash 8
05_596918 ch01.qxd 10/7/05 7:09 PM Page 15
In Windows only, the Flash interface has new arrow buttons above panels thatare docked at the bottom of your screen and to the left of panels docked at theright. Click an arrow to collapse the panels to just the tiny arrow button. Clickthe arrow again to expand the panels to their previous display.
The Tools panel contains all the tools that you need to draw and edit objects.At the bottom of the Tools panel are options that modify how the tools func-tion. (See Chapters 3 and 4 for a complete description of the Tools panel.)
The Property inspector is another important panel. This panel displays infor-mation about selected objects, such as size, name, and location. You canmodify objects in the Property inspector as well. It is context-sensitive, whichmeans that its contents change according to what you’re doing. For example,if you select a graphic object, the Property inspector provides settings relat-ing to that object, and you can use the Property inspector to edit that object.
For the best in customization, you can save any layout of panels you like. Setup the panels and choose Window➪Workspace Layout➪Save Current. In theSave Workspace Layout dialog box that opens, give the layout a name andclick OK. To restore that layout at any time, choose Window➪WorkspaceLayout and choose your very own layout.
Discovering the Flash menusMost drawing functions are available only in the Tools panel. Similarly, youoften use the Timeline, as we discuss in the section “Following a timeline,”later in this chapter, for creating animation. Almost every other function inFlash is on a menu somewhere. You just need to find it. In general, we discussthe specific menu functions where appropriate throughout this book. Table1-1 offers a brief overview of the menus.
Table 1-1 Flash MenusMenu What It Does
Flash (Mac only) Enables you to set preferences, create keyboardshortcuts, and quit Flash.
File Enables you to open and close files; save files; import andexport files; print; publish movies for the Web; send a movie asan e-mail attachment (Windows only); and quit Flash.
Edit Provides commands that let you undo and redo actions; cut,copy, and paste to and from the Clipboard; delete, duplicate,select, and deselect objects; find and replace; copy and pasteentire frames on the Timeline; edit symbols (see Chapter 7 forthe whole story on symbols); set preferences (Windows only);and create keyboard shortcuts for commands (Windows only).
16 Part I: A Blast of Flash
05_596918 ch01.qxd 10/7/05 7:09 PM Page 16

Menu What It Does
View Helps you get a better view by letting you zoom in and out; showor hide various parts of the screen; and view a grid for easylayout.
Insert Enables you to insert symbols (Chapter 7 explains this topic);insert and delete Timeline features, such as frames andkeyframes (see Chapter 9 for more); insert layers (check outChapter 6); add Timeline effects (see Chapter 9); and addscenes (also in Chapter 9).
Modify Helps you modify symbols, shapes, frames, Timeline effects,scenes, or the entire movie. Offers tools for transforming, align-ing, grouping, and ungrouping objects, and breaking objectsapart.
Text Enables you to format text and check spelling.
Commands Enables you to reuse and manage saved commands. A com-mand is any action that you take in Flash, such as drawing orediting objects. You can save commands from the History panel.(See Chapter 4.)
Control Provides options that let you control the playing of movies; testmovies and scenes; engage certain interactive functions; andmute sounds.
Window Enables you to open lots of things, including a new window;panels that help you control objects; the Library (more on theLibrary in Chapter 2); windows for creating interactive controls(which we explain in Chapter 10); and the Movie Explorer (tohelp manage your movie — see Chapter 12).
Help Comes to the rescue when you need help.
Many menu commands offer keyboard shortcuts. You can also create yourown keyboard shortcuts. (See Appendix A for instructions.)
The shortcuts are displayed on the menus, next to the command name. Hereare some of the most commonly used keyboard shortcuts (for more short-cuts, see the tear-out Cheat Sheet at the front of this book):
� Ctrl+N (Windows) or Ô+N (Mac): Open the New Document dialog box soyou can start a new movie.
� Ctrl+O (Windows) or Ô+O (Mac): Open an existing movie.
� Ctrl+S (Windows) or Ô+S (Mac): Save your movie. Use this shortcutoften!
17Chapter 1: Getting Aquainted with Flash 8
05_596918 ch01.qxd 10/7/05 7:09 PM Page 17

� Ctrl+X (Windows) or Ô+X (Mac): Cut to the Clipboard. Chapter 4explains more about using the Clipboard.
� Ctrl+C (Windows) or Ô+C (Mac): Copy to the Clipboard.
� Ctrl+V (Windows) or Ô+V (Mac): Paste from the Clipboard.
� Ctrl+Z (Windows) or Ô+Z (Mac): Undo. Would you believe that bydefault Flash remembers your last 100 actions and can undo them? Whata relief! And if you choose Window➪Other Panels➪History, the Historypanel lists each action, so you know what the next Undo will undo.Think of it as a journey into the long-forgotten past. (See Chapter 4 formore on the History panel, and see Appendix A for details on customiz-ing the number of Undos that Flash remembers.)
� Ctrl+Y (Windows) or Ô+Y (Mac): Redo. This redoes actions that youundid by using the Undo button. (Got that?) This button remembers justas many actions as the Undo button. If you undo more actions than youwant, click Redo (or press Ctrl+Y/Ô+Y) until you’re back where youwant to be. Using the Undo and Redo buttons is like traveling throughFlash time — and it gives you lots of slack while you’re working.
� Ctrl+Q (Windows) or Ô+Q (Mac): Exit Flash.
We mention other keyboard shortcuts throughout this book when we discusstheir corresponding commands.
You should note, although it’s not a shortcut, that you can find the ZoomControl box in the upper-right corner of your screen — if you open the Editbar (choose Window➪Toolbars➪Edit Bar). Click the arrow and choose azoom factor to zoom in and out. Zooming doesn’t change the actual size ofobjects — it just makes them look bigger or smaller.
You aren’t limited to the choices on the Zoom drop-down list. Type a number inthe Zoom Control box and press Enter (Windows) or Return (Mac) to set yourown zoom factor. For example, type 85 to set the zoom factor to 85 percent.
Staging your moviesThe white box in the center of your screen is the Stage. Think of the Stage asa movie screen where you place objects. You can place graphics and textthere and then animate them. Flash also plays back movies on the Stage.
Around the edge of the Stage is a gray area called the Pasteboard. You can usethe Pasteboard to store graphics that you plan to use soon but don’t want onthe Stage just yet. (For more permanent storage, use the Library, as we explainin Chapter 2.) You can also store data and other nongraphical content on thePasteboard. Content that you put on the Pasteboard doesn’t appear in yourFlash movie.
18 Part I: A Blast of Flash
05_596918 ch01.qxd 10/7/05 7:09 PM Page 18
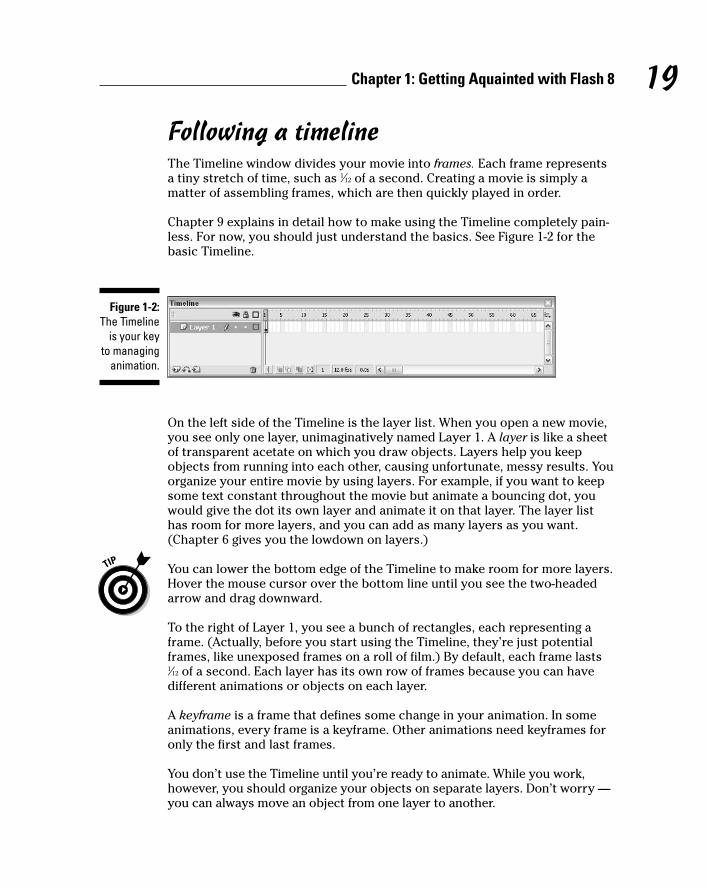
Following a timelineThe Timeline window divides your movie into frames. Each frame representsa tiny stretch of time, such as 1⁄12 of a second. Creating a movie is simply amatter of assembling frames, which are then quickly played in order.
Chapter 9 explains in detail how to make using the Timeline completely pain-less. For now, you should just understand the basics. See Figure 1-2 for thebasic Timeline.
On the left side of the Timeline is the layer list. When you open a new movie,you see only one layer, unimaginatively named Layer 1. A layer is like a sheetof transparent acetate on which you draw objects. Layers help you keepobjects from running into each other, causing unfortunate, messy results. Youorganize your entire movie by using layers. For example, if you want to keepsome text constant throughout the movie but animate a bouncing dot, youwould give the dot its own layer and animate it on that layer. The layer listhas room for more layers, and you can add as many layers as you want.(Chapter 6 gives you the lowdown on layers.)
You can lower the bottom edge of the Timeline to make room for more layers.Hover the mouse cursor over the bottom line until you see the two-headedarrow and drag downward.
To the right of Layer 1, you see a bunch of rectangles, each representing aframe. (Actually, before you start using the Timeline, they’re just potentialframes, like unexposed frames on a roll of film.) By default, each frame lasts1⁄12 of a second. Each layer has its own row of frames because you can havedifferent animations or objects on each layer.
A keyframe is a frame that defines some change in your animation. In someanimations, every frame is a keyframe. Other animations need keyframes foronly the first and last frames.
You don’t use the Timeline until you’re ready to animate. While you work,however, you should organize your objects on separate layers. Don’t worry —you can always move an object from one layer to another.
Figure 1-2:The Timeline
is your keyto managing
animation.
19Chapter 1: Getting Aquainted with Flash 8
05_596918 ch01.qxd 10/7/05 7:09 PM Page 19
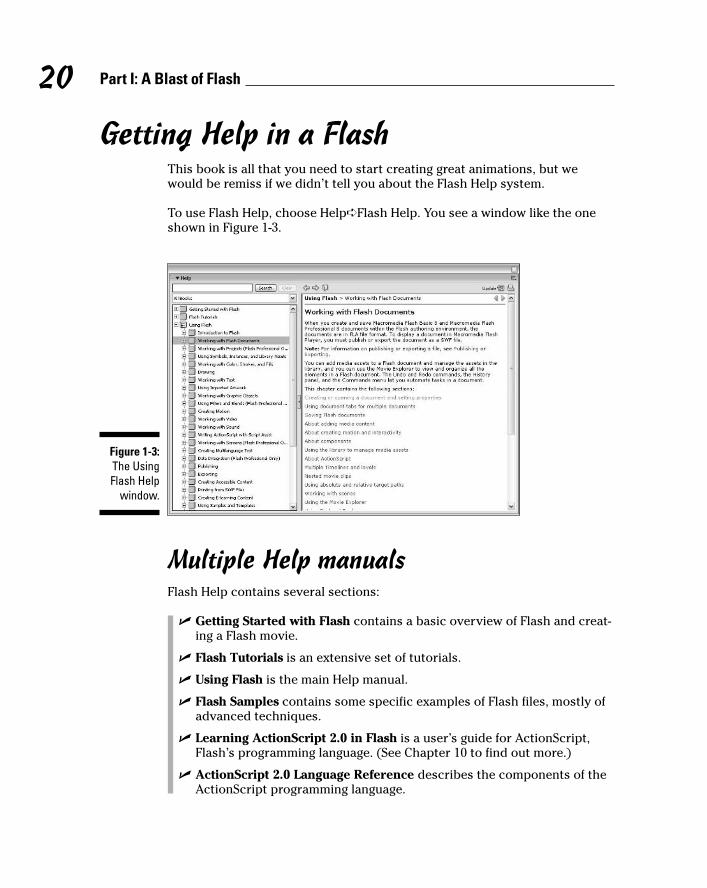
Getting Help in a FlashThis book is all that you need to start creating great animations, but wewould be remiss if we didn’t tell you about the Flash Help system.
To use Flash Help, choose Help➪Flash Help. You see a window like the oneshown in Figure 1-3.
Multiple Help manualsFlash Help contains several sections:
� Getting Started with Flash contains a basic overview of Flash and creat-ing a Flash movie.
� Flash Tutorials is an extensive set of tutorials.
� Using Flash is the main Help manual.
� Flash Samples contains some specific examples of Flash files, mostly ofadvanced techniques.
� Learning ActionScript 2.0 in Flash is a user’s guide for ActionScript,Flash’s programming language. (See Chapter 10 to find out more.)
� ActionScript 2.0 Language Reference describes the components of theActionScript programming language.
Figure 1-3:The UsingFlash Help
window.
20 Part I: A Blast of Flash
05_596918 ch01.qxd 10/7/05 7:09 PM Page 20

� Using Components explains how to use components (did you guess?),which we explain in Chapter 10. Components are basic Web interface ele-ments, such as check boxes and forms that you can drop into your movie.
� Components Language Reference contains a components dictionary.
� Extending Flash offers help for Flash programmers who want to extendits capabilities.
� Flash Lite Developer Guide explains how to use Flash Professional 8 todevelop Flash movies for mobile phones. Flash Lite is a version of theFlash Player for mobile phones.
� Learning Flash Lite ActionScript is about the special version ofActionScript for Flash Lite movies.
� Flash Lite 1.x ActionScript Language Reference is a programming refer-ence for Flash Lite ActionScript.
To search for a term, click the Search button. Then enter the term and clickSearch. You can choose one of the Help sections from the drop-down list tofocus your search more narrowly. You can then choose from the list of topics.
Finding more help on the WebMacromedia offers support on its Web site. To access it, choose Help➪FlashSupport Center, which takes you to www.macromedia.com/support/flash.There you can search the knowledge base and tutorials for answers to yourquestions.
Try It; You’ll Like ItPerhaps by now you’re getting impatient to try out Flash. Getting started iseasy. You collect a few ideas, put together some art, add animation, save yourmovie, and publish it. Then you view it in a browser either online or offline.That’s the gratifying part. In the following sections, you get to try out Flashby working through a basic animation. The rest of the book explains the basicconcepts in more detail.
Conceiving your first animationSuppose that you want to add an animated logo to a home page that you’vealready set up. You want the animation to run when the page loads and thenstop. Figure 1-4 shows the Rainbow Resources company logo — unanimated,of course — that you can find on this book’s Web site, at www.dummies.com/go/flash8.
21Chapter 1: Getting Aquainted with Flash 8
05_596918 ch01.qxd 10/7/05 7:09 PM Page 21

Suppose that you want the word Rainbow to fly into your page from the rightand the word Resources to fly in from the left. At the same time, you want thegraphic to rotate 180 degrees. The following section shows you how to createthis animation.
Creating flashy drawingsYou can use Flash to create a company logo, but importing one from thisbook’s Web site is simpler. Often, you import existing graphics (such as acompany logo) from a file rather than create them from scratch. (Chapter 3explains how to import and manipulate graphics.)
If you’re going through the steps and make a mistake, choose Edit➪Undo (orpress Ctrl+Z/Ô+Z) and try again. You can use Undo repeatedly to undo sev-eral steps, if necessary.
To import the Rainbow Resources logo into Flash, follow these steps. (Thesteps might vary if you’re importing some other graphic in a different format.)
1. Start Flash.
See the instructions in the section “Starting Flash on a PC” or “StartingFlash on a Mac,” earlier in this chapter, if you need help.
2. Choose Flash Document from the Create New section of the Startupscreen.
You see a spanking-new movie on your screen.
3. Go to www.dummies.com/go/flash8 and download the rainbow.giffile.
4. Choose File➪Import➪Import to Stage.
The Import dialog box opens.
Figure 1-4:A company
logo thatcould stand
someanimation.
22 Part I: A Blast of Flash
05_596918 ch01.qxd 10/7/05 7:09 PM Page 22

5. Browse the dialog box until you find rainbow.gif in the locationwhere you downloaded it.
6. Click to select rainbow.gif and then click Open.
If you have difficulty importing the file, copy it to your hard drive andtry Steps 3–5 again.
You see the logo on your screen. You need to break the logo intopieces and make it a vector graphic so that you can animate sectionsof it separately.
7. Choose Modify➪Bitmap➪Trace Bitmap.
The Trace Bitmap dialog box appears.
8. In the Trace Bitmap dialog box, set the color threshold to 100, theminimum area to 1, the curve fit to Pixels, and the corner thresholdto Many Corners. Click OK in the Trace Bitmap dialog box.
In our example, we chose to use settings that reproduce the bitmap asfaithfully as possible. Flash creates a vector graphic and breaks up thegraphic into individual components. The entire graphic, however, isselected.
9. Click anywhere outside the graphic to deselect it.
You’ve got your logo! Now you need to set it up for animation.
Turning your objects into symbolsIn the logo that you imported in the preceding section, each letter is a sepa-rate object, which can get pretty confusing. Each line in the logo’s design isalso separate. But you want your words to stay together — and the littledesign, too. So you must combine each word and the logo into a symbol. Asymbol helps keep objects together and is required for some kinds of anima-tion. (See Chapter 7 for the scoop on symbols.)
To turn the words and the logo into symbols, follow these steps:
1. To get a better view of your image, click the Zoom Control drop-downlist (at the upper-right corner of the Stage area) and choose 200%.
If you don’t see the Zoom Control drop-down list, choose Window➪Toolbars➪Edit Bar to display it.
Use the scroll bar to scroll the words of the logo into view, if necessary.
2. Click the Selection tool on the Tools panel if it’s not already selected.
23Chapter 1: Getting Aquainted with Flash 8
05_596918 ch01.qxd 10/7/05 7:09 PM Page 23
3. Click the upper-right corner of the word Rainbow (just above and tothe right of the w) and drag to the lower-left corner of the first letter, R.
Dragging from right to left makes it easier to avoid selecting the logo atthe same time. You should see the entire word selected. If not, click out-side the word and try again.
4. Choose Modify➪Convert to Symbol. In the Convert to Symbol dialogbox, click Graphic for the behavior and then click OK.
It is normally good practice to name the symbol, but not necessary forthis exercise. When you click OK, Flash places a box around the word sothat you can see that it’s one object.
5. Repeat the procedure outlined in Steps 3 and 4 with the wordResources.
In this case, you might want to start clicking and dragging from theupper-left area of the word; then choose Modify➪Convert to Symbolagain and click OK. Now all the letters of the word Resources are a singleobject.
6. Click the Zoom Control drop-down list and choose 100% so that youcan see the entire logo.
7. Click above and to the left of the logo and drag to the lower right toselect the entire logo.
8. Hold down the Shift key and click each word to remove both wordsfrom the selection.
Now the design portion of the logo is selected.
9. Press F8 (the keyboard shortcut to create a symbol) and click OK inthe Convert to Symbol dialog box.
Flash creates a symbol from the lines of the logo’s design.
See Chapter 7 to find out more about what symbols are and how to use them.Symbols are important building blocks in Flash movies.
Putting your graphics on layersYou need to place different pieces on different layers when you’re animating.You use layers to organize your movie and keep shapes separate so that theydon’t interfere with each other. (See Chapter 6 for the complete story onlayers.)
To split your three symbols onto three separate layers, you can use a conve-nient feature of Flash 8: Distribute to Layers. Follow these steps:
24 Part I: A Blast of Flash
05_596918 ch01.qxd 10/7/05 7:09 PM Page 24
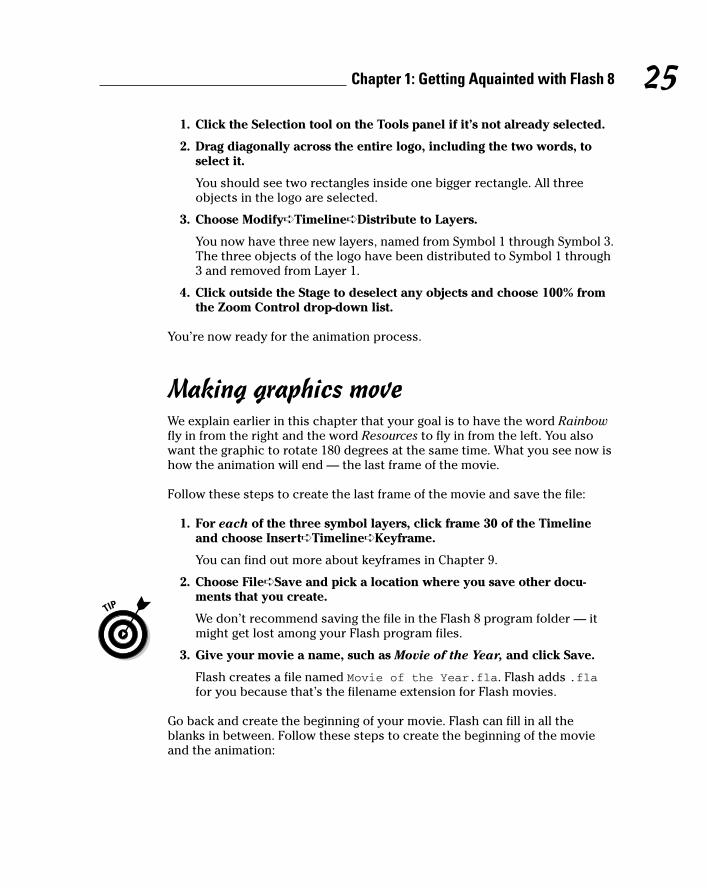
1. Click the Selection tool on the Tools panel if it’s not already selected.
2. Drag diagonally across the entire logo, including the two words, toselect it.
You should see two rectangles inside one bigger rectangle. All threeobjects in the logo are selected.
3. Choose Modify➪Timeline➪Distribute to Layers.
You now have three new layers, named from Symbol 1 through Symbol 3.The three objects of the logo have been distributed to Symbol 1 through3 and removed from Layer 1.
4. Click outside the Stage to deselect any objects and choose 100% fromthe Zoom Control drop-down list.
You’re now ready for the animation process.
Making graphics moveWe explain earlier in this chapter that your goal is to have the word Rainbowfly in from the right and the word Resources to fly in from the left. You alsowant the graphic to rotate 180 degrees at the same time. What you see now ishow the animation will end — the last frame of the movie.
Follow these steps to create the last frame of the movie and save the file:
1. For each of the three symbol layers, click frame 30 of the Timelineand choose Insert➪Timeline➪Keyframe.
You can find out more about keyframes in Chapter 9.
2. Choose File➪Save and pick a location where you save other docu-ments that you create.
We don’t recommend saving the file in the Flash 8 program folder — itmight get lost among your Flash program files.
3. Give your movie a name, such as Movie of the Year, and click Save.
Flash creates a file named Movie of the Year.fla. Flash adds .flafor you because that’s the filename extension for Flash movies.
Go back and create the beginning of your movie. Flash can fill in all theblanks in between. Follow these steps to create the beginning of the movieand the animation:
25Chapter 1: Getting Aquainted with Flash 8
05_596918 ch01.qxd 10/7/05 7:09 PM Page 25

1. If the Property inspector isn’t already open, choose Window➪Properties➪Properties to open it.
If the Property inspector is open but collapsed, click the arrow at the leftend of its title bar to expand the panel.
2. Select the word Rainbow. Click the first frame of the Timeline in thehighlighted row.
When you select the word Rainbow, you can tell which layer it is on bylooking at the highlighted layer.
3. Press and hold down the Shift key while you drag the word to theright, just off the Stage into the gray area.
You might need to use the horizontal scroll bar or choose a lower zoompercentage from the Zoom drop-down list to see the gray area. PressingShift keeps the object from moving up or down while you drag to theright. By clicking the first frame and moving the word, you set its posi-tion at the beginning of the animation.
4. Click the word Rainbow’s layer, anywhere between the first and the30th frame.
5. On the Tween drop-down list of the Property inspector, chooseMotion.
You now see a solid arrow and a light blue color on the Timeline betweenthe first and 30th frames. Choosing Motion from the Tween drop-down listcreates animation that moves the symbol from the position in the firstframe to its position in the next keyframe, which is frame 30 in this movie.
6. Repeat Steps 2–4 for the word Resources. When you move the wordResources, hold down the Shift key and drag the word to the left, justoff the Stage.
7. Select the logo design and click the first frame of the Timeline in thehighlighted row.
8. Choose Modify➪Transform➪Rotate 90° CW to rotate the design 90degrees clockwise.
9. Repeat the Modify➪Transform➪Rotate 90° CW command to rotate thedesign a total of 180 degrees.
10. Click the logo’s highlighted layer, anywhere between the first and30th frames, and choose Motion from the Tween drop-down list of theProperty inspector.
11. If necessary, drag the horizontal scroll box until the Stage is in thecenter of your screen.
Otherwise, you won’t be able to see the entire animation — and youdon’t want to miss this one!
26 Part I: A Blast of Flash
05_596918 ch01.qxd 10/7/05 7:09 PM Page 26
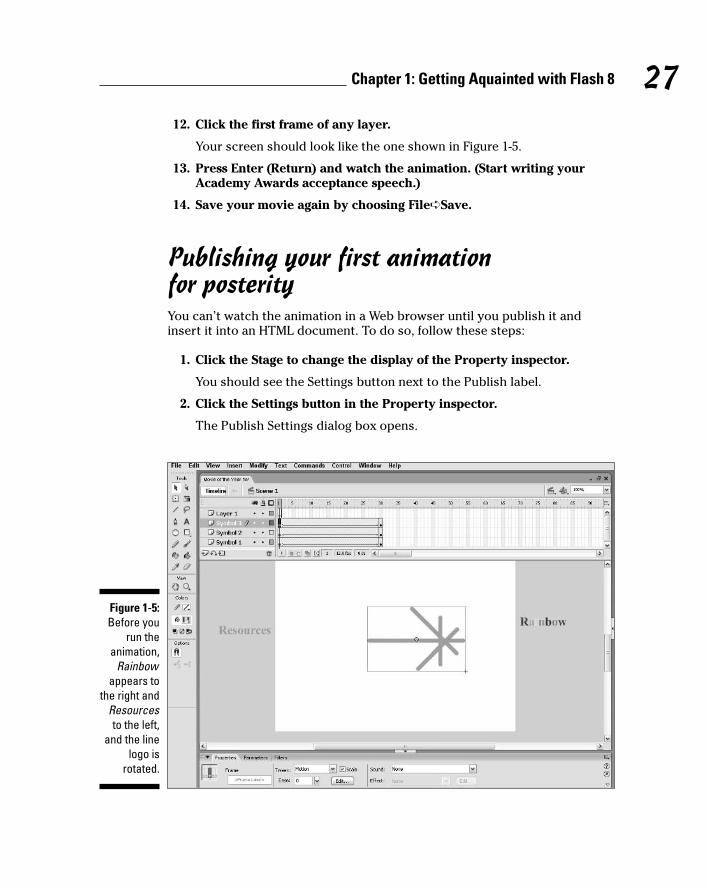
12. Click the first frame of any layer.
Your screen should look like the one shown in Figure 1-5.
13. Press Enter (Return) and watch the animation. (Start writing yourAcademy Awards acceptance speech.)
14. Save your movie again by choosing File➪Save.
Publishing your first animation for posterityYou can’t watch the animation in a Web browser until you publish it andinsert it into an HTML document. To do so, follow these steps:
1. Click the Stage to change the display of the Property inspector.
You should see the Settings button next to the Publish label.
2. Click the Settings button in the Property inspector.
The Publish Settings dialog box opens.
Figure 1-5:Before you
run theanimation,
Rainbowappears to
the right andResourcesto the left,
and the linelogo is
rotated.
27Chapter 1: Getting Aquainted with Flash 8
05_596918 ch01.qxd 10/7/05 7:09 PM Page 27

3. Click the HTML tab.
4. Deselect the Loop check box in the Playback section.
We want the animation to play only once.
5. Click the Publish button and then click OK to close the dialog box.
With scarcely a blip, Flash publishes your movie and creates two files,one named Movie of the Year.swf (assuming you used that name)and Movie of the Year.html. They’re in the same folder as your .flamovie file. Movie of the Year.swf is the file that your browser readsto play the animation. Movie of the Year.html contains the HTMLcode required to display your movie on a Web page.
6. Open your Web browser.
7. Choose File➪Open (or Open File) and find Movie of the Year.html(or whatever you named your movie file).
You might need to click Browse and navigate to the file.
8. Double-click the file.
Your browser opens the HTML document and reads its instructions toplay the Flash movie.
9. Sit back and watch it roll.
Don’t blink or you’ll miss it. (If you do miss it, click the Refresh orReload Current Page button in your browser.) You can see the moviein Figure 1-6.
10. When you finish watching the movie, close your browser.
You can find the Movie of the Year files (.fla, .html, and .swf) in the Ch01folder on this book’s Web site, www.dummies.com/go/flash8.
Exiting FlashWhen you finish creating something in Flash, choose File➪Exit (Windows) orchoose Flash➪Quit (Mac).
28 Part I: A Blast of Flash
05_596918 ch01.qxd 10/7/05 7:09 PM Page 28
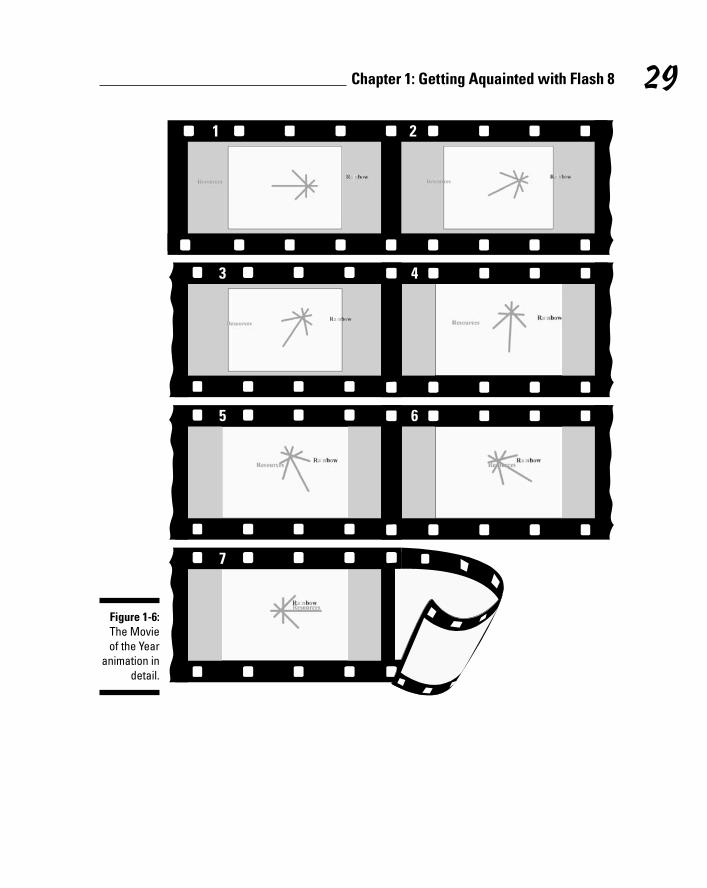
21
3 4
5 6
7
Figure 1-6:The Movieof the Year
animation indetail.
29Chapter 1: Getting Aquainted with Flash 8
05_596918 ch01.qxd 10/7/05 7:09 PM Page 29

30 Part I: A Blast of Flash
05_596918 ch01.qxd 10/7/05 7:09 PM Page 30

Chapter 2
Your Basic FlashIn This Chapter� Examining the big picture
� Setting movie properties
� Getting graphics
� Using templates
� Printing your movie
This chapter starts with an overview of the process of creating animationin Flash. We then discuss some tools and features that are fundamental to
using Flash efficiently.
As you find out in this chapter, you use movie properties to set the screensize and color, frame rate, and measurement units for the Flash movie as awhole. We also discuss the Library and how it’s a storehouse for images, sym-bols, and sound. Templates enable you to create great movies without muchwork. Finally, near the end of this chapter, we explain how you can print aFlash movie.
Looking at the Big PictureWhen you use Flash to create animation for your Web site, you generally gothrough several steps of construction. The steps might vary in their order,depending on your situation. After you know the basics, you can start gettingcreative and make your Web site rock. Here’s a typical path to add animationto an existing Web page:
1. Think about it. Noodle around, maybe make some doodles on a napkin,collect a few ideas, and choose one or all of them.
2. Set up your movie. Flash lets you choose the size and color of the Stage,the speed of animation (number of frames per second), and other gen-eral parameters that affect the entire Flash movie. See the next sectionof this chapter for details.
06_596918 ch02.qxd 10/7/05 7:03 PM Page 31
3. Add some graphics. You have to decide whether you want to creategraphics in Flash, create them in another graphics software package, orimport existing graphics. Your choice partly depends on how artisticyou are, whether you have other software available to you, and whetheryou can find the right graphics elsewhere. You can also use a combina-tion of sources, which is a common practice. (See Chapter 3 for somesuggestions on great places to get graphics.)
4. Lay out your graphics the way you want your animation to start.Here’s where you might want to scale, rotate, or otherwise fiddle withyour graphics. (Chapter 4 has more on transforming your graphics.)
5. Add some text. Using Flash is a great way to get terrific text onto yourWeb site. Add text (also called type); then reshape it, make it transparent(if you don’t want to be too obvious), add other effects, and move itwhere you want it. (Check out Chapter 5 for typography tips.)
6. Organize your text and graphics by using layers. Layers help you keeptrack of what each graphic and text object does while you organizeeverything into a powerful, coherent statement. Layers keep your anima-tions from going bump in the night and getting entangled. Create asmany layers as you need and transfer your existing graphics and text tothose layers. (See Chapter 6 for further details on layers.)
7. Turn a graphic into a symbol and multiply it all over the Stage. Makingobjects into symbols is a way to keep them from merging with otherobjects while they merrily animate. You also use symbols to keep the filesize down and to enable animation, as well as for interactivity, especiallybuttons. (Turn to Chapter 7 for more info on symbols.)
8. Design some buttons. You know those buttons you click on Web sites allthe time? The coolest ones are made in Flash. You can even use movieclips to create animated buttons. (Chapter 8 has more on buttons.)
9. Animate! You can create your animation frame by frame or let Flash fillin the animation between your first and last frames, which is calledtweening. Flash can tween motion, shapes, colors, and transparency,which means that you can create some real magic. (See Chapter 9 formore on animation and the section in Chapter 1 where we step youthrough your first animation.)
10. Get interactive. You want to start a relationship with your Web viewers,so you can create buttons, frames, and symbols that respond to yourviewers’ actions. This is probably the most complex functionality ofFlash, but we make most of it seem easy. (Turn to Chapter 10 for addi-tional info on interactivity.)
11. Make it louder! Make it move! Who wants a quiet Web site? Add soundto your movies or your buttons. You can also add a video file. (Checkout Chapter 11 for more on sound and video.)
32 Part I: A Blast of Flash
06_596918 ch02.qxd 10/7/05 7:03 PM Page 32

12. Publish your magnum opus. Flash makes getting your movie to yourWeb site easy by creating both the Flash Player (.swf) file and theHyperText Transfer Language (HTML) code for your Web page. Flash hasother options, too, so you can publish to other formats if you want.(Chapter 12 explains how to put it all together, and Chapter 13 is allabout publishing your animation.)
Congratulations! You’ve completed your first Flash Web animation — in fan-tasy, at least. The following sections cover some details about how to getstarted.
Setting the StageBefore you create graphics and animate them — all that fun stuff — you needto make some decisions about the structure of your entire movie. You shouldmake these decisions before you start because changing midway can createproblems.
The first step is to decide on the size and color of your Stage and other fun-damental settings. Make sure that the Property inspector is open (chooseWindow➪Properties➪Properties). When the Stage is active (just click theStage), the Property inspector looks like Figure 2-1.
Choosing the Stage colorYou can set the color of the Stage to create a colored background for yourentire movie. Like with other settings, you need to consider the context ofthe Web page that will contain the Flash movie. For example, you might wantto match the color of your Web page’s background. If your Flash movie willconstitute the entire Web page, set the Stage color to the color you want forthe Web page background. You can also color the Stage to create a mood foryour animation.
Figure 2-1:You canchange
movieproperties inthe Property
inspector.
33Chapter 2: Your Basic Flash
06_596918 ch02.qxd 10/7/05 7:03 PM Page 33

To set the Stage color, click the Background color swatch in the Propertyinspector. Flash opens the Color palette. Click the color that you want.
Specifying the frame rateIn the Frame Rate text box, specify how many frames that a Flash movie playseach second, and then press Enter (Windows) or Return (Mac). A faster rateallows for smoother animation but might present a performance problem onslower computers. Chapter 9 explains more about this setting. The Flashdefault is 12 fps (frames per second), which is a good starting point. But chang-ing the frame rate midstream in the creation process changes the rate of all theanimation in your movie, which might not give you the results that you want.
Setting the Stage size and adding metadataThe Size button displays the current size of the Stage. By default, Flash uses aStage size of 550 pixels wide by 400 pixels high. To determine the proper set-ting, you need to know how your Flash movie will fit into your Web page orsite. The default fits on almost everyone’s browser screen. You might, how-ever, want to fit your movie into a small corner of a Web page: for example,placing an animated logo in a top corner of a page. In that case, make theStage smaller.
To change the Stage size, click the Size button to open the DocumentProperties dialog box, as shown in Figure 2-2. Type the dimensions that youwant in the width and height text boxes.
Figure 2-2:The
DocumentPropertiesdialog box
sets themovie’soverall
parameters.
34 Part I: A Blast of Flash
06_596918 ch02.qxd 10/7/05 7:03 PM Page 34

Flash offers two shortcuts for setting the Stage size in the Document Propertiesdialog box:
� Match Printer: Click this option to set the Stage size according to thepaper size set in the Page Setup dialog box (choose File➪Page Setup).(For the Mac, the Print Margins dialog box, which you access by choos-ing File➪Print Margins, also affects the paper size.) Flash sets the size ofthe Stage to the maximum possible area of the paper minus the margins.Later in this chapter, in the section “Printing Your Movie,” we cover thisdialog box in more detail.
� Match Contents: Click this option to set the Stage size to the contentsof the Stage. Of course, for this to work, you need some objects on theStage. Flash creates a Stage size by placing equal space around all sidesof the entire contents of the Stage. If you want to create the smallest pos-sible Stage, place your objects in the upper-left corner and then clickMatch Contents.
To change the units used for measuring the screen and objects, choose a unitfrom the Ruler Units drop-down list.
You can add metadata to your movies. The metadata is information embed-ded in the movie that search engines can find. You can include a title in theTitle text field that describes your movie. In the Description text field, addkeywords and descriptions of your movie’s content that you would like to beavailable when people search in a browser. For more information, see the sec-tion on adding Web search information to your Flash movie in Chapter 12.
Click the Make Default button to make your settings the default for all yournew Flash movies. However, the Title and Description fields don’t becomedefaults; you need to specify them individually for each movie.
When you’re done setting document properties, click OK to close thedialog box.
Grabbing a GraphicThe first step when creating animation for your Web site is usually to createor import graphics. First, you should know a little about the different kinds ofgraphics that you can use in a Flash movie.
35Chapter 2: Your Basic Flash
06_596918 ch02.qxd 10/7/05 7:04 PM Page 35

Understanding vectors and bitmapsIf you know enough about graphics to understand the difference betweenbitmap and vector graphics, feel free to skip this section. (We hope youalways feel free.)
Bitmaps are created with lots of dots. Put them all together, and you get a pic-ture. On-screen, they’re displayed as pixels. As you can imagine, it can takea large file to store the information about all the dots in a bitmap. Anotherproblem with bitmaps is that they don’t scale up well. If you try to enlarge abitmap, it starts to look grainy because you see all those dots (as in the leftexample shown in Figure 2-3).
Vector graphics are defined with equations that specify lines, shapes, andlocations. Blank space doesn’t have to be recorded, and the equations areparticularly efficient at storing information. As a result, file sizes are usuallysmaller than bitmap file sizes.
Vector graphics are infinitely scalable, either up or down. No matter how bigyou make your graphic, it always looks perfect, as shown in the right examplein Figure 2-3. In fact, your graphic might even look better when it’s largerbecause the curves are smoother.
Flash creates vector-based graphics. The small size of the files means thatFlash Player files load and play super-fast on a Web page. As you undoubtedlyknow, fast file-loading means that your Web page viewers don’t have to wait along time to see your effects. That’s the advantage of Flash. Nevertheless, youcan create great graphics with bitmaps that you can’t duplicate with vectorgraphics, and we explain how to import bitmaps in Chapter 3.
Figure 2-3:Bitmaps
lose focuswhen
enlarged(left); vector
graphicsremain
sharp andclear (right).
36 Part I: A Blast of Flash
06_596918 ch02.qxd 10/7/05 7:04 PM Page 36
Finding graphicsOkay, so you’ve doodled and played around with some ideas for your Flashanimation and perhaps jotted down a few notes or maybe even made a fewsketches. You’re ready to start building your Flash animation. A logical placeto start is to collect some of the graphics that will serve as building blocks inthis process.
Where do you get them? You have several choices:
� Create your graphics from scratch (if you feel artistic) by using the Flashdrawing tools that we describe in detail in Chapter 3.
� Create graphics in another graphics software package, such as Fireworksor FreeHand.
� Import graphics from archives of art available on this book’s Website, from other places on the Web, or from digital (or scanned) photographs — perhaps your own.
� Combine any or all of these approaches.
You can also import video files. If you want to add video to your Flash movies,see Chapter 11 for detailed instructions.
Going to the LibraryEvery graphic that you create in Flash is precious and deserves to be archivedin style. Each movie file that you create has a Library. The Library saves thefollowing types of objects so that they never get lost:
� Graphic, movie clip, and button symbols
� Sounds
� Imported bitmap graphics (but not vector graphics that you create inFlash)
� Imported video files
You’ll find yourself going to the Library often. Figure 2-4 shows a Library con-taining several types of symbols plus a sound and a bitmap.
To go to the Library of the current movie file, choose Window➪Library. Youcan also press Ctrl+L (Windows)/Ô+L (Mac). When you open the Library,Flash creates a new window or adds the Library panel to the set of panelsthat are already open.
37Chapter 2: Your Basic Flash
06_596918 ch02.qxd 10/7/05 7:04 PM Page 37

To use any object in the Library, follow these steps:
1. Select the layer on which you want to put the object or create a newlayer for the object.
2. Click the point on the Timeline where you want the object to start orappear.
The point that you click on the Timeline (in Step 2) must be a keyframe.Chapter 9 explains keyframes in detail.
3. Click and drag the object from its listing in the Library to the Stage.
You can also select an object from the listing or drag its image from thepreview box.
You can drag items to the Pasteboard, the gray area around the edge of theStage, until you’re ready to use them.
Pin Current Library
New Library panel
Options menu
Graphicsymbol
Button
Previewbox
Sound
Movieclip
Folder
Narrow Library View
Wide Library View
Toggle Sorting Order
Trash can
View Item Properties
New Folder
New Symbol
Figure 2-4:You can
storegraphics,
animation,buttons,
sounds, andvideo files inyour current
movie file’sLibrary.
38 Part I: A Blast of Flash
06_596918 ch02.qxd 10/7/05 7:04 PM Page 38
Using foldersA Flash movie can contain dozens or even hundreds of symbols, so you needto keep them organized. Flash provides several features to keep you fromtearing out your hair.
You can, and should, organize your symbols into folders if you have morethan a few. To create a new folder, follow these steps:
1. Click the New Folder button at the bottom of the Library panel.
Flash creates a new folder.
2. Type a name that describes the type of symbols that you want to putinto the folder.
For example, you could create a folder named Intro and another onenamed Conclusion.
3. Press Enter (Windows) or Return (Mac).
To put symbols into a folder, drag them to the folder. You can also move sym-bols from one folder to another — just drag them. Note that folders exist justto help keep you organized. You can move symbols from one folder to anotherwithout affecting your movie.
To keep your symbol list from getting unwieldy, you can collapse folders. Acollapsed folder doesn’t display its contents. As soon as you need to seewhat’s inside, you can expand the folder. Double-click a folder to either col-lapse or expand it.
To quickly see the structure of your folders, click the Library’s Options menu.Choose Collapse All Folders. You can also choose Expand All Folders to seeeverything in the Library.
More Library housekeepingBy default, Flash alphabetizes items in the Library by name. You might, how-ever, have different ideas. You can sort from A to Z (ascending) or from Z to A(descending). You can also sort by any of the columns in the Library. Tochange the direction of sorting (for any column in the Library), click theToggle Sorting Order button in the upper-right corner of the list (Windowsonly). To sort, click the heading of the column that you want to sort by. (Onthe Mac, you can click the column heading again to change the sort order.)
You can resize the Library panel by dragging its lower-right corner. Or youcan click the Wide Library View or Narrow Library View button to grow orshrink its width, respectively (refer to Figure 2-4). You can resize any columnby dragging the column heading’s divider left or right.
39Chapter 2: Your Basic Flash
06_596918 ch02.qxd 10/7/05 7:04 PM Page 39

To rename any Library item, double-click the item’s name, type the new name,and press Enter or Return. Don’t worry — the original filenames of importedfiles remain unchanged at their original location.
To duplicate an item, select the item. Then right-click (Windows) orControl+click (Mac) and choose Duplicate. To delete an item, select the itemand click the Trash can.
If you want to find out which items in the Library you aren’t using, look in thethird column (Use Count) for items with a zero use count. To make sure thatthe use count is accurate, click the Library’s Options menu and choose KeepUse Counts Updated or Update Use Counts Now. After you know which itemsyou aren’t using, you can delete them.
You can update imported bitmaps and sounds if the original files havechanged. Select the file and choose Update from the Options menu of theLibrary panel.
Using the Libraries of other moviesAfter you place objects in a file’s Library, you can use those objects in anyother Flash movie that you create. Just open the movie and display itsLibrary panel, and its Library’s contents are available for you to use in yourcurrent movie.
Choose File➪Import➪Open External Library to open the Library of anotherFlash movie that isn’t open.
You can now switch among the Libraries of open movies by using a drop-down list at the top of the Library panel.
When you have libraries open from more than one Flash file, you can copysymbols or anything else in a Library from one movie to another by simplydragging them from one Library to another. Choose the Library that you wantto use, select an item, and drag it into the other Library. Easy!
To create a new symbol that goes directly into the Library (rather than on theStage), choose New Symbol from the Library Options menu in the upper-rightcorner (refer to Figure 2-4). You’re transported to symbol-editing mode,where you can create your symbol as you normally would. To return to yourmain movie, choose Edit➪Edit Document. For more information on creatingand editing symbols, see Chapter 7.
Exploring the Flash stock LibraryFlash comes with two Libraries that contain a basic assortment of buttonsymbols. They are well done, so they’re worth looking through. ChooseWindow➪Other Panels➪Common Libraries and choose Buttons.
40 Part I: A Blast of Flash
06_596918 ch02.qxd 10/7/05 7:04 PM Page 40
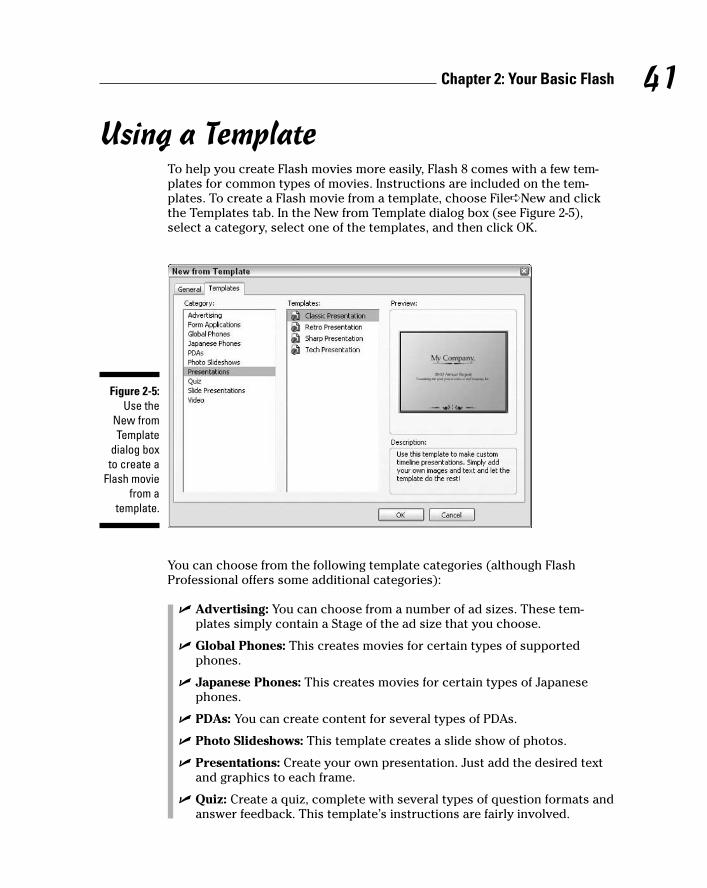
Using a TemplateTo help you create Flash movies more easily, Flash 8 comes with a few tem-plates for common types of movies. Instructions are included on the tem-plates. To create a Flash movie from a template, choose File➪New and clickthe Templates tab. In the New from Template dialog box (see Figure 2-5),select a category, select one of the templates, and then click OK.
You can choose from the following template categories (although FlashProfessional offers some additional categories):
� Advertising: You can choose from a number of ad sizes. These tem-plates simply contain a Stage of the ad size that you choose.
� Global Phones: This creates movies for certain types of supportedphones.
� Japanese Phones: This creates movies for certain types of Japanesephones.
� PDAs: You can create content for several types of PDAs.
� Photo Slideshows: This template creates a slide show of photos.
� Presentations: Create your own presentation. Just add the desired textand graphics to each frame.
� Quiz: Create a quiz, complete with several types of question formats andanswer feedback. This template’s instructions are fairly involved.
Figure 2-5:Use the
New fromTemplate
dialog boxto create a
Flash moviefrom a
template.
41Chapter 2: Your Basic Flash
06_596918 ch02.qxd 10/7/05 7:04 PM Page 41

When you open a new movie from a template, you should save it as a movie.This way, the template is unchanged, and you are free to make any changesthat you want.
You can also save movies as templates. If you create a movie that you want toreuse in many variations, choose File➪Save as Template to open the Save asTemplate dialog box, as shown in Figure 2-6.
Type a name, choose a category, and enter a description for your template.Then click Save. From now on, you can open your template just like any ofthe templates that come with Flash, just as we describe. Using templates cansave you lots of work!
To create your own category for templates, type a category name in theCategory list box instead of choosing one of the existing categories fromthe list.
Printing Your MovieUsually, you don’t print your movies — you publish them on the Web. Butyou might want to collaborate on a movie with others who don’t have Flash.(How unenlightened of them!) Or, you might just want to analyze a movie onpaper, tack your animation frames on the wall, and rearrange their sequence.In this type of situation, you can print your animation frame by frame.
To print a movie, follow these steps:
1. To set page margins, choose File➪Page Setup (Windows) or File➪Print Margins (Mac).
The Page Setup (Windows) or Print Margins (Mac) dialog box appears,as shown in Figure 2-7.
Figure 2-6:The Save as
Templatedialog boxsaves yourmovies astemplates.
42 Part I: A Blast of Flash
06_596918 ch02.qxd 10/7/05 7:04 PM Page 42

2. In the Margins section, set the margins.
You can probably keep the default margins.
3. Select the Center check boxes to center the printing horizontally (L–R)and vertically (T–B) on the page.
4. In the Layout section, click the Frames drop-down list and decidewhether to print only the first frame or all frames.
5. Click the Layout drop-down list in the Layout section to choose fromthe following options:
• Actual Size: Lets you choose a scale. This option prints one frameto a page.
• Fit on One Page: Fits one frame on a page, scaling it to fit the paper.
• Storyboard – Boxes: Places several thumbnail sketches of yourmovie on a page. You can specify how many frames that you wantin a row in the Frames text box. You might need to experiment toget the right result. In the Frame Margin text box, enter in pixelsthe space between the boxes. The Storyboard – Boxes optionplaces each frame in a box.
• Storyboard – Grid: Creates a grid of lines for your storyboardrather than individual boxes around the frames. This option is justa matter of aesthetics — don’t get too hung up over these choices.
• Storyboard – Blank: Leaves out the boxes or grid and just printsall your frames in the storyboard. You have the same Frames andFrame Margin settings as for the other storyboard options.
6. If you chose a Storyboard option, select the Label Frames check box(Windows) or Label (Mac) to give each frame a number.
Figure 2-7:Use the
Page Setupdialog boxto specify
how to printyour Flash
movie.
43Chapter 2: Your Basic Flash
06_596918 ch02.qxd 10/7/05 7:04 PM Page 43

7. On a Mac, when you finish setting your options, click OK; then chooseFile➪Page Setup.
In Windows, you skip this step because you already opened the PageSetup dialog box in Step 1.
8. Select the size of the paper; (Windows only) define the paper sourcein the Paper section.
Usually you can leave this section as is because it’s based on yourprinter’s default settings.
9. In the Orientation section, select Portrait (taller rather than wider) orLandscape (wider rather than taller).
10. (Mac only) In the Format section, choose your printer from the drop-down list.
11. When you finish setting your options, click OK.
12. (Windows only) If you chose a storyboard option, choose File➪Print Preview to preview your movie to ensure that you like the setup.Click the Close button to return to the regular display.
13. To print, choose File➪Print.
Alternatively, you can press Ctrl+P (Windows) or Ô+P (Mac).
Figure 2-8 shows an example of the storyboard with the grid option. The sto-ryboard shows four frames across with a portrait orientation.
You can find out more about the Flash Player’s special printing capabilities inChapter 13.
Figure 2-8:You can
print astoryboard
of yourmovie thatdisplays athumbnailsketch of
each frame.
44 Part I: A Blast of Flash
06_596918 ch02.qxd 10/7/05 7:04 PM Page 44

Part II1,000 Pictures and
1,000 Words
07_596918 pt02.qxd 10/7/05 7:10 PM Page 45

In this part . . .
Graphics are the basis of animation. Before you canmake anything move, you need to create the graph-
ics that form the building blocks of your animation.Chapter 3 describes all the types of graphics that you canuse, from basic shapes created in Flash to sophisticatedimported bitmap graphics. The Flash tools are quite capa-ble, and you can create exciting effects with gradient fills,softened edges, and transparency. The Flash editing fea-tures, as we describe in Chapter 4, offer more opportuni-ties to create great-looking graphics — including skewingobjects, using the Distort and Envelope options, andmanipulating fills every which way.
In Chapter 5, you find ways to say great things with flexi-ble text options and formatting. You can even break uptext and animate it, letter by letter. To keep all the piecesof your animation from going completely out of control,you see how to use layers to organize your movie anima-tion in Chapter 6. You can use special layers to guide ani-mation along a path and hide objects behind a mask.
07_596918 pt02.qxd 10/7/05 7:10 PM Page 46

Chapter 3
Getting GraphicIn This Chapter� Using the Pencil tool
� Drawing lines, rectangles, and ovals
� Working with shapes
� Making curves with the Pen tool
� Getting creative with the Brush tool
� Finding more drawing tools
� Making strokes with the Ink Bottle tool
� Filling shapes with the Paint Bucket
� Creating beautiful colors and fills
� Using the precision tools
� Importing graphics
In this chapter, you get down to the details of creating your own graphicsin Flash. The Flash graphics tools (found on the Tools panel) offer you the
capability to easily create interesting and professional-looking shapes. Ofcourse, you can also import graphics created in other programs.
After you master all the techniques for drawing and editing, you can createsome very cool graphics. If you’re new to Flash, take the time to try out allthe tools and techniques until you feel comfortable with them.
For a handy reference to the Tools panel, which we refer to throughout thisentire chapter, see the Cheat Sheet at the front of this book.
Sharpening Your PencilThe Flash Pencil tool is designed to be used like a real pencil to create free-hand shapes. Whenever you want to create a shape not available from otherFlash tools (such as the circle and square), you can use the Pencil. But thePencil tool goes beyond a regular pencil’s capabilities by incorporating cool
08_596918 ch03.qxd 10/7/05 7:13 PM Page 47

features that smooth or straighten what you draw. In addition to those fea-tures, the Pencil also includes the shape-recognition feature (perfect for thosewho are less artistic). Draw something that approximates a triangle, and Flashforgivingly perfects it for you. In this section, we explain exactly how to usethis tool.
To start, click the Pencil tool on the Tools panel. To draw without changingthe Pencil modifier, move the cursor onto the Stage, click, and draw. Afteryou release the mouse button, Flash modifies the shape according to theactive modifier setting, as we explain in the next section.
Setting the Pencil modifierWhen you choose the Pencil tool, the Options area below the Tools panelchanges to display the drawing mode modifier for the Pencil tool.
The Pencil modifier has three drawing modes:
� Straighten: Straightens lines and converts sloppy squares, rectangles,circles, ellipses, and triangles to perfect ones.
� Smooth: Smoothes out curved lines, eliminating unsightly bumps andlumps. You can specify the amount of smoothing.
� Ink: Slightly smoothes and straightens your curves and lines but leavesthem mostly the way that you drew them.
In Figure 3-1, you see a right-pointing arrow. Suppose that you have alreadydrawn the horizontal line and now want to create the arrow’s point. See howthe point looks before and after Flash modified it by using the Straightendrawing mode to create perfectly straight lines.
Suppose that you want to animate some waves on your Web site. You start todraw the outline of the waves. Figure 3-2 shows how the waves look beforeand after Flash smoothes them out by using Smooth mode.
Before After
Figure 3-1:Use the
Straightenmode of the
Pencil toolto draw
straight lines.
48 Part II: 1,000 Pictures and 1,000 Words
08_596918 ch03.qxd 10/7/05 7:13 PM Page 48
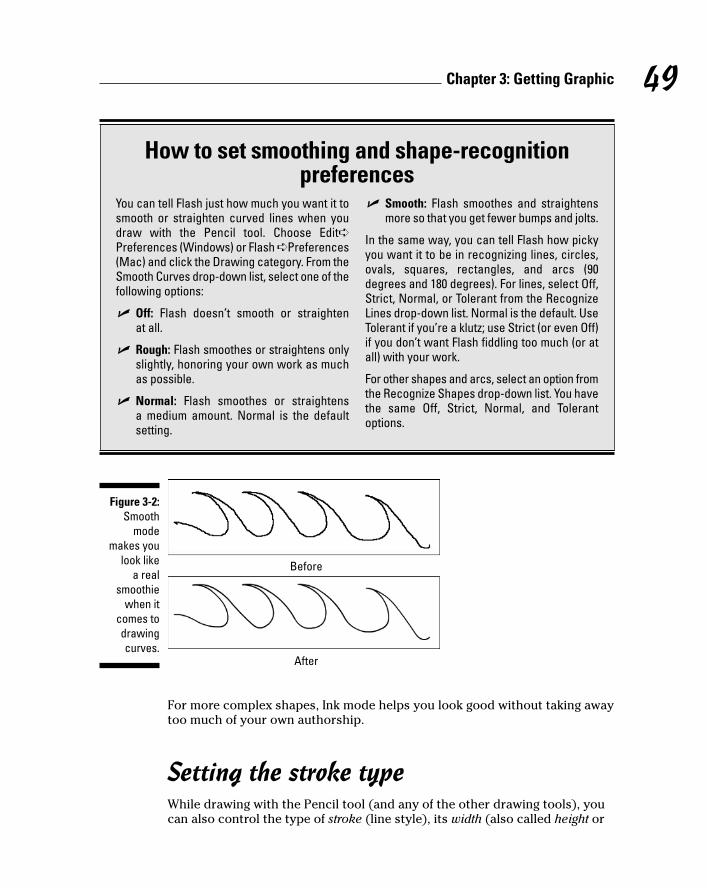
For more complex shapes, Ink mode helps you look good without taking awaytoo much of your own authorship.
Setting the stroke typeWhile drawing with the Pencil tool (and any of the other drawing tools), youcan also control the type of stroke (line style), its width (also called height or
After
Before
Figure 3-2:Smooth
modemakes you
look likea real
smoothiewhen it
comes todrawingcurves.
49Chapter 3: Getting Graphic
How to set smoothing and shape-recognition preferences
You can tell Flash just how much you want it tosmooth or straighten curved lines when youdraw with the Pencil tool. Choose Edit➪Preferences (Windows) or Flash ➪Preferences(Mac) and click the Drawing category. From theSmooth Curves drop-down list, select one of thefollowing options:
� Off: Flash doesn’t smooth or straightenat all.
� Rough: Flash smoothes or straightens onlyslightly, honoring your own work as muchas possible.
� Normal: Flash smoothes or straightensa medium amount. Normal is the defaultsetting.
� Smooth: Flash smoothes and straightensmore so that you get fewer bumps and jolts.
In the same way, you can tell Flash how pickyyou want it to be in recognizing lines, circles,ovals, squares, rectangles, and arcs (90degrees and 180 degrees). For lines, select Off,Strict, Normal, or Tolerant from the RecognizeLines drop-down list. Normal is the default. UseTolerant if you’re a klutz; use Strict (or even Off)if you don’t want Flash fiddling too much (or atall) with your work.
For other shapes and arcs, select an option fromthe Recognize Shapes drop-down list. You havethe same Off, Strict, Normal, and Tolerantoptions.
08_596918 ch03.qxd 10/7/05 7:13 PM Page 49

weight), its cap (ending), and how it joins with other strokes. To modifystroke settings, follow these steps:
1. Click the Pencil tool to make it active.
2. Open the Property inspector by choosing Window➪Properties➪Properties.
The Property inspector appears, as shown in Figure 3-3. As we explain inChapter 1, the Property inspector changes depending on which tool isactive and which part of the Flash window you’re using.
3. Click the Stroke Style drop-down list to display the available linestyles and select a new line style from the list.
You can choose from seven line styles, including dashed and dotted lines.
4. To change the line width, type a new weight in the Stroke Height textbox and press Enter or Return or drag the slider bar to the value thatyou want.
The first available stroke width on the Stroke Style drop-down list isHairline, which creates a hairline-width line. Flash measures weights(widths) of other line types in points.
You can now create a line up to 200 points wide. A point equals 1⁄72 ofan inch. You can create lines with caps, which are line endings, as weexplain in Step 5, next.
5. Click the Cap drop-down list and select one of the styles:
• None: The end is square with no added ending.
• Round: A rounded cap is added to the end of the line. The lengthof the cap is half the line’s width.
• Square: A squared cap is added to the end of the line. The lengthof the cap is half the line’s width. See Figure 3-4.
Strangely, when you draw a line that crosses another line, both lines arechanged to round caps, regardless of the cap style that you select.
Stroke StyleStroke Height
Stroke Color
Figure 3-3:Use the
Propertyinspector tocontrol line
type andwidth.
50 Part II: 1,000 Pictures and 1,000 Words
08_596918 ch03.qxd 10/7/05 7:13 PM Page 50

6. If you want, select the Stroke Hinting check box.
Stroke hinting makes slight adjustments to avoid blurry horizontal orvertical lines. If your text doesn’t look as clear as you’d like, try selectingthis option.
7. Click the Join drop-down list and select one of the styles (see Figure3-5) to control how lines look when they meet:
• Miter: A pointed corner.
• Round: A rounded corner.
• Bevel: A squared-off (beveled) corner.
8. The Scale drop-down box specifies how the thickness of strokes scalesif you include them in a symbol. (We discuss symbols in Chapter 7.)From the Scale drop-down list, select an option to control how linesscale:
Miter Round Bevel
Figure 3-5:You can
choose howlines meet.
Howromantic!
Figure 3-4:I drew these
lines to be100 pixels
long, but thebottom twohave roundand square
caps, sothey’relonger.
51Chapter 3: Getting Graphic
08_596918 ch03.qxd 10/7/05 7:13 PM Page 51
• Normal: Thickness scales both horizontally and vertically.
• Horizontal: Thickness scales horizontally only. This applies to ver-tical lines, so that they become thicker as you scale them.
• Vertical: Thickness scales vertically only. This applies to horizon-tal lines, so that they become thicker as you scale them.
• None: Lines don’t become thicker as you scale them.
9. (Optional) In the Miter text box, you can enter a limit to help preventbeveling a Miter join.
When you draw two lines that meet at a sharp angle with a Miter join (asharp point), you might get a bevel instead. Increase the value in theMiter text box to get a nice sharp point where the two lines meet.
You can create custom line styles, as well. In the Property inspector, click theCustom button. In the Line Style dialog box that opens, you can create yourown designer line styles.
Setting the colorWhen using the Pencil, you can set the color of the stroke in the Propertyinspector or in the Colors section of the Tools panel. In either location, clickthe Stroke Color box to open the Color palette and then select a color.
We explain more about using colors in the section “A Rainbow of Colors,”later in this chapter.
Creating Shapely ShapesIn the preceding section, we explain that you can draw shapes by using thePencil tool. You can also draw lines, rectangles, squares, ovals, and circles byusing the shape tools. Use these tools when you want more control over yourshapes — for example, when you want to draw perfect circles, perfect squares,and straight lines.
Line upTo draw a line, choose the Line tool from the Tools panel. Click the Stage atthe desired starting point of the line and drag to the ending point. Thenrelease the mouse button. To keep your lines at multiples of 45 degrees, pressShift while dragging. Flash creates the line at the 45-degree angle closest toyour drag line.
52 Part II: 1,000 Pictures and 1,000 Words
08_596918 ch03.qxd 10/7/05 7:13 PM Page 52

When you use the Line tool, you can modify the line weight, style, and colorin the same way as for the Pencil tool, as we discuss in the preceding section.
Be squareTo draw a rectangle, choose the Rectangle tool from the Tools panel. Clickthe Stage at one corner of the rectangle and drag to the opposite corner.Then release the mouse button. To create a square, press Shift as you drag.
When you click the Rectangle tool, you can modify the line weight, style, andcolor of the rectangle in the same way that you can modify a line when youuse the Pencil tool. You can’t see the effect of caps when you create a rectan-gle because it’s a closed shape; however, if you later cut out part of the rec-tangle, the remaining lines take on the cap you specified.
Unlike lines, rectangles contain two objects: the fill (the area inside thestroke) and the stroke (the outline of the rectangle).
Flash provides the following tools for adjusting the settings for rectangles:
� Fill Color: Determines the color that fills the inside of the rectangle. Youcan click the Fill Color box — either in the Property inspector or in theColors section of the Tools panel — and select one of the colors fromthe palette that opens. You can also select from the gradients displayedat the bottom of the palette. (See the section “A Rainbow of Colors,”later in this chapter, for details about customizing colors and gradients.)
� Stroke Color: Determines the color of the stroke (the outline) of the rec-tangle. Click the Stroke Color box — either in the Property inspector orin the Colors section of the Tools panel — and select a color from thepalette.
� Black and White: Sets the stroke color to black and the fill color towhite. Click the Black and White button in the Colors section of theTools panel.
� No Color: Sets either the stroke color or the fill color (whichever tool ispressed) to no color. You have to click either the Stroke Color box or theFill Color box before you click the No Color box.
� Swap Colors: Switches the stroke and fill colors.
� Round Rectangle Radius modifier: Creates a rectangle with roundedcorners. (It’s located in the Options section of the Tools panel.) Clickthis tool to open the Rectangle Settings dialog box, where you can setthe radius of corners in points; then click OK to close the dialog box.The rectangle that you draw has nicely rounded corners.
53Chapter 3: Getting Graphic
08_596918 ch03.qxd 10/7/05 7:13 PM Page 53
You can also specify the dimensions of the rectangle in advance. Select theRectangle tool, press Alt (Windows)/Option (Mac), and click the Stage. TheRectangle Settings dialog box opens, but this time it includes Width andHeight text boxes that you can use to get exactly the size rectangle that youwant. When you click OK, the rectangle appears immediately. You can thenmove it to the location that you want.
If you want to create a rectangle with no fill, choose the Rectangle tool, openthe Fill Color box, and click the box with the diagonal line in the upper-rightcorner of the Color palette. To create a rectangle with a fill but no outline,choose the Rectangle tool, click the Stroke Color tool, and choose the boxwith the diagonal line at the top of the palette.
Be an eggTo draw an oval, choose the Oval tool from the Tools panel. Click the Stageat one corner of the oval and drag to the opposite corner. (Ovals don’t reallyhave corners, but you get the idea after you try one or two.) Then release themouse button. To create a perfect circle, press and hold Shift while you drag.
After you click the Oval tool, you can change the line color, type, and weightin the same way as we describe in the “Setting the stroke type” section, ear-lier in this chapter, for the Pencil tool. You can set the colors as we describein the preceding section on drawing rectangles.
You can specify the exact width and height of the oval. Select the Oval tool,press Alt (Windows)/Option (Mac), and click on the Stage. The Oval Settingsdialog box opens. Use the Width and Height text boxes to specify the sizethat you want, and click OK to create the oval.
Mixing and Matching ShapesAfter you create shapes on the Stage, you need to understand what happenswhen two objects touch. It’s a little weird, but you soon see how flexible theFlash drawing tools are. Two basic rules exist about objects that touch.
On the other hand, Flash 8 has a new object-drawing model that lets you keepyour objects whole. We discuss both scenarios in the following sections. (Ifyou’re trying to follow the next two sections and the objects you draw haveblue boundaries around them, you’re using the object-drawing model. To turnthe object-drawing model on and off, click the Object Drawing button in theOptions section of the Tools panel.)
54 Part II: 1,000 Pictures and 1,000 Words
08_596918 ch03.qxd 10/7/05 7:13 PM Page 54

Cutting up shapesThe first rule is that when you use the Pencil or Line tool to draw a line thatintersects any other shape or line, the line acts like a knife to cut the othershape or line. The line that you draw is also cut into segments. You don’t seethe effect until you try to select or move one of the objects. Suppose that youwant to draw a broken heart. You can draw the breaking line by using thePencil tool. You now have several objects, and you can easily move apart thetwo halves of the heart. In the second heart (see Figure 3-6), we erased theline and separated the halves of the heart.
Placing objects on top of each otherThe second rule about objects that touch is that when you place one shapeon top of another, the top shape replaces whatever is beneath it. Again, youcan see the results only when you try to select or move the shapes. But nowit gets a little complicated:
� If the two shapes are the same color, they merge together into one com-bined shape.
� If the two shapes are different colors, they remain separate.
Figure 3-7 shows a circle and a triangle on the left. They are the same color.On the right, you can see the result after moving the circle down over the tri-angle. Presto! It’s an ice cream cone. If you try to select the shape, it’s nowone object.
Figure 3-6:Intersect
any shapewith a line,
and the linesplits the
shape andis itself
segmented.
55Chapter 3: Getting Graphic
08_596918 ch03.qxd 10/7/05 7:13 PM Page 55

When you combine shapes of different colors, you create cutouts. Ratherthan add the shapes together, the top shape just replaces the area beneath it.Figure 3-8 shows how you can create a cutout. We display a grid on the Stage(find more about that in Chapter 4) so that you can see that the image on theright is a cutout.
To create a cutout effect, follow these steps:
1. Create two separate shapes of different colors.
2. Move one shape on top of another shape.
3. Deselect the shape that you moved by clicking anywhere off theshape.
4. Select the top shape again and drag it away from the bottom shape tocreate the cutout.
See Chapter 4 for details on selecting and moving objects.
Keeping objects safe and secureYou can now use the object-drawing model to keep your objects safe fromcutups, replacements, and cutouts.
Figure 3-8:A cutout.There’s a
hole in thebucket!
Figure 3-7:Build
complexshapes bycombining
basicshapes ofthe same
color.
56 Part II: 1,000 Pictures and 1,000 Words
08_596918 ch03.qxd 10/7/05 7:13 PM Page 56

The object-drawing model is new for Flash 8. When you draw using this model,objects maintain their integrity — no dishonest objects here! Other objects ontop of or beneath these objects do not cut up, cut out, or merge with them.
To draw any object with the object-drawing model, follow these steps:
1. Choose any drawing tool from the Tools panel.
2. Click the Object Drawing modifier in the Options section so that thebutton has a white area around it (Windows) or the button darkens(Mac).
You click the modifier again to turn off the Object Drawing modifier.
3. Draw your object.
Your object now has a blue rectangular bounding box around it. Thisbounding box is similar to the one you see when you turn objects into asymbol (as we explain in Chapter 7) or group objects (see Chapter 4 formore information).
If you change your mind and don’t want your object to stay separate fromtouching objects, select the object and choose Modify➪Break Apart.
Creating Curves with the PenThe Pen lets you draw Bezier curves, also called splines. Bezier curves arenamed after the French mathematician Pierre Bézier, who first describedthem. By using the Pen tool, you can create smooth curves that flow intoeach other. You can also create straight lines.
You can set preferences for the Pen tool by choosing Edit➪Preferences(Windows) or Flash➪Preferences (Mac) and clicking the Drawing category.We suggest enabling Show Pen Preview to display a preview of the line orcurve while you draw. This setting helps you get a better idea of what theresult will be. Click OK when you finish setting your preferences.
To create a line or curve, choose the Pen tool from the Tools panel. What youdo next depends on whether you want to draw a straight line or a curve. Thefollowing sections show you how to draw both.
Drawing straight linesTo draw a straight line with the Pen tool, follow these steps:
1. To create a line segment, click the start point and then click the endpoint.
57Chapter 3: Getting Graphic
08_596918 ch03.qxd 10/7/05 7:13 PM Page 57

2. Continue to add line segments by clicking additional points.
3. Double-click to complete the process. You can also Ctrl+click(Windows) or Ô+click (Mac) anywhere off the line.
Flash previews segments in a color that depends on the layer you’reworking on — see the color of the square next to the current layer asshown on the Timeline. (Chapter 6 explains layers in full.) When youchoose another tool, Flash displays Beziers in the current stroke color.
Close a figure by pointing near the start point. You see a small circle. Clickthe start point, and Flash closes the figure. Flash fills in the shape with thecurrent fill color.
Drawing curvesDrawing curves with the Pen tool involves a couple of steps, depending onthe complexity of the curve that you want to create. To draw a curve with thePen tool, follow these steps:
1. Click where you want to start and drag the mouse in the desireddirection and distance for the start of the curve, as shown in Figure3-9(a). Then release the mouse button.
You see a tangent line that defines both the direction and length, asshown in Figure 3-9(b).
2. To create one curve, move the mouse cursor to the desired end of thecurve; then double-click to end the curve, as shown in Figure 3-9(c).
If you set preferences to show a preview of the curve (as we explain earlier in the section “Creating Curves with the Pen”), you also see astretchy line attached to your mouse cursor that previews the shape.
(c)(b)(a)
Figure 3-9:Drawing acurve with
the Pen tool:1, 2, 3, andyou have a
big nose!
58 Part II: 1,000 Pictures and 1,000 Words
08_596918 ch03.qxd 10/7/05 7:13 PM Page 58

3. To continue to draw curves, again click and drag in the desired direc-tion, release the mouse button, and move the mouse cursor to wher-ever you want the end of the next curve to be. Double-click to end thecurve.
For both lines and curves, you can press and hold Shift to constrain the linesor curves (the tangent lines) to 45-degree angles.
Drawing curves with the Pen tool takes practice, but you soon get the hangof it.
Getting Artistic with the BrushThe Brush tool lets you create artistic effects that look like painting. You canadjust the size and shape of the brush, and if you have a pressure-sensitivepen and tablet, you can adjust the width of the stroke by changing the pres-sure on the pen.
To paint with the Brush tool, select the tool on the Tools panel and then clickand drag anywhere on the Stage. Press and hold Shift while you brush tokeep your strokes either horizontal or vertical. The brush doesn’t have astroke (line) color. The brush creates only fills. Use the Fill Color drop-downlist in the Property inspector or in the Colors section of the Tools panel toselect a fill color.
When you choose the Brush tool, the Brush modifiers appear in the Optionssection of the Tools panel, as shown in Figure 3-10. We discuss the ObjectDrawing modifier (shown here in Figure 3-10) earlier in this chapter, in the“Keeping objects safe and secure” section.
Lock FillObject Drawing
Brush Size
Brush Mode
Brush Shape
Use TiltUse Pressure
Figure 3-10:The brushmodifiers
control thesize and
shape of thebrush as
well as howthe brushrelates to
existingimages.
59Chapter 3: Getting Graphic
08_596918 ch03.qxd 10/7/05 7:13 PM Page 59
Brush Mode modifierThe Brush Mode modifier determines how the brush relates to existing objectson the Stage. Here are your choices for brush mode. (Figure 3-11 shows someexamples.)
� Paint Normal: You just paint away, oblivious to anything else. Use thissetting when you don’t need to worry about other objects.
� Paint Fills: You paint fills and empty areas of the Stage. The paint doesn’tcover lines. Note that your lines seem to be covered while you paint, butwhen you release the mouse button, they reappear.
� Paint Behind: You paint behind existing objects, but only blank areasof the Stage. While you paint, the brush seems to cover everything, butwhen you release the mouse button, your existing objects reappear. Youcan messily paint over your objects, knowing that they won’t be affected.
� Paint Selection: You paint only a filled-in area that you previouslyselected. While you paint, your existing objects are covered, but theyreappear when you release the mouse button. You don’t need to worryabout painting within the lines because Flash fills only the selected area.
� Paint Inside: You paint inside lines. Only the fill where you start brush-ing is painted. Paint Inside also paints an empty area on the Stage ifthat’s where you start brushing. Again, at first the paint seems to coverup everything, but when you release the mouse button, Flash keeps yourpaint nice and neat, inside the lines — like every little kid learns inkindergarten.
Brush Size drop-down listClick the Brush Size drop-down list and select a size from the list of circles.This list defines the width of the brush. If you use a brush mode that helpsyou draw neatly, such as Paint Selection, you don’t need to be too concernedwith the size of the brush. On the other hand, if you’re creating an artisticeffect by using Paint Normal mode, the width of the brush is important.
Brush Shape drop-down listFlash offers several brush shapes you can choose from. Click the BrushShape drop-down list and choose one of the shapes. Each shape produces adifferent effect, especially when you paint at an angle — you just need to trythem out to see what works best. Figure 3-12 shows a honey jar drawn withvarious brush shapes.
60 Part II: 1,000 Pictures and 1,000 Words
08_596918 ch03.qxd 10/7/05 7:13 PM Page 60

Figure 3-12:Each brush
shapecreates adifferenteffect —
especially atthe ends ofthe stroke.
Original corn Corn with worms— Paint Normal
Corn with bad kernels— Paint Fills
Corn with background— Paint Behind
Sheath with gray gradient— Paint Selection
Corn with bad kernels— Paint Inside
Figure 3-11:Set the
brush modewhen using
the Brushtool to getthe effectyou want.
61Chapter 3: Getting Graphic
08_596918 ch03.qxd 10/7/05 7:13 PM Page 61

Pressure and Tilt modifiersIf you have a pressure-sensitive pen and tablet, Flash also displays a Pressuremodifier so that you can vary the width of your strokes according to the pres-sure that you put on your pen while you draw. Click the Use Pressure button(refer to Figure 3-10) to turn on this feature.
Flash fully supports pressure-sensitive pens and adds some unusual features,such as the ability to use the opposite end of the pen to erase — just like areal pencil. Figure 3-13 shows this type of pen and tablet.
Photo courtesy of Scott Rawlings of Wacom
A pressure-sensitive pen works together with a tablet to help you draw inFlash. The tablet tracks the movement and pressure of the pen while youdraw. You can also use the pen as a mouse to choose menu and dialog boxitems. In other words, if you want, you can use the pen for all your Flashwork. Alternatively, you can use the pen and tablet just for drawing and usethe mouse when you want to work with menus and dialog boxes.
Figure 3-13:This Wacom
pen andtablet set is
easier todraw with
than amouse and
enables youto easilyvary the
brush widthas youdraw.
62 Part II: 1,000 Pictures and 1,000 Words
08_596918 ch03.qxd 10/7/05 7:13 PM Page 62

The Tilt modifier varies the angle of your brush stroke when you vary theangle of the stylus on the tablet. For example, holding the stylus straight upand down produces a different-shape brush stroke from the one that you getif you hold the stylus at a 45-degree angle to the tablet.
Use the Tilt modifier for fine control over your brush strokes. Click the UseTilt button in the Options section of the Tools panel to turn on this feature.You see the effect most clearly with a large brush size and one of the narrowbrush shapes. When you start to draw, change the angle of the stylus to thetablet. Watch the cursor shape turn, giving you a hint as to the shape of thebrush stroke. Try brushing at a few angles to see how this works.
See the section “A Rainbow of Colors,” later in this chapter, for an explana-tion of the Lock Fill modifier, one of the brush tool’s modifiers.
Brush smoothingSmoothing brush strokes is similar to smoothing pencil strokes. You canfinely adjust how much your brush strokes are smoothed after you finishdrawing them. You can set smoothing anywhere from 0 to 10.
To set brush smoothing, follow these steps:
1. Click the Brush tool and open the Property inspector (chooseWindow➪Properties➪Properties).
2. Click the Expand arrow at the lower-right corner.
3. Use the Smoothing text box or slider to set a new value.
The default value is 5. The lower values change your strokes less.Therefore, if you set the Smoothing to 0, the brush stroke is closest towhat you actually drew. Lower values create more vectors, resulting ina larger file size for your movie. The higher values smooth and simplifyyour strokes more. A setting of 10 creates strokes that are smoother.
Pouring on the PaintThe Paint Bucket creates fills that fill shapes with color. You might want to fillan enclosed area that you created with the Line or Pencil tool. You can alsofill enclosed shapes created with the Pen or Brush tool, as we explain earlierin this chapter.
63Chapter 3: Getting Graphic
08_596918 ch03.qxd 10/7/05 7:13 PM Page 63

The Paint Bucket is also handy for changing existing fills. You can change thecolor as well as fiddle around with gradient and bitmap fills. (See Chapter 4for more on editing fills.)
To use the Paint Bucket, choose it from the Tools panel. Set the color byclicking the Fill Color tool and selecting a color. Alternatively, you can use theFill Color drop-down list in the Property inspector.
Flash can fill areas that aren’t completely closed. The Gap Size modifier (inthe Options section of the Tools panel) determines how large of a gap Flashwill overlook to fill in an almost enclosed area. Choices range from Don’tClose Gaps to Close Large Gaps. Because small and large are relative terms,you might have to experiment to get the result that you want. After youchoose an option from the Gap Size modifier, click any enclosed or almostenclosed area to fill it, as shown in Figure 3-14.
After you use the Paint Bucket to fill a shape created with another tool, youcan delete the outline of the shape and keep just the fill.
Strokes, InkYou use the Ink Bottle tool to create an outline on an existing shape. You canalso use the Ink Bottle tool to change an existing line (also called a stroke).
To use the Ink Bottle tool, click it on the Tools panel. Click the Stroke Colortool to select a color. Use the Property inspector, as we explain earlier in thischapter (in the discussion of the Pencil tool) to choose a line thickness andline style. Then click anywhere on the shape. If the shape has no existing line,Flash adds the line. If the shape has a line, Flash changes its color, width, orstyle to the settings that you specified in the Property inspector.
Figure 3-14:You can fillareas that
aren’tcompletely
closed byusing theGap Sizemodifier.
64 Part II: 1,000 Pictures and 1,000 Words
08_596918 ch03.qxd 10/7/05 7:13 PM Page 64
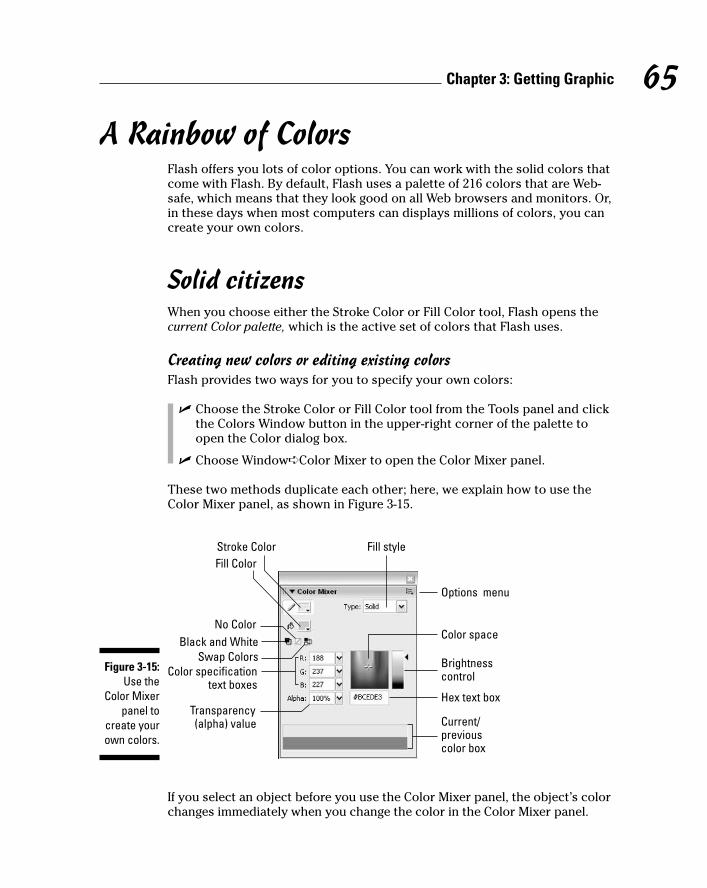
A Rainbow of ColorsFlash offers you lots of color options. You can work with the solid colors thatcome with Flash. By default, Flash uses a palette of 216 colors that are Web-safe, which means that they look good on all Web browsers and monitors. Or,in these days when most computers can displays millions of colors, you cancreate your own colors.
Solid citizensWhen you choose either the Stroke Color or Fill Color tool, Flash opens thecurrent Color palette, which is the active set of colors that Flash uses.
Creating new colors or editing existing colorsFlash provides two ways for you to specify your own colors:
� Choose the Stroke Color or Fill Color tool from the Tools panel and clickthe Colors Window button in the upper-right corner of the palette toopen the Color dialog box.
� Choose Window➪Color Mixer to open the Color Mixer panel.
These two methods duplicate each other; here, we explain how to use theColor Mixer panel, as shown in Figure 3-15.
If you select an object before you use the Color Mixer panel, the object’s colorchanges immediately when you change the color in the Color Mixer panel.
Fill style
Black and WhiteSwap Colors
Stroke ColorFill Color
Color space
Options menu
Brightnesscontrol
Hex text box
Current/previouscolor box
Transparency(alpha) value
Color specificationtext boxes
No Color
Figure 3-15:Use the
Color Mixerpanel to
create yourown colors.
65Chapter 3: Getting Graphic
08_596918 ch03.qxd 10/7/05 7:13 PM Page 65

To create a new color or edit an existing color, follow these steps:
1. Click the menu icon in the upper-right corner of the Color Mixerpanel to open the pop-up menu; then choose the color mode.
RGB specifies a color according to red, green, and blue components; HSBspecifies a color by hue, saturation, and brightness. You can also definea color by using hexadecimal notation, which is the color system used onthe Web: Just type the hexadecimal code in the Hex text box of the ColorMixer panel.
2. Click the Stroke Color or Fill Color icon to specify which color youwant to change — stroke or fill.
Click the icon to the left of the Stroke Color or Fill Color box — not thebox itself, because if you click the box, you open the Color palette.
3. Type the color specs in the text boxes, use the sliders to drag to thedesired color, or find a color in the color space that’s close to the onethat you want, and then click that color.
4. Set the level of opacity/transparency (also called alpha) by using theAlpha slider or by typing a number in the Alpha box.
A setting of 0% is completely transparent; 100% is opaque.
5. If you want to create a new color swatch, click the Options menu iconin the upper-right corner of the panel and choose Add Swatch.
Flash adds the new color to the Color palette so that you can access itfrom the Stroke Color or Fill Color boxes on the Tools panel, theProperty inspector, or the Color Swatches panel.
Managing colorsIf you’ve added or changed colors, you can save this new palette. (A palette isa set of colors.) You can then save the palette for use in other Flash moviesor import a Color palette from another Flash movie (so that you don’t have tobother creating the colors again). Color palettes are saved as .clr files andare called Flash Color Set files. To save a color palette, choose Save Colorsfrom the Color Swatches option menu. (Choose Window➪Color Swatches toopen the Color Swatches panel and click the option menu icon in the upper-right corner of the panel to display the menu.) In the Export Color Swatchdialog box, choose a location for the file, name it, and click Save.
Macromedia Fireworks and Adobe Photoshop use Color Table files (ACTfiles), and Flash can import and save these as well.
To import a Color palette that you’ve saved, use the option menu of the ColorSwatches panel. Choose Add Colors if you want to append this importedpalette to an existing palette. Choose Replace Colors if you want the importedpalette to replace an existing palette. You can use the same Color Swatchespanel option menu to manage your Color palettes. Choose from the followingoptions:
66 Part II: 1,000 Pictures and 1,000 Words
08_596918 ch03.qxd 10/7/05 7:13 PM Page 66

� Duplicate Swatch: Creates a duplicate of a swatch. Do this when youwant to create your own color and use an existing color as a basis.
� Delete Swatch: Deletes a color.
� Load Default Colors: Replaces the active Color palette with the Flashdefault palette.
� Save as Default: Saves the active Color palette as the default palette forany new Flash movies that you create.
� Clear Colors: Clears all colors except black and white — for when youreally want to start from scratch.
� Web 216: Loads the Web-safe, 216-color palette.
� Sort by Color: Sorts the display of colors by luminosity.
Gradient colorsSo you’re bored with solid colors and want something more interesting.Gradients are combinations of two or more colors that gradually blend fromone to another. Flash can create gradients of as many as 16 colors — quite afeat. Gradients are always used as fills. The gradient can be linear or radial(concentric), as shown in Figure 3-16. Because the figure isn’t in color, it can’tbegin to show you the glory of gradients.
Flash offers a few standard gradients that you can find at the bottom of theColor palette. But you often need a more customized look, and Flash has thetools to create just about any gradient that you want.
Radial gradients look best on curved objects. A circle suddenly looks like asphere when you fill it with a radial gradient. Radial gradients give the impres-sion of light highlights if you put white at the center of the gradient. Lineargradients look best on straight objects.
Linear gradient Radial gradientFigure 3-16:Linear and
radialgradients
make yourgraphics
much moreinterestingthan plain
solid colors.
67Chapter 3: Getting Graphic
08_596918 ch03.qxd 10/7/05 7:13 PM Page 67

To create your own gradient, follow these steps:
1. Choose Window➪Color Mixer to open the Color Mixer panel (refer toFigure 3-15). Then choose Linear or Radial from the Fill Style drop-down list.
You see a gradient bar with color pointers that specify the colors of thegradient and where the gradient changes from one color to the next.
If you select a fill before you use the Color Mixer panel, the object’s fillcolor changes immediately when you change the gradient in the ColorMixer panel.
2. To use an existing gradient as a starting point, click the Fill Color boxon the Tools panel and choose a gradient from the bottom of the Colorpalette.
You can also choose Window➪Color Swatches to open the Color Swatchespanel and choose a gradient from the bottom of the Color palette there.
3. To specify the color for each color pointer, click and hold the pointerand then release the mouse button (this is like a long mouse click);when the color swatches appear, select a color.
You can click the Fill Color box and select an existing color from the Colorpalette or specify a new color by using the methods that we describe inthe earlier section, “Creating new colors or editing existing colors.”
Note that when you click a pointer, its point turns black to indicate thatit’s the active pointer. The square beneath the point displays the colorpointer’s current color.
4. To change the number of colors in the gradient, add or delete colorpointers.
To add a color pointer, click where you want the pointer to appear,just below the gradient bar. To delete a color pointer, drag it off the gradient bar.
5. To adjust where the color changes, drag a color pointer to the left orright.
6. To add control over how colors are applied to a selected shape beyondthe gradient, select one of the following overflow modes from theOverflow drop-down list:
• Extend: Extends the last or outermost gradient color past the endof the gradient.
• Reflect: Fills the shape by mirroring the gradient pattern.
• Repeat: Repeats the gradient from beginning to end.
68 Part II: 1,000 Pictures and 1,000 Words
08_596918 ch03.qxd 10/7/05 7:13 PM Page 68

Overflow modes are new for Flash 8. To use these effects, fill a shapewith a gradient and then use the Gradient Transform tool to reduce thesize of the gradient so that it no longer completely fills the shape. (Wediscuss the Gradient Transform tool in Chapter 4.) Then try out thethree overflow modes to see the results. The overflow modes are onlysupported in the Flash 8 player.
Select the Linear RGB check box to create a gradient that complies withScalable Vector Graphics (SVG) standards. SVG is an XML language fordescribing 2-D graphics.
7. To save the gradient, click the menu icon in the upper-right corner ofthe Color Mixer panel and choose Add Swatch.
The new gradient now appears in the Color palette of the Fill Color box onthe Tools panel and in the Color Swatches panel. Go ahead and fill somethingwith it!
You can also move a gradient’s center and focal points, change its width andheight, rotate it, scale it, skew it, and tile it. See Chapter 4 for more on editinggradients.
Bitmap fillsYou can create the coolest, weirdest fills by importing a bitmap graphic andusing the bitmap to fill any shape. For a hypothetical Web site protestinggenetically engineered foods, for example, we could find a bitmap of a bug(representing the Bt bacteria genetically engineered into corn) and use it tofill a graphic of corn. Figure 3-17 shows the result.
Figure 3-17:You can fillany shape
with abitmap,
repeatedover andover andover. . . .
69Chapter 3: Getting Graphic
08_596918 ch03.qxd 10/7/05 7:13 PM Page 69

To use a bitmap graphic to fill a shape, follow these steps:
1. Create the object or shape that you want to fill.
2. Choose File➪Import➪Import to Stage.
The Import dialog box opens.
3. In the Import dialog box, choose the bitmap that you want to use asthe fill and then click Open/Import.
The bitmap appears on the Stage. If necessary, move it to the desiredlocation.
We explain more about importing graphics in the section “The ImportBusiness — Using Outside Graphics,” at the end of this chapter.
4. Choose Modify➪Break Apart.
Flash breaks the bitmap into separate areas of color.
5. Click the Eyedropper tool on the Tools panel.
6. Click the bitmap on the Stage.
Notice that the Fill Color tool on the Tools panel now shows a tiny pic-ture of your bitmap. Flash also automatically switches you to the PaintBucket tool so that you can immediately fill an object.
7. Click inside the object that you want to fill.
Flash fills it with the bitmap. The bitmap is repeated over and over in aneffect called tiling.
If you’ve already imported a bitmap, you can fill an object with the bitmap byusing the Color Mixer panel. Follow these steps:
1. Choose Bitmap from the Fill Style drop-down list.
Bitmaps in the movie appear as small tiles at the bottom of the ColorMixer panel.
2. Click the Fill Color box if it isn’t already selected.
3. Select the bitmap from the small bitmap tiles.
4. Choose the Paint Bucket tool from the Tools panel.
5. Click inside a closed object on the Stage.
You may need to scale the bitmap. See the section on transforming fillsin Chapter 4 for details.
For either method of choosing a bitmap, you can choose the Brush tool(instead of using the Paint Bucket tool) and then brush with the bitmap. Usea thick-enough brush size so that the bitmap shows clearly.
70 Part II: 1,000 Pictures and 1,000 Words
08_596918 ch03.qxd 10/7/05 7:13 PM Page 70

Locking a fillFlash has another trick up its sleeve for gradient or bitmap fills. A locked filllooks as though the fill is behind your objects and the objects are just uncov-ering the fill. As a result, if you use the same fill for several objects, Flashlocks the position of the fill across the entire drawing surface rather thanfixing the fill individually for each object. Figure 3-18 shows an example of alocked fill. In this figure, you see some windows and portholes filled with alocked bitmap of the sky. Doesn’t it look as though the sky is really outsidethe windows?
To lock a fill, choose the Brush tool or the Paint Bucket tool with a gradientor bitmap fill, as we explain in the two preceding sections. Then click theLock Fill modifier in the Options section of the Tools panel. Start paintingwhere you want to place the center of the fill and continue to other areas.
Drawing PreciselyIf drawing in Flash seems too loosey-goosey to you, you need to know about afew features that can help you draw more precisely. Other programs do offermore precise tools, but Flash might have the tools that you need.
The ruler rulesTo help you get your bearings, you can choose View➪Rulers to display theFlash ruler along the top and the left side of the Stage, as shown in Figure 3-19.
Figure 3-18:When youlock a fill,
the fill’spattern
continuesacross theStage, but
appearsonly whereyou use it.
71Chapter 3: Getting Graphic
08_596918 ch03.qxd 10/7/05 7:13 PM Page 71

To give yourself more room to work while you create drawing objects on theStage, you can hide the Timeline by choosing Window➪Timeline. Do thesame to display the Timeline again when you need to work with layers orstart animating your work.
By default, the ruler is measured in pixels. Computer screens are measuredby how many pixels they display horizontally and vertically. Pixels are usefulfor Web site work because Web browsers work with only this unit. A pixel,however, is not a fixed physical size because it depends on the resolutioncapacity and settings of your screen. You might find it easier to think ininches or millimeters.
You can set the ruler to the unit of measurement that is most helpful to you.Choose Modify➪Document to open the Document Properties dialog box.From the Ruler Units drop-down list, choose one of the units (pixels, inches,points, centimeters, or millimeters) and click OK.
When the ruler is displayed, lines appear on the top and side rulers when-ever you drag an object — either while creating it or editing it. For example,when you drag to create a rectangle, you see a line on each ruler telling youwhere you started and where you ended up. If you’re moving the rectangle,Flash displays two lines on each ruler indicating the outside dimensions ofthe rectangle. You can easily move the rectangle one inch — or 50 pixels —to the left by looking at the lines on the top ruler.
Using guidesGuides help you lay out the Stage more precisely. Guides (refer to Figure 3-19)are horizontal and vertical lines that you can use as drawing aids while youwork. Don’t worry — guides never appear in the published Flash Player file.
Figure 3-19:Display the
ruler to helpyou draw
moreprecisely;
for morecontrol,
drag guidesonto the
Stage.
72 Part II: 1,000 Pictures and 1,000 Words
08_596918 ch03.qxd 10/7/05 7:13 PM Page 72

To use the guides, you must display the rulers, as we describe in the preced-ing section. To display guides, choose View➪Guides➪Show Guides. But thataction simply turns on the Guides feature; you still don’t see anything!
To display the guides, you need to drag them from the rulers. Drag from theleft ruler to create a vertical guide, and drag from the top ruler to create ahorizontal guide.
To customize the guides, choose View➪Guides➪Edit Guides to open theGuides dialog box, where you can choose the guide color or clear all theguides. To force objects to snap to (attach themselves to) the guides, selectthe Guides check box in the Guides dialog box. You can use the Snap Accuracydrop-down list in the Guides dialog box to choose how precisely Flash snapsto the guides.
To remove an individual guide, drag it back to its vertical or horizontal ruler.To lock the guides so that they don’t move while you work, choose View➪Guides➪Lock Guides.
Working with the gridYou can display a grid on the Stage to help you draw more accurately and togauge distances. The grid exists only to guide you — it never appears whenthe movie is printed or published on a Web site. Simply displaying the griddoesn’t constrain your objects to points on the grid. Use the grid by itselfwhen you want a visual guide for sizing, moving, and laying out the Stage.
To display the grid, choose View➪Grid➪Show Grid. Use the same commandto hide the grid again. You can set the size of the grid squares. Choose View➪Grid➪Edit Grid to open the Grid dialog box. You can also change the color ofthe grid lines here.
You can change the units of measurement used for the grid by choosingModify➪Document. In the Modify Document dialog box, select the unit thatyou want from the Ruler Units drop-down list and click OK.
Snapping turtleWhen you want even more precision, you can turn on snapping. Snappingtells Flash to snap objects to the intersections on the grid or to other objects.Usually, you want the grid on when you use snapping so that you can see thesnap points.
73Chapter 3: Getting Graphic
08_596918 ch03.qxd 10/7/05 7:13 PM Page 73

To turn on snapping, choose the Selection tool and click the Snap modifier inthe Options section of the Tools panel or Choose View➪Snapping➪Snap toObjects. To snap to the grid, choose View➪Snapping➪Snap to Grid. Use thesame method to turn snapping off again.
Snapping pulls your cursor to the grid points and to existing objects while youwork. You can take advantage of snapping both while drawing new objects andediting existing objects. When you have snapping on and select an object,Flash displays a small, black circle and snaps that circle to the grid points.
Setting snap-to-grid preferencesYou can get downright picky about how Flash snaps to grid points. Do youwant the end of a line (for example) to always snap, or should it snap only ifit’s close to a grid point or existing object? To set your preferences, chooseView➪Grid➪Edit Grid. From the Snap Accuracy drop-down list, select one ofthe options, which range from Must Be Close to Always Snap.
Setting snap-to-objects preferencesBecause snapping applies to objects as well as grid points, you can separatelyset how Flash snaps to objects. Choose Edit➪Preferences (Windows) orFlash➪Preferences (Mac) and click the Drawing category. Click the ConnectLines drop-down list and select Must Be Close, Normal, or Can Be Distant.Although Flash calls this the Connect Lines setting, it affects rectangles andovals as well as lines that you draw with the Line and Pencil tools.
This setting also affects how Flash recognizes horizontal and vertical linesand makes them perfectly horizontal or vertical. For example, the Can BeDistant setting adjusts a more angled line than the Must Be Close setting.
Pixel, pixel on the wallIf the grid isn’t precise enough, you can snap to pixels. Choose View➪Snapping➪Snap to Pixels to toggle snapping to pixels on and off. If Snap toPixels is on, when you zoom in to 400 percent or higher, Flash automaticallydisplays the pixel grid. With Snap to Pixels on, all objects that you create ormove snap to the pixel grid.
When Snap to Pixels is on, you can press the C key to temporarily turn offpixel snapping. In the same situation, you can press the X key to temporarilyhide the pixel grid (but not while you’re in the process of drawing).
74 Part II: 1,000 Pictures and 1,000 Words
08_596918 ch03.qxd 10/7/05 7:13 PM Page 74

You can also precisely align existing objects. For more information, seeChapter 4.
The Import Business — UsingOutside Graphics
So maybe you’re the lazy type — or totally without artistic talent — and youreally need help. Flash hasn’t given up on you completely. Rather than createyour own graphics, you can use the work of others. Although Flash createsvector-based graphics, it can import both bitmap and vector graphic files.
When using others’ artwork, be careful about copyright issues. For example,some graphics available on the Web can be used for personal, but not com-mercial, purposes. Most Web sites that offer graphics for downloading have awritten statement explaining how you can use their graphics.
Importing graphicsTo import a graphic file, follow these steps:
1. Choose File➪Import➪Import to Stage.
The Import dialog box opens.
2. In the dialog box, locate and choose the file that you want.
3. Click Open/Import to open the file.
The file appears on the Stage. If the file is a bitmap, it also goes into theLibrary. To import a graphic file directly into the Library without dis-playing it on the Stage, choose File➪Import➪Import to Library.
A cool feature of Flash is its capability to recognize and import sequences ofimages. If the image file that you choose in the Import dialog box ends with anumber and other files in the same folder have the same name but end withconsecutive numbers (for example, an1, an2, and so on), Flash asks whetheryou want to import the entire sequence of files. Click Yes to import thesequence. Flash imports the images as successive frames on the active layerso that you can use them as the basis for animation. (Chapter 9 explainsmore about frames and animation.)
Table 3-1 provides a list of the types of files you can import into Flash.
75Chapter 3: Getting Graphic
08_596918 ch03.qxd 10/7/05 7:13 PM Page 75

Table 3-1 Files That Flash Can ImportFile Type Windows Mac
Adobe Illustrator (.eps, .ai) through version 10 X X
All PostScript, including Acrobat PDF (.eps, .pdf, .ai) X X
AutoCAD DXF (.dxf); 2-D only X X
Bitmap (.bmp) X X*
Enhanced Metafile (.emf) X
Flash Player 6/7 (.swf) X X
FreeHand (.fh*); versions 7 to 11 X X
FutureSplash Player (.spl) X X
GIF/animated GIF (.gif) X X
JPEG (.jpg) X X
MacPaint (.pntg)* X X
Photoshop (.psd)* X X
PICT (.pct, .pic) X
PNG (.png) X X
QuickTime image (.qtif)* X X
Silicon Graphics Image (.sgi)* X X
Targa (.tga)* X X
TIFF (.tif)* X X
Windows Metafile (.wmf) X*Only if QuickTime 4 or later is installed
You can also simply copy and paste graphics. From the other application,copy the graphic to the Clipboard; then return to Flash and choose Edit➪Paste. However, in some cases, you might lose transparency when using thismethod. See Chapter 13 for details on exporting objects.
Using imported graphicsVector graphics from any drawing program become a grouped object thatyou can use like any other Flash object. The .wmf format, which is a Windows
76 Part II: 1,000 Pictures and 1,000 Words
08_596918 ch03.qxd 10/7/05 7:13 PM Page 76

vector graphics format, also imports in this way. These formats work espe-cially well when imported into Flash. You can sometimes find .wmf graphicsin clip art collections and on the Web.
You can import text from a text editor, and Flash turns it into a Flash textobject so that you can edit and format it within Flash. See Chapter 5 for moreon text.
When you import a bitmap graphic, you often need to take some steps beforeyou can use the graphic in your Flash file. You can manipulate your graphicsin several ways to make them more Flash friendly:
� Delete the background: In many cases, Flash imports not only the shapeyou want, but also a rectangular background that you don’t want. To getrid of that background, deselect the imported object, select just the rec-tangular background, and press Delete. If that doesn’t work, read on.
� Ungroup the graphic: Ungrouping separates grouped elements into indi-vidual elements. Ungrouping retains most of the features of your graphic.Select the graphic and choose Modify➪Ungroup. If you find that you stillcan’t work with your graphic properly, read the next item.
� Break apart the graphic: Break imported graphics to separate them intoungrouped, editable elements. Breaking apart is useful for reducing thefile size of graphics that you import. Breaking apart converts bitmaps tofills, converts text to letters and outlines, and breaks the link between anObject Linking and Embedding (OLE) embedded object and its sourceapplication. In other words, the Break Apart command is a powerful tool.Select the graphic and choose Modify➪Break Apart. You may have torepeat the process to break the graphic completely apart.
� Trace the bitmap: Flash can work magic. If you want total control withinFlash, convert a bitmap to a vector graphic.
To trace a bitmap, follow these steps:
1. Import the bitmap — don’t deselect it or perform any other actionon it.
2. Choose Modify➪Bitmap➪Trace Bitmap.
The Trace Bitmap dialog box opens.
3. In the Color Threshold text box, type a number to represent thethreshold.
The higher the number, the fewer the colors you get in the final vectorgraphic. For close results, try a value of 10.
4. In the Minimum Area text box, type a number to represent the numberof nearby pixels that Flash considers when assigning a color to a pixel.
For greatest fidelity, try a value of 1.
77Chapter 3: Getting Graphic
08_596918 ch03.qxd 10/7/05 7:13 PM Page 77

5. From the Curve Fit drop-down list, select an option to represent howsmoothly Flash draws the outlines.
For the most exact results, select Pixels.
6. From the Corner Threshold drop-down list, select an option to repre-sent how Flash reproduces sharp edges.
For sharpest results, choose Many Corners.
7. Click OK to close the Trace Bitmap dialog box, and then deselect thegraphic to see the result.
When you import a bitmap graphic, Flash places the graphic in the currentmovie’s Library. For best results, don’t delete the original graphic from theLibrary, even if you have modified it. Flash continues to refer to the graphicafter you have converted it to a symbol. (Chapter 2 explains all about theLibrary. See Chapter 7 for our total wisdom on symbols.)
Whether you created your graphics in Flash or imported them, you probablyneed to edit them in many ways. Chapter 4 explains the details of editingobjects.
78 Part II: 1,000 Pictures and 1,000 Words
08_596918 ch03.qxd 10/7/05 7:13 PM Page 78

Chapter 4
You Are the Object EditorIn This Chapter� Selecting objects
� Manipulating objects (moving, copying, and deleting)
� Reshaping shapes
� Working with fills
� Transferring properties to other objects
� Using the Transform command (scaling, rotating, skewing, and flipping)
� Combining objects
� Grouping and ungrouping
� Breaking apart objects
� Changing object order
� Undoing, redoing, and reusing actions
This chapter tells you all you need to know about editing objects. You canmanipulate objects in a zillion ways to suit your artistic fancy. The Flash
editing tools can give you precisely the results that you want. Sometimes youneed to edit because you made a mistake (rarely, of course), but often editingis just part of the creation process. You might also find that you have to alterimported graphics so that they fit into the scheme of things.
Selecting ObjectsBefore you can edit any object on the Stage, you need to select it. Flash offersmany ways to select objects. After you get the hang of using the Flash selec-tion tools, you’ll find them efficient and easy to use.
09_596918 ch04.qxd 10/7/05 7:11 PM Page 79
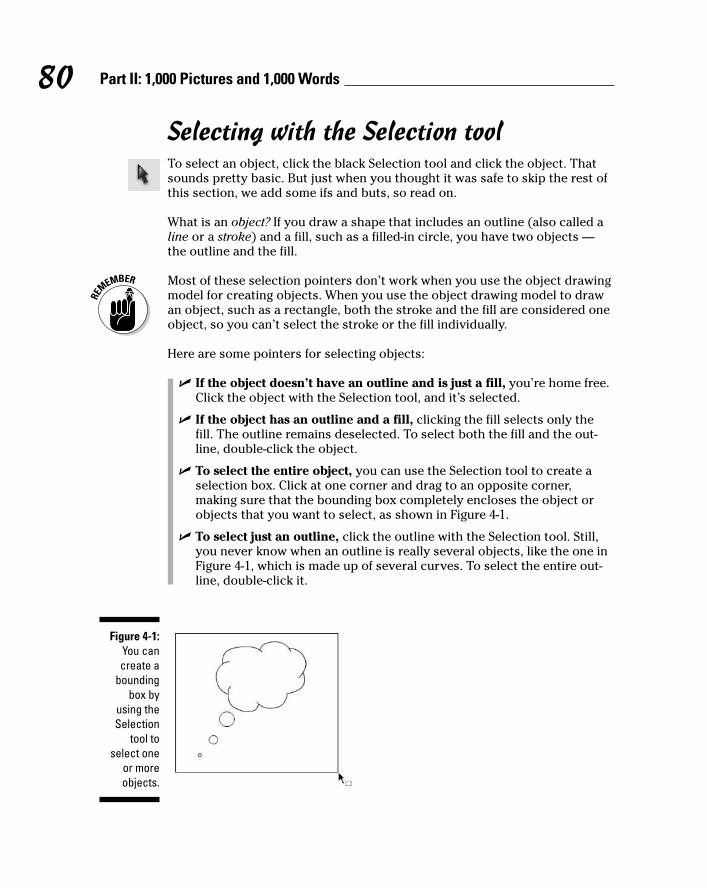
Selecting with the Selection toolTo select an object, click the black Selection tool and click the object. Thatsounds pretty basic. But just when you thought it was safe to skip the rest ofthis section, we add some ifs and buts, so read on.
What is an object? If you draw a shape that includes an outline (also called aline or a stroke) and a fill, such as a filled-in circle, you have two objects —the outline and the fill.
Most of these selection pointers don’t work when you use the object drawingmodel for creating objects. When you use the object drawing model to drawan object, such as a rectangle, both the stroke and the fill are considered oneobject, so you can’t select the stroke or the fill individually.
Here are some pointers for selecting objects:
� If the object doesn’t have an outline and is just a fill, you’re home free.Click the object with the Selection tool, and it’s selected.
� If the object has an outline and a fill, clicking the fill selects only thefill. The outline remains deselected. To select both the fill and the out-line, double-click the object.
� To select the entire object, you can use the Selection tool to create aselection box. Click at one corner and drag to an opposite corner,making sure that the bounding box completely encloses the object orobjects that you want to select, as shown in Figure 4-1.
� To select just an outline, click the outline with the Selection tool. Still,you never know when an outline is really several objects, like the one inFigure 4-1, which is made up of several curves. To select the entire out-line, double-click it.
Figure 4-1:You cancreate a
boundingbox by
using theSelection
tool toselect one
or moreobjects.
80 Part II: 1,000 Pictures and 1,000 Words
09_596918 ch04.qxd 10/7/05 7:11 PM Page 80

� To select several unconnected objects, select one object, press andhold the Shift key, and select additional objects. When you press Shift,you can add to already selected objects and select as many objects asyou want.
To deselect selected objects, click any blank area.
So you’re happily drawing away, using the various drawing tools. Then youwant to select one of the objects, but you forget to change to the Selectiontool. Oops! You draw another object by accident. Immediately, choose Edit➪Undo. Then use one of the Flash arrow shortcuts:
� Press the V key to switch to the Selection tool.
� To temporarily switch to the Selection tool while you’re using anothertool, hold the Ctrl (Windows) or Ô (Mac) key while you select an objector objects.
Lassoing your objectsFor you rodeo types, you can lasso your objects so that they can’t escape.The Lasso tool creates a customized select area and selects everythinginside. Use the Lasso tool when you want to select a number of objects thatare near other objects that you want to remain free.
To lasso objects, click the Lasso tool on the Tools panel.
To lasso freehand, make sure that the Polygon Mode modifier (in the Optionssection of the Tools panel) is not selected. Click anywhere on the Stage anddrag around the objects that you want to select. Flash creates a selectionarea while you drag. Release the mouse button close to where you started itto close the lasso’s loop, as shown in Figure 4-2.
Figure 4-2:Lasso
freehand toselect onlythe objects
you want.
81Chapter 4: You Are the Object Editor
09_596918 ch04.qxd 10/7/05 7:11 PM Page 81

You might find that freehand lassoing is somewhat hard to control. If youtend to inadvertently cut across objects rather than glide around them, usethe Polygon Mode modifier to draw straight-line polygons instead — like alasso with a very stiff rope.
To lasso by using straight lines, follow these steps:
1. Click to choose the Lasso tool.
2. Click the Polygon Mode modifier in the Options section of the Toolspanel.
3. Click where you want the first line of the polygon to start.
4. Click again where you want the first line to end.
5. Continue to click, creating line segments as you go.
6. Double-click when you finish lassoing the objects.
Selecting everything in one fell swoopSuppose that you want to select or deselect all objects at one time. Flash hassome handy shortcuts to help you do that:
� To select everything: Press Ctrl+A (Windows) or Ô+A (Mac). Or chooseEdit➪Select All. The Select All command selects all objects on all layersexcept for objects on locked or hidden layers. (See Chapter 6 for anexplanation of layers.)
� To select everything on one layer: Click the layer name.
� To deselect everything: The easiest method is to click off the Stage oron any blank area of the Stage. Alternatively, you can press Ctrl+Shift+A(Windows) or Ô+Shift+A (Mac). Or choose Edit➪Deselect All. TheDeselect All command deselects all objects on all layers.
To lock a group or symbol so that it can’t be selected or edited, select thegroup or symbol and choose Modify➪Arrange➪Lock. To unlock a group orsymbol, choose Modify➪Arrange➪Unlock All. (See the section “GettingGrouped,” later in this chapter, to find out about groups. Chapter 7 is allabout symbols.)
Moving, Copying, and DeletingThe most common changes that you make to objects are to move them, copythem, and delete them. Usually, moving, copying, and deleting are straightfor-ward tasks, but Flash has a few tricks up its sleeve, so keep on truckin’.
82 Part II: 1,000 Pictures and 1,000 Words
09_596918 ch04.qxd 10/7/05 7:11 PM Page 82

Movin’ on down the roadBefore you can move, you have to select. After you select your object orobjects, place the mouse cursor over any selected object until your cursordisplays the dreaded four-headed arrow. (Okay, most people don’t dread it atall.) Then click and drag to wherever you’re going. Press Shift while you dragto constrain the movement to a 45-degree angle.
Moving precisely with Snap AlignWhen you drag an object, you notice vertical and horizontal dashed lines whenyour object approaches existing objects. This Snap Align feature displays tem-porary dashed lines when you move objects to show you when the edges ofobjects are aligned, both vertically and horizontally, with existing objects.
Snap alignment is great for quickly aligning two objects without using the Alignpanel. While you drag a selected object, the dashed lines appear when youmove an object in alignment with an existing object, as shown in Figure 4-3.You also see the lines when you drag an object close to any edge of the Stage.
To turn on snap alignment (although it is on by default), choose View➪Snapping➪Snap Align. You see a check mark next to the Snap Align item.Repeat the process to turn off snap alignment.
You can customize your snap alignment settings. Choose View➪Snapping➪Edit Snapping to open the Edit Snapping dialog box. Then click the Advancedbutton to expand the dialog box. Figure 4-4 shows the expanded dialog box.
In the Edit Snapping dialog box, you can also turn on snap alignment for thecenters of objects, for easy centering of objects. Mark both check boxes inthe Center Alignment section of the Edit Snapping dialog box.
Figure 4-3:Snap
alignmentvisually
displaysalignmentbetween
objectswhile you
move them.
83Chapter 4: You Are the Object Editor
09_596918 ch04.qxd 10/7/05 7:11 PM Page 83

Flash assumes that a border exists around the edge of the Stage. To changethe border width, type a different number in the Stage Border text box. Tochange the accuracy for alignment between objects, type a number in theHorizontal and Vertical text boxes in the Object Spacing section of the dialogbox. Click OK when you’re done to close the dialog box.
You can also use the grid and turn on the snapping feature for moving andcopying objects. (See Chapter 3 to find out about the grid and snapping.) Forexample, you can attach one object to another by moving your first object untilit snaps to the second, using the small black circle at the cursor as a guide.
The snap align feature aligns objects by their edges. Object snapping alignsobjects by their transformation point. See the section “Changing theTransformation Point,” later in this chapter for more information.
You can also use the four arrow keys on your keyboard to move a selectedobject or objects. Each press of an arrow key moves the selection one screenpixel in the direction of the arrow. Press Shift plus an arrow key to move theselection by 10 screen pixels.
Moving with the ClipboardYou can move an object by cutting to the Clipboard and pasting if you wantto move the object to another layer, scene, file, or application. After youselect the object or objects, choose Edit➪Cut. Alternatively, press Ctrl+X(Windows) or Ô+X (Mac). Choose another layer or scene or open another fileand do one of the following:
� To paste the selection in the center of the display: Choose Edit➪Pasteor press Ctrl+V (Windows)/Ô+V (Mac).
� To paste the selection in the same position relative to the Stage: ChooseEdit➪Paste in Place or press Ctrl+Shift+V (Windows)/Ô+Shift+V (Mac).
Figure 4-4:The Edit
Snappingdialog box
makes yoursnap
alignmentssnap to your
orders.
84 Part II: 1,000 Pictures and 1,000 Words
09_596918 ch04.qxd 10/7/05 7:11 PM Page 84

Moving with the Property inspectorIf you want to place objects precisely, use the Property inspector. After youselect an object or objects, choose Window➪Properties➪Properties and thenclick the Expand/Collapse arrow to display the expanded panel, as shown inFigure 4-5.
Use the X and Y text boxes to specify the location. The X setting specifieshorizontal distance; the Y setting specifies vertical distance — both are mea-sured from the top-left corner of the Stage.
Moving with the Info panelYou can also use the Info panel to specify the X and Y positions of objects.Choose Window➪Info to open the panel, as shown in Figure 4-6. You can usethe grid next to the X and Y text boxes to measure either from the upper-leftcorner or the center of the selection — just click in the desired referencepoint on the grid. Flash uses the units that you specify in the DocumentProperties dialog box. (See the section in Chapter 3 on drawing precisely forinformation on setting the units.)
Remember that moving an object onto another existing object on the samelayer either joins it (if the objects are the same color) or cuts it out (if they aredifferent colors) — unless you drew the object in object-drawing mode. Seethe section in Chapter 3 on mixing and matching shapes for more information.
Figure 4-6:The Info
panel.
Figure 4-5:Use the
expandedProperty
inspector toplace
objectsprecisely.
85Chapter 4: You Are the Object Editor
09_596918 ch04.qxd 10/7/05 7:11 PM Page 85
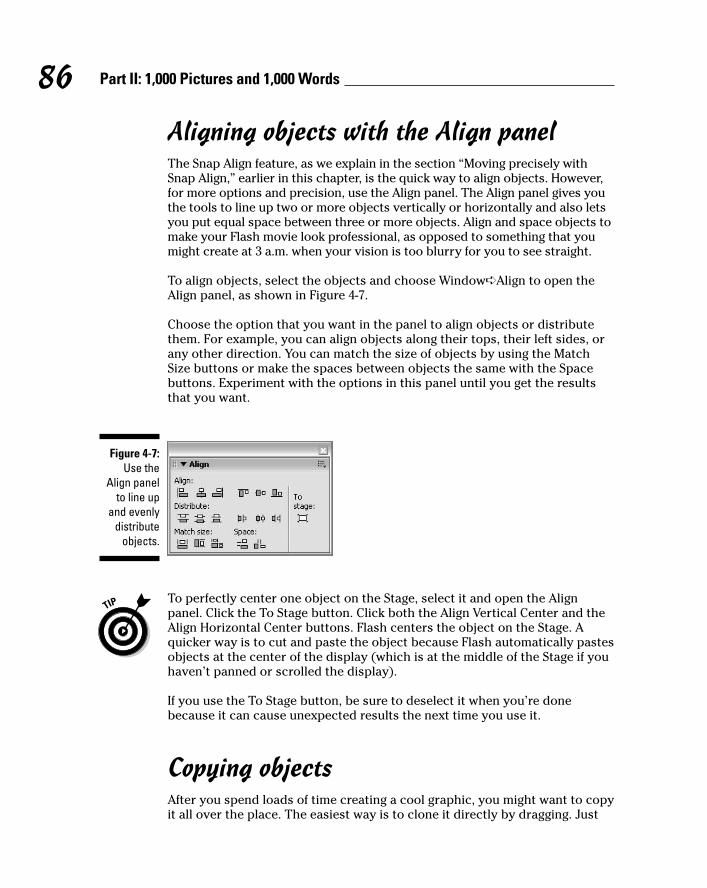
Aligning objects with the Align panelThe Snap Align feature, as we explain in the section “Moving precisely withSnap Align,” earlier in this chapter, is the quick way to align objects. However,for more options and precision, use the Align panel. The Align panel gives youthe tools to line up two or more objects vertically or horizontally and also letsyou put equal space between three or more objects. Align and space objects tomake your Flash movie look professional, as opposed to something that youmight create at 3 a.m. when your vision is too blurry for you to see straight.
To align objects, select the objects and choose Window➪Align to open theAlign panel, as shown in Figure 4-7.
Choose the option that you want in the panel to align objects or distributethem. For example, you can align objects along their tops, their left sides, orany other direction. You can match the size of objects by using the MatchSize buttons or make the spaces between objects the same with the Spacebuttons. Experiment with the options in this panel until you get the resultsthat you want.
To perfectly center one object on the Stage, select it and open the Alignpanel. Click the To Stage button. Click both the Align Vertical Center and theAlign Horizontal Center buttons. Flash centers the object on the Stage. Aquicker way is to cut and paste the object because Flash automatically pastesobjects at the center of the display (which is at the middle of the Stage if youhaven’t panned or scrolled the display).
If you use the To Stage button, be sure to deselect it when you’re donebecause it can cause unexpected results the next time you use it.
Copying objectsAfter you spend loads of time creating a cool graphic, you might want to copyit all over the place. The easiest way is to clone it directly by dragging. Just
Figure 4-7:Use the
Align panelto line up
and evenlydistribute
objects.
86 Part II: 1,000 Pictures and 1,000 Words
09_596918 ch04.qxd 10/7/05 7:11 PM Page 86

select the object and press Ctrl (Windows) or Option (Mac) while you drag.Flash makes a copy and moves it wherever you drag.
You can also copy objects to the Clipboard. Select an object or objects andchoose Edit➪Copy or press Ctrl+C (Windows) or Ô+C (Mac). You can pastethe selection on the same layer or move it to another layer, scene, or file byusing one of these techniques:
� To paste the selection in the center of the display: Choose Edit➪Pasteor press Ctrl+V (Windows) or Ô+V (Mac).
� To paste the selection in the same position relative to the Stage: ChooseEdit➪Paste in Place. If you’re on the same layer, scene, and file, you nowhave two copies, one on top of the other. The new object is selected, soyou can immediately drag it to a new location.
Because Flash pastes objects from the Clipboard to the exact center of thedisplay, cutting and pasting is a great technique for centering objects on topof each other. For example, if you want to create two concentric circles, oneon top of the other, create the circles in separate locations. Cut and paste thelarger circle first, and then the smaller circle. You now have perfect concen-tric circles, and you can move them together to the desired location. Thistechnique works only if the Stage is at the center of your display — that is, ifyou haven’t scrolled the display.
When you paste a new object, be sure to move the new object right away if itcovers an existing object on the same layer. If you deselect the new object, iteither joins the existing object (if the objects are the same color) or cuts itout (if they’re different colors). Of course, that might be your intention. Seethe section in Chapter 3 on mixing and matching shapes for more informa-tion, including how to avoid the joining and cutout behavior.
Makin’ objects go awayMaking objects go away is easy. Just select them and press Delete orBackspace in Windows/Delete or Clear on the Mac.
Making Shapes More ShapelySuppose that you created an object and now you want to tweak it a bit. Flashhas many techniques to help you perfect your artwork, and you can modifyboth lines and fills.
87Chapter 4: You Are the Object Editor
09_596918 ch04.qxd 10/7/05 7:11 PM Page 87

Reshaping shapes and outlinesThe Selection tool can do more than select objects — it can also reshapethem — as long as you didn’t create them using the object drawing model.When you reshape with the Selection tool, you do not select the object.
To reshape an outline or a fill, choose the Selection tool and place the mousecursor near the object or on the edge of the object:
� If you see a corner next to the cursor, you can move, lengthen, orshorten an end point, as shown on the left side of Figure 4-8.
� If you see a curve next to the cursor, you can reshape a curve, as shownon the right side of in Figure 4-8.
Click and drag in the desired direction. Flash temporarily displays a blackdrag line to show you what the result will look like when you release themouse button. If you don’t like the result, choose Edit➪Undo — or pressCtrl+Z (Windows) or Ô+Z (Mac) — and try again.
As with drawing, you might find it helpful to increase the zoom factor. Tryediting at 200 or 400 percent.
Using the Subselect toolYou can use the Subselect tool to reshape individual strokes or fills createdby using the Pen, Pencil, Brush, Line, Oval, or Rectangle tools. When you usethe Subselect tool, you move anchor points, which are small squares thatappear on the object. To use Subselect, follow these steps:
1. Choose the Subselect tool (the white arrow in the Tools panel).
2. Click the stroke (outline) or fill shape to display the anchor points onthe line or shape outlines.
Figure 4-8:The
Selectiontool
modifiesend points
and curves.
88 Part II: 1,000 Pictures and 1,000 Words
09_596918 ch04.qxd 10/7/05 7:11 PM Page 88

3. Drag the anchor points to modify the shape.
4. To change the direction of a curve, click any anchor point to displaytangent lines and drag the tangent line handles (the little dots at theends of the tangent lines).
The tangent lines indicate the direction of the curve. See the section inChapter 3 on drawing curves with the Pen tool for information on anchorpoints and tangent lines.
If you click a graphic with the Subselect tool and points aren’t displayed onits edges, you might have grouped the graphic, as we describe later in thischapter, or created it with the object-drawing model, or maybe you didn’tcreate it with the Pen, Pencil, Brush, Line, Oval, or Rectangle tool. In anycase, try choosing Modify➪Ungroup or Modify➪Break Apart and then usingthe Subselect tool.
You can also delete anchor points. Flash reshapes the shape without thatanchor point. Select the object with the Subselect tool, select an anchorpoint, and press Delete.
Freely transforming and distorting shapesFor way-cool distortions and reshapings, use the Free Transform tool, with itsDistort & Envelope options. The Free Transform tool can work its magic onobjects, groups, instances, or text blocks. In addition to its special abilityto create distortions, it’s flexible enough to move, rotate, scale, and skewobjects. Flash also has other tools that rotate, scale, and skew — we coverthem later in this chapter.
To use the Free Transform tool, select an object, symbol instance, group, ortext block. (See Chapter 7 for more about symbols. We discuss groups later inthis chapter.) Click the Free Transform tool in the Tools panel. The object dis-plays a bounding box with handles and a transformation point, shown as acircle at the center of the bounding box, as shown in Figure 4-9.
Figure 4-9:We lovethe Free
Transformtool!
89Chapter 4: You Are the Object Editor
09_596918 ch04.qxd 10/7/05 7:11 PM Page 89

You can perform the following commonly used transformations on theselected object:
� Move: Place the cursor on the object itself; when you see the four-headed arrow, click and drag to move the selected object.
� Set the center for rotation and scaling: Place the cursor on the transfor-mation point; when you see the small circle, you can drag the circle atthe center of the bounding box to move the transformation point. Thetransformation point is the base point used for the current rotation orscaling operation.
� Rotate: Place the cursor just outside any corner handle; when you seethe circular arrow, drag the object to rotate it around the transformationpoint.
Press Shift while you drag to constrain the rotation to 45-degree incre-ments. Press Alt (Windows) or Option (Mac) while you drag to rotatearound the diagonally opposite corner from your cursor.
� Scale both dimensions: Place the cursor on any corner handle; whenyou see the broken, two-headed arrow, drag inward or outward. PressShift while you drag to ensure that the object is scaled proportionallywithout being distorted.
You can select as many objects as you want, and Flash scales them all.When you select more than one object, Flash places the handles aroundan imaginary bounding box that encompasses all the objects. Sometimesyou might not get exactly the result you want with this method, so checkcarefully.
� Scale one dimension: Place the cursor on any side handle; when yousee the two-headed arrow, drag inward or outward to scale in the direc-tion that you’re dragging.
� Skew: Place the cursor anywhere on the bounding box except on thehandles; when you see the parallel lines, drag in any direction. (Wecover skewing in more detail in the “Getting skewy” section, later inthis chapter.)
In the following sections, you find out about the more exciting transformationsthat you can create with the Free Transform tool.
Tapering objectsYou can turn a square into a trapezoid by tapering. When you taper, you usethe Free Transform tool to drag a corner handle. While you drag, the adjoin-ing corner moves an equal distance in the opposite direction, as shown inFigure 4-10. You can taper other shapes, not just squares — but adjoining corners are always simultaneously stretched in opposite directions.
90 Part II: 1,000 Pictures and 1,000 Words
09_596918 ch04.qxd 10/7/05 7:12 PM Page 90
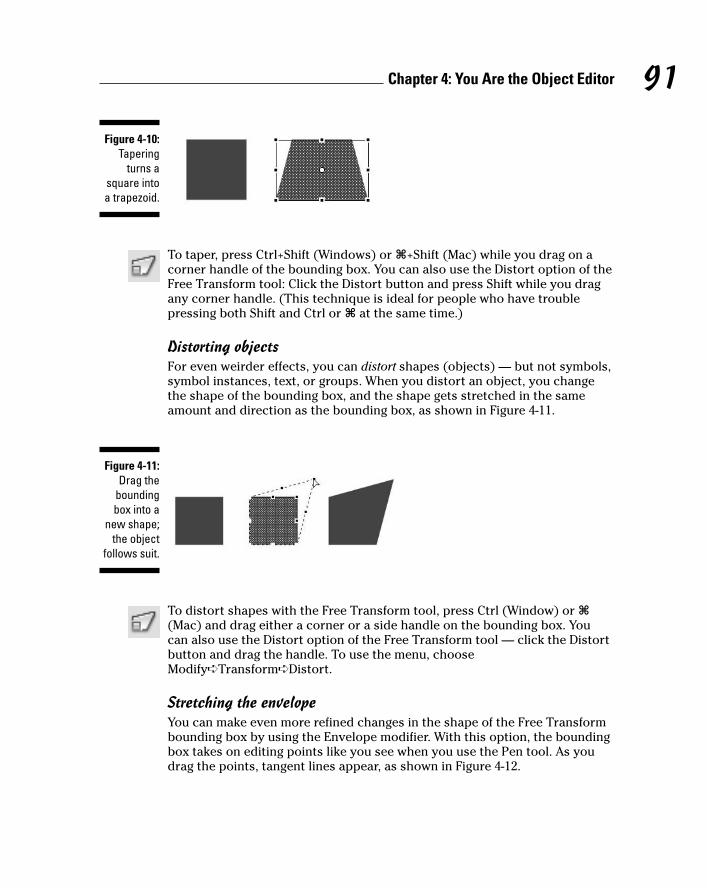
To taper, press Ctrl+Shift (Windows) or Ô+Shift (Mac) while you drag on acorner handle of the bounding box. You can also use the Distort option of theFree Transform tool: Click the Distort button and press Shift while you dragany corner handle. (This technique is ideal for people who have troublepressing both Shift and Ctrl or Ô at the same time.)
Distorting objectsFor even weirder effects, you can distort shapes (objects) — but not symbols,symbol instances, text, or groups. When you distort an object, you changethe shape of the bounding box, and the shape gets stretched in the sameamount and direction as the bounding box, as shown in Figure 4-11.
To distort shapes with the Free Transform tool, press Ctrl (Window) or Ô(Mac) and drag either a corner or a side handle on the bounding box. Youcan also use the Distort option of the Free Transform tool — click the Distortbutton and drag the handle. To use the menu, chooseModify➪Transform➪Distort.
Stretching the envelopeYou can make even more refined changes in the shape of the Free Transformbounding box by using the Envelope modifier. With this option, the boundingbox takes on editing points like you see when you use the Pen tool. As youdrag the points, tangent lines appear, as shown in Figure 4-12.
Figure 4-11:Drag the
boundingbox into a
new shape;the object
follows suit.
Figure 4-10:Tapering
turns asquare intoa trapezoid.
91Chapter 4: You Are the Object Editor
09_596918 ch04.qxd 10/7/05 7:12 PM Page 91

To use the Envelope modifier, select an object — a shape — but not a symbol,instance, text, or group. Choose the Free Transform tool and the Envelopemodifier. Drag any of the points in or out and then drag the end of any of thetangent lines to change the direction of the curve.
To end a free transformation, click anywhere off the selected object.
Straightening lines and curving curvesJust like you can straighten and smooth strokes by using the Straighten andSmooth modifiers of the Pencil tool, you can straighten and smooth strokesand fills of existing objects. (See Chapter 3 for more about the Pencil tool.)
You can activate the Straighten and Smooth modifiers repeatedly and watchwhile Flash slightly reshapes your strokes or fills each time. Eventually, Flashreaches a point where it can’t smooth or straighten anymore.
Choose Edit➪Preferences and choose the Drawing category to adjust howFlash calculates the straightening and smoothing. Change the Smooth Curvesand Recognize Shapes settings.
To straighten a stroke, first select the object. With the Selection tool active,click the Straighten Modifier button in the Options section of the Tools panel.Flash straightens out curves and recognizes shapes, if appropriate.
To smooth a curve, first select the object. With the Selection tool active, clickthe Smooth Modifier button in the Options section of the Tools panel. Smoothsoftens curves and reduces the number of segments that create a curve.
Modifying line endingsFlash 8 offers line caps that you can choose to customize the ends of linesthat you draw. (See the section on setting the stroke type in Chapter 3 fordetails on caps.) You can also change existing line caps. Select a line and dis-play the Property inspector (choose Window➪Properties➪Properties). Selecta new option from the Cap or Join drop-down list.
Figure 4-12:The oval is
like taffywhen you
push theenvelope.
92 Part II: 1,000 Pictures and 1,000 Words
09_596918 ch04.qxd 10/7/05 7:12 PM Page 92

Optimizing curvesFlash offers a technique called optimizing for curves. Optimizing reduces thenumber of individual elements in a curve. Optimizing reduces the size of yourfile, resulting in faster download times on your Web site. You can optimizerepeatedly, just as you can with smoothing and straightening. Optimizingworks best for complex art created with many lines and curves. The visualresult is somewhat like smoothing but might be even subtler.
To optimize, select the object or objects and choose Modify➪Shape➪Optimize.Flash opens the Optimize Curves dialog box, as shown in Figure 4-13.
As you can see in the dialog box, you can choose how much you want Flashto optimize curves. If you mangle your work too much on the first try, undo itand try again with a different setting. You can generally leave the other set-tings as they are. For a slower but more thorough optimization, mark the UseMultiple Passes (Slower) check box. And it’s helpful to see the totals messagethat shows you how many curves Flash cut out and the percentage of opti-mization that number represents, so select the Show Totals Message checkbox. Click OK to optimize.
Be careful to check the results after optimizing. Flash sometimes eliminatessmall objects that you may want to remain. If you don’t like the results ofoptimizing, choose Edit➪Undo.
Expanding and contracting filled shapesYou can expand and contract shapes. Expanding and contracting works beston shapes with no stroke (outline) because Flash deletes the outline when exe-cuting the command. If you want to expand or contract a shape with a stroke,scale it. We explain scaling later in this chapter in the “Scaling, scaling . . .” section. The advantage of expanding and contracting is that you can specifya change in size in terms of pixels.
Figure 4-13:Optimize toreduce thenumber of
curves.
93Chapter 4: You Are the Object Editor
09_596918 ch04.qxd 10/7/05 7:12 PM Page 93

To expand or contract a shape, select it and choose Modify➪Shape➪Expand Fill. The Expand Fill dialog box appears, as shown in Figure 4-14. Typea number in the Distance text box, using the units that you have set for theentire movie. By default, movies are measured in pixels. (See the section inChapter 3 on drawing precisely for the details on setting movie units.)
To expand a shape, select the Expand radio button. To contract a shape,select the Inset radio button. Then click OK.
Softening edgesSoftening edges is another shape-modification tool. You can soften edges ofa shape to get a graphic to look like you created it in a bitmap image editor,such as Photoshop. Figure 4-15 shows some text before and after its edgesare softened. Note that adding softened edges can increase your file size.
You can create this effect by breaking apart the text twice before softeningthe edges. We discuss breaking apart objects later in this chapter; Chapter 5explains more specifically about breaking apart text into editable shapes.
To soften edges, select the object or objects and choose Modify➪Shape➪Soften Fill Edges. Flash opens the Soften Fill Edges dialog box, as shown inFigure 4-16.
Figure 4-15:Soften the
edges ofobjects to
create cooleffects.
Figure 4-14:The Expand
Fill dialogbox.
94 Part II: 1,000 Pictures and 1,000 Words
09_596918 ch04.qxd 10/7/05 7:12 PM Page 94

To soften edges, follow these steps:
1. Set the distance, which is the width of the softened edge.
The distance is measured in pixels unless you have changed the docu-ment units. (See the section in Chapter 3 on drawing precisely for infor-mation on setting the units in the Document Properties dialog box.)
2. Select the number of steps, which means the number of curves thatFlash uses to create the softened edge.
Try the Flash default first and change it if you don’t like the result. Youcan increase the number to get a smoother effect.
3. Select either the Expand radio button to create the softened edge out-side the shape or the Inset radio button to create the softened edgewithin the shape.
4. Click OK to create the softened edge.
Your shape is still selected, so click anywhere outside it to see the result.If you don’t like it, press Ctrl+Z (Windows) or Ô+Z (Mac) and try againusing different options.
You can also create soft edges by using gradients that blend into the Stagecolor or with partially transparent colors. Chapter 3 explains more aboutusing colors. Flash 8 Professional also has a blur filter that you can use ontext, movie clip symbols, and buttons. Chapter 7 describes filters.
Converting lines to fillsFlash offers lots of great ways to fill a shape — for example, with gradientsand bitmap images. But what about those boring strokes or outlines? You canconvert lines to fills and make them fun, fun, fun. (See Chapter 3 for an expla-nation of fills, including gradients and bitmap images.)
Figure 4-16:The Soften
Fill Edgesdialog box
softensup your
boss . . . uh,graphics.
95Chapter 4: You Are the Object Editor
09_596918 ch04.qxd 10/7/05 7:12 PM Page 95

Mind you, there’s not much point in converting a line to a fill if it’s so thinthat no one would ever see a fill in it. Figure 4-17 shows some waves createdwith a line (by using the Pencil tool) that is 10 points wide. We converted theline to a fill and then used the Paint Bucket tool to fill the line with a gradient.
To convert a line to a fill, select the line and choose Modify➪Shape➪ConvertLines to Fills. You don’t see any visible difference when you deselect the line,but now you can change the fill to anything that you want.
Transforming FillsThe Fill Transform tool offers a unique way to edit gradient and bitmap fills.You can perform the following changes to a fill:
� Move its center point.
� Change its width or height.
� Rotate it.
� Scale it.
� Tile it.
� Change the radius of a radial gradient.
� Move the focus of a radial gradient.
� Skew (slant) it.
From this list, you can see that there’s no point in fiddling with solid fills.They would look the same no matter what direction, size, or scale they were.(See the section in Chapter 3 on colors for colorful coverage of gradient andbitmap fills.)
Figure 4-17:Change theline to a fill
and usethe Paint
Bucket toolto change
the fill.
96 Part II: 1,000 Pictures and 1,000 Words
09_596918 ch04.qxd 10/7/05 7:12 PM Page 96

To edit a fill, choose the Fill Transform tool. Click any gradient or bitmap fill.Flash places an editing boundary and editing handles around the fill, asshown in Figure 4-18. The editing boundary varies with the type of fill —bitmap, linear gradient, or radial gradient.
After you have a fill with an editing boundary, you’re ready to go ahead andfiddle with the fills. Here’s how to make changes:
� Move the center of the fill: Drag the center point, marked by a smallcircle at the center of the fill. You can move a center fill to move thecenter of a radial gradient, move the stripes of a linear gradient, or placea bitmap off-center.
� Move the focal point of a fill: Drag the focal point, marked by a trianglealong the center line of a radial gradient. Moving the focal point canmake the apparent direction of light move from side to side in a radialgradient with a lightly colored center.
� Change the width of a fill: Drag the square handle on one side of theediting boundary. To change the height of a fill, drag the handle on thebottom of the editing boundary. If a fill doesn’t have one of these han-dles, you can’t edit the fill that way. Changing the width of a linear fillthat’s perpendicular to the direction of its stripes is the same as scalingthe fill — the stripes get wider (or narrower).
� Rotate a fill: Drag the rotation handle, which is a small circle just out-side the corner of the editing boundary. On a radial gradient, use thebottom of the three handles on the circumference of the boundary.Figure 4-19 shows a linear gradient rotated 45 degrees.
When rotating a fill, you can press and hold the Shift key while you dragto constrain the rotation of the fill to multiples of 45 degrees.
� Scale a bitmap fill: Drag the square handle at the corner of the editingboundary — inward to scale down and outward to scale up. To scale acircular gradient, drag the middle circular handle on the editing bound-ary. Figure 4-20 shows a bitmap gradient at original size and scaleddown. Flash tiles the bitmap if you scale down significantly.
Figure 4-18:The Fill
Transformtool placesan editingboundary
around the fill.
97Chapter 4: You Are the Object Editor
09_596918 ch04.qxd 10/7/05 7:12 PM Page 97

If you scale down a bitmap so that you see many tiles, the next time thatyou want to edit the bitmap, Flash places an editing boundary aroundeach tile so that you have to edit each one individually. That could takea long time! If you want to edit a bitmap in several ways, save scalingdown for last.
� Skew (slant) a fill: Drag one of the rhombus-shaped handles on the topor side of the editing boundary. You can skew only if the fill is a bitmap.Skewing is different from rotating because the bitmap is distorted. Figure4-21 shows an example of a skewed bitmap.
Later in this chapter, we explain how to rotate, scale, and skew entire objects.
Figure 4-21:You canskew a
bitmap fillfor really
weirdresults.
Figure 4-20:You canscale a
bitmap fill tomake it
larger orsmaller.
Figure 4-19:Rotate a
linear fill tocreate
diagonalfills.
98 Part II: 1,000 Pictures and 1,000 Words
09_596918 ch04.qxd 10/7/05 7:12 PM Page 98

Transferring PropertiesYou can use the Eyedropper tool to copy outline and fill properties from oneobject to another. (See the section on bitmap fills in Chapter 3 for instructionson using the Eyedropper tool to create bitmap fills.)
To transfer properties, follow these steps:
1. Choose the Eyedropper tool.
2. Select an outline or a fill.
If you select an outline, Flash activates the Ink Bottle tool. If you select afill, Flash activates the Paint Bucket tool and turns on the Lock Fill modi-fier. (For more information on the Lock Fill modifier, see the section inChapter 3 that discusses locking a fill.)
3. Click another outline or fill.
Flash transfers the properties of the original outline or fill to the newobject.
Finding and Replacing ObjectsOne way to change an object is to change its properties. You can find graph-ics objects by color or bitmap and then replace the color or bitmap. Forexample, you can easily change every blue fill or stroke to red if your Webcolor scheme changes.
You can find and replace according to color, bitmap, text, and font (Chapter 5);sound; or video (Chapter 11). You can also find and replace symbols (seeChapter 7).
To find and replace objects, choose Edit➪Find and Replace to open the Findand Replace dialog box, as shown in Figure 4-22.
From the Search In drop-down list, choose to search in the entire Flash moviedocument or only in the current scene. (See Chapter 9 for a full explanationof scenes.)
99Chapter 4: You Are the Object Editor
09_596918 ch04.qxd 10/7/05 7:12 PM Page 99
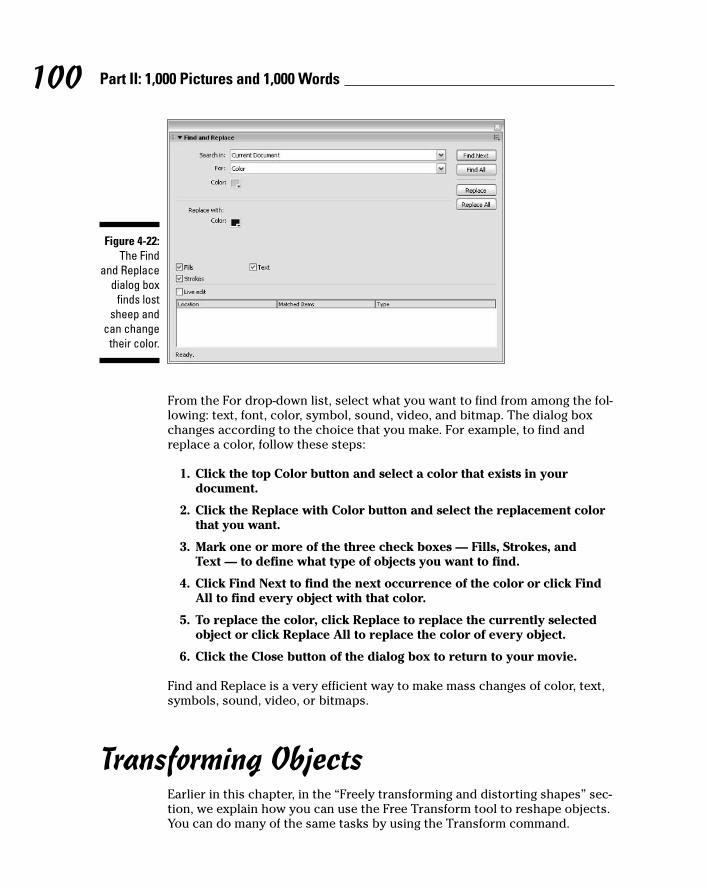
From the For drop-down list, select what you want to find from among the fol-lowing: text, font, color, symbol, sound, video, and bitmap. The dialog boxchanges according to the choice that you make. For example, to find andreplace a color, follow these steps:
1. Click the top Color button and select a color that exists in your document.
2. Click the Replace with Color button and select the replacement colorthat you want.
3. Mark one or more of the three check boxes — Fills, Strokes, andText — to define what type of objects you want to find.
4. Click Find Next to find the next occurrence of the color or click FindAll to find every object with that color.
5. To replace the color, click Replace to replace the currently selectedobject or click Replace All to replace the color of every object.
6. Click the Close button of the dialog box to return to your movie.
Find and Replace is a very efficient way to make mass changes of color, text,symbols, sound, video, or bitmaps.
Transforming ObjectsEarlier in this chapter, in the “Freely transforming and distorting shapes” sec-tion, we explain how you can use the Free Transform tool to reshape objects.You can do many of the same tasks by using the Transform command.
Figure 4-22:The Find
and Replacedialog box
finds lostsheep and
can changetheir color.
100 Part II: 1,000 Pictures and 1,000 Words
09_596918 ch04.qxd 10/7/05 7:12 PM Page 100

To scale, rotate, and flip objects, choose Modify➪Transform and choose oneof the submenu commands. When you scale, rotate, or skew an object, Flashkindly remembers the object’s qualities so that you can return the object tothe state it was in before you fiddled around with it.
Scaling, scaling . . .Most of the time, scaling by using the Free Transform tool (as we describe ear-lier in this chapter) is the easiest, fastest way to go. Sometimes you might wantmore precision. You can scale any selected object in the Property inspector.(Choose Window➪Properties➪Properties. You might need to expand theProperty inspector to its full size by clicking the Expand/Collapse arrow at thelower-right corner.) Change the value in the W (width) box or H (height) box,or change both.
To make sure that the proportions of the object stay the same, click the padlock next to the W and H text boxes so that it looks locked. When youchange either the W or the H text box, the other box automatically adjustsproportionally.
For yet more scaling options, select an object and choose Window➪Transform to open the Transform panel, as shown in Figure 4-23.
The controls in the Transform panel work only if an object is selected. If youforgot to select an object, you don’t need to close the panel; just select anobject.
To scale the selected object or objects, type a scale value between 1 and1000. Any value less than 100 reduces the size of the object, so a value of 10creates a new object at 10 percent of the original object, and a value of 1000multiplies the object’s size by a factor of 10. Then press Enter or Return.
Figure 4-23:The
Transformpanel letsyou scale,
rotate, andskew
objects withprecision.
101Chapter 4: You Are the Object Editor
09_596918 ch04.qxd 10/7/05 7:12 PM Page 101

To make a copy of an object at a scaled size, click the Copy button (the leftbutton in the lower-right corner of the panel). The copy appears on top of theoriginal object but is selected so that you can immediately move it if youwant. Figure 4-24 shows an example of how you can use scaling and copyingtogether to create the impression of objects at varying distances. After youmake the copy, just move it to a new location.
When you’re done, click the Close button of the Transform panel to close it.
’Round and ’round and ’round we rotateMost of the time, you can probably use the Free Transform tool to rotateobjects, as we explain earlier in this chapter. If you want to rotate somethingby an exact number of degrees, such as 20 degrees, use the Transform panel.Select the object and choose Window➪Transform to open the Transformpanel (refer to Figure 4-23).
To rotate the selected object or objects clockwise, type a value between 1and 359. To rotate counterclockwise, type a value between –1 and –359. Thenpress Enter or Return.
If you don’t like the results, click the Reset button in the lower-right corner ofthe panel and try again.
To make a copy of an object at a different rotation, click Copy (the left buttonin the lower-right corner of the panel). The copy appears on top of the origi-nal object but is selected so that you can immediately move it.
If you want to rotate a section by 90 degrees quickly by using the menu,follow these steps:
� To rotate right (clockwise): Choose Modify➪Transform➪Rotate 90° CW.
� To rotate left (counterclockwise): Choose Modify➪Transform➪Rotate90° CCW.
Figure 4-24:The braincreatures
areattacking!
102 Part II: 1,000 Pictures and 1,000 Words
09_596918 ch04.qxd 10/7/05 7:12 PM Page 102

When you rotate, Flash rotates the object around its center. To rotate around adifferent point on the object, you can convert the object to a group or symboland change its registration point, the point on an object that Flash referenceswhen rotating. See the section later in this chapter on changing the registra-tion point.
You can create groovy circular patterns by using the rotate and copy func-tions, as shown in Figure 4-25. Unless the object you’re working with is com-pletely symmetrical, you need to change the registration point.
Getting skewySkewing is a variation of rotating. Rather than rotate an entire object, youslant it horizontally, vertically, or both. Skewing a square creates a rhombus(diamond). In Figure 4-26, you see a simple arrow before and after skewing.
The easiest way to skew objects is by using the Free Transform tool. Justselect an object, choose the Free Transform tool, and drag along one of thesides of the boundary.
Figure 4-26:After
skewing, aboring
arrow lookslike it’s in a
hurry.
Figure 4-25:By rotating
and copyingan object at
the sametime, youcan add
flowerpower to
your Website.
103Chapter 4: You Are the Object Editor
09_596918 ch04.qxd 10/7/05 7:12 PM Page 103

Usually, you can eyeball the skewing process. If you want precision or to com-bine skewing with scaling, use the Transform panel. Select the object andchoose Window➪Transform to open the Transform panel. To skew theselected object or objects, click Skew.
Use the left box to skew horizontally. To skew clockwise, type a value between1 and 89. To skew counterclockwise, type a value between –1 and –89. Thenpress Enter or Return.
To skew vertically, type a value in the right text box. Positive values skewclockwise, and negative values skew counterclockwise. If that sounds confus-ing, just try something out and see whether you like it. If you don’t, clickReset (the right button in the lower-right corner of the panel) and try again.
To make a copy of an object at a skewed angle, click the Copy button (the leftbutton in the lower-right corner of the panel). The copy appears on top of theoriginal object but is selected so that you can immediately move it.
Flippety, floppetyFlipping reverses an object so that you have a mirror image of your originalobject. You can flip both horizontally (left to right or vice versa) and verti-cally (up to down or vice versa). Flash flips objects about their center so thatthey stay in their original position on the Stage.
Figure 4-27 shows a curlicue design in its original form, flipped horizontally,and flipped vertically. If you flip an object horizontally and then vertically,you end up with an object that has been mirrored in both directions.
Original Flipped vertically
Flipped horizontally Flipped both horizontallyand vertically
Figure 4-27:You can flip
objectsvertically,
horizontally,or both.
104 Part II: 1,000 Pictures and 1,000 Words
09_596918 ch04.qxd 10/7/05 7:12 PM Page 104

To flip an object, select it and choose Modify➪Transform➪Flip Vertical orFlip Horizontal. To flip an object in both directions, flip it in one direction andthen in the other.
To create symmetrical objects, you need to change the object’s registrationpoint from the center to one side or corner. Later in this chapter, in the sec-tion “Changing the Transformation Point,” we explain how to use flipping tocreate symmetrical objects.
Combining ObjectsA new feature in Flash 8 is the ability to combine objects in various ways. Youcan perform the following actions:
� Union: Combines two objects into one object. The effect is similar togrouping objects, which we cover in the next section of this chapter. (Infact, you can use the Ungroup command to separate the objects again.)Combining two objects puts a boundary around them, like the boundaryyou see when you use the object-drawing model. To combine objects,select them and choose Modify➪Combine Objects➪Union.
See the section on keeping objects safe and secure in Chapter 3 for moreinformation on how to use the object-drawing model.
� Intersect: Creates a shape that is the intersection of two overlappingshapes. However, this works only with objects that you create by usingthe object-drawing model. The shape that remains is from the top object.
� Punch: Removes the object on top from an object beneath it and requirestwo objects that you drew using the object-drawing model. If you put asmaller circle on top of a larger circle, the Punch feature is like punchinga hole in the larger circle (but it doesn’t hurt). Select two overlappingobjects and choose Modify➪Combine Objects➪Punch.
� Crop: Creates a shape that is the intersection of two overlapping shapesthat you created by using the object-drawing model, but the object thatremains is from the bottom object. Select two overlapping objects andchoose Modify➪Combine Objects➪Crop.
Getting GroupedWhen you know how to create objects, you can get carried away and createso many objects on the Stage that they’re hard to manage. You might wantto move a number of objects at once. Although you can select them all andmove them, that technique might not be enough. For example, you mightinadvertently leave behind one piece and discover that it’s hard to move that
105Chapter 4: You Are the Object Editor
09_596918 ch04.qxd 10/7/05 7:12 PM Page 105
piece in the same way that you moved the rest. That’s why Flash providesgrouping. You select multiple objects and group them once. From then on,you can select them with one click. If you move one of the grouped objects,the rest come along for the ride.
In Flash, grouping has an additional advantage: If you put objects on top ofeach other, they merge if they’re the same color or create cutouts if they’redifferent colors, unless you draw them by using the object-drawing model.One way that you can avoid such friendly behavior and keep the integrity ofobjects is to group them. (You can also put them on different layers, as weexplain in Chapter 6, or turn them into symbols, as we explain in Chapter 7.)
Grouping objects is easy. Select them and choose Modify➪Group. You short-cut types can press Ctrl+G (Windows) or Ô+G (Mac). When you group objectsand select them, all the objects are surrounded by one blue selection border.
After you group objects, you can ungroup them at any time. Select the groupand choose Modify➪Ungroup. You can also break apart a group. See the dis-cussion later in this chapter on breaking apart objects.
If you want to edit an element of the group without ungrouping first, Flashlets you do so. To edit without ungrouping, follow these steps:
1. Using the Selection tool, double-click the group.
Flash dims other objects on the Stage and displays the Group symbolabove the layer list.
2. Edit any of the group components.
3. Return to regular editing mode.
Double-click any blank area on the Stage with the Selection tool, clickthe current scene symbol to the left of the group symbol, or click theBack arrow to the left of the scene symbol. You can also chooseEdit➪Edit All.
Changing the Transformation PointWhen Flash rotates or scales an object, it uses a transformation point as a ref-erence. This point is generally the center of the object. For positioning andcertain transformations of lines and shapes, Flash uses the upper-left corner.You might find that the point Flash uses isn’t suitable for your needs. Forexample, you might want to rotate an object around its lower-left corner. Fora single rotation or scaling of a simple graphic object, use the Free Transformtool and drag the transformation point — the little circle — to the desiredlocation. If you deselect and reselect the object, you see that the circle hasreturned to its original central position.
106 Part II: 1,000 Pictures and 1,000 Words
09_596918 ch04.qxd 10/7/05 7:12 PM Page 106
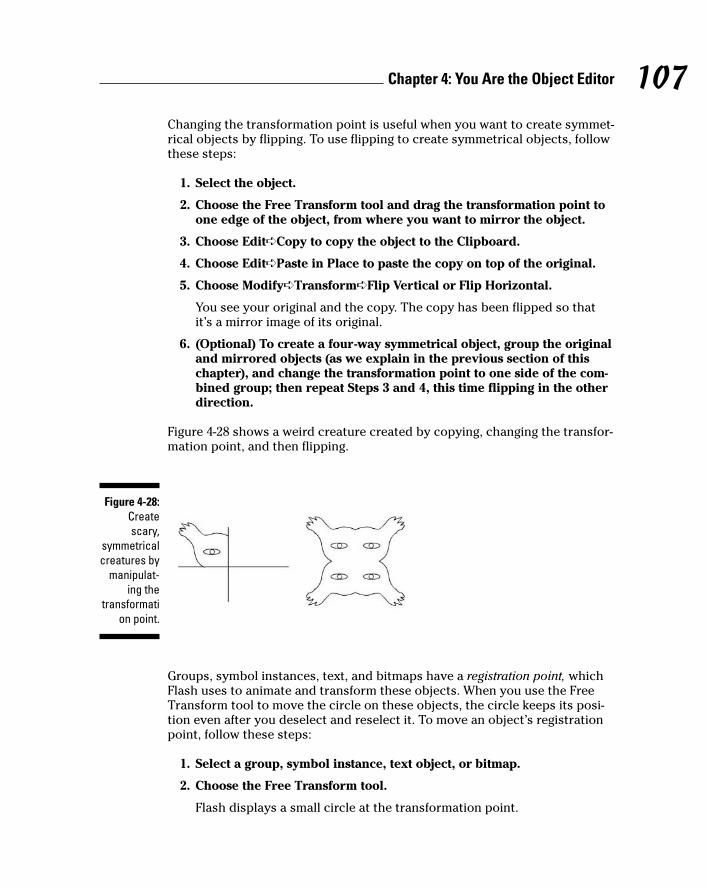
Changing the transformation point is useful when you want to create symmet-rical objects by flipping. To use flipping to create symmetrical objects, followthese steps:
1. Select the object.
2. Choose the Free Transform tool and drag the transformation point toone edge of the object, from where you want to mirror the object.
3. Choose Edit➪Copy to copy the object to the Clipboard.
4. Choose Edit➪Paste in Place to paste the copy on top of the original.
5. Choose Modify➪Transform➪Flip Vertical or Flip Horizontal.
You see your original and the copy. The copy has been flipped so thatit’s a mirror image of its original.
6. (Optional) To create a four-way symmetrical object, group the originaland mirrored objects (as we explain in the previous section of thischapter), and change the transformation point to one side of the com-bined group; then repeat Steps 3 and 4, this time flipping in the otherdirection.
Figure 4-28 shows a weird creature created by copying, changing the transfor-mation point, and then flipping.
Groups, symbol instances, text, and bitmaps have a registration point, whichFlash uses to animate and transform these objects. When you use the FreeTransform tool to move the circle on these objects, the circle keeps its posi-tion even after you deselect and reselect it. To move an object’s registrationpoint, follow these steps:
1. Select a group, symbol instance, text object, or bitmap.
2. Choose the Free Transform tool.
Flash displays a small circle at the transformation point.
Figure 4-28:Createscary,
symmetricalcreatures by
manipulat-ing the
transformation point.
107Chapter 4: You Are the Object Editor
09_596918 ch04.qxd 10/7/05 7:12 PM Page 107
3. Drag the circle to the desired location.
4. Click anywhere else on the Stage to hide the registration point.
To return the registration point to its original position, double-click it.
Breaking Apart ObjectsWith the Break Apart command, you can break apart text, groups, instancesof symbols, and bitmaps into separate objects that you can edit individually.To break apart one of these types of objects, select it and choose Modify➪Break Apart.
What happens to your objects when you break them apart? Do they splatterall over the Stage? Here’s what happens when you break apart the followingobjects:
� Text: Flash divides the words into individual letters, each one a separateobject. If you use the Break Apart command a second time on one of theletters, the letter becomes a shape that you can modify like any othershape.
Break apart blocks of text and then use the Distribute to Layers com-mand to animate individual letters. For more information, see Chapter 5about text and Chapter 6 about layers.
� Shapes created in the object-drawing model: The shape loses itsobject-drawing model status, as if you had drawn it without using theobject-drawing model.
� Groups: Flash breaks up the group into its component parts. The resultis that same as ungrouping.
� Instances of symbols: The symbol becomes a shape. (Symbols are cov-ered fully in Chapter 7.)
� Bitmaps: Flash converts the bitmap to a fill. You can then erase parts of it.
Establishing Order on the StageFlash stacks objects in the order that you create them. If you draw a circleand then an overlapping square, the square looks like it’s on top of the circlebecause you created it more recently.
If you place an object on top of another object, the two objects become one ifthey’re the same color. If they’re different colors, the top object cuts out theunderlying object.
108 Part II: 1,000 Pictures and 1,000 Words
09_596918 ch04.qxd 10/7/05 7:12 PM Page 108
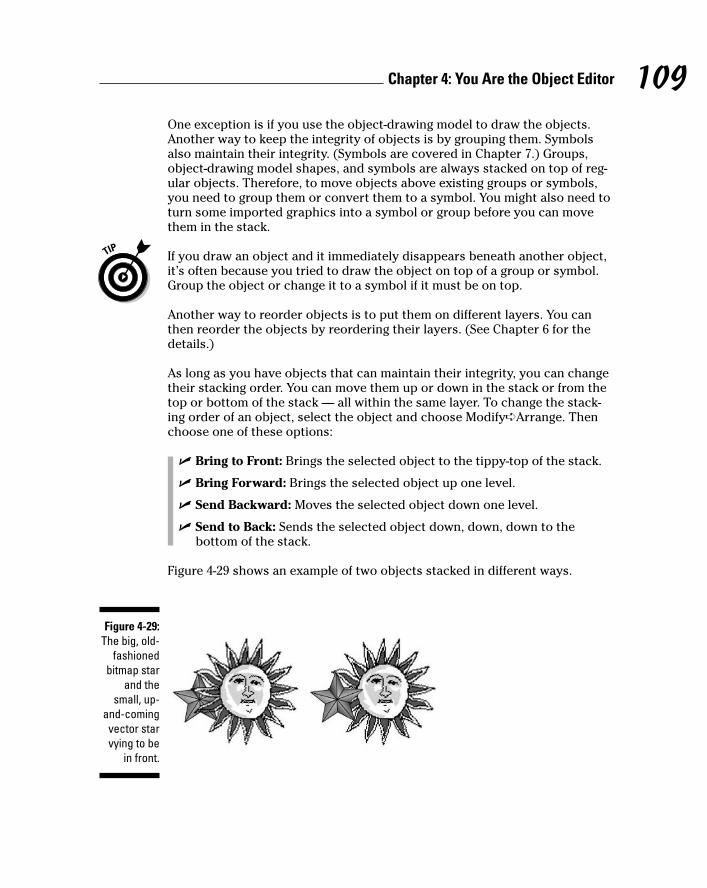
One exception is if you use the object-drawing model to draw the objects.Another way to keep the integrity of objects is by grouping them. Symbolsalso maintain their integrity. (Symbols are covered in Chapter 7.) Groups,object-drawing model shapes, and symbols are always stacked on top of reg-ular objects. Therefore, to move objects above existing groups or symbols,you need to group them or convert them to a symbol. You might also need toturn some imported graphics into a symbol or group before you can movethem in the stack.
If you draw an object and it immediately disappears beneath another object,it’s often because you tried to draw the object on top of a group or symbol.Group the object or change it to a symbol if it must be on top.
Another way to reorder objects is to put them on different layers. You canthen reorder the objects by reordering their layers. (See Chapter 6 for thedetails.)
As long as you have objects that can maintain their integrity, you can changetheir stacking order. You can move them up or down in the stack or from thetop or bottom of the stack — all within the same layer. To change the stack-ing order of an object, select the object and choose Modify➪Arrange. Thenchoose one of these options:
� Bring to Front: Brings the selected object to the tippy-top of the stack.
� Bring Forward: Brings the selected object up one level.
� Send Backward: Moves the selected object down one level.
� Send to Back: Sends the selected object down, down, down to thebottom of the stack.
Figure 4-29 shows an example of two objects stacked in different ways.
Figure 4-29:The big, old-
fashionedbitmap star
and thesmall, up-
and-comingvector starvying to be
in front.
109Chapter 4: You Are the Object Editor
09_596918 ch04.qxd 10/7/05 7:12 PM Page 109

Undoing, Redoing, and ReusingSometimes you do something in Flash and decide that it’s a mistake. Oops!For this situation, you can undo actions. You can even redo the actions thatyou undid. Finally, if you’re environmentally conscious, you can reuse earlieractions to avoid wasting any more of your energy.
Undoing actionsTo undo your last action, choose Edit➪Undo or press Ctrl+Z (Windows) orÔ+Z (Mac). You can continue this process for a very long time. This is thefamiliar — and default — type of undo, and Flash calls it document-level undo.
To set the number of undo steps that Flash remembers, follow these steps:
1. Choose Edit➪Preferences (Windows)/Flash➪Preferences (Mac) toopen the Preferences dialog box.
2. Click the General category.
3. From the Undo drop-down list, select Document-level Undo.
4. In the text box just below the Undo drop-down list, enter the numberof undo actions you want Flash to track. (The default is 100, and themaximum is 300.)
Later in this chapter, in the “Reusing actions” section, we explain anotherway to undo actions.
Redoing actionsMaybe you were right the first time. After you undo an action, suppose thatyou want to redo it. You can do that, too. To redo actions, choose Edit➪Redoor press Ctrl+Y (Windows) or Ô+Y (Mac).
If you haven’t undone anything, you can use the same command (and key-board shortcut) to repeat your last action, in which case it’s called theRepeat command.
Using object-level undo and redoGenerally, undos and redos apply to every action you take in Flash. But Flash 8offers something new — object-level undo and redo.
110 Part II: 1,000 Pictures and 1,000 Words
09_596918 ch04.qxd 10/7/05 7:12 PM Page 110

Object-level undo applies only to editing symbols, which we cover in Chapter7. When you use object-level undo and redo, Flash remembers actions bysymbol. Therefore, when you’re editing a symbol, using the Undo commandapplies only to changes that you made to that symbol, even though you havemade other changes to your movie in the meantime. If you use a lot of sym-bols, object-level undo offers you more flexibility. Object-level redo works inthe same way.
You can use only one type of undo and redo at a time. To use object-levelundo and redo, choose Edit➪Preferences (Windows)/Flash➪Preferences(Mac) and select the General category. From the Undo drop-down list, selectObject-level Undo.
You see a message explaining that switching from one type of undo to anotherwill delete your current undo history. Flash can keep track of only one streamat a time. Click OK to close the message and again to close the Preferencesdialog box.
Deleting your current history is not generally a problem. But if you are in themiddle of a long, complicated experiment and might need to undo many steps,choose another time to switch.
Reusing actions with the History panelIf you make several changes to an object and would like to make the samechanges to other objects, you can save time and increase accuracy by savingand reusing the steps for the operations that you perform. Flash tracks thesteps in the History panel.
The History panel lists every command that you perform in Flash during onesession. When you save and close the file, the history list isn’t saved for thenext time. To open the History panel, choose Window➪Other Panels➪History,as shown in Figure 4-30. The shortcut is Alt+F10 (Windows) or Option+F10(Mac).
Figure 4-30:The History
panel keepstrack of
everythingyou do.
111Chapter 4: You Are the Object Editor
09_596918 ch04.qxd 10/7/05 7:12 PM Page 111

You can use the History panel to troubleshoot recent steps, repeat steps,undo steps, or save steps as commands for future use.
By default, Flash records up to 100 steps in the History panel. You can changethe number of steps recorded by choosing Edit➪Preferences (Windows) orFlash➪Preferences (Mac) to open the Preferences dialog box. On the Generaltab, change the value for Undo levels. Valid settings are from 2 to 300. If youwant to be able to go back and save earlier steps as commands, you probablyneed to record more than 100 steps.
Undoing stepsOne of the simplest things that you can do in the History panel is to undo oneor more operations. You can also undo operations by choosing Edit➪Undo,but you can see more specific descriptions of the operation (such as UndoMove) in the History panel, such as Move {x:0, y:-103.6}. To view thespecifics, right-click (Windows) or Control+click (Mac) any history item andchoose View➪Arguments in Panel. With these details, you can more easilypredict the result of undoing an operation.
You undo steps by using the slider on the left side of the History panel:
� Undo the last operation that you performed: Drag up the slider one step.
� Undo several steps: Drag the slider to the step above the first step thatyou want to undo.
For example, if you want to undo three steps, drag the slider up threesteps — it’s now next to the step previous to the one that you undid.This is the last step that has still been executed. You can also click tothe left of a step. The slider scrolls up to that step and undoes all thelater steps.
When you undo a step, the History panel displays the step as dimmed.
Replaying a stepYou can repeat any command from any time during a Flash session. For exam-ple, if you filled an object with a specific color, you can fill another object withthe same color, even if you have done other operations in the meantime.
To replay a step, click the step itself (not the left side of the step above theslider) in the History panel. Then click the Replay button. If you want toreplay the step on a different object, first select that object.
Copying stepsYou might want to keep a list of certain steps or use them in a different movie.Select one or more steps in the History panel and click the Copy Selected Stepsto the Clipboard button.
112 Part II: 1,000 Pictures and 1,000 Words
09_596918 ch04.qxd 10/7/05 7:12 PM Page 112

To use these steps in another Flash movie, open the movie and choose Edit➪Paste. To apply the steps to an object, select the object first.
Flash copies the step or steps as JavaScript code. Therefore, when you pastethe step or steps into a word processor or text editor, you see the JavaScriptcode, which looks more complex than the step listed in the History panel.Usually, you can figure out what it means, even if you don’t know JavaScript.For example, Fill Color: ‘#0000ff’ appears as fl.getDocumentDOM().setFillColor(‘#0000ff’);.
Saving commandsIf you want to save a step or set of steps to use the next time that you openthe movie, save a command. Saving a command is even useful if you wantto re-execute some steps several times later on in the same session becausescrolling back to find the exact steps that you want to reuse can be time-consuming.
To save a command, follow these steps:
1. In the History panel, select the steps that you want to save.
You can drag along the step names (not along the left side, where theslider is). You can also use the usual methods of selecting multipleobjects in a list — click the first object, press Shift and click the last, orpress and hold Ctrl (Windows)/Ô (Mac) and click each step that youwant to select.
2. Click the Save Selected Steps as a Command button.
This button is in the lower-right corner of the History panel. The Save AsCommand dialog box opens.
3. In the Save As Command dialog box, enter a name for the command.
You can simply summarize the steps. For example, you might name acommand fill blue, rotate 45.
4. Click OK to close the dialog box.
When you save a command, it appears on the Commands menu. The menuin Figure 4-31 shows the command fill blue, rotate 45, which fills anyselected shape with blue and rotates the shape 45 degrees. To use that com-mand, you simply select a shape and then choose Commands➪Fill Blue,Rotate 45. Presto! It’s all done. As you can imagine, you can combine complexcommands and save them to automate the authoring process of creatingFlash movies.
113Chapter 4: You Are the Object Editor
09_596918 ch04.qxd 10/7/05 7:12 PM Page 113
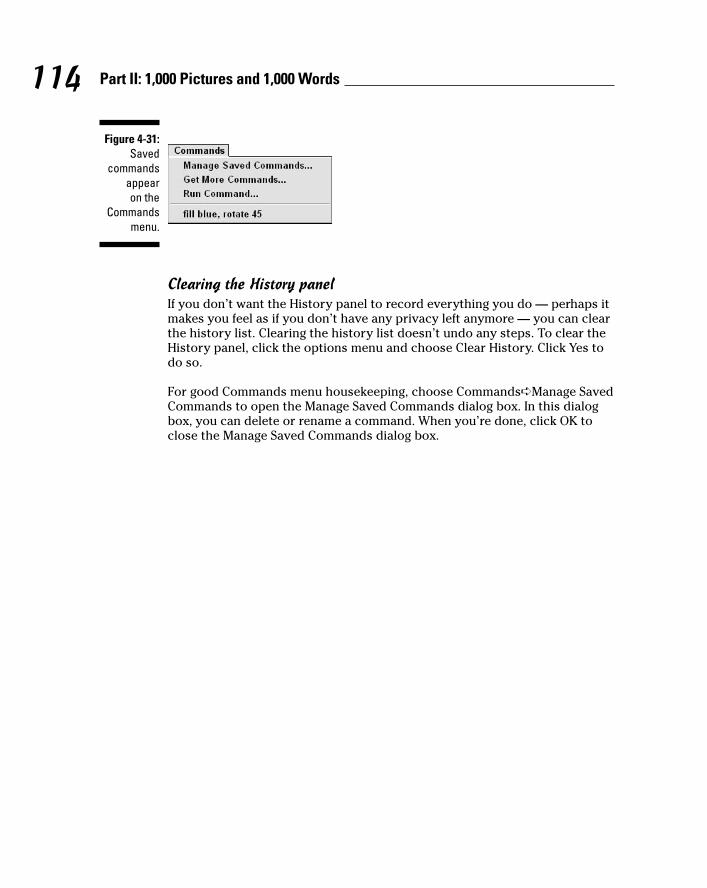
Clearing the History panelIf you don’t want the History panel to record everything you do — perhaps itmakes you feel as if you don’t have any privacy left anymore — you can clearthe history list. Clearing the history list doesn’t undo any steps. To clear theHistory panel, click the options menu and choose Clear History. Click Yes todo so.
For good Commands menu housekeeping, choose Commands➪Manage SavedCommands to open the Manage Saved Commands dialog box. In this dialogbox, you can delete or rename a command. When you’re done, click OK toclose the Manage Saved Commands dialog box.
Figure 4-31:Saved
commandsappear on the
Commandsmenu.
114 Part II: 1,000 Pictures and 1,000 Words
09_596918 ch04.qxd 10/7/05 7:12 PM Page 114

Chapter 5
What’s Your Type?In This Chapter� Creating, editing, and formatting text
� Using cool text effects
We assume that occasionally you want to say something on your Website, so this chapter covers text in all its forms and formats. You can use
Flash to create the text for your Web pages if you want (although you don’thave to). But if you want flashy text effects, Flash is definitely the way to go.
Typography is the art or process of arranging text on a page, and basicallythat’s what this chapter is all about. Many graphics programs call text type.We use the words interchangeably here — we don’t care what you call it.
Presenting Your TextThe majority of text on most Web sites is formatted by using HyperTextMarkup Language (HTML) coding that sets the font, size, and color of thetext. Using HTML code is ideal for larger amounts of text because the HTMLis simple to code and loads quickly.
For smaller amounts of text that you want to have special formatting oreffects, Flash offers more options than HTML. Of course, if you want to ani-mate your text, you can use Flash. For example, an animated logo usuallyincludes not only the graphic art but also the name of the organization,which is, of course, text.
Here are some innovative things that you can do with text:
� Rotate, scale, skew, or flip text without losing the ability to edit the text.
� Turn text into shapes and modify them any way that you want. However,after you turn text into shapes, you can’t edit the text characters bysimply typing. Figure 5-1 shows some text that was modified in this way.
10_596918 ch05.qxd 10/7/05 7:08 PM Page 115

� Create transparent type.
� Create hyperlinked text that sends users’ browsers to other Web pageswhen the users click the text.
� Enable viewers to control some aspect of the movie by entering text in atext box
� Load text, such as sports scores or current weather, dynamically from aserver.
Creating textCreating text in Flash is simple. Follow these steps:
1. Click the Text tool on the Tools panel.
2. Specify the text starting point on the Stage.
• To specify the width of the text, click the Stage in the upper-leftcorner where you want your text to start and drag to the right untilyou have the width that you want. Flash places a square blockhandle in the upper-right corner of the text block.
• To create a text block that expands while you type, just click theStage at the desired starting point. Flash places a round blockhandle in the upper-right corner of the text block.
3. Start typing.
To force a return to the left margin, press Enter or Return.
4. After you finish typing, click anywhere off the Stage to deselect the text.
Congratulations — you’ve just said something! We hope it was worthwhile.
Figure 5-1:You can turn
text into ashape and
edit it toyour heart’s
content.
116 Part II: 1,000 Pictures and 1,000 Words
10_596918 ch05.qxd 10/7/05 7:08 PM Page 116

Editing textAfter you type text, it never fails that you want to change it. Editing text iseasy in Flash, but first you have to select it. Here are the selection techniques:
� To edit an entire text block: Choose the Selection tool and click thetext. Flash places a selection border around the text. You can move,rotate, and scale all the text in a text block this way, just as you wouldwith any other object. For example, you can use the Free Transform toolto scale the text.
� To edit the content of text itself: Double-click the text by using theSelection tool. (Or choose the Text tool and click the text.) Flashswitches you to the Text tool automatically and places the text cursorwhere you clicked or double-clicked the text, more or less.
� To select a character or characters individually: Choose the Text tooland drag across one or more characters. Do this when you want to editonly those characters.
� To select a word: Choose the Text tool and double-click any word toselect it.
� To select a string of words or block of text: Choose the Text tool, clickat the beginning of the text that you want to select, and then Shift+clickat the end of the desired selection.
� To select all the text in a text block: Choose the Text tool, click in a textblock, and then press Ctrl+A (Windows) or Ô+A (Mac).
To change the content of the text, select the characters or words that youwant to change, as we explain in the preceding list. Type to replace theselected text. Other text-editing techniques are the same as in your wordprocessor. For example, you can press the Delete key to delete characters tothe right of the text cursor or press the Backspace key (Windows) or Deletekey (Mac) to delete characters to the left of the cursor.
Checking spellingSpell checking works like the spell check in your word processor, so you’llprobably find it easy to use. This feature shows Macromedia’s commitmentto reducing typos on the Web!
The first step is to set up the parameters for spell checking. Choose Text➪Spelling Setup to open the Spelling Setup dialog box, as shown in Figure 5-2.In fact, you can’t check your spelling until you have opened this dialog boxand closed it again; then the Check Spelling item becomes available on theText menu.
117Chapter 5: What’s Your Type
10_596918 ch05.qxd 10/7/05 7:08 PM Page 117

The Spelling Setup dialog box has three sections:
� Document Options: Choose which parts of a movie that you want tocheck. You can also specify whether you want each misspelled word tobe highlighted.
� Personal Dictionary: You can change the location of the file that holdswords that you add to the dictionary. Click the Edit Personal Dictionarybutton to add words directly. Otherwise, you add words when you arechecking spelling of specific text.
� Checking Options: Set options that define how spell checking works. Forexample, you can choose to ignore words in uppercase or with numbers.
You can also choose which dictionaries you want to use for checking spellingfrom the Dictionaries list. When you’re done, click OK to return to yourmovie. You’re now ready to check spelling.
To check spelling, you can select text if you want to check just that text orleave all the text deselected to check the entire movie. Choose Text➪CheckSpelling to open the Check Spelling dialog box, as shown in Figure 5-3.
Figure 5-2:Use theSpelling
Setup dialogbox to
specify howspell
checkingworks.
118 Part II: 1,000 Pictures and 1,000 Words
10_596918 ch05.qxd 10/7/05 7:08 PM Page 118

If you selected text, Flash checks that text first and then asks you whether youwant to check the rest of the document. Click Yes to continue or No to end thespell check. For each misspelled word, you can do one of the following:
� Choose one of the suggestions and click Change to change that instanceof the word.
� Choose one of the suggestions and click Change All to change allinstances of the word.
� Click Ignore to go to the next misspelled word.
� Click Ignore All to ignore all instances of that word and go to the nextmisspelled word.
� Click Delete to delete the word.
� Click Add to Personal to add the word to the Personal Dictionary so thatit won’t appear as misspelled in the future.
To finish spell checking, click Close. You may see a message asking whetheryou want to start from the beginning of the document. Click Yes to do so.When spell checking is complete, you see a Spelling Check Completed mes-sage. Click OK to return to your movie.
Finding and replacing textIf you need to change all instances of the word big to large, you’re in luck. TheFind and Replace feature comes to the rescue. For more information aboutthis feature, see Chapter 4. In that chapter, we discuss this feature in detailand specifically how to find and replace color. Here we explain the steps(which are very similar) for finding and replacing text:
Figure 5-3:The Check
Spellingdialog box.
119Chapter 5: What’s Your Type
10_596918 ch05.qxd 10/7/05 7:08 PM Page 119

1. Choose Edit➪Find and Replace.
The Find and Replace dialog box appears.
2. In the For drop-down list, choose Text.
3. In the Search in Text text box, enter the text that you want to find.
4. In the Replace with Text text box, enter the replacement text.
5. (Optional) Enable one or more of the left three check boxes to definewhat type of text you want to find: Whole Word, Match Case, andRegular Expressions.
Regular expressions are formulas that you use to locate specific text pat-terns in a text string. Regular expressions are beyond the scope of thisbook, but you can find a good tutorial at www.regular-expressions.info/tutorial.html.
6. (Optional) Select one or more of the check boxes on the right todefine where you want Flash to look for text.
• Text Field Contents searches text objects.
• Frames/Layers/Parameters looks for frame labels and scenenames (see Chapter 9), layer names (see Chapter 6), and compo-nent parameters (see Chapter 10).
• Strings in ActionScript looks for text strings in ActionScript.
• ActionScript looks for all ActionScript code.
7. To edit each object one at a time, select the Live Edit check box.
When you use Live Edit, you can’t make multiple changes at one time,and your cursor returns to the Stage to directly edit each object.
8. Click the appropriate button as needed:
• Click Find Next to find the next occurrence of the text.
• Click Find All to find all occurrences of the text.
• Click Replace to replace the currently selected object.
• Click Replace All to replace all instances of that text.
When Flash finds the specified text, the box at the bottom of the Find andReplace dialog box displays its location and type along with the entire text sothat you can see the context of the text that you’re replacing. You can resizethe Find and Replace dialog box as well as the columns in the list of founditems. When you’re done, click the Find and Replace dialog box Close buttonto return to your movie.
120 Part II: 1,000 Pictures and 1,000 Words
10_596918 ch05.qxd 10/7/05 7:08 PM Page 120

Setting character attributesOf course, you don’t always want to use the Flash default font and size foryour Web site. Boring! You can set the attributes before you start typing oredit the attributes of existing text. To edit existing text, double-click the textblock and then select the characters or words that you want to format. Toeither set or edit attributes of text, choose Window➪Properties➪Properties toopen the Property inspector. Figure 5-4 shows the expanded Property inspec-tor when some static text is selected. (Static text is normal text that just sitsthere and looks pretty.) The Property inspector changes slightly depending onwhich type of text you select. See “Creating input and dynamic text,” later inthis chapter, for more information about the various types of text.
Setting the font, font size, and font styleUsually, the first step in formatting text is selecting a font. To select a font foryour text, simply pick one from the Font drop-down list on the Property inspec-tor. Flash changes the font of the selected text. You can change the font charac-teristics that control specific properties of the font, such as size and style:
� To select a font size: Type a font size in the text box or drag the slider tothe desired value.
� To select a font style: Click Bold, Italic, or both. Flash applies the styleto selected text.
Auto Kern
Target for URL
ChangeDirectionof Text
EditformatoptionsItalic
Bold
Text (fill) ColorCharacter Position
FontFontSize
Character Spacing
Text Type
Full Justify
Right Justify
Center Justify
Left JustifyFont Rendering Method
ShowBorder
around Text
Render as HTML
Selectable
URL link
Line Type
Location
Width and Height
Figure 5-4:The
Propertyinspector isthe place to
liven upyour text.
121Chapter 5: What’s Your Type
10_596918 ch05.qxd 10/7/05 7:08 PM Page 121

You can also select fonts, font sizes, and font styles directly from the Textmenu. This menu is devoted entirely to helping you format your text.
Flash 8 offers FlashType, a new method of displaying fonts for extra clarity.FlashType is especially helpful for small font sizes.
You can create vertical text, where letters flow downward instead of across.Okay, so the purpose is mostly for languages that are often written vertically,such as Chinese. Vertical text must be static and can go from either left toright or right to left. (We explain static, input, and dynamic text later in thischapter.) Figure 5-5 shows some vertical text.
To create vertical text, follow the instructions for creating normal text, butbefore clicking on the Stage to place the text, select the Left-to-Right or theRight-to-Left option from the Change Direction of Text button on the Propertyinspector (refer to Figure 5-4).
Specifying text colorBlack is the Flash default color, but you have lots of additional options. Thefirst concern is that the text is legible against its background. For example,yellow text looks great in front of a black background, but it’s almost invisibleagainst white. Also consider that text is often unreadable in front of complexgraphic images, no matter what the color.
To set text color, select the text that you want to change if you’ve already cre-ated the text. In the Property inspector, click the Text Color button (refer toFigure 5-4) to open the Color palette, and select a color. (For more informa-tion on colors, see Chapter 3.) If you haven’t created the text yet, choose theText tool, select the color, and then create the text.
Figure 5-5:Try vertical
text for achange ofdirection.
122 Part II: 1,000 Pictures and 1,000 Words
10_596918 ch05.qxd 10/7/05 7:08 PM Page 122
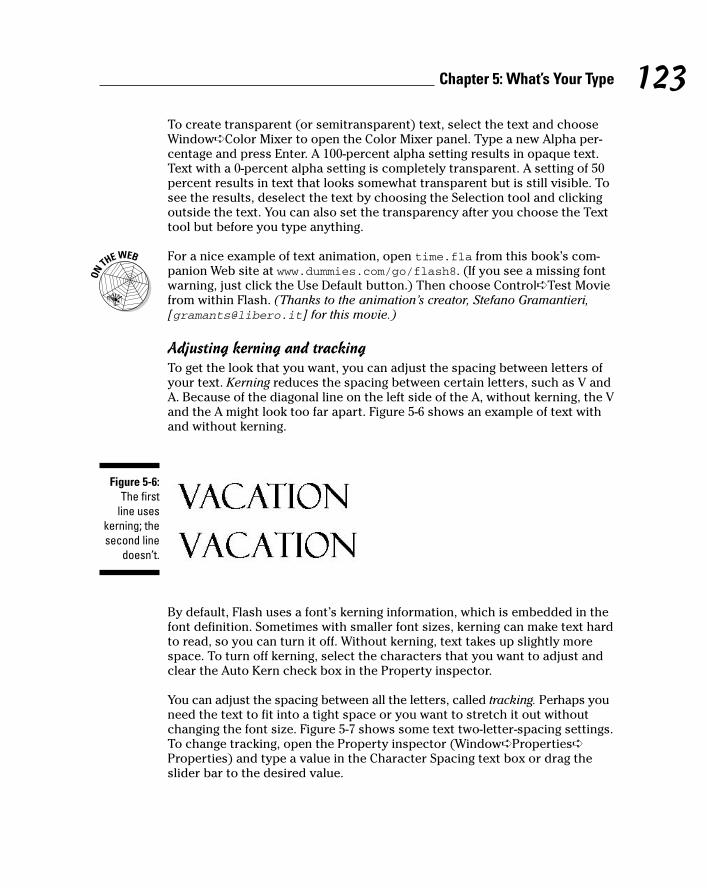
To create transparent (or semitransparent) text, select the text and chooseWindow➪Color Mixer to open the Color Mixer panel. Type a new Alpha per-centage and press Enter. A 100-percent alpha setting results in opaque text.Text with a 0-percent alpha setting is completely transparent. A setting of 50percent results in text that looks somewhat transparent but is still visible. Tosee the results, deselect the text by choosing the Selection tool and clickingoutside the text. You can also set the transparency after you choose the Texttool but before you type anything.
For a nice example of text animation, open time.fla from this book’s com-panion Web site at www.dummies.com/go/flash8. (If you see a missing fontwarning, just click the Use Default button.) Then choose Control➪Test Moviefrom within Flash. (Thanks to the animation’s creator, Stefano Gramantieri,[[email protected]] for this movie.)
Adjusting kerning and trackingTo get the look that you want, you can adjust the spacing between letters ofyour text. Kerning reduces the spacing between certain letters, such as V andA. Because of the diagonal line on the left side of the A, without kerning, the Vand the A might look too far apart. Figure 5-6 shows an example of text withand without kerning.
By default, Flash uses a font’s kerning information, which is embedded in thefont definition. Sometimes with smaller font sizes, kerning can make text hardto read, so you can turn it off. Without kerning, text takes up slightly morespace. To turn off kerning, select the characters that you want to adjust andclear the Auto Kern check box in the Property inspector.
You can adjust the spacing between all the letters, called tracking. Perhaps youneed the text to fit into a tight space or you want to stretch it out withoutchanging the font size. Figure 5-7 shows some text two-letter-spacing settings.To change tracking, open the Property inspector (Window➪Properties➪Properties) and type a value in the Character Spacing text box or drag theslider bar to the desired value.
Figure 5-6:The first
line useskerning; thesecond line
doesn’t.
123Chapter 5: What’s Your Type
10_596918 ch05.qxd 10/7/05 7:08 PM Page 123
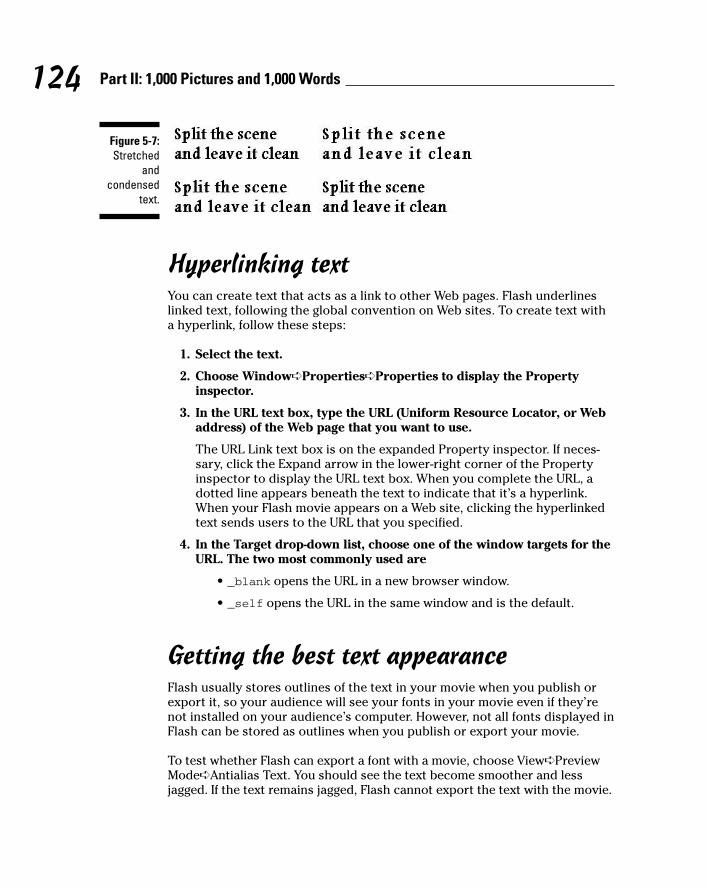
Hyperlinking textYou can create text that acts as a link to other Web pages. Flash underlineslinked text, following the global convention on Web sites. To create text witha hyperlink, follow these steps:
1. Select the text.
2. Choose Window➪Properties➪Properties to display the Propertyinspector.
3. In the URL text box, type the URL (Uniform Resource Locator, or Webaddress) of the Web page that you want to use.
The URL Link text box is on the expanded Property inspector. If neces-sary, click the Expand arrow in the lower-right corner of the Propertyinspector to display the URL text box. When you complete the URL, adotted line appears beneath the text to indicate that it’s a hyperlink.When your Flash movie appears on a Web site, clicking the hyperlinkedtext sends users to the URL that you specified.
4. In the Target drop-down list, choose one of the window targets for theURL. The two most commonly used are
• _blank opens the URL in a new browser window.
• _self opens the URL in the same window and is the default.
Getting the best text appearanceFlash usually stores outlines of the text in your movie when you publish orexport it, so your audience will see your fonts in your movie even if they’renot installed on your audience’s computer. However, not all fonts displayed inFlash can be stored as outlines when you publish or export your movie.
To test whether Flash can export a font with a movie, choose View➪PreviewMode➪Antialias Text. You should see the text become smoother and lessjagged. If the text remains jagged, Flash cannot export the text with the movie.
Figure 5-7:Stretched
andcondensed
text.
124 Part II: 1,000 Pictures and 1,000 Words
10_596918 ch05.qxd 10/7/05 7:08 PM Page 124
Anti-aliasing is a method of making text look smoother — reducing the jaggiesthat sometimes create stair-like lines on text. Anti-aliasing is especially help-ful for smaller font sizes.
The way that your type looks on the Stage is only an approximation of how itlooks when you publish or export your movie. To see a more accurate render-ing of how your type looks when you publish or export it, view your movie bychoosing Control➪Test Movie.
Flash 8 offers new options to anti-alias text so that it looks smoother, both inFlash and in the Flash player, after you publish your movie. The new anti-aliasing kicks in when you choose the Anti-alias for Readability option fromthe Font Rendering Method drop-down list in the Property inspector. You alsoneed to choose Flash Player 8 (the default) when you publish your movie.
If you want to use type in a font that Flash can’t export, you can break apartthe type into shapes, as we describe at the end of this chapter, but thisincreases the size of your movie file, and you cannot edit the text any more.
If you’d like a space-saving alternative to storing your text as outlines in yourFlash movie, you can use Flash’s three device fonts that the Flash Playeralways converts to the closest available font on the local computer:
� _sans: A sans serif font similar to Arial (Windows) and Helvetica (Mac).
� _serif: A serif font similar to Times New Roman (Windows) and Times (Mac).
� _typewriter: A font that looks like it has been typed on a typewriter.(Are you old enough to remember what that is?) It’s similar to CourierNew (Windows) and Courier (Mac).
When you use device fonts, your resulting published movies are smaller, sodownload time is shorter. With device fonts, your text also might be more leg-ible in text sizes below 10 point. To use device fonts, specify one of thedevice fonts and then deselect the text. Then select Use Device Fonts fromthe Font Rendering Method drop-down list in the Property inspector. (Thissetting applies only to horizontal static text.) When you publish your movie,select the Device Font check box on the HTML tab (Windows only) of thePublish Settings dialog box. Chapter 13 tells more about publishing settings.
Setting up paragraph formatsYou can set paragraph attributes such as alignment, margins, indents, andline spacing. Use these settings whenever you type more than one line of text.
125Chapter 5: What’s Your Type
10_596918 ch05.qxd 10/7/05 7:08 PM Page 125

Setting text alignmentYou can align text along the left margin (left justification) or right margin (rightjustification) of the text block. You can also center text. You can create an evenedge along both margins, called full justification or justified text. By default, textis left justified.
To align text, select it and choose Window➪Properties➪Properties to openthe Property inspector (refer to Figure 5-4). Then click the Align Left, AlignCenter, Align Right, or Justify button.
Setting margins and indentsThe margin is the space between the text block border and your text. Bydefault, the margin is 0 pixels. You can increase the margin to guarantee somespace around the text. You can set only the left and right margins (not the topor bottom ones).
To set the left margin, select the paragraph and click the Edit Format Optionsbutton in the Property inspector to open the Format Options dialog box, asshown in Figure 5-8. Type a value in the Left Margin text box or click the arrowand use the slider to specify a value. Then press Tab or Enter (Windows) orReturn (Mac) to see the result right away. To set the right margin, use theRight Margin text box.
Indentation creates an indented first line. It’s equivalent to placing a tab atthe beginning of a paragraph. (Remember your sixth grade teacher who toldyou to always start each paragraph with an indent?) To indent the first line,select the paragraph and type a value in the Indent text box in the FormatOptions dialog box or click the arrow and drag the slider bar.
Specifying line spacingLine spacing determines the space between lines. Flash measures line spacingin points (1⁄72 of an inch) because font size is measured in points. For example,
Figure 5-8:Use theFormat
Optionsdialog box
to whip yourtext into
shape.
126 Part II: 1,000 Pictures and 1,000 Words
10_596918 ch05.qxd 10/7/05 7:08 PM Page 126
if your text is 18 points high and you want to double-space the lines, use aline spacing of 18 points so that a space exactly one line high exists betweeneach line of text. To set line spacing, select the paragraph, then click the EditFormat Options button in the Property inspector to open the Format Optionsdialog box, and type a value in the Line Spacing text box or click the arrowand drag the slider bar. Press Tab or Enter (Windows) or Return (Mac).
Click OK (Windows) or Done (Mac) when you’re done with the FormatOptions dialog box.
Flash remembers paragraph properties from movie to movie. When you changeparagraph properties for one movie, the properties rear their ugly heads in yournext movie. If your text automatically indents at the beginning of paragraphs orcomes out double-spaced, check out the Format Options dialog box.
Creating input and dynamic textYou can create three kinds of text in Flash:
� Static text: Regular text that doesn’t change or do anything, althoughyou can animate it.
� Input text: Text that viewers can enter, as in a text box. You can useinput text for forms and surveys or to interactively create values thataffect the movie.
� Dynamic text: Text that changes based on data coming from an externalsource (such as a Web server), an internal source (such as ActionScript),or input text in the movie (often used for data such as sports scores,current weather, and stock prices).
To choose the type of text, use the Text Type drop-down list in the Propertyinspector. (It’s a good thing the Flash creators didn’t call it the Type Typedrop-down list.) For an example of input text, see Chapter 8.
Several of the text settings in the Property inspector apply only to input ordynamic text (and therefore don’t appear if you use static text):
� Instance Name: This text box appears under the Text Type drop-downlist when you select Input or Dynamic text. An instance name identifiesthe text object so that you can refer to the text in ActionScript. (SeeChapter 10 for the scoop on ActionScript.)This is handy because withInput or Dynamic text, the contents of the text field can change whileyour Flash movie is playing; but if you give your text field an instancename, you can always refer to it by using ActionScript, even though youdon’t know the contents of the text field ahead of time.
127Chapter 5: What’s Your Type
10_596918 ch05.qxd 10/7/05 7:08 PM Page 127

� Line Type: Defines how text is displayed.
• Multiline displays the text in multiple lines.
• Single Line displays the text as one line.
• Multiline No Wrap displays text in multiple lines that break only ifthe last character is a breaking character, such as Enter (Windows)or Return (Macintosh).
• Password displays asterisks.
� Render Text as HTML: Preserves formatting, such as fonts and hyper-links, with certain HTML tags. You need to create the formatting byusing ActionScript.
� Show Border Around Text: Displays a black border and white back-ground for the text field. This border helps users know where to entertext in an input text block.
� Selectable: Enables users to select dynamic text by dragging across itwith the mouse. They can then copy it to the Clipboard. Deselect thisbutton to prevent users from selecting dynamic text.
� Variable: Type a variable name for the text field. Variable names areused similarly to instance names, but your options are more limited.
� Maximum Characters: Specifies the maximum allowable characters thatusers can input in a text box.
� Embed: Opens the Character Embedding dialog box, where you canselect options for embedding font outlines. Choose one or more of theoptions (such as Uppercase and Lowercase). You can press Ctrl(Windows) or Ô (Mac) and click several options. Or click the Don’tEmbed button if you don’t want to embed font outlines. When you’redone, click OK. The font outlines you chose are exported when you pub-lish the movie to ensure a smooth appearance. Limiting the font outlinesyou export helps to make the file size smaller.
Creating Cool Text EffectsFlash wouldn’t be worth its salt if you couldn’t create some flashy effectswith text. You can manipulate text in several ways:
� Transform text just like other objects. In other words, you can scale,rotate, skew, and flip type. Figure 5-9 shows an example of skewed text.
128 Part II: 1,000 Pictures and 1,000 Words
10_596918 ch05.qxd 10/7/05 7:08 PM Page 128

� Convert type to shapes by breaking it apart. Select the text and chooseModify➪Break Apart. The first time that you use the Break Apart com-mand, words are broken up into individual letters. Use this commandagain, and letters are turned into shapes so that you can then edit thetext in the same way that you edit shapes. However, you can no longeredit the text as text, so check your words before converting them! Referto Figure 5-1 for an example of text turned into shapes.
� In the Professional version of Flash, you can apply special graphiceffects to text, called filters. Select the text and click the Filters tab ofthe Property inspector. Click the Plus (+) icon and choose one (or more)of the following filters: Bevel, Drop Shadow, Glow, Blur, Gradient Glow,Gradient Blur, or Adjust Color.
Of course, you can animate text to your heart’s content. To animate text, youusually break it apart so that you can move letters individually. You can thenuse the Modify➪Timeline➪Distribute to Layers command to put each letteron a separate layer. After that, you can animate each letter. (See Chapter 9 forthe details on animation.)
Figure 5-9:This text isskewed tomatch theangles of
the skewedrectangles,creating a 3-D effect.
129Chapter 5: What’s Your Type
10_596918 ch05.qxd 10/7/05 7:08 PM Page 129

130 Part II: 1,000 Pictures and 1,000 Words
10_596918 ch05.qxd 10/7/05 7:08 PM Page 130

Chapter 6
Layering It OnIn This Chapter� Creating layers
� Modifying layers
� Using guide layers
� Creating holes with mask layers
Flash lets you organize objects on the Stage in layers. Layers keep objectsseparated from each other. Flash either combines or creates cutouts
when two objects overlap if you don’t use the object-drawing model (as weexplain in Chapter 3). By placing the two objects on different layers, youavoid this behavior yet retain the appearance of overlapping objects. In addi-tion, by rearranging your layers, you can easily rearrange the order of yourobjects, that is, which objects appear to be on top and which appear to be onthe bottom.
Layers are also necessary for error-free animation. To move one objectacross the Stage in front of other objects, such as a background, you need toput the object on its own layer. If you want to animate several objects acrossthe Stage, put each object on a separate layer.
You can hide layers. Flash doesn’t display objects on hidden layers. Hiddenlayers are great for hiding some objects temporarily while you figure outwhat to do with all the rest of the stuff on the Stage.
Finally, layers are great places to put sounds and ActionScript code. Forexample, you can name a layer Music and put your music there. Then you caneasily find the music if you want to change it. Layers provide a great way tokeep the various components of your movie organized. (See Chapter 10 tofind out more about ActionScript.) In this chapter, you get all the informationthat you need to use layers effectively.
11_596918 ch06.qxd 10/7/05 7:06 PM Page 131

Creating LayersFlash lists layers at the left side of the Timeline. New movies start out withone layer, named Layer 1. You can, and should, change the name of this layerand new layers to something more descriptive, as shown in Figure 6-1.
If you’re the organized type, you should think about your animation in advanceand decide which layers you need. However, animations often don’t work outthe way you plan, and you might find yourself creating layers after you’vecreated objects. Either way, your method for creating the layer is the same.
To create a layer, click the Insert Layer button at the bottom of the layer list(or choose Insert➪Timeline➪Layer). Flash displays the new layer above theactive layer and makes the new layer active. To name the layer, double-clickits name, type something meaningful, and then press Enter (Windows) orReturn (Mac).
Using layersAny object that you create goes on the active layer. You can tell which layeris active because it’s highlighted and has a pencil icon next to its name (referto the Rainbow layer in Figure 6-1). To change the active layer, just click anyinactive layer’s name. You can also click anywhere in the layer’s row on theTimeline.
To help make your work easier, Flash automatically changes the active layerto match any object that you select. So, if you’re working on a layer that younamed Text and select a shape on a layer that you named Shapes, Flash auto-matically activates the Shapes layer. Any new objects that you create are nowon the Shapes layer. Of course, if that’s not the layer that you want, you canswitch to any other layer at any time by clicking its name.
Figure 6-1:Flash
keeps youorganized
by listing allyour layers.
132 Part II: 1,000 Pictures and 1,000 Words
11_596918 ch06.qxd 10/7/05 7:06 PM Page 132

If you click a layer to make it active, Flash selects all the objects on that layerthat exist in the current frame. (Even if a layer is already active, you can clickits name to select all its objects.) This feature is helpful for working with allthe objects on a layer and discovering which objects a layer contains. If youdon’t want all the objects selected, click anywhere not on an object.
Because each animated object needs to be on its own layer, you often need todistribute objects to their own layers. Select the objects and choose Modify➪Timeline➪Distribute to Layers. This command saves lots of work!
Changing layer statesBesides being active or inactive, layers have three states that determine howobjects on that layer function or look; you can show or hide a layer, lock orunlock it, or display objects on a layer as outlines. Use these states to helpyou organize how you work. The more objects and more layers that youhave, the more you need to use these layer states.
To the right of the layer name, you see an eye, a lock, and a box. These aren’tmystical symbols. The following sections explain what they are and how touse them.
Show/HideUse Show/Hide (as shown at the left) to hide all objects on a layer (also calledhiding a layer). Hide a layer to reduce clutter while you work. To hide a layer,click beneath the eye icon on that layer’s row. Flash places a red X under theeye icon. All the objects on that layer disappear. Keep in mind, however, thatyou can’t work on a hidden layer. Click the X to get them back again. To hide(or show) all the objects on the Stage, click the eye icon itself.
Don’t forget hidden layers because they do appear in your published movies.
To show or hide all layers except one, Alt+click (Windows) or Option+click(Mac) beneath the eye icon on that layer’s row. You can also right-click(Windows) or Control+click (Mac) on a layer and choose Hide Others fromthe shortcut menu.
Lock/UnlockUse Lock/Unlock to prevent objects from being edited by locking their layers.Lock a layer when you want to avoid changing objects by mistake. To lock alayer, click beneath the lock icon on that layer’s row. Flash places a lock inthe layer’s row. Click the lock to unlock the layer again. The lock disappears,and you can now edit objects on that layer. You can lock all layers by clickingthe lock icon directly — but remember that you can’t work on a locked layer.Click the lock icon again to unlock all the layers.
133Chapter 6: Layering It On
11_596918 ch06.qxd 10/7/05 7:06 PM Page 133

To lock or unlock all layers except one layer, Alt+click (Windows) or Option+click(Mac) beneath the lock icon on that layer’s row. You can also right-click(Windows) or Control+click (Mac) a layer and choose Lock Others from theshortcut menu.
OutlinesUse Outlines to display objects as outlines of different colors. Outlines helpyou see which layer’s objects are on because each layer uses a differentcolor, as shown in Figure 6-2. (Okay, you can’t really see the colors in a black-and-white book, but you can probably tell by the variations in gray that theobjects aren’t all the same color.) To display outlines, click beneath theOutlines (box) icon on that layer’s row. Flash puts a colored box in the layer’srow, and all objects on that layer are now shown as outlines in that color.(Text is still filled in, however.) Click the box to display objects on that layernormally. To display all layers as outlines, click the Outlines icon directly.Click it again to see your objects as normal. You can work on outlined layers,but all new objects appear as outlines, so telling how they appear when dis-played normally is difficult.
Thanks to Polly Wickstrom, www.tomatotreedesigns.com, for this Flash movie.
In Figure 6-2, some text has been broken apart for animation and is thereforeoutlined like other objects.
To display all layers as outlines except for one layer, Alt+click (Windows) orOption+click (Mac) beneath the outline icon on that layer’s row.
Getting Those Layers RightGood layer housekeeping can help keep you sane. Delete layers that you nolonger need. You can rename layers when their content changes; you can
Figure 6-2:All the
objects onthe Stage
are shownas outlinesexcept for
text thathasn’t been
brokenapart.
134 Part II: 1,000 Pictures and 1,000 Words
11_596918 ch06.qxd 10/7/05 7:06 PM Page 134
copy layers with their entire contents (rather than re-create them fromscratch). Here we explain how to keep control over layers.
You can select more than one layer at a time. To select a contiguous group,click the first layer, hold down the Shift key, and click the last layer in thegroup. To select more than one layer when they’re not all together in a group,click the first layer, press and hold Ctrl (Windows) or Ô (Mac), and click anyadditional layers that you want to select.
Deleting layersWhen you work, you might find that a layer no longer has any objects. It’s alayer without a purpose in life, so delete it. Select the layer and click theTrash can at the bottom of the layer list. You can also drag the layer to theTrash can.
When you delete a layer, you delete everything on the layer. However, someobjects on a layer might not be visible, because you see only what exists onthe Stage in the current frame. For example, if you introduce a circle in Frame15 of a layer named Circle but you’re in Frame 1, you don’t see that circle.Deleting the Circle layer, however, deletes the circle, although you can’t seeit. (We discuss frames in more detail in Chapter 9.)
To check for objects on a layer, right-click the layer and choose Hide Othersfrom the contextual menu. Click the first frame on the Timeline and pressEnter (Windows) or Return (Mac) to run any existing animation. Objects onthat layer appear during the animation if they exist.
Copying layersYou can copy a layer, along with its entire contents, throughout all frames. If you’ve created a great bouncing ball and now want two balls, copy the layer.You can then modify the position of the second ball throughout the Timelinewithout having to re-create the ball itself. Now you have two bouncing balls.
To copy and paste a layer, follow these steps:
1. Click the layer name to select the layer.
2. Choose Edit➪Timeline➪Copy Frames.
3. Click the Insert Layer button to create a new layer.
4. Click the new layer to make it active.
5. Choose Edit➪Timeline➪Paste Frames.
135Chapter 6: Layering It On
11_596918 ch06.qxd 10/7/05 7:06 PM Page 135

Renaming layersRename a layer whenever you want. By default, Flash names layers Layer 1,Layer 2, and so on. When you use a layer, rename it to reflect its contents. Torename a layer, double-click the layer name and type a new name. Then pressEnter (Windows) or Return (Mac).
Reordering layersIn Chapter 4, we explain how to change the order of objects on the Stagewhen they’re on the same layer. When objects are on different layers, a newrule applies. The order of the layers indicates the display order of objects onthe Stage. Therefore, objects on the uppermost layer on the list are always ontop, objects on the second layer appear one level down, and so on. Objectson the last layer on the list appear on the bottom level of the Stage, behindeverything else.
In fact, a simple and effective way to control object stacking is to put objectson different layers and then move the layers higher or lower on the layer list.To move a layer, just click and drag it within the layer list to the desired posi-tion. Figure 6-3 shows an example before and after moving a layer. The balland the oval are on different layers. The left image looks a little odd, butwhen you reorder the layers, their objects are reordered as well, and you canthen see a ball and its shadow.
Changing the layer order can help you more easily select and edit objectsthat are covered up by other objects. Simply drag the layer to the top of thelist, and the objects on that list then appear on top. When you finish editingthe objects, drag the layer back to its original location.
Figure 6-3:By changingthe order of
the layers,you changethe order ofthe objects
on thoselayers.
136 Part II: 1,000 Pictures and 1,000 Words
11_596918 ch06.qxd 10/7/05 7:06 PM Page 136

Organizing layersSometimes layers can get out of hand. You might have several layers withsounds on them or several layers for each animation. Tame those layers byputting them into folders. A folder holds layers. Instant organization! Forexample, you can create a Sounds folder and folders for each animation group.
To create a folder, click the Insert Layer Folder icon below the layer list. Yousee a new folder just above the active layer. Name the folder in the same way that you name a layer: Double-click it, type the name, and press Enter(Windows) or Return (Mac). You can distinguish a folder from a layer by itsfolder icon.
After you have a folder, you fill it up with layers by dragging layers into it.Click and drag a layer onto the folder’s row until the folder icon darkens, andthen release the mouse button. At the same time, the layer’s name becomesindented so that you can easily tell that it’s in a folder, as shown in Figure 6-4.
You can even put folders in folders. Just drag one folder into another. A folderwithin a folder is a nested folder, and the folder that it’s in is the parent folder.
Here are some other things that you can do with folders:
� Remove a folder from a folder: Drag the nested folder above its parentfolder.
� Remove a layer from a folder: Drag the layer above the folder name orto another location where it doesn’t darken a folder.
� Collapse or expand individual folders: Click the folder’s arrow at theleft of its icon.
� Expand or collapse all folders: Right-click (Windows) or Control+click(Mac) and choose Expand All Folders or Collapse All Folders from theshortcut menu.
� Hide or lock an entire folder and its layers: You can hide or lock afolder just like you hide or lock a layer. (See the section “Changing layer
Figure 6-4:Put your
layers intofolders to
keepyourself
organized.
137Chapter 6: Layering It On
11_596918 ch06.qxd 10/7/05 7:06 PM Page 137
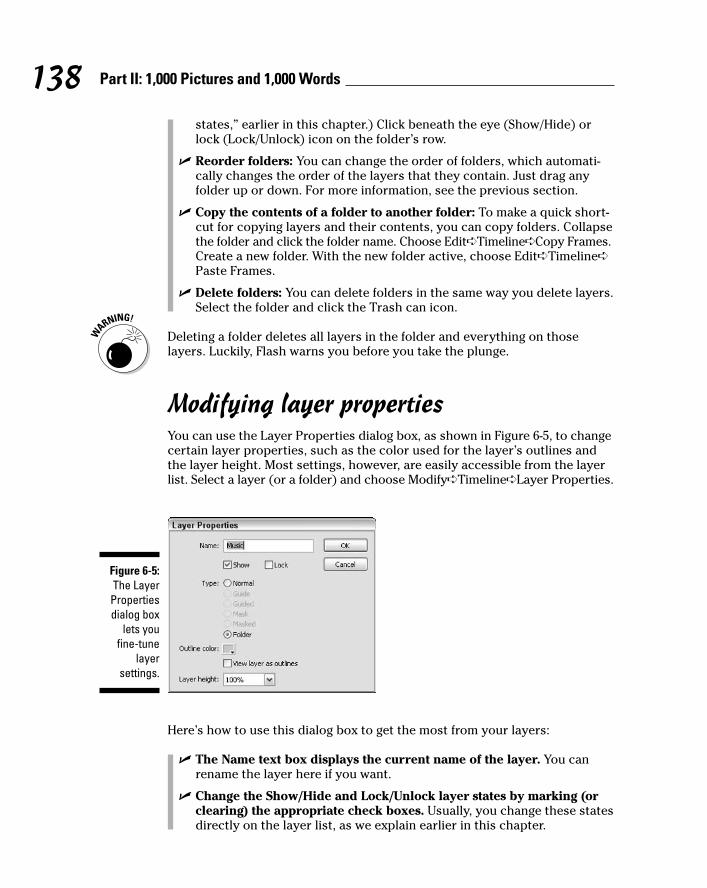
states,” earlier in this chapter.) Click beneath the eye (Show/Hide) orlock (Lock/Unlock) icon on the folder’s row.
� Reorder folders: You can change the order of folders, which automati-cally changes the order of the layers that they contain. Just drag anyfolder up or down. For more information, see the previous section.
� Copy the contents of a folder to another folder: To make a quick short-cut for copying layers and their contents, you can copy folders. Collapsethe folder and click the folder name. Choose Edit➪Timeline➪Copy Frames.Create a new folder. With the new folder active, choose Edit➪Timeline➪Paste Frames.
� Delete folders: You can delete folders in the same way you delete layers.Select the folder and click the Trash can icon.
Deleting a folder deletes all layers in the folder and everything on thoselayers. Luckily, Flash warns you before you take the plunge.
Modifying layer propertiesYou can use the Layer Properties dialog box, as shown in Figure 6-5, to changecertain layer properties, such as the color used for the layer’s outlines andthe layer height. Most settings, however, are easily accessible from the layerlist. Select a layer (or a folder) and choose Modify➪Timeline➪Layer Properties.
Here’s how to use this dialog box to get the most from your layers:
� The Name text box displays the current name of the layer. You canrename the layer here if you want.
� Change the Show/Hide and Lock/Unlock layer states by marking (orclearing) the appropriate check boxes. Usually, you change these statesdirectly on the layer list, as we explain earlier in this chapter.
Figure 6-5:The LayerPropertiesdialog box
lets youfine-tune
layersettings.
138 Part II: 1,000 Pictures and 1,000 Words
11_596918 ch06.qxd 10/7/05 7:06 PM Page 138
� You can change the type of layer by choosing from the list of layertypes. We cover guide and mask layers later in this chapter.
� You can change the color that Flash uses when the layer is displayedas outlines. Click the Outline Color swatch and choose another colorfrom the Color palette.
� Select the View Layer as Outlines check box to turn on outlines. As weexplain earlier in this section, you can accomplish this task easily fromthe layer listing.
� You can change the layer height to two or three times the normalheight. One reason to change the height of a layer is to more easily viewsound waves on a layer that contains a sound. Another is to see largerpreviews of your keyframes in the Timeline — you can turn these on byclicking the drop-down list in the upper-right corner of the Timeline andchoosing Preview or Preview in Context from the pop-up menu.
After you finish using the Layer Properties dialog box, click OK.
Creating Guide LayersA guide layer is a layer that’s invisible in the final, published animation. Youcan use guide layers for several purposes:
� Animation: You can place a path on a guide layer to control the motion ofan object during animation. Figure 6-6 shows a guide layer that contains amotion guide for the skateboarder. When animated, the skateboard doestwo flips, following the motion guide. (Read through Chapter 9 for thelowdown on how to create a motion guide.)
� Layout: Although Flash MX 2004 lets you display guides on the screen tohelp you draw precisely (as we describe in Chapter 3), you can alsoplace gridlines on guide layers to help you lay out the Stage. Graphicdesigners use these types of gridlines to figure out how to create a bal-anced, pleasing effect in their art.
� Drawing: You can import a bitmap graphic onto a guide layer and drawover the graphic on a regular layer by using the Flash drawing tools.This technique of drawing over a graphic can be a big help when creat-ing your artwork.
Of course, you could use a regular layer and then erase whatever youdon’t want to appear in the final movie. But if you need to go back andmake changes, you would have to create the guide layer over again.Using a guide layer gives you the flexibility of keeping the layer in themovie file, knowing that it will never appear in the published animation.
Layers that are hidden appear in the published .swf file, but guide layersdon’t appear.
139Chapter 6: Layering It On
11_596918 ch06.qxd 10/7/05 7:06 PM Page 139

To create a guide layer, create a new layer. Then right-click (Windows) orControl+click (Mac) and choose Guide from the contextual menu. The layer isnow a guide layer. Use the same procedure to convert a guide layer back to aregular layer. The Guide item on the menu is a toggle, so when you click itagain, Flash removes the guide status of the layer.
When you use a guide layer as a motion guide, you must link the guide layer to a layer that contains the objects that you want to guide. The layer with theguided objects is called a guided layer. In Figure 6-6, the loops are on a guidelayer, and the skateboarder is on a guided layer. All objects on a guided layerautomatically snap to the path of the motion guide on the guide layer. To link alayer to a guide layer, creating a guided layer, you can do any of the following:
� Create a new layer under the guide layer.
� Drag an existing layer under the guide layer.
� Choose Modify➪Layer and choose Guided in the Layer Properties dialog box.
Flash indents the guided layer beneath the guide layer to help you see thatthey’re linked. If you want to unlink a guided layer, drag it above the guidelayer or choose Modify➪Timeline➪Layer Properties and select the Normaloption in the Layer Properties dialog box.
Opening Windows with Mask LayersA mask layer hides every object on its related layers except those inside a filledshape or text object. You can use mask layers to create peepholes or spotlighteffects. Figure 6-7 shows a keyhole shape on a mask layer that hides the entiregarden scene except for the part within the keyhole. The garden scene is a rec-tangle much larger than the section displayed through the keyhole.
Figure 6-6:A guide
layer con-trols the
motion of an object
duringanimation.
140 Part II: 1,000 Pictures and 1,000 Words
11_596918 ch06.qxd 10/7/05 7:06 PM Page 140

Creating a mask layerTo create a mask layer, the object on the mask layer, and the objects behindthe mask layer, follow these steps:
1. Create the objects that you want to show through the hole in the mask layer.
These objects can be on one or more layers. Place all the layers that youwant to be masked next to each other and at the top of the layer list.
2. Select the topmost layer on the layer list and click the Insert Layerbutton to create a new layer at the top of the list.
This layer will become the mask layer.
3. Create, insert, or import one filled shape, text, or an instance of asymbol on the new layer. (See Chapter 7 for more about symbols.)
The filled part of the shape, text, or instance becomes the hole — inother words, it’s transparent. Unfilled portions of the objects becomeopaque, so everything becomes the opposite of its current state.
4. Right-click (Windows) or Control+click (Mac) the layer’s name andchoose Mask from the contextual menu.
Flash turns the layer into a mask layer and locks the mask layer as wellas the layer just beneath it on the layer list. The masked layer is indented.You see the mask effect displayed. (To link more than one layer to themask layer, see the next section, “Editing mask layers.”)
Editing mask layersBecause Flash locks both the mask layer and the layer or layers that aremasked, you cannot edit them. To edit them, click the lock icon above the
Figure 6-7:You can use
a mask layerto create a
hole throughwhich you
can see the layer or layersbeneath.
141Chapter 6: Layering It On
11_596918 ch06.qxd 10/7/05 7:06 PM Page 141

layer list. Flash unlocks the layers and removes the mask effect. After youfinish editing the layers, lock them again to redisplay the mask effect.
When you create a mask layer, Flash links only the layer directly beneath it tothe mask layer. A layer linked to a mask layer is masked. If you place objectsthat you want to be masked on several layers, you need to change the prop-erty of all those layers from normal to masked.
All the layers that you want to be masked must be directly under the mask layer.
You can link a layer to a mask layer in several ways:
� If you drag a normal layer directly beneath a mask layer, Flash links it tothe mask layer in addition to existing masked layers.
� Right-click (Windows) or Control+click (Mac) the layer and chooseProperties. Select the Masked option button in the Layer Propertiesdialog box.
Similarly, you can unlink a layer from its mask layer by using one of thesemethods:
� Drag the linked layer above the mask layer.
� Right-click (Windows) or Control+click (Mac) the layer and chooseProperties. Select the Normal option button in the Layer Propertiesdialog box.
Animating mask layersMask layers are more fun when you animate them. You can move them,change their sizes, and change their shapes. If you create a keyhole like theone shown in Figure 6-7, you can move the keyhole past the masked layers,revealing what lies beneath while the keyhole moves. You can use the sametechnique to create an effect of a spotlight moving around a stage, revealingwhatever it lights up. The only thing that you can’t do is to animate the masklayer objects along motion paths. (Chapter 9 explains how to animate masksalong with other objects.) You can create more complex mask animations byusing ActionScript. For the steps to do this, see the section on creating ani-mated masks with movie clips in Chapter 10.
Look for ffd_reveal.fla on this book’s Web site at www.dummies.com/go/flash8. To see the mask, open the file and unlock all the layers. (Thanks toShane Mielke, one of our top ten designers to watch [see Chapter 16], for this file.)
142 Part II: 1,000 Pictures and 1,000 Words
11_596918 ch06.qxd 10/7/05 7:06 PM Page 142

Part IIIGetting Symbolic
12_596918 pt03.qxd 10/7/05 7:03 PM Page 143

In this part . . .
Symbols can show you the deeper levels of life, andFlash symbols let you get down deep into the mechan-
ics of animation. In this part, you discover the three kindsof symbols — graphic, button, and movie clip symbols —and how to use them.
Manipulating symbols is a critical feature of Flash.Symbols enable you to easily place duplicate graphics inyour movie without significantly increasing the movie’ssize, and you use symbols when you start to animate. Thispart of the book also gives you the lowdown on buttons,which are central to the Web lifestyle in the 21st century.Flash lets you create buttons that change when you passthe mouse cursor over them and again when you clickthem. You can even make animated buttons. Part III pro-vides you with the basis for creating great animations.
12_596918 pt03.qxd 10/7/05 7:03 PM Page 144

Chapter 7
Heavy SymbolismIn This Chapter� Exploring types of symbols
� Making symbols
� Creating instances
F lash offers a way to simplify your work, called symbols. A symbol can beany object or combination of objects, animation, or a Web button. When
you create a symbol, the objects (or animation) become one object. Soundslike grouping, yes? (If you’ve already read Chapter 4, you know what wemean.) The difference is that Flash stores the definition of the symbol in theLibrary. From the Library, you can now effortlessly insert multiple copies ofthe symbol into your movie. Each copy is called an instance.
Besides making your life easier when you want to use a set of objects morethan once, symbols have another advantage: They significantly reduce thesize of your files. Rather than store each instance that you use, Flash storesone definition for the symbol and refers to that definition each time that youdisplay an instance of the symbol. You can place symbols inside other sym-bols, which is called nesting. Used this way, symbols are the building blocksfor complex graphics and animation. Motion-tweened animation requiressymbols, groups, or text, so you often create symbols when preparing to ani-mate. (Chapter 9 explains tweened animation.)
So, symbols are all-around good guys, and you should use them as much aspossible.
Understanding Symbol TypesFlash offers four types of symbols: graphic, movie clip, button, and font. Eachtype is made up of a group of objects or animation, but each type has a differ-ent purpose. Understanding these types is very important to understandingsymbols and Flash animation in general.
13_596918 ch07.qxd 10/7/05 7:10 PM Page 145

Using graphic symbolsGraphic symbols are the simplest and most obvious type of symbol. When youcreate a Flash movie, you create objects on the Stage. Some objects may remainstill, such as backgrounds. You animate other objects — after all, what wouldFlash be without animation? Use graphic symbols for collections of staticobjects or for simple animation. Figure 7-1 shows a graphic symbol createdfrom several curves and circles.
You create graphic symbols to reduce the size of your file and to make it easierto add multiple copies of a graphic to your movie. Symbols are stored in theLibrary and are available to not only the movie in which you created them butalso any other movie. Therefore, using symbols is a good way to store graphicimages for use in Flash movies. You don’t have to re-create the wheel.
Flash ignores sounds and ActionScript inside graphic symbols. ActionScriptcode (which we explain in detail in Chapter 10) is the key to creating interac-tive movies. For that reason, use graphic symbols only when the animation issimple.
Figure 7-1:A graphic
symbol,created
from severalobjects, has
a singleselection
border.
146 Part III: Getting Symbolic
13_596918 ch07.qxd 10/7/05 7:10 PM Page 146

Using movie clip symbolsA movie clip is like a movie within your movie that you can manipulate byusing interactive controls (created with ActionScript, which you can readabout in Chapter 10). Movie clips are crucial for complex animation and espe-cially interactive animation. A movie clip has its own Timeline independent ofthe movie’s main Timeline. For example, you can go to a movie clip at anypoint in the movie, play it, and then return to where you left off on theTimeline. You can also attach movie clips to buttons. We explain how tocreate movie clips in this chapter; Chapter 8 discusses using movie clips withbuttons. Chapter 9 covers using movie clips in animation, and Chapter 10explains how to use and control movie clips by using interactive controls.
Flash comes with several components, which are special movie clips thatallow you to add user interface elements — such as radio buttons, checkboxes, and scroll bars — to your movies. Choose Window➪Components anddrag one of your choices to the Stage. Then choose Window➪ComponentInspector to set the parameters of the component. For example, you caninsert a list box and then add all the items (called labels on the ComponentParameters panel) that you want on the list. For more information on compo-nents, see Chapter 12.
Using button symbolsButton symbols create buttons — those little graphics that you click on Webpages to take you to other pages on the site or the Internet. In Flash, you canuse buttons in the same way, but you can also use buttons to interact withyour site. For example, you can let viewers decide whether they want to see a movie — when they click the button, the movie starts. You can also useadvanced scripting to create buttons that control interactive games and otherviewer activities. However you want to use buttons, button symbols are theway to start. You can add movie clips and interactive controls to buttons.Find out all about buttons in Chapter 8.
Using font symbolsA font symbol exports a font for use in multiple Flash movies. This is greatwhenever you use the same font in more than one Flash movie on a Web site:Your audience needs to download the font information only once instead ofevery time for every single Flash movie. This makes your Flash movies smallerand the user’s loading time faster. We show you how to use font symbols inChapter 12.
147Chapter 7: Heavy Symbolism
13_596918 ch07.qxd 10/7/05 7:10 PM Page 147

Creating SymbolsFor graphic symbols and button symbols, usually you create the objects thatyou need and then turn them into a symbol. The same is true of movie clips ifthey are static and you use ActionScript to control them. However, when youuse a movie clip as a type of animation, you either create an animation on theStage and then convert it to a movie clip symbol; or create the movie clipsymbol, create the initial objects, and then create the animation.
In the next few sections, we explain the various ways of creating symbols, forwhichever purpose you want to use them. Each type of symbol has its ownicon that’s used in the Library. The following table shows what type ofsymbol each icon represents:
Symbol What It Represents
Movie clip
Button
Graphic
Creating symbols from existing objectsTo create a symbol from unanimated objects you’ve already created, followthese steps:
1. On the Stage, select the objects that you want to convert to a symbol.
2. Choose Modify➪Convert to Symbol or press F8.
The Convert to Symbol dialog box opens, as shown in Figure 7-2.
3. In the Name text box, type a name for the symbol.
A common convention is to name the symbol in a way that’s unique and also indicates the symbol type. For example, help_btn could be
Figure 7-2:The Convert
to Symboldialog box.
148 Part III: Getting Symbolic
13_596918 ch07.qxd 10/7/05 7:10 PM Page 148

the name for a button symbol that will become a Help button on a Web site.
4. From the Behavior list, select the type of symbol that you want tocreate: graphic, button, or movie clip.
5. Click OK to create the symbol and close the Convert to Symbol dialog box.
The objects that you selected become one object, indicated by a singleselection border around all the objects. Flash also stores the symbol inthe Library. (Chapter 2 explains how to use the Library.)
Creating empty symbolsRather than create a symbol from existing objects, you can create an emptysymbol and then create the objects for the symbol. If you know in advancethat you want to create a symbol, you can use this method.
To create an empty symbol, follow these steps:
1. With no objects selected, choose Insert➪New Symbol.
The Create New Symbol dialog box opens.
2. In the Name text box, type a name for the symbol.
3. From the Behavior list, select the type of symbol you want to create —graphic, button, or movie clip — and then click OK.
Flash switches to symbol-editing mode, which we describe in the section“Editing symbols,” later in this chapter.
4. Create the objects or animation for the symbol in the same way thatyou do in regular movie-editing mode.
5. Choose Edit➪Edit Document to leave symbol-editing mode and returnto your movie.
Your new symbol disappears! Don’t worry — Flash saved the symbol inthe Library. To insert an instance of the symbol on the Stage, see thesection “Inserting instances,” later in this chapter.
Converting an animation to a movie clip symbolYou can create a movie clip symbol by converting regular animation to amovie clip. Use this method when you already have the animation created onthe Timeline.
149Chapter 7: Heavy Symbolism
13_596918 ch07.qxd 10/7/05 7:10 PM Page 149

To convert an animation on the Stage to a movie clip symbol, follow these steps:
1. On the layer listing, select all frames in all layers containing the ani-mation by clicking the first layer and pressing Shift while you clickthe last layer in the group.
Alternatively, you can press Ctrl (Windows) or Ô (Mac) and click addi-tional layers.
2. On the Timeline, right-click (Windows) or Control+click (Mac) andchoose Copy Frames to copy all the frames of the animation to theClipboard.
Alternatively, you can choose Edit➪Timeline➪Copy Frames.
3. With no objects selected (click off the Stage to be sure that no objectsare selected), choose Insert➪New Symbol.
The Create New Symbol dialog box opens.
4. In the Name text box, type a name for the movie clip.
5. From the Behavior list, select Movie Clip as the type of symbol.
6. Click OK to close the Create New Symbol dialog box.
Flash switches to symbol-editing mode so that you can edit the symbol.
7. Click the first frame of the Timeline to set the start of the movie clip symbol.
8. Choose Edit➪Timeline➪Paste Frames to paste the animation into theTimeline and create the symbol.
9. To return to the main movie and Timeline, choose Edit➪Edit Document.
10. To delete the animation from the main movie (now that you’ve savedit in a movie clip), select all layers as you did in Step 1 and chooseEdit➪Timeline➪Remove Frames.
You can delete the animation from the main movie because your Librarynow has a movie clip that contains that animation. When you choose themovie clip in the Library panel, you can click the small Play button toplay the animation in the Library panel’s window.
Creating a symbol by duplicating a symbolOne more way to create a graphic, button, or movie symbol is to duplicate anexisting symbol. To duplicate a symbol, follow these steps:
1. Open the Library (choose Window➪Library).
2. Select the symbol that you want to duplicate.
150 Part III: Getting Symbolic
13_596918 ch07.qxd 10/7/05 7:10 PM Page 150

3. Click the Options menu in the upper-right corner of the Librarywindow and choose Duplicate.
Flash opens the Duplicate Symbol dialog box.
4. In the Name text box, type a name for the duplicate. Select the type of symbol that you want to create if you want a different kind fromthe original.
5. Click OK to close the dialog box and create the duplicate symbol.
Modifying SymbolsFlash is a master of flexibility, and sometimes you need to make changes. Ofcourse, you can change symbols after you create them. Here we explain theprocedures you need to know.
Changing the properties of a symbolYou might need to change a symbol’s properties. For example, you mightcreate a graphic symbol and then realize that you need it to be a movie clip.Or you might want to change the font used by a font symbol. No problem!
To change the properties of a symbol, follow these steps:
1. Choose Window➪Library to open the Library.
2. Right-click (Windows) or Control+click (Mac) the symbol’s icon (not itsname) and choose Properties from the menu.
The Symbol Properties dialog box opens.
3. If the symbol is a graphic, button, or movie clip, select the type ofsymbol that you want from the Behavior list and click OK. If thesymbol is a font, change the font or its size or style as you desire andclick OK.
Look on our companion Web site at www.dummies.com/go/flash8 forffd_reveal.fla — a good example of a short movie with lots of symbols.(The Flash movie is courtesy of Shane Mielke. You can see the full Web site atwww.pixelranger.com.)
Editing symbolsAn instance is a copy of a symbol that you insert into your movie. Part of thepower of symbols lies in their control over instances. If you edit a symbol,
151Chapter 7: Heavy Symbolism
13_596918 ch07.qxd 10/7/05 7:10 PM Page 151

Flash updates all instances of that symbol in the movie. You can change asymbol once and save yourself the time of creating the same change forevery instance of that symbol. For that reason, it’s worthwhile to make asymbol every time that you want to use a certain shape or group of shapesmore than once.
You can edit a symbol in three different modes:
� Edit in Symbol-Editing Mode: Switches you to symbol-editing mode. Yousee only the symbol. Right-click a selected symbol and choose Edit.
� Edit in Place: Lets you edit a symbol while still viewing other objects onthe Stage. Other objects are dimmed while you edit the symbol. Right-click a selected symbol and choose Edit in Place.
� Edit in a New Window: Opens a new window where you can edit yoursymbol. You see only the symbol. Right-click a selected symbol andchoose Edit in New Window.
The value of editing in place is that you can see how your change works withthe rest of the objects that you have on the Stage. For example, if you want tomake your symbol bigger, you may need to make sure that it doesn’t obscuresome nearby text. If you have lots of stuff on the Stage, however, editing insymbol-editing mode or in a new window can help you focus more easily onthe symbol itself.
To edit a symbol, follow these steps:
1. Select any instance of the symbol on the Stage.
2. Right-click (Windows) or Control+click (Mac) the instance and chooseEdit, Edit in Place, or Edit in New Window. (Choosing Edit puts youinto symbol-editing mode.)
Flash displays the symbol name above the Timeline. If you choose Editin Place, other objects are dimmed, as shown in Figure 7-3.
This kaleidoscope animation is in the Ch07 folder on the companionWeb site at www.dummies.com/go/flash8.
3. Edit the symbol in any way you want.
4. After you finish editing (from Edit or Edit in Place), click the scenename to the left of the symbol name or choose Edit➪Edit Document;from a new window, click the Close button.
You are now back in your main movie.
152 Part III: Getting Symbolic
13_596918 ch07.qxd 10/7/05 7:10 PM Page 152

Using Symbols from Other MoviesAfter you create a symbol and store it in the Library, you can use that Libraryin any other movie. You can also open the Library from any other movie anduse its symbols in your current movie.
If the other movie is open and its Library is open, you can access that movie’sLibrary from within your current movie. Libraries of any open movie areavailable from any other open movie. Just choose that other movie from thedrop-down list at the top of the Library palette. (Choose Window➪Library toopen the Library.)
To use a symbol from the Library of another movie that is closed, followthese steps:
1. Choose File➪Import➪Open External Library.
The Open as Library dialog box opens.
2. Select the movie file.
3. Click Open.
Flash displays the Library of the other movie in a new Library window.
Figure 7-3:One symbol,
whichincludes a wedge
and somecircles, is beingedited.
Otherobjects are
dimmedbecause
Flash is in edit-in-
place mode.
153Chapter 7: Heavy Symbolism
13_596918 ch07.qxd 10/7/05 7:10 PM Page 153

The new Library might hide your current movie’s Library. Just drag it by itsgrabber in the upper-left corner of the panel window under the current Libraryuntil it docks there. In the new Library, many Option menu items and icons aredisabled to prevent you from making changes in the other movie’s file.
When you have more than one Library open, the background of the listing ofopen movies is white. The background of Libraries from other, unopenedmovies is gray. So you can look at the background to quickly see whichLibrary is which.
To use a symbol from the other Library, drag it onto the Stage. When you dothis, Flash places a copy of the symbol in the current movie’s Library. (SeeChapter 2 for more information about the Library.)
You can also update or replace any graphic, button, or movie clip symbol in your movie’s Library with the content of a symbol from any other Library on your hard drive or network. Accessing a symbol in this way is called author-time sharing of symbols or assets. On the other hand, you can also share sym-bols or assets at runtime, after you have uploaded your movie. A font symbolis a special type of symbol that you use at runtime. We explain runtimeshared libraries (which can include sounds) in Chapter 12.
When you share a symbol while you’re creating a movie (during authoring),the symbol in your current movie keeps its original name, but the contentstake on the properties of the symbol that you’re sharing. If you have alreadyreplaced a symbol and the outside symbol changes (because it has beenedited), use author-time sharing to update the symbol in your current draw-ing to match the symbol’s new properties.
To update or replace a graphic, button, or movie clip symbol in your moviewith the properties of another symbol, follow these steps:
1. Open the Library (choose Window➪Library) and select the symbolthat you want to update or replace.
2. From the Library menu, choose Properties.
The Symbol Properties dialog box opens.
3. Click Advanced, if necessary, to see the expanded dialog box. In theSource section, click Browse.
The Locate Macromedia Flash Document File dialog box opens.
4. Navigate to the movie (.fla) file that contains the symbol that youwant to use. Select it and click Open.
The Select Source dialog box opens. You see a list of the symbols in themovie that you selected.
154 Part III: Getting Symbolic
13_596918 ch07.qxd 10/7/05 7:10 PM Page 154

5. Choose a symbol and click OK.
When you choose a symbol, you see a preview in the preview box, soyou can easily find the symbol you want. When you click OK, you’reback in the Symbol Properties dialog box.
6. In the Source section of the Symbol Properties dialog box, select theAlways Update Before Publishing check box if you want to automati-cally update the symbol if the original has changed.
Enable this check box to create a link between the source symbol andthe symbol in your current movie.
7. Click OK.
You now have a symbol in your Library that has its original name but lookslike the symbol that you chose from the other movie.
Using the Flash LibraryFlash comes with three common libraries that you can use. To access theselibraries, choose Window➪Common Libraries and then select one of thelibraries. Flash includes buttons, learning interactions (interface items forcreating online courses), and classes (building blocks for developingActionScript applications). These libraries are also a good place to pick upideas and see what you can create in Flash.
Using the Flash For Dummies LibraryThe Flash libraries contain some good examples, but they miss many basicshapes and simple objects, some of which are hard to draw in Flash. Wedecided to fill in the gaps! We created a library of art, geometric shapes, andfun shapes that you can use in your movies, with some new shapes designedespecially for this edition. The Flash For Dummies Library is named Flash 8For Dummies Library.fla. You can find it at www.dummies.com/go/flash8.
To use this library, go to www.dummies.com/go/flash8 and download FlashFor Dummies Library.fla. In Windows, download it to the Program Files\Macromedia\Flash 8\en\Configuration\Libraries folder on your harddrive. On the Mac, download it to the Applications/Macromedia Flash 8/Configuration/Libraries folder on your hard drive.
After that, you can always open this library the same way you open othercommon libraries: Choose Window➪Common Libraries➪Flash 8 For DummiesLibrary.fla. We hope you enjoy it!
155Chapter 7: Heavy Symbolism
13_596918 ch07.qxd 10/7/05 7:10 PM Page 155

Working with Instances, for InstanceAfter you create a symbol, you can use it in many ways. You can insert it inyour movie, inside other symbols, or even in other movies. Each copy of thesymbol is called an instance. You can change the properties of an instance sothat it differs from its parent symbol. For example, you can change the colorof an instance — the original symbol remains unchanged.
Inserting instancesTo insert an instance of a symbol, follow these steps:
1. Choose Window➪Library (Ctrl+L or F11 for Windows or ÔÔ+L or F11for the Mac) to open the Library, as shown in Figure 7-4.
2. Choose the layer where you want the instance to be placed.
3. Click a keyframe on the Timeline where you want the instance to be placed.
Flash places instances only in keyframes. If you don’t select a keyframe,Flash puts the instance in the first keyframe to the left of the current frame.(See Chapter 9 for more about keyframes.)
4. Drag the symbol from the Library to the Stage.
Figure 7-4:Insert an
instance ofa symbol bydragging it
from theLibrary.
156 Part III: Getting Symbolic
13_596918 ch07.qxd 10/7/05 7:10 PM Page 156
When you insert a graphic instance, you need to consider how it fits withinyour entire animation. For example, the instance might be the starting pointfor some animation, or it might be part of the background that remains staticthroughout the animation. Perhaps you want the instance to suddenly appearat some point in the animation. If the instance contains animation, you needto insert it at its proper starting point. (Chapter 9 explains how to copygraphics across any number of frames to create a static background andcovers the entire topic of animation in detail.)
A movie clip instance, on the other hand, takes up only one frame on theTimeline. It plays and loops automatically unless you create ActionScriptcode to control it. (Chapter 10 talks about ActionScript.)
Editing instancesA symbol’s children don’t have to be carbon copies of their parents, thankgoodness. Instances of a symbol can differ from their parent symbol by color,type, and play mode. You can also rotate, scale, or skew an instance, leavingthe parent symbol unchanged.
When you edit an instance, Flash remembers the changes. When you edit thesymbol, Flash doesn’t forget those changes. Suppose that you create a redcircle graphic symbol, and then you create several instances of it and changeone instance to pink. Then you edit the (still red!) circle symbol to change itto an oval. All the instances are now ovals, but the one you turned pink is stillpink. The instance’s shape has been updated, but the pink color remains.
In the Property inspector (choose Window➪Properties➪Properties), you canchange an instance’s color (or tint), brightness, or transparency, giving yousome very useful control over the appearance of your instances. To changean instance’s color, brightness, or transparency, follow these steps:
1. Select the instance.
2. Choose Window➪Properties➪Properties to open the Property inspector.
3. From the Color drop-down list, select one of these options:
• None: Adds no color effect.
• Brightness: Changes the lightness or darkness of the instance.
• Tint: Changes the color of the instance.
• Alpha: Changes the opacity/transparency of the instance.
• Advanced: Changes both the color and the alpha at one time.
4. Make the desired changes, as we explain in the next few sections.
You see the changes that you make in the Property inspector immedi-ately in your selected instance.
157Chapter 7: Heavy Symbolism
13_596918 ch07.qxd 10/7/05 7:10 PM Page 157

Changing brightnessWhen you choose Brightness from the Color drop-down list, a slider and a textbox appear. Type a brightness percentage or drag the slider and see the resultimmediately in the symbol instance. High brightness makes the image light,and 100-percent brightness makes the instance disappear. Low brightnessmakes the image dark so that 0-percent brightness turns the instance black.
Changing tintWhen you choose Tint from the Color drop-down list, you can pick the colorand then the amount of the color (the tint), by percentage, that you want toapply. Figure 7-5 shows the controls for this option. You can pick a color byclicking the Tint Color button and choosing from the color swatches or typered, green, and blue values (if you know them).
Specify the percentage of the color that you want to apply by typing a valuein the percent text box or by clicking the drop-down arrow and dragging theslider to choose a percentage. When the percentage is set to 100%, the instancecompletely changes to the color that you specified. If the percentage is set to0%, Flash leaves the instance unchanged.
The Flash method of specifying a color gives you great flexibility and preci-sion. You can choose a color and use the tint control to create a meld of thecurrent color and your chosen color.
If you want to stick to the 216 Web-safe color palette, just select a colorswatch from the ones displayed when you click the Tint Color button andthen slide the tint control all the way up to 100%.
Changing transparencyChoose Alpha from the Color Effect drop-down menu to change the trans-parency of an instance. (Alpha enables levels of transparency, and you canthink of the term as somewhat synonymous to opaqueness.) Use the slider ortype a value in the text box. A value of 0 means that your instance becomescompletely transparent — in that case, when you return to the Stage, all you
Figure 7-5:Changingcolor and
tint used ona symbolinstance.
158 Part III: Getting Symbolic
13_596918 ch07.qxd 10/7/05 7:10 PM Page 158

see is the selection border and the small plus sign that marks the symbol’sregistration point. When you deselect the instance, you see absolutely noth-ing! (Chapter 4 explains more about a symbol’s registration point, includinghow to move it. See the section on groups.)
Partial transparency lets your background show through. A partially trans-parent instance blends in with your background, creating a softer effect.However, transparency is a complex feature and can slow down the loadingand playing of a movie.
Changing color and transparency at the same timeSelect Advanced from the Color Effect drop-down menu to change both thecolor and the transparency at the same time by using red, green, and bluevalues. The Settings button appears on the Property inspector. Click Settingsto open the Advanced Effect dialog box. Figure 7-6 shows the controls, whichare complex.
Use the controls on the left to specify the color or transparency as a specificpercentage of the current value. Use the controls on the right to change thecolor or transparency to a specific, absolute amount. Flash then calculatesthe new color value by multiplying the current value by the percentage thatyou specified and then adding the value from the right side. As you can see,this method provides lots of control — but it might make you crazy first.
To simply change both the color and the transparency of an instance, use theTint controls to change the color and then just change the left Alpha settingin the Advanced Effect dialog box.
Adding filters and blendsIn the Professional version of Flash only, you can apply special graphiceffects to buttons and movie clips, called filters. Select the text and click theFilters tab of the Property inspector. Click the Plus (+) icon and choose one(or more) of the following filters: Bevel, Drop Shadow, Glow, Blur, GradientGlow, Gradient Blur, or Adjust Color.
Figure 7-6:The
AdvancedEffect
dialog box.
159Chapter 7: Heavy Symbolism
13_596918 ch07.qxd 10/7/05 7:10 PM Page 159

You can also apply new blend modes to movie clips in Flash 8 Professional.Blend modes determine how movie clips that overlap blend with each other atthe point of overlap. To apply a blend, select a movie clip instance and adjustthe color and transparency as we explain in the previous sections. Thenchoose a blend mode from the Blend drop-down list in the Property inspector.
Changing an instance’s typeThe instance type — graphic, movie clip, or button — comes from thesymbol type, but you might want to change it. For example, if you createdsome animation and saved it as a graphic symbol, you might want to use it asa movie clip. Rather than change the symbol type, you can change only thetype of the instance that you have inserted.
To change the instance type, follow these steps:
1. Select the instance.
2. Choose Window➪Properties➪Properties to open the Property inspector.
3. From the Instance Behavior drop-down list, select one of the follow-ing types:
• Graphic: If the graphic contains animation, select Graphic in theBehavior drop-down list and then determine how the animationwill run in the Options for Graphics drop-down list on the Propertyinspector. You have three choices:
Loop plays the animation contained in the instance over and overduring the frames occupied by the instance.
Play Once plays the animation one time from the frame that youspecify.
Single Frame displays any one frame of the animation. In otherwords, the animation doesn’t play; you specify which frame themovie displays.
• Button: Select the Button option to determine how the button istracked in the Tracking Options section. From the Options forButtons drop-down list, select Track as Button when you’re creatingsingle buttons. Select Track as Menu if you’re creating pop-up menus.
• Movie Clip: Select the Movie Clip option and specify an Instancename in the Name text box. You use this name with certainActionScript controls so that you can refer to and control theinstance. (For more information about ActionScript, see Chapter 10.)
Replacing an instanceSuppose that you create a complex animation with bouncing bunnies all overthe Stage. Suddenly your boss decides that some of the bouncing bunnies
160 Part III: Getting Symbolic
13_596918 ch07.qxd 10/7/05 7:10 PM Page 160

should be bouncing squirrels instead. Meanwhile, you had already edited allthe bunnies to make them different sizes and colors. You need a way to replacesome of the bunnies with squirrels without losing their sizes and colors.
To replace an instance, follow these steps:
1. Create the squirrel symbol (or whichever new symbol you need).
Flash stores the new symbol in the Library.
2. Select an instance of the bunny — that is, your original instance — onthe Stage.
3. Choose Window➪Properties➪Properties to open the Property inspector.
4. Click the Swap button to open the Swap Symbol dialog box.
5. In the dialog box, select the squirrel or any other symbol.
6. Click OK to swap the symbols and close the Swap Symbol dialog box.
Flash retains your color effects and size changes but changes thesymbol.
Unfortunately, you must repeat this process for all the bunnies that you wantto change on the Stage, but it’s better than reinserting all your instances andre-creating the instance changes.
If your boss actually wants you to change ALL the bunnies to squirrels, yourjob is much simpler. Just edit the bunny symbol (as we describe in the “Editingsymbols” section, earlier in this chapter) to replace the bunny image with asquirrel. Then all the instances of that symbol instantly change to squirrelsyet retain the color effects and size changes that you gave them while theywere still bunnies.
Duplicate a symbol when you want to use one symbol as a springboard forcreating a new symbol. Follow the instructions in the “Creating Symbols” sec-tion, earlier in this chapter. Make any changes that you want to the newsymbol and place instances on the Stage.
Breaking apart an instanceYou can break apart an instance into its component objects. The originalsymbol remains in the movie’s Library. You might want to use the instance asa starting point for creating a completely new symbol, or you might want toanimate the components of the symbol so that they move separately. Otherinstances remain unchanged.
To break apart an instance, select it and choose Modify➪Break Apart. If aninstance contains symbols or grouped objects within it, you can use theBreak Apart command again to break apart those internal objects as well.
161Chapter 7: Heavy Symbolism
13_596918 ch07.qxd 10/7/05 7:10 PM Page 161

162 Part III: Getting Symbolic
13_596918 ch07.qxd 10/7/05 7:10 PM Page 162

Chapter 8
Pushing ButtonsIn This Chapter� Making simple buttons
� Testing your buttons
� Moving on to more complex buttons
When you view a Web page, you see buttons that you can click to moveto other pages or sites. These buttons are graphical images, but
they’re hyperlinks as well. If you start to pay attention to these buttons, yousee that some of them change when you pass your mouse cursor over them.They change again when you click them. Sometimes they make a sound whenyou click them.
Flash can create these types of buttons and more. You can animate Flash but-tons, for example, so that they move or rotate when viewers pass over orclick them. You can add interactive controls (actions) to buttons so thatpassing over or clicking them starts other movies or creates other effects.
In this chapter, you find out how to create buttons that look the way youwant. You also discover how to make more complex buttons that includesounds, movie clips, and simple ActionScript. To discover more aboutActionScript and interactivity, see Chapter 10.
Creating Simple ButtonsBefore you create a button, stop and think about what you want the button toaccomplish on a Web page and how you want it to look. Web page designersoften create a series of similar buttons that lead to various Web pages. Thissimilarity creates a coherent style to the page. Buttons often include sometext to identify the button’s purpose.
But you can use buttons for lots of other more advanced purposes than navi-gating to Web pages. A button can stop music, indicate a choice in a surveyor game, or be dragged around on a puzzle or game Web page.
14_596918 ch08.qxd 10/7/05 7:04 PM Page 163

A button is a symbol that responds when a user clicks it. (See Chapter 7 forthe lowdown on how to create and edit symbols.) In this chapter, we coverthe entire process of creating buttons.
Understanding button statesA button has four states that define characteristics of the button:
� Up: Defines what the button looks like when the mouse pointer is notover the button. The viewer initially sees the Up state of a button.
� Over: Defines what the button looks like when the pointer is over thebutton (but it hasn’t been clicked).
� Down: Defines what the button looks like when the button is clicked.
� Hit: Defines the area of the button that responds to the mouse. The userdoesn’t see this area — it’s invisible. When you pass the pointer over thehit area, the pointer is considered to be over the button. When you clickanywhere in the hit area, the button works.
Figure 8-1 shows a button in its four states. A typical, simple button mightshow a lit-up effect for the Over state and an indented look (as though thebutton is pressed in) for the Down state. In this example, the Down statemoves the highlight to the right, giving the impression of movement when theuser clicks the button.
Radial gradients are useful for creating a lit-up or pushed-in look. Use a lightcolor or white to create the appearance of a highlight. Use a dark color orblack to create an indented look. Just changing the color of the fill (often to alighter color) is often enough to make it seem lit up.
The button shown in Figure 8-1 is on the companion Web site at www.dummies.com/go/flash8. Look for capsule.fla in the Ch08 folder. To try out the but-tons in this movie, choose Control➪Test Movie.
Up Over
Down Hit
Figure 8-1:The four
states of abutton: Up,
Over, Down,and Hit.
164 Part III: Getting Symbolic
14_596918 ch08.qxd 10/7/05 7:04 PM Page 164

Making a basic buttonTo create a simple button, follow these steps:
1. Choose Insert➪New Symbol to open the Create New Symbol dialog box.
2. In the Name text box, type a name for the button.
3. In the Behavior section, choose the Button option and click OK.
You’re now in symbol-editing mode. Flash displays the special Timelinefor buttons, with four frames: Up, Over, Down, and Hit, as shown inFigure 8-2. Note the dot in the Up frame, indicating that the frame is akeyframe. (For more information about keyframes, see Chapter 9.) Theword Up is highlighted, indicating that the Up frame is active.
4. Create the graphic for the Up state.
You can use the Flash drawing tools, an imported graphic, or an instanceof a symbol. You can create as many layers as you want for the button.For an animated button, use a movie clip symbol. We explain how tocreate an animated button in the “Adding a movie clip to a button” sec-tion, later in this chapter.
If you want the button image for the four states to be in the same place,place the graphic in the center of the display and build the other statesin the center as well. To do this, cut and paste the graphic. (See Chapter4 for more about centering objects on the display.) If the button imagesaren’t in the same place, the button appears to shift when the viewerpasses the cursor over, or clicks, the button.
5. Right-click (Windows) or Control+click (Mac) the Over frame andchoose Insert Keyframe from the contextual menu.
Flash inserts a keyframe in the Over frame of the button. You can alsochoose Insert➪Timeline➪Keyframe or press F6. The graphic for the Upstate remains on the Stage.
Figure 8-2:The Flash
symbol-editing
mode forbuttons
displays aTimelinewith four
frames.
165Chapter 8: Pushing Buttons
14_596918 ch08.qxd 10/7/05 7:04 PM Page 165

6. Create the graphic for the Over state.
You can use the graphic for the Up state as a starting point and change it(or leave it the same if you don’t want the button to change when themouse pointer passes over the button). You can also delete the graphicand put a new one in its place. If you have more than one layer, place akeyframe on each layer before creating the artwork for that layer.
7. Right-click (Windows) or Control+click (Mac) the Down frame andchoose Insert Keyframe from the contextual menu.
8. Create the graphic for the Down frame.
Repeat as in Step 6.
9. Right-click (Windows) or Control+click (Mac) the Hit frame andchoose Insert Keyframe from the contextual menu.
10. If necessary, create the shape that defines the active area of thebutton.
This shape should completely cover all the graphics of the other state.Usually, a rectangle or circle is effective. If you ignore the Hit frame,Flash uses the boundary of the objects in the Up frame, which might bewhat you want.
If you use text for the button, viewers have to click the letters preciselyunless you create a rectangular hit area around the text. To cover anarea of text, create a filled-in shape on a new layer.
11. Click the scene name above the layer list (or the Back arrow to the leftof the scene name) to return to the regular Timeline and leavesymbol-editing mode.
12. If the Library isn’t open, choose Window➪Library and drag the buttonsymbol that you just created to wherever you want it on the Stage.
You just created a button!
A button is a symbol, but when you want to place a button on the Stage, youmust drag the button from the Library to create an instance of the symbol.See Chapter 7 for a full explanation of symbols and instances.
Putting Buttons to the TestAfter you create a button, you need to test it. You can choose from a couplemethods.
The fastest way to test a button is to enable it. An enabled button responds toyour mouse as you would expect — it changes as you specified when you passthe mouse over it and click it. To enable the buttons on the Stage, chooseControl➪Enable Simple Buttons. All the buttons on the Stage are now enabled.
166 Part III: Getting Symbolic
14_596918 ch08.qxd 10/7/05 7:04 PM Page 166

Have fun with your button! Pass the mouse over it, click it, and watch it change.
After you test your button, suppose that you want to select the button tomove it. You try to click it to select it, and it only glows at you, according tothe Down frame’s definition. Choose Control➪Enable Simple Buttons again todisable the buttons. Now you can select a button like any other object. Ingeneral, enable buttons only to test them.
However, if you really want to select an enabled button, you can do so withthe Selection tool by dragging a selection box around it. You can use thearrow keys to move the button. If you want to edit the button further, chooseWindow➪Properties➪Properties to open the Property inspector and edit thebutton’s properties, as we explain in Chapter 7.
If you have other animations on the Stage, you can play an animation with thebuttons enabled. Choose Control➪Play or press Enter (Windows) or Return(Mac). By playing the animation, you can see how the buttons fit in with therest of your movie.
Another way to test a button is to test the entire movie. Choose Control➪TestMovie. Flash creates an .swf file just as it would if you were publishing themovie based on default publishing settings. Any animation plays, and you cantest your buttons as well. When you’re done, click the Close box of the window.
If your button contains movie clips, you must use this method of testing thebutton because the animation doesn’t play on the Stage.
Creating Complex ButtonsButtons can do more than just change color or shape. You can enhance abutton in three ways:
� Add a sound: For example, you can add a clicking sound to the Downframe of a button so that users hear that sound when they click the button.
� Add a movie clip: To animate a button, you add a movie clip to it. Youcan animate the Up, Over, and Down frames, if you want.
� Add an action (interactive control): To make a button do something,you need to add an action to it by using ActionScript. Actions are cov-ered in Chapter 10, but we discuss some of the basic concepts here.
Adding a sound to a buttonFor fun, you can add a sound to a button. Usually, sounds are added to theOver or Down frame — or both, if you want. Chapter 11 explains lots more
167Chapter 8: Pushing Buttons
14_596918 ch08.qxd 10/7/05 7:04 PM Page 167

about sound, but in this section, we explain how to add a simple sound to a button.
Look in the Ch08 folder of the companion Web site at www.dummies.com/go/flash8 for click.wav. You can add this sound to the Down frame of a button.
To add a sound to a button, follow these steps:
1. Create the button symbol.
2. Choose File➪Import➪Import to Library to open the Import dialog box.
3. Select the sound file (in .wav, .aiff, or .mp3 format) and click Open.
Flash stores the file in the Library.
4. Choose Window➪Library to open the Library.
5. If you aren’t in symbol-editing mode, double-click the button’s icon inthe Library to enter symbol-editing mode.
6. Click the plus sign at the bottom of the layer list to add a new layer.
See Chapter 6 for a full explanation of layers.
7. Name the new layer Sound or something similar.
8. In the new layer, right-click (Windows) or Control+click (Mac) theframe where you want to place the sound — for example, the Downframe — and choose Insert Keyframe from the contextual menu.
9. Choose Window➪Properties➪Properties to open the Property inspector.
10. From the Sound drop-down list, select the sound file that you want.
Flash lists all the sounds that you have imported into the Library. Whenyou select the sound file, you see the sound wave indicator on the sound’slayer in the frame where you inserted the sound, as shown in Figure 8-3.
11. From the Sync drop-down list of the Property inspector, select Event.
To see the Sync drop-down list, you need to click the Expand arrow atthe lower-right corner of the Property inspector.
Figure 8-3:When you
add a soundto a button,
the soundwave
appears inthe Timeline.
168 Part III: Getting Symbolic
14_596918 ch08.qxd 10/7/05 7:04 PM Page 168
The Event setting synchronizes the sound to the occurrence of an event:in this case, the clicking of the button. Event is the default setting.
12. Click the scene name in the upper-left area of the layer list or theBack arrow to the left of the scene name.
Flash returns you to the regular Timeline and leaves symbol-editing mode.
13. Drag the button symbol that you just created from the Library towherever you want the button on the Stage.
You’re done! Now test the button as we explain in the earlier section,“Putting Buttons to the Test.”
Be sure to look in Chapter 11 for more information on adding sounds to but-tons and movies.
If you’ve already added the sound to another movie, choose File➪Import➪Open External Library and choose the other movie. Click the desiredkeyframe and drag the sound from the Library to anywhere on the Stage.Flash places the sound in the selected keyframe.
Adding a movie clip to a buttonIf you think that simple buttons are b-o-r-i-n-g, you can animate them. To ani-mate a button, you must create a movie clip symbol and then insert the movieclip into one of the frames. Generally, button animation is localized in thearea of the button. If you want to make an elaborate button, you can animateall three frames — Up, Over, and Down.
To add a movie clip to a button, you must first create the movie clip. Chapter 7explains how to create a movie clip symbol, and Chapter 9 explains how tocreate the animation to put in the movie clip.
For the following steps, you can use the movie clip that we provide in theCh08 folder of the companion Web site at www.dummies.com/go/flash8.Open flower power.fla. It’s a blank movie whose Library contains the sym-bols necessary to create a button with a movie clip.
If you’ve never created a button, review the steps in the section “Making abasic button,” earlier in this chapter. Then, to create a button with a movieclip, follow these steps:
1. If you’re using the movie file included on the Web site, open flowerpower.fla; otherwise, open any new movie file.
2. Choose Insert➪New Symbol to open the Create New Symbol dialog box.
3. In the Name text box, type a name for the button.
169Chapter 8: Pushing Buttons
14_596918 ch08.qxd 10/7/05 7:04 PM Page 169

4. In the Behavior section, choose the Button option and click OK.
5. Create the graphic for the Up state.
If you’re using the movie from the Web site, choose Window➪Libraryand drag to the Stage the graphic symbol named Flower. Click anywhereon the Stage to make it active, and press the arrow buttons on the key-board (left, right, up, and down, as necessary) to center the flowersymbol’s registration point (shown by a little plus sign) exactly over theregistration point (also a plus sign) on the Stage (see Figure 8-4). You canalso cut and paste the symbol to center it. The flower graphic symbol isstatic, not animated.
6. Right-click (Windows) or Control+click (Mac) the Over frame andchoose Insert Keyframe from the contextual menu.
Flash inserts a keyframe.
7. Create the graphic for the Over state.
For this example, delete the graphic on the Stage (it’s still there from theUp frame) and drag the movie clip called Flower Rotating to the center ofthe Stage. Click the Stage and use the arrow keys to perfectly center theflower. The Flower Rotating movie clip animates the flower by rotating it.
8. Right-click (Windows) or Control+click (Mac) the Down frame andchoose Insert Keyframe from the contextual menu.
9. Create the graphic for the Down state.
In this example, delete the graphic on the Stage and drag the FlowerLight graphic symbol to the exact center of the Stage.
10. Right-click (Windows) or Control+click (Mac) the Hit frame andchoose Insert Keyframe from the contextual menu.
11. Use the Rectangle tool and drag a square to cover the entire area ofthe symbol, leaving the symbol on top; use the Selection tool to selectand delete the symbol, leaving only the square.
If you don’t perform this step, viewers must place the mouse cursorexactly over one of the petals to see the animation. By defining the Hitframe as a square, placing the cursor anywhere within that square acti-vates the button. Your screen should look like Figure 8-4, shown with theUp frame active.
12. Click the scene name (Scene 1) above the layer list to return to theregular Timeline.
13. Drag the button symbol that you just created from the Library towherever you want the button placed on the Stage.
Congratulations! You have just created a button with a movie clip.
170 Part III: Getting Symbolic
14_596918 ch08.qxd 10/7/05 7:04 PM Page 170

To test the button that you just created, choose Control➪Test Movie. Placethe cursor over the button, click the button, and watch the animation. If youused the Flower Power movie from the Web site, first save the file on yourcomputer by choosing File➪Save As and choosing a location on your harddrive. When you test this movie, the flower rotates when you pass the cursorover it and also lightens. When you click the flower, it seems to freeze. Whenyou’re done, click the Close box of the window.
If you want to see the final result of the preceding steps, check out flowerpower final.fla in the Ch08 folder on the companion Web site at www.dummies.com/go/flash8.
Adding an action to a buttonA button doesn’t do anything except look pretty until you give it the properinstructions. For example, a button can link you to another Web page or starta movie. You find out about ActionScript in Chapter 10, but in this section, weexplain the basic principle of adding an action to a button — in this case, anaction that links the user to another Web page.
You can add an action for a button in two ways. Both methods have advan-tages and disadvantages. We explain both ways next.
Figure 8-4:You can use
the FlowerPower
library tocreate ananimated
button.
171Chapter 8: Pushing Buttons
14_596918 ch08.qxd 10/7/05 7:04 PM Page 171

Adding an action directly to a buttonThe most direct method is to add the ActionScript directly to the button.This method is very intuitive, because the code is right there in the button.However, if you have lots of code in lots of different buttons (and perhapsmovie clips as well), you might have a hard time troubleshooting problems.Opening each button and looking at the ActionScript could be difficult.
Put the ActionScript directly on the button if you want the simplest methodand you won’t be adding a lot of code to your movie. For the maximum sim-plicity, use the Behaviors panel.
To add an action to a button by using the Behaviors panel, follow these steps:
1. If you haven’t already done so, drag an instance of the button onto theStage. If the button isn’t selected, select it.
2. Choose Window➪Behaviors to open the Behaviors panel.
We explain the Behaviors panel in Chapter 9.
3. Click the plus sign and choose whichever category and subcategorycontains the action that you want.
In our example, choose Web and then choose Go to Web Page.
4. Depending on the behavior that you chose, complete the informationin the dialog box.
In our example, complete the URL, as shown in Figure 8-5. When typingthe Uniform Resource Locator (URL), follow the same rules that youwould to create any hyperlink on your Web site. For example, usuallyyou can use local URLs (referring just to the page, for example) for otherpages on the same Web site, but you need absolute URLs (that is, com-plete URLs, starting with http://) for hyperlinks to other sites.
5. (Optional) You can change the Open In drop-down option, whichdetermines how the URL opens.
For example, _blank opens a new browser window, and _self displaysthe URL in the same window.
Figure 8-5:The Go to URL
dialog box.
172 Part III: Getting Symbolic
14_596918 ch08.qxd 10/7/05 7:04 PM Page 172

6. Click OK.
Figure 8-6 shows the Behaviors panel with the Go to Web Page action.Note that the top line of the ActionScript says that the event is OnRelease, which means that the button works when the mouse button is released.
7. If you want, select another event by clicking the event and selectingfrom the drop-down list.
See Chapter 10 for a list of button events and how they work.
To view the ActionScript that you created, select the button and open theActions panel (choose Window➪Actions). You can type ActionScript directlyin the Actions panel if you’re familiar with the proper syntax. For more infor-mation, see Chapter 10.
You can add your button to an existing Web page. In such a case, the buttonmight be the only Flash element on the page. You can also include buttons aspart of an environment completely created in Flash. Either way, buttons are avaluable piece of the Flash arsenal.
For a gorgeous example of a button, as shown in Figure 8-7, look fornav_button.fla on the companion Web site at www.dummies.com/go/flash8. Open the .fla file and choose Control➪Test Movie to see how thebutton works. Right-click (Windows)/Control+click (Mac) the button (not the entire symbol) and choose Actions to see the Get URL action attached to this button. (The nav_button.fla file is courtesy of Jeremy Wachtel, VicePresident of Project Management at Macquarium Intelligent Communications — www.macquarium.com.)
Adding an action to the TimelineYou can add an action for a button by placing the action on the Timeline, usually in the first frame. This method is more difficult than the method we describe in the preceding section, because you need to know someActionScript. However, if you put all your ActionScript on the Timeline, it’svery easy to find because all the code is in one place. Click the frame — youusually create a special layer just for your actions — and when you open theActions panel, you see all the ActionScript there.
Figure 8-6:The
Behaviorspanel.
173Chapter 8: Pushing Buttons
14_596918 ch08.qxd 10/7/05 7:04 PM Page 173

To place ActionScript for a button on the Timeline, follow these steps:
1. If you haven’t already done so, drag an instance of the button onto theStage. If the button isn’t selected, select it.
2. Open the Property inspector (choose Window➪Properties➪Properties).In the Instance Name text box, enter a name for this instance of thebutton symbol.
The name can’t include any spaces. You can use an underscore orhyphen for readability.
If you see a Frame Label text box, click the button again to deselect anyframe on the Timeline.
Each instance of a button symbol should have a different instance name.
3. Click anywhere off the Stage to deselect the button.
4. Create a new layer, called Actions.
Chapter 6 explains how to create layers.
Figure 8-7:This movie
sportsbeautiful
bubblebuttons.
174 Part III: Getting Symbolic
14_596918 ch08.qxd 10/7/05 7:04 PM Page 174

5. Click the first frame of the Actions layer.
This instruction assumes that you want the button to appear at thebeginning of the movie. If you want the button to appear later on, right-click (Windows)/Control+click (Mac) the frame where you want thebutton to appear and choose Insert Keyframe. When you click a keyframeof a layer, all actions that you add go in that keyframe and on that layer.
175Chapter 8: Pushing Buttons
Testing your button’s Get URL actionTo properly test a button with a Get URL action,you need to publish your movie, upload it to yourWeb page, go online, and try it out. You can testthe button on your hard drive first, however, sothat you can be fairly sure that it will work whenyou put it on your Web page.
To test your button without publishing it, chooseControl➪Test Movie and click a button with aGet URL action. If you used an absolute (com-plete) URL, you should have no problem. Yourbrowser should open and display the appropri-ate Web page. However, a relative (local) URLmight not be available.
You can still test a relative URL on your harddrive. Perhaps the relative URL is tips.html.Assume that tips.html is in the same folderas the Web page containing your Flash buttonso that you can use this simple local URL.
To test your button’s Get URL action, followthese steps:
1. After creating the button and its Get URLaction with a URL of tips.html (or what-ever is appropriate in your situation),choose File➪Save to save the movie file.
2. Choose File➪Publish.
Flash publishes the file, creating a HyperTextMarkup Language (HTML) file and an .swffile in the same folder as your .fla file.(These are default settings. See Chapter 13for more information on publishing movies.)
3. To test the button, you need a file on yourhard drive with the same URL that you usedfor your button. Create a file named tips.html (or whatever URL you used) on yourhard drive in the same folder as your movie.
You can use either of two methods:
� Copy the existing tips.html file (ifyou have it on your hard drive) to thefolder containing your movie.
� Create a new HTML document andsave it as tips.html in the samefolder as your movie. This documentcan be a dummy document — you canput any text you want in it. For exam-ple, you can type This is a test HTMLdocument. If you create this documentin a word processor, be sure to save itas an HTML document. Otherwise,use the software that you normallyuse to create HTML documents.
4. Working offline, open your browser,choose File➪Open, and open the HTML filefor your Flash movie. (It has the same nameas your movie.)
5. Click your button.
You should see tips.html displayed. If you don’t, go back and check yourActionScript.
14_596918 ch08.qxd 10/7/05 7:04 PM Page 175
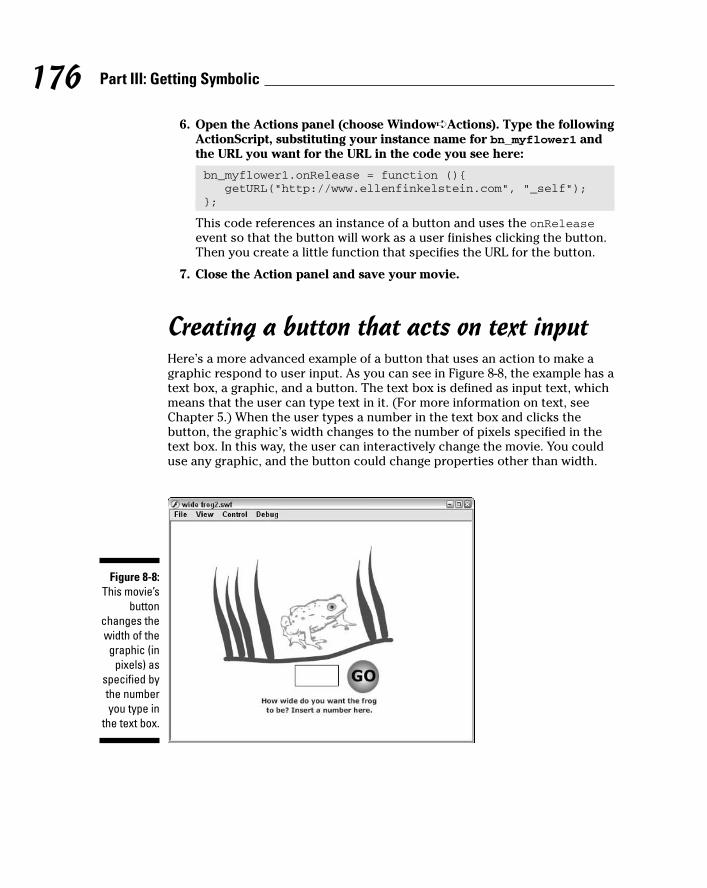
6. Open the Actions panel (choose Window➪Actions). Type the followingActionScript, substituting your instance name for bn_myflower1 andthe URL you want for the URL in the code you see here:
bn_myflower1.onRelease = function (){getURL(“http://www.ellenfinkelstein.com”, “_self”);
};
This code references an instance of a button and uses the onReleaseevent so that the button will work as a user finishes clicking the button.Then you create a little function that specifies the URL for the button.
7. Close the Action panel and save your movie.
Creating a button that acts on text inputHere’s a more advanced example of a button that uses an action to make agraphic respond to user input. As you can see in Figure 8-8, the example has atext box, a graphic, and a button. The text box is defined as input text, whichmeans that the user can type text in it. (For more information on text, seeChapter 5.) When the user types a number in the text box and clicks thebutton, the graphic’s width changes to the number of pixels specified in thetext box. In this way, the user can interactively change the movie. You coulduse any graphic, and the button could change properties other than width.
Figure 8-8:This movie’s
buttonchanges thewidth of thegraphic (in
pixels) asspecified bythe numberyou type in
the text box.
176 Part III: Getting Symbolic
14_596918 ch08.qxd 10/7/05 7:04 PM Page 176

Before trying to re-create this example, look on the companion Web site atwww.dummies.com/go/flash8 for Wide Frog.fla to see how it works.Open the movie and press Ctrl+Enter (Windows) or Ô+Return (Mac) to testthe movie. Enter a number in the text box and click the button. Then enter adifferent number and try again. Have fun with it! Follow these steps to createthis example:
1. Create a symbol with a movie clip behavior.
This symbol will be the graphic that changes in width. For informationon creating movie clips, see Chapter 7.
2. Open the Library (choose Window➪Library) and drag an instance ofthe symbol onto the Stage.
3. Open the Property inspector (choose Window➪Properties➪Properties).In the Instance Name text box, type a name for the instance.
For example, you could name the instance mc_frog_wide. Later, youneed to refer to this name.
4. Click the Text tool. In the Property inspector, select Input Text fromthe Text Type drop-down list. Drag out a text box on the Stage.
5. In the Instance Name text box, type an instance name for the inputtext box that you created on the Stage.
In the sample movie, the variable name is width_txt.
6. Click the Show Border around Text button in the Property inspector sothat the border of the text box is visible when you publish the movie.
7. Click the Embed button on the Property inspector to open theCharacter Embedding dialog box, choose Numerals [0–9] from the list, and click OK.
8. Create a button as we describe earlier in this chapter.
If you want, put some text on the button to help guide users to click thebutton. In the example, the word Go appears on the button.
9. Drag an instance of the button onto the Stage.
10. In the Property inspector, enter an instance name for the button inthe Instance Name text box.
In our example, we use the instance name bn_go1.
11. Create a new layer and call it Actions.
12. With the first keyframe of the Actions layer selected, open the Actionspanel (choose Window➪Actions).
177Chapter 8: Pushing Buttons
14_596918 ch08.qxd 10/7/05 7:04 PM Page 177
13. In the ActionScript panel, enter the following:
bn_go1.onRelease = function() {mc_frog_wide._width= width_txt.text;
};
This ActionScript creates a function that operates when the userreleases the Go button. It sets the width property of the frog movie clipto the number that the user enters in the text box.
14. Collapse or close the Actions panel. Add some text that explains to userswhat to do and make the rest of the Stage look pretty, if you want.
15. Save your movie.
16. Test the movie! Press Ctrl+Enter (Windows) or ÔÔ+Return (Mac). Trydifferent numbers and click the button. Make the symbol skinny or fat!
178 Part III: Getting Symbolic
14_596918 ch08.qxd 10/7/05 7:04 PM Page 178
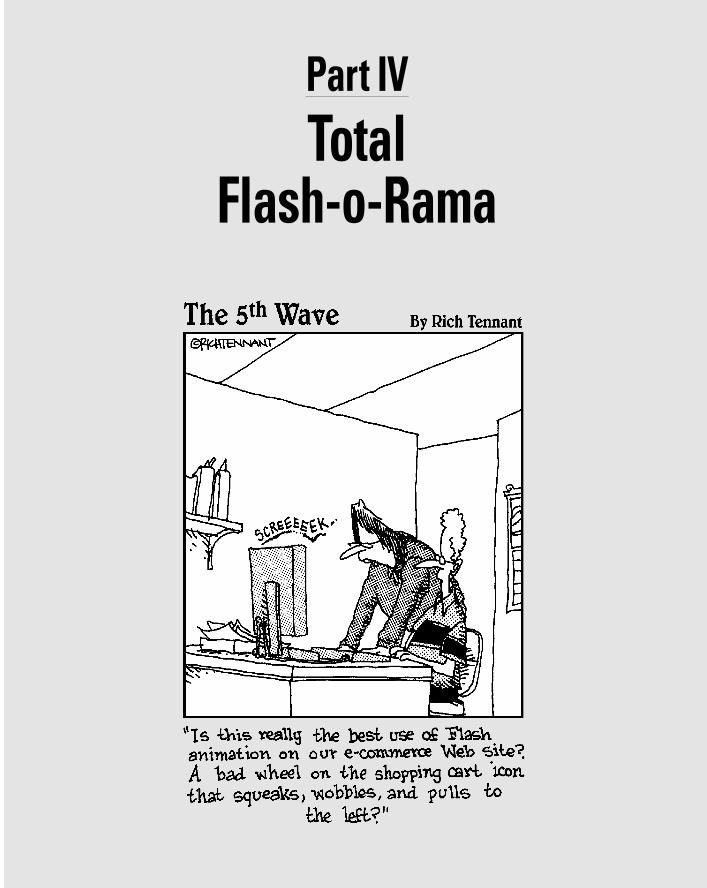
Part IVTotal
Flash-o-Rama
15_596918 pt04.qxd 10/7/05 7:05 PM Page 179

In this part . . .
Moving imagery is the heart and soul of Flash, and inthis part you make your Flash creations come to life
through the power of animation and video. You find outabout moving objects, changing their shape (or morphingthem), letting Flash create animation for you, and easyways to integrate video into your Flash extravaganzas.
After you create your movie, you can make it interactiveso that the viewer’s Web experience is more meaningfuland engaging. Flash ActionScript offers infinite potential,so let your imagination soar. We show you how to com-bine your animation with your symbols and then addactions to script your entire movie.
The world is not silent, and your Flash movies don’t haveto be either. Find out how to add sounds and music toyour movies — from the simplest sound of a button clickto the majestic tones of a full-fledged symphony.
15_596918 pt04.qxd 10/7/05 7:05 PM Page 180

Chapter 9
Getting AnimatedIn This Chapter� Understanding animation in Flash
� Getting ready to animate
� Using Timeline effects to create animations instantly
� Animating with keyframes
� Using motion tweening
� Editing your animation
� Managing scenes
In this chapter, we explain animation and making your graphics move. Areyou ready to plunge into a world where you can make almost anything
seem to happen? Hold on to your hats!
We start by explaining the basics of animation, including how to prepare foranimation and how to work with the Timeline. Then we go into the specifictechniques — Timeline effects, frame-by-frame animation, and tweening —that you can use to create great, animated effects in Flash. We cover bothmotion and shape tweening and then give you the details of editing your ani-mation. So let’s get moving!
Who Framed the Animation?The secret of animation in Flash, as in the movies, is that nothing ever reallymoves. A Flash movie creates the illusion of movement by quickly displayingthe sequence of still images. Each still image is slightly different. Your brainfills in the gaps to give you the impression of movement.
One of the great things about Flash is that you can easily create complicated,spectacular extravaganzas of animation. And Flash stores lots of informationin super-compact vector format. Because the files are so small, they down-load quickly. So Flash = spectacular animation + fast download. That’s goodfor your Web site viewers.
16_596918 ch09.qxd 10/7/05 7:20 PM Page 181

Just as in a movie on film, each still image is contained in a frame. Each framerepresents a unit of time. You create the animation by placing images in theframes. A frame can contain one object or none or many, depending on howcrowded a scene you want to create.
Time is your ally in Flash because you have complete control over it. You canlook at each individual image in time and tweak it to your heart’s content.Then you can step on the gas, play everything back at full speed, and watcheverything appear to move.
In Flash, you create animation in three ways:
� Frame by frame: You move or modify objects one frame at a time. Thisframe-by-frame animation is time consuming but is sometimes the onlyway to create complex animated effects. This method can certainly sat-isfy your appetite for total control.
� Tweening: You create starting frames and ending frames and let Flashfigure out where everything goes in the in-between frames, which is whyit’s called tweening. Tweening is much more fun and easier than frame-by-frame animation. If you can create the animation that you want bytweening, it’s definitely the way to go. Flash offers two types of tweening:motion tweening and shape tweening, both of which we describe later inthis chapter, in the section “The Animation Tween.”
� Timeline effects: You choose from a list of prebuilt animations, adjust afew settings, and then instantly apply them to your text, graphics, but-tons, or movie clips. Flash automatically creates the tweens for you.This cool feature of Flash takes the automatic creation of animation to awhole new level.
In tweening, the starting and ending frames are called keyframes becausethey are the key moments in time that the software uses to calculate the in-between frames. Tweening not only means less work for you but also createssmaller files (which download faster) because you’re describing your anima-tions more concisely. In frame-by-frame animation, every frame is a keyframebecause every frame defines a change in the action.
Preparing to AnimateYou probably want to get started animating already, but you need to set thestage first so that your animation works properly. Here are the steps that youneed to take before you can begin creating your animation:
1. Choose Insert➪Timeline➪Layer to create a new layer for your anima-tion and put your starting graphic or graphics on that layer.
182 Part IV: Total Flash-o-Rama
16_596918 ch09.qxd 10/7/05 7:20 PM Page 182
You should always animate each object on a separate layer that has noother objects on it. Otherwise, your animated objects might erase, connectto, or segment other objects . . . with messy results. And your animationprobably won’t work. Refer to Chapter 6 for more information on layers.
2. If you plan to use motion tweening, turn your object into a symbol orgroup; if you plan to use shape tweening, make sure that your objectis a shape and not a symbol; and if you plan to do frame-by-frame ani-mation, your graphic can be anything that you want.
See the section “The Animation Tween,” a little later in this chapter, tofind out more about motion tweening and shape tweening. Your graphicabsolutely must be a symbol instance, a group, or text in order for yourmotion tweening to work properly. (Refer to Chapter 7 for more aboutsymbols and instances, and Chapter 4 for the lowdown on groupingobjects.) For shape tweening, the rule is the opposite of motion tweening.If your graphic is a symbol or a group or both, you can’t shape tween it,so for shape tweening just draw a shape by using the drawing tools.
3. Set a frame rate. (See the later section “Turtle or hare?” for moreinformation.)
When you animate, you often need to play back your animation during theprocess. The simplest way is to press Enter (Windows) or Return (Mac),which plays the movie. Sometimes, however, you might want more control —perhaps to play part of your movie. In this case, the Controller is invaluable.The Controller, as shown in Figure 9-1, is a simple toolbar that looks like thecontrols on a tape recorder. Use it to play, rewind, fast-forward, and stop youranimation.
Pressing Enter or Return or using the Controller is a quick way to see youranimation, but if you have a movie clip on the Timeline, you won’t see theanimation within the movie clip until you choose Control➪Test Movie.
Master of the TimelineThe Timeline is the map of your animation sequence. If the Timeline isn’t visible, choose Window➪Timeline. Each layer has its own Timeline row. TheTimeline has its own coding to help you understand the structure of your animation, as shown in Figure 9-2.
Figure 9-1:The
Controller.
183Chapter 9: Getting Animated
16_596918 ch09.qxd 10/7/05 7:20 PM Page 183

You can undock the Timeline from the main Flash window and resize it. Justgrab the Timeline in the gray area below the title bar and to the left of the Eyeicon, and drag it to where you want it. Then you can resize it as an indepen-dent window by dragging the lower-right corner (Windows) or by draggingthe Size box in the lower-right corner (Mac).
Half the power of the Timeline is that it divides motion into frames — bits oftime that you can isolate and work with — one at a time. The other half of theTimeline’s power is that you can organize different components of your ani-mation into different layers.
Always animate one layer at a time.
Click any frame to make it active. Remember to click in the row of the layer con-taining the graphics that you want to animate. By clicking any frame, you canview your animation frozen in a moment of time.
As you read through the examples and steps in this chapter, you quickly getthe hang of working with the Timeline.
Hide the layers that you’re not interested in (click beneath the Eye icon) tohelp you visualize the animation. But don’t forget to check the animation withall the layers displayed to see how everything looks together. You should alsolock layers when you’re finished with them to avoid unwanted changes. Referto Chapter 6 for further instructions on hiding and locking layers.
EmptykeyframeIncompletetweenedanimation(no endingkeyframe)
Keyframe
Playhead (current frame marker)
Frame label
Scene name
Folder
Elapsed secondsFrame rate
Unchanged content(light gray, ending with rectangle)
Shape tween(light green)
Motion tween(light blue)
Layers
Figure 9-2:Use the
FlashTimeline to
control youranimations.
184 Part IV: Total Flash-o-Rama
16_596918 ch09.qxd 10/7/05 7:20 PM Page 184

Turtle or hare?All you need to do to make animation work is to view your sequence of stillimages over time at high speed. Unless you have a remarkable attentionspan, one image per second is way too slow. Silent movies were typically 16or 18 frames per second (fps). With the arrival of talkies, the speed gotbumped up to 24 fps for better quality sound. On your television, the speed isroughly 30 images per second.
The smoothness of the playback of your animation depends not only on theframe rate that you specify but also on the complexity of the animation andthe speed of the computer that’s playing it. Generally, 12 fps is a good choicefor Web animation. Luckily, that’s the default rate in Flash.
To change the frame rate for your animation, follow these steps:
1. Double-click the Frame Rate box (which displays a number and theletters fps) at the bottom of the Timeline to open the DocumentProperties dialog box.
Alternatively, you can choose Modify➪Document.
2. In the Frame Rate text box, type a new number (in frames per second).
You can set only one frame rate for all the animation in your currentFlash file, and you should set the frame rate before you start animating.
3. Click OK to set the new speed and close the dialog box.
A Flash movie’s frame rate represents the maximum speed at which themovie runs. Flash animation has no guaranteed minimum speed. If your ani-mation is lagging or bogging down, increasing the frame rate doesn’t help atall; in fact, it might make things worse.
Creating Animations Instantly with Timeline Effects
You can instantly create complex animations in Flash simply by choosingfrom a list of Timeline effects and applying one to your art. With Timelineeffects, you can use prebuilt animations to make your art spin, shrink,explode, expand, fade in or out, and do many other tricks, with just a fewclicks of your mouse.
185Chapter 9: Getting Animated
16_596918 ch09.qxd 10/7/05 7:20 PM Page 185

To add animation by using Timeline effects, do the following steps:
1. Select an object that you want to animate.
You can apply Timeline Effects to a shape, text, a bitmap image, agraphic symbol, a button symbol, a group, or a movie clip.
2. Choose Insert➪Timeline Effects and the submenus you want.
For example, from the Assistants submenu, you can choose Copy to Gridor Distributed Duplicate. From the Effects submenu, you can chooseBlur, Drop Shadow, Expand, or Explode. From the Transform/Transitionsubmenu, you can choose Transform or Transition.
The Effects Settings dialog box opens for the effect that you select. Figure9-3 shows the effects setting dialog box for the Drop Shadow effect.
3. In the Effects Settings dialog box, modify any of the default settings ifyou want to change them and then click OK.
The Effects Settings dialog box disappears. Flash automatically creates anew layer. The layer has the same name as the effect but with a numberappended corresponding to the number of Timeline effects that you’vecreated so far.
Flash also automatically puts your object inside a new symbol, which isin turn inside a new graphic symbol that contains all the new tweensand transformations needed for the effect. Flash transfers all this to thenew layer.
4. Choose Control➪Test Movie to view your animation.
Your movie is exported to a Flash Player (“swf”) window.
5. To further adjust your Timeline effect, close the Flash Player (“swf”)window and click the Edit button in the Property inspector.
The Effects Settings dialog box for your Timeline effect reappears.
6. Repeat Steps 4 and 5 as desired.
To delete a Timeline effect, follow these steps:
1. On the Stage, right-click (Windows) or Control+click (Mac) the objectwith the Timeline effect that you want to remove.
A contextual menu appears.
2. Choose Timeline Effects➪Remove Effect from the contextual menu.
The Timeline effect is removed, and the original layer names are restored.
186 Part IV: Total Flash-o-Rama
16_596918 ch09.qxd 10/7/05 7:20 PM Page 186

Animating with KeyframesKeyframes are the frames that are key to your animation. In frame-by-frameanimation, every frame is a keyframe. In tweened animation, only the firstand last frames of a tween are keyframes. By creating keyframes, you specifythe duration and therefore the speed of an animated sequence.
To create a keyframe, select a frame on the Timeline and choose Insert➪Timeline➪Keyframe. For faster service, right-click (Windows) or Control+click(Mac) a frame on the Timeline and choose Insert Keyframe from the contex-tual menu that appears. You can also press F6.
You can change the display of the appearance of frames on the Timeline byclicking the Frame View button in the upper-right corner of the Timeline. Thisaction brings up the Frame View pop-up menu. With this menu, you can
� Set the width of frame cells to Tiny, Small, Normal, Medium, or Large.
� Decrease the height of frame cells by choosing Short.
� Turn on or off the tinting of frame sequences.
� Choose to display a thumbnail of the contents of each frame. This is anawesome feature, like unspooling a reel of film. If you choose Preview,the thumbnail is scaled to fit the Timeline frame; if you choose Previewin Context, the thumbnail also includes any empty space in the frame.
Figure 9-3:You can use
the DropShadoweffect to
automaticallyadd a
shadowbehind your
graphics.
187Chapter 9: Getting Animated
16_596918 ch09.qxd 10/7/05 7:20 PM Page 187

Frame after frame after frameIf your animation isn’t a simple motion in an easily definable direction or achange of shape or color — and isn’t one of the prebuilt Timeline effects —you probably need to use frame-by-frame animation.
If you must, you must. Some complex animations just have to be createdframe by frame. The basic procedure is simple.
To create an animation by using the frame-by-frame technique, follow these steps:
1. Select a frame in the row of the layer that you want to use.
The animation starts in that frame.
2. Right-click (Windows) or Control+click (Mac) the frame and chooseInsert Keyframe from the menu that appears.
The first frame on a movie’s Timeline is automatically a keyframe, so youdon’t have to create it.
3. Create the graphic for the first frame.
You can import a graphic, paste a graphic from the Clipboard, or use theFlash drawing tools. (Refer to Chapter 3 for help with creating or import-ing a graphic.)
4. Right-click (Windows) or Control+click (Mac) the next frame andchoose Insert Keyframe again.
The next frame on the Timeline now has the same graphic as the preced-ing one.
5. Modify the graphic to create the second frame of the animation.
6. Repeat Steps 4 and 5 until you’ve created all the frames that you needfor your animation.
While you work, you can continually check your cool animation bypressing Enter (Windows) or Return (Mac) to play it back.
Figure 9-4 shows frames of an animation as the word New! is created from afew specks on the page.
188 Part IV: Total Flash-o-Rama
16_596918 ch09.qxd 10/7/05 7:20 PM Page 188

1 2
3 4
5 6
7
Figure 9-4:A complexanimation
must becreated
frame byframe.
189Chapter 9: Getting Animated
16_596918 ch09.qxd 10/7/05 7:20 PM Page 189
Stillness in the nightRegular frames cannot contain changes. Therefore, if you insert a graphic inthe first keyframe, the graphic remains throughout the Timeline until itreaches another keyframe with a new graphic.
For several reasons, you might need to copy objects over a number offrames. Sometimes, you want a still image to sit unmoving for a while on alayer of your animation — as a background image, for example — while youranimation moves in front. A background gives context to your animatedobjects. Even animated objects often need to remain on the Stage afterthey’ve finished moving about. A key element of animation is timing, and forexample, an animated character is often still for a few moments (even inDisney cartoons) before taking its next action.
To make this happen, add a new layer for your background or other object.With that layer active, create or paste your object (or objects) at the startingframe you choose. Then click your chosen ending frame and choose Insert➪Timeline➪Frame. Flash duplicates your image throughout all intermediateframes.
As a shortcut, after you have your object or objects in the starting frame,Alt+drag (Windows) or Option+drag (Mac) the frame along the Timeline untilyou reach the last frame that you want to contain the object. Flash copies thecontents of the first keyframe through all the frames.
If you copy the objects to a keyframe, they remain on the Stage until the nextkeyframe.
The Animation TweenIf your animation follows some simple guidelines, you can save yourself lots ofwork (and control your file size, too) by using Flash to calculate the in-betweenframes for you automatically. You create just the first and last keyframes, andFlash figures out what should go in-between. In animation technobabble, that’scalled tweening — a quick, fun way to create great animations.
You can do a lot with Flash’s tweening capabilities, including
190 Part IV: Total Flash-o-Rama
16_596918 ch09.qxd 10/7/05 7:20 PM Page 190

� Motion tweening: This is probably the most common type of tweening.Simple motion tweening moves your objects in a straight line from hereto there. Flash can, however, easily handle animation along any path thatyou create, even one with lots of curves.
� Shape tweening: This type of tweening gradually changes any shape toanother shape. You create the first and last shapes. These days, kids callit morphing. The results may be a little unpredictable, but always inter-esting. You can add shape hints to try to tell Flash exactly how you wantyour shape to morph.
And with both motion tweening and shape tweening, you can
� Change an object’s size: For example, if you make an object smaller asyou move it, the object often appears to be moving away from theviewer.
� Rotate an object: You specify the amount of the rotation. Flash com-bines the motion or shape tweening with the rotation so that you getboth effects at one time.
� Change color and/or transparency: Flash creates a gradual change incolor based on your starting and ending colors.
Animating your graphic’s transparency is a particularly cool effect because itlets you fade objects in and out, making them magically appear and disap-pear at just the right moment.
Of course, you can create several animations, one after another, to mix andmatch the effects. You can also combine frame-by-frame animation withtweened animation. Let your imagination soar!
From here to there — motion tweeningIn motion tweening, you move an object from one place to another. Themovement can be a straight line or any path that you can draw with thePencil tool. Figure 9-5 shows a few frames from a motion tween that uses alooped path. While the animation progresses, the skateboarder image alsoscales down to 50 percent of its original size so that it appears to be movingaway from you. In this example, the path is made visible so that you can seehow the animation works. You usually hide the layer that contains the path.
191Chapter 9: Getting Animated
16_596918 ch09.qxd 10/7/05 7:20 PM Page 191
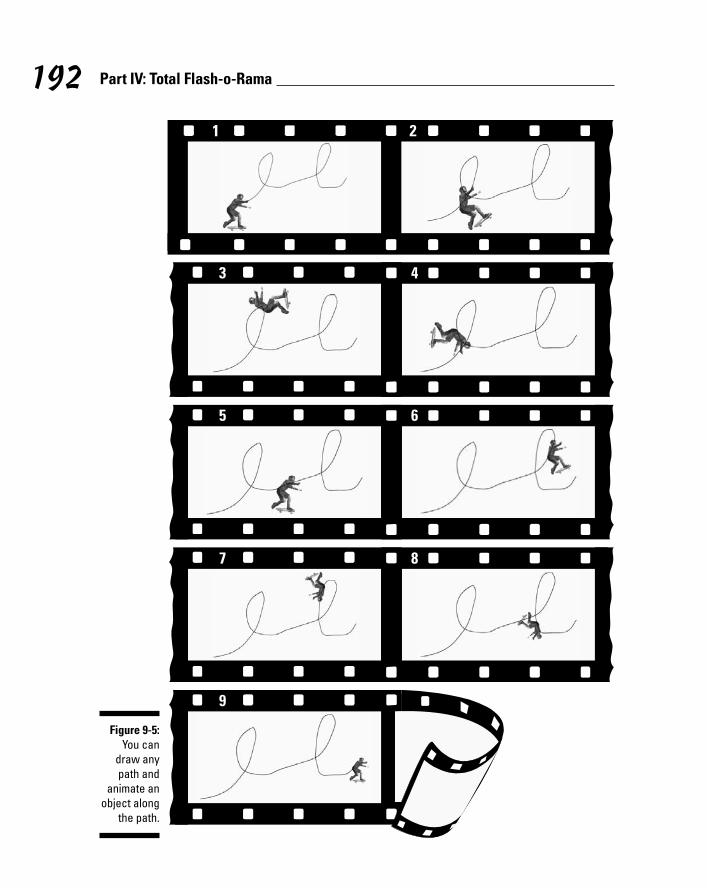
1 2
3 4
5 6
7
9
8
Figure 9-5:You can
draw anypath and
animate anobject along
the path.
192 Part IV: Total Flash-o-Rama
16_596918 ch09.qxd 10/7/05 7:20 PM Page 192

Moving symbols, groups, and typeYou can motion tween symbol instances, objects that you’ve made into agroup, or type (text). You can not only move them but also change their size,rotation, and skew. And, in the case of instances, you can also motion tweentheir color. (To change the color of groups or text during motion tween, youhave to convert them into symbols first.) See Chapter 7 to discover all aboutsymbols and instances.
To skew an object means to slant it along one or both axes.
To create a simple motion tween animation, follow these steps:
1. Right-click (Windows) or Control+click (Mac) an empty frame whereyou want the animation to start and then choose Insert➪Keyframe.
The Timeline’s first frame is always a keyframe, so if you’re starting fromthe first frame, just click the frame.
2. Create a group or text block or drag a symbol instance from theLibrary.
Refer to Chapter 7 for the details on creating symbols and instances.Refer to Chapter 2 for the lowdown on using the Library.
3. Create another keyframe where you want to end the animation.
4. Move the object to a new position.
5. If you want to change the object’s size, rotation, or color (as we explainin the sections that follow), make the adjustments at this point.
See the next two sections of this chapter for details.
6. Click anywhere in the tween before the last keyframe.
The frame just before the last keyframe is a good place to click.
7. Choose Window➪Properties➪Properties to open the Property inspec-tor if it’s not already open.
If necessary, click the collapse arrow on the Property inspector title barto expand the inspector to its full size.
8. From the Tween drop-down list in the Property inspector, selectMotion.
Flash creates the motion tween. If you want to change the object’s sizeor rotation, specify the settings in the Property inspector, as we explainin the next section.
You’re done! Click the first frame and press Enter (Windows) or Return (Mac)to play the animation.
193Chapter 9: Getting Animated
16_596918 ch09.qxd 10/7/05 7:20 PM Page 193

Here’s a silly phrase to help you remember the procedure for creating amotion tween:
Funny First keyframe
Objects Object — place it
Love Last keyframe
Moving Move object
In In the middle — click between the keyframes
Tweens Tween — select Motion from the Tween drop-down list
Scaling and rotating an animated objectOkay, so you’re creative and ambitious and want to do more. Changing otherproperties of your graphic while you’re moving it is easy. In Step 5 of the pro-cedure in the preceding section, you can scale and rotate (including skewing)your object.
Use the Free Transform tool, located on the Tools panel, or any other methodof changing size or rotation. (Refer to Chapter 4 for instructions on scalingand rotating objects.)
In Step 7 of the motion tweening procedure in the preceding section, com-plete the rest of the settings in the Property inspector, as shown in Figure 9-6(and described in the following text).
After you specify motion tweening, settings appear in the Property inspector,letting you specify how your motion tweening will work:
� To put into effect any scaling changes you made, select the Scalecheck box. Enabling Scale has no effect if you don’t change the object’ssize when you create the motion tween. Clearing the Scale check boxdisables the scaling.
� To rotate your graphic, select one of the Rotate options from the drop-down list. The Auto option automatically rotates the graphic once in thedirection that uses the least movement. Or, you can choose to rotate itclockwise (CW) or counterclockwise (CCW) and then type the number of
Figure 9-6:The
Propertyinspector.
194 Part IV: Total Flash-o-Rama
16_596918 ch09.qxd 10/7/05 7:20 PM Page 194
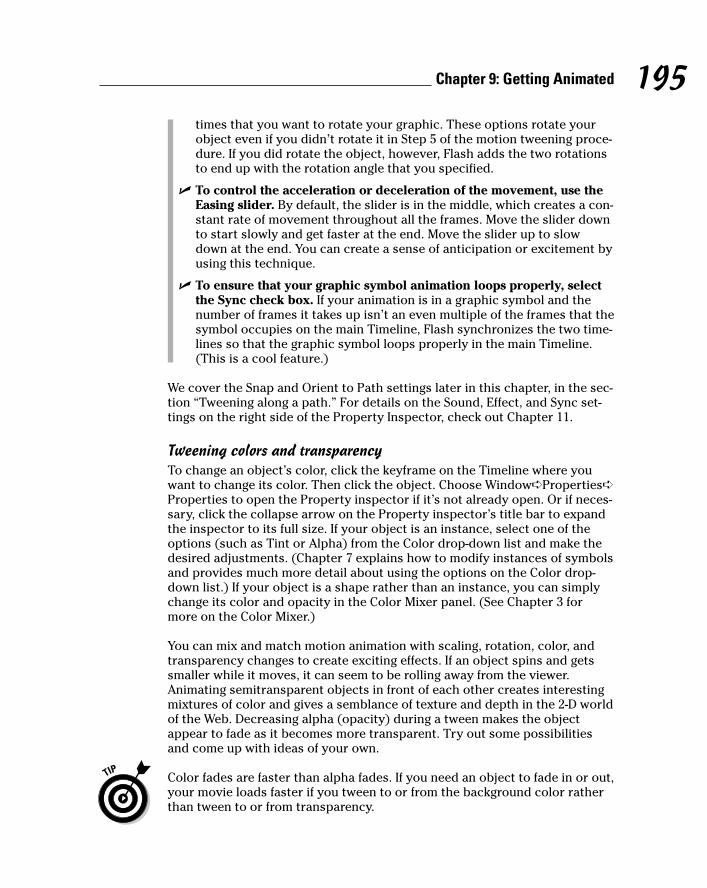
times that you want to rotate your graphic. These options rotate yourobject even if you didn’t rotate it in Step 5 of the motion tweening proce-dure. If you did rotate the object, however, Flash adds the two rotationsto end up with the rotation angle that you specified.
� To control the acceleration or deceleration of the movement, use theEasing slider. By default, the slider is in the middle, which creates a con-stant rate of movement throughout all the frames. Move the slider downto start slowly and get faster at the end. Move the slider up to slowdown at the end. You can create a sense of anticipation or excitement byusing this technique.
� To ensure that your graphic symbol animation loops properly, selectthe Sync check box. If your animation is in a graphic symbol and thenumber of frames it takes up isn’t an even multiple of the frames that thesymbol occupies on the main Timeline, Flash synchronizes the two time-lines so that the graphic symbol loops properly in the main Timeline.(This is a cool feature.)
We cover the Snap and Orient to Path settings later in this chapter, in the sec-tion “Tweening along a path.” For details on the Sound, Effect, and Sync set-tings on the right side of the Property Inspector, check out Chapter 11.
Tweening colors and transparencyTo change an object’s color, click the keyframe on the Timeline where youwant to change its color. Then click the object. Choose Window➪Properties➪Properties to open the Property inspector if it’s not already open. Or if neces-sary, click the collapse arrow on the Property inspector’s title bar to expandthe inspector to its full size. If your object is an instance, select one of theoptions (such as Tint or Alpha) from the Color drop-down list and make thedesired adjustments. (Chapter 7 explains how to modify instances of symbolsand provides much more detail about using the options on the Color drop-down list.) If your object is a shape rather than an instance, you can simplychange its color and opacity in the Color Mixer panel. (See Chapter 3 formore on the Color Mixer.)
You can mix and match motion animation with scaling, rotation, color, andtransparency changes to create exciting effects. If an object spins and getssmaller while it moves, it can seem to be rolling away from the viewer.Animating semitransparent objects in front of each other creates interestingmixtures of color and gives a semblance of texture and depth in the 2-D worldof the Web. Decreasing alpha (opacity) during a tween makes the objectappear to fade as it becomes more transparent. Try out some possibilitiesand come up with ideas of your own.
Color fades are faster than alpha fades. If you need an object to fade in or out,your movie loads faster if you tween to or from the background color ratherthan tween to or from transparency.
195Chapter 9: Getting Animated
16_596918 ch09.qxd 10/7/05 7:20 PM Page 195

Tweening along a pathYou can create animation that doesn’t move in a straight line by motiontweening along a path that you draw. Suppose that you want to get the skate-boarder shown in Figure 9-5 to do some tricks. The following steps show youhow to do that.
If you want to follow along with these steps, you can download the skate-boarder image (skateboarder.bmp) from the Ch09 folder on the companionWeb site for this book at www.dummies.com/go/flash8. Then choose File➪Import➪Import To Library and in the File dialog box that appears, navigate toskateboarder.bmp and click Import to Library. (We made him in Poser — acool program for generating 3-D people, in case you’re interested. You canfind out more about Poser at www.e-frontier.com.)
To tween along a path, follow these steps. (The first steps are the same as theones we provide earlier in this chapter for motion tweens, in the section“Moving symbols, groups, and type.”)
1. Create the first keyframe (if necessary).
2. Place your instance, text block, or group on the Stage.
If you’re using the skateboarder, drag it from the Library to the left sideof the Stage.
3. Create the ending keyframe.
Don’t move the object as you usually would when creating a motiontween.
4. Click anywhere between the two keyframes.
5. Choose Window➪Properties➪Properties to open the Property inspec-tor if it’s not already open.
If necessary, click the collapse arrow in the Property inspector’s title bar(Windows and Mac) or bottom-right corner (Mac) to expand the inspec-tor to its full size.
6. From the Tween drop-down list, select Motion.
You now have a motion tween with no motion.
7. In the Property inspector, select the Snap check box to snap the regis-tration point of the object to the motion path.
8. Select the Orient to Path check box if you want to rotate the objectwith the angle of the motion path.
9. Right-click (Windows) or Control+click (Mac) the object’s layer andchoose Add Motion Guide.
A new layer appears on the Timeline. It’s labeled Guide and has a motionguide icon. (If you want, you can create this layer before you start theprocess of creating the animation.)
196 Part IV: Total Flash-o-Rama
16_596918 ch09.qxd 10/7/05 7:20 PM Page 196

10. Draw your path, making a few curves or loop-the-loops, if you want.
You can use any of the drawing tools: Pen, Pencil, Line, Circle, Rectangle,or Brush. You can also use the Straighten or Smooth modifiers if you’reusing the Pencil tool. (The path shown in Figure 9-5 was created by usingthe Pencil tool with the Smooth modifier.)
Lock the object’s layer while you’re drawing the guide path so that youdon’t move the object by accident. Refer to Chapter 6 for further instruc-tions on hiding and locking layers.
11. Click the first frame of the animation and drag the object by its regis-tration point (shown by a small circle) to the place on your pathwhere you want your animation to start; let the mouse button gowhen the registration point snaps to the desired place on the path.
12. Click the last keyframe and drag the object by its registration point tothe place on the path where you want the animation to end; let gowhen the registration point snaps to the desired place on the path.
13. Press Enter (Windows) or Return (Mac) to play the animation.
You should see a few moments of death-defying skateboarding (or what-ever animation you’ve created).
You can find the completed animation, skateboarder.fla, in the Ch09folder on this book’s companion Web site at www.dummies.com/go/flash8.
Getting your tween ready for prime timeThe steps listed in the preceding section for tweening along a path provideonly the basic process. You often need to make several refinements to motionanimation along a path.
Not satisfied with your motion path? No problem. Here’s a really great featurethat lets you easily modify your path. Select the motion guide layer. Choosethe Selection tool and reshape the line by dragging from any point on theline. (Just be sure not to break the line apart!) Press Enter (Windows) orReturn (Mac) again, and the skateboarder follows the revised path.
Want to get rid of that unsightly motion guide? That’s easy, too. Click the eyecolumn of the motion guide layer to hide it. Press Enter (Windows) or Return(Mac) to play back the animation. (Even if you don’t hide the motion guidelayer in this way, the motion guide isn’t visible when the movie is published.)
Symbols, groups, text, and bitmap images have registration points that are usu-ally at the center of the graphic. When you tween along a path, you might wantanother point to follow the path. In the section on groups in Chapter 4, you findout how to change the registration point to get the results that you want.
What if you’ve already got a motion guide and you want to link it to an objecton a different layer? Perhaps you draw an oval and then decide that you want
197Chapter 9: Getting Animated
16_596918 ch09.qxd 10/7/05 7:20 PM Page 197

an electron revolving along the oval, so you make the oval’s layer a motionguide layer. Here are three ways you can link your motion guide to your object:
� Add a layer: Create a new layer under the motion guide layer. The newlayer appears indented under the motion guide layer, showing that it’slinked to the motion guide, as shown in Figure 9-7. Then, any objectsthat you put on the new layer snap automatically to the motion guide.After putting your objects on the new layer, all you need to do is clickthe starting keyframe, drag your object to snap to where you want youranimation to start on the path, click the ending keyframe, and snap towhere you want your animation to end on the path.
� Drag the layer: If you already have a layer that you want to attach toyour path, drag the layer with your graphics so that it’s under themotion guide layer. When the new layer appears indented under themotion guide layer, you know that it’s linked.
� Modify Layer Properties: Select your graphics layer and then chooseModify➪Timeline➪Layer Properties. In the Layer Properties dialog box,select Guided and click OK. This links the graphics layer to the nearestmotion guide layer above your graphics layer.
Tweening shapesIn shape tweening, you change an object’s shape at one or more points in theanimation, and the computer creates the in-between shapes for you. You canget some great animation effects by using shape tweening. This process isoften called morphing. You can see an example in Figure 9-8.
When shape tweening, you can combine changes in shape with changes inposition as well as changes in size, color, and transparency. As with motiontweening, you should work with one shape per layer to avoid problems.
You can shape tween objects that you have created by using the Flash draw-ing tools.
Figure 9-7:A guide
layer.
198 Part IV: Total Flash-o-Rama
16_596918 ch09.qxd 10/7/05 7:20 PM Page 198
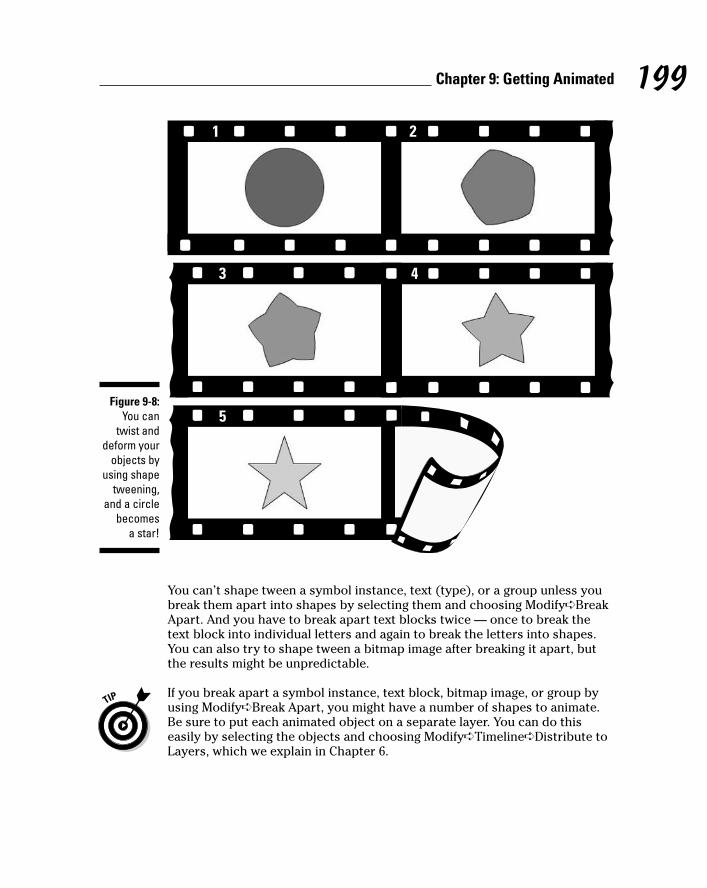
You can’t shape tween a symbol instance, text (type), or a group unless youbreak them apart into shapes by selecting them and choosing Modify➪BreakApart. And you have to break apart text blocks twice — once to break thetext block into individual letters and again to break the letters into shapes.You can also try to shape tween a bitmap image after breaking it apart, butthe results might be unpredictable.
If you break apart a symbol instance, text block, bitmap image, or group byusing Modify➪Break Apart, you might have a number of shapes to animate.Be sure to put each animated object on a separate layer. You can do thiseasily by selecting the objects and choosing Modify➪Timeline➪Distribute toLayers, which we explain in Chapter 6.
21
3 4
5Figure 9-8:
You cantwist and
deform yourobjects by
using shapetweening,
and a circlebecomes
a star!
199Chapter 9: Getting Animated
16_596918 ch09.qxd 10/7/05 7:20 PM Page 199

To create a simple shape tween, follow these steps:
1. Right-click (Windows) or Control+click (Mac) an empty frame whereyou want the animation to start and then choose Insert➪Timeline➪Keyframe.
2. Use the drawing tools to create the beginning shape.
You can create complex objects by merging objects of the same color orcreating cutouts with objects of differing colors. (Refer to Chapter 3 fordetails.)
3. Create a new keyframe after the first keyframe wherever you want iton the Timeline by using the same technique that you used in Step 1.
4. Create the ending shape.
You can erase the old shape and draw a new one; or use the first shape,still on the Stage, and modify it. You can also move the shape andchange its color/transparency. You can quickly change the color byusing the Color modifiers in the toolbox. Use the Color Mixer panel tochange opacity (alpha). Refer to Chapter 3 for more information oncolors and transparency.
5. Click anywhere in the tween between the first and last keyframe.
The frame just before the last keyframe is a good place to click.
6. Choose Window➪Properties➪Properties to open the Property inspec-tor if it’s not already open.
If necessary, click the collapse arrow on the Property inspector’s titlebar (Windows and Mac) or bottom-right corner (Mac) to expand theinspector to its full size.
7. Select Shape from the Tween drop-down list.
8. Select an Angular Blend or Distributive Blend type.
Select the Angular Blend type for blending shapes with sharp cornersand straight lines. It preserves corners and straight lines in the in-between shapes of your animation. If your shapes don’t have sharp cor-ners, use the Distributive Blend type (the default) for smootherin-between shapes.
Using the Angular Blend on irregular shapes may cause the animation to vanish!
9. You’re finished! Click the first frame and press Enter (Windows) orReturn (Mac) to play the animation.
Look in the Ch09 folder on this book’s companion Web site (www.dummies.com/go/flash8) for a great example of shape tweening. The file is named openingmovie.fla. Here, Jennie Sweo takes two circles and changes them into words
200 Part IV: Total Flash-o-Rama
16_596918 ch09.qxd 10/7/05 7:20 PM Page 200

using shape tweening. Amazingly, Flash handles this process automatically.To shape tween one circle into a word, start with a circle. When you get toStep 4 of the shape tweening process, delete the circle and create the textwherever you want. Choose any size, color, and font and then break apart thetext (choose Modify➪Break Apart). This command breaks the text into let-ters. Then break apart the text again (choose Modify➪Break Apart) to breakthe letters into shapes. Finish the shape tween, and you’re done! To createthe effect that Jennie created, create a second, similar shape tween onanother layer. To view the effect, choose Control➪Test Movie. (The Flashmovie is courtesy of Jennie Sweo. You can see this movie on the Web athttp://sweo.tripod.com.)
Getting Flash to take a hint — using shape hintsDoes the transformation of your shape animation look strange? Flash tries to figure out the simplest and most probable way to change one of yourshapes into another, but this solution might not turn out the way that youexpect or want.
Never fear. You can use the Flash shape hints feature to fix this problem. Ashape hint is a marker that you attach to a point on a shape at the beginningand end of a shape change. The shape hints signal to Flash exactly how youwant this point and the area around it to move from start to end of the shapetweening process.
You can use up to 26 shape hints per layer. Shape hints are displayed on theStage as small, colored circles with a letter (a–z) inside. On the startingkeyframe, the shape hint is yellow; and on the ending keyframe, it’s green.When you first insert a shape hint — before you move it onto your shape —it’s red. Figure 9-9 shows an example of beginning and ending shapes withshape hints.
From this book’s companion Web site, at www.dummies.com/go/flash8, youcan download the Flash movie file shown in Figure 9-9. It’s the file 4 to 5point star with shape hints.fla in the Ch09 folder.
Figure 9-9:Shape hintsguide Flash
as it tweensyour shape.
201Chapter 9: Getting Animated
16_596918 ch09.qxd 10/7/05 7:20 PM Page 201

To use shape hints, follow these steps:
1. If you haven’t already done so, create a shape animation by usingshape tweening.
Refer to the set of steps in the preceding section if you need help withthis task.
2. Click the keyframe where you want to add your first shape hint.
3. With the object selected, choose Modify➪Shape➪Add Shape Hint orpress Ctrl+Shift+H (Windows) or ÔÔ+Shift+H (Mac).
Your beginning shape hint appears as the letter a in a small, red circlesomewhere on the Stage.
4. Click the small, red circle and drag it to the part of your graphic thatyou want to mark.
5. Click the keyframe at the end of the shape animation.
The ending shape hint appears somewhere on the Stage, again as theletter a in a small, red circle.
6. Click the small, red circle and drag it to the point on your shape towhich you want your beginning point to move.
The ending shape hint turns green. If you go back to the first frame ofthe animation, the beginning shape hint turns yellow.
7. Press Enter (Windows) or Return (Mac) to play your movie.
You can drag shape hints off the Stage to remove them. Or choose Modify➪Shape➪Remove All Shape Hints to nuke them all — but the layer with shapehints must be selected. (Your animation then reverts to its original tween.)Choose View➪Show Shape Hints to see all the shape hints in your currentlayer and keyframe. Choose it again to hide them. (Again, the layer andkeyframe with shape hints must be selected.)
Adjusting shape hintsTo tweak your animation, click the keyframe at the start or end of your shapeanimation and move your shape hint. Then play your animation again to seethe new result. The more complicated your shape animation, the more shapehints you need to use. For more complicated shape animations, you can alsoadd more keyframes between your original starting and ending keyframe.This creates intermediate shapes at the new keyframes which you can thentween (using plenty of shape hints, of course). In other words, you can createtwo or more shape tweens, one immediately following the other.
If you aren’t getting the results that you want, make sure that you haveplaced your shape hints logically. If you have a curve with shape hints a, b,
202 Part IV: Total Flash-o-Rama
16_596918 ch09.qxd 10/7/05 7:20 PM Page 202
and c — in that order — don’t have them tween to a curve with the shapehints in c, b, a order unless you want some unusual effects. Flash does abetter job with shape hints when you arrange them in counterclockwiseorder, starting from the upper-left corner of your object.
Editing AnimationOf course, nothing is perfect the first time, and Flash is quite forgiving. Youcan edit keyframes in assorted ways.
You can’t edit tweened frames directly — you can view them, but you canedit your objects only in the keyframes, not in the in-between frames. Youcan overcome this restriction and edit your tweened frames by inserting anew keyframe between your beginning and ending keyframe and then editingthe new keyframe. You do this by clicking a frame in the Timeline and thenchoosing Insert➪Timeline➪Keyframe. Don’t choose Insert➪Timeline➪BlankKeyframe unless you want to nuke your existing tween animation. Of course,you can always edit tweened frames by simply changing the starting orending keyframe that defines them. When you edit a keyframe of a tweenedanimation, Flash automatically recalculates the entire tween.
The following sections explain some useful techniques for editing and manag-ing your animations.
Adding labels and commentsAnimation can get complicated after a while. You might find it helpful to addcomments to the Timeline to explain what each part of the Timeline is doing.Also, when you start adding interactivity to your movies, you can add labelsto frames and then refer to them in your ActionScript. (You can find out moreabout ActionScript in Chapter 10.)
To add a label or a comment to a frame, follow these steps:
1. Select a frame.
See the next section for information on selecting a frame.
2. Choose Window➪Properties➪Properties to open the Property inspec-tor if it’s not already open.
If necessary, click the collapse arrow on the Property inspector’s titlebar to expand the inspector to its full size.
203Chapter 9: Getting Animated
16_596918 ch09.qxd 10/7/05 7:20 PM Page 203
3. In the Frame Label text box, type the text for the label or commentand press Enter (Windows) or Return (Mac).
To make the text function as a comment, type two slashes (//) at thebeginning of the comment. (If you get long-winded and go to a new line,type the two slashes at the beginning of the new line as well.)
Adding frame labels can be a really nice way to lay out the timing of a movie,by typing in what you want to happen where on your Timeline, for a kind ofbrief verbal storyboard. This can be particularly helpful when you’re workingwith others on a project.
Selecting framesFlash offers two styles of making selections on the Timeline:
� Frame-based selection (the default): In this method, if you click a frameor a keyframe, it’s selected. To select a range of frames, you can clickand drag over the frames that you want to select, or you can click thefirst frame, press Shift, and then click the last frame in the range.
� Span-based selection: In this method, if you click a frame, it selects theentire sequence containing that frame, from one keyframe to the next.Clicking and dragging moves the entire sequence (between thekeyframes) along the Timeline in either direction. To select an individualframe, you need to press Ctrl (Windows) or Ô (Mac).
You can change the style of selection by choosing Edit➪Preferences (Windows)or Flash Basic➪Preferences (Mac) or Flash Professional➪Preferences (Mac),clicking the General tab in the Preferences window, and then marking orunmarking the Span Based Selection check box in the Timeline Options section.
In span-based selection, when you click the first or last keyframe of a tweenand drag, you change the length of the tween rather than just select frames.
Copying and pasting framesYou can copy frames that contain contents you want elsewhere. Then youcan paste the frames in another location.
To copy and paste frames, follow these steps:
1. Select one or more frames.
2. Choose Edit➪Timeline➪Copy Frames to copy the frames to theClipboard.
204 Part IV: Total Flash-o-Rama
16_596918 ch09.qxd 10/7/05 7:20 PM Page 204
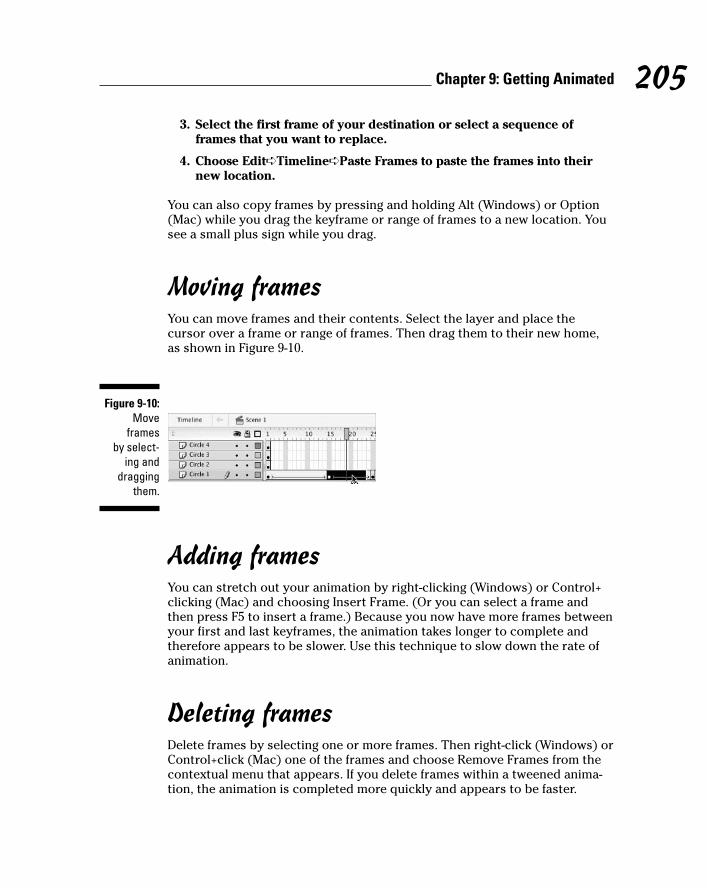
3. Select the first frame of your destination or select a sequence offrames that you want to replace.
4. Choose Edit➪Timeline➪Paste Frames to paste the frames into theirnew location.
You can also copy frames by pressing and holding Alt (Windows) or Option(Mac) while you drag the keyframe or range of frames to a new location. Yousee a small plus sign while you drag.
Moving framesYou can move frames and their contents. Select the layer and place thecursor over a frame or range of frames. Then drag them to their new home,as shown in Figure 9-10.
Adding framesYou can stretch out your animation by right-clicking (Windows) or Control+clicking (Mac) and choosing Insert Frame. (Or you can select a frame andthen press F5 to insert a frame.) Because you now have more frames betweenyour first and last keyframes, the animation takes longer to complete andtherefore appears to be slower. Use this technique to slow down the rate ofanimation.
Deleting framesDelete frames by selecting one or more frames. Then right-click (Windows) orControl+click (Mac) one of the frames and choose Remove Frames from thecontextual menu that appears. If you delete frames within a tweened anima-tion, the animation is completed more quickly and appears to be faster.
Figure 9-10:Move
frames by select-
ing anddragging
them.
205Chapter 9: Getting Animated
16_596918 ch09.qxd 10/7/05 7:20 PM Page 205

Turning keyframes back into regular framesIf you don’t like a keyframe, you can change it back to a regular frame byright-clicking (Windows) or Control+clicking (Mac) the offending keyframeand choosing Clear Keyframe. Changing a keyframe into a regular frameremoves the change that occurred at that keyframe. You can use this tech-nique to merge two consecutive tweens into one tween — change thekeyframe in the middle to a frame.
Reversing your animationYou can make your animation play backward by selecting the relevant framesin one or more layers and choosing Modify➪Timeline➪Reverse Frames. Yourselection must start and end with keyframes. (This is a pretty amazing fea-ture, which is worth trying.)
Changing speedAfter you set up your animation, play your movie to check the speed. If onepart of your tweened animation is too fast or too slow, you can slide keyframesaround on the Timeline to shorten or lengthen the time between keyframes.You can do this simply by clicking a keyframe and dragging it to another pointon the Timeline. This technique gives you lots of control over the timing ofyour animation.
If you have difficulty dragging an ending keyframe, create a new keyframesomewhere to the keyframe’s right and then drag the obstinate keyframe.
Figure 9-11 shows two possible versions of the Timeline for the shape tweenshown in Figure 9-9. The black dots on the Timeline are the keyframes. Tocreate the version on the bottom, we dragged the last keyframe to the right,thereby lengthening the tween. Because the same change in shape nowoccurs over a longer period, the tween appears slower.
Figure 9-11:You can
change thelength of a
tween.
206 Part IV: Total Flash-o-Rama
16_596918 ch09.qxd 10/7/05 7:20 PM Page 206
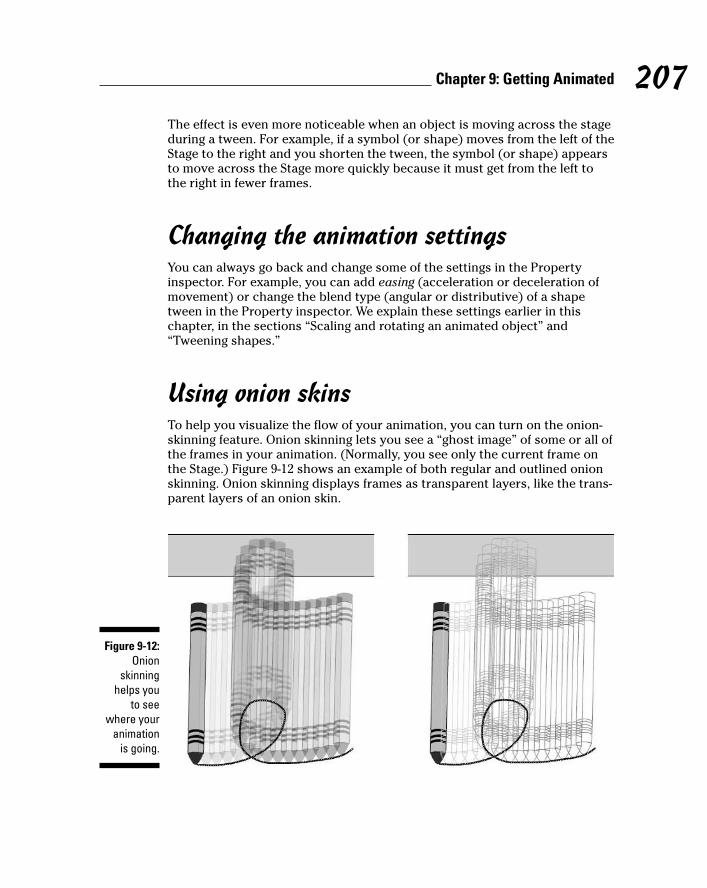
The effect is even more noticeable when an object is moving across the stageduring a tween. For example, if a symbol (or shape) moves from the left of theStage to the right and you shorten the tween, the symbol (or shape) appearsto move across the Stage more quickly because it must get from the left tothe right in fewer frames.
Changing the animation settingsYou can always go back and change some of the settings in the Propertyinspector. For example, you can add easing (acceleration or deceleration ofmovement) or change the blend type (angular or distributive) of a shapetween in the Property inspector. We explain these settings earlier in thischapter, in the sections “Scaling and rotating an animated object” and“Tweening shapes.”
Using onion skinsTo help you visualize the flow of your animation, you can turn on the onion-skinning feature. Onion skinning lets you see a “ghost image” of some or all ofthe frames in your animation. (Normally, you see only the current frame onthe Stage.) Figure 9-12 shows an example of both regular and outlined onionskinning. Onion skinning displays frames as transparent layers, like the trans-parent layers of an onion skin.
Figure 9-12:Onion
skinninghelps you
to seewhere your
animation is going.
207Chapter 9: Getting Animated
16_596918 ch09.qxd 10/7/05 7:20 PM Page 207

To display onion skinning, click the Onion Skin button at the bottom of theTimeline.
To display onion skinning with outlines, click the Onion Skin Outlines button.Sometimes this makes it easier to see how your objects are animating.
When you display onion skinning, Flash places markers at the top of theTimeline around the frames that are displayed as onion skins. (See Figure 9-13.)Usually, these markers advance automatically when the current frame pointeradvances. You can manually adjust the beginning and ending of the onion-skinning effect by clicking and dragging either the left or right marker to anew location on the Timeline.
To edit any of the frames on the Timeline no matter where your current framepointer is, click the Edit Multiple Frames button. If you also have onion skin-ning turned on, you can then edit any frame while viewing all the other onion-skinned frames.
Click Modify Onion Markers to display a menu to help you adjust the waythat your onion markers work:
� Always Show Markers: Shows onion markers even when you’ve turnedoff onion skinning.
� Anchor Onions: Locks the onion markers in their current position andprevents them from moving along with the current frame pointer, as theynormally do.
� Onion 2: Applies onion skinning to the two frames before and the twoframes after the playhead (the current frame pointer).
� Onion 5: Applies onion skinning to the five frames before and the fiveframes after the playhead.
� Onion All: Applies onion skinning to all the frames on your Timeline.
Onion skin markersFigure 9-13:
When youdisplay
onionskinning,
markers areplaced on
the Timeline.
208 Part IV: Total Flash-o-Rama
16_596918 ch09.qxd 10/7/05 7:20 PM Page 208

Hidden or locked layers never show as onion-skinned. Hide or lock layers toisolate them from the layers that you really want to change and to keep youronion skinning from getting out of control. Chapter 6 explains how to hideand lock layers.
Moving everything around the Stage at onceIf you move a complete animation on the Stage without moving the graphicsin all frames and all layers at one time, you might quickly go nuts when youdiscover that every little thing must be realigned. Instead, retain your sanityand move everything at one time.
To move a complete animation, follow these steps:
1. Unlock all layers that contain the animation you want to move andthen lock or hide any layers that you don’t want to move.
To lock (or unlock) a layer, click beneath the lock icon on that layer’srow. To hide (or unhide) a layer, click beneath the eye icon on thatlayer’s row. See Chapter 6 for more information on working with layers.
2. Click the Edit Multiple Frames button at the bottom of the Timeline.
If you ever need to resize a project, this button is your new best friend.
3. Drag the onion-skin markers to the beginning and ending frames ofyour animation.
Alternatively, if you want to select all frames, click the Modify OnionMarkers button at the bottom of the Timeline and choose Onion All.
4. Choose Edit➪Select All.
5. Drag your animation to its new place on the Stage.
Making the SceneAnimations can get complicated fast, and one way to manage that complexityis by organizing them in layers and layer folders. (Refer to Chapter 6 for thelowdown on layers and layer folders.) Another great way to manage the com-plexity of your animations is to break them into chunks of time — into scenes.You can then use scenes as the modular building blocks of your movies,which you can then rearrange in any way that you want.
209Chapter 9: Getting Animated
16_596918 ch09.qxd 10/7/05 7:20 PM Page 209

When is a good time to break up your movie into scenes? If your movie issimple, one scene might be all that you need. But if the movie gets more com-plex, you might want to break it up into a loading message, an introduction,the main act, the ending, and the credits.
Or, if your Timeline becomes longer than one screen will hold at a time, youmight want to find logical places to separate segments of your animation intoscenes. If your cast of graphics characters changes at a particular time, thatmight be a good place to break into a new scene. And if a section of yourmovie can conceivably be reused elsewhere in other movies, you might havean excellent reason to break it out into its own scene.
Breaking your movie into scenesWhen you create a new Flash movie file (by running Flash for the first time orby choosing File➪New and selecting a Flash Document under the Generaltab), by default the file contains one empty scene, cleverly titled Scene 1. Anyanimations that you create then become part of Scene 1.
If you want to add a scene, choose Insert➪Scene. The Stage clears, and theTimeline is labeled Scene 2.
Manipulating that sceneTo keep track of your scenes, open the Scene panel by choosing Window➪Other Panels➪Scene, as shown in Figure 9-14. The Scene panel lists all thescenes in your movie. When you choose Control➪Test Movie, the scenes playin order from the top of the list down.
Here’s how to use the Scene panel to control your scenes:
� To change the order in which scenes play, drag a scene’s name on theScene panel to a new place in the list.
� To rename a scene, double-click the scene’s name in the Scene panel,type the new name, and then press Enter (Windows) or Return (Mac).
Figure 9-14:The Scenepanel lets
you make abig scene.
210 Part IV: Total Flash-o-Rama
16_596918 ch09.qxd 10/7/05 7:20 PM Page 210

To delete a scene, select that scene and click the Delete Scene button at thebottom of the Scene panel.
To duplicate a scene, click the Duplicate Scene button at the bottom of theScene panel.
To view a particular scene, click its name on the Scene panel. Or, choose View➪Go To and choose the name of the scene that you want from the submenu.
Look in the Ch09 folder on this book’s companion Web site (at www.dummies.com/go/flash8) for picturetour.fla, which is a nice example of a Flashmovie divided into scenes. This movie is part of The Raj’s Web site, at www.theraj.com. (Thanks to Lindsay Oliver, of The Raj, and Jesse Spaulding, themovie’s creator, for this Flash movie.)
211Chapter 9: Getting Animated
16_596918 ch09.qxd 10/7/05 7:20 PM Page 211

212 Part IV: Total Flash-o-Rama
16_596918 ch09.qxd 10/7/05 7:20 PM Page 212

Chapter 10
Getting InteractiveIn This Chapter� Getting familiar with actions
� Using behaviors to instantly create interactivity
� Adding actions to frames
� Using actions with buttons
� Adding actions to movie clips
� Working with actions
� Using methods to control objects
� Investigating advanced ActionScript features
The real fun with Flash begins when you start to make your art and anima-tions interactive. Interactivity means that a computer user’s input triggers
immediate changes on the computer screen, which the user can thenrespond to further, as if a conversation is taking place between the user andthe computer. Examples include clicking a button to go to another Web pageand choosing to stop the music.
Flash uses actions to specify how the interactivity works. Actions are simplyshort instructions that tell Flash what to do next. By combining actions, youcan create very complex sets of instructions to give your Flash moviessophisticated capabilities. You can use actions to control your animationwithout interactivity, if you want. Flash actions offer a great deal of flexibility,and only your imagination limits what you can do.
Understanding ActionsFlash lets you put actions in only two places:
� A keyframe on the Timeline
� An instance of a symbol (that is, an instance of a button, a movie clip, agraphic symbol, or a font symbol)
17_596918 ch10.qxd 10/7/05 7:33 PM Page 213
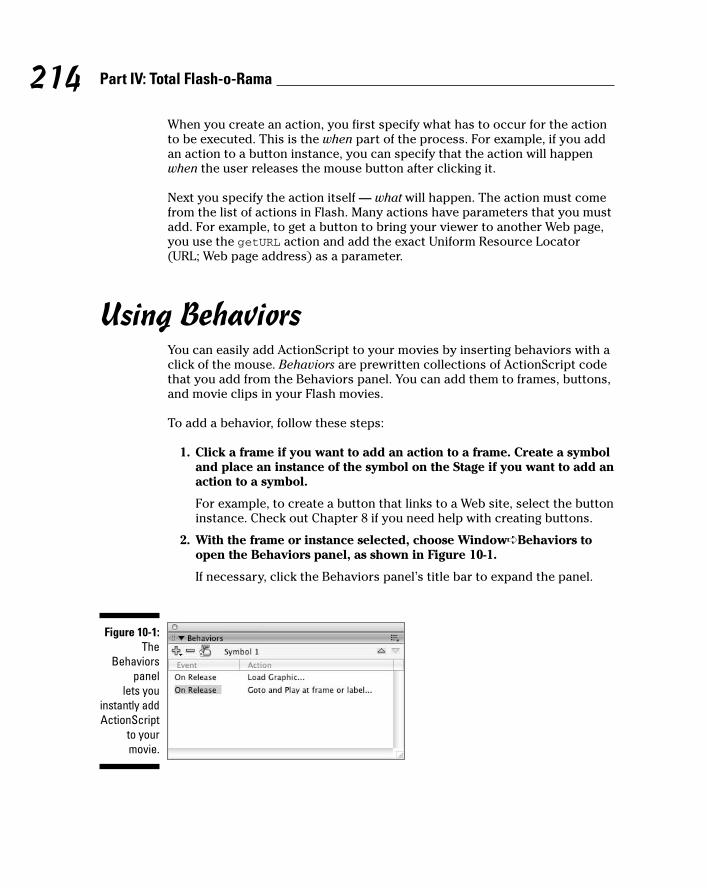
When you create an action, you first specify what has to occur for the actionto be executed. This is the when part of the process. For example, if you addan action to a button instance, you can specify that the action will happenwhen the user releases the mouse button after clicking it.
Next you specify the action itself — what will happen. The action must comefrom the list of actions in Flash. Many actions have parameters that you mustadd. For example, to get a button to bring your viewer to another Web page,you use the getURL action and add the exact Uniform Resource Locator(URL; Web page address) as a parameter.
Using BehaviorsYou can easily add ActionScript to your movies by inserting behaviors with aclick of the mouse. Behaviors are prewritten collections of ActionScript codethat you add from the Behaviors panel. You can add them to frames, buttons,and movie clips in your Flash movies.
To add a behavior, follow these steps:
1. Click a frame if you want to add an action to a frame. Create a symboland place an instance of the symbol on the Stage if you want to add anaction to a symbol.
For example, to create a button that links to a Web site, select the buttoninstance. Check out Chapter 8 if you need help with creating buttons.
2. With the frame or instance selected, choose Window➪Behaviors toopen the Behaviors panel, as shown in Figure 10-1.
If necessary, click the Behaviors panel’s title bar to expand the panel.
Figure 10-1:The
Behaviorspanel
lets youinstantly addActionScript
to yourmovie.
214 Part IV: Total Flash-o-Rama
17_596918 ch10.qxd 10/7/05 7:33 PM Page 214
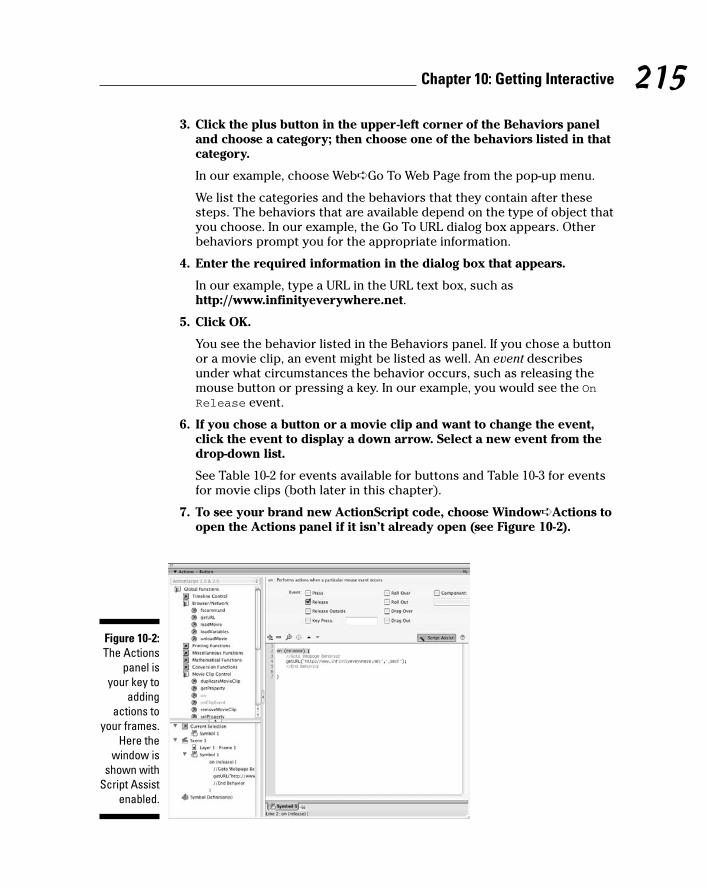
3. Click the plus button in the upper-left corner of the Behaviors paneland choose a category; then choose one of the behaviors listed in thatcategory.
In our example, choose Web➪Go To Web Page from the pop-up menu.
We list the categories and the behaviors that they contain after thesesteps. The behaviors that are available depend on the type of object thatyou choose. In our example, the Go To URL dialog box appears. Otherbehaviors prompt you for the appropriate information.
4. Enter the required information in the dialog box that appears.
In our example, type a URL in the URL text box, such ashttp://www.infinityeverywhere.net.
5. Click OK.
You see the behavior listed in the Behaviors panel. If you chose a buttonor a movie clip, an event might be listed as well. An event describesunder what circumstances the behavior occurs, such as releasing themouse button or pressing a key. In our example, you would see the OnRelease event.
6. If you chose a button or a movie clip and want to change the event,click the event to display a down arrow. Select a new event from thedrop-down list.
See Table 10-2 for events available for buttons and Table 10-3 for eventsfor movie clips (both later in this chapter).
7. To see your brand new ActionScript code, choose Window➪Actions toopen the Actions panel if it isn’t already open (see Figure 10-2).
Figure 10-2:The Actions
panel isyour key to
addingactions to
your frames.Here the
window isshown with
Script Assistenabled.
215Chapter 10: Getting Interactive
17_596918 ch10.qxd 10/7/05 7:33 PM Page 215

Flash’s behaviors allow you to add interactivity for controlling graphics,movie clips, sound, video, and more. Table 10-1 lists the available behaviors.
Table 10-1 ActionScript BehaviorsCategory Behavior Description
Data Trigger Data Source Loads and manipulates informa-tion from data sources.
Embedded Video Fast Forward Fast forwards embedded videoby the number of frames that youspecify. For more information,see Chapter 11.
Embedded Video Hide Hides the video.
Embedded Video Pause Pauses the video.
Embedded Video Play Plays the video.
Embedded Video Rewind Rewinds the video by the numberof frames that you specify.
Embedded Video Show Displays the video.
Embedded Video Stop Stops playing the video.
Movie Clip Bring Forward Brings the movie clip one levelhigher in the stacking order.
Movie Clip Bring to Front Brings the movie clip to the top ofthe stack, so it’s on top of allother movie clips.
Movie Clip Send Backward Sends the movie clip one levellower in the stacking order.
Movie Clip Send to Back Sends the target movie clip to thebottom of the stack.
Movie Clip Load External Movieclip Loads an external SWF file into amovie clip.
Movie Clip Load Graphic Loads a JPEG graphic file that isexternal to the movie (FLA) file.
Movie Clip Unload Movieclip Removes a movie loaded with theLoad Movie behavior or action.
Movie Clip Duplicate Movieclip Duplicates a movie clip. You canoffset the new movie clip by aspecified x and y distance.
216 Part IV: Total Flash-o-Rama
17_596918 ch10.qxd 10/7/05 7:33 PM Page 216

Category Behavior Description
Movie Clip Goto and Play at Plays a movie clip. You can spec-frame or label ify the frame number or label.
Movie Clip Goto and Stop at Stops a movie clip. You can spec-frame or label ify the frame number or label.
Movie Clip Start Dragging Starts dragging a movie clip. For Movieclip more information about dragging
movie clips, see Chapter 14.
Movie Clip Stop Dragging Stops the current drag.Movieclip
Projector Toggle Full Toggles full-screen mode on and Screen Mode off when you play a movie with a
projector (a self-playing movie).For more information on projec-tors, see Chapter 13.
Sound Load Sound Loads a sound from a runtime from Library shared library. For more informa-
tion, see Chapter 12.
Sound Load Streaming Loads an MP3 sound file.MP3 File
Sound Play Sound Plays a sound.
Sound Stop All Sounds Stops all sounds.
Sound Stop Sound Stops a specific sound.
Web Go to Web Page Displays the Web page found atthe URL you specify.
Adding Actions to FramesYou add an action to a frame to control what happens when the moviereaches that frame. Frame actions are often used to play a movie clip or toloop a movie so that a certain section of the animation is repeated. Anotheruse for frame actions is to stop a movie or to automatically link to anotherURL (such as a Web page address). You can also use frame actions for morecomplex programming of Flash.
You can add many actions to frames. Later in this chapter, we list the majoractions and how to use them.
217Chapter 10: Getting Interactive
17_596918 ch10.qxd 10/7/05 7:33 PM Page 217

Adding a basic action to a frameTo add a basic action to a frame, follow these steps:
1. Create a new layer for your actions (if you haven’t already done so).
Chapter 6 explains how to add a new layer.
2. Click a keyframe.
If the frame that you want to use is not a keyframe, right-click it(Windows) or Control+click it (Mac) and choose Insert Keyframe.
3. Choose Window➪Actions to open the Actions panel (refer to Figure 10-2)if it isn’t already open.
If necessary, click the Actions panel title bar to expand the panel. And ifthe left pane of the Actions panel is not visible, click the tiny triangle inthe middle of the left side of the Actions panel to make the left paneappear.
4. Click the Script Assist button on the right side of the Actions windowif it isn’t already enabled.
In Script Assist mode, the right-hand side of the Actions window is splitin half into two horizontal sections, so that the upper-right pane of theActions window can display any parameters you need to type in to writeyour actions.
Using Script Assist makes creating actions much easier for you. We loveit, and leave it on all the time, and suggest that you do, too.
5. Click a category and subcategory in the left pane of the Actions paneland either double-click an action or drag the action to the right side.
You can also click the plus sign, choose a category, and then choose anaction from the submenu.
6. If the action requires parameters, type the required information atthe top of the Actions panel.
We list the details of specific actions and their parameters later in thischapter. You can continue to add actions by repeating Steps 4 through 6.
If you want to get the Actions panel out of the way, click the panel’s title bar.
Stopping the movie before it startsA simple example of using a frame action is to place a Stop action at thebeginning of the movie. You might provide a button that starts the movie so
218 Part IV: Total Flash-o-Rama
17_596918 ch10.qxd 10/7/05 7:33 PM Page 218

that viewers can choose whether they want to see it. (They might want to getdown to business right away and purchase something. Who are you to makethem wait?) In this example, the movie loads, but the first thing that it encoun-ters is a command to stop. Nothing happens until someone clicks a button tostart the movie. Of course, the Web page should contain other buttons andinformation that viewers can use to navigate through your Web site.
To add the Stop action to your movie, follow these steps:
1. Create your animation.
2. Choose Control➪Test Movie and watch your animation run.
3. Create a layer for your action and name it Actions.
Chapter 6 explains how to create and name layers.
4. Click the keyframe where you want to add the action.
5. Choose Window➪Actions to open the Actions panel if it isn’t already open.
If necessary, click the Actions panel’s title bar to expand the panel.
6. In the left pane, click Global Functions, click Timeline Control, andthen double-click Stop in the list of actions.
7. Choose Control➪Test Movie again.
This time, the movie doesn’t run; the Stop action halts it.
Adding Actions to ButtonsA common way to add interactivity is to create a button. The viewer clicksthe button and something happens (or stops happening). Usually, you addtext near or on the button so that your viewers know what the button is for.
If you already work on a Web site, you’re familiar with the concept of hyper-links. If you know HyperText Markup Language (HTML) — the language behindWeb pages — you know that you can create hyperlinks by using the <a> tagand its href attribute. This tag links text or an image to another URL. Whenpeople click the text or the image, they are teleported to that URL. You cancreate Flash buttons that accomplish the same purpose but with much greaterflair. (Check out the end of Chapter 8 for an example of a button that links toa different Web page.)
Buttons can do more! They can start or stop animation, jump to differentparts of a movie, and stop sounds, among other things.
219Chapter 10: Getting Interactive
17_596918 ch10.qxd 10/7/05 7:33 PM Page 219
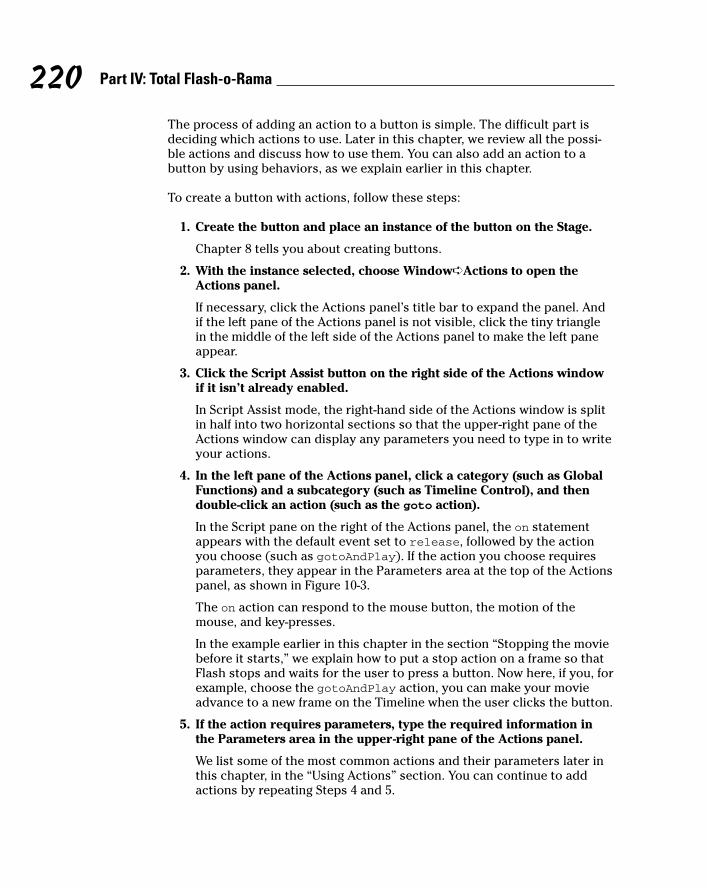
The process of adding an action to a button is simple. The difficult part isdeciding which actions to use. Later in this chapter, we review all the possi-ble actions and discuss how to use them. You can also add an action to abutton by using behaviors, as we explain earlier in this chapter.
To create a button with actions, follow these steps:
1. Create the button and place an instance of the button on the Stage.
Chapter 8 tells you about creating buttons.
2. With the instance selected, choose Window➪Actions to open theActions panel.
If necessary, click the Actions panel’s title bar to expand the panel. Andif the left pane of the Actions panel is not visible, click the tiny trianglein the middle of the left side of the Actions panel to make the left paneappear.
3. Click the Script Assist button on the right side of the Actions windowif it isn’t already enabled.
In Script Assist mode, the right-hand side of the Actions window is splitin half into two horizontal sections so that the upper-right pane of theActions window can display any parameters you need to type in to writeyour actions.
4. In the left pane of the Actions panel, click a category (such as GlobalFunctions) and a subcategory (such as Timeline Control), and thendouble-click an action (such as the goto action).
In the Script pane on the right of the Actions panel, the on statementappears with the default event set to release, followed by the actionyou choose (such as gotoAndPlay). If the action you choose requiresparameters, they appear in the Parameters area at the top of the Actionspanel, as shown in Figure 10-3.
The on action can respond to the mouse button, the motion of themouse, and key-presses.
In the example earlier in this chapter in the section “Stopping the moviebefore it starts,” we explain how to put a stop action on a frame so thatFlash stops and waits for the user to press a button. Now here, if you, forexample, choose the gotoAndPlay action, you can make your movieadvance to a new frame on the Timeline when the user clicks the button.
5. If the action requires parameters, type the required information inthe Parameters area in the upper-right pane of the Actions panel.
We list some of the most common actions and their parameters later inthis chapter, in the “Using Actions” section. You can continue to addactions by repeating Steps 4 and 5.
220 Part IV: Total Flash-o-Rama
17_596918 ch10.qxd 10/7/05 7:33 PM Page 220

6. If you want to change the default on (release) statement, click toselect release in the lower-right pane of the Actions panel, and thenselect a different option in the Parameters area in the upper-rightpane of the Actions panel.
See Table 10-2 for more information on the events you can use to definewhen a button action goes into effect.
7. When you’ve had enough action, click the Actions panel title bar tocollapse the panel.
Table 10-2 Mouse EventsEvent When the Action Occurs
Press When the user clicks the mouse button
Release When the user releases the mouse button
Release Outside When the user moves the mouse outside the hit area andreleases the mouse button
Key Press When a key that you specify is pressed (for example,keyPress “<Left>” specifies the left-arrow key)
Roll Over When the mouse cursor moves over the button’s hit areawithout clicking
Roll Out When the mouse cursor moves out of the button’s hit areawithout clicking
(continued)
Figure 10-3:In this
example, agotoAndPlay
action hasbeen added
to thebutton.
221Chapter 10: Getting Interactive
17_596918 ch10.qxd 10/7/05 7:33 PM Page 221

Table 10-2 (continued)Event When the Action Occurs
Drag Over When the mouse cursor moves over the button’s hit areawith the mouse button held down
Drag Out When the mouse cursor moves out of the button’s hit areawith the mouse button held down
The hit area of a button is the button’s active area — the area that respondsto mouse clicks and other user interactions. Turn to Chapter 8 to find out allabout buttons.
Adding an Action to a Movie ClipYou add an action to a movie clip in the same way you add one to a button; bothare objects to which you can add an action. Actions in movie clips work withinthe Timeline of the movie clip, not on the main Timeline of the entire movie.Therefore, you can create movie clips that are interactive within themselves.
You can use actions in movie clips to do all kinds of things. You can useActionScript within one movie clip to control a second movie clip — theActionScript could set the second movie’s properties, for instance, andchange its size, visibility, and so on. You can use ActionScript to start or stopa movie clip from playing and to replace one movie clip with another. Forexample, you might make a movie clip that contains a cartoon of a TV set,and add actions to the movie clip so that each time you click it, the TV showsa different cartoon.
You can also add actions to movie clips by using behaviors, as we explainearlier in this chapter.
To add an action to a movie clip, follow these steps:
1. Create the movie clip and place an instance of the movie clip on theStage.
Chapter 7 explains how to create movie clips.
2. With the instance selected, choose Window➪Actions to open theActions panel.
If necessary, click the Actions panel title bar to expand the panel. And ifthe left pane of the Actions panel is not visible, click the tiny triangle inthe middle of the left side of the Actions panel to make the left pane appear.
3. Click the Script Assist button on the right side of the Actions windowif it isn’t already enabled.
222 Part IV: Total Flash-o-Rama
17_596918 ch10.qxd 10/7/05 7:33 PM Page 222

In Script Assist mode, the right-hand side of the Actions window is splitin half into two horizontal sections so that the upper-right pane of theActions window can display any parameters you need to type in to writeyour actions.
You can attach many kinds of actions to movie clips. A typical examplemight be that you want something to happen when the movie clip loads.
4. Find the action that you want in the left pane of the Actions panel anddouble-click it.
In the Script pane on the right of the Actions panel, the action appears.Flash also automatically inserts an onClipEvent statement, using thedefault load event.
If the action you choose requires parameters, they appear in theParameters area at the top of the Actions panel.
5. If the action requires parameters, type the required information inthe Parameters area at the top of the Actions panel.
We list several common actions and their parameters later in this chap-ter, in the “Using Actions” section. You can continue to add actions byrepeating Steps 4 and 5.
6. If you want to change the default onClipEvent (load) statement,click to select load in the lower-right pane of the Actions panel (asshown in Figure 10-4), and then choose a different option in theParameters area in the upper-right pane of the Actions panel.
See Table 10-3 for a list of the events available for onClipEvent.
7. Click the Actions panel title bar to collapse the panel.
Figure 10-4:In this
example, agotoAndPlay
action hasbeen added
to the movie clip.
223Chapter 10: Getting Interactive
17_596918 ch10.qxd 10/7/05 7:33 PM Page 223

Table 10-3 Movie Clip EventsEvent When the Action Occurs
Load As soon as the movie clip loads into memory (that is, whenthe movie clip first appears on the Timeline)
EnterFrame When the movie clip enters each frame
Unload In the first frame after the movie clip is removed from theTimeline
Mouse Down When the mouse button (Mac) or left mouse button(Windows) is clicked
Mouse Up When the mouse button (Mac) or left mouse button(Windows) is released
Mouse Move When the mouse is moved (anywhere on the screen)
Key Down When a key is pressed
Key Up When a key is released
Data When data is received in a loadVariables or aloadMovie action
Using ActionsBefore you can create actions, you need to know which actions are available.In this chapter, we explain only the basic actions. For more information aboutadvanced actions and programming in ActionScript, choose Help➪Flash Help,and in the Help window that appears, browse through Learning ActionScript 2.0in Flash or ActionScript 2.0 Language Reference. Then refer to the precedingsections for instructions on inserting actions into frames, movie clips, andbuttons.
The following sections describe the most common actions.
Timeline Control actionsThe Timeline Control category of the Actions panel contains actions you canuse to control which frames play in your movie at what time. (To see this cat-egory list, choose Window➪Actions to open the Actions panel and, if neces-sary, click the title bar to expand the panel. And if the left pane of the Actionspanel is not visible, click the tiny triangle in the middle of the left side of the
224 Part IV: Total Flash-o-Rama
17_596918 ch10.qxd 10/7/05 7:33 PM Page 224
Actions panel to make the left pane appear. Click Global Functions and thenTimeline Control in the left pane of the Actions panel.)
In the following descriptions, we assume you have Script Assist mode on, sobe sure to turn it on by clicking the Script Assist button on the right side ofthe Actions window if it isn’t already enabled.
Go ToGo To tells your movie to go to a different frame. To define the frame, insertthe action, click the Type drop-down list at the top of the Actions panel, andselect one of the options. You can define the frame in several ways:
� Frame Number: Defines the frame by its number on the Timeline. In theFrame text box, type the number of the frame.
� Frame Label: Defines the frame by a label you have given it. In theFrame text box, type the frame label. Using a label is preferable if youmight move frames to a different location on the Timeline, therebychanging their numbers. If you move a frame with a label, the label fol-lows the frame. (Create a label by typing it in the Frame Label text box ofthe Property inspector.)
� Expression: Defines the frame number by some ActionScript code youwrite. (ActionScript code that produces a number as a result of a calcu-lation is called an expression.) This code might be a combination ofActionScript code, for example, that calculates a frame number based onthe current location of the mouse. In the Frame text box, type in theActionScript code that defines the frame number.
� Next Frame: Goes to the next frame.
� Previous Frame: Goes to the previous frame.
What do you want to happen after your movie goes to the desired frame? GoTo has two variations:
� Go To and Stop: The movie goes to the specified frame and stops play-ing. You might choose this option if you want to wait for the user topress one of several buttons at that frame’s location. For example, ifyou’re creating a Flash movie for an art gallery, you might put introduc-tory information and buttons on frame one of your Timeline, with a stopaction on frame one as described earlier in this chapter in the section“Stopping the movie before it starts.” When the user chooses a categoryof artist by pressing one of the buttons, the Flash movie can then Go Toand Stop at a new frame. This new frame can contain new informationand new buttons that Go To and Stop to more new frames about individ-ual artists in that category.
To create a Go To and Stop action, choose Global Functions➪TimelineControl➪goto in the left pane of the Actions panel, and then click the Go
225Chapter 10: Getting Interactive
17_596918 ch10.qxd 10/7/05 7:33 PM Page 225

To and Stop radio button that appears in the upper-right pane of theActions panel.
� Go To and Play (default): The movie goes to the specified frame andplays. Use this option when you want to jump to a new area of the movieand play the animation there. This option is commonly used to loop amovie. On the last frame, you insert an action that goes to the first frameand plays the movie over again. gotoAndPlay is also used in preloaders,short scenes that encourage the viewer to wait while a bigger movie isloading. (See Chapter 12 for more information on preloaders.)
On (mouse event)You use the On (mouse event) action to respond to mouse clicks, themotion of the mouse, and pressing a key on the keyboard.
The default mouse event is “release,” but you can choose other mouse eventsas we describe earlier in this chapter in the section “Adding Actions toButtons.” See Table 10-2 for a list of mouse events.
When you add an action to a button in Script Assist mode, Flash automati-cally adds the On (mouse event) action so that you can specify when theaction will occur — for example, passing the mouse cursor over it or clickingit. We explain the procedure for adding an action to a button earlier in thischapter as well as in Chapter 8.
You can, however, manually add the On (mouse event) action. You woulddo this if you were writing your own ActionScript and not choosing an actionfrom the list of actions (which you can do if you turn off the Script Assistbutton in the Actions panel).
You can also add the On (mouse event) action to a movie clip, by selectinga movie clip and then in the Actions pane choosing Global Functions➪MovieClip Control➪On.
PlayThe Play action tells a movie to start playing.
StopStop stops a movie from playing. (Did you guess?) One important use is atthe end of a movie clip because, otherwise, movie clips automatically loop.You can also put a Stop action on a button so that users can stop an intro-duction and get to the rest of your site. For a tidy ending to a movie, Flashusers often place a Stop action at the end.
stopAllSoundsThe stopAllSounds action simply stops all sounds from playing.
226 Part IV: Total Flash-o-Rama
17_596918 ch10.qxd 10/7/05 7:33 PM Page 226

Browser/Network actionsNext, we look at some actions that you find in the Browse/Network categoryof the Actions panel. (To see this list, choose Window➪Actions to open theActions panel and, if necessary, click the title bar to expand the panel. In theleft pane of the panel, click Global Functions to expand that category, andthen click Browser/Network to expand that subcategory.)
In the following instructions, we assume you have Script Assist mode on, sobe sure to turn it on by clicking the Script Assist button on the right side ofthe Actions window, if it isn’t already enabled
fscommandYou can use the fscommand to control the Flash Player or other applications,like browsers. For example, the fscommand lets you execute JavaScript that you have written on the Web page. To use this action, select the ScriptAssist button in the Actions panel, and then choose Global Functions➪Browser/Network➪fscommand in the list in the left pane of the Actions panel.Then double-click fscommand in the lower-right pane of the Actions panel.The parameters required then appear in the upper-right pane of the Actionspanel. In the Command text box in the upper-right pane, type the name of theJavaScript command that you’ve created. In the Arguments text box in theupper-right pane, add any arguments that your command requires or takes.
You need to add some code to the HTML page. For more information, see thefscommand in the ActionScript Language Reference. (You can get there fastby selecting fscommand on the left side of the Actions panel and then clickingthe Help button on the right side of the panel.)
getURLAs you may remember from Chapter 8, the getURL action is the Flash equiva-lent to a hyperlink in HTML, which is the language used to code Web pages.You often use getURL on buttons, so when you click the button, you jump toanother Web page. You need to supply the URL so that Flash knows where tosend your viewers.
To use this action, double-click getURL in the list in the Actions panel. Thenin the URL text box in the Actions panel, type in the URL (such as http://www.infinityeverywhere.net). From the Windows drop-down list, select from thefollowing options:
� _self: Opens the new Web page in the current window. Viewers canreturn to the previous window by using the Back button of theirbrowsers.
� _blank: Opens a new window.
227Chapter 10: Getting Interactive
17_596918 ch10.qxd 10/7/05 7:33 PM Page 227

� _parent: If you have a movie within a nested frame, this option puts thenew Web page in the parent of the nested frame (that is, one level abovethe nested frame).
� _top: If your movie is in a frame within a window, this option blowsaway all the frames and replaces them with the new Web page.
You can leave the Variables setting at its default of Don’t Send. (The reasonwhy is beyond the scope of this book.)
loadMovieThe loadMovie command lets you load any Flash Player movie (an .swf file)or PNG, JPEG, or GIF image file that Flash can find. It can be another movie orimage residing in the same folder or somewhere else on the Web. You can useloadMovie to let users choose what they want to see next. This type of tran-sition is smoother than using getURL to load new Web pages. (What’s coolabout PNG is that if you use an image containing transparency, the transparencyworks, and you see the PNG superimposed over any image behind it.)
To use this action, double-click loadMovie in the list in the Actions panel.Then you need to set the following parameters:
� URL: Type the URL. If the movie or image that you’re loading is in thesame folder as the current movie, you can just type its name. If it’s in asubfolder, for example, type just the path to the file, such as movies/mymovie.swf. But if the movie or image is elsewhere on the Web, typethe entire URL (for instance, http://www.mum.edu/multimedia/arts/digital-media.swf).
While you’re testing your movie, you must place the SWF, PNG, GIF, orJPEG file in the same folder as the open movie and simply list the file-name. Therefore, if you plan to use a different arrangement on the Web,be sure to change the reference to the file as necessary. If you don’t, theSWF, PNG, GIF, or JPEG file won’t appear for your viewers.
� Location: Select Level and specify a level number if you want to main-tain more than one open movie or image at a time.
• To replace the main (original) open movie or image (and any otherloaded movies or images) with the new one, specify level 0. This islike switching movies or switching images in a slideshow.
• To load a new movie or image without replacing the original (orany other loaded movie or image), specify a level number not usedby any other movie or image. You can continue to load movies andimages on different levels above the one in level 0. The frame rate,background color, and movie size are determined by the movie onthe lowest level.
228 Part IV: Total Flash-o-Rama
17_596918 ch10.qxd 10/7/05 7:33 PM Page 228

• To replace a movie or image that is already loaded, use the levelnumber of that movie or image. You can select Target rather thanLevel if you want to replace a particular movie clip. Type the nameof a movie clip that you want to replace. Specifying the URL andthe target lets you replace a movie clip (the target) with an exter-nal movie or image (the URL). Note that the new movie or imagewill be placed in the same location as the original movie clip, withthe same rotation and scale.
You can leave the Variables setting at its default of Don’t Send. (The reasonwhy is beyond the scope of this book.)
unloadMovieunloadMovie unloads Flash Player movies that you’ve loaded with theloadMovie command. To use this action, double-click unloadMovie in thelist in the Actions panel. Then specify either Level or Target as well as theparameters we explain in the preceding section. Using this command helps tomake sure that transitions are smooth, and it frees up your computer’smemory sooner rather than later.
Making Objects Work for YouIn ActionScript, information is organized into classes that share similar prop-erties and capabilities. (The capabilities are called methods.) You can createmultiple instances of a class in ActionScript to use in your scripts. Theseinstances are called objects.
ActionScript comes with many objects already built-in and ready to use.Buttons, for example, are one kind of object in ActionScript, and sounds areanother.
Objects such as buttons, text, movie clips, and sounds have properties andmethods built into them in ActionScript, and this makes it easy to useActionScript to control them.
Method actingYou can make an object work for you by calling on one of its built-in methods.Doing this is easy: You specify the object by name, followed by the dot (.) oper-ator, followed by the method and the parameters that you want to pass to it.
229Chapter 10: Getting Interactive
17_596918 ch10.qxd 10/7/05 7:33 PM Page 229

For example, if you have a movie clip with an instance named owl, you canset up to change its color by creating a variable named my_color, like this:
var my_color:Color = new Color(owl);
Then you can change owl’s color by specifying the color object by name, fol-lowed by the dot (.) operator, followed by the setRGB method (to set its red,green, and blue intensity), followed by a number for the new color you want,like this:
my_color.setRGB(0x445566)
As usual, Flash makes it easy for you to control objects and their built-inmethods — you can just click methods in the list of actions on the Actionspanel, and Flash shows you the parameters you need to fill in. The followingsections look at some examples of how this process works with two exam-ples: animated masks and drag-and-drop movie clips.
Creating animated masks with movie clipsFlash has loads of useful methods built into its objects. One is the movieclip’s setMask method, which you can use to create an animated mask. Whena mask is animated, the mask reveals the background beneath while it moves.(For more on masks, refer to Chapter 6.)
To use the setMask method to make a movie clip into a mask, follow thesesteps:
1. Create a movie clip and place an instance of it on the Stage.
This instance will be the background movie clip behind the mask. If youneed to know how to create movie clips, check out Chapter 8.
2. With the instance selected, choose Window➪Properties➪Properties toopen the Property inspector.
If necessary, click the Property inspector title bar to expand the inspector.
3. Enter an instance name for the movie clip (such as Background) inthe text field near the upper-left corner of the Property inspector.
4. Create another movie clip and place an instance of it on a new layeron the Stage. Enter an instance name (such as Binoculars) for thesecond movie clip in the Property inspector.
This instance will be the mask movie clip. Check out Chapter 6 for infor-mation on creating new layers. See Chapter 9 for information on creatinganimation.
230 Part IV: Total Flash-o-Rama
17_596918 ch10.qxd 10/7/05 7:33 PM Page 230

5. Create some animation for this movie clip so that it moves over thebackground movie clip.
6. Click Frame 1 of the new layer on the Timeline.
7. With the frame selected, choose Window➪Actions to open the Actionspanel.
If necessary, click the Actions panel title bar to expand the panel.
8. In the left pane of the Actions panel, choose ActionScript 2.0 Classes➪Movie➪MovieClip➪Methods, and then double-click setMask.
The code not_set_yet.setMask(); appears in the Script pane of theActions panel.
9. Enter the first movie clip’s instance name (such as Background) in theObject text field at the upper-right pane of the Actions panel.
10. Enter the mask movie clip’s instance name (such as Binoculars) in theMask Movieclip text field in the Actions panel. Deselect the Expressioncheck box.
You deselect the Expression check box because you’re typing in theactual name of the instance, not a mathematical expression that whencomputed will result in the name.
If your mask movie clip’s instance name is Binoculars and your othermovie clip instance is named Background, the code in the Actions panelshould now look like this:
Background.setMask(“Binoculars”);
11. Choose Control➪Test Movie and enjoy the new animation.
Exploring Advanced ActionScriptFlash contains approximately one zillion more actions than the basic actionsthat we cover in this chapter. For more information, choose Help➪Flash Help,and in the Help window that appears, browse through Learning ActionScript 2.0in Flash or ActionScript 2.0 Language Reference. In the following sections, webriefly explain a few of the more advanced aspects of ActionScript program-ming to give you an idea of some of the possibilities.
Programming constructsIf you’re familiar with programming, you will recognize several familiar commands, such as For and While, which let you process certain actions
231Chapter 10: Getting Interactive
17_596918 ch10.qxd 10/7/05 7:33 PM Page 231

repeatedly while certain conditions that you specify are true. The If andElse statements create conditional expressions.
Start-and-stop dragFlash lets you create objects that your audience can drag around the screen.Draggable objects are used for games, slider bars, and other fun purposes.
You can create draggable movie clips to use for games, drag-’n’-drop inter-faces, or slider bars. Although creating draggable movie clips is an advancedfunction, it’s too much fun to leave out of this book. To create a draggablemovie clip, follow these steps:
1. Choose Insert➪New Symbol to create a new symbol.
2. In the Create New Symbol dialog box that appears, name your newsymbol, select the radio button for the Movie Clip behavior, and click OK.
3. On the Stage, create an object that you want the viewer to be able todrag.
4. Choose Edit➪Edit Document to return to the main Timeline.
5. Drag the movie clip that you created from the Library to the Stage.
An instance of the movie clip appears on the stage.
To open the Library, choose Window➪Library.
6. Choose Window➪Properties➪Properties to open the Property inspec-tor if it’s not already open.
7. In the Property inspector, type in a name in the Instance Name text box.
Your instance now has a name.
8. Select the first frame in a layer in your movie.
9. Choose Window➪Actions to open the Actions panel if it’s not alreadyopen.
If necessary, click the collapse arrow on the Actions panel title bar toexpand it.
10. Click the Script Assist button to turn it off if it is selected.
11. Type in this code in the right pane of the Actions panel:
horse.onPress=function(){this.startDrag();}
horse.onRelease=stopDrag;
If your instance isn’t named horse, substitute the name you gave toyour instance instead.
232 Part IV: Total Flash-o-Rama
17_596918 ch10.qxd 10/7/05 7:33 PM Page 232

This code tells Flash to start dragging your movie clip instance whenyou click on it, and to stop dragging it when you release the mousebutton.
12. Choose Control➪Test Movie and then click and drag your movie clip.
The movie clip follows your mouse!
You can constrain the movement of the movie clip to certain areas. For exam-ple, on a slider bar, you don’t want the movie clip going all over the page —only along the bar. You can constrain the movement by specifying a constraintrectangle for the movie clip. See startDrag in the ActionScript 2.0 LanguageReference for more details. (In the Actions window, select startDrag andclick the Help button next to the Script Assist button to view the discussionof startDrag in the Help section.)
For another example of drag-and-drop techniques, look for drag_and_drop.flain the Ch14 folder of the companion Web site (www.dummies.com/go/flash8).Open the movie and choose Control➪Test Movie. Drag the red circle to see itsnap to the source or the target. To understand how it works, close the TextMovie window, and then choose Window➪Actions to check out the ActionScript.(Thanks to Keith Peters of The BIT-101 Lab, at www.bit-101.com, for this file.)
Making commentsTo help make your ActionScript clear when you look back at it a few months from now, you should add comments that explain the purpose of theActionScript. To do this, if you have Script Assist on, first temporarily turn off Script Assist in the Actions panel by clicking the Script Assist button.Then in the Script pane you can type two slashes (//) and then your com-ments. Anything on the line after the two slashes is ignored when running theanimation. If you need more than one line for comments, you can type thetwo slashes at the beginning of each comment line.
If you’re like we are, you’ll love Script Assist and will want to turn it on again(by clicking the Script Assist button again) after typing your comments.
ActionScript 2.0ActionScript 2.0 is a major new version of ActionScript that became availablein Flash MX 2004 — the predecessor of Flash 8. The new version adds newcommands to ActionScript that are mostly of interest to intermediate oradvanced programmers who are building applications in Flash which imple-ment new classes and subclasses of objects. These new commands provideeven more ways to use Flash to build extremely sophisticated applicationsthat easily support rich media formats.
233Chapter 10: Getting Interactive
17_596918 ch10.qxd 10/7/05 7:33 PM Page 233
External scriptingYou can keep your actions in separate text files that your Flash movie canload when needed. This makes it easier to reuse your beautiful ActionScriptcode in multiple movies. You can create your ActionScript files with any texteditor that you like.
Macromedia recommends that rather than attaching actions or behaviors to your buttons, movie clips, and other symbols, you instead put all theActionScript code for your symbols in a single place, making it easier to findand debug all your code. You can do this by giving instance names to yoursymbols and then using each object’s built-in methods, as we explain in theearlier section “Making Objects Work for You.” You can then put all this codeanywhere you like — in the first frame of the Timeline, for example, or in aseparate text file. When starting to use Flash, though, it’s probably easier tostick with putting your actions in frames, buttons, graphics, and movie clips.
To create a separate new ActionScript file within Flash, choose File➪New andthen choose ActionScript File from the General tab of the New Documentdialog box. You can type in your ActionScript code in this file and save it.
You can create separate ActionScript files by using Dreamweaver or a sepa-rate text editor, such as Notepad (Windows) or TextEdit (Mac). (In TextEdit,choose TextEdit➪Preferences, and when the Preferences window appears, inthe New Document Attributes section, select Plain Text rather Rich Text.) Besure to save the file with the .as suffix, which stands for ActionScript, ofcourse.
To include the code from a separate ActionScript file in any part of your movie,simply add this ActionScript into the relevant frame, button, or movie clip:
#include “your-filename-goes-here.as”
This specifies an ActionScript file in the same directory as your .fla or .swf file.
Discovering more about ActionScriptActionScript gives you tremendous power over your Flash movies. If youenjoy using ActionScript, you might want to check out some of the greatresources we list in Chapter 15. Another great reference is the MacromediaFlash 8 ActionScript Bible, by Robert Reinhardt and Snow Dowd, due out inearly 2006 (Wiley Publishing, Inc).
234 Part IV: Total Flash-o-Rama
17_596918 ch10.qxd 10/7/05 7:33 PM Page 234

Chapter 11
Extravagant Audio, High-Velocity Video
In This Chapter� Adding sounds to your movies
� Manipulating sounds
� Controlling sound properties
� Adding video to your movies
� Streaming video — in Flash!
Silent movies have been gone for a long time now. Why should your Flashmovies be silent? You can create music and sound effects that play con-
tinuously or are controlled by your animation Timeline. You can also addsounds to buttons to liven things up a little. You can edit sounds and controlwhen they start and stop. But be careful: Sound adds overhead to a movie,slowing down loading on a Web site, and some audiences might not be in themood to hear any sound. If you’re careful about how you use sounds, how-ever, you can get great results.
You can also easily include video clips in your Flash animations. You canimport video clips in a variety of file formats and then scale them, rotatethem, tween them, stack them up in layers, animate their transparency level,and do all the other creative things that you’re used to doing in Flash, just asthough the video clips were regular Flash animations. And you can streamyour video clips in Flash, so your audience may view the clips while they’redownloading.
Acquiring Amazing AudioTo add some great sound to your Flash movie, you must first import thesound. You can import AIFF, WAV, and MP3 sounds. Flash places these soundsin your Library. (See Chapter 2 for more information about the Library.)
18_596918 ch11.qxd 10/7/05 7:33 PM Page 235

Sounds vary in sample rate, bit rate, and channels. These statistics are importantbecause they affect both the quality and the size of the sound file. Of course, thelength of the sound also affects its size. Here’s what you need to know:
� Sample rate: The number of times the recorder samples an audio signalwhen it’s recorded in digital form. Measured in kilohertz (kHz). Try notto use more than 22 kHz unless you want CD-quality music.
� Bit rate: The number of bits used for each audio sample. Sometimescalled bit resolution. Sixteen-bit sound files are clearer with less back-ground noise, but if you need to reduce file size, use 8-bit sound.
� Channels: Typically one channel of sound (monophonic) or two chan-nels (stereophonic). In most cases, mono is fine for Flash files and useshalf the amount of data that stereo uses.
Often, you need to take a sound as you find it unless you have software thatcan manipulate sounds. Luckily, you can set the specs of sounds when youpublish your movie to an .swf file. You generally get best results by startingwith high-quality sounds and compressing during publishing. (Turn toChapter 13 for details on settings for publishing Flash files.)
You can check a sound’s stats after you’ve imported the sound into Flash.The next section explains how to import a sound.
Importing soundsImporting a sound is easy. To import a sound, follow these steps:
1. Choose File➪Import➪Import To Library to open the Import dialog box.
2. Locate the sound that you want to import.
3. Click Open.
Nothing seems to happen, but Flash has placed your sound in the Library.Choose Window➪Library to check it out. To see the sound’s stats, click thename of the sound in the Library window. Then click the Properties button(with the little “i” symbol) at the bottom of the Library window.
Placing sounds into a movieAfter you import a sound into your movie, you need to place it and set itsparameters. To place sounds in a movie, follow these steps:
1. Create and name a new layer for the sound.
236 Part IV: Total Flash-o-Rama
18_596918 ch11.qxd 10/7/05 7:33 PM Page 236

Click the Add Layer icon in the lower-left corner of the layer list to add anew layer. Each sound should have its own layer. Sounds are combined(mixed) when the movie is played.
2. With the keyframe in the new layer selected, open the Library anddrag the sound to the Stage.
Flash places the sound on the active layer. Flash extends the sound untilthe next keyframe, if there is one. (If there isn’t a next keyframe, youneed to add one to see the sound.) The image of the sound wavesappears in the Timeline between the keyframes.
3. Choose Window➪Properties➪Properties to open the Property inspec-tor, if it isn’t already open.
If necessary, click the collapse arrow at the lower-right corner of theProperty inspector title bar to expand the inspector to its full size.
4. From the Sound drop-down list, select the sound that you want toplace in your movie.
If necessary, click the keyframe where the sound starts. The Sound drop-down list shows all sounds that you’ve imported. Below the name of thesound, at the bottom of the Property inspector, the sound’s stats arelisted (sample rate, channels, bit rate, duration, and file size), as shownin Figure 11-1.
5. If desired, select an effect from the Effect drop-down list.
These effects are fairly self-explanatory. For example, Left Channel playsthe sound from only the left speaker. Fade In starts the sound softly andgradually brings it up to full volume. The default setting is None.
6. Select one of the following synchronization options from the Syncdrop-down list:
• Event: Plays the sound when its first keyframe plays and continuesto play the sound until it’s finished, even if the movie stops. If Flashplays the keyframe again before the sound is finished, Flash startsthe sound again. Use this setting for button sounds when you wantthe sound to play each time that the button is passed over or
Figure 11-1:You can set
soundparameters
in theProperty
inspector.
237Chapter 11: Extravagant Audio, High-Velocity Video
18_596918 ch11.qxd 10/7/05 7:33 PM Page 237

clicked. (Check out Chapter 8 for more information on addingsounds to buttons.) This setting is the default.
• Start: Plays the sound when its first keyframe plays and continuesto play the sound until it’s finished, even if the movie stops. If thekeyframe is played again before the sound is finished, Flash doesn’tstart the sound again.
• Stop: Stops the sound. (See Chapter 10 for details on the Stop AllSounds action.)
• Stream: Synchronizes the sound to the Timeline. Flash skips ani-mation frames if it can’t draw them fast enough to keep up with thesound. The sound stops when Flash plays the last frame containingthe sound wave. Use this option when you want to match thesound with a portion of the animation in your movie. You caninsert an ending keyframe before placing the sound to controlwhen the sound ends.
7. In the Loop text box, type the number of loops if you want to repeatthe sound.
You can figure how many loops you need to play a sound throughout ananimation by knowing how many seconds the sound is, how manyframes your animation is, and what the frame rate is. If your animation is48 frames and the rate is 12 frames per second (12 fps; the default), youranimation is 4 seconds. If your sound is 2 seconds long, loop it twice toplay it throughout your animation. Use a high number of loops if youdon’t want to do the math, just to make sure.
If you want, you can manually edit the sound, as we discuss in the “EditingSounds” section, later in this chapter.
After you place the sound, press Enter (Windows) or Return (Mac) or use theController to play your movie and hear the results.
Sounds can add significantly to file size and download time. You can placesounds in a shared library to reduce file size. See Chapter 12 for informationon creating and accessing shared libraries.
Editing SoundsAfter you place a sound, you can edit the sound to fine-tune its settings. Youshould delete unused or unwanted portions of a sound to reduce file size.You can also change the volume while the sound plays.
238 Part IV: Total Flash-o-Rama
18_596918 ch11.qxd 10/7/05 7:33 PM Page 238
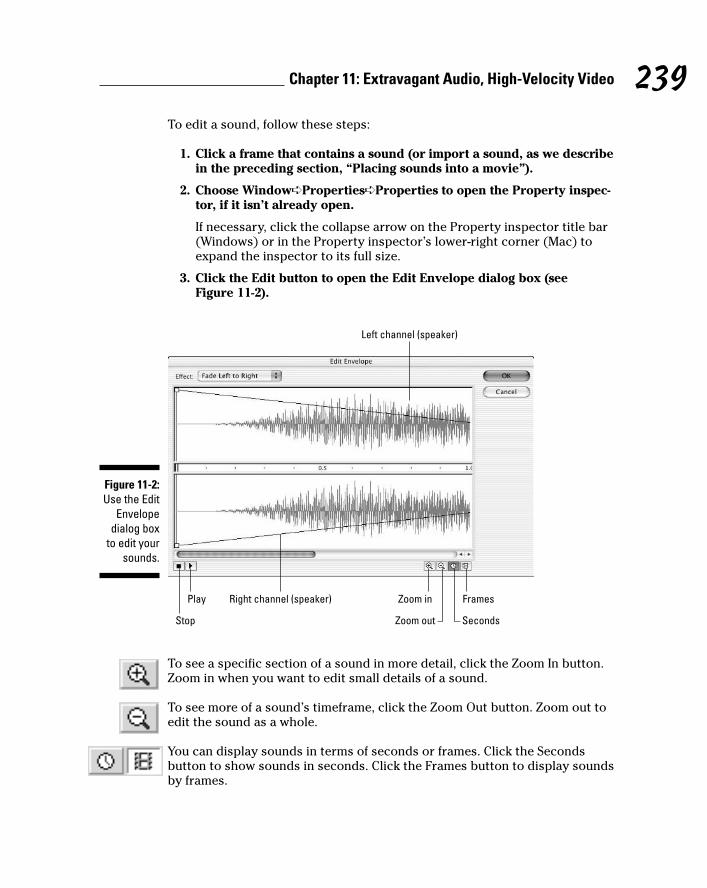
To edit a sound, follow these steps:
1. Click a frame that contains a sound (or import a sound, as we describein the preceding section, “Placing sounds into a movie”).
2. Choose Window➪Properties➪Properties to open the Property inspec-tor, if it isn’t already open.
If necessary, click the collapse arrow on the Property inspector title bar(Windows) or in the Property inspector’s lower-right corner (Mac) toexpand the inspector to its full size.
3. Click the Edit button to open the Edit Envelope dialog box (see Figure 11-2).
To see a specific section of a sound in more detail, click the Zoom In button.Zoom in when you want to edit small details of a sound.
To see more of a sound’s timeframe, click the Zoom Out button. Zoom out toedit the sound as a whole.
You can display sounds in terms of seconds or frames. Click the Secondsbutton to show sounds in seconds. Click the Frames button to display soundsby frames.
Left channel (speaker)
Stop
Play Zoom in
Zoom out
Frames
Seconds
Right channel (speaker)
Figure 11-2:Use the Edit
Envelopedialog box
to edit yoursounds.
239Chapter 11: Extravagant Audio, High-Velocity Video
18_596918 ch11.qxd 10/7/05 7:33 PM Page 239
Deleting parts of a soundBetween the left (top) and right (bottom) channel display is a narrow stripthat controls the starting and ending points of a sound. By deleting the begin-ning and end of a sound, you can eliminate unused portions of the sound.Along this strip are two vertical bars: one at the beginning of the sound andanother at the end. These bars control when the sound starts and ends. Usethem to edit the sound as follows:
� Time In control: This bar, on the left edge of the sound, specifies thestart of the sound. Drag the bar to the right to delete the beginning ofthe sound.
� Time Out control: This bar, on the right edge of the sound, specifies theend of the sound. Drag the bar to the left to delete the end of the sound.
Changing the volumeOn both the left and right channel displays, Flash shows an envelope line toindicate the approximate direction of the sound’s volume (refer to Figure 11-2).Where the volume changes, Flash places small squares, called envelope han-dles. To change the sound’s volume, drag an envelope handle up (to increasevolume) or down (to decrease volume).
You can click an envelope line to add a new envelope handle. This newhandle enables you to create a new direction for the sound’s volume at thehandle’s location.
When you finish editing a sound, click OK to close the Edit Envelope dialog box.
Managing SoundSound can increase the size of your movie by such a great extent that youneed to be very careful how you use it. You should make every effort to com-press the sound. You can also lower the sampling rate; however, your sound’squality is then reduced. Nevertheless, you should try out all the possibilitiesuntil you get the best results.
The sampling rate is the rate at which the computer measures sound and con-verts it into numerical data. The computer makes these sample measurementsmany thousands of times per second. A higher sampling rate provides moreinformation about the sound and, therefore, better audio quality. But all thoseextra measurements make for a much bigger data file.
240 Part IV: Total Flash-o-Rama
18_596918 ch11.qxd 10/7/05 7:33 PM Page 240

Flash offers two ways to control the properties of a sound:
� Use the Publish Settings dialog box to specify properties for all thesounds in a movie. If you have only one sound or a couple similarsounds, specifying settings this way is easy.
� Use the Sound Properties dialog box to specify properties of specificsounds. As long as you don’t specifically override these properties whenyou publish, these settings stick. Use the Sound Properties dialog boxwhen you want to specify different properties for each sound.
Because you specify the publish settings when you publish a movie, we dis-cuss those settings in Chapter 13. In this section, we explain how to fine-tunesound properties in the Sound Properties dialog box.
To open the Sound Properties dialog box, open the Library (choose Window➪Library) and double-click the icon of the sound that you want to work with.Figure 11-3 shows the Sound Properties dialog box.
At the top of the dialog box, Flash displays statistics for the sound — its loca-tion, date, sample rate, channels, bit rate, duration, and file size. Use theExport Settings section to specify how you want to export the file. For eachcompression type, Flash displays the settings available for that type. Whenyou choose settings, look at the bottom of the dialog box, where Flash dis-plays the new file size in kilobytes and in percentage of original size. The filesize reduction can be pretty amazing. Here are the options available in theCompression drop-down list box:
Figure 11-3:Use the
SoundPropertiesdialog boxto set the
propertiesof individual
sounds,including
theircompres-sion and
quality.
241Chapter 11: Extravagant Audio, High-Velocity Video
18_596918 ch11.qxd 10/7/05 7:33 PM Page 241

� Default: This option uses the compression settings specified in the Flashtab of the Publish Settings dialog box when you publish your .swf file.(Chapter 13 gives you more information on publishing to .swf files.)
� ADPCM: You can convert stereo to mono to cut down file size. Availablesampling rates are 5, 11, 22, and 44 kHz. You can choose from 2, 3, 4, or 5bits. Five bits results in the best sound; the default is 4 bits. ADPCM isshort for Adaptive Differential Pulse Code Modulation. This compressionmethod produces files that take up less storage space than CD-qualityaudio. In case you’re wondering what the heck this compression is, it’sused to store music on Sony Mini Discs.
� MP3: MP3 has been available since Flash 4 and is a popular and efficientcompression method. (To change the settings of an imported MP3 file,be sure to deselect the Use Imported MP3 Quality check box.) You canconvert stereo to mono and choose a bit rate, measured in kilobits persecond. You can choose from 8 Kbps (poor quality) to 160 Kbps (near-CD quality). Generally, you want something between these two extremes.Try a bit rate between 20 and 84 Kbps for a good balance of file size andquality. You can also choose the quality — Fast, Medium, or Best. TheFast option optimizes the sound for faster download from your Web sitebut with some quality compromise.
For music, MP3 provides the best compression, letting you keep yourquality as high as possible.
� Raw: This option exports the sound with no sound compression. Youcan convert stereo to mono and select the same sampling rates as forADPCM.
� Speech: This option exports the sound with compression techniquesspecially designed for speech. You can select the same sampling rates asfor ADPCM. A good choice for speech is 11 kHz.
After you specify a group of settings, click the Test button. This handy buttonlets you hear how your sound file sounds with each setting.
The Sound Properties dialog box also lets you update the original sound afteryou modify it with sound-editing software — just click the Update button. Youcan also click Import to import a sound file. The Stop button stops playing asound that you’re previewing.
When you’re done, click OK to finalize your settings and close the dialog box.
Video MagicThe Flash Player has achieved more universal adoption than any other Webvideo technology, so Flash can be a great way to deliver video over the Web. Flash Player version 6 and later can play video, and (at this writing)
242 Part IV: Total Flash-o-Rama
18_596918 ch11.qxd 10/7/05 7:33 PM Page 242

Macromedia claims that more than 96 percent of U.S. Web surfers have FlashPlayer 6 or higher, and 97.6 of all Web surfers have some version of Flash, com-pared with 84.3 percent for Windows Media Player, 64.1 percent for Apple’sQuickTime Player, and 58.9 percent for Real Player. The Macromedia Web siteprovides more details — you can check it out at www.macromedia.com/software/player_census/flashplayer/tech_breakdown.html.
Flash 8 includes important new video features, including support for the pow-erful new VP6 codec (video signal coder and decoder) for greatly improvedvideo quality on the Web. Some experts think the greatly improved videocapabilities make Flash a significant competitor for Windows Media technol-ogy, RealNetworks’ Real video format, and Apple Computer’s QuickTimevideo format.
Flash can use a variety of video formats. You can use Flash to create orimport Macromedia Flash Video (FLV) files. (FLV is a file format developed byMacromedia for video on the Web.) If you have QuickTime 7 installed on yourMac or QuickTime 6.5 for Windows on your PC, you can import files in theAVI, MPG/MPEG, MOV, and DV formats. If you have DirectX 9 or higherinstalled on your Windows PC, you can import files in the AVI, MPG/MPEG,and Windows Media File (WMV and ASF) formats.
Four cool ways to use video in FlashYou may include video in your Flash movie in various ways. For starters, youmay embed video in your SWF file and play it in the Timeline. This lets youplay your video from within your .swf file. This can work well for short videoclips (perhaps 10 seconds or less), but longer video clips might make yourFlash file take a looooooong time to download, and these clips might haveproblems with audio/video synchronization. For more information, see thenext sections in this chapter, “Preparing to embed video in Flash” and“Embedding and editing a video.”
And using Flash Professional 8, you may also
� Stream video from your Web server. You can connect to an .flv videofile from within your .swf file and play the video while it downloadsfrom a plain old Web server. This is a really cool feature and definitely agood idea if you have a video longer than around 10 seconds. Your audi-ence can start to watch the video while it’s still downloading, and theaudio and video won’t get out of sync. For more information, see the sec-tion “Streaming a video,” later in this chapter.
� Stream video from a Flash Video Streaming Service. You can play yourvideo from a Web hosting service provider that specializes in Flash video.This can give you good performance if you want to do fancy things likehost video-on-demand applications, webcam chats, live-event broad-casts, and real-time collaboration applications. But it’s not cheap.
243Chapter 11: Extravagant Audio, High-Velocity Video
18_596918 ch11.qxd 10/7/05 7:33 PM Page 243

� Stream video from a Flash Communication Server. You can play yourvideo from a Flash Communication Server that you host. This can giveyou good performance for heavy-duty deployment of multiple Web videostreams, as if you are your own Flash Video Streaming Service, but theFlash Communication Server software is complex, and again it’s notcheap, with prices ranging from $499 to $7,500.
Preparing to embed video in FlashBefore you embed video into your Flash file, you need to find out the frame rateof your video and make sure your Flash document has the same frame rate toavoid erratic playback. On the Mac, you can do this by following these steps:
1. Click the Finder in the Dock. In a Finder window, open yourApplications folder and double-click the QuickTime Player.
The QuickTime Player starts, and the QuickTime Player menus appear.
2. In the QuickTime Player menus, choose File➪Open File, and in thefile dialog box that appears, locate and select your video, and thenclick the Open button.
Your video appears.
3. Choose Window➪Show Movie Info.
The Movie Info window appears.
4. Make a note of the video’s frame rate (shown in the Movie Infowindow as FPS — frames per second).
You might also want to note the Normal Size of the video. (A typical sizeis 720 x 480 pixels.)
5. Choose File➪Quit.
The QuickTime Player closes.
6. Return to Flash (perhaps by clicking the Flash icon in the Dock) andchoose Modify➪Document.
The Document Properties dialog box appears, showing the document’sdimensions, frame rate, and other properties.
7. To avoid unstable video playback, change the number in the FrameRate text box to match your video’s frame rate.
In Windows, you can match your Flash movie’s frame rate to your video’sframe rate by following these steps:
1. If you don’t have the QuickTime Player installed on your WindowsPC, point your Web browser to www.apple.com/quicktime/downloadand follow the instructions there to download and install QuickTime.
244 Part IV: Total Flash-o-Rama
18_596918 ch11.qxd 10/7/05 7:33 PM Page 244
2. From Windows, choose Start➪QuickTime➪QuickTime Player.
The QuickTime Player appears.
3. In the QuickTime Player, choose File➪Open Movie in New Player.
The Open dialog box appears.
4. Locate and select your video, and then click the Open button.
Your video appears.
5. Choose Window➪Show Movie Info.
The Movie Info window appears.
6. If necessary, click the More Info disclosure triangle to see the detailedinformation about the movie. Make a note of the video’s frame rate(shown in the Movie Info window as Movie FPS — frames per second).
You might also want to note the Normal Size of the video. (A typical sizeis 720 x 480 pixels.)
7. In the video window, choose File➪Exit.
The QuickTime Player closes.
8. Return to Flash and choose Modify➪Document.
The Document Properties dialog box appears, showing the document’sdimensions, frame rate, and other properties.
9. To avoid unstable video playback, change the number in the FrameRate text box to match your video’s frame rate.
Embedding and editing a videoYou can easily import video directly into your Flash animations. Flash’sImport Video wizard walks you through the complexities of compressing andembedding your video. The wizard even lets you split up your video clipsbefore importing them so that after they’re in Flash, it’s easy to rearrange dif-ferent sections of them.
Embedding video in your Flash movie is convenient if your video is short —perhaps 10 seconds or less. If the video is longer, downloading your videowhile the Flash movie plays is probably a better approach. To do that, youneed Flash Professional 8, as we describe in the section “Streaming a video,”later in this chapter.
Before you embed video into Flash, first you should make sure that the framerate of your video and your Flash movie match, which we show you how todo in the preceding section, “Preparing to embed video in Flash.” After you’vedone that, you can make video clips part of your Flash movie by followingthese steps:
245Chapter 11: Extravagant Audio, High-Velocity Video
18_596918 ch11.qxd 10/7/05 7:33 PM Page 245
1. Click a keyframe (or create one by clicking a frame and choosingInsert➪Timeline➪Keyframe).
2. Choose File➪Import➪Import Video.
The Video Import Wizard appears.
3. If you’re using Flash Basic 8, skip to Step 4. If you’re using FlashProfessional 8, select the On Your Computer radio button to import avideo from your computer.
4. Click the Choose button.
The Open File dialog box appears
5. Find and choose a movie file in the Open File dialog box and thenclick the Open button. Then in the Import Video dialog box, click theNext (Windows) or Continue (Mac) button.
The Import Video dialog box now gives you choices for deploying yourvideo, including Embed Video in SWF and Play in Timeline.
6. Select the Embed Video in SWF and Play in Timeline radio button,and then click Next (Windows) or Continue (Mac).
The Video Import Wizard now gives you a choice of symbol type foryour embedded video. You can also decide whether to import youraudio track integrated with the video or as a separate track. Embeddingyour video as a movie clip symbol, and with the audio track integrated,are usually good choices.
You have a choice of importing the entire video or editing it first. If yourmovie’s codec doesn’t support editing, the edit option is not available.(The codec is the software that encodes the movie’s images and soundinto a computer file and then decodes it for playback. Many codecsexist, and they use different techniques with varying advantages and dis-advantages.)
7. You probably want to select Movie Clip from the Symbol Type drop-down list, and you probably want to select Integrated from the AudioTrack drop-down list. Select the Edit the Video First radio button ifyou want to do that; otherwise, select the Embed the Entire Videoradio button and skip to Step 20.
8. Click Next (Windows) or Continue (Mac).
The Split Video pane in the Video Import Wizard appears, as shown inFigure 11-4.
To view your video in the preview pane, click the Play button or drag theplayhead (the triangle above the scrubber bar). Click the Stop button tostop playing the video. To zero in on a particular frame of video, youmight want to move backward or forward a frame at a time by clickingthe Backward or Forward button.
246 Part IV: Total Flash-o-Rama
18_596918 ch11.qxd 10/7/05 7:33 PM Page 246

9. To change the beginning frame of a video clip, drag the leftmost trian-gle below the scrubber bar, or move the playhead to the desiredframe and click the In button to set the new beginning frame. Tochange the ending frame of a video clip, drag the rightmost trianglebelow the scrubber bar, or move the playhead to the desired frameand click the Out button, to set the new ending frame.
The beginning and ending frames are In and Out points, respectively.
10. To see your video with the new In and Out points, click the PreviewClip button.
The video plays in the preview pane, starting at the new In point andending at the new Out point.
11. When you’re happy with the In and Out points that you’ve set, clickthe + (Plus) button to create a video clip with the current In and Out points.
The name of the clip appears in the scroll pane on the left side of theVideo Import Wizard.
12. To rename the clip, click the name in the scroll pane and type a new name.
The new name appears in the scroll pane.
13. Repeat Steps 9 through 12 to extract additional clips with new In andOut points from the same file.
Figure 11-4:In the Video
ImportWizard, you
can splityour video
clip intosections
whilebringing
them intoFlash.
247Chapter 11: Extravagant Audio, High-Velocity Video
18_596918 ch11.qxd 10/7/05 7:33 PM Page 247

14. To change the In and Out points in one of the new clips in the scrollpane, click the clip’s name in the scroll pane, move the In and Outpoints as we describe in Step 9, and then click the Update Clip button.
15. To delete a clip from the scroll pane, click the name of the clip in the scroll pane, and then click the – (minus) button at the top of thescroll pane.
The selected clip disappears from the list.
16. Click Next (Windows) or Continue (Mac).
The Encoding pane in the Video Import Wizard appears, as shown inFigure 11-5. This pane lets you select an encoding profile and advancedsettings.
17. Click the Flash Video encoding profile drop-down list and select a suit-able profile.
You can select profiles for users with modems or with the differentspeeds (150–700 Kbps) of local area networks, digital subscriber lines(DSLs), or cable modems.
Higher-speed connections make it practical to use higher-quality videothat requires less compression.
18. You may grab and drag the In point and Out point markers (the trian-gles below the scrubber bar, below your video image in the Encoding
Figure 11-5:In the
Encodingpane of
the ImportVideo dialog
box, you can selecthow muchcompres-
sion to applyto your
video clip.
248 Part IV: Total Flash-o-Rama
18_596918 ch11.qxd 10/7/05 7:33 PM Page 248

pane of the Video Import Wizard) to give the video clip displayedthere a new starting and ending point, if you want.
This is convenient because sometimes you want to import only part of avideo clip.
To facilitate this, grab and drag the playhead pointer (the triangle abovethe scrubber bar, below your video image in the Video Import Wizardwindow) to preview different locations in your video clip.
19. Click Next (Windows) or Continue (Mac).
The Finish Video Import pane appears in the Video Import Wizard, sum-marizing your choices.
20. If you want to change any of your choices, click Go Back. Otherwise,click Finish.
The Flash Video Encoding Progress window appears. When Flash fin-ishes encoding your video, the window disappears, and the movie clipor clips (or embedded video symbol or symbols) containing your videoappear in your library (which you can view by choosing Window➪Library, if it isn’t visible).
Now your video segments are inside movie clips (if you choose that in Step 7),and as with any other movie clips, you can drag them around on the Timeline,rearrange them, rotate them, motion tween them, paint on top of them inother layers, and tween their brightness and transparency — you can manglethem, destroy them, and bring them to life in all the usual Flash ways. This ispretty amazing. (See Chapter 9 for lots more animation ideas.)
Streaming a videoIf you have Flash Professional 8, you can set your movie up to stream a videowhile the video appears inside your Flash movie. That means that viewerscan see the video play fairly smoothly even while it’s still downloading fromthe Web — without having to wait until the entire video has downloaded.This is a fantastic feature. You’ll certainly want to do this rather than embedyour video in Flash if your video is more than a few seconds long.
In Flash Professional 8, to make an .flv video file to put online and thenstream, follow these steps:
1. Click a keyframe (or create one by clicking a frame and choosingInsert➪Timeline➪Keyframe).
2. Choose File➪Import➪Import Video.
The Video Import Wizard appears.
249Chapter 11: Extravagant Audio, High-Velocity Video
18_596918 ch11.qxd 10/7/05 7:33 PM Page 249

3. Select the radio button labeled “On Your Computer” if you want toimport a video from your computer. If you want to import an .flvvideo file from the Web, select the radio button labeled “Alreadydeployed to a Web server, Flash Video Streaming Service, or FlashCommunication Server,” type the Web address of the video file intothe URL text box, and skip to Step 11.
Importing a video file from the Web works only for video files that arealready in the .flv format.
4. Click the Choose button.
The Open File dialog box appears.
5. Find and choose a movie file in the file dialog box, and then click theOpen button.
6. In the Import Video dialog box, click the Next (Windows) or Continue(Mac) button.
The Import Video dialog box now gives you choices for deploying your video.
7. Select one of the three radio buttons: Progressive Download from aWeb Server, Stream from Flash Video Streaming Service, or Streamfrom Flash Communication Server.
Using a Flash Video Streaming Service or the Flash CommunicationServer isn’t cheap, so if you’re just getting started, you probably want tochoose “Progressively download from a Web server.” This lets you con-vert your video into an .flv file and play it within your .swf file while itdownloads from any Web server.
This is a really cool feature — you are about to find out how to make an .flv file that you can put on any Web server to stream video thatyou’ve made.
8. Click Next (Windows) or Continue (Mac).
The Encoding pane in the Video Import Wizard appears. This pane letsyou select an encoding profile and advanced settings.
9. Click the Flash Video encoding profile drop-down list and select a suit-able profile.
You may choose between profiles for users with modems or with the dif-ferent speeds (150–700 Kbps) of local area networks, digital subscriberlines (DSLs), or cable modems.
Higher-quality video is less compressed and therefore requires a largerfile size and higher bandwidth for speedy delivery.
10. You may grab and drag the In point and Out point markers (the trian-gles below the scrubber bar, below your video image in the Video
250 Part IV: Total Flash-o-Rama
18_596918 ch11.qxd 10/7/05 7:33 PM Page 250

Import Wizard) to give the video clip displayed there a new startingand ending point, if you want.
This is convenient because sometimes you want to import only part of avideo clip.
To facilitate this, you can grab and drag the playhead pointer (the tri-angle above the scrubber bar) to preview different locations in yourvideo clip.
11. Click Next (Windows) or Continue (Mac).
The Skinning pane of the Import Video dialog box appears.
12. Select the style of play controls you want for your video from the Skindrop-down list.
The skin is the graphic design of the video play controls. You can inferthe characteristics of some skins from their names. For example, theskin named ArcticOverPlaySeekMute.swf has an Arctic color scheme(in someone’s mind, at least), and the play controls are placed Over thevideo and include Play, Seek, and Mute buttons. And the skin namedClearExternalNoVol.swf has a Clear color scheme, and the play con-trols are placed External to the Video and include No Volume control.
You are probably going to love fooling around choosing your skin — it’sso easy.
The skin you select in the drop-down list appears as a preview in thepane above the drop-down list.
13. Click Next (Windows) or Continue (Mac).
The Finish Video Import pane appears in the Import Video dialog box,summarizing what happens next, and you may want to make notes onthat, because unfortunately this information disappears when you clickFinish in Step 14. Among other things, this pane tells you where yournew .flv file will be located relative to your .swf file.
14. If you want to change any of your choices, click Go Back. Otherwise,click Finish.
The Flash Video Encoding Progress window appears. When Flash fin-ishes encoding your video, the window disappears, and the encodedvideo and the player controls appear on the Stage.
15. Choose Window➪Component Inspector.
The Component inspector appears. If necessary, click the collapse arrowat the upper-right corner of the title bar to expand the inspector to itsfull size.
16. Click the Parameters tab in the Component inspector, and click therow labeled contentPath.
The name of the .flv file is highlighted.
251Chapter 11: Extravagant Audio, High-Velocity Video
18_596918 ch11.qxd 10/7/05 7:33 PM Page 251

17. Click the magnifying glass next to the contentPath text box, and theContent Path dialog box appears. Here you can enter the Web addressof the final location for your .flv file on your Web server or FlashCommunication Server.
For example, you might type http://www.helpexamples.com/flash/video/clouds.flv.
18. Upload your new .flv file to your Web server, your Flash Communi-cation Server, or your Flash Video Streaming Service. Also, upload thevideo skin you chose in Step 12 — you can find a copy of it on yourcomputer in the same folder as your .fla file.
For instance, if you choose MojaveExternalPlaySeekMute in Step 12,you see a file there called MojaveExternalPlaySeekMute.swf, whichyou need to upload to your Web server in the same directory as your.fla file.
19. Choose Control➪Test Movie.
A new window appears showing your Flash movie, and your video appearswith the play controls in the style of the skin you chose in Step 12.
20. Use the play controls to play your streaming video.
Your video .flv file plays from within your Flash movie while it down-loads from your Web server, your Flash Communication Server, or yourFlash Video Streaming Service.
It probably looks great. This is pretty amazing.
252 Part IV: Total Flash-o-Rama
18_596918 ch11.qxd 10/7/05 7:33 PM Page 252

Part VThe Movie and
the Web
19_596918 pt05.qxd 10/7/05 7:35 PM Page 253
In this part . . .
The not-so-secret desire of every Flash movie animationis to appear under the bright lights on the Web. In this
part, we show you how to make that happen. We explainhow to put all the pieces together to create a way-coolFlash-only site. You see how to build a Web site that con-tains a complete navigational system so that viewers canquickly get the information they need. We cover threetechniques for creating a complete site.
We also discuss the nitty-gritty details of publishing yourFlash movie to a Flash Player file, the only kind of Flashfile a Web browser can display. Besides the Flash Playerfile, Flash can create the HTML code you need and thealternative images you might want to use in case a viewerdoesn’t have the Flash Player. Flash makes it easy: Justspecify your settings and click Publish.
19_596918 pt05.qxd 10/7/05 7:35 PM Page 254

Chapter 12
Putting It All TogetherIn This Chapter� Enhancing navigation through your movie with named anchors
� Building user interfaces with components
� Offering your viewers a preloader
� Adding information for Web searches to your Flash movie
� Putting together an entire Web site with Flash
� Checking out your viewers’ Flash Player version
� Analyzing your movies with the Movie Explorer
� Making your site accessible to people with disabilities
� Using shared libraries while your movie plays
When creating your Flash animation, you need to consider how you willintegrate it with your entire Web site. Are you creating a small anima-
tion to insert into an existing HyperText Markup Language (HTML) site, or doyou want your entire site to be Flashed? In this chapter, we cover techniquesfor creating entire presentations, Web pages, and sites by using Flash.
Using Named AnchorsOne complaint that people have about earlier versions of Flash is that theirbrowsers’ Forward and Back buttons don’t allow them to navigate throughFlash movies. If Flash takes over your entire Web page, suddenly yourForward and Back buttons can seem dead.
Flash fixed that problem by letting you insert named anchors into yourmovies. Your Web browser sees these anchors as though they’re delineatingseparate Web pages within your Flash file. This makes it easy for a Webbrowser’s Forward and Back buttons to work in movies. When someonewatching your Flash movie clicks the Web browser’s Back button, thebrowser simply moves to your movie’s nearest previous frame that containsa named anchor. If the previous named anchor is in an earlier scene, the
20_596918 ch12.qxd 10/7/05 7:21 PM Page 255
browser moves to the named anchor point in that scene. Clicking theForward button undoes the results of pressing the Back button.
Named anchors work only when you save your work as Flash Player 6, 7, or 8movies and when they’re viewed with Flash Player 6 or above.
To use named anchors in your movie, follow these steps:
1. Create a new Flash document by choosing File➪New and then choos-ing Flash document in the General tab of the New Document dialogbox that appears. Or use an existing document that you want to addnamed anchors to.
2. Choose Window➪Properties➪Properties to open the Property inspec-tor if it’s not already open. If necessary, click the collapse arrow onthe Property inspector title bar to expand it.
3. Click the keyframe where you want to add a named anchor.
4. In the upper-left corner of the Property inspector, type a name in theFrame Label text box.
5. Choose Anchor in the Type pop-up menu near the Frame Label text box.
An anchor icon appears in the keyframe that you clicked in Step 3.
To publish your Flash movie with named anchors, follow these steps:
1. Add named anchors to your Flash document as described in the pre-ceding step list.
2. Choose File➪Publish Settings.
The Publish Settings dialog box appears.
3. In the Formats tab of the Publish Settings dialog box, select the Flashcheck box and the HTML check box.
4. Choose the Flash tab of the Publish Settings dialog box and adjust thesettings as desired.
See Chapter 13 for information on all the settings in the Flash tab.
5. Choose the HTML tab of the Publish Settings dialog box, and in theHTML tab, choose Flash with Named Anchors in the Template drop-down list.
For details on other settings, see the section in Chapter 13 on specifyingHTML settings in the Publish Settings dialog box.
6. Click Publish.
256 Part V: The Movie and the Web
20_596918 ch12.qxd 10/7/05 7:21 PM Page 256

Flash saves an .swf file and an HTML file, both of which contain codesupporting named anchors.
At this writing, named anchors don’t work properly in all Web browsers, unlessyou add a bunch of complex code to your Web pages to patch things up.
Adding the Power of ComponentsComponents in Flash are built-in, pre-coded wonders that simplify the cre-ation of interactive Flash movies. Components can be used to add interactionand navigation elements to your Flash movies, allowing you to use Flash tocreate surveys, forms, interactive art galleries, or even complete graphicaluser interfaces for your Flash movies. Among other things, you can also usecomponents (with the help of some fairly sophisticated ActionScript) toaccess and manipulate data from the Web and other sources.
Flash 8 ships with more than a dozen components, and you can downloadmore components built by Flash community members by choosing Help➪Flash Exchange. Some of the components that ship with Flash 8 are
� Radio buttons: These let you make one choice from several buttons.
� Check boxes: You can mark or clear each check box.
� Push buttons: Clicking one of these makes something happen in yourmovie.
� Combo boxes: These are drop-down lists.
� List boxes: These are scrolling lists of choices.
� Scroll panes: These are scrollable (but not draggable) windows for yourmovie clips, JPEG images, and Flash Player files.
� Windows: These are draggable windows within your Flash movie that candisplay a movie clip, JPEG image, or Flash Player file. They also include atitle bar, a border, and a Close button.
To add a component to your Flash movie, drag it from the Components panel(see Figure 12-1) onto the Stage.
In the following sections, we look at how you use several types of compo-nents. We skip push buttons because button symbols (which we describe inChapter 8) are easier to use and do almost everything that you need.
257Chapter 12: Putting It All Together
20_596918 ch12.qxd 10/7/05 7:21 PM Page 257
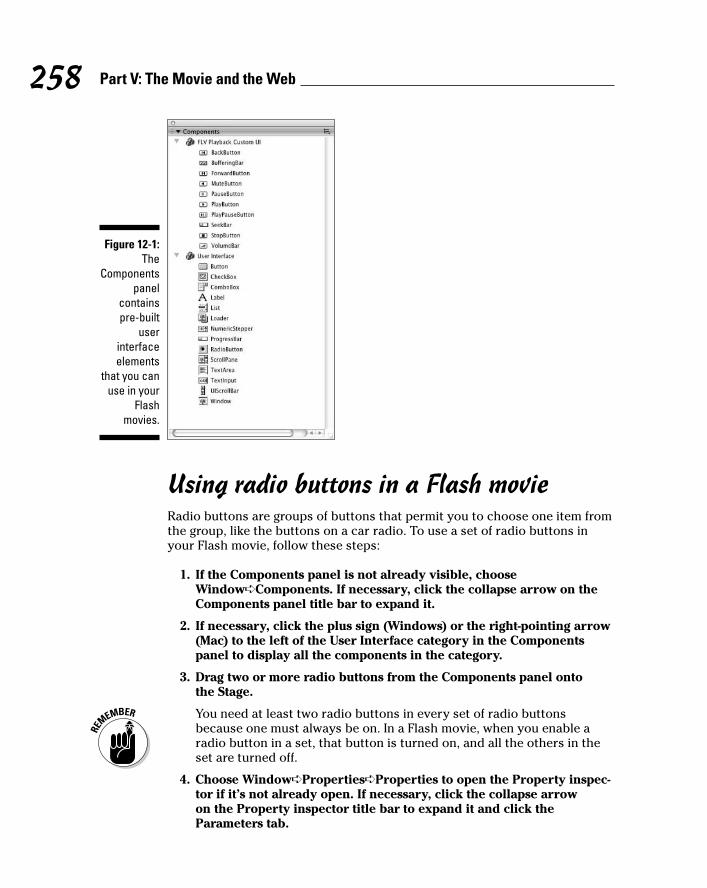
Using radio buttons in a Flash movieRadio buttons are groups of buttons that permit you to choose one item fromthe group, like the buttons on a car radio. To use a set of radio buttons inyour Flash movie, follow these steps:
1. If the Components panel is not already visible, chooseWindow➪Components. If necessary, click the collapse arrow on theComponents panel title bar to expand it.
2. If necessary, click the plus sign (Windows) or the right-pointing arrow(Mac) to the left of the User Interface category in the Componentspanel to display all the components in the category.
3. Drag two or more radio buttons from the Components panel onto the Stage.
You need at least two radio buttons in every set of radio buttonsbecause one must always be on. In a Flash movie, when you enable aradio button in a set, that button is turned on, and all the others in theset are turned off.
4. Choose Window➪Properties➪Properties to open the Property inspec-tor if it’s not already open. If necessary, click the collapse arrow on the Property inspector title bar to expand it and click theParameters tab.
Figure 12-1:The
Componentspanel
containspre-built
userinterfaceelements
that you canuse in your
Flashmovies.
258 Part V: The Movie and the Web
20_596918 ch12.qxd 10/7/05 7:21 PM Page 258

The Property inspector appears with the Parameters tab on top. TheProperty inspector lists five parameters.
5. Select the radio button whose parameters you want to set.
6. To change the radio button’s label, click in the label field on theProperty inspector, type a new name for the radio button, and pressEnter (Windows) or Return (Mac).
The radio button’s label changes on the Stage.
7. To change the radio button’s initial state, click the Selected drop-downlist on the Property inspector and select True or False, depending onwhat you want.
If you select True, the radio button is initially selected. If you selectFalse, the radio button is initially clear.
8. To change the group to which the radio button belongs, type a newname in the Group Name text field on the Property inspector.
For example, type myRadioGroup into the Group Name text field.
All the radio buttons with the same group name act as one group.Selecting one radio button in the group deselects all the other radio but-tons with the same group name.
9. To change the radio button’s label placement, click the LabelPlacement drop-down list on the Property inspector and select theright, left, top, or bottom option to place the label to the right, left,top, or bottom of its radio button.
If you choose top or bottom, you undoubtedly want to type in a largervalue in the Height text box in the Property inspector to increase theheight of the radio button box.
10. To associate additional information with the radio button, enter theinformation in the Data text field on the Property inspector.
Step 13 shows you how to use this data.
11. Repeat Steps 5 to 10 for each radio button.
12. Decide which elements of your Flash movie will change when a radiobutton is selected; then add those elements to the Flash movie if youhaven’t already done so.
If for example, you decide that the contents of a dynamic text box willchange when a radio button is selected, create a dynamic text box onthe Stage and give it an instance name, such as myInfo. (See Chapter 5to discover how to create dynamic text.)
13. Choose Window➪Actions to open the Actions panel if it isn’t openalready, and in the Actions panel click the Script Assist button to dese-lect it (if it’s selected).
259Chapter 12: Putting It All Together
20_596918 ch12.qxd 10/7/05 7:21 PM Page 259

14. Select Frame 1 in the Timeline and enter the following code in theScript pane of the Actions panel:
myEvent = new Object();myForm = new Object();myForm.click = function(myEvent){
myInfo.text = myEvent.target.selection.data;}myRadioGroup.addEventListener(“click”,myForm);
You can replace myForm, myEvent, myInfo, and myRadioGroup with anynames that you like. myInfo in this example is the name of the dynamictext field that we mention in Step 12, and myRadioGroup is the groupname of your radio buttons.
Lines 1 and 2 of the preceding code create new little bundles of methods andproperties named myEvent and myForm. Line 6 adds an event listener tomyForm so that when you select one of the radio buttons in myRadioGroup,the code in Lines 3, 4, and 5 sets the text of the dynamic text field to what-ever is in the data parameter of the radio button that you click.
The second line of code shows an example of how to change the contents ofthe dynamic text box that we describe in Step 11, but you can replace thisline with other ActionScript code to do something else in your movie torespond to changes in which radio button is selected.
For example, if you want to set the text of the dynamic text field to be thelabel of the radio button that you click, replace this line:
myInfo.text = myEvent.target.selection.data;
with this line:
myInfo.text = myEvent.target.selection.label;
For radio buttons, the Property inspector has two tabs in the upper-rightcorner — one tab for properties and one tab for parameters. If you have aradio button selected but its parameters don’t show on the Property inspec-tor, you probably clicked the Properties tab by accident. Click to select theParameters tab in the upper-right corner of the Property inspector; now itshould display the radio button parameters.
When you look at the preceding code, on some deep level you may be think-ing, “Huh?” But it’s possible to do a lot of coding in Flash without getting aPhD in ActionScriptology first. You can accomplish a lot by copying existingcode, playing with it, and observing the effect.
260 Part V: The Movie and the Web
20_596918 ch12.qxd 10/7/05 7:21 PM Page 260

Using check boxes in a Flash movieCheck boxes are square boxes that you can check or uncheck to indicate thatan option is selected or deselected. To use check boxes in your Flash movie,follow these steps:
1. Choose Window➪Components to view the Components panel if it isn’talready open.
2. Drag a check box from the Components panel onto the Stage.
3. Choose Window➪Properties➪Properties to open the Property inspec-tor if it isn’t already open. If necessary, click the collapse arrow on the Property inspector title bar to expand it, and click theParameters tab.
The Property inspector appears with the Parameters tab on top. TheProperty inspector lists three parameters: Label, Label Placement, andSelected.
4. To change the check box’s label, click the Label field on theParameters tab of the Property inspector, type a new name for thecheck box, and press Enter (Windows) or Return (Mac).
The check box’s label changes on the Stage.
5. To change the check box’s initial state, click the Selected drop-downlist on the Property inspector and select True or False.
If you choose True, the check box is initially marked. If you chooseFalse, the check box is initially cleared.
6. To change the check box’s label placement, click the Label Placementdrop-down list on the Property inspector and select Right, Left, Top,or Bottom.
7. To give the check box an instance name, type a name in the InstanceName field on the Property inspector.
For instance, you can enter myCheckBox.
8. Decide which elements of your Flash movie will change when a checkbox is selected; then add those elements to the Flash movie if youhaven’t already done so.
For example, if you decide the movie will go to and play Frame 20 whena check box is marked, create a keyframe at Frame 20. (See Chapter 9 todiscover how to create keyframes.)
9. Choose Window➪Actions to open the Actions panel if it isn’t openalready, and in the Actions panel click the Script Assist button to dese-lect it (if it’s selected).
261Chapter 12: Putting It All Together
20_596918 ch12.qxd 10/7/05 7:21 PM Page 261

10. Select Frame 1 in the Timeline and enter the following code in theScript pane of the Actions panel:
myEvent2 = new Object();myForm2 = new Object();myForm2.click = function(myEvent2){
if (myEvent2.target.selected){gotoAndPlay(20);}
}myCheckBox.addEventListener(“click”,myForm2);stop();
You can replace myForm2, myEvent2, and myCheckBox with any namesthat you like. myCheckBox in this example is the instance name of yourcheck box.
You might not need the stop() action in the last line of the code,depending on what you want your movie to do. We assume in this exam-ple that you want the movie to wait in Frame 1 for the user to press abutton or mark the check box, so for that you would want to stop theaction in Frame 1.
Lines 1 and 2 of the preceding code create new little bundles of methods andproperties named myEvent2 and myForm2. Line 8 adds an event listener tomyForm so that when you mark the check box named myCheckBox, the codein Lines 3, 4, 5, 6 and 7 causes Flash to go to Frame 20 and start playing there.
An event listener is a little bit of software that checks for events generated byone object and notifies a second object when they occur.
So the code in Line 8 sets up an event listener that notifies a function namedmyForm2 whenever myCheckbox has been clicked. In the code in Lines 3, 4,and 5, whenever myForm2 receives a message that myCheckbox has beenclicked, myForm2 checks to see if myCheckbox was selected or deselected,and if myCheckbox was selected, then Flash goes to frame 20 and starts play-ing there.
Lines 4 and 5 of the code show an example of how to set the Flash playheadto move to another section of the movie if the viewer selects the check box.You can replace this line with other ActionScript code to make the movie dosomething else when the viewer selects the check box.
Using combo boxes in a Flash movieA combo box is text box that shows the current selection, combined with adrop-down list of possible selections. To use combo boxes in your Flashmovie, follow these steps:
262 Part V: The Movie and the Web
20_596918 ch12.qxd 10/7/05 7:21 PM Page 262

1. Choose Window➪Components to view the Components panel if it isn’talready open.
Refer to Figure 12-1 to see the Components panel in all its splendor.
2. Drag a combo box from the Components panel onto the Stage.
3. Choose Window➪Properties➪Properties to open the Property inspec-tor if it isn’t already open. If necessary, click the collapse arrow on the Property inspector title bar to expand it and click theParameters tab.
The Property inspector appears with the Parameters tab on top. TheProperty inspector lists four parameters: Data, Editable, Labels, andRow Count.
4. Type a name in the Instance Name text field in the upper-left cornerof the Property inspector.
5. To control whether the user can edit the items on the combo box’smenu list, select True or False from the drop-down list for the Editableparameter.
Selecting True allows the user to rename each item on the menu list.Selecting False prevents that from happening.
6. To create items on the menu list, click the magnifying glass next to theLabels text field in the Parameters tab of the Property inspector.
The Values dialog box appears.
7. In the Values dialog box, click the plus sign to add a menu item orclick the minus sign to delete a menu item. Click the upward-pointingtriangle to move an item up on the list and click the downward-pointingtriangle to move a menu item down on the list.
When you add an item to the list, it is excitingly named defaultValue.
8. To change a menu item’s name from defaultValue to somethingmore interesting and meaningful, click the menu item in the Valuesdialog box and type a more useful name there.
9. Click OK.
The Values dialog box closes.
10. To change the number of items that can be displayed in the combobox without a scroll bar, click the Row Count field on the Propertyinspector and type a new number.
The default number is 5.
11. If you want to make the combo box wider so that longer menu itemsare more readable, choose Modify➪Transform➪Scale and change thesize of the combo box by pulling the handles that appear on its borders.
263Chapter 12: Putting It All Together
20_596918 ch12.qxd 10/7/05 7:21 PM Page 263
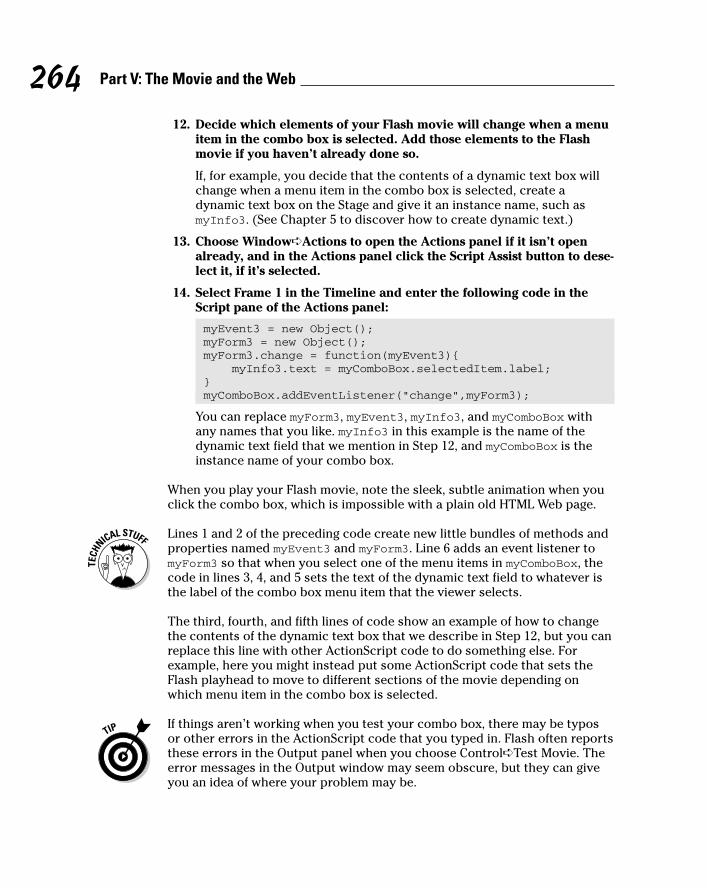
12. Decide which elements of your Flash movie will change when a menuitem in the combo box is selected. Add those elements to the Flashmovie if you haven’t already done so.
If, for example, you decide that the contents of a dynamic text box willchange when a menu item in the combo box is selected, create adynamic text box on the Stage and give it an instance name, such asmyInfo3. (See Chapter 5 to discover how to create dynamic text.)
13. Choose Window➪Actions to open the Actions panel if it isn’t openalready, and in the Actions panel click the Script Assist button to dese-lect it, if it’s selected.
14. Select Frame 1 in the Timeline and enter the following code in theScript pane of the Actions panel:
myEvent3 = new Object();myForm3 = new Object();myForm3.change = function(myEvent3){
myInfo3.text = myComboBox.selectedItem.label;}myComboBox.addEventListener(“change”,myForm3);
You can replace myForm3, myEvent3, myInfo3, and myComboBox withany names that you like. myInfo3 in this example is the name of thedynamic text field that we mention in Step 12, and myComboBox is theinstance name of your combo box.
When you play your Flash movie, note the sleek, subtle animation when youclick the combo box, which is impossible with a plain old HTML Web page.
Lines 1 and 2 of the preceding code create new little bundles of methods andproperties named myEvent3 and myForm3. Line 6 adds an event listener tomyForm3 so that when you select one of the menu items in myComboBox, thecode in lines 3, 4, and 5 sets the text of the dynamic text field to whatever isthe label of the combo box menu item that the viewer selects.
The third, fourth, and fifth lines of code show an example of how to changethe contents of the dynamic text box that we describe in Step 12, but you canreplace this line with other ActionScript code to do something else. Forexample, here you might instead put some ActionScript code that sets theFlash playhead to move to different sections of the movie depending onwhich menu item in the combo box is selected.
If things aren’t working when you test your combo box, there may be typosor other errors in the ActionScript code that you typed in. Flash often reportsthese errors in the Output panel when you choose Control➪Test Movie. Theerror messages in the Output window may seem obscure, but they can giveyou an idea of where your problem may be.
264 Part V: The Movie and the Web
20_596918 ch12.qxd 10/7/05 7:21 PM Page 264

Using list boxes in a Flash movieA list box is a scrollable list of selectable items. To use list boxes in your Flashmovie, follow these steps:
1. Choose Window➪Components to view the Components panel if it’snot already open.
2. Drag a list box from the Components panel onto the Stage.
3. Choose Window➪Properties➪Properties to open the Property inspec-tor if it isn’t already open. If necessary, click the collapse arrow on theProperty inspector title bar to expand it and click the Parameters tab.
The Property inspector appears with the Parameters tab on top. TheProperty inspector lists four parameters: Data, Labels, MultipleSelection, and Row Height.
4. Type a name in the Instance Name text field in the left corner of theProperty inspector.
For example, you might name the instance myListBox.
5. To create items in the list box, click the magnifying glass next to theLabels text field on the Parameters tab of the Property inspector.
The Values dialog box appears.
6. In the Values dialog box, click the plus sign to add a list item or clickthe minus sign to delete a list item. Click the upward-pointing triangleto move an item up on the list and click the downward-pointing trian-gle to move an item down on the list.
When you add an item to the list, it is cleverly named defaultValue.
7. To change a list item’s name from defaultValue to something moreuseful, click the menu item in the Values dialog box and type a moredescriptive name there.
8. Click OK.
The Values dialog box closes.
9. To set whether the user can select multiple items on the list, select Trueor False from the drop-down list for the Multiple Selection parameter.
Selecting True allows the user to select multiple items on the list.Selecting False allows the user to select only one item on the list.
10. To change the height (in pixels) of each item in the list, click the RowHeight field on the Property inspector and type a new number.
The default height is 20 pixels.
265Chapter 12: Putting It All Together
20_596918 ch12.qxd 10/7/05 7:21 PM Page 265

11. Choose Modify➪Transform➪Scale and change the size of the list boxif you want to make the list box wider in order to make the menuitems more legible.
12. Decide which elements of your Flash movie will change when aviewer selects a menu item in the list box. Add those elements to theFlash movie if you haven’t already done so.
If, for example, you decide that the contents of a dynamic text box willchange when a list item is selected, create a dynamic text box on theStage and give it an instance name, such as myInfo4. (See Chapter 5 todiscover how to create dynamic text.)
13. Choose Window➪Actions to open the Actions panel if it isn’t openalready, and in the Actions panel click the Script Assist button to dese-lect it (if it’s selected).
14. Select Frame 1 in the Timeline and enter this code in the Script paneof the Actions panel:
myEvent4 = new Object();myForm4 = new Object();myForm4.change = function(myEvent4){
myInfo4.text = myListBox.selectedItem.label;}myListBox.addEventListener(“change”,myForm4);
You can replace myForm4, myEvent4, myInfo4, and myListBox with anynames that you like. myInfo4 in this example is the name of the dynamictext field that we mention in Step 12, and myListBox is the instancename of your list box.
In Lines 1 and 2 of the preceding code, we create new objects namedmyEvent4 and myForm4. Line 6 adds an event listener to myForm4 that “lis-tens” for whenever the viewer selects one of the menu items in myListBox.When the viewer selects one of the menu items, myListBox broadcasts toFlash that it has changed. myForm4 “hears” that and, using the code in lines 4,sets the text of the dynamic text field to whatever is the label of the list boxmenu item that the viewer selects.
You can replace Line 4 with other ActionScript code to do something else.For example, Line 4 might instead set the value of some variable dependingon which menu item in the list box is selected. The new value of that variablemight then be used to, for example, change the size of a graphic on the Stage.
Using scroll panes in a Flash movieScroll panes allow you to put a movie clip, a JPEG image, or an .swf file insidea pane with scroll bars. This feature is useful if you want to display bigmovies or images without taking up lots of space on the Stage.
266 Part V: The Movie and the Web
20_596918 ch12.qxd 10/7/05 7:21 PM Page 266

To add a scroll pane to your Flash movie, follow these steps:
1. Choose Window➪Components to view the Components panel if it isn’talready open.
2. Drag a scroll pane from the Components panel onto the Stage.
3. Choose Window➪Properties➪Properties to open the Property inspec-tor if it isn’t already open. If necessary, click the collapse arrow on theProperty inspector title bar to expand it and click the Parameters tab.
The Property inspector appears with the Parameters tab on top. TheProperty inspector lists these parameters: Content Path, Horizontal LineScroll Size, Horizontal Line Page Size, Horizontal Scroll Policy, ScrollDrag, Vertical Line Scroll Size, Vertical Page Scroll Size, and VerticalScroll Policy.
4. To set the content of the scroll pane, click the Content Path field onthe Property inspector and type the symbol linkage ID of the movieclip that you want to display. Alternatively, you can type the relativeor absolute path to a JPEG image file or an .swf file.
For information on creating a symbol linkage ID, see the section “SharingLibraries on the Run,” later in this chapter.
5. To specify whether horizontal or vertical scroll bars are displayed,click the Horizontal Scroll Policy drop-down list or the Vertical ScrollPolicy drop-down list and select Auto, True, or False.
True means that the scroll bar will be displayed. False means that itwon’t. Auto means that the scroll bar will be displayed only if necessary.Therefore, Auto is usually a good choice.
6. To specify whether the user must scroll in the window by grabbingand dragging the image or by grabbing and dragging the scroll bar(s),select True or False from the Scroll Drag drop-down list.
True means that the user must drag the image. False means that theuser must drag the scroll bars. False is the default.
7. To change the number of pixels that a scroll bar moves horizontally orvertically each time that the viewer pushes one of the scroll bar’s arrowbuttons, click the Horizontal Line Scroll Size or Vertical Line Scroll Sizefield on the Property inspector and type the number that you want.
The default value is 5 pixels.
8. To change the number of pixels that a scroll bar moves horizontally orvertically each time that the user pushes the scroll bar track (above orbelow one of the scroll bar arrow buttons), click the Horizontal PageScroll Size or Vertical Page Scroll Size field on the Property inspectorand type the number that you want.
The default value is 20 pixels.
267Chapter 12: Putting It All Together
20_596918 ch12.qxd 10/7/05 7:21 PM Page 267

Using windows in a Flash movieWindows allow you to put a movie clip, a JPEG image, or an SWF file inside amovable window with a title bar, a border, and an optional Close button. Thewindow appears inside your Flash movie. You can’t drag the window outsidethe movie.
To add a window to your Flash movie, follow these steps:
1. Choose Window➪Components to view the Components panel if it’snot already open.
2. Drag a window component from the Components panel onto the Stage.
3. Choose Window➪Properties➪Properties to open the Property inspec-tor if it isn’t already open. If necessary, click the collapse arrow on theProperty inspector title bar to expand it and click the Parameters tab.
The Property inspector appears with the Parameters tab on top. TheProperty inspector lists three parameters: Close Button, Content Path,and Title.
4. To set the content of the window, click the Content Path field on theProperty inspector and type the symbol linkage ID of the movie clipthat you want to display. Alternatively, type the relative or absolutepath to a JPEG image file or an SWF file.
For information on creating a symbol linkage ID, see the section “SharingLibraries on the Run,” later in this chapter.
5. To specify whether the window has a close button, click the CloseButton drop-down list and select True or False.
True means that the Close button will be displayed. False means that itwon’t. Some tricky ActionScript code is needed to make the windowclose when you click the Close button, so for now, choose False.
6. To specify the name of the window that will appear in the title bar,click the Title field on the Property inspector and type a name.
Creating a PreloaderIf you’re very ambitious and create a huge Flash file, downloading it to aviewer’s browser might take a long time. Your audience won’t wait forever. Tosolve this problem, you can create a preloader, which is a tiny movie thatloads quickly and tells your viewers to wait. Often, it simply says loading,followed by a percentage loaded.
Flash 8 comes with a Loader component and a ProgressBar component that youcan use to build preloaders, but they require more lines of fancy ActionScript
268 Part V: The Movie and the Web
20_596918 ch12.qxd 10/7/05 7:21 PM Page 268

code than you may want to deal with if you’re new to Flash. For now, youmight want to start out with a simple preloader using a few lines of more old-fashioned ActionScript code, which you can create by following these steps:
1. Create two scenes — the second for your main movie and the first forthe preloader. Or if your movie already has multiple scenes, addanother scene for the preloader and make it the first scene.
The scenes must be within the same movie. See Chapter 9 for the low-down on creating and changing the order of scenes.
2. In the first scene (the preloader), create whatever you want your audi-ence to see while the rest of your movie loads. Keep this scene simpleso that it loads quickly.
3. Click the first frame of your preloader scene. Then choose Window➪Actions to open the Actions panel if it isn’t already open, and if neces-sary, click the collapse arrow on the title bar to expand it. In the Actionspanel, click the Script Assist button to deselect it (if it’s selected).
4. In the Script pane on the right side of the Actions panel, type in thefollowing ActionScript code:
if (_root._framesloaded >= _root._totalframes) {gotoAndPlay(“Scene 2”,1);}
The ActionScript specifies that if the number of frames loaded is greaterthan or equal to the total number of frames in your movie (in other words,if the last frame of the main movie is loaded), the playhead of the Timelineshould go to the first frame of the scene named Scene 2 and play it. Turnto Chapter 10 to find out about ActionScript.
5. Click the last frame of your preloader scene.
6. From the list of action types on the left side of the Actions panel, clickthe Global Functions category and then the Timeline Control subcate-gory; then double-click the gotoAndPlay action.
gotoAndPlay(); appears in the Script pane on the right side of theActions panel.
7. Type 1 in the Script pane.
Now your code should look like this:
gotoAndPlay(1);
This ActionScript loops your preloader so that it plays over and overuntil your main movie is loaded.
You can test your preloader by choosing Control➪Test Movie, but your mainmovie might load so quickly that you don’t even see the preloader. ChooseView➪Simulate Download to see how your preloader works while your mainmovie loads. (See Chapter 13 for more information on testing a movie andanalyzing its download performance). You can also upload your file to a test
269Chapter 12: Putting It All Together
20_596918 ch12.qxd 10/7/05 7:21 PM Page 269

page on your Web site to see how the preloader works. Make sure that yourpreloader is long enough for the human eye to see. Remember that one frameis displayed for only a fraction of a second.
Adding Web Search Information to Your Flash Movie
You can easily add information to your .swf file to help Web search sites(such as Google, Clusty, and so on) find your Flash movie. The informationyou add is called search metadata. (It’s called metadata because it’s informa-tion about the information in your document.)
This is a good thing if you want to be noticed because search engines typi-cally ignore the contents of Flash movies, which are more difficult to deci-pher than the contents of regular HTML Web pages.
To add metadata for Web search sites to your Flash movie, follow these steps:
1. Choose Modify➪Document.
The Document Properties window appears.
2. Enter a meaningful title for the document in the Title text box andenter additional descriptive information in the Description text box.
The descriptive information may include searchable keywords, copy-right and author information, and other brief information about the con-tent of the document.
3. Click OK.
Creating an Entire Web Site with FlashYou can use Flash to create the complete user interface, along with all thegraphics and text, on your site. Some Web sites are almost 100 percent Flash(for example, www.funonmars.com, the Web site of this book’s Technical Editor,Sally Cruikshank). But most Flash Web sites (including www.macromedia.com)are a hybrid of Flash and HTML. So, typically, a Flash Web site has the follow-ing structure:
� An HTML home page that contains these items:
• A user interface (and perhaps other graphics) built in Flash
• Tests that detect the Flash Player and Player version
270 Part V: The Movie and the Web
20_596918 ch12.qxd 10/7/05 7:21 PM Page 270

• Automatic or user-controlled download of the Flash Player fromMacromedia
• JavaScript that automatically redirects viewers to an HTML site ifthey don’t have Flash, or a button that viewers can use to surf toan HTML site if they have a slow connection or don’t want todownload the Flash Player.
• A Flash Player movie (perhaps requiring the latest Flash Player)including a preloader (if needed) and all the visual content of thepage, with all text, graphics, and navigation created in Flash
� Additional HTML pages that, like the home page, utilize a user interface(and other graphics) built in Flash, for all the remaining pages in theWeb site. You might want each of these pages to also test for Flash incase your viewers don’t enter the site via your home page.
� An HTML page for viewers without the required version of Flash, sug-gesting that they download and install it.
� HTML pages that contain a non-Flash version of the Web site (if youwant the site to be available to those who don’t have and don’t want toinstall the required version of Flash).
For information on creating an HTML page that tests for the Flash Player, seethe “Testing for the Flash Player” section, later in this chapter.
The opening HTML page is (usually) the first thing that your viewers see. Onthe World Wide Web, first impressions are important if you want to your audi-ence to stick around, so be sure to think carefully about what your goals arefor this page.
To match a Flash movie in a Web page to the rest of the page, match the back-ground colors of the movie (by choosing Modify➪Document) and the HTMLpage. (This technique doesn’t work if your Web page uses an image for abackground.) To set the background of the HTML page to a different color,edit the HTML file that Flash creates when you publish your movie. Afterdetermining the background color in hexadecimal code (by looking at theHTML code for the existing Web page), change the BGCOLOR tag in the HTMLcode in three places:
� In the background color where you see <BODY bgcolor=”#99CCFF”>(for example)
� In the OBJECT tag where you see <PARAM NAME=bgcolor VALUE=#99CCFF>
� In the EMBED code where you see BGCOLOR=#99CCFF
After people get to your Flash page, you can do whatever you want. Somesites using Flash start with an intro, which is a preliminary movie that eitherbriefly explains what your site is for or just wows your viewers. Intros were a
271Chapter 12: Putting It All Together
20_596918 ch12.qxd 10/7/05 7:21 PM Page 271

hot thing in Flash a few years ago, when people were more captivated by thenovelty of vector animation on the Web. But now intros tend to simply irritatethe viewer, so in this century an intro is probably a really bad idea. You wantpeople to get to the main content of your site immediately. If the informationin your intro is valuable, put that information in the main content of your siteinstead, where people won’t feel annoyed that they’re forced to view it.
Your site probably contains buttons that people can use to navigate throughyour site, get more information, or contact you.
You can create the navigation structure in three main ways:
� Attach On (mouse event) or Load Movie actions to the buttons to dis-play the content of movie clips or Flash Player movies (.swf files).
� Attach getURL actions to the buttons to link to other HTML pages ormovies on your site. You can, of course, create the HTML pages with Flash.
� Use the buttons to display information or graphics located on other partsof your Timeline by using the gotoAndPlay or gotoAndStop action.
We describe the On (mouse event) and Load Movie actions in Chapter 10.We explain the getURL action in Chapters 8 (with regard to buttons) and 10.You can use combinations of these methods. For example, you can use On(mouse event) to display information when the mouse cursor is over abutton, and you can use getURL to link to another page when the user clicksthe button.
Creating navigation with getURLWhen you attach a getURL action to a button, the button links to anotherHTML page in the same way that a button on a regular, non-Flash, HTML Webpage does. For more information on the getURL action, see Chapter 10. Also,Chapter 8 explains how to add an action to a button.
Using the Timeline to store Web contentIn most cases, you use the Timeline to display frames in sequence — in otherwords, animation. But the Timeline can also store static frames. You cancreate anything on the Stage in those frames, and you can display what is inthose frames whenever you want. So different frames on the Timeline canbecome the equivalent of separate Web pages.
Suppose that you have several buttons on the left side of your page. You wantviewers to see different graphics and animation on the right side of the pagewhen they click each button. Perhaps clicking one button displays information
272 Part V: The Movie and the Web
20_596918 ch12.qxd 10/7/05 7:21 PM Page 272

about a product. Clicking another button might display information about asecond product.
To create a set of buttons that move the playhead to different sections of theTimeline, follow these steps:
1. Place instances of your buttons in separate layers on the first frame ofthe Timeline of your movie.
2. On each layer, about 20 or so frames after the first frame, add akeyframe.
These 20 or so frames leave room to store static display frames or movieclips on the Timeline. The buttons continue to be displayed throughoutthe movie until the ending keyframe. If you have a lot of buttons, youmight need to choose a keyframe that’s more than 20 frames after thefirst frame. The more buttons you want to provide descriptions for, thefurther out your ending keyframe needs to be.
3. Create a new layer to display the right side of the page and give it aname, such as Product Views.
4. A few frames out (on Frame 10, for example) on the Product Viewslayer, create a keyframe.
This step starts a Timeline section for the product displayed when theuser clicks your first button.
5. Open the Property inspector if it isn’t already open (choose Window➪Properties➪Properties). If necessary, click the collapse arrow on theProperty inspector title bar to expand it and click the Properties tab.
6. In the Frame Label text box on the left side of the Property inspector,type a label name.
7. On the Stage, create the graphics and words that you want to be dis-played when a user clicks the first button. If you want to display ani-mation when a user clicks the first button, drag a movie clip from theLibrary. (Check out Chapter 7 for the scoop on creating movie clips.)
Place the graphics so that they don’t cover the buttons when they appear.
8. Repeat Steps 4 through 7 to create labels and displays on the ProductViews layer for all your buttons, using later sections of the Timelineeach time until you reach the ending keyframe.
9. Select a button.
10. Choose Window➪Actions to open the Actions panel if it’s not alreadyopen, and in the Actions panel click the Script Assist button to selectit, if it’s not selected.
11. In the list on the left side of the Actions panel, choose the GlobalFunctions category, then the Timeline Control subcategory, and thendouble-click goto.
273Chapter 12: Putting It All Together
20_596918 ch12.qxd 10/7/05 7:21 PM Page 273
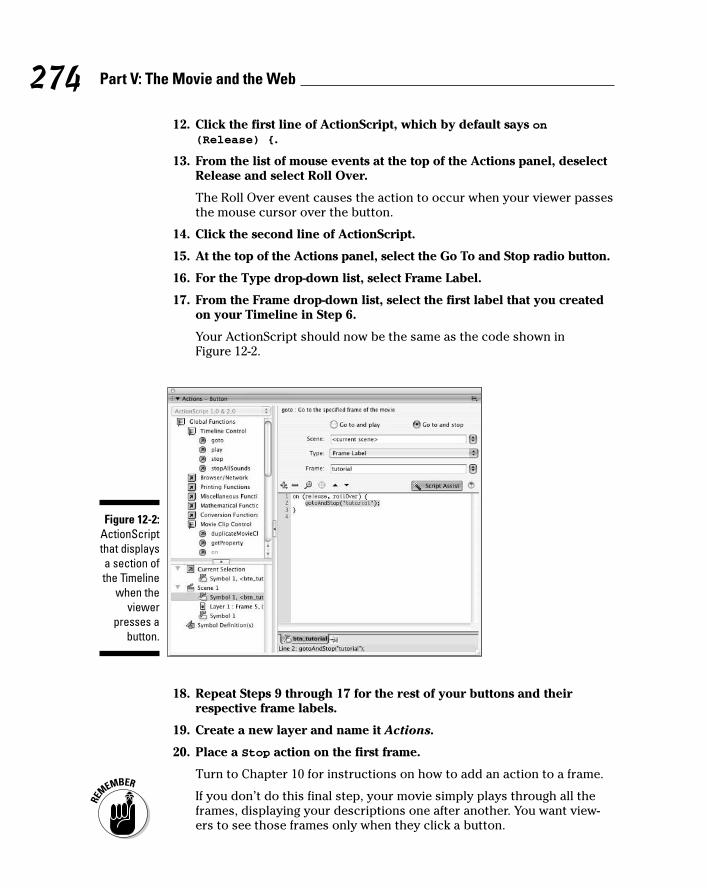
12. Click the first line of ActionScript, which by default says on(Release) {.
13. From the list of mouse events at the top of the Actions panel, deselectRelease and select Roll Over.
The Roll Over event causes the action to occur when your viewer passesthe mouse cursor over the button.
14. Click the second line of ActionScript.
15. At the top of the Actions panel, select the Go To and Stop radio button.
16. For the Type drop-down list, select Frame Label.
17. From the Frame drop-down list, select the first label that you createdon your Timeline in Step 6.
Your ActionScript should now be the same as the code shown in Figure 12-2.
18. Repeat Steps 9 through 17 for the rest of your buttons and theirrespective frame labels.
19. Create a new layer and name it Actions.
20. Place a Stop action on the first frame.
Turn to Chapter 10 for instructions on how to add an action to a frame.
If you don’t do this final step, your movie simply plays through all theframes, displaying your descriptions one after another. You want view-ers to see those frames only when they click a button.
Figure 12-2:ActionScriptthat displaysa section ofthe Timeline
when theviewer
presses abutton.
274 Part V: The Movie and the Web
20_596918 ch12.qxd 10/7/05 7:21 PM Page 274

Choose Control➪Test Movie to try it out! When you roll over a button, thegraphics, text, and movie clip animation on the appropriate frames appear.
Figure 12-3 shows a Timeline with frames that are displayed when the mousecursor passes over buttons.
If you choose Release instead of Roll Over in Step 13, you can display dif-ferent information when the mouse clicks each button.
Look for HelpDesk-Timeline.fla in the Ch12 folder on the companion Website (www.dummies.com/go/flash8) for an example of buttons that use theTimeline to display information about the purpose of the buttons. To test themove, choose Control➪Test Movie. To see the ActionScript, click a framewith an a in it and choose Window➪Actions to open the Actions panel.
Testing for the Flash PlayerAlthough most people have the Flash Player installed, some viewers mightstill have totally out-of-date browsers. For viewers who don’t have the FlashPlayer, it often downloads automatically (as a result of the code that Flashplaces in the HTML file when you publish your .swf and HTML files, as wedescribe in Chapter 13). If Flash doesn’t download automatically, those view-ers simply might not be able to view your site. You can test for the presenceof the Flash Player and, even more, you can test to see which version of theFlash Player they have. If you’re using features that exist only in Flash 8,make sure that viewers have Flash Player 8 because many people might stillhave Flash Player 7 (or an even earlier version) installed.
You can test for the Flash Player in several ways; we describe two possibili-ties in the following sections.
Figure 12-3:You can usethe Timeline
to displaydifferentgraphicsand text
when thecursor
passes overeach button.
275Chapter 12: Putting It All Together
20_596918 ch12.qxd 10/7/05 7:21 PM Page 275

Letting the user decideSome sites let the viewer simply choose between a Flash site and a non-Flashsite. The problem with this method is that many users have no idea whatFlash is, let alone whether they have the Flash Player.
A better method to let users determine whether they have the Flash Player isto place a small Flash animation that is also a button on an initial HTML Webpage. Instructions tell them to click the button if they can see the animation,which links them to the main portion of your Flash site. If they cannot see theanimation, you can offer an image with a link (or linked text) to the MacromediaFlash Player download site and another link to an alternative HTML site. (SeeChapter 8 for instructions on creating a Flash button.)
At the very least, you should offer users the opportunity to download theFlash Player. Do this with a link that connects them to the following URL:
www.macromedia.com/go/getflashplayer
Detecting the Flash Player versionA more sophisticated method is to automatically test for a particular versionof the Flash Player. Then you might have one site for Flash Player 5 or later, forexample, and a second HTML site for viewers that don’t have Flash Player 5or later.
You may detect a particular Flash Player version simply by marking theDetect Flash Version check box in the HTML tab in Flash’s Publish Settingsbefore you publish your movie. (See Chapter 13 for the scoop on specifyingPublish Settings.) This does a great job of detecting a particular Flash Playerversion but generates a lot of fairly fancy JavaScript code. This works reallywell if you don’t need to customize the code, but the code isn’t easy forbeginners to customize.
Suppose you do enable the Detect Flash Version check box (as we describe inChapter 13). Then when you publish your Flash file, the resulting HTML codedisplays Alternate HTML content should be placed here on your Webpage if the Flash Player of the specified version can’t be found or if the Webbrowser doesn’t have scripting enabled.
You can edit the HTML to replace the sentence Alternate HTML contentshould be placed here with whatever alternative content you want to dis-play to the viewer if the Flash Player version can’t be found.
276 Part V: The Movie and the Web
20_596918 ch12.qxd 10/7/05 7:21 PM Page 276

You can even paste in the HTML here from another page you publish thatchecks for an earlier version of the Flash Player.
So you could check first for Flash Player 8, for example, and then if that isn’tdetected, the HTML code for the alternative HTML content might check forFlash Player 6. And if even that isn’t detected, the alternative HTML contentcould consist of HTML code for a page in a series of HTML-only, non-Flashpages.
Creating alternative sitesSome Flash sites include a complete set of non-Flash (HTML) pages for view-ers who don’t have the Flash Player and don’t want to bother downloading it.
If you use features unique to Flash 8, you can also create a Flash 6 site thatuses only features available in Flash 6. The overwhelming majority of Websurfers have Flash Player 6 or later. But don’t forget how much time you spendupdating your Web site now. Imagine updating two or three sites! Make surethat you think through the consequences of having so many alternatives.
For detailed information on how many computer users have which versions of the Flash player, check out the latest Macromedia statistics at www.macromedia.com/software/player_census/flashplayer/version_penetration.html. You may be surprised by the statistics there.
Using the Movie ExplorerThe Movie Explorer is a great tool for analyzing an entire movie. When youstart creating complex relationships among several Timelines, you might havetrouble remembering what you’ve done. The Movie Explorer lays out theentire structure of your movie for you to see. The Movie Explorer is also agreat tool for troubleshooting problems that might arise. By visually display-ing your movie’s components, you can more easily find where the trouble lies.
Another use for the Movie Explorer is to analyze other people’s FLA files.When you open someone else’s movie, you might wonder where the movie is.It might all be hidden in movie clips and actions that call other movies andmovie clips. The Movie Explorer can help you ferret out the magic behind theanimation.
To open the Movie Explorer, choose Window➪Movie Explorer. The MovieExplorer is shown in Figure 12-4.
277Chapter 12: Putting It All Together
20_596918 ch12.qxd 10/7/05 7:21 PM Page 277

You usually know what you’re looking for when you open the Movie Explorer.For example, you might be looking for ActionScript or movie clips. Use thebuttons at the top of the Movie Explorer to specify which movie elements areshown in the main window:
� Show Text: Displays all text objects in the movie.
� Show Buttons, Movie Clips, and Graphics: Displays a list of those objects.
� Show Action Scripts: Lists all ActionScript in the movie.
� Show Video, Sounds, and Bitmaps: Lists those objects.
� Show Frames and Layers: Shows each frame and each layer that con-tains objects.
� Customize Which Items to Show: Opens the Movie Explorer Settingsdialog box, where you can indicate which items you want to show bymarking or clearing them in a list of check boxes. You can also choose todisplay Movie Elements (scenes), Symbol Definitions (a separate listingby symbol), or both. Click OK to close this dialog box.
Movie elements are shown in a hierarchical manner in the Movie Explorer.For example, if a button has an action attached to it, you see a plus sign(Windows) or a right-pointing triangle (Mac) next to the button. Click anyplus sign or right-pointing triangle to expand the display — in this case, toreveal the ActionScript for that button. Click any minus sign (Windows) ordownward-pointing triangle (Mac) to collapse the display.
Figure 12-4:Go exploring
with theMovie
Explorer to discover
the manynooks and
crannies ina movie.
278 Part V: The Movie and the Web
20_596918 ch12.qxd 10/7/05 7:21 PM Page 278

In the Find text box, you can type any expression to search the entire movie.Suppose that you want to know whether a movie contains the getURL action.Just type getURL in the Find text box, and the Movie Explorer displays everyinstance containing that word.
The Find feature is not case-sensitive, which is handy if you can’t rememberhow things are capitalized. But the Find feature is sensitive to spaces, so ifthe movie contains getURL and you type get URL, you don’t get any result.Also, be sure to clear your search when it’s done, or the Movie Explorer willseem to stop working.
You can use the Movie Explorer to select objects on the Stage or frames. Justclick the item in the Movie Explorer, and Flash selects the object or frame. (Ifyou select a frame, Flash also includes the frames up to the next keyframe.) Ifyou select a scene, Flash selects the first frame of the scene.
The Movie Explorer contains an extensive menu that you can access by eitherclicking in the upper-right corner of the Movie Explorer panel, or right-clicking(Windows) or Control+clicking (Mac) inside the Movie Explorer panel.
Some of the more useful features of this menu are
� Find in Library: Opens the Library (if it isn’t already open) and high-lights the object that you previously selected in the Movie Explorer.
� Rename: Lets you rename the selected object, such as a button instance.
� Copy All Text to Clipboard: Copies all the text in the Movie Explorer tothe Clipboard (of course) so that you can paste it into another application.
� Print: Prints the entire contents of the Movie Explorer. All items,whether collapsed or expanded, are printed.
If you have difficulty understanding one of the more advanced Flash movieson our companion Web site, try opening the Movie Explorer in the movie.Look for actions and movie clips. You might be surprised at what you can dis-cover by using this tool.
Making Your Site More AccessibleFlash includes capabilities that make it possible for you to make Flash moreaccessible to people with disabilities.
Most of the components in Flash 8 are designed to be accessible to the visu-ally impaired through the use of screen readers, which generate a spokendescription of the contents of your Flash screen. Screen reader software iswidely available from a variety of companies.
279Chapter 12: Putting It All Together
20_596918 ch12.qxd 10/7/05 7:21 PM Page 279

Users can also navigate around most of Flash’s components by using the key-board rather than the mouse — this is automatically built into the compo-nents. And ActionScript has features that can enhance the accessibility ofFlash documents.
One of the easiest ways to make your Flash movie more accessible to peoplewith disabilities is to use the Accessibility panel. When you add buttons,movie clips, text, Input Text fields, or components to your movie, you can usethe Accessibility panel to make them accessible to screen readers. (Not allcomponents can be made accessible, but most can.) To make a button, movieclip, text, Input Text field, or component accessible, follow these steps:
1. Choose Window➪Other Panels➪Accessibility to open the Accessibilitypanel if it isn’t already open. If necessary, click the collapse arrow onthe Accessibility panel title bar to expand it.
2. Select the button, movie clip, text, Input Text field, or component onthe Stage.
3. In the Accessibility panel, select Make Object Accessible.
4. If you selected a movie clip in Step 2, select the Make Child ObjectsAccessible check box in the Accessibility panel if you want objectsembedded within the movie clip to also be accessible.
For example, select the Make Child Objects Accessible check box if youwant to allow text objects in the movie clip to be read by the screenreader software.
5. In the Accessibility panel’s Name text field, type in a name for thesymbol or component.
The screen reader can read this name aloud.
6. In the Accessibility panel’s Description text field, type in a descriptionof the symbol or component.
The screen reader can read this description aloud.
7. In the Accessibility panel’s Shortcut text field, type in a keyboardshortcut that viewers can use to select the object, if appropriate.
If, for instance, the object is a radio button that needs to be selected toreceive input, follow this step.
The screen reader can then use this information to read aloud somethinglike, “The shortcut for this text field is Ctrl+K.” (Not all screen readerssupport this feature.) Typing in information in the Shortcut text fielddoesn’t actually implement keyboard shortcut functionality. You need touse ActionScript to detect and respond to any shortcut key-presses.
280 Part V: The Movie and the Web
20_596918 ch12.qxd 10/7/05 7:21 PM Page 280

8. In Flash Professional 8 only, in the Accessibility panel’s Tab Indexfield, you may enter the number corresponding to the object’s tabindex value, if appropriate.
The tab index determines how users can use the Tab key to navigatethrough and select one of the buttons, check boxes, and other controlsin your movie. For example, suppose that you have three buttons with atab index of 1, 2, and 3, respectively. When the movie starts, if the userpresses the Tab key three times, the button with the tab index of 3would be selected for input.
If you have the Accessibility panel open when nothing in your movie isselected, the panel offers you the option to Make Movie Accessible, which isselected by default. This allows screen readers to read the different objects inthe Flash movie. You definitely want this option selected if you want to makeyour movie accessible to screen readers and other hardware and software forpeople with disabilities. Of course, you also have to name each object byusing the Accessibility panel, as we describe in the preceding steps, for thisto be useful.
Sharing Libraries on the RunA runtime shared library is a library in a movie that has been posted to a Website and is used by another Flash Player file (.swf). The movie using the sharedlibrary object doesn’t contain the object but just uses it from the sharedlibrary. Shared libraries can help make it easier to manage and revise the ele-ments in your movies. For example, you can use a single shared library formultiple Flash movies to access a sound; when you update the sound in theshared library, the sound is updated for all the movies that share it.
Creating a shared libraryA runtime shared library can be a movie clip, a button, a graphic symbol, a sound, a bitmap, or a font symbol. (See Chapter 7 for the lowdown on symbols.)
You create a runtime shared library when you want to make an element in yourmovie available to other SWF player files. You do this by defining linked objectsin a movie’s library. To create a runtime shared library, follow these steps:
281Chapter 12: Putting It All Together
20_596918 ch12.qxd 10/7/05 7:21 PM Page 281

1. With the Library panel open, select a symbol, sound, or bitmap fromthe Library panel. Then right-click (Windows) or Control+click (Mac)and choose Linkage from the contextual menu that appears.
You can select any kind of symbol: a graphic symbol, button, movie clipsymbol, or font symbol.
The Linkage Properties dialog box appears.
2. In the Linkage Properties dialog box, select the Export for RuntimeSharing check box.
3. Type a name (no spaces allowed) for the symbol in the Identifier text box.
4. In the URL text box, enter the planned URL (location on the Web) ofthe .swf file containing the shared resource.
5. Click OK.
The Linkage Properties dialog box closes.
6. Save the file.
7. Publish the file as an .swf file.
See Chapter 13 for instructions on publishing files.
8. Upload the file to your Web site — to the location that you specified in Step 4.
In Step 3, you give the shared Library a name; and in Step 4, you give theshared library an address. The next section describes how you can usethis name and address to link to the shared library from within a differ-ent movie.
To share a font, you first have to create a font symbol, but that’s easy. Tocreate a font symbol, follow these steps:
1. Choose Window➪Library to open the Library panel.
2. Click the Options menu in the upper-right corner of the Library paneland then choose New Font.
The Font Symbol Properties dialog box appears.
3. Select a font from the Font menu in the dialog box. Alternatively, typein the name of the font in the Font text box.
4. Type in a name for the font symbol in the Name text box.
5. Select bold or italic text (if you like) and then type in the font size thatyou desire in the Size box.
6. Click OK.
The dialog box disappears, and the name that you gave the font symbolappears in the Library panel.
282 Part V: The Movie and the Web
20_596918 ch12.qxd 10/7/05 7:21 PM Page 282
Using a shared libraryAfter you create a shared Library, you can use it from within a different movieby specifying its name and URL, or by dragging it into the destination movie.To use a shared Library by specifying its name and URL, follow these steps:
1. In the destination movie, choose Window➪Library.
The Library panel appears.
2. Select an object on the Library panel, right-click (Windows) orControl+click (Mac), and choose Linkage from the contextual menuthat appears.
The Linkage Properties dialog box appears.
3. In the Linkage Properties dialog box, select the Import for RuntimeSharing check box.
4. Type the name of the shared resource that you want into theIdentifier text box (no spaces allowed).
This name should be identical to the Identifier you assigned to theshared library you want to use.
If the Identifier text box already has a name in it, ignore that name andtype in the name of the shared library you want to use.
5. Enter the URL of the shared resource you want.
6. Click OK.
The Linkage Properties dialog box closes.
To use a runtime shared Library by dragging it into your destination movie,follow these steps:
1. Open your source movie.
The source movie is the .swf file whose runtime shared Library youwant to use.
2. Choose File➪Open.
The Open dialog box appears.
3. In the dialog box, navigate to your destination movie, select it, andclick Open.
The destination movie file opens.
4. If the Library panel isn’t open, choose Window➪Library. If necessary,click the collapse arrow on the Library panel title bar to expand it.
The Library panel shows the library of the destination movie.
283Chapter 12: Putting It All Together
20_596918 ch12.qxd 10/7/05 7:21 PM Page 283

5. Choose the name of the source file from the drop-down list beneaththe title bar of the Library panel.
The Library panel now shows the contents of the library of the sourcemovie.
6. Drag the linked object from its Library panel onto the Stage of yourdestination movie.
Working with shared libraries requires that all the pieces be in the properplace at the same time. We suggest checking a movie that contains an objectfrom a shared library to verify that the object is displayed properly. You cando so by going online and viewing it in your browser.
284 Part V: The Movie and the Web
20_596918 ch12.qxd 10/7/05 7:21 PM Page 284

Chapter 13
Publishing Your Flash FilesIn This Chapter� Reducing your movie’s size for fast download
� Testing your Flash movies
� Saving your work as a Flash MX 2004 document
� Publishing Flash movies to SWF, HTML, and other formats
� Using Publish Profiles
� Posting your movie to your Web site
� Exporting movie and image files
� Creating movies that viewers can print
Your Flash movie is done. Now you need to publish it in its final form —most likely an .swf file that you can post on your Web site. In this chap-
ter, we explain how to prepare a Flash movie for publishing and help youdetermine the ideal publish settings for your needs. We also discuss how topublish to other graphic file formats such as PNG, in case you want to createa non-Flash site or use your material in another program. We cover all thebases so that you can get your animation up and running.
The filenames of Flash-published movies end with the .swf suffix. The lettersSWF originally stood for Shockwave Flash, but Macromedia no longer usesthat term for Flash-published movies, even though the letters remain thesame. So, to follow the Macromedia usage, we refer to SWF files as FlashPlayer files, not Shockwave Flash files. Flash converts your movie data into ahighly compact and efficient form in an SWF file so that your SWF file con-tains only the information needed for playback of your movies. In contrast,when you save your movies by choosing File➪Save (or File➪Save As), theyare saved with the .fla suffix. They are saved in a format that can be read bythe Flash 8 application, but not the Flash Player. The .fla file contains lots ofinformation about layers, Library items, your video source files, and so on,which you need when you are creating your movies and which the FlashPlayer doesn’t need.
21_596918 ch13.qxd 10/7/05 7:19 PM Page 285

Optimizing Your Movies for Fast Download
Throughout this book, we offer suggestions for designing a Flash movie withspeedy downloading in mind. In this section, we put the suggestions togetherso that you can review your movie as a whole before you publish it.
Reducing your Flash Player file sizes is no longer so important because manypeople now have high-speed Internet connections. But not everyone does. Soit still isn’t a bad idea to spend a little time thinking about shrinking the sizeof your Flash movies.
Simplifying artworkBy simplifying the artwork in your movie, you can greatly reduce the size of a Flash movie, thereby increasing its speed. Here are the most importanttechniques:
� Use symbols for every object that appears more than once. You can turnany object or group of objects into a symbol. Nest your symbols — forexample, turn an object into a symbol and then use it in a movie clip orbutton. Remember that you can change the color of symbol instances —you don’t need to create a new symbol. (Chapter 7 covers symbols indetail.)
� Group objects whenever possible. Groups are almost as efficient assymbols. (Chapter 4 explains how to create groups.)
� Avoid bitmaps as much as possible. If you must use bitmaps, use themonly for still elements — don’t animate them. (Chapter 3 explains how toimport a bitmap and how to turn it into a vector graphic by tracing thebitmap.)
� Optimize curves (choose Modify➪Shape➪Optimize). Whenever possi-ble, optimize curves to reduce the number of lines used to create ashape. (Check out Chapter 4 for further explanation.)
� Use solid lines rather than dashed, dotted, and other line types whenpossible. Try to avoid custom line widths. (We explain line types inChapter 3.)
� Use the Pencil tool rather than the Brush tool whenever possible. ThePencil tool uses fewer bytes in your movie.
� Use the Web-safe color palette. Avoid custom colors. (Check outChapter 3 for the lowdown on colors.) Custom color definitions are keptwith the Flash Player file.
286 Part V: The Movie and the Web
21_596918 ch13.qxd 10/7/05 7:19 PM Page 286
� Avoid using transparency when you don’t need it. Using transparencydoesn’t make your Flash file bigger, but it can slow down playback becauseof extra calculation required. (On the other hand, sometimes transparencyeffects make your movie look really great.) See Chapter 7 to find out aboutchanging the transparency of the elements in your movie.
� Use solid fills rather than gradients. Gradients are more complex andmake the Flash Player file bigger.
Optimizing textText can consume lots of bytes. Here’s what you can do to reduce the byte bite:
� Reduce the number of fonts and font styles (bold, italic) as much aspossible. Use simpler sans serif fonts if you can. You get the best resultsfile-size-wise with the device fonts (sans, serif, and typewriter), althoughyou might find these device fonts boring. Flash doesn’t need to store theoutlines of device fonts in the .swf file, so these take up fewer bytes.(See Chapter 5 for more information on fonts.)
� If you create text fields, limit the text and specify any restrictions that you can in the Character Options dialog box. (Choose Window➪Property➪Properties to open the Property inspector if it’s not alreadyopen, and then click Character in the Property inspector to open theCharacter Options dialog box.) For example, exclude unnecessary char-acter outlines, such as numbers.
Using shared librariesIf you’re using some of the same elements in more than one movie, you canput them into a shared library, and then your audience will need to downloadthem only once. This can be especially useful for items that can be large, likemusic and fonts. Check out Chapter 12 for the details on shared libraries.
Compressing soundYou can compress sounds to reduce file size. When you compress individualsounds in the Sound Properties dialog box, you can fine-tune settings foreach individual sound in your movie. Later in this chapter, we review how tocompress sound when you publish a Flash movie. Use the MP3 format when-ever possible because it compresses well. If you need more information oncompressing sounds, check out Chapter 11.
287Chapter 13: Publishing Your Flash Files
21_596918 ch13.qxd 10/7/05 7:19 PM Page 287

Here are some other ways that you can reduce the size of your sound files:
� Adjust the sound’s Time In and Time Out points to prevent silent areasfrom being stored in your .swf file.
� Reuse sounds by using different In and Out points and by looping differ-ent parts of the same sound.
� Don’t loop streaming sound.
See Chapter 11 for more information on editing, looping, and streaming sound.
Animating efficientlyOne of the most effective ways to reduce file size is to use tweens (seeChapter 9) whenever possible. Frame-by-frame animation creates larger files.Keeping animation localized in one area also helps. Small animations (anima-tions where the objects don’t move much) use less space than wide-area ani-mations. Finally, place non-animated objects on different layers fromanimated objects.
Testing MoviesBefore publishing your movie, you should test it. The first step is to simplyplay your animation, as we explain in Chapter 9. But playing the animation onthe Stage doesn’t provide you with enough information to determine the filesize. Movie clips and certain actions that interface with other movies (suchas Load Movie) don’t function from within your .fla file. To find those kindsof bugs, you have to use the Test Movie command or test your movie in abrowser. The following sections tell you how to test both ways.
Flash 8 is optimized for the tasks (such as drawing, adding keyframes, show-ing and hiding layers, typing in ActionScript code, and so on) that you per-form when creating a Flash movie. It’s not optimized for playing back youranimation — the Flash Player is optimized for that. Your .fla file containslots of information that you need when you’re creating your movies andwhich the Flash Player doesn’t need. The Flash Player plays only .swf files,which you can create when you choose File➪Publish.
Using the Test Movie commandAfter playing your animation, you want to use the Test Movie (or Test Scene)command. These commands provide estimates of downloading speed, so youcan find bottlenecks that pause your animation. You can also see the results ofmovie clips and all actions.
288 Part V: The Movie and the Web
21_596918 ch13.qxd 10/7/05 7:19 PM Page 288

To test a movie or scene, follow these steps:
1. Choose Control➪Test Movie (or Test Scene).
Flash publishes your movie to an .swf file by using the current settingsin the Publish Settings dialog box (see the section “Publishing FlashMovies,” later in this chapter) and opens a new window. You see youranimation run. You can change the settings in the Publish Settings dialogbox (choose File➪Publish Settings) before using this command.
2. Choose View➪Download Settings and choose a downloading speedbetween 14.4 Kbps and 131.2 Kbps.
If you repeatedly change the download settings, you get a better senseof their effect.
To specify your own settings, choose Customize, and in the CustomModem Settings dialog box, enter the menu text that you want to appearon the menu and the bit rate in bytes per second. Click OK. Then openthe Download Settings menu again and choose your customized setting,which now appears on the menu.
3. Choose View➪Bandwidth Profiler to see the graph that shows thedownloading performance.
The bandwidth profiler (as shown in Figure 13-1) displays the byte sizeof each individual frame. Frames whose bars rise above the lower redhorizontal line cause loading delays.
4. To see settings for any one frame, stop the movie by clicking theframe’s bar.
To the left of the bandwidth profiler, Flash displays the movie’s statistics —dimensions, frame rate, file size, movie duration, and the amount of ani-mation to preload in frames and seconds. You also see the size of eachindividual frame.
Frames with bars above this line cause loading delays.
Figure 13-1:When you
test a movie,Flash helps
you analyzethe
downloadingperformance
of yourmovie.
289Chapter 13: Publishing Your Flash Files
21_596918 ch13.qxd 10/7/05 7:19 PM Page 289

5. Choose View➪Streaming Graph to see how the Flash movie streamsinto a browser.
6. Choose View➪Frame by Frame Graph to see which frames contributeto delays. A frame whose bar extends above the red line may cause abottleneck.
By default, Flash opens the SWF window in Streaming Graph mode.
7. Choose View➪Simulate Download if you want to see the Flash movieplay as if loading at the speed you choose in Download Settings inStep 2.
8. To close the SWF window, click its Close button.
After you analyze your movie, you can go back and optimize it to eliminatedelays. A short delay in the first frame is usually acceptable, but significantdelays during the movie result in jerky animation or pauses.
If you have a long movie divided into scenes, you can save time by using theTest Scene command instead of the Test Movie command.
Testing a movie in a Web browserThe final steps of testing a movie are publishing it and viewing it in a Webbrowser. For a quick view, you can use the Publish Preview command.Flash publishes your movie to an .swf file, creates the appropriate HTMLfile, and opens the HTML file in your default browser. Viewing your FlashPlayer file in a browser reveals how the browser will display the movie whenyou upload it to a Web site.
Flash uses the current settings in the Publish Settings dialog box to createthe preview, including the types of file formats that you have selected.
To preview your movie in a browser, follow these steps:
1. Choose File➪Publish Settings to open the Publish Settings dialog boxand choose the desired file formats and publish settings. Then click OK.
See the “Publishing Flash Movies” section, later in this chapter, for moreinformation on the Publish Settings dialog box.
2. Choose File➪Publish Preview and choose the desired format from thesubmenu.
Generally, you can use the first (default) HTML option, but if you havespecified HTML settings, choose the second HTML option. Flash opensyour browser and runs your movie.
3. Close your browser to end the preview.
290 Part V: The Movie and the Web
21_596918 ch13.qxd 10/7/05 7:19 PM Page 290

As with any Web page material, you need to consider the following when test-ing a Flash Player file:
� The browser that your audience is using: Preview your Flash Player filein the current version of both Internet Explorer (IE) and Mozilla Firefox,if possible. Ideally, you should try out at least one earlier version ofInternet Explorer, too. And you should test it in Safari on a Mac. Okay, soyou probably won’t do all this, but don’t say that we didn’t tell you.
� The resolution of viewers’ screens: Test at least the following mostcommon settings: 800 x 600 and 1024 x 768. Remember that the amountof material that appears on the screen changes with the resolution. Ifyou preview at 640 x 480, you can be sure that people with higher resolu-tions can see your entire movie.
� The color settings of viewers’ screens: Color settings might range from256 colors to 16 million. If you aren’t using Web-safe colors, some view-ers might not see them accurately. But the vast majority of viewers nowhave thousands or millions of colors, which means that it’s not soimportant to test that your movie looks good with fewer colors.
Professional Web site developers take this testing phase seriously. No matterhow good an animation looks on your screen, if it doesn’t translate well toyour target number of viewers’ screens, it’s not a good animation.
Saving Your Work in Flash MX 2004 Format
If you’re collaborating on a Flash project with a group of friends or coworkersand they’re still using Flash MX 2004 (the predecessor of Flash 8), there isstill hope for them. You can save your work in Flash MX 2004 format.
To save your work in Flash MX 2004 format, follow these steps:
1. Choose File➪Save As.
The Save As dialog box appears.
2. Choose where you want to save your file and type the filename thatyou want.
3. Click the Format drop-down list and select Flash MX 2004.
4. Click Save.
If you’re using features new to Flash 8, a window appears, listing the newfeatures that won’t be saved in the Flash MX 2004 file and asking whetheryou want to continue. Click the Save as Flash MX 2004 button if you wantto continue. If you do so, some of the data in your file will be lost.
291Chapter 13: Publishing Your Flash Files
21_596918 ch13.qxd 10/7/05 7:19 PM Page 291

Publishing Flash MoviesSo you’re finally ready to publish your Flash masterpiece. It’s time to chooseFile➪Publish Settings. This brings you to the Publish Settings dialog box.Don’t be overwhelmed by all the options. Usually, you use only a few of them.Start by specifying the settings. Then publish the movie to create the .swffile viewed on a Web page.
After you specify the settings, you can click OK rather than Publish if you wantto go back to your Flash movie file and choose Control➪Test Movie to see theresults of your settings. You can try various settings until you’re satisfied. Thenclick Publish to create the final SWF (Flash Player) file. Published files are in thesame folder as your FLA movie file by default; you can specify another locationif you want. Of course, you can also move the files afterward.
The Publish Settings dialog box lets you easily specify all your settings in oneplace. Then you click the Publish button, and Flash creates the SWF (FlashPlayer) file according to your settings. Choose File➪Publish Settings to openthe Publish Settings dialog box, as shown in Figure 13-2, with the Formats tabon top.
Figure 13-2:The Publish
Settingsdialog box is
your one-stop place
for start-ing the
publishingprocess ofyour Flash
movie.
292 Part V: The Movie and the Web
21_596918 ch13.qxd 10/7/05 7:19 PM Page 292

Flash automatically names the files that it creates for you, using the Flashmovie’s name and adding the appropriate file extension, such as .html and.swf. You can see the names in the Publish Settings dialog box when youhave the Formats tab on top. To specify your own name for a file, click in theFile text box and type the name that you want. To revert back to the defaultfilenames, click the Use Default Names button.
Most of the time, you need only the Flash (SWF) and HTML formats. But ifyou want other formats, select them on the Formats tab. When you mark anadditional format, the dialog box adds a new tab for that format (except forthe projector formats, which don’t need one).
After you mark the formats that you want, click each tab to specify the set-tings for that format. The next few sections of this chapter explain eachformat, why you might want to use it, and how to specify the settings.
After you finish specifying all your settings, click the Publish button, andFlash does your bidding, creating the files that you need to put your greatcreation on the Web.
Publishing to SWFThe second tab in the Publish Settings dialog box (choose File➪PublishSettings) is the Flash tab, which creates the Flash Player file, also called an.swf file. On this tab, as shown in Figure 13-3, you specify settings that affectthe .swf file.
Flash gives you the following options:
� Version: Allows you to save in previous version formats for backwardcompatibility (or in the Flash Lite format for playing Flash movies onmobile phones, but that’s a subject for another book). If you use newfeatures but choose an old Flash Player version, Flash warns you ofpotential problems when you publish your movie.
� Load Order: Specifies how Flash displays the first frame of the Flashmovie. Bottom Up (the default) loads layers from the lowest layerupward. Top Down loads layers starting from the top layer and movingdownward. Your viewers will see the difference between these two set-tings only if the Flash movie is loading slowly (because of a slow Internetconnection, for instance).
� ActionScript Version (for Flash Player 6, 7, and 8 only): Specifieswhether your movie is using ActionScript 1.0 or ActionScript 2.0.ActionScript 2.0 was introduced in Flash MX 2004, the predecessor toFlash 8. ActionScript 2.0 adds new commands to ActionScript that aremostly of interest to intermediate or advanced programmers who are
293Chapter 13: Publishing Your Flash Files
21_596918 ch13.qxd 10/7/05 7:19 PM Page 293
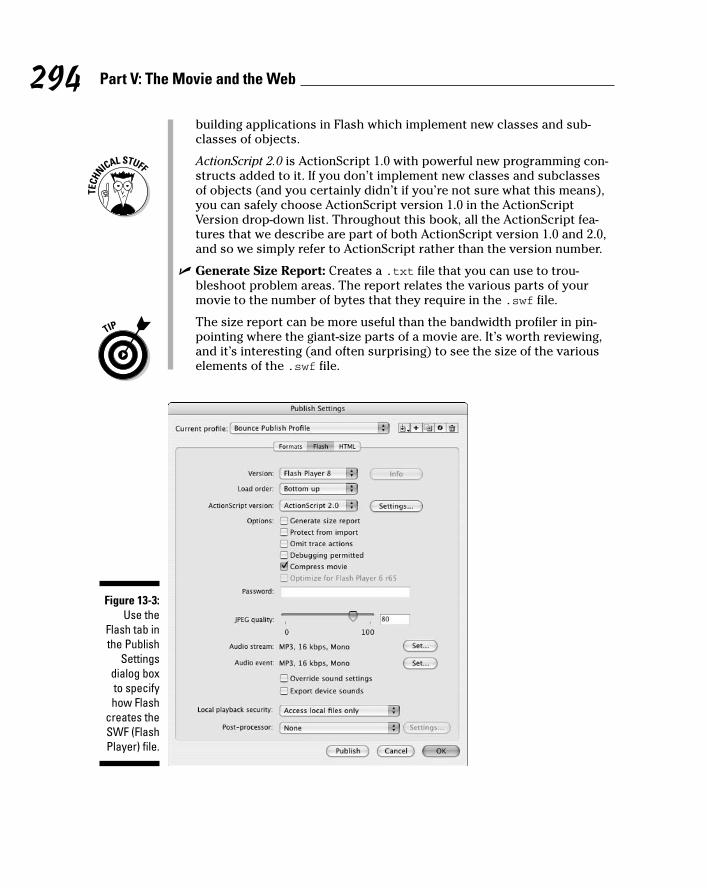
building applications in Flash which implement new classes and sub-classes of objects.
ActionScript 2.0 is ActionScript 1.0 with powerful new programming con-structs added to it. If you don’t implement new classes and subclassesof objects (and you certainly didn’t if you’re not sure what this means),you can safely choose ActionScript version 1.0 in the ActionScriptVersion drop-down list. Throughout this book, all the ActionScript fea-tures that we describe are part of both ActionScript version 1.0 and 2.0,and so we simply refer to ActionScript rather than the version number.
� Generate Size Report: Creates a .txt file that you can use to trou-bleshoot problem areas. The report relates the various parts of yourmovie to the number of bytes that they require in the .swf file.
The size report can be more useful than the bandwidth profiler in pin-pointing where the giant-size parts of a movie are. It’s worth reviewing,and it’s interesting (and often surprising) to see the size of the variouselements of the .swf file.
Figure 13-3:Use the
Flash tab inthe Publish
Settingsdialog boxto specifyhow Flash
creates theSWF (FlashPlayer) file.
294 Part V: The Movie and the Web
21_596918 ch13.qxd 10/7/05 7:19 PM Page 294
� Protect from Import: Prevents the .swf files from being downloadedfrom the Web site and imported back into Flash. This feature doesn’tprovide 100-percent-guaranteed protection, but it helps keep your workfrom being “borrowed.”
� Omit Trace Actions: Omits special codes used by programmers. Traceactions insert into Flash movies the codes used to record and displaytechnical information about a Flash movie’s progress in a special window,named the Flash Debugger. Programmers use this information to debug(remove errors from) their ActionScript programming. If you added Traceactions to your Flash movie, select the Omit Trace Actions check box toomit these codes from the .swf file, and your file will be smaller.
� Debugging Permitted: Lets you use the Debugger to debug a Flash moviefrom another computer. If you permit debugging, you can add a passwordto protect the movie file. Although this option is useful for ActionScriptprogrammers, discussing it is beyond the scope of this book.
� Compress Movie: Compresses your Flash Player file, especially text andActionScript, so that it can download faster. This option is great exceptthat your compressed file does not play in Flash Player versions earlierthan Flash Player 6.
Your Flash movie probably uses some feature that’s been added to Flashafter Flash Player 5 anyway, so you might as well go for it and compressyour movie.
� Optimize for Flash Player 6 r65: This option appears if you chooseFlash Player 6 when you choose the Flash Player version at the top ofthe dialog box. Flash Player 6 r65 was an updated version of Flash Playerwith significant bug fixes and performance enhancements.
� Password: Allows you to select a password for debugging, if you enablethe Debugging Permitted (or Protect from Import) check box. Thisoption prevents viewers from debugging (or importing) the movie unlessthey have the password.
� JPEG Quality: Sets the compression (size) versus quality of bitmaps, ifyou have any in your movie. You can set the quality anywhere from 0(the lowest quality and highest compression) to 100 (the highest qualityand lowest compression).
� Audio Stream: Displays and sets the audio compression for stream sounds(sounds that use the Stream Sync setting in the Property inspector when aframe with the sound is selected). This setting applies if you haven’t setthe compression for individual sounds in the Sound Properties dialog box.Also, if you enable the Override Sound Settings check box in the PublishSettings dialog box, this setting overrides the setting in the SoundProperties dialog box. To change the current setting, click Set. The
295Chapter 13: Publishing Your Flash Files
21_596918 ch13.qxd 10/7/05 7:19 PM Page 295

options are the same as in the Sound Properties dialog box. (Turn toChapter 11 for details on setting sound properties.)
� Audio Event: Displays and sets the audio compression for event sounds(as set in the Property inspector when a frame with the sound isselected). Otherwise, it’s the same as Audio Stream.
� Override Sound Settings: Select this check box to override settings inthe Sound Properties dialog box. Then the settings here apply to allsounds in your movie.
� Export Device Sounds (Flash 8 Professional only): This gives you theoption of exporting sounds in formats suitable for playback on mobiledevices, such as certain mobile phones and personal digital assistants(PDAs). To do this, you use proxy sound files, which are beyond thescope of this book.
� Local Playback Security: If you select Local Access Only, your Flashmovie can interact only with files and resources on the computer it’splaying on. If you select Access Network Only, your movie can interactonly with files and resources on the network, and not with those on thecomputer it’s playing on. (This separation of local and network accesshelps make it more difficult for a malicious programmer to create a Flashfile that collects data from your computer and transmits it over a net-work such as the Internet.)
� Post-Processor (Flash 8 Professional only): Here you can choose a post-processor from the drop-down list. A post-processor is software youmight install to automatically make changes to your SWF file when youpublish it. Macromedia says that they mainly envision this as a way toprepare SWF files for various future new versions of mobile devices,which is beyond the scope of this book.
If all these settings seems like a bit much, you can always just use the defaultsettings, roll with the flow, and see how it goes.
Publishing to HTMLMany people create Web pages by using HTML. If you work on a Web site, youcan write the HTML code from scratch or use an HTML editor. However, manypeople use a Web authoring program, such as Dreamweaver by Macromediaor FrontPage by Microsoft.
To place a Flash Player file on a Web page, you need the proper HTML code.Luckily, Flash creates this code for you, in formats suitable for both InternetExplorer and Mozilla Firefox browsers. The HTML code simply tells thebrowser to look for and display your Flash Player file. Of course, you canwrite the HTML code yourself, but this method is easier.
296 Part V: The Movie and the Web
21_596918 ch13.qxd 10/7/05 7:19 PM Page 296

Understanding the HTML code for a movieFigure 13-4 shows the default HTML code created for a Flash movie, dis-played in TextEdit on a Mac. (In TextEdit, before opening your HTML file, besure to choose TextEdit➪Preferences and then select the Plain Text radiobutton in the New Document Attributes section of the Preferences dialogbox.) Windows users can use Notepad to view HTML code created by thePublish command.
If you know some HTML, this page will look familiar to you. (And if you don’t,you might want to check out HTML 4 For Dummies, 5th Edition, by Ed Titteland Mary Burmeister, from Wiley Publishing, Inc.) It starts with the tags (codes)that all HTML documents contain, namely <html>, <head>, <title>, and<body>. Here’s how to understand the code in Figure 13-4:
� After <body, you see bgcolor=”#ffffff”>. This is the backgroundcolor of the entire HTML page.
By default, Flash makes the background color of the HTML page thesame color as the background of your Flash movie, but you might preferto change it to a different color to help visually define the Flash movie.
� After the comments (which start with !--), you see the object code.Microsoft Internet Explorer requires this tag in order to display yourFlash Player files. The object code includes the following:
Figure 13-4:Flash
createsHTML code
that lookslike this
when youpublish a
movie to aplayer file.
297Chapter 13: Publishing Your Flash Files
21_596918 ch13.qxd 10/7/05 7:19 PM Page 297

• Detailed codes (which are required to tell Internet Explorer how todisplay your player file).
• The specification of the version of the Flash viewer to look for andwhere to download it if necessary.
• The width and height of the display in the browser.
• The name of the file (value=”movie of the year.swf”).
• Parameter settings for local or network access, looping, quality,and background color. You set the background color by choosingModify➪Document in Flash and choosing a background color inthe Document Properties dialog box. (See Chapter 2 for details onusing this dialog box.)
• The embed code is for Netscape Navigator, Mozilla, and MozillaFirefox browsers, and accomplishes the same thing as the object code.
� Finally, you see the closing </object> tag as well as the tags that endevery HTML document: </body> AND </html>.
If you want to use the HTML document as is, you can. But if you want to placeyour Flash Player file in an existing HTML file, as you would for a Flashbutton, for example, you need to insert the <embed> and <object> codesinto the desired location of your existing file. To do this, copy the HTML codestarting from <object through </object>. Then paste this code into yourexisting HTML document, perhaps within the code for a table cell or wher-ever you want your Flash Player file to be displayed on your page.
If you didn’t change your default folder locations in the Formats section of thePublish Settings dialog box, your .swf file will be in the same folder as theHTML file that Flash creates when you publish your movie. In that case, theHTML <object> and <embed> tags created by the Flash publishing processreference the .swf file by simply mentioning the filename. For that to work,the .swf file must be in the same folder on your Web site’s server as yourWeb page’s HTML file.
If you usually keep images in a subfolder and want to place your .swf file inthat subfolder, you can specify them in the Formats tab of the Publish Settingsdialog box. Or you can edit the HTML code in a text editor to change the ref-erences for both the <object> and <embed> tags to add the path to the sub-folder. If you already do this for other images, the process is the same for the.swf file. For example, if you keep your images in a subfolder named imagesand the current code refers to tulip.swf, change the reference for both the<object> and <embed> tags to “images/tulip.swf”.
298 Part V: The Movie and the Web
21_596918 ch13.qxd 10/7/05 7:19 PM Page 298
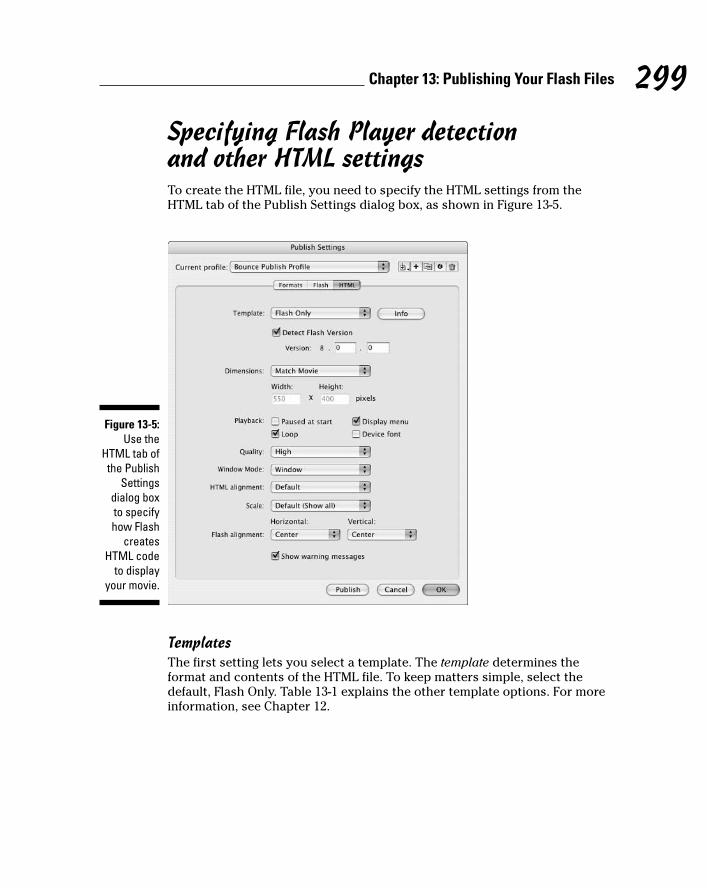
Specifying Flash Player detection and other HTML settingsTo create the HTML file, you need to specify the HTML settings from theHTML tab of the Publish Settings dialog box, as shown in Figure 13-5.
TemplatesThe first setting lets you select a template. The template determines theformat and contents of the HTML file. To keep matters simple, select thedefault, Flash Only. Table 13-1 explains the other template options. For moreinformation, see Chapter 12.
Figure 13-5:Use the
HTML tab ofthe Publish
Settingsdialog boxto specifyhow Flash
createsHTML code
to displayyour movie.
299Chapter 13: Publishing Your Flash Files
21_596918 ch13.qxd 10/7/05 7:19 PM Page 299

Table 13-1 HTML Template OptionsOption Comments
Flash for Pocket PC 2003 Creates an HTML file with <object> and<embed> tags and with Pocket PC–specificalignment. Can be used with Pocket IE andwith desktop Internet Explorer and Netscapebrowsers.
Flash HTTPS Creates an HTML file with <object> and<embed> tags, using the HTTPS protocol tospecify where to go to download the FlashPlayer if that’s necessary. HTTPS is amethod that is designed to send data overthe Web more securely than the standardmethod (HTTP).
Flash Only (Default) Creates an HTML file, as we describe in theearlier section “Understanding the HTMLcode for a movie,” with <object> and<embed> tags.
Flash with AICC Tracking Includes support for AICC (Aviation IndustryComputer-Based-Training Committee) track-ing when using Macromedia LearningInteractions.
Flash with FSCommand Used when you have added an FSCommandaction to your movie to interface withJavaScript. The HTML file also includes the<object> and <embed> commands.
Flash with Named Anchors Adds browser scripting and HTML anchorsso that viewers can bookmark Flash contentin Flash Player 6 and later, and thus use theWeb browser’s Back button effectively whilenavigating within a Flash movie.
Flash with SCORM 1.2 Tracking Includes support for SCORM (SharableContent Object Reference Model) version 1.2tracking when using Macromedia LearningInteractions.
Flash with SCORM 2004 Tracking Includes support for SCORM 2004 trackingwhen using Macromedia LearningInteractions.
300 Part V: The Movie and the Web
21_596918 ch13.qxd 10/7/05 7:19 PM Page 300

Option Comments
Image Map (If you don’t know what an image map is,don’t worry about this option.) Rather thandisplay an SWF player file, uses a GIF, JPEG,or PNG image (which you need to choosefrom the Formats tab) as a client-side imagemap coded in your HTML page.
QuickTime Creates <embed> and <object> tags inan HTML page to display a QuickTime Flashmovie based on your Flash movie. You needto select the QuickTime check box on theFormats tab. A QuickTime Flash movie playswith only QuickTime 4 or later. QuickTime 4can recognize only Flash 3 features.QuickTime 5 can recognize Flash 4 features.(QuickTime 4 and 5 are pretty old, so thisisn’t a very interesting way to publish yourFlash movies.)
Beneath the Template drop-down list is the Detect Flash Version check box.(This option is available only if you choose Flash Player 4 or later in the Flashtab of the Publish Settings dialog box, and you choose the Flash HTTPS orFlash Only template.) Select this check box to add browser scripting todetect the Flash Player for the version of Flash you specify on the Flash tab.When this check box is enabled, the Version Number text boxes below it arealso enabled. If you want to more exactly specify the minimum versionrequired, type revision numbers in the Major Revision and Minor Revisiontext fields there.
If you enable the Detect Flash Version check box, when you publish yourFlash file, the resulting HTML code prints “Alternate HTML content should beplaced here” in your Web page if the Flash Player of the specified versioncan’t be found or if the Web browser doesn’t have scripting enabled.(Scripting must be enabled by the Web browser for the Flash Player versiondetection to work.) You can edit the HTML to replace the sentence “AlternateHTML content should be placed here” with whatever alternative content youwant to display to the viewer in case the Flash Player version can’t be found.
If you enable the Detect Flash Version check box, viewers who have the FlashPlayer but who have disabled scripting in their Web browser will see onlyyour alternative content — not your Flash Web pages.
301Chapter 13: Publishing Your Flash Files
21_596918 ch13.qxd 10/7/05 7:19 PM Page 301
DimensionsThe Dimensions options control the size allotted to your Flash Player movieon your Web page. You have three options:
� Match Movie matches the width and height that you set in the MovieProperties dialog box (choose Modify➪Document).
� Pixels lets you specify, in pixels, the Width and Height. Type the desiredvalues in the text boxes.
� Percent lets you specify the area used by the Flash Player movie as apercentage of the browser window size. The 100% setting is ideal forpages that are designed to take up the entire page. Type the desiredvalues in the text boxes.
PlaybackThe Playback section determines the values of parameters in the HTML code.You have four options:
� Paused at Start creates a PLAY parameter whose value is FALSE. Theviewer must start the movie by clicking a button in the movie — thebutton’s instance needs to have a Play action in it. Alternatively, view-ers can right-click (Windows) or Control+click (Mac) the movie andchoose Play from the shortcut menu, but they might not be aware ofthis. By default, this check box is deselected, so movies start to playautomatically.
� Loop creates a LOOP parameter whose value is TRUE. The movie repeatsover and over. By default, this check box is selected, so make sure toclear it if you don’t want to loop your movie!
� Display Menu creates a MENU parameter set to TRUE. This option enables viewers to right-click (Windows) or Control+click (Mac) themovie and choose from a menu. The menu options in Flash Player 8 areZoom In/Out, Show All, Quality (High, Medium, or Low), Play, Loop,Rewind/Forward/Back, Settings, Print, Show Redraw Regions, Debugger,and About Macromedia Flash Player. Without this option, Settings, ShowRedraw Regions, Debugger, and About Flash Player are the only items onthe shortcut menu. By default, Display Menu is selected.
In case you’re wondering, Show Redraw Regions shows you the outlinesof which regions of your movie Flash refreshes every frame.
� Device Font applies to Windows playback only. When this check box isenabled, the HTML file includes a DEVICE FONT parameter set to TRUE,and Flash substitutes anti-aliased (smoothly curved) system fonts forfonts not available on the viewer’s system. This applies only to statictext you create in Flash. By default, this item is deselected.
302 Part V: The Movie and the Web
21_596918 ch13.qxd 10/7/05 7:19 PM Page 302

QualityThe Quality section determines the quality parameter in the <object> and<embed> tags of the HTML code. Quality refers to the level of anti-aliasing,which means the smoothing of the artwork so that it doesn’t have jaggededges. Of course, the lower the quality, the faster the playback. Usually, youwant to find a middle ground between quality and speed. You have six options:
� Low doesn’t use any anti-aliasing.
� Auto Low starts at low quality but switches to high quality if theviewer’s computer, as detected by the Flash Player, can handle it.
� Auto High starts at high quality but switches to low quality if theviewer’s computer can’t handle the playback demand. This optionshould provide good results on all computers.
� Medium applies some anti-aliasing but doesn’t smooth bitmaps. Thisoption is a good middle ground between low and high.
� High always uses anti-aliasing for vector art. Bitmaps are smoothed onlyif the file doesn’t contain tweens. This setting is the default. (SeeChapter 9 for the scoop on tweens.)
� Best always uses anti-aliasing, including for bitmaps.
Window ModeWindow Mode specifies how the player movie’s window interacts with therest of the page. Here are your options:
� The Window setting plays your movie as an opaque rectangle withinyour Web page and does not allow your HTML to render other content inthat rectangle.
� The Opaque Windowless setting creates an opaque background for themovie so that other elements in the Web page don’t show through whenthey’re behind the movie. This setting does allow your HTML to rendercontent in front of the movie.
� The Transparent Windowless setting makes the Flash background colortransparent so that other elements on your Web page show through (orcan appear on top of) your Flash content. This setting might slow downplayback.
� The Windowless settings embed window-related attributes in the<object> and <embed> tags. The code for Windowless has an effect onlyin more recent browsers running on Windows or Mac OS X — InternetExplorer version 5 and later, Netscape version 7 and later, Mozilla 1 andlater, and Opera 6 and later.
303Chapter 13: Publishing Your Flash Files
21_596918 ch13.qxd 10/7/05 7:19 PM Page 303
HTML AlignmentThe HTML Alignment setting specifies the ALIGN attribute and specifies howthe Flash Player movie is aligned within the browser window. You have fiveoptions:
� Default theoretically centers the Flash movie. If the browser window issmaller than the movie, this option theoretically crops the edges of themovie. But in our tests, the default is always left even though it shouldbe center.
� Left aligns the movie along the left side of the browser window. If thebrowser window is too small, this option crops the other sides of themovie.
� Right aligns the movie along the right side of the browser window. If thebrowser window is too small, this option crops the other sides of themovie.
� Top aligns the movie along the top of the browser window. If the browserwindow is too small, this option crops the other sides of the movie.
� Bottom aligns the movie along the bottom of the browser window. If thebrowser window is too small, this option crops the other sides of themovie.
ScaleThe Scale setting defines how the movie is placed within the boundaries when(and only when) you set a width and height different from the movie’s originalsize, using the Pixels or Percent options in the Dimensions section of thePublish Settings dialog box. You have four options:
� Default (Show All) displays the entire movie without distortion but mightcreate borders on two sides of the movie.
� No Border scales the movie to fill the dimensions without distortion butmight crop portions of the movie.
� Exact Fit fits the movie to the dimensions, distorting the movie if necessary.
� No Scale stops the movie from changing its scale if the viewer resizesthe Flash Player window.
Flash AlignmentFlash Alignment determines how the movie fits within the movie window (as opposed to the browser window). It works together with the Scale andDimensions settings. In other words, it determines how the Flash movie fits
304 Part V: The Movie and the Web
21_596918 ch13.qxd 10/7/05 7:19 PM Page 304
within the dimensions that you specify. For the Horizontal setting, you canchoose Left, Center, or Right. For the Vertical setting, you can choose Top,Center, or Bottom.
At the bottom of the Publish Settings dialog box is the Show Warning Messagescheck box. When it’s enabled, you see warning messages during the publishingprocess. Nevertheless, the publishing process continues, but you know thatyou might have made an error. For example, if you’ve chosen a template thatrequires a GIF or JPEG image but you haven’t selected either format on theFormats tab, you see a warning message.
After you choose your settings, click OK to return to your movie or clickPublish to publish it.
Publishing to Other FormatsYou can use Flash’s Publish Settings to generate files in a variety of other for-mats besides HTML pages and Flash Player movies, These other formatsinclude GIF images, animated GIFs, JPEG images, PNG images, QuickTimemovies, and self-playing Windows and Mac projectors.
Even if you use Flash all day every day, you might never need to generate GIFimages, JPEG images, or QuickTime images from your Flash movies, so we won’tclog up your life by describing the Publish Settings for those formats here.
Creating PNG graphic filesPNG files can display millions more colors than GIF files and support trans-parency. They offer some of the advantages of both GIFs and JPEGs.
To create a PNG image, choose PNG Image on the Formats tab of the PublishSettings dialog box (refer to Figure 13-2). Flash creates a PNG tab in the dialogbox, as shown in Figure 13-6.
Flash publishes the first frame of your movie unless you label a differentframe with the label #Static. (To create a label, click the frame and chooseWindow➪Properties➪Properties to open the Property inspector. If necessary,click the collapse arrow on the Property inspector title bar to expand it. Typea label name in the Frame text box on the left side of the Property inspector.)
305Chapter 13: Publishing Your Flash Files
21_596918 ch13.qxd 10/7/05 7:19 PM Page 305

You have the following options:
� Dimensions: By default, Flash matches the dimensions of the movie. Clearthe Match Movie check box to specify your own Width and Height settings.
� Bit Depth: Controls the number of bits per pixel, which in turn meanshow many colors the image contains. You can select 8-bit for 256 colors(like a GIF), 24-bit for 16.7 million colors, or 24-bit with Alpha, whichallows for transparency. When you choose 24-bit with Alpha, the image’sbackground becomes transparent. This is one of the things that design-ers love about PNG files.
� Options: See the Options settings for GIF images that we explain earlierin this chapter.
� Dither: See the Dither settings for GIF images that we explain earlier inthis chapter. Note: This option applies only if you choose an 8-bit depth.
� Palette Type: See the Palette Type settings for GIF images that weexplain earlier in this chapter. Note: This option applies only if youselect an 8-bit depth.
� Max Colors: See the Palette Type settings for GIF images that we explainearlier in this chapter.
Figure 13-6:Use the
PNG tab tocreate PNG
images.
306 Part V: The Movie and the Web
21_596918 ch13.qxd 10/7/05 7:19 PM Page 306

� Palette: See the Palette Type settings for GIF images that we explain ear-lier in this chapter.
� Filter Options: The PNG format filters an image line-by-line in order tocompress it. You have these options:
• None: Applies no filtering. The resulting file is larger than with theother options.
• Sub: Filters adjoining pixel bytes (working horizontally). Worksbest when the image has repeated horizontal information.
• Up: Filters in a vertical direction. Works best when the image hasrepeated vertical information.
• Average: Uses a mixture of horizontal and vertical comparison; agood first-try option.
• Path: Uses a more complex method that uses the three nearestpixels to predict the next one.
• Adaptive: Creates a unique color table for your PNG file, based onthe actual colors present. You get more accurate color, althoughthese colors might not be Web safe. The file size might also belarger. Use this option if accurate representation of colors is mostimportant, as in a photographic bitmap image.
After you specify your settings, click OK to return to your movie or click Publishto publish your PNG image and create the other files that you’ve chosen.
Creating self-playing moviesYou can also create projectors in the Publish Settings dialog box. A projectoris a self-playing Flash movie that doesn’t require the Flash Player. All theinteractive and animated features of your Flash movie work in a projector.You can use a projector for a Flash movie that you want to place on aCD-ROM or even on a floppy disk.
You can create a Windows or Mac version from either platform. But if youcreate a Mac version in Windows, you need to use a file translator, such asBinHex, so that the Mac Finder recognizes it as an application.
To create a projector, follow these steps:
1. Choose File➪Publish Settings.
The Publish Settings dialog box opens.
2. On the Formats tab, select the Windows Projector check box or theMacintosh Projector check box, or both.
307Chapter 13: Publishing Your Flash Files
21_596918 ch13.qxd 10/7/05 7:19 PM Page 307

3. Click Publish.
4. Click OK or Cancel to close the Publish Settings dialog box.
For Windows, Flash creates an EXE file. For the Mac, Flash creates a MacintoshProjector file. If you create the Macintosh Projector file in Flash while using aWindows computer, the Macintosh Projector file is stored inside a compressedBinHex file (HQX), which can then be uncompressed on a Mac.
Don’t forget to test your movie after you place it on a CD-ROM or floppy disk.Try it out with a variety of processor speeds if possible.
Using Publish ProfilesYou can save all the settings that you configure in the Publish Settings dialogbox as a publish profile. You can then duplicate, modify, export, import, anddelete your publish profiles and trade them with your collaborators. Thismakes it easy for you to repeatedly use any collection of settings that youneed. You can create standard publish profiles, which you use to make surethat all your files are published uniformly, and you can create specializedpublish profiles that are specific to a single project. The following sectionstell you how.
Creating a publish profileTo create a publish profile, follow these steps:
1. Choose File➪Publish Settings.
The Publish Settings dialog box appears.
2. Click the Create New Profile button in the upper-left part of the dialog box.
The Create New Profile dialog box appears.
3. Type in a name for your profile and click OK.
The Create New Profile dialog box disappears, and the name of your newprofile appears in the Current Profile drop-down list of the PublishSettings dialog box.
4. Specify the publish settings for your document in the Publish Settingsdialog box, as we describe in earlier sections of this chapter, and thenclick OK.
308 Part V: The Movie and the Web
21_596918 ch13.qxd 10/7/05 7:19 PM Page 308

Duplicating a publish profileYou might want to duplicate a publish profile to use it as a springboard fornew variations. To duplicate a publish profile, do the following steps:
1. Choose File➪Publish Settings.
The Publish Settings dialog box appears.
2. Select the publish profile that you want to copy in the Current Profiledrop-down list (near the top of the dialog box).
3. Click the Duplicate Profile button in the upper-right part of the dialog box.
The Duplicate Profile dialog box appears.
4. Type in a name for your duplicate profile and click OK.
The Duplicate Profile dialog box disappears. The name of your dupli-cated profile appears in the Current Profile drop-down list of the PublishSettings dialog box.
Modifying a publish profileYou might use a particular publish profile as, for example, a standard for yourco-workers. As circumstances change, you might want to modify the publishprofile, and that’s easy to do. To modify a publish profile, follow these steps:
1. Choose File➪Publish Settings.
The Publish Settings dialog box appears.
2. Select the publish profile that you want to modify in the CurrentProfile drop-down list (near the top of the dialog box).
3. Select the publish settings that you want for your document in thePublish Settings dialog box, as we describe in the earlier sections ofthis chapter, and then click OK.
Deleting a publish profileTo delete a publish profile, follow these steps:
1. Choose File➪Publish Settings.
The Publish Settings dialog box appears.
309Chapter 13: Publishing Your Flash Files
21_596918 ch13.qxd 10/7/05 7:19 PM Page 309

2. Select the publish profile that you want to delete in the CurrentProfile drop-down list (near the top of the dialog box).
3. Click the Delete Profile button in the upper-left part of the dialog box.
A dialog box appears asking you to confirm that you want to delete the profile.
4. Click OK.
Exporting and importing publish profilesTo use a publish profile in documents other than the document in which youcreated it, first you export it from the document in which you created it.Then you import it into the new document.
This makes your work easier if, for example, you’re working on a Flash pro-ject with a team and you need to publish your Flash documents according toa single standard. The entire team can easily share the same publish profile.
To export a publish profile, follow these steps:
1. Choose File➪Publish Settings.
The Publish Settings dialog box appears.
2. Select the publish profile that you want to export in the CurrentProfile drop-down list (near the top of the dialog box).
3. Click the Import/Export Profile button (in the upper-left part of thedialog box) and select Export from the drop-down list.
The Export Profile dialog box appears.
4. In the dialog box, select a location where you want to save the file andClick Save.
The default location is a folder named Publish Profiles, which is locatedwithin the Flash 8 application folder.
To import a publish profile, follow these steps:
1. Choose File➪Publish Settings.
The Publish Settings dialog box appears.
2. Click the Import/Export Profile button (in the upper-left part of thedialog box) and select Import from the drop-down list.
The Import Profile dialog box appears.
310 Part V: The Movie and the Web
21_596918 ch13.qxd 10/7/05 7:19 PM Page 310
3. In the dialog box, browse to find the publish profile that you want toimport and click Open.
The name of the imported publish profile appears in the Current Profiledrop-down list of the Publish Settings dialog box.
Using Publish PreviewIf you want to specify publish settings, see the results, and then go back totweak your settings, you can use Publish Preview rather than Publish. PublishPreview creates the files specified in the Publish Settings dialog box, just asthe Publish command does. The only difference is that Publish Preview auto-matically displays the requested file, usually the SWF file. The value is insimply saving the steps of manually opening your files in your browser —helpful when you’re doing lots of tweaking and going back and forth betweenyour publish settings and your browser to see what works best.
To use Publish Preview, follow these steps:
1. Specify your settings by using the Publish Settings dialog box (as weexplain earlier in this chapter) and click OK.
2. Choose File➪Publish Preview.
3. From the Publish Preview submenu, choose the file format that youwant to preview.
4. When you’re done, close the window or browser.
Posting Your Movie to Your Web SiteAfter you finish publishing your movie, post it on your Web site or place it ona CD-R or other media.
To put your movie on a CD-R, you can make Mac and Windows projectors andcopy them onto a CD-R by using CD-burner software. Then you don’t need toview it through a Web browser. Or copy your published HTML and SWF filesonto a CD-R along with any external scripts, image files, or text files used byyour HTML and SWF files.
Refer to the section “Understanding the HTML code for a movie,” earlier inthis chapter, for instructions on modifying the HTML code if you want toplace your SWF file on an existing page or place your SWF file in a subfolder.
311Chapter 13: Publishing Your Flash Files
21_596918 ch13.qxd 10/7/05 7:19 PM Page 311
To post your movie to a Web site, upload both the HTML and the SWF file. Ifyour HTML or SWF files load data from any external scripts, image files, ortext files, you need to upload those, too.
Open your browser and load the page that contains your Flash movie.Hopefully, it works perfectly and looks great! If not, check out the HTML code,check your publish settings, and make sure that the necessary files are in theproper location on your Web site’s server.
Exporting Movies and ImagesIn addition to publishing, Flash lets you export image files and QuickTimemovies. Export a Flash file when you want to use it in another application.For example, you may want to export a frame as a PNG file and insert it into aword processing document. You can use Export Movie to export to aQuickTime movie or to create a still image of every frame.
After you export a movie or image, you can then import it into the desiredapplication for further editing or display.
Note that when you choose File➪Export➪Export Movie to export a movie toa format such as GIF, JPG, or PNG, you export a sequence of individually num-bered images. That might give you some interesting raw material to importinto other graphics applications.
To export a movie or image, follow these steps:
1. Open the Flash document from which you want to export. (SeeChapter 1 for information about opening an existing Flash movie.)
2. To export to an image, select the frame that you want to export; other-wise, skip to Step 3.
3. Choose File➪Export➪Export Image or File➪Export➪Export Movie.
4. In the dialog box, navigate to the desired location and type a name foryour image or movie.
5. Select a type of file from the Save as Type drop-down list.
6. Click Save.
7. Depending on the format that you selected, a dialog box mightappear. If so, specify the settings and then click OK.
These settings are similar to the kind of settings that we describe, earlierin this chapter, in the section “Creating PNG graphic files.”
Table 13-2 lists the types of files that you can export.
312 Part V: The Movie and the Web
21_596918 ch13.qxd 10/7/05 7:19 PM Page 312

Table 13-2 Export File TypesFile Type Windows Mac Comments
Adobe Illustrator (AI) X X A vector format.
Drawing Exchange X X A format that you Format (DXF) can import into AutoCAD,
although you lose fills.
Encapsulated X X A vector format PostScript (EPS) used in Adobe Illustrator
and recognized by manyother applications.
Graphics Interchange X X A bitmap format, lim-File (GIF) ited to 256 colors.
Joint Photographic X X A bitmap format Experts Group that supports (JPEG/JPG) 24-bit color.
Macromedia Flash X X A video format Video (FLV) designed for use with
video conferencing andother communicationsapplications.
PICT (PCT) X A bitmap format that canbe used with most Macand many PC applica-tions. The PICT formatsupports transparencyand variable bit-depths.
Portable Network X X A bitmap format Graphic (PNG) that supports variable
bit-depth and trans-parency.
QuickTime (MOV) X X A QuickTime 4 formatmovie.
QuickTime Video (MOV) X On Macs only, uses theVideo QuickTime 3format, bitmapping allcontent.
Video for Windows (AVI) X A bitmap video format.Files can get large.
(continued)
313Chapter 13: Publishing Your Flash Files
21_596918 ch13.qxd 10/7/05 7:19 PM Page 313

Table 13-2 (continued)File Type Windows Mac Comments
Windows Audio (WAV) X Exports just the sound.
Windows Bitmap (BMP) X A bitmap format. Manyapplications recognize it.Offers variable bit-depthsand transparency sup-port. File size is large.
Windows Metafile and X A vector format Enhanced Metafile supported by many(WMF/EMF) applications.
Creates smaller files than EPS.
Creating Printable MoviesSuppose that you want your Web site viewers to be able to print a form onyour Web site that you created in Flash. Or perhaps you want them to printyour contact information so that your Web page can become your businesscard. The Flash Player printing features enable your viewers to print receipts,information sheets, coupons, or whatever else helps you do business on theWeb. You can specify certain frames in a movie — including frames in themain Timeline, a button, or a movie clip — to be printable from the FlashPlayer shortcut menu. Viewers right-click (Windows) or Control+click (Mac)to access the Print command.
Your viewers need instructions on how to print, so place some text some-where telling them what to do.
Of course, viewers can use their browser’s Print command to print. Theresult, however, isn’t nearly as controllable. When we tried it, our browserprinted only the first frame, which was useless in our example. The browseralso added the Uniform Resource Locator (URL), the name of the movie, thedate, and the page number.
By default, the Flash Player shortcut menu lets viewers print the entiremovie, frame by frame. This feature is fairly useless for most purposes. Butby specifying which frames are printed and the print area, you can use thePlayer’s Print command to make specific information or forms available toyour viewers.
314 Part V: The Movie and the Web
21_596918 ch13.qxd 10/7/05 7:19 PM Page 314
Preparing your movie for printingIf you want a nice, clean result, you need a nice, clean frame. The Flash Playerprints all objects on all layers of the movie. If you want to create a form, forexample, put it in its own frame and make sure that objects on other layersdon’t continue into that frame.
Alternatively, you can specify the print area so that you include only the areathat you want printed, excluding other objects on the Stage in the frame. Butif you specify a small area, this area becomes the entire page size when print-ing, so the objects in that small area are enlarged to take up the entire printedpage. You can control the layout by changing the dimension, scale, and align-ment HTML settings (on the HTML tab of the Publish Settings dialog box).
Make sure that everything you want to print is on the Stage. For example, ifyou want to print from a movie clip, it must be on the Stage and have aninstance name.
You can make a movie clip invisible by setting its _visible property to false.(Use the Actions panel.) This capability enables you to instruct viewers toprint a form that they don’t see on the screen.
If your movie displays text instructing users how to print from the printablearea, you might want to exclude this text from the printable area. They proba-bly don’t want to print the instructions on how to print, right?
Specifying printable framesTo specify which frame or frames you want to print when your viewerschoose Print from the Flash Player shortcut menu, follow these steps:
1. With the movie open, choose Window➪Properties➪Properties toopen the Property inspector.
The shortcut is Ctrl+F3 (Windows) or Ô+F3 (Mac).
If necessary, click the collapse arrow on the Property inspector’s titlebar to expand it.
2. Select from the Timeline the frame that you want printed.
3. If the frame that you selected is not a keyframe, make it a keyframe bychoosing Insert➪Timeline➪Keyframe. (Turn to Chapter 9 for the low-down on keyframes.)
4. In the Property inspector, type #p in the Frame text box, as shown inFigure 13-7. Beneath the Frame text box, set the Label Type drop-down list to Name.
315Chapter 13: Publishing Your Flash Files
21_596918 ch13.qxd 10/7/05 7:19 PM Page 315
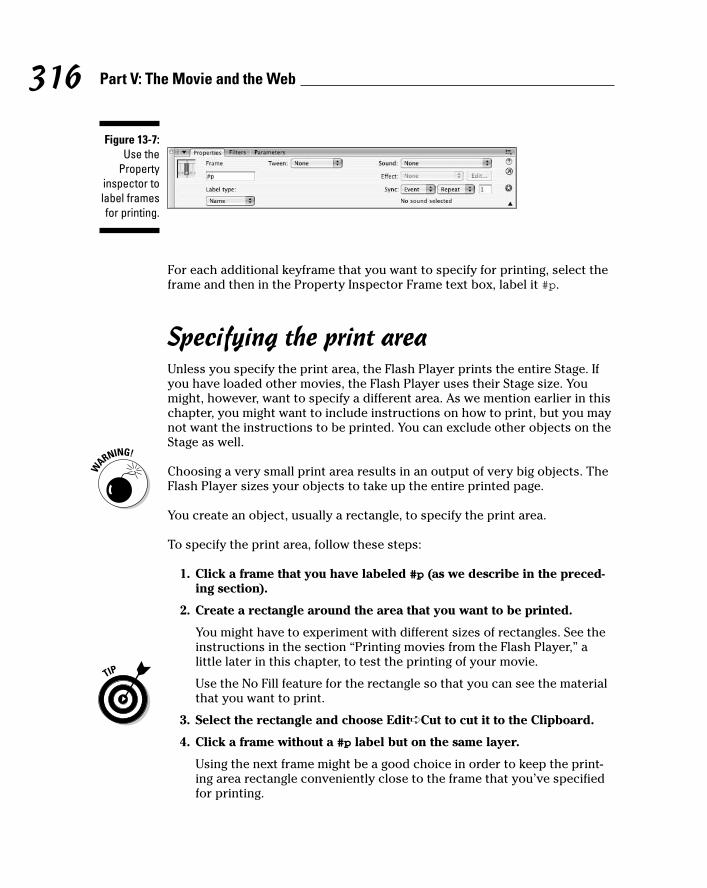
For each additional keyframe that you want to specify for printing, select theframe and then in the Property Inspector Frame text box, label it #p.
Specifying the print areaUnless you specify the print area, the Flash Player prints the entire Stage. Ifyou have loaded other movies, the Flash Player uses their Stage size. Youmight, however, want to specify a different area. As we mention earlier in thischapter, you might want to include instructions on how to print, but you maynot want the instructions to be printed. You can exclude other objects on theStage as well.
Choosing a very small print area results in an output of very big objects. TheFlash Player sizes your objects to take up the entire printed page.
You create an object, usually a rectangle, to specify the print area.
To specify the print area, follow these steps:
1. Click a frame that you have labeled #p (as we describe in the preced-ing section).
2. Create a rectangle around the area that you want to be printed.
You might have to experiment with different sizes of rectangles. See theinstructions in the section “Printing movies from the Flash Player,” alittle later in this chapter, to test the printing of your movie.
Use the No Fill feature for the rectangle so that you can see the materialthat you want to print.
3. Select the rectangle and choose Edit➪Cut to cut it to the Clipboard.
4. Click a frame without a #p label but on the same layer.
Using the next frame might be a good choice in order to keep the print-ing area rectangle conveniently close to the frame that you’ve specifiedfor printing.
Figure 13-7:Use the
Propertyinspector tolabel framesfor printing.
316 Part V: The Movie and the Web
21_596918 ch13.qxd 10/7/05 7:19 PM Page 316
You can have only one #b label in a Timeline. Also note that if you use a#b label, it must be on the same layer as the #p label.
5. Choose Edit➪Paste in Place.
You now have a rectangle of the right size, but in its own frame — aframe without a #p label.
6. Select the frame containing the rectangle and choose Window➪Properties➪Properties to open the Property inspector.
If necessary, click the collapse arrow on the Property inspector’s titlebar to expand it.
7. In the Frame text box on the left side of the Property inspector, type#b to signify that the shape in this frame will be used as the boundaryfor the print area.
Printing movies from the Flash PlayerBefore uploading your printable movie to your Web site, you should test theprinting function. To do so, use the Publish Settings dialog box to specify thepublish settings that you want, as we explain throughout this chapter. Thenchoose File➪Publish Preview➪Default. Your browser opens, and you see yourmovie play.
To test-print your movie, right-click (Windows) or Control+click (Mac) in thebrowser. From the Flash Player shortcut menu, choose Print.
On the Mac, the Page Setup dialog box appears; choose the printer, papersize, orientation, and scale you want, and then click OK.
Then, for both Mac and Windows, the Print dialog box appears. Choose theprint range to select which frames to print or choose All. In Windows, youcan also choose Selection to print the current frame. If only one frame hasbeen made printable, the Pages option appears dimmed. Any option that youchoose prints the frame that you’ve specified for printing. Click OK(Windows) or Print (Mac) to print.
After you upload your movie onto your Web site, viewers use the same proce-dure to print your movie.
Place on your page some text that explains to your viewers how to print yourmovie. Many viewers don’t even know that the shortcut menu exists.
317Chapter 13: Publishing Your Flash Files
21_596918 ch13.qxd 10/7/05 7:19 PM Page 317

318 Part V: The Movie and the Web
21_596918 ch13.qxd 10/7/05 7:19 PM Page 318

Part VIThe Part of Tens
22_596918 pt06.qxd 10/7/05 7:17 PM Page 319

In this part . . .
In the famous For Dummies Part of Tens, we answer theten most-asked questions — or at least the ten ques-
tions we most wanted to answer. In this part, you findsome cool techniques for creating drag-and-drop objectsand simulating 3-D effects in Flash. In the chapter on theten best Flash resources, we manage to give you dozens ofFlash resources, such as the many Flash resource Websites (while convincing our publisher that only ten exist).Finally, to top off the book, we give you our votes for tengreat Flash designers. Surf to see the work of all ten andbe amazed and inspired by the possibilities!
22_596918 pt06.qxd 10/7/05 7:17 PM Page 320

Chapter 14
Ten Frequently Asked Questions
In this chapter, we answer some frequently asked questions about Flashwhile explaining how to create some very cool effects and streamline the
process of creating Flash movies.
How Do I Combine Two Flash Movies into One?It’s not difficult to merge two Flash movies into one. You simply copy all theframes in each scene in your first movie to new scenes that you create inyour second movie. To merge two Flash movies into one, follow these steps:
1. Choose File➪Open, and in the Open dialog box that appears, navigateto and select the Flash movie you want to copy from.
The Flash movie you select appears on the Stage.
2. Click the Edit Scene button near the top right of the Timeline, and fromthe drop-down list that appears, choose the scene you want to copy.
The scene you select appears on the Stage.
3. Unlock all the layers in the scene.
See Chapter 4 for information on unlocking layers.
4. Choose Edit➪Timeline➪Select All Frames.
This selects all keyframes and tweens in all layers in the scene.
5. Choose Edit➪Timeline➪Copy Frames.
This copies all the keyframes and tweens in your scene.
6. Choose File➪Open, and in the Open dialog box that appears, navigateto and select the Flash movie you want to copy to.
The Flash movie you select appears on the Stage.
7. Choose Insert➪Scene.
An empty scene appears on the Stage.
23_596918 ch14.qxd 10/7/05 7:23 PM Page 321

8. Click the first frame in the Timeline and choose Edit➪Timeline➪Paste Frames.
This pastes the scene you copied from your first movie into your newscene in your second movie.
9. Repeat Steps 1 through 8 for each scene you want to copy from yourfirst movie.
10. Choose Control➪Test Movie.
Your second movie now includes all the scenes you copied from yourfirst movie.
Why Is Motion Tweening not Working?For motion tweening to work, you need to make sure that several pieces arein place. (Review Chapter 9 for the basic instructions on motion tweening.)
Motion tweening problems can arise from any number of sources, a few ofwhich follow:
� You need to tween the right stuff. Make sure that you’ve created agroup, some text, or an instance of a symbol. Motion tweening doesn’twork reliably on anything else.
� You need an ending keyframe. If you have a dashed line rather than asolid line indicating your motion tween on the Timeline, you didn’t prop-erly create an ending keyframe. Undo the steps that created the tween,create an ending keyframe, and try again.
� You need to tween a keyframe. If you’re having trouble changing thelength of the tween by dragging on one of the keyframes, that keyframewasn’t included when you created the motion tween. Select the offend-ing keyframe by itself (press Ctrl for Windows or Ô for Mac while youselect, if necessary), and select Motion from the Tweening drop-downlist of the Property inspector.
� You need to isolate the problem. If you can’t figure out why your motiontweening isn’t working, you might have some action or setting that youdon’t even remember. Movies can get very complex, and comprehendingall the relationships and interconnections can be difficult. Try copying tothe Clipboard the object that you’re animating and pasting it into a new,“clean” movie. You can copy and paste frames as well. In the new movie,you should be able to analyze the situation more clearly.
� You need to undo or revert. If the animation worked previously, tryundoing your last several actions. You can also try removing anyrecently created objects or ActionScript. If you can revert to the timeyour animation worked, you can start again from there.
322 Part VI: The Part of Tens
23_596918 ch14.qxd 10/7/05 7:23 PM Page 322
� You need to try choosing Control➪Test Movie. Only the simplestActionScript and button behaviors work on the Stage. If you’re trying torun your animation by using the Controller or pressing Enter, try choos-ing Control➪Test Movie instead. If your movie has more than one scene,choose Control➪Test Scene to try to isolate the problem to one scene.
� You need to put each object on its own layer. If you have more than oneobject on a layer, place each object on its own layer. (Refer to Chapter 6for a discussion of working with layers.) Animate only one object on alayer. (This solves many tweening problems.)
How Can I Sync Sound with Motion?Suppose that you want certain parts of your animation synchronized withspecific sounds. For example, you want a bouncing ball to synchronize withthe beat of some music you imported into Flash. Without specifically syn-chronizing the sounds, the sound and the animation might play at differentspeeds. A faster computer might play the animation faster but doesn’t adjustthe length of the sound. (For basic information on adding sound to Flash,refer to Chapter 11.)
To synchronize animation with the sound, you need to use a stream sound.When you add the sound file to a frame, choose Stream from the Sync drop-down list in the Property inspector. Then adjust the keyframes so that theanimation and the sound end at the same time.
To be more precise, you can synchronize your animation with specific partsof the sound. To accomplish this task, choose Modify➪Timeline➪LayerProperties and choose 200% or 300% from the Layer Height drop-down list.You can also click the little button in the upper-right corner of the Timelineand choose Medium or Large for the size of the frames from the option menuthat appears. Now you can see the shape of your sound wave more clearly sothat you can adjust the keyframes of your animation to match certain parts ofthe sound.
One way to pinpoint which frame to use for placing an animation event is todrag the playhead (the red rectangle) just above the Timeline. This techniquelets you control the speed of the animation. You can drag left or right untilyou find the exact frame that you want to work with. You can then move akeyframe to that frame, for example, to move an animation event to a framethat contains a specific portion of your sound.
What Is the Best Way to Import Bitmaps?Maybe you need to put into your Flash animation your boss’s photograph ora photo of the product that you sell. Or maybe you want an effect in your
323Chapter 14: Ten Frequently Asked Questions
23_596918 ch14.qxd 10/7/05 7:23 PM Page 323

Flash movie that you can create only in Photoshop. So you need to use abitmap image. What format of bitmap do you use?
You might not have a choice of format. If your information systems depart-ment hands you a logo in JPEG format, you probably have to use it.
A trick for changing a file’s format is to open an existing bitmap file in animage-editing program. Most let you save that file in another format.
At other times, you can choose your format. For example, when you scan aphoto, most scanner software lets you choose from among several formats. Adigital camera may also let you choose the format. Of course, if you createthe bitmap in an image-editing program, you can choose from any format thatthe program supports. (Turn to Chapter 3 for instructions on importingbitmap images. Hint: Choose File➪Import➪Import to Stage or File➪Import➪Import to Library.)
Here are some commonly used bitmap formats:
� The GIF file format, which generally displays well in a browser, can’thave more than 256 colors. You can use the GIF format for simple draw-ings that have a limited color palette, but you may be better off with thePNG format, described later in this list.
� JPEG files can display many more colors than GIF files and thereforeproduce more realistic photos and other complex drawings. AlthoughJPEG graphics can be highly compressed to reduce file size, they losesome fidelity as a result. Also, when Flash compresses the file againduring export or publishing, you might end up with an unfocused mess.
� BMP doesn’t lose quality when compressed, but the BMP format resultsin larger file sizes than GIF or JPEG.
� PNG is a nice compromise between file size and image quality. The PNGformat doesn’t lose quality when compressed and allows many morecolors than the GIF format. And it provides the capability for transparency.Formerly, the PNG format wasn’t supported in all Web browsers, butnow it is supported in almost all current browsers. If you want the small-est file size but don’t want to compromise quality, the PNG format is agood choice. The Flash image compressor works best and most effi-ciently with images that have not been compressed using techniquesthat may lose some image quality.
Your final result is the .swf file that you publish. Flash compresses bitmaps(as well as the entire movie) when the movie is exported to an .swf FlashPlayer file. Therefore, you need to think about the entire round-trip journeythat your bitmap will make. You might have to test varying bitmap formatsand publish the movie for each one to see the exact results.
324 Part VI: The Part of Tens
23_596918 ch14.qxd 10/7/05 7:23 PM Page 324
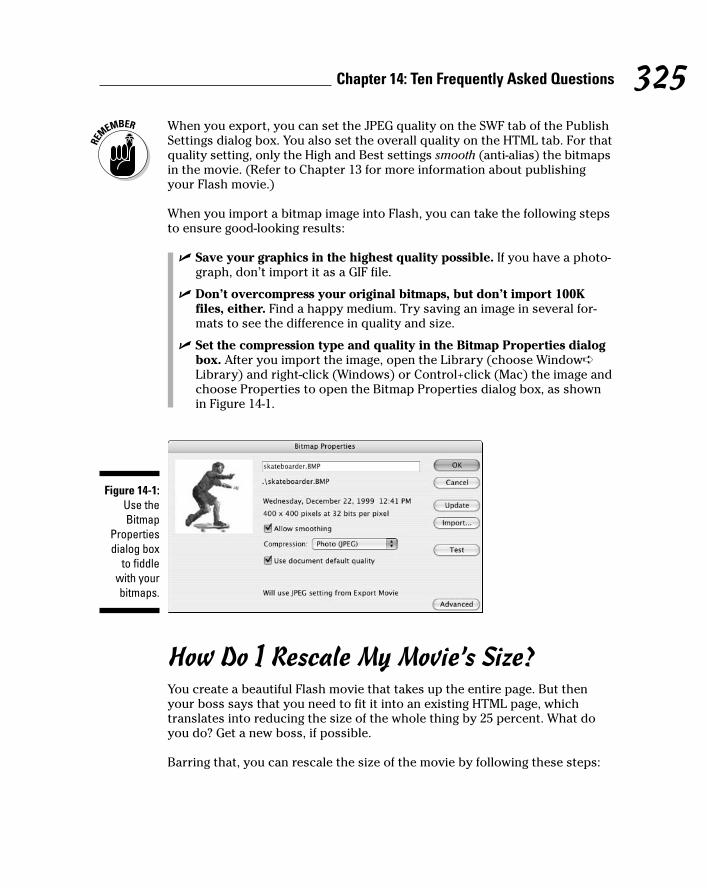
When you export, you can set the JPEG quality on the SWF tab of the PublishSettings dialog box. You also set the overall quality on the HTML tab. For thatquality setting, only the High and Best settings smooth (anti-alias) the bitmapsin the movie. (Refer to Chapter 13 for more information about publishingyour Flash movie.)
When you import a bitmap image into Flash, you can take the following stepsto ensure good-looking results:
� Save your graphics in the highest quality possible. If you have a photo-graph, don’t import it as a GIF file.
� Don’t overcompress your original bitmaps, but don’t import 100Kfiles, either. Find a happy medium. Try saving an image in several for-mats to see the difference in quality and size.
� Set the compression type and quality in the Bitmap Properties dialogbox. After you import the image, open the Library (choose Window➪Library) and right-click (Windows) or Control+click (Mac) the image andchoose Properties to open the Bitmap Properties dialog box, as shownin Figure 14-1.
How Do I Rescale My Movie’s Size?You create a beautiful Flash movie that takes up the entire page. But thenyour boss says that you need to fit it into an existing HTML page, whichtranslates into reducing the size of the whole thing by 25 percent. What doyou do? Get a new boss, if possible.
Barring that, you can rescale the size of the movie by following these steps:
Figure 14-1:Use theBitmap
Propertiesdialog box
to fiddlewith yourbitmaps.
325Chapter 14: Ten Frequently Asked Questions
23_596918 ch14.qxd 10/7/05 7:23 PM Page 325

1. Decide the amount of the reduction you need to achieve, such as 25 percent.
2. If you have any hidden layers, right-click (Windows) or Control+click(Mac) any layer and choose Show All from the contextual menu thatappears.
This step ensures that all layers are considered in the reduction.
3. Click the Edit Multiple Frames button (just below the Timeline).
4. Drag the onion skin markers to the beginning and ending frames ofyour animation.
See Chapter 9 if you need more information on how to use the onion skinmarkers.
5. Choose Edit➪Select All.
6. Choose Window➪Info to open the Info panel.
You see the Width (W) and Height (H), and X and Y coordinates.
7. Multiply all the numbers in the Info panel by the reduction percentage.
Write down the results of your calculations, just to be safe.
8. Click in the W (Width) text box and type the new number for thereduction percentage; then press Tab to move to the next box.
9. Repeat Step 8 for the H (Height), X, and Y text boxes.
You’re done! Flash scales your entire movie by the percentage you specified.You may have to drag everything so that it fits appropriately within yoursmaller-sized movie.
Size requirements are key pieces of information that you need to nail downbefore building a Flash movie so that you can (you hope!) avoid any need torescale your movie’s size.
What Are the Best Movie-Creating Tips?Every Flash user collects a number of techniques that make creating a Flashmovie easier. The following items are a few ideas to help you get started.
� Save multiple versions of your movie by choosing File➪Save As. If a prob-lem arises, you can always go back to a previous version and start again.
� As soon as you have an overall structure, test your movie in a variety ofbrowsers (for example, Internet Explorer, Mozilla Firefox, and Apple’sSafari) at various resolutions, if possible. You can more easily fix prob-lems early, before your project becomes too complex. Choose Control➪
326 Part VI: The Part of Tens
23_596918 ch14.qxd 10/7/05 7:23 PM Page 326

Test Movie as soon as you develop your animation and continue to testit in this way for each new significant change.
� Add comments (see Chapter 10) to your ActionScript so that you canfigure out what you did when you go back to your movie after your vacation.
� Use consistent names for symbols. Many Flash users add the type ofsymbol after the name, so a button could be called Contact_btn, and amovie clip could be called Intro_mc. When you start creating movie clipsinside buttons, you might get confused if you don’t name your symbolsintelligently.
� Use meaningful names for your instances. If you have three instances ofa button symbol, you need to be able to distinguish which is which. Youcan name them by their purpose, such as Email, Services, and Clients.
� When you complete work on a layer, lock the layer to avoid makingunwanted changes.
You’re sure to discover other techniques as you become more experienced in Flash.
Can Flash Do 3-D?You can’t really create 3-D in Flash. Flash is decidedly a 2-D program. But, notto be deterred, Flash users have created many tricks to make you think you’reseeing 3-D.
One simple approach is to rotate a 2-D object in what appears to be 3-Dspace. For example, you can draw a circle and scale it in one dimension sothat it becomes progressively more of an oval until all you see is a straightline. Continue to expand it from the line through fatter and fatter ovals untilyou have a circle again. You’ve just apparently rotated the circle 180 degrees.Continue until you’re finished. You can select a group of frames and copythem or reverse them. (Turn to Chapter 9 for more details.) You can see asimple example in Figure 14-2.
You can use shape tweening to create this 3-D effect. You can shape tween acircle into a line and back again to make it look like it’s rotating.
For fancier results, you can use software packages, such as Swift 3D, that aredesigned for creating 3-D animation for Flash. Also, some high-end 3-D anima-tion packages, such as Maya, have Flash export capabilities built in.
Another technique for simulating 3-D is to import an object from a 3-D program,such as 3D Studio Max, AutoCAD, or Maya.
327Chapter 14: Ten Frequently Asked Questions
23_596918 ch14.qxd 10/7/05 7:23 PM Page 327

In the following steps, we use AutoCAD as an example. To import an objectfrom AutoCAD, follow these steps:
1. Within AutoCAD, create the 3-D object, display the view that you wantto start with, and then choose File➪Export.
The Export Data dialog box opens. The Files of Type drop-down listshould read Metafile (*.wmf).
2. In the File Name text box, enter a name for the file. Add a 1 after thefilename. Click Save and select the object when prompted.
3. Rotate the 3-D model slightly.
In AutoCAD 2000 and later, you can use the 3D Orbit command for this step.
4. Save this new view as a .wmf file as we explain in Step 2, consecu-tively numbered from the first file.
For example, if the first file is 3d1.wmf, name the second file 3d2.wmf.
5. Repeat Steps 2 through 4 until you’ve rotated the model 360 degrees.
6. In Flash, choose File➪Import➪Import to Stage.
7. Select Windows Metafile (*.wmf) from the Files of Type drop-downlist, select the first WMF file that you created, and then click Open.
3 4
5 6
1 2
5 6
Figure 14-2:The circle is
2-D, but itlooks like it’s
rotating in 3-D; here,
you see thefirst quarter
revolution.
328 Part VI: The Part of Tens
23_596918 ch14.qxd 10/7/05 7:23 PM Page 328
8. When Flash asks whether you want to import all the files in thesequence, click Yes.
Flash imports all the files, placing them in consecutive keyframes. TheWMF file may be imported with a border as well as the lines that makeup the object.
9. For each keyframe, do the following:
a. If your graphic has a border: Click anywhere outside the objects,select just the border, and press Delete.
b. If your graphic is imported as one object: Select all the objects andthen choose Modify➪Break Apart.
c. Select the objects and then choose Modify➪Convert to Symbol.
You can now play your animation. Note that you lose any shading or materi-als that you created in AutoCAD, so your model has a wire-frame look. Youcan use fills to modify your 3-D object in Flash to create the appearance ofsolidity.
For an example of creating a simple 3-D animation using this technique, lookin the Ch14 folder of the companion Web site for 3d rotation.fla. (Thecompanion site is at www.dummies.com/go/flash8.) You can also useActionScript to scale, layer, and move 2-D objects interactively according tothe movement of the mouse, and this can give the effect of moving in 3-Dspace. For a cool example of this, see basic_3d.fla in the Ch14 folder of thecompanion Web site. (Thanks again to Keith Peters of The BIT-101 Lab, atwww.bit-101.com , for this file.)
What if you don’t have a 3-D program? Well, do you have Microsoft Word?Yes, folks, you can create 3-D objects in your lowly word processing program.
To create a 3-D object by using Microsoft Word, follow these steps:
1. Open Microsoft Word and, in a new document, open the Drawing tool-bar if it isn’t already open by choosing View➪Toolbars➪Drawing.
2. On the Drawing toolbar, click the AutoShapes drop-down arrow andselect any shape that you want.
You can even draw your own shape by using the Scribble tool (one ofthe options on the Lines submenu, under AutoShapes).
3. Click in your blank document to place the shape.
If you want, use the Fill Color tool to change the fill. Select the shape andthen, from the Fill Color drop-down list, select Fill Effects and create acool gradient on the Gradient tab.
4. Click the 3-D button at the right end of the Drawing toolbar and selectfrom the box that opens a 3-D perspective that you like.
You might need to try out a few choices until you get the best effect.
329Chapter 14: Ten Frequently Asked Questions
23_596918 ch14.qxd 10/7/05 7:23 PM Page 329

5. Click the 3-D button again and choose the 3-D Settings button at thebottom of the box to open the 3-D Settings toolbar.
Use the Tilt Left, Right, Up, or Down button to tilt the object until itlooks perfectly flat so that you don’t see any of the 3-D effect. Keep the 3-D Settings toolbar open.
6. Choose Edit➪Copy to copy the shape to the Clipboard.
7. Return to Flash and choose Insert➪New Symbol; specify a movie clipbehavior for the symbol and then name it.
8. Click OK.
9. Choose Edit➪Paste to paste the shape into the first frame.
10. Go back to Word and decide which way you want your shape to rotate.
You can choose up, down, left, or right.
11. Select your 3-D shape in the Word document and click twice on TiltLeft (or Right, Up, or Down) on the 3-D Settings toolbar.
12. Copy the shape to the Clipboard.
13. Go to Flash and create a keyframe in the next frame.
14. Paste the shape from the Clipboard.
15. Repeat Steps 11 through 14 until you’re looking at your shape on edge.
16. Select all the frames except the first and the last, and then chooseEdit➪Timeline➪Copy Frames.
17. Click the first empty frame (the one after your last frame) and thenchoose Edit➪Timeline➪Paste Frames.
You now have the quarter revolution twice, and you need to modify thesecond set so that it becomes the second quarter revolution.
18. Select all the frames that you’ve pasted and choose Modify➪Timeline➪Reverse Frames.
If you play the animation now, it looks as though the shape is revolvingone quarter and then back again.
19. Select the first of the frames that you pasted and choose Modify➪Transform➪Flip Horizontal (if you used Tilt Left or Right in Word) orFlip Vertical (if you chose Tilt Up or Down in Word).
20. Repeat Step 19 with the remaining frames that you’ve pasted.
You now have a half revolution.
21. Select all but the first and last frames and then choose Edit➪Timeline➪Copy Frames.
330 Part VI: The Part of Tens
23_596918 ch14.qxd 10/7/05 7:23 PM Page 330

22. Click the first empty frame after the last frame and choose Edit➪Timeline➪Paste Frames.
23. Select all the frames that you’ve pasted and choose Modify➪Timeline➪Reverse Frames.
You’re done! Play your animation and watch your shape roll.
This method does have some disadvantages. First, all your images from Wordare imported as bitmaps, not vector images. Second, you’re animating frameby frame. As a result, your file is larger and downloads slower. If you use thismethod for just a small animation, however, it beats learning how to use afancy 3-D program (and paying for it, too). Test the results and see whether itworks for you.
Look in the Ch14 folder on our companion Web site (www.dummies.com/go/flash8) for rotating star.fla, which is an example of using Word tocreate 3-D objects. The animation is in a movie clip, so choose Control➪TestMovie to see the results (or open the .swf file directly).
How Do I Center a Flash Movie in a Web Page?As we discuss in Chapter 13, you can make your Flash movie appear in a Webpage by choosing both the Flash and HTML formats in your Publish Settingsand then publishing your movie. Flash then generates the HTML code (likethe code in Figure 13-4) for a Web page. This Web page appears to containyour Flash movie when you view the Web page in a browser. To make theFlash movie centered in that Web page, you just need to add a little bit ofextra code to the HTML page, which you can do with a text editor.
To add the HTML code for centering your Flash movie in the Web page, followthese steps:
1. After choosing the Publish Settings for Flash and HTML (as wedescribe in Chapter 13), choose File➪Publish.
Flash creates a Flash Player (.swf) file and a Web page (HTML) file.
2. Start a text editor or an HTML editor, and open the HTML page withinthe editor.
You can use an HTML editor such as Macromedia Dreamweaver or a texteditor such as Notepad (Windows) or TextEdit (Mac). (In TextEdit,choose TextEdit➪Preferences, and when the Preferences window
331Chapter 14: Ten Frequently Asked Questions
23_596918 ch14.qxd 10/7/05 7:23 PM Page 331

appears, in the New Document Attributes section, select Plain Textrather than Rich Text.)
3. Find <object in the file and insert <div align=“center”> before it.
4. Find </object> in the file and insert </div> after it.
In HTML lingo, the word <div> and <object> and any other wordsstarting with a bracket (<) are called tags. The <div> tag defines thebeginning of a division or section of a Web page, and the </div> tagdefines the end of it.
Figure 14-3 shows an example of an HTML file with the <div> and</div> tags added.
5. In the editor, save the file with the changes you made.
Now when you view the HTML page in a Web browser, your Flash movieappears centered in the Web page.
What Are the Size Limits for a Flash Movie?Usually you won’t be too concerned about how big a movie you can createwith Flash because one of the reasons to use Flash is that it employs vector
Figure 14-3:Here’s
the codepreviously
shown inFigure 13-4,
revised with<div> and
</div> tags,which
center themovie in the
Web page.
332 Part VI: The Part of Tens
23_596918 ch14.qxd 10/7/05 7:23 PM Page 332

graphics and tweening to create small files which download quickly over theWeb. So if you’re using Flash to create gigantic projects, that can be great funand even very workable in some cases, but it’s good to keep in mind that thatisn’t what Flash is primarily designed to do. On the other hand, more andmore studios are using Flash for production animation (including broadcastTV shows), and video is now an important feature of Flash.
In any case, it’s interesting to know that, in addition to limits imposed byyour computer’s RAM, CPU, hard drive, video card, browser, and operatingsystem, there are a few hard limits to the size of a Flash movie. For example,your Flash movie can have a maximum of 16,000 frames.
If you need longer Flash movies, you can create them in pieces by using fewerthan 16,000 frames in each piece, and then play them in sequence withloadMovie. (See Chapter 11 for more information on loadMovie.)
By coincidence or a strange twist of fate, 16,000 is also the maximum number of layers, the maximum number of loaded movies, and the maxi-mum number of symbol instances you might have in your Flash movie.
How Do I Dynamically Load Music from the Web?You can use an ActionScript to load music into your movie live from the Webby using the ActionScript loadsound method. (Turn to Chapter 10 to find outmore about ActionScript.)
To load an MP3 file on the Web into your movie while your movie is playing,follow these steps:
1. Create a new layer.
Chapter 6 explains how to add a new layer.
2. Click a keyframe.
If the frame that you want to use is not a keyframe, right-click it(Windows) or Control+click it (Mac) and choose Insert Keyframe.
3. Choose Window➪Actions to open the Actions panel.
If necessary, click the Actions panel title bar to expand the panel.
4. In the left pane of the Actions panel, choose ActionScript 2.0 Classes➪Media➪Sound and then double-click new Sound.
new Sound() should appear in the Expression text field at the top of theActions panel.
333Chapter 14: Ten Frequently Asked Questions
23_596918 ch14.qxd 10/7/05 7:23 PM Page 333

5. Decide on an instance name, such as mySound, and type this name andan equal sign in the Expression text box at the top of the Actions panel.
The text in the Expression text box should be
mySound = new Sound();
This step creates an instance of a new sound object with the namemySound.
6. Click in the Script pane of the Actions panel on the line below the lineyou just created (in our example, mySound = new Sound) to start anew line of code.
7. In the left pane of the Actions panel, click the ActionScript 2.0 Classescategory, then the Media category, then the Sound category, then theMethods category, and then double-click loadSound.
The text in the Script pane should now be
mySound = new Sound();not_yet_set.loadSound();
8. Enter the sound’s instance name (such as mySound) in the Object textbox at the top of the Actions panel. Enter the URL (enclosed in quota-tion marks) of an MP3 file in the URL text box. In the isStreamingtext field, enter the word true.
This step signifies that it’s true you want to stream the sound. (Youhear streaming audio as it’s being sent over the Web to you. You don’thave to download the entire audio file before you can start hearing it.)
Now your code in the lower-right pane of the Actions panel should looklike this (except with your own URL):
mySound = new Sound();mySound.loadSound(“http://www.example.com/fun-sound.mp3”,
true);
9. Choose Control➪Test Movie and enjoy the music.
334 Part VI: The Part of Tens
23_596918 ch14.qxd 10/7/05 7:23 PM Page 334
Chapter 15
The Ten Best Flash Resources
Flash is such a flexible program that you never stop discovering what itcan do. And just when you think you’ve got it, out comes a new version!
In this chapter, we point you to the many resources that you can turn towhen you want to increase your knowledge about Flash.
Of course, we think that this book is a great resource on Flash. But you’realready using this book, and much more about Flash is out there, readilyavailable to help you become a truly great Flash designer and animator.
Play Around with the SamplesFlash comes with a set of sample files that showcase many capabilities. Youcan find information on each of these samples by choosing Help➪Flash Help,and then, in the Help window that appears, navigating to the Flash Samples“book” in the list on the left pane, and clicking the chapter that you want.Each chapter tells you where to find the sample file on your hard drive. Agreat way to find out more about Flash is to play with, take apart, and analyzeeach sample that interests you.
If your computer is connected to the Internet, you can get the latest updatedversion of Help from Macromedia by clicking the green arrow labeled Updatein the upper-right area of the Help window.
Visit Our SiteCheck out the Macromedia Flash 8 For Dummies page on the Wiley Web site.You can find the site by surfing to www.dummies.com/go/flash8. It containssample files from the book, tips, and updates. We hope that you find the sitehelpful!
24_596918 ch15.qxd 10/7/05 7:17 PM Page 335
Take a CourseMany colleges and universities offer courses in Flash. Sometimes thesecourses are part of a Web design or graphic arts course, or they might standalone. To find these courses, call local educational institutions and ask.
The advantage of a course led by a teacher is that you have a chance to askquestions — and receive answers. A teacher also guides the learning processand possibly even gives you lots of tips and hints!
You might also consider taking courses from Macromedia University, whichoffers both self-paced and instructor-led courses in the use of Flash and otherMacromedia products. Choose Help➪Macromedia Training for more informa-tion, including free sample lessons.
Look on the Flash Web PageMacromedia maintains a large resource on its Web site. Point your browser towww.macromedia.com/go/flash_support, where you can find tips, tutori-als, support, technical notes, news, and updates.
Join a Flash Discussion GroupMacromedia maintains several Flash newsgroups where anyone can ask ques-tions and get expert answers. The two main newsgroups are
� Flash: For technical issues relating to Flash and Flash Player.
� Flash Site Design: For discussing techniques as well as technical issues.
To read messages from and send messages to these groups, just point yourWeb browser to http://webforums.macromedia.com/flash.
If you have software for reading newsgroups on your computer, you can alter-natively go to news://forums.macromedia.com/macromedia.flash andnews://forums.macromedia.com/macromedia.flash.sitedesign to readmessages from and send messages to the two main groups.
Several other excellent active discussion groups reside on Web sites. Thebest way to tell whether a discussion group is active is to see how many mes-sages have been posted in the past one or two days. You can also check out
336 Part VI: The Part of Tens
24_596918 ch15.qxd 10/7/05 7:17 PM Page 336
how many different people are participating. See the following section in thischapter.
You can also subscribe to electronic mailing lists for ongoing discussionssent by e-mail. With more than 3,000 members, the Yahoo! FLASHmacromedialist is one of the largest lists specifically for users who want to discuss Flashtechniques. You can ask questions and get answers from the community ofFlash users. To sign up or to view the Web archive of messages, go to http://groups.yahoo.com/group/FLASHmacromedia. You can also subscribe bysending a blank e-mail to [email protected].
You can find more than 100 other Macromedia Flash e-mail discussion groupsat Yahoo! alone. Find them by surfing the Web to http://groups.yahoo.comand typing Macromedia Flash into the Search box.
Check Out the Flash Resource SitesA huge Flash community is on the Internet . . . so vast, in fact, that you’llprobably never be able to participate in all its offerings. These Web sites offernews, tutorials, discussion groups, tips, and links to other Flash resources.
Some of these sites are more up to date, lively, and complete than others. Thequality of the tips and tutorials varies widely. Some specialize in tips forbeginners; others are geared toward advanced users. The following listbriefly reviews the ones that we find most useful, in alphabetical order:
� www.actionscript.org: This site is a well-designed, comprehensiveresource on ActionScript. It includes extremely active discussion forums(with tens of thousands of messages); more than 200 tutorials onActionScript at beginning, intermediate, and advanced levels; a librarywith more than 600 ActionScripts, more than 900 Flash movies, andmore than 40 components; links; an employment section; and a Flashbookstore.
� www.bestflashanimationsite.com: This site showcases Flash sitesthat have been voted the best by viewers. This is a good place to find top-notch examples of Flash in a variety of categories, including Applications,Corporate, Experimental, Technical Merit, Video, and more.
� www.canfieldstudios.com: Here you can find dozens of example .flafiles to download and study. You can use these to learn everything fromcreating embossed text to adding animated fog to a background photo.
� www.d-art.ch: This is another site with a few dozen cool Flash files youcan preview, download, and study. Many of the experiments shown here
337Chapter 15: The Ten Best Flash Resources
24_596918 ch15.qxd 10/7/05 7:17 PM Page 337

are striking, including text rotating in 3-D, graphics that wobble whenyou click them, and interactive elastic lines that you can create.
� www.flashkit.com: Flash Kit is probably the largest Flash site, and it’sup to date. (We define up to date as having Flash 8 material within daysafter it has shipped.) You can find thousands of .fla files to downloadand study, hundreds of tutorials, dozens of active discussion forums(some with hundreds of thousands of posts), links, thousands of sounds,more than a thousand downloadable fonts — if you can think of it, youcan find it here.
� www.flashgoddess.com: Flashgoddess is an informative site showcas-ing women who do brilliant work with Flash. It includes profiles of andarticles on terrific Flash designers, a gallery of work by featured artists,and more.
� www.flashmagazine.com: This site includes news and reviews of Flashand Flash-related products. You also find links, articles, and a list of hun-dreds of applications that can output Flash Player files.
� www.kirupa.com: This is MIT student Karupa Chinnathamei’s site allabout Flash, with interviews, reviews, dozens of tutorials, and discus-sion forums with thousands of posts.
� www.moock.org/webdesign/flash: Colin Moock is a master Flashdesigner, and his Web site contains tons of advanced technical informa-tion, Flash industry news, his blog, annotated links, and more. You cangenerally find lots to chew on here.
� www.peterjoel.com/Samples: Peter Joel Hall’s site includes about twodozen sample .fla files that you may preview, download, and study.You can discover how to use Flash to make text follow a path, how tocreate interactive color fills, and how to perform other interesting Flashtricks.
� www.flashcomponents.net: Flash components hosts a collection ofmore than 200 pre-built components you can download and use in yourFlash documents. Here you can find components for video effects, userinterface widgets, mouse trailers, pan and zoomers, and more.
� www.ultrashock.com: Ultrashock is a multifaceted site that includestutorials, downloads of .fla files, and discussion forums with morethan half a million posts.
� www.were-here.com: At We’re Here Forums, you find a wealth ofresources: discussion forums with almost a million posts, daily newsabout Flash, Flash games, dozens of tutorials, and more than 100 .flafile downloads.
338 Part VI: The Part of Tens
24_596918 ch15.qxd 10/7/05 7:17 PM Page 338
Check Out Sites That Use FlashYou can get ideas by looking at what others do. (It’s interesting, for instance,that simple Flash sites are sometimes the most beautiful and practical.) InChapter 16, we list sites by ten great designers that use Flash. And manyresource sites have galleries of great sites, as does Macromedia.
Attend a Flash ConferenceAttending a conference on Flash is an exciting way to find out much moreabout Flash from an array of experts, see award-winning Flash movies, partic-ipate in workshops and seminars, hear the latest news from Macromedia,make contacts with others interested in Flash, and generally immerse your-self in the world of Flash. Even just visiting the Web sites of some of theseconferences can be quite instructive. Conferences you might consider attend-ing include:
� Flashforward (including the Flash Film Festival): A three-day confer-ence held in the spring in San Francisco and in the summer in New YorkCity. For information, visit www.flashforwardconference.com.
� Flash in the Can Conference: A three-day conference in the spring inToronto, Ontario, Canada. For information, visit www.fitc.ca.
� Powered by Detroit Conference: A two-day conference on Flash andCold Fusion, sponsored by Macromedia in Detroit in the spring. Forinformation, visit www.poweredbydetroit.org.
� FlashBelt Conference: A two-day conference in Minneapolis in June. Forinformation, visit www.flashbelt.com.
Collect Flash MoviesMany Flash resource Web sites let you download .fla files. You can alsotrade .fla files with others who you know use Flash. Analyzing .fla files is agreat way to see how effects are created. In Chapter 14, we explain how touse the Movie Explorer to ferret out all the hidden details of an .fla file.
Be sure to check out the Library of an .fla file — many of the secrets liethere. And you can use the Movie Explorer to find and study all the actions inan .fla file. You’ll soon be on your way to adapting the techniques that yousee to your own projects.
339Chapter 15: The Ten Best Flash Resources
24_596918 ch15.qxd 10/7/05 7:17 PM Page 339
Reuse Your Best StuffAfter you’ve created some great Flash movies, you can reuse your best stuff.Fadeouts (changing transparency), glows (soft edges), and masks are simpleeffects that you can use again and again. You can also reuse ActionScript onnew objects. After you get a technique down, you don’t need to re-create thewheel. If you’ve created an animated logo, you might be able to use it overand over. Certain simple animations can be created in new colors, using thesame original symbols.
You can import items from the Library of any movie into your current movie.Choose File➪Import➪Open External Library and choose the Flash file thatcontains the Library that you want to use. Then drag the items that you wantfrom the imported movie Library onto the Stage or into the Library of yourcurrent movie. This is a really nifty Flash feature.
340 Part VI: The Part of Tens
24_596918 ch15.qxd 10/7/05 7:17 PM Page 340

Chapter 16
Ten Flash Designers to Watch
Trying to choose ten of the best designers that use Flash is almost absurd —so many brilliant designers are out there. Nevertheless, we give you a
shortcut to finding some of the most innovative and skilled Flash designersso that you can check out their work, get ideas, and see the possibilities.
Note that some of the sites they’ve designed can take a really long time toload if you don’t have a broadband connection to the Web.
Ola BergerSwedish animator Ola Berger took more than a year to create his acclaimedGooberstory animation, which you may view along with many other treats atwww.goober.nu. The tranquil quality and reflective pace of his work are aninteresting contrast to the animated energy of Ben Hantoot (whom we dis-cuss later in this chapter).
Hillman CurtisHillman Curtis’ studio is one of the most well-known Flash design firms in theworld. His clients include MTV, Apple Computer, OgilvyOne Worldwide, BritishAirways, and many more. His studio has won dozens of design awards. Hismotto is “making the invisible visible,” and his work combines simplicity,freshness, and sophistication. You can check out the work of Hillman and hiscrew at www.hillmancurtis.com.
25_596918 ch16.qxd 10/7/05 7:32 PM Page 341

Joshua DavisJoshua Davis is one of the most relentless explorers of Flash’s capabilities.His legendary “praystation” site, an archive that you may see at http://ps3.praystation.com/pound/v2, originally went online in 1997 as a spoof ofPlayStation graphics, but soon morphed into one of the most aggressivelyexperimental Flash sites on the Web. He then moved on to create Once UponA Forest (which you may see at www.once-upon-a-forest.com), a visuallypoetic series of computer-generated imagery that is easier to experience thandescribe. (He likes to bury his links, so you may have to search to find any-thing clickable.) You may see his current work at www.joshuadavis.com.Benek Lisefski’s essay on Joshua Davis, at www.pixelinspectors.com/reviews/joshua-davis.html, can help you understand his mysteriouswork a little more clearly. (Incidentally, Alek Lisefski’s Web site, located atwww.pixelinspectors.com, features meaty reviews and interviews withother top Flash designers that you might find of interest.)
Anthony EdenAustralian designer Anthony Eden showcases a fascinating group of Flashexperiments at his site, www.arseiam.com.
Ben HantootYoung Ben Hantoot is already one of the most, as he says, “over-the-top” ani-mators on the planet. Other Flash sites look positively motionless comparedto the site of his studio, www.webfeatsdesign.com. The incessant inventive-ness of his work is outrageously delightful.
Shane MielkeShane Mielke is the art director of 2Advanced Studios. Shane’s Web site, at www.2advanced.com, features impressive and sophisticated use of Flash.Shane’s clients include Lexus, Sony, Toshiba, Toyota, Elektra Records, FordMotor Company, and many more. You can view his outstanding personalportfolio at www.pixelranger.com.
Shane supplied us with a beautiful Flash animation that we use as an exampleof animated mask layers at the end of Chapter 6. You can download the ani-mation (fffd_reveal.fla) from the Ch06 folder of our companion Web siteat www.dummies.com/go/flash8.
342 Part VI: The Part of Tens
25_596918 ch16.qxd 10/7/05 7:32 PM Page 342

Keith PetersThe BIT-101 Lab at Keith Peters’ Web site www.bit-101.com is his personalonline laboratory, where you can find the results of more than 500 of hisexplorations with Flash in which he uses various principles of math andphysics to take Flash into interesting new artistic realms. He says, “It was myoriginal intention, possibly now achieved, to have the largest repository ofsingle-author experimental Flash files on the Web.” We think you’ll agree it’san outstanding achievement. At www.bit-101.com/dev, you can also see hisportfolio links to other cutting-edge projects he’s worked on.
Keith provided us with two Flash movies that are great examples of drag-and-drop objects and 3-D effects in Flash, which we discuss in Chapter 14. Youcan download them (drag_and_drop.fla and basic_3d.fla) from theCh14 folder of our companion Web site www.dummies.com/go/flash8.
Ellen PronkEllen Pronk is a Dutch artist whose personal Web site, www.lfs.nl/preview.php, is her visual diary and sketchbook in which she records her doodles,photos, and mostly abstract Flash animations. Each animation does one thingsimply but well. Lfs is a kind of shorthand for liefs, which translates to with love.
Micaël ReynaudThe young French award-winning Flash designer Micaël Reynaud has createdin www.dunun.com a site full of surprises that, like several of the sites in thischapter, is difficult to describe but charming to experience. The site com-bines music, imagery, and unusual user-interface techniques to showcase apanoramic view of this artist’s multiple skills.
Craig SwannCraig Swann is a member of CRASH!MEDIA, an award-winning and prolificstudio that has been doing cutting-edge Flash work for years, for clients suchas Chevrolet, Pontiac, Honda, Cadillac, Mercedes-Benz, and many others. Youcan view the work of Craig and his team at www.crashmedia.com.
343Chapter 16: Ten Flash Designers to Watch
25_596918 ch16.qxd 10/7/05 7:32 PM Page 343

344 Part VI: The Part of Tens
25_596918 ch16.qxd 10/7/05 7:32 PM Page 344

Part VIIAppendixes
26_596918 pt07.qxd 10/7/05 7:34 PM Page 345

In this part . . .
In the appendixes, we dump everything that we couldn’tfit elsewhere but thought too useful to forget. We
explain how to install Flash (it’s a snap), customize yourpreferences, and create your own keyboard shortcuts.One appendix shows you all the Flash 8 panels, and labelsthem carefully so that you know what they do. We also tellyou what’s on the companion Web site (lots of stuff!).
26_596918 pt07.qxd 10/7/05 7:34 PM Page 346

Appendix A
Installing Flash and Setting Your Preferences
Installing Flash is simple. Nevertheless, sometimes a few pointers can help.After you’re up and running, you might want to customize how Flash works.
You can set quite a number of preferences. You can also create your own key-board shortcuts.
Now, time to stop stalling and start installing.
Installing FlashInstalling Flash is a cinch, although you have a couple of options. Here’s thelowdown on getting started.
You can install Flash in four different ways:
� Install it from a CD (onto a PC).
� Download it to a PC.
� Install it from a CD (onto a Mac).
� Download it to a Mac.
We discuss these methods separately in the next four sections.
27_596918 appa.qxd 10/7/05 7:18 PM Page 347
Installing Flash onto a PC from a CDSo you went out and bought Flash in the box, and you have a CD-ROM driveon your PC. To install Flash from the box, follow these steps:
1. Exit all Windows programs.
2. Insert the CD-ROM.
In most cases, the setup program starts automatically. If not, chooseStart➪Run and click Browse. Then find and double-click Setup.exe onyour CD-ROM drive. Click Run.
3. Follow the instructions on the various screens that appear.
Unless you want to save space by not installing the lessons and samples,choose the typical installation. Other than that, the most significantchoice that you have is where you install Flash. You can browse to changethe location or accept the default, which is C:\Program Files\Macromedia\Flash 8.
4. After you follow the on-screen instructions, the setup program startscopying files; when it is completed, click Finish.
5. Read the ReadMe file offered on the last screen.
Although we guarantee that most of the stuff in the file is irrelevant toyou, sometimes this file has just the weird detail that applies to your sit-uation, so take the two minutes to read it.
Installing Flash by downloading it to your PCIf you like, you can download the Flash trial directly from the MacromediaWeb site. You can then pay for it within 30 days or it stops working. Followthese steps:
1. Go to www.macromedia.com/software/downloads.
2. From the list of Macromedia products, choose Flash Basic 8 or FlashProfessional 8.
You need to choose a location and answer a few questions.
3. Follow the instructions on the screen for downloading the installa-tion file.
When you download the file, you select a location on your hard drive. Ifyou have a Downloads folder, you can use that. Another good option isthe Desktop. Remember this location.
348 Part VII: Appendixes
27_596918 appa.qxd 10/7/05 7:18 PM Page 348

4. When the download is complete, double-click the installation file.
Here’s where you need to remember where you saved it. The installationprogram guides you through the process of installing Flash.
5. Choose the typical installation, unless you want to save space by notinstalling the lessons and samples.
The only other significant choice that you have is where you installFlash. You can browse to change the location or accept the default,which is C:\Program Files\Macromedia\Flash 8.
After you install Flash, you can play with it! You can buy it at any time byclicking Buy Now on the first screen when you open Flash.
Installing Flash onto a Mac from a CDIf you bought Flash in a box, you have a CD-ROM drive that you can use toinstall Flash.
To install Flash on your Mac from a CD, follow these steps:
1. Insert the CD-ROM.
An installer icon appears on your desktop.
2. Double-click the Flash 8 Installer icon.
3. When a window appears, displaying a software license agreement,click the Accept button so that you can continue the installation.
Of course, being the responsible people we are, we recommend readingthe license agreement.
4. Unless you want to save space by not installing the lessons and sam-ples, choose the Easy Install option, which is the default.
Other than that, the most significant choice that you have is where youinstall Flash. You can browse to change the location or accept the defaultlocation, which is in the Applications folder on the startup disk drive.
5. Click Install.
The installer program starts copying files. When it’s done, you see theMacromedia Flash 8 folder displayed on your computer screen, contain-ing the Flash 8 program, a few documents, and a bunch of other folders.One of the documents is the ReadMe.html file. You can view the con-tents of this file by simply double-clicking it. Although most of the stuffin the file is irrelevant to you, sometimes this file has a detail thatapplies to your situation, so reading it can be worthwhile.
349Appendix A: Installing Flash and Setting Your Preferences
27_596918 appa.qxd 10/7/05 7:18 PM Page 349

Installing Flash by downloading it to your MacIn this ultramodern day and age, you can install Flash on your computer with-out ever leaving your Web browser. To download Flash, follow these steps (orsomething like them, assuming that the Macromedia Web site doesn’t changetoo much):
1. Go to www.macromedia.com/software/downloads.
2. From the list of Macromedia products, choose Flash Basic 8 or FlashProfessional 8.
You need to choose a geographic location, complete or create a pass-word, and answer a few questions.
3. Follow the instructions on the screen for downloading the installa-tion file.
4. When the download is complete, find and double-click the installa-tion file.
The installation program guides you through the process of installingFlash.
The most significant choice that you have is where you install Flash. Youcan browse to change the location or accept the default, which is theApplications folder on the startup disk drive.
After you install Flash, you can play with it for 30 days before it stops work-ing. If you download the trial version, you can buy it at any time by clickingBuy Now on the first screen when you open Flash.
Setting Your PreferencesFlash offers numerous ways to customize how you work. Why not make Flashsuit you?
The main location for setting preferences is the Preferences dialog box, asshown in Figure A-1, with the General tab on top. To open the Preferencesdialog box, choose Edit➪Preferences (Windows) or Flash➪Preferences (Mac).
350 Part VII: Appendixes
27_596918 appa.qxd 10/7/05 7:18 PM Page 350

The following sections describe how to use this dialog box.
General categoryClick the General category to set the following options:
� On Launch: When Flash opens, it can show a start page that gives youoptions of opening an existing document or starting a new one. This isthe default, but if you find the start page useless, you can choose toalways start a new document, open the documents that you were usingthe last time you used Flash, or start with no document and decidewhere to go from there.
� Undo: Here you choose whether you want to use object-level or document-level undo (as we explain in Chapter 4). Then choose the number ofactions you want to keep. The text box is set to 100 by default; you can enter any value from 2 to 300. The higher the value, the morememory Flash takes to remember all those steps. You might be sur-prised by how many commands you give in a short period of time, so
Figure A-1:Use the
Preferencesdialog box
to bendFlash to
your will.
351Appendix A: Installing Flash and Setting Your Preferences
27_596918 appa.qxd 10/7/05 7:18 PM Page 351

100 is probably a good setting. However, if you want to save commandsfrom the History panel that you executed, set the number of actionshigher.
� Printing — Disable PostScript: (For Windows only.) Selecting this checkbox disables PostScript output when you print to a PostScript printer.Mark this check box only if you have trouble printing to a PostScriptprinter. This option is deselected by default.
� Document — Open Documents in Tabs: (For Mac only.) This option ismarked by default so that new documents open in a single window withtabs. Deselect this check box if you want each new document to open ina separate window.
� Test Movie — Open Test Movie in Tabs: By default, Flash opens a newwindow to play your movie when you test it. Select this check box toinstead open a new document tab (like the ones Flash creates for eachopen document).
� Selection — Shift Select: This option is enabled by default. It means thatyou have to press Shift to select more than one object (by clicking). Ifyou don’t press Shift, the first object is deselected. Clearing this optionmeans that you can click as many objects as you want to select them.This method is an efficient way to work, but most people aren’t familiarwith it. If you select something by accident, press Shift and click theobject to deselect it.
� Selection — Show Tooltips: By default, this option shows short explana-tions of Flash interface features (such as toolbars and buttons) whenyou hover your cursor over them. You can make the ToolTips go awayby clearing this check box.
� Selection — Contact-Sensitive Selection and Lasso Tools: By default,you need to completely surround objects with the selection or lassotools to select them. Mark this check box so that you can select anyobject that is just partly within the selection or lasso selection border.
� Timeline — Span Based Selection: Lets you click between twokeyframes to select the entire section between them, à la Flash 5.
� Timeline — Named Anchor on Scene: Automatically creates a namedanchor at the beginning of each scene.
� Highlight Color: Lets you specify the color of the box around selectedsymbols and groups. Click the color swatch to display all the availablecolors and pick a different color. Or you can select Use Layer Color touse the layer’s outline color.
Flash 8 Professional has a couple options that apply to projects, which areavailable in the Professional version only.
352 Part VII: Appendixes
27_596918 appa.qxd 10/7/05 7:18 PM Page 352
ActionScript categoryThe ActionScript category offers settings relating to the ActionScript Editorso that you can customize how ActionScript looks and functions on theAction panel:
� Editing: By default, any ActionScript that you type is automaticallyindented. The tab size (amount of indentation) is four spaces. You canremove the automatic indentation or change the tab size. Code hintsprovide pop-up text in the Actions panel that helps you complete yourcode based on what you’re typing. You can remove these hints and set atime delay for the display of the hints.
� Font: You can set the font type and size in the ActionScript Editor. ForWindows only: Select the Use Dynamic Font Mapping check box to haveFlash substitute a font if the selected font family doesn’t have the requiredglyphs (character shapes). Dynamic font mapping is generally useful ifyou’re working with multilingual text.
� Open/Import: This specifies the encoding used for fonts when openingor importing. The default, UTF-8, provides Unicode encoding that sup-ports multiple languages.
� Save/Export: This specifies the encoding used for fonts when saving orexporting. The default, UTF-8, provides Unicode encoding that supportsmultiple languages.
� Reload Modified Files: You can have Flash prompt you to reload modi-fied files or choose Never or Always options. Reloading files keeps yourActionScript up to date.
� Syntax Coloring: By default, ActionScript is colored based on the syntaxof your code. For example, comments are highlighted in gray. You canremove coloring completely or change the colors for each syntax type.
� Language: You can put ActionScript in frames, buttons, movie clips, andmultiple separate ActionScript text files. If you click the ActionScript 2.0Settings button here, you can modify the places that Flash searcheswhen your ActionScript in one place references certain kinds ofActionScript (called classes), which might be elsewhere. If you’re juststarting out with Flash, you almost certainly are not defining new classdefinition files in ActionScript, in which case you definitely don’t have toworry about this.
Click the Reset to Defaults button to return all the settings in this category totheir defaults.
353Appendix A: Installing Flash and Setting Your Preferences
27_596918 appa.qxd 10/7/05 7:18 PM Page 353

Auto Format categoryThis category offers specific options for formatting ActionScript.Programmers are picky about how their code looks, and this category letsyou format your code the way you like. Select the various check boxes; thepreview pane shows the result.
Clipboard categoryThe Clipboard category enables you to set preferences for displaying, export-ing, and importing certain objects. Here are your choices:
� Bitmaps — Color Depth: (For Windows only.) Specifies the color depthfor bitmaps copied to the Clipboard. You can choose to match thescreen or set a color depth from 4-bit to 32-bit with Alpha. You can usethis setting to reduce the size of bitmaps that you paste into Flash fromthe Windows Clipboard.
� Bitmaps — Resolution: (For Windows only.) Sets the resolution ofbitmaps copied to the Clipboard. Select Screen to match your screenresolution or select 72, 150, or 300. You can use this setting to reducethe size of bitmaps you paste into Flash from the Windows Clipboard.
� Bitmaps — Size Limit: (For Windows only.) Lets you specify a size limitin kilobytes for the amount of RAM (memory) that is used for a bitmapon the Windows Clipboard. If you have large images, you might need toincrease this number, which is set to 250K by default.
� Bitmaps — Smooth: (For Windows only.) This box, marked by default,applies anti-aliasing to bitmaps. Anti-aliasing smoothes the appearance ofbitmaps so that they don’t appear so jagged. You can affect the smooth-ing of bitmaps during publishing by choosing the quality of the output,which we explain in the discussion of the HTML tab in Chapter 13.
� Gradient Quality: (For Windows only.) Lets you specify the quality ofgradients that you copy to the Clipboard for use in other applications.Your options range from None to Best.
� PICT Settings: (For Mac only.) Lets you specify the method and resolu-tion used to copy art to the Clipboard. From the Type menu, selectObjects to copy art as vector graphics, or select one of the bitmap set-tings to copy it as a bitmap. In the Resolution input box, type in the reso-lution that you desire in dots per inch. If you want to include PostScriptdata, select the Include PostScript check box. In the Gradients menu,select the Gradient quality you want when you paste the Clipboard intoa document outside of Flash. (When pasting within Flash, this setting isignored, and you always get the full gradient quality.)
� FreeHand Text: By default, the Maintain Text as Blocks check box ismarked so that text pasted from FreeHand can be edited in Flash.
354 Part VII: Appendixes
27_596918 appa.qxd 10/7/05 7:18 PM Page 354

Drawing categoryClick the Drawing category to set the following items:
� Pen Tool — Show Pen Preview: Displays a preview of the line or curvesegment before you click the next point. Recommended!
� Pen Tool — Show Solid Points: When marked, shows filled points atvertices.
� Pen Tool — Show Precise Cursors: Displays a small crosshair ratherthan the pen-shaped cursor, for more precise placement of points.
We cover the rest of the drawing settings in this category in Chapter 3.
Text categoryThe text category allows you to specify your text preferences, as follows:
� Font Mapping Default: This is the default that Flash uses when you opena movie that contains a font that you don’t have on your computer.Select an option from the drop-down list.
� Vertical Text — Default Text Orientation: Sets vertical text as thedefault. Use this option for some Asian fonts.
� Right to Left Text Flow: Sets text lines to flow from right to left bydefault. This option is usually used for Arabic and Hebrew.
� No Kerning: Removes kerning from vertical text.
� Input Method: If you’re working in Japanese, Chinese, or Korean, selectthe appropriate language.
Warnings categoryThe Warnings category lists 13 (Windows) or 12 (Mac) situations in whichFlash displays a warning message. All are enabled by default, so you’re safe. Ifyou find these warnings annoying or unnecessary, you can clear the appro-priate check box.
Customizing Keyboard ShortcutsYou can create a shortcut for any menu item and change existing shortcuts.(See the Cheat Sheet at the front of this book for commonly used keyboard
355Appendix A: Installing Flash and Setting Your Preferences
27_596918 appa.qxd 10/7/05 7:18 PM Page 355

shortcuts.) Besides the standard set of shortcuts, Flash 8 comes with somebuilt-in shortcuts based on other programs, such as FreeHand, Illustrator,and Photoshop, so that you can use those same familiar shortcuts in Flash 8.
To create shortcuts, choose Edit➪Keyboard Shortcuts (Windows) or Flash 8➪Keyboard Shortcuts (Mac) to open the Keyboard Shortcuts dialog box, asshown in Figure A-2 with the Drawing Menu Commands option displayedfrom the Commands drop-down list.
You can’t change the original set of shortcuts. Instead, create a duplicate setof shortcuts and modify the duplicate. Give the duplicate a new name, suchas MyWay, and then use these shortcuts:
To duplicate a shortcut set, click the Duplicate Set buttonat the top of the Keyboard Shortcuts dialog box.
To rename a set of shortcuts, click the Rename Set buttonat the top of the Keyboard Shortcuts dialog box. (Thisoption is not available until you duplicate a shortcut set.)
To delete a set of shortcuts, click the Delete Set button atthe top of the Keyboard Shortcuts dialog box.
When you have a new set of shortcuts, select from the Commands drop-downlist the types of commands that you want to change. You can change all six(Windows) or eight (Mac) types of commands, but only one at a time:
Figure A-2:The
KeyboardShortcutsdialog box
enables youto use yourfingers the
way youwant.
356 Part VII: Appendixes
27_596918 appa.qxd 10/7/05 7:18 PM Page 356

� Drawing Menu Commands: Changes shortcuts for commands from the menu.
� Tools Panel: Changes shortcuts for the tools in the Tools panel.
� Test Movie Menu Commands: Changes shortcuts for commands fromthe menu that appears when you choose Control➪Test Movie.
� Script Edit Commands: (Mac only.) Changes shortcuts for commandsfrom the menu that appears when you are using the Script window. Thisis the editor window that appears when you choose File➪New (or File➪Open) and then choose a script file to edit, such as an ActionScript(.as) file or a Flash JavaScript (.jsfl) file.
� Timeline Commands: Changes shortcuts for commands that move andselects frames on the Timeline.
� Workspace Accessibility Commands: Changes shortcuts for commandsthat change the focus to the Stage or the Timeline, selects panels, andselects objects within a panel.
� Mobile Menu Commands: (Flash Professional 8 only.) Changes short-cuts for the menu that appears when you choose Control➪Test Moviefor a Flash Lite movie. (In Flash Professional 8, you can create a FlashLite movie, designed to run on certain PDAs, cell phones, or othermobile devices, by choosing File➪Publish Settings, choosing the Flashtab in the Publish Settings window, and selecting a Flash Lite player inthe Version drop-down list.)
� Actions Panel Commands: Changes shortcuts for working in the Actionspanel.
For each type of command set, click the plus sign (+) (in Windows) or theright-pointing arrow (on the Mac) on the list to display all the commands andtheir current shortcuts. Here’s how to create a new shortcut:
1. Select the command that you want to customize.
2. Click the Add Shortcut button.
Flash adds a new shortcut, named empty.
3. Press the keyboard combination that you want to use.
You must include Ctrl (Windows)/Ô (Mac), Alt (Windows)/Option (Mac),or Shift before the second key. Flash tells you whether that combinationis already assigned to another shortcut.
• If you want to use that shortcut, click Change. Flash alerts you ifthe shortcut is already taken and lets you reassign the shortcut.
357Appendix A: Installing Flash and Setting Your Preferences
27_596918 appa.qxd 10/7/05 7:18 PM Page 357
• If you don’t want to use that shortcut, select the empty shortcut fromthe Shortcuts list and click the Remove Shortcut button.
4. Repeat Steps 2 and 3 to change as many shortcuts as you want.
5. Click OK when you finish changing shortcuts.
Until you get used to your new shortcuts, create a list and tape it to the sideof your monitor or place it nearby for easy reference.
358 Part VII: Appendixes
27_596918 appa.qxd 10/7/05 7:18 PM Page 358

Appendix B
The Property Inspector and the Panels
Several panels have been changed in Flash 8. In this appendix, we helpyou discover these features in more detail. The panels often have unla-
beled buttons and menus that hold hidden treasures — or at least hidden features — if you know where to look.
The Tools PanelThe Tools panel contains all the drawing tools as well as many editing tools.You’ll use this panel a lot!
Most drawing tools have their own modifiers that control how the drawingtool works. In this figure, you see only one set of modifiers — for the Brushtool. However, other tools offer different modifiers, so the options section ofthe Tools panel looks different, depending on the tool you’re using.
If you’re upgrading from an earlier version of Flash, you might notice that theorder of some of the tools is different. The Free Transform and Fill Transformbuttons are now near the top, instead of tucked away somewhere in themiddle of the panel. That’s probably because they’re so useful. Check outChapter 3 for the full scoop on the Tools panel and all its helpful tools.
28_596918 appb.qxd 10/7/05 7:34 PM Page 359

The Property Inspector GadgetThe Property inspector is context sensitive, which means that it displaysinformation that’s useful to what you’re doing at the time. In this section, you see some variations on this theme.
Property inspector with no selectionWhen no object is selected and the cursor is on the Stage, you see the docu-ment properties, as shown here.
Background color
Frame rateDocument properties
SubselectionSelection Fill TransformFree TransformLassoLineTextPenRectangleOvalBrushPencilPaint BucketInk BottleEraserEyedropper
ZoomHand (pan)
Stroke colorFill colorSwap colorsBlack and white
No color
Lock fillObject Drawing
modeBrush mode
Brush sizeBrush shape
Use TiltUse Pressure
360 Part VII: Appendixes
28_596918 appb.qxd 10/7/05 7:34 PM Page 360
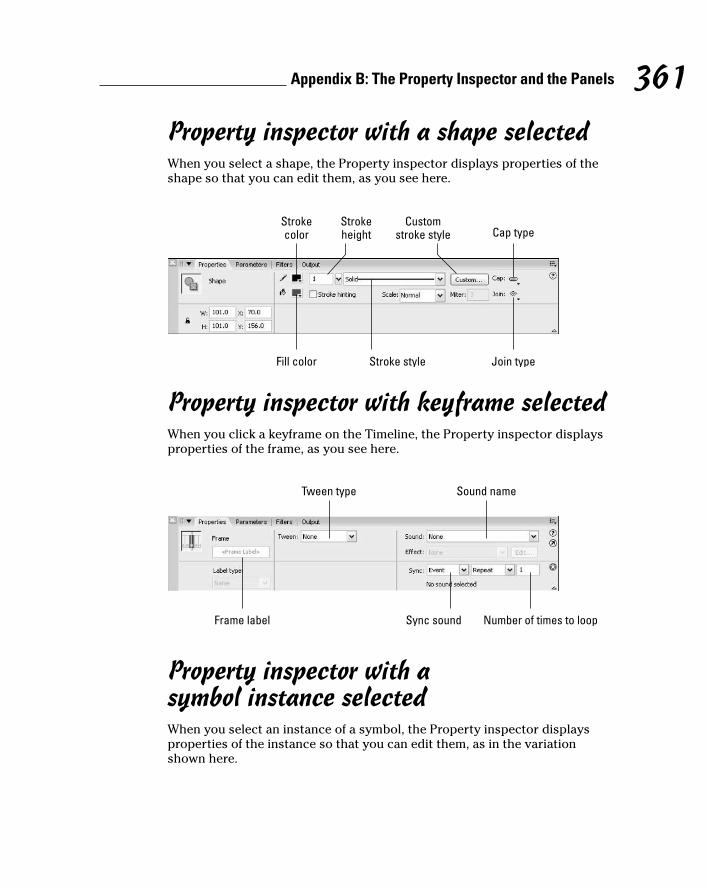
Property inspector with a shape selectedWhen you select a shape, the Property inspector displays properties of theshape so that you can edit them, as you see here.
Property inspector with keyframe selectedWhen you click a keyframe on the Timeline, the Property inspector displaysproperties of the frame, as you see here.
Property inspector with a symbol instance selectedWhen you select an instance of a symbol, the Property inspector displaysproperties of the instance so that you can edit them, as in the variationshown here.
Tween type Sound name
Number of times to loopSync soundFrame label
Strokeheight
Customstroke style Cap type
Stroke style
Strokecolor
Fill color Join type
361Appendix B: The Property Inspector and the Panels
28_596918 appb.qxd 10/7/05 7:34 PM Page 361

The Align PanelThe Align Panel gets your objects in line, where they ought to be. For moreinformation, flip to Chapter 4.
The Color Mixer PanelThe Color Mixer panel is similar to an artist’s palette. You can create yourown colors for both strokes (lines) and fills.
Align/distributerelative to entire stage
Distribute objects evenly
Align objectshorizontally
Align objectsvertically
Space objects evenlyhorizontally/vertically
Match size by width,height, or both
Color styleInstance behavior
Swap symbolInstance name
362 Part VII: Appendixes
28_596918 appb.qxd 10/7/05 7:34 PM Page 362

The Color Swatches PanelYou can use the Color Swatches panel to manage your colors. New colors andfills that you create appear on this panel for easy access. (See Chapter 3 formore information.)
The Info PanelThe Info panel lets you control the precise size and location of objects. (Checkout Chapter 4 for more information on using this panel.) The X and Y measure-ments are relative to the upper-left corner of the Stage.
Fill style
Colorspecifications
Fill color
Swap colors
Color space
Brightness control
Hexadecimaltext box
Previous/currentcolor box
Strokecolor
Blackand white
No color
Transparency(alpha) value
363Appendix B: The Property Inspector and the Panels
28_596918 appb.qxd 10/7/05 7:34 PM Page 363

The Scene PanelThe Scene panel is quite simple. You can use it to move from one scene toanother, change the order of scenes, and rename, add, and delete scenes.
The Transform PanelUse the Transform panel to scale, rotate, and skew objects with precision.You scale by percentage, and you rotate and skew by degrees (increasingdegrees going clockwise). To use the Copy and Apply Transform button,select an object and specify any transform settings that you want. Then clickCopy and Apply Transform. Flash creates a new object with the new settingson top of the old object. You can leave the new object there to create a com-posite object or immediately move it to a new location. Use the Reset buttonto return a transformed object to its original properties. Chapter 4 gives youmore information about this panel.
Add scene
Duplicate scene Delete scene
Width
Height
X location
Y location
364 Part VII: Appendixes
28_596918 appb.qxd 10/7/05 7:34 PM Page 364
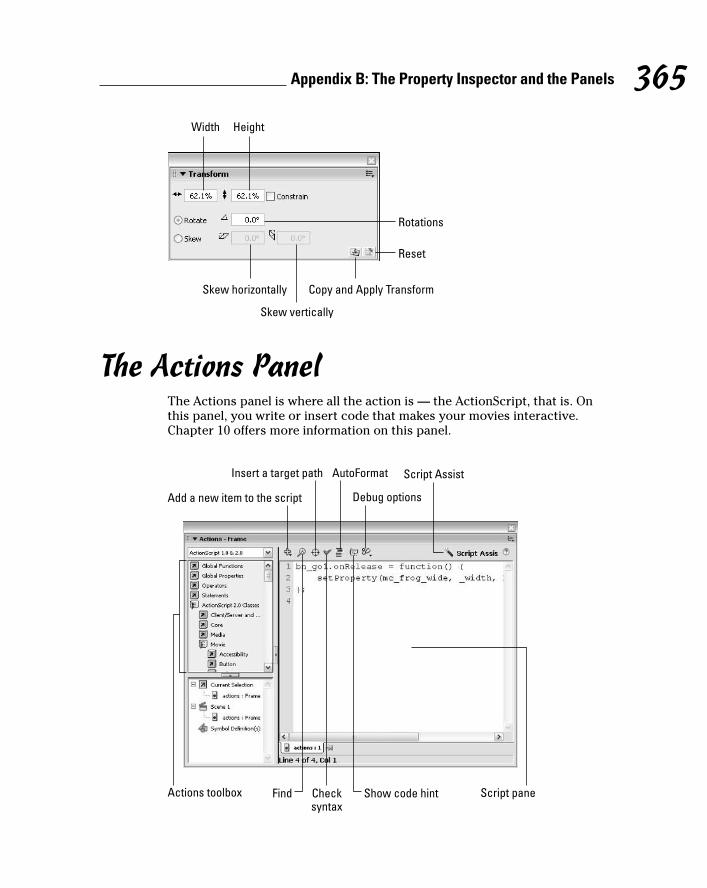
The Actions PanelThe Actions panel is where all the action is — the ActionScript, that is. Onthis panel, you write or insert code that makes your movies interactive.Chapter 10 offers more information on this panel.
Script pane
Script Assist
Debug options
AutoFormatInsert a target path
Actions toolbox
Add a new item to the script
Show code hintChecksyntax
Find
Rotations
Reset
Width Height
Skew horizontally
Skew vertically
Copy and Apply Transform
365Appendix B: The Property Inspector and the Panels
28_596918 appb.qxd 10/7/05 7:34 PM Page 365

The Debugger PanelThe Debugger panel contains features to help you debug your ActionScriptcode. You can set breakpoints, which are points where the ActionScript stops,to help you find out where the bugs are. You can also step through your codebit by bit to find those elusive bugs. You use the Debugger panel whilemovies are playing in the Flash Player, on your hard drive, or even on a Webserver. To use the Debugger panel with an .fla movie on your hard drive,choose Control➪Debug Movie.
The Movie Explorer PanelExplore the depths of your movie with the Movie Explorer. Refer to Chapter12 for details.
Step out
Step over
Toggle breakpoint
Continue
Step in
Remove all breakpoints
Stop debugging
366 Part VII: Appendixes
28_596918 appb.qxd 10/7/05 7:34 PM Page 366

The Output Tab of the Property InspectorUse the Output tab as a way to test your movie. Choose Control➪Test Movieand then choose Window➪Output. Some errors are displayed automatically,and you can also choose List Objects or List Variables from the Debug menuin the Player window to view a list of objects and variables.
On the Mac, you have a standalone Output panel.
Showframes and layers
Show ActionScript
Showtext
Customizewhich items
to show
Show video, sounds, and bitmaps
Show buttons,movie clips,
and graphics
367Appendix B: The Property Inspector and the Panels
28_596918 appb.qxd 10/7/05 7:34 PM Page 367

The Accessibility PanelAccessibility features make your movies more accessible to people with cer-tain disabilities or limitations — for example, limited or no sight. You can dis-play or hide objects, depending on the needs of your viewers. These featuresmake some of the nongraphical objects in your movie available to screenreaders, which read parts of the screen out loud. Choose Window➪OtherPanels➪Accessibility.
The Components PanelComponents are prebuilt movie clips that come with predefined parametersthat you can set to alter their appearance and behavior. They allow you tobuild complex Flash applications even if you don’t have an advanced under-standing of ActionScript. Some components are nonvisual and allow you todo such things as manipulate information from data sources (for a Flashmovie with a news ticker, for instance). Other components are interface ele-ments, such as check boxes, radio buttons, and drop-down lists (comboboxes), which you can add to your movies to create interactivity. For moreinformation, see Chapter 12.
Note: Flash 8 Basic does not offer as many components as Flash 8Professional.
368 Part VII: Appendixes
28_596918 appb.qxd 10/7/05 7:34 PM Page 368

The Component InspectorUse this panel to assign labels and parameters to components, such as checkboxes, lists, and other interface elements.
The History PanelThe History panel stores all your commands. You can review them, repeatthem, or save them to use again later. See Chapter 4 for details.
369Appendix B: The Property Inspector and the Panels
28_596918 appb.qxd 10/7/05 7:34 PM Page 369

The Strings PanelUse the Strings panel to create strings of text in various languages. These canbe used for Web sites in multiple languages.
The Behaviors PanelUse the Behaviors panel to choose ActionScript from a dialog box.
370 Part VII: Appendixes
28_596918 appb.qxd 10/7/05 7:34 PM Page 370

Appendix C
What’s on the Companion Web Site
Here’s some of the cool stuff that you find on the Macromedia Flash 8 ForDummies companion Web site, at www.dummies.com/go/flash8:
� A library of geometric, whimsical, and artistic vector graphics ready tobe instantly opened in any Flash movie
� Flash movies that you can dissect and learn from
Your Own Personal Library of Vector Graphics
We’ve created more than 50 vector graphics that you can use in your Flashmovies. Some are geometric shapes that are hard to create in Flash. Weadded some fun shapes . . . some practical and others whimsical, such asour thought bubble and explosion. Finally, we included some artistic draw-ings of everyday objects. We hope you like them! (Please keep in mind thatthese files are provided for your personal use and are not to be sold orredistributed.)
To download the library of graphics, point your Web browser to www.dummies.com/go/flash8 and choose the file named Flash 8 For Dummies Library.fla.
All that you see when you open the Flash file is a blank screen. To see thegraphics, choose Window➪Library. To use these shapes in another Flash file,choose File➪Import to Library and choose the file named Flash 8 ForDummies Library.fla, which you downloaded from the companion Website to your computer.
29_596918 appc.qxd 10/7/05 7:34 PM Page 371

An even better idea is to copy the .fla file from wherever it is on your computer to the Libraries subfolder of your Flash 8 folder. (In Windows, youfind this at Program Files\Macromedia\Flash 8\en\Configuration\Libraries on your hard drive. On the Mac, you find it at Applications/Macromedia Flash 8/Configuration/Libraries on your hard drive.)Then you can access this file at any time by choosing Window➪Other Panels➪Common Libraries.
Flash Movies GaloreThroughout this book, we refer you to the companion Web site to look atFlash movies as examples of the features that we are explaining. Thesemovies are organized by chapter. They help you understand some of themore complex capabilities of Flash that are hard to explain or show in afigure. Some of these movies are real-world Flash movies that come fromactive Web sites. Others are examples that we created for you to isolate theFlash feature. Either way, we hope that you can use them to further yourunderstanding of Flash.
To examine and use these movie files, you need to first download them toyour hard drive. Point your Web browser to www.dummies.com/go/flash8and select the file you want. Then the file downloads to your hard drive.When it’s finished downloading, double-click the file to open it.
Here are a few troubleshooting tips to keep in mind when you use the Flashmovie files provided on the Web site:
� The Flash movie doesn’t play. Sometimes when you open a Flash movie,nothing happens when you try to play the animation. Choose Control➪Test Movie to see the animation.
� The fonts look different. If some of the fonts required by the Flash filesaren’t available on your system, you might see less-than-satisfactorysubstitutions when you play the Flash Player files.
Bonus ChapterAlso on the Web site, you’ll find a bonus chapter entitled “What ThoseObscure Terms Really Mean.” It’s a glossary of need-to-know terms for flashDesigners. Be sure to check it out.
372 Part VII: Appendixes
29_596918 appc.qxd 10/7/05 7:34 PM Page 372

• Numerics •2Advanced Studios, 3423-D
simulating, 327simulating with AutoCAD, 328–329simulating with Microsoft Word, 329–331
• A •Accessibility panel
purpose/example of, 368using, 280–281
actionsadding basic to frames, 217–218adding directly to buttons, 171–173adding to buttons, 219–222adding to movie clips, 222–224adding to Timeline, 173–176Browse/Network, 227–229creating navigation with getURL, 272fscommand, 227getURL, 227–228Go To, 225–226loadMovie, 228–229mouse events and, 221–222On (mouse event), 226overview, 213–214Play, 226Stop, 226stopALLSOUNDS, 226stopping movie with, 218–219testing buttons with getURL, 175Timeline Control, 224–226unloadMovie, 229
Actions panel, example of, 365ActionScript. See also actions, ActionScript
codeadding behaviors, 214–215adding comments to, 233
creating draggable movie clips with,232–233
creating separate file for, 234dynamically loading music from Web,
333–334graphic symbols and, 146programming constructs and, 231–232types of behaviors, 216–217using methods, 229–230version 2.0, 233, 293–294Web sites for, 337
ActionScript category preferences,setting, 353
ActionScript codefor creating preloader, 269debugging, 366for using check boxes, 262for using combo boxes, 264using in Flash, 260for using list boxes, 266for using radio buttons, 260
Advertising templates, 41Align panel
example of, 362outlining objects with, 86
aligning, objects, 83–84, 86alignment, setting text, 126alpha fades, 195anchor points, reshaping objects
and, 88–89animated GIFs, advantage of, 12animated masks, creating with movie
clips, 230animation
adding frames in, 205adding labels and comments to, 203–204adding still graphics to, 190adding with Timeline effects, 185–186adjusting shape hints and, 202–203changing keyframes to regular frames, 206changing settings for, 207
Index
30_596918 bindex.qxd 10/7/05 7:22 PM Page 373

animation (continued)changing speed of, 206–207converting to movie clip symbols, 149–150copying and pasting frames in, 204–205creating first, 26–27creating guide layer for, 139creating scenes with, 209–211creating simple shape tween, 200–201deleting frames in, 205distinction Web sites with, 10experimenting with first, 21–22with keyframes, 187–190motion tweening symbols, groups, and
type, 193–194motion tweening to scale and rotate,
194–195Movie of the Year, in detail, 29moving complete, 209moving frames in, 205overview, 181–182playing back while creating, 183preparation steps to creating, 182publishing first, 27–28reasons for limiting, 12refining tweening, 197–198reversing, 206selecting frames in, 204with tweening, 190–191tweening along paths, 196–197tweening colors and transparency, 195typical steps for adding to Web sites,
31–33using onion skins with, 207–209ways of creating, 182
anti-aliasing, using, 125artwork, simplifying, 286–287audio. See soundAuto Format category preferences,
setting, 354AutoCAD, simulating 3-D with, 328–329
• B •behaviors
adding, 214–215types of, 216–217
Behaviors panel, purpose/example of, 370Berger, Ola (Flash designer), 341Best Flash Animation Site Web site, 337bevel corner, 51Bezier curves, drawing with Pen tool, 57bit rate sound, 236bitmap fills
creating, 69–70scaling, 97–98
bitmap graphicsadvantage of, 12avoiding, 286best way of importing, 323–325breaking apart, 108making Flash friendly, 77–78overview, 36using as fill, 69–70
Black and White tool, for rectangles, 53blend modes, adding to instance, 160BMP files, overview, 324Break Apart command, 108breakpoints, debugging ActionScript code
and, 366brightness, changing instance, 158Browse/Network actions, 227–229browsers, testing movies and, 290–291,
326–327Brush Mode modifier
example of options, 61setting, 60
Brush tooloverview, 59replacing Pencil tool with, 286selecting brush shape, 60selecting brush size, 60smoothing strokes, 63
button symbols, 147. See also symbolsbuttons
adding actions to, 171–173, 219–222adding actions to Timeline for, 173–176adding movie clips to, 169–171adding sound to, 167–169creating basic, 165–166creating to act on text input, 176–178creating Web sites navigation, 272defined, 164
374 Macromedia Flash 8 For Dummies
30_596918 bindex.qxd 10/7/05 7:22 PM Page 374

designing, 32with Get URL action, testing, 175navigating through Timeline Web content
with, 273–275overview, 163states of, 164testing, 166–167using text for, 166
• C •Canfield Studios Web site, 337caps
modifying, 92setting, 50–51
center, moving fill, 97centering, objects on top of each other, 87channel sound, 236check boxes
purpose of, 257using, 261–262
Chinnathamei, Karupa (resource Website), 338
Clear Colors command, 67Clipboard
copying objects to, 87moving objects with, 84
Clipboard category preferences,setting, 354
closing, panels, 15code. See ActionScript code; HyperText
Markup Language (HTML) codecodec, defined, 246collapsed panel, display of, 15collapsing, folders, 137color
avoiding custom on Web sites, 286changing instance transparency and, 159choosing Stage, 33–34creating new or editing existing, 65–66gradient, 67–69managing, 67matching movie to Web page, 271setting Pencil tool, 52setting text, 122–123tweening, 195
color fades, 195Color Mixer panel
example of, 65, 363purpose of, 362using, 65–66
Color Swatches panelexample of, 363importing Color palettes with, 66–67
combo boxespurpose of, 257using, 262–264
commandsBreak Apart, 108Clear Colors, 67copying, 112–113Crop, 105Delete Swatch, 67Duplicate Swatch, 67Intersect, 105keyboard shortcuts for menu, 17–18Load Default Colors, 67programming, 231–232Publish Preview, 290–291, 311Punch, 105redoing, 110–111replaying, 112reusing, 111–114Save As Default, 67saving, 113–114Sort by Color, 67Test Movie, 288–290Transform command, 100–105Undo, 22undoing, 110–112Union, 105Web 216, 67
Commands menu, purpose of, 17comments
adding to ActionScript, 233, 327adding to animation, 203–204
companion Web siteFlash movies on, 372glossary on, 372samples on, 335vector graphics on, 371–372
375Index
30_596918 bindex.qxd 10/7/05 7:22 PM Page 375

componentscheck boxes, 261–262combo boxes, 262–264list boxes, 265–266Loader, 268overview, 257ProgressBar, 268radio buttons, 258–260scroll panes, 266–267using, 147windows, 268
Components Inspector, 369Components panel
example of, 258, 369purpose of, 368using check boxes and, 261using combo boxes and, 263using list boxes and, 265using radio buttons and, 258using scroll panes and, 267using windows and, 268
computer screens, testing Flash Player filesand, 291
conferences, learning from, 339context-sensitivity, defined, 16, 360contracting, filled shapes, 93–94Control menu, purpose of, 17Controller, purpose of, 15Convert to Symbol dialog box, 148–149copying
commands, 112–113frames, 204–205folder contents, 138layers, 135objects, 86–87outline and fill properties, 99
copyright issues, using outside graphicsand, 75
corners, setting type of, 51courses, learning from, 336CRASH!MEDIA studio, 343Crop command, combining objects
with, 105Curtis, Hillman (Flash designer), 341curves
drawing with Pen tool, 58–59optimizing, 93
optimizing to simplify artwork, 286smoothing existing objects’, 92
customization, saving panel layouts, 16cutout affect, creating, 56
• D •d-art Web site, 337–338Davis, Joshua (Flash designer), 342Debugger panel, purpose/example of, 366Delete Swatch command, 67deleting
layers, 135objects, 87
desktop shortcut, creating, 13device fonts, using, 125dialog boxes
Convert to Symbol, 148–149Edit Envelope, 239Edit Snapping, 83–84Keyboard Shortcuts, 356Layer Properties, 138–139Manage Saved Commands, 114Optimize Curves, 93Page Set up, 42–44Preferences, 350–351Publish Settings, 241, 292–293, 299–301,
302–308Save as Template, 42Sound Properties, 241–242Spelling Setup, 117–118
Dimensions settings (Publish Settingsdialog box), 302
dimensions, specifying rectangle inadvance, 54
discussion groups, learning from, 336–337distorting, objects, 91Dock adding Flash 8 icon to, 13docking, panels, 15document-level undo, 110Down state, overview, 164draggable movie clips, creating, 232–233draggable objects, creating, 232drawing
creating guide layer for, 139curves with Pen tool, 58–59with grid, 73
376 Macromedia Flash 8 For Dummies
30_596918 bindex.qxd 10/7/05 7:22 PM Page 376

with guides, 72–73lines with Line tool, 52–53ovals, 54with pressure-sensitive pen/tablet, 62–63rectangles, 53–54with ruler, 71–72splines with Pen tool, 57squares, 53straight lines with Pen tool, 57–58using snapping, 73–74
Drawing category preferences, setting, 355Duplicate Swatch command, 67duplicating
existing symbols, 150–151Library items, 40publish profile, 309
dynamic textcreating, 127–128defined, 127
• E •Eden, Anthony (Flash designer), 342edges, softening, 94–95Edit bar, purpose of, 15Edit Envelope dialog box, 239Edit in a New Window mode, 152Edit in Place mode, 152Edit in Symbol-Editing Mode, 152Edit menu, purpose of, 16Edit Snapping dialog box, 83–84Envelope modifier, using, 91–92errors, troubleshooting ActionScript
code, 264event listener, defined, 262events
mouse, button actions and, 221–222movie clip, 224
exiting, Flash, 28expanding
filled shapes, 93–94folders, 137
exportingmovies and images, 312–314publish profiles, 310–311
Eyedropper toolcreating bitmap fills with, 70transferring properties with, 99
• F •fadeouts, reusing, 340file formats
bitmap, 324for publishing, 293
File menu, purpose of, 16filenames, for Flash-published movies, 285files
creating separate ActionScript, 234exportable, 313–314importable, 76
fillconverting lines to, 95–96locking, 71of rectangle, 53reshaping with Subselect tool, 88–89selecting objects and, 80simplifying artwork with, 287transferring properties of, 99transforming, 96–98
Fill Color tool, for rectangles, 53filters
adding to instance, 159applying to text, 129
Find feature, in Movie Explorer, 279finding and replacing
objects, 99–100text, 119–120
Flash Alignment settings (Publish Settingsdialog box), 304–305
Flash Communication Server, streamingvideo from, 244, 250–252
Flash component Web site, 338Flash For Dummies Library
using, 155vector graphics on, 371–372
Flash in the Can Conference, 339Flash Kit Web site, 337Flash Magazine Web site, 338Flash menu (Mac only), purpose of, 16Flash MX 2004 format, saving work in, 291Flash Player (Macromedia)
downloading, 10HTML settings for detection, 299–301printing movies from, 317testing for, 275–277
377Index
30_596918 bindex.qxd 10/7/05 7:22 PM Page 377

Flash screen. See also specific elementsexample of, 14overview, 14–20
Flash stock Library, 40Flash Video Streaming Service, streaming
video from, 243, 250–252FlashBelt Conference, 339Flashforward conference, 339Flashgoddess Web site, 338flipping, with Transform command, 104–105focal point, moving fill, 97folders
organizing layers with, 137–138organizing Library with, 39removing folders from, 137
font stylesreducing number of, 287setting, 121–122
font symbols. See also symbolscreating, 282overview, 147
fontsdevice, 125reducing number of, 287setting, 121–122
frame actionsadding basic, 218defined, 217stopping movie with, 218–219
frame by frame animationcreating, 188–189overview, 182
frame ratechanging, 185embedding video and, 244–245setting, 34
frame-based selection, 204frames
adding, 205adding basic actions to, 217–218changing keyframes to regular, 206copying and pasting, 204–205deleting, 205dividing motion into, 184moving, 205specifying printable, 315–316
storing static Web page, 272–275telling movie to go to different, 225–226Timeline window and, 19
Free Transform toolchanging transformation point, 106–108distorting objects with, 91Envelope modifier, 91–92overview, 89–90tapering objects with, 90–91
fscommand action, 227
• G •Gap Size modifier, overview, 64General category preferences, setting,
351–352getURL action
creating navigation with, 272overview, 227–228testing buttons with, 175
GIF filesadvantage of animated, 12overview, 324
Global Phones templates, 41glossary, on companion Web site, 372glows, reusing, 340Go To action, 225–226Gooberstory animation, 341gradients
for buttons, 164creating, 68–69defined, 11increasing file size, 287overview, 67softening edges with, 95
graphic filestypes of exportable, 313–314types of importable, 76
graphic symbols, 146. See also symbolsgraphics
creating animation from, 26–27creating for buttons states, 165–166creating last movie frame with, 25determining source of, 32importing, 22–23, 76laying out, 32
378 Macromedia Flash 8 For Dummies
30_596918 bindex.qxd 10/7/05 7:22 PM Page 378

organizing in Library, 39organizing with layers, 32putting on layers, 24–25source options, 37turning into symbols, 23–24, 32understanding types of, 35–36using from Library, 37–38using imported, 76–78using imported existing, 22ways of manipulating, 11
grid, using, 73grouping, objects, 105–106groups
breaking apart, 108motion tweening, 193–194simplifying artwork and, 286
guide layers, creating, 139–140guides, using, 72–73
• H •Hall, Peter Joel (resource Web site), 338Hantoot, Ben (Flash designer), 342Help feature
accessing, 20accessing on Web site, 21sections of, 20–21
Help menu, purpose of, 17hiding, folders, 137History panel
clearing, 114example of, 370overview, 111–112purpose of, 369undoing/replaying/copying/saving
commands, 112–114Hit state, overview, 164home pages, on Flash Web sites, 270–271hyperlinks
creating text, 124versus buttons, 219
HyperText Markup Language (HTML)Alignment settings (Publish Settings
dialog box), 304pages, on Flash Web sites, 270–271templates, 299–301
HyperText Markup Language (HTML) codechanging to match movie and Web page
color, 271creating hyperlinks and, 219creating Web pages and, 296creating Web sites with, 115Publish Settings dialog box settings and,
299–305understanding for movies, 297–298
• I •icons, symbol, 148ideas, brainstorming, 31images, exporting, 312–314importing
bitmap graphics, 323–325file types available for, 76graphics, 22–23, 75–76from Library, 340publish profile, 310–311saved Color palettes, 66–67sound, 236
In point, defined, 247indents, setting text, 126Info panel
example of, 364moving objects with, 85purpose of, 363
Ink Bottle tool, overview, 64ink drawing mode, 48input text
creating, 127–128defined, 127
Insert menu, purpose of, 17installation
downloading onto Mac, 350downloading onto PC, 348–349onto Mac from CD, 349onto PC from CD, 348overview, 347
instancesadding filters and blend modes to, 159–160breaking apart, 161changing brightness of, 158changing color and transparency of, 159
379Index
30_596918 bindex.qxd 10/7/05 7:22 PM Page 379

instances (continued)changing tint of, 158changing transparency of, 158–159changing type of, 160defined, 151editing, 157inserting, 156–157replacing, 160–161updating, 151–152using meaningful names for, 327
interactivity. See also buttonsadding, 32behaviors adding, 216–217defined, 213
Intersect command, combining objectswith, 105
intros, on Web sites, 271–272
• J •Japanese Phones templates, 41JPEG files, overview, 324
• K •kerning, adjusting, 123keyboard shortcuts
customizing, 355–358for menu commands, 17–18
Keyboard Shortcuts dialog box, 356keyframes
adding still graphics to, 190changing to regular frames, 206creating frame by frame animation
with, 188–189defined, 19overview, 187
Kirupa Web site, 338
• L •labels, adding to animation, 203–204Lasso tool, selecting objects with, 81–82Layer Properties dialog box, 138–139
layersactive, 132–133copying, 135creating, 132creating guide, 139–140deleting, 135hiding, 184linking motion guide to objects and, 198locking, 327managing, 134–135mask, 140–142modifying properties of, 138–139organizing, 137–138organizing movie with, 19organizing text and graphics with, 32overview, 131placing sounds into movies with, 236–237putting graphics on, 24–25renaming, 136reordering, 136selecting, 135selecting everything on one or all, 82states of, 133–134
layout, creating guide layer for, 139Library
creating shared, 281–282Flash stock, 40housekeeping of, 39–40importing from, 340organizing with folders, 39overview, 37reducing file size with shared, 287using Flash, 155using Flash For Dummies, 155using objects from, 38using other movies’, 40using shared, 283–284using symbols from other, 153–155
Library panel, resizing, 39limits, movie size, 332–333line endings
modifying, 92setting, 50–51
line spacing, setting, 126–127
380 Macromedia Flash 8 For Dummies
30_596918 bindex.qxd 10/7/05 7:22 PM Page 380

Line toolcutting shapes with, 55overview, 52–53
linear gradientcreating, 68–69defined, 67
lines. See also strokesconverting to fill, 95–96cutting shapes with, 55drawing straight with Pen tool, 57–58drawing with Line tool, 52–53using solid to simplify artwork, 286
links, creating text, 124Lisefski, Alek (Web site), 342list boxes
purpose of, 257using, 265–266
Load Default Colors command, 67Loader component, 268loading, Flash animation versus bitmap, 12loading time, vector graphics, 36loadMovie action, 228–229locked fills, overview, 71locking, folders, 137Lock/Unlock layer state, 133–134
• M •Macromedia Flash Player
downloading, 10HTML settings for detection, 299–301printing movies from, 317testing for, 275–277
Macromedia University, 336Macromedia Web site, accessing help on, 21Macs
downloading Flash onto, 350installing Flash from CD onto, 349starting Flash on, 13toolbars for, 15
mailing lists, learning from, 337Main toolbar (Windows only), purpose
of, 15Manage Saved Commands dialog box, 114margins, setting text, 126
mask layersanimating, 142creating, 141editing, 141–142overview, 140
maskscreating animated, 230reusing, 340
Match Contents Stage size option, 35Match Printer Stage size option, 35Menu bar, example of, 14menu commands, keyboard shortcuts
for, 17–18menus
ability to create, 11overview, 16–18
metadataadding search to movies, 270adding to movies, 35
methodsdefined, 229using, 229–230
Microsoft Word, simulating 3-D with,329–331
Mielke, Shane (Flash designer), 342mistakes, correcting, 22miter styled corner, 51Modify menu, purpose of, 17Moock, Colin (resource Web site), 338morphing, defined, 11motion, synching sound with, 323motion tweening
along paths, 196–197colors and transparency, 195editing/cleaning, 197–198example of, 192moving symbols, groups, and type with,
193–194overview, 191scaling and rotating animated objects,
194–195troubleshooting, 322–323
mouse eventsbutton actions and, 221–222On action, 226
381Index
30_596918 bindex.qxd 10/7/05 7:22 PM Page 381

movie clip symbols. See also symbolsconverting animation to, 149–150overview, 147
movie clipsadding actions to, 222–224adding to buttons, 169–171creating animated masks with, 230creating draggable, 232
Movie Explorer panelexample of, 367purpose of, 366using, 277–279
Movie of the Year animationcreating, 26–27in detail, 29publishing, 27–28
moviesadding metadata to, 35adding named anchors to, 256adding search metadata to, 270analyzing, 277–279breaking into scenes, 210centering on Web page, 331–332collecting, 339on companion Web site, 372creating bass, 326–327creating beginning and animation of, 26–27creating last frame of, 25creating new, 13creating printable, 314creating self-playing, 307–308embedding/editing video into, 245–249emerging two into one, 321–322exporting, 312–314matching to Web page, 271opening existing, 13–14placing sounds into, 236–238posting to Web sites, 311–312preparing for printing, 315printing, 42–44printing from Flash Player, 317publishing, 292–293publishing to PNG files, 305–307publishing to SWF files, 293–296publishing with named anchors, 256–257reducing file size of, 286–288rescaling size of, 325–326reusing, 340
setting up, 31size limits of, 332–333specifying print area for, 316–317specifying printable frames for, 315–316staging, 18telling to go to different frames, 225–226testing, 288–290testing in Web browser, 290–291understanding HTML code for, 297–298using check boxes and, 261–262using combo boxes and, 262–264using list boxes and, 265–266using radio buttons in, 258–260using scroll panes in, 266–267using symbols from, 153–155using windows in, 268
movingcenter of fill, 97focal point of fill, 97objects with Clipboard, 84objects with Info panel, 85objects with Property inspector, 85objects with Snap Align, 83–84
music, dynamically loading from Web,333–334
• N •named anchors, using, 255–257navigation tools, ability to create, 11newsgroups, learning from, 336No Color tool, for rectangles, 53
• O •object-drawing model
breaking apart shapes made with, 108protecting shapes with, 56–57selecting objects and, 80
object-level redo, 110–111object-level undo, 110–111objects
aligning, 86breaking apart, 108checking for on layers, 135combining, 105copying, 86–87created by ActionScript, 229
382 Macromedia Flash 8 For Dummies
30_596918 bindex.qxd 10/7/05 7:22 PM Page 382

creating draggable, 232–233creating empty symbols for, 149creating symbols from existing, 148–149defined, 80deleting, 87distorting, 91finding and replacing, 99–100flipping, 104–105grouping, 105–106lassoing, 81–82linking motion guide to, 198moving with Clipboard, 84moving with Info panel, 85moving with Property inspector, 85moving with Snap Align, 83–84ordering on Stage, 108–109reshaping with Subselect tool, 88–89rotating, 101–102scaling, 101–102selecting all, 82selecting with Selection tool, 80–81skewing, 103–104softening edges of, 94–95tapering, 90–91transferring properties among, 99turning into symbols, 23–24using Color Mixer panel with, 65using from Library, 38
On (mouse event) action, 226Once upon a Forest Web site, 342onion skins, using, 207–209opening, panels, 15Optimize Curves dialog box, 93optimizing, curves, 93organizing
layers, 137–138Library with folders, 39
Out point, defined, 247outlines
creating, 64deleting, 64reshaping with Selection tool, 88selecting objects and, 80transferring properties of, 99
Outlines layer state, 134Output panel, 367oval, drawing, 54Oval tool, overview, 54
Over statecreating graphic for, 166overview, 164
overflow modes, creating gradientsand, 68–69
• P •Page Set up dialog box, printing movie
with, 42–44Paint Behind tool, 60Paint Bucket tool
converting lines to fill and, 96overview, 63–64
Paint Fills tool, 60Paint Inside, 60Paint Normal tool, 60Paint Selection tool, 60palettes
saving new, 66using Web-safe, 286
panelsAccessibility, 280–281, 368Actions, 365Align, 86, 362Behaviors, 370closing, 15Color Mixer, 65–66, 362, 363Color Swatches, 66–67, 363Components, 258, 261, 263, 265, 267, 268,
368, 369Debugger, 366displaying collapsed, 15docking, 15example of, 14History, 111–114, 369, 370Info, 85, 363, 364Library, 39managing, 15–16Movie Explorer, 277–279, 366, 367opening, 15Output, 367Scene, 364stacking, 15Strings, 370Tools, 14, 16, 359, 360Transform, 364, 365undocking, 15
383Index
30_596918 bindex.qxd 10/7/05 7:22 PM Page 383

paragraphs, setting attributes for, 125–126Pasteboard
keeping items on, 34overview, 18
pasting, covering other objects and, 87paths, tweening along, 196–197PCs
downloading Flash onto, 348–349installing Flash from CD onto, 348starting Flash on, 13toolbars for, 15
PDA templates, 41Pen tool
drawing curves with, 58–59drawing straight lines with, 57–58overview, 57
Pencil Mode modifier, setting, 48–49Pencil tool
cutting shapes with, 55overview, 47–48setting color, 52setting stroke type, 49–52simplifying artwork with, 286
Peters, Keith (Flash designer), 343Photo Slideshows templates, 41pixels
bitmaps and, 36measuring with, 72snapping to, 74
Play action, 226Playback settings (Publish Settings dialog
box), 302PNG files
overview, 324publishing movies to, 305–307
Polygon Mode modifier, lassoing objectsand, 82
Powered by Detroit conference, 339“praystation” Web site, 342preferences
overview, 350–351setting ActionScript category, 353setting Auto Format category, 354setting Clipboard category, 354setting Drawing category, 355setting General category, 351–352
setting Text category, 355setting Warnings category, 355
Preferences dialog box, 350–351preloader
creating, 269overview, 268–269testing, 269–270
Presentations templates, 41Pressure modifier, 62pressure-sensitive pen/tablet, drawing
with, 62–63printing
movies, 42–44movies from Flash Player, 317preparing movie for, 315specifying frames for, 315–316
printing area, specifying, 316–317programming commands, 231–232ProgressBar component, 268projectors, creating, 307–308Pronk, Ellen (Flash designer), 343properties
changing symbols, 151transferring objects, 99
Property inspectorcontrolling lying type and wit with, 50creating text types and, 127–128example of, 14with keyframes selected, 361moving objects with, 85with no selection, 316Output tab of, 367purpose of, 16setting character attributes with, 121–124with shape selected, 361with symbol instance selected, 361–362using check boxes and, 261using combo boxes and, 263using list boxes and, 265–266using radio buttons and, 258–259, 260using scroll panes and, 267using windows and, 268
Publish Preview command, 290–291, 311publish profile. See also publishing
creating, 308deleting, 309–310
384 Macromedia Flash 8 For Dummies
30_596918 bindex.qxd 10/7/05 7:22 PM Page 384

duplicating, 309exporting/importing, 310–311modifying, 309
Publish Settings dialog boxcreating PNG files and, 305–307creating projectors with, 307–308Dimensions settings, 302Flash Alignment settings, 304–305HTML Alignment settings, 304managing sound with, 241Playback settings, 302publishing movies with, 292–293Quality settings, 303Scales settings, 304Templates settings, 299–301Window Mode settings, 303
publishing. See also publish profile animation, 33first animation, 27–28overview, 292–293to PNG files, 305–307to SWF files, 293–296
Punch command, combining objects with,105
push buttons, purpose of, 257
• Q •Quality settings (Publish Settings dialog
box), 303Quiz templates, 41
• R •radial gradient
for buttons, 164creating, 68–69defined, 67
radio buttonsoverview, 258–260purpose of, 257
Rectangle toolcreating buttons and, 170overview, 53–54
rectangles, drawing, 53–54redoing, 110–111
regular expressions, defined, 120renaming
layers, 136Library items, 40
reorderingfolders, 138layers, 136objects on Stage, 108–109
replaying, commands, 112rescaling, movie size, 325–326resizing
Library panel, 39Timeline, 184
Reynaud, Micaël (Flash designer), 343rotating
fill, 97motion tweening and, 194–195with Transform command, 102–103
round corner, 51Round Rectangle Radius modifier tool, for
rectangles, 53ruler, using, 71–72runtime shared Library
creating, 281–282defined, 281reducing file size with, 287using, 283–284
• S •sample rate sound, 236samples, experimenting with, 335sampling rate, defined, 240Save As Default command, 67Save as Template dialog box, 42saving
commands, 113–114panel layouts, 16
scalability, bitmaps versus vectorgraphics, 36
Scalable Vector Graphics (SVG) standards,creating gradient that complieswith, 69
Scales settings (Publish Settings dialogbox), 304
385Index
30_596918 bindex.qxd 10/7/05 7:22 PM Page 385

scalingbitmap fill, 97–98motion tweening and, 194–195movie size, 325–326with Transform command, 101–102
Scene panel, example of, 364scenes
breaking movies into, 210managing animation with, 209–210manipulating, 210–211
screen readers, 279screens, testing Flash Player files and, 291Script Assist mode, working with Timeline
Control actions and, 225scroll panes
purpose of, 257using, 266–267
search metadata, adding to movies, 270selecting
all objects, 82layers, 135objects with Lasso tool, 81–82objects with Selection tool, 80–81
selection box, using, 80Selection tool
reshaping objects with, 88selecting objects with, 80–81
servers, streaming video from, 243, 250–252setMask method, 230–231shape hints
adjusting, 202–203using, 201–202
shape tweeningadjusting shape hints and, 202–203creating simple, 200–201defined, 191overview, 198–199using shape hints and, 201–202
shape-recognition preferences, settingPencil tool, 49
shapesbreaking apart, 108combining, 55–56converting type to, 129creating cutout effect, 56creating outline for, 64
creating to define active area ofbuttons, 166
cutting up, 55expanding and contracting filled, 93–94line, 52–53oval, 54rectangles/squares, 53–54reshaping with Selection tool, 88using object-drawing model with, 56–57working with, 54
Show/Hide layer state, 133size
limits, movie, 332–333reducing movie file, 286–288rescaling movie, 325–326selecting Brush tool, 60setting font, 121–122setting Stage, 34–35
skewing (slanting)fill, 98text, 128–129with Transform command, 103–104
skin, defined, 251smooth drawing mode, 48–49smoothing, curves of existing objects, 92smoothing preferences, setting Pencil
tool, 49Snap Align feature, moving objects with,
83–84snapping, using, 73–74snap-to-grid preferences, setting, 74snap-to-object preferences, setting, 74snap-to-pixels preferences, setting, 74softening, edges, 94–95Sort by Color command, 67sorting, Library items, 39sound
ability to add, 11adding, 32adding to buttons, 167–169changing volume of, 240compressing, 287–288deleting parts of, 240dynamically loading music from Web,
333–334editing, 238–239
386 Macromedia Flash 8 For Dummies
30_596918 bindex.qxd 10/7/05 7:22 PM Page 386

graphic symbols and, 146importing, 236managing, 240–242overview, 235–236placing into movies, 236–238synching with motion, 323ways of manipulating, 11
Sound Properties dialog box, 241–242sound synchronization options, 237–238span-based selection, 204spell checking, text, 117–118Spelling Setup dialog box, 117–118splines, drawing with Pen tool, 57squares, drawing, 53stacking, panels, 15Stage
displaying grid on, 73example of, 14laying out with guides, 72–73moving complete animation on, 209multiplying graphics over, 32ordering objects on, 108–109overview, 18setting color of, 33–34setting frame rate, 34setting size, 34–35
static text, defined, 127steps, typical for adding animation to Web
sites, 31–33Stop action, 226stopALLSOUNDS action, 226straighten drawing mode, 48straightening, strokes of existing objects, 92streaming audio, loading, 333–334streaming video
from Flash Communication Server, 244,250–252
from Flash Video Streaming Service, 243,250–252
overview, 249–252from Web server, 243, 250–252
Strings panel, purpose/example of, 370Stroke Color tool, for rectangles, 53Stroke hinting feature, 51stroke type, setting Pencil tool, 49–52
stroke width, setting pencil, 50strokes
changing with Ink Bottle tool, 64of rectangle, 53reshaping with Subselect tool, 88–89setting color of pencil, 52setting thickness of scales for pencil,
51–52smoothing brush, 63
Subselect tool, reshaping with, 88–89SVG (Scalable Vector Graphics) standards,
creating gradient that complieswith, 69
Swann, Craig (Flash designer), 343Swap Colors tool, for rectangles, 53SWF files
publishing to, 293–296reducing size of, 286–288saving movies and, 285
symbols. See also buttons; instancesbreaking apart, 108button, 147changing properties of, 151converting animation to movie clip,
149–150creating empty, 149creating font, 282creating from existing objects, 148–149creating new for Library, 40duplicating existing, 150–151editing, 151–153font, 147graphic, 146icons for, 148motion tweening, 193–194movie clip, 147, 149–150overview, 145simplifying artwork and, 286turning graphics into, 32turning objects into, 23–24types of, 145using consistent names for, 327using from other movies, 153–155
synching, sound with motion, 323synchronization options, 237–238
387Index
30_596918 bindex.qxd 10/7/05 7:22 PM Page 387
• T •tangent line, drawing curves and, 58tapering, objects, 90–91templates
creating own category for, 42setting HTML, 299–301using, 41–42
tense, changing instance, 158Test Movie command, 288–290testing
basic buttons, 166–167buttons with Get URL action, 175for Flash Player, 275–277movies, 288–290movies in Web browsers, 290–291,
326–327preloader, 269–270
textadding, 32adjusting kerning and tracking of,
123–124aligning, 126breaking apart, 108creating, 116creating a fax for, 128–129creating input and dynamic, 127–128editing, 117finding and replacing, 119–120Flash options with, 115–116HTML code and, 115hyperlinking, 124organizing with layers, 32setting color of, 122–123setting fonts, font size, font style for,
121–122smoothing, 124–125spell checking, 117–119using device fonts, 125using for buttons, 166ways of manipulating, 11
Text category preferences, setting, 355text input, creating button that acts on,
176–178Text menu, purpose of, 17
Text tool, creating text with, 1163-D
simulating, 327simulating with AutoCAD, 328–329simulating with Microsoft Word, 329–331
Tilt modifier, 63Timeline
adding actions to, 173–176changing animation speed and, 206–207displaying, 183hiding, 72overview, 184selecting frames and, 204storing Web content with, 272–275synching motion with sound and, 323
Timeline Control actions, 224–226Timeline effects
adding animation with, 186creating animation with, 182deleting, 186
Timeline windowexample of, 14overview, 19
toolbars, overview, 15Tools panel
example of, 14, 360overview, 359purpose of, 16
tracking, adjusting, 123–124training, formal, 336Transform command
flipping objects with, 104–105overview, 100–101rotating objects with, 101–102scaling objects with, 101–102skewing objects with, 103–104
Transform panelexample of, 365purpose of, 364
transformation pointchanging, 106–108using, 89–90
transparencychanging instance, 158–159slowing playback, 287tweening, 195
388 Macromedia Flash 8 For Dummies
30_596918 bindex.qxd 10/7/05 7:22 PM Page 388
transparency feature, purpose of, 11tweening
adjusting shape hints and, 202–203along paths, 196–197colors and transparency, 195creating animation by, 182creating simple shape, 200–201defined, 32editing/tweening, 197–198moving symbols, groups, and type
with, 193–194overview, 190–191preparing to animate and, 183reducing file size with, 288scaling and rotating animated
objects, 194–195shape, 198–199troubleshooting, 322–323using shape hints and, 201–202
tweening Web site, 3382Advanced Studios, 342type, motion tweening, 193–194
• U •Undo command, using, 22undocking
panels, 15Timeline, 184
undoingdocument-level, 110with History panel, 112object-level, 110–111
Union command, combining objectswith, 105
unloadMovie action, 229Up state
creating graphic for, 165overview, 164
• V •vector graphics
on companion Web site, 371–372converting bitmap graphics to, 77–78overview, 36versus bitmap graphics, 12
videoability to play, 11embedding/editing, 245–249overview, 242–243preparing to embed, 244–245streaming, 249–252ways of using, 243–244
Video Import Wizardembedding video and, 245–249streaming videos and, 249–252
View menu, purpose of, 17viewers
considering when testing Flash Playerfiles, 291
creating interactivity for, 32creating intros and, 271–272creating printables for, 314–317detecting Flash Player versions, 276–277electing Flash versus non-Flash sites, 276inputting text, 127meeting accessibility needs of, 280, 368using text buttons, 166Web page creation considerations
and, 271volume, changing, 240
• W •Warnings category preferences, setting,
355Web browsers
testing movies and, 290–291testing movies in, 326–327
Web pagescentering movies and, 331–332creating buttons for, 11designing buttons for, 163–164HTML code and, 296matching movies to, 271storing as frames on Timeline, 272–275using named anchors with, 255–257
Web search information, adding tomovies, 270
Web server, streaming video from, 243,250–252
389Index
30_596918 bindex.qxd 10/7/05 7:22 PM Page 389

Web sitescreating navigation structure for, 272creating non-Flash, 277creating runtime shared libraries for,
281–282distinguishing with animation, 10Flash movies on companion, 372Flash resource, 337–338glossary on companion, 372HTML code on, 115improving accessibility of, 279–281Macromedia, 336optimizing movie text for, 287posting movies to, 311–312reasons for limiting animation on, 12samples on companion, 335simplifying movie artwork for, 286–287structure of Flash, 270–271testing for viewer Flash Player, 275–277typical steps for adding animation to,
31–33
using intros, 271–272using runtime shared libraries on, 283–284vector graphics on companion, 371–372
Web 216 command, 67We’re Here Forums, 338width
changing fill, 97setting pencil stroke, 50
Window menu, purpose of, 17Window Mode settings (Publish Settings
dialog box), 303windows
purpose of, 257using, 268
Windows (Microsoft), panel arrow buttonsin, 16
• Z •Zoom Control box, using, 18
390 Macromedia Flash 8 For Dummies
30_596918 bindex.qxd 10/7/05 7:22 PM Page 390