
Wilderness Survival for Dummies
484
-
Upload
khangminh22 -
Category
Documents
-
view
0 -
download
0
Transcript of Wilderness Survival for Dummies


Wilderness SurvivalFOR
DUMmIES‰
by John Haslett and Cameron M. Smith, PhD

AbWilderness Survival For Dummies®
Published byWiley Publishing, Inc.111 River St.Hoboken, NJ 07030-5774www.wiley.com
Copyright © 2009 by Wiley Publishing, Inc., Indianapolis, Indiana
Published by Wiley Publishing, Inc., Indianapolis, Indiana
Published simultaneously in Canada
No part of this publication may be reproduced, stored in a retrieval system or transmitted in any form or by any means, electronic, mechanical, photocopying, recording, scanning or otherwise, except as permitted under Sections 107 or 108 of the 1976 United States Copyright Act, without either the prior written permission of the Publisher, or authorization through payment of the appro-priate per-copy fee to the Copyright Clearance Center, 222 Rosewood Drive, Danvers, MA 01923, (978) 750-8400, fax (978) 646-8600. Requests to the Publisher for permission should be addressed to the Permissions Department, John Wiley & Sons, Inc., 111 River Street, Hoboken, NJ 07030, (201) 748-6011, fax (201) 748-6008, or online at http://www.wiley.com/go/permissions.
Trademarks: Wiley, the Wiley Publishing logo, For Dummies, the Dummies Man logo, A Reference for the Rest of Us!, The Dummies Way, Dummies Daily, The Fun and Easy Way, Dummies.com, Making Everything Easier, and related trade dress are trademarks or registered trademarks of John Wiley & Sons, Inc. and/or its affiliates in the United States and other countries, and may not be used without written permission. All other trademarks are the property of their respective owners. Wiley Publishing, Inc., is not associated with any product or vendor mentioned in this book.
LIMIT OF LIABILITY/DISCLAIMER OF WARRANTY: THE PUBLISHER AND THE AUTHOR MAKE NO REPRESENTATIONS OR WARRANTIES WITH RESPECT TO THE ACCURACY OR COMPLETE-NESS OF THE CONTENTS OF THIS WORK AND SPECIFICALLY DISCLAIM ALL WARRANTIES, INCLUDING WITHOUT LIMITATION WARRANTIES OF FITNESS FOR A PARTICULAR PURPOSE. NO WARRANTY MAY BE CREATED OR EXTENDED BY SALES OR PROMOTIONAL MATERIALS. THE ADVICE AND STRATEGIES CONTAINED HEREIN MAY NOT BE SUITABLE FOR EVERY SITU-ATION. THIS WORK IS SOLD WITH THE UNDERSTANDING THAT THE PUBLISHER IS NOT ENGAGED IN RENDERING LEGAL, ACCOUNTING, OR OTHER PROFESSIONAL SERVICES. IF PRO-FESSIONAL ASSISTANCE IS REQUIRED, THE SERVICES OF A COMPETENT PROFESSIONAL PERSON SHOULD BE SOUGHT. NEITHER THE PUBLISHER NOR THE AUTHOR SHALL BE LIABLE FOR DAMAGES ARISING HEREFROM. THE FACT THAT AN ORGANIZATION OR WEBSITE IS REFERRED TO IN THIS WORK AS A CITATION AND/OR A POTENTIAL SOURCE OF FURTHER INFORMATION DOES NOT MEAN THAT THE AUTHOR OR THE PUBLISHER ENDORSES THE INFORMATION THE ORGANIZATION OR WEBSITE MAY PROVIDE OR RECOMMENDATIONS IT MAY MAKE. FURTHER, READERS SHOULD BE AWARE THAT INTERNET WEBSITES LISTED IN THIS WORK MAY HAVE CHANGED OR DISAPPEARED BETWEEN WHEN THIS WORK WAS WRIT-TEN AND WHEN IT IS READ.
For general information on our other products and services, please contact our Customer Care Department within the U.S. at 877-762-2974, outside the U.S. at 317-572-3993, or fax 317-572-4002.
For technical support, please visit www.wiley.com/techsupport.
Wiley also publishes its books in a variety of electronic formats. Some content that appears in print may not be available in electronic books.
Library of Congress Control Number: 2009928733
ISBN: 978-0-470-45306-3
Manufactured in the United States of America
10 9 8 7 6 5 4 3 2 1
About the AuthorsJohn Haslett is a veteran expedition leader and adventure
writer. He is the author of various adventure books, magazine
articles, and academic papers, and his work has been featured
in National Geographic Adventure, Archaeology, QST, and other
magazines. He has spent decades catching unpleasant tropical
diseases, explaining himself to local authorities, fleeing from
various misguided animals, and putting into practice many of
the tenets of this book.
In the 1990s, with the help of an isolated community of
Ecuadorian mariners, John built four 30,000-pound wooden
rafts and then voyaged on the Pacific Ocean aboard those
primitive vessels for hundreds of days. He and Cameron are
now preparing their most extensive expeditions to date.
John lives in Los Angeles with his wife, film director Annie Biggs.
Cameron M. Smith’s mountaineering, sailing, archaeological,
and icecap expeditions have taken him to Africa, South
America, arctic Alaska, Canada, and Iceland. In 2004, he made
the first solo winter ski crossing of Iceland’s storm-lashed
Vatnajökull icecap, an expedition televised on the National Geographic Channel. He is currently documenting arctic Alaska
in winter by trekking on, piloting a paraglider over, and scuba
diving beneath the sea ice.
Cameron has written for Scientific American Mind, Hang Gliding & Paragliding, Archaeology, and Spaceflight magazines and in
the books The Best Travel Writing (2008, 2009), Science under Siege, They Lived to Tell the Tale, The Top 10 Myths about Evolution, and Anthropology For Dummies.
A Life Fellow of the Royal Geographical Society, a Fellow of the
Explorers Club, and a member of the Society for Human
Performance in Extreme Environments, Cameron is currently
writing a narrative of his Iceland expeditions and preparing for
balloon exploration of the stratosphere as well as another
Pacific expedition with John Haslett. You can track his expedi-
tion at www.cameronmsmith.com.
y
ppro- d to ) 748-
ce
ohn used
Wiley
AKE ETE-IES,
OSE. ALS. ITU-NOT PRO-NAL BLE E IS HER THE S IT
D IN RIT-
rint

AuDedicationJohn Haslett: This book is dedicated to Annie Biggs,
Cameron Smith, Alejandro Martinez, Cesar Alarcon, and
Dower Medina — five extraordinary people who know a thing
or two about surviving in bad conditions.
And to the boys and men of Troop 100, BSA, wherever
you are . . .
Cameron M. Smith: Like John, I dedicate this book to my
companions in adventure: namely, John himself; my moun-
taineering partners, Dr. Chiu Liang Kuo, W. McRee Anderson
III, and Jamie Anderson; my flight instructors, Larry Pindar
and George McPherson; my diving partner, Todd Olson;
Arctic Expedition Coordinator Chuck Sullivan; and Dr. Evan
T. Davies. Thank you all for throwing your dice with me. I
also dedicate this book to the indigenous people across the
globe — the Samburu of East Africa, the fisher-folk of West
Ecuador, and the Inupiat of Alaska — who taught me how to
survive in places where suburbanites like me would other-
wise just vanish.

Authors’ AcknowledgmentsJohn Haslett: I would like to send my thanks to my wife, Annie
Biggs, for her editing, proofing, scheduling, strategizing, and
solid backboned, fighting spirit. I am lucky. I would also like to
acknowledge Cameron McPherson Smith, PhD, my coauthor.
Not only did he write roughly half of this book, but he also
hand-drew some 120 technical illustrations at the same time.
Thanks to Literary Agent Matt Wagner at Fresh Books, Inc.,
who represented this book and who has been exceedingly sup-
portive. I’d like to thank the editor of this book, Chad Sievers,
who has been excellent to work with and someone I would
work with again, as well as copy editor Danielle Voirol, who
made important contributions to this manuscript. Lindsay
Lefevere, Acquisitions Editor, deserves credit for believing this
would be a worthwhile book. Search and Rescue veterans Gary
Cascio and Rick Goodman, both of New Mexico, were generous
with their time, advice, and facts. Finally, I’d like to send out
my deepest thanks to all the readers and supporters of my pre-
vious work — all the letter writers and e-mailers and lecture
attendees.
Cameron M. Smith: I thank John Haslett for inviting me aboard
one of his extraordinary raft expeditions and for his rock-solid
friendship over more than a decade. I am particularly pleased
to have the opportunity to thank John’s wife, Annie Biggs, for
supporting John’s expeditions. I thank Literary Agent Matt
Wagner for suggesting this project, Acquisitions Editor Lindsay
Lefevere for managing it, and our primary editors, Chad
Sievers and Danielle Voirol, for deftly improving the text. I
thank our technical reviewers for their helpful comments, and
like John, I thank my friends and mentors from Boy Scout
Troop 616, among whose company I first learned the rewards
of an outdoor life. I thank Angela Perri for her limitless
patience during this time-devouring project and Search and
Rescue Technician Jeff Parsons of the Idaho Falls Fire
Department for his technical comments. Finally, I thank my
parents, professors Donald E. and Margit J. Posluschny Smith,
for granting me the freedom to weave reality from my dreams.
There is no greater gift, and I know that the price — their
worry while I’m on expedition — is real.
ing
-
on
r
n
e
t
to

Publisher’s AcknowledgmentsWe’re proud of this book; please send us your comments through our Dummies online registration form located at http://dummies.custhelp.com. For other comments, please contact our Customer Care Department within the U.S. at 877-762-2974, outside the U.S. at 317-572-3993, or fax 317-572-4002.
Some of the people who helped bring this book to market include the following:
Acquisitions, Editorial, and Media
Development
Project Editor: Chad R. Sievers
Acquisitions Editor: Lindsay Lefevere
Senior Copy Editor: Danielle Voirol
Assistant Editor: Erin Calligan Mooney
Editorial Program Coordinator: Joe Niesen
Technical Editors: Jeffrey Hunt Mantel, Edward Sobey, PhD, Alan Searle, MD
Editorial Manager: Michelle Hacker
Editorial Assistant: Jennette ElNaggar
Art Coordinator: Alicia B. South
Cover Photos: Image Source Pink
Cartoons: Rich Tennant
(www.the5thwave.com)
Composition Services
Project Coordinator: Lynsey Stanford
Layout and Graphics: Melanee Habig, Christin Swinford, Ronald Terry, Christine Williams
Special Art: Cameron M. Smith
Proofreaders: Caitie Copple, John Greenough, Nancy L. Reinhardt
Indexer: Anne Leach
Special Help: Megan Knoll, Jennifer Tebbe
Publishing and Editorial for Consumer Dummies
Diane Graves Steele, Vice President and Publisher, Consumer Dummies
Kristin Ferguson-Wagstaffe, Product Development Director, Consumer Dummies
Ensley Eikenburg, Associate Publisher, Travel
Kelly Regan, Editorial Director, Travel
Publishing for Technology Dummies
Andy Cummings, Vice President and Publisher, Dummies Technology/General User
Composition Services
Debbie Stailey, Director of Composition Services

Contents at a GlanceIntroduction ...................................................... 1
Part I: Stayin’ Alive: Basic Wilderness Survival Principles ............................................ 7
Chapter 1: Surviving the Wilderness ...................................................... 9
Chapter 2: Preparing Yourself for a Survival Situation ...................... 19
Chapter 3: The Psychology of Survival: Gaining the Upper Hand ..... 33
Chapter 4: Survival Style: Keeping Warm or Cool ............................... 45
Chapter 5: Making Fire in the Wilderness ............................................ 63
Chapter 6: Home, Sweet Hut: Survival Shelters ................................... 75
Chapter 7: Liquid Capital: Finding Drinking Water ............................. 87
Chapter 8: Gathering and Hunting to Stay Alive
in the Wilderness ............................................................................ 105
Part II: Eyeing Advanced Survival Techniques ... 141Chapter 9: Finding Your Way with Tools: Basic
Wilderness Navigation ................................................................... 143
Chapter 10: Looking Up to the Skies: Celestial Navigation .............. 167
Chapter 11: Trekking over Land .......................................................... 177
Chapter 12: Signaling for Rescue ......................................................... 195
Chapter 13: Administering First Aid.................................................... 219
Chapter 14: Survive or Thrive? Advanced Methods and Tools ....... 249
Part III: Surviving in Extreme Land Environments ........................................ 269
Chapter 15: Special Considerations for Forests and Jungles ........... 271
Chapter 16: The Big Chill: Enduring in Snowy Places ....................... 289
Chapter 17: Staying Alive under the Sun ............................................ 313
Part IV: Surviving on the Seas, Oceans, and Great Lakes ............................................ 337
Chapter 18: Staying Afloat and Warm ................................................. 339
Chapter 19: The Great Drift: Aboard Life Rafts and
Disabled Vessels ............................................................................. 357
Chapter 20: Food and Drink at Sea ...................................................... 373
Chapter 21: Emergency Travel and Navigation at Sea ...................... 397
Chapter 22: First Aid on the Water...................................................... 413

Part V: The Part of Tens ................................. 423Chapter 23: Ten Ways to Practice Wilderness Survival Skills ......... 425
Chapter 24: Ten Quick Escapes ........................................................... 433
Index ............................................................ 441

Table of ContentsIntroduction ....................................................... 1
About This Book ........................................................................ 2
Conventions Used in This Book ............................................... 2
Foolish Assumptions ................................................................. 2
What You’re Not to Read .......................................................... 3
How This Book Is Organized .................................................... 3
Icons Used in This Book ............................................................ 5
Where to Go From Here ............................................................ 6
Part I: Stayin’ Alive: Basic Wilderness Survival Principles ............................................. 7
Chapter 1: Surviving the Wilderness . . . . . . . . . . . . . . . . .9Being Prepared and Proactive .................................................. 9
Keeping the Right Attitude ..................................................... 10
Identifying Survival Basics ...................................................... 11
Navigating in the Wild ............................................................. 14
Surviving Injury ........................................................................ 15
Avoiding Some of the Causes of Survival Situations ........... 16
Chapter 2: Preparing Yourself for a Survival Situation . . . . . . . . . . . . . . . . . . . . . . . . . . . . . .19
Being Ready for Mother Nature ............................................. 19
Carrying Survival Equipment ................................................. 23
Chapter 3: The Psychology of Survival: Gaining the Upper Hand . . . . . . . . . . . . . . . . . . . . . . . .33
Getting into the Right Mindset ............................................... 33
Being Aware of Your Emotions .............................................. 40
Improving Morale ..................................................................... 44
Chapter 4: Survival Style: Keeping Warm or Cool . . . . .45Regulating Body Temperature ............................................... 45
Relying on Layering for Warmth ............................................ 49
Improvising Cold-Weather Clothing ...................................... 52
Using Other Ways to Keep Warm .......................................... 58
23425
433
41
Wilderness Survival For Dummies xCool Threads: Clothing for Staying Cool ............................... 59
A Cool Proposition: Working at Night, Resting
During the Day ...................................................................... 62
Chapter 5: Making Fire in the Wilderness . . . . . . . . . . .63Making a Fire ............................................................................ 63
Trying Other Ways to Start Fire ............................................. 70
Extinguishing a Fire ................................................................. 74
Chapter 6: Home, Sweet Hut: Survival Shelters . . . . . .75Grasping the Importance of Shelter ...................................... 76
Before Making Camp: What to Do .......................................... 76
Using Natural Shelters ............................................................. 79
Putting a Roof over Your Head: Building
Simple Shelters ..................................................................... 82
Keeping Your Shelter Clean .................................................... 86
Chapter 7: Liquid Capital: Finding Drinking Water . . . .87Knowing Your Water Needs.................................................... 87
What Not to Drink .................................................................... 90
Finding Bodies of Water .......................................................... 92
Catching Rain............................................................................ 94
Collecting Condensation ......................................................... 95
Extracting Water from Plants ................................................. 98
Filtering and Purifying Water ............................................... 100
Chapter 8: Gathering and Hunting to Stay Alive in the Wilderness . . . . . . . . . . . . . . . . . . . . . . . . . . . . .105
Managing Food in the Wild ................................................... 106
Including Plants in Your Wilderness Diet ........................... 107
Hunting and Trapping Food .................................................. 115
Getting Your Hands on Freshwater Fish ............................. 130
The Wilderness Café: Preparing Food Outdoors ............... 136
Part II: Eyeing Advanced Survival Techniques ... 141
Chapter 9: Finding Your Way with Tools: Basic Wilderness Navigation . . . . . . . . . . . . . . . . . .143
Grasping Navigation Basics .................................................. 143
Map Reading Made Easy ....................................................... 146
Table of Contents xiNavigating with a Map ........................................................... 151
Understanding How Your Compass Works ........................ 153
Navigating with a Map and Compass .................................. 156
Navigating with a GPS Receiver ........................................... 163
Chapter 10: Looking Up to the Skies: Celestial Navigation . . . . . . . . . . . . . . . . . . . . . . . . . . .167
Finding Direction with the Sun ............................................. 167
Finding Direction with the Stars .......................................... 174
Chapter 11: Trekking over Land . . . . . . . . . . . . . . . . . . .177Understanding Trail Travel .................................................. 177
Getting Back on Course When You’re Disoriented ............ 180
What to Do When You’re Lost .............................................. 183
Blazing Your Own Trail ......................................................... 187
Crossing Obstacles in the Wild ............................................ 190
Chapter 12: Signaling for Rescue . . . . . . . . . . . . . . . . . .195Grasping the Basics to Signaling .......................................... 195
Mastering the Language of Signaling ................................... 198
Mastering Signaling Tools ..................................................... 202
Signaling with Electronics ..................................................... 209
Getting a Lift: What to Do When the Helicopter Comes .... 215
Chapter 13: Administering First Aid . . . . . . . . . . . . . . . .219Understanding First Aid Basics ............................................ 219
Controlling Bleeding .............................................................. 226
Treating Shock ....................................................................... 229
Handling Breaks, Sprains, and Wounds .............................. 231
Treating Burns ........................................................................ 239
Addressing Hypothermia and Dehydration ........................ 241
Treating Bites, Stings, and Poisonings ................................ 243
Chapter 14: Survive or Thrive? Advanced Methods and Tools . . . . . . . . . . . . . . . . . . . . . . . . . . . . . . . . . . . .249
Keeping It Together: Ropes and Knots................................ 249
Crafting Your Own Tools ...................................................... 260
Making Natural Remedies ..................................................... 264
.. 59
.. 62
.63.. 63
.. 70
.. 74
.75.. 76
.. 76
.. 79
.. 82
.. 86
.87.. 87
.. 90
.. 92
.. 94
.. 95
.. 98
100
105106
107
115
130
136
41
143143
146

Wilderness Survival For Dummies xii
Part III: Surviving in Extreme Land Environments ................................................. 269
Chapter 15: Special Considerations for Forests and Jungles . . . . . . . . . . . . . . . . . . . . . . . . . . . . . . . . . .271
Identifying Hazardous Wildlife in Dry Forests.................... 271
Laws of the Jungle: Surviving in the Tropics ...................... 276
Identifying Dangerous Animals in the Tropics ................... 284
Chapter 16: The Big Chill: Enduring in Snowy Places . . . . . . . . . . . . . . . . . . . . . . . . . . . . . .289
Staying Warm.......................................................................... 289
Cold Comfort: Making Your Shelter
in a Snowy Environment.................................................... 291
Making Fire in Cold, Snowy Environments ......................... 297
Don’t Eat the Yellow Snow: Safe-to-Drink Snow and Ice ... 299
Steering Clear of Cold-Environment Terrain Hazards ....... 300
Making Wearable Tools for Cold-Weather Survival ........... 307
Chapter 17: Staying Alive under the Sun . . . . . . . . . . . .313Knowing the Dangers the Sun and Heat Pose .................... 313
Wearing Sun Shields .............................................................. 316
Finding Shelter in the Desert ................................................ 318
Finding Water in the Desert .................................................. 320
Finding Food in the Dry Places............................................. 325
Avoiding Dangerous Desert Animals ................................... 328
Wind and Water: Watching Out for Desert Weather ......... 331
Finding Your Way in the Desert ........................................... 332
Crossing Desert Terrain ........................................................ 336
Part IV: Surviving on the Seas, Oceans, and Great Lakes ............................................. 337
Chapter 18: Staying Afloat and Warm . . . . . . . . . . . . . .339Recognizing When Your Vessel Is in Trouble .................... 339
Knowing What to Do If Your Boat Starts to Sink ................ 345
Staying Warm as You Float with a Life Jacket .................... 352
Floating without a Life Jacket ............................................... 354
Table of Contents xiiiChapter 19: The Great Drift: Aboard Life
Rafts and Disabled Vessels . . . . . . . . . . . . . . . . . . . .357Getting from Ship to Life Raft ............................................... 358
Adjusting to Life Afloat .......................................................... 364
Controlling Drifting Vessels .................................................. 370
Chapter 20: Food and Drink at Sea . . . . . . . . . . . . . . . . .373On the Water Front: Improving Your Chances
for Survival .......................................................................... 373
Making Fresh Water on the Sea ............................................ 379
Considering Living Sources of Water .................................. 383
Fishing at Sea .......................................................................... 386
Bringing in Your Catch .......................................................... 392
Preparing and Eating Fish ..................................................... 393
Identifying Other Delicious Things to Eat in the Sea ......... 395
Chapter 21: Emergency Travel and Navigation at Sea . . . . . . . . . . . . . . . . . . . . . . . . . . . . . . . . . . . . . . .397
Swimming Back to Land ........................................................ 397
Improvised Open-Sea Navigation for Life Rafts.................. 402
Coming Ashore: A Dangerous Ordeal .................................. 410
Chapter 22: First Aid on the Water . . . . . . . . . . . . . . . . .413Responding to Water Casualties .......................................... 413
Treating Common Sea Ailments ........................................... 418
Treating Bites and Stings ...................................................... 420
Part V: The Part of Tens .................................. 423
Chapter 23: Ten Ways to Practice Wilderness Survival Skills . . . . . . . . . . . . . . . . . . . . . . . . . . . . . . . .425
Make a Fire with Two Matches ............................................. 425
Make a Fire with a Magnifying Glass.................................... 426
Make a Fire with a Bow Drill ................................................. 427
Make a Flotation Device from Your Pants .......................... 427
Find North with the Sky’s Help............................................. 428
Make a Tripod ........................................................................ 429
Make a Bow and Arrow ......................................................... 429
Make a Transpiration Bag ..................................................... 430
Use a CD to Practice Signaling.............................................. 430
Practice CPR ........................................................................... 431
69
271271
276
284
289289
291
297
299
300
307
313313
316
318
320
325
328
331
332
336
37
339339
345
352
354
Wilderness Survival For Dummies xivChapter 24: Ten Quick Escapes . . . . . . . . . . . . . . . . . . .433
Escaping a Sinking Car .......................................................... 433
Escaping a Small Plane in Water .......................................... 434
Righting a Small Boat or Canoe ............................................ 435
Escaping a Forest Fire ........................................................... 436
Escaping a Bee Swarm ........................................................... 436
Surviving a Bear Encounter .................................................. 437
Encountering a Mountain Lion ............................................. 438
Surviving an Avalanche ......................................................... 439
Surviving a Whiteout ............................................................. 439
Getting Out of Quicksand ...................................................... 440
Index ............................................................ 441

Introduction
Welcome to the realm of the extraordinary. Survival
situations can bring out greatness in some people,
and they can also bring out foolishness or terror or spiritual
renewal or changes in perspective or sometimes, just
enormous gratitude for being alive. We, your friendly authors,
have crawled like fleas in the face of enormous winds and
waves, and we, too, have experienced these extraordinary
states of mind — and many more.
But more often than not, survival situations aren’t so romantic:
You’re on a day hike, 5 miles from a major city — hopelessly
lost — and even though you can hear and see signs of
civilization, you’re still in danger of dying from hypothermia
in the next hour. Unfortunately, this situation can kill you
just as fast as being lost on an expedition to the North Pole.
Perhaps even worse, when you do finally make it out, you
don’t get an ounce of respect for it from the folks back home!
Well, we wrote this book with sympathy for both — those
involved in exotic adventures and those who just got a little
turned-around while taking pictures.
You may worry, understandably, that wilderness survival
requires you to bite off the heads of snakes and eat them raw
or perhaps leap from a cliff into a raging river. Nothing could
be further from the truth. Many survival skills are much more
mundane. For example, you can extend the life of your batteries
by taking them out of your flashlight and putting them inside
your shirt (or better yet, in a plastic bag taped to your
armpit) — against your skin. Keeping batteries warm makes
your flashlight run much, much longer during the cold and
dark night. There. That wasn’t so bad, was it? You picked up a
basic survival skill and you didn’t have to shiver or go hungry.
You’re already rolling.
Wilderness Survival For Dummies 2
W
H
About This BookThis book is designed to thoroughly cover the basics of
wilderness survival. To compile the information, we’ve
used the most tried-and-true sources, such as The U.S. Army Survival Manual and Essentials of Sea Survival, by Frank
Golden and Michael Tipton (Human Kinetics), but we’ve
called upon our own practical experiences as well. We give
you much of this information in a cheerful voice, but we also
interject a more serious tone when we have to give you grim
news. You can find both voices in these pages.
Conventions Used in This BookThroughout this book, we use the word we when we, Cameron
and John, both want to say something personal to you, our
reader. This book comes from the combined experiences of
two people who’ve been through a lot of misadventures and
who are very close friends. We’ve been in enough trouble —
and scared enough — that we think alike, basically, and
therefore we speak with the same voice.
We define the wilderness as just about any place out-of-doors.
We know from bitter experience that it’s easy to freeze to
death in places that a geographer wouldn’t necessarily think
of as “wilderness areas.” With that in mind, you should know
that this isn’t a camping book; it’s a book for anyone at risk of
perishing from exposure to the elements, whether camping or
off on a harmless stroll.
We try not to use too much technical terminology in this
book, but when we do offer new vocab, we italicize the term
the first time we use it. Shortly after giving you the new term,
we always define it.
Foolish AssumptionsAlthough we know that you don’t fit every description in
this list of assumptions we make about you, our reader, we
do assume that you have a least a few of the following
characteristics:

Introduction 3 ✓ You want a basic survival book that gives practical,
tried-and-tested advice, whether you’re solo or with a
group.
✓ You’ve tried other manuals, but they seem just a little
too, well, dry.
✓ You want a comprehensive survival manual that you can
throw in your car or backpack (or carry-on luggage), just
in case.
✓ You’re already in a wilderness survival situation and you
have this handbook nearby.
✓ You’ve seen a survival show on television and it has
intrigued you.
✓ You’re not someone who is into bushcraft (at least not
yet), which is the art of being completely self-sufficient in
the wilderness. You can find numerous, excellent books
if you want to live off the land, long term. We simply want
to help you survive so you can find your way back to
civilization or signal a search and rescue team.
What You’re Not to ReadAlthough we hope you enjoy reading every word that
we’ve written, we also realize that you’re a busy person,
juggling a career, family, and friends and handling ten other
responsibilities. If you just want the bare essentials of
surviving in the wild, feel free to skip the sidebars that appear
in the gray shaded boxes. The information in the sidebars is
additional information, purely for the curious. You can also
skip over any paragraphs marked with the Technical Stuff
icon, which marks info that’s fun or useful but not essential.
We hope you read them, but if you don’t, you won’t miss any
vital information.
How This Book Is OrganizedThough you can turn to any section in this book and start
reading, we’ve organized the information so that we start
with the most basic needs and then work up to the extremes.
Whenever we talk about a basic idea that we think has an
y
so
m
ron
f
d
—
rs.
nk
ow
k of
g or
m
m,
Wilderness Survival For Dummies 4
I
exception in an extreme situation, we tell you where to look
for that exception. We also try to do the reverse: In extreme
environments, we frequently send you back to the basics to
help you review the foundations of survival. Here’s what you
can find in the various parts of this book.
Part I: Stayin’ Alive: Basic Wilderness Survival PrinciplesIn this part, we start with basic survival protocol — what you
should do and in what order you should do it. We show you
how to make improvised clothing, how to make fire, how to
make shelters, and how to find water and food. We also spend
some time showing you how to prepare for the wilderness —
what to carry and what to keep an eye out for.
Part II: Eyeing Advanced Survival TechniquesThis is the part that we hope gives you the upper hand over
your surroundings. In this part, you discover how to navigate,
trek through trails and the bush, make sure someone sees
you so you can be rescued, handle a bleeding wound, and tie
knots and make tools from wood and stone.
Part III: Surviving in Extreme Land EnvironmentsIn this part, we address all the special problems (and miseries,
frankly) that jungle, desert, and polar environments can
present to you, the survivor. We delve into topics such as
tropical disease prevention, snake avoidance, cactus eating,
and avalanche safety.
Introduction 5
Part IV: Surviving on the Seas, Oceans, and Great LakesThis part takes you from the moment your vessel begins to
sink to the moment you make it back to shore and every place
in between. It shows you how to abandon a ship safely, how
to float for extended periods of time, how to inflate a life raft,
and hopefully, how to catch a fish — without accidentally
deflating the raft!
Part V: The Part of TensIn this part, we give you ten fun exercises that you can do to
improve your survival skills in the field. We also show you ten
scenarios that aren’t so much about survival as escape.
Icons Used in This BookIn this book, we place icons, little pictures in the margins,
next to some of the paragraphs that we feel need a little extra
emphasis.
This symbol gives you a little added info that (hopefully) makes
the survival skill we’ve just explained a little easier. Sometimes,
a tip is also a small qualification — a little explanation that tells
you when you should use another method.
This symbol is a reminder to do a particular action that
makes a survival skill successful, or it makes you think about
common sense before you rush out and try something!
This symbol means danger. When we use this symbol, we’re
trying to emphasize some aspect of a survival situation that
can really get you into trouble.
k
e
o
ou
ou
u
o
end
—
al
r
ate,
tie
es,
g,
Wilderness Survival For Dummies 6
This symbol tells you that we’re giving you some background
info on the topic, but you don’t necessarily need to know the
info to be able to execute the actions outlined in the text.
This symbol marks true stories of survival and some of our
own accounts of close calls, foolish mistakes, and improvised
solutions.
Where to Go From HereFeel free to start reading this book anywhere you like. The five
parts are completely modular, so you don’t have to read them
in order. However, Chapter 1 is certainly a good place to start
because it tells you exactly what to do first if you find yourself
lost in the woods.
Part I is a great place to start to get a good foundation for all
things wilderness survival. If you’re planning on a trip to an
extreme environment, you may want to start with Part III. On
the other hand, if you’re looking for adventures on the sea,
you can go straight to Part IV.
Of course, when you’re in a survival situation, you can check
out the index or table of contents and simply flip to the
information you need. If you’re bleeding, or if you’ve twisted
your ankle, or if you’ve been bitten by a snake, check out
Chapter 13. Or if your ship has gone under and you find
yourself in a life raft, go to Chapter 19.

Part IStayin’ Alive: Basic Wilderness Survival
Principles
In this part . . .
Whether you’re adrift at sea or lost on a day hike,
survival situations throw the same basic questions
at you: How can you stay warm overnight? How are you
going to prevent dehydration or get something to eat?
In this part, we show you how to prioritize your actions.
For instance, we let you know that while you’re waiting for
rescue or planning your escape, your fi rst priorities are to
keep warm (or cool), fi nd water, and take shelter — only
then do you start looking for food. We also give advice on
psychological preparedness, talk about improvising clothing,
and name some practical methods for making fi re, building
shelter, fi nding water, and harvesting food from the
wilderness.

Chapter 1
Surviving the WildernessIn This Chapter▶ Being prepared for common wilderness survival situations
▶ Having the right attitude and being proactive
▶ Taking care of basic needs and signaling for rescue
▶ Navigating and avoiding mistakes
Knowing the threats you face in the wilderness and the
wisest courses of action to take to counter those threats
can go a long way toward keeping you alive in a bad situation.
If you know in advance what the real problems are, then as
soon as you find yourself lost or adrift, you can go to work
immediately — and that changes you from victim to survivor.
This chapter serves as a jumping-off point to wilderness
survival. Here, we give you an overview of the basics you need
to know in practically any wilderness survival situation. We
show what the threats are and how to take care of them in the
right order. Finally, we take a minute to show you how
so many people go wrong and how you can prevent your
situation from getting worse — or perhaps how to stay out of
trouble altogether!
Being Prepared and ProactiveEvery piece of knowledge or equipment you carry with you
makes you stronger in the wild. Preparation gives you staying
power, and it frequently gives you that little extra advantage
you need to stay out of a crisis. Chapter 2 discusses what you
can do to be prepared.

Part I: Stayin’ Alive: Basic Wilderness Survival Principles 10
I
Being proactive usually means stopping and getting control —
such as slowing your swimming stroke or even floating to
conserve your energy. If you’re lost, don’t react and don’t
speed up. Stop, sit, and think carefully about your situation
for a long time. Take control of the situation instead of letting
it take control of you.
Keeping the Right AttitudeReal survival situations feel enormously unfair. Almost all
survivors face the feeling of injustice — it’s as though the
world is conspiring against you or the odds are simply
beyond your abilities. To survive this situation, you can’t
let these feelings take over. You need to have your head on
straight and keep a positive outlook. Chapter 3 gives more
info on survival psychology.
To keep a positive attitude, the first thing you have to do is
size up your situation. Take it all in. This can be very difficult
for some people, and it can stand in the way of clear thinking.
The truth is that most survival situations are so unexpected
that they leave you a little stunned. You have to master
disbelief. Many people perish simply because they can’t go
beyond denial.
The following suggestions can help you keep your spirits up:
✓ Be resourceful. Resources and options that you’ve never
considered are available to you. Use rocks as hammers,
nails as fishhooks, and belt buckles as reflectors for
signaling. Then think of new options and work out more
plans. Think of a way.
✓ Be patient. Consider that being rescued or working your
way out of the problem may take time, but never assume
that no one will come looking for you.
✓ Never say die. Misery and fear can fool you into thinking
you’re finished. Don’t let your mind play tricks on you.
You can keep going long after you feel like you can’t. A
lot longer. Don’t give up. Keep a positive attitude, or
grit your teeth in grim determination. If you slip into a
negative attitude, you’ll melt like a candle.
Chapter 1: Surviving the Wilderness 11
Identifying Survival BasicsWhen you find yourself in a survival situation, the immediate
decisions you make can significantly impact what happens
to you. Make sure you address your basic needs in the order
they appear in this section.
You may also face a medical situation, which may take
precedence over the ones we mention here, depending on
its severity. For first aid procedures, see Chapter 13.
Regulating your body temperatureThermoregulation is the management of your body temperature.
It’s the highest priority because being too cold (hypothermia)
or being too hot (hyperthermia) are the fastest killers in the
wilderness. You have to stay warm in cold environments and
cool in hot environments. Here’s how:
✓ Cool or cold environments: Don’t allow yourself to get
wet. Be careful near streams and rivers, shelter yourself
from rain, and keep sweating to a minimum. If night is
coming, realize that hypothermia is a threat and construct
an insulating shelter.
✓ Hot environments: You need liquid and shade to cool
the body. If your temperature is rising, recognize this
and rest or find shade. Waiting too long is the biggest
contributor to heat exhaustion. Always stay well hydrated
in all situations but especially in hot environments.
The four components that govern thermoregulation are
clothing, fire, shelter, and your own actions. The following
sections give an overview of them.
Your first line of defense: ClothingIn a survival situation, you have to cope with the entire
temperature range of a particular environment, as well as the
changes in your own body’s temperature. The best way to do
this is to dress in layers or to improvise layers. You want to
be able to add or subtract clothing. For more on clothing, see
Chapter 4.
—
n
ng
n
s
ult
ng.
d
p:
ver
s,
re
our
me
ing
.
A

Part I: Stayin’ Alive: Basic Wilderness Survival Principles 12
In many survival situations, people discard clothing that they
don’t think they need (it’s true, honest). Never discard any
clothing, under any circumstances. If you take off a shirt or
jacket, tie it around your waist or jam it in your belt. Be
prepared to carry the layers that aren’t currently in use.
If you’re in a cold environment, strip off layers of clothing if
you start to sweat. You must stay dry. If you’re facing a cold
night, add insulating layers by stuffing grass, leaves, or moss
inside your clothing. You can use other materials, including
debris, trash bags, cardboard, or anything that you can attach
to or wrap around your body, to make layers and insulation.
Remember, trapped air is an excellent insulator, so you can
use anything that traps a layer of air next to your body.
In all environments, cover your head. If you don’t have a hat,
improvise one that covers your head and neck thoroughly.
In the cold, a head and neck covering deters hypothermia,
especially if you’ve fallen into cold water, and in the sun, it
deters heat stroke.
Warming up to the fireStarting a fire is crucial because it prevents hypothermia, it
boosts morale, and it can be used to send a distress signal.
Think overkill when preparing your first fire in a survival
situation. Don’t rush things. Plan it out and have lots of
backups to keep the flame going after it ignites. For info on
how to make fire, see Chapter 5.
Gimme shelterLike a fire, a shelter can help you maintain a sufficient body
temperature, which is your first priority. And just like fire,
shelter can really boost your morale. Even if you’re not a
do-it-yourselfer around your home, you should know that
anybody can make an insulating shelter, regardless of how
much experience he or she has had in the woods.
Chapter 6 discusses how to build general shelters. But if you
find yourself in a specific wilderness setting, such as a wintry
tundra or a hot desert, check out the specialized shelters in
the chapters in Part III.
Regulating temperature in oceans, seas, and lakesIf you’re in a water environment, thermoregulation is especially
important. Take the following measures to say warm:

Chapter 1: Surviving the Wilderness 13 ✓ Stay as still as you possibly can. Don’t tread water if you
can help it. That just makes you colder.
✓ Cover your head. If you have access to anything that can
act as a hat, use it.
✓ Try to keep your armpits closed by holding your
elbows at your side, and keep your crotch closed by
crossing your legs. These areas leak a lot of body heat.
✓ Don’t take any heat-saving measure that causes your
head to go under the water. You lose more heat from
your head than from any other body part.
Check out Chapter 18 for a discussion of staying warm at sea.
Signaling for rescueThe sooner you help others figure out where you are, the
better. You need to be ready to signal for rescue at all times.
Begin thinking about signaling for help the moment trouble
starts. Don’t ever believe that no one will come looking for
you — someone usually does.
To get potential rescuers’ attention, your distress signals
need to be huge. Shouting is fine if that’s all you can do, but
just know that shouting is a very poor signal because the
human voice doesn’t travel very far. To be seen or heard,
signals have to be big — choose large symbols, loud noises,
bright colors, or large clusters of objects, such as debris fields
or people in groups. Even if you believe rescuers are nearby,
make sure your signals are big. Chapter 12 provides info on
signaling for help.
Avoiding dehydrationIn a hot environment, water can become a life-threatening
problem within hours, but in most temperate environments,
you usually have roughly three days before the lack of water
completely incapacitates you. The minute you think you’re in
trouble, start practicing water discipline, which means you’re
minimizing your usage in everything you do.
To practice water discipline, no matter where you are, take
immediate action in these ways:
ey
f
d
ss
g
ach
n.
n
at,
t
y
ou
try
n
ally

Part I: Stayin’ Alive: Basic Wilderness Survival Principles 14
S
✓ Stop consuming diuretics immediately. These are
liquids that make you urinate a lot, like coffee, tea, soda,
and alcohol.
✓ Minimize your physical exertion if you can. Even if you
can’t feel it, you’re losing water through perspiration and
heavy breathing.
✓ Don’t eat or smoke. These activities use up your body’s
water reserves. Try to enforce this measure as long as
possible.
✓ Limit your water intake as much as you can. If you’re in
temperate conditions or at sea, don’t drink anything for
the first 24 hours — you’ll just lose it through urination.
The only exception to this rule is if you’re in very hot
conditions on land. In these conditions, you have to drink
as soon as you feel yourself becoming incapacitated.
Check out Chapter 7 for a discussion of catching water, finding
water, treating water, and drinking water in the wilderness.
Staying nourishedFood is the last on the list, by far, because in most cases,
you’re rescued before it becomes a real factor. You can go a
week or more before a lack of food begins to incapacitate you.
Nevertheless, finding and eating something can really boost
your energy and morale.
Many plants and animals are poisonous. If you’re in any
way uncertain about a food source, don’t eat it — becoming
incapacitated is the worst thing that can happen to you in the
wild. For more on finding food in the wilderness, see Chapter 8.
Navigating in the WildThe first and most basic rule of navigation is to know exactly
where you are as often as you can. Now, you can’t stop every
two minutes to look at the map — certainly not all day — but
that’s not necessary to maintain good navigational awareness.
Make sure you don’t allow yourself to get more lost. If you’re
disoriented, stop and take a moment to remember where

Chapter 1: Surviving the Wilderness 15you were when you last knew your location. If you’re lost,
consider staying put — especially if you know someone is
looking for you or may look for you in the future. (See
Chapter 11 for more on traveling with trails and on what to
do when you’re disoriented or lost.) This section provides an
overview of navigating in the wild with the help of tools and
with the sun and stars.
Relying on tools to navigateYou may find this astounding, but many people are rescued
every year even though they have a map and GPS in their
hands. Satellite navigation and modern map making haven’t
taken all the challenge out of the wilderness — if anything,
they’ve given people a false sense of confidence. Whenever
navigating with instruments, make sure they’re calibrated and
that you’re looking at the correct map. Chapter 9 provides
in-depth coverage on using these tools to help you navigate in
the wilderness.
Looking to the heavensFinding direction with the use of the sun and stars is really
quite easy. You can start with the sun — it rises in the east
and sets in the west, and if you’re anywhere in North America,
Europe, or Northern Asia, it’s due south of you at midday.
Check out Chapter 10 for specific ways you can use the sun
and stars to find your way.
Surviving InjuryWhen you’re in the wild, staying healthy and injury-free can
go a long way toward surviving your experience. To do so,
keep the following tips in mind, and for more on first aid,
check out Chapter 13.
✓ Always be on guard for hypothermia and hyperthermia.
Even if you don’t feel the symptoms, someone in your
party may be becoming incapacitated, and unfortunately,
people don’t necessarily cry out when they’re afflicted by
hypothermia — they just lie down.
da,
ou
and
y’s
e in
or
n.
rink
ng
a
you.
t
he
r 8.
ly
ry
ut
ess.
re
Part I: Stayin’ Alive: Basic Wilderness Survival Principles 16
✓ Treat trauma immediately. If a member of your party
has suffered a trauma, you must make sure his or her
ABCs are working:
• Airway: Check to make sure nothing is interfering
with that person’s airway.
• Breathing: Make sure the subject is breathing.
• Circulation: Make sure he or she has a pulse.
Be prepared to administer cardiopulmonary resuscitation
(CPR). If you’ve checked the ABCs and they’re fine, put
the subject in the recovery position, which means lying on
his or her side with the head on an arm.
✓ Stop bleeding. If you have a bleeding wound on your
hands (or anywhere else!), keep in mind that nothing’s
changed since you were in Boy Scouts or Girl Scouts:
Direct pressure for about 10 to 15 minutes does more to
stop bleeding than just about anything else.
Avoiding Some of the Causes of Survival Situations
Most survival stories never make the news. This section looks
at some of the most common reasons people end up lost in
the wild. Use this info to ensure you don’t end up in the same
situation.
Making errors in judgmentThe leading cause of crises in the wilderness, according to
various authorities, is errors in judgment. This is an exceedingly
broad term, but a few examples can do a lot to show you how
people commit errors in judgment in the wilderness:
✓ Not watching out for potential falls: Be especially careful
whenever you’re near cliffs or when traveling at night or
in low visibility conditions. Watch for ledges and earthen
trails that can give way.
Chapter 1: Surviving the Wilderness 17 ✓ Letting yourself become dehydrated: You only have to
dehydrate by about 5 percent to become physically and
mentally impaired by 20 percent. When you add this on
top of fatigue and hypothermia, you end up incapacitated.
✓ Trying to walk too far: Anytime you or one of your party
isn’t physically fit, you need to be prudent in estimating
how far you can go. If you’ve missed a meal or have been
through an excessively exhausting event within the
previous 24 hours, don’t push it.
✓ Continuing to walk long after you’re lost: Doing so just
gets you more lost.
✓ Wearing inadequate clothing: You should know that wet
cold is vastly more dangerous than dry cold. Anytime
you face wet cold, take extra precautions. This type
of environment causes fatalities. Chapter 4 discusses
important clothing information.
✓ Carrying inadequate gear: Not having durable or warm
clothing and footgear or the tools to start a fire are
the prerequisites for a deadly hypothermia scenario.
Chapter 2 identifies the equipment to take.
✓ Relying too much on GPS or cellphones to carry you
through rough conditions: Not watching your maps
because you have GPS or ignoring a deteriorating situa-
tion because you think can always call for help is a recipe
for disaster. Take a look at Chapter 11 for more on this.
Losing it: Behaviors that help you get lostYou can get lost in the wild for an infinite number of reasons,
but certain common denominators frequently crop up in
statistical surveys of lost persons. Chapter 11 has more info
about avoiding getting lost and what to do if you’re lost.
✓ Leaving the trail to take a shortcut: An inordinate
number of people get lost every year because they leave
the trail to try a shortcut. Stick to the trail, especially if
you’re in unknown territory.
ng
on
t
g on
s
to
oks
n
me
gly
ow
eful
or
hen
Part I: Stayin’ Alive: Basic Wilderness Survival Principles 18 ✓ Letting your awareness lapse: You pass through a tunnel
in the foliage, or you’re concentrating on your photography
or on seeing a particular species of bird, and suddenly
you’re not exactly sure where you are.
✓ Walking downslope from a trail: Whenever you walk
down from a trail (descend), you break your line of sight
with the trail.
✓ Being overconfident in wilderness areas where you
haven’t been in for a while: You can easily get lost when
going back to your old stomping grounds.
✓ Turning onto false trails: Keep in mind that the world’s
wilderness areas are constantly in flux. One good rain
can wash away enough earth to make it appear as though
there’s a new trail.
✓ Forging ahead: Many people get lost because they reach
a point where the trail fades or is poorly marked and
they continue on but can’t pick up the trail again. Be on
guard for this, and make sure you leave behind your own
markers in these areas.
✓ Going farther than you normally go when hunting, hiking,
bird-watching, shooting outdoor photography, or berry-
or mushroom-picking: You leave your normal stomping
grounds — you push a little farther, and then when you
turn around to come back, you get turned around.
✓ Falling behind the group: Parties of friends or social
groups get spread out, or one particular person becomes
begins to straggle.
✓ Getting separated from the group: This can happen when-
ever you’re transported to a remote area, such as when
you’re taken to a dive site or a location in the desert.

Chapter 2
Preparing Yourself for aSurvival Situation
In This Chapter▶ Developing basic weather awareness
▶ Knowing what to take along every time you go outdoors
▶ Assembling survival kits
You can take a quantum leap in self-sufficiency and
survivability by making a few preparations before going
into the wilderness. In particular, you need to consider the
weather and how it can affect your situation. Furthermore, a
discussion of being prepared isn’t complete without mentioning
the importance of having a stocked survival kit in case
something happens to you or your group.
In this chapter, we give you some practical suggestions for
predicting bad weather and knowing how to handle it, and we
show you a practical survival kit and how to carry it.
Being Ready for Mother NatureVarious authorities and surveys can tell you that errors in
judgment cause more emergencies in the wild than just
about anything else. High on that list of mistakes is being
ill-equipped for the environment. Properly judging what
you’re getting into — and carrying the right gear for the
environment — can go a very long way toward staying out
of survival situations.
Part I: Stayin’ Alive: Basic Wilderness Survival Principles 20
By knowing what weather to expect, you can take precautions
in deciding what clothing to wear (see Chapter 4) and when
and where to venture. This section helps you get a firm grasp
on weather-related issues. Later in this chapter, we discuss
some of the equipment you need to take with you to be
prepared.
Relying on weather forecastsBefore you head out into the field — and until you build up
enough expertise to read clouds and wind — your best bet for
knowing what kind of weather to expect is to use the forecasts
available to you. Try the following resources:
✓ The local news: It can give you very detailed, specific
info that nationwide forecasts can’t.
✓ The Internet: What doesn’t the Web have these days?
Check out the following sites:
• The National Weather Service: This is a part of the
National Oceanic and Atmospheric Administration,
or NOAA, and it’s a great place to start if you’re in
the U.S. The Web page (www.nws.noaa.gov) is
excellent.
• Commercial sources: Other good sources are
AccuWeather (www.accuweather.com), Intellicast
(www.intellicast.com), and The Weather
Channel (www.weather.com). All these sites have
an advisories section that lists watches and warnings
of bad weather throughout the world.
✓ Weather radios: To receive National Weather Service
reports in the wilderness, bring along an NOAA radio
receiver. These units are very inexpensive.
When checking any weather source, know at least four basic
pieces of info:
✓ The 24-hour temperature range: This one piece of info
prepares you more than just about anything else because
it tells you how to dress and what gear you need to
have. If you get lost, delayed, or injured, you may end up
having to endure the entire temperature range — from
the lowest to the highest.
Chapter 2: Preparing Yourself for a Survival Situation 21
If you’re planning on leaving your base, such as a road
or a campsite, for any length of time, take the estimated
temperature range, add 10 degrees to the high and
subtract 10 degrees from the low, and then consider the
wind in your preparations. The wind can make cold
temperatures even more formidable.
✓ The short-term forecast: The three-day forecast is
usually the most reliable.
✓ Watches and warnings: Keep in mind the difference
between the two types of advisories:
• Watch: A watch is simply the weather service’s
way of telling you that ideal conditions exist for
a certain type of weather — tornadoes, floods,
storms, and so on.
• Warning: A warning means that the weather
phenomenon is known to be occurring at this
moment. For example, a tornado warning means
that someone actually saw a tornado nearby.
If you’re going into the mountains or near a coastline,
you need to locate the authority who issues the
avalanche warnings or rip current and surge
warnings.
✓ Barometric pressure: Barometric pressure is simply a
measurement of how much air is sitting on top of the
area you’re in. The pressure tells you one of two things:
• If the pressure is dropping, the atmosphere around
you is becoming unstable. This means that the
weather is probably going to deteriorate.
• If the pressure is rising, the atmosphere around
you is stabilizing. Rising or steady pressure usu-
ally means good weather or a continuation of the
weather you already have.
Watching for weather signsWhen you’re in the field, you usually don’t have a chance
to check the Web. However, you can watch out for signs of
approaching weather — especially changes that weren’t
predicted or that had a low chance of occurring. Pay attention
to the winds and clouds to help you make weather predictions.
ons
n
sp
s
for
asts
the
on,
n
cast
ve
ngs
ic
o
use
up
m

Part I: Stayin’ Alive: Basic Wilderness Survival Principles 22
C
Considering the windsKeep an eye on the wind you feel now as well as the wind
you don’t feel yet. If the wind increases or changes direction,
conditions around you are changing. If the wind changes
radically, that usually means a substantial change in the
weather.
To gauge the wind you don’t feel, try to size up the terrain
around you and then estimate what a big wind would do if it
were to come upon you suddenly. Here’s what wind can do in
various terrains:
✓ If you’re on an exposed mountainside, a hard wind can
cause a drastic drop in temperature.
✓ If you have open plains around you, remember that wide
open spaces are nature’s speedway for high winds.
✓ If you’re near an exposed cliff, the wind may come in,
explode against that cliff, and cause havoc.
Watching the cloudsTwo types of clouds signify the coming of rain within a few
hours or minutes. Here are the nimbus (rain) clouds:
✓ Any dark, low, heavily laden clouds: Rain’s obviously
coming, right? These gray, blanket-like clouds are
nimbostratus clouds.
✓ Tall, dense, fluffy clouds: Though less obvious, this
second type of rain cloud indicates heavy rain and
thunderstorms. An anvil head (a cumulonimbus cloud)
is usually tall, dense (like a large island in the sky), and
as puffy as cotton. If, during the day, you see this type of
cloud grow very tall in the sky, or worse, start to become
lopsided at the top — blown sideways by high-altitude
winds — you’re seeing an anvil head (see Figure 2-1).
These storm clouds usually bring rain, lightning, high
winds, and sometimes hail.
If you’ve received a forecast of 20 percent chance of rain
and an anvil head or low, gray clouds are nearby, feel free
to increase the chance of rain to 50 percent (or more), all by
yourself.

Chapter 2: Preparing Yourself for a Survival Situation 23
Figure 2-1: An anvil head cloud.
Carrying Survival EquipmentAlways carry a survival kit with you in the wilderness. If you
spend enough time in the dark and in trouble, as we’ve done,
you find that one little item is almost always what saves you.
Being prepared and carrying a survival kit can often turn a
bad situation into at least a tolerable one. In this section,
we discuss different types of kits. Each list of equipment is
slightly more elaborate than the previous one. Sometimes we
list a piece of equipment twice because to be fully prepared,
having two types of a particular item is ideal.
Five items you needYou need to have five basic items with you at all times, even
if others in your party have them, too. Without these items,
you’re utterly defenseless — naked, in fact. You can put three
of these items on a keychain, and four out of the five can fit in
one pocket.
FlashlightYou need a flashlight so you can perform complicated tasks
in the dark and also so you can signal for help at night. Many
times, especially when you have plenty of moonlight, you
should try to do everything with your natural night vision;
however, you may not have time to adjust to darkness, or you
may have to perform a critical task, such as map reading in
n,
it
in
n
de
y
d
of
me
e
by
Part I: Stayin’ Alive: Basic Wilderness Survival Principles 24
a dense forest on a moonless night. Luckily, your flashlight
options are almost unlimited:
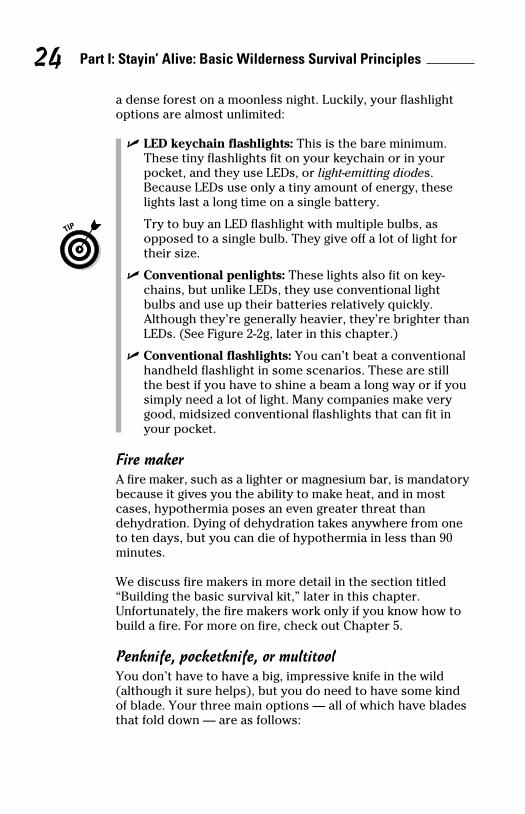
✓ LED keychain flashlights: This is the bare minimum.
These tiny flashlights fit on your keychain or in your
pocket, and they use LEDs, or light-emitting diodes.
Because LEDs use only a tiny amount of energy, these
lights last a long time on a single battery.
Try to buy an LED flashlight with multiple bulbs, as
opposed to a single bulb. They give off a lot of light for
their size.
✓ Conventional penlights: These lights also fit on key-
chains, but unlike LEDs, they use conventional light
bulbs and use up their batteries relatively quickly.
Although they’re generally heavier, they’re brighter than
LEDs. (See Figure 2-2g, later in this chapter.)
✓ Conventional flashlights: You can’t beat a conventional
handheld flashlight in some scenarios. These are still
the best if you have to shine a beam a long way or if you
simply need a lot of light. Many companies make very
good, midsized conventional flashlights that can fit in
your pocket.
Fire makerA fire maker, such as a lighter or magnesium bar, is mandatory
because it gives you the ability to make heat, and in most
cases, hypothermia poses an even greater threat than
dehydration. Dying of dehydration takes anywhere from one
to ten days, but you can die of hypothermia in less than 90
minutes.
We discuss fire makers in more detail in the section titled
“Building the basic survival kit,” later in this chapter.
Unfortunately, the fire makers work only if you know how to
build a fire. For more on fire, check out Chapter 5.
Penknife, pocketknife, or multitoolYou don’t have to have a big, impressive knife in the wild
(although it sure helps), but you do need to have some kind
of blade. Your three main options — all of which have blades
that fold down — are as follows:

Chapter 2: Preparing Yourself for a Survival Situation 25 ✓ Penknife: The smallest knife, the penknife, fits on a
keychain. This little item may be the best purchase you
ever make — even if you never set foot in the outdoors.
Just make sure you take it off before you try to board a
commercial airliner.
✓ Pocketknife: The next step up from the penknife is the
small pocketknife. You can choose from infinite varieties.
Regardless of which type you buy, it should have a hole
at one end for a lanyard, a string that runs from the knife
to your wrist, so you don’t lose your blade when you’re
working. A 5-inch long folding pocketknife with a sturdy
lanyard on it is a lifesaver.
✓ Multipurpose knife or multitool: The next step up is
the multipurpose pocketknife, such as the Swiss Army
knife, which has a variety of tools folded into one case
(see Figure 2-2e, later in this chapter).
Probably the handiest of the multipurpose knives is the
multitool, which has blades and other utensils packed
into a foldable pair of pliers. You can carry a multitool in
your pocket, or better, in a pouch that fits on your belt.
We talk more about knives later in “Building the basic
survival kit.”
Water containerStaying hydrated keeps you strong and running at your peak.
Carrying a good container gives you the ability to refill it
easily. Keep in mind two ideas when buying and carrying a
container:
✓ Durability and versatility: An army-style canteen is
great, and better still is a water bottle that has a wide-
mouthed, screw-off top. This offers you the ability to
easily scoop up water or collect rain. If you have nothing
else, you can grab bottled water from the convenience
store.
✓ Convenience in carrying: Many times, unbelievably,
people who are lost discard equipment, clothing, water
bottles, and so on — you don’t want that temptation.
If you’re not using a pack of any type, know that water
bottles tend to ride better on a crossover shoulder strap
when they’re full and on your belt when they’re empty.
r
han
nal
ou
ory
ne
o
d
es

Part I: Stayin’ Alive: Basic Wilderness Survival Principles 26
Instruments and electronicsIf you have electronics and other related instruments within
reach, grab them — even if you think you’re going to be
beyond coverage. Examples include cellphones, any type
of compass (Figure 2-2m, later in this chapter), and a GPS
receiver (Figure 2-2n). For more on these types of equipment
and how they can help you navigate, check out Chapter 9.
Building the basic survival kitA good wilderness survival kit is a great asset when you
go outdoors. Although some good kits are available on the
market, we strongly suggest you make your own because you
can be sure of the quality of the items inside it (and it’s also
fun). The basic kit we discuss in this section weighs only a
few pounds, and you can assemble it in a day. You can see a
fully assembled survival kit in the section titled “Building the
complete kit.”
We like to brag that you can fit this little kit into a large
zipper-lock bag, but we suggest you find a sturdier container.
Look for a container around your house, use an ammunition
pouch from a surplus store, or your best bet, get a dry bag, a completely waterproof vinyl bag that you can get from a
boating store. When you have the container you want, take
a permanent marker and write your name and WILDERNESS
SURVIVAL KIT in large letters on the container.
A complete fire-making kitYour complete fire-making kit should contain at least three
fire-making instruments and some tinder. Good fire-making
instruments include the following:
✓ Lighters: Butane cigarette lighters (see Figure 2-2s) are
good, but saltwater causes them to malfunction within
just a few days. Long-nosed fireplace lighters, which are
usually red and black in color, last much longer under
corrosive conditions, and they’re generally superior
to just about any other lighter. Some high-tech lighters
claim to work in any conditions, but we take that claim
with a grain of salt.

Chapter 2: Preparing Yourself for a Survival Situation 27 Some of our colleagues swear by Zippo lighters, which
are metal cigarette lighters that use wicks soaked in
lighter fluid. If you carry one, also carry spare flints and
wicks.
✓ Matches: Carry two types: Plain, wooden, strike-anywhere
matches and wooden waterproof matches that you can
get at a boating supply store (Figure 2-2t).
✓ Magnesium bar (metal match): This is a tiny rod of metal
that, when you shave it forcefully with a knife, produces
a small pile of magnesium, which ignites under any
conditions — even when wet! On top of the bar is flint,
which produces a shower of white-hot sparks when you
scrape it with a knife, igniting the magnesium (Figure 2-2i).
✓ Magnifying glass: Get a flat, flexible plastic magnifying
glass, about the size of a credit card, to focus the sun’s
rays on your tinder (Figure 2-2r).
Tinder is the highly flammable stuff you carry that starts a fire
on the first try — even in wet conditions. A film canister filled
with lint from your clothes dryer and treated with a couple
of drops of lighter fluid or gasoline is good (Figure 2-2b), as
is rolled newspaper dipped in paraffin wax. Some people like
to stuff paper egg cartons with straw, pour in wax, and then
separate each little pocket to create a set of fire starters. The
wax and straw burn for as long as 10 minutes, giving you time
to get your kindling started. You can also find prepackaged
tinder at the outdoors stores.
Pack your fire-making instruments and tinder in a waterproof
container, seal it with tape, and put it inside your survival kit.
Items for clean water, shelter, and sun protectionPack the following items to help you take care of your basic
needs for clean water and protection from the elements:
✓ Water purification chemicals: These are usually small
tablets of chlorine or crystals of iodine. You can buy
them at all outdoors stores. Follow the directions on the
bottle, and expect to have to wait an hour or two for
them to purify your water (see Figure 2-2w).
n
nt
ou
o
a
he
er.
n
S
e
n
re
s
m
Part I: Stayin’ Alive: Basic Wilderness Survival Principles 28
✓ Steel cup: A small metal cup is invaluable because you
can boil water in it — which is still the very best way to
disinfect water in the wild (Figure 2-2k).
✓ High-SPF sun block: Get the highest rating you can find
in the smallest container you can, or transfer some into
a separate, clean miniature bottle. Put this in a plastic
zipper storage bag so it doesn’t leak on everything else
(Figure 2-2x).
✓ Plastic painter’s tarp: In an emergency, you can build a
waterproof shelter with this tarp, or you can use it as a
ground cloth or a water catcher (Figure 2-2a).
✓ Space blanket: A space blanket is a large and very thin
sheet of plastic, coated with a reflective material that
traps body heat (Figure 2-2q). These blankets can be
invaluable on a cold night, and you can spread the
bright, mirror-like surface out on the ground as a signaling
device. We suggest putting two in your survival kit.
Tools for making other thingsWilderness survival usually involves a fair amount of
improvisation. You may have to make your own shelter,
clothing, or weapons for hunting. Pack the following tools so
you can cut, tie, cover, tape, and light your way to safety:
✓ A second knife: Even if you already have a small knife
or multitool (refer to the “Five items always to have”
section, earlier in this chapter), a large knife is
indispensable in a real survival situation (see Figure 2-2d).
If you get into a serious situation, you have to use this
knife to dig, pry, hammer, and do just about everything
else.
Look for a substantial knife that you can really punish
without having it break. Many folding blades are excellent,
but you should consider getting a knife made from a
single piece of steel — these knives usually require a
sheath.
✓ Rope and wire: You frequently have to bind things
together or make improvised repairs in the wild, so carry
some cordage. Here’s what to pack:
Chapter 2: Preparing Yourself for a Survival Situation 29 • The easiest cordage to carry is the ready-made
30-foot lengths of parachute cord (Figure 2-2j),
which you can buy at outdoors stores. This is a
lightweight line that has an infinite number of uses.
• A small spool of thin metal wire is also a life-saving,
multipurpose item.
• For small jobs, consider carrying a spool of
50-pound-test monofilament fishing line or unwaxed
dental floss.
✓ Plastic garbage bags: You can use plastic bags (Figure
2-2l) as containers and as improvised rain ponchos. Get
three or four bags of the heaviest gauge you can find.
✓ Duct tape and safety pins: You can use these items when
you have to bind, repair, and seal all sorts of things in a
crisis (Figure 2-2y).
✓ A spare flashlight: You need a backup flashlight. You can
carry a medium-sized conventional flashlight if you have
room.
A really good idea is to carry a headlamp, such as a Petzl
lamp, with a halogen bulb (www.petzl.com/en). The
benefits are threefold: it uses less battery power than a
conventional flashlight, it throws off an intense light, and
you wear it on your forehead, thus freeing the hand that
would normally carry a flashlight.
Reverse the batteries when you stow the spare flashlight
in your kit — that way, they won’t run down if the light is
accidentally turned on. Remember: Take plenty of extra
batteries. You never know how long you may be out
there.
Navigation stuffThe following items can help you find your way — and
eventually, your way out (for info on using navigation
equipment, see Chapter 9):
✓ Compass: Even if you’ve never used one, this handy item
can reveal things to you that nothing else can — namely
which way you’re going! Like your knife, your compass
should have a hole for a lanyard. If you have a choice,
opt for an orienteering compass, which is molded into a
baseplate (see Figure 2-2m).
u
to
nd
o
e
a
a
n
ing
so
d).
g
nt,
arry
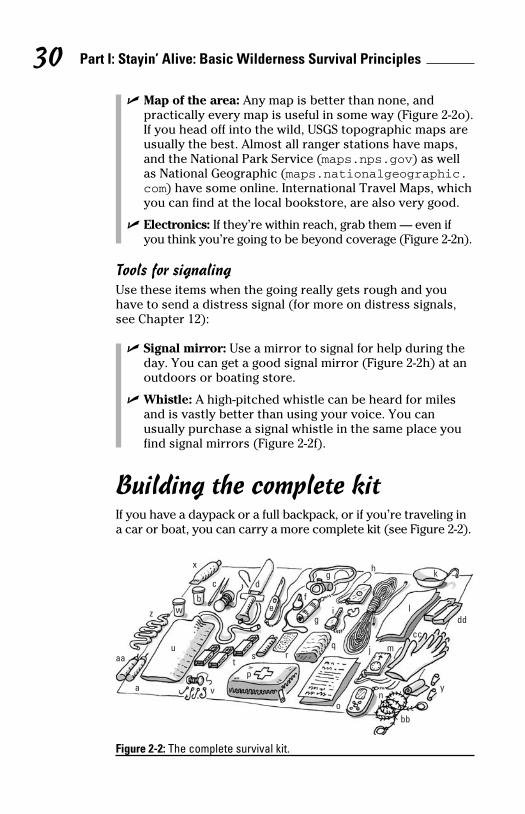
Part I: Stayin’ Alive: Basic Wilderness Survival Principles 30
✓ Map of the area: Any map is better than none, and
practically every map is useful in some way (Figure 2-2o).
If you head off into the wild, USGS topographic maps are
usually the best. Almost all ranger stations have maps,
and the National Park Service (maps.nps.gov) as well
as National Geographic (maps.nationalgeographic.com) have some online. International Travel Maps, which
you can find at the local bookstore, are also very good.
✓ Electronics: If they’re within reach, grab them — even if
you think you’re going to be beyond coverage (Figure 2-2n).
Tools for signalingUse these items when the going really gets rough and you
have to send a distress signal (for more on distress signals,
see Chapter 12):
✓ Signal mirror: Use a mirror to signal for help during the
day. You can get a good signal mirror (Figure 2-2h) at an
outdoors or boating store.
✓ Whistle: A high-pitched whistle can be heard for miles
and is vastly better than using your voice. You can
usually purchase a signal whistle in the same place you
find signal mirrors (Figure 2-2f).
Building the complete kitIf you have a daypack or a full backpack, or if you’re traveling in
a car or boat, you can carry a more complete kit (see Figure 2-2).
a
b
c d
aa
bb
ccdd
ef
g
g
h
i
j
k
l
m
no
p
qrs
tu
v
w
y
z
x
Figure 2-2: The complete survival kit.
Chapter 2: Preparing Yourself for a Survival Situation 31Here’s what goes in the complete kit. The items on this list are
in addition to the basic kit we discuss in the preceding section,
and they give you a lot of staying power in the wilderness.
✓ Bivy sack (bivouac sack): These are fabric bags that
work like improvised sleeping bags/tents (see Figure
2-2q). Along with a space blanket or two, they can save
your life in the cold.
✓ Heavy duty camel bag: A camel bag, sometimes called
a camelback, is a flexible bladder that fits on your back
like backpack and has a tube that you drink from (Figure
2-2u). These are the very best water-carrying devices.
✓ First aid kit and pamphlet: Dozens of premade first aid
kits are available (Figure 2-2p). Good first aid kits come
with pamphlets reminding you how to deal with cuts,
burns, infections, broken limbs, and so on. We cover
wilderness first aid in Chapter 13.
✓ Map collection: Collect any map you can. Anything
helps — even sightseeing or tourist maps, because each
map contains a different type of info. Put your maps in a
zipper-lock plastic bag.
✓ Sewing needles, thread, and buttons: Being able to
repair your clothing is important, as is the ability to
improvise clothing from scraps of fabric, plastic, and so
on. You can carry several needles in a survival kit. We
suggest large, heavy needles, at least 2 inches long,
with large eyes that are easy to thread with a variety of
cordage (Figure 2-2c). Also carry some large buttons,
which you can use to repair or improvise clothing.
✓ Flexible straw/surgical tubing: You can use tubing
(Figure 2-2z) to suck water out of small crevices in rocks
when you can’t get water in any other way.
✓ Candles and spare wicks (Figure 2-2aa): Before you buy
candles, be sure you know how long they’ll burn. Some
types can burn for 6 hours and are favorites among
mountaineers, who know a thing or two about long, cold
nights. You can use them for light or to start fires.
✓ Wire saw: You can buy wire saws (Figure 2-2bb) at outdoors
stores. Use these flexible tools to cut off tree branches.
✓ Gloves: Heavy-duty yard gloves (Figure 2-2cc) can give
you an almost superhuman ability in the wild — the only
problem is that these types don’t have a lot of dexterity.
2o).
are
,
ll
c.ich
d.
2n).
,
he
an
s
u
in -2).
dd

Part I: Stayin’ Alive: Basic Wilderness Survival Principles 32 ✓ Food: Good old-fashioned granola bars (Figure 2-2dd)
can help a lot in a demoralizing situation. Nuts are good,
as are packets of soup — just make sure they don’t have
excess salt in them. If they do, they’re diuretics, and they
don’t help you in the end.
✓ Mini fishing kit: These kits (Figure 2-2v) are so lightweight
and useful that you should squeeze in a couple of them if
you have room. These aren’t just for fishing — the hooks
and the fishing line have a million and one uses.
You may also want to include an extremely lightweight
insulator that you spread on the ground to sleep on. This pad
prevents the ground cold from getting to your body and can
prevent hypothermia during the night.
Gathering equipment for going out on the waterIf you’re going to be out on a ship or boat, be prepared with
the right equipment. Most importantly, you need a personal
flotation device, or PFD, for everyone on board. All PFDs are
labeled by type:
✓ Type I: These life jackets are the best. They keep you
afloat in heavy seas, and they turn you right-side-up if
you’ve been knocked unconscious.
✓ Type II: These vests are for near-shore activities, and they
don’t turn you right-side-up if you’re knocked unconscious.
✓ Type III: These floatation aids are used when water-
skiing or duck hunting. Don’t use these in the ocean.
✓ Type IV: These are life rings and seat cushions, and
they’re designed to be thrown to someone in peril.
✓ Type V: These are work vests, and they usually look like a
harness. They’re designed to inflate in time of emergency.
Also, we suggest that you always have a spare propulsion
device, such as an extra paddle or oar. Check with your outfit-
ter or the U.S. Coast Guard to see what’s required by law to be
aboard any vessel you rent.
Chapter 3
The Psychology of Survival: Gaining the Upper Hand
In This Chapter▶ Understanding your emotions during a survival situation
▶ Understanding how survivors think
▶ Building morale
More often than not, survival situations catch you off
guard. They’re nothing like you expected, and the
mindset that you always wanted to have in a crisis suddenly
seems foreign. There’s no background music, like in the
movies, and there’s nothing heroic about the situation at all.
But with a little understanding, perhaps you can find that
inner heroic survivor and bring him or her to the surface.
In this chapter, we discuss the mindset you need to get
through a survival situation, what you can expect to feel when
the crisis comes, and how you can expect others to act — or
react — when things go bad. We also show you how you can
boost your morale.
Getting into the Right MindsetThe psychological factor — in other words, having the right
mindset about the experience — is the most important com-
ponent in any survival situation. It’s more important than
training, knowledge, experience, odds, or luck. How you per-
ceive what’s happening to you dictates your ability to perform
and to survive.

34 Part I: Stayin’ Alive: Basic Wilderness Survival Principles
You need to remember one startling fact when facing a sur-
vival situation: Many people succumb — they give up and
perish — before they’re physically overwhelmed. They give
up trying to get into a life raft after just a few tries, or they
lie down on the trail after just a few days or even hours of
misery. Their perception, and therefore their belief, is that the
situation is beyond their means or that the struggle simply
isn’t worth it. If you’ve ever had the misfortune to see this,
then you know, as we do, that it’s one of the most bizarre,
unfathomable characteristics of humankind.
Just knowing that this problem exists can be a huge advan-
tage for you in a survival situation. Even more, knowing
how to summon up some coping mechanisms can help you
manufacture — in the field — the mentality that gives you
the power to hold out longer, push further, and endure more,
which is the essence of survival. This section explains how to
develop a survivor’s mindset and how to stay focused when
you’re in a survival situation.
Mastering disbeliefAll survival situations are extraordinary — especially when
they’re happening to you. Many times, the events leave
people so stunned with disbelief that they take action very
slowly or not at all.
To master disbelief, you need to know that most survival situ-
ations feel unfair: You just went for a swim, and now you’re 5
miles offshore, dragged out by a current. Or perhaps you’re in
familiar territory, hiking, and you have lots of experience, but
Hundreds of miles from landIn 1995, a U.S. Marine stepped out on the deck of an aircraft carrier for a little air and promptly fell off the boat — in the middle of the Arabian Sea. The fleet sailed away into the night and there he was, with no flo-tation, no land for hundreds of miles,
treading water — a single head in a vast, empty plain of waves. The odds of surviving were off the scale, but nonetheless, he made a flotation device by inflating his pants and then held on for 34 hours — until he was picked up by Pakistani fishermen.

Chapter 3: The Psychology of Survival: Gaining the Upper Hand 35now you’re lost and an unexpected cold front is coming in. It’s
not fair, but it’s reality. Some of the most gruesome, incom-
prehensible stories of survival revolve around not being able
to master disbelief.
Make sure you do the following to help you fully accept your
situation.
Realize that it’s happening to youSome people simply can’t get over the outrage of being put in
such a position. Don’t let this happen to you. It is unfair, but
nonetheless, you’re in a survival situation, so fair or unfair is
irrelevant. Now, that doesn’t make the ordeal one ounce more
pleasant, but it gives you strength, and the more quickly the
idea of what’s happening sinks in, the better. Only the inexpe-
rienced think this idea is obvious or easy.
Keep in mind that modern ships still sink, people with GPS units
still get lost, friends who are just trying to have a nice time still
fall into disaster. Realize this immediately and start planning
proactive procedures to save yourself and your companions.
Dismiss the odds of survivingDon’t believe that the odds of surviving are just too low. You
have to dismiss that type of thinking.
Statistics and odds mean nothing after you go into action. If
you spend enough time studying the history of human beings
in impossible conditions — survivors — you begin to see that
people survive “the impossible” quite frequently. Realize that
thousands of people before you have survived these types of
perilous situations. These people are just like you — they look
like you, they talk like you — they’re usually not supermen or
superwomen. They’re just like you. And they made it.
Working with stress and fearAfter you realize you’re in a survival situation, you can expect
a flood of stress and fear. Stress and fear are necessary
because they make you stronger and more alert — but only
if you control them. People who don’t have any fear get com-
placent and get themselves into trouble — we know, because
we’ve done it! What’s most important is how you channel this
emotional response.
-
e
the
u
re,
to
n
n
itu-
e 5
e in
but
n e e, n n s

Part I: Stayin’ Alive: Basic Wilderness Survival Principles 36
You can be scared and still function and still succeed. What
you need is self-control; otherwise, your thinking becomes
muddled. Here are some methods of controlling fear and gain-
ing the upper hand:
✓ Take a deep breath and slow your heart rate. Simply
realize that your heart is racing, and relax. Relax your
shoulders — let them sag a bit — and then stretch your
neck. Draw in a deep breath through your nose and let
it out through your mouth. Your heart rate should slow
down a little.
✓ Take inventory. Get a total grip on your situation. Where
are you? What are your options? How can you improve
your situation? Consider taking a piece of paper and writ-
ing down the history of your situation. For example, note
when and where you saw the last familiar landmark, as
well as what your threats are and your options for deal-
ing with them. Plans and escapes present themselves
when you do this, and you gain strength by being
proactive.
✓ Boil things down to their basics. Ask yourself what
exactly you’re facing here. This is a good exercise
because it reduces your situation from “the whole world
against you” to just one or two problems.
✓ Get to work. Do something — anything at all — to take
your mind off the situation.
✓ Get angry. Anger can be super-potent, even in the weak-
est people. If you need a serious burst of strength, take
a moment to get seriously angry. Refuse to accept that
some small mistake is reason to lose your life.
✓ Get some contempt. Tell nature and fear and every-
thing else to shove it. Refuse to give in. Feel free to be
obstinate — it works.
✓ Become resigned to the fact that you’re in extreme
peril. Many survivors have made it through their dark-
est hours by resigning themselves to the moment, by
taking the attitude that come what may, they’re going
to keep fighting. Many have looked at death and said to
themselves that they don’t care if they live or die — but
they’re not going to give in. This is grim business, indeed,
but it has worked in many cases.

Chapter 3: The Psychology of Survival: Gaining the Upper Hand 37 ✓ Try the tire-changing mentality. Instead of flying into
frenzied action, act like you’re just changing a tire. Just
go to work, one thing at time. The no-nonsense body
language that comes from this mentality can give you a
clear head in an instant — and it has a miraculous effect
on others around you. Frequently, when they see you act
this way, they adopt this mentality for themselves. Soon,
you have a cool-headed group working through a serious
problem. We’ve used this technique in the middle of the
night when there was panic all around us and our vessel
was in trouble, and it worked.
Planning and taking actionAs you calm your stress and fears, you also need to clear
your head and think to the future with a clear plan. In stress-
ful situations, your thinking can become muddled. Confusion
and bad plans can take over quickly, so make sure you put
together a thorough plan before doing anything.
To make your plan so you can take action, keep the following
suggestions in mind:
✓ Eliminate as much physical misery as you can. Cold,
hunger, being soaked, injury — any of these can cloud
your judgment. With that in mind, take inventory and try
to relieve yourself of some small — or large — misery if
you can. You may find that suddenly your mind clears
and that making good plans isn’t hard after all.
✓ Observe carefully. These types of situations can close
off your powers of perception. You may have options
right in front of your nose that you can’t see or haven’t
even considered. Take time to take it all in, and never,
ever assume that you see everything.
✓ Give yourself an extra choice. In emergency situa-
tions, the either/or decision-making loop can blind you
to options that are in fact right in front of your face.
We know that not every situation has a wide array of
options, but if you have an either/or decision in front of
you and both are bad, try coming up with a third — the
results may shock you and even give you strength.
t
ain-
ur
t
w
ere
e
writ-
ote
s
al-
rld
e
ak-
e
t
-
o
ut
eed,
Part I: Stayin’ Alive: Basic Wilderness Survival Principles 38
After you come up with a third option, continue to
expand outward. View the problem from a new perspec-
tive. There may be a fourth option you haven’t thought
of — or maybe even a fifth. Never assume you’ve thought
of everything.
✓ Keep in mind that survival can be a war of attrition —
a fight in which small, persistent actions allow you to
succeed. Your first plans may fail. That isn’t a sign or
an indication that you’re not going to make it. On the
contrary, you frequently have to work through several
failures before you get to something that works. Just take
a lesson from every failure.
If you can’t solve your problem immediately, you may be
able to improve your position. Small steps can help a lot. Just
about any action is better than none, and some small success
can lead to another. The more action you take, the more confi-
dence you feel.
Understanding disciplineMuch of your chances for survival revolve around how well
you stay disciplined and practice self-denial. The more you
can conserve, the better. You’re in the business of holding
out, hanging on, and extending your reserves. Discipline your-
self. Tell yourself that using small amounts — of water, food,
electrical power, and so on — is going to save your life.
Disciplining yourself is especially important when using sig-
nals. Be careful to not let fear run away with the moment.
You can easily waste flares that nobody sees or run radios
that have only a limited amount of battery time if you’re not
careful. In a survival situation, those who can discipline them-
selves are usually the ones who make it out.
Valuing life and homeOne way to get in the right mindset is to value living and
value your life. In many cases, this simple idea gets lost in
the moment. Realize that your life is valuable, that it’s worth
saving, and that you still have a lot of good living to do.

Chapter 3: The Psychology of Survival: Gaining the Upper Hand 39
Keep in mind that people want you to return. Picturing their
grief can be a powerful tool in motivating yourself to stay
alive. Many survivors have done this. Know that you can
cause great suffering to those back home if you don’t survive
and that you have a duty to them, and to your own life, to stay
alive. Picture the faces of your family, your friends. This frame
of mind can carry you through when no other can.
Using humor and a positive attitudeOptimism and a positive attitude can turn a bad situation
around in a second. We’ve seen people use positive thinking
in the field. The effect really is incredible. Many lifeboat survi-
vors can attest to the fact that a smile and a joke — no matter
how strained — can give you hope.
ec-
ht
ght
—
o
l
ake
ust
ess
onfi-
l
our-
d,
g-
ot
em-
th
Group decision-making: Getting people in a crisis to cooperate
Getting a group to be disciplined can be exceedingly difficult. For many people, this may be the first time they’ve ever had to go on rationed food or water, and they rebel. And food and water aren’t the only pos-sible sticking points. Whenever your group has to make a decision — whether deciding when to stop for the night, coordinating your open-sea fishing team, or figuring out which way is north — you have a potential for conflict.
When working with a group, explain everything in full. Try to be as con-vincing as you can. One of the best ways to do this is to look at the faces around you and make a quick asso-ciation with those who are cool-
headed and fully functional. Try to get a majority, and try to explain the wisest course of action.
If possible, try not to enforce deci-sions through power and might. However, you may have to. You may have to guard the water, take dan-gerous tools and objects away from irrational people, and even physically restrain someone who’s doing some-thing that’s going to get you killed.
If you have people who simply won’t cooperate, you may have to go it alone. Many times, groups go off and do incredibly unwise things. You can always abstain from this; you don’t have to go along with a group that’s determined to destroy itself.

Part I: Stayin’ Alive: Basic Wilderness Survival Principles 40
Although a humorous comment can alleviate stress and
defuse a situation, comments that appear callous can be
harmful. Sometimes you have to be sensitive. Pick and choose
your moments for levity carefully.
You should try to celebrate sometimes and be proud of your-
self. Survival, more often than not, is a clumsy business. You
get very few clean successes, and it’s easy to see how imper-
fect your progress is. We’ve had times when we were making
progress in the face of very grim circumstances, but because
the progress was small, the pessimists among us used it
to show how we were failing. Don’t let this happen to you.
Survival is about tiny victories. When you win, give yourself
credit. It makes you stronger.
Being Aware of Your EmotionsReal survival situations bring out all kinds of spontaneous
reactions in you and others that you may have never consid-
ered. This section looks at some of the common emotions you
and your group may feel and how you can cope with them.
Thankfully, there are practical ways to fight all the emotions
we talk about in this section. You can strengthen yourself
in the field by taking just a few of the practical steps in the
upcoming section “Improving Morale.”
Optimism on icePerhaps the greatest expedition leader of the 20th century, Sir Ernest Shackleton, himself a survivor, always maintained a cheerful atti-tude no matter how bad things got. His results were nothing short of miraculous. He kept all his men alive
through a year-long ordeal when they were stranded on Antarctica with no support. He knew that optimism was the highest quality a person could have when facing a survival situa-tion, and he never allowed dark talk or bad attitudes.

Chapter 3: The Psychology of Survival: Gaining the Upper Hand 41
FearFear is the most common emotion people in survival situa-
tions feel. Fear is a reaction to uncertainty, and it can range
from a simmering anxiety to heart-stopping terror. You should
expect it and know how to use it to your advantage. We talk
about taking advantage of this emotion in the section “Getting
into the Right Mindset,” earlier in this chapter.
In surveys of lost persons, some fears tend to crop up again
and again. None of these will come as a surprise, but knowing
that others have experienced these feelings can be reassuring.
Here are some top wilderness fears:
✓ Being alone
✓ The night
✓ Suffering and pain
✓ The unknown
✓ Death
✓ Animal attack
Trying to take on all your fears at once can incapacitate you
quickly. Any of the preceding threats can come upon you, but
you probably won’t have to face all at once, and none of them
may develop into real threats at all. If you must think about
them, take one at a time. Boil down your situation: What are
you really facing?
For more on how to cope with fear, check out the “Working
with stress and fear” section earlier in this chapter.
PanicPanic is the most counterproductive emotion you can feel in a
crisis. Realize that if you panic, you lose. The most important
action you can take is to practice self-awareness, to realize
which direction you’re going, and to reel yourself back in.
ose
ur-
ou
er-
ng
se
f
d-
you
ns
y o s d -k

Part I: Stayin’ Alive: Basic Wilderness Survival Principles 42
If you feel an enormous surge of fear rushing over you, or if
you feel your body actually speeding up — such as hiking
faster or shaking — immediately recognize that you’re think-
ing in the wrong way, and pull tightly on your own personal
leash. Self control may feel unnatural, but it makes you very
strong in the field, and ultimately, it saves lives.
Some people around you are going to go into a panic and lose
their heads. These reactions, such as shouting and scream-
ing, can be severe and very disturbing. Unfortunately, the
Hollywood cliché of someone yelling, “We’re all going to die!”
is all too real sometimes. Expect it. Be ready for it. Some
people are unstable, and they explode in the shrillest of fash-
ions in these situations. Don’t let it unnerve you or influence
you into doing something stupid.
Understanding Lost Person BehaviorLost Person Behavior (LPB) exam-ines case histories of people who’ve gone lost and tries to find common denominators. Over the years, LPB has revealed some common mistakes that people make when they’re lost. Make sure you don’t commit them.
✓ Speeding up: In most cases, as soon as people suspect they’re lost, they speed up. They don’t exactly start running; they just start hiking much, much faster, which usually only gets them lost much, much quicker.
✓ Disbelieving instruments or maps: This happens with com-passes, GPS units, and most especially maps. Trust your instruments and the map.
✓ Disrobing and discarding equip-ment: Never leave anything
behind. Find a way to carry it — you’ll invariably end up need-ing it.
✓ Lying down: Sometimes the size of the wilderness simply over-comes people, and they lie down and give up.
✓ Assuming no one will come looking for you: Don’t assume that no one will come looking for you. Be ready to signal.
✓ Traveling in the direction of least resistance: When lost, many people take wrong turns on the trail intentionally because a particular part of the trail simply looks easier to walk on. Think through your trail junctions. Another path-of-least-resistance error is to go down a slope, even though it’s not the way back.

Chapter 3: The Psychology of Survival: Gaining the Upper Hand 43
IrrationalityFrequently, people in survival situations act in completely
irrational ways — ways that can astonish you. We’re not talk-
ing about panic here; we’re talking about irrational thinking.
People sometimes refuse to cooperate even though their lives
depend on it, or they sometimes commit acts that put you and
your party in even more danger than you’re already in!
As soon as you know you have an unstable or irrational
person on your hands, you have to be ready for that person
to do anything. People can sabotage equipment, foil plans, and
commit acts that can kill the whole group. Watch irrational
people carefully, and never trust them with anything, even if
they seem to get better. You may have to restrain them or at
least assign someone to watch them.
Anger and blameMany times, people in survival situations are overcome by
guilt for having gotten themselves into such a mess. If you
find yourself feeling this way, don’t despair; forgive yourself
immediately. If someone else caused it, forgive them. Regret,
anger, and blame only distract you and waste precious time
and energy.
Misery and fatigueMisery and fatigue can amplify the feeling of despair to the
point where it seems that you can’t possibly make it. You
can gain strength from self awareness and self inventory. Be
honest with yourself: You’re hot, you’re cold, you’re hurt,
you’re fatigued, you’re frankly scared. Then admit that these
feelings and conditions warp your judgment and make every-
thing seem hopeless.
Some people wilt very quickly. The desire to keep going dies
and the will to live or just to save themselves dries up. This
reaction can discourage and demoralize you if you misinter-
pret it. People decline unevenly, but someone else’s decline
isn’t a sign that you have to decline, too. For some sugges-
tions on slowing this decline, or sometimes even reversing it,
see the next section.
f
k-
l
y
ose
-
e!”
sh-
ce
— -
e -n
e e r
f t, n a y k
s. e n
Part I: Stayin’ Alive: Basic Wilderness Survival Principles 44
Improving Morale
The more you improve your morale, the stronger you
become. The situation is serious, but you can give yourself an
emotional boost by doing the following:
✓ Get ready for night. Be prepared to face the night, to
have to wait it out. Start thinking about coping with the
night before it comes — even if it’s 3:00 in the afternoon.
When the sun goes down, every problem you have is
going to be harder to handle, even if you have flashlights.
Solve as many problems as you can before the sun sets.
Also, know that you can function in the dark. You may be
on a sharp learning curve, to be sure, but you can over-
come night paralysis.
✓ Assume a positive attitude. Sometimes improving your
outlook can be as simple as stretching a smile across
your face when you don’t feel like smiling at all. If you
have a series of failures, undertake a minor task that you
know you can achieve. Doing so can help you regain your
confidence.
✓ Warm up. A fire, a hot cup of water, or just a hat or a
coat can clear your head. If you’re feeling confused or
fatigued and you have the ability, do something to warm
your body.
✓ Clean up. Try to keep up your cleanliness in the field. It
promotes clear thinking and calms you and your com-
panions. Pull your hair out of your face, wash your face,
and take a moment to remove irritants. Inspect your
body. Look for wounds and clean them if you can.
✓ Adjust your clothing. If your clothes are chafing you,
locate the problem and eliminate it. Some small discom-
fort can take away your strength overnight.
✓ Get something in your stomach. A hot meal or some hot
liquid can sometimes give people a lot of strength. Some
people decline very quickly when there’s nothing to eat.
Remember: Deciding to eat or drink has to be a judgment
call. If water is scarce, don’t eat (see Chapter 7 for why
you shouldn’t eat if you don’t have water). Also, worrying
about food when you should be trying to figure out how
to get out of your predicament is sometimes a dubious
decision.

Chapter 4
Survival Style: Keeping Warm or Cool
In This Chapter▶ Grasping how the human body regulates temperature
▶ Understanding the principles of cold- and hot-weather clothing
▶ Knowing how to improvise survival clothing
▶ Working in the cool of the night
In any survival situation, you have to know how to warm up
if you’re cold and how to cool down if you’re hot. At home,
you control temperature with air conditioning, central heating,
sweaters, flip-flops, or what-have-you. But if you find yourself
in desolate snow-covered mountains wearing just jeans and a
t-shirt, things are going to go bad, fast. Even if you have plenty
of food and water supplies, none of that can help you if you
succumb to hypothermia.
In this chapter, we cover the basics of temperature regulation
in wilderness survival situations. We tell you how to stay
warm or cool with certain kinds of clothes (and how to
improvise them) and discuss strategies for staying cool in
hot environments. (Note: We detail shelters for hot and cold
environments in Chapter 6.)
Regulating Body TemperatureThe human body, tough as it is, is really comfortable in only
a pretty narrow temperature margin. Above 75°F (24°C), most
people begin to feel too hot, and below about 50°F (10°C),

Part I: Stayin’ Alive: Basic Wilderness Survival Principles 46most people start to feel chilly. Figure 4-1 shows specific
effects of air temperature on the body.
105 118 123 129 135 141 148 155 163 171 180 190 199
35 40 45 50 55 60 65 70 75 80 85 90
5 10 15 20 25 30 35 40 45 50 55 60
100 107 111 115 119 124 129 135 141 147 154 161 168
95 98 101 104 107 110 114 117 122 126 131 136 141
90 91 92 94 96 98 100 103 106 109 112 115 119
85 83 84 85 86 87 88 89 90 92 94 96 97
80 78 78 79 79 80 81 82 83 84 85 86 87
40 36 34 32 30 29 28 28 27 26 26 25 25
35 31 27 25 24 23 22 21 20 19 19 18 17
30 25 21 19 17 16 15 14 13 12 12 11 10
25 19 15 13 11 9 8 7 6 5 4 4 3
20 13 9 6 4 3 1 0 -1 -2 -3 -3 -4
15 7 3 0 -2 -4 -5 -7 -8 -9 -10 -11 -11
10 1 -4 -7 -9 -11 -12 -14 -15 -16 -17 -18 -19
75
70
65
60
55
50
45
5 -5 -10 -13 -15 -17 -19 -21 -22 -23 -24 -25 -26
0 -11 -16 -19 -22 -24 -26 -27 -29 -30 -31 -32 -33
-5 -16 -22 -26 -29 -31 -33 -34 -36 -37 -38 -39 -40
-10 -22 -28 -32 -35 -37 -39 -41 -43 -44 -45 -46 -48
-15 -28 -35 -39 -42 -44 -46 -48 -50 -51 -52 -54 -55
-20 -34 -41 -45 -48 -51 -53 -55 -57 -58 -60 -61 -62
-25 -40 -47 -51 -55 -58 -60 -62 -64 -65 -67 -68 -69
-30 -46 -53 -58 -61 -64 -67 -69 -71 -72 -74 -75 -76
-35 -52 -59 -64 -68 -71 -73 -76 -78 -79 -81 -82 -84
-40 -57 -66 -71 -74 -78 -80 -82 -84 -86 -88 -89 -91
-45 -63 -72 -77 -81 -84 -87 -89 -91 -93 -95 -97 -98
R E L A T I V E H U M I D I T Y (%)
W I N D S P E E D (MPH)
°F
Discomfort particulary if humid, working, or resting
Dehydration and high heat cramp risk
Heatstroke in 10 minutes
Comfortable conditions if remaining active
Optimal temperatures for moderate exertionfor extended periods outdoors with little or nospecialized clothing or techniques.
Above 55°F, note that high humidity makes temperaturesfeel somewhat warmer, and below, somewhat cooler.
Uncomfortable cold if resting and normally dressed.
Frostbite in 30 minutes
Frostbite in 15 minutes
Frostbite in 10 minutes
Frostbite in 5 minutes
Figure 4-1: General effects of heat and cold on the human body.
Humidity can intensify the effects of heat, and wind speed can
intensify the effects of cold. Note that in the top half of Figure
4-1, relative humidity increases to the right, showing your
perceived temperature at different temperature and humidity
Chapter 4: Survival Style: Keeping Warm or Cool 47combinations. For example, at 85°F, with a relative humidity
of 85 percent, you actually feel a temperature of about 96°F. In
the lower half of the figure, wind speed increases to the right.
At –5°F with a wind of just 20 mph, for example, your skin
feels a temperature of –29°F.
can
ure
ity
Zipless at 40 belowIn March 2007, I (Cameron) was trekking alone on Alaska’s North Slope to learn about the beautiful world of the tundra in winter. One day, while testing a new clothing system, I felt myself getting colder by the minute. My experimental system wasn’t working, and I knew that if I felt cold, my body was screaming at me to do something to warm up.
I should have listened, but I pressed on, thinking, “Oh just do another hour. You’ve been plenty cold before.” This was an almost fatal mistake. Soon my body was conserving heat in emergency mode, calling warm blood in from my extremities to keep my core organs warm (fingers, toes, and nose freeze first). Before I knew it, my hands and feet were profoundly numb.
To warm up, I stopped dragging my sled and instantly tried to put on a heavy parka, one that I’d used to bring me back from the brink many times. I knew that if I just got the zipper up, my core temperature would rise enough that my body would let blood back into my fingers and toes.
When I had the zipper halfway up, though, the little metal pull-tab
snapped off in my glove. It was a cheap zipper I’d sewn onto my customized parka. I stopped breathing. With my whole chest uninsulated, I was in real trouble, and my hands were so useless that making some kind of repair was unthinkable. Without my hands, I might not be able to set up my tent and get inside, out of the wind, to get warm. This was no spectacular Hollywood moment, but the situation was potentially lethal.
With near-useless hands, setting up my tent took an hour — it normally took about three minutes. Using my teeth and the heels of my mittens as crude clamps, somehow I managed to get the tent up and crawled into my sleeping bag, and somehow I opened my thermos flask to get some hot liquid into my guts. An hour later, the crisis was over as hot blood flooded back into my fingers and toes. Rewarming felt exactly like when you hit your thumb with a hammer, but it went on for half an hour or so, on every fingertip and toe.
My parka is in my closet now, and on my list of things to do before I go back to Alaska is “replace parka zipper with sturdier.”

Part I: Stayin’ Alive: Basic Wilderness Survival Principles 48
R
The body’s internal temperature is different from the air
temperature. Internal temperature is normally about 97–98.6°F
(36.1–37°C); if it rises above 104°F (40°C), you suffer the
effects of heat stroke (a form of hyperthermia), and if it dips
below 95°F (35°C), you begin to suffer from hypothermia.
We introduce these conditions later in this section, and we
discuss how to recognize and deal with them in detail in
Chapters 17 and 13, respectively.
The sensations of uncomfortable heat or cold are your body’s
signal that something’s wrong! Don’t try to just headbang
your way though uncomfortable temperatures. If you feel
uncomfortably cold or hot, use the techniques we describe in
this chapter to regulate your temperature.
The cold continuum: What happens as your body coolsWhen the body cools below the optimal temperature of
97–98.6°F (36.1–37°C), you begin to feel the effects of
hypothermia. Hypothermia is a debilitating reduction of body
temperature (you can identify hypothermia by the symptoms
we outline in Chapter 13). Unless you do something to stop
cooling, you can easily slip into a lethal hypothermic coma.
It’s that serious. Table 4-1 shows you what can happen when
your body cools.
Table 4-1 What Happens as Your Body CoolsStage Body Temperature Range Symptoms
Mild hypothermia 95–98.6°F (35–37°C) Shivering, clumsiness
Moderate hypothermia
90–95°F (30–32.2°C) Loss of shivering; loss of muscular coordination, leading to clumsiness
Severe hypothermia
85–90°F (29.4–32.2°C) Confusion, loss of vision, apathy
Profound hypothermia
Below 85°F (29.4°C) Dilated pupils, coma, death
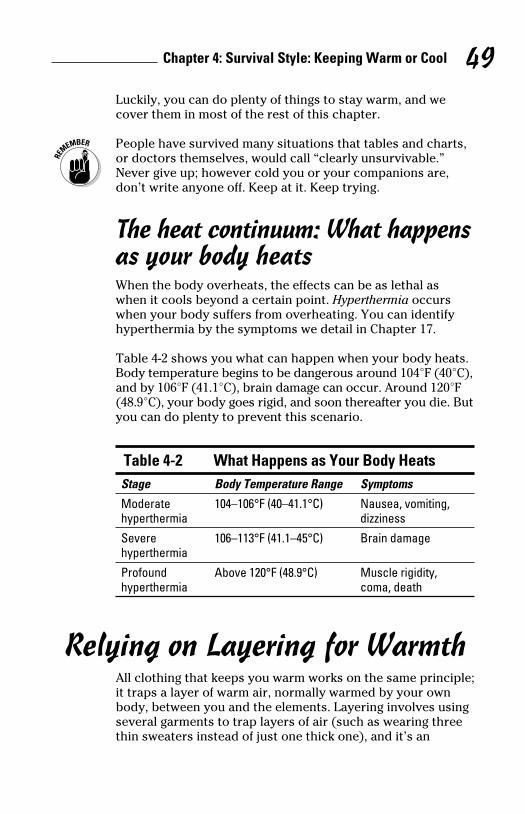
Chapter 4: Survival Style: Keeping Warm or Cool 49Luckily, you can do plenty of things to stay warm, and we
cover them in most of the rest of this chapter.
People have survived many situations that tables and charts,
or doctors themselves, would call “clearly unsurvivable.”
Never give up; however cold you or your companions are,
don’t write anyone off. Keep at it. Keep trying.
The heat continuum: What happens as your body heatsWhen the body overheats, the effects can be as lethal as
when it cools beyond a certain point. Hyperthermia occurs
when your body suffers from overheating. You can identify
hyperthermia by the symptoms we detail in Chapter 17.
Table 4-2 shows you what can happen when your body heats.
Body temperature begins to be dangerous around 104°F (40°C),
and by 106°F (41.1°C), brain damage can occur. Around 120°F
(48.9°C), your body goes rigid, and soon thereafter you die. But
you can do plenty to prevent this scenario.
Table 4-2 What Happens as Your Body HeatsStage Body Temperature Range Symptoms
Moderate hyperthermia
104–106°F (40–41.1°C) Nausea, vomiting, dizziness
Severe hyperthermia
106–113°F (41.1–45°C) Brain damage
Profound hyperthermia
Above 120°F (48.9°C) Muscle rigidity, coma, death
Relying on Layering for WarmthAll clothing that keeps you warm works on the same principle;
it traps a layer of warm air, normally warmed by your own
body, between you and the elements. Layering involves using
several garments to trap layers of air (such as wearing three
thin sweaters instead of just one thick one), and it’s an
6°F
s
y’s
e in
ns
dy
ms
p
.
en
ing
f
Part I: Stayin’ Alive: Basic Wilderness Survival Principles 50
important basic principle of cold-weather clothing. This
section explains the importance of layering to keep you warm
and suggests how to layer your own clothing.
Avoiding a cold sweatYou should wear several layers of clothing that you can add
to or take off, depending on your activity level. When you
start to sweat, you can take off a layer or two.
Sweat is your number-one enemy in cold-weather situations
for a few important reasons:
✓ Sweat deprives you of bodily fluids, leading to
dehydration. Dehydration worsens hypothermia.
✓ As sweat evaporates, it cools your body and brings on the
onset of hypothermia much faster than if you were dry.
✓ Sweat can soak your insulating layers, making them stick
together so that they no longer effectively trap a layer of
warm air, ruining their insulation properties.
Although a single, heavy layer — such as a parka — definitely
keeps you warm, it also makes you sweat, even if you’re just
moving around camp or chopping wood. But with layers,
you can add to them or strip them off according to your
circumstances.
If you’re breaking up firewood, plowing your way through
knee-deep snow, or doing other similar heavy work, strip off
a layer or two to prevent sweat from soaking your insulating
layers. On the other hand, when you’re doing less strenuous
work — such as butchering an animal, setting traps, fishing,
or washing plant foods — you’re best off wearing more layers.
Because keeping warm mainly relies on trapping a layer of
warm air next to your body, you should always try to keep your
clothes dry in a survival situation. If it’s raining, you’re going to
have to wait before really drying your clothes (unless you’re
lucky enough to have access to a cave or can use a tarp to
protect your fire from the rain). If you’re caught in a downpour,
use whatever you can (such as the space blanket or a plastic bag
from your survival kit) as shelter from the rain and make a fire as
soon as it stops raining. If you can’t make a fire, you can at least
wring out your clothes and hang them in direct sunlight.
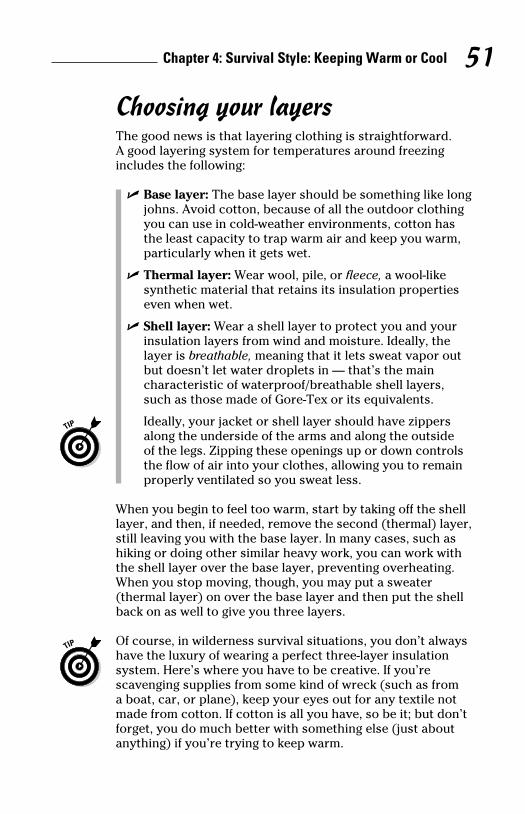
Chapter 4: Survival Style: Keeping Warm or Cool 51
Choosing your layersThe good news is that layering clothing is straightforward.
A good layering system for temperatures around freezing
includes the following:
✓ Base layer: The base layer should be something like long
johns. Avoid cotton, because of all the outdoor clothing
you can use in cold-weather environments, cotton has
the least capacity to trap warm air and keep you warm,
particularly when it gets wet.
✓ Thermal layer: Wear wool, pile, or fleece, a wool-like
synthetic material that retains its insulation properties
even when wet.
✓ Shell layer: Wear a shell layer to protect you and your
insulation layers from wind and moisture. Ideally, the
layer is breathable, meaning that it lets sweat vapor out
but doesn’t let water droplets in — that’s the main
characteristic of waterproof/breathable shell layers,
such as those made of Gore-Tex or its equivalents.
Ideally, your jacket or shell layer should have zippers
along the underside of the arms and along the outside
of the legs. Zipping these openings up or down controls
the flow of air into your clothes, allowing you to remain
properly ventilated so you sweat less.
When you begin to feel too warm, start by taking off the shell
layer, and then, if needed, remove the second (thermal) layer,
still leaving you with the base layer. In many cases, such as
hiking or doing other similar heavy work, you can work with
the shell layer over the base layer, preventing overheating.
When you stop moving, though, you may put a sweater
(thermal layer) on over the base layer and then put the shell
back on as well to give you three layers.
Of course, in wilderness survival situations, you don’t always
have the luxury of wearing a perfect three-layer insulation
system. Here’s where you have to be creative. If you’re
scavenging supplies from some kind of wreck (such as from
a boat, car, or plane), keep your eyes out for any textile not
made from cotton. If cotton is all you have, so be it; but don’t
forget, you do much better with something else (just about
anything) if you’re trying to keep warm.
rm
d
s
the
ick
of
ely
st
ff
ng
us
g,
ers.
ur
o
ur,
bag
e as
ast

Part I: Stayin’ Alive: Basic Wilderness Survival Principles 52
Improvising Cold-Weather Clothing
If you don’t have access to nice, dry, cold-weather clothing,
you have to improvise. You just need to know a few basic
skills and apply them with some creativity to improvise with
cold-weather clothing.
For improvising cold-weather clothing, the best guides are
the native people of the polar regions, who’ve adapted to
various wildernesses for thousands of years. Their invaluable
expertise can help you when you find yourself trapped in a
place you’ve seen only on TV. In this section, we describe how
to stay warm outdoors, using a lot of advice based on native
methods. Figure 4-2 shows the native dress of Arctic Canada
and a hypothetical cold-weather wilderness survivor. Note the
following items of clothing:
✓ A hide jacket trapping a layer of air against the skin
(Figure 4-2a)
✓ Fur used to block wind from the face (Figure 4-2b)
✓ Heavy mittens (Figure 4-2c)
✓ High boots for deep snow (Figure 4-2d)
✓ Cloth used to wrap the head and neck (Figure 4-2e)
✓ Improvised snow goggles (Figure 4-2f)
✓ A heavy jacket trapping a layer of warm air next to the
body (Figure 4-2g)
✓ Mittens improvised from heavy socks (Figure 4-2h)
✓ Improvised gaiters/boot covers (Figure 4-2i)
✓ Fabric sewn to a coat to provide a sitting surface
(Figure 4-2j)
✓ Improvised snow shoes (Figure 4-2k)
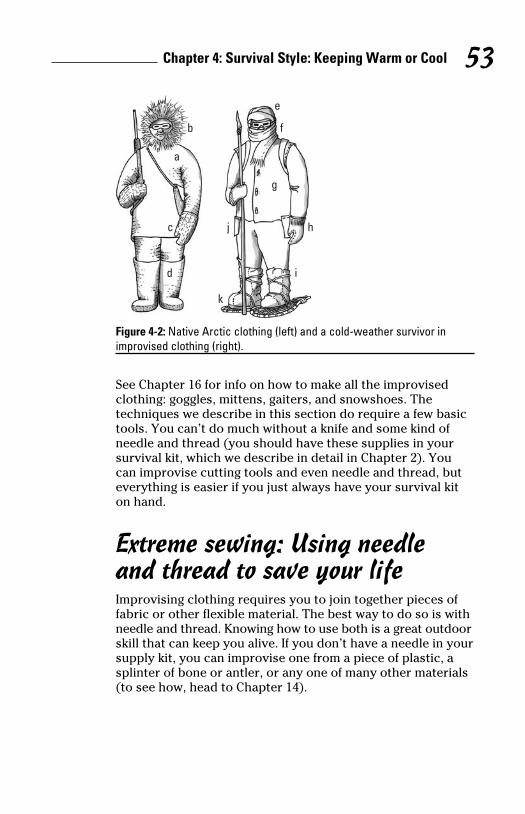
Chapter 4: Survival Style: Keeping Warm or Cool 53
a
b
c
d
e
f
g
h
i
j
k
Figure 4-2: Native Arctic clothing (left) and a cold-weather survivor in improvised clothing (right).
See Chapter 16 for info on how to make all the improvised
clothing: goggles, mittens, gaiters, and snowshoes. The
techniques we describe in this section do require a few basic
tools. You can’t do much without a knife and some kind of
needle and thread (you should have these supplies in your
survival kit, which we describe in detail in Chapter 2). You
can improvise cutting tools and even needle and thread, but
everything is easier if you just always have your survival kit
on hand.
Extreme sewing: Using needle and thread to save your lifeImprovising clothing requires you to join together pieces of
fabric or other flexible material. The best way to do so is with
needle and thread. Knowing how to use both is a great outdoor
skill that can keep you alive. If you don’t have a needle in your
supply kit, you can improvise one from a piece of plastic, a
splinter of bone or antler, or any one of many other materials
(to see how, head to Chapter 14).
,
th
ble
how
ve
da
the
e

Part I: Stayin’ Alive: Basic Wilderness Survival Principles 54
After you have a needle, you can improvise cordage (thread)
from any number of materials; shoelaces or laces pulled from
a hood, wiring ripped from the wreckage of a machine, and
dental floss are all acceptable, though they make different
sizes of holes in the fabric you’re sewing. Natural cordage for
sewing includes sinew (the tough, stringy tissues stripped
from animal joints) and tough vegetable fibers.
To thread your needle, slip the cordage you’re using through
the eye and pull through a good measure; put a knot in the
thread at the beginning of where you’ll make your seam to
prevent the thread from pulling through the fabric (refer to
Figure 4-3a). Join the two fabrics (Figure 4-3b) and end the
seam with a final knot to prevent the seam from coming apart.
a b
Figure 4-3: Using a bone needle to sew a flat seam.
Using plastic, cardboard, and other materials for warmthIf you need to improvise and make your own cold-weather
clothing, you can look to different materials, such as plastic,
cardboard, and so on. These materials are durable and can
make weatherproof layers for keeping warm. When you’re
considering improvising cold-weather clothing, keep in mind
the layering principles we outline in the section “Relying on
Layering for Warmth,” earlier in this chapter.
If you find yourself in a cold setting and need to improvise
with materials around you, look at the following items:

Chapter 4: Survival Style: Keeping Warm or Cool 55 ✓ Car seat covers: They’re often made of a flexible plastic,
and you can easily cut them away and sew them into an
improvised shell layer to protect you from wind, rain,
and snow. Use the padding inside these seats as insulation
(the thermal layer) by stuffing it inside your outer layer.
✓ Plastic sheet, tarp, or garbage bag: You can easily
convert one of these plastic items into a poncho simply
by cutting a foot-wide slit along a fold, near the center,
for your head to pass through.
✓ Cardboard: You can sew cardboard together to make
large sheets for use as a poncho, though it breaks down
in rain after a while.
✓ Extra sleeping bag: You can modify a sleeping bag into
a heavy insulation layer, but only do this if you have a
spare. A sleeping bag is more useful in keeping you alive
overnight, when the temperature really plummets; during
the day, you can stay active to keep warm.
✓ Duct tape: Duct tape is one of the wonders of modern
civilization, and it’s useful in a hundred wilderness
survival scenarios. You can use it to patch holes in your
clothing, tape over a cloth hat to make it waterproof,
and even tape over sneakers to help keep out rain. Keep
some in your survival kit. You can wrap a few yards of it
around a cigarette lighter for easy access later.
✓ Dry grass, leaves, moss: You can stuff dry grass, leaves,
and moss into your clothes, or better, between your
layers to make that all important space of dead air that
insulates you.
✓ Newspapers or magazines: You can crumple up pages
of newspapers or magazines and stuff them inside your
outer layer. The crumpling helps trap a layer of air inside
the paper, which acts as a very good insulator inside
your clothing. Whenever you drive into extreme cold or
snowstorms, you can keep an ample supply of newspapers
or magazines in the trunk of your vehicle.
Putting together animal skinsIf your survival situation has you trapping small animals, such
as squirrels, you can use their skins to help you keep warm
(Chapter 8 explains trapping). You need multiple skins to sew
together to create a garment, though a hat may take just a few.
d)
om
or
gh
o
art.
c,
nd
n
Part I: Stayin’ Alive: Basic Wilderness Survival Principles 56
You need to process and preserve the skin before you use it.
To preserve an animal skin so you can use it to create a piece
of clothing, follow these steps:
1. Scrape off the loose, fatty tissues from the inside (the
non-fur side) of the skin.
If you don’t, these tissues will rot and degrade the
hide. You can de-fat the skin of any mammal with any
sharp instrument, such as a knife blade or a broad
scrap of plastic. Soaking a hide in water for a day can
make de-fatting easier, as can using wooden pegs to
stretch the hide flat on the ground.
Hold the scraper blade across the skin and scrape
(don’t slice) off the fatty tissues by drawing the
scraper toward you; the motion is like shaving your
cheek or leg with a razor. This is a messy job, and the
fat adheres to the blade; clean it off every few strokes.
2. When you have enough animal skins prepared, let
them dry out; then begin to sew them together.
Just let one overlap the other a bit and start sewing
to join the overlapping margins. Soon you’ll have a
towel-sized skin that you can use as a hat or a light
cloak. Be creative and make whatever garment you
need.
If you wear the fur on the inside of the garment (next
to your skin), you get a warmer garment because the
fur next to your body traps a layer of air.
Processed skins stiffen over time. Keep them pliable by
bending and wringing them with your hands every day.
Process and store your animal skins away from camp when
you’re not wearing them, because their odors may attract
bears or mountain lions.
Having the right headwear, handwear, and footwearWhen you’re in a cold setting and not wearing clothing that
adequately keeps you warm, you at least want to keep your
head, hands, and feet warm. Keeping these body parts warm
is particularly important, because

Chapter 4: Survival Style: Keeping Warm or Cool 57 ✓ So much heat is lost from the head.
✓ If your feet freeze, you can’t travel.
✓ If your hands freeze, you can’t even make a fire or set up
a camp.
Also take care to keep your wrists and neck insulated; in both
places, the skin is particularly thin, and you can lose heat
from these regions very quickly. You can use duct tape (or
any kind of tape) to tighten your cuffs if they don’t already
have Velcro tabs for adjustment.
Keep the following in mind about these important body parts:
✓ Your head: The first thing to do when you feel cold is get
a hat on. The scalp contains so little fat that you lose a
great deal of heat though the head. Slowing or stopping
that heat loss can keep your whole body warm.
✓ Your hands: Mittens are usually warmer than gloves, and
they’re easy to improvise from a pair of socks. Mittens
trap a larger layer of air around your hands than gloves
do because gloves wrap only around individual fingers.
✓ Your feet: To keep your feet warm, you can take several
steps:
• Loosen the laces on your boots or shoes. Don’t
loosen so much that they fall off, but make them
loose enough that your blood (which warms your
skin) can circulate.
• Add layers to the inside of your footwear. This can
be as easy as slipping on another layer of socks,
being sure to keep your laces somewhat loose. If
you don’t have the luxury of extra socks, improvise
them by making a simple tube of cloth sewn down
the side and across the toe-end. This doesn’t have
to be particularly comfortable; it just has to help
trap warm air inside your shoe or boot.
• Insulate the outside of your footwear. The padding
from seat cushions can be useful as insulation that
you layer on the outside of your footwear. Cut the
padding into slabs and sew them together, paying
particular attention to the toe area. You can also
make snowshoes from cordage and flexible, green
branches.
it.
ece
(the
ny
an
o
r
he
es.
t
g
xt
he
n
t
r
m

Part I: Stayin’ Alive: Basic Wilderness Survival Principles 58
Cf
Using Other Ways to Keep Warm
In addition to wearing layers of dry, air-trapping clothing,
you can keep warm by staying active, covering yourself with
blankets or other insulation, and using fire. We cover fire later
in this chapter and discuss shelters in Chapter 6. For now,
here are some good ways to keep warm.
Staying activeOne way to stay warm is to keep moving, which generates
body heat. On really cold mornings, you may want to do some
jumping jacks, run in place, or windmill your arms (which
drives blood back into your fingertips).
However, being active does have its drawbacks. When you’re
active, you sweat, which can soak your clothes — and then
they can freeze solid. (Check out the earlier section “Avoiding
a cold sweat” for more on the dangers of sweating.)
During a hard day in the Arctic winter, we constantly adjust
our clothing systems to prevent them from being sweated up
and freezing solid. If you’re going to do some vigorous exercise,
remember to strip off a layer before you start, but put it back
on soon after you stop moving. The other problem with staying
active is that it burns calories. If your food supply is an issue,
weigh the pros and cons of having to consume more food to stay
active. In the extreme cold, recovering from hypothermia is very
difficult, so err on the side of eating more rather than less.
Staying warm when you’re staying stillA cold night can turn into an eternal agony; it seems that the
sun will never come up. But remember, it will. To help you
keep warm, you can try the following options:
✓ Insulation from cold surfaces: Never sit or lie directly on
the ground. Always use some kind of padding to insulate

Chapter 4: Survival Style: Keeping Warm or Cool 59you from cold surfaces; for example, you can gather pine
boughs to make a soft, thick insulating pad that you can
sleep on.
✓ Hot rocks: If you’ve had a fire, you can pull warm rocks
from near the fire to slip inside your clothes. Be careful
that they’re not hot enough to burn you, though.
✓ Huddling with your companions: If you have companions,
huddling with them allows you to conserve the group’s
body heat by having it all under one cover. Use any type
of cover you have as a blanket to stay warm (you should
definitely have at least one space blanket in your survival
kit; see Chapter 2).
✓ Candles: If you have a candle, hunch over it to keep your
hands warm and to allow you to inhale warm, dry air.
Cool Threads: Clothing for Staying Cool
We think the best guides to surviving in a hot wilderness are
the native people of such areas, and in this case, we look to
the nomadic Bedouin folk originally of the Arabian Peninsula.
Figure 4-4 shows a Bedouin in native dress, and shows a
desert wilderness survivor in improvised clothing. Note the
following items of clothing:
✓ A long cloth used to completely protect the head and
neck from the sun (Figure 4-4a)
✓ Long, flowing, robe-like clothes that let air circulate next
to the skin but shield the skin from direct sun (Figure 4-4b)
✓ Lack of shoes (Figure 4-4c)
Going barefoot is an aboriginal custom you shouldn’t
emulate. Bedouin folk go shoeless from childhood, and
their feet are very tough. Your feet aren’t accustomed to
going barefoot, so make sure you wear shoes.
✓ Survivor’s t-shirt head-garment that completely protects
the neck and head (also note use of sunglasses and face
mask) (Figure 4-4d)
✓ An untucked shirt to let air circulate (Figure 4-4e)
h
ater
me
re
n
ing
se,
ng
stay
ery
he
y on
ate
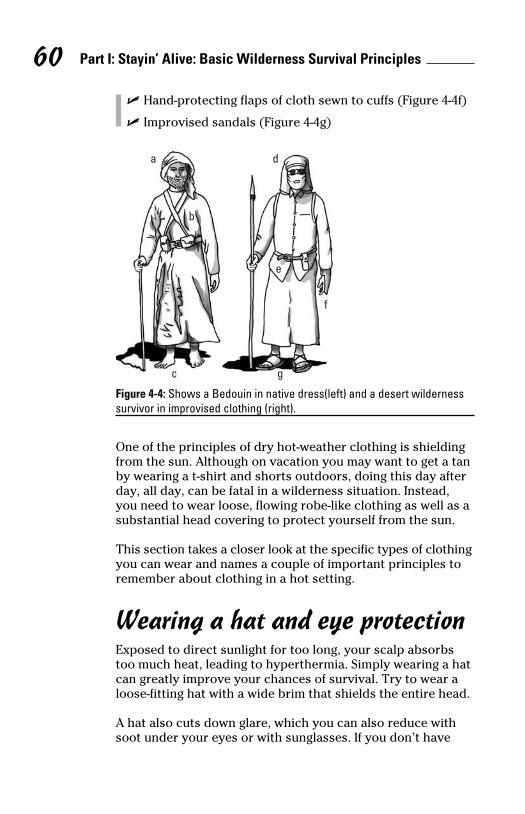
Part I: Stayin’ Alive: Basic Wilderness Survival Principles 60
✓ Hand-protecting flaps of cloth sewn to cuffs (Figure 4-4f)
✓ Improvised sandals (Figure 4-4g)
a
b
c
d
e
f
g
Figure 4-4: Shows a Bedouin in native dress(left) and a desert wilderness survivor in improvised clothing (right).
One of the principles of dry hot-weather clothing is shielding
from the sun. Although on vacation you may want to get a tan
by wearing a t-shirt and shorts outdoors, doing this day after
day, all day, can be fatal in a wilderness situation. Instead,
you need to wear loose, flowing robe-like clothing as well as a
substantial head covering to protect yourself from the sun.
This section takes a closer look at the specific types of clothing
you can wear and names a couple of important principles to
remember about clothing in a hot setting.
Wearing a hat and eye protectionExposed to direct sunlight for too long, your scalp absorbs
too much heat, leading to hyperthermia. Simply wearing a hat
can greatly improve your chances of survival. Try to wear a
loose-fitting hat with a wide brim that shields the entire head.
A hat also cuts down glare, which you can also reduce with
soot under your eyes or with sunglasses. If you don’t have

Chapter 4: Survival Style: Keeping Warm or Cool 61sunglasses, you can improvise them from a strip of stiff cloth,
a piece of bark, or plastic. You can protect your face from the
sun simply by hanging a handkerchief below the eyes: Pin or
sew it to your headgear. Check out Chapter 17 for ways you
can improvise your own eye protection and headgear to keep
cool.
Considering other clothing concepts to keep coolAs you try to come up with clothing in a hot setting, keep the
following pointers in mind. These concepts can help keep you
cool:
✓ Select light colors. If you have the luxury of choosing
what color material to wear in the direct sun, wear white
or other light colors; they reflect the sun instead of
absorbing its rays as darker colors do.
✓ Wear loose-fitting clothing. Hot-weather clothing should
be loose and flowing rather than tight. Loose clothing
allows a little ventilation to keep your skin cool, but tight
clothing makes you sweat, leading to dehydration. Note
the Bedouin’s loose, flowing robes in Figure 4-4.
✓ Be prepared to add or subtract layers. As in cold
environments, adjust your clothing according to the
conditions. At night, be prepared to bundle up, because
hot areas can get very cold, particularly on cloudless
nights when there’s no cloud layer to trap the Earth’s
warmth.
✓ Cover your skin. Improvise a robe-like garment from a
blanket or sheet to protect you from the sun.
✓ Use ventilation. Keep ventilated by unbuttoning your
cuffs and shirt neck. Wear your trousers loose, or
better yet, roll them up to your knees and wear your
improvised robe over them.
✓ Drape yourself with damp cloth. Wet skin cools much
faster than dry skin, and if you have the luxury of excess
water, you can keep cool by draping damp fabric over
your body while resting in shade. As the water evaporates,
it carries excess heat away from the skin.
4f)
ss
ng
tan
er
s a
ing
o
n
hat
a
ad.
h

Part I: Stayin’ Alive: Basic Wilderness Survival Principles 62
A Cool Proposition: Working at Night, Resting During the Day
If it’s really hot and you’re trying to walk your way out of the
survival situation, you would do best to travel at night, when
it’s cooler (deserts may be very cold indeed, but it’s easier to
keep warm by moving than to keep cool when it’s very hot).
Sleep in the day, under shelter if you can, and travel and/or do
your work of finding water, food, and keeping your temperature
regulated at night. We tell you how to work and travel at night
in Chapter 17.

Chapter 5
Making Fire in the Wilderness
In This Chapter▶ Understanding what makes fire burn
▶ Building a wilderness fire
▶ Starting fires in the rain
▶ Using alternative methods to get a fire started
You don’t just start a fire — you build one! With that in
mind, remember that most people have trouble getting
their fires started in the wilderness because they hurry the
building process and use a haphazard selection of starter
materials. So try to think of your fire as being like a well-designed
structure — if you build it right, you’ll be rewarded.
In this chapter, we show you how you go about constructing
a fire. We also show you some interesting alternatives to
matches and lighters, as well as some advice for the toughest
task of all: starting a fire in the rain.
Making a FireIf you find yourself in a wilderness survival situation, being
able to build a fire to stay warm may be question of life or
death. Always keep in mind that every fire needs three things:
heat to ignite it, oxygen to breathe, and fuel to burn.
This section explains what you need to do to get a fire going,
including different fire-building options, depending on your
situation. The most important thing to keep in mind is that

Part I: Stayin’ Alive: Basic Wilderness Survival Principles 64
getting the fire going — from igniting it until it becomes self-
sustaining — is a critical time for you in a survival situation.
Looking at fire-building materialsTo get a fire going, you need the right materials. All wilderness
fires require three distinctly different kinds:
✓ Tinder: This is the first material to be ignited, so it must
be the most flammable. Make sure you have plenty of it
before you strike your first match. Good tinder includes
straw, grass, scraped fibers or husks from trees or dried
fruit, lint from your clothing, dry shavings from a stick,
dry pine needles or leaves, a ball of dry toilet paper or
newspaper (although when paper is damp, it’s worse
than useless), and even sap from pine trees, which burns
hot and bright. Be sure to collect tinder if you see it when
traveling.
✓ Kindling: Kindling is the first real fuel to burn, and it’s
composed of thin twigs (pencil-thick at most) and/or
splinters of wood split with an ax or knife.
✓ Fuel: This is the main fuel for the fire, usually composed
of wrist-thick or larger branches and even logs if you’re
really lucky. You can also burn dried animal dung, as well
as natural tar or oil that seeps from the ground.
Whatever kinds of tinder, kindling, and fuel you use, you light
the tinder first, which ignites the kindling, which ignites the
fuel. Figure 5-1 shows the process, which we discuss in more
detail in this section — after looking at how to light a fire in
the first place.
Understanding fire-making basicsBefore you start trying to create flames or sparks, arrange
your tinder and fuel and have it ready to go. One of the main
reasons many people have such a hard time is poor selection
of starter fuels. The following tips can help you build a good
fire:
✓ Watch out for Mother Nature. Make sure your fire-
building site is protected from heavy winds and rain that
can extinguish it or make starting it difficult.

Chapter 5: Making Fire in the Wilderness 65
a b c
Figure 5-1: Essentials to making a teepee fire: Tinder (a), a teepee of kin-dling (b), and fuel added to the teepee (c).
✓ Take time to build your fire. Don’t be impatient.
Generally speaking, the easiest type of fire to ignite is
the teepee (check out the next section). Take your time
making a beautiful teepee. Carefully construct your fire
to take full advantage of the fact that fire always burns
upward: Put the lightest, driest tinder at the very bottom —
wispy-fine fibers are the best — and then build your way
up with kindling (twigs) that gradually gets thicker.
✓ Use the driest wood you can find. Wood is dry when it
snaps cleanly in your hands. You should actually hear
a very dry snap! when you break it. This type of wood
ignites quickly and burns well. Green wood, which is
wood that still has a little moisture in it, is hard to ignite.
If you have to work a stick or twig in your hands to get
it to break — or if it holds together by a fiber when you
bend it — then it isn’t dry enough.
✓ Use the thinnest possible kindling. Twigs less than 1⁄8
inch (3 millimeters) in thickness (thinner than your
shoelaces) make the best kindling. When you build a
teepee fire, make sure you have very dry tinder at the
bottom and then a nice structure of these dry twigs
above it.
Have an extra pile of very dry kindling next to you to feed
the flame as it arises, because a fire is very precarious
when it first starts. You want to make sure you can feed
it at just the right speed to really get it going.
f-
n.
lsess
ust
it
es
ed
k,
r
rns
hen
ed
re
well
ght
e
re
n
cs
in
on
d
hat
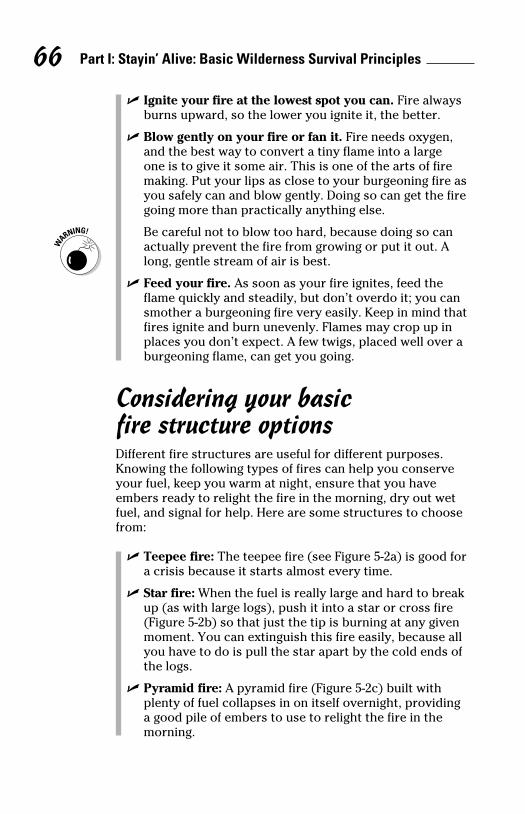
Part I: Stayin’ Alive: Basic Wilderness Survival Principles 66
✓ Ignite your fire at the lowest spot you can. Fire always
burns upward, so the lower you ignite it, the better.
✓ Blow gently on your fire or fan it. Fire needs oxygen,
and the best way to convert a tiny flame into a large
one is to give it some air. This is one of the arts of fire
making. Put your lips as close to your burgeoning fire as
you safely can and blow gently. Doing so can get the fire
going more than practically anything else.
Be careful not to blow too hard, because doing so can
actually prevent the fire from growing or put it out. A
long, gentle stream of air is best.
✓ Feed your fire. As soon as your fire ignites, feed the
flame quickly and steadily, but don’t overdo it; you can
smother a burgeoning fire very easily. Keep in mind that
fires ignite and burn unevenly. Flames may crop up in
places you don’t expect. A few twigs, placed well over a
burgeoning flame, can get you going.
Considering your basic fire structure optionsDifferent fire structures are useful for different purposes.
Knowing the following types of fires can help you conserve
your fuel, keep you warm at night, ensure that you have
embers ready to relight the fire in the morning, dry out wet
fuel, and signal for help. Here are some structures to choose
from:
✓ Teepee fire: The teepee fire (see Figure 5-2a) is good for
a crisis because it starts almost every time.
✓ Star fire: When the fuel is really large and hard to break
up (as with large logs), push it into a star or cross fire
(Figure 5-2b) so that just the tip is burning at any given
moment. You can extinguish this fire easily, because all
you have to do is pull the star apart by the cold ends of
the logs.
✓ Pyramid fire: A pyramid fire (Figure 5-2c) built with
plenty of fuel collapses in on itself overnight, providing
a good pile of embers to use to relight the fire in the
morning.

Chapter 5: Making Fire in the Wilderness 67
a b c
Figure 5-2: The different types of fires.
Whatever fire you make, pile up some dirt, rocks, or vegetation
around it, like a screen, just before going to sleep to help
reflect the heat into your shelter area on a cold night.
You should have a signal fire structure on standby at all
times. For more on signal fires, see Chapter 12.
Striking matches correctlyLighting a match seems straightforward — until your life
depends on it. Then you take your time to think through just
what you’re going to do. Particularly if you have a limited
number of matches, you don’t have much room for error.
To strike a wooden match, follow these steps:
1. Turn your back to the wind, crouch near the tinder
pile, and cradle the box securely in one hand, cup-
ping it against any breeze.
2. Hold the match in the other hand and stab down
deliberately across the striker patch.
3. After the match is lit, give it a second (or three) to
fully ignite the first quarter of the wood.
4. Carefully move the lit match toward the tinder
(unless you’ve struck the match right next to the
tinder, which is preferable if there’s a breeze or it’s
drizzling).
ys
as
re
n
hat
a
t
se
or
ak
n
all
of
g
Part I: Stayin’ Alive: Basic Wilderness Survival Principles 68
Making fire in wet conditionsWhen things get wet, making fire is more difficult, but if
you’re persistent, you may be able to get a fire going. First and
Starting a fire with a dead lighterEven after your lighter has run out of fuel, you can still get fire from it. The trick is to force the lighter’s spark into the very best tinder you find: Lint pulled from cotton socks or some other cotton garment is ideal. Here’s how to do it:
1. Pull off enough lint to make a wad about half the size of golf ball.
Make sure the lint is pulled apart as much as possible. Don’t com-press the lint or roll it into a ball. When you’re finished, you should be able to see through the lint. This process is time consum-ing — it may take you as long as an hour — but it really works.
2. Roll a tissue or a small length of toilet paper into a cone.
You can use any type of paper for this, but tissue is the best. When you have a cone, mount the lint ball just inside the very end of it — think of the shape of a snow cone. This paper apparatus is your fire-starter.
3. Take a lighter and flick it into the wad of lint at the end of your paper cone.
The sparks should fly into the wad and ignite it.
4. If the lint hasn’t ignited after a dozen or so attempts, take the metal housing off the lighter and try again.
If you have a pocket knife or some other straight edge, you can pry the housing off pretty easily. You may have to use your fingernail. Make sure you don’t accidentally dislocate the steel wheel or the flint. The wheel and flint shouldn’t be attached to the housing in any way, so they shouldn’t move when you’re taking the housing off. If they move during the process, stop what you’re doing and reexam-ine. After the housing comes off, the lint should ignite on the first few tries.
The lint ignites very quickly, so you need to have everything perfectly prepared beforehand. Have your kin-dling expertly prepared so it catches properly.

Chapter 5: Making Fire in the Wilderness 69foremost, look for dry tinder, kindling, and fuel in the following
places:
✓ Under rock shelters and in caves
✓ Under or inside downed trees or logs (found lying on the
ground)
✓ Under heavy snow pack (if temperatures are just under
freezing, everything above the snow may be dripping
with melt water, but deep under the cold snowpack may
be colder, dry wood)
✓ In animal burrows, such as squirrel or marmot dens
Sometimes you can take sticks that are slightly wet and
whittle away the soaked parts to produce somewhat dry
kindling.
Also search your clothes and possessions, especially the
inside of your wallet, for dry tinder. Sometimes papers or
even paper money deep inside a wallet or pocketbook remain
dry even though everything else around you is soaked. If you
aren’t completely soaked through, you can try making a tinder
pile using lint from your underclothes. Lint ignites almost
every time. The problem is having enough. Making a lint ball
large enough to start kindling can take as much as an hour.
In wet conditions, try to build your fire on top of something
and under some kind of shelter. Before building the fire, look
for a base — a board or a piece of metal is good, and cloth
or plastic cloth can work in pinch. Or you can try building
on rock; almost anything is preferable to the wet earth. Use
anything you can for shelter, as long as it keeps the drops off
your fire for a moment.
In wet conditions, consider trying to start your fire without
the use of tinder. Many times, when it’s wet, tinder is harder
to ignite than kindling — especially leaves or paper. If that’s
the case, make a small teepee of twigs and try lighting the
thin stems directly. The kindling must be exceedingly thin,
though — the thinnest twigs you can find. A dense teepee
made of wire-thin twigs can sometimes ignite when a tinder-fire
won’t.
and
e
a e d
r u y r t
el el o y e y p -f, t
u y -s
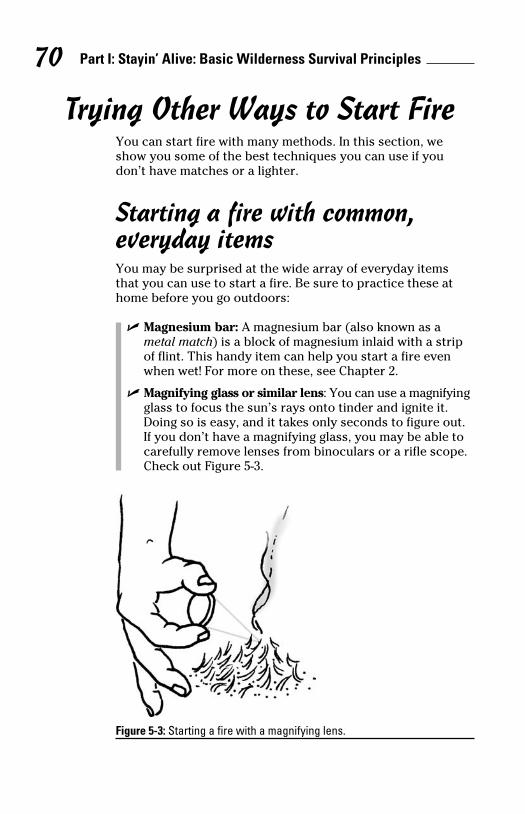
Part I: Stayin’ Alive: Basic Wilderness Survival Principles 70
Trying Other Ways to Start FireYou can start fire with many methods. In this section, we
show you some of the best techniques you can use if you
don’t have matches or a lighter.
Starting a fire with common, everyday itemsYou may be surprised at the wide array of everyday items
that you can use to start a fire. Be sure to practice these at
home before you go outdoors:
✓ Magnesium bar: A magnesium bar (also known as a
metal match) is a block of magnesium inlaid with a strip
of flint. This handy item can help you start a fire even
when wet! For more on these, see Chapter 2.
✓ Magnifying glass or similar lens: You can use a magnifying
glass to focus the sun’s rays onto tinder and ignite it.
Doing so is easy, and it takes only seconds to figure out.
If you don’t have a magnifying glass, you may be able to
carefully remove lenses from binoculars or a rifle scope.
Check out Figure 5-3.
Figure 5-3: Starting a fire with a magnifying lens.
Chapter 5: Making Fire in the Wilderness 71 ✓ Stone and steel: Steel produces a spark if struck against
some kinds of stone (including flint and chert). Check
the local creek bed for a variety of stones, and then try
striking your knife against them. Anytime you’re trying to
ignite a fire with the use of a spark from metal and stone,
try to use the lightest tinder you can find. Lint pulled
from clothing is ideal.
✓ Batteries and steel wool: Many alkaline batteries (includ-
ing car batteries and the common 9-volt rectangular bat-
teries used in transistor radios) have enough charge to
start a bit of steel wool on fire. Make sure the steel wool
is fine. If you’re using common soap pads, you have to
pull them apart until they’re wispy-thin.
Anytime you can connect the two poles of a battery with
the steel wool, you have a chance of getting ignition.
Here’s how:
• 9-volt: The best thing to do is wrap your steel wool
in tinder or toilet paper and rub the 9-volt battery’s
poles in the wool.
• Other batteries: When using any other type of
battery, you must pull the steel wool apart and
form a cord that can reach both poles.
The steel wool ignites almost immediately, so have your
tinder ready.
✓ Batteries and wire: If you’re lucky enough to have
machinery nearby, such as a car or tractor, you can make
a spark by attaching a wire to each terminal of a battery
and then touching the tips of the wires. Doing so pro-
duces a serious spark that you can use to ignite tender.
Be careful not to shock yourself if you’re using a car
battery. Insulate yourself from the steel wool or wire by
holding it with thick, dry cloth.
Igniting a fire, primitive styleHumans have made fire for hundreds of thousands of years,
if not a million or more. Still, many aboriginal people prefer
to keep a fire going after it’s lit rather than building a new one
every night. You can discover a lot from them that can help you
survive outdoors. This section explains the two easiest kinds of
primitive fires most useful in wilderness survival situations.
p
ing
ut.
to
pe.
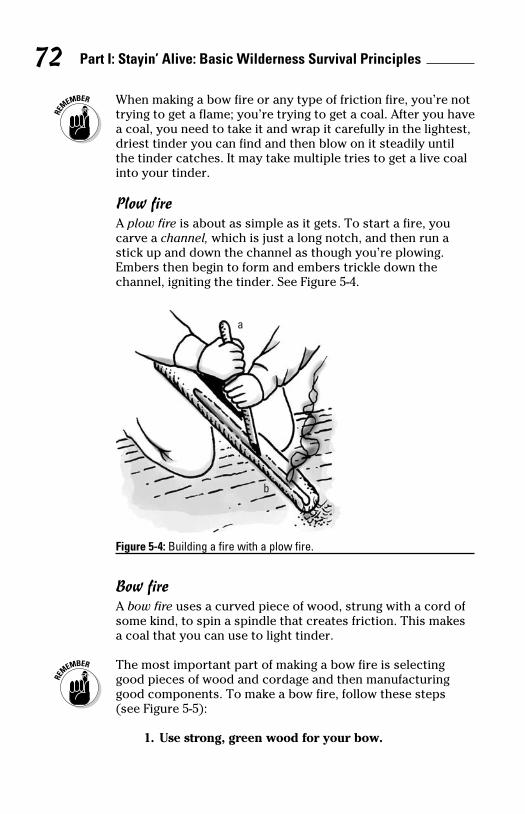
Part I: Stayin’ Alive: Basic Wilderness Survival Principles 72
When making a bow fire or any type of friction fire, you’re not
trying to get a flame; you’re trying to get a coal. After you have
a coal, you need to take it and wrap it carefully in the lightest,
driest tinder you can find and then blow on it steadily until
the tinder catches. It may take multiple tries to get a live coal
into your tinder.
Plow fireA plow fire is about as simple as it gets. To start a fire, you
carve a channel, which is just a long notch, and then run a
stick up and down the channel as though you’re plowing.
Embers then begin to form and embers trickle down the
channel, igniting the tinder. See Figure 5-4.
a
b
Figure 5-4: Building a fire with a plow fire.
Bow fireA bow fire uses a curved piece of wood, strung with a cord of
some kind, to spin a spindle that creates friction. This makes
a coal that you can use to light tinder.
The most important part of making a bow fire is selecting
good pieces of wood and cordage and then manufacturing
good components. To make a bow fire, follow these steps
(see Figure 5-5):
1. Use strong, green wood for your bow.

Chapter 5: Making Fire in the Wilderness 73 2. Choose the straightest, most symmetrical length of
wood you can find for your spindle.
The spindle needs to spin very quickly, so it must be
a perfect stick or one carved that way. Even small
imperfections can slow the spinning process. An ideal
spindle is around 8 to 9 inches (20 to 23 centimeters)
long and a little thicker than a quarter. Both ends
should be carved to a shallow taper (picture a used
crayon — not blunt, but close) to allow for maximum
spinning speed and friction.
3. String the bow with shoelaces.
When stringing the bow, the string should be just taut
enough to grip the spindle.
4. Carve a shallow notch into the handhold.
The handhold is the small piece of wood you use to
apply downward force on the spindle. The deeper the
notch in the handhold, the more friction you have in
the handhold, so you want it as shallow as possible.
You can use leaves or pine needles inside the hand-
hold to dampen the friction. Don’t use water or oil
because liquids only make the wood swell.
5. Carve a circular notch in a baseboard.
The baseboard is a heavy piece of wood split in half.
6. Start spinning your spindle slowly, using your bow,
and make sure you have a good groove going.
At this stage, you’re just trying to make sure you have
a good connection between the spindle and the notch
in the baseboard. Try to keep the spindle perpendicu-
lar to the line, because that cuts down on the problem
of having the spindle slip out of the string (which is
the most frustrating part, we know).
7. After you have the connection you want, cut a V
from the baseboard’s edge to the circular notch.
Put your tinder directly below the V notch in the base-
board. This allows the coal that you make to fall onto
the tinder under the baseboard.
8. Speed up your drilling only after you start to see
white smoke smoldering from the baseboard.
not
ave
est,
oal
of
es
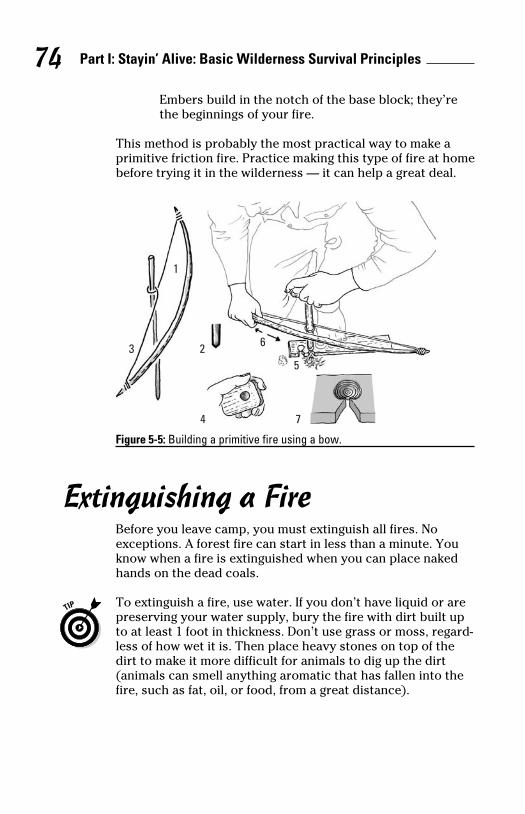
Part I: Stayin’ Alive: Basic Wilderness Survival Principles 74 Embers build in the notch of the base block; they’re
the beginnings of your fire.
This method is probably the most practical way to make a
primitive friction fire. Practice making this type of fire at home
before trying it in the wilderness — it can help a great deal.
1
23
4
5
7
6
Figure 5-5: Building a primitive fire using a bow.
Extinguishing a FireBefore you leave camp, you must extinguish all fires. No
exceptions. A forest fire can start in less than a minute. You
know when a fire is extinguished when you can place naked
hands on the dead coals.
To extinguish a fire, use water. If you don’t have liquid or are
preserving your water supply, bury the fire with dirt built up
to at least 1 foot in thickness. Don’t use grass or moss, regard-
less of how wet it is. Then place heavy stones on top of the
dirt to make it more difficult for animals to dig up the dirt
(animals can smell anything aromatic that has fallen into the
fire, such as fat, oil, or food, from a great distance).
Chapter 6
Home, Sweet Hut: Survival Shelters
In This Chapter▶ Understanding the importance of taking shelter from the elements
▶ Choosing a good campsite
▶ Finding natural shelters
▶ Making your own shelters
▶ Keeping clean and organized
When you’re in a wilderness setting, getting in from the
elements can be a lifesaver. A shelter can keep you
warm in cold environments, cool in hot conditions, and dry
when it’s raining. Sometimes you can take shelter in natural
formations, such as caves, but many times you need to build
your own haven. That’s okay, though, because most survival
shelters are easy to make.
In this chapter, we show you the simplest and most effective
shelters you can find and make. In Part III, we cover shelters
for specific conditions (snowdrift shelters, for example, or
desert sunshades and jungle hammocks). For the moment, we
look at the simplest ways to take shelter outdoors.
Part I: Stayin’ Alive: Basic Wilderness Survival Principles 76
Grasping the Importance of Shelter
Shelter is important in survival situations for physical and
psychological reasons. Physically, the human body is pretty
frail. A few hours in the sun can burn you severely, and a cold
night can incapacitate you. A good shelter
✓ Gets you out of the direct sun, which can prevent sunburn
and stave off hyperthermia (such as heat stroke)
✓ Can be warmed, preventing hypothermia and frostbite
✓ Protects you from rain, keeping you warm
✓ Includes an insulating bed that keeps your body heat
from being sucked into the cold earth
As for the psychological reasons, everything seems so much
better when you can get in from the rain, wind, or storm. If
you’re fully exposed, heavy weather wears you down, but from
inside a shelter, the world and your chances look a lot better.
Taking the time to plan a camp and build a good shelter are
proactive steps that remind you that you’re working toward
survival, not just reacting to things that happen to you. We
cover the full importance of the psychology of survival in
Chapter 3.
To make a shelter in the wilderness, you can try to make do
with natural shelters or build your own. Whenever you’re in
a survival situation, keep a constant lookout for good natural
shelters. If you’re pretty sure you’re going to be stranded out-
doors overnight, finding or making shelter is a top priority. The
upcoming sections look at the main natural-shelter alternatives.
Before Making Camp: What to Do
Whether you’re going to use a natural shelter or build your
own, you need to consider a few things before starting to
make camp. In this section, we outline some important ideas
to consider when using any outdoor shelter.
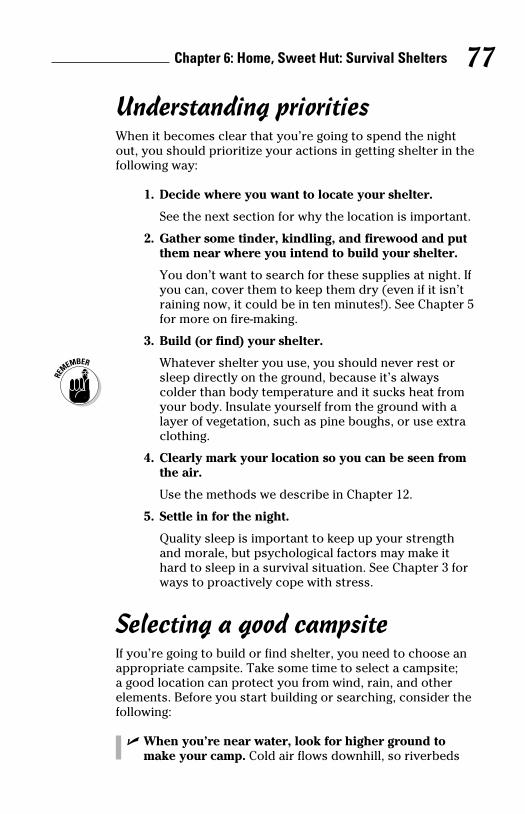
Chapter 6: Home, Sweet Hut: Survival Shelters 77
Understanding prioritiesWhen it becomes clear that you’re going to spend the night
out, you should prioritize your actions in getting shelter in the
following way:
1. Decide where you want to locate your shelter.
See the next section for why the location is important.
2. Gather some tinder, kindling, and firewood and put
them near where you intend to build your shelter.
You don’t want to search for these supplies at night. If
you can, cover them to keep them dry (even if it isn’t
raining now, it could be in ten minutes!). See Chapter 5
for more on fire-making.
3. Build (or find) your shelter.
Whatever shelter you use, you should never rest or
sleep directly on the ground, because it’s always
colder than body temperature and it sucks heat from
your body. Insulate yourself from the ground with a
layer of vegetation, such as pine boughs, or use extra
clothing.
4. Clearly mark your location so you can be seen from
the air.
Use the methods we describe in Chapter 12.
5. Settle in for the night.
Quality sleep is important to keep up your strength
and morale, but psychological factors may make it
hard to sleep in a survival situation. See Chapter 3 for
ways to proactively cope with stress.
Selecting a good campsiteIf you’re going to build or find shelter, you need to choose an
appropriate campsite. Take some time to select a campsite;
a good location can protect you from wind, rain, and other
elements. Before you start building or searching, consider the
following:
✓ When you’re near water, look for higher ground to
make your camp. Cold air flows downhill, so riverbeds
y
old
urn
e
h
om
r.
e
d
al
t-
The
ves.
as

Part I: Stayin’ Alive: Basic Wilderness Survival Principles 78
Uand lakesides are colder than slopes that lead down to
them, particularly in the early morning.
Beware of flash floods, sudden bursts of water that can turn
a dry riverbed into a raging torrent. Look for high-water
marks, such as water stains on rock faces or vegetation
trapped by running water in trees or bushes. Be sure your
camp is considerably higher than the usual high-water
mark. For more on the dangers of flash floods, and how to
spot high-water marks, see Chapter 17.
✓ When on the spines of exposed ridges, beware of
lightning hazards. Although you may want to build
your rescue signals on a ridge, actually camping on such
exposed ground is a lightning risk.
✓ When you’re in the mountains, watch out for the
telltale signs of avalanche or rockfall. Either of these
can wipe out your camp in an instant. An example of an
avalanche area is a treeless swath on a mountainside. An
example of a rockfall area is a cone-shaped talus slope
at the bases of mountains (talus is loose, rocky debris
that piles up at the bases of cliffs and mountains). See
Chapter 16 for more on avalanche hazards.
✓ Keep aware of high-wind hazards. Check trees to see
whether they’re all leaning the same way or are missing
limbs on the same side; these signs can indicate the
prevailing wind direction. Set up your shelter in a protected
area if you can, because incessant wind really can wear
you down psychologically. If you have the misfortune to
be camped on sea ice (a skin of ice on the surface of the
ocean), keep in mind that wind can move sea ice. Look
for older, stable ice that has wind-rounded corners and
snow on it rather than newer ice that has sharp corners
and is free of snow.
Remember that on frozen ocean surfaces (and even some
large frozen lakes), pressure ridges occur where two
large pieces of ice crash together (caused by wind or
sea currents). They can be up to 30 feet (9 meters) tall;
camping in their lee (the side protected from wind) can
provide excellent shelter from high winds.
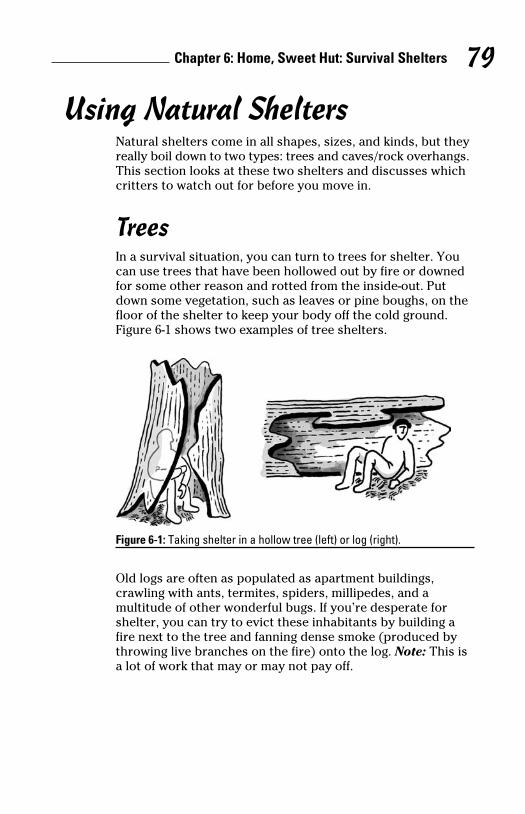
Chapter 6: Home, Sweet Hut: Survival Shelters 79
Using Natural SheltersNatural shelters come in all shapes, sizes, and kinds, but they
really boil down to two types: trees and caves/rock overhangs.
This section looks at these two shelters and discusses which
critters to watch out for before you move in.
TreesIn a survival situation, you can turn to trees for shelter. You
can use trees that have been hollowed out by fire or downed
for some other reason and rotted from the inside-out. Put
down some vegetation, such as leaves or pine boughs, on the
floor of the shelter to keep your body off the cold ground.
Figure 6-1 shows two examples of tree shelters.
Figure 6-1: Taking shelter in a hollow tree (left) or log (right).
Old logs are often as populated as apartment buildings,
crawling with ants, termites, spiders, millipedes, and a
multitude of other wonderful bugs. If you’re desperate for
shelter, you can try to evict these inhabitants by building a
fire next to the tree and fanning dense smoke (produced by
throwing live branches on the fire) onto the log. Note: This is
a lot of work that may or may not pay off.
o
urn
ur
o
ch
n
An
e
ng
ted
ar
to
he
k
d
rs
ome
l;
an
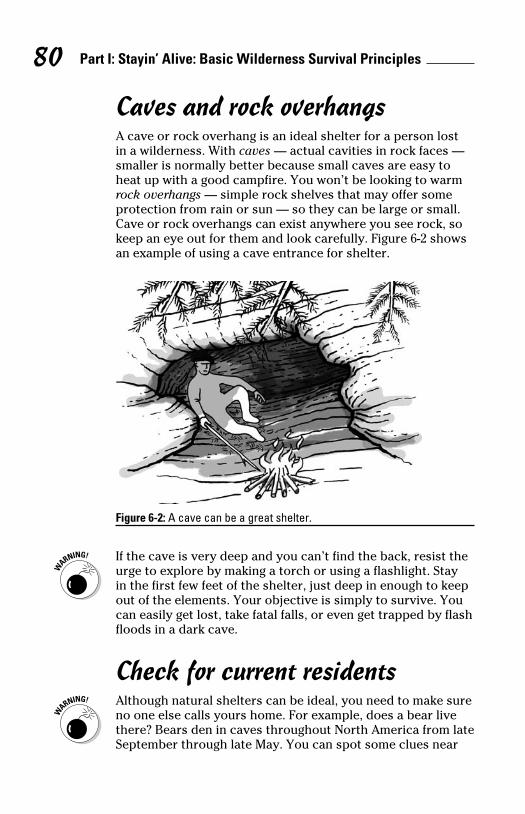
Part I: Stayin’ Alive: Basic Wilderness Survival Principles 80
Caves and rock overhangsA cave or rock overhang is an ideal shelter for a person lost
in a wilderness. With caves — actual cavities in rock faces —
smaller is normally better because small caves are easy to
heat up with a good campfire. You won’t be looking to warm
rock overhangs — simple rock shelves that may offer some
protection from rain or sun — so they can be large or small.
Cave or rock overhangs can exist anywhere you see rock, so
keep an eye out for them and look carefully. Figure 6-2 shows
an example of using a cave entrance for shelter.
Figure 6-2: A cave can be a great shelter.
If the cave is very deep and you can’t find the back, resist the
urge to explore by making a torch or using a flashlight. Stay
in the first few feet of the shelter, just deep in enough to keep
out of the elements. Your objective is simply to survive. You
can easily get lost, take fatal falls, or even get trapped by flash
floods in a dark cave.
Check for current residents
Although natural shelters can be ideal, you need to make sure
no one else calls yours home. For example, does a bear live
there? Bears den in caves throughout North America from late
September through late May. You can spot some clues near

Chapter 6: Home, Sweet Hut: Survival Shelters 81the cave entrance to find out whether the place is vacant;
caves occupied by larger mammals often display the following
telltales:
✓ A faint trail leading into the entrance. (Look at the paw
prints in the trail — are they squirrel-sized, dog-sized, or
person-sized? Larger prints may indicate a bear.)
✓ Food debris, such as bones, shells, and bits of vegetation,
scattered at the entrance.
✓ Feces (scat) present at the entrance or just off to the
sides of the entrance.
✓ Animal hair hanging on vegetation near the entrance.
✓ A distinctive odor, much like a wet dog.
Depending on the environment, snakes, spiders, scorpions,
bats, birds, and a dozen other kinds of critters may well live in
the shelter, too, so you should check any natural shelter out
carefully before moving in.
If you suspect a bear lives in the shelter, back away slowly
and then get the heck out of there. It’s tough to say how far
you should go to stay safe in this situation, but you may want
to travel several hours to get out of the bear’s territory —
even that may not be enough. If it’s a mama bear inside with
her cubs, you sure don’t want to challenge her for the shelter.
In other cases, do the following to determine whether any-
thing lives in a tree:
✓ Use a long and sturdy stick to knock on the shelter.
Be ready for a raccoon, bird, or some other animal to
explode out of the entrance.
✓ Creep closer and look closely. Don’t assume there’s
nobody home, because some animals freeze rather than
run when frightened.
✓ Carefully explore the inside of the tree shelter with the
end of the stick. Use the stick like a poker.
A good fire may deter animals from coming back to the shelter
at night. Build the fire right at the entrance to the cave or rock
overhang. Take care to shield the fire from strong winds near
the entrance and be sure to place your fire so it can’t be
extinguished by rain.
t
—
m
l.
o
ws
he
y
ep
ou
ash
ure
e
late
r

Part I: Stayin’ Alive: Basic Wilderness Survival Principles 82
Putting a Roof over Your Head: Building Simple Shelters
If you’re going to be out even just one night, building a shelter
is well worth it. Doing so is easier than it sounds. You can
build a simple and effective shelter within an hour with just
a few materials — either found in the wild or carried in your
survival kit. In your kit, you should have the following three
shelter-building tools:
✓ Knife (or other cutting and chopping implement): See
Chapter 14 for how to improvise knives and chopping
tools from stone.
✓ Tarp: A tarp can help waterproof the shelter. A large
plastic bag or three may work in a pinch.
✓ Cordage: You can use cordage (rope, shoelaces, wire,
strips of cloth, whatever you have) to lash wooden parts
of a shelter together; parachute cord is ideal. If you’re
running low, you can cut open parachute cord to get at
multiple strands inside it, giving you three or five times
as much cordage as you think you have.
By making a temporary home, you can really improve your
situation. This section shows a few simple shelters to make.
Making a tarp shelterA simple plastic tarp is invaluable outdoors. It’s probably
most useful for making a shelter that can keep you out of the
rain, sun, and wind. If you can make a fire near the entrance
and block the rear entrance with brush or a backpack, you
have a shelter that can keep you alive indefinitely.
If you build a fire in your shelter, always be careful not to light
your shelter on fire. Keeping a pile of sand or dirt (or, if you
can afford it, a jug of water) next to the fire can help you put
out a fire before it spreads.
The basic type of tarp shelter uses a line tied between two
trees as the peak of the tarp. All you need are a couple trees
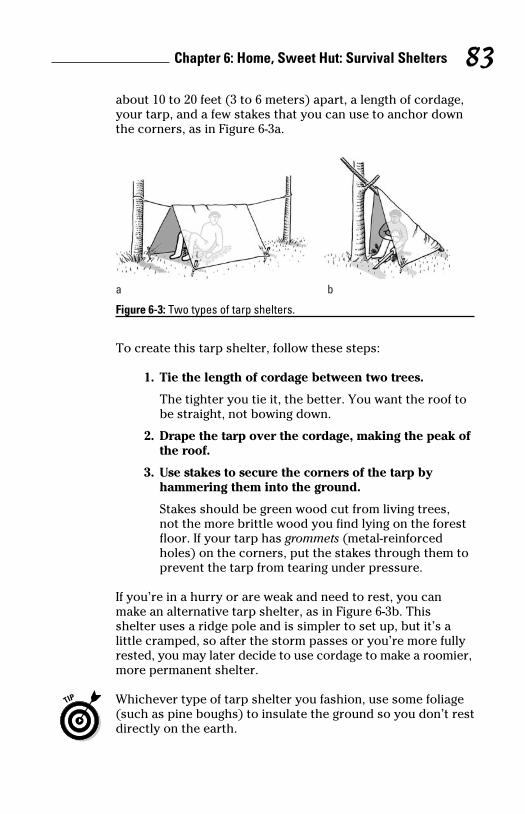
Chapter 6: Home, Sweet Hut: Survival Shelters 83about 10 to 20 feet (3 to 6 meters) apart, a length of cordage,
your tarp, and a few stakes that you can use to anchor down
the corners, as in Figure 6-3a.
a b
Figure 6-3: Two types of tarp shelters.
To create this tarp shelter, follow these steps:
1. Tie the length of cordage between two trees.
The tighter you tie it, the better. You want the roof to
be straight, not bowing down.
2. Drape the tarp over the cordage, making the peak of
the roof.
3. Use stakes to secure the corners of the tarp by
hammering them into the ground.
Stakes should be green wood cut from living trees,
not the more brittle wood you find lying on the forest
floor. If your tarp has grommets (metal-reinforced
holes) on the corners, put the stakes through them to
prevent the tarp from tearing under pressure.
If you’re in a hurry or are weak and need to rest, you can
make an alternative tarp shelter, as in Figure 6-3b. This
shelter uses a ridge pole and is simpler to set up, but it’s a
little cramped, so after the storm passes or you’re more fully
rested, you may later decide to use cordage to make a roomier,
more permanent shelter.
Whichever type of tarp shelter you fashion, use some foliage
(such as pine boughs) to insulate the ground so you don’t rest
directly on the earth.
lter
t
ur
e
e
rts
at
es
e.
he
e
ght u
ut
s

Part I: Stayin’ Alive: Basic Wilderness Survival Principles 84
Building a downed-tree or other A-frame shelterDowned-tree or A-frame shelters can provide a little more
protection from the elements than a simple tarp shelter if the
downed tree (or A-frame materials) has a lot of vegetation
still on it. Like the tarp shelter, you can supplement these
shelters with a tarp for waterproofing. They should always
be equipped with an insulated sleeping/sitting area and a fire
with a fire reflector. Figure 6-4 shows examples of these types
of shelters.
a
b
Figure 6-4: A downed-tree shelter and an A-frame shelter.
Both shelters use a ridgepole (a pole at the peak of the shelter)
flanked by walls. In the case of the downed-tree shelter
(Figure 6-4a), the ridgepole is simply a tree trunk that’s fallen
(you can fell it yourself if you have an ax). Crawl under the
tree and cut out tree limbs that hang down to the ground,
making a hollow under the ridgepole; you may also want to
cut off branches that stick up above the ridgepole to prevent
them from catching wind and shaking the shelter.
Here’s how to build the A-frame shelter:
1. Gather wood to make the frame.

Chapter 6: Home, Sweet Hut: Survival Shelters 85 In the A-frame (Figure 6-4b), the ridgepole is a sturdy
sapling supported by about six uprights; all of these
should be green wood, not dead wood from the forest
floor.
2. Build the frame as in Figure 6-4b.
Lash the uprights to the ridgepole at an angle of 45
degrees or more.
3. Pile branches with vegetation against the ridgepole,
at the angle of the uprights, to make the walls.
In either case, a tarp draped over the ridgepole (and tied
down or staked down, as seen in Figure 6-3) can help waterproof
the shelter. Build an insulation bed under the shelter and a
fire with a fire-reflecting screen of sticks, placed vertically in
the ground, to reflect the fire’s heat back into the shelter area.
Constructing an insulated shelterYou can make a very simple, very warm shelter by doing the
following:
1. Next to a log or long rock, make a 2-foot-thick
(0.6-meter) bed of leaves, grass, moss, pine needles,
any other dry vegetation, clothing, or other items
that can insulate you from the ground.
2. Lean four or five 5-foot-long (1.5-meter) branches
against the log or rock, forming a sloping roof over
the bedding.
This is the frame for your shelter. Don’t make it too
big. You want this shelter to be tight-fitting so it
insulates you almost like a sleeping bag.
3. Pile a 3-foot-thick (0.9-meter) insulating layer of leaves,
grass, moss, pine needles, any other dry vegetation,
clothing, or other items on top of the roof.
If you have a waterproof tarp, you can tie it to the roof
to help you stay dry.
4. Mark the outside of the shelter so it can be clearly
seen and then squirm inside, sealing the opening with
a backpack or more vegetation; then try to sleep.
Remember, you can improve your morale with just a
few hours of good sleep.
he
re
pes
r)
en
nt
Part I: Stayin’ Alive: Basic Wilderness Survival Principles 86
Keeping Your Shelter CleanRemember the old adage: Cleanliness is next to godliness. The
same goes for your shelter and campsite. A clean, organized
campsite is important because
✓ It’s less likely to attract bears, wolverines, or other
potentially dangerous animals. To keep camp clean,
designate a butchery and food preparation area 20 or
more paces away from your actual shelter (though still
within sight).
✓ It allows you to find what you need when you need
it. When you hear a helicopter flying overhead, you’re
ready to light your signal fires, find your signaling mirror,
or turn on your radio or any other electronic device. To
stay organized, we suggest hanging signaling gear from
lines or branches so you can easily access it when the
chopper flies overhead.
A clean and organized camp also gives you some peace of
mind. You’re not just eking out a filthy, savage existence;
you’re doing okay. You know what you’re doing, you’re
taking steps toward staying healthy and being found —
you’re surviving!
Chapter 7
Liquid Capital: Finding Drinking Water
In This Chapter▶ Knowing how much water you need
▶ Knowing where to look for water
▶ Collecting rain and condensation
▶ Extracting drinkable water from plants
▶ Filtering and purifying liquids
Regardless of the wilderness setting you find yourself in,
finding and storing water is your second priority after
you do all you can to protect your body temperature. If you
have the problems of hypothermia or heat exhaustion under
control, then go to work on collecting and conserving as much
water as you can.
In this chapter, we show you the average time it takes for
dehydration to incapacitate you in the wilderness — and how
to extend that time. We show you how to find water, how to
extract it from various sources, and finally how to filter and
purify unclean liquids so you can consume them.
Knowing Your Water NeedsYou can estimate how much water you need in any situation
by starting with the averages. Under average, moderate condi-
tions, you lose from 2 to 3 quarts (2 to 3 liters) of body water
per day. If you don’t replenish this lost water, you begin to
feel the effects of dehydration.

Part I: Stayin’ Alive: Basic Wilderness Survival Principles 88
Dehydration usually starts with a drop in your energy level,
which is quickly followed by headache, mental confusion, dry
mouth, quivering muscles, and then extreme fatigue. If the
average human loses water at the average rate and doesn’t
replace any of it, he or she loses consciousness after three
days and perishes after five.
Now that you know the averages, you need to know the
extremes:
✓ If you’re in temperate conditions and you stay in bed
all day, you lose only about 1 quart (1 liter) of water
per day.
✓ If you’re involved in normal activities in a hot climate,
you lose about 1 gallon (4 liters).
✓ If you walk across a desert at midday, you can lose over
5 gallons (more than 20 liters) in one day, which, if not
replaced, is fatal.
For more on the special problems of hot climates, see
Chapter 17.
You can measure your personal dehydration rate by examin-
ing your urine. If your urine is clear and straw-colored, you’re
basically hydrated, but if it becomes yellow or orange, or
cloudy or “thick,” or if you don’t urinate at all over a 10-hour
period, then you’re dehydrated.
Your first strategy in a survival situation is to conserve your
body’s water usage. If you’re thorough in the conservation
practices, you can stretch your water — and your survival
time — significantly.
Stretching your water supplyYour body uses water all the time, even when you’re at rest.
It leaks out in three ways: urination, perspiration, and respi-
ration (breathing). Though you can’t stop the water-leaking
process, you can slow it down to a trickle, and in a survival
situation, that’s your goal. Here’s how to do it:
✓ Stop water intake in the short term. Stop consuming
your water supply for a short while. Your body has a
reserve supply, and any water you consume before the

Chapter 7: Liquid Capital: Finding Drinking Water 89reserve is used up will be lost through urination. You
have to make a judgment call here: Adrift in a life raft
in moderate conditions, you can go the first 24 hours
without any water at all. In hot desert conditions (or in
extreme cold, such as the Arctic), you may not be able to
last that long.
✓ Don’t consume any diuretics. Diuretics are liquids that
make you have to urinate a lot, such as coffee, soda, alco-
hol, and salt water.
✓ Limit strenuous movement. Limit your physical exertion
to the absolute minimum. Lie still and rest if you can.
✓ Keep your body cool. If you’re in hot conditions, stay in
the shade or erect a covering to make shade. Splash any
liquid that you can — even salt water — on your body.
Don’t lie on hot surfaces like the ground. If you’re in cold
conditions, strip off layers of clothing when you feel
yourself start to perspire.
✓ Don’t eat or smoke. If you have to eat, try to eat carbohy-
drates. You need water to digest food in general but espe-
cially fats and proteins, as well as to process tobacco.
✓ Breathe through your nose and limit talking. Try to
limit the loss of your breath’s vapor.
✓ If you’re at high altitude, descend. The higher you are,
the harder you breathe, and the more vapor you lose.
Rationing water
You ration water only when you know you’re in a real survival
situation. If you don’t know whether you’ve reached the sur-
vival stage yet, then practice some or all of the water conser-
vation steps listed in the preceding section — this is the first
step in your overall strategy.
Base any water-rationing program on your environment. You
have to find a balance between extending your life and impair-
ing your physical capacities so much that you can no longer
function. For instance, consider the following:
✓ At sea in a raft, the minimum you need is around 1 cup
(237 milliliters) per day. This is the smallest amount you
can consume and still survive for more than a week or
so, and this pertains only to ideal conditions.
, dry
er
t
n-
’re
ur
ur
t.
i-
g
l
e

Part I: Stayin’ Alive: Basic Wilderness Survival Principles 90 ✓ If you’re on land, especially in hot conditions, cutting
down to a cup per day when you have 2 or 3 gallons (7.5
or 11.5 liters) lying around is counterproductive, because
you end up physically incapacitated long before you con-
sume your water.
Discuss any type of water rationing with your companions
thoroughly. Make sure everyone in your party feels they’re
included and that they’re being treated fairly. You should also
discuss plans for finding water, which we cover later in this
chapter.
What Not to Drink
You may be tempted to drink whatever fluids you can find
during a survival situation. However, some liquids, such as
salt water, blood, and urine, cause more trouble than they’re
worth. Here’s why you should stay away from them:
✓ Salt water: Salt water increases urination, which makes
you even more dehydrated. Although some survival
texts claim you can consume salt water, these claims are
almost invariably based on faulty sources, or they don’t
take into account the practical problems (namely, that
as soon as you start drinking salt water, it’s very hard to
stop), or they ignore volumes of research. So we have
some simple advice: Never drink saltwater. For more on
the problems of drinking salt water, see Chapter 20.
✓ Blood: Consuming animal blood causes trouble in several
ways: Your body must draw on its own water reserves
to digest the protein contained in the blood, so even
though you’re drinking fluid, you may be depleting your-
self. Secondly, animals frequently carry diseases in their
blood — diseases you don’t normally contract because
you cook the meat. Consuming blood also puts you at
risk for vomiting, which further dehydrates you. (Note:
We endorse only one exception to this rule: drinking
turtle blood at sea. For details, see Chapter 20.)
✓ Urine: Generally speaking, drinking unpurified urine is
highly inadvisable. It’s most likely a diuretic, or worse,
a poison. And as soon as you begin to dehydrate, your
urine only becomes denser and saltier. For more on the
bitter controversy surrounding drinking urine, see the
nearby sidebar.

Chapter 7: Liquid Capital: Finding Drinking Water 91
7.5
use
on-
also
s
re
es
are
n’t
t
to
on
eral
s
ur-
eir
e
e:
s
,
r
he
e
The controversy over drinking urineOf all the issues we address in this book, none is more controversial than the question of whether drink-ing urine extends your life or hastens your demise. The truth is that some castaways and wilderness survivors have endured extended dehydration times while drinking urine, and some have probably hastened their deaths from drinking it, too.
Each year, a story surfaces in which a person drinks urine and then stays alive well beyond the average survival time. The problem is that knowing what the person could’ve endured had he or she not drunk urine is practically impossible. In some cases, survivors have gone seven full days — an unusually long survival time — without any liquid at all. Some didn’t even lose conscious-ness during these extended times, even though they drank nothing at all. So just because a survivor drank urine and had an unusual survival time, while dehydrated, doesn’t nec-essarily mean that urine-drinking and extended times are related.
The argument is divided into three camps: Those who absolutely oppose drinking urine, those who favor it, and those who oppose it but who’ve read enough case stud-ies to know that the question prob-ably doesn’t have an easy answer. This last camp, which consists of some famous survival experts, usu-ally addresses the issue in a highly diplomatic fashion or simply tries to ignore it altogether.
That leaves us with some facts:
✓ Urine is sterile when it comes out of the body.
✓ Urine will keep for about two to three days, depending on how it’s stored.
✓ If you’re properly hydrated at the start of the survival situation, your first urination would be the purest.
✓ Drinking urine before you’ve exhausted all other possibilities is most likely a very bad strat-egy. You don’t know whether you’re drinking something that’s harmless or something that’s a diuretic. There’s no use, in the initial stages, in taking a chance.
✓ The more you dehydrate in a survival situation, the more salty, toxic, and diuretic your urine becomes. If you’re cycling your urine through your system, you need to know that this can hasten a shutdown of your renal system.
✓ In the last stages of dehydra-tion, the uric acid in unpurified urine strips the membranes from the inside of your mouth and severely aggravates the cracks in your lips. Both are exceedingly painful traumas.
Based on this information, we sug-gest that you avoid drinking urine and look for other water sources. If you have no other water source and you’re desperate, consider running urine through a solar still.

Part I: Stayin’ Alive: Basic Wilderness Survival Principles 92
If you’re in dire straits, you can get drinkable water from salt
water or urine through distillation. See “Distilling salt water
and urine,” later in this chapter, for details.
Knowing the signs of a low-grade or even possibly poisonous
water supply is essential. Here’s what to watch out for:
✓ An acrid, foul, or sewage smell
✓ Skeletons of dead animals nearby
✓ No plant life whatsoever near the water source
✓ Bubbles, foam, or thick green slime on the surface
✓ Milky colored water (especially from glaciers)
✓ A profusion of cattails or rushes in a stagnant area
You want the highest quality water you can find — before you
filter and purify. For more on purifying water, see “Filtering
and Purifying Water,” later in this chapter.
Finding Bodies of WaterYou can find drinkable liquid in almost any environment; you
just have to know where to look. After you find that liquid, you
may then have to transform it into something you can safely
consume. (For a look at cleaning water, check out the later
section titled “Filtering and Purifying Water”; for tips on rec-
ognizing contaminated water, see the preceding section.) This
section identifies water sources and helps you locate water.
Locating water in drainagesOne of the first places to look for water is in a drainage, which
is any place where rain trickles down and collects. Most drain-
ages are at the bottoms of slopes. Valleys and canyons are
drainages, as are creek beds, culverts, gullies, ditches, run-
offs, and depressions in the land, such as ponds or lakes.
Sometimes the nearest drainage is obvious: It’s the raging
river right next to the trail. Many times, however, you have to
examine your surroundings to determine the pathway rain-
water takes after it falls on the ground. Sometimes old sewer
pipes can indicate the existence of nearby drainages. Any
drainage may hold water for months after the last rain.
Chapter 7: Liquid Capital: Finding Drinking Water 93If you find a drainage that seems dry, work your way
downstream until you find a puddle; in temperate or near-
temperate climates, you can almost always find one. If you’re
in bone-dry conditions, dig for water underneath the drainage.
When heading into an unknown drainage, you must mark your
trail or, at the very least, turn around as you descend to make
sure you know your way back. Walking downslope from a trail
frequently gets people lost because as they walk down, they
break their line-of-sight with the trail. For more on marking
trails, see Chapter 11.
Knowing other signs of waterYou should keep a sharp lookout for signs of water at all
times — even before the survival situation occurs. Places to
look for water include the following:
✓ Where you see a profusion of green vegetation: This is
especially true if the vegetation is bunched in a low
spot, such as in a ditch or at the bottom of a valley or
depression.
✓ Beneath a damp surface, such as damp sand or mud:
This may indicate ground water. You may have to dig
down and allow the water to seep into the hole.
✓ At the foot of concave banks of dry rivers: For more on
dry riverbeds, see Chapter 17.
✓ In holes and fissures in rock faces: Sometimes rock
faces have cracks or deep holes in them that hold water
for months at a time between rains. You may have to use
a tube or straw made from a reed to suck up the water.
You can also find water by paying attention to wildlife. Most
animals drink at dawn and at dusk, so try to track their
courses at these times of the day. When checking out animal
behavior, look out for the following:
✓ Game trails: Game trails are narrow pathways that
animals of the area beat through the grass. Many times
these trails lead to water — especially the trails that go
downslope or converge.
✓ Birds, especially smaller birds: If they fly low and
straight, they’re usually headed for water; after they
alt
r
us
you
g
ou
you
y
-
his
.
ich
ain-
to
-
er

Part I: Stayin’ Alive: Basic Wilderness Survival Principles 94
C
drink, they usually have to fly from tree to tree to rest.
Large birds of prey, however, like eagles, hawks, owls, or
buzzards, aren’t indicators.
✓ Bees, flies, and ants: Bees fly to water, as do green flies.
Trails of ants crawling up trees frequently lead to pock-
ets of water trapped in hollows.
Catching RainAll too often, survivors miss their golden opportunity to col-
lect rainwater because they didn’t realize that you have to be
highly prepared to really take advantage of rainfall. Make sure
you get organized before the first drop falls.
To catch rain, you basically want to create the biggest funnel
that you can and channel as much water as you can into as
many containers as you can acquire. The key is to have a
large surface area, or plane, to catch the maximum number of
drops. A water-catching plane can be (and usually is) a plastic
poncho or tarp (see Figure 7-1a), but you can also use metal
sheeting, broad leaves (Figure 7-1b), fabric such as canvas, or
even wood to channel drops into your containers.
As in any survival situation, containers are king. If you believe
rain is coming, collect or build as many water-collection con-
tainers as you can. Here are some options:
✓ Look for plastic debris, such as bottles.
✓ Shape paper or heavy cloth, like denim, into cups that
last long enough to drink from.
✓ Make large bowls from sturdy half-pieces of bark, sealing
the ends with plastic, fabric, or clay.
✓ Use split bamboo canes — they’re nothing more than a
long row of bowls.
✓ Channel water into natural receptacles that you’ve wid-
ened, such as nearby tree hollows or natural depressions.
✓ Let your water-catching plane serve as your container:
Dig a wide, shallow pit and line it with plastic, fabric,
paper, or leaves to make a little pond (see Figure 7-1c).
If your collection materials are clean, you can drink the col-
lected rainwater straight, without purifying it.

Chapter 7: Liquid Capital: Finding Drinking Water 95
a b
c
Figure 7-1: Ways to catch rain.
Collecting CondensationIf water isn’t flowing down rocks or falling from the sky, you
may have to pull some water out of thin air. The good news
is that this process is more science than magic. After water
vapor condenses and reverts to its liquid form, you can move
in and collect it. In this section, we tell you how to gather dew
and collect the water that evaporates out of plants.
Gathering dewYou can frequently collect enough condensation or dew to
drink. This water has to be purified only if you think the sur-
face it comes from is somehow contaminated. Here’s how to
collect dew:
✓ Take your shirt off, tie it to your ankle, and walk through
the wet grass; then wring out the water into your mouth.
✓ Look for puddles of condensation that form in the pits of
rock faces and inside bowl- or pitcher-shaped leaves.
✓ Soak up the drops on metal or glass surfaces with your
shirt or a sponge. You can also use a credit card or some-
thing like it to coax the drops into a container.
Dew usually forms sometime during the night, not at dawn.
You can maximize the amount of water you collect if you act
right after the dew has formed.
.
or
es.
k-
l-
be
ure
nel
r of
stic
al
or
eve
n-
ing
a
d-
ons.
:
.
-

Part I: Stayin’ Alive: Basic Wilderness Survival Principles 96
Making a transpiration bagYou can get water from plants by using a transpiration bag. A
transpiration bag is a plastic bag that you wrap around a tree
or bush that captures the water that naturally evaporates
from the vegetation. Droplets form inside the tightly sealed
bag and then trickle down to collect in the bottom.
You can use any plastic sheeting to make a transpiration bag —
just make sure you have a tight seal around the vegetation and
try to make sure that it’s exposed to direct sunlight. If you have
a tube of any kind, you can thread it down to the bottom of the
bag and just suck up the fluid as it accumulates — that way,
you never have to break the seal of the bag and interrupt the
evaporation process. Check out Figure 7-2 to see how a transpi-
ration bag works.
If a plant is poisonous, the water you collect from it is poison-
ous. For more on poisonous plants, see Chapter 8.
Figure 7-2: Transpiration bags on the ground and on a tree.
Setting up a solar stillA solar still is a tightly sealed evaporation unit that allows
droplets to form and then trickle down to a collection cup.
You can use this method to get water from vegetation; you
can also use it to desalinate salt water or purify urine or other
contaminated water. Sometimes just the wet earth below the
topsoil can be enough to produce drops if you build a solar
still over a freshly dug pit.
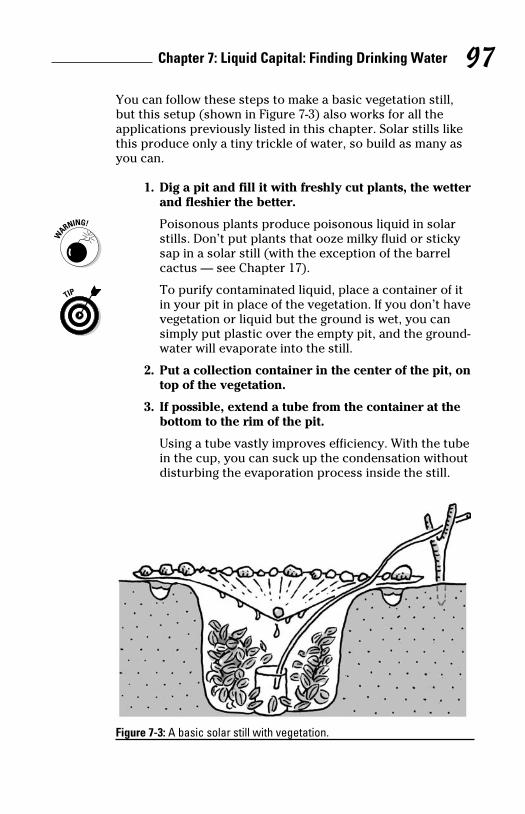
Chapter 7: Liquid Capital: Finding Drinking Water 97You can follow these steps to make a basic vegetation still,
but this setup (shown in Figure 7-3) also works for all the
applications previously listed in this chapter. Solar stills like
this produce only a tiny trickle of water, so build as many as
you can.
1. Dig a pit and fill it with freshly cut plants, the wetter
and fleshier the better.
Poisonous plants produce poisonous liquid in solar
stills. Don’t put plants that ooze milky fluid or sticky
sap in a solar still (with the exception of the barrel
cactus — see Chapter 17).
To purify contaminated liquid, place a container of it
in your pit in place of the vegetation. If you don’t have
vegetation or liquid but the ground is wet, you can
simply put plastic over the empty pit, and the ground-
water will evaporate into the still.
2. Put a collection container in the center of the pit, on
top of the vegetation.
3. If possible, extend a tube from the container at the
bottom to the rim of the pit.
Using a tube vastly improves efficiency. With the tube
in the cup, you can suck up the condensation without
disturbing the evaporation process inside the still.
Figure 7-3: A basic solar still with vegetation.
. A
ee
d
g —
nd
ave
the
e
spi-
on-
her
he
r

Part I: Stayin’ Alive: Basic Wilderness Survival Principles 98
4. Drape plastic sheeting over the pit; then take a
slightly pointed stone and push the plastic down
gently to form a slope.
This allows the condensation to roll down and drip
into the container. You want to end up with a minia-
ture stalactite shape just over the container. You can
try canvas if no plastic is available.
5. Heap sand or stones around the edge of the plastic
sheeting to anchor it in place.
Make sure you get a good seal around the plastic.
Extracting Water from PlantsYou can get the water you need from nearby vegetation, but
you have to be on guard for signs of poisonous liquids. This
section identifies trees and plants that provide safe drinking
water.
Consider any plant liquids that are sticky or milky to be poi-
sonous and unfit to drink!
You can frequently find water in tree hollows and in pitcher-
or cup-shaped leaves. Or you can extract water from trees if
you know the right methods. Here’s how:
✓ Palms: Coconut, buri, nipa, rattan, and sugar palms all
contain drinkable liquid. Bend over a flowering stalk of
palm and cut the tip off to allow the liquid to drip into a
cup. Make a new cut every 12 hours to renew the flow.
✓ Banana and plantain: Cut down the tree and then con-
vert the stump into a reservoir by hollowing it out. The
tree’s liquid rises and fills this reservoir quickly. Check
out Figure 7-4. At first, the liquid is too bitter to drink, so
you have to sit through two to three fillings before the
liquid is palatable. One tree can provide you with three
to four days’ worth of liquid.
✓ Umbrella tree: Found in western tropical Africa, this tree
has leaf bases and roots that can yield water.
✓ Traveler’s tree: Water collects at the bases of the leaves
of this fanlike tree, which grows in Madagascar.

Chapter 7: Liquid Capital: Finding Drinking Water 99
✓ Baobab tree: Water collects and is stored in the bottle-
like trunk of this tree, which grows in Australia and
Africa.
Figure 7-4: Cut down a banana or plantain tree to get water in the trunk reservoir.
Other plants that yield water include the following:
✓ Bamboo: Green bamboo may contain water. You can
either cut the sections open and drain them or bend the
entire cane over, cut the top off, and let the water drip
into a cup. If the water is clear and doesn’t smell bad, you
can drink it straight; if it’s brown or smells fermented,
you have to purify it (see the next section). Brown canes
sometimes contain water as well.
✓ Coconuts: Drink only from mature, brown coconuts.
Young, green coconuts contain an oil that acts as a laxa-
tive, and too much of it can cause diarrhea.
✓ Fleshy plants: Cut down plants with fleshy centers and
then squeeze or mash them to extract the liquid from
them. Warning: Some varieties of fleshy cactus are poi-
sonous. For information, see Chapter 17.
✓ Vines: To extract water from a vine, first cut it at the
highest point you can; then cut it at a lower point to
allow the liquid to drain down. If you cut low first, the
water just runs back up the vine. Don’t drink any vine
liquid that appears sticky or milky.
a-
an
c
ut
s
ng
i-
r-
if
l
f
a
.
n-
e
k
so
e
e
ree
ves
Part I: Stayin’ Alive: Basic Wilderness Survival Principles 100
Filtering and Purifying WaterIn the field, any body of water can contain bacteria, parasites,
and toxins, such as pesticides — any one of which can make
you ill. Nearly all water-borne diseases involve a violent bout
of diarrhea, which only accelerates dehydration. To avoid
sickness, consider all water dangerous, regardless of how
clear it appears. Filter and purify all your water to the best
of your ability. This section explains methods you can use to
purify or treat water, starting with the most effective one.
In most tropical situations, it’s vastly better to get an orga-
nized rain-catching operation going than to mess around with
having to filter and purify water.
Boiling waterBoiling water for 10 to 15 minutes is the very best course of
action in a wilderness situation. If you have a tin cup or some
other type of metal container and you can get a fire going,
always boil your water.
Boiling water in a plastic container is possible, but you risk
destroying your only container. Put some thought into this
procedure before you risk it. If boiling in plastic is your only
alternative, proceed slowly and keep a sharp eye on the plas-
tic. It should turn black, but you obviously want to watch for
the deformities that indicate the plastic is melting. The key
is to suspend the plastic container from a tripod and never
allow it to touch hot flames or coals. (For instructions on
building a tripod, see Chapter 14.)
Before boiling any water, consider filtering it first to remove
larger particles. See the later section “Improvising filters” for
details.
Going with chemical treatmentsIf you can’t boil your water, you should use chemicals to
purify it. (Preferably after filtering — see the later section
“Improvising filters.”)

Chapter 7: Liquid Capital: Finding Drinking Water 101The general rule when using chemicals is to use a standard
dosage if the water is clear and doesn’t smell bad and to
double the dosage if the water is cloudy or foul smelling.
When you have access to chemicals, you usually have one of
three options, which we present in Table 7-1.
Table 7-1 Chemicals for Purifying WaterChemical Description Standard Treatment
Water purification tablets, commonly chlorine or iodine
These are standard-ized water treatments, packaged in bottles and blister packs.
Follow the directions to the letter — the chemicals themselves are poisonous!
Iodine This is liquid iodine, which you can find in many first aid kits. You may find iodine swabs in your kit, which you can also use.
3–5 drops liquid iodine (when using a 2% iodine solution) per quart (liter) of water; or drop in the swabs and remove them when you think the water is purified
Sodium hypochlorite
You can find this in household bleach.
2–3 drops per quart (liter) of water
For small amounts of water, you should wait at least 30 min-
utes for the chemical to kill enough germs to make the water
safe. For gallon jugs and larger, wait two hours or more.
Distilling salt water and urineIf you have the necessary tools and time, you can convert salt
water or urine into drinkable water by heating it in a metal
container and collecting the steam in fabric. Then wring out
the fabric into a container. Or you can distill salt water and
urine in a solar still. For more on this, see “Setting up a solar
still,” earlier in this chapter.
Distillation is the only method that makes salt water or urine
drinkable. Using water purification tablets doesn’t do any-
thing to make salt water or urine safe. Some filters can desali-
nate salt water, but you must read the label on the package of
the filter to make sure it’s built to do this highly specialized
task.
es,
ke
ut
to
ith
f
me
k
y
as-
or
e
or
Part I: Stayin’ Alive: Basic Wilderness Survival Principles 102
Using commercial water filtersCommercially made water filters are available at most outfit-
ters. These are usually small hand pumps that force liquid
through a cylinder filled with purifying chemicals and dense
particle filters. The main thing to keep in mind is that many
water makers aren’t guaranteed to filter out all harmful germs
or to remove the salt from salt water. Read the instructions
thoroughly, as well as the warning labels on the pump itself.
Improvising filtersYou have access to several types of natural water filters in the
wilderness, and though they can remove excrement, leeches,
body parts of dead animals, and many other unpalatables,
they don’t necessarily remove all the bacteria and toxins from
the water.
The only time you want to use this last method, improvised filters, is as a last resort — or as a precursor to chemical treat-
ments or boiling. Improvised filters are filters you make in the
field from natural elements, like sand and grass. This section
looks at a couple of options you have.
Using improvised filters is a judgment call. If you’re on the
verge of being incapacitated and you can’t boil your water,
distill it, or treat it with chemicals, you may have to try an
improvised filter so you can remain conscious and ready to
signal for rescue. The water that comes out of the improvised
filter may not harm you at all, or it may give you a disease.
Most water-borne diseases give you diarrhea, and when your
body begins to purge itself, you begin to dehydrate rapidly.
Diarrhea can begin as quickly as 8 to 12 hours (in the case of
dysentery) after you consume bad water, or it may not start
for several days.
Many times, you have access to several types of filters in the
wild. You can use any of the following filters, either by them-
selves or in combination:
✓ Fabric: You can filter water through a t-shirt or sock (see
Figure 7-5, on the left) — just make sure you’re not making
salt water! If you’re near the ocean or if you’ve perspired
a lot and you try to filter a small amount of fresh water
through a shirt or sock, you usually taint it with salt.
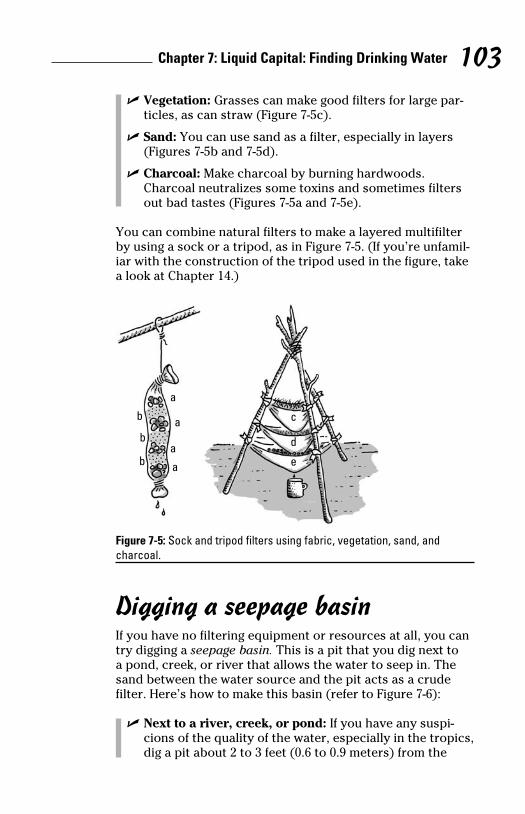
Chapter 7: Liquid Capital: Finding Drinking Water 103 ✓ Vegetation: Grasses can make good filters for large par-
ticles, as can straw (Figure 7-5c).
✓ Sand: You can use sand as a filter, especially in layers
(Figures 7-5b and 7-5d).
✓ Charcoal: Make charcoal by burning hardwoods.
Charcoal neutralizes some toxins and sometimes filters
out bad tastes (Figures 7-5a and 7-5e).
You can combine natural filters to make a layered multifilter
by using a sock or a tripod, as in Figure 7-5. (If you’re unfamil-
iar with the construction of the tripod used in the figure, take
a look at Chapter 14.)
a
a
a
a
b
b
b
c
d
e
Figure 7-5: Sock and tripod filters using fabric, vegetation, sand, and charcoal.
Digging a seepage basinIf you have no filtering equipment or resources at all, you can
try digging a seepage basin. This is a pit that you dig next to
a pond, creek, or river that allows the water to seep in. The
sand between the water source and the pit acts as a crude
filter. Here’s how to make this basin (refer to Figure 7-6):
✓ Next to a river, creek, or pond: If you have any suspi-
cions of the quality of the water, especially in the tropics,
dig a pit about 2 to 3 feet (0.6 to 0.9 meters) from the
t-
e y
ms
s
f.
the
es,
om
d eat-
the
on
o
sed
ur
.
of
rt
he
m-
ee
king
ed
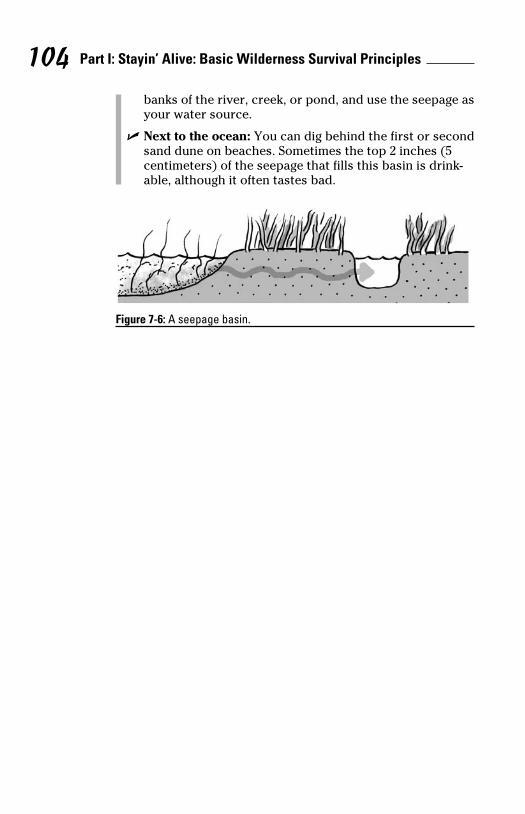
Part I: Stayin’ Alive: Basic Wilderness Survival Principles 104banks of the river, creek, or pond, and use the seepage as
your water source.
✓ Next to the ocean: You can dig behind the first or second
sand dune on beaches. Sometimes the top 2 inches (5
centimeters) of the seepage that fills this basin is drink-
able, although it often tastes bad.
Figure 7-6: A seepage basin.

Chapter 8
Gathering and Hunting to Stay Alive in the
WildernessIn This Chapter▶ Evaluating your food situation
▶ Finding safe plant foods in the wilderness
▶ Hunting with improvised bows, arrows, and spears
▶ Trapping and fishing
▶ Cleaning, cooking, and preserving wilderness foods
After you solve your most immediate survival problems
— maintaining good health, keeping a tolerable body
temperature, and securing a water supply — you need to start
thinking about food. Although people can and have gone for
weeks or even months without significant amounts of food,
having the strength to keep up your campsite, signal for help,
or start traveling toward civilization all require food.
The good news is that humans have lived off the land for a lot
longer than they’ve been going to the nearby grocery store.
Although most civilization-dwellers have forgotten how to
subsist on what nature provides, this chapter shows you how
to do exactly that: how to find — and get your hands on —
food sources even when it seems that there’s nothing to be
had. You also discover how to clean and cook food.

Part I: Stayin’ Alive: Basic Wilderness Survival Principles 106 C
IW
Managing Food in the WildWhen you find yourself in a survival situation, the first thing
you think about is probably food. But despite your immediate
desire for food, the human body can go much longer without
food than it can without water.
As soon as your water situation is under control, you need
to assess your food situation. If you have food on hand,
remember the following:
✓ Don’t eat for the first 24 hours. Your body can handle
this time just fine on its own, and you may as well get
used to a little hunger.
✓ Don’t eat if you don’t have a good supply of water.
Digestion requires water.
✓ Eat what will spoil earliest first. Consume spoilables,
such as meat, before foods that keep well, like dry rice or
any canned or packaged food.
✓ Arrange your food by dividing it into portions per person
per day. Start by assuming you’ll be out for a week (most
lost hikers are found well within this time frame). If you’re
dealing with relatively small quantities of food, say, back-
packing meals, lay the food out so you can inspect it
visually. Doing so allows you to be sure the food isn’t spoiling,
and it shows you how serious the situation really is.
✓ Immediately consider using any existing food as an
emergency supply and plan to subsist on what you can
hunt and gather. If you can find food in the wilderness,
this leaves your nonperishable civilization foods — such
as granola bars or a can of chili — as a reserve that you
can count on.
✓ Consider ways of preserving your incoming food
supply. Keep a supply of food coming into camp and
being stored, while eating only a portion. You can rely
on that supply if you have to travel or you’re injured and
unable to check your snares and fishing traps for a while.
Find out how to preserve food in the later “Drying and
smoking food” section.
Unless you have a tremendous amount of nonperishable food
on hand, you should begin to think about living off the land.

Chapter 8: Gathering and Hunting to Stay Alive in the Wilderness 107
Including Plants in Your Wilderness Diet
When you’re stranded in the wild and looking for food, plants
are a great food source. The good news is that human beings
can safely eat thousands of kinds of plants. All you have to
know is which ones are safe to eat. Unfortunately, figuring
out which ones you can eat — and their seasonal variations
across the planet — would take a lifetime. No worries. We’re
here to help. This section explains how you can figure out
which plants to eat, names some common edible plants, and
identifies which types of plants to avoid.
Perusing the salad bar: Where to find a variety of plantsOne of your first tasks in finding plant food is to find a decent
vantage point, sit down, and take a careful look at the terrain.
No matter how uniform the area you’re stranded in appears,
you can probably find some variations in the landscape
(ecological niches) where different kinds of plants thrive. Even
in a desert, you can find vegetation niches — including open
ground (in direct sun) and shaded terrain (under the edges of
large boulders) — if you look carefully.
Instead of wandering aimlessly in search of plant foods,
systematically search each vegetation niche to increase your
odds of finding new kinds of plant food. For example, search
carefully near a lakeshore, then on the open plain between
the lakeshore and some foothills, and then up in the foothills
themselves; you can find different plant life in each area.
g
ate
ut
e
e or
son
t
re
-
ng,
an
s,
ch
ou
y
and
hile.
od
d.
Trying new foodsYou want to survive, don’t you? Then get over food taboos. If you can stom-ach it without throwing up or setting off your food allergies, you’re getting calories to your body, and that’s the
point. Of course, if you’re vegetarian or vegan, you may have some seri-ous philosophical soul-searching to do if you get into a wilderness survival situation. Good luck!

Part I: Stayin’ Alive: Basic Wilderness Survival Principles 108 C
Looking at a plant’s edible partsYou can divide each plant into segments that you can consider
eating. If the flower doesn’t look at all appetizing, maybe the
leaves are more palatable, or maybe the roots can supply
food. This section looks at some common guidelines for
consuming different types of plant parts. (For info on cooking
and preparing these plant parts, see “Cooking food you can
eat now,” later in this chapter.)
FruitsFruits are the ripened reproductive elements of plants that
have flowers. They often contain large numbers of seeds.
Fruits are normally safe to eat unless they’re
✓ Divided into five segments (bananas are an exception)
✓ Fermenting (the sickly sweet smell is unmistakable)
✓ Moldy
You need to be aware of the poisonous berry varieties in the
areas you’re most likely to visit — do some research before
you go hiking or camping. Remember this fun little saying
when deciding whether to eat berries (but to be sure berries
are safe, always use the Universal Plant Edibility Test that we
describe later in this chapter):
Red, white, or yellow might kill a fellow!Black or blue, that’s for you!
LeavesYou can eat many leaves safely. Although you want to avoid
leaves with hairs or spines, even these can sometimes be
softened by boiling, as in the case of stinging nettle leaves.
FlowersSoft flower petals are often edible. They may be bitter, though
boiling may help.
Flowers may cause allergic reactions because they’re often
coated with pollen.

Chapter 8: Gathering and Hunting to Stay Alive in the Wilderness 109
Mosses and lichensIn the Arctic, reindeer (caribou) and people alike eat tundra
mosses. These mosses grow in small tufts, often clinging to
rocks. Lichens, which are technically a combination of algae
and a certain kind of fungus, are similarly low-lying; some are
edible.
Nuts and seedsNuts and seeds are high in calories. Except in the case of fruit
seeds, though, they’re often encased in hard shells that can
take time to process. Some people have nut allergies. Many
seeds are poisonous or can at least make you very sick, but
cooking many of these is an effective way to make them safe.
Roots and tubersRoots and tubers, which are swollen underground stems, are
the plant’s nutritional feelers. They can contain quite a bit
of water when you dig them up. You can dig out and pry up
roots with a stout wooden staff. Try not to take so many that
you kill the plant. Some roots and tubers are poisonous, so
use the Universal Plant Edibility Test if you have any doubt.
Naming edible plantsYou’d have to be a botanist to know the thousands of edible
plants available to you in the wild. To help you, this section
identifies some of the most common edible plants in various
climates. We just scratch the surface here, but this list can
guide you to further researching what’s available in your area.
(Tip: Identifying plants can be tricky business, so perform the
Universal Plant Edibility Test, described in the next section, if
you’re not certain of a plant’s identity.)
Edible Temperate Climate Plants
Amaranth Persimmon
Arrowroot Plaintain
Beechnut Pokeweed
Blackberries Purslane/little hogweed
Blueberries Sassafras
der
e
ng
n
)
he
e
es
we
d
ugh
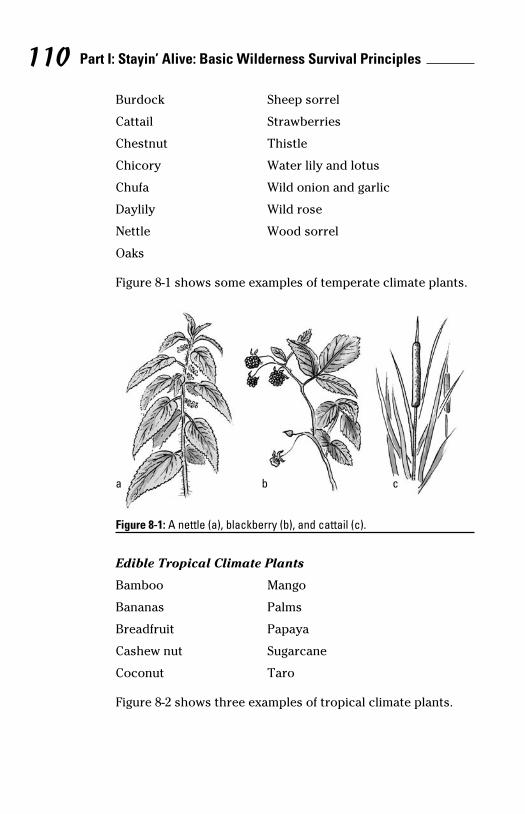
Part I: Stayin’ Alive: Basic Wilderness Survival Principles 110 C
Burdock Sheep sorrel
Cattail Strawberries
Chestnut Thistle
Chicory Water lily and lotus
Chufa Wild onion and garlic
Daylily Wild rose
Nettle Wood sorrel
Oaks
Figure 8-1 shows some examples of temperate climate plants.
a cb
Figure 8-1: A nettle (a), blackberry (b), and cattail (c).
Edible Tropical Climate Plants
Bamboo Mango
Bananas Palms
Breadfruit Papaya
Cashew nut Sugarcane
Coconut Taro
Figure 8-2 shows three examples of tropical climate plants.

Chapter 8: Gathering and Hunting to Stay Alive in the Wilderness 111
a cb
Figure 8-2: Taro (a), coconut (b), and breadfruit (c).
Edible Desert Climate Plants
Acacia Date palm
Agave Desert amaranth
Cactus Prickly pear cactus
Figure 8-3 shows three examples of desert climate plants.
a c
b
Figure 8-3: Agave (a), acacia pods (b), and prickly pear cactus (c).
ts.
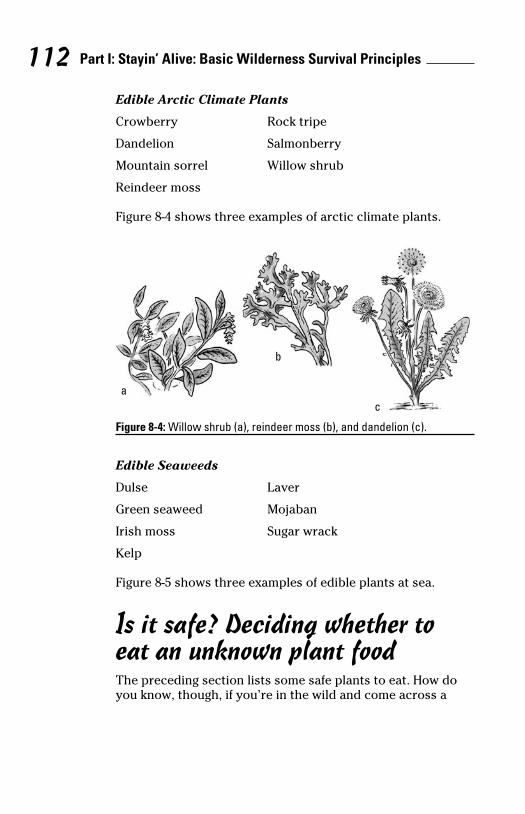
Part I: Stayin’ Alive: Basic Wilderness Survival Principles 112 C
Edible Arctic Climate Plants
Crowberry Rock tripe
Dandelion Salmonberry
Mountain sorrel Willow shrub
Reindeer moss
Figure 8-4 shows three examples of arctic climate plants.
ac
b
Figure 8-4: Willow shrub (a), reindeer moss (b), and dandelion (c).
Edible Seaweeds
Dulse Laver
Green seaweed Mojaban
Irish moss Sugar wrack
Kelp
Figure 8-5 shows three examples of edible plants at sea.
Is it safe? Deciding whether to eat an unknown plant foodThe preceding section lists some safe plants to eat. How do
you know, though, if you’re in the wild and come across a
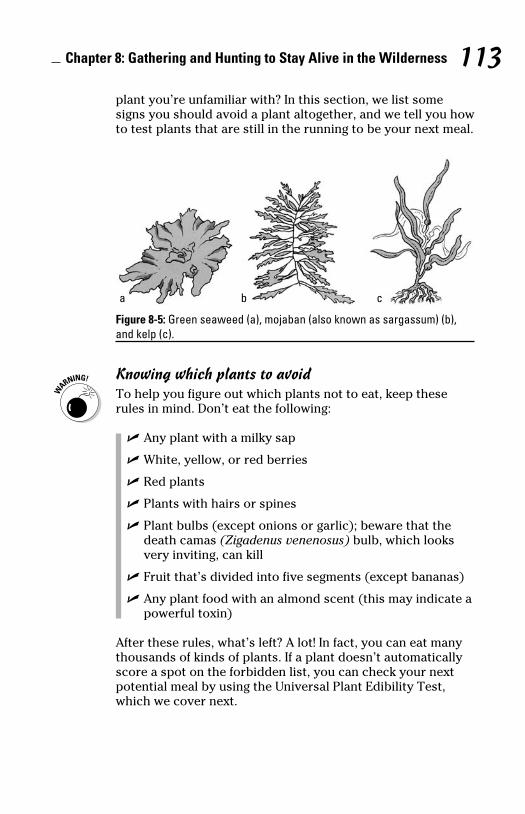
Chapter 8: Gathering and Hunting to Stay Alive in the Wilderness 113plant you’re unfamiliar with? In this section, we list some
signs you should avoid a plant altogether, and we tell you how
to test plants that are still in the running to be your next meal.
a b c
Figure 8-5: Green seaweed (a), mojaban (also known as sargassum) (b), and kelp (c).
Knowing which plants to avoid
To help you figure out which plants not to eat, keep these
rules in mind. Don’t eat the following:
✓ Any plant with a milky sap
✓ White, yellow, or red berries
✓ Red plants
✓ Plants with hairs or spines
✓ Plant bulbs (except onions or garlic); beware that the
death camas (Zigadenus venenosus) bulb, which looks
very inviting, can kill
✓ Fruit that’s divided into five segments (except bananas)
✓ Any plant food with an almond scent (this may indicate a
powerful toxin)
After these rules, what’s left? A lot! In fact, you can eat many
thousands of kinds of plants. If a plant doesn’t automatically
score a spot on the forbidden list, you can check your next
potential meal by using the Universal Plant Edibility Test,
which we cover next.
o

Part I: Stayin’ Alive: Basic Wilderness Survival Principles 114 C
H
Taking the Universal Plant Edibility TestWhen you’re considering eating any unfamiliar plant food,
you must carry out the Universal Plant Edibility Test (but
don’t use the test for fungi, because some are lethal even in
small doses — see the nearby “Hold the mushrooms, please!”
sidebar). This test determines whether a given plant is safe
to eat. The test takes a whole day, and you can only drink
water during that day, so it’s quite an investment. The return,
though — knowing that you can safely eat a certain plant —
may well be worth it.
You can find the test in Table 8-1. If you get through a step
without having a bad reaction, proceed to the next one. And
if you go all the way through without any problems,
congratulations! You can consider the part of the plant
that you’ve eaten to be safe to eat.
Table 8-1 The Universal Plant Edibility TestStep Test Duration Possible Bad
Reactions
1 Hold a piece of the plant on the sensitive skin inside your elbow joint or on the forearm.
15 minutes Rash
2 Touch a small piece of the plant to your lips.
5 minutes Burning sensation
3 Hold a piece of the plant on your tongue.
3 minutes Stinging sensation
4 Chew a small piece of the plant and hold the chewed vegetation in your mouth — without swallowing.
15 minutes Burning or stinging sensation
5 Swallow the vegetation you’ve been holding in your mouth.
Wait 8 hours Vomiting or diarrhea
6 Eat another small portion (about 1⁄4 cup).
Wait 8 hours Vomiting or diarrhea

Chapter 8: Gathering and Hunting to Stay Alive in the Wilderness 115
Hunting and Trapping FoodEven though getting meat may be more difficult than gather-
ing plants, it’s not impossible. Since the beginning of time,
native people all over the world have hunted and trapped
animals. Instead of running down animals or lunging for them
from a bush, you too can make tools that extend your reach
and make it sharper. (Or you can pick up some grasshoppers,
mealworms, and other little critters that are yours for the
taking. See the sidebar titled “Finders keepers: Foraging for
food” for details.)
This section helps you find animals you may want to hunt and
includes info on how to make and use snares and weapons,
such as a bow and arrow, spear, and bola. Finally, we tell you
how to get to the meat.
Looking for tracks and critter highwaysTo hunt or trap successfully, keep an eye open for places
where animals often travel, feed, drink, and/or sleep. Animals
often travel repeatedly on game trails, which you can spot
in many environments. Game trails (see Figure 8-6) are faint
clearings through vegetation.
You may also notice the trails marked with animal tracks.
n
e!”
e
rn,
—
d
on
on
ng
Hold the mushrooms, please!However enticing mushrooms look, the species you’re hungrily eyeing may be a deadly mimic of the kind you grew up finding in forests back at home. That’s why we suggest that you completely avoid mushrooms and other fungi in survival situations. Having said that, if you’re in the most desperate straits and have only fungi
to eat and can’t hold out any longer, three rules can help you stay alive. Don’t eat any fungi with
✓ White gills
✓ A cup-like basin at its base
✓ Rings around the stem

Part I: Stayin’ Alive: Basic Wilderness Survival Principles 116 C
Figure 8-6: Look for faint (or distinctive) paths through vegetation.
Finders keepers: Foraging for foodMost hunting-and-gathering aborigi-nal folk worldwide gather just as much as they hunt or trap. This life-style is called foraging. Foragers are
✓ Opportunistic: Just about any-thing that flies, hops, swims, walks, or crawls can be cooked and eaten (including mussels, limpets, and clams). For exam-ple, a grasshopper, a snail, or a nest of eggs all serve as nutri-tious food sources. You can also snare the parent when it returns to the nest.
✓ Observant: Learn the patterns of the land. See how things change by day, night, and at high- and low-tide (but avoid any shellfish you find above the high-tide mark — they can be poisonous). Think of yourself as a part of the landscape rather than an actor on the stage of the landscape. Think about how other animals make their living out here and envision how you can do the same. If it isn’t feasible where you are, you may have to move somewhere else.
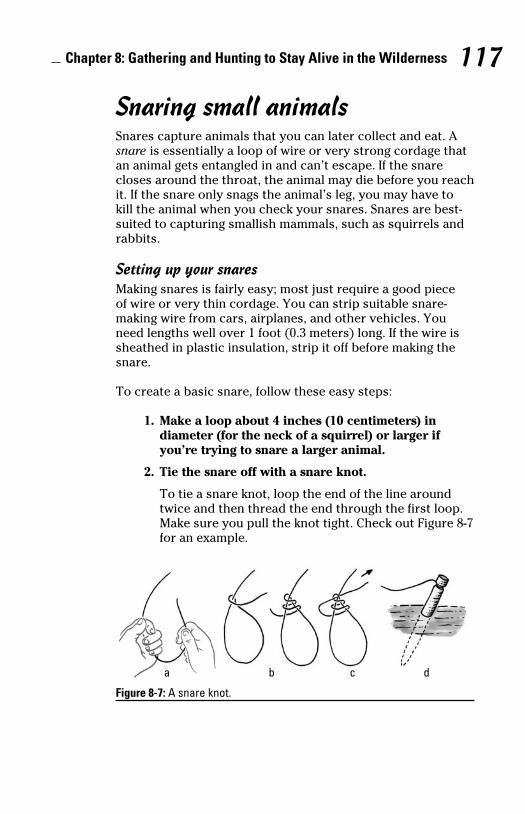
Chapter 8: Gathering and Hunting to Stay Alive in the Wilderness 117
Snaring small animalsSnares capture animals that you can later collect and eat. A
snare is essentially a loop of wire or very strong cordage that
an animal gets entangled in and can’t escape. If the snare
closes around the throat, the animal may die before you reach
it. If the snare only snags the animal’s leg, you may have to
kill the animal when you check your snares. Snares are best-
suited to capturing smallish mammals, such as squirrels and
rabbits.
Setting up your snaresMaking snares is fairly easy; most just require a good piece
of wire or very thin cordage. You can strip suitable snare-
making wire from cars, airplanes, and other vehicles. You
need lengths well over 1 foot (0.3 meters) long. If the wire is
sheathed in plastic insulation, strip it off before making the
snare.
To create a basic snare, follow these easy steps:
1. Make a loop about 4 inches (10 centimeters) in
diameter (for the neck of a squirrel) or larger if
you’re trying to snare a larger animal.
2. Tie the snare off with a snare knot.
To tie a snare knot, loop the end of the line around
twice and then thread the end through the first loop.
Make sure you pull the knot tight. Check out Figure 8-7
for an example.
a b c d
Figure 8-7: A snare knot.
f e d h e ). e r
e. s d e e e

Part I: Stayin’ Alive: Basic Wilderness Survival Principles 118 C
3. Arrange the snare loop so that it lies right in the
animal’s path.
Take some time to study the game trail or branch on
which you’re deploying the snare.
4. Tie one end of the snare wire to a sturdy tree or
stake, bury the stake deep, and regularly check on it
to see what you’ve caught.
When you make a snare, wear gloves (if you have them) to
prevent your scent from getting on the wire, which alerts the
animal of danger. If you can’t do this, you can camouflage
your scent by burying the snare wire in dirt for 24 hours
before deploying it, using pieces of cloth or socks on your
hands to prevent you from scent-marking your snare lines.
Some types of snares you may want to use include the following:
✓ Branch snare: Place branch snares in series on branches
where you’ve seen animals like squirrels travel frequently.
Figure 8-8a shows a series of squirrel snares; place many
of these snares so that one traps the squirrel as it travels
on the branch.
✓ Burrow-hole snare: You can spot animal burrows in
many places, such as near the banks of rivers or under
heavy brush. In any case, you can use a burrow-hole
snare (see Figure 8-8b), which you place just outside the
entrance to a burrow. It traps the animal as it exits or
enters.
When setting up a burrow-hold snare, firmly anchor a
strong stake near the burrow. Better yet, anchor the
snare to an existing branch, sapling, or trunk so the animal
doesn’t spot some new element in its environment.
✓ Game-trail snare: A snare on a game trail has lightweight
brush walls that corral the animal into the snare (see
Figure 8-8c). Most animals are unwilling to travel
backward, so they run into the snare instead of backing
away from it if they spot it.
You make this snare by suspending a slipknot loop over
a trail. Place the wire on two small forked twigs just
above ground level so the animal’s neck goes into the
snare.

Chapter 8: Gathering and Hunting to Stay Alive in the Wilderness 119
a b
c
Figure 8-8: Different types of snare setups.
You can use bait to lure animals into snares, but we suggest
focusing on laying out many baitless snares and checking
them often. Baiting is complicated, and some baits alert the
animal that something is amiss. If you do use bait, you need
bait that the animal is familiar with or bait that’s unfamiliar
but attractive to the animal.
Checking snares and collecting your catchCheck and maintain your snares regularly. Sometimes the
snare kills the animal, which is one reason to check snares
often; predators may get to your prospective meal before
you do. Other times, you may come back to a snare and find
it holding a wounded, desperate, and potentially dangerous
animal. Kill a snared animal as quickly and humanely as
possible. A sturdy club works fine. (Check out the later
section “Going in for the kill with a club.”)
Be equipped with a spear (or bow and arrow, bola, or other
weapon that extends your reach) anytime you venture away
from camp, ready to kill animals you come across while
making or checking your snares. We discuss these other
weapons in the upcoming sections.
n
n it
he
ng:
hes
tly.
any
vels
r
he
mal
ght
ng
er

Part I: Stayin’ Alive: Basic Wilderness Survival Principles 120 C
Using a throwing stickA throwing stick, although not as sexy as a spear or bow and
arrow (see the next sections), can be effective for killing small
animals such as rabbits and squirrels. A throwing stick is
larger than a stone and more likely to hit the target. It’s
especially useful when you throw it into groups of smaller
animals, such as a flock of birds.
Use any 1- to 2-foot long (0.3- to 0.6-meter long) green branch
or sapling that’s from 1 to 2 inches (2.5 to 5 centimeters) in
diameter. Strip it of all bark and whittle away any branches.
Try to find a branch that’s a little heavier on one end than
the other. Throw the stick so that it hurtles through the air
horizontally, something like a Frisbee.
Making and using a spearA spear is a good implement for nearly any wilderness survival
situation. You can use a good, sturdy spear for self-defense
from animals, as a probe for checking out murky water or
thick brush, and for a dozen other things. For hunting, spears
can wound large animals enough that, although the animal
flees the attack, you can follow its blood trail (the spoor) until
the animal dies or is so weak that it’s an easy kill.
Constructing a spear isn’t difficult. Just follow these steps
(and Figure 8-9):
1. Select a green sapling, thicker than a broomstick,
and cut it down (Figure 8-9a).
2. Strip the bark from the sapling and cut the length to
about 6 feet (1.8 meters; see Figure 8-9b).
3. Sharpen one end of the sapling with any knife you
have available, be it metal or stone, as in Figure 8-9c.
4. Harden the sharp end of the spear by holding it over a
fire for a while, being sure to rotate it (see Figure 8-9d).
Rotating drives some of the water out of the wood,
blackening the tip and making it very hard; now it will
puncture rather than just bend. Note: If you’re going
to add an armature (keep reading for instructions),
you don’t have to sharpen or harden the tip with fire.
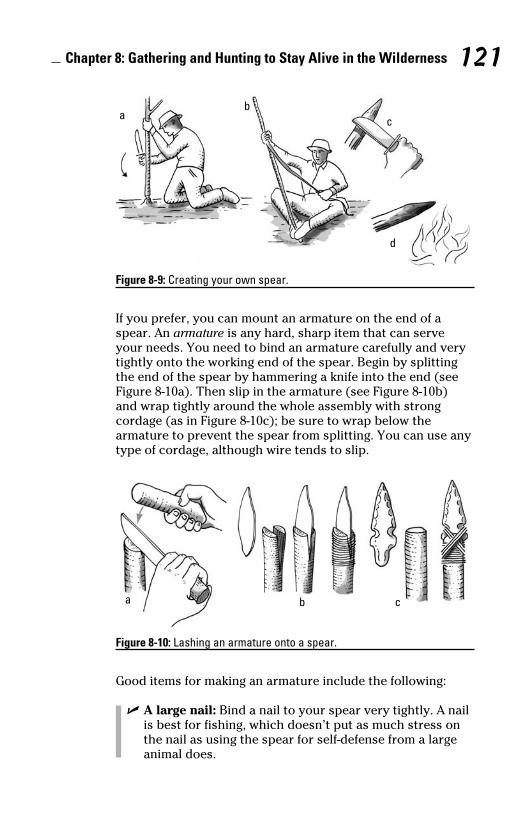
Chapter 8: Gathering and Hunting to Stay Alive in the Wilderness 121
ab
c
d
Figure 8-9: Creating your own spear.
If you prefer, you can mount an armature on the end of a
spear. An armature is any hard, sharp item that can serve
your needs. You need to bind an armature carefully and very
tightly onto the working end of the spear. Begin by splitting
the end of the spear by hammering a knife into the end (see
Figure 8-10a). Then slip in the armature (see Figure 8-10b)
and wrap tightly around the whole assembly with strong
cordage (as in Figure 8-10c); be sure to wrap below the
armature to prevent the spear from splitting. You can use any
type of cordage, although wire tends to slip.
a b c
Figure 8-10: Lashing an armature onto a spear.
Good items for making an armature include the following:
✓ A large nail: Bind a nail to your spear very tightly. A nail
is best for fishing, which doesn’t put as much stress on
the nail as using the spear for self-defense from a large
animal does.
nd
mall
ch
n
.
val
e
ars
ntil
to
u
-9c.
r a
9d).
will
g
re.

Part I: Stayin’ Alive: Basic Wilderness Survival Principles 122 C
✓ A sharpened sliver of hard plastic: You can get one from
a shattered car-light cover.
✓ A sharpened splinter of bone or antler: See Chapter 14
for how to process bone and antler into sharp slivers.
✓ A sharpened sliver of stone or glass: These take more
time and effort to shape than bone or antler splinters,
but they can be very effective.
If you can put notches into the sides of the armature, your
cordage has something more to grab, which holds the
armature more firmly.
Despite what you see on TV or at the movies, few aboriginal
people worldwide actually throw spears at animals to kill
them. Throwing your spear will probably just result in a
fleeing animal and a broken spear tip. For attacks at range, a
bow and arrow, throwing stick, or bola is much more likely to
land you some food than a spear is.
Making and using a bow and arrowPeople have been using bows and arrows for tens of thousands
of years, and they can be very effective weapons against
both small and large animals. Making and using them is a fun
activity for an afternoon, and it’s great practice for anyone
contemplating going outdoors. Among other things, practice
can show you how far you can expect to be accurate with a
bow (for most people — with practice — that’s about 10 to 15
yards, or 9.1 to 13.7 meters).
Creating the bowTo make a bow, just follow these easy steps:
1. Select and cut down a sturdy 1- to 1.5-inch (2.5- to
4-centimeter) diameter sapling with a straight trunk
(see Figure 8-11a).
2. Strip off the bark (Figure 8-11b), leaving a clean
4-foot (1.2-meter) pole.
3. Whittle away the ends of the bow with a knife (as
in Figure 8-11c), leaving a sturdy midsection as a
handle (Figure 8-11d).
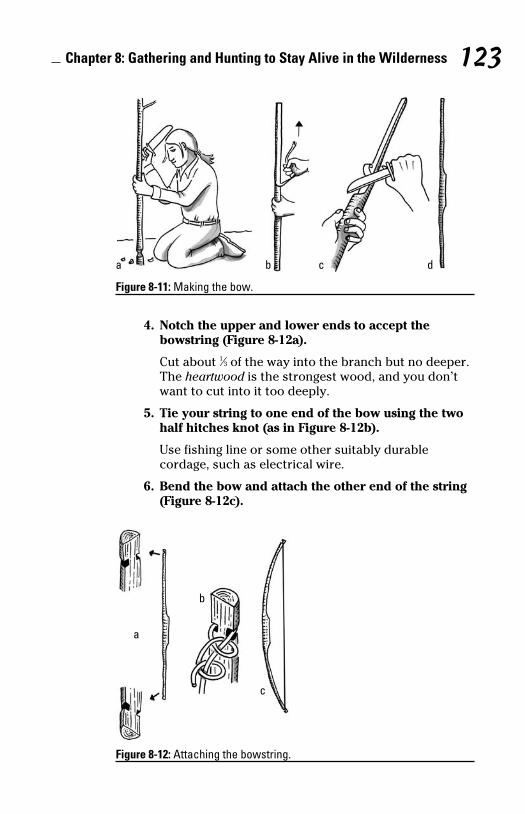
Chapter 8: Gathering and Hunting to Stay Alive in the Wilderness 123
a b c d
Figure 8-11: Making the bow.
4. Notch the upper and lower ends to accept the
bowstring (Figure 8-12a).
Cut about 1⁄3 of the way into the branch but no deeper.
The heartwood is the strongest wood, and you don’t
want to cut into it too deeply.
5. Tie your string to one end of the bow using the two
half hitches knot (as in Figure 8-12b).
Use fishing line or some other suitably durable
cordage, such as electrical wire.
6. Bend the bow and attach the other end of the string
(Figure 8-12c).
a
b
c
Figure 8-12: Attaching the bowstring.
rom
14
e
al
a
to
nds
un
ce
a
15
nk

Part I: Stayin’ Alive: Basic Wilderness Survival Principles 124 C
Making arrowsCarrying about six to ten arrows should be sufficient. Here’s
how to make each arrow:
1. Select a thin, sturdy (green wood) branch as an
arrow shaft (see Figure 8-13a).
2. Strip off the bark (Figure 8-13b).
3. Use a knife (or sharp stone) to shave away irregular-
ities and whittle a point on the arrow (Figure 8-13c).
At this point, you can harden the tip over a fire as in
Figure 8-13d, or you can try to attach a separate point
(the armature). Here’s how:
1. Split the shaft on one end and then tie off the
shaft below the split (to prevent the split from
spreading).
2. Insert an armature (such as a sharpened splinter
of bone or a sliver of glass) into the split (Figure
8-13e). For more on how to make armatures from
stone, bone, or antler, see Chapter 14.
3. Use more cordage to secure the split wood
around the base of the armature (Figure 8-13e).
3. Cut a notch into the base of the arrow for the bow-
string and then tie off the arrow above the notch to
prevent it from splitting the arrow (as in Figure 8-13f).
Your complete arrow should look something like
Figure 8-13g.
ab
c
d
e
f
g
Figure 8-13: Making arrows.

Chapter 8: Gathering and Hunting to Stay Alive in the Wilderness 125
Practicing the fine art of archeryHere’s how to use the bow and arrow (see Figure 8-14):
1. Stand with your chest at 90 degrees to the target (not
facing the target), as in Figure 8-14a.
In Figure 8-14b, the archer has dropped to one knee,
perhaps hiding behind cover in an ambush or simply
seeking a more stable firing position.
2. Fit the notch of the arrow on the bowstring.
In Figure 8-14c, you see the grip you use to hold the
arrow in place and draw back the string (Note: We
show a left hand drawing the bow for clarity.) Use
the three upper fingers of the hand (not the thumb or
pinky finger), holding the arrow between your index
and middle fingers. The other end of the arrow should
rest against the bow, not quite resting on your thumb,
as in Figure 8-14d.
3. Lock the arm that’s holding the bow straight out in
front and aim for the target.
In a survival situation, simply aim for the largest body
mass visible, such as the abdomen. A gut-shot animal
won’t die quickly, so you’ll have to use your club to
kill it.
To prevent the string from chafing you when you
release it, you may want to first tie a patch of cloth
to the wrist of the hand holding the bow. Figure 8-14e
shows this bracer.
4. Draw the string only as far back as your chin and
then sight directly down the arrow shaft; release the
arrow.
Pulling the bowstring beyond the ear can cause the
string to lacerate your ear and probably doesn’t add
much more power.
s
ar-
c).
n
int
m
nter
ure
om
).
o
3f).
g

Part I: Stayin’ Alive: Basic Wilderness Survival Principles 126 C
a
b
c
d
e
Figure 8-14: Properly using a bow and arrow.
Making and using a bolaPeople have used bolas for thousands of years to hunt all
kinds of animals, including birds and rabbits. Bolas are simply
strings weighted at one end. When they find their target, they
can wrap around and ensnare the legs, immobilizing the prey
and allowing you to move in for the killing blow with a club.
Bolas are easy to make; just stick to these steps:
1. Find three to five smooth, round stones, each an
inch or so in diameter; for each stone, cut a piece of
cloth or other textile about 4 inches (10 centimeters)
square (see Figure 8-15a).
2. Wrap each stone in its own cloth (Figure 8-15b) and
tie off this cloth tightly with cord (Figure 8-15c).
3. Connect all the cords and make a loop for swinging
the bola (Figure 8-15d).
You need to practice using bolas accurately. Whirl a bola well
above your head (Figure 8-15e) and then release to send
the weapon at the target. Whirling a bola without knocking
yourself out takes practice. In the heat of the hunt, whirl the
bola only one or two times before releasing so you don’t alert
the prey.
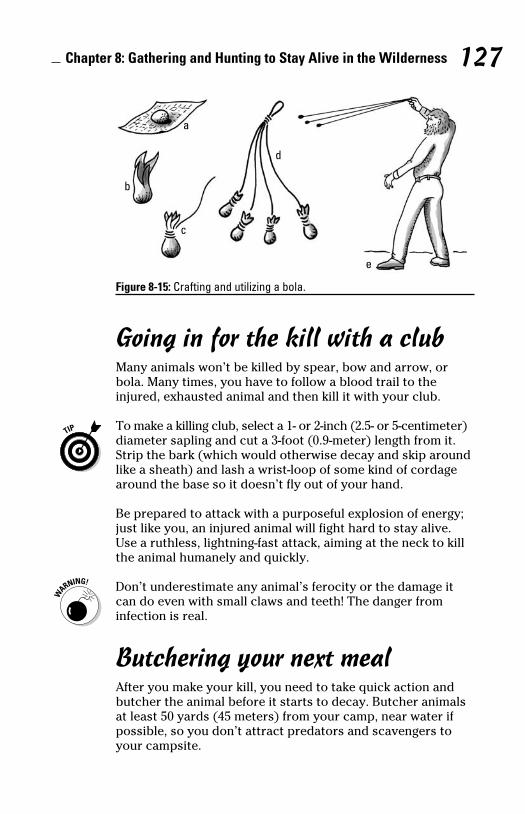
Chapter 8: Gathering and Hunting to Stay Alive in the Wilderness 127
a
b
c
d
e
Figure 8-15: Crafting and utilizing a bola.
Going in for the kill with a clubMany animals won’t be killed by spear, bow and arrow, or
bola. Many times, you have to follow a blood trail to the
injured, exhausted animal and then kill it with your club.
To make a killing club, select a 1- or 2-inch (2.5- or 5-centimeter)
diameter sapling and cut a 3-foot (0.9-meter) length from it.
Strip the bark (which would otherwise decay and skip around
like a sheath) and lash a wrist-loop of some kind of cordage
around the base so it doesn’t fly out of your hand.
Be prepared to attack with a purposeful explosion of energy;
just like you, an injured animal will fight hard to stay alive.
Use a ruthless, lightning-fast attack, aiming at the neck to kill
the animal humanely and quickly.
Don’t underestimate any animal’s ferocity or the damage it
can do even with small claws and teeth! The danger from
infection is real.
Butchering your next mealAfter you make your kill, you need to take quick action and
butcher the animal before it starts to decay. Butcher animals
at least 50 yards (45 meters) from your camp, near water if
possible, so you don’t attract predators and scavengers to
your campsite.
ply
hey
ey
.
of
ers)
nd
ng
well
e
ert

Part I: Stayin’ Alive: Basic Wilderness Survival Principles 128 C
Skinning a larger animalTo butcher a larger animal, follow these steps:
1. Hang a large mammal by the hind limbs, cut deeply
across the neck, and let the blood drain away (see
Figure 8-16a).
You can capture and consume the blood instead of
draining it away, but consuming it can carry a heavy
risk of infection, and we don’t recommend it except in
the direst of circumstances.
2. Cut along the dotted lines shown in Figure 8-16b to
facilitate removing the hide.
You’re not butchering the animal (taking it apart) yet,
just removing the hide.
3. Cut with just the tip of a sharp knife slipped under
the skin (see Figure 8-16c) and cut the genitals as
shown to prevent infection.
4. Remove the hide, cut away the intestines, and gener-
ally empty the body cavity (see Figure 8-16d.)
Deer have scent glands behind the knee that can smell
foul; you can avoid the smell by cutting around the
knee rather than through it.
You’re now ready to cut the muscle from the bones
and cook it. In survival situations, you want to eat as
many parts of the animal as you can stomach: lungs,
knuckles — everything but hooves, bones, and hide
are pretty much edible (though carnivore livers can
be toxic).
Keep the bones (and if available, antlers) of any mammal
larger than a small dog. Bone and antler are excellent raw
materials for making survival tools (as you see in Chapter 14),
as are the hide and sinews (stringy tissues that hold the limbs
together), which you can use as cordage.

Chapter 8: Gathering and Hunting to Stay Alive in the Wilderness 129
a b d
c
Figure 8-16: Butchering a large mammal, such as a deer.
Skinning a smaller animalTo skin a small animal, follow these steps:
1. Make an incision though the skin (but not deeper
than the skin) across the back, as in Figure 8-17a.
2. Grab the two sides of the hide by slipping your fin-
gers under it and pulling outward (see Figure 8-17b).
When the skin snags at the paws, you can easily slice
it off with a knife. Small mammals don’t need to be
bled if you’re going to roast them whole next to a fire,
which is a good way to cook them.
3. After you skin the animal, remove the meat.
For information on getting that meat into edible form,
see “The Wilderness Café: Preparing Food Outdoors,”
later in this chapter.
a b
Figure 8-17: Skinning a small mammal.
ply
e
y
t in
o
et,
r
ner-
mell
as
s,
e
n
14),
mbs
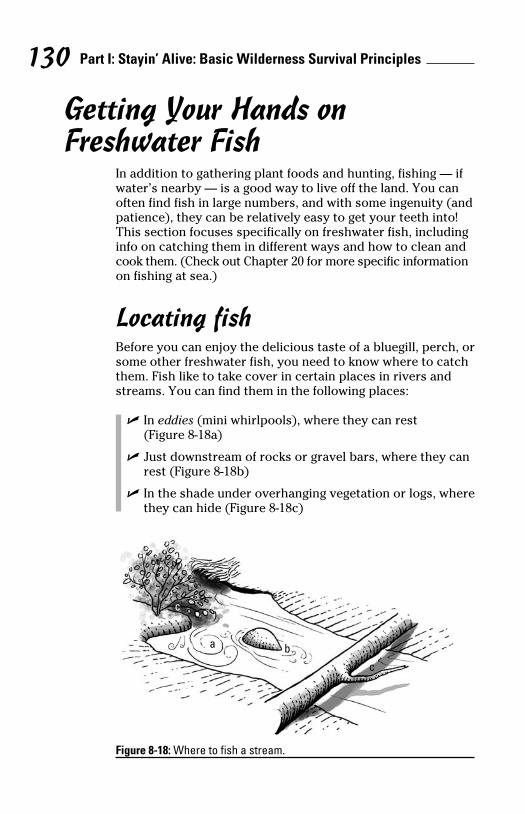
Part I: Stayin’ Alive: Basic Wilderness Survival Principles 130 C
Getting Your Hands on Freshwater Fish
In addition to gathering plant foods and hunting, fishing — if
water’s nearby — is a good way to live off the land. You can
often find fish in large numbers, and with some ingenuity (and
patience), they can be relatively easy to get your teeth into!
This section focuses specifically on freshwater fish, including
info on catching them in different ways and how to clean and
cook them. (Check out Chapter 20 for more specific information
on fishing at sea.)
Locating fishBefore you can enjoy the delicious taste of a bluegill, perch, or
some other freshwater fish, you need to know where to catch
them. Fish like to take cover in certain places in rivers and
streams. You can find them in the following places:
✓ In eddies (mini whirlpools), where they can rest
(Figure 8-18a)
✓ Just downstream of rocks or gravel bars, where they can
rest (Figure 8-18b)
✓ In the shade under overhanging vegetation or logs, where
they can hide (Figure 8-18c)
a bc
c
c
Figure 8-18: Where to fish a stream.
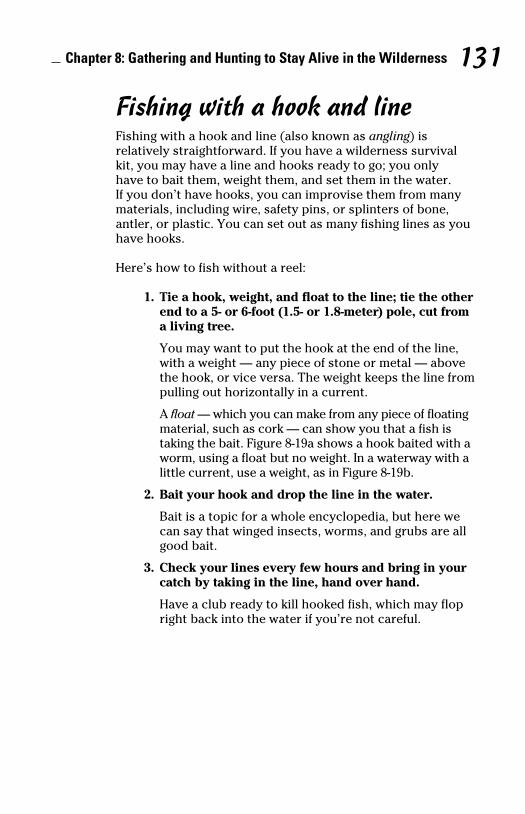
Chapter 8: Gathering and Hunting to Stay Alive in the Wilderness 131
Fishing with a hook and lineFishing with a hook and line (also known as angling) is
relatively straightforward. If you have a wilderness survival
kit, you may have a line and hooks ready to go; you only
have to bait them, weight them, and set them in the water.
If you don’t have hooks, you can improvise them from many
materials, including wire, safety pins, or splinters of bone,
antler, or plastic. You can set out as many fishing lines as you
have hooks.
Here’s how to fish without a reel:
1. Tie a hook, weight, and float to the line; tie the other
end to a 5- or 6-foot (1.5- or 1.8-meter) pole, cut from
a living tree.
You may want to put the hook at the end of the line,
with a weight — any piece of stone or metal — above
the hook, or vice versa. The weight keeps the line from
pulling out horizontally in a current.
A float — which you can make from any piece of floating
material, such as cork — can show you that a fish is
taking the bait. Figure 8-19a shows a hook baited with a
worm, using a float but no weight. In a waterway with a
little current, use a weight, as in Figure 8-19b.
2. Bait your hook and drop the line in the water.
Bait is a topic for a whole encyclopedia, but here we
can say that winged insects, worms, and grubs are all
good bait.
3. Check your lines every few hours and bring in your
catch by taking in the line, hand over hand.
Have a club ready to kill hooked fish, which may flop
right back into the water if you’re not careful.
if
n
and
!
ng
nd
on
h, or
ch
can
here

Part I: Stayin’ Alive: Basic Wilderness Survival Principles 132 C
a
b
Figure 8-19: Fishing with a hook and line but no reel.
Put out multiple fishing lines and check them often, just like
snares. The beauty of this system is that it works 24/7.
Making and using fishing spearsCatching fish with a spear is common worldwide even today.
You can master this technique with some practice. To make
your spear, stick to these easy steps (and check out Chapter
14 for more on tying knots):
1. Cut down a long sapling (up to 8 feet, or 2.4 meters)
and strip it of bark.
2. Cut a notch into the base of the spear to attach a
lanyard (see Figure 8-20a).
A lanyard is a simple leash made of any durable
cordage that prevents you from losing your spear in
the water.
3. Use a quick clove hitch to tie your lanyard into the
notch at the base of the spear (Figure 8-20b).
4. Finish the leash with a bowline knot, leaving a loop
large enough to slip your hand in and out easily
(refer to Figure 8-20c).

Chapter 8: Gathering and Hunting to Stay Alive in the Wilderness 133
a b c
Figure 8-20: Crafting a fishing spear and fastening it to your wrist.
5. Fashion some barbs from bone, antler, or even hard
plastic or wood; attach the armature to the spear.
We show you how to attach armatures in the earlier
section “Making and using a spear.” You should catch
fish with barbed spear armatures; these prevent the
fish from wriggling off the spear. Figure 8-21 shows
a range of possible designs. Because fish are hard to
spear, lash several armatures on the spearhead. Make
your lashings tight. You can secure lashing with sticky
pine pitch (sap).
Figure 8-21: Barbed armatures can make spearing fish easier.
e
sy.
e
er
rs)
n
e
op

Part I: Stayin’ Alive: Basic Wilderness Survival Principles 134 C
Here are some spear-fishing tips:
✓ When spear-fishing from a bank (see Figure 8-22), try to
keep your shadow under you or behind you to keep from
alerting fish of your presence.
✓ If you wade into the shallows, don’t go deeper than
knee-deep and move slowly to prevent splashes that
drive fish away.
✓ Aim a little lower than the fish appears in the water.
This corrects for the water’s distortion of perspective;
as Figure 8-22, the fish’s apparent position (in gray) is
somewhat above its real position.
Figure 8-22: Fishing with a spear.
Fishing with a netMaking a net is so laborious (and requires so much cordage)
that we don’t want to cover it in this book. However, if you
come across an old fishing net (you may find one on the
seashore), you can use it to catch fish by stretching it across
a water course and weighting the bottom. Check the net every
few hours.

Chapter 8: Gathering and Hunting to Stay Alive in the Wilderness 135
Creating a fish bottle trapA 2-liter soda bottle makes a great trap for small fish. To use
the bottle, just cut off the top and add some rocks or sand
to weigh the bottle down. Flip the top around and insert it
backward into the rest of the bottle, as in Figure 8-23. It may
hold by itself, or you can sew through the plastic with heavy
thread for a few stitches or use duct tape to secure the joint.
Simply place the bottle trap in the water and wait. With the
weighted bottle on the bottom of a stream, small fish may
enter the opening but find it hard to swim out again.
Figure 8-23: A soda-bottle trap.
Preparing fish to eatYou can boil small fish whole, without bothering with butchery,
but any fish larger than the palm of the hand should be
butchered. Here’s how to clean and cook a fish:
1. Cut the fish down the belly and remove the guts,
either by pulling them out (Figure 8-24a) or by
cutting them out with a knife (Figure 8-24b).
You can use the guts as bait. Just be sure to store
them away from camp.
o
om
;
e)
ss
ery

Part I: Stayin’ Alive: Basic Wilderness Survival Principles 136 C
2. Decapitate larger fish.
You can boil the head for soup and cook the resulting
fillet.
a b
Figure 8-24: Cleaning fish.
The Wilderness Café: Preparing Food Outdoors
You may not have a fancy cutlery set or a stove or a clean
kitchen sink, but you can still prepare your food in the
wilderness to make it safe and reasonably appetizing. In this
section, we tell you how to prepare food before you eat it and
how to preserve food for later. (For information on building a
fire, see Chapter 5; for directions on lashing together a tripod
that you can use to cook over a fire, flip to Chapter 14.)
Whatever animal parts you don’t eat can be burned
(thoroughly, down to just ashes) or buried away from camp
(at least 50 yards, or 45 meters) to prevent attracting other
animals.
Cooking food you can eat nowWith few exceptions, you should cook wilderness survival
food to kill bacteria and parasites. Cooking can also improve
flavor and make some foods (like snails) more palatable. This
section gives you an overview of how to cook and otherwise
prepare foods in the wild.
Chapter 8: Gathering and Hunting to Stay Alive in the Wilderness 137
Plant foodsAlthough not all plant foods require cooking, you should cook
most of them. Microorganisms thrive on plant surfaces as well
as in water that plants may be growing in. Boiling, steaming,
and otherwise cooking plant foods can decrease their nutritional
value, but it’s worth knowing that you’re not eating the
colonies of bacteria that live in a single drop of swamp water.
You can boil plant foods, bake them, or roast them over a
flame. Here’s how to prepare various plant foods:
✓ Fruits: Wash fruits before eating them. Most fruits don’t
need to be cooked, though you can make some (like the
plantain, a banana-like fruit) more palatable by cooking.
✓ Nuts and seeds: Wash and shell the nuts and seeds on a
large, clean working area, such as the surface of a clean
tarp.
✓ Leaves and flowers: Thoroughly wash leaves before
eating them. Flowers must be washed and boiled.
✓ Moss: Boil moss before eating it.
✓ Roots: You have to cook most roots to soften them up
before eating. Bake them in coals or boil them. When
they’re softened, you can mash them if you like.
You can bake foods like roots in a ball of wet clay, which
you then place into embers until it hardens. When you
break off the clay, the root food should be well cooked.
Mammal foods
Although some wilderness TV shows have featured people
devouring uncooked (or even living) animals on camera, don’t
do it. This is just a trick for dramatic TV, and it’s a spectacularly
bad idea. Cooking kills many potentially lethal microscopic
life-forms; it’s the main reason that humans cook food in the
first place!
You can roast mammal meat on a rack or spit above fire, boil
it in water, or bake it in clay or wrapped in thick layers of
leaves. Mammal meat should be well-done, not raw or bloody,
when you consume it.
ng
is
and
g a
od
p
r
ve
his
e
Part I: Stayin’ Alive: Basic Wilderness Survival Principles 138 C
You can split open mammal bones with a heavy rock (crush
the bone on an anvil stone) to get at the marrow, a nutritious,
calorie-rich tissue inside. You can also boil bones to extract
every possible calorie and nutrient in a tasty broth.
The organs of mammals are normally good to eat, but be
aware that the liver of many carnivores contains high
concentrations of vitamin A, which can cause death. Don’t eat
carnivore livers.
Insects and invertebratesGrasshoppers, snails, mussels, and other critters can be
roasted on a rack over a fire or boiled. Some insects are so
hard to process, though, that it’s best to just crush them into
a paste that you boil in water as a soup.
Insects are related to shellfish, so if you have a seafood
allergy, leave insects off the menu.
FishAlthough you may get away with eating some fish uncooked
(and you may have to if you’re stranded in a dinghy!), fish
should normally be cooked, like any other animal tissues.
Fish are excellent survival food because they cook quickly
and can be dried and preserved for a long time. Figure 8-25a
shows how to rack a larger fish next to a fire for cooking (we
explain smoking fish and other meat in the next section); be
sure to slice small flaps in the meat, allowing the filet to hang
on the rack. You can simply skewer smaller fish on a clean
stick next to a fire as in Figure 8-25b; when the fish is dry and
flaky, it’s ready to eat. Or use other methods, as long as you
can prevent the body from falling apart when it heats up.
Boiling prevents you from losing any of the fish in the fire.
Drying and smoking foodPreserve your survival foods if you’re not eating them immedi-
ately; the wilderness is no place to waste anything! Dried food
is less liable to attract insects and is slightly water-resistant.
Store dried foods carefully.

Chapter 8: Gathering and Hunting to Stay Alive in the Wilderness 139
a
b
Figure 8-25: Cooking large and small fish.
You can mash fruit flat and spread it (not too thinly!) on a
flat surface, like a rock, to dry in the sun. The resulting fruit
leather makes a good trail food.
You can dry meat and fish on a rack — just be sure the wood
for making the drying rack is clean. Also try to use nonresinous wood for smoking foods — smoke from resin, which is present
in pine, sours the meat. To smoke fish and meat, follow these
steps using a teepee-style rack (see Figure 8-26):
1. Build your fire and let it die down.
You don’t need a hot fire with flames to dry meat; in
fact, it’s better to dry food slowly, over coals.
2. Build a tripod over the fire.
Make sure the branches are sturdy. We explain how to
build a tripod in Chapter 14.
3. After laying strips of meat (either mammal or fish)
on the various rungs of the tripod, you can cover the
structure with a tarp or even brush to concentrate
the smoke.
h
us,
t
eat
nto
d
a
we
e
ng
nd
u
edi-
ood
t.
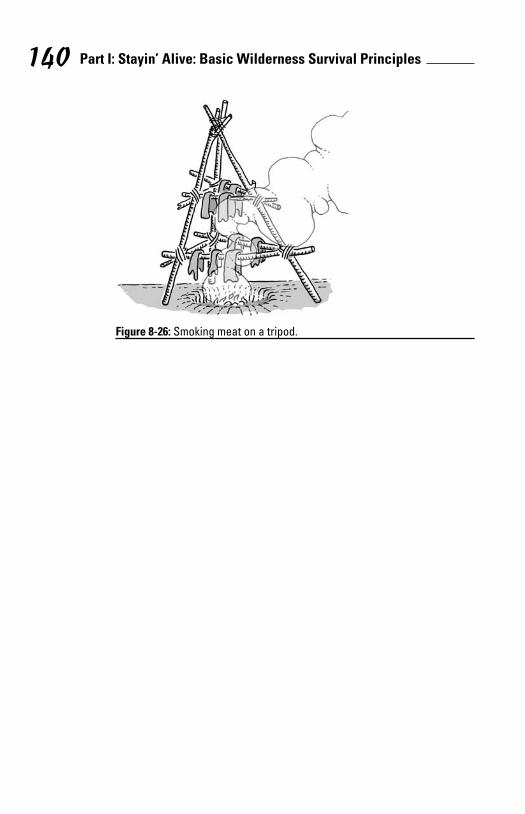
Part I: Stayin’ Alive: Basic Wilderness Survival Principles 140
Figure 8-26: Smoking meat on a tripod.
Part IIEyeing Advanced
Survival Techniques
In this part . . .
As soon as you understand the basics of staying alive in the wilderness, you need to know how to get
yourself out and back to civilization. There are two ways to do this: Signal for help, or make the big decision to walk out. In this part, we tell you how to navigate across land, how to use Mother Nature’s clues to help you find your way, and how to signal for help with things like fire and smoke. Finally, we cover first aid and give you a bundle of no-nonsense techniques (such as how to tie knots) that can make the difference between just surviving outdoors and thriving.
Chapter 9
Finding Your Way with Tools: Basic Wilderness
NavigationIn This Chapter▶ Understanding the basics of land navigation
▶ Using maps
▶ Relying on a compass
▶ Using a GPS receiver
Navigation, like fire building, is a skill you should practice
a little when the pressure’s off. Later on, when it counts,
this small amount of practice can end up meaning as much to
you in the wild as a good knife or a dependable lighter.
In this chapter, we show you the basics of navigation, or
otherwise staying oriented in the wild. We show you how to
use a map, a compass, and a GPS receiver. (For information
on navigation using the stars and sun, see Chapter 10.)
Grasping Navigation BasicsWhether you’re working your way back to civilization, moving
toward a water source, or simply trying to figure out where
you left your pack, being able to navigate is essential to your
survival. You want to know not only where you are but also
where you’re heading. Even in the era of the GPS, you should
keep in mind some basic navigational practices. These
principles apply whenever you head into the wild:
Part II: Eyeing Advanced Survival Techniques 144 Ch
✓ Try to know your position as closely as you can, as
often as you can. Many times, people get lost in the
wilderness due to a momentary lapse in awareness. (If
you have no idea where you are, see Chapter 11 for tips
on what to do when you’re lost or disoriented.)
✓ Navigate for yourself. Work out as many situations and
problems as you can in your own mind, regardless of
who “the navigator” is, because nobody’s perfect.
✓ Trust your instruments. When you’re disoriented (and
really frustrated!), you tend to ignore what your map and
compass are telling you — especially when they don’t
seem to make sense. Maps and compasses can be wrong,
but it’s rare.
✓ Always orient your map. Keep your map aligned with
the terrain around you at all times. Check out the section
“Orienting your map,” later in this chapter, for more info.
✓ Be thorough. Double-check your calculations, and if
you’re moving through new, unexplored territory, make
notes of your movements.
To simplify the whole process of navigation, use your wits
and instruments to find large landmarks; then use these large,
easy-to-find landmarks to find smaller ones.
Setting a route with waypointsWhenever you move through the wilderness, you should
establish a route made up of a series of waypoints. Waypoints are prominent places along your route that give you the ability
to know precisely where you are for a moment. You can use
waypoints in two ways:
✓ Beforehand: You can use waypoints as a way to break up
your route into goals — places you want to reach, check
off, and then move past. Plot your waypoints on a map or
pick them out in the terrain in front of you.
✓ As you go: You can use waypoints to record your course,
which gives you a “trail of breadcrumbs” so you can
make your way out of the wilderness. This is such an
important part of navigation that practically all GPS units
have a waypoint function that allows you to record your
waypoints as you’re passing them.

Chapter 9: Finding Your Way with Tools: Basic Wilderness Navigation 145If you’re operating in an area that doesn’t have trails, you can
always use handrails. A handrail is exactly what the name
implies: a sturdy, reliable object or landmark — such as a
large rock outcropping or a river or creek — that can guide
you. Even if you seem to be going a long way out of your
way, moving from large landmark to large landmark is almost
invariably the fastest, easiest way to travel in the wilderness.
A handrail is almost always better than a beeline. A beeline
is a straight line cut across the wilderness, and it often only
looks like the shortest route. In reality, it’s almost invariably
the longest — especially when you’re dealing with hilly terrain
or dense underbrush in a jungle.
Using deliberate offset
Deliberate offset, sometimes called aiming off, is a navigation
trick in which you intentionally miss a small landmark to hit a
large one. Why would you want to do that? Because sometimes
the waypoint you need to reach is so small that when you aim
right for it, you miss it and go right past.
A lot of navigation in the wilderness centers on trying to use
large landmarks to find smaller ones. For example, you can
use deliberate offset if you’re trying to reach a house that sits
near a road. Instead of trying to hit a bull’s-eye and land on the
front porch, aim a little off — say, a quarter mile down the road
(Figure 9-1). When you arrive at the road, you should know
which direction to turn because you deliberately aimed a little
off, and you can now turn and travel straight to the house.
Figure 9-1: Using deliberate offset to find a small landmark.
f
ps
nd
d
and
ng,
ion
nfo.
ke
rge,
nts ity
e
k up
ck
p or
rse,
nits
ur

Part II: Eyeing Advanced Survival Techniques 146 Ch
Map Reading Made EasyWhen you head out into the wilderness, you need to be able
to read the appropriate kind of map. You may end up using
any of the following:
✓ State and national park maps: You usually find these
maps at the ranger station or online on the park’s Web
site.
✓ Travel maps: These maps tend to incorporate detail of
both human-made and natural features; they usually
cover a large area, such as an entire province or nation.
✓ United States Geological Survey (USGS) maps: USGS
maps are usually referred to as topographic maps, or topo
maps. These maps use contour lines to show the shape
of landforms, such as mountains and valleys.
To make sense of the map you’re using, you need a good
foundation in map reading. The map’s key or legend can give
you the specifics on your map’s symbols and colors. Also
note the map’s scale; sometimes the scale is inches to miles
or inches to kilometers. For now, this section helps you figure
out what the different parts on your map mean so you know
where you are and where you’re going.
Deciphering your map’s colorsThe colors on your map can tell you a lot (as long as you take
them with a grain of salt). Table 9-1 lists the standard colors
for a map showing the area’s physical features.
Table 9-1 A Standard Map Color KeyColor Feature Comments
White Open ground Open ground doesn’t mean bald. Many white areas have a respectable amount of vegetation.
Green Vegetation The map implies that there’s usually more vegetation in these areas, but you don’t always encounter verdant, lush growth in areas marked green on your map.
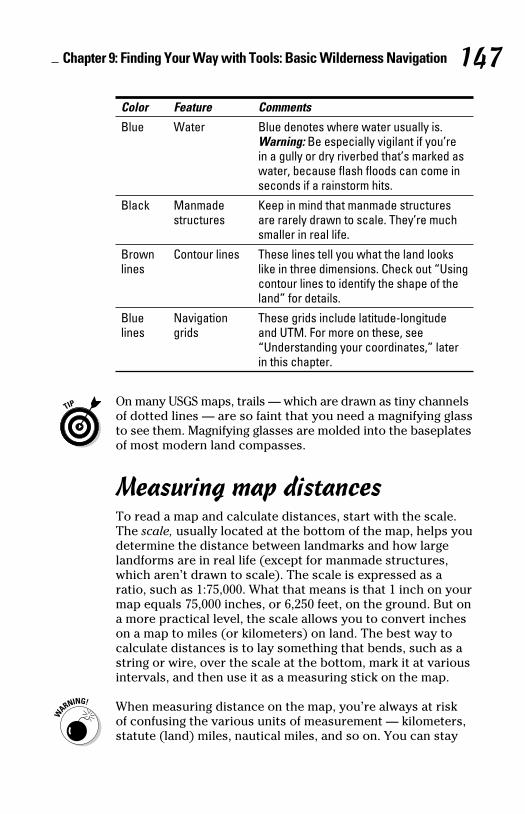
Chapter 9: Finding Your Way with Tools: Basic Wilderness Navigation 147
Color Feature Comments
Blue Water Blue denotes where water usually is. Warning: Be especially vigilant if you’re in a gully or dry riverbed that’s marked as water, because flash floods can come in seconds if a rainstorm hits.
Black Manmade structures
Keep in mind that manmade structures are rarely drawn to scale. They’re much smaller in real life.
Brown lines
Contour lines These lines tell you what the land looks like in three dimensions. Check out “Using contour lines to identify the shape of the land” for details.
Blue lines
Navigation grids
These grids include latitude-longitude and UTM. For more on these, see “Understanding your coordinates,” later in this chapter.
On many USGS maps, trails — which are drawn as tiny channels
of dotted lines — are so faint that you need a magnifying glass
to see them. Magnifying glasses are molded into the baseplates
of most modern land compasses.
Measuring map distancesTo read a map and calculate distances, start with the scale.
The scale, usually located at the bottom of the map, helps you
determine the distance between landmarks and how large
landforms are in real life (except for manmade structures,
which aren’t drawn to scale). The scale is expressed as a
ratio, such as 1:75,000. What that means is that 1 inch on your
map equals 75,000 inches, or 6,250 feet, on the ground. But on
a more practical level, the scale allows you to convert inches
on a map to miles (or kilometers) on land. The best way to
calculate distances is to lay something that bends, such as a
string or wire, over the scale at the bottom, mark it at various
intervals, and then use it as a measuring stick on the map.
When measuring distance on the map, you’re always at risk
of confusing the various units of measurement — kilometers,
statute (land) miles, nautical miles, and so on. You can stay
e
g
b
f
n.
opo
e
ve
s
ure
w
ake
rs
t
re
in

Part II: Eyeing Advanced Survival Techniques 148 Ch
out of trouble by writing down distances or any other type of
measurement on paper rather than trying to work things out
in your head.
Using contour lines to identify the shape of the landTo read a topographic map, you need to know how to interpret
contour lines. Contour lines are the mapmaker’s way of
expressing a three-dimensional world on a flat map. Each
contour line denotes a change in the altitude of the terrain,
such as when you have hills or valleys. At the bottom of
your topographic map, you can find the contour interval, the
amount of altitude change that each contour line equals. For
example, a contour interval may equate to 500 feet in elevation.
On a topographic map, the closer the contour lines, the
steeper the terrain. Densely packed lines (as in Figure 9-2a)
may indicate a sharp slope or cliff. Widely spaced lines (as
in Figure 9-2b) mean gentle grades, easy slopes, and flatter
terrain.
Many times, the contour lines form designs on your map that
correspond with certain types of landforms. You can use
these recognizable shapes to quickly identify landforms in the
terrain around you. Following is a list of contour designs and
their real-world equivalents; Figure 9-2 shows how those
contour lines translate into 3D.
✓ V-shaped lines pointing toward higher elevation:
Drainages, like creeks, runoffs, washes, and sometimes
canyons (as in Figure 9-2c)
✓ V-shaped lines pointing toward lower elevation: Ridge lines, which are long crests, and spurs, which are small
crests that that protrude from the main crest (as in
Figure 9-2d)
✓ U-shaped lines pointing toward higher elevation:
Valleys, usually gentler depressions than canyons (as in
Figure 9-2e); densely packed lines near the base of the U
usually mean a cliff or sometimes a waterfall
✓ Circles, especially circles decreasing in size: Peaks and
hilltops, as in Figure 9-2f
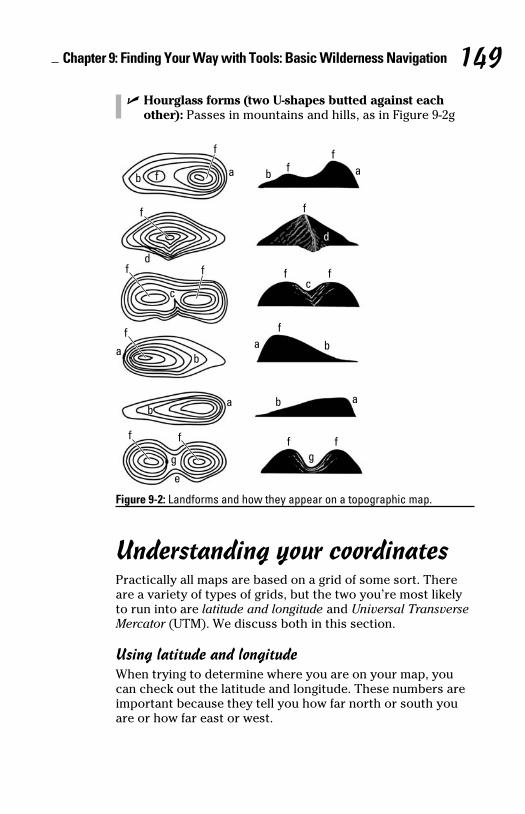
Chapter 9: Finding Your Way with Tools: Basic Wilderness Navigation 149 ✓ Hourglass forms (two U-shapes butted against each
other): Passes in mountains and hills, as in Figure 9-2g
a
a
f
f
f f
cf
g
e
g
d
d
f
f
f
a
aa
ab f
f
f f
c
f
bb
bb
b
f
f f
Figure 9-2: Landforms and how they appear on a topographic map.
Understanding your coordinatesPractically all maps are based on a grid of some sort. There
are a variety of types of grids, but the two you’re most likely
to run into are latitude and longitude and Universal Transverse Mercator (UTM). We discuss both in this section.
Using latitude and longitudeWhen trying to determine where you are on your map, you
can check out the latitude and longitude. These numbers are
important because they tell you how far north or south you
are or how far east or west.
of
ut
et
e
or
on.
)
hat
the
nd
s
ge l
in
U
nd
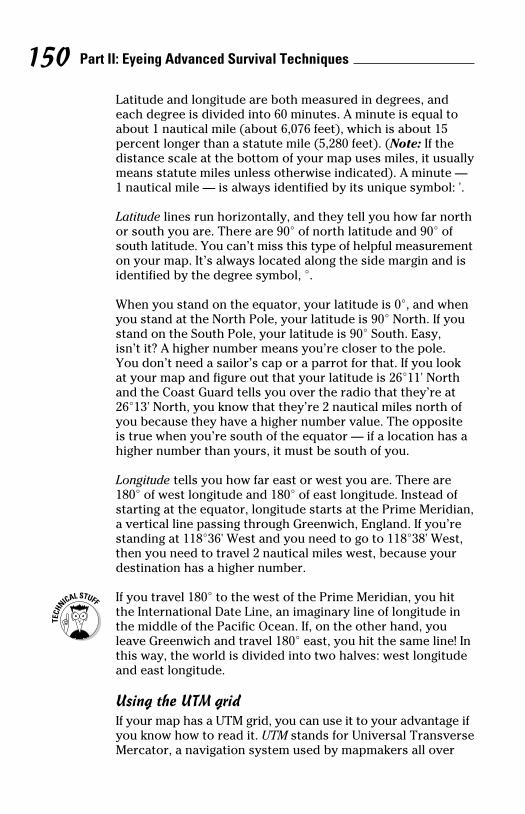
Part II: Eyeing Advanced Survival Techniques 150 Ch
N
Latitude and longitude are both measured in degrees, and
each degree is divided into 60 minutes. A minute is equal to
about 1 nautical mile (about 6,076 feet), which is about 15
percent longer than a statute mile (5,280 feet). (Note: If the
distance scale at the bottom of your map uses miles, it usually
means statute miles unless otherwise indicated). A minute —
1 nautical mile — is always identified by its unique symbol: '.
Latitude lines run horizontally, and they tell you how far north
or south you are. There are 90° of north latitude and 90° of
south latitude. You can’t miss this type of helpful measurement
on your map. It’s always located along the side margin and is
identified by the degree symbol, °.
When you stand on the equator, your latitude is 0°, and when
you stand at the North Pole, your latitude is 90° North. If you
stand on the South Pole, your latitude is 90° South. Easy,
isn’t it? A higher number means you’re closer to the pole.
You don’t need a sailor’s cap or a parrot for that. If you look
at your map and figure out that your latitude is 26°11' North
and the Coast Guard tells you over the radio that they’re at
26°13' North, you know that they’re 2 nautical miles north of
you because they have a higher number value. The opposite
is true when you’re south of the equator — if a location has a
higher number than yours, it must be south of you.
Longitude tells you how far east or west you are. There are
180° of west longitude and 180° of east longitude. Instead of
starting at the equator, longitude starts at the Prime Meridian,
a vertical line passing through Greenwich, England. If you’re
standing at 118°36' West and you need to go to 118°38' West,
then you need to travel 2 nautical miles west, because your
destination has a higher number.
If you travel 180° to the west of the Prime Meridian, you hit
the International Date Line, an imaginary line of longitude in
the middle of the Pacific Ocean. If, on the other hand, you
leave Greenwich and travel 180° east, you hit the same line! In
this way, the world is divided into two halves: west longitude
and east longitude.
Using the UTM gridIf your map has a UTM grid, you can use it to your advantage if
you know how to read it. UTM stands for Universal Transverse
Mercator, a navigation system used by mapmakers all over

Chapter 9: Finding Your Way with Tools: Basic Wilderness Navigation 151the world. This system is based on the meter, with grid lines
drawn on maps at every kilometer (1,000 meters, or about
0.62 miles).
Using UTM is very easy: The vertical lines drawn on your map
are called eastings. Eastings are numbered, and their numbers
increase as you move east. Moreover, the numbers count
meters as they move across your map. For example, if you’re
near the easting 350000 m.E. and your map shows that the
easting 351000 m.E. is near your camp, then you know that
your tent is 1,000 meters to the east.
The light blue lines running horizontally across your map are
called northings. Northings’ numbers increase as they move
northward. So if your GPS tells you you’re located at 411536
m.N and you look on your map and see that the river you
want to reach runs along the northing 411000 m.N., then you
know that the river is 536 meters to your south.
Navigating with a MapMany times, you can navigate through the wilderness with
just a map — especially if you’re on well-marked trails. The
problem is that your map can get you lost, too! The basic
practices in this section can cut down on the unwanted angst.
Orienting your map
Each time you pull your map out, you have to orient it.
Orienting a map means physically aligning the map so that it
matches the surrounding terrain. If the river is on your left
and the hills are on the right, then you should rotate the map
in your hands until the map reflects that real-world reality —
even if it means turning the map upside down! Why? Because
the very essence of map reading is about interpreting spatial
relationships — how the real world really looks. If your map
isn’t in sync with the real world around you, then you’re just
inviting mistakes. You can orient your map in one of two
ways:
✓ Eyeball it. Look at the nearby features and then rotate
the map until it’s close.
o
ally
—
'.
rth
ent
is
en ou
k
h
t
of
te
s a
f
ian,
e
t,
r
n
! In
de
e if
erse

Part II: Eyeing Advanced Survival Techniques 152 Ch
UC
✓ Use a compass. If you have a compass nearby, use it;
compass orientation is much more exact. For more on
orienting you map with the use of a compass, see “Using
your compass to orient the map,” later in this chapter.
Keeping track of distance traveled: Dead reckoningYou can find your way in the wild with a map by dead reckoning.
Dead reckoning is a method of figuring out where you probably
are by keeping track of how fast you’re going and how long
you’ve traveled. For example, if you walk at 3 miles (4.8
kilometers) an hour and you’ve walked for about two hours,
you can estimate that you’ve travelled 6 miles (9.6 kilometers).
Ideally, you should dead-reckon every time you go out.
Keeping a log, a journal of your travels, is the very best way
to dead-reckon, but even if you just make a mental note of
the time of day at every important juncture, you’re helping
yourself a lot.
When estimating how fast you’re moving, you have to take
into account difficulties in terrain, especially when you leave
the trail. The accepted standard of rate of travel by foot is 3
miles per hour over flat terrain. When leaving the trail, your
pace usually drops off to less than a mile an hour. One of the
most common errors in navigation is to overestimate how fast
you’re traveling on foot.
When estimating your rate of travel and navigating through
the wilderness, you frequently estimate distances to landmarks,
even if it’s just subconsciously. Here are a few situations in
which just about anybody can assume landmarks are closer
than they really are:
✓ When looking uphill or downhill (watch out for this one
especially)
✓ Whenever a bright light is shining on your landmark,
especially a large one, such as a mountain; if the sun is
shining brightly on a mountain in front of you, expect it
to be much farther away than you initially think

Chapter 9: Finding Your Way with Tools: Basic Wilderness Navigation 153 ✓ Whenever looking across flatlands, such as a desert, or
bodies of water
✓ Whenever the air is unusually clear, such as after a good
rain and when the air is cool and crisp
Understanding How Your Compass Works
Your compass gives you the ability to stand anywhere in the
world and determine which direction is north. If you know
that, you can determine all the other directions relatively
easily.
A variety of compass types are out there. You can find highly
accurate digital compasses that correct a compass’s errors
for you, or you can opt for back-sighting compasses, which
have what look like gun sights mounted on them to tell you
which direction you’re currently pointing. But the standard
compass for wilderness travel is an orienteering compass molded into a clear plastic baseplate, like the one in Figure
9-3. It’s top-sighting, which means it’s made to be mounted
below eye-level, or held low, so you can read it by looking
over its top. Top-sighting compasses also include many
cheap compasses — affectionately called gumball-machine compasses — that find their way into survival kits, in glove
compartments, or onto keychains.
Orienteering and gumball-machine compasses are the two
compass types you’re likely to come across in a survival
situation. Both are top-sighting, so if you understand how an
orienteering compass works, you can figure out how to use
the gumball-machine one.
Breaking down the parts of an orienteering compassBefore you can fully understand how an orienteering compass
works and how you can use it in the wild, you need to know
the parts of a compass:
ng
.
ing.
bly
s,
s).
y
ve
3
r
he
fast
h
ks,
r
ne
s
it
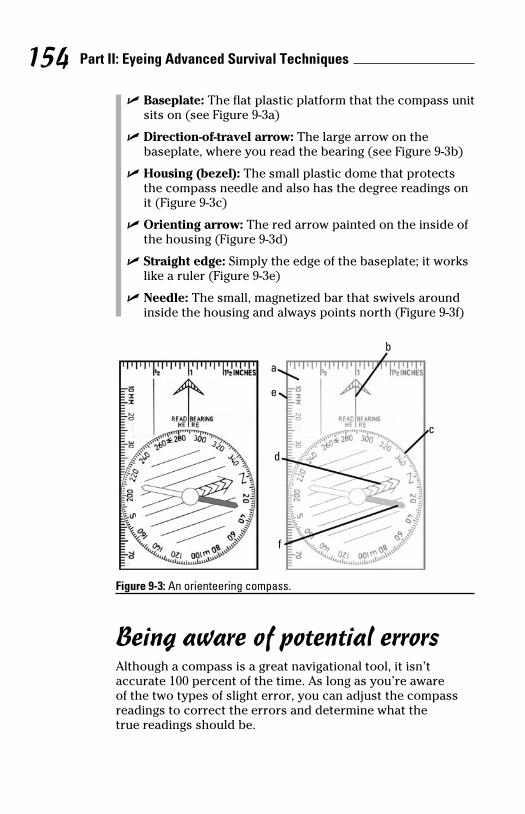
Part II: Eyeing Advanced Survival Techniques 154 Ch
✓ Baseplate: The flat plastic platform that the compass unit
sits on (see Figure 9-3a)
✓ Direction-of-travel arrow: The large arrow on the
baseplate, where you read the bearing (see Figure 9-3b)
✓ Housing (bezel): The small plastic dome that protects
the compass needle and also has the degree readings on
it (Figure 9-3c)
✓ Orienting arrow: The red arrow painted on the inside of
the housing (Figure 9-3d)
✓ Straight edge: Simply the edge of the baseplate; it works
like a ruler (Figure 9-3e)
✓ Needle: The small, magnetized bar that swivels around
inside the housing and always points north (Figure 9-3f)
a
e
d
f
c
b
Figure 9-3: An orienteering compass.
Being aware of potential errorsAlthough a compass is a great navigational tool, it isn’t
accurate 100 percent of the time. As long as you’re aware
of the two types of slight error, you can adjust the compass
readings to correct the errors and determine what the
true readings should be.
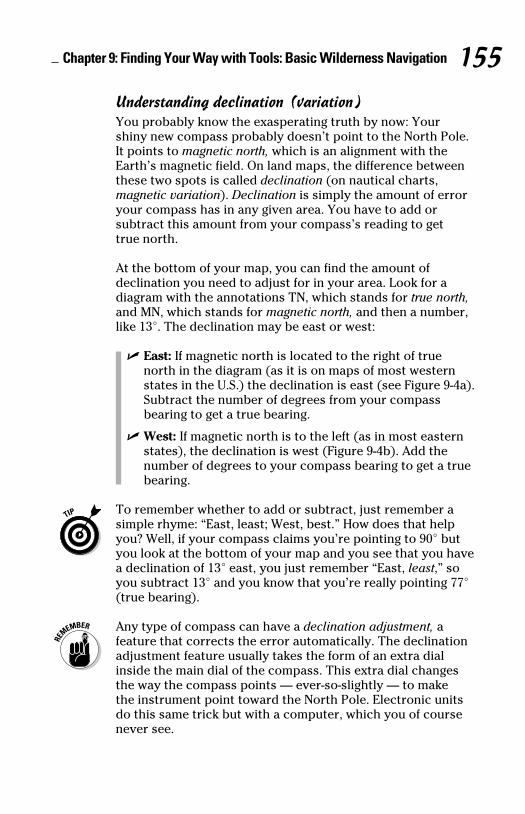
Chapter 9: Finding Your Way with Tools: Basic Wilderness Navigation 155
Understanding declination (variation)You probably know the exasperating truth by now: Your
shiny new compass probably doesn’t point to the North Pole.
It points to magnetic north, which is an alignment with the
Earth’s magnetic field. On land maps, the difference between
these two spots is called declination (on nautical charts,
magnetic variation). Declination is simply the amount of error
your compass has in any given area. You have to add or
subtract this amount from your compass’s reading to get
true north.
At the bottom of your map, you can find the amount of
declination you need to adjust for in your area. Look for a
diagram with the annotations TN, which stands for true north, and MN, which stands for magnetic north, and then a number,
like 13°. The declination may be east or west:
✓ East: If magnetic north is located to the right of true
north in the diagram (as it is on maps of most western
states in the U.S.) the declination is east (see Figure 9-4a).
Subtract the number of degrees from your compass
bearing to get a true bearing.
✓ West: If magnetic north is to the left (as in most eastern
states), the declination is west (Figure 9-4b). Add the
number of degrees to your compass bearing to get a true
bearing.
To remember whether to add or subtract, just remember a
simple rhyme: “East, least; West, best.” How does that help
you? Well, if your compass claims you’re pointing to 90° but
you look at the bottom of your map and you see that you have
a declination of 13° east, you just remember “East, least,” so
you subtract 13° and you know that you’re really pointing 77°
(true bearing).
Any type of compass can have a declination adjustment, a
feature that corrects the error automatically. The declination
adjustment feature usually takes the form of an extra dial
inside the main dial of the compass. This extra dial changes
the way the compass points — ever-so-slightly — to make
the instrument point toward the North Pole. Electronic units
do this same trick but with a computer, which you of course
never see.
unit
b)
on
of
rks
d
3f)
s
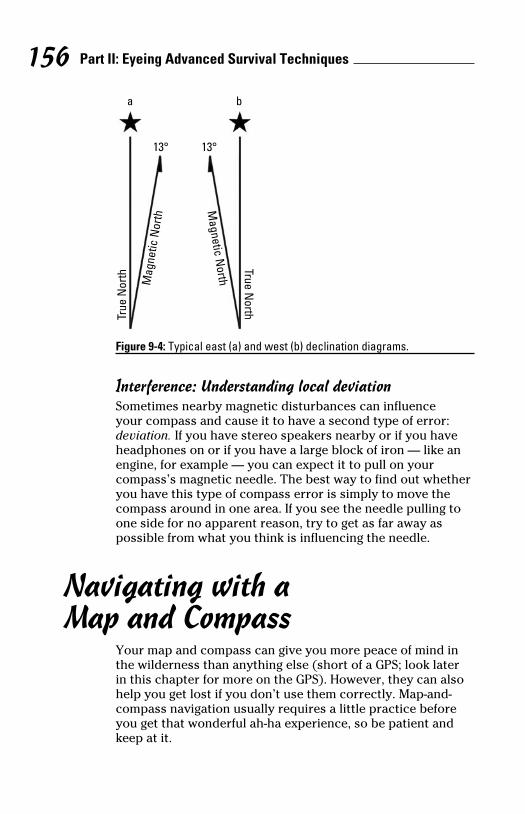
Part II: Eyeing Advanced Survival Techniques 156 Ch
a b
13°13°
True
Nor
th
True North
Magnetic N
orthMag
netic
Nor
th
Figure 9-4: Typical east (a) and west (b) declination diagrams.
Interference: Understanding local deviationSometimes nearby magnetic disturbances can influence
your compass and cause it to have a second type of error:
deviation. If you have stereo speakers nearby or if you have
headphones on or if you have a large block of iron — like an
engine, for example — you can expect it to pull on your
compass’s magnetic needle. The best way to find out whether
you have this type of compass error is simply to move the
compass around in one area. If you see the needle pulling to
one side for no apparent reason, try to get as far away as
possible from what you think is influencing the needle.
Navigating with a Map and Compass
Your map and compass can give you more peace of mind in
the wilderness than anything else (short of a GPS; look later
in this chapter for more on the GPS). However, they can also
help you get lost if you don’t use them correctly. Map-and-
compass navigation usually requires a little practice before
you get that wonderful ah-ha experience, so be patient and
keep at it.

Chapter 9: Finding Your Way with Tools: Basic Wilderness Navigation 157
When using your map and compass, keep in mind a few basic
procedural ideas:
✓ Try to hold your compass at stomach-level when
sighting (unless your compass is back-sighting). This
usually gives you the greatest understanding of the
spatial relationships around you.
✓ When moving across the landscape, try to be flexible
in the way you use the compass. For example, if you’re
moving on a river and you know where you are, you
don’t have to be precise in every bearing. On the other
hand, if you’re approaching a small landmark, you should
slow down and be very precise, because small landmarks
are so easy to miss.
✓ Write down anything and everything, especially if you’re
at risk of being lost. A journal or log or simply a good piece
of scratch paper to keep notes on can help tremendously.
This section gives you directions for performing basic
navigational functions with a common handheld, top-sighting
orienteering compass. If you have a cheap gumball-machine
compass, check out the sidebar titled “Stuck with a gumball-
machine compass?” for some adjustments you can make.
Understanding common compass usageThe orienteering compass may seem complex, but keep in
mind that most of what you do with this compass requires
only two or three actions:
✓ Taking a bearing: A bearing is an imaginary line drawn
from your compass to something you see, like a
landmark. Simply point the direction-of-travel arrow at
something in the terrain, and you’re taking a bearing.
✓ Adjusting the housing: Turn the housing dial, usually
while holding the compass stationary on the map.
✓ Using the compass like a ruler: Line up the straight edge
of the compass’s baseplate on two points of the map.
This is useful because the baseplate’s sides are made
to run perfectly parallel to the direction-of-travel arrow
(more on that later.)
e
n
her
o
n
r
so
e
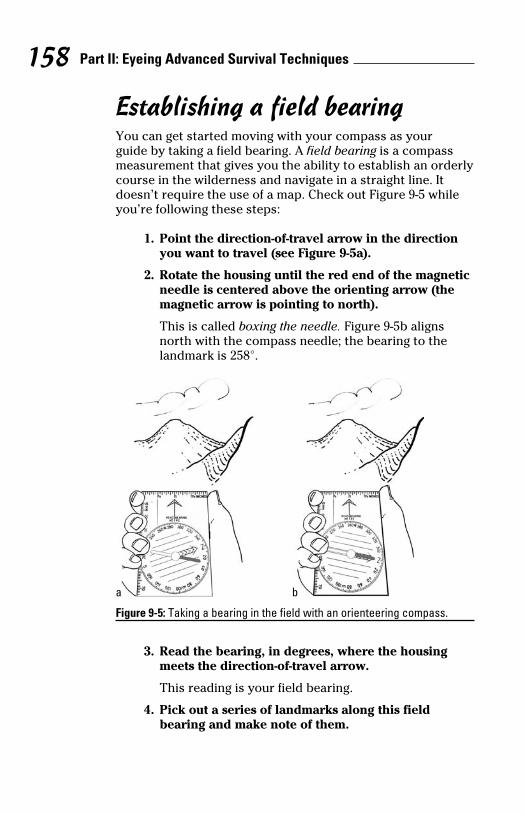
Part II: Eyeing Advanced Survival Techniques 158 Ch
Establishing a field bearingYou can get started moving with your compass as your
guide by taking a field bearing. A field bearing is a compass
measurement that gives you the ability to establish an orderly
course in the wilderness and navigate in a straight line. It
doesn’t require the use of a map. Check out Figure 9-5 while
you’re following these steps:
1. Point the direction-of-travel arrow in the direction
you want to travel (see Figure 9-5a).
2. Rotate the housing until the red end of the magnetic
needle is centered above the orienting arrow (the
magnetic arrow is pointing to north).
This is called boxing the needle. Figure 9-5b aligns
north with the compass needle; the bearing to the
landmark is 258°.
a b
Figure 9-5: Taking a bearing in the field with an orienteering compass.
3. Read the bearing, in degrees, where the housing
meets the direction-of-travel arrow.
This reading is your field bearing.
4. Pick out a series of landmarks along this field
bearing and make note of them.
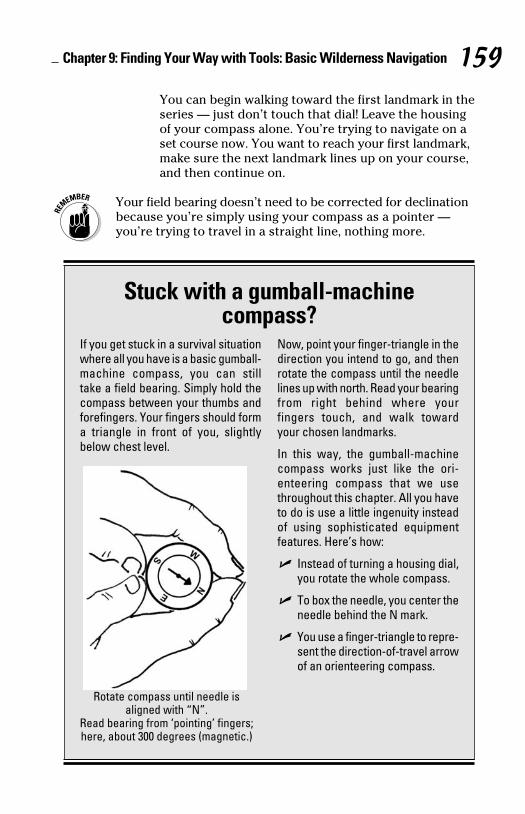
Chapter 9: Finding Your Way with Tools: Basic Wilderness Navigation 159 You can begin walking toward the first landmark in the
series — just don’t touch that dial! Leave the housing
of your compass alone. You’re trying to navigate on a
set course now. You want to reach your first landmark,
make sure the next landmark lines up on your course,
and then continue on.
Your field bearing doesn’t need to be corrected for declination
because you’re simply using your compass as a pointer —
you’re trying to travel in a straight line, nothing more.
erly
e
n
tic
Stuck with a gumball-machine compass?
If you get stuck in a survival situation where all you have is a basic gumball-machine compass, you can still take a field bearing. Simply hold the compass between your thumbs and forefingers. Your fingers should form a triangle in front of you, slightly below chest level.
Rotate compass until needle isaligned with “N”.
Read bearing from ‘pointing’ fingers;here, about 300 degrees (magnetic.)
Now, point your finger-triangle in the direction you intend to go, and then rotate the compass until the needle lines up with north. Read your bearing from right behind where your fingers touch, and walk toward your chosen landmarks.
In this way, the gumball-machine compass works just like the ori-enteering compass that we use throughout this chapter. All you have to do is use a little ingenuity instead of using sophisticated equipment features. Here’s how:
✓ Instead of turning a housing dial, you rotate the whole compass.
✓ To box the needle, you center the needle behind the N mark.
✓ You use a finger-triangle to repre-sent the direction-of-travel arrow of an orienteering compass.

Part II: Eyeing Advanced Survival Techniques 160 Ch
Using your compass to orient the mapUsing your compass to orient your map can go a long way
toward helping you figure out where you are — especially if
you’re disoriented or lost. When you use this technique, you
can rest assured that your map matches up with the physical
features around you. That helps a lot if you’re trying to figure
out whether the trail is on your right or left — or behind you!
1. Lay your map on a flat surface and place your compass
on it, with the straight edge of the compass’s baseplate
lined up with any straight edge on the map.
2. Rotate your compass’s housing until the N, located
above the 360° marker, is centered on the red
direction-of-travel line.
3. Rotate the entire map and compass around smoothly
until the red end of the compass’s magnetic needle is
centered over the orienting arrow inside the housing.
You’re boxing the needle. Your map is now oriented to
magnetic north (see Figure 9-6a) — which isn’t exactly
good enough, because you want true north.
4. Correct for declination.
Now you want to eliminate the error between magnetic
north and true north. For example, if you have a 13° east
declination, you have to subtract 13° from your magnetic
heading, which gives you 347° (360° – 13°). Rotate the
housing to 347° and then box the needle by rotating the
entire map again. (See the earlier section “Being aware of
potential errors” for more on declination.)
When you’re finished, your map and compass should look like
this:
✓ The baseplate of the compass should be lined up on one
of the straight edges of the map.
✓ The red needle should be hovering over the orienting
arrow inside the compass housing.
✓ The housing should be set to read 347° on the direction-of-
travel arrow (corrected for declination).

Chapter 9: Finding Your Way with Tools: Basic Wilderness Navigation 161When this is done, your map is officially oriented to true
north, and it matches your surroundings exactly. Check out
Figure 9-6b.
ab
Figure 9-6: A map oriented with a compass both before (a) and after (b) correcting for declination.
The following sections show you additional ways to use your
map and compass. All these methods use this map-orienting
procedure as their foundation.
Setting your course from a map bearingIf you know where you are on the map and you know where
you want to go, you can take a bearing from the map and then
use it to make your way across the terrain. The upshot is that
you can navigate toward a landmark that isn’t yet in sight.
Just follow these steps:
1. Orient the map (see the preceding section).
2. Lightly draw a straight line from your starting
position to your destination.
3. Place the edge of your compass’s baseplate on the
line, with the direction-of-travel arrow pointing
toward your destination.
4. While holding the compass and map firmly in place,
rotate the housing until you’ve boxed the red part
of the magnetic needle in the orienting arrow inside
the housing.
f ou
cal
ure
ou!
ass
ate
d
hly
e is
ng.
d to
ctly
ic
ast
etic
he
e of
like
ne
n-of-
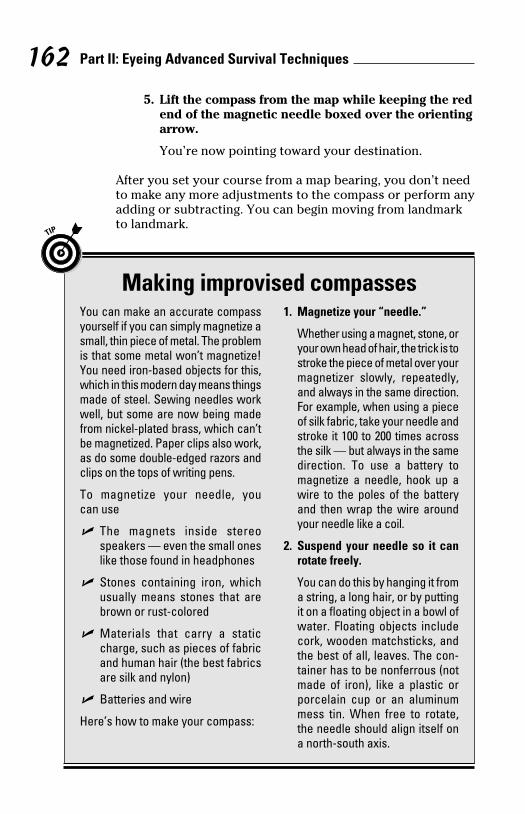
Part II: Eyeing Advanced Survival Techniques 162 Ch
N
5. Lift the compass from the map while keeping the red
end of the magnetic needle boxed over the orienting
arrow.
You’re now pointing toward your destination.
After you set your course from a map bearing, you don’t need
to make any more adjustments to the compass or perform any
adding or subtracting. You can begin moving from landmark
to landmark.
Making improvised compassesYou can make an accurate compass yourself if you can simply magnetize a small, thin piece of metal. The problem is that some metal won’t magnetize! You need iron-based objects for this, which in this modern day means things made of steel. Sewing needles work well, but some are now being made from nickel-plated brass, which can’t be magnetized. Paper clips also work, as do some double-edged razors and clips on the tops of writing pens.
To magnetize your needle, you can use
✓ The magnets inside stereo speakers — even the small ones like those found in headphones
✓ Stones containing iron, which usually means stones that are brown or rust-colored
✓ Materials that carry a static charge, such as pieces of fabric and human hair (the best fabrics are silk and nylon)
✓ Batteries and wire
Here’s how to make your compass:
1. Magnetize your “needle.”
Whether using a magnet, stone, or your own head of hair, the trick is to stroke the piece of metal over your magnetizer slowly, repeatedly, and always in the same direction. For example, when using a piece of silk fabric, take your needle and stroke it 100 to 200 times across the silk — but always in the same direction. To use a battery to magnetize a needle, hook up a wire to the poles of the battery and then wrap the wire around your needle like a coil.
2. Suspend your needle so it can rotate freely.
You can do this by hanging it from a string, a long hair, or by putting it on a floating object in a bowl of water. Floating objects include cork, wooden matchsticks, and the best of all, leaves. The con-tainer has to be nonferrous (not made of iron), like a plastic or porcelain cup or an aluminum mess tin. When free to rotate, the needle should align itself on a north-south axis.

Chapter 9: Finding Your Way with Tools: Basic Wilderness Navigation 163
Navigating with a GPS ReceiverThe global positioning system (GPS) is a network of satellites
that send precise navigation data to hundreds of thousands
of receivers all over the world. Receivers come in all sizes
and levels of sophistication. More and more, they’re becoming
a standard feature in cars and cellphones. Knowing how the
technology can work for you in the wild can go a long way
toward getting you back home.
This section familiarizes you with what GPS receivers offer —
what they can and can’t do — and then shows you some basic
actions to make sure GPS works for you in the wild.
What to expect from GPSWhen you activate a GPS receiver, the unit makes contact with
its satellite network, works out a few calculations, and then
tells you where you are. (It usually lets you know by flashing
“Position Acquired” on the screen.) The modern GPS system is
so accurate that it’s rarely off by more than just a few feet.
GPS receivers range widely in sophistication, but all units do
one or two things:
✓ They give you your position purely as a series of
coordinates, which you then have to transfer to a paper
map to find exactly where you are. (See the earlier
section “Understanding your coordinates” for info on
using map coordinates.)
✓ They show you your position on an electronic map that’s
installed on the unit.
Most GPS receivers also have a compass function that can tell
you which way you’re pointing.
Most maps on GPS units lack sufficient detail to help you with
navigation in tricky areas, and the compass calculations in
GPS receivers sometimes lag behind real time. And like any
other electronic instrument, GPS receivers can break down
in the field or simply run out of battery power. A great
navigational package for the wilderness includes a GPS, a
paper map, and an orienteering compass — regardless of
what data your GPS receiver can offer you.
red
ing
eed
any
rk
r o r
y, n. e d s e o a y d
n
m g f e d -t r
m e, n

Part II: Eyeing Advanced Survival Techniques 164 Ch
When carrying a GPS receiver in cold conditions, put it on a
cord around your neck and slip it inside your shirt to keep the
batteries warm, which makes them last longer.
Setting your receiverBefore you start trying to figure out where you are, you have
to make sure the receiver is giving you the right data! Some
GPS receivers give you the right data through default, but
you still need to make sure you’re set up before heading out
into the wild. Check the GPS receiver’s settings for the datum,
position format, and unit format.
DatumDatum is the survey information that was used to make a
particular map, especially a topographic map. If you’re using
a GPS receiver that gives only coordinates, you first have to
make sure that your receiver sends you information based on
the datum used to create your paper map.
To find out which datum was used to make the map you’re
currently using, look in the margins of the map for one of the
following statements or abbreviations:
✓ North American Datum 1927 (NAD27)
✓ North American Datum 1983 (NAD83)
✓ World Geodetic System 1984 (WGS84)
To determine which datum your GPS unit is set to, go to the
menu and click on the datum function. Then select the datum
that matches your map’s datum.
Position formatRegardless of whether your unit gives you a map or just
coordinates, you have to set the position format. This is
your opportunity to choose which coordinate system you
want to use to locate your position. Most receivers offer
you the choice between latitude/longitude and the UTM
coordinate system. Choose the one used by your paper map
Chapter 9: Finding Your Way with Tools: Basic Wilderness Navigation 165or the system you feel most comfortable using if the map has
both. For more on how these coordinate systems work, see
“Understanding your coordinates,” earlier in this chapter.
Unit formatFinally, you need to make sure you’re using a unit format that
you understand. The unit format setting is your chance to set
the receiver to the units of measurement — miles, kilometers,
degrees, whatever — that your map is using in its scale. The
GPS unit may do this for you, or it may offer you a choice.
If you’re using the latitude/longitude coordinate system,
you probably want to use nautical miles as your unit of
measurement. If you’re using UTM positions, using kilometers
is best.
Using GPS in the wild
Probably the most important action you can take with your
GPS receiver is to record waypoints, places of interest and
importance you pass along your travels. The single most
important waypoint is your start point. Before entering
any wilderness area, bring up the unit’s menu, go into the
waypoint feature, and record your position at that moment.
Regardless of where you go afterward or how lost you
become, you can now go into the waypoint feature and ask
the receiver where this starting point is — and how far away
you are.
As you go about your travels in the wild, you can continue to
record waypoints. If you do become disoriented, you can go
to the waypoint feature and find where the last waypoint was
and backtrack. (Record these waypoint readings on paper,
too, because GPS units can run down in the field.)
A second function that can go a long way toward keeping you
found, not lost, is the track function. After you turn on the
track feature, the unit automatically makes a record of your
travels. The receiver has to remain turned on for this to work,
so battery power is always a consideration. But if you have
a
the
ve
e
ut
um,
ng
o
on
he
e
um
p

Part II: Eyeing Advanced Survival Techniques 166fresh batteries, this is a great feature because it gives you a
“trail of breadcrumbs” that can help you find your way back
or simply tell you how far you’ve gone.
GPS receivers can’t always communicate with the satellites,
but you can solve this problem many times by simply knowing
that receivers sometimes have to be in just the right spot to
work. If your unit isn’t receiving, move it — especially if a cliff
or a hill is nearby. If it still doesn’t work, move it again. You
may have to get creative.

Chapter 10
Looking Up to the Skies: Celestial Navigation
In This Chapter▶ Relying on the sun to find your way
▶ Checking with the stars
People have been using the sun and the stars to find their
way across land and sea for thousands of years. Sometimes
this type of navigation can be complex, but more often than not,
using the heavens to navigate is relatively easy.
In this chapter, we show you how to find direction using
the sun, the stars, and a little ingenuity. Keep in mind that
though these techniques are sometimes incredibly accurate,
more often than not, they give you only general direction.
Nevertheless, if you don’t have a compass or a GPS unit, you
should consider the results that come from these methods to
be very reliable.
Finding Direction with the SunThe sun can be a great tool to help you find your way in the
wilderness. You can use its position in the sky just like a
compass if you know a few easy techniques.
None of these methods are hard to do; just keep in mind
that the closer you are to the equator or to the poles, the
less accurate these methods are. Luckily, the majority of the
world’s landmasses — including North America, Europe, and
most of Asia — lie at latitudes that make these sun-navigation
techniques useful.
Part II: Eyeing Advanced Survival Techniques 168
You can improve the usefulness of all these techniques by
carefully drawing a mock-up of a compass in the dirt or sand.
After you find north and south, draw a 90° line to indicate east
and west. Likewise, if your technique gives you east and west,
draw in north and south.
Finding north and south around middayThe sun rises in the east and sets in the west, regardless of
where you find yourself on planet Earth. Just keep in mind
that it doesn’t always rise at due east, or precisely east, nor
does it always set at due west. But you can take the dawn’s
early light to be generally east and sunset to be generally west
anywhere in the world.
At midday, if you’re anywhere in North America, Europe, or
Northern Asia, the sun lies due south of you. For example, if
it’s lunch hour, say, between 11 a.m. and 1 p.m., you can rest
assured that if you turn and face the shining sun, you’re facing
south. And behind you, over your shoulder, lies north. From
this easy technique, you can figure out the other directions,
too. If you face the sun at midday in the Northern Hemisphere,
east is on your left, and west is on your right.
Likewise, you can use this technique to find north in some
of the southernmost parts of the Southern Hemisphere. At
midday, if you’re in New Zealand, Argentina, or South Africa,
the sun lies due north of you. (In the northernmost extremes
of Argentina or South Africa, this may not be accurate on a
few days out of the year. On those days, the sun appears to be
directly overhead at midday.)
Drawing a compass with the stick and shadow methodIf you’re in the wilderness without a compass or GPS, you
can construct a reliable type of compass using the stick and shadow method. This direction-finding instrument can be
highly accurate, and it works everywhere on Earth.
To create a compass using the stick and shadow method,
follow these simple steps:

Chapter 10: Looking Up to the Skies: Celestial Navigation 169 1. Take a 3-foot-long stick and plant it in the ground.
You can use practically any length of stick, but 3 feet
(0.9 meters) is ideal.
2. Take a rock and place it right on the point where the
stick’s shadow ends (see Figure 10-1a).
This is your first mark, and it represents west.
3. Wait at least 15 minutes and mark the new location of
the shadow’s point with another rock (Figure 10-1b).
During this time, the shadow moves. This second
point is east. If you don’t have a watch, you can simply
estimate this time — it doesn’t have to be exact.
4. Put your left foot on the first mark and your right
foot on the second mark.
You’re now facing true north.
5. Draw a straight line from one rock to the next.
This is your west-east line. See Figure 10-1c.
6. To complete the compass, make a cross by drawing a
line through the middle of the west-east line (Figure
10-1d).
This second line should be at a 90° angle to your first
line. This is your north-south line.
15 min
a b
c d
WS
E N
Figure 10-1: The stick and shadow compass.
nd.
east
est,
r
west
r
if
st
cing
m
s,
ere,
a,
es
o be
d

Part II: Eyeing Advanced Survival Techniques 170
Finding direction with your wristwatch and the sunIf you have your wristwatch set to local time, you can use it
to find direction. This technique uses the sun’s position to
determine north and south. Although the wristwatch method
isn’t as precise as the stick and shadow method (see the
preceding section), it’s much faster because you don’t have to
wait 15 minutes to find out which way is north or south. Just
keep in mind that this method becomes less accurate
the closer you are to the equator. But if you don’t have the
time to wait, just point your wristwatch at the sun and get on
your way!
If you’re in the Northern Hemisphere, follow these instructions
to find directions by using a watch:
1. Take a sheet of paper and place it on the ground;
then put your wristwatch on the paper.
You don’t have to use paper to mark your directions;
you can perform this technique on dirt or sand. The
main idea is to be thorough and make sure you have a
clear picture of a compass before moving on.
The wristwatch technique for finding direction uses
the hour hand of a watch. But what if your watch is
digital? No problem. Simply draw a circle on a piece
of paper and then draw in where the hands would be
at the current time. This is your “wristwatch” for the
next few minutes.
2. Take a twig and stand it up on the paper so the
twig forms a shadow.
3. Rotate your wristwatch until the hour hand (the
small hand!) points toward the sun and is perfectly
lined up under the shadow.
If your watch is set to local Daylight Saving Time
(DST), you must subtract one hour from the time
shown on your watch. For example, if your watch
reads 3:00, either temporarily turn it back to 2:00 or
simply make sure the stick’s shadow falls over the
point where the hour hand would be if you did move

Chapter 10: Looking Up to the Skies: Celestial Navigation 171it back (in this case, 2:00). Note: In the United States,
DST runs from the second Sunday in March until the
first Sunday in November; in Europe, it goes from the
last Sunday in March until the last Sunday in October.
4. Make a mark on the sheet of paper over the 12 at the
top of your watch.
5. Draw a mark at the halfway point between the
shadow and 12.
This mark points due south. Take a look at Figure 10-2a.
6. Take a straight edge and lay it over the watch; make
a mark on the exact opposite side of your watch
from your due south mark.
When you have this second mark, you have due north.
7. Without disturbing the paper, remove the watch and
draw your north-south line; then draw your east-west
line.
When navigating with a wristwatch, you don’t necessarily
have to use the paper each time you take a reading. If you
have a good idea of which way you’re going, take readings on
the move by just eyeballing the wristwatch.
a b
Figure 10-2: Using your wristwatch to find direction in the Northern Hemisphere (a) and Southern Hemisphere (b).
t
od
e to
st
on
ons
ns;
e
e a
s
e
be
he
y
r
ve

Part II: Eyeing Advanced Survival Techniques 172
The wristwatch method of finding direction works only if your
watch is set to local time. If your watch isn’t set to local time,
use another technique. See the earlier section “Drawing a
compass with the stick and shadow method” for one option.
In due time: Making a portable sun compass
If you’re a hands-on type of person, you can create your own portable sun compass to help you in a bind. All you need to make this improvised compass is a piece of paper (paper-board or cardboard work slightly better, because they’re slightly tougher than paper, and you have to carry the sun compass with you when you navigate), a stick, and a watch so you can track the time. The only prob-lem with this method is that you need several hours, or even an entire day, to make it right. But if you’re facing a long march to safety, it’s a good idea to make one of these because it keeps you from having to stop and set up a shadow compass every time you want to find direction.
To make a sun compass, follow these steps (and check out the following figure):
1. Take a piece of paper (or paper-board or cardboard) and put it on the ground in a place where the sun will shine on it all day.
2. Attach a 1- to 2-inch (2.5- to 5-centimeter) stick to the center of the paper.
This is your shadow-maker. Making your compass consists of simply tracking the shadow’s
path across the paper for as long as possible.
3. Throughout the day, at intervals of every 30 minutes, mark where the stick’s shadow ends; write down the time of day next to each mark.
For example, at 10:30, place a dot at the very tip of the shadow and write “10:30” next to your mark. Then wait 30 minutes and make a new mark with “11:00” next to it and so on. Look at the following figure. (The time increments in the figure are marked only on the hour for clarity, but you get the idea.)
4. Stay at it as long as you can.
It won’t take long to have a long arc of dots streaming across the piece of paper.
5. When you have enough marks to form an arc, draw an arrow that goes from your shadow stick to the closest part of the shadow line.
This line is true north.
You navigate with your sun compass by holding it to the sun and rotating it until the shadow falls on the current time of day. Your arrow will then point

Chapter 10: Looking Up to the Skies: Celestial Navigation 173our
me,
n.
g
s e e o
ot d k. e o g e r
g e
o at o
w
s it
nt nt
to true north. As the day progresses and you’re moving across the land, you just keep rotating the compass to keep the shadow on the current time. For example: If it’s 4 p.m., turn the sun compass until the shadow falls on the 4:00 mark. The north line you drew earlier is pointing to true north.
Consider your sun compass to be accurate for only a week. After seven days, you have to make another one (by then, hopefully, you’ll be out of the wilderness!). Also, try to use as many of the other techniques in this chapter as you can to constantly confirm your direction.
a
a b
c d
You can find direction in the Southern Hemisphere by using
your wristwatch, but you have to modify the technique
slightly. It’s still very easy, and it works every time. To do so,
follow these steps:
1. Place a sheet of paper on the ground and stand up a
twig on the paper so the twig casts a shadow on the
paper.
2. Place your watch behind the twig so that the shadow
falls directly over the 12.
The twig’s shadow should draw a straight line right
down the very center of your watch’s face, from 12 to 6.
3. Make your first mark at the midway point between
the shadow and the watch’s hour hand.

Part II: Eyeing Advanced Survival Techniques 174
This mark represents due north. Look at Figure 10-2b.
Your watch must be set to local time for this method
to work. If you’re in the Southern Hemisphere and the
country you’re in uses Daylight Saving Time (DST),
then you need to compensate by subtracting one hour
from the current time. For example, if it’s 4:00 p.m.
DST, you want to determine the midpoint between 12
and 3 on the watch to find north.
4. Take a straight edge and place it so you can make
your second mark on the exact opposite side of the
watch from your first mark.
You can now draw your north-south line. Afterward, you
can draw a perpendicular line to represent east and west.
Finding Direction with the StarsWhen you’re in the wilderness and don’t have any tools to
help you find your way, you can resort to what men and
women have done for thousands of years: Just look up. You
can rely on the stars to guide you to safety.
What follows in this section are the easiest methods in the
world, and they’re a lot of fun to know. Don’t be surprised if
you find yourself checking every night for your newfound
beacons in the sky. Enjoy.
Looking for the North StarYou can count on the North Star, called Polaris, to be your
most reliable signpost in the sky, because it’s the only heavenly
body that never moves or sets. (Actually, it does move, but
only a tiny bit — so little, in fact, that you’d need instruments
to detect its movement.) After you find the North Star, you can
easily determine the other directions: south, east, and west.
When you’re facing the North Star, west is on your left and
east is on your right. If you want to travel west, for example,
you simply turn to the left and keep your right shoulder
oriented on the North Star as you walk. The North Star lies
almost directly over the North Pole, so when you’re facing
it, you’re facing true north, not magnetic north, which is the
direction your compass points.

Chapter 10: Looking Up to the Skies: Celestial Navigation 175Before you can find the North Star, you have to find one of the
constellations that lie on either side of it, the Big Dipper or
Cassiopeia. These constellations point the way to the North
Star and allow you to confirm that you have just the right
pinpoint of light in the sky. The following methods work in
any season for everyone in the Northern Hemisphere (see
Figure 10-3):
✓ The Big Dipper (Ursa Major): The Big Dipper appears in
the sky just as its name suggests: like an enormous ladle.
You can find the North Star by following the pointer stars
at the end of the bowl.
✓ Cassiopeia: This constellation looks like a huge W,
although it usually appears tipped over on its side.
Find the North Star by following the inside point of
Cassiopeia.
a
b
c
North
Figure 10-3: The Big Dipper (a), the North Star (c), and Cassiopeia (b)
Finding due south with the Southern CrossIf you’re anywhere near the equator or below it, you can see
the Southern Cross and use it to find direction at night.
The Southern Cross appears in the sky just as advertised —
like a cross — so locating it after nightfall is no problem. Just
be sure you have the genuine article! Next to the Southern
Cross lies a false cross (see Figure 10-4c). The only way to be
sure you’ve found the right one is to locate the Pointer Stars,
2b.
od
he
our
12
he
you
west.
s
u
if
enly
s
an
e,
e

Part II: Eyeing Advanced Survival Techniques 176two bright stars near the Southern Cross’s base. You should
think of the Southern Cross and the Pointers as parts of the
same body.
You can find south with the Southern Cross; just remember
that the Southern Cross doesn’t always sit directly over the
South Pole. You find due south by using the Southern Cross
and Pointers like a ruler. Just draw an imaginary line straight
down the center of the Southern Cross (Figure 10-4b) and
draw another imaginary line that cuts the space between the
Pointers in half (Figure 10-4a); follow these two imaginary
lines, and you get a point in space where the lines cross
(Figure 10-4d). Directly below this point lies due south.
a
b c
d
South
Figure 10-4: The Pointer Stars (a), Southern Cross (b), and false cross (c).
Chapter 11
Trekking over LandIn This Chapter▶ Traversing trails
▶ Knowing what to do when you’re disoriented
▶ Sitting still or moving when you’re lost
▶ Traveling over open wilderness
▶ Handling obstacles
It’s not hard to picture the situation: You’ve been walking
all day on a well-marked trail or in a seemingly familiar
area, and now the sun is going down and suddenly nothing
seems well-marked or familiar at all.
You can work your way out of this mess, but it’ll take time,
a clear head, and a lot of patience. This chapter helps you
traverse over trails and shows you the basics of traveling
through the wilderness, including info on how to cross rivers
and streams and what to do if you’re lost.
Understanding Trail TravelYou may be wondering how difficult traveling on trails can
actually be. You’d be surprised, brave traveler. Any wilderness
area you go into is in reality a maze — a labyrinth of trails,
false trails, animal trails, and washes. To avoid meandering or
even getting lost in the wild, check out the following practical
tips for successfully traveling trails. (And see Chapter 9 for
the basics on finding direction.)
Before you head out, let someone know where you’re going
and when you plan to be back. If you don’t return as expected,

Part II: Eyeing Advanced Survival Techniques 178
that person can contact the authorities and help set the
search-and-rescue teams in motion.
Knowing where you areWhen traveling on a trail or doing some other activity in the
wild, try to know your position as closely as you can, as often
as you can. This deceptively simple principle can do more to
keep you from getting lost than just about any other.
Leaving the trail to take a shortcut gets more people lost in
the wilderness than just about anything else. Many times,
leaving the trail and heading directly for a large landmark
seems like a shorter route, but doing so is frequently the start
of trouble. Without the help of the trail, even experienced
wilderness people sometimes become disoriented.
Another practice that gets people lost is leaving the trail to
walk down a slope, such as down to a creek. When you walk
down from a trail, you lose sight of it. You can still see signs
of it, but many times they can be misleading. If you do walk
down slope from a trail, always turn around and look behind
you to make sure you know the way back.
People usually get lost in the wilderness due to a momentary
lapse in awareness — part-time navigation. Many times, people
who are bird-watching, berry-picking, or hunting end up lost
because they’re so concentrated on the task at hand that they
only occasionally look up to see where they’re going. They
frequently find what they were looking for, but then they
realize that they’ve strayed into an unknown area.
Knowing where you’ve beenFinding your way back is more important than forging ahead.
You can stay out of trouble almost indefinitely if you can
remember how to get back to where you came from, such as
the car, the river, or the trail.
Your greatest survival tool on the trail is the ability to stop,
turn around, and look behind you. Always look behind you
when you’re walking on any trail — even if you don’t expect to
go back that way. People get lost in the wilderness every year

Chapter 11: Trekking Over Land 179because they get on the trail and think only about moving
ahead. When they turn around to go back, the trail doesn’t
look the same — it has lots of turns they didn’t see and lots
of landmarks they aren’t sure about. The following is a list of
problem areas to keep an eye on. When encountering these
points, examine the area well enough that you’d know it in the
dark or in a driving rain.
✓ Trail junctions and intersections: Many times, a pathway
joins the trail you’re walking on and you don’t realize it.
When you come back down your trail, that seemingly
harmless junction is going to be a fork — a fork you’ve
never seen before. When you’re hiking, turn around and
look at each junction from the direction you’d see it from
if you were returning. Stop and make sure your mind
absorbs each junction. Let it really sink in.
✓ Old trails, false trails, animal trails, and washes: Always
watch for trail imitators and imposters. A single sudden
rain can create a track in the land that looks just like the
turnoff that takes you back to your car or the road, but it
in fact takes you off to nowhere.
✓ Tunnels through foliage: These are especially bad
because when you emerge from the tunnel after you’ve
had no view for a long time, your sense of spatial
relationship is distorted.
✓ Rivers, streams, lakes, landforms, and manmade
structures: If you run into a landmark in the wilderness,
keep in mind that it may have a twin — a nearby lookalike
that can easily fool you in the rain or in the dark. Always
look for distinguishing characteristics — shapes of rocks,
strange trees, and so on.
✓ An area outside your normal stomping grounds: If you
frequently hike in a particular area but then decide to
push your boundaries a bit, look behind you as you leave
familiar grounds.
✓ Your old stomping grounds: Remember that when you
go back to your Uncle’s old farm, or when you take the
trail to your favorite old swimming hole, the lay of the
land may have changed.
In the next section, we show you various techniques you can
use to find your way back should you become disoriented.
e
ten
to
n
tart
k
s
k
nd
ry
ople
st
hey
ad.
as
,
t to ear
Part II: Eyeing Advanced Survival Techniques 180
Getting Back on Course When You’re Disoriented
If you’re disoriented, stop. Plant yourself. Take a deep breath
and settle your mind. You can almost always find your way
out of the wilderness if you can calm yourself and work the
problem thoroughly.
If that seems like simple advice, it’s not. More often than not,
your instincts tell you to double your efforts, to try harder, to
walk more — and to walk faster. But the harder you try, the
less you think. The instinct to double your efforts only makes
things worse. If you find yourself off course and disoriented,
this section can help you get back on course.
Don’t backtrack unless you’re absolutely certain that you
know where you came from. The most important thing to do
when you’re disoriented is to find out where you are now. Sometimes backtracking just gets you more disoriented. If you
do backtrack, establish a range and mark your trail. For more
on these basic travel practices, see “Traveling in a straight
line” and “Marking your trail,” later in this chapter.
Reviewing your calculationsIf you’re using instruments to find your way and you’ve
become disoriented, make sure you haven’t made an error in
your calculations or measurements (for more on calculations,
see Chapter 9):
✓ Make sure your map is oriented correctly. Incorrectly
oriented maps get more people in trouble than just about
anything else.
✓ Make sure you’re looking at the right map. Keep in mind
that you may have walked off the map or that you may
have been navigating all this time with the wrong map.
✓ Check the date of your map. Your map may be outdated
and inaccurate — especially in the category of manmade
features, which change all the time.
✓ Check your compass corrections. Many times, you have
to correct for compass error, which is the source of so

Chapter 11: Trekking Over Land 181many mistakes. Make sure your compass isn’t being
affected by some metallic or magnetic influence.
✓ Make sure you’re calculating with the right units of
measurement. Not all maps use the same units of
measurement, and many maps offer the ability to
measure distances in two or three different units —
miles, kilometers, and so on. When using a GPS receiver,
make sure it’s calibrated to the units of measurement on
the map and to the datum setting (the frame of reference
that matches the geographic features to map coordinates).
Using your senses to help you find your wayIf you don’t have maps or instruments with you, or if you’ve
examined them and you still can’t make heads or tails of
where you are, you can reorient yourself by examining various
clues around you.
Stop and observeTaking a moment to stop and look around can be tough, and
sitting still can be excruciating, but stopping to observe your
surroundings and thinking through your earlier movements
can get you back on the trail. Try the following:
✓ In your mind, go back to the last point where you were
certain you knew where you were. Make a list of what
you’ve seen and everywhere you could’ve gone wrong.
If you can figure out where you had your lapse in
awareness, you can probably get out of trouble.
✓ In your mind, try to replay your entire hike, from when
you left your base to where you are now. What were
the major features you passed? Did you cross a river or
stream?
✓ Examine the features and landforms around you. Any
two landforms can look the same if you only glance at
them, so don’t assume that you’ve seen everything on
the first glance. You usually can’t distinguish one creek
bed or hill from another unless you spend a minute
contemplating it. Many features appear different in
different shades of light.
ath
y
e
ot,
to
e
kes
d,
o
you
ore
in
ns,
y
out
nd
ted
ade
ve
o

Part II: Eyeing Advanced Survival Techniques 182
W
✓ Watch for sunlight in thinning forests or scrub. You
may be next to a major trail or road that’s only 50 feet
away. A major shaft of sunlight can indicate a break in
the forest from a road or a trail.
ListenSitting in the quiet can be brutal, but it works. The only way to
listen is to be still — really still. Hold your breath if you have
to. Here are common sounds to listen for:
✓ River rapids, waterfalls, and surf: Water noises are
among the very best. On some clear nights, it’s not
uncommon to hear the surf crashing on a beach that’s
miles away — even on the other side of hills.
✓ Highways and roads: One can hear the roar of cars from
miles away, but hearing a single car takes a little work.
Sometimes people mistake these sounds for water noise.
✓ Barking dogs: A steady, single bark usually denotes a
domesticated dog. But remember that in most wilderness
areas of the world, domesticated dogs aren’t the only
types of canine.
✓ Slamming doors: This noise can be heard from a long
distance, but you must be attuned to hearing it. This
sound is especially prevalent in state and national parks.
✓ Laughter: You can frequently hear people sitting around
a campfire from a long distance — if you’re listening for
them.
Taking action when you’re disorientedIf you’ve become disoriented, your sole priority should be to
figure out where you are — not to travel more. If you can’t
establish your position on a map, do everything you can to
understand your relative position — in other words, where
you are in relation to some nearby landmark. At least you
can establish a base, a single point you can work from. After
you’ve established your base, mark that spot.
Plan on returning to your base after you’ve tried one or both
of the following tricks:
Chapter 11: Trekking Over Land 183 ✓ Move to higher ground. Higher ground gives you the
ability to see a lot of terrain and landmarks all at once —
this alone can tell you where you are. Move to higher
ground only if you know where higher ground is — and
you’re positive you’ll be able to find your way back to
your current position.
✓ Expand out in concentric circles. Do this slowly.
Venture out nearby and look at the lay of the land around
your position. Do this in very small increments, and
return to base frequently. You may be able to pick up the
trail again this way.
Before you move, make sure you’ll be able to get back to
where are right now. Whether you move to higher ground or
move outward in concentric circles, you need to mark your
trail very prominently. Check out the later section “Marking
your trail” for specific advice.
What to Do When You’re LostWhether you wandered off trail or your plane had an
unplanned, not-so-gentle landing in the woods, it never hurts
to admit it: You’re lost. In this section, we discuss staying put
and waiting for rescue, and we tell you what to do if you make
the risky decision to move when you’re lost.
Staying put so people can find youIf you’re monumentally lost, or if you have good reason to
believe that someone is going to come looking for you, stay
put. The following is a list of typical situations in which you
need to stay where you are:
✓ You’re separated from your hiking or tour group.
✓ You’ve left word saying you’ll be back.
✓ You were involved in a crash or any other tragedy that
typically mobilizes search-and-rescue services.
✓ You know that search-and-rescue services are already
looking for you. Many times, hikers or victims call in a
y to
ve
om
.
se.
ness
ks.
nd
or
to
er
th

Part II: Eyeing Advanced Survival Techniques 184
rescue and then move, which is the worst thing they can
do. You only have to be a few feet away — only a few
feet — to make yourself invisible to search-and-rescue
services.
If you have reason to believe someone may come looking for
you, your responsibility is to stay alive and healthy so you can
signal them. (For more on signaling, check out Chapter 12.)
Even if your current situation is tough, try to do what you can
to stay put. Here’s how to ward off the cold and make yourself
more comfortable as you sit tight:
✓ Make a fire and stay the night. If you can get a fire going,
you can turn the tables on the wilderness. For more on
the fine art of starting a fire, see Chapter 5.
✓ Make a shelter. A small, tight-fitting, hovel-like shelter
can do much to insulate you. Building a shelter when
you know there’s a town nearby may seem crazy, but
you need to fight hypothermia in any way you can. If you
build a good shelter, you can get through the night —
which is much better than wandering. For more on
building your wilderness home, see Chapter 6.
Anytime you build a shelter, you need to mark it;
otherwise, you’re building camouflage! You can use
brightly colored cloth or reflective metal, or you can
break branches or stack rocks to mark your shelter.
Deciding to travelWhen you’re lost, you may realize the only way you’re going
to be rescued is to move. In this section, we tell you how to
move systematically when you’re lost. In the next, we explain
how to travel over open wilderness.
Traveling when lost may make you even more lost than you
already are. Even worse, you may move out of the area where
people are searching for you. Making the decision to travel
when lost must be your last resort. Travel only if you must
move because of safety reasons or you’ve logically concluded
that no one is going to come looking for you.
Preparing to moveIf you’re dead set on moving, take the following precautions:

Chapter 11: Trekking Over Land 185 ✓ Above all, make a plan. Take a bearing on something —
a tree, a rock, anything; don’t just walk aimlessly. (For
more on traveling with bearings, see “Traveling in a
straight line,” later in this chapter.) If you’re leaving
people behind, make a timetable and a schedule of
contacts (if possible) and thoroughly discuss what the
plan of action is.
✓ Make the necessary preparations. Carry water, make
copies of maps, and carry as many tools as you can.
✓ Leave a message at your current location. Write down,
specifically, the following information:
• Who you are
• What you’re doing
• The history of your situation
• What time you left
• Where you went
Then display this note prominently. If someone comes
looking for you, this information may be the only hope he
or she has of locating you. If possible, periodically leave
small notes that searchers may discover along the way.
✓ Leave bright markers behind you as you move. Do
everything you can to help search-and-rescue units find
you. If you don’t mark your trail, you complicate the
process enormously.
Detecting signs of civilizationYou can detect civilization by listening for sounds and looking
for physical signs. For a list of some of these, check out the
earlier section “Using your senses to help you find your way.”
Here’s a list of ways to find civilization; always look for as
many indicators as you can:
✓ A glow on the horizon: Cities and towns glow on the
horizon. Even if a town isn’t nearby, look for the glow of
large distribution complexes or trucking terminals in the
countryside.
✓ Reflections off of low clouds: Anytime you have a low
sky at night, especially if it’s dense, white, and overcast,
you can see reflections from human-made light. Even a
campfire reflects on the underside of an overcast sky.
an
e
or
can
can
self
ing,
n
r
you
g
o
ain
u
ere
ded
s:
Part II: Eyeing Advanced Survival Techniques 186
B
✓ Smoke: You can see smoke from great distances. A single
campfire gives off only a tiny black trickle, so scan the
horizon slowly and carefully.
✓ Converging power lines or railroads: Power lines and
railroads are especially useful for finding civilization if
they seem to be converging.
Never assume that your troubles are over if you have a
road or power line in front of you. Many times, road and
power lines go for miles and miles and lead you deeper
into the wilderness.
✓ Frequent, low-flying aircraft: If you can see aircraft
descending or ascending, especially if you see a series of
aircraft moving in the same general direction, that may
point to an airfield or airport.
✓ Noise: Keep your ears tuned for noises that indicate
civilization, such as car or snowmobile engines, voices,
industrial machinery, and so on.
✓ Squared land and fences: If you have a view of the area
around you, look closely for squares or rectangles in the
distance. These shapes are a dead giveaway for civilization.
✓ Smells of food or industry: Food smells and industry
exhaust travel long distances. Many experienced
navigators have followed their nose to safety.
Following water to civilizationYou’ve probably heard the old adage that you can follow
water to civilization, or perhaps you’ve heard that you should
always work your way downstream. Nothing’s wrong with this
advice, except that it’s not a guarantee. Sorry! You can follow
a drainage to a creek and then a creek to a river and so on,
but you may be traveling for a very, very long time before you
hit people.
Don’t travel down the bottoms of steep canyons or river
drainages — especially if you have no way to get out in a
hurry. The water level can rise swiftly, even if it hasn’t been
raining. We’ve been on rivers when, unknown to us, the
floodgates of a nearby dam were suddenly opened. The water
rose 10 feet in 20 minutes.
Chapter 11: Trekking Over Land 187
Blazing Your Own TrailIf you’re in the wild and don’t have a trail to guide you, you
may end up setting out across the open wilderness. This
section gives some pointers you need to remember when
traveling without a trail and explains what you need to do to
orient yourself.
Be realistic when estimating your rate of travel off trail. Even
if you’re tough, you can still probably travel only about 1 mile
per hour in bad terrain. Many times, you go much slower. Just
a small amount of underbrush and growth can slow you down
to a crawl.
Understanding meanderingWhen you’re moving through territory without the use of
trails, maybe for the first time, keep in mind the following
unavoidable problems:
✓ Without anything to orient you, you tend to walk in a
series of arcs or in an aimless fashion. Everybody, you
included, tends to veer to one side. This has nothing to
do whatsoever with being right-handed or left-handed;
it has to do with the fact that one leg is always slightly
longer (and usually stronger) than the other. (Didn’t
Mother always say you were special?) This is true for
everyone, and it causes a slow and constant turn unless
your mind can orient itself and correct for it.
✓ You tend to make arbitrary turns when you reach obsta-
cles you’re unsure of. Many people take the path of least
resistance, or they turn down the trail that appears more
inviting, or they prefer to turn right or left, even though
there’s no real navigational rationale for this turn. If you’re
uncertain, take your time and think through your turns.
✓ You always tend to turn away from irritants. Irritants include heavy winds on one side of your face, burning
sun, briars and thorns, and especially slopes. Whenever
you walk on the side of a slope, you tend to want to walk
either up it or down it (especially down).
Now that you know some ways you can get turned around,
you’re ready to try to walk in a (somewhat) straight line.
ngle
d
f
a
nd
r
s of
y
s,
ea
he
on.
uld
this
ow
you
n
ter

Part II: Eyeing Advanced Survival Techniques 188
Traveling in a straight line
To make a straight path, establish a bearing before you set
out into the unknown. A bearing is simply an imaginary line
you draw from your position to a prominent landmark or
feature. Even if you can see only 50 feet in front of you, draw
a bearing to a tree or a rock. This helps immensely because it
cuts down on the meandering and wandering that can cause
you to become disoriented. One of the best types of bearings
is the type you make with a compass. (For more on compass
bearings, check out Chapter 9.)
You can make an excellent bearing by establishing a range.
A range is an imaginary line that you draw through any three
landmarks that line up in a column. To make a range, you
have two options:
✓ Connect three landmarks. Draw a straight line through
three landmarks ahead of you, such as a bush, a rock,
and a hill (as in Figure 11-1a). Then follow this straight
line through a twisting and turning wilderness.
✓ Use a back bearing. A back bearing is simply a line that
runs from an object behind you, through your body,
and to an object in front of you. This gives you a range
because it gives you three things you can line up in a
column.
a b
Figure 11-1: Using a bearing (a) and file (b).
Chapter 11: Trekking Over Land 189
Marking your trail
Whenever you’re working in uncharted territory with bearings
and ranges, mark your trail. Marking your trail, or trailblazing, means leaving behind physical signs of your movement
through the wild. Just keep in mind that marking the wilderness
is something you do only if you’re truly lost. Marking your
trail does the following:
✓ Gives you the ability to work your way back if you hit a
dead end
✓ Allows you to turn around
✓ Prevents you from getting lost
✓ Helps you to maintain a straight line of travel because
you can check your back bearing on the trail markers
you’ve left behind
You can mark your trail with just about anything you want —
use piles of rocks (cairns), break tree limbs, or tie brightly
colored or reflective material to branches. Just make sure
your markers are visible from both sides of the tree or landmark,
back and front, so you can see them when you look behind
you and so search-and-rescue units can see them as they’re
following you.
In dense jungle, forest, high underbrush, or bad conditions,
you may need to shorten the distance between markers down
to just 20 feet or less. Patience is the key in these situations.
Trailblazing can seem tedious at times, but if you’re thorough,
this method can save your life in low-visibility terrains.
If you’re lucky enough to be traveling with a group, you can
blaze the trail by setting up a moving range, known as a file. Here’s how (refer to Figure 11-1b):
1. Send two people out in front of you.
One is the aimer, and one is the trailblazer.
2. If you’re standing at the back of the line, use the
aimer in the file to line up the trailblazer; then coach
the two down the range using hand signals until
they’re almost out of sight.
e
w
e it
e
gs
ss
ee
h
t
at
e
Part II: Eyeing Advanced Survival Techniques 190
3. After the trailblazer has gone as far as you want him
or her to go, the trailblazer sets a mark — blazes the
trail — while the rest of the file moves forward.
Crossing Obstacles in the WildWhen you encounter obstacles in the wilderness, you should
generally try to go around them rather than over or through
them. All too often, survivors are injured or killed in falls or
are swept away in streams and rivers. Sometimes, however,
you have little choice. This section focuses on obstacles you
may encounter and how to handle them. Before you attempt
to climb or go through an obstacle, make sure you’ve
established a bearing on a distinct landmark on the other
side. For more on establishing a bearing, see “Traveling in a
straight line,” earlier in this chapter.
Crossing rivers and streamsIf you come up to a river or stream and crossing it is your only
option, you need to take some precautions. You can either
try to walk through the water or build a raft. This section
covers these two choices. (For info on crossing frozen water
obstacles, see Chapter 16.)
Wading acrossThe first step in walking across a river or stream is to choose
a place to cross. From high ground or a safe tree, examine
the river for possible crossings and look for a ford. A ford is
a place where the river narrows or becomes shallow. Many
times, a little exploration can really pay off. Fords aren’t
necessarily obvious, and many times you can see them only
when you’re close to them.
As you evaluate possible crossing places, think about where
you’ll end up on the other side of the river. The best choice
for a landing site is a sandy bank. Know that your landing
site will be well downstream. The moment you start to move
toward the opposite bank, the current will push you. Don’t
fight this power; crossing at an angle is always best. Expect to
cross a river at a 45° angle.

Chapter 11: Trekking Over Land 191
If you have any type of plastic sheeting with you, take your
clothes off and roll them into it, and then tie up the whole
bundle with your belt or shoelaces. Then tie the bundle to
your wrist and try to hold it above the water. If tied tightly,
even the most improvised of packages can keep your
clothes dry long enough for you to get across (and help
you momentarily float should you lose your footing).
When crossing, you can use any one of the following techniques:
✓ Crossing solo with a pole: You can use a pole to help
break the river’s current. Find a strong tree branch or
other pole, about 3 to 4 inches (7.5 to 10 centimeters) in
diameter and about 7 to 8 feet (2 to 2.5 meters) long, and
dig it into the riverbed upstream from your body, as in
Figure 11-2a. The pole disrupts the flow so you can walk
at a 45° angle to a strong current. Drag the pole along the
riverbed, moving it by small increments, and stay behind
the break in the current.
✓ Crossing with a group and a pole: Use a strong pole that
several people can hold onto. Have your group form a
single column, lined up on the pole, as in Figure 11-2b.
This column breaks the flow of water, making it easy
for everyone to keep his or her feet. The lightest person
should be the one farthest upstream.
✓ Crossing with a group and a loop of rope: Send the
strongest person across first. That person should stay
on the inside the loop of rope, with the other two people
holding the rope on shore. The second person holds
onto the rope as he or she crosses. The third person
crosses on the inside of the loop, as the first person did.
See Figure 11-2c.
a
b
c
Figure 11-2: Crossing a stream solo (a), in a group (b), and with a rope (c).
him
the
ld
h
r
r,
ou
pt
a
only
er
se
s
y
y
re
e
ve
t to

Part II: Eyeing Advanced Survival Techniques 192
You should avoid rapids, but if you find yourself in swift
water, try to float on your back with your feet pointing
downstream. Escaping rough water is possible as long as you
keep your feet in front of you and your buttocks high. Your
feet and hands may occasionally graze and bounce off the
riverbed like shock absorbers — try to keep this to a minimum,
because you want to avoid having underwater rocks or tree
roots entrap one of your limbs, and you’re trying not to fight
the current. Try to float smoothly until you can swim to one
side of the river.
Building a raft to cross the waterYou can make improvised rafts from one of three types of
materials or a combination of all three. We list these raft-
building materials here, in order of their practicality:
✓ Empty containers: Anything that holds air can be
tied together or put in a bag or tarp and tied up, as in
Figure 11-3a.
✓ Logs and Styrofoam: Styrofoam is the best. Always test
the floatability of wood — many types don’t float very
well. Thick bamboo canes are ideal for building fast,
lightweight rafts. You can tie logs or Styrofoam together
with two pieces of rope and sit in it as in Figure 11-3c.
You steer and propel this raft with your hands and feet
(it doesn’t lend itself very well to paddles).
✓ Lots of logs or bamboo poles: With these materials, you
can build a conventional raft using crossbeams, as in
Figure 11-3b. Use a simple levering process to tighten the
lines. Simply wrap the line around a pole a few times and
then pry upward.
a b c
Figure 11-3: Your options for rafts to cross rivers and streams.
Here’s how to make a trapped-air raft with a plastic sheet
(check out Figure 11-4):
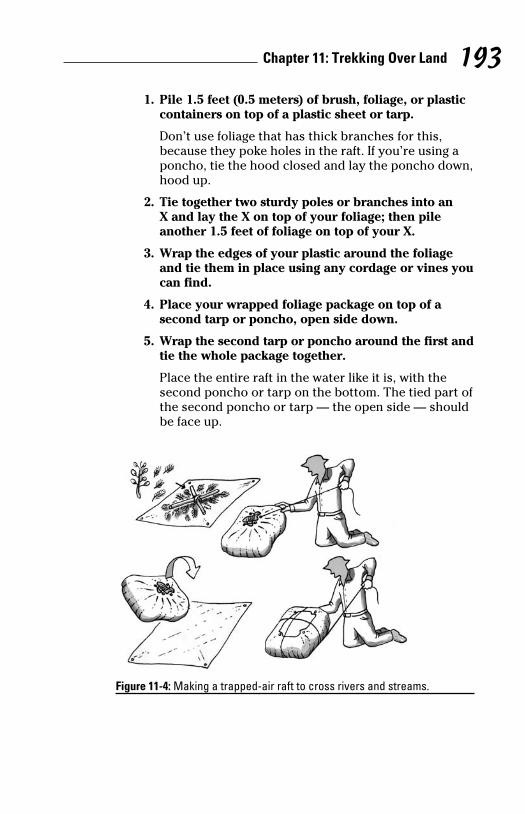
Chapter 11: Trekking Over Land 193 1. Pile 1.5 feet (0.5 meters) of brush, foliage, or plastic
containers on top of a plastic sheet or tarp.
Don’t use foliage that has thick branches for this,
because they poke holes in the raft. If you’re using a
poncho, tie the hood closed and lay the poncho down,
hood up.
2. Tie together two sturdy poles or branches into an
X and lay the X on top of your foliage; then pile
another 1.5 feet of foliage on top of your X.
3. Wrap the edges of your plastic around the foliage
and tie them in place using any cordage or vines you
can find.
4. Place your wrapped foliage package on top of a
second tarp or poncho, open side down.
5. Wrap the second tarp or poncho around the first and
tie the whole package together.
Place the entire raft in the water like it is, with the
second poncho or tarp on the bottom. The tied part of
the second poncho or tarp — the open side — should
be face up.
Figure 11-4: Making a trapped-air raft to cross rivers and streams.
ou
um,
e
ht
e
st
er
et
ou
the
and
Part II: Eyeing Advanced Survival Techniques 194
Improvised rafts are vulnerable to capsize and disintegration.
To cut down on the problem of capsize, build your raft as
wide as you can. Small rafts, or long thin ones, are unstable.
The best design is a large raft in the form of a square or circle.
To avoid having your raft fall apart, overbuild it. Use as much
cordage as you can and tie your knots tightly. (For more on
ropes and knots, see Chapter 14.)
Going over loose rock and sandA gentle slope can be just as dangerous to you in the wild as
a cliff. Many times, easy-looking hills have gravel and loose
sand on them, and as soon as you begin to slide on this type
of surface, you can’t stop. Before working your way up or
down, take a moment to plan a route. If you really examine the
terrain before you, you can usually see a possible pathway
of ledges, pits, divots, holes, tufts of grass, flat spots you can
step on — anything that may support your weight.
When going over loose rock and sand on a slope, you have
two options:
✓ The kick-step: The kick-step is one of the most effective
techniques you can use on loose rock or sand. To use
this method, take a moment to aggressively kick or dig
each foothold with your shoes. Make sure you have a
good purchase on the land before you put your weight
on the foot you’ve been kicking with.
✓ The heel kick-step: This method is excellent for descend-
ing a sandy slope. Facing outward, with your back to the
hill, take your heel and drive it sharply into a pit or tuft of
grass below you. Use your heel like a sharp edge — you
want to drive your heel into the earth and form a step
that can hold your weight. With a little practice, you can
figure out which pits and imperfections in the surface
lend themselves to this method.
When using the heel kick-step to descend, keep your
downward momentum to a minimum. Dig your heel in,
and then stop. Then dig in again, and stop. After you get
moving and your confidence in this method builds, your
upper body often begins to take on mind of its own —
and this leads to slipping and sliding, so take it slow.
Chapter 12
Signaling for RescueIn This Chapter▶ Understanding the ins and outs of signaling
▶ Choosing the right language
▶ Knowing some tools you can signal with
▶ Using radios and cellphones to signal
▶ Preparing for the arrival of a rescue helicopter
You can kick up quite a bit of commotion in the wild and
still not be noticed. What seems obvious to you can be
completely invisible to a potential rescuer. Understanding
what people can actually see and hear — what really gets you
noticed — is part of the art and skill of signaling.
In this chapter, we show you ways to get the attention of
anybody who’s looking for you — and even those who aren’t.
We show you how you can get attention, how to use a radio
to make a Mayday distress call, and how to prepare for the
arrival of help from the skies.
Grasping the Basics to SignalingWhen you’re in the wild and need someone to find you,
you send out a signal — basically anything that can get you
noticed. A good signal is one that not only gets the attention
of search-and-rescue units but also gets the attention of those
who are not looking for you, too — people or passersby who
may be able to help you long before the professionals arrive.
This section helps you establish a firm signaling foundation so
you’re easier to find.
Part II: Eyeing Advanced Survival Techniques 196
Picking a good locationIf you’re in a situation where you have to begin signaling, take
a moment to consider doing it in a place that gives you the
maximum visibility. Prime real estate for good signaling is
usually
✓ The highest elevation you can safely get to
✓ A spot that can be seen from all sides; ideally, you want
to have 360º visibility
✓ An expanse with few natural objects that would distract
rescuers; for instance, an open field with no large boulders
✓ A wide opening, free from tree lines or cliffs; the wider
the opening, the better
If you can’t stay at your signaling spot, leave behind a signal
pointing to where you are. Large, well-contrasted, and angled
arrows make excellent signals. For more on these types of
signals, see “Mastering the Language of Signaling,” later in this
chapter.
Making your signal stand outThe basic philosophy of signaling is bigger, brighter, different. These three ideas encapsulate the entire spectrum of signaling.
Anytime you can do something bigger, brighter, or different —
especially in conspicuous spot — you’re improving your
chances of being found. This section explains how you can
make your signals bigger, brighter, and different.
BiggerBigger means anything that makes you, or your signal, larger.
A human being is actually a very small thing on this Earth,
so whenever you can be a part of something larger, you’re
making yourself more visible.
If you’ve been in an accident, stay with your downed aircraft
or near the debris field of your damaged or capsized vessel.
Debris fields represent a much larger position marker than
your body — and search-and-rescue units look for them
specifically.
Chapter 12: Signaling for Rescue 197If you’re in a group, stay together and form a symbol. If you’re
in the water, link arms with others in your group.
BrighterBrighter means a more intense signal. Brighter can mean more
light at night, such as more fire or more flares, but it can also
mean using the brightest colors you can get your hands on.
Here are some ways to make your signal brighter:
✓ Make more than one fire, or make a larger fire.
✓ Put reflectors near anything that puts out light.
✓ Use any types of colored objects, such as clothing, for
your signals. If your undershirt is brighter than your
outerwear, consider putting the undershirt on over
the outerwear.
✓ If you have brightly colored objects that you can lie out
on the ground or sea ice, do so. Anything that contrasts
with the earth’s tones can stand out.
DifferentDifferent can mean almost anything that contrasts with its
surroundings or that appears wrong or out of place.
Whenever you make something stand out, such as when you
fly the flag upside down or leave the hood up on your car,
you’re signaling.
Nature’s lines are curvy and messy, so any line you can make
that’s straight and clean is good for signaling. Your best signals
are right angles and hard angles — these can be seen in the
wilderness from great distances.
Being persistentUnfortunately, getting someone’s attention may take a while.
Don’t expect to be seen easily or on the first try. You should
always be prepared to send out multiple, repetitive signals.
It’s common for search-and-rescue units or people going
about their business to pass right by someone who’s signaling
frantically. Many times, airplanes or ships change course and
only appear to be heading your way. This can be frustrating in
the extreme and demoralizing. Continue to signal until you’re
certain they’re coming for you.
ake
nt
ct
ders
r
al
ed
this
nt. ng.
—
er.
aft
l.

Part II: Eyeing Advanced Survival Techniques 198
Mastering the Language of Signaling
You can always simply shout, “Help!” but in survival situations,
you often want to send a message that lasts longer, goes
farther, or describes more. A distinct group of words and
symbols comprising the language of signaling, known as
distress signals, can increase your odds of being rescued.
These internationally recognized symbols mean only one
thing: Someone is in peril.
This section takes a closer look at the language of signaling,
whether you’re writing, speaking, moving dirt, or sending out
sounds or flashes of light. Read on for the basic symbols and
words you can use if you need help.
Using three of anything to show something’s upAnytime you use three of any type of signal, you’re sending
out a strong, universally recognized message. Three loud
noises, three bright flashes, three fires built in a triangle — all
of these are recognized as distress signals, and they fall into
our criteria of “bigger, brighter, and different.” (See the earlier
section “Making your signal stand out.”)
You can use three of anything if you don’t know any other
types of signals, or you can communicate in more specific
terms, such as SOS or Mayday. These are a little bit more
complex, but they’re very powerful — check out the next
section.
SOS and Mayday: Calling for urgent helpYou can use SOS or Mayday anytime, anywhere — you don’t
have to be on the water or in the air, and you don’t have to be
an official, like a ship’s captain, to use them.
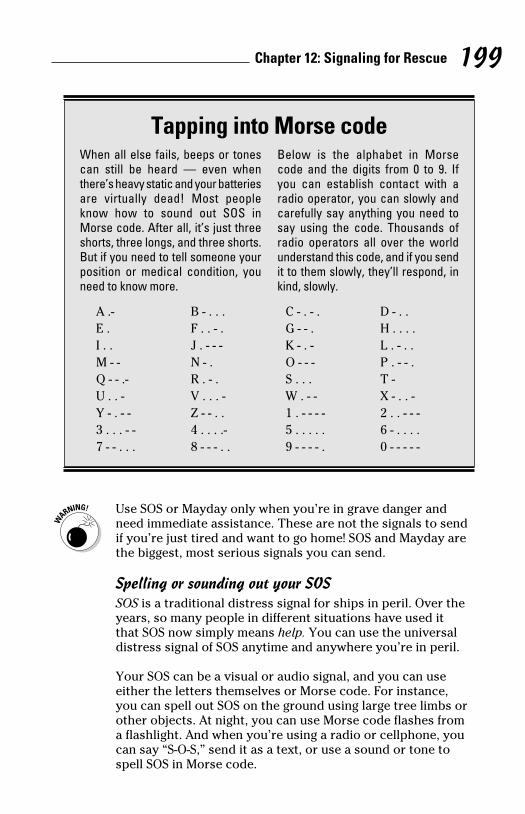
Chapter 12: Signaling for Rescue 199
Use SOS or Mayday only when you’re in grave danger and
need immediate assistance. These are not the signals to send
if you’re just tired and want to go home! SOS and Mayday are
the biggest, most serious signals you can send.
Spelling or sounding out your SOSSOS is a traditional distress signal for ships in peril. Over the
years, so many people in different situations have used it
that SOS now simply means help. You can use the universal
distress signal of SOS anytime and anywhere you’re in peril.
Your SOS can be a visual or audio signal, and you can use
either the letters themselves or Morse code. For instance,
you can spell out SOS on the ground using large tree limbs or
other objects. At night, you can use Morse code flashes from
a flashlight. And when you’re using a radio or cellphone, you
can say “S-O-S,” send it as a text, or use a sound or tone to
spell SOS in Morse code.
ns,
g,
out
nd
g
all
o
lier
’t
be
Tapping into Morse codeWhen all else fails, beeps or tones can still be heard — even when there’s heavy static and your batteries are virtually dead! Most people know how to sound out SOS in Morse code. After all, it’s just three shorts, three longs, and three shorts. But if you need to tell someone your position or medical condition, you need to know more.
Below is the alphabet in Morse code and the digits from 0 to 9. If you can establish contact with a radio operator, you can slowly and carefully say anything you need to say using the code. Thousands of radio operators all over the world understand this code, and if you send it to them slowly, they’ll respond, in kind, slowly.
A .- B - . . . C - . - . D - . .
E . F . . - . G - - . H . . . .
I . . J . - - - K - . - L . - . .
M - - N - . O - - - P . - - .
Q - - .- R . - . S . . . T -
U . . - V . . . - W . - - X - . . -
Y - . - - Z - - . . 1 . - - - - 2 . . - - -
3 . . . - - 4 . . . .- 5 . . . . . 6 - . . . .
7 - - . . . 8 - - - . . 9 - - - - . 0 - - - - -

Part II: Eyeing Advanced Survival Techniques 200
Try Morse code on your radio if your batteries are running
low, you have poor reception, or there’s a lot of static. Radio
operators can frequently hear sharp, piercing beeping sounds
through heavy static when no other signals can be heard.
These sounds are unlike the sound your voice makes over
the radio, and because of that, they’re rarely mistaken or
confused for something else. (For more on using a radio, see
“Sending a distress call over the radio,” later in this chapter.)
Anybody can spell SOS in Morse code. It’s just nine signals:
Three short signals, three long ones, and three short again. In
Morse code, SOS looks like this:
. . . - - - . . .
That’s it! If you want to know numbers and the rest of the
alphabet, check out the nearby sidebar titled “Tapping into
Morse code.”
Calling MaydayThe most common radio distress signal is Mayday, which is the
international code word for serious emergencies. Mayday comes
from the French phrase m’aidez, which means “help me.”
You can spell Mayday on the ground or on the roof of downed
aircraft or shelters, but its most common use is as a radio
signal. For more on how to use Mayday over the radio, go to
“Sending a distress call over the radio,” later in this chapter.
Sea stuff: Saying Pan-Pan when you’re not in immediate dangerPan is the international code word you use when your situ-
ation is serious but not life-threatening. Pan is usually used
only on the sea, but it can be helpful in international areas
where you don’t speak the local language, because most mili-
taries understand it.
Use Pan if you want to send a signal saying your situation is
serious but not immediately life-threatening. Generally speak-
ing, Pan is spoken twice, three times in a row. It’s pronounced
so that it rhymes with swan: “Pahn-Pahn, Pahn-Pahn, Pahn-
Pahn.”

Chapter 12: Signaling for Rescue 201
Using ground-to-air emergency code (patterns)Large symbols that you make on the ground around you are
referred to as ground-to-air emergency code, or simply patterns. Generally speaking, you make these patterns using debris,
colored items, branches, and rocks. Or you can build up
mounds of earth — just make sure your patterns are big.
Here are the main messages you may need and the basic
patterns:
✓ Require assistance: V
✓ Require medical assistance: X
✓ Proceed in this direction: ↑
Make the lines of your pattern signals six times longer than
their width. When you draw your V, for example, the lines
should be 3 feet wide but 18 feet long. If you can make each
line 4 feet wide, then make the lines 24 feet long. This 6-to-1
ratio makes your signal really stand out from the air. (Check
out the Cheat Sheet at the beginning of this book to see what
these symbols look like in the proper proportions.)
Using your body to signalYou can communicate with low-flying aircraft and ground
units on nearby hills by standing still and forming signals
with your arms and body position. Depending on your
situation, you basically have four body signals to make in
times of distress. They mean the following:
✓ Need help, or pick us up: Raise both arms into the
air, similar to signaling a touchdown in football (see
Figure 12-1a). Just make sure you turn your palms
forward.
Don’t wave at aircraft with one hand if you’re in trouble.
Waving with one hand means that you don’t need
assistance. If you’re in peril, you must put both hands in
the air.
io
nds
ee
r.)
. In
o
he
mes
ned
o
r.
ili-
s
ak-
ced
-

Part II: Eyeing Advanced Survival Techniques 202
✓ Land here: Crouch down and hold your arms straight
out, parallel to the ground (Figure 12-1b). Make sure
you’re pointing toward the specific area where you want
the aircraft to land.
✓ Don’t attempt to land here: This is vigorous waving
motion you use to prevent an aircraft from landing in a
hazardous area (Figure 12-1c).
✓ Urgently need medical assistance. Lie on your back with
your arms straight overhead and your legs extended
(Figure 12-1d).
You can enhance any of these signals by standing still, with
your feet together. When you take that stance, you leave no
doubt that you are signaling — not just waving.
a b c d
Figure 12-1: Body signals.
Mastering Signaling ToolsThe more creative your tools, the better your chances of being
rescued. However, some tools are much better than others, and
these are bound to catch the eyes of searchers. In this section, we
take a look at basic tools that have proven very effective in saving
the lives of survivors. (For info on radios and other electronic
devices, see “Signaling with Electronics,” later in this chapter.)
Noisemakers and hornsYou can use anything to make audio signals — just try to make
your signals unusual. Repeated patterns are the best type of audio
signals, and distinct patterns of three sound blasts are usually
recognized as distress signals. Here are some good noisemakers:

Chapter 12: Signaling for Rescue 203 ✓ Whistles of all types
✓ Aerosol-propelled noisemakers, like the type used at
sporting events
✓ Gunshots
✓ A steel pot or a metal wing or any other large or hollow
piece of metal you can beat on
Almost any noisemaker we list here is better than the human
voice. You can obviously shout anytime you want, just keep in
mind that the human voice isn’t nearly as piercing.
Mirrors and other reflectorsA mirror or other reflector can sometimes be seen from 50
miles (80 kilometers) away in normal conditions. If you have
access to a survival kit, look inside for a signal mirror. If you
don’t have that luxury, practically anything shiny will work.
Here’s a list of good reflective materials:
✓ Mirrors in cosmetic cases
✓ CDs, DVDs, or computer discs of any kind (these are
very good)
✓ Any piece of glass (a dark backing, like mud smeared on
the back, can sometimes increase its reflecting ability)
✓ Plastic space blankets
✓ Glossy book covers
✓ Polished metal lids
✓ A split log with water splashed on (the exposed white
wood inside shines when it’s soaked)
✓ Flashes on cameras
✓ Belt buckles or buckles on purses
✓ Plastic wrap stretched over a pot
If you signal with a mirror or some other reflective device, you
need to aim your signal carefully. A simple way to aim is to put
your hand out before you, line up the mirror so it reflects light
on your hand, and then quickly remove your hand. Or you can
send an adequate signal by simply moving the mirror back and
forth in a tight pattern. Practice before the rescuers get to
ant
a
with
h
o
g
nd
, we
ving
e
udio
rs:

Part II: Eyeing Advanced Survival Techniques 204
you — it’s harder than it looks! Check out the Cheat Sheet at
front of this book to see how to aim your signal mirror.
Even if you can’t actually see someone to signal to, continually
sweeping the horizon with your mirror or other reflector is a
good idea.
FireYou can use fire anytime as a signaling tool, day or night.
However, keep in mind that other fires may be nearby, so
yours must be bigger, brighter, or different. In the case of fire,
it’s almost always best to be different. You can make yours
different the following ways, alone or in combination:
✓ Three fires in a triangle: Pilots and search-and-rescue
units universally recognize this signal, and it’s the very
best use of fire as a signal. Try to space these fires at
least 75 feet apart.
✓ Three fires in a line: This type of signal isn’t as good as
fires in a triangle, but if your surroundings hamper you,
three in a row works. Again, try to space these fires at
least 75 feet apart.
✓ A fire that flares up sharply: Use this technique if you’re
able to make your fire flare up when ground units or
low-flying aircraft are nearby. Oil, gas, or any other
petroleum products are good for this, but you can also
use paper, leaves, or grass.
✓ Large bonfires: This option is okay if you have no other;
just remember that if another large fire is nearby, your
fire may not be distinctive enough. Also keep in mind
that big fires can quickly get out of control and start
forest fires, which can put you in more peril.
For more on starting fires, check out Chapter 5. And for tips
on escaping a forest fire, flip to Chapter 24.
SmokeSmoke is another signaling tool you can use, but make sure
you understand that it’s very similar to fire (see the preceding
section): If you want to use smoke, you have to distinguish it
from normal smoke, which can come from any fire anywhere.

Chapter 12: Signaling for Rescue 205The international signal for distress is three columns of smoke.
However, simply producing an abundance of smoke that
contrasts with your environment can frequently do the trick.
You can create contrast and abundance in one of two ways:
✓ Black smoke: This is your best bet in snowy conditions or
when you have overcast skies. Only certain materials can
produce large amounts of black smoke, so if these materi-
als are in short supply, you may want to consider building
a large fire of other materials and hold your black-smoke
producers in reserve. You can then throw these items on
the fire when searchers are in your vicinity. Thick, black
smoke immediately comes from any of the following:
• Engine oil, vegetable oil, animal oils, and fats
• Rags soaked in oil
• Rubber or rubbery products, like tires
• Plastic
✓ White smoke: White smoke is very effective in green
forest environments. You can create a sudden surge of
white smoke by starting a fire and then partially smother-
ing it. Use any of the following materials for the partial
smothering that produces white smoke:
• Green leaves or grass, or wet leaves or grass
• Moss
• Green branches
• A small amount of water or wet clothes
t
lly
a
ire,
e
y
as
u,
u’re
o
er;
r
s
e
ding
it
re.
The torch: Setting an evergreen afireIf you’re in the wild and need to signal rescuers, then lighting an evergreen tree on fire — creating an evergreen torch — is an option. To make an evergreen torch, cut down an entire evergreen tree or bush, carry it to a large clearing, and pile tinder and kindling in its lower branches. Then light the tinder. Though green, these
trees will ignite. The tree’s resin, or pitch, burns black, and it produces an enormous plume of smoke.
Warning: The risk with the evergreen torch is that it can start a forest fire, so be careful. Do not perform this is in dense forest.
Part II: Eyeing Advanced Survival Techniques 206
Pitch, sap, or resin — or wood that contains it — can make
either white or black smoke, so you have to experiment.
Smoke isn’t very effective in windy conditions. If it’s windy,
consider some other type of signal and save your materials
for making colored smoke for when conditions are calmer.
ShadowsYou can use shadows to make contrasting patterns that are
visible from the air in sunny conditions. Remember that
sharp, hard angles get you noticed, especially when using
shadow. Always use the standard 6-to-1 ratio when making
any pattern. (For more on the 6-to-1 ratio in pattern-making,
see “Using ground-to-air emergency code [patterns],” earlier
in this chapter.)
Here are some methods you can use to make patterns with
shadow:
✓ Build up mounds of earth. This is useful in desert
conditions, but the mounds must be substantial. To make
this signal stand out, pile up sand or dirt at least 1 foot,
preferably more. Keep in mind that what looks obvious
to you isn’t obvious to others.
✓ Tramp down snow. You can make visible ground-to-air
signals with this method; just be meticulous in making
your angles and contrasts distinct. In large, flat fields of
snow, this kind of signal has to be very sharp and very
large. It’s not optimal in overcast conditions or gray light.
✓ Make piles of branches, foliage, and rocks. To make this
type of signal, you have to be really elaborate. Don’t take
any chances. This type of signal has to be very large, and
the edges must be very well defined.
Dye markers and other colorIf you’re lucky enough to have a survival kit handy, check
whether it contains a dye marker. These signaling devices
usually look like bulging little packets of tightly packed sand,
and they contain about 2 pounds (0.9 kilograms) of food
Chapter 12: Signaling for Rescue 207coloring. You usually use this type of signal to mark your
position in water. When you open the package, the coloring
agent turns the water around you a bright yellow or sometimes
yellow-orange.
If you don’t have a dye marker, you should still try splashing
as much color around as you can. Essentially, you want to
use a color that delivers the maximum contrast against your
surroundings. Opt for primary colors:
✓ Yellow: Superb in all conditions except snow
✓ Royal blue: Very good as well, even sometimes in green
forested environments
✓ Red: Works well on snow or ice
If it’s snowy out, you can simply turn over the snow and
expose the sod underneath. This makes a good signal because
the dark earth contrasts so well against the white snow. You
can use charcoal from fire on snow as well.
A good way to signal is to take a bright piece of cloth, tie it
to the end of a tree branch, and then wave it vigorously over
your head. This is very effective because it gives you motion
in addition to color.
s
e
g,
er
ake
t,
s
ir
g
of
y
ght.
this
ake
and
d,
Leaving directional signalsYou can use branches, foliage, and rocks to mark your trail or lead searchers to your position. The trick is to be obvious. If you break several branches all in the same direction, search-and-rescue units, especially the experienced ones, will pick up on the message you’re trying to send.
You can also use rocks to make cairns. A cairn is simply a pile of stones built up in a pyramid shape to mark a trail or direction of travel.
The top stone should be an oblong rock that points in your direction of travel.
People frequently use cairns to leave messages for rescuers (such as number in the party, medical condi-tion, equipment condition, available food and water, and so on). Simply write messages on paper and put them into a weatherproof container, such as a zipper-lock bag; then leave them near the cairn’s top stone.

Part II: Eyeing Advanced Survival Techniques 208
S
Aerial flaresYou can use aerial flares in the daytime or at night. If you
decide to use flares, take extraordinary precautions when
using them. Don’t fire flares at random — fire only when you
feel reasonably sure someone can see them.
Aerial flares usually come in one of two types:
✓ Pistol-fired flares: These types of flares usually fly only a
few hundred feet and burn only for a few seconds.
✓ Parachute-type flares, or rockets: These flares are
usually housed in their own cylinders and are sometimes
labeled as rockets. They can fly to 1,000 feet (305 meters)
or more, and they usually burn up to a minute.
If there’s a breeze, fire your flare just downwind of vertical.
Shoot it at about a 75º angle so it adequately marks your real
position without letting the flare come back to land on your
vessel.
Aerial flares are basically firearms, and they have the ability
to kill people and set survival craft on fire. Old fashioned
hand-flares, like the cardboard type found in car trunks
and highway emergency kits, have the tendency to drip
pyrotechnics. These flares must be ignited well away from the
body and should never come near anything flammable or near
any important piece of gear made of plastic. These types of
flares can sink an inflatable raft in the blink of an eye.
Flashlights and electronic lightsUse a flashlight so it leaves no doubt that you’re sending a
distress signal. You can use SOS or any other distinctive
pattern, like three flashes, or you can tape the flashlight to
the end of branch and wave it overhead. This gives the light
a wide range of motion and makes you bigger, brighter, and
different.
If three flashlights are available, have three people stand as
if on the three corners of a triangle and flash in unison.
This eye-catching display is clearly different from your
surroundings.
Chapter 12: Signaling for Rescue 209
Recently, pilots equipped with night-vision goggles were able
to detect the light from a survivor’s electronic device — his
PDA. If you hear an aircraft coming toward you at night,
consider moving to a clearing and turning a cellphone or PDA
on so that the face lights up. If the pilots have night vision
goggles, they can see this from a great distance.
Upside-down flags and other things out of placeYou can simply put something where it doesn’t belong to get
attention (it always got the attention of your mom, right?). For
example, you can turn a flag upside down and run it up the
pole, you can raise the hood of your car, or you can place a
large piece of debris in a clearing.
Signaling with ElectronicsElectronics can give you peace of mind in the wilderness, as
long as you understand their limitations. Electronic devices
and beacons have gone through several changes over the
years, so whenever you’re preparing to take them with you
into the wild, make sure that your equipment is up-to-date and
that the frequencies and procedures you’ve used in the past
are still valid. This section delves into the many ways you can
use electronics to make contact with potential rescuers.
If you rely on electronics, you’re relying on batteries. Try to
keep your electronics turned off until you know you need them.
Keep your batteries warm and dry. Excessive cold or heat
greatly reduces battery life, as does the exposure to corrosives
like transmission fluid or brake line fluid (in air crashes and car
wrecks) and salt water (in shipwrecks). In extreme cold condi-
tions, place your batteries in a soft pouch with a strap so you
can secure the pouch inside your clothing under your armpit or
on your belly. This keeps them warm and increases battery life.
Radioing for helpEven in this era of satellite phones, there’s nothing like having
a good radio around. Many times, the folks who hear your
ou
y a
mes
rs)
al
r
the
near
f
ht
d
s

Part II: Eyeing Advanced Survival Techniques 210
transmission are amateur radio operators and ship captains,
and they’re great allies when you’re in trouble.
Tuning your radio into a distress frequencyIn a survival situation, you can use any radio transmitter you
have access to, and you can tune it to any frequency to call for
help. The law gives you unlimited access to radios and their
frequencies when in need of rescue. However, you’re much
more likely to get a quick response if you send your distress
signal on a distress frequency. Here’s a list of the radios you’re
likely to run into and their respective distress frequencies:
✓ VHF Radio: Channel 16. VHF radios are those radios
you usually see on boats and other vehicles. They
tend to be mounted on the overhead dash, with the
microphone hanging on a hook at the unit’s side.
You can expect these radios to have a range of 25 to 40
miles (40 to 64 kilometers) if you’re near a U.S. port or
a U.S. Coast Guard installation and about a 10-mile
(16-kilometer) range when transmitting to other boats on
the sea. On land, the radio’s range is dictated by hills and
other obstacles that the radio can’t transmit through.
You may have a range of 40 miles or less than 1 mile.
Generally, all distress signals on VHF are sent out on
Channel 16. If you receive no response, try Channel 13,
especially if you have a large vessel in your line-of-sight
or if you find yourself in a shipping lane or near the
inbound or outbound lanes near a large port. In some
cases, large vessels are legally required to monitor 13.
✓ CB Radio: Channel 9. These are radios used by many
long-haul truckers. These are short range, usually less
than a few miles.
✓ Family Radio Service (FRS) UHF: Channel 1. These are
handheld units that make up a burgeoning radio network
that’s becoming popular in the U.S. They have a very
short range, usually less than a few miles.
✓ Single-sideband: 2,182 kHz. These are long-range
maritime radios, and they’re only on the better-equipped
boats. These radios are usually used for long-range
communications, between 75 and 300 miles (120 and 480
kilometers), so they may send a signal that overshoots a
nearby station.
Chapter 12: Signaling for Rescue 211 ✓ Shortwave (ham) radios: 2,182 kHz. These radios can
transmit hundreds of miles, or sometimes, all over the
globe. When using shortwave radios, you can try calling
on 14.300 MHz or 14.313 MHz. These are the Maritime
Networks for ham radio operators, and they’re run by
people who will help you anytime you call.
If you don’t have a ham radio on your own boat, you may
be able to contact people who have a shortwave radio on
theirs, and they can perform a relay for you. Generally,
the people who operate these types of radios are the
most well-trained and experienced radio operators in the
world. Distress signals sent on these radios get a very
quick response.
✓ Airband Radios: 121.5 MHz and 243.0 MHz. These
are radios found in aircraft. Military personnel and
volunteers monitor these frequencies.
Getting a clear signalWhenever you use a radio, keep in mind that transmitting a
clear signal requires a few physical actions:
✓ Try to find high ground or an area where obstacles won’t
impede your radio signal. Most radio transmitters are
limited in range to line of sight, which means they can’t
send a signal around obstacles or over the horizon. Try
to elevate the antenna as much as you can. If you’re
using a handheld VHF unit, just standing up in the boat
helps.
✓ Make sure you know what kind of microphone the radio
has: push-to-talk or voice-activated.
✓ Switch to the correct frequency (see the preceding section).
✓ Have your info ready before you send your signal.
✓ Try to keep your radio’s antenna perpendicular to your
intended receiver.
If you have nothing in sight, try keeping the antenna at
a right angle to the ground. Why? Because the antenna
doesn’t send out energy in an even fashion; it sends out
its signal in the shape of a lobe, which is a slightly
flattened bubble. Check out Figure 12-2 to get an idea
of the type of lobe a radio antenna develops.
ns,
u
for
’re
0
on
and
,
ht
re
ork
ped
480
s a
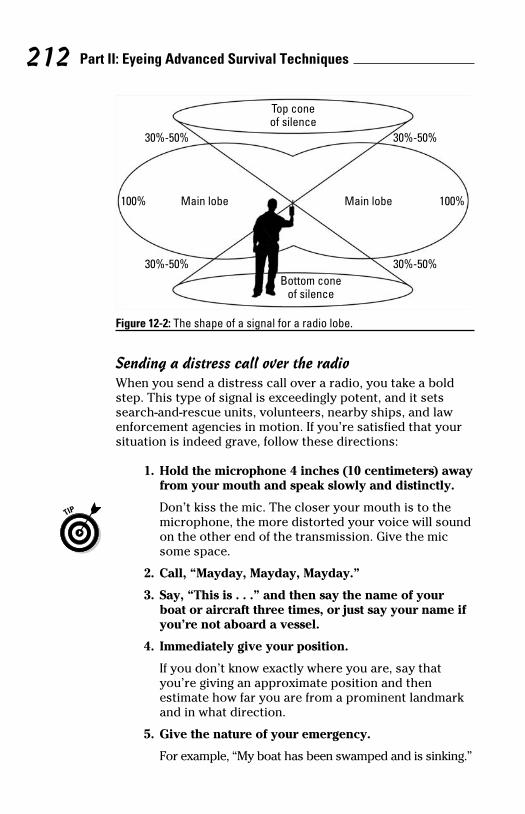
Part II: Eyeing Advanced Survival Techniques 212
Top coneof silence
Bottom coneof silence
30%-50% 30%-50%
30%-50% 30%-50%
100%100% Main lobe Main lobe
Figure 12-2: The shape of a signal for a radio lobe.
Sending a distress call over the radioWhen you send a distress call over a radio, you take a bold
step. This type of signal is exceedingly potent, and it sets
search-and-rescue units, volunteers, nearby ships, and law
enforcement agencies in motion. If you’re satisfied that your
situation is indeed grave, follow these directions:
1. Hold the microphone 4 inches (10 centimeters) away
from your mouth and speak slowly and distinctly.
Don’t kiss the mic. The closer your mouth is to the
microphone, the more distorted your voice will sound
on the other end of the transmission. Give the mic
some space.
2. Call, “Mayday, Mayday, Mayday.”
3. Say, “This is . . .” and then say the name of your
boat or aircraft three times, or just say your name if
you’re not aboard a vessel.
4. Immediately give your position.
If you don’t know exactly where you are, say that
you’re giving an approximate position and then
estimate how far you are from a prominent landmark
and in what direction.
5. Give the nature of your emergency.
For example, “My boat has been swamped and is sinking.”

Chapter 12: Signaling for Rescue 213 6. Give the number of people in your party.
7. Give a very short description of your vessel, aircraft,
or automobile.
8. Say, “Over,” and then listen.
Try to be patient and wait for a response. Sometimes
it takes a few moments.
The more calmly and clearly you can talk on the radio, the
better. You must say “over” every time you transmit, or the
other radio operators won’t know you’re finished transmit-
ting; they’ll wait, which wastes precious time.
If you know your radio signal is weak for some reason, send
SOS via Morse code (nine tones or beeps: three short, three
long, and three short). On many radios, the button to make
beeps or tones is labeled Key or sometimes CW or Tone. (For
more on SOS, check out “SOS and Mayday: Calling for urgent
help,” earlier in this chapter.)
Using cell and sat phonesCellphones function just like handheld radios. They can send
and receive voice and text transmissions only when they’re
in a line of sight with a transmission tower — in other words,
they can’t send signals around obstacles like hills or mountains
or canyon walls.
If you find yourself in a survival situation and you have cell-
phone reception, dialing 911 is generally best. Even if you
haven’t paid your phone bill, the system will take this kind of
call. (We list emergency numbers for various countries at the
front of the book on the Cheat Sheet.) And if you don’t know
your position, sometimes dialing 911 is enough: With the new
Enhanced 911, the emergency system receives your exact
location whenever you dial 911. This system is replacing the
old 911, but it’s not countrywide in the United States yet.
If you have no cellphone reception, you have a few options:
✓ If you’re moving and your phone is fully charged or
nearly so, send a distress text to someone who checks
his or her messages. After you’ve sent this text, your
cellphone continuously tries to get through to a tower for
0%
ur
way
und
if
rk
ng.”
Part II: Eyeing Advanced Survival Techniques 214
Gt
as long as the phone is turned on. If you’re walking, you
may briefly pass through an area that — unknown to
you — is in line-of-sight with a distant tower, at which
time the phone will automatically send the message. This
can happen virtually anytime, anywhere.
✓ If you’re moving and the phone doesn’t have much
charge, text only at the most advantageous spots — like
on the tops of tall hills or areas with wide visibility.
After you’ve texted, turn the phone off, at least for a
while, to conserve batteries.
✓ If you’re not moving, have no reception, and are low on
battery power, shut off the phone. Conserve your power
and think of a plan.
Satellite phones are becoming more and more popular each
year. Despite their popularity, they’re like any other electronic
device in that they’re limited by their battery’s life. They
also have trouble getting reception when you’re in a spot
that doesn’t have a clear view of the sky overhead. Keep in
mind that sat phone technology is still somewhat embryonic.
During times of large-scale calamity, like during tsunamis
or hurricanes, sat phone networks can be overwhelmed by
surges in traffic. However, if you’re going on a serious trip
where there’s no cellphone coverage, you should look into
taking a sat phone with you.
Using radio beacons: EPIRBs, ELTs, and PLBsRadio beacons may look like small, handheld radios, but you
don’t speak into them. When you activate a radio beacon, it simply transmits a distress signal with your exact position to
a low-orbiting satellite, which then relays this info to national
search-and-rescue units. You register radio beacons so that
at the beacon’s activation, search-and-rescue services receive
info specifically about you (and your vessel) that could save
your life. Here are some of the beacons available:
✓ Emergency position-indicating radio beacon (EPIRB):
This is a small radio beacon used for ships at sea. EPIRBs
are usually yellow in color and have a simple activating
mechanism that requires you to pull a small cord.
Chapter 12: Signaling for Rescue 215
EPIRBs must continuously transmit to be successful; in
other words, just pulling the cord and sending a single
signal may not be enough. After you’ve activated your
EPIRB, try to keep it in a position that has a 360º access
to the sky so the EPIRB can continue to signal its satellites.
✓ Emergency locator transmitter (ELT): This is similar to
an EPIRB, but it’s standard-issue for all aircraft, and most
people never come into contact with one. It’s activated
on impact.
✓ Personal locator beacon (PLB): This is a personal,
land-based equivalent of an EPIRB that’s usually very
small and portable. It’s for terrestrial applications, such
as backcountry hiking. Although PLBs are meant to be
carried by a specific person, you can find them in small
aircraft and sometimes on boats. Some outfitters now
rent these units to hikers headed into backcountry.
In the past, EPIRBs, ELTs, and PLBs transmitted on a 121.5
MHz frequency, but in February 2009, those types of units
became officially obsolete.
If you buy a 406 MHz radio beacon, you must register it with
the NOAA or your country’s search-and-rescue authorities.
Getting a Lift: What to Do When the Helicopter Comes
If you have reason to believe that you may be rescued by
helicopter, take precautions to ensure your safety. Helicopters
can indeed hover and lower a basket to you, but this is a
complicated process. Allowing the helicopter to land and
then take you aboard is a safer option. This section discusses
preparation for a landing and goes over some copter safety.
Preparing a landing zoneYour first action is to select a piece of ground suitable for
landing. The following is a checklist for preparing a helicopter
landing zone.
ou
This
ike
w on
wer
h
nic
ic.
ou
t
to
nal
t
ive
ve
:
RBs
g

Part II: Eyeing Advanced Survival Techniques 216
✓ Choose an opening that’s at least 110 feet (37 meters)
wide. This is the touchdown area, and it’s the bare
minimum that the aircraft can enter (see Figure 12-3).
The wider the space, the better, especially in windy
conditions. Ideally, the touchdown area should have
an entrance and exit that allow the helicopter to fly into
the wind.
Touchdownarea
Minimum 110feet across
Surroundingarea
Cleared of alldebris at least300 feet across
Wind
Obstacle-free air space
Obstacle-free air space
Figure 12-3: Minimum requirements for a helicopter landing zone.
✓ The surrounding area, the area near the touchdown
area, needs to be wide, clear airspace if possible. Some
bald ridgelines work well. You want to have several
hundred feet around the touchdown area that’s obstacle
free. Though a helicopter can indeed hover, you want to
try to give the aircraft the opportunity to land and take
off using forward motion because it’s much safer for the
aircraft and its crew.
✓ Find the flattest ground you can. Helicopters have
trouble landing on slopes of more than 5º to 10º.
✓ Clear the touchdown area. Remove any object or
plant that stands taller than 1.5 feet (0.5 meters) in the
touchdown area.
✓ Remove or hold down all loose items in your landing
zone, especially little things like plastic bags. When the

Chapter 12: Signaling for Rescue 217helicopter arrives, it can blow everything that isn’t held
down into the air, which can play havoc on the whole
rescue process. Make sure you’ve removed all the
cardboard, paper, and plastic bottles from your landing
zone, and try to stomp down as much loose snow as
possible in the touchdown area.
✓ If you can make contact with the pilot or crew, tell
them the direction of the wind and where the nearest
power lines or other obstacles are. Electrical wires are
especially hard to see.
Practicing helicopter safety
When the helicopter is on its approach to your landing zone,
you need to practice scrupulous helicopter safety. Here are
basic points to keep in mind as the chopper lands:
✓ Stop signaling with mirrors or any bright reflective
devices the moment you’re sure the helicopter has
seen you. If using a flashlight, don’t shine it anywhere
near the pilot’s eyes. Mirrors and flashlight beams can
blind the pilot.
✓ Put out any fires or smoke-producing devices. The
smoke can obscure the pilot’s view.
✓ Be prepared to be winched if necessary. If the helicopter
can’t safely land, one of two devices will be lowered to you:
• A metal basket: These float, and all that’s required
is for you to get inside the basket and make sure
you have nothing hanging over the side that could
get hung up somewhere during the winching process.
• A strop: This is simply a loop of very heavy cordage.
Put both arms through the loop, pull it backward
until it’s under your armpits, and then hold your
arms at your sides. Make sure you keep your arms
by your side, or you may fall out.
If you’re at sea, static electricity builds around these
devices, so when they’re lowered, allow them to dip into
the water first to discharge the static electricity.
✓ Try not to stand underneath a landing helicopter. Stay
well clear of the aircraft as it lands.
)
to
n
me
cle
to
e
he
e
g
the

Part II: Eyeing Advanced Survival Techniques 218
Here’s what to do after a helicopter has landed:
✓ Wait until you’re signaled to board the aircraft. Watch
for the crew to tell you that approaching the helicopter is
okay.
✓ Always approach a helicopter from the front. Position
yourself so you’re in plain sight of the pilots or aircrew.
Never approach the helicopter from the rear (check out
Figure 12-4). If you do, you’re walking into the pilot’s
blind spot and are at grave risk of injury. Stay clear of the
tail at all times, and never go under the tail boom.
✓ Never approach a helicopter from higher ground. The
risk of injury from the rotor is too great. If the aircraft
is lower than you, stay well away from it until you’ve
walked down to an even elevation.
✓ Keep long-handled tools out of the way. Carry long-
handled tools like ice axes, ski poles, walking sticks, or
digging implements low and parallel to the ground.
DESIREDApproach so the pilot(s) can see you
Anywhere behind the midline is dangerous and must be avoided.
Acceptable Acceptable
Figure 12-4: Safe helicopter approach zones.
Chapter 13
Administering First AidIn This Chapter▶ Responding to emergencies
▶ Treating major trauma
▶ Treating sprains, fractures, cuts, and burns
▶ Handling bites, stings, and poisoning
You can make a quantum leap in your ability to survive
by just knowing a few basic first aid procedures. In a
real survival situation, the inability to deal with even minor
medical trauma can prevent you from getting back to safety.
In this chapter, you find the step-by-step procedures you need
to know when you face trauma in the field. We give you advice
for dealing with injuries of all types, including animal attacks
and insect stings. Of course, how much first aid you can pick
up from a book is limited, so consider taking a course on
Basic Life Support or first aid.
Understanding First Aid BasicsWhenever you encounter a person who is injured or
incapacitated, you should assume the situation is serious.
No matter the circumstances, following the basic responses
in this section can help you stabilize the situation. Read on.
Responding to serious traumaIn any crisis, you should work in a sequence of priorities:

Part II: Eyeing Advanced Survival Techniques 220
1. Watch for danger to you or the subject and move the
subject only if necessary.
Be on guard for whatever may have caused the injury —
rock falls or other debris threats, dangerous vehicles,
poisonous gasses, and so on. If no danger exists, treat
the subject in the position you found him in.
If a threat exists, remove the subject from danger
using the clothes drag: Grasp the collar at the lowest
point you can, and keeping your buttocks low, drag
the subject gently out of danger (see Figure 13-1a).
Moving someone with a neck or spinal injury can
cause further damage. Make the best decision you
can about which is the greater threat: the immediate
danger or the possibility of worsening the injury. If
danger is imminent, support the neck with your hands,
or better, immobilize the neck with an improvised
brace (Figure 13-1b). As soon as the neck is secured,
practice the clothes drag.
a
b
Figure 13-1: Practicing the clothes drag (a) and immobilizing a neck injury (b).
2. Make sure the subject’s breathing and heartbeat are
restored.
See the next section for details on checking pulse and
breathing and on what to do if you find none.
Chapter 13: Administering First Aid 221
If bleeding is especially heavy, control it before
dealing with the subject’s breathing and heartbeat.
3. Treat bleeding (see “Controlling Bleeding,” later in
this chapter).
4. Protect wounds and immobilize fractures.
5. Treat for shock.
Check out the “Treating Shock” section later for more
info. If you have a subject who has been in the water,
look at Chapter 22 for info on cold shock response.
Keep in mind that all the procedures here are for survival
situations only. In any of these cases, you should try to obtain
professional medical treatment as soon as possible.
Assessing the ABCsAfter you remove the subject from immediate danger, you
need to make sure the person is breathing and has a heartbeat.
Just remember your ABCs: Check the person’s airway,
breathing, and circulation (see Figure 13-2).
AirwayThe first part of the ABCs is making sure the person has a
clear airway. To do so, follow these simple steps:
1. Lay the palm of one hand on the subject’s forehead
and put two fingers of the other hand under his chin,
pulling the jaw forward; then ease the subject’s head
back a couple of inches (see Figure 13-2a).
This procedure prevents the tongue from blocking the
airway. If you suspect the person has a broken neck,
don’t tilt the head back unless doing so is the only
way the person can breathe.
2. Open the mouth gently and examine the airway.
3. If you can see anything that’s obviously blocking the
airway, use two fingers to reach in and pull it out.
Things that usually prevent breathing include foreign
objects, broken teeth, blood or bloody froth, vomit,
the person’s tongue, swelling, or kinks in the wind-
pipe. Don’t use your fingers to blindly feel around in
the person’s throat.
the
—
es,
eat
t
te
nds,
d,
are
nd

Part II: Eyeing Advanced Survival Techniques 222
a b c
Figure 13-2: Checking the airway (a), breathing (b), and circulation (c).
BreathingThe second part of the ABCs is making sure the person is
breathing. You can detect shallow breathing by placing your
cheek right next to the person’s mouth (see Figure 13-2b).
You should also listen for any sucking noises coming from
the upper body of the person, which can indicate a punc-
tured lung. For the procedure for handling this injury, go to
“Bandaging a sucking chest wound,” later in this chapter.
If you can’t detect any breathing, follow these simple steps:
1. Check the pulse.
We describe how to take a pulse in the next section. If
you find neither a pulse nor breathing, perform CPR.
2. If you find a pulse but no breathing, pinch the per-
son’s nose completely shut and give him two com-
plete breaths by mouth-to-mouth.
Blow slowly and steadily twice. Watch for the chest to
expand when you’re administering these two breaths.
3. If the torso doesn’t expand, check the person’s
airway again.
If you can’t find anything, try pushing three to five
times forcefully on the subject’s abdomen, halfway
between his breastbone and belly button. This may
eject the blockage.
4. Repeat the two-breaths-and-clearing process until the
person responds.
People commonly vomit during mouth-to-mouth resuscitation,
so be ready for it. If the person vomits, clear it away with your
fingers. You can also try rolling the person onto his side so he
can expel the vomit or fluid more easily.

Chapter 13: Administering First Aid 223
CirculationThe third part of the ABC list is to assess circulation. Check
whether the heart is beating by taking a pulse. The easiest
place to take a pulse is the carotid artery, a large blood vessel
in the neck. Lightly place your first two fingers on the side of
the windpipe just where it meets the underside of the jaw, as
in Figure 13-2c.
To measure the heart rate per minute, count the pulses you
feel in a 10-second period and then multiply by 6. Healthy
pulse rates vary, but you can compare the subject’s pulse to
these general ranges:
✓ Children: 90–110 per minute
✓ Healthy adults: 70–90 per minute
✓ Strong athletes: 45–60 per minute
A rapid pulse may be a sign of shock (see the later section
“Treating Shock”). If you find no pulse, begin chest compressions
(see the later section “Giving CPR”). Otherwise, put the
subject in the recovery position, as we explain in the next
section.
Using the recovery positionIf the subject’s ABCs are fine but he’s unconscious, place him
in the recovery position, which allows fluids or vomit to drain
from the mouth and keeps the tongue from rolling backward
and blocking the airway. Warning: If you believe the injured
person has a neck or spinal injury, don’t place him in the
recovery position unless you’ve first immobilized the neck
(refer to Figure 13-1b).
To place someone in the recovery position, reach across,
grasp the subject’s leg behind the knee, and pull the leg
toward you. Place the leg at a 90° angle so that it props up the
body (see Figure 13-3). You want the subject to end up with
the following:
✓ One leg and one arm raised
✓ His head resting on his arm
✓ His mouth free of obstruction
ur
o
:
. If
R.
r-
-
t to
hs.
y
the
ion,
our
he

Part II: Eyeing Advanced Survival Techniques 224
Ideally, you want to place the subject in the horizontal
recovery position, with the head below the feet, to help treat
shock. For info on shock, see “Treating Shock,” later in this
chapter.
Figure 13-3: The recovery position.
Giving CPRAnyone who plans to spend a good deal of time outdoors
should know the principles of cardiopulmonary resuscitation
(CPR), a method of supporting the heart and breathing until
rescue crews arrive or until the subject is breathing on his
own. CPR is best administered by someone who has received
formal training. To find a CPR course near you, consult the
Red Cross at www.redcross.org.
You should use CPR only if the person both
✓ Has no detectable pulse
✓ Is unconscious and not breathing
If the subject is breathing but has no pulse, do the chest com-
pressions only. Here are the four main steps of CPR on adults:
1. Place the person flat on his back, making sure his
mouth is slightly open.
Kneel next to him in such a position that you can
perform the chest compressions and breathing
without moving.

Chapter 13: Administering First Aid 225 2. Locate the spot where you perform chest
compressions, and position your hands.
Place two fingers at the bottom of the person’s
breastbone and then place the heel of your hand
just above the fingers. Your hand should be near the
center of the person’s chest (see Figure 13-4a).
Place your other hand over your first and interlock your
fingers. The heels of both hands should now be aligned
as in Figure 13-4b. Make sure your hands are well above
the subject’s sternum (breastbone); otherwise, you’re
just pumping on the abdomen, which does no good.
3. Using a straight-armed stance and a steady, smooth
motion, lean forward to compress the breastbone
down about 2 inches (5 centimeters), and then come
back up, releasing pressure (see Figure 13-4c).
You should try to do compressions at a rate of slightly
more than one per second. A good way to do this is to
count “one and two and three and four” and so on.
4. After every 15 compressions, pinch the person’s nos-
trils together and give two slow breaths (Figure 13-4d).
The whole cycle of 15 compressions and two breaths
should take you about 15 seconds.
a
b
c
d
Figure 13-4: Administering CPR.
Continue CPR until the person resuscitates (check the person’s
pulse and breathing on occasion) or until you’re unable to
continue. Keep at it as long as you can. In some cases of
cold-water immersion or other causes of hypothermia,
prolonged CPR has proved successful if the subject was also
warmed during CPR.
at
n
il
ed
om-
lts:

Part II: Eyeing Advanced Survival Techniques 226
Controlling BleedingWhen an accident occurs, you can expect to see one or more
of the three types of bleeding:
✓ Capillary: This is usually superficial bleeding from tiny
blood vessels near the skin.
✓ Venous: This bleeding comes from the veins, the blood
vessels that return blood to the heart. It’s characterized
by a steady flow of dark red or maroon colored blood.
✓ Arterial: This is potentially the most dangerous type of
bleeding, and it’s characterized by spurts of bright red
blood.
This section shows you how to control visible bleeding. Signs
of internal bleeding include blood in the urine (though other
things can result in bloody urine) or a blue or red discoloration
in the skin, but this kind of injury can’t be treated without
surgery.
Treating capillary and venous bleedingCapillary and venous bleeding are the two most common
types of bleeding. You can control them in the following four
basic ways. Think of these techniques as a system, not just
individual methods that you have to perform separately.
✓ Direct pressure: Apply pressure directly to the wound
with a bandage, with some other type of cloth, or with
your hand if you have nothing else. Apply pressure for
10 to 15 minutes or more, and resist the urge to look at
the wound during that time. If the bleeding doesn’t stop,
keep up the pressure for an additional 15 minutes and
consider applying indirect pressure to a pressure point.
If you need to continue applying pressure but are unable
to do so manually, you can apply a pressure bandage.
For more on applying a pressure bandage, see “Cleaning
and covering wounds,” later in this chapter.
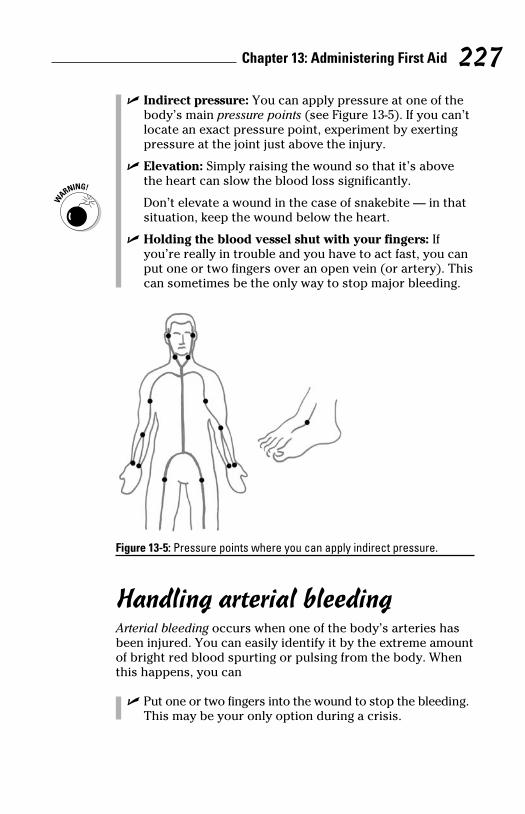
Chapter 13: Administering First Aid 227 ✓ Indirect pressure: You can apply pressure at one of the
body’s main pressure points (see Figure 13-5). If you can’t
locate an exact pressure point, experiment by exerting
pressure at the joint just above the injury.
✓ Elevation: Simply raising the wound so that it’s above
the heart can slow the blood loss significantly.
Don’t elevate a wound in the case of snakebite — in that
situation, keep the wound below the heart.
✓ Holding the blood vessel shut with your fingers: If
you’re really in trouble and you have to act fast, you can
put one or two fingers over an open vein (or artery). This
can sometimes be the only way to stop major bleeding.
Figure 13-5: Pressure points where you can apply indirect pressure.
Handling arterial bleedingArterial bleeding occurs when one of the body’s arteries has
been injured. You can easily identify it by the extreme amount
of bright red blood spurting or pulsing from the body. When
this happens, you can
✓ Put one or two fingers into the wound to stop the bleeding.
This may be your only option during a crisis.
re
y
d
ed
of
d
gns
er
ion
ur
d
r
t
op,
nt.
ble
ng
Part II: Eyeing Advanced Survival Techniques 228
T
✓ Try to staunch the flow of blood by exerting pressure
on a pressure point above the wound. (Check out Figure
13-5 for where the pressure points are.)
✓ Apply a tourniquet if the situation is dire. A tourniquet is
a band you apply with extreme compression to cut off
circulation.
Deciding to use a tourniquet
Use a tourniquet only when the subject is in clear and
immediate danger of bleeding to death. The tourniquet is an
absolute last resort! Tourniquets are usually overkill and can
cause severe tissue damage, which can lead to the loss of the
limb later on. Tourniquets are also very painful, which can
cause undue stress and trauma.
Traumatic amputation, such as when a limb is severed or torn
off as a result of an accident or an animal attack, doesn’t necessarily warrant a tourniquet. The muscles in the remaining
portion of the limb may spasm and close the artery. You still
have other bleeding to deal with, but you can control this,
many times, with other methods. To see those other methods,
read the earlier section “Treating capillary and venous
bleeding.”
Applying a tourniquetTo make a tourniquet, you need a stick (to restrict the
tourniquet) and a band, preferably a thick one. A good width
is 3 inches (7.5 centimeters) or more. (Tip: If you have to use
line or wire, wrap cloth under or around the line to reduce the
pain and damage from the tourniquet.) The stick should be
about 6 inches (15 centimeters) long — you can use a pen or
pencil.
If applying a tourniquet is your only option, keep in mind the
following instructions and refer to Figure 13-6:
1. Apply the tourniquet just above the bleeding site
and tighten it only as much as is necessary to stop
the arterial bleeding.
To tighten the band, thread the stick under the band
and then twist. Attempt to put a pressure bandage
on the wound after the bleeding has stopped (see the
later section “Cleaning and covering wounds”).

Chapter 13: Administering First Aid 229 2. If you know that no help is coming for at least 2
hours, loosen the tourniquet, very slowly, after
about 20 minutes.
3. If the person is breathing and has a pulse, and if
the bleeding is either under control or absent, treat
immediately for shock.
Never cover a tourniquet. Leave it exposed so that emergency
personnel can see it if they arrive to help. Take a pen, lipstick,
or blood and print TK on the subject’s forehead so that
everyone knows this extreme type of treatment has been
given. And of course, never apply a tourniquet to a neck wound.
Figure 13-6: Applying a tourniquet.
Treating ShockShock is a reaction your body develops as a response to inad-
equate blood flow. The blood pressure is too low to maintain
all the body’s functions, especially the brain, and they begin
to shut down, which can be fatal. Shock can come as a result
of a wide variety of traumas. In any traumatic situation, you
should keep an eye out for the following signs of shock:
✓ Cold, clammy skin
✓ Acute anxiety, psychological distress, or disorientation
re
is
n
an
he
orn
ng
ill
ods,
th
se
the
e
or
he
p
d
he
Part II: Eyeing Advanced Survival Techniques 230
Ha
✓ Bluish lips and extremities
✓ Rapid pulse
✓ Sensation of thirst
Because shock is a reaction to trauma, your first priority
is to make sure that none of the subject’s traumas are
life-threatening. If the patient is breathing, has a heartbeat,
and isn’t severely bleeding, treatment for shock is as follows
(see Figure 13-7):
✓ Maintain the subject’s body temperature. Place a sheet
or blanket under and over the subject to keep him warm.
If it’s hot out, find shade and try pouring cool fluids onto
a rag or sheet and then gently administering the cooling
cloth to the subject’s body.
✓ Try to calm the subject. Stay near the subject and be
reassuring, upbeat, and firm. People in shock can benefit
greatly from reassurance.
✓ Lay the subject down and elevate his feet. The proper
position depends on whether the subject is conscious:
• Conscious: Lay the person on his back and elevate
the feet about 12 inches (30 centimeters) to
improve the blood flow to the brain. Don’t let the
person smoke, eat, or drink.
• Unconscious: Lay the person on his side, supporting
his neck, and elevate his feet 12 inches. Make sure
the subject’s airway is clear and that he’s breathing.
Do not attempt to give fluids to someone who’s
unconscious.
If the subject has a head injury, don’t elevate the feet.
Just keep him warm and calm.
✓ Continue to monitor the subject. Be on guard and ready
to treat for shock even if the subject is conscious and
doesn’t immediately feel pain or other discomfort. If the
subject is unconscious, watch for changes in breathing,
temperature, and circulation, and try to keep him in the
recovery position (refer to Figure 13-3). Anything other
than dry, healthy-pink skin and a normal body temperature
can indicate the patient is still in shock.

Chapter 13: Administering First Aid 231
Figure 13-7: Treating conscious and unconscious subjects for shock.
Handling Breaks, Sprains, and Wounds
Any one of the common conditions that follow can debilitate
you in the wilderness, and as we tell you at the beginning of
this chapter, just knowing the basic procedures can mean the
difference between life and death. In this section, we explain
how to deal with broken bones, soft tissue injuries, and
wounds.
Treating fracturesA fracture is a break in a bone, usually from some type of
force-trauma. If you don’t treat this type of injury, it can cause
permanent damage and/or internal injuries. It can also seriously
hamper your ability to travel, build, or otherwise move
around without causing pain to the injury.
As soon as you believe you or someone else has sustained a
fracture (or a sprain), you should assume the injured limb is
going to swell. Remove wristwatches, jewelry, or any type of
constrictive clothing near the injury.
In treating any fracture, strive to immobilize the part of the
body that sustained the trauma. Immobilizing a fracture
prevents the broken bone from doing more damage, and it
makes transport of the subject possible.
There are two types of fractures, classified according to
whether the bone breaks through skin: open and closed. This
section explains how to treat them.
ws
et
rm.
nto
ng
efit
r
:
e
e
ing
re
ng.
dy
he
g,
he
r
ure

Part II: Eyeing Advanced Survival Techniques 232
ClosedClosed fractures, in which the broken bone doesn’t break
through skin, can be more difficult to identify. Signs that a
person has a closed fracture include the following:
✓ Immediate swelling, usually in the form of a knot or lump
✓ Tenderness at the site of the trauma
✓ A grating sound when trying to move
✓ An unnaturally bent or crooked limb or joint
To immobilize the fracture, apply a splint (see Figure 13-8).
A splint is simply a rigid support, firmly attached above and
below the fracture point. You can use poles, sticks, rolled
newspapers, or anything else that’s strong and firm as the
support for your splint.
Try to use cloth to tie the splint, and try to use square knots
or bows that you can easily undo (go to Chapter 14 for more
on knots). Always try to align all the knots on one side of the
splint.
Figure 13-8: Splinting broken bones.
If a limb is bent at such an angle that you can’t immobilize
the fracture, you can try applying traction — a gentle
straightening of the limb — so you can apply a splint.
Traction should be relatively painless, especially if you
perform it before the swelling becomes excessive. To apply
traction, gently pull the misaligned part of the limb away

Chapter 13: Administering First Aid 233from the fracture and move it slowly toward alignment. If this
causes any appreciable pain in the subject, stop. Sometimes
you can perform traction only in small movements.
After you perform traction on a fracture, you need to check
for circulation in at the extremity of the limb. If you feel no
pulses, or if the skin is discolored beyond a fracture, you may
have to realign the fracture to restore circulation. If circulation
is okay, go ahead and apply the splint.
OpenYou can quickly identify open fractures because when the
bone breaks, it pierces the skin.
Open fractures are exceedingly susceptible to infection, so
now’s the time to put on sterile gloves, wash your hands, wear
a mask — do whatever you can to keep things sterile with
the supplies you have. Try not to breathe on the wound, and
don’t touch the protruding bone directly.
Here’s how to treat an open fracture (see Figure 13-9a):
1. Apply traction if necessary (as we explain in the
preceding section).
2. If bleeding is severe, apply direct pressure to the
wound or skin near the break.
Try pushing downward on either side of the bone to
stop bleeding, but don’t put any pressure directly on
the bone (refer to Figure 13-9b). For more on applying
direct pressure to stop bleeding, see “Treating capillary
and venous bleeding.”
3. Pad around and protect the bone before bandaging.
You can do this by putting a protective housing over
it, such as a clean plastic cup, or you can use rolled
gauze (Figure 13-9c). Afterward, apply the proper
dressing and bandage. For more on that, see “Cleaning
and covering wounds,” later in this chapter.
4. Bandage firmly (Figure 13-9d) and then pinch the
limb’s extremity to make sure circulation is adequate.
The limb is now ready to splint, as we explain in the
preceding section.
mp
d
ts
re
he
y
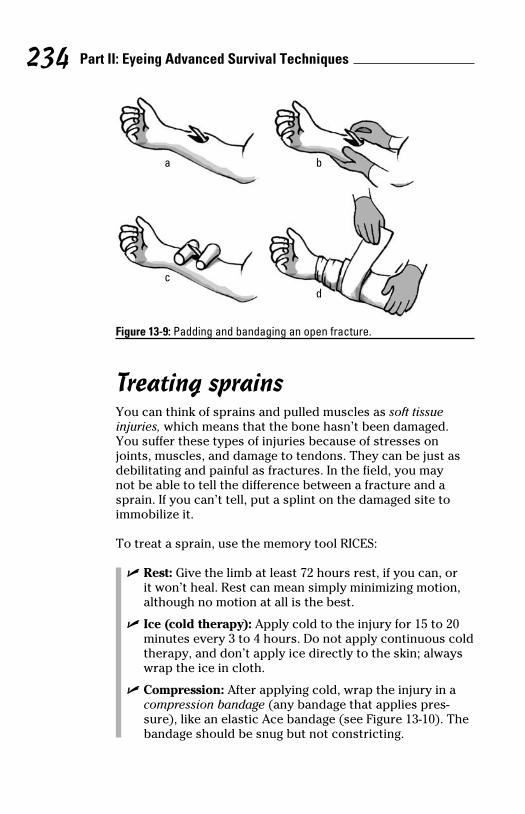
Part II: Eyeing Advanced Survival Techniques 234
a b
cd
Figure 13-9: Padding and bandaging an open fracture.
Treating sprainsYou can think of sprains and pulled muscles as soft tissue injuries, which means that the bone hasn’t been damaged.
You suffer these types of injuries because of stresses on
joints, muscles, and damage to tendons. They can be just as
debilitating and painful as fractures. In the field, you may
not be able to tell the difference between a fracture and a
sprain. If you can’t tell, put a splint on the damaged site to
immobilize it.
To treat a sprain, use the memory tool RICES:
✓ Rest: Give the limb at least 72 hours rest, if you can, or
it won’t heal. Rest can mean simply minimizing motion,
although no motion at all is the best.
✓ Ice (cold therapy): Apply cold to the injury for 15 to 20
minutes every 3 to 4 hours. Do not apply continuous cold
therapy, and don’t apply ice directly to the skin; always
wrap the ice in cloth.
✓ Compression: After applying cold, wrap the injury in a
compression bandage (any bandage that applies pres-
sure), like an elastic Ace bandage (see Figure 13-10). The
bandage should be snug but not constricting.

Chapter 13: Administering First Aid 235
After you apply the bandage, pinch a finger or toe on the
injured limb to see whether the blood is circulating
properly. If you don’t see a noticeable flood of blood
under the skin after you pinch it, you’ve put the bandage
on too tightly, and you have to rewrap the injury.
✓ Elevation: Elevate the limb by propping it up about 6
inches to 1 foot (15 to 30.5 centimeters) on something
soft. This cuts down on swelling and throbbing.
✓ Stabilization: Don’t move the injury, and take precautions
to prevent an object or person from bumping into or
striking the damaged limb. In the case of a sprained wrist
or arm, you can use a sling to immobilize it, or you can
simply tie the limb to the person’s body.
Bandage clip
Figure 13-10: Wrapping a sprained ankle.
Cleaning and covering woundsYou should bandage any wound, no matter how small, to
protect it from infection. Take three important steps: clean
the wound, dress it, and then bandage the wound. This
section explains how to do all three.
Cleaning the woundBefore you start to dress the wound, take a moment to clean
it. Cleaning the wound reduces the risk of infection, which
could slowly incapacitate you. When cleaning the wound,
keep in mind these basic guidelines:
✓ Operate cleanly. Try to use sterile gloves when handling
a wound. If you don’t have them, wash your hands
thoroughly with soap and water if possible, or use
alcohol or hand sanitizer.
s
r
n,
0
old
ys
a
he

Part II: Eyeing Advanced Survival Techniques 236
✓ Irrigate the wound to remove debris. Use a flow of clean
water to wash debris out of a wound instead of removing
it with your hands or with a cloth, because your hands
usually have unwanted bacteria on them. If clean water
is unavailable, you may need to remove grit and dirt with
tweezers (make sure your first aid kit has a set).
✓ Use soap and water. Washing a wound with common
soap and then rinsing it with clean water can do more
to prevent infection than anything else. The iodine or
antiseptic wipes in most first aid kits are fine, but you
should use them only if you don’t have soap and water.
Don’t use antiseptics on deep wounds. Antiseptics are for
small, shallow wounds.
✓ Clean the wound from the center, outward. If you clean
from the outside toward the center, you risk bringing in
dirt and germs from the surrounding skin.
Dressing the woundAfter you clean the wound, you’re ready to put on a dressing, the
covering that goes directly over the injured area. Remember
the following points:
✓ Make sure the dressing is the right size. It should be
large enough to extend well beyond the wound’s edges.
✓ Without touching any of the surrounding skin, place
the dressing directly on the injured site. Skin isn’t
sterile, so avoid sliding or dragging the dressing over the
wound.
✓ If blood soaks through your dressing, don’t take the
dressing off. Instead, put another one directly over the
first.
✓ Use sterile gauze if you have it. If you don’t have any,
use any clean, nonfluffy material. Fluffy cloth produces a
lot of lint, which gets into the wound.
Bandaging the woundWith your dressing in place, you’re ready to bandage. When
you bandage the wound, keep the following guidelines in
mind:

Chapter 13: Administering First Aid 237 ✓ Use nonfluffy cloth, such as fabric from a shirt, as your
first option. If you don’t have any, then you can use
almost anything else.
If you’re desperate, you can reuse old bandages and
dressings — but only if you boil them in water first.
✓ Make your bandages wide. Roll the bandage in a wide
area to spread the friction and force, and tape the
bandage to itself, not to the skin.
✓ Apply bandages firmly with tape or safety pins, or tie
them with a square knot directly over the dressing. To
see how to tie a square knot, see Chapter 14.
✓ Monitor the circulation. Keep an eye on circulation,
because cutting off the blood flow with a bandage is all
too easy. If blood is flowing properly, you should see a
rapid return of blood under the skin after you pinch it.
A pressure bandage, which you use for continuous bleeding, is
a tighter bandage. To apply a pressure bandage, place a thick
wad of gauze or cloth over the wound so that when you tie
the bandage over it, you apply extra pressure. Always tie the
knot of the bandage directly over the wound. A large knot of
gauze, firmly tied over a bleeding wound, can slowly stop the
bleeding. This bandage isn’t a tourniquet, so don’t cut off
circulation completely.
Periodically check bandages, and the wounds under them, to
make sure infection isn’t setting in. For more on infections,
see the later section “Treating infections in wounds.”
Closing open woundsIf you encounter a clean, open wound, try to close it to avoid
infection. There’s little reason to sew up wounds in most out-
door situations, but you can essentially tape a wound shut:
✓ Butterfly bandages: A butterfly bandage is a special
adhesive strip shaped like an hourglass. Many first aid
kits have them. When applying the butterfly bandage,
make sure that the wide parts grab the skin on either
side of the injury, with the thin part stretched across the
closed wound.
ean
ing
s
er
with
r.
for
ean
in
the
er
s.
the
e
s a
n
Part II: Eyeing Advanced Survival Techniques 238
T
✓ Tape: If you’re desperate, you can use strong tape to
close a wound. Bring the edges of the flesh loosely
together with adhesive tape or, in dire circumstances, a
safety pin.
Do not close dirty wounds; bandage them and seek help. If
you can’t close the wound or if the wound is dirty, simply
bandage the wound and monitor it for infection.
Bandaging a sucking chest woundIf your subject has had her chest punctured and you can hear
air being drawn through the wound, or if you can see bubbles
coming from it, you have a special case on your hands: a
sucking chest wound. If left untreated, this type of wound
causes the lung to collapse. Take action immediately by doing
the following:
1. Put the palm of your hand over the wound to seal it
shut.
This can prevent the lung from collapsing.
2. Quickly bandage the wound on only three sides.
Place sterile gauze over the puncture and then tape it
in so that one side is left unattached. In a pinch, you
can tape plastic wrap over the puncture.
The gauze or dressing should lie down snugly over
the hole. When the subject inhales, you want the ban-
dage to close tightly over the puncture, like a one-way
valve; when the subject exhales, you want the air to
escape.
Treating infections in woundsDespite cleaning and washing, some wounds still become
infected. Wounds that have become infected usually display
one or all of the following characteristics:
✓ Inflammation, redness, and pain at the wound
✓ Elevated temperature at the wound (the skin feels hot)
✓ Reduction of mobility in the limb
✓ Presence of fluid discharge (pus) from the wound

Chapter 13: Administering First Aid 239If you or someone else develops an infection, you can treat
the infection with the following treatments:
✓ Rest: One way to help fight infection is to rest. This may
not be possible in a wilderness survival situation, but if
you can’t rest the whole body, try to rest the infected
area as much as possible.
✓ Heat therapy: Apply very warm, moist bandages over the
wound for half an hour, three times daily. A clean, sterile
cloth soaked in hot water is ideal.
✓ Daily wound cleaning: If you collect foreign matter in
the wound, or if it appears infected, take a moment to
wash your wound with soap and water if possible.
✓ Antibiotics: Antibiotics can fight infection, but in many
survival situations, broad-range antibiotics, such as
ciproflaxin (Cipro), aren’t always effective. Before going
into the field, check with your doctor to find which
antibiotics have proven effective for treating infections in
the area you’re planning to travel in.
Treating BurnsBurns threaten your life in two major ways: shock and
infection. When you’re burned, your body leaks fluid in
response, which you can think of as “clear bleeding.” If you’re
burned over a significant portion of your body, you’re going
to have the same situation you’d have if you were severely
bleeding, and that puts you at risk for shock. Not only that,
but burns damage the body’s protective layer, and that’s
where you get the infection. Burned skin leaves you with
nothing to fight off bacteria and other germs.
In this section, we tell you how to treat burns, both minor and
severe. (For information on treating sunburn, see Chapter 17.)
Handling minor burnsThankfully, most burns are minor scalds. To treat minor
burns, follow these directions:
1. Remove jewelry and clothing.
a
ndear
les
ing
it
e it
u
an-
way
o
y
)

Part II: Eyeing Advanced Survival Techniques 240
Aa
You don’t want anything to impede the swelling that
accompanies all burns.
2. Pour cool liquid over the burn site for at least 10
minutes.
You can use water for this, but canned soda will do in
a pinch.
3. Bandage the wound according to the guidelines in
the “Cleaning and covering wounds” section, earlier
in this chapter.
Try to be as clean and sterile as you can, because
burns invite infection.
Don’t break or burst any blister. New skin will form under the
blister during the healing process. If you break the blister,
you interfere with the healing process and could introduce
infection. Cover blisters with a protective bandage, like the
type used to protect an open fracture (see the earlier section
“Treating fractures”).
Dealing with more-severe burnsSome burns are more severe and require different treatment.
Generally, in severe burns, the skin is clearly charred or
disfigured. Here’s the procedure for treating severe burns:
1. Put a covering on the ground and then lay the
subject on it, taking special care that the burned
area doesn’t come into contact with the ground.
2. Douse the burn with cool liquid immediately to stop
the burning process.
If you’re short on water, put some kind of receptacle
or dish underneath the subject so that you can catch
the poured water and recycle it over the wound.
Continuously pour water over the wound as needed
for pain.
3. Check the subject’s airway, breathing, and circulation
and treat as needed.
We explain how in “Assessing the ABCs,” at the
beginning of this chapter.

Chapter 13: Administering First Aid 241 4. Remove constricting jewelry or smoldering clothing
near the burn site.
5. Apply a sterile bandage.
See “Cleaning and covering wounds,” earlier in this
chapter.
Addressing Hypothermia and Dehydration
In this section, we discuss hypothermia (the cooling of the
body) and dehydration. We cover some additional hot- and
cold-weather concerns in the chapters that deal with extreme
environments, such as the desert (Chapter 17) or tundra
(Chapter 16).
Treating hypothermiaWhen your body cools below the optimal temperature
of 97–98.6°F (36.1–37°C), you begin to feel the effects of
hypothermia. If the human body cools down too much, basic
functions shut down and death follows shortly. (Check out
Chapters 4, 5, and 6 for tips on how clothing, fire, and shelter
can help you avoid hypothermia.)
Hypothermia is a progressive condition, which means that the
longer it’s left untreated, the more dangerous it gets and the
more difficult it is to treat. If you notice initial signals of cold,
such as shivering, do something immediately, such as putting
on an extra layer of clothing or covering your head. Signs of
hypothermia include the following:
✓ Extreme shivering
✓ Bluish coloring
✓ Apathy and the desire to lie down or give up
✓ Dizziness, disorientation, slurred speech
✓ A stop in shivering (very dangerous)
at
in
n
ier
he
e
on
nt.
op
e
ch
d
ion

Part II: Eyeing Advanced Survival Techniques 242
Ta
If a person who is cold has stopped shivering, or if she lies
down after a long bout of shivering, assume that she’s in
extreme danger. Treat for hypothermia immediately.
To treat for hypothermia, follow these directions:
1. Try to keep the hypothermic subject horizontal.
When dealing with water casualties, try to hoist the
subject out of the water horizontally rather than head
first. In any case, try to keep the subject’s heart level
with her head. In extreme circumstances, turning the
subject vertical can cause cardiac arrest.
2. Remove wet clothing.
If possible, replace wet clothing with dry clothing.
3. Rewarm slowly and steadily, monitoring the subject
very closely.
Rewarming a hypothermia subject too fast can cause
the person to go into shock or cardiac arrest, so watch
closely and be ready to perform CPR. When treating
for hypothermia, it pays to be slow and gentle. Trying
to speed recovery can cause more problems than it
solves because the dangerously weakened subject
can’t withstand harsh changes. To rewarm someone
with hypothermia, follow these steps:
1. Apply sources of warmth slowly, gently, and
steadily, starting with the chest.
Work steadily by applying warm rocks, hot water
bottles, warm hands, or anything else you can to
warm the skin of the upper torso. Don’t boil your
subject!
2. Warm the neck and crotch.
Don’t rewarm the limbs. Doing so may cause the
subject’s body to divert precious blood to those
areas, which can cause shock, stroke, or cardiac
arrest.
3. Cover yourself and the subject with a blanket,
sleeping bag, and/or your survival kit’s space
blanket.

Chapter 13: Administering First Aid 243 A cold person needs rewarming, not just a cover,
so get under the covers with the hypothermic
person. Give the subject skin-to-skin contact —
don’t be afraid to strip down.
Never assume that a hypothermia subject is out of trouble
after you’ve rewarmed her. All hypothermia subjects are at
risk for afterdrop, a continued cooling of the body even after
exposure to heat. Don’t take your eyes off your subject. Stay
with the person and treat for shock and exhaustion.
Dealing with dehydrationThe longer dehydration goes on, the harder recovery
becomes. As it progresses, dehydration causes fatigue,
dizziness, high pulse rate, nausea, and in advanced cases, a
swollen tongue, delirium, and death. The only way to treat
dehydration is to slow the loss of bodily fluids and to take in
liquids that don’t dehydrate you further. For a thorough look
at getting water, turn to Chapter 7.
If dehydration has already set in and you’re lucky enough to
have access to water, have the subject take a long series of
small sips of water, not big gulps. Large volumes of water can
cause complications like nausea and vomiting.
Treating Bites, Stings, and Poisonings
In case of an animal attack, your first priority is to make sure
that you and the subject are no longer in danger. Your second
priority is to record accurate information. Whenever you deal
with bites, stings, or poisonings, you need to immediately
gather as much info as you can. That way, you can pass it
on to the medical team when you reach professional help.
Specifically note the following:
✓ The type of creature or source of poisoning: For
instance, record the color and shape of the spider.
Most effective treatments are specially designed for a
particular species or substance.
e
ead
el
he
ect
se
atch
g
ng
t
e
ater
n to
our
the
ose
iac
et,
e

Part II: Eyeing Advanced Survival Techniques 244
✓ The condition an animal was in: Notes on obviously sick
animals can help doctors choose treatments or watch for
specific signs of disease.
✓ When the incident occurred: Some treatments depend
on the time that has expired since the bite, sting, or
poisoning.
If you can do so safely, capture whatever attacked or bit
you. That way, the pros can identify the culprit and test it for
disease.
This section provides some basic advice for treating bites,
stings, and poisonings when medical help isn’t nearby.
Mammal bitesIf you’re attacked by a mammal, here’s what you should do:
✓ For superficial bites: These are basic puncture and
scratch wounds. Clean and bandage the wound (as we
describe in “Cleaning and covering wounds,” earlier in
this chapter). Mammal and reptile bites, especially deep
puncture wounds, also carry the threat of tetanus
infection. Make sure your tetanus shots are up-to-date.
✓ For serious bites and attacks: In case of a dismembering
or deep gouging, concentrate on stopping the bleeding.
Cleaning this type of wound in the field is usually
counterproductive because getting bleeding under control
is vastly more important. Tightly bandage the wound and
then get help or transport the subject out of the wild as
soon as possible.
Whenever a mammal bites you, you’re at risk for rabies, a
virus that causes severe neurological disorders in all mammals
and is fatal if not treated. If you can’t safely catch the animal
that attacked you and verify that it doesn’t have the disease,
you may have to undergo treatment for rabies.
SnakebitesLethal snake venom usually takes several hours to kill a
person. However, venomous snakes usually don’t inject
enough toxin during a strike to kill an adult human. In fact,

Chapter 13: Administering First Aid 245bite marks don’t necessarily mean that the snake has discharged
venom at all. But even if a snake isn’t venomous, its bite can
still cause tetanus and infection, and that makes all snakebites
dangerous. You have to take each bite seriously.
You should monitor the subject of a bite for at least 2 hours
after she’s been bitten. Be on the lookout for the following
signs of a reaction to venom:
✓ Continuous extreme pain at the bite site
✓ Head and muscle aches
✓ Dizziness, nausea, and sweating
✓ Difficulty breathing and shock
If you’ve been bitten by a snake in a wilderness situation and
you believe the snake is venomous, try to slow the spread of
the venom. Here are the steps you should take (Note: In some
countries the advice for treating snakebites varies from what
we provide here, so check with local experts before you go):
1. Try to identify the snake.
Most antivenins are engineered to work against venom
from only one type of snake, so knowing exactly which
type of snake bit the subject is critical.
When trying to identify or catch the snake, keep in
mind that a dead snake can still strike from reflex and
that the venom is still just as potent.
2. Make sure the bite is lower than the subject’s heart
at all times.
3. Work to calm the subject.
Anxiety makes the snakebite much worse. Any
reassurance you can give the person helps.
4. Wash the wound.
Soak up any venom that may be near the teeth marks
and then wash the site (with soap and water if
possible) and pat it dry.
5. Apply a pressure bandage.
This is a simply a compression bandage that starts
above the wound and then winds tightly down to the
puncture site. For example, if you’re bitten on the ankle,
sick
for
d
or
:
e
n
ep
.
ng
g.
trol
and
as
als
al
e,
Part II: Eyeing Advanced Survival Techniques 246
you start bandaging above the calf and work your way
down, winding tightly until you reach the bite. This can
help stop the flow of toxin through the body. Warning: Don’t cut off circulation with a tourniquet.
6. Immobilize the limb.
In any situation involving a snakebite, be ready to treat for
shock and perform CPR. For instructions, see “Treating
Shock” and “Giving CPR,” earlier in this chapter.
The best treatment for a venomous snakebite is the
administration of antivenin, so get to the hospital as soon as
you can. The longer you wait before seeking medical help, the
more likely that the snakebite will cause complications, and
the antivenin will be less useful.
Spider bites and insect stingsMost spider bites and insect stings are merely itchy or painful,
but others can cause allergic reactions, paralysis, tissue
damage, or death. Avoidance, of course, is the best course of
action. (For more on avoiding spider bites and insect stings,
see Chapter 15.)
Of the dangerous spiders, black widows, brown recluses,
and tarantulas tend to cause the most harm. Brown recluse
bites are usually the worst. These bites are painful, and they
usually form a large pustule at the bite site; this normally
ruptures, and the dead tissue around it falls away in 10 to 14
days. Black widow bites usually cause pain and even partial
paralysis, usually for no more than 24 hours; bites are rarely
fatal. Tarantula bites are painful, but they’re also rarely fatal.
In any bite or sting situation, follow these instructions:
1. Try to identify the insect or spider.
Try to catch the insect or at least make sure you know
what color it was and what specific markings it had.
2. Make sure the subject’s ABCs are satisfactory.
For a look at these procedures, see “Assessing the
ABCs,” earlier in this chapter. Be on guard for signs of
difficulties swallowing and choking, which are signs of
anaphylactic shock (check out the nearby sidebar).

Chapter 13: Administering First Aid 247 3. Try to calm and reassure the person who’s been
stung.
Anxiety and high heart rate only amplify the symptoms.
4. Remove the stinger or mouthparts if they’re still in
the skin.
If the stinger has been left in, scrape it off with a piece
of paper or the edge of a knife or credit card. Don’t use
tweezers for this procedure, which can squeeze the
poison sac and just inject more venom.
A tick anchors itself in your skin with its sucker, which
can break off and stay inside you if you remove the
critter in the wrong way. To force a tick to release,
grasp it at the precise point where it enters the skin,
preferably with tweezers, and then pull slowly and
steadily. Your skin should rise slightly with the pull
on the animal. Hold this pressure. You may have to
wait for anywhere from 10 seconds to 2 or 3 minutes,
but the tick should disengage and pull its sucker out.
When performing this procedure, don’t crush or twist
the tick’s body. You want it to stay alive so it can
disengage cleanly.
5. Wash the sting or bite site with soap and water, and
then apply cold compresses.
6. Monitor the subject for an allergic reaction or shock,
and be ready to give CPR.
Regardless of the type, insects pose the greatest
threat to you when they inflict multiple stings. Even if
you’re not allergic, multiple hornet stings or ant bites
can cause you to go into anaphylactic shock. Always
take multiple sting situations seriously.
PoisoningUnlike venom, which critters inject, a poison is a substance you
ingest through your food or water. As always, prevention is
best. You can avoid eating poisonous plants by performing the
Universal Plant Edibility Test, which we outline in Chapter 8.
The common symptoms of poisoning are
✓ Nausea, vomiting, abdominal cramps, and/or diarrhea
ay
can
ng:
as
the
d
l,
of
s,
e
ey
4
al
ly
al.
ow
.
of
s of
.

Part II: Eyeing Advanced Survival Techniques 248
Watching for anaphylactic shockMany allergens and toxins, such as those found in insect bites and stings, foods, and medicines, can cause anaphylactic shock, a deadly allergic reaction. Symptoms usually include difficulty swallowing, dizziness, wheezing, nausea, hives, and swelling of the eyes, face, and tongue.
If you see signs of a severe reaction developing, especially choking and difficulty in swallowing, take extra precautions to maintain a clear airway in the subject, and be prepared to give CPR. Don’t put a pillow under the head of the subject, because this can close the airway.
Some people who are prone anaphy-lactic shock carry medications with them. If you believe you’re dealing with a case of anaphylactic shock, ask the subject whether she’s carry-ing medication, or if she can’t com-municate, look in her backpack or kit. The most common medication is epinephrine, usually carried in syringe called an Epi-Pen. If this isn’t available, you can try administering diphenhydramine (Benadryl). Anyone experiencing anaphylactic shock should be evacuated to a medical facility as soon as possible.
✓ Weakness
✓ Sweating
✓ Seizures
If you have a person who has lost consciousness due to
suspected poisoning, put him in the recovery position and
monitor his airway. The subject may vomit, which can
obstruct the breathing. To see the recovery position, check
out Figure 13-3, earlier in this chapter.
Note when the subject ingested the poison and how much
he took, and try as hard as you can to identify exactly what
caused the poisoning. Treatment can vary depending on
the substance, so you may have to make a judgment call. If
someone has recently eaten a poisonous plant — and he’s
conscious and coherent — he can put a finger down his
throat to induce vomiting and attempt to get it out of his
system. However, note that vomiting up caustic substances
can burn the throat.

Chapter 14
Survive or Thrive? Advanced Methods
and ToolsIn This Chapter▶ Tying some basic knots and lashings
▶ Making tools with bone and antler
▶ Using plants for medicinal purposes
Sometimes you need just a little bit more skill to get out
of a jam, and sometimes, well, you just want to look
good, right? The skills in this chapter make you a little more
versatile in the wilderness. They help you change from being
an intruder in the wild to, hopefully, being a natural.
In this chapter, we give you a basic primer on rope, knots,
and lashings, we show you how to make tools and weapons,
and we tell you how to make medicines from plants.
Keeping It Together: Ropes and Knots
Even possessing just a few skills with rope (or cordage) can
give you tremendous confidence in the wild. This section
gives you the lowdown on ropes, including the different types
you can use, and then delves into some knots and lashings.
Part II: Eyeing Advanced Survival Techniques 250
Getting the lowdown on ropeHere are some important principles to keep in mind about the
strength of rope:
✓ Shock puts tremendous strain on rope. When you’re
estimating whether your rope can hold a certain amount
of weight, keep in mind that you need a thicker rope to
handle a sudden snap or shock on the line than you’d
need if that same amount of weight were applied slowly.
✓ Ropes lose their strength rapidly. If you have a rope
that’s been sitting out for a while or one that has lots of
burrs and scrapes on it, or if its coloring is faded, consider
it to be weakened and vulnerable to breaking.
You weaken your rope whenever you put a knot in it. The
average knot weakens a rope by about 60 percent. Seems
kind of unfair, doesn’t it?
✓ Braided rope is stronger than laid rope. Ropes that are
braided, or woven together, are stronger than ropes that
are the same size and made of the same material but are
laid, or twisted.
Knowing the types of cordageYou usually don’t have whole lot of choice of cordage in a
survival situation, so you frequently have to improvise. Some
ropes are better than others for certain situations, so try to
get an idea of what you can expect from the type of rope you
do have. Knowing your rope’s relative strength and stretchiness
can tell you, say, whether you can rely on that rope to hold a
raft together, support your jungle hammock, or save you from
a fall down the mountainside.
The following list names the main types of rope you’re likely
to use in your travels, from strongest to weakest:
✓ Nylon: This fiber is used for climbing ropes and for
anchor lines on boats. It’s usually white, and it feels soft
to the touch, though in climbing rope, it’s usually hidden
inside a colorful sheath. Nylon is exceptionally strong,
and it’s very stretchy — almost like rubber in some
cases. The stretchiness allows the cordage to act as a
shock absorber. Nylon doesn’t float.
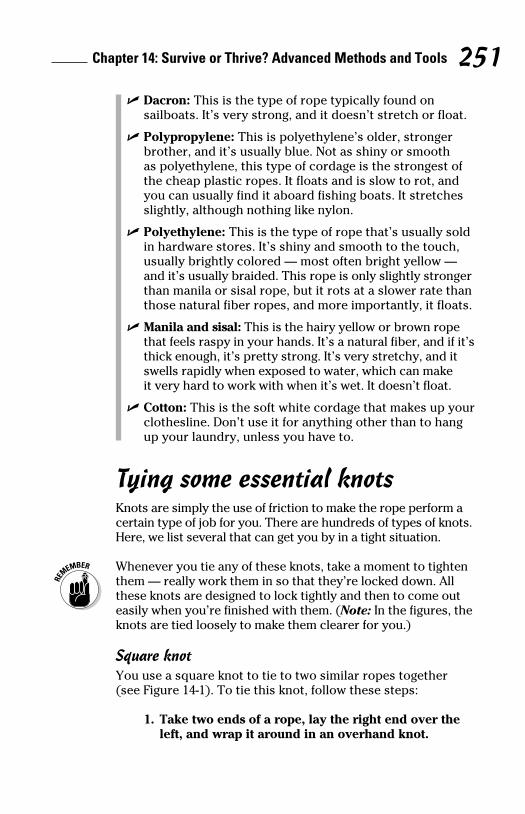
Chapter 14: Survive or Thrive? Advanced Methods and Tools 251 ✓ Dacron: This is the type of rope typically found on
sailboats. It’s very strong, and it doesn’t stretch or float.
✓ Polypropylene: This is polyethylene’s older, stronger
brother, and it’s usually blue. Not as shiny or smooth
as polyethylene, this type of cordage is the strongest of
the cheap plastic ropes. It floats and is slow to rot, and
you can usually find it aboard fishing boats. It stretches
slightly, although nothing like nylon.
✓ Polyethylene: This is the type of rope that’s usually sold
in hardware stores. It’s shiny and smooth to the touch,
usually brightly colored — most often bright yellow —
and it’s usually braided. This rope is only slightly stronger
than manila or sisal rope, but it rots at a slower rate than
those natural fiber ropes, and more importantly, it floats.
✓ Manila and sisal: This is the hairy yellow or brown rope
that feels raspy in your hands. It’s a natural fiber, and if it’s
thick enough, it’s pretty strong. It’s very stretchy, and it
swells rapidly when exposed to water, which can make
it very hard to work with when it’s wet. It doesn’t float.
✓ Cotton: This is the soft white cordage that makes up your
clothesline. Don’t use it for anything other than to hang
up your laundry, unless you have to.
Tying some essential knotsKnots are simply the use of friction to make the rope perform a
certain type of job for you. There are hundreds of types of knots.
Here, we list several that can get you by in a tight situation.
Whenever you tie any of these knots, take a moment to tighten
them — really work them in so that they’re locked down. All
these knots are designed to lock tightly and then to come out
easily when you’re finished with them. (Note: In the figures, the
knots are tied loosely to make them clearer for you.)
Square knotYou use a square knot to tie to two similar ropes together
(see Figure 14-1). To tie this knot, follow these steps:
1. Take two ends of a rope, lay the right end over the
left, and wrap it around in an overhand knot.
the
unt
o
ly.
of
der
The
ms
re
hat
are
me
o
ou
ess
d a
om
y
oft
den

Part II: Eyeing Advanced Survival Techniques 252
This is the same way you start to tie your shoelaces
or any other bow, for that matter; just fold the rope
around itself.
2. Take the end in your left hand, lay it over the right,
and fold it over once again.
You know you have a square knot when it looks
symmetrical. If it looks crooked, it’s a granny knot —
and granny knots don’t work very well for anything!
Figure 14-1: A square knot.
Sheet bendThe sheet bend can join two different types of ropes, which is
exactly what’s required in most survival situations. You can
tie any two types of line together with this knot (like nylon to
manila, for example), or you can use it to tie any two types
of improvised cordage together in an emergency (like if you
have to tie a bed sheet to a garden hose or an electrical cord
to a beach towel). Just remember that if you’re using two
dissimilar cordages, the one that is the thickest is the one
that forms the bight. To tie the sheet bend, follow these steps
(see Figure 14-2):
Bight
Figure 14-2: Tying a sheet bend.

Chapter 14: Survive or Thrive? Advanced Methods and Tools 253 1. Take the thicker of the two ropes and make a bight.
The bight is the big loop that the thin line snakes
around.
2. Thread the thin line up through the bight and then
wrap it around the head of the bight.
3. Thread the thin rope between itself and the bight;
then tighten.
Sheet bend double (Beckett bend)The sheet bend double is the exact same knot as the sheet
bend (Figure 14-2) with one extra step: You just wrap another
loop of rope around the bight to increase its gripping strength.
Use this knot (Figure 14-3) when you join two things that are
really slippery.
Figure 14-3: Making a sheet bend double.
Anchor bendUse the anchor bend knot (Figure 14-4) whenever you want
to attach a rope to a pole or a log or a ring. To tie this knot,
follow these simple steps:
1. Wrap your rope twice around whatever you want it
to hold so you end up with a circle of rope around
your object.
2. Take the free end of your rope, bring it around, and
thread it through the circle; then tighten.
s
e
ht,
—
!
h is
n
to
u
rd
eps

Part II: Eyeing Advanced Survival Techniques 254
3. Lay the free end over the rope again and now thread
it through this new loop; then tighten.
Figure 14-4: Tying an anchor bend.
BowlineThe bowline knot (Figure 14-5) instantly gives you a loop that
won’t slip. To make this knot, do the following:
1. Hold the palm of your left hand up and lay your
rope on top of it so that you’re grasping the rope
about 3 feet (0.9 meters) from the end.
The 3 feet of line should be hanging down from the
heel of your upturned palm.
2. Take the hanging bit of line in your right hand,
reach up, and lay a loop over the line in your left,
forming a design that looks like the numeral 6.
You should now have a loop of line in your left hand,
with about 2 feet (0.6 meters) hanging down from the
heel of your upturned palm.
3. Take the point of the rope, which is called the
rabbit, in your right hand; thread the point up
through the bottom of the loop, snake it around the
rope on the other side of your left hand, and then
thread it straight back down into the loop.
This saying can help you remember what to do: The rabbit comes up through the hole, runs around the tree, and goes back down the hole.
4. After you thread the end of the line back into the
loop, pull on it to tighten the knot.
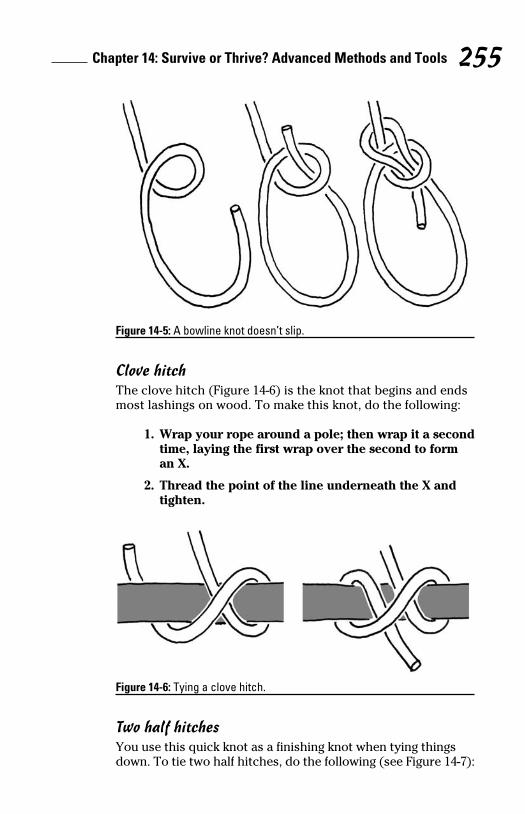
Chapter 14: Survive or Thrive? Advanced Methods and Tools 255
Figure 14-5: A bowline knot doesn’t slip.
Clove hitchThe clove hitch (Figure 14-6) is the knot that begins and ends
most lashings on wood. To make this knot, do the following:
1. Wrap your rope around a pole; then wrap it a second
time, laying the first wrap over the second to form
an X.
2. Thread the point of the line underneath the X and
tighten.
Figure 14-6: Tying a clove hitch.
Two half hitchesYou use this quick knot as a finishing knot when tying things
down. To tie two half hitches, do the following (see Figure 14-7):
ead
hat
d,
he
he
e e,
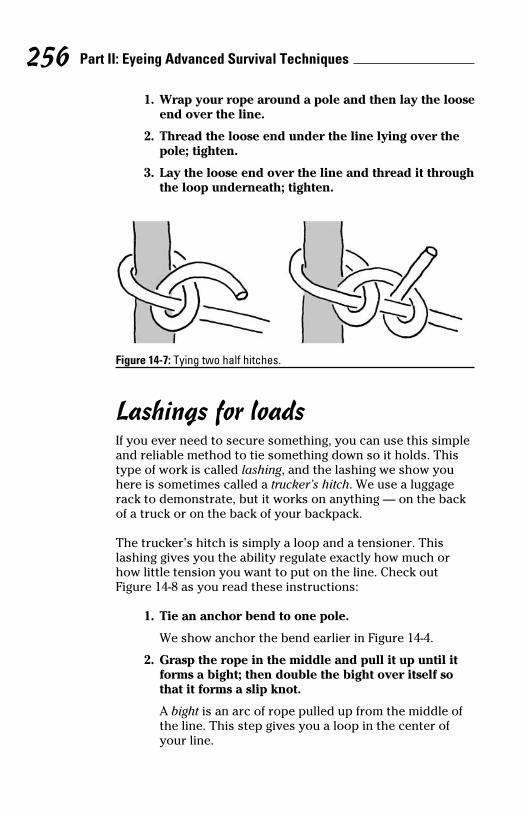
Part II: Eyeing Advanced Survival Techniques 256
1. Wrap your rope around a pole and then lay the loose
end over the line.
2. Thread the loose end under the line lying over the
pole; tighten.
3. Lay the loose end over the line and thread it through
the loop underneath; tighten.
Figure 14-7: Tying two half hitches.
Lashings for loadsIf you ever need to secure something, you can use this simple
and reliable method to tie something down so it holds. This
type of work is called lashing, and the lashing we show you
here is sometimes called a trucker’s hitch. We use a luggage
rack to demonstrate, but it works on anything — on the back
of a truck or on the back of your backpack.
The trucker’s hitch is simply a loop and a tensioner. This
lashing gives you the ability regulate exactly how much or
how little tension you want to put on the line. Check out
Figure 14-8 as you read these instructions:
1. Tie an anchor bend to one pole.
We show anchor the bend earlier in Figure 14-4.
2. Grasp the rope in the middle and pull it up until it
forms a bight; then double the bight over itself so
that it forms a slip knot.
A bight is an arc of rope pulled up from the middle of
the line. This step gives you a loop in the center of
your line.

Chapter 14: Survive or Thrive? Advanced Methods and Tools 257 3. Wrap the line around the second pole and then
return it to feed through your loop.
This is your tensioner.
4. Pull the line through the loop until you have the
amount of tension you want; then pinch the neck of
the loop with your hand to hold the tension.
5. Finish with two half hitches.
Tie two half hitches (Figure 14-7) at the neck while
holding the tension.
Begin withanchor bend.
Put simpleknot in rope,leaving a loop.
Finish withtwo halfhitches.
Feed rope aroundlower bar, thencome back up.
Pull ropethrough loop.
Pulltensionerto tighten.
Note: Pull all knots tight! These are shown loose for clarity.
Figure 14-8: Lashing a load down.
That’s a wrap: Making a tripodYou can use a tripod for a wide variety of purposes in the
wild. A tripod is three poles, tied together by a lashing, that
you can use to make tents, hold pots for cooking, and do a
host of other practical things. Refer to Figure 14-9 as you read
these instructions:
1. Start with three thin logs of the same length; place
two on the ground, with a space between them, and
place the end of the third log between them.
ose
e
ugh
ple
s
ck
t
of
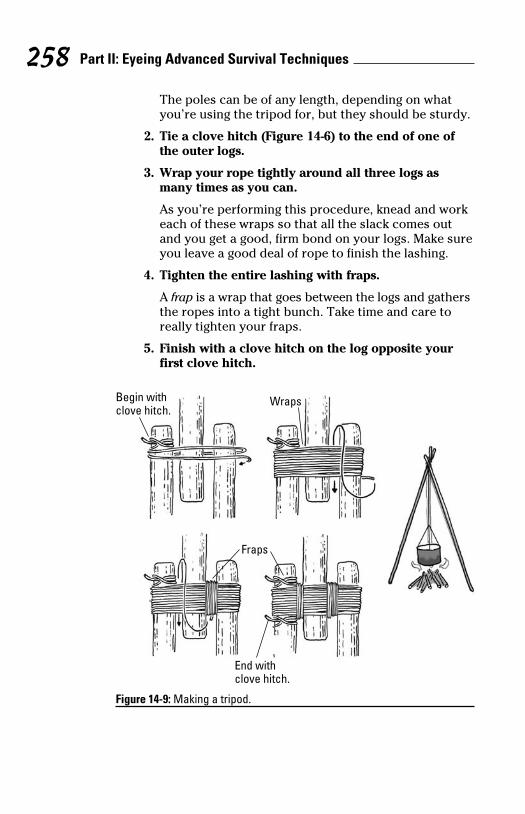
Part II: Eyeing Advanced Survival Techniques 258
The poles can be of any length, depending on what
you’re using the tripod for, but they should be sturdy.
2. Tie a clove hitch (Figure 14-6) to the end of one of
the outer logs.
3. Wrap your rope tightly around all three logs as
many times as you can.
As you’re performing this procedure, knead and work
each of these wraps so that all the slack comes out
and you get a good, firm bond on your logs. Make sure
you leave a good deal of rope to finish the lashing.
4. Tighten the entire lashing with fraps.
A frap is a wrap that goes between the logs and gathers
the ropes into a tight bunch. Take time and care to
really tighten your fraps.
5. Finish with a clove hitch on the log opposite your
first clove hitch.
Wraps
Fraps
Begin withclove hitch.
End withclove hitch.
Figure 14-9: Making a tripod.

Chapter 14: Survive or Thrive? Advanced Methods and Tools 259
Making a square lashingYou can use a square lashing to bind one pole to another at
a right angle, such as when you’re building a platform in the
jungle or making any other type of shelter. Refer to Figure 14-10
as you follow these steps:
1. Put a clove hitch (Figure 14-6) on one pole; then
wrap the rope around that pole once to get the
lashing started.
Begin withclove hitch.
End withclove hitch.
Wraps
Fraps
Figure 14-10: Creating a square lashing.
2. Mount the tied pole at a right angle to the new pole
you want to attach it to; wrap the free end of the
rope behind the new pole.
3. Bring the rope around, pass it over the original pole,
and then wrap it around the new pole once again.
4. Continue this binding process until you have about
four or five wraps; then frap.
dy.
f
ork
ure
ers
Part II: Eyeing Advanced Survival Techniques 260
To frap, take the rope and go between the poles,
wrapping up only the rope — not the poles. Fraps are
for tightening the wraps.
5. After you get about three fraps squeezing the wraps,
finish tightly with a clove hitch on the pole that
doesn’t have one yet.
Crafting Your Own ToolsWith just a few raw materials, such as stone, wood, and
cordage of some sort, you can quickly fashion tools to defend
yourself from wildlife as well as to catch food to eat.
This section looks at how to make some basic survival tools
almost entirely from natural materials. Keep in mind that it
always helps to have your wilderness survival kit handy, con-
taining at least a knife and some cordage (for more on kits,
see Chapter 2). You can survive without the kit, but the kit is
invaluable in making other tools.
Making stone toolsIf you lose your knife, never fear — a stone tool will do in a
pinch. This section explains how you can break a stone to
determine its type. After you know the type, you can shape it
into a tool for various tasks.
Splitting a stone to assess its typeBefore you can craft your own stone tool, you need to know
about the different stones available and what they can do for
you. Superficially, river or beach cobbles (baseball to softball-
sized round rocks) all seem the same: round, boring, gray
rocks. But if you split them open, you find some differences.
To split a stone, take it in two hands and slam it down on
another rock. (Warning: At the moment of the blow, close
your eyes to prevent being injured by a chip of flying stone.
Better yet, wear glasses or sunglasses.) You can simply throw
the stone at a cliff wall if you don’t want to risk smashing your
fingers, but holding the rock can give you a little more control
over what you’re doing.

Chapter 14: Survive or Thrive? Advanced Methods and Tools 261
After you open the stone, you can assess its grain size and
identify what the stone is useful for. Run your thumb over
the exposed surface of the rock to assess its grain size. The
following are common rock types listed in order of increasing
grain size, along with some ways you can use them:
✓ Obsidian: Obsidian is volcanic glass. It’s often black, and
when chipped, the edges come off razor-sharp.
✓ Flint and chert: Flint and chert are smooth, fine-grained
stones that have edges that can be very sharp, but they
aren’t as brittle as obsidian. These rocks are ideal for
making spearheads or arrowheads. (If you have access
to steel, you may want to save a piece of flint or chert for
starting fires — see Chapter 5 for details.)
✓ Basalt: Basalt is dense, dark rock that doesn’t shatter as
easily as obsidian. Its edges aren’t as sharp as obsidian,
but because basalt is more durable, it’s great for making
tools for heavy-duty work like scraping or chopping.
✓ Pumice and sandstone: Pumice, an igneous rock, and
sandstone, a sedimentary rock, are the sandpaper of the
natural world. They’re both ideal for abrading wood,
bone, and antler into various shapes.
Shaping the stone into a toolAfter you have an idea of how fine the grain is, you can begin
to shape the stone into the tool you want. Here are the two
main tools you need so you can work stone into shapes useful
to the survivor:
✓ Hammerstone: A hammerstone is a rock you use to break
open another rock. Larger hammers (about the size of a
baseball; see Figure 14-11a) are useful for breaking the rock
to get good slivers and splinters of rock; smaller ham-
mers (Figure 14-11c) can be the size of a peach pit or a
large marble and are used to trim the edge of a splinter
of rock with a little more control. In either case, the point
is to break the core (the main rock) with the hammer and
produce shatter (Figure 14-11b), bits of stone that have
sharp and robust edges that are useful for woodworking
or other tasks. In Figure 14-11d, you see a cobble that has
conveniently split in half, providing a great hard, sharp
edge for chopping wood.
are
ps,
nd
s
on-
is
it
w
or
all-
s.
.
ow
our
trol

Part II: Eyeing Advanced Survival Techniques 262
Smash the hammerstone against the edge of a core stone.
Holding the core in the hand gives you more control over
where your strike lands. This bashing often results in
sharp flakes of stone that you can easily use as knives
without any further shaping. In most survival situations,
you can get what you need just by breaking open lots of
rock and picking through the debris to find just the right
shape — no pressure flaker required.
✓ Pressure flaker: A pressure flaker is a piece of metal,
bone, or antler, about the size of a pen or pencil, with a
robust but sharpened tip (Figure 14-11e); you use it to
press hard on the very edge of a flake of a piece of
shatter. The pressure flaker allows fine control of the
shape of the rock you’re working on, allowing you to
make shapes as intricate as notched arrowheads
(Figure 14-11f) after some practice. To shape a stone
with a pressure flaker, carefully trim the edges of a flake
of stone into the desired shape.
ab
c
d
ef
Figure 14-11: Breaking and shaping stone for tools and weapons.
Most of the time, when a stone tool isn’t working, the problem
is that the rock is the wrong grain size or the hammerstone is
too large or small. The only way to figure out these subtleties
is through trial and error; experiment in your backyard, and
get your hands on a book about basic flintknapping.

Chapter 14: Survive or Thrive? Advanced Methods and Tools 263
Carving bone and antler toolsYou can carve bone and antler into tools you can use in the
wild. In fact, sometimes bone and antler are easier to work
with than stone. They flex under impact instead of shattering
(which stone does), which makes them particularly good tips
for spears.
You can harvest bone and antler from the carcasses of many
large mammals. Figure 14-12a shows an elk, highlighting (in
white) the very useful antlers and the metapodials, the lower
leg bones. Don’t leave these at a carcass! Collect them, scrape
away any tissues, and wash them if you can. Soaking bone
and antler in water for 24 to 48 hours can make them easier to
work with.
a b
cd e
f
g
h
i
Figure 14-12: Making tools from bone and antler.
Here are the main ways to shape bone and antler:
one.
ver
ns,
of
ght
a
ke
lem
e is
ies
d

Part II: Eyeing Advanced Survival Techniques 264 ✓ Smash them with a hammerstone on an anvil to produce
splinters. To split a bone open, smash down on the bone
with a baseball-sized stone or even hit a small wedge of
stone into the bone with a hammerstone, as in Figure
14-12b. Many bones (and antlers you may find just lying
on the ground, as in Figure 14-12c) are hard to break,
especially if the animal died recently. Try again a few
days later, when the bone begins to dry out.
✓ Abrade the splinters with a coarse stone. Grind away
the surface of the bone or antler with sandstone or
pumice, just like you do when you use regular sandpaper.
See Figure 14-12d.
✓ Perforate the abraded splinters with a hard item, such
as the awl on your knife. You can instead use a sharp
stone splinter to perforate bone and antler, but this is
very hard to do. It’s much better — as always — just
never to be out there without your pocketknife or
multitool.
Figure 14-12 shows a variety of bone and antler tools you can
make, such as spear tips, harpoons, and fishing hooks. Use
your imagination and experiment to find useful shapes.
Making Natural RemediesWhen you’re in the wild, you may encounter sickness, infection,
and other ailments. If you’re in a bind and don’t have certain
treatments in your first aid kit, you can improvise by making
your own remedies. This section looks at a few easy and safe
medicines you can make.
Using salicin, nature’s aspirinSalicin, or salicylic acid, is one of the main ingredients in
aspirin, and you can use it as a cold and headache reliever,
as well as a treatment for swelling and inflammation. You can
find it in aspen and willow trees. To extract salicin, peel away
some bark and scrape off the soft tissue between the bark and
the wood. Figure 14-13 shows an example.
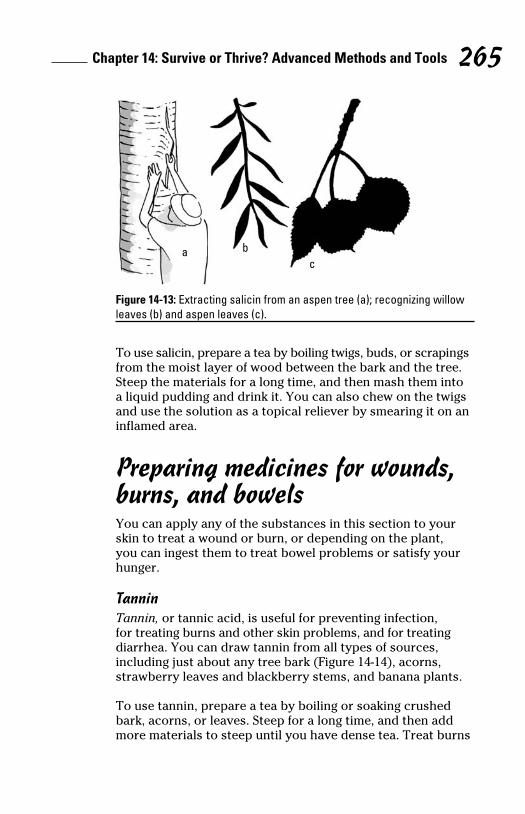
Chapter 14: Survive or Thrive? Advanced Methods and Tools 265
a bc
Figure 14-13: Extracting salicin from an aspen tree (a); recognizing willow leaves (b) and aspen leaves (c).
To use salicin, prepare a tea by boiling twigs, buds, or scrapings
from the moist layer of wood between the bark and the tree.
Steep the materials for a long time, and then mash them into
a liquid pudding and drink it. You can also chew on the twigs
and use the solution as a topical reliever by smearing it on an
inflamed area.
Preparing medicines for wounds, burns, and bowelsYou can apply any of the substances in this section to your
skin to treat a wound or burn, or depending on the plant,
you can ingest them to treat bowel problems or satisfy your
hunger.
TanninTannin, or tannic acid, is useful for preventing infection,
for treating burns and other skin problems, and for treating
diarrhea. You can draw tannin from all types of sources,
including just about any tree bark (Figure 14-14), acorns,
strawberry leaves and blackberry stems, and banana plants.
To use tannin, prepare a tea by boiling or soaking crushed
bark, acorns, or leaves. Steep for a long time, and then add
more materials to steep until you have dense tea. Treat burns
uce
one
of
ng
er.
ch
p
an
on,
in
ng
afe
an
way
and

Part II: Eyeing Advanced Survival Techniques 266or wounds by applying cool compresses soaked in the tea. If
you’re desperate and suffering from a debilitating bout of
diarrhea, try drinking a small portion of tea made from white
oak bark or other hardwood barks known to contain tannin.
Figure 14-14: The bark from just about any tree has tannin in it.
PlantainsPlantain plants, which come in more than 200 varieties in the
tropics, are good for treating wounds of all kinds, itching, and
problems in the bowels, such as diarrhea and dysentery. A
plantain (see Figure 14-15) is a little banana-like fruit, usually
green, flat, and hard like wood.
To use plantain plants, brew a tea of plantain leaves or seeds.
Drink it for diarrhea, or mash up the boiled or soaked leaves
in the tea and then apply it to irritated skin.
Figure 14-15: Plantain fruit.

Chapter 14: Survive or Thrive? Advanced Methods and Tools 267
Common cattailCattail grows at the edge of water sources and is good for
treating wounds, sores, and burns. It’s also a food source.
Check out Figure 14-16 to see a cattail and its roots.
a
b
Figure 14-16: Common cattail (a) and cattail roots (b).
To prepare cattail, pound the roots into a mash and then
apply the mash to wounds or sores. Cook and eat the green
bloom spikes, or peel and eat the shoots raw.
If
te
n.
he
and
ly
ds.
es

Part II: Eyeing Advanced Survival Techniques 268

Part IIISurviving in Extreme Land Environments
In this part . . .
Although the basics of wilderness survival are the same worldwide, different environments can pose
different problems. How do you build a shelter in the snowy tundra, where the nearest stick of wood is 300 miles away? How do you survive the relentless rays of the sun if you’re trapped in the desert? In this part, we cover three main environments: forests (both temperate and tropical), snowy climates, and arid deserts. We tell you how to survive them by looking for food and water in specific places and by making shelter from the materials at hand.
Chapter 15
Special Considerations for Forests and Jungles
In This Chapter▶ Watching out for dangerous animals
▶ Preventing tropical disease
▶ Taking care of water, clothing, and shelter in the jungle
▶ Making your way through the rainforest
Temperate forests offer many resources that make sur-
vival a little easier than it is on the open sea or in the
desert. Nevertheless, jungles and tropical forests present
many problems for the survivor because these areas harbor
so many diseases and parasites. Before entering either type
of forest — temperate or tropical — make sure you’re ready
for these situations.
In this chapter, we cover bear safety, insect and parasite aware-
ness, and the dangers of tropical disease. We also give special
instructions for dealing with the problem of getting off the floor
of the jungle (which is a particularly nasty place) and explain
how to use your best friend in the tropics, the machete.
Identifying Hazardous Wildlife in Dry Forests
Knowing what kinds of animal life are nearby gives you an
advanced understanding of the wilderness around you. It
helps you know where to set traps for food, where to make
camp, and where you shouldn’t tread. This section points out
Part III: Surviving in Extreme Land Environments 272
some dangerous wildlife you may encounter in the woods and
how to recognize it.
Preventing bear attacksMany times, bear attacks occur because a person acciden-
tally stumbles upon the animal when it’s feeling vulnerable
or territorial. Knowing the signs that bears are nearby can
help you remain safe in the wild. Bear paw prints (check out
Figure 15-1a) are about the size of a large human hand, and
their claw marks are unmistakable on trees — just make sure
you’re looking in the right place for these marks. Bear claw
marks on trees are frequently 8 to 9 feet (2.4 to 2.7 meters) up
the side of the trunk.
Whenever traveling in bear country, take the following proper
precautions:
✓ Carry bear spray or bear pepper spray: You can buy it
in most National Parks and outfitter stores. Make sure
you read the label and follow the instructions. Recent
studies suggest that bear pepper spray really works, and
you should have it handy — not buried in your pack.
✓ Be exceedingly careful about food smells: Never keep
food in your shelter, not even a morsel. Perfumed soaps
and deodorants fall into this category, too. Always place
your food at least 100 yards (91 meters) from your shel-
ter. Don’t sleep in the same clothes you wear when you
cook your food.
✓ Make plenty of noise as you travel: Many experienced
hikers in bear country make constant noise as they hike.
Singing, banging metal, or making other such noises lets
bears know that you’re approaching. Making a noise often
causes the bear to move away long before you get there.
✓ Remember which way the wind is blowing: If the wind
is at your back, the bears can smell you coming and usu-
ally get out of the way. But if the wind is in your face,
you’re in danger of startling a bear because your smell is
flowing behind you. Make a lot of noise when the wind is
in your face.
You should also keep an eye out for three important scenarios
in which bear attack is likely:

Chapter 15: Special Considerations for Forests and Jungles 273 ✓ Cubs: If you see bear cubs in the wild, consider yourself
in peril. Locate the mother bear as quickly as you can
and move away from her. Female bears are known to
attack anything near their young.
✓ Fresh kills: If you come across a freshly killed animal
that has been covered up with some freshly flung dirt, a
tree branch, or some leaves (Figure 15-1b), you may have
run across a bear’s cache, and the animal may be nearby.
Get away from this kill site as quickly as possible.
✓ Hibernation dens: A large hole that faces away from
the wind or at an angle to the wind — especially one
that allows snow to build up around its face — may be
a hibernation den, especially if you’re in bear country
between the months of September and April.
a b
Figure 15-1: Keep an eye open for bear paw prints (a) and kill sites (b).
If you do encounter a bear, freeze. Talk calmly in a monotone
and try to back away slowly. For more on what to do when a
bear attacks, see Chapter 24.
Avoiding mountain lionsMountain lions (Puma concolor), or cougars, are big cats that
stand about 3 feet (0.9 meters) tall and weigh anywhere from
100 to 250 pounds (45 to 115 kilograms). They rarely attack
humans, but attacks have climbed recently to about one per
year. Mountain lions usually attack children or the elderly,
and they usually do so by lunging for the neck.
Keep in mind that big cats of all kinds hunt for the weakest of
the species and that many times, they can tell when you’re
and
ut
re
up
per
it
and
p
ps
ce
el-
u
e.
s
ten
e.
nd
su-
l is
d is
rios
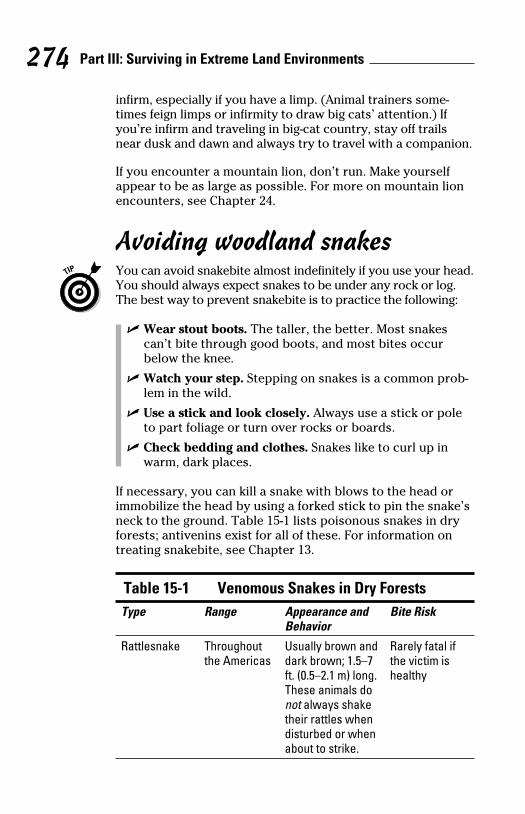
Part III: Surviving in Extreme Land Environments 274
infirm, especially if you have a limp. (Animal trainers some-
times feign limps or infirmity to draw big cats’ attention.) If
you’re infirm and traveling in big-cat country, stay off trails
near dusk and dawn and always try to travel with a companion.
If you encounter a mountain lion, don’t run. Make yourself
appear to be as large as possible. For more on mountain lion
encounters, see Chapter 24.
Avoiding woodland snakes
You can avoid snakebite almost indefinitely if you use your head.
You should always expect snakes to be under any rock or log.
The best way to prevent snakebite is to practice the following:
✓ Wear stout boots. The taller, the better. Most snakes
can’t bite through good boots, and most bites occur
below the knee.
✓ Watch your step. Stepping on snakes is a common prob-
lem in the wild.
✓ Use a stick and look closely. Always use a stick or pole
to part foliage or turn over rocks or boards.
✓ Check bedding and clothes. Snakes like to curl up in
warm, dark places.
If necessary, you can kill a snake with blows to the head or
immobilize the head by using a forked stick to pin the snake’s
neck to the ground. Table 15-1 lists poisonous snakes in dry
forests; antivenins exist for all of these. For information on
treating snakebite, see Chapter 13.
Table 15-1 Venomous Snakes in Dry ForestsType Range Appearance and
BehaviorBite Risk
Rattlesnake Throughout the Americas
Usually brown and dark brown; 1.5–7 ft. (0.5–2.1 m) long. These animals do not always shake their rattles when disturbed or when about to strike.
Rarely fatal if the victim is healthy
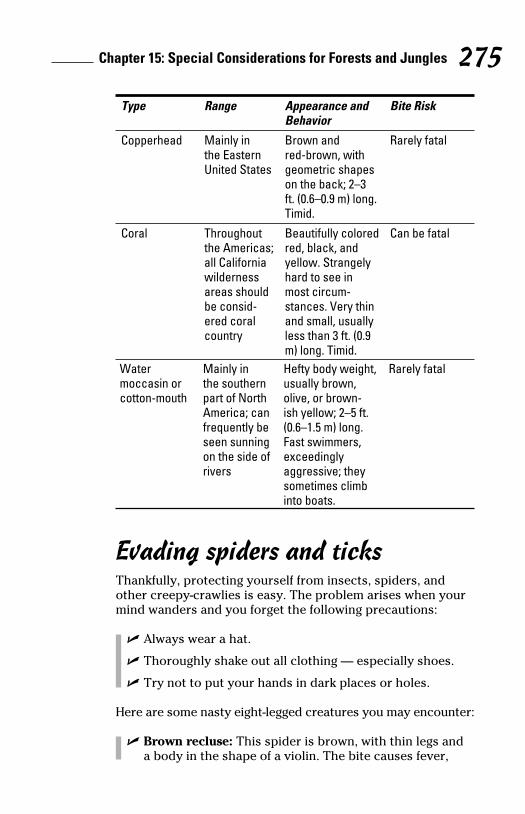
Chapter 15: Special Considerations for Forests and Jungles 275
Type Range Appearance and Behavior
Bite Risk
Copperhead Mainly in the Eastern United States
Brown and red-brown, with geometric shapes on the back; 2–3 ft. (0.6–0.9 m) long. Timid.
Rarely fatal
Coral Throughout the Americas; all California wilderness areas should be consid-ered coral country
Beautifully colored red, black, and yellow. Strangely hard to see in most circum-stances. Very thin and small, usually less than 3 ft. (0.9 m) long. Timid.
Can be fatal
Water moccasin or cotton-mouth
Mainly in the southern part of North America; can frequently be seen sunning on the side of rivers
Hefty body weight, usually brown, olive, or brown-ish yellow; 2–5 ft. (0.6–1.5 m) long. Fast swimmers, exceedingly aggressive; they sometimes climb into boats.
Rarely fatal
Evading spiders and ticksThankfully, protecting yourself from insects, spiders, and
other creepy-crawlies is easy. The problem arises when your
mind wanders and you forget the following precautions:
✓ Always wear a hat.
✓ Thoroughly shake out all clothing — especially shoes.
✓ Try not to put your hands in dark places or holes.
Here are some nasty eight-legged creatures you may encounter:
✓ Brown recluse: This spider is brown, with thin legs and
a body in the shape of a violin. The bite causes fever,
on.
on
ead.
.
g:
ob-
le
e’s
y
f

Part III: Surviving in Extreme Land Environments 276
chills, and vomiting for up to 48 hours. It’s rarely fatal,
but it can cause disfigurement and even lead to limb
amputation from tissue death.
✓ Black widow: The notorious black widow is generally
black with a distinctive red or orange hourglass design on
the body. This spider is usually found in warmer environ-
ments. The bite, which is rarely fatal, is very painful and
can cause temporary paralysis, sometimes up to a week.
If someone is envenomed by a brown recluse or black
widow, treat for shock and be prepared to administer CPR
(see Chapter 13). Seek medical help as soon as possible.
✓ Ticks: You can find many varieties of these tiny arach-
nids. Ticks carry a wide variety of diseases, including
Lyme disease. See Chapter 13 for tips on removing ticks.
Laws of the Jungle: Surviving in the Tropics
We wish we could tell you that you should prepare yourself
to fight off a stealthy jaguar or swing from a vine, but unfortu-
nately, the main problem you face in jungle survival is disease.
All extreme environments have their own forms of misery, and
in the tropics, it’s the microscopic creatures that kill.
This section gives you a heads-up on how to survive in the
tropics, including info on how to prevent tropical diseases;
obtain safe drinking water, clothing, and shelter; and travel
specifically in the jungle.
Preventing jungle diseases
Taking necessary precautions is the best way you can avoid
major jungle diseases. You can take four basics steps to fend
off illnesses that can kill you. If you do them all, the chances
of being infected drop significantly. Here are the four methods
of prevention, in order of importance:
✓ Boil water and cook food thoroughly. Many tropical dis-
eases come from contaminated water and food. Chapter 7
explains how to filter and purify water (or collect rainwater,
which is usually fresh if your collecting surface is clean).
Chapter 15: Special Considerations for Forests and Jungles 277 ✓ Wear proper clothing, sleep under protective nets, and
use insect repellant. Just keeping the bugs off of you
goes a long way toward staying disease-free.
✓ Wash and bathe often. Regular soap and water can do a
surprisingly good job of stripping away harmful bacteria
and other parasites.
✓ Use vaccines and preventive medication (prophylac-
tics): These of course must be specific for the environ-
ment. Talk to your doctor before your trip.
We highly recommend visiting the Centers for Disease Control
(CDC) Web site at www.cdc.gov/travel for travelers’ info
well in advance of your journey.
Diseases from contaminated water or foodUnfortunately, if you’re out there long enough, you eventually
pick up something — it is, after all, the tropics. Knowing the
signs of disease, when combined with prevention, gives you
the best defense. The following tropical diseases are usually
contracted from contaminated food or water:
✓ Bilharzia: You contract bilharzia from contaminated
water, either from drinking it or through a break in the
skin. A microscopic worm grows in the liver and irritates
the urinary tract. The disease responds to medication.
✓ Cholera: You contract cholera from contaminated food
or water. It causes very runny, “rice water” diarrhea,
which causes rapid dehydration. It’s fatal in the very
young, the very old, and the sick. Treatment is large
quantities of clean water. A vaccine is available.
✓ Dysentery: This comes from contaminated water.
Dysentery causes severe and persistent bloody diarrhea.
Treatment is rest and rehydration. The disease may
respond to antibiotics.
✓ Giardia: Giardia comes from contaminated water. This
parasite causes severe and persistent diarrhea, as well
as unpleasant burps. Treatment is rest and rehydration.
The disease responds to antibiotic courses. No vaccine is
available.
✓ Hepatitis: Hepatitis comes from contaminated water,
sexual contact, or contact with urine or feces. It causes
nausea, loss of appetite, abdominal pain, and yellowing
of the skin (jaundice). There are many variations of this
on
on-
d
k.
CPR
e.
-
ks.
u-
se.
nd
l
d
nd
s
ods
s-
7
ter,

Part III: Surviving in Extreme Land Environments 278
disease; some have vaccines, others don’t. Treatment is
rest and nursing.
✓ Paragonimiasis: This parasitic disease, which is preva-
lent in Southeast Asia, occurs when a fluke worm grows
in the lungs. It comes from undercooked food, espe-
cially shellfish. Paragonimiasis responds to antiparasitic
medicines.
✓ Traveler’s diarrhea: This is the commonest complaint
in travelers to the tropics, and it may be caused by bac-
teria, viruses, or parasites. Avoiding contaminated food
and water is important. Maintaining fluid intake is very
important. This condition may respond to Pepto Bismol
or antibiotics.
✓ Typhoid fever: Typhoid comes from contaminated food.
It causes severe intestinal disturbances and pink spots
on the chest and the abdomen. Treatment is antibiotics,
rehydration, and rest. A vaccine is available.
Diseases from insect and animal bitesHere are the identifying characteristics of the most common
tropical diseases that are passed on through insect and animal
bites (for more on protection from bug bites, see the later sec-
tion “Identifying jungle insects and other buggy creatures”):
✓ Bubonic plague: You contract this disease from fleas,
and it causes fever, persistent vomiting, and painful
swelling in the lymph nodes. It’s fatal if not treated, but it
responds to antibiotics if diagnosed early.
✓ Dengue fever: This disease, which you contract through
mosquitoes, has been on the rise in areas in the trop-
ics. Dengue fever causes flu-like symptoms and some-
times rashes, especially on the face and neck. It usually
lasts a week and is sometimes fatal. There’s no vaccine.
Treatment is rest. Don’t take aspirin or ibuprofen if you
think you have dengue.
✓ Malaria: Malaria comes from mosquitoes, and it causes
weakness, fever and chills, violent shivering, nausea,
coma, and death. Preventive medications are effective,
but they must be taken up to one week before exposure
to the disease and several weeks afterward. Malaria can’t
be cured, but medicine courses can reduce the severity
of the symptoms during the lifelong outbreaks that come
after infection.

Chapter 15: Special Considerations for Forests and Jungles 279
Malaria is a constantly evolving disease, and older medi-
cations become ineffective over time. You must take a
prophylactic that’s up-to-date — one that’s engineered to
cope with new strains. Opt for one with a proven record
of working in the area in which you’re traveling. No vac-
cine is available.
✓ Leishmaniasis: This disease is passed on through sand
flies. It causes large sores on the face, neck, and arms
that can last for months and frequently disfigure the
victim. This condition can lie dormant in the body for
months or even years before rising to the surface. It’s
very difficult to treat, and there’s no vaccine.
✓ Onchocerciasis (river blindness): Bites from black flies
cause worm larvae to infest the victim, which causes
tissue damage and blindness. It responds to worm-killing
drugs and antibiotic courses. No vaccine is available.
✓ Rabies: This viral disease comes from bites from infected
mammals, including bats. It causes madness and death.
Rabies may respond to a vaccine.
✓ Yellow fever: Yellow fever is another mosquito-borne ill-
ness. It causes headaches, pain in the limbs, high fever,
constipation, vomiting, and yellowing skin after about
four to five days. It’s sometimes fatal. Treatment is rest
and rehydration. A vaccine is available.
Obtaining safe waterThe tropical forest is the greatest incubator of disease on
planet Earth, and every single body of water presents the
possibility of dysentery, hepatitis, and cholera. Consider
river and stream water deadly, and make sure you boil all
water in the tropics. The clarity of the water in a particular
stream means absolutely nothing.
Boil your water for as long as you can. Ideally, you want to
bring your water to a rolling boil and keep it that way for 15
minutes. You can sterilize water with water purification tab-
lets, too, but they aren’t as reliable as boiling. Whether you
use boiling or chemicals, strain your water through a filter
first. For more on filtering and purifying, see Chapter 7.
If you don’t have the equipment or fire to boil water, start a
rain-catching operation. Even a brief rain shower — like the
is
va-
ws
sitic
t
c-
od
y
ol
od.
s
cs,
mal
ec-
ut it
gh
y
e.
u
es
,
re
an’t
ty
me

Part III: Surviving in Extreme Land Environments 280
type that comes almost every day in the tropics — can give
you more than enough water. You can use broad leaves, like
those on plantain and banana plants, as water-catching planes
and receptacles. For more on the spine-tingling adventure of
catching rainwater, see Chapter 7.
The jungle cover-up: Dressing for the tropicsFrankly, Tarzan was a little underdressed. When you’re in a
jungle environment, you can think about clothing in terms of
coverage. You want to cover as much of your skin as possible
to prevent bites from insects. Make sure you wear the follow-
ing pieces of clothing (and Check out Chapter 4 for a basic
overview of clothing needs in a survival situation):
✓ Hat: The most important piece of gear in a tropical forest
is a hat. Keep your head covered as often as you can,
because spiders and insects can drop from foliage and
into your hair.
Wear a hat even inside a tropical house or hut, even if it
has a metal roof. Many insects dwell in the roof of a tropi-
cal house or hut, where they have the nasty habit of fall-
ing on victims.
✓ Lightweight long-sleeved shirt and long pants: The
material you wear should breathe. Examples of this
fabric are ripstop nylon, nylon blends, and cotton. Cuffs,
both at the wrists and the ankles, should be snug.
Ideally, you want adjustable cuffs so you can loosen them
during the day and tighten them at dusk. Many outfitters
sell lightweight pants and shirts with Velcro on the cuffs
just for this purpose.
✓ Boots: A boot that rises up and meets the pants leg, com-
bined with a snug cuff on the pants at the ankle, can do
much to protect you from mosquitoes, fleas, and mites.
In any tropical environment, mold and mildew are serious
threats. Mold appears as small black and gray dots on fabric,
and it eats through clothing, backpacks, and webbing in just a
few days. The best way to defend against this is to hang all fab-
rics to dry every chance you get. If you’ve ever wondered why
castaways’ clothes are always so shredded, now you know.
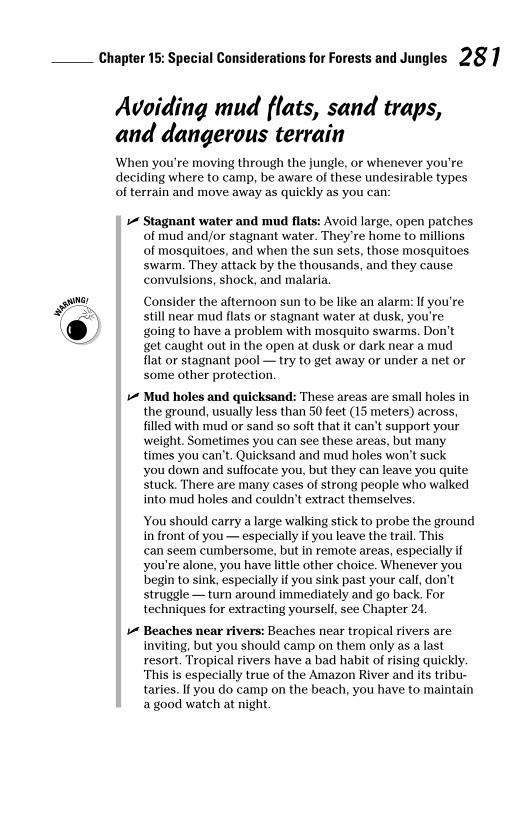
Chapter 15: Special Considerations for Forests and Jungles 281
Avoiding mud flats, sand traps, and dangerous terrainWhen you’re moving through the jungle, or whenever you’re
deciding where to camp, be aware of these undesirable types
of terrain and move away as quickly as you can:
✓ Stagnant water and mud flats: Avoid large, open patches
of mud and/or stagnant water. They’re home to millions
of mosquitoes, and when the sun sets, those mosquitoes
swarm. They attack by the thousands, and they cause
convulsions, shock, and malaria.
Consider the afternoon sun to be like an alarm: If you’re
still near mud flats or stagnant water at dusk, you’re
going to have a problem with mosquito swarms. Don’t
get caught out in the open at dusk or dark near a mud
flat or stagnant pool — try to get away or under a net or
some other protection.
✓ Mud holes and quicksand: These areas are small holes in
the ground, usually less than 50 feet (15 meters) across,
filled with mud or sand so soft that it can’t support your
weight. Sometimes you can see these areas, but many
times you can’t. Quicksand and mud holes won’t suck
you down and suffocate you, but they can leave you quite
stuck. There are many cases of strong people who walked
into mud holes and couldn’t extract themselves.
You should carry a large walking stick to probe the ground
in front of you — especially if you leave the trail. This
can seem cumbersome, but in remote areas, especially if
you’re alone, you have little other choice. Whenever you
begin to sink, especially if you sink past your calf, don’t
struggle — turn around immediately and go back. For
techniques for extracting yourself, see Chapter 24.
✓ Beaches near rivers: Beaches near tropical rivers are
inviting, but you should camp on them only as a last
resort. Tropical rivers have a bad habit of rising quickly.
This is especially true of the Amazon River and its tribu-
taries. If you do camp on the beach, you have to maintain
a good watch at night.
e
ke
nes
of
a
of
ble
w-
rest
d
it
opi-
all-
ffs,
hem
ers
ffs
om-
o
s.
c,
a
ab-
hy

Part III: Surviving in Extreme Land Environments 282
Using a macheteA machete is a long metal blade with a plastic handle. They’re
found in practically every house, bus, and car in the tropics.
Sometimes they’re called cutlasses. Because the vegetation in
the jungle is soft and it grows over the trails quickly, you need
the unique cutting ability of a machete, as opposed to the
harder, blunter cutting ability of an ax. (Sorry, but that beauti-
ful ax you bought at the outfitter starts to lose its value the
moment you head off into the Great Green Tangle.)
Choosing and using the right bladeA variety of types of machetes are available. Just know that
they can be divided into two categories: those you use to
travel with and those you use to work with. If you can, carry
both types. Here’s when and how to use them:
✓ Use the long blades when you’re traveling. To travel a
trail with this type of machete, you use a lazy forehand
swing to reach down low and strike the stalks of the
plants standing in your way. Try not to flail away at the
leaves or stems hanging in your face. Cut the foliage low,
at the stalk, using a reaching motion. Done well, you
shouldn’t have to bend over all day — which is precisely
why the blade is made so long.
✓ Use the short blades for work. When chopping, making
shelters, or preparing rafts, use the shortest blade you
can. Attempting to use a long blade for work — like when
you’re doing a lot of chopping — causes fatigue and
injury, and it destroys the wood. Always use the short,
cleaver-type of machete for work.
A machete isn’t a baseball bat or tennis racket; it’s not designed
to be swung with enormous speed. When working your way
through tangled foliage, make your low cuts with a controlled
medium-speed motion (which isn’t very Hollywood, we know,
but there’s nothing we can do about it). Wide and fast swings
made with a machete eventually result in the blade’s coming
back and striking you. Even the most experienced jungle people
occasionally miss what they’re aiming at and strike themselves
or someone nearby. Practically everybody we know has a
machete scar on his or her leg.

Chapter 15: Special Considerations for Forests and Jungles 283
Cutting bambooIn the tropics, you build just about everything out of bamboo
cane, and the act of cutting bamboo cane is a fine art that
requires a lot of technique. Generally speaking, you cut at an
angle. If you deliver the blow straight down — at a 90° angle
to the wood — you just splinter the cane, and as soon as
bamboo begins to splinter, it becomes exceedingly difficult to
cut through. (If you’re in the mood for a bout of hair-pulling
frustration, just try cutting bamboo cane the wrong way.)
Here’s the right way:
1. Deliver the first blow at an angle slightly higher
than 45°.
Cut just below the joint, and cut away from the joint,
not toward it. The farther you move away from the
joint, the harder cutting the cane becomes.
2. Rotate the cane slightly and deliver another blow, at
the same angle, so that the cuts are joined.
You want to form one, continuous incision. If the cane
is standing, you need to move your body around it to
make this continuous incision.
3. Continue cutting around the joint, lengthening the
incision until you’ve severed the cane.
Firm blows made with a slight flick of the wrist at the
end of the motion — not heavy or hard blows — are
the best. Don’t rear back and slam the machete into
the cane. This just causes it to splinter. Most of the
cutting should come from your wrist at the end of the
motion. Experienced jungle people cut cane with a
subtle wrist motion at the end of the chop.
Making camp and shelters
When you’re in a tropical environment, making camp well
before dark is absolutely critical. Keep in mind that there’s
almost no dusk in tropical areas, especially in the jungle.
When the sun starts to drop in the late afternoon, the clock
begins ticking for you. Stop what you’re doing and set up
camp at least two hours before sunset.
’re
s.
in
eed
uti-
t
y
a
d
e
ow,
ely
ng
u
hen
,
ned
d
w,
s
g
ople
ves

Part III: Surviving in Extreme Land Environments 284
When making camp, take extra precautions to get off the
ground. Even if you’re really in trouble and have no equipment
at all, you can make a platform. The platform is an essential
tool in the jungle or swamp (see Figure 15-2a). To make one,
you want to find three or more stout trees that you can tie
poles to. The best poles are usually bamboo canes that are at
least 6 inches (15 centimeters) thick. Tie the poles to the trees
so you have a rough triangle, and then use branches or other
poles as crossbeams. You may have to use vines to make your
platform if you don’t have rope. When building a platform, use
square lashings. (To see how to make a square lashing, go to
Chapter 14.)
If you can stand it, consider building a smoldering fire below
your platform. The smoke can do much to drive away insects.
If you can’t build a platform, try to get off the ground and lie
in a hammock (Figure 15-2b).
a b
Figure 15-2: Get off the ground with a platform or hammock.
Identifying Dangerous Animals in the Tropics
Like so many other dangerous animals, those in the tropics can
be surprisingly hard to see. You can do a lot to protect yourself
by using a long stick to part foliage or probe tangled bushes;
this almost always flushes out these animals. This section iden-
tifies some of the most dangerous critters in the tropics.
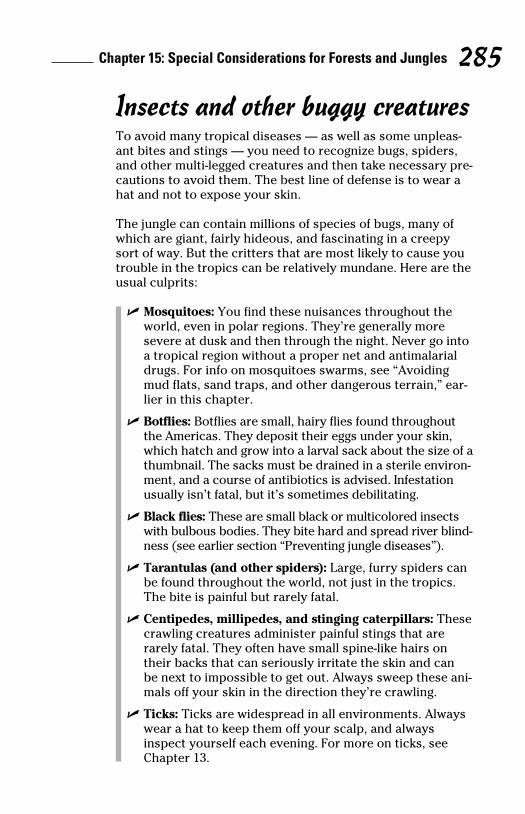
Chapter 15: Special Considerations for Forests and Jungles 285
Insects and other buggy creaturesTo avoid many tropical diseases — as well as some unpleas-
ant bites and stings — you need to recognize bugs, spiders,
and other multi-legged creatures and then take necessary pre-
cautions to avoid them. The best line of defense is to wear a
hat and not to expose your skin.
The jungle can contain millions of species of bugs, many of
which are giant, fairly hideous, and fascinating in a creepy
sort of way. But the critters that are most likely to cause you
trouble in the tropics can be relatively mundane. Here are the
usual culprits:
✓ Mosquitoes: You find these nuisances throughout the
world, even in polar regions. They’re generally more
severe at dusk and then through the night. Never go into
a tropical region without a proper net and antimalarial
drugs. For info on mosquitoes swarms, see “Avoiding
mud flats, sand traps, and other dangerous terrain,” ear-
lier in this chapter.
✓ Botflies: Botflies are small, hairy flies found throughout
the Americas. They deposit their eggs under your skin,
which hatch and grow into a larval sack about the size of a
thumbnail. The sacks must be drained in a sterile environ-
ment, and a course of antibiotics is advised. Infestation
usually isn’t fatal, but it’s sometimes debilitating.
✓ Black flies: These are small black or multicolored insects
with bulbous bodies. They bite hard and spread river blind-
ness (see earlier section “Preventing jungle diseases”).
✓ Tarantulas (and other spiders): Large, furry spiders can
be found throughout the world, not just in the tropics.
The bite is painful but rarely fatal.
✓ Centipedes, millipedes, and stinging caterpillars: These
crawling creatures administer painful stings that are
rarely fatal. They often have small spine-like hairs on
their backs that can seriously irritate the skin and can
be next to impossible to get out. Always sweep these ani-
mals off your skin in the direction they’re crawling.
✓ Ticks: Ticks are widespread in all environments. Always
wear a hat to keep them off your scalp, and always
inspect yourself each evening. For more on ticks, see
Chapter 13.
ent
at
es
r
ur
se
o
w
cts.
e
can
self
;
en-
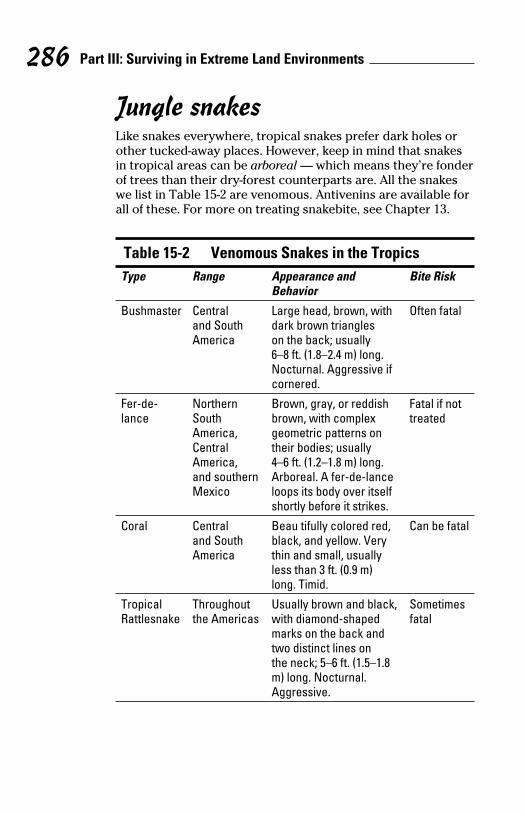
Part III: Surviving in Extreme Land Environments 286
Jungle snakesLike snakes everywhere, tropical snakes prefer dark holes or
other tucked-away places. However, keep in mind that snakes
in tropical areas can be arboreal — which means they’re fonder
of trees than their dry-forest counterparts are. All the snakes
we list in Table 15-2 are venomous. Antivenins are available for
all of these. For more on treating snakebite, see Chapter 13.
Table 15-2 Venomous Snakes in the TropicsType Range Appearance and
BehaviorBite Risk
Bushmaster Central and South America
Large head, brown, with dark brown triangles on the back; usually 6–8 ft. (1.8–2.4 m) long. Nocturnal. Aggressive if cornered.
Often fatal
Fer-de-lance
Northern South America, Central America, and southern Mexico
Brown, gray, or reddish brown, with complex geometric patterns on their bodies; usually 4–6 ft. (1.2–1.8 m) long. Arboreal. A fer-de-lance loops its body over itself shortly before it strikes.
Fatal if not treated
Coral Central and South America
Beau tifully colored red, black, and yellow. Very thin and small, usually less than 3 ft. (0.9 m) long. Timid.
Can be fatal
Tropical Rattlesnake
Throughout the Americas
Usually brown and black, with diamond-shaped marks on the back and two distinct lines on the neck; 5–6 ft. (1.5–1.8 m) long. Nocturnal. Aggressive.
Sometimes fatal

Chapter 15: Special Considerations for Forests and Jungles 287
Type Range Appearance and Behavior
Bite Risk
Mamba Throughout sub-Saharan Africa
Frequently called black mamba because the inside of their mouths are sometimes black. Light gray or green in appear-ance, very slender, and 7–13 ft. (2.1–4 m) long. Live in abandoned rodent nests and are active in both the day and night. Extremely fast.
Fatal if not treated
Boomslang Throughout sub-Saharan Africa
Green, with very large eyes. Thin body, 3–7 ft. (0.9–2.1 m) long. Arboreal and very hard to see. Inflates its head before it strikes.
Fatal if not treated
Gators, crocs, and caimansAlligators, crocodiles, and caimans are ambush predators.
Generally, they strike at short range, trying to catch you
unaware. The most dangerous areas are near water’s edge,
where these animals wait to make their ambush. Also keep
an eye out for large clumps of bushes near rivers; these are
sometimes used as nests for females laying eggs.
These animals usually don’t chase their prey long distances.
However, they have been known to chase people in the water,
as well as capsize boats. Black caimans in the Amazon and
saltwater crocodiles in Australia are the most dangerous. Give
these animals a wide berth.
LeechesLeeches are small wormlike parasites, usually black in color,
that live in tropical and temperate waters. They attach them-
selves to your skin when you swim in streams and rivers; they
r
es
der
s
for
k
al
ot
atal
es

Part III: Surviving in Extreme Land Environments 288suck your blood until they’ve had their fill, and then they fall
off. Sometimes leeches can be found on the ground, too, or in
dense, water-covered vegetation.
The best way to avoid leeches is to stay out of the water as
much as you can. If you do go into the water, even if you’re
just crossing a stream, keep your skin covered and the cuffs
of your pants cinched tightly around your boots. Leeches can
also find their way into the water supply, so as always, strain
and boil your water thoroughly. Leeches can make you quite
ill in the bowels if accidentally swallowed.
Like ticks, leeches have a way of working into strange places
on your body, so take a moment each night to examine your-
self thoroughly. You can remove them by applying salt, alco-
hol, kerosene, or gasoline, or you can burn them off with a lit
cigarette or burning ember. Do not attempt to pull leeches off
with your fingers — always allow them to disengage and roll
away. If you pull them off, the animal’s jaws may stay inside
your skin and cause infection.
PiranhasPiranhas are small fish, ranging from 8 inches to 1.5 feet
(20 centimeters to 0.5 meters) in length. They’re found in
the Amazon, Orinoco, and Paraguay Rivers, as well as the
tributaries of those rivers. Though they’re nowhere near as
dangerous as their legendary reputation suggests, they do
nevertheless bite humans with their large, razor-sharp teeth,
which causes infection.
Piranhas have developed a reputation of being especially
dangerous when water levels are low and when the victim is
bleeding, although precautions should be taken at all times.
Stay out of waters where locals say piranhas live, and be care-
ful crossing shallow streams. Like elsewhere in the wild, we
recommend you wear tall, stout boots and long pants.

Chapter 16
The Big Chill: Enduring in Snowy Places
In This Chapter▶ Staying warm when it’s cold out
▶ Building survival shelters from nothing but snow
▶ Avoiding avalanches, crevasses, and thin ice
▶ Finding water when you’re surrounded by snow and ice
▶ Making tools (like snowshoes) to survive in snowy environments
Cold is simply an absence of heat energy, and you can
feel cold in just about any environment on Earth. In
this chapter, we focus on snowy environments, which you
can encounter in around half of all the land masses in the
Northern Hemisphere and somewhat less in the Southern
Hemisphere. You can find snow even in unexpected places —
both Hawaii and Australia offer snow skiing — so being
prepared for cold is always a good idea. In this chapter, we
cover methods for surviving in cold, snowy wildernesses.
When you’re cold, you have to do something. Don’t try to
just force your way through the sensation of cold — it’s your
body’s signal that something is wrong, and you may not have
much time to solve the problem. Take action.
Staying WarmKeeping your body warm is your first priority in a cold-weather
survival situation. If you become hypothermic in extreme cold
or wind chill, survival can become an epic battle. The following

Part III: Surviving in Extreme Land Environments 290
CS
are general principles to remember for staying warm outdoors
(also be sure to check out Chapter 4 for important info on
cold-weather dressing):
✓ Breathe through your nose and wear a scarf. Breathing
through your nose conserves body moisture, and wrapping
a scarf or other cloth across your nose and mouth can
cut the chill so that the coldest air doesn’t hit your lungs
directly.
✓ Stay dry. Wet clothing cools your body faster than just
about anything else, so if you get wet, get under some
shelter, make a fire, and dry out your clothes. If you don’t
have the option of making a fire, try to keep moving —
this may help to dry damp clothes, but soaked clothes
really need to be properly dried out.
✓ Eat and drink. Keeping the body fueled and hydrated
can prevent most cold injuries! If you have food, eat it —
eating keeps the body’s fires stoked. From your food
supply, choose the food that has the most calories.
Drinking lots of liquid keeps your body hydrated, which
can forestall hypothermia.
✓ Get out of the wind. Wind rapidly sucks heat away from
the body, so take shelter when there’s wind; if you can’t
take shelter, try to improvise a windproof layer for your
clothing.
✓ Loosen your footwear. Tighter footwear constrains the
blood vessels that would normally carry warm blood to
the feet, leading to frostbite. So when it gets cold, loosen your laces. But be careful to keep the top of your footwear
sealed around your calves so that cold air, snow, and ice
can’t get in. Duct tape or any strong cordage works well.
✓ Protect your hands and feet. These are the first to go
when your body gets cold, and because you can’t really
travel with frozen feet or do anything at all with frozen
hands, you have to protect them. Mittens are normally
warmer than gloves, something to keep in mind when
you prepare to go outdoors in the first place. Gloves
under windproof mittens are ideal.
✓ Stay active. If your clothes aren’t providing enough
warmth, you can temporarily stay active to warm up; but
don’t do so much that you sweat, which dampens your
clothes. Stay out of the wind while getting your heart rate
(and heat rate) up.

Chapter 16: The Big Chill: Enduring in Snowy Places 291
Cold Comfort: Making Your Shelter in a Snowy Environment
In cold areas, a shelter is as much psychological as it is
physical (well maybe not, but nearly so!). One of the first
things you notice in a snow shelter is how quiet it is. Coming
in out of wind and storm — and into a warm, quiet place —
is a tremendous relief. This section first walks you through
some general building principles. We then describe three
main ways to use snow to make a shelter.
Grasping snow shelter basicsYou may think that a snowy landscape provides no shelter,
but the snow itself can provide a home. Snow, which is
composed of loosely piled granules of frozen water crystals,
traps air, which is a good insulator. That’s why you can use
snow to make a great, warm survival shelter. Just remember
these important tips, whatever shelter you build:
✓ Build your shelter in a safe location. Stay away from
avalanche slopes, and if you’re on a frozen lake or
sea surface, build on thick ice. Later, in the section
“Avoiding avalanche terrain,” we cover assessing snowy
environments for the likelihood of these catastrophic
snow-slides, which can bury your shelter under feet of
snow in an instant.
✓ Keep the shelter as small as is practical. A large shelter is
nice and roomy, but to make it warm, you have to warm
more air than in a smaller shelter. Keep your shelter
roomy enough so you can sit up, work on gear, and so
on, but don’t make it much bigger. Opting for a small
shelter also saves you work when you’re building your
shelter.
✓ Keep your shelter ventilated (see Figure 16-1a). Burning
a camp stove or other fuel in your shelter can lead to an
excess of carbon dioxide (a colorless, odorless, lethal
gas), so carefully poke several ventilation holes in the
shelter’s roof with a long pole. A ski pole is thin, so you
may need more than eight or ten holes.
ors
ng
ing
n
ngs
t
on’t
—
s
—
ch
om
n’t
ur
he
to
en ear
ice
ell.
ly
n
y
but
r
rate
Part III: Surviving in Extreme Land Environments 292
Keep your eyes open for the signs of carbon monoxide
poisoning, which include a splitting headache, nausea,
dizziness, and weakness — if you notice these, get
outside fast and then vent that shelter!
✓ Keep a digging-out tool inside your shelter (Figure
16-1b). Heavy snow — or in the worst case, avalanche —
can trap you inside a shelter, so always store a digging
tool in your shelter. You can improvise a digging tool
simply from several stout branches lashed together with
cordage (see Chapter 14 for tips on lashing), or you can
use a helmet, a license plate, or even a cooking pot.
✓ Block the entrance of your shelter (Figure 16-1c). Just
covering the entrance/exit hole of your shelter with your
backpack and perhaps some heavy brush is a great aid
in trapping warm air inside; a snow shelter with an open
door isn’t much better than a refrigerator. Don’t block
the door until you’re satisfied that you have the shelter
properly ventilated.
✓ Make a cold trap in your shelter (Figure 16-1d). Warm
air rises and cold air sinks, and you can use this knowledge
to improve your shelter by making a cold trap at the
lowest point of the floor. A cold trap is simply a basin,
trench, or other hole in the snow floor of your shelter
that traps the coldest air in the shelter; don’t stand in the
cold trap unless you want to chill your feet.
✓ Make your shelter visible. Snow shelters can blend
right into the landscape, so make your position visible to
rescue personnel. For example, lay out giant symbols in
the snow using dye markers, charcoal from your fire, or
sod from beneath the snow. Or securely peg a brightly
colored piece of cloth or tarp to the top of the shelter.
See Chapter 12 for more on signaling.
✓ Insulate yourself from the snow. Never sit or sleep
directly on snow; use anything — such as pine boughs,
a bed of moss, seat cushions, the fireproof hood liner
from a car, or an extra blanket — to stay off the snow
(Figure 16-1f). When you’re sitting, place a backpack or
other insulating object between your back and the wall of
the shelter.

Chapter 16: The Big Chill: Enduring in Snowy Places 293 ✓ Keep your shelter organized. At the least, designate a
place to store the first-aid kit, your wilderness survival
kit (see Chapter 2), and any items you have for signaling
passing aircraft or other potential rescuers. Keep these
items in the designated places; you don’t want to be
scrambling around in the dark interior of a snow shelter
for your signal mirror when you hear the sweet sound of
a helicopter!
You can customize any snow shelter by building in
conveniences such as niches — little cavities cut in the
side of the shelter to store gear or food — and hangers,
which can just be sturdy sticks stuck in the walls, on
which you can hang equipment. These modifications get
your gear up off the floor and make it easier to find what
you need when you need it.
a
b
c
d
f
f
Figure 16-1: Snow shelter basics.
Making a snow-caveA snow-cave is the simplest snow shelter, and it’s entirely
capable of keeping you warm enough to stay alive indefinitely.
A snow-cave is basically a burrow inside a snowdrift or a pile
of snow. You can either burrow into a naturally occurring
snowdrift or build your own mound of snow.
e
,
—
g
ith
an
t
our
d
en
k
er
m
dge
the
e to
in
or
y
s,
r
ll of

Part III: Surviving in Extreme Land Environments 294
To make a snow-cave shelter, you need a digging tool, such
as a helmet, ski, snowshoe, cooking pot, several strong green
sticks (cut from a tree) lashed together, or even the glove-
compartment door from a car. The best tool, of course, is a
mountaineer’s snow shovel, which is small enough to strap
to a backpack (the handle telescopes out) and very strongly
built — we won’t even travel in snow country without one.
The best, made by Life-Link (www.life-link.com), have metal
blades that don’t break. Plastic shovel blades eventually do.
Consider stripping off a layer of clothing before you start
working. Making any kind of snow shelter is heavy work that
can make you sweat, and wet clothing quickly cools your
body. Also, you’ll probably be covered in snow after all the
digging that’s involved, and that snow can melt from your
body heat, leaving you wet.
Gas poisoning in the ArcticA few winters back, I (Cameron) was the sole inhabitant of a remote gla-ciological research hut on Iceland’s Vatnajökull glacier. One night, I heard a machine turn on behind a locked door — an electrical engine activated by satellite control. It was hard to sleep, but finally I did. I’m lucky I ever woke up.
About the incident, I wrote, “A few hours later, I woke with stinging eyes and aching lungs. It felt like someone was standing on my chest. I coughed and hacked and lunged out the door leading to the antechamber. A fierce migraine was slowly slicing my brain in two. Without consciously thinking about it, I was suiting up, and soon
I was crawling dizzily out the hatch and gulping fresh air. The first gasps I took in the blast of storm outside collared me and tugged me back from the brink.
“Crouched in the storm just outside the hatch, I realized that the gas-powered generator’s exhaust fumes had filled the hut. I hated the thing even more, now, the deep, human hatred of inventions that don’t do as they’re told. My symptoms were those of carbon monoxide poison-ing. I breathed for a minute or so before climbing back in and opening the door to the living compartment. This let in piles of blowing snow, but I didn’t care. I had to breathe.”

Chapter 16: The Big Chill: Enduring in Snowy Places 295
Creating shelters from natural snow driftsWind often blows snow into dunes or drifts, which you may
be able to use as a shelter. Before you use a natural snowdrift
as a shelter, verify that it’s compact enough to hold its shape
when you burrow inside. Some snowdrifts are composed of
very loose, fluffy snow that’s of no use for a shelter.
To test the snow’s compactness, dig into the drift a few feet.
You may start out in compact snow but then punch through
a hard wind crust to find loose snow underneath. Is the roof
constantly collapsing in like sand? Can you even keep a shape
to the cavity you’re digging in? If not, move on and find more
compact snow.
After you find compact snow, dig horizontally into the drift
for about a body-length before burrowing left for half a
body length and then right for half a body length, making an
L-shaped burrow (see Figure 16-2). You can use the entrance
tunnel to store your gear and food and the perpendicular
tunnel as your sleeping and resting area.
a b
c d
Figure 16-2: Building an L-shaped burrow in a natural snowdrift.
The L-shape of the natural-drift burrow is a strategy for the
fact that many drifts aren’t deep enough to make a large,
round burrow inside. But if the drift is large enough, you can
use any shape you like, though we suggest conserving your
energy by making it only as large as you need to stay alive and
reasonably comfortable.
h
en
a
y
etal
at
h s e k
e -s g n o e -o g t. t
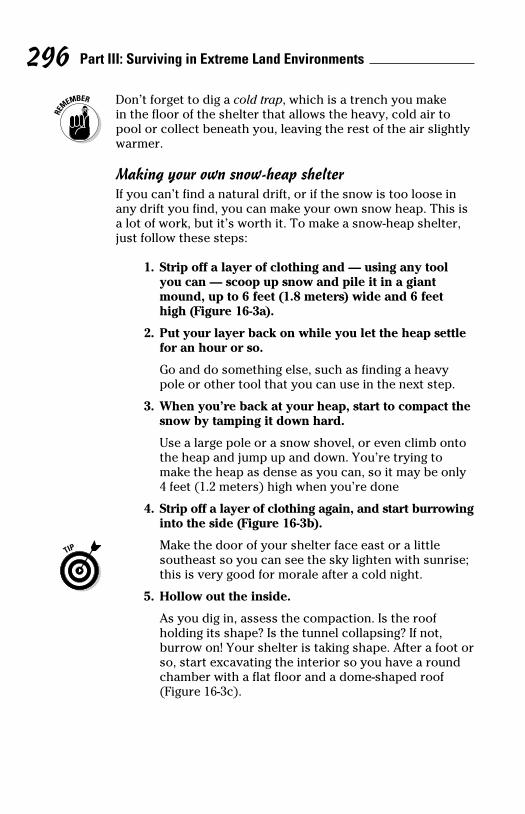
Part III: Surviving in Extreme Land Environments 296
MS
Don’t forget to dig a cold trap, which is a trench you make
in the floor of the shelter that allows the heavy, cold air to
pool or collect beneath you, leaving the rest of the air slightly
warmer.
Making your own snow-heap shelterIf you can’t find a natural drift, or if the snow is too loose in
any drift you find, you can make your own snow heap. This is
a lot of work, but it’s worth it. To make a snow-heap shelter,
just follow these steps:
1. Strip off a layer of clothing and — using any tool
you can — scoop up snow and pile it in a giant
mound, up to 6 feet (1.8 meters) wide and 6 feet
high (Figure 16-3a).
2. Put your layer back on while you let the heap settle
for an hour or so.
Go and do something else, such as finding a heavy
pole or other tool that you can use in the next step.
3. When you’re back at your heap, start to compact the
snow by tamping it down hard.
Use a large pole or a snow shovel, or even climb onto
the heap and jump up and down. You’re trying to
make the heap as dense as you can, so it may be only
4 feet (1.2 meters) high when you’re done
4. Strip off a layer of clothing again, and start burrowing
into the side (Figure 16-3b).
Make the door of your shelter face east or a little
southeast so you can see the sky lighten with sunrise;
this is very good for morale after a cold night.
5. Hollow out the inside.
As you dig in, assess the compaction. Is the roof
holding its shape? Is the tunnel collapsing? If not,
burrow on! Your shelter is taking shape. After a foot or
so, start excavating the interior so you have a round
chamber with a flat floor and a dome-shaped roof
(Figure 16-3c).
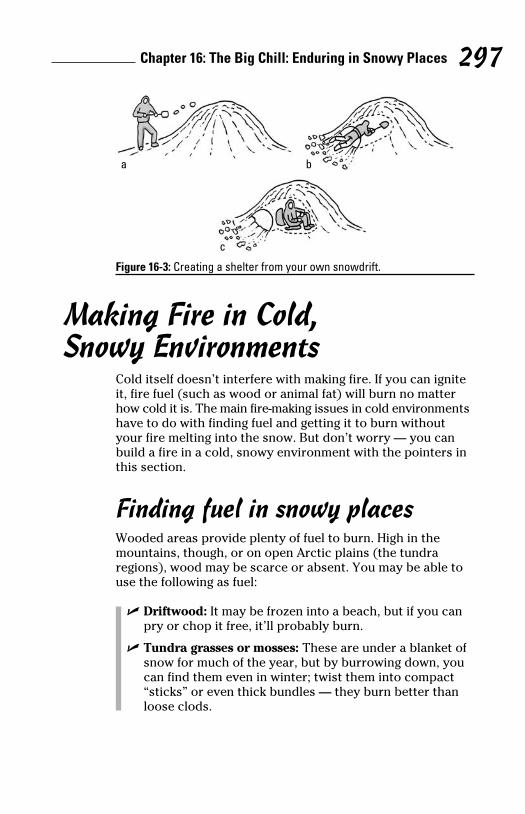
Chapter 16: The Big Chill: Enduring in Snowy Places 297
a b
c
Figure 16-3: Creating a shelter from your own snowdrift.
Making Fire in Cold, Snowy Environments
Cold itself doesn’t interfere with making fire. If you can ignite
it, fire fuel (such as wood or animal fat) will burn no matter
how cold it is. The main fire-making issues in cold environments
have to do with finding fuel and getting it to burn without
your fire melting into the snow. But don’t worry — you can
build a fire in a cold, snowy environment with the pointers in
this section.
Finding fuel in snowy placesWooded areas provide plenty of fuel to burn. High in the
mountains, though, or on open Arctic plains (the tundra
regions), wood may be scarce or absent. You may be able to
use the following as fuel:
✓ Driftwood: It may be frozen into a beach, but if you can
pry or chop it free, it’ll probably burn.
✓ Tundra grasses or mosses: These are under a blanket of
snow for much of the year, but by burrowing down, you
can find them even in winter; twist them into compact
“sticks” or even thick bundles — they burn better than
loose clods.
tly
n
is
r,
tle
the
to
nly
wing
se;
t or
d

Part III: Surviving in Extreme Land Environments 298
DS
✓ Dried animal dung: Caribou, polar bear, musk ox, and
wolf droppings may burn.
✓ Animal fats: Fats such as seal blubber burn well. If you
have the luxury of such a resource, use it sparingly — for
example, only to cook or dry clothes but not for warmth
unless you really need it. It burns quickly.
Getting any fuel to burn requires the fire-making skills we
introduce in Chapter 5.
Protecting a fire from the snow
If you build a fire on a snowy surface, the heat quickly melts
the snow and your fire collapses into a wet, smoky snow
crater — not what you were after. Building a fire directly on
ground you’ve cleared of snow and ice doesn’t work well,
either; in the Arctic regions, this ground is usually interlaced
with ice, and the heat of the fire melts it into a soggy mess.
You can make fire in these situations by using the following
methods and building the fire on the following surfaces:
✓ In or on a piece of metal: You can use a cooking pot
(see Figure 16-4a); any sheet of metal stripped from a
car, snowmobile, or airplane wreck (be sure to burn off
potentially toxic plastics and paints before cooking over
such a fire); or even a piece of tin foil (double it a few
times to be sure you don’t burn right through it). If
you have only one pot, you’ll have to find some other
container to boil water, but if you’re just cooking food,
you can roast it above the flames.
✓ On a wood platform: Build a flat platform of several
layers of branches, each layer laid out at 90° to the last
(as in Figure 16-4b). The log platform will catch fire
eventually, but by using lots of logs, you can keep a small
fire going well enough.
✓ On a slab or bed of rock: Exposed rock slabs work
fine. You can make a bed of rock by setting small rocks
together on a flat snow surface, as in Figure 16-4c.
Chapter 16: The Big Chill: Enduring in Snowy Places 299
a b c
Figure 16-4: Making a fire on a platform in snowy environments.
Don’t Eat the Yellow Snow: Safe-to-Drink Snow and Ice
Locating clean drinking water is essential in any wilderness
setting. You may be in a cold tundra with pristine white snow
everywhere, but before you grab a big handful and start
eating, take a moment to read this section.
Choosing and treating frozen water sourcesMicrobes can live in the coldest places on Earth, so before
you eat snow or drink melted ice, make sure you disinfect
it with iodine crystals or the other methods we describe in
Chapter 7. Whatever method you use, keep these points in
mind:
✓ Select clean snow. You don’t want snow that has been
discolored by urine or feces (either yours, from around
camp, or that of other animals). Snow can be discolored
pink (watermelon snow), black, brown, or yellow by
cold-climate algae. Some people feel nauseous after
consuming these.
✓ Select non-salt ice. If you’re near frozen seashore,
remember that sea ice is salty, but over a period of years,
the salt leaches out. Salty ice is gray or white, but blue or
glassy ice should be safe to melt and drink.
d
u
for
th
s
n
ed
g
ff
ver
,
t
mall
s
Part III: Surviving in Extreme Land Environments 300
You can chip off a small piece of sea ice and taste it for
saltiness. But be careful — eating ice causes a loss of
body heat, so make the pieces small. And choose your
ice wisely so you don’t have to repeat the tasting process
more than once or twice.
Melting snow and ice
Never eat snow in extreme cold unless you’re in a warm
shelter or have other ways to keep warm beside just your
body heat. No amount of snow will provide enough water to
quench your thirst, so in cold environments, you have to melt
snow and ice to stay hydrated.
Ice is denser than snow, so it yields more water than snow when
you melt it. If you can’t find ice, then choose snow that’s as
densely packed as possible. The denser the snow, the higher the
water yield. Here are several main methods to melt snow or ice:
✓ In a pot over a fire: Always use a lid to keep as much
heat in the pot as possible.
✓ In a cloth bag next to a fire: Hang snow or ice in a
bundle of porous (nonwaterproof) cloth next to a fire and
catch the melt in a container. This works if you have, for
example, a plastic container (such as a milk jug or soda
bottle) but no metal pan to melt in.
✓ In a container you keep next to your body: Packing
some snow into a bottle that you keep next to your body
overnight (inside your sleeping bag or blankets) can
yield some liquid water and keeps it from freezing.
✓ In the sun: If you have a black or dark-colored plastic
bag and the temperature isn’t too cold, you can pack
snow into the bag and leave it out in the sun.
Steering Clear of Cold-Environment Terrain Hazards
Cold, snowy environments present a number of special
hazards for the survivor, some of them lethal. With the basic
information in this section, however, you can avoid this
dangerous terrain altogether.
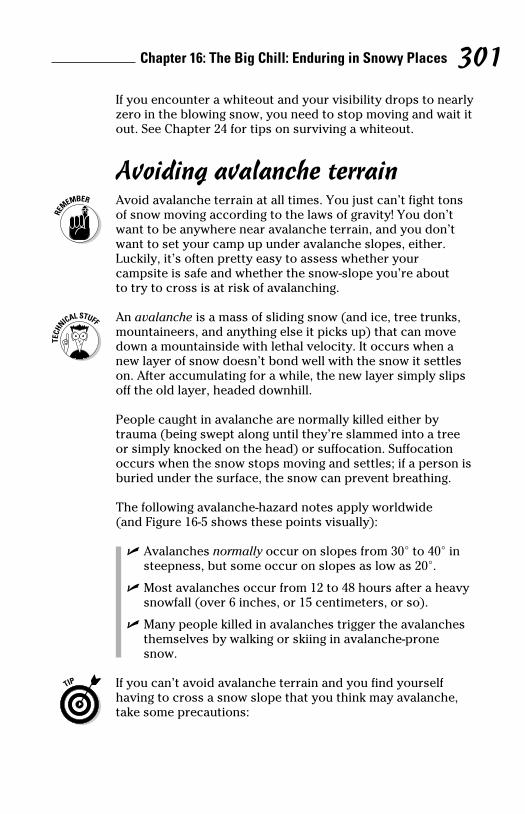
Chapter 16: The Big Chill: Enduring in Snowy Places 301If you encounter a whiteout and your visibility drops to nearly
zero in the blowing snow, you need to stop moving and wait it
out. See Chapter 24 for tips on surviving a whiteout.
Avoiding avalanche terrain
Avoid avalanche terrain at all times. You just can’t fight tons
of snow moving according to the laws of gravity! You don’t
want to be anywhere near avalanche terrain, and you don’t
want to set your camp up under avalanche slopes, either.
Luckily, it’s often pretty easy to assess whether your
campsite is safe and whether the snow-slope you’re about
to try to cross is at risk of avalanching.
An avalanche is a mass of sliding snow (and ice, tree trunks,
mountaineers, and anything else it picks up) that can move
down a mountainside with lethal velocity. It occurs when a
new layer of snow doesn’t bond well with the snow it settles
on. After accumulating for a while, the new layer simply slips
off the old layer, headed downhill.
People caught in avalanche are normally killed either by
trauma (being swept along until they’re slammed into a tree
or simply knocked on the head) or suffocation. Suffocation
occurs when the snow stops moving and settles; if a person is
buried under the surface, the snow can prevent breathing.
The following avalanche-hazard notes apply worldwide
(and Figure 16-5 shows these points visually):
✓ Avalanches normally occur on slopes from 30° to 40° in
steepness, but some occur on slopes as low as 20°.
✓ Most avalanches occur from 12 to 48 hours after a heavy
snowfall (over 6 inches, or 15 centimeters, or so).
✓ Many people killed in avalanches trigger the avalanches
themselves by walking or skiing in avalanche-prone
snow.
If you can’t avoid avalanche terrain and you find yourself
having to cross a snow slope that you think may avalanche,
take some precautions:
r
r
cess
o
melt
hen
the
ce:
and
for
da
dy
ic
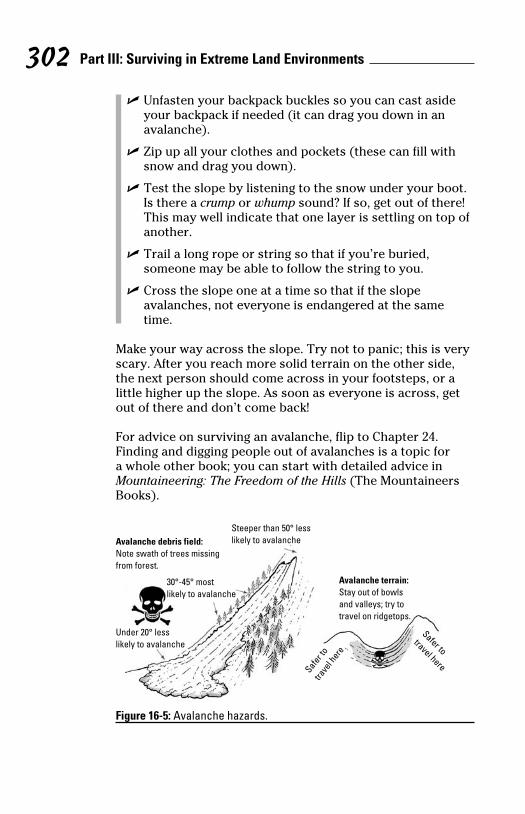
Part III: Surviving in Extreme Land Environments 302
✓ Unfasten your backpack buckles so you can cast aside
your backpack if needed (it can drag you down in an
avalanche).
✓ Zip up all your clothes and pockets (these can fill with
snow and drag you down).
✓ Test the slope by listening to the snow under your boot.
Is there a crump or whump sound? If so, get out of there!
This may well indicate that one layer is settling on top of
another.
✓ Trail a long rope or string so that if you’re buried,
someone may be able to follow the string to you.
✓ Cross the slope one at a time so that if the slope
avalanches, not everyone is endangered at the same
time.
Make your way across the slope. Try not to panic; this is very
scary. After you reach more solid terrain on the other side,
the next person should come across in your footsteps, or a
little higher up the slope. As soon as everyone is across, get
out of there and don’t come back!
For advice on surviving an avalanche, flip to Chapter 24.
Finding and digging people out of avalanches is a topic for
a whole other book; you can start with detailed advice in
Mountaineering: The Freedom of the Hills (The Mountaineers
Books).
Avalanche debris field:Note swath of trees missingfrom forest.
Avalanche terrain:Stay out of bowlsand valleys; try totravel on ridgetops.
Steeper than 50° lesslikely to avalanche
30°-45° mostlikely to avalanche
Under 20° lesslikely to avalanche
Safer t
otra
vel h
ere
Safer totravel here
Figure 16-5: Avalanche hazards.
Chapter 16: The Big Chill: Enduring in Snowy Places 303
Staying off thin iceFalling through thin ice (ice over a stream or lake, for example)
is a terrible survival scenario. The definitive studies of Dr.
Gordon Giesbrecht, at the University of Manitoba, have
identified exactly what happens: The body goes into cold shock, leading to hyperventilation, gasping reflex, and possible
cardiac overload, panic, and death. Every person is different,
though. The cold shock response may not come for a few
minutes, so use those minutes wisely to get out of the situation
(check out Chapter 22 for more on cold shock response).
Do your best not to fall through the ice in the first place.
Here’s how to avoid this terrible fate:
✓ If you can see how thick the ice is, make sure it’s thick
enough for your activity. You may be able to spot the
thickness of ice if it’s clear, or you may spot some broken
ice somewhere. Conditions vary, but here are estimates
of how thick the ice needs to be:
• Walking: Avoid freshwater ice that’s less than 4
inches (10 centimeters) thick or saltwater ice less
than 6 inches (15 centimeters) thick.
• Driving a snowmobile: Avoid freshwater ice that’s
less than 6 inches thick or less than 1 foot (30.5
centimeters) for sea ice.
• Driving a car or truck: Avoid ice that’s less than 1
foot thick.
✓ Keep an eye on the color of the ice. In Wisconsin, where
people spend a lot of time ice-fishing (and therefore
wandering around on the surface of frozen lakes), folks
say, “Thick and blue, tried and true; thin and crispy, way
too risky.”
✓ Be extra-careful when the ice is covered with snow,
which can mask or hide the ice’s true color or texture.
On sea ice, stay away from dark, smooth ice that forms
thin plates directly over seawater.
✓ Don’t walk on ice without using a probe. Use a hard
pole that you use to test the ice ahead every few steps.
e
h
ot.
re!
of
ery
a
et
s

Part III: Surviving in Extreme Land Environments 304
If you need to get someone else out of ice, don’t rush to his or
her aid! Take a second to think through the situation. Here’s
what to do:
✓ Calm down. Take a deep breath. Look for any long item —
a rope or pole or branch for example — that you can
use to reach the victim. If you have a rope, tie something
to the end (to give it a little weight) and throw it to the
victim or slide it to that person across the ice. If you
don’t have a rope and your stick is too short to reach,
consider lashing together branches or poles.
✓ If you have to go for the person, get on your belly and
slither to distribute your weight over a larger area.
Remember that the two of you are at risk of death, so be
extra careful.
✓ If you have several people available, you can reach out
to the victim like a human chain. Each person holds the
next person’s ankles, all spread out on their bellies on
the ice.
After getting out of the ice, anyone who’s fallen through must
get his or her clothes dry and warm up immediately. Make a
shelter and a fire and treat the victim for hypothermia and
shock (see Chapter 13 for treatment details).
Avoiding cornicesWhen you’re traveling in snowy mountains, you want to stay
on ridges, the spines between mountain peaks. That’s because
avalanches slide down the sides of mountains, and on the
ridge tops, you really can’t get avalanched. However, when
you’re on ridges, you want to be aware of cornices and avoid
them at all costs. Cornices are unstable ledges of snow that
can form on ridges. Figure 16-6 shows where cornices form
and how to avoid them.
Glacial cracks: Avoiding crevassesCrevasses are cracks in glaciers, which are vast rivers of ice
that creep down from mountainous terrain. Crevasses are
normally V-shaped, so if you fall in, you continue to fall until
your body wedges in tightly at the bottom. Obviously, you
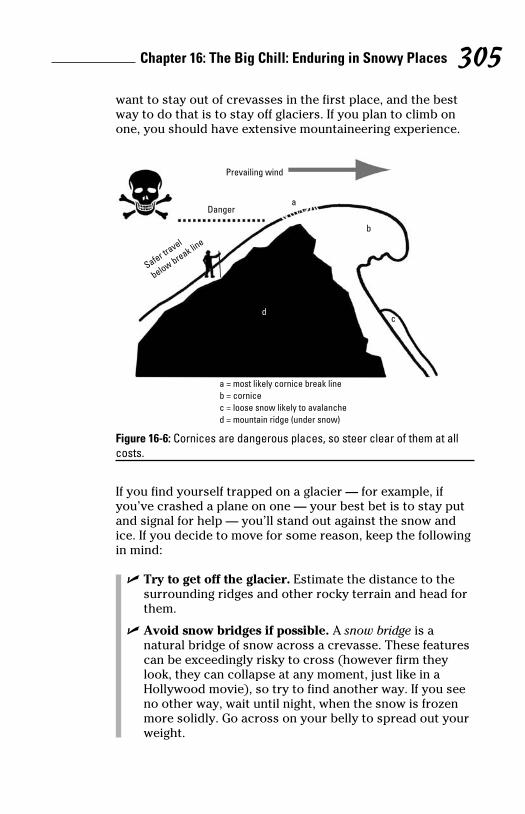
Chapter 16: The Big Chill: Enduring in Snowy Places 305want to stay out of crevasses in the first place, and the best
way to do that is to stay off glaciers. If you plan to climb on
one, you should have extensive mountaineering experience.
Prevailing wind
Dangera
b
dc
a = most likely cornice break lineb = cornicec = loose snow likely to avalanched = mountain ridge (under snow)
Safer travel
below break line
Figure 16-6: Cornices are dangerous places, so steer clear of them at all costs.
If you find yourself trapped on a glacier — for example, if
you’ve crashed a plane on one — your best bet is to stay put
and signal for help — you’ll stand out against the snow and
ice. If you decide to move for some reason, keep the following
in mind:
✓ Try to get off the glacier. Estimate the distance to the
surrounding ridges and other rocky terrain and head for
them.
✓ Avoid snow bridges if possible. A snow bridge is a
natural bridge of snow across a crevasse. These features
can be exceedingly risky to cross (however firm they
look, they can collapse at any moment, just like in a
Hollywood movie), so try to find another way. If you see
no other way, wait until night, when the snow is frozen
more solidly. Go across on your belly to spread out your
weight.
or
s
—
ing
e
nd
be
out
the
ust
a
ay
use
id
ese
il
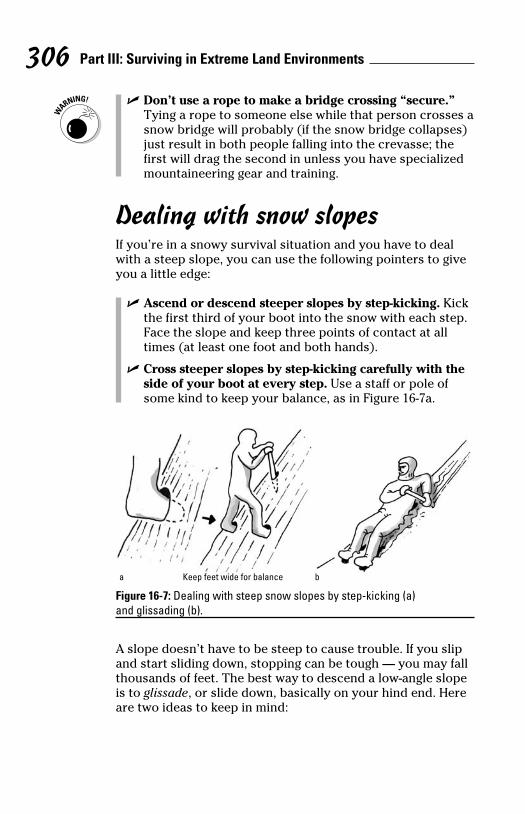
Part III: Surviving in Extreme Land Environments 306
MC
✓ Don’t use a rope to make a bridge crossing “secure.”
Tying a rope to someone else while that person crosses a
snow bridge will probably (if the snow bridge collapses)
just result in both people falling into the crevasse; the
first will drag the second in unless you have specialized
mountaineering gear and training.
Dealing with snow slopesIf you’re in a snowy survival situation and you have to deal
with a steep slope, you can use the following pointers to give
you a little edge:
✓ Ascend or descend steeper slopes by step-kicking. Kick
the first third of your boot into the snow with each step.
Face the slope and keep three points of contact at all
times (at least one foot and both hands).
✓ Cross steeper slopes by step-kicking carefully with the
side of your boot at every step. Use a staff or pole of
some kind to keep your balance, as in Figure 16-7a.
a Keep feet wide for balance b
Figure 16-7: Dealing with steep snow slopes by step-kicking (a) and glissading (b).
A slope doesn’t have to be steep to cause trouble. If you slip
and start sliding down, stopping can be tough — you may fall
thousands of feet. The best way to descend a low-angle slope
is to glissade, or slide down, basically on your hind end. Here
are two ideas to keep in mind:
Chapter 16: The Big Chill: Enduring in Snowy Places 307 ✓ Control your speed with a very heavy wooden pole.
A metal rod or a ski pole works fine. Just grasp it firmly
(fit it with a wrist loop) and lean on it as you descend,
as Figure 16-7b shows. Go slowly while glissading — you
may be headed for a cliff!
✓ Stop sliding if the terrain gets steeper. Dig in hard with
the pole. If you’re going fast, whatever you do, don’t dig
in your heels — that just catapults you forward!
Making Wearable Tools for Cold-Weather Survival
If you’re in a wilderness survival situation, sometimes the
smallest tool can do wonders for you. And often, these special
tools don’t require a lot of extra supplies or work — just a
little patience and ingenuity. The special tools in this section,
which are all clothing-based, can really help you in cold
environments and stack the odds in your favor.
Creating footwearYou can’t travel if your feet are frozen, and sinking into the
snow makes walking a cold, wet, exhausting ordeal. In this
section, we explain how to assemble footwear to protect your
feet and help you make tracks.
Making your own snow bootsIf you can’t loosen your shoes to increase circulation and you
constantly feel your feet are frozen, taking off your shoes and
making your own boots from heavy cloth or any other flexible
material is a good idea. To make your own boots, follow these
steps:
1. Lay out a square or rectangle of any heavy cloth
(see Figure 16-8a).
2. Place a slab of bark, plastic, or other semirigid
material on the cloth (Figure 16-8b.)
This is the footbed; if your shoes really are useless in
the situation, you can cut your shoes down to supply
the footbed only.
es a
es)
ed
ve
ck
ep.
he
p
all
pe
re

Part III: Surviving in Extreme Land Environments 308
3. Wearing the warmest socks you have, place your
foot on the footbed; then put dried grass, crumpled
newspaper, padding from a car cushion, or any other
insulating material under, on, and around your foot
(Figure 16-8c).
You need a lot of this insulating material to stay warm,
so don’t be skimpy. Depending on which material you
use, you may have to change this insulation frequently
as it gets wet or squashed flat.
4. Draw the sides of the boot up and around your
ankle, and tie off with a cord (Figure 16-8d).
Don’t tie so tight that you constrict blood flow.
These boots are better than nothing, but stay out of water
while wearing them, because they fall apart more easily than
normal boots.
a c db
Figure 16-8: Making your own snow boots.
Making a pair of snowshoesSnowshoes spread your weight over a large area, allowing you
to walk on top of the snow instead of punching through it at
each step. Functional snowshoes are easy to fashion from a
few sturdy branches, some good, strong cordage, and some
patience and creativity. To make your own pair of snowshoes,
follow these steps:
1. Cut two sturdy, green branches from a tree to use as
the frame; strip them of bark.
These should be about 3 feet (0.9 meters) long and
at least 1 inch (2.5 centimeters) in diameter. Cut the
wood from living trees, because dry wood breaks.
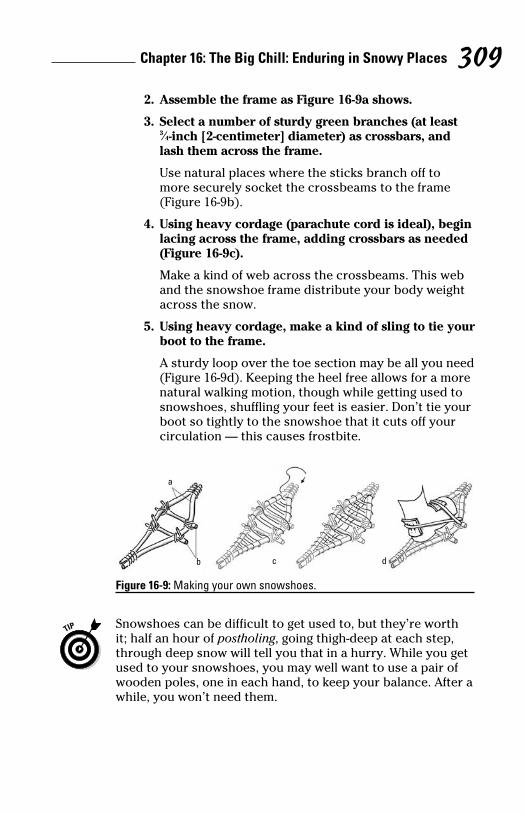
Chapter 16: The Big Chill: Enduring in Snowy Places 309 2. Assemble the frame as Figure 16-9a shows.
3. Select a number of sturdy green branches (at least 3⁄4-inch [2-centimeter] diameter) as crossbars, and
lash them across the frame.
Use natural places where the sticks branch off to
more securely socket the crossbeams to the frame
(Figure 16-9b).
4. Using heavy cordage (parachute cord is ideal), begin
lacing across the frame, adding crossbars as needed
(Figure 16-9c).
Make a kind of web across the crossbeams. This web
and the snowshoe frame distribute your body weight
across the snow.
5. Using heavy cordage, make a kind of sling to tie your
boot to the frame.
A sturdy loop over the toe section may be all you need
(Figure 16-9d). Keeping the heel free allows for a more
natural walking motion, though while getting used to
snowshoes, shuffling your feet is easier. Don’t tie your
boot so tightly to the snowshoe that it cuts off your
circulation — this causes frostbite.
a
b dc
Figure 16-9: Making your own snowshoes.
Snowshoes can be difficult to get used to, but they’re worth
it; half an hour of postholing, going thigh-deep at each step,
through deep snow will tell you that in a hurry. While you get
used to your snowshoes, you may well want to use a pair of
wooden poles, one in each hand, to keep your balance. After a
while, you won’t need them.
ed
her
oot
rm,
ou
ntly
an
you
at
a
e
oes,
as
e
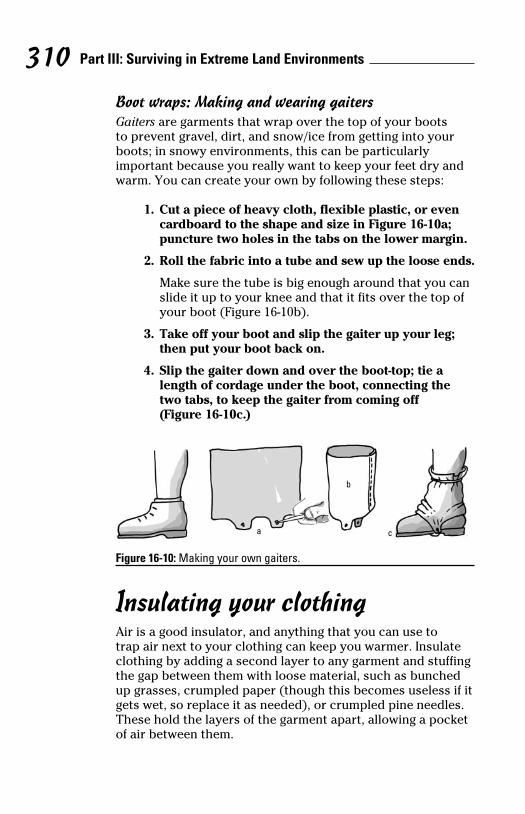
Part III: Surviving in Extreme Land Environments 310
Boot wraps: Making and wearing gaitersGaiters are garments that wrap over the top of your boots
to prevent gravel, dirt, and snow/ice from getting into your
boots; in snowy environments, this can be particularly
important because you really want to keep your feet dry and
warm. You can create your own by following these steps:
1. Cut a piece of heavy cloth, flexible plastic, or even
cardboard to the shape and size in Figure 16-10a;
puncture two holes in the tabs on the lower margin.
2. Roll the fabric into a tube and sew up the loose ends.
Make sure the tube is big enough around that you can
slide it up to your knee and that it fits over the top of
your boot (Figure 16-10b).
3. Take off your boot and slip the gaiter up your leg;
then put your boot back on.
4. Slip the gaiter down and over the boot-top; tie a
length of cordage under the boot, connecting the
two tabs, to keep the gaiter from coming off
(Figure 16-10c.)
a
b
c
Figure 16-10: Making your own gaiters.
Insulating your clothingAir is a good insulator, and anything that you can use to
trap air next to your clothing can keep you warmer. Insulate
clothing by adding a second layer to any garment and stuffing
the gap between them with loose material, such as bunched
up grasses, crumpled paper (though this becomes useless if it
gets wet, so replace it as needed), or crumpled pine needles.
These hold the layers of the garment apart, allowing a pocket
of air between them.

Chapter 16: The Big Chill: Enduring in Snowy Places 311
Protecting your face and eyesSnow is white because it reflects nearly all the light that
strikes it, and all those bouncing rays of sunlight can cause
sunburn and damage your vision. In this section, we tell you
how to make tools that reduce the glare and protect your face
from the sun, wind, and cold.
Sunblock is extremely important in polar regions because
the sun reflects off the snow and ice, quickly causing severe
burns. Be sure to carry sunblock (or improvise it, as we
describe in Chapter 17), even in cold weather.
Making a balaclavaWhen improvising headgear for the cold, make a balaclava, a
head garment that’s snug around the face and entirely covers
the head and neck. You can make one from the leg of a spare
pair of pants or stitch together any sheet of plastic or cloth,
as we show you in Figure 16-11.
Figure 16-11: An improvised balaclava.
Carving snow-glare goggles
Light reflecting from snow can temporarily blind you; this
can happen on an overcast day as easily as on a sunny day.
Always wear eye protection in snowy terrain. Snow blindness
(retinal sunburn) is very painful. The main symptom is
extreme pain in the eyes, as though hot sand grains have been
packed under your eyelids. The cure is to rest with the eyes
closed, perhaps wearing a blindfold. Twelve to 48 hours of
rest should be enough, allowing you to see again.
nd
n
in.
nds.
can
of
e
ing
d
if it
s.
ket

Part III: Surviving in Extreme Land Environments 312You can avoid snow blindness by always wearing sunglasses
and/or goggles in snowy terrain. If you don’t have goggles,
you can make them very easily from a piece of cardboard,
leather, heavy cloth, or pliable plastic, using the steps here:
1. Cut a slab of bark, plastic, cardboard, or other
semi-pilable material into a bar about 8 inches
(20 centimeters) across and 1 to 2 inches (2.5 to 5
centimeters) high (Figure 16-12a).
2. Cut slits into the material, about eye distance apart
(Figure 16-12b).
3. Tie a headband onto the goggles by perforating
the ends and tying cordage through them
(Figure 16-12c).
a
b
c
Figure 16-12: Improvising snow goggles.
Making mittens out of socksIf you have spare socks, you can make mittens to keep your
hands warm. Mittens are normally warmer than gloves and
are easy to improvise. Simply cut a slit in the sock for the
thumb. Then sew up the slit so that the thumb has its own
compartment.
Chapter 17
Staying Alive under the SunIn This Chapter▶ Protecting yourself from the dangers of sunlight and dehydration
▶ Finding or building shelter in the desert
▶ Finding food and water in the desert
▶ Safely crossing desert terrain in the cool of the night
You face unique challenges in hot desert regions.
Dehydration is always a threat because water is scarce
and the heat makes you sweat. But deserts aren’t always
just hot. Believe it or not, you have to be ready for very cold
nights as well, which make you hypothermic in short order.
These regions are also home to some hard-to-see animals that
strike quickly with dangerous, sometimes lethal, poisons.
In this chapter, we show you how to protect yourself from
the sun, make shelter, find food and water, and avoid certain
critters. We also show you how to hike your way safely across
desert terrain in the dark, when it’s cooler.
Knowing the Dangers the Sun and Heat Pose
Your body reacts to overheating by sweating and dilating
your blood vessels to expel more heat from your system. If
the body becomes so hot that these methods can no longer
dump excessive heat, injury can occur. Overheating can be
just as deadly as hypothermia (excessive cold).
Part III: Surviving in Extreme Land Environments 314
The heat and sun can threaten your well-being in three ways:
sunburn, heat exhaustion, and heat stroke. This section helps
you grasp what the sun and heat can do to you if you don’t
take action.
If you have a good supply of water with you, you can prevent
most heat injuries simply by drinking an adequate quantity of
liquid.
Going skin deep with sunburnSunburn is a common heat malady that can become
debilitatingly painful. You can easily prevent sunburn by
wearing the correct clothing and using sunblock (see the
later section titled “Wearing Sun Shields”).
If you do get sunburned, treat the burn by draping a cloth
soaked in water over the affected areas. Juice from the aloe
vera plant can sometimes give you relief from the pain,
although some evidence suggests that aloe vera can slow the
healing process.
Overheating your body with heat exhaustion and strokeHeat exhaustion and heat stroke are forms of hyperthermia, an
excessive heating of the body. Heat exhaustion can turn into
heat stroke, which can lead to brain damage and death. Here’s
how to recognize and treat these problems.
Recognizing the symptoms of hyperthermiaHeat exhaustion is indicated by one or all of these symptoms:
✓ Pale and perhaps clammy skin
✓ Racing pulse
✓ Dizziness and/or headache
✓ Nausea and/or diarrhea
A person with heat exhaustion isn’t always sweating
profusely; the body may have already used up its water
supply prior to reaching heat exhaustion.

Chapter 17: Staying Alive under the Sun 315Heat stroke is a more dire condition than heat exhaustion, and
it’s indicated by the following:
✓ A red, flushed look to the skin
✓ Shock
✓ Extreme mental disorientation or unconsciousness
✓ Very dark urine
✓ Body temperature over 103°F (39.4°C)
Use your first aid kit thermometer to take a rectal temperature
and monitor it carefully; anything over 103°F is potentially
life-threatening, so keeping the body cool, wet, and rested is
critical.
Cooling offIf the person has heat exhaustion or heat stroke, do the
following to treat it:
✓ Get the person out of the sun.
✓ Loosen the clothing.
✓ Cool the body with liquid. Applying warm to tepid water
to the skin and then fanning it may be the best course
of action. You can substitute alcohol or soda if water is
scarce.
✓ Fan the body vigorously, or if you’re the victim, fan
gently to avoid overexerting yourself.
✓ Massage the body to keep the blood circulating.
✓ Rehydrate the exhausted person with cool water.
When the body temperature is below 102°F (38.9°C), you can
stop the cooling with water treatments (both applying it to
the skin and drinking it), but be sure to monitor temperature
carefully, because a person may go back into heat stroke.
If your survival situation doesn’t allow you copious amounts
of water to cool a heat-stressed person, you have to decide
what’s more important: long-term water conservation or
saving the person right now.
ys:
lps
nt
y of
e
he
an
to
re’s
ms:

Part III: Surviving in Extreme Land Environments 316
Wearing Sun ShieldsThe first step in protecting your body from the sun is to dress
appropriately. You should also cover your exposed skin with
some kind of sunblock, whether you’ve packed some SPF 50
lotion or have to improvise some from your surroundings.
This section tells you how to wear your sun defenses.
Cool clothes for hot times: Dressing for desert survivalYour first thought may be to strip down while in a desert to
avoid overheating, but actually, you have to shield yourself
from the sun’s rays. Dress yourself from head to toe in clothing
that shields you from the sun. You can find out how in
Chapter 4 and with the tips we show you here (see Figure 17-1):
✓ Hat or head covering: To improvise a head covering
to keep your brain from cooking, you can use a t-shirt:
Simply put the neck of the upturned t-shirt on your head
and drop the rest of the t-shirt behind your head, fully
protecting your neck and ears. Alternately, you can sew
stiff fabric, cardboard, or even pliable plastic, cut to
shape with a knife, into a ball cap.
✓ Sunglasses or goggles and a mask: Sunglasses or even
goggles protect you from becoming sunblind. If you don’t
have sunglasses or goggles, you can improvise them (see
Chapter 16). You can also improvise a cloth mask to keep
the dust and sand out of your lungs (see Chapter 4).
✓ Shoes or sandals: These protect your feet from hard
stones, sharp thorns, cactus spines, and hot sand and
rocks. You can improvise footwear from many materials,
such as wood, hard plastic, or rubber. You may be able
to protect your legs from snakebite by making a pair of
gaiters (that come to the calf) from heavy cloth or even
cardboard (see Chapter 16 for more on making gaiters).
Don’t ditch your warm clothes! Deserts get cold at night (or
they can), and then you face the risk of hypothermia.

Chapter 17: Staying Alive under the Sun 317
a c
b
Figure 17-1: Improvised hot-weather clothing for the head and feet.
If you have the luxury of extra water, keeping a wet cloth
wrapped around your head can keep your brain cool. If you’re
short on water, you may as well use urine’s cooling potential.
Yes, that’s right: Urinate on your hat and then put it back on.
Hey, we never said any of this wilderness survival business
was going to be pretty. Urine is sterile when you first urinate,
and in a desert survival situation, it evaporates before
bacteria become problematic.
Slathering on the sunblockYou can protect yourself from the sun with any cream or
other paste that stands between your skin and the rays of the
sun. If you’re venturing into hot terrain, always carry a tube
of sunblock. If you don’t have any on you, you can improvise
sunblock from the following:
✓ Mud or clay: Pigs and rhinos have the right idea when
they wallow in the mud. Smear either mud or clay on the
skin.
✓ Charcoal: Grind it up (after you’ve made a fire) and
smear it on your face, mixing it first, if possible, with
water or motor oil.
ess
th
0
o
f
ng
7-1):
ad
y
w
n
on’t
see
eep
als,
e
of
en
s).
r
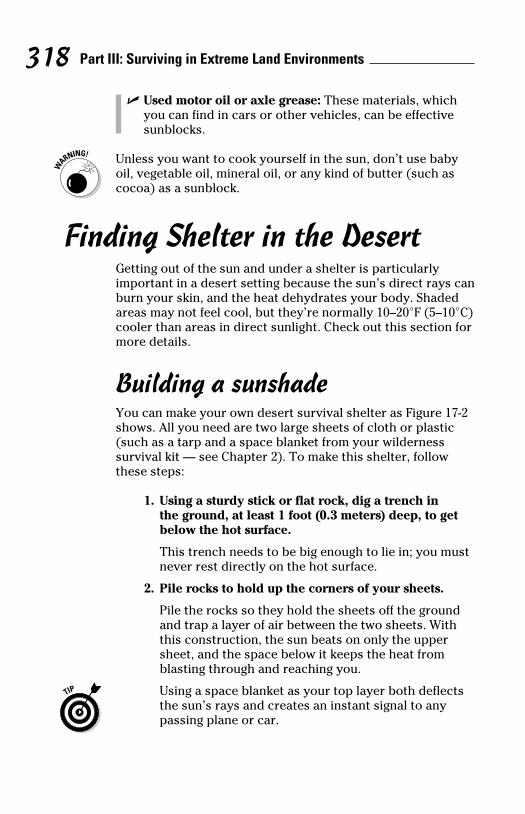
Part III: Surviving in Extreme Land Environments 318
✓ Used motor oil or axle grease: These materials, which
you can find in cars or other vehicles, can be effective
sunblocks.
Unless you want to cook yourself in the sun, don’t use baby
oil, vegetable oil, mineral oil, or any kind of butter (such as
cocoa) as a sunblock.
Finding Shelter in the DesertGetting out of the sun and under a shelter is particularly
important in a desert setting because the sun’s direct rays can
burn your skin, and the heat dehydrates your body. Shaded
areas may not feel cool, but they’re normally 10–20°F (5–10°C)
cooler than areas in direct sunlight. Check out this section for
more details.
Building a sunshadeYou can make your own desert survival shelter as Figure 17-2
shows. All you need are two large sheets of cloth or plastic
(such as a tarp and a space blanket from your wilderness
survival kit — see Chapter 2). To make this shelter, follow
these steps:
1. Using a sturdy stick or flat rock, dig a trench in
the ground, at least 1 foot (0.3 meters) deep, to get
below the hot surface.
This trench needs to be big enough to lie in; you must
never rest directly on the hot surface.
2. Pile rocks to hold up the corners of your sheets.
Pile the rocks so they hold the sheets off the ground
and trap a layer of air between the two sheets. With
this construction, the sun beats on only the upper
sheet, and the space below it keeps the heat from
blasting through and reaching you.
Using a space blanket as your top layer both deflects
the sun’s rays and creates an instant signal to any
passing plane or car.

Chapter 17: Staying Alive under the Sun 319 3. If possible, pile up sand and/or rocks to make a shel-
ter against wind.
Wind can be strong and prolonged in desert areas,
preventing sleep and wearing you down.
In windy conditions, your shelter tarps may blow away, so
weight them down securely.
Figure 17-2: A desert shelter.
Looking for shady placesIf you don’t have the resources to make the desert shelter we
show in Figure 17-2, look for the following shady spots:
✓ Bushes and rock overhangs: Before you find shade,
always evict snakes, scorpions, or other critters from
the bush, rock overhang, or boulder by first pelting it
with rocks or prodding it vigorously with a stick. Animals
want that shade as much as you do.
The animals you find, such as rabbits or snakes, may
be edible, so always be prepared to kill with a club
(see Chapter 8).
✓ Wrecked vehicles: Make sure all the doors and windows
are open so breezes can blow through. Otherwise, they
act like ovens.
Anytime you’re stuck in a survival situation with a disabled
car, be sure to leave the hood propped up, 24/7; this
signals help to anyone who sees it.
h
y
can
d
°C)
for
7-2
t
ust
d
h
ts

Part III: Surviving in Extreme Land Environments 320
The surface of a desert is normally about 35°F (19.4°C) hotter
than the air a foot (30.5 centimeters) above the surface, so
you never want to sit directly on the sand or rock. Instead, tip
over a rock — watching out for snakes, scorpions, or other
critters, of course — and sit on the side that was shaded. Or
sit on a bundled-up jacket or your backpack.
Warming shelters overnightWhatever shelter you use, be sure to make a fire in the late
afternoon if you’re staying put for the night (if you plan to travel,
see later section “Traveling at night”). Collect wood, brush, and
other fuel before it gets dark, so you can see what you’re doing.
Do not burn wood from species of the genus Euphorbia (milk
bush or pencil-tree) — the smoke is toxic. Before venturing
into desert terrain, look up the milk-bush and see what they
look like — there are many kinds!
If you’re short on fire-starting equipment, such as matches
or lighters, pile on heavy fuel throughout the night so you’re
always creating more coals, which you can use to restart
the fire in the morning. Even in the desert, you should keep
embers ready to make a smoke signal (see Chapter 12), and
you can use a fire to cook food and purify water. For more on
making fires, see Chapter 5.
If you can’t make a fire — for whatever reason — you can use
rocks heated by the sun to stay warm overnight. Slip some
sun-warmed rocks inside your clothes before you turn in.
These can keep you warm through a night. As soon as they
cool down, though, toss them out; otherwise, they suck heat
from your body.
Finding Water in the DesertThough deserts may lack flowing water, every desert does
have some moisture — moisture you need to keep cool and
slake your thirst. You just need to know where and how to
find it. This section gives you some water-finding methods
that are particularly useful in deserts. Chapter 7 covers
general methods to collect and purify water (including info
on gathering dew, which can work in a desert).
Chapter 17: Staying Alive under the Sun 321
In the desert, dehydration can kill you in hours. You must
prevent dehydration at all costs, even at the risk of getting a
water-borne disease. Even in hot, arid places, we advise you
to filter and purify all water you find in the wild. However, if
you’re on the verge of perishing from dehydration and you
have nothing to purify your water with, just drink unpurified
water. Purifying water usually requires you to boil it (which
may boil away all that you have in the desert) or put chemicals
in it (chemicals you may not have). Unpurified water can give
you a wide variety of diseases, but if you’re facing death by
dehydration right now, you’d better just take your chances.
Discovering standing waterWhen looking for water, one of the best places to start with is
standing water. Huecos are holes in rocks or the ground that
contain standing water. Even in the driest-appearing deserts,
you can usually find such water in three main areas:
✓ River courses: Wet mud or sand, and even pools of
water, can stand for a long time wherever rock or canyon
walls hang over the riverbed. (“Squeezing water from
mud or sand,” later in this chapter, shows how to extract
water from mud or sand.)
✓ Under the shade of boulders and in caves, where shade
may prevent evaporation: Don’t venture too far into
a dark cave, though, or you could get lost or fall into a
hole.
✓ In solution pockets: Solution pockets are bowl-like
depressions in rocks that catch rain and may contain
anything from a cup of water to hundreds of gallons.
A mirage is an illusion created by heat rising from the ground,
and you can see plenty in desert terrain (they can also occur
on open, snowy plains). A common — and frustrating —
desert mirage is that of a distant pool of water, shimmering
on the horizon. Don’t change your course to head toward an
oasis you think you see on the horizon unless it’s accompanied
by lots of thick, green vegetation.
ter
tip
Or
vel,
nd
ng.
lk
g
y
re
p
d
on
use
at
d

Part III: Surviving in Extreme Land Environments 322
Locating water undergroundYou may be able to discover some water in river courses that
appear dry. Figure 17-3 shows you where you may be able to
find water. Dig in the outside bends of turns in the riverbed —
the outside bend often undercuts the riverbank, providing
shade and preventing all the water from evaporating.
Flow
Figure 17-3: The most likely place to find water in an apparently dry river-bed.
Sometimes, palm trees can indicate the presence of water as
well. You can often find water about 3 feet (0.9 meters) below
a palm tree of any type.
To access underground water, dig down several feet, using a
stick, a flat rock, or some other tool to preserve your hands.
If you find wet sand, wait awhile; water may seep into your
excavation, filling it like a basin. If the water doesn’t seep
into the excavation, you can either try digging deeper or in
another spot, or you can try to squeeze water from damp
sand or mud.
Squeezing water from mud or sandYou can extract water that remains frustratingly locked in
sand or mud. Simply pile some wet sand or mud on a cloth,
and then roll the cloth around the sand or mud before twisting
it and catching the water in a receptacle (refer to Figure 17-4.)

Chapter 17: Staying Alive under the Sun 323
Figure 17-4: Squeezing water from wet mud or sand.
Unearthing water from cracks in rockYou can get water from narrow cracks in rocks or very shallow
pools by sucking water through a tube. Surgical tubing is
ideal, as is a long straw (see Figure 17-5). If you don’t have
tubing, sometimes you can use a hollow reed.
Figure 17-5: Using a tube to get water from a rock cranny.
You may have to suck vigorously a few times to get the water
going. Don’t drink the water when you suck it from the cranny
unless you’re on the verge of succumbing to dehydration. Spit
hat
to
—
r-
as
ow
a
s.
,
ng
-4.)

Part III: Surviving in Extreme Land Environments 324
F
the water into a receptacle and then use some method to filter
and purify it. This, however, may be impractical. You may
have to simply take your chances and drink it unpurified.
Making a desert solar stillYou can use a solar still to recycle urine (or any other impure
water) and make it into drinkable water. Chapter 7 discusses
how to make a solar still. To repurpose your urine, place a
receptacle of urine in the bottom of the still, next to the
collection receptacle (see Figure 17-6). The heat evaporates
the water from the urine, leaving behind the impurities; the
clean water condenses on the plastic and drips into your
water collector, from which you can suck up the water with a
tube or straw.
Figure 17-6: A desert solar still for distilling pure water from urine.
Collecting water from a cactusHollywood cowboys often cut open cacti to drink, but only
one cactus is really safe for this method: the barrel cactus.
The best cactus for drinking is the fishhook barrel cactus
(see Figure 17-7), which normally stands about 6 inches
(15 centimeters) high and has distinctive, fishhook-like thorns.

Chapter 17: Staying Alive under the Sun 325
Figure 17-7: The safe fishhook cactus.
To get water from a fishhook cactus, cut it open with a heavy
knife, mash the inside with a stick, and scoop out the fleshy
tissue onto a piece of cloth. You can then squeeze the water
out using the method we describe in the earlier section
“Squeezing water from mud or sand.”
When drinking the fluid out of a barrel cactus, take your time
and make sure you can digest it. Some of these cacti are very
alkaline, which can make you ill, even if you put the fluid
through a solar still. For more on solar stills, see Chapter 7.
Finding Food in the Dry PlacesOnly after you’ve protected your body from the sun with
clothing and shelter and have secured some water (or thought
out how you’re going to get it) can you turn your thoughts to
food. You can go weeks without food, so water always comes
first.
Food requires water to digest, so if you don’t have water,
too, don’t eat. Some experts even recommend throwing away
or destroying your food if you don’t have water to help you
avoid the temptation of eating! This is a pretty extreme
measure, though — a decision best left to the circumstances
and your judgment.
This section considers the different types of food sources you
may find in the desert as well as some to avoid at all costs.
lter
ure
es
s
e
h a
ns.

Part III: Surviving in Extreme Land Environments 326
Fruits of the desert: Eating cacti and other plantsThe fruit of any cactus is edible. Just cut off the bulbs and
peel the fruit, being very careful of the spines, which can be
as fine as peach fuzz. Boiling is the safest way to consume the
fruit.
You can eat the tender, young pads of the prickly pear cactus.
Just peel and cook them.
The leaves, stems, roots, and flowers of many desert plants
are safe to eat, but many species can sicken or kill you. For
instance, species of the genus Euphorbia (commonly known
as milk bush or pencil-tree) are poisonous. So before you eat
any plants, check them with the Universal Plant Edibility Test
in Chapter 8. Remember: Some fungi do grow in the desert,
but don’t eat them or use the Universal Plant Edibility Test on
them — they can be toxic even in small amounts.
Eating insectsInsects are excellent survival foods. Here’s how to prepare
them:
✓ Ants and termites: You can collect ants and termites one
by one and eat them raw (they’re one of the few survival
foods that are safe without cooking). Or you can mash
them into a paste if you have a lot of them.
✓ Grasshoppers and beetles: The wings and legs of
grasshoppers and beetles are a choking hazard, so
remove them before cooking. You can boil these animals
in water to make a soup, or to save water, broil them
next to a fire.
✓ Larvae: If you find beetles, you may find beetle larvae —
white, grub-like animals — under or inside logs or other
pieces of wood. Simply cook and eat them as you do for
beetles.
Stay away from bees and hornets because of their painful
stings — you may be allergic, leading to a serious and
sometimes life-threatening reaction.

Chapter 17: Staying Alive under the Sun 327
Choosing poultry and eggsAll birds are edible, and so are their eggs. Remember that
birds don’t just nest in tree branches; they may occupy a
cavity in a cactus or tree trunk, or their nests may be under
a bush on the ground, in a cave, or on a rock ledge. Boil the
eggs, and broil the birds after plucking off the feathers.
Catching desert mammalsSmall mammals, such as mice, are common in many deserts.
They can be tough to catch, though — they’re so small that
snaring them would require a very small, delicate snare. You
can sometimes trap mice by placing a can of water or other
bait in the bottom of a 2-foot (0.6-meter) deep, steep-sided
hole. At night, mice are attracted by the smell of food or
water, and as soon as they fall into the hole, they can’t get out.
Larger desert mammals include foxes and various herbivores,
such as antelope. You may be able to snare these animals as
well, but insects, snakes, or small mammals are much easier
to catch. If you do catch a mammal, you can butcher and cook
it in ways we cover in Chapter 8.
Dining on lizards and snakesMany lizards and snakes are harmless. If you do decide to
hunt them, make sure you know what you’re hunting. We
don’t recommend hunting snakes because some have lethal
bites, but if you do come across one and feel the situation is
manageable, there’s no reason not to kill and eat it. What is a
manageable situation, with respect to a potential killer (like
a rattlesnake), is up to you. Your decision depends on how
hungry, well-armed, strong, and confident you are. (See the
next section for more on venomous reptiles.)
If you choose to eat snakes and lizards, here’s how to process
them:
1. Cut off the head by cutting at the neck, several
inches down from the base of the skull.
e
the
tus.
s
n
at
est
,
on
one
val
h
als
—
er
or
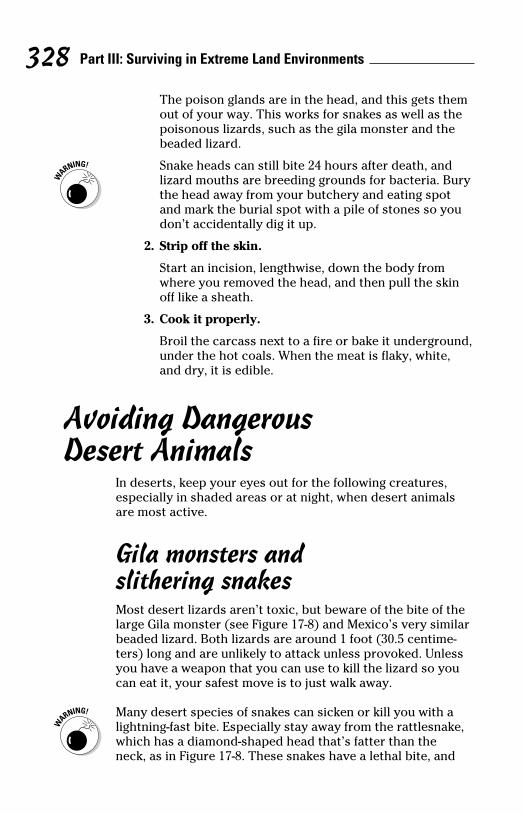
Part III: Surviving in Extreme Land Environments 328
The poison glands are in the head, and this gets them
out of your way. This works for snakes as well as the
poisonous lizards, such as the gila monster and the
beaded lizard.
Snake heads can still bite 24 hours after death, and
lizard mouths are breeding grounds for bacteria. Bury
the head away from your butchery and eating spot
and mark the burial spot with a pile of stones so you
don’t accidentally dig it up.
2. Strip off the skin.
Start an incision, lengthwise, down the body from
where you removed the head, and then pull the skin
off like a sheath.
3. Cook it properly.
Broil the carcass next to a fire or bake it underground,
under the hot coals. When the meat is flaky, white,
and dry, it is edible.
Avoiding Dangerous Desert Animals
In deserts, keep your eyes out for the following creatures,
especially in shaded areas or at night, when desert animals
are most active.
Gila monsters and slithering snakesMost desert lizards aren’t toxic, but beware of the bite of the
large Gila monster (see Figure 17-8) and Mexico’s very similar
beaded lizard. Both lizards are around 1 foot (30.5 centime-
ters) long and are unlikely to attack unless provoked. Unless
you have a weapon that you can use to kill the lizard so you
can eat it, your safest move is to just walk away.
Many desert species of snakes can sicken or kill you with a
lightning-fast bite. Especially stay away from the rattlesnake,
which has a diamond-shaped head that’s fatter than the
neck, as in Figure 17-8. These snakes have a lethal bite, and
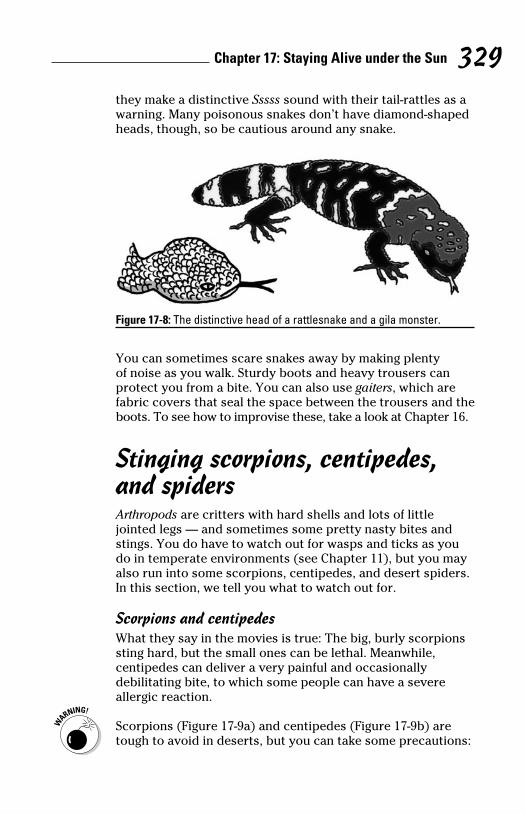
Chapter 17: Staying Alive under the Sun 329they make a distinctive Sssss sound with their tail-rattles as a
warning. Many poisonous snakes don’t have diamond-shaped
heads, though, so be cautious around any snake.
Figure 17-8: The distinctive head of a rattlesnake and a gila monster.
You can sometimes scare snakes away by making plenty
of noise as you walk. Sturdy boots and heavy trousers can
protect you from a bite. You can also use gaiters, which are
fabric covers that seal the space between the trousers and the
boots. To see how to improvise these, take a look at Chapter 16.
Stinging scorpions, centipedes, and spidersArthropods are critters with hard shells and lots of little
jointed legs — and sometimes some pretty nasty bites and
stings. You do have to watch out for wasps and ticks as you
do in temperate environments (see Chapter 11), but you may
also run into some scorpions, centipedes, and desert spiders.
In this section, we tell you what to watch out for.
Scorpions and centipedesWhat they say in the movies is true: The big, burly scorpions
sting hard, but the small ones can be lethal. Meanwhile,
centipedes can deliver a very painful and occasionally
debilitating bite, to which some people can have a severe
allergic reaction.
Scorpions (Figure 17-9a) and centipedes (Figure 17-9b) are
tough to avoid in deserts, but you can take some precautions:
em
he
ury
u
n
nd,
he
lar
-
ss
u
e,
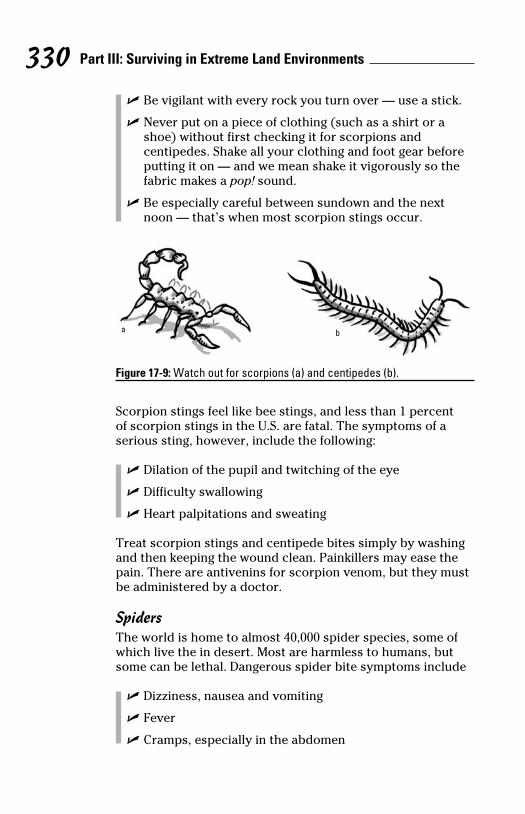
Part III: Surviving in Extreme Land Environments 330
WO
✓ Be vigilant with every rock you turn over — use a stick.
✓ Never put on a piece of clothing (such as a shirt or a
shoe) without first checking it for scorpions and
centipedes. Shake all your clothing and foot gear before
putting it on — and we mean shake it vigorously so the
fabric makes a pop! sound.
✓ Be especially careful between sundown and the next
noon — that’s when most scorpion stings occur.
a b
Figure 17-9: Watch out for scorpions (a) and centipedes (b).
Scorpion stings feel like bee stings, and less than 1 percent
of scorpion stings in the U.S. are fatal. The symptoms of a
serious sting, however, include the following:
✓ Dilation of the pupil and twitching of the eye
✓ Difficulty swallowing
✓ Heart palpitations and sweating
Treat scorpion stings and centipede bites simply by washing
and then keeping the wound clean. Painkillers may ease the
pain. There are antivenins for scorpion venom, but they must
be administered by a doctor.
SpidersThe world is home to almost 40,000 spider species, some of
which live the in desert. Most are harmless to humans, but
some can be lethal. Dangerous spider bite symptoms include
✓ Dizziness, nausea and vomiting
✓ Fever
✓ Cramps, especially in the abdomen

Chapter 17: Staying Alive under the Sun 331Chapter 13 covers spider bite treatment. Avoid spiders by
checking under rocks and shaking out clothing.
Wind and Water: Watching Out for Desert Weather
Deserts seem so calm most of the time — little wind, not
much weather to speak of other than the relentless sun. But
there are two real dangers you have to keep an eye out for,
outlined in this section.
Staying high and dry during flash floodsA flash flood is any unexpected arrival of water on a landscape,
and strangely enough, this is a big danger in deserts. A big
storm can drop millions of gallons of water 100 miles away —
while you’re being blistered by the sun — and suddenly the
dry riverbed you’re staggering along, or sleeping in, turns into
a raging river!
To avoid flash flood dangers, walk along the rim of a dry river
while you assess the danger, remembering a few tips:
✓ Look for high-water marks. High-water marks (refer to
Figure 17-10) include stains on rock walls or piles of
vegetation snagged in tree limbs adjacent to watercourses,
where vegetation floating on a prior flash flood rose up
and got caught. Stripes in the rock may not be high-water
marks — they may be natural rock layers — so look for
stranded vegetation and other signs of flooding.
✓ Before venturing into a canyon or dry riverbed, look at
the horizon all around for clouds. If you see low, dark
clouds that look rainy, get back up on higher ground. The
flash-flood water may be pouring down way over there,
right now — just an hour from where you are.
k.
re
e
ng
e
ust
f
de
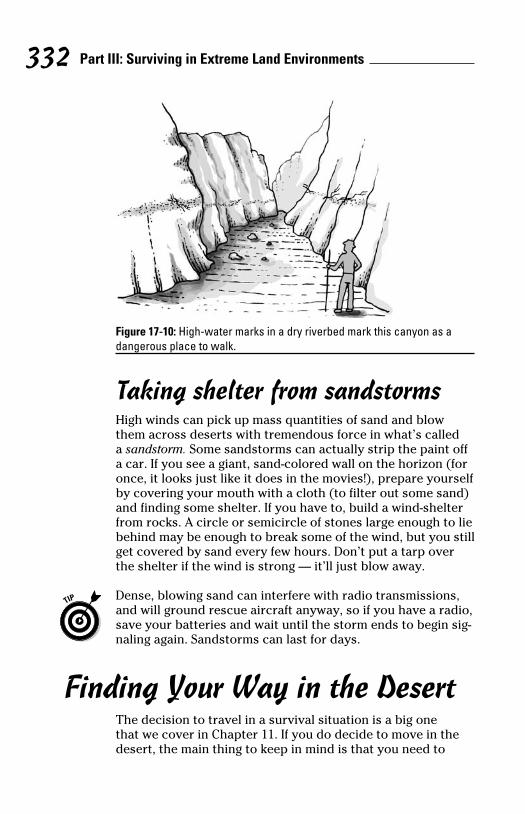
Part III: Surviving in Extreme Land Environments 332
Figure 17-10: High-water marks in a dry riverbed mark this canyon as a dangerous place to walk.
Taking shelter from sandstormsHigh winds can pick up mass quantities of sand and blow
them across deserts with tremendous force in what’s called
a sandstorm. Some sandstorms can actually strip the paint off
a car. If you see a giant, sand-colored wall on the horizon (for
once, it looks just like it does in the movies!), prepare yourself
by covering your mouth with a cloth (to filter out some sand)
and finding some shelter. If you have to, build a wind-shelter
from rocks. A circle or semicircle of stones large enough to lie
behind may be enough to break some of the wind, but you still
get covered by sand every few hours. Don’t put a tarp over
the shelter if the wind is strong — it’ll just blow away.
Dense, blowing sand can interfere with radio transmissions,
and will ground rescue aircraft anyway, so if you have a radio,
save your batteries and wait until the storm ends to begin sig-
naling again. Sandstorms can last for days.
Finding Your Way in the DesertThe decision to travel in a survival situation is a big one
that we cover in Chapter 11. If you do decide to move in the
desert, the main thing to keep in mind is that you need to
Chapter 17: Staying Alive under the Sun 333have a plan and stick to it. Determine the direction you want
to travel, prepare your gear, and then stick to your plan, day
after day — or as we suggest in this section, night after night.
The good news is that in a desert, you can see a long way,
allowing you to plan your trek, take compass bearings, and
navigate more efficiently than in, say, a dense jungle. (See
Chapters 9 and 10 for more on navigating.) This section helps
you travel in the desert both during the day and night.
Whenever you make the decision to travel, be sure to leave a
note or signal at the place where you first became lost. And
as you travel, leave notes behind updating your progress.
Put messages in trees or under conspicuous piles of stone so
people can find them easily. Indicate the following:
✓ What direction you’re headed and why
✓ Who you are and what happened to you
✓ What supplies you have
✓ The date that you’re departing
Traveling at nightIf you’ve committed to traveling to get out of your wilderness
survival situation, traveling at night is a good tactic for dealing
with hot country. Temperatures are cooler and sometimes
downright cold in deserts at night, so your body uses less
water — about half the water it needs when traveling in
daylight.
For navigation, you can use the stars, which — after you know
a few basics — are nothing less than a vast compass in the
sky (and the stars never lie, thankfully). Chapter 10 tells you
how to navigate by the stars.
Spend plenty of time during the day making your plans before
traveling at night. Get to the highest point you can safely
reach to give you a better vantage point, and then study the
terrain, locating the features that can act as landmarks.
Seeing in the darkTo travel at night, you have to use night vision, which you can
acquire by letting your eyes adjust to darkness. In the space
of an hour of sitting in darkness — with no campfire or any
d
off
or
self
nd)
er
lie
still
s,
dio,
sig-
te

Part III: Surviving in Extreme Land Environments 334
other artificial light — your pupils dilate to their maximum,
which allows your eyes to gather more light.
When using night vision, you have to maintain strict light
discipline. Don’t use a flashlight or even light a match after
you start traveling, because these lights will ruin your night
vision.
If you have a red lens filter on your flashlight, you can use it
to read maps at night without destroying your night vision. A
red filter is simply a red-colored translucent plastic cap that
fits over your flashlight bulb housing. If you don’t have a red
filter, improvise one by taping red fabric over your flashlight.
Using a staff to probe ahead in darknessWhen traveling at night, make sure you use a walking stick
or staff to feel the ground in the darkness and help you keep
your balance on uneven terrain. Using one in each hand, like
ski poles, is also effective.
You can also use a walking stick or staff to prod bushes or
other obstacles (or better yet, go around them) when you sus-
pect they may be home to a snake or other potentially danger-
ous animal. Remember, a lot of desert animals come out at
night, when it’s cooler.
Confronting drop-offsWalking at night can pose potential dangers, such as the
inability to see that canyon in front of you. If you’re on rocky
ground, beware of sudden drop-offs.
If the ground goes completely black in front of you, stop
and feel with your walking stick or staff. You may have to go
around an obstacle, or you may be able to judge how far a
drop-off is by probing with a walking staff. If you can feel that
solid ground is just a few feet down (and, by throwing a stone
into the darkness, you can tell that it’s not just a little ledge
leading to a high cliff!), you can proceed. But don’t jump down
the drop-off — that’s crazy! To clamber down a 3-foot (0.9-
meter) cliff, do the following (see Figure 17-11):
1. Probe the ground at the bottom of the drop-off with
your walking stick.
2. Turn to face the land you’re walking on and kneel
down.

Chapter 17: Staying Alive under the Sun 335 3. Hold onto the edge and shove your legs over.
4. Slide/lower yourself down, using your arms for
support.
Figure 17-11: Checking height and clambering down a 3-foot drop-off.
Traveling in daylight
We don’t believe there’s any good reason to travel significant
distances in deserts in daylight in a real survival situation.
You may as well wait for cooler hours of dusk till dawn, when
you’ll consume less water and you’re at less risk of heat
exhaustion or heat stroke. However, if you’re forced to travel
in the day (we can’t really think why, but it may happen):
✓ Watch yourself and your companions for the symptoms
of heat exhaustion and dehydration. We discuss these
earlier in “Knowing the Dangers the Sun and Heat Pose.”
✓ Protect yourself from the sun with the proper clothing.
See the earlier section “Wearing Sun Shields.”
✓ Drink plenty of water. If you have the water, drink
at least 1 gallon (4 liters) a day. You may need up to
5 gallons (19 liters) a day.
✓ Rest in shade and up off the ground for at least 10
minutes every hour. This gives you a few moments to
cool off.
,
t
t
A
t
ed
ht.
p
ke
sus-
ger-
ky
o
hat
one
e
own
th
l
Part III: Surviving in Extreme Land Environments 336 ✓ Breathe through your nose rather than your mouth.
You want to minimize water loss from exhaled vapor.
Better yet, avoid all these problems by traveling at night.
Crossing Desert TerrainThe vast, open terrain of deserts can be deceptive, making
distant hills look three times closer than they really are. Don’t
get frustrated. Stick to your plan even as you encounter these
obstacles:
✓ Sand dunes: The wind can blow sand into mountainous
heaps. Dunes present no real immediate dangers, but
they’re dangerously exhausting to climb. You either have
to slog over them — sinking back with each step — or go
around them, which may cost miles. Tough call.
✓ Rocky terrain: Crossing rocky terrain requires shoes or
boots. Sturdy soles protect you from heat, sharp rock,
and thorns, and high cuffs prevent the dreaded twisted
ankle and may stop a snake attack.
✓ Wadis and lagas: Dry watercourses — termed wadis
in Arabia and lagas in East Africa — are riverbeds that
flow in the spring (when mountain snows melt) but are
dry the rest of the year. They can be the home of flash
floods in the springtime, so beware of this danger. They
may have water in them, though (see the earlier section
“Locating water underground”).
✓ Gallery forests: These are vegetation stands that run
along the banks of river courses that are dry most of
the year but flow with spring meltwater. They can be a
great source of water — because tree roots and other
vegetation trap water in their vicinity — but remember
that a lot of nonhuman animals (such as African lions)
like to take shelter in the shade of gallery forests, just like
you do.

Part IVSurviving on the
Seas, Oceans, and Great Lakes

In this part . . .
Survival challenges on the water are so unique that
we’ve dedicated an entire part to this topic. How do
you protect yourself from hypothermia if you fall into one
of the Great Lakes? How can you satisfy your thirst on the
ocean when you’re surrounded by salt water? Which
foods are safe to collect from the sea? Can you fend off
sharks and other dangerous animals? And how are you
going to get to land — or even fi nd land in the fi rst place?
In this part, we answer these questions, and we show you
the skills you need to know when you head offshore.
Chapter 18
Staying Afloat and WarmIn This Chapter▶ Coping with a sinking vessel
▶ Abandoning ship
▶ Floating after a sinking
▶ Preventing hypothermia
If you get into trouble while at sea (or on a large lake), your
ordeal begins, most likely, in one of two ways: You get
separated from your boat in some way, or your vessel sinks.
Neither are pleasant thoughts, we know, but you can use
plenty of good strategies to make it through.
In this chapter, we look at scenarios in which life rafts aren’t
involved. (Chapter 19 covers life raft procedures as well what
to do if your vessel is disabled.) For now, we show you how to
recognize a ship or small boat is in trouble, how to cope with
that situation, and how to stay alive in the minutes and hours
after the sinking — with or without a life jacket.
Recognizing When Your Vessel Is in Trouble
If you spend any time studying the harrowing history of
tragedies at sea, you quickly see a clear pattern: Those who
recognize what’s happening immediately — as it’s happening —
usually have the highest rate of survival. This section shows
you some of the causes of sinking and the warning signs that
the vessel you’re aboard, whether large or small, may be in
danger.
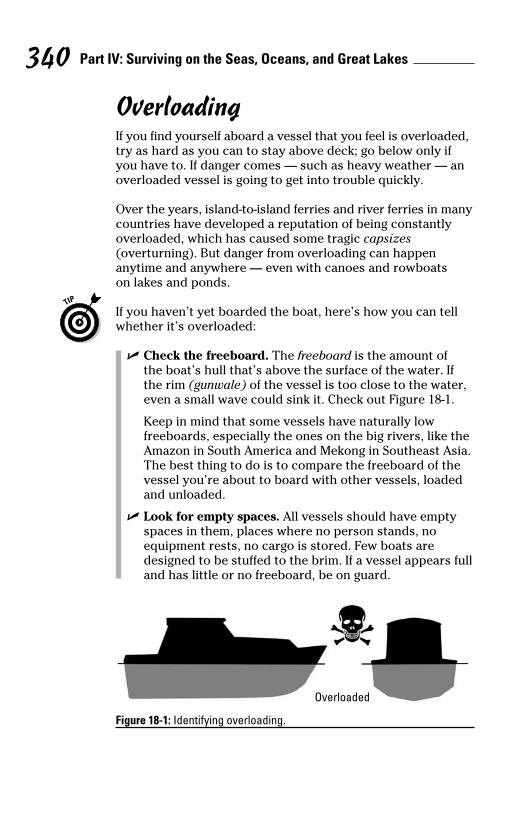
Part IV: Surviving on the Seas, Oceans, and Great Lakes 340
OverloadingIf you find yourself aboard a vessel that you feel is overloaded,
try as hard as you can to stay above deck; go below only if
you have to. If danger comes — such as heavy weather — an
overloaded vessel is going to get into trouble quickly.
Over the years, island-to-island ferries and river ferries in many
countries have developed a reputation of being constantly
overloaded, which has caused some tragic capsizes
(overturning). But danger from overloading can happen
anytime and anywhere — even with canoes and rowboats
on lakes and ponds.
If you haven’t yet boarded the boat, here’s how you can tell
whether it’s overloaded:
✓ Check the freeboard. The freeboard is the amount of
the boat’s hull that’s above the surface of the water. If
the rim (gunwale) of the vessel is too close to the water,
even a small wave could sink it. Check out Figure 18-1.
Keep in mind that some vessels have naturally low
freeboards, especially the ones on the big rivers, like the
Amazon in South America and Mekong in Southeast Asia.
The best thing to do is to compare the freeboard of the
vessel you’re about to board with other vessels, loaded
and unloaded.
✓ Look for empty spaces. All vessels should have empty
spaces in them, places where no person stands, no
equipment rests, no cargo is stored. Few boats are
designed to be stuffed to the brim. If a vessel appears full
and has little or no freeboard, be on guard.
Overloaded
Figure 18-1: Identifying overloading.

Chapter 18: Staying Afloat and Warm 341
Poor trim or listingIf a vessel you’re traveling on suddenly leans in the water, this
is called a list, and it may be a sign you should be planning
your escape. This is especially true if the boat is rolling. If the
vessel rolls one way and doesn’t roll back, this is a definite
sign that something is wrong.
All boats should remain trimmed in the water, which means
they should sail along in a balanced fashion. Even sailboats,
which lean over (heal) naturally, should still be trim — in
other words, they should lean over in a straight and organized
fashion. Many vessels start out their voyages poorly trimmed,
and like overloaded vessels, when they get into trouble, bad
things happen quickly. Figure 18-2 shows trimmed and poorly
trimmed boats.
Small boats swamp quickly. Swamping means that the boat
floods almost to the brim. This happens when an enormous
mass of water comes over the side, or over the back (transom),
of the boat.
Out of trim
Trim and notoverloaded
Figure 18-2: An out-of-trim vessel and a trimmed vessel.
ed,
an
any
l
er,
he
sia.
e
d
y
full
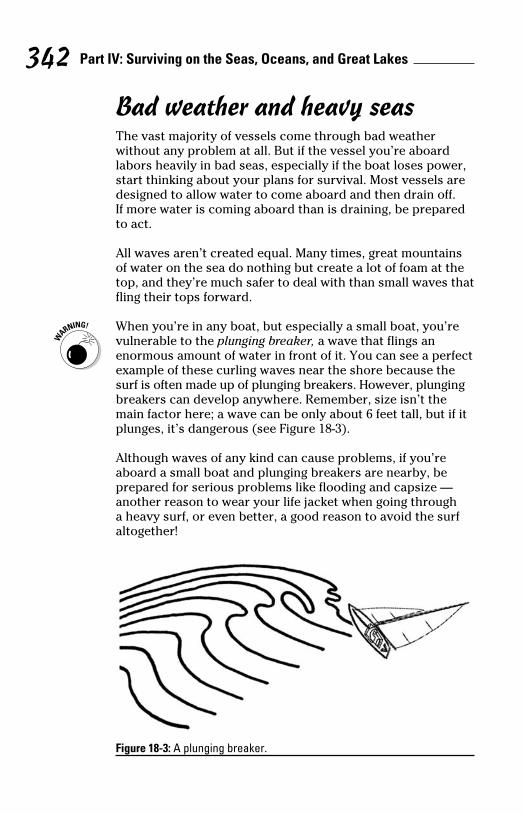
Part IV: Surviving on the Seas, Oceans, and Great Lakes 342
Bad weather and heavy seasThe vast majority of vessels come through bad weather
without any problem at all. But if the vessel you’re aboard
labors heavily in bad seas, especially if the boat loses power,
start thinking about your plans for survival. Most vessels are
designed to allow water to come aboard and then drain off.
If more water is coming aboard than is draining, be prepared
to act.
All waves aren’t created equal. Many times, great mountains
of water on the sea do nothing but create a lot of foam at the
top, and they’re much safer to deal with than small waves that
fling their tops forward.
When you’re in any boat, but especially a small boat, you’re
vulnerable to the plunging breaker, a wave that flings an
enormous amount of water in front of it. You can see a perfect
example of these curling waves near the shore because the
surf is often made up of plunging breakers. However, plunging
breakers can develop anywhere. Remember, size isn’t the
main factor here; a wave can be only about 6 feet tall, but if it
plunges, it’s dangerous (see Figure 18-3).
Although waves of any kind can cause problems, if you’re
aboard a small boat and plunging breakers are nearby, be
prepared for serious problems like flooding and capsize —
another reason to wear your life jacket when going through
a heavy surf, or even better, a good reason to avoid the surf
altogether!
Figure 18-3: A plunging breaker.
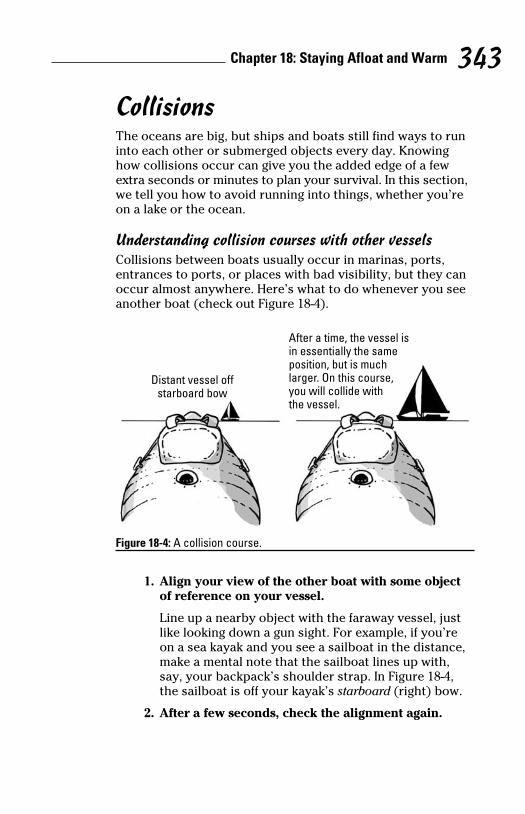
Chapter 18: Staying Afloat and Warm 343
CollisionsThe oceans are big, but ships and boats still find ways to run
into each other or submerged objects every day. Knowing
how collisions occur can give you the added edge of a few
extra seconds or minutes to plan your survival. In this section,
we tell you how to avoid running into things, whether you’re
on a lake or the ocean.
Understanding collision courses with other vesselsCollisions between boats usually occur in marinas, ports,
entrances to ports, or places with bad visibility, but they can
occur almost anywhere. Here’s what to do whenever you see
another boat (check out Figure 18-4).
Distant vessel offstarboard bow
After a time, the vessel isin essentially the sameposition, but is muchlarger. On this course,you will collide withthe vessel.
Figure 18-4: A collision course.
1. Align your view of the other boat with some object
of reference on your vessel.
Line up a nearby object with the faraway vessel, just
like looking down a gun sight. For example, if you’re
on a sea kayak and you see a sailboat in the distance,
make a mental note that the sailboat lines up with,
say, your backpack’s shoulder strap. In Figure 18-4,
the sailboat is off your kayak’s starboard (right) bow.
2. After a few seconds, check the alignment again.
er,
re
ed
ns
he
that
e
fect
ng
f it
h
rf

Part IV: Surviving on the Seas, Oceans, and Great Lakes 344
KB
If the sailboat is still aligned with the same object
on your sea kayak but the sailboat is much larger —
in other words, much closer — the two of you are
moving toward the same point.
In a few more seconds, you may take your sighting
again, and now the sailboat is so large that you can
see the person who’s steering it — but it’s still at the
same sighting point, over the same sighting object:
You’re on a collision course.
3. If you’re on a collision course, take action to get
away or turn very sharply.
Or if you have no control of the vessel — such as
when you’re on a charter or ferry, begin taking the
steps we show you in “Knowing What to Do If Your
Boat Starts to Sink,” later in this chapter.
Anytime you’re sailing or motoring in waters where there are
Jet Skis, Sea-Doos, or any other sort of personal water crafts
(PWC), be especially vigilant. These small motorcycles-on-
water are involved in a lot of collisions.
Watching out for underwater obstaclesThe second type of collision is the type that occurs when the
boat you’re on strikes a fixed object, or a submerged one, like
a reef or rock. Maintain a very sharp lookout for the following:
✓ Any signs or buoys that have large red diamonds on
them: These signs can vary from country to country, but
in North America, they mark danger.
✓ Any foam near the shore: This usually means that a rock
is just right under the surface (awash).
✓ Any long lines of rocks extending from land: Where these
long, rocky peninsulas stop is only the start of danger.
These rocks usually continue just under the surface.
FireFire burns well on the water because you’re in an open space
with lots of oxygen. Fire burns so aggressively on the water
that the flames and the heat frequently make it impossible for
the crew to maintain control of the vessel, which puts you at
the mercy of the waves and the sea.

Chapter 18: Staying Afloat and Warm 345If you see a fire on a cruise or charter, notify the crew
immediately. Though you should always try to let the crew
of the vessel perform the fire-extinguishing duties, know that
on most boats, fire extinguishers are available.
Hatch failure and ship damageLoosely speaking, a hatch failure occurs whenever a previously
closed opening breaks and lets water into the boat. Doors can
be left unsecured, allowing water to pour into the vessel, and
large waves can break windows on boats quite easily. Heavy
flooding in these cases happens in an instant, so be ready for
it. Some vessels can pump the water out, and some can’t.
Many tragedies at sea give warnings in the form of sounds or
bad vibrations. The water itself can make horrendous noises
against a boat’s hull without causing any damage whatsoever,
but when a ship strains, the sound is significantly different.
The ship groans, metal twisting on metal. All ships make these
sounds when laboring, but listen for them, and try to develop
a sense of what’s unusual. The best way to react to loud or
violent noise is to be vigilant, but not panicked.
Knowing What to Do If Your Boat Starts to Sink
As soon as the boat you’re on starts to sink, you need to take
action. If you keep calm and take a few steps in a timely fashion,
you greatly increase your chance of survival. This section
takes you through the important immediate steps you need to
take if your ship is in trouble and starting to sink.
Radioing for helpIf you can get to a radio and your vessel is in grave and
immediate danger, you need to signal for help. The law states
very clearly that anyone, regardless of experience or licenses,
can operate any radio he or she has access to if sending a
distress signal. The single stipulation to this law — and it’s
a serious stipulation — is that to signal SOS or Mayday, you
must be in “grave and immediate danger” of death or loss of
—
he
re
ts
he
ike
ing:
but
ock
ese
ce
r
for
at

Part IV: Surviving on the Seas, Oceans, and Great Lakes 346significant property. If your situation isn’t that bad, consider
signaling Pan, which is for smaller problems. (For directions
on how to send a Mayday or Pan signal, check out Chapter 12.)
If you’ve made radio contact with someone and your distress
signal has been sent and completely received, make a schedule. Tell the radio operator on the other end that if you lose
contact, she should listen again at a specific time for another
signal. If radio contact is very good — for example, if you’ve
made contact with a U.S. Coast Guard radio operator or with
one of the ham radio networks (such as the Maritime Mobile
Net) — then after making your distress call, make your
schedule, confirm it, and then shut off your transmitter or
cellphone. Good battery discipline can give you the upper
hand on your surroundings.
If you know you’re going to leave the vessel — in other words,
if the boat is sinking and you know there won’t be a second
contact — tape down the button on the microphone so that
the radio continues to transmit for as long as possible.
Putting on a life jacketFaced with a deteriorating situation, you should put on a life
jacket. If the captain or one of the mates of the vessel you’re
on doesn’t give you a life jacket, you may have to find one
yourself. Life jackets usually live in the dark. If you’re in
trouble, look in the darkest places of a boat:
✓ Under the seats, in the seat lockers
✓ In the forepeak, the dark place at the very front point of
the boat
✓ In the lazarette, the trunk at the very back of the boat
✓ In the closet behind the bridge, the room from which the
boat is steered
If you have time and the water is cold, put on as much clothing
as you can before putting on your life jacket. Forget all those
Hollywood movies where the hero strips off his shirt to
dive in. Clothing traps water near your body, which is then
warmed by your body, forming a protective layer. Extra
clothing usually doesn’t hinder you so much in swimming that
you should discard it.
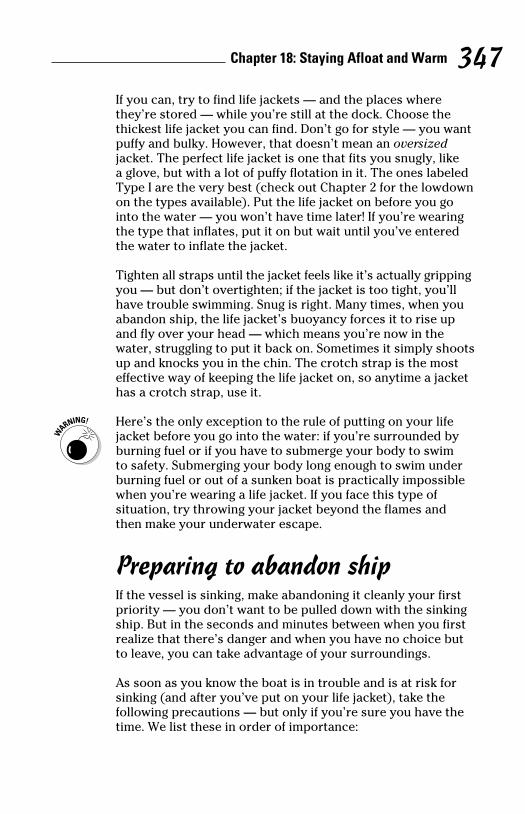
Chapter 18: Staying Afloat and Warm 347If you can, try to find life jackets — and the places where
they’re stored — while you’re still at the dock. Choose the
thickest life jacket you can find. Don’t go for style — you want
puffy and bulky. However, that doesn’t mean an oversized
jacket. The perfect life jacket is one that fits you snugly, like
a glove, but with a lot of puffy flotation in it. The ones labeled
Type I are the very best (check out Chapter 2 for the lowdown
on the types available). Put the life jacket on before you go
into the water — you won’t have time later! If you’re wearing
the type that inflates, put it on but wait until you’ve entered
the water to inflate the jacket.
Tighten all straps until the jacket feels like it’s actually gripping
you — but don’t overtighten; if the jacket is too tight, you’ll
have trouble swimming. Snug is right. Many times, when you
abandon ship, the life jacket’s buoyancy forces it to rise up
and fly over your head — which means you’re now in the
water, struggling to put it back on. Sometimes it simply shoots
up and knocks you in the chin. The crotch strap is the most
effective way of keeping the life jacket on, so anytime a jacket
has a crotch strap, use it.
Here’s the only exception to the rule of putting on your life
jacket before you go into the water: if you’re surrounded by
burning fuel or if you have to submerge your body to swim
to safety. Submerging your body long enough to swim under
burning fuel or out of a sunken boat is practically impossible
when you’re wearing a life jacket. If you face this type of
situation, try throwing your jacket beyond the flames and
then make your underwater escape.
Preparing to abandon shipIf the vessel is sinking, make abandoning it cleanly your first
priority — you don’t want to be pulled down with the sinking
ship. But in the seconds and minutes between when you first
realize that there’s danger and when you have no choice but
to leave, you can take advantage of your surroundings.
As soon as you know the boat is in trouble and is at risk for
sinking (and after you’ve put on your life jacket), take the
following precautions — but only if you’re sure you have the
time. We list these in order of importance:
er
ns
2.)
ess
e.
er
e
th
le
rds,
d
t
fe
re
of
he
ing
se
hat

Part IV: Surviving on the Seas, Oceans, and Great Lakes 348
✓ Put on a hat. If you have access to wool, grab it. Having
a covering on your head can double your survival time in
some cases.
✓ Protect your cellphone. If you have access to plastic,
wrap up your phone. A woman’s handbag can function as
a sufficient dry-bag — put the phone in and roll the bag
tightly around it.
✓ Gather signaling materials. You need to be able to signal
for help when you’re in the water. Chapter 12 lists items
you can grab to make signals.
✓ Collect water and/or containers. Even just a small
amount of water can help. Your ability to survive long
term on the sea, many times, comes down to your ability
to catch and store rainwater. (For more on fresh water at
sea, see Chapter 20.)
If you can, make sure water containers have a little air inside
them so that they’ll float well in the waves.
Abandoning ship: The how-toIf you have the choice, stay with the vessel for as long as you
can. It’s large and easier to see than a life raft, and it’s where
search teams will start looking for you. It may float, partially
sunk, for a very long time. If, however, the vessel is leaving
the surface and you can step straight into a life raft, boarding
the raft is preferable to releasing the life raft and swimming
for it. (For more on using life rafts, see Chapter 19.) The rest
of this chapter deals with situations in which you don’t have
a life raft.
A sinking vessel is a body in motion. Just because the boat
is oriented one way right now doesn’t mean it’s going to stay
that way. Expect the boat to roll or pitch heavily. The following
are procedures for abandoning a sinking ship or boat:
✓ Leave from the side on which the wind is blowing
(upwind). If you jump off the boat on the other side
(downwind), you run the risk of having the boat blown
over you.
✓ Enter at the lowest point. Ideally, you want to slip
smoothly into the water — slowly. Doing so can help to
prevent cold shock response (see Chapter 22 and the

Chapter 18: Staying Afloat and Warm 349nearby sidebar). Jumping from height can also cause
injuries as you hit the water.
✓ If you must jump into the water, assume the following
position:
• Fold your arms across your chest and grasp
the lapels of your life jacket with your fingers
before you jump. Hold your jacket down strongly.
Remember, when people lose their life jackets,
they usually lose them over their heads because
the buoyancy makes the device shoot up while the
people are plunging down.
• Cross your legs tightly at the ankles. You do this
to cut down on becoming entangled in lines and
cables and to make your body a solid unit.
✓ Above all things, part company cleanly. Stray lines and
fishing gear, cables and railing, masts — all these things
can grab you. Abandon, and swim away quickly.
ng
e in
n as
ag
gnal
ms
ity
r at
de
ou
re
y
ng
g
st
ve
ay
ing
n
o
Coping with cold shock responseMembers of polar bear clubs may get a thrill out of the gasping breaths and racing pulses that come from plunging into cold water, but cold water is no friend to the survivor. Unlike hypothermia, cold shock response kills by causing cardiac arrest or stroke or by incapacitating you so much that you drown or are unable to perform physical tasks, such as climbing into a life raft. If you enter the water and you’re surprised by how cold it is, you’re at risk.
Entering the water slowly and gradually — if you have that luxury — can go a long way toward preventing cold shock response. Another way to help yourself is to gently swim to something nearby that you can
hold onto, or just float in your life jacket, and wait until your heart rate normalizes. This usually takes from 7 to 10 minutes. Of course, if you’re in extremely cold water and in danger of hypothermia immediately and a lifeboat is nearby, you obviously don’t have the luxury of waiting.
You should know that if you have cold shock response, holding your breath for any length of time becomes very difficult. If you’re expecting to have to hold your breath for any amount of time and you have cold shock, be very still and wait patiently for your heart rate to go back down. After this happens, you should be able to hold your breath for almost as long as you normally can.

Part IV: Surviving on the Seas, Oceans, and Great Lakes 350
After the vessel has sunk, and you’re sure it has sunk, return
to the sight of the sinking and begin working through the
debris field. All vessels disgorge odd and ends when they sink,
any one of which can save your life later on. But you must
act quickly. Debris disperses incredibly fast. Scan for jugs,
bottles, sheets of fabric, anything.
Coping with sharksWhen you’re in the water, sharks can be a problem. You
need to practice shark attack safety and prevention. Keep the
following pointers in mind:
✓ Keep blood out of the water, if possible. Tend to any
wounds as best you can.
✓ Don’t swim erratically. Swim in smooth powerful
strokes. Avoid weak or fluttering strokes, and don’t
thrash about in the water.
✓ Don’t urinate or defecate in the water if sharks are
nearby. Sharks have a keen sense of smell and may be
attracted to the scent.
✓ Stay in a group. Most sharks are scavengers and are
looking for easy targets. Larger may be better.
In case you’re forced into fighting sharks, we offer the following
methods, in the order in which we think they’re effective.
✓ Pull your knife out and be ready to use it: Put your knife
on the end of a pole — if you’re lucky enough to have
one or find one floating in the debris. You can use this
weapon to scare them away. For more on this procedure,
check out the nearby sidebar.
✓ Shark repellant: You can find shark repellant in many
life rafts — just know that it’s a one-time-use-only agent.
After you open the package, the repellant works for a
very short time.
✓ Strike a shark in the eyes or gills. Try to dig them out
with your fingertips or your knife. People have tried
this with varying degrees of success. It’s certainly better
than doing nothing.

Chapter 18: Staying Afloat and Warm 351 ✓ Slapping the water or screaming underwater: There
are, admittedly, two schools of thought concerning this
method: Some say it drives sharks away, some say it can
attract them. Again, you may have to use trial and error.
rn
ink,
the
e
wing
nife
ure,
nt.
t
ter
Organizing your shark defenseYears ago, when we were drifting on the open sea and were surrounded by thousands of sharks, we devised a method for coping with these ani-mals that was crude but effective.
Our vessel was sinking, and the only way to repair it involved spending a lot of time in the water, so we needed some way to chase away the sharks. To do this, we behaved in a highly territorial fashion and made the sharks believe that they had to leave. The key to success seemed to be to attack several sharks in rapid succession — as many as we could in the shortest amount of time possible. Using a sharp pole or spear, we’d come in from above and behind and jab them sharply in the back, an area that they couldn’t easily defend. When we did this, we’d also scream loudly under water.
Whenever we made an attack on one shark, most of the others seemed to take notice — they’d jump as though startled or would suddenly begin swimming much faster than normal. They seemed to register the fact that something had attacked one of their own and would begin to clear out, leaving for better grounds. They seemed to have a short memory, though. A pack would scurry away after an attack, disappear into the
ocean, and then slowly reemerge a few minutes later. We frequently needed repeated attacks on a school to drive it away permanently.
Keep in mind that we got these results under very limited conditions:
✓ We were fighting small animals, less than 8 feet (2.4 meters) long.
✓ We were working in water free of blood.
✓ We had four people, were orga-nized, and had time to perfect our methods.
✓ We had pointed weapons and experience using them.
We don’t know whether this method would work on larger animals, and we don’t believe that it, or any other type of method, would be guaranteed to work in waters filled with blood. However, we did experience good success under the limited condi-tions we had, so we don’t hesitate to recommend this technique. If you’re desperate and you’re organized, and if you have something that you can use to stab the sharks, then acting territorial in an organized fashion is a proactive method that may give you the upper hand.

Part IV: Surviving on the Seas, Oceans, and Great Lakes 352
Staying Warm as You Float with a Life Jacket
Floating with a life jacket seems pretty straightforward, doesn’t
it? You just float there and the jacket does all the work. But
you may be shocked: Floating the correct way can improve
your survival time by 100 percent in some cases! This section
gives you the details.
What to do in the waterRegardless of how you end up in the water, you now have to
survive in a life jacket, and the first and greatest problem you
face is hypothermia — the slow draining of your body’s core
heat.
If you enter cold water, perform as many sophisticated tasks
as you can, as soon as you can. Cold water causes impairment:
As your body gets colder and colder, you have more difficulty
performing sophisticated tasks — like removing things from
bags or closing difficult zippers.
To slow the onset of hypothermia, use the following strategies:
✓ Be as still as you can. This action is the most effective
you can take to prevent the hypothermia in the water.
Contrary to popular belief, swimming, treading water, or
generally moving around makes you much, much colder:
You’re moving warmed water away from your body and
constantly bathing your body in colder water. The less
water circulating around your body, the better.
Whenever you go into the water, you develop a boundary
layer. A boundary layer is the water next to your skin;
your body heats it a little, and it protects you from the
colder water.
✓ Use HELP. HELP, or the Heat Escape Lessening Position, is
a body posture you use to close off your main heat leaks.
Check out Figure 18-5, and remember to protect the
following areas, which are some of the main places where
your body leaks heat:
Chapter 18: Staying Afloat and Warm 353 • Armpits: Hold your elbows near your sides to close
the armpit area.
• Crotch: Squeeze your thighs together so that your
crotch is insulated and protected.
Losing heat from the top of your head is worse than
anything else, so don’t use a heat-retaining position that
would cause your head to go under the water. Ideally,
you want to end up with your armpits and crotch sealed
and your head above the water. If you can, keep as much
of your body out of the water as possible; pull your chest
up onto a piece of floating material.
Figure 18-5: The HELP heat-saving position.
Staying warm in groupsIf you’re with a group, huddle together for support and extra
warmth. Doing so can increase survival times dramatically.
Just put your arms around your companions and have them
do the same. For a demonstration on the group huddle, see
Figure 18-6.
Just as important, staying together in a group makes you a
bigger target for search and rescue to see. For more on being
seen, check out Chapter 12.
sn’t
t
on
o ou
re
ks
nt:
ulty
m
es:
e
or
er:
nd
s
ary
e
n, is
aks.
here

Part IV: Surviving on the Seas, Oceans, and Great Lakes 354
Figure 18-6: Huddle together in groups to keep warm.
Floating without a Life JacketAs the years pass, more and more incredible stories of people
surviving long-term floating experiences come to light. It’s
no doubt a frightening thought, but many have survived this
ordeal. If you ever find yourself in this situation, this section
can help improve your chances of survival.
If you’re involved in a sinking and you don’t have a life jacket
on, swim through the debris field after the vessel has sunk. In
many cases, you can find extra life jackets or floating debris
that you may be able to make into a raft.
Inflating your clothesIf you don’t have a life jacket, you can create a provisional
float from your own pants. Your success partially depends on
the fabric your pants are made of. It doesn’t work at all with
shorts. The technique is simple (see Figure 18-7):
1. Remove your pants and tie knots at the bottoms of
each leg.
In our experience, tying each leg separately works
best. Try to tie the knots just as closely to the ends as
you can, and tie them very, very tightly.
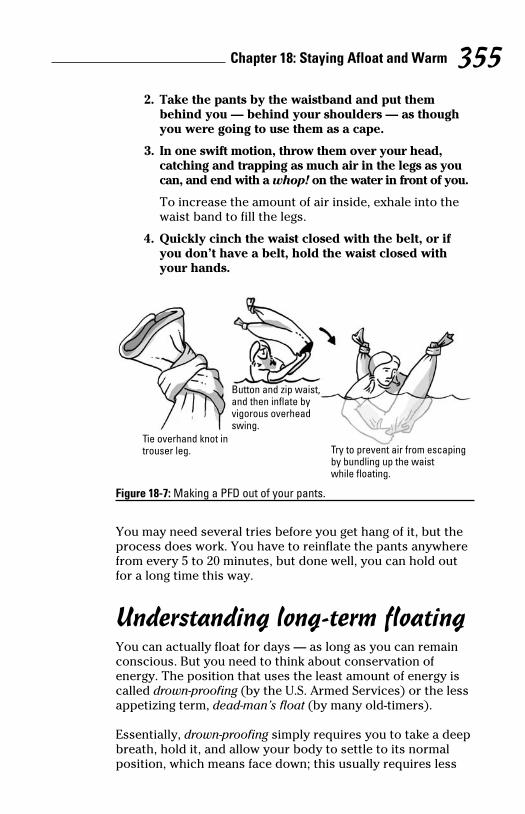
Chapter 18: Staying Afloat and Warm 355 2. Take the pants by the waistband and put them
behind you — behind your shoulders — as though
you were going to use them as a cape.
3. In one swift motion, throw them over your head,
catching and trapping as much air in the legs as you
can, and end with a whop! on the water in front of you.
To increase the amount of air inside, exhale into the
waist band to fill the legs.
4. Quickly cinch the waist closed with the belt, or if
you don’t have a belt, hold the waist closed with
your hands.
Tie overhand knot introuser leg.
Button and zip waist,and then inflate byvigorous overheadswing.
Try to prevent air from escapingby bundling up the waistwhile floating.
Figure 18-7: Making a PFD out of your pants.
You may need several tries before you get hang of it, but the
process does work. You have to reinflate the pants anywhere
from every 5 to 20 minutes, but done well, you can hold out
for a long time this way.
Understanding long-term floatingYou can actually float for days — as long as you can remain
conscious. But you need to think about conservation of
energy. The position that uses the least amount of energy is
called drown-proofing (by the U.S. Armed Services) or the less
appetizing term, dead-man’s float (by many old-timers).
Essentially, drown-proofing simply requires you to take a deep
breath, hold it, and allow your body to settle to its normal
position, which means face down; this usually requires less
ple
is
n
et
In s
on
h
f
as

Part IV: Surviving on the Seas, Oceans, and Great Lakes 356effort than floating on your back. Your lungs and buttocks
are the two parts that float the best, so after you achieve this
position, maintaining it takes almost no energy. There are
dozens and dozens of stories of people who have gone into
this position and floated for two to three days.
When drown-proofing, you must look up often for search and
rescue units. One of the false assumptions that many people
make in these situations is that no one is going to come
looking for them. In some cases, search and rescue helicop-
ters hovered right over a floating person, but subject failed
to respond and the helicopter never saw that person! Don’t
make that mistake.
Don’t drown-proof in cold water. If you do, you end up with
your head in the water, which is the worst thing you can do.
This causes hypothermia faster than anything else. If you’re in
cold water and you have no flotation whatsoever, tread water
very slowly and gently. You must keep the top of your head
out of the water. If you have no flotation, see the preceding
section.
When floating long term, maintain a sharp lookout for groups
of jellyfish. Many of these animals are translucent, and unless
you’re really watching for them, you can drift right into the
center of a group (we know — we’ve done it, and a close
friend once wandered into a group and ended up sucking
some of them down his snorkel!). If you feel a little sting, look
around immediately. It’s a heck of a lot easier to swim around
a group of jellyfish than to look up from your floating position
and find yourself in the center — having to swim out!

Chapter 19
The Great Drift: Aboard Life Rafts and Disabled Vessels
In This Chapter▶ Deploying a life raft
▶ Being prepared for the difficulties of surviving in life rafts
▶ Handling a drifting boat
In most survival situations at sea, you end up on a drifting
vessel, such as a raft or disabled boat (it happens on lakes
and rivers, too). Life rafts are small inflatable pods, used the
world over, for survival situations. They’re what you usually
find yourself in if you have to fend for yourself on the ocean.
However, most cruise ships have two types of survival craft:
Life rafts and lifeboats, which are small, rigid boats, many
times with motors on them. When the captain orders aban-
donment, the crew usually tries the lifeboats first because
they’re motorized. But if you’re aboard a ship that begins to
lean to one side, or list, your only chance of escape may be
the rafts. As the ship leans, the crane-like arms (davits) that
hold the lifeboats frequently can’t launch them, so the life
rafts, which are launched by hand, are the only way off the
ship.
Having a realistic understanding of what you can expect when
dealing with a life raft can go a long way toward saving your
life. This chapter covers the basics of how to deploy life rafts,
how to keep them afloat, and other relevant info concerning
a life raft at sea. This chapter also explains what you can do if
you’re in a small vessel that loses power.

Part IV: Surviving on the Seas, Oceans, and Great Lakes 358 Cha
Getting from Ship to Life RaftUnfortunately, you have no guarantee that the captain or
crew of the boat you’re on will be conscious or even alive
when the time comes to launch the life raft. You may have to
activate the raft and get into it by yourself or participate in
these actions in some way. In this section, we give you the
how-to on inflating and using life rafts. Before going aboard
any vessel, you also need to know how to put on a life jacket,
which we cover in Chapter 18.
Locating the life raftBefore you even leave port, make sure you know where the
life raft is on your boat. Although life rafts usually come in
containers, those containers unfortunately don’t shout, “Here
I am!” On small yachts, they may even be buried in closets or
under a lot of equipment. Life raft containers come in three
basic varieties:
✓ The valise: A valise is heavy bag like a large gym bag. It
looks like an oblong cube, with a carrying strap sewn on
it. Valises are usually very heavy, so if you grab some-
thing you think is the valise and it’s light in your hands,
it’s probably not the life raft.
✓ Cylindrical canisters: These containers are made of
metal or fiberglass and look like beer kegs or barrels.
They can be any color, but many times they’re white.
These types of cylindrical canisters sit in a cradle, or
holder, like a large, sturdy bracket.
✓ Flat canisters: These types of canisters look like the
typical modern luggage rack found on the top of an auto-
mobile. They can be any color but are usually white, and
they’re usually strapped into a cradle.
All these containers should have a painter, the raft’s main
rope (bow line) — protruding from them. This line keeps the
raft attached to the sinking ship or boat as you’re launching,
and it also activates the automatic inflator. The painter usu-
ally ends with a loop, which is called the eye.

Chapter 19: The Great Drift: Aboard Life Rafts and Disabled Vessels 359
Knowing when to abandon shipLife rafts aren’t pleasant. They’re made to keep you alive
when other options aren’t available, so you want to use one as
a last resort. Basically, you deploy a life raft only if
✓ The boat you’re in is completely sinking. If the boat
sinks only partially, stay with the vessel. It’s probably
easier to see from the air, it has equipment that you can
salvage, and it may float for a long time.
A partially sunken vessel can sink suddenly, which
could take your inflated (or uninflated) raft down with
it or damage the fragile little craft. In case of a partially
sunken boat, have the raft ready to inflate at a moment’s
notice and be ready to be cut free of the sinking boat.
to
d
et,
e
ere
or
e
It
on
s,
to-
nd
he
g,
u-
Whatever floats your boat: Making a DIY life raft
If your sinking vessel doesn’t have a life raft, you need to act quickly. You can work the debris field and collect floating items and tie them together. When boats sink, they almost always disgorge items that float.
Always maintain a lookout on the sea for debris or flotsam of any kind. A lot of stuff is out there — Styrofoam, entire trees, and so on — and you can use any of these things to make a raft. Look for garbage patches and snarls of line and buoys. You can use plastic bottles if you find enough of them. It’s not a bad idea to start col-lecting them when you’re in trouble. You need only about 25 to 50 plastic bottles, wrapped in a tarp, canvas, or
netting, to make a raft that supports a human being.
When building your raft, anything goes, but here are a few structural ideas that may help you:
✓ The closer you can get to a square or circular shape, the better. Oblong or rectangular rafts are more prone to capsize than wide ones.
✓ The wider you spread out — in other words, the more stuff you tie on — the more stable your craft becomes.
✓ If you can rig rigid poles, such as bamboo canes, to floating flot-sam, you can make a very stable raft.

Part IV: Surviving on the Seas, Oceans, and Great Lakes 360 Cha
✓ The ship’s crew can’t get you into a lifeboat. Sometimes
even a competent crew becomes overwhelmed. In these
extreme cases, you may have to consider fending for
yourself. Generally, if you’re aboard a boat or ship that
has a crew, they control the abandonment; they direct
you to the lifeboats, or they deploy the rafts themselves,
and you simply their follow instructions.
Launching a life raft
Letting the crew operate the safety equipment, especially the
life rafts, is your best choice. Launch the life raft yourself only
as a last resort.
You have to launch the life raft correctly, or you end up with a
disaster on your hands. Take your time and make sure you’re
acquainted with these steps before disaster strikes. That way,
you’re prepared in case you have to abandon ship. Here’s the
basic procedure:
1. If your raft isn’t already in place, carry the raft to the
side of the vessel.
If your raft is in a flat or cylindrical canister, you often
have to release the canister from its cradle before you
can deploy the raft. There are two ways to do this:
• Wait for the automatic hydrostatic release to
activate. The hydrostatic release is a device that
automatically releases the raft if the boat sinks
to a depth of between 10 to 15 feet (3 to 4.6
meters). If you wait for the vessel to sink and for
the hydrostatic release to release the canister,
you may end up in cold dark water, trying to find
the life raft.
• Pull the quick release, which is located near
the hydrostatic release. The quick release is usu-
ally a pin or a button. When you pull or push the
quick release, the life raft may roll off into the
water, or you may be able to pick the entire can-
ister up and move it to a safer place to launch.
If you can’t release the raft, the hydrostatic release
should activate after the boat has sunk, so be on the
lookout for the raft to come up in a hurry, and don’t
let it get away.
Chapter 19: The Great Drift: Aboard Life Rafts and Disabled Vessels 361 2. Make sure the painter (the raft’s main line) is
secured to something strong on the boat.
When the raft inflates, it’s just like a kite, and if it’s not
attached to something strong, it flies away — just like
a kite! You may find that the painter is already secured
to the weak link, which is a fitting designed to break if
the boat has sunk and the raft has inflated underwa-
ter. Weak links are usually made of lightweight wire. If
you think the painter is secured to a weak link, leave
it alone. The weak link is strong enough to hold the
raft near the boat while you get aboard. If the painter
is not attached to a weak link, attach the painter to
something solid, like a railing.
3. Throw the raft overboard.
No exceptions: You always hurl or push the raft into
the water before you inflate it. If you inflate it aboard
the boat, it usually hits a sharp edge and bursts, or it
gets wedged in a spot where you can’t get it out. This
happens fast, and you can’t stop it after it gets going.
Throw the raft downwind from the vessel if you can. If
you throw it into the wind and it inflates, the wind just
pushes it right back against the boat, where it deflates
against the boat’s sharp edges.
Sometimes cradles are made so that when you release
the canister, it just rolls right into the water. If the
boat is leaning too far over, you may have to give the
canister a good kick to get it to roll overboard.
4. Inflate the raft in the water.
You inflate a life raft by pulling sharply on the painter.
Painters commonly range from 20 to 60 feet (6 to 18
meters) in length, but they can be much longer, and
they activate the raft’s inflation device only when you
reach the end of the line. You may have to pull out
a lot of line before you reach the firing point. When
the slack stops coming, you yank very sharply, and
the raft begins inflating. The inflation takes between
30 and 90 seconds. The overhead canopy (see Figure
19-1a) is the last part to inflate.
mes
se
at
t
es,
he
nly
th a
’re
way,
the
the
ten
you
o
at
s
for
r,
ind
usu-
the
an-
.
e
t

Part IV: Surviving on the Seas, Oceans, and Great Lakes 362 Cha
a
b
c
Figure 19-1: A typical modern life raft with a canopy (a), inflated bulwarks (b), and a boarding ladder (c).
Entering a life raftIn the ideal scenario, you enter the life raft directly from the
sinking vessel — you never enter the water. However, doing
so may not be easy, because the life raft has to be held closely
to the sinking vessel, which means the raft can be punctured
or dragged down when the boat finally sinks. To enter from
the sinking vessel, try to climb down the side of the boat and
enter gently. You probably won’t have access to a ladder to
do this, so the process can be clumsy. Make sure you don’t
injure someone who’s already in the raft or damage the little
craft by barging in with all your weight.
If there’s any chance that the life raft could come into contact
with sharp edges from the sinking boat — any chance at all —
you have to keep the raft away and enter it from the water.
Don’t jump into a life raft. Jumping in is likely to injure you
and anyone already aboard and possibly damage the life raft.
Entering a life raft from the water can be difficult. You have to
lift yourself over the raft’s walls (see Figure 19-2), and you’re
Chapter 19: The Great Drift: Aboard Life Rafts and Disabled Vessels 363usually hampered by fatigue, waves, and a life jacket. Keep in
the following ideas in mind:
✓ Get your upper torso on top of the walls of the raft. If
you can get your chest on top, or even just close, you can
usually roll in or be pulled aboard by other survivors.
Fling your body up and forward using all the momentum
you can muster.
✓ If your raft has a submerged boarding ladder, step on
the rungs (Figure 19-2a), pull yourself up with your
hands, drape your chest over the raft’s opening, and
start heaving yourself in. If you’re almost there, throw
your head forward as aggressively as you can and try to
roll or wallow in.
If you’re almost there, throw your foot up to hook the
opening, and then use the extra leverage to work your
way in. Flight attendants practice this technique when
they train.
✓ Some life rafts have a boarding platform that resem-
bles a common air mattress and floats right below the
opening; you have to fling yourself aboard the platform
first and then pull yourself into the raft. Fling your body
up and forward.
✓ Using wave action can help. If a lot of waves are moving
around the raft, you can sometimes use the ocean to get
you started — to lift you a little higher — maybe just high
enough to get your torso in. Watch how the waves rise to
the opening, and then try to time one to correspond with
your physical efforts (Figure 19-2b). Momentum counts.
✓ Allow the strongest to go in first and then have them
help the others into the raft. If you go inside first, kneel
on the floor of the raft and reach over the inflated walls
to haul survivors aboard. If someone else is inside the
raft, have him go to the other side to prevent capsizing
the lightweight craft while you’re hauling aboard the
struggling survivors (always avoid bunching around the
opening, which can cause the raft to turn over). For a
firm grip, reach over the sides and grab the boarding
survivors by the upper arms, or better, the armpits
(Figure 19-2c).
ks
e
g
sely
ed
m
nd
o
t
le
act
l —
aft.
e to
re

Part IV: Surviving on the Seas, Oceans, and Great Lakes 364 Cha
ab
c
Figure 19-2: Getting aboard a life raft.
Adjusting to Life AfloatWhen you’re inside an inflated life raft, you’re not out of
danger. You and your fellow raft-mates have lots of work to
do — which is good, because in a bad situation, staying
busy is sometimes the best medicine. This section walks you
through what you need to do while in a life raft and discusses
possible scenarios.
The first ten minutes in a raftAs soon as you’re inside the raft, the first few minutes are
important for ensuring your safety. Locate the raft’s knife
immediately, and be ready to cut the painter if the sinking
boat goes down. The raft’s knife is usually in a pocket in the
overhead canopy, near the entrance. Knives in life rafts are
squared-off, not pointed, to keep them from puncturing the
raft. They have plastic handles that float, and they’re usually
orange in color. You can still bring aboard survivors after
you’ve cut the raft loose.
A sharp object can sink your only hope in two seconds. Most
modern inflatables are strong, but we’ve seen rafts, hard
ones, sliced-through like butter. When you’re in your raft,
quickly probe for sharp objects or protrusions among your

Chapter 19: The Great Drift: Aboard Life Rafts and Disabled Vessels 365companions: Check for purses with metal latches or orna-
ments, belt buckles, earrings, snaps with jagged edges, and
even ballpoint pens. Make sure your pocket knife is folded.
When people come on board, they tend to congregate near
the entrance, which unbalances the raft and can cause it to
capsize. Tell people to spread out, and start assigning mainte-
nance jobs. Here’s what to do:
✓ Address immediate medical concerns. We discuss first
aid for problems such as cold shock response, hypo-
thermia, and near-drowning in Chapter 22, and we cover
general first aid in Chapter 13. A few inches of water pres-
ent a drowning hazard for anyone who’s unconscious,
so make sure no person is lying face down in the bottom
of the raft. If water accumulates as people board, assign
people to bail it out.
✓ If the boat you’ve abandoned has sunk completely,
scavenge the debris field. Ask yourself whether any
equipment you can grab — containers, sheets of plastic,
anything — is floating nearby.
✓ Gather the equipment together and tie it down, espe-
cially the inflation pump. As time passes, the raft
deflates a little, so you have to reinflate it.
✓ Check the pressure-escape valves, and check the seams
for leaks. The escape valves usually hiss for a little while
to release excess gas. This is normal. If you do find leaky
seams, look to see whether a repair kit is in the raft’s bag.
If there isn’t one, watch the leak carefully and try not to
put undue stress or weight on it.
✓ Activate the ballast bags if necessary. These are bags
under the raft that fill up with water to stabilize the craft
(Figure 19-3d). Many times they fill on their own.
✓ Deploy the drogue when the raft is clear of the sink-
ing vessel. The drogue is a small cone or parachute
that drags in the water on a long line that keeps the raft
headed into the waves (see Figure 19-3a). Some drogues
have a recovery float, a piece of Styrofoam that connects
to the drogue and makes it easier to haul out of the water
(Figure 19-3b). Some drogues automatically deploy, and
some don’t.
o
ou
ses
e
e
e
ly
ost
r
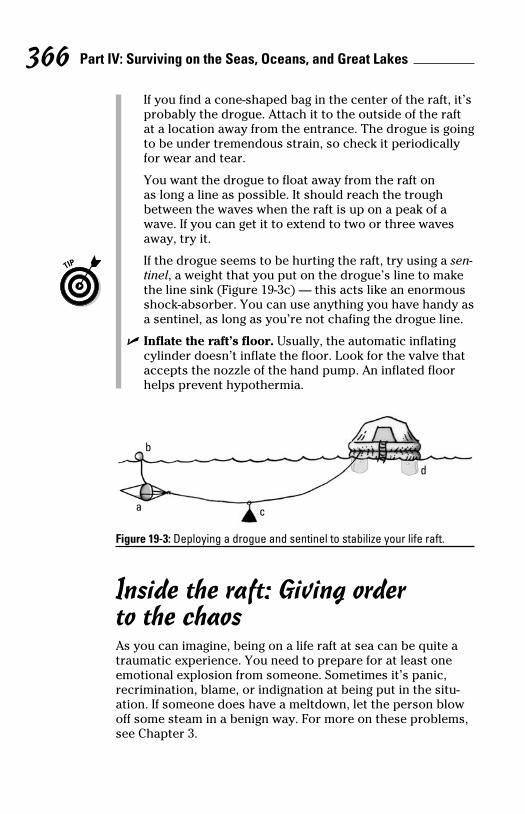
Part IV: Surviving on the Seas, Oceans, and Great Lakes 366 Cha
If you find a cone-shaped bag in the center of the raft, it’s
probably the drogue. Attach it to the outside of the raft
at a location away from the entrance. The drogue is going
to be under tremendous strain, so check it periodically
for wear and tear.
You want the drogue to float away from the raft on
as long a line as possible. It should reach the trough
between the waves when the raft is up on a peak of a
wave. If you can get it to extend to two or three waves
away, try it.
If the drogue seems to be hurting the raft, try using a sen-tinel, a weight that you put on the drogue’s line to make
the line sink (Figure 19-3c) — this acts like an enormous
shock-absorber. You can use anything you have handy as
a sentinel, as long as you’re not chafing the drogue line.
✓ Inflate the raft’s floor. Usually, the automatic inflating
cylinder doesn’t inflate the floor. Look for the valve that
accepts the nozzle of the hand pump. An inflated floor
helps prevent hypothermia.
a
b
c
d
Figure 19-3: Deploying a drogue and sentinel to stabilize your life raft.
Inside the raft: Giving order to the chaosAs you can imagine, being on a life raft at sea can be quite a
traumatic experience. You need to prepare for at least one
emotional explosion from someone. Sometimes it’s panic,
recrimination, blame, or indignation at being put in the situ-
ation. If someone does have a meltdown, let the person blow
off some steam in a benign way. For more on these problems,
see Chapter 3.

Chapter 19: The Great Drift: Aboard Life Rafts and Disabled Vessels 367In this section, we explain how you can organize your raft-
mates to increase your chances of rescue, and we name a few
ways you can keep everyone a little more comfortable while
you’re still adrift.
Organizing operationsMost rafts are small, so people are going to be sitting on each
other, which can cause injury. It also may be dark inside.
Having a plan — and assigning specific functions that people
can focus on — can help everyone stay relatively calm.
Try to get everyone to listen and organize, or take a look
around and figure out whom you can make an alliance with.
Who looks like they can function? They may not be the ones
you expect. Begin discussing life raft operations with them
rationally, just like you’re operating any other piece of equip-
ment. If you can get just two to three level heads working the
problem with obvious rationality, this can have a tremendous
effect on organizing the others.
Here’s how to organize your crew, however small it is:
✓ Start a watch-keeping system immediately. A watch team is a person or persons temporarily on guard. These
people look for ships and tend the raft while others rest.
Have each watch team go through all the maintenance
procedures we list earlier in “The first ten minutes in a
raft.” When the team is changed, the new watch performs
them again.
✓ Organize your bailing operation. Raft bailers are notori-
ously small, so use a boot if you have one, and make sure
you bail water downwind. Bail out the last drops with the
sponge you find in the raft’s kit.
If you have two sponges, only use one for bailing. Keep the
other clean for collecting fresh water dew to drink later.
✓ Take stock of your equipment and how much food and
water you have on hand. Discuss each item thoroughly
with your companions. For more on collecting and ration-
ing food and water at sea, see Chapter 20.
✓ Make sure everyone’s ready for multiple capsizes. If the
waves are big and the wind is strong, you may have to
get out of the raft and right it again and again. Familiarize
yourself with the procedure we discuss later in “The flip-
out: Righting a raft.”
it’s
ft
oing
y
sen-ke
us
y as
e.
g
at
r
a
u-
w
ms,

Part IV: Surviving on the Seas, Oceans, and Great Lakes 368 Cha
✓ Make yourself visible. Have your signals, like aerial
flares, smoke, or mirrors, ready to go (for more on sig-
nals, see Chapter 12). If other rafts are nearby, consider
tying them to yours to make you a bigger visual target.
Don’t do this is rough seas, though, because the rafts will
beat against each other and cause damage.
✓ Watch for land (or search-and-rescue teams) and dis-
cuss navigation. Make sure you start writing everything
right away — especially your last known position. For
more information on finding land, see Chapter 21.
Increasing your safety and comfortLife in a raft is uncomfortable at best. Here are a few ways to
keep everyone a little less cold, wet, and miserable:
✓ Dry off. If you’re in wet clothes, take them off and wring
the water out, over the side, and then put them back on.
Have everyone remove wet cotton clothing, because wet
cotton causes them to cool quickly.
✓ If you’re in cold conditions, or if you’re trying to keep
the seas out, close the canopy. If you close it using ties,
use bows or slipknots so it can be opened easily later on.
✓ Stay with the raft. If you have to leave the raft to do
something, tie a tether to yourself.
✓ When someone starts to become seasick, anticipate a
bout of vomiting. Try to move the sick to the opening,
because even a small amount of vomit in the raft can
make others ill.
✓ Know that sea creatures like to bump against life rafts.
These creatures include dorados (mahi-mahi), sharks,
and turtles. This is largely harmless, but it can be annoy-
ing and unnerving.
✓ Treat sea-related ailments. Be prepared for sunburn,
seasickness, and the like. We discuss treatment in
Chapter 22.
The flip-out: Righting a raftLife rafts are some of the lightest vessels in the world, used
in the very worst conditions, such as strong winds and big
waves. That’s why life rafts capsize all the time, especially
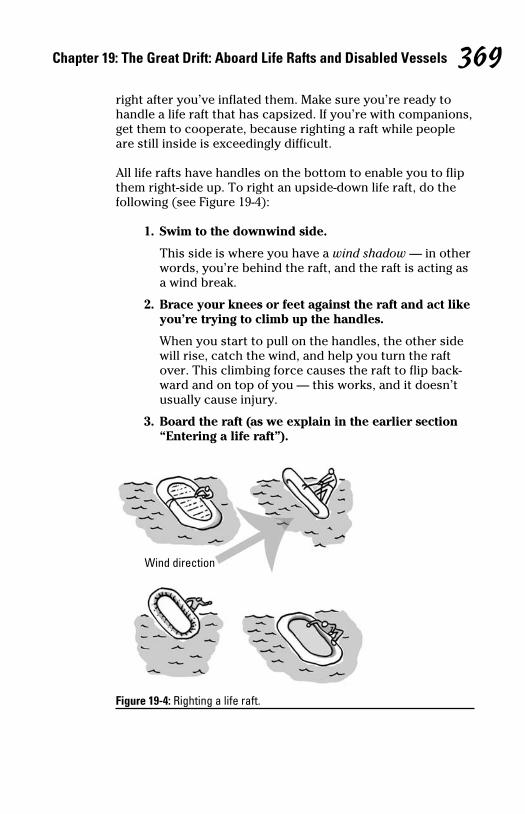
Chapter 19: The Great Drift: Aboard Life Rafts and Disabled Vessels 369right after you’ve inflated them. Make sure you’re ready to
handle a life raft that has capsized. If you’re with companions,
get them to cooperate, because righting a raft while people
are still inside is exceedingly difficult.
All life rafts have handles on the bottom to enable you to flip
them right-side up. To right an upside-down life raft, do the
following (see Figure 19-4):
1. Swim to the downwind side.
This side is where you have a wind shadow — in other
words, you’re behind the raft, and the raft is acting as
a wind break.
2. Brace your knees or feet against the raft and act like
you’re trying to climb up the handles.
When you start to pull on the handles, the other side
will rise, catch the wind, and help you turn the raft
over. This climbing force causes the raft to flip back-
ward and on top of you — this works, and it doesn’t
usually cause injury.
3. Board the raft (as we explain in the earlier section
“Entering a life raft”).
Wind direction
Figure 19-4: Righting a life raft.
-
er
.
will
-
ng
to
ng
on.
wet
ep
es,
on.
a
,
ts.
oy-
d

Part IV: Surviving on the Seas, Oceans, and Great Lakes 370 Cha
Controlling Drifting VesselsIf you find yourself aboard a small or medium-sized boat
that has lost power, you have to act fast to gain control of
the vessel. This is where you enter the realm of the Lost
Opportunity. Slow reaction time is the hallmark of these need-
less disasters. Most of the tips in this section also pertain to
handling life rafts.
Taking action with depowered boatsBoats that have lost power are vulnerable to filling with water
or capsizing because instead of driving through the waves,
the waves overwhelm the boat. Even on a small lake, large
boats can motor by and create waves big enough to sink a
small disabled boat. The moment your boat is disabled, take
action immediately:
✓ Try to get some kind of propulsion going, quickly.
Organize a paddling operation immediately. Keep the
boat pointed into (toward) the waves, and watch for
unexpected waves. If you’re with others, quickly explain
why they need to paddle or row, or you’ll end up with
an uncoordinated group. Paddle with anything you can;
even your hands will do in a pinch.
✓ Be ready to bail. Many times, a wave plunges in and fills
the boat halfway, and then shortly afterward, a second
wave sinks the craft entirely. Acting quickly can keep this
second wave from finishing you off. Organize your bailing
operation before you need it.
✓ Balance the boat. If the boat is tilted to one side,
vmove some weight to the other side. If the back end
is squatting down, move some weight forward. If your
motor is out of gas, take the motor off the back and stow
it in the lowest part of the boat and as near to the center
as you can.
✓ Consider throwing heavy equipment overboard. If your
boat is close to being overloaded and has lost power,
you may have to heave something overboard to save
your life.

Chapter 19: The Great Drift: Aboard Life Rafts and Disabled Vessels 371 ✓ If you’re being blown in a way you don’t want to go,
employ a drogue. A drogue is a weight that you stream
off the front of the boat on a line (or off the back of the
boat) that slows you down. If you’re near the shore and
you’re being taken out by the wind, try throwing out a
drogue to slow you down. For more on drogues, see “The
first ten minutes in a raft,” earlier in this chapter, and
“Traveling with current and sail,” coming up next.
✓ If you’re by yourself in an inflatable boat, sit on the
front (bow) and paddle by pulling the water toward
you (see Figure 19-5). The process may seem clumsy at
first, but you’ll get the hang of it.
Figure 19-5: Paddling an inflatable boat by yourself.
Traveling with current and sailBeyond the use of paddles, the only other means of moving
your disabled vessel or raft is to use the water’s current or to
use the wind. The key is to pick the one that’s going the direc-
tion you want to travel and harness it.
To use the water’s current, you can simply put a paddle or a
drogue into the water and let the water pull you. If the wind
is blowing you in a direction you don’t want to go but the
current is flowing the way you want to go, drogues can many
times pull you against the wind. Traveling against the wind in
a raft is entirely possible if you can figure out the current. For
more on using drogues, see “The first ten minutes in a raft,”
earlier in this chapter.
eed-
o
ter
ke
ain
n;
lls
d
this
ling
ow
ter
our
Part IV: Surviving on the Seas, Oceans, and Great Lakes 372You can erect a sail out of just about anything. Two paddles
and a shirt will do. The higher your sail is, the better — just
make sure you can handle the sail. If the wind really gets
strong, be ready to take the sail down. Keep in mind that all
life rafts travel in the direction of the wind, with or without a
sail.
The wind usually cycles near land. During the day, the wind
blows toward land, and at night, it blows away from land. This
isn’t a sure thing, though. For more on winds and currents,
see Chapter 21.
Restarting outboard motorsIf your outboard motor won’t run, you can take several simple
actions that may get it running again:
✓ Let it dry out. If the motor is wet from water, or if it’s
flooded with gas, many times just taking the cover off
during the day and letting the motor sit under the sun
is enough to get it going. Put the cover back on before
sundown to prevent condensation from accumulating.
Sometimes this drying process takes several days.
✓ Make sure everything is clean. The fuel or the fuel filter
could be dirty and/or clogged.
✓ Make sure debris hasn’t fouled the propeller. Examine
below the water line. If anything is tangled, get down
there and pull it out before restarting the motor.

Chapter 20
Food and Drink at SeaIn This Chapter▶ Employing an effective water plan for survival
▶ Collecting and purifying water
▶ Fishing from a life raft
▶ Finding alternative food sources in the sea
Not surprisingly, the challenge of finding food and water
becomes life-or-death business within just a day of
being adrift in a life raft or lifeboat. It’s a terrible irony that at
sea you’re surrounded by water you can’t drink and by food
you can’t see. The good news is that you can find the food and
water you need on the sea by using generous amounts of inge-
nuity and patience.
In this chapter, we show you the minimum needs you have to
fulfill to survive on the ocean, and we look at your options for
getting fresh water and food at sea.
On the Water Front: Improving Your Chances for Survival
If you find yourself lost at sea, expect thirst to be a prob-
lem very quickly and prepare accordingly. To enhance
your chances for survival at sea, take the following actions
immediately:
✓ Master disbelief. Believing that you can actually die from
thirst in this modern, high-tech era is kind of difficult,
isn’t it? But you need to recognize immediately that the
risk is real. Come to grips with this unfair situation and
go to work right away on your water plans.
Part IV: Surviving on the Seas, Oceans, and Great Lakes 374
✓ Expect water to be a problem even if you’re within
sight of land. The ocean current can still take you out to
sea within a matter of minutes.
✓ Concentrate on finding and taking any water you can
from the sinking or disabled boat before it’s lost. Try
to make sure the water containers have a little air inside
them so they float well in the waves.
✓ Scan the debris field, the area around the sinking
vessel, for important resources you can use later. You
may be able to find containers or sheets of plastic you
can use for your water-storing needs.
✓ Take stock of the water you have and secure it. Tie all
your water containers to yourself or your life raft.
In addition to these immediate actions, you want to conserve
and ration the water you do have. The following sections
explain your situation and highlight what to do.
Understanding your body’s dehydration limitsWithout any liquid, the average human begins to lose con-
sciousness after about three days on the sea and perishes
after about six (slightly longer time than on land, usually). We
don’t like these numbers any more than you do, but they pro-
vide the foundation for your hydration goals, so knowing and
understanding them is key to your survival.
First, take heart: Those numbers are only averages. Many
people have survived much, much longer. And here’s another
factor to take heart in: If you take steps to conserve your
body’s natural water supply, you need only a small amount of
liquid to stay alive. We discuss these important steps in the
following sections.
If your body is in the water, such as when you’re adrift in a life
jacket, death from hypothermia is a much greater threat than
dehydration. If you’re floating in a life jacket and you’re suffer-
ing from advanced hypothermia and dehydration, try to drink
as much fresh water as you need. For tips on staying warm at
sea, flip to Chapter 18.
Chapter 20: Food and Drink at Sea 375
The first line of defense: Conserving your body’s waterAs soon as you realize that you may be entering a survival
situation on the sea, begin conserving your body’s water. The
more you conserve, the less you’ll need to consume to stay
alive. Fresh water is always scarce on the open sea, so you
have to cut your needs down accordingly.
Take the following steps to conserve your body’s internal
water supply:
✓ Don’t drink anything for the first 24 hours.
✓ Don’t drink diuretics, such as alcohol, soda, salt water, or
urine (which also contains toxins).
✓ Avoid perspiration; soak rags in seawater and put them
on your body to stay cool.
✓ Avoid any type of excessive effort, and breathe through
your nose.
to
n
y
de
u
u
ll
ve
We
ro-
nd
her
t of
e
life
an fer-
ink
at
The cup (or half-cup) of lifeIn 1956, a group of scientists in the UK published a remarkable scientific paper called “The hazards to men in ships lost at sea.” The study was drawn from the experiences of thou-sands of sea survivors in World War II, such as downed air pilots or sail-ors from torpedoed ships. It was the largest such survey ever taken.
One of the most revealing statistics to come out of the study was that if a human received just 8 ounces (0.25 liters) of water per day while adrift on the sea, his or her chances of living through the ordeal were actually very good — just 8 ounces. However,
at the other end of the scale, the study revealed that if the survivor’s water ration was cut down to below 4 ounces (0.12 liters) of liquid per day, the chance of death was very high. This area, between about 4 and 8 ounces of water per day, was clearly a deciding factor in whether a person survived or perished.
Even more compelling was the com-parison of people who had drunk salt water to those who had not. Those groups who drank salt water were roughly 13 times more likely to die on the ocean than those who didn’t.
Part IV: Surviving on the Seas, Oceans, and Great Lakes 376
✓ Try not to eat protein; many types of seaweed are edible
and contain carbohydrates.
Chapter 7 discusses the importance of conserving your
body’s water in more depth.
Rationing your waterControlling the amount of water you consume, or rationing, can improve your chances of survival at sea. A small amount
of drinking water can last you a long time if you consume it
efficiently. A human can survive for a short time on as little
as 6 to 8 ounces of fresh water per day. That’s a daily ration
of about 1 cup of water, or 0.25 liters. If fresh water is really
scarce, you can get by for a short time, perhaps a week or
longer, on this ration.
Take inventory of your water and try to determine how much
water you can afford to drink per day. You can’t determine
when you’ll be rescued, so think long-term. Aim for survival,
not comfort or perfect health. Here are some rationing
guidelines:
✓ If you have little water, limit your intake to 1 cup (0.25
liters) a day. You may have to drink even less than that,
but know that a ration of less than 1/2 cup usually doesn’t
extend survival time.
✓ If you have an adequate water supply, you can afford
to go on a larger ration. If your water inventory isn’t so
small, a ration of 2 cups (0.5 liters) per day can keep a
person alive for many weeks.
✓ If you find yourself sitting on a 50-gallon (190-liter) drum
of beautiful drinking water, 1 quart per day (1 liter) is
ideal.
Take care to keep in mind that this is a water ration at sea, and
it doesn’t apply to other environments, especially deserts.
Take your ration in several increments rather than all in one
swallow; doing so relieves the agonies of dry mouth more
often. When taking in your ration, hold it in your mouth for
as long as you can to soak the membranes inside cheeks and
gums to lessen the pain of dehydration.

Chapter 20: Food and Drink at Sea 377
Before you begin a water-rationing program, talk to your com-
panions. If they aren’t well-versed in survival at sea, take a
leadership position and explain how best to conserve water.
Then get everyone to agree to the rationing scheme you’ve
developed. Designate one person to distribute the water
and one person to assist and keep track of who has gotten a
ration. Don’t assume these positions yourself, because you,
the leader, will be called on later to arbitrate any disagree-
ments. This issue is sensitive, and the more you make it a
group project, the better.
Avoiding salt waterConsuming salt water only causes you to further dehydrate, so
don’t do it. Drinking salt water increases your need for fresh
water. If you drink 1 pint (0.5 liters) of salt water, your body
will drain at least 1 pint of fresh water from your tissues just
to get rid of it. The net effect is to worsen your fluid balance.
Even worse, drinking saltwater is closely linked to delirium
and hallucinations on the sea. The old warning that “salt
water makes you mad” probably has some truth in it. There
are so many case studies on the books that show castaways
becoming mentally unbalanced after they drank large portions
of saltwater that you can’t ignore this danger.
The hallucinations linked to drinking salt water probably
occur because of hypernatremia, an electrolyte imbalance in
the body. Usually, this condition occurs due to an advanced
state of dehydration, but drinking large portions of salt water
can cause it as well.
The dangers of drinking “a little” salt waterNo matter how thirsty you become at sea, don’t drink even
a little salt water, because after you start, you can’t stop.
People in survival situations often begin to drink salt water
very slowly because they think that if they take just a few
sips, it won’t matter. It does matter, and you’ll get into serious
trouble.
Drinking salt water only makes you thirstier. If you drink a few
harmless gulps of salt water, you feel satisfied for only about
10 minutes. When your thirst returns, it comes back with a
vengeance. You’ll be on a vicious cycle, needing to drink more
each time.
ble
nt
e
n
y
ch
l,
at,
n’t
o
um
nd
ne
nd

Part IV: Surviving on the Seas, Oceans, and Great Lakes 378
M
Kon-Tiki and the Heretic: Survival stories to take with a grain of salt
In 1947, a Norwegian adventurer named Thor Heyerdahl crossed the Pacific Ocean on a giant wooden raft, which he called Kon-Tiki. Heyerdahl was trying to demonstrate to the world that primitive mariners possessed the ability to travel from South America to Polynesia in ancient times. His voyage was one of the most significant expeditions of the 20th century, and whenever the question of drinking salt water comes up, many people point to this famous story of men drifting on the ocean.
Heyerdahl and his crew reported that during their time on the sea, they drank great quantities of fresh water mixed with salt water. What most people don’t realize is that Heyerdahl and his mates weren’t facing dehy-dration. On the contrary, they were hungry for salt. Fighting the sea day-in and day-out made them per-spire very heavily. Although they had plenty of fresh water aboard their raft and drank pure, fresh water until their stomachs were bloated, they still felt a lack of something: salt. Their saltwater cocktail was brewed to replenish their body’s lost sodium, not to remedy dehydration.
Shortly after the voyage of the Kon-Tiki, another raft voyage came along — one that seemed to present absolute proof that you could drink salt water for long periods of time on the sea. In 1952, a French doctor
name Alain Bombard crossed the Atlantic Ocean in a small inflatable raft. Bombard claimed that he had carried no water during his voyage and that he had survived on little more than salt water and the fluid he wrung from fish. He had undertaken his voyage to prove his theory that most survivors in rafts die of despair, not from dehydration or starva-tion, and that if you could keep your spirits up, you could survive almost anything. He also believed that the claim that drinking salt water was suicide simply wasn’t true. This was a highly controversial position, and accordingly, Bombard named his little rubber raft The Heretic.
Though Bombard survived several months at sea, his claims simply can’t be proven. The French doctor didn’t keep accurate or complete records of his exploits. To complicate the matter further, Bombard drifted through regions where rain showers are really quite frequent and collect-ing adequate fresh water is entirely possible. Important questions of how much salt water he actually drank, how much rainwater he col-lected, and how much water he was given by passing ships were never fully answered. In the end, Bombard proved his theory that castaways need not die of despair, but his brave voyage didn’t prove that a human could survive by drinking salt water.

Chapter 20: Food and Drink at Sea 379
The salt water–drinking scenario can happen even to the
most disciplined. A downed U.S. Air Force pilot once admit-
ted, after being picked up in the Gulf of Mexico, that he had
begun to drink salt water after the first day and that after that
he “just didn’t care anymore,” gorging himself on even more
salt water. Shortly afterward, he vomited, further dehydrating
himself. This particular survivor was lucky to be picked up.
Most aren’t so fortunate.
The dangers of mixing salt water with fresh water
Don’t consider mixing salt water with fresh water and drinking
it. If you mix salt water with fresh, you’ll most likely be creat-
ing a diuretic. You’re better off concentrating on getting liquid
in other ways rather than polluting what little good fresh
water you have.
Making Fresh Water on the SeaYou have a variety of ways to acquire drinkable liquid on the
sea, and all these methods have one thing in common: They
require immense patience and persistence. Some of these
methods in this section may give you only a mouthful of
water or just a few drops, but every little bit helps. The his-
tory books are filled with survivors who, after a little practice,
were able to get enough liquid to keep them going.
Take extra steps to safeguard your fresh water supply at sea.
Life rafts and other small vessels pitch and roll violently and
in the most unexpected of ways.
There are other cases like these that are reported from time to time, or that are rumored. Under careful investi-gation, however, most of them have mitigating circumstances. Worse, these cases do little to address the
risk of delirium. There are hundreds of documented cases, sadly, that show a strong relation between the drinking of salt water and the onset of short-term psychiatric affliction and death.e
e d e e e n
at r, -r
st e s s d s
al y r e e d s t-y
of y -s r d s e n .

Part IV: Surviving on the Seas, Oceans, and Great Lakes 380
Collecting and drinking rainwaterCollecting rainwater is harder than it seems. Most showers
last only a few minutes, so before the first drop falls, adopt
an aggressive, proactive program to catch every drop you
can. We cover rain collection in Chapter 7, but here are some
notes on gathering rain-catching supplies:
✓ Gather containers first. Scan the debris field and recover
anything that can hold water.
✓ After containers, sheets of plastic or fabric are of the
highest priority. Hold onto any item that you can use as a
rain-catching plane.
Shortly before a shower comes, make sure your rain-catching
plane — the mouth of your giant funnel — is fully extended,
and then rinse off all the surfaces with seawater. The seawater
rinse cuts through the salt crust that develops on all things
within just a day or so on the sea.
If possible, designate a container to hold only the initial rain-
fall. Then quickly put that container aside and concentrate
on collecting water in another container for your main rain-
catching operation. Most of what you collect in the first 20 to
30 seconds of a rain shower at sea is slightly fouled by salt,
even if you’ve rinsed your collection surfaces. Sample this
water later to determine whether it’s drinkable. If not, use it
next time for rinsing collection surfaces.
The biggest problem in collecting rainwater at sea is keeping
all the components in place. Violent flapping of the rain-catch-
ing plane in the wind can make getting collected water into a
container difficult. Develop a rain-catching plan that involves
everyone, and use it as a team-building exercise.
If you catch your water in clear or translucent jugs, such as
milk jugs, try to store them out of the sunlight. Sunlight makes
algae and mold grow in these containers.
Collecting condensationYou can collect condensation from the surfaces of your vessel
and use it for drinking purposes — but only if it’s free of salt,
which is rare. You can sometimes use a cloth or rag to soak

Chapter 20: Food and Drink at Sea 381up the moisture, but the results can be meager. Sponges are
better for this.
Maintain a close watch on all your water-collecting surfaces.
You may have a surface that’s relatively free of salt. You may
be able to maximize the amount of water you collect if you act
just as the condensation is forming during the night.
Using water makersA reverse osmosis water maker is a small pump that forces
water through a filter, making the water safe to consume
(though not all are designed to remove salt from seawater, so
check the capabilities of your device). The water maker looks
like a small bicycle pump, and if you come across one in a life
raft or abandon-ship bag, check immediately for a package of
spare filters and put them in a dry, secure place. Most small
cylindrical water makers require you to change their filters at
regular intervals, although new types use ceramic filters that
must be cleaned.
Always attach a cord to your water maker and then tie the
other end to your body or to your vessel. As with all tools on
the sea, the water maker has a good chance of slipping out of
your hands and sinking to the bottom of the ocean or simply
drifting away from you. Even if you have good hands and are
conscientious, things slip. We can’t stress this point enough.
Why? Because we’ve lost a lot of good equipment to the deep
blue!
If you have enough containers, use one to hold salt water in
the bottom of the boat. Then pump this water through the
unit into another container. This system reduces the risk of
losing equipment overboard.
Setting up a still at seaA solar still at sea is simply a clear container that uses the
sun’s rays to heat and evaporate water; the still then con-
denses the water vapor and collects the fresh water.
A variety of commercially manufactured models (see Figure
20-1a) are available, but they all work on the same principle:
You pour salt water (or anything containing water) onto a
er
me
ver
as a
ng
,
ater
s
n-
-
to
t
ng
tch-
a
es
s
kes
ssel
lt,
k

Part IV: Surviving on the Seas, Oceans, and Great Lakes 382
CS
piece of dark cloth or into a reservoir made of black plastic,
and then you put the cloth or reservoir under a little tent of
clear plastic. When you put the tent in the sun, the seawa-
ter evaporates — but it leaves the salt behind. Droplets of
purified water soon form on the inside of the tent, and these
trickle down into a receptacle at the bottom of the still.
If you have the materials and the time, build as many solar
stills as you can. And take your time with the construction,
because craftsmanship counts. Solar stills, especially impro-
vised stills, produce only a tiny amount of drinkable water per
day — and this only in calm conditions.
Here’s how to build the basic still using odds and ends at sea
(remember the debris field you were in?). This type is a varia-
tion on the land-based solar still (see Figure 20-1b):
1. Glue or tape a cup at the bottom of a medium-sized
bucket.
2. Use a plastic sheet to form a dripper over the cup.
The dripper is basically a stalactite-in-a-bucket. To
make the dripper, just drape a plastic sheet over the
top of your bucket and place a weight in the center of
the sheet, which sags down over the cup.
3. Secure the plastic with string or a rubber band.
Water collection tank
ab
Inflatable, transparent conical roof
Saltwater
Fresh water droplets Freshwater
droplets
Saltwater-soaked rag
Weight (bolt) holdingdown container cover
Figure: 20-1: A commercially manufactured solar still (a) and an improvised design (b).
Try to have good seals around the still the outer perimeter of
the still so that you get an air-tight evaporation unit. You may
be able to stabilize your solar still at sea by attaching a handle
to it and suspending it from a boom or ceiling. Commercially

Chapter 20: Food and Drink at Sea 383manufactured solar stills usually have weights in their
rounded bottoms to make them stable on the bucking ocean.
Using a solar still on the sea can try your patience to the
breaking point because everything is in motion, and getting
the little drops to fall into the right receptacle can be a night-
mare. If your first efforts to distill water yield meager results,
look for ways to improve your methods. It takes practice.
Removing salt with desalination kitsDesalination kits use chemicals and filters to convert seawater
into drinkable liquid. Usually the kits require you to pour one
or two chemicals into a pouch full of seawater and then allow
the seawater to pass through a filter. Even the larger kits can’t
produce much water, many times only a few pints, but they
can save you in a pinch. If you’re lucky enough to run across
a chemical desalination kit, save it for a cloudy day — when
your solar still won’t work (the preceding section explains
solar stills). Try to concentrate on getting liquid from other
sources first.
Considering Living Sources of Water
You can supplement your rain-catching and saltwater-
distillation activities by drinking the bodily fluids of fish or
the blood of turtles. Draining the juice from sea creatures
may sound unappetizing, but many castaways owe their
lives to these techniques.
Drinking the juice of fishYou can consume bodily fluids of fish to get extra water intake
while on the sea. The key here is to use only the fluids that
don’t contain protein: the spinal fluid and the eyes. Note: Try
not to drink the fluid in the meat of the fish. This juice con-
tains protein, so your body has to use water to process it. Of
course, you have to catch fish before you can wring the juice
from them! See “Fishing at Sea” later in this chapter.
c,
f
e
o-
per
ea
ria-
d
e
of
ag
ngver
sed
of
may
ndle
ly

Part IV: Surviving on the Seas, Oceans, and Great Lakes 384
A modern castaway’s storyOn a windy night in late March, 1980, a close friend of ours, a Colombian fisherman named Joaquin Cuellar, went lost-at-sea off the coast of Colombia. He had gone out in a small boat to run an errand with two other men, and unbelievably, his shipmates had managed to get into a childish shoving match and had knocked the boat’s outboard motor into the sea. Without power, the tiny vessel drifted away from land and into the vast Pacific.
For nine days, Joaquin drifted on the open sea. His thoroughly unlik-able shipmates all but gave up. But he didn’t. His will to live was incred-ible. He tenaciously clawed at every opportunity that came along, and instead of falling into despair, he became defiant. He loved life, and he was going to live. Though it was distasteful, he drank the fluid from his prescription earache medicine. At one point, he found a piece of drifting bamboo and tried to drink the
fluid sloshing inside, but quickly had to spit it out. It was fermented.
On the fifth day, Joaquin managed to snag the leg of a passing sea turtle with a fishing hook. He hauled the 50-pound (23-kilogram) animal aboard and then quickly slashed its throat with a screwdriver he had sharpened. “There was so much blood,” he later told us. “It was incredible.”
The others in the boat wouldn’t drink the turtle blood. But Joaquin did, and it gave him strength. Like so many other mariners, he reported that the blood was not salty but “very sweet.”
Drinking the turtle’s blood was something of a turning point for Joaquin. It gave him strength and it renewed his determination. With a favorable wind now upon the little boat, he fashioned a sail from plastic and sailed to land, and safety, saving himself and his foolish mates.
Some fish are toxic and you shouldn’t consume them or drink
their juices. For more info, check out “Knowing which fish
aren’t on the menu” later in this chapter.
Here are two methods for extracting the spinal fluid from fish:
✓ For large fish: Cut an incision along the back of the fish
and then suck the fluid out, or turn the fish vertical and
allow the spinal fluid to flow down into a container.
Sometimes, if you’re careful, you can use this method to
simply remove the backbone altogether.
Chapter 20: Food and Drink at Sea 385 ✓ For small fish: Make an incision in the spine near the tail
fin and then turn the fish’s body until it’s vertical. Either
allow the spinal fluid to drip out or simply suck it out
with your mouth.
You can chew or suck fish eyes to get the fluid from them.
They can be very bitter, and some castaways have gagged
when doing this. Even so, juice from fish can sustain you
when you have nothing else.
Drinking turtle bloodTo get water intake, you can also safely drink turtle’s blood
to save your life. This method has saved many castaways.
Technically, the blood has protein in it, so it would seem to
violate one of the rules of water conservation. But because
this last-ditch source of liquid has saved so many, including
friends of ours, we don’t hesitate in recommending it.
Sea turtles are slow-moving animals and you can easily catch
them, either by snagging them with hooks or gaffs (hooked
poles) or by catching them with your hands. For information
on catching turtles, check out the section titled “Identifying
Other Delicious Things to Eat in the Sea” later in this chapter.
After you have a turtle in your possession, you have to extract
the blood. Here’s how to do it for best results:
1. Turn the animal on its back and step on or hold
down its beak and claws.
2. Take a pointed knife or spear and cut the arteries
where the neck joins the body, near the animal’s
backbone.
The severed veins will spurt blood, so you need to be
ready with your containers.
3. If possible, turn the animal upside down and allow
the blood to drain into a container.
You may be able to collect as much as 2 quarts (2
liters) of the sickly sweet liquid.
4. Drink the blood within about 1 minute of draining it;
otherwise, it will coagulate.
d
d a d
al s d h s
k d y t y
s r t
a e c g
ink
sh:
h
d
to
Part IV: Surviving on the Seas, Oceans, and Great Lakes 386
Sea turtles are endangered and are important to their respec-
tive ecosystems — besides being remarkable creatures. Kill
one only if you’re at risk of death on the open sea.
Fishing at SeaAfter you take care of your water needs, you can begin to take
food from the sea. Fishing for survival at sea is a completely
unique experience. You usually have to fish from a flimsy
craft that’s close to the water — a craft that a large fish can
damage or destroy. You’re probably in crowded conditions,
so when you bring the fish aboard, it’s like being trapped in a
closet with a wild animal. So you have to rethink fishing. You
can make a huge leap in thinking by simply reminding yourself
that you are now hunting on the sea.
Keep the following pointers in mind when fishing at sea:
✓ Always use stealth when fishing. A fish can see you on
your raft, and it can hear many of the noises you make.
Even more than that, it has a very strong sense of vibra-
tion. Try to be as quiet as possible when you fish.
✓ Maintain a sharp watch on all your lines every second
they’re in the water. After you put them in the water, try
to keep a hand on every line at all times. If you allow your
vigilance to lapse, the fish will surely get away.
✓ Maintain a disciplined fishing time, just before dawn.
Get ready to fish every morning in the same way you’d
get dressed for your job on land. Don’t be late! Have all
your gear in the water before dawn — this alone can save
you. Fish for as long as you can every day but especially
during this critical time window.
✓ Make plans ahead of time for bringing your fish
aboard. Ocean fish can easily get away — even after you
have them aboard — or they can deflate your life raft or
cause personal injury, so plan ahead. For details on how
to board fish, see “Bringing in Your Catch” later in this
chapter.
This section focuses on some specific fishing-related point-
ers if you’re lost at sea. You can also check out Chapter 8 for
more-general fishing techniques.

Chapter 20: Food and Drink at Sea 387
Tackling hooks and linesYou need hooks, line, and bait or lures. Almost anything
works, but for a rundown on improvised hooks and lines, see
Chapter 8. The best substance for bait is freshly butchered fish
meat or entrails. Generally speaking, lures made from white
cloth or some shiny object, such as aluminum foil, work best.
When you’re at sea, you usually fish with hand lines, and you
should fish with the strongest tackle you have first — the
strongest and best lines, best hooks, and so on — especially
at dawn, when the big fish are hitting. If the fish steal your
bait, reduce the size of your hook.
Fishing tackle can save your life on the open sea, but it’s very
hard to hold onto. Lines break and precious hooks are lost all
the time, so take precautions to safeguard your equipment:
✓ Stow your tackle in a container that’s attached to the
vessel.
✓ Service your tackle — such as tying on new hooks —
only when you have the boat’s bottom below you, never
over the side.
✓ Fish with an assistant if possible. People lose gear or
have other minor disasters usually because they’re
overwhelmed.
✓ Maintain the lightest touch possible on a hooked fish.
Never fight a fish on the sea if you can help it. Give the
fish as much slack as it can handle and wait for it to tire.
Salt crystals develop on fishing lines, and when a big fish pulls
sharply, it can turn the line into a cutting instrument — not
something you want inside a life raft. When fishing from an
inflatable craft, always tie your fishing lines to the exterior
grab lines, never to something inside the raft.
Using a spearSpearing a fish is well within the ability of even the most die-
hard of landlubbers. Spears are immensely useful and can be
good weapons for killing violent fish in the water (which is
better than doing it in your raft or boat, because that can be
ec-
l
ake
y
n
s,
n a
ou
self
n
e.
a-
nd
try
our
n.
d
ll
ave
lly
ou
or
ow
s
-
or

Part IV: Surviving on the Seas, Oceans, and Great Lakes 388
a dangerous, clumsy process). You can stab dorados in the
spine to paralyze them or sharks in the eyes to produce the
same affect.
Craft spears by sharpening wood that you find on the open
sea (like split bamboo cane) or from metal (such as rod from
an outboard motor that’s run out of gas or the frame of a
backpack). Make spear tips from odd and ends you find in
your drifting boat, such as broken oar locks. All you have to
do is grind these metal parts on other metal until you form a
point, a process that usually takes about two days. You can
attach the metal tip as we show you how to do in Chapter 8,
or if you have access to wire (perhaps from dead electrical
devices or outboard motors), you can simply bind the two
together, wood and metal, as we show you in Figure 20-2a.
a
cd
b
Figure 20-2: Fishing with spears.
If you’re using a spear, be extra careful. A spear can deflate
your raft or cause injury very quickly! Never underestimate
this crude weapon. Treat it like a loaded gun.
Always keep in mind that fish on the open sea like to congre-
gate. In the first few days you’re adrift, you may see only the
types of sea creatures that swim too fast to be speared. But
after a few days, a community of fish will spring up, including
the slower swimmers, such as the slow gray groupers, which
are meaty and easily speared. Here’s how you do it:
1. Enter the water with a rope tied from the boat or raft
to your waist or ankle.

Chapter 20: Food and Drink at Sea 389 Doing so helps you avoid getting separated. You also
want to have a loop of string that goes from the spear
to your wrist so you don’t lose your new tool!
2. Float quietly and wait for a slow fish to come near,
or drift casually over to the fish without making any
hurried movements.
3. Grasp the spear at the halfway point so that it’s bal-
anced in your hand; then cock your fist under your
armpit (see Figure 20-2b).
4. When you think you’re close enough, thrust straight
out, from armpit to fish.
Because you’re horizontal, this feels almost like you’re
pushing the spear directly over your head (Figure
20-2c). This is the fastest motion your arm and the
spear can develop underwater. No other way works.
5. After you spear the fish, reach forward and hold the
struggling animal with your other hand, and return
to your raft or boat.
You can construct a slightly more effective fishing spear,
called a Hawaiian sling, by simply attaching a length of
bungee cord, rubber tubing, or elastic, to the butt end of your
lightweight spear. After you’ve done that, just put your thumb
through the loop of elastic, reach forward with the same
hand, and grasp the spear about three-quarters of the way up.
This stretches the elastic and makes the spear ready to fire
(check out Figure 20-2d). When you thrust forward, release
your hold on the spear for just a moment so that it travels
slightly farther and much faster. This weapon is very effective
on small fish that congregate within a few feet of rafts.
Using netsYou can use nets, fashioned out of clothing and other fabric,
to capture small fish near your raft for use as bait. Submerge
your net in an area where smaller fish may be schooling,
and then be prepared to pull up sharply. This is an exercise
in patience and quiet. Keep in mind that successful fishers
who use nets do so with the help of lots of equipment. You
may find net fishing impractical, and you may find it better to
move on to other methods.
e
e
m
o
a
n
8,
e
e
e-
he
t
ng
ch
raft

Part IV: Surviving on the Seas, Oceans, and Great Lakes 390
Advanced fishing for the hungryYou may want to consider trying a couple of advanced fishing
methods to augment the basics. These methods include the
following:
✓ Get flying fish to jump in your boat. You can catch
flying fish on the sea at night sometimes by simply turn-
ing on a flashlight or a lamp, or better, flashing the light
on some background, like a sail or a piece of plastic.
These tasty fish many times fly out of the water and land
aboard your vessel. They make good eating, but they’re
sometimes better used as bait. Put a hook in one and
toss it out on a line. Larger fish are fanatical about flying
fish.
✓ Fish with a gaff, a pole with a very sharp hook on the
end of it. You can make hooks for this, but large, barbed
fishhooks are the best. To fish with a gaff, drop your
pole into the water, hook end down. When a fish swims
over the hook, jerk the gaff sharply upward. Be careful,
though: Like spear fishing, this is also a good method for
accidentally sinking a raft.
Catching small sharks by handOne of the easiest ways to get food from the ocean is to catch
small sharks by hand. When you carry this out in an orga-
nized fashion, it’s safe, and it’s a sure thing. This method also
doesn’t require you to risk your fishing gear to the sea. When
you’re a castaway, you suddenly notice that you lose fishing
tackle at an incredible rate through day-to-day usage: Lines
break or hooks are lost or fall overboard. So if you’re short
on equipment — or have no equipment to speak of — this is a
good method to practice.
Use the barehanded method to catch only small sharks; don’t
try to catch anything longer than about 3 feet (0.9 meters). To
catch a shark, simply wait until the creature swims past. Then
swiftly reach into the water and grasp the thinnest part of its
body — just in front of its tail — and yank it out of the water
smartly.

Chapter 20: Food and Drink at Sea 391
Don’t grab a shark by the tail if you can help it. Grasp the thin-
nest part of its body — right where the tail joins the body.
Some sharks have sharp tails that can cut you severely. Also,
never attempt to use two hands to grasp a shark (or a turtle)
in the water; use one hand for the fish and the other hand to
hold onto your vessel.
Turn the shark upside down as soon as you can and throw
something over its eyes, such as a shirt or towel. After doing
so, hold the shark by the tail until it dies. Alternatively, if
you’ve a cleared spot inside the raft and you have the shark
upside down and blinded, you can do this inside. Otherwise,
hold the shark on a reinforced area near the entrance to your
raft. You may want to club the fish.
Keep in mind, when you start out, that even the very smallest
of sharks seem fantastically strong. They fight, wriggle, and
twist and writhe violently in your hands. Be aware that sharks
writhe violently for as long as 5 minutes and can still bite even
after they seem dead. Be patient.
Shark meat tastes of ammonia when first caught. To improve
the flavor, let the meat sit out in the sun or overnight. The
ammonia taste usually subsides significantly after just 8
hours. You can also rinse it in fresh water or slightly fouled
fresh water if you have precious liquid to spare or in salt
water if you’re desperate.
ing
e
n-
ht
nd
re
ng
e
ed
s
l,
for
tch
lso
en
ng
s
s a
n’t
To hen
ts
er
The Baileys’ shark-catching operationHand-catching sharks may take you a couple of tries, but it’s well within the physical abilities of most fit adults. Maralyn Bailey, a 98-pound (44-kilogram) tax accountant from Southampton, England, was fre-quently able to pull these animals aboard her dinghy during her famous 1973 survival voyage of 117 days, saving herself and her husband, Maurice, from starvation. During the
operation, Maurice usually stood by with a towel to throw over the shark’s head as soon as Maralyn pulled the animal out of the water. She was so good at it that Maurice eventually had to tell her to stop. We, your friendly authors, have used variations of this method to catch dozens of sharks during the voyage of the Manteño II without endanger-ing ourselves in the slightest.
Part IV: Surviving on the Seas, Oceans, and Great Lakes 392
P
Bringing in Your CatchBefore you catch fish at sea, you need to have a plan for
bringing your fish aboard your vessel. Many fish are essen-
tially pointed animals, and they can deflate your raft or cause
injury. They’re spring-loaded, too: Most fish have the ability
not just to flop but also to jump — sometimes several feet
into the air — after they’re aboard a raft or boat. You have to
make sure the fish can’t jump back into the water.
The following is a list of strategies to consider when bringing
your catch in:
✓ Get organized. Discuss thoroughly with your fellows
exactly how you’ll bring the fish aboard and keep it
aboard.
✓ Estimate the pathway that the fish will take when you
pull it from the sea and put it in your vessel. Reinforce
this area with anything you can and make sure there are
no vulnerable points in the spot where you intend to land
the fish.
✓ Kill or stun large or aggressive fish while they’re still
in the water. To do this, stab the fish in the eye or just
behind the head with a spear — grim business, we know,
but you need to be certain.
When killing or stunning a fish in the water, it’s best not to use a spear that has your pocketknife for a spearhead.
Your knife is irreplaceable. Use some other type of spear
for this operation if you can.
✓ Be ready to guard the exits when the fish is aboard. Get
between the fish and the sea.
✓ Throw a piece of cloth or canvas over the fish’s eyes.
Doing so can sometimes calm it after it’s aboard.
✓ Be ready to club the fish after it’s aboard. This can be
grim business as well, like the stabbing, but you need to
get yourself fully prepared to overpower the fish.
Don’t use a spear when the fish is aboard the life raft under
any circumstances. That operation is way too clumsy — you’ll
most assuredly miss and damage the boat.
Chapter 20: Food and Drink at Sea 393
Preparing and Eating FishAfter maybe a few false starts, we hope you’re starting to
bring in the catch. Now you have a new problem: How do you
eat it? In this section, you find out how to prepare and dry raw
fish. We also include some notes on identifying fish that aren’t
fit for consumption.
Setting up the sushi barAfter you’ve killed the fish (see the earlier section “Bringing
in Your Catch”), you can fillet it if you like, but many times it’s
easier simply to peel the skin back and then cut the meat into
long strips for drying. This is especially true in the case of
large fish such as dorado (mahi mahi) and tuna. Here’s how to
prepare and dry large fish like these:
1. Cut a large triangle in the fish’s skin.
Start your triangle just behind the gill and narrow it
down to a point at the tail fin.
If you have no blade, you need to improvise. Anything
that’s made of metal works; a close friend of ours once
cut open the armor plating of a turtle with a sharpened
tin can. Unfortunately — or fortunately, depending on
how you look at it — you have lots of time on a raft.
2. Start at the point and peel the skin toward the gill.
3. After the meat is exposed, slice off long thin strips.
4. String a line from one side of your raft or boat to the
other, and hang the strips over it to dry.
Tuna is the only fish you shouldn’t dry in this fashion. Tuna
is easy to distinguish because of its shiny silver body and the
bloody meat that comes out of it. Consume this meat quickly,
or it spoils within just a few hours. Save the entrails for bait.
Knowing which fish aren’t on the menuWhen you’re fishing at sea, you need to know that not every
fish you catch is edible. A few varieties of fish flesh can actually
poison you. Most of these fish are found near reefs, although
use
y
to
ng
u
ce
are
and
l
t
ow,
ot ad.
ear
Get
.
e
to
r
ou’ll

Part IV: Surviving on the Seas, Oceans, and Great Lakes 394
IT
there’s no guarantee that you won’t catch them on the open
sea. The following is a list of these toxic fish:
✓ Puffers: Consider any fish that can expand its diaphragm,
or puff up, or any fish covered by spines, to be toxic and
inedible. These include
• Puffer fish (Figure 20-3a)
• Porcupine fish (Figure 20-3b)
• Cowfish (Figure 20-3c)
✓ Barracuda: Larger and older barracuda (Figure 20-3d)
have developed a reputation over the years for carrying
the toxin that causes ciguatera, or seafood poisoning.
This is especially true in Polynesia.
✓ Triggerfish: The general rule with triggerfish (Figure
20-3e) is to consider those species near reefs to be poi-
sonous and those on the open sea — the ones around
your raft — not poisonous. If you want to give yourself
added protection, you can approach the triggerfish
around your raft in the same way most indigenous
people do around the world: strictly as a bait fish.
a
c
d
e
b
Figure 20-3: Fish with poisonous flesh.
Other fish should be considered dangerous not because they’re
toxic but because of their various defense mechanisms. For
more on fish with nasty spines and stings that can cause inju-
ries at sea, check out Chapter 22.

Chapter 20: Food and Drink at Sea 395
Identifying Other Delicious Things to Eat in the Sea
Beyond fish, you can find other creatures and plants to eat in
sea. You can eat all these foods raw, like fish, although they’re
invariably more edible when dried in the sun. This section
lists some of the more common foods you can eat at sea.
If you’re susceptible to deadly bouts of anaphylactic shock
from seafood, abstain from eating, at least in the short term.
You can try seaweed if faced with starvation, but perform
the Universal Plant Edibility Test first (see Chapter 8). You
need to know, however, that plankton can attach to the broad
leaves of seaweed, and these hard-to-see creatures could
cause a reaction, even if the seaweed itself doesn’t.
TurtlesTurtles are among the easiest animals to catch in the sea
because like sharks, they frequently bump up against your life
raft or small boat. To catch a turtle, simply grasp its hind flip-
pers and haul it aboard. It may be possible to turn the animal
over on its back and haul it in upside down, which makes con-
trolling it vastly easier.
Sea turtles may appear to be benign animals, but they’re more
than capable of sinking your inflatable raft with their sharp
beak and claws. They’re exceedingly strong. You need to have
a good plan and be well-organized before you begin to board
the animal. Wrap heavy canvas or plastic around this animal’s
head and claws if you can.
If you can’t pierce the turtle’s hard shell, you can still cut out
its forequarters and hindquarters. On large turtles, this can
provide you with as much as 30 pounds (13.5 kilograms) of
meat. Handle the meat same way as with large fish — in other
words, cut it into strips and dry it.
BirdsYou can catch the sea birds that inevitably land on your life
raft or boat, many times by hand. We’ve had many birds land
gm,
nd
ng
i-
f
y’re
u-

Part IV: Surviving on the Seas, Oceans, and Great Lakes 396on our rafts, as have many castaways. All bird flesh is entirely
edible, although it has a tendency to glow at night due to the
bioluminescence of the fish in the birds’ diet.
Sea birds can administer nasty bites that can become infected
almost immediately. Put on gloves, if you got them or you can
make them, when catching birds.
BarnaclesBarnacles, which begin to grow almost overnight on any hull,
are the little brown creatures that cling to the undersides
of boats or rafts. They appear as long brown tubes, usually
with white shells at one end. These critters are crustaceans,
related to lobsters and crabs, but they aren’t nearly as appe-
tizing. We can tell you here that the good news and the bad
news are the same: They’re completely edible. You can eat
them raw, so feel free to pull them off with a satisfying snap.
Bon appétit!
SeaweedSeaweed is unappetizing but edible. Generally speaking,
you’re looking for seaweed with broad, flat leaves. Kelp is
good, and it contains carbohydrates and fiber, which are hard
to come by on the sea. You can find many other broad-leaf
species floating in the open ocean. To see what the edible
types of seaweed look like, go to Chapter 8.
Thin, threadlike seaweed can be acidic and irritating to the
stomach. Also, keep in mind that eating too much seaweed
(rarely a problem) can cause diarrhea and dehydration. You
should use seaweed to supplement your diet, not as a main
staple.
Dry seaweed in the sun before eating it. Rinsing it in fresh water
helps tremendously if you have that luxury. You probably
shouldn’t eat seaweed if it’s salty, because that dehydrates you.
Chapter 21
Emergency Travel and Navigation at Sea
In This Chapter▶ Traveling in the water without a raft
▶ Using nature’s indicators to navigate for long-term drifting
▶ Coming ashore in hazardous conditions
Regardless of what circumstances you find yourself in —
whether floating, swimming, drifting in a disabled boat,
or castaway in a raft — a few good decisions can help get you
back to land. We hope to show how a little wily observation,
combined with some decisive action, can help you walk on
the shore again — drenched, to be sure, but alive and well.
In this chapter, we discuss how to size up your situation at
sea and what signs to look out for — just in case you’re in the
mood for some dry land. At the end, we give you a few pointers
on how to make your landing a little smoother.
Swimming Back to LandWhen you’re in the water, getting back to land, or just back
to the safety of a good vessel, becomes your most important
goal. And you don’t need us to tell you that it’s heck of a
lot harder than people think. But if you can measure a few
things — if you can use some knowledge and techniques to
eliminate chance — you can, like so many survivors before
you, give yourself that little edge.

Part IV: Surviving on the Seas, Oceans, and Great Lakes 398
In this section, we talk about getting your bearings, considering a
current’s direction and speed, and measuring distances when
you’re in the water. We also tell you how to decide whether
to swim or float and give you advice on getting out of a rip
current.
Measuring distance to shoreEstimating the distance you must travel to get back to land
can be tricky. Land has a nasty habit of always appearing to
be a lot closer than it really is. This is especially true when
sunlight shines on large landforms, such as large rocks,
peninsulas, or mountains near shore. When the sunlight is
shining on these types of landforms, expect them to be much
farther than you initially estimate. (For more on the funny
business of estimating distances, see Chapter 9.)
When you’re in the water (either in a life raft or bobbing in a
life vest), your ability to see land is diminished because the
water interferes with your line of sight. Nevertheless, here are
some general guidelines for estimating distances to land:
✓ Within a mile (1.6 kilometers) of shore: You can clearly
distinguish the limbs on humans or the individual
branches on trees.
✓ Roughly 2 miles (3.2 kilometers) out: You can distinguish
individual windows on houses or buildings.
✓ More than 3 miles (4.8 kilometers) out: You can’t
distinguish exactly where the surf strikes the land.
This last distinction is probably the most important, because
if you’re in the water and you’re more than 3 miles out, you
should try getting to land by drifting, not swimming. We talk
about the decision of whether to swim or drift later in this
chapter.
Figuring out where the current is taking youYou can do a lot of things in life, but you can’t swim against
an ocean current — at least not for long. You have to work
with the current, and that takes patience and faith. Regardless

Chapter 21: Emergency Travel and Navigation at Sea 399of your predicament, you save a lot of energy and frustration
by knowing which way the water is moving before you start
making swimming plans.
Debunking some myths about ocean currentsTo really understand how currents affect you, consider these
truths:
✓ The current isn’t necessarily going with the waves or
swells. So even though you may feel as though you’re
being pushed one way, you may be drifting another.
✓ Tides aren’t currents (usually). Generally speaking,
when the tide is flooding onto the land or ebbing away
from it, the current actually flows parallel to the shoreline.
This isn’t always true, but it helps to point out that the
current isn’t necessarily rushing toward the beach or
hurtling out to sea during the tides — it may be just
running down the coast.
Determining the direction and speed of a currentSo which way is the current really going? Here’s one way to
be sure: If you can see land, you can use a range. A range is
simply an imaginary line drawn through two objects on land
(see Figure 21-1). Using a range is an exceptionally accurate
way of determining which way you’re moving — vastly more
accurate than using the waves as a measurement.
When you’re in the water, take a look at the lights or landmarks
on land and try to find two that are in line with each other —
such as two large trees, or perhaps the glow from a village
and the hill behind it. The line through these two landmarks
is your range. In a few minutes, you should be able to detect
that the linear relationship between the two landmarks has
changed. Remember: You’re moving in the opposite direction
of the closest landmark.
Figure 21-1: Using a range to tell which way you’re drifting.
ng a
hen
r
o
ch
a
e
are
rly
ish
se
u
k
t
ess
Part IV: Surviving on the Seas, Oceans, and Great Lakes 400
Another way to figure out the current’s direction is to look
at a buoy. Most river mouths and bays have large navigation
buoys anchored to the riverbed. If you’re near a river mouth
or a bay inlet, you can simply observe which way the buoy
is leaning — that’s the direction the water is headed. A buoy
that’s leaning at a 20° angle indicates a pretty strong current.
Whenever two large rivers converge, or whenever a powerful
river emerges into the ocean, the water is pushed up so that
you get very dangerous, turbulent seas. The large, standing
waves can cause havoc for you when swimming. When making
your way back to land, avoid these places at all costs.
Also, beware of riptides, or rip currents, that lead back out
to sea. This current exists very close to the shoreline and
causes a lot of drowning. For info on handling this special
type of current, see “Swimming out of a rip current,” later in
this chapter.
Moving in the water: Float or swimWhen you’re in the water, you have a decision to make: float
or swim. Either mode of transport can get you where you
need to go — you just need to know which is better in your
situation. In all but a very few cases, it’s better to drift with
the current. Because the current is doing all the work, you
may be able to travel as much as five or ten times as far by
drifting than by actively swimming.
In this section, we cover floating and swimming as a means
of travel toward land. Before you do any type of swimming,
either for travel or just to escape from a burning vessel, you
should take a look at Chapter 18 on staying afloat.
Letting yourself floatMany floating survivors have been picked up or have reached
a distant shore that was well beyond their swimming abilities.
If you’re without a life jacket, using the dead-man’s float, or
drown-proofing, may give you the ability to float for as long as
two days. For more on floating, see Chapter 18.

Chapter 21: Emergency Travel and Navigation at Sea 401
Do not drown-proof in cold water, because floating like this
makes your head go under, which makes you lose too much
heat.
Swimming slowly
The most critical factor when swimming back to land is
conservation of energy. In practical terms, that means that you
need to relax and take your time. Swim more slowly than you
want to — much more slowly, because that keeps your heart
rate down, doing more to prevent fatigue than just about
anything else. Swimming slowly can try your patience and
make you feel as though what you’re doing is futile, but it’s
the best way.
If you’re wearing a life jacket, consider doing a slow, easy
dog paddle. This type of swimming stroke requires very little
energy and gives you steady progress.
If you don’t have a life jacket on, keep in mind that the
more you fatigue, the less efficiently you swim. One way to
cut down on fatigue is to use a variety of strokes, sometimes
referred to as relief strokes. The three strokes usually
recommended for swimming long distances are a lazy
backstroke, the breast stroke, and the sidestroke. Alternating
among these three is your best bet.
You swim best when your body is horizontal, with your legs
more or less behind you instead of below you. As you tire,
your body begins to turn upright, and your legs sink below
you. This creates more and more drag (check out Figure 21-2).
Again, the only way to avoid this is to take your time and try
to relax.
Figure 21-2: Swimming failure.
on
th
oy
nt.
ful
at
g
king
n
at
r
u
hed
ies.
as
Part IV: Surviving on the Seas, Oceans, and Great Lakes 402
If you feel yourself becoming fatigued, you should drift rather
than swim. When you’re fatigued, swimming starts to become
counterproductive. You can also check to see whether you’re
moving toward the coast or away from it. If currents are
moving you away, stop wasting your energy. Many people
have survived by drifting until they were picked up. Also, after
you’ve drifted awhile, your strength may come back.
Swimming out of a rip currentAs you approach shore, watch out for riptides. A riptide is
an area near the surf line where the water is flowing quickly
down an underwater trough. You can usually see this
phenomenon because it looks like a calm stream or creek
flowing through the surf. The surface is usually flat, and
sometimes it has an outline of debris or flotsam around it.
More often than not, it runs perpendicularly to the main surf.
(Note: This effect can influence the course of boats, too.)
When you’re in a riptide, you should be able to notice that you’re
moving away from shore. You may also notice that you’ve
sped up — that the land is leaving you in a hurry!
To get out of a riptide, swim at a right angle to the flow of the
water, parallel to the beach. Don’t swim against it, toward
land. It may take you a long time to get out, maybe as much as
half an hour, and you may end up a mile or so offshore — but
this is the only way. Don’t panic — just realize you’re in a rip,
and swim to the edge. As soon as you’re out of the rip, swim
to shore.
Improvised Open-Sea Navigation for Life Rafts
What happens if you’re out on the ocean and you can’t
actually see the land? In this section, we talk about long-term
navigation, such as the type you have to perform when you’re
in a life raft, life boat, or aboard a disabled boat, adrift on the
open sea. (For info on actually steering or propelling your
vessel, flip to Chapter 19.)

Chapter 21: Emergency Travel and Navigation at Sea 403
If you’re out of sight of land, start writing down as much
information as you can (if you haven’t already started), such
as estimated rate of travel, sightings of ships or signs of land,
and so on. This is your log, and it’s one of the best safety
devices you can have because it helps you put all the pieces
of the navigational puzzle together. Even if you’re lucky
enough to have a GPS unit, you quickly realize that navigation
is best when it’s the product of a combination of many factors.
Getting your bearingsIf you can get you bearings at sea, you can estimate where
land lies. Even if you don’t have a map, you still usually know
where the world’s continents lie, and you may have a good
idea of where a large island is. So developing a sense of
direction can help you guide your craft to safety, or at least
help you to know how long you may be drifting, which helps
when figuring out what your food and water rationing program
should be.
The following sections discuss improvised navigation methods
that are unique to the sea. For a basic course on navigation,
including instructions for correcting compass errors, see
Chapter 9. For info on finding directions by using the sun and
stars, see Chapter 10.
Finding direction with compasses and chartsWhen you’re at sea, the most common instruments for
navigation are compasses and nautical charts. If you have
access to a compass, take a moment to see whether any metal
or electronic device may be influencing it — simply move the
compass around and watch the needle carefully. Metal items
can cause errors by pulling the needle toward them. The best
thing you can do is to try to locate the interference and move
as far away as you can.
If you have access to a nautical chart, the compass-error info
is called magnetic variation — not declination, as it’s called
on land maps. These two terms mean precisely the same
thing. Magnetic variation simply tells you that your compass
will always be in error by a certain amount in the area of the
chart. So if your chart says VAR 10 W, the needle is always
pointing 10° west of the true direction. If it says VAR 10 E, the
needle points 10° east of the true direction.
her
me
’re
fter
y
rf.
u’re
he
h as
but
ip,
m
on
rm
u’re
he
Part IV: Surviving on the Seas, Oceans, and Great Lakes 404
Whenever you measure any distance on a nautical chart, you
must use the latitude scale on the side of the chart. This scale
may be delineated in minutes. A minute is equal to 1 nautical
mile, which is about 15 percent longer than a terrestrial
(statute) mile.
If you think you’re located somewhere in the middle of the
chart, simply go to the latitude scale nearest your position,
take a piece of string, and measure out a minute (a nautical
mile). You can then take this string and use it to measure how
far you have to go from your position to get to land. If the
latitude scale nearest you is in degrees, keep in mind that
there are 60 minutes (60 nautical miles) in a degree.
For more on correcting compass error and using latitude and
longitude, see Chapter 9.
Determining direction with wavesIf you don’t have a compass or any other type of navigational
instrument, you can use the direction of the waves (and
swells) as a rough guide to help you steer your boat or raft
throughout the day. At dawn, when you know the sun is rising
in the east, study the prevailing direction of the waves. This
can give you a general sense of direction throughout the day —
until late in the afternoon, that is, when the sun is obviously
pointing west, and you’ll have to measure the waves’ direction
again.
This method of orienting with the waves is only useful if
you understand that at least two wave systems are usually
around you:
✓ Swells: These are the largest masses of sea and are
usually very constant. In other words, if at dawn you see
that the swells are moving to the southwest, you can be
pretty certain they’ll continue to do so all day. These are
the best to follow, because they’re so constant.
✓ Waves: These aren’t usually exactly in sync with the
swells — they’re smaller masses of sea that come along
a little faster than swells. Sometimes the waves can be in
sync with the swells, though watching swells is almost
always better.
Chapter 21: Emergency Travel and Navigation at Sea 405You need only about an hour of careful observation to see
which is which and which way they’re moving. Give it a try. If
you combine this method with the navigation method of using
the sun and stars that we describe in Chapter 10, you should
be able to figure out which way you’re moving without too
much trouble.
Estimating current at seaIf you’re far out to sea (you can’t see land), it’s virtually
impossible to establish the current’s direction and speed
unless you have sophisticated navigational instruments, like a
GPS or a sextant.
As a default, you can assume that most of the world’s ocean
currents move at a speed of between 0.5 and 0.75 miles (0.8
and 1.2 kilometers) per hour. But keep in mind that this is a
generalized assessment — many currents move much faster,
and some move much slower. If you’re drifting off the coast of
South America, for example, you can expect to move at about
1 mile (1.6 kilometers) per hour. In the Gulf Stream off the
coast of Florida or South Carolina, you can sometimes speed
along at 5 miles (8 kilometers) per hour — even though it feels
like you’re not moving at all! But 0.5 to 0.75 mph is a good
baseline to estimate your speed, if you have no other way to
judge.
Understanding signs of landWith heightened awareness, you can find your way to land —
even if you can’t see it and you don’t have a compass or chart.
Land gives all kinds of clues, but many of them are subtle, so
you have to pay close enough attention. In this section, we
name some of the signs of land.
At sea, the height of your eye or your antenna or your signal
means everything. So when you’re looking for land, try to get
in as high a position as you can — just standing up for a few
minutes in a raft can make all the difference in the world.
ou
ale
al
,
l
ow
nd
nal
ing
s
y —
y
on
ee
be
are
ng
e in
t

Part IV: Surviving on the Seas, Oceans, and Great Lakes 406
Signs of civilizationSome signs point you not only to land but, sometimes even to
civilization:
✓ City glow: This can be more subtle than you think. Many
times a city’s glow shows up as a very light gray semicircle
way out on the horizon.
✓ Navigation lights: Many are very hard to see, especially
because they often blink only about once a minute — and
then only in red! Sometimes, finding a navigation light
can be like finding a certain comma on this page.
✓ The courses of small airplanes, helicopters, and small
boats: Watch which way these small boats are traveling —
if you see a civilian helicopter moving in the same
direction, an offshore platform may be nearby.
✓ Nautical bells and horns: Nautical bells are rarely bells
at all; they’re long, heavy bass tones. They can be heard
at night from immense distances, but you have to be on
guard — you can easily miss them if you’re not paying
attention.
We hate to tell you this, but many times foghorns are
deactivated because someone finds them annoying or
because they need repairs. This is a common problem.
If a foghorn is listed on your chart but you can’t hear it,
that doesn’t necessarily mean it’s not there.
If you’re out to sea or in heavy fog, you can use an AM radio
to find land. This is an easy and reliable technique:
1. Open the antenna and point it toward the horizon.
2. Tune the radio to any station you can, no matter how
poor the reception.
You’re not trying to hear what they’re saying on the
station — you’re just trying to pick up a signal.
3. Slowly pivot your body while keeping the antenna
pointed at the horizon.
4. When the station disappears completely, you’ve hit
the null — the quiet spot where the station suddenly
goes silent or gets very faint.
When this happens, you’re pointing directly at the
transmitting tower — and land!

Chapter 21: Emergency Travel and Navigation at Sea 407If you have an AM radio with an internal antenna, you have
to take the housing off and find out which way the antenna is
pointing. The antenna is simply a metal rod with a lot of wires
coiled around it. When you find the antenna, point it toward
the horizon and start your pivoting procedure.
Hints from the birdsSometimes the flight paths of seabirds can point you toward
land. The general rule when using birds to find land revolves
around understanding what they’re doing out at sea. Each day
at dawn, they leave the land and fly offshore to hunt for fish.
Then, in the afternoon, after they’ve eaten their fill, they begin
steadily gaining altitude. When they reach a certain height
and spot land, they tend to immediately fly in a straight line,
and often in a V formation, to their home.
Watch for groups of birds coming out to sea at dawn and then
leaving in the afternoon or at dusk. If you see birds behave
in this manner, especially in groups, that’s a pretty good
indication that the direction of their flight leads to land.
The idea that all birds must eventually return to land is a
myth. For some unknown reason, this idea still persists today,
even among some serious mariners. This is false. Many birds
stay out and sleep on the ocean — often thousands of miles
out to sea.
The problem with identifying birds is that so many varieties
exist, so it’s easy to mistake land birds for those that sleep
on the sea. The most reliable land-returning birds are the
following:
✓ Boobies and gannets: Boobies and gannets have two
important distinguishing characteristics: long, thin wings
and tails like arrowheads. Their tails aren’t split, blunt,
or flat-edged — they look just like a sharp triangle or
a spearhead. If dusk is coming and you see a group of
these birds, watch carefully to see which way they fly
away.
✓ Frigate birds: Identify these birds by their split tails,
which are long, thin, and forked, like swallow tails.
Frigate birds return to land near dusk.
to
any
cle
ly
and
ll
—
ls
rd
on
g
m.
t,
o
n.
how
e
a
hit
nly
Part IV: Surviving on the Seas, Oceans, and Great Lakes 408
Other land signs from the water, wind, and air
There are other signs of land, ones that the great Polynesian
navigators have used for centuries. Now, you can’t master all
of these overnight, but you’d be shocked at what you can see
if only you pay attention:
✓ Sea breeze/land breeze: On many shorelines around the
world, the wind’s direction frequently changes with the
time of day. Here’s the standard pattern: The wind blows
toward the land from about noon until sundown, and
then it reverses, blowing out from the land from early
evening until just before dawn. If you record these types
of wind changes in your log, they’re probably coming
from land. Land will most likely be in the direction from
which the night breeze is coming.
✓ Smells, pollen, or brown or gray air: Land has a very
distinctive smell, especially at night, when the wind
tends to blow offshore toward the sea. If you have
allergies and your nose starts to run just after the wind
switches direction, the wind is probably coming from
land. Also keep in mind that off the coasts of North
Africa, Chile, and even Southern California, when the
winds get things stirred up, the sky turns brown with
dust from the desert.
✓ A stationary cloud: Most islands — even islands that
aren’t in the tropics — tend to develop puffy cumulus
clouds over them during the day (see Figure 21-3a). If you
see a single, puffy cumulus cloud that stays in the same
spot while all the others are drifting by, this is almost
always a dead giveaway that an island is underneath.
✓ Discoloration of flat-bottomed clouds: Low-lying, flat-
bottomed clouds reflect whatever is directly under them.
If these types of clouds are over an island, they appear
distinctly green underneath.
✓ Long, curved waves: If you see long lines of straight,
parallel waves moving in the general direction of the
wind and then you suddenly notice a distinct curve in the
waves (a long bend that extends from one horizon to the
other), an island is probably somewhere downwind from
you. The island is bending the waves, and you’re seeing
the first sign of it.

Chapter 21: Emergency Travel and Navigation at Sea 409 ✓ A sudden, confused wave pattern: When ocean waves
hit islands or ricochet in and out of gulfs and large
bays, they develop a distinctive crosshatch pattern (see
Figure 21-3b). The sea suddenly becomes exceedingly
turbulent — which means the waves have been hitting
something solid and reflecting. You’re close to land.
Unfortunately, this crosshatch pattern usually means
you’ve already passed the island — although you may
still be able to navigate toward it.
a
b
Figure 21-3: Stationary clouds (a) and wave patterns (b) indicating land.
✓ Walls of white mist on the horizon: Some very low
shores — like many of the beaches around the Gulf of
Mexico — are so low that they’re hard to see, but you
can see the mist that their multiple lines of heavy breakers
kick up. Look for a wall of mist on the horizon that
doesn’t evaporate as the day gets hot. You may hear this
before seeing it.
✓ Water color: Generally, deep water is blue and shallow
water is green or turquoise, although there are exceptions.
This is another reason to keep your log — if you can
combine clues, you can put together a pretty good
picture of what’s going on around you.
✓ Increase of flotsam: Random debris floating on the
surface (such as tree trunks, coconuts, garbage, and
so on) usually indicates the presence of land nearby —
especially if the wood or vegetation is still fresh.
an
all
ee
the
he
ows
es
m
d
you
me
em.
r
the
the
om
ng
Part IV: Surviving on the Seas, Oceans, and Great Lakes 410
✓ Butterflies and other insects: There are no insects on the
sea, so unless they’ve stowed away on your raft, they’re
coming from land.
We hope that all these indicators help you find your way back
to land. Just know that when you get there, you still have
some surviving to do.
Coming Ashore: A Dangerous Ordeal
Make no mistake about it: As good as land seems after you’ve
spent a perilous time at sea, coming ashore is almost invariably
unpleasant. You face heavy surf, coral, rocks, and vicious
currents, all of which can drown you and your companions.
Everyone wants to go ashore, but the act of landing may be
the most dangerous part of your ordeal.
Basic landing principles
Before you think about landing, consider the following facts,
which can mean the difference between life and death:
✓ If you have stormy conditions, stay offshore and wait
until things calm down. In storms, generally speaking,
the closer you get to land, the more violent the waves
become. If you have a sea anchor, a drogue, or the ability
to paddle, deploy these defensive measures to hold your
ground until things calm down.
✓ If it’s dark out, try to wait until dawn to land. Going
ashore in the dark is excessively dangerous. Waiting for
dawn takes a lot of discipline, but this alone can save
your life. (We know. We can remember nights when we
really wanted to come in to land but didn’t — because it
was suicide!)
✓ If you know the tide cycle, try to land when the tide
is coming in. When the tide is going out and opposing
incoming waves, the seas peak more sharply, making a
landing more dangerous.
✓ Try to land on the leeward side of an island or pen-
insula or near a headland or jetty that breaks up the
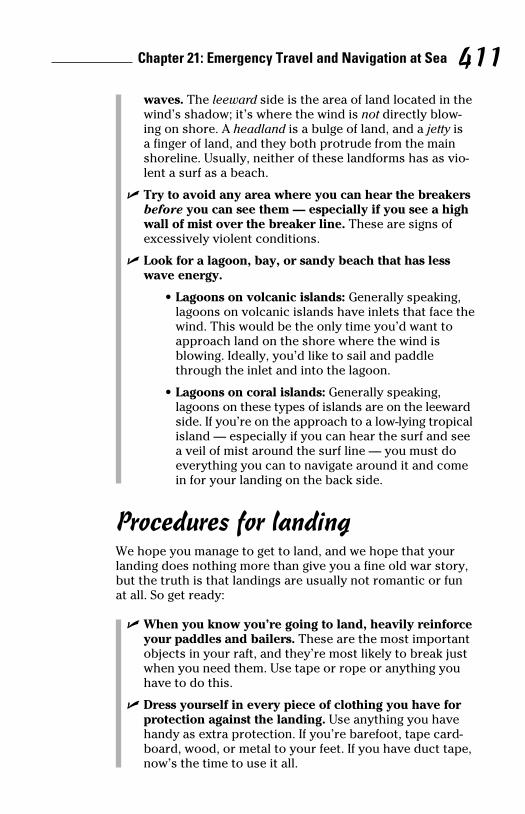
Chapter 21: Emergency Travel and Navigation at Sea 411waves. The leeward side is the area of land located in the
wind’s shadow; it’s where the wind is not directly blow-
ing on shore. A headland is a bulge of land, and a jetty is
a finger of land, and they both protrude from the main
shoreline. Usually, neither of these landforms has as vio-
lent a surf as a beach.
✓ Try to avoid any area where you can hear the breakers
before you can see them — especially if you see a high
wall of mist over the breaker line. These are signs of
excessively violent conditions.
✓ Look for a lagoon, bay, or sandy beach that has less
wave energy.
• Lagoons on volcanic islands: Generally speaking,
lagoons on volcanic islands have inlets that face the
wind. This would be the only time you’d want to
approach land on the shore where the wind is
blowing. Ideally, you’d like to sail and paddle
through the inlet and into the lagoon.
• Lagoons on coral islands: Generally speaking,
lagoons on these types of islands are on the leeward
side. If you’re on the approach to a low-lying tropical
island — especially if you can hear the surf and see
a veil of mist around the surf line — you must do
everything you can to navigate around it and come
in for your landing on the back side.
Procedures for landingWe hope you manage to get to land, and we hope that your
landing does nothing more than give you a fine old war story,
but the truth is that landings are usually not romantic or fun
at all. So get ready:
✓ When you know you’re going to land, heavily reinforce
your paddles and bailers. These are the most important
objects in your raft, and they’re most likely to break just
when you need them. Use tape or rope or anything you
have to do this.
✓ Dress yourself in every piece of clothing you have for
protection against the landing. Use anything you have
handy as extra protection. If you’re barefoot, tape card-
board, wood, or metal to your feet. If you have duct tape,
now’s the time to use it all.
the re
ack
ve bly
.
e
s,
t
,
lity
our
or
e
e it
a

Part IV: Surviving on the Seas, Oceans, and Great Lakes 412 ✓ Tie down all objects inside the boat, and tie important
electronics, wrapped in waterproof plastic, to your body.
You still need to be able to swim, no doubt, but if you land
on an uninhabited coast; you want to land with a stripped-
down collection of your best gear, intact and functioning.
✓ Deflate the overhead canopy of the life raft. That way,
you won’t be trapped below during capsize.
✓ If you’re in a small, rigid boat, consider backing in.
Simply tie a line to something heavy (such as a big battery
or a tire) and hurl it over the front (bow) of the boat.
This gives you a drogue that keeps the front of the boat
pointed toward the surf while you’re landing. The surf
has more than enough power to slowly push you —
backward — onto the land. This is a safe, common
method used by mariners throughout the world.
✓ On approach to any shoreline that has steep land
nearby, such as a cliff or a mountain, be ready for the
wind to die. High cliffs frequently block the wind and
cause a vacuum near the shore. If you’re using sails to
guide your craft to safety, these areas can mean serious
trouble. Be ready with your paddles, and have the
paddling chores already assigned.
✓ Be ready for multiple lines of breakers. Many times it
looks like you have to get through only one line of big
waves. Watch out — you may face two or more.
✓ Stay with the raft or disabled boat for as long as you
can. You’ll most likely get stuck — hung up on a rock or
some kind of coral. Try to stay with the vessel; the ocean
has the nasty habit of hammering boats, and hopefully,
it will hammer you ashore. Don’t get caught between the
boat and a rock or shore.
✓ Cut your drogue or sea anchor only as a very last
resort. If you stall and you’re still far offshore, you may
have to cut it free.
Ideally, you want to wash up on shore and quite literally crawl
out onto the sand. That may sound crazy, but that’s a safe
landing!

Chapter 22
First Aid on the WaterIn This Chapter▶ Understanding the risks of hypothermia, cold shock, and drowning
▶ Treating typical sea illnesses
▶ Dealing with dangerous sea creatures
Even just a little knowledge and ability can make a big
difference when you’re trying to survive emergencies on
the sea. Knowing the signs of danger — and some of those
signs are only visible if you know exactly what to look for —
can save lives, including your own.
In this chapter, we show you how to respond to cold water
immersion and near drowning. After that we show you how to
handle the medical problems you may encounter when you
drift in a life raft, as well as how to treat bites and stings from
sea creatures.
Responding to Water CasualtiesIn any survival situation on the water, you face four major
threats. Most people know about drowning, but you should
know that anytime you go into the water — especially when
you go into cold water — you’re also at risk for the following:
✓ Hypothermia
✓ Cold shock response
✓ Near drowning
In this section, we first tell you how to get people out of the
water so you can treat them, and then we show you how to
deal with these dangers separately.
Part IV: Surviving on the Seas, Oceans, and Great Lakes 414
Getting someone out of the waterWhen rescuing someone from the water, always try to reach or throw something to the person in the water, so you can haul
her in. This is almost invariably better than going into the water
yourself, unless you’re trained in lifesaving, because the weight
and movement of the person in peril can easily overwhelm you.
Here’s how to get to someone out of the water:
✓ Reaching: Remember to plant yourself firmly. Use one
hand to hold onto the vessel and one hand to extend a
long stick or pole to the person in the water. Expect a
heavy tug when the person grabs on.
✓ Throwing: The best thing to throw is a coil of line or a life ring, a circular flotation device found on practically every
vessel in the world. When throwing, remember to use a
long, swinging forehand (don’t throw it like Frisbee — this
never works!), and always hold on with your other hand.
Going overboard is very easy because of the momentum
your body develops when you hurl the line or ring.
✓ Getting in water: If you do have to go into the water, tie
a tether to your body so you can get back safely.
For pointers on how to help someone into a life raft, see
Chapter 19.
Understanding hypothermiaHypothermia is the progressive cooling of the human body,
which leads to mental and physical impairment and later,
death. If you’re in the water, hypothermia can kill you much
faster than on land, because it can incapacitate you so much
that your mouth falls below the water’s surface, thus causing
drowning — long before you actually perish from the cold.
Hypothermia can occur even if you’re in tropical waters. It
can sometimes take days, whereas it can take only minutes in
frigid seas, but enough heat can eventually leave your body to
cause hypothermia.
Anytime you’ve been exposed to a water environment, be on
guard for one or more of the symptoms of hypothermia:
✓ Extreme shivering

Chapter 22: First Aid on the Water 415 ✓ Bluish coloring in the lips or skin
✓ Apathy and the desire to lie down or give up
✓ Dizziness, disorientation, slurred speech
✓ A stop in shivering (very dangerous)
If you or one of your companions exhibits the symptoms in
the preceding bulleted list, treat for hypothermia. Here are
the main points of treatment:
✓ Try to keep the subject from exerting himself to the
point of tiring. Climbing out of the water can put an
enormous strain on a person with hypothermia. Assist
the subject as much as possible.
✓ Try to keep the subject’s body horizontal, even when
pulling him out of the water. After he has cleared the
water, elevate the feet slightly, and, if possible, put him
in the recovery position (which we cover in Chapter 13).
✓ Warm the subject slowly, especially if he has been in
the water for a long time. Warm the torso and neck first.
Don’t warm the limbs. You may have to hold the subject
close to your body to transfer heat.
✓ Monitor the airway closely, and don’t allow him to
inhale vomit. Be prepared for afterdrop, which is a
continued decline of central body temperature after the
rewarming process has begun.
Turn to Chapter 13 for a detailed explanation of how to treat
hypothermia, the most deadly of conditions.
Treating cold shock responseCold shock response is a sudden incapacitation of the human
body due to cold water immersion. It can incapacitate you so
suddenly that you can’t swim, inflate a life vest, or climb into
a life raft. Signs of cold shock response include the following:
✓ Accelerated heartbeat
✓ Dizziness and disorientation
✓ Hyperventilation
✓ Motor skill impairment
r
aul
ater
ght
you.
e
a
life ry
his
d.
m
ie
h
ch
ng
in y to
on
Part IV: Surviving on the Seas, Oceans, and Great Lakes 416
Anyone immersed in water that’s less than 50°F (10°C) is
considered at risk for cold shock response.
When subjects perish from cold shock response, their core
temperatures aren’t at the level necessary to cause death
from hypothermia. Cold shock deaths usually come from the
inability to move (the muscles don’t respond) or sometimes
cardiac arrest, either of which may lead to drowning.
Treat cold shock response the same way you treat hypothermia,
which we discuss in the preceding section. If you’re with
someone who’s at risk of cold shock response, monitor the
person closely (don’t leave the person unattended) and be
ready to perform CPR.
Studies have demonstrated that humans, if exposed to cold
water often enough, can build up a tolerance to cold shock.
If you’re accustomed to crossing cold rivers or swimming in
cold seas but you’re with someone who isn’t, be ready for
the possibility that your companion will go into cold shock
response, even though you don’t feel any effects yourself.
Handling near drowningDrowning is death due to asphyxiation from fluid in the
lungs. Unfortunately, you can’t do anything for those who’ve
expired. But many times people inhale enough fluid simply to
lose consciousness, become incapacitated, or have difficulty
breathing. This condition is called partial drowning or near drowning.
Reviving near-drowning subjectsYou can revive some near-drowning subjects through
resuscitation. Treatment involves performing CPR and
allowing gravity to withdraw as much fluid out of the lungs
as possible. Follow these steps:
1. Remove the subject from the water, trying to keep
the head, especially the mouth, lower than the rest
of the body.
This prevents the accidental inhalation of water that
may be in the throat.

Chapter 22: First Aid on the Water 417 2. Lay the subject down on the ground and check her
airway, breathing, and circulation (ABC); perform
CPR if the subject isn’t breathing and has no pulse.
Continue CPR until you’re exhausted. The only good
thing we can say about long-term cold water immersion
is that sometimes it slows the body’s functions down
to such an extent that people survive for a very long
time, even after they’ve lost consciousness.
3. If the subject is breathing and has a pulse, place her
in the recovery position, and make sure the mouth is
free of obstructions like grass or clothing.
Water and vomit should be able to drain freely from
the airway.
4. Monitor the subject (as we explain in the next section).
For more on the ABCs, CPR, and the recovery system, flip to
Chapter 13.
Monitoring someone after near drowning
Even just a small amount of inhaled water can cause the lungs
to become swollen and congested, a deadly process that can
take anywhere from a few minutes to a couple of hours. More
often than not, death occurs after the subject has been pulled
from the water and seems to be recovering. Watch near-
drowning subjects for the following signs:
✓ Incessant coughing
✓ Coughing up water, froth, or bubbles
✓ Shortness of breath
✓ Lightheadedness and disorientation
If you or someone around you exhibits these signs, go to the
nearest medical facility. If that’s impossible, be ready to
perform mouth-to-mouth resuscitation or CPR. Putting the
subject in the recovery position can help.
e
he
s
mia,
d
.
n
ve
to
ty
p
st
at
Part IV: Surviving on the Seas, Oceans, and Great Lakes 418
Treating Common Sea AilmentsMost of the problems we talk about in this section aren’t
deadly by themselves, but they can become deadly when
they’re combined with other conditions, fatigue, or
demoralization.
Dehydration is also a serious concern at sea. For information
on collecting and rationing water, go to Chapter 20.
SeasicknessSeasickness, or simply motion sickness, occurs when a vessel’s
rolling motion irritates your sense of balance. It usually begins
with a bout of yawning, followed by headache, nausea and
finally, vomiting. Seasickness usually lasts no more than
three days, although in severe cases it can be persistent. It’s
unfortunately very common in life rafts.
You can take medications to prevent seasickness, but generally
speaking, you have to take the medicine before the onset of
the symptoms. The most common over-the-counter medicine
is dimenhydrinate (Dramamine), which is sometimes in first
aid kits. One effective prescription treatment is the transdermal
patch of scopolamine. A transdermal patch is a dime-sized
adhesive gauze that sticks to your skin and releases medication
into your body over a period of days.
Prevention and treatment are basically the same thing when
dealing with seasickness. Your goal is to try to relieve the
irritation as much as you can. The following list includes
the most reliable methods for preventing and treating
seasickness — experiment with each method until you find
one that works for you:
✓ Look at the distant horizon. The distant horizon is the
only thing at sea that doesn’t move, and looking at it can
prevent your sense of balance from being irritated.
✓ Try not to sit down. Sitting only makes seasickness worse.
When you stand, you allow your body to compensate a
little for the boat’s motion. In a life raft, you may not have
any choice, although you can always try to kneel.
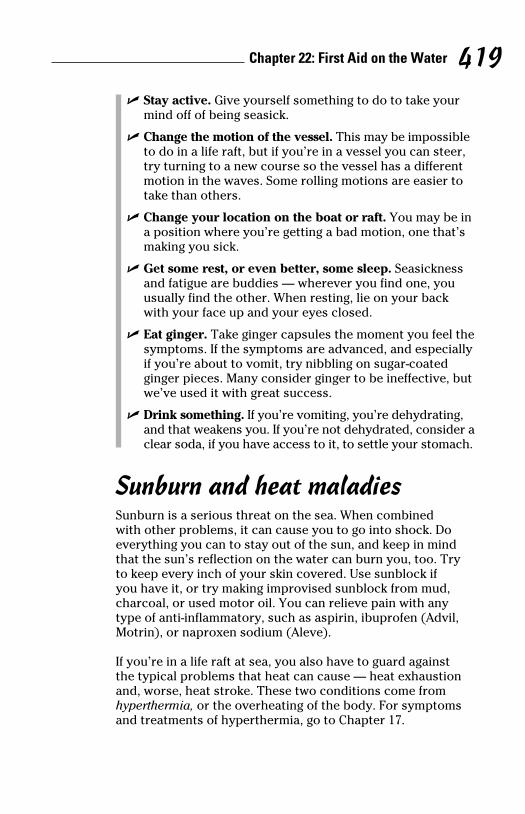
Chapter 22: First Aid on the Water 419 ✓ Stay active. Give yourself something to do to take your
mind off of being seasick.
✓ Change the motion of the vessel. This may be impossible
to do in a life raft, but if you’re in a vessel you can steer,
try turning to a new course so the vessel has a different
motion in the waves. Some rolling motions are easier to
take than others.
✓ Change your location on the boat or raft. You may be in
a position where you’re getting a bad motion, one that’s
making you sick.
✓ Get some rest, or even better, some sleep. Seasickness
and fatigue are buddies — wherever you find one, you
usually find the other. When resting, lie on your back
with your face up and your eyes closed.
✓ Eat ginger. Take ginger capsules the moment you feel the
symptoms. If the symptoms are advanced, and especially
if you’re about to vomit, try nibbling on sugar-coated
ginger pieces. Many consider ginger to be ineffective, but
we’ve used it with great success.
✓ Drink something. If you’re vomiting, you’re dehydrating,
and that weakens you. If you’re not dehydrated, consider a
clear soda, if you have access to it, to settle your stomach.
Sunburn and heat maladiesSunburn is a serious threat on the sea. When combined
with other problems, it can cause you to go into shock. Do
everything you can to stay out of the sun, and keep in mind
that the sun’s reflection on the water can burn you, too. Try
to keep every inch of your skin covered. Use sunblock if
you have it, or try making improvised sunblock from mud,
charcoal, or used motor oil. You can relieve pain with any
type of anti-inflammatory, such as aspirin, ibuprofen (Advil,
Motrin), or naproxen sodium (Aleve).
If you’re in a life raft at sea, you also have to guard against
the typical problems that heat can cause — heat exhaustion
and, worse, heat stroke. These two conditions come from
hyperthermia, or the overheating of the body. For symptoms
and treatments of hyperthermia, go to Chapter 17.
on
el’s
gins
’s
ally
f
ne
st
mal
tion
n
e
an
rse.
ave
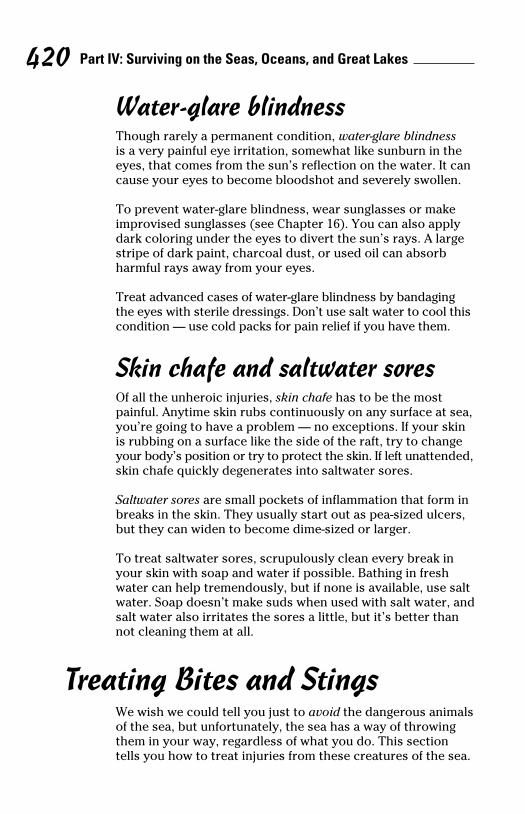
Part IV: Surviving on the Seas, Oceans, and Great Lakes 420
Water-glare blindnessThough rarely a permanent condition, water-glare blindness
is a very painful eye irritation, somewhat like sunburn in the
eyes, that comes from the sun’s reflection on the water. It can
cause your eyes to become bloodshot and severely swollen.
To prevent water-glare blindness, wear sunglasses or make
improvised sunglasses (see Chapter 16). You can also apply
dark coloring under the eyes to divert the sun’s rays. A large
stripe of dark paint, charcoal dust, or used oil can absorb
harmful rays away from your eyes.
Treat advanced cases of water-glare blindness by bandaging
the eyes with sterile dressings. Don’t use salt water to cool this
condition — use cold packs for pain relief if you have them.
Skin chafe and saltwater soresOf all the unheroic injuries, skin chafe has to be the most
painful. Anytime skin rubs continuously on any surface at sea,
you’re going to have a problem — no exceptions. If your skin
is rubbing on a surface like the side of the raft, try to change
your body’s position or try to protect the skin. If left unattended,
skin chafe quickly degenerates into saltwater sores.
Saltwater sores are small pockets of inflammation that form in
breaks in the skin. They usually start out as pea-sized ulcers,
but they can widen to become dime-sized or larger.
To treat saltwater sores, scrupulously clean every break in
your skin with soap and water if possible. Bathing in fresh
water can help tremendously, but if none is available, use salt
water. Soap doesn’t make suds when used with salt water, and
salt water also irritates the sores a little, but it’s better than
not cleaning them at all.
Treating Bites and StingsWe wish we could tell you just to avoid the dangerous animals
of the sea, but unfortunately, the sea has a way of throwing
them in your way, regardless of what you do. This section
tells you how to treat injuries from these creatures of the sea.

Chapter 22: First Aid on the Water 421
JellyfishJellyfish stings occur when you brush against the animal’s
membranes and it releases venom into your skin. All stings
are painful, but some are fatal. The white, translucent box jellyfish, which inhabits the waters north of Australia, is
probably the most deadly. An animal that looks like a jellyfish,
but is actually a colony of small animals, is the clear, purple
Portuguese man-of-war, which is present in all the world’s
oceans. Reactions to serious stings include nausea, vomiting,
shock, and cardiac arrest.
To treat jellyfish stings, follow these procedures:
1. If you have access to vinegar, pour it on the tentacles;
otherwise, use seawater.
This neutralizes the stinging mechanism.
2. Remove the tentacles using tweezers, sticks, or gloves.
Don’t touch the tentacles with your hands.
3. Apply shaving cream, baking soda, or even mud to
the wound, and then shave the area with a razor or a
knife.
4. Apply more water or vinegar (or seawater) to the
wound to dilute the poison.
If the tentacles have gotten in the eyes, irrigate liberally
with fresh water. If in the mouth, rinse with a solution
of one part vinegar to three parts water.
5. Treat the wound like a sprain and use the RICES
procedure (see Chapter 13).
Keep in mind that if you or one of your companions has been
stung, CPR may be necessary.
Sea snakesSea snakes usually live out their entire lives on the sea. Most
strikes don’t envenomate the subject enough to cause seri-
ous harm; however, you should consider all sea snakes to be
dangerously venomous. The symptoms of being envenomed
don’t always show up immediately after a strike. The first sign
is usually a headache and aching muscles. You treat a sea
s
e
can
n.
e
y
ge
g
his
sea,
in
ge
ded,
in
rs,
salt
and
n
mals
g
ea.
Part IV: Surviving on the Seas, Oceans, and Great Lakes 422snake bite like you treat other snakebites, which we detail in
Chapter 13.
Stinging fish and stingraysFish stings can damage large portions of tissue and be
exceedingly painful — the pain can sometimes last for days
or even weeks.
Never try to handle any fish that has spines, points, spikes, or
bristles. Never handle a fish that’s spotted, that looks like a
stone or a rock, or that has zebra stripes or tiger stripes. And
never wade near a reef barefoot.
Anytime you believe stingrays may be nearby, keep your feet
off the seabed. Stingrays swim across the seabed, and if they
feel threatened, they may sting you with the barb on the end of
their tail, which is sometimes fatal. If you hook a stingray while
fishing, consider cutting the line rather than boarding the ray.
If you get stung, wash the wound immediately with soap and
water if possible. If you have access to hot water, immerse the
wound in the warmest water the person can handle without
being scalded. Repeated immersions in hot water should help.
Be prepared to treat for shock and administer CPR.
Cone shells and terebra shellsCone shells are small gastropods that look like miniature,
brightly colored pine cones, between 1 and 4 inches (2.5 and
10 centimeters) in length. You can find them in the Indian and
Pacific Oceans, and they frequently travel across the seabed,
usually at night. Don’t handle cone shells, because they can
be lethal — they have a venomous barb that they use like a
harpoon to kill their food.
Terebra shells also live in the Indian and Pacific Oceans.
They’re thin and usually 4 to 6 inches (10 to 15 centimeters)
in length. Like the cone shell, the terebra shell has a stinging
barb and should be considered very dangerous, although the
stings are rarely fatal.
Like ray stings, you treat shell stings by immersing the wound
in hottest water the person can stand without scalding.

Part VThe Part of Tens

In this part . . .
In this classic For Dummies part, we give you ten-item
lists to boost your survival power. The best way to
increase your chances of survival is to practice a few tech-
niques so that when you need to use them in a crisis,
you’re not doing them for the fi rst time. Another good idea
is to be ready to escape some common — or uncommonly
dangerous — situations before they get worse. In this part,
we tell you which ten techniques are best to practice and
how to get out of ten desperate situations, such as escap-
ing a sinking plane or surviving an encounter with a bear.
Chapter 23
Ten Ways to Practice Wilderness Survival Skills
In This Chapter▶ Building a fire
▶ Creating survival tools
▶ Practicing techniques
As you can imagine, many of the skills we talk about in
this book require some practice before you can do them
every time. However, performing many of these just once is a
quantum leap that can boost your confidence considerably.
This chapter covers several skills you may want to practice,
including building tools, finding direction, and performing
CPR. We start with the fire exercises because they’re the ones
you should master first. (Note: When working on a fire-building
exercise, have a garden hose or other fire extinguisher at the
ready, don’t build next to anything flammable, and be sure to
check into local regulations regarding campfires or open fires
before you start building one!)
Make a Fire with Two MatchesYour ability to start a fire can mean life or death in cold
conditions, so practicing your ability to successfully ignite
a fire and keep it going is the cornerstone of being able to
survive in the wilderness. One great practice exercise is to
take two matches into the backyard and see what you can do
to make a fire. Remember, you get only two matches to get
the whole thing started, so overbuild everything. Get as much
of the following as you can:

Part V: The Part of Tens 426
M
Mf
✓ Tinder: Try to use the wispiest of fibers, like a dense wad
of hair-thin scrapings from the inside of a dry piece of
bark. A dense wad of dry, dead grass works well, as does
straw. You can also try something more substantial, like
thin wood shavings or leaves.
✓ Kindling: Only use wire-thin twigs that snap cleanly in
your hands — that indicates they’re completely dry. The
largest kindling in your arsenal should be pencil-sized
sticks that are so dry that they snap cleanly. Snap!
✓ Fuel: Use thumb-sized sticks and larger.
Build the fire meticulously before you start, and make sure
you build a wind break around it. Hold the box of matches
firmly and stab down. Give the match a few seconds to really
start burning, and then ignite your tinder at lowest point
possible. You get only two tries. For more on fire craft, see
Chapter 5.
Make a Fire with a Magnifying Glass
To start a fire with a magnifying glass, you need pretty strong
sunlight. Here’s how to light your fire:
1. Find a spot where you can hold the magnifying glass
so that direct sunlight can reach it (that is, out of any
shadows).
2. Build your fire as in the preceding section.
The fire-starting method using a magnifying glass (or
sparks) requires you to use exceedingly flammable
tinder, such as a golf-ball sized wad of lint collected
from your clothes. This tinder ignites fast and burns
for only two to three seconds, so you have to use it
to ignite secondary tinder, like bark scrapings, dead
grass, straw, wood shavings, or leaves.
3. Hold the magnifying glass in the sunlight, a few
inches over the primary tinder, until a bright white
spot appears on the tinder; when this happens,
adjust the distance from the magnifying glass to the
tinder until the spot is as small as you can get it.

Chapter 23: Ten Ways to Practice Wilderness Survival Skills 427 Now it’s at its hottest, and in a few seconds the tinder
should catch fire.
4. Use the primary tinder to ignite your secondary
tinder; use that, in turn, to light your kindling.
Make a Fire with a Bow DrillMaking a bow drill is a fun afternoon activity that can help
you figure out a lot of info that’s valuable outdoors. By making
and using your own bow drill, you can discover
✓ What kind of cordage does — and doesn’t — work for
the bowstring (long, tough boot laces are good; however,
although the drawstring from sweatpants may work, it’s
perilously fragile, and it slips)
✓ How to use a branch to make the bow
✓ The feeling of the right type of friction you need to make
an ember
Chapter 5 outlines the how-to to make a bow drill fire.
Make a Flotation Device from Your Pants
You can use a swimming pool for a few hours to figure out
how to make an improvised life preserver from a pair of
trousers (as we show in Chapter 18). Here’s how:
✓ Start in the shallow end of the pool (standing in chest-deep
water) to see how the inflation process works. Tie tight
knots in the bottom of each pant leg and grasp the pants
by the waistband. Hold the pants behind your head. In
one quick motion, swing the pants over your head and
down onto the water, trapping the air inside. Cinch the
waist tightly with a belt.
✓ After you see how your pants inflate, try going through
the whole process in the deeper end of the pool, where
you have to take your pants off while floating and/or
treading water. If you have a lot of trouble removing your
wad
oes
ke
n
The
ly
ng
ass
any
or
d
s
d
te
he
Part V: The Part of Tens 428
M
M
shoes and pants while you’re treading water, you can
take a good lungful of air, try to float calmly as you can,
and then (very gingerly) untie your shoes and slip off
your trousers.
If you’re not a good swimmer, obviously the deep-end
practice session can be lethal, because you may get
tangled in your clothes and drown. Don’t try it unless
you’re very confident and competent in water.
This is a very realistic simulation, and it’s one of the best
survival practice sessions you can do. If your pants don’t
inflate well, try submerging for a moment and blowing air up
into the partially inflated pants legs.
Find North with the Sky’s HelpIf you know which direction is north, the rest of the directions
are easy enough to find. If you face north, east is on your
right, west is on your left, and south is behind you. To locate
north, just look to the sun and stars for direction (Chapter 10
covers these methods in detail):
✓ If it’s lunchtime — midday — and you’re in North
America, Northern Asia, or Europe, the sun is due south
of you. Put the sun at your back, and you’re facing north.
✓ Use a wristwatch to find north in the daytime. (If you
have a digital watch, you can draw a simulated watch
face, with the current time, on a slip of paper.) If you’re
in the Northern Hemisphere, point the hour hand of your
watch directly at the sun. Due south lies halfway between
the hour hand and the 12. When you’re facing due south,
north is directly behind you. (Note: If you’re on local
Daylight Saving Time, you have to adjust your watch by
subtracting an hour. You can either wind it back manually,
or you can simply estimate where the hour hand would
be if you were to set the watch back.)
✓ Use a simple stick-shadow compass to find your east-
west line, and then derive north from that. Place a 3-foot
(0.9-meter) stick in the ground and mark the end of
its shadow. Fifteen minutes later, mark the end of its
shadow again. Put your left foot on the first mark and
your right on the second, and you’re facing north.

Chapter 23: Ten Ways to Practice Wilderness Survival Skills 429 ✓ Go out on a clear night and locate the Big Dipper and
Cassiopeia. Between them lies the North Star. This
method only works in the Northern Hemisphere; if you’re
in the Southern, you want to look for the Pointer Stars
and the Southern Cross to find due south.
Make a TripodYou can use a tripod of stout poles to hang a pot over a stove,
to use as a rack for drying clothes or food by a fire, and to
smoke food. In the wilderness, you’d make a tripod from
three saplings, stripped of bark and each about 2.5 inches
(6.5 centimeters) in diameter. At home, you can simulate
these with broomsticks or other similar poles.
Most people need about three tries before they understand
the amount of tension they need on the lines to make the
tripod work. Use whatever kind of cordage you can scrounge
up at home (such as electrical wire or clothesline) to simulate
the realities of having less-than-ideal materials in a survival
situation. Chapter 14 covers cordage and lashing in detail.
Make a Bow and ArrowA bow-and-arrow project makes for a fun afternoon. The main
obstacle to making a bow in the city is finding a piece of green
(living) wood to carve into the bow. You need a sapling about
1.5 to 2 inches (3.8 to 5 centimeters) in diameter. After you
have this, the rest of the elements are relatively straightforward,
as we outline in Chapter 14. Find a safe place to practice
shooting a bow — the local park isn’t good because you could
injure or kill someone! Call your local police station for advice
on where you can shoot your bow and arrow.
A good bow and arrow is lethal, and you shouldn’t try to build
anything less than that. You want to develop the skills to
make something you could use to hunt in the wild. This is a
real weapon, so don’t point it at anyone.
n,
up
ns
te
10
th
rth.
e
our
een
th,
by
ally,
d
oot

Part V: The Part of Tens 430
PMake a Transpiration BagWater is a major concern in any survival situation, and you
should know several places to find it outdoors and several
ways to extract it from wilderness resources (such as plants).
Chapter 7 addresses the actual how-to directions on making
transpiration bags, tools you use to collect water from plants.
A transpiration bag is simply a large bag (preferably plastic)
that you wrap around the bushy end of a tree or bush limb.
The resulting assembly should be about the size of a beach
ball, and you should fit it with a drinking hose. As water
naturally evaporates from the plant tissues, it collects inside
the bag.
Beware that covering a whole plant with a bag can kill it; try
to cover no more than 20 percent of a plant’s leaves every
time you use a transpiration bag.
Use a CD to Practice SignalingYou can practice signaling for help by taking an old CD (and a
friend) to a park on a sunny day. Without blinding anyone, try
to use the CD to flash the sun at your friend from across the
park. Have your friend wear sunglasses to prevent light injury.
Sight directly through the hole in the center of the CD: Put
your friend “in the hole” and then tilt the CD very slightly to
put the sun on the target. To help you aim, frame your target
between two fingers held up like a V. Have your friend raise an
arm when he or she sees the distinctive flash so you can tell
the method is working.
To make the exercise more fun, have your friend stand in
various places. Then see how fast you can get at spotting your
friend and then picking the CD off the ground and signaling
successfully. Or try a moving target: Signal your friend while
he or she walks.
Chapter 23: Ten Ways to Practice Wilderness Survival Skills 431
Practice CPRAt home, you can practice cardiopulmonary resuscitation
(CPR) simply by going through the motions of finding the
right place press on the chest, lacing your fingers in the right
way (to do the compressions), and figuring out how to get the
rhythm of compressions and breaths down. Doing this is a
good idea because it builds memories that you can refer to if
you end up in a bad spot. Remember: When practicing, don’t
actually do the compressions or breaths; just practice the
motions and the rhythm. Of course, taking a course from the
Red Cross is the best way to practice CPR, and it’s inexpen-
sive. For more on CPR, see Chapter 13.
ts).
g
nts.
)
.
h
de
y
d a
try
e
ury.
o
et
e an
ll
our
le

Part V: The Part of Tens 432

Chapter 24
Ten Quick EscapesIn This Chapter▶ Escaping from cars and planes in the water
▶ Getting out of some tight spots in the wilderness
When you get home, you can tell everyone how you
cobbled together a shelter, built a fire, and finally
flagged down your rescuers. The most dramatic part of your
story, however, usually comes when you have to tell how you
made your great escape. In this chapter, we tell you how to
get out of ten high-adrenaline situations.
Escaping a Sinking CarWhether an accident sends your car into a river or a flash
flood sweeps you off the road, here’s how to escape if your
car ends up in water:
1. Brace for impact.
Put your arms up in the shape of an X to protect your
face and grab the shoulder strap of your safety belt.
2. The moment you strike the water and stop moving,
roll the windows down (not up) and unlock the
doors.
A flooded electrical system prevents electrical locks
from unlocking or windows from coming down.
3. If no water is flooding through the window yet,
unbuckle your seatbelt and go out the side window
right away; if water is already pouring in, stay
buckled up and wait.

Part V: The Part of Tens 434
R
If the water is flooding in or you can’t get the window
to roll down, keep your seatbelt buckled. The flooding
water can overwhelm you and push you around in the
car, disorienting you. Also, as the car floods, it will
most likely roll, and staying in the seat helps to keep
you oriented.
4. Wait until the water reaches your chin and then take
a deep breath and hold it.
You can probably hold your breath for about 45
seconds, which is plenty of time to make it out alive.
5. If you’ve gone down fast and you can’t roll down the
windows or open a door, use a heavy object, like a
flashlight or hammer (you can carry one under the
driver’s seat) to break a side window; don’t try to
break the windshield — it’s too strong.
Many companies manufacture survival tools specifically
made to both cut seatbelts and knock out a window.
Every car should have one convenient to reach, and
everyone should know how to use it.
6. Swim out through the window if it’s down; if not, try
the door.
You must wait until the car floods and the pressures
are equalized — inside the car and out — before you
can open the door. Even when the car is flooded,
getting the door open is difficult, but you can do it.
If you’re disoriented when you reach the outside of
the car, follow bubbles; they tend to go toward the
surface.
Escaping a Small Plane in WaterMany small planes turn upside down when they ditch in the
water, so you’re most likely to find yourself inverted, with the
cabin filling with water. Keep composed — you probably have
about 30 seconds, which is plenty of time to do this maneuver
right.
Wait until the motion of the plane has completely stopped.
Identify your exit (the nearest door handle) with one hand,

Chapter 24: Ten Quick Escapes 435and with your other hand, find a point of reference inside the
cabin, like the dash or the handle near the ceiling. Release
your seat belt and pull yourself out through the exit you’ve
identified. If that door is stuck, you may have to go out the
other. If all the doors are stuck, break out a window. Use a
heavy tool, if possible, such as a fire extinguisher. Kick with
your legs; they’re much stronger than your arms.
Righting a Small Boat or CanoeSmall boats and canoes are easy to tip if you’re not careful.
Unless your vessel is very easy to right, don’t bother trying to
do it on your own unless you’re an expert and have practiced
it a lot. Some small vessels have good flotation capabilities, so
you can actually sit in a sunken canoe and paddle it to shore,
even if it’s 90 percent underwater. Here’s what to do if your
vessel capsizes.
As soon as you’re in the water, be sure to put on a personal
flotation device (PFD) if you’re not already wearing one.
You can usually right a small sailboat that’s flopped on its
side by standing on the daggerboard (also known as a
centerboard) and letting your weight roll the boat upright.
If the boat has turned all the way over (turned turtle), you
may have to step on the gunwale (the ridge that runs along
the edge of sides of the boat), grasp the daggerboard with
your hands, and lean back to slowly turn the boat on its side.
If you were in a canoe and you have a friend with you, go
under the overturned boat (with your PFD still on). When
you’re underneath, the two of you have to push the canoe
up out of the water a few inches and then throw it over to
one side. Decide, when under the inverted canoe, which
side you’re going to throw it to, and then count, “One, two,
three” to a combined upwards shove. Many times, doing this
requires the two of you to kick with your legs at the same
time to give yourself just enough buoyancy. If you have two
canoes, one capsized and the other upright, you can lift the
inverted canoe out of the water and slide it crosswise across
the floating canoe; then turn it over and launch it back into
the water.
ow
ng
the
p
ake
e.
the
a
e
ally
w.
d
try
es
u
ere
the
ave
ver

Part V: The Part of Tens 436
S
Escaping a Forest FireForest fires can move quickly and wipe out almost anything in
their path. For humans, the main dangers are suffocation (the
fire consumes so much oxygen that there’s literally nothing to
breathe), choking (breathing in ash or dense smoke), and of
course, burning. Here’s how to escape a forest fire:
1. Make a mask from a bandana or other material to
protect yourself from smoke inhalation.
Use it to cover your mouth and nose tightly.
2. Try to get downhill and into a clearing with little or
no fuel to burn.
Fire moves upward fastest, so going downhill buys you
time. Sandy areas like dry riverbeds are good places
to go. A forest clearing is better than a fully vegetated
forest. If you find a lake or river, get in and wait for the
fire to pass.
3. If you can’t find cover and a fire is coming close, dig
a ditch, get in, and cover yourself with as much sand
or dirt as you can.
Be sure the sand or dirt doesn’t contain a large
percentage of dead wood or forest duff, the soft,
decaying layer of vegetation that carpets many forest
floors; this material explodes into flames.
4. When the fire has passed, stay in the areas that are
burnt off and begin efforts to signal for help.
With nothing left to burn, the fire can’t come back.
Escaping a Bee SwarmIf bees start swarming, here’s how you can evade the attack:
✓ Run as fast as you can for dense vegetation; they may
lose your trail there.
✓ If you have a campfire going, run to it and try to make a
lot of smoke with wet vegetation to deter the bees.
Chapter 24: Ten Quick Escapes 437 ✓ If you have a blanket or tarp, wrap yourself in it tightly
and wait them out.
✓ If you can find a body of water, you can lie in it, on your
back, breathing with just your lips out of the water or
using a reed to breathe (a fun thing to practice on a hot
afternoon) However, the bees may still be there when
you surface.
Try not to crush bees; their dead bodies emit an alarm to
others.
Surviving a Bear EncounterBears are common in many wilderness regions. With bears —
from black bears to grizzlies and even polar bears — the best
offense is a good defense. Let them know you’re coming in the
first place; some people wear a bell when they hike in bear
country, yell, “Hey bear!” loudly every few minutes and/or hit
trees or rocks with sticks. These sounds often frighten bears
away before an encounter even happens. For more on keeping
bears away from you, see Chapter 15.
Although bears are unpredictable, some general advice has
proven valuable. Here’s how to handle a bear encounter:
✓ If a bear spots you: Don’t run, and don’t make eye
contact. Hold your ground for a moment and then back
away slowly. You can try speaking in calm monotone
voice to reassure the bear. If you’re between a mother
and a cub, get away from them as fast as you can without
making jerky, panicky moves.
✓ If the bear rushes you: Hold your ground. This is
important but hard to do.
✓ If a bear attacks you: Don’t fight back. A bear is much
stronger than you are. Play dead by curling up in a ball
and protecting your neck and skull with your hands. (The
only time to fight back is if the bear doesn’t leave you
alone after you’ve played dead for a while; then, it has
decided to eat you, and you might as well fight. Go for
the eyes.)
g in
the
g to
of
or
you
s
ed
the
dig
and
est
re
k:
a

Part V: The Part of Tens 438
S
S
Many people venturing into bear country carry bear spray, a
large canister containing some kind of pepper or deterrent
that bears don’t like to get in their snouts or eyes. Sometimes
it deters bears, other times it doesn’t, and sometimes it
backfires when the wind blows the spray back into the
human’s face! All things considered, carrying bear spray is a
good idea, but be sure you know how to use it, and don’t let it
fool you into thinking you’re safe from bears.
The most unpredictable and dangerous bear is the polar
bear. In a survival situation, only a high-powered rifle or a
large-gauge shotgun loaded with slugs are realistic defenses.
Don’t get caught in the high Arctic without one of these
weapons and the knowledge of how to use them effectively
and humanely. If you’re forced to shoot a polar bear, aim for
the lungs first. If you disable the bear, be sure to kill it with a
final, lethal shot, to prevent suffering.
Encountering a Mountain LionMountain lions (also known as cougars, pumas, or panthers)
are big cats, roughly 100 to 200 pounds (45 to 90 kilograms)
in weight. In spite of constant media hysteria to the contrary,
attacks on humans are rare. Mountain lions are opportunistic
predators, which means that they’re looking for the easiest thing to eat.
When a mountain lion confronts you, you want to convince it
that you’re the hardest thing in the world to eat. Make yourself
larger by opening your jacket and spreading it out to the sides
or by lifting your backpack over your head. You can also try
holding up branches of trees or large boards — anything that
makes you appear to be a very large animal.
Never run from a mountain lion. Instead, you want to signal
to the animal that you’re not a sheep or deer. Do not crouch,
limp, or act in any way infirm. The cat knows the difference
between strong and weak prey.
If the animal attacks, it usually goes for the neck or head. You
can fight off mountain lions. A sharp blow to the bridge of
the nose or to the eyes with a large stone or the blunt end of
an ax communicates to the animal that you’re not easy prey.
Continued strikes may be necessary to get your point across, but
the animal should disengage as soon as it realizes its mistake.

Chapter 24: Ten Quick Escapes 439
Surviving an AvalancheAvalanches are sudden landslides of ice and snow that can
bury you and suffocate you in the blink of an eye. The best
policy is to avoid avalanche terrain altogether (see Chapter
16). However, if you are caught in an avalanche, follow these
steps:
1. Try to get your backpack off.
Some people say this prevents the body from being
dragged down into the snow.
2. Use a swimming motion to try to stay on the surface.
Swim in an overhand, freestyle motion. Some survivors
say being in an avalanche is like being caught in a
raging river.
3. As you slow down, fold your arms across your face.
If you’re lucky, this creates a breathing space as the
snow settles all around you.
4. After you stop moving, try to dig for the surface or
make sounds to help rescuers.
If you’re not sure where up is, let some drool slide out
of your mouth: It heads downward, so you want to dig
in the opposite direction.
Surviving a WhiteoutA whiteout is a thick mist or blizzard that reduces visibility to
just a few feet. If you don’t know exactly where you are, you
may find yourself stepping off a cliff, so traveling in a whiteout
is a bad idea unless you’re highly experienced and have a
good map and compass skills. A whiteout, though, should
really just be an inconvenience. Remember that you don’t
really need food for the night and that things will probably
look better in the morning. To wait out a whiteout, do the
following:
1. Get your hat on, and if you’re going to sit down,
insulate your body from the snow with anything you
can, such as a backpack or vegetation pulled from a
tree or bush.
a
mes
a
et it
s.
or
a
)
)
ry,
tic
e it
self
des
y
hat
l
h,
e
but

Part V: The Part of Tens 440 2. Make a snow shelter (refer to Chapter 16).
3. Do whatever you can to keep your body
temperature up.
Light a candle, wrap yourself in a survival blanket,
huddle with another person — whatever you need
to do. If it gets very cold, get active. Be sure to leave
some signal outside the entrance so rescue crews
don’t just ski right past you.
Getting Out of QuicksandQuicksand forms when water wells up from an underground
spring and “liquefies” sand or mud to the consistency of
gelatin. If you find yourself in quicksand, don’t panic — your
body is probably less dense than quicksand, so you shouldn’t
sink fast. Note that on television, survival experts have to
leap into quicksand with both feet to show how to get out
dramatically. You’re much more likely to realize you’re in
quicksand when one leg goes in.
If you’re walking in the country and suddenly find yourself
with one leg deep in quicksand, simply sit back on the firm
ground you just stepped off. Shove your walking stick down
alongside your leg and work the shaft back and forth as you
try to pull out your leg slowly. This breaks the vacuum formed
by trying to pull your leg out. Don’t try to jerk your leg out
of the pool; work your leg free slowly and get back on firm
ground.
If you find yourself suddenly up to your hips in quicksand,
slowly bend forward at the waist to try to lay some of your
body on the surface. If you have a walking stick, lay it across
the quicksand in front of you and lie on it, distributing your
weight across a larger area. Use your arms to slowly swim or
drag yourself forward. Continue to work your way toward firm
ground. If you can’t see firm ground in front of you, work back
toward the firm ground you last walked on.

• A •abandoning ship, 347–
350, 359–360. See also water-bound
environments,
adrift on lakes or
oceans
ABCs (airway, breathing,
and circulation),
assessing, 16,
221–223, 417
abdominal pain, 277
Ace bandages, 234, 235
action, benefi cial effects
of taking, 36, 37–38,
58, 290, 367, 419
adrift on water. See
water-bound
environments,
adrift on lakes or
oceans
aerial fl ares, 208
A-frame shelters, 84–85
African lions, 336
afterdrop, hyperthermia,
243, 415
aimers, 189
aiming off (deliberate
offset) when
navigating, 145
airband radios, 211
aircraft, 186, 434–435
airway, checking, 221, 222
alcohol
as diuretic, 14, 89, 375
for removing leeches,
288
algae, cold-climate, 299
allergies
anaphylactic shock,
treating, 248
insect stings or bites,
247, 326
nuts, 109
pollen, 108, 408
seafood,138, 395
alligators, crocodiles,
and caimans, 287
aloe vera plants, 314
AM radios, 406–407
ambush predators, 287
amputation, traumatic,
228
anaphylactic shock
(allergic reaction),
248
anchor bend knots,
253–254
anger, 36, 43
angling (fi shing), 130–132
animal bites and stings,
243–247, 244–246,
278–279, 420–422
animal products
blood, 90, 128, 120, 127,
384, 385-386
bones, 122, 128,133,
138, 263-264
dung, 298
fats, 298
hair, 81
marrow, 138
sinew, 54, 128
skins, 55-56
animals as food. See food
animals in the wild
avoiding, 80–81, 86
as cave/log residents,
79, 80–81
in forests, 273–276
fresh kill sites, 273
in jungle environments,
284–288
tracks at water
sources, 93
antelope, 327
antibiotics, 239
antiseptics, 236
antlers, 122, 128, 133,
263–264
ants, 94, 326
anvil head cloud, 22, 23
apathy, 48, 241, 415
archery, 125–126
Arctic native peoples’
cold-weather
clothing, 52–53
Arctic/Antarctic. See
snow- or ice-bound
environments
armature, 120, 121, 124
armpitsand warmth,
1, 13, 353
arterial bleeding, 226,
227–229
arthropods, 329
aspen tree leaves, 264,
265
aspirin, 419
aspirin substitute
(salicin or salicylic
acid), 264–265
avalanche areas and
avalanches, 78, 291,
301–302, 304, 305,
439
axle grease, 318
• B •baby oil, 318
back bearings, 188
backtracking, 180
Bailey, Maralyn
(survivor), 391
bailing out vessels, 367,
370, 411
bait, 119, 131, 135, 387
balaclavas, 311, 311
ballast bags (on life
rafts), 365
Index

cam
cam
cand
cani
capi
car s
carb
card
card
caro
cars
Cass
cate
catt
cave
CB r
CDC
CDs
cele
cellp
cent
chafi
chan
char
chem
cher
ches
chlo
chok
chol
circ
city
civil
clam
clea
clot
bamboo, 99, 192, 283
banana and plantain
trees, 98, 99, 280
bandaging wounds. See
fi rst aid
Baobab tree, 99
barnacles, 396
barometric pressure, 21
barracuda, 394
barrel cacti, 324–325
basalt, 261
baseboard for bow
fi remaking, 74
bats, 279
batteries
in cars for fi remaking, 71
conserving, 38, 209, 346
extending life of, 1, 29,
164, 209
extra, 29
for magnetizing
needles, 162
and steel wool for
starting fi res, 71
beaches
attempting landings on,
410–412
near jungle rivers, 281
bear spray, 272, 438
bearings, taking, 157,
188, 403–405
bears, 80–81, 86,
272–273, 437–438
bedding, checking for
snakes, 274
Bedouin clothing,
59–60
beelines, 145
bees, 94, 326, 436–437
beetles, 326
bells. See noise,
noisemakers,
whistles, and horns
Benadryl, 248
berries, 108
Big Dipper (Ursa Major),
175, 429
bights, 253, 256
bilharzia (disease), 277
birds, 93–94, 327,
395–396, 407
bites and stings, 243–247,
278–279, 420–422
bivy (bivouac) sacks, 31
black fl ies, 279, 285
black mamba snakes, 287
black widow spiders,
246, 276
blazing trails. See
trailblazing
bleach, household, 101
bleeding, controlling, 16,
226–229
blindness
river blindness
(onchocerciasis),
279, 285
snow, 311-312
water glare, 420
blisters, 240
blood (animal), 90,120,
127, 128, 384,
385-386
blood pressure, 229
blood trail, following, 120
boarding platforms
(life rafts), 363
boats in trouble, 35. See also water-bound
environments, adrift
on lakes or oceans
body, signaling with,
201–202
body temperature, 11,
46–49, 289. See also
clothing; shelter;
thermoregulation
boiling water for
purifi cation, 28,
100, 276, 279
bolas, 126–127
Bombard, Alain (doctor),
378
bone fractures, 231–233,
234
bones of creatures,
122, 128, 133, 138,
263–264
boobies (birds), 407
boomslang snakes, 287
boots. See footgear
boots for deep snow,
52, 53
botfl ies, 285
boundary layer (of
warmed water), 352
bow and arrows,
122–126, 429
bow drills and bow fi res,
72–74, 427
bowline knots, 254, 255
box jellyfi sh, 421
boxing the needle
(compass), 158, 160
braided rope, 250
breakers at shorelines,
411
breathable clothing
layers, 51
breathing
checking, 222
deeply, 36
hyperventilation, 415
through the nose, 89,
290, 336, 375
brown recluse spiders,
246, 275–276
bubonic plague, 278
buckles, 203
buoys, 400
burns, 239–241, 266, 267,
314
bushcraft, 3
bushmaster snakes, 286
butter, 318
butterfl ies, 410
butterfl y bandages, 237
buttons, 31
• C •cacti, 99, 324–325, 326
caimans, alligators, and
crocodiles, 287
cairns, 189, 207
camel bags, 31
camera fl ash, 203
442 Wilderness Survival For Dummies

Index 443campfi res. See
fi remaking
camps and shelters. See
shelters
candles, 31, 59
canister (containing a
ship’s life raft), 358
capillary bleeding,
226–227
car seat covers, 55
carbon monoxide
poisoning, 292, 294
cardboard, 54, 55
cardiac arrest, 416, 421
carotid artery, 223
cars. See vehicles
Cassiopeia, 175, 429
caterpillars, stinging, 285
cattails, 267
caves as shelters, 80
CB radios, 210
CDC (Centers for Disease
Control), 277
CDs, mirrors and other
refl ectors, 30, 430
celestial navigation,
174–176
cellphones, 26, 30, 209,
213–214, 348
centipedes, 285, 329–330
chafi ng and saltwater
sores, 420
channel for plow fi re, 72
charcoal, 103, 317
chemical treatments for
water, 100–101
chert (stone), 261
chest wounds, 238
chlorine, 27, 101
choking, 248
cholera, 277, 279
circulation, checking,
222, 223
city glow, 406
civilization, signs of,
185–186, 406–407
clams, 116
cleanliness, as morale
builder, 44, 86
clothes drag method, 220
clothing
adjustment as morale
builder, 44
appropriate
for expected
weather, 20
checking for critters,
274, 330
for cold weather or
environments, 12,
52–57, 310
colors and fi t, 61
cuffs snug, 280
discarding, 12, 42, 316
drying, 50
for hot environments,
59–62, 316–317
infl ating for fl otation,
354–355
insulating, 12, 310
for jungles, 280
layering for
temperature
control, 11, 49–51,
346
mold and mildew, 280
as padding for shore
landings, 411
as rescue signal, 207
wetting for evaporative
cooling, 61, 375
wetting or sweating in,
avoiding, 11, 17, 50,
290, 294
clouds, 22–23, 408, 409.
See also weather
considerations
clove hitch knots, 255
clubs, 119, 127
clumsiness, 48
cobbles stone, 260
cocoa butter, 318
coconuts, 99
coffee as diuretic, 14, 89
cold environments. See
snow- or ice-bound
environments
cold shock response,
303, 349, 415–416
cold traps, 296
collisions involving
vessels, 343–344
compasses
gumball-machine, 153,
159
improvising, 162
need for, 26
orienteering, 29,
153–154
stick-and-shadow-style,
168–169, 428
top-sighting, 153
types, 153
using
boxing the needle,
158, 160
correcting for
potential errors,
154–156, 160–161,
180–181
establishing fi eld
bearings, 158–159
holding, 157
with map, 156–157
with nautical chart,
403–404
orienting maps,
160–161
setting course from
map bearing,
161–162
condensation, collecting,
95–98, 380–381
cone shells, 422
confusion, 48, 88, 229
constipation, 279
contempt, using to
advantage, 36
contour lines on maps,
147, 148–149
control, 10
cool-headedness, 37
cooling off, 315. See also
thermoregulation
cooperation, 39
coordinates on maps,
149–151
copperhead snakes, 275
coral islands, 411
coral snakes, 275, 286
87
352
res,
55
160
s,
5
9,
s,
267,
286
37
6
nd

444 Wilderness Survival For Dummies
• Eeast
eatin
eddi
eggs
elec
elec
ELT
emo
epin
EPIR
equi
dis
ess
ma
mo
pr
sh
tak
too
for
erro
esca
av
be
be
for
cordage. See also knots
best for survival kits,
28–29
for bolas, 126
improvising, 54
as shelter-building
essential, 82
for snares, 117
strength
considerations, 250
as “tail” in avalanche
areas, 302
types, 250–251
cornices, 304, 305
cotton clothing, 51
cotton rope, 251
cotton-mouth snakes, 275
cougars, 273–274, 438
coughing, 417
cowfi sh, 394
CPR (cardiopulmonary
resuscitation), 16,
224–225, 417, 431
cradles (for life raft’s
canister), 358
cramps, abdominal, 330
creeks. See water
(creeks, rivers,
or ponds)
crevasses (glacial
cracks), 304–306
crocodiles, alligators,
and caimans, 287
crotch and warmth, 353
Cuellar, Joaquin
(survivor), 384
cumulonimbus clouds, 22
currents, 371, 374,
398–400, 405
cutlasses (machetes), 282
• D •dacron rope, 251
daggerboards
(centerboards), 435
datum for GPS receivers,
164, 181
davits (holding
lifeboats), 357
dead reckoning, 152–153
dead-man’s fl oat,
355–356, 400–401
debris fi elds, 196, 354,
359, 365, 374, 409
debris signals, 201
declination and
declination
adjustment, 155,
156, 160–161, 403
dehydration avoidance,
13–14, 17, 50, 87–88,
100, 320–321. See also water for
drinking
dehydration treatment,
243
deliberate offset (aiming
off) when
navigating, 145
delirium, 377, 379
dengue fever, 278
dental fl oss, 29
deodorants, 272
desalination kits, 383
deserts. See hot
environments
deviation, compass, 156
dew, gathering, 95
diarrhea, 100, 102, 247,
265, 266, 277, 278,
314
dimenhydrinate
(Dramamine), 418
diphenhydramine
(Benadryl), 248
directional signals, 207
disbelief, mastering,
34–35
discipline, 38
diseases/ailments. See also fi rst aid;
poisons
of hot environments,
314–315
of jungle environments,
276–279
of snow- and ice-bound
environments,
311–312
of water-bound
environments,
413–422
disorientation, 241, 315,
415, 417
distances and scale,
147–148, 398. See also map reading;
navigating
distress signals, 198.
See also signaling
for rescue
diuretics, avoiding, 14,
89, 375
dizziness, 49, 241, 243,
248, 292, 314, 330,
415, 417
dog paddling, 401
dorados (mahi-mahi),
368, 393
downed-tree style
shelters, 84–85
drainages, 92–93, 186
Dramamine, 418
dressings for wounds,
236
driftwood, 297
drogue on boat or raft,
365–366, 371, 412
drowning, reviving
someone from,
416–418
drown-proofi ng fl oat
position, 355–356,
400–401
dry bags, 26
dry mouth, 88
drying or smoking food,
139–140
duct tape, 29, 55
dung, 298
dye markers and other
color, 206–207
dysentery, 266, 277, 279

Index 445
• E •eastings, 151
eating. See food
eddies, 130
eggs, 116, 327
electronic lights, 208–209
electronics, 26, 30
ELT (emergency locator
transmitter), 215
emotional component of
survival. See
psychology of
survival
epinephrine (Epi-Pen),
248
EPIRB (emergency
position-indicating
radio beacon),
214–215
equipment. See also
clothing; footgear;
head coverings;
navigating; survival
kits
discarding, 42, 370
essential items, 23–26
machetes, 282
mold and mildew on,
280
preventing loss, use of
lanyards, 25, 29,
132, 381
shovels or other
digging tools, 292,
293, 294
taking ashore intact,
412
tools and false
confi dence, 15, 17
for water trips, 32
errors in judgment,
16–17
escaping
avalanches, 439
bear encounters,
437–438
bee swarms, 436–437
forest fi les, 436
mountain lion
encounters, 438
quicksand, 440
and righting capsized
small boats, 435
sinking ship, 347-350,
359-360
small plane in water,
434–435
whiteouts, 439–440
Essentials of Sea Survival (Golden and
Tipton), 2
Euphorbia (milk bush or
pencil-tree), 320,
326
evergreen torches, 205
eye (loop in bow line),
358
eye protection, 52, 53,
59, 60–61, 311–312,
316, 420
• F •fabric, as water fi lter,
102–103
face, protecting from
cold, 311
falls, avoiding, 16, 190
family and friends, 39,
177–178
Family Radio Service
(FRS) UHF, 210
fatigue, 43, 88, 243, 247
fats, 298
fear and stress, working
with, 35–37, 41
feet. See footgear
fences, 186
fer-de-lance snakes, 286
ferries, 340
fever, 278, 279, 330
fi eld bearings, 158
fi les (moving ranges),
188–189
fi lters for water, 102–103
fi re aboard vessels,
344–345
fi remaking. See also
signaling for rescue
as animal deterrent, 81
basic process, 64–66
choosing site, 64, 66,
69, 81, 82
extinguishing fi res,
74, 82
feeding new fl ames, 66
importance, 11, 12, 17,
63, 64
materials,
fl ammable, 64
materials, gathering
near shelter site,
77, 320
practicing, 425–427
refl ector screen, 67, 84
in snow- or ice-bound
environments,
297–299
striking matches, 67
structure options,
66–67
as structure requiring
care, 63–64
using common items,
24, 26–27, 70–71
using dead lighters, 68
using primitive means,
71–74
in wet conditions,
68–69
fi res, signal, 204, 208
fi rst aid
basics
assessing ABCs,
221–223
CPR, 224–225
having kit on hand, 31
importance, 219
recovery position,
223–224
serious trauma,
219–221
controlling bleeding,
226–229
und
15,
e g;
ng
4,
3,
0,
,
,
t,
2
56,
od,
er
79

Wilderness Survival For Dummies 446fore
fore
da
ed
fork
foxe
frac
frap
free
freq
friga
fruit
fuel
fung
• Ggaff
gaite
gam
gam
gann
garb
gaso
gath
giar
Gies
gila
fi rst aid (continued)medicines and
remedies
aloe vera plants, 314
antibiotics, 239
antiseptics, 236
aspirin, 419
aspirin substitute
(salicin or salicylic
acid), 264–265
Benadryl, 248
Dramamine, 418
epinephrine (Epi-
Pen), 248
ibuprofen, 419
iodine, 27, 101, 236
making from nature,
264–267
treating
anaphylactic shock
(allergic reaction),
248
bites and stings,
243–247, 420–422
burns, 239–241,
265–266, 267
cold shock response,
415-416
dehydration, 243
fractures,
231–233, 234
hypothermia,
241–243, 414–415
poisoning, 247–248
seasickness, 418-419
serious trauma,
219–221
shock, 229–230, 231
skin chafe and
saltwater sores, 420
sprains, 234-235
sunburn and heat
maladies, 418–419
water-glare
blindness, 420
wounds, 235-239,
266, 267
fi sh as food, 130–140
fi sh as source of water,
383–385
fi sh, stings from, 422
fi shhook cacti, 324–325
fi shing, 130–132, 386–392
fi shing kits, 32
fi shing line, 29
fl ares, 208
fl ash fl oods
indications on maps,
147
jungle rivers, 281
from opened fl oodgates
of dams, 186
signs of, 78
in wadis, lagas, and
desert washes,
331–332, 336
fl ashlights, 23–24, 29,
208–209
fl eece, 51
fl ies
black fl ies, 279, 285
botfl ies, 285
sand fl ies, 279
in search of water, 94
fl int, 261
fl intknapping, 262
fl oating or swimming,
400–401
fl oats, 131
fl otation devices, 32,
354–355, 427–428
fl otsam as sign of land,
409
fl owers, 108, 137
fl u-like symptoms, 278
fl ying fi sh, 390
foghorns, 406
food
animals, 115–129
consumption
avoiding protein,
376, 383
minimizing, 14, 89,
106, 325
as morale builder, 44
for preventing
injuries from cold,
290
trying new, 107
edible plants,
107, 112, 113
fi nding in hot
environments, 107,
111, 325–328
fi nding when adrift on
water, 386–396
fi sh, 130–136
managing supplies, 106
plants and fruits,
107–115
preparing, 136–140
in survival kits, 32
unsafe, 112–115
food coloring, 206–207
food debris, 81, 86, 136
footbed, 308
footgear
checking inside for
critters, 274, 330
for deep snow, 52, 53,
307–308
gaiters/bootcovers, 52,
53, 316, 329
for hot environments,
316, 317
importance, 17, 56–57
insulation for, 308
for jungle
environments, 280,
288
lack of, 59
loosening in snow- or
ice-bound
environments, 290
for snake avoidance,
274, 329
foraging, 115, 116
fords, 190
forest duff, 436
forest fi res, 436

Index 447forests in desert areas
(gallery forests),
336. See also hot
environments
forests in temperate
climates. See also
hiking in wilderness
areas
dangerous wildlife
bears, 272–273
mountain lions
(cougars or
pumas), 273–274
snakes, 274–275
spiders and ticks,
275–276
edible plants, 109–110
forks in trails, 179
foxes, 327
fractures, 231–233, 234
fraps, 258, 259, 260
freeboard, 340
frequency for radio
signaling, 210–211
frigate birds, 407
fruits, edible, 108, 137,
139
fuel for fi re, 64, 69, 426
fungi (mushrooms), 114,
115
• G •gaff for fi shing, 390
gaiters/boot covers, 52,
53, 310, 316
game trails, 93, 115–116,
179
game-trail snares, 118
gannets (birds), 407
garbage bags, 29
gasoline, 288
gathering and hunting.
See food
giardia, 277
Giesbrecht, Gordon
(doctor), 303
gila monsters, 328, 329
ginger, 419
giving up or refusing to,
34, 36, 42, 241
glaciers, 305. See also
snow- or ice-bound
environments
glass, 122, 203
glissading, 306, 307
gloves and mittens, 31,
52, 53, 56–57, 118,
290, 312
goggles, 52, 53, 311–312,
316
Golden, Frank
Essentials of Sea
Survival, 2
Gore-Tex material, 51
GPS (global positioning
system) receivers.
See also navigating
caution on overreliance
on, 17
extending battery life,
164
how they work,
163–164
positioning for satellite
reception, 166
settings, 164–165, 181
track feature, 165–166
units of measurement,
181
usefulness in basic
survival kit, 26
waypoint feature, 144,
165
granola bars, 32
grass and straw, 12, 55,
85, 103, 297, 426
grasshoppers, 116, 138,
326
grief of family and
friends, 39
grommets, 83
ground, lying or sitting
on (don’t!), 58–59,
77, 79, 83, 284, 292,
293, 320
ground-to-air emergency
code (patterns),
201
groups
crossing rivers, 191
decision-making and
leadership, 39, 377
forming symbol as
rescue signal, 197
getting separated, 18,
183
huddling as possible
protection from
sharks, 350
huddling together for
warmth, 59
huddling together for
warmth in water,
353, 354
paddling depowered
boats, 370
rain catching teams,
380
separating by choice,
39, 185
water rationing
decisions, 90, 377
grubs, 326
gumball-machine
compasses, 153,
159
gunshots, 203
gunwales, 340, 435
• H •half hitch knots, 255–256
hallucinations and
delirium, 377, 379
ham radios and
networks, 211, 346
hammerstones, 261–262
hammocks, 284
handhold for bow
fi remaking, 74
handrails (landmarks),
145
, 44
ld,
07,
on
106
7
36
0
3,
52,
ts,
57
80,
or
90
e,

Wilderness Survival For Dummies 448su
tra
wa
we
hum
hum
hun
hyd
hyp
hype
hyp
hyp
• Iibup
icy e
infec
infl a
hands, keeping warm,
56–57
hatch failure and ship
damage, 345
hats. See head coverings
Hawaiian sling, 389
head coverings
in cold environments,
311–312
in hot environments,
59, 60, 316, 317
importance, 12, 13,
56–57, 60–61, 353
in jungles, 280
in water, 348, 353
headache, 88, 279, 292,
314, 418
headlamps, 29
headlands, 411
heart rate, 36, 243, 314,
330, 349, 415
heartwood, 123
heat exhaustion, 314, 419
heat stroke, 48, 314, 315
heel kick-steps, 194
helicopters
practicing safety,
217–218
preparing landing zone,
215–217
HELP (Heat Escape
Lessening
Position), 352–353
hepatitis, 277–278, 279
The Heretic (raft), 378
Heyerdahl, Thor
(adventurer),
378–379
hibernation dens, 273
hides, 128
high altitudes,
descending from, to
slow water lost, 89
high-water marks, 331,
332
hiking in wilderness
areas. See also
fi remaking; fi rst aid;
food; hot
environments;
jungles; navigating;
shelters, signaling
for rescue; snow- or
ice-bound
environments;
water (creeks,
rivers, or ponds);
water for drinking
getting back on course
when disoriented
observing and
listening, 180–182
reviewing
calculations,
180–181
stopping and
thinking, 180
taking action,
182–183
preparing for
wilderness outings
equipment
considerations,
23–32
weather
considerations,
19–23
understanding off-trail
travel
crossing obstacles,
190–194
estimating rate of
travel, 187
marking trail,
189–190
meandering, 187
traveling in straight
lines, 188
understanding trail
travel
knowing where you
are, 178
knowing where
you’ve been,
178–179
notifying friends of
expected return
date, 177–178
what to do when lost
deciding to move on,
184–186
staying put, awaiting
rescue, 183–184
hives, 248
hooks for fi shing, 387
hornets, 326
horns and other
noisemakers. See
noise, noisemakers,
whistles, and horns
hot environments
clothing for, 59–62
covering head and feet,
316–317
dangerous wildlife
centipedes, 329–330
in gallery forests, 336
gila monsters, 328,
329
rattlesnakes, 328–329
scorpions, 329–330
spiders, 330–331
dangers in
dehydration, 87–88
hyperthermia, heat
exhaustion and
heat stroke,
313–315
quicksand, 440
sunburn, 314
food
edible plants, 107,
111, 326
insects, 326
mammals, 327
poultry and eggs, 327
reptiles, 327–328
water considerations
of eating, 325
shelters
shady places,
319–320
sunshade, 318–319
warming overnight,
320

Index 449sunblock, 317–318
traveling
crossing desert
terrain, 336
in daylight, 62,
335–336
at night, 62, 333–335
planning, leaving
notes, 332–333
water for drinking
cacti, 324–325
cracks in rocks, 323,
324
dehydration danger,
320–321
mud or sand, 322,
323
rationing, 90
solar stills, 323, 324
standing water, 321
underground, 322
weather considerations
fl ash fl oods, 331–332
sandstorms, 332
humidity, 46–47
humor and optimism, 10,
39–40, 44
hunting and gathering.
See food
hydrostatic release, 360
hypernatremia, 377
hyperthermia (electrolyte
imbalance), 11, 48,
49, 314–315, 419
hyperventilation, 415
hypothermia, 11, 48–49,
225, 241–243, 374,
414–415
• I •ibuprofen, 419
icy environments. See
snow- or ice-bound
environments
infection, treating,
238–239
infl ation pump on life
raft, 365
injuries and bodily
threats, 15, 16. See also diseases/
ailments; fi rst aid
insect repellant, 277
insect stings, 246–247
insects
avoiding, 284–285, 319
as cave/log residents,
79, 81
as food, 115, 116, 138,
326
as sign of land, 410
insulating pads, 32
internal temperature
(body), 48
Internet. See Web sites
intersections and trail
junctions, 179
iodine, 27, 101, 236
irrationality, 43
irritants, turning away
from, 187
islands, approaching
from sea, 411
• J •jaundice, 277
jellyfi sh, 356, 421
Jet-Skis, 344
jetties, 411
journals/logs of outings,
36, 144, 152, 157,
165, 403, 409
jungles
avoiding dangerous
terrain, 281
quicksand, 440
bamboo cutting, 283
camps and shelters,
283–284
dangerous wildlife
alligators, crocodiles,
and caimans, 287
insects, spiders, and
ticks, 284–285
leeches, 287–288
piranhas, 288
snakes, 286–287
diseases
from contaminated
water or food,
277–278
from insect and
animal bites,
278–279
preventing, 276–277
dressing for, 280
edible plants, 110–111
machete use, 282
obtaining safe drinking
water, 279–280
• K •kelp, 396
kerosene, 288
kick-steps, 194
kindling, 64, 65, 69, 426
knives, 25, 28, 71, 82, 364
knots
anchor bend, 253–254
bowline, 254, 255
clove hitch, 255
lashings for loads and
tripods, 256–260
sheet bend, 252–253
sheet bend double
(Beckett bend), 253
square, 251–252
trucker’s hitch,
256–257
two half hitches,
255–256
usefulness, 251
Kon-Tiki (raft), 378
• L •lagas (dry
watercourses), 336
lagoons, 411
laid (twisted) rope, 250
of
st
on,
ting
e
kers,
orns
eet,
330
336
8,
–329
30
88
at
,
327
ons
9
ht,

Wilderness Survival For Dummies 450mah
mala
mam
man
map
co
co
co
dis
map
ch
co
ori
in
typ
rev
us
Mar
mar
mar
mas
mat
May
mea
med
med
alo
an
an
asp
asp
Be
Dr
ep
ibu
lakes. See water-bound
environments,
adrift on lakes or
oceans
lakesides, coolness, 78
land, signs of, 406–410
landing, water
procedures, 411-412
landing zone preparation
for helicopter,
215–217
landmarks
for establishing fi eld
bearings, 158–159
importance, 144
slowing down when
approaching, 157
taking bearing on,
before crossing
obstacles, 190
taking care in
distinguishing, 179
taking “shortcuts” to,
178
underestimation of
distance to,
152–153
viewing from higher
ground, 183
lanyards, 25, 29, 132, 381,
389
larvae, 326
lashings, 256–260
latitude and longitude,
149–150, 404
leaves, 12, 55, 85, 94, 108,
137, 205
LEDs (light-emitting
diodes), 24
lee side of wind, 78
leeches, 287–288
leeward landings from
sea, 410–411
leishmaniasis (disease),
279
lichens, 109
life jackets, 32, 342,
346–347
life rafts
caution with sharp
objects!, 361, 362,
364–365, 387, 388,
390, 392, 395
caution with signal
fl are guns!, 208
coming ashore,
410–412
entering, 362–364
essentials for fi rst ten
minutes, 364–366
food considerations,
367
getting organized,
366–368
improvising, 359
infl ating, 361
launching, 360–361
and lifeboats, 357
locating on ship, 358
righting capsized,
368–369
safety and comfort on,
368
watch-keeping and
bailing, 367
life rings (and other
fl otation devices)
essential for water
trips, 32
improvising, 354–355,
427–428
throwing, 414
lifeboats, 357
lighters, 24, 26–27, 68
lightheadedness, 49, 241,
243, 248, 292, 314,
330, 415, 417
lightning hazards, 78
line of sight (signal
transmission), 211,
213
lint as tinder, 68, 426
lions
African, 336
mountain, 273–274
list (vessel tilt), 341, 357
listening when
disoriented, 182
livers eating , 138
lizards, 327–328
lobe-shaped radio
signals, 211, 212
logs as shelters, 79
logs/journals of outings,
36, 144, 152, 157,
165, 403, 409
longitude and latitude,
149–150
Lost Person Behavior
(LPB), 42
lost, what to do when
deciding to move on
(with precautions),
184–186
getting back on course
when disoriented
observing and
listening, 181–182
reviewing
calculations,
180–181
stopping and
thinking, 180
taking action,
182–183
how it happens, 17
staying put, awaiting
rescue, 183–184
lung, punctured, 238
lures for fi sh, 387
lymph node swelling, 278
• M •machetes, 282
magazines, 55
magnesium bars (metal
matches), 24, 27, 70
magnetic north (MN),
155, 156
magnetic variation, 155,
403
magnifying glasses, 27,
70, 147, 426–427

Index 451mahi-mahi (dorado), 368,
393
malaria, 278–279
mamba snakes, 287
manila rope, 251
map reading. See also
navigating
colors, 146–147
contour lines, 148–149
coordinates, 149–151
distances and scale,
147–148
maps. See also
navigating
checking periodically,
14–15, 17
correct for area, 180
orienting, 144, 151–152
in survival kits, 30, 31
types, 146
revieweing when
disoriented,
180-181
using with compass,
156–157
Maritime Networks (ham
radio), 211, 346
maritime radios, 210
marrow, 138
masks, 316
matches, 27, 67, 70, 425,
426
Mayday, 198, 199, 200,
345–346
meandering, 187
medical treatment. See
fi rst aid
medicines and remedies
aloe vera plants, 314
antibiotics, 239
antiseptics, 236
aspirin, 419
aspirin substitute
(salicin or salicylic
acid), 264–265
Benadryl, 248
Dramamine, 418
epinephrine (Epi-Pen),
248
ibuprofen, 419
iodine, 27, 101, 236
metal cups, 28
metal pots. See pots,
metal
metapodials, 263
mice, 327
millipedes, 285
mineral oil, 318
minutes (of latitude), 404
mirages, 321
mirrors, 203–204
mirrors, CDs, and other
refl ectors, 30
misery and fatigue, 34,
37, 43
mist, 409
mittens and gloves, 31,
52, 53, 290, 312
MN (magnetic north),
155
mold and mildew, 280
monofi lament fi shing
line, 29
morale improvement, 44
Morse code, 199–200
mosquitoes, 278, 279,
281, 285
moss, 12, 55, 85, 109, 137,
205, 297
motion sickness
(seasickness),
418–419
motor oil, 318
motor skill impairment,
415
mountain lions, 273–274,
438
Mountaineering: The Freedom of the Hills (The Mountaineers
Books), 302
mud fl ats and mud holes
dangers of, 281
as desert water sources,
321, 322, 323
mud or clay as
sunblock, 317
squeezing water from
mud or sand, 322,
323
multipurpose knives, 25
multitools, 25
mushrooms, 114, 115
mussels, 116, 138
• N •naproxen sodium, 419
National Oceanic and
Atmospheric
Administration
(NOAA), 20
National Weather
Service, 20
native peoples’ cold-
weather clothing,
52–53
nausea, 49, 243, 247, 248,
277, 278, 292, 314,
330, 418, 421
nautical bells and horns,
406
nautical charts, 403–404
navigating
aids
compass, 15, 153–156
disbelieving versus
trusting, 42, 144
false confi dence in,
15, 17
GPS receiver, 11, 17,
26, 163–166
map and compass,
156–162
maps, 14–15, 17, 30,
31, 144, 146–153,
156–157, 180, 181
nautical chart and
compass, 403–404
portable sun
compass, 172–173
and potential errors,
147–148, 155–156,
163, 166
stars, 174–176
sun, 167–169
sun and wristwatch,
170–174, 428
gs,
,
e,
n
n
ns),
rse
ed
82
g
278
tal
7, 70
,
55,
7,

Wilderness Survival For Dummies 452pain
pale
palm
pani
Pan-
pant
para
para
part
pati
patt
paw
PDA
penk
penl
pepp
pers
Petz
PFD
pine
pira
pitc
plan
plan
plan
plan
co
dry
ed
ide
kn
wh
navigating (continued)awareness, checking
position often, 14,
144, 178–179
common errors,
152–153
dead reckoning of
distance, 152–153
deliberate offset
(aiming off), 145
getting back on course
when disoriented,
180–183
landmarks, 144, 152–153,
158–159, 178, 179,
183, 190
on open sea
estimating current,
405
getting bearings,
403–405
keeping journal/log,
403
understanding signs
of land, 405–410
practicing, 143, 428–429
route setting, 144–145
waypoints, 144–145
what to do when lost,
183–186
navigation lights, 406
neck coverings, 12, 57, 59
neck injury, suspicion of,
220, 223
needles, 31, 53–54, 162
nets, mosquito, 281
netting fi sh, 134, 389
newspapers, 55
niches
ecological, 107
shelves, 293
night vision, 333–334
nighttime
for activity in hot
environments, 62,
333–335
avoiding shore landings
during, 410
psychological
preparation, 44
rapid descent in
tropics, 283
staying put, sheltering,
and awaiting
rescue, 184
night-vision goggles, 209
nimbostratus clouds, 22
nimbus (rain) clouds, 22
911, calling, 213
NOAA (National Oceanic
and Atmospheric
Administration), 20
noise, noisemakers,
whistles, and horns
nautical bells and
foghorns, 406
unusual, repeated
sounds for signals,
202–203
for warning bears, 272,
437
for warning sharks, 351
whistles for signaling,
30, 203
noises of civilization, 186
north, fi nding, 155, 156,
168, 428–429. See also navigating
North Star (Polaris), 174,
429
northings, 151
nose, breathing through,
89, 290, 336, 375
notes, leaving behind,
185, 207, 333
nourishment. See eating
nuts, 32, 109, 137
nylon rope, 250
• O •observing, 36, 37,
181–182
obsidian, 261
oceans. See water-bound
environments,
adrift on lakes or
oceans
odors/scents
cooked food attracting
wild animals, 272
food debris, 86, 135,
136
food or industry, 186
land, when at sea, 408
low-grade or poisonous
water source, 92
perfumed soap and
deodorants
attracting wild
animals, 272
wild animals, 81
your own, 118
oil
animals’ ability to smell
odor of, 74
for black smoke
signals, 205
for fuel, 64
for signal fi re, 204
as sunblock (motor oil
or axle grease),
318, 419
onchocerciasis (river
blindness), 279, 285
open fractures, 233, 234
optimism, 10, 39–40, 44
orienteering compasses,
29, 153–154
orienting maps, 144,
151–152
outboard motors,
restarting, 372
overexertion, 17
• P •paddles/oars, 32, 411,
412
paddling depowered
boats, 371, 371

Index 453painters (raft’s bow line),
358, 361
paleness, 314
palms, 98
panic and staying calm,
41–42, 229
Pan-Pan signal for help,
200, 346
panthers, 273–274, 438
parachute cord, 29, 82
paragonimiasis
(disease), 278
part-time navigation, 178
patience, 10
patterns (ground-to-air
emergency code),
201
paw prints, 81
PDAs, 209
penknives, 25
penlights, 24
pepper spray, 272, 438
personal fl otation
devices (PFD), 32
Petzl headlamps, 29
PFD (personal fl otation
devices), 32. See also life rings
pine needles, 85
piranhas, 288
pitch (tree resin),
205–206
plane, water-catching, 94
planes, aircraft, 186,
434–435
plantains, 137, 266, 280
plants as food
cooking or preparing,
137
drying or smoking, 139
edible parts, 108–109
identifying by name,
109–112
knowing which to
avoid, 112–115
where to fi nd, 107
plants as water source
evaporating moisture
with solar still,
96–98
fl eshy, 99
poisonous, 96, 98
as water fi lter, 103
plastic materials
bags, 96, 430
as barbs for fi sh hooks,
133
for black smoke
signals, 205
bottles as fi sh traps,
135
garbage bags, 29, 55, 82
for improvised
clothing, 54, 55
for improvised snow
goggles, 312
for rain catchers, 380
refl ective for signaling,
203
slivers for car-light
cover, 122
for solar still, 382
styrofoam rafts, 192
tarps, 28, 55, 82, 94,
318–319
trapped-air rafts,
192–193
for waterproof
bundling of
clothing when
fording rivers, 191
platform for sleeping,
284
PLB (personal locator
beacon), 215
plow fi res, 72
plunging breakers
(waves), 342
pocketknives, 25
Pointer Stars, 175–176,
429
poisoning, treating,
247–248
poisons
carbon dioxide excess,
291
carbon monoxide, 292,
294
fi sh, shellfi sh, 14, 96,
97, 356, 394,
421–422
insects, 246–247
plants, 326
reptiles, 244–246,
274–275, 328, 329,
421–422
symptoms and
treatment, 247–248
polar bears, 438
Polaris, 174
pollen allergies, 408
polyethylene rope, 251
polypropylene rope, 251
ponchos, 29, 55, 94
ponds. See water
(creeks, rivers, or
ponds)
porcupine fi sh, 394
Portuguese man-of-war,
421
position format for GPS
receivers, 164–165
postholing and the need
for snowshoes, 309
pots, metal, 203, 298, 299
poultry and eggs, 327
power lines, 186
pressure bandages, 237
pressure fl aker, 262
pressure points, 227
pressure ridges, 78
prickly pear cacti, 326
proactive attitude, 9–10
progressive conditions,
241
protein, avoiding, 376,
383
und
r
ing
2
6
08
ous
2
mell
oil
285
34
44
ses,
,

Wilderness Survival For Dummies 454salt
in
no
for
salt
salt
av
dis
as
saltw
sand
sand
sand
sand
sand
sand
sate
saw
scal
scar
scat
scen
sche
scop
scor
sea
sea
sea
Sea-
seas
seas
seaw
seed
seep
seiz
self-
sent
sew
Shac
psychology of survival
awareness of emotions,
1, 40
anger and blame, 43,
366
fear, 41
irrationality, 43
misery and fatigue, 43
panic, 41–42, 366
delirium from saltwater
ingestion, 377, 379
Lost Person Behavior
(LPB), 42
mindset as advantage,
9–10, 33–34
group decision-
making, 39
humor and
optimism, 10,
39–40, 44
improving morale, 44
mastering disbelief,
34–35, 373
planning and taking
action, 37–38
stopping, settling,
getting calm, 180
understanding
discipline, 38
valuing life and
home, 38–39
working with stress
and fear, 35–37
sheltering as
comforting, 76, 86
pufferfi sh, 394
pulse, checking for, 222,
223
pulse rate, 36, 243, 314,
330, 349, 415
Puma concolor (mountain lion),
273–274, 438
pumice, 261
punctured lung, 238
pupils, dilation, 330
PWC (personal water
craft), 344
pyramid-style fi re, 66, 67
• Q •quick release, 360
quicksand, 281, 440
• R •rabbit (point of rope), 254
rabies, 279
radio beacons (EPIRBs,
ELTs, and PLBs),
214–215
radios
AM, 406–407
conserving batteries, 38
ham radios and
networks, 211, 346
NOAA for National
Weather Service
reports, 20
for signaling for help,
209–213, 345–346
rafting across rivers,
192–194
rafting in life boats. See
water-bound
environments,
adrift on lakes or
oceans
railroads, 186
rain
catching, 94, 95,
279–280, 380
clouds as indicators of,
22
sheltering from, 50
rain ponchos, 29, 55
ranges (taking bearings),
188, 399
rapids, 192
rationing of essentials,
38, 44, 89–90, 106,
376–377
rattlesnakes, 274, 286,
328–329
razors, 421
recovery fl oats, 365
recovery position, 16,
223–224, 415, 417
Red Cross, 224
red lens fi lters for
fl ashlights, 334
reefs, 422
relative position, 182
relief strokes
(swimming), 401
rescue. See also signaling
for rescue
expecting, 42
preparing for
helicopter landing
zone, 215–217
helicopter safety,
217–218
resourcefulness, 10
return date, notifying
friends of, 177–178
reverse osmosis, 381
RICES (fi rst aid memory
tool), 234–235
ridge lines and ridges,
148, 149, 304
ridgepoles, 84
riptides and rip currents,
400, 402
river blindness
(onchocerciasis),
279, 285
riverbeds, 78
rivermouths, 400
rivers. See water (creeks,
rivers or ponds)
rock overhangs as
shelters, 80
rockets (parachute-type
fl ares), 208
rockfall areas, 78
rocky terrain, 336
roots, 109, 137
rope. See cordage
• S •safety pins, 29
sailboats, escaping from
and righting
capsized, 435
salicin (salicylic acid),
264–265

Index 455salt
in foods in survival
kit, 32
non-salt sea ice,
299–300
for removing leeches,
288
salt crystals, 387
salt water
avoiding, 377–379
distilling, 96, 101
as diuretic, 89, 90, 375,
379
saltwater sores, 420
sand, as water fi lter, 103
sand dunes, 336
sand fl ies, 279
sandals, 316, 317
sandstone, 261
sandstorms, 332
satellite phones, 214
saws, wire saws, 31
scale on maps, 147–148
scarves, 290
scat, 81
scent. See odors/scents
scheduling callback time,
346
scopolamine (drug), 418
scorpions, 329–330
sea ice, 78
sea snakes, 421–422
sea turtles, 368, 395
Sea-Doos, 344
seas. See water-bound
environments,
adrift on lakes or
oceans
seasickness, 418–419
seaweed, 112, 113, 396
seeds, 109, 137
seepage basins, 103–104
seizures, 248
self-discipline, 13–14, 38
sentinel (weight on life
raft’s drogue line),
366
sewing kits, 31
Shackleton, Sir Ernest
(adventurer), 40
shadows
as desert shelter,
319–320
as signal for rescue,
206
shark defense, 351
shark repellant, 350
sharks, 368, 390–391
shatter (stone), 261, 262
sheet bend double
(Beckett bend)
knots, 253
sheet bend knots,
252–253
shell layer of clothing,
51, 55
shelters
A-frame or downed-tree
style, 84–85
caves and rock
overhangs, 80
checking for current
residents, 80–81
cleanliness and
organization, 86,
293
in hot environments,
318–320, 319
importance, 11, 12,
75, 76
insulating, 85
in jungles, 283–284
preparations, 77
preparing for nightfall,
77, 283, 320
from sandstorms, 332
site selection, 77–78
in snow- or ice-bound
environments,
293–296, 297
tarps, 82–83
tools for building, 82
trees, 79
ventilating, 291–292,
293
visibility, 184, 292, 318
ships in trouble. See
water-bound
environments, adrift
on lakes or oceans
shivering, 48, 241, 242,
278, 414, 415
shock, 229–230, 231
shoes. See footgear
shortcuts, 178
shortwave (ham) radios,
211
shovels or other digging
tools, 292, 293, 294
signaling for rescue. See also rescue
basics
discipline, 38
importance, 13
location, 196
noticeability, 195,
196–197, 368
persistence, 197
electronic signaling
cell and satellite
phones, 213–214
importance of
battery power, 209
importance of up-to-
date equipment,
209
radio beacons
(EPIRBs, ELTs, and
PLBs), 214–215
radios, 209–213
sandstorms’
interference with,
332
language of signaling
body signals,
201–202
ground-to-air
emergency code
(patterns), 201
Mayday, 198, 199, 200
Morse code, 199–200
Pan-Pan, 200, 346
signals in threes, 198
SOS, 198–200
from life rafts, 368
signaling tools
aerial fl ares, 208
collecting before
abandoning ship,
348
1
aling
g
178
ory
,
nts,
),
eks,
)
ype
om
),

Wilderness Survival For Dummies 456step
stick
as
as
an
as
as
as
as
sting
ston
as
co
as
as
ma
as
as
as
su
typ
stor
stra
stra
stre
strin
styr
suck
sun,
sun
sunb
sunb
sung
sunl
signaling for rescue
(continued)
directional signals,
207
dye markers and
other color,
206–207
fi re, 67, 204
fl ashlights and
electronic lights,
208–209
keeping within reach,
67, 86, 293
mirrors, CDs, and
other refl ectors, 30,
203–204, 430
shadows, 206
smoke, 204–206
space blankets, 318
upside-down fl ags
and out-of-place
items, 209
whistles,
noisemakers and
horns, 30, 202–203
sinew, 54, 128
single-sideband radios,
210
sinking vessels. See
water-bound
environments,
adrift on lakes or
oceans
sisal rope, 251
skin conditions
bluish coloring, 415
chafi ng and saltwater
sores, 420
paleness, 314
rash, 266, 278
skinning and butchering,
127–129
sky, dust-colored,
viewed from sea,
408
sleep, 77, 85, 419
sleeping bags, 31, 55
slopes, 178, 194
smoke, 186, 204–206, 284
smoking, 14, 89
smoking food, 139–140
snails, 116, 138
snake bites, 244–246,
274–275, 286–287
snakes, 274–275,
286–287, 327–328,
421–422
snares, 117–119
snow blindness, 311–312
snow boots, 307–308
snow bridges, 305
snow drifts, 295–296
snow heaps, 296, 297
snow- or ice-bound
environments
avoiding hazardous
terrain
avalanche areas,
301–302, 304, 305,
439
cornices, 304, 305
crevasses (glacial
cracks), 304–306
snow slopes, 306, 307
thin ice, 303–304
whiteouts, 301,
439–440
edible plants, 112
fi remaking, 297–298,
299
making wearable tools
clothing insulation,
310
footgear, 307–308
gaiters (boot wraps),
310
head, face, and eye
coverings, 311–312
mittens, 312
snowshoes, 308–309
rescue signals, 206, 207
sheltering
basic concepts,
291–293
site selection, 78
snow drifts, 295–296
snow heaps, 296, 297
snow-caves, 293–294
staying warm, 289–290
water sources, 299–300
snow slopes, 306, 307
snow-caves, 293–294
snowmobiles and thin
ice, 303
snowshoes, 52, 53, 57,
308–309
soaps, 272, 277, 420
sodas (soft drinks) as
diuretic, 14, 89, 375
sodium hypochlorite,
101
soft tissue injuries, 234
solar stills, 96–98, 323,
324, 381–383
solution pockets, 321
SOS signals, 198–200,
345–346
soups, 32
Southern Cross, 175–176,
429
space blankets, 28,
318–319
spearing, 120–122,
132–134, 387–389
speech slurring, 415
speeding up, as reaction
to fear, 42
spider bites, 246–247
spiders, 275–276,
284–285, 330–331
spinal fl uid of fi sh,
383–385
spinal injury, suspicion
of, 220, 223
splints, 232
spoor (blood trail), 120
sprains, 234–235
spurs, 148, 149
square knots, 251–252
squared fi elds, 186
stagnant water, 281
standing water, 321
starboard (right), 343
stars, navigating by,
174–176
star-style fi re, 66, 67
steel cups, 28
steel wool, 71

Index 457step-kicking, 306, 307
sticks. See also wood
as cane, 274
as probe, 281, 284, 303,
334, 335
and shadow-style
compass, 168–169,
428
as ski poles, 310
as spear, 120–122
as step-kick anchor,
306, 307
as walking stick, 334, 335
stingrays, 422
stones and rocks
as cairns, 189
cobbles, 260
as directional signal, 207
as fi re platform, 298, 299
making tools from,
260–262
as possible fl ints, 71
as rescue signal
shadow, 206
as spear points, 122
sun-warmed for
overnight warmth,
320
types, 261
storms, waiting out, 410
straw and grass, 12, 55,
85, 103, 297, 426
straws, 31
streams. See water
(creeks, rivers, or
ponds)
string. See cordage
styrofoam rafts, 192
sucking chest wounds,
238
sun, navigating by,
168–174, 428
sun shields, 316–318
sunblock, 28, 311, 316,
317–318, 419
sunburn, 314, 418–419
sunglasses, 59, 60–61,
312, 316, 420
sunlight on water
containers, 380
sunshades, 318–319
surgical tubing, 31
survival equipment. See
equipment
survival in the wild. See
wilderness survival
survival kits
basic, 26–30
complete, 30–32
for water trips and
vessels, 32
survival situations. See also wilderness
survival
caused by errors in
judgment, 16–17
exotic to ordinary, 1
ten quick escapes,
433–440
swallowing, diffi culty,
248, 330
swamped vessels, 341
sweating, 248, 330
sweating, avoiding, 11,
14, 17, 50, 58, 89,
290, 294, 375
swelling of eyes, face, or
tongue, 248
swells, oceanic, 404–405
swimming back to land,
398–402
Swiss Army knives, 25
• T •tackle for fi shing, 387
talking, limiting to
conserve body’s
water, 89
talus slopes, 78
tannin (tannic acid),
265–266
tarantulas, 246, 285
tarp shelters, 82–83
tarps, 28, 55, 82, 94,
318–319
tea as diuretic, 14
teepee-style fi re, 65, 66,
67, 69
temperature. See
thermoregulation;
weather
considerations
terebra shells, 422
termites, 326
thermal layer of clothing,
51
thermometers, 315
thermoregulation. See also clothing;
shelter
for cold environments,
49–51, 52–59,
289–290
for hot environments,
59–62, 315
regulating body
temperature, 45–49
thin ice, 303–304
thread, 31, 53–54. See also cordage
threes, signals in, 198
ticks, 247, 275, 276,
284–285
tides, 399, 410
tinder, 27, 64, 68, 69, 426
Tipton, Michael
Essentials of Sea
Survival, 2
tire-changing mentality,
37
tissue, 68
TN (true north), 155
toilet paper, as tinder, 68
tool making, 260–262,
263–264
tools. See equipment
topographic (topo)
maps, 146, 148
top-sighting compasses,
153
touchdown area
(helicopter landing
zone), 216
tourniquets, 228–229
track feature of GPS
receivers, 165–166
tracks and paths (game
trails), 115–116
290
300
n
,
s
375
34
3,
176,
9
ion
1
on
20
2
3

Wilderness Survival For Dummies 458
• wad
warm
watc
watc
wate
wate
ca
co
co
typ
wate
ca
ca
cro
cro
as
dra
fol
traction, 232–233
trail junctions and
intersections, 179
trail marking, 185,
189–190
trail travel. See hiking
trailblazers, 190
trailblazing
crossing obstacles,
190–194
estimating rate of
travel, 187
marking trail, 189–190
meandering, 187
traveling in straight
lines, 188
trails. See also hiking in
wilderness areas;
navigating
in animal blood, 120, 127
losing through
common errors,
17–18
marking when
searching for
water, 93
taking easiest when
lost, 18, 42
transdermal patches, 418
transoms (on vessels),
341
transpiration bags, 96, 430
trapped-air rafts,
192–193
trauma, treating, 16,
219–221
traumatic amputation,
228
Traveler’s Tree, 98
trees. See also sticks;
wood
aspen and willow, 264,
265
as shelters, 79
trekking over land. See
hiking in wilderness
areas
triggerfi sh, 394
trimmed vessels, 341
tripods, 139, 140,
257–258, 429
tropical climate jungles.
See jungles
trucker’s hitch knots,
256–257
trucks. See vehicles
true north (TN), 155, 156
tubers, 109, 137
tubes, surgical tubing,
31, 97, 323, 324
tuna, 393
tundra grass, 297
tunnels through foliage,
179
turtle blood, 384,
385–386
turtles, 368, 395
typhoid fever, 278
• U •umbrella trees, 98
underground water, 322
unfairness of survival
situations, 34–35
unit format for GPS
receivers, 165
units of measurement,
181
Universal Plant Edibility
Test, 114
Universal Transverse
Mercator (UTM)
grid, 150–151
uprights for A-frame
shelter, 85
upside-down fl ags and
out-of-place items,
209
urine
color and signs of
dehydration, 88, 315
controversy over
drinking, 91
distilling, 96, 101, 323,
324
as diuretic or poison,
90, 375
possible shark
attractor, 350
for wetting hats, 317
Ursa Major (Big Dipper),
175
The U.S. Army Survival Manual, 2
USGS (United States
Geological Survey)
maps, 146
UTM (Universal
Transverse
Mercator) grid,
150–151
• V •vaccines, 277
valise (containing a
ship’s life raft), 358
vegetable fi bers, 54
vegetable oil, 318
vehicles
disabled, 319
keeping survival tool
convenient, 434
as shelter, 319
sinking, escaping from,
433–434
and thin ice, 303
venous bleeding,
226–227
vessels in trouble. See
water-bound
environments,
adrift on lakes or
oceans
VHF radios, 210
vinegar, 421
vines, 99
volcanic islands, 411
vomiting, 49, 222, 247,
248, 278, 279, 330,
368, 418, 421

Index 459
• W •wadis (dry
watercourses), 336
warmth. See
thermoregulation
watch and sun
navigation, 170-172
watch team, 367
water color (at sea), 409
water containers
camel bags, 31
collecting before
abandoning ship,
348
convenience, 25
types, 25
water (creeks, rivers or
ponds). See also
water-bound
environments,
adrift on lakes or
oceans
caution on fl ash fl oods
indications on maps,
147
jungle rivers, 281
from opened
fl oodgates of dams,
186
signs of, 78
in wadis, lagas, and
desert washes,
331–332, 336
caution in jungle
terrain, 281,
287–288
crossing by wading,
190–192
crossing on rafts,
192–194
as desert water
sources, 321, 322,
323
drainages, 92–93, 186
following to civilization,
186
mud or clay as
sunblock, 317
squeezing water from
mud or sand, 322,
323
water for drinking
basic considerations
avoiding
dehydration, 13–14,
17, 50, 87–88, 100,
320–321, 374–375
fi ltering and
purifying, 27, 28,
100–104, 276, 279
rationing and water
discipline, 13–14,
14, 89–90
stretching body’s
internal supply,
88–89, 375–376
understanding
body’s needs,
87–88, 325, 375
in hot environments
cacti, 324–325
cracks in rocks, 324
mud or sand, 322
solar stills, 323
in jungles
boiling, 276, 279
catching rain,
279–280
cautions, 280
in snow- or ice-bound
environments,
299–300
in water-bound
situations, adrift at
sea
avoiding salt water,
375, 377–379
catching rain, 380
collecting before
abandoning ship,
348
collecting
condensation,
380–381
conserving body’s
water, 375–376
drinking juice of fi sh,
383–385
drinking turtle blood,
385–386
essential fi rst steps,
373–374
importance of
avoiding
dehydration,
374–375
protecting supply,
379
rationing, 375,
376–377
using desalination
kits, 383
using solar still,
381–383, 382
using watermakers,
381
in wilderness areas
catching rain, 94, 95
collecting
condensation,
95–98
extracting from
plants, 98–99
fi ltering and
purifying, 100–104
signs of possibly
poisonous
source, 92
what to avoid, 90–92
where to look, 93–94
water moccasins
(snakes), 275
water-bound
environments,
adrift on lakes or
oceans
aboard drifting vessels
depowered boats,
370–371
importance of
prompt action, 370
n,
7
er),
al
ey)
358
ol
om,
e
r
,
0,
Wilderness Survival For Dummies 460wav
br
co
de
he
as
tur
way
wea
wea
wea
wea
ch
fl a
for
san
ve
wea
Web
Ce
Na
Na
Na
Pe
Re
we
whe
whis
whit
wick
wild
water-bound
environments,
adrift on lakes or
oceans (continued)
restarting outboard
motors, 372
using current and
sail, 371–372
aboard life rafts
caution with sharp
objects!, 364–365
attending to safety
and comfort, 368
collecting useful
debris, 365
entering, 362–363, 364
essentials for fi rst
ten minutes,
364–366
food considerations,
367
getting organized,
366–368
illustration, 362
improvising, 359
infl ating, 361
launching, 360–361
and lifeboats, 357
locating on ship, 358
righting capsized,
367, 368–369
awareness, recognizing
signs of vessel in
trouble
bad weather and
heavy seas, 342
collisions, 343–344
fi re, 344–345
hatch failure and
ship damage, 345
overloaded, 340
poor trim, listing, or
swamped, 341
coming ashore
basic landing
principles, 410–411
as dangerous ordeal,
410
landing procedures,
411–412
fi rst aid
responding to water
casualties, 413–417
treating common sea
ailments, 418–422
food
barnacles, 396
birds, 395–396
fi sh, 386–394
seaweed, 396
turtles, 395
navigating on open sea
estimating current,
405
getting bearings,
403–405
keeping journal/log,
403
understanding signs
of land, 405–410
swimming back to land
fi guring our currents,
398–400
fl oating or swimming,
400–402
measuring distance
to shore, 398
swimming out of
riptides, 402
water for drinking
avoiding salt water,
375, 377–379
collecting and
drinking rainwater,
380
collecting
condensation,
380–381
conserving body’s
water, 375–376
drinking juice of fi sh,
383–385
drinking turtle blood,
385–386
essential fi rst steps,
373–374
protecting supply,
379
rationing, 376–377
understanding
dehydration,
374–375
using desalination
kits, 383
using solar still,
381–383
using watermakers,
381
what to do when in the
water
collecting useful
debris, 350, 354, 374
coping with sharks,
350–351
with life jackets,
352–353, 354
swimming under
water, 347
without life jackets,
354–356
what to do when
sinking
abandoning ship,
348–350, 359–360
cold shock response,
349
donning life jackets,
346–347
jumping, 348–350
looking for potable
water, 374
preparing to
abandon ship,
347–348, 359–360
radioing for help,
345–346
water-glare blindness,
420
watermakers, 381

Index 461waves
breakers at shorelines,
411, 412
compared to swells,
404
determining direction,
404–405
heavy seas, 342
as sign of land, 408–409
turbulence near
shorelines, 410
waypoints, 144–145, 165
weak links, 361
weakness, 248, 292
weapons for catching
food, 119–127
weather considerations
checking for signs,
21–23, 331
fl ash fl oods, 331–332
forecasts, watches and
warnings, 20–21
sandstorms, 332
vessels in trouble, 342
weather radios, 20
Web sites
Centers for Disease
Control (CDC), 277
National Geographic
maps, 30
National Oceanic and
Atmospheric
Administration
(NOAA), 20
National Park Service
maps, 30
Petzl headlamps, 29
Red Cross, 224
weather forecast
services, 20
wheezing, 248
whistles. See noise,
noisemakers,
whistles, and horns
whiteouts, 301, 439–440
wicks for candles, 31
wilderness, defi ned, 2
wilderness outings. See
hiking in wilderness
areas
wilderness survival. See also psychology of
survival
adrift in water
fi rst aid, 413–421
fl otation and warmth
after abandoning
ship, 339–356
food and drink,
373–396
navigation, 397–412
on rafts and disabled
vessels, 357–372
escaping
avalanches, 439
bear encounters,
437–438
bee swarms, 436–437
forest fi les, 436
mountain lion
encounters, 438
quicksand, 440
and righting capsized
small boats, 435
sinking car, 433–434
small plane in water,
434–435
whiteouts, 439–440
in extreme land
environments
forests and jungles,
271–288
hot environments,
313–336
snow- or ice-bound
environments,
289–312
practicing skills for
fi nding north,
428–429
fi remaking, 425–427
improvising fl otation
device, 427–428
making bow and
arrow, 429
making transpiration
bag, 430
making tripods, 429
practicing CPR, 431
using CD for
signaling, 430
techniques, advanced,
141
fi rst aid, 219–248
hiking, 177–194
methods and tools,
advanced, 249–267
navigation, basic,
143–166
navigation, celestial,
167–176
signaling for rescue,
195–218
techniques, basic
fi nding drinking
water, 87–104
fi nding food, 105–137
fi remaking, 63–74
preparing for
outings, 9–18
psychology of
survival, 19–32
shelters, 75–86
thermoregulation,
11–13, 33–44
willow tree leaves, 264,
265
wind. See also weather
considerations
avoiding in hot
environments, 319
avoiding in snow- or
ice-bound
environments, 290
boating against,
371–372
checking, 21–22
checking hazards in
shelter site
selection, 78
cliffs blocking, 412
direction and bears,
272
ood,
ps,
y,
7
n
rs,
the
374
ks,
ts,
0
nse,
ts,
le
0
,

Wilderness Survival For Dummies 462wind (continued)
effect on body
temperature, 46, 47
launching life rafts
downwind, 361
leaving sinking vessel
upwind, 348
lee side, 78
leeward landings from
sea, 410–411
onshore and offshore
cycles (sea/land
breezes), 372, 408
righting life rafts from
downwind side, 369
sandstorms, 332
wind crust on snow, 295
wind shadows, 369
wire, 29, 117, 162
wire saws, 31
wolverines, 86
wood. See also sticks
as barbs for fi sh hooks,
133
branches as fi re
platform, 298, 299
branches or foliage as
signal, 206
green, 65
heartwood, 123
nonresinous, 139
pitch (tree resin),
205–206
wool clothing, 51
worms, 279
wounds, 235–239, 266,
267
wrists and warmth, 57
wristwatch as navigation
aid, 170–174
• Y •yawning, 418
yellow fever, 279
• Z •zippers
malfunction incident,
47
in shell layer of
clothing, 51
Zippo lighters, 27

Available wherever books are sold. For more information or to order direct: U.S. customers visit www.dummies.com or call 1-877-762-2974. U.K. customers visit www.wileyeurope.com or call (0) 1243 843291. Canadian customers visit www.wiley.ca or call 1-800-567-4797.
* Separate Canadian edition also available† Separate U.K. edition also available
BUSINESS, CAREERS & PERSONAL FINANCE
Accounting For Dummies, 4th Edition*978-0-470-24600-9
Bookkeeping Workbook For Dummies†978-0-470-16983-4
Commodities For Dummies 978-0-470-04928-0
Doing Business in China For Dummies 978-0-470-04929-7
E-Mail Marketing For Dummies978-0-470-19087-6
Job Interviews For Dummies, 3rd Edition* † 978-0-470-17748-8
Personal Finance Workbook For Dummies* † 978-0-470-09933-9
Real Estate License Exams For Dummies 978-0-7645-7623-2
Six Sigma For Dummies978-0-7645-6798-8
Small Business Kit For Dummies, 2nd Edition* † 978-0-7645-5984-6
Telephone Sales For Dummies 978-0-470-16836-3
FOOD, HOME, GARDEN, HOBBIES & HOME
Bridge For Dummies, 2nd Edition978-0-471-92426-5
Coin Collecting For Dummies, 2nd Edition 978-0-470-22275-1
Cooking Basics For Dummies, 3rd Edition978-0-7645-7206-7
Drawing For Dummies978-0-7645-5476-6
Etiquette For Dummies,2nd Edition978-0-470-10672-3
Gardening Basics For Dummies*† 978-0-470-03749-2
Knitting Patterns For Dummies978-0-470-04556-5
Living Gluten-Free For Dummies† 978-0-471-77383-2
Painting Do-It-Yourself For Dummies 978-0-470-17533-0
BUSINESS PRODUCTIVITY & MICROSOFT OFFICE
Access 2007 For Dummies978-0-470-03649-5
Excel 2007 For Dummies978-0-470-03737-9
Office 2007 For Dummies978-0-470-00923-9
Outlook 2007 For Dummies978-0-470-03830-7
PowerPoint 2007 For Dummies978-0-470-04059-1
Project 2007 For Dummies978-0-470-03651-8
QuickBooks 2008 For Dummies978-0-470-18470-7
Quicken 2008 For Dummies978-0-470-17473-9
Salesforce.com For Dummies, 2nd Edition978-0-470-04893-1
Word 2007 For Dummies978-0-470-03658-7
HEALTH, SELF HELP, PARENTING & PETS
Anger Management For Dummies 978-0-470-03715-7
Anxiety & Depression Workbook For Dummies978-0-7645-9793-0
Dieting For Dummies, 2nd Edition978-0-7645-4149-0
Dog Training For Dummies, 2nd Edition978-0-7645-8418-3
Horseback Riding For Dummies 978-0-470-09719-9
Infertility For Dummies† 978-0-470-11518-3
Meditation For Dummies with CD-ROM, 2nd Edition978-0-471-77774-8
Post-Traumatic Stress Disorder For Dummies 978-0-470-04922-8
Puppies For Dummies, 2nd Edition978-0-470-03717-1
Thyroid For Dummies, 2nd Edition† 978-0-471-78755-6
Type 1 Diabetes For Dummies*† 978-0-470-17811-9
EDUCATION, HISTORY, REFERENCE & TEST PREPARATION
African American History For Dummies978-0-7645-5469-8
Algebra For Dummies978-0-7645-5325-7
Algebra Workbook For Dummies978-0-7645-8467-1
Art History For Dummies978-0-470-09910-0
ASVAB For Dummies, 2nd Edition978-0-470-10671-6
British Military History For Dummies978-0-470-03213-8
Calculus For Dummies978-0-7645-2498-1
Canadian History For Dummies, 2nd Edition978-0-470-83656-9
Geometry Workbook For Dummies978-0-471-79940-5
The SAT I For Dummies, 6th Edition978-0-7645-7193-0
Series 7 Exam For Dummies978-0-470-09932-2
World History For Dummies 978-0-7645-5242-7

Arabic For Dummies 978-0-471-77270-5
Chinese For Dummies, Audio Set 978-0-470-12766-7
French For Dummies978-0-7645-5193-2
German For Dummies978-0-7645-5195-6
Hebrew For Dummies978-0-7645-5489-6
Ingles Para Dummies978-0-7645-5427-8
Italian For Dummies, Audio Set 978-0-470-09586-7
Italian Verbs For Dummies978-0-471-77389-4
Japanese For Dummies978-0-7645-5429-2
Latin For Dummies978-0-7645-5431-5
Portuguese For Dummies978-0-471-78738-9
Russian For Dummies978-0-471-78001-4
Spanish Phrases For Dummies978-0-7645-7204-3
Spanish For Dummies978-0-7645-5194-9
Spanish For Dummies, Audio Set978-0-470-09585-0
The Bible For Dummies978-0-7645-5296-0
Catholicism For Dummies978-0-7645-5391-2
The Historical Jesus For Dummies 978-0-470-16785-4
Islam For Dummies978-0-7645-5503-9
Spirituality For Dummies,2nd Edition 978-0-470-19142-2
ASP.NET 3.5 For Dummies978-0-470-19592-5
C# 2008 For Dummies978-0-470-19109-5
Hacking For Dummies, 2nd Edition978-0-470-05235-8
Home Networking For Dummies, 4th Edition978-0-470-11806-1
Java For Dummies, 4th Edition978-0-470-08716-9
Microsoft® SQL Server™ 2008 All-in-One Desk Reference For Dummies978-0-470-17954-3
Networking All-in-One Desk Reference For Dummies, 2nd Edition978-0-7645-9939-2
Networking For Dummies, 8th Edition978-0-470-05620-2
SharePoint 2007 For Dummies978-0-470-09941-4
Wireless Home Networking For Dummies, 2nd Edition978-0-471-74940-0
AdWords For Dummies978-0-470-15252-2
Blogging For Dummies, 2nd Edition978-0-470-23017-6
Digital Photography All-in-One Desk Reference For Dummies, 3rd Edition978-0-470-03743-0
Digital Photography For Dummies, 5th Edition978-0-7645-9802-9
Digital SLR Cameras & Photography For Dummies, 2nd Edition978-0-470-14927-0
eBay Business All-in-One Desk Reference For Dummies978-0-7645-8438-1
eBay For Dummies, 5th Edition*978-0-470-04529-9
eBay Listings That Sell For Dummies978-0-471-78912-3
Facebook For Dummies978-0-470-26273-3
The Internet For Dummies, 11th Edition978-0-470-12174-0
Investing Online For Dummies, 5th Edition978-0-7645-8456-5
iPod & iTunes For Dummies, 5th Edition978-0-470-17474-6
MySpace For Dummies978-0-470-09529-4
Podcasting For Dummies978-0-471-74898-4
Search Engine Optimization For Dummies, 2nd Edition978-0-471-97998-2
Second Life For Dummies978-0-470-18025-9
Starting an eBay Business For Dummies,3rd Edition† 978-0-470-14924-9
GRAPHICS, DESIGN & WEB DEVELOPMENT
Available wherU.K. customers
* Separate C† Separate U
INTERNET & DIGITAL MEDIA
LANGUAGES, RELIGION & SPIRITUALITY
Adobe Creative Suite 3 Design Premium All-in-One Desk Reference For Dummies978-0-470-11724-8
Adobe Web Suite CS3 All-in-One Desk Reference For Dummies978-0-470-12099-6
AutoCAD 2008 For Dummies978-0-470-11650-0
Building a Web Site For Dummies, 3rd Edition978-0-470-14928-7
Creating Web Pages All-in-One Desk Reference For Dummies, 3rd Edition978-0-470-09629-1
Creating Web Pages For Dummies, 8th Edition978-0-470-08030-6
Dreamweaver CS3 For Dummies978-0-470-11490-2
Flash CS3 For Dummies978-0-470-12100-9
Google SketchUp For Dummies978-0-470-13744-4
InDesign CS3 For Dummies978-0-470-11865-8
Photoshop CS3 All-in-One Desk Reference For Dummies978-0-470-11195-6
Photoshop CS3 For Dummies978-0-470-11193-2
Photoshop Elements 5 For Dummies978-0-470-09810-3
SolidWorks For Dummies978-0-7645-9555-4
Visio 2007 For Dummies978-0-470-08983-5
Web Design For Dummies, 2nd Edition978-0-471-78117-2
Web Sites Do-It-Yourself For Dummies978-0-470-16903-2
Web Stores Do-It-Yourself For Dummies978-0-470-17443-2
NETWORKING AND PROGRAMMING
OPERATI
iMac For Du978-0-7645-8
Laptops For978-0-470-0
Linux For D978-0-470-11
MacBook Fo978-0-470-0
Mac OS X LeDesk Refere978-0-470-0
SPORTS,
Coaching H978-0-470-8
Coaching So978-0-471-77
Fitness For 978-0-7645-7
Football Fo978-0-470-12

mies,
0
mmies0
Dummies2
sus
4
es9
Dummies,
2
Dummies,
2
4
etworking d Edition
0
r Dummies,
6
mmies4
Dummies4
ptimization nd Edition2
Dummies9
Business d Edition† 9
Available wherever books are sold. For more information or to order direct: U.S. customers visit www.dummies.com or call 1-877-762-2974. U.K. customers visit www.wileyeurope.com or call (0) 1243 843291. Canadian customers visit www.wiley.ca or call 1-800-567-4797.
Get smart @ dummies.com®
• Find a full list of Dummies titles
• Look into loads of FREE on-site articles
• Sign up for FREE eTips e-mailed to you weekly
• See what other products carry the Dummies name
• Shop directly from the Dummies bookstore
• Enter to win new prizes every month!
* Separate Canadian edition also available† Separate U.K. edition also available
ents 5
3
Dummies4
ummies5
Dummies,
Yourself
2
-Yourself
2
OPERATING SYSTEMS & COMPUTER BASICS
iMac For Dummies, 5th Edition978-0-7645-8458-9
Laptops For Dummies, 2nd Edition978-0-470-05432-1
Linux For Dummies, 8th Edition978-0-470-11649-4
MacBook For Dummies978-0-470-04859-7
Mac OS X Leopard All-in-One Desk Reference For Dummies978-0-470-05434-5
Mac OS X Leopard For Dummies978-0-470-05433-8
Macs For Dummies, 9th Edition978-0-470-04849-8
PCs For Dummies, 11th Edition978-0-470-13728-4
Windows® Home Server For Dummies978-0-470-18592-6
Windows Server 2008 For Dummies978-0-470-18043-3
Windows Vista All-in-One Desk Reference For Dummies978-0-471-74941-7
Windows Vista For Dummies978-0-471-75421-3
Windows Vista Security For Dummies978-0-470-11805-4
SPORTS, FITNESS & MUSIC
Coaching Hockey For Dummies978-0-470-83685-9
Coaching Soccer For Dummies 978-0-471-77381-8
Fitness For Dummies, 3rd Edition978-0-7645-7851-9
Football For Dummies, 3rd Edition978-0-470-12536-6
GarageBand For Dummies978-0-7645-7323-1
Golf For Dummies, 3rd Edition978-0-471-76871-5
Guitar For Dummies, 2nd Edition978-0-7645-9904-0
Home Recording For Musicians For Dummies, 2nd Edition978-0-7645-8884-6
iPod & iTunes For Dummies, 5th Edition 978-0-470-17474-6
Music Theory For Dummies 978-0-7645-7838-0
Stretching For Dummies 978-0-470-06741-3

Check out the Dummies Product Shop at www.dummies.com for more information!
DVDs • Music • Games • DIY • Crafts Consumer Electronics • Software Hobbies • Cookware • and more!
Do More with Dummies
Products for the Rest of Us!

John HaslettExpedition leader and adventure writer
Cameron M. SmithArctic explorer
• Use survival techniques to stay alive on land or at sea
• Understand basic navigation
• Find enough water and food
• Signal for help and get rescued
Learn to:
Wilderness Survival
Making Everything Easier!™
Open the book and find:
• Common survival scenarios you may encounter
• Tried-and-tested advice for individuals or groups
• The items you need to stay alive
• Basic orientation skills
• Ways to keep warm or cool
• The best methods for building a fire in any environment
• What you can (and can’t) eat and drink in the wild
• True stories of survival
John Haslett is a veteran expedition leader and adventure writer whose articles have been featured in National Geographic Adventure. Cameron M. Smith is an archaeologist at Portland State University. He has traveled the world’s wildernesses in some of the most unreasonable ways imaginable.
Nature/Outdoor Adventure
$19.99 US / $23.99 CN / £14.99 UK
ISBN 978-0-470-45306-3
Go to Dummies.com®
for videos, step-by-step photos, how-to articles, or to shop the store!
Your one-stop guide to surviving and enjoying the Great OutdoorsWant to know how to stay alive in extreme situations? This practical, accurate guide gives you all the expert, field-tested tools and techniques you need to survive. Whether you find yourself lost in the woods, adrift on a life raft, bitten by a snake, or needing shelter in cold weather, this hands-on resource teaches you how to stay safe (and sane), find rescue, and live to tell the tale!
• Know the basics of survival — perform life-saving first aid, make fire and shelter, and find water and food
• Manage your emotions — cope with panic and anger, get the “survivor’s attitude,” and foster cooperation and hope with others
• Increase your chances of rescue — signal for help and navigate using a compass or the sky
• Practice expert survival methods — tie essential knots, craft your own weapons and tools, and make natural remedies
• Gain wisdom for water emergencies — stay afloat when your ship or boat sinks, avoid dehydration and starvation, and make it to shore
Wilderness Survival
Haslett Smith
est. spine=.9600”