Macramé Bracelets - Om Tara
19
©2017 Laura Gasparrini www.omtara.com Macramé Bracelets Spiraling Half Hitch Knot Lark’s Head Knot By Laura Gasparrini MATERIALS: Two 4-Foot lengths of 1mm -1.5mm cord (for thicker cord, you need to cut a longer cord) Large-holed beads that fit on your cord Bead or button for clasp Clipboard and binder clip How to begin your bracelet: Step 1: Fold your cord at the 1-foot mark, so you have 1 foot on one side of the fold and 3 feet on the other side.
-
Upload
khangminh22 -
Category
Documents
-
view
0 -
download
0
Transcript of Macramé Bracelets - Om Tara

©2017 Laura Gasparrini www.omtara.com
Macramé Bracelets
Spiraling Half Hitch Knot Lark’s Head Knot
By Laura Gasparrini
MATERIALS:
Two 4-Foot lengths of 1mm -1.5mm cord (for thicker cord, you need to cut a longer cord)
Large-holed beads that fit on your cord Bead or button for clasp
Clipboard and binder clip
How to begin your bracelet: Step 1:
Fold your cord at the 1-foot mark, so you have 1 foot on one side of the fold and 3 feet on the other side.

©2017 Laura Gasparrini www.omtara.com
NOTE:
The 1-foot side is your Core; the 3-foot side is your Worker. General ratio for macramé is 1:3 or 1:4; 1 being the length of your Core, 3 or 4 being the length of your Worker. Generally, your Core length is your “desired finished length” plus ~ 5 to 7 extra inches for knotting.
Step 2: Tie an overhand knot at the fold to make a loop. See illustration. Make sure your closure bead or button can fit through the loop snugly.
This is what it will look like:

©2017 Laura Gasparrini www.omtara.com
Step 3:
Clip your loop onto a clipboard or tape it to your workstation. Step 4:
Load your beads onto your Core. You will need 10 – 12 beads depending on bead size and desired length. Step 5:
Anchor the bottom of the Core with a binder clip to the bottom of your clipboard.
Next you’ll learn how to make two different knots:
The Spiraling Half Hitch Knot &
The Lark’s Head Knot
Practice making your first bracelet using the Half Hitch Knot;
then make your second bracelet using the Lark’s Head Knot.

©2017 Laura Gasparrini www.omtara.com
Forming the Spiraling Half Hitch Knot
Step 6:
Pull the 3-foot Worker away from the 1-foot Core.
Step 7:
Cross the Worker over the Core to make the shape of a letter P.
Step 8:
Tuck the Worker under the Core, and pull through the loop you formed when making the letter P.
Step 9:
Pull and slide this knot up until it reaches the top. You have just made a half hitch knot!

©2017 Laura Gasparrini www.omtara.com
Step 10:
Cross the Worker over the Core to make the shape of a letter P. (Same as Step 7.)
Step 11:
Tuck the Worker under the Core, and pull through the loop you formed when making the letter P. (Same as Step 8)
Step 12:
Pull and slide this knot up until it reaches your first knot.

©2017 Laura Gasparrini www.omtara.com
Step 13: Repeat Steps 10 - 12 three more times; you will have made 5 knots and will notice the Half Hitch Knots begin to move around your Core making a spiral. Don’t worry if the cords want to flip around – let it flip, then continue knotting as before.
Adding Beads To Your Macramé – 2 options Beads on the Core You can add beads to your Core as you knot. Take a bead that is waiting on your Core, and slide it up toward your last knot. Tie another Half Hitch Knot with the Worker as you have in Steps 7-9, just pretend the bead is not there. The Worker will wrap around the outside of your bead and form a knot underneath it. Knot a few more half hitches to get a desired space between beads, then slide another bead up and repeat!

©2017 Laura Gasparrini www.omtara.com
Beads on the Worker You can add beads to your Worker as you knot. Slide a bead onto your cord and up toward your last knot. Tie a Half Hitch as you have in Steps 7-9 above, making sure the bead is snug against your bracelet. Adding beads on your Worker will make your beads pop out to the side and spiral around as you knot. Depending on how often you add in a bead on your Worker, this option may require a longer Worker cord length. (1:4 ratio)
Step 14: Continue knotting and adding beads until you near your desired length.
When you are nearing your finished length, take a moment to test the length of your growing bracelet.

©2017 Laura Gasparrini www.omtara.com
Step 15: To check the length, unclip your work, grab the cords together and wrap your bracelet around your wrist.
(I usually thread the cord ends through the loop to get a good fit.)
Make sure your bracelet sits comfortably on your wrist. Check how many more beads you may need to reach the loop end of your bracelet.
ð If you need to add more length, knot in another bead or two.
ð If you need fewer beads, take off one bead at a time until you find your desired length. The easy way to “unknot” a Half Hitch Knot is to pull the Core out of the center of your knot, then the knots just fall away!
Remember since we started with 5 Half Hitch Knots, you will end your bracelet pattern with 5 Half Hitch Knots.
Clip your work again; add any beads and tie any last Half Hitch Knots needed to get your desired length.

©2017 Laura Gasparrini www.omtara.com
Finishing
Tie an overhand knot with both cords after your last Half Hitch Knot. I wrap the cords around my finger to make a loop and then tuck both cord ends through that loop. Pull tightly.
This is what it will look like:
Step 11: Adding your Clasp Bead or Button
ð Adding a Bead Clasp
To add a clasp bead, thread the bead on the shortest cord. Wrap the remaining cord around the bead. Tie an overhand knot with both cords after the bead.
Trim any excess leather to no less than ¼ of an inch. You can add a drop of glue on the knot for extra security.

©2017 Laura Gasparrini www.omtara.com
ð Adding a Shank Button To add a button with a shank, thread the button on the shortest cord. Wrap the remaining cord around the button shank. Tie an overhand knot with both cords after the button.
Trim any excess leather to no less than ¼ of an inch. You can add a drop of glue on the knot for extra security.
ð Adding a 2-hole Button To add a button with 2 holes, thread one cord through each of the holes of the button. Tie an overhand knot with the two cords above the button.
Trim any excess leather to no less than ¼ of an inch. You can add a drop of glue on the knot for extra security.

©2017 Laura Gasparrini www.omtara.com
Forming the Lark’s Head Knot
The Lark’s Head Knot is a two-step knot that does not spiral. A Lark’s Head Knot begins the same way as the Half Hitch Knot you made above. Here’s a review:
Step 1:
Start with How to begin your bracelet above.
Step 2:
Cross the 3-foot Worker over the Core to make the shape of a letter P.
Step 3:
Tuck the Worker under the Core, and pull through the loop you formed when making a letter P. Step 4:
Pull and slide this knot up until it reaches the top.
You have just made the first half of a Lark’s Head Knot!
©2017 Laura Gasparrini www.omtara.com
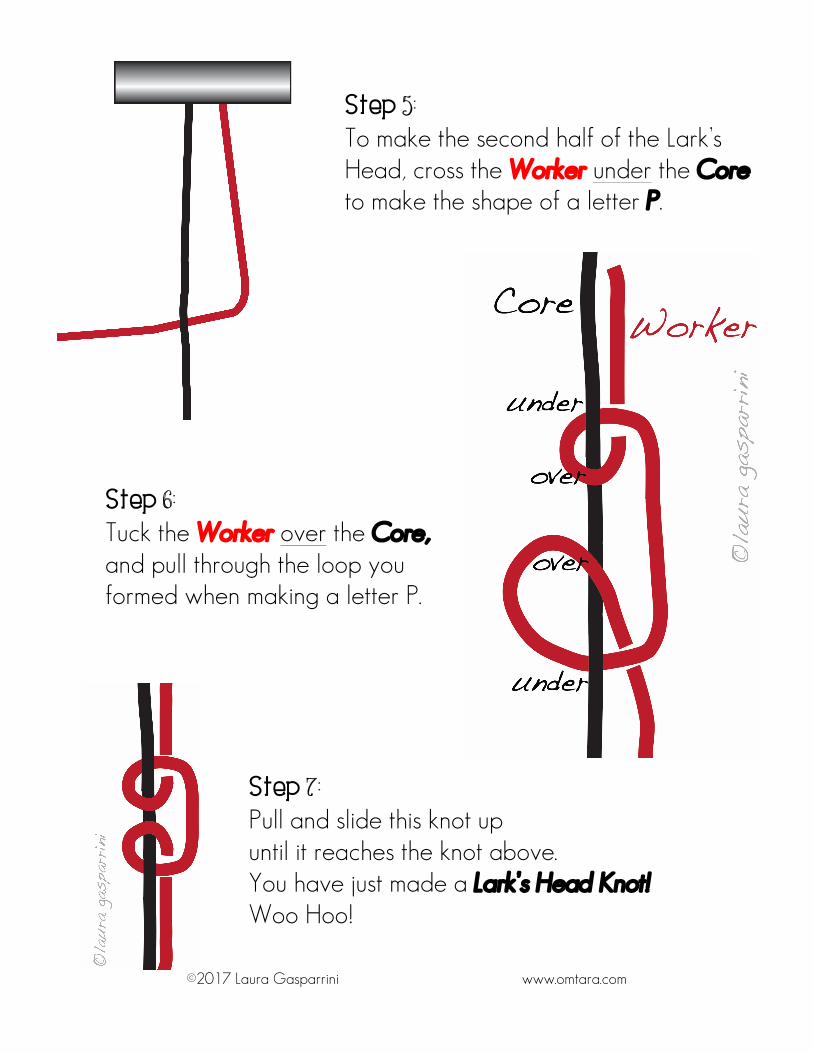
Step 5:
To make the second half of the Lark’s Head, cross the Worker under the Core to make the shape of a letter P.
Step 6:
Tuck the Worker over the Core, and pull through the loop you formed when making a letter P.
Step 7:
Pull and slide this knot up until it reaches the knot above. You have just made a Lark’s Head Knot! Woo Hoo!

©2017 Laura Gasparrini www.omtara.com
Step 8:
Repeat Steps 2 - 7 one more time; you will have made 4 individual knots, which equals 2 Lark’s Head Knots. You’ll notice the Lark’s Head Knots are flat and do not spiral.
Step 9:
Add beads as above in the Half Hitch Instructions.
Knot in as many Lark’s Head Knots as needed to get the spacing you like.
Keep Going!

©2017 Laura Gasparrini www.omtara.com
Step 10: Check the length of your bracelet, and see how many more beads you may need to reach the loop end of your bracelet.
ð If you need to add more length, knot in another bead or two.
ð If you need fewer beads, take off one bead at a time until you find your desired length. You can “unknot” a Lark’s Head Knot the same way you did the Half Hitch Knot – just pull the Core out of the center of your knot, and the knots just fall away!
Remember since we started with 2 Lark’s Head Knots, you will end your bracelet pattern with 2 Lark’s Head Knots. Clip your work again; add any beads and tie any last Lark’s Head Knots needed to get your desired length.

©2017 Laura Gasparrini www.omtara.com
Finishing
Tie an overhand knot with both cords after your last Lark’s Head Knot. Pull tightly. This is what it will look like:
Add a clasp the same way you did when making the Half Hitch Bracelet above. Trim the cord ends after your last knot to no less than ¼ inch.
You did a great job!

©2017 Laura Gasparrini www.omtara.com
MODIFICATIONS
Finished length guidelines & Wrap Bracelet Formula
Macramé Bracelets look great stacked or wrapped for an earthy, boho look. You can modify the instructions above and make double and triple wrap bracelets by using a simple formula. Remember that the ratio between the Core and the Worker is 1:3 – if the Core is 1 foot, the Worker is 3 times that long: 3 feet. To make a wrap bracelet of any length, first determine how long your bracelet needs to be when its finished. You can wrap a string or measuring tape around your wrist to estimate the length. Then add 5 to 7 inches to that length. This combined amount will be the length of your Core. Remember that the Worker is 3 times as long as the Core. Multiply the length of the Core by 3 to determine how long your Worker needs to be. Add the Core length and the Worker length together to find out how much leather you need to cut.

©2017 Laura Gasparrini www.omtara.com
Here’s an example for a Double Wrap Bracelet: Step 1 Finished length 17 inches
add 5 - 7 inches + 7 inches Total length of Core = 24 inches (2 feet)
Step 2 Multiply Core length by 3 2 feet x 3
to find the Worker length = 6 feet
Step 3 Add the Core 2 feet and the Worker together + 6 feet to find the total length of your cord = 8 feet
Step 4 Cut 8 feet of cord, and fold it at the 2-foot mark. The Core will be 2 feet; the Worker is 6 feet.
• A finished Double Wrap bracelet usually measures ~16 -17 inches depending on your wrist size. You can also wear your Double Wrap Bracelet as a Choker!
• A finished Triple Wrap bracelet usually measures ~23 – 24
inches depending on your wrist size. • For each additional wrap, add ~7 more inches to your finished
length.

©2017 Laura Gasparrini www.omtara.com
Here’s a Wrap Bracelet Cheat Sheet for you!
Step 1 Finished length inches
add 5 - 7 inches + 7 inches Total length of Core = inches
Step 2 Multiply Core length by 3 x 3 to find the Worker length =
Step 3 Add the Core and the Worker together + to find the total length of your cord =
Step 4 Cut of cord, and fold it at the mark. The Core is ; the Worker is .

©2017 Laura Gasparrini www.omtara.com
Now your Macramé Bracelets are ready to wear or give as a gift. Make a few, and share them with your loved ones!
I hope you enjoyed this tutorial. If you like my work, please visit my website, www.OmTara.com, to learn more about my beading classes, tools, books and programs. Sign up to receive my newsletter featuring bead-related tips, news and more! Stop by my facebook page at www.facebook.com/omtarabead and give me a Like!
Happy Beading!
About Laura Gasparrini Laura Gasparrini, M.A., is an artist, writer, educator, counselor and inventor. She has been teaching the Art of Beadwork for over 15 years and creating jewelry since childhood. She is the principle designer and owner of Om Tara®. Laura is the inventor of the Om Tara® Crimping Pliers and the developer of Om Tara® precision beading tools. Laura offers classes in beautiful Santa Barbara, California, and at beading trade shows across the country. She is the creative mind behind Jewelry Arts Academy – an online classroom that offers instruction in beadwork and jewelry design, ranging from beginning beading skills to over 100 project-specific workshops.
Copyright disclaimer! You are welcome to make bracelets like these for your enjoyment or commercial sale. This tutorial document is included in Laura’s published book, Earth & Elegance ~ Volume 1. Please do not distribute, lend or copy this tutorial. Do not mass-produce. Please give credit to the designer.