LISTBOX USER MANUAL - HubSpot
16
LISTBOX USER MANUAL www.playboxtechnology.com
-
Upload
khangminh22 -
Category
Documents
-
view
0 -
download
0
Transcript of LISTBOX USER MANUAL - HubSpot
2
Legal notice The information in this manual is furnished for informational use only. No part of this manual may be reproduced or transmitted in any form or by any
means, electronic or mechanical, for any purpose, without the prior written permission of PlayBox Technology UK Ltd.
The software, described in this manual, is owned by PlayBox Technology UK Ltd. It is protected by Copyright Law of England and Wales as well as by
international copyright treaties, and may be used or copied only in accordance with the license agreement.
PlayBox Technology UK Ltd provides this manual “as is” without any warranty, either express, or implied.
This publication may contain typographical errors or technical inaccuracies. While every precaution has been taken in the preparation of this document,
PlayBox Technology UK Ltd assumes no responsibility for errors or omissions. Nor is any liability assumed for damages, resulting from the use of the
information, contained herein. Changes are periodically made to the information herein. They will be incorporated in new versions of the manual. Please,
check the PlayBox Technology UK Ltd website regularly for User Manual updates.
PlayBox Technology UK Ltd may introduce changes or improvements in the products, described in this manual at any time, without any special notice.
Please, address your comments or questions to:
Playbox Technology UK Ltd
Brookmans Park Teleport
Great North Road
Hatfield AL96NE
United Kingdom
www.playboxtechnology.com

3
Contents
Legal notice ................................................................................................................................................................................... 2 Contents ........................................................................................................................................................................................ 3 Preface .......................................................................................................................................................................................... 4 Style Conventions ......................................................................................................................................................................... 5 GETTING STARTED ........................................................................................................................................................................ 6 USER INTERFACE ........................................................................................................................................................................... 7 PLAYLIST CONTROL BUTTONS ........................................................................................................................................................................................................................................................ 7 PLAYBACK CONTROL AND COUNTERS ........................................................................................................................................................................................................................................ 7 PLAYLIST GRID ...................................................................................................................................................................................................................................................................................... 8 STATUS BAR........................................................................................................................................................................................................................................................................................... 9 MENU BAR .................................................................................................................................................................................. 10 FILE MENU........................................................................................................................................................................................................................................................................................... 10
Export Capture list ...................................................................................................................................................... 10
Export Logs to XLS ...................................................................................................................................................... 10
Reload Graphic Rules ................................................................................................................................................. 10 EDIT MENU ......................................................................................................................................................................................................................................................................................... 10 VIEW MENU ........................................................................................................................................................................................................................................................................................ 10 SETTINGS MENU ............................................................................................................................................................................................................................................................................... 10
General ........................................................................................................................................................................ 10
Interface ...................................................................................................................................................................... 10
Modules ....................................................................................................................................................................... 11 TOOLS MENU..................................................................................................................................................................................................................................................................................... 11 COMMANDS MENU......................................................................................................................................................................................................................................................................... 11 HELP MENU ........................................................................................................................................................................................................................................................................................ 11
PlayBox Help .............................................................................................................................................................. 11
PlayBox Doctor… ....................................................................................................................................................... 11
About… ....................................................................................................................................................................... 11 APPENDIX – LISTBOX KEYBOARD SHORTCUTS ........................................................................................................................ 12
GENERAL ..................................................................................................................................................................... 12
GRID CONTROL .......................................................................................................................................................... 14
SELECTION MANAGEMENT ........................................................................................................................................ 14
4
Preface
Dear PlayBox customer,
Thank you for purchasing our product! We would like to assure you that you have chosen the most cost-effective and versatile TV
automation system on the market. As always, we are trying to stay close to our customers’ needs, making sure they all receive adequate
support and satisfaction. Your opinion about our product is an exceptionally valuable source of information for us. The ease of working
with the PlayBox products results mainly from the suggestions and comments of our current respected customers.
This manual is structured into several sequential chapters, each aiming to ease the installation, fine tuning, and use of our products. We
hope that you will enjoy working with it, and we are anxiously looking forward to receiving your feedback.
Please, send your questions, suggestions, and assistance requests to:
General feedback:
5
Style Conventions • File names, software, documents or terms are written in italics
▪ The data is written in the settings.ini file.
▪ The file is located in C:\Program Files\PlayBox Technology UK Ltd\AirBox
▪ For further information read Shortcuts reference book.
▪ The VTR is controlled via RS-422.
• Direct quotations from the computer screen are presented as follows:
▪ Menu Items and commands
▪ Tab/Page names
▪ Column names (i.e. in a playlist or another grid) ▪ Field names, check boxes
▪ Buttons ▪ Screen readings are written in [square brackets]
▪ The keyboard keys are enclosed in <> signs
▪ Terms are defined in the Glossary at the end of the manual
• The arrows, used in the setting procedures mean as follows:
▪ ➔ A menu item follows;
▪ A page(tab) name follows;
▪ → A field name, a check box name, or a value name follows.
Except for arrows, you can distinguish between the relevant menu categories also by the styles, listed above.
6
GETTING STARTED
ListBox is dedicated to creating and editing playlists. It allows preparing playlists in advance for the AirBox module and playing them on-air later.
ListBox does not need any special workstation or platform.
Quick Start
▪ Launch ListBox ;
▪ Right-click on the grid;
▪ Select Add ➔ Media file;
▪ Browse for the files you want to insert in the playlist and click on the Open button.
▪ Go to File menu ➔ Save playlist as and browse for the location to save your playlist to.
▪ Type some name for the playlist and press Save.
Congratulations! You have just created your first PlayBox playlist!
7
USER INTERFACE The interface of ListBox is identical with the AirBox interface. It is designed like that for user’s convenience. There are some differences, which are
described in this section.
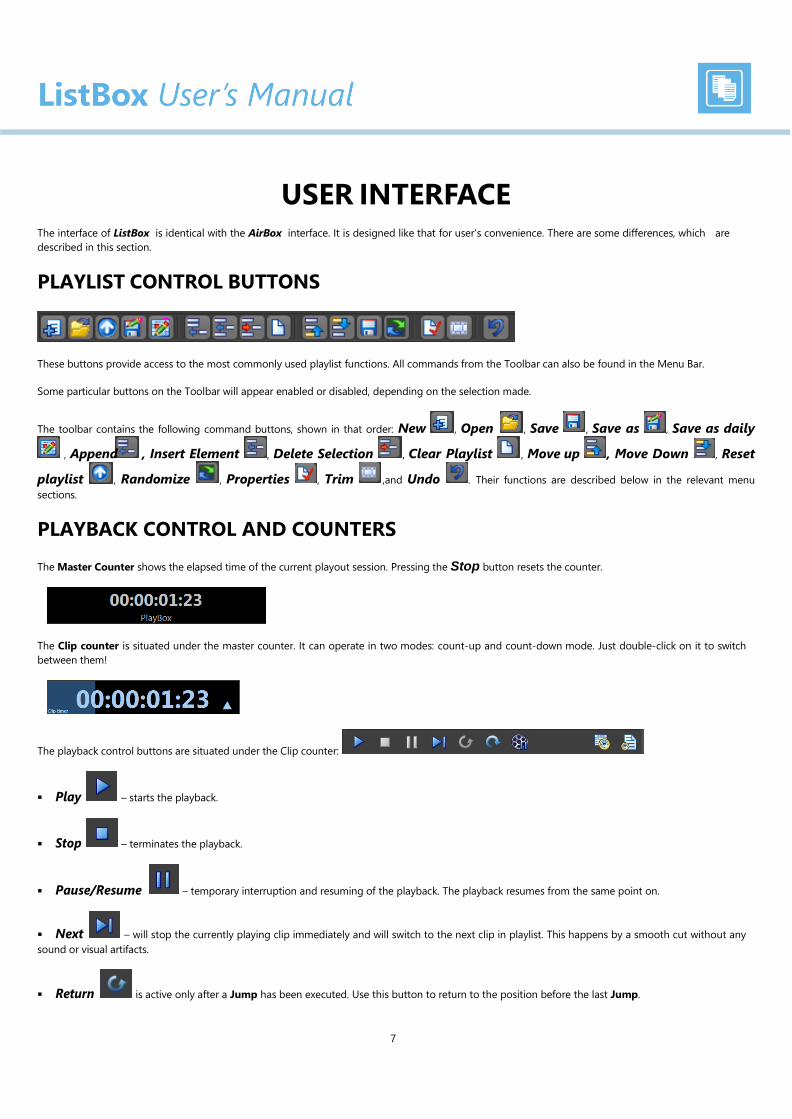
PLAYLIST CONTROL BUTTONS
These buttons provide access to the most commonly used playlist functions. All commands from the Toolbar can also be found in the Menu Bar.
Some particular buttons on the Toolbar will appear enabled or disabled, depending on the selection made.
The toolbar contains the following command buttons, shown in that order: New , Open , Save , Save as , Save as daily
, Append , Insert Element , Delete Selection , Clear Playlist , Move up , Move Down , Reset
playlist , Randomize , Properties , Trim ,and Undo . Their functions are described below in the relevant menu
sections.
PLAYBACK CONTROL AND COUNTERS
The Master Counter shows the elapsed time of the current playout session. Pressing the Stop button resets the counter.
The Clip counter is situated under the master counter. It can operate in two modes: count-up and count-down mode. Just double-click on it to switch
between them!
The playback control buttons are situated under the Clip counter:
▪ Play – starts the playback.
▪ Stop – terminates the playback.
▪ Pause/Resume – temporary interruption and resuming of the playback. The playback resumes from the same point on.
▪ Next – will stop the currently playing clip immediately and will switch to the next clip in playlist. This happens by a smooth cut without any
sound or visual artifacts.
▪ Return is active only after a Jump has been executed. Use this button to return to the position before the last Jump.

8
▪ Cue – This button will interrupt the playback, and will pause at the first frame of the selected clip. You can also activate it by holding down
the <Ctrl>key and pressing the Jump button at the same time. Use this to prepare a clip for playback, while showing its first frame on the output.
Since this is a machine-and-decoder-dependent function, you might have to increase the Cue Delay time in the Settings dialog box (Settings ➔
General General → Cue delay).
▪ Fix overlapping – press it to fix the overlapping issues in the playlist. The fixed time flags will be removed and the duration of the
overlapping files will be truncated.
▪ Fixed playlist start mode – press it to see the start time of the clips in the playlist in relation to the start time of the playlist, which is
defined in the Current playlist tab. Press the button again to see the start times of the clips in the playlist in relation the current system time.
PLAYLIST GRID
This area is dedicated to playlist visualization. It looks the same as the AirBox Playlist Grid, but the grid headers are colored, so you can easily
distinguish between AirBox and ListBox . The order of grid columns can be changed by drag-n-dropping them to the left or to the right.
You can control the columns to appear and their order in the grid from Settings menu ➔ General ➔ Grid.
Grid Features:
- The Color Coding in the grid provides additional information for the users:
Dark Blue bar shows the currently selected clip –all actions, i.e., Move Up/Down are applied to it.
Red text rows contain events. You can insert the same events as in AirBox .
Red-colored rows represent clips, which cannot be found at the specified file location. A red minus appears in front of the clip position number.
- Drag-n-Drop – It allows dragging playlist items within the grid or from one grid to another (from DataBox or from/to AirBox ). If
you hold down the <Ctrl>key while dragging, the executed operation is Copy. If you just drag-n-drop, the operation is Move.
- Multi-selection – allows simultaus manipulation of many clips– move, randomize, etc. Clips can be added to the selection by holding the <Shift>
or <Ctrl> key. The <Shift> key selects from-to, while the <Ctrl> adds a single clip to the selection.
▪ Jump – terminates the currently playing clip immediately and starts playing the selected one, regardless of its position in the grid.
9
- Double-clicking over a clip invokes the Clip Trimmer. A detailed description of the Clip Trimmer can be found further in the manual in its
corresponding chapter. Double-clicking over a missing clip invokes its properties dialog. If you want to view the properties of an existing clip, right-click
in its row and select Clip properties… from the context menu.
- Right-clicking in the grid opens a context menu. It contains commands from the Edit menu and the Playlist menu that are described further in the
manual.
▪ Columns description:
- Start Time – shows the start time of each clip.
- Duration – shows the actual duration of each clip. If a clip has been trimmed, its new actual duration is displayed in this column.
- Type – shows the type of the clip (MPEG, or AVI DV).
- Category – contains category information, fed by DataBox. The background is colored with the predefined category color.
- File Name – contains information about the file-paths and names. If you need to change the path of a certain file in List Box, just press <F8> to
open the Browse dialog.
If a file is missing after the playlist is loaded in AirBox , its line will be skipped and the playout will continue with the next available clip.
- Title, ClipID, Star – contain data, fed by DataBox, describing the clip name, clip ID, and the performing artists. You can edit these fields manually
in ListBox , in the clip properties dialog.
- Notes – displays trimming notification and data from the fields, defined in DataBox ➔ Options General → Fields to AirBox notes. You can
edit these notes in the clip properties dialog in ListBox .
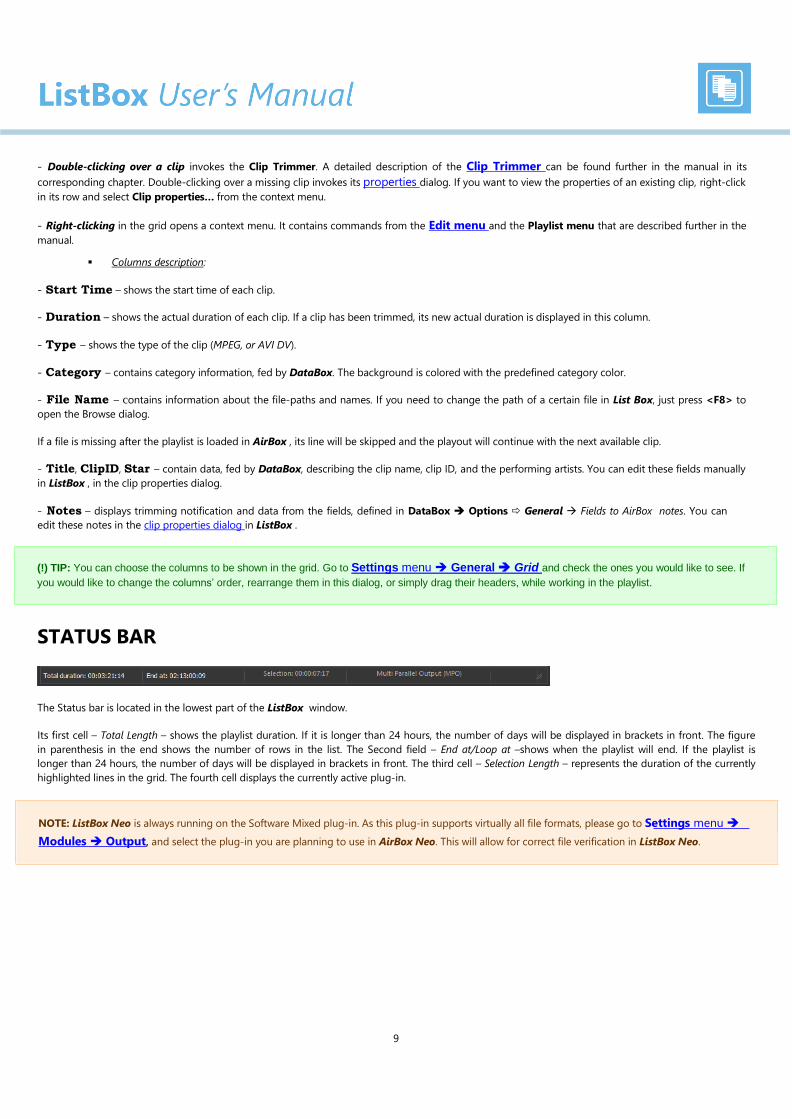
STATUS BAR
The Status bar is located in the lowest part of the ListBox window.
Its first cell – Total Length – shows the playlist duration. If it is longer than 24 hours, the number of days will be displayed in brackets in front. The figure
in parenthesis in the end shows the number of rows in the list. The Second field – End at/Loop at –shows when the playlist will end. If the playlist is
longer than 24 hours, the number of days will be displayed in brackets in front. The third cell – Selection Length – represents the duration of the currently
highlighted lines in the grid. The fourth cell displays the currently active plug-in.
NOTE: ListBox Neo is always running on the Software Mixed plug-in. As this plug-in supports virtually all file formats, please go to Settings menu ➔
Modules ➔ Output, and select the plug-in you are planning to use in AirBox Neo. This will allow for correct file verification in ListBox Neo.
(!) TIP: You can choose the columns to be shown in the grid. Go to Settings menu ➔ General ➔ Grid and check the ones you would like to see. If
you would like to change the columns’ order, rearrange them in this dialog, or simply drag their headers, while working in the playlist.
10
MENU BAR The Menu Bar is situated in the upper left end of the window and contains the same menus as AirBox . However, some of the options are disabled, as
they are not relevant in playlist preparation. The following paragraphs contain description of the differences that appear in ListBox . Please, check the
AirBox File menu section above for detailed information about the common settings.
FILE MENU
Export Capture list
If there are missing files in the playlist, you can create a list for CaptureBox to ingest them. Select Export capture list from the File menu and browse
for the location to save the playlist to. The resulting capture lists (*.cap) will be named after the currently loaded playlist.
Export Logs to XLS
This File menu item appears in AirBox , but it is not visible in ListBox .
Reload Graphic Rules
This File menu item appears in AirBox , but it is not visible in ListBox .
EDIT MENU
This menu contains commands, related to playlist editing. As it is identical to the AirBox Edit menu, please, check the relevant section above for
details.
VIEW MENU
This menu is identical to the AirBox View menu. The only difference is that in ListBox you cannot view external preview window, while in
AirBox you can.
SETTINGS MENU
As the Settings menu contains many playback-related options, here you will find most of the differences between the two modules.
General
In the General tab of this options dialog, there are several fields that are not accessible in ListBox :
Restart playback after – this setting is always enabled.
Enable remote IP control – This functionality is related to remote control of the playback. As ListBox is intended for playlist preparation, it is not
needed here.
TC transmission options – as they are related to on-air subtitling, they are not needed in ListBox .
All the other settings in this dialog are the same as in AirBox ➔ Settings menu ➔ General General.
Interface
In the Interface tab, there are two options that are always enabled and inaccessible:

11
Modules
AirBox Output tab – here you can find a list of presets that will be used for file verification while building your playlists in ListBox . All you have to do is
select the platform and file format you intend to use for playout in AirBox , and double-click to assign it.
In the Remote tab you can enable the events plug-ins you intend to use in AirBox and configure them. If AirBox and ListBox are running on the same
server, these settings will be shared between them. Please, check the AirBox section for external events description.
The Logo tab and the TC tab are not relevant in ListBox , thus, they are disabled.
TOOLS MENU
The Tools menu is identical to the AirBox Tools menu. Please, check the relevant section above for details.
COMMANDS MENU
The commands menu contains some playback-related and logo-related commands. As they are identical to the AirBox commands, please, check the
relevant section above for details.
HELP MENU
PlayBox Help
This menu item opens the ListBox context-sensitive help. It is still under development.
PlayBox Doctor…
Open it to start a tool that automatically collects data about your system and current setting, in order to provide you with proper support. All you have
to do is fill-in the mandatory fields and send the resulting PlayBox Doctor report to us. See detailed description of the PlayBox Doctor features in the
Basic PlayBox manual.
About… Clicking on this menu item displays the About box of the ListBox module. It contains useful information about the module version, WIBU Box number,
license type, registration, etc.
12
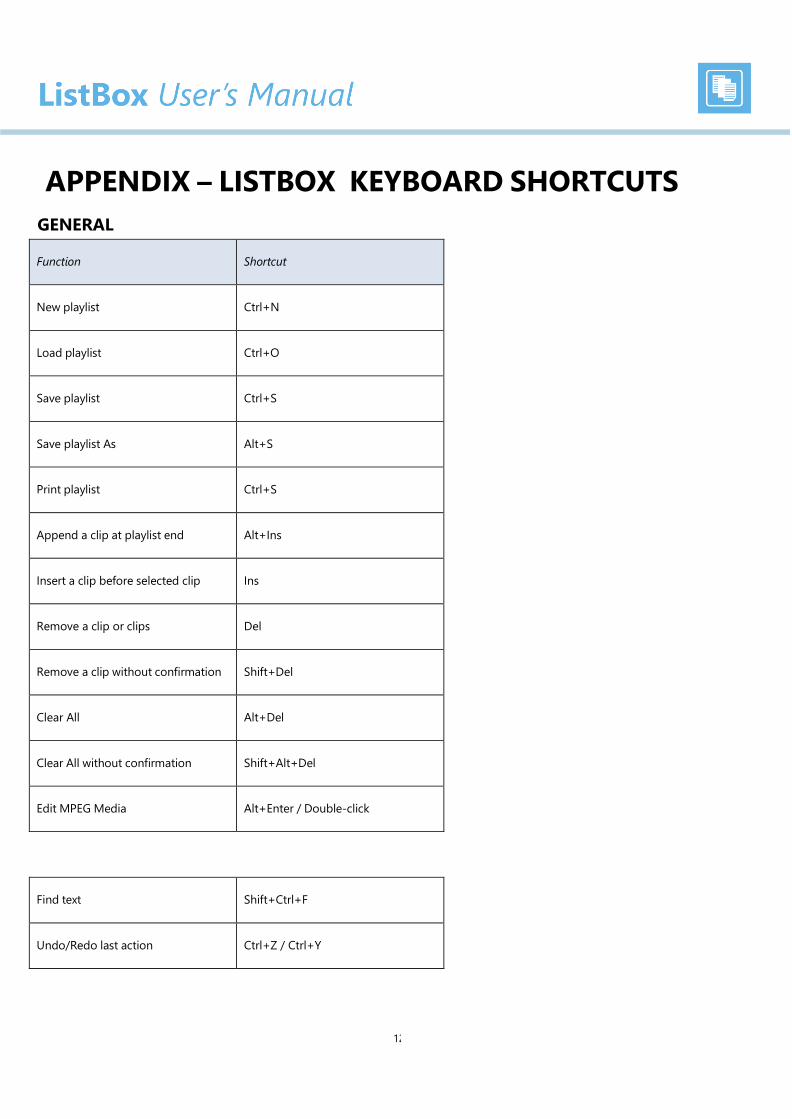
APPENDIX – LISTBOX KEYBOARD SHORTCUTS
GENERAL
Function
Shortcut
New playlist
Ctrl+N
Load playlist
Ctrl+O
Save playlist
Ctrl+S
Save playlist As
Alt+S
Print playlist
Ctrl+S
Append a clip at playlist end
Alt+Ins
Insert a clip before selected clip
Ins
Remove a clip or clips
Del
Remove a clip without confirmation
Shift+Del
Clear All
Alt+Del
Clear All without confirmation
Shift+Alt+Del
Edit MPEG Media
Alt+Enter / Double-click
Find text
Shift+Ctrl+F
Undo/Redo last action
Ctrl+Z / Ctrl+Y

13
Insert Stop event
Ctrl+Alt+S
Insert Stop Cue event
Ctrl+Alt+C
Insert Wait event
Ctrl+Alt+W
Insert Wait Until event
Ctrl+Alt+U
Insert Wait Time Code event
Ctrl+Alt+A
Insert Logo event
Ctrl+Alt+L
Insert GPI event
Ctrl+Alt+G
Insert KramerSwitcher event
Ctrl+Alt+K
Insert KramerMatrix output
Ctrl+Alt+R
Insert TitleBoxNetCtrl output
Ctrl+Alt+T
Add Stop event
Shift+Ctrl+S
Add Stop Cue event
Shift+Ctrl+C
Add Wait event
Shift+Ctrl+W
Add Wait Until event
Shift+Ctrl+U
Add Wait Time Code event
Shift+Ctrl+A
Add Logo event
Shift+Ctrl+L
Add GPI event
Shift+Ctrl+G
Add KramerSwitcher event
Shift+Ctrl+K
14
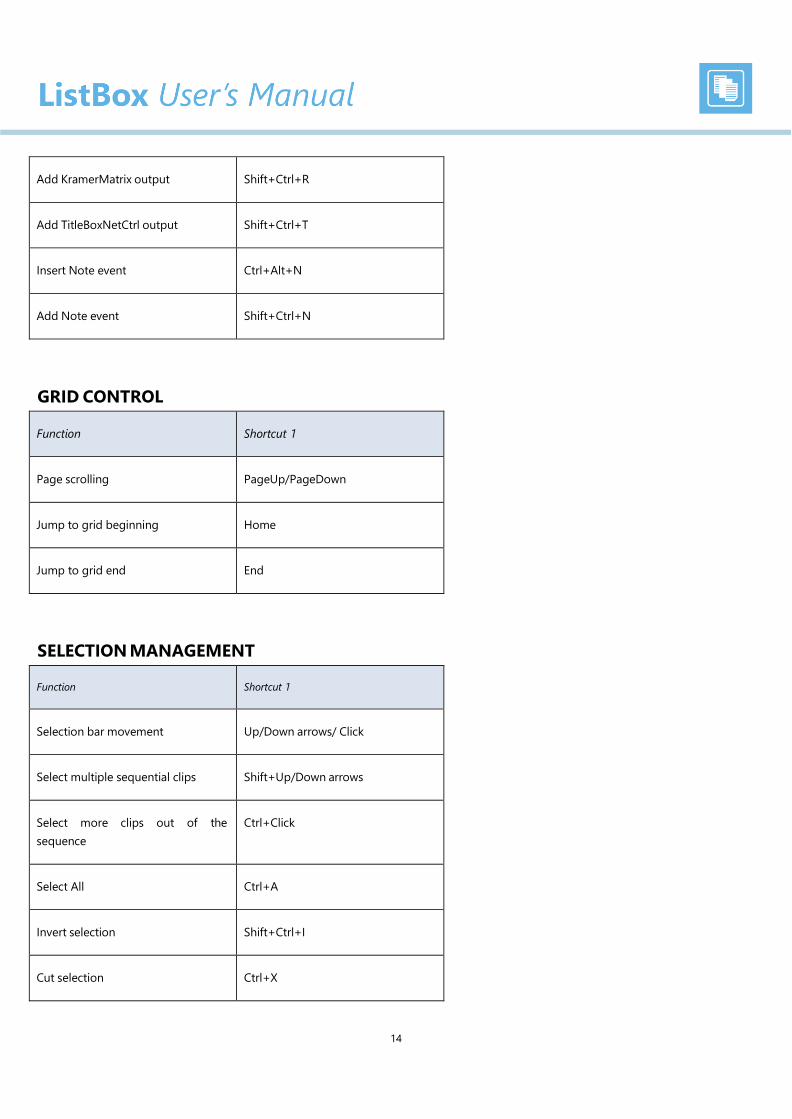
Add KramerMatrix output
Shift+Ctrl+R
Add TitleBoxNetCtrl output
Shift+Ctrl+T
Insert Note event
Ctrl+Alt+N
Add Note event
Shift+Ctrl+N
GRID CONTROL
Function
Shortcut 1
Page scrolling
PageUp/PageDown
Jump to grid beginning
Home
Jump to grid end
End
SELECTION MANAGEMENT
Function
Shortcut 1
Selection bar movement
Up/Down arrows/ Click
Select multiple sequential clips
Shift+Up/Down arrows
Select more clips out of the
sequence
Ctrl+Click
Select All
Ctrl+A
Invert selection
Shift+Ctrl+I
Cut selection
Ctrl+X
15
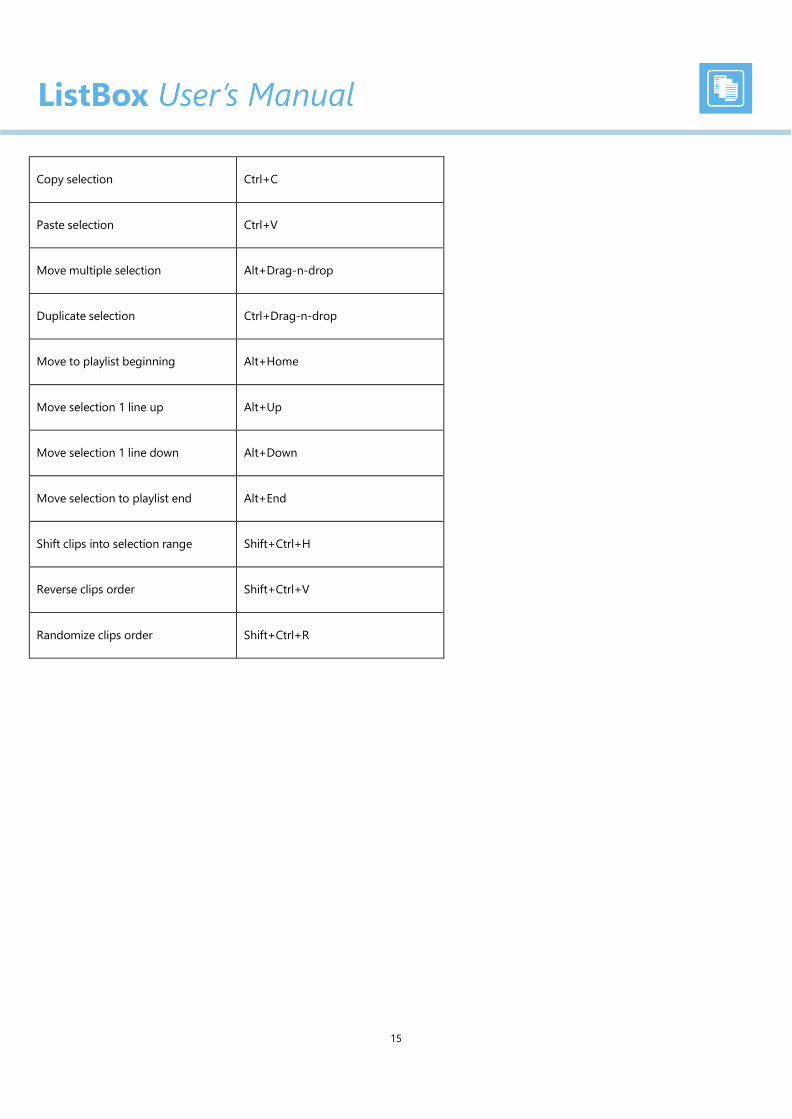
Copy selection
Ctrl+C
Paste selection
Ctrl+V
Move multiple selection
Alt+Drag-n-drop
Duplicate selection
Ctrl+Drag-n-drop
Move to playlist beginning
Alt+Home
Move selection 1 line up
Alt+Up
Move selection 1 line down
Alt+Down
Move selection to playlist end
Alt+End
Shift clips into selection range
Shift+Ctrl+H
Reverse clips order
Shift+Ctrl+V
Randomize clips order
Shift+Ctrl+R
16
Playbox Technology UK Ltd
Brookmans Park Teleport
Great North Road
Hatfield AL96NE
United Kingdom
www.playboxtechnology.com
All rights reserved copyright ©