Lab Manual Meat science
81
1 PONDICHERRY UNIVERSITY (A CENTRAL UNIVERSITY) PUDUCHERRY-605014 M.Sc. Food Science & Technology FS&T551 Technology of Animal Products Lab Certified that this is the bonafide record work of …………………………………………. With Register No.:.……………………… of Third Semester Food Science & Technology during the Academic year 2014. Date: Course Teacher Examiners 1: 2:
-
Upload
pondiuni-anthropology -
Category
Documents
-
view
0 -
download
0
Transcript of Lab Manual Meat science

1
PONDICHERRY UNIVERSITY(A CENTRAL UNIVERSITY)
PUDUCHERRY-605014
M.Sc. Food Science & Technology
FS&T551 Technology of Animal Products Lab
Certified that this is the bonafide record work of ………………………………………….
With Register No.:.……………………… of Third Semester Food Science & Technology during
the Academic year 2014.
Date: Course Teacher
Examiners 1:
2:
2
FS&T551 Technology of Animal Products Lab
3
INDEXSr. no. Date Experiment Name Page
No.Teacher’s Signature
1. Detection of presence of glycogen in meat
2. Blotting paper test
3. Determination of Water Holding Capacity
4. Bleeding test
5. Quality Evaluation of Eggs: External Qualities
6. Quality Evaluation of Eggs: Internal Qualities
7. Cattle slaughter and dressing
8. Fabrication of Beef or Buffalo Carcass
9. Fabrication of Pork Carcass
10. Fabrication of Goat, Lamb or Sheep Carcass
11. Slaughter and dressing of pigs
12. Smoking of meat
13. Dehydration of Meat
14. Slaughter and dressing of poultry
15. Microbiology Of Meat
A. Preparation Of Different Agar
B. Culture Methods
C. Gram Staining
4
D. Motility Testing
E. Indole Test
F. Methyl Red Test
G. Voges- Proskauer Test
H. Citrate Utilization Test
I. Triple Sugar Iron Agar Media
J. Mannitol Motility Media
K. Microbiological Analysis Of Meat
16. Preservation of shelled eggs
17. Sensory Analysis Of Fish
18. Preparation of chicken based products-
A. Chicken chilli
B. Chicken Popcorn
C. chicken masala curry
19. Preparation Of Fish Based Product

5
Expt. no:
Date :
Detection of presence of glycogen in meat
Aim:
To detect the presence of glycogen in the given meat sample.
Principle:
Glycogen is the storage form of glucose in animals and humans which is analogous to the starch in
plants. Glycogen is synthesized and stored mainly in the liver and the muscles. Slaughter of the
animal is followed by anaerobic glycolysis leading to formation of lactic acid from the glycogen
reserves:
Glycogen Lactic acid + 2 ATP
Materials Required:
Meat sample, Beakers, Funnel, Weigh balance, Thermometer, lugol’s iodine.
Procedure:
50g of minced meat in 4 volumes of water was boiled for 15 minutes. Then the filtrate was cooled
through filter paper. Few amount of the filtrate was taken and to this a few drops of lugol’s s iodine
was added. Reddish brown colour indicates the presence of glycogen.
Observation:
Reddish brown colour was detected which decolourised on heating the filtrate to 800 C.
Result:
Inferences:
6
Expt.no:
Date :
Blotting paper test
Aim:
To check the efficiency of bleeding by ‘Blotting paper test’.
Materials required:
Meat sample, knife, blotting paper
Procedure:
In a block of meat an incision is made, then a stripe of white blotting paper or filter paper was placed
in the incision and the paper was removed after 2 minutes.
Result:
Badly bled meat will stain the paper light or dark red and moisten it irregularly beyond the line of
contact with the meat, while well bled meat stain the paper faint pink and not exceed the line of
contact.
Inferences:

7
Expt.no:
Date :
Determination of Water Holding Capacity
Aim:
To determine the water holding capacity of the given meat sample.
Principle:
The capacity of meat to retain its water during the application of physical forces is known as water
holding capacity. This property of meat has a special significance because it contributes to the
juiciness of cooked meat besides influencing the texture and color.
Procedure:
20g of meat is taken
Keep in centrifuge tube containing 30ml 0.6N NaCl
Stirred with glass rod for 1 min
Tube is kept for 15min at 4°C
Stirred for 1min
Centrifuge at 3000 RPM for 25min
8
Observations:
Weight of the empty tubes
Weight of the empty tube 1 =
Weight of the empty tube 2=
Weight of the Tube and Sodium Chloride
Weight of NaCl in tube 1 =
Weight of NaCl in tube 2 =
Weight of tube and meat
Weight of the meat in tube 1 =
Weight of the meat in tube 2 =
Weight of the supernatant
Weight of the supernatant in 1st tube =
Weight of the supernatant in 2nd tube =
Result:
Inferences:
9
Expt.no:
Date :
Bleeding test
Aim:
To check whether the meat is well bled or not
Factors affecting on bleeding:
Species, sex and age:
Species: Each species is specifically characterized by a certain range of total blood
and blood yielded during bleeding.
Sex: Cow yield more blood than bulls or bullocks of the same weight.
Age: With advanced age, blood yield decreases (at similar weight).
Live weight: There is a relation between live weight (usually muscle not fat) and total blood &
blood yielded during bleeding.
Health and physical condition: Healthy and well rested animal will give greater amount of blood
that diseased or fatigued one.
Technology of slaughter:
Method of stunning
Position of carcasses during bleeding
Duration of bleed
Hemoglobin extraction test:
In a clean test tube put 5g of chopped meat and add 10ml of water(few drops of ether may be
added) shake well and allow to stand for 10 minutes.

10
Result:
Inferences:
11
Expt.no:
Date :
Quality Evaluation of Eggs: External Qualities
Aim:
To study the external physical qualities of egg by physical examination.
Materials required:
Eggs, Weighing Balance, Beaker, Water, measuring cylinder etc..
Theory:
There are two types of eggs that are present in market
1. Fertile egg
2. In fertile egg
In fertile egg the embryo development takes place due to the functional properties of egg and content
changes take place continuously to a considerable extent. So, infertile eggs are produced for more
shelf-life. Eggs are to be evaluated in-order to check their quality.
Egg contains about 11% Shell, 50% Albumin, and 30-33% yolk.
Air cells are formed by the contraction of the inside of the egg by evaporation of moisture during
storage. High quality eggs have small air cells.
Procedure:
Physical examination of eggs is carried out by judging the following external qualities of egg:
1. Colour of Eggs
Colour of the egg affects the egg qualities but it is the basis of separation of eggs in the market.
2. Shell Shape and Texture
The normal egg has oval shape and grading is done as follows:
AA Grade => Normal shape, Free from rough areas
A Grade => It is somewhat similar to AA grade, but the shell may not be smooth.
12
B Grade => Presence of raises over the surface of egg.
C Grade => Presence of raises and rough areas.
3. Shell Soundness
Soundness of eggs attributes to the condition of the shells. A perfect shell is the one which is
unbroken and is in a sound condition.
Cracked eggs, leakers (having broken shell membrane) are the terms used for the characterizing the
soundness of the shells.
4. Shell Cleanliness
Based on the shell cleanliness eggs are graded as follows
A Grade => Shell free from foreign materials and discolouration
B Grade => Slightly discoloured but free from dirt.
C Grade => Egg shell containing dirt and other foreign materials on the surface and also discoloured.
5. Specific gravity
Specific gravity should be measured within few hours after laying to reduce the loss of air due to
evaporation. It is calculated by Archimedes’s principle.
Observations:-
1. Color of egg =
2. Shell shape and texture =
3. Shell Soundness =
4. Shell Cleanliness =
5. Length of the egg =
6. Breadth of the egg =
7. Weight of the egg in air =
8. Weight of water displaced by the egg =
9. Specific gravity of egg =

13
Calculation:
Weight of the egg in air
Specific gravity of the egg =
Weight of water displaced by the egg
=
Result:
1. Colour of egg =
2. Shell shape and texture =
3. Shell Soundness =
4. Shell Cleanliness =
5. Length of the egg =
6. Breadth of the egg =
8. Weight of the egg in air =
9. Weight of water displaced by the egg =
10. Specific gravity of egg =
Inferences:
14
Expt.no:
Date :
Quality Evaluation of Eggs: Internal Qualities
Aim:
To study the internal physical qualities of egg by breakout test.
Materials required:
Eggs, Weighing Balance, Beaker, Vernier Calipers, flat bottom plate, spoon etc..
Theory:
There are two types of eggs that are present in market
1. Fertile egg
2. In fertile egg
In fertile egg the embryo development takes place due to the functional properties of egg and content
changes take place continuously to a considerable extent. So, infertile eggs are produced for more
shelf-life. Eggs are to be evaluated in-order to check their quality.
Egg contains about 11% Shell, 50% Albumin, and 30-33% yolk.
Air cells are formed by the contraction of the inside of the egg by evaporation of moisture during
stirage. High quality eggs have small air cells.
Procedure:
1. Break out test
Contents of the eggs are collected on a flat surface by breaking the shell and height and breadth of
yolk are observed and recorded. The weight of the yolk and albumin and their percentage are also
recorded.
2. Yolk quality
This is determined by the condition of yolk i.e. whether it is thick or thin. It determines the
freshness of yolk. Yolk index is determined by calculating the ratio of yolk height to its breadth
and the albumin index is calculated by finding out the ratio of height to the breadth of albumin.
15
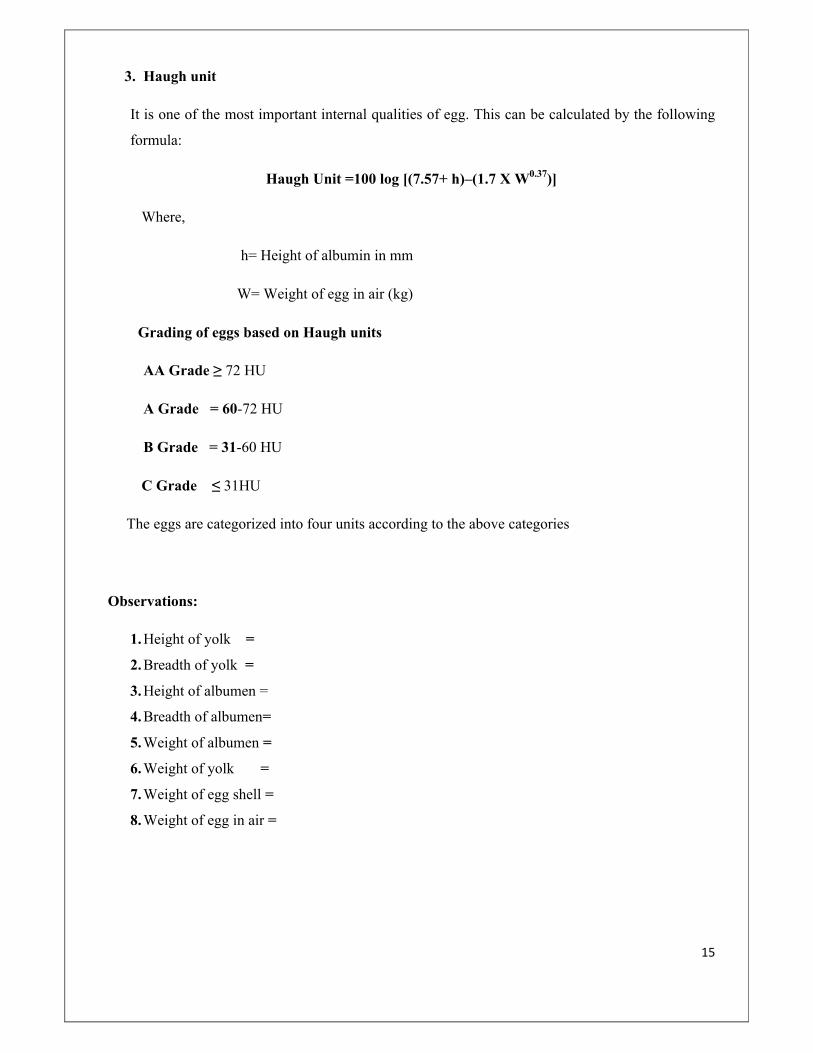
3. Haugh unit
It is one of the most important internal qualities of egg. This can be calculated by the following
formula:
Haugh Unit =100 log [(7.57+ h)–(1.7 X W0.37)]
Where,
h= Height of albumin in mm
W= Weight of egg in air (kg)
Grading of eggs based on Haugh units
AA Grade ≥ 72 HU
A Grade = 60-72 HU
B Grade = 31-60 HU
C Grade ≤ 31HU
The eggs are categorized into four units according to the above categories
Observations:
1.Height of yolk =
2.Breadth of yolk =
3.Height of albumen =
4.Breadth of albumen=
5.Weight of albumen =
6.Weight of yolk =
7.Weight of egg shell =
8.Weight of egg in air =

16
Calculations:
1. Yolk index = Height of yolk x 100 =
Breadth of yolk
2. Albumin index = Height of albumin x 100 =
Breadth of albumin
3. % yolk = Weight of yolk x 100 =
Weight of egg
4. % albumen = Weight of albumin x 100 =
Weight of egg
5. % Shell = Weight of egg shell x 100 =
Weight of egg
6. Haugh Unit = 100 log [(7.57+ h)–(1.7 X W0.37)]=

17
Results:
Yolk index =
Albumin index =
Percent yolk =
Percent albumin=
Percent shell =
Haugh unit =
Grade of egg =
Inferences:

18
Expt.no:7
Date :
Cattle slaughter and dressing
Aim:
To slaughter cattle and perform dressing

19
Steps in cattle slaughter and dressing
1. Reception- Animals are unloaded to a platform of height 9- 12 m
2. Rest- Animals are kept in lairage to reduce stress. Lairage space for cattle is 2.3-2.8 m2. Cattle
and pig should not be mixed.
3. AMI- This is done for diagnosis of disease and also for a sound PMI. Diseases detected in
AMI are rabies, tetanus etc.
AMI judgment:
Total unfit (FMD, tetanus)
Suspect
Fit for slaughter
Three steps in slaughter are: emergency, casualty and delayed
4. Stunning, Hoisting and breeding- Stunning by 3 methods:
i. Mechanical/ captive bolt pistol/ free bullet- speed of bullet is 65-70m/s- acceleration
concussion method
ii. Chemical by mixing CO2 gas.
iii. Electrical- 250 mA, 70-75 V is used.
Bleeding/ sticking by cutting jugular vein and carotid artery on both sides. Time is 6-9
minutes.
5. Dehiding or Flaying- removal of hide
6. Decapitation- done at atlanto occipital junction.
7. Evisceration- first rectum is removed and then viscera
8. PMI- involves inspection of head, viscera and carcass
Head- inspects eye, lip and tongue. Mainly done to detect FMD, stomatitis, actinomycosin
and actinobacillosin. Incision is made on massetee parallel to lower jaw for eg: sticercus

20
bovis. Retropharyngeal, submaxillary and parotid lymph nodes are inspected for T.B., abcess,
tonsil for tubercle bacilli.
Viscera- color, consistency and congestion is noted. For lung- froth may be there in
pneumonia, pleuritis, TB, fasciolosis, hydratid cyst, Taenia saginata, lung worm, node should
be examined.
Heart- pericarditis, haemorrage on pericardium, endocardium, epicardium, cysticercus,
hydratid cyst in myocardium, flabby condition in septicemia
Liver- Visual examination and palpitation is done in cirrhosis, hepatosis, falty change,
cysticurcus bovis, linguatulla, fasciolosis, oesophagostomum radiations, larvae can be seen.
Milk spots due to larval migrance can be seen. Portal lymph node and bile duct are examined.
Oesophagus, stomach and intestine- Serons surface examined for TB, actinobacillosis,
anterior part of reticulum examined for penetration by foreign body. Mesentric lymph node
examined for TB and linguatula.
Kidney- Renal lymph node and adrenal gland are examined.
Spleen- Surface and substance examined for TB, anthrax
Uterus- Visual examination is done
Udder- Mastitis, abscess, TB, super maxillary lymph node examined
Testis- Visual examination and palpitation
Urinary bladder- Cysticercus tennicolis
PMI judgment
i. Fit for consumption
ii. Partially condemned- abscess
iii. Totally condemned- TB, FMD, anthrax
Carcass- Cut surface of bones and muscle, pleura, peritoas, diaphragm is noted. Condition
and efficacy of bleeding, color, cleanliness and odour is noted. Triceps brachi muscle is
examined for C. bovis. Superficial inguinal external and internal iliac, pectoral and renal LN
should be examined in TB. Thoracic and abdominal cavity are noted for inflammation, abcess,
actinobacillosis, mesothelioma, TB.
Meat can be graded as:
A: Fit for human consumption

21
B: Totally condemned
D: Partially condemned
I: Inferior quality
L: Limited distribution
Splitting: longitudinally
9. Washing and weighing
10. Chilling and processing- To improve smoothness and texture at 4 - 7⁰C. Freezing is done at -
15 to -20⁰C.
Result:-
Inference:

22
Expt.no:
Date :
Fabrication of Beef or Buffalo Carcass
Aim:
Fabrication of beef or buffalo carcass and identification of their whole sale cuts.
Principle:
Beef carcass is divided into halves by splitting vertebral column from posterior to anterior end
of carcass. The resulting halves are then further divided into quarters by cutting by cutting between
12th & 13th rib. Separating the beef forequarter from hind quarter is known as ribbing of carcass. 13th
rib remains with hind quarter. Ribbing aside of beef is accomplished by inserting the knife between
12th – 13th rib near the centre of the carcass & adjacent to the posterior edge of the 12th rib. Follow the
contour of 12th rib & cut towards the longissmus dorsi muscle, making a smooth cut through
longismus dorsi & adjacent muscle. It will be necessary to saw through the thoracic vertebrae at this
point.
Procedure:
Fabrication of Beef Fore Quarter
1. Place the fore quarter on the cutting table with the ribs up & remove the peritoneum & diaphragm.
2. Rib & short plate: Remove the rib short plates section by cutting between 5th & 6th rib in a straight
line perpendicular to the outside skin surface. This sawing through thoracic vertebrae, scapula, costal
cartilage & sternum. The rib is removed from the short plate by a straight cut across the ribs. The
straight cut is determined by measuring not more than 25cm from the most ventral point of the 6th &
12th thorasic vertebrae to the point of intersection of respective ribs.
3. Chuck, brisket , fore shank: Brisket & fore shank are removed from chuck by cutting perpendicular to
rib across the lateral end of humerus & perpendicular to the original cut made between 5th & 6th rib.
The fore shank is separated from brisket by following natural seam that exist between these two
wholesale cuts.
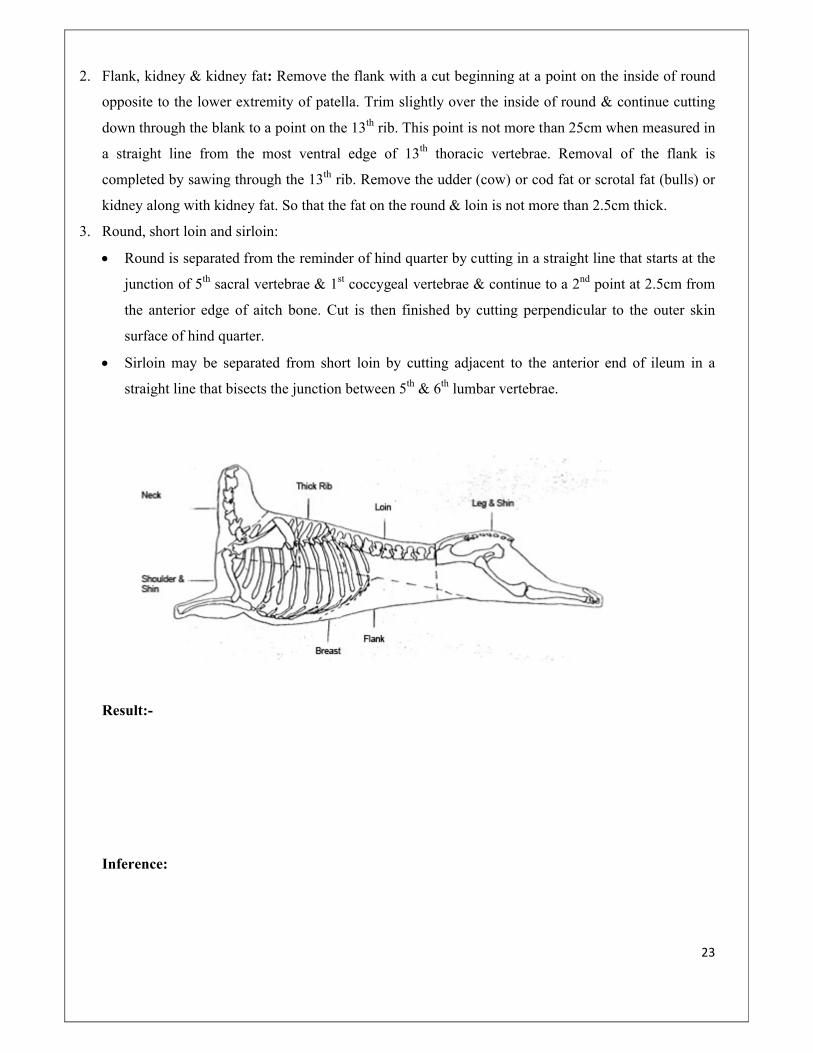
Fabrication of beef hind quarter
1. Place the hind quarter of carcass on cutting table.
23
2. Flank, kidney & kidney fat: Remove the flank with a cut beginning at a point on the inside of round
opposite to the lower extremity of patella. Trim slightly over the inside of round & continue cutting
down through the blank to a point on the 13th rib. This point is not more than 25cm when measured in
a straight line from the most ventral edge of 13th thoracic vertebrae. Removal of the flank is
completed by sawing through the 13th rib. Remove the udder (cow) or cod fat or scrotal fat (bulls) or
kidney along with kidney fat. So that the fat on the round & loin is not more than 2.5cm thick.
3. Round, short loin and sirloin:
Round is separated from the reminder of hind quarter by cutting in a straight line that starts at the
junction of 5th sacral vertebrae & 1st coccygeal vertebrae & continue to a 2nd point at 2.5cm from
the anterior edge of aitch bone. Cut is then finished by cutting perpendicular to the outer skin
surface of hind quarter.
Sirloin may be separated from short loin by cutting adjacent to the anterior end of ileum in a
straight line that bisects the junction between 5th & 6th lumbar vertebrae.
Result:-
Inference:
24
Expt.no:
Date :
Fabrication of Pork Carcass
Aim:
1. To study the procedure of fabrication of pork carcass in to wholesale cuts
2. To determine the dressing % & yield of wholesale cuts
Procedure:
Pork carcass is dressed in packers style as two sides with joule attached but head removed & leaf
layout. Carcass is divided into sides by sawing the vertebral column from the posterior to
anterior end of the carcass.
Place the sides of pork on the cutting table with the ribs up & feet towards the person cutting it.
Neck bones, joule, clear plate, Boston shoulder/ butt, picnic shoulder & fore foot:
Remove the shoulders, clear plates, neck bones, forefoot & joule from the rest of the carcass by
cutting between 2nd & 3rd ribs. The cut should be perpendicular to the long axis of the side &
outside of skin surface. This enables sawing through scapula ribs, thoracic vertebrae, costal
cartilage & sternum.
The neck bones (cervical vertebrae, ribs, sternum, costal cartilage & thoracic vertebrae) are
removed without allowing excessive amount of lean muscle to adhere to bone. Turn the shoulder
over with the skin side up & remove the jowl by cutting close to the shoulder & parallel to the
original cut between the 2nd & 3rd ribs. Square & trim the joule
Remove the clear plates & excess fat & skin from atleast the upper 50% of shoulder, the fat
thickness should not be more than 2.5 cm thick. Separate the Boston butt & picnic shoulder by
sawing across the scapula just above its junction with the humerus & parallel to the dressed side
of shoulder appropriately 2.5 cm below the posterior edge of scapula. Cut should be
perpendicular to the outer skin surface of the carcass. Remove the flap from picnic shoulder at
this point. Remove forefoot by saving across the carpel bone
Remove the leg & hind foot by cutting at a point approximately 6.25 cm from the most anterior
part of the active bone. Cut should be made perpendicular to the long axis of the leg & outside
skin surface. Cut should pass through sacral vertebrae & shaft of the ileum.
Loin , backfat, belly& spare ribs
25
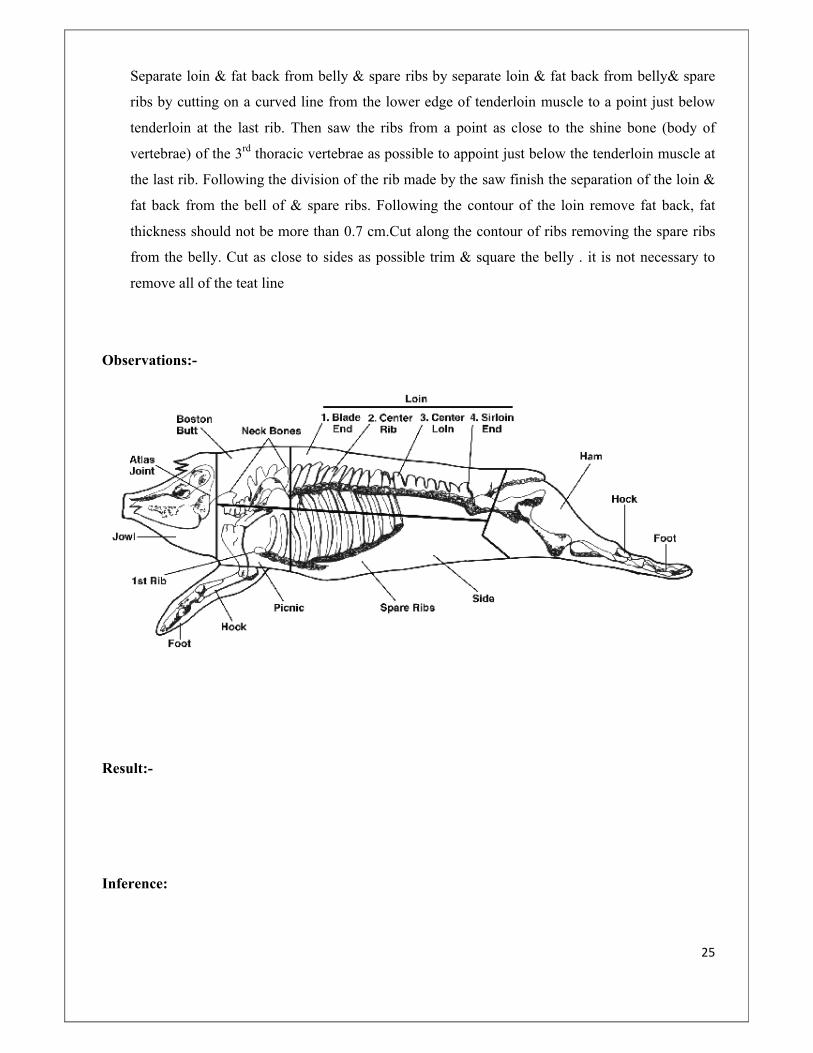
Separate loin & fat back from belly & spare ribs by separate loin & fat back from belly& spare
ribs by cutting on a curved line from the lower edge of tenderloin muscle to a point just below
tenderloin at the last rib. Then saw the ribs from a point as close to the shine bone (body of
vertebrae) of the 3rd thoracic vertebrae as possible to appoint just below the tenderloin muscle at
the last rib. Following the division of the rib made by the saw finish the separation of the loin &
fat back from the bell of & spare ribs. Following the contour of the loin remove fat back, fat
thickness should not be more than 0.7 cm.Cut along the contour of ribs removing the spare ribs
from the belly. Cut as close to sides as possible trim & square the belly . it is not necessary to
remove all of the teat line
Observations:-
Result:-
Inference:
26
Expt.no:
Date :
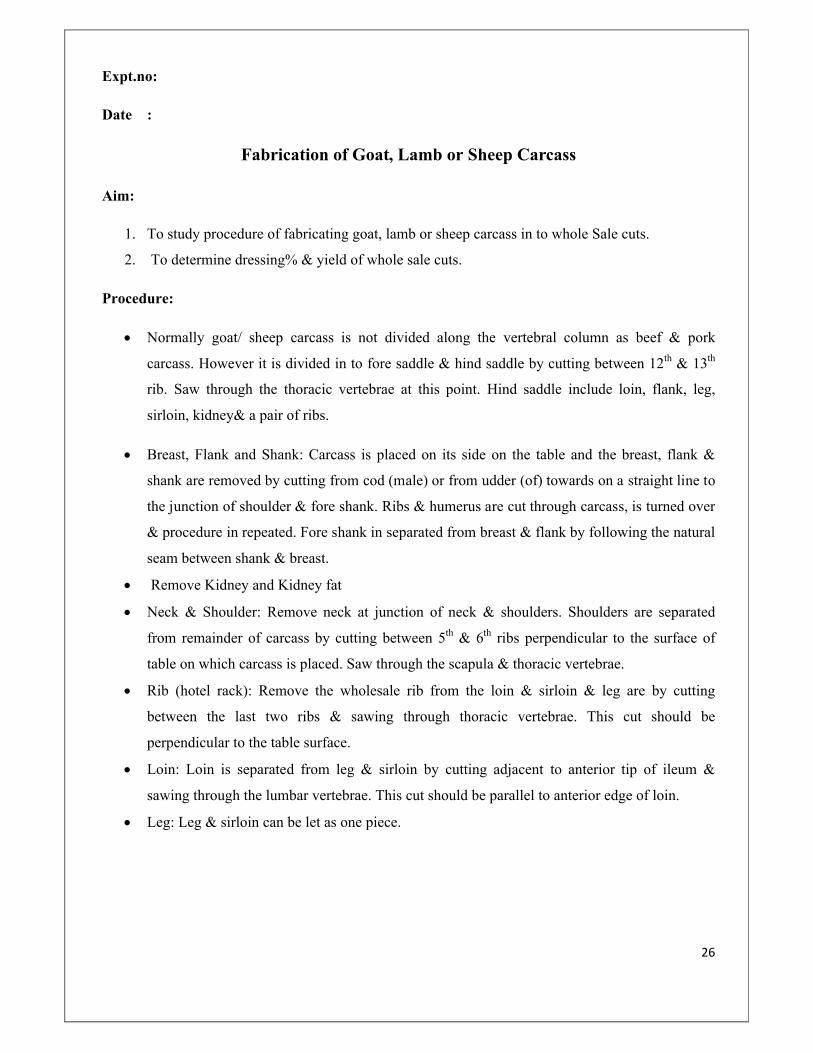
Fabrication of Goat, Lamb or Sheep Carcass
Aim:
1. To study procedure of fabricating goat, lamb or sheep carcass in to whole Sale cuts.
2. To determine dressing% & yield of whole sale cuts.
Procedure:
Normally goat/ sheep carcass is not divided along the vertebral column as beef & pork
carcass. However it is divided in to fore saddle & hind saddle by cutting between 12th & 13th
rib. Saw through the thoracic vertebrae at this point. Hind saddle include loin, flank, leg,
sirloin, kidney& a pair of ribs.
Breast, Flank and Shank: Carcass is placed on its side on the table and the breast, flank &
shank are removed by cutting from cod (male) or from udder (of) towards on a straight line to
the junction of shoulder & fore shank. Ribs & humerus are cut through carcass, is turned over
& procedure in repeated. Fore shank in separated from breast & flank by following the natural
seam between shank & breast.
Remove Kidney and Kidney fat
Neck & Shoulder: Remove neck at junction of neck & shoulders. Shoulders are separated
from remainder of carcass by cutting between 5th & 6th ribs perpendicular to the surface of
table on which carcass is placed. Saw through the scapula & thoracic vertebrae.
Rib (hotel rack): Remove the wholesale rib from the loin & sirloin & leg are by cutting
between the last two ribs & sawing through thoracic vertebrae. This cut should be
perpendicular to the table surface.
Loin: Loin is separated from leg & sirloin by cutting adjacent to anterior tip of ileum &
sawing through the lumbar vertebrae. This cut should be parallel to anterior edge of loin.
Leg: Leg & sirloin can be let as one piece.
27
Observations:-
Wholesale cuts of the Lamb
Result:-
Inference:

28
Expt.no:
Date:
Slaughter and dressing of pigs
Aim:
Steps in slaughter and dressing of pigs

29
Reception: Animals are unloaded to the platform having a height of 0.9-1.2m. It is followed by
unloading ramp.
Rest: Animals are kept in lairage to minimise the stress enough water should be provided.
AMI: It can be done in lairage to detect Haemorrhagic scepticaemia, foot & mouth disease, tumour
etc.
Stunning: Three Methods
a) Electrical Stunning: - 250 mA & 70-75V tong should be applied on temporal side on
either part of ear. Sensory centre like thalamus, medulla oblangata, lymphatic system are
affected, tong should be properly placed, otherwise leads to missed shock.
b) Captive bolt pistol: - Sudden jerk decrease intra cranial pressure, leadings to acceleration
concussion.
c) Gaseous method: - CO2 gas method. It is a non inflammable gas and has high specific
gravity than air, sinking to bottom of any containers. CO2 is usually stored in cylinders or
bulk tank as a liquid under pressure. CO2 blocks nerve endings and reduce the speed of
nerve impulse .70% CO2 is used for the purpose. If concentration is low, pig can’t be
properly stunned and if too high there is tendency for carcass to become stiff. It shows
reflex muscular activity and bleeds poorly. If exposure period is too long, superficial
congestion of the skin occurs and when pigs are scalded the skin is bluish in color.
Types of Apparatus: Three types
1. Oval tunnel is used for higher killing rate i.e. 120-140 pigs per hr (113kg can be handled).
2. Dip lift is suitable for smaller through puts.
3. Ferris wheel is a horizontally revolving apparatus divided into 3 compartments operating in
such a way that when one section in uppermost, the other two all out merged in gas chamber
Advantages of CO2 Stunning:
Relaxed carcass allowing easier dehairing & dressing.
Less noise & reduced labour requirement.
Yield of blood from pigs stunned by this method is 0.75%. It is better because CO2 stimulate
respiration, thus favour blood circulation & subsequent bleeding.

30
Muscular haemorhage are avoided & price of meat will be lower.
Hoisting & Bleeding:
Sticking of the animal is done at the site just in front of sternum, cutting anterior venacava, it should
be done with in 30 sec of stunning. Bleeding is for 6 min. if sticking in not proper, blood will
accumulate loading to a condition called as muscular splash.
Scalding: - Done at a temp of 61-620 C for 2-4 minutes.
Vertical scalding:-Vertical scalding tank in provided so that pigs will not be dipped in to
water for scalding in order to avoid contamination through cuts/wounds on the carcass.
Apparatus involves a double walled funnel in which steam generated from a water bath in its
bottom is blown over the carcass through ventilation located over the condenser. It also
involves a conveyer system, collector, filler & pump for making the flow of hot water,
continuous controls are for detecting water flow & temperature. Thermostat is for maintaining
temp at 62-640 C. Cooling water from the condenser in the funnel is used to flash the pig
carcass during the dehairing process. Before entry into the funnel carcass should hang for 3
min and then on the side for 2 min. pig carcass are then transported to the tunnel on a rising
rail so that the hend is under the other parts of the body, the whole scalding process which last
for 6 min. Trimming & singeing take place afterwards.
Aim of Vertical Scalding;
1. Improve bacteriological standard of pig meat produce bacteria, cocci & organism
belonging to coli-proteus group-Salmonella paratyphi & typhimureum.
2. Reduce incidence of PSE, because in vertical scalding won’t be a rise in body temperature
to above 410 C as in normal scalding operations.
3. De hairing will be more efficient.
4. Operating cost also reduced.
Disease spread through scalding tank, aerobic & anaerobic spore forming bacteria, cocci & organisms
belonging to coli- protease group. Salmonella paratyphi & typhimureum, Ascalis sunm, nelip worm,
trichulis, Balantidium coli, mold such as aspergillosis & mucor. There can gain in to blood vessels in
wound & can gain entry to lungs.

31
Dehairing: - By putting carcass in a rotating platform.
Singeing: - Remaining hair is removed by burning using kerosene blow lamp or LPG lamp at a temp
of 13000 C.
Scraping & Washing:-Done with a bell scrapper & washed using cold water
Decapitation:-At atlanto occipital axis.
Evisceration: - Cut the carcass medially & remove intestinal contents
PMI:-Include examination of color, consistency, presence of parasites, and examination of carcass
lymph node.
Splitting: - Can be done electrically.
Washing & Weighing: - Wash with clean water.
Chilling & Processing: - Meat should be chilled to a temperature of < 70 C in the processing room,
offal room <30 C, storage temperature should be less than -150 C.
Zoonotic disease of Pig: - Trichenellosis, Anthrax, Actinomycosin, lung worm infestation.
Result:-
Inference:
32
Expt no:
Date:
Smoking of meat
Aim:
Preservation of meat by smoking
Theory:
Smoking gives a drying effect to the meat, imparts a desirable taste, gives a pleasant odor,
brings out the color of the meat, and helps keep the meat from going rancid and from spoiling. Smoke
is an additive to the food processing system as is salt, sugar, water, and spices. The woods used for
smoking meats are in the group referred to as hardwoods. Oak, hickory, pecan, cherry, and maple are
a few of the more frequently used hardwoods. When wood is burned and smoke is generated, there
are two phases of the smoke: gaseous and particulate. The pyrolysis of cellulose and hemicellulose
produces carbonyls. These carbonyl compounds play an important role in color development of meat
when smoke is applied. The carbonyls then react with amino groups in the meat and follow a similar
path of reactions as in the Maillard browning reaction. This group of reactions is enhanced as the
temperature and dryness of the product are increase. The phenolic portion of the smoke is credited
with contributing the antioxidant capability. Oxidation in processed meats leads to rancidity
development and a negative impact, in most cases, on the sensory response of consumers.
There are three primary ways that wood is burned for smoking: Friction, Smoldering and Steam
Smoke is produced in the specially constructed ‘smoke house’ where saw dust or hardwood and
sometimes both are subjected to combustion at room temperature of about 300℃. High temperature is
desirable to minimize the production of carcinogenic compounds. Smoke generation is accompanied
by production of numerous organic compounds and their condensation products. Aldehydes and
phenols condense to form resins, which constitute 50% of the smoke components and contribute to
most of the color in smoked meat. Phenol acts as bacteriostatic and formaldehyde as chief bactericidal
compound.
Liquid Smoke:
Smoke is generated and applied to products for the objectives of positive flavor and color attributes
along with antioxidant and antimicrobial activity. Liquid smoke is produced by the pyrolysis of
hardwoods followed by the capturing of beneficial components of the smoke as a liquid. The raw

33
liquid smoke is filtered to give various products. The liquid smoke would then be applied to the meat
or food product in the form of a drench, dip, atomized mist, or internal addition as an ingredient.
Result:-
Inference:
34
Expt No:
Date:
Dehydration of Meat
Aim:
Dehydration of meat sample at different temperatures and studying the drying curve.
Materials required:
Meat sample, Petri plates, oven, dessicator etc.
Theory:
Drying is probably one of the oldest methods of food preservation. It is a process in which water is
removed from a material by evaporation or sublimation. It takes advantage of the fact that only part of
the water in food has the properties of bulk water, i.e. it is a good solvent and an environment for
biological reactions to take place. Removing that part of water from food ensures its microbial
stability and limits or inhibits chemical and enzymatic reactions. The aim of drying is to increase the
shelf-life of the product and to create new, sometimes unusual, properties in the final product. Dry-
cured ham, semi-dry and dry sausages are good examples of controlled drying that imparts and
develops special texture and flavour to the product.
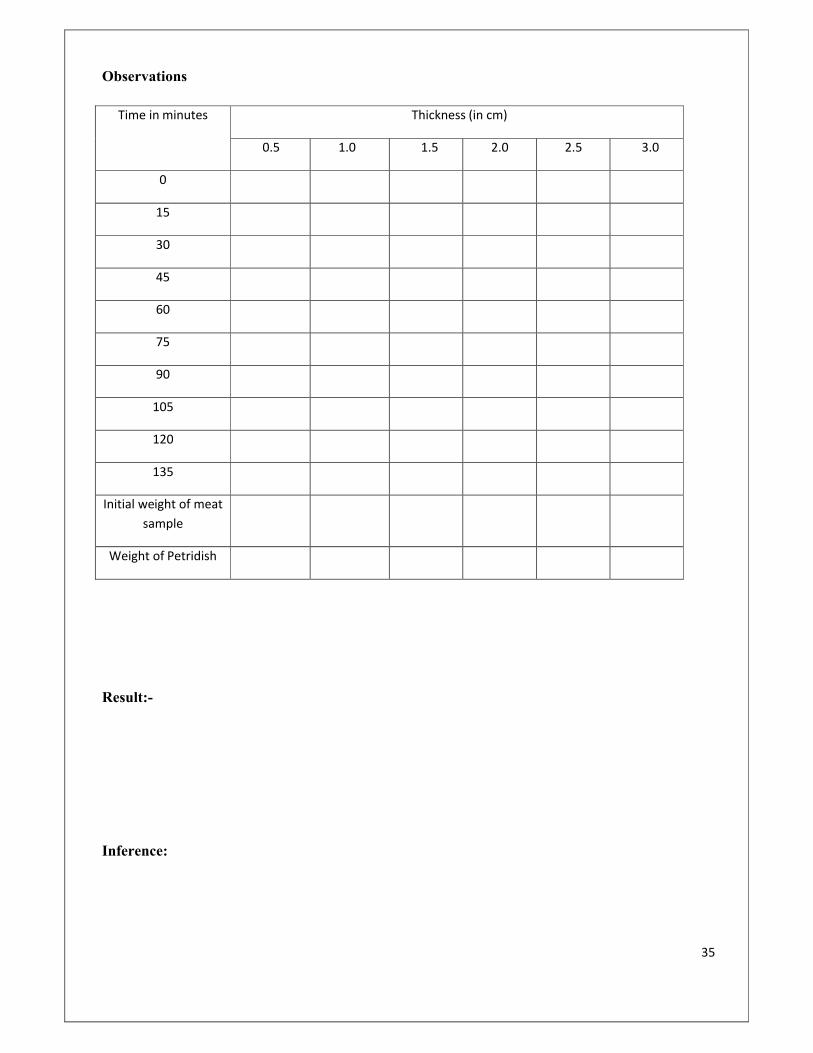
Procedure:
Meat samples were cut into cubes of 0.5, 1.0, 1.5, 2.0, 2.5 and 3.0 cm thickness. Samples of various
thickness were weighed and dried at 60, 70, 80° C in hot air oven.
Samples were taken out after every 15 mins and cooled in a dessicator.
Cooled samples were weighed and again kept in oven for drying.
The procedure was repeated till constant weight was obtained.
From the data obtained at various temperature, drying curve was plotted.
35
Observations
Time in minutes Thickness (in cm)
0.5 1.0 1.5 2.0 2.5 3.0
0
15
30
45
60
75
90
105
120
135
Initial weight of meat sample
Weight of Petridish
Result:-
Inference:

36
Expt no:
Date:
Slaughter and dressing of poultry
Aim:
To study the slaughtering and dressing of meat animals and also the post-mortem changes
Principle:
1) Slaughtering: In case of poultry (chicken), it involves bleeding only and not stunning. Most
commonly, ‘modified Kocher method’ is used in which jugular vein is severed just below the
jowl taking care not to cut trachea and oesophagus. In general, a bleeding time of 1.5 to 2.0
minutes is allowed. Incomplete bleeding retards the keeping quality of dressed chicken.
2) Defeathering: The feathers are removed manually by pulling it. Alternatively feather plucker
can be used which consist of two drums with rubber fingers which revolve in opposite
direction.
3) Removal of feet and oil gland: The feet are cut from tars metatarsal joint with the sharp
knife. Also the oil glands are removed.
4) Evisceration: By a slit opening from the tip of breast bone, abdominal cavity is opened by
means of a transverse cub. The viscera is drawn outside but allowed to remain attached to the
carcass for post-mortem inspection (PMI). A slit cut is made in the skin of the neck for easy
removal of crop and neck.
After PMI, inedible offals are removed.
5) Washing cutting & storing: The chicken is washed thoroughly and is cut into various cuts
and graded. The cuts are packaged and stored in deep freezer at -18° to -20°C for period of 4-
6 months.
37
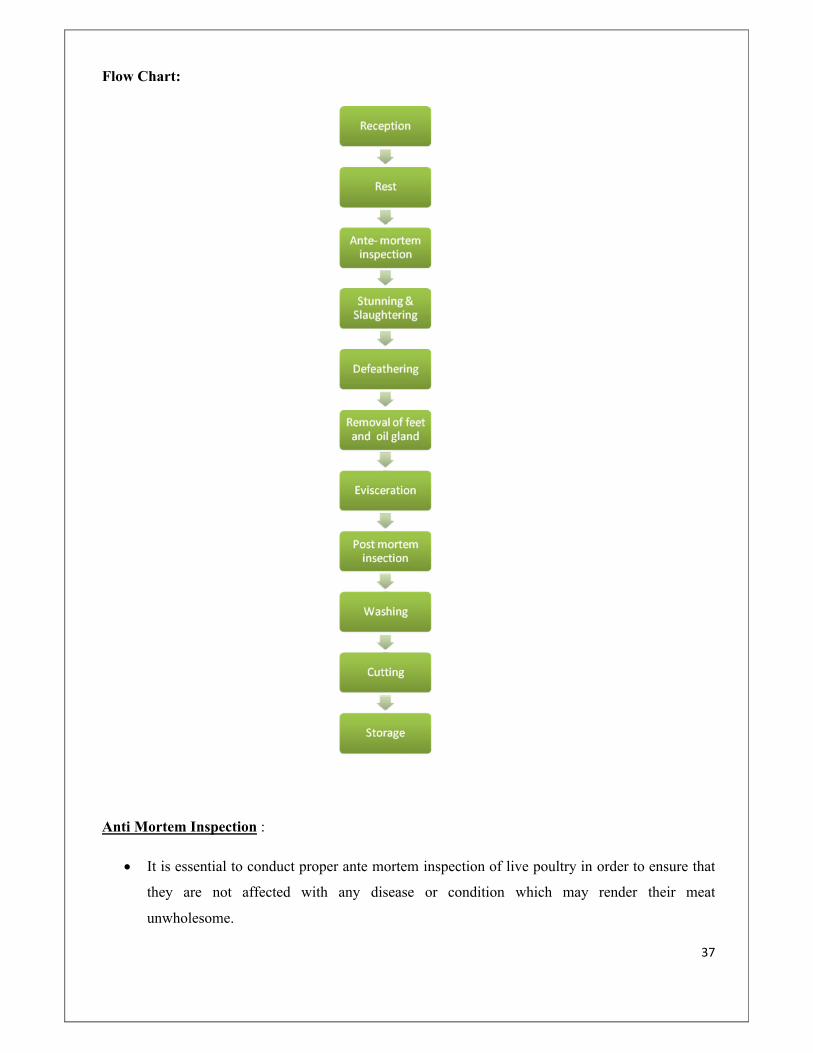
Flow Chart:
Anti Mortem Inspection :
It is essential to conduct proper ante mortem inspection of live poultry in order to ensure that
they are not affected with any disease or condition which may render their meat
unwholesome.
38
It is carried out in the holding pens. Enough space and water should be provided in the
holding pens. Adequate light is an essential requirement during inspection.
The birds are careful examined and those in good conditions are declared fit for slaughter
Birds with abnormal conditions are categorized as:
1) Unfit for slaughter:
Birds with morbid condition due to clinical evidence of a contagious disease, heat stroke or traumatic
injury which cannot be treated are declared unfit for slaughter
2) Suspects
Birds affected with disease conditions not advanced enough to declare unfit are passed for slaughter
as suspect. Such birds are slaughtered separately and both ante & post mortem findings are
considered while taking a final decision.
Various diseases that can be detected are ornitnosis, bronchitis, cholera, pox…
Post Mortem Inspection:
The carcass is inspected externally for signs of disease, bone abnormalities, wounds, muscular
atrophy, tumors, etc followed by body cavity.
Liver is examined ofr consistency, texture and abnormalities.
Spleen is also palpated for texture and abnormalities.
Procedure
1) Live chicken are weighed and AMI is carried out
2) The chickens were slaughtered and dressing was done
3) It was eviscerated and PMI was carried out
4) Inedible offal was removed and various organes were also taken out and weight
5) The carcass was cut and various cuts were weighed
6) Then the meat was deboned and weighed

39
Observation:
Table 1
Parameters BIRD 1 BIRD 2
Live Weight
Weight After Slaughter
Liver
Heart
Lungs
Kidney
Gizard
Spleen
Legs(2)
Breast bone
Wings
Loin
Feathers
Crop
Neck
Gall Bladder
Bone Weight
Muscle Weight
40
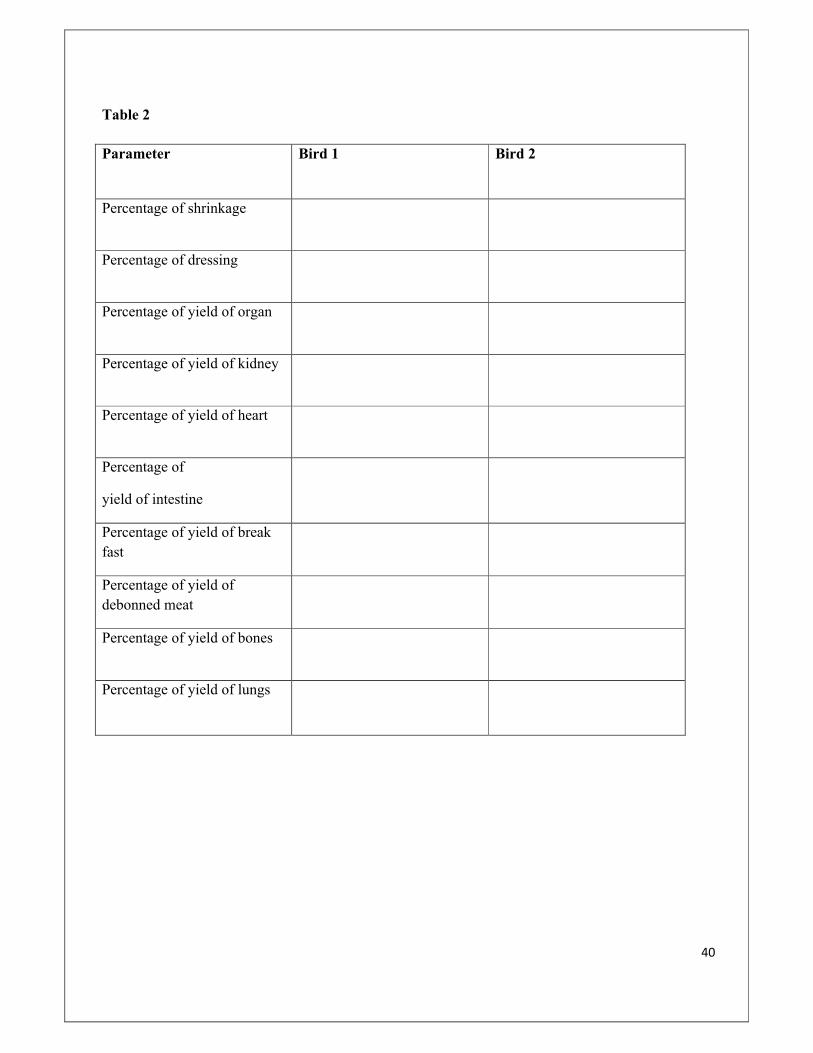
Table 2
Parameter Bird 1 Bird 2
Percentage of shrinkage
Percentage of dressing
Percentage of yield of organ
Percentage of yield of kidney
Percentage of yield of heart
Percentage of
yield of intestine
Percentage of yield of break fast
Percentage of yield of debonned meat
Percentage of yield of bones
Percentage of yield of lungs

41
Wholesale cuts of poultry carcass
Result:-
Inference:

42
Expt no:
Date:
MICROBIOLOGY OF MEAT
PREPARATION OF DIFFERENT AGAR
NUTRIENT AGAR
Aim:
To prepare nutrient agar
Theory:
In order to obtain the isolated colonies of bacteria, it is necessary to use solid media. Organism
growing on solid media exhibit characteristic colony morphology and specific feature like
pigmentation, hemolysis etc. these will enable the identification of organisms.
The commonly used solid media in microbiology laboratory is nutrient agar. Nutrient agar is
prepared by adding 2-2.5% of agar to nutrient broth. It is used for isolation of common pathogens
which are non fastidious from clinical specimens. It is also used for preparation of enriched media by
supplementing it with blood, serum or other nutrients. Routine antimicrobial sensitivity tests are
performed on nutrient agar.
Composition:
Peptone - 1g
Meat extract- 0.5g
Sodium chloride- 0.5g
Agar- 2.5g
Distilled water- 100ml
pH- 7.2
Procedure:-
1) The solid ingredients expect agar were weighed and added to a 250ml conical flask.

43
2) 80ml of distilled water is added and stirred with a glass rod till the solids were dissolved
(warmed if necessary).
3) Adjusted the pH to 7.2 by adding 0.1N NaOH or 0.1N HCl.
4) Made up to 100ml with distilled water.
5) Agar is weighed and added to the flask.
6) Heated in a boiling water bath to dissolve the agar.
7) Flask is plugged with non absorbent cotton and covered with Kraft paper.
8) Sterilized by autoclaving at 121°C for 15 minutes.
9) 15-20ml of sterile media is added to a sterile petridish aseptically and is allowed to
solidify.
10) Used for culture after sterility check.
Result:-
Inference:

44
Mac Conkey’s AGAR
Aim:
To prepare Mac Conkey’s agar
Theory:
Mac Coney’s agar is a selective as well as differentiated medium. The presence of bile salt inhibits
the growth of non enteric bacteria and lactate with neutral red differentiates lactose fermenters from
non lactose fermenters. The media is used mainly for culturing enteric bacteria and for water analysis.
Composition
Peptone- 2g
Sodium taurochloride- 0.5g
Neutral red (2% in 50% ethanol) – 0.35ml
Agar – 2.5g
Distilled water – 90ml
Lactose (aqueous solution sterile) – 10ml
Procedure:
1) Peptone and sodium taurochloride were weighed and transferred to a 250ml conical flask.
Dissolve in water by heating.
2) adjusted the pH to 7.5 and agar is added to the media.
3) Sterilizing at 121°C for 15 minutes.
4) Allowed the media to cool to 60°C and allowed to solidify after adding lactose in the
petriplates.
Result:

45
CULTURE METHODS
STREAK CULTURE
Aim:-
To study the streak culture method.
Theory:-
This method is routinely used in microbiology laboratory in order to obtain pure culture from mixed
population of bacteria. For economy of material and time this method is best. This method is
performed on solid media in Petri plates. A small amount of the sample is transferred to the plate by
using a sterile wire loop and thinning the inoculum by drawing parallel lines in different directions on
the medium. Streaking is done in such a way that the density of the organism will become less at the
ends of the streaks so that isolated colonies will develop on these areas of the plates. This method is
also used for studying cultural characteristics of bacteria.
Requirements:-
Bacterial culture, nutrient agar plates, wire loop, routine microbiology lab facilities.
Procedure:-
1. Prepared nutrient agar and sterilized by autoclaving at 121°C for 20 minutes.
2. Dispensed about 20ml of sterile media into each sterile Petridishes. It is allowed to solidify.
3. Sterilize the wire loop by showing in Bunsen burner flame and cooled to room temperature.
4. A loopful of sample was taken by the sterile loop and transferred to area marked on the Petridish.
5. Streaks were made in the quadrants to obtain the pure isolated colonies.
6. The lid was closed and the plates were incubated at 37°C for overnight.
7. After incubation, the plates were observed for the presence of isolated colonies.
Result:-
46
GRAM STAINING
Aim:-
To study the gram character of bacteria in given culture.
Principle:-
Gram staining is based on the differences in the structure and composition of cell wall between the
gram positive and gram negative bacteria. The cell wall of gram positive bacteria contains thick
peptidoglycan layer and no lipopolysaccharide layer as compared to that of gram negative cell. When
crystal violet is applied to react with the cell and stain it. Subsequently on the application of mordant
(iodine), formation of crystal violet-iodine takes place in the cell. On application of decolourizing
agent like alcohol, due to dehydration, shrinkage of cell takes place in gram positive cells which
inturn decreases the permeability of crystal violet- iodine complex. Thus the complex is retained in
the cell wall and cell wall is stained deep violet in the colour. On the other hand, the treatment of
decolourizing agent extracts lipid from the cell wall of gram negative bacteria. This results in
increased permeability of cell wall. Thus the complex is extracted out and thereby cells are
decolorized. On application of counter stain, cell takes the colour of counter stain.
Requirements:-
Bacterial culture, crystal violet, iodine, decolourizing agent, saffranine, routine microbiology lab
facilities
Procedure:-
1) Smear was prepared and fixed by heat.
2) The smear was flooded with crystal violet solution and allowed to react for one minute.
3) Gram’s iodine was added to wash off crystal violet solution and allowed the smear to react with
fresh iodine for one minute.
4) Rinsed the slide with running tap water.
5) Added the decolourizing agent drop wise at the end of inclined slide till the washing is clear.
6) Rinsed the smear with water.
7) Counter stain with saffranine for 30-60 sec is done.

47
8) Dried the slide and examine under oil immersion lens.
Result:-
48
MOTILITY TESTING
Aim:-
To observe the motility of the bacteria.
Principle:-
Some bacteria are motile when they are viable. They can be observed in living condition by using a
compound microscope. Hanging drop method is used for this. Greater number of bacteria is seen
towards the edge due to their greater tendency to move towards the edge of the drop. Bacteria move
with the help of flagella in a rotary motion.
Requirements:-
Cavity slides, cover slips, petroleum jelly, and bacterial culture
Procedure:-
1) On the 4 corners of clean grease free cover slip, petroleum jelly was placed.
2) By using a sterile wire loop the actively growing culture was taken and placed at the centre of the
cover slip as a drop.
3) Clean cavity slide was placed over the cover slip in such a way that the drop comes at the centre of
the cavity.
4) Inverted the slide and observed under the microscope.
5) The periphery of the slide was focused by using 10X objective and then turned to high power. The
movement of cells were observed and noted.
Result:-
49
TESTS FOR IDENTIFICATION OF BACTERIA
INDOLE TEST
Aim:-
To study the indole test.
Principle:-
This test demonstrates the ability of certain bacteria to decompose the amino acid tryptophan to
indole by the enzymes tryptophanases. Indole is then detected using kovac’s reagent. Indole
chemically reacts with p-dimethylaminobenzaldehyde (DMAB) under acidic conditions to produce
the red dye rosindole.
There is formation of reddish pink ring in indole positive organism and yellow ring in indole
negative organism.
Requirements:-
1) Bacterial culture – overnight grown culture
2) Tryptone agar broth
Tryptone – 10g
NaCl - 5g
The ingredients are dissolved in 1 ltr of sterile water. The media was dispensed into sterile tubes and
the autoclaved at 121°C for 15 minutes. Then stored at refrigerated conditions.
3) Kovac’s reagent:-
Amyl or isoamyl alcohol – 150 ml

50
p-dimethyl amino benzaldehyde – 10g
Concentrated HCl- 50ml
Dissolved the aldehyde to the alcohol. Slowly acid is added to the aldehyde-alcohol mixture. The pale
yellow colour reagent is stored in brown coloured reagent bottle.
Procedure:-
1. The tryptone broth tubes were inoculated with a small amount of overnight grown bacterial
cultures.
2. Tubes were incubated at 37°C for 48 hrs.
3. 0.5ml of Kovak’s reagent was added to the tubes.
4. Formation of cherry red ring in the reaction layer on the top of the medium within seconds of
adding the reagent shows the positive result. Presence of yellow ring indicates negative indole test.
Result:-
Fig- Indole test

51
METHYL RED TEST
Aim:-
To study the methyl red test.
Principle:-
Methyl red test is used to detect the ability of an organism to produce and maintain stable acid end
products from glucose fermentation. This tells about the mixed acid fermentation by the bacteria.
These bacteria produce large amount of acids that they overcome the buffering capacity of the
system. The pH indicator, methyl red, is yellow above pH 6.0 and will turn red at pH below 4.4
showing the positive result. An orange colour indicates the intermediate pH and would be considered
negative.
Requirements:-
1. Overnight grown bacterial cultures
2. MR-VP media:-
Peptone – 0.5g
Potassium hydrogen phosphate – 0.5g
Distilled water – 95ml
Glucose (10% solution sterilized separately) – 5ml
3. Methyl red indicator solution:-
Methyl red- 0.1g
Ethanol – 300ml
Distilled water – 200ml
Methyl red powder dissolved in ethanol completely and then made upto 500ml with distilled
water.
Procedure:-
1) Preparation of MR-VP broth:-

52
Peptone and potassium hydrogen phosphate were dissolved in distilled water and adjusted the pH to
7.6. 5ml of media was dispensed into the tubes and sterilized by autoclaving at 121°C for 15 minutes.
Added 250 ml of sterile 10% solution of glucose to each tube and mixed.
2) Methyl red test:-
i) The test media was inoculated with the overnight grown bacterial cultures and incubated at 37°C
for 24-48hrs.
ii) After incubation, 5 drops of methyl red reagent was added and mixed. It was read immediately.
iii) Development of red colour was noted as positive and yellow colour was noted negative.
Result:
Fig:- Methyl red test
53
VOGES- PROSKAUER TEST
Aim:-
To study Voges-Proskauer test.
Principle:-
The Voges- Proskauer test determines the capability of some microorganisms to ferment
carbohydrate with the production of acetyl methyl carbinol or its reduction product 2,3- butylene
glycol. The substance can be tested by a colorimetric reaction between diacetyl formed during the test
by oxidation of acetyl methyl carbinol and 2,3- butylene glycol and a guanidine group under alkaline
conditions. A pink colour indicates positive test.
The production of acetyl methyl carbinol and 2,3- butylene glycol usually result in insufficient acid
production during fermentation and is usually done in conjugation with the methyl red test. An
organism of the enterobacteria group is either MR positive or VP positive.
Requirements:-
1) Overnight grown bacterial cultures
2) Glucose phosphate peptone water media (MR media)
Peptone – 0.5g
Dipotassium hydrogen phosphate – 0.5g
Distilled water – 95ml
Glucose (10% solution sterilized separately) – 5ml
3) Test reagent
a) 40% potassium hydroxide – prepared by dissolving 40g of potassium hydroxide pellets in
100ml of distilled water.
b) α- naphthol – 5% solution prepared by dissolving 5g of α-naphthol in 100ml of absolute
alcohol.

54
Procedure:-
1) Preparation of MR-VP broth:-
Peptone and dipotassium hydrogen phosphate were dissolved in distilled water and adjusted the pH
to 7.6. 5ml of media was dispensed into the tubes and sterilized by autoclaving at 121°C for 15
minutes. Added 250 ml of sterile 10% solution of glucose to each tube and mixed.
2) VP test:-
a) Inoculated the test organisms in test medium.
b) Incubated at 37°C for 24-48hrs.
c) After incubation period, to each test tube, 1ml of 40% KOH solutions added followed by 3ml
of 5% α-naphthol solution and mixed.
d) A pink colour development within 2-5 minutes (becoming crimson in 30 minutes) is noted as
positive reaction.
Result:-
55
CITRATE UTILIZATION TEST
Aim:-
To study the citrate utilization test.
Principle:-
This is a test for the ability of an organism to utilize citrate as the sole carbon source and energy
source for growth and an ammonium salt as the sole source of nitrogen. In Simmon’s citrate medium,
bromothymol blue is added as an indicator and at the initial pH of the medium (6.8), it has green
colour. The utilization of citrate in the medium will increase the pH of the medium to the alkaline
slide thereby changing the colour of the medium to the blue.
Requirements
1) Overnight bacterial culture
2) Simmon’s citrate medium:-
Sodium chloride – 0.5g
Magnesium sulphate – 0.02g
Ammonium dihydrogen phosphate – 0.1g
Potassium dihyrogen phosphate- 0.1g
Sodium citrate – 0.5g
Distilled water – 100ml
Bromothymol blue (0.2% solution) – 4ml
Procedure
1) Preparation of media:-
All solid ingredients except agar were dissolved in distilled water. Adjusted the pH to 6.8 and added
the bromothymol blue indicator and agar. Filled in tubes and autoclaved at 121°C for 15mins. Then
these are made into tubes.
2) Method:-
56
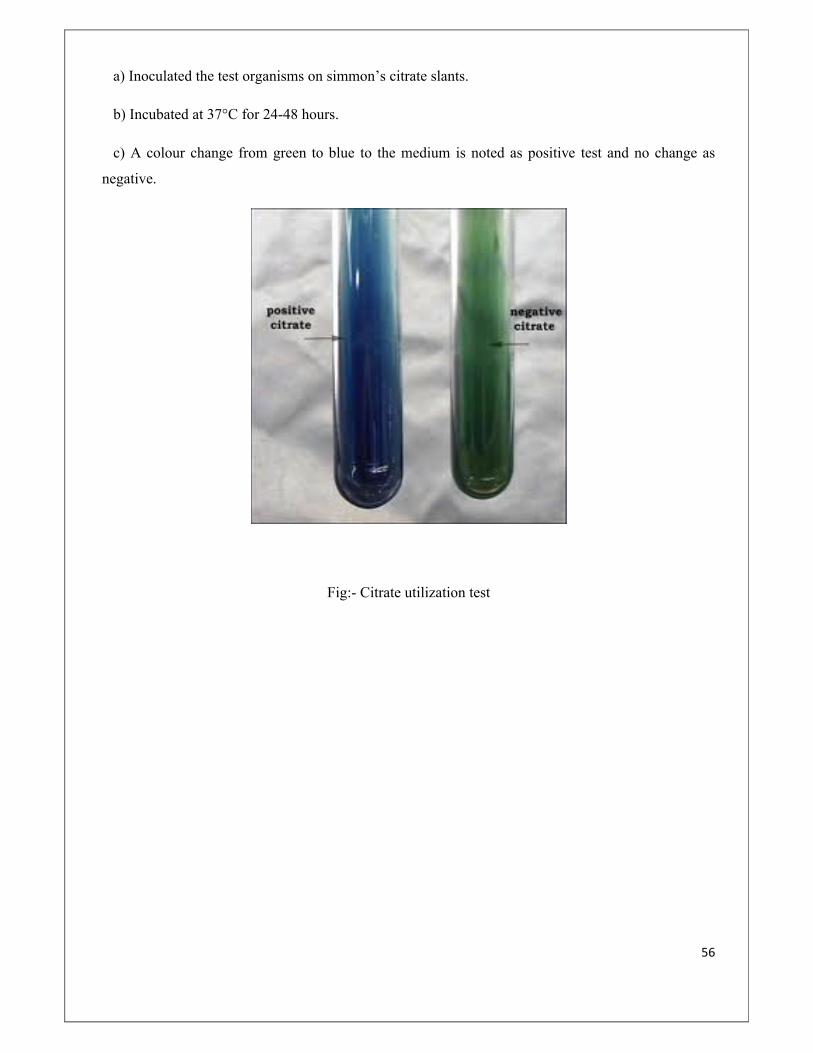
a) Inoculated the test organisms on simmon’s citrate slants.
b) Incubated at 37°C for 24-48 hours.
c) A colour change from green to blue to the medium is noted as positive test and no change as
negative.
Fig:- Citrate utilization test
57
TRIPLE SUGAR IRON AGAR MEDIA
Aim:-
To study the biochemical properties of bacteria by using triple sugar iron agar media.
Principle:-
Triple sugar iron agar (TSI) is a differential medium that contains lactose, sucrose, a small amount of
glucose (dextrose), ferrous sulfate, and the pH indicator phenol red. It is used to differentiate enterics
based on the ability to reduce sulfur and ferment carbohydrates.
As with the phenol red fermentation broths, if an organism can ferment any of the three sugars
present in the medium, the medium will turn yellow. If an organism can only ferment dextrose, the
small amount of dextrose in the medium is used by the organism within the first ten hours of
incubation. After that time, the reaction that produced acid reverts in the aerobic areas of the slant,
and the medium in those areas turns red, indicating alkaline conditions. The anaerobic areas of the
slant, such as the butt, will not revert to an alkaline state, and they will remain yellow.
If an organism can reduce sulfur, the hydrogen sulfide gas which is produced will react with the iron
to form iron sulfide, which appears as a black precipitate. If the fermentation produced gas, fissures
are formed in the medium, or the entire slant may be raised above the bottom of the test tube.
Results (slant/butt) Symbol Interpretation
Red/yellow K/AGlucose fermentation only; Peptone
catabolized
Yellow/yellow A/AGlucose and lactose and/or sucrose
fermentation
Red/red K/K No fermentation; Peptone catabolized
Red/no color change K/NCNo fermentation; Peptone used
aerobically
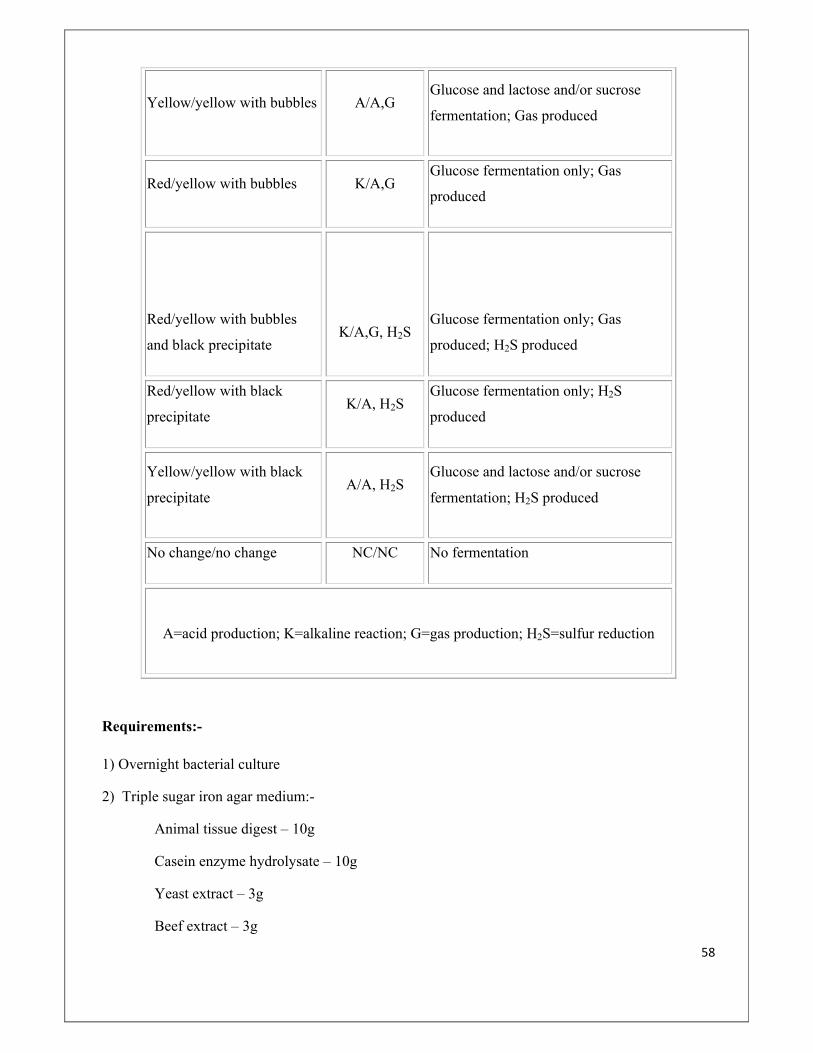
58
Yellow/yellow with bubbles A/A,GGlucose and lactose and/or sucrose
fermentation; Gas produced
Red/yellow with bubbles K/A,GGlucose fermentation only; Gas
produced
Red/yellow with bubbles
and black precipitateK/A,G, H2S
Glucose fermentation only; Gas
produced; H2S produced
Red/yellow with black
precipitateK/A, H2S
Glucose fermentation only; H2S
produced
Yellow/yellow with black
precipitateA/A, H2S
Glucose and lactose and/or sucrose
fermentation; H2S produced
No change/no change NC/NC No fermentation
A=acid production; K=alkaline reaction; G=gas production; H2S=sulfur reduction
Requirements:-
1) Overnight bacterial culture
2) Triple sugar iron agar medium:-
Animal tissue digest – 10g
Casein enzyme hydrolysate – 10g
Yeast extract – 3g
Beef extract – 3g

59
Saccharose – 10g
Dextrose – 1g
Ferrous sulphate – 0.2g
Sodium chloride -5g
Sodium thiosulphate – 0.3g
Phenol red – 0.024g
Agar – 12g
Distilled water – 1L
Procedure:-
1) Preparation of media:- 13g of dehydrated medium is weighed and dissolved in 100ml distilled
water. About 3ml is dispensed in test tubes and the autoclaved at 121°C for 15 mins. Then the tubes
were placed in slanting position to form the slants.
2) Method:-
a) A small amount of culture is stabbed into the butt region of the media and followed by streaking in the slant.
b) The tubes were incubated at 37°C for overnight.
c) After the incubation time, the result was noted and interpreted.
Result:
Fig:- Triple sugar iron agar
60
MANNITOL MOTILITY MEDIA
Aim:-
To study the motility and mannitol fermentation by bacteria.
Principle:-
Motility and mannitol fermentation have significance in the identification of bacterial species. Both
characters of the organism were studied by using mannitol motility media. The test is performed in
stab cultures. Mannitol fermentation is detected by the presence of pH indicator in the medium and
motility is checked by observing the growth pattern on stab line in the semisolid media.
Requirements:-
1) Overnight bacterial culture
2) Mannitol motility medium:-
Peptic digest of animal tissues – 20g
Mannitol – 2g
Potassium nitrate – 1g
Phenol red – 0.04g
Agar – 3g
Distilled water – 1ltr
pH – 7.6± 0.2
Procedure:-
1) Preparation of media:- 7g of media was weighed and dissolved in 250ml distilled water. About 3
ml was dispensed in each test tube and sterilized by autoclaving at 121°C for 15 mins. The tubes were
allowed to solidify in vertical position.
2) Method:-
61
a) Small amount of media was taken in the loop and stabbed into the media for inoculation.
b) Tubes were incubated at 37°C for 24 hrs and then observed.
Result
62
Expt no:
Date:
MICROBIOLOGICAL ANALYSIS OF MEAT
Aim:-
To conduct microbiological analysis of the processed meat products.
Principle:-
All foods contain a resident microflora and in their processing they usually become further
contaminated. Although many bacteria on food are harmless, some may be potentially pathogenic.
One aspect of food microbiology is the detection and identification of pathogenic bacteria on food as
well as assessing the general microbial load of the food which relates to the shelf-life and spoilage
potential of the food.
The microbial load in product after processing and the storage condition and time will determine the
microbiology of the processed meat. The microbial analysis will help in prevention of diseases caused
by consumption of spoiled or contaminated meat product.
Requirements:-
Meat samples, Ringer’s solution, various agar and biochemical media, microbiology lab facilities
Procedure:-
1) Preparation of sample:-
20g of meat was weighed and put into 20ml of sterile quarter strength ringer solution and gently
mixed. Above mixture was diluted to 10-7 in sterile saline solution.
2) The diluted sample was plated on nutrient agar and Mac Conkey agar plates using the spread plate
method. The plates were incubated at 37°C for 24hrs.
3) After incubation, the culture characteristics of the isolated colonies were studied. Also gram
staining and motility study is done.
4) For the isolated colonies, various biochemical tests were conducted and the result was
interpretated.

63
Observations:-
Sample Colony
characteristics
Gram
character
Motility Lactose
fermentation

64
Biochemical tests:-
Sample colony Indole
test
MR test VP test Citrate
test
Mannitol
motility
TSI

65
Total cfu/g of meat:-
1) Sample 1
2) Sample 2
3) Sample 3
66
Expt no:
Date:
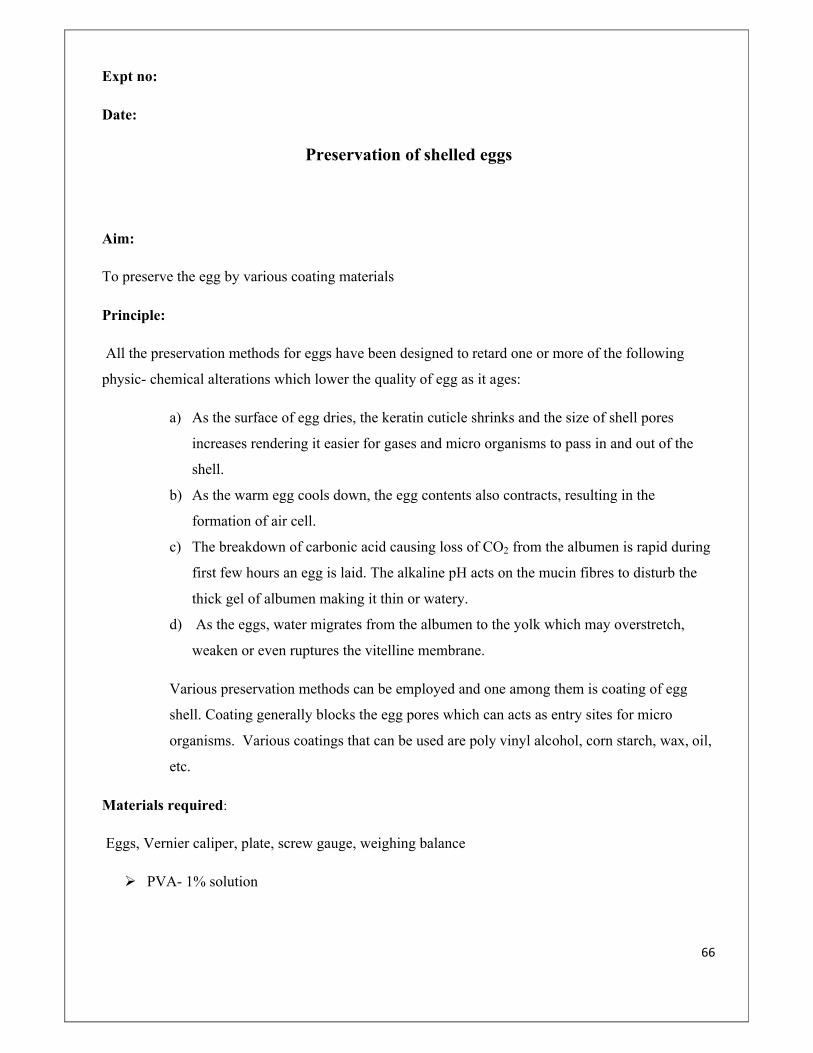
Preservation of shelled eggs
Aim:
To preserve the egg by various coating materials
Principle:
All the preservation methods for eggs have been designed to retard one or more of the following
physic- chemical alterations which lower the quality of egg as it ages:
a) As the surface of egg dries, the keratin cuticle shrinks and the size of shell pores
increases rendering it easier for gases and micro organisms to pass in and out of the
shell.
b) As the warm egg cools down, the egg contents also contracts, resulting in the
formation of air cell.
c) The breakdown of carbonic acid causing loss of CO2 from the albumen is rapid during
first few hours an egg is laid. The alkaline pH acts on the mucin fibres to disturb the
thick gel of albumen making it thin or watery.
d) As the eggs, water migrates from the albumen to the yolk which may overstretch,
weaken or even ruptures the vitelline membrane.
Various preservation methods can be employed and one among them is coating of egg
shell. Coating generally blocks the egg pores which can acts as entry sites for micro
organisms. Various coatings that can be used are poly vinyl alcohol, corn starch, wax, oil,
etc.
Materials required:
Eggs, Vernier caliper, plate, screw gauge, weighing balance
PVA- 1% solution

67
Starch- (1% solution) aqueous solution of 20g/ L starch was cold gelatinized with 10g/ L
NaOH to obtain the coating. This is neutralized with7 M H3PO4 and then 2g of sunflower/
coconut oil is added and the emulsion is prepared by stirring
Oil
Wax
Procedure:
1. The eggs were taken and coated with various coatings (PVA, oil, corn starch, wax)
2. Keep the eggs in dry place .
3. Check the interior and external quality of eggs every week.
4. Repeat the process till next 4-5 weeks .
Observations:-

68
External Quality Parameters:
Parameters 1ST Week 2nd Week 3rd Week
Colour of EggPVA
Starch Oil Wax PVA Starch Oil Wax PVA Stach Oil Wax
Shell shape and texture
Shell soundness
Shell cleanliness
Length of the egg (mm)
Breadth of the Egg (mm)
Weight of the egg in air (gm)
Volume of the water displaced by the egg (ml)
Specific gravity (gm/ml)

69
Internal Quality Parameters:
Parameters 1ST Week 2nd Week 3rd Week
PVA Starch Oil Wax PVA Starch Oil Wax PVA Stach Oil Wax
Height of albumen(mm)
Breadth of albumen(mm)
Breadth of yolk(mm)
Height of yolk(mm)
Weight of egg shell (gm)
Weight of albumen (gm)
Weight of yolk (gm)
Result:-
Inference:
70
Expt no:
Date:
Sensory Analysis Of Fish
Aim:-
To determine the fish quality, by sensory analysis
Theory:-
Fish is a vulnerable, highly perishable and as other food products,the quality and safety must be
guarenteed. These parameters are strongly related with the freshness degree of fish.
Sensory analysis is the most direct method for evaluating the freshness and the quality of fish.
It is defined as the scientific decipline that allows measuring. Analysing and interpretating human
reaction face to the characterization of food through its five senses that is : view, taste, smell, touch
and hear. Among these attributes that allows determining the freshness grade of fish by evaluating its
external aspects like eyes, gills, skin and texture.
Sensory analysis constitutes reliable, reproduciple and relative easy way to evaluate freshness.
Moreover it can be applied to all fish species being in most case it should be non-destructive.
Materials And Methods
Plates, Knife, Beakers (250 ml), Fish sample.

71
Observations:-
Table 1
Organs Parameters 5 4 3 2 1 0
Skin Outer slime transparent Transparent Milky Opaque Clotted Yellowis
h
pigmentatio
n
Bright iridescent natural Less natural,
not bright
Feded Discolore
d
Grey
Eye colour Bright pupil
,translucent
cornea
Bright
pupil,
translucent
cornea
Translucent
cornea, faded
pupil.
Opalesce
nt cornea
Grey
pupil,
Milky
cornea
Opaque
discolore
d
sinking Completely
convex
Completely
convex
Less convex Plane Slightly
concave
Complete
ly
concave,
sunken
Gills colour Bloody red Bloody red Dull red Pale red Dirty
yellow
White
greyish
odour Fresh (algae sea) Neutral
sweet
Neutral sweet Slightly
rancid
Disagree
able
Nauseous
Flesh rigid Firm
(slightly
rigid)
Elastic Flexible Soft Very soft
Quality
of belly
Firm rigid Intact (not
rigid)
Distented
(firm)
Soft (not
firm)
fragile perforate
d
72
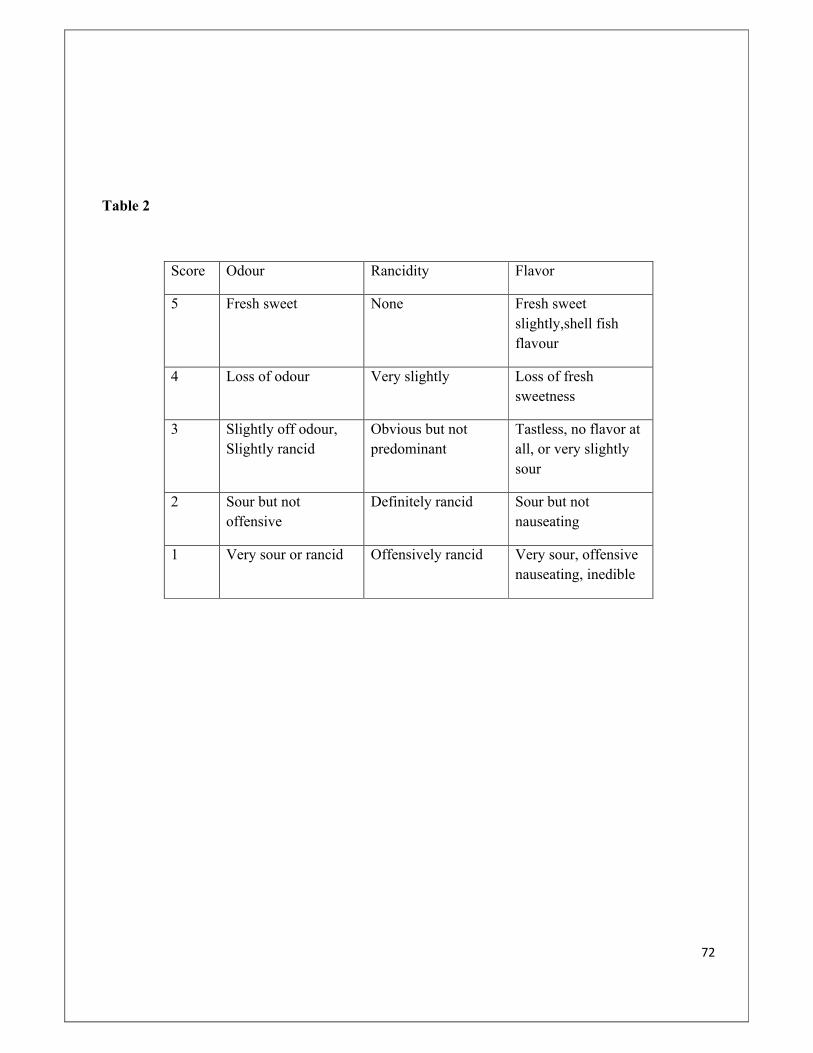
Table 2
Score Odour Rancidity Flavor
5 Fresh sweet None Fresh sweet slightly,shell fish flavour
4 Loss of odour Very slightly Loss of fresh sweetness
3 Slightly off odour, Slightly rancid
Obvious but not predominant
Tastless, no flavor at all, or very slightly sour
2 Sour but not offensive
Definitely rancid Sour but not nauseating
1 Very sour or rancid Offensively rancid Very sour, offensive nauseating, inedible

73
Observation:-
organ parameters A B C D
skin
Outer skin
Transparent Transparent Yellowish Yellowish
pigmentation Bright Bright Bright Bright
Eye Colour Bright pupil Bright pupil Translucent cornea,faded pupil
Translucent cornea, faded pupil
sinking Plane Plane Slightly concave
Slightly concave
Gills colour Dull red Dark red Blood red Blood red
odour Fresh No smell Neutral sweet
Neutral sweet
Flesh Firm and elastic
Soft Firm elastic Firm elastic
Quality of belly
soft Firm rigid Soft soft
Result:-
Inference:
74
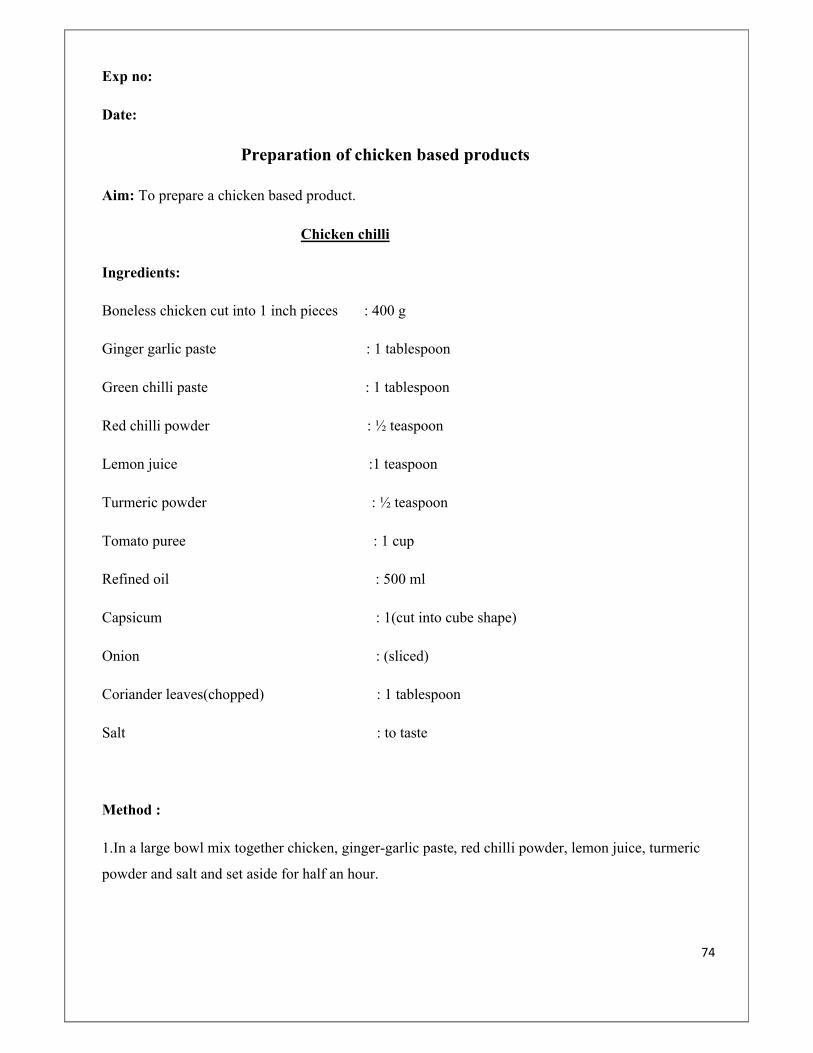
Exp no:
Date:
Preparation of chicken based products
Aim: To prepare a chicken based product.
Chicken chilli
Ingredients:
Boneless chicken cut into 1 inch pieces : 400 g
Ginger garlic paste : 1 tablespoon
Green chilli paste : 1 tablespoon
Red chilli powder : ½ teaspoon
Lemon juice :1 teaspoon
Turmeric powder : ½ teaspoon
Tomato puree : 1 cup
Refined oil : 500 ml
Capsicum : 1(cut into cube shape)
Onion : (sliced)
Coriander leaves(chopped) : 1 tablespoon
Salt : to taste
Method :
1.In a large bowl mix together chicken, ginger-garlic paste, red chilli powder, lemon juice, turmeric
powder and salt and set aside for half an hour.

75
2. Heat sufficient oil in a non-stick pan. Deep fry the chicken on medium heat till done. Drain on
absorbent paper and set aside.
3. Heat 2 tablespoon oil in a non-stick pan. Add green chilli paste, salt & tomato putree & mix well
and cok on low heat for 10 minutes.
4. Add chicken pieces & cook on low heat for 5 minutes.
5. Serve hot garnished with coriander leaves.
Result:-
Inference:
76
Exp No:-
Date:-
Preparation of chicken based Product
Aim:- To prepare a fish/chicken based product.
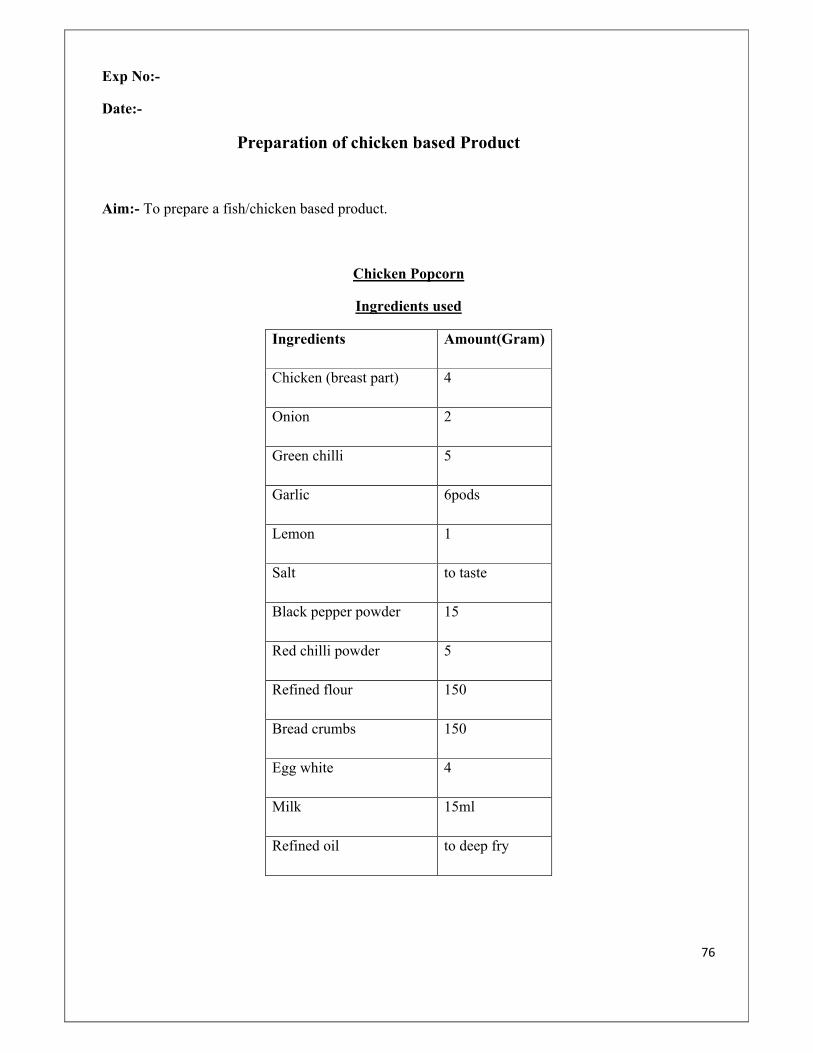
Chicken Popcorn
Ingredients used
Ingredients Amount(Gram)
Chicken (breast part) 4
Onion 2
Green chilli 5
Garlic 6pods
Lemon 1
Salt to taste
Black pepper powder 15
Red chilli powder 5
Refined flour 150
Bread crumbs 150
Egg white 4
Milk 15ml
Refined oil to deep fry
77
Method of preparation:-
a) Cut the chicken in small bites.b) Make a fine paste of onion, green chilli, garlic and mix with chicken pieces. Keep it in freeze
for 30mins.c) In refined flour add 5g chilli powder, 10g black pepper powder and salt. Mix it well.d) Mix egg white and milk. e) Take out the marinated chicken pieces roll it over flour mix then to bread crumbs. Deep fry it.
Result:-
Inference:
78
Exp No:-
Date:-
Preparation of chicken based Product
(Chicken masala curry)
Aim:- To prepare a chicken based product.
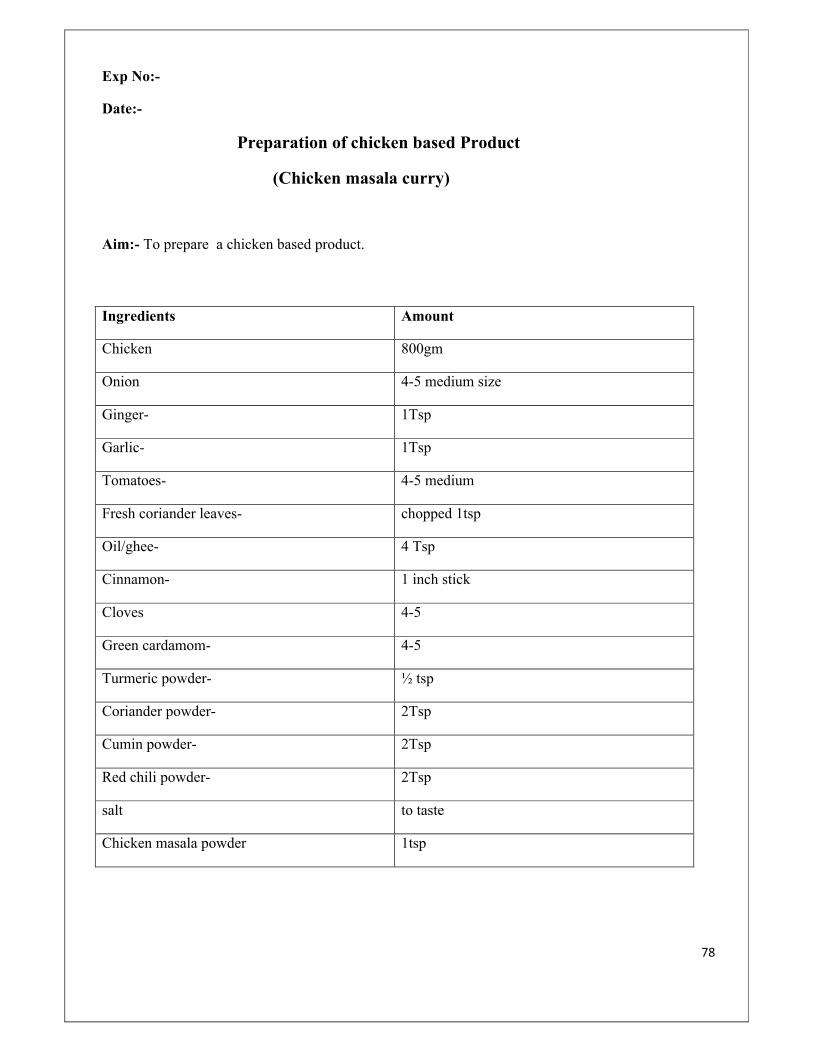
Ingredients Amount
Chicken 800gm
Onion 4-5 medium size
Ginger- 1Tsp
Garlic- 1Tsp
Tomatoes- 4-5 medium
Fresh coriander leaves- chopped 1tsp
Oil/ghee- 4 Tsp
Cinnamon- 1 inch stick
Cloves 4-5
Green cardamom- 4-5
Turmeric powder- ½ tsp
Coriander powder- 2Tsp
Cumin powder- 2Tsp
Red chili powder- 2Tsp
salt to taste
Chicken masala powder 1tsp

79
Method:-
Step 1:-
Heat ghee/oil in a thick bottomed pan. Add cinnamon,cloves and green cardmoms &sauté for half a minute.add onions and sauté till golden brown.
Step2:-
Add ginger &garlic paste and continous to sauté for two to three minutes,stirring continuosly.
Step3:-
Add turmeric powder,coriander powder,cumin powder,and red chilli powder.Mix well.
Add pureed tomato and stir.Cook till oil separates from the masala.
Add the chicken pieces and salt.
Step 4:-
Saute on high heat for five minutes.Add two cup water.bring to a boil,cover and cook till the chicken is fully done.Sprinkle garam masala powder and garnish with coriander leaves.
Serve hot.
Result:-
Inference:

80
Exp No:-
Date:-
PREPARATION OF FISH BASED PRODUCT
Aim:
1-To prepare fish fry
2-To prepare roasted prawn
Material Required:
Bowl, plates, knife, chopper, laddle, frying pan
Ingredients:
Red chili, powder, garlic, ginger, turmeric powder, salt, onion, tomato, green chili, curry leaf, black pepper, oil, coriander leaf, lemon
Procedure:
(A)FOR FISH FRY
Wash the fish
Cut the fish
Mix all spices together and allow to put over the fish pieces and kept for 10 min
Fry the fish pieces uniformly under and particular temperature of oil
Keep the fish fried on plates and squeeze lemon and also decorate with coriander leaf
(B) FOR PREPARATION OF PRAWN ROAST
Weigh and wash the prawn
Mix with chili powder, turmeric, fish masala and salt
Mix well and allowed for 10 mins
Pour oil and add the fish in it
81
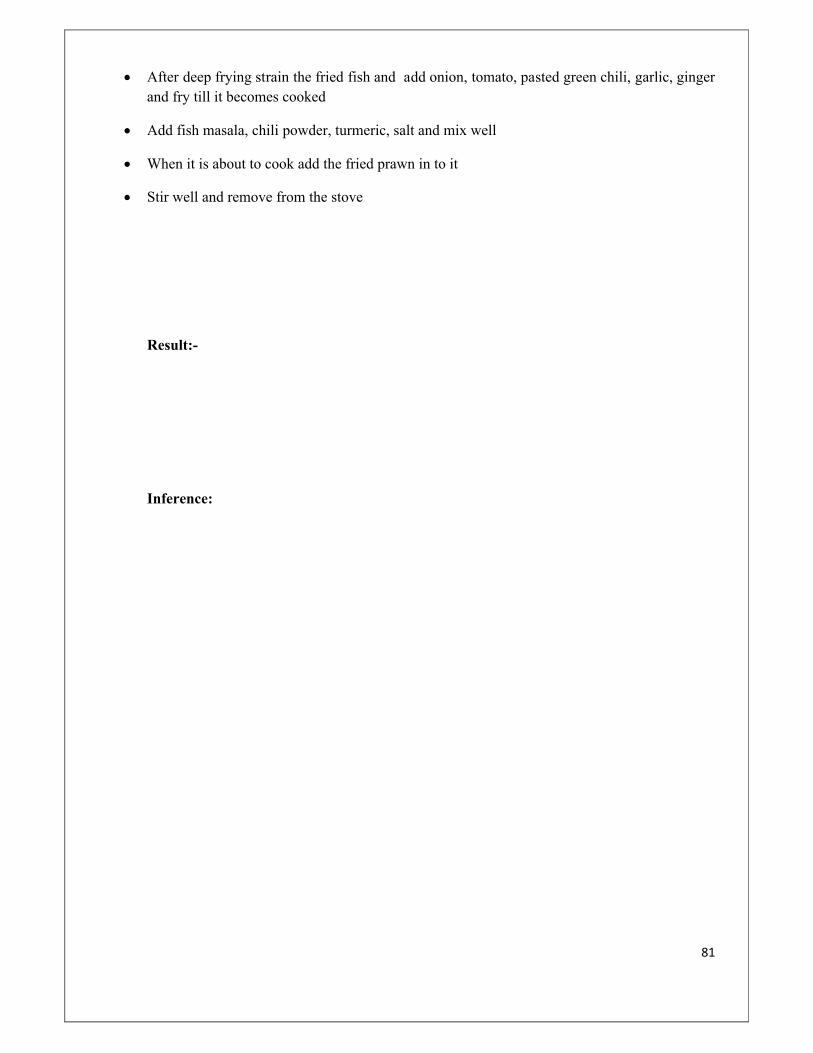
After deep frying strain the fried fish and add onion, tomato, pasted green chili, garlic, ginger and fry till it becomes cooked
Add fish masala, chili powder, turmeric, salt and mix well
When it is about to cook add the fried prawn in to it
Stir well and remove from the stove
Result:-
Inference: