
Kali Linux Official Documentation
185
Official Kali Linux Documentation This PDF has been autogenerated on docs.kali.org - May 25, 2014 00. Introduction to Kali Linux Official Kali Linux Documentation eBook We have created an offline version of the official Kali Linux documentation (this site), in a PDF format in your chosen language for easy viewing. These eBooks will be updated when any new content has been added to the site. All the translations have been done to the best of our abilities; however if you are able to make it more accurate, please get in touch . eBook Download English - http://docs.kali.org/pdf/kali-book-en.pdf 简体中文 – http://docs.kali.org/pdf/kali-book-zh-hans.pdf Français - http://docs.kali.org/pdf/kali-book-fr.pdf Deutsch - http://docs.kali.org/pdf/kali-book-de.pdf - ﺍﻟﻌﺮﺑﻴﺔhttp://docs.kali.org/pdf/kali-book-ar.pdf Português - http://docs.kali.org/pdf/kali-book-pt-br.pdf Nederlands – http://docs.kali.org/pdf/kali-book-nl.pdf Italiano - http://docs.kali.org/pdf/kali-book-it.pdf 日本語 - http://docs.kali.org/pdf/kali-book-ja.pdf Русский - http://docs.kali.org/pdf/kali-book-ru.pdf Español - http://docs.kali.org/pdf/kali-book-es.pdf Indonesia - http://docs.kali.org/pdf/kali-book-id.pdf Last updated: 2013-Dec-06 © Offensive Security 2014 Page: 1 / 185
-
Upload
khangminh22 -
Category
Documents
-
view
0 -
download
0
Transcript of Kali Linux Official Documentation

Official Kali Linux DocumentationThis PDF has been autogenerated on docs.kali.org - May 25, 2014
00. Introduction to Kali Linux
Official Kali Linux Documentation eBookWe have created an offline version of the official Kali Linux documentation (this site), in a PDF format in yourchosen language for easy viewing.
These eBooks will be updated when any new content has been added to the site.
All the translations have been done to the best of our abilities; however if you are able to make it moreaccurate, please get in touch.
eBook Download
English - http://docs.kali.org/pdf/kali-book-en.pdf 简体中文 – http://docs.kali.org/pdf/kali-book-zh-hans.pdf Français - http://docs.kali.org/pdf/kali-book-fr.pdf Deutsch - http://docs.kali.org/pdf/kali-book-de.pdfhttp://docs.kali.org/pdf/kali-book-ar.pdf العربية - Português - http://docs.kali.org/pdf/kali-book-pt-br.pdf Nederlands – http://docs.kali.org/pdf/kali-book-nl.pdf Italiano - http://docs.kali.org/pdf/kali-book-it.pdf 日本語 - http://docs.kali.org/pdf/kali-book-ja.pdf Русский - http://docs.kali.org/pdf/kali-book-ru.pdf Español - http://docs.kali.org/pdf/kali-book-es.pdf Indonesia - http://docs.kali.org/pdf/kali-book-id.pdf
Last updated: 2013-Dec-06
© Offensive Security 2014 Page: 1 / 185

Official Kali Linux DocumentationThis PDF has been autogenerated on docs.kali.org - May 25, 2014
What is Kali Linux ?Kali Linux is an advanced Penetration Testing and Security Auditing Linux distribution.
Kali Linux Features
Kali is a complete re-build of BackTrack Linux, adhering completely to Debian development standards. All-newinfrastructure has been put in place, all tools were reviewed and packaged, and we use Git for our VCS.
More than 300 penetration testing tools: After reviewing every tool that was included in BackTrack,we eliminated a great number of tools that either did not work or had other tools available that providedsimilar functionality.Free and always will be: Kali Linux, like its predecessor, is completely free and always will be. You willnever, ever have to pay for Kali Linux.Open source Git tree: We are huge proponents of open source software and our development tree isavailable for all to see and all sources are available for those who wish to tweak and rebuild packages.FHS compliant: Kali has been developed to adhere to the Filesystem Hierarchy Standard, allowing allLinux users to easily locate binaries, support files, libraries, etc.Vast wireless device support: We have built Kali Linux to support as many wireless devices as wepossibly can, allowing it to run properly on a wide variety of hardware and making it compatible withnumerous USB and other wireless devices.Custom kernel patched for injection: As penetration testers, the development team often needs todo wireless assessments so our kernel has the latest injection patches included.Secure development environment: The Kali Linux team is made up of a small group of trustedindividuals who can only commit packages and interact with the repositories while using multiple secureprotocols.GPG signed packages and repos: All Kali packages are signed by each individual developer whenthey are built and committed and the repositories subsequently sign the packages as well.Multi-language: Although pentesting tools tend to be written in English, we have ensured that Kali hastrue multilingual support, allowing more users to operate in their native language and locate the toolsthey need for the job.Completely customizable: We completely understand that not everyone will agree with our designdecisions so we have made it as easy as possible for our more adventurous users to customize Kali Linuxto their liking, all the way down to the kernel.ARMEL and ARMHF support: Since ARM-based systems are becoming more and more prevalent andinexpensive, we knew that Kali’s ARM support would need to be as robust as we could manage, resultingin working installations for both ARMEL and ARMHF systems. Kali Linux has ARM repositories integratedwith the mainline distribution so tools for ARM will be updated in conjunction with the rest of thedistribution. Kali is currently available for the following ARM devices:
rk3306 mk/ss808Raspberry Pi
© Offensive Security 2014 Page: 2 / 185

Official Kali Linux DocumentationThis PDF has been autogenerated on docs.kali.org - May 25, 2014
ODROID U2/X2Samsung ChromebookEfikaMXBeaglebone BlackCuBoxGalaxy Note 10.1
Kali is specifically tailored to penetration testing and therefore, all documentation on this site assumes priorknowledge of the Linux operating system.
© Offensive Security 2014 Page: 3 / 185

Official Kali Linux DocumentationThis PDF has been autogenerated on docs.kali.org - May 25, 2014
Should I Use Kali Linux?Differences Between Kali Linux and Debian
Kali Linux is geared towards professional penetration testing and security auditing. As such, several corechanges have been implemented in Kali Linux which reflect these needs:
1. Single user, root access by design: Due to the nature of security audits, Kali linux is designed to beused in a “single, root user” scenario.
2. Network services disabled by default: Kali Linux contains sysvinit hooks which disable networkservices by default. These hooks allow us to install various services on Kali Linux, while ensuring that ourdistribution remains secure by default, no matter what packages are installed. Additional services suchas Bluetooth are also blacklisted by default.
3. Custom Linux kernel: Kali Linux uses an upstream kernel, patched for wireless injection.
Is Kali Linux Right For You?
As the distribution developers, one would likely expect us to recommend that everyone use Kali Linux. The factof the matter is however, that Kali is a Linux distribution specifically geared towards professional penetrationtesting and security auditing and as such, it is NOT a recommended distribution for those unfamiliar with Linux.
In addition, misuse of security tools within your network, particularly without permission, may cause irreparabledamage and result in significant consequences.
If you are looking for a Linux distribution to learn the basics of Linux and need a good starting point, KaliLinux is not the ideal distribution for you. You may want to begin with Ubuntu or Debian instead.
© Offensive Security 2014 Page: 4 / 185

Official Kali Linux DocumentationThis PDF has been autogenerated on docs.kali.org - May 25, 2014
Kali Linux Default PasswordsKali Linux Default root Password is toor
Default root Password
During installation, Kali Linux allows users to configure a password for the root user. However, should youdecide to boot the live image instead, the i386, amd64, VMWare and ARM images are configured with thedefault root password – “toor“, without the quotes.
© Offensive Security 2014 Page: 5 / 185

Official Kali Linux DocumentationThis PDF has been autogenerated on docs.kali.org - May 25, 2014
01. Downloading Kali Linux
Download Official Kali Images
Alert! Always make certain you are downloading Kali Linux from official sources and be sure to verify theSHA1 checksums against our official values. It would be easy for a malicious entity to modify a Kaliinstallation to contain malicious code and host it unofficially.
Official Kali Linux Images
ISO Files
Kali Linux is available as a bootable ISO in both 32 and 64-bit formats.
Download Kali ISOs
VMware Images
Kali is available as a pre-made VMware virtual machine with VMware Tools installed. The VMware image isavailable in a 32-bit PAE format.
Download Kali VMware Images
ARM Images
Due to the nature of the ARM architecture, it is not possible to have a single image that will work across all ARMdevices. We have Kali Linux ARM images available for the following devices:
rk3306 mk/ss808Raspberry PiODROID-U2/X2MK802/MK802 IISamsung Chromebook
Verifying SHA1 Checksums of Downloaded Images
When you download an image, be sure to download the SHA1SUMS and SHA1SUMS.gpg files that are next tothe downloaded image (i.e. in the same directory on the server).
© Offensive Security 2014 Page: 6 / 185

Official Kali Linux DocumentationThis PDF has been autogenerated on docs.kali.org - May 25, 2014
Ensure the Origin of the SHA1SUMS File
Before verifying the checksums of the image, you must ensure that the SHA1SUMS file is the one generated byKali. That’s why the file is signed by Kali’s official key with a detached signature in SHA1SUMS.gpg. Kali’s officialkey can be downloaded in one of two ways:
$ wget -q -O - http://archive.kali.org/archive-key.asc | gpg --import# or$ gpg --keyserver subkeys.pgp.net --recv-key 44C6513A8E4FB3D30875F758ED444FF07D8D0BF6
Once you have downloaded both SHA1SUMS and SHA1SUMS.gpg, you can verify the signature as follows:
$ gpg --verify SHA1SUMS.gpg SHA1SUMSgpg: Signature made Thu Mar 7 21:26:40 2013 CET using RSA key ID 7D8D0BF6gpg: Good signature from "Kali Linux Repository <[email protected]>"
If you don’t get that “Good signature” message or if the key ID doesn’t match, then you should stop theprocess and review whether you downloaded the images from a legitimate Kali mirror. If the SHA1SUMS file isthe one provided by Kali, then you can verify that the image downloaded has the required checksum. You caneither generate the checksum and do a manual comparison with what’s listed in SHA1SUMS or use a tool thatknows how to verify those checksums. TODO: explain how to use GPG on OS X and Windows. Seehttps://www.torproject.org/docs/verifying-signatures.html.en for inspiration.
Verifying SHA1 Checksums on Linux
With a manual comparison:
$ sha1sum kali-linux-1.0-i386.iso796e32f51d1bf51e838499c326c71a1c952cc052 kali-linux-1.0-i386.iso$ grep kali-linux-1.0-i386.iso SHA1SUMS796e32f51d1bf51e838499c326c71a1c952cc052 kali-linux-1.0-i386.iso
© Offensive Security 2014 Page: 7 / 185
Official Kali Linux DocumentationThis PDF has been autogenerated on docs.kali.org - May 25, 2014
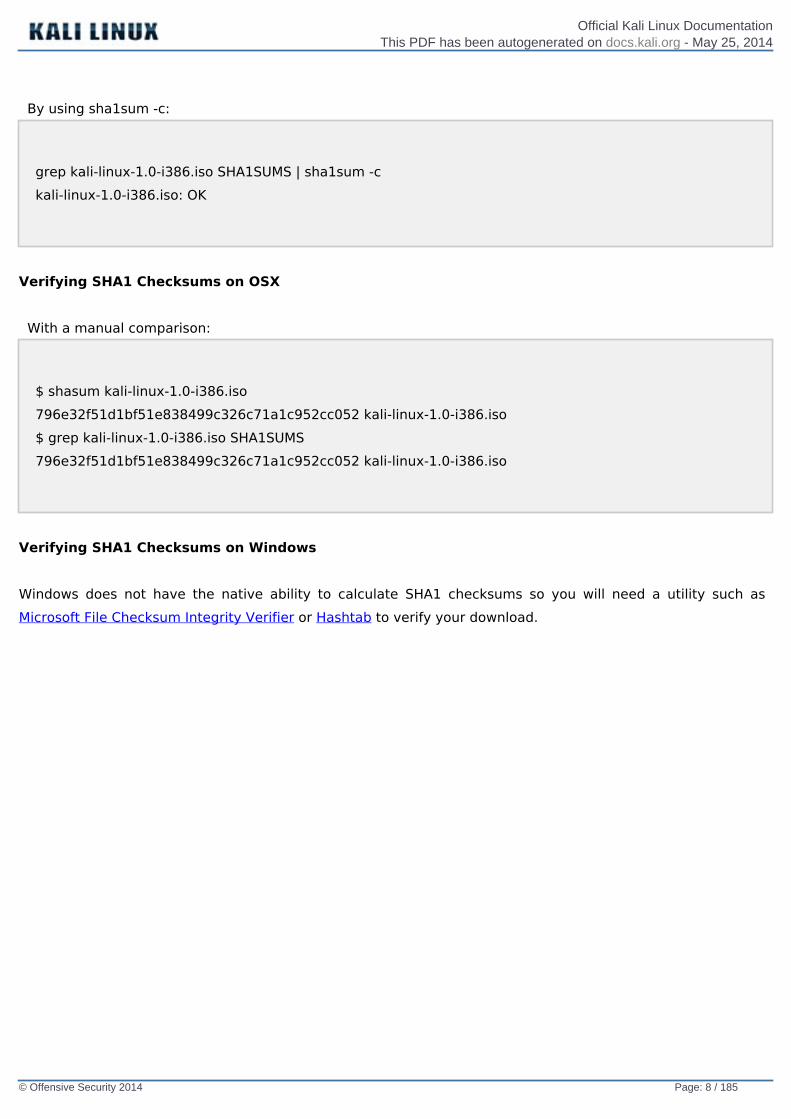
By using sha1sum -c:
grep kali-linux-1.0-i386.iso SHA1SUMS | sha1sum -ckali-linux-1.0-i386.iso: OK
Verifying SHA1 Checksums on OSX
With a manual comparison:
$ shasum kali-linux-1.0-i386.iso796e32f51d1bf51e838499c326c71a1c952cc052 kali-linux-1.0-i386.iso$ grep kali-linux-1.0-i386.iso SHA1SUMS796e32f51d1bf51e838499c326c71a1c952cc052 kali-linux-1.0-i386.iso
Verifying SHA1 Checksums on Windows
Windows does not have the native ability to calculate SHA1 checksums so you will need a utility such asMicrosoft File Checksum Integrity Verifier or Hashtab to verify your download.
© Offensive Security 2014 Page: 8 / 185

Official Kali Linux DocumentationThis PDF has been autogenerated on docs.kali.org - May 25, 2014
Live Build a Custom Kali ISOBuild Your Own Kali ISO – Introduction
Building a customized Kali ISO is easy, fun, and rewarding. You can configure virtually every aspect of yourcustom Kali ISO build using the Debian live-build scripts. These scripts allow one to easily build live systemimages by providing a framework that uses a configuration set to automate and customize all aspects ofbuilding the image. We have adopted these scripts and use them for the official Kali ISO releases.
Prerequisites
Ideally, you should build your custom Kali ISO from within a pre-existing Kali environment . However, if thisis not the case for you, make sure you are using the latest version of live-build (in the 3.x branch which targetsDebian wheezy).
Getting Ready
We first need to prepare the Kali ISO build environment with the following commands:
apt-get install git live-build cdebootstrap kali-archive-keyringgit clone git://git.kali.org/live-build-config.gitcd live-build-configlb config
Configuring the Kali ISO Build (Optional)
Through the config directory, your ISO build supports significant customization options, which are welldocumented on the Debian live build 3.x page. However, for the impatient, the following configuration files areof particular interest:
config/package-lists/kali.list.chroot – contains the list of packages to install in the Kali ISO. You can choosespecific packages to be installed, while dropping others. This is also where you can change your Kali ISODesktop Environment (KDE, Gnome, XFCE, LXDE, etc).
hooks/ – The hooks directory allows us to hook scripts in various stages of the Kali ISO live build. For moreinformation about hooks, refer to the live build manual. As an example, Kali adds its forensic menu this way:
© Offensive Security 2014 Page: 9 / 185

Official Kali Linux DocumentationThis PDF has been autogenerated on docs.kali.org - May 25, 2014
$ cat config/hooks/forensic-menu.binary#!/bin/sh
cat >>binary/isolinux/live.cfg <<END
label live-forensicmenu label ^Live (forensic mode)linux /live/vmlinuzinitrd /live/initrd.imgappend boot=live noconfig username=root hostname=kali noswap noautomountEND
Building the ISO
Before you generate your ISO, you can specify your required architecture, choosing either amd64 or i386. Alsonote that “lb build” requires root rights. If you do not specify an architecture, live build will generate an ISO withthe same architecture as the host machine.
If you want to build a 64 bit ISO on a 32 bit Kali system, make sure you enable multi archi support:
dpkg --add-architecture amd64apt-get update
Configure live-build to generate with a 64 bit or 32 bit ISO:
lb config --architecture amd64 # for 64 bit# ...or...lb config --architecture i386 # for 32 bit
lb build
© Offensive Security 2014 Page: 10 / 185

Official Kali Linux DocumentationThis PDF has been autogenerated on docs.kali.org - May 25, 2014
The last command will take a while to complete, as it downloads all of the required packages needed to createyour ISO. Good time for a coffee.
Building Kali Linux for older i386 architecture
The Kali Linux i386 ISO has PAE enabled. If you require a default kernel for older hardware, you need to rebuilda Kali Linux ISO. The rebuilding process is much the same as above, other than the 686-pae parameter thatneeds to be changed to 486 in auto/config :
apt-get install git live-build cdebootstrap kali-archive-keyringgit clone git://git.kali.org/live-build-config.gitcd live-build-configsed -i 's/686-pae/486/g' auto/configlb cleanlb config --architecture i386lb build
Speeding up future builds
If you plan to build custom ISOs often, you might want to cache kali packages locally for future builds. This caneasily be done by installing apt-cacher-ng, and configuring the http_proxy environment variable before everybuild.
apt-get install apt-cacher-ng/etc/init.d/apt-cacher-ng startexport http_proxy=http://localhost:3142/.... # setup and configure your live buildlb build
© Offensive Security 2014 Page: 11 / 185

Official Kali Linux DocumentationThis PDF has been autogenerated on docs.kali.org - May 25, 2014
02. Building Custom Kali Images
Generate an Updated Kali ISOKali Linux allows you to generate updated ISOs of Kali using Debian live-build scripts on the fly. The easiest wayto generate these images is from within a pre existing Kali Linux environment.
You will first need to install the live-build and cdebootstrap packages:
apt-get install git live-build cdebootstrap
Next, we clone the Kali cdimage Git repository as follows:
git clone git://git.kali.org/live-build-config.git
Now you can change to the live directory under cdimage.kali.org and build your ISO.
cd live-build-configlb clean --purgelb configlb build
The live build scripts allow for complete customization of Kali Linux images. For moreinformation about Kali live build scripts, check out our Kali customization page.
© Offensive Security 2014 Page: 12 / 185

Official Kali Linux DocumentationThis PDF has been autogenerated on docs.kali.org - May 25, 2014
© Offensive Security 2014 Page: 13 / 185

Official Kali Linux DocumentationThis PDF has been autogenerated on docs.kali.org - May 25, 2014
Customize the Kali DesktopChanging the Kali Desktop Environment
Although Kali Linux uses Gnome for its default desktop environment, we recognize that not all users wish to useGnome so we have made it simple to change to a WM of your choosing. To build your own Kali ISO image with acustom Desktop Environment, start by following the Live Build a Custom Kali ISO guide. Before building yourISO, edit the last section of config/package-lists/kali.list.chroot to contain the entries related to the desktopenvironment of your choice. The section starts with this comment:
# Graphical desktops depending on the architecture## You can replace all the remaining lines with a list of the# packages required to install your preferred graphical desktop# or you can just comment everything except the packages of your# preferred desktop.
KDEGnomeLXDEXFCEI3WMMATE
kali-defaultskali-root-logindesktop-basekde-plasma-desktop
© Offensive Security 2014 Page: 14 / 185

Official Kali Linux DocumentationThis PDF has been autogenerated on docs.kali.org - May 25, 2014
gnome-corekali-defaultskali-root-logindesktop-base
kali-defaultskali-root-logindesktop-baselxde
kali-defaultskali-root-logindesktop-basexfce4xfce4-places-plugin
# cheers to 0xerrorxorgdmenuconkyi3
© Offensive Security 2014 Page: 15 / 185

Official Kali Linux DocumentationThis PDF has been autogenerated on docs.kali.org - May 25, 2014
The “MATE” desktop is not included by default in our repositories, and requires a few more steps to integrateinto a Kali build.
echo "deb http://repo.mate-desktop.org/debian wheezy main" >> /etc/apt/sources.listapt-get updateapt-get install mate-archive-keyring
# apt-get install git live-build cdebootstrap# git clone git://git.kali.org/live-build-config.gitcd live-build-configmkdir config/archivesecho "deb http://repo.mate-desktop.org/debian wheezy main" > config/archives/mate.list.binaryecho "deb http://repo.mate-desktop.org/debian wheezy main" > config/archives/mate.list.chrootcp /usr/share/keyrings/mate-archive-keyring.gpg config/archives/mate.key.binarycp /usr/share/keyrings/mate-archive-keyring.gpg config/archives/mate.key.chrootecho "sleep 20" >> config/hooks/z_sleep.chroot
# add mate desktop to the packages list:nano config/package-lists/kali.list.chroot
# after editing, it should look like this:xorgmate-archive-keyringmate-coremate-desktop-environment
© Offensive Security 2014 Page: 16 / 185

Official Kali Linux DocumentationThis PDF has been autogenerated on docs.kali.org - May 25, 2014
© Offensive Security 2014 Page: 17 / 185

Official Kali Linux DocumentationThis PDF has been autogenerated on docs.kali.org - May 25, 2014
03. Installing Kali Linux
Kali Linux remote install via rescue systemInstalling Kali Linux on a rented or colocated server can be useful for freelancers or enthusiasts alike. It providesa fast environment for performing network scans without having to go the extra mile to get a leased line athome. Before starting the Installation, the server has to be booted into rescue mode and it’s networkconfiguration saved. The extent of tool availability in the different rescue systems is taken care of where itmatters. First after connecting to the server via SSH, the disk has to be formatted. This is best achieved using parted, if available.
This is some test code.
Some totally irrelevant quote from Ram Dass on the topic of encryption.
© Offensive Security 2014 Page: 18 / 185

Official Kali Linux DocumentationThis PDF has been autogenerated on docs.kali.org - May 25, 2014
Kali Linux Live USB Persistence + EncryptionAdding Persistence to a Kali Live USB
As of Kali Linux 1.0.7, USB persistent options have been added to the default boot menu.These optionsrequire additional setup on your USB storage to function properly , and are described in the followingarticle.
Adding persistence (the ability to save files and changes across live boots) to your Kali Linux image can be veryuseful in certain situations. To make your Kali Linux USB stick persistent, follow these steps as the root user.Inthis example, we assume our USB drive is /dev/sdb and that we’ve downloaded kali-linux-1.0.7-amd64.iso. Make sure you’re using a large enough USB stick (8GB and up).
1. Image the Kali Linux ISO to your USB stick. We used the “Linux Method” and dd.
dd if=kali-linux-1.0.7-amd64.iso of=/dev/sdb bs=1M
2. Create and format an additional partition on the USB stick. In our example, we create a 5 GB persistentpartition and create a persistence.conf file on it.
© Offensive Security 2014 Page: 19 / 185

Official Kali Linux DocumentationThis PDF has been autogenerated on docs.kali.org - May 25, 2014
size=5gbread bytes _ < <(du -bcm kali-linux-1.0.7-amd64.iso |tail -1); echo $bytesparted /dev/sdb mkpart primary $bytes $sizemkfs.ext3 -L persistence /dev/sdb2e2label /dev/sdb2 persistencemkdir -p /mnt/my_usbmount /dev/sdb2 /mnt/my_usbecho "/ union" > /mnt/my_usb/persistence.confumount /dev/sdb2
Adding USB Persistence with LUKS Encryption
As of Kali Linux 1.0.7, there is also the option of using a LUKS encrypted persistent storage space. This adds anextra layer of security to your sensitive files when traveling with Kali on USB devices.
1. Image the Kali Linux ISO to your USB stick. We used the “Linux Method” and dd.
dd if=kali-linux-1.0.7-amd64.iso of=/dev/sdb bs=1M
2. Create and format an additional LUKS encrypted partition on the USB stick. In our example, we create a5 GB persistent partition and create a persistence.conf file on it.
size=5gbread bytes _ < <(du -bcm kali-linux-1.0.7-amd64.iso |tail -1); echo $bytesparted /dev/sdb mkpart primary $bytes $sizecryptsetup --verbose --verify-passphrase luksFormat /dev/sdb2cryptsetup luksOpen /dev/sdb2 my_usbmkfs.ext3 -L persistence /dev/mapper/my_usbe2label /dev/mapper/my_usb persistencemkdir -p /mnt/my_usbmount /dev/mapper/my_usb /mnt/my_usbecho "/ union" > /mnt/my_usb/persistence.confumount /dev/mapper/my_usb
© Offensive Security 2014 Page: 20 / 185

Official Kali Linux DocumentationThis PDF has been autogenerated on docs.kali.org - May 25, 2014
cryptsetup luksClose /dev/mapper/my_usb
That’s it! Plug the USB stick into the computer you want to boot up. Make sure your BIOS is set to boot fromyour USB device. When the Kali Linux boot screen is displayed, you can now choose the persistent option (eithernormal or encrypted, whichever you set up).
© Offensive Security 2014 Page: 21 / 185

Official Kali Linux DocumentationThis PDF has been autogenerated on docs.kali.org - May 25, 2014
Kali Linux Hard Disk InstallKali Linux Installation Requirements
Installing Kali Linux on your computer is an easy process. First, you’ll need compatible computer hardware. Kaliis supported on i386, amd64, and ARM (both armel and armhf) platforms. The hardware requirements areminimal as listed below, although better hardware will naturally provide better performance. The i386 imageshave a default PAE kernel, so you can run them on systems with over 4GB of RAM. Download Kali Linux andeither burn the ISO to DVD, or prepare a USB stick with Kali Linux Live as the installation medium. If you do nothave a DVD drive or USB port on your computer, check out the Kali Linux Network Install.
Installation Prerequisites
A minimum of 10 GB disk space for the Kali Linux install.For i386 and amd64 architectures, a minimum of 512MB RAM.CD-DVD Drive / USB boot support
Preparing for the Installation
1. Download Kali linux.2. Burn The Kali Linux ISO to DVD or Image Kali Linux Live to USB.3. Ensure that your computer is set to boot from CD / USB in your BIOS.
Kali Linux Installation Procedure
1. To start your installation, boot with your chosen installation medium. You should be greeted with the KaliBoot screen. Choose either Graphical or Text-Mode install. In this example, we chose a GUI install.
© Offensive Security 2014 Page: 22 / 185

Official Kali Linux DocumentationThis PDF has been autogenerated on docs.kali.org - May 25, 2014
2. Select your preferred language and then your country location. You’ll also be prompted to configure yourkeyboard with the appropriate keymap.
© Offensive Security 2014 Page: 23 / 185

Official Kali Linux DocumentationThis PDF has been autogenerated on docs.kali.org - May 25, 2014
3. The installer will copy the image to your hard disk, probe your network interfaces, and then prompt youto enter a hostname for your system. In the example below, we’ve entered “kali” as our hostname.
© Offensive Security 2014 Page: 24 / 185

Official Kali Linux DocumentationThis PDF has been autogenerated on docs.kali.org - May 25, 2014
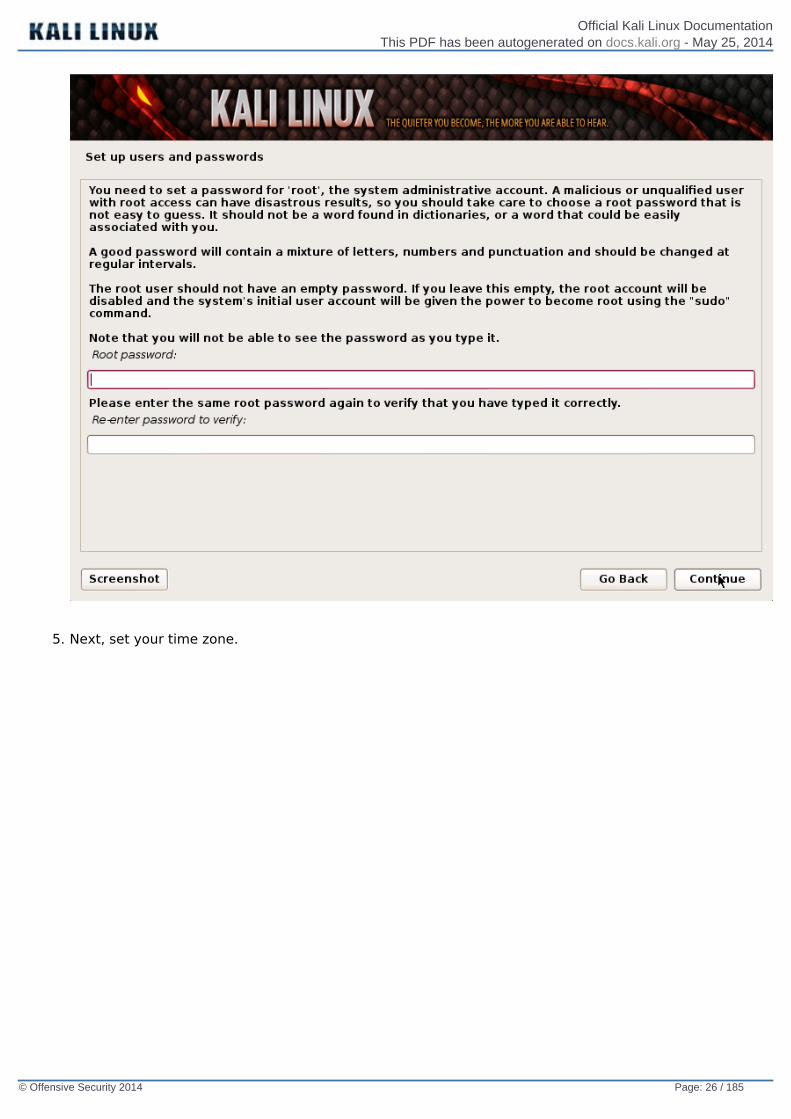
4. Enter a robust password for the root account.
© Offensive Security 2014 Page: 25 / 185
Official Kali Linux DocumentationThis PDF has been autogenerated on docs.kali.org - May 25, 2014
5. Next, set your time zone.
© Offensive Security 2014 Page: 26 / 185

Official Kali Linux DocumentationThis PDF has been autogenerated on docs.kali.org - May 25, 2014
6. The installer will now probe your disks and offer you four choices. In our example, we’re using the entiredisk on our computer and not configuring LVM (logical volume manager). Experienced users can use the“Manual” partitioning method for more granular configuration options.
© Offensive Security 2014 Page: 27 / 185

Official Kali Linux DocumentationThis PDF has been autogenerated on docs.kali.org - May 25, 2014
7. Next, you’ll have one last chance to review your disk configuration before the installer makesirreversible changes. After you click Continue, the installer will go to work and you’ll have an almostfinished installation.
© Offensive Security 2014 Page: 28 / 185

Official Kali Linux DocumentationThis PDF has been autogenerated on docs.kali.org - May 25, 2014
8. Configure network mirrors. Kali uses a central repository to distribute applications. You’ll need to enterany appropriate proxy information as needed.
NOTE! If you select “NO” in this screen, you will NOT be able to install packages from Kalirepositories.
© Offensive Security 2014 Page: 29 / 185

Official Kali Linux DocumentationThis PDF has been autogenerated on docs.kali.org - May 25, 2014
9. Next, install GRUB.
© Offensive Security 2014 Page: 30 / 185

Official Kali Linux DocumentationThis PDF has been autogenerated on docs.kali.org - May 25, 2014
10. Finally, click Continue to reboot into your new Kali installation.
© Offensive Security 2014 Page: 31 / 185

Official Kali Linux DocumentationThis PDF has been autogenerated on docs.kali.org - May 25, 2014
Post Installation
Now that you’ve completed installing Kali Linux, it’s time to customize your system. The Kali General Usesection of our site has more information and you can also find tips on how to get the most out of Kali in our UserForums.
© Offensive Security 2014 Page: 32 / 185

Official Kali Linux DocumentationThis PDF has been autogenerated on docs.kali.org - May 25, 2014
Dual Boot Kali with WindowsKali Linux Dual Boot with Windows
Installing Kali alongside a Windows installation can be quite useful. However, you need to exercise cautionduring the setup process. First, make sure that you’ve backed up any important data on your Windowsinstallation. Since you’ll be modifying your hard drive, you’ll want to store this backup on external media. Onceyou’ve completed the backup, we recommend you peruse Kali Linux Hard Disk Install, which explains thenormal procedure for a basic Kali install.
In our example, we will be installing Kali Linux alongside an installation of Windows 7, which is currently takingup 100% of the disk space in our computer. We will start by resizing our current Windows partition to occupyless space and then proceed to install Kali Linux in the newly-created empty partition.
Download Kali Linux and either burn the ISO to DVD, or prepare a USB stick with Kali linux Live as theinstallation medium. If you do not have a DVD or USB port on your computer, check out the Kali Linux NetworkInstall. Ensure you have:
Minimum of 8 GB free disk space on WindowsCD-DVD / USB boot support
Preparing for the Installation
1. Download Kali Linux.2. Burn The Kali Linux ISO to DVD or copy Kali Linux Live to USB.3. Ensure that your computer is set to boot from CD / USB in your BIOS.
Dual Boot Installation Procedure
1. To start your installation, boot with your chosen installation medium. You should be greeted with the KaliBoot screen. Select Live, and you should be booted into the Kali Linux default desktop.
2. Now launch the gparted program. We’ll use gparted to shrink the existing Windows partition to give usenough room to install Kali Linux.
© Offensive Security 2014 Page: 33 / 185

Official Kali Linux DocumentationThis PDF has been autogenerated on docs.kali.org - May 25, 2014
3. Select your Windows partition. Depending on your system, it will usually be the second, larger partition.In our example, there are two partitions; the first is the System Recovery partition, and Windows isactually installed in /dev/sda2. Resize your Windows partition and leave enough space (8GB minimum)for the Kali installation.
© Offensive Security 2014 Page: 34 / 185

Official Kali Linux DocumentationThis PDF has been autogenerated on docs.kali.org - May 25, 2014
4. Once you have resized your Windows partition, ensure you “Apply All Operations” on the hard disk. Exit gparted and reboot.
© Offensive Security 2014 Page: 35 / 185

Official Kali Linux DocumentationThis PDF has been autogenerated on docs.kali.org - May 25, 2014
Kali Linux Installation Procedure
1. The installation procedure from this point onwards is similar to a Kali Linux Hard Disk install, until thepoint of the partitioning, where you need to select “Guided – use the largest continuous free space” thatyou created earlier with gparted.
© Offensive Security 2014 Page: 36 / 185

Official Kali Linux DocumentationThis PDF has been autogenerated on docs.kali.org - May 25, 2014
2. Once the installation is done, reboot. You should be greeted with a GRUB boot menu, which will allowyou to boot either into Kali or Windows.
© Offensive Security 2014 Page: 37 / 185

Official Kali Linux DocumentationThis PDF has been autogenerated on docs.kali.org - May 25, 2014
Post Installation
Now that you’ve completed installing Kali Linux, it’s time to customize your system. The Kali General Usesection of our site has more information and you can also find tips on how to get the most out of Kali in our UserForums.
© Offensive Security 2014 Page: 38 / 185

Official Kali Linux DocumentationThis PDF has been autogenerated on docs.kali.org - May 25, 2014
Kali Linux Live USB InstallBooting and installing Kali from a USB stick is our favorite and fastest method of getting up and running. Inorder to do this, we first need to image the Kali ISO on a USB drive.
Preparing for the USB copy
1. Download Kali linux.2. If running Windows, download Win32 Disk Imager.3. No special software is needed for a *nix OS.4. A USB Key (at least 2GB capacity for mini, 4GB for regular).
Kali Linux Live USB Install Procedure
Imaging Kali on a Windows Machine
1. Plug your USB stick into your Windows USB port and launch the Win32 Disk Imager software2. Choose the Kali Linux ISO file to be imaged and verify that the USB drive to be overwritten is the correct
one.
3. Once the imaging is complete, safely eject the USB drive from the Windows machine. You can now usethe USB device to boot into Kali Linux.
© Offensive Security 2014 Page: 39 / 185

Official Kali Linux DocumentationThis PDF has been autogenerated on docs.kali.org - May 25, 2014
Imaging Kali on a Linux Machine
Creating a bootable Kali Linux USB key in a Linux environment is easy. Once you’ve downloaded your Kali ISOfile, you can use dd to copy it over to your USB stick as follows (make sure your root first):
WARNING. Although the process of imaging Kali on a USB stick is very easy, you can just as easily destroyarbitrary partitions with dd if you do not understand what you are doing. Consider yourself warned.
1. Plug in your USB device to your Linux computer’s USB port.2. Verify the device path of your USB storage with dmesg.3. Proceed to (carefully!) image the Kali ISO file on the USB device:
dd if=kali.iso of=/dev/sdb bs=512k
That’s it, really! You can now boot into a Kali Live / Installer environment using the USB device.
© Offensive Security 2014 Page: 40 / 185

Official Kali Linux DocumentationThis PDF has been autogenerated on docs.kali.org - May 25, 2014
Troubleshooting a Kali InstallationKali Linux installation failures
There can be a wide variety of reasons for a Kali Linux installation to fail. This could include issues such as acorrupt or incomplete ISO download, not enough disk space on the target machine, etc. The following article willgive you some pointers on what to look for when your Kali Linux installation has failed. The following is anexample of the dreaded “Red Screen”, indicating the installation encountered a problem.
© Offensive Security 2014 Page: 41 / 185

Official Kali Linux DocumentationThis PDF has been autogenerated on docs.kali.org - May 25, 2014
© Offensive Security 2014 Page: 42 / 185

Official Kali Linux DocumentationThis PDF has been autogenerated on docs.kali.org - May 25, 2014
Hitting the continue button should take you to the Debian installer main menu. From that main menu,browse to the “save debug logs“:
© Offensive Security 2014 Page: 43 / 185

Official Kali Linux DocumentationThis PDF has been autogenerated on docs.kali.org - May 25, 2014
© Offensive Security 2014 Page: 44 / 185

Official Kali Linux DocumentationThis PDF has been autogenerated on docs.kali.org - May 25, 2014
Going into the debug logs, you are presented with several ways of transferring the installation log files awayfrom the failed installation. The most convenient way is usually to start a web server on the machineundergoing the installation.
Once you choose this option, a web server is started from which you are able to download or view severalinstallation log files.
Look over the logs files for anything irregular, or any error messages which look like they might be the cause ofyour failed installation. In this case, the target machine did not have enough disk space to install Kali Linux, aswas seen towards the end of the syslinux log file
Aug 19 23:45:05 base-installer: error: The tar process copying the live system failed (only 152937 out of
© Offensive Security 2014 Page: 45 / 185

Official Kali Linux DocumentationThis PDF has been autogenerated on docs.kali.org - May 25, 2014
286496 files have been copied, last file was ).Aug 19 23:45:05 main-menu[927]: (process:7553): tar: write error: No space left on deviceAug 19 23:45:05 main-menu[927]: WARNING **: Configuring 'live-installer' failed with error code 1Aug 19 23:45:05 main-menu[927]: WARNING **: Menu item 'live-installer' failed.Aug 19 23:50:23 main-menu[927]: INFO: Modifying debconf priority limit from 'high' to 'medium'Aug 19 23:50:23 debconf: Setting debconf/priority to mediumAug 19 23:56:49 main-menu[927]: INFO: Menu item 'save-logs' selected
© Offensive Security 2014 Page: 46 / 185

Official Kali Linux DocumentationThis PDF has been autogenerated on docs.kali.org - May 25, 2014
Kali Linux Encrypted Disk InstallAt times, we have sensitive data we would prefer to encrypt using full disk encryption. With the Kali Installer,you can initiate an LVM encrypted install on either Hard Disk or USB drives. The installation procedure is verysimilar to a “normal Kali Linux Install”, with the exception of choosing an Encrypted LVM partition during theinstallation process.
Kali Linux Encrypted Installation Requirements
Installing Kali Linux on your computer is an easy process. First, you’ll need compatible computer hardware. Thehardware requirements are minimal as listed below, though better hardware will naturally provide betterperformance. The i386 images have a default PAE kernel, so you can run them on systems with over 4GB ofRAM. Download Kali Linux and either burn the ISO to DVD, or prepare a USB stick with Kali Linux Live as theinstallation medium.
Installation Prerequisites
A minimum of 8 GB disk space for the Kali Linux install.For i386 and amd64 architectures, a minimum of 512MB RAM.CD-DVD Drive / USB boot support
Preparing for the Installation
1. Download Kali linux.2. Burn The Kali linux ISO to DVD or Image Kali Linux Live to USB.3. Ensure that your computer is set to boot from CD / USB in your BIOS.
Kali Linux Installation Procedure
1. To start your installation, boot with your chosen installation medium. You should be greeted with the KaliLinux boot menu. Choose a Graphical or a Text-Mode install. In this example, we chose a GUI install.
© Offensive Security 2014 Page: 47 / 185

Official Kali Linux DocumentationThis PDF has been autogenerated on docs.kali.org - May 25, 2014
2. Select your preferred language and then your country location. You’ll also be prompted to configure yourkeyboard with the appropriate keymap.
© Offensive Security 2014 Page: 48 / 185

Official Kali Linux DocumentationThis PDF has been autogenerated on docs.kali.org - May 25, 2014
3. The installer will copy the image to your hard disk, probe your network interfaces, and then prompt youto enter a hostname for your system. In the example below, we’ve entered “kali” as the hostname.
© Offensive Security 2014 Page: 49 / 185

Official Kali Linux DocumentationThis PDF has been autogenerated on docs.kali.org - May 25, 2014
4. Enter a robust password for the root account.
© Offensive Security 2014 Page: 50 / 185

Official Kali Linux DocumentationThis PDF has been autogenerated on docs.kali.org - May 25, 2014
5. Next, set your time zone.
© Offensive Security 2014 Page: 51 / 185

Official Kali Linux DocumentationThis PDF has been autogenerated on docs.kali.org - May 25, 2014
6. The installer will now probe your disks and offer you four choices. For an Encrypted LVM install, choosethe “Guided – use entire disk and set up encrypted LVM” option as shown below.
© Offensive Security 2014 Page: 52 / 185

Official Kali Linux DocumentationThis PDF has been autogenerated on docs.kali.org - May 25, 2014
7. Choose the destination drive to install Kali. In this case, we chose a USB drive destination. We will usethis USB drive to boot an encrypted instance of Kali.
© Offensive Security 2014 Page: 53 / 185
Official Kali Linux DocumentationThis PDF has been autogenerated on docs.kali.org - May 25, 2014
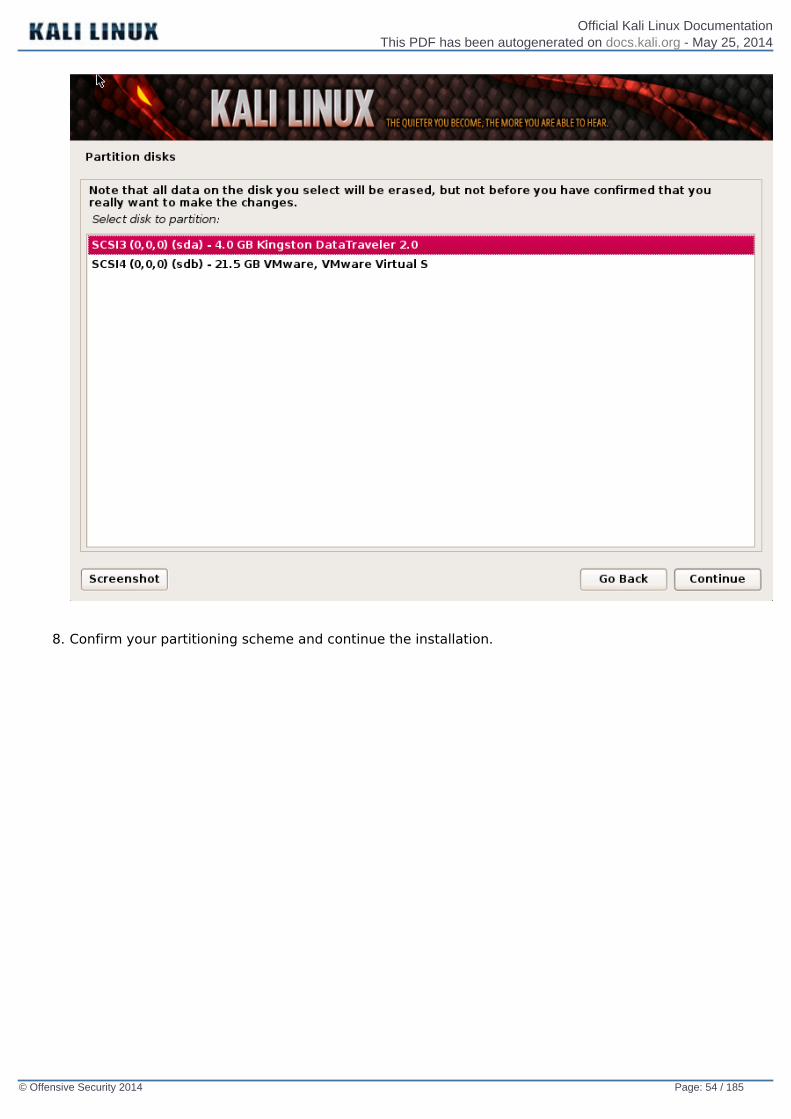
8. Confirm your partitioning scheme and continue the installation.
© Offensive Security 2014 Page: 54 / 185

Official Kali Linux DocumentationThis PDF has been autogenerated on docs.kali.org - May 25, 2014
9. Next, you will be asked for an encryption password. You will need to remember this password and use iteach time to boot the encrypted instance of Kali Linux.
© Offensive Security 2014 Page: 55 / 185

Official Kali Linux DocumentationThis PDF has been autogenerated on docs.kali.org - May 25, 2014
10. Configure network mirrors. Kali uses a central repository to distribute applications. You’ll need to enterany appropriate proxy information as needed.
NOTE! If you select “NO” in this screen, you will NOT be able to install packages from the Kalirepositories.
© Offensive Security 2014 Page: 56 / 185

Official Kali Linux DocumentationThis PDF has been autogenerated on docs.kali.org - May 25, 2014
11. Next, install GRUB.
© Offensive Security 2014 Page: 57 / 185

Official Kali Linux DocumentationThis PDF has been autogenerated on docs.kali.org - May 25, 2014
12. Finally, click Continue to reboot into your new Kali installation. If you used a USB device as a destinationdrive, make sure you enable booting from USB devices in your BIOS. You will be asked for the encryptionpassword you set earlier on every boot.
© Offensive Security 2014 Page: 58 / 185

Official Kali Linux DocumentationThis PDF has been autogenerated on docs.kali.org - May 25, 2014
Post Installation
Now that you’ve completed installing Kali Linux, it’s time to customize your system. The Kali General Usesection of our site has more information and you can also find tips on how to get the most out of Kali in our UserForums.
© Offensive Security 2014 Page: 59 / 185

Official Kali Linux DocumentationThis PDF has been autogenerated on docs.kali.org - May 25, 2014
04. Kali Linux Network Installs
Kali Linux Mini ISO InstallKali Mini ISO Install
The Kali mini ISO is a convenient way to install a minimal Kali system and install it “from scratch”. The miniinstall ISO will download all required packages from our repositories, meaning you need to have a fast Internetconnection to use this installation method.
Installation Prerequisites
A minimum of 8 GB disk space for the Kali Linux install.For i386 and amd64 architectures, a minimum of 512MB RAM.CD-DVD Drive / USB boot support
Preparing for the Installation
1. Download the Kali mini ISO.2. Burn The Kali Linux ISO to DVD or Image Kali Linux Live to USB.3. Ensure that your computer is set to boot from CD / USB in your BIOS.
Kali Linux Installation Procedure
When you first boot the mini ISO, you will be presented with a small boot menu with various options. For thisarticle, we will simply be doing a basic install.
© Offensive Security 2014 Page: 60 / 185
Official Kali Linux DocumentationThis PDF has been autogenerated on docs.kali.org - May 25, 2014
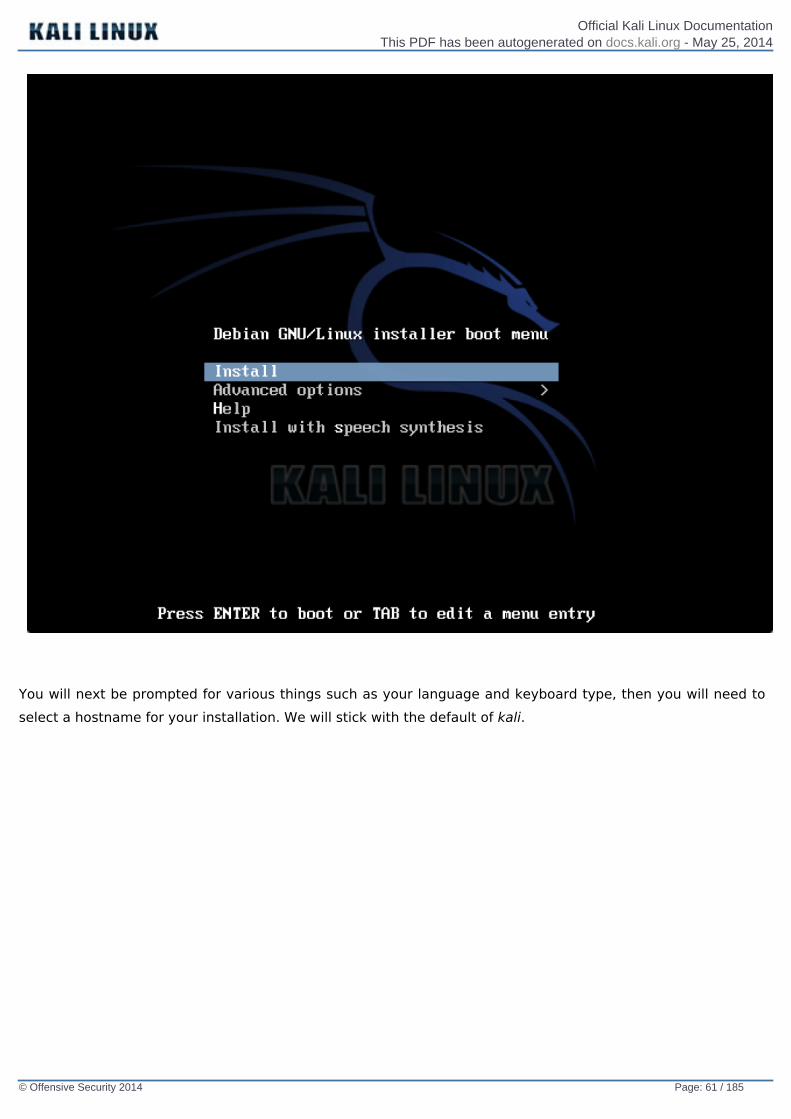
You will next be prompted for various things such as your language and keyboard type, then you will need toselect a hostname for your installation. We will stick with the default of kali.
© Offensive Security 2014 Page: 61 / 185

Official Kali Linux DocumentationThis PDF has been autogenerated on docs.kali.org - May 25, 2014
Next, you will need to select your time zone, then you’ll be shown the partition options. To get up and runningquickly, we will use ‘Guided – use entire disk’ and follow the prompts all the way through to create the newpartitioning setup.
© Offensive Security 2014 Page: 62 / 185

Official Kali Linux DocumentationThis PDF has been autogenerated on docs.kali.org - May 25, 2014
In order to reduce network bandwidth, a small subset of packages will be selected by default. If you wish to adddifferent services or features, this is the area you would make your selections.
© Offensive Security 2014 Page: 63 / 185

Official Kali Linux DocumentationThis PDF has been autogenerated on docs.kali.org - May 25, 2014
At this point, the installer will download all of the packages it requires and install them on the system.Depending on your Internet connectivity speed, this could take some time. Eventually, you will finally beprompted to install GRUB to finish the installation.
© Offensive Security 2014 Page: 64 / 185

Official Kali Linux DocumentationThis PDF has been autogenerated on docs.kali.org - May 25, 2014
Post Installation
Now that you’ve completed installing Kali Linux, it’s time to customize your system. The Kali General Usesection of our site has more information and you can also find tips on how to get the most out of Kali in our UserForums.
© Offensive Security 2014 Page: 65 / 185
Official Kali Linux DocumentationThis PDF has been autogenerated on docs.kali.org - May 25, 2014
Kali Linux Network PXE InstallSetup a PXE Server
Booting and installing Kali over the network (PXE) can be useful from a single laptop install with no CDROM orUSB ports, to enterprise deployments supporting pre-seeding of the Kali installation.
First, we need to install dnsmasq to provide the DHCP/TFTP server and then edit the dnsmasq.conf file.
apt-get install dnsmasqnano /etc/dnsmasq.conf
In dnsmasq.conf, enable DHCP, TFTP and PXE booting and set the dhcp-range to match your environment. Ifneeded you can also define your gateway and DNS servers with the dhcp-option directive as shown below:
interface=eth0dhcp-range=192.168.101.100,192.168.101.200,12hdhcp-boot=pxelinux.0enable-tftptftp-root=/tftpboot/dhcp-option=3,192.168.101.1dhcp-option=6,8.8.8.8,8.8.4.4
With the edits in place, the dnsmasq service needs to be restarted in order for the changes to take effect.
service dnsmasq restart
© Offensive Security 2014 Page: 66 / 185

Official Kali Linux DocumentationThis PDF has been autogenerated on docs.kali.org - May 25, 2014
Download Kali PXE Netboot Images
Now, we need to create a directory to hold the Kali Netboot image and download the image we wish to servefrom the Kali repos.
mkdir -p /tftpbootcd /tftpboot# for 64 bit systems:wget http://repo.kali.org/kali/dists/kali/main/installer-amd64/current/images/netboot/netboot.tar.gz# for 32 bit systems:wget http://repo.kali.org/kali/dists/kali/main/installer-i386/current/images/netboot/netboot.tar.gztar zxpf netboot.tar.gzrm netboot.tar.gz
Configure Target to Boot From Network
With everything configured, you can now boot your target system and configure it to boot from the network. Itshould get an IP address from your PXE server and begin booting Kali.
© Offensive Security 2014 Page: 67 / 185

Official Kali Linux DocumentationThis PDF has been autogenerated on docs.kali.org - May 25, 2014
05. Kali Linux General Use
Kali Linux sources.list RepositoriesWe’ve seen many people break their Kali Linux installations by following unofficial advice, or arbitrarilypopulating their sources.list file with unneeded repositories. The following post aims to clarify what repositoriesshould exist in sources.list, and when they should be used.
Any additional repositories added to the Kali sources.list file will most likely BREAK YOUR KALILINUX INSTALL.
Regular repositories
On a standard, clean install of Kali Linux, you should have the following two entries present in/etc/apt/sources.list:
deb http://http.kali.org/kali kali main non-free contribdeb http://security.kali.org/kali-security kali/updates main contrib non-free
You can find a list of official Kali Linux mirrors here.
Source repositories
In case you require source packages, you might also want to add the following repositories as well:
deb-src http://http.kali.org/kali kali main non-free contribdeb-src http://security.kali.org/kali-security kali/updates main contrib non-free
Bleeding Edge repositories
If you have a need for bleeding edge repositories, you can add the following entry. Do not add this repo “for theheck of it” – it’s called “bleeding edge” for a reason. Packages in this repository are NOT manually maintained(they are auto-generated), and are low priority in general.
© Offensive Security 2014 Page: 68 / 185

Official Kali Linux DocumentationThis PDF has been autogenerated on docs.kali.org - May 25, 2014
deb http://repo.kali.org/kali kali-bleeding-edge main#deb-src http://repo.kali.org/kali kali-bleeding-edge main
© Offensive Security 2014 Page: 69 / 185

Official Kali Linux DocumentationThis PDF has been autogenerated on docs.kali.org - May 25, 2014
Install NVIDIA Drivers on KaliThis document explains how to make use of NVIDIA video hardware and install the drivers on a Kali Linuxsystem. The first step is to fully update your Kali Linux system and make sure you have the kernel headersinstalled.
apt-get updateapt-get dist-upgradeapt-get install -y linux-headers-$(uname -r)apt-get install nvidia-kernel-dkms
The next step is to disable the nouveau driver. Nouveau is a open source NVIDIA driver project, however it lacksthe 3D graphics acceleration needed to run Cuda pentest tools.
sed 's/quiet/quiet nouveau.modeset=0/g' -i /etc/default/grubupdate-grubreboot
Once the system boots back up, you may see a NVIDIA splash screen, which will indicate that the driversinstalled correctly, however, this is not always the case. In order to check if the drivers are working properly,execute the following command.
root@kali:~# glxinfo | grep -i "direct rendering"direct rendering: Yes
Although utilizing the Cuda tools included in Kali is beyond the scope of this article, checking to make sure that
© Offensive Security 2014 Page: 70 / 185

Official Kali Linux DocumentationThis PDF has been autogenerated on docs.kali.org - May 25, 2014
they are working properly is always a good idea. The following command uses Oclhashcat-plus with some of theexample files included in the package.
cd /usr/share/oclhashcat-plus/./cudaHashcat-plus.bin -t 32 -a 7 example0.hash ?a?a?a?a example.dictcudaHashcat-plus v0.14 by atom starting...
Hashes: 6494 total, 1 unique salts, 6494 unique digestsBitmaps: 16 bits, 65536 entries, 0x0000ffff mask, 262144 bytesWorkload: 256 loops, 80 accelWatchdog: Temperature abort trigger set to 90cWatchdog: Temperature retain trigger set to 80cDevice #1: GeForce G210M, 511MB, 1468Mhz, 2MCUDevice #2: GeForce 9400M G, 253MB, 1100Mhz, 2MCUDevice #1: Kernel ./kernels/4318/m0000_a1.sm_12.64.ptxDevice #2: Kernel ./kernels/4318/m0000_a1.sm_11.64.ptx
Generated dictionary stats for example.dict: 1210228 bytes, 129988 words, 129988 keyspace
27b797965af03466041487f2a455fe52:mo0000a48dd0f09abaf64324be83ce86414b5f:ap23000007becb9424f38abff581f6f2a82ff436a:sail001459ccf0940e63051d5a875a88acfaaf:pigi003baa3048651a65d1260eb521ab7c3bc0:ek1107a7a8220266f71f54f85685969ce999f:davi012345678998c627ca129e64dfff3bf08fbaab6c86:fire01man
As you can see in the output above, the cards are recognized and the passwords are being recoveredsuccessfully.
© Offensive Security 2014 Page: 71 / 185
Official Kali Linux DocumentationThis PDF has been autogenerated on docs.kali.org - May 25, 2014
Kali Linux Virtual Box GuestShould you decide to install Kali Linux within VirtualBox, you will need to follow the instructions below in order tosuccessfully install the Linux Guest Addition tools.
You must use version 4.2.xx or higher of VirtualBox in order to take advantage of the improvements, includingcompatibility updates, and enhanced stability of both the core application and the Guest Additions.
Installing VirtualBox Guest Additions in Kali Linux
In order to have proper mouse and screen integration as well as folder sharing with your host system, you willneed to install the VirtualBox Guest additions.
Once you have booted into your Kali Linux virtual machine, open a terminal window and issue the followingcommand to install the Linux Kernel headers.
apt-get update && apt-get install -y linux-headers-$(uname -r)
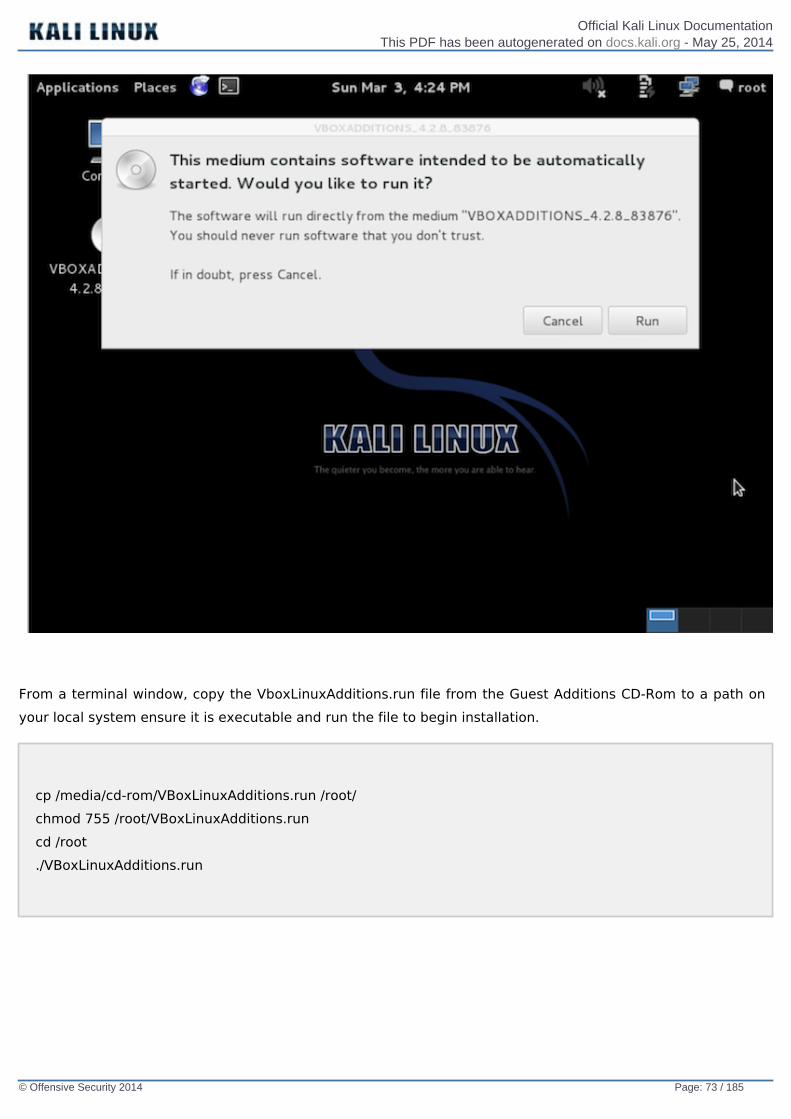
Once this is complete you can now attach the Guest Additions CD-Rom. This can be done by selecting ‘Devices’from the VirtualBox Menu and selecting ‘Install Guest Additions.’ This will mount the GuestAdditions iso to thevirtual CD Drive in your Kali Linux virtual machine. When prompted to autorun the CD, click the Cancel button.
© Offensive Security 2014 Page: 72 / 185
Official Kali Linux DocumentationThis PDF has been autogenerated on docs.kali.org - May 25, 2014
From a terminal window, copy the VboxLinuxAdditions.run file from the Guest Additions CD-Rom to a path onyour local system ensure it is executable and run the file to begin installation.
cp /media/cd-rom/VBoxLinuxAdditions.run /root/chmod 755 /root/VBoxLinuxAdditions.runcd /root./VBoxLinuxAdditions.run
© Offensive Security 2014 Page: 73 / 185

Official Kali Linux DocumentationThis PDF has been autogenerated on docs.kali.org - May 25, 2014
Reboot the Kali Linux VM to complete the Guest Additions installation. You should now have full mouse andscreen integration as well as the ability to share folders with the host system.
Creating Shared Folders with the Host System
In order to share folders on your host system with your Kali Linux VM, there are a few short steps that need tobe completed.
From the VirtualBox Manager, select your Kali Linux VM instance and click on the ‘Shared Folders’ link in theright window pane. This will launch a pop up window for adding shared folders. Within this window click the iconto add a folder.
In the Folder Path text box, provide the path to the folder you would like to share, or click the drop-down arrowto browse your host system for the path. Select the check boxes that allow for ‘Auto-mount’ and ‘Make
© Offensive Security 2014 Page: 74 / 185

Official Kali Linux DocumentationThis PDF has been autogenerated on docs.kali.org - May 25, 2014
Permanent’ and click the OK button both times when prompted.
Your shared folders will now be available in the media directory. You can create a bookmark or link for easieraccess to the directory.
© Offensive Security 2014 Page: 75 / 185

Official Kali Linux DocumentationThis PDF has been autogenerated on docs.kali.org - May 25, 2014
© Offensive Security 2014 Page: 76 / 185

Official Kali Linux DocumentationThis PDF has been autogenerated on docs.kali.org - May 25, 2014
Starting Metasploit FrameworkIn keeping with the Kali Linux Network Services Policy, there are no network services, including databaseservices, running on boot so there are a couple of steps that need to be taken in order to get Metasploit up andrunning with database support.
Start the Kali PostgreSQL Service
Metasploit uses PostgreSQL as its database so it needs to be launched first.
service postgresql start
You can verify that PostgreSQL is running by checking the output of ss -ant and making sure that port 5432 islistening.
State Recv-Q Send-Q Local Address:Port Peer Address:PortLISTEN 0 128 :::22 :::*LISTEN 0 128 *:22 *:*LISTEN 0 128 127.0.0.1:5432 *:*LISTEN 0 128 ::1:5432 :::*
Start the Kali Metasploit Service
With PostgreSQL up and running, we next need to launch the metasploit service. The first time the service islaunched, it will create a msf3 database user and a database called msf3. The service will also launch theMetasploit RPC and Web servers it requires.
service metasploit start
© Offensive Security 2014 Page: 77 / 185

Official Kali Linux DocumentationThis PDF has been autogenerated on docs.kali.org - May 25, 2014
Launch msfconsole in Kali
Now that the PostgreSQL an Metasploit services are running, you can launch msfconsole and verify databaseconnectivity with the db_status command as shown below.
msfconsole
msf > db_status[*] postgresql connected to msf3msf >
Configure Metasploit to Launch on Startup
If you would prefer to have PostgreSQL and Metasploit launch at startup, you can use update-rc.d to enablethe services as follows.
update-rc.d postgresql enable
update-rc.d metasploit enable
© Offensive Security 2014 Page: 78 / 185

Official Kali Linux DocumentationThis PDF has been autogenerated on docs.kali.org - May 25, 2014
Kali Linux Forensics ModeBackTrack Linux introduced a “Forensic Boot” option to the operating system that continued on throughBackTrack 5 and now exists in Kali Linux. The “Forensics Boot” option has proven to be very popular due to thewidespread availability of our operating system. Many people have Kali ISOs laying around and when a forensicneed comes up, it is quick and easy to put Kali Linux to the job. Pre-loaded with the most popular open sourceforensic software, Kali is a handy tool when you need to do some open source forensic work.
When booted into the forensic boot mode, there are a few very important changes that are made.
1. First off, the internal hard disk is not touched. This means that if there is a swap partition it will not beused and no internal disk will be auto mounted. To verify this, we took a standard system and removedthe hard drive. Attaching this to a commercial forensic package we took a hash of the drive. We then re-attached the drive to the computer and booted up off of Kali in forensic boot mode. After using Kali for a
© Offensive Security 2014 Page: 79 / 185

Official Kali Linux DocumentationThis PDF has been autogenerated on docs.kali.org - May 25, 2014
period of time, we then shut the system down, removed the hard drive, and took the hash again. Thesehashes matched, indicating that at no point was anything changed on the drive at all.
2. The other, just as important, change that was made was we disabled the auto mount of any removablemedia. So thumb drives, CDs, and so on will not be auto-mounted when inserted. The idea behind all ofthis is simple: Nothing should happen to any media without direct user action. Anything that you do as auser is on you.
If you are interested in using Kali for real world forensics of any type, we recommend that you don’t just takeour word for any of this. All forensic tools should always be validated to ensure that you know how they willbehave in any circumstance that you may place them.
And finally, as Kali is focused on having the best collection of open source penetration testing tools available, itis possible that we may have missed your favorite open source forensic tool. If so, let us know! We are alwayson the lookout of high quality open source tools that we can add to Kali to make it even better.
© Offensive Security 2014 Page: 80 / 185

Official Kali Linux DocumentationThis PDF has been autogenerated on docs.kali.org - May 25, 2014
VMware Tools in a Kali GuestShould you decide to create your own VMware installation of Kali Linux rather than using our pre-made VMwareimages, you will need to follow the instructions below in order to successfully install VMware Tools in your Kaliinstallation. You can opt to install either open-vm-toolbox, or the native VMware tools.
Installing open-vm-Tools
This is probably the easiest way to get “VMware tools” functionality inside a Kali VMware guest.
apt-get install open-vm-toolbox
Installing VMware Tools in Kali
kernel 3.14 – introduced 23rd May, 2014
The latest version of vmware-tools at this date compiles against our kernel, albeit with several warnings.
kernel 3.12 – introduced 7th January 2014
At the time this kernel was introduced to our repositories, VMware tools would not build cleanly against it, andrequires several patches. These patches, as well as instructions on how to build VMware tools for this newkernel can be found on our Kali Linux VMware Tool Patches Github page. Please note that depending on theVMware tools version you use, you might get some patch hunks fail on you – that’s expected.
kernel 3.7 – introduced 7th March 2013
If open-vm-toolbox does not work for you, or if you prefer using native VMware tools, begin by installing somepackages that are required by the VMware Tools installer:
echo cups enabled >> /usr/sbin/update-rc.decho vmware-tools enabled >> /usr/sbin/update-rc.d
apt-get install gcc make linux-headers-$(uname -r)ln -s /usr/src/linux-headers-$(uname -r)/include/generated/uapi/linux/version.h /usr/src/linux-headers-$(uname -r)/include/linux/
© Offensive Security 2014 Page: 81 / 185

Official Kali Linux DocumentationThis PDF has been autogenerated on docs.kali.org - May 25, 2014
Next, mount the VMware tools ISO by clicking “Install VMware Tools” from the appropriate menu. Once theVMware Tools ISO has been attached to the virtual machine, we mount the drive and copy the VMware Toolsinstaller to /tmp/.
mkdir /mnt/vmwaremount /dev/cdrom /mnt/vmware/cp -rf /mnt/vmware/VMwareTools* /tmp/
Then, change directory to /tmp/, extract the tarball and start the installer:
cd /tmp/tar zxpf VMwareTools-*.tar.gzcd vmware-tools-distrib/./vmware-tools-install.pl
Follow the prompts for the VMware Tools installation and you are done.
Lastly, to get rid of possible VMware service errors, edit the /etc/init.d/vmware-tools script, and at around line876, change:
# POSIX shell uses '!' for negation during bracket expansion. # See http://pubs.opengroup.org/onlinepubs/9699919799/utilities/V3_chap02.html IFS=. set -- `uname -r`
© Offensive Security 2014 Page: 82 / 185

Official Kali Linux DocumentationThis PDF has been autogenerated on docs.kali.org - May 25, 2014
to :
# POSIX shell uses '!' for negation during bracket expansion. # See http://pubs.opengroup.org/onlinepubs/9699919799/utilities/V3_chap02.html IFS=. set -- `uname -r|cut -d"-" -f1`
Once changed, proceed to restart the VMware tool service.
Slow Mouse Movement in VMware
If your mouse movement is slow and sluggish in a Kali Linux VMware guest, try installing thexserver-xorg-input-vmmouse package in the Kali guest.
apt-get install xserver-xorg-input-vmmousereboot
VMware Tools Won’t Compile!
This is an unfortunate reality that has often plagued us, as Kali Linux uses a bleeding edge kernel which is notalways supported by VMware. On occasion, it might be required to search for “upstream compatibility VMwareTools patches” from the VMware community.
Known Issues
As of March 2nd, 2013, VMware tools will compile with kernel 3.7, barring the shared folder module. Patchesexist to fix this issue..
© Offensive Security 2014 Page: 83 / 185

Official Kali Linux DocumentationThis PDF has been autogenerated on docs.kali.org - May 25, 2014
06. Kali Linux ARM Architecture
Install Kali HP ARM ChromebookThe HP ARM Chromebook is an ultraportable laptop. It was quite a challenge, but we have a Kali image that runsgreat on the Chromebook. Boasting an Exynos 5250 1.7GHz dual core processor and 2 GB of RAM, theChromebook is a fast ARM laptop. Kali linux fits on an USB stick on this machine which leaves the internal diskuntouched.
Kali on Chromebook – User Instructions
If all you want to do is install Kali on your HP ARM Chromebook, follow these instructions:
1. Get a nice fast 8 GB USB stick.2. Put your Chromebook in developer mode, and enable USB boot.
3. Download the Kali HP ARM Chromebook image from our downloads area.4. Use the dd utility to image this file to your USB device. In our example, we use a USB stick which is
located at /dev/sdb. Change this as needed.
Alert! This process will wipe out your USB stick. If you choose the wrong storage device, you may wipe outyour computers hard disk.
dd if=kali-chromebook.img of=/dev/sdb bs=512k
This process can take awhile depending on your USB storage device speed and image size.
Once the dd operation is complete, boot up the Chromebook with the USB stick plugged in. At the developerboot prompt, hit CTRL+U, which should boot you into Kali Linux. Log in to Kali (root / toor) and startx. That’s it,you’re done!
Kali on HP ARM Chromebook – Developer Instructions
If you are a developer and want to tinker with the Kali HP ARM Chromebook image, including changing thekernel configuration and generally being adventurous, check out the kali-arm-build-scripts repository on github,
© Offensive Security 2014 Page: 84 / 185

Official Kali Linux DocumentationThis PDF has been autogenerated on docs.kali.org - May 25, 2014
and follow the README.md file’s instructions. The script to use is chromebook-arm-hp.sh
© Offensive Security 2014 Page: 85 / 185

Official Kali Linux DocumentationThis PDF has been autogenerated on docs.kali.org - May 25, 2014
Install Kali ARM on an EfikaMXThe EfikaMX is a low end, low cost ARM computer. Despite its less-than-stellar specifications, its affordabilitymakes it an excellent option for a tiny Linux system.
Stock Kali on EfikaMX – Easy Version
If all you want to do is to install Kali on your EfikaMX, follow these instructions:
1. Get a nice fast 8 GB (or more) SD card. Class 10 cards are highly recommended.
2. Download the Kali Linux EfikaMX image from our downloads area.3. Use the dd utility to image this file to your SD card. In our example, we assume the storage device is
located at /dev/sdb. Change this as needed.
Alert! This process will wipe out your SD card. If you choose the wrong storage device, you may wipe outyour computers hard disk.
root@kali:~ dd if=kali-1.0.3-efikamx.img of=/dev/sdb bs=512k
This process can take a while depending on your USB storage device speed and image size. Once the ddoperation is complete, boot up your EfikaMX with the SD card plugged in. You will be able to log in to Kali (root /toor) and startx. That’s it, you’re done!
Kali on EfikaMX – Long Version
If you are a developer and want to tinker with the Kali EfikaMX image, including changing the kernelconfiguration and generally being adventurous, check out the kali-arm-build-scripts repository on github, andfollow the README.md file’s instructions. The script to use is efikamx.sh
© Offensive Security 2014 Page: 86 / 185
Official Kali Linux DocumentationThis PDF has been autogenerated on docs.kali.org - May 25, 2014
Kali ARM on a Beaglebone BlackThe Beaglebone Black is a low end, low cost ARM computer. Despite its less-than-stellar specifications, itsaffordability makes it an excellent option for a tiny Linux system.
Stock Kali on Beaglebone Black – Easy Version
If all you want to do is to install Kali on your Beaglebone Black, follow these instructions:
1. Get a nice fast 8 GB (or more) SD card. Class 10 cards are highly recommended.
2. Download the Kali Linux Beaglebone Black image from our downloads area.3. Use the dd utility to image this file to your SD card. In our example, we assume the storage device is
located at /dev/sdb. Change this as needed.
Alert! This process will wipe out your SD card. If you choose the wrong storage device, you may wipe outyour computers hard disk.
root@kali:~ dd if=kali-bbb.img of=/dev/sdb bs=512k
This process can take a while depending on your USB storage device speed and image size. Once the ddoperation is complete, boot up your Beaglebone Black with the SD card plugged in. You will be able to log in toKali (root / toor) and startx. That’s it, you’re done!
Kali on Beaglebone Black – Long Version
If you are a developer and want to tinker with the Kali Beaglebone Black image, including changing the kernelconfiguration and generally being adventurous, check out the kali-arm-build-scripts repository on github, andfollow the README.md file’s instructions. The script to use is bbb.sh
© Offensive Security 2014 Page: 87 / 185

Official Kali Linux DocumentationThis PDF has been autogenerated on docs.kali.org - May 25, 2014
Install Kali ARM on a CuBoxThe CuBox is a low end, low cost ARM computer. Despite its less-than-stellar specifications, its affordabilitymakes it an excellent option for a tiny Linux system and it can do far more than act as a media PC.
The easiest way to generate these images is from within a pre existing Kali Linux environment.
Stock Kali on CuBox – Easy Version
If all you want to do is to install Kali on your CuBox, follow these instructions:
1. Get a nice fast 8 GB (or more) SD card. Class 10 cards are highly recommended.
2. Download the Kali Linux CuBox image from our downloads area.3. Use the dd utility to image this file to your SD card. In our example, we assume the storage device is
located at /dev/sdb. Change this as needed.
Alert! This process will wipe out your SD card. If you choose the wrong storage device, you may wipe outyour computers hard disk.
root@kali:~ dd if=kali-1.0.3-cubox.img of=/dev/sdb bs=512k
This process can take a while depending on your USB storage device speed and image size. Once the ddoperation is complete, boot up your CuBox with the SD card plugged in. You will be able to log in to Kali (root /toor) and startx. That’s it, you’re done!
Alert! If the image does not boot, please connect via serial and make sure that your u-boot version islisted as 5.4.4 NQ SR1. If it is just 5.4.4 NQ, you will need to upgrade it via the CuBox installer. Instructionscan be found at Cubox Installer
Kali on CuBox – Long Version
If you are a developer and want to tinker with the Kali CuBox image, including changing the kernel configurationand generally being adventurous, check out the kali-arm-build-scripts repository on github, and follow the
© Offensive Security 2014 Page: 88 / 185

Official Kali Linux DocumentationThis PDF has been autogenerated on docs.kali.org - May 25, 2014
README.md file’s instructions. The script to use is cubox.sh
© Offensive Security 2014 Page: 89 / 185

Official Kali Linux DocumentationThis PDF has been autogenerated on docs.kali.org - May 25, 2014
Kali Linux on Galaxy Note 10.1The Samsung Galaxy Note 10.1 is a 10.1-inch tablet computer designed, developed, and marketed by Samsung.The tablet incorporates a 1.4 GHz quad-core Exynos processor and 2 GB of RAM. The touch screen workssurprisingly well with Kali as well as the wireless card, however Bluetooth and audio are not yet functional onthis image.
Stock Kali on Galaxy Note 10.1 – Easy Version
If all you want to do is to install Kali on your Galaxy Note 10.1, follow these instructions:
1. You’ll need at least 7 GB free on your internal SD card for our image.
2. Root your Samsung Galaxy Note 10.1 if you have not already done so.
3. Download the Kali Linux Galaxy Note 10.1 image from our downloads area.
4. Rename the downloaded Kali image to linux.img and copy it to /storage/sdcard0.
5. Download our recovery.img file from here and copy it to /storage/sdcard0.
6. Get root on your Galaxy Note 10.1, change /storage/sdcard0, and backup your recovery partition:
dd if=/dev/block/mmcblk0p6 of=recovery.img_orig
1. dd the downloaded recovery.img image to the recovery partition:
Alert! This process will overwrite your recovery partition. Please make sure you know what you are doing.You may brick your device if you fumble this.
dd if=recovery.img of=/dev/block/mmcblk0p6
© Offensive Security 2014 Page: 90 / 185

Official Kali Linux DocumentationThis PDF has been autogenerated on docs.kali.org - May 25, 2014
1. Reboot your Galaxy Note 10.1 into recovery mode. You can do this by turning it off, then press andhold both the power button and the volume up button. Once you see the “Samsung Galaxy Note10.1″ text appear, release the power button but keep pressing the volume up button . Thisshould boot you into Kali and auto-login into Gnome. The root password is “changeme” (without thequotes!)
2. Open the onscreen keyboard by going to : Applications -> Universal Access -> Florence VirtualKeyboard.
3. Wireless works but seems to skip the scanning of networks without some massaging.If the GnomeNetwork Manager shows no wireless networks , simply add your wireless network as a “hidden”one and you should get connected as usual.
4. You can modify, debug, and explore our image easily from within your Galaxy Note, using a wonderfulAndroid App called Linux Deploy.
© Offensive Security 2014 Page: 91 / 185

Official Kali Linux DocumentationThis PDF has been autogenerated on docs.kali.org - May 25, 2014
Install Kali Samsung ChromebookThe Samsung ARM Chromebook is an ultraportable laptop. It was quite a challenge, but we have a Kali imagethat runs great on the Chromebook. Boasting an Exynos 5250 1.7GHz dual core processor and 2 GB of RAM, theChromebook is a fast ARM laptop. Kali linux fits on an external SD card on this machine which leaves theinternal disk untouched.
Kali on Chromebook – User Instructions
If all you want to do is install Kali on your Samsung ARM Chromebook, follow these instructions:
1. Get a nice fast 8 GB SD card or USB stick.2. Put your Chromebook in developer mode, and enable USB boot.
3. Download the Kali Samsung ARM Chromebook image from our downloads area.4. Use the dd utility to image this file to your SD /USB device. In our example, we use a USB stick which is
located at /dev/sdb. Change this as needed.
Alert! This process will wipe out your SD card. If you choose the wrong storage device, you may wipe outyour computers hard disk.
dd if=kali-chromebook.img of=/dev/sdb bs=512k
This process can take awhile depending on your USB storage device speed and image size.
Once the dd operation is complete, boot up the Chromebook with the SD / USB plugged in (NOT IN THE BLUEUSB PORT!). At the developer boot prompt, hit CTRL+U, which should boot you into Kali Linux. Log in to Kali(root / toor) and startx. That’s it, you’re done!
Kali on Samsung Chromebook – Developer Instructions
If you are a developer and want to tinker with the Kali Samsung Chromebook image, including changing thekernel configuration and generally being adventurous, check out the kali-arm-build-scripts repository on github,and follow the README.md file’s instructions. The script to use is chromebook-arm-samsung.sh
© Offensive Security 2014 Page: 92 / 185

Official Kali Linux DocumentationThis PDF has been autogenerated on docs.kali.org - May 25, 2014
Install Kali ARM on MK/SS808The SainSmart SS808 is a rockchip-based ARM device that comes in various forms and flavors. It has a dual-core 1.6 GHz A9 processor with 1 GB of RAM and runs Kali very well.
Stock Kali on SS808 – Easy Version
If all you want to do is to install Kali on your SS808, follow instructions below:
1. Get a nice fast 8 GB (or more) microSD card. Class 10 cards are highly recommended.
2. Download the Kali Linux SS808 image from our downloads area.3. Use the dd utility to image this file to your microSD card. In our example, we assume the storage device
is located at /dev/sdb and are using an SS808 image. Change this as needed.4. Download the MK808-Finless-1-6-Custom-ROM to a Windows machine and extract the zip file.5. Read the README file of the MK808 Finless ROM tool, then install the required Windows drivers.6. Run the Finless ROM Flash Tool and ensure that it says “Found RKAndroid Loader Rock USB” at the
bottom. Deselect kernel.img and recovery.img from the list, and flash the device.7. Next overwrite both kernel.img and recovery.img in the FInless ROM directory with the kali “kernel.img”.8. In the Finless ROM tool, make sure only “kernel.img” and “recovery.img” are selected, and flash your
device again.9. Insert your microSD card in the SS808 and boot it up.
Alert! This process will wipe out your SD card! If you choose the wrong storage device, you may wipe outyour computers hard disk.
dd if=kali-SS808.img of=/dev/sdb bs=1M
This process can take a while depending on your USB storage device speed and image size. Once the ddoperation is done, boot up your SS808, with the microSD card plugged in. Log in to Kali (root / toor) and startx.That’s it, you’re done!
Kali on SS808 – Long version
If you are a developer and want to tinker with the Kali SS808 image, including changing the kernel configuration
© Offensive Security 2014 Page: 93 / 185

Official Kali Linux DocumentationThis PDF has been autogenerated on docs.kali.org - May 25, 2014
and generally being adventurous, check out our Custom MK/SS808 Image article.
© Offensive Security 2014 Page: 94 / 185
Official Kali Linux DocumentationThis PDF has been autogenerated on docs.kali.org - May 25, 2014
Install Kali ARM on ODROID U2The ODROID U2 is a tricky piece of hardware as console output is not a given. Ideally, when purchasing anODROID, you should also get a USB UART cable, used for serial debugging of the boot process. Saying this,these machines are (at this time) some of the most impressive in terms of size, horsepower and memoryavailability.
The ODROID-U2 and ODROID-U3 hardware are based on the same basic platform, so the U2 image willwork with the U3 without modification.
Kali on ODROID U2 – User Instructions
If all you want to do is to install Kali on your awesome ODROID, follow these instructions:
1. Get a nice fast 8 GB (and above) microSD. Class 10 cards are highly recommended.
2. Download the Kali Linux ODROID U2 image from our downloads area.3. Use the dd utility to image this file to your microSD card. In our example, we assume the storage device
is located at /dev/sdb. Change this as needed.
Alert! This process will wipe out your SD card. If you choose the wrong storage device, you may wipe outyour computers hard disk.
dd if=kali-ordoidu2.img of=/dev/sdb bs=1M
This process can take a while depending on your USB storage device speed and image size. Once the ddoperation is done,boot up the Odroid with the microSD plugged in. You should be welcomed with a Gnome loginscreen – (root / toor). That’s it, you’re done!
Troubleshooting
To troubleshoot the Odroid boot process, you will need to connect a UART serial cable to the Odroid. Once thecable is connected, you can issue the following command to connect to the console:
© Offensive Security 2014 Page: 95 / 185

Official Kali Linux DocumentationThis PDF has been autogenerated on docs.kali.org - May 25, 2014
screen /dev/ttySAC1 115200
Kali on ODROID U2 – Developer Instructions
If you are a developer and want to tinker with the Kali ODROID image, including changing the kernelconfiguration and generally being adventurous, check out the kali-arm-build-scripts repository on github, andfollow the README.md file’s instructions. The script to use is odroid-u2.sh
© Offensive Security 2014 Page: 96 / 185

Official Kali Linux DocumentationThis PDF has been autogenerated on docs.kali.org - May 25, 2014
Install Kali ARM on a Raspberry PiThe Raspberry Pi is a low end, low cost ARM computer. Despite its less-than-stellar specifications, itsaffordability makes it an excellent option for a tiny Linux system and it can do far more than act as a media PC.
Stock Kali on Raspberry Pi – Easy Version
If all you want to do is to install Kali on your Raspberry Pi, follow these instructions:
1. Get a nice fast 8 GB (or more) SD card. Class 10 cards are highly recommended.
2. Download the Kali Linux Raspberry Pi image from our downloads area.3. Use the dd utility to image this file to your SD card. In our example, we assume the storage device is
located at /dev/sdb. Change this as needed.
Alert! This process will wipe out your SD card. If you choose the wrong storage device, you may wipe outyour computers hard disk.
root@kali:~ dd if=kali-pi.img of=/dev/sdb bs=512k
This process can take a while depending on your USB storage device speed and image size. Once the ddoperation is complete, boot up your Rasberry Pi with the SD card plugged in. You will be able to log in to Kali(root / toor) and startx. That’s it, you’re done!
IMPORTANT Please change your ssh host keys as soon as possible as ALL rpi images have the same keys.You should also change the root password to something more secure, especially if this machine will bepublicly accessible!
Changing ssh host keys can be accomplished by doing the following:
root@kali:~ rm /etc/ssh/ssh_host_*
© Offensive Security 2014 Page: 97 / 185

Official Kali Linux DocumentationThis PDF has been autogenerated on docs.kali.org - May 25, 2014
root@kali:~ dpkg-reconfigure openssh-serverroot@kali:~ service ssh restart
Kali on Raspberry Pi – Long Version
If you are a developer and want to tinker with the Kali Raspberry Pi image, including changing the kernelconfiguration and generally being adventurous, check out the kali-arm-build-scripts repository on github, andfollow the README.md file’s instructions. The script to use is rpi.sh
© Offensive Security 2014 Page: 98 / 185

Official Kali Linux DocumentationThis PDF has been autogenerated on docs.kali.org - May 25, 2014
Preparing a Kali Linux ARM chrootAlthough you can download Kali ARM images from our Download area, some prefer building their own updatedboostraped Kali rootfs. The following procedure shows an example of building a Kaliarmhf rootfs. Change toarmel if needed.
The easiest way to generate these images is from within a pre existing Kali Linux environment.
Install Required Tools and Dependencies
apt-get install debootstrap qemu-user-static
Define Architecture and Custom Packages
This is where you define some environment variables for your required ARM architecture (armel vs armhf) andlist the packages to be installed in your image. These will be used throughout this article, so make sure tomodify them to your needs.
export packages="xfce4 kali-menu wpasupplicant kali-defaults initramfs-tools uboot-mkimage nmapopenssh-server"export architecture="armhf"
Build the Kali rootfs
We create a standard directory structure and bootstrap ARM rootfs from the Kali Linux repositories. We thencopy over qemu-arm-static from our host machine into the rootfs in order to initiate the 2nd stage chroot.
cd ~mkdir -p arm-stuffcd arm-stuff/mkdir -p kernelmkdir -p rootfscd rootfs
© Offensive Security 2014 Page: 99 / 185

Official Kali Linux DocumentationThis PDF has been autogenerated on docs.kali.org - May 25, 2014
debootstrap --foreign --arch $architecture kali kali-$architecture http://archive.kali.org/kalicp /usr/bin/qemu-arm-static kali-$architecture/usr/bin/
2nd Stage chroot
This is where we configure base image settings such as keymaps, repositories, default network interfacebehavior (change if needed), etc.
cd ~/arm-stuff/rootfsLANG=C chroot kali-$architecture /debootstrap/debootstrap --second-stage
cat << EOF > kali-$architecture/etc/apt/sources.listdeb http://http.kali.org/kali kali main contrib non-freedeb http://security.kali.org/kali-security kali/updates main contrib non-freeEOF
echo "kali" > kali-$architecture/etc/hostname
cat << EOF > kali-$architecture/etc/network/interfacesauto loiface lo inet loopbackauto eth0iface eth0 inet dhcpEOF
cat << EOF > kali-$architecture/etc/resolv.confnameserver 8.8.8.8EOF
3rd Stage chroot
This is where your customization comes in. Your $packages are installed and a default “toor” root password isset as well as other configuration changes and fixes.
© Offensive Security 2014 Page: 100 / 185

Official Kali Linux DocumentationThis PDF has been autogenerated on docs.kali.org - May 25, 2014
export MALLOC_CHECK_=0 # workaround for LP: #520465export LC_ALL=Cexport DEBIAN_FRONTEND=noninteractive
mount -t proc proc kali-$architecture/procmount -o bind /dev/ kali-$architecture/dev/mount -o bind /dev/pts kali-$architecture/dev/pts
cat << EOF > kali-$architecture/debconf.setconsole-common console-data/keymap/policy select Select keymap from full listconsole-common console-data/keymap/full select en-latin1-nodeadkeysEOF
cat << EOF > kali-$architecture/third-stage#!/bin/bashdpkg-divert --add --local --divert /usr/sbin/invoke-rc.d.chroot --rename /usr/sbin/invoke-rc.dcp /bin/true /usr/sbin/invoke-rc.d
apt-get updateapt-get install locales-all#locale-gen en_US.UTF-8
debconf-set-selections /debconf.setrm -f /debconf.setapt-get updateapt-get -y install git-core binutils ca-certificates initramfs-tools uboot-mkimageapt-get -y install locales console-common less nano gitecho "root:toor" | chpasswdsed -i -e 's/KERNEL\!=\"eth\*|/KERNEL\!=\"/' /lib/udev/rules.d/75-persistent-net-generator.rulesrm -f /etc/udev/rules.d/70-persistent-net.rulesapt-get --yes --force-yes install $packages
rm -f /usr/sbin/invoke-rc.ddpkg-divert --remove --rename /usr/sbin/invoke-rc.d
rm -f /third-stageEOF
chmod +x kali-$architecture/third-stage
© Offensive Security 2014 Page: 101 / 185

Official Kali Linux DocumentationThis PDF has been autogenerated on docs.kali.org - May 25, 2014
LANG=C chroot kali-$architecture /third-stage
Manual Configuration Within the chroot
If needed, you can perform any final modifications in your rootfs environment by manually chrooting into it andmaking any necessary last changes.
LANG=C chroot kali-$architecture{make additional changes within the chroot}exit
Cleanup
Lastly, we run a cleanup script in our chroot to free up space used by cached files and run any other cleanupjobs we may require:
cat << EOF > kali-$architecture/cleanup#!/bin/bashrm -rf /root/.bash_historyapt-get updateapt-get cleanrm -f cleanupEOF
chmod +x kali-$architecture/cleanupLANG=C chroot kali-$architecture /cleanup
umount kali-$architecture/procumount kali-$architecture/dev/ptsumount kali-$architecture/dev/
cd ..
© Offensive Security 2014 Page: 102 / 185

Official Kali Linux DocumentationThis PDF has been autogenerated on docs.kali.org - May 25, 2014
Congratulations! Your custom Kali ARM rootfs is located in the kali-$architecture directory. You can now tar upthis directory or copy it to an image file for further work.
© Offensive Security 2014 Page: 103 / 185

Official Kali Linux DocumentationThis PDF has been autogenerated on docs.kali.org - May 25, 2014
07. Kali Linux Development
Custom EfikaMX ImageThe following document describes our own method of creating a custom Kali Linux EfikaMX ARM image andis targeted at developers. If you would like to install a pre-made Kali image, check out our Install Kali on anEfikaMX article.
01. Create a Kali rootfs
Build a Kali rootfs as described in our Kali documentation, using an armhf architecture. By the end of thisprocess, you should have a populated rootfs directory in ~/arm-stuff/rootfs/kali-armhf.
02. Create the Image File
Next, we create the physical image file, which will hold our EfikaMX rootfs and boot images.
apt-get install kpartx xz-utils sharutilscd ~mkdir -p arm-stuffcd arm-stuff/mkdir -p imagescd imagesdd if=/dev/zero of=kali-custom-efikamx.img bs=1MB count=7000
03. Partition and Mount the Image File
parted kali-custom-efikamx.img --script -- mklabel msdosparted kali-custom-efikamx.img --script -- mkpart primary ext2 4096s 266239sparted kali-custom-efikamx.img --script -- mkpart primary ext4 266240s 100%
loopdevice=`losetup -f --show kali-custom-efikamx.img`device=`kpartx -va $loopdevice| sed -E 's/.*(loop[0-9])p.*/\1/g' | head -1`
© Offensive Security 2014 Page: 104 / 185

Official Kali Linux DocumentationThis PDF has been autogenerated on docs.kali.org - May 25, 2014
device="/dev/mapper/${device}"bootp=${device}p1rootp=${device}p2
mkfs.ext2 $bootpmkfs.ext4 $rootpmkdir -p bootmkdir -p rootmount $bootp bootmount $rootp root
04. Copy and Modify the Kali rootfs
rsync -HPavz /root/arm-stuff/rootfs/kali-armhf/ rootecho nameserver 8.8.8.8 > root/etc/resolv.confsed 's/0-1/0//g' root/etc/init.d/udev
05. Compile the EfikaMX Kernel and Modules
If you’re not using ARM hardware as the development environment, you will need to set up an ARM cross-compilation environment to build an ARM kernel and modules. Once that’s done, proceed with the followinginstructions.
cd ~/arm-stuffmkdir -p kernelcd kernelgit clone --depth 1 https://github.com/genesi/linux-legacy.gitcd linux-legacyexport ARCH=armexport CROSS_COMPILE=~/arm-stuff/kernel/toolchains/arm-eabi-linaro-4.6.2/bin/arm-eabi-make efikamx_defconfig# configure your kernel !make menuconfigmake -j$(cat /proc/cpuinfo|grep processor|wc -l)
© Offensive Security 2014 Page: 105 / 185

Official Kali Linux DocumentationThis PDF has been autogenerated on docs.kali.org - May 25, 2014
make modules_install INSTALL_MOD_PATH=~/arm-stuff/images/rootmake uImagecp arch/arm/boot/uImage ~/arm-stuff/images/boot
cat << EOF > ~/arm-stuff/images/boot/boot.scriptsetenv ramdisk uInitrd;setenv kernel uImage;setenv bootargs console=tty1 root=/dev/mmcblk0p2 rootwait rootfstype=ext4 rw quiet;${loadcmd} ${ramdiskaddr} ${ramdisk};if imi ${ramdiskaddr}; then; elsesetenv bootargs ${bootargs} noinitrd;setenv ramdiskaddr "";fi;${loadcmd} ${kerneladdr} ${kernel}if imi ${kerneladdr}; thenbootm ${kerneladdr} ${ramdiskaddr}fi;EOF
mkimage -A arm -T script -C none -n "Boot.scr for EfikaMX" -d ~/arm-stuff/images/boot/boot.script~/arm-stuff/images/boot/boot.scr
umount $bootpumount $rootpkpartx -dv $loopdevicelosetup -d $loopdevice
Use the dd utility to image this file to your SD card. In our example, we assume the storage device is located at/dev/sdb. Change this as needed.
dd if=kali-custom-efikamx.img of=/dev/sdb bs=1M
© Offensive Security 2014 Page: 106 / 185

Official Kali Linux DocumentationThis PDF has been autogenerated on docs.kali.org - May 25, 2014
Once the dd operation is complete, unmount and eject the SD card and boot your EfikaMX into Kali Linux
© Offensive Security 2014 Page: 107 / 185

Official Kali Linux DocumentationThis PDF has been autogenerated on docs.kali.org - May 25, 2014
Custom Beaglebone Black ImageThe following document describes our own method of creating acustom Kali Linux Beaglebone Black ARMimage and is targeted at developers. If you would like to install a pre-made Kali image, check out our Install Kalion Beaglebone Black article.
01. Create a Kali rootfs
Build a Kali rootfs as described in our Kali documentation, using an armhf architecture. By the end of thisprocess, you should have a populated rootfs directory in ~/arm-stuff/rootfs/kali-armhf.
02. Create the Image File
Next, we create the physical image file, which will hold our Beaglebone Black rootfs and boot images.
apt-get install kpartx xz-utils sharutilscd ~mkdir -p arm-stuffcd arm-stuff/mkdir -p imagescd imagesdd if=/dev/zero of=kali-custom-bbb.img bs=1MB count=7000
03. Partition and Mount the Image File
parted --script kali-custom-bbb.img mklabel msdosfdisk kali-custom-bbb.img << __EOF__np1
+64Mtepw
© Offensive Security 2014 Page: 108 / 185

Official Kali Linux DocumentationThis PDF has been autogenerated on docs.kali.org - May 25, 2014
__EOF__parted --script kali-custom-bbb.img set 1 boot onfdisk kali-custom-bbb.img << __EOF__np2
w__EOF__
loopdevice=`losetup -f --show kali-custom-bbb.img`device=`kpartx -va $loopdevice| sed -E 's/.*(loop[0-9])p.*/\1/g' | head -1`device="/dev/mapper/${device}"bootp=${device}p1rootp=${device}p2
mkfs.vfat -F 16 $bootp -n bootmkfs.ext4 $rootp -L kalirootmkdir -p bootmkdir -p rootmount $bootp bootmount $rootp root
04. Copy and Modify the Kali rootfs
rsync -HPavz /root/arm-stuff/rootfs/kali-armhf/ rootecho nameserver 8.8.8.8 > root/etc/resolv.conf
05. Compile the Beaglebone Black Kernel and Modules
If you’re not using ARM hardware as the development environment, you will need to set up an ARM cross-compilation environment to build an ARM kernel and modules. Once that’s done, proceed with the following
© Offensive Security 2014 Page: 109 / 185

Official Kali Linux DocumentationThis PDF has been autogenerated on docs.kali.org - May 25, 2014
instructions.
cd ~/arm-stuffwgethttps://launchpad.net/linaro-toolchain-binaries/trunk/2013.03/+download/gcc-linaro-arm-linux-gnueabihf-4.7-2013.03-20130313_linux.tar.bz2tar xjf gcc-linaro-arm-linux-gnueabihf-4.7-2013.03-20130313_linux.tar.bz2export CC=`pwd`/gcc-linaro-arm-linux-gnueabihf-4.7-2013.03-20130313_linux/bin/arm-linux-gnueabihf-
git clone git://git.denx.de/u-boot.gitcd u-boot/git checkout v2013.04 -b beaglebone-blackwgethttps://raw.github.com/eewiki/u-boot-patches/master/v2013.04/0001-am335x_evm-uEnv.txt-bootz-n-fixes.patchpatch -p1 < 0001-am335x_evm-uEnv.txt-bootz-n-fixes.patchmake ARCH=arm CROSS_COMPILE=${CC} distcleanmake ARCH=arm CROSS_COMPILE=${CC} am335x_evm_configmake ARCH=arm CROSS_COMPILE=${CC}cd ..
mkdir -p kernelcd kernelgit clone git://github.com/RobertCNelson/linux-dev.gitcd linux-dev/git checkout origin/am33x-v3.8 -b tmp./build_kernel.shmkdir -p ../patcheswget http://patches.aircrack-ng.org/mac80211.compat08082009.wl_frag+ack_v1.patch -O../patches/mac80211.patchcd KERNELpatch -p1 --no-backup-if-mismatch < ../../patches/mac80211.patchcd .../tools/rebuild.shcd ..
cat << EOF > boot/uEnv.txtmmcroot=/dev/mmcblk0p2 rommcrootfstype=ext4 rootwait fixrtc
© Offensive Security 2014 Page: 110 / 185

Official Kali Linux DocumentationThis PDF has been autogenerated on docs.kali.org - May 25, 2014
uenvcmd=run loaduimage; run loadfdt; run mmcargs; bootz 0x80200000 - 0x80F80000EOF
cp -v kernel/linux-dev/deploy/3.8.13-bone20.zImage boot/zImagemkdir -p boot/dtbstar -xovf kernel/linux-dev/deploy/3.8.13-bone20-dtbs.tar.gz -C boot/dtbs/
tar -xovf kernel/linux-dev/deploy/3.8.13-bone20-modules.tar.gz -C root/tar -xovf kernel/linux-dev/deploy/3.8.13-bone20-firmware.tar.gz -C root/lib/firmware/
cat << EOF > root/etc/fstab/dev/mmcblk0p2 / auto errors=remount-ro 0 1/dev/mmcblk0p1 /boot/uboot auto defaults 0 0EOF
umount $rootpkpartx -dv $loopdevicelosetup -d $loopdevice
Use the dd utility to image this file to your SD card. In our example, we assume the storage device is located at/dev/sdb. Change this as needed.
dd if=kali-custom-bbb.img of=/dev/sdb bs=1M
Once the dd operation is complete, unmount and eject the SD card and boot your Beaglebone Black into KaliLinux. When booting you will need to press and hold the “BOOT” button, it’s the one closest to the microSDcard.
© Offensive Security 2014 Page: 111 / 185

Official Kali Linux DocumentationThis PDF has been autogenerated on docs.kali.org - May 25, 2014
Custom CuBox ImageThe following document describes our own method of creating a custom Kali Linux CuBox ARM image and istargeted at developers. If you would like to install a pre-made Kali image, check out our Install Kali on CuBoxarticle.
01. Create a Kali rootfs
Build a Kali rootfs as described in our Kali documentation, using an armhf architecture. By the end of thisprocess, you should have a populated rootfs directory in ~/arm-stuff/rootfs/kali-armhf.
02. Create the Image File
Next, we create the physical image file, which will hold our CuBox rootfs and boot images.
apt-get install kpartx xz-utils sharutilscd ~mkdir -p arm-stuffcd arm-stuff/mkdir -p imagescd imagesdd if=/dev/zero of=kali-custom-cubox.img bs=1MB count=7000
03. Partition and Mount the Image File
parted kali-custom-cubox.img --script -- mklabel msdosparted kali-custom-cubox.img --script -- mkpart primary ext4 0 -1
loopdevice=`losetup -f --show kali-custom-cubox.img`device=`kpartx -va $loopdevice| sed -E 's/.*(loop[0-9])p.*/\1/g' | head -1`device="/dev/mapper/${device}"rootp=${device}p1
© Offensive Security 2014 Page: 112 / 185

Official Kali Linux DocumentationThis PDF has been autogenerated on docs.kali.org - May 25, 2014
mkfs.ext4 $rootpmkdir -p rootmount $rootp root
04. Copy and Modify the Kali rootfs
rsync -HPavz /root/arm-stuff/rootfs/kali-armhf/ rootecho nameserver 8.8.8.8 > root/etc/resolv.conf
05. Compile the CuBox Kernel and Modules
If you’re not using ARM hardware as the development environment, you will need to set up an ARM cross-compilation environment to build an ARM kernel and modules. Once that’s done, proceed with the followinginstructions.
cd ~/arm-stuffmkdir -p kernelcd kernelgit clone --depth 1 https://github.com/rabeeh/linux.gitcd linuxtouch .scmversionmkdir -p ../patcheswget http://patches.aircrack-ng.org/mac80211.compat08082009.wl_frag+ack_v1.patch -O../patches/mac80211.patchpatch -p1 --no-backup-if-mismatch < ../patches/mac80211.patchexport ARCH=armexport CROSS_COMPILE=~/arm-stuff/kernel/toolchains/arm-eabi-linaro-4.6.2/bin/arm-eabi-make cubox_defconfig# configure your kernel !make menuconfigmake -j$(cat /proc/cpuinfo|grep processor|wc -l)make modules_install INSTALL_MOD_PATH=~/arm-stuff/images/rootmake uImagecp arch/arm/boot/uImage ~/arm-stuff/images/root/boot
© Offensive Security 2014 Page: 113 / 185

Official Kali Linux DocumentationThis PDF has been autogenerated on docs.kali.org - May 25, 2014
cat << EOF > ~/arm-stuff/images/root/boot/boot.txtecho "== Executing ${directory}${bootscript} on ${device_name} partition ${partition} =="setenv unit_no 0setenv root_device ?
if itest.s ${device_name} -eq usb; thenitest.s $root_device -eq ? && ext4ls usb 0:1 /dev && setenv root_device /dev/sda1 && setenv unit_no 0itest.s $root_device -eq ? && ext4ls usb 1:1 /dev && setenv root_device /dev/sda1 && setenv unit_no 1fi
if itest.s ${device_name} -eq mmc; thenitest.s $root_device -eq ? && ext4ls mmc 0:2 /dev && setenv root_device /dev/mmcblk0p2itest.s $root_device -eq ? && ext4ls mmc 0:1 /dev && setenv root_device /dev/mmcblk0p1fi
if itest.s ${device_name} -eq ide; thenitest.s $root_device -eq ? && ext4ls ide 0:1 /dev && setenv root_device /dev/sda1fi
if itest.s $root_device -ne ?; thensetenv bootargs "console=ttyS0,115200n8 vmalloc=448M video=dovefb:lcd0:[email protected]_enable=1 clcd.lcd1_enable=0 root=${root_device} rootfstype=ext4"setenv loadimage "${fstype}load ${device_name} ${unit_no}:${partition} 0x00200000 ${directory}${image_name}"$loadimage && bootm 0x00200000echo "!! Unable to load ${directory}${image_name} from ${device_name} ${unit_no}:${partition} !!"exitfi
echo "!! Unable to locate root partition on ${device_name} !!"EOF
mkimage -A arm -T script -C none -n "Boot.scr for CuBox" -d ~/arm-stuff/images/root/boot/boot.txt~/arm-stuff/images/root/boot/boot.scr
umount $rootp
© Offensive Security 2014 Page: 114 / 185

Official Kali Linux DocumentationThis PDF has been autogenerated on docs.kali.org - May 25, 2014
kpartx -dv $loopdevicelosetup -d $loopdevice
Use the dd utility to image this file to your SD card. In our example, we assume the storage device is located at/dev/sdb. Change this as needed.
dd if=kali-custom-cubox.img of=/dev/sdb bs=1M
Once the dd operation is complete, unmount and eject the SD card and boot your CuBox into Kali Linux
© Offensive Security 2014 Page: 115 / 185

Official Kali Linux DocumentationThis PDF has been autogenerated on docs.kali.org - May 25, 2014
Custom Raspberry Pi ImageThe following document describes our own method of creating a custom Kali Linux Raspberry Pi ARMimage and is targeted at developers. If you would like to install a pre-made Kali image, check out our Install Kalion Raspberry Pi article.
01. Create a Kali rootfs
Build a Kali rootfs as described in our Kali documentation, using an armel architecture. By the end of thisprocess, you should have a populated rootfs directory in ~/arm-stuff/rootfs/kali-armel.
02. Create the Image File
Next, we create the physical image file, which will hold our Raspberry Pi rootfs and boot images.
apt-get install kpartx xz-utils sharutilscd ~mkdir -p arm-stuffcd arm-stuff/mkdir -p imagescd imagesdd if=/dev/zero of=kali-custom-rpi.img bs=1MB count=7000
03. Partition and Mount the Image File
parted kali-custom-rpi.img --script -- mklabel msdosparted kali-custom-rpi.img --script -- mkpart primary fat32 0 64parted kali-custom-rpi.img --script -- mkpart primary ext4 64 -1
loopdevice=`losetup -f --show kali-custom-rpi.img`device=`kpartx -va $loopdevice| sed -E 's/.*(loop[0-9])p.*/\1/g' | head -1`device="/dev/mapper/${device}"bootp=${device}p1
© Offensive Security 2014 Page: 116 / 185

Official Kali Linux DocumentationThis PDF has been autogenerated on docs.kali.org - May 25, 2014
rootp=${device}p2
mkfs.vfat $bootpmkfs.ext4 $rootpmkdir -p rootmkdir -p bootmount $rootp rootmount $bootp boot
04. Copy and Modify the Kali rootfs
rsync -HPavz /root/arm-stuff/rootfs/kali-armel/ rootecho nameserver 8.8.8.8 > root/etc/resolv.conf
05. Compile the Raspberry Pi Kernel and Modules
If you’re not using ARM hardware as the development environment, you will need to set up an ARM cross-compilation environment to build an ARM kernel and modules. Once that’s done, proceed with the followinginstructions.
cd ~/arm-stuffmkdir -p kernelcd kernelgit clone https://github.com/raspberrypi/tools.gitgit clone https://github.com/raspberrypi/linux.git raspberrypicd raspberrypitouch .scmversionexport ARCH=armexport CROSS_COMPILE=~/arm-stuff/kernel/toolchains/arm-eabi-linaro-4.6.2/bin/arm-eabi-make bcmrpi_cutdown_defconfig# configure your kernel !make menuconfigmake -j$(cat /proc/cpuinfo|grep processor|wc -l)make modules_install INSTALL_MOD_PATH=~/arm-stuff/images/root
© Offensive Security 2014 Page: 117 / 185

Official Kali Linux DocumentationThis PDF has been autogenerated on docs.kali.org - May 25, 2014
cd ../tools/mkimage/python imagetool-uncompressed.py ../../raspberrypi/arch/arm/boot/Image
cd ~/arm-stuff/imagesgit clone git://github.com/raspberrypi/firmware.git rpi-firmwarecp -rf rpi-firmware/boot/* boot/rm -rf rpi-firmware
cp ~/arm-stuff/kernel/tools/mkimage/kernel.img boot/echo "dwc_otg.lpm_enable=0 console=ttyAMA0,115200 kgdboc=ttyAMA0,115200 console=tty1root=/dev/mmcblk0p2 rootfstype=ext4 rootwait" > boot/cmdline.txt
umount $rootpumount $bootpkpartx -dv $loopdevicelosetup -d $loopdevice
Use the dd utility to image this file to your SD card. In our example, we assume the storage device is located at/dev/sdb. Change this as needed.
dd if=kali-pi.img of=/dev/sdb bs=1M
Once the dd operation is complete, unmount and eject the SD card and boot your Pi into Kali Linux
© Offensive Security 2014 Page: 118 / 185

Official Kali Linux DocumentationThis PDF has been autogenerated on docs.kali.org - May 25, 2014
Custom Chromebook ImageThe following document describes our own method of creating acustom Kali Linux Samsung ChromebookARM image and is targeted at developers. If you would like to install a pre-made Kali image, check out ourInstall Kali on Samsung Chromebook article.
In this guide, we create an image with two boot partitions – one containing a kernel hard-coded to bootfrom the SD card and the other containing a kernel hard-coded to boot from USB. Depending on your USBstorage media type, make sure to mark the relevant boot partition with higher priority after you dd theimage to your USB device as instructed in the last stages of this guide.
01. Create a Kali rootfs
Start by building a Kali rootfs as described in our Kali documentation, using an armhf architecture. By the endof this process, you should have a populated rootfs directory in ~/arm-stuff/rootfs/kali-armhf.
02. Create the Image File
Next, we create the physical image file that will hold our Chromebook rootfs and boot images.
apt-get install kpartx xz-utils gdisk uboot-mkimage u-boot-tools vboot-kernel-utils vboot-utils cgptcd ~mkdir -p arm-stuffcd arm-stuff/mkdir -p imagescd imagesdd if=/dev/zero of=kali-custom-chrome.img bs=1MB count=7000
03. Partition and Mount the Image File
parted kali-custom-chrome.img --script -- mklabel msdosparted kali-custom-chrome.img --script -- mktable gptgdisk kali-custom-chrome.img << EOFxl8192
© Offensive Security 2014 Page: 119 / 185

Official Kali Linux DocumentationThis PDF has been autogenerated on docs.kali.org - May 25, 2014
mn1
+16M7f00n2
+16M7f00n3
wyEOF
loopdevice=`losetup -f --show kali-custom-chrome.img`device=`kpartx -va $loopdevice| sed -E 's/.*(loop[0-9])p.*/\1/g' | head -1`device="/dev/mapper/${device}"bootp1=${device}p1bootp2=${device}p2rootp=${device}p3
mkfs.ext4 $rootpmkdir -p rootmount $rootp root
04. Copy and Modify the Kali rootfs
Copy over the Kali rootfs you bootstrapped earlier using rsync to the mounted image.
cd ~/arm-stuff/images/
© Offensive Security 2014 Page: 120 / 185

Official Kali Linux DocumentationThis PDF has been autogenerated on docs.kali.org - May 25, 2014
rsync -HPavz ~/arm-stuff/rootfs/kali-armhf/ root
echo nameserver 8.8.8.8 > root/etc/resolv.conf
mkdir -p root/etc/X11/xorg.conf.d/cat << EOF > root/etc/X11/xorg.conf.d/50-touchpad.confSection "InputClass"Identifier "touchpad"MatchIsTouchpad "on"Driver "synaptics"Option "TapButton1" "1"Option "TapButton2" "3"Option "TapButton3" "2"Option "FingerLow" "15"Option "FingerHigh" "20"Option "FingerPress" "256"EndSectionEOF
05. Compile the Samsung Chromium Kernel and Modules
If you’re not using ARM hardware as the development environment, you will need to set up an ARM cross-compilation environment to build an ARM kernel and modules. Once that’s done, proceed with the followinginstructions.
Fetch the Chromium kernel sources and place them in our development tree structure:
cd ~/arm-stuffmkdir -p kernelcd kernelgit clone http://git.chromium.org/chromiumos/third_party/kernel.git -b chromeos-3.4 chromeoscd chromeos
cat << EOF > kernel.its
© Offensive Security 2014 Page: 121 / 185
Official Kali Linux DocumentationThis PDF has been autogenerated on docs.kali.org - May 25, 2014
/dts-v1/;
/ {description = "Chrome OS kernel image with one or more FDT blobs";#address-cells = ;images {kernel@1{description = "kernel";data = /incbin/("arch/arm/boot/zImage");type = "kernel_noload";arch = "arm";os = "linux";compression = "none";load = ;entry = ;};fdt@1{description = "exynos5250-snow.dtb";data = /incbin/("arch/arm/boot/exynos5250-snow.dtb");type = "flat_dt";arch = "arm";compression = "none";hash@1{algo = "sha1";};};};configurations {default = "conf@1";conf@1{kernel = "kernel@1";fdt = "fdt@1";};};};EOF
© Offensive Security 2014 Page: 122 / 185
Official Kali Linux DocumentationThis PDF has been autogenerated on docs.kali.org - May 25, 2014
Patch the kernel, in our case, with wireless injection patches.
mkdir -p ../patcheswget http://patches.aircrack-ng.org/mac80211.compat08082009.wl_frag+ack_v1.patch -O../patches/mac80211.patchwget http://patches.aircrack-ng.org/channel-negative-one-maxim.patch -O ../patches/negative.patchpatch -p1 < ../patches/negative.patchpatch -p1 < ../patches/mac80211.patch
Configure, then cross-compile the Chromium kernel as shown below.
export ARCH=armexport CROSS_COMPILE=~/arm-stuff/kernel/toolchains/arm-eabi-linaro-4.6.2/bin/arm-eabi-
./chromeos/scripts/prepareconfig chromeos-exynos5# Disable LSMsed -i 's/CONFIG_SECURITY_CHROMIUMOS=y/# CONFIG_SECURITY_CHROMIUMOS is not set/g' .config# If cross compiling, do this once:sed -i 's/if defined(__linux__)/if defined(__linux__) ||defined(__KERNEL__) /g' include/drm/drm.h
make menuconfigmake -j$(cat /proc/cpuinfo|grep processor|wc -l)make dtbscp ./scripts/dtc/dtc /usr/bin/mkimage -f kernel.its kernel.itbmake modules_install INSTALL_MOD_PATH=~/arm-stuff/images/root/
# copy over firmware. Ideally use the original firmware (/lib/firmware) from the Chromebook.git clone git://git.kernel.org/pub/scm/linux/kernel/git/dwmw2/linux-firmware.gitcp -rf linux-firmware/* ~/arm-stuff/images/root/lib/firmware/rm -rf linux-firmware
© Offensive Security 2014 Page: 123 / 185

Official Kali Linux DocumentationThis PDF has been autogenerated on docs.kali.org - May 25, 2014
echo "console=tty1 debug verbose root=/dev/mmcblk1p3 rootwait rw rootfstype=ext4" > /tmp/config-sdecho "console=tty1 debug verbose root=/dev/sda3 rootwait rw rootfstype=ext4" > /tmp/config-usb
vbutil_kernel --pack /tmp/newkern-sd --keyblock /usr/share/vboot/devkeys/kernel.keyblock --version 1--signprivate /usr/share/vboot/devkeys/kernel_data_key.vbprivk --config=/tmp/config-sd --vmlinuz kernel.itb--arch armvbutil_kernel --pack /tmp/newkern-usb --keyblock /usr/share/vboot/devkeys/kernel.keyblock --version 1--signprivate /usr/share/vboot/devkeys/kernel_data_key.vbprivk --config=/tmp/config-usb --vmlinuzkernel.itb --arch arm
06. Prepare the Boot Partition
dd if=/tmp/newkern-sd of=$bootp1 # first boot partition for SDdd if=/tmp/newkern-usb of=$bootp2 # second boot partition for USB
umount $rootp
kpartx -dv $loopdevicelosetup -d $loopdevice
07. dd the Image and Mark the USB Drive Bootable
dd if=kali-custom-chrome.img of=/dev/sdb bs=512kcgpt repair /dev/sdb
2
This is the point where you need to mark either boot partition 1 or 2 to have higher priority. The numberwith the higher priority will boot first. The example below will give priority 10 to the first partition (-i) andwill thus boot successfully from a SD card.
© Offensive Security 2014 Page: 124 / 185

Official Kali Linux DocumentationThis PDF has been autogenerated on docs.kali.org - May 25, 2014
cgpt add -i 1 -S 1 -T 5 -P 10 -l KERN-A /dev/sdbcgpt add -i 2 -S 1 -T 5 -P 5 -l KERN-B /dev/sdb
To see your partition list and order, use the command cgpt show.
root@kali:~# cgpt show /dev/sdbstart size part contents0 1 PMBR1 1 Pri GPT header2 32 Pri GPT table8192 32768 1 Label: "KERN-A"Type: ChromeOS kernelUUID: 63AD6EC9-AD94-4B42-80E4-798BBE6BE46CAttr: priority=10 tries=5 successful=140960 32768 2 Label: "KERN-B"Type: ChromeOS kernelUUID: 37CE46C9-0A7A-4994-80FC-9C0FFCB4FDC1Attr: priority=5 tries=5 successful=173728 3832490 3 Label: "Linux filesystem"Type: 0FC63DAF-8483-4772-8E79-3D69D8477DE4UUID: E9E67EE1-C02E-481C-BA3F-18E721515DBB125045391 32 Sec GPT table125045423 1 Sec GPT headerroot@kali:~#
Once this operation is complete, boot up your Samsung Chromebook with the SD/USB device plugged in. At thedeveloper mode boot screen, hit CTRL+u to boot from from your USB storage device. Log in to Kali (root / toor)and startx.
© Offensive Security 2014 Page: 125 / 185

Official Kali Linux DocumentationThis PDF has been autogenerated on docs.kali.org - May 25, 2014
Custom MK/SS808 ImageThe following document describes our own method of creating a custom Kali Linux MK/SS808 ARM imageand is targeted at developers. If you would like to install a pre-made Kali image, check out our Install Kali onMK/SS808 article.
01. Create a Kali rootfs
Build yourself a Kali rootfs as described in our Kali documentation, using an armhf architecture. By the end ofthis process, you should have a populated rootfs directory in ~/arm-stuff/rootfs/kali-armhf.
02. Create the Image File
Next, we create the physical image file which will hold our MK/SS808 rootfs and boot images.
apt-get install kpartx xz-utils sharutilscd ~mkdir -p arm-stuffcd arm-stuff/mkdir -p imagescd imagesdd if=/dev/zero of=kali-custom-ss808.img bs=1MB count=7000
03. Partition and Mount the Image File
parted kali-custom-ss808.img --script -- mklabel msdosparted kali-custom-ss808.img --script -- mkpart primary ext4 1 -1
loopdevice=`losetup -f --show kali-custom-ss808.img`device=`kpartx -va $loopdevice| sed -E 's/.*(loop[0-9])p.*/\1/g' | head -1`device="/dev/mapper/${device}"rootp=${device}p1
© Offensive Security 2014 Page: 126 / 185

Official Kali Linux DocumentationThis PDF has been autogenerated on docs.kali.org - May 25, 2014
mkfs.ext4 $rootpmkdir -p rootmount $rootp root
04. Copy and Modify the Kali rootfs
rsync -HPavz /root/arm-stuff/rootfs/kali-armhf-xfce4/ rootecho nameserver 8.8.8.8 > root/etc/resolv.conf
05. Compile the rk3066 Kernel and Modules
If you’re not using ARM hardware as the development environment, you will need to set up an ARM cross-compilation environment to build an ARM kernel and modules. Once that’s done, proceed with the followingsteps.
apt-get install xz-utilscd ~/arm-stuffmkdir -p kernelcd kernel
git clone git://github.com/aloksinha2001/picuntu-3.0.8-alok.git rk3066-kernelcd rk3066-kernelsed -i "/vpu_service/d" arch/arm/plat-rk/Makefile
export ARCH=armexport CROSS_COMPILE=~/arm-stuff/kernel/toolchains/arm-eabi-linaro-4.6.2/bin/arm-eabi-
# A basic configuration for the UG802 and MK802 III# make rk30_hotdog_ti_defconfig# A basic configuration for the MK808make rk30_hotdog_defconfig
© Offensive Security 2014 Page: 127 / 185

Official Kali Linux DocumentationThis PDF has been autogenerated on docs.kali.org - May 25, 2014
# configure your kernel !make menuconfig# Configure the kernel as per http://www.armtvtech.com/armtvtechforum/viewtopic.php?f=66&t=835mkdir ../initramfs/wget http://208.88.127.99/initramfs.cpio -O ../initramfs/initramfs.cpio
mkdir -p ../patcheswget http://patches.aircrack-ng.org/mac80211.compat08082009.wl_frag+ack_v1.patch -O../patches/mac80211.patchwget http://patches.aircrack-ng.org/channel-negative-one-maxim.patch- O ../patches/negative.patchpatch -p1 < ../patches/mac80211.patchpatch -p1 < ../patches/negative.patch
./make_kernel_ruikemei.sh
make modules -j$(cat /proc/cpuinfo|grep processor|wc -l)make modules_install INSTALL_MOD_PATH=~/arm-stuff/images/rootgit clone git://git.kernel.org/pub/scm/linux/kernel/git/dwmw2/linux-firmware.git firmware-gitmkdir -p ~/arm-stuff/images/root/lib/firmwarecp -rf firmware-git/* ~/arm-stuff/images/root/lib/firmware/rm -rf firmware-git
umount $rootpkpartx -dv $loopdevicelosetup -d $loopdevice
07. dd the Image to a USB device
Use the dd utility to image this file to your SD card. In our example, we assume the storage device is located at/dev/sdb. Change this as needed.
© Offensive Security 2014 Page: 128 / 185

Official Kali Linux DocumentationThis PDF has been autogenerated on docs.kali.org - May 25, 2014
dd if=kali-custom-ss808.img of=/dev/sdb bs=512k
Once the dd operation is complete, unmount and eject the SD card and boot your MK/SS808 into Kali Linux
© Offensive Security 2014 Page: 129 / 185

Official Kali Linux DocumentationThis PDF has been autogenerated on docs.kali.org - May 25, 2014
Custom ODROID X2 U2 ImageThe following document describes our own method of creating a custom Kali Linux ODROID image and istargeted at developers. If you would like to install a pre-made Kali ODROID image, check our Install Kali onODROID article.
01. Create a Kali rootfs
Start by building a Kali rootfs as described in our Kali documentation using an armhf architecture. By the end ofthis process, you should have a populated rootfs directory in ~/arm-stuff/rootfs/kali-armhf.
02. Create the Image File
Next, we create the physical image file which will hold our ODROID rootfs and boot images.
apt-get install kpartx xz-utils uboot-mkimagecd ~mkdir -p arm-stuffcd arm-stuff/mkdir -p imagescd imagesdd if=/dev/zero of=kali-custom-odroid.img bs=1MB count=7000
03. Partition and Mount the Image File
parted kali-custom-odroid.img --script -- mklabel msdosparted kali-custom-odroid.img --script -- mkpart primary fat32 4096s 266239sparted kali-custom-odroid.img --script -- mkpart primary ext4 266240s 100%
loopdevice=`losetup -f --show kali-custom-odroid.img`device=`kpartx -va $loopdevice| sed -E 's/.*(loop[0-9])p.*/\1/g' | head -1`device="/dev/mapper/${device}"bootp=${device}p1rootp=${device}p2mkfs.vfat $bootpmkfs.ext4 -L kaliroot $rootpmkdir -p boot root
© Offensive Security 2014 Page: 130 / 185

Official Kali Linux DocumentationThis PDF has been autogenerated on docs.kali.org - May 25, 2014
mount $bootp bootmount $rootp root
04. Copy and Modify the Kali rootfs
Copy over the Kali rootfs you bootstrapped earlier using rsync to the mounted image.
cd ~/arm-stuff/images/rsync -HPavz ~/arm-stuff/rootfs/kali-armhf/ rootecho nameserver 8.8.8.8 > root/etc/resolv.conf
Edit the ~/arm-stuff/images/root/etc/inittab file and locate the “Example how to put a getty on a serial line”.
nano root/etc/inittab
Add the following line to the end of that section.
T1:12345:respawn:/sbin/agetty 115200 ttySAC1 vt100
If you want the serial console to autologin as root, use the following line instead:
T1:12345:respawn:/bin/login -f root ttySAC1 /dev/ttySAC1 >&1
© Offensive Security 2014 Page: 131 / 185
Official Kali Linux DocumentationThis PDF has been autogenerated on docs.kali.org - May 25, 2014
Now, make sure there is a ttySAC1 entry in the ~/arm-stuff/images/root/etc/udev/links.conf file.
nano root/etc/udev/links.conf
If an entry for ttySAC1 doesn’t already exist, add it to the file so it looks as follows:
M null c 1 3M console c 5 1M ttySAC1 c 5 1
Add ttySAC entries in the ~/arm-stuff/images/root/etc/udev/links.conf file.
cat << EOF >> root/etc/securettyttySAC0ttySAC1ttySAC2EOF
Place a basic xorg.conf file in the rootfs.
cat << EOF > root/etc/X11/xorg.conf
© Offensive Security 2014 Page: 132 / 185

Official Kali Linux DocumentationThis PDF has been autogenerated on docs.kali.org - May 25, 2014
# X.Org X server configuration file for xfree86-video-mali
Section "Device"Identifier "Mali-Fbdev"# Driver "mali"Option "fbdev" "/dev/fb1"Option "DRI2" "true"Option "DRI2_PAGE_FLIP" "true"Option "DRI2_WAIT_VSYNC" "true"Option "UMP_CACHED" "true"Option "UMP_LOCK" "false"EndSection
Section "Screen"Identifier "Mali-Screen"Device "Mali-Fbdev"DefaultDepth 24EndSection
Section "DRI"Mode 0666EndSectionEOF
Link init in the root, rootfs directory:
cd ~/arm-stuff/images/rootln -s /sbin/init init
05. Compile the ODROID Kernel and Modules
If you’re not using ARM hardware as the development environment, you will need to set up an ARM cross-compilation environment to build an ARM kernel and modules. Once that’s done, proceed with the followinginstructions.
© Offensive Security 2014 Page: 133 / 185

Official Kali Linux DocumentationThis PDF has been autogenerated on docs.kali.org - May 25, 2014
We next need to fetch the ODROID kernel sources and place them in our development tree structure:
cd ~/arm-stuffmkdir -p kernelcd kernelgit clone --depth 1 https://github.com/hardkernel/linux.git -b odroid-3.8.y odroidcd odroidtouch .scmversion
Configure, then cross-compile the ODROID kernel.
export ARCH=armexport CROSS_COMPILE=~/arm-stuff/kernel/toolchains/arm-eabi-linaro-4.6.2/bin/arm-eabi-
# for ODROID-X2make odroidx2_defconfig# for ODROID-U2make odroidu2_defconfig# configure your kernel !make menuconfig# and enableCONFIG_HAVE_KERNEL_LZMA=yCONFIG_RD_LZMA=y
# If cross compiling, run this oncesed -i 's/if defined(__linux__)/if defined(__linux__) ||defined(__KERNEL__) /g' include/uapi/drm/drm.h
make -j $(cat /proc/cpuinfo|grep processor|wc -l)make modules_install INSTALL_MOD_PATH=~/arm-stuff/images/root/
© Offensive Security 2014 Page: 134 / 185
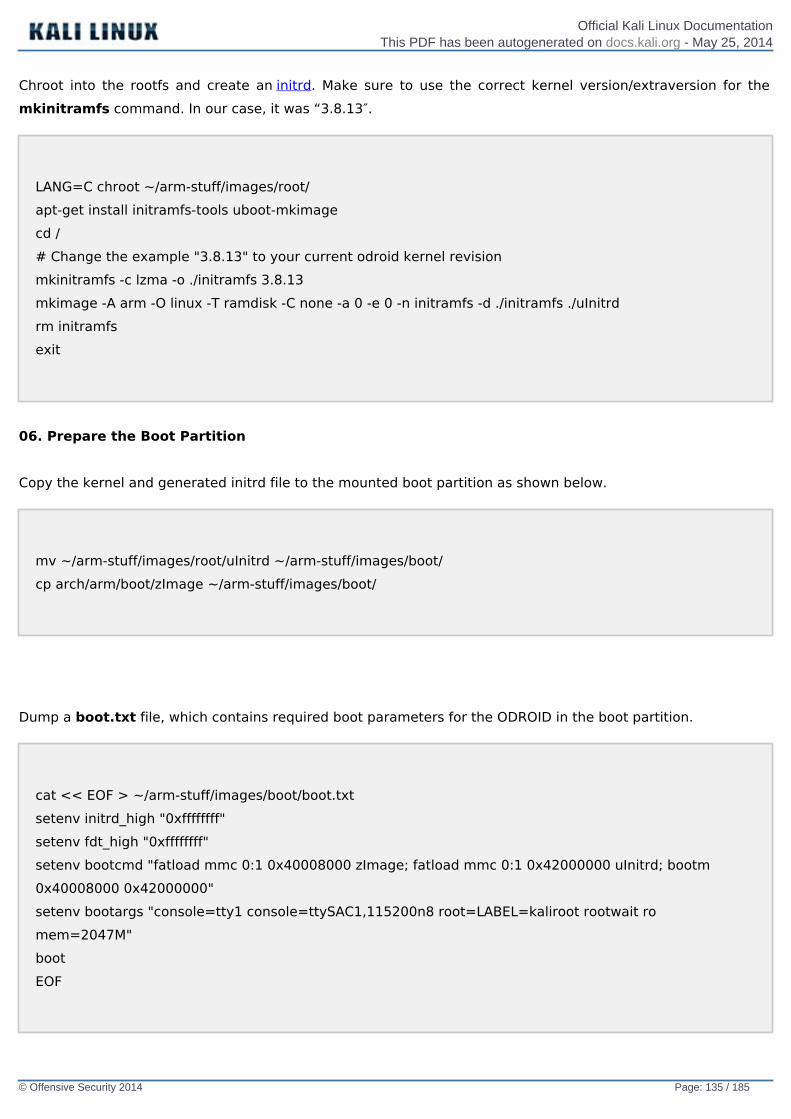
Official Kali Linux DocumentationThis PDF has been autogenerated on docs.kali.org - May 25, 2014
Chroot into the rootfs and create an initrd. Make sure to use the correct kernel version/extraversion for themkinitramfs command. In our case, it was “3.8.13″.
LANG=C chroot ~/arm-stuff/images/root/apt-get install initramfs-tools uboot-mkimagecd /# Change the example "3.8.13" to your current odroid kernel revisionmkinitramfs -c lzma -o ./initramfs 3.8.13mkimage -A arm -O linux -T ramdisk -C none -a 0 -e 0 -n initramfs -d ./initramfs ./uInitrdrm initramfsexit
06. Prepare the Boot Partition
Copy the kernel and generated initrd file to the mounted boot partition as shown below.
mv ~/arm-stuff/images/root/uInitrd ~/arm-stuff/images/boot/cp arch/arm/boot/zImage ~/arm-stuff/images/boot/
Dump a boot.txt file, which contains required boot parameters for the ODROID in the boot partition.
cat << EOF > ~/arm-stuff/images/boot/boot.txtsetenv initrd_high "0xffffffff"setenv fdt_high "0xffffffff"setenv bootcmd "fatload mmc 0:1 0x40008000 zImage; fatload mmc 0:1 0x42000000 uInitrd; bootm0x40008000 0x42000000"setenv bootargs "console=tty1 console=ttySAC1,115200n8 root=LABEL=kaliroot rootwait romem=2047M"bootEOF
© Offensive Security 2014 Page: 135 / 185

Official Kali Linux DocumentationThis PDF has been autogenerated on docs.kali.org - May 25, 2014
Generate a boot.scr file, which is required to boot the ODROID.
mkimage -A arm -T script -C none -n "Boot.scr for ODROID" -d ~/arm-stuff/images/boot/boot.txt~/arm-stuff/images/boot/boot.scr
Unmount the root and boot partitions, then umount the loop device.
cd ~/arm-stuff/images/umount $bootpumount $rootpkpartx -dv $loopdevice
wget http://www.mdrjr.net/odroid/mirror/old-releases/BSPs/Alpha4/unpacked/boot.tar.gztar zxpf boot.tar.gzcd bootsh sd_fusing.sh $loopdevicecd ..losetup -d $loopdevice
Now, image the file onto your USB storage device. Our device is /dev/sdb. Change this as needed.
dd if=kali-custom-odroid.img of=/dev/sdb bs=1M
© Offensive Security 2014 Page: 136 / 185

Official Kali Linux DocumentationThis PDF has been autogenerated on docs.kali.org - May 25, 2014
Once this operation is complete, connect your UART serial cable to the ODROID and boot it up with themicroSD/SD card plugged in. Through the serial console, you will be able to log in to Kali (root / toor) and startx.
If everything works and you want the ODROID to start on boot, make sure to use the “autologin” line in theinittab given above and add the following to your bash_profile:
# If you don't have a .bash_profile, copy it from /etc/skel/.profile firstcat << EOF >> ~/.bash_profileif [ -z "$DISPLAY" ] && [ $(tty) = /dev/ttySAC1 ]; thenstartxfiEOF
08. Install Mali Graphic Drivers (Optional)
These steps are experimental and not fully tested yet. They should be preformed inside the Kali rootfs.
# http://malideveloper.arm.com/develop-for-mali/drivers/open-source-mali-gpus-linux-exadri2-and-x11-display-drivers/apt-get install build-essential autoconf automake make libtool xorg xorg-dev xutils-dev libdrm-devwgethttp://malideveloper.arm.com/downloads/drivers/DX910/r3p2-01rel0/DX910-SW-99003-r3p2-01rel0.tgzwgethttp://malideveloper.arm.com/downloads/drivers/DX910/r3p2-01rel0/DX910-SW-99006-r3p2-01rel0.tgzwget --no-check-certificate https://dl.dropbox.com/u/65312725/mali_opengl_hf_lib.tgz
tar -xzvf mali_opengl_hf_lib.tgzcp mali_opengl_hf_lib/* /usr/lib/
tar -xzvf DX910-SW-99003-r3p2-01rel0.tgztar -xzvf DX910-SW-99006-r3p2-01rel0.tgzcd DX910-SW-99003-r3p2-01rel0/x11/xf86-video-mali-0.0.1/./autogen.shchmod +x configure
CFLAGS="-O3 -Wall -W -Wextra -I/usr/include/libdrm
© Offensive Security 2014 Page: 137 / 185
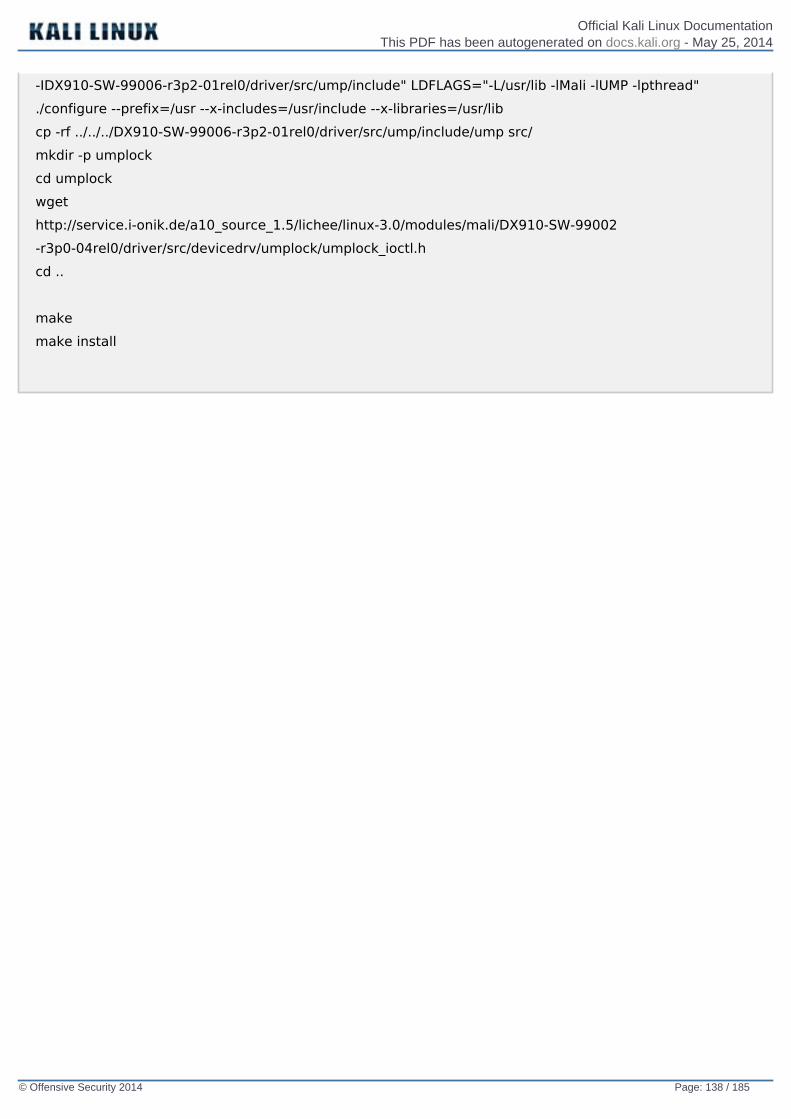
Official Kali Linux DocumentationThis PDF has been autogenerated on docs.kali.org - May 25, 2014
-IDX910-SW-99006-r3p2-01rel0/driver/src/ump/include" LDFLAGS="-L/usr/lib -lMali -lUMP -lpthread"./configure --prefix=/usr --x-includes=/usr/include --x-libraries=/usr/libcp -rf ../../../DX910-SW-99006-r3p2-01rel0/driver/src/ump/include/ump src/mkdir -p umplockcd umplockwgethttp://service.i-onik.de/a10_source_1.5/lichee/linux-3.0/modules/mali/DX910-SW-99002-r3p0-04rel0/driver/src/devicedrv/umplock/umplock_ioctl.hcd ..
makemake install
© Offensive Security 2014 Page: 138 / 185

Official Kali Linux DocumentationThis PDF has been autogenerated on docs.kali.org - May 25, 2014
ARM Cross-CompilationThe following guide will demonstrate how to set up an ARM cross-compilation environment in Kali Linux. Thisguide is the starting point for many of our contributed “Custom ARM Images” articles.
Setting Up Your Development Box
Compiling kernels and generating images usually comes at the cost of disk space. Make sure you have at least50 GB of disk space available on your Kali development machine as well as ample RAM and CPU juice.
Install Dependencies
Start off by installing the required dependencies for ARM cross-compilation.
apt-get install git-core gnupg flex bison gperf libesd0-dev build-essential \zip curl libncurses5-dev zlib1g-dev libncurses5-dev gcc-multilib g++-multilib
If you are running a 64 bit Kali Linux system, add i386 architecture support to your development environmentas follows.
dpkg --add-architecture i386apt-get updateapt-get install ia32-libs
Download Linaro Toolchain
Download the Linaro cross-compiler from our Git repository.
cd ~mkdir -p arm-stuff/kernel/toolchainscd arm-stuff/kernel/toolchains
© Offensive Security 2014 Page: 139 / 185
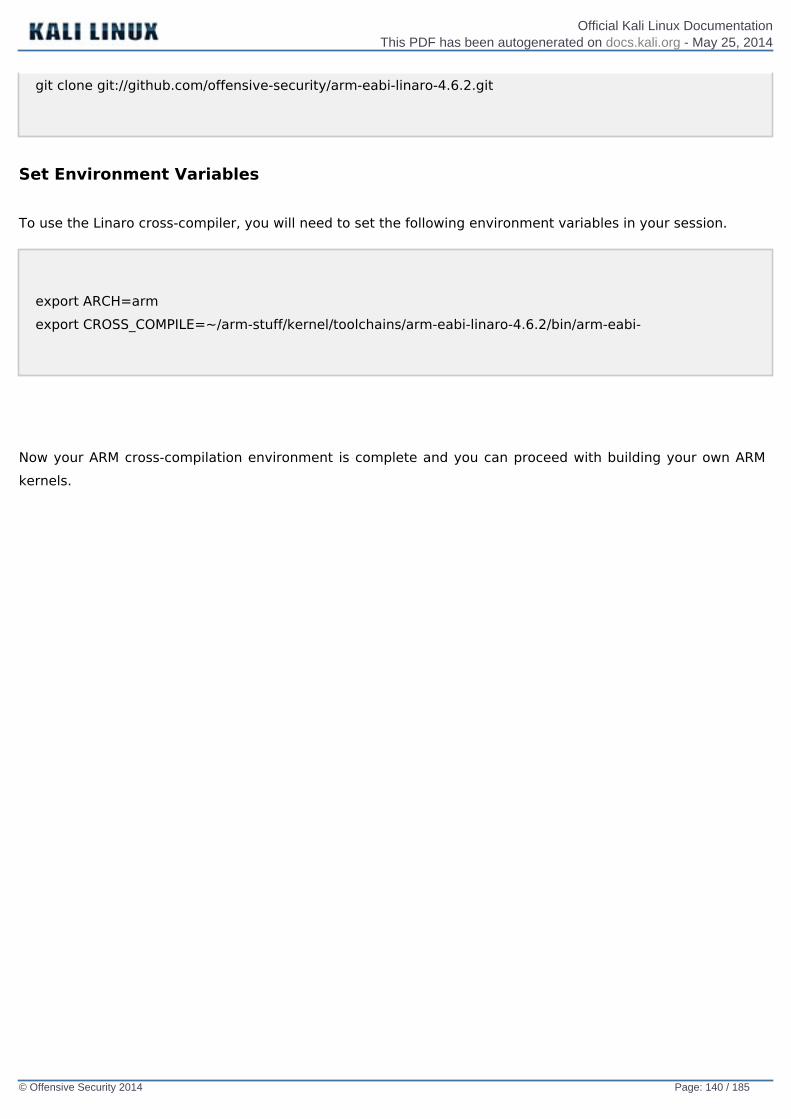
Official Kali Linux DocumentationThis PDF has been autogenerated on docs.kali.org - May 25, 2014
git clone git://github.com/offensive-security/arm-eabi-linaro-4.6.2.git
Set Environment Variables
To use the Linaro cross-compiler, you will need to set the following environment variables in your session.
export ARCH=armexport CROSS_COMPILE=~/arm-stuff/kernel/toolchains/arm-eabi-linaro-4.6.2/bin/arm-eabi-
Now your ARM cross-compilation environment is complete and you can proceed with building your own ARMkernels.
© Offensive Security 2014 Page: 140 / 185

Official Kali Linux DocumentationThis PDF has been autogenerated on docs.kali.org - May 25, 2014
Rebuilding a Package from SourceOn occasion, we need to rebuild a Kali package from source. Fortunately, this is as simple as apt-getting thepackage sources, modifying them to your needs, and then rebuilding them using Debian tools. In this example,we will recompile the libfreefare package in order to add some extra hardcoded Mifare access keys into themifare-format tool.
Downloading the Package Source
# Get the source packageapt-get source libfreefarecd libfreefare-0.3.4~svn1469/
Edit the Package Source Code
Make the changes needed to the source code of the package. In our case, we modify an example file, mifare-classic-format.c.
nano examples/mifare-classic-format.c
Check for Build Dependencies
Check for any build dependencies the package may have. These need to be installed before you can build thepackage.
dpkg-checkbuilddeps
The output should be similar to the following, depending on what packages you already have installed. Ifdpkg-checkbuilddeps returns no output, that means you do not have any missing dependencies and can proceed
© Offensive Security 2014 Page: 141 / 185

Official Kali Linux DocumentationThis PDF has been autogenerated on docs.kali.org - May 25, 2014
with the build.
dpkg-checkbuilddeps: Unmet build dependencies: dh-autoreconf libnfc-dev
Install Build Dependencies
Install any build dependencies if needed, as shown in the output of dpkg-checkbuilddeps:
apt-get install dh-autoreconf libnfc-dev
Build the Modified Package
With all of the dependencies installed, it is a simple matter of invoking dpkg-buildpackage to build your newversion.
dpkg-buildpackage
Install the New Package
If all went well, you should be able to install your newly-created package.
dpkg -i ../libfreefare*.deb
© Offensive Security 2014 Page: 142 / 185

Official Kali Linux DocumentationThis PDF has been autogenerated on docs.kali.org - May 25, 2014
Recompiling the Kali Linux KernelOn occasion, you might want to add certain drivers, patches, or kernel features that are not included in thestock Kali Linux kernel. The following guide will describe how the Kali Linux kernel can be quickly modified andrecompiled for your needs. Please note that global wireless injection patches are already present by default inthe Kali Linux kernel.
Install Build Dependencies
Start by installing all the build dependencies required for recompiling your kernel.
apt-get install kernel-package ncurses-dev fakeroot bzip2
Download Kali Linux Kernel Source Code
Download and extract the Kali Linux kernel source.
apt-get install linux-sourcecd /usr/src/tar jxpf linux-source-3.7.tar.bz2cd linux-source-3.7/
Configure Your Kernel
Copy over the default Kali kernel .config file and then modify it to your needs. This is the stage where you wouldapply various patches, etc. In this example, we are re-compiling a 64 bit kernel.
cp /boot/config-3.7-trunk-amd64 .configmake menuconfig
Build the Kernel
© Offensive Security 2014 Page: 143 / 185

Official Kali Linux DocumentationThis PDF has been autogenerated on docs.kali.org - May 25, 2014
Compile your modified kernel image. Depending on your hardware, this could take a while.
export CONCURRENCY_LEVEL=$(cat /proc/cpuinfo|grep processor|wc -l)make-kpkg cleanfakeroot make-kpkg kernel_image
Install the Kernel
Once the kernel has successfully compiled, go ahead and install the new kernel and reboot. Please note thatkernel version numbers may change – in our example, it was 3.7.2. Depending on the current kernel version,you might need to adjust it accordingly.
dpkg -i ../linux-image-3.7.2_3.7.2-10.00.Custom_amd64.debupdate-initramfs -c -k 3.7.2update-grub2reboot
Once rebooted, your new kernel should be running. If things go wrong and your kernel does not boot, you canstill boot the original stock Kali kernel and fix your issues.
© Offensive Security 2014 Page: 144 / 185

Official Kali Linux DocumentationThis PDF has been autogenerated on docs.kali.org - May 25, 2014
08. Troubleshooting Kali Linux
Submitting Bugs for Kali LinuxIntroduction
This document will guide a reporter on how best to present a bug report so it gets addressed as quickly aspossible. The goal of a bug report is to enable the Kali Linux developers to reproduce the issue and see thefailure, if any. If the Kali developers can make it fail, they will work to gather extra information until the rootcause is known. If the Kali developers are unable to reproduce the failure, they will require additionalinformation until they experience the same results as the submitter. Please note, submissions are best read byour team in English.
Kali Linux was born out of a labor of love to give back to the community. It is our drive to make things better foreveryone which keeps this project evolving. The developers who provide support to you are volunteers doing soout of altruism. Please keep this in mind when making your comments.
Here are a few pointers that will lead to success in getting issues resolved:
You are reporting the bug because you want it fixed so supply all the information you can.Make it very clear in your submission what are facts and what are hypotheses.Keep the bug report objective with just the facts needed for proper research.Do not quote Wikipedia and other non-primary resources as facts in your submission.One report, per person, per hardware combination, per bug.Do not stack multiple issues into a single report; submit additional reports as needed.Do not post comments that are unhelpful such as “Me too!” or “+1″Do not complain about how long it takes to fix a bug.
How to Report Bugs
The Kali Linux bug tracker can be found at http://bugs.kali.org. This document will guide you through accountcreation, creating a system profile, and how to submit a detailed report for submission to the bug tracker.
Create a Kali Linux Bug Tracker Account
If you have not already created an account, you will need to complete this first. Creating the account will allowyou to submit reports and comment on existing ones.
On the bug tracker website, click ‘Signup for new account’ to begin the process.
© Offensive Security 2014 Page: 145 / 185

Official Kali Linux DocumentationThis PDF has been autogenerated on docs.kali.org - May 25, 2014
You will need to provide a username, e-mail address, and enter the information from the captcha challenge.Click the signup button to proceed.
© Offensive Security 2014 Page: 146 / 185

Official Kali Linux DocumentationThis PDF has been autogenerated on docs.kali.org - May 25, 2014
If successful, the next page will notify you that the account registration has been processed. You will need torespond to the confirmation email in order to have your account officially activated. Click ‘Proceed’ to continueto the Bug Tracker Login page.
© Offensive Security 2014 Page: 147 / 185

Official Kali Linux DocumentationThis PDF has been autogenerated on docs.kali.org - May 25, 2014
Create a Profile in the Kali Linux Bug Tracker
Although not required, it is recommended to create a unique profile as part of your bug tracker account. Youcan create a custom profile for each system or select from the default profiles provided. These profiles areshortcuts to define the values for your Platform, OS, and version information submitted as part of your bugreport.
To create or edit a custom profile, select ‘My Account’ from the main page and then select ‘Profiles’. Add thespecific information and description for your system and click the ‘Add Profile’ button when done.
© Offensive Security 2014 Page: 148 / 185
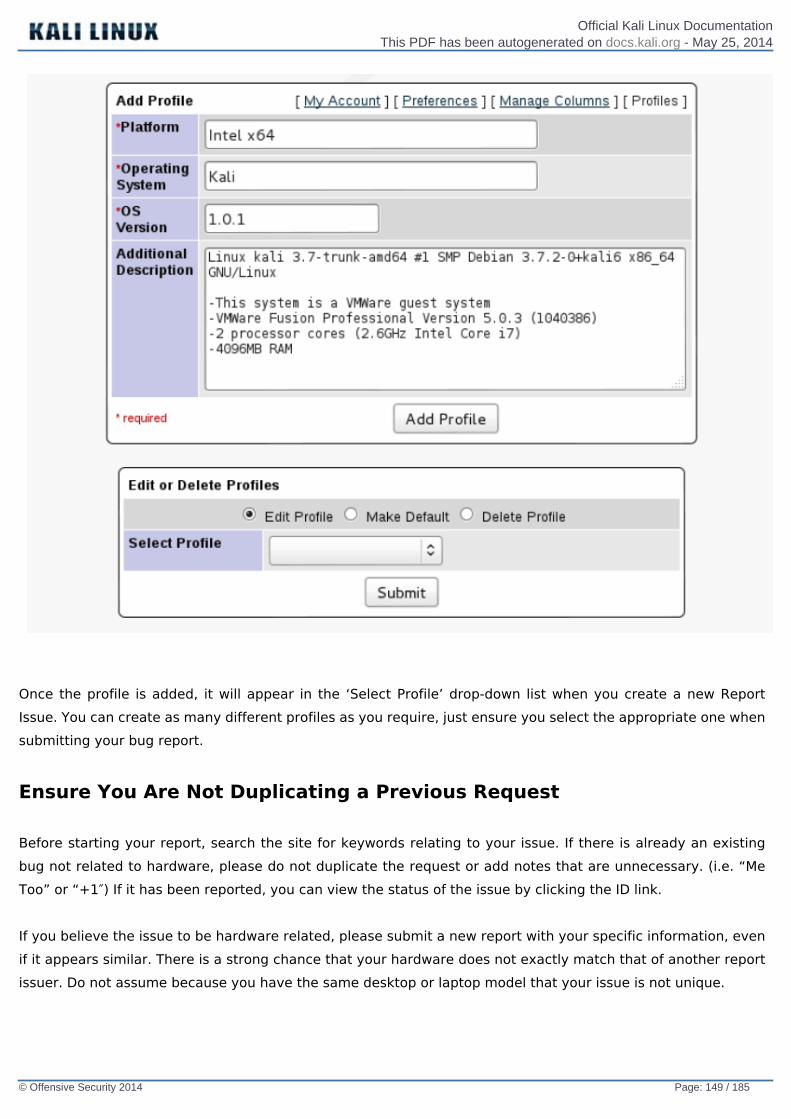
Official Kali Linux DocumentationThis PDF has been autogenerated on docs.kali.org - May 25, 2014
Once the profile is added, it will appear in the ‘Select Profile’ drop-down list when you create a new ReportIssue. You can create as many different profiles as you require, just ensure you select the appropriate one whensubmitting your bug report.
Ensure You Are Not Duplicating a Previous Request
Before starting your report, search the site for keywords relating to your issue. If there is already an existingbug not related to hardware, please do not duplicate the request or add notes that are unnecessary. (i.e. “MeToo” or “+1″) If it has been reported, you can view the status of the issue by clicking the ID link.
If you believe the issue to be hardware related, please submit a new report with your specific information, evenif it appears similar. There is a strong chance that your hardware does not exactly match that of another reportissuer. Do not assume because you have the same desktop or laptop model that your issue is not unique.
© Offensive Security 2014 Page: 149 / 185

Official Kali Linux DocumentationThis PDF has been autogenerated on docs.kali.org - May 25, 2014
Creating the Report
To begin your report, log into your account and click the “Report Issue” link on the landing page. You will needto fill out as much information as you possibly can. If it helps, review the pointers at the beginning of thisdocument to make sure you are conforming to expectations.
The following fields are mandatory within the report:
CategorySummaryDescription
Even though the other fields are not mandatory, we recommend you try to include as much information aspossible within each option while paying special attention to the following:
ReproducibilitySelect ProfileSteps to ReproduceAdditional InformationUpload File (error logs, screenshot)
Decide the Proper Category
There are currently four (4) categories available in the Kali bug tracker. Before you begin your request, ensure itis properly designated for one of the following:
General BugKali Package BugNew Tool RequestsTool Upgrade
Do not request support within the bug tracker. Kali Linux offers several options for support includinghttp://docs.kali.org , https://forums.kali.org and the IRC chat room on freenode (#kali-linux)
Providing a Descriptive Summary
The summary field is essentially the ‘name’ of the report, it will be the first thing the Kali developers and othervisitors see. Provide a short yet descriptive summary that can describe the issue or request.
Good: Chromium Package installed from Repo will not run as root user
© Offensive Security 2014 Page: 150 / 185

Official Kali Linux DocumentationThis PDF has been autogenerated on docs.kali.org - May 25, 2014
Bad: Chromium doesn’t work
The summary does not need to include everything, but it should convey your reason for submitting the report.
Using dpkg to Find the Package and Version for the Report
You can find which package is installed using a combination of dpkg flags. It is important to include relevantinformation from the output of these commands in your report. The output can also be placed in a text file anduploaded. (Discussed later within this document.)
searchliststatus
Sample Output
root@kali:~# which chromium/usr/bin/chromiumroot@kali:~# type chromiumchromium is /usr/bin/chromiumroot@kali:~# dpkg --search /usr/bin/chromiumchromium: /usr/bin/chromiumroot@kali:~# dpkg --list chromiumDesired=Unknown/Install/Remove/Purge/Hold| Status=Not/Inst/Conf-files/Unpacked/halF-conf/Half-inst/trig-aWait/Trig-pend|/ Err?=(none)/Reinst-required (Status,Err: uppercase=bad)||/ Name Version Architecture Description+++-==============-============-============-=================================ii chromium 24.0.1312.68 amd64 Google open source chromium webroot@kali:~# dpkg --status chromiumPackage: chromiumStatus: install ok installedPriority: optionalSection: webInstalled-Size: 98439Maintainer: Debian Chromium Maintainers <[email protected]> Architecture:amd64Source: chromium-browser
© Offensive Security 2014 Page: 151 / 185
Official Kali Linux DocumentationThis PDF has been autogenerated on docs.kali.org - May 25, 2014
Version: 24.0.1312.68-1…Output Truncated…
Building the Description Scenario
This is your opportunity to provide a well thought out description of what you are reporting. This is your chanceto shine and provide as many details and facts as possible.
Please ensure you include the following where applicable:
Exact and complete text of any error messages (screen output or log files)Exactly what you typed or actions you took to produce the issueA suggested fix, or patch if you are able to produce oneThe version of the package and any information relating to dependent packagesThe kernel version, shared C library, and any other details that seem appropriateuname –adpkg -s libc6 | grep ^VersionIf applicable, software version – ( i.e. python –V)Details of your hardwareIf you are reporting an issue with a device driver, please list all hardware in your systemFor a complete report on your system install lshw from the repos.Add any other details that seems relevantDo not worry about the report being “too long” as long as the information is relevant, it’s important toinclude.
Example
Package: Chromium
Architecture: amd64
Maintainer: Debian Chromium Maintainers
Source: chromium-browser
Version: 24.0.1312.68-1
I installed the chromium web browser from the Kali Linux repos, using the command ‘apt-get install chromium’. Ilaunched the program from the Kali menu by selecting Applications/Internet/Chromium Web Browser. Chromium
© Offensive Security 2014 Page: 152 / 185

Official Kali Linux DocumentationThis PDF has been autogenerated on docs.kali.org - May 25, 2014
did not launch as expected, instead it provided an error pop-up window.
The error message stated, “Chromium cannot be run as root. Please start Chromium as a normal user. To run asroot, you must specify an alternate –user-data-dir for storage of profile information”.
I clicked the Close button to close the pop up window.
uname –a output: Linux kali 3.7-trunk-amd64 #1 SMP Debian 3.7.2+kali6 x86_64 GNU/Linux
C Library Version: 2.13-38
The Importance of Reproducibility
The Kali Linux bug tracker allows you to provide the frequency of the issue being reported. If you are submittinga request for a new tool or an upgrade to an existing tool, simply select N/A from the drop down options. Ifsubmitting a bug, please provide the appropriate response.
Continuing the example above, by design Chromium will not launch as root, you would select ‘always’ from thedropdown menu.
It is extremely important you provide an accurate response. If the Kali developers attempt to reproduce theissue, they need to know the frequency. If the issue happens occasionally but you have marked ‘always’, theissue may be closed prematurely as the developer doing the testing may not experience the issue.
Selecting the Proper Profile
As discussed above, using a custom defined profile is best for each issue reported. If custom profiles are notcreated, select the appropriate profile from the drop-down menu. At the time of this writing, the followingoptions are available.
armel Kali 1.0armhf Kali 1.0x64 Kali 1.0x86 Kali 1.0
Providing Steps to Reproduce the Issue
Although this may seem redundant when compared with the description section, this section should only includethe steps taken to reproduce the issue. Some steps may seem remedial, but it is important to ensure youdocument as well as you can. The missing step may be the one needed to reproduce the issue.
© Offensive Security 2014 Page: 153 / 185

Official Kali Linux DocumentationThis PDF has been autogenerated on docs.kali.org - May 25, 2014
Example:
1. Opened a terminal window by selecting Applications/Accessories/Terminal2. Typed ‘apt-get install chromium’ in the terminal and hit enter to run the command3. Attempted to run Chromium web browser by selecting Applications/Internet/Chromium Web
Browser
Providing Additional Information
In this section, you can provide any additional information relevant to the issue. If you have a fix for the issue,please provide it in this portion. Again, it is important to stick to the facts and document the steps properly sothe developers can reproduce the issue.
Example:
There is a simple fix that is well documented on several forums. I tried it and it fixed the issue for me.
Using a text editor open /etc/chromium/defaultAdd –user-data-dir flagi.e. CHROMIUM_FLAGS=”–user-data-dir”
Can this be patched within the repo version of Chromium so adding this flag is not required for future releases?
Uploading Relevant Files
Sometimes it is important to provide information to the development team that can’t easily be provided. Thissection of the report allows you to add screenshots and log files. Be mindful of the size limitation in place.
You can add a file by clicking the ‘Choose File’ button. This will open the file manager for your system and allowyou to select the file. Once you have selected the file, click the ‘Open’ button to return to your report and clickthe ‘Upload File’ button.
Submitting the Report
If you’ve come this far, you are ready to submit the report. All that is left to do is click the ‘Submit Report’button. Your report will be submitted and assigned a tracking ID. The report will show up on your ‘My View’ pageunder ‘Reported by Me’. This will allow you to track the issue to resolution.
Summary
The purpose for a bug report is to help the developers see the failure with their own eyes. Since they cannot be
© Offensive Security 2014 Page: 154 / 185

Official Kali Linux DocumentationThis PDF has been autogenerated on docs.kali.org - May 25, 2014
with you to experience the failure, you must provide detailed instructions so they can make it fail themselves.
Describe everything in detail, stating the steps taken, what you saw, what you did, as well as the expectedoutcome.
Attempt to find an issue or fix through research. If you are able to provide a solution to fix the issue for yoursystem, provide the developers with the same level of detail for bug reporting. It is important that thedevelopers know exactly what you did, so they can successfully repeat the process. This should not stop youfrom filing a full explanation of the symptom that caused the unexpected behavior.
Write accurately, be clear, precise, and concise to ensure the developers cannot misinterpret what you aretrying to convey.
No developer will be deliberately coy. Be prepared to provide additional information; the developers will not askif they don’t need the information.
Please be patient with your request, the developers want to fix your issue as much as you do. We love what wedo and are proud to continue making Kali the most advanced penetration testing distribution ever.
This articles has been composed from various resources listed below, and modified to suit our needs:
http://www.chiark.greenend.org.uk/~sgtatham/bugs.html - Fetched March 20,2013 https://help.ubuntu.com/community/ReportingBugs - Fetched March 20,2013 http://www.debian.org/Bugs/Reporting - Fetched March 20,2013
© Offensive Security 2014 Page: 155 / 185

Official Kali Linux DocumentationThis PDF has been autogenerated on docs.kali.org - May 25, 2014
Troubleshooting Wireless DriversTroubleshooting wireless driver issues in Linux can be a frustrating experience if you don’t know what to lookfor. This article is meant to be used as a general guideline to better help you find the information you need tosolve your wireless issues.
Carefully read carefully ANY error message as they will VERY OFTEN tell you what’s wrong and how to fix it.If not, then use your Google-Fu.
1. No Interface
Stupid question: Is it a wireless card? (We’ve seen that several times)Is the device plugged in?Does it show up on lsusb or lspci (with the exception of phones)? You might want to update pci ids andusb idsDoes dmesg contain any information about the driver loading and/or failingIs Kali a VM? Then, unless your card is USB, it will not be useable (VMWare/VirtualBox/QEMU willvirtualize EVERY PCI device). Is it attached to the VM?If there is nothing in dmesg and it’s not in a VM, then you might want to try the latest compat-wireless(and sometimes, you’ll need firmware) -> check on Linux-Wireless drivers
2. Interface But Can’t Do Anything
Read error messagesIf there are no error messages, then run dmesg | tail and it will most likely tell you what’s wrongFirmware might be missingCheck rfkill and any hardware switches and BIOS options
3. No Monitor Mode
STA drivers (Ralink, Broadcom) and every other manufacturer’s provided driver doesn’t support monitormodendiswrapper doesn’t support monitor mode AND NEVER WILL.Airodump-ng/Wireshark don’t show any packets: check rfkill and any hardware switches and BIOSoptions
4. Injection
Test with aireplay-ng -9 (Make sure the card is in monitor mode with airmon-ng)
© Offensive Security 2014 Page: 156 / 185

Official Kali Linux DocumentationThis PDF has been autogenerated on docs.kali.org - May 25, 2014
Airmon-ng doesn’t display chipset information: It’s not a big issue as it just didn’t get that informationfrom the card and doesn’t change the abilities of your cardNo injection but monitor mode: Check rfkill and any hardware switches and BIOS optionsNetwork managers sometimes interfere with Aircrack tools. run airmon-ng check kill to kill theseprocesses.
Additional Links
Will my card work with Aircrack-ng?Compat-wireless
© Offensive Security 2014 Page: 157 / 185

Official Kali Linux DocumentationThis PDF has been autogenerated on docs.kali.org - May 25, 2014
Troubleshooting a Kali InstallationKali Linux installation failures
There can be a wide variety of reasons for a Kali Linux installation to fail. This could include issues such as acorrupt or incomplete ISO download, not enough disk space on the target machine, etc. The following article willgive you some pointers on what to look for when your Kali Linux installation has failed. The following is anexample of the dreaded “Red Screen”, indicating the installation encountered a problem.
© Offensive Security 2014 Page: 158 / 185
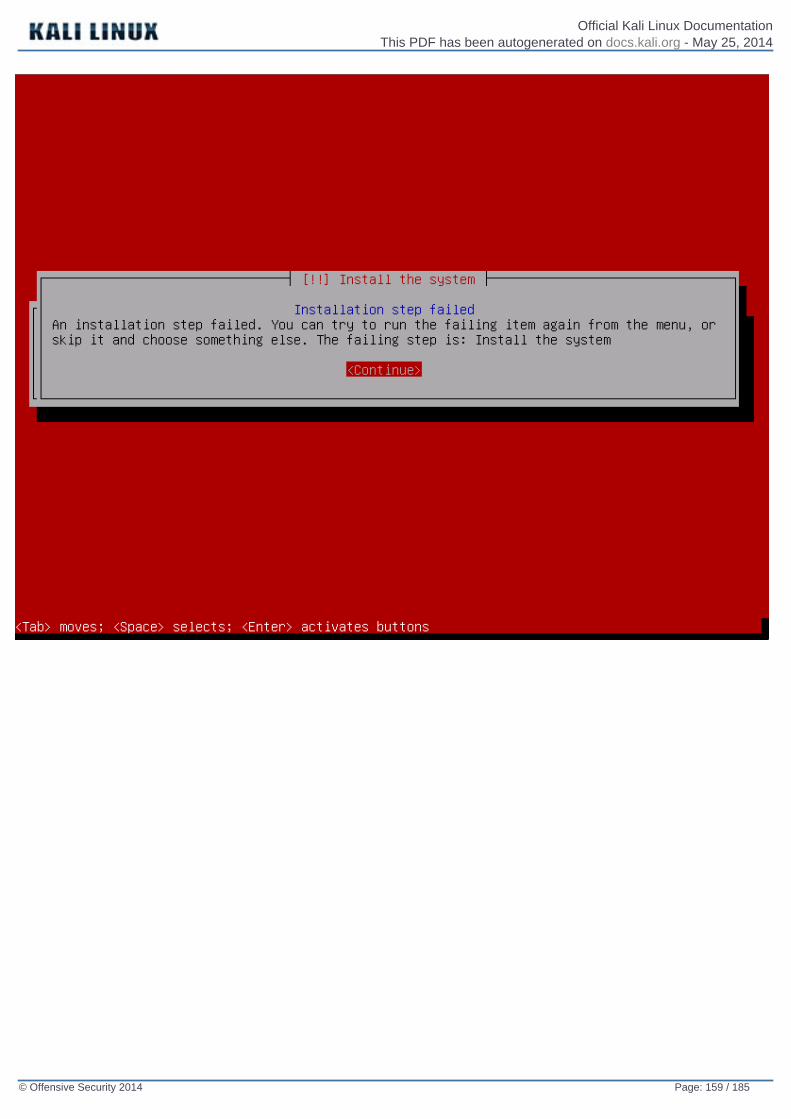
Official Kali Linux DocumentationThis PDF has been autogenerated on docs.kali.org - May 25, 2014
© Offensive Security 2014 Page: 159 / 185

Official Kali Linux DocumentationThis PDF has been autogenerated on docs.kali.org - May 25, 2014
Hitting the continue button should take you to the Debian installer main menu. From that main menu,browse to the “save debug logs“:
© Offensive Security 2014 Page: 160 / 185

Official Kali Linux DocumentationThis PDF has been autogenerated on docs.kali.org - May 25, 2014
© Offensive Security 2014 Page: 161 / 185

Official Kali Linux DocumentationThis PDF has been autogenerated on docs.kali.org - May 25, 2014
Going into the debug logs, you are presented with several ways of transferring the installation log files awayfrom the failed installation. The most convenient way is usually to start a web server on the machineundergoing the installation.
Once you choose this option, a web server is started from which you are able to download or view severalinstallation log files.
Look over the logs files for anything irregular, or any error messages which look like they might be the cause ofyour failed installation. In this case, the target machine did not have enough disk space to install Kali Linux, aswas seen towards the end of the syslinux log file
Aug 19 23:45:05 base-installer: error: The tar process copying the live system failed (only 152937 out of
© Offensive Security 2014 Page: 162 / 185

Official Kali Linux DocumentationThis PDF has been autogenerated on docs.kali.org - May 25, 2014
286496 files have been copied, last file was ).Aug 19 23:45:05 main-menu[927]: (process:7553): tar: write error: No space left on deviceAug 19 23:45:05 main-menu[927]: WARNING **: Configuring 'live-installer' failed with error code 1Aug 19 23:45:05 main-menu[927]: WARNING **: Menu item 'live-installer' failed.Aug 19 23:50:23 main-menu[927]: INFO: Modifying debconf priority limit from 'high' to 'medium'Aug 19 23:50:23 debconf: Setting debconf/priority to mediumAug 19 23:56:49 main-menu[927]: INFO: Menu item 'save-logs' selected
© Offensive Security 2014 Page: 163 / 185
Official Kali Linux DocumentationThis PDF has been autogenerated on docs.kali.org - May 25, 2014
09. Kali Community Support
Kali Linux IRC ChannelKali Linux has an official IRC channel located on the Freenode network. The official IRC channel is #kali-linuxPlease take a few moments to review the rules and guidelines below before joining the channel
IRC Rules and Guidelines
We try to remain as informal as possible but there are some rules that we’d appreciate if you would follow!Broadly, if you’re friendly, tolerant, and reasonable, you’ll probably get a long way without any specificknowledge of the rules – but for the avoidance of doubt, here they are.
How to Treat Other Users
In order to make the channel a pleasant place for all of our users, we expect all to remain as friendly andtolerant as possible. We request that you refrain from profanity and that you show respect to channel membersand visitors. If you find that you’re becoming frustrated with the channel or other users, we encourage you totake a moment to do something else. Try to ensure you don’t make people feel like you’re just taking advantageof them – help others out while you’re waiting for a reply to your questions, and say thanks!
How to Argue
As mentioned above, we’d appreciate it if you’d strive to be friendly and tolerant. We also encourage debatesand in-depth discussions about topical subjects. If you choose to participate in one, we expect you to remain asreasonable as possible and employ the skills of logic and critical thinking. These skills will serve you well indiscussion, enable you to communicate more efficiently, and spot when others are being less than forthcomingwith the truth!
Language
Our IRC channel is an English-speaking channel. There aren’t any other official channels in any other language.We are a family friendly IRC channel and do not approve of foul language.
Staying on Topic
We maintain no strict policy regarding off-topic chat in the channel however, the discussion of Kali Linuxprojects is the primary focus of the channel, so you may be asked to take discussions elsewhere, particularly ifthere are venues on freenode better suited to them (such as ##politics), if there are other conversations going
© Offensive Security 2014 Page: 164 / 185

Official Kali Linux DocumentationThis PDF has been autogenerated on docs.kali.org - May 25, 2014
on, or if they’re repetitive or otherwise seen by the channel staff as being detrimental to the good atmosphereof the channel.
Certain things are seen as being specifically off-topic. These topics include:
Support or encouragement of illegal activity – it should go without saying, but we don’t exist to help you breakthe law or do things you shouldn’t be doing. Such queries are off-topic for the channel, for freenode as a whole,and may well get you removed from the channel and/or network. Please don’t ask. Laws vary from country tocountry and channel OPs may determine whether a specific discussion is appropriate for the channel or not.Warez/Cracks/Pirated Software – these too are offtopic for the channel and network so please don’t ask.
Political/Religious Matters
Many people have very strong political/religious beliefs and we respect that. We also recognize that these arevolatile topics, which have nothing to do with Kali Linux and are best discussed elsewhere.
Asking for Help
If you’re asking for help, first off, thanks! – questions and the resulting discussion of the answer(s) in acollaborative environment are what make IRC great and by helping to add to the atmosphere, you benefit all ofus. We often find that we learn a lot even from questions we already think we know the answers to – aboutpeople, alternative approaches, and cool new resources and tools. However, if you are intending to ask aquestion, we’d appreciate it if you’d follow a couple useful guidelines to help you, and us, make the best use ofour time: Do your research first – it’s very frustrating when people ask a question that can virtually be answeredby punching the keywords into a Google search! We also have forums and a wiki that contain answers to manyquestions we see daily so it’s to everyone’s benefit if these assets are used before asking in IRC.
Give Us the Whole Picture
If you’re asked for more information, please provide it accurately. The correct answer will depend on it. Lookingat this from another angle: the more we learn about your problem, the more this independently benefits us too –a large part of the development of new releases is derived from helping others with issues discovered withspecific setups; even if you’re asking us questions, you can help teach us something too! If you find the answersomewhere else, tell us – it isn’t compulsory, but if you don’t get an answer to your question in the channel butyou find it elsewhere, consider letting us know! That way, we can help out the next person with a similarquestion. It also lets people know that you already have an answer you’re happy with, or that if anyone’sresearching the question for you, they can stop. Wait for the answer – not everyone in the channel is online allthe time – you may find you get an answer a few minutes, or even hours, later. Feel free to stick around andchat, or even answer other peoples questions – you’ll find it helps pass the time and makes others likely to helpyou! Help us build a community of friendly security professionals and enthusiasts.
© Offensive Security 2014 Page: 165 / 185

Official Kali Linux DocumentationThis PDF has been autogenerated on docs.kali.org - May 25, 2014
Spam, Flooding, and Various Other Forms of Disruptive Behaviour
Spam, flooding, disrespect or verbal attacks against other users, misleading links, intentionally wrong answers,and other forms of disruptive behaviour not otherwise specified are unwelcome. Disruptive behaviour includesbut is not restricted to the operation of unauthorised bots, public logging of the channel, and scripts such asthose that publicly announce what track your MP3 player is playing or your away status. If you have more than 5lines of text to paste, use pastebin for your data and then paste the URL into channel.
Dealing With the Channel Staff
From time to time, you may be asked to take conversations elsewhere, treat others reasonably, steer aconversation in a particular direction, or a variety of other things in order to preserve the ambiance andusefulness of the channel. If you’re the target of such a request, please be as reasonable as you can and if youwish to take issue with it, do so in a private message with the channel staffer in question, rather than makingnoise in channel.
Discipline
Repeated breaking of the rules will cause channel staffers to mute (+q), ban (+b), kick, or otherwise removeyou from the channel. This will particularly apply if you’re seen to be willfully ignoring the rules after we’vedrawn your attention to them. Many forms of disruptive behaviour, such as flooding or trolling, may result indiscipline without a warning. We try and avoid the use of force wherever possible and we’d appreciate it if you’dhelp us in pursuing this goal! If you’re a bystander while a staffer is forced to use his or her powers for channelmanagement, we’d appreciate your understanding and consideration in awaiting the end of the incident, andyour assistance in keeping the situation as favorable as possible by not complaining, commentating, or gloating.This serves to make antisocial behavior such as flooding less attractive (the smaller the reaction, the less thereturn on the malfeasance), and so benefits you as well as us!
© Offensive Security 2014 Page: 166 / 185

Official Kali Linux DocumentationThis PDF has been autogenerated on docs.kali.org - May 25, 2014
Official Kali Linux MirrorsUsing Official Repositories
The Kali Linux distribution has three repositories, which are mirrored world-wide:
http.kali.org (mirrorlist): the main package repository;security.kali.org (mirrorlist): the security package repository;cdimage.kali.org (mirrorlist): the repository with ISO images.
When using the 3 default hosts listed above, you’ll automatically be redirected to a mirror close to you, which isguaranteed to be up-to-date. If you prefer to manually select a mirror, click on the mirrorlist link near eachhostname above and select a mirror that suits you. You will then need to edit your /etc/apt/sources.list fileaccordingly with the chosen values.
Do not add additional repositories to your /etc/apt/sources.list file.Doing so will most likely break your Kali installation.
Setting Up a Kali Linux Mirror
Requirements
To be an official Kali Linux mirror, you need a server with lots of disk space, good bandwidth, rsync, and an SSHserver. As of 2013-03-14, the main package repository is about 160 GB and the ISO images repository is about10 GB but you can expect those numbers to grow regularly. You are expected to make the files available overHTTP and RSYNC so you will need the corresponding services too. FTP access is optional.
Push Mirroring of Package Archives
The mirroring infrastructure uses SSH-based triggers to ping the mirrors when they need to be refreshed. Thiscurrently takes place 4 times a day.
If you don’t have yet an account dedicated for the mirrors, create such an account (here we call it “archvsync”):
$ sudo adduser --disabled-password archvsyncAdding user 'archvsync' ...[...]
© Offensive Security 2014 Page: 167 / 185

Official Kali Linux DocumentationThis PDF has been autogenerated on docs.kali.org - May 25, 2014
Is the information correct? [Y/n]
Create the directories that will contain the mirrors and change their owner to the dedicated user that you justcreated:
$ sudo mkdir /srv/mirrors/kali{,-security,-images}$ sudo chown archvsync:archvsync /srv/mirrors/kali{,-security,-images}
Next, configure the rsync daemon (enable it if needed) to export those directories:
$ sudo sed -i -e "s/RSYNC_ENABLE=false/RSYNC_ENABLE=true/" /etc/default/rsync$ sudo vim /etc/rsyncd.conf$ cat /etc/rsyncd.confuid = nobodygid = nogroupmax connections = 25socket options = SO_KEEPALIVE
[kali]path = /srv/mirrors/kalicomment = The Kali Archiveread only = true
[kali-security]path = /srv/mirrors/kali-securitycomment = The Kali security archiveread only = true
[kali-images]path = /srv/mirrors/kali-images
© Offensive Security 2014 Page: 168 / 185
Official Kali Linux DocumentationThis PDF has been autogenerated on docs.kali.org - May 25, 2014
comment = The Kali ISO imagesread only = true$ sudo service rsync startStarting rsync daemon: rsync.
This tutorial doesn’t cover the configuration of the web server and the FTP server. Ideally, you should export themirrors at http://yourmirror.net/kali, http://yourmirror.net/kali-security and http://yourmirror.net/kali-images(same for FTP). Now comes interesting part: the configuration of the dedicated user that will handle the SSHtrigger and the actual mirroring. You should first unpack ftpsync.tar.gz in the user’s account:
$ sudo su - archvsync$ wget http://archive.kali.org/ftpsync.tar.gz$ tar zxf ftpsync.tar.gz
Now we need to create two configurations files. We start from a template and we edit at least the MIRRORNAME,TO, RSYNC_PATH, and RSYNC_HOST parameters:
$ cp etc/ftpsync.conf.sample etc/ftpsync-kali.conf$ cp etc/ftpsync.conf.sample etc/ftpsync-kali-security.conf$ vim etc/ftpsync-kali.conf$ grep -E '^[^#]' etc/ftpsync-kali.confMIRRORNAME=`hostname -f`TO="/srv/mirrors/kali/"RSYNC_PATH="kali"RSYNC_HOST=archive.kali.org$ vim etc/ftpsync-kali-security.conf$ grep -E '^[^#]' etc/ftpsync-kali-security.confMIRRORNAME=`hostname -f`TO="/srv/mirrors/kali-security/"RSYNC_PATH="kali-security"
© Offensive Security 2014 Page: 169 / 185

Official Kali Linux DocumentationThis PDF has been autogenerated on docs.kali.org - May 25, 2014
RSYNC_HOST=archive.kali.org
The last step is to setup the .ssh/authorized_keys file so that archive.kali.org can trigger your mirror:
$ mkdir -p .ssh$ wget -O - -q http://archive.kali.org/pushmirror.pub >>.ssh/authorized_keys
If you have not unpacked the ftpsync.tar.gz in the home directory, then you must adjust accordingly the“~/bin/ftpsync” path, which is hard-coded in .ssh/authorized_keys. Now you must send an email [email protected] with all the URLs of your mirrors so that you can be added in the main mirror list and to open upyour rsync access on archive.kali.org. Please indicate clearly who should be contacted in case of problems (or ifchanges must be made/coordinated to the mirror setup). Instead of waiting for the first push fromarchive.kali.org, you should run an initial rsync with a mirror close to you, using the mirror list linked above toselect one. Assuming that you picked archive-4.kali.org, here’s what you can run as your dedicated mirror user:
$ rsync -qaH archive-4.kali.org::kali /srv/mirrors/kali/ &$ rsync -qaH archive-4.kali.org::kali-security /srv/mirrors/kali-security/ &$ rsync -qaH archive-4.kali.org::kali-images /srv/mirrors/kali-images/ &
Manual Mirror of ISO Images
The ISO images repository does not use push mirroring so you must schedule a daily rsync run. We provide abin/mirror-kali-images script, which is ready to use that you can add in the crontab of your dedicated user. Youjust have to configure etc/mirror-kali-images.conf.
$ sudo su - archvsync$ cp etc/mirror-kali-images.conf.sample etc/mirror-kali-images.conf
© Offensive Security 2014 Page: 170 / 185

Official Kali Linux DocumentationThis PDF has been autogenerated on docs.kali.org - May 25, 2014
$ vim etc/mirror-kali-images.conf$ grep -E '^[^#]' etc/mirror-kali-images.confTO=/srv/mirrors/kali-images/$ crontab -e$ crontab -l# m h dom mon dow command39 3 * * * ~/bin/mirror-kali-images
Please adjust the precise time so that archive.kali.org doesn’t get overloaded by too many mirrors at the sametime.
© Offensive Security 2014 Page: 171 / 185

Official Kali Linux DocumentationThis PDF has been autogenerated on docs.kali.org - May 25, 2014
Official Kali Linux SitesKali Linux has a number of sites available to serve our users. Listed below are the official Kali sites and thepurpose each serves. Note that these sites are the only official Kali Linux sites and are the only authoritativesources of information available for the distribution.
The sites listed below are the ONLY official outlets for the Kali Linux Distribution.
Public Websites
www.kali.orgdocs.kali.orgforums.kali.orgbugs.kali.orggit.kali.org
The main Kali Linux website is our primary means of communicating about Kali Linux news, basic information,and updates about our project in general. It is here that you will find blog posts about new tools, features, andtricks about Kali Linux and this should be your one and only source to download the distribution.
This is where you are right now. Our documentation site contains a basic set of Kali Linux related documentationand tutorials. The changes that have been introduced with Kali are substantial and we have tried to cover awide range of commonly asked questions. Sub-domains of docs.kali.org are also considered official (documenttranslation servers).
Should you encounter an issue or situation that isn’t covered in the official Kali Linux documentation, there is avery high likelihood that there is a member of the Kali Linux Forums knows the answer. You will find that theKali forum members are from all over the world, cover the entire range of skill levels, and are open and willingto help newcomers who are willing to learn.
Despite our best efforts at making Kali Linux perfect, unanticipated bugs and errors are inevitable. We arealways open to improvement and can only effectively do so when issues or tools suggestions are reported to us.You are encouraged to submit bug reports at bugs.kali.org to help us make Kali Linux even better.
© Offensive Security 2014 Page: 172 / 185

Official Kali Linux DocumentationThis PDF has been autogenerated on docs.kali.org - May 25, 2014
For our users that wish to closely monitor the development of Kali Linux or for people who want to know whenthey should run ‘apt-get upgrade’, our Git repository tree is available for perusal by the public.
Social Media
twitterfacebook
We don’t tweet a lot but when we do, it’s important. Information on releases and blog posts will be pushed toour twitter account, @KaliLinux.
As with our Twitter account, we won’t overwhelm you with information on our Kali Facebook page but when wedo post, it will be worth it.
© Offensive Security 2014 Page: 173 / 185

Official Kali Linux DocumentationThis PDF has been autogenerated on docs.kali.org - May 25, 2014
Kali Linux Bug TrackerKali Linux has an official bug tracker where our users can submit bugs and/or fixes to the developers andsuggest new tools for inclusion in the distribution. Anyone can register for this site, but we ask that you pleasereview the rules below to ensure bugs are submitted properly, with the correct information, and in the properformat.
The Bug Tracker is NOT for support issues.Use a real email address so we can contact you if we need further clarification.Provide a descriptive subject.Provide as much detail as possible, including console output, architecture type, and exact versions.Tool requests must be accompanied by a URL and justification for adding the tool.Do not assign your bug to anyone. Developers will determine who is assigned the ticket.
© Offensive Security 2014 Page: 174 / 185

Official Kali Linux DocumentationThis PDF has been autogenerated on docs.kali.org - May 25, 2014
Kali Linux Community ForumsKali Linux has official community-driven forums located at forums.kali.org
We welcome everyone to the Kali Linux community and we have outlined a few simple rules below. Please takea few moments to review them before joining the forums.
Forum Rules
By registering with our forums you agree to be bound by the following rules.We do not condone any illegal activity at all.Any advice/information offered in the forums is to be used for the legalinformational/professional/educational purposes for which it is intended.New registrants posts will be moderated first, causing a slight delay in the post appearing – DO NOTreport problems with your post not appearing instantly during your first 3 days of membership.Use sensible descriptive titles for your posts – not titles such as “Please Help!!” or “Need Assistance” or“what Am I Doing Wrong?” etcDo not cross-post – 1 post in the relevant area is enough!Search for related previous postings before creating a new thread. If you create a new thread askingsomething that has already been asked, don’t be surprised if the thread gets deleted without notice.Do not post about breaking into networks that do not belong to you and for which you have nopermissions.Any religious, political, or pornographic references will not be tolerated.Posts like – “Oooh! look!! I’ve cracked my neighbours wireless AP” or “How do I hack a network!?” arenot needed here, thanks.Please don’t bother with spam messages – they will be removed/moved/edited/deleted and you will bebanned.Members signatures may NOT contain URL links, in any form.We will not tolerate abusive, sexist, racist, or any other derogatory remarks, or members acting like self-appointed moderators. The forum staff are here to help you. Please use their services. If ANY memberhas an issue with the content of ANY post within the forums, use the “REPORT THIS POST” button – Thisis the red triangle icon when using the default forum theme, or the asterisk icon when using theBlackfire Razor forum theme, found in the top right corner of each post.Breaking the forum rules may incur infractions ranging from loss of posting privileges to a temporary orpermanent ban.These rules are subject to alteration and/or addition. It is your responsibility to be aware of any changes.
© Offensive Security 2014 Page: 175 / 185

Official Kali Linux DocumentationThis PDF has been autogenerated on docs.kali.org - May 25, 2014
10. Kali Linux Policies
Kali's Relationship With DebianKali Linux 1.0 is a Debian derivative based on Debian Wheezy. Therefore, most of the Kali packages areimported unmodified from the Debian repositories. In some cases, newer packages got imported from Unstableor Experimental, either because it improved the user experience, or because it was required to fix some bugs.
Forked Packages
Some packages obviously had to be forked in order to implement some of the Kali-specific features but Kalistrives to keep that number of packages to a minimum by improving the upstream packages when possible(either by integrating the feature directly, or by adding the required hooks so that it’s trivial to enable it withoutactually modifying the upstream packages).
Each package forked by Kali is maintained in a Git repository with a “debian” branch so that updating a forkedpackage can be easily done with a simple git merge debian in the master branch.
New Packages
On top of this, Kali brings many new Debian packages, which are specific to the penetration testing and securityauditing field. A large percentage of these packages are free according to Debian’s Free Software Guidelinesand Kali intends to contribute those to Debian and to maintain them directly within Debian.
As a consequence of this, Kali packages strive to be compliant to the Debian Policy and follow the best practicesin use in Debian.
© Offensive Security 2014 Page: 176 / 185

Official Kali Linux DocumentationThis PDF has been autogenerated on docs.kali.org - May 25, 2014
Kali Linux Open Source PolicyKali Linux is a Linux distribution that aggregates thousands of free software packages in its main section. As aDebian derivative, all of the software therein complies with the Debian Free Software Guidelines.
As an exception to the above, Kali Linux’s non-free section contains several tools which are not open source,but allowed for redistribution by Offensive Security through default licensing or specific license agreements withsaid vendors. If you want to build a Kali derivative, you should review the license of each Kali-specific non-freepackage before including it in your distribution (non-free packages which are imported from Debian are safe toredistribute).
More importantly, all of the specific developments that Kali made for its infrastructure or to integrate theprovided software have been put under the GNU GPL.
If you want more information about the license of any given piece of software, you can either check�debian/copyright in the source package or /usr/share/doc/package/copyright for a package that you havealready installed.
© Offensive Security 2014 Page: 177 / 185

Official Kali Linux DocumentationThis PDF has been autogenerated on docs.kali.org - May 25, 2014
Kali Linux Trademark PolicyKali Linux and Offensive Security want to promote the widespread recognition of our trademarks among theInternet community however, we also need to ensure our trademarks solely identify our company and ourproducts. At the heart of our trademark policy is trust – we want to avoid the public from being confused intobelieving they are dealing with Kali Linux and/or Offensive Security when, in fact, they are not. This is ofparticular importance with regards to the development and distribution of trusted penetration testingdistribution such as Kali Linux.
This document identifies and the describes our trademarks and provides guidance as to their fair use. We aregenerally quite accommodating when it comes to fair and honest use of our trademarks so if you are so inclined,feel free to contact us for further guidance.
Some of our Trademarks
© Offensive Security 2014 Page: 178 / 185

Official Kali Linux DocumentationThis PDF has been autogenerated on docs.kali.org - May 25, 2014
Use in Print, Web, Media and Public Display
It is important to maintain the look and spelling of the trademarks. Please do not modify the marks. Examples ofmodifying the marks include abbreviating names, adding logos to the marks, or combining the marks with otherwords. We recommend you use the trademarks in the exact form as we use them.
The Offensive Security trademarks are to designate the source of our products and services. We encourageothers to use the marks so long as they are used to identify the products and services of Offensive Security. Wedo not want to confuse the public into believing that they are dealing with us, when in fact, they are not.
The first mention of an Offensive Security trademark should be accompanied by a symbol indicating whetherthe mark is a registered trademark “®” or an unregistered trademark “™”. Please refer to the above list for theappropriate symbol to use and if in doubt, use “™”.
The use of an Offensive Security trademark should be set apart from surrounding text, either by capitalizing it orby italicizing, bolding or underlining it. The Offensive Security trademarks are to designate the source of ourproducts and services.
When using an Offensive Security trademark in written materials, you should provide a statement indicatingthat the [trademark] is a trademark of Offensive Security. For example:
“KALI LINUX ™ is a trademark of Offensive Security.” This statement can be provided directly in your text, or asa footnote or an endnote.
The use of Offensive Security trademarks in your domain names is prohibited because such use will lead to theconfusion of customers. Any other use outside of the scope of the Trademark Policy is not permitted withoutexpress written permission of Offensive Security.
You may make t-shirts, desktop wallpaper, or other merchandise with Offensive Security Marks on them, thoughonly for yourself and your friends (meaning people from whom you don’t receive anything of value in return).You can’t put the trademarks on anything that you produce commercially (whether or not you make a profit) —
© Offensive Security 2014 Page: 179 / 185

Official Kali Linux DocumentationThis PDF has been autogenerated on docs.kali.org - May 25, 2014
at least not without receiving written permission.
Contact
If you have any questions or comments, or wish to report misuse of the Offensive Security trademarks, pleasecontact us.
© Offensive Security 2014 Page: 180 / 185

Official Kali Linux DocumentationThis PDF has been autogenerated on docs.kali.org - May 25, 2014
Kali Linux Root User PolicyMost distributions encourage their users to use normal user privileges while running the operating system. Thisis sound security advice, as this behaviour provides an extra layer of security between the user and OS. This isespecially true for multiple user systems, where user privilege separation is required.
By nature, Kali Linux is a security and auditing platform, where many tools need to run with root privileges.Generally, when using Kali Linux, being in a multi-user environment is unlikely and therefore the default Kaliuser is “root”. Additionally, Kali Linux is not recommended for use by Linux beginners who might be more proneto making destructive mistakes while using the super user account.
© Offensive Security 2014 Page: 181 / 185

Official Kali Linux DocumentationThis PDF has been autogenerated on docs.kali.org - May 25, 2014
Penetration Testing Tools PolicyKali Linux Tools Policy
We realize that there are many tools or scripts that can do the same job. Some are better than others, some arejust a matter of personal preference. With this in mind, keeping an updated, useful penetration testing toolrepository is a challenging task. The Kali Development team uses some of the following litmus tests todetermine whether a specific tool should be included in our Distribution.
Is the tool useful / functional in a Penetration Testing environment?Does the tool contain functionality of other existing tools?Does the licensing of the tool allow for free re-distribution?How much resources does the tool require? Will it work in a “standard” environment?
Depending on the answers to these questions, and other considerations, we then decide if the tool should bemarked for inclusion in Kali.
The majority of the members of the Kali development team are penetration testers, and thus rely on ourcombined experience to choose the best tools that add the most value to the Kali distribution, while taking inother considerations as well. Tools which are specifically aimed at DOS, DDOS or anonymity are rarely used inlegitimate engagements, and are therefore not installed by default in Kali Linux.
New Tool Requests
We are always open to adding new and better tools to our distribution, however a valid case must be made foreach tool. Please put some thought and effort into the tool submission and do not just send the developers aone line request. Submissions for new tool requests can be made through our Kali Linux bug tracker.
© Offensive Security 2014 Page: 182 / 185

Official Kali Linux DocumentationThis PDF has been autogenerated on docs.kali.org - May 25, 2014
Kali Network Service PoliciesKali Linux deals with network services differently than most other distributions. Most importantly, Kali does notenable any externally-listening services by default with the goal of minimizing exposure when in a defaultstate.
Default Disallow Policy
Kali Linux will disallow network services to persist across reboots by default. The following example can be seenwhen attempting to install a tool which would by default would start a network proxy service on TCP port 3142:
root@kali:~# apt-get install apt-cacher-ng...Setting up apt-cacher-ng (0.7.11-1) ...update-rc.d: We have no instructions for the apt-cacher-ng init script.update-rc.d: It looks like a network service, we disable it....root@kali:~#
Notice how the update-rc.d script disallowed persistence of the apt-cacher-ng daemon by default.
Service boot persistence
In certain situations, we’ll actually want certain services to persist over reboots. To allow for this, we can enablea service to persist through reboots using the update-rc.d script as follows:
root@kali:~# update-rc.d apt-cacher-ng enableupdate-rc.d: using dependency based boot sequencing
Service whitelists and blacklists
Service whitelists and blacklists can be found in the /usr/sbin/update-rc.d file. Through this file you canexplicitly allow or deny services to automatically boot in their default state.
© Offensive Security 2014 Page: 183 / 185

Official Kali Linux DocumentationThis PDF has been autogenerated on docs.kali.org - May 25, 2014
root@kali:~# tail -95 /usr/sbin/update-rc.d |more}
__DATA__## List of blacklisted init scripts#apache2 disabledavahi-daemon disabledbluetooth disabledcups disableddictd disabledssh disabled...## List of whitelisted init scripts#acpid enabledacpi-fakekey enabledacpi-support enabledalsa-utils enabledanacron enabled...
© Offensive Security 2014 Page: 184 / 185

Official Kali Linux DocumentationThis PDF has been autogenerated on docs.kali.org - May 25, 2014
Kali Linux Security Update PoliciesKali Linux is tightly woven with the Debian repositories and as such, receives security updates just as frequentlyas the main Debian distribution for all the packages that Kali left unchanged (i.e. the vast majority). Otherpackages are supported on a best-effort basis by the Kali team.
Powered by TCPDF (www.tcpdf.org)
© Offensive Security 2014 Page: 185 / 185