Proteins of the PIAS family enhance the sumoylation of the papillomavirus E1 protein
Upload
independentCategory
view
0download
0
E1: SEC: Security Workbench [ID 626545.1]
Modified 15-DEC-2010 Type BULLETIN Status PUBLISHED
In this Document Purpose Scope and Application E1: SEC: Security Workbench Overview Row Exits for Security Setup Application Security Action Security Row Security Column Security Processing Option/Data Selection Security Tab Security Exit Security Exclusive Application Security External Call Security Solution Explorer Security Miscellaneous Security Push Button, Link and Image Security Data Browser Security Media Object Security Text Block Control and Chart Control Security Published Business Services Security Application Query Security References
Applies to: JD Edwards EnterpriseOne Tools - Version: 8.93 and later [Release: 8.93and later ]Information in this document applies to any platform.
PurposeThis document details the different types of security that are available within EnterpriseOne using the Security Workbench application P00950.

Scope and ApplicationThis document is intended for the Security Administrator who will be setting up and maintaining security within the EnterpriseOne environment.
E1: SEC: Security WorkbenchOverview
NOTE: This document describes the security set by Security Workbench (P00950), and does not cover roles, security on batch versions or Sign-onSecurity. User documentation for batch versions is in the Enterprise Report Writing manual and Security Workbench and Sign-on Security is in the Security Administration guide. For additional information on SecurityWorkbench and defining security values, see the Security Administration manual. For Tools Releases prior to 8.96, this information is documented in the System Administration documentation. Even though the concepts andmost of the steps are the same, depending on your EnterpriseOne release level, some items may not be available.
Use Security Workbench to apply security to JD Edwards EnterpriseOne applications, application versions, forms, and other objects within JD Edwards EnterpriseOne. You can apply security for these objects to users,roles, or *PUBLIC. JD Edwards EnterpriseOne stores security information in the F00950 table and caches the security information in the web server's memory for the web clients and each workstation's memory on Microsoft Windows clients. Changes that you make to security are applied after the user exits JD Edwards EnterpriseOne and signs back in. For the security changes to take affect on web clients, you must restart the web server or clear the web server's cache. Refer to the following document for details on how to clear the cache Document 659276.1 E1: SEC: Clearingthe Security Cache in Web Environments.
There are three levels of security that can be setup:
User - This options controls security by a specific User ID Role/Group - This option controls security by Role. This allows you
to group users based on similar job requirements, such as putting all of the accounts payable clerks in one role whose role could be AP Clerk. (NOTE: The use of a Role replaces groups in Security Workbench beginning with the EnterpriseOne 8.9 release.) For more information on Roles and Security, refer to Document: 1087848.1 E1:SEC: Frequently Asked Questions on Roles and Security

Public - This option controls security for all users, designated bythe ID type *PUBLIC in the Group ID field. The designation *PUBLIC is a special group ID within EnterpriseOne that automatically includes all users within it. The *Public ID can be used to apply security even though there is not a specifically setup record for it in the user profile application.
When applying object level security, you need to consider how JD Edwards EnterpriseOne checks for security. When a user signs in, the system firstchecks the user ID for security. If no object security is assigned to theuser ID, then it checks the role (if the user is part of a specific role), and then finally it checks *PUBLIC.
NOTE: When the runtime engine selects these records, it only considers the lowest level of input. If a record exists on the User, then the records for Role and *PUBLIC are ignored. Therefore, do not try to setup security combining logic from user, role and *PUBLIC records.
Application security - Secures users from running a particular application, version or an application or a particular form within an application.
Action security - Secures users from executing a particular action,such as adding, deleting, revising, inquiring, or copying a record.
Row security - Secures users from accessing a particular range or list of records in any table. An example of this would to lock certain users or groups from accessing records for a specific rangeof account numbers.
Column security - Secures users from viewing a particular field or changing a value for a particular field. This can be a database or non-database field that is defined in the data dictionary, such as the work/calculated fields. For example, securing a user from viewing the Salary field on the Employee Master application, the Salary field does not appear on the form when that user accesses that application.
Processing option security - Secures users from changing the valuesof processing options, or from prompting for versions and promptingfor values for specific applications. For example, securing a user from changing the processing options for Address Book Revisions, the user could still view the processing options (if the user is not secured from prompting for values), but would not be able to change any of the values. If a user was secured from prompting for versions, the user would not be able to see the versions for a

specific application, which means that the user would not be able to choose a different version of an application from the version that the administrator assigned.
Tab security - Secures users from seeing a tab or tabs on a given form.
Exit security - Secures users from row, form and report menu bar exits on EnterpriseOne forms. These exits call applications that may allow users to manipulate data.
Exclusive application security - Works only in combination with row security. Sets security specific to an application regardless of any row security that might be set. When exclusive application security is set for a user, that user gains access to just the specific application that you define. All other security still applies.
External calls security - Secures users from accessing standalone executables that exist external to EnterpriseOne. These external executables, which might include design tools, system monitors, anddebugging tools, are specific to EnterpriseOne.
Solution Explorer security - Secures users from accessing or makingchanges to Solution Explorer features such as Menu Design, Menu Filtering, Favorites, Fast Path and Documentation.
Misc Security - Secures users and roles from Read/Write reports andWorkflow status monitoring.
Data Browser Security - Grants permission to users, roles, or *PUBLIC to access the Data Browser program.
Push Button, Link and Image Security - Enables you to secure users from using or viewing push button, link, and image controls. You can secure users from using a control but still allow them to view it. Or you can prevent users from both using and viewing a control.
Media Object Security - Secures users from adding, changing, deleting or viewing media object attachments in Interactive Applications.
For answers to some frequently asked questions on Security Workbench, refer to Document 1076527.1
Row Exits for Security Setup
When making changes to the different types of security, there are row exits available to speed up the process. Each type of security has a row exit in the security workbench application that will give you access to the proper forms to setup each security type.
Application Security

Application security enables you to secure these types of items from users:
Applications o When you secure an application, you secure all versions and
forms associated with the application. Versions
o You can secure access to a version of an application while leaving other versions available to the user.
Forms o You can secure access to a single form in an application or
application version.
Adding Application Security
Enter P00950 in the Fast Path.
1. On the Work With User/Role Security form, select the Form menu, Setup Security, Application.
2. On the Application Security form, enter the user or role ID in the User / Role field.
3. Enter a complete user or role, which includes *PUBLIC but not wildcards.
4. In the Display UnSecured Items region, complete the appropriate fields, and then click Find.
o Application o Version
Enter a particular version of the application that you entered in the Application field. If you leave this field blank, the system displays all versions associated with the application in the UnSecured node.
o Product Code Enter a product code to display all applications, versions, and forms associated with a particular product code. This field does not work in conjunction with the Application or Version fields. The search results appear under the UnSecured node.
5. Expand the UnSecured node to view the individual applications or versions, and the forms associated with each, that do not already have security set for them. After you expand the node, the individual items also appear in the grid.
6. In the Create with region, select one or both of these security options:
o Run Security Select this option to secure users from running the application.

o Install Security Select this option to prevent the just-in-time installation (JITI) of anything necessary to run the application.
7. Complete one of these steps: o Drag applications, versions, or forms from the UnSecured node
to the Secured node. o From the Row menu, select All Objects to move all
applications to the Secured node. o From the Row menu, select Secure to All to move all objects
that are under the UnSecured node to the Secured node. If you secured an individual form, only the form appears under the Secured node. If you secured an application or version, the application or version and the forms associated with each appear under the Secured node.
8. To change the security on an item, select the item under the Secured node, select the appropriate security option, and then, from the Row menu, select Revise Security. In the grid, the values under the Run and Install fields change accordingly.
To move all of the applications for a particular user or group from the unsecured node to the secured node, choose Secure to All on the Row exit.
Note: A commonly adapted strategy is to secure all users or all users in a role from all applications, then un-secure users/role to those applications that they should have access to. To secure a user or role from all applications, select the All Objects option on the Row exit. See Document 626551.1 for additional details on applications that should be granted back when applying security in this manner.
For answers to some frequently asked questions on Application Security, refer to Document 1212684.1 E1: SEC: Frequently Asked Questions on Application Security.
Action Security
Action security enables you to secure the buttons that enable users to perform particular actions, such as adding, deleting, inquiring, revising, or copying a record. These buttons typically reside on the toolbar in a form. Do not confuse these buttons with buttons that are located on other parts of a form.
Adding Action Security
Enter P00950 in the Fast Path.

1. On the Work With User/Role Security form, select the Form menu, Setup Security, Action.
2. On Action Security, enter the user or role ID in the User / Role field and click Find.
o You can enter *PUBLIC but not wildcards. o Current action security settings for the user or role appear
under the Secured node in the tree. 3. To find the applications, versions, or forms to which you want to
apply action security, complete any of these fields under the Display UnSecured Items heading, and then click Find:
o Application Enter an application name, such as P01012. Enter *ALL to display all applications.
o Version Enter a version of the application you entered in the Application field. If you leave this field blank, all versions associated with the application will appear in the UnSecured node.
o Product Code 4. Expand the Unsecured node to view individual applications,
versions, and forms in the detail area. 5. In the Create with region, select any of these options:
o Change o Add o Delete o OK/Select o Copy o Scroll To End
6. To secure the actions on an application, version, or form, perform one of these steps:
o Drag the application, version, or form from the UnSecured node to the Secured node.
o From the Row menu, select All Objects to move all items to the Secured node.
o From the Row menu, select Secure to All to move all objects under the UnSecured node to the Secured node. For example, to set delete security on an application, selectthe Delete option. Next, drag the application from the UnSecured node to the Secured node. The detail area will reflect the delete security that you set for this application, which means that the user you entered cannot perform the delete action on this application. The applications or forms now appear under the Secured node and they have the appropriate action security.
7. To change the security on an item, select the item under the Secured node, select the appropriate security option, and then,

from the Row menu, select Revise Security. In the grid, the values for the security options change accordingly.
For answers to some frequently asked questions on Action Security, refer to Document 1100827.1 E1: SEC: Frequently Asked Questions on Action Security
Row Security
Row security enables you to secure users from accessing a particular range or list of data in any table. Use row security sparingly because itcan adversely affect system performance. Additional processing occurs foreach data item that you set with row security. You can set up row security at three levels:
User Role *PUBLIC
JD Edwards EnterpriseOne first looks for row security at the user level, then at the group level, and then at the *PUBLIC level. If you set any ofthe security at a higher level, such as at the user level, the software ignores lower-level security settings, such as the role or *PUBLIC levels.
Before you set up row security for an item in a table, you should verify that the item is actually in that table. For example, the F0101 table contains the data item AN8. Therefore, you can set up row security for that item. However, the same table does not contain data item PORTNUM. Setting row security on this item for the F0101 table has no effect.
You set up row security on a table, not on a business view. You should verify that the object that you want to secure uses a business view over a table containing the object. For example, the Work With Environments application (P0094) uses business view V00941 over the F00941 table. You could secure the data item RLS (Release) because it is in the F00941 table. On the other hand, the same item is not in the F0094 table. If youattempt to secure the item on the F0094 table, data item RLS is not secured.
Adding Row Security
Enter P92001 in the Fast Path.

1. On the Work With Data Items form, click Find. 2. Select the data item that you want to secure, and click Select. The
Data Item Specifications form appears. 3. On the Item Specifications tab, select the Row Security option and
click OK. This option must be selected for row security to work. 4. Click OK. 5. Exit the data dictionary application. 6. In Solution Explorer, enter P00950 in the Fast Path and press
ENTER. 7. On the Work With User/Role Security form, select the Form menu,
Setup Security, Row. 8. On the Row Security Revisions form, complete the User / Role field
and then click Find to display current row security. 9. Complete these fields, either in the first open detail area row (to
add security) or in a pre-existing detail area row (to change security):
o Table You can enter *ALL in this field.
o Data Item This field is required.
o From Value This field is required.
o Thru Value o Add o Change o Delete o View
10. Click OK to save the security information.
For more information on Row Security, refer to the following documents:
Document: 1079604.1 E1: SEC: How to Apply Row Security Document: 1067192.1 E1: SEC: Overview of Inclusive Row Security
versus Exclusive Row Security Document: 1078989.1 E1: SEC: Frequently Asked Questions on Row
Security
Column Security
This section explains how to add and revise column security. You can secure users from viewing a particular field or changing the value for a particular field. This item can be a database field, or a field that is defined in the data dictionary but is not in the database.

You can set up column security on a table, an application, an applicationversion, or a form. Even if an application uses a business view that doesnot contain the data item that you want to secure, you can still secure it, as long as the item appears on a form in the application.
Column Security on a Table
Before you set up column security on a table, do these:
Verify that the object that you want to secure is in the table. Verify that the object that you want to secure is part of an
application that uses a business view over a table containing the object.
Verify that the object that you want to secure uses a business viewthat includes the column containing the object.
For example, if you want to apply column security to data item RLS (Release Number) in the F00941 table, RLS must be an item in that table, and it must also be part of an application using a business view over that table. Finally, the business view over the F00941 table must includea column containing the data item RLS.
If all of these conditions are met, you can successfully apply column security to the data item. Setting column security on a table also means that you set security on the data item for any other applications that use the F00941 table.
Column Security on an Application
Before you set up column security on an application, do these:
Verify that the object that you want to secure is in the application.
Verify that you are securing the correct data item in an application (data item descriptions can be similar, if not identical).
For example, if you want to apply column security to data item UGRP (UserRole) in the Object Configuration Manager application (P986110), youfirst verify that the item is in the application. Because it is in the application, you can apply security to the data item. However, note that data items UGRP, MUSE, USER, and USR0 all contain the identical data description of User ID. Verify the item by its alias, not by its data description.
Column Security on an Application Version

You can secure users from using columns (or fields) in a version of an application. When you secure a column in a version, the system secures the column in all forms associated with that application version.
Before you set up column security on an application version, do these:
Verify that the object that you want to secure is in the version ofthe application.
Verify that you secure the correct data item in an application (data item descriptions can be very similar, if not identical). Verify the item by its alias, not by its data description.
Column Security on a Form
Security Workbench enables you to secure the column in one particular form, either in an application or in a version of an application.
Before you set up column security on a form, do these:
Verify that the object that you want to secure is in the form. Verify that you secure the correct data item in the form (data item
descriptions can be very similar for different data items).
Adding Column Security
Enter P00950 in the Fast Path.
1. On the Work With User/Role Security form, select the Form menu, Setup Security, Column.
2. On the Column Security Revisions form, complete the User / Role field, and then click Find to display current column security for the user or role.
3. To add new security, go to the last row of the detail area and enter information into any of these fields:
o Table o Application o Version
If you want to add column security to a particular version, enter a version of the application that you entered in the Application field.
o Form Name You can enter *ALL in any of these fields; however, after *ALL is entered for a table, application, or form for a specific data item, you cannot enter *ALL again for that dataitem.

4. Complete these fields: o Data Item o View o Add o Change
5. To change security, change the row values in the detail area. 6. Click OK to save the security information.
For answers to some frequently asked questions on Column Security refer to Document: 1073209.1 E1: SEC: Frequently Asked Questions on Column Security
Processing Option/Data Selection Security
Processing Option Security
Processing option security is used to secure users from viewing/changing the values of processing options or from prompting for values and versions. For example, if a user is secured from changing the processing options for Address Book Revisions, they could still view the processing options (if they are not secured from viewing), but they would not be able to change any of the values. If they are secured from prompting for versions, they would not be able to see the versions for a specific application, which means they would not be able to choose a different version of an application from the version that the administrator set up for them.
Data Selection Security
Until Tools Release 8.98.1.0, the only option available for defining dataselection was the option to prevent users from Prompting for Data Selection when submitting a version. This was defined within Processing Option security by selecting the option for Prompt for Data Selection. When this option is selected, users will receive an error if attempting to access data selection at runtime.
Beginning with Tools Release 8.98.1.0, you can secure users from modifying, adding, deleting, and viewing the data selection for batch applications or specific versions of batch applications. This security applies to the data selection during submission of a batch application (or report). Data selection security only applies to web clients. You can set up data selection security by running the security workbench application on the Windows client. However, the security is only enforcedfor end users submitting batch applications from the web client. It is not enforced for other means of launching reports, such as RUNUBE and RUNUBEXML commands or the scheduler.
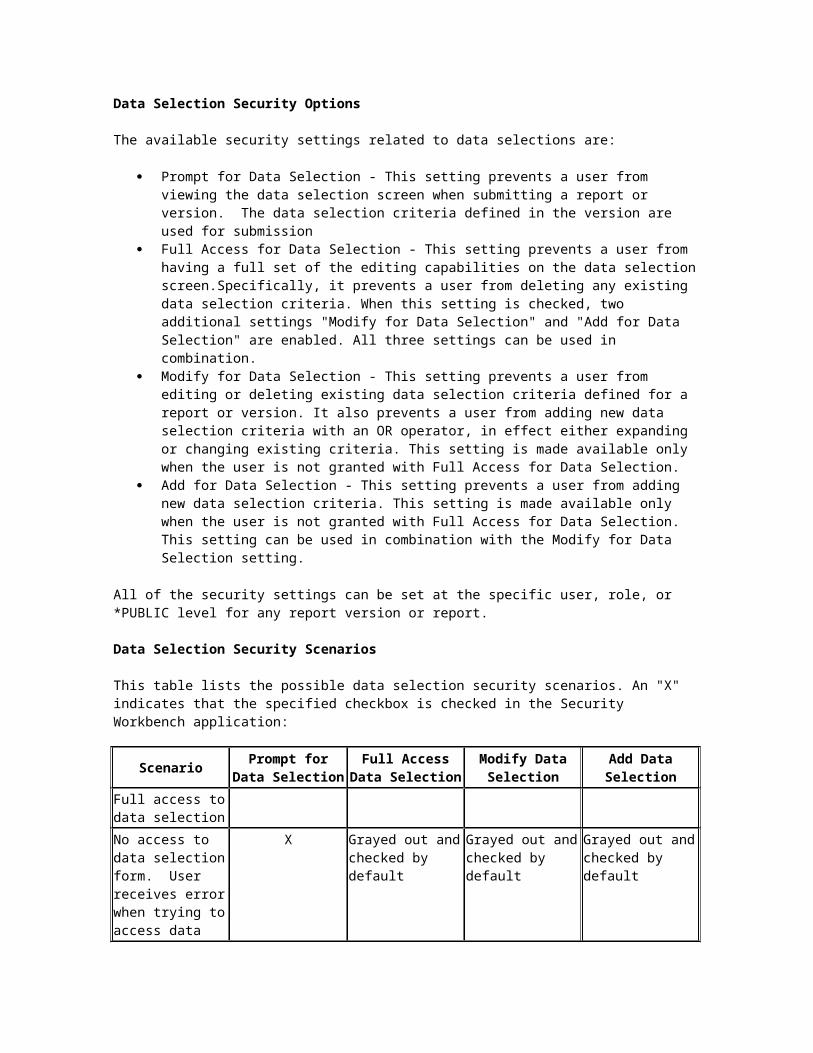
Data Selection Security Options
The available security settings related to data selections are:
Prompt for Data Selection - This setting prevents a user from viewing the data selection screen when submitting a report or version. The data selection criteria defined in the version are used for submission
Full Access for Data Selection - This setting prevents a user from having a full set of the editing capabilities on the data selectionscreen.Specifically, it prevents a user from deleting any existing data selection criteria. When this setting is checked, two additional settings "Modify for Data Selection" and "Add for Data Selection" are enabled. All three settings can be used in combination.
Modify for Data Selection - This setting prevents a user from editing or deleting existing data selection criteria defined for a report or version. It also prevents a user from adding new data selection criteria with an OR operator, in effect either expanding or changing existing criteria. This setting is made available only when the user is not granted with Full Access for Data Selection.
Add for Data Selection - This setting prevents a user from adding new data selection criteria. This setting is made available only when the user is not granted with Full Access for Data Selection. This setting can be used in combination with the Modify for Data Selection setting.
All of the security settings can be set at the specific user, role, or *PUBLIC level for any report version or report.
Data Selection Security Scenarios
This table lists the possible data selection security scenarios. An "X" indicates that the specified checkbox is checked in the Security Workbench application:
Scenario Prompt forData Selection
Full AccessData Selection
Modify DataSelection
Add DataSelection
Full access todata selectionNo access to data selectionform. User receives errorwhen trying toaccess data
X Grayed out andchecked by default
Grayed out andchecked by default
Grayed out andchecked by default
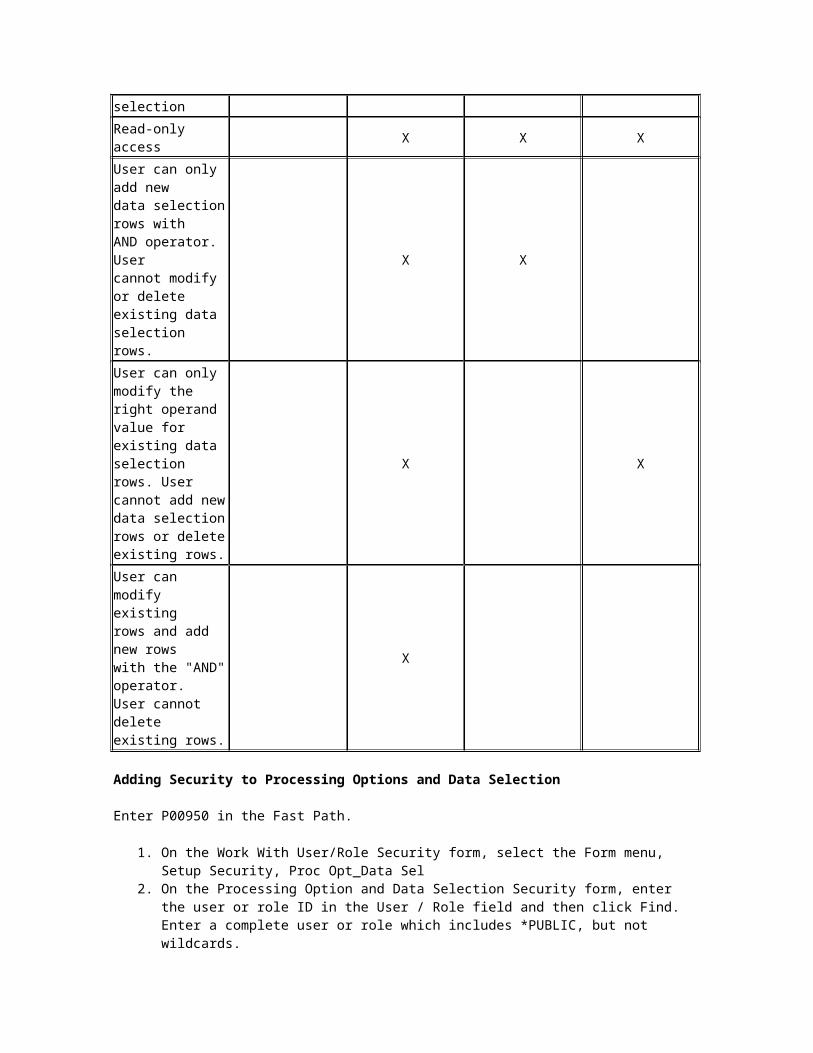
selectionRead-only access X X X
User can only add newdata selectionrows withAND operator. Usercannot modify or deleteexisting data selectionrows.
X X
User can only modify theright operand value forexisting data selectionrows. User cannot add newdata selectionrows or deleteexisting rows.
X X
User can modify existingrows and add new rowswith the "AND"operator.User cannot deleteexisting rows.
X
Adding Security to Processing Options and Data Selection
Enter P00950 in the Fast Path.
1. On the Work With User/Role Security form, select the Form menu, Setup Security, Proc Opt_Data Sel
2. On the Processing Option and Data Selection Security form, enter the user or role ID in the User / Role field and then click Find. Enter a complete user or role which includes *PUBLIC, but not wildcards.

3. In the Display UnSecured Items region, complete the appropriate fields and then click Find:
1. Application - Enter an application name, such as P01012. Enter *ALL to display all applications.
2. Version - You can enter a particular version of the application that you entered in the Application field. If youleave this field blank, all versions associated with the application will appear in the UnSecured node.
3. Product Code4. You must perform this step before you can add new security. This
step provides a list of applications from which you can apply data selection security. The search results appear under the UnSecured node. Expand the node to view applications (interactive and batch) and menus with interactive or batch applications. After you expand the node, the applications appear in the detail area. For example, to set security on applications within the 00 product code, you enter 00 in the Product Code field and click Find. All of the applications (interactive and batch) attached to product code 00 appear after you expand the UnSecured node.
5. In the Create with region, select one or more of these options and drag applications from the UnSecured node to the Secured node:
o Changeo Prompt for Values
When you select this option, you automatically activatethe Change option.
o Prompt for Versionso Prompt for Data Selectiono Full Access Data Selection
When you select this option, you automatically activatethe following two options
Modify Data Selection Add Data Selection
6. Perform one of these actions:o Drag applications from the UnSecured node to the Secured
node.o From the Row menu, select All Objects to move all
applications to the Secured node.o From the Row menu, select Secure to All to move all objects
under the UnSecured node to the Secured node.o The applications now appear under the Secured node and have
the appropriate security.7. To change the security on an item, select the item under the
Secured node, select the appropriate security option, and then, from the Row menu, select Revise Security. In the grid, the values for the security options change accordingly.

For additional information on Processing Option and Data Selection security, refer to the Frequently Asked Question document Document 1137370.1.
Tab Security
Tab Security secures users from seeing a Tab(s) on a given form.
NOTE: If a user is secured from an application, the user cannot also be secured from certain tabs on a form in that application. This restrictionprevents redundant "double" security. Similarly, if a user is secured from a tab, the user cannot be secured from an application that contains the tab. In this scenario the tab security would need to be removed in order to create the application security.
Adding Tab Security
Enter P00950 in the Fast Path
1. On the Work With User/Role Security form, select the Form menu, Setup Security, Tab Security.
2. On the Tab Exit Security form, complete these fields and click Find:
o User / Role Enter a complete user or role, which includes *PUBLIC but notwildcards.
o Application You can view security for a specific application or enter *ALL to display all applications. Current security settings for the user or role appear under the Secured node in the tree. Expand the nodes to view the secured tabs. After you expand the node, the secured tabs also appear in the grid.
3. Complete only one of these fields in the Display UnSecured Items region and click Find:
o Application Enter *ALL in this field to select all JD Edwards EnterpriseOne objects. In the detail area, this special object appears as *ALL and displays the security that you defined for the object, such as Run Security or Install Security. The *ALL object acts as any other object, and you can use the Revise Security and Remove All options from the Row menu.
o Product Code You must perform this step before you can add new security. This step provides a list of applications from which to select. The search (application or product code) appears under the UnSecured node. Expand the node to view

applications (interactive and batch) and the associated tabs.After you expand the node, the applications or tabs also appear in the detail area. For example, to set security for tabs in applications within the 00 product code, you enter 00in the Product Code field and click Find. All of the applications (interactive and batch) attached to product code00 appear after you expand the UnSecured node.
4. In the Create with region, select one or more of these options: o Change
Select this option to prohibit a user or role from changing information on the tab page.
o View Select this option to hide the tab from the user or the role.
5. Drag tabs from the UnSecured node to the Secured node. These tabs now appear under the Secured node.
6. To change the security on an item, select the item under the Secured node, select the appropriate security option, and then, from the Row menu, select Revise Security. In the grid, the values for the security options change accordingly.
Exit Security
Exit Security is used to secure users from menu bar exits on J.D. EdwardsEnterpriseOne forms. These exits call applications that may allow users to manipulate data.
Adding Exit Security
Enter P00950 in the Fast Path.
1. On the Work With User/Role Security form, select the Form menu, Setup Security, Exit Security.
2. On the Hyper Exit Security form, complete these fields and click Find:
o User / Role Enter a complete user or role ID, which includes *PUBLIC but not wildcards.
o Application View security for a specific application. Enter *ALL to display all applications. Current security settings for the user or role appear under the Secured node in the tree. Expand the node to view the individual secured applications, such as interactive and batch. After you expand the node, thesecured hyper-button exits also appear in the detail area.
3. In the Display Unsecured Items region, complete only one of these fields to locate the applications to which you want to apply exit security, and click Find:

o Application You can enter *ALL in this field.
o Product Code You can search for all of the applications within a product code. For example, to set security on hyper-buttons in applications within the 00 product code, you enter 00 in the Product Code field and click Find. All of the applications (interactive and batch) attached to product code 00 appear after you expand the UnSecured node. The search (application, product code, or menu) appears underthe UnSecured node. Expand the node to view applications (interactive and batch) and hyper-button exits. After you expand the node, the hyper-button exits also appear in the detail area.
4. Expand the UnSecured node to view and select applications (interactive and batch) and hyper-button exits. After you expand the node, the hyper-button exits also appear in the detail area.
5. In the Create with region, select the Run Security option. 6. Drag exits one at a time from the UnSecured node to the Secured
node. The exits that you dragged now appear under the Secured node.The grid reflects the security that you set for these exits. This security prevents the user that you entered from using the exit.
Exclusive Application Security
Exclusive application security enables you to grant access to otherwise secured information through one exclusive application. For example, assume that you use row security to secure a user from seeing a range of salary information; however, the user needs to run a report for payroll that includes that salary information. You can grant access to the report, including the salary information, using exclusive application security. JD Edwards EnterpriseOne continues to secure the user from all other applications in which that salary information might appear. Exclusive Application Security is used only in combination with row security. It does not apply to any other types of security.
Adding Exclusive Application Security
Enter P00950 in the Fast Path.
1. On the Work With User/Role Security form, select the Form menu, Setup Security, Exclusive Application.
2. On the Exclusive Application Security form, complete the User / Role field. Enter a complete user or role, which includes *PUBLIC but not wildcards.

3. Complete these fields in the detail area: o Object Name
Enter the name of the exclusive application for which you want to allow access (the security). For example, to change the security for a user of the Vocabulary Overrides application, enter P9220 in this field.
o Run Application 4. Click OK to save the information.
External Call Security
External Call Security secures users from accessing standalone executables that exist external to EnterpriseOne. These external executables, which might include design tools, system monitors, and debugging tools, are specific to J.D. Edwards EnterpriseOne. Examples of these types of EnterpriseOne standalone executables include Report DesignAid (RDA), Form Design Aid (FDA), Universal Table Browser (UTB), BusBuild, etc. By default these files reside in the \system\bin32 directory.
Adding External Call Security
Enter P00950 in the Fast Path.
1. On the Work With User/Role Security form, select the Form menu, Setup Security, External Calls.
2. Complete these fields, and click Find: o User / Role
Enter a complete user or group ID, which includes *PUBLIC butnot wildcards.
o Executable Enter the name of the external application, such as debugger.exe. When you enter information into this field, thesoftware searches only for the indicated application. Currentsecurity settings for that user or group appear under the Secured node in the tree. Expand the node to view the individual secured applications, such as debugger.exe.
3. In the Create with region, select the Run Security option. 4. Complete one of these steps:
o Drag applications from the UnSecured node to the Secured node.
o To move all applications to the Secured node, select All Objects from the Row menu. The external call applications now appear under the Secured node and have the appropriate security. For example, to set run security on the Business Function Design application, select the Run Security option and then

drag the Business Function Design node from the UnSecured node to the Secured node. The detail area reflects the run security that you set for this application, which means that the user you entered could not run the Business Function Design application.
5. To change the security on an item, select the item under the Secured node, select the Run Security option, and then, from the Row menu, select Revise Security. In the grid, the value in the Runfield changes accordingly.
For releases Xe/ERP 8.0, it is not possible to enter the Executable name directly. Instead, you must enter a Menu ID where the executable is defined as a menu item under the Display UnSecured Items. This will thenlist all the executables for that menu under the UnSecured node. The rest of the steps for dragging the option from UnSecured to Secured node remains the same.
Solution Explorer Security
Use the Security Workbench application (P00950) to set up security for the JD Edwards Solution Explorer. Setting up security correctly ensures that users in the system will have permission to perform only those actions that are essential to their jobs. In addition to setting up security for JD Edwards Solution Explorer, you can set security for thesefeatures:
Menu Design Menu Filtering Fast Path Documentation OMW Logging
This table describes the three JD Edwards Solution Explorer security settings
Security Setting Description
Secured Restricts the user from accessing the feature.
ViewAllows read-only access to the feature but no modification capability
ChangeGives the user full access to the feature with no restrictions on changing, adding, or deleting data.
The Work With Solution Explorer Security Revisions form contains security

presets that represent default security settings for different types of system users. These user types correspond to novice (Preset One), intermediate (Preset Two), and expert (Preset Three) users. If you click one of these preset buttons, Solution Explorer changes the Security Revisions default settings for each feature.
Novice users require the most restrictive security settings; expert usersrequire the least restrictive settings. Although you can fine-tune these default settings for a particular individual, using the default settings can free you from the task of manually choosing security setting options for each individual in the system because you can apply the settings to groups as well as to individual users.
Level One - A typical end user without access to the Fast Path Level Two - A typical end user with access to the Fast Path Level Three - An administrator (maximum security settings)
For additional information on Solution Explorer security, refer to the following documents:
Document: 949524.1 E1: SEC: How to Implement Solution Explorer Security
Document: 1108472.1 E1: SEC: Frequently Asked Questions on SolutionExplorer Security
Miscellaneous Security
JD Edwards EnterpriseOne security enables you to secure users and roles from:
Read/write reports Workflow status monitoring
Read/Write Reports Security
JD Edwards EnterpriseOne enables administrators to prevent specific usersand roles from running reports that update JD Edwards EnterpriseOne database tables (read/write reports). Administrators can assign users to a user profile called No Update Report Creation User (NUR), which restricts users to running only read-only reports. When an NUR user runs a report, JD Edwards EnterpriseOne prevents the report from making table input/output (I/O) calls to databases that can affect business data. Users assigned to this profile can create and run read-only reports, but are restricted from creating or running existing update reports. NUR users can copy existing update reports and run the copied report, although the software disables the report's ability to change business data and displays a warning that the copied report cannot be updated. NUR

users can edit NUR reports in Report Design Aid, but are prevented from even opening existing update reports in RDA.
Workflow Status Monitoring Security
Users can access Workflow Modeler, (a scaled-down version of Process Modeler) to design JD Edwards EnterpriseOne workflow models. Process Modeler Server includes a JD Edwards EnterpriseOne Portal-based componentcalled Model Viewer, which enables users with appropriate access to monitor the status of a workflow and perform workflow administration tasks directly from the Viewer. Miscellaneous security includes these Workflow Status Monitoring settings, which determine the operations a user can perform from the Model Viewer:
Secured o Restricts users from accessing any Model Viewer tasks using
the Portal. Partial
o Allows users to view workflow models and to monitor their status, but restricts these users from performing any administrative tasks.
Full o Allows users to access all Model Viewer tasks using the JD
Edwards Collaborative Portal. Users can view workflow statuses and perform administrative tasks.
Managing Miscellaneous Security Features
Enter P00950 in the Fast Path.
1. On the Work With User/Role Security form, select the Form menu, Setup Security, Misc Security.
2. Complete the User / Role field and click Find. Enter a complete user or role, which includes *PUBLIC but not wildcards.
3. To change Read-Only Report security, select one of these options: o Read / Write o Read Only
4. To change Workflow Status Monitoring security, select one of these options:
o Secured - Prevents users from viewing or administering workflow.
o View - Allows users to view workflow but prevents them from making changes.
o Full - Allows users to view and administer workflow. 5. Click OK to accept the changes.

Push Button, Link and Image Security
JD Edwards EnterpriseOne enables you to secure users from using or viewing push button, link, and image controls. You can secure users from using a control but still allow them to view it. Or you can prevent usersfrom both using and viewing a control.
NOTE:. In JD Edwards EnterpriseOne forms, static text and text boxes can be made into links. However, you can only apply security to static text links, not to text box links.
Security Workbench displays the objects that you want to secure in a hierarchical tree structure that contains nodes for each application, application version, and form. Security Workbench only displays the formsthat contain push button, link, and image controls. You can secure an individual control by dragging the control from the UnSecured node to theSecured node. In addition, you can secure all controls - push buttons, links, or images on a form by dragging the form node to the Secured node.You can perform the same action on applications and application versions.For example, to secure all the links within an entire application, you drag the application from the UnSecured node to the Secured node to secure all the links in every form within the application as well as within any versions of the application. If you drag an application version node to the Secured node, only the links in that application version are secured.
Push Button, Link and Image security is a security enhancement that is available beginning with EnterpriseOne 8.11 SP 1 and later releases and tools release 8.96. This security enhancement applies only to the Web client. It is not available on the Windows client. For additional detailson the availability, see the related document Document: 648710.1 E1: SEC:Push Button, Link and Image Security
Adding Push Button, Link and Image Security
Enter P00950 in the Fast Path.
1. On the Work with User/Role Security form, select the Form menu, Setup Security, and then the menu for push buttons, links, or images, depending on the type of object that you want to secure.
2. Complete the User / Role field and click Find. Enter a complete user or role, which includes *PUBLIC.
3. In the Display UnSecured Items region, complete the appropriate fields and then click Find:

o Application Enter an interactive application name, such as P01012. Enter *ALL to display all applications. Note. Batch applications are not supported.
o Version You can enter a particular version of the application that you entered in the Application field. If you leave this fieldblank, Security Workbench displays all unsecured versions associated with the application in the UnSecured node.
o Product Code Enter a product code to display all applications, versions, and forms associated with a particular product code. This field does not work in conjunction with the Application and Version fields.
4. The search results appear under the UnSecured node. 5. Expand the UnSecured node to view the individual applications or
versions, and the forms associated with each. Only the forms that contain controls are displayed.
6. Under the Create with region, select the type of security that you want to apply:
o View - This option prevents the user from using and viewing the control.
o Enable - This option prevents the user from using the control. However, the control is still visible.
7. Use one of these actions to secure the items: o Drag items from the UnSecured node to the Secured node. o From the Row menu, select All Objects to move all
applications to the Secured node. The system displays the items under the Secured node that have the appropriate security. You can view the security for each item in the grid.
Data Browser Security
Data Browser security enables you to grant permission to users, roles, or*PUBLIC to access the Data Browser program. There are two levels of Data Browser security that you can assign to users. The first level grants access to the Data Browser, which users can use to perform public or personal queries. After you grant this access, you can grant an additional level of security that allows Data Browser users to select a particular table or business view that they wish to query.
Data Browser security is available beginning with EnterpriseOne tools release 8.95 and application release 8.11 SP 1. For additional details onthe availability of this security, see the related document Document: 639420.1 E1: SEC: Security for Data Browser on Web Client.

Adding Data Browser Security
Enter P00950 in the Fast Path.
1. On the Work With User/Role Security form, select the Form menu, Setup Security, Data Browser.
2. On the Data Browser Security Revisions form, enter the user or roleID in the User / Role field and click Find. You can enter *PUBLIC but not wildcards.
3. In the Data Browser hierarchical security permissions region, select one or both of these options, depending on the level of security that you want to grant:
o Allow access to launch Data Browser. This option gives users access to the Data Browser, which they can use to perform personal or public queries.
o Allow access to Search and Select for Tables or Business ViewQueries. This option gives users the ability to search and select the table or business view that they want to query. Note: This option is enabled only after you select the first option
4. Click OK.
Note: To activate Data Browser security changes, you must refresh the jdbj security cache using Server Manager or SAW.
Media Object Security
JD Edwards EnterpriseOne enables you to secure users from adding, changing, deleting, or viewing media objects within interactive applications, forms, or application versions. You can apply media object security to ensure that media object attachments cannot be modified or tampered with after they have been added.
If you apply view security to media object attachments, Security Workbench automatically prevents the user from adding, deleting, or changing media objects. If you apply change security to media object attachments, Security Workbench automatically prevents the user from deleting the media object.
Media object security enables you to use media object attachments as a mechanism for recording justifications for transactions and for legal purposes. For example, your company may have a business process that requires clerks to use media object attachments to document the reason orjustification for adjusting a price on an item in a transaction. In this case, you would allow the clerks to add and view media object attachmentsin an application, but secure them from deleting or modifying them. In

addition, this type of security prevents users from modifying or deletingattachments that others have added. As a result, the media object attachments provide secured information about previous transactions. Thisinformation can be reviewed by interested parties for legal or other purposes.
NOTE: Media object security is enforced only in interactive applications on the JD Edwards EnterpriseOne web client and the Portal. It is not supported on the Microsoft Windows client. Also, media object system functions enforce media object security in the web client. When running applications that have media object security applied to them, the system logs the security information for the system functions in the web client debug log file.
Media object security is available with tools release 8.96 and application release 8.12. For additional information on Media Object security, see the related documents:
Document 960464.1 E1: SEC: Security on Media Object Attachments Document 1092219.1 E1: SEC: Frequently Asked Questions on Media
Object Security.
Adding Media Object Security
Enter P00950 in the Fast Path.
1. On the Work With User/Role Security form, select the Form menu, Setup Security, Media Object.
2. On the Media Object Security form, enter the user or role ID in theUser / Role field and click Find. You can enter *PUBLIC but not wildcards. Current media object security settings for the user or role appear under the Secured node in the tree.
3. To find the applications, versions, or forms to which you want to apply media object security, complete any of these fields in the Display UnSecured Items region, and then click Find:
o Application Enter an application name, such as P01012. Enter *ALL to display all applications.
o Version Enter a version of the application you entered in the Application field. If you leave this field blank, all versions associated with the application will appear in the UnSecured node.
o Product Code 4. Expand the Unsecured node to view individual applications,
versions, and forms in the detail area. 5. In the Create with region, select any of these options:

o Change o Add o Delete o View o Note. If you apply view security to media object attachments,
Security Workbench automatically prevents the user from adding, deleting, or changing media objects. If you apply change security to media object attachments, Security Workbench automatically prevents the user from deleting the media object.
6. To secure the media objects on an application, application version,or form, perform one of these steps:
o Drag the application, version, or form from the UnSecured node to the Secured node.
o From the Row menu, select All Objects to move all items to the Secured node.
o From the Row menu, select Secure to All to move all objects beneath the UnSecured node to the Secured node. For example, to set delete security, select the Delete option. Next, drag the application from the UnSecured node tothe Secured node. The detail area will reflect the media object security that you set for this application. The applications or forms now appear under the Secured node, and they have the appropriate media object security.
Text Block Control and Chart Control Security
JD Edwards EnterpriseOne enables you to secure users from using or viewing text block and chart controls. You can secure users from using a control but still allow them to view it. Or you can prevent users from both using and viewing a control.
In JD Edwards EnterpriseOne, a text block or chart control can have separate segments that contain links to other objects. You cannot secure these individual segments of a control. When you secure a text block or chart control, security is applied to the entire control.
Adding Text Block Control and Chart Control Security
Enter P00950 in the Fast Path.
1. From the Form menu, select Set Up Security, and then select the menu for text block control or chart control, depending on the typeof control that you want to secure.
2. Complete the User / Role field and click Find. Enter a complete user or role, which includes *PUBLIC.

3. In the Display UnSecured Items region, complete the appropriate fields and then click Find:
o Application Enter an interactive application name, such as P01012. Enter *ALL to display all applications. Note. Batch applications are not supported.
o Version You can enter a particular version of the application that you entered in the Application field. If you leave this fieldblank, Security Workbench displays all unsecured versions associated with the application in the UnSecured node.
o Product Code Enter a product code to display all applications, versions, and forms associated with a particular product code. This field does not work in conjunction with the Application and Version fields.
4. Expand the UnSecured node to view the individual applications or versions, and the forms associated with each. Only the forms that contain controls are displayed.
5. Under the Create with region, select the type of security that you want to apply:
o View - This option prevents the user from using and viewing the control
o Enable - This option prevents the user from using the control. However, the control is still visible
6. Use one of these actions to secure the items: o Drag the text block or chart control from the UnSecured node
to the Secured node o Select the control that you want to secure and then select
Secure Selected from the Row menu. o From the Row menu, select All Objects to move all
applications to the Secured node. The system displays the items under the Secured node that have the appropriate security. You can view the security for each item in the grid. The search results appear under the UnSecured node.
For Text Block Control Security, beginning with EnterpriseOne 9.0 and Tools Release 8.98, a new option is available called Application Encoding. The check box for Application Encoding should be Checked (value = "N") in order for the user/role to be allowed to execute scripts specified in the Text Block segments on the application. When this Application Encoding option is not selected, then the script is encoded and will not be executed within the Text Block control.
Published Business Services Security

JD Edwards EnterpriseOne provides security to ensure that web service consumers are authenticated in the JD Edwards EnterpriseOne system and authorized to access published business services. The authentication of users of published business service users is handled by the Business Services Server and EnterpriseOne security server. After a user is authenticated by the JD Edwards EnterpriseOne security server, the systemchecks if the user is authorized to run a published business service by retrieving records from the JD Edwards EnterpriseOne F00950 security table, which contains all the object security records.
Note. This section discusses only the authorization of users to access published business services.
For published business services, JD Edwards EnterpriseOne uses a "secureby default" security model which means that users cannot access a published business service unless a security record exists that authorizes access. For all other objects in JD Edwards EnterpriseOne, access is granted unless otherwise secured or restricted.
You manage published business services security using Security Workbench (P00950), the application used to manage all object security in JD Edwards EnterpriseOne. In P00950, you can add, copy, modify, or delete security records for published business services. When a user tries to access or run a published business service, verification of authorizationis done through an API that queries records in the F00950 security table.
As with all object security in JD Edwards EnterpriseOne, you can assign published business service security to a user, role, or *PUBLIC. You can create a security record that allows a user or role access to:
A particular method in a published business service. All methods in a published business service. All published business services.
It is recommended that you set up security by role first. This method makes setting up published business services security easier; instead of defining security for individual users, you can define security for the role and then assign users to the appropriate roles. If an individual in a role needs a different security setup, you can assign security at the user level, which overrides the role settings.
In addition, you can create a security record that disallows access to a published business service. Typically, there is no need to add security records that disallow access because by default, access to published business services is not allowed. However, creating a security record that disallows access can be an efficient method to set up published

business services security. For example, to allow a role access to all but a small subset of published business services, you can:
Enter *ALL in the fields for the published business service and published business service method to create a security record that allows the role access to all published business services.
Create security records for the same role that disallows access to a subset of published business services.
Inherited Security
When creating a published business service, a developer can configure it to pass its context to any published business service that it calls. In this configuration, authorization for the called published business service is inherited; that is, if the calling business service is authorized, then the called business service is authorized as well. In this scenario, the system does not check the security for the called business service.
However, it is possible (though not supported) to configure a published business service so that it does not pass its context to another businessservice. In this scenario, the security or authorization for the called published business service is not inherited. Even if a user is authorizedto access the calling or parent business service, the system also checks if access to the called business service is allowed. As a result, if there is not a security record that allows access to the called business service, the system will produce an exception or error, denying access tothe called business service.
How JD Edwards EnterpriseOne Checks Published Business Services Security
JD Edwards EnterpriseOne checks security for published business services in the same sequence that it checks security for all other JD Edwards EnterpriseOne objects - first by user, then role, and finally *PUBLIC. The system applies the first security record found. In addition, for the user, role, and *PUBLIC, the system checks for published business services security in this sequence:
Published business service + method Published business service *ALL
This illustration shows how the system checks for published business services security for a user signed in with *ALL and a user signed in with a specific role:

*Role 1 has the highest role sequence
If a user is assigned to multiple roles and signs in as *ALL, the system uses role sequencing to determine which security record is used. A systemadministrator sets up role sequencing when setting up user and role profiles.
Published Business Services Security Log Information
The log file provides administrators with information that you can use for troubleshooting business service security without revealing details that could possibly create a gap in the security.
When a web service attempts to access a published business service in JD Edwards EnterpriseOne, the system records the authorization information in the log file. If the logging level is set to "Debug" the log file records whether authorization was granted or denied. If the log level is set to "Severe" the system only logs information if the attempt to accessa web service fails. This is an example of the information provided in the log file:
Access to in is for with .
Authorizing Access to Published Business Services
In P00950, you can create security records that allow a user, role, or *PUBLIC access to:
A particular method in a published business service. A published business service. All published business services.
Enter P00950 in the Fast Path.
1. On Work with User/Role Security, select the Form menu, Set Up Security, Published BSSV. By default, *PUBLIC is in the User / Rolefield. If any records exist for *PUBLIC, those records appear in the grid.
2. On Published Business Service Security Revision, enter the user, role, or *PUBLIC to which you want to allow access to a published business service.
3. To allow access to a particular method in a published business service:

o On Published Business Service Security Revision, click the visual assist in the Published BSSV column to search for and select a published business service.
o On the same form, click the visual assist in the Published BSSV Method column to select the method that you want to allow access to. On Published BSSV Method, you must enter thepublished business service again in the Published BSSV columnto see a list of all the methods for the published business service. The system displays published business services by the method that is being exposed in the published business service. A published business service that contains multiple methods will have multiple rows in the grid, one for each method.
o Select the row that contains the method that you want to secure and then click the Select button.
o On Published Business Service Security Revision, click the visual assist in the Execute Allowed column and then select Yto allow access to the published business service method.
4. To allow access to a published business service (including all its methods):
o Click the visual assist in the Published BSSV column to search for published business services.
o On Select Business Service, complete the Business Service field and click the Find button.
o Select the published business service that you want to secureand then click the Select button.
o On Published Business Service Security Revision, in the row that contains the published business service, enter *ALL in the Published BSSV Method column.
o In the same row, click the visual assist in the Execute Allowed column and then select Y to allow access to the published business service
5. To allow access to all published business services: o Enter *ALL in the row under the Published BSSV column. o Enter *ALL in the row under the Published BSSV Method column.o Click OK. o In the same row, click the visual assist and then select Y to
allow access to the published business services objects. By default, users are not allowed access to published business services objects in JD Edwards EnterpriseOne. However, you can select N to create a security override that disallows access to an object.
Adding Multiple Published Business Services Security Records at a Time
Security Workbench provides a form that you can use to add multiple published business services security records at a time.

Enter P00950 in the Fast Path.
1. On Work with User/Role Security, select the Form menu, Set Up Security, Published BSSV.
2. On Published Business Service Security Revision, from the Form menu, select Secure by Method.
3. On the Secure by Method form, enter the user, role, or *PUBLIC for which you want to set up published business services security, and then click the Find button. The system displays published business services by the method that is being exposed in the published business service. A published business service that contains multiple methods will have multiple rows, one for each method.
4. Use the query-by-example fields at the top of the grid to refine your search. For example, if you want to set up security for all methods that perform an add or delete, you search for those methodsby typing add* or delete* in the Published BSSV Method query by example field in the grid.
5. Select the check box next to the items that you want to secure. 6. Click either the Allow Execute or Disallow Execute button. 7. On Confirm Batch Secure, click OK.
The system displays the number of records that were added or updated.
Application Query Security
Application Query Security prevents users from performing searches if they have not entered search criteria in the form filter fields or QBE fields. If users try to perform a search without entering search criteria, they receive an error or warning message that alerts them that their search has been suppressed. If users enter search criteria, then the search functionality will proceed.
NOTE: Application Query Security is available only on the Web client starting with Tools Release 8.98.2.0 in Application Release 8.11 SP1 and above.
Setting up Application Query Security for Applications
Enter P00950 in the Fast Path and the Work with User/Role Security form displays.
1. From the Form menu, click Set Up Security, and then click App QuerySecurity.
o The Work with Application Query Security form displays.2. From the Form menu, click Add Application.

o The Setup Application Query Security form displays.3. Select Application.4. In the Application Name field, enter the application name to which
you are adding query security, or click the Search button and select an application from the Interactive Application Search and Select form.
5. In the Form Name field, enter the form name to which you are addingquery security, or click the Search button and select a form from the Interactive Application Search and Select form. For example, ifyou enter W01012B in the Form Name field, then the options you assign for the query security will apply to the Work With Address Book (W01012B) form.
6. Select one of the following Field Entry Requirements:o At Least One Form Filter or QBE Field
Select this option if users must enter search criteria into at least one filter field on the form or QBE column.
o Configured Fields Select this option to select one or more required form
filter fields or QBE fields for the form.7. Select one of the following Message Types:
o Error Select this option if you want an error message to pop
up when users try to execute a query that does not satisfy the Field Entry Requirements specified previously.
o Warning Select this option if you want a warning message to pop
up when users try to execute a query that does not satisfy the Field Entry Requirements specified previously.
8. Click OK.
Setting up DataBrowser Query Security
You set up databrowser query security records if you want to secure usersfrom entering wide open queries from the Data Browser. Similar to Application Query Security, you can specify required filter fields and QBE columns the user must enter when querying via the Data Browser.
Enter P00950 in the Fast Path and the Work with User/Role Security form displays.
1. From the Form menu, click Set Up Security, and then click App QuerySecurity.
o The Work with Application Query Security form displays.2. From the Form menu, click Add Application.
o The Setup Application Query Security form displays.3. From the Form menu, click Add Application, and then select
Databrowser. Notice that DATABROWSE already displays in the Application Name field, and the databrowser options display.
o At Least One Form Filter Field or QBE Field Select this option if users must enter search criteria
into at least one filter field on the form or QBE column.
o Configured Fields Select this option to select one or more required form
filter fields or QBE fields for the form.4. Select one of the following Message Types:
o Error Select this option if you want an error message to pop
up when users try to execute a query that does not satisfy the Field Entry Requirements specified previously.
o Warning Select this option if you want a warning message to pop
up when users try to execute a query that does not satisfy the Field Entry Requirements specified previously.
5. Click OK.
Excluding Users
Application Query Security is applied to all users (*PUBLIC), which encompasses all users. Some users may need to perform an open ended fetchfor a particular reason. Therefore, some users need to be excluded from the application query security. The Exclude Users form enables you to exclude one or more users from the application security record.
To exclude users, enter P00950 in the Fast Path and the Work with User/Role Security form displays.
1. From the Form menu, click Set Up Security, and then click App QuerySecurity.
o The Work with Application Query Security form displays. Any query security instances that have already been set up display in the grid.
2. From the grid, select the existing record, and then click the Row exit.
3. Click Exclude Users.o The Exclude Users form displays.
4. In the User ID field, enter the ID of the user you want to exclude from the Application Query Security you have set up for the record you selected.

5. Click OK.
Configuring Fields
Configuring fields enables you to select one or more specific form filterfields, QBE fields, or both for the required search criteria. To configure fields, follow the steps for Setting Up Application Query Security for Applications, making sure to select the Configured Fields option.
1. From the Tools menu, click Configured Fields.o The available form filter fields and QBE fields display.
2. Select the required fields for the search value, and then click Save
For more information on Application Query Security, refer to Document 1232653.1
ReferencesNOTE:1067192.1 - E1: SEC: Overview of Inclusive Row Security versus Exclusive Row SecurityNOTE:1073209.1 - E1: SEC: Frequently Asked Questions on Column SecurityNOTE:1076527.1 - E1: SEC: Frequently Asked Questions on Security WorkbenchNOTE:1078989.1 - E1: SEC: Frequently Asked Questions on Row SecurityNOTE:1079604.1 - E1: SEC: How to Apply Row SecurityNOTE:1087848.1 - E1: SEC: Frequently Asked Questions on Roles and SecurityNOTE:1092219.1 - E1: SEC: Frequently Asked Questions on Media Object SecurityNOTE:1100827.1 - E1: SEC: Frequently Asked Questions on Action SecurityNOTE:1108472.1 - E1: SEC: Frequently Asked Questions on Solution ExplorerSecurityNOTE:1137370.1 - E1: SEC: Frequently Asked Questions on Processing Optionand Data Selection SecurityNOTE:1212684.1 - E1: SEC: Frequently Asked Questions on Application SecurityNOTE:626467.1 - E1: SEC: Row Exits in Security WorkbenchNOTE:626551.1 - E1: SEC: *ALL Application Security and Common Objects to Grant BackNOTE:639420.1 - E1: SEC: How to Define Security for Data Browser on Web ClientNOTE:648710.1 - E1: SEC: Push Button, Link and Image SecurityNOTE:659276.1 - E1: SEC: Clearing the Security Cache in Web EnvironmentsNOTE:814174.1 - JD Edwards EnterpriseOne Tools 8.98 Update 1 Batch

Application Data Selection SecurityNOTE:884562.1 - JD Edwards EnterpriseOne Tools 8.98 Update 2 Application Query SecurityNOTE:949524.1 - E1: SEC: How to Implement Solution Explorer SecurityNOTE:960464.1 - E1: SEC: Security on Media Object AttachmentsNOTE:1232653.1 - E1: SEC: Application Query Security
Related
Products
JD Edwards EnterpriseOne > Tools and Technology > EnterpriseOne Tools > JD Edwards EnterpriseOne Tools
Keywords
P00950; SOLUTION EXPLORER SECURITY; ACTION SECURITY; ROW SECURITY; EXCLUSIVE APPLICATION SECURITY; APPLICATION SECURITY; COLUMN SECURITY; SECURITY.RDF
Back to top
Article RatingRate this document
Excellent
Good
PoorDid this document help you?
Yes
No
Just browsingHow easy was it to find this document?
Very easy
Somewhat easy
Comments
Important Note: this feedback is anonymously visible to other customers until processed by Oracle Support.
626545.1 Thank you for yo Provide feedback
Provide feedback for this article. Please use 'Contact Us' for other feedba

Not easyCancel
Copyright © 2022 FDOKUMEN