Japanese 1 - Houston ISD
18
The University of Texas at Austin, Continuing Education K-16 Education Center 1 Japanese 1 Examination for Acceleration/Credit by Exam Study Guide This EA/CBE Study Guide can help you prepare for the exam by giving you an idea of what you need to study, review, and learn. To succeed, you should be thoroughly familiar with the subject matter before you attempt to take the exam. Every question that appears on the EA/CBE is grounded in the knowledge and skills statements and student expectations within the state-mandated standards, the Texas Essential Knowledge and Skills (TEKS). It should be noted that the exam will not test every student expectation. However, it is important that students study and know the entire scope of the TEKS so that they can develop a complete understanding of the content. The EA/CBEs are global exams grounded in the TEKS and are not designed to be a final exam for the University of Texas high school courses. You can view the TEKS for this exam online at http://www.tea.state.tx.us/teks/. Since questions are not taken from any one source, you can prepare by reviewing any of the state-adopted textbooks. About the Exam The EA/CBE consists of the following: Part 1: Listening Comprehension, 20 multiple-choice questions, 1 point each Part 2: Grammar, 25 multiple-choice questions, 1 point each Part 3: Vocabulary, 25 multiple-choice questions, 1 point each Part 4: Reading, 20 multiple-choice questions, 1 point each Part 5: Culture, Communities, Comparisons, 10 multiple-choice questions, 1 point each Part 6: Writing, 1 writing task, 10 points Part 7: Speaking, 3 oral tasks, 5 points each The exam may consist of multiple-choice, true-false, and matching type questions. You will be allowed 3 hours to take the exam. You will need to bring a blank CD-RW to the exam for the Speaking portion. Your proctor should provide a listening/recording device for the Listening Comprehension portion. Concepts and Objectives The bulleted lists and sample questions below may not refer to all the material that will be on the exam. This list only provides additional information for some of the student expectations tested in the Japanese 1 EA/CBE. Ultimately, you should use the TEKS to guide your exam preparation. • Standard Japanese (You should not use any regional dialects.) • Be able to read and write Hiragana, Katakana, and some Kanji. You are expected to use Katakana accordingly in your answers for the writing section. • Know the variations in written and spoken Japanese. For example, ~ではありません, ~じゃありません, and ~じゃないです are all considered the same though they differ in formality.
-
Upload
khangminh22 -
Category
Documents
-
view
5 -
download
0
Transcript of Japanese 1 - Houston ISD

The University of Texas at Austin, Continuing Education K-16 Education Center
1
Japanese 1 Examination for Acceleration/Credit by Exam Study Guide This EA/CBE Study Guide can help you prepare for the exam by giving you an idea of what you need to study, review, and learn. To succeed, you should be thoroughly familiar with the subject matter before you attempt to take the exam. Every question that appears on the EA/CBE is grounded in the knowledge and skills statements and student expectations within the state-mandated standards, the Texas Essential Knowledge and Skills (TEKS). It should be noted that the exam will not test every student expectation. However, it is important that students study and know the entire scope of the TEKS so that they can develop a complete understanding of the content. The EA/CBEs are global exams grounded in the TEKS and are not designed to be a final exam for the University of Texas high school courses. You can view the TEKS for this exam online at http://www.tea.state.tx.us/teks/. Since questions are not taken from any one source, you can prepare by reviewing any of the state-adopted textbooks. About the Exam The EA/CBE consists of the following:
Part 1: Listening Comprehension, 20 multiple-choice questions, 1 point each Part 2: Grammar, 25 multiple-choice questions, 1 point each
Part 3: Vocabulary, 25 multiple-choice questions, 1 point each Part 4: Reading, 20 multiple-choice questions, 1 point each
Part 5: Culture, Communities, Comparisons, 10 multiple-choice questions, 1 point each Part 6: Writing, 1 writing task, 10 points
Part 7: Speaking, 3 oral tasks, 5 points each The exam may consist of multiple-choice, true-false, and matching type questions. You will be allowed 3 hours to take the exam. You will need to bring a blank CD-RW to the exam for the Speaking portion. Your proctor should provide a listening/recording device for the Listening Comprehension portion. Concepts and Objectives The bulleted lists and sample questions below may not refer to all the material that will be on the exam. This list only provides additional information for some of the student expectations tested in the Japanese 1 EA/CBE. Ultimately, you should use the TEKS to guide your exam preparation. • Standard Japanese (You should not use any regional dialects.) • Be able to read and write Hiragana, Katakana, and some Kanji. You are expected to use
Katakana accordingly in your answers for the writing section. • Know the variations in written and spoken Japanese. For example, ~ではありません, ~じゃありません, and ~じゃないです are all considered the same though they differ in formality.

JPN 1 09304 EA/CBE
Study Guide
The University of Texas at Austin, Continuing Education K-16 Education Center
2
Vocabulary topics covered • Basic greetings (including meal time and leaving home) • Introductions • Family members • Age • Residence and hometown • Major city/state/country names • Nationality • Occupation • Hobbies and sports, including traditional Japanese cultural activities and sports • Skills/abilities • School subjects • Schools • Objects and places at school • Nouns for tools such as telephone, chopsticks, etc. • Basic adjectives for describing people, things, places, activities, and feelings, such as fun,
interesting, quiet, new, difficult, delicious, glad, etc. • Basic adverbs such as very, especially, etc. • Question words • Basic verbs used in daily life, such as いきます, きます, たべます, etc. • Activity nouns for daily life, such as パーティー, えいが, etc. • Food and drink • Likes and dislikes • Time expressions, such as today, last week, everyday, one hour, etc. • Year, month, and date • Birthday • Days of the week • Telling time • Numbers and phone numbers • Shopping • Vacation • Traveling • Receiving • Seasons • Weather-related adjectives • Color terms • Expressions for apology • Negating

JPN 1 09304 EA/CBE
Study Guide
The University of Texas at Austin, Continuing Education K-16 Education Center
3
Grammar topics covered • Particles, such as は, が, を, の, も, へ, に, で, と, や, から, まで, より, ~について • Sentence-final particles, such as よ, か, ね, な~ • Sentence conjunction, such as でも, だから, ~から • Copula です and na-adjectives • Adjective + noun phrase • Want to do ~ • Verbs • Verb gerund forms (te-forms) • Conjoining sentences using gerund forms and ~ので • Conjugation (affirmative/negative, non-past/past) • Request form (~てください) • Counters • Word order • Polite speech style • Honorifics/polite forms, such as ~ございます, わたくし, ~さん • Personal pronouns • Demonstrative known as ko-so-a-do • Adverbs and negative adverbs Kanji covered • 一 二 三 四 五 六 七 八 九 十 曜 日 月 火 水 木 金 土 時 分 半 市 父 母 学 校 高 大 小 中 今 山 川 年 生 人 何 先 行 来 国 語 阪
Culture topics covered • Education in Japan • Japanese customs at home • Japanese social behaviors • Japanese diet • Pastime in Japan • Japanese society (government, religion, etc.)

JPN 1 09304 EA/CBE
Study Guide
The University of Texas at Austin, Continuing Education K-16 Education Center
4
Sample Questions These sample questions will give you a better idea of the types of questions you can expect on the EA/CBE. These are provided to illustrate the format of the exam. They are not the actual exam. In order to be successful on the exam, you must study the TEKS and all of the concepts previously listed. Part 1: Listening Comprehension (20 points) For this part of the exam, you will listen to several recordings and answer questions about what was said. Your proctor should provide a listening/recording device for the Listening Comprehension portion.
1. Today is _____ 3rd.
A January B July C August
2. How long is her school day?
A 9 a.m. to 5 p.m. B 8:30 a.m. to 4:30 p.m. C 8 a.m. to 4:15 p.m.
Part 2: Grammar (25 points) This part of the exam tests your knowledge of grammar.
1. Aさん: どうもありがとう。 Bさん: _____。
A どうぞ B どういたしまして C どうぞよろしく D おはよう
2. きのう ともだちの いえへ _____。
A でした B いきます C しました D いきました

JPN 1 09304 EA/CBE
Study Guide
The University of Texas at Austin, Continuing Education K-16 Education Center
5
3. きょうは _____ ありません。
A あつい B あつくて C あつく D あついじゃ
4. わたしの なまえ _____ やまだです。
A は B が C を D の
Part 3: Vocabulary (25 points) This part of the exam tests your knowledge of Japanese vocabulary. Choose the appropriate expression for each occasion below.
1. Coming home A いただきます 2. Going to bed B すみません 3. Saying good-by C おやすみなさい 4. Before eating D さようなら 5. Apologizing E ただいま
6. The one word that does not belong in this series is
A すうがく B ちゅうがっこう C こうこう D だいがく
7. Choose the correct translation for the underlined word.
I speak English.
A えいが B にほんご

JPN 1 09304 EA/CBE
Study Guide
The University of Texas at Austin, Continuing Education K-16 Education Center
6
C イギリスじん D えいご
Choose the appropriate equivalent for the underlined word or phrase.
8. あしたは十日です。
A じゅうにち B じゅっか C とか D とおか
9. あしたはきんようびです。
A 金 B 来 C 火 D 水
10. Choose the best answer for the blank. (There will be an image of a clock to see.)
今なん時ですか。 _____
A くじです。 B くじはんです。 C きゅうじです。 D はんくじです。

JPN 1 09304 EA/CBE
Study Guide
The University of Texas at Austin, Continuing Education K-16 Education Center
7
Choose the best translation for the English word or phrase.
11. Water
A 土 B 火 C 水 D 木
12. Basketball
A バスケトボール B バスケートボール C バスケットバール D バスケットボール
Part 4: Reading (20 points) This part of the exam contains three passages that test your reading comprehension. You will read each passage carefully and respond to the questions that follow. Part 5: Culture, Communities, Comparisons (10 points) You will determine whether each statement is true or false about Japanese culture, customs, society, and language. Part 6: Writing (10 points) You will complete a writing task in Japanese. The questions are asked in English; however, you must provide information about yourself in Japanese. Your answers should be extensive, use accurate word choices, and show appropriate use of Japanese writing systems. Part 7: Speaking (15 points) You will record your answers to three prompts in Japanese. Each prompt gives you the context and specific information you should include in your recording. You should make your responses as extensive as possible and should demonstrate your knowledge of grammar, vocabulary, and correct Japanese pronunciation. You will need to bring a blank CD for the Speaking portion. Your proctor should provide a listening/recording device for the Listening Comprehension portion.

JPN 1 09304 EA/CBE
Study Guide
The University of Texas at Austin, Continuing Education K-16 Education Center
8
Speaking & Listening Administration Supplement to the Proctor Manual
Students taking Foreign Language exams may be asked to listen to and/or produce an audio recording. Students may complete these sections after they have completed the multiple-choice part of the their exams. All parts of the exam must be completed within 3 hours. The testing site must provide access to a device that plays audio CDs/tape and a device that records audio either on CD or on tape. The student must provide a blank CD or tape for recording. To listen to audio on a CD, the student must have access to a portable audio player or a computer with CD-playing capabilities. When using a computer, an audio player must be installed. Windows Media Player, iTunes, or Winamp Media Player can be found for free online if not already factory-installed. To record onto a CD, the student must have access to a computer with a microphone, the ability to save files to the desktop, and CD-burning capabilities. The preferred formats for audio recording is WMV or MP3. On a PC you can use the Sound Recorder, or Audacity. Audacity is a free audio recording application that can be downloaded to most computers. Go to http://audacity.sourceforge.net/ and follow the instructions to export the recorded audio to the MP3 format. Please Note: In order to export MP3s from Audacity, you must also download the LAME MP3 encoder. The link for this file can be found under “Optional Downloads” on the download pages of the Audacity website. During the exam, the proctor:
• must not elaborate on the prompt; • must not give students an opening and/or closing sentence; • must not give students an outline for organizing their work; • must not give students information about how to develop their ideas; • must not allow students to use reference materials; and • must not translate the prompt into another language (except sign language).
If a student asks a question about the prompt, you may SAY, “I can’t explain it to you; just respond to the prompt in the best way you can.” Before returning the exam, please make sure:
• the student CD/tape has his/her name and 9-digit Assigned Number written on it; • the student’s recording begins at the start of Side A when using a tape; • the recording is loud and clear; and • the student CD/tape and the exam CD are both returned with the exam and computer
graded answer sheet. Proctors must not duplicate written compositions or audio recordings without specific authorization from the K-16 Education Center.

JPN 1 09304 EA/CBE
Study Guide
The University of Texas at Austin, Continuing Education K-16 Education Center
9
Recording Your Audio and Creating Your MP3 File How to Record and Save an Audio File on a PC or a Mac
Contents How to Record Sound on a PC Burning a CD with Windows XP How to Record Sound on a Mac Keys to Success in Recording Audio NOTE: This information is provided for your convenience only; the K-16 Education Center does not provide support for this application nor is the center responsible for the reliability of the manufacturer's website or its products. When downloading any application or file from the Internet, it is strongly recommended that you check the file with anti-virus software before installing and opening it.
How to Record Sound on a PC Recording an audio presentation requires the right tools. There are many helpful applications available, including free recording software and shareware plus utilities to make your audio recording sound great. Many students are choosing a program called Audacity. Download Audacity here (free): http://audacity.sourceforge.net/. There are Windows, Mac OS 9 or X, and Linux/Unix versions available. You will also have to download the LAME MP3 encoder, which allows Audacity to export MP3 files. You will see the download link for the MP3 encoder here: http://audacity.sourceforge.net/download/lame. Recording your voice with Audacity is very simple, and the website provides an easy tutorial here [http://www.guidesandtutorials.com/audacity-tutorial.html]. Download the program and review the clearly written help information. Recording the Sound
1. Torecordwithyourmicrophone,yousettherecordingsourcetomicrophoneinAudacity'smixertoolbarinputselectorhttp://audacity.sourceforge.net/onlinehelp‐1.2/toolbar_mixer.htm (or,ifyouareonOSX,yousetthemicrophoneasthedefaultrecordingsourceinAppleAudio‐MidiSetup).
2. ThenpresstheredRecordbutton.3. OnceyouhavemadeyourrecordinginAudacity,youneedtoexportitasanMP3,whichisa
universalcompressedaudioformatthatwillbesuitableforyourteachertolistentoonhisorhercomputerandwhichwillalsobesmallenoughtodistributeviatheWeb.ToexportyourProjecttoanMP3,youneedtoaddtheLAMEMP3encodertoAudacity,whichisan"optionalextra."FollowtheinstructionsatLameInstallationtodownloadandinstallLAME.
4. ThenyouclickFile>ExportasMP3,whichconvertsyourrecordingtoanMP3file.

JPN 1 09304 EA/CBE
Study Guide
The University of Texas at Austin, Continuing Education K-16 Education Center
10
If, after you have downloaded and tried Audacity you think it is still too complicated for your situation, there is another alternative. Windows has its own recording utility called Sound Recorder that is a very easy way to record just voice. Sound Recorder will only save files in .wav format, which means you will still have to convert your final recording into an .mp3 file. Audacity can also do this for you. You will also need a microphone. There are many types that range in quality and price. For affordable voice recording, Radio Shack sells inexpensive ones. You’ll also find a good selection of higher quality mikes at most computer or music stores. How much you spend on a microphone is a personal matter between you and your budget. Some computers come with a microphone built in. Before buying a microphone, check and see if your computer already has one. When you are ready to record, plug your microphone into your computer’s mike input and open up Windows' Volume Control. Here's how:
1. Click: Start. 2. Navigate to: Programs>Accessories>Entertainment>Volume Control. 3. On Volume Control in the upper left hand corner, click Options and highlight
Properties. 4. Select Recording. 5. Press OK. 6. Make sure you put a check in the Select box under where it says MIC.
The Volume switch can be adjusted using the slider control as you begin to do your recording.
Start a new recording using Audacity or Sound Recorder, check your levels, and begin your program. Edit test audio or other glitches when you are finished.
JPN 1 09304 EA/CBE
Study Guide
The University of Texas at Austin, Continuing Education K-16 Education Center
11
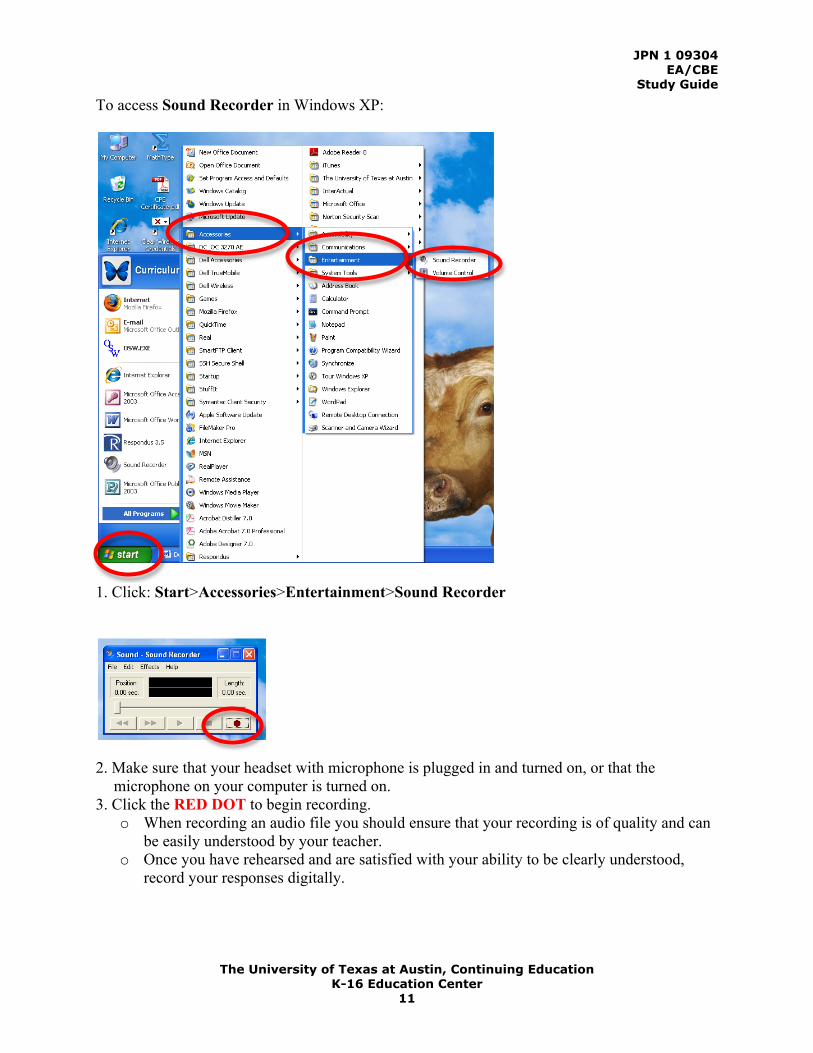
To access Sound Recorder in Windows XP:
1. Click: Start>Accessories>Entertainment>Sound Recorder
2. Make sure that your headset with microphone is plugged in and turned on, or that the
microphone on your computer is turned on. 3. Click the RED DOT to begin recording.
o When recording an audio file you should ensure that your recording is of quality and can be easily understood by your teacher.
o Once you have rehearsed and are satisfied with your ability to be clearly understood, record your responses digitally.

JPN 1 09304 EA/CBE
Study Guide
The University of Texas at Austin, Continuing Education K-16 Education Center
12
4. When you are finished recording click the SQUARE DOT.
o Check the quality of your recording before submitting it. If it is incomprehensible, it will be returned to you.
o Be sure you check the volume. o Answer all personal questions in complete sentences, not just "Yes" or "No" or, in
Spanish courses, "Si" or "No."
5. To save the file, click File>SaveAs
6. Type in the name of your file as directed on your exam or assignment and Save to the desktop.
Note: When submitting audio, please make sure to use the naming conventions below when naming your files:

JPN 1 09304 EA/CBE
Study Guide
The University of Texas at Austin, Continuing Education K-16 Education Center
13
Exams: [exam name]_[your name]_[9-DigitNumber].wmv Example: Spn1A_JohnStudent_123456789.wmv
Assignments:
[course name]_[unit #]_[graded assignment #]_[part #]_[your UT EID]_[your last name].mp3
Example: Art1A_U1_GA1_P2_jdoe123_doe.mp3
The file is saved to the desktop. When your audio is done and saved, you will need to remember to write down:
A) Where you saved it so you can upload it later. B) The exact file size.
To ascertain the file size, just:
A) Right click on the .mp3 file you created. B) Click “properties” and note the size. For example, it might look like this:
Size: 4.61 MB (4,834,743 bytes) Remember that the file upload size limit within the course is 5 megabytes. If your recording is larger than 5 megabytes you must upload your sound file to an external website. (See “Large File Upload Assistance” in the Resource Center.)

JPN 1 09304 EA/CBE
Study Guide
The University of Texas at Austin, Continuing Education K-16 Education Center
14
7. Finally, you will need to write the file to a CD-R so that you may submit it for grading. See
the directions below. Burning a CD with Windows XP Did you know that Windows XP has built-in CD burning software? It's actually very easy. You will need a CD burner and a rewritable CD. Here's all you need to do: 1. First, you need to tell Windows what files you want copied to CD. You can do this in a couple
of different ways: Method 1 The first method is to right-click the file you want to copy, then select Send To, CD-R (or whatever your CD writer is called).
Of course, you can use your CTRL key to select multiple files and then send all of them to the CD burner.

JPN 1 09304 EA/CBE
Study Guide
The University of Texas at Austin, Continuing Education K-16 Education Center
15
When you do this Send To thing, you'll get a little "balloon" from your system tray telling you that the files have been added to your recording list. Click that little balloon and you'll open the list.
Method 2 The next method is to open My Computer, then your CD-R or CD-RW drive. It's probably best not to have any CD in the drive at this point, since all the files on that CD will show up and make things a little confusing. Just drag and drop (or copy/paste) the files you need to copy to the open window.
Note that when you send, drag, or copy these files, it only puts them on a list; it doesn't automatically start making the CD. 2. At this point you should have some files that have been sent to the CD burner. Now it's time to
actually make your CD.

JPN 1 09304 EA/CBE
Study Guide
The University of Texas at Austin, Continuing Education K-16 Education Center
16
So, put a blank (writable) CD into your drive, open My Computer (if it isn't already), then double-click the CD-R/RW drive. You should see the list of files you've selected to record. Note that you may already be on this screen if you either did a Send To and clicked the balloon or if you dragged and dropped (since this was where you were dragging & dropping to). Now, look for the CD Writing Tasks section. It should be at the top left of the screen. Click the Write these files to CD link and it will start Windows’ CD-burning wizard. From there, just follow the prompts.
Note that if you accidentally put a file on the list that you don't want on CD, you can remove it by right-clicking the file and selecting Delete. Don't worry; it won't delete the file from your computer, just from the CD writing list. As stated previously, during the actual CD writing process it's best not to do anything else with your computer. Just stand 4-6 feet away and let it write the CD. Why? Most CD recorders record on the fly. If the computer is busy and can't get the information to the CD burner fast enough, you'll get a buffer underrun error, and your CD will be useless. You cannot burn additional files to a CD after burning is completed.
How to Record Sound on a Mac

JPN 1 09304 EA/CBE
Study Guide
The University of Texas at Austin, Continuing Education K-16 Education Center
17
Recording an audio presentation requires the right tools. There are many helpful applications available, including free recording software and shareware plus utilities to make your audio recording sound great. Many students are choosing a program called Audacity. Download Audacity here (free): http://audacity.sourceforge.net/ There are Windows, Mac OS 9 or X, and Linux/Unix versions available. You will also have to download the LAME MP3 encoder, which allows Audacity to export MP3 files. You will see the download link for the MP3 encoder here: http://audacity.sourceforge.net/download/lame. Recording your voice with Audacity is very simple, and the website provides an easy tutorial here [http://www.guidesandtutorials.com/audacity-tutorial.html]. Download the program and review the clearly written help information. Recording the Sound To record with your microphone, you set the recording source to microphone in Audacity's mixer toolbar input selector http://audacity.sourceforge.net/onlinehelp-1.2/toolbar_mixer.htm (or, if you are on OS X, you set the microphone as the default recording source in Apple Audio-Midi Setup). Then press the red Record button. Once you have made your recording in Audacity, you need to export it as an MP3, which is a universal compressed audio format that will be suitable for your teacher to listen to on his or her computer and which will also be small enough to distribute via the Web. To export your project to an MP3, you need to add the LAME MP3 encoder to Audacity, which is an "optional extra." Follow the instructions at Lame Installation to download and install LAME. Then you click File > Export as MP3, which converts your recording to an MP3 file. If, after you have downloaded and tried Audacity you think it is still too complicated for your situation, there is another alternative. Save the audio file When submitting audio assignments or exams electronically (uploading), please make sure to use the naming conventions below when naming your files:

JPN 1 09304 EA/CBE
Study Guide
The University of Texas at Austin, Continuing Education K-16 Education Center
18
Exams: [exam name]_[your name]_[9-DigitNumber].wmv Example: Spn1A_JohnStudent_123456789.wmv
Assignments:
[course name]_[unit #]_[graded assignment #]_[part #]_[your UT EID]_[your last name].mp3 Example: Art1A_U1_GA1_P2_jdoe123_doe.mp3
When your audio is done and saved, you will need to remember to write down:
A) Where you saved it so you can upload it later. B) The exact file size.
To ascertain the file size, just:
A) Right click on the .mp3 file you created. B) Click “properties” and note the size. For example, it might look like this:
Size: 4.61 MB (4,834,743 bytes) Remember that the file upload size limit within the course is 5 megabytes. If your recording is larger than 5 megabytes you must upload your sound file to an external website. [link to FAQ] Keys to Success in Recording Audio
o Check the quality of your recording before submitting it. If it is incomprehensible, it will be returned to you.
o Be sure to check the volume. o Answer all personal questions in complete sentences, not just "Yes" or "No" or, in
Spanish courses, "Si" or "No."