Jama Connect User Guide
658
Jama Connect User Guide Self-hosted 8.62
-
Upload
khangminh22 -
Category
Documents
-
view
2 -
download
0
Transcript of Jama Connect User Guide

Jama Connect User GuideSelf-hosted 8.62
Table of ContentsWelcome to Jama Connect ..................................................................................................... 8Get started ............................................................................................................................ 9
Exploring the Jama Connect workspace ........................................................................ 10Project approach and tree structure .............................................................................. 11Item-based product development .................................................................................. 13Traceability from Requirements to Test .......................................................................... 14Tracking changes in your project ................................................................................... 17How reviews work ........................................................................................................ 19Exporting documents from Jama Connect ..................................................................... 21Testing ........................................................................................................................ 23All about baselines ....................................................................................................... 24Reuse and synchronization .......................................................................................... 26Administration ............................................................................................................. 28
Manage item types .............................................................................................. 29Managing relationship rules .................................................................................. 30Managing workflow .............................................................................................. 31
REST API and extensibility ........................................................................................... 32Jama Connect top tasks ............................................................................................... 34Additional information ................................................................................................... 35
Setting up your work environment ......................................................................................... 36Editing and managing your profile ................................................................................. 36
Reset your password ........................................................................................... 36Configure email notifications and subscriptions ...................................................... 37Configure my review settings ................................................................................ 38View and unlock locked items ............................................................................... 38Adding and deleting bookmarks ............................................................................ 41Learn more .......................................................................................................... 42
Getting familiar with the Jama Connect interface ............................................................ 42Explorer Tree ....................................................................................................... 42Tools for viewing and controlling content ............................................................... 45Single Item View .................................................................................................. 52
Create content ..................................................................................................................... 56Import items ................................................................................................................ 56
Import from Microsoft Word .................................................................................. 56Import from Microsoft Excel .................................................................................. 67Import from IBM DOORS ...................................................................................... 81
Use the rich text editor ................................................................................................. 91Insert rich text images .......................................................................................... 94Insert rich text links .............................................................................................. 95Insert rich text tables ............................................................................................ 96Insert rich text diagrams ....................................................................................... 97Insert rich text equations ...................................................................................... 98Insert rich text templates ...................................................................................... 99Enable Accessibility Checker .............................................................................. 100
Containers ................................................................................................................ 101Components ...................................................................................................... 101Sets .................................................................................................................. 102Folders ............................................................................................................. 104
Items ........................................................................................................................ 106Add an item ....................................................................................................... 107Child items ........................................................................................................ 110Edit items .......................................................................................................... 110Edit items in List View ........................................................................................ 112
Jama Connect User Guide
2

Batch update items ............................................................................................ 112Add, edit, or delete links ..................................................................................... 114Lock items ......................................................................................................... 115Convert an item to another item type ................................................................... 117Move items ........................................................................................................ 124Duplicate items .................................................................................................. 129Delete an item ................................................................................................... 129Restore a deleted item ....................................................................................... 130
Links ......................................................................................................................... 130Add, edit, or delete links ..................................................................................... 130
Tags .......................................................................................................................... 131Add and delete tags ........................................................................................... 133
Attachments .............................................................................................................. 133Add, edit, and delete attachments ....................................................................... 133
Find content ...................................................................................................................... 136Full text search .......................................................................................................... 136
Search for content ............................................................................................. 137Filter items for targeted results ............................................................................ 138
Advanced filters ......................................................................................................... 139Add or edit advanced filters ................................................................................ 140Duplicate advanced filters .................................................................................. 142Filter the Explorer Tree ....................................................................................... 143Export from advanced filters ............................................................................... 144
Quick find .................................................................................................................. 144Relationship rules quick find ............................................................................... 148Suspect links quick find ...................................................................................... 148Test cases quick find .......................................................................................... 149
Find moved items ...................................................................................................... 150Find an item in the Explorer Tree ................................................................................ 151
Reviews in Jama Connect .................................................................................................. 153Roles for review workflow ........................................................................................... 153Review lifecycle — Who does what during a review ..................................................... 154Workflow status for reviews ........................................................................................ 154Review status quick find ............................................................................................. 154Introducing the Reviews dashboard ............................................................................ 155Moderator tasks ......................................................................................................... 156
Initiate a review ................................................................................................. 157Add and manage review participants ................................................................... 164Modifying an "In progress" review ....................................................................... 164Modifying a "Closed" review ............................................................................... 165Incorporate review feedback ............................................................................... 166Close an "In progress" review ............................................................................. 167Publish a revised review ..................................................................................... 168Finalize a review ................................................................................................ 168Delete a review .................................................................................................. 169Archive a review ................................................................................................ 169Recover an archived review ............................................................................... 170Transition a Peer review to an Approval review .................................................... 171Close and finalize Approval review ...................................................................... 172
Reviewer tasks .......................................................................................................... 173Contribute feedback ........................................................................................... 174Finish a review as a reviewer .............................................................................. 175
Approver tasks .......................................................................................................... 176Approve or reject review items ............................................................................ 176Finish a review as an approver ........................................................................... 177
Jama Connect User Guide
3
Sign a review electronically ................................................................................ 178Delegate approval .............................................................................................. 178Add reviewers ................................................................................................... 179
Review administrator tasks ......................................................................................... 179Recover a deleted review ................................................................................... 180Configure review comments to appear in projects ................................................ 181
Tasks for all participant roles ....................................................................................... 182Find and filter items in a review ........................................................................... 183Highlighting review comments ............................................................................ 184Compare versions .............................................................................................. 186Show related items in a review ........................................................................... 187View participant progress ................................................................................... 189View item progress ............................................................................................ 190View review activity ............................................................................................ 191Filter review comments ...................................................................................... 192Subscribe to a review ......................................................................................... 193Export reviews ................................................................................................... 194Voting ............................................................................................................... 194
Collaborating with your team .............................................................................................. 197Email notifications and subscriptions ........................................................................... 197
Subscribe to emails for yourself .......................................................................... 198Subscribe other users to email notifications ......................................................... 198
Workflow ................................................................................................................... 200Using workflow in Projects .................................................................................. 200
Stream — Staying connected ..................................................................................... 205Types of streams ............................................................................................... 206Activity stream ................................................................................................... 210Comments ........................................................................................................ 211Email notifications for the stream ........................................................................ 215Upload images to the stream .............................................................................. 216Request or resolve an action .............................................................................. 217Filter the stream ................................................................................................ 219View collaboration stream at an item level ........................................................... 221View collaboration stream at a project level ......................................................... 223View global stream across projects ..................................................................... 224View connected users ........................................................................................ 225
Electronic signatures .................................................................................................. 225Sign a review electronically ................................................................................ 227Sign a baseline electronically .............................................................................. 228
Manage content ................................................................................................................. 230Item versions ............................................................................................................. 230
Item versions quick find ...................................................................................... 230Make a past item version current ........................................................................ 231Compare versions .............................................................................................. 231
Change requests ....................................................................................................... 232Add a change request and associate items .......................................................... 232Edit change request associations ........................................................................ 234Create change request Impact Analysis .............................................................. 235Delete change request associations .................................................................... 235Close a change request ..................................................................................... 236
Releases ................................................................................................................... 236Assign an item to a release ................................................................................ 236Release field ..................................................................................................... 236Release settings ................................................................................................ 237
Baselines .................................................................................................................. 239
Jama Connect User Guide
4

What is a baseline source? ................................................................................. 239Benefits of organizing your baseline tree ............................................................. 240Edit a baseline ................................................................................................... 243Locate an existing baseline ................................................................................ 243Create a baseline manually ................................................................................ 245Comparing baselines ......................................................................................... 247View baseline activity ......................................................................................... 247Locate review baselines ..................................................................................... 248Sign a baseline electronically .............................................................................. 249Deleting sources and baselines .......................................................................... 250Replace current items with baseline .................................................................... 252
Coverage and traceability ........................................................................................... 253Trace View ........................................................................................................ 253Relationships ..................................................................................................... 257Relationship Status Indicator .............................................................................. 266Trace Matrix ...................................................................................................... 269Impact Analysis ................................................................................................. 270Coverage Explorer ............................................................................................. 271
Reuse and synchronization ........................................................................................ 273Finding reuse and synchronization ...................................................................... 274Global ID ........................................................................................................... 275Reuse and synchronization guardrail .................................................................. 275When to use reuse and synchronize ................................................................... 275Reuse ............................................................................................................... 276Synchronization ................................................................................................. 285
Exports ..................................................................................................................... 295Export to Word .................................................................................................. 297Export to Excel using default templates ............................................................... 297Export to PDF .................................................................................................... 298Office Templates ................................................................................................ 299
Test .................................................................................................................................. 308Test cases ................................................................................................................. 308
Test cases quick find .......................................................................................... 309Import test cases ............................................................................................... 309Special use of item types for test ........................................................................ 310View and edit test case details ............................................................................ 310Test steps .......................................................................................................... 311Test case status ................................................................................................. 313View test run results ........................................................................................... 314Export test cases to Microsoft Excel .................................................................... 317
Test plans .................................................................................................................. 319Test plans quick find ........................................................................................... 319Add a test plan .................................................................................................. 320Add test cases to a plan ..................................................................................... 321View test plan details ......................................................................................... 324Edit a test plan ................................................................................................... 325Send a test plan for review ................................................................................. 326Duplicate a test plan .......................................................................................... 328Archive a test plan or run .................................................................................... 329Delete a test plan ............................................................................................... 330
Test cycle .................................................................................................................. 330Add a test cycle ................................................................................................. 331Edit a test cycle ................................................................................................. 332Send a test cycle for review ................................................................................ 333
Test runs ................................................................................................................... 333
Jama Connect User Guide
5

Find and manage test runs ................................................................................. 333View test run details ........................................................................................... 335Configure test run view ...................................................................................... 335Assign test runs ................................................................................................. 336Execute a test run .............................................................................................. 337Configure custom fields to appear during test execution ....................................... 340Make test runs current ....................................................................................... 341Test run status ................................................................................................... 342Batch update test run status ............................................................................... 343
Analysis ............................................................................................................................ 346Dashboard ................................................................................................................ 346
Dashboard options ............................................................................................. 346Manage the dashboard ...................................................................................... 353
Reports ..................................................................................................................... 355Publish a report ................................................................................................. 356Custom reports .................................................................................................. 369Reports history .................................................................................................. 373
Risk .......................................................................................................................... 374Risk management process ................................................................................. 374Risk administrator .............................................................................................. 378Moderator ......................................................................................................... 398Contributor ........................................................................................................ 404Viewer .............................................................................................................. 410
Installing Jama Connect ..................................................................................................... 425Which type of installation do you need? ....................................................................... 425Planning your installation ............................................................................................ 427
System requirements ......................................................................................... 427Application server requirements .......................................................................... 427Resource sizing for your application server .......................................................... 428Database server requirements ............................................................................ 429Things to do before installation ........................................................................... 429
Installing software for the first time (internet) ................................................................ 436Downloading Replicated and Docker (internet) .................................................... 436Install the Admin Console (internet) ..................................................................... 436Install Jama Connect (internet) ........................................................................... 438
Installing software for the first time (airgap) .................................................................. 444Retrieve Jama Connect images (airgap installation) ............................................. 444Downloading Replicated and Docker (airgap) ...................................................... 445Install the Admin Console and Docker (airgap) .................................................... 446Install Jama Connect (airgap) ............................................................................. 446
After installing Jama Connect ..................................................................................... 452Upgrading your software ............................................................................................ 453
Upgrade and Configure MySQL .......................................................................... 454Upgrade and configure Microsoft SQL Server ...................................................... 455Determine your version of Replicated .................................................................. 457Upgrade the Admin Console (internet) ................................................................ 458Upgrade the Admin Console (airgap) .................................................................. 458Retrieve Jama Connect images (airgap upgrade) ................................................. 459Upgrade Jama Connect ..................................................................................... 460
Appendix ................................................................................................................... 461Troubleshooting your installation ......................................................................... 461Sample airgap installation script .......................................................................... 461Configure proxy settings ..................................................................................... 463Uninstall Jama Connect ..................................................................................... 463
Administration ................................................................................................................... 466
Jama Connect User Guide
6

Authentication methods .............................................................................................. 466Configure Basic authentication ........................................................................... 468Configure SAML authentication .......................................................................... 469Configure multi-mode authentication ................................................................... 470Configure LDAP authentication ........................................................................... 473Configure Crowd authentication .......................................................................... 478
REST API ................................................................................................................. 482System administrator ................................................................................................. 482
Configuring the Admin Console settings .............................................................. 482Setting up Jama Connect ................................................................................... 501Backup and restore your data ............................................................................. 510Maintain ............................................................................................................ 513Migrate ............................................................................................................. 527Troubleshoot ..................................................................................................... 529
Organization administrator ......................................................................................... 534Monitoring changes with the Admin Activity stream .............................................. 534Manage content ................................................................................................. 535Manage users ................................................................................................... 550Manage process ................................................................................................ 573Manage collaboration ......................................................................................... 604Organize projects .............................................................................................. 611Integrations ....................................................................................................... 617
Project administrator .................................................................................................. 618Monitoring changes with the Admin Activity stream (project admin) ....................... 618Manage projects ................................................................................................ 619View project users ............................................................................................. 635
Reference ......................................................................................................................... 639Permissions .............................................................................................................. 639
License types .................................................................................................... 639Roles ................................................................................................................ 641Access permissions ........................................................................................... 645
Best practices and guardrails ...................................................................................... 646Keyboard shortcuts .................................................................................................... 647Get help ................................................................................................................... 648Glossary ................................................................................................................... 649Widgets ..................................................................................................................... 656
Jama Connect User Guide
7

Welcome to Jama Connect
Jama Connect is a centralized web application that helps you manage the development of new technol-ogy products. It manages all aspects of product requirements. Jama Connect also records test resultsand manages risk while maintaining regulatory compliance.
As a new user or trial user, read through this section to learn how Jama Connect can change the wayyou work and can enhance your product development process. We want to answer all your "What do Ineed to get started?" questions.
This information isn’t linear — feel free to scan through and jump to the different areas that are mostinteresting to you.
The right tool at the right time
This guide contains information about a self-hosted release of Jama Connect. If you're a system admin-istrator new to Jama Software you can skip straight to the system administrator section [482].
Jama Connect User Guide
8

Get started
To start using Jama Connect, you need your user account credentials.
• Trial accountSign up for a free trial at https://www.jamasoftware.com/platform/jama-connect/trial/
• New user accountYour administrator has your account username and password.
As a new user of Jama Connect, this is the place to start: log in and get familiar with the different areasof the workspace.
To log in to Jama Connect:
1. In a supported web browser, enter the URL provided by your administrator.2. Type your username and password, then select Log in.
Header — Includes the main sections of the Jama Connect interface.Homepage — Shows links to your most relevant content like bookmarks, recent views, open views,stream comments, and actions.
Tips and more
• You're allowed 10 login attempts within five minutes before you're locked out for 30 minutes. To un-lock your account before then, follow the forgotten password procedure.
• To manage your account, select your name in the top right navigation to open the My Profile window.• To log out of the application, select Log Out in the top right header. If you don't log out, the default
timeout is two hours.
Jama Connect User Guide
9

Exploring the Jama Connect workspaceThe Jama Connect workspace is where you set up and manage your projects, create test plans, com-municate with your team, track relationships, and more.
You can also view these short videos to learn the Jama Connect basics: how to navigate the system,add and edit information, build in traceability, send information for review, and collaborate with yourproject team.
The workspace is divided into five panes that you can expand, collapse, and resize.
1. Explore and manage projects — Select the tabs at the top of the left panel to expand these views:Explorer, Filters, Releases, Baselines, and Test Plans.
2. View item details — View the details for specific items. Content from Components, Sets, Folders,Filters, and individual items are located in this pane.
3. Create trace relationships — Add relationships for traceability or items within a change request.Open this section from the Relationships tab and close when it's not needed.
4. Manage item information — Manage information associated with comments, relationships, attach-ments, versions, and activities.
5. Use keywords to navigate the workspace — Use the tags cloud to navigate to items grouped bykeywords.
Jama Connect is highly configurable, so you can customize the workflow that works best for you. Forexample, focus on creating requirements from the Explorer Tree, view details about a test case, or ex-plore relationships. Depending on the task or goal, you might interact with one area or all areas of theworkspace.
Navigation
These links can help you find your way around Jama Connect:
Jama Connect User Guide
10

• Explorer Tree [42]• Toolbar [45]• Side toolbar [53]
Views
You can choose how you view your selected items in the center panel. Each view is suited to differenttypes of work.
• Single Item View [52] — Displays the information about one item in the center panel.• List View [47] — Shows data from multiple items in a table with a different field in each column so
you can sort, select, and compare items at a glance.• Reading View [48] — Shows both text and images for a particular group of items so you can read
through selected items like a document.• Trace View [49] — Shows related upstream and downstream items, missing relationships, and item
details in context of their relationship.• Compare View [54] — Shows side by side content so you can compare differences between differ-
ent item versions.
Project approach and tree structureJama Connect is made up of projects and uses a tree approach, which allows users to easily organizecontent and view the content of each project.
What is a project?
Think of a project as a virtual container or “workspace” of information. Each project relates to a productyou are creating or a software application you are developing.
Why have a project?
Projects allow you to organize content and apply permission schemas. For example, a user might beable to create and edit requirements in Project A, but might not be able to see content in Project B.
Projects are created by the Jama Connect admins at your organization, who also control correspondingpermissions for each project.
At a high-level, each Jama Connect environment can contain multiple projects. Typically, a singleproject in Jama Connect relates to a single product or a single version of a system that you are building.
Monitoring your project
Within a Jama Connect project, you can track releases/phases, baselines, test plans, and results. Youcan also create a project dashboard to track the data your team wants to monitor for quality and pro-gress.
Jama Connect User Guide
11

How do I access my project?
To open a single project, click Projects in the header. If you’re already in a project, select Changeproject to switch to a different project.
Advantages of projects and tree structure
Jama Connect projects and the Explorer Tree are highly configurable, which allows your organization toadapt the solution to fit your own unique hierarchy and development process.
We also have several templates to get your team started. This allows your organization to:
• Standardize methodology across different teams• Decrease context switching when working across multiple projects• Enable reuse of shared requirements
Organizing your content
Jama Connect User Guide
12
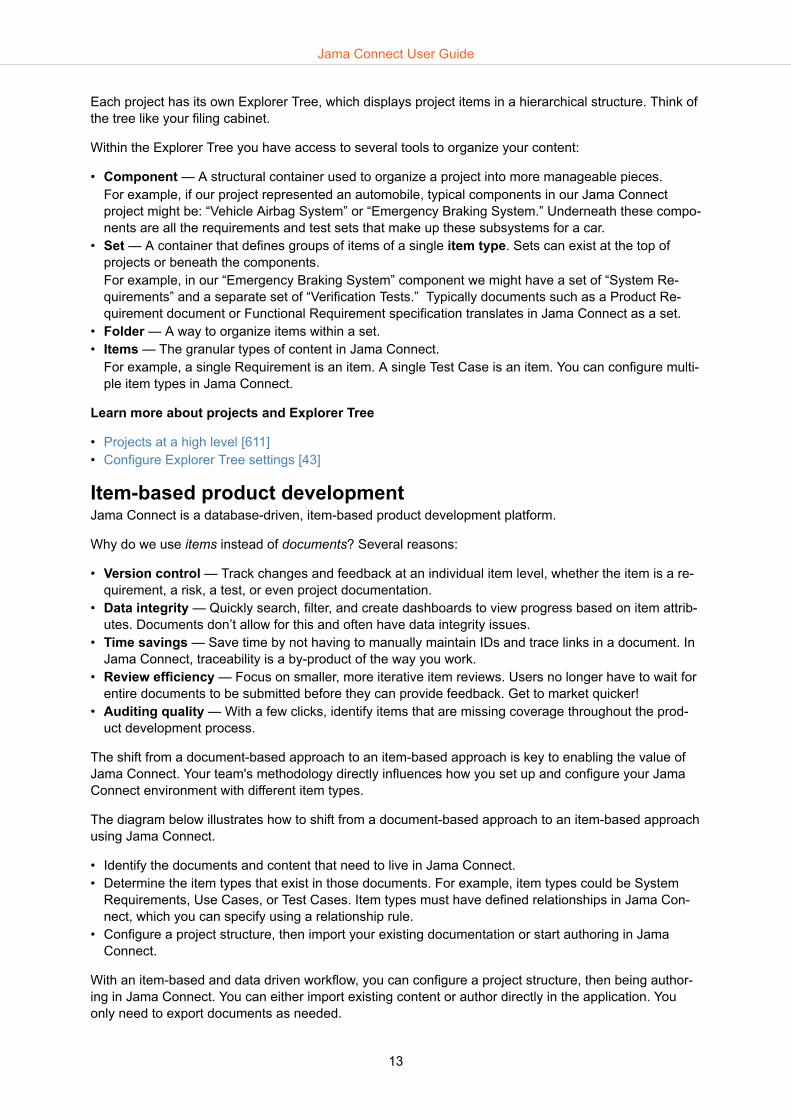
Each project has its own Explorer Tree, which displays project items in a hierarchical structure. Think ofthe tree like your filing cabinet.
Within the Explorer Tree you have access to several tools to organize your content:
• Component — A structural container used to organize a project into more manageable pieces.For example, if our project represented an automobile, typical components in our Jama Connectproject might be: “Vehicle Airbag System” or “Emergency Braking System.” Underneath these compo-nents are all the requirements and test sets that make up these subsystems for a car.
• Set — A container that defines groups of items of a single item type. Sets can exist at the top ofprojects or beneath the components.For example, in our “Emergency Braking System” component we might have a set of “System Re-quirements” and a separate set of “Verification Tests.” Typically documents such as a Product Re-quirement document or Functional Requirement specification translates in Jama Connect as a set.
• Folder — A way to organize items within a set.• Items — The granular types of content in Jama Connect.
For example, a single Requirement is an item. A single Test Case is an item. You can configure multi-ple item types in Jama Connect.
Learn more about projects and Explorer Tree
• Projects at a high level [611]• Configure Explorer Tree settings [43]
Item-based product developmentJama Connect is a database-driven, item-based product development platform.
Why do we use items instead of documents? Several reasons:
• Version control — Track changes and feedback at an individual item level, whether the item is a re-quirement, a risk, a test, or even project documentation.
• Data integrity — Quickly search, filter, and create dashboards to view progress based on item attrib-utes. Documents don’t allow for this and often have data integrity issues.
• Time savings — Save time by not having to manually maintain IDs and trace links in a document. InJama Connect, traceability is a by-product of the way you work.
• Review efficiency — Focus on smaller, more iterative item reviews. Users no longer have to wait forentire documents to be submitted before they can provide feedback. Get to market quicker!
• Auditing quality — With a few clicks, identify items that are missing coverage throughout the prod-uct development process.
The shift from a document-based approach to an item-based approach is key to enabling the value ofJama Connect. Your team's methodology directly influences how you set up and configure your JamaConnect environment with different item types.
The diagram below illustrates how to shift from a document-based approach to an item-based approachusing Jama Connect.
• Identify the documents and content that need to live in Jama Connect.• Determine the item types that exist in those documents. For example, item types could be System
Requirements, Use Cases, or Test Cases. Item types must have defined relationships in Jama Con-nect, which you can specify using a relationship rule.
• Configure a project structure, then import your existing documentation or start authoring in JamaConnect.
With an item-based and data driven workflow, you can configure a project structure, then being author-ing in Jama Connect. You can either import existing content or author directly in the application. Youonly need to export documents as needed.
Jama Connect User Guide
13
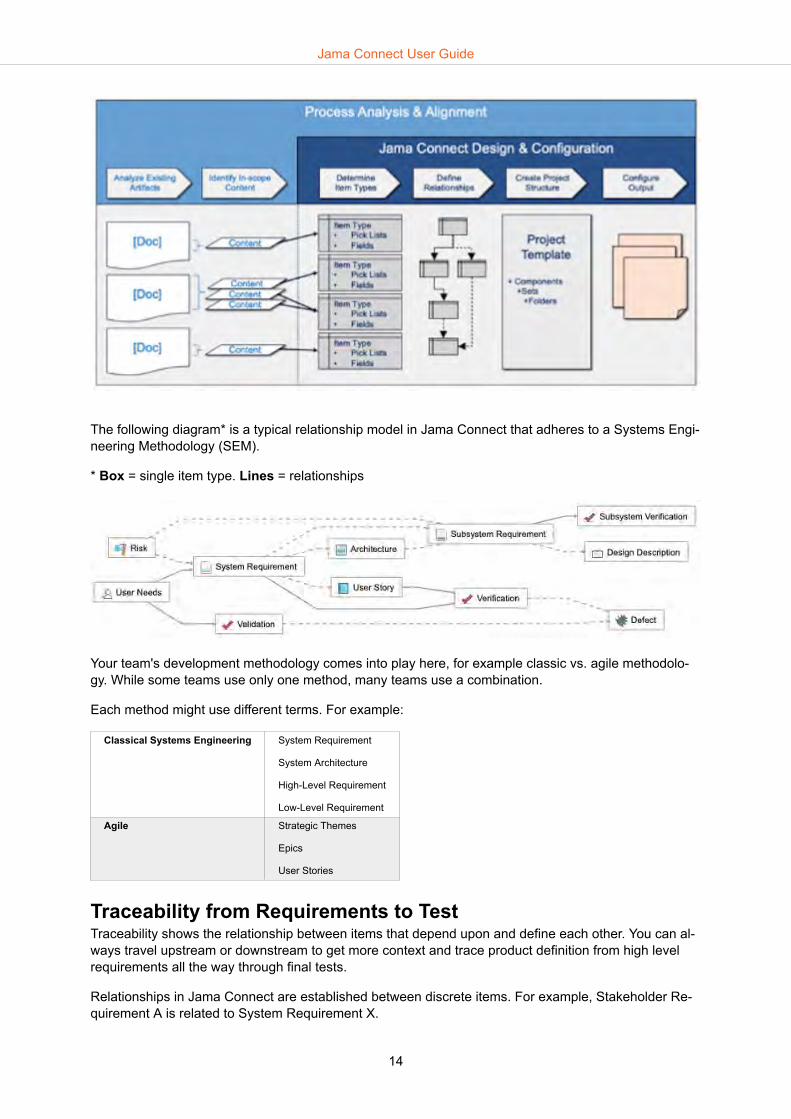
The following diagram* is a typical relationship model in Jama Connect that adheres to a Systems Engi-neering Methodology (SEM).
* Box = single item type. Lines = relationships
Your team's development methodology comes into play here, for example classic vs. agile methodolo-gy. While some teams use only one method, many teams use a combination.
Each method might use different terms. For example:
Classical Systems Engineering System Requirement
System Architecture
High-Level Requirement
Low-Level Requirement
Agile Strategic Themes
Epics
User Stories
Traceability from Requirements to TestTraceability shows the relationship between items that depend upon and define each other. You can al-ways travel upstream or downstream to get more context and trace product definition from high levelrequirements all the way through final tests.
Relationships in Jama Connect are established between discrete items. For example, Stakeholder Re-quirement A is related to System Requirement X.
Jama Connect User Guide
14

Benefits of establishing relationships
Why are relationships important in Jama Connect?
• Allocation — Understand which systems and subsystems implement the requirements.• Traceability — Break down high-level requirements into more detailed specifications.• Verification — Prove implementation and quality by linking requirements to tests and their results.• Impact analysis — When requirements change, identify and understand the ripple effect to lower-
level requirements and testing.
Relationship rules are applied to projects to drive compliance to your organization’s model and method-ology. Setting up relationship rules for your item types is critical because it enforces the methodologyyour organization wants to use in Jama Connect.
Jama Connect uses the terms “upstream” and “downstream” to describe relationship direction. Whenupstream items change, their downstream items are flagged as “suspect” so that you can review anyimpact the change might have.
How to establish a relationship:
1. Navigate to a single item in your project such as a user need or a requirement.2. Click Add > Add related and select the item type you want to add.
Jama Connect User Guide
15

Jama Connect opens a new window where you configure the item relationship.3. Click Save and Close.
The original item (Requirement) and the new item (Verification) are now linked with a trace relationship.
View and add relationships
1. To view relationships, click the “Relationships” widget in right corner of the item.2. To add more relationships, click Relate Items.
To learn more about adding relationships, see: Relationships [258]
What's next
Once you have established relationships, the Trace View in Jama Connect is a great way to view a livetrace matrix [269]. You can also filter and extract views of your traceability.
Trace view:
Jama Connect User Guide
16
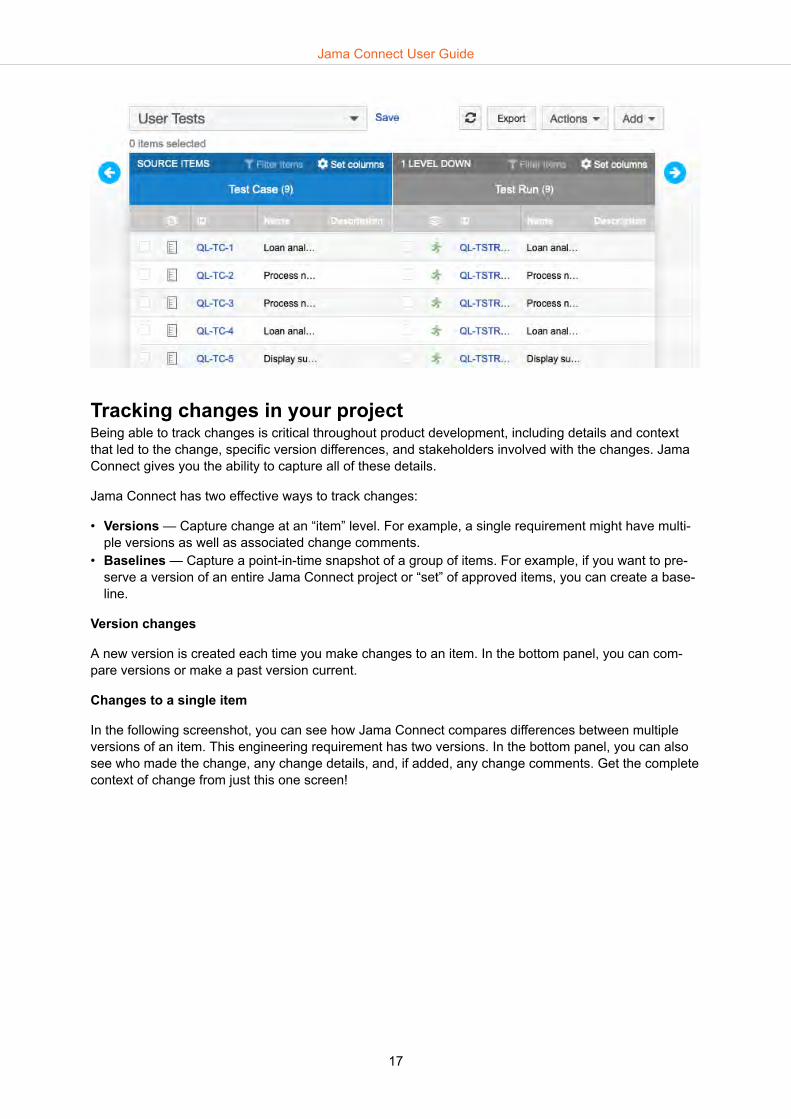
Tracking changes in your projectBeing able to track changes is critical throughout product development, including details and contextthat led to the change, specific version differences, and stakeholders involved with the changes. JamaConnect gives you the ability to capture all of these details.
Jama Connect has two effective ways to track changes:
• Versions — Capture change at an “item” level. For example, a single requirement might have multi-ple versions as well as associated change comments.
• Baselines — Capture a point-in-time snapshot of a group of items. For example, if you want to pre-serve a version of an entire Jama Connect project or “set” of approved items, you can create a base-line.
Version changes
A new version is created each time you make changes to an item. In the bottom panel, you can com-pare versions or make a past version current.
Changes to a single item
In the following screenshot, you can see how Jama Connect compares differences between multipleversions of an item. This engineering requirement has two versions. In the bottom panel, you can alsosee who made the change, any change details, and, if added, any change comments. Get the completecontext of change from just this one screen!
Jama Connect User Guide
17
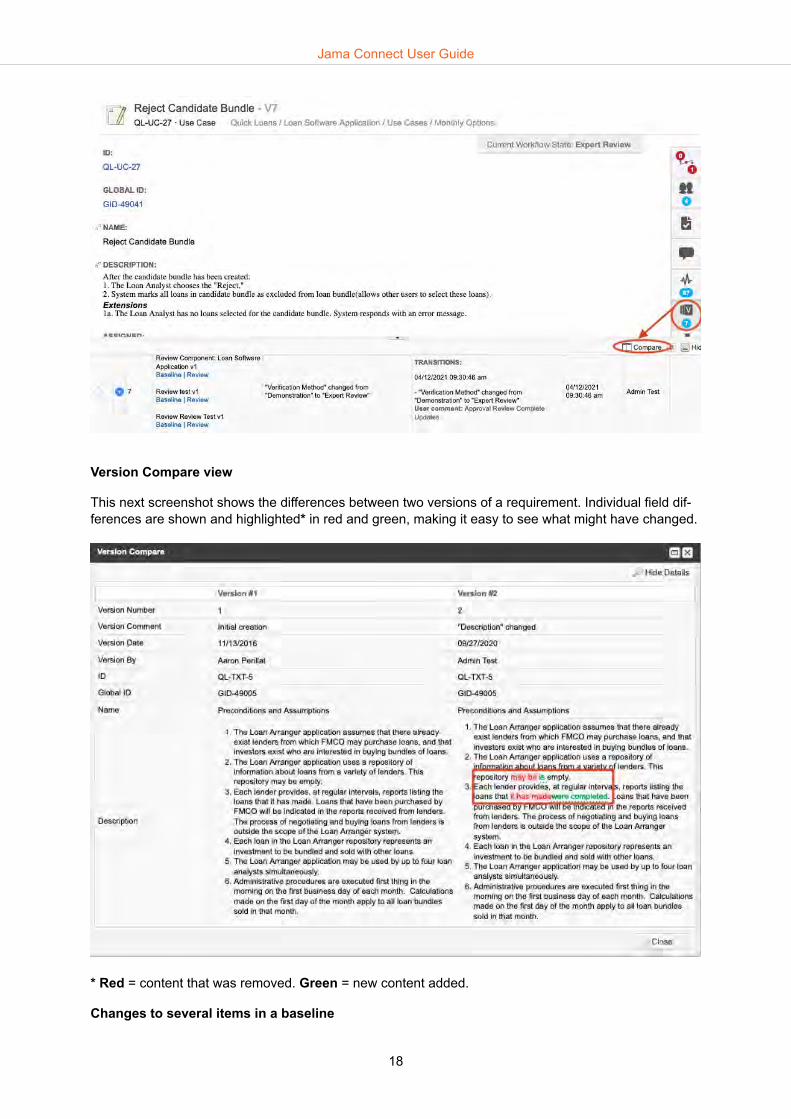
Version Compare view
This next screenshot shows the differences between two versions of a requirement. Individual field dif-ferences are shown and highlighted* in red and green, making it easy to see what might have changed.
* Red = content that was removed. Green = new content added.
Changes to several items in a baseline
Jama Connect User Guide
18

This next screenshot shows a baseline in Jama Connect, which is a snapshot of several items.
Baselines can also change over time as new requirements are added, removed, or updated. Jama Con-nect provides users with the ability to track these changes between different baselines through out-of-the-box reports.
How reviews workEver feel like work is harder than it should be? Multiple revisions of a document get emailed around;conflicting or out-of-sequence feedback on shared documents; expensive time-consuming review meet-ings: sound familiar?
Jama Connect alleviates these pain points with its review features.
• Everyone is automatically placed in the latest revision.• Reviewers can simultaneously log their feedback and approvals.• All feedback is in sequence with document revisions.• It’s easy to filter and view only the items that need additional review or feedback.
Reviews are critical to improving requirements and test quality and in increasing the shared understand-ing among the teams who are engineering and implementing the requirements. Most item types in Ja-ma Connect can be sent to a review.
Review roles: who does what?
• Moderator — Content Owner. Starts the review and facilitates the discussion.• Reviewer — Contributes to the discussion.
Jama Connect User Guide
19

• Approver — Signs off and approves items that are in review.
Who can start a review?
Users with Creator license and permissions to author and edit in the project can start and moderate areview.
What's involved in a review?
Here’s what a typical workflow looks like.
1 Define what gets reviewed Before starting a review, determine which set or folder of items you want to send for re-view. A review doesn’t need to be for an entire document. It can be for particular sectionsonly, which allows for a more agile and iterative review. In addition to location, a reviewcan be started from a filter, release, baseline, or test plan.
2 Start the review If leveraging Jama Connect workflow functionality, make sure the status of items is set to“Review:” right-click on the location in the Explorer Tree and click Send for review. Ifyou’re starting from a filter, release, baseline or test plan, right-click the Filter/Release/Baseline/Test Plan name and click Send for review. Jama Connect loads the review setupwizard, where you can configure the review deadline and invite Reviewers and Approvers.
3 Monitor progress the review is initialized, Reviewers and Approvers receive an email invitation to participate.They work concurrently, adding comments and marking items as “Approved” or “Rejected.”As a moderator, you can track participant progress and respond to comments.
4 Incorporate changes As the moderator, you incorporate edits based on feedback from the participants.After in-corporating changes, you are prompted to publish a new revision of the review.
5 Close the review Reviews close when the review deadline is reached or when the Moderator closes the re-view manually (Action > Close Review).
Reviews can always be reopened to publish new revisions and review what has changed.
Best practices
• Facilitate a review before Requirement is moved to “Approved” or “Rejected” status.• Focus on small, iterative reviews with fewer than 200 requirements per review. A large requirements
doc can be hard to consume.• It’s OK to have lots of review revisions; approvers are always placed into the “latest” revision.• Offer guidance on the type of feedback you need.
Create a review
You can create a review for any group of items in a project. And you can start a review from severalplaces in the Jama Connect interface.
Jama Connect User Guide
20

Regardless of where you begin, the process is the same through an easy-to-follow wizard.
Let’s start from Reviews in the top navigation.
1. Select Reviews, then select Start a review.
The wizard opens to the Definitions page.2. Follow the prompts in the wizard to define your review:
3. Click Initiate review.
Learn more about reviews
For details about how to create and use reviews, explore these topics in the User Guide:
• Review moderator [156]• Compare versions [186]• Filter or search the review workspace [183]• Organize and find review comments [181]• Review Education Resources from Community site• Review Center FAQ from Community site
Exporting documents from Jama ConnectWhile Jama Connect alleviates many of the pain points around managing documents, you might stillneed to create documents to share with your customers, quality teams, or auditors.
The basics
With Jama Connect, you can easily create documents using our standard export to Word and Excel orby creating your own custom office templates.
Jama Connect User Guide
21

The items that appear in your Jama Connect view are exported:
Beyond the basics with Office templates
If you need more than what the default Office templates provide, you can customize a template to suityour project. For details about how to create a custom Office template:
• Exports [295] (User Guide)• Word Template Guide (Community)
Advanced reporting
If you require more control over the report output than Word templates provide, you can use an ad-vanced reporting tool like BIRT or Velocity.
Here are some common scenarios for using an advanced reporting tool:
• Ordering of documents — Word templates always arrange your included items in the same orderthat they appeared in Jama Connect when you generated the export. If you need like items to staytogether or certain item types to always be displayed before other types, you need to use a customexport.
• Style formatting — Although Word templates support basic text formatting like bullets and text deco-ration, they don’t support control for page formatting options like section breaks or custom page num-bering. BIRT and Velocity exports provide a broader level of control than Word.
• Multiple levels of relationships — Default Word templates can export relationships one level up-stream or one level downstream. BIRT and Velocity both allow more access to follow relationshipsand tree structure through multiple levels.
• Conditional logic — BIRT and Velocity both allow more control over when and where to display in-formation. If you want to display an item’s status, but only if it were created more than 30 days agoand has an upstream relationship to a Feature, you need to use an advanced reporting engine.
For more detailed information about advanced reporting:
• Introduction to Advanced Reporting (Community)
Dashboards
You can configure your projects to show key metrics to quickly see what needs attention. Typically,dashboards are used to:
• Monitor progress (for example, status of Requirements or Execution Results of a Test Cycle)• Audit progress (for example, show the count of items that are missing a critical data point or process
step)
To access the dashboard, select the project name in the Explorer Tree.
Jama Connect User Guide
22

As an administrator with organization or project permissions, you can customize dashboards per project(not per user).
Customizations include:
Filter results Displays the results of an existing filter.
Assigned to me Displays a list of items "assigned to" the current user.
Bar chart Displays the results of an existing filter as a bar chart.
Recent activity Displays a line graph of recent activity over a period of time.
Pie chart Displays a pie chart for a filter and field that the user selects.
Activity stream Displays the current activity stream of the project. View all current activity including comments, editsmade, new items created, and assignment changes.
Project summary Displays a summary of the entire project, including total number of items in the project, number of daysuntil next release, and number of days until project completion.
Rich text Displays user defined text, images, diagrams, and equations.
Recently viewed Displays the last 15 items viewed by the current user.
Relationship diagram Displays the relationship rules applied to the project.
TestingDo you need to validate and verify your product? Or maybe you need to create a report that shows theconnection between regulations, requirements, and tests?
Then look no further: use Jama Connect test capabilities to guide your teams through the testing proc-ess, so you can validate and verify your products and systems.
Let's define our terms
Test cases Items that contain the tests needed to validate or verify product features or systems. They contain theessential information about your tests, and can be organized by project, library, or ad hoc.
Test plans Document that describe the strategy and objective of the test.
Test groups Allows teams to organize test cases within a test plan.
Test runs Item used to record results for a test case you ran against your product.
Test cycles A series of test runs consisting of groups of test cases, that are ready for execution. In a test plan, youcan add a test cycle to help manage and execute test runs.
Defects Testing errors that are logged from test runs and traced to upstream test cases and requirementsthrough the relationship configuration.
What's involved in testing?
Here's a typical workflow:
Jama Connect User Guide
23

1 Create test cases for yourproject
Create test cases that meet the needs of a particular project or multiple projectsacross your organization.Test cases describe the specific tests you plan to use andtheir steps. Relate test cases to the requirement you’re testing.
2 Create a test plan to testrequirements
Create a test plan that gives an overview of how you want to test requirements.
3 Organize test cases ingroups
Associate the cases you want to use into that plan using groups to organize them.
4 Move groups into cycles Get ready for testing, by moving those groups into cycles where you can see a listof all the tests you want to run.
5 Execute test runs and logdefects
Execute the test runs and log defects as needed.
6 Get overall test case sta-tus
Resulting test run statuses roll up to calculate the overall test case status.
7 Generate report showingresults
You can then generate a report showing results, such as the Test Plan SummaryReporter or the Test Plan Detail Report.
Learn more about testing
• Test cases [308]• Test plans [319]• Test groups [322]• Test cycles [330]• Test runs [333]• Defect item type [579]
All about baselinesA baseline in Jama Connect is a snapshot of your project at a point in time. The current version of eachselected item — and their relationships — are forever associated with that baseline.
Why are baselines important?
Jama Connect User Guide
24

A baseline captures the relationship of your selected project components to each other, as well as theirstate — for example: draft, reviewed, approved.
A project in Jama Connect can have many baselines. Use baselines as the basis for an export or as areference for a historical milestone. By creating a baseline at each project milestone, you can view thestatus of your project at those key points in the lifecycle. For example:
• At gate reviews• Before a reorganization• Before an import of requirements
Where to create the baseline
In the Jama Connect Project, navigate to the Baselines tab and click Add > Baseline.
Create a baseline (snapshot)
Are you ready to send an item for review? Or maybe you need to capture the current set of require-ments. Perhaps your project has reached a milestone like testing or approval.
Create a baseline to secure a snapshot of one or several items in your project.
1. Select the Baseline tab from the left panel tabs of your project.2. From the Add drop-down menu, select Baseline.3. Select the criteria that you want to include in your baseline, using the three tabs in the pop-up win-
dow:• Item selection — A copy of the project where you are working. Select your entire project, a sin-
gle set, multiple sets, a single item, or multiples items.• Releases — If you created a release, baseline one or multiple items.• Filters — Baseline any advanced filters you created.
4. Click Create. The Add Baseline window appears with a pre-populated name.5. (Optional) Rename the baseline or add a description.6. Click Save.
Your baseline is now created and is highlighted under the source where you created it.
Jama Connect User Guide
25
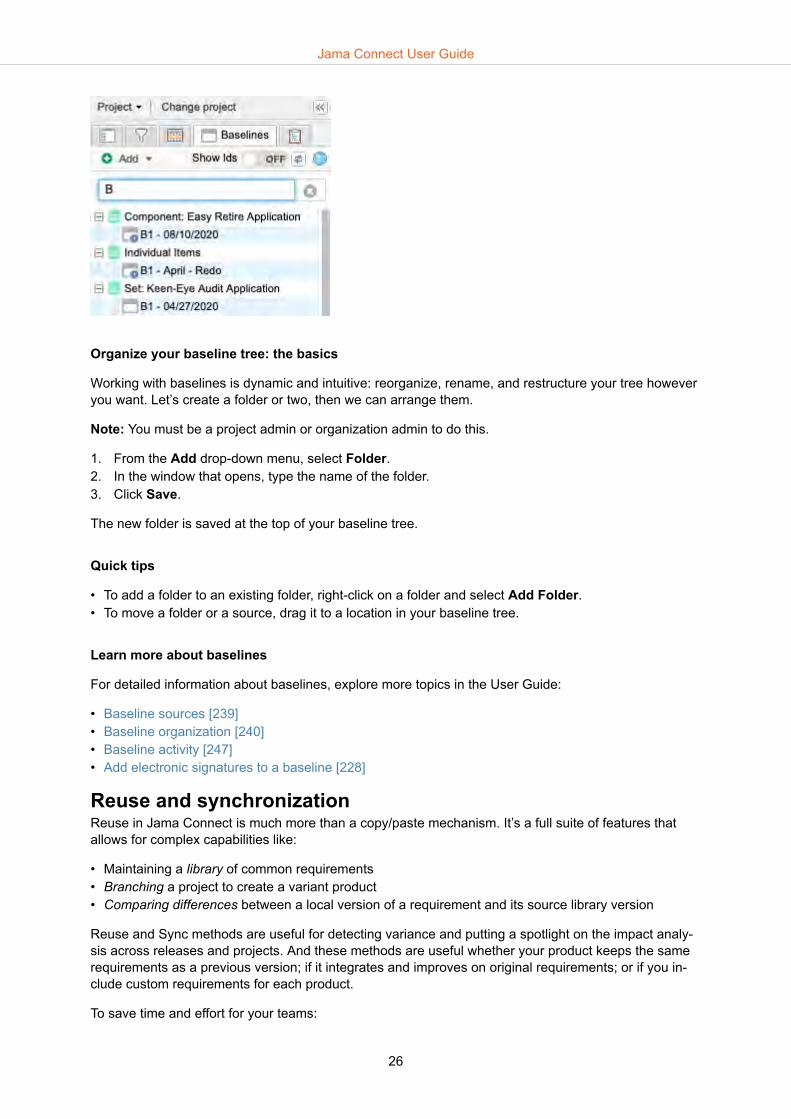
Organize your baseline tree: the basics
Working with baselines is dynamic and intuitive: reorganize, rename, and restructure your tree howeveryou want. Let’s create a folder or two, then we can arrange them.
Note: You must be a project admin or organization admin to do this.
1. From the Add drop-down menu, select Folder.2. In the window that opens, type the name of the folder.3. Click Save.
The new folder is saved at the top of your baseline tree.
Quick tips
• To add a folder to an existing folder, right-click on a folder and select Add Folder.• To move a folder or a source, drag it to a location in your baseline tree.
Learn more about baselines
For detailed information about baselines, explore more topics in the User Guide:
• Baseline sources [239]• Baseline organization [240]• Baseline activity [247]• Add electronic signatures to a baseline [228]
Reuse and synchronizationReuse in Jama Connect is much more than a copy/paste mechanism. It’s a full suite of features thatallows for complex capabilities like:
• Maintaining a library of common requirements• Branching a project to create a variant product• Comparing differences between a local version of a requirement and its source library version
Reuse and Sync methods are useful for detecting variance and putting a spotlight on the impact analy-sis across releases and projects. And these methods are useful whether your product keeps the samerequirements as a previous version; if it integrates and improves on original requirements; or if you in-clude custom requirements for each product.
To save time and effort for your teams:
Jama Connect User Guide
26

• Reuse common product requirements between projects.• Sync across those reused items to help determine and track variance across projects.
When you use Reuse and Sync within your requirements management configuration infrastructure, youmaximize your requirements resource management. You can modify and evolve existing work quicklywhile maintaining your requirement lineage.
Library approach
• A library project houses a collection of requirements maintained by a “librarian” or “curator” (permis-sions-based).
• The curator of a library can pull differences back into the library when needed.• Project members can pull and push updates between the project and the library.
Branching approach
Jama Connect User Guide
27

• Projects are branched by project duplication.• Synchronization is enabled during project duplication and differences are monitored between contain-
ers/items.• Jama Connect project baselines are created just after duplication. This captures the state of the
project at the time of duplication and is used for baseline comparisons.
AdministrationAdministration in Jama Connect is primarily used to control the product development process andusers’ access to the data.
Product development process
There is no “one size fits all” process for developing products or applications. Each industry starts with atemplate modeled after best practices, but every company can tailor the process to fit their needs.
Here is an example process* used to develop a medical device.
* Boxes = an artifact/document (generically defined as item types in Jama Connect).
Lines = relationships that enforce traceability between the items.
Item types = items with configurable fields to record specific details about each requirement, includingdetails like ID, Name, and Description. Also include values for capturing data like workflow status andvalidation method, similar to columns in spreadsheet.
User management
Jama Connect User Guide
28

A primary role for administration in any enterprise system is the assignment of licenses and managingaccess to data. Jama Connect includes several options to give administrators the ability to fine-tuneread/write/review access to fit their company’s needs.
Learn more about user management
• Licensing [560]• Managing users [550]
Manage item typesBy default, a trial user account is set up with permissions of an organization administrator, which givesyou access to the ADMIN module in the top-level navigation. If you don’t see this, ask your administra-tor to update your permissions.
Edit an existing item type
1. Select Admin > Organization, then select Item Types.2. Find the item type you want and select Edit in that row.3. Adjust the details that your project users can see when working with items.
• Display, Display plural — The name used to identify the item type, for example, System Re-quirement.
• Type key —The part of the ID that helps users quickly determine the item type of an item. Forexample, the default type key for System Requirement is SREQ, so when a user sees an itemwith the ID of QR-SREQ-34, they can know at-a-glance that the item is a System Requirement forthat project.
• Use as — Specific functions or permissions for item types configured as a test case or defect.• Image — An icon to help users quickly differentiate items.• Widgets — A graphic that shows additional data for the item. The most common widgets are Ver-
sions, Links, Attachments, Relationships, Activities, and Tags.4. Click Save.
Add a field
Chances are that the fields available in your selected item type are just what you need for your process.But if you want to add details specific to your organization, you can do that too.
1. Select Admin > Organization , then select Item types.2. Select Fields from the row of the item type.3. Select Add Field from the fields’ header for the item type.4. Select Custom Fields, then select the type of field you want to add.5. Enter the name you want users to see in Field Label.
The Unique Field Name is pre-populated with a suggestion. This name is used for reporting or ac-cessing from REST API.
6. Depending on the field type you select, additional options might be required. If prompted, configurethem now.
7. Click Save.8. (Optional) Use the arrow keys in the header to move the field into the order you want on the form.
Configure pick lists
Jama Connect User Guide
29
A common field to configure on an item type is a pick list. Pick lists can be reused, and the list you want,like Priority, might already exist. You can adjust the language or values to fit your needs.
If you need a new list, you can create it before you add the new field to an item type.
1. Select Admin > Organization, then select Pick lists.2. Find the pick list you want and select Values in that row.3. Add a new value or edit an existing value:
• New — Select the + icon and enter the value.• Existing — Select the row and click the pencil icon.
4. Click Save.5. (Optional) Use the arrow keys in the header to move the field into the order you want on the form.
Managing relationship rulesRelationships are an important part of ensuring compliance and quality. Many industries base their pro-cesses around the V-Model and need relationships to enforce the traceability through the stages.
Creating the correct relationships can be challenging for users, so Jama Connect gives administratorsthe ability to configure rules that help guide users in making the correct connections.
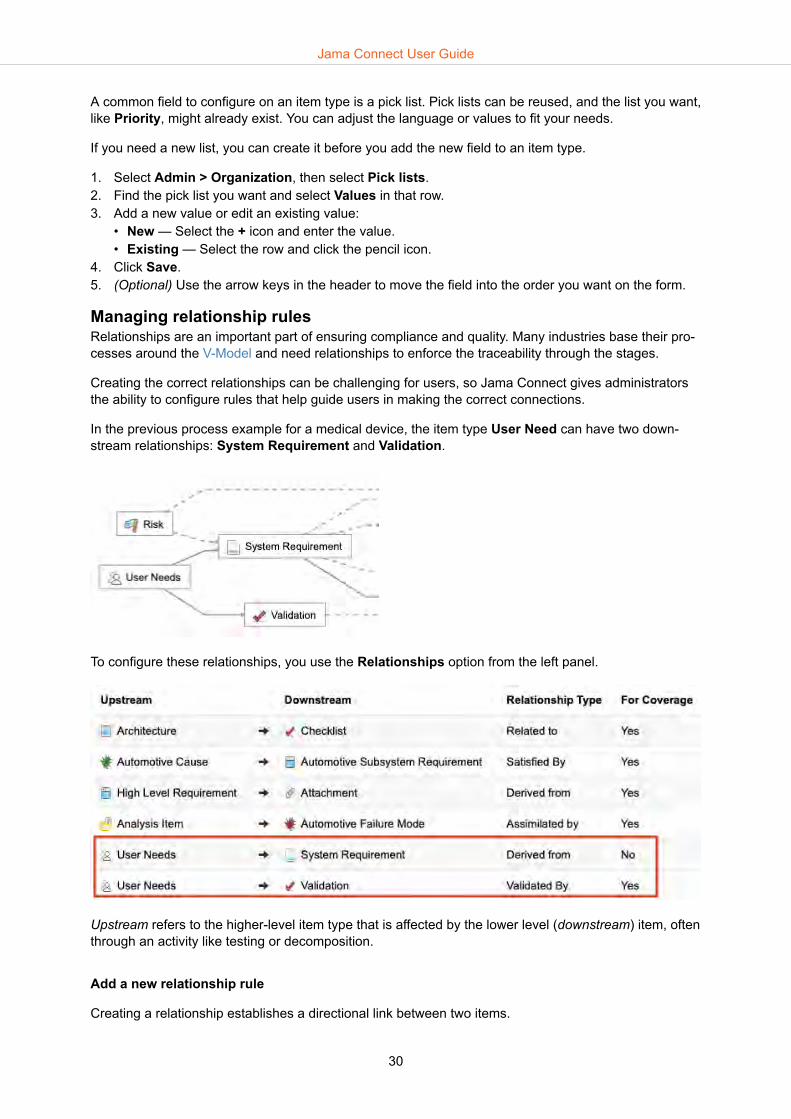
In the previous process example for a medical device, the item type User Need can have two down-stream relationships: System Requirement and Validation.
To configure these relationships, you use the Relationships option from the left panel.
Upstream refers to the higher-level item type that is affected by the lower level (downstream) item, oftenthrough an activity like testing or decomposition.
Add a new relationship rule
Creating a relationship establishes a directional link between two items.
Jama Connect User Guide
30
1. Select Admin > Organization, then select Relationships.2. Find the relationship ruleset you want.3. Scroll to the bottom of the list of rules and select Add relationship.4. Configure the relationships:
a. Select the Upstream Type.b. Select the Downstream Type.
Relationship types describe why the relationship between the two items exists. View the pick listabove the rulesets on the Relationships page.
c. Select Yes or No to configure if the relationship is used for coverage.Note: If you select For Coverage, Jama Connect notifies users if this relationship doesn’t exist.
d. Click Save.
Managing workflowSimilar to relationships, workflow is an important part of ensuring compliance and quality.
Workflow in Jama Connect is highly configurable. In general, workflow is set up on an item type with apick list of available statuses. This process guides a user though specific steps, making sure that onlyusers with correct permissions can make the transitions (by utilizing the Transition Permissions fea-tures), then locking items from further updates when needed.
For example, when an item is moved from Draft to Approved, it is locked so no changes can be madewhile it is in the Approved state.
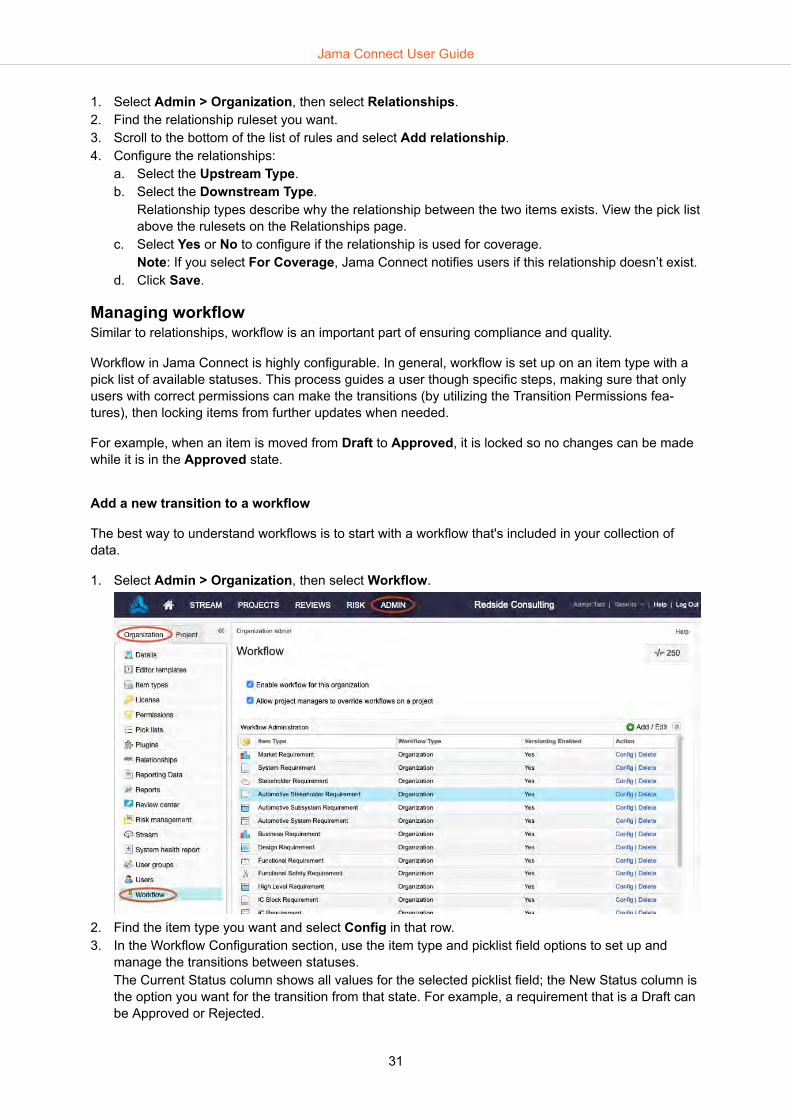
Add a new transition to a workflow
The best way to understand workflows is to start with a workflow that's included in your collection ofdata.
1. Select Admin > Organization, then select Workflow.
2. Find the item type you want and select Config in that row.3. In the Workflow Configuration section, use the item type and picklist field options to set up and
manage the transitions between statuses.The Current Status column shows all values for the selected picklist field; the New Status column isthe option you want for the transition from that state. For example, a requirement that is a Draft canbe Approved or Rejected.
Jama Connect User Guide
31
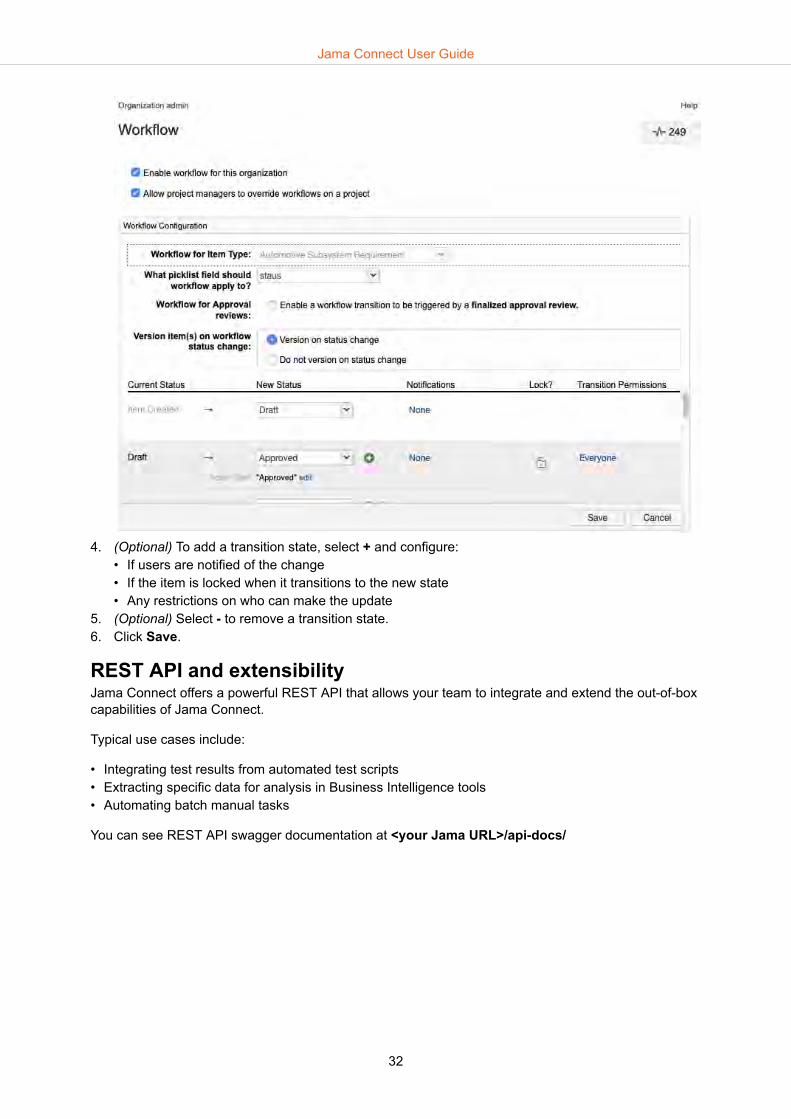
4. (Optional) To add a transition state, select + and configure:• If users are notified of the change• If the item is locked when it transitions to the new state• Any restrictions on who can make the update
5. (Optional) Select - to remove a transition state.6. Click Save.
REST API and extensibilityJama Connect offers a powerful REST API that allows your team to integrate and extend the out-of-boxcapabilities of Jama Connect.
Typical use cases include:
• Integrating test results from automated test scripts• Extracting specific data for analysis in Business Intelligence tools• Automating batch manual tasks
You can see REST API swagger documentation at <your Jama URL>/api-docs/
Jama Connect User Guide
32

Interested in learning how to work with the Jama Connect REST API? The following resources can helpyou get started.
• API Cookbook provides recipes for users and partners creating integrations using the Jama ConnectREST API: https://dev.jamasoftware.com/cookbook/
• Jama Connect REST API documentation provides information about the specifics of our API: https://rest.jamasoftware.com/
ID Description
Project ID Project IDs are unique to Jama Connect. Your administrator sets the default project and set keys.
Example: <project key> - <set key> # <SBX-REQ-1 or SBX-TEST-3>
Global ID Global IDs are used to reference where a requirement or test was reused globally across JamaConnect projects. The Global ID isn’t unique because several copies of items might be connectedthat share the same Global ID.
Example: GID-1234
API ID API IDs are the database identifier for an item and is used by developers when interacting withJama Connect from the REST API.
In List View, you can locate the API ID as a column or in the browser URL for the item you’reviewing in Jama Connect.
Example: 21374
Find Project API ID in URL:
Find Filter API ID, navigate to the filter in Jama Connect and look at URL:
Find Item API IDs:
Jama Connect User Guide
33
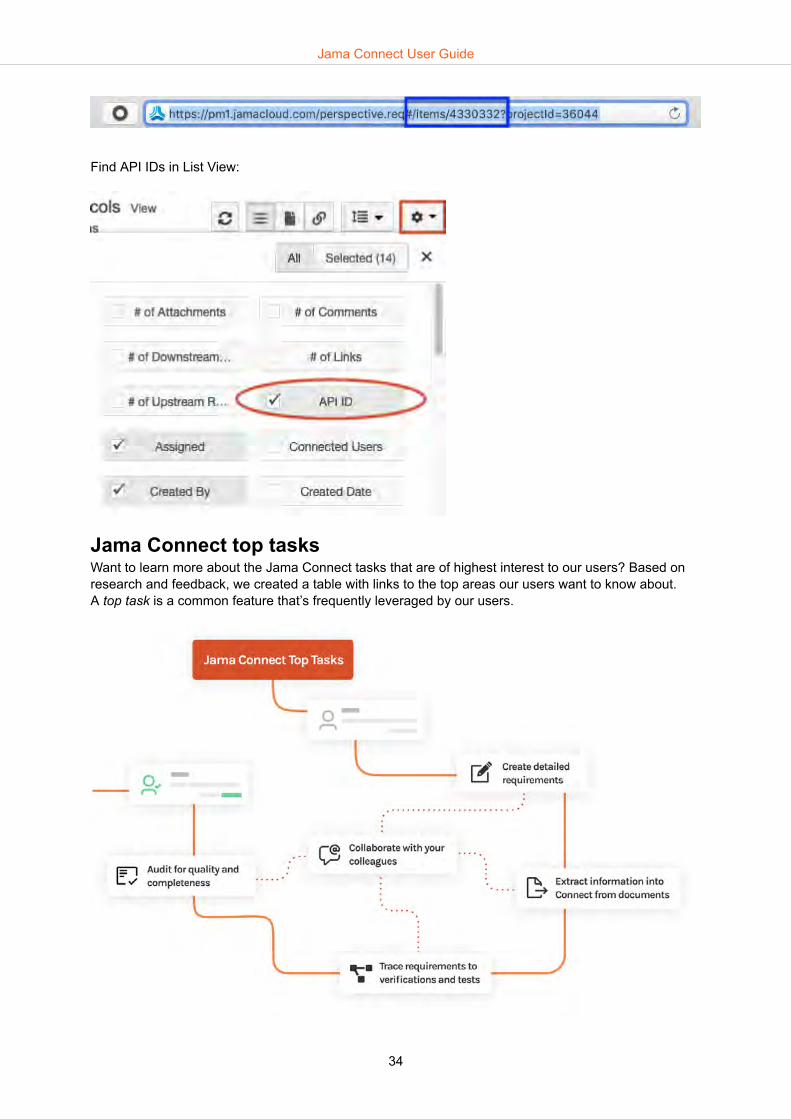
Find API IDs in List View:
Jama Connect top tasksWant to learn more about the Jama Connect tasks that are of highest interest to our users? Based onresearch and feedback, we created a table with links to the top areas our users want to know about.A top task is a common feature that’s frequently leveraged by our users.
Jama Connect User Guide
34

Top task Helpful links
Create detailed requirements Add an item [107]
Create new items
Trace requirements to verifications and tests Traceability from requirements to test [14]
Jama Connect for modern requirements management
Extract information into Jama Connect from documents Import items [56]
Import from Microsoft Word [56]
Import from Microsoft Excel [67]
Import from IBM DOORS [81]
Audit for quality and completeness Item-based product development [13]
Export test cases to Microsoft Excel [317]
Test [308]
Advanced filters [139]
Dashboard [346]
Collaborate with your colleagues Collaborating with your team [197]
Reviews in Jama Connect [153]
Staying connected with the Stream [205]
Electronic signatures [225]
Roles for review workflow [153]
Additional information• A quick tour of Jama Connect for Modern Requirements Management• Jama Community Top Resources• Getting started with Jama Connect
Jama Connect User Guide
35

Setting up your work environment
You can change the settings for your profile and workspace to suit your needs and your project work.
My Profile page
• Add a photo• Add contact information• Change your password• Control subscriptions (email notifications)• Manage settings for reviews
Workspace
• Customize the Explorer Tree• View a group of content• Configure fields
Editing and managing your profileYour profile is where you change your password, view locked items, and manage subscriptions.
To manage your profile, select your name in the top right navigation to open the My Profile window.
To do this... Select...
Edit your user details Edit settings
Replace your default user picture Edit avatar
Reset your password [36] and you're not using SSO Change password
Set API credentials Set API credentials
Configure your item subscriptions [37] My subscriptions
View your locked items [38] My locked items
View and unlock system-locked items [38] System locked items
Configure your review subscriptions [38] Review Center
Reset your passwordYou can change your password from your My Profile window or reset it from the login screen.
An organization or system administrator can also reset user passwords [560].
NOTEIf your organization is using LDAP or Crowd authentication, this feature is disabled.
1. Select your name in the header to open the My Profile window.2. Select Change Password from the options at the top of the window.
Jama Connect User Guide
36

3. Enter and confirm your new password.Passwords must meet the strength requirements set by the system administrator [468]. To displaytips about which characters are required for password strength, hover over the center of the win-dow.
4. Select Close.
Configure email notifications and subscriptionsYou can subscribe to email notifications [197] to stay up to date on item changes. To receive email noti-fications, you must configure your profile to receive them.
You can only unsubscribe to notifications that you created for yourself. If you have notifications that oth-ers subscribed you to, you can’t unsubscribe, but you can mute them.
NOTEMuting notifications can be disabled by an organization administrator [604].
1. Select your name in the header to open the My Profile window.2. Select My Subscriptions, then select the tab with the subscriptions you want to see:
• Me — Subscriptions you created• Others — Subscriptions that others created for you
3. Define how often you want to receive notifications: use the drop-down menu at the bottom of thewindow.Default is to check for new notifications every 5 minutes.• Daily — Receive a batch of notifications in a single daily email.• Weekly — Receive a batch of notifications in a single weekly email.• Mute All Notifications — Silence all item subscription emails.
Jama Connect User Guide
37
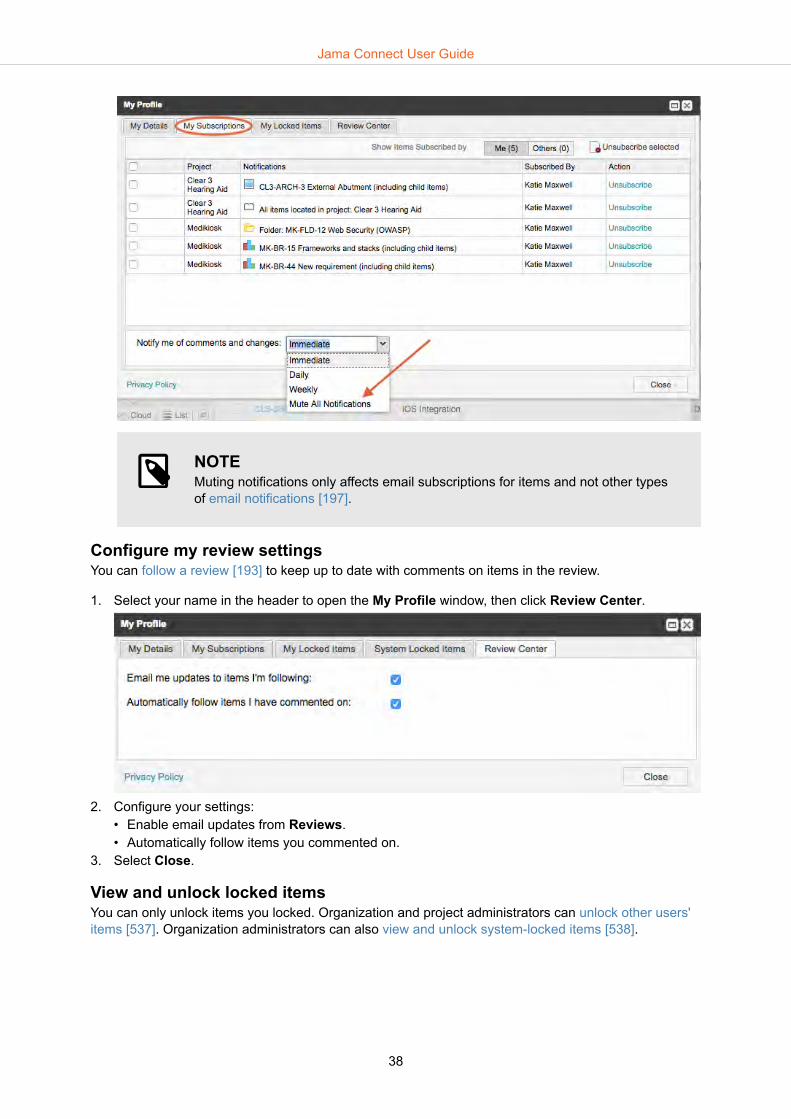
NOTEMuting notifications only affects email subscriptions for items and not other typesof email notifications [197].
Configure my review settingsYou can follow a review [193] to keep up to date with comments on items in the review.
1. Select your name in the header to open the My Profile window, then click Review Center.
2. Configure your settings:• Enable email updates from Reviews.• Automatically follow items you commented on.
3. Select Close.
View and unlock locked itemsYou can only unlock items you locked. Organization and project administrators can unlock other users'items [537]. Organization administrators can also view and unlock system-locked items [538].
Jama Connect User Guide
38

NOTEOrganization admins have the ability to Show All Locked Items while project adminscan only batch unlock items manually.
Important considerations
• In Single Item View, you can see who locked an item when you hover over the Edit button.• Organization and project admins can't unlock system-locked items using the batch update workflow.
To unlock items across projects:
1. Select your name in the header to open the My Profile window.2. Click My Locked Items to view a list of locked items.
3. Select the item you want to unlock, then select Unlock in the top right corner of the window.4. For List View — Select the gear icon, configure which fields are visible, then select Locked,
Locked By, and Last Locked, as needed.
To lock or unlock items in List View:
Jama Connect User Guide
39

1. In List View, select the items you want to unlock.2. Select Actions > Batch edit.
3. In the Batch update window, enable Locked Status, then select one of the following:• Unlock all items• Lock all items
4. Click Next, comment and notify users as needed, then select Commit.5. For List View — Select the gear icon, configure which fields are visible, then select Locked,
Locked By, and Last Locked.
Jama Connect User Guide
40

The new columns and results appear in the table.
Adding and deleting bookmarksBookmarks are links to content you view frequently and are displayed at the top of your homepage.
NOTEYou can use your browser's bookmarks or favorites feature to bookmark any view inJama Connect.
Bookmarks remain at the top of the homepage, sorted by most recently viewed. Projects, components,folders, sets, filters, risk analyses, and Trace Views can be bookmarked for future reference.
You can add bookmarks in two different ways:
• Bookmark recently viewed content on the homepage — When you view a particular folder, set,component or filter it will appear in the Recently viewed list on your homepage. Select the emptybookmark icon for the content you want to bookmark. The bookmark icon changes to a solid icon andthe content appears under the Bookmarks section.
• Bookmark Trace Views — When viewing a Trace View that you want to bookmark, you first save theTrace View [255], then select the bookmark icon at the top of the page. Trace View is now book-marked on your homepage.To remove a bookmark, select the solid bookmark icon in the bookmarks list on the homepage. Thecontent you remove appears at the top of the section.
NOTEYou can also bookmark risk analyses [412]. These are visible for organizations withrisk management licensing, and appear when you select Risk in the header.
Jama Connect User Guide
41
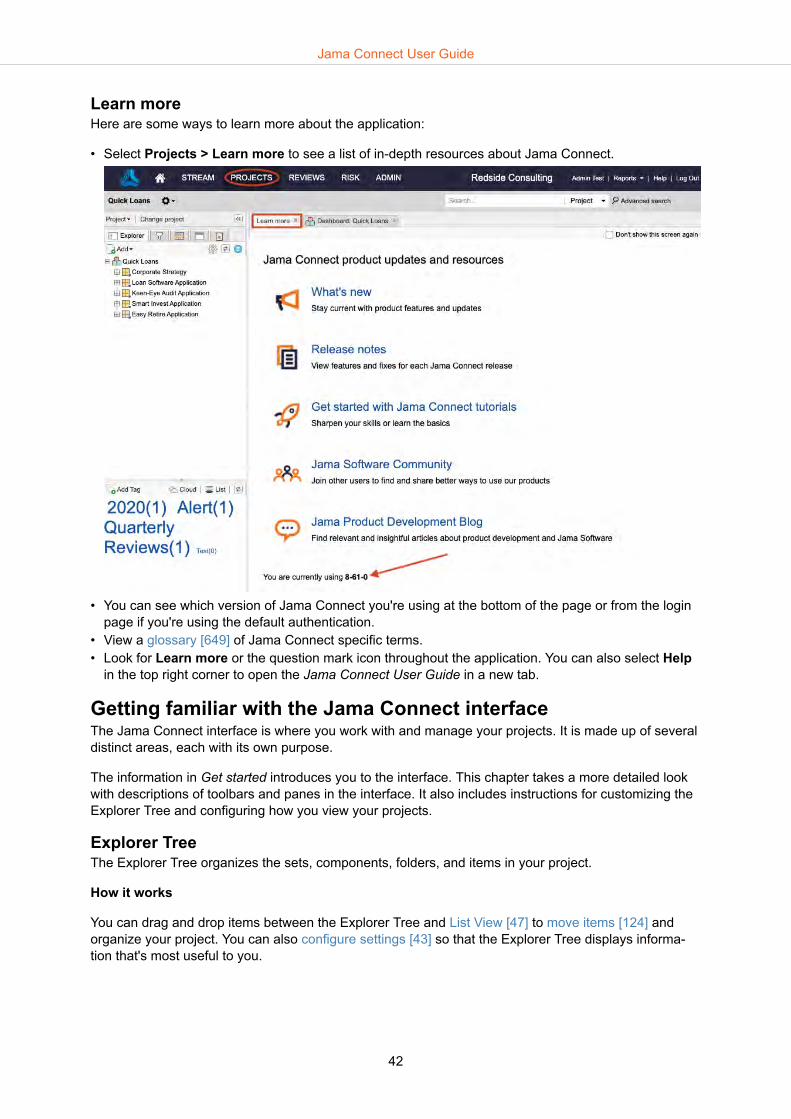
Learn moreHere are some ways to learn more about the application:
• Select Projects > Learn more to see a list of in-depth resources about Jama Connect.
• You can see which version of Jama Connect you're using at the bottom of the page or from the loginpage if you're using the default authentication.
• View a glossary [649] of Jama Connect specific terms.• Look for Learn more or the question mark icon throughout the application. You can also select Help
in the top right corner to open the Jama Connect User Guide in a new tab.
Getting familiar with the Jama Connect interfaceThe Jama Connect interface is where you work with and manage your projects. It is made up of severaldistinct areas, each with its own purpose.
The information in Get started introduces you to the interface. This chapter takes a more detailed lookwith descriptions of toolbars and panes in the interface. It also includes instructions for customizing theExplorer Tree and configuring how you view your projects.
Explorer TreeThe Explorer Tree organizes the sets, components, folders, and items in your project.
How it works
You can drag and drop items between the Explorer Tree and List View [47] to move items [124] andorganize your project. You can also configure settings [43] so that the Explorer Tree displays informa-tion that's most useful to you.
Jama Connect User Guide
42

Jama Connect arranges content by component, set, and folder. Select one to view its content.
For more information about how to use use the Explorer Tree:
• Find an item in the Explorer Tree [151]• Filter the Explorer Tree [143]• Move items in the Explorer Tree [124]
Tips and more
• When working with a large number of items — more than 250 items per folder — work with them inList View instead of the Explorer Tree.
• To move multiple items, you can multi-select in the List View and drag them to their new location inthe Explorer Tree.
Customize the Explorer TreeThe Explorer Tree organizes the sets, components, folders and items in your project hierarchy. You canconfigure the Explorer Tree settings so that it displays only information that's useful to you.
1. Select the gear icon at the top of the Explorer Tree to open the Explorer Settings window.
Jama Connect User Guide
43
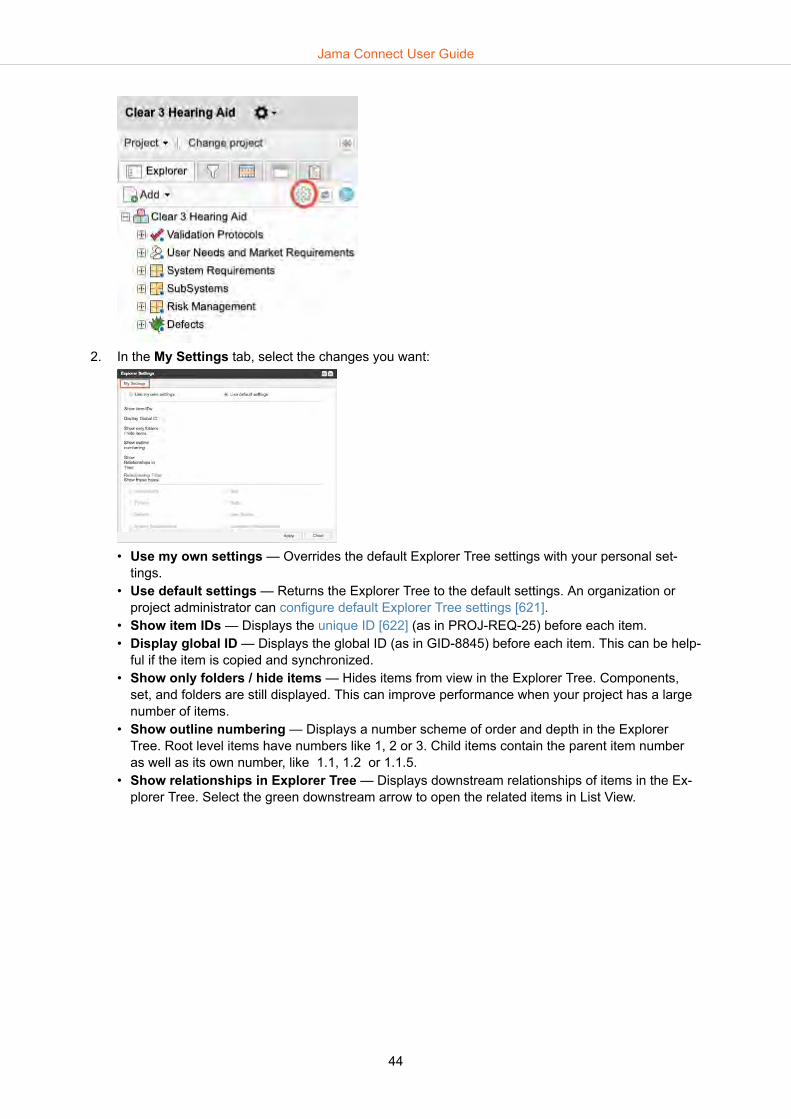
2. In the My Settings tab, select the changes you want:
• Use my own settings — Overrides the default Explorer Tree settings with your personal set-tings.
• Use default settings — Returns the Explorer Tree to the default settings. An organization orproject administrator can configure default Explorer Tree settings [621].
• Show item IDs — Displays the unique ID [622] (as in PROJ-REQ-25) before each item.• Display global ID — Displays the global ID (as in GID-8845) before each item. This can be help-
ful if the item is copied and synchronized.• Show only folders / hide items — Hides items from view in the Explorer Tree. Components,
set, and folders are still displayed. This can improve performance when your project has a largenumber of items.
• Show outline numbering — Displays a number scheme of order and depth in the ExplorerTree. Root level items have numbers like 1, 2 or 3. Child items contain the parent item numberas well as its own number, like 1.1, 1.2 or 1.1.5.
• Show relationships in Explorer Tree — Displays downstream relationships of items in the Ex-plorer Tree. Select the green downstream arrow to open the related items in List View.
Jama Connect User Guide
44

CAUTIONBe careful not to relate an item back to itself. You can create an infinite loop thatcauses the Explorer Tree to expand. To avoid this, don't relate items in a waythat creates an infinite loop.
3. Select Apply. When you're satisfied with changes, select Close.
Tools for viewing and controlling contentWith Jama Connect, you can look at and control your content according to the type of work you need todo.
• Toolbar [45] — Provides different methods to control and view your content.• List View [47] — Shows data from multiple items in a table with a different field in each column.• Reading View [48] — Shows text and images for a group of items so you can read through selected
items like a document.• Trace View [49] — Shows related upstream and downstream items, missing relationships, and item
details in context of their relationship.
You can also customize fields [51] that control how you view your projects.
ToolbarThe toolbar is located in the center of the workspace. The tools allow you ways to control and view yourcontent.
Toolbar options vary slightly depending on your location in the application.
Jama Connect User Guide
45

Select... To...
Filter Items Open the filter panel and filter the items you want to see.
A filter limits the group of items or comments by content, like author, keyword, date, or coverage.
View See the details of a component, set, folder, or a project overview.
Refresh Refresh the list of results and recent changes from other users.
List View Show data from multiple items in a table with a different field in each column.
You can sort, select, and compare items at a glance.
For more information, see List View [47].
Reading View Show text and images for a group of items, which allows you to read through selected items like a docu-ment.
For more information, see Reading View [48].
Trace View Show related upstream and downstream items, missing relationships, and item details in context of theirrelationship.
For more information, see Trace View [49].
Row height In List View, manually adjust the height of the rows.
If you select Extended, rows are formatted to wrap text.
Gear icon (show/hide fields)
Configure which fields appear for each item in Reading View, List View, or Trace View.
For more information, see Configure fields [51].
Export Export your data to Word, Excel, PDF, or use one of the Office Templates.
Actions Edit, delete, convert, lock, batch transition, find, email a link, relate, reuse, and send items for review.
The options that are available in the Actions menu depend on where you are in Jama Connect.
Note: The maximum number of items you can Send for review is 500.
Jama Connect User Guide
46

Select... To...
Add Add items, folders, sets, and components.
List ViewList View shows data from multiple items in a table with a different field in each column. You can sort,select, and compare items at a glance.
The button is in the toolbar at the top of the center panel.
In List View you can:
1. Arrange columns by selecting the column header and dragging2. Select the column header to sort items. Click again to sort in reverse order. Configure fields [51] to
view the ones you want.3. Open items by selecting the ID or global ID link.4. Select single or multiple items to move [124] them or use the Actions in the toolbar.5. Edit an item inline by double-clicking on the item to make it editable, make changes, then select
Save.6. Reorder items by dragging them from List View to the Explorer Tree.7. View locked items [38].8. View the Relationship Status Indicator [266].
Jama Connect User Guide
47

9. Add comments [211] and view connected users. [225]10. View related items [258].11. Change pages.
If your organization has a risk management license, you can also configure this view [51] to see risksin List View. [419]
Reading ViewReading View shows text and images for a group of items so you can read through selected items like adocument.
You can use Reading View in both Projects and Reviews. Click Reading View on the toolbar at the topof the center panel.
From Projects > Reading View you can:
1. Change pages2. View images3. Select individual or multiple items4. Open items5. View hierarchy with numbering6. Drag items to the Explorer Tree to reorder (as long as item type allows it)7. Add comments and view connected users8. Configure fields [51]9. View related items10. Export hierarchical content from an advanced filter [144]11. If your organization has a risk management license, you can also configure this view [51] to see
risks in Reading View. [419]
In Reviews > Reading View you can:
Jama Connect User Guide
48
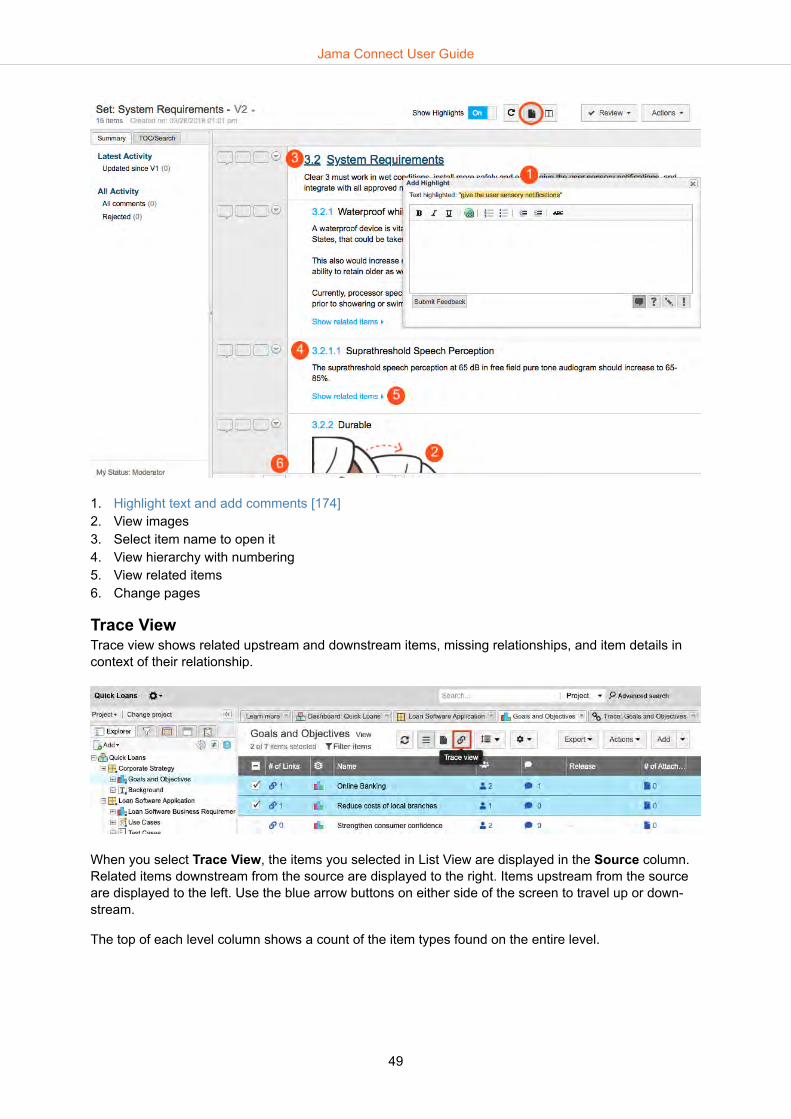
1. Highlight text and add comments [174]2. View images3. Select item name to open it4. View hierarchy with numbering5. View related items6. Change pages
Trace ViewTrace view shows related upstream and downstream items, missing relationships, and item details incontext of their relationship.
When you select Trace View, the items you selected in List View are displayed in the Source column.Related items downstream from the source are displayed to the right. Items upstream from the sourceare displayed to the left. Use the blue arrow buttons on either side of the screen to travel up or down-stream.
The top of each level column shows a count of the item types found on the entire level.
Jama Connect User Guide
49

NOTEThe item count is a unique count. If the same item is downstream of multiple items inthe source column, it appears multiple times in the "1 level down" column, but it's coun-ted only once.
Select an item in the source column to highlight its specific upstream and downstream relationships.You can select multiple items using the checkboxes. Selections remain highlighted as you navigate. Se-lect Clear all to clear your selections.
Select Set columns at the top of each trace level to turn fields on or off [51] for items in that level.
Jama Connect User Guide
50

Use Trace View to find missing coverage and use the Add menu in the toolbar to add items directly fromthis view.
You can also filter Trace View [256] or use Trace View to save a view [255] or export the content [256].
You can also use the Trace View to see validation and verification testing results. If a test case is visiblein Trace View, you also see the related test runs. No manual creation of relationships is required; TraceView infers the relationship between test cases and runs and once a test cycle is created.
If your organization has a risk management license, you can also configure this view [51] to see risksin Trace View. [419]
Configure fieldsChoose which fields you see for each item in Projects Reading View, List View, or Trace View.
1. Select the gear icon in the toolbar [45] to open a Configure fields window.
Jama Connect User Guide
51

In Trace View you can configure fields for each level independently.
2. In the configure fields drop-down list, select the fields you want to see. Projects Reading View re-members user selections for a particular location so they appear across sessions.
NOTEAll users see the Risk field as an option. However, risk analyses function only ifyou purchased additional licensing.
You can also configure your Compare View for synchronized items [293] or yourList View for baselines [247].
Single Item ViewSingle Item View displays the information about one item in the center panel.
Jama Connect User Guide
52

From this view you can view item contents, edit the item [110], and use the following:
1. top right toolbar [45]2. projects workflow [200]3. side toolbar [53]4. unique ID [622]5. global ID [275]6. view risks [417]7. add tags [133]8. add attachments [133]9. add links [114]
Side toolbarThe Side toolbar appears on the right side in Single Item View. The widgets are buttons that give youaccess to different features of Jama Connect. Widgets can be configured by an organization administra-tor configured by an organization administrator [578].
Jama Connect User Guide
53

Select... To...
Relationship Status Indi-cator
Open the bottom panel where you can see the required relationships for this item and whether theitem follows the project's relationship rules. Suspect relationships [267] are also flagged.
Connected users Opens a window that displays the users directly associated with the item as well as indirectly asso-ciated with related or traced items. The number displayed is the number of connected users.
Review comments Opens and closes the bottom panel of review comments [181] related to this item. The numberdisplayed is the total number of comments for this item.
Comments Opens and closes the bottom panel of comments [211] related to this item. The number displayedis the total number of comments for this item.
Activities Opens and closes the bottom panel display of activities [210] related to this item.
Versions Opens and closes the bottom panel of item versions [230]. The number displayed is the total num-ber of versions for this item.
Synchronized items Opens and closes the bottom panel of synchronized items [285].
Child items Opens and closes the bottom panel with a list view of child items [110]. Appears only if the selec-ted items has child items.
Items to be changed Opens and closes the bottom panel with a list of change requests [232] that might affect this item.
Compare ViewCompare View shows side-by-side content so you can compare differences between different item ver-sions.
To open compare view, select the Version widget in the side toolbar.
Jama Connect User Guide
54
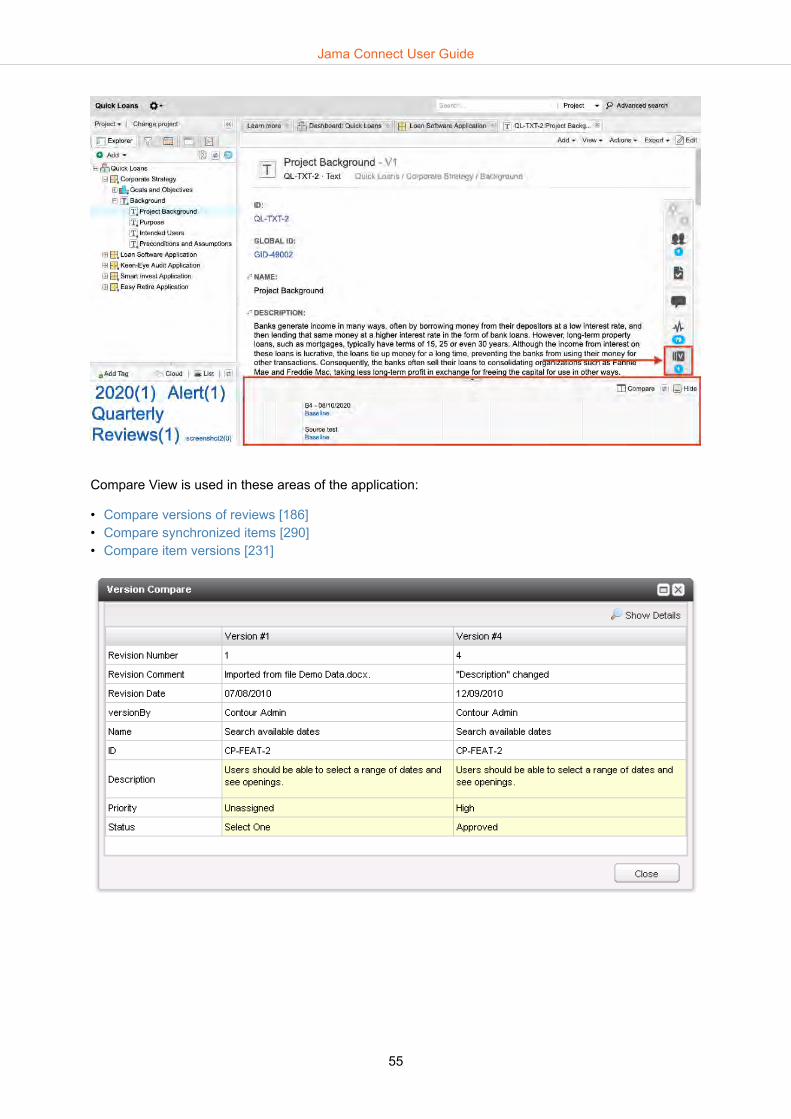
Compare View is used in these areas of the application:
• Compare versions of reviews [186]• Compare synchronized items [290]• Compare item versions [231]
Jama Connect User Guide
55
Create content
Before populating the Jama Connect application with your data, you might want to discuss with othersin your organization which elements of the application you want to use and how you want to use them.
Typically, organizations create items as requirements, features, use cases, test cases, defects, or otherbasic information types that are needed to define the scope of the project or product.
When you're ready, you can:
• Import items [56]• Create new items [107]• Add tags [133], links [114], and attachments [133]• Add images, graphs, and equations with the rich text editor [91]• Organize with components [101] and folders [104]
Learn more about how to manage content [230] and collaborate [197] once your content is available.
Import itemsYou can import items into Jama Connect from various platforms including Microsoft Word [56], Excel[67], and IBM Doors [81].
For Excel documents, you can make a round-trip import and export [77] to efficiently add items andupdate fields in a spreadsheet format.
You can also batch create relationships between existing items using the Import Relationships Plugin[540].
Import from Microsoft WordYou can import items into Jama Connect from a Microsoft Word document. You can use headings, bul-leted lists, numbered lists, and text formatting to affect how items are imported.
After you prepare your Word document for import [56], follow these instructions to import items with aWord document [67].
Prepare Microsoft Word document for importWhether or not you are creating the Microsoft Word document for importing items into Jama Connect,consider these things to make sure the import goes smoothly.
• Headings and styles [57]Use Headings and Styles within your Word document to determine hierarchy.
• Tables [58]When importing, you can use tables in Word documents in three distinct ways.
• Field mapping [65]The field mapping process is slightly different depending whether you're using headers [57] or tables[58] to determine hierarchy.
NOTEMany Word styles are imported, but not all styles are converted exactly. The Data Im-port Wizard is unable to import a table of contents. Images are included as part of theimport. OLE components, such as embedded Visio diagrams, are imported as PNG im-ages.
Jama Connect User Guide
56

Set hierarchy with headings and styleWhen importing items with a Microsoft Word document you can create hierarchies using styles.
• Headings determine the name of the items and place them as parent and child items.• Normal describes a heading. Jama Connect moves this text to the description field of the associated
item.
For Headings to determine hierarchy, you must use the default Word styles like Heading 1, Heading 2,Heading 3. You can use up to seven levels of hierarchy in Word.
Bullets, bold, italic, and underline keep the same formatting. Numbered lists are imported as bullets.When the list contains multiple levels, Jama Connect continues to use bullets. However, each set is in-dented to indicate where the original levels existed.
For example, this Word document includes three levels of headings.
Once imported, they appear as three items on three levels because sub-sections in Word are treated aschild items in Jama Connect.
The Headings serve as the item Summary field, and the normal text style translates to the Descriptionfield.
Jama Connect User Guide
57
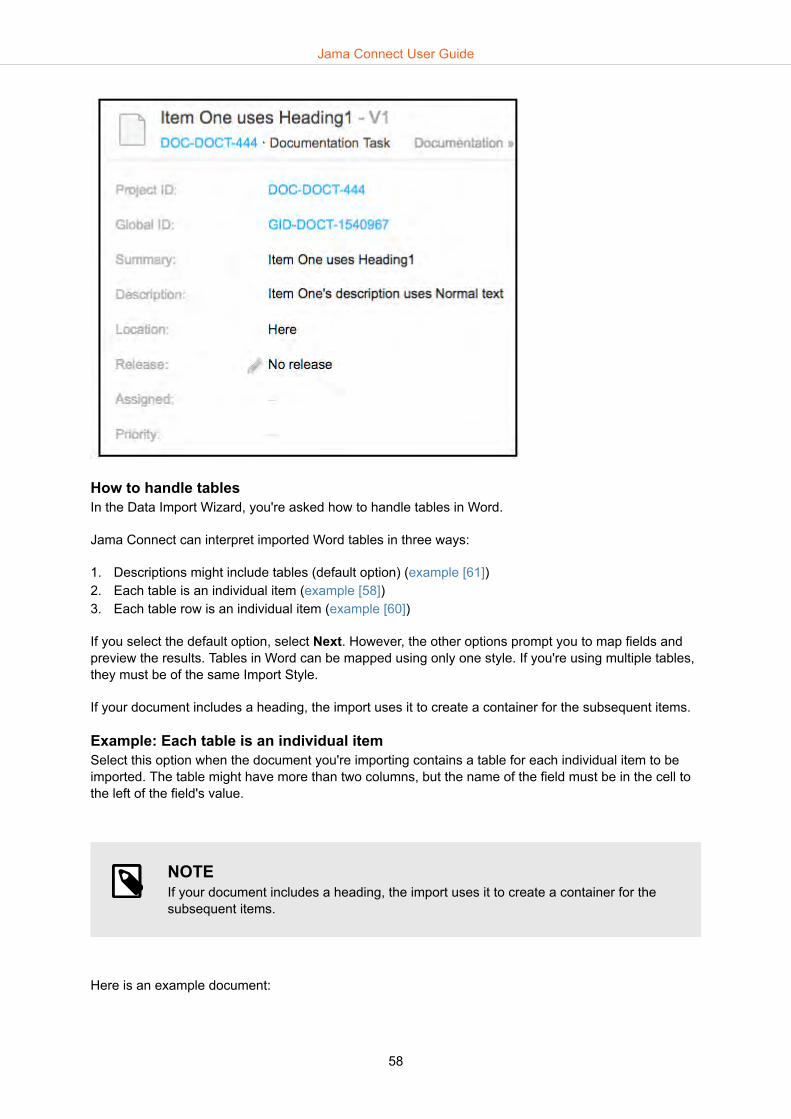
How to handle tablesIn the Data Import Wizard, you're asked how to handle tables in Word.
Jama Connect can interpret imported Word tables in three ways:
1. Descriptions might include tables (default option) (example [61])2. Each table is an individual item (example [58])3. Each table row is an individual item (example [60])
If you select the default option, select Next. However, the other options prompt you to map fields andpreview the results. Tables in Word can be mapped using only one style. If you're using multiple tables,they must be of the same Import Style.
If your document includes a heading, the import uses it to create a container for the subsequent items.
Example: Each table is an individual itemSelect this option when the document you're importing contains a table for each individual item to beimported. The table might have more than two columns, but the name of the field must be in the cell tothe left of the field's value.
NOTEIf your document includes a heading, the import uses it to create a container for thesubsequent items.
Here is an example document:
Jama Connect User Guide
58

In the import results, the heading in the document becomes a container in Jama Connect:
Each table becomes an individual item:
Jama Connect User Guide
59
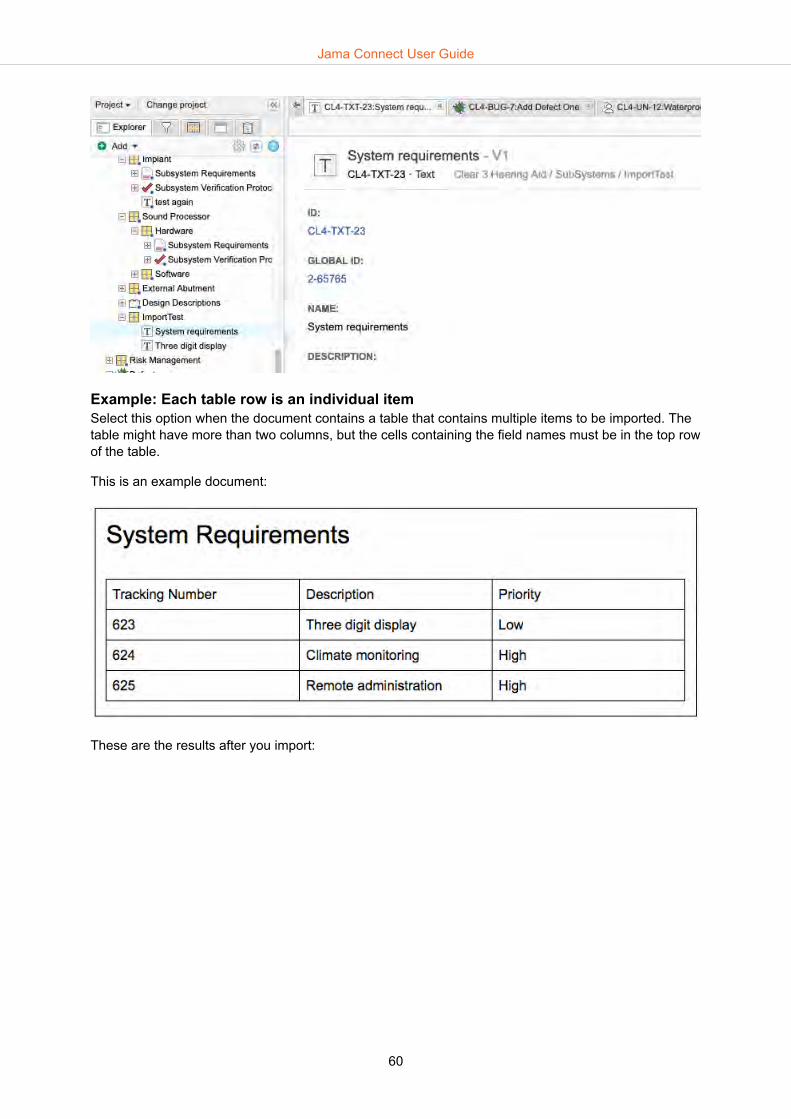
Example: Each table row is an individual itemSelect this option when the document contains a table that contains multiple items to be imported. Thetable might have more than two columns, but the cells containing the field names must be in the top rowof the table.
This is an example document:
These are the results after you import:
Jama Connect User Guide
60
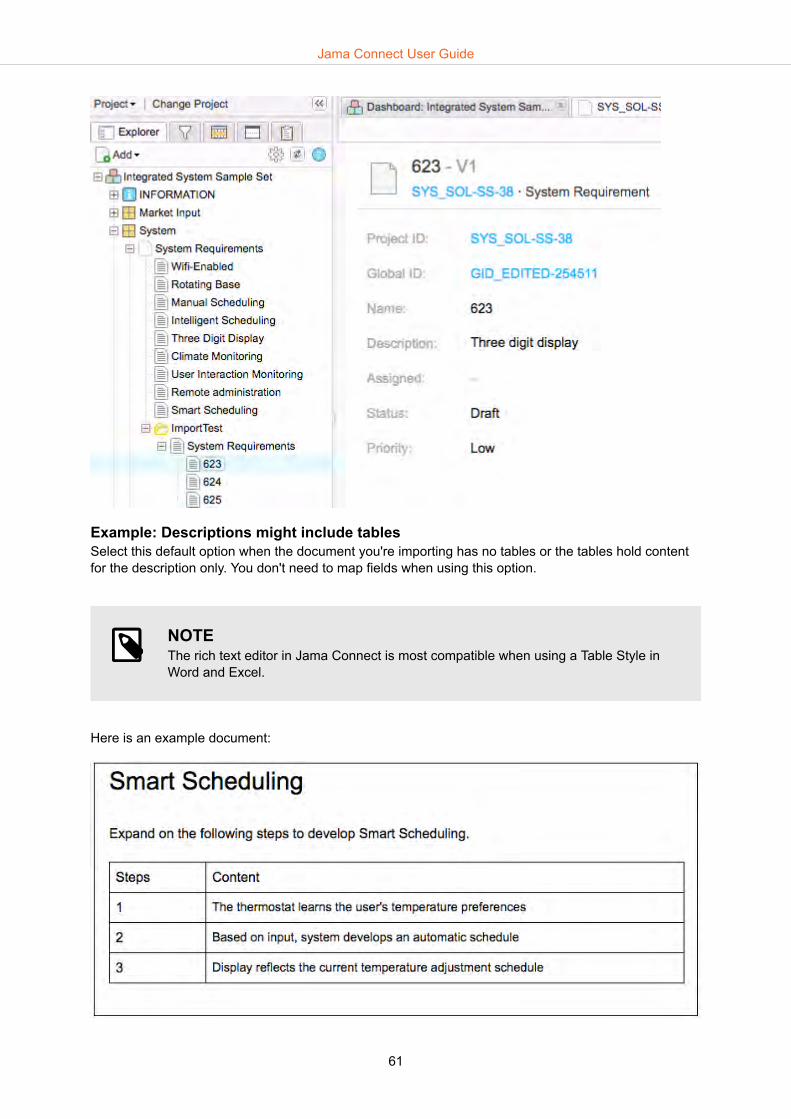
Example: Descriptions might include tablesSelect this default option when the document you're importing has no tables or the tables hold contentfor the description only. You don't need to map fields when using this option.
NOTEThe rich text editor in Jama Connect is most compatible when using a Table Style inWord and Excel.
Here is an example document:
Jama Connect User Guide
61

Here are the results after import:
Field mapping for tablesIf you're not using the default option for tables, you are asked to map fields for tables.
Jama Connect User Guide
62

1. Copy the exact field names from the tables and paste them into the appropriate Identifier cell.2. Select default values that are used for all new items that don't have a value in the document you're
importing. Rich text fields can't have a default value. Also, you can't map a workflow field (for ex-ample: Status).
3. Select Next and review the mapping of the first item found in the document you're importing.4. If the mapping is correct, select Submit to import the target document. If the mapping is incorrect,
select Back and make the necessary adjustments.
Document scopeSometimes requirement documents are large and contain sections or items that need to be importedinto different sets, folders, or not at all. With the Document Scope Options, you can mark sections of adocument to be imported or excluded.
If the application detects the file as DOC or DOCX, you're asked to determine the document scope andto choose field mapping [65] options for the import.
Jama Connect User Guide
63

To set the document scope:
1. Before importing your Word document, decide which sections of text you want to import or ignore.Open the document and indicate which section or sections of the document to import by insertingtextual tags around the areas. In the following example, only the part of the document located be-tween the text IMPORTSECTION is included.
2. Select the file for import.3. In the window that opens, under Choose Field Mappings for Import , select the box next to Im-
port sections surrounded by start/stop text and enter corresponding start/stop text to indicatesections to be imported. Select the box next to Ignore sections surrounded by start/stop textand enter corresponding start/stop text to indicate sections to be ignored. Both options can be usedtogether.
Jama Connect User Guide
64

TIPThe examples use the default start/stop text IMPORTSECTION and IGNORESEC-TION. Jama Connect doesn't restrict the start/stop text to just these two entries. How-ever, due to Word styles and formatting, we recommend using text that's simple, one-word, and all caps.
Any words used as start/stop text must not be words that can be included in the docu-ment's text as content. For example, the word "exclude."
Field mappingIf Jama Connect detects the file to be a DOC or DOCX, it asks you to determine the document scope[63] and to choose field mapping options for the import. If you're using tables, see field mapping for ta-bles [62].
Enter the following information in the Field Mapping section:
• Use Name field as description if no description is foundCheck this box if your target document has several heading sections with no text included. This op-tion populates the name and description field with the text found in the heading. This is best usedwhen the names for the imported items are likely to be updated with shorter names.
• Max length of Name fieldCheck this box and enter a number of characters to limit the name length. Jama Connect automati-cally truncates names to 255 characters, so that the names don't overwhelm the explorer and resultslist. This option allows the user to further control the name length.
• Default valuesThe list at the bottom displays Jama Connect item fields, their default value, and an explanation ofhow they're being mapped. You can enter a Default value for some fields. However, rich text fieldscan't have default values.
Select files for importThe process for importing files includes selecting the files you want to import. Optionally, select the des-tination and choose the field-mapping layout.
Jama Connect User Guide
65
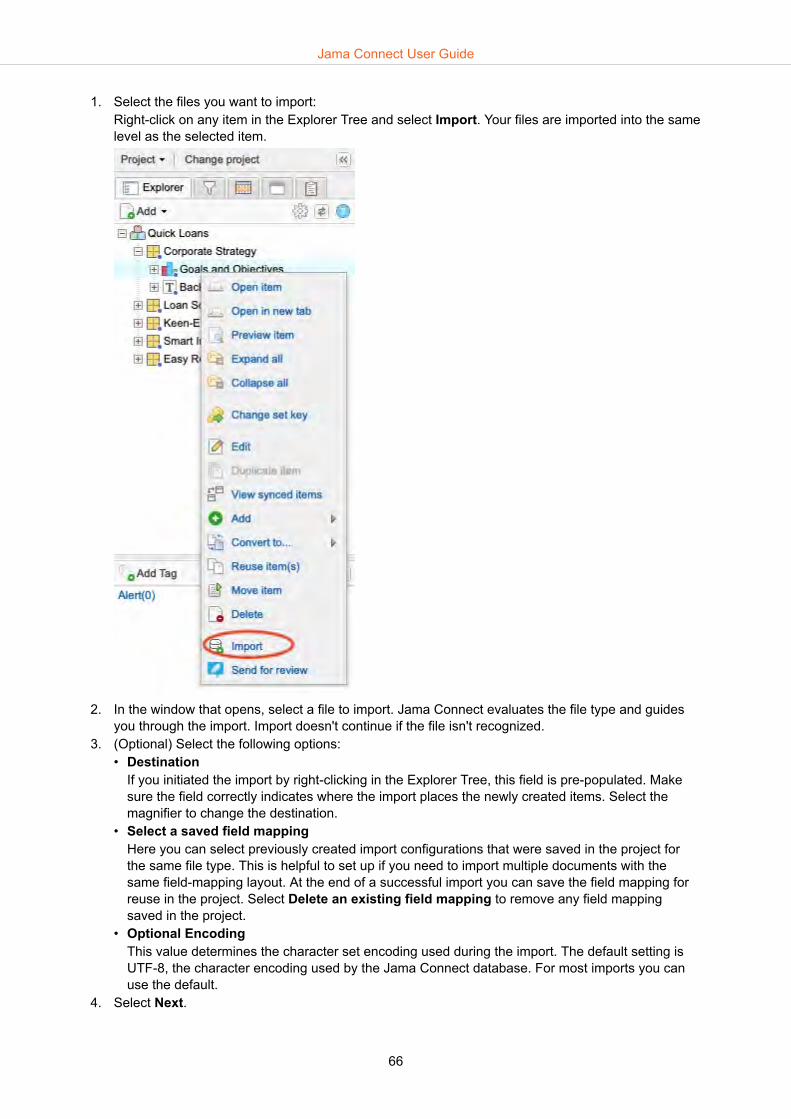
1. Select the files you want to import:Right-click on any item in the Explorer Tree and select Import. Your files are imported into the samelevel as the selected item.
2. In the window that opens, select a file to import. Jama Connect evaluates the file type and guidesyou through the import. Import doesn't continue if the file isn't recognized.
3. (Optional) Select the following options:• Destination
If you initiated the import by right-clicking in the Explorer Tree, this field is pre-populated. Makesure the field correctly indicates where the import places the newly created items. Select themagnifier to change the destination.
• Select a saved field mappingHere you can select previously created import configurations that were saved in the project forthe same file type. This is helpful to set up if you need to import multiple documents with thesame field-mapping layout. At the end of a successful import you can save the field mapping forreuse in the project. Select Delete an existing field mapping to remove any field mappingsaved in the project.
• Optional EncodingThis value determines the character set encoding used during the import. The default setting isUTF-8, the character encoding used by the Jama Connect database. For most imports you canuse the default.
4. Select Next.
Jama Connect User Guide
66

Word to Jama Connect one-way import
1. Select the file [65] you want to import. If the system doesn't recognize the file extension (DOC orDOCX) the import doesn't continue.
2. In the window that opens, enter the document scope [63] and field mapping [65] options.3. If your Word document includes tables, select a table import style. [58]4. A text-only preview is displayed. Verify that the first item to be imported is correct and select Sub-
mit if you're satisfied with the preview. If not, select Back to make necessary changes.5. Review the Final Import Summary. You can select Import another file to start again. You can
also re-use the field mapping settings that you used in this import by selecting Save this as newdocument mapping. Saved import field mappings can be used by any user in the project wherethe mappings are saved. However, the mappings are project-specific so you can't use them fromproject to project.
Import from Microsoft ExcelYou can import items to Jama Connect from a Microsoft Excel document.
You can use cell coloring and indentation to determine a hierarchy for items imported to Jama Connect.
After you prepare your Excel document for import, you can import items one-way from Excel to JamaConnect, or you can execute a round-trip import between Jama Connect and Excel to efficiently updateitems.
Prepare Excel document for importBefore importing your Excel document, keep these points in mind to avoid common errors.
• Include a header row [67] in your Excel document (required).• Only use valid options from pick list fields [68] (required).• When using round-trip [77] for multiple projects, always be sure you're clear which project you're
making changes to, because imported data overwrites previous data.• For complex imports like round-trip data, consider creating a baseline [239] first, in case you need to
restore old data.• To use the Update items option, the spreadsheet must be created by Jama Connect using a properly
configured Excel template. Excel documents missing the required Jama Connect data triggers a "fail-ure previewing file" error.
• If you're importing dates in text-formatted cells in Excel, they must be in exactly this format to importaccurately: mm/dd/yyyy hh:mm:ss Z, where Z is the time zone difference from GMT (for example:-0800, +1000, +0700).
TIPAdd the "Imported" status to a pick list in the targeted set's item type, so you can filterfor newly imported items. Just filter for the pick list value "Imported."
Header row in Excel importsRequired fields must be listed horizontally at the top of the spreadsheet, with qualifying information be-low them.
Jama Connect User Guide
67

IMPORTANTAlthough an organization administrator can add or delete fields [583] from an itemtype, the name field is a system field and can't be disabled.
To include custom fields in your import, list them the same way. The worksheet must contain only onerow of column headers and the corresponding data presented here. If you don't want to use columnheaders, the import automatically numbers the columns from left to right, starting with the number one.
NOTEHeader rows work differently when importing test cases [309].
Jama Connect can only import one Excel worksheet at a time. You can select which worksheet you'reimporting during import. If your Excel document has several worksheets, you must import them sepa-rately.
You must also select the Excel row number that corresponds to the field names in Jama Connect. Thecorresponding columns in this row map to field values in Jama Connect. If a heading row doesn't exist,users can select row "0" which populates the Mapping section with the Excel default column names.
Pick lists in Excel importsWhen entering information into a field that's a pick list (such as Priority), be sure to exclusively use op-tions from that pick list. Values in the spreadsheet that you want to map to pick lists in Jama Connectmust exactly match the valued displayed in that pick list. Use the Excel filter to filter pick list columnsand make sure that the values in the spreadsheet match the targeted pick list in Jama Connect. This isa quick way to identify any pick list options that are misspelled or items that are missing a value.
Jama Connect User Guide
68

Entering options that aren't in the pick list results in blank entries upon import, as shown in this examplewith the value of "Fun."
Field mapping for ExcelThe field mapping area shows three columns that indicate the value that specific fields of an item willget for the import. If you don't specify a mapping for a Jama Item Field, the import skips the field (forupdating existing items) or uses the specified default value (for importing new items).
1. Jama Item FieldThis section indicates each of the fields available to the type of item in Jama Connect you're creat-ing or updating.
Jama Connect User Guide
69

2. Default ValueThe values specified here for the coinciding Jama Item Field are used if no value is specified in anExcel field that's being mapped. Required fields in Jama Connect force users to provide a defaultvalue to prevent null or empty values.
3. MappingThe mapping section contains a select list for each coinciding Jama Item Field. The select list is alist of column values in Excel from the "Excel Header Row" specified earlier. Select the Excel col-umn value in the select list that's intended for each Jama Item Field.
Import relationships
OverviewRelationships are imported to Jama Connect from a CSV file. The file consists of two columns.
1. Column A: Parent or upstream item references.2. Column B: Child or downstream item references.
Tip: It's possible to import multiple relationships to a single item or many relationships to many items bycreating duplicate cell combinations for those items. In this example, CP-REQ-10 has three relation-ships created to it.
Prerequisites
1. A relationship import plugin must be configured [540] and enabled.2. A CSV must be generated with the correct parent and child field values.
ProcessIn Jama Connect, select Project > Import > Custom Import.
This opens a pop-up window with settings to configure.
Select a destination: Select the location in your project for the Import Relationships Plugin. While des-tination is a required setting, it doesn't affect the import.
Select custom importer: Select the Import Relationships Plugin created by an organization admin.
Field delimiter: Select Comma.
Optional encoding: Select UTF8.
Select file to import: Upload the CSV file containing the required relationships.
Jama Connect User Guide
70
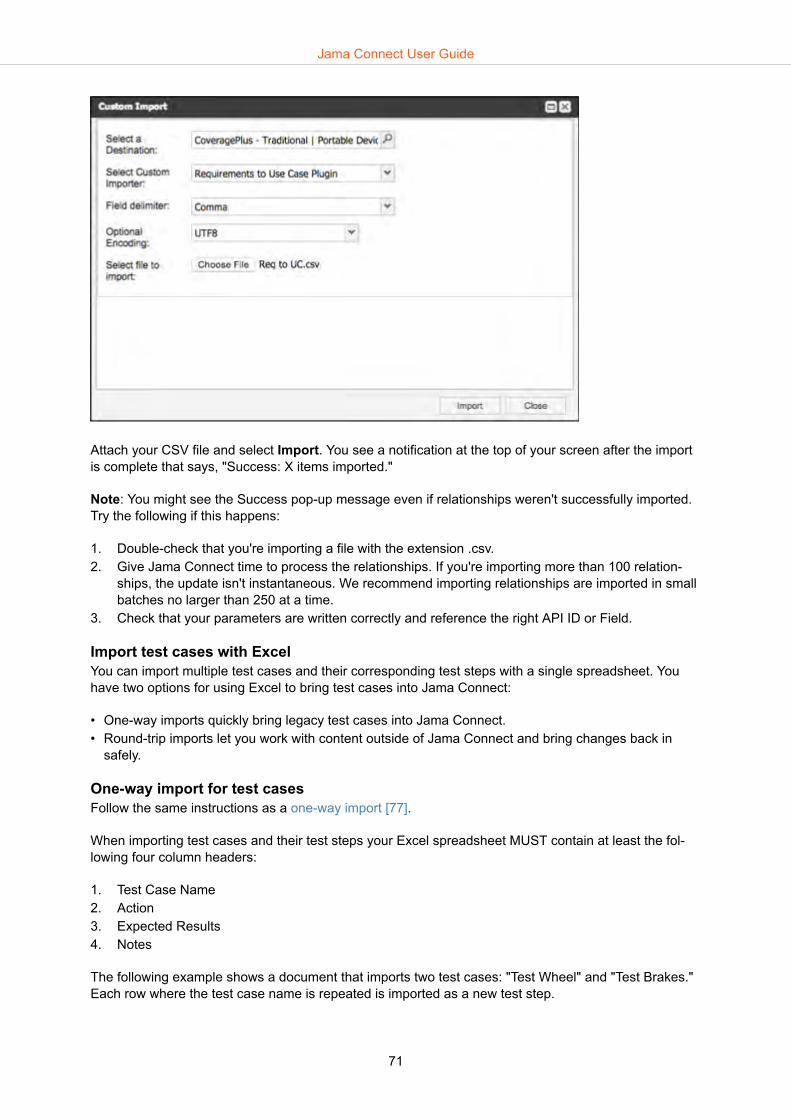
Attach your CSV file and select Import. You see a notification at the top of your screen after the importis complete that says, "Success: X items imported."
Note: You might see the Success pop-up message even if relationships weren't successfully imported.Try the following if this happens:
1. Double-check that you're importing a file with the extension .csv.2. Give Jama Connect time to process the relationships. If you're importing more than 100 relation-
ships, the update isn't instantaneous. We recommend importing relationships are imported in smallbatches no larger than 250 at a time.
3. Check that your parameters are written correctly and reference the right API ID or Field.
Import test cases with ExcelYou can import multiple test cases and their corresponding test steps with a single spreadsheet. Youhave two options for using Excel to bring test cases into Jama Connect:
• One-way imports quickly bring legacy test cases into Jama Connect.• Round-trip imports let you work with content outside of Jama Connect and bring changes back in
safely.
One-way import for test casesFollow the same instructions as a one-way import [77].
When importing test cases and their test steps your Excel spreadsheet MUST contain at least the fol-lowing four column headers:
1. Test Case Name2. Action3. Expected Results4. Notes
The following example shows a document that imports two test cases: "Test Wheel" and "Test Brakes."Each row where the test case name is repeated is imported as a new test step.
Jama Connect User Guide
71

For Jama Connect to read the test steps, you must select the Header Row as Row 2, so that the map-pings begin with the first test step rather than the field names.
Round-trip for test casesA round-trip import for test cases works just like a regular round-trip [77]. Because of the relationshipbetween test cases and test runs, some caveats must be considered when editing test cases fromround-trip.
While you can update, add, remove, or re-assign a test case in a round-trip, you can't update the testcase status [313] this way. The test case status field is calculated from all of the test runs derived fromthat test case.
Add a test step
1. Copy a pre-existing row.2. Insert the copied cells where appropriate. You must insert the copied cells rather than pasting di-
rectly over the cells. Otherwise, you will replace the row instead of adding a new row and subse-quent steps are removed on import.
3. Make needed changes to the copied fields.
Jama Connect User Guide
72

Note: The numbering of the steps appears off but is re-numbered on import.
Remove a stepRemove a step anywhere in the sequence of steps. Re-numbering takes effect on import.
Select files for importThe process for importing files includes selecting the files you want to import. Optionally, select the des-tination and choose the field-mapping layout.
1. Select the files you want to import:Right-click on any item in the Explorer Tree and select Import. Your files are imported into the samelevel as the selected item.
2. In the window that opens, select a file to import. Jama Connect evaluates the file type and guidesyou through the import. Import doesn't continue if the file isn't recognized.
3. (Optional) Select the following options:• Destination
If you initiated the import by right-clicking in the Explorer Tree, this field is pre-populated. Makesure the field correctly indicates where the import places the newly created items. Select themagnifier to change the destination.
• Select a saved field mappingHere you can select previously created import configurations that were saved in the project forthe same file type. This is helpful to set up if you need to import multiple documents with the
Jama Connect User Guide
73

same field-mapping layout. At the end of a successful import you can save the field mapping forreuse in the project. Select Delete an existing field mapping to remove any field mappingsaved in the project.
• Optional EncodingThis value determines the character set encoding used during the import. The default setting isUTF-8, the character encoding used by the Jama Connect database. For most imports you canuse the default.
4. Select Next.
Additional options for Excel importsThe Data Import Wizard asks how you want to handle hierarchy for your import.
• Set the hierarchy within your import by colored or indented cells.On import, rows with the colored [75] or indented [76] cells appear as parent folders with the rowsbelow them as child items.
• Import items not folders. Jama Connect imports parent rows as folders by default. You can disable this by selecting Use item-subitem structure.
Whether you're importing parent items or folders, the names of the parent items and folders must be inthe same Excel column that you mapped to the name field in the prior window.
For round-trip imports [77], you likely don't need to set the hierarchy. If you do set a hierarchy withround-trip imports, hierarchy changes are applied only to new items.
Jama Connect User Guide
74

Set Excel import hierarchy with colorThe cell coloring hierarchy method allows only one tier of hierarchy and doesn't differentiate betweencolors.
1. Select the cell you want to use as a parent container and change the color of that cell.
2. Import the document as usual. [77] You must indicate which column you're using to determine thehierarchy in the Additional Options [74] step in the Data Import Wizard.
3. The resulting import shows the colored cells as parent containers.
Jama Connect User Guide
75
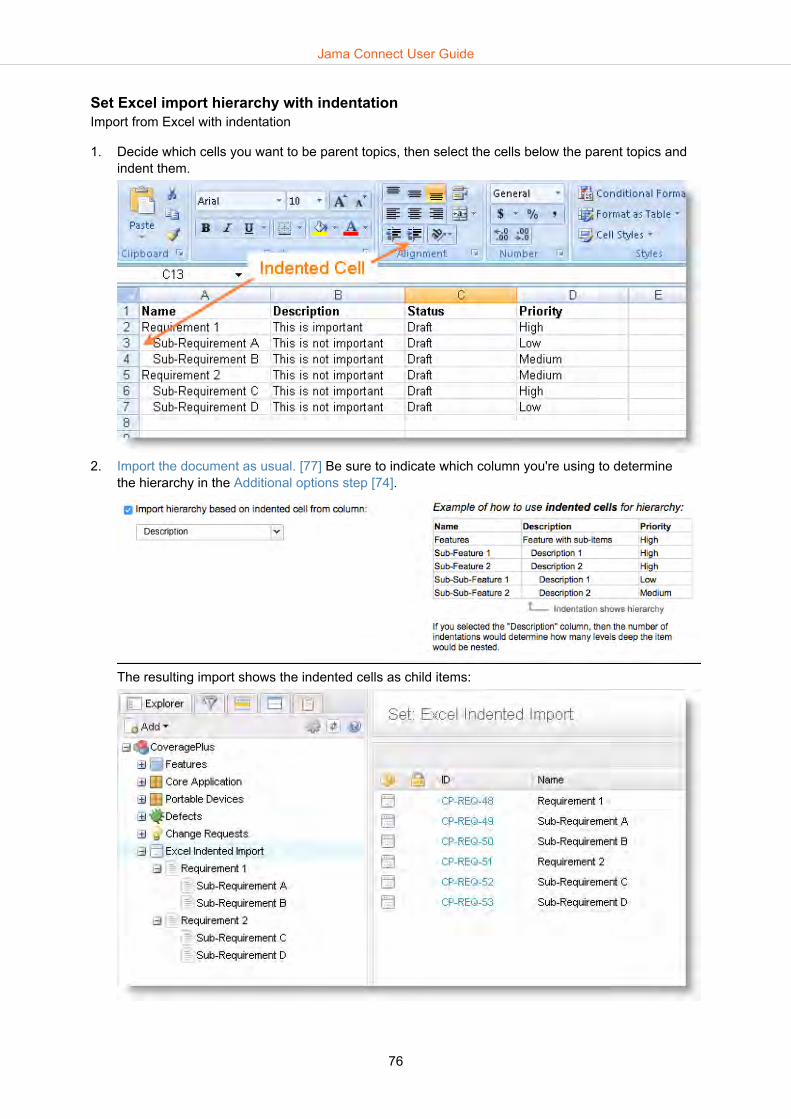
Set Excel import hierarchy with indentationImport from Excel with indentation
1. Decide which cells you want to be parent topics, then select the cells below the parent topics andindent them.
2. Import the document as usual. [77] Be sure to indicate which column you're using to determinethe hierarchy in the Additional options step [74].
The resulting import shows the indented cells as child items:
Jama Connect User Guide
76

Excel to Jama Connect one-way importPrepare your spreadsheet before importing files from Excel.
1. Select files for import [65]. 2. Complete the field mappings step for Excel documents.
• Select the Excel worksheet and header row. For basic one-way import, this is likely row 1, therow that contains field names. For round-trips [77] this is likely row 2.
• Indicate whether this is a round trip import and how to resolve conflicts.• Map fields for your import [69].
3. To open the Additional options [74] window, select Next. If you're using indentation or cell color todesignate hierarchy, indicate that here.
4. If the fields were mapped successfully, you see a preview of your import. If it's correct, select Sub-mit. You can also select Back to make changes.
5. The last window confirms how many total items you imported. From this page, you can import an-other file, if needed. You can also save the current mappings to use for future uploads.
Jama Connect to Excel round trip With a round trip, you can batch edit multiple items in Jama Connect. Export the Jama Connect itemsyou want to edit to Excel, then make your changes in the spreadsheet. Finally, import the edited docu-ment back into Jama Connect, where you see the updated changes to the items.
Round trip requires you to re-import Excel documents created by Jama Connect using an Excel tem-plate. When the system identifies items that originated in Jama Connect, it updates your items accord-ing to the conflict rule set at the time of the import.
1. In List View, select the folder, filter, or set to be exported to Excel. You can also select multipleitems individually. Only the columns shown in List View are exported, so be sure to display all col-umns that need to be included.
NOTEExcel has a cell character limitation. When exporting Rich Text fields, a field thatexceeds the limit is truncated on export, which impacts the data that’s imported toJama Connect using Round Trip.
2. Select Export > Office Templates in the top right corner.
Jama Connect User Guide
77
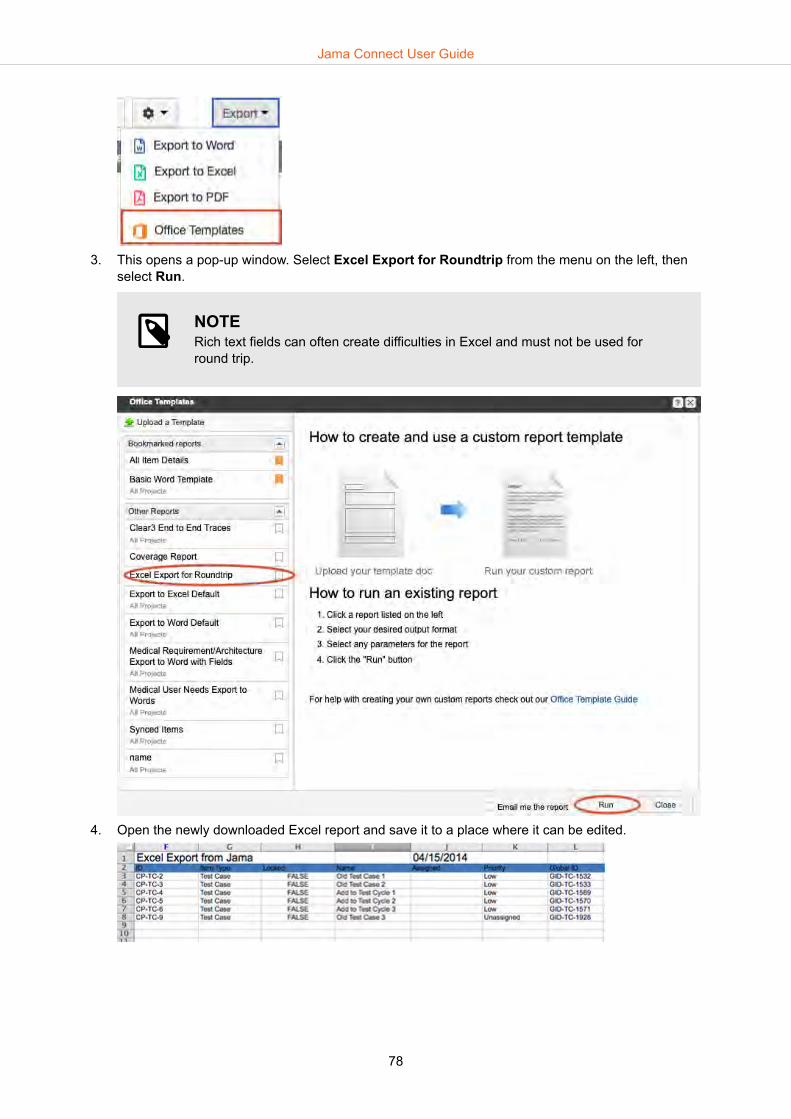
3. This opens a pop-up window. Select Excel Export for Roundtrip from the menu on the left, thenselect Run.
NOTERich text fields can often create difficulties in Excel and must not be used forround trip.
4. Open the newly downloaded Excel report and save it to a place where it can be edited.
Jama Connect User Guide
78

NOTEColumns A-E are hidden. These columns contain the fields that Jama Connect re-quires to update existing items.
5. Make updates to the exported Excel document. In this example, we are changing the names ofthree test cases. Clearing a field's value in the spreadsheet also clears the field's value once thedata is imported back into Jama Connect.
NOTEIf a field is based on a pick list in Jama Connect, the pick list is exported as well.This helps ensure that valid data is entered before re-importing to Jama Connect.
6. You can also add new items to the Excel document that are added as new items in Jama Connectwhen you import it again. If you add an item to your round-trip document, it appears at the bottomof the set or folder you decide to import to. You can add only one item type for the chosen set orfolder. Item IDs and Global IDs are assigned to any new items when you import, so be sure toleave those columns blank. Assigned and Priority field values can be left blank.
7. Save the document and import [77] the document into Jama Connect, keeping in mind the followingtips:• Make sure all updated fields are mapped correctly, otherwise the import fails.• Under Excel Options, set Header Rows to 2 because the Jama Connect Excel Export Report
defaults to mapping a Header Row in row 2.
Jama Connect User Guide
79

• Select the appropriate conflict setting on import. Conflicts might occur when a field in Jama Con-nect has changed values since the round-trip export was generated. Choose the conflict rule thatyou prefer to keep your data correct. Select Update items to update Jama Connect items modi-fied since the last round-trip export.
• Columns aren't resizable by default because the document is protected to preserve the hiddencolumns Jama Connect needs to match up items on import. If you need to resize columns, selectReview and unprotect the document.
• Import the document to the location where you want to place new items added to Jama Connect.• Copying or filling complete rows copies the hidden text that Jama Connect uses to match up col-
umns on import. Copy only cells, not complete rows, to be sure you don't copy information youdon't want. If extra information like this isn't removed, the import might update existing items withthe new rows. For new items created from copied rows, you must unprotect the document, ex-pand columns A–E and delete the text contained in the cells.
• Rich text fields in Jama Connect will include HTML in Excel, so the formatting is preserved whenthe items are re-imported. This depends on the field's configuration [583], which can be set as atext box or as rich text. Fields set as text box are displayed as plain text.
Jama Connect User Guide
80

• You can't manually update IDs or add new IDs. These are ignored on import.• You can't update a pre-existing Jama Connect item hierarchy by applying cell indenting, cell col-
oring, or changing values in the default hidden columns. Also, items added to the spreadsheetthat aren't in Jama Connect can't use the hierarchy options.
IMPORTANTYou can only create new items with Excel round-trip import by copying or addingindividual cells.
CSV importsJama Connect imports spreadsheet data saved as comma-separated values (CSV format). Commasare the most common delimitation character used to save spreadsheet data, but tabs, semicolons, andcolons are also supported.
A CSV import doesn't create folders or hierarchy. To import a large number of documents this way, youcan create a temporary set in Jama Connect with the same item type as the targeted set. This allowseasy identification of imported items.
Import from IBM DOORSYou can import active IBM DOORS data, such as requirements, test cases, and project information toJama Connect, and also maintain relationships during migration.
Here are the steps for a successful import:
1. Ensure you meet Jama Connect [82] and DOORS [82] prerequisites.
Jama Connect User Guide
81

2. Export HTML zip file from DOORS. [85]3. Import to Jama Connect [85].
DOORS export prerequisitesBefore exporting, verify these prerequisites for a successful export. It's helpful to think through all as-pects of the import before carrying it out.
The Object Identifier column is typically mapped to the Name field in Jama Connect.
If you're importing hierarchy, the DOORS standard Object Heading and Text (or Main) column mustbe mapped to the Jama Connect Description field. This is the only column that exports hierarchy infor-mation to HTML for Jama Connect imports.
If you're importing links (trace relationships) across multiple modules in DOORS:
• The modules must be open when you export. DOORS exports include the modules that are shown inyour view. For this reason, you must not have filters selected or it limits the number of items exported.
• Each module must have a unique prefix so that the Object Identifier is unique. DOORS doesn't en-force this, but if you add a unique prefix to each module, the Object Identifiers are unique.
• The Object Identifier column must be visible in the DOORS module view (not Object Number orAbsolute Number). The Object Identifier is a combination of the Module Prefix and the AbsoluteNumber (as in SYS32). If the Object Identifier has only integer values, the Module Prefix is mostlikely empty.
Jama Connect prerequisites (DOORS)When importing to Jama Connect, DOORS Modules create sets or folders in an existing set. DOORSAttributes map to fields in Jama Connect.
Relationships aren't created until both items you want to relate are imported.
To import relationships (or trace links), you must first create a new custom field in Jama Connect foreach item type you're importing. This field is used to contain a unique identifier that facilitates the migra-tion of relationships from DOORS to Jama Connect.
1. In Jama Connect, select Admin > Organization > Item types.
2. Find the item type you're using for the DOORS import, select Fields.
Jama Connect User Guide
82

TIPIt might be helpful to create a new item type [574]only to be used for the migration,then convert the items to the correct item type after the import is complete.
This way every item imported has a record of legacy DOORS information in itsversion history. You can view this information by comparing versions [231].
3. In the panel that opens, select Add Field.
4. In the window that opens, select Custom Fields and Text Field from the drop-down menu.1. Next to Field Label, enter a name for the field (such as "DOORS ID").2. Next to Unique Field Name, enter "SYS_DOORS_ID." This is case sensitive and must exactly
match the following image.3. Select Read Only and Save.
Jama Connect User Guide
83

5. Now this item type can accept relationships (trace links) imported from DOORS.
IMPORTANTThis field must be created for all the item types you're relating.
6. When you import, DOORS Modules are added as sets, or folders within sets. If you're using the tip,you might want to add a set of the new item type you created before you import. You must alsoconfigure the project for this item type [620]. That way you can right-click on the new set and importdirectly to that location.
Jama Connect User Guide
84

Export from DOORSYou must only use an HTML .zip file when importing to Jama Connect.
IMPORTANTFollow these steps carefully to ensure the export is successful.
1. Create the export target folder in the local drive/directory.Tip: The folder can have the same name as the module being exported, but it's not required.
2. Open a module to export. Make sure there aren't active filters.3. Select File > Export > HTML...4. Select Layout > Table.5. Select Export > Current.6. Select Links to import them as relationships and create the necessary field in Jama Connect [82].7. Select a folder or location to store your DOORS files.8. Browse to the target folder and select Export.
9. Without making changes, compress (.zip) the target folder that contains the exported HTML con-tent.Note: Changing or moving the exported files before compressing them can create unreliable re-sults.
Images in the item description are imported. Comments, attachments, and item history aren't imported.
Import to Jama ConnectOnce you complete the export from DOORS, Jama Connect guides you through the following steps ofthe import.
1. Select files and destination [65]2. Select field mapping (DOORS) [87]3. Hierarchy and relationships (DOORS) [88]4. Verify and submit [89]
Jama Connect User Guide
85

Select files for importThe process for importing files includes selecting the files you want to import. Optionally, select the des-tination and choose the field-mapping layout.
1. Select the files you want to import:Right-click on any item in the Explorer Tree and select Import. Your files are imported into the samelevel as the selected item.
2. In the window that opens, select a file to import. Jama Connect evaluates the file type and guidesyou through the import. Import doesn't continue if the file isn't recognized.
3. (Optional) Select the following options:• Destination
If you initiated the import by right-clicking in the Explorer Tree, this field is pre-populated. Makesure the field correctly indicates where the import places the newly created items. Select themagnifier to change the destination.
• Select a saved field mappingHere you can select previously created import configurations that were saved in the project forthe same file type. This is helpful to set up if you need to import multiple documents with thesame field-mapping layout. At the end of a successful import you can save the field mapping forreuse in the project. Select Delete an existing field mapping to remove any field mappingsaved in the project.
• Optional Encoding
Jama Connect User Guide
86

This value determines the character set encoding used during the import. The default setting isUTF-8, the character encoding used by the Jama Connect database. For most imports you canuse the default.
4. Select Next.
Select field mappings (DOORS)In this window, Jama Connect field names are listed on the left. You can assign a default value and se-lect which DOORS attributes you want to map to each Jama Connect field.
TIPIt might be helpful to open the DOORS HTML zip file in a separate tab when selectingfield mappings to ensure you're mapping fields they way you had planned.
Jama Connect User Guide
87

IMPORTANTYou must select a mapping for the Name field. This is usually the DOORS ObjectIdentifier attribute.
The Description field is usually mapped to the Main attribute in DOORS. Bullets andother symbols are exported from DOORS as images, not as formatting. If you're map-ping a field that contains images or formatting, the corresponding import field must beconfigured as a rich text field, otherwise these images don't appear.
You can't select a mapping for Step action, Step expected results or Step notes.
Hierarchy and relationships (DOORS)
IMPORTANTFor hierarchy and relationships to migrate successfully, be sure you follow the DOORS[82] and Jama Connect [82] prerequisites carefully prior to importing.
In this window, you can select the options you want for hierarchy and relationships:
1. Select Preserve hierarchy if you want to keep the DOORS hierarchy when importing. If left unse-lected, the resulting items are at the same level.
Jama Connect User Guide
88

2. Select Use item/sub-item structure (instead of folder/item structure) when creating hierarchyof imported items if you want all parent items to keep the item type of their children. If left unselec-ted, all parent items become folders.
IMPORTANTAll items converted to folders lose their relationships (links). If you're importing rela-tionships, use the item or child-item structure.
3. Select Create relationships from DOORS links if you want to migrate Trace Links from DOORSto relationships in Jama Connect.If you see the following error, double-check that you successfully completed all Jama Connect pre-requisites [82] before import.
4. Next to Relationship type, select the type of relationship you want to create. This value is set toyour organization's default value if left unselected.
5. Next to DOORS ID column , select the name of the column from your export which contains theDOORS Object Identifier, which is used as the identifier when creating relationships and mustmatch between item types.
6. Next to 'From' (OUT) link direction in DOORS maps to, set OUT=upstream or OUT=downstream.DOORS and Jama Connect use different terminology for relationship direction. The selection de-pends on how relationships are used in DOORS. Double-check the HTML file or run a test import toverify that this works as expected.
IMPORTANTBecause relationships are created based on the DOORS Object Identifier, importingitems twice creates multiple relationships.
Verify and submitIn this window you can see a preview of the first item that imported and verify that it looks correct.
Jama Connect User Guide
89

If the import looks correct, select Submit and a summary page outlines the number of items importedas well as the number of relationships created.
You can continue and import another DOORS Module.
If you plan on importing the same item type (objects) with the same mappings multiple times, you cansave your mapping changes as a new document mapping here.
Jama Connect User Guide
90

Use the rich text editorUse rich text fields to format text and embed other data, like images and tables, in item fields. An organ-ization administrator can enable the rich text editor for item type fields [583].
With rich text fields you can use text formatting, hyperlinks [95], images [94], tables, spellchecker(English), templates [99], diagrams, graphs [97], and equations [98].
NOTEThe equation editor requires additional licensing. Contact your Jama Software accountmanager for more information.
CAUTIONMany third-party reporting tools can't display rich text (HTML) properly. Also, each richtext section can have its own style, making it difficult to control the overall look and feelof your report.
Integrations with third-party applications also might not be able to accept rich text(HTML) data.
You can disable the rich text editor [583] in these cases or to tightly control the dataentered in these fields.
Jama Connect User Guide
91
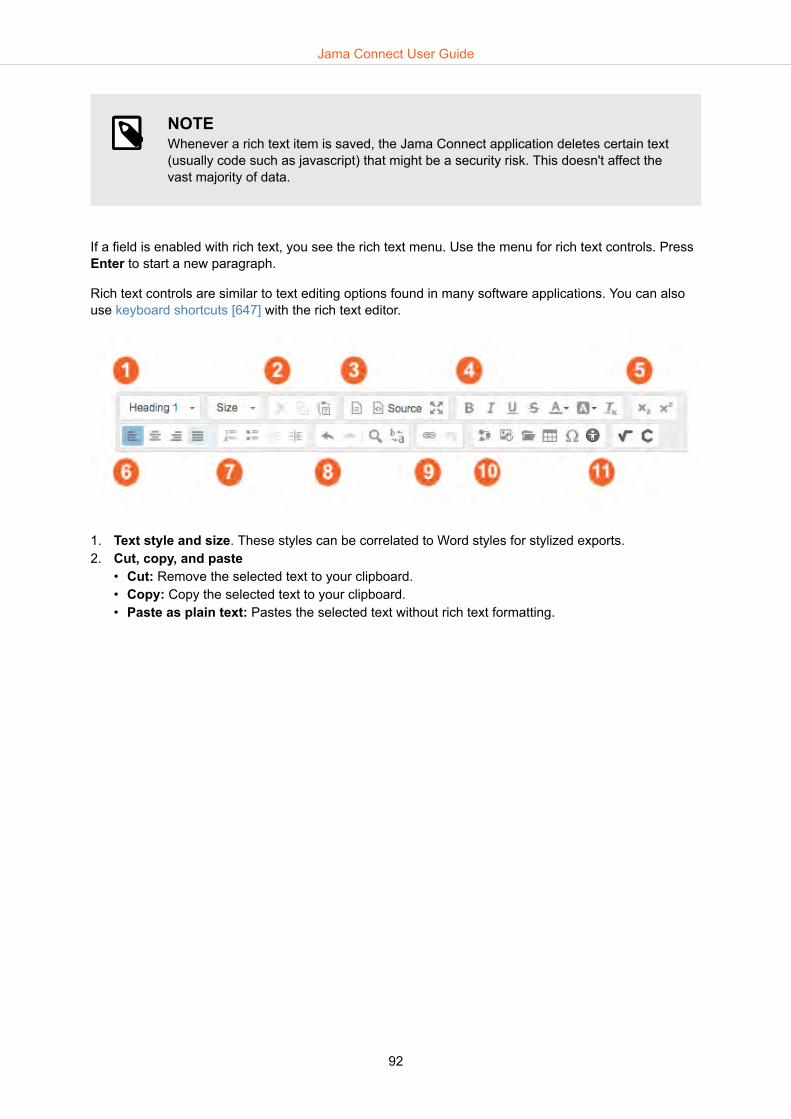
NOTEWhenever a rich text item is saved, the Jama Connect application deletes certain text(usually code such as javascript) that might be a security risk. This doesn't affect thevast majority of data.
If a field is enabled with rich text, you see the rich text menu. Use the menu for rich text controls. PressEnter to start a new paragraph.
Rich text controls are similar to text editing options found in many software applications. You can alsouse keyboard shortcuts [647] with the rich text editor.
1. Text style and size. These styles can be correlated to Word styles for stylized exports. 2. Cut, copy, and paste
• Cut: Remove the selected text to your clipboard.• Copy: Copy the selected text to your clipboard.• Paste as plain text: Pastes the selected text without rich text formatting.
Jama Connect User Guide
92

NOTEYou can also right-click or control + click inside the text field to pull up the editorcontext menu to complete these actions.
3. Field view• Insert document templates: [99] Organization administrators can configure these templates
[594].• View source code: You can add HTML elements to create custom styling, but be aware that not
all styling might be supported in other areas of Jama Connect, like reports. • Fullscreen mode: Select to maximize the field.
4. Format text• Bold• Italic• Underline• Strikethrough• Text color• Highlight color• Clear formatting
You can convert any text to the default style and size. This can be helpful for copying and pastingtext from external sources.
5. Script• Subscript: Any text highlighted when this button is selected becomes a subscript.• Superscript: Any text highlighted when this button is selected becomes a superscript.
6. Text alignment7. List formatting
• Numbered list• Bulleted list• Offset left• Offset right
8. Edit text• Undo• Redo
Jama Connect User Guide
93

• Find• Replace
9. Insert links [95]Highlight any text and use this control to add a hyperlink to that text.
10. Special tools• Add/edit diagram: Create or edit a diagram [97] that was created.• Add image: Insert images [94].• Add image from server: Display an image [94] that was uploaded to the Jama Connect appli-
cation server.• Table: Insert a table [96].• Special character: Insert special characters.
11. Equations editor [98]• Math editor• Chemistry editor
12. The spell-checker automatically underlines misspelled words in red. Cmd+right-click on the wordto view browser and operating system spelling suggestions.
Insert rich text imagesYou can add images with the rich text editor using one of these methods.
1. Upload an image into the editorClick Add image in the toolbar to open a window. Browse for a file, then select Open.
NOTEProvide the full path to the image file to comply with third-party converters for PDFand Word. If you move Jama Connect to a new server location or modify the servername, edit your image files to match the path or name changes.
2. Upload an image using copy and pasteCopy an image. Place your cursor in the rich text field and use Ctrl+V.
NOTEThis functionality isn't available with Internet Explorer 10.
3. Drag and drop an imageYou can drag an image from your desktop and drop it into the rich text editor.
4. Browse the server for images.Select Add image from the server to open a new browser tab and see the list of images previous-ly loaded onto the Jama Connect application server. Choose an image from the list and click Se-lect to insert the image.
Once the image is inserted into the editor, it can be resized by grabbing and dragging the bottom rightcorner. The image can be moved by hovering over the top left corner, grabbing the handle, and drag-ging the image to its new location. A maximum height and width setting can be applied by a system ororganization administrator in organization detail [604].
If the image is too large to be displayed, users see an Expand button. Select Expand to view the imagein full size.
Jama Connect User Guide
94

NOTEA system administrator can manage file types [507] for self-hosted customers.
Insert rich text linksYou can link from a rich text field directly to other sets, items, and attachments in Jama Connect or toexternal links. Direct links to attachment files can be helpful to reviewers.
1. Select the Link icon in the rich text toolbar. Highlight the text you want to use as a hyperlink orplace your cursor on an existing link to include that information in the next step.
2. In the Enter URL window, enter a URL for external links. You can also select tabs to choose yourlink from recently viewed locations, the Explorer Tree, releases, search results, or attachments. Un-der the Attachments tab, upload a file directly from your desktop.
Jama Connect User Guide
95

3. To place your link in the rich text field, use Select. The link doesn't work until you save changes toyour item.
4. To break a link, select the Break link icon next to the Link icon in the toolbar.
Insert rich text tablesUse the rich text editor button [91] to insert a table.
Format tables by right-clicking any cell, then selecting Table Edit:
Jama Connect User Guide
96

Resize tables by selecting the borders.
Create a space above or below a table or text that's near the top or bottom of the editor by hoveringyour mouse near the space, then select the blue button that appears on the right.
NOTECreating tables manually in Jama Connect is more efficient than importing them fromother documents. Once a table is imported, it becomes difficult to work with anddoesn't export cleanly.
Insert rich text diagrams
1. Select Diagram in the rich text toolbar to open the Graph Editor window. If you highlight an exist-ing diagram before selecting the button, it appears in the window for editing.
2. In the Graph Editor window, create new shapes by dragging from the menu on the left and drop-ping to the canvas.
Jama Connect User Guide
97

3. Explore the menus on the left to add different shapes, icons, tables, and text or use the searchfunction. Format style text and arrangement in the menu on the right. For more information, seeMXGraph Editor.
4. When you're finished, select Save and Close in the bottom right corner to insert your image intothe field in Jama Connect.
NOTEYou can't copy and paste between the diagram editor and other applications, or importimages from other diagramming tools.
Insert rich text equations
NOTEThe MathType Equations Editor requires a separate license. Contact your Jama Con-nect administrator or sales representative to inquire about purchasing this license.
For self-hosted customers with a license, the system administrator can enable theequations editor [499].
With this editor, you can create complex equations and edit them in Jama Connect. These are conver-ted into images for safe storage and export, but are always editable when you have a MathType li-cense.
Jama Connect User Guide
98

1. To open the editor, select the Math Editor icon or the Chemistry Editor icon. To edit an existingequation in your item, you can either:• Select the equation to highlight it, then select the Math Editor icon (for math equations) or
Chemistry Editor icon (for chemistry formulas).• Double-click on the equation to open the correct equations editor.
2. For more information about how to create mathematical equations or chemistry formulas, see theMathType User Guide.
Insert rich text templatesTemplates are pre-written text or documents that can be inserted into the rich text editor to help uniform-ly format items, such as test cases or use cases.
IMPORTANTThis feature must be configured by an organization administrator [594] before using.
1. To use a template, select the Templates button to open the Content templates window.
2. You can use several default templates with the rich text editor, including basic use case, documentstyle use case, basic test case, and agile story card. If you select Replace actual contents, thetemplate deletes content currently in the field. Select a template and continue editing the item.
Jama Connect User Guide
99

Enable Accessibility CheckerThe Accessibility Checker allows you to inspect content created in the rich text editor for how well itmeets standards for people with impaired visual, cognitive, or motor skills.
1. Select the Accessibility Checker icon from the Rich Text toolbar. The plugin inspects output HTMLcode and identifies common accessibility problems that you can fix.
2. If the Accessibility Checker finds an issue, it offers a Quick Fix solution for common problems. Enterthe changes requested and select Quick Fix to apply the changes or choose Ignore. Use the arrows atthe top of the pop-up window to scroll through issues found by the Accessibility Checker.
Jama Connect User Guide
100

3. If the Accessibility Checker finds no issues, you see a confirmation message. Select OK to close themessage and exit Accessibility Checker.
ContainersContainers help with organization in Jama Connect. For example, components [101], sets [102], folders[104], and source folders [239] are all containers. All are items, except source folders.
ComponentsA component is a structural container item used to organize a project into more manageable pieces.
For example, you might define each of the individual pieces that comprise your product with a differentcomponent.
• Components can only be located or moved to the root of the Explorer Tree or inside another compo-nent.
• Components might contain sets of various item types, text items, and sub-components. Each compo-nent can have different access rights.
NOTEText items can appear anywhere in this structure.
Add componentsA component is a structural container used to organize a project into more manageable pieces.
To add a component:
1. Right-click on the project name in the Explorer Tree wherever you want to add a component orsub-component.
Jama Connect User Guide
101

You can also select Add > Component at the top of the left panel in the project where you want toadd the component.
2. In the Add item window, select a name and description for the component.(Optional) Select Notify to select users or groups you want to notify about the creation of this com-ponent.
3. Select Save, Save and close, or Add another if you want to add more components.4. If you used the Add button, use the Select location window to select the location for the new com-
ponent. Invalid locations are disabled.5. Click Select and close.
SetsA set is a structural container item with configurable access rights, used to group items of the sametype. It can also contain folders, text items, child text items, and child items of the same type.
A set contains items of the same type. You can move or copy between sets of the same item type.
Item types for a set are configured by an organization administrator [574]. For example, you might havea set of Business Requirements and a set of Non-Functional Requirements that share the Require-ments item type.
Add setsA set is a structural container item with configurable access rights, used to group items of the sametype. It can also contain folders, text items, child text items, and child items of the same type.
Jama Connect User Guide
102

To add a set:
1. Right-click on the project name in the Explorer Tree wherever you want to add a folder. Select Add> New item > Set of... > [item type].
You can also select Add > Set of... > [item type] at the top of the left panel.
Jama Connect User Guide
103

2. In the window that open, edit the set key [622], name, and description of the set.(Optional) Select Notify to select users or groups you want to notify about the creation of this set.
3. Select Save, Save and close, or Add another to add more sets.4. If you clicked Add, use the Select location window to select the location for the new set. Invalid
locations are disabled.5. Click Select and close.
FoldersA folder is a container item you can use to organize items and manage hierarchy in the Explorer Tree.
Folders are items [106] themselves, and can contain items of different types. Folders can be located ormoved inside a set of the same item type, or inside another folder. You can't place a folder inside acomponent of mixed item types.
An item can be moved between folders and sets of the same item type using drag and drop within theExplorer Tree or from List View. Folders can be dragged to other sets of the same item type or into oth-er folders also in the same item type.
Add foldersA folder is a container item you can use to organize items and manage hierarchy in the Explorer Tree.
Jama Connect User Guide
104

To add a folder:
1. Right-click on the set name in the Explorer Tree wherever you want to add a folder. Select Add >New item > Folder.
You can also select Add > Folder at the top of the left panel in the project where you want to addthe folder.
Jama Connect User Guide
105
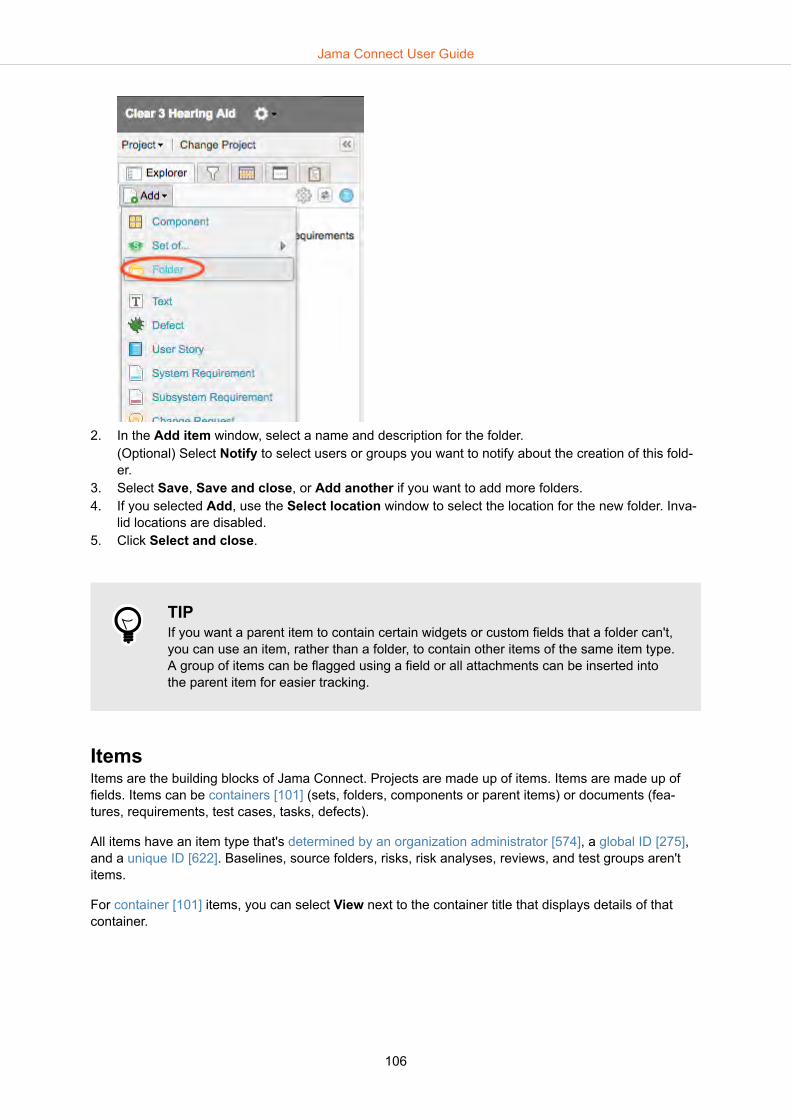
2. In the Add item window, select a name and description for the folder.(Optional) Select Notify to select users or groups you want to notify about the creation of this fold-er.
3. Select Save, Save and close, or Add another if you want to add more folders.4. If you selected Add, use the Select location window to select the location for the new folder. Inva-
lid locations are disabled.5. Click Select and close.
TIPIf you want a parent item to contain certain widgets or custom fields that a folder can't,you can use an item, rather than a folder, to contain other items of the same item type.A group of items can be flagged using a field or all attachments can be inserted intothe parent item for easier tracking.
ItemsItems are the building blocks of Jama Connect. Projects are made up of items. Items are made up offields. Items can be containers [101] (sets, folders, components or parent items) or documents (fea-tures, requirements, test cases, tasks, defects).
All items have an item type that's determined by an organization administrator [574], a global ID [275],and a unique ID [622]. Baselines, source folders, risks, risk analyses, reviews, and test groups aren'titems.
For container [101] items, you can select View next to the container title that displays details of thatcontainer.
Jama Connect User Guide
106

Select View to:
• Open container attachments [133].• Edit the name or description of the container itself.
TIPSubscribe yourself [198] or others [198] to this container item to receive email notifica-tions when this container changes.
Several places in Jama Connect allow you to see a quick preview of an item withoutopening it in the center panel. For example, right-click on an item in the Explorer Treeand select Preview item.
Add an item
1. Right-click on the project name in the Explorer Tree or wherever in that project you want to add anitem. Select Add > New item > Item type, where the Item type is the type of item you want to add.You are given options to add the type of items that are valid for that location or the option to add anew folder or set of an item type.
Jama Connect User Guide
107

You can also select Add > Item at the top of the left panel in the project where you want to add theitem and choose the item type you want to add.
Jama Connect User Guide
108

You can also add an item from the toolbar above Single Item View [52], List View [47], or ReadingView [48]. Select Add > Item type.
If you're in List View that contains items of a single item type and no items are selected, you canadd an item of the same type, a text item, or a set to the bottom of the list.If an item is selected, you can use:• Insert new to insert a new item below the selected item or add a child item.• Add Item Type as child to add an item as a child item of the selected item.• Add related to add a related item to the selected item. If a relationship rule [257] was applied to
that project, only item types that meet the rules are available for that selection.
Jama Connect User Guide
109

NOTEYou can't add items in filters or lists of mixed item types.
2. In the Add item window fill in the fields for that item type.3. Select Save, Save and close, or Save and new.4. If you didn't select a location in step 1, the Select location window opens for you to select the lo-
cation where you want to add the new item. Invalid locations are disabled. Select Save. 5. In the Add item window, add a notification comment and select users or groups you want to notify
about the creation of this item. These comments are included in the version notes for the item [230]and are displayed in the stream [210].
6. Select Commit.
Child itemsA parent item with child items can't be converted to text items. An item can also contain text items as achild item. Relationships and attribute values aren't inherited to child items.
To create a child item:
• Right-click on an item and select Add > New item > Sub Component.
Edit itemsSingle Item View automatically displays items in a read-only format.
Jama Connect User Guide
110

1. Double-click on the field you want to edit.You can also hover over the field and select the pencil icon at the top left corner of the field to makeall fields editable.
You can also select Edit item from the toolbar to open a separate Edit item window.
NOTEIf you don't see the pencil icon or the Edit item button, you do not have create/edit permissions.
2. Make changes to the item fields.
NOTEIf a field is disabled for editing, an organization administrator might have config-ured the field to be read-only [583].
3. Select Save to intermittently save the updates but keep the editing view open.4. Once you're done editing, select Save and done.
• To save and add another item of the same type, select the arrow on the middle button and selectSave and add another.
• To save and notify other Jama Connect users, select the arrow on the middle button and selectSave and notify.
5. If you selected Save and notify, Jama Connect prompts you for comments and provides a list ofgroups and users to notify about the update. Users who are subscribed to the item appear in the
Jama Connect User Guide
111

Notify window. The X icon removes users from the notification list. Users who are already subscri-bed can't be unsubscribed from this view.
6. To subscribe the user or group for future updates to this item, select the envelope icon.7. Select Commit to complete the edit and create a new version.
Edit items in List View
1. Double-click the field you want to edit in projects List View.
2. Select Save or press Enter to save the change and move to the next item in the list, or use Ctrl+Sto save the item.Press Escape or select Cancel just below the selected item to undo any unsaved changes.
TIPYou can also update multiple items with batch update [112].
Batch update itemsYou can update picklist fields and tags for multiple items at a time.
Rich text fields are not supported in batch update, but this can be done using a Jama Connect to Excelround trip [77].
1. In List View, select the items that you want to edit, then select Actions > Batch edit to open theBatch update window.
If you're a review moderator, you can also select items for batch update in the item progress [190]tab of review statistics.
Jama Connect User Guide
112

2. In the Batch update window, select the field names you want to update. Change the values or addtags. Select Next to continue.
3. In the next window, select users or groups and send a notification alerting them to this batch up-date. When you're done, select Commit.
Jama Connect User Guide
113

NOTEYou can't batch update rich text fields or use this method to batch update test runs.Use the Test runs window to batch update test runs [343].
Add, edit, or delete linksIf the Links widget was enabled by an organization administrator [578], you can store a link or URL inthe application that you can assign to individual items across projects.
1. In Single Item View, select Add link.
2. Fill in the fields and select Save.
Jama Connect User Guide
114

TIPURLs that are prefixed with "http://" are treated as unique links. URLs without theprefix are put at the end of the Jama Connect URL, which might be helpful if youplaced files on the server and you want to link them without uploading them as at-tachments. For example:
• http://www.creativecommons.org — Opens a new browser window with theURL http://www.creativecommons.org
• screenshots/login.html — Opens a new browser window with the URL http://localhost:8080/contour/screenshots/login.html
3. To edit or delete a link, select the Edit or Delete buttons from the link's row.
Lock itemsA lock makes items read-only. Locks can be set automatically or manually.
You can reuse [276] and create relationships from a locked item. You can't edit, delete, or synchronizelocked items.
Items can be manually locked [115] or automatically locked [204] by the system.
You can view and unlock locked items [38]. You can also find out who locked them.
An organization or project administrator can unlock system locked items [538], but only an organizationadministrator can unlock items manually locked by another user [537].
Who can unlock Jama Connect items?
Items Creator User with Workflow Transition Permis-sions
Project Ad-min
Organization Ad-min
Manual locks by otherusers
X
System/workflow locks X
Only applies in projects they administer.
X X
Manually lock itemsTo prevent others from making changes while you're working on an item, you can manually lock thatitem.
Important considerations
• If you need to access an item locked by another user, contact that user or your organization adminis-trator to unlock it.
• Users with organization or project permissions can unlock an item [38] from that item's Actions menu.
Jama Connect User Guide
115

• In Single Item View, select Actions > Lock item from the toolbar.
A gray lock is displayed if the item is locked.
When you configure List View to show locked items, a gold lock is displayed next to items that aremanually locked.
Jama Connect User Guide
116
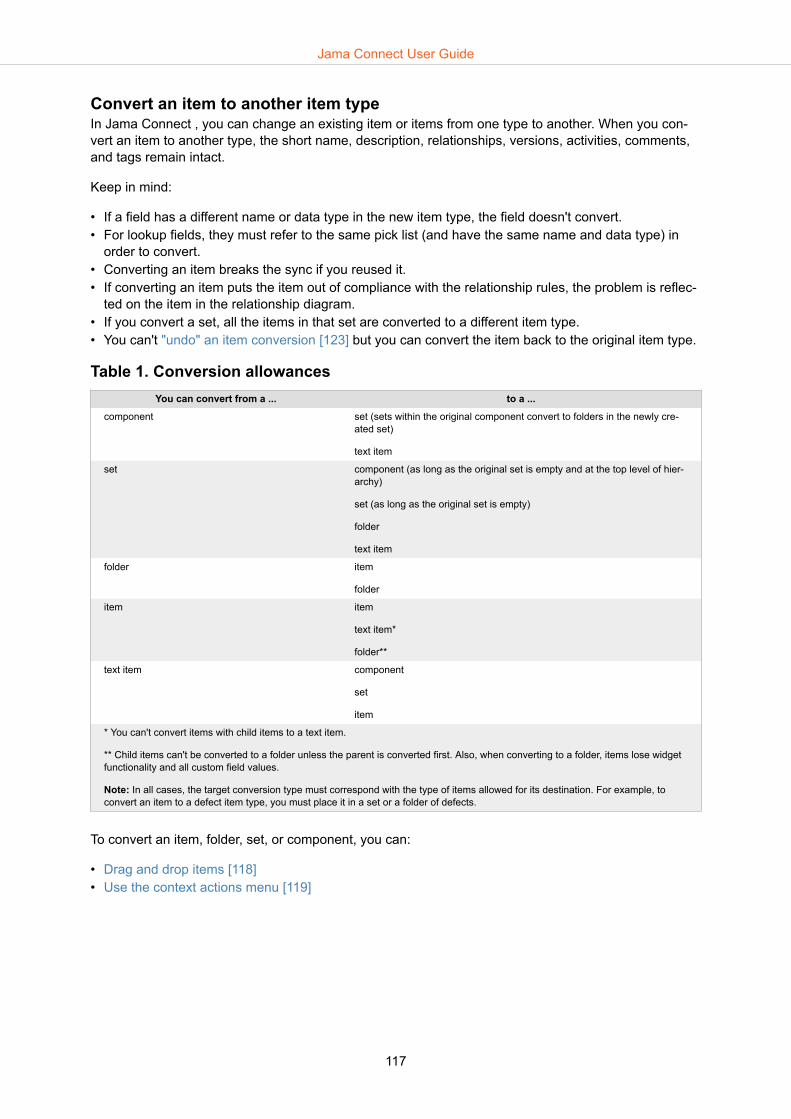
Convert an item to another item typeIn Jama Connect , you can change an existing item or items from one type to another. When you con-vert an item to another type, the short name, description, relationships, versions, activities, comments,and tags remain intact.
Keep in mind:
• If a field has a different name or data type in the new item type, the field doesn't convert.• For lookup fields, they must refer to the same pick list (and have the same name and data type) in
order to convert.• Converting an item breaks the sync if you reused it.• If converting an item puts the item out of compliance with the relationship rules, the problem is reflec-
ted on the item in the relationship diagram.• If you convert a set, all the items in that set are converted to a different item type.• You can't "undo" an item conversion [123] but you can convert the item back to the original item type.
Table 1. Conversion allowancesYou can convert from a ... to a ...
component set (sets within the original component convert to folders in the newly cre-ated set)
text item
set component (as long as the original set is empty and at the top level of hier-archy)
set (as long as the original set is empty)
folder
text item
folder item
folder
item item
text item*
folder**
text item component
set
item
* You can't convert items with child items to a text item.
** Child items can't be converted to a folder unless the parent is converted first. Also, when converting to a folder, items lose widgetfunctionality and all custom field values.
Note: In all cases, the target conversion type must correspond with the type of items allowed for its destination. For example, toconvert an item to a defect item type, you must place it in a set or a folder of defects.
To convert an item, folder, set, or component, you can:
• Drag and drop items [118]• Use the context actions menu [119]
Jama Connect User Guide
117

Convert items using drag and drop
IMPORTANTBefore converting items make sure you understand how conversions work in JamaConnect [117].
To convert an item or set to another item type with drag and drop:
1. From List View or the Explorer Tree, select the items and drag them into the set where you want tomove them.
2. Review the information and select Convert.
IMPORTANTDragging and dropping a text item into a folder of your required type doesn't trig-ger the conversion functionality. The text item is moved to that location. Text itemsmust be converted one at a time. Bulk conversion doesn't work with text items.
3. Changes are reflected in the item's version tab. To access this, select Versions in the side toolbar[53] of Single Item View [52].
Jama Connect User Guide
118
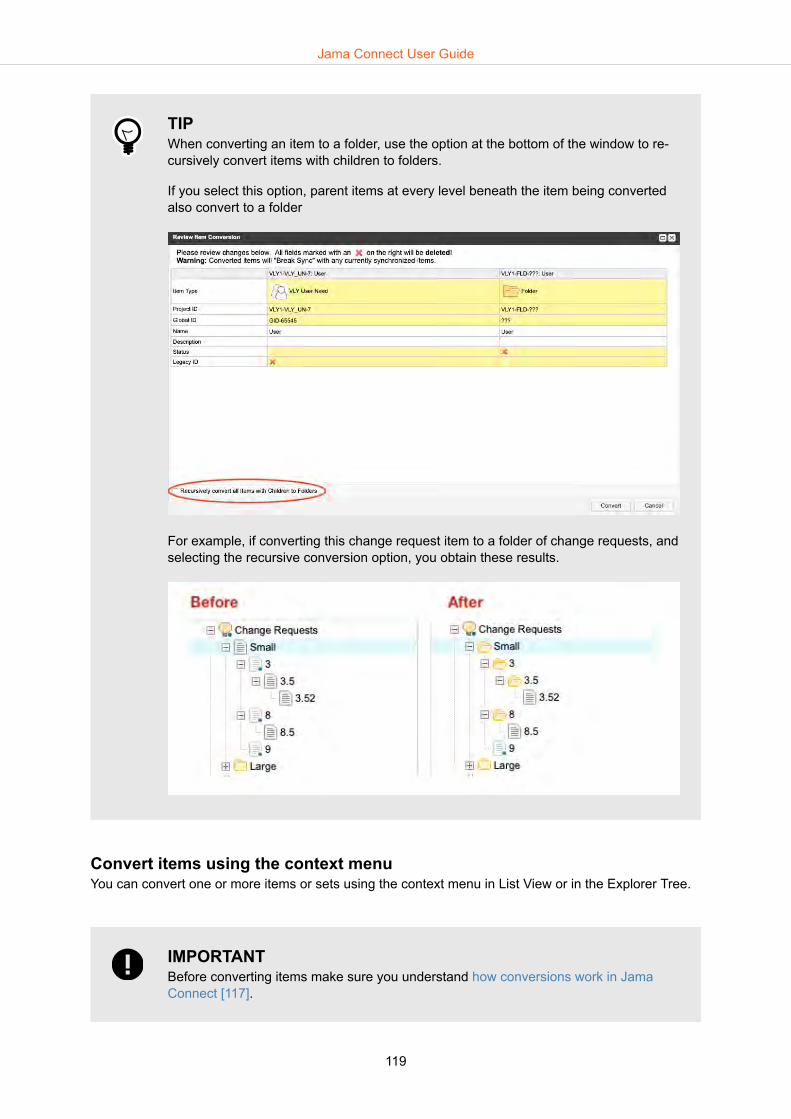
TIPWhen converting an item to a folder, use the option at the bottom of the window to re-cursively convert items with children to folders.
If you select this option, parent items at every level beneath the item being convertedalso convert to a folder
For example, if converting this change request item to a folder of change requests, andselecting the recursive conversion option, you obtain these results.
Convert items using the context menuYou can convert one or more items or sets using the context menu in List View or in the Explorer Tree.
IMPORTANTBefore converting items make sure you understand how conversions work in JamaConnect [117].
Jama Connect User Guide
119

1. In List View, select the item or items you want to convert and select Actions > Convert to > [nameof item type].
Alternatively, right-click on an item or set in the Explorer Tree and select Convert to > [name ofitem type].
Jama Connect User Guide
120
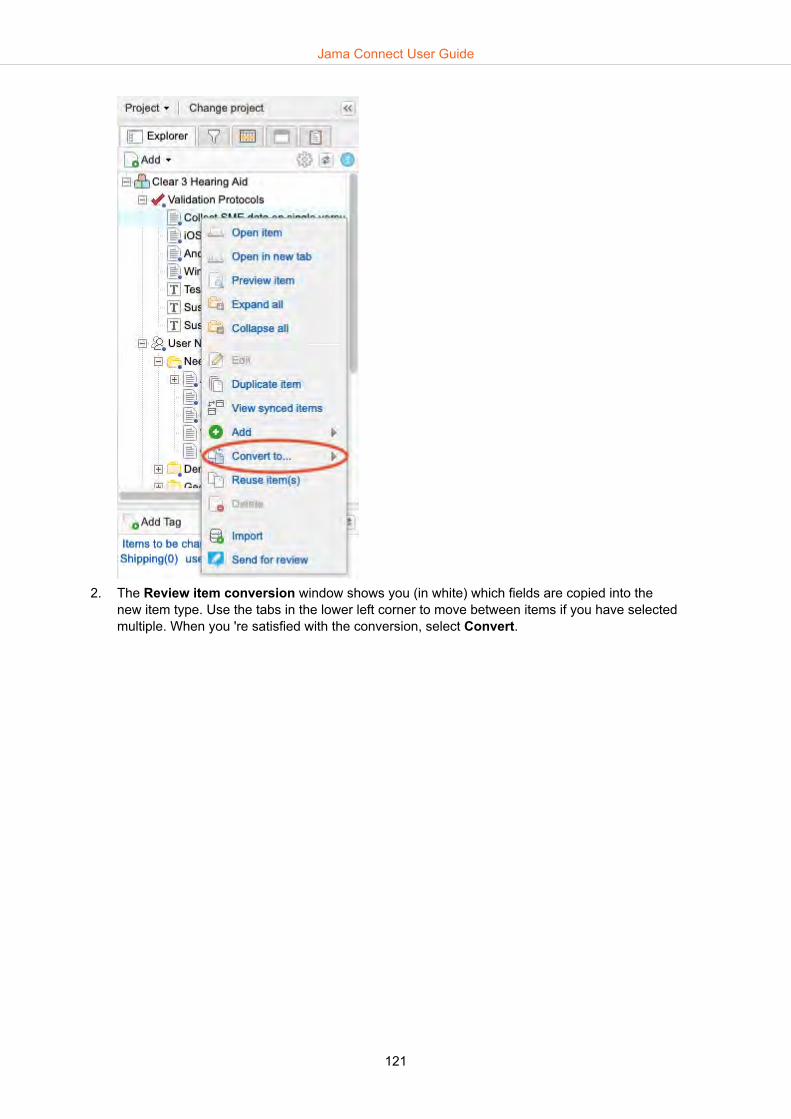
2. The Review item conversion window shows you (in white) which fields are copied into thenew item type. Use the tabs in the lower left corner to move between items if you have selectedmultiple. When you 're satisfied with the conversion, select Convert.
Jama Connect User Guide
121

3. When you select Convert, if the item can belong in its current location (such as a text item),the item remains there. However, sets can't contain mixed item types, so the item might need to bemoved. If so, the Select location window appears and requires you to select the new location forthat item. Click Select and close.
NOTEIf you select multiple items in List View, you must also specify a location, even ifit's the items' original location. Doing this ensures that the items end up in the cor-rect place.
4. Changes are reflected in the item's version tab. To access this, select Versions in the side toolbar[53] of Single Item View [52].
Jama Connect User Guide
122

TIPWhen converting an item to a folder, use the option at the bottom of the window to re-cursively convert items with children to folders.
If you select this option, similar parent items at every level beneath the item convertedis also converted in the same way.
For example, if converting this change request item to a folder of change requests, andselecting the recursive conversion option, you obtain these results.
Undo an item conversionYou can't undo an item conversion, but you can convert your items back to their original type. Whenchanging back, the item receives new identifiers.
1. Use the same procedure you used to convert your items to convert the same items back to theoriginal type.
2. Any fields that don't convert in the new conversion direction are lost. To determine if fields werelost, select Versions in the side toolbar of Single Item View to open the bottom panel and selectCompare.
Jama Connect User Guide
123
3. Any fields that were lost must be manually replaced by an organization administrator [583].
Move itemsTo move items within a project you can move them in the Explorer Tree [124] or use List View [127].
Once items are moved, you can undo the move or find them in the stream [150].
To move items, they must follow these rules for valid item locations:
• Components — Can have child components and be moved to the root of the Explorer Tree.• Sets — Can be moved inside of a component or to the root of the Explorer Tree. Sets can't have
child sets.• Folders — Can be moved to a set that's the same item type as the set where the folder was created,
or to another folder.• Items — Can have child items of the same item type and be moved to a set of the same item type or
to a folder.• Text items — Can be moved anywhere in the Explorer Tree.• General — You must have write access to move any items. For example, when moving items be-
tween sets, you must have write access to both sets. When components, sets, and folders aremoved, all the items within them are moved as well.
Move items in Explorer TreeItems must meet valid item location rules [124] before then can be moved.
You can also move items between projects [128].
1. Select the item or items you want to move in the Explorer Tree. 2. Drag and drop the items into the new location. A green indicator appears for moves that are al-
lowed.
Jama Connect User Guide
124

A red indicator appears for moves that aren't allowed.
Jama Connect User Guide
125
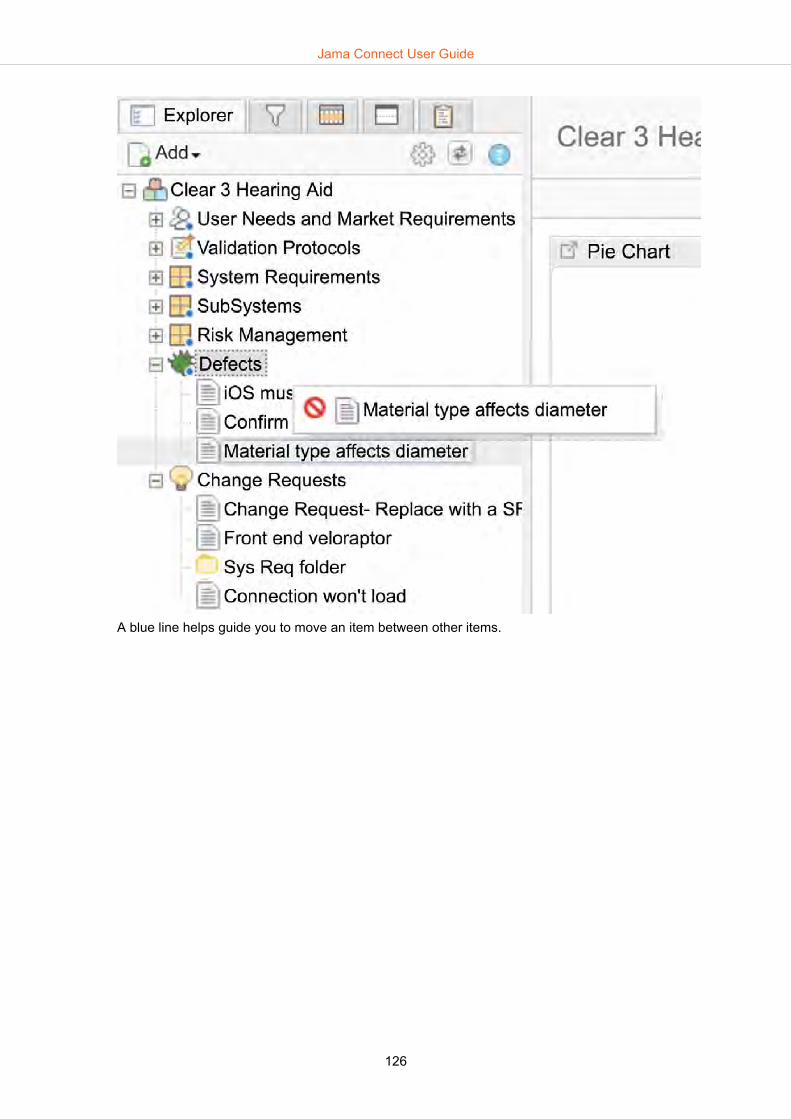
A blue line helps guide you to move an item between other items.
Jama Connect User Guide
126

Move items using List ViewItems must meet valid item location rules [124] in order to be moved.
Quick tips
• If you select the tab at the top of the Explorer Tree, drag items from List View to the release, then youcan change the release on single or multiple items.
• You can also move items between projects [128].
1. In List View, select the item or items you want to move. 2. Drag and drop the items to the chosen location.
Jama Connect User Guide
127

Move items between projectsYou can move an item or set of items, along with all associated conversations, versions, and attach-ments to a different project. This is useful when a project has grown too large and performance hasstarted to degrade.
IMPORTANTBefore moving items between projects:
• A move can't be undone. Users can move items back to the original project but IDsare changed.
• You can only move components and sets between projects. If you're trying to move afolder of items or individual items from a component or set, you must first create anew component/set and move those items to the new component/set.
• Document key IDs are changed when moved. The new ID is based on rules set up inthe destination project.
• When an item is moved, all associated stream collaboration, activities, and versionsare moved into the new project. Attachments, tags, and releases are copied to thenew project.If you delete the source project, images inserted in a rich text field that are copied inother projects are also deleted because they are referenced and aren’t copied fromthe original project. To keep images intact in the duplicated project, we recommendarchiving the source project.
• Original attachments, tags, and releases still exist in the source project, includinglinks, images, and diagrams within rich text fields.
• Test runs can't be moved. Test cases can be moved without impacting test runs.• Items contained in a review aren't shown in future versions of a review after they are
moved.• The document ID in old baselines reflect the new ID.• If any moved item is associated with an integration sync, integrations such as the
JIH can't be running while a move is being performed.• Performance might be impacted at the time of the move if other resource-intensive
processes are being done at the same time.
Before you can move an item:
Jama Connect User Guide
128
• You have write permissions in the source and destination project.• The items to be moved must be unlocked.• All other move operations must be completed. You can't make two moves at the same time.
To move items between projects:
1. In the source project, right-click on the set or component of items you want to move. Select Moveitem.
2. In the Move items to... window, select the destination project and select Move. 3. Review details and select Confirm.4. During the move you can go to the destination project by selecting Go to project or stay in the
same project by selecting Done.5. A pop-up window shows progress of the move. If any item fails to move, the entire move fails.6. Once the move is complete, you can find moved items [150].
Duplicate itemsYou can duplicate items in Jama Connect using these methods.
1. Duplicate items — Create a copy of the item's name, description, test steps (if applicable), and theability to choose to include tags, attachments, and links. You can duplicate items that are locked.
2. Reuse items [276] — Creates a copy of an item, but with more options. With this method you canreuse multiple items, reuse items with children, duplicate more of the item's content, or duplicate anitem from another project.
NOTEYou must have read/write permissions to duplicate an item.
To duplicate an item:
1. Right-click on the item you want to duplicate and select Duplicate item from the menu.2. In the Duplicate item window, indicate whether you want to duplicate tags, attachments, or links.3. Press Enter or select Duplicate.
NOTEAccording to the item type, preferences you select in the pop-up window aresaved across sessions. However, clearing your browser data restores default op-tions. When specific attributes (as in links) aren't enabled for an item type, the op-tion doesn't appear in the pop-up window.
You're directed to the Single Item View of the duplicated item.
Delete an itemWhen you delete items, they aren't physically deleted but are marked as inactive and aren't visible tousers or reports. If absolutely required, they can be re-activated through the database.
Anyone with read/write permissions for an item can delete it, unless an organization administrator hasmade the option unavailable [604].
To delete an item:
Jama Connect User Guide
129

• Select Actions > Delete in Single Item View [52].• Select one or more items from List View [47] or Reading View [48], then select Actions > Delete.• Right-click on the item in the Explorer Tree and select Delete.
IMPORTANTOnly unlocked items can be deleted.
Deleted items show up in the activity stream. The activity entry is also the only methodof restoring a deleted item [130] for those with delete permissions.
In most cases, nothing is deleted from the Jama Connect database. Even if you deleteanother user, item, or something else in the system, a record is maintained and the de-leted object is merely de-activated on the front end.
However, deleting a project [616] permanently deletes the selected project and ev-erything under it from the database.
Restore a deleted itemIf you have permission to delete an item, you can also restore a deleted item. Restoring a deleted itemalso retains all comments, versions, and relationships associated with the item.
1. Select the project name at the top of the left panel to open the dashboard, then open the ActivityStream widget [346] to view recent activities.
2. Search for "delete" in the search field at the top of the Activity Stream widget. This brings up allrecently deleted items.
3. Find the item you want to restore and select Restore.
If the set for the restored item was removed, a component with a temporary set is created. The item canthen be moved to any set of the same item type.
LinksThere are two methods for adding links to items.
• Associate a link with an item [114].• Embed a link in a rich text field [95] in an item.
Add, edit, or delete linksIf the Links widget was enabled by an organization administrator [578], you can store a link or URL inthe application that you can assign to individual items across projects.
1. In Single Item View, select Add link.
Jama Connect User Guide
130

2. Fill in the fields and select Save.
TIPURLs that are prefixed with "http://" are treated as unique links. URLs without theprefix are put at the end of the Jama Connect URL, which might be helpful if youplaced files on the server and you want to link them without uploading them as at-tachments. For example:
• http://www.creativecommons.org — Opens a new browser window with theURL http://www.creativecommons.org
• screenshots/login.html — Opens a new browser window with the URL http://localhost:8080/contour/screenshots/login.html
3. To edit or delete a link, select the Edit or Delete buttons from the link's row.
TagsTags are labels you can attach to items that can help you find items that have something in common.
Tips and more
• Tags are displayed in the bottom of the left panel in a section that can be hidden.• Select Add tag to add a tag [133].• Search for tags [137] using the "tag:" prefix.• You can edit tags in List View.
Jama Connect User Guide
131

Tags can be displayed in a Cloud view:
List View:
In either view, select the tag to view the associated items.
Jama Connect User Guide
132
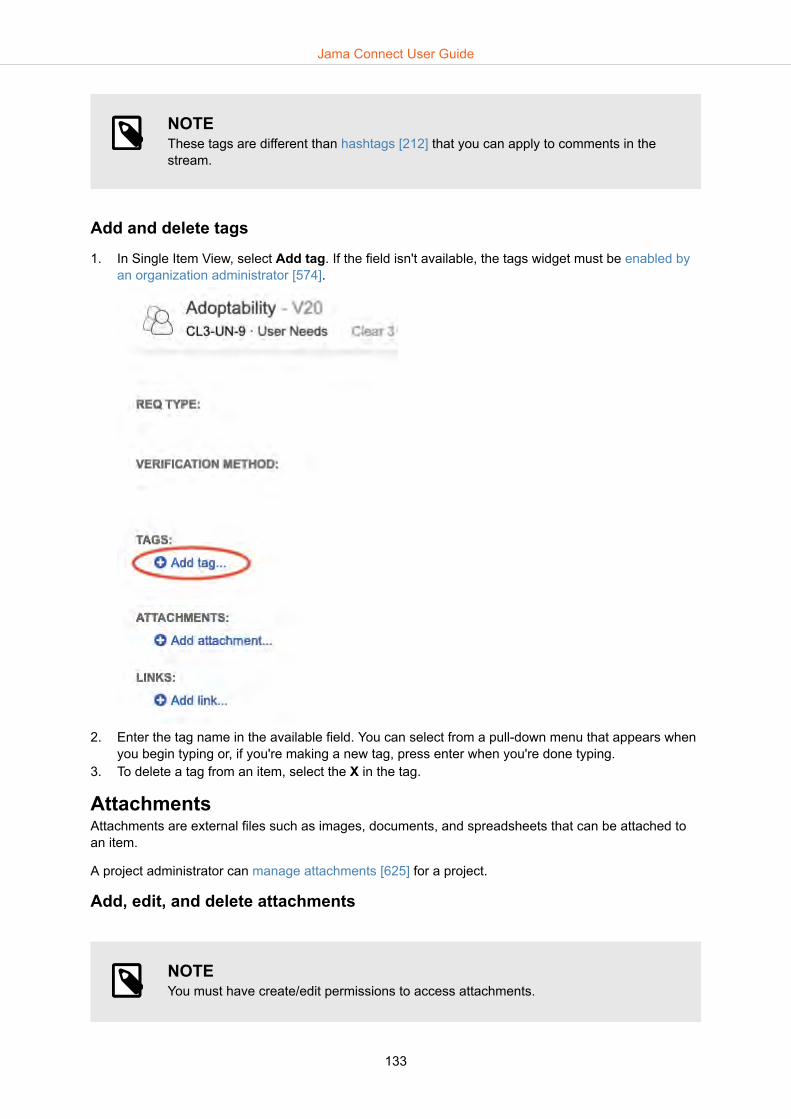
NOTEThese tags are different than hashtags [212] that you can apply to comments in thestream.
Add and delete tags1. In Single Item View, select Add tag. If the field isn't available, the tags widget must be enabled by
an organization administrator [574].
2. Enter the tag name in the available field. You can select from a pull-down menu that appears whenyou begin typing or, if you're making a new tag, press enter when you're done typing.
3. To delete a tag from an item, select the X in the tag.
AttachmentsAttachments are external files such as images, documents, and spreadsheets that can be attached toan item.
A project administrator can manage attachments [625] for a project.
Add, edit, and delete attachments
NOTEYou must have create/edit permissions to access attachments.
Jama Connect User Guide
133
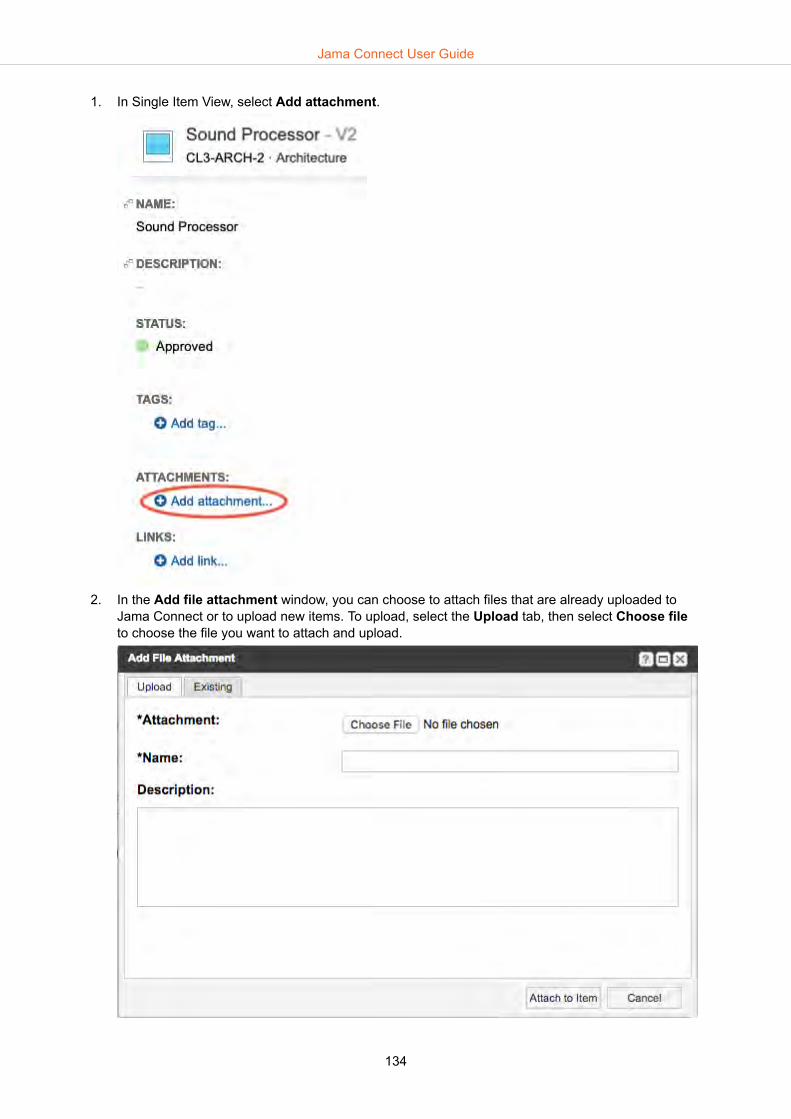
1. In Single Item View, select Add attachment.
2. In the Add file attachment window, you can choose to attach files that are already uploaded toJama Connect or to upload new items. To upload, select the Upload tab, then select Choose fileto choose the file you want to attach and upload.
Jama Connect User Guide
134

To choose from existing files, select the Existing tab, then select the file you want to attach. SelectShow all to see all the files that are already attached to an item.
NOTEThese default filetypes are allowed: APK, AVI, BMP, CSV, DOC, DOCM, DOCX,DOT, DOTX, DWG, GIF, GZ, JAMA, JPEG, LOG, MD, MOV, MP3, MP4, MPEG,ODG, ODP, ODS, ODT, PAGES, PDF, PGP, PNG, PPT, PPTM, PPTX, RAR, RTF,TGZ, TIF, TIFF, TRA, TXT, VCS, VSD, VSDX, VSS, WAR, WAV, WMA, WMV,WPS, XCF, XLS, XLSB, XLSM, XLSX, XLT, XPS, ZIP, ZIPX.
For cloud customers who want to add filetypes, or ask about the number or sizelimits for attachments, your Named Support Contact can request this from support.
For self-hosted customers, the system administrator can update this list directly[507].
3. Select Attach to item. 4. The file is now shown in Single Item View as an attachment.
Select the attachment name or the down arrow icon to download the attachment.Select the trash icon to delete the attachment.Select the three dots icon to open the Edit file attachment window. From here, you can reloadthe attachment or update the name and description. If you upload a different attachment from thiswindow, it overwrites the existing one. To add a new attachment, start from step 1.
Jama Connect User Guide
135

Find content
The content you want to find might be anywhere in your project. For example, you might want to look atthe requirements or test plans.
Jama Connect gives you many ways to directly access the items you need:
• Search [136] — Look through an index of your item type fields, as well as text within a Word docu-ment, a PDF document, or text attachments, to bring up a list of items.Use the search bar in the header to help you find the topic you're looking for.
• Filter [138] — Limit the results of a search to a group of items by content such as author, keyword,date, or coverage. You can also filter stream comments, review comments, reviews, review items,Trace View items, and project items.Select Filter items at the top of the center panel in List View or Reading View to open the filter paneland filter out the items you want to see.
• Advanced filters [139] — Save a set of rules or conditions for later use and share that filter with otherusers.
• Quick find [144] — If you don't remember where to find something in the application, use the quickfind [144] topic in this guide.
You can also find moved items [150] or find an item in the Explorer Tree [151].
Full text searchJama Connect uses an index of the database fields for its search function. It also searches in text, Wordfiles, and PDF files to find the items you're looking for.
You can search item IDs, descriptions, attachments, and field values. Search for a specific unique itemID (not global ID) and it opens.
Important considerations
• The application doesn't support searches for null values. This includes checkboxes that haven't beenchecked.
• Files over 25 MB aren't indexed so their content isn't searchable.• The following file types are indexable: PDF, DOC, DOCX, PPT, PPTX, TXT, RTF.• The following file types are not indexable: XLSX, XLS, XML, HTML, HTM.
Ways you can search
You can search for a word or a phrase for a simple search, and you can use advanced methods likewildcards, Boolean operators, and more to find the items you need.
• Single term — Use a single word to find items with that exact term or items that contain that term.For example, Test returns items with the terms test, pretest, tests, tested, and tester.
• Phrase — Use a group of words surrounded by double quotes. For example, “primary test" re-turns only items that contain the words primary test.
• Single character wildcard — Use a single character wildcard (?) with a single term (not a phrase).For example, te?t returns items that contain test, tent, and text.
• Multi-character wildcard — Use a multi-character wildcard (*) with a single term (not a phrase). Forexample, syn*ize returns items containing the terms synchronize and synthesize.
Jama Connect User Guide
136

NOTEYou can't begin a search with a wildcard (such as ?!*) or you will receive a syntaxerror.
• Boolean operators — Boolean operators in ALL CAPS to combine phrases or terms.• OR (||) is the default Boolean operator when you enter two terms or phrases. For example, pri-mary test or sample returns items that contain either primary test OR sample.
• AND returns items where both terms and phrases exist. For example, primary test and sam-ple returns documents that contain both primary test and sample.
• + returns items that must contain the term or phrase immediately following the +. For example,+primary test returns items that must contain primary and might contain test.
• NOT (-) excludes items that contain the word or phrase after NOT. The application doesn't allownull searches, so you must enter something before the word NOT to get any results. For example,primary test NOT sample returns items that contain primary test but not sample.
• Parentheses — Use parentheses to group clauses and form sub queries. For example, (tests ORsamples) AND maps return results that contain tests, maps, samples and maps or all threeterms.
• Prefix — Use the prefix tag: to indicate the tag field in your query. For example, tag: require-ment management AND tag:security.
• Field name — Use field names followed by a colon to search for information in specific fields. Forfield names that contain spaces use an underscore. For example, user_status:new returns itemswith a User status field that contains new.
Search for contentNeed to search across all projects or within a current project? Enter a query in the search field to findwhat you need.
For more complex searches, use advanced filters [139].
You must have read permissions for projects or sets to be included in your search results.
1. From the drop-down menu in the upper right header, select where you want to search:• Project — Within the current project.• All — Across all projects in your organization.
2. Enter your query in the search field and press Enter.
3. (Optional) Select Filter Items to refine your search. For details, see Filter items for targeted results[138].
Jama Connect User Guide
137

The results appear in List View.
Filter items for targeted resultsUsing a filter is an easy way to refine your search results. To limit and focus your text search, you canfilter content by author, date, or coverage.
Filters can't be saved. If you want to reuse a specific filter, use the advanced filters.
1. In Projects, select Filter Items to open the Filter by panel.
2. Define how you want to filter your results. Filters are cumulative and the options you select are dis-played at the top of the screen.• Keyword — Enter a term in the Keyword field.• Item Type — Templates for sets used within each project. For example, you can filter by System
Requirement, Set, Folder, or more.• Author — The person who created or last modified the item.• Direct Coverage — Parameters for upstream, downstream, missing, and suspect relationships.• Last Modified — Time stamp of when the item was last modified.
Jama Connect User Guide
138
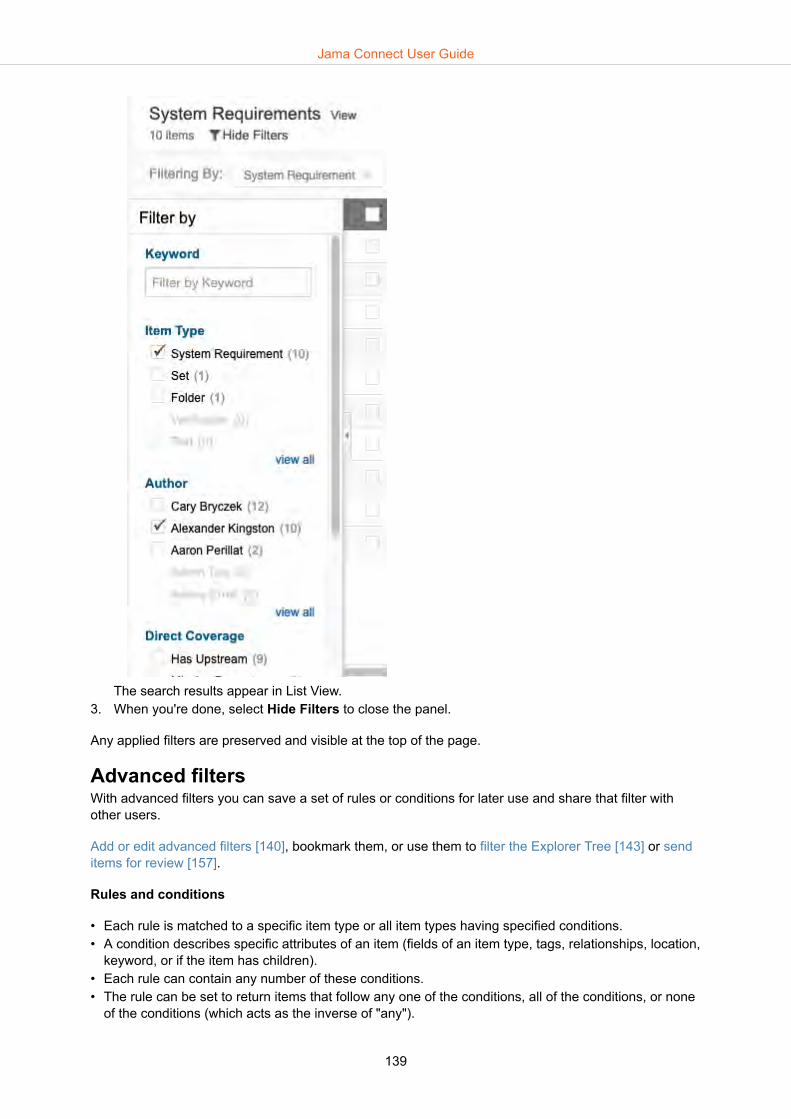
The search results appear in List View.3. When you're done, select Hide Filters to close the panel.
Any applied filters are preserved and visible at the top of the page.
Advanced filtersWith advanced filters you can save a set of rules or conditions for later use and share that filter withother users.
Add or edit advanced filters [140], bookmark them, or use them to filter the Explorer Tree [143] or senditems for review [157].
Rules and conditions
• Each rule is matched to a specific item type or all item types having specified conditions.• A condition describes specific attributes of an item (fields of an item type, tags, relationships, location,
keyword, or if the item has children).• Each rule can contain any number of these conditions.• The rule can be set to return items that follow any one of the conditions, all of the conditions, or none
of the conditions (which acts as the inverse of "any").
Jama Connect User Guide
139
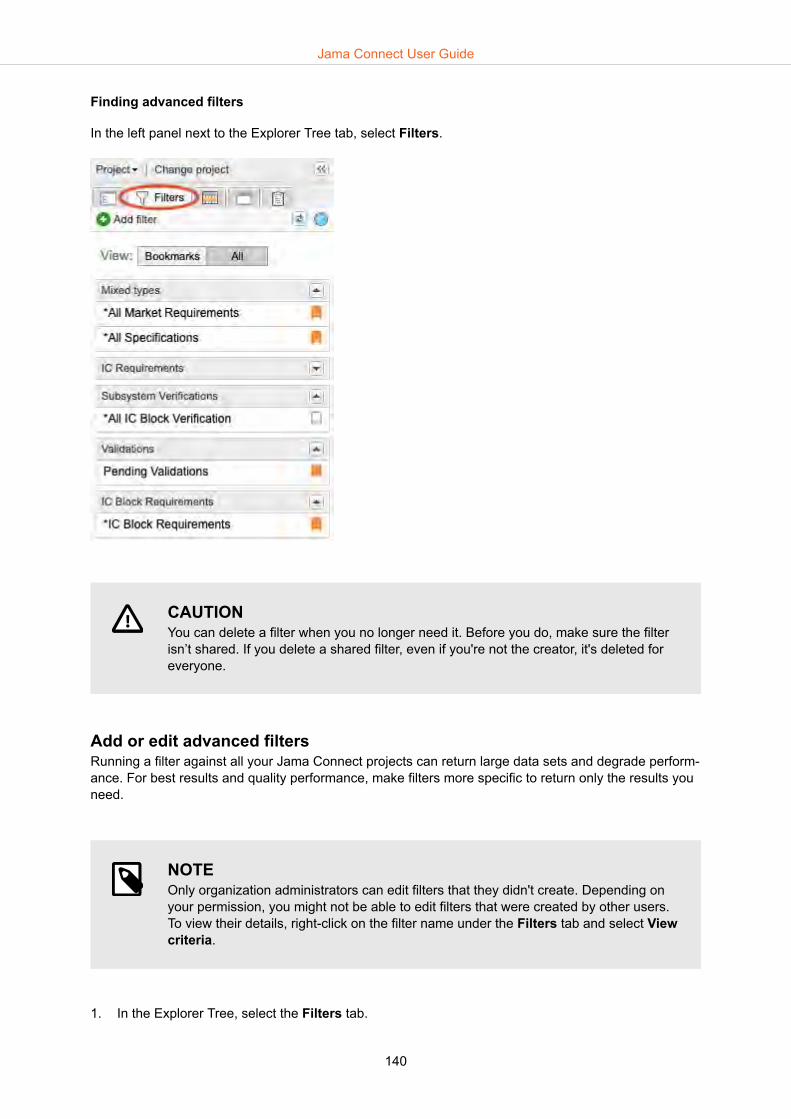
Finding advanced filters
In the left panel next to the Explorer Tree tab, select Filters.
CAUTIONYou can delete a filter when you no longer need it. Before you do, make sure the filterisn’t shared. If you delete a shared filter, even if you're not the creator, it's deleted foreveryone.
Add or edit advanced filtersRunning a filter against all your Jama Connect projects can return large data sets and degrade perform-ance. For best results and quality performance, make filters more specific to return only the results youneed.
NOTEOnly organization administrators can edit filters that they didn't create. Depending onyour permission, you might not be able to edit filters that were created by other users.To view their details, right-click on the filter name under the Filters tab and select Viewcriteria.
1. In the Explorer Tree, select the Filters tab.
Jama Connect User Guide
140

2. Select Add filter to open the New filter window.
3. Name the filter and indicate the project scope by selecting one of these options:• This project only — Use this filter to query data from the project the user is viewing at the time.
The filter appears only when using this project.• Current project — Use this filter to query data from the project the user is viewing at the time.
But the filter is also available for use in other projects.• All projects — The filter pulls data from every project in the organization that the user has per-
missions to view. Using this option, you can see items from other projects that match the filtercriteria.
4. (Optional) Select Make public to make the filter public. This filter is available to anyone with ac-cess to the project.
5. Define your filter. Condition options change depending on which item type is selected.• Select Add rule to create a new rule. A filter can contain any number of rules. • Add a condition (+)• Remove a condition (–)• Select the blue Add condition group button to add a condition group. Condition options change
depending on which item type is selected.
• If your relationship condition requires a sub-filter, select this filter... to open the Embedded Fil-ter window.
Jama Connect User Guide
141

Example: A filter to identify all change requests with downstream relationships to requirements.Create a filter to identify change requests with downstream relationships and another sub-filter tolimit downstream items to the relationship item type.
• To limit the filter to items updated within a certain amount of time, use the drop-down menu nextto Limit to items updated within.
• To define the how the results are sorted on output, use the drop-down menus next to Sort orderfor results by.
6. Preview your results by selecting Preview in the bottom left corner of the New filter window. Re-sults appear in the same window.
7. Choose from one of these options:• Select Save.• Select Back to Filter to make changes to the filter.• Select View in List to see the filtered items in List View. Your filter isn't saved.
Duplicate advanced filtersAdvanced filters allow you to use complex criteria. To save time, copy a filter so you can reuse it in fu-ture searches.
1. Under the Filters tab of the Explorer Tree, right-click on the filter you want to copy and select Du-plicate.
Jama Connect User Guide
142

2. Enter a name and edit the filter settings [140].
3. Select Save.
Filter the Explorer TreeThe Explorer Tree can contain a lot of items, making it time consuming to find what you need. Apply anexisting filter to quickly locate multiple items.
1. To view saved filters, select the Filters tab in the Explorer Tree.
Jama Connect User Guide
143

2. Right-click on the filter you want to use and select Apply filter to Explorer.
The filter results are shown in the Explorer Tree. Items in the hierarchy that don't apply are shownin lighter text.
Export from advanced filtersSelect the data you want to export using advanced filters and export directly to Word, Excel, or PDF.
If you view your filter results in Reading View, the hierarchy container items are visible. These itemsoffer visual context and are included in your export. However, they can't be selected or changed fromthis view.
1. Create the advanced filter [139] that gathers the items you want to export. 2. Select Export and choose the output type.
Quick findDo you know what you're looking for, but just forgot where it is in the application? Use this handy tableto quickly find what you need.
To find... Where Select...
Baselines Explorer Tree Baselines tab
Jama Connect User Guide
144

To find... Where Select...
Dashboard • Upper left corner of the screen• Explorer Tree
Project name
Homepage Top header from anywhere in Ja-ma Connect
House icon
Impact Analysis Single Item View View > Impact Analysis
Item versions Single Item View (side toolbar) Versions widget
Jama Connect User Guide
145

To find... Where Select...
Relationships Single Item View (side toolbar) Relationships widget
Relationship Sta-tus Indicator
• Side toolbar• In a column in List View (when
configured)
Relationships widget
• Top number -- Represents the number of upstream items relatedto this item.
• Bottom number -- Represents the number of downstream items.
If an item isn't in compliance with the relationship rules, it appears inred. Otherwise, it's gray.
Relationshiprules
Single Item View Relationships widget > Relate items in the bottom panel > Showrelationship diagram at the top of the right panel
For more information, see Relationship rules quick find [148].
Releases Top of the left panel Releases
Jama Connect User Guide
146

To find... Where Select...
Review status Header Reviews
• Grid -- Displays review status at the bottom of each card.
• Table -- Displays review status in Review status column.
Risk analyses Header Risk
Suspect links • List View• Single Item View• Advanced filters• Explorer Tree
You can find suspect links from several places in Jama Connect.For more information about finding suspect links, see Suspect linksquick find [148].
Test cases • Explorer Tree• Projects > List View• Projects > Trace View
You can find test cases from several places in Jama Connect. Formore information about finding test cases, see Test cases quick find[149].
Test plans Explorer Tree Test Plans tab > <plan>
Trace View Projects Trace View button
Traceability Ma-trix
Projects > Project > Traceability Trace Matrix
Jama Connect User Guide
147

Relationship rules quick findRelationship rules are set up by an organization administrator [600], but can be viewed by all users intwo places.
• In Single Item View, select the Relationships widget, select Relate items in the bottom panel, thenselect Show relationship diagram at the top of the right panel. The relationship diagram for thisproject appears in a pop-up window.
• Display the diagram for a project on the dashboard [353].
Suspect links quick findYou can find suspect links [267] using one of these methods.
• To view (or clear [267]) all suspect links for a project, select Project > Suspect links.
Jama Connect User Guide
148

• To view all suspect links for an item, open an item in Single Item View [52] and select Relationshipsin the side toolbar to open the bottom panel.
In the Suspect column, you can see if an item is suspect because of upstream changes. You canalso clear suspect links [267].
• In List View or Single Item View, view suspect links in the Relationship Status Indicator [266].• Find suspect links using advanced filters [139].
Test cases quick findYou can find test cases using one of these methods.
Jama Connect User Guide
149

• Look for test cases in the Explorer Tree [43].• Projects > Trace View [49] where they appear in relationship to items they test, along with associ-
ated test runs.• Projects > List View [47] where you can filter by item type name to find test cases.• Test Plans where you can see them in the test cases section of the plan by selecting Test Cases.
Find moved itemsIf you don't know where to look for items that were moved, you can use the Activity Stream to find andaccess recently moved items. This is also an easy way to move all items back to the previous location(or to another location) after a move is made.
1. Open the Activity stream and use the search box to search for moved items.2. Hover your mouse over the location to see a file path.3. Select View moved items to see the files that were moved.
Jama Connect User Guide
150

4. (Optional) In List View, you can move items.
Find an item in the Explorer TreeIf you've navigated to an item from search results, filter results, or tags, you can quickly locate an itemin the Explorer Tree.
NOTEWhen viewing the Explorer Tree, some items aren't visible if a component, set, or fold-er contains over 250 items.
1. From the Single Item View toolbar, select Actions > Find me.
2. From the Explorer Tree, view the highlighted item you want to find.
Jama Connect User Guide
151

Jama Connect User Guide
152

Reviews in Jama Connect
Reviews play a key role in successful product development. They help ensure that a new project meetsstakeholder, market, and compliance requirements.
Jama Connect uses an iterative and collaborative approach for reviewing requirements and other arti-facts in real-time, which improves stakeholder alignment, reduces review cycles, and eases the path tocompliance.
Your organization administrator configures review center settings [608] to meet the needs of your or-ganization.
Review features include a wizard that streamlines review setup and electronic signatures for coordina-ted approval and signoff.
Roles for review workflowYour role determines which tasks you perform in a review.
Moderator — Create, manage, finalize, and close a review.
Approver — Provide feedback and approve or reject the item during the review.
Reviewer — Provide feedback.
Review Administrator — See and manage all reviews.
Role Responsibilities and actions
Moderator • Initiate a review.• Add and manage review participants.• Modify a review.• Edit an item to incorporate feedback.• Close and reopen a review.• Publish a revised review.• Finalize a review.• Archive a review.• Delete a review.• Recover an archived review.• Transition items based on item workflow.
Reviewer* • Contribute feedback.• Finish a review as a reviewer.
Approver • Contribute feedback.• Approve or reject review items.• Delegate approval.• Finish the review as an approver.• Add electronic signatures to a review.
Review administrator • View a list of all reviews.• Perform administration tasks for all reviews, whether or not they were invited to participate.• Archive and unarchive a review.• Recover a deleted review.• Configure review comments.
All • Find and view review items.• Compare versions.• Monitor progress.• Vote on items.• Subscribe to items on the page.
* Moderators and approvers can also perform all reviewer actions.
Jama Connect User Guide
153

Review lifecycle — Who does what during a reviewAction Moderator Reviewer Approver Review Ad-
min
Initiate a review [157] X
Invite participants [162] X X
Add and manage review participants [164] X
Modify a review [164] X
Delegate approval [178] X
Participate as a reviewer [173] X X X
Find and view review items [183] X X X X
Contribute feedback [174] X X X
Finish the review as a reviewer [175] X X
Finish the review as an approver [177] X
Electronically sign the review [178] X
Edit items in a review [166] X
Close a review [167] X
Mark a review as completed and update workflow status [172] X
Compare versions [186] X X X X
Monitor progress [189] X X X X
Vote on items [194] X X X X
Subscribe to items on the page [193] X X X X
View list of all reviews [155] X
Perform administration tasks for all reviews [179] X
Archive a review [169] X X
Recover an archived review [170] X X
Recover a deleted review [180] X
Configure review comments [181] X
Workflow status for reviewsThe review status field shows the current workflow stage (status) of a review. This field changes as aresult of other operations, like closing and archiving a review.
Review status is visible in Grid View and Table View [154].
Status Definition
In progress Default status when moderator initiates a review. [157] Status can be changed to “In progress” when themoderator restores a deleted review or marks the review status as "In progress [154]."
Closed for feed-back
Automatic status when the review deadline is reached or when the moderator closes a review [167].
Completed Status displayed when a moderator selects Close for feedback or a deadline date is met.
Review finalized Status when a moderator marks a review as finalized.
Archived Status when a moderator archives a review [169], or when a review administrator recovers a deleted re-view or sets the status to "Archived."
Deleted Status when a moderator or review administrator deletes a review [169].
Review status quick findQuickly find a review status using one of these methods.
Jama Connect User Guide
154

Location Option
Reviews (header) Select Grid to see the review status at the bottom of each card.
Table Select Table. Review status appears in the Review status column.
Introducing the Reviews dashboardAccess reviews from the top navigation by selecting Reviews in the header.
From the header, you have two options:
My reviews All reviews where you are assigned as a reviewer [173], approver [176], or moderator [156].
All reviews Reviews that haven't yet been archived.
What you see in the dashboard
What is displayed in the dashboard depends on your role, whether you’ve been invited to a review, andthe options you select.
Jama Connect User Guide
155

Review administrators — See all reviews.
Users — See only public reviews until they are invited to a review (depends on how your organizationadministrator and moderator have set public review permissions).
Filter by — Filter reviews by review status or by your role in the review.
Include/Hide archived reviews — See reviews that have been archived or remove them from your re-sults.
The indicator for a pubic review depends on your view:
Grid View Table View
Moderator tasksCertain tasks can only be performed by a moderator. Moderators can also be reviewers or approvers, inwhich case they can perform all tasks for those roles as well as moderator tasks.
• Initiate a review [157]• Add and manage participants [164]• Modify a review [164]• Incorporate feedback for review items [166]
Jama Connect User Guide
156

• Close an "in progress" review for feedback [167]• Finalize a review [168]• Publish a revised workflow [168]• Archive a review [169]• Delete a review [169]• Recover an archived review [170]• Transition a Peer review to an Approval review [171]• Close and finalize Approval review [172]
Initiate a reviewYou can create reviews for any item or group of items that you can access. By default, you are the mod-erator for any reviews you create.
You can start a review from several places in the interface. Whichever method you use, a wizard opensand guides you through the process.
Method/location Action
Reviews Select Reviews in the top navigation, then select Start a review.
Test plan Select Test runs > Cycle > Send for review to send a cycle of test runs to review.
Projects > SingleItem View
Select the item you want to review, then from the Actions drop-down menu, select Send for review.
Projects > List View Select the items you want to review, them from the Actions drop-down menu, select Send for review.
Explorer Tree Right-click on an item and select Send for review.
Filters tab — Right-click on the filter that points to the items you want to review, then select Send forreview.
Releases tab — Right-click on the filter that points to the release you want to review, then select Sendfor review.
Baselines tab — Right-click on the source that includes the baselined items you want to review, thenselect Send for review (reviews the items in their current state, not their baselined state). If all itemsfrom an existing source were deleted, you can't select Send for review from the baseline tree.
TIPWhen you initiate a review, a baseline of the selected reviews is automatically gener-ated [248]. You can find this baseline [248] under the Baselines tab or you can find alink under the Versions tab of any item in this review.
To start a review:
1. Select the items you want to review using one of the methods described in the previous table.
Jama Connect User Guide
157

2. Definition [158] — Define your review.3. Settings [160] — Configure the settings for your review.4. Participants [162] — Configure who you want to review your items.5. Invitation [163] — Complete the invitation email.
DefinitionWhen you initiate a review [157], the first step is to define the review.
1. If you selected items before initiating the review, the system suggests a name, or select a name forthe review.
2. Set a deadline for the review, or the deadline defaults to one week from today.
NOTEIf you're using Windows, be sure that "Adjust for daylight saving time automatically"is enabled in "Date and time" settings in Windows, so that the time zone is dis-played correctly when initiating a review.
3. If you selected items before initiating the review, the Project field shows the name of the sourceproject. Otherwise, select the Project that contains the items for this review.
4. If you selected items before initiating the review, this field isn't editable. Otherwise, select the itemsthat you want to review.You can select whole containers or expand the containers to select individual items. You can alsouse the Releases or Filters tab to select a release or filter to send to review. You can't select itemsfrom multiple tabs. Use the Select button to indicate your choice is complete.
Jama Connect User Guide
158
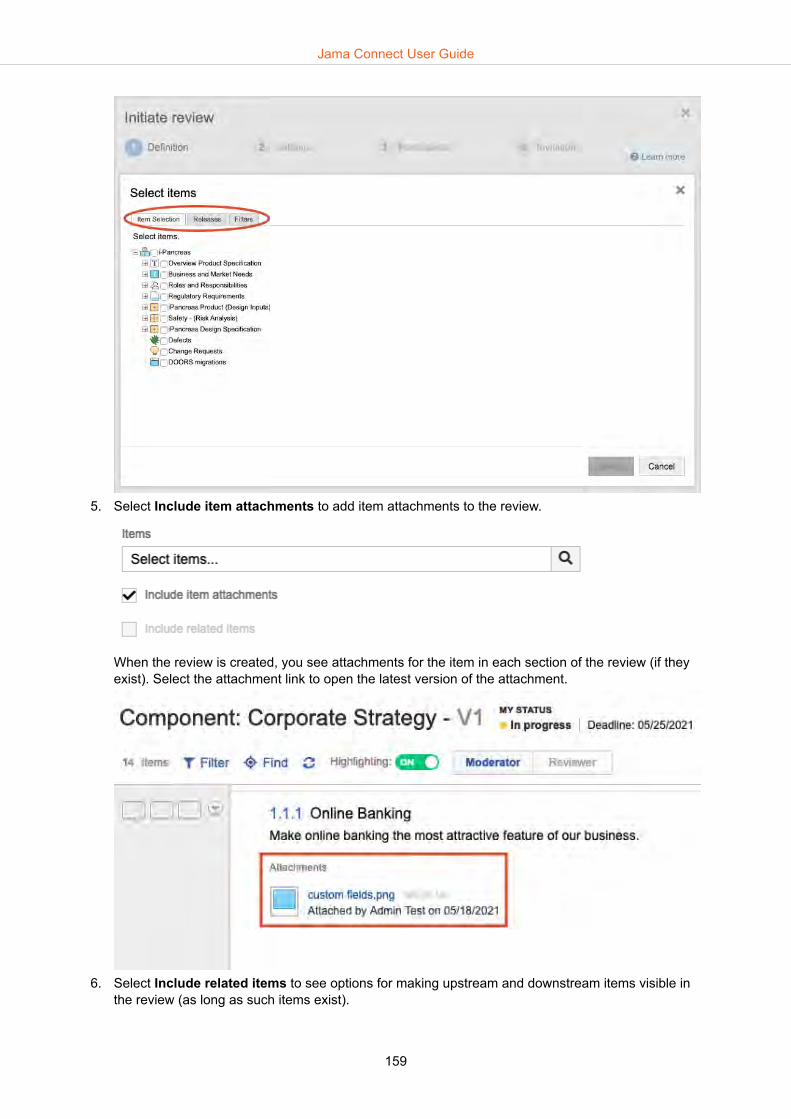
5. Select Include item attachments to add item attachments to the review.
When the review is created, you see attachments for the item in each section of the review (if theyexist). Select the attachment link to open the latest version of the attachment.
6. Select Include related items to see options for making upstream and downstream items visible inthe review (as long as such items exist).
Jama Connect User Guide
159

You see each item type that's related either upstream or downstream, along with a count of thenumber of related items.Select Show filters to filter those relationships by relationship type.Select the related items you want to include in the review.
7. Select Next.
SettingsWhen you initiate a review [157], the second step is to choose the review settings. This image showsthe default settings. Additional settings are available only if they are configured by an organization orprocess administrator.
Jama Connect User Guide
160

You see the Review template option if it's enabled in Review center by an organization admin. For moreinformation about review templates, see Item workflow for Approval Reviews [610].
1. Select electronic signature settings.If you select Require electronic signatures from approvers, all approvers must sign the review inorder to approve it. Select Enable signature group for approvers if you want your review signa-tures to have a particular signer role. Find out more about how electronic signatures work [225].
2. Select permission settings.Allow for review comments to also appear in the single item view within a project:Administrators must first enable this option in the Review Center Settings for this option to appear.Make public: This option makes the review visible beyond those invited to participate. An organiza-tion administrator determines whether public reviews [608] can be seen by anyone with access toreviews, or only by those with permission to ALL items in a review.Let approvers add reviewers and approvers: Select to allow approvers to add others to the re-view.Let approvers delegate their review to others: Select to allow delegation of the approver role. Ifan approver is assigned a signer role, and they delegate their approver role, the signer role is alsodelegated.
Jama Connect User Guide
161

3. Select optional settings.Enable time tracking: Check this box to track the amount of time each reviewer spends within thereview. The clock that tracks the time is visible to all participants in review statistics [189].Notify me when a participant finishes a review: Check this box to send notification emails [197]to the moderator when a reviewer marks a review complete or when a participant requests a newversion.Enable voting: Check this box so participants can provide input on priority or other issues the mod-erator needs to resolve. Read more about voting [194]. If you select this box, you are asked to des-ignate the number of votes per user and a label for what the vote means.
4. Select Next.
ParticipantsWhen you initiate a review [157], the third step is to choose review participants.
IMPORTANTInviting anyone to a review gives them read access to the entire content of the review,even if they don't have permission to the underlying items.
1. Using the left column, select participants for this review.Use the tabs at the top of the column to select from users on the project team, or from outside theproject team.You can select individuals or groups. Search by name or email using the field at the top of the list. Ifyou select a group, you can add all users or select individual users from the group.Select the Invite user by email tab to invite users from outside of Jama Connect. Those users re-ceive an email invitation with a link to the review. When they select the link, they are given a review-
Jama Connect User Guide
162

er license (as long as there are floating reviewer licenses available) and are asked to set up an ac-count. They can only access the review you invite them to.
IMPORTANTAn organization administrator can disable this function or can restrict the domainsfor which outside review invitations are allowed. [608]
2. Selected participants appear in the right panel. Select a review role for each participant (approver[176] or reviewer [173]).If you enabled signer roles [160], you can also assign a signer role to each approver.Signer roles are based on groups. If you select a group name, then select All users, the signer rolefor those users defaults to the group name.
3. Select Next.
InvitationWhen you initiate a review [157], the final step is to complete the invitation.
1. You see a draft of the email that's sent to participants. At the top, it shows the total number of par-ticipants who receive the email and their roles.Fields for the email subject and message are the only two fields you can modify in this panel.The email also shows the review role and signer role as determined in the participants panel[162]. For reviews that have participants with different reviewer roles, light gray text shows informa-tion that might vary for each participant.The signature meaning is the same for all reviews and defaults to "I approve this review" and can'tbe modified.The email includes a link to the review and the deadline.
2. Select Initiate review to receive a confirmation that your email was sent.
Jama Connect User Guide
163

Add and manage review participantsAs a moderator, you can add or remove moderators from your review.
1. In a review, select Update moderators from the Actions drop-down menu or from the Actions col-umn in the table view when you select Reviews in the header.The Update Moderators window opens.
2. Add moderators from your team (Project Team tab) or from outside your team/Jama Connect (Out-side Project Team tab).
3. To remove a moderator, select the X next to the name in the Review Moderators panel.4. (Optional) Add a comment about the changes you made.5. To finish, select Update Moderators.
Important considerations
• If you remove yourself from a review, you no longer have access to that review. All added and exist-ing moderators receive email notifications for changes to the list of moderators during the review.
• Moderators can be added to a review regardless of their access rights to the items in the review.However, when a new revision for the review is published, it includes only items that moderators havewrite access to. This can have unexpected consequences for reviews sent from filters, such as miss-ing or extra items in the new revision.
Modifying an "In progress" reviewYou might want to change the content that's included in a review, the due date, or the participants. Youcan also close a review so that feedback is no longer allowed.
Only a moderator [156] or a review administrator [179] can change a review.
You can change a review from different locations and views in Jama Connect:
Jama Connect User Guide
164

• In a review, use the Actions drop-down menu.
• In Reviews > Table View, use the Actions column.
The icons in the Actions column are:Edit — Open the wizard where you change the deadline, invite new reviewers, or change an approv-er’s status (role).Reopen — Open a review that was closed.Delete — Remove a review permanently (only a review administrator can recover a deleted review).Update moderators — Add to or remove moderators from your review.Archive — Remove the review from the list that appears to users.
Modifying a "Closed" reviewA review closes automatically on the end date and time or it can be closed manually by the modera-tor. When a review is closed, reviewers can no longer add comments.
As the moderator, you might want to reopen a closed review to allow more feedback, archive the re-view, or publish a new version.
Only a moderator or a review administrator can edit a review.
When viewing a closed review, you see a blue status bar at the top of the review, which notifies partici-pants if a review is closed.
Use the buttons on the blue status bar, the Actions menu, or Reviews > List View to do the followingwith a closed review:
• Archive — Remove a review from the primary list of reviews.
Jama Connect User Guide
165
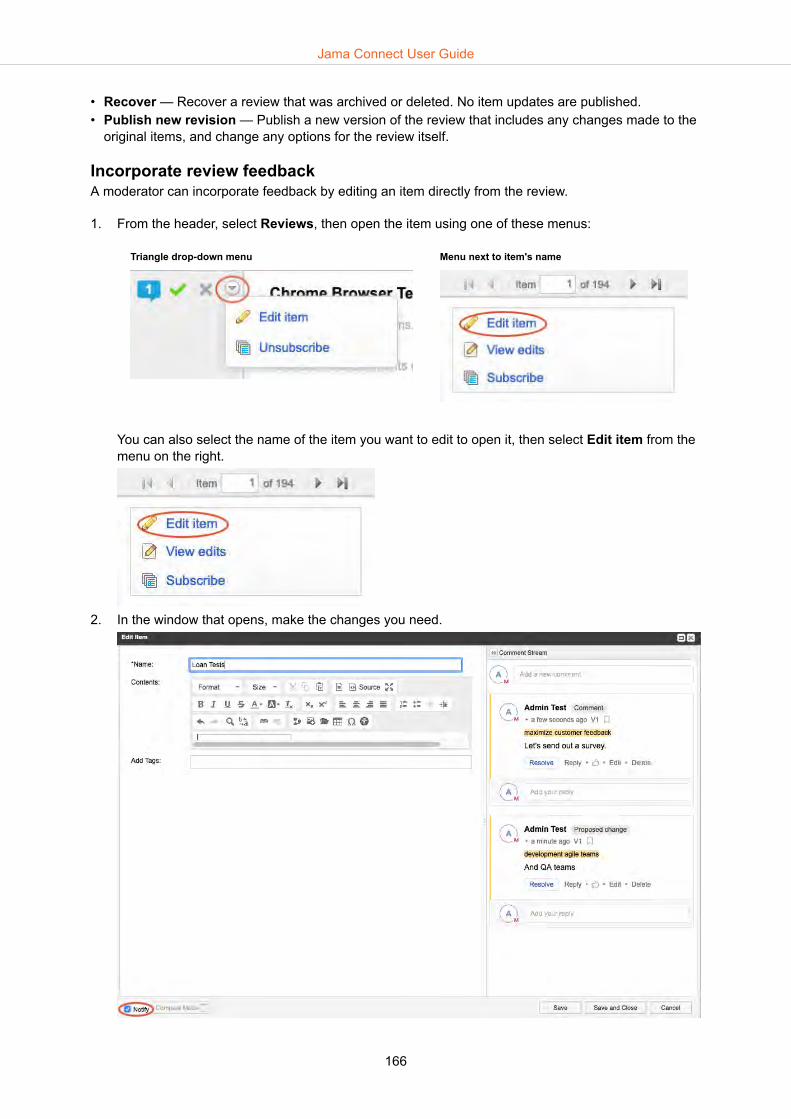
• Recover — Recover a review that was archived or deleted. No item updates are published.• Publish new revision — Publish a new version of the review that includes any changes made to the
original items, and change any options for the review itself.
Incorporate review feedbackA moderator can incorporate feedback by editing an item directly from the review.
1. From the header, select Reviews, then open the item using one of these menus:
Triangle drop-down menu Menu next to item's name
You can also select the name of the item you want to edit to open it, then select Edit item from themenu on the right.
2. In the window that opens, make the changes you need.
Jama Connect User Guide
166

3. (Optional) Select Notify to designate people or groups you want to inform about this change,choose the people to be informed, then select Save and close.
Your changes are saved in the project, but not in the review.
Any time an update is made to an item that's in review, a blue status bar appears at the top of thereview. The review remains unchanged until the moderator publishes a new version.
4. Select Commit.5. Update changes in the review using one of these methods:
• Blue status bar — Publish updated revision• Actions menu — Publish new revision
6. In the window that opens, select one:• Publish — Update the review for all participants.• Modify review — Make further changes to the review itself in the wizard.
Participants receive an email notifying them about the new revision.
Close an "In progress" reviewA review closes automatically when its deadline is reached. A moderator might want to close a reviewmanually before the deadline if, for example, all reviewers already provided feedback.
Once a review is closed, a moderator can recover it by changing the status back to “In progress.”
1. To close a review manually that you are currently viewing, select Actions > Close for feedback.
Jama Connect User Guide
167

The closed review now displays the message “This review is closed” in the blue status bar.2. To reopen a closed review, select Recover in the blue status bar of the review.
The blue status bar no longer appears when the review is reopened.
Publish a revised reviewWhen changes are made to the original review items, you can publish a new version of the review thatincludes the changes.
1. Open a review that includes changes. The blue status bar indicates that you can publish a revision.
2. Select Publish updated revision to include these changes in the review.3. Select an option:
• Publish — Publish the revision immediately (available only when a new version of an item is cre-ated).
• Modify review — Change more options for the review in the wizard.
Finalize a reviewWhen you’re satisfied that your review is complete — that all items have been reviewed and approvedand that all comments have been resolved — the next step is to finalize the review.
Important considerations
• When you finalize the review, the review workflow tool automatically updates the status of the reviewitems. For example, at the end of a review, a moderator can trigger the status of reviewed items tochange from "In review" to "Approved."
• If workflow is assigned to an item type in your Approval review [610], the item will transition. If youdon't use a template, the review is marked as finalized.
Jama Connect User Guide
168

1. In the review, select Actions > Finalize approval review.
2. In the window that opens, select Finalize review.
This action automatically triggers Review Status Workflow, which updates the status of the review.
Delete a reviewYou can delete a review, but not if it includes electronic signatures. However, if an entire project is de-leted, all reviews in that project are also deleted, even if they include electronic signatures.
Once a review is deleted, only a review administrator can recover it.
1. From the header, select Reviews > Actions > Delete review.
2. When prompted to confirm, select Yes.
Now, when a user selects Reviews, the review that you just deleted is no longer listed with other re-views.
Archive a reviewWhen a review is archived, it's no longer visible in the list that’s displayed when users select Reviews inthe header.
Jama Connect User Guide
169

Reviews can only be archived by moderators and review administrator, and only if their status is“Closed.”
As the moderator, you can control which reviews are visible to your participants:
• Select Filter by > Include archived reviews.• Select Filter by > Hide archived reviews.
1. From the header, select Reviews > Table. 2. In the Actions column of the review you want to archive, select the folder icon to archive the re-
view, then confirm when prompted.
Recover an archived reviewA moderator or review administrator can recover a review that was archived [169].
When an archived review is recovered, the participant roles and contributions are unchanged. For ex-ample, if an approver signed and approved a review before it was archived or deleted, it remains thesame after the review is recovered.
If items were edited after a review was archived or deleted, they don't appear in the recovered reviewuntil the moderator publishes a revised review.
You can recover an archived review from the review’s Actions column or from its blue status bar.
1. To recover an archived review from the Actions column:1. From the header, select Reviews > Table.2. In the row with the review you want to recover, select the Reopen icon from the Actions col-
umn.
3. In the window that opens under Select review status, use the drop-down menu to select "Inprogress," select a new end date and time, then select Save.
Jama Connect User Guide
170

2. To recover an archived review from the review’s blue status bar:1. Open a review that was archived.2. From the blue status bar across the top, select Recover.
Transition a Peer review to an Approval reviewWhen reviewers are done looking over a Peer review, the moderator can transition a review to an Ap-proval review.
Both templates must be enabled [610] by an organization administrator.
1. In the review, select Actions > Transition to approval review.
The Transition to approval review wizard opens.
Jama Connect User Guide
171

2. On the Definition page, make your changes, then click Next.
3. On the Settings page, confirm you’re using the approval template, then click Next.
4. On the Participants page, make your changes, then click Next.5. On the Invitation page, update the subject and message as needed, then click Transition review.
A revision is created and an email notification is sent to reviewers.
Close and finalize Approval reviewAfter the review is approved, the moderator closes and transitions items to their approved state. Youdon’t need a Peer review to finalize an Approval review.
Workflow must be enabled [31] in Admin > Organization for the items in the review, or the option toClose and transition items won't appear when you finalize a review.
Example with workflow disabled
Jama Connect User Guide
172

1. In the review, select Actions > Finalize approval review.Wizard opens. can change the name and deadline. Can change participants.
2. View the review overview and workflow transitions, then click Finalize review.
The review is now closed.
Reviewer tasks• Contribute feedback [174]• Finish a review as a reviewer [175]
Reviewers can also perform tasks that are available to all review roles.
For example:
Jama Connect User Guide
173

• Find and view review items [183]• Compare versions [186]• Vote on items [194]• Subscribe to items on the page [193]
For details, see Tasks for all review roles [182].
Contribute feedbackOnce a review is created, all participants can read through the items, make comments, and ask ques-tions.
By default, you see only comments made in a specific version. For example, comments made in version1 only appear in that version.
1. From the review, open the Comment window using one of these methods:• Select the Comments icon next to the item.• Select the text you want to comment on.
2. Type your comment.3. (Optional) Apply a category to your comment to help participants understand and track key feed-
back.
Jama Connect User Guide
174

Category Outline color Meaning
Comment / Speech bubble Yellow Open
Green Acknowledged by Moderator
Question mark Yellow Open
Green Answered by Moderator
Pencil / Proposed change Yellow Open
Green Accepted by Moderator
Red Rejected by Moderator
Exclamation / Issue Yellow Open
Green Resolved by Moderator
4. Select Submit feedback to save the comment.
Additional ways to collaborate with your team
• Use the like icon when you agree with a comment and want to track how team members vote on adecision.
Finish a review as a reviewerWhen you complete your work as a reviewer, the next step is to “finish” the review. This action lets themoderator know you're done with your work (if notifications were set up) and updates the overall reviewprogress in review statistics [190].
If the review is closed before you finish the review, the blue status bar includes a message: “This reviewis closed.”
Jama Connect User Guide
175
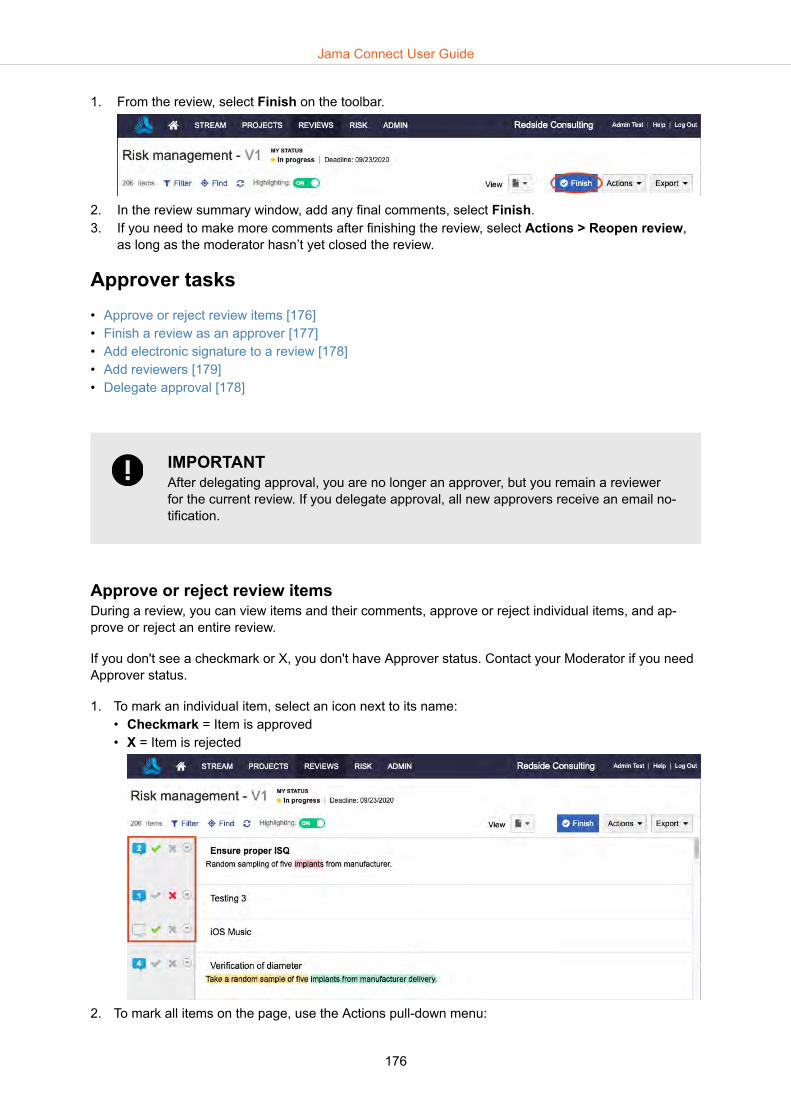
1. From the review, select Finish on the toolbar.
2. In the review summary window, add any final comments, select Finish.3. If you need to make more comments after finishing the review, select Actions > Reopen review,
as long as the moderator hasn’t yet closed the review.
Approver tasks• Approve or reject review items [176]• Finish a review as an approver [177]• Add electronic signature to a review [178]• Add reviewers [179]• Delegate approval [178]
IMPORTANTAfter delegating approval, you are no longer an approver, but you remain a reviewerfor the current review. If you delegate approval, all new approvers receive an email no-tification.
Approve or reject review itemsDuring a review, you can view items and their comments, approve or reject individual items, and ap-prove or reject an entire review.
If you don't see a checkmark or X, you don't have Approver status. Contact your Moderator if you needApprover status.
1. To mark an individual item, select an icon next to its name:• Checkmark = Item is approved• X = Item is rejected
2. To mark all items on the page, use the Actions pull-down menu:
Jama Connect User Guide
176

• Mark entire page approved• Mark entire page rejected
3. If your review contains more than one page of items, repeat this action for each page.
When you're done, the blue status bar includes the message “You’ve marked all items in the review.”You can then finish the review as an approver and electronically sign the review.
Finish a review as an approver
1. When you're finished with a review, select one of the following:• Select Finish from the toolbar.
• Select Finish review in the blue banner that appears when you mark all items approved.
2. In the Review finished window, you can mark any remaining items "Approved" and add a finalcomment. These comments are visible under Reviews > Feedback in the top-right menu, or in anemail sent to the moderator if email notifications are enabled for this review. If this review requiresan electronic signature [178], you can also add that here.
3. Select Request new revision or Approve (or Approve and sign if you're using an electronic sig-nature).
Jama Connect User Guide
177
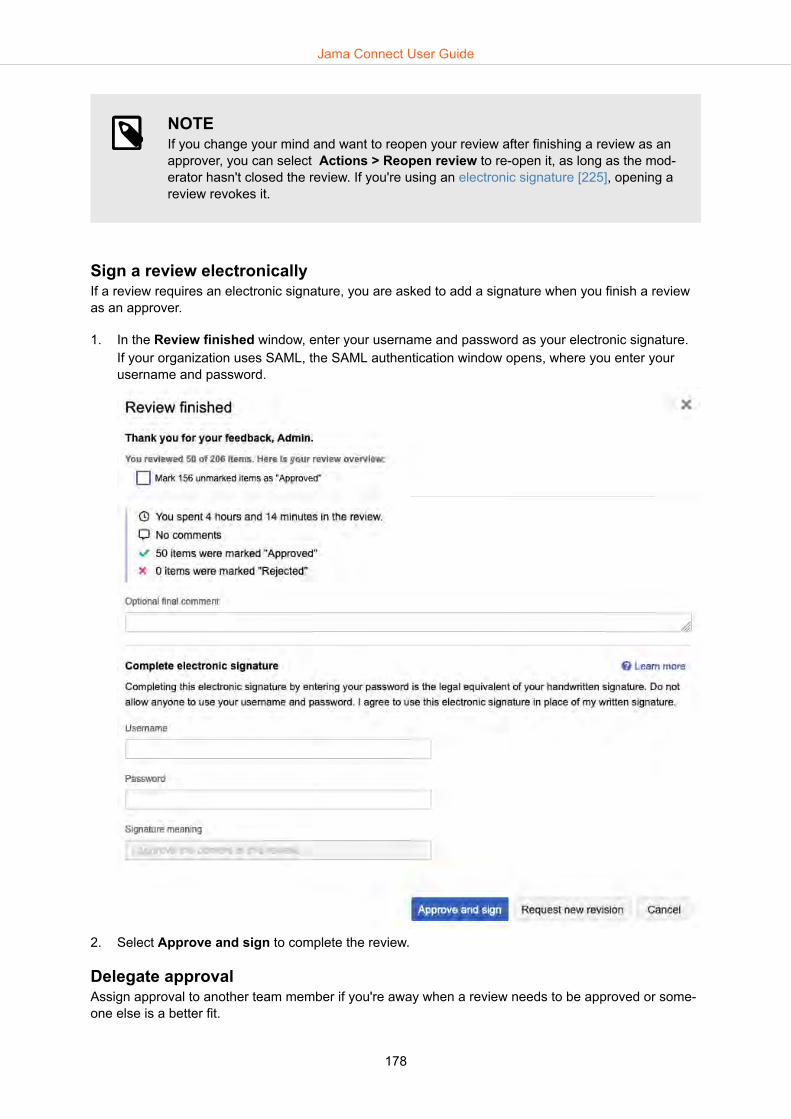
NOTEIf you change your mind and want to reopen your review after finishing a review as anapprover, you can select Actions > Reopen review to re-open it, as long as the mod-erator hasn't closed the review. If you're using an electronic signature [225], opening areview revokes it.
Sign a review electronicallyIf a review requires an electronic signature, you are asked to add a signature when you finish a reviewas an approver.
1. In the Review finished window, enter your username and password as your electronic signature.If your organization uses SAML, the SAML authentication window opens, where you enter yourusername and password.
2. Select Approve and sign to complete the review.
Delegate approvalAssign approval to another team member if you're away when a review needs to be approved or some-one else is a better fit.
Jama Connect User Guide
178

1. In the review, select Actions > Delegate my approval.2. In the Request Reviewer Delegation window, select a delegate.3. Click Delegate Approval.
An email is sent to the new approver notifying them of the request.
Add reviewersYou can add reviewers to a review at any time.
1. In the review, select Actions > Add reviewers.2. In the Add Reviewers window, select the users you want to add.
3. Click Add Reviewers.
An email is sent to the reviewers notifying them of the request.
Review administrator tasks• Recover a deleted review [180]• Configure review comments to appear in projects [181]• Recover an archived review [170]• Modify a review [164]• Make a review public [160]
Important considerations
• Permissions for a review administrator must be assigned by an organization administrator.• As a review administrator, you can access a review's content when the review is public; when you are
also a reviewer, approver, or moderator in the review; or when you add yourself to the review.
Jama Connect User Guide
179
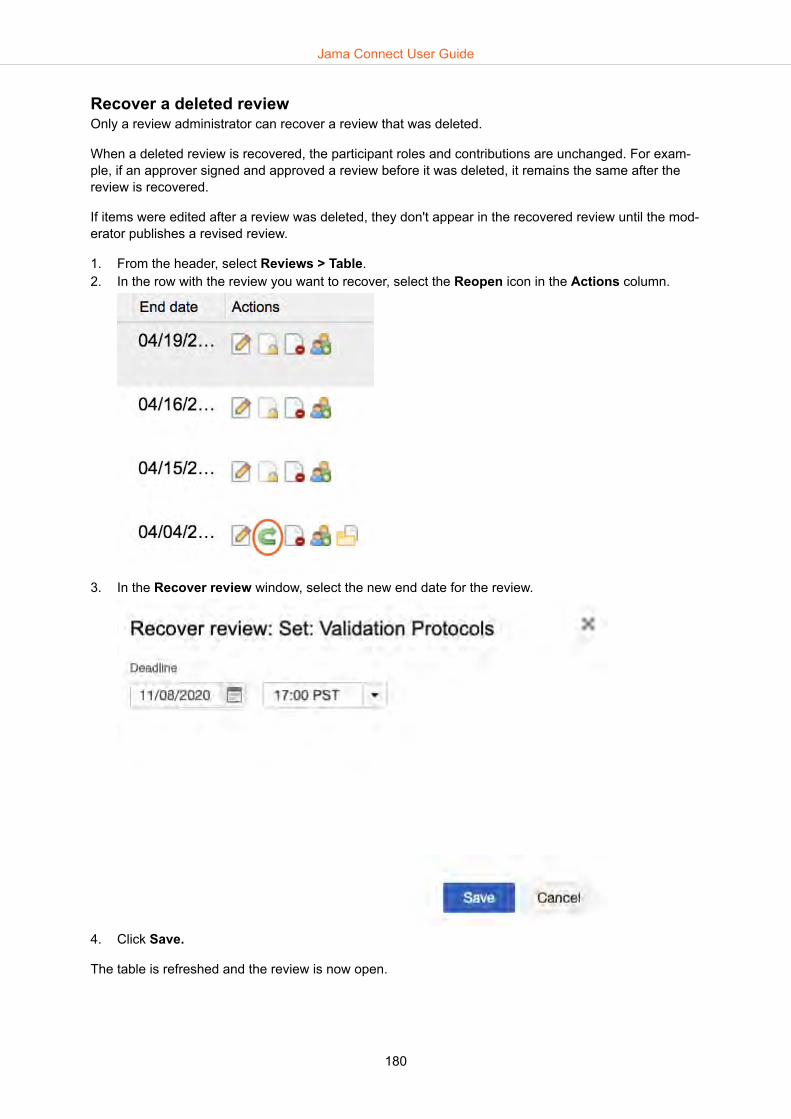
Recover a deleted reviewOnly a review administrator can recover a review that was deleted.
When a deleted review is recovered, the participant roles and contributions are unchanged. For exam-ple, if an approver signed and approved a review before it was deleted, it remains the same after thereview is recovered.
If items were edited after a review was deleted, they don't appear in the recovered review until the mod-erator publishes a revised review.
1. From the header, select Reviews > Table. 2. In the row with the review you want to recover, select the Reopen icon in the Actions column.
3. In the Recover review window, select the new end date for the review.
4. Click Save.
The table is refreshed and the review is now open.
Jama Connect User Guide
180

Configure review comments to appear in projectsComments made during reviews can provide valuable context, whether you're reviewing a requirement,lower-level feature, or test item. A record of those comments offers enhanced traceability, so you canmake informed decisions over the course of the item's lifecycle.
The review moderator can allow comments from a review to appear in the project view for that item.
When enabled, the Review comments widget appears in Single Item View. Select it to see the reviewcomments for that item.
This option needs to be enabled in two places for it to take effect. The organization administrator mustenable it in the Review Center Settings and the moderator must enable it when creating a review.
For the administrator
1. Select Admin > Organization > Review center.2. Under Permission settings, select Allow for review comments to also appear..., then click Save
settings.This option is now available and visible to review moderators when they create reviews.
Jama Connect User Guide
181

For the review moderator
• When creating a review, select Allow for review comments to also appear in the single item viewwithin a project.
Once enabled, comments are grouped by review and sorted with the latest comments at the top.
Tips and more
• Why aren't comments appearing? For review comments to be visible within a project, this settingmust be enabled for each review.
• How do I see comments from older reviews? For reviews created without this setting, you can goback and change this setting to include review comments.
• View More — Appears if there are more comments from that review that haven't loaded.• Load More — Provides comments from older reviews that haven't loaded, including comments that
might have occurred since the page loaded.
Tasks for all participant roles• Find and filter items in a review [183]• Highlighting review comments [184]• Compare versions [186]• Show related items in a review [187]• View participant progress [189]• View item progress [190]• View review activity [191]• Filter review comments [192]• Subscribe to a review [193]• Export reviews [194]• Voting [194]
Jama Connect User Guide
182

Find and filter items in a reviewAll user roles can search for and filter specific items in a review.
You can navigate to different areas of the review workspace without losing your filter or search selec-tion. For example, if you make a filter selection and go to another view, your filter selection is savedwhen you navigate back to the review.
Find items in a review
• Enter text in the Search field, then expand the Choose item types drop-down menu to filter yoursearch.
• Select the item type, then enter text in the Search field.
When you select an item from the search results or table of contents, the item is selected and outlinedin blue. In the Find item panel, you can refine your search based on the filtered results.
Filter items in a review
Use filtering to view items and comments that need your attention.
Jama Connect User Guide
183
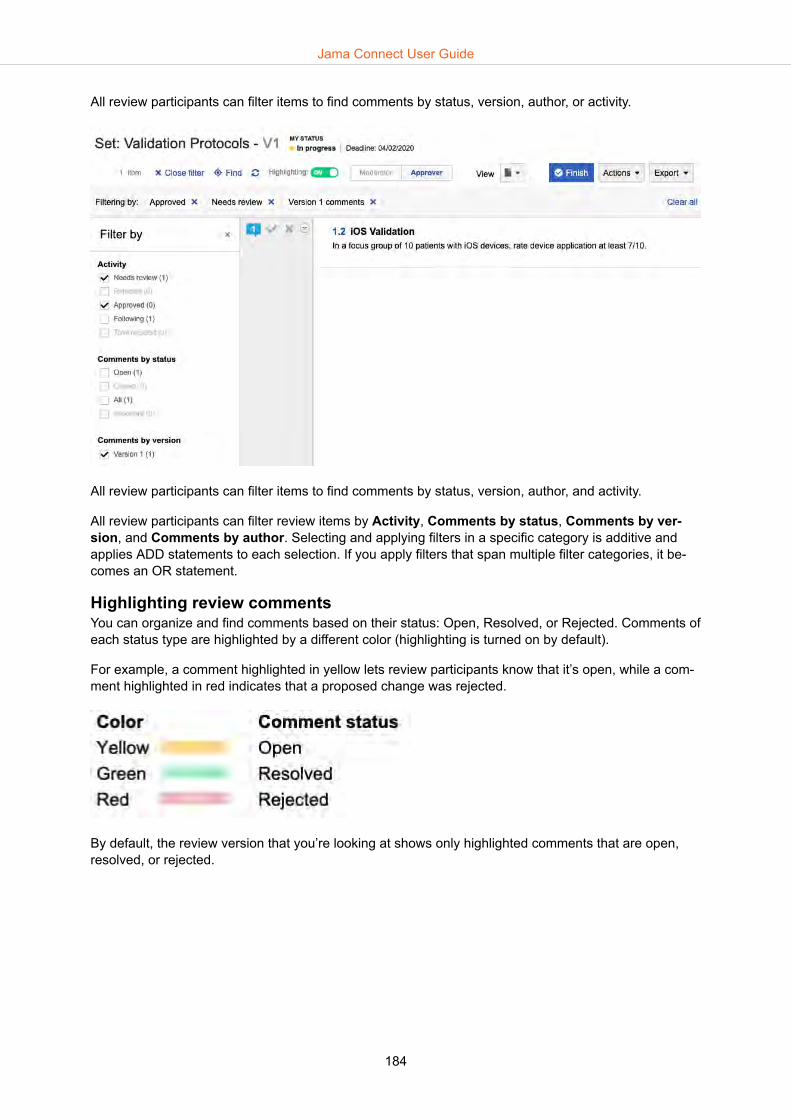
All review participants can filter items to find comments by status, version, author, or activity.
All review participants can filter items to find comments by status, version, author, and activity.
All review participants can filter review items by Activity, Comments by status, Comments by ver-sion, and Comments by author. Selecting and applying filters in a specific category is additive andapplies ADD statements to each selection. If you apply filters that span multiple filter categories, it be-comes an OR statement.
Highlighting review commentsYou can organize and find comments based on their status: Open, Resolved, or Rejected. Comments ofeach status type are highlighted by a different color (highlighting is turned on by default).
For example, a comment highlighted in yellow lets review participants know that it’s open, while a com-ment highlighted in red indicates that a proposed change was rejected.
By default, the review version that you’re looking at shows only highlighted comments that are open,resolved, or rejected.
Jama Connect User Guide
184

When two highlighted comments overlap, that text is highlighted in light blue.
Moderators resolve an open comment: select it, (optional) type a response and click Reply, then clickResolve.
Jama Connect User Guide
185

The comment box and highlighted text changes to a resolved status (green).
Compare versionsWhenever a published review has more than one version, you can compare two versions.
Good to know
• If you want to make other fields visible in the review, an organization administrator can configure itemtype views [595] for Reading View or Single Item View to show those fields.
• Typically, item fields contain fewer than 10,000 characters (2,000 words). When you compare reviewversions, the applications might skip fields with lengthy content.
• The date and version a comment was added appears in the comment.
Jama Connect User Guide
186

1. From the View drop-down menu in the review, select Compare.2. Select the versions drop-down menu near the review title to select the version you want to compare
to the current review.
Changes are displayed inline. Deleted text is red and highlighted. Added text is green and under-lined.
The "compare view" displays inline changes for most field types. If the field can't be compared, yousee the message: Not available for reviews.
Show related items in a reviewIncluding related items in a review gives reviewers context and helps them understand the coverage ofitems in a review. Related items are visible only if the moderator selected the option Include relateditems when the review was created.
Jama Connect User Guide
187

If you don't have permissions to view a related item, you see an item type icon and the text This item isoutside the scope of this review.
To view items directly related to a review item:
1. In the review, select Show related items.
Initially, up to five upstream and downstream items are displayed.2. To view additional related items, select Load More Downstream Items.
Jama Connect User Guide
188

3. Select a related item to see more details.
View participant progressAs a review progresses, you can view statistics about the participants' progress. This information isunique to the current version of the review.
In separate tabs, you can see item progress [190] for this version, or review activity [191] across ver-sions.
1. From the View drop-down menu in the review, select Stats.
Jama Connect User Guide
189

2. Under the Participant progress tab, you can see a panel with participant details and links to emailparticipants.Next to that, bar charts show overall progress for the review for approvers and reviewers who havefinished the review. For approvers the chart shows how many items they marked approved or re-jected. For other reviewers it shows how many items are marked read. Reviewers' time spent.Below that, each participant is listed with their review role, signer role, signature information, com-ment count, time spent shown in hours:minutes, and a progress bar showing their completion level.
NOTETime is logged if a tab with the review is left open by a reviewer.
View item progressAs a review progresses, you can view statistics about the progress of the items in review. This informa-tion is unique to the current version of the review.
In separate tabs, you can see participant progress [189] for this version and review activity [191] acrossversions.
• From the View drop-down menu in the review, select Stats.
Jama Connect User Guide
190

Under the Item progress tab, you see an overview with the total number of items in the review, theiritem types, the start and end dates for this version of the review, the current approval status for allitems (if this review uses approvers), and a summary of open comments in the review.Below that, is a table showing item fields along with the number of votes, as well as the number ofparticipants who marked the item approved, rejected, or reviewed.
For reviews with multiple approvers, the item approval status count increases when all approvers ap-prove the item. However, it only takes one approver to reject an item for the rejected count to in-crease. Items that aren't marked as approved or rejected are considered not reviewed. Items thataren't marked as approved or rejected are considered not reviewed.If you're a moderator, you see the preset filters to filter the list by item type, folder, or set. You can useViews to configure which fields are visible in the table. You can use Actions to batch update items[112].
View review activityYou can see all activities for a review across versions, including when reviews were opened, closed,when new versions were published or when signatures were added. This can be useful for collectingelectronic signature [225] information for FDA 21 CFR Part 11 compliance.
You can also see item progress [190] and participant progress [189] for each version of the review.
1. From the View drop-down menu in the review, select Stats.
Jama Connect User Guide
191

2. In the page that opens, select the Review activity tab.The table shows activity for all versions since the review was created.
Filter review commentsYou can view and filter comments for all the items in a review to find only the comments you want tosee.
1. From the View drop-down menu in a review, select Feedback to see all the comments for the re-view, with a filter panel on the left. You can read and reply to comments here.
Jama Connect User Guide
192

2. (Optional) You can also use the filters in the filter panel to search for comments by category or key-word. Available categories are:
All Every comment from the review.
Open Comments the moderator hasn't acknowledged or responded to
Mine Your comments
Review Comments sent to participants about the review by email
Important Comments flagged as important by a moderator
Questions Comments that are questions to be answered
Proposed changes Comments that suggest changes
Issues Comments that raise issues
Subscribe to a reviewIf you're a review participant, you can stay up-to-date on review comments with email notifications inreviews where you're a participant.
To receive notifications, you must first configure your review subscriptions [38] in your profile. You canalso configure your profile so that you automatically follow an item when you comment on it.
1. Open the review with the items you want to subscribe.2. Select Actions > Subscribe to the items on this page.
Jama Connect User Guide
193
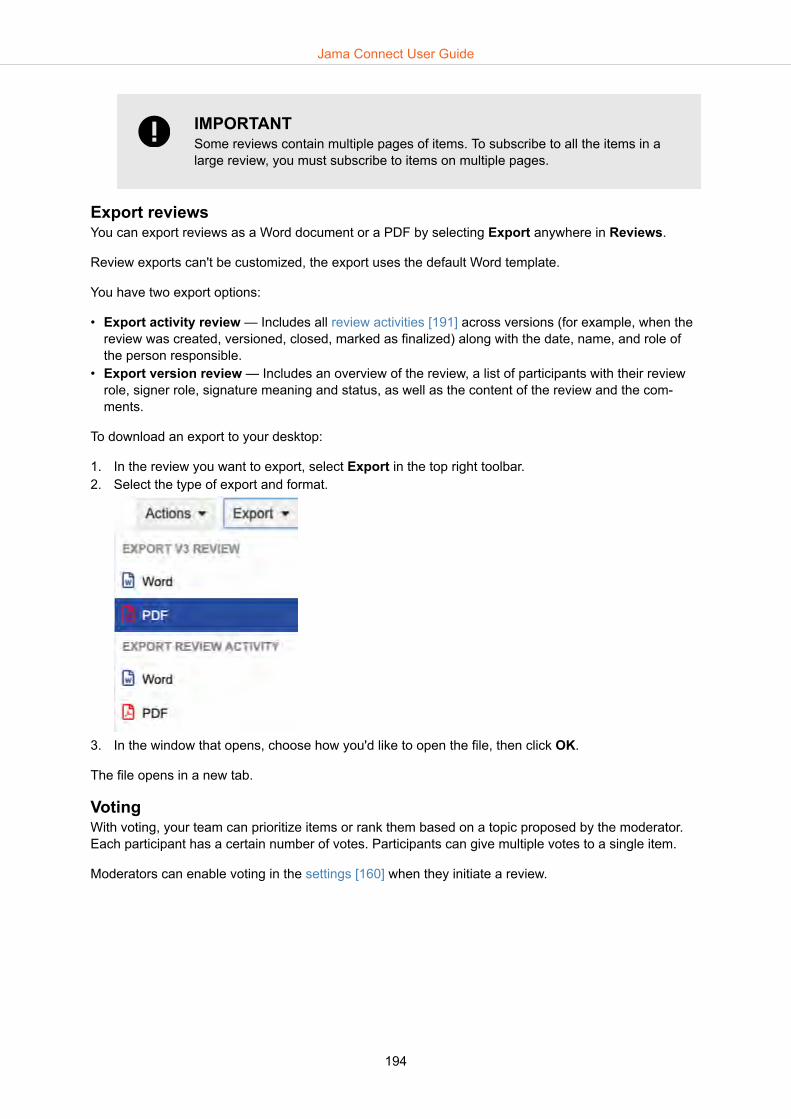
IMPORTANTSome reviews contain multiple pages of items. To subscribe to all the items in alarge review, you must subscribe to items on multiple pages.
Export reviewsYou can export reviews as a Word document or a PDF by selecting Export anywhere in Reviews.
Review exports can't be customized, the export uses the default Word template.
You have two export options:
• Export activity review — Includes all review activities [191] across versions (for example, when thereview was created, versioned, closed, marked as finalized) along with the date, name, and role ofthe person responsible.
• Export version review — Includes an overview of the review, a list of participants with their reviewrole, signer role, signature meaning and status, as well as the content of the review and the com-ments.
To download an export to your desktop:
1. In the review you want to export, select Export in the top right toolbar.2. Select the type of export and format.
3. In the window that opens, choose how you'd like to open the file, then click OK.
The file opens in a new tab.
VotingWith voting, your team can prioritize items or rank them based on a topic proposed by the moderator.Each participant has a certain number of votes. Participants can give multiple votes to a single item.
Moderators can enable voting in the settings [160] when they initiate a review.
Jama Connect User Guide
194
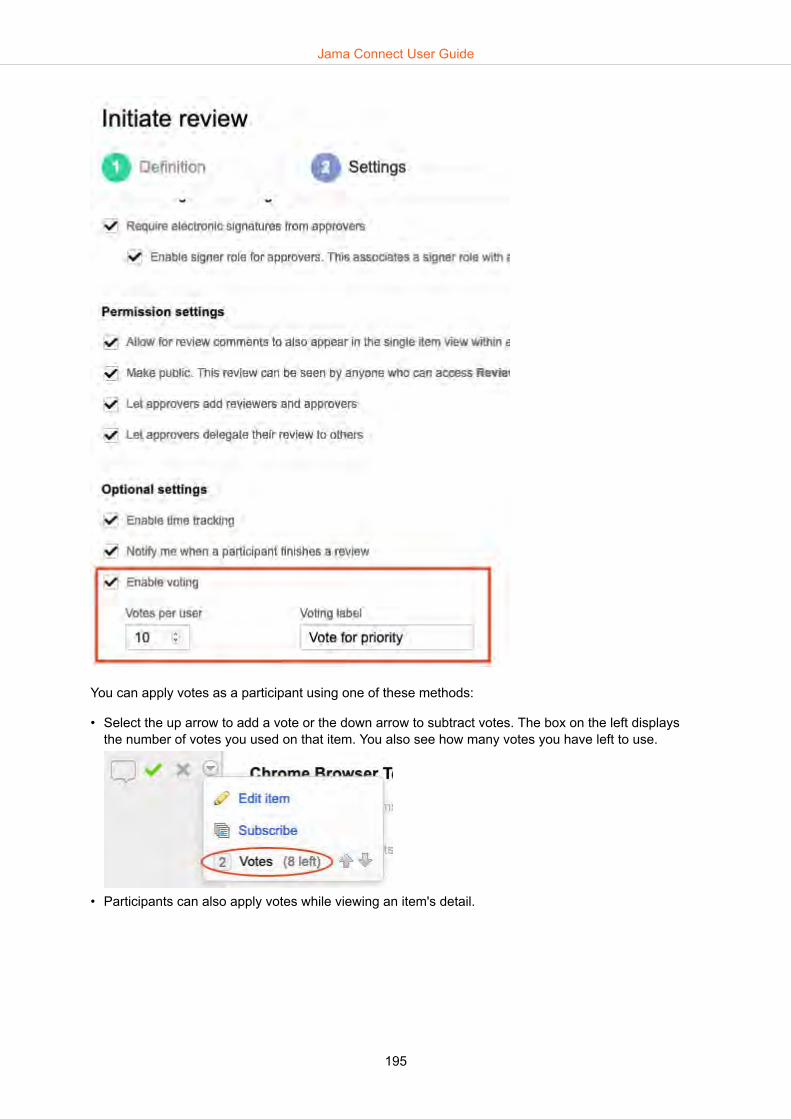
You can apply votes as a participant using one of these methods:
• Select the up arrow to add a vote or the down arrow to subtract votes. The box on the left displaysthe number of votes you used on that item. You also see how many votes you have left to use.
• Participants can also apply votes while viewing an item's detail.
Jama Connect User Guide
195
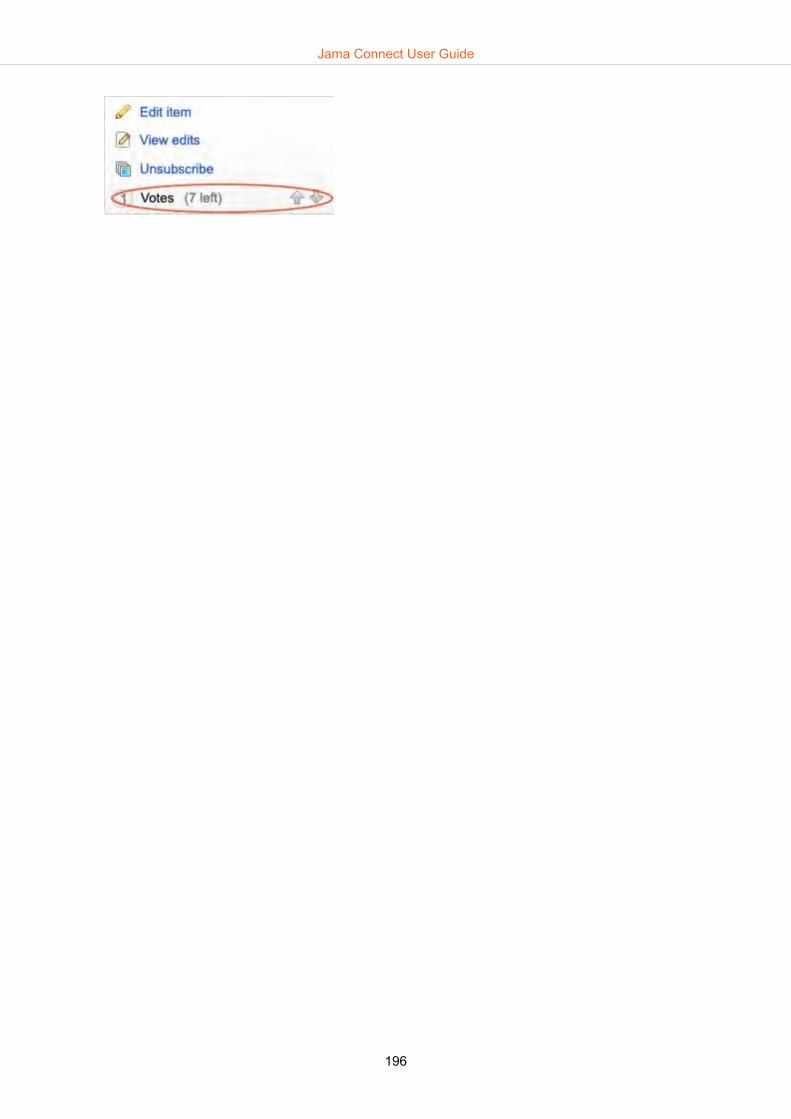
Jama Connect User Guide
196

Collaborating with your team
For companies to turn today’s research into tomorrow’s products, teams must stay connected andsynchronized. Jama Connect equips teams to track decisions and ensure quality of the product they setout to build.
Jama Connect links globally distributed team members and facilitates collaboration in the product devel-opment lifecycle. It allows you to provide and capture feedback, decision making, and approval for re-quirements and all product aspects under review.
Jama Connect enables efficient sharing of data, documents, files, information, and knowledge withinand across teams in your organization.
Use these features to work with your team, document conversations, and track decisions.
• Reviews [153] — A method to help teams, stakeholders, and customers discuss, evaluate, revise,and approve items in the development process. For details, see Reviews in Jama Connect [153].
• Workflows [200] — An automated set of transitions, from one status to another, over the course ofan item's lifespan.
• Notifications [197] — Optional emails sent to groups or individuals to alert you when changes toitems are made.
• Stream [205] — A collection of the most recent comments and activities in the project.• Electronic signatures [225] — A method for getting approval on electronic documents or forms.
Email notifications and subscriptionsUsers can configure email and notification settings in their profile [36] to stay up to date with activity intheir projects.
IMPORTANTTo receive notifications in Jama Connect, your SMTP must be enabled by your systemadministrator.
You can sign up for notifications to be sent to you automatically from several places in Jama Connect.
Notifications from... Sent to you...
Review [157] When you're invited to participate
When someone replies to your comments in a review
Workflow [627] When status of an item changes
Stream [215] When you're mentioned in the stream
System Health Report [539] With updates on license usage
Your Jama Connect administrators control what you can do with subscriptions. For example:
• Organization administrators — Can allow users to subscribe others and to mute subscriptions.• Project organization administrators — Can unsubscribe groups or individuals from any of their
subscriptions.
As a user, you can:
Jama Connect User Guide
197

• Set up notifications for a single item in a project or for an entire project.• Configure email notifications and subscriptions.
Subscribe to emails for yourselfYou can subscribe to a single item, to multiple items, or to an entire project.
1. To subscribe to a single item, select the item in Single Item View, then select Actions > Subscribe.
2. To subscribe to multiple items:1. Open the items in Project > List View.2. Select each item you want to subscribe to.3. Select Actions > Subscribe.
A confirmation message appears below the toolbar.
Subscribe other users to email notificationsYou must be a system, organization, or project administrator to subscribe others to all items at a projectlevel.
1. To subscribe others to a single item, select the item in Single Item View, then select Actions >Subscribe others.
Jama Connect User Guide
198

2. To subscribe others to multiple items:1. Open the items in Projects > List View.2. Select each item you want to subscribe to.3. Select Actions > Subscribe others.
4. In the Subscribe Others window, select the groups or users that you want to subscribe to thisitem.
Jama Connect User Guide
199

5. Click OK.
WorkflowA workflow is a set of transitions from one status to another, over the course of an item's lifespan.
All workflows must be set up by an organization or process administrator before they can be used.
Workflow can be used in these scenarios:
• Project items [200] — Creates a common pathway for items to follow.• Review items [610] — Allows organizations to configure items to transition to a specific workflow state
following the review process.
Using workflow in ProjectsYou can set up a workflow for Project items, so that users at your organization can move items in yourproject along a similar path as they progress.
Workflow in Projects allows you to:
• Update status for an item or group of items. Items must be the same type and in the same workflowstate.
• Transition items from one status to the next, either for a single item or as a batch transition for agroup of items.
If workflow is configured by an organization [627] or process admin, use the drop-down menu in SingleItem View to move the status of an item along the workflow and activate any related actions or notifica-tions.
Jama Connect User Guide
200

Use workflow to batch transition itemsWith batch transitions, you can select multiple items of the same item type and transition them to a dif-ferent workflow status.
Important considerations
• All items that you transition must be in the same state. For example, you might batch transition all "InProgress" items to a "Complete" status, but you can't select both "In Progress" and "Proposed" itemsfor batch transition.
1. Select the project, folder, or set that contains the items you want to transition and view them in ListView. Select the items you want to transition, then select Actions > Batch transition.
2. In the Batch Transition Workflow window, confirm your item selection, choose the status, add acomment, then click Commit.
Jama Connect User Guide
201
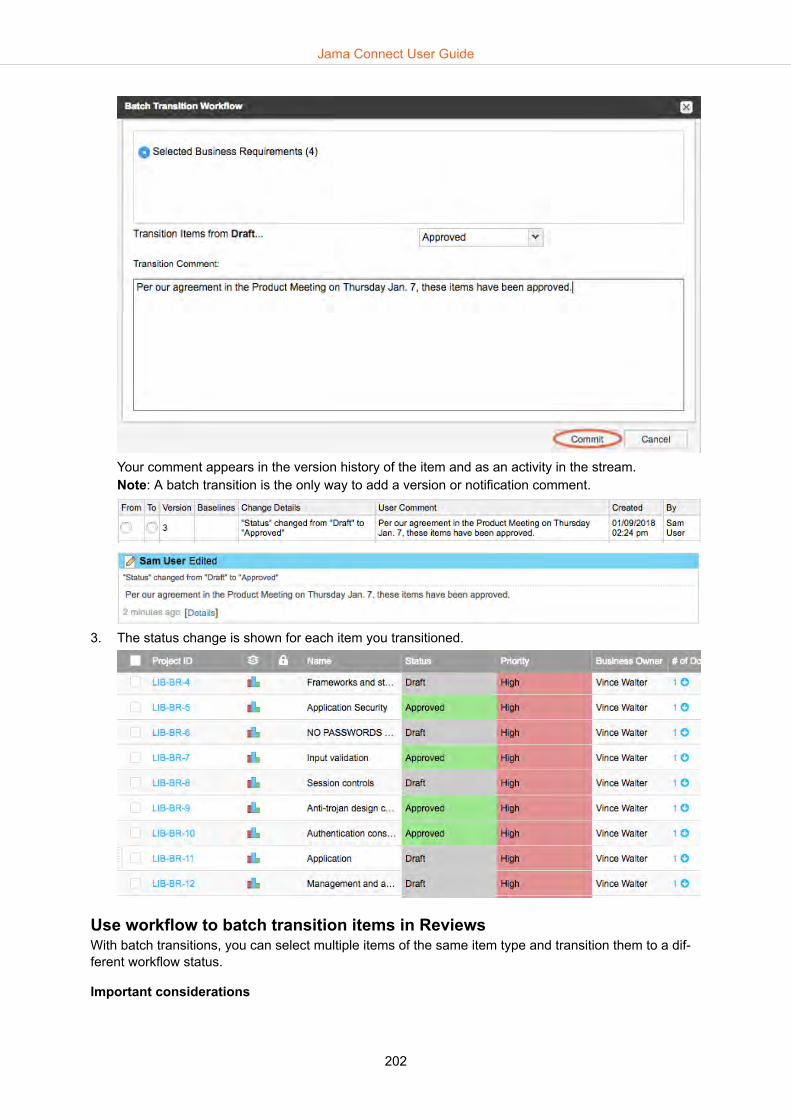
Your comment appears in the version history of the item and as an activity in the stream.Note: A batch transition is the only way to add a version or notification comment.
3. The status change is shown for each item you transitioned.
Use workflow to batch transition items in ReviewsWith batch transitions, you can select multiple items of the same item type and transition them to a dif-ferent workflow status.
Important considerations
Jama Connect User Guide
202
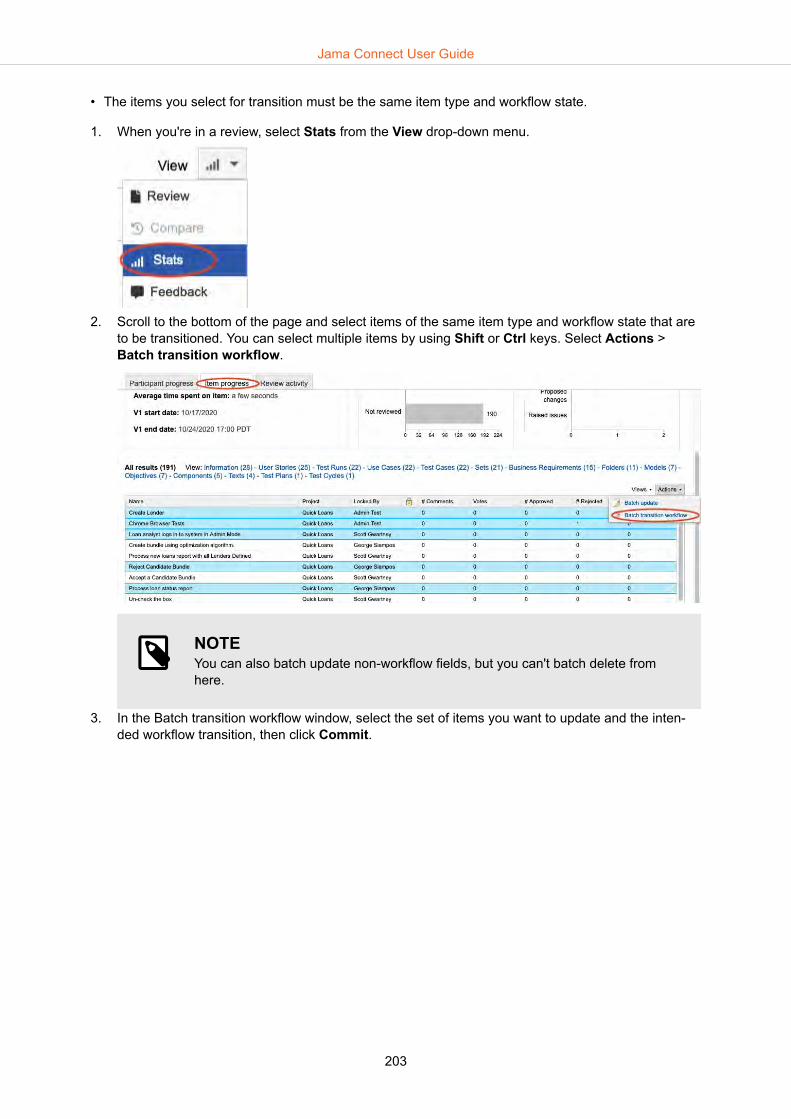
• The items you select for transition must be the same item type and workflow state.
1. When you're in a review, select Stats from the View drop-down menu.
2. Scroll to the bottom of the page and select items of the same item type and workflow state that areto be transitioned. You can select multiple items by using Shift or Ctrl keys. Select Actions >Batch transition workflow.
NOTEYou can also batch update non-workflow fields, but you can't batch delete fromhere.
3. In the Batch transition workflow window, select the set of items you want to update and the inten-ded workflow transition, then click Commit.
Jama Connect User Guide
203

If the workflow doesn't have another transition state to select, you don't have permission or the itemis locked. A pop-up window displays a warning that you can't proceed.
Lock items in a workflowLocking items in a workflow can help avoid unwanted changes. For example, a project administratormight want to leave items unlocked while in "draft" status, but lock them when they reach "approved"status.
NOTEYou must have organization or project administrator permissions to configure workflow.
Items can also be automatically locked by the workflow [200]. These items show a gray lock after theirname and a blue lock in List View.
System-locked items unlock when transitioned through the workflow or by an organization or project ad-ministrator.
To add an automatic lock to the workflow:
1. Select Admin > Project > Workflow.2. For the item you want to lock, select Override.3. In the Lock? column, select the lock icon to include (or remove) an automatic lock in the workflow.
Jama Connect User Guide
204

4. Click Save.
Stream — Staying connectedThe stream is where you can see the most recent comments and activities of your Jama Connectproject.
The stream is built on three basic activities:
Working with the stream
Jama Connect User Guide
205
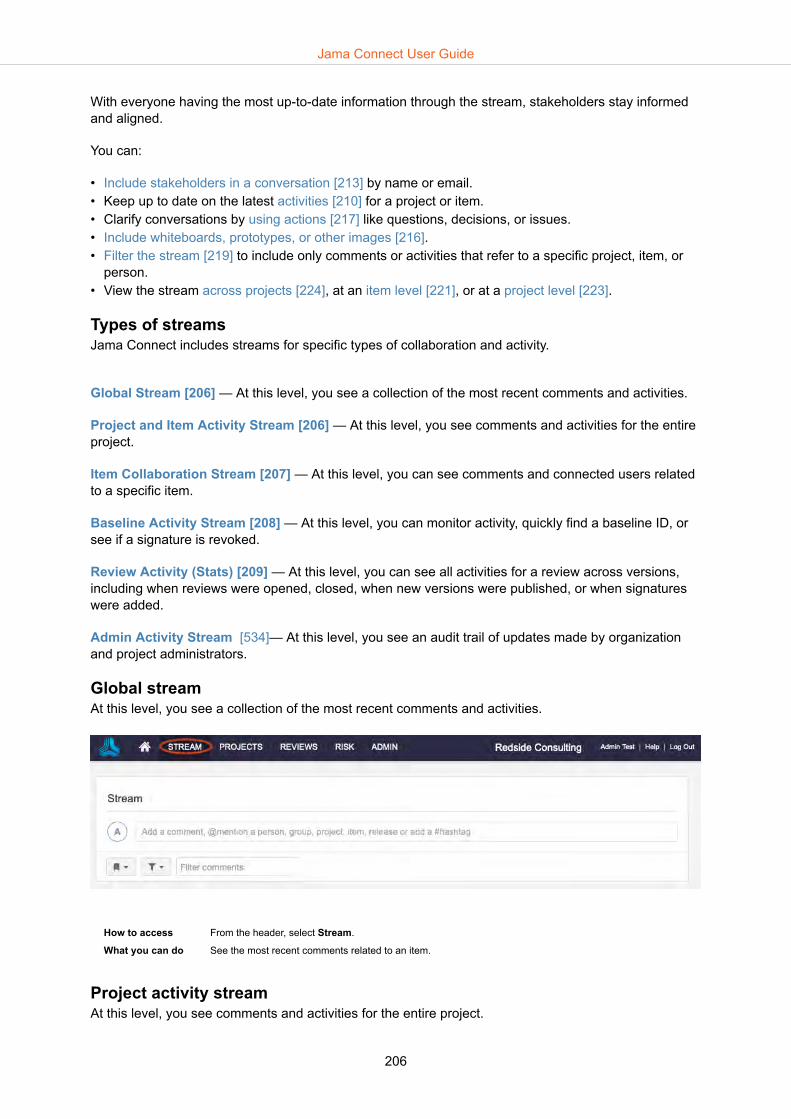
With everyone having the most up-to-date information through the stream, stakeholders stay informedand aligned.
You can:
• Include stakeholders in a conversation [213] by name or email.• Keep up to date on the latest activities [210] for a project or item.• Clarify conversations by using actions [217] like questions, decisions, or issues.• Include whiteboards, prototypes, or other images [216].• Filter the stream [219] to include only comments or activities that refer to a specific project, item, or
person.• View the stream across projects [224], at an item level [221], or at a project level [223].
Types of streamsJama Connect includes streams for specific types of collaboration and activity.
Global Stream [206] — At this level, you see a collection of the most recent comments and activities.
Project and Item Activity Stream [206] — At this level, you see comments and activities for the entireproject.
Item Collaboration Stream [207] — At this level, you can see comments and connected users relatedto a specific item.
Baseline Activity Stream [208] — At this level, you can monitor activity, quickly find a baseline ID, orsee if a signature is revoked.
Review Activity (Stats) [209] — At this level, you can see all activities for a review across versions,including when reviews were opened, closed, when new versions were published, or when signatureswere added.
Admin Activity Stream [534]— At this level, you see an audit trail of updates made by organizationand project administrators.
Global streamAt this level, you see a collection of the most recent comments and activities.
How to access From the header, select Stream.
What you can do See the most recent comments related to an item.
Project activity streamAt this level, you see comments and activities for the entire project.
Jama Connect User Guide
206

How to access Select the project name to open the Activity Stream.
Note: If you don’t see the Activity Stream, select the green Add button. In the window, select Ac-tivity stream, then click Add. You must have Project Admin permissions to do this.
What you can do • See comments and activities for the entire project.• See changes to items — Adding, editing, or deleting content from item fields, commenting on
an item; using features like releases, baselines, or reviews that impact the item.• Find out when a review is opened, revised, closed, reopened; when signatures are added or
revoked.• View items that are reused and synchronized and reuse details that appear in the activity
stream. Users with read permission can view details about reused items and can select a linkto view newly copied and synchronized items.
• From a project, select the Collaboration Stream View icon to see information only for thatproject.
Item collaboration streamAt this level, you can see comments and connected users related to a specific item.
Here's an example of what the stream looks like in List View and Reading View:
Jama Connect User Guide
207

How to access There are several ways to view the stream at the item level.
In Project > List View, select the speech bubble icon.
In Project > Reading View, select the speech bubble icon.
In Project > Single Item View, select the speech bubble icon.
What you can do • See comments and connected users related to a specific item.• See changes to items — Adding, editing, or deleting content from item fields, commenting on
an item; using features like releases, baselines, or reviews that impact the item.• View items that are reused and synchronized and reuse details that appear in the activity
stream. Users with read permission can view details about reused items and can select a linkto view newly copied and synchronized items.
Baseline activity streamAt this level, you can monitor activity, quickly find a baseline ID, or see if a signature is revoked.
Jama Connect User Guide
208

How to access Select the Baselines tab, baseline name, and View details (which changes to View items) toopen the Activity stream.
What you can do • Monitor activity, quickly find a baseline ID, or see if a signature is revoked.• View changes to baselines — Adding (manually or automatically with a review), editing, or de-
leting* baselines or sources. Visible to users with read-only permission. Baseline activitystreams.
*Deleting requires admin permissions. Baselines with e-signatures can’t be deleted.
Review activity (stats)At this level, you can see all activities for a review across versions, including when reviews wereopened, closed, when new versions were published, or when signatures were added.
Jama Connect User Guide
209
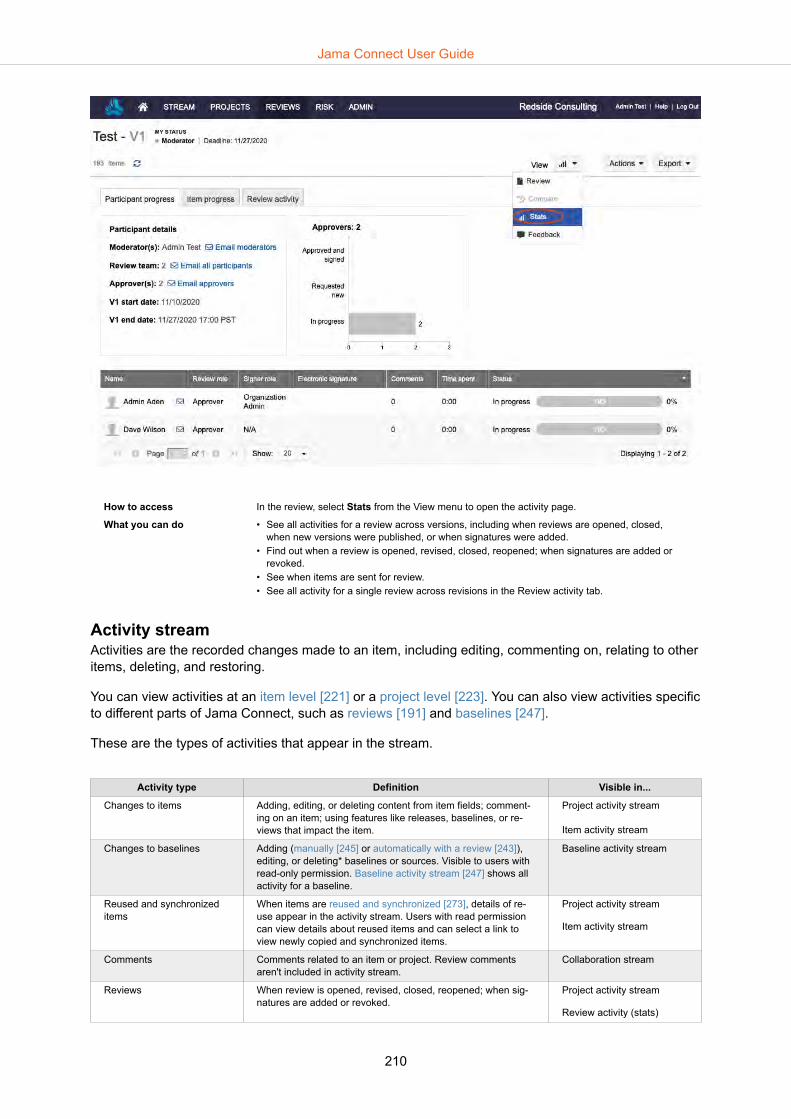
How to access In the review, select Stats from the View menu to open the activity page.
What you can do • See all activities for a review across versions, including when reviews are opened, closed,when new versions were published, or when signatures were added.
• Find out when a review is opened, revised, closed, reopened; when signatures are added orrevoked.
• See when items are sent for review.• See all activity for a single review across revisions in the Review activity tab.
Activity streamActivities are the recorded changes made to an item, including editing, commenting on, relating to otheritems, deleting, and restoring.
You can view activities at an item level [221] or a project level [223]. You can also view activities specificto different parts of Jama Connect, such as reviews [191] and baselines [247].
These are the types of activities that appear in the stream.
Activity type Definition Visible in...
Changes to items Adding, editing, or deleting content from item fields; comment-ing on an item; using features like releases, baselines, or re-views that impact the item.
Project activity stream
Item activity stream
Changes to baselines Adding (manually [245] or automatically with a review [243]),editing, or deleting* baselines or sources. Visible to users withread-only permission. Baseline activity stream [247] shows allactivity for a baseline.
Baseline activity stream
Reused and synchronizeditems
When items are reused and synchronized [273], details of re-use appear in the activity stream. Users with read permissioncan view details about reused items and can select a link to view newly copied and synchronized items.
Project activity stream
Item activity stream
Comments Comments related to an item or project. Review commentsaren't included in activity stream.
Collaboration stream
Reviews When review is opened, revised, closed, reopened; when sig-natures are added or revoked.
Project activity stream
Review activity (stats)
Jama Connect User Guide
210

Activity type Definition Visible in...
When items are sent for review, see all activity for a single re-view across revisions in the review activity [191] tab.
Review activity (stats)
* Deleting requires admin permission. Baselines with e-signatures can’t be deleted.
CommentsComments are user-created messages that you can see in the stream or in reviews.
Comments are visible:
• At an item level [221]• At a project level [223]• In reviews [174]• Across projects [224]
You can add and delete a comment as well as restore comments that you deleted. You can also add ahashtag (#) to a comment for filtering or add a reference to a specific person, project, or group.
Add, delete, or restore a commentAll comments made in Jama Connect are displayed in the stream. You can see any comment you havepermissions to view.
You can add comments, delete comments that you made, and restore comments that you deleted.
You can also restore comment threads or replies that you deleted, but only if they were associated withan item. You can't restore deleted comments that aren't associated with an item.
1. To add a comment to the stream, an item, or a project:1. Open the stream at an item level [221], project level [223], or across projects [224].2. Enter your comment:
• New comment — In the Stream comment box.• Replying to a comment — In the reply box below the comment.
3. (Optional) As needed, you can refer to a particular person, group, project or item [213], requestor resolve an action [217], upload an image [216], or add a hashtag [212].
4. Select Comment.2. To delete a comment:
1. Select Delete below the comment.2. When prompted, click Yes.
3. To restore a deleted comment:
Jama Connect User Guide
211
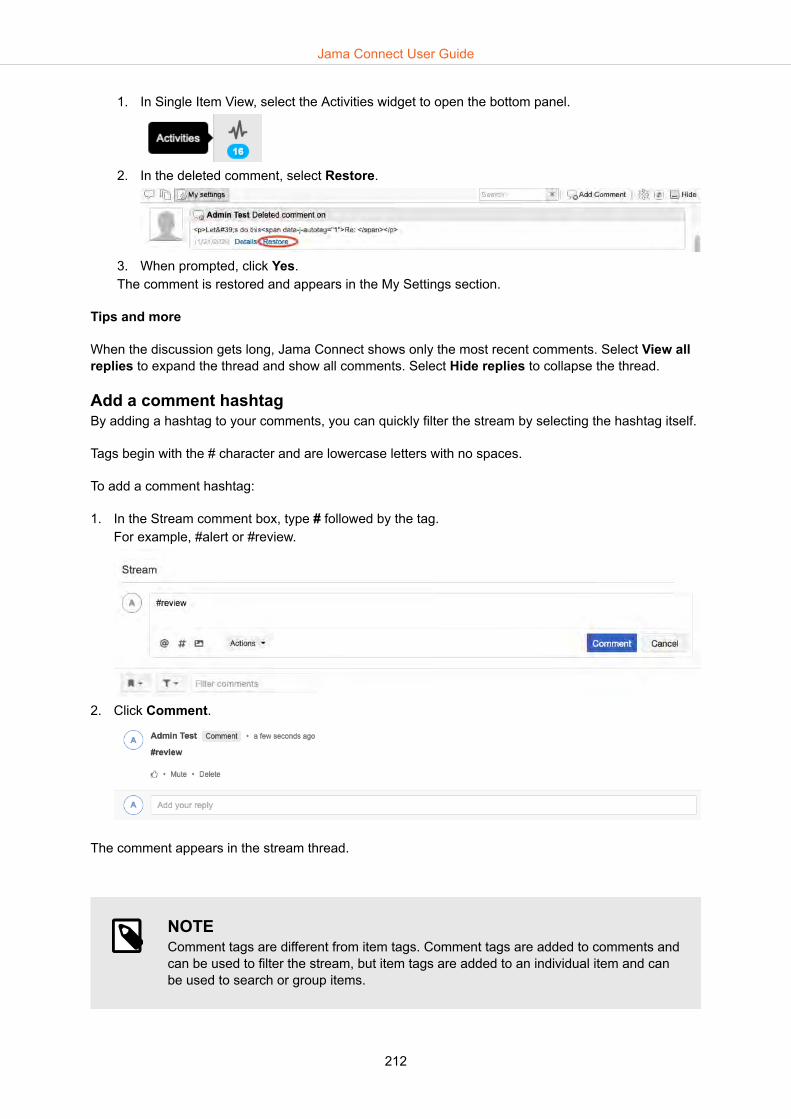
1. In Single Item View, select the Activities widget to open the bottom panel.
2. In the deleted comment, select Restore.
3. When prompted, click Yes.The comment is restored and appears in the My Settings section.
Tips and more
When the discussion gets long, Jama Connect shows only the most recent comments. Select View allreplies to expand the thread and show all comments. Select Hide replies to collapse the thread.
Add a comment hashtagBy adding a hashtag to your comments, you can quickly filter the stream by selecting the hashtag itself.
Tags begin with the # character and are lowercase letters with no spaces.
To add a comment hashtag:
1. In the Stream comment box, type # followed by the tag.For example, #alert or #review.
2. Click Comment.
The comment appears in the stream thread.
NOTEComment tags are different from item tags. Comment tags are added to comments andcan be used to filter the stream, but item tags are added to an individual item and canbe used to search or group items.
Jama Connect User Guide
212
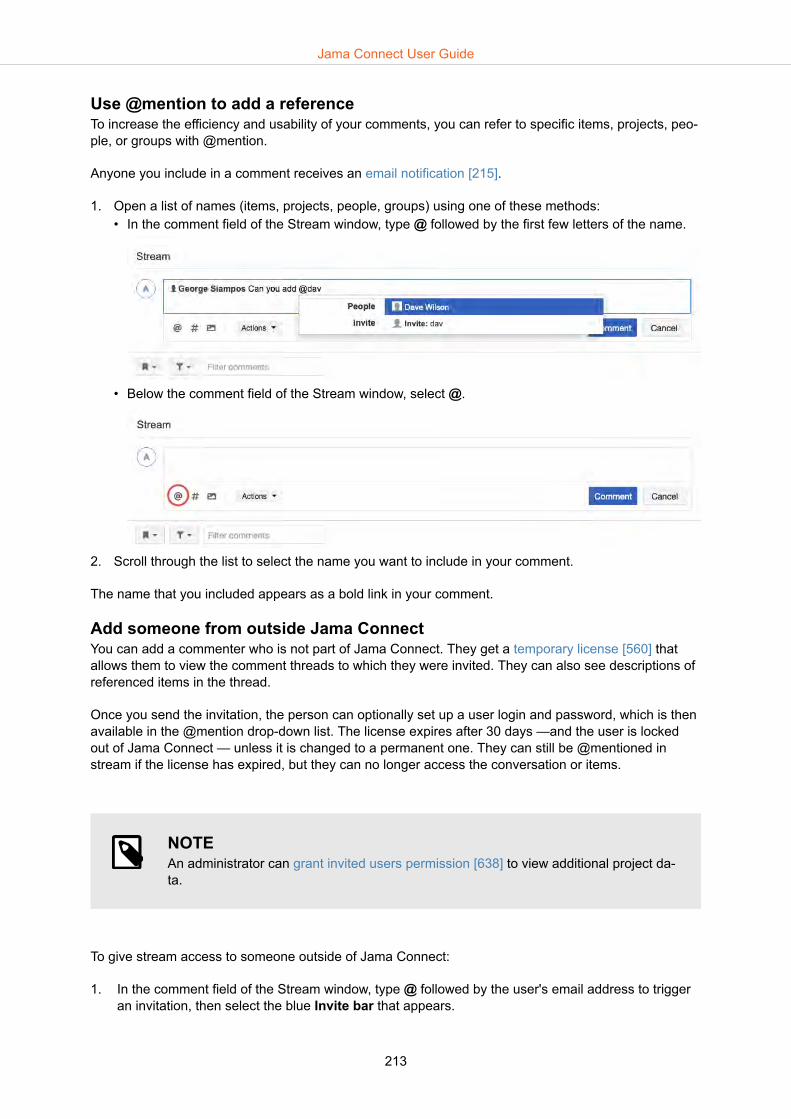
Use @mention to add a referenceTo increase the efficiency and usability of your comments, you can refer to specific items, projects, peo-ple, or groups with @mention.
Anyone you include in a comment receives an email notification [215].
1. Open a list of names (items, projects, people, groups) using one of these methods: • In the comment field of the Stream window, type @ followed by the first few letters of the name.
• Below the comment field of the Stream window, select @.
2. Scroll through the list to select the name you want to include in your comment.
The name that you included appears as a bold link in your comment.
Add someone from outside Jama ConnectYou can add a commenter who is not part of Jama Connect. They get a temporary license [560] thatallows them to view the comment threads to which they were invited. They can also see descriptions ofreferenced items in the thread.
Once you send the invitation, the person can optionally set up a user login and password, which is thenavailable in the @mention drop-down list. The license expires after 30 days —and the user is lockedout of Jama Connect — unless it is changed to a permanent one. They can still be @mentioned instream if the license has expired, but they can no longer access the conversation or items.
NOTEAn administrator can grant invited users permission [638] to view additional project da-ta.
To give stream access to someone outside of Jama Connect:
1. In the comment field of the Stream window, type @ followed by the user's email address to triggeran invitation, then select the blue Invite bar that appears.
Jama Connect User Guide
213

2. In the Invite User window that opens, enter the full email address and click Invite.
3. Type your note and click Comment.
The person you invited now automatically receives stream emails [215].
View referenced projects and itemsWhen a project or item is referenced with @mention, you can view it in its activity stream.
1. To view a reference to a:• Project — Open the project's activity stream.• Item — Open the item's activity stream in Single Item View.
2. (Optional) In the activity stream, select Description to see details about the referenced project oritem.
Jama Connect User Guide
214

3. (Optional) Select View additional references to see more than the first displayed reference.
Email notifications for the streamJama Connect includes several types of email notifications, including ones initiated in the stream. Thisinformation applies only to stream email notifications.
Adding participants
When you comment on an item or project in the activity stream, you can add people to a comment byusing @mention. This includes people who aren't current Jama Connect users.
When you receive stream notifications
Initial email — When your name is added to a comment in the stream.
Update email — When anyone replies to a comment thread where your name was added.
New comments — If you subscribed to the item.
Tips and more
• If you are in multiple groups that are mentioned in a comment, they receive only one email for eachcomment or reply.
• When participants receive an email because they're mentioned in the stream, they can comment di-rectly to the thread by replying to that email. A copy of the comment is emailed to everyone on thethread.
• Email updates contain links to see the entire comment thread in Jama Connect.
Jama Connect User Guide
215
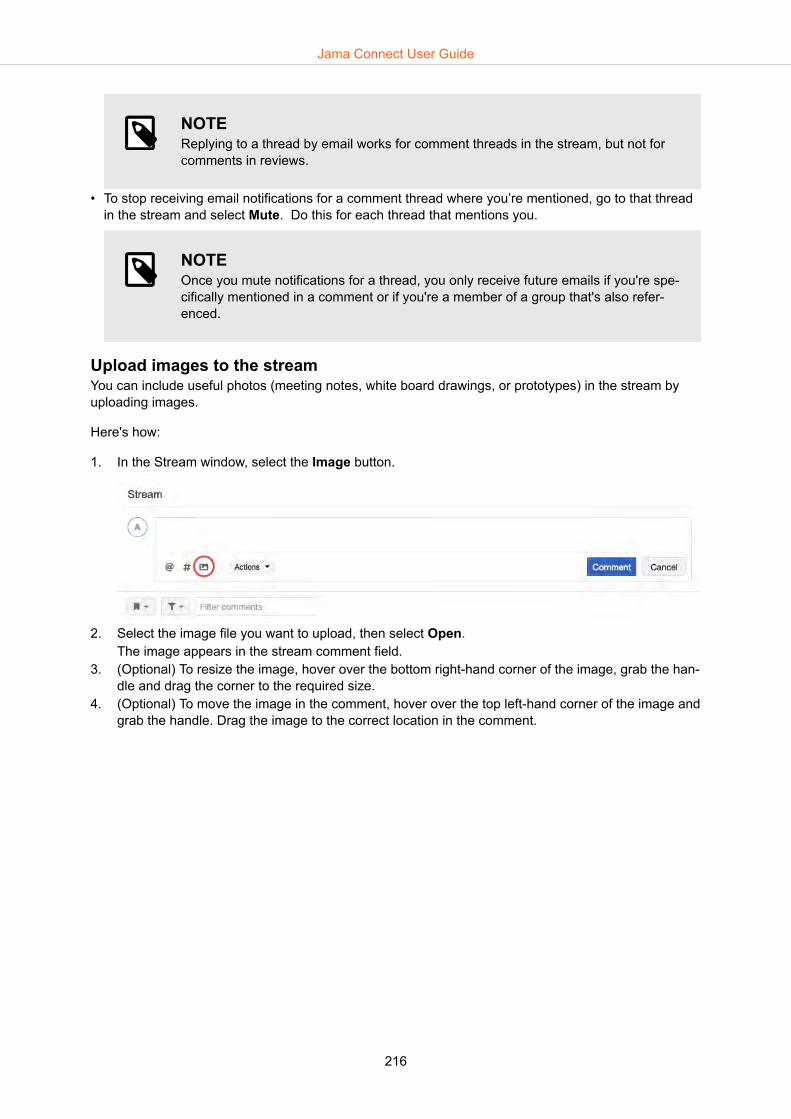
NOTEReplying to a thread by email works for comment threads in the stream, but not forcomments in reviews.
• To stop receiving email notifications for a comment thread where you’re mentioned, go to that threadin the stream and select Mute. Do this for each thread that mentions you.
NOTEOnce you mute notifications for a thread, you only receive future emails if you're spe-cifically mentioned in a comment or if you're a member of a group that's also refer-enced.
Upload images to the streamYou can include useful photos (meeting notes, white board drawings, or prototypes) in the stream byuploading images.
Here's how:
1. In the Stream window, select the Image button.
2. Select the image file you want to upload, then select Open.The image appears in the stream comment field.
3. (Optional) To resize the image, hover over the bottom right-hand corner of the image, grab the han-dle and drag the corner to the required size.
4. (Optional) To move the image in the comment, hover over the top left-hand corner of the image andgrab the handle. Drag the image to the correct location in the comment.
Jama Connect User Guide
216
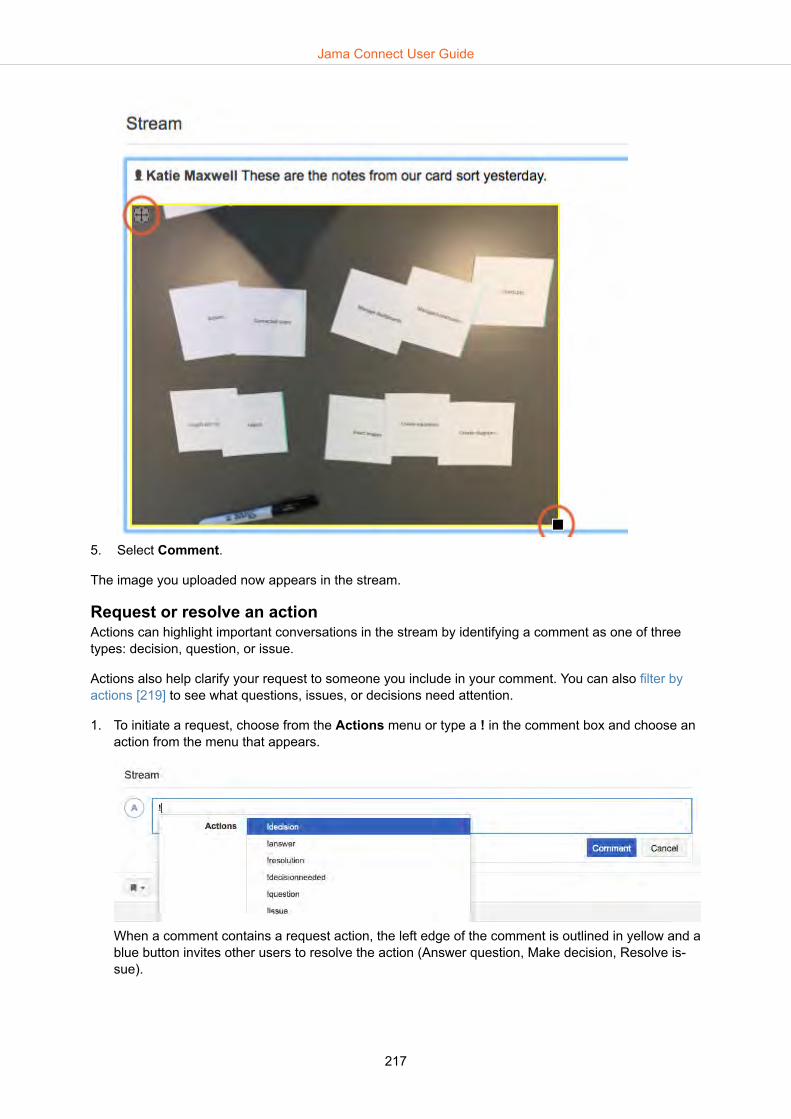
5. Select Comment.
The image you uploaded now appears in the stream.
Request or resolve an actionActions can highlight important conversations in the stream by identifying a comment as one of threetypes: decision, question, or issue.
Actions also help clarify your request to someone you include in your comment. You can also filter byactions [219] to see what questions, issues, or decisions need attention.
1. To initiate a request, choose from the Actions menu or type a ! in the comment box and choose anaction from the menu that appears.
When a comment contains a request action, the left edge of the comment is outlined in yellow and ablue button invites other users to resolve the action (Answer question, Make decision, Resolve is-sue).
Jama Connect User Guide
217

2. To respond to a request, choose from the Actions menu: Decision, Answer, or Resolution.
Tips and more
• Resolved actions are displayed in green.
• Open actions are displayed with a yellow border.
Jama Connect User Guide
218

• Use the like icon when you agree with a comment and want to track how team members vote on adecision.
• Select the number next to the like icon to see who agreed.
Filter the streamFilters let you see only comments that matter to you. When you create a filter, it remains active only ifthe session is active.
If you want to reuse a filter, you can save it. You can also bookmark a filter in your browser to view later.
NOTEYou can create custom filters [221] at an item level to filter comments or activities in thestream.
1. Open a Stream window and select the Filter comments field.
Jama Connect User Guide
219
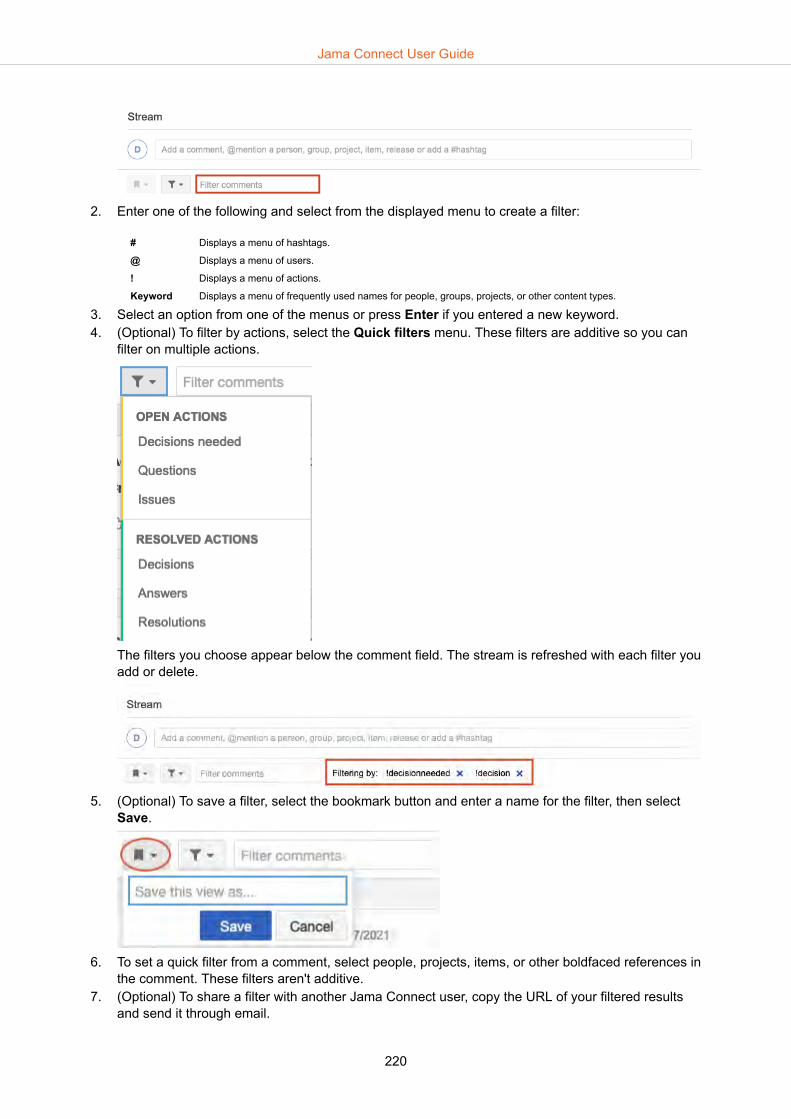
2. Enter one of the following and select from the displayed menu to create a filter:
# Displays a menu of hashtags.
@ Displays a menu of users.
! Displays a menu of actions.
Keyword Displays a menu of frequently used names for people, groups, projects, or other content types.
3. Select an option from one of the menus or press Enter if you entered a new keyword.4. (Optional) To filter by actions, select the Quick filters menu. These filters are additive so you can
filter on multiple actions.
The filters you choose appear below the comment field. The stream is refreshed with each filter youadd or delete.
5. (Optional) To save a filter, select the bookmark button and enter a name for the filter, then selectSave.
6. To set a quick filter from a comment, select people, projects, items, or other boldfaced references inthe comment. These filters aren't additive.
7. (Optional) To share a filter with another Jama Connect user, copy the URL of your filtered resultsand send it through email.
Jama Connect User Guide
220

View collaboration stream at an item levelYou can view the stream [205] comments and activity for an item, for example, to see all "Open" (unre-solved) questions about that item. A speech bubble icon includes a number that indicates how manycomments were recorded for that item.
NOTEThe side toolbar is only visible if it is configured by the organization administrator [578].
To view comment stream
1. Select an item’s speech bubble icon using one of these methods:Projects > Reading View
Projects > List View
Single Item View > Side toolbar
2. In the window that opens, select the silhouette icon to view comments, add comments, or view con-nected users.
Jama Connect User Guide
221

To view comment and activity stream
1. In Single Item View, select the Activities button on the side toolbar to see the history of an item.The number on the button indicates the item's activity.
2. The bottom panel displays the stream and all activities (such as edits, reviews, relationships) andcomments for this item. From here you can add a comment, search the stream with a keyword, re-fresh the display, or hide the panel.
3. Use the three buttons in the top left corner of the stream to:• Display active comments• Display all activities• Apply a custom filter to activities
4. Select the settings (gear) icon in the top right corner to open the Activity Filter Settings window.5. Keep the default settings or customize keywords, activity type, date range, or item type, then select
Apply. Your custom filters are saved across items.
Jama Connect User Guide
222

View collaboration stream at a project levelYou can view the stream [205] at a project level, you see comments [211] and activities [210] for theentire project in the project dashboard.
Important considerations
• Any comments you enter at this level automatically refer to the selected project.
• If the stream doesn't already appear on your project dashboard, a project or organization administra-tor can add it.
Open the project dashboard using one of these methods:
• Explorer Tree — Select the main project level in the Explorer Tree or select the name of the projectjust above the Explorer Tree.
Jama Connect User Guide
223
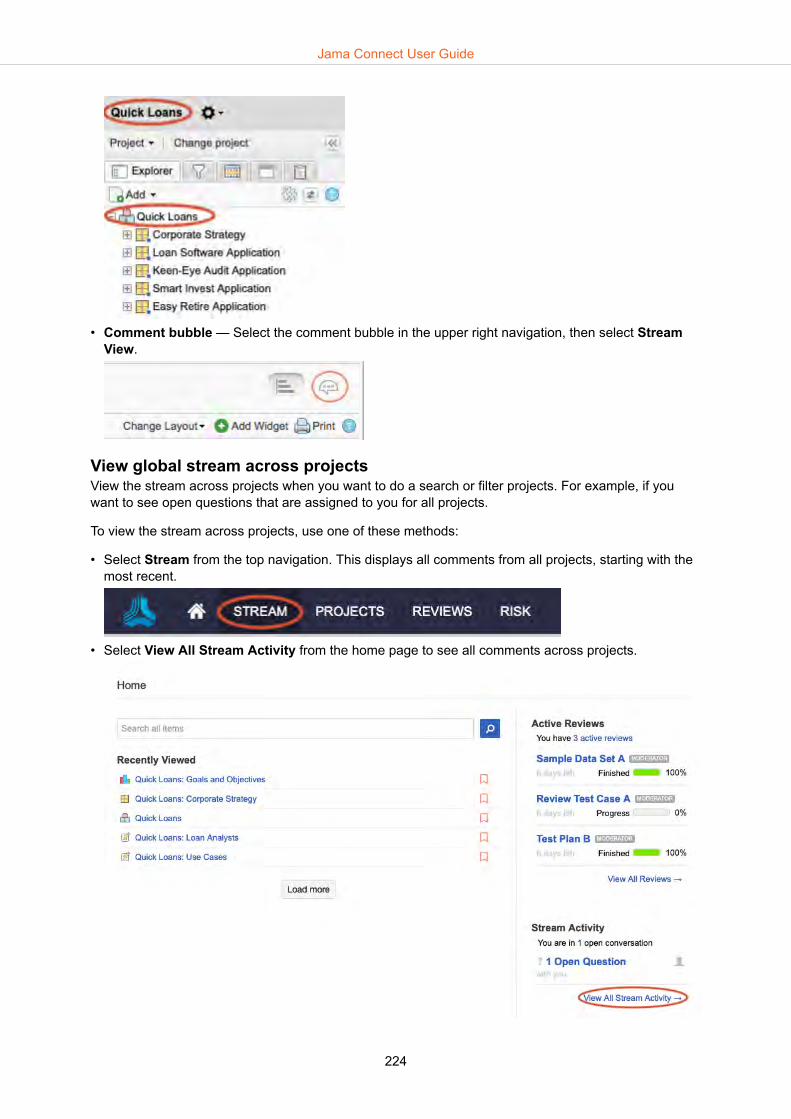
• Comment bubble — Select the comment bubble in the upper right navigation, then select StreamView.
View global stream across projectsView the stream across projects when you want to do a search or filter projects. For example, if youwant to see open questions that are assigned to you for all projects.
To view the stream across projects, use one of these methods:
• Select Stream from the top navigation. This displays all comments from all projects, starting with themost recent.
• Select View All Stream Activity from the home page to see all comments across projects.
Jama Connect User Guide
224

View connected users
A connected user is a creator, editor, or someone who has commented, subscribed, or been @men-tioned on an item.
View connected users to see who is connected to items. For example, if you're changing a requirementand want to see who might be impacted by a change.
To view connected users:
1. Open the Connected users window using one of these methods:• Single Item View — Select the connected users icon.
• List View — Select the user icon.
2. Select Show indirectly connected users to view users who are interested in items related to thisone.
3. (Optional) To toggle the related users on or off, select the circle icons at the top of the list.
You can now view the list of connected users and make comments in the stream.
Electronic signaturesAn electronic signature is a way for project participants to virtually approve reviews, baselines, andelectronic documents like test plans and requirements.
Review moderators can require a signature for a review and add a signer role. All review signaturescarry the Signature meaning: "I approve the content of this review."
Electronic signatures consist of a username and password. They are captured with a time and datestamp and an audit trail. Each signature is tied to the individual user, as well as to a baseline or reviewwhere the signature was added.
Jama Connect User Guide
225

Electronic signatures, time stamps, signer roles, and signature meaning are all visible in review activity[191].
Things to know
• For easy identification, a baseline with an electronic signature includes a blue dot and white exclama-tion mark in the baseline tree.
• As the moderator, you can add a signer role or a reason for signing to a review signature [178], butnot to a baseline signature.
• Signatures are enabled by default, but can be disabled by a system administrator.• Electronic signatures depend on the authentication system your organization is using. Authentication
properties can be configured by a system administrator.• You can't delete a review with an electronic signature, or a baseline created from a review with an
electronic signature.• You can revoke your signature if it was signed in error or something needed to change. Select Re-
voke to cancel your signature. Only the user who signed the baseline can remove their signature.When revoking a signature, you can leave a reason for revoking, which appears in the activity streamas a comment.
• As an approver, you can reopen a review that you signed, but this revokes your signature.• To see a review that was signed, look in the participant progress [189] or review activity [191] tab.• Self-hosted customers can't edit a baseline that is signed.
NOTEYou can't delete a review with an electronic signature, or a baseline created from a re-view with an electronic signature.
Electronic signatures depend on the authentication system your organization is using.Authentication properties can be configured by a system administrator.
Jama Connect User Guide
226

Sign a review electronicallyIf a review requires an electronic signature, you are asked to add a signature when you finish a reviewas an approver.
1. In the Review finished window, enter your username and password as your electronic signature.If your organization uses SAML, the SAML authentication window opens, where you enter yourusername and password.
2. Select Approve and sign to complete the review.
Add signer roleAs a moderator, you can enable the signer role for other approvers. This allows them to associate theirrole with their signature. Signer roles are created from user group names.
If your moderator is inviting a user from outside of Jama Connect, they must log in and register beforeyou can assign them to a group. After your organization or project admin adds them to a group, themoderator can edit the review to give them a signer role.
1. Initiate a review [157].2. Make sure electronic signatures and signer roles are enabled in settings [160].
Jama Connect User Guide
227

3. To invite participants [164], select the user, then use the Signer role drop-down menu to assign asigner role.
• If the user belongs to multiple groups, you can choose their role as signer from multiple options.• If they don't belong to any groups, their role is "Not assigned."• To add a signer role, create a user group [551] with a name that indicates the role you want to
represent (for example, QA, Business Analysts, Security). Be sure the person you want to assignthe role to belongs to that group.
• If you select a group in the participants panel, select Add all users. The signer role defaults tothe name of that group.
4. Click Initiate review.
Approvers assigned a signer role are notified of their role in their email invitation [163].
TIPAfter a review is signed, anyone with permission to a review can view signer roles thatwere used for a signature under review activity [191].
Sign a baseline electronicallyAdding an electronic signature lets users see items that are approved or revoked. For example, if youwant to sign and approve a review.
Jama Connect User Guide
228

1. In the Explorer Tree under the Baselines tab, select the baseline you want to sign, then selectView details.
2. Select Add signature.
3. In the Electronic signature window, enter your username, password, and any optional comments,then select Save. Username and password must match that of the logged in user.If your organization is using SAML for authentication, you are asked to select Sign baseline, thenenter your username and password to authenticate your signature.
Jama Connect User Guide
229

Manage content
Use these features to plan, organize, track progress and impact.
• Compare versions [231]• Change requests [232]• Releases [236]• Baselines [239]• Coverage and Traceability [253]• Reuse and synchronization [273]• Exports [295]
Item versionsA new version is created each time you make changes to an item. In the bottom panel you can compareversions [231] or make a past version current [231].
When viewing item versions, you can see Baselines that were created when that version was active,any automatically generated Change details, any user comments applied by the person who made thechanges, as well as the date and name of the person who made the changes.
Item versions quick findIn Single Item View, select Versions in the side toolbar to open a list of item versions in the bottompanel.
The current version number appears after the item name and in the small blue circle on the Versionsbutton.
Jama Connect User Guide
230

Make a past item version currentWhen you make a past item current, the system creates a new version that's identical to the versionyou chose. By doing this, you don't lose access to past versions.
All pick list values that existed at the time the previous version of the item was active are restored, evenif that value was removed as an option for new items.
1. Select Versions to open the bottom panel in Single Item View [230].2. Find the row that contains the item version that you want to make current and select Make Cur-
rent.
NOTEYou can't make past versions of test cycles or test runs current. For converted items,you can't revert back to the previous item type using this method.
Compare versions
1. Select Versions to open the bottom panel in Single Item View [230].2. Select the two versions you want to compare using the buttons in the From and To columns, then
select Compare.
Jama Connect User Guide
231

3. In the Version compare window, the From version is on the left and the To version on theright. Changes are displayed inline. Deleted text is red and highlighted. Added text is green andunderlined.
Change requestsChange requests are items that call for a change to product or system.
Change requests don't entail any sort of automated process; they are simply a way to track requestedchanges. When an item type is activated as a change request [574], you can add new change requestsand associate them with other items [232].
With change requests you can:
• Use Impact Analysis [235] to determine if and how your change requests affect other items, and cre-ate direct relationships between affected items and the change request.
• Send a change request to review [157] to gather feedback from stakeholders and determine if thechange request is approved or rejected.
Add a change request and associate items
1. Create a new set in your project called "Change requests" to make them easy to find.2. Add a new item [107] to that set.3. Open the item and select Items to be changed. This button doesn't appear unless configured by
an organization administrator [578].
Jama Connect User Guide
232
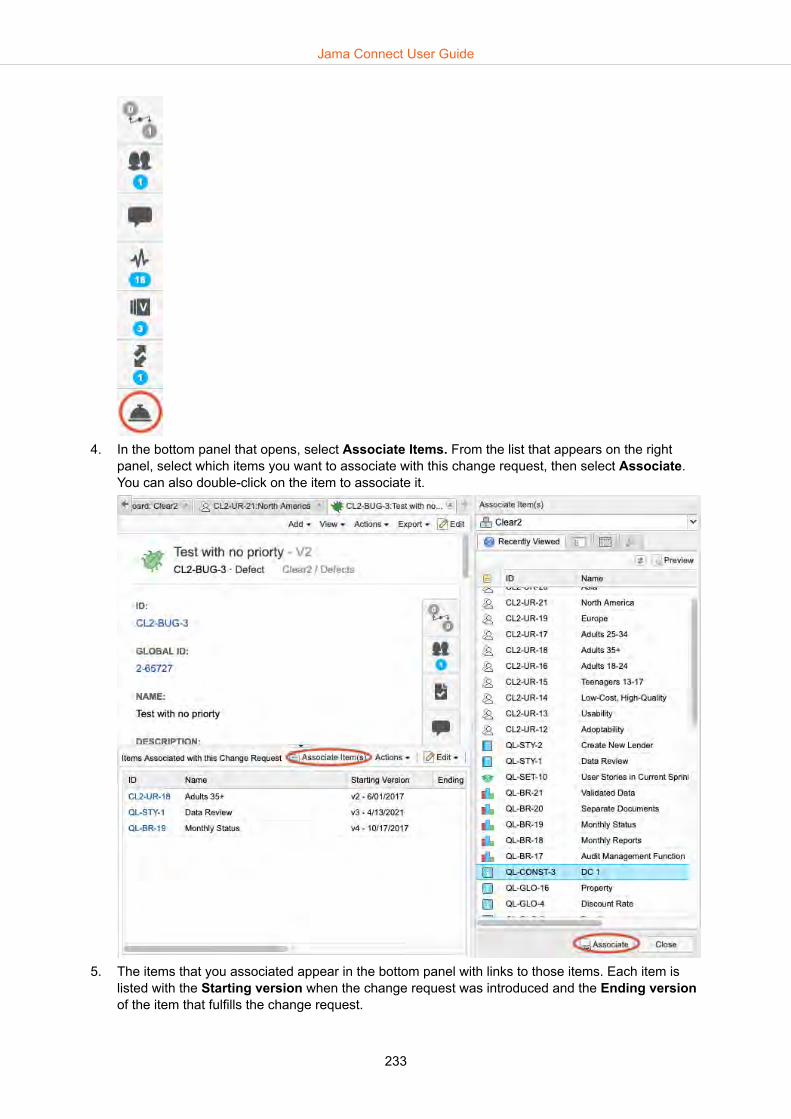
4. In the bottom panel that opens, select Associate Items. From the list that appears on the rightpanel, select which items you want to associate with this change request, then select Associate.You can also double-click on the item to associate it.
5. The items that you associated appear in the bottom panel with links to those items. Each item islisted with the Starting version when the change request was introduced and the Ending versionof the item that fulfills the change request.
Jama Connect User Guide
233

IMPORTANTIf an item has the change request tab enabled, it's a change request. Items thatare change requests can't be associated with other items that are change re-quests.
6. You can edit the association [234] to indicate the starting version when the change request was in-troduced, the ending version of the item that fulfills the change request, and additional notes. Youcan also run an Impact Analysis [235], delete an association [235], or close a change request [236].
7. When you view other items that were associated with this change request, you see the same but-ton in the right toolbar of their Single Item View, as well as any change requests they're associatedwith in the bottom panel.
TIPWhen the change request author locks the change request, it can't be edited. Thisway the author can moderate the progress of requested items to be changed, canupdate associations, or close the change request as edits are made.
Edit change request associationsEdit change request associations to indicate which version is the starting or ending version of a changerequest.
1. In Single Item View, select Change Request to open the bottom panel with a list of associatedchange requests.
2. Double-click in the row with the item you want to update. You can also select the row, then selectEdit > Update association.
3. In the window that opens, modify the Starting Version, Ending Version, or Note.
Jama Connect User Guide
234

4. Select Save.
Create change request Impact Analysis
1. In Single Item View, select Change Request to open the bottom panel with a list of associatedchange requests.
2. Select the item you want to know more about and select Actions > Impact Analysis.
The Impact Analysis is populated by the items in the change request.
Delete change request associations
1. In Single Item View, select Change Request to open the bottom panel with a list of associatedchange requests.
2. Double-click in the row with the item you want to update. You can also select the row, then selectEdit > Update association.
3. Select Edit > Remove Association.
Jama Connect User Guide
235
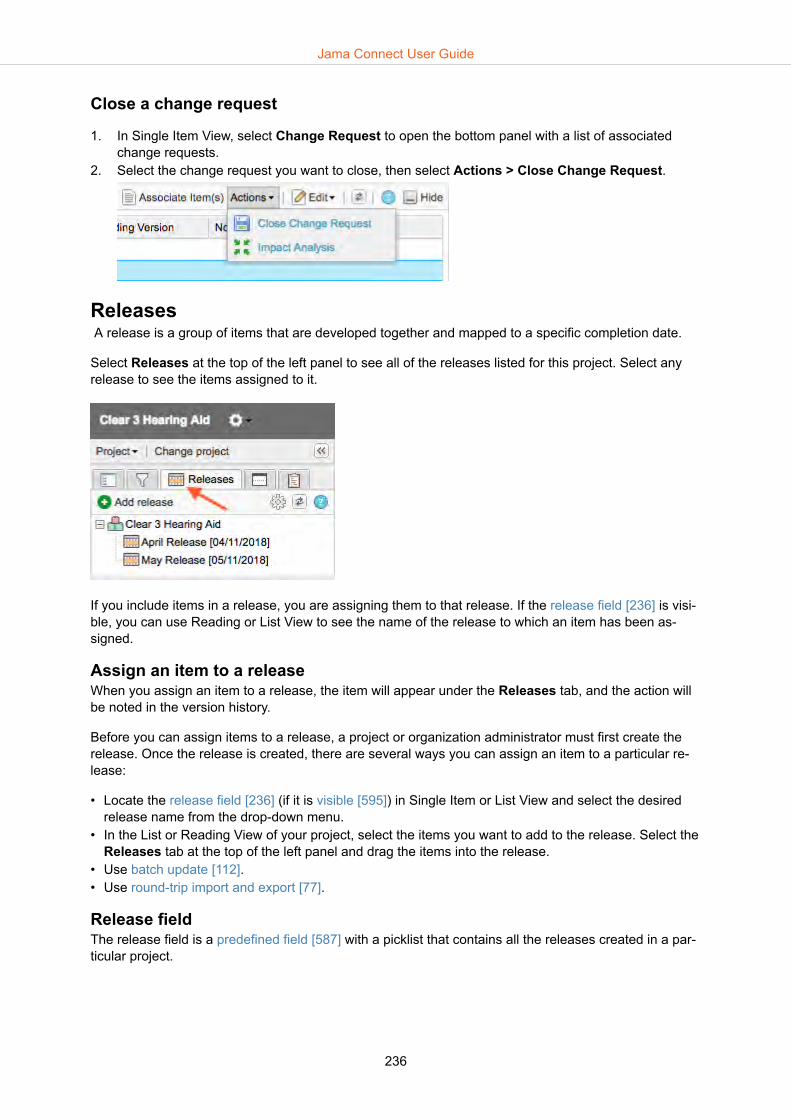
Close a change request
1. In Single Item View, select Change Request to open the bottom panel with a list of associatedchange requests.
2. Select the change request you want to close, then select Actions > Close Change Request.
Releases A release is a group of items that are developed together and mapped to a specific completion date.
Select Releases at the top of the left panel to see all of the releases listed for this project. Select anyrelease to see the items assigned to it.
If you include items in a release, you are assigning them to that release. If the release field [236] is visi-ble, you can use Reading or List View to see the name of the release to which an item has been as-signed.
Assign an item to a releaseWhen you assign an item to a release, the item will appear under the Releases tab, and the action willbe noted in the version history.
Before you can assign items to a release, a project or organization administrator must first create therelease. Once the release is created, there are several ways you can assign an item to a particular re-lease:
• Locate the release field [236] (if it is visible [595]) in Single Item or List View and select the desiredrelease name from the drop-down menu.
• In the List or Reading View of your project, select the items you want to add to the release. Select theReleases tab at the top of the left panel and drag the items into the release.
• Use batch update [112].• Use round-trip import and export [77].
Release fieldThe release field is a predefined field [587] with a picklist that contains all the releases created in a par-ticular project.
Jama Connect User Guide
236
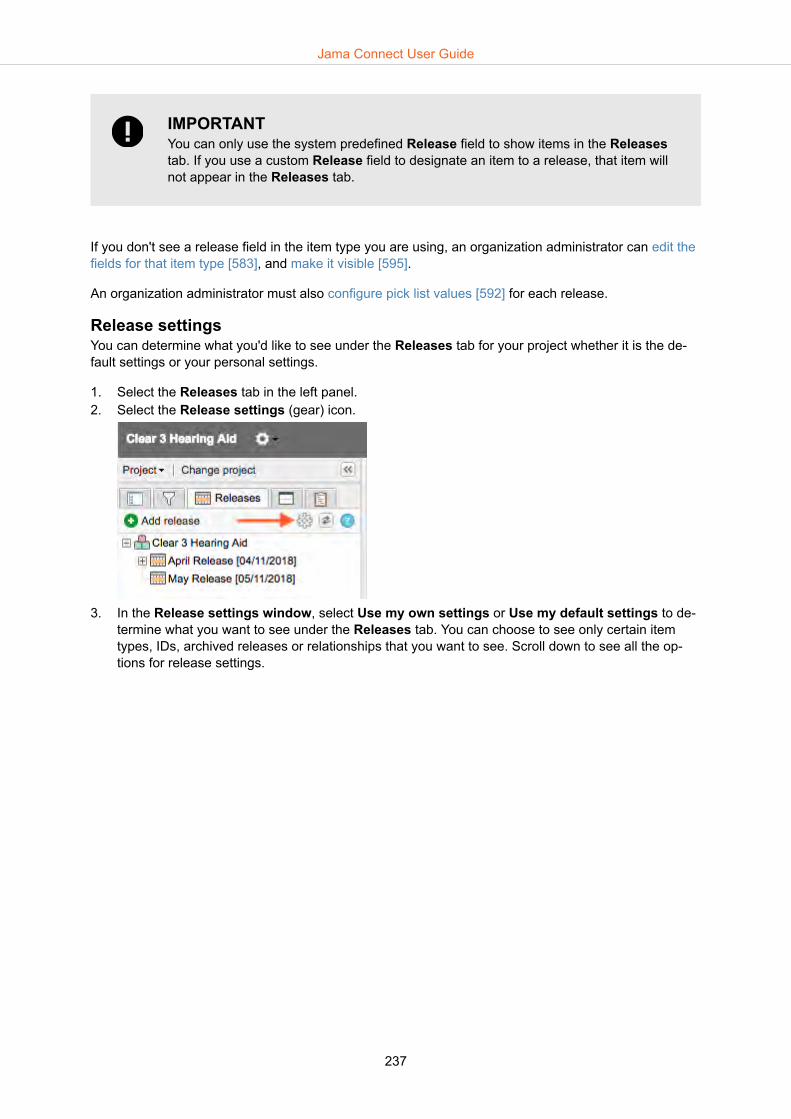
IMPORTANTYou can only use the system predefined Release field to show items in the Releasestab. If you use a custom Release field to designate an item to a release, that item willnot appear in the Releases tab.
If you don't see a release field in the item type you are using, an organization administrator can edit thefields for that item type [583], and make it visible [595].
An organization administrator must also configure pick list values [592] for each release.
Release settingsYou can determine what you'd like to see under the Releases tab for your project whether it is the de-fault settings or your personal settings.
1. Select the Releases tab in the left panel. 2. Select the Release settings (gear) icon.
3. In the Release settings window, select Use my own settings or Use my default settings to de-termine what you want to see under the Releases tab. You can choose to see only certain itemtypes, IDs, archived releases or relationships that you want to see. Scroll down to see all the op-tions for release settings.
Jama Connect User Guide
237

4. Select Apply to apply these settings.
Jama Connect User Guide
238
NOTEIf you are an organization or project administrator, you can configure default settingsunder the Default settings tab and select Apply.
BaselinesA baseline in Jama Connect is a snapshot of your project at a point in time. The current version of se-lected items — and their relationships — are forever associated with that baseline. A baseline also cap-tures the state of the selected items, like Draft, Reviewed, and Approved.
Important considerations
• When you add a relationship to a baseline, the version doesn't change.• Relationships do not change if you replace it with a baseline.
For example, if you have two relationships at the time of baseline version one, make a change to ver-sion two, add a relationship to version three and replace it with a baseline, you still have three rela-tionships.
• If you click Revert to Baseline, all content is switched back to the content that was versioned at thetime it was baselined.
What you need to create a baseline
Versioning must first be enabled to create a baseline. Once versioning is enabled [633], a baseline iscreated:
• Automatically [248] when someone initiates or revises a review• Manually [245] by anyone with read/write permissions
Why are baselines important?
By creating a baseline at each project milestone, you can view the status of your project at those keypoints in the lifecycle. You can also see which items are related in the baseline list and reading views.
What can I do with a baseline?
• Locate an existing baseline [243]• Create a baseline manually [245]• Compare baselines [247]• View baseline activity [247]• Replace current items with baseline [252]
What is a baseline source?A source is a container that holds all the baselines for a specific group of items.
When you add a baseline for a new group of items, the source is created automatically. Whenever youadd the baseline — from a project, set, folder, filter, release, or individual items — the source is createdin the tree and contains the new baseline. A source can't exist without a baseline.
If a source already exists when a new baseline is created for the same set of items, the baseline is add-ed to that source. Otherwise, a new source is created and added to the top of the tree.
Key to the baseline tree
Jama Connect User Guide
239

• Green database icon — Source• White box wrapped in gray — Baseline• Individual Items — Default source name when multiple items are selected at the time the baseline is
created.• B1-04/27/2020 — Example of default baseline name (baseline number and date it was created).
Baseline name is editable as needed.
Tips and more
• If you create a baseline from a container, filter, release, or review, the source and its initial baselineare created. If you use the same source the next time you create a baseline, that second baselineadded to the source under the first baseline.
• If you create a new baseline from a set and add another single item to it from another set, a sourcelabeled "Individual Items" is created.
• Deleting a baseline source deletes all the baselines it contains.
Benefits of organizing your baseline treeOrganize your baseline tree to reflect how your organization works.
Project and organization administrators can reorganize the baseline tree by dragging and droppingsources and folders.
Organizing baseline sources and folders
• Use drag and drop to move baseline sources from one location to another, from the root level to afolder, and between folders.
• Editing a source name creates an event in the project activity stream. In the activity stream, select thebaseline source ID to open the baseline tree and view the highlight.
• Baseline folders can be created at the root level or added to a folder. Use drag and drop to reorderbaseline folders.
• If you hover over an icon or name in the baseline tree, hover text appears describing the contents ofthe item.
Jama Connect User Guide
240

Searching baselines, baseline folders, and baseline sources
• When you type a name in the search field, the results are highlighted so you can find them easily.
• When you clear the search field, the results from the previous search are expanded and highlightedin the baseline tree.
• When you create a folder or baseline, it is highlighted in the baseline tree.• If you accessed the baseline from a link or the Explorer Tree hierarchy is collapsed, select Find me
to locate the baseline in the baseline tree.• When you toggle Show IDs to On, the baseline IDs are displayed in the baseline tree. When the IDs
are visible, you can search for them using the baseline search box.
Jama Connect User Guide
241
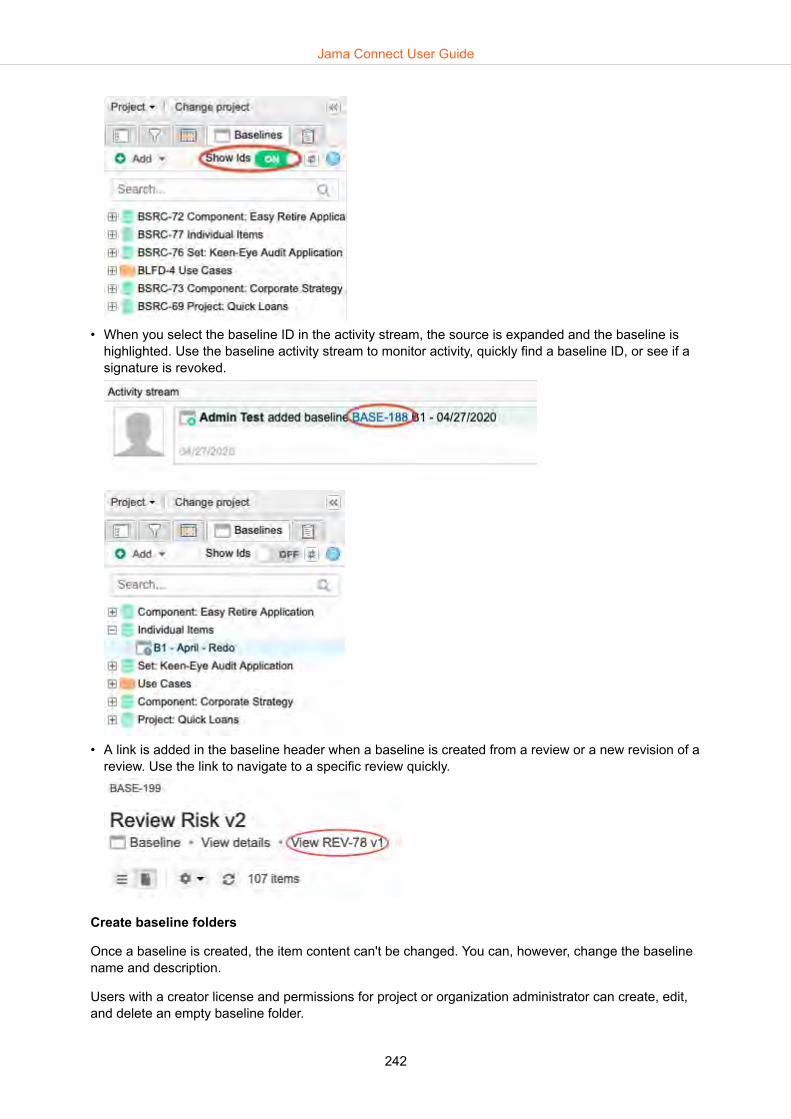
• When you select the baseline ID in the activity stream, the source is expanded and the baseline ishighlighted. Use the baseline activity stream to monitor activity, quickly find a baseline ID, or see if asignature is revoked.
• A link is added in the baseline header when a baseline is created from a review or a new revision of areview. Use the link to navigate to a specific review quickly.
Create baseline folders
Once a baseline is created, the item content can't be changed. You can, however, change the baselinename and description.
Users with a creator license and permissions for project or organization administrator can create, edit,and delete an empty baseline folder.
Jama Connect User Guide
242

Anyone with read/write permissions can edit, delete, or restore a baseline that they created. However,you must have project or organization administrator permissions to edit, delete, or restore baselinescreated by others.
• Create a baseline folder using one of these methods:• From the Add drop-down menu, select Folder.• Right-click on the folder, then select Add Folder.
Edit a baselineOnce a baseline is created, the item content can't be changed. You can, however, change the baselinename and description.
Important considerations
• Anyone with read/write permissions can edit, delete, or restore a baseline that they created.• You must have project or organization administrator permissions to edit, delete, or restore baselines
created by others.• You must be an organization or project administrator to edit a signed baseline.
1. Select the Baselines [243] tab in the Explorer Tree, then select the baseline you want to edit.2. You can edit a baseline in two ways:
• Right-click on the baseline and select Edit.• In the upper right corner of the main panel, click Edit.
3. In the Edit baseline window, enter your changes and select Save.
Your changes appear in the Explorer Tree.
Locate an existing baselineWhen anyone creates or revises a review, a baseline is automatically generated. Knowing where to lookfor an existing baseline can be helpful when you want to compare changes in a review that has multipleversions.
You can find a baseline for a specific project from the Explorer Tree or Single Item View.
Explorer Tree
Jama Connect User Guide
243

Use the Explorer Tree to find a baseline if you need to quickly find a baseline.
1. Select the Baselines tab of the project you want to look at.2. Type the baseline name in the search field. The results are highlighted so you can find them easily.
3. Expand the source to see all the baselines from the same source, then select the one you want. If abaseline was created from a review, it is preceded by the word "review" in the name.
4. Select the baseline to view its contents.
Single Item View
Use this method if you know which items were included in the baseline or the review that created it.
1. Open the item in Single Item View [52].2. Select the Versions button on the side toolbar [53].
The list of reviews and baselines is displayed in the bottom panel under the Baselines/Reviews col-umn.
Jama Connect User Guide
244

3. Select the link to open the review or the corresponding baseline. If the review link is disabled, youweren't invited to the review or the review isn't public.
Create a baseline manuallyCreate a baseline when you want to capture a snapshot of where items are at in that moment.
NOTEYou must have a creator license and read/write permissions to manually create a base-line.
1. In the Explorer Tree, select the Baselines tab in the project where you want to create the baseline.2. Add a baseline using one of these methods:
• If the item already has a source, right-click on the source and select Add baseline.• If you need to choose items, select Add > Baseline from the top.
Jama Connect User Guide
245

NOTEIf the items from an existing source were deleted, you can't add a new baselinefrom that source.
3. In the window that opens, click a tab (Item selection, Releases, Filters) and select containers orindividual items in that tab. You can select containers or individual items, but you can select fromonly one tab.
4. Click Create.5. (Optional) Change the default name for the baseline and add a description.
6. Select Save to create the baseline.
The new baseline is added to the tree, either under and existing source or to the top of the tree. Base-lines are always listed in the order they were created.
Tips and more
• Baselines are created automatically [248] whenever anyone creates a review.• Project versioning must be enabled [633] to be able to create a baseline.
Jama Connect User Guide
246

Comparing baselinesYou can compare baselines to see if an item changed since the last baseline, and what those changeswere.
Two default reports analyze baselines to show changes over time:
• Baseline Comparison [358] compares two baselines.• Baseline Compared to Current [356] compares the items and relationships from a baselined version
to the current version.
There are several ways to compare baselines:
• Select the Baselines tab in the Explorer Tree, then select the baseline you want to view.(Optional) In List View, select the gear icon (Show/Hide) to open the drop-down menu, then selectCurrent version and Version to display those columns.
• To view the version of an item that was baselined, select the row, then select Preview item.• To compare a baselined item with the current version side-by-side, select the row for that item, then
select Compare with current in the top right.
Tips and more
• To see the current state of the item, select any Global ID [275] or Unique ID [622] in List View.
View baseline activityUse the baseline activity stream to monitor activity, quickly find a baseline ID, or see if a signature isrevoked.
1. Select the Baselines tab, then select the name of the baseline that you want to view.2. Select View details.
The baseline activity stream is visible at the bottom of the center panel.
Jama Connect User Guide
247

Locate review baselinesWhen anyone creates or revises a review, a baseline is automatically generated so that you can com-pare changes between reviews.
You can find automatically generated review baselines in two ways:
• Select Baselines in the Explorer Tree of your project.
Baselines that were automatically generated for reviews are displayed with the word "Review" pre-ceding the name of the review.
Jama Connect User Guide
248
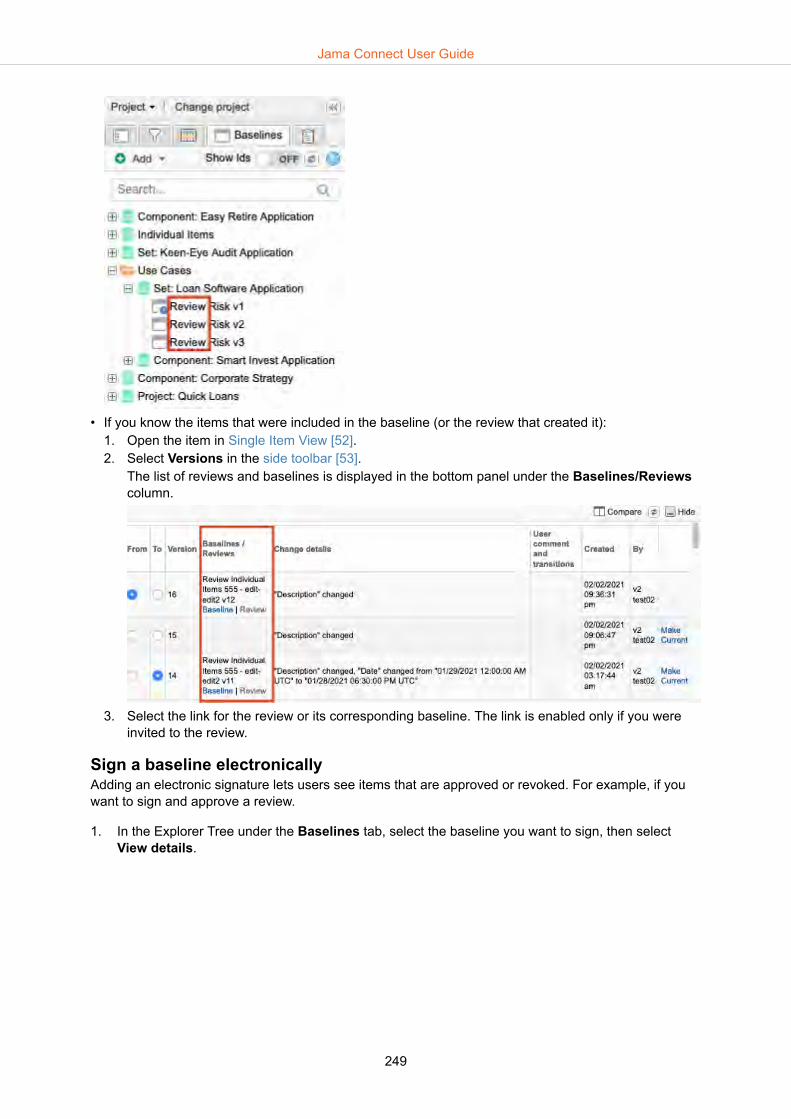
• If you know the items that were included in the baseline (or the review that created it):1. Open the item in Single Item View [52].2. Select Versions in the side toolbar [53].
The list of reviews and baselines is displayed in the bottom panel under the Baselines/Reviewscolumn.
3. Select the link for the review or its corresponding baseline. The link is enabled only if you wereinvited to the review.
Sign a baseline electronicallyAdding an electronic signature lets users see items that are approved or revoked. For example, if youwant to sign and approve a review.
1. In the Explorer Tree under the Baselines tab, select the baseline you want to sign, then selectView details.
Jama Connect User Guide
249

2. Select Add signature.
3. In the Electronic signature window, enter your username, password, and any optional comments,then select Save. Username and password must match that of the logged in user.If your organization is using SAML for authentication, you are asked to select Sign baseline, thenenter your username and password to authenticate your signature.
Deleting sources and baselinesDelete a source or baseline if it was created by mistake or you no longer need it.
Things to know
Jama Connect User Guide
250

• Deleting a source deletes all the baselines it contains.• The option to delete a baseline or source that contains a baseline is only enabled for baselines that
are not yet electronically signed. However, deleting a project [616] deletes all project content, includ-ing baselines and signatures.
NOTEYou must have project or organization administrator permissions to delete sources andbaselines.
Delete a source
• Right-click on the source you want to delete.
Delete a baseline
Delete a baseline from the project using one of these methods:
• Select the baseline, then select Delete (trash icon) in the top right.• Right-click on the baseline name, then select Delete.
Tips and more
• Undo — If you change your mind after deleting a source or baseline, you can select Undo in the suc-cess notice.
• Restore — You can restore a deleted baseline or source by finding the deletion activity [210] in theprojects activity stream and selecting Restore. If you deleted a source that contains multiple base-lines, you can restore individual baselines or the source and all its baselines. When you restore abaseline or source, this event appears in the baseline activity stream.
• Limitations — You can't edit or delete a baseline that is electronically signed. You also can't delete asource if it contains an electronically signed baseline.
Jama Connect User Guide
251

Replace current items with baselineWhen you replace current items with a baselined version, a new version of the item is created and con-tent is replaced with the baseline content. No versions are lost.
Important considerations
• Items that were deleted are restored to the version at time of the baseline.• Relationships that were deleted aren't restored.• You can update an individual item from the versions tab in Single Item View [230].
NOTEYou must have project or organization administrator permissions to do this.
1. Select the baseline you want to revert in the Baselines tab of the Explorer Tree [243].2. Select Replace with baseline.
3. In the confirmation message, click Yes.
A pop-up message displays the number of items that were updated.
Jama Connect User Guide
252
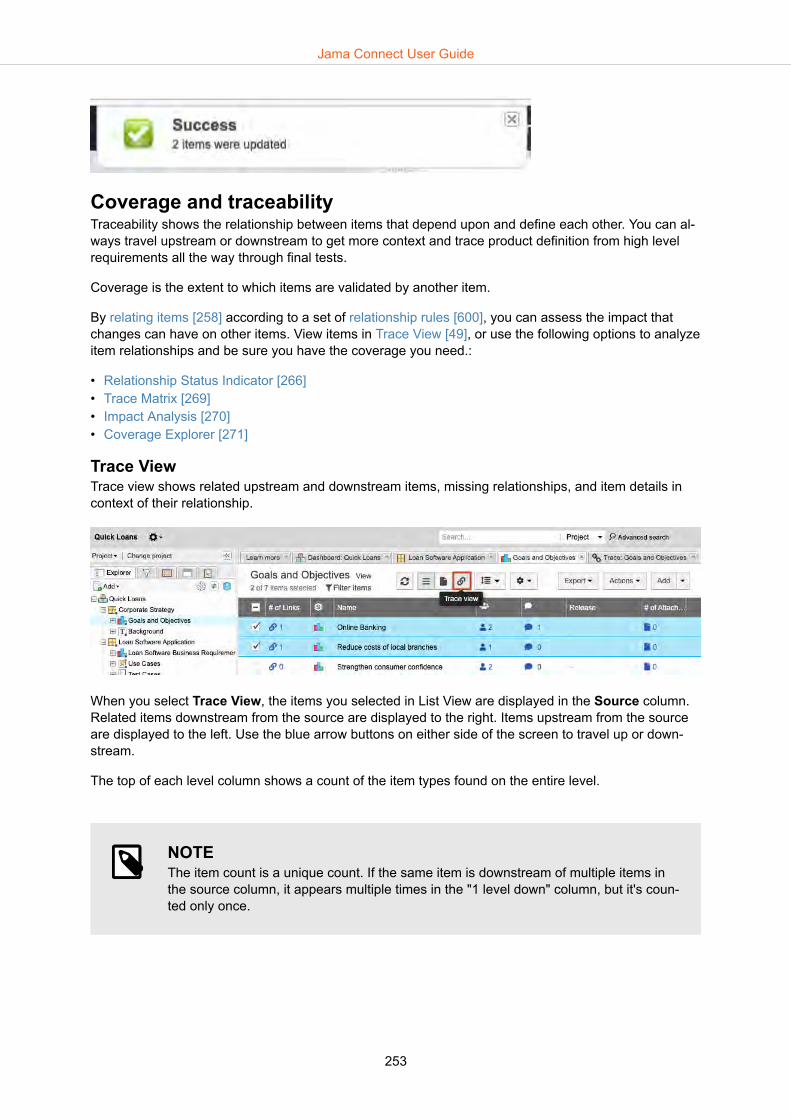
Coverage and traceabilityTraceability shows the relationship between items that depend upon and define each other. You can al-ways travel upstream or downstream to get more context and trace product definition from high levelrequirements all the way through final tests.
Coverage is the extent to which items are validated by another item.
By relating items [258] according to a set of relationship rules [600], you can assess the impact thatchanges can have on other items. View items in Trace View [49], or use the following options to analyzeitem relationships and be sure you have the coverage you need.:
• Relationship Status Indicator [266]• Trace Matrix [269]• Impact Analysis [270]• Coverage Explorer [271]
Trace ViewTrace view shows related upstream and downstream items, missing relationships, and item details incontext of their relationship.
When you select Trace View, the items you selected in List View are displayed in the Source column.Related items downstream from the source are displayed to the right. Items upstream from the sourceare displayed to the left. Use the blue arrow buttons on either side of the screen to travel up or down-stream.
The top of each level column shows a count of the item types found on the entire level.
NOTEThe item count is a unique count. If the same item is downstream of multiple items inthe source column, it appears multiple times in the "1 level down" column, but it's coun-ted only once.
Jama Connect User Guide
253

Select an item in the source column to highlight its specific upstream and downstream relationships.You can select multiple items using the checkboxes. Selections remain highlighted as you navigate. Se-lect Clear all to clear your selections.
Select Set columns at the top of each trace level to turn fields on or off [51] for items in that level.
Use Trace View to find missing coverage and use the Add menu in the toolbar to add items directly fromthis view.
Jama Connect User Guide
254

You can also filter Trace View [256] or use Trace View to save a view [255] or export the content [256].
You can also use the Trace View to see validation and verification testing results. If a test case is visiblein Trace View, you also see the related test runs. No manual creation of relationships is required; TraceView infers the relationship between test cases and runs and once a test cycle is created.
If your organization has a risk management license, you can also configure this view [51] to see risks inTrace View. [419]
Save a Trace View
1. Select the Trace View [49] that you want to save.2. Select Save at the top of the center panel next to the Trace View name.
3. The name turns to an editable field. Edit the name and select Save.
4. After you save it, you can change the name and save it as something else. You can also bookmarkit by selecting the orange Bookmark icon.
5. Select the arrow next to the name to see a pull-down list of saved Trace Views. Bookmarked viewsappear at the top of the list.
Jama Connect User Guide
255
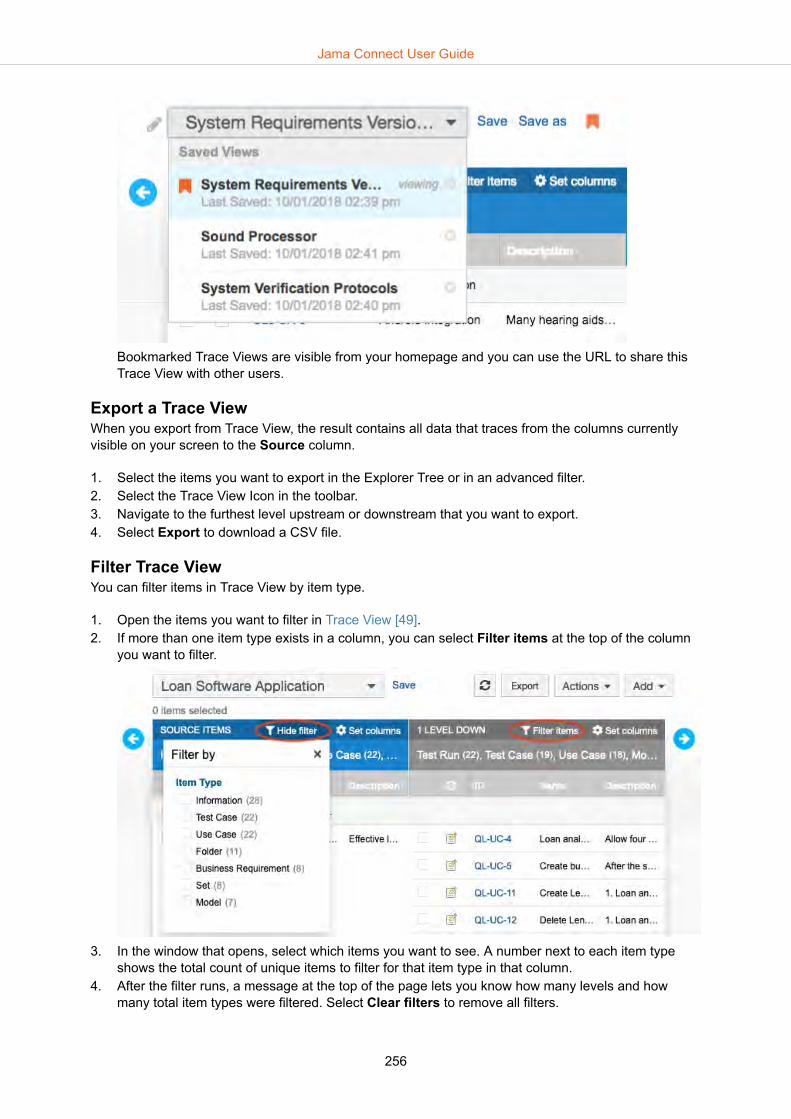
Bookmarked Trace Views are visible from your homepage and you can use the URL to share thisTrace View with other users.
Export a Trace ViewWhen you export from Trace View, the result contains all data that traces from the columns currentlyvisible on your screen to the Source column.
1. Select the items you want to export in the Explorer Tree or in an advanced filter.2. Select the Trace View Icon in the toolbar.3. Navigate to the furthest level upstream or downstream that you want to export.4. Select Export to download a CSV file.
Filter Trace ViewYou can filter items in Trace View by item type.
1. Open the items you want to filter in Trace View [49].2. If more than one item type exists in a column, you can select Filter items at the top of the column
you want to filter.
3. In the window that opens, select which items you want to see. A number next to each item typeshows the total count of unique items to filter for that item type in that column.
4. After the filter runs, a message at the top of the page lets you know how many levels and howmany total item types were filtered. Select Clear filters to remove all filters.
Jama Connect User Guide
256

5. You can save the Trace View [255] or export the Trace View [256] with filters in place.
RelationshipsRelationships link items together and can help assess the impact an item or group of items can have onother items.
Traceability is defined by relationships. When one item changes, you know to check related items tomake sure they are still correct.
Relationships can be upstream or downstream from an item. With the appropriate permissions [265],you can relate items within the same project or between projects. Find and view relationships [257] inSingle Item View.
You can also add relationships from:
• Single Item View [258]• List, Reading or Trace View [261] (by adding a new related item)• The trace matrix [260]
Relationships quick findIn Single Item View, select Relationships to open the bottom panel where you can view and filter [264]related items.
Jama Connect User Guide
257

Select Visual Layout to see a different perspective with links to more rapid actions.
Add a relationship from Single Item ViewCreating a relationship establishes a directional link between two items. The related items can exist inthe same set or project, or in completely different projects.
1. Select View > Open Relate in the toolbar:
Jama Connect User Guide
258

Or select Relationships in the side toolbar, then select Relate Items in the bottom panel.
2. This opens the side panel where you can select the items that you want to relate. Recently vieweditems is the default view, but you can also choose the Explorer Tree, Releases , or Search tab tofind the items you want to relate. Double-click on the item, or select the item you want to relate andselect Relate.
NOTEIf you don't have rights to a linked related item, you can still see the related item’sname, project, and relationship attributes. However, you can't preview, open, oredit the item if you don't have permission.
IMPORTANTIf relationship rules [600] were applied to the project, only items that meet therule's criteria appear in the right panel. You can only create a relationship with itemtypes that meet the applied relationship rules. Select Show relationship diagramat the top of the right panel to display the rules that are associated to this project.
Jama Connect User Guide
259
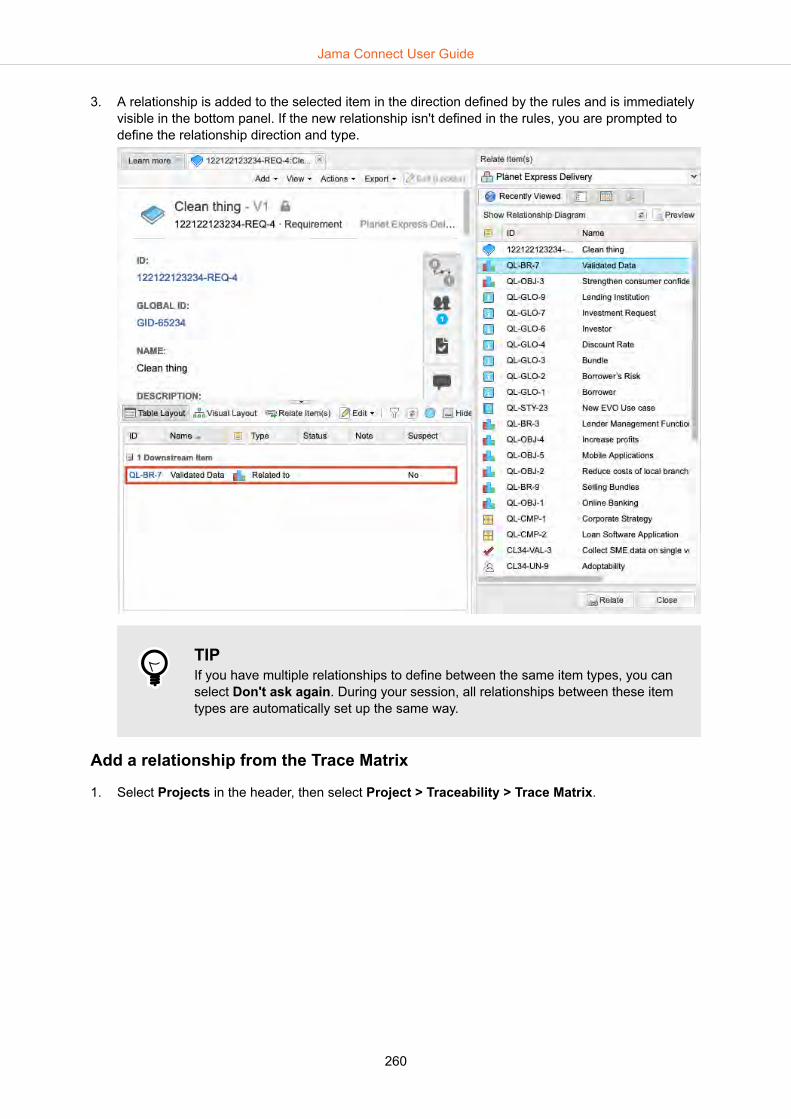
3. A relationship is added to the selected item in the direction defined by the rules and is immediatelyvisible in the bottom panel. If the new relationship isn't defined in the rules, you are prompted todefine the relationship direction and type.
TIPIf you have multiple relationships to define between the same item types, you canselect Don't ask again. During your session, all relationships between these itemtypes are automatically set up the same way.
Add a relationship from the Trace Matrix
1. Select Projects in the header, then select Project > Traceability > Trace Matrix.
Jama Connect User Guide
260

2. In the Trace Matrix window header, select the two item types you want to compare, and limit thenumber of items you want to see, then select View Matrix.
3. Double-click in any cell where you want to add or edit a relationship. 4. In the Add/Edit Relationship window, make changes and select Update.
Add a new related itemYou can add a new item and, at the same time, relate it to one or more items.
1. View the items to be related in List [47], Trace [49], or Reading View [48].2. Select the items to which you want to add related items. To use the Add related option, all selected
items must be the same item type.3. Select Add> Add related in the top right toolbar. From the drop-down menu, select the item type
for the missing upstream or downstream items you want to add. The drop-down menu lists onlyitem types allowed by relationship rules.
Jama Connect User Guide
261
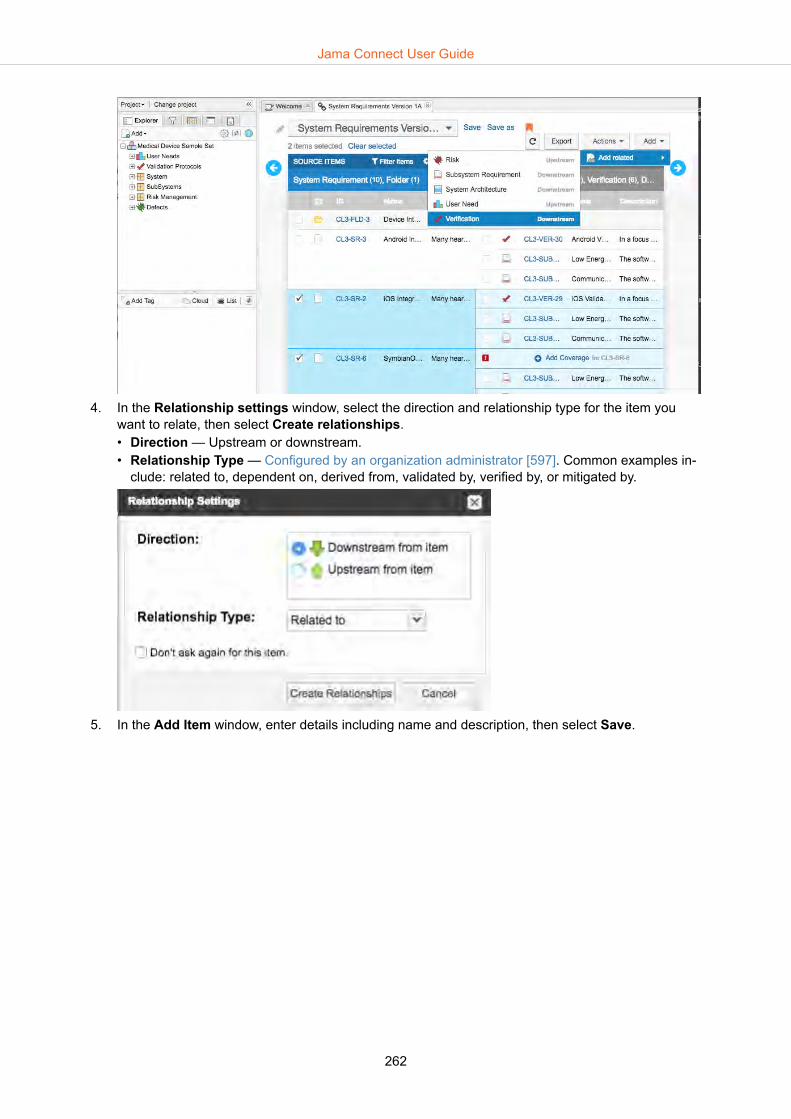
4. In the Relationship settings window, select the direction and relationship type for the item youwant to relate, then select Create relationships.• Direction — Upstream or downstream.• Relationship Type — Configured by an organization administrator [597]. Common examples in-
clude: related to, dependent on, derived from, validated by, verified by, or mitigated by.
5. In the Add Item window, enter details including name and description, then select Save.
Jama Connect User Guide
262

6. In the Select Location window, you must select a location for this new item. Locations that aren'tpermitted appear in light gray. You might need to expand folders, sets, or components to find thelocation you want. Select a location, then Select and close.
7. If you checked the Notify option in the Add Item window, you can notify other groups or users ofthis new related item.
Jama Connect User Guide
263
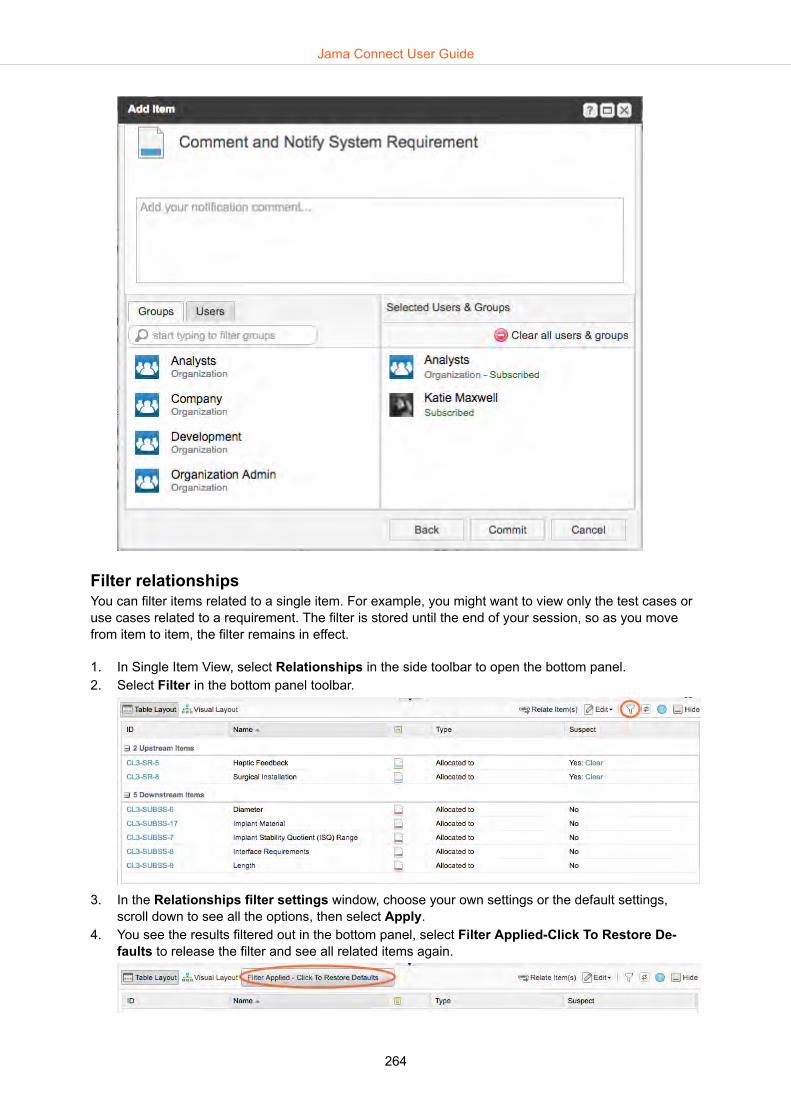
Filter relationshipsYou can filter items related to a single item. For example, you might want to view only the test cases oruse cases related to a requirement. The filter is stored until the end of your session, so as you movefrom item to item, the filter remains in effect.
1. In Single Item View, select Relationships in the side toolbar to open the bottom panel. 2. Select Filter in the bottom panel toolbar.
3. In the Relationships filter settings window, choose your own settings or the default settings,scroll down to see all the options, then select Apply.
4. You see the results filtered out in the bottom panel, select Filter Applied-Click To Restore De-faults to release the filter and see all related items again.
Jama Connect User Guide
264

Relate to an existing itemYou can relate two existing items of the same item type.
1. View the items to be related in List [47], Trace [49], or Reading [48] view.2. Select the items to relate. All selected items must be the same item type.3. Select Actions > Relate to existing.
4. In the side panel that opens, select the items that you want to relate, then click Relate.
Recently viewed items is the default view, but you can also use the Explorer Tree, Releases,or Search tab to find the items you want to relate.
A relationship is added to the selected item in the direction defined by the rules and is immediately visi-ble in the bottom panel of the relationships [257] view. If the new relationship isn't defined in the rules,you are prompted to define the relationship direction and type.
Tip: If you have multiple relationships to define between the same item types, you can select Don't askagain. During your session, all relationships between these item types are automatically set up thesame way.
Access permissions and relationshipsHow you interact with relationships depends on the access permissions you have for each of the relateditems. Read more about permissions [562].
If you have theseaccess permis-
sions for the cur-rent item...
and these ac-cess permis-
sions for the re-lated item...
you can....
Read/Write Read only ... view trace relationships as well as the ID and name of the related item. You canmodify relationships and create new ones. You can also navigate to the relateditem and clear suspect links.
Jama Connect User Guide
265
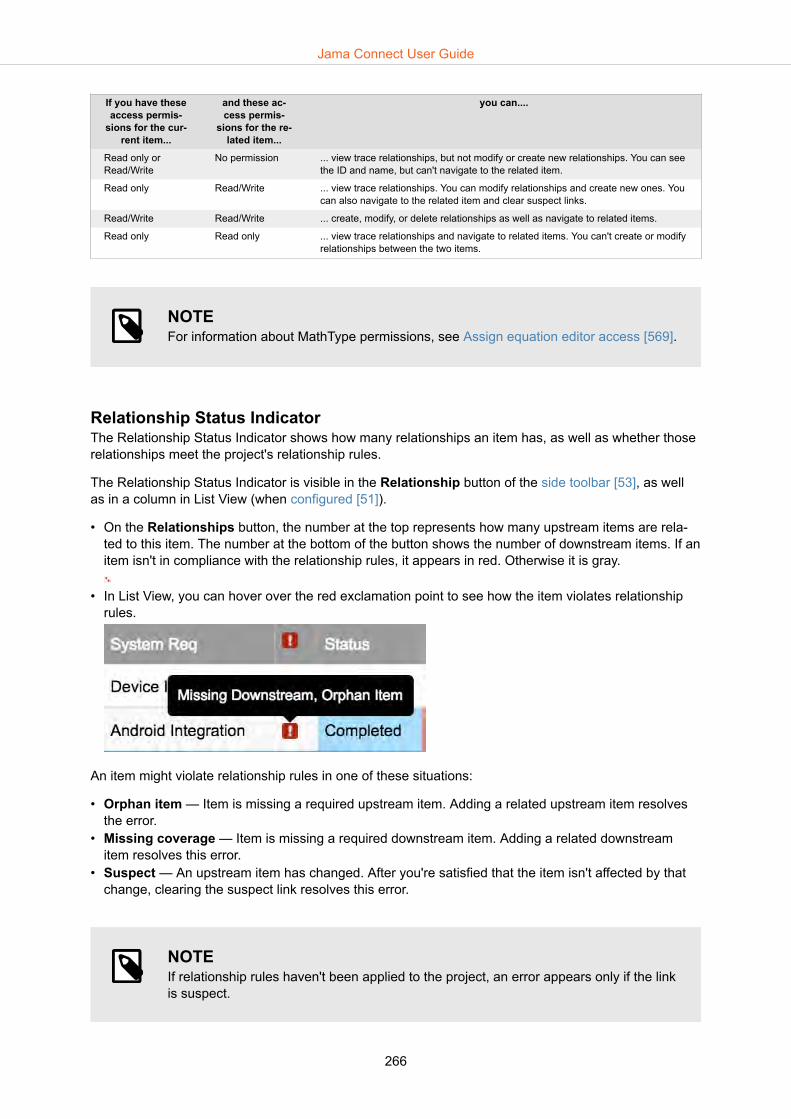
If you have theseaccess permis-
sions for the cur-rent item...
and these ac-cess permis-
sions for the re-lated item...
you can....
Read only orRead/Write
No permission ... view trace relationships, but not modify or create new relationships. You can seethe ID and name, but can't navigate to the related item.
Read only Read/Write ... view trace relationships. You can modify relationships and create new ones. Youcan also navigate to the related item and clear suspect links.
Read/Write Read/Write ... create, modify, or delete relationships as well as navigate to related items.
Read only Read only ... view trace relationships and navigate to related items. You can't create or modifyrelationships between the two items.
NOTEFor information about MathType permissions, see Assign equation editor access [569].
Relationship Status IndicatorThe Relationship Status Indicator shows how many relationships an item has, as well as whether thoserelationships meet the project's relationship rules.
The Relationship Status Indicator is visible in the Relationship button of the side toolbar [53], as wellas in a column in List View (when configured [51]).
• On the Relationships button, the number at the top represents how many upstream items are rela-ted to this item. The number at the bottom of the button shows the number of downstream items. If anitem isn't in compliance with the relationship rules, it appears in red. Otherwise it is gray.
• In List View, you can hover over the red exclamation point to see how the item violates relationshiprules.
An item might violate relationship rules in one of these situations:
• Orphan item — Item is missing a required upstream item. Adding a related upstream item resolvesthe error.
• Missing coverage — Item is missing a required downstream item. Adding a related downstreamitem resolves this error.
• Suspect — An upstream item has changed. After you're satisfied that the item isn't affected by thatchange, clearing the suspect link resolves this error.
NOTEIf relationship rules haven't been applied to the project, an error appears only if the linkis suspect.
Jama Connect User Guide
266
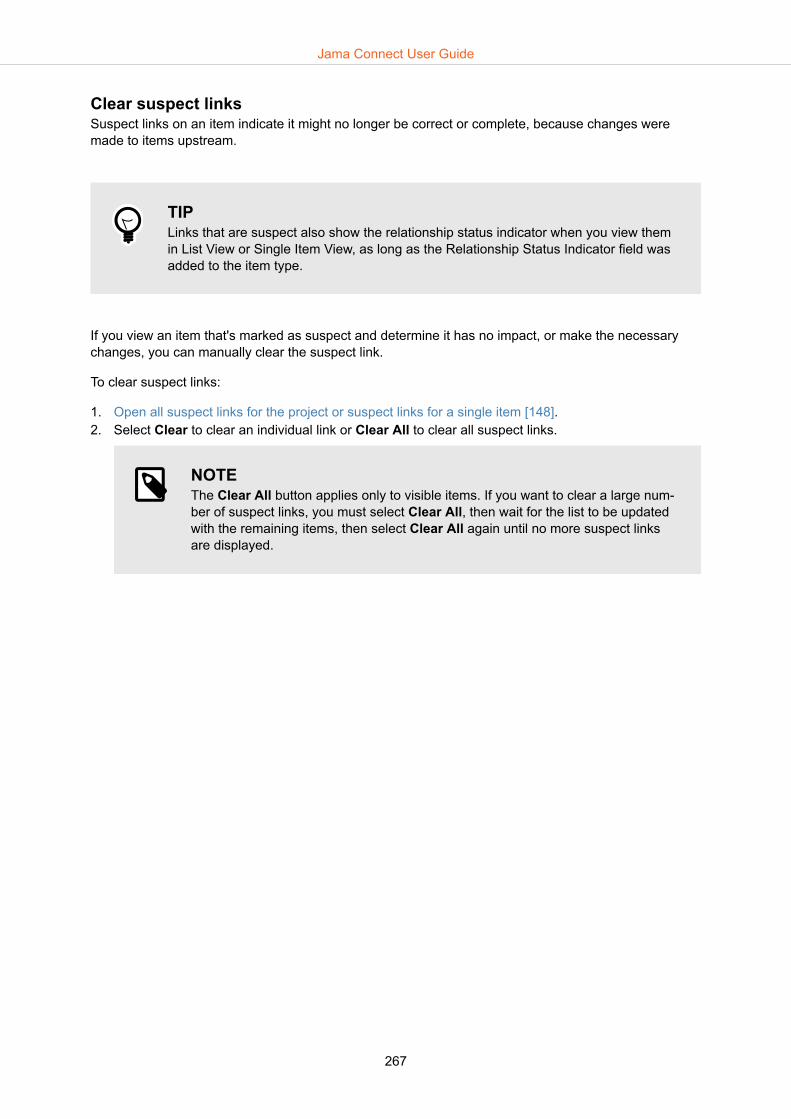
Clear suspect linksSuspect links on an item indicate it might no longer be correct or complete, because changes weremade to items upstream.
TIPLinks that are suspect also show the relationship status indicator when you view themin List View or Single Item View, as long as the Relationship Status Indicator field wasadded to the item type.
If you view an item that's marked as suspect and determine it has no impact, or make the necessarychanges, you can manually clear the suspect link.
To clear suspect links:
1. Open all suspect links for the project or suspect links for a single item [148].2. Select Clear to clear an individual link or Clear All to clear all suspect links.
NOTEThe Clear All button applies only to visible items. If you want to clear a large num-ber of suspect links, you must select Clear All, then wait for the list to be updatedwith the remaining items, then select Clear All again until no more suspect linksare displayed.
Jama Connect User Guide
267

NOTEOnly updates to certain fields trigger suspect links. These fields are determined by theorganization administrator who configures item types [583].
Jama Connect User Guide
268

Trace MatrixThe Trace Matrix is a visual representation of relationships within a project.
This is an intuitive way to quickly see relationships for two groups of items. For example, you can selecta set of requirements and see which have related test cases. The matrix also helps determine impactwhen a change occurs.
IMPORTANTThe Trace Matrix doesn't enforce relationship rules.
Traceability Matrix quick findSelect Projects > Project > Traceability > Trace Matrix to access the Trace Matrix.
Add a relationship from the Trace Matrix
1. Select Projects in the header, then select Project > Traceability > Trace Matrix.
2. In the Trace Matrix window header, select the two item types you want to compare, and limit thenumber of items you want to see, then select View Matrix.
Jama Connect User Guide
269

3. Double-click in any cell where you want to add or edit a relationship. 4. In the Add/Edit Relationship window, make changes and select Update.
Impact AnalysisImpact Analysis shows you the entire picture of all upstream and downstream related items that mightbe affected by changes.
With traceability, you can see the impact of a change to a selected item before the change is made.
For example, if you're about to change a requirement, you can first see who is assigned to related itemsand include them on a comment about the change.
Impact Analysis quick findIn the top toolbar of Single Item View, select View > Impact Analysis.
You can also perform an impact analysis on a change request. Select Items to change (bell icon) onthe Change request in the side toolbar to open the bottom panel, then select Actions > Impact Analy-sis.
Jama Connect User Guide
270

Coverage ExplorerThe Coverage Explorer is tool to view or export a set of items, including related items that provide nee-ded coverage.
You can create and save coverage views and export them to an Excel document [272].
Find the Coverage ExplorerSelect Project > Traceability > Coverage Explorer.
Jama Connect User Guide
271
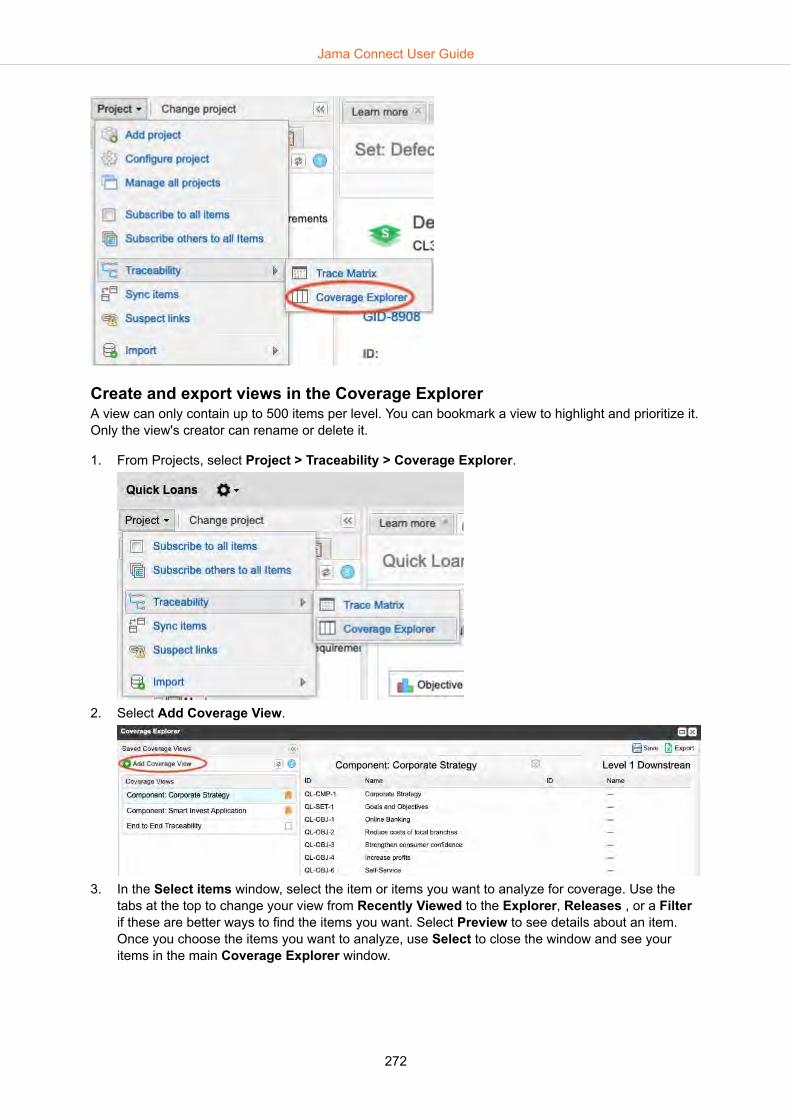
Create and export views in the Coverage ExplorerA view can only contain up to 500 items per level. You can bookmark a view to highlight and prioritize it.Only the view's creator can rename or delete it.
1. From Projects, select Project > Traceability > Coverage Explorer.
2. Select Add Coverage View.
3. In the Select items window, select the item or items you want to analyze for coverage. Use thetabs at the top to change your view from Recently Viewed to the Explorer, Releases , or a Filterif these are better ways to find the items you want. Select Preview to see details about an item.Once you choose the items you want to analyze, use Select to close the window and see youritems in the main Coverage Explorer window.
Jama Connect User Guide
272

4. Use the gear icon at the top of the Coverage Explorer window to hide, show, and reorder fields forthat level.
5. Select the green plus button to add a new level of downstream relationships. You can add onlyone item type per level. However, if you add a downstream level and leave the item type blank, itdisplays multiple item types.
6. Select Save to save the view. It is added to the saved views in the left column with a favorite star.You can deselect the star by clicking on it.
7. Select Export to export a view to an Excel document.
Reuse and synchronizationWith reuse [276] and synchronization [285] you can duplicate supporting information for any item, con-tainer of items, or even a project and continuously keep it in sync.
Supporting information can include the entire item, item fields, item widget information (relationships,tags, attachments), related items, child items, project details, and other information. You can choosehow much of this you want to include when you reuse items [276]. Duplicate [129] is a simple way toreuse information.
Jama Connect User Guide
273

NOTEAttachment links are synchronized, not attachment content.
When items are synchronized, they receive a global ID [275] that they share regardless of where theyare located in the system. You can synchronize the items that you reuse, or connect existing items [289]so that they can be maintained in parallel.
To keep track of synchronized items, use the Sync items window [274] where you can compare items[290] and decide how to update synchronized items.
NOTEReuse and synchronization can require significant memory. This is especially true ifyour organization has a large Jama Connect database and has heavy reuse or syn-chronization use.
Finding reuse and synchronizationWith reuse and synchronization, you can duplicate supporting information for any item, container ofitems, or even a project and continuously keep it in sync.
• Organization administrator — Only an organization administrator can configure reuse and syn-chronize [538].
• Explorer Tree — In the Explorer Tree, a blue dot in the bottom right-hand corner indicates that anitem was synchronized.
• List View — Select an item in list view then select Actions > Reuse to open the Reuse item(s)window.
• Project drop-down menu — An organization or project administrator can select Project > Syncitems to open the Sync items window, or Project >Manage all projects to duplicate (and optionallysynchronize) projects [613].
• Stream — Reuse and synchronization of items adds activity entries to the stream [221] for all itemscreated or modified during the process.
• Synced items window — Right-click on any item in the Explorer Tree, then select View syncheditems.
Jama Connect User Guide
274

This opens the Sync Items window, where you can select any item or container on the left to seewhich other items have the same global ID.
• Single Item View synced items bottom panel — Open an item in Single Item View. On the righttoolbar select, select Synchronized items.This opens the bottom panel to display all items that are currently synchronized with this item. Fromhere, you can connect items [289], synchronize items [285], break sync [287], or compare details foritems that are out of sync [290].
Global IDGlobal IDs are identifiers of items that are connected through synchronization. While every item has itsown unique ID [622] (which is also the project ID), two items that are synchronized can share a GlobalID.
Items that share this ID are considered cloned artifacts, despite being located in different areas of JamaConnect, and possibly representing different versions of each other.
Global IDs have two parts:
• Global ID prefix — The Global ID is the same across the organization. An organization administratorcan change the Global ID prefix [535].
• Global ID counter — The Global ID counter only grows and can't be reset or reduced. An organiza-tion administrator can change the starting point of the Global ID counter. If a user tries to set thecounter value below the Last Used Global ID Counter, Jama Connect shows an error message notify-ing the user to choose a greater value.
When items are connected for synchronization, they are assigned the same Global ID. When an item isremoved from this group (through Break sync [287]) a new Global ID is assigned.
Reuse and synchronization guardrailReuse and synchronization of hundreds of items can affect system performance, causing it to feel slow-er than usual for users and decrease performance for other processes such as exporting.
If you try to reuse and synchronize a very large number of items, a warning appears if it’s likely to im-pact performance.
If you still want to do this, consider reusing items in smaller batches or starting a large reuse and syn-chronize process during off hours when there is less competition for resources.
When to use reuse and synchronizeTypical scenarios for reuse and synchronize include creating a library or catalog, branching, and re-lease management.
• Duplicate — You can make a copy of an item, container, or project. Synchronization is optional butcan be enabled between items.
• Library/Catalog — Create a library or catalog to establish system-wide standards in your organiza-tion for all business units to follow. These might include common business practices, rules, glossariesor even a set of non-functional requirements that teams must reference but not modify.For example, a business that relies heavily on acronyms and terminology might create a glossary thatcan be defined and managed in one place, and used as a reference everywhere else. Another organ-ization might create and manage business practices in one place, allowing references to those practi-ces to remain consistent across the organization.
Jama Connect User Guide
275

TIPIf you're using a catalog to push changes to many projects, you can synchronizeitems to push changes from your “catalog” project to all other project items thatshare the same global ID. You must have write access on all projects in the sync todo this.
• Shared requirements — Large projects typically adhere to a common set of requirements, but ofteneach requirement also has information specific to a project and must be managed by that project. Forinstance, a requirement name and description can be shared across multiple projects but release val-ues, priorities, assignments, and relationships can continue to be managed by each project.
• Branching — With branching, you can split a set of information from a single point in time into sever-al branches such that each branch can be modified in parallel.This can be useful when you want a snapshot of items at a particular point in time, but to still allowthese items to be modified in parallel. In this case, reuse results in the versioning of an entire docu-ment made up of multiple items, rather than just a version of a single requirement.
• Release management — Similar to branching, reuse and synchronization lets you use items acrossmultiple releases or sprints in parallel.
• Project template — You can set up a project to act as a template that you reuse and synchronize toquickly ramp up new projects or to establish standard practices on content organization. You can alsosynchronize the template to push updates to associated projects.
ReuseIf your projects contain items that often are the same or differ slightly, reuse can help you work moreefficiently. You can reuse items over multiple projects and synchronize them, if needed.
You can only duplicate items to sets of the same item type. For example, if you have two requirementsets in a project created from the same item type then you can duplicate and move items betweenthese sets. Child items behave much the same as sets: if you reuse items to a parent item, makingthem child items, they must be the same item type as the parent item.
TIPIf you have several items that are reused regularly, put them in a central project so fu-ture changes to items can easily be maintained from one central location.
NOTEFor instance, during reuse, relationships can automatically be created that are incon-sistent with the relationship rules of a specific project.
Reuse an item
1. Select items for reuse [277].2. In the Reuse Items window do the following:
• Select source items (if not already selected)
Jama Connect User Guide
276

• Select reuse options [279]• Select target destination [282]
3. Select Reuse and sync at the bottom of the window. If you're reusing something that has alreadybeen reused, a warning asks you whether you want to overwrite or skip the items. Select one of thefollowing:• Overwrite Items — Overwrites the items in the destination and replaces it with the items in the
source project. Overwritten items use the fields you specified for reuse. Any fields not included inthe reuse operation are set to null or their default value. Tags, attachments, and links are re-placed, if you included tags, attachments, and links.
• Skip Items — Skips any existing items in the destination, so they don't get replaced with sourceitems.
4. The Reuse Complete window shows a summary of what was reused. Select one of the following:• View Results — Shows a list of all of the newly reused items.• Reuse Again — Select to reuse the same source items in a different destination.• Finished — Closes the windows.
Select items for reuseFollow these steps to reuse multiple items, the full content of a single item, or to reuse an item from oneproject in another project.
You can select items for reuse in two ways.
1. In the Explorer Tree, select the item or container that you want to reuse. Right-click to open the con-text menu and select Reuse items.
Jama Connect User Guide
277

2. In List View, select the items you want to reuse, then from the Actions menu in the toolbar, selectReuse.
TIPTo quickly make a copy of an item in the same project you can use Duplicate items[129].
Jama Connect User Guide
278
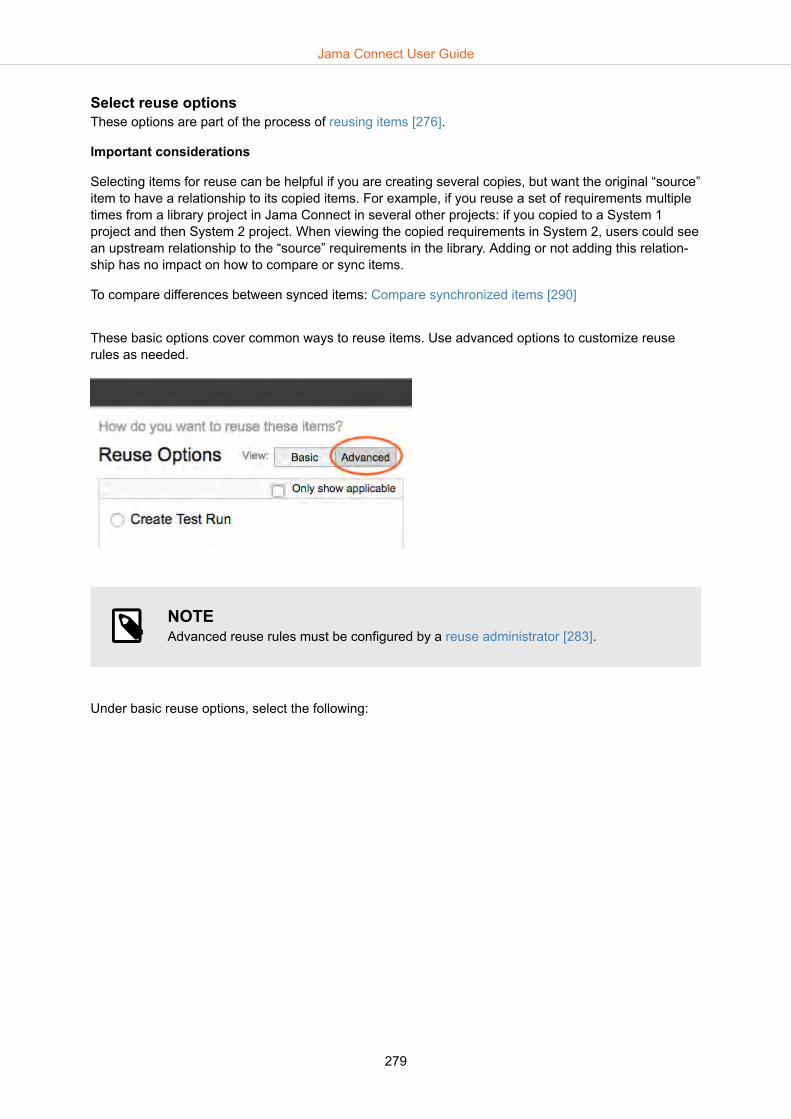
Select reuse optionsThese options are part of the process of reusing items [276].
Important considerations
Selecting items for reuse can be helpful if you are creating several copies, but want the original “source”item to have a relationship to its copied items. For example, if you reuse a set of requirements multipletimes from a library project in Jama Connect in several other projects: if you copied to a System 1project and then System 2 project. When viewing the copied requirements in System 2, users could seean upstream relationship to the “source” requirements in the library. Adding or not adding this relation-ship has no impact on how to compare or sync items.
To compare differences between synced items: Compare synchronized items [290]
These basic options cover common ways to reuse items. Use advanced options to customize reuserules as needed.
NOTEAdvanced reuse rules must be configured by a reuse administrator [283].
Under basic reuse options, select the following:
Jama Connect User Guide
279

• Sync item(s) and share Global ID (default)This option is selected by default and gives source and destination items the same Global ID. Anychanges to synced items displays an out-of-sync flag. You can use Compare View to understandwhat no longer matches between synced items and choose to sync them again. Deselect this reuseoption if you only want to duplicate items, but not sync them.
• Append a prefixAdds a prefix to the name of the item. Example: Entering "ABC-" as the prefix for item "Example A"results in the name "ABC-Example A."
• Add a relationship from the original itemThis not only reuses the source item, but also creates a relationship between the source item and thenewly created one.
• Include all tags, attachments and linksSelect this if you also want to duplicate all tags, attached files and URL links associated with theitems. If an existing item is overwritten and this is checked, all tags, attachments, and links are upda-ted to match (any tags, attachments, or links that existed in the destination but not in the source itemare removed). If this isn't selected and you overwrite an existing item, any tags, attachments, andlinks are cleared in the destination item.
• Don't include relationships outside of the source selection
Jama Connect User Guide
280
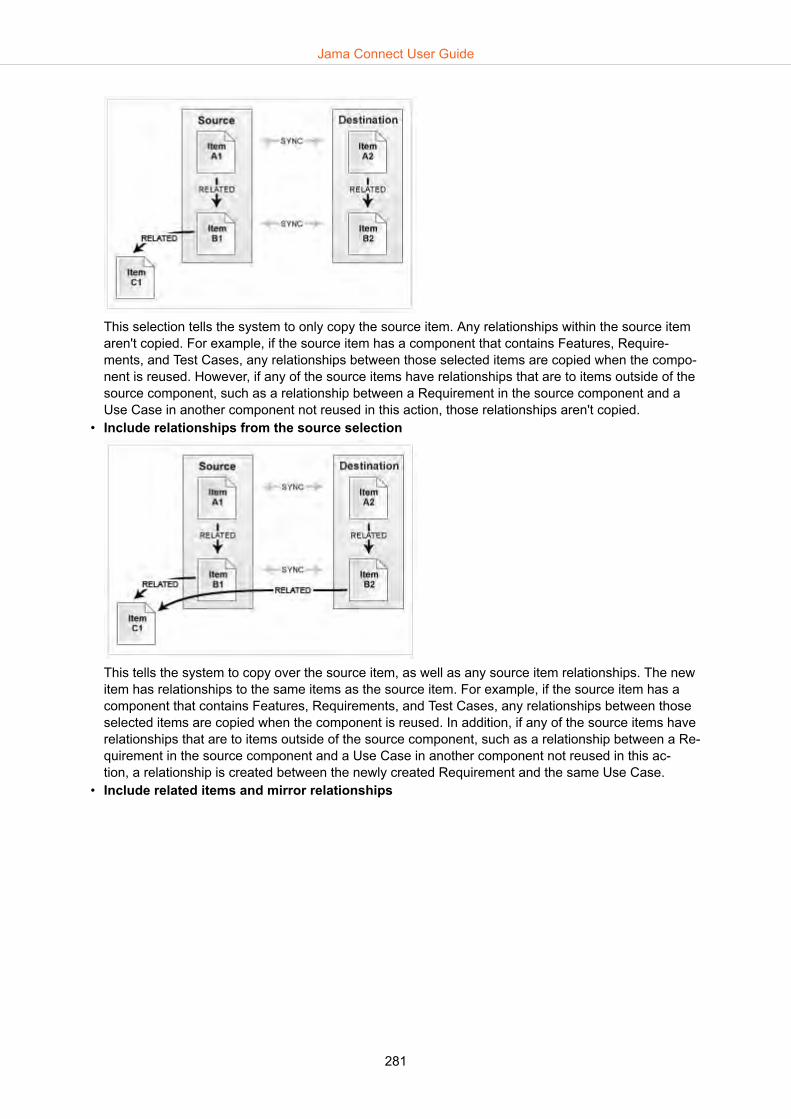
This selection tells the system to only copy the source item. Any relationships within the source itemaren't copied. For example, if the source item has a component that contains Features, Require-ments, and Test Cases, any relationships between those selected items are copied when the compo-nent is reused. However, if any of the source items have relationships that are to items outside of thesource component, such as a relationship between a Requirement in the source component and aUse Case in another component not reused in this action, those relationships aren't copied.
• Include relationships from the source selection
This tells the system to copy over the source item, as well as any source item relationships. The newitem has relationships to the same items as the source item. For example, if the source item has acomponent that contains Features, Requirements, and Test Cases, any relationships between thoseselected items are copied when the component is reused. In addition, if any of the source items haverelationships that are to items outside of the source component, such as a relationship between a Re-quirement in the source component and a Use Case in another component not reused in this ac-tion, a relationship is created between the newly created Requirement and the same Use Case.
• Include related items and mirror relationships
Jama Connect User Guide
281

This tells the system to copy over the source item and any related items and create a relationship tothose newly created related items. For example, if the source item has a component that containsFeatures, Requirements, and Test Cases, any relationships between those selected items are copiedwhen the component is reused. Also, if any of the source items have relationships that are to itemsoutside of the source component, such as a relationship between a Requirement in the source com-ponent and a Use Case in another component not reused in this action, a new Use Case and its con-tainer appears in this project, as well as a new relationship between the new Requirement and thenew Use Case.
IMPORTANTIf you change the hierarchy of the source component, those changes aren't made inthe destination component.
Select target destinationThe target destination is the place where you want to create a reused item. When reusing items youcan create a new item or you can overwrite an existing item with the source item.
In the Reuse Items window, under Select a target destination, select where you want the item to go:
Jama Connect User Guide
282

• Reuse source project hierarchy in destination projectSelect this option if you are choosing a target destination in a different project that has the same hier-archy as the source project. If a similar set and folder exist, or if they have the same names and lay-out in the source and destination project, then those sets and folders aren't remade in the destinationproject. If a similar set or folder doesn't exist, a new one is created. For example, if you reuse a feature in the Features component, but no Features component exists inthe target project, this option creates the Features component and reuses the feature.
• Manually select location(s) for reused items(s)Select this option if you're copying an item to a different project with a very different structure, or ifyou're reusing an item to a different section of the same project.
Reuse administratorBecause of the complexity of reuse and synchronization, it can be helpful to have a person managingreuse. An organization administrator can assign reuse administrator permissions [566].
Reuse administrators are the only ones who can:
• Edit and delete compare views of synchronized items• Add, edit, and delete reuse rules under advanced options
Add and edit reuse rules
IMPORTANTYou must be a reuse administrator [283] to perform these tasks.
A reuse rule allows you to reuse not only specific items, but also items related to your primary selection.You can also select which fields are copied to the new item (fields not selected use default values).
1. After selecting items for reuse, the Reuse window opens. Under Reuse options, select Advanced.
2. Only reuse rules that apply to the item type selected are shown. To view all reuse rules, deselectOnly show applicable. As a reuse administrator, you can add, edit , or delete rules.
Jama Connect User Guide
283

3. If you add or edit a rule, the Reuse window opens.4. To add a rule, select Add item type rule, then select an item type from the drop-down menu.
5. Select the green Related button to define how to handle up and downstream items related to thisitem type. You can add multiple rules for each item type and each rule can go 16 levels deep. Se-lect the red minus delete button to remove any level or rule.
6. Select the reuse options that you want to apply to these rules:• Sync items and share global ID
Select this box to give the source item and the destination item the same global ID. With thesame global ID, changes to one item flag the relationship between them as out of sync.
• Append a prefix to the names of the copied itemsIf the items are only being reused but not synchronized, you can append a prefix to the new itemin order to differentiate between two copies of the same items. Enter the prefix you want to use inthe field.
• Add a relationship from the original itemSelect this to create a relationship between the original item and the new item.
7. At the bottom of the window under Fields to copy, you can configure each item type to limit thefields and widgets to be copied. Select Configure next to the item type you want to configure.
8. The fields tab allows you to define whether you want all fields copied or specific fields copied.
Jama Connect User Guide
284

IMPORTANTRelease fields can't be reused and synced between projects because they areunique to each project.
9. The Widgets tab allows you to define whether you copy tags, attachments, and links. Once youhave configured your item type, select Done to save your changes and close the window.
SynchronizationSynchronization monitors for differences between reused items and containers. When differences exist,users have the option to update the data for those items or containers.
Synchronized items are only visible to users with read permissions to both items. You must have writepermissions to make edits, synchronize [285], reuse [276], or duplicate items.
If you change the hierarchy of a source component, those changes aren't synchronized in the destina-tion component.
When you convert a synchronized item to different item type, such as converting a Requirement to aFeature Request, the item loses its synchronization and receives a new global ID.
NOTESynchronization changes don't trigger suspect links [267].
Running a synchronization does not remove deleted items. For example, if an item isdeleted from the original component, you can't choose Sync All to delete that itemfrom the new component.
Synchronize items Synchronization updates are allowed only on those projects where you have read/write permissions.You can pull data from projects where you have read-only permissions, but you can't push data to itemsin those projects.
If you add a new item to a container in the source project, then synchronize it to other projects, JamaConnect checks the destination projects to see whether an item with the new global ID already exists.
You can synchronize items in one of these ways:
• When you connect items from Single Item View [289]• In the Synced items window (when syncing multiple items) [287]• When you reuse items [276]• When an organization or project administrator duplicates projects [613]
NOTEIf multiple items with the same global IDs are allowed in that project [535], a new syncitem is added to the container in the destination project, and other copies of that itemelsewhere in the project are ignored. If multiple items with the same global ID aren'tallowed (default), the destination items sync, even though they aren't in the proper hi-erarchy.
Jama Connect User Guide
285

Sync options windowIf you're viewing the Sync options window when synchronizing items in the Synced items window[287], you see reuse options and a destination for your item.
If you're viewing Sync options window from the Compare View, you see a top and bottom half. The topsection displays rules for items in the left column of Compare View. The bottom section displays rulesfor items in the right column of Compare View. The functionality is the same for each pane.
Rules you create in the Sync options window override synchronization rules created through adminis-tration or reuse.
Select Basic in the top right corner to view and select these options:
• Choose how you want to handle relationships:• Don't synchronize relationships• Include relationships from the source selection• Include related items and mirror relationships
• Select the following options as needed:• Synchronize all tags, attachments, and links
When synchronizing related items that don't exist in the destination project, all fields, tags, attach-ments, and links are reused. Fields that aren't applicable to the destination project are set to de-faults.
NOTEOnly links to attachments are synchronized, not the attachments themselves.
• Add a relationship from the original item• The default destination uses the specified target destination.
Reused items are placed in the destination project based on the hierarchy of the source project. If amatching location isn't found, the system automatically creates components, sets, and folders in thedestination project as needed.
Jama Connect User Guide
286

Select Advanced to:
• Display and modify existing reuse rules or add new ones.Reuse rules shown are filtered by item type. Deselect Only show applicable to display all reuserules. Select Add rule to add a new rule to the items selected in this view.
• Select a destination.Select Manually select location(s) for reused item(s) to select a specific destination for yoursynced items.
Select Synchronize to sync all fields specified in the reuse rules in the Sync options window. This alsoremoves all attachments, tags, links, and relationships if selected.
When synchronizing related items that don't exist in the destination project, all fields, tags, attachments,and links follow the sync option that's applied to the view (fields that aren't applicable to the destinationproject are set to defaults).
Break synchronizationBreaking the synchronization removes the connection between items and any other relationships builton this connection. In addition, it gives the removed item a new global Id. Further synchronizations forthat original global ID don't affect the item with the broken connection.
1. Open the Synced items window or open the bottom panel in Single Item View [274] of the itemwhose synchronization you want to break.
2. Select the item whose synchronization you want to break and select Break Sync.
In the Sync Items window, select Break Sync in the same row as a specific item to remove thesync and reassign that item a new global ID. Click the Break Sync button at the top to break thesynchronization between all of the items listed and reassign a new global ID to all of the items.
3. You are asked to confirm the break. Select Yes to continue.
Synchronize items from Synced items window
1. Open the Synced items window [274].2. Select the component, set, or items that you want to sync from the Explorer Tree. Select Sync All
to open the Sync options [286] window for all of the items shown, or select the up or down arrowto sync changes to or from the items shown.
Jama Connect User Guide
287

3. Alternatively, you can select Compare to open the Compare View. Then use the right or left arrowbuttons for each item to sync them in a particular direction. Or, you can select multiple items (high-lighted in blue) using the Ctrl and Shift keys and use the arrows at the top of the Sync All columnto synchronize all the items in a particular direction.
CAUTIONSynchronizing all items can't be undone. If the wrong groups are chosen to be up-dated, fixing those updates might be cumbersome and time intensive.
4. The Batch Sync window displays the selected number of items to update. Selected Itemsare au-tomatically selected, but you can also choose All items.
5. Select Batch Sync to complete the update.
Jama Connect User Guide
288

NOTEWhen synchronizing items, only those fields that are enabled as synchronized fields[578] have their data updated. Child items are added to the destination if they exist inthe source only.
When syncing a container, the container and all children are always synced unless youcreated advanced reuse rules [283] that specify otherwise.
Connect items from Single Item View
1. Open the bottom panel in Single Item View [274].2. In the bottom panel, select Connect Items.
3. In the right panel that opens, select the item you want to connect to, then select Connect. You canuse the recently viewed, search, explorer, or releases tabs to help you find the item. You can alsoselect Preview to open a window with details about an item.
Jama Connect User Guide
289

4. The newly connected item now appears in the bottom panel with the same global ID. This changealso appears as an activity in the Stream [205].
Compare synchronized items
1. Open the Synced items window [274], then select an item or container in the Explorer Tree.2. The selected item or component is displayed with a sync status that lets you know whether that
item is in sync or out of sync. If it's out of sync, select it to open a Detailed Comparison View ofthose differences.
Jama Connect User Guide
290

3. To view the differences at an item level, select Compare.
4. You see a list of all synchronized items in that component. Use the links at the top to filter itemswithin a component. Use your mouse to scroll left or right so you can compare fields. Click Config-ure View to configure which fields are displayed [293]. Yellow highlights indicate synchronizeditems with content that doesn't match.
Jama Connect User Guide
291

NOTEIf an organization administrator didn't enable a field to be synced [578], it's neverhighlighted in yellow, and it can't be synced.
5. (Optional) Select Save compare view.
6. If this view doesn't give you enough information to determine whether or not you want to syncsomething, select Detailed compare view for the items you want to compare. This opens a De-tailed Compare View window.You see individual changes that were made with the old text highlighted and in red and the newtext underlined and in green. You can synchronize the data by selecting the green arrow, or selectthe pencil icon to manually edit the content of the fields. Select Save when you're done.
Jama Connect User Guide
292

7. Select Back to go back to the initial window where you can select synced items.
Configure Compare View for synchronized itemsTo configure Compare View in the Synced items window:
1. Select Configure View in the upper right corner.
2. Select the item type to configure from the drop-down menu at the top of the Configure view win-dow.
3. Under the Fields tab, double-click, drag or use the middle arrows to move the fields you want tosee from Hidden fields to Visible fields.
Jama Connect User Guide
293
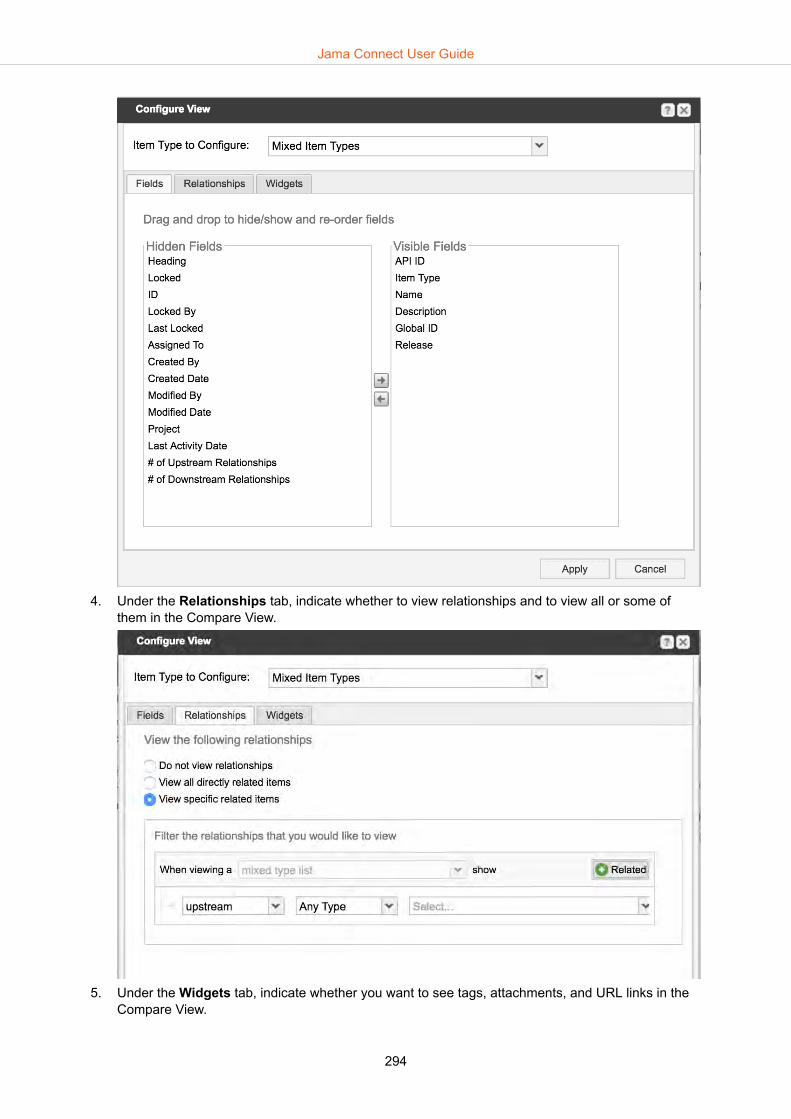
4. Under the Relationships tab, indicate whether to view relationships and to view all or some ofthem in the Compare View.
5. Under the Widgets tab, indicate whether you want to see tags, attachments, and URL links in theCompare View.
Jama Connect User Guide
294

6. Select Apply to save your changes or select Cancel to close the window without saving.
NOTEThe changes you make in this window are only set for the specific Compare Viewyou're currently viewing in the Sync Items window. Changes don't persist if you closethis window. If you want to keep the same configuration, you can save a CompareView [290].
ExportsSelect the data you want to export using advanced filters [139] or the Explorer Tree and export directlyto Word [297] or Excel [297] from List or Reading View. Use these options to quickly export without atemplate.
If you view your filter results in Reading View, you see container items. These items offer a sense ofhierarchy and visual context and are included in your export. However, you can't select or change con-tainers from Reading View.
Important considerations
Data exported from Jama Connect to Excel can be interpreted as formulas in Excel, leading Excel toevaluate the cell and return a value. For example, if the name of an in item in Jama Connect is“=1338-1”, Excel interprets it as a formula and the value is displayed as “1337”. All Excel formulas beginwith the equal symbol (=). When Excel encounters a field value that starts with =, the cell might interpretit as a formula.
To avoid issues with how Excel might interpret data, don't use field names starting with the equal sym-bol (=).
You can also:
• Export data using a custom template [299]• Export data from Trace View [256]• Export review activity [194]• Export test cases [317]
Jama Connect User Guide
295

• Make round-trip exports [77]• Export a risk analysis [423] (if your organization has this feature)
To use specific templates, select Office Templates [299]. From the Office templates window, you candownload and modify some of the more basic templates [302].
Do you have information you want to include or exclude from an export? In List View, select the gearicon to modify the fields that appear in your in your document.
Export template parameter
By default, extra line breaks are removed to improve the published document, however this might causeconsecutive tables to be combined. If you need to restore a template to previous export results, you canapply a new parameter to the report parameter field in the template.
Setting Definition Parameter
Default Removes extra line breaks; consecutive tables are combined. cleanEmptyParagraphs=true
Custom Keeps extra line breaks; consecutive tables are separate. cleanEmptyParagraphs=false
TIPFor self-hosted customers, a system or organization administrator can upload customVelocity exports [370] that are also displayed in the Export window.
Jama Connect User Guide
296

Export to WordYou can export a set of items as a Microsoft Word document. If you want to show your content in con-text, you can include hierarchy in these exports. The default Word export is a boilerplate that was cre-ated with Office Templates and can be modified to meet your needs.
To export contextual hierarchy with Reading View:
1. Select the items you want to export using the Explorer Tree or an advanced filter.2. Choose Reading View.3. Select Export > Export to Word.4. Upon export, your content appears as follows, depending on how you selected your data:
• Selection with the Explorer TreeThe selected container becomes the title page for the export.
• Selection with an advanced filter within a single projectReading View includes the container hierarchy above the filtered items, up to the top of theproject. Container items that show hierarchy have a grayed-out (disabled) checkbox, while therest of the items can be selected. Hierarchical containers are exported with the content items.
• Selection with a cross-project filterReading View doesn't display numbering. The export is a listing of items without hierarchical in-formation.
When you export items from List View, all of the items appear in list form. The export displays a table ofcontents, followed by each of the items, their names, and a list of field names and values for each.
To export a list of items from List View:
1. Select the items you want to export using the Explorer Tree or an advanced filter.2. Choose List View.3. Select Export > Export to Word.
NOTEWord for Mac is known to have some issues with exporting certain formats and ta-bles. If you experience issues, try to eliminate any special formatting or tableswithin tables.
Export to Excel using default templatesExport to Microsoft Excel if you need to provide data to external stakeholders who don’t have access toJama Connect. You can also use round trip to work offline or share data in a format that can be used toupdate existing data.
You can export selected items to an Excel document two ways:
• Using the default boilerplate template• Using Office Templates, which can be customized
To export data to Excel:
1. From an advanced filter or the Explorer Tree, select the data you want to export.2. In List View, select the gear icon (Show/Hide) to open the drop-down menu.3. Select the fields that you want to include in the Excel output.4. Deselect (hide) the fields that you don't want to include.
Jama Connect User Guide
297

NOTEExcel doesn't support rich text. Jama Connect removes formatting when it exportsto Excel.
5. In the toolbar, select Export.6. For default template
If you want to export using the default boilerplate, select Export to Excel. Your results appear im-mediately.
7. For Office TemplatesIf you want to customize your template, select Office Templates, select an Excel export option,then click Run.
• Export to Excel defaultGenerates an export that includes the fields that appear in List View (one column per field). Thisexport isn’t meant for importing data updates to existing items in Jama Connect. If you need todo this, use Excel Export for Roundtrip [77].
• Excel Export for RoundtripIncludes all available fields. You can edit the resulting spreadsheet and import the changes backinto Jama Connect.
NOTEAll fields that you plan to update using round trip must be included in the export,including rich text fields like Description. Rich text is output in raw HTML format,so the content can be preserved if re-imported.
Export to PDFYou can export a set of items as a PDF using the PDF reports included with Jama Connect. If you wantto show your content in context, you can include hierarchy in these exports. The default export is cre-ated with Office templates and can be modified to meet your needs.
Jama Connect User Guide
298
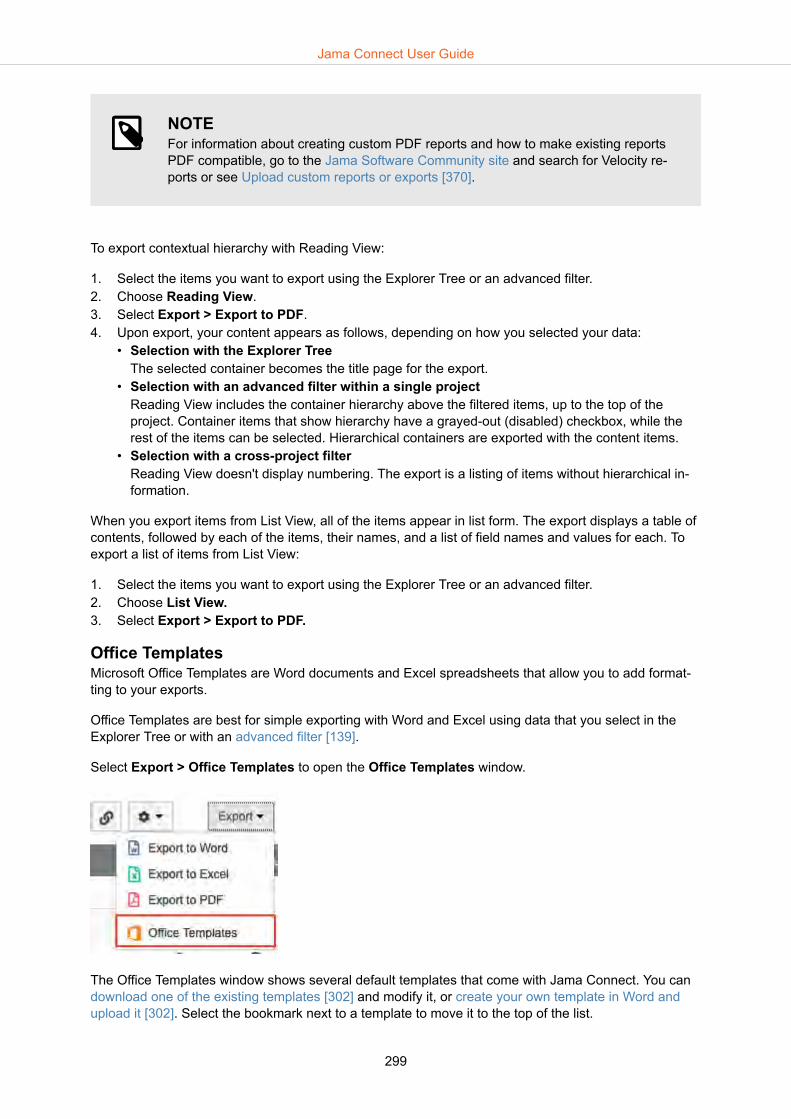
NOTEFor information about creating custom PDF reports and how to make existing reportsPDF compatible, go to the Jama Software Community site and search for Velocity re-ports or see Upload custom reports or exports [370].
To export contextual hierarchy with Reading View:
1. Select the items you want to export using the Explorer Tree or an advanced filter.2. Choose Reading View.3. Select Export > Export to PDF.4. Upon export, your content appears as follows, depending on how you selected your data:
• Selection with the Explorer TreeThe selected container becomes the title page for the export.
• Selection with an advanced filter within a single projectReading View includes the container hierarchy above the filtered items, up to the top of theproject. Container items that show hierarchy have a grayed-out (disabled) checkbox, while therest of the items can be selected. Hierarchical containers are exported with the content items.
• Selection with a cross-project filterReading View doesn't display numbering. The export is a listing of items without hierarchical in-formation.
When you export items from List View, all of the items appear in list form. The export displays a table ofcontents, followed by each of the items, their names, and a list of field names and values for each. Toexport a list of items from List View:
1. Select the items you want to export using the Explorer Tree or an advanced filter.2. Choose List View.3. Select Export > Export to PDF.
Office TemplatesMicrosoft Office Templates are Word documents and Excel spreadsheets that allow you to add format-ting to your exports.
Office Templates are best for simple exporting with Word and Excel using data that you select in theExplorer Tree or with an advanced filter [139].
Select Export > Office Templates to open the Office Templates window.
The Office Templates window shows several default templates that come with Jama Connect. You candownload one of the existing templates [302] and modify it, or create your own template in Word andupload it [302]. Select the bookmark next to a template to move it to the top of the list.
Jama Connect User Guide
299

For self-hosted customers, an administrator can also upload Velocity templates [370] and they are alsodisplayed here.
TIPThe All Items Details Export [304], and the Coverage Report [305] are made with Ve-locity and can't be downloaded and modified with Microsoft Word.
Each Office Template has three sections:
• Cover page This section contains general information about the export, and the data it references.Some fields typically included in this area are:
<<reportName>> - shows the Report Name entered in the Office Templates window <<reportDescription>> - shows the Report Description entered in the Office Templates window <<contextType>> - shows the type of content being used (e.g. release, component, filter, folder, item etc) <<contextName>> - immediate context for the data being used (e.g.
Jama Connect User Guide
300

container name, like "Requirements") <<userName>> - name of the user generating the report <<projectName>> - name of the project <<projectManager>> - project administrator <<organizationName>> - name of the organization <<contextPath>> - hierarchical path from the content to the project level
• Table of contentsThis is automatically generated using Word's heading hierarchy. You can delete this by editing thetemplate to remove this section.
• Items and fieldsThis section contains the items and their respective fields from the selected data set. This section canbe modified.
TIPFor a list of fields available for export in your current project, you can download theField Reference Guide [306].
If you need to roll up field data or do something more complex than simply export for-matted data from Jama Connect, read about reports [355] or custom reports [369].
Export data with Office templates
1. In List View or Single Item View, select Export > Office Templates.2. In the window that opens, select the export you want to run from the list of templates on the left.
Jama Connect User Guide
301

3. Select the format for your export. You might also need to enter additional information about yourexport for some of the templates to work correctly.
4. Exports that contain lots of data can take several minutes. You can select Email me the report toreceive a link to the export when it's finished. Links are stored for 7 days before they're automatical-ly deleted.
5. Click Run.
Download an existing export templateYou can download an existing Office Template to modify it or to start a new template.
1. In List View, Reading View, or Single Item View, select Export > Office Templates.2. In the Office Templates window that opens, right-click on the template you want to download or
open the template and use the top toolbar to select Download Template.
3. The template is downloaded to your computer. You can modify the template in Word and upload itas a new template [302].
Upload an export templateAny user with read/write permissions can upload and export a custom template. You must be a projectadministrator to upload and save a template to a particular project.
NOTEFor self-hosted customers, an organization or system administrator can upload tem-plates to be available in multiple projects.
To upload a template:
Jama Connect User Guide
302
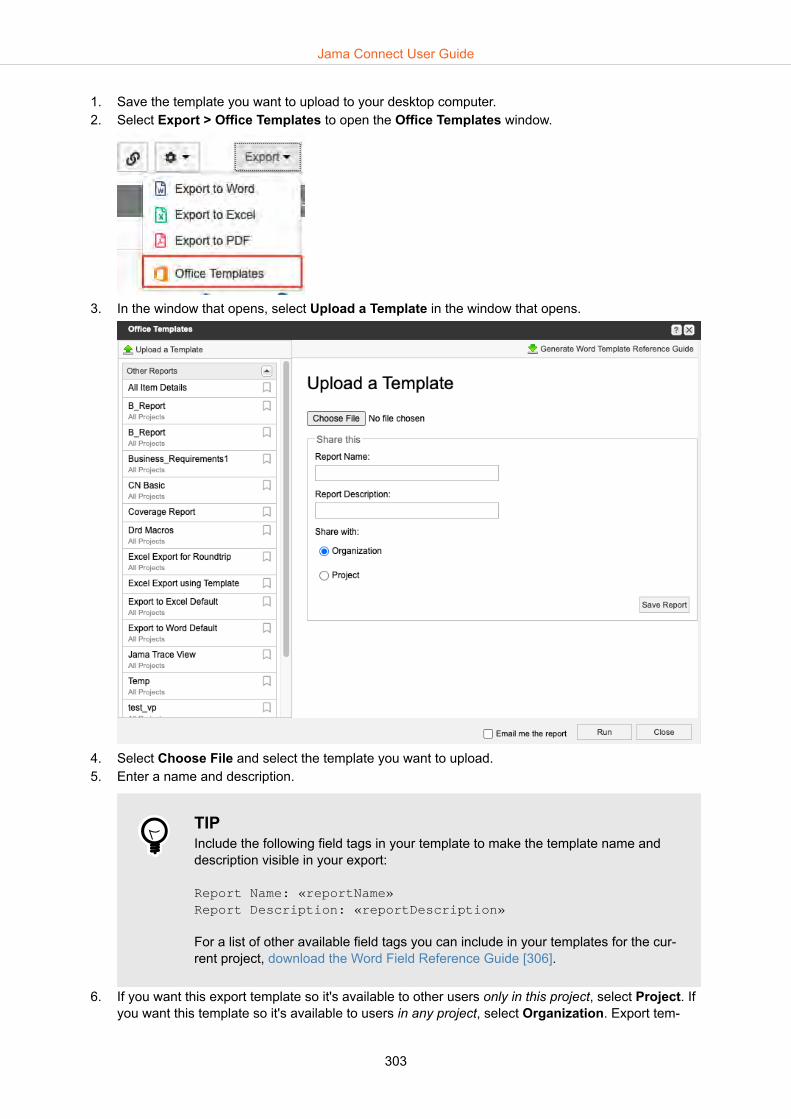
1. Save the template you want to upload to your desktop computer.2. Select Export > Office Templates to open the Office Templates window.
3. In the window that opens, select Upload a Template in the window that opens.
4. Select Choose File and select the template you want to upload.5. Enter a name and description.
TIPInclude the following field tags in your template to make the template name anddescription visible in your export:
Report Name: «reportName»Report Description: «reportDescription»
For a list of other available field tags you can include in your templates for the cur-rent project, download the Word Field Reference Guide [306].
6. If you want this export template so it's available to other users only in this project, select Project. Ifyou want this template so it's available to users in any project, select Organization. Export tem-
Jama Connect User Guide
303

plates that are shared with the organization are visible in the left column of the Office Tem-plateswindow with the label All Projects.
7. Select Save Report.
All Item Details ExportThe All Item Details Export displays all item details for the selected project. It was designed in Velocityfor output in Microsoft Word and HTML. It's a useful export for sharing details of a set of requirementsor other group of artifacts with others outside of Jama Connect.
Once the main panel in Projects shows the correct data set, then select Export > Office Templates. Inthe Office Templates window, select All Item Details, select a format, choose the parameters you need("Include relationships" and/or "Include tags"), and select Run.
Jama Connect User Guide
304

Coverage ReportThe Coverage Report displays downstream relationships to the selected set in HTML, Microsoft Word,or Microsoft Excel. It provides summary and detailed information on the traceability coverage for the se-lected items.
1. Select the data you want to export using the Explorer Tree or an advanced filter.2. Select Export > Office Templates.3. In the Office Templates window, select Coverage Report.4. Select a format, choose the parameters you need (Missing coverage only, Downstream item lo-
cation), and select Run. Selecting no parameters provides a report like the one shown here. If youwant to see a more specific set of relationships, then select one or both of the parameter options.
Jama Connect User Guide
305

Download the Field Reference GuideThe Field Reference Guide is helpful when you're creating or editing templates. It provides a dynamicreference of all the field tags that you can use to surface information in your export templates.
This guide is unique to each project in Jama Connect. Downloading the guide provides an up-to-datelist of all the field tags available for items in the currently selected Jama Connect project.
You can copy and paste from this reference guide when creating a new template.
To download the guide:
1. In Projects List View or Single Item View select Export > Office Templates.
2. Select Upload a template, then select Generate Word Template Reference Guide.
3. If any fields change in your project, download a new guide to see how the changes affect exporttemplates.
Embed custom fonts in exportsYou can embed custom fonts into Word or PDF exports.
1. Download the template [302] for the existing export that you want to publish with a custom font.
Jama Connect User Guide
306

2. Convert that template to DOCX format by selecting File > Save As > Word Document (.docx) inMicrosoft Word.
3. Select all of the text in the document and change it to use your custom font.
NOTEThe custom font must be in the TrueType Font format (TTF).
4. Enable embedded fonts in the document.5. Upload the template [302] to an existing or new export in Jama Connect.6. Export the document [301] in Word or PDF format.
Jama Connect User Guide
307
Test
You can use tests in Jama Connect to validate and verify the quality of your product and provide reportsto show connections between regulations, requirements, and tests.
A typical workflow looks like this:
• Create test cases [308] that meet the needs of a particular project or multiple projects across yourorganization. Test cases describe the specific tests you plan to use and their steps [311].
• Create a test plan [319] that gives an overview of how you want to test requirements.• Associate the cases you want to use into that plan using groups [322] to organize them.• Get ready for testing, by moving those groups into cycles [330] where you can see a list of all the
tests you want to run. • Execute the test runs and log defects [337] as needed.• Resulting test run statuses roll up to calculate the overall test case status [313]. You can then gener-
ate a report showing results, such as the Test Plan Summary Report [366] or the Test Plan Detail Re-port [364].
IMPORTANTYou must have at least a test runner license to be able to add and edit defects anditems, create test plans and runs, and manage relationships and attachments. Howev-er, test runners can only affect items that are used as defects [310]. More extensivepermissions require a different license [562].
Test casesTest cases are items that contain the tests needed to validate or verify product features or systems.
Test cases contain essential information about your tests. Depending on how you want to use them youcan make standalone tests, or specific tests aligned with your use cases and requirements to assistwith validation and verification.
Creating test cases is the first step in getting tests set up for your organization. Although Jama Connectcomes with a default item type of Test Case, you can use any item type as a test case [579]. You canadd a new test case in the same way you would add any other item [107].
Here are three ways you might want to organize test cases:
• By project: Keep all the test cases in the same location as your project so the team goes to thesame place to collaborate, and can see a similar mirrored structure between your tests and require-ments. This makes it easy to manage permissions for users and contain the test case and test runstatus in your reports.
• By library: You can create a single library of tests in a separate project and reuse test cases in differ-ent projects. This can be useful to standardize the testing setup and to allow the entire organization touse the same test cases. However, with test cases being reused in multiple plans and projects, re-ports are more likely to rely on test run status than test case status.
• Adhoc: You can pull test cases from multiple projects into any plan. You can find test cases acrossmultiple projects by using a filter.
Test cases are where you create test steps [311] that are used every time that case is run.
Jama Connect User Guide
308

Test cases contain an automatically calculated (and uneditable) test case status [313] field.
Test cases quick findYou can find test cases using one of these methods.
• Look for test cases in the Explorer Tree [43].• Projects > Trace View [49] where they appear in relationship to items they test, along with associ-
ated test runs.• Projects > List View [47] where you can filter by item type name to find test cases.• Test Plans where you can see them in the test cases section of the plan by selecting Test Cases.
Import test casesYou can import multiple test cases and their corresponding test steps by importing them from a spread-sheet. Use one-way import [77] to quickly bring legacy test cases into Jama Connect.
You can also use a round-trip import [77] so you can work with content outside of Jama Connect andbring changes back in safely.
TIPAlthough you can import test cases using Microsoft Word, you can only map the Nameand Description fields, not the individual steps. Instead, use Excel for test case im-ports.
When importing test cases:
• Your Excel spreadsheet must contain the following column headers: Test case name, Action, Expec-ted results, and Notes.
• Add columns to represent additional fields as part of the import, which is consistent with how otherimports to Excel work.
• Each row with the same test case name imports as a new test step for that case.• You can't use a round-trip [77] to edit the test case status [313] because that field is automatically
calculated from test run statuses.• To add a test step in Excel, copy a pre-existing row and insert that row where you want it. Change the
content of the cells as needed to create the new step. The numbering of the steps appears off but re-numbers on import.
Jama Connect User Guide
309
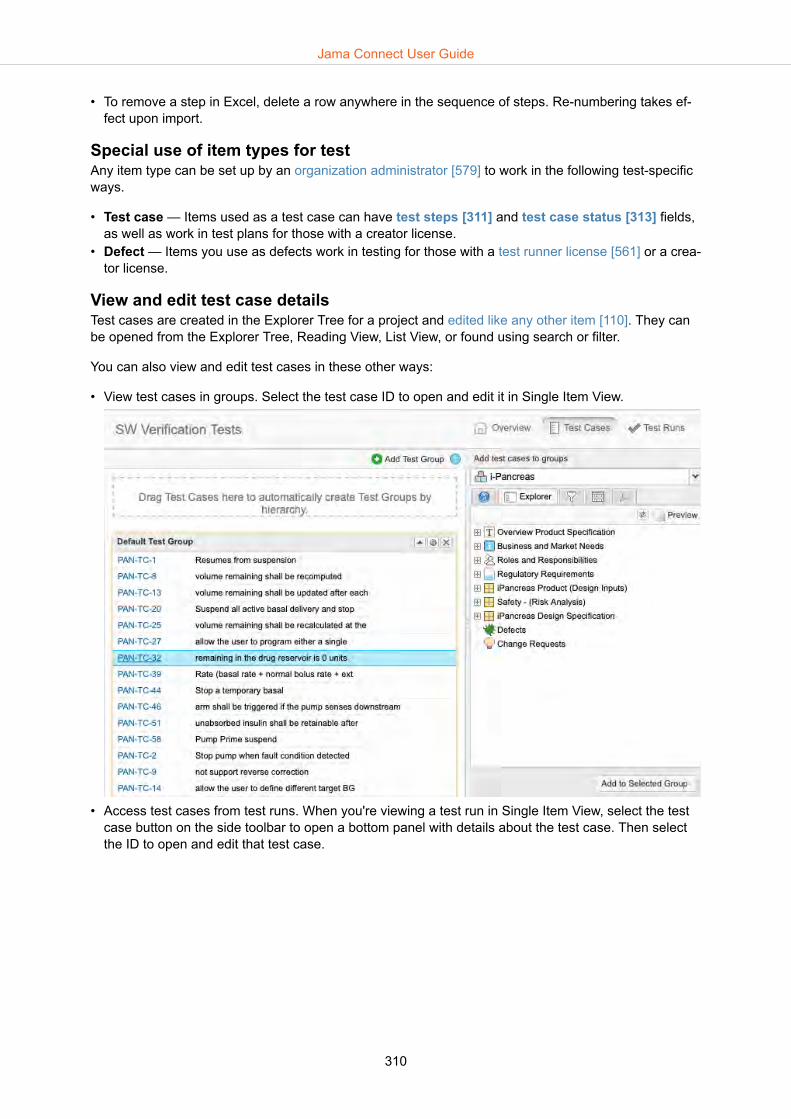
• To remove a step in Excel, delete a row anywhere in the sequence of steps. Re-numbering takes ef-fect upon import.
Special use of item types for testAny item type can be set up by an organization administrator [579] to work in the following test-specificways.
• Test case — Items used as a test case can have test steps [311] and test case status [313] fields,as well as work in test plans for those with a creator license.
• Defect — Items you use as defects work in testing for those with a test runner license [561] or a crea-tor license.
View and edit test case detailsTest cases are created in the Explorer Tree for a project and edited like any other item [110]. They canbe opened from the Explorer Tree, Reading View, List View, or found using search or filter.
You can also view and edit test cases in these other ways:
• View test cases in groups. Select the test case ID to open and edit it in Single Item View.
• Access test cases from test runs. When you're viewing a test run in Single Item View, select the testcase button on the side toolbar to open a bottom panel with details about the test case. Then selectthe ID to open and edit that test case.
Jama Connect User Guide
310

Test stepsTest steps are distinct steps used to run a test.
When running a test, you can indicate the success or failure of each step. The test steps field is availa-ble in any item whose item type is used as a test case [579].
Add and edit test stepsTest steps are plain text by default. When an organization administrator enables rich text in test steps[580], you can edit with rich text by selecting the pencil icon or double-clicking on the Steps field. Se-lecting Edit in the toolbar only allows plain text or html edits.
You can't edit test steps when editing a test run.
1. View details of the test case [310] where you want to add steps, or create a new test case [308].2. Select Edit in the toolbar, the pencil icon next to the field, or double-click in the field to make it edit-
able. In the steps field, select Add step.
Jama Connect User Guide
311

3. Enter text in the Action, Expected result, and Notes fields, if you want. You can use the Tab keyto move between fields. Use the rich text editor [312] to format text or to add images in the steps.
4. Use the up and down arrows to re-order the steps. You can also grab the handle by the row num-ber to drag it to the right position.
5. Use the insert icon to insert a step. Delete a step with the trash can icon.6. Select Save to include the test steps in the test case.
Add images to test stepsTest steps are plain text by default. An organization administrator can enable rich text for basic format-ting and embedded images. [580]
To add an image:
1. Edit a test case.
IMPORTANTYou must save a test case first before adding images to test step fields.
Jama Connect User Guide
312

2. Select Edit in the toolbar, the pencil icon next to the field, or double-click in the field to make it edit-able. Place your cursor in the step where you want to add the image.
3. Select the add image icon, then select the image from your browser. You can also select the filefolder icon, then select the image from those already saved onto the application server as attach-ments.
4. Large images are resized automatically to fit the width of the cell. To view the full-sized image, navi-gate to the image location by right-clicking on the image.
Test case statusTest case status is an automatically calculated status that indicates the state of the last edited test runassociated with that test case.
By default, this status is calculated using all available test runs associated with the test case, includingruns that aren't scheduled. An organization administrator can disable this option [604] so that unexecu-ted runs aren't included in the calculation.
The status is calculated in one of these methods:
• If the test case is used in only one test plan, the latest status is reported on the test case.• If the test case is used in multiple test plans, test case status shows the most urgent test run status
based on the following hierarchy, regardless of when it ran: Not Scheduled, Failed, Blocked, Sched-uled, Passed.
The status is visible in Single Item View of each test case.
NOTEBecause test case status is automatically calculated, it can't be manually updatedwhen editing a test case.
Jama Connect User Guide
313
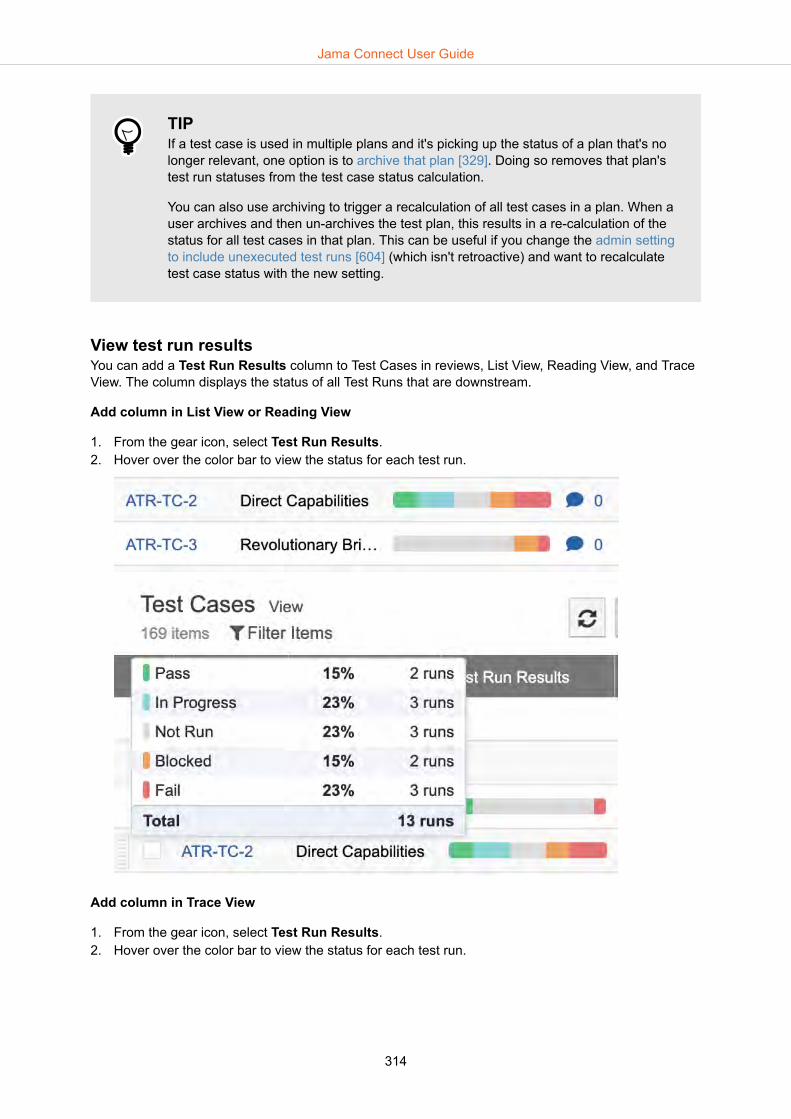
TIPIf a test case is used in multiple plans and it's picking up the status of a plan that's nolonger relevant, one option is to archive that plan [329]. Doing so removes that plan'stest run statuses from the test case status calculation.
You can also use archiving to trigger a recalculation of all test cases in a plan. When auser archives and then un-archives the test plan, this results in a re-calculation of thestatus for all test cases in that plan. This can be useful if you change the admin settingto include unexecuted test runs [604] (which isn't retroactive) and want to recalculatetest case status with the new setting.
View test run resultsYou can add a Test Run Results column to Test Cases in reviews, List View, Reading View, and TraceView. The column displays the status of all Test Runs that are downstream.
Add column in List View or Reading View
1. From the gear icon, select Test Run Results.2. Hover over the color bar to view the status for each test run.
Add column in Trace View
1. From the gear icon, select Test Run Results.2. Hover over the color bar to view the status for each test run.
Jama Connect User Guide
314

Add column in reviews
1. Select Admin > Organization, then select Item types.2. On the Item types page, select Test Case > Edit.
Note: Your administrator might use a different name for Test Case, like "verification." To confirm theitem type, look at the "Use as" section in the Edit Item Type window.
Jama Connect User Guide
315
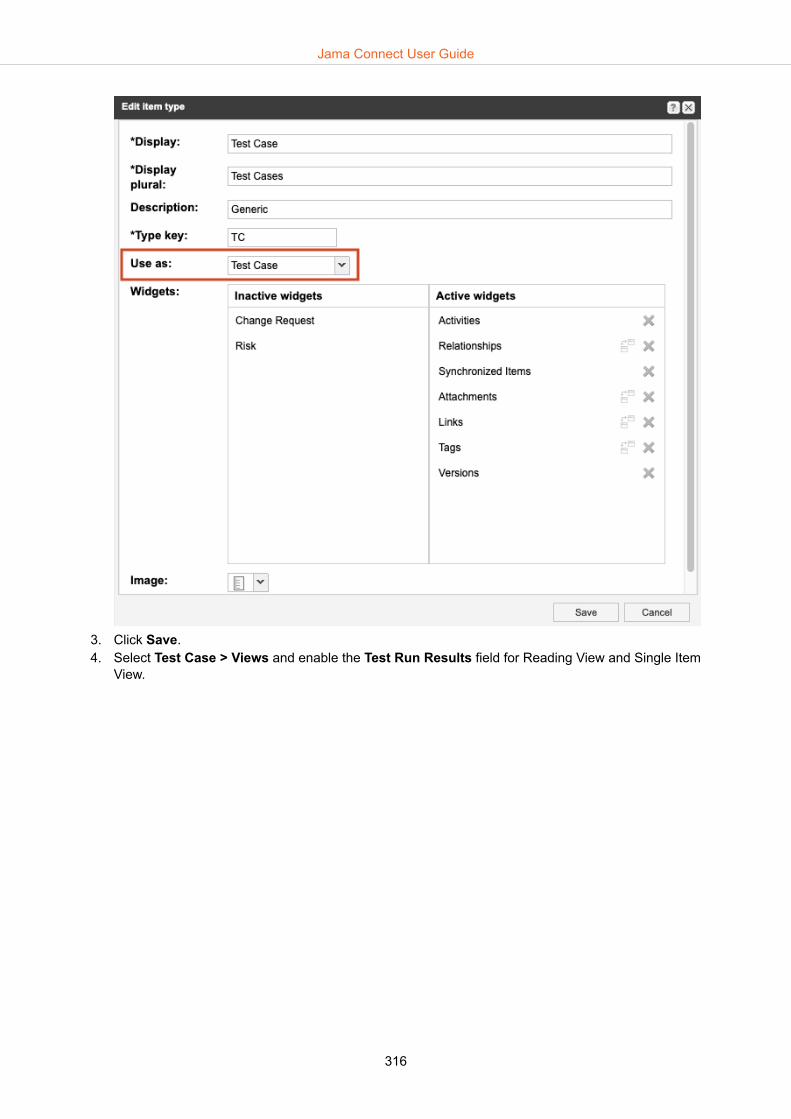
3. Click Save.4. Select Test Case > Views and enable the Test Run Results field for Reading View and Single Item
View.
Jama Connect User Guide
316

In a review with Test Case items, the results rollup bar now appears.5. Hover over the color bar to view the status for each test run.
Export test cases to Microsoft ExcelYou might want to export test cases to Excel for manual testing or for audit purposes when the docu-ments need to be saved in a formal repository.
The content that appears in the final output depends on the items you select. For example, if you selectName and Modified by, those are the only fields that appear in the output.
Jama Connect User Guide
317
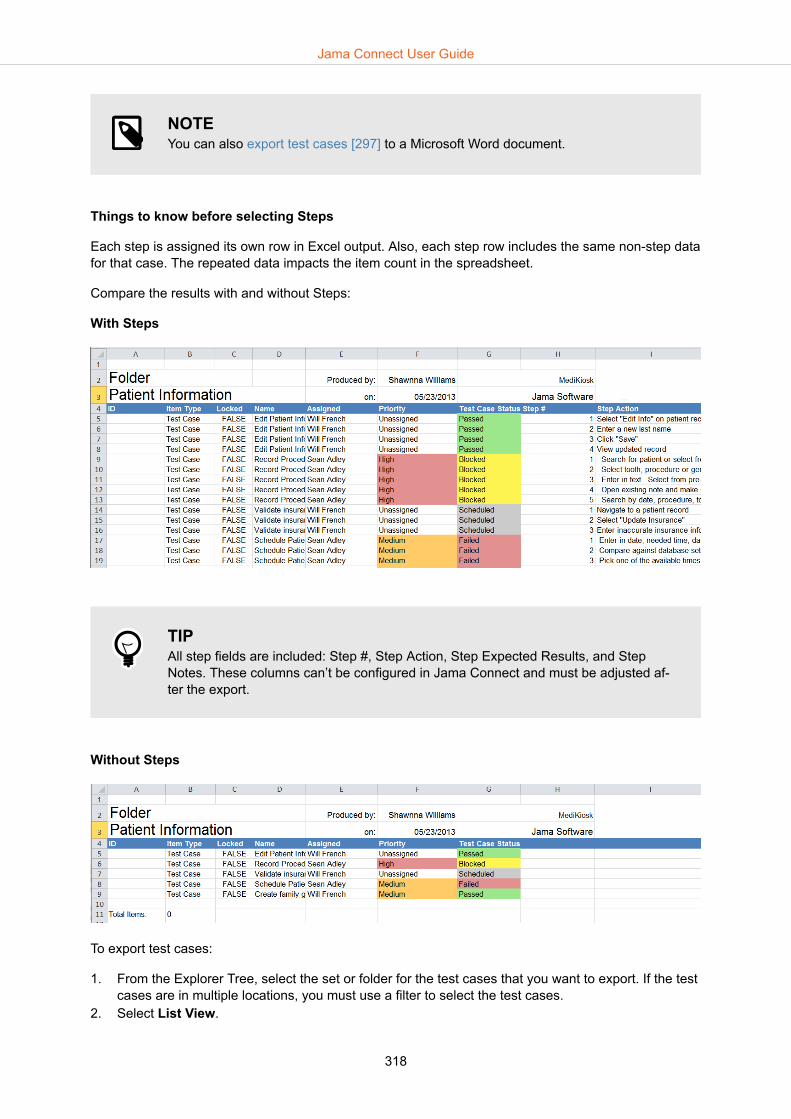
NOTEYou can also export test cases [297] to a Microsoft Word document.
Things to know before selecting Steps
Each step is assigned its own row in Excel output. Also, each step row includes the same non-step datafor that case. The repeated data impacts the item count in the spreadsheet.
Compare the results with and without Steps:
With Steps
TIPAll step fields are included: Step #, Step Action, Step Expected Results, and StepNotes. These columns can’t be configured in Jama Connect and must be adjusted af-ter the export.
Without Steps
To export test cases:
1. From the Explorer Tree, select the set or folder for the test cases that you want to export. If the testcases are in multiple locations, you must use a filter to select the test cases.
2. Select List View.
Jama Connect User Guide
318

3. Select the gear icon to open a drop-down menu and select what you want to include in the Excelspreadsheet.
4. In the toolbar, select Export > Export to Excel.
Test plansA test plan is an item that documents the overall strategy for validating or verifying that a product orsystem meets its design specifications and requirements.
Test plans quick findAlthough test plans are items, they aren't visible in the Explorer Tree.
To find test plans and their details:
1. Select the Tests tab at the top of the Explorer Tree.
2. Select the plan you want to use to view details [324] of that plan.3. View and comment on test plans in review [326], as needed.
TIPAlthough test plans don't appear in the Explorer Tree, you can surface them with anadvanced filter [139].
Jama Connect User Guide
319

Add a test plan
NOTEYou must have read/write permissions for the entire project in order to create a testplan.
1. Select the Tests tab in the left panel.
2. Select Add test plan.3. In the Add item window that opens, enter the name and description of your new plan, and add any
tags. An organization administrator can edit the default template [594] included in the test plan de-scription.
Jama Connect User Guide
320
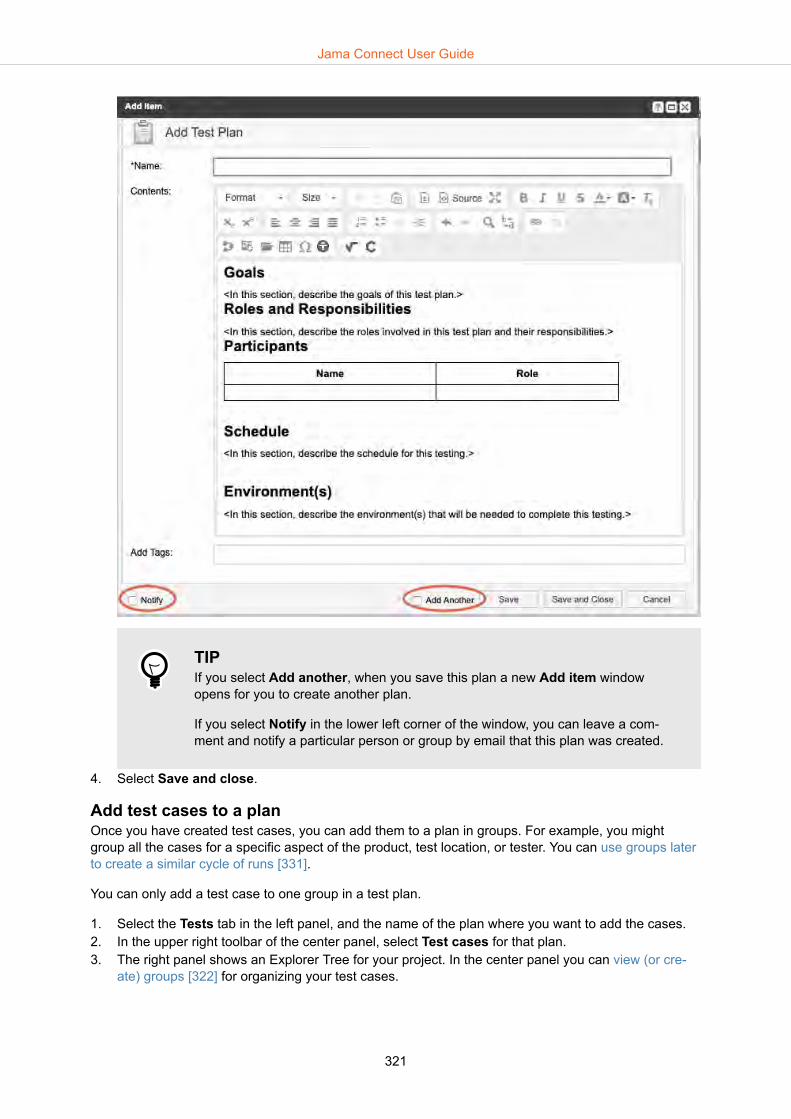
TIPIf you select Add another, when you save this plan a new Add item windowopens for you to create another plan.
If you select Notify in the lower left corner of the window, you can leave a com-ment and notify a particular person or group by email that this plan was created.
4. Select Save and close.
Add test cases to a planOnce you have created test cases, you can add them to a plan in groups. For example, you mightgroup all the cases for a specific aspect of the product, test location, or tester. You can use groups laterto create a similar cycle of runs [331].
You can only add a test case to one group in a test plan.
1. Select the Tests tab in the left panel, and the name of the plan where you want to add the cases. 2. In the upper right toolbar of the center panel, select Test cases for that plan.3. The right panel shows an Explorer Tree for your project. In the center panel you can view (or cre-
ate) groups [322] for organizing your test cases.
Jama Connect User Guide
321

4. Select any component, set, or folder of test cases, or an individual test case from the tree on theright. You can also use the Releases, Filters , or Search tabs to find the test cases you want toadd. Drag it to an existing group to add cases to that group.Alternatively, grab test cases and drag to the dashed line box at the top of the center pane to cre-ate a new group. If you drag a component, set or folder that contains test cases, the hierarchy ispreserved. For example, if you drag this set of test cases to the top of the center panel:
... it results in the creation of these three groups:
Test groupsTest groups let you combine and label similar tests in a test plan.
Test cases are added to a plan in groups. Organizing test cases this way makes it easier for others tounderstand and run your test plan. For example, you might want to put all the cases for a specific as-pect of the product, test location, or tester in the same group.
Add, edit, or delete a test groupWhen adding test cases to a plan [321], they are added in groups. In addition to the default test group,or automatic groups that are created by dragging test cases, you can also manually create a newgroup.
Jama Connect User Guide
322

1. Select Test cases [149] for the plan you want to see.2. Select the green Add Test Group button.
3. In Add/Edit Group of Test Cases, enter the name of the group.4. Select the magnifying glass icon to open the Add users window. Select the name of the person
you want to assign to run the tests in this group. Use Select user to complete the action. This alsoautomatically assigns any runs created from this group to that person.
TIPSome organizations create a user as a placeholder for a particular team, such as"Test Team A" and assign groups to that team.
This does require an active license, but it allows members of the team to see allthe runs that are assigned to their team in a cycle.
When you execute a run that was assigned to another user (such as "Test TeamA") you can reassign that run to yourself.
5. Select Save on the Add/Edit groups of test cases window.6. To edit an existing test group, select the settings icon in the corner of the group to open the Add/
Edit window. You can also use the triangle to collapse or expand groups, or the X to deletegroups.
Jama Connect User Guide
323
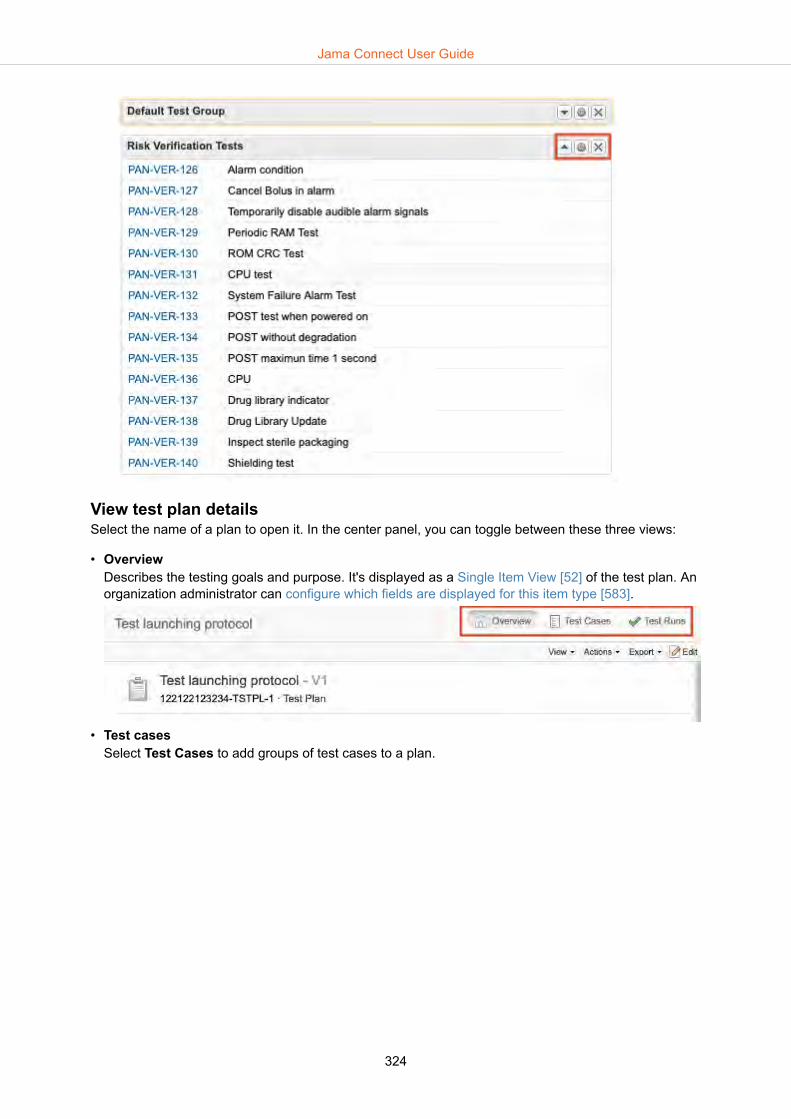
View test plan detailsSelect the name of a plan to open it. In the center panel, you can toggle between these three views:
• OverviewDescribes the testing goals and purpose. It's displayed as a Single Item View [52] of the test plan. Anorganization administrator can configure which fields are displayed for this item type [583].
• Test casesSelect Test Cases to add groups of test cases to a plan.
Jama Connect User Guide
324

• Test runsSelect Test Runs to add and perform a cycle of test runs.
Edit a test planOnce you find the test plan you want to use, decide which way to edit the overview section of a plan.
1. Right-click on the plan you want to edit. 2. Select Edit to open the Edit item window.
Jama Connect User Guide
325
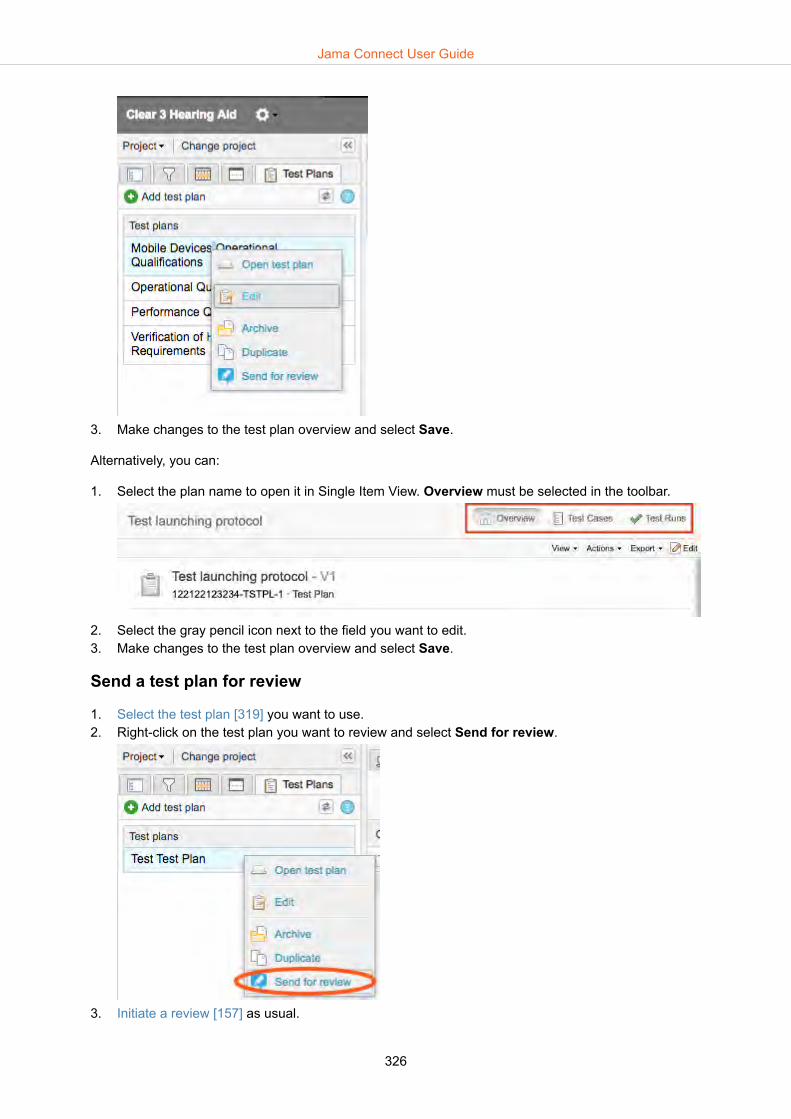
3. Make changes to the test plan overview and select Save.
Alternatively, you can:
1. Select the plan name to open it in Single Item View. Overview must be selected in the toolbar.
2. Select the gray pencil icon next to the field you want to edit.3. Make changes to the test plan overview and select Save.
Send a test plan for review
1. Select the test plan [319] you want to use.2. Right-click on the test plan you want to review and select Send for review.
3. Initiate a review [157] as usual.
Jama Connect User Guide
326

TIPYou can also create an advanced filter [139] that contains any combination of testplans, cycles, cases and runs and send that to review.
Jama Connect User Guide
327

TIPWhen sending test items to review, not all relevant fields might appear in Reviews Sin-gle Item View or in Reviews Reading View. An organization administrator can configureviews [595] for an item type to include the necessary fields.
Duplicate a test planRight-click on the test plan you want to duplicate (active or archived) and select Duplicate.
Jama Connect User Guide
328

This creates an active copy of the selected test plan.
IMPORTANTThe copy contains the same details as the original and the same groups of test cases,but doesn't contain the test runs or test cycles from the original.
Archive a test plan or run
1. Right-click on the test plan that you want to archive and select Archive.
2. Archived test plans move into a group at the bottom of the list of test plans.3. To unarchive a test plan, right-click an archived test plan and select Unarchive to make it active.
NOTEThe only way to archive a test run is to archive the associated test plan. When you ar-chive a test plan, the associated test runs no longer appear in the associated testcase, and the test case status reverts to "not scheduled." You can unarchive test runsand recalculate test case status by unarchiving the associated test plan.
Jama Connect User Guide
329

Delete a test plan
CAUTIONWhen you delete a test plan, you also delete all associated test cycles and runs. If youdo this, test cases associated with deleted test runs can change status. If a plan hasany associated test runs, consider archiving the test plan [329] rather than deleting it.
1. View details [324] of the plan you want to delete. 2. In the toolbar, select Actions > Delete.
Test cycleTest cycles convert groups of test cases into a series of test runs that are ready for execution.
Inside of a test plan, you can add a test cycle [331] to help you manage and execute runs [337]. Youcan also send a test cycle for review [333].
Test cycles can include tests for a particular team, from a particular test case, tests you want to run onthe same day or at the same location.
TIPYou can't add a test case directly to a cycle; it must first be included in a group.
Jama Connect User Guide
330

Add a test cycleCycles are created from groups of test cases. Add a test cycle to hold the test runs that you want toexecute together.
1. Inside of a plan, select Test runs from the toolbar. On the left side of the toolbar you see the nameof the cycle. The runs associated with that cycle are displayed here.
2. In the upper left toolbar, select the small arrow next to Cycle to open the drop-down menu. Fromthis menu you can view cycle details, add, edit or delete a cycle, or send a cycle for review [333].
3. To add a cycle, select Add Cycle. If this is the first cycle you're adding, you see a green Add firstcycle button.If you want to edit an existing cycle, select the name of the cycle you want to edit from the pull-down, then select Cycle > Edit cycle.
4. Enter the test cycle details in the Add test cycle window.
5. Click Next.6. Select the groups you want to include in the cycle. Select Select all if you want to include all test
groups in this cycle. You can also filter the status of which test runs you want to include. For example, it's possible toonly add failed or blocked test runs.
Jama Connect User Guide
331

7. Click Save.
Edit a test cycleCycles are created from groups of test cases. You can edit the name and description of a test cyclewithout impacting the cycle's contents.
1. In a test plan, select Test Runs from the toolbar. On the left side of the toolbar you see the name ofthe cycle. The runs associated with that cycle are displayed here.
2. Select Cycle to open the drop-down menu, then make your changes.• Select Edit cycle to make changes to the contents associated with the test cycle.• Select Edit details to change the name and description without impacting the cycle's contents.
3. Click Next.
A pop-up message confirms that the changes were successful.
Jama Connect User Guide
332

Send a test cycle for reviewWhen sending test items to review, not all relevant fields might appear in Reviews Single Item View orin Reviews Reading View. An organization administrator can configure views [595] for an item type toinclude the necessary fields.
1. Select the test plan [319] that you want to use.2. Select Test Runs in the toolbar.
3. Select the name of the cycle you want to send to review.4. Select the small arrow next to Cycle to open a drop-down menu, then select Send for review.
5. Initiate a review [157].
Test runsA test run is an item used to record results for a test case you ran against your product.
Find and manage test runsBy selecting Test runs in the toolbar, you can manage all the runs in the cycles for a plan.
• For the plan you're using, select Test runs in the upper right toolbar.
Jama Connect User Guide
333

• Test runs are displayed in a configurable List View in the center panel. Select Views > Configureview in the upper right toolbar to make the fields you want to see visible.
NOTEIf you select Test Case as one of the visible columns, the Test Case column showsthe ID in front of the name.
• Select the column header to sort columns. Return them to their original order by selecting Restoreorder. For older data, a project reindex [634] might be required to properly restore the order.
NOTEThe Test group column order is based on the hierarchy of groups [322]. The namesthemselves can't be sorted in List View.
• Use the drop-down menu next to Cycles [330] to display the test runs for a cycle.
Jama Connect User Guide
334

• To execute a run, select the blue circle at the left of each row, or right-click and select Execute testrun.
• You can also right-click on a test run and select Open test case to see the test case associated withthis run or Assign test run to select an assignee.
• Select Show only assigned to me in the upper left toolbar to filter the List View for test runs as-signed only to you.
• Select Export to export the test runs shown as a standard Word, Excel, or custom format document(Office Templates).
TIPYou can see and analyze test runs in Trace View [49] if you view their associated testcases there.
View test run details
1. In the test plan, select Test runs from the upper right toolbar to display test runs in List View. 2. Select the name of a test run to view its details.3. From the toolbar on the right, you can view and add relationships, comments, and connected users.
You can also check the activity and version history for the test run or open the associated test case.4. Double-click on any of the fields to edit the test run.
Configure test run viewYou can choose which columns are displayed under test runs. These settings only apply to you.
1. Select a test plan, then select Test runs in the top right menu.2. Under Views, select Configure view.
Jama Connect User Guide
335
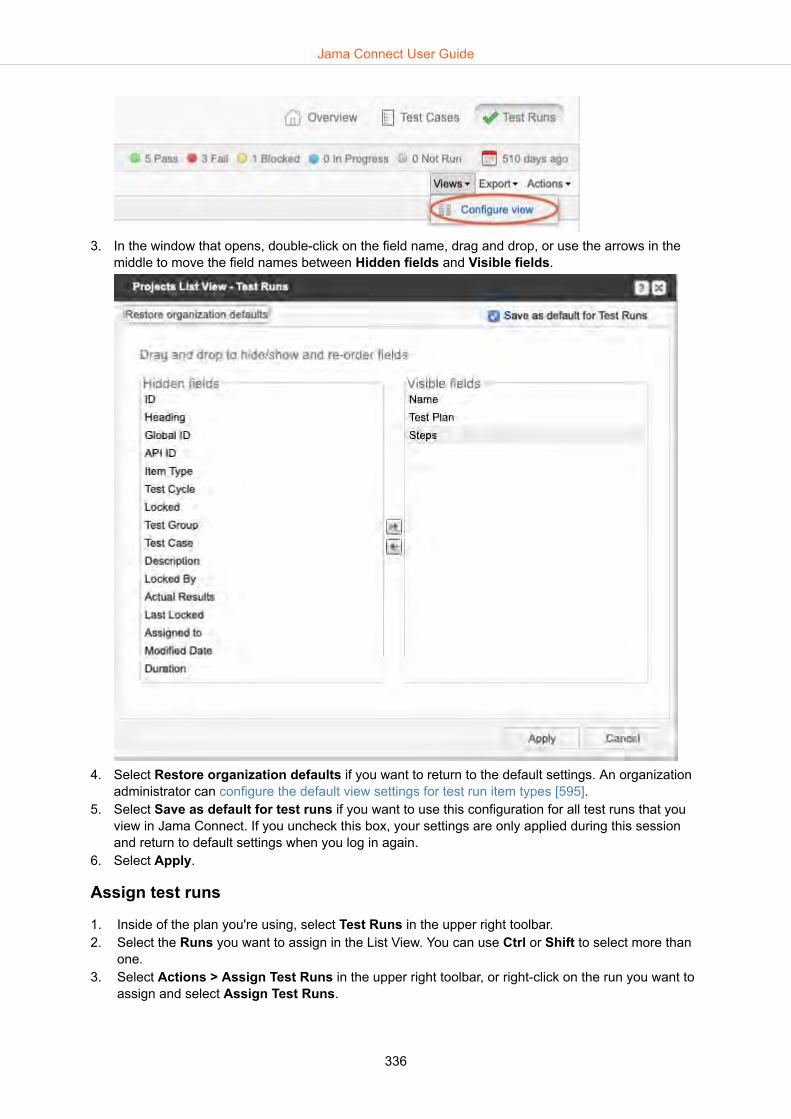
3. In the window that opens, double-click on the field name, drag and drop, or use the arrows in themiddle to move the field names between Hidden fields and Visible fields.
4. Select Restore organization defaults if you want to return to the default settings. An organizationadministrator can configure the default view settings for test run item types [595].
5. Select Save as default for test runs if you want to use this configuration for all test runs that youview in Jama Connect. If you uncheck this box, your settings are only applied during this sessionand return to default settings when you log in again.
6. Select Apply.
Assign test runs
1. Inside of the plan you're using, select Test Runs in the upper right toolbar. 2. Select the Runs you want to assign in the List View. You can use Ctrl or Shift to select more than
one.3. Select Actions > Assign Test Runs in the upper right toolbar, or right-click on the run you want to
assign and select Assign Test Runs.
Jama Connect User Guide
336
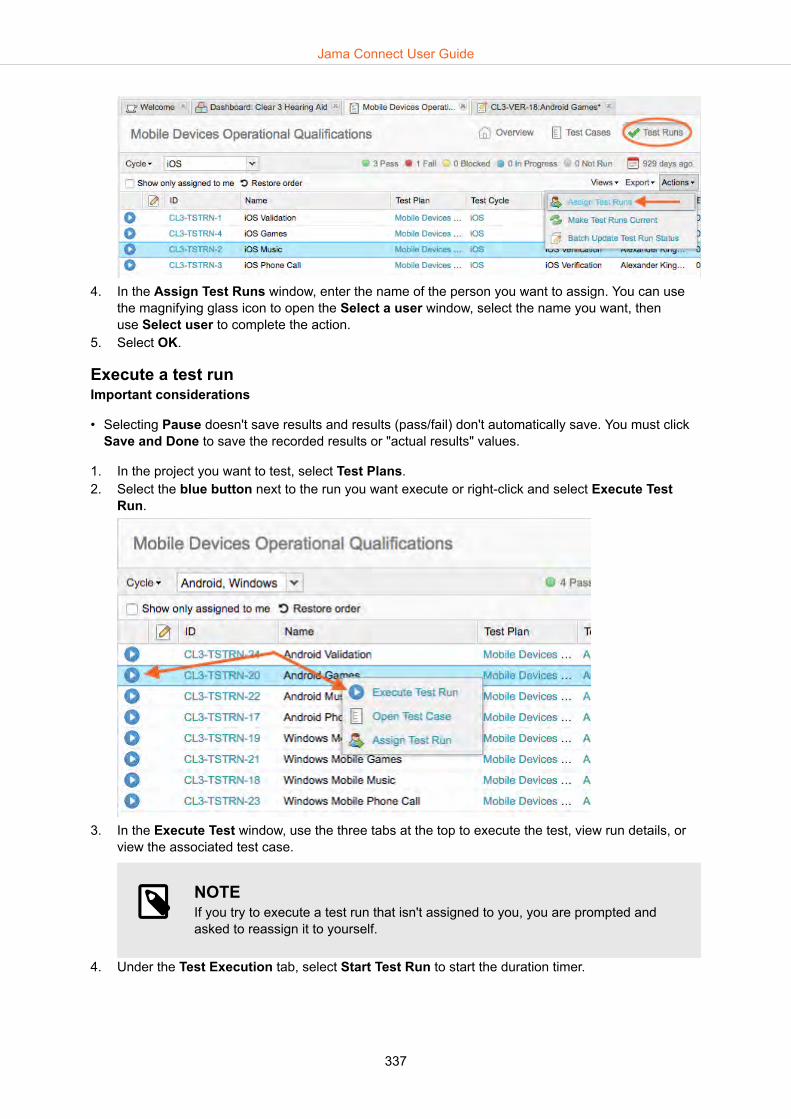
4. In the Assign Test Runs window, enter the name of the person you want to assign. You can usethe magnifying glass icon to open the Select a user window, select the name you want, thenuse Select user to complete the action.
5. Select OK.
Execute a test runImportant considerations
• Selecting Pause doesn't save results and results (pass/fail) don't automatically save. You must clickSave and Done to save the recorded results or "actual results" values.
1. In the project you want to test, select Test Plans.2. Select the blue button next to the run you want execute or right-click and select Execute Test
Run.
3. In the Execute Test window, use the three tabs at the top to execute the test, view run details, orview the associated test case.
NOTEIf you try to execute a test run that isn't assigned to you, you are prompted andasked to reassign it to yourself.
4. Under the Test Execution tab, select Start Test Run to start the duration timer.
Jama Connect User Guide
337

NOTEUnless the field is configured to read-only, you can double-click on the durationfield and change the timer to reflect the actual testing time.
5. If you discover a defect while running a test, select Log a Defect to open the right panel, fill in theinformation and select Save Defect. A project administrator can determine where these defects aresaved [633]. When you add a defect from the Test Execution window it's automatically related tothat test run.
6. Once you start the time and begin the test, you can mark each step as passed (green check) orfailed (red x). You can add results for each step in the results field. If no steps were added to theoriginal test case, you see a single pass/fail button.You can also add or upload an attachment by clicking Add attachment. These attachments aren'taccessible from any defect items created during the test run. Attachments or screenshots for a de-fect must be recorded separately on the defect item.
7. (Optional) Include images in the Results column of the test steps, or provide feedback in the Ac-tual results section below the test steps table.
Jama Connect User Guide
338

8. The test case status [313] (in progress, passed, failed, blocked) is shown at the bottom of the sta-tus column. If at least one step failed, you can select Mark as blocked, (when something preven-ted performing all the steps) or Pass with errors.
9. Select the Test run details tab to view details about the run. Select the arrow in a column headerto use the drop-down menu to sort the column or to select which columns are visible.
You can see the following items in this window:• The test case that generated this test run
Select the ID to open up a new window that displays the details of the derived item, such as thegoal of the test case, pre-conditions, steps in the case, and the duration of the test run.
• Upstream items related to this test runSelect the item ID to view detailed information about the related items in a separate window.
10. Select the Test case tab to view details about the test case that generated this test run.
Jama Connect User Guide
339

11. Select Save and Close.
Configure custom fields to appear during test executionCustom fields added to the Test Run item type now appear in the Test Execution window during test-ing.
Similar to the Actual Results field, these custom fields can be filled in during test execution.
1. Click Admin > Item Types >Test Runs, then select Fields.2. Select Add field to add field types, then click Save.
On the next test run, the custom fields are displayed and can be edited.
Example: Add a test field to capture the serial number for a product being tested during that test run'sexecution.
Jama Connect User Guide
340

Make test runs currentWhen creating test runs, a copy of the test case is put into the test run. But if a change is made to thetest case after that, the change isn't reflected in the test run.
1. You will know if a test case has changed since the test cycle was created, because a pencil andpaper icon appears in the second column if the test case has changed.
2. Select test runs you want to make current (using the Shift key to select multiple), then select Ac-tions > Make test runs current.
Jama Connect User Guide
341

3. In the Make test runs current window, select whether you want to make all items current or onlythose you selected.
4. You are asked to confirm. Select Commit to make test runs current. 5. Only runs associated with test cases that were changed are updated. The previous versions are
deleted and the updated version is added. Any previous progress, results, or statuses are also re-moved from the updated test runs. Any test runs that didn't change still retains progress, results,and statuses.
NOTEIf you don't have read/write access to an item or if it's locked by someone else, it isn'tupdated.
Test run statusTest run status indicates the current state of a test run, and is used in calculating test case status.
Test run status is visible in the test run execution window and in Single Item View.
You can also use a rollup of test run status for all tests in a cycle. You can see it above the cycles whenyou select Test runs in the toolbar.
Jama Connect User Guide
342

Possible states are:
• Pass• Fail• Blocked • In progress • Not run
NOTEIf you need to reset the test run to a status of Not run, you can batch update test runstatus [343] or unmark steps that were marked as pass or fail, and set the test run du-ration to 0. This automatically resets the status to Not run.
Batch update test run statusAs long as test runs aren't locked and you have write permissions, you can batch update the test runstatus.
1. Select Test Runs in the upper right toolbar. 2. Select the test runs you want to update in the center panel. Use the Ctrl or Shift keys to select
multiple.3. Select Actions > Batch Update Test Run Status.
Jama Connect User Guide
343

4. This opens a window for you to confirm the number of runs selected. Select Next.
5. Select the new status you want for the selected runs. Select Next.
6. In the next window, you can select users or groups and send a notification alerting them to thisbatch update. When you're done, select Commit.
Jama Connect User Guide
344

IMPORTANTYou can only batch update test runs in the Test runs window. You can't use advancedfilters to batch update test runs.
Jama Connect User Guide
345
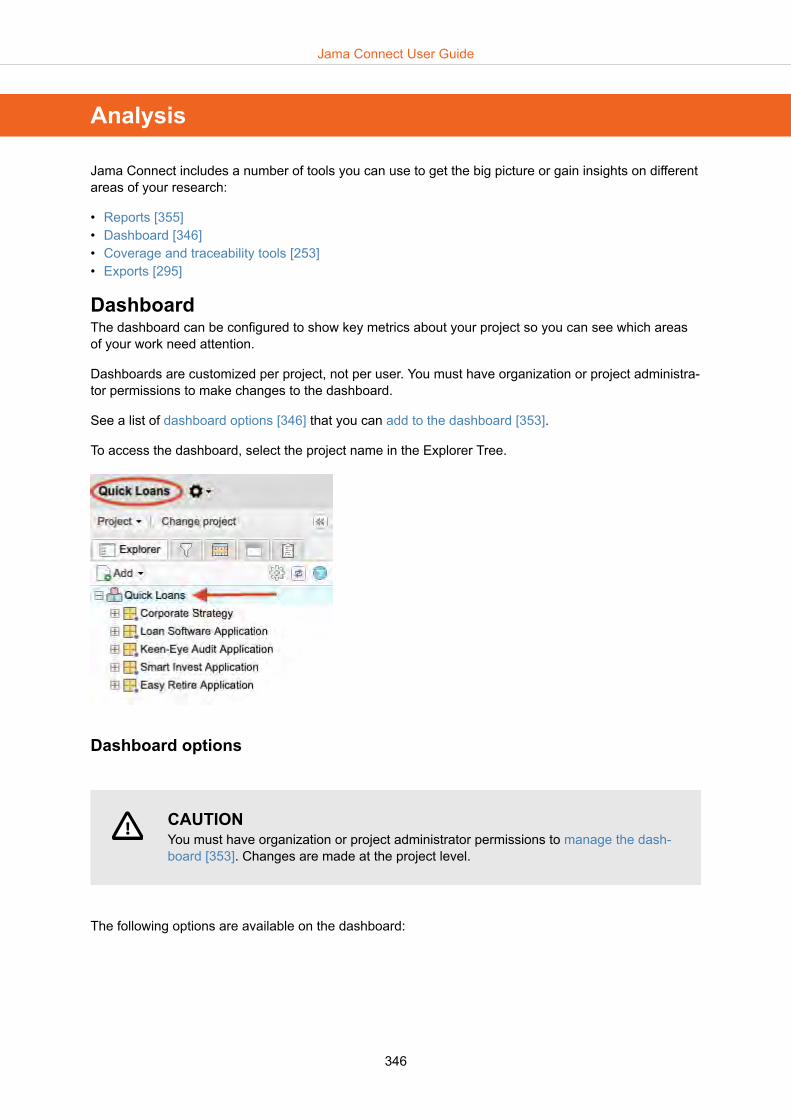
Analysis
Jama Connect includes a number of tools you can use to get the big picture or gain insights on differentareas of your research:
• Reports [355]• Dashboard [346]• Coverage and traceability tools [253]• Exports [295]
DashboardThe dashboard can be configured to show key metrics about your project so you can see which areasof your work need attention.
Dashboards are customized per project, not per user. You must have organization or project administra-tor permissions to make changes to the dashboard.
See a list of dashboard options [346] that you can add to the dashboard [353].
To access the dashboard, select the project name in the Explorer Tree.
Dashboard options
CAUTIONYou must have organization or project administrator permissions to manage the dash-board [353]. Changes are made at the project level.
The following options are available on the dashboard:
Jama Connect User Guide
346

• Filter resultsDisplays the results of an existing filter. Name the window, select a filter and which columns to dis-play. Select how many items you want to display.Note: Available filters only include lists that can be applied to totals. For example, text or numbersaren't included.
You can use the buttons in the top right for any of these windows: Collapse, Configure, Refresh, orDelete.
Jama Connect User Guide
347

•• Assigned to me
Displays a list of items "assigned to" the current user.
Select the gear icon in the top right to edit the settings. Name the window, select a filter and whichcolumns to display. Select how many items you want to display.
• Bar chartDisplays the results of an existing filter as a bar chart. You can configure the name, filter, field shownand number of elements with the gear icon in the top right. Select the individual bars in the bar chartto move directly to a view of those items in a new tab.
Jama Connect User Guide
348

• Recent activityDisplays a line graph of recent activity over a period of time. You can configure the time period andchange the name with the gear icon in the top right.
• Pie chartDisplays a pie chart for a filter and field that the user selects. You can configure the filter and fieldwith the gear icon button in the top right. Select the individual items in the pie chart to open thoseitems in a new tab.
Jama Connect User Guide
349

• Activity streamDisplays the current activity stream [205] of the project. View all current activity including comments,edits made, new items created, and assignment changes. Use the filters at the top right to filter onlycomments, activities or search for specific items.
Jama Connect User Guide
350

• Project summaryDisplays a summary of the entire project, including total number of items in the project, number ofdays until next release, and number of days until project completion. This window displays informa-tion that project administrators set in Configure project > Project details and under the Releasetab.
Jama Connect User Guide
351
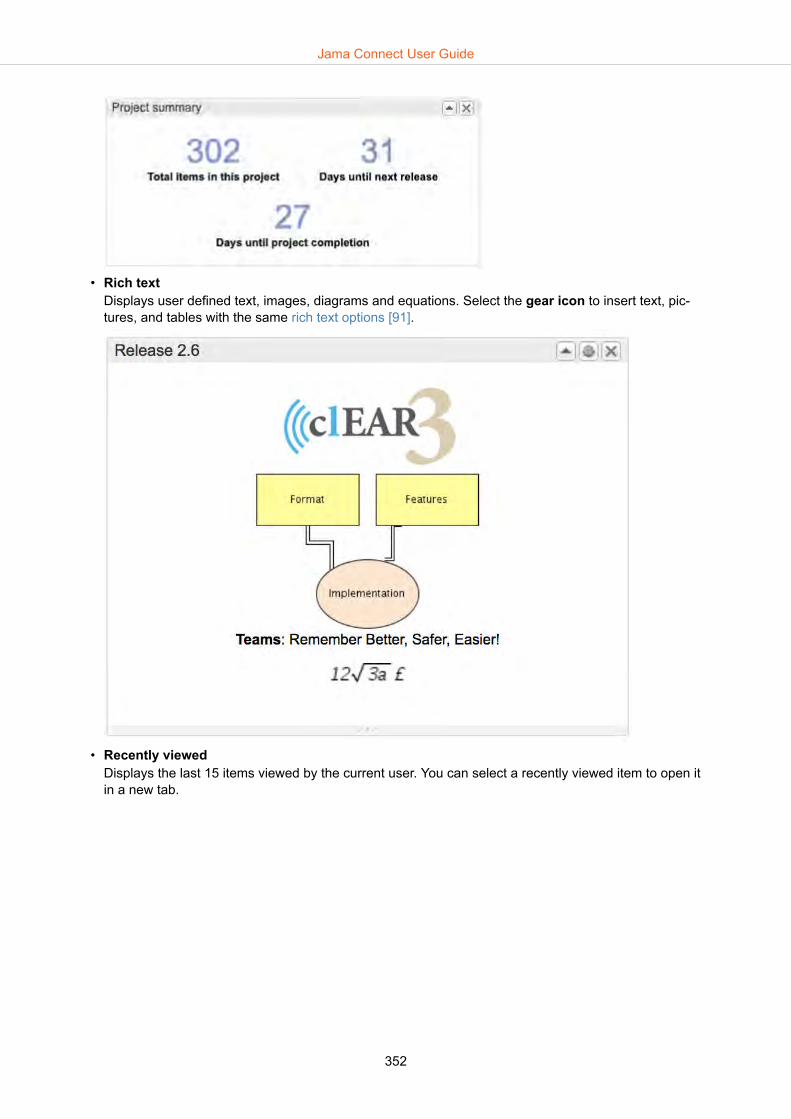
• Rich textDisplays user defined text, images, diagrams and equations. Select the gear icon to insert text, pic-tures, and tables with the same rich text options [91].
• Recently viewedDisplays the last 15 items viewed by the current user. You can select a recently viewed item to open itin a new tab.
Jama Connect User Guide
352
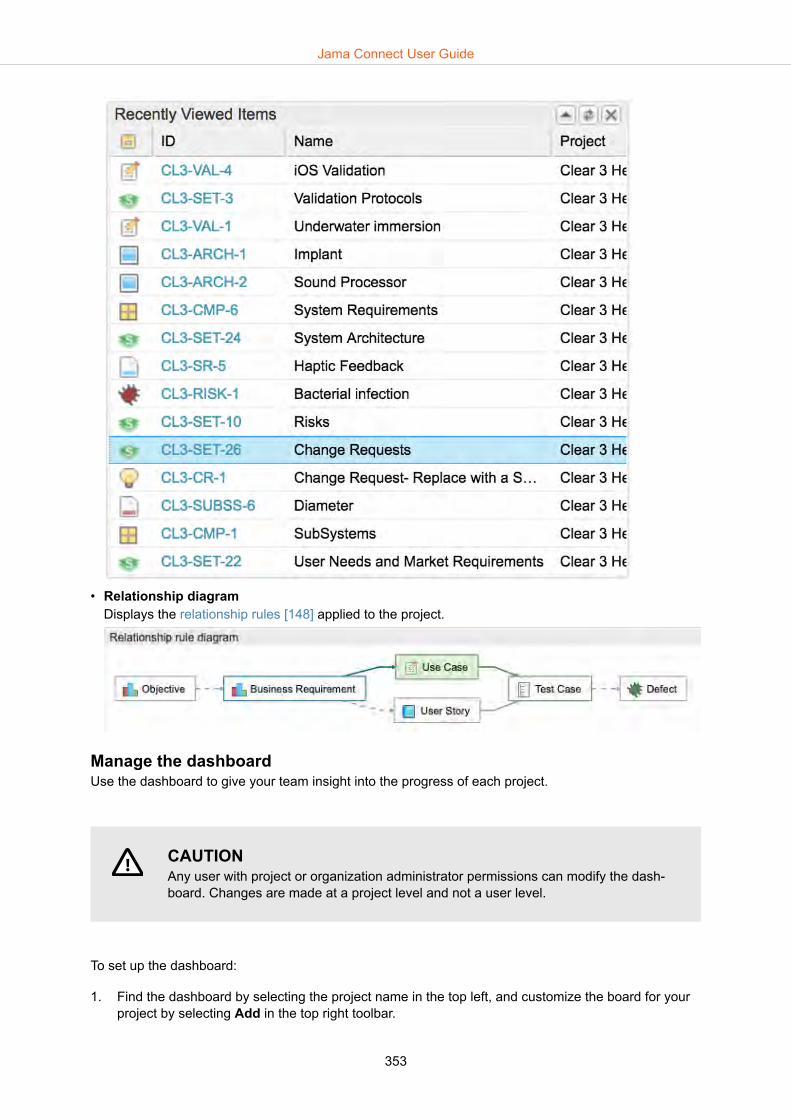
• Relationship diagramDisplays the relationship rules [148] applied to the project.
Manage the dashboardUse the dashboard to give your team insight into the progress of each project.
CAUTIONAny user with project or organization administrator permissions can modify the dash-board. Changes are made at a project level and not a user level.
To set up the dashboard:
1. Find the dashboard by selecting the project name in the top left, and customize the board for yourproject by selecting Add in the top right toolbar.
Jama Connect User Guide
353
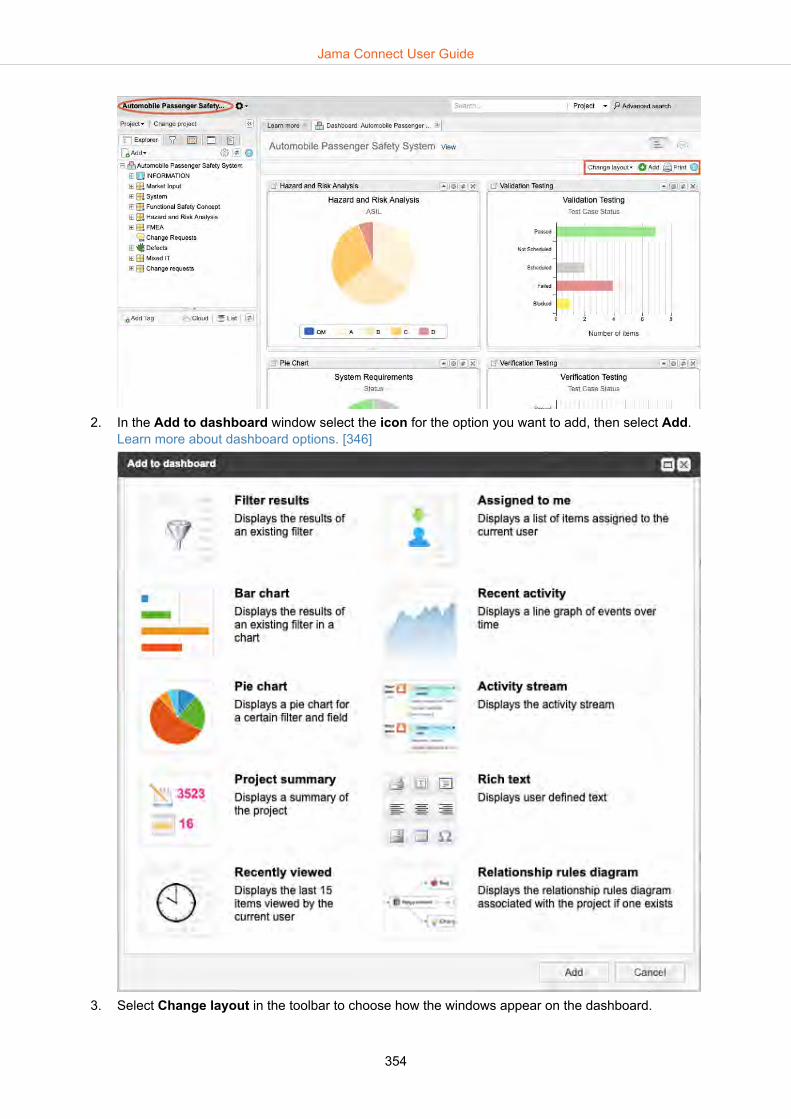
2. In the Add to dashboard window select the icon for the option you want to add, then select Add.Learn more about dashboard options. [346]
3. Select Change layout in the toolbar to choose how the windows appear on the dashboard.
Jama Connect User Guide
354
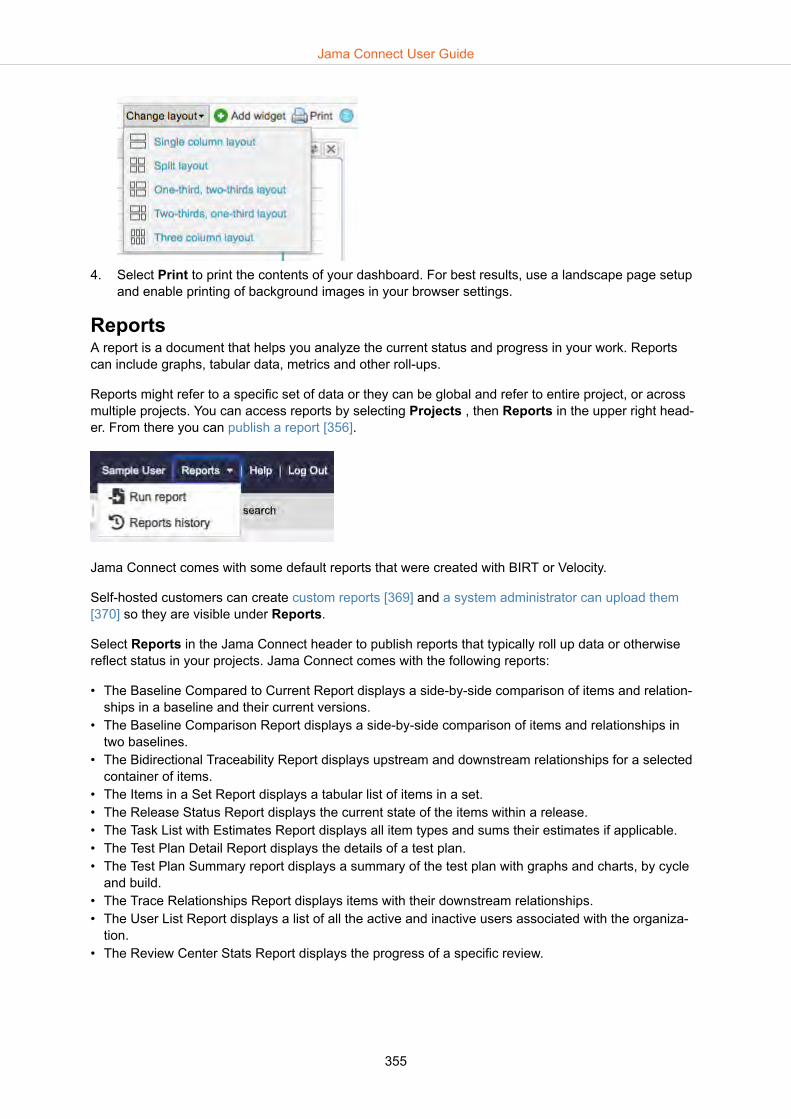
4. Select Print to print the contents of your dashboard. For best results, use a landscape page setupand enable printing of background images in your browser settings.
ReportsA report is a document that helps you analyze the current status and progress in your work. Reportscan include graphs, tabular data, metrics and other roll-ups.
Reports might refer to a specific set of data or they can be global and refer to entire project, or acrossmultiple projects. You can access reports by selecting Projects , then Reports in the upper right head-er. From there you can publish a report [356].
Jama Connect comes with some default reports that were created with BIRT or Velocity.
Self-hosted customers can create custom reports [369] and a system administrator can upload them[370] so they are visible under Reports.
Select Reports in the Jama Connect header to publish reports that typically roll up data or otherwisereflect status in your projects. Jama Connect comes with the following reports:
• The Baseline Compared to Current Report displays a side-by-side comparison of items and relation-ships in a baseline and their current versions.
• The Baseline Comparison Report displays a side-by-side comparison of items and relationships intwo baselines.
• The Bidirectional Traceability Report displays upstream and downstream relationships for a selectedcontainer of items.
• The Items in a Set Report displays a tabular list of items in a set. • The Release Status Report displays the current state of the items within a release.• The Task List with Estimates Report displays all item types and sums their estimates if applicable.• The Test Plan Detail Report displays the details of a test plan.• The Test Plan Summary report displays a summary of the test plan with graphs and charts, by cycle
and build. • The Trace Relationships Report displays items with their downstream relationships.• The User List Report displays a list of all the active and inactive users associated with the organiza-
tion.• The Review Center Stats Report displays the progress of a specific review.
Jama Connect User Guide
355
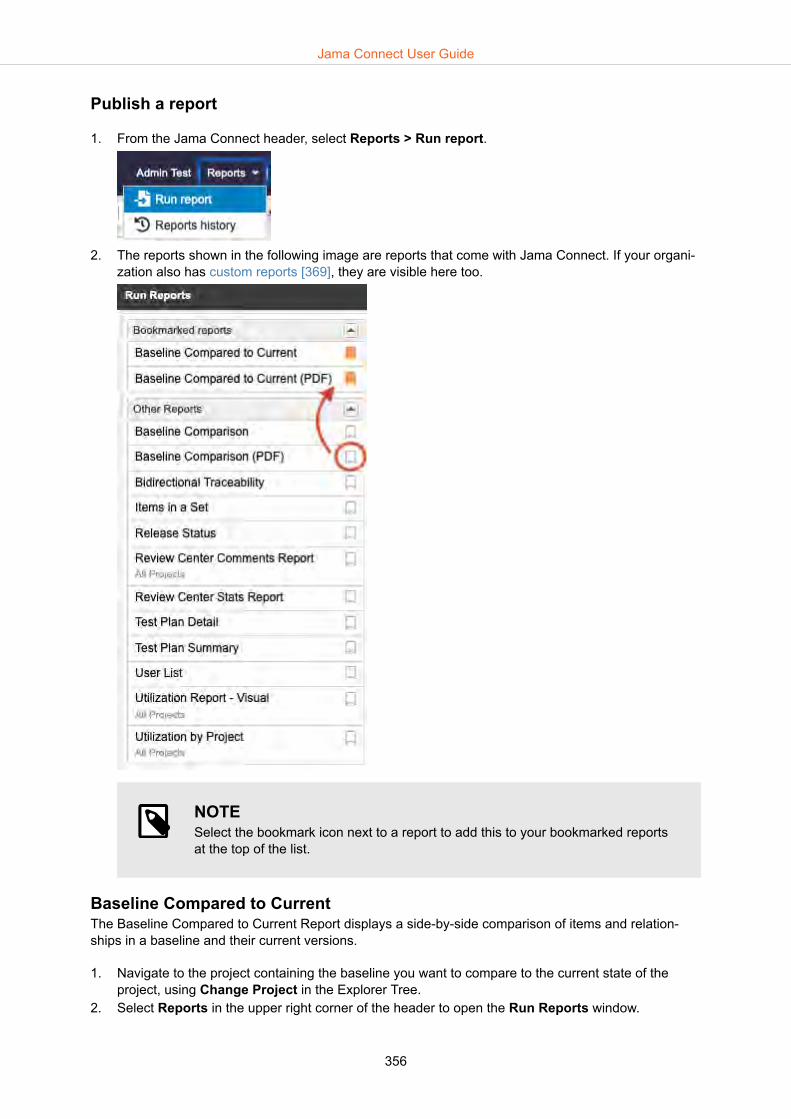
Publish a report
1. From the Jama Connect header, select Reports > Run report.
2. The reports shown in the following image are reports that come with Jama Connect. If your organi-zation also has custom reports [369], they are visible here too.
NOTESelect the bookmark icon next to a report to add this to your bookmarked reportsat the top of the list.
Baseline Compared to CurrentThe Baseline Compared to Current Report displays a side-by-side comparison of items and relation-ships in a baseline and their current versions.
1. Navigate to the project containing the baseline you want to compare to the current state of theproject, using Change Project in the Explorer Tree.
2. Select Reports in the upper right corner of the header to open the Run Reports window.
Jama Connect User Guide
356

3. Select one of these report options:• Baseline Compared to Current• Baseline Compared to Current (PDF)
4. Select the format of the report.5. Select the baseline you want to compare.6. Select the options you want to include:
• Include Relationships• Include Version Comments
7. Select Email me the report if you want to receive it by email.8. Select Run Report.
Baseline Compared to Current shows a table that compares the baseline items and relationships sideby side.
Jama Connect User Guide
357

Items that were modified since the baseline are highlighted.
Baseline ComparisonThe Baseline Comparison Report displays a side-by-side comparison of items and relationships in twobaselines.
This report is like the Baseline Compared to Current [356] report, but instead compares two specificstates of selected items at a certain point in time. For example, you can compare the baseline that'screated when you open a review with a baseline of the completed review to see what changed.
1. Navigate to the project containing the items you want to include, using Change project in the Ex-plorer Tree.
2. Select Reports in the upper right corner of the header to open the Run Reports window.3. Select one of these report options:
• Baseline Comparison• Baseline Comparison (PDF)
4. Select the format of the report. 5. Select the two baselines you want to compare.6. Select the options you want to include:
• Include Relationships• Include Version Comments
7. Select Email me the report if you want to receive it by email.8. Select Run Report.
Jama Connect User Guide
358

Items added or deleted between the compared baselines are noted at the top of the report.
Jama Connect User Guide
359

NOTEWhen comparing baselines, the hierarchical order must be the same between the twobaselines. If items are reordered in the Explorer Tree from one baseline to the next, thereport shows incorrect or no results.
Bidirectional TraceabilityThe Bidirectional Traceability Report displays upstream and downstream relationships for a selectedcontainer of items.
To run this report:
1. Select Reports in the upper right header to open the Run Reports window.
2. In the Run Reports window, select one of the default output formats (HTML, PDF, WORD, or XLS).3. Choose the Location that contains the items you want to analyze in this report.
NOTEYou must choose a container of items to analyze for upstream and downstreamtraceability. The report doesn't work on single items.
4. Select Run Report.
The report displays all the items that have relationships from the selected location. Both downstreamand upstream relationships are displayed for each item. The report also indicates whether any relatedartifacts are marked as suspect (T = suspect, F= not suspect).
Jama Connect User Guide
360

Items in a Set
The Items in a Set Report displays a tabular list of items in a set.
Columns in the table show the Header (hierarchy), ID, Name, and Description columns. To run this re-port:
1. Navigate to the project containing the items you want to include, using Change project in the Ex-plorer Tree.
2. Select Reports in the upper right corner of the header to open the Run Reports window.
3. Select the Items in a Set report.4. Select the format of the report. 5. Select the location of the items you want to include.6. Select Email me the report if you want to receive it by email.
Jama Connect User Guide
361
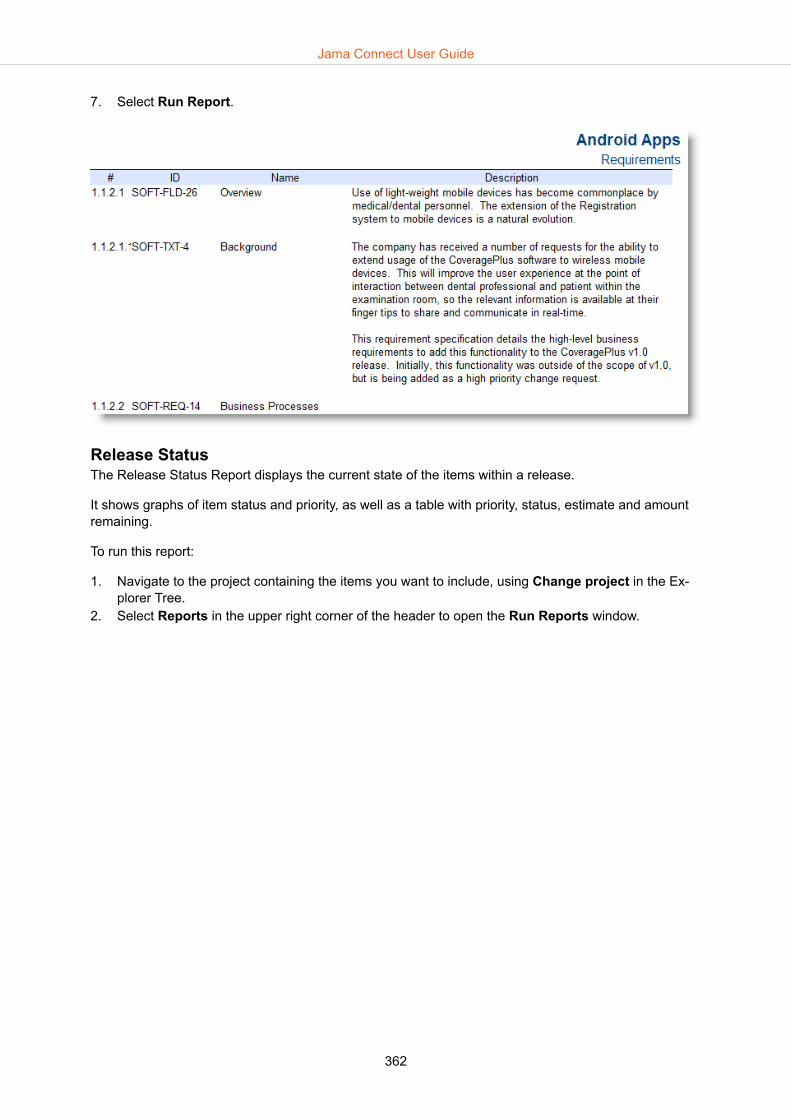
7. Select Run Report.
Release StatusThe Release Status Report displays the current state of the items within a release.
It shows graphs of item status and priority, as well as a table with priority, status, estimate and amountremaining.
To run this report:
1. Navigate to the project containing the items you want to include, using Change project in the Ex-plorer Tree.
2. Select Reports in the upper right corner of the header to open the Run Reports window.
Jama Connect User Guide
362
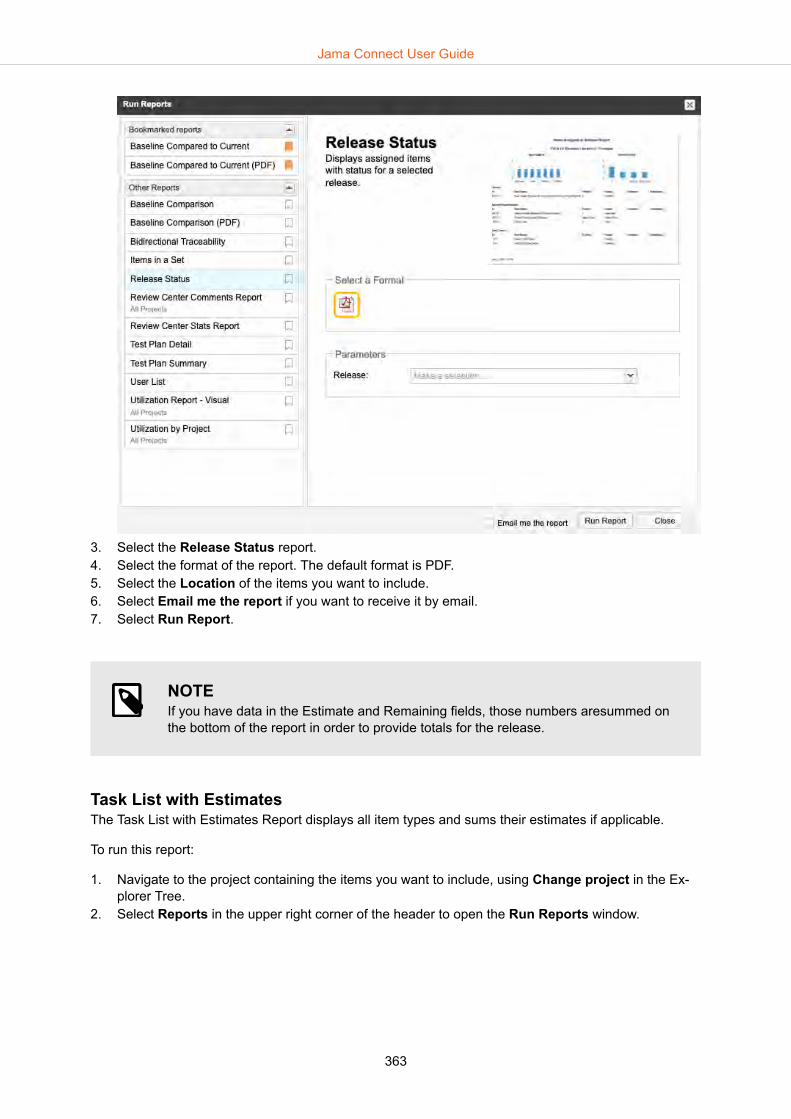
3. Select the Release Status report.4. Select the format of the report. The default format is PDF.5. Select the Location of the items you want to include.6. Select Email me the report if you want to receive it by email.7. Select Run Report.
NOTEIf you have data in the Estimate and Remaining fields, those numbers aresummed onthe bottom of the report in order to provide totals for the release.
Task List with EstimatesThe Task List with Estimates Report displays all item types and sums their estimates if applicable.
To run this report:
1. Navigate to the project containing the items you want to include, using Change project in the Ex-plorer Tree.
2. Select Reports in the upper right corner of the header to open the Run Reports window.
Jama Connect User Guide
363

3. Select the Test Plan Detail report.4. Select the format of the report.5. Select the Location of the items you want to include.6. Select Email me the report if you want to receive it by email.7. Select Run Report.
Test Plan DetailThe Test Plan Detail Report displays the details of a test plan.
To run this report:
1. Navigate to the project containing the test plan you want to include, using Change project in theExplorer Tree.
Jama Connect User Guide
364
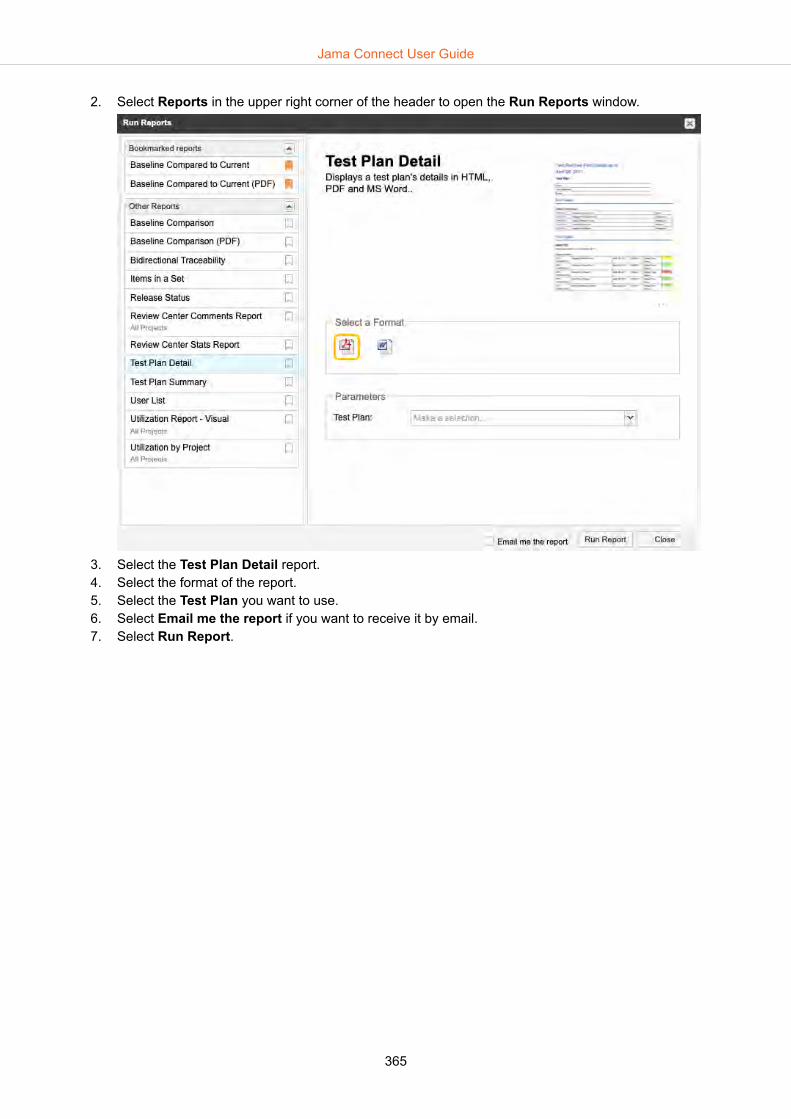
2. Select Reports in the upper right corner of the header to open the Run Reports window.
3. Select the Test Plan Detail report.4. Select the format of the report.5. Select the Test Plan you want to use.6. Select Email me the report if you want to receive it by email.7. Select Run Report.
Jama Connect User Guide
365

Test Plan SummaryThe Test Plan Summary report displays a summary of the test plan with graphs and charts, by cycleand build.
1. Navigate to the project containing the test plan you want to include, using Change project in theExplorer Tree.
2. Select Reports in the upper right corner of the header to open the Run Reports window.
Jama Connect User Guide
366

3. Select the Test Plan Summary report.4. Select the format of the report.5. Select the Test Plan you want to use.6. Select Email me the report if you want to receive it by email.7. Select Run Report.
Jama Connect User Guide
367
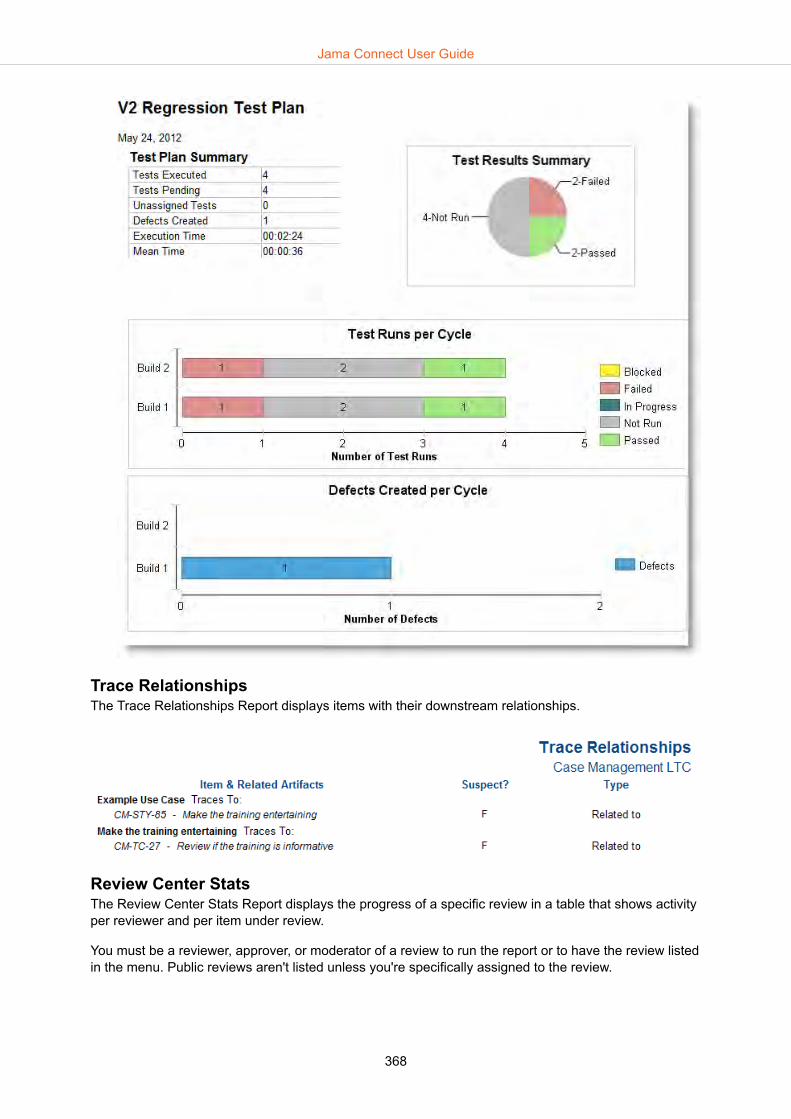
Trace RelationshipsThe Trace Relationships Report displays items with their downstream relationships.
Review Center StatsThe Review Center Stats Report displays the progress of a specific review in a table that shows activityper reviewer and per item under review.
You must be a reviewer, approver, or moderator of a review to run the report or to have the review listedin the menu. Public reviews aren't listed unless you're specifically assigned to the review.
Jama Connect User Guide
368

User ListThe User List Report displays a list of all the active and inactive users associated with the organization.
The report includes:
• Username• Full name• Disabled (Inactive) status• Email• License type
Table 2. License type key for User List ReportCreator (named) N
Creator (float) C
Test runner TR
Stakeholder S
Temporary ET
Reviewer (named) NV
Reviewer (float) - legacy V
Reserved reviewer - legacy RV
Reserved collaborator - legacy R
Collaborator (float) - legacy FC
Inactive I
Custom reportsJama Connect's default reports [355], exports [295], or Office Templates [299] can be used to meet themost common reporting requirements.
However, if your needs go beyond built-in default reports, custom reports might be of benefit to you.
Jama Software Consulting Services can offer help creating:
Jama Connect User Guide
369
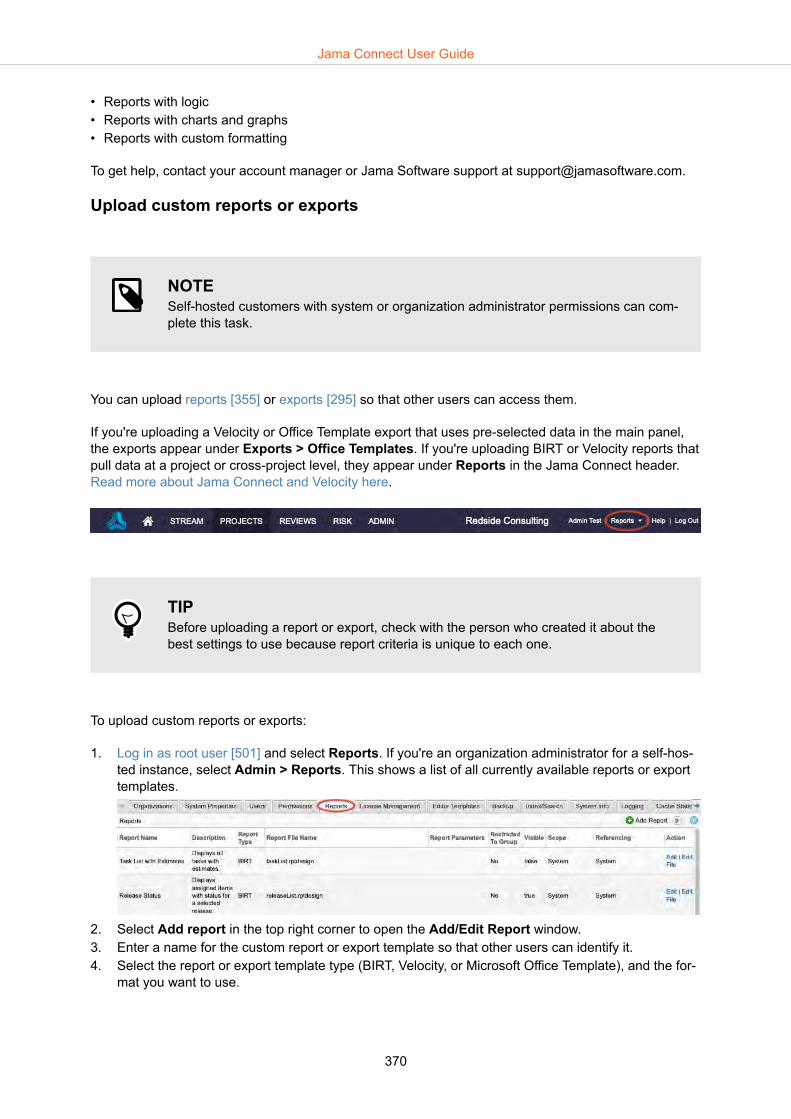
• Reports with logic• Reports with charts and graphs• Reports with custom formatting
To get help, contact your account manager or Jama Software support at [email protected].
Upload custom reports or exports
NOTESelf-hosted customers with system or organization administrator permissions can com-plete this task.
You can upload reports [355] or exports [295] so that other users can access them.
If you're uploading a Velocity or Office Template export that uses pre-selected data in the main panel,the exports appear under Exports > Office Templates. If you're uploading BIRT or Velocity reports thatpull data at a project or cross-project level, they appear under Reports in the Jama Connect header.Read more about Jama Connect and Velocity here.
TIPBefore uploading a report or export, check with the person who created it about thebest settings to use because report criteria is unique to each one.
To upload custom reports or exports:
1. Log in as root user [501] and select Reports. If you're an organization administrator for a self-hos-ted instance, select Admin > Reports. This shows a list of all currently available reports or exporttemplates.
2. Select Add report in the top right corner to open the Add/Edit Report window.3. Enter a name for the custom report or export template so that other users can identify it.4. Select the report or export template type (BIRT, Velocity, or Microsoft Office Template), and the for-
mat you want to use.
Jama Connect User Guide
370
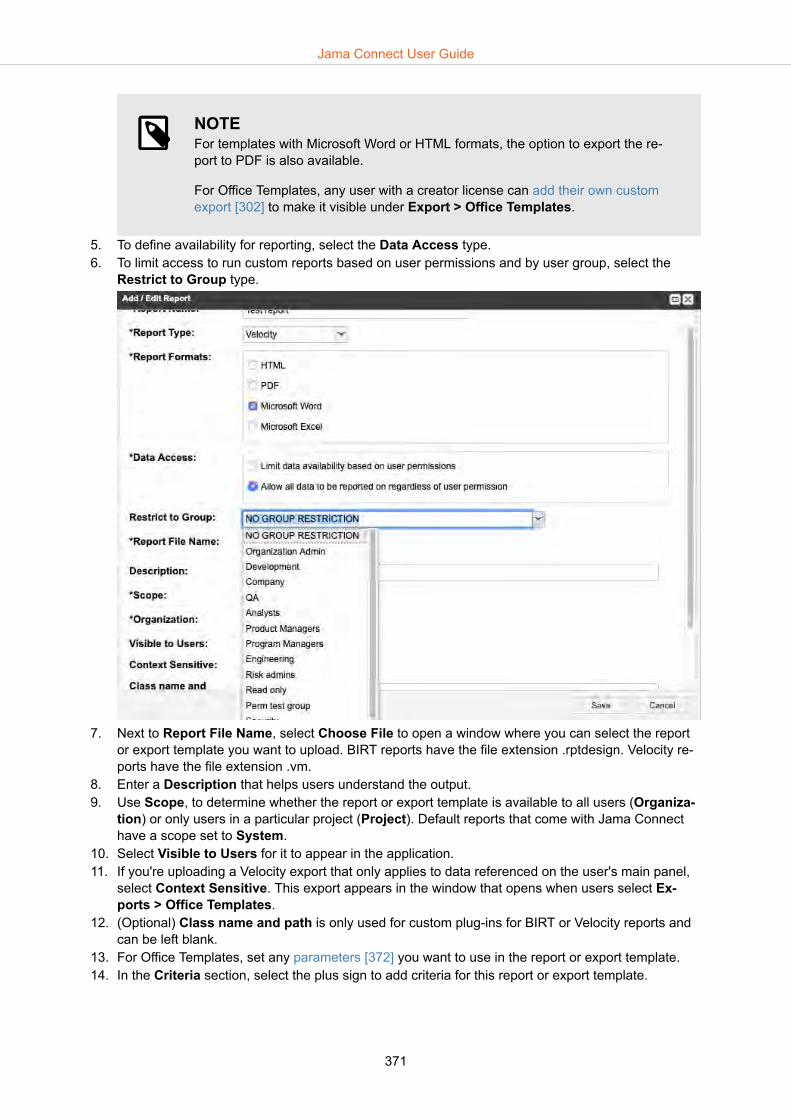
NOTEFor templates with Microsoft Word or HTML formats, the option to export the re-port to PDF is also available.
For Office Templates, any user with a creator license can add their own customexport [302] to make it visible under Export > Office Templates.
5. To define availability for reporting, select the Data Access type.6. To limit access to run custom reports based on user permissions and by user group, select the
Restrict to Group type.
7. Next to Report File Name, select Choose File to open a window where you can select the reportor export template you want to upload. BIRT reports have the file extension .rptdesign. Velocity re-ports have the file extension .vm.
8. Enter a Description that helps users understand the output.9. Use Scope, to determine whether the report or export template is available to all users (Organiza-
tion) or only users in a particular project (Project). Default reports that come with Jama Connecthave a scope set to System.
10. Select Visible to Users for it to appear in the application. 11. If you're uploading a Velocity export that only applies to data referenced on the user's main panel,
select Context Sensitive. This export appears in the window that opens when users select Ex-ports > Office Templates.
12. (Optional) Class name and path is only used for custom plug-ins for BIRT or Velocity reports andcan be left blank.
13. For Office Templates, set any parameters [372] you want to use in the report or export template.14. In the Criteria section, select the plus sign to add criteria for this report or export template.
Jama Connect User Guide
371

• From the drop-down menu, select the type of data for this individual criteria. For example, select"Release" for it to pass in a release ID, or "Baseline" for it to pass in a baseline ID.
• For Display, enter the label you want users to see. This name is what the user reads when pub-lishing the report and exporting from Jama Connect and describes the expected input from theuser.
• For Name, enter a case-sensitive name that is passed to the report or export template. Each pa-rameter in a report or export template must be unique. When users publish a report or exportJama Connect content, these are displayed in alphabetical order by the name field, not in theorder shown in the report setup screen.
TIPIf you're editing an existing report or export template, and you change the Namecriteria, you must change the reference to the criteria in your report or export tem-plate or it breaks.
15. Select Save to upload the report or export template and save your changes.
Report parametersYou might need to select one of the following report parameters when uploading custom reports.
NOTEOnly system administrators with access to editing reports can make these changes.
Jama Connect User Guide
372
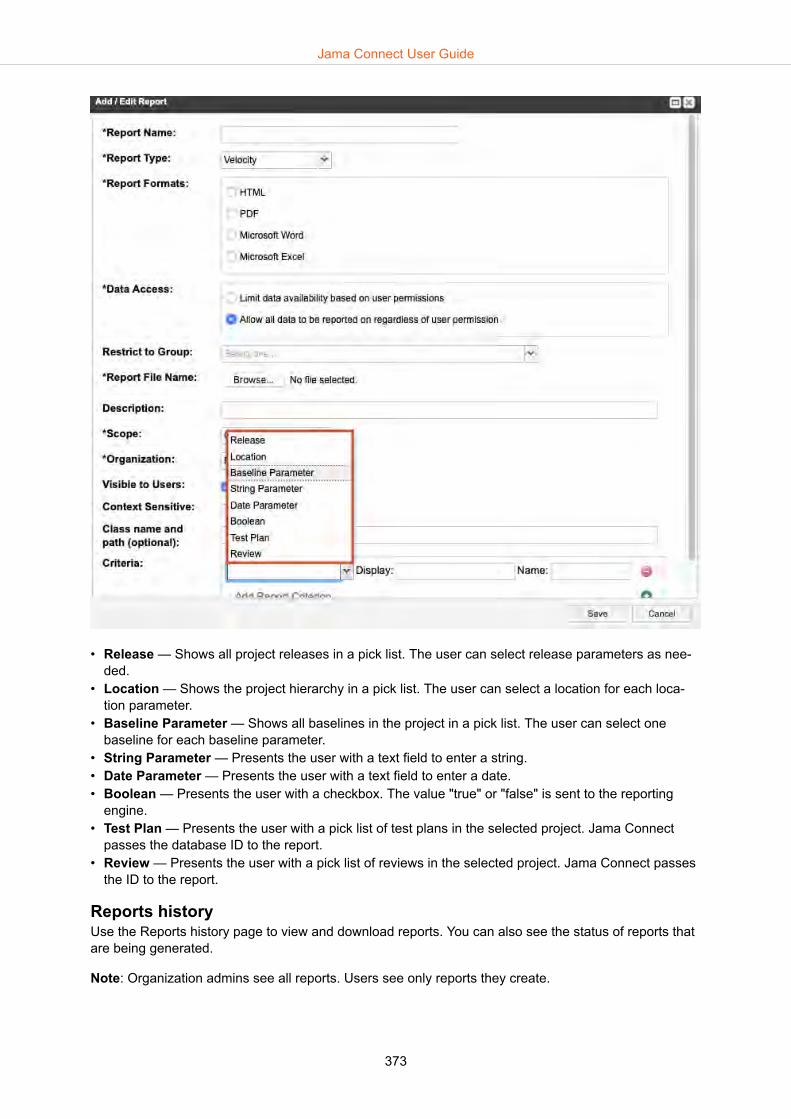
• Release — Shows all project releases in a pick list. The user can select release parameters as nee-ded.
• Location — Shows the project hierarchy in a pick list. The user can select a location for each loca-tion parameter.
• Baseline Parameter — Shows all baselines in the project in a pick list. The user can select onebaseline for each baseline parameter.
• String Parameter — Presents the user with a text field to enter a string.• Date Parameter — Presents the user with a text field to enter a date.• Boolean — Presents the user with a checkbox. The value "true" or "false" is sent to the reporting
engine.• Test Plan — Presents the user with a pick list of test plans in the selected project. Jama Connect
passes the database ID to the report.• Review — Presents the user with a pick list of reviews in the selected project. Jama Connect passes
the ID to the report.
Reports historyUse the Reports history page to view and download reports. You can also see the status of reports thatare being generated.
Note: Organization admins see all reports. Users see only reports they create.
Jama Connect User Guide
373

• Download reports — In the Actions column, select the down arrow icon.• Remove reports — In the Actions column, select the trash icon.
RiskWith Risk Management, your organization can use Jama Connect to organize and conduct a risk analy-sis for your products.
The default starter templates are based on the FMEA and ISO 14971 standards and follow a commonrisk management process [374]. However, they can be adjusted to better meet your needs.
Once your organization has purchased the additional licensing, you can find risk analyses by selectingRisk in the header.
NOTERisk Management requires additional licensing for your organization, as well as crea-tor, stakeholder or test runner licenses for all risk management participants. Contactyour Jama Software account manager for more information.
Risk management processRisk Management in Jama Connect is intended to help your organization assess and mitigate riskbased on the requirements for your product. In general, the risk analysis process follows this format:
1. A risk administrator [378] creates a risk template [379] to standardize how risks are captured andevaluated for their organization, or for a certain type of product.
2. Moderators [398] create a risk analysis based on a risk template and invite participants to view orwork on the analysis.
3. Participants assigned to a risk analysis work together to:• Define risks [374]• Set rankings [375]• Mitigate risks [376]• Adjust rankings [377]• Perform risk-benefit analysis [378]
Define risksOnce a moderator invites participants to an analysis [401], the risk management process begins withdefining risks. Participants identify risks and potential consequences in the first part of a risk analysis.
Jama Connect User Guide
374
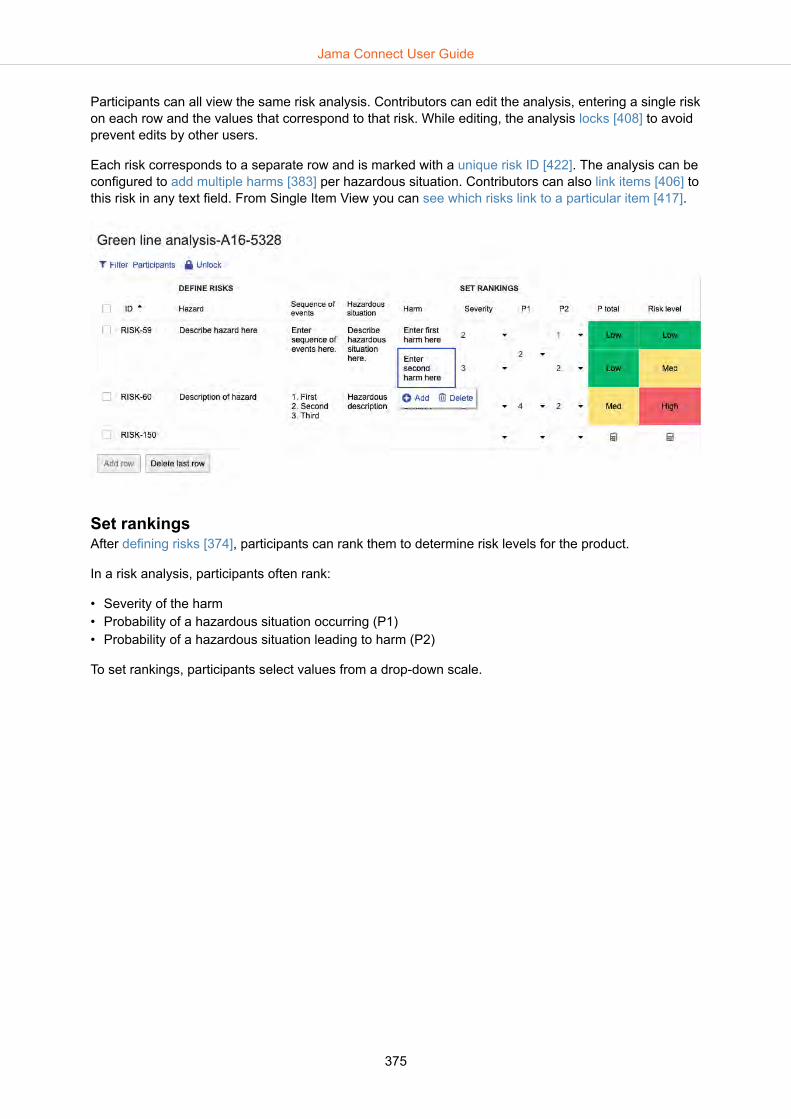
Participants can all view the same risk analysis. Contributors can edit the analysis, entering a single riskon each row and the values that correspond to that risk. While editing, the analysis locks [408] to avoidprevent edits by other users.
Each risk corresponds to a separate row and is marked with a unique risk ID [422]. The analysis can beconfigured to add multiple harms [383] per hazardous situation. Contributors can also link items [406] tothis risk in any text field. From Single Item View you can see which risks link to a particular item [417].
Set rankingsAfter defining risks [374], participants can rank them to determine risk levels for the product.
In a risk analysis, participants often rank:
• Severity of the harm • Probability of a hazardous situation occurring (P1)• Probability of a hazardous situation leading to harm (P2)
To set rankings, participants select values from a drop-down scale.
Jama Connect User Guide
375

Selecting severity and probability values automatically generates risk levels. Based on what's accepta-ble risk for the product, participants can use this information to consider how to mitigate risk and makethe product safer.
TIPA risk administrator sets default values for scales and matrices, as well as the way thatP total and Risk level are calculated [380].
Mitigate risksOnce participants set rankings [375] for the defined risks, it becomes apparent which risks exceed anacceptable level. Participants can suggest ways to make the product safer. Often, these are additionalproduct requirements that must be defined, tested and added to the risk analysis for traceability.
When mitigating risks, participants document the options, measures, and verification used.
Jama Connect User Guide
376

• Under Options, participants select the best path for reducing a specific risk. Typically, organizationshave a short list of options from which they choose, for example, the ISO 14971 standard uses:• Inherent safety by design• Protective measures in the product or manufacturing process• Information for safety
• Under Measures, participants enter the procedures or requirements implemented to reduce risk. • Under Verification, participants confirm that new product requirements are successfully tested.
Contributors can also link items [406] to this risk in any field. From Single Item View, you can see whichrisks link to a particular item [417].
Adjust rankingsAfter mitigating risks [376], participants evaluate again to see if they successfully lowered risk to accept-able levels.
They may adjust rankings for:
• Probability of a hazardous situation occurring (P1)• Probability of a hazardous situation leading to harm (P2)• Severity
NOTESome data under Adjust rankings might not be visible or editable, depending on yourprocess. Risk administrators can control which values are displayed or can be edited[397]. All others can see which values are visible or editable in Definitions. When avalue isn't editable in Adjust rankings, it's carried over from Set rankings to deter-mine final risk levels.
To adjust rankings, participants select values from a drop-down scale.
Jama Connect User Guide
377
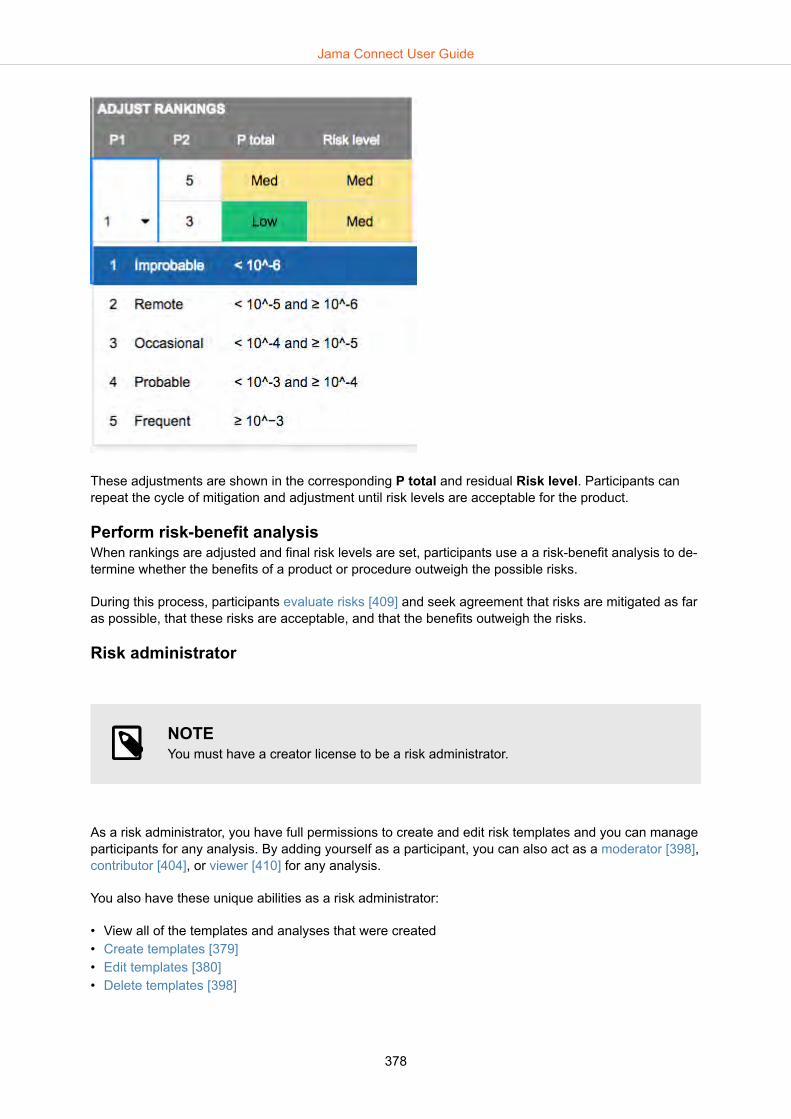
These adjustments are shown in the corresponding P total and residual Risk level. Participants canrepeat the cycle of mitigation and adjustment until risk levels are acceptable for the product.
Perform risk-benefit analysisWhen rankings are adjusted and final risk levels are set, participants use a a risk-benefit analysis to de-termine whether the benefits of a product or procedure outweigh the possible risks.
During this process, participants evaluate risks [409] and seek agreement that risks are mitigated as faras possible, that these risks are acceptable, and that the benefits outweigh the risks.
Risk administrator
NOTEYou must have a creator license to be a risk administrator.
As a risk administrator, you have full permissions to create and edit risk templates and you can manageparticipants for any analysis. By adding yourself as a participant, you can also act as a moderator [398],contributor [404], or viewer [410] for any analysis.
You also have these unique abilities as a risk administrator:
• View all of the templates and analyses that were created• Create templates [379]• Edit templates [380]• Delete templates [398]
Jama Connect User Guide
378
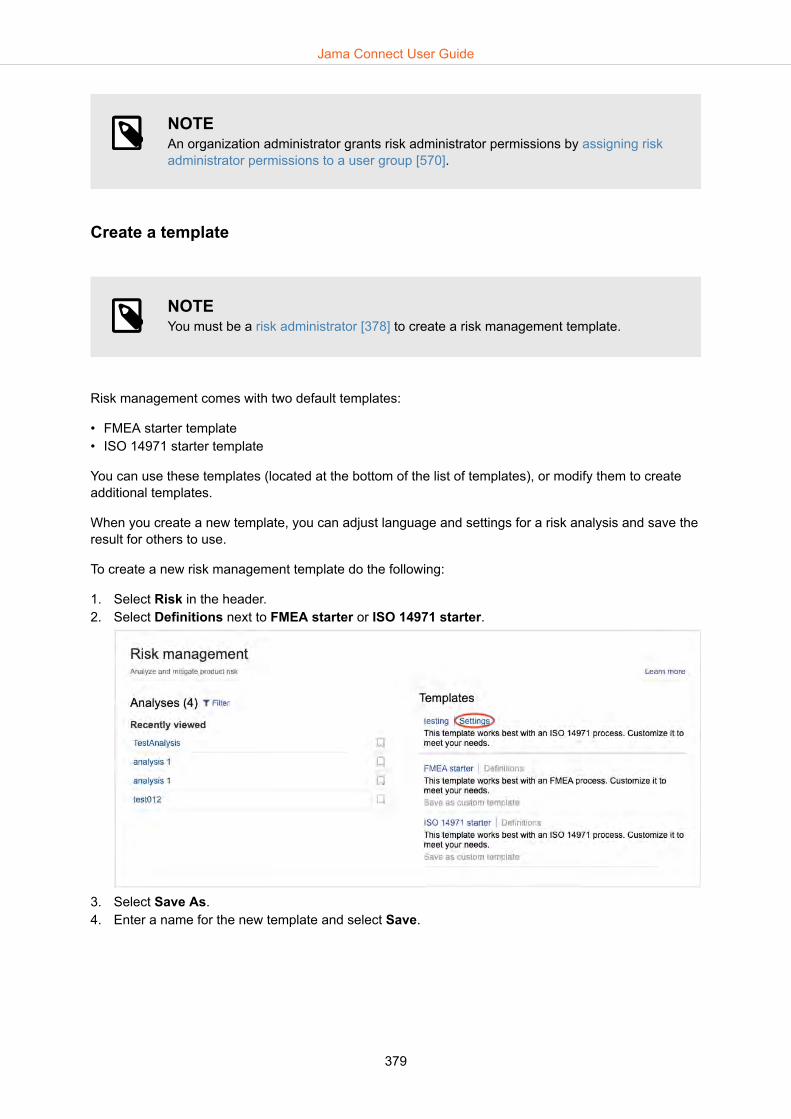
NOTEAn organization administrator grants risk administrator permissions by assigning riskadministrator permissions to a user group [570].
Create a template
NOTEYou must be a risk administrator [378] to create a risk management template.
Risk management comes with two default templates:
• FMEA starter template• ISO 14971 starter template
You can use these templates (located at the bottom of the list of templates), or modify them to createadditional templates.
When you create a new template, you can adjust language and settings for a risk analysis and save theresult for others to use.
To create a new risk management template do the following:
1. Select Risk in the header.2. Select Definitions next to FMEA starter or ISO 14971 starter.
3. Select Save As.4. Enter a name for the new template and select Save.
Jama Connect User Guide
379

5. To build your new template, edit the settings, then save the result as a new template.
Edit template settings
NOTEYou must be a risk administrator [378] to edit template settings.
If you remove all fields from a section in a risk template, the section header and risk analyses don't ap-pear in the template. Also, the section itself is no longer visible to users when they view definitions inthe risk analysis.
NOTEThe Adjust Rankings section is an exception to this rule. If you enable a ranking fieldbefore mitigation, the section is still displayed.
To edit template settings:
1. Select Risk in the header.2. In the list of templates, select Settings next to the template you want to edit.
Jama Connect User Guide
380

3. Here you can:• Enter a template description [383]
Add a description to help moderators choose the right template.
• Edit display text [383]Add or remove a text column, change column headers and descriptions for text columns, allowusers to add multiple harms, allow users to add links.
• Edit scales [386]Add or remove a scale, change column headers, descriptions and drop-downs for scale columns.
Jama Connect User Guide
381

• Edit matrices [391]Add or remove a matrix, change column headers, descriptions and field values for matrix col-umns.
Jama Connect User Guide
382

• Hide data or make it read-only [397]Show or hide certain columns of the analysis, or make them read only.
4. Scroll to the bottom of the Settings page and select Save.
NOTEThe starter templates' settings can't be modified: you can only use them to create anew template. You can select Definitions to see how a starter template is set up.
Edit display text
NOTEYou must have risk administrator [378] permissions to edit display text settings.
You can edit the following aspects of a template to better meet the needs of your risk managementteam.
To do this:
1. Select Settings next to the template you want to edit, allowing you to change the following:• Template description
Enter text that describes how to use this template. Select Save.
Jama Connect User Guide
383
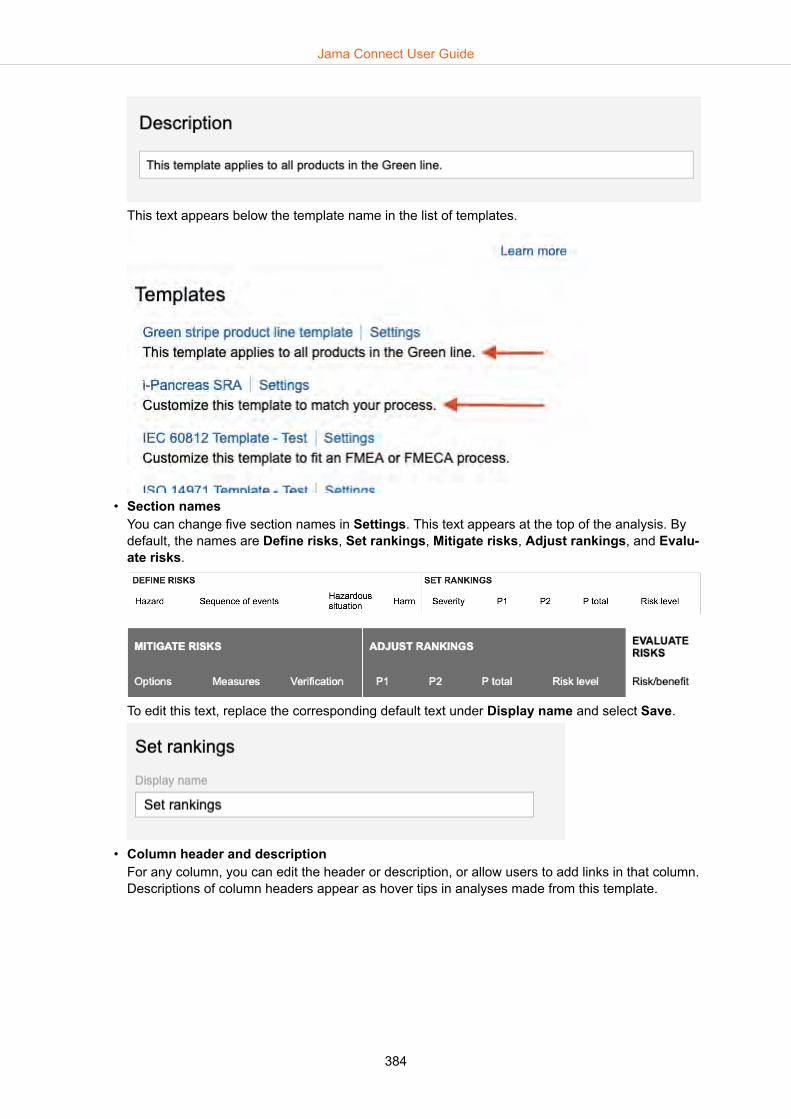
This text appears below the template name in the list of templates.
• Section names You can change five section names in Settings. This text appears at the top of the analysis. Bydefault, the names are Define risks, Set rankings, Mitigate risks, Adjust rankings, and Evalu-ate risks.
To edit this text, replace the corresponding default text under Display name and select Save.
• Column header and description For any column, you can edit the header or description, or allow users to add links in that column.Descriptions of column headers appear as hover tips in analyses made from this template.
Jama Connect User Guide
384

Edit names and descriptions on the Settings page below each column header name. Select Al-low links if you want to allow users to add links to that column in the analysis.
You can enable two special fields so that participants can add multiple harms per risk. By default,these are labeled Harm and Cause in the starter templates, although you can rename them.
• Remove columnsRemove text, scale or matrix columns from the template by selecting Remove next to the columnname. You can also restore these columns by selecting Add.
Jama Connect User Guide
385

NOTEThe risk ID column can't be removed or edited.
2. Select Save.
Edit scales
NOTEYou must have risk administrator [378] permissions to edit matrix settings.
On the settings page, you can adjust the values for scales (such as P1, P2 and Severity). The valuesfrom these scales appear in drop-down menus the corresponding columns of the analysis.
Jama Connect User Guide
386
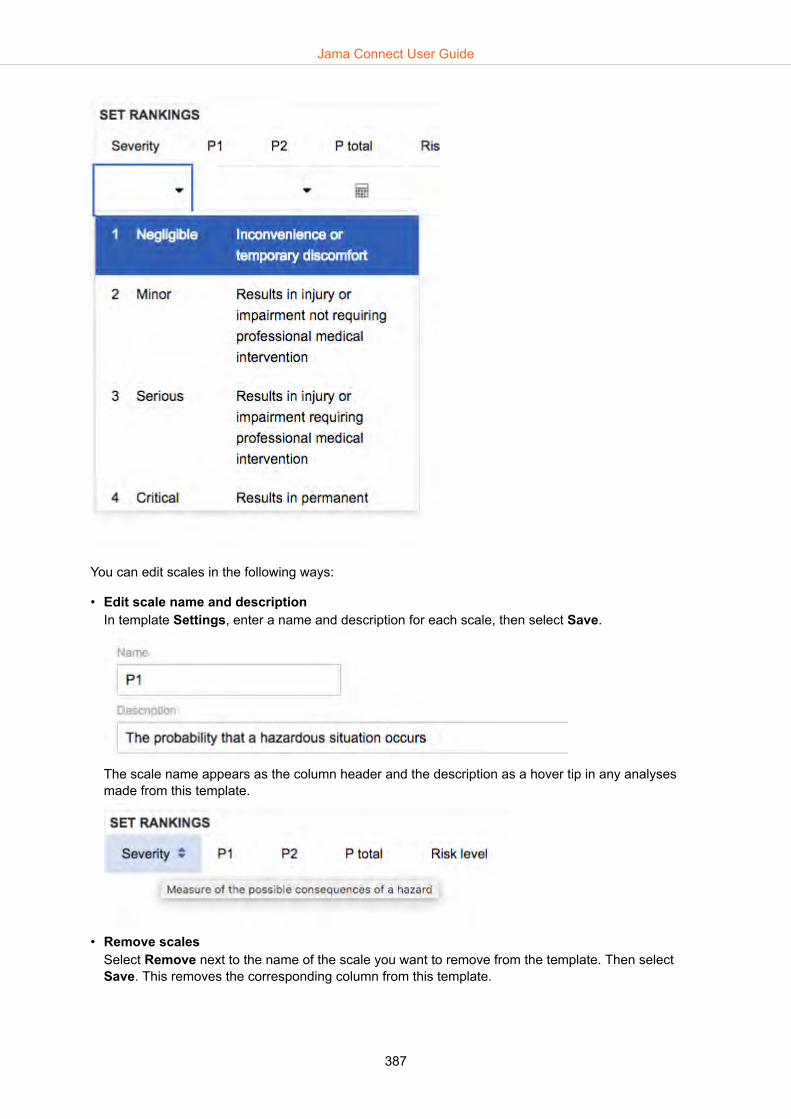
You can edit scales in the following ways:
• Edit scale name and descriptionIn template Settings, enter a name and description for each scale, then select Save.
The scale name appears as the column header and the description as a hover tip in any analysesmade from this template.
• Remove scalesSelect Remove next to the name of the scale you want to remove from the template. Then selectSave. This removes the corresponding column from this template.
Jama Connect User Guide
387
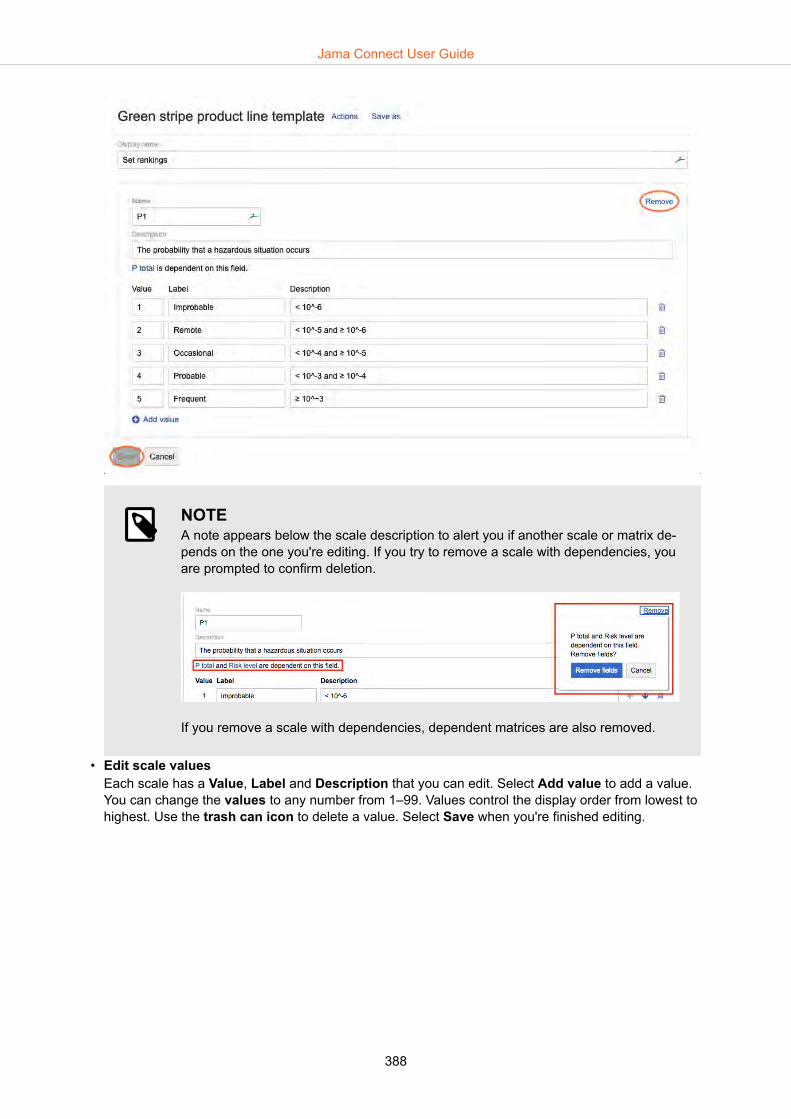
NOTEA note appears below the scale description to alert you if another scale or matrix de-pends on the one you're editing. If you try to remove a scale with dependencies, youare prompted to confirm deletion.
If you remove a scale with dependencies, dependent matrices are also removed.
• Edit scale valuesEach scale has a Value, Label and Description that you can edit. Select Add value to add a value.You can change the values to any number from 1–99. Values control the display order from lowest tohighest. Use the trash can icon to delete a value. Select Save when you're finished editing.
Jama Connect User Guide
388
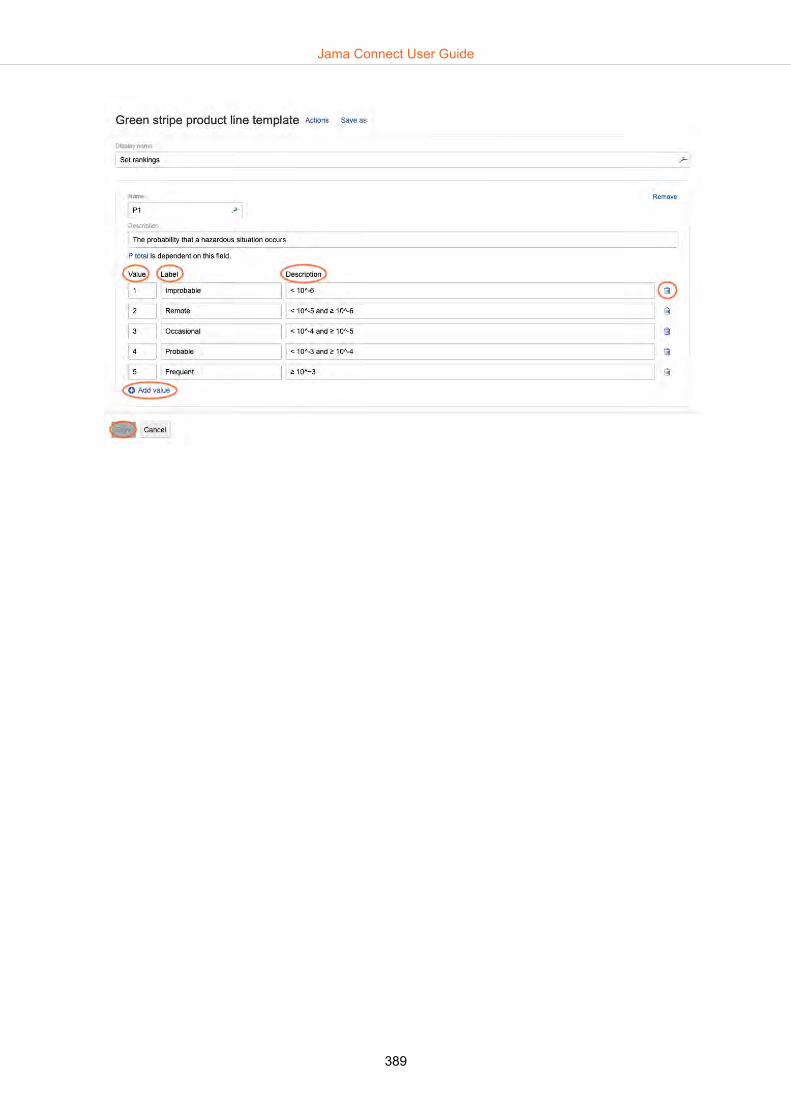
Jama Connect User Guide
389
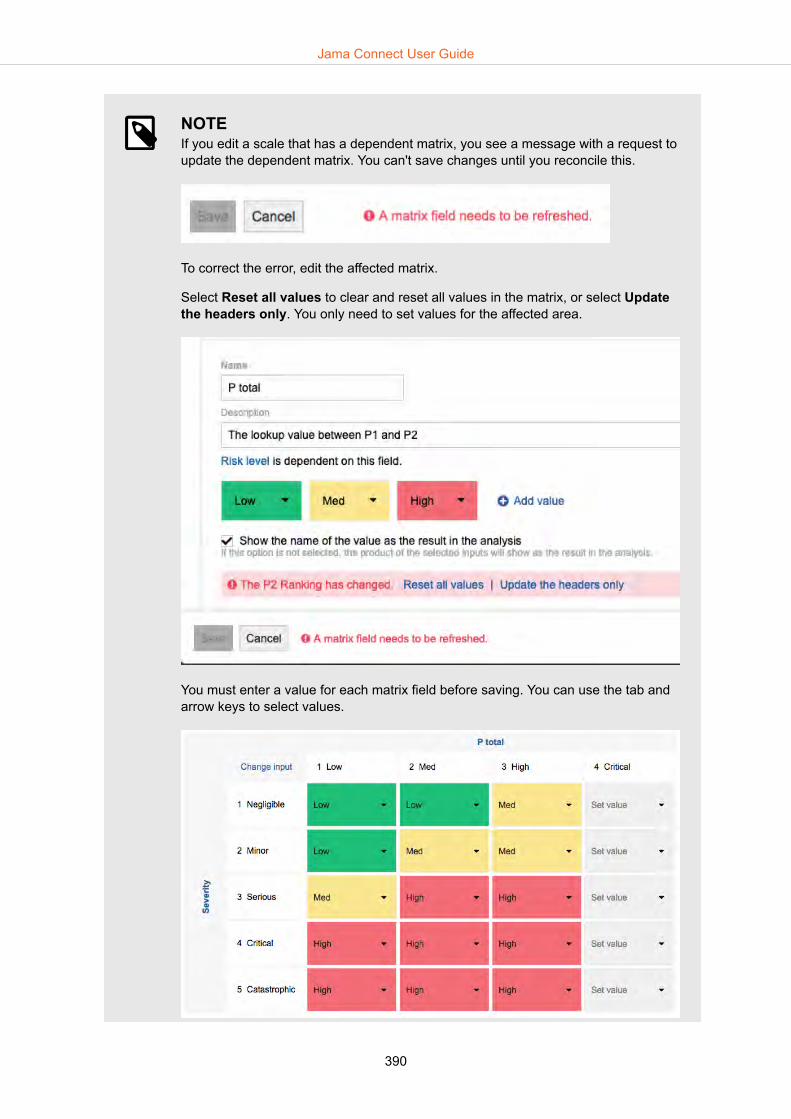
NOTEIf you edit a scale that has a dependent matrix, you see a message with a request toupdate the dependent matrix. You can't save changes until you reconcile this.
To correct the error, edit the affected matrix.
Select Reset all values to clear and reset all values in the matrix, or select Updatethe headers only. You only need to set values for the affected area.
You must enter a value for each matrix field before saving. You can use the tab andarrow keys to select values.
Jama Connect User Guide
390

When you're finished, select Save.
• Restore a scaleThe default starter template comes with three scales. If you remove a scale and want to add it back,select Add. Edit the scale as needed, then select Save.
Edit matricesYou can edit the existing matrices in a template or add a new matrix.
NOTEYou must have risk administrator [378] permissions to edit matrix settings.
Matrices are based on input from scales. Each field in the matrix is determined by the product of the twocorresponding inputs.
The resulting calculated fields from this matrix display in the corresponding column in the analysis.
Jama Connect User Guide
391

To save a matrix, you must assign text values (like low, medium, high) to each of the matrix fields. How-ever, you can choose whether to display that text, or the actual numerical product for that field in theanalysis.
To edit matrix settings, select Settings next to the template you want to edit, and choose any of thefollowing aspects to edit:
• Edit matrix name and descriptionEnter a name and description for each matrix, then select Save.
The matrix name appears as the column header and the description as a hover tip in any analysesmade from this template.
Jama Connect User Guide
392
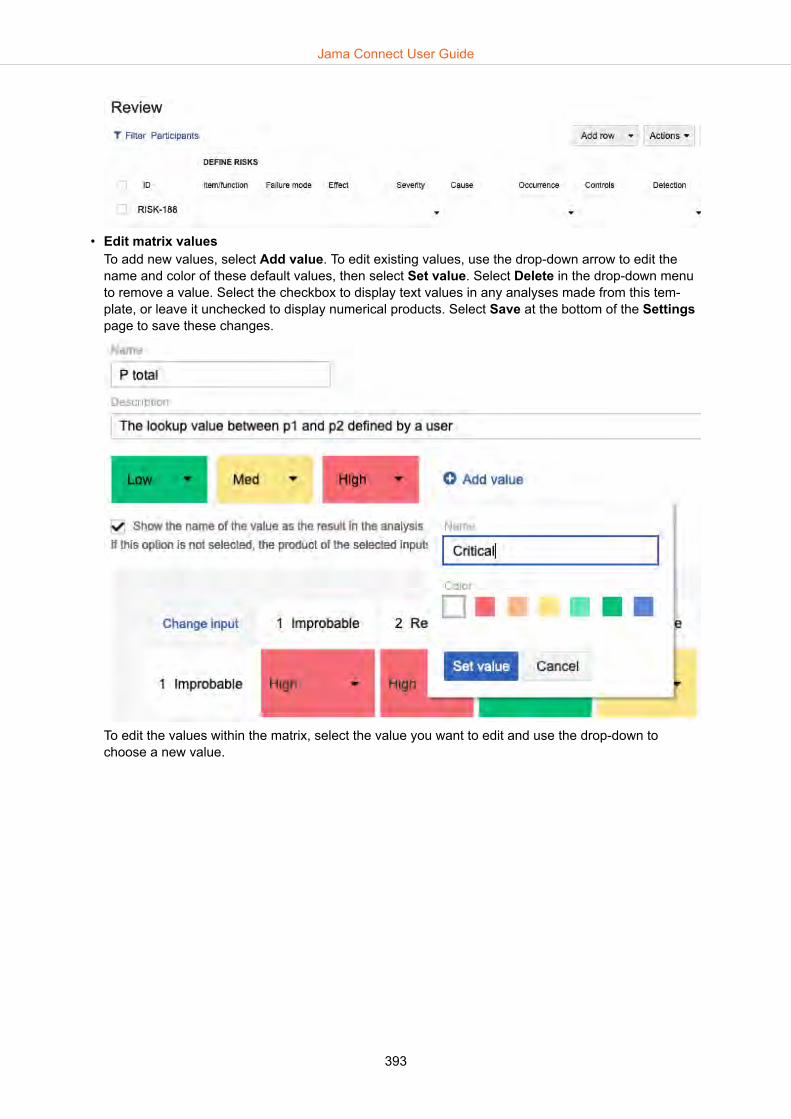
• Edit matrix valuesTo add new values, select Add value. To edit existing values, use the drop-down arrow to edit thename and color of these default values, then select Set value. Select Delete in the drop-down menuto remove a value. Select the checkbox to display text values in any analyses made from this tem-plate, or leave it unchecked to display numerical products. Select Save at the bottom of the Settingspage to save these changes.
To edit the values within the matrix, select the value you want to edit and use the drop-down tochoose a new value.
Jama Connect User Guide
393

• Edit matrix inputsYou can adjust the risk level matrix to use different scales. For example, you might only want a matrixthat balances probability and severity. To edit matrix inputs, select Change input at the top left cornerof the matrix.
In the window that opens, select the scales or matrices that you want to use as inputs from the drop-down menus. Select Save.
NOTEYou can't use the same matrix or scale as an input for more than one matrix in thesame template.
Jama Connect User Guide
394

NOTEIf you edit a matrix that has a dependent matrix or scale, you will see an error mes-sage with a request to update the dependent matrix or scale. You can't savechanges until you reconcile this error.
To correct the error, select Reset all values to clear and reset all values in the matrixor, select Update the headers only. You only need to set values for the affectedarea.
You can also use the tab and arrow keys to navigate and select values you want toset.
• Remove a matrixSelect Remove next to the name of the matrix to remove it from the template. Then select Save. Thisalso removes the corresponding column from this template.
Jama Connect User Guide
395
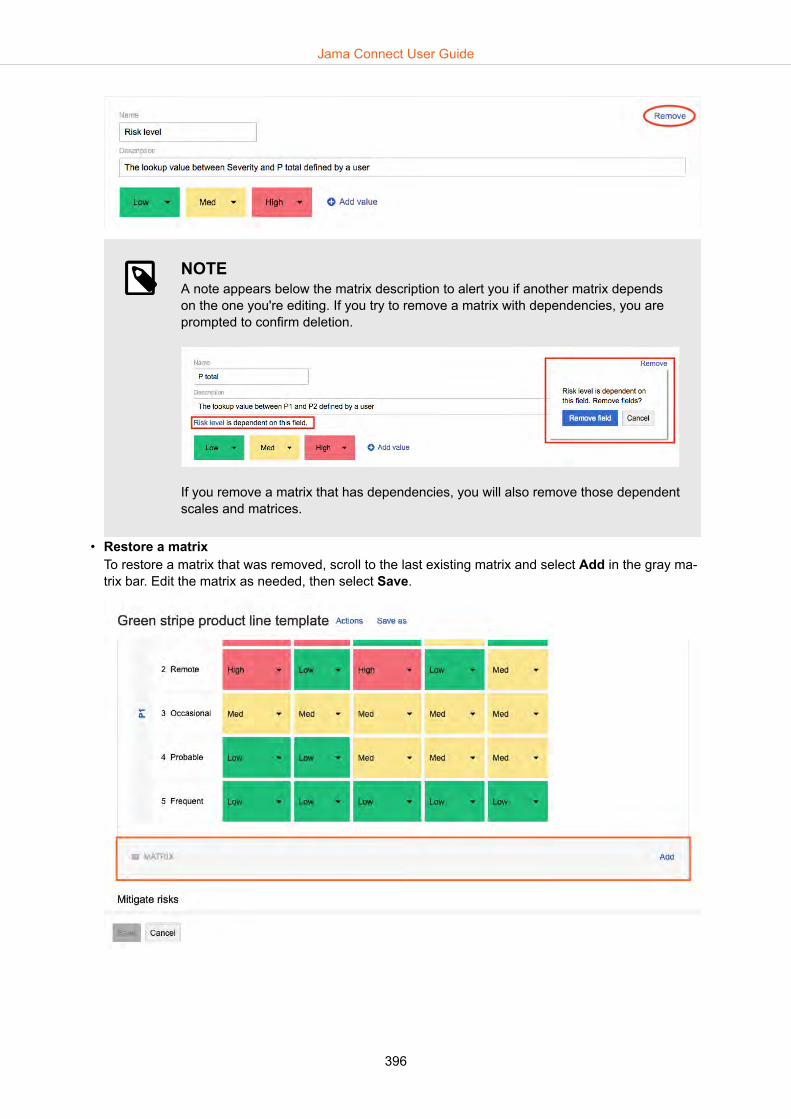
NOTEA note appears below the matrix description to alert you if another matrix dependson the one you're editing. If you try to remove a matrix with dependencies, you areprompted to confirm deletion.
If you remove a matrix that has dependencies, you will also remove those dependentscales and matrices.
• Restore a matrixTo restore a matrix that was removed, scroll to the last existing matrix and select Add in the gray ma-trix bar. Edit the matrix as needed, then select Save.
Jama Connect User Guide
396

NOTEYou must enter a value for all fields in the matrix before you can save it.
Show, hide, or lock data
NOTEYou must have risk administrator [378] permissions to show, hide, or lock data.
For certain data under Adjust Rankings, you can decide whether to make it visible or editable. To findthese options, scroll to the bottom of the Settings page and select the checkboxes you prefer:
Scales marked Make visible are shown as columns in the analysis. If you mark Allow edits, the analy-sis shows a small arrow that opens a drop-down menu for editing.
Jama Connect User Guide
397

Delete a template
NOTEYou must have risk administrator permissions to delete a template.
To delete a risk management template:
1. Select Risk in the header.2. Next to the template you want to delete, select Settings.
3. On the Settings page, select Actions at top of the page.4. In the Actions window, select Delete template.5. Selecting Delete to confirm that you want to delete the template.
NOTEYou can't delete the ISO 14971 default starter template.
Moderator
NOTEYou must have a creator license to be a moderator.
A risk moderator initiates and manages a risk analysis.
If you initiate a risk analysis, you become the risk moderator by default.
Jama Connect User Guide
398

A moderator can do everything that contributors [404] and viewers [410] can do.
A moderator can:
• Initiate an analysis [399] (this is how they become a moderator)• Add participants [401]• Edit an analysis name [401]• Delete an analysis [404]
TIPA risk analysis can have more than one moderator. Moderators or risk administratorscan add other participants as moderators, if needed.
Initiate a risk analysis
NOTEYou must have a creator license to initiate an analysis. By default, you become themoderator for any analysis you create.
To initiate a risk analysis:
1. Select Risk in the header.2. Decide which template you want to use and select it.
Jama Connect User Guide
399

3. Type the analysis name and click Save.4. This opens the new analysis. Select the title at the top of the page to edit the analysis name [401].
5. Select Participants to add participants [401].6. The analysis is only be visible to any users you added as participants. Participants see the analysis
when they select Risk in the header.
Jama Connect User Guide
400

Edit analysis name
NOTEYou must be a moderator [398] to edit an analysis name.
To edit a risk analysis name:
1. Select Risk in the header.2. Find and select the analysis you want to rename.3. When the analysis opens, select the name at the top of the page and the field becomes editable.
4. Changes to the name are shown in the header at the top of the analysis, as well as in the list ofanalyses when you select Risk in the header.
Add participants
NOTEYou must be a moderator or risk administrator to add or update risk analysis partici-pants.
To add participants to an analysis:
1. Open the analysis [411].2. Select Participants.
Jama Connect User Guide
401

3. In the panel that opens, enter the name of the person you want to invite and select their name fromthe drop-down menu.
IMPORTANTYou can only select Jama Connect users with a creator, stakeholder, or test runnerlicense. To invite participants who don't appear here, contact your organization ad-ministrator to add users [553] or update license types [558].
NOTEYou can't add users who are currently participants. If you want to change a userfrom one role to another, you must first remove them from their current role, theninvite them to the new role.
4. Once you select a name, use the drop-down menu to select a role for the new participant:• Moderator [398]• Contributor [404]• Viewer [410]
Jama Connect User Guide
402

NOTERisk analyses can have multiple moderators, contributors, and viewers.
5. Add a message to the participant, if you like, and select Invite. An email is sent to this user to invitethem to the analysis. When they select Risk in the header, the analysis is available for them to use.After you invite new participants, you see them listed in the Participants panel. You can removeparticipants from this panel, too.
6. To delete a participant, select Remove.7. Select the X at the top of the panel or Close participants to close this panel.
TIPIn the event that an analysis has a single moderator who isn't available to manage ananalysis, a risk administrator can assign a new moderator.
Jama Connect User Guide
403

Delete an analysis
NOTEYou must be a moderator or a risk administrator to delete a risk analysis.
To delete a risk analysis:
1. Select Risk in the header.2. Select the name of the analysis you want to delete.3. Select Actions > Delete analysis in the top right menu.
4. Select Delete to confirm that you want to delete the analysis. You can't restore an analysis or itsdata once you delete it.
Contributor
NOTEYou must have a creator license to be a contributor.
A contributor changes content and values in an existing analysis. A moderator adds contributors to arisk analysis.
As a contributor, you can do everything a viewer can do [410], plus the following:
• Add, edit and delete risks [404]• Lock and unlock an analysis [408]• Link items to an analysis [406]
Add, edit, and delete risks
NOTEYou must have contributor or moderator permissions to complete this task. Viewerscan't add, edit, or delete risks.
To add a risk to an analysis:
Jama Connect User Guide
404

1. Add a row for the new risk.Select Add row at the bottom of the analysis or in the top right toolbar, to add a new row to theanalysis.
TIPYou can also use the Tab key to add rows to the bottom of the analysis. Tabbingthrough the last row land your cursor on the Add row button, and you can useEnter to add a new row.
To specify where to add a new row, select the row above it. Then use the Add row drop-downmenu in the top right toolbar and select Insert after selected.
The new row appears with an automatically generated risk ID [422].
2. The analysis locks [408] when you're editing to prevent others from overwriting your work. Your datais autosaved as soon as you move from one cell to the next. Select Unlock when you're done edit-ing so others can edit.
3. To delete a risk from an analysis, select the box at the beginning of the row you want to delete, thenuse the drop-down arrow next to Add row to select Delete.To delete the last row, select Delete last row at the bottom of the page.
Jama Connect User Guide
405

Link items to an analysis
NOTEYou must be a moderator [398] or contributor [404] to link items to an analysis.
NOTEFor you to add a link to a particular field in an analysis, a risk administrator must con-figure the template [383] to allow this.
You can link from any text column of an analysis to Jama Connect.
1. Select the field where you want to add a link to open the Add link option.
2. Select Add link to open a drop-down menu. Begin typing any part of the unique ID [622] of theitem, container, or attachment you want to link.
3. Select the link from the drop-down menu.
Jama Connect User Guide
406
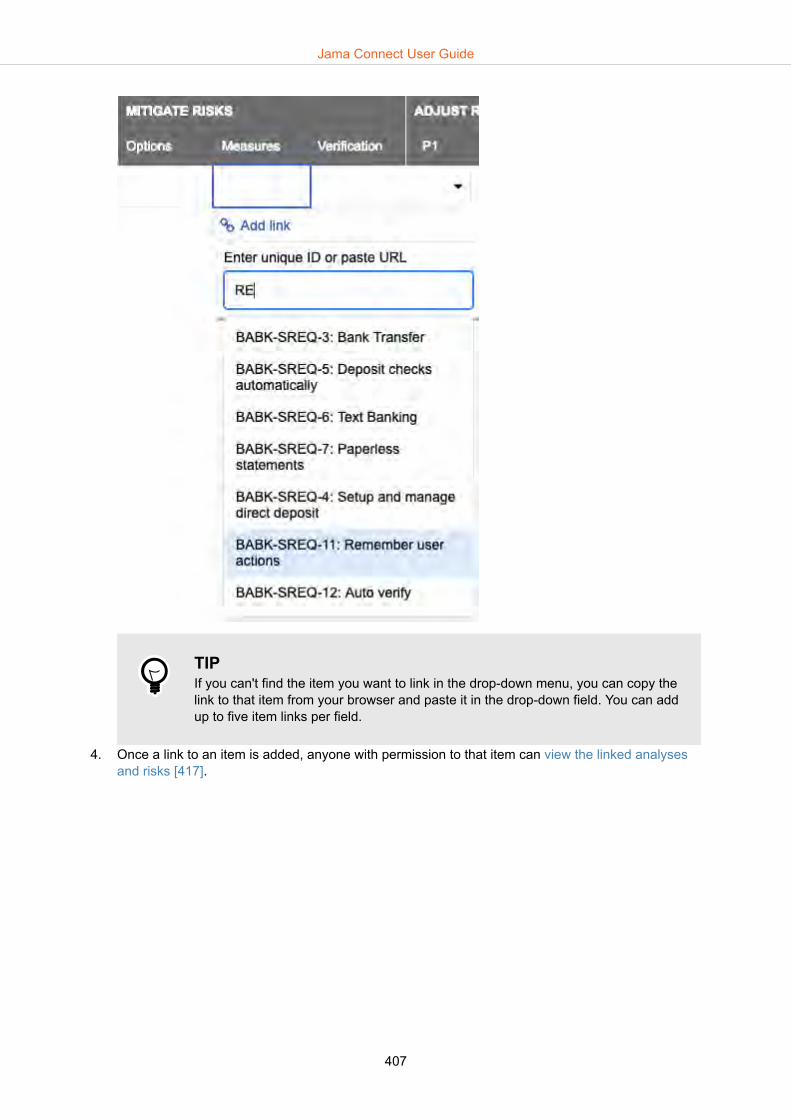
TIPIf you can't find the item you want to link in the drop-down menu, you can copy thelink to that item from your browser and paste it in the drop-down field. You can addup to five item links per field.
4. Once a link to an item is added, anyone with permission to that item can view the linked analysesand risks [417].
Jama Connect User Guide
407
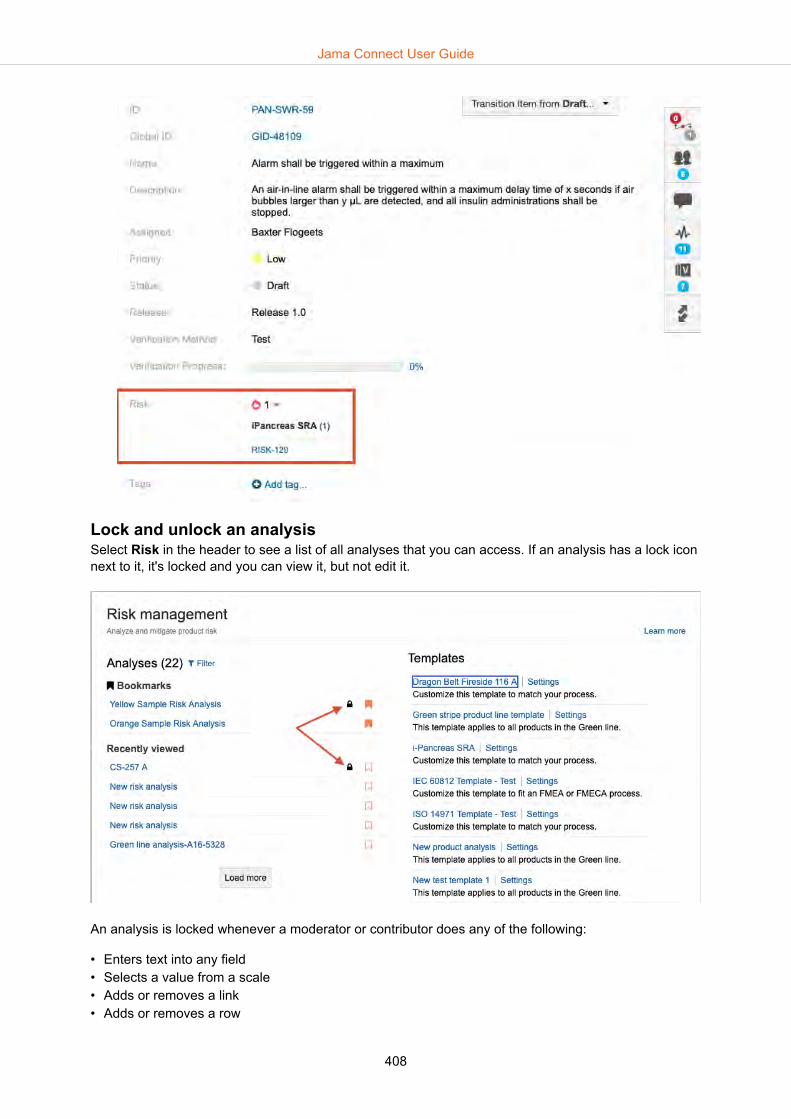
Lock and unlock an analysisSelect Risk in the header to see a list of all analyses that you can access. If an analysis has a lock iconnext to it, it's locked and you can view it, but not edit it.
An analysis is locked whenever a moderator or contributor does any of the following:
• Enters text into any field • Selects a value from a scale• Adds or removes a link• Adds or removes a row
Jama Connect User Guide
408

To unlock an analysis, select Unlock when you have finished editing. This allows other participants toedit the analysis.
While you're editing an analysis, other participants see a LOCKED notification next to the analysisname, along with information about who is editing the analysis and when it was last edited. They canselect Refresh to update that information.
WARNINGThe only person who can unlock an analysis before it times out, is the person wholocked it.
Otherwise, the lock times out 60 minutes after the last edit and the analysis becomesavailable for others to edit. This happens even if the user is still working in other areasof Jama Connect.
If another user edits the analysis after the lock times out, any unsaved data the firstuser entered is lost. Data is automatically saved when a user moves from one cell toanother.
If the same user returns to edit the analysis before other users, any changes are savedwhen they make another edit.
Evaluate risksDuring a risk-benefit analysis, you might want to add comments about how the final risk level was deter-mined and its acceptance. You can also add a link to a Jama Connect item in this field.
Analyses created with the ISO 14971 starter template, or any template that was customized by a riskadministrator [383] can include a column to the right of the final risk level where participants can addcomments about that risk and its acceptance.
Jama Connect User Guide
409

Viewer
NOTEYou must have a stakeholder, test runner, or creator license to be invited to an analysisas a viewer.
A viewer can read, but not edit, a risk analysis.
A moderator or contributor can also do everything that a viewer can do.
For example, all participants (viewers, moderators, and contributors) can:
• View an analysis [411]• Bookmark an analysis [412]• View risk definitions [413]• Filter risk analyses [414]• Filter and sort risks [415]• View risks and analyses for an item [417]• View and sort risk IDs [422]• Export a risk analysis [423]
Jama Connect User Guide
410

View a risk analysis
NOTETo view a risk analysis, you must be invited [401] to that analysis, be the moderator[398] of that analysis, or have risk administrator permissions [378].
To view a risk analysis:
1. Select Risk in the header.2. In the list of analyses, find the analysis you want to open and select it. Analyses are listed in the
order they were created. Any bookmarked analyses are at the top of the list. Any locked analyses[408] show a lock icon. To see more analyses, select Load more.
TIPYou can filter [414] and bookmark [412] analyses to find them more easily.
Jama Connect User Guide
411

3. If you're invited to an analysis, you receive an email with a link to view it. Any participant can usethat same link to view the analysis.
NOTEYou only see the analyses for which you're a participant. Risk administrators [378] arethe only ones who can see all the analyses.
Bookmark an analysisYou can bookmark a risk analysis to keep it near the top of your list and make it easy for you to find.
1. Select Risk in the header.2. In the list of recently viewed analyses, select the bookmark icon next to the analysis you want to
bookmark.
3. The analysis that you bookmarked moves to the list of bookmarks at the top of the page.
TIPYou can also bookmark projects, components, folders, sets, filters, and Trace Views toyour homepage [41].
Jama Connect User Guide
412

View risk definitionsThe risk administrator creates templates for the analysis and makes decisions about how the analysesare set up. This includes setting rankings in the scales, configuring matrices and making certain fieldsvisible or editable.
Select Actions > View definitions to understand how an analysis works. This page gives contextabout how this analysis was set up. Anyone with access to an analysis can view definitions.
In addition to specific descriptions for scale rankings and matrix values, the definitions page also showswhich fields allow links and which fields are editable.
Jama Connect User Guide
413

TIPYou can also hover your mouse over the column headers to see the definition for eachone.
Filter risk analysesWhen you select Risk in the header, you see a list of all active risk analyses. You can filter the list ofanalyses by your role to find the analysis you're looking for more easily.
1. Select Filter next to the Analyses header.
2. In the drop-down menu select a role. The filter is applied to bookmarked and recently viewed analy-ses.
Jama Connect User Guide
414

3. The Analyses header now includes the number of results returned. Text below the header showswhich filters are being applied.
4. To clear the filter, select Clear filter.
TIPYou can also bookmark analyses [412] to keep them at the top of the list.
Filter and sort risksYou can filter and sort the risks in an analysis by scale and matrix values to find what you need.
To filter risks:
Jama Connect User Guide
415

1. Select Filter.
2. The filter panel shows all the values you can use, grouped by scale, or matrix. Select the boxes forthe values you want to see in your filtered results.
3. Selected filters are displayed as tags at the top of the risk analysis. Active filters are shown at thetop of the page. Select X to remove a filter or Clear all to remove all filters.
Jama Connect User Guide
416

IMPORTANTFilters can only block or show entire rows. If you have multiple harms per risk, thefilter displays all of the harm values if any one of them meets the criteria.
4. Select Close filter to hide the filter panel. Filters remain active until you release them.
NOTEYou can't add rows while an analysis is being filtered.
5. You can also sort values for scale or matrix columns. Select the header to toggle between ascend-ing, descending or unsorted order (indicated by small black arrows next to the header name).
TIPTo resize columns, hover between two column headers, click and drag to the rightwidth.
IMPORTANTFor risks with multiple harms, sorting on values uses the harm with the highest val-ue for the entire row.
View risks in Single Item ViewContributors can add links to items in text fields in an analysis as a way of linking requirements, mitiga-tions, or verifications to a particular risk.
Jama Connect User Guide
417

You can see which risks or analyses link to a particular item when viewing that item in Single Item View[52].
IMPORTANTAn organization administrator must enable the risk widget [578] for the item type beforerisk is visible in single item view.
Your organization must have active risk licensing and you must be an invited partici-pant in order to view a risk analysis.
When the widget is enabled, you see a flame icon next to the number of risks that correspond to thatitem.
Select the small arrow next to the number to view details about the analyses and risks that refer to thisitem.
Jama Connect User Guide
418

The names of analyses are listed in bold, followed by the number of risks in that analysis that refer tothis item. The risks IDs [422] are listed below each analysis name.
As long as you are invited to the analysis, you can select the analysis or the risk ID to view the item incontext. When you select the risk ID you see the risk that links to the item outlined in blue.
TIPYou can also see risks in other areas of the application [419], even when the risk widg-et hasn't been enabled for that item type.
View risks across the application
NOTEYour organization must have active risk licensing and you must be an invited partici-pant in order to view a risk analysis.
Jama Connect User Guide
419
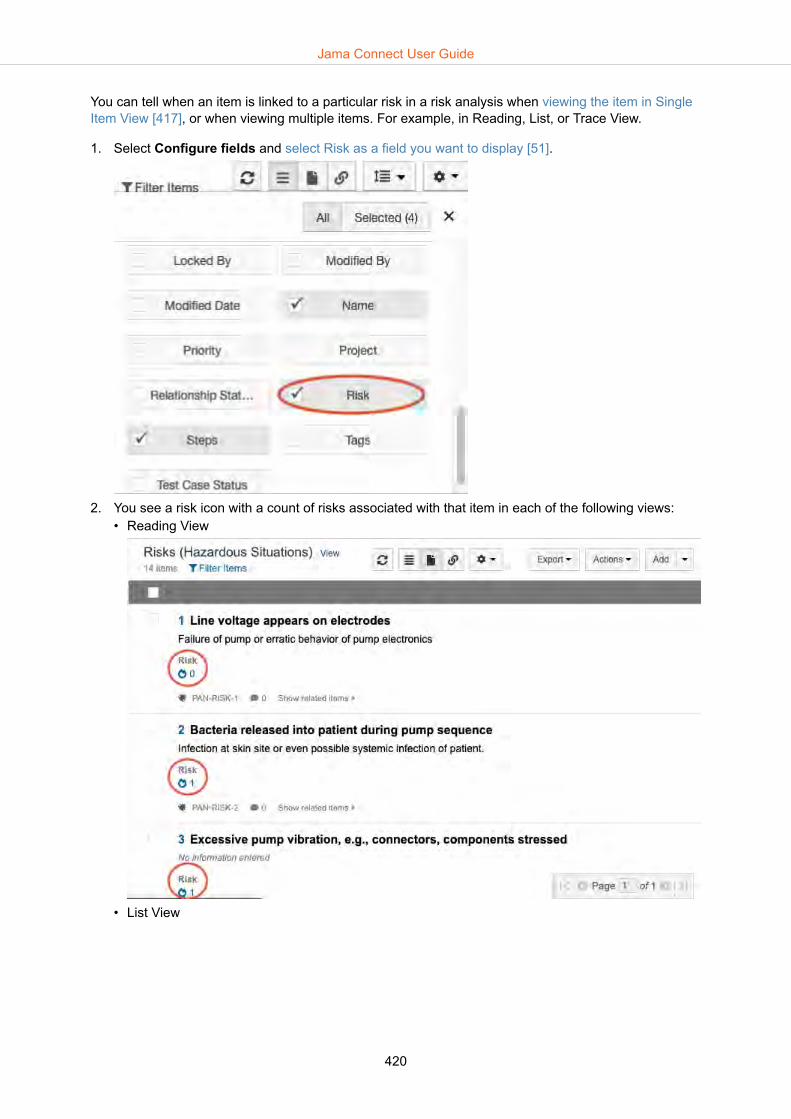
You can tell when an item is linked to a particular risk in a risk analysis when viewing the item in SingleItem View [417], or when viewing multiple items. For example, in Reading, List, or Trace View.
1. Select Configure fields and select Risk as a field you want to display [51].
2. You see a risk icon with a count of risks associated with that item in each of the following views:• Reading View
• List View
Jama Connect User Guide
420

• Trace View
3. Select the risk icon to open a side panel with detailed information about the risks that are linked tothat item. Select the risk ID or the analysis name in the side panel to go directly to the risk or analy-sis.
Jama Connect User Guide
421

TIPYou can configure fields to show risk in the following areas of the application: ReadingView [48], List View [47], Trace View, [49] Test cycles [330], Dashboard [346], Relea-ses [236], Coverage Explorer [271].
Risks aren't visible in Reviews [153], baselines [239], sync items compare view [293],or compare item versions [231].
View and sort risk IDsRisk IDs are unique IDs assigned to each row in an analysis. Risk IDs are automatically generatedacross all analyses and numbered sequentially in the order they were created.
Risk IDs are visible in the left column of every analysis. This column can't be moved or edited. Howev-er, you can select the column header to sort risk IDs in ascending or descending order.
Jama Connect User Guide
422
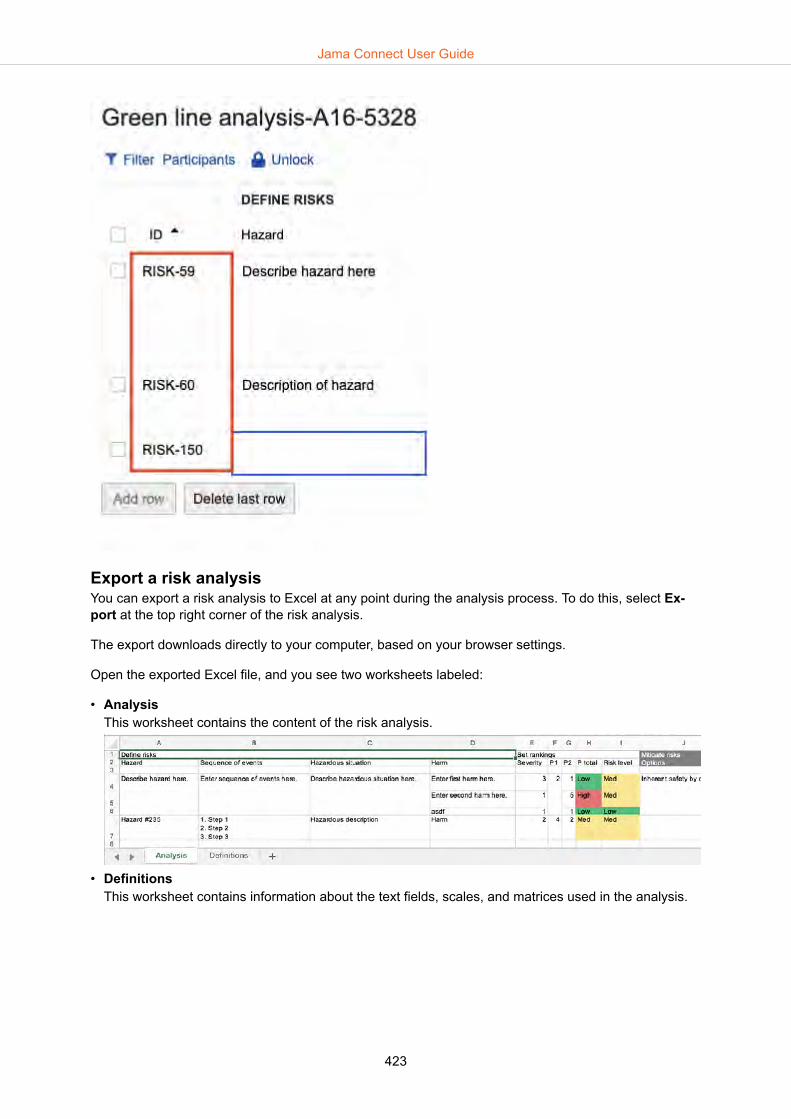
Export a risk analysisYou can export a risk analysis to Excel at any point during the analysis process. To do this, select Ex-port at the top right corner of the risk analysis.
The export downloads directly to your computer, based on your browser settings.
Open the exported Excel file, and you see two worksheets labeled:
• AnalysisThis worksheet contains the content of the risk analysis.
• DefinitionsThis worksheet contains information about the text fields, scales, and matrices used in the analysis.
Jama Connect User Guide
423

Jama Connect User Guide
424

Installing Jama Connect
Jama Connect is a Linux-based application that runs on Docker containers and uses Replicated soft-ware to "orchestrate" deploying applications. The process of installing Jama Connect includes installingand configuring Docker and Replicated. These tasks deliver the components necessary to run JamaConnect.
Components and what they do
Docker containers — A standalone executable package of software that includes code, runtime, sys-tem tools, system libraries, and settings. See https://www.docker.com/resources/what-container for de-tails.
Replicated — A container-based platform for easily deploying cloud native applications inside custom-ers' environments to provide greater security and control. The Admin Console is the interface for instal-ling and administering the Jama Connect application. See https://www.replicated.com/ for details.
Jama Connect license — The license included in your Welcome email. You upload the license to yourapplication server, then begin installing Jama Connect.
• Jama Connect users access Jama Connect by browsing to the instance URL (https://jamainstan-ceurl.customer.com/).
• Replicated administrators browse to the Admin Console by browsing to the same instance URL, buton port 8800 (https://jamainstanceurl.customer.com:8800/).
• Replicated updates Jama Connect and the license via API calls for internet-enabled environments.Our airgap option removes the need for remote API calls.
• Any content added to your Jama Connect instance is stored in the database. Uploaded artifacts, suchas attachments and report templates, are stored in the file system in the /data directory.
Which type of installation do you need?Decide which type of installation you need to perform, then follow the instructions for that type.
Jama Connect User Guide
425
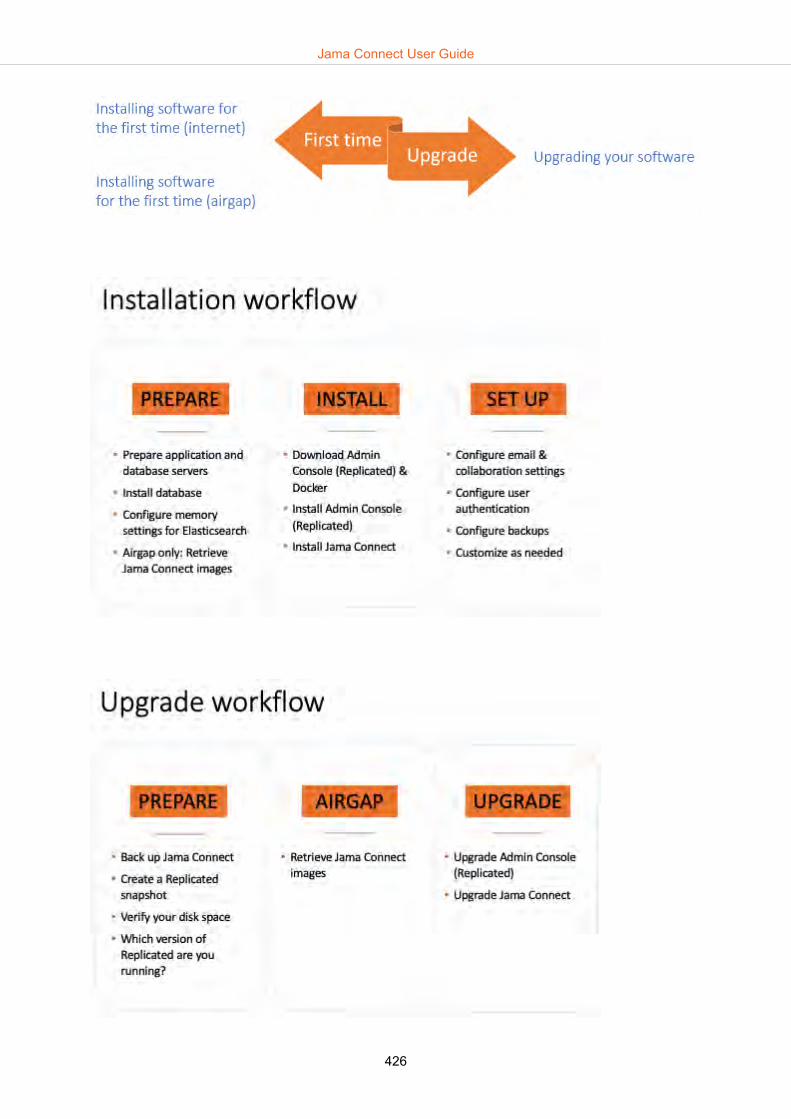
Jama Connect User Guide
426

Planning your installationBefore you install the Admin Console and Jama Connect, make sure you have the following.
All installations
• The license file sent from Jama Software, a small file with the .rli file extension (included in the Wel-come email)
• An application server with the necessary preparation [429] and requirements [427]• A database server with the necessary preparation [430]• Supported 64-bit Linux distribution with a kernel of:
• 4.x or greater (recommended)• 3.10 (minimum)
• Supported version of Docker
Airgap installations
If you are using the airgap method to install Jama Connect, you must have the following items.
• URL to the airgap-safe portal (included in the Welcome email) for downloading the Jama Connect ap-plication file
• A unique password (included in the Welcome email) to access the airgap-safe portal• PDF of this installation guide for the version of Jama Connect you are installing
IMPORTANTIf you lose the URL and password, contact support to generate new ones.
Optional
• TLS certificate and private key to secure the Admin Console and Jama Connect application
System requirementsMake sure that your environment conforms to all requirements and recommendations before installingJama Connect software.
For a list of current requirements, see supported software and system requirements and follow the linkfor your version of Jama Connect.
For the supported authentication types, see Authentication methods [466].
Application server requirementsTo install and run Jama Connect successfully, your application server must meet these requirements.
Requirement Notes
Be a dedicated applica-tion server
Aside from Jama Connect, make sure that no other applications are running on the applicationserver. Any external services affect the stability of the application. For example, diminishing mem-ory resources.
Have sufficient storage,CPU, and memory
Usage patterns and data size can be varied and complex, and application performance dependson the amount of CPU and memory provided. Use the tables in Resource sizing for your applica-tion server [428] to estimate the appropriate size and resources for your application server.
Have administrative rightsto that server
An administrator must be able to maintain the application, perform upgrades, and access theserver for regular maintenance.
Jama Connect User Guide
427

Requirement Notes
Use compatible softwareand environments
Verify that you're using compatible and supported software and environments with our most re-cent self-hosted release.
Resource sizing for your application serverFollow the data size thresholds in the following table when estimating your needs for an applicationserver. Monitor usage [517] and adjust your settings [495] as necessary. If you're approaching the En-terprise threshold, contact support to ensure optimal performance.
Small Medium Large Enterprise
Active items in system Up to 600,000 Up to 1 million Up to 1.5 million 2–4 million
Active projects Up to 100 Up to 500 Up to 1,000 1,000–1,500
Concurrent users 50 or fewer Up to 75 Up to 100 100–150
CPU cores* 4 8 16 32
Total system RAM 16 GB 24 GB 32 GB 64 GB+
* Database sizing is based on your usage patterns and platform. You must have a minimum of 2–8cores and 4–8 GB of memory. Consult with your database administrator when determining databasesize.
Total system RAM can vary if you're using memory intensive workflows such as reuse [276], exporting[295], move items [124], integrations [617], and batch updates [112].
The memory allocation allows for a minimum amount of headroom. If you need to run additional soft-ware for monitoring and analysis, consider the additional system requirements for that software. Config-ure dynamic memory settings [495] as needed in the Admin Console.
We recommend setting up dedicated volumes for the data your application is going to write. For infor-mation about setting up these volumes, see Preparing your application server, Example: Setting updedicated volumes [429].
Use this storage calculator below to get a better idea of your particular needs for the application server.
Item Default lo-cation
Recommen-ded file sys-
tem type
Explanation Small ex-ample
Enter-prise ex-
ample
Calculateyour own
Operatingsystem
N/A N/A Not included in this cal-culation
N/A N/A ______ GB
Docker im-ages
/var/lib/docker
XFS withftype=1, orEXT4
Variable 30 GB 50 GB ______ GB
User data /data NFS Filesystem can vary,but consider size of at-tachments you're stor-ing
40-100 GB 100 GB ______ GB
Replicated /var/lib/repli-cated/
EXT4 Tip: Configure snap-shots to be stored in /data/replicated/snap-shots/ to ensure back-up
20 GB 30 GB ______ GB
Log files /logs EXT4 10 GB (fixed) 10 GB 10 GB 10 GB
Total: 100 + GB 160+ GB ______ GB
Important considerations
• To avoid performance issues, use XFS with the dtype option of ftype=1 or use EXT4. For Docker'sdefault data root directory, /var/lib/docker, if an XFS filesystem doesn’t have the dtype attribute set toftype=1, performance can degrade for container creation at startup.
Jama Connect User Guide
428

• Jama Software supports internally hosted network storage mounts (NFS). EBS is suggested in cloud-based environments. Cloud NFS (like EFS) isn't supported because Docker doesn't work with EFS.
Database server requirementsThe database must be hosted on a server separate from the Jama Connect application. This server canhost other databases, but we don’t support other applications running on the same server as the data-base.
• MySQL 5.7 and 8 (recommended)• Microsoft SQL 2016, 2017, and 2019
What is NOT supported
• Azure database• MariaDB• Custom configurations of Jama Connect databases. Customizations such as query optimization and
additional indexes that aren’t shipped with Jama Connect aren’t supported.
Things to do before installationWhether your environment is internet-enabled or airgap, make sure that your application server and da-tabase server are ready before installing Jama Connect.
• Prepare your application server [429]• Prepare your database server [430]• Install and configure your database (MySQL [432] or SQL Server [433])• Configure custom memory settings for Elasticsearch [435]
Preparing your application serverMake sure your application server meets all requirements. See Supported software and system require-ments.
For users and administrators to properly access Jama Connect, the following ports must be accessibleto inbound traffic. Work with your network administrator to ensure your network is configured properly.
• Port 22 — The SSH port. This allows administrators to make remote connections to the applicationserver using SSH.
• Port 8800 — The Admin Console port. This is needed for administrators to access the Admin Con-sole used to configure, install, and upgrade Jama Connect.
• Port 80 — The Jama Connect port for clear text communication (HTTP). This port can be used toaccess Jama Connect. It can be disabled, or the port number can be reconfigured.
• Port 443 — The Jama Connect port for SSL/TLS communication (HTTPS). This port can be used toaccess Jama Connect. It can be disabled, or the port number can be reconfigured.
For Jama Connect to successfully run its processes, the following User IDs must be available and un-used on the application host.
• User ID 91 — UID 91 is used by Tomcat to read and write to directories under /data.• User IDs 480 – 499 — These ports are used by the various services.
To ensure accurate time on the application server, sync the time on a routine schedule (for example, seta cron job to sync time every day or hour). To set up the cron job, use the command:
ntpdate pool.ntp.org
Important considerations
• To improve resolution time of any issues, keep ports open. Closing access to ports for communicationwithin the server isn't supported and risks application accessibility.
Jama Connect User Guide
429

• Docker pre-routes traffic so be sure to set rules in the DOCKER-USER table, not the INPUT table.• To avoid blocking issues when installing on RHEL or CentOS Linux distributions, disable firewall or
add the docker0 interface to the "trusted" zone.• We recommend setting up dedicated volumes for the data your application is going to write.
Example: Setting up dedicated volumes
Use this example to partition the logical volumes on your application server.
Start with a 100 GB disk.
1. Create a mountpoint:
mkdir /data /logs /var/lib/docker /var/lib/replicated
2. Create a physical volume:
pvcreate /dev/<your-disk-name>
3. Create a volume group:
vgcreate vg_jama /dev/<disk-name>
4. Create logical volumes:
lvcreate -L 30G -n lv_docker vg_jamalvcreate -L 20G -n lv_replicated vg_jamalvcreate -L 10G -n lv_logs vg_jamalvcreate -l 100%FREE -n lv_data vg_jama
5. Write file systems:
mkfs.xfs -L docker -n ftype=1 /dev/vg_jama/lv_dockermkfs.ext4 -L replicated /dev/vg_jama/lv_replicatedmkfs.ext4 -L data /dev/vg_jama/lv_data (ext4 or NFS)mkfs.ext4 -L logs /dev/vg_jama/lv_log
6. Edit the file /etc/fstab to include the following lines:
LABEL=docker /var/lib/docker xfs defaults 0 0LABEL=replicated /var/lib/replicated ext4 defaults 0 0LABEL=data /data ext4 defaults 0 0LABEL=logs /logs ext4 defaults 0 0
7. Mount all volumes:
mount -a
8. Confirm that all volumes were mounted properly:
df -h
Preparing your database serverThe following information is needed when connecting the application server to the database server.
Information Requirements
Type/vendor Database must be one of the following:
• MySQL (recommended) — Install and configure MySQL [432]• Microsoft SQL Server — Install and configure Microsoft SQL Server [433]
Database hostname Example: jama.companydb.com
Jama Connect User Guide
430

Information Requirements
Listening ports The application server must be allowed to communicate, remotely, with the database server over thelistening ports. Default ports are:
• MySQL = 3306• Microsoft SQL Server = 1433
Database schemaname
The database owner must be able to either:
• Create a new database schema.• Create tables inside an existing database schema of the given name.
The database name must follow these rules:
• Start with a letter (a–z).• Contain any number of characters: a–z, 0–9 or an underscore ("_").• Letters must be lowercase.
Username jamauser
Password
Connections The database must be able to accept a minimum of 300 concurrent connections.
SAML schema user-name
samluser
OAuth database user-name
oauthuser
The username and password for SAML and OAuth must match what's entered in the Microsoft SQLServer upgrade preparation script. See Upgrade and configure Microsoft SQL Server [455] for more de-tails.
Jama Connect User Guide
431

Install and configure MySQLMySQL is the recommended database server. Follow these steps to install and configure it.
If you want to upgrade MySQL, see Upgrade and Configure MySQL [454].
1. Make sure that the InnoDB engine is enabled.2. Download and install a supported version of MySQL. To find out which version of MySQL you need,
see Supported software, environments, and system requirements and click the link for your versionof Jama Connect.
3. Create an empty Jama Connect schema / database that uses UTF8.
create database jama character set utf8;
4. Use the following commands to create a user called "jamauser" with the ability to access, create,and update tables within the database.
IMPORTANTBefore installing Jama Connect 8.62.x, you must create two additional databaseschemas for the installation/upgrade to succeed. To create the database schemas,run these SQL commands on the MySQL database server:
CREATE DATABASE jama character set utf8;CREATE DATABASE saml;CREATE DATABASE oauth;CREATE USER 'jamauser'@'%' IDENTIFIED BY 'password';GRANT ALL PRIVILEGES ON jama.* TO `jamauser`@`%`;GRANT ALL PRIVILEGES ON oauth.* TO `jamauser`@`%`;GRANT ALL PRIVILEGES ON saml.* TO `jamauser`@`%`; GRANT SELECT ON mysql.user TO `jamauser`@`%`;
5. Restart the database server.
The following recommended settings require 8 GB of memory allocated to MySQL Server for a typicalinstallation and 16 GB for an enterprise installation.
Depending on your database server's operating system, this can be added to your my.cnf file (Linux) ormy.ini file (Windows). You can also make these changes directly to the database.
Property Typical Installation Enterprise Installation
max_allowed_packet 1 GB 1 GB
query_cache_type 1 1
query_cache_size 256 MB 256 MB
tmp_table_size 2 GB 2 GB
max_heap_table_size 2 GB 2 GB
table_open_cache 512 512
innodb_buffer_pool_size 2 GB 12 GB
innodb_log_file_size 256 MB 256 MB
innodb_log_buffer_size 12 MB 12 MB
innodb_thread_concurrency 16 16
max_connections 151 351
wait_timeout 259200 259200
Here is a sample text config file at an enterprise level. You must add the following values for your envi-ronment:
Jama Connect User Guide
432
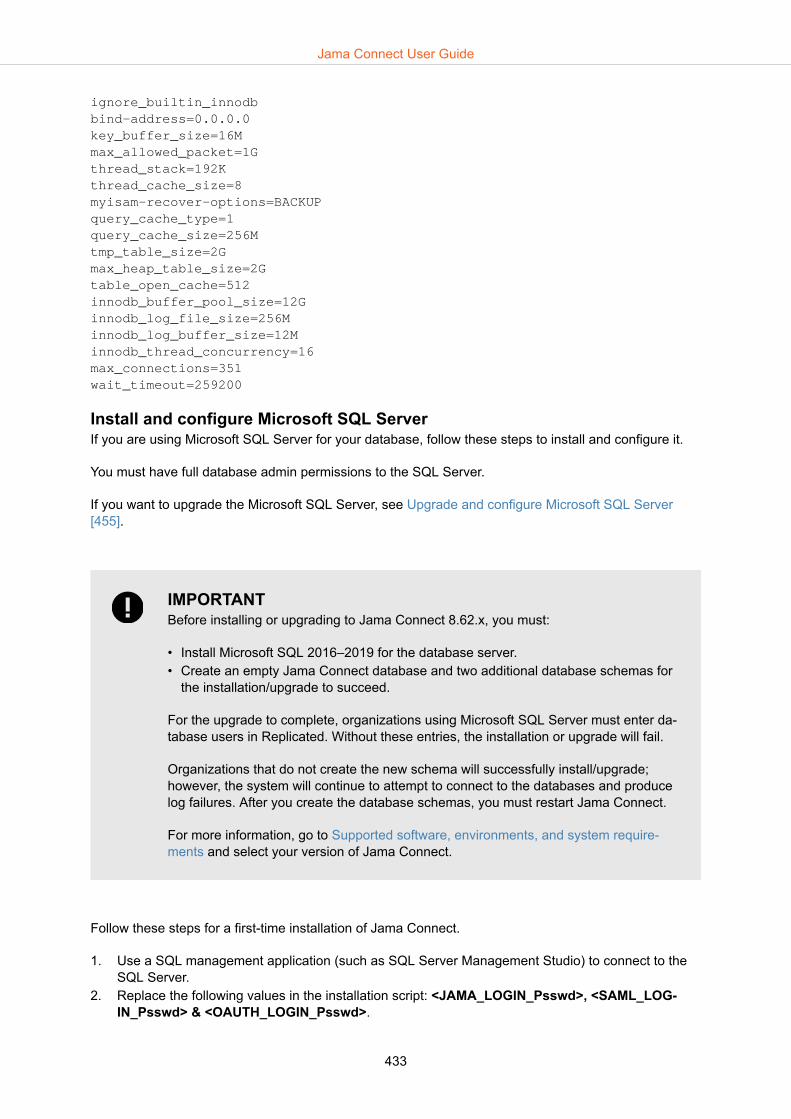
ignore_builtin_innodbbind-address=0.0.0.0key_buffer_size=16Mmax_allowed_packet=1Gthread_stack=192Kthread_cache_size=8myisam-recover-options=BACKUPquery_cache_type=1query_cache_size=256Mtmp_table_size=2Gmax_heap_table_size=2Gtable_open_cache=512innodb_buffer_pool_size=12Ginnodb_log_file_size=256Minnodb_log_buffer_size=12Minnodb_thread_concurrency=16max_connections=351wait_timeout=259200
Install and configure Microsoft SQL ServerIf you are using Microsoft SQL Server for your database, follow these steps to install and configure it.
You must have full database admin permissions to the SQL Server.
If you want to upgrade the Microsoft SQL Server, see Upgrade and configure Microsoft SQL Server[455].
IMPORTANTBefore installing or upgrading to Jama Connect 8.62.x, you must:
• Install Microsoft SQL 2016–2019 for the database server.• Create an empty Jama Connect database and two additional database schemas for
the installation/upgrade to succeed.
For the upgrade to complete, organizations using Microsoft SQL Server must enter da-tabase users in Replicated. Without these entries, the installation or upgrade will fail.
Organizations that do not create the new schema will successfully install/upgrade;however, the system will continue to attempt to connect to the databases and producelog failures. After you create the database schemas, you must restart Jama Connect.
For more information, go to Supported software, environments, and system require-ments and select your version of Jama Connect.
Follow these steps for a first-time installation of Jama Connect.
1. Use a SQL management application (such as SQL Server Management Studio) to connect to theSQL Server.
2. Replace the following values in the installation script: <JAMA_LOGIN_Psswd>, <SAML_LOG-IN_Psswd> & <OAUTH_LOGIN_Psswd>.
Jama Connect User Guide
433

NOTECopy and store the passwords you create here. You will need them later to config-ure the Admin Console settings.
3. In a new query window, run the following SQL query code:
-- Fresh Install Preparation SCRIPT/*Jama Connect Preparation Commands for a fresh install. It is required to run these command / script on the Microsoft SQL Server BEFORE running the Jama Connect 8.62.x installfor ON-PREM installation using Microsoft SQL Server 2016 - 2019DATE: 05/10/2021NOTES:This script assumes this is a new Installation of JAMA Connect. DO NOT RUN THIS SCRIPT ON AN EXISTING JAMA INSTALLATION.The script will create a new empty JAMA database, add 2 new schemas (empty) to the Jama Database, 2 new DB Logins and Database users to support the Multi-Auth functionality released in Jama Connect 8.62.0.
INSTRUCTIONS:This script must be run prior to Jama installation or installation may fail to complete.Modify the <JamaUser_LOGIN_Psswd>, <SAML_LOGIN_Psswd> & <OAUTH_LOGIN_Psswd> values in the script below before Execution. Passwords must be enclosed in single quotes.*/USE master;CREATE LOGIN jamauser with password = 'password';CREATE LOGIN samluser with password = 'password';CREATE LOGIN oauthuser with password = 'password';GO
USE master;CREATE DATABASE jama;GOALTER DATABASE jama SET READ_COMMITTED_SNAPSHOT ON WITH ROLLBACK IMMEDIATEGO
USE jama;EXEC ('CREATE SCHEMA oauth');EXEC ('CREATE SCHEMA saml');GO
USE jama;CREATE USER jamauser for LOGIN jamauser;
Jama Connect User Guide
434

CREATE USER samluser for LOGIN samluser with DEFAULT_SCHEMA=saml;CREATE USER oauthuser for LOGIN oauthuser with DEFAULT_SCHEMA=oauth;GO
EXEC sp_addrolemember N'db_owner', jamauser;EXEC sp_addrolemember N'db_owner', samluser;EXEC sp_addrolemember N'db_owner', oauthuser;GO
4. Confirm that these actions were successful:1. Script completed — Check the Query Execution results for errors.2. Users created — Run the following SQL script in a new query window.
USE jamaSELECT * from master.sys.sql_loginsSELECT * from Jama.sys.sysusers
The results include jamauser, samluser, and oauthuser in the "Name" column of the resultpanes.
3. Users granted the DB_owner role — Run the following SQL script in a new query window.
USE jamaSELECT DP1.name AS DatabaseRoleName,isnull (DP2.name, 'No members') AS DatabaseUserNameFROM sys.database_role_members AS DRMRIGHT OUTER JOIN sys.database_principals AS DP1ON DRM.role_principal_id = DP1.principal_idLEFT OUTER JOIN sys.database_principals AS DP2ON DRM.member_principal_id = DP2.principal_idWHERE DP1.type = 'R'ORDER BY DP1.name;
The results will show that db_owner role is granted to jamauser, samluser, and oauthuser.5. Run the following query to keep the database from locking users' accounts while they are logging
in or working in Jama Connect. You must have db_owner permissions.
ALTER DATABASE jama SET READ_COMMITTED_SNAPSHOT ON WITH ROLLBACK IMMEDIATE;
6. Run this question to make sure the flag was successfully enabled:
SELECT is_read_committed_snapshot_on FROM sys.databases WHEREname='jama';
If the returned value is 1, the flag is on.
Configure custom memory settings for ElasticsearchTo prepare for installing Jama Connect, you must first update the system that hosts Docker. The updateconsists of configuring memory settings for Elasticsearch.
1. Open the /etc/sysctl.conf file, add the following line to the file, then save the file.
vm.max_map_count=262144
2. Reload the sysctl.conf file:
sysctl -p
3. To confirm, type this command:
sudo sysctl -a | grep max_map_count
Jama Connect User Guide
435

The system responds with:
vm.max_map_count=262144
Installing software for the first time (internet)If your organization is internet-enabled, follow these instructions to download, install, and configure thesoftware you need for your Jama Connect instance. The software includes Admin Console (Replica-ted), Docker, and Jama Connect.
Jama Software sends a Welcome email that includes your Jama Connect license (.rli) file.
The installation process consists of these tasks:
Prepare • Prepare application server and database server• Install database• Download Replicated and Docker• Configure memory settings for Elasticsearch
Install • Install Admin Console (Replicated)• Install Jama Connect
Set up • Add organization admin account• Configure email/collaboration settings• Configure authentication• Configure backups
Downloading Replicated and Docker (internet)You can download the Admin Console (Replicated) and Docker files to your desktop system, then moveand extract them to the /data/install directory on your application server.
Replicated
https://community.jamasoftware.com/blogs/kristina-king/2016/11/11/standard-channel-on-premises-re-lease-notes
Click Notes for Administrators for your version of Jama Connect to get the correct cURL command toinstall Replicated.
Docker
https://help.replicated.com/community/t/installing-docker-enterprise-edition-ee/58
Install the Admin Console (internet)The Admin Console (Replicated) is the interface used to install the Jama Connect application and Dock-er. You can use the Replicated installation script to install the latest supported version of Docker andReplicated.
Important considerations
• During installation, the application server must have access to the internet, including the Replicatedlisted domains.
• The Admin Console isn't compatible with Internet Explorer.• If you receive a warning that Docker is using the devicemapper storage driver, cancel the installation
and configure Docker to use the overlay2 storage driver.• The Release Notes might include the unique cURL command for your version of Jama Connect.• The supported software page in the Community specifies which versions were used during regres-
sion testing of the version of Jama Connect you want to install.
To install the Admin Console:
Jama Connect User Guide
436

1. Connect to the command shell of the application server using SSH.2. As root user or a user with sudo bash privileges, download and install the Admin Console using
one of these methods:• Use the cURL command from the Release Notes.• Download and install a specific version of the Admin Console with this command:
curl -sSL "https://get.jamasoftware.com/docker?replicated_tag=<REPLICATED_VERSION>"| sudo bash -s no-auto
3. Replace <REPLICATED_VERSION> with the Replicated versions recommended in the ReleaseNotes for your version of Jama Connect. For example:
curl -sSL "https://get.jamasoftware.com/docker?replicated_tag=2.38.1" | sudo bash -s no-auto
If the cURL command displays the following message, the Admin Console must be installed man-ually.
Either your platform is not easily detectable, is not supported by this installer script, or does not yet have a package for Replicated.Please visit the following URL for more detailed installation instructions:
https://www.replicated.com/docs/distributing-an-application/installing/
NOTEThe no-auto option is only used to make sure that questions during the installationdon't time out (default timeout setting is 20 seconds).
4. Follow the installation prompts, then you can leave the installation unattended.
IMPORTANTThe prompts are displayed for 20 seconds unless you chose the no-auto option. Ifyou skip the step to choose an IP address, the URL that you see at the end of thisstep doesn’t work. You must run the cURL command again and select an IP ad-dress.
Please choose one of the following network interfaces:
[0] eth0 10.0.2.15[1] eth1 172.28.128.3[2] docker0 172.17.0.1Enter desired number (0-2):
• Enter the number (0–2) of the network used to access Jama Connect (your DNS entry alsoroutes to this network). The same network is used to access the Admin Console and the JamaConnect application.
Does this machine require a proxy to access the Internet? (y/N)
• If using a proxy, enter Y and input the proxy information. If your server is set up to use a proxy,the user environment auto-detects that configuration and asks if you want the installer to config-ure the proxy for you.
• When prompted for a service IP address, leave it blank and press Enter.
Jama Connect User Guide
437

When the installation is complete, you see the following message:
==> default: To continue the installation,visit the following URL in your browser:https://<your_ip_address>:8800
5. Take note of the URL of the Admin Console; you will need it when you configure Replicated set-tings.
6. In the /data directory, create a custom Replicated snapshots folder and change the ownership tothe replicated user with the following command. Later you can configure the Admin Console tostore snapshots there.
7. Change the ownership of the folder to the Replicated user with this command:
mkdir -p /data/replicated/{snapshots,statsd,support-bundle}chown -R replicated /data/replicated
After changing ownership to Replicated with the command, the permissions look something likethis:
# ll /data/replicated/total 20drwxr-xr-x 5 replicated root 4096 Oct 21 21:27 ./drwxrwxrwx 10 root root 4096 Nov 7 18:48 ../drwxr-xr-x 5 replicated root 4096 Oct 21 21:29 snapshots/drwxr-xr-x 6 replicated docker 4096 Oct 21 22:11 statsd/drwxr-xr-x 2 replicated root 4096 Oct 21 21:27 support-bundle/
Later you can configure the Admin Console to store snapshots in the Replicated snapshots folder.
Install Jama Connect (internet)The installation script walks you through the process of uploading the license file, installing Jama Con-nect, and configuring the Admin Console. To start the process, you use the URL that was generatedwhen you installed Replicated.
The license file is attached to the Welcome email you received from Jama Software.
1. Open the Welcome email and download the attached license file to you local system.2. In a supported browser, enter the URL for the Admin Console, which was generated when you in-
stalled Replicated.
Jama Connect User Guide
438

3. Enter your hostname.4. Do one of the following, depending on whether you have a private key and certificate:
• Have key/certificate — Select Choose file under Private key and Certificate, navigate to thefiles, then click Upload & Continue.
• No key/certificate — Click Self-Signed Cert.
Jama Connect User Guide
439

5. Click Choose license to upload your license file.
6. Enter and confirm a password for access to the Admin Console, then click Continue.
Jama Connect User Guide
440

The system performs the preflight checks.7. When the preflight checks are complete, click Continue.
The Settings page for the Admin Console opens.8. Configure the settings for each group, as needed. Scroll down to see each group of settings.
Database Settings — Use the information from Preparing your database server [430].• MySQL
• Microsoft SQL Server
Jama Connect User Guide
441

TLS Key & Cert — (Optional) If you have the key and certificate, click Choose file to select them.9. Scroll to the bottom of the page and click Save. You see a confirmation that your settings were
saved.
Jama Connect User Guide
442

10. Select Restart now.The system restarts and opens the Admin Console.
11. Log in to Jama Connect as root [501].
Jama Connect User Guide
443
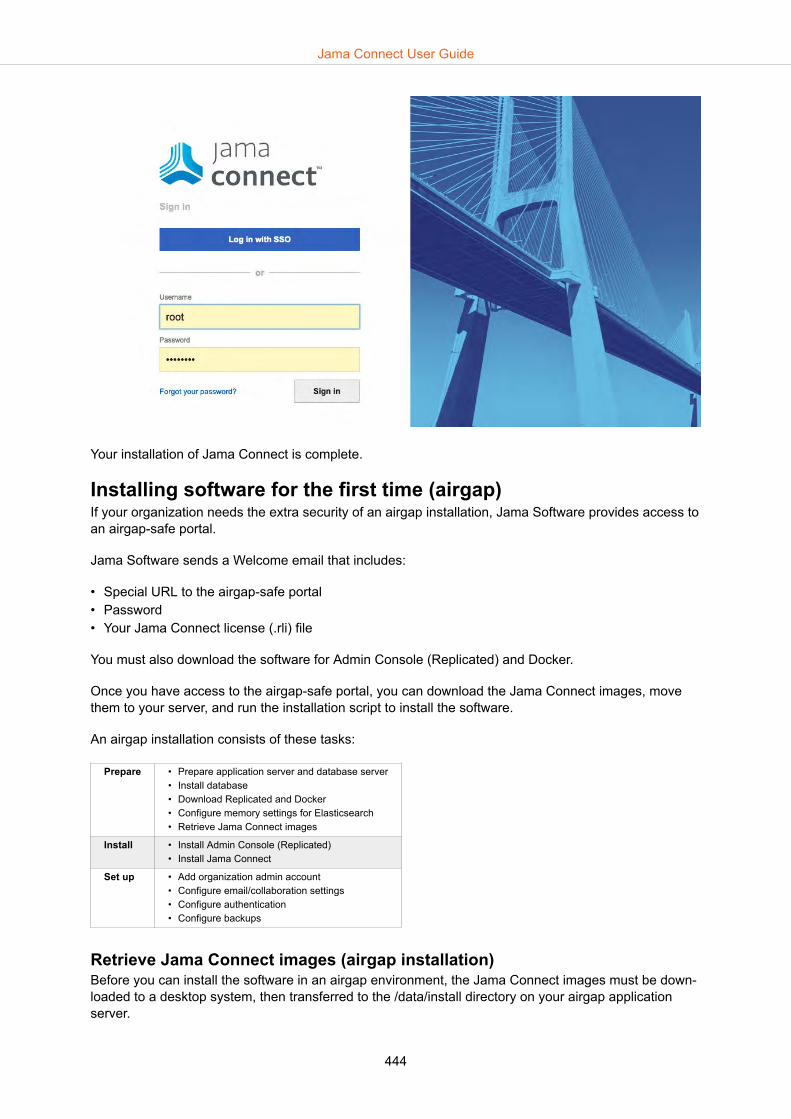
Your installation of Jama Connect is complete.
Installing software for the first time (airgap)If your organization needs the extra security of an airgap installation, Jama Software provides access toan airgap-safe portal.
Jama Software sends a Welcome email that includes:
• Special URL to the airgap-safe portal• Password• Your Jama Connect license (.rli) file
You must also download the software for Admin Console (Replicated) and Docker.
Once you have access to the airgap-safe portal, you can download the Jama Connect images, movethem to your server, and run the installation script to install the software.
An airgap installation consists of these tasks:
Prepare • Prepare application server and database server• Install database• Download Replicated and Docker• Configure memory settings for Elasticsearch• Retrieve Jama Connect images
Install • Install Admin Console (Replicated)• Install Jama Connect
Set up • Add organization admin account• Configure email/collaboration settings• Configure authentication• Configure backups
Retrieve Jama Connect images (airgap installation)Before you can install the software in an airgap environment, the Jama Connect images must be down-loaded to a desktop system, then transferred to the /data/install directory on your airgap applicationserver.
Jama Connect User Guide
444

TIPBecause the download might take a long time, we recommend doing this on a differentday than when you install the software.
To retrieve the images, you need the airgap-safe portal URL and password provided in the Welcomeemail sent from Jama Software.
1. Open the Welcome email to access the airgap-safe portal URL and password.2. In a supported browser, enter the URL and the password.3. You see a list of available releases since your license was issued, along with a download link and a
checksum for each.4. Find the version you want to install and select Get Download Link to generate a new temporary
download link.
5. Select Download to download the files directly to your desktop system.
6. Move the downloaded airgap files to your application server host in the following directory:
/data/install
Downloading Replicated and Docker (airgap)You can download the Admin Console (Replicated) and Docker files to your desktop system, then moveand extract them to the /data/install directory on your application server.
Replicated
https://s3.amazonaws.com/replicated-airgap-work/stable/replicated-2.48.0%2B2.48.0%2B2.48.0.tar.gz
Docker
Jama Connect User Guide
445

https://help.replicated.com/community/t/installing-docker-in-airgapped-environments/81
Install the Admin Console and Docker (airgap)Once you have retrieved the Jama Connect images [444] and transferred them to the data/install direc-tory of your airgap application server, install the Admin Console (Replicated) and Docker in the samedirectory.
1. Make sure the Admin Console (Replicated) and Docker files have been transferred to the /data/install directory on your application server and extracted there.
2. At the server’s command line, enter the following command:
tar -xzvf replicated.tar.gz
You see this output:
install.shoperator_install.shreplicated-operator.tarreplicated-ui.tarreplicated.tar
3. In the same directory, use this command to execute the application installation script, which identi-fies the airgap installation file.
cat ./install.sh | sudo bash -s airgap
4. Complete these questions as the script runs:• Network interface — Enter the number (0–2) of the network used to access Jama Connect. The
same network is used to access the Admin Console and the Jama Connect application.• Proxy (Y/N) — Enter N (not needed for an airgap system).
5. Copy the URL to use when you install Jama Connect (airgap).
Install Jama Connect (airgap)An installation wizard walks you through the process of uploading the license file, installing Jama Con-nect, and configuring the Admin Console. To start the wizard, you use the URL that was generatedwhen you installed the Admin Console [446].
The license file is attached to the Welcome email you received from Jama Software.
1. Open the Welcome email and save the license file to the /data/install directory on your applicationserver.
2. In a supported browser, enter the URL for the Admin Console, which was generated when you in-stalled Replicated.
Jama Connect User Guide
446

3. Enter your hostname.4. Do one of the following, depending on whether you have a private key and certificate:
• Have key/certificate — Select Choose file under Private key and Certificate, navigate to thefiles, then click Upload & Continue.
• No key/certificate — Click Use Self-Signed Cert.5. Click Choose license to upload your license file.
Jama Connect User Guide
447

6. Select Airgapped for your installation type, then click Continue.
IMPORTANTIf you select Online as your installation type, an internet installation begins. Theonly way to correct this is to uninstall Replicated, reinstall it, and start this taskagain from the beginning.
Jama Connect User Guide
448

7. Upload your license using one of these methods:• Enter /data/install (the path of directory where you saved the license file on your application
server), then click Continue.• Click Upload Airgap Bundle.The system installs the airgap package, then performs the preflight checks.
Jama Connect User Guide
449

8. When the preflight checks are complete, click Continue.The Settings page for the Admin Console opens.
Jama Connect User Guide
450

9. Configure the settings for each group, as needed. Scroll down to see each group of settings.• Database Settings — Use the information from Preparing your database server [430].• TLS Key & Cert — (Optional) If you have the key and certificate, click Choose file to select
them.• Airgapped Settings — (Optional) Enter a new path for airgap update packages and for the li-
cense file.10. Scroll to the bottom of the page and click Save.
You see a confirmation that your settings were saved.
11. Select Restart now.The system restarts and opens the Admin Console.
Jama Connect User Guide
451
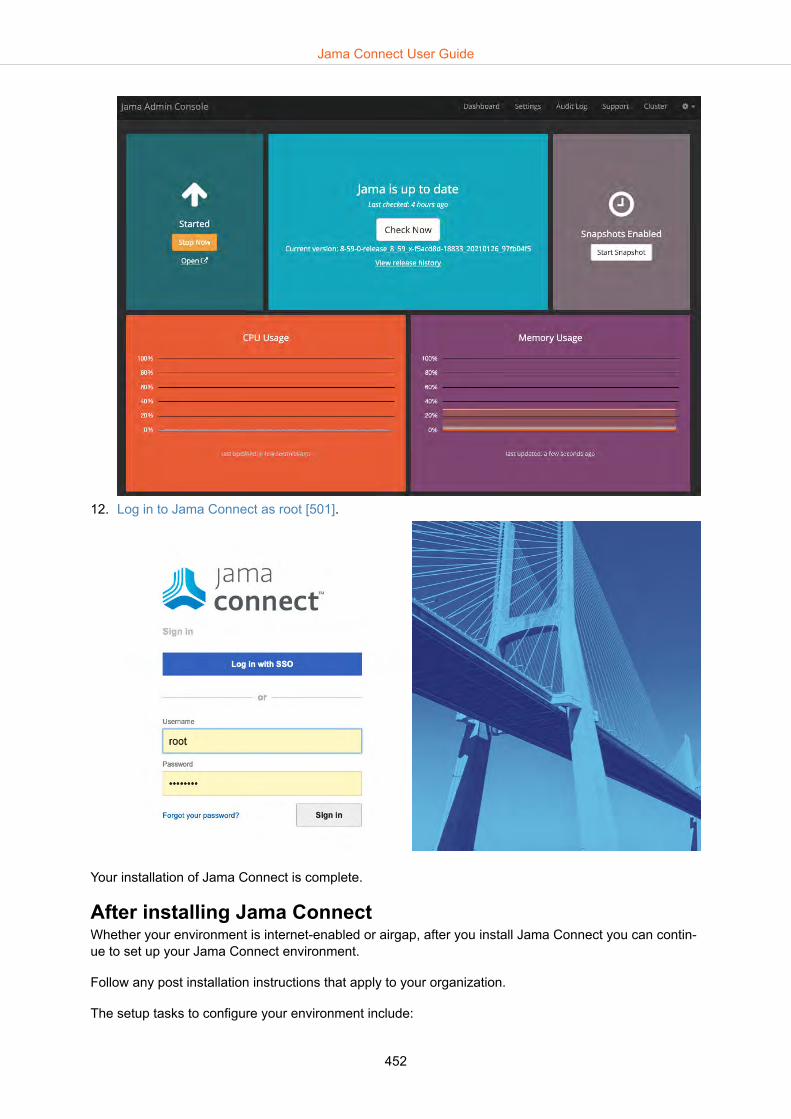
12. Log in to Jama Connect as root [501].
Your installation of Jama Connect is complete.
After installing Jama ConnectWhether your environment is internet-enabled or airgap, after you install Jama Connect you can contin-ue to set up your Jama Connect environment.
Follow any post installation instructions that apply to your organization.
The setup tasks to configure your environment include:
Jama Connect User Guide
452
• Add Organization Admin account [503]• Modify organization details [506]• Configure proxy settings (optional) [463]• Configure email/collaboration settings [507]• Configure user authentication [466]• Create XML backups (optional) [510]
If you have further questions about Jama Connect installation and setup, visit the Jama Support Com-munity or contact support.
Upgrading your softwareWhether your organization is internet-enabled or airgap, follow these instructions to download and in-stall the upgrade software you need for your Jama Connect instance.
If your organization needs the extra security of an airgap installation, Jama Software provides access toan airgap-safe portal to retrieve your Jama Connect images.
You might need to upgrade only the Jama Connect application. Or you might need to upgrade JamaConnect and the Admin Console (Replicated) at the same time.
Before upgrading, be aware of the supported software for your current installation and the produc-tion system requirements [427].
IMPORTANTBefore installing or upgrading to Jama Connect 8.62.x, you must:
• Create two additional database schemas [455] for the installation/upgrade to suc-ceed.
• Be running a version of Jama Connect (8.62.x or earlier) that uses Microsoft SQL2016-2019 for the database server.
For more information, go to Supported software, environments, and system require-ments and select your version of Jama Connect.
Important considerations
• Always perform the upgrade in a test environment before upgrading your production environment.• Jama Connect versions 8.0 and later don’t work in a Windows Server environment or with an Oracle
database. For details, see Application server requirements [427].• If you're on a version of Jama Connect earlier than 8.36.0, you must perform a step upgrade. First
upgrade to version 8.36.0, then upgrade to version 8.49.0. You can’t skip the step upgrades.See Incremental Step Upgrade for Jama 8.x and Beyond for details.
Things to do before upgrading
• Upgrade and configure Microsoft SQL Server [455].• Create a backup of Jama Connect [510].• Create a Replicated snapshot [484].• Make sure you have enough disk space for the upgrade:
• Remove old Docker images [524].• Remove or move old Replicated snapshots.
Jama Connect User Guide
453

• Determine your version of Replicated.• Airgap only: Retrieve the Jama Connect images.
Upgrade and Configure MySQLMySQL is the recommended database server. Follow these steps to upgrade and configure it.
If you want to install MySQL for the first time, see Install and configure MySQL [432].
IMPORTANTBefore upgrading Jama Connect 8.62.x, you must create two additional databaseschemas for the installation/upgrade to succeed. To create the database schemas, runthese SQL commands on the MySQL database server:
CREATE DATABASE saml;CREATE DATABASE oauth;GRANT ALL PRIVILEGES ON oauth.* TO ‘jamauser’@‘%’;GRANT ALL PRIVILEGES ON saml.* TO ‘jamauser’@‘%’;GRANT SELECT ON mysql.user TO ‘jamauser’@‘%’;
1. Make sure that the InnoDB engine is enabled.2. Download and install a supported version of MySQL. To find out which version of MySQL you need,
see Supported software, environments, and system requirements and click the link for your versionof Jama Connect.
3. Create an empty Jama Connect schema / database that uses UTF8.
create database jama character set utf8;
4. Use the following commands to create a user called "jamauser" with the ability to access, create,and update tables within the database.
CREATE USER 'jamauser'@'%' IDENTIFIED BY 'password'; GRANT ALL PRIVILEGES ON jama.* TO 'jamauser'@'%'.
5. Restart the database server.The following recommended settings require 8 GB of memory allocated to MySQL Server for a typi-cal installation and 16 GB for an enterprise installation.Depending on your database server's operating system, this can be added to your my.cnf file (Li-nux) or my.ini file (Windows). You can also make these changes directly to the database.
Property Typical Installation Enterprise Installaton
max_allowed_packet 1 GB 1 GB
query_cache_type 1 1
query_cache_size 256 MB 256 MB
tmp_table_size 2 GB 2 GB
max_heap_table_size 2 GB 2 GB
table_open_cache 512 512
innodb_buffer_pool_size 2 GB 12 GB
innodb_log_file_size 256 MB 256 MB
innodb_log_buffer_size 12 MB 12 MB
innodb_thread_concurrency 16 16
max_connections 151 351
wait_timeout 259200 259200
Jama Connect User Guide
454

Here is a sample text config file at an enterprise level. You must add the following values for yourenvironment:
ignore_builtin_innodbbind-address=0.0.0.0key_buffer_size=16Mmax_allowed_packet=1Gthread_stack=192Kthread_cache_size=8myisam-recover-options=BACKUPquery_cache_type=1query_cache_size=256Mtmp_table_size=2Gmax_heap_table_size=2Gtable_open_cache=512innodb_buffer_pool_size=12Ginnodb_log_file_size=256Minnodb_log_buffer_size=12Minnodb_thread_concurrency=16max_connections=351wait_timeout=259200
Upgrade and configure Microsoft SQL ServerIf you are using Microsoft SQL Server for your database, follow these steps to upgrade and configure it.
You must have full database admin permissions to the SQL Server.
If you want to install the Microsoft SQL server for the first time, see Install and configure Microsoft SQLServer [433].
IMPORTANTBefore installing or upgrading to Jama Connect 8.62.x, you must:
• Be running a version of Jama Connect that's earlier than 8.62.x and using MicrosoftSQL 2016-2019 for the database server.
• Create two additional database schemas for the installation/upgrade to succeed.
For the upgrade to complete, organizations using Microsoft SQL Server must enter da-tabase users in Replicated. Without these entries, the installation or upgrade will fail.
Organizations that do not create the new schema will successfully install/upgrade;however, the system will continue to attempt to connect to the databases and producelog failures. After you create the database schemas, you must restart Jama Connect.
For more information, go to Supported software, environments, and system require-ments and select your version of Jama Connect.
1. Use a SQL management application (such as SQL Server Management Studio) to connect to theSQL Server.
2. Replace the following values in the installation script: <SAML_LOGIN_Psswd> & <OAUTH_LOG-IN_Psswd>.
Jama Connect User Guide
455
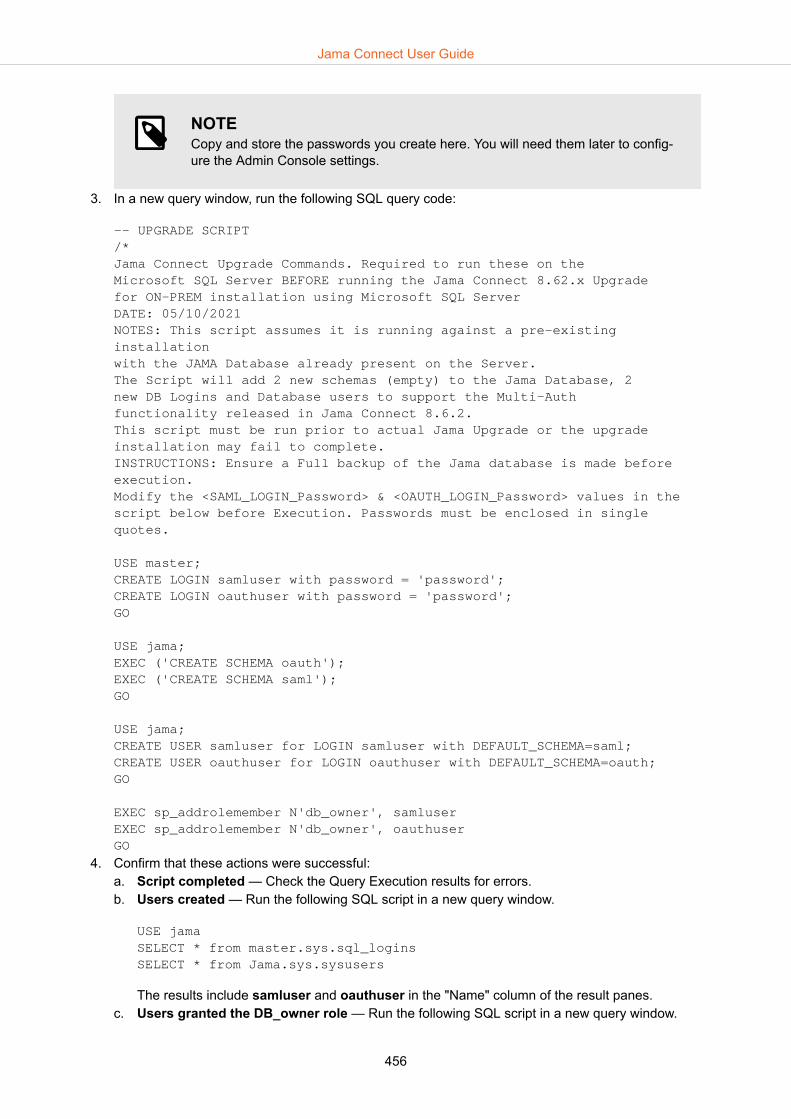
NOTECopy and store the passwords you create here. You will need them later to config-ure the Admin Console settings.
3. In a new query window, run the following SQL query code:
-- UPGRADE SCRIPT/*Jama Connect Upgrade Commands. Required to run these on the Microsoft SQL Server BEFORE running the Jama Connect 8.62.x Upgrade for ON-PREM installation using Microsoft SQL ServerDATE: 05/10/2021NOTES: This script assumes it is running against a pre-existing installation with the JAMA Database already present on the Server.The Script will add 2 new schemas (empty) to the Jama Database, 2 new DB Logins and Database users to support the Multi-Auth functionality released in Jama Connect 8.6.2.This script must be run prior to actual Jama Upgrade or the upgradeinstallation may fail to complete.INSTRUCTIONS: Ensure a Full backup of the Jama database is made before execution.Modify the <SAML_LOGIN_Password> & <OAUTH_LOGIN_Password> values in the script below before Execution. Passwords must be enclosed in single quotes.
USE master;CREATE LOGIN samluser with password = 'password';CREATE LOGIN oauthuser with password = 'password';GO
USE jama;EXEC ('CREATE SCHEMA oauth');EXEC ('CREATE SCHEMA saml');GO
USE jama;CREATE USER samluser for LOGIN samluser with DEFAULT_SCHEMA=saml;CREATE USER oauthuser for LOGIN oauthuser with DEFAULT_SCHEMA=oauth;GO
EXEC sp_addrolemember N'db_owner', samluserEXEC sp_addrolemember N'db_owner', oauthuserGO
4. Confirm that these actions were successful:a. Script completed — Check the Query Execution results for errors.b. Users created — Run the following SQL script in a new query window.
USE jamaSELECT * from master.sys.sql_loginsSELECT * from Jama.sys.sysusers
The results include samluser and oauthuser in the "Name" column of the result panes.c. Users granted the DB_owner role — Run the following SQL script in a new query window.
Jama Connect User Guide
456

SELECT DP1.name AS DatabaseRoleName,isnull (DP2.name, 'No members') AS DatabaseUserNameFROM sys.database_role_members AS DRMRIGHT OUTER JOIN sys.database_principals AS DP1ON DRM.role_principal_id = DP1.principal_idLEFT OUTER JOIN sys.database_principals AS DP2ON DRM.member_principal_id = DP2.principal_idWHERE DP1.type = 'R'ORDER BY DP1.name;
The results will show that db_owner is granted to oauthuser and samluser.5. Run the following query to keep the database from locking users' accounts while they are logging in
or working in Jama Connect. You must have db_owner permissions.
ALTER DATABASE jama SET READ_COMMITTED_SNAPSHOT ON WITH ROLLBACK IMMEDIATE;
6. Run this question to make sure the flag was successfully enabled:
SELECT is_read_committed_snapshot_on FROM sys.databases WHERE name='jama';
If the returned value is 1, the flag is on.
Determine your version of ReplicatedTo be able to upgrade the Admin Console to the latest version, you must be running Replicated 2.x.
1. In the Admin Console, click the Cluster link.
The first entry on the Cluster page lists your version of the Admin Console (Replicated).
Jama Connect User Guide
457
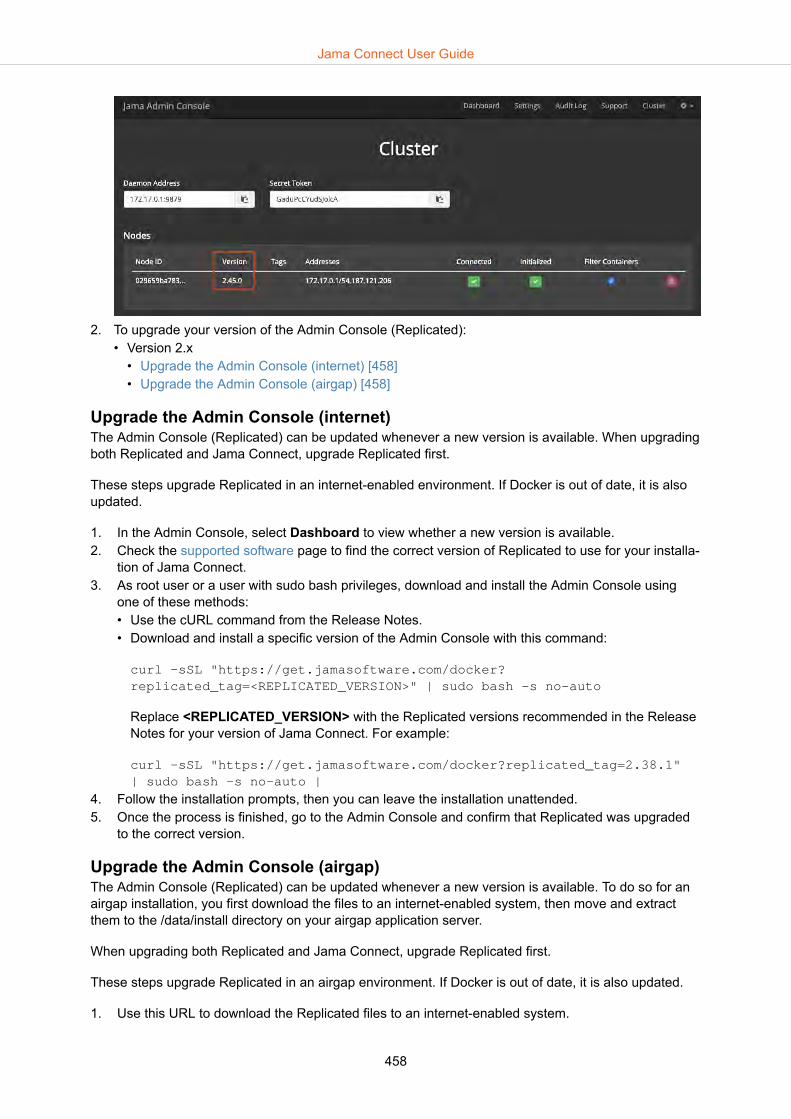
2. To upgrade your version of the Admin Console (Replicated):• Version 2.x
• Upgrade the Admin Console (internet) [458]• Upgrade the Admin Console (airgap) [458]
Upgrade the Admin Console (internet)The Admin Console (Replicated) can be updated whenever a new version is available. When upgradingboth Replicated and Jama Connect, upgrade Replicated first.
These steps upgrade Replicated in an internet-enabled environment. If Docker is out of date, it is alsoupdated.
1. In the Admin Console, select Dashboard to view whether a new version is available.2. Check the supported software page to find the correct version of Replicated to use for your installa-
tion of Jama Connect.3. As root user or a user with sudo bash privileges, download and install the Admin Console using
one of these methods:• Use the cURL command from the Release Notes.• Download and install a specific version of the Admin Console with this command:
curl -sSL "https://get.jamasoftware.com/docker?replicated_tag=<REPLICATED_VERSION>" | sudo bash -s no-auto
Replace <REPLICATED_VERSION> with the Replicated versions recommended in the ReleaseNotes for your version of Jama Connect. For example:
curl -sSL "https://get.jamasoftware.com/docker?replicated_tag=2.38.1" | sudo bash -s no-auto |
4. Follow the installation prompts, then you can leave the installation unattended.5. Once the process is finished, go to the Admin Console and confirm that Replicated was upgraded
to the correct version.
Upgrade the Admin Console (airgap)The Admin Console (Replicated) can be updated whenever a new version is available. To do so for anairgap installation, you first download the files to an internet-enabled system, then move and extractthem to the /data/install directory on your airgap application server.
When upgrading both Replicated and Jama Connect, upgrade Replicated first.
These steps upgrade Replicated in an airgap environment. If Docker is out of date, it is also updated.
1. Use this URL to download the Replicated files to an internet-enabled system.
Jama Connect User Guide
458

https://s3.amazonaws.com/replicated-airgap-work/stable/replica-ted-2.48.0%2B2.48.0%2B2.48.0.tar.gz
2. Transfer the Replicated files to the same location on your airgap application server as your originalairgap installation files.
3. Execute the following command in the same directory where the airgap installation files were origi-nally installed.
tar -xzvf replicated-A.BC.D+A.BC.D+A.BC.D.tar.gz --overwrite
To find the original file, look in the Admin Console:Gear icon > Console settings > Airgap settingsNote the update path. The filename looks like this, where A.BC.D is the version ID:"replicated-A.BC.D+A.BC.D+A.BC.D.tar.gz"
4. Run the installation script in the same directory where the files were extracted. You must have sys-tem administration permissions to do this.
cat ./install.sh | sudo bash -s airgap
5. Follow the installation prompts, then you can leave the installation unattended.6. Once the process is finished, go to the Admin Console and confirm that Replicated was upgraded
to the correct version.
Retrieve Jama Connect images (airgap upgrade)Before you can upgrade the software in an airgap environment, the Jama Connect images must bedownloaded to a desktop system, then transferred to the /data/install directory on your airgap applica-tion server.
TIPBecause the download might take a long time, we recommend doing this on a differentday than when you upgrade the software.
To retrieve the images, you need the airgap-safe portal URL and password provided in the original Wel-come email sent from Jama Software.
1. In a supported browser, enter the URL and the password for the airgap-safe portal.You see a list of available releases since your license was issued, along with a download link and achecksum for each.
2. Find the version you want to install and select Get Download Link to generate a new temporarydownload link.
3. Select Download to copy the files directly to your desktop system.4. Log in to the application host via SSH and move the downloaded files to the /data/install directory.
Jama Connect User Guide
459

Upgrade Jama ConnectWhether your environment is internet-enabled or airgap, you can upgrade an existing installation of Ja-ma Connect to a newer version using the Admin Console.
An installation script walks you through the process of upgrading Jama Connect. To start the wizard,you use the URL that was generated when you installed or upgraded the Admin Console (Replicated).
Important considerations
• If you are upgrading both the Admin Console (Replicated) and Jama Connect, upgrade the AdminConsole first.
• If you're on a version of Jama Connect earlier than 8.36.0, you must perform a step upgrade. Firstupgrade to version 8.36.0, then upgrade to version 8.49.0. You can’t skip the step upgrades. SeeIncremental Step Upgrade for Jama 8.x and Beyond for details.
• Airgap only: Before you can upgrade the application in an airgap environment, you must first retrieveJama Connect images [459] and transfer them to your application server.
To upgrade Jama Connect:
1. Use a browser to navigate to Admin Console > Dashboard and make sure that the Admin Con-sole is up to date.
2. Depending on whether an update is available, select the following:• If an update was already discovered, the dashboard reads "There is an update available." Select
View update.• If no update was already discovered, the dashboard reads: "Jama is up to date." Select
Check now.
If an update is then discovered, the dashboard reads "Update Available." Select View update.3. Review the proposed update or updates and select Install Update.4. Go to the dashboard, which displays the progress of the upgrade.
• Updating — The Jama Connect components are downloaded from our private and secure regis-try on the Internet.
• Starting... Queued — The components are started and initialized, as well as the database is up-dated.
5. When the dashboard reads “Started,” the update is complete. Select the Open link under Started toopen Jama Connect in a new browser window.
Jama Connect User Guide
460

6. Log in to Jama Connect [501].7. Rebuild the search index [526].
Appendix• Troubleshooting your installation [461]• Sample airgap installation script [461] • Configure proxy settings [463]• Uninstall Jama Connect [463]
Troubleshooting your installationIf any errors occurred during installation, use this table to fix the issues.
Error message Solution
This webpage is notavailable
Verify that the "Host Name" section of the settings was correctly entered to point to the applicationserver.
Not private or Not se-cure
This might happen if you chose a self-signed certificate or uploaded an invalid certificate. Verify thatyou correctly entered the Custom TLS configuration in the Host Name window.
If this happens only for other users and not the system administrator, and the Admin Console is usinga self-signed certificate, you might have already told your web browser to "Proceed ... (unsafe)" or"Add exception," while other users haven't. Verify that you selected the setting you want for Reuseadmin console TLS configuration in the Host Name window.
Problem: Cannot createdatabase jama: Con-nections could not beacquired from the un-derlying database!
Most likely, something is wrong with your Admin Console database settings (for example, bind-ad-dress, DBO credentials), or the connection between the application server and the database server.Double-check your database settings in the Admin Console.
Sample airgap installation scriptA full airgap installation script looks like this example script.
tar -xzvf replicated.tar.gz$ cat ./install.sh | sudo bash -s airgapThe installer was unable to automatically detect the private IP address of this machine.Please choose one of the following network interfaces:[0] eth0
Jama Connect User Guide
461

10.0.2.15[1] eth1 172.28.128.3[2] docker0 172.17.0.1Enter desired number (0-2): 1The installer will use network interface 'eth1' (with IP address '172.28.128.3').Does this machine require a proxy to access the Internet? (y/N) nWARNING: No swap limit supportLoading replicated and replicated-ui images from package2314ad3eeb90: Loading layer [==================================================>] 5.037 MB/5.037 MB20cf0ca78550: Loading layer [==================================================>] 1.395 MB/1.395 MB79da1e49a9ec: Loading layer [==================================================>] 39.57 MB/39.57 MB10127b12860b: Loading layer [==================================================>] 2.56 kB/2.56kB54c848181027: Loading layer [==================================================>] 1.024 kB/1.024 kBf8559cfb1d7e: Loading layer [==================================================>] 1.024 kB/1.024 kBd07f68c6454a: Loading layer [==================================================>] 3.072 kB/3.072 kBe7ebe443cebe: Loading layer [==================================================>] 1.024 kB/1.024 kBe26ab0a00993: Loading layer [==================================================>] 1.024 kB/1.024 kB2314ad3eeb90: Loading layer [==================================================>] 5.037 MB/5.037 MB20cf0ca78550: Loading layer [==================================================>] 1.395 MB/1.395 MB90dd48adb644: Loading layer [==================================================>] 2.56 kB/2.56kBbcfb6537f172: Loading layer [==================================================>] 40 .86 MB/40.86 MB9f84694e322f: Loading layer [==================================================>] 11.78 kB/11.78 kBd88f3b6fbcb2: Loading layer [==================================================>] 11.73 MB/11.73 MBab1f2e0fdc51: Loading layer [==================================================>] 1.024 kB/1.024 kBe0dd0d7697b0: Loading layer [==================================================>] 1.024 kB/1.024 kBc58a11ad5860: Loading layer [==================================================>] 1.024 kB/1.024 kBStopping replicated and replicated-ui serviceInstalling replicated and replicated-ui serviceStarting replicated and replicated-ui servicereplicated start/running, process 21870replicated-ui start/running, process 21879Installing replicated command aliasInstalling local operatorLoading replicated-operator image from package2314ad3eeb90: Loading layer [==================================================>] 5.037 MB/5.037 MB20cf0ca78550: Loading layer [==================================================>] 1.395 MB/1.395 MB94be066a32a4: Loading layer [==================================================>] 12.04 MB/12.04 MB10f95420dba3: Loading layer [==================================================>] 1.024 kB/1.024 kBStopping replicated-operator serviceInstalling replicated-operator serviceStarting replicated-operator servicereplicated-operator start/running, process 22155Operator installation successfulTo continue the
Jama Connect User Guide
462

installation, visit the following URL in your browser:https://<this_server_address>:8800To create an alias for the replicated cli command run the following in your current shell or log out and log back in:source /etc/replicated.alias
Configure proxy settingsIf using a proxy server, you must add the Jama Connect application server's IP to the no_proxy Dockervariable to prevent traffic from the application server from being proxied. Work with your Linux systemadministrator to set this value.
The steps to do this depend on your operating system.
NOTEThe steps related to Replicated are only necessary if you have already installed theAdmin Console.
1. Stop Replicated with the following commands:• For Red Hat-derived systems version 7 and later:
sudo systemctl stop replicated replicated-ui replicated-operator
• For all other distributions:
sudo service replicated-operator stopsudo service replicated-ui stopsudo service replicated stop
2. Follow the instructions from Docker on configuring the no_proxy settings, setting the appropriateIPs and hostnames that identify the Jama Connect server.
3. Restart Replicated with the following commands:• For Red Hat-derived systems version 7 and greater
sudo systemctl start replicated replicated-ui replicated-operator
• For all other distributions
sudo service replicated startsudo service replicated-ui startsudo service replicated-operator start
Uninstall Jama ConnectIf for any reason you need to uninstall your instance of Jama Connect, follow this procedure.
IMPORTANTUninstalling removes the Admin Console, the installed components that make up JamaConnect, the default snapshot directory, /var/lib/replicated/snapshots, snapshots (ifthey were left in the default directory), and your license. It doesn’t remove user data orlog files.
Jama Connect User Guide
463
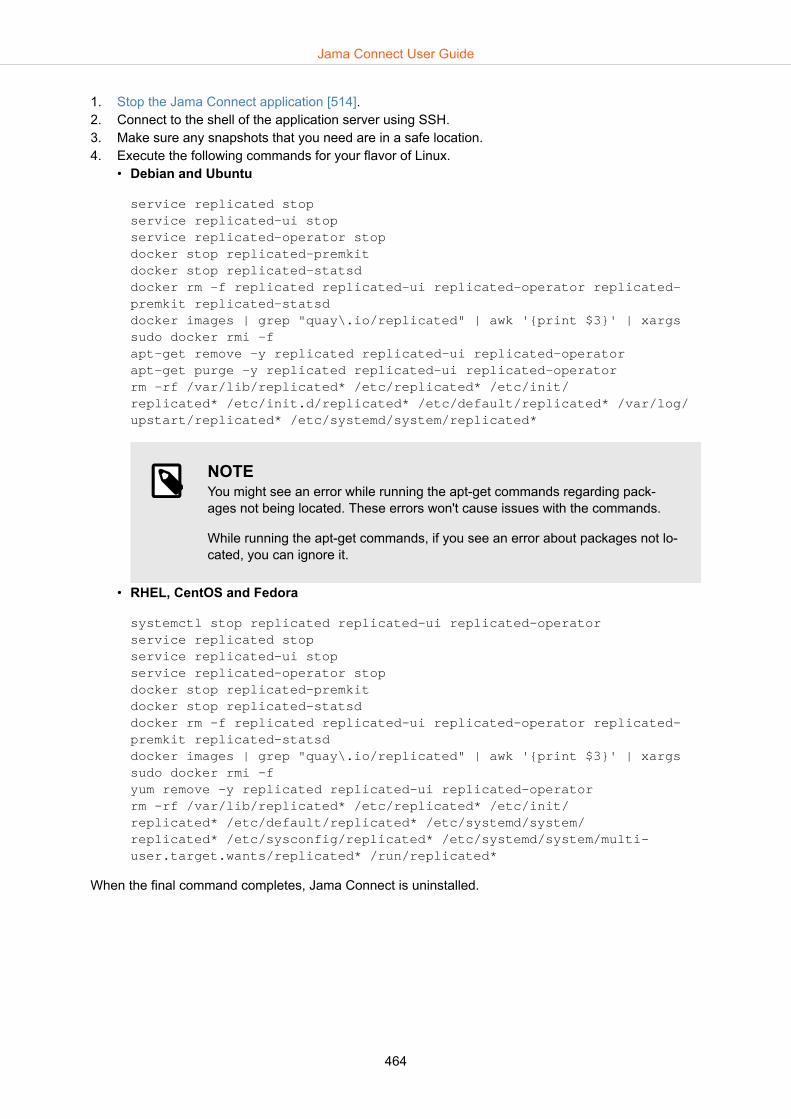
1. Stop the Jama Connect application [514].2. Connect to the shell of the application server using SSH.3. Make sure any snapshots that you need are in a safe location.4. Execute the following commands for your flavor of Linux.
• Debian and Ubuntu
service replicated stopservice replicated-ui stopservice replicated-operator stopdocker stop replicated-premkitdocker stop replicated-statsddocker rm -f replicated replicated-ui replicated-operator replicated-premkit replicated-statsddocker images | grep "quay\.io/replicated" | awk '{print $3}' | xargs sudo docker rmi -fapt-get remove -y replicated replicated-ui replicated-operatorapt-get purge -y replicated replicated-ui replicated-operatorrm -rf /var/lib/replicated* /etc/replicated* /etc/init/replicated* /etc/init.d/replicated* /etc/default/replicated* /var/log/upstart/replicated* /etc/systemd/system/replicated*
NOTEYou might see an error while running the apt-get commands regarding pack-ages not being located. These errors won't cause issues with the commands.
While running the apt-get commands, if you see an error about packages not lo-cated, you can ignore it.
• RHEL, CentOS and Fedora
systemctl stop replicated replicated-ui replicated-operatorservice replicated stopservice replicated-ui stopservice replicated-operator stopdocker stop replicated-premkitdocker stop replicated-statsddocker rm -f replicated replicated-ui replicated-operator replicated-premkit replicated-statsddocker images | grep "quay\.io/replicated" | awk '{print $3}' | xargs sudo docker rmi -fyum remove -y replicated replicated-ui replicated-operatorrm -rf /var/lib/replicated* /etc/replicated* /etc/init/replicated* /etc/default/replicated* /etc/systemd/system/replicated* /etc/sysconfig/replicated* /etc/systemd/system/multi-user.target.wants/replicated* /run/replicated*
When the final command completes, Jama Connect is uninstalled.
Jama Connect User Guide
464

IMPORTANTUninstalling removes the Admin Console, the installed components that make up JamaConnect, snapshots (if they were left in the default /var/lib/replicated/snapshots directo-ry), and your license. It doesn't remove user data or log files [516].
Jama Connect User Guide
465

Administration
Jama Connect administrators have special roles in working with your organization's content.
A role is a set of permissions granted to a user so that they can perform particular functions.
• System administrators [482] set up and install Jama Connect. They are able to access the server set-tings and log in as the root user. Jama Connect manages system administration for hosted custom-ers. For self-hosted customers, this role holds the initial license and can't be assigned.
• Organization administrators [534] have the highest level of permissions in Jama Connect and canconfigure settings for the organization. All Jama Software customers have at least one organizationadministrator, and there might be multiple within a single organization. They must have a creator li-cense.
• Project administrators [618] have the necessary permissions to manage many aspects of a projectthat those with create/edit permissions can't. They must have a creator license.
• Review administrators [179] have the necessary permissions to manage reviews. They must have acreator or reviewer license.
• Reuse administrators [283] have the necessary permissions to create advanced reuse and synchroni-zation rules. They must have a creator license.
• Process administrators [573] have the necessary permissions to configure content and connections inJama Connect. They must have a creator license.
• User administrators [550] have the necessary permissions to manage licenses, users, and groups.They must have a creator license.
Authentication methodsJama Connect supports a wide range of authentication methods to keep your data safe and secure. Inaddition to email and password, single sign-on (SSO), and Jama Connect Basic authentication, we alsouse several external authentication methods.
Supported combinations
Jama Connect User Guide
466

• The combination of SAML and OAuth is supported in self-hosted and cloud environments.• The combination of of multi-mode and OAuth is supported in self-hosted and cloud environments.
For information about using the Jama Connect REST API with OAuth, see Set API credentials.
Supported third-party authentication methods
• SAML [469] — Open standard for transferring identity data between two parties: an identity provider(IdP) and a service provider (SP).Electronic signatures are enabled by default, but can be disabled by a system administrator.To set up SAML in your internet-enabled environment, your company must meet these requirements:• Have a SAML 2.0-compliant Identity Provider (IdP).• Identify a technical person, often an IT administrator, who can provide the URL of the Identity Pro-
vider. Name this person before engaging with Jama Software and, for testing purposes, providethem access to Jama Connect.
• Cloud customers — You must contact support to schedule enablement.• Self-hosted customers — If you're on a version of Jama Connect earlier than 8.62, you must follow
instructions for that release instead of the instructions here. Contact support for help accessing thecorrect instructions and with the process.
• LDAP [473] — Tool used to centralize the management of user accounts. Jama Connect includes abuilt-in integration of LDAP and Microsoft Active Directory.
• Crowd [478] — Manage users and groups within a single a system. Jama Connect accepts user de-tails from Crowd, then syncs them with authentication data in the application.
Internal authentication methods
• Basic [468] — The default authentication for Jama Connect. Basic authentication uses a usernameand password that’s stored in the Jama Connect application database.
• Basic + IdP [470] — The combination of Basic and SAML creates multi-mode authentication, whichgives you the ability to separate your internal users from your external partners, vendors, and con-tractors. Multi-mode authentication provides an extra layer of protection for external users so they canbe part of the requirement, approval, and tracking process in Jama Connect.
NOTETo use multi-mode authentication [470], you must be running Jama Connect 8.62 orlater.
How does authentication work in Jama Connect?
By default, Basic authentication uses the login data stored in the Jama Connect database to authenti-cate users. However, a system administrator can enable these external single-mode authenticationmethods for their users: LDAP, Crowd, or SAML authentication.
You can enable only one form of authentication at a time, unless you’re using Basic + IdP authentica-tion. Basic + IdP authentication allows Basic and SAML to work together. When you switch to anotherform of authentication, all user information except passwords is retained for users that already exist inJama Connect. The new and previous authentication tools must use the same Jama Connect user-names for users to sync properly.
To update or change the organization authentication type, log in as root user [501] and select Sys-tem Properties > Authentication Properties.
Jama Connect User Guide
467

Configure Basic authenticationThe default authentication method is Jama Connect Basic, which authenticates users by their usernameand password that are stored in the Jama Connect database. Passwords are encrypted before they arestored in the database.
NOTEYou must be a system administrator to complete this task.
To configure the Basic authentication properties:
1. Log in to Jama Connect as root, [501] then select System Properties > Authentication Proper-ties > Basic.
2. Configure the authentication properties for the method you are using.• Enable basic authentication — Enabled by default. You must deselect this option to use LDAP
or Crowd.• Enable "Forgot Password" functionality — Users who forget their password can request a
new password without notifying the system admin.• Allow users to change their username — Users can change their username when they man-
age their profile [36].• Password requirements — Set the required password strength for all future passwords. New
user passwords must meet the required password strength to be saved. Changes to these set-tings do not affect passwords already in the system.
3. Click Save.
Jama Connect User Guide
468

Configure SAML authenticationTo configure SAML authentication, you must first update the authentication properties.
Important considerations
• Cloud customers — Contact support to schedule enablement.• Self-hosted customers — Follow these steps to configure multi-mode authentication.• To connect multiple instances of Jama Connect to the SAML service, you must create unique meta-
data or applications for each instance through the identity provider. This is true for any combination ofproduction, sandboxes, or self-hosted instances. The entity ID is a unique value that allows the serv-ice and identity provider to locate each other and send users to the correct Jama Connect instance.
• We recommend testing an integration instance before using SAML on a production instance. For ex-ample, disable a sandbox instance from SAML before connecting on a production instance.
• Starting with Jama Connect 8.48, organizations that use SAML can use electronic signatures [225],which are enabled by default. If your identity provider (IdP) can't process the re-authentication, youcan disable signatures.
• You can enable a different authentication method at any time. If you do, SAML is disabled.• You can control the auto-provisioning of new SAML users in both single SAML and multi-mode. If
your users are set up in SAML but not yet added to your Jama user table, this option allows you tocontrol whether users can auto-provision in Jama Connect.When this option is selected and properties are saved, your SAML users (SAML and multi-mode)can’t sign in to Jama Connect until you add them to the Jama user table. A message tells them tofinish the authentication process with their administrator.This option is selected by default after you upgrade to 8.62.
To configure SAML authentication:
1. Log in to Jama Connect as root user [501].2. Select System Properties > Authentication Properties > SAML.3. Before you enter data, select Enable SAML, then click Save.
Jama Connect User Guide
469

4. Contact your identity provider for the metadata URL or XML, then paste it in the appropriate field.If a connection is established, the last three read-only fields are auto-populated with a URL.• SP metadata URL — https://saml-or.jamacloud.com/saml/metadata/alias/defaultAlias• ACS / single-sign-on URL — https://saml-or.jamacloud.com/saml/SSO/alias/defaultAlias• SP entity ID / Audience restriction — https://saml-or.jamacloud.com/saml/metadata/alias/
defaultAliasIf the connection doesn't work, you might need to adjust the information in the ACS binding, Firstname attribute mapping, and Last name attribute mapping fields or contact support.
TIPThe mapping fields serve as the key that connects user identity between JamaConnect and your identity provider. If name attribute mapping fields aren't speci-fied, then a new user's full name defaults to their email address.
5. Click Save.
Once SAML is enabled, Jama Connect redirects all users to the identity provider's login page. The Ja-ma Connect login page is only accessible for system administrators if they log in as the root user withthis URL:
https://your-jama-url/casper/login.req
Configure multi-mode authenticationThe combination of Jama Connect Basic and SAML authentication (Basic + IdP) provides extra securi-ty by separating your internal users from external partners.
Important considerations
• Cloud customers — Contact support to schedule enablement. • Self-hosted customers — Follow the steps in this task to configure multi-mode authentication.
Jama Connect User Guide
470

To configure multi-mode authentication:
1. If you haven't entered the SAML metadata in the root menu, go to the SAML tab and enter it there.• Contact your identity provider for the metadata URL or XML, then paste it in the appropriate field.
If a connection is established, the last three read-only fields are auto-populated with a URL.• SP metadata URL — https://saml-or.jamacloud.com/saml/metadata/alias/defaultAlias• ACS / single-sign-on URL — https://saml-or.jamacloud.com/saml/SSO/alias/defaultAlias
Jama Connect User Guide
471

• SP entity ID / Audience restriction — https://saml-or.jamacloud.com/saml/metadata/alias/defaultAliasIf the connection doesn't work, you might need to adjust the information in the ACS binding,First name attribute mapping, and Last name attribute mapping fields or contact support.
TIPThe mapping fields are the key that connects user identity between JamaConnect and your identity provider. If name attribute mapping fields aren'tspecified, a new user's full name defaults to their email address.
2. Log in to Jama Connect as root [501], then select System Properties > Authentication Proper-ties > Basic + IdP.
3. Select Enable BOTH Basic authentication and SAML, then click Save.The Basic + IdP tab transitions can now accept input. While the Basic and SAML tabs are nowread-only This type of input is the same on both tabs: Basic and SAML.
4. Complete the Basic and SAML sections in the Basic + IdP tab:Basic — Fill out the the Basic Authentication section.SAML — If you haven't entered the SAML metadata in the root menu, complete the following stepsin the SAML section of the Basic + IdP tab.
5. Click Save.6. Confirm the configuration was successful.
• Select the Users tab, then verify that the Authentication Type column appears in the table.If you see the Authentication Type column, Basic + IdP authentication is now enabled.
Jama Connect User Guide
472

Configure LDAP authenticationLDAP (Lightweight Directory Access Protocol) is a tool for organizations to centralize the managementof user accounts. Jama Connect includes a built-in integration for LDAP and Microsoft Active Directory.
LDAP must be configured before it can be used in Jama Connect to authenticate users against yourLDAP server.
To configure LDAP authentication:
1. Log in to Jama Connect as root [501] , then select System Properties > Authentication Proper-ties > LDAP.
2. Configure the authentication properties for the method you are using.• Enable LDAP — Select this to enable LDAP and disable the default Jama Connect authentica-
tion. Save the settings for changes to take effect.• Enable Self Registration — Users can register themselves by logging in to Jama Connect using
their LDAP credentials. If successfully authenticated, they get a prompt to register for Jama Con-nect. Without self-registration, users must be added manually by an organization administrator.Once registered, users will be assigned a license type based the rules below. An organization orproject administrator must then assign permissions for that user.• If there are available creator licenses, they are assigned a creator license.• If there are no named creator licenses, users are assigned floating creator licenses (shared
among others).• If there are no creator or floating creator licenses available, you can still create users, but they
are set to inactive. An organization administrator must manually assign the user an active li-cense when one becomes available.
• Default organization for self-registered user — Select the organization that self-registeredusers are assigned by default. There should only be one option.
• Default user group for self-registered user — Select the default group to which a self-regis-tered user should be assigned. Organization administrators will need to assign permissions toself-registered users.
3. You can configure multiple directories with LDAP authentication. To add a new provider, select AddAD Provider or Add LDAP Provider, depending on the LDAP tool you use.
Jama Connect User Guide
473

4. In the window that opens, provide the following server information used to connect to the ActiveDirectory or LDAP server, then click Next.
• Name — Name of the connection that will appear in the Jama Connect interface.• Description — Description of the connection that will appear in the Jama Connect interface.• URL — The URL to the Active Directory or LDAP server.• Bind DN — The reference to the account that Jama Connect will use to perform all actions
against the Active Directory or LDAP server. This field accepts the Distinguished Name of theaccount ("cn=John Doe,ou=Users,dc=jamasoftware,dc=com").
Jama Connect User Guide
474

Some Active Directory servers support the use of Full Name ("John Doe") or Email ("[email protected]").
• Bind Password — The password of the Bind DN account.• Test Configuration — Select Test configuration to test for a successful connection to the
specified server and bind account information. If successful, a "Configuration Successful" mes-sage will display in the window and the Base DN selection screen will expand.
• Select the Base DN — The Base DN is the directory where users in Active Directory or LDAPexist that need to be added to Jama. Successfully tested configurations will load a radio buttonselection list of all available Base DNs.
5. Specify the attributes in Active Directory and LDAP that automatically populates the Jama Connectuser attributes.
• Username — Enter the username of a sample user that exists in the specified Base DN.• Username Attribute — Enter the attribute where the username value is stored (for example, Ac-
tive Directory commonly uses "samaccountname"). 6. Select Next to validate that the provided username and username attribute exist. If successful, the
window expands to show a selection list of all available attributes for each of the Jama Connectuser attributes.• Jama User Attributes — First Name, Last Name, Full Name, Email, Location, Phone, Title. • LDAP attribute — The selection drop-down shows all available directory attributes that are con-
nected to the provided username. Select the correct value in the selection list that matches theJama Connect user attribute.
7. Select Advanced setup if you know all the details of the connection and user attribute values. Ifyou choose this option, you must add the Full Name Attribute or errors will result.
Jama Connect User Guide
475

8. After saving the connection, select Synchronize Now to manually sync all existing users in JamaConnect to LDAP. This updates user information with attributes from LDAP.
Any Jama Connect users who are not registered in LDAP are deactivated. Users in LDAP that do notalready exist in Jama Connect aren't synchronized. New users must be added manually [503] with ex-isting LDAP credentials.
Troubleshooting LDAP errorsIf any errors occurred during installation, use this table to troubleshoot the issues.
Jama Connect User Guide
476
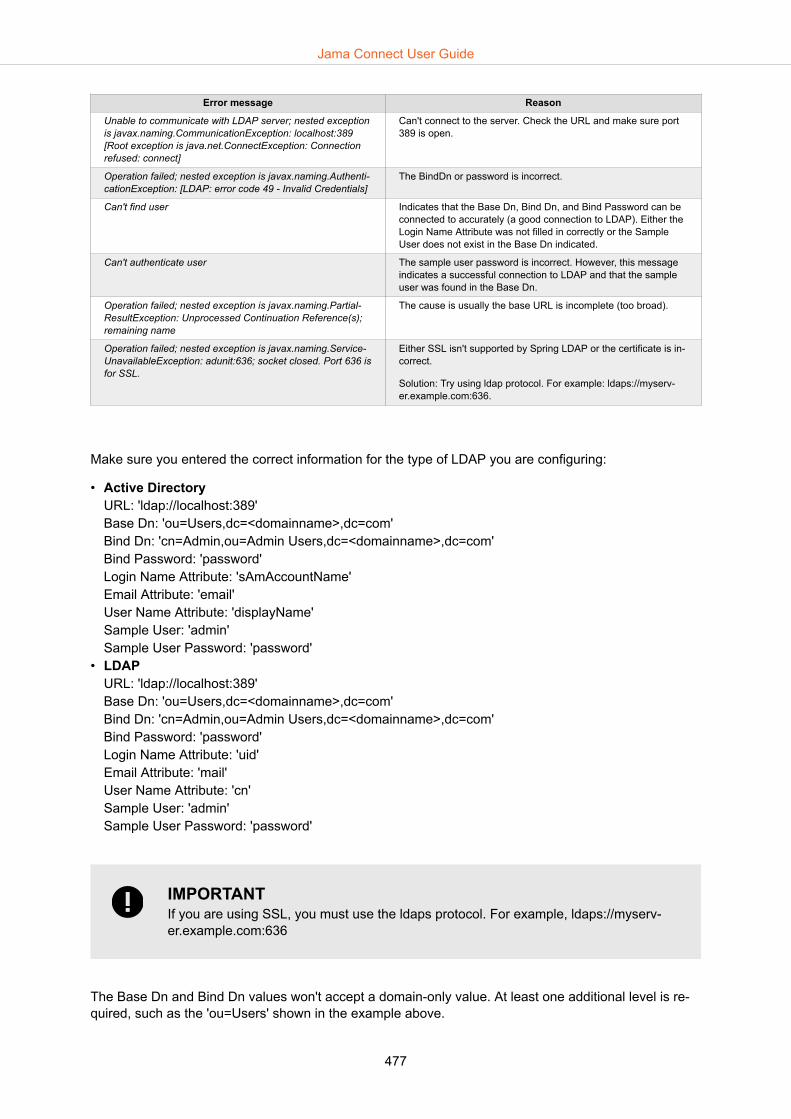
Error message Reason
Unable to communicate with LDAP server; nested exceptionis javax.naming.CommunicationException: localhost:389[Root exception is java.net.ConnectException: Connectionrefused: connect]
Can't connect to the server. Check the URL and make sure port389 is open.
Operation failed; nested exception is javax.naming.Authenti-cationException: [LDAP: error code 49 - Invalid Credentials]
The BindDn or password is incorrect.
Can't find user Indicates that the Base Dn, Bind Dn, and Bind Password can beconnected to accurately (a good connection to LDAP). Either theLogin Name Attribute was not filled in correctly or the SampleUser does not exist in the Base Dn indicated.
Can't authenticate user The sample user password is incorrect. However, this messageindicates a successful connection to LDAP and that the sampleuser was found in the Base Dn.
Operation failed; nested exception is javax.naming.Partial-ResultException: Unprocessed Continuation Reference(s);remaining name
The cause is usually the base URL is incomplete (too broad).
Operation failed; nested exception is javax.naming.Service-UnavailableException: adunit:636; socket closed. Port 636 isfor SSL.
Either SSL isn't supported by Spring LDAP or the certificate is in-correct.
Solution: Try using ldap protocol. For example: ldaps://myserv-er.example.com:636.
Make sure you entered the correct information for the type of LDAP you are configuring:
• Active DirectoryURL: 'ldap://localhost:389'Base Dn: 'ou=Users,dc=<domainname>,dc=com'Bind Dn: 'cn=Admin,ou=Admin Users,dc=<domainname>,dc=com'Bind Password: 'password'Login Name Attribute: 'sAmAccountName'Email Attribute: 'email'User Name Attribute: 'displayName'Sample User: 'admin'Sample User Password: 'password'
• LDAPURL: 'ldap://localhost:389'Base Dn: 'ou=Users,dc=<domainname>,dc=com'Bind Dn: 'cn=Admin,ou=Admin Users,dc=<domainname>,dc=com'Bind Password: 'password'Login Name Attribute: 'uid'Email Attribute: 'mail'User Name Attribute: 'cn'Sample User: 'admin'Sample User Password: 'password'
IMPORTANTIf you are using SSL, you must use the ldaps protocol. For example, ldaps://myserv-er.example.com:636
The Base Dn and Bind Dn values won't accept a domain-only value. At least one additional level is re-quired, such as the 'ou=Users' shown in the example above.
Jama Connect User Guide
477

Take note of the "Can't find/authenticate user" errors. Errors often indicate a successful connection, butthe Sample User/Password are incorrect.
IMPORTANTThe Sample User and Password fields are deleted every time the configuration windowis closed.
Configure Crowd authenticationUse Crowd to manage users and groups within a single system. Jama Connect can accept user detailsfrom Crowd and sync them with authentication data in Jama Connect.
To configure Crowd authentication:
1. Log in to Crowd as an administrator.2. Select Applications > Add Application, fill in the fields for a new application and select Next.
• Application type — Generic Application.• Name — "jama" or any other unique name that identifies Jama Connect as the application.
NOTEThe name must match. For example, lower case "jama" in the above example.
• Description — (Optional) Provide a short description of the application.• Password — Create a new password that Jama Connect uses to access Crowd.
3. Enter the URL and IP address for Jama Connect, then select Next.
Jama Connect User Guide
478
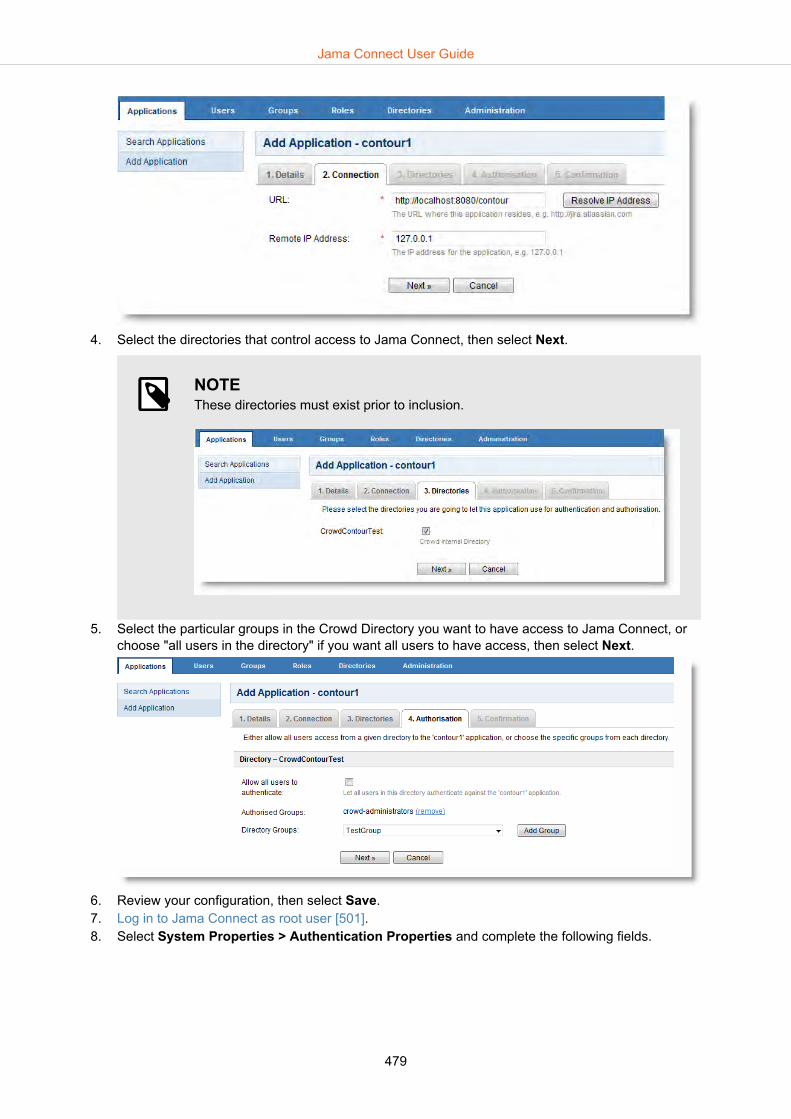
4. Select the directories that control access to Jama Connect, then select Next.
NOTEThese directories must exist prior to inclusion.
5. Select the particular groups in the Crowd Directory you want to have access to Jama Connect, orchoose "all users in the directory" if you want all users to have access, then select Next.
6. Review your configuration, then select Save.7. Log in to Jama Connect as root user [501].8. Select System Properties > Authentication Properties and complete the following fields.
Jama Connect User Guide
479

• Enable Crowd — Select to enable or disable Crowd Connector. When disabled, the Jama Con-nect database is used for users and passwords.
• Crowd location — Enter the URL for the Crowd server.• Crowd application name — Name of the application created in step 2 above.• Crowd application password — Enter the password for Jama Connect that was created in
Crowd.• Validation interval — The amount of times a user can access the application prior to re-authen-
ticating. The larger the number, the less communication with Crowd.• Sync Crowd users and groups — Select this option to push Crowd Groups and Users into Ja-
ma Connect at regular intervals. Make sure you understand how users and groups in Crowd in-teract with Jama Connect [481] before you do this.When syncing with Crowd, Jama Connect assigns licenses as follows:• If there are available named creator licenses, users are assigned a named creator license.• If there are no available creator licenses, users are assigned a float license.• If there are no available creator or float licenses, the user is skipped and it appears in the log.When Crowd is synced, Jama Connect runs through its list of users, adds new users, and modi-fies existing users in the Jama Connect userbase. When that's complete, Jama Connect runsthrough the list again to see if there are any existing users in the Jama Connect userbase thatneed to be deactivated.Since Jama Connect makes two passes at adding and deactivating users, you might need tosync twice consecutively for it to work. For example, if you reach your license threshold, don'tuse float licenses, try adding a new user and deactivating an existing user, or must sync twiceconsecutively before the new user is given a named license.
IMPORTANTYou can also select Manual Sync at the bottom of the window to manually syn-chronize all users and groups. Manual sync removes all Jama Connect config-ured Users and Groups and insert Crowd users and groups.
Jama Connect User Guide
480
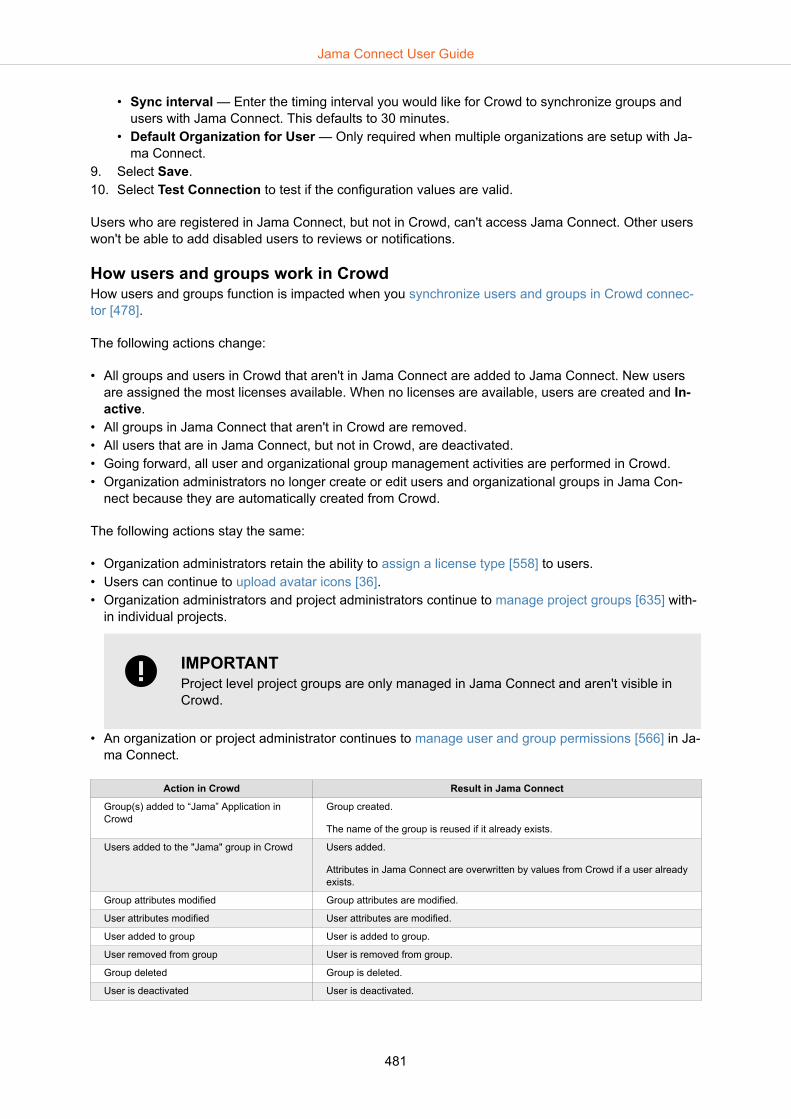
• Sync interval — Enter the timing interval you would like for Crowd to synchronize groups andusers with Jama Connect. This defaults to 30 minutes.
• Default Organization for User — Only required when multiple organizations are setup with Ja-ma Connect.
9. Select Save.10. Select Test Connection to test if the configuration values are valid.
Users who are registered in Jama Connect, but not in Crowd, can't access Jama Connect. Other userswon't be able to add disabled users to reviews or notifications.
How users and groups work in CrowdHow users and groups function is impacted when you synchronize users and groups in Crowd connec-tor [478].
The following actions change:
• All groups and users in Crowd that aren't in Jama Connect are added to Jama Connect. New usersare assigned the most licenses available. When no licenses are available, users are created and In-active.
• All groups in Jama Connect that aren't in Crowd are removed.• All users that are in Jama Connect, but not in Crowd, are deactivated.• Going forward, all user and organizational group management activities are performed in Crowd.• Organization administrators no longer create or edit users and organizational groups in Jama Con-
nect because they are automatically created from Crowd.
The following actions stay the same:
• Organization administrators retain the ability to assign a license type [558] to users.• Users can continue to upload avatar icons [36].• Organization administrators and project administrators continue to manage project groups [635] with-
in individual projects.
IMPORTANTProject level project groups are only managed in Jama Connect and aren't visible inCrowd.
• An organization or project administrator continues to manage user and group permissions [566] in Ja-ma Connect.
Action in Crowd Result in Jama Connect
Group(s) added to “Jama” Application inCrowd
Group created.
The name of the group is reused if it already exists.
Users added to the "Jama" group in Crowd Users added.
Attributes in Jama Connect are overwritten by values from Crowd if a user alreadyexists.
Group attributes modified Group attributes are modified.
User attributes modified User attributes are modified.
User added to group User is added to group.
User removed from group User is removed from group.
Group deleted Group is deleted.
User is deactivated User is deactivated.
Jama Connect User Guide
481

Action in Crowd Result in Jama Connect
User activated User is activated.
If the user doesn't exist, a new user is created. The new user is assigned thehighest available license. If a license isn't available, the user is inactive.
REST APIJama Software REST API is an application program interface to assist developers in a clean, straight-forward integration with the application.
A system administrator can enable REST API in system properties [507].
Get more information about REST API, features and documentation.
System administratorSystem administrators are in charge of the following tasks.
• Logging in to the application server operating system and Jama Connect as root user• Installing, updating, and maintaining the Jama Connect platform• Setting up the database and application servers• Installing the admin console and Jama Connect• Configure settings such as authentication and mail servers• Regular maintenance such as updates and uploading custom reports
Ideally a system administrator has expertise in these areas of administration:
• DatabaseSystem administrators set up and administer the database including database sizing, resource alloca-tion, recommended backups, and availability of the database engine.
• LinuxJama Connect must be installed on a Linux based system. System administrators need to use Com-mand Line Interface (CLI) for basic navigation, file manipulation, permissions, and network configura-tion when they are installing, upgrading, allocating resources, and maintaining availability and securi-ty of the server.
• Directory serverIf you're not using Jama Connect native authentication, system administrators must perform setupand administration or your organization's supported directory server [468].
• Mail serverIf you're using these functions in Jama Connect, system administrators perform setup and administra-tion of your organization's mail server.
System administration are necessary for customers who are self-hosting Jama Connect. For cloud cus-tomers, Jama Software manages system administration. If you're interested in an implementation thatdoesn't require system administration at your organization, contact your sales representative regardingour cloud solution.
Configuring the Admin Console settingsJama Connect uses Replicated technology to deliver all microservices to self-hosted customers. Repli-cated software is a container orchestration tool that provides the interface, Admin Console, for JamaConnect.
Replicated and Jama Connect are hosted on the same application server, running on different ports.
The Admin Console stores settings, such as SSL certificates and database connection information, thatJama Connect uses to start and run correctly. Some of its functions include:
Jama Connect User Guide
482

• Manage the run state of Jama Connect• Perform upgrades• Synchronize license renewals
Many of the settings for the Admin Console are configured during installation. However, you can makechanges to the settings whenever you need.
Application server overview
Your application server hosts the Jama Connect application, Docker containers, and the Admin Console(Replicated software). It also stores data such as attachments, images, reports, and a micro-servicecache.
Docker containers — A standalone executable package of software that includes code, runtime, sys-tem tools, system libraries, and settings. See https://www.docker.com/resources/what-container for de-tails.
Replicated — A container-based platform for easily deploying cloud native applications inside custom-ers' environments to provide greater security and control. The Admin Console is the user interface forinstalling the Jama Connect application. See https://www.replicated.com/ for details.
• Jama Connect users access Jama Connect by browsing to the instance URL (https://jamainstan-ceurl.customer.com/).
• System administrators access the Admin Console by browsing to the same instance URL, but on port8800 (https://jamainstanceurl.customer.com:8800/).
• Replicated updates Jama Connect and the license via API calls for internet-enabled environments.Our airgap option removes the need for remote API calls.
• Any content added to your Jama Connect instance is stored in the database. Uploaded artifacts arestored in the file system in the /data directory.
Restart the Admin ConsoleOccasionally, you might need to restart the Admin Console. For example, when you need to sync a newlicense.
The commands to restart the Admin Console depend on the flavor of Linux you're using.
Jama Connect User Guide
483

1. To restart the Admin Console on Debian or Ubuntu systems, execute these commands:
sudo service replicated restartsudo service replicated-ui restartsudo service replicated-operator restart
2. To restart the Admin Console on CentOS, RHEL, or Fedora systems, execute these commands:
sudo systemctl restart replicated replicated-ui replicated-operator
Once restarted, the Admin Console displays the login page.
Create a Replicated snapshotA Replicated snapshot is a backup of the Admin Console environment. It includes the Replicated data-base, registry images, and container volumes (when specified).
A Replicated snapshot can be taken while Jama Connect is running without interruption.
IMPORTANTReplicated snapshots don't include the contents of the Jama Connect database, thecontents of the /data directory, or the log files.
When to create a snapshot
• When migrating Jama Connect to new hardware [528]. When you replace one server with another(create a clone), you can perform a fresh installation of Docker andReplicated, then restore from thesnapshot.
• During disaster recovery.
Jama Connect User Guide
484

• Before upgrading your software (Jama Connect or Replicated).
Snapshot location
By default, Replicated snapshots are stored in this location:
/var/lib/replicated/snapshots
To include the Replicated snapshots in your regular backups of Jama Connect, you can change the lo-cation for the snapshots, like this:
/data/replicated/snapshots
To create a Replicated snapshot:
1. (Optional) Identify and configure a custom directory for your snapshots: Select Admin Console >Settings (gear icon) > Console Settings > Snapshots.
2. Create a snapshot: Open the Admin Console and select Start Snapshot.
Snapshots Enabled changes to Snapshotting and a progress spinner appears while it backs upthe registry data and container volumes. When the snapshot is ready, you see a timestamp for thelast snapshot.
Jama Connect User Guide
485

If the Replicated snapshot fails, the dashboard displays an error message with technical detail of thefailure, including the file or folder involved. This error message is generated from the underlying file sys-tem (for example, readdirent: errno 523), which means the problem is likely with the underlying file sys-tem and not the Jama Connect installation.
Restore all settings from a Replicated snapshotWhen you set up a new application server for Jama Connect, you can restore the Admin Console set-tings that you saved in a Replicated snapshot.
Snapshots include the Replicated database, registry images, and container volumes (when specified).
1. Install Jama Connect on the new server.2. When the page Upload your license is displayed, select Restore from a snapshot.
Jama Connect User Guide
486

3. When the Restore from snapshot page is displayed, enter the path to your snapshot and click Re-store.Use the same path on the new server as you did on the old server. For example, /var/lib/replica-ted/snapshots or /data/snapshots.
4. On the Restore Cluster page, click Restore.
Jama Connect User Guide
487
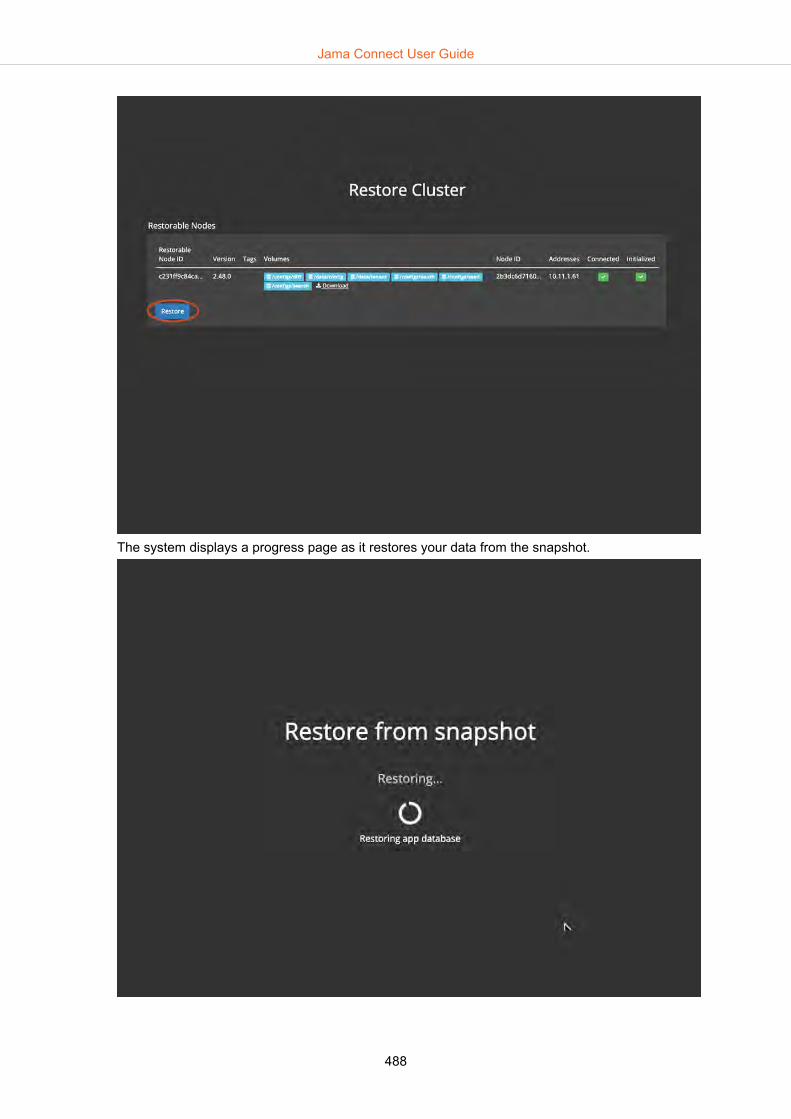
The system displays a progress page as it restores your data from the snapshot.
Jama Connect User Guide
488

Configure database settingsDatabase settings can be configured as part of your initial installation of Jama Connect or any time youneed to make changes.
1. In the header of the Admin Console, select Settings to open the Settings page.2. Scroll down to the Database Settings section of the page.
3. Select the type of database you're using, MySQL [432] or Microsoft SQL [433], then complete orchange the database settings as needed.
4. (Optional) If you need to connect to your database through an SSL-encrypted connection, provideadditional connection string parameters. These parameters specify key/value pairs in the formatappropriate to your database.• MySQL
useSSL=true&requireSSL=tru
• SQL Server
ssl=require;appName=jama;bufferMinPackets
More options are available for MySQL and SQL Server
Jama Connect User Guide
489

5. Scroll to the bottom of the page and click Save. A message confirms that your settings were saved.6. To apply settings, you must restart the application:
• Immediately — Select Restart now.• Later — Select Cancel and Restart later.
Configure web server settingsWeb server settings can be configured as part of your initial installation of Jama Connect or any timeyou need to make changes.
The web server configuration allows the use of SSL (TLS) or plain text connections.
1. In the header of the Admin Console, select Settings to open the Settings page.2. Scroll down to the Web Server section of the page.3. Enter the context path for Jama Connect, for example, https://<hostname>. Don't use this configura-
tion unless you need to specify a sub-path or sub-directory.4. (Optional) Select Check context path syntax.
Jama Connect User Guide
490

5. (Optional) Set the TLS and plain text port as needed.6. Scroll to the bottom of the page and click Save. A message confirms that your settings were saved.7. To apply settings, you must restart the application:
• Immediately — select Restart now.• Later — Select Cancel and Restart later.
Configure host nameYour Host Name settings can be configured as part of your initial installation of Jama Connect or anytime you need to make changes.
If possible, choose a host name that's meaningful to users. Be sure the domain name matches yourTLS certificate.
If you need to change this host name, you must also change the base URL. [522]
1. In the header of the Admin Console, select Settings to open the Settings page.2. Scroll down to the Host Name section of the page.
Jama Connect User Guide
491
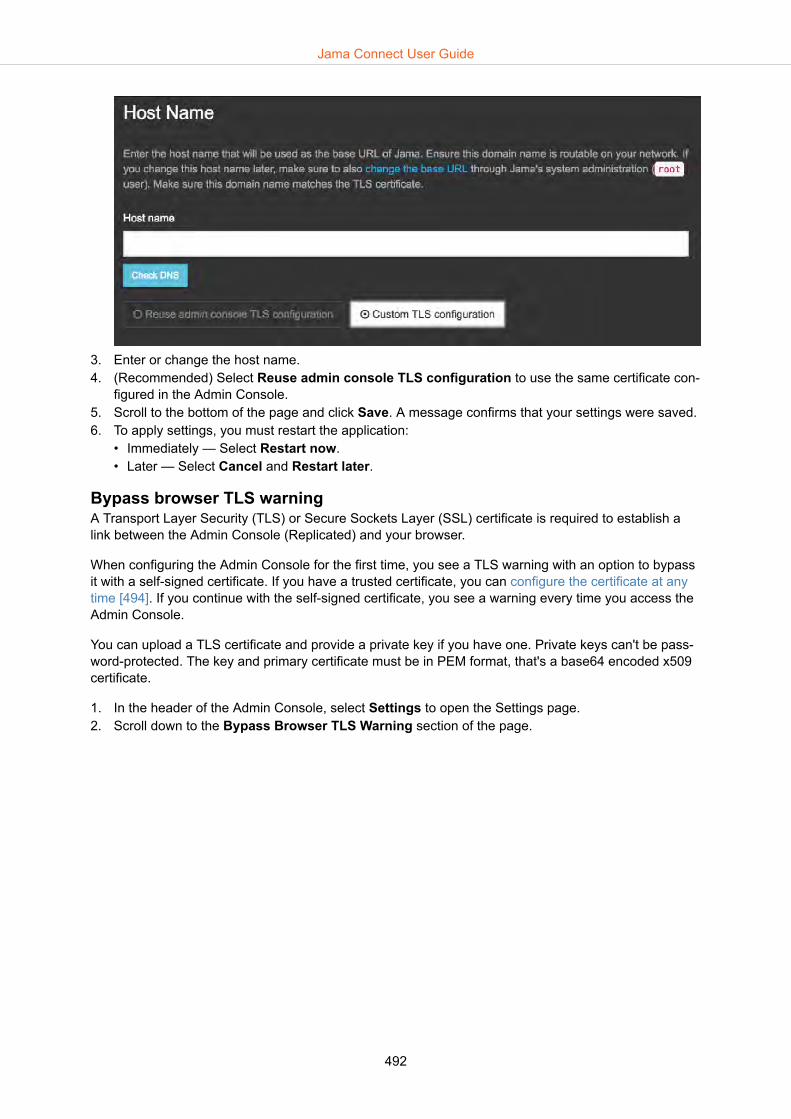
3. Enter or change the host name.4. (Recommended) Select Reuse admin console TLS configuration to use the same certificate con-
figured in the Admin Console.5. Scroll to the bottom of the page and click Save. A message confirms that your settings were saved.6. To apply settings, you must restart the application:
• Immediately — Select Restart now.• Later — Select Cancel and Restart later.
Bypass browser TLS warningA Transport Layer Security (TLS) or Secure Sockets Layer (SSL) certificate is required to establish alink between the Admin Console (Replicated) and your browser.
When configuring the Admin Console for the first time, you see a TLS warning with an option to bypassit with a self-signed certificate. If you have a trusted certificate, you can configure the certificate at anytime [494]. If you continue with the self-signed certificate, you see a warning every time you access theAdmin Console.
You can upload a TLS certificate and provide a private key if you have one. Private keys can't be pass-word-protected. The key and primary certificate must be in PEM format, that's a base64 encoded x509certificate.
1. In the header of the Admin Console, select Settings to open the Settings page.2. Scroll down to the Bypass Browser TLS Warning section of the page.
Jama Connect User Guide
492

3. Click Continue to Setup to upload a TLS certificate.
4. Click Choose file to select the key and certificate, then click Upload & Continue.5. Scroll to the bottom of the page and click Save. A message confirms that your settings were saved.6. To apply settings, you must restart the application:
• Immediately — Select Restart now.
Jama Connect User Guide
493
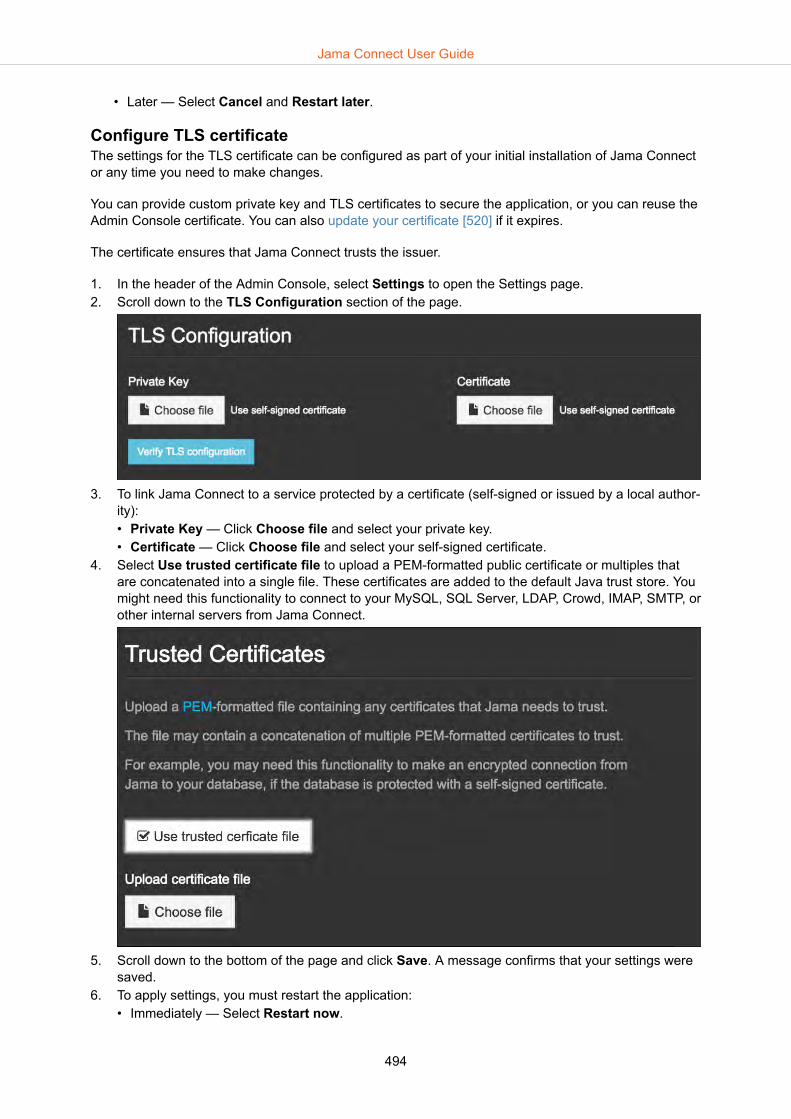
• Later — Select Cancel and Restart later.
Configure TLS certificateThe settings for the TLS certificate can be configured as part of your initial installation of Jama Connector any time you need to make changes.
You can provide custom private key and TLS certificates to secure the application, or you can reuse theAdmin Console certificate. You can also update your certificate [520] if it expires.
The certificate ensures that Jama Connect trusts the issuer.
1. In the header of the Admin Console, select Settings to open the Settings page.2. Scroll down to the TLS Configuration section of the page.
3. To link Jama Connect to a service protected by a certificate (self-signed or issued by a local author-ity):• Private Key — Click Choose file and select your private key.• Certificate — Click Choose file and select your self-signed certificate.
4. Select Use trusted certificate file to upload a PEM-formatted public certificate or multiples thatare concatenated into a single file. These certificates are added to the default Java trust store. Youmight need this functionality to connect to your MySQL, SQL Server, LDAP, Crowd, IMAP, SMTP, orother internal servers from Jama Connect.
5. Scroll down to the bottom of the page and click Save. A message confirms that your settings weresaved.
6. To apply settings, you must restart the application:• Immediately — Select Restart now.
Jama Connect User Guide
494

• Later — Select Cancel and Restart later.
Configure memory settingsMemory settings can be configured as part of your initial installation of Jama Connect or any time youneed to make changes.
Use the advanced memory settings to change the memory allocation of containers that are runningJava processes.
jamacore service Uses 6.5 GB plus a portion of the remaining total memory.
Recommended: 6.5 GB + ($total-15 GB)*50%
Search service Uses 1 GB plus a portion of the remaining total memory.
Recommended: 1 GB + ($total-15 GB)*5%
Diff service Default recommendation is 128 MB.
Elasticsearch Uses 3.5 GB plus a portion of the remaining total memory.
Recommended: 3.5 GB + ($total-15 GB)*20%
SAML service Uses 1 GB plus a portion of the remaining total memory.
OAuth service Uses 512 MB plus a portion of the remaining total memory.
Memory settings can be expressed as a simple formula, using:
Operators + - / *
Brackets ( ) to specify order of operations
Variable $total to reference the total memory of the application server
Numbers with units KB, MB, or GB
Numbers with percentages %
NOTEWhen changing memory settings, make sure you don't over-allocate the total memoryof the application server [428]. Monitor usage [517] and make sure to leave enoughmemory for system processes to run smoothly. For information, see Resource sizingfor your application server [428].
To configure memory settings:
1. In the header of the Admin Console, select Settings to open the Settings page.2. Scroll down to the Advanced Memory Settings section of the page.
Jama Connect User Guide
495

3. Use the default values. If you have performance issues, contact Support for help configuring thesevalues.
4. Scroll to the bottom of the page and click Save. A message confirms that your settings were saved.5. To apply settings, you must restart the application:
• Immediately — Select Restart now.• Later — Select Cancel and Restart later.
Configure advanced startup settingsStartup settings can be configured as part of your initial installation of Jama Connect or any time youneed to make changes.
Enable Java Management Extensions (JMX) and set additional Java Virtual Machine JVM options(JAVA_OPTS) for the following containers that are running Java processes:
• The jamacore application• Search service• Elasticsearch
IMPORTANTEach of these containers already adds a number of their own JVM options that mightclash with additional JVM options configured here.
Use JMX support in a secure environment, because JMX ports have no authentication on the JMX portswhen JMX is enabled. A formula can also be used [495] to set an exact memory amount.
To configure advanced startup settings:
1. In the header of the Admin Console, select Settings to open the Settings page.2. Scroll down to the Advanced Startup Settings section of the page.
Jama Connect User Guide
496

3. Select Enable JMX remote for core Jama application.4. Enter the JMX remote port number for the core Jama application.
Don't overlap JMX ports between containers and don't overlap other ports that are already in useon the application server.
5. (Optional) Enter additional Java JVM options for Jama core, search service, and Elasticsearch.
6. Enter a Java RMI server hostname.A single Java RMI server hostname can be given that works across all containers that have JMXenabled. The host IP address is used by default. However, if the host IP address isn't accessible bythe JMX client for the configured JMX ports, the public hostname or the public host IP is set here. Ifan SSH tunnel is used, set the hostname to "localhost."
7. (Optional) In the Add services configuration field, add services configuration specific to JamaConnect, such as throttling.
8. Scroll to the bottom of the page and click Save. A message confirms that your settings were saved.9. To apply settings, you must restart the application:
• Immediately — Select Restart now.
Jama Connect User Guide
497

• Later — Select Cancel and Restart later.
TIPGarbage collection logging (GC logging) is automatically enabled for containers thatare running Java processes. GC log files are available alongside other log files for therespective container [516]. When you restart Jama Connect [514], previous GC logfiles are packaged as a ZIP file. Typically, the default GC logging configuration is suffi-cient, but it's possible to override GC logging parameters through the Additional JVMoptions for Jama core field in admin console advanced startup settings [496].
Configure Advanced Search SettingsAdvanced Search settings can be configured as part of your initial installation of Jama Connect or anytime you need to make changes.
Configure index settings for Elasticsearch. Making changes to these settings requires re-indexing.
1. In the header of the Admin Console, select Settings to open the Settings page.2. Scroll down to the Advanced Search Service Settings section of the page.
3. Accept the default values.4. Scroll to the bottom of the page and click Save. A message confirms that your settings were saved.5. To apply settings, you must restart the application:
• Immediately — Select Restart now.• Later — Select Cancel and Restart later.
Configure New Relic settingsNew Relic settings can be configured as part of your initial installation of Jama Connect or any time youneed to make changes.
1. In the header of the Admin Console, select Settings to open the Settings page.2. Scroll down to the New Relic Settings section of the page.
The "Application name" and "License key" are required to connect jamacore to New Relic.3. For the Application name, enter Jama. If unsure where to find your license key, see the New Relic
instructions.4. (Optional) Select Use proxy for New Relic to expand the proxy settings. If you're using High Se-
curity Mode, make that selection to expand the settings.
Jama Connect User Guide
498

5. Click Save. A message confirms that your settings were saved.6. To apply settings, you must restart the application:
• Immediately — Select Restart now.• Later — Select Cancel and Restart later.
Set a custom location for the MathType Equations EditorSettings for the MathType Equations Editor can be configured as part of your initial installation of JamaConnect or any time you need to make changes.
NOTEThe MathType Equations Editor requires a separate license. After your organizationhas purchased the license, and the system administrator sets up a location for the edi-tor, users can access the editor in the Rich Text Editor [98] in Jama Connect.
Airgap or self-hosted instances of Jama Connect can add math and chemical equation options to therich text editor without making calls to an external server.
Before enabling the MathType Equations Editor, you must:
• Designate a server inside your environment that can listen for MathType calls and responses. Checkfor the latest supported version on the Community.
• Acquire a MathType license from Jama Software.
To configure settings for MathType Editor:
1. Log in to the Admin Console.2. In the side panel, select WIRIS Connection Settings.
Jama Connect User Guide
499
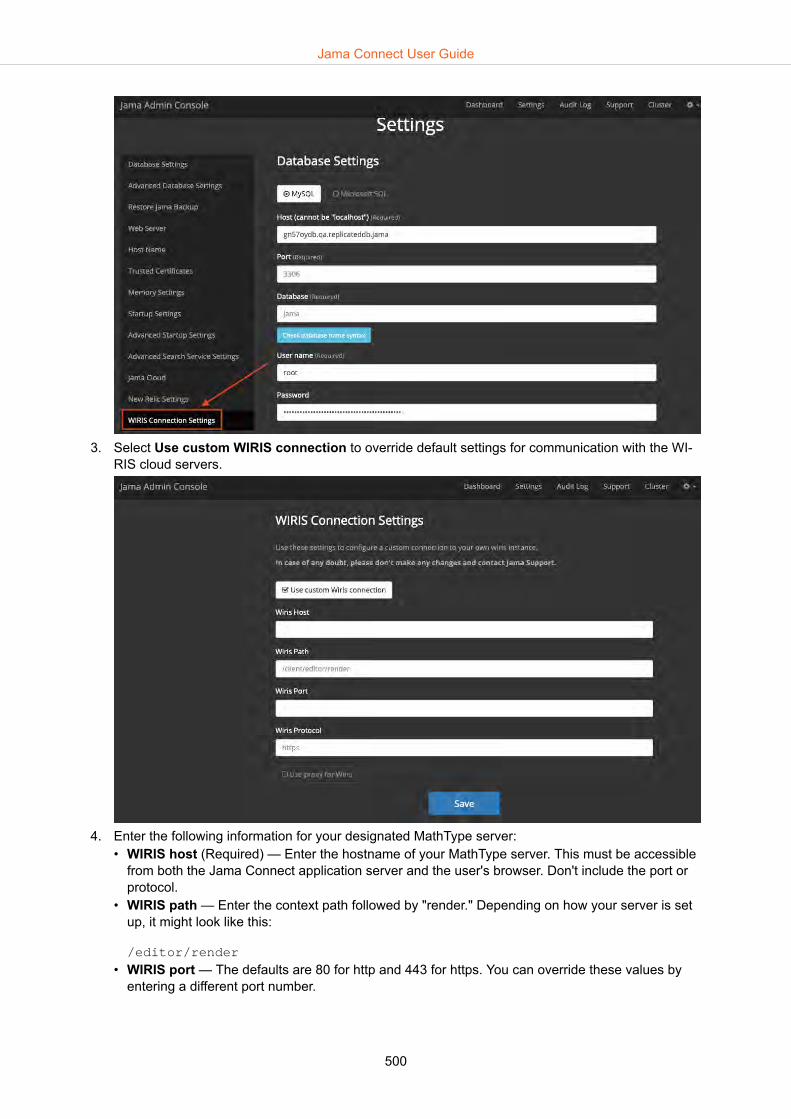
3. Select Use custom WIRIS connection to override default settings for communication with the WI-RIS cloud servers.
4. Enter the following information for your designated MathType server:• WIRIS host (Required) — Enter the hostname of your MathType server. This must be accessible
from both the Jama Connect application server and the user's browser. Don't include the port orprotocol.
• WIRIS path — Enter the context path followed by "render." Depending on how your server is setup, it might look like this:
/editor/render
• WIRIS port — The defaults are 80 for http and 443 for https. You can override these values byentering a different port number.
Jama Connect User Guide
500
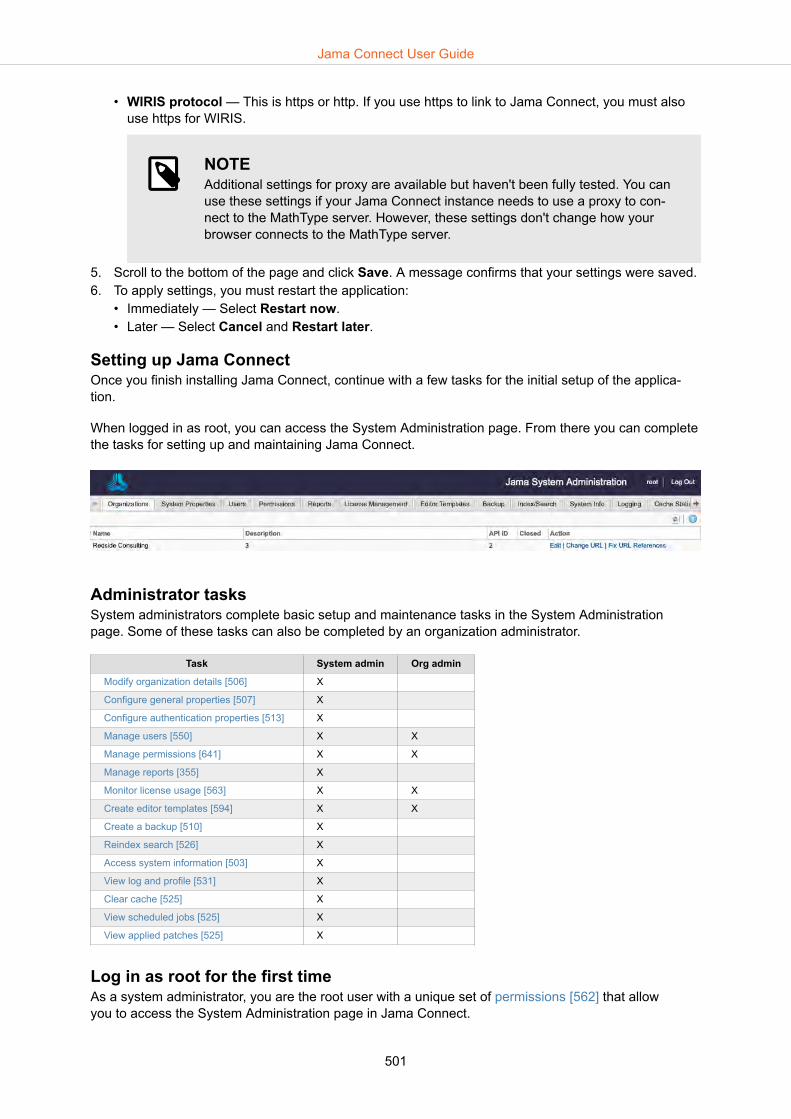
• WIRIS protocol — This is https or http. If you use https to link to Jama Connect, you must alsouse https for WIRIS.
NOTEAdditional settings for proxy are available but haven't been fully tested. You canuse these settings if your Jama Connect instance needs to use a proxy to con-nect to the MathType server. However, these settings don't change how yourbrowser connects to the MathType server.
5. Scroll to the bottom of the page and click Save. A message confirms that your settings were saved.6. To apply settings, you must restart the application:
• Immediately — Select Restart now.• Later — Select Cancel and Restart later.
Setting up Jama ConnectOnce you finish installing Jama Connect, continue with a few tasks for the initial setup of the applica-tion.
When logged in as root, you can access the System Administration page. From there you can completethe tasks for setting up and maintaining Jama Connect.
Administrator tasksSystem administrators complete basic setup and maintenance tasks in the System Administrationpage. Some of these tasks can also be completed by an organization administrator.
Task System admin Org admin
Modify organization details [506] X
Configure general properties [507] X
Configure authentication properties [513] X
Manage users [550] X X
Manage permissions [641] X X
Manage reports [355] X
Monitor license usage [563] X X
Create editor templates [594] X X
Create a backup [510] X
Reindex search [526] X
Access system information [503] X
View log and profile [531] X
Clear cache [525] X
View scheduled jobs [525] X
View applied patches [525] X
Log in as root for the first timeAs a system administrator, you are the root user with a unique set of permissions [562] that allowyou to access the System Administration page in Jama Connect.
Jama Connect User Guide
501

The first time you log in as root, change the default password for the root user and edit any details inthe My Profile page, such as email address, phone number, or location.
1. At the Jama Connect login page, enter the default credentials for root, then select Sign In.• Username = root• Password = password
2. In the top right header, select root.
3. On the root user's My Profile page, select Change Password.
4. Enter the existing password, enter and confirm a new secure password, then select Save.
Jama Connect User Guide
502

5. (Optional) Select Edit Settings to configure the root user email and any other details as needed.
6. Select Save, then select Close
Assign a new user as organization adminOnly system and organization administrators can assign roles or grant permissions to other users. Ifyou configure an organization admin right after you install Jama Connect, you can share thetasks of setting up user accounts and permissions.
You must be have system administrator permissions to complete this task.
1. Log in as root user or as an organization admin.
Jama Connect User Guide
503
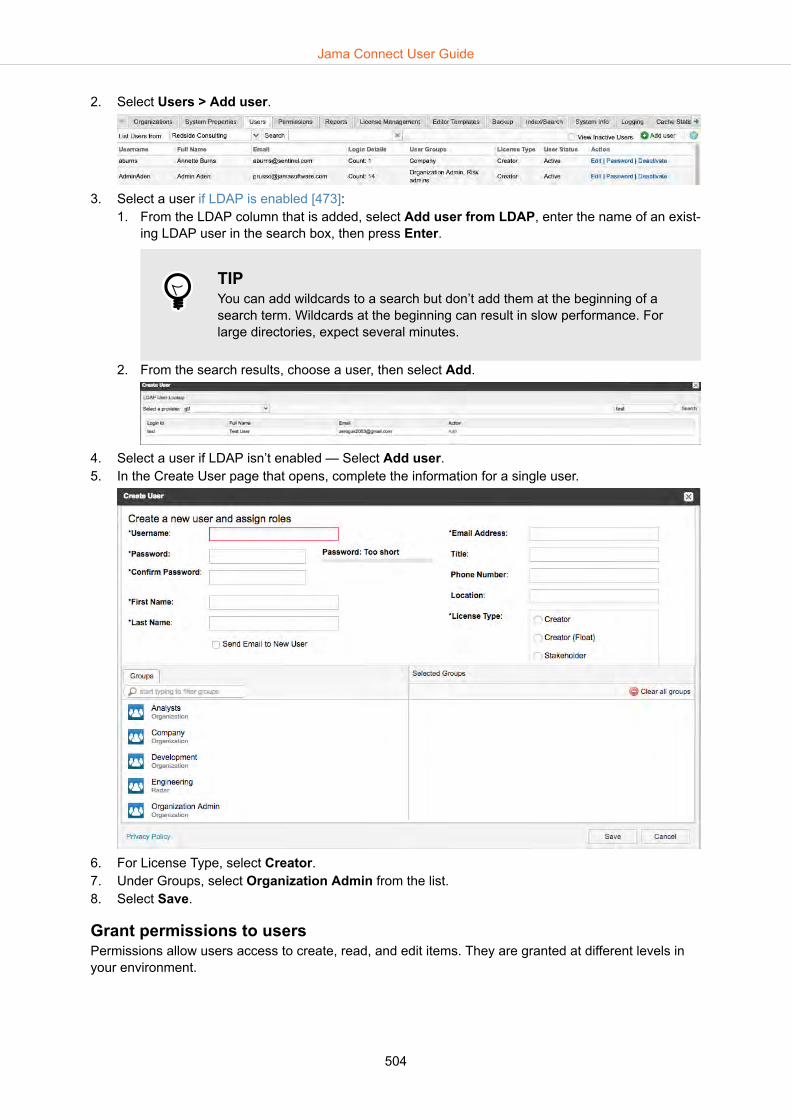
2. Select Users > Add user.
3. Select a user if LDAP is enabled [473]:1. From the LDAP column that is added, select Add user from LDAP, enter the name of an exist-
ing LDAP user in the search box, then press Enter.
TIPYou can add wildcards to a search but don’t add them at the beginning of asearch term. Wildcards at the beginning can result in slow performance. Forlarge directories, expect several minutes.
2. From the search results, choose a user, then select Add.
4. Select a user if LDAP isn’t enabled — Select Add user.5. In the Create User page that opens, complete the information for a single user.
6. For License Type, select Creator.7. Under Groups, select Organization Admin from the list.8. Select Save.
Grant permissions to usersPermissions allow users access to create, read, and edit items. They are granted at different levels inyour environment.
Jama Connect User Guide
504
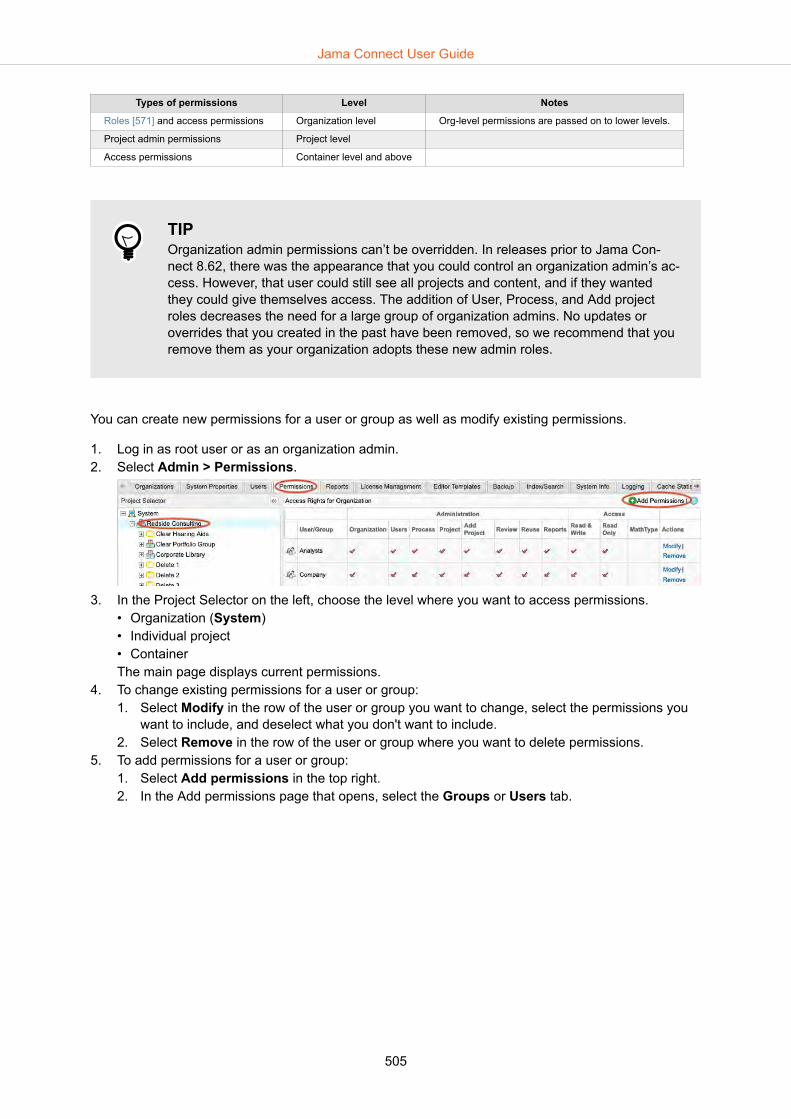
Types of permissions Level Notes
Roles [571] and access permissions Organization level Org-level permissions are passed on to lower levels.
Project admin permissions Project level
Access permissions Container level and above
TIPOrganization admin permissions can’t be overridden. In releases prior to Jama Con-nect 8.62, there was the appearance that you could control an organization admin’s ac-cess. However, that user could still see all projects and content, and if they wantedthey could give themselves access. The addition of User, Process, and Add projectroles decreases the need for a large group of organization admins. No updates oroverrides that you created in the past have been removed, so we recommend that youremove them as your organization adopts these new admin roles.
You can create new permissions for a user or group as well as modify existing permissions.
1. Log in as root user or as an organization admin.2. Select Admin > Permissions.
3. In the Project Selector on the left, choose the level where you want to access permissions. • Organization (System)• Individual project• ContainerThe main page displays current permissions.
4. To change existing permissions for a user or group:1. Select Modify in the row of the user or group you want to change, select the permissions you
want to include, and deselect what you don't want to include.2. Select Remove in the row of the user or group where you want to delete permissions.
5. To add permissions for a user or group:1. Select Add permissions in the top right.2. In the Add permissions page that opens, select the Groups or Users tab.
Jama Connect User Guide
505

• Existing user or group — Select a user or group from the list on the left, then under Per-missions, select the role (access permissions) for that user or group.
• New user or group — Select New user or New group in the top right corner of the page.Then under Permissions, select the role or access permissions for that user or group.
3. Select Save.
Edit organization detailsAs a system administrator, you can change your organization’s information such as the name, descrip-tion, or return email address.
1. Log in as root user.2. Select Admin > Organizations > Edit.
3. Enter or change any of the following information:
Jama Connect User Guide
506

• Organization name — Typically the name of your company or team. This name appears in theapplication as well as in reports.
• Description — Additional information about your company.• Return email — Email notifications automatically sent by the application. Typically, the organiza-
tion administrator's email address is used or [email protected].• Base URL — The base URL is used to create URLs sent in email notifications and embed im-
ages in exports.• Rich text image max width (px) — Maximum pixel width setting that shrinks all images embed-
ded into rich text fields. Default 0 means no max width is applied.• Rich text image max height (px) — Maximum pixel height setting that shrinks all images em-
bedded into rich text fields. Default 0 means no max height is applied.
NOTEImages retain their aspect ratio when adjusted to fit the maximum setting ofheight or width. The adjustment only happens during an upload or document im-port. Images that already exist on the server are not adjusted. Compres-sion is based on the width and height setting applied.
• Allow project admins to subscribe to others — Allows project administrators to subscribe oth-er users to items.
• Allow users to mute subscriptions — Allows users to turn off a subscription that was subscri-bed to by another user.
• Allow non-administrators to delete items/containers — Allows a user to delete items even ifthey don't have organization admin permissions. Default is On.
• Include unexecuted test run in status calculations (Not retroactive) — Jama Connect usesall associated test runs to automatically calculate test case status.
NOTEFor test cases associated with a single plan, test case status reflects the statusof the test run with the most recent activity, which includes unexecuted tests (ifenabled). When the case is associated with multiple plans, the most urgent sta-tus is chosen in this priority order: unexecuted, failed, blocked, scheduled,passed.
Select this box to include unexecuted test runs in the calculation of test case status (default). Un-check this box to remove unexecuted test runs from the status priority order.If you don't include unexecuted test runs and there are no executed test runs, the system defersto including unexecuted test runs.
• Allow multiple items with the same Global ID in a single project — Allows items to be reusedmultiple times within one project. Default is off.
Configure general propertiesThe general properties need to be configured for all Jama Connect installations. Properties include con-figuring email, the session timeout value, and any messages you want to display on the login page.
1. Log in as root user.2. Select the System properties tab in the Jama System Administration panel, then select Edit in the
top, right corner.
Jama Connect User Guide
507

3. Change any of the following settings.• Session timeout — Automatically disconnects idle users after a set time (default is 120 mi-
nutes). When a session times out, the user is prompted to log in and their license is re-leased. Recommended when using floating licenses.
• Enable HTML tag security cleaning — Prevents suspicious HTML tags from being added tonew and modified rich text fields and test steps. Doesn’t clean up data retroactively. Enabled bydefault.
• SMTP settings — Settings that affect notifications and subscriptions.
SMTP Enabled Select Yes to use SMTP.
SMTP Host The domain address of your SMTP server.
SMTP Port The port for SMTP access.
SMTP User User account to access SMTP.
SMTP Password Password for the user account.
Authorization Required Select Yes if authorization is required for the SMTP server.
Use TLS Select Yes if your mail server uses TLS. Jama Connect supports only Explicit (Opportunistic)SSL/TLS connections for SMTP.
Jama Connect User Guide
508

• Collaboration from Address/IMAP — IMAP must be supported to enable reply-to e-mails in thestream [215].
System "From" ad-dress
Enter an address for the system to use when it sends notifications or other system messag-es (for example, [email protected]).
Collaboration "From"address
Must match the email address used for IMAP, so replies to stream emails are sent to thesame account that processes incoming mail (for example, [email protected]).
IMAP enabled Select Yes to use IMAP and stream emails.
IMAP server Enter the domain address of your email server (for example, imap.gmail.com).
IMAP port The port for IMAP access, typically different from SMTP. Standard ports are Non-SSL:143,SSL:993.
IMAP use SSL Select Yes to use SSL.
IMAP user account Enter a user account for someone with access to the folder where IMAP emails are saved.
IMAP user password Enter the password for the user account.
IMAP folder Folder where collaboration emails are sent or saved (for example, Inbox). Must be accessi-ble to the person with the IMAP user account.
IMAP error Folder where IMAP collects parsing issues or errors.
• Time and date formatting — Set the time to meet the needs of your users.Set the time to meet the needs of your users.Java and JavaScript do not use the same date-time syntax. Review the difference before settingthe values. Some typical formats for JavaScript are m/d/Y h:I a and m/d/Y. Some typical formatsfor Java are MM/dd/yyyy hh:mm:ss a z and MM/dd/yyyy.If you use Windows, enable Adjust for daylight saving time automatically is in Windows Dateand time settings so that the time zone is displayed correctly in reviews.The Trace View date format is inherited from a different format than other items in the applica-tion. To match formats, you must have the Javascript Day/Month/Year format and Java-script Date/Time format in the same order. This is most notable when using a European date for-mat.
• Allow project administrators to add groups — Select Yes for project administrators to addgroups [635]. Otherwise, only system and organization administrators can add groups.
• Allow project administrators to set project permissions — Select Yes for project administra-tors to grant project permissions [638]. Otherwise, only system and organization administratorscan grant permissions.
• Allow access to REST API — Enables users to perform actions in Jama Connect from outsidethe user interface.
• Attachment file extensions — List of file types (lowercase, separated by commas, periods,spaces, or newline characters) that can be uploaded as an attachment.
NOTEFiles are rejected if the content of the file doesn’t match the file extension, or ifthe MIME type is not understood by the system, even if the file type is listedhere. To allow files of an unknown type, set the option to a blank string.
File extensions must be lowercase even if the actual extension on the file is up-percase. Learn more.
• Notice on login page — Displays a notice to users below the login page and in a yellow bar atthe base of the application page.
Jama Connect User Guide
509
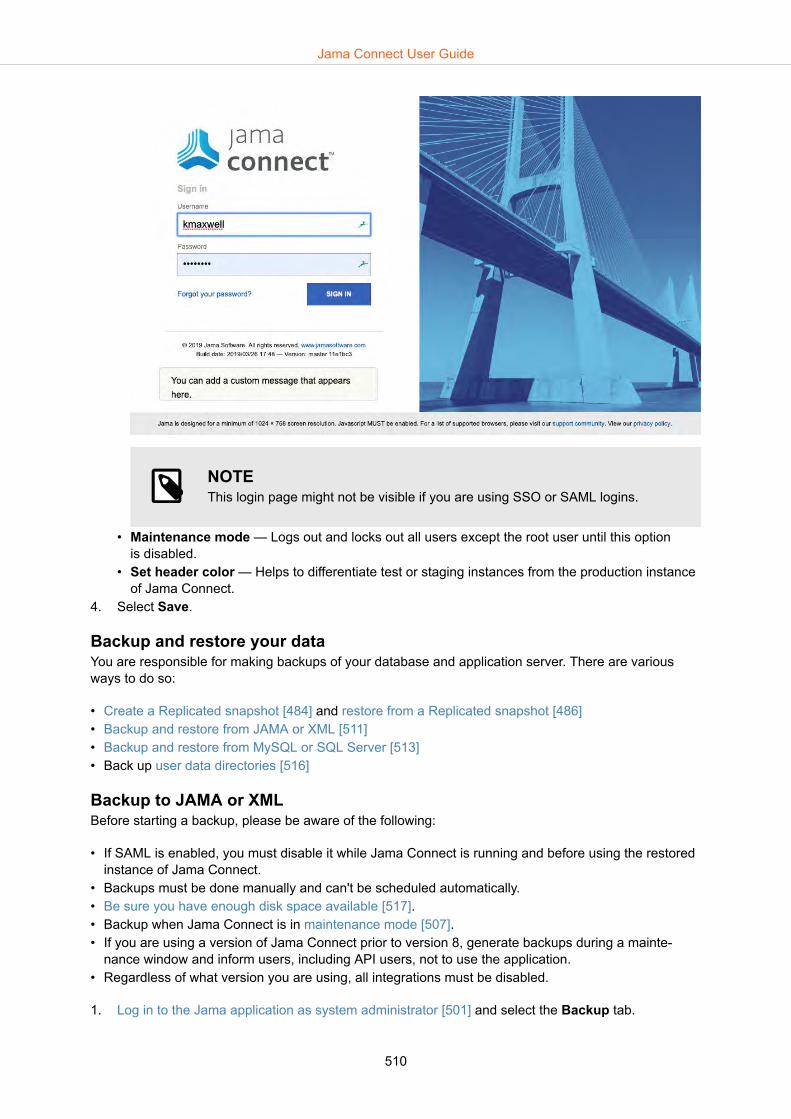
NOTEThis login page might not be visible if you are using SSO or SAML logins.
• Maintenance mode — Logs out and locks out all users except the root user until this optionis disabled.
• Set header color — Helps to differentiate test or staging instances from the production instanceof Jama Connect.
4. Select Save.
Backup and restore your dataYou are responsible for making backups of your database and application server. There are variousways to do so:
• Create a Replicated snapshot [484] and restore from a Replicated snapshot [486]• Backup and restore from JAMA or XML [511]• Backup and restore from MySQL or SQL Server [513]• Back up user data directories [516]
Backup to JAMA or XMLBefore starting a backup, please be aware of the following:
• If SAML is enabled, you must disable it while Jama Connect is running and before using the restoredinstance of Jama Connect.
• Backups must be done manually and can't be scheduled automatically.• Be sure you have enough disk space available [517].• Backup when Jama Connect is in maintenance mode [507].• If you are using a version of Jama Connect prior to version 8, generate backups during a mainte-
nance window and inform users, including API users, not to use the application.• Regardless of what version you are using, all integrations must be disabled.
1. Log in to the Jama application as system administrator [501] and select the Backup tab.
Jama Connect User Guide
510
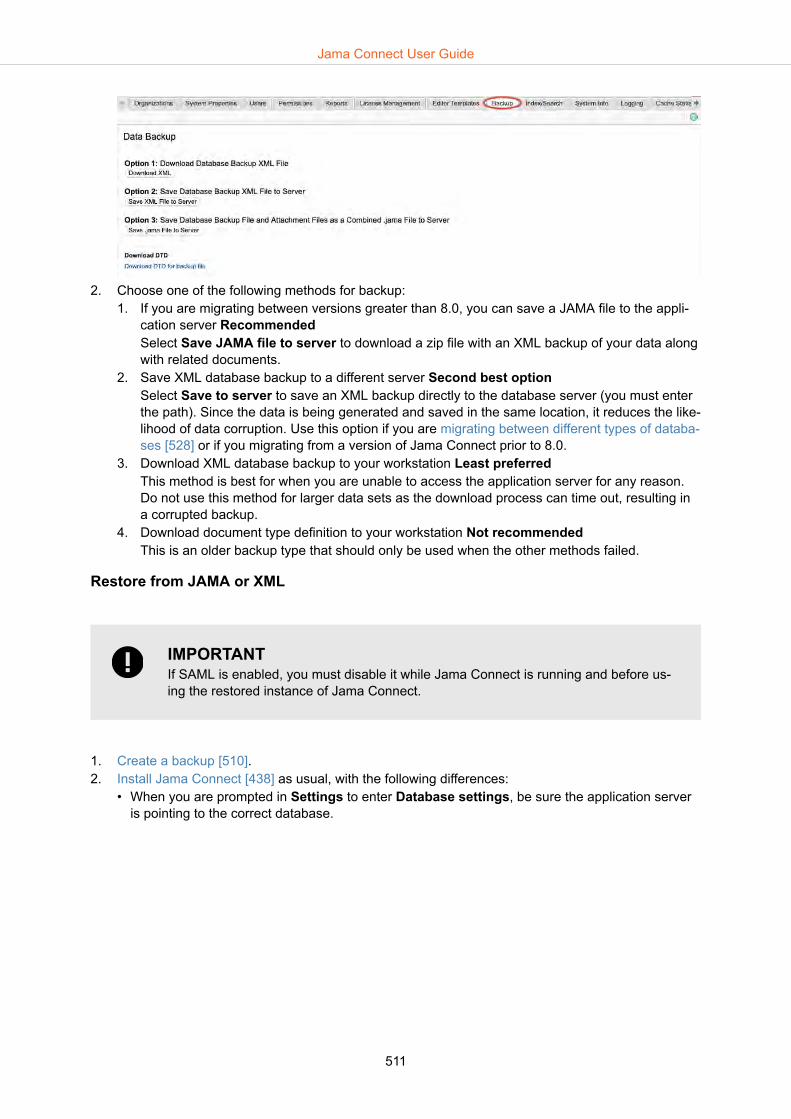
2. Choose one of the following methods for backup:1. If you are migrating between versions greater than 8.0, you can save a JAMA file to the appli-
cation server RecommendedSelect Save JAMA file to server to download a zip file with an XML backup of your data alongwith related documents.
2. Save XML database backup to a different server Second best optionSelect Save to server to save an XML backup directly to the database server (you must enterthe path). Since the data is being generated and saved in the same location, it reduces the like-lihood of data corruption. Use this option if you are migrating between different types of databa-ses [528] or if you migrating from a version of Jama Connect prior to 8.0.
3. Download XML database backup to your workstation Least preferredThis method is best for when you are unable to access the application server for any reason.Do not use this method for larger data sets as the download process can time out, resulting ina corrupted backup.
4. Download document type definition to your workstation Not recommendedThis is an older backup type that should only be used when the other methods failed.
Restore from JAMA or XML
IMPORTANTIf SAML is enabled, you must disable it while Jama Connect is running and before us-ing the restored instance of Jama Connect.
1. Create a backup [510].2. Install Jama Connect [438] as usual, with the following differences:
• When you are prompted in Settings to enter Database settings, be sure the application serveris pointing to the correct database.
Jama Connect User Guide
511

• When you are prompted in Settings to Restore the Jama backup, enter the file path for thebackup you created, (for example, /data/restore/your_backup.xml). Follow the instructions givento make sure that the file is available on the application server correctly.
IMPORTANTIn the case of XML file installation mode, it is very important to enter this filepath before proceeding to install. Once the database is populated on the initialstartup, changes to this setting will not be picked up.
Jama Connect User Guide
512

3. Stop Jama Connect [514]. 4. Migrate the data manually [527].5. Start Jama Connect. [514] 6. Log in to the application as root user [501].7. If the environment URL has changed, change the URL [522] to update the base URL.8. While you are still logged in as root user, reindex search [526].
Backup and restore from MySQL or SQL Server Migrate servers using a proprietary backup whenever possible to avoid corruption. However, if you aremigrating from one server to another (for example, MySQL to SQL Server) you need to use an XMLbackup [528].
Follow instructions for a proprietary database backup for the system you are using MySQL or SQLServer.
MaintainA system administrator is in charge of keeping the system up and running. Maintenance includes thefollowing tasks:
• Upgrade the admin console [458]• Upgrade the application [453] (or upgrade from a version prior to 8.0 [523])• Update the license over the internet [518] or with airgap [519]• Upload custom reports and exports [370]• Update the certificate [520]• Update the application's IP address [520]• Monitor usage [517]• Backup and restore your data [510]• Remove old Docker images [524]• View scheduled jobs [525]• View applied patches [525]• Clear cache [525]• Reindex search [526]• Java Management Extensions (JMX) and maintaining performance of Java Virtual Machines (JVM)
[496]
Add or update console authenticationIf you did not secure the admin console during installation [425] or you want to update the authentica-tion already configured:
1. On the application server, run the command:
replicated auth reset
2. Navigate to https://[your.admin.console.ip]:8800/create-password.
Jama Connect User Guide
513

3. Update the security settings of the admin console to one of the following options:• Anonymous
No authentication required to access the admin console.• Password
You can either create a password if one does not exist or update the existing password.• LDAP
Configure or update LDAP authentication. This will allow users to access the admin console us-ing their existing LDAP credentials.
NOTEThis will not configure or update LDAP authentication within Jama itself [473].
Stop and restart the Jama Connect applicationSometimes you need to stop the Jama Connect application while you complete a particular task.
1. In the admin console, select Stop now.
Jama Connect User Guide
514

2. Wait until the screen shows "Stopped" and complete the desired tasks.
3. When you are finished, start the application by selecting Start now.4. Wait for the components that make up Jama to be started and initialized. The dashboard first reads
"Starting", then "Queued" and will finally read "Started" when it is up and running.
Jama Connect User Guide
515

Deactivate and reactivate users
IMPORTANTYou must have organization or system administrator permissions to deactivate and re-activate a user. When you deactivate a user, this makes the user inactive and frees upany named assigned license associated with that user. Users cannot be deleted fromJama Connect.
1. Log in to Jama Connect as root user.2. Select the Users tab.3. Select Deactivate in the Action column next to the user you want to deactivate.4. Deactivated users will disappear from the list until you select View inactive users to view all users.5. Alternatively, to reactivate a deactivated user, select Activate.
6. In the User license type window, select a license type and select Save.
Folder locationsYou can use an exported filesystem, such as NFS, for mounting the following directories, provided thepath remains the same. Mounting these directories in the cloud is not supported.
The following two directories are on the application server:
• /datacontains all Jama Connect user data including reports and attachments.
• /logscontains all log files of the Jama Connect components such as the following:• /logs/tomcat
Apache Tomcat log files, logs all activities [210] in the application• /logs/tomcat/contour
Core Jama Connect log files• /logs/elasticsearch
Elasticsearch log files• /logs/search
Search service log files• /logs/nginx
Nginx log files (note that currently only error logging is provided for Nginx)
Jama Connect User Guide
516
NOTEYou cannot change the location where log files are written to, however, you canchange the appenders and logging levels for different components of the Jama Con-nect application. The core Jama Connect application log configuration can be updatedin:
/data/log4jconfig/log4j.properties
The log configuration for Elasticsearch and search service can also be found in
/data/config
Changes to these configuration files persist when you restart Jama Connect and areapplied in a few seconds.
IMPORTANTReplicated snapshots are stored in the following location by default:
/var/lib/replicated/snapshots
However, if you change the path to include /data it will be easier to include these snap-shots in your regular backups of Jama Connect data at /data/directory, as such:
/var/lib/replicated/data/snapshots
Note that /snapshots should have three times the space allocated as the rest of /data.
Supported image extensions and attachment typesJama Connect only allows attaching file types that exist in the Allow List, which provides improved se-curity and prevents uploading harmful file types that aren’t blocked.
To prevent uploading file types that might be harmful, Jama Connect filters the file types that you canupload as an attachment.
Uses this method to filter attachment types... Supported version
Allow List Cloud, Jama Connect 2015.2 and later
Block List Jama Connect 2015.1 and earlier
Jama Connect allows these attachment types. We collected this list based on the usage pattern of ourcurrent customers. Each type has been screened for potential security risks.
APK, AVI, BMP, CSV, DOC, DOCM, DOCX, DOT, DOTX, DWG, GIF, GZ, JAMA, JPEG, JPG, MD,MOV, MP3, MP4, MPEG, ODG, ODP, ODS, ODT, PAGES, PDF, PGP, PNG, PPT, PTM, PPTX, RAR,RTF, TGZ, TIF, TIFF, TRA, TXT, VCS, VSD, VSDX, VSS, WAR, WAV, WMA, WMV, WPS, XCF, XLS,XLSB, XLSM, XLSX, XLT, XPS, ZIP, ZIPX
Monitor usageIt is important to monitor usage to be sure your organization has an adequate number licenses to meetyour needs, and also to allocate an appropriate amount of memory for your usage.
Jama Connect User Guide
517
The amount of memory that the application requires depends on several factors including:
• the size of your dataset• number of concurrent users• users' common workflows
If the memory consumption by any of the containers is close to the maximum available memory you canfine tune those values. Keep in mind that the jamacore container requires the highest amount of memo-ry, then elasticsearch containers, and finally searchservice.
IMPORTANTBackup files can be very large in size; be sure to have enough disk space availablebefore starting. If the file is too large and saved directly to your application server, thiscan cause issues. When you generate an export, be sure the machine you are savingto has more available disk space than the size of your actual database.
Make sure to not over-allocate the total memory of the application server and leave a fair amountof memory (headroom) available for system processes. Use these tables to estimate application serversize and allocation [428].
Monitor usage and fine tune your memory settings [495] as needed. There are several ways to keep aneye on usage:
• Log in to the application as root user [501] and select the License management tab to view usageby license type.
• Use the admin console monitoring graphs.• Use any Java application monitoring tool that supports JMS or use JavaMelody (which comes pre-
configured with the Jama Connect application). To access JavaMelody navigate to [your.jama.url]/javamelody when you are logged in as root user [501].
Update the license
NOTEThis involves an interruption to the Jama Connect application it is best to schedule alicense update during a maintenance window.
When you purchase or renew your licenses you receive a single key for your organization called a li-cense key. The license key includes the type and amount of licenses you have.
If you renew your license or change the number of seats available you will need to update your license.All license updates require the application server to have access to the internet (unless you are an air-gap [519] customer).
You need to sync your license as follows:
1. Select Admin Console > Settings (gear icon) > View License.2. Select Sync license.
Jama Connect User Guide
518
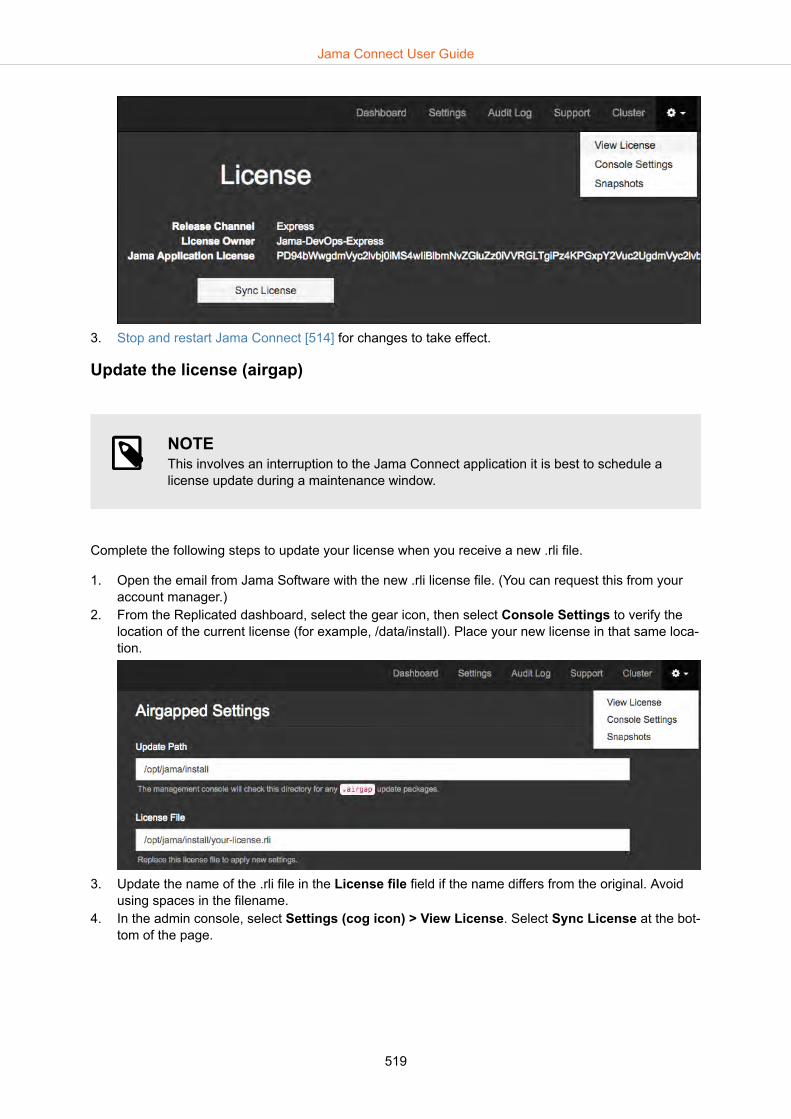
3. Stop and restart Jama Connect [514] for changes to take effect.
Update the license (airgap)
NOTEThis involves an interruption to the Jama Connect application it is best to schedule alicense update during a maintenance window.
Complete the following steps to update your license when you receive a new .rli file.
1. Open the email from Jama Software with the new .rli license file. (You can request this from youraccount manager.)
2. From the Replicated dashboard, select the gear icon, then select Console Settings to verify thelocation of the current license (for example, /data/install). Place your new license in that same loca-tion.
3. Update the name of the .rli file in the License file field if the name differs from the original. Avoidusing spaces in the filename.
4. In the admin console, select Settings (cog icon) > View License. Select Sync License at the bot-tom of the page.
Jama Connect User Guide
519

TIPOptionally, you could also use this command to sync the new license once youhave replaced it:
curl -o jama_8-#-#.airgap -O
5. Scroll to the bottom and select Save to save the settings.
Update the certificate
1. Select Settings in the admin console header, then select the gear icon drop-down Console set-tings.
2. Under TLS Key and Cert, select the location of the SSL private key and certificate.• If the SSL key and certificate are on the application server, select the Server path option and
enter the file locations.
• If the SSL key and certificate are on the computer you use to access the admin console, selectUpload files to upload the key and certificate files.
3. Scroll to the bottom of the page and select Save. You see a confirmation that your settings weresaved.If you want to come back later to apply changes (when downtime won't be an issue for users), se-lect Cancel and restart later [514].You must restart the application to apply changes. Select Restart now or Do not restart to comeback and restart the changes to avoid user downtime.
Update the application's IP addressIf you need to update the IP address or hostname of your application server after installation.
Jama Connect User Guide
520

NOTEIf you are using DNS and the hostname for this server is not changing (just the under-lying IP) you do not need to edit any files.
1. Make the IP/Hostname changes in your network/on the server.2. Stop the application [514].3. Stop Replicated:
• CentOS, RHEL 7+, and Fedora
sudo systemctl stop replicated replicated-ui replicated-operator
• Debian, Ubuntu and Others
sudo service replicated stopsudo service replicated-ui stopsudo service replicated-operator stop
4. Edit the Replicated configuration files to replace all occurrences of the old IP address or hostnamewith the new IP address or hostname. If you were previously using an IP address, you should con-tinue using an IP address. If you were previously using a hostname, you should continue using ahostname.• Fedora/CentOS/RHEL
/etc/sysconfig/replicated and /etc/sysconfig/replicated-operator• Debian/Ubuntu
/etc/default/replicated and /etc/default/replicated-operator• Others
Contact support at [email protected] if you are unable to locate the Replicated configfiles.
5. If you have a firewall in place, or use a proxy and configured no_proxy settings in Docker, you willneed to update these settings with the new IP address [463].
6. Restart Docker.• Fedora/CentOS/RHEL 7+
sudo systemctl restart docker
• Debian/Ubuntu and Others
sudo service docker restart
7. Start the Replicated service.• Fedora/CentOS/RHEL 7+
sudo systemctl start replicated replicated-ui replicated-operator
• Debian/Ubuntu and Others
sudo service replicated startsudo service replicated-ui startsudo service replicated-operator start
8. Once the Replicated containers are up, navigate to https://{new_ip_address}:8800. Under Settings> Hostname input the new IP address or hostname.
9. Log in to the application as system administrator [501]. Change the URL [522] to reflect the newIP address. You may also want to run Fix URL [522] to change any existing references in the textof items that has already been created.
Jama Connect User Guide
521

Change URLThe Base URL is the first part of all web addresses that Jama installations use, beginning with http andending with a /. You may wish to change your Base URL if a company changes names or if there is arequirement for a test instance. Do the following to change your Base URL.
1. Log in to the application as system administrator [501].2. Select the Organizations tab.3. Select Change URL from the Action column.
4. Enter the new URL in the New base URL text box.5. Select Change URL.
6. After changing the Base URL, fix the URL [522] to update all URL references in the application tothe new value.
CAUTIONIf this step is not completed, the application will still contain old URL referenceswhich can result in unpredictable behavior such as images not displaying in ex-ports.
7. If you're using SAML authentication, SAML settings must be disabled and re-enabled to update thebase URL in our SAML services.• For self-hosted customers, disable and re-enable SAML.• For cloud customers, the Jama Software support agent changing your URL also toggles the
SAML settings.
The new URL is updated and active.
Fix URLThis function updates all URL references in the application to reflect a new URL and should be usedafter changing a URL [522].
You can use fix URL if you notice images not displaying in exports, a login prompt appearing after URLredirection, or an error message when running exports.
1. Select Fix URL references from the Action column to update all URL references in the applicationto the new value.
Jama Connect User Guide
522

2. Enter the new URL in the To this URL text box.3. Select Fix URL references.
4. Select Yes to complete.
IMPORTANTFix URL References will NOT modify items in archived projects. It will also NOTchange the URL used to connect the application server to your database serversince that is stored in your database.properties file. The baseurl field is only upda-ted in the database organization table by the Change URL [522] option.
Upgrade from a version prior to 8.0If you are upgrading from versions of Jama prior to 8.0, e.g. 2015.5, the upgrade process will be differ-ent from previous upgrades as the deployment model has changed.
CAUTIONIt is highly recommended that you perform the upgrade in a test environment beforeupgrading your production environment.
Prerequisites
1. Configure a supported environment with proper application server preparation [429].2. Choose your upgrade channel.3. Locate your production and staging environment licenses.4. Ensure your current version of Jama does not have a build date older than 2015/11/20. If you are
running an older version of Jama, you will not be able to successfully upgradeNote: Our recom-mended upgrade path is 3.x > 4.x > 4.2.x > 2014.x > 2015.x > 2015.5 > 8.62
UpgradeDepending on your current environment setup, the steps in the upgrade process to 8.62 will vary. Be-fore upgrading, be sure you are fully aware of the Supported Software for your channel and the Produc-
Jama Connect User Guide
523

tion System Requirements [427]. Jama versions 8.0 and above will not work in a Windows Server envi-ronment nor will they work with an Oracle database.
Migrating from OracleIf you are upgrading from a version of Jama using Oracle, you will need to migrate to a supported data-base before upgrading to 8.62. See Migrating Databases [528] for more information on the process.
Migrating from WindowsIf you are upgrading a version of Jama running on Windows, you will need to migrate to a supportedLinux operating system [427]. Once the Linux environment is properly configured, move on to Migrat-ing to 8.62.
Migrating to 8.62Since this is your first time upgrading to Jama version 8.62, this process will consist of a migration.
Migrating on the same serverIf Jama is currently running in a supported OS, you can stage the new installation on the same server.However, there are a few caveats to this.
1. Your previous version of Jama must not be running at the time of installation.2. No other applications can run on the server.3. Once you have completed the migration, you must remove your previous Jama installation.
Migration process
1. Migrate existing data [527] from [contour_home] on your current Jama server to /data/contour/on the Jama 8.62 server.
2. If you are migrating your database, see Migrating database server [528].3. Follow the installation instructions [425].
Follow the installation instructions for airgap [444].4. Verify that the installation was successful.5. Remove any previous installations of Jama from the server.
Once Jama has been successfully installed, upgrading [453] to future releases will be done in the adminconsole.
Remove old Docker imagesYour system stores old Docker images from previous versions of the Connect application. These old im-ages will use up storage space and may cause indexing to fail. To avoid this, you must periodically re-move old Docker images.
Use command line to clean up your volumes:
1. Run the following command to identify how much space is being used on your server:
sudo docker system df
2. Run the following command to list out all Docker images on your server:
sudo docker images
3. Determine which images should be removed based on the image IDs found in the IMAGE ID col-umn.
4. Run the following command, where IMAGE_ID is the ID of the image you want to remove:
sudo docker rmi IMAGE_ID
Jama Connect User Guide
524

5. Dangling volumes are volumes that are associated with a container that no longer exists. JamaConnect creates volumes with the containers. When you restart the application, Jama Connect creates new containers and volumes. This canleave dangling volumes that fill up disk space. Run the following command to clean up the Dockerdata root directory.
docker volume rm $(docker volume ls -qf dangling=true)
To identify the volumes being removed, you can run the following command in the subshell:
docker volume ls -qf dangling=true
NOTECommands only clean images and volumes loaded with the Docker storage driver inuse. Files that were written with other storage drivers will remain on the volume untilseparate commands are run for that storage driver.
NOTEWhen you run the commands above to remove an image that is currently in use, youwill get an error. For hosted customers, any missing images download again when yourestart Jama Connect. For airgap customers, you'll need to manually load the images.
View scheduled jobs
1. Log in as root user [501] to access the system administration panel.2. Select Scheduled jobs to view jobs, their group, class and firing time.
View applied patches
1. Log in as root user [501] to access the system administration panel.2. Select Scheduled jobs to view jobs, their group, class and firing time.
Clear cache
1. Log in as root user [501]and access the system administration panel.2. Select Cache statistics.3. Select Clear all cache will clear all cache items from the cache.4. Select Clear Cache on a specific cache item to clear that item from the cache.
NOTEThe Cache Statistics tab prints out current memory cache statistics. It allows the ad-ministrator to clear out the cache under special circumstances.
Jama Connect User Guide
525

Index all items
NOTEYou must have system administrator permissions to complete this task while logged inas root. An organization administrator or a project administrator can also index projectitems [634].
Search indexes get out of sync with the database due to large batch updates, API updates, or databaseupdates. During a full index, all search indexes will be rewritten to the current values in the database.
1. Notify users prior to initiating an index.2. Disable all integrations including legacy connectors and the Jama/Tasktop Integration Hub. DWR,
SOAP and REST API calls will be automatically blocked during the reindex.
NOTEThe system administrator does not have access to disable integrations. Work withan organization admin or integrations admin [617] to disable those services.
3. Log in to Jama Connect as system administrator. [501]4. Select the Index/Search tab and select Index items.5. You will see a count of items in the application and the estimated time to complete the index. Select
Yes to continue.6. The application automatically enters maintenance mode [507] during the index. Users will not be
able to log in during this time. Users who are already logged in will receive a pop-up message in-forming them of the maintenance.
7. You will see an alert when indexing is complete and maintenance mode will be automatically disa-bled.
NOTELarge files over 25 MB aren't indexed and therefore, their content isn't searchable. Thefollowing filetypes are indexable: PDF, DOC, DOCX, PPT, PPTX, TXT, RTF. The follow-ing filetypes aren't indexable: XLSX, XLS, XML, HTML, HTM.
Delete an organizationDeleting an organization is an activity that should only be done when more than one organization exists.
NOTEYou must have system administrator permissions to complete this task.
Jama Connect User Guide
526

NOTEPrior to version 4.3, users had the option to add multiple organizations however thisoption was removed in the spring of 2014. As of release 8.10, customers who havemultiple organizations should delete all but their production organization.
Overall system performance might be affected during the delete process depending on the size of theorganization to be deleted. Consider scheduling the deletion during a time when there is not a heavyload on your system.
1. Before deleting an organization, back up your data [510]. Deleting an organization completely re-moves all data about the organization including projects, settings and users. Deleted organizationscannot be recovered. If you need to preserve the non-production organizations, contact your ac-count representative.
2. Log into Jama Connect as the root user.3. Enable maintenance mode [507] under the System properties tab. If maintenance mode is not en-
abled, the option to delete organizations will not be available.4. Under the Organizations tab, select the Delete action in the row of the organization to be deleted.5. Confirm you are deleting the organization by selecting Yes in the pop-up.
MigratePossible reasons to migrate Jama include:
• Upgrading from a version of Jama prior to 8.0 [523]• Setting up or updating a test server [529]• Updating database server requirements [429] (for example, Oracle to SQL Server)• Migrating database servers [528]• Migrating the application server to new hardware [528]
IMPORTANTIf you move the application to a new server location or modify the server name, you’llneed to edit your image files to reference the name change. If you are restoring with anXML or JAMA file this happens automatically, but otherwise you will need to do it man-ually [522].
Migrate existing dataWhen you are migrating an existing Jama installation [528] or restoring from a JAMA or XML backup[511], you need to migrate some of the existing data folders to the (new) application server.
1. In /data directory, delete the following directories (they will be restored on restart): • tenant• ActiveMQData• elasticsearch
2. Migrate the rest of the files according to this table:
File Type Migration
/database.properties File No
Jama Connect User Guide
527

/ff.properties File No
Note: This file may not be found in all existing data folders.
/setup.properties File No
/activeMQData/** Folder No
/attachments/** Folder Yes, move to the (new) application server at /data/contour/attachments/**
/avatars/** Folder Yes, move to the (new) application server at /data/contour/avatars/**
/diagrams/** Folder Yes, move to the (new) application server at /data/contour/diagrams/**
/metrics/** Folder Yes, move to the (new) application server at /data/contour/metrics/**
/reports/** Folder Yes, move to the (new) application server at /data/contour/reports/**
/search/** Folder No
/tempreports/** Folder No
** indicates all folders and files below the given folder3. On the (new) application server, all files and folders need to be given the appropriate ownership
and permissions for Jama to run properly. Execute the following commands to set these permis-sions.
chown -R 91:91 /data/contourchmod -R u+rwX /data/contour
Migrate the application server to new hardwareIf you have an existing Jama 8 installation on your application server that you want to migrate to differ-ent hardware (physical or virtual), use the following process:
1. Log in to Jama as root user [501].2. Enable maintenance mode [507].3. Create a snapshot [484] of the system.4. Migrate the existing data [527], including the /data directory (and all of its contents) from the old
server to the new server, preserving the structure and permissions of the contents.5. Move the snapshot from the old server to the new server.6. Restore the snapshot [486] on the new server.7. If the IP address of the two servers are different, please update the IP address of your application
server [520].
Note: Since the snapshot contains the license, this isn't a viable option for creating a test instance.
Migrate database server
1. If you are migrating from the the same database type, such as MySQL to MySQL, perform a propri-etary backup and restore [513] instead, to avoid converting the data.
2. If this is a migration from a version of Jama Connect earlier than 8.0 or you are migrating betweendifferent database types, generate a backup [510] of your database using your current installationof Jama Connect.
NOTEFor Jama Connect versions earlier than 8.0, this must be an XML backup. For ver-sions greater than 8.0 you can use a JAMA export.
3. Copy the backup file (XML or JAMA) to the new application server. The backup must be stored un-der /data/restore. (You might need to create this folder if it does not already exist).
4. Ensure the restore folder and backup file have permissions to be read by all users and groups ("-rw-r--r--").
5. Migrate existing data [527].
Jama Connect User Guide
528

6. Load the backup for a new installation [436] or if this is to update an existing instance, or you aremigrating data to a Jama Connect instance already configured with a database, such as a testserver, continue with the next step.
7. Stop the application in the admin console. [514]8. On the application server, remove the tenant.properties file located under /data/tenant/.9. In the admin console under Settings > Database settings, make any changes to point to your
new database. Adhere to database server requirements [429], if creating a new database.10. If you are restoring from XML or JAMA, enter the backup file path under the Restore Jama back-
up section in the admin console.11. Save the settings.12. Restart Jama Connect. [514]
Set up a test serverIf configuring a test server, you must disable the following features before taking the backup. This pre-vents duplicate information from being sent out from both your test and production environments.
• Legacy connectors such as the JIRA, TFS, and Rally connectors• SMTP or IMAP
TroubleshootYou can avoid troubleshooting by following regular maintenance practices [513], but if you run into prob-lems here are some resources that might help:
• For issues with installation, log in to the Jama application as root user [501] and select the SystemInfo tab to see a quick overview of you installation.
• View log and profile [531] • Clear cache [525]• View scheduled jobs [525]• Index all items [526]• Remove old Docker images [524]• Reconnect to the Wiris server [533]• Generate a support bundle [529] and contact [email protected]
Generate a support bundleA support bundle contains information about the application server and the Jama installation, includingthread dumps [530] and log files from the admin console and the components that make up Jama.
To generate a support bundle select Support in the header of the admin console, then Download sup-port bundle. For more information, see Jama Support Bundle: How do I get it, what's in it, and whichlogs should I care about?
Jama Connect User Guide
529

NOTEIf you are unable to access the admin console or the bundle is failing to generate fromthe UI, a support bundle can be generated from the application server's command lineinterface (CLI). To generate a Support Bundle from the CLI, run the following com-mands:
replicated appsreplicated support-bundle <app_id>
Where <app_id> is the id of your application taken from the output of the first com-mand.
Dump threadsA thread dump is a snapshot of the state of your application instances' processes at a point in time.
Thread dumps are useful when troubleshooting performance issues and may be requested when work-ing with Support.
Any time you generate a support bundle [529], it will include three thread dumps taken at 5-second in-tervals.
To manually create a thread dump, run the following command on the core Jama application:
jamacli jamacore-thread-dump
You can also dump threads from the Logging configuration window [531].
NOTEA single thread dump on its own does not provide complete information about an is-sue. It is best to take multiple thread dumps over an interval of time.
Jama Connect User Guide
530
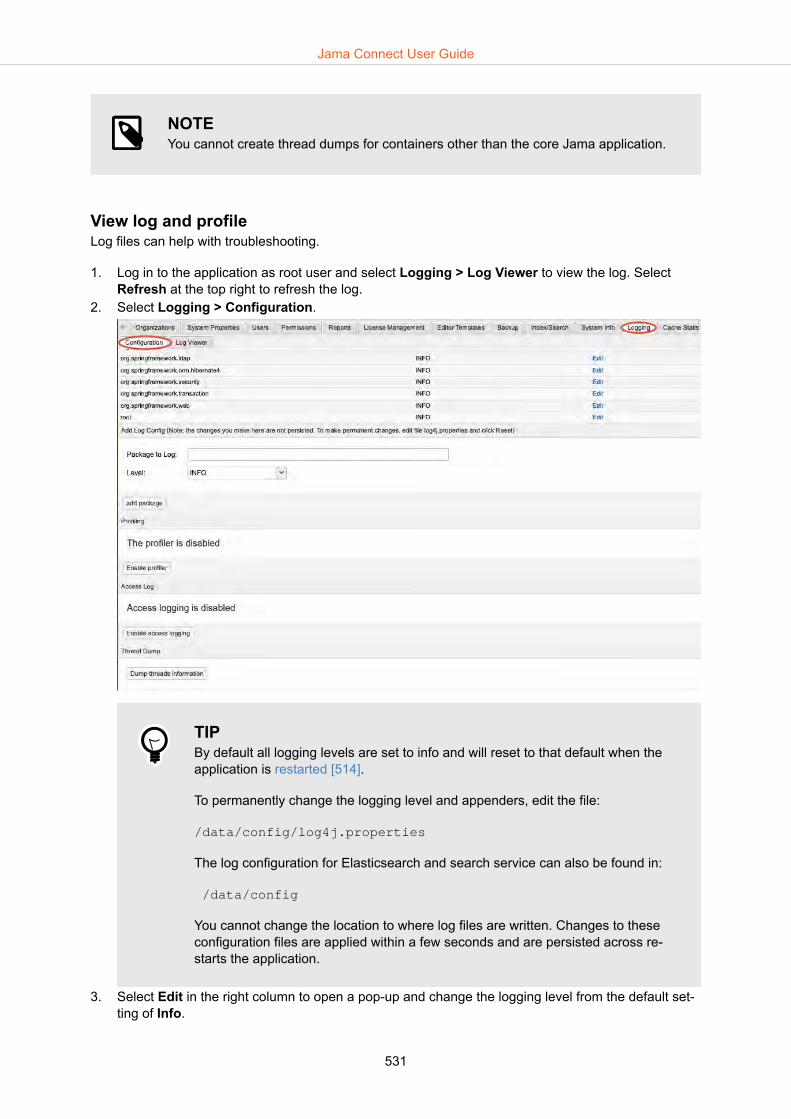
NOTEYou cannot create thread dumps for containers other than the core Jama application.
View log and profileLog files can help with troubleshooting.
1. Log in to the application as root user and select Logging > Log Viewer to view the log. SelectRefresh at the top right to refresh the log.
2. Select Logging > Configuration.
TIPBy default all logging levels are set to info and will reset to that default when theapplication is restarted [514].
To permanently change the logging level and appenders, edit the file:
/data/config/log4j.properties
The log configuration for Elasticsearch and search service can also be found in:
/data/config
You cannot change the location to where log files are written. Changes to theseconfiguration files are applied within a few seconds and are persisted across re-starts the application.
3. Select Edit in the right column to open a pop-up and change the logging level from the default set-ting of Info.
Jama Connect User Guide
531

4. Scroll to the bottom of the list. Under Profiling select Enable profiler log additional content for ev-ery log entry in the contour.log.
Profiling is indicated in the log file as the [jama.Profiler] package. The profiler prints out the follow-ing information:• The user who submitted the call.• The organization the user belongs to.• The java thread id of the call.• A stack trace of the call that includes processing time and memory usage of each trace.
NOTEEnabling the profiler logging strongly enhances the logging in Jama but may re-quire additional resources to generate this content. For best performance, use theprofiler for investigative purposes.
Here is a sample log entry:2011-04-28 09:37:19,865 INFO [org.directwebremoting.impl.DefaultRemoter] - Exec: proj-ectSvc.getExtTreeNodeForProject()
Jama Connect User Guide
532

2011-04-28 09:37:19,869 INFO [jama.Profiler] - user:admin org:2 thread:96 start:2011-04-2809:37:19,866[3ms] [+88K/-88K 837755K/254041K]- com.jamasoftware.Jama.dwr.impl.DwrProjectServi-ceImpl.getExtTreeNodeForProject[3ms] [+88K/-88K 837755K/254041K]- com.jamasoftware.contour.service.impl.ProjectServi-ceImpl.getExtTreeNodeForProject[2ms] [+88K/-88K 837755K/254041K]- com.jamasoftware.contour.service.impl.DocumentTypeSer-viceImpl.getAvailableDocumentTypesForProject
5. Under Access log select Enable access logging to capture information of all requests usersmakes in Jama, whether it is logging in or selecting an item. It will also store locked out users. In-formation is captured in contour.log.Entries in the log file are noted by the [jama.AccessLog] package:• Date of the request• Server processing time to handle the request• The user who submitted the request• The organization id of the user who submitted the request• The user session id of the user whom made the request• The server address the request was made toHere is a sample log entry:2014-08-29 16:24:59,370 INFO http-bio-8080-exec-17 [jama.AccessLog] - [3 ms] PRBDIJN9 1 -083BBE5B1E8C481033DA7AFBBEF023A5 160 http://localhost:8080/contour/
6. Under Thread dump select Dump threads information to take a one time dump of the currentrunning java threads being executed.Information is captured in contour-threaddump.log.This information is useful for identifying long running processes. If Jama seems to hang, run athread dump and send the log file to [email protected].
Reconnect to the Wiris server (self-hosted only)If your connection to the Wiris server is interrupted, you can fix the issue by modifying the Wiris set-tings, restarting your system, then returning the settings to their original values.
1. Modify the Wiris settings:a. In the Admin Console, select Settings > WIRIS Connection Settings.b. Select Use custom Wiris connection.c. Make the following changes:
• Wiris Host — Add “xx” to the end of the string• Wiris Path — Add “xx” to the end of the string• Wiris Port – Change to 44311
d. Select Save and restart your system.2. Test the connection. Use Jama Connect in a field that calls the Wiris MathType Editor:
a. In Jama Connect, select Projects, and select the item you want to modify.b. From the Add drop-down menu, select New item > Text.c. In the Add item window, select the Math Editor icon.d. Add an equation using the equation editor. As expected, this action fails.
3. In the Admin Console, reset the modified Wiris setting to the original values.4. Select Save and restart your system.5. Test the connection. Use Jama Connect in a field that calls the Wiris MathType Editor:
a. In Jama Connect, select the item you want to modify.b. From the Add drop-down menu, select New item > Text.c. In the Add item window, select the Math Editor icon.d. Add an equation using the equation editor. This action now succeeds
Jama Connect User Guide
533

Organization administratorAn organization administrator controls all aspects around the configuration of Jama Connect and theuser and groups. This is a role that can be assigned to an individual or a group.
An organization administrator can manage users [550], content [535], collaborations [604], and inte-grations [617].
Most of the organization administrator tasks can be found under Admin in the top-level navigation. Ifyou don't see this, you don't have organization administrator permissions.
Many changes made in the organization administration pages require signing out before they take ef-fect. By default, Jama Connect creates a group called Organization Admin and assigns it Administratorand Manage project rights to the organization.
Monitoring changes with the Admin Activity streamThe Admin Activity stream provides an audit trail of updates made by organization and project adminis-trators.
To open the Activity stream panel, select Admin, then select the Activity stream button on the rightside of the panel.
Need to find something quickly? Search for activities by entering the search term, like the name of apick list or the user who performed the action.
Jama Connect User Guide
534

Manage contentThere are many areas of the application that require organization administrator permissions to set upand maintain content for the broader group of users.
Change Global IDGlobal IDs are unique identifiers of items that are connected through synchronization. While every itemhas its own unique ID [622], two items that are synchronized can share a global ID.
NOTEYou must have organization administrator permissions to complete this task.
You can change or add a prefix, as well as an optional item type key, in front of the Global ID assignedto items.
1. Select Admin > Details, then select Edit.
2. Confirm if you want to allow multiple items with the same Global ID in a single project.• Yes — One item can be synchronized with one or more items in the same project.• No — Items can only be synchronized to items in other projects. The default setting is No.
Jama Connect User Guide
535

3. To change the Global ID Prefix Value and Item Type Key, select Edit.
• Change only future prefixes: Change the Global ID Prefix and select Update. No current IDsare affected. Future IDs include the new prefix.
• Change ALL prefixes (past and future): Select Apply prefix to existing items. All existingprefixes are changed if they match the old prefix, and new IDs will contain the new prefix. If thepast Global IDs didn't have a prefix, the new one is appended to those IDs.
• Include item type in the global ID: Select Include Item Type Key. To change the item type key,you must configure the item type [574].
Jama Connect User Guide
536
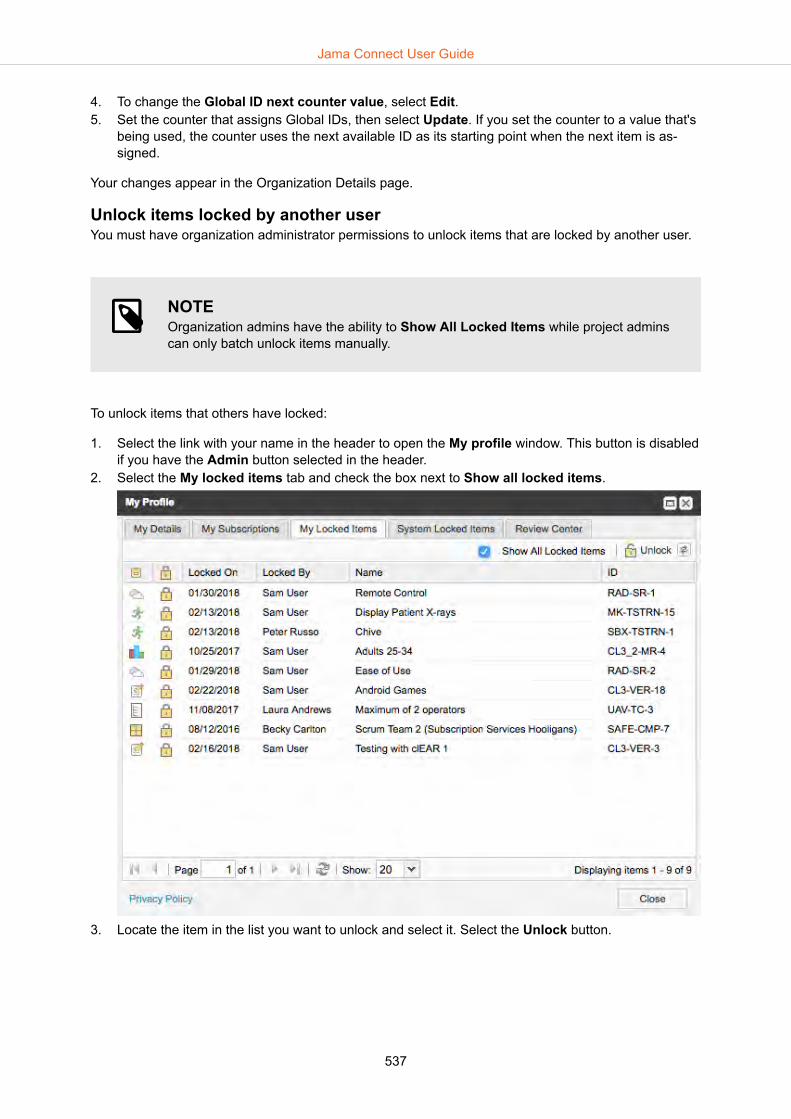
4. To change the Global ID next counter value, select Edit.5. Set the counter that assigns Global IDs, then select Update. If you set the counter to a value that's
being used, the counter uses the next available ID as its starting point when the next item is as-signed.
Your changes appear in the Organization Details page.
Unlock items locked by another userYou must have organization administrator permissions to unlock items that are locked by another user.
NOTEOrganization admins have the ability to Show All Locked Items while project adminscan only batch unlock items manually.
To unlock items that others have locked:
1. Select the link with your name in the header to open the My profile window. This button is disabledif you have the Admin button selected in the header.
2. Select the My locked items tab and check the box next to Show all locked items.
3. Locate the item in the list you want to unlock and select it. Select the Unlock button.
Jama Connect User Guide
537

TIPIf you are an organization or project administrator, you can also access the systemlocked items tab to unlock system locked items [538].
Users with Organization Administrations permissions can also unlock an item from thatitem's Actions menu.
Unlock system locked itemsYou must have organization or project administrator permissions to unlock system-locked items.
NOTEOrganization admins have the ability to Show All Locked Items while project adminscan only batch unlock items manually.
1. Select your name in the header to open the My Profile window.2. Select System Locked Items to see all items that were automatically locked [204] (blue lock).
3. Select the items you want to unlock, then select the Unlock button in the top right corner of thewindow.
Configure reuse and synchronizationYou must have write permissions [566] to modify items through synchronization. Items with a user lock[537] or system lock [538] can't be modified through synchronization.
NOTEYou must have organization administrator [534] permissions to complete this task.
As an organization administrator you can:
Jama Connect User Guide
538

• Grant permissions to a reuse administrator [566]• Configure global ID. [535]• Sync or remove Compare Views [290]• Enable synchronization of widgets [578]• Prevent users from synchronizing items [285]
System health reportThe system health report is an optional feature that notifies you of areas of the application that can af-fect performance and user experience.
Projects that are too large, reports that contain too many items, and syncing too many items at a timeare just a few of the things that can slow Jama down and cause problems. This report can be emailedto designated users weekly.
NOTEYou must have organization administrator permissions to view the system health re-port.
1. To view the report, select Admin > Organization, then select System health report.2. Select Add or change recipients to add or modify who receives the report.
3. You can set a threshold for each of the areas (Projects, Reviews, Reports and Test Plans) by se-lecting Edit the threshold.
Jama Connect User Guide
539

Plugins
IMPORTANTYou must be an organization administrator to complete this task.
There are two plugins you can install:
1. User import plugin [543]2. Import relationship plugin [540]
Configure Import Relationships Plugin
NOTEYou must have organization administrator permissions to complete this task.
The Import Relationships Plugin helps you batch create relationships between existing items in the ap-plication.
1. Select Admin > Organization, then select Plugins > Add entry.2. In the Add plugin entry window, enter the following information and select Save:
• Name: Import Relationships (or whatever name you want visible to users)• Enabled: Check this box to make the plugin available to users.• Class (case sensitive): Enter the name of the object defined in the source code. For a single
project enter:
com.jamasoftware.contour.plugin.jama.ImportRelationships
Jama Connect User Guide
540
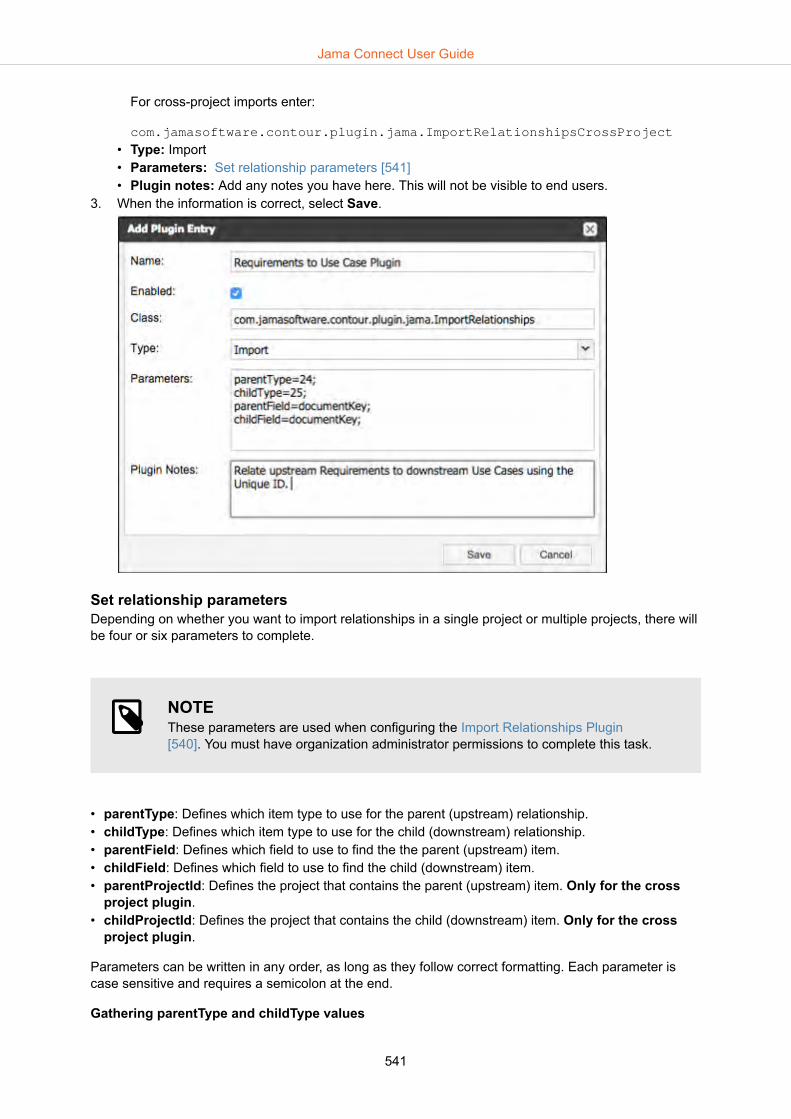
For cross-project imports enter:
com.jamasoftware.contour.plugin.jama.ImportRelationshipsCrossProject
• Type: Import• Parameters: Set relationship parameters [541]• Plugin notes: Add any notes you have here. This will not be visible to end users.
3. When the information is correct, select Save.
Set relationship parametersDepending on whether you want to import relationships in a single project or multiple projects, there willbe four or six parameters to complete.
NOTEThese parameters are used when configuring the Import Relationships Plugin[540]. You must have organization administrator permissions to complete this task.
• parentType: Defines which item type to use for the parent (upstream) relationship.• childType: Defines which item type to use for the child (downstream) relationship.• parentField: Defines which field to use to find the the parent (upstream) item.• childField: Defines which field to use to find the child (downstream) item.• parentProjectId: Defines the project that contains the parent (upstream) item. Only for the cross
project plugin.• childProjectId: Defines the project that contains the child (downstream) item. Only for the cross
project plugin.
Parameters can be written in any order, as long as they follow correct formatting. Each parameter iscase sensitive and requires a semicolon at the end.
Gathering parentType and childType values
Jama Connect User Guide
541

To specify the item Types, you need the API IDs of the item Types to be related. You can find the API IDunder Admin > Item Types.
For example, if you wanted to create relationships for upstream Requirements to downstream Use Ca-ses, you join the item Type with the corresponding API-ID:
parentType=24;
childType=25;
Gathering parentField and childField values
The CSV file used for import needs to contain an identifying field for each item, such as the Name orGlobal ID. To specify which field in the parent and child item will be used for this identification, use thesystem Field value. You can see which fields are available to use under Admin > Item Types > [High-light the item type to be used] > Config.
For example, if you wanted to use the ID (also known as the Unique ID) for your parentField and child-Field, your parameters need to join the field type with the field value:
parentField=documentKey;
childField=documentKey;
Gathering parentProjectId and childProjectId values
Jama Connect User Guide
542

To specify which projects the parent and child items are associated with, you need the API-IDs of bothprojects. You can get the project API-ID under Admin > Manage all project > [select the project tobe used] > API-ID.
For example, if you wanted to import relationships between a parent project with API-ID 20258 and achild project with API-ID 31548, your parameters need to join the item with the corresponding projectAPI-ID:
parentProjectId=20258;
childProjectId=31548;
Configure User Import PluginWith the User Import Plugin, organization administrators can add multiple users at once by importing aspreadsheet. Imports don't delete users from Jama Connect.
NOTEYou must have organization administrator permissions to complete this task.
With the User Import Plugin, organization administrators can add multiple users at once by importing aspreadsheet.
1. Select Admin > Organization, then select Plugins > Add plugin entry.
Jama Connect User Guide
543

2. In the Add plugin entry window, enter the following information and select Save.
• Name: User Import• Enabled: Make the plugin available to users• Class (case sensitive): Enter the name of the object defined in the source code:
com.jamasoftware.contour.plugin.jama.UserImportPlugin
• Type: Event or Import• Parameters: Leave this field blank• Plugin Notes: Add any notes you have here. This isn't visible to the end user.
3. Create a CSV document with no header row that contains the following values in columns Athrough K:• Username
If LDAP or CROWD is enabled, the username must match what is listed in the directory.• First name• Last name• Email• Password• Title• Location• Phone number• License type
Values must be one of the following:
Jama Connect User Guide
544

• Add/UpdateValues must be one of the following:
• Company• Groups
If a user belongs to multiple groups you can add them in columns L and up.For example:
4. Select Project > Import > Custom import to open the Custom Import window.
5. Enter the following information in the Custom import window:
Jama Connect User Guide
545

• Select a destination: This is a required field. Your selection doesn't affect the outcome.• Select Custom Importer: User Import• Field Delimiter: Comma• Optional Encoding: UTF8• Select file to import: Choose the CSV file you created in step 3, that contains the list of users to
be imported.6. Select Import. Each user that's added with the user import plugin receives a welcome email with
the Jama Connect URL.
IMPORTANTIf the import fails it might be because:
• A user that already exists was set to add (rather than update).• A user that does not exist was set to update (rather than add).• One or more of the records is incorrect.• A required field was missing.
Upload custom reports or exports
NOTESelf-hosted customers with system or organization administrator permissions can com-plete this task.
Jama Connect User Guide
546

You can upload reports [355] or exports [295] so that other users can access them.
If you're uploading a Velocity or Office Template export that uses pre-selected data in the main panel,the exports appear under Exports > Office Templates. If you're uploading BIRT or Velocity reports thatpull data at a project or cross-project level, they appear under Reports in the Jama Connect header.Read more about Jama Connect and Velocity here.
TIPBefore uploading a report or export, check with the person who created it about thebest settings to use because report criteria is unique to each one.
To upload custom reports or exports:
1. Log in as root user [501] and select Reports. If you're an organization administrator for a self-hos-ted instance, select Admin > Reports. This shows a list of all currently available reports or exporttemplates.
2. Select Add report in the top right corner to open the Add/Edit Report window.3. Enter a name for the custom report or export template so that other users can identify it.4. Select the report or export template type (BIRT, Velocity, or Microsoft Office Template), and the for-
mat you want to use.
NOTEFor templates with Microsoft Word or HTML formats, the option to export the re-port to PDF is also available.
For Office Templates, any user with a creator license can add their own customexport [302] to make it visible under Export > Office Templates.
5. To define availability for reporting, select the Data Access type.6. To limit access to run custom reports based on user permissions and by user group, select the
Restrict to Group type.
Jama Connect User Guide
547
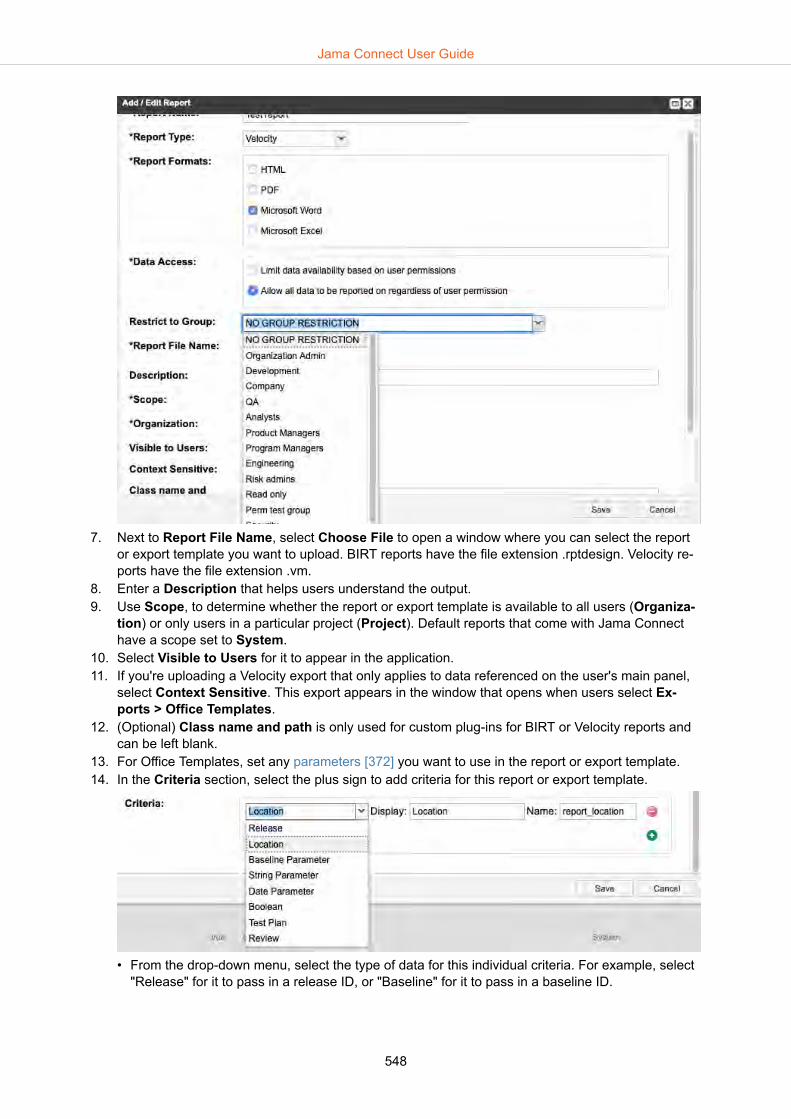
7. Next to Report File Name, select Choose File to open a window where you can select the reportor export template you want to upload. BIRT reports have the file extension .rptdesign. Velocity re-ports have the file extension .vm.
8. Enter a Description that helps users understand the output.9. Use Scope, to determine whether the report or export template is available to all users (Organiza-
tion) or only users in a particular project (Project). Default reports that come with Jama Connecthave a scope set to System.
10. Select Visible to Users for it to appear in the application. 11. If you're uploading a Velocity export that only applies to data referenced on the user's main panel,
select Context Sensitive. This export appears in the window that opens when users select Ex-ports > Office Templates.
12. (Optional) Class name and path is only used for custom plug-ins for BIRT or Velocity reports andcan be left blank.
13. For Office Templates, set any parameters [372] you want to use in the report or export template.14. In the Criteria section, select the plus sign to add criteria for this report or export template.
• From the drop-down menu, select the type of data for this individual criteria. For example, select"Release" for it to pass in a release ID, or "Baseline" for it to pass in a baseline ID.
Jama Connect User Guide
548

• For Display, enter the label you want users to see. This name is what the user reads when pub-lishing the report and exporting from Jama Connect and describes the expected input from theuser.
• For Name, enter a case-sensitive name that is passed to the report or export template. Each pa-rameter in a report or export template must be unique. When users publish a report or exportJama Connect content, these are displayed in alphabetical order by the name field, not in theorder shown in the report setup screen.
TIPIf you're editing an existing report or export template, and you change the Namecriteria, you must change the reference to the criteria in your report or export tem-plate or it breaks.
15. Select Save to upload the report or export template and save your changes.
Report parametersYou might need to select one of the following report parameters when uploading custom reports.
NOTEOnly system administrators with access to editing reports can make these changes.
Jama Connect User Guide
549

• Release — Shows all project releases in a pick list. The user can select release parameters as nee-ded.
• Location — Shows the project hierarchy in a pick list. The user can select a location for each loca-tion parameter.
• Baseline Parameter — Shows all baselines in the project in a pick list. The user can select onebaseline for each baseline parameter.
• String Parameter — Presents the user with a text field to enter a string.• Date Parameter — Presents the user with a text field to enter a date.• Boolean — Presents the user with a checkbox. The value "true" or "false" is sent to the reporting
engine.• Test Plan — Presents the user with a pick list of test plans in the selected project. Jama Connect
passes the database ID to the report.• Review — Presents the user with a pick list of reviews in the selected project. Jama Connect passes
the ID to the report.
Manage usersAs an organization or user admin, you can set up user access for your organization.
• Add user groups [551]• Add users [553] and assign them to one or more groups• Open projects and assign users and groups access rights [638]
You can also assign this task to a project administrator.
Jama Connect User Guide
550

User groupsUser groups are an efficient way to manage notifications, permissions, access, and actions for multipleusers at a time.
You can create groups based on the users' roles, permissions or position so you can efficiently:
• Grant access permissions [566]• Grant role permissions [571]• Initiate a review [157]• Subscribe users to items [198]• Notify users of changes [197]• Send workflow notifications [627]• Grant access to projects workflow [593]• Add signer roles to reviews [227]
TIPUsers can be assigned to multiple groups.
Jama Connect includes two types of groups:
• Organization group — These groups have no project context and are available to all projects in theorganization when adding permissions.
• Project group — These groups are created in the context of a project and are available to that spe-cific project when adding permissions.
Name groups in a way that works well for your organization. You might use your internal structure (suchas job title or work group), or name groups by access permission (read only, read/write), or roles (reuseadmin, review admin, project admin). If you're using signer roles [227] for electronic signatures [225],the group name is used as the signer role.
By default, Jama Connect comes with a number of pre-defined organization and project user groups.For example, the group Organization Admin is a default group that has organization and project rights.
Add, edit, or delete user groupOrganization administrators can delete a group or make changes to an existing group's members, de-tails, or subscriptions.
NOTEYou must have organization administrator permissions to add or delete user groupsavailable to all projects. A system administrator can also add groups [503]. A projectadministrator can also add groups at a project level [635].
1. Select Admin > Organization > User groups, then select Add group.
Jama Connect User Guide
551

Note: Project groups that a member of the project is in determine which groups are available forthe signer roles.
2. In the Create Group window, enter a name and description for the group, and select members bytheir username. Large lists are searchable.
3. Select Save.The new group appears in the table.
The review moderator now has the ability to edit a review and give a user a signer role [227].
Jama Connect User Guide
552

Add new userIf this is a new installation, it's better to add user groups [551] before you add individual users, so youcan manage users, permissions, and security more efficiently.
NOTEYou must have organization administrator permissions to complete this task. A systemadministrator can also add new users [503].
To add multiple new users, configure the user import plugin [543].
To add users individually:
1. Select Admin > Organization, then select Users to display a list of active users.If you don't see the user you're looking for, select View inactive users.
2. If LDAP is enabled [473], you can select Add user from LDAP and search for an existing LDAPuser in the search box. Jama Connect searches LDAP against the configured "Login Name Attrib-ute" and the "User Name Attribute." You can add wildcards to a search, but if you add them at thebeginning of a search term, they can result in slow performance. For large directories, expect sev-eral minutes.
3. From the toolbar, select Add user.4. In the Add user window, fill in the required fields, then select Save.
• UsernameThe username must be unique so using an email address is recommended.
• License typeKeep in mind the number of licenses purchased [560] and the expected usage [563] by theuser when assigning license types.
• User groupsConsider how you use groups to manage users, permissions, and security [551], then select theappropriate groups for this user.
• Send email to new userSend an email to the user with their username, password, and URL to log into the system.
Jama Connect User Guide
553

Configure User Import PluginWith the User Import Plugin, organization administrators can add multiple users at once by importing aspreadsheet. Imports don't delete users from Jama Connect.
NOTEYou must have organization administrator permissions to complete this task.
With the User Import Plugin, organization administrators can add multiple users at once by importing aspreadsheet.
1. Select Admin > Organization, then select Plugins > Add plugin entry.
2. In the Add plugin entry window, enter the following information and select Save.
• Name: User Import• Enabled: Make the plugin available to users• Class (case sensitive): Enter the name of the object defined in the source code:
com.jamasoftware.contour.plugin.jama.UserImportPlugin
• Type: Event or Import• Parameters: Leave this field blank
Jama Connect User Guide
554
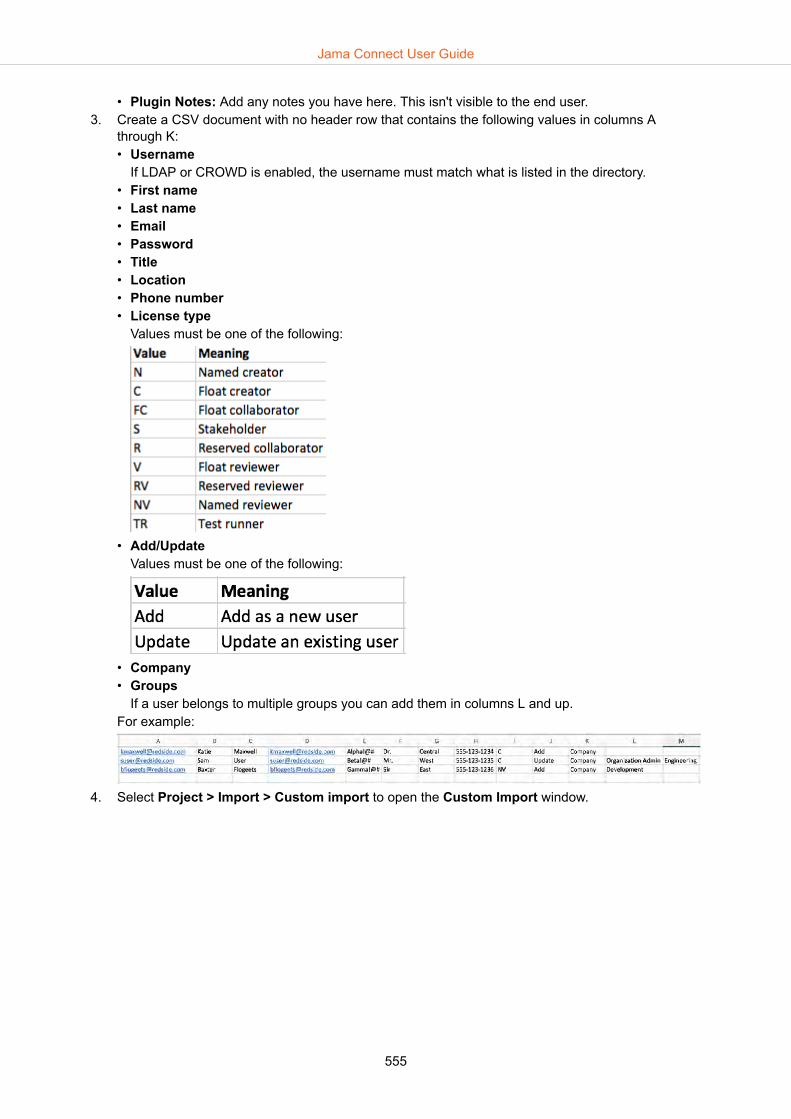
• Plugin Notes: Add any notes you have here. This isn't visible to the end user.3. Create a CSV document with no header row that contains the following values in columns A
through K:• Username
If LDAP or CROWD is enabled, the username must match what is listed in the directory.• First name• Last name• Email• Password• Title• Location• Phone number• License type
Values must be one of the following:
• Add/UpdateValues must be one of the following:
• Company• Groups
If a user belongs to multiple groups you can add them in columns L and up.For example:
4. Select Project > Import > Custom import to open the Custom Import window.
Jama Connect User Guide
555

5. Enter the following information in the Custom import window:
• Select a destination: This is a required field. Your selection doesn't affect the outcome.• Select Custom Importer: User Import• Field Delimiter: Comma• Optional Encoding: UTF8• Select file to import: Choose the CSV file you created in step 3, that contains the list of users to
be imported.6. Select Import. Each user that's added with the user import plugin receives a welcome email with
the Jama Connect URL.
Jama Connect User Guide
556
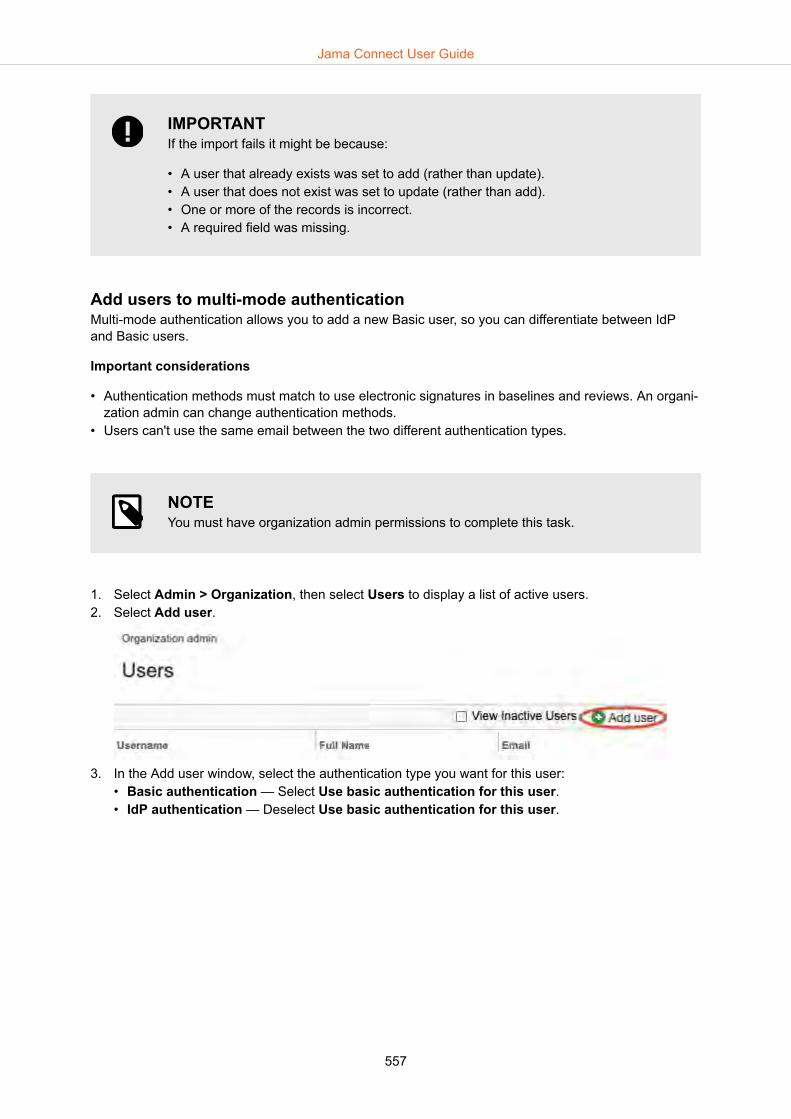
IMPORTANTIf the import fails it might be because:
• A user that already exists was set to add (rather than update).• A user that does not exist was set to update (rather than add).• One or more of the records is incorrect.• A required field was missing.
Add users to multi-mode authenticationMulti-mode authentication allows you to add a new Basic user, so you can differentiate between IdPand Basic users.
Important considerations
• Authentication methods must match to use electronic signatures in baselines and reviews. An organi-zation admin can change authentication methods.
• Users can't use the same email between the two different authentication types.
NOTEYou must have organization admin permissions to complete this task.
1. Select Admin > Organization, then select Users to display a list of active users.2. Select Add user.
3. In the Add user window, select the authentication type you want for this user:• Basic authentication — Select Use basic authentication for this user.• IdP authentication — Deselect Use basic authentication for this user.
Jama Connect User Guide
557

4. Click Save.
Jama Connect runs a check to see which authentication method was used. Initially, the AuthenticationType for the user you added is blank. When they log in for the first time, the column is populated withBasic or IdP.
Edit user details
NOTEYou must have organization administrator permissions to complete this task.
1. Select Admin > Organization, then select Users to display a list of active users. If you can't findthem, select View Inactive Users.
2. Select Edit in the Action column of the user you want to edit. This opens the Edit User window.
Jama Connect User Guide
558

3. Select Save.
Edit user or group subscriptionsUsers can subscribe to email notifications. Administrators don't have control over a user's own subscrip-tions, only to subscriptions added by others. Only the user can control their subscriptions.
NOTEYou must have organization or project administrator permissions to complete this task.
1. Select Admin > Organization, then select Users.2. Select Edit subscriptions in a user row to open the Edit Subscriptions window.
Jama Connect User Guide
559

3. Select the user you want to edit from the left column. On the right you see a list of their currentsubscriptions.
4. If you're an organization administrator, select Unsubscribe in the Action column or to remove mul-tiple subscriptions, select the subscriptions you want to remove, then select Unsubscribe selec-ted. If you're a project administrator, select the items you want to mute and select Mute subscrip-tions.
TIPOrganization administrators can also edit group subscriptions by selecting Admin >Organization > User groups > Subscriptions.
Reset user password
NOTEYou must have system or organization administrator permissions to complete this task.
1. Select Admin > Organization, then select Users to view a list of users.2. Select Password in the Action column for the user whose password you want to change.3. In the Edit password window, enter and confirm a password that meets the default authentication
requirements.
License typesThe license type limits the possible permissions and roles that can be granted to a user. For example,creator, stakeholder, test runner, and reviewer.
Each user, regardless of license type, has a unique login (username and password). Organization ad-ministrators can view the current license [565] or assign users license types [558]. You can also see atable of permissions that are included with each license type [562].
All licenses can be named or float licenses, except for test runner and stakeholder which are namedonly.
These are the available user license types:
• CreatorA creator license is a named or floating license that gives full read and edit rights, and full access toreviews, for those who are active users managing items and projects on a daily basis.
Jama Connect User Guide
560

• Test runnerA test runner license is a named license that includes basic permissions to read and review, as wellas the additional ability to create test plans and defects, and execute test runs. They can also addattachments to test runs during execution.
• CollaboratorA collaborator license is a named or floating license that gives read-only privileges to those who needvisibility into a project, but don’t need editing rights. These users can view items, provide comments,participate in (but not create) reviews, execute test runs and log defects.
• StakeholderA stakeholder license is a named license that gives read-only privileges to those who need visibilityinto a project, but don’t need editing rights. Stakeholders can view items, provide comments and actas reviewers.
• ReviewerA reviewer license is a named or floating license that grants permission to participate in reviews, actas approvers, moderators, or review administrators, and respond to comments in the stream. A re-viewer license doesn't allow users to initiate reviews or access items in the core project.
• TemporaryA temporary license is a 30-day full creator license, automatically granted to a non-licensed individualwhose email address is used to invite them to a review or to comment in the stream. It has no defaultpermissions except for the discussion thread or review to which they were invited, although an organ-ization administrator can add permissions.
Configure Jama Connect for test runner licenseUsers with a test runner license can only manage attachments and relationships, and edit certain itemsfor tests. For example, test plans, cycles, groups, runs, as well as item types used as defects [310].They don't have permissions to manage attachments and relationships, or to edit items in the rest of theproject.
IMPORTANTYou must have organization administrator permissions to configure Jama Connect forthe test runner license type.
If your organization has purchased a test runner license type, you must make the following changes inJama Connect:
• Configure item types to be used as a defect [579]• Assign access permissions [566]
Batch update license typesOccasionally, you might want to update many users at once. For example, several users might be as-signed a temporary license that's about to expire and you need to assign creator licenses.
If you select more users than the number available of your selected license type, that license type isn'tavailable when batch updating.
NOTEYou must have organization administrator permissions to complete this task.
Jama Connect User Guide
561

1. Select Admin > Organization, then select Users.
2. Sort the users by license type by selecting the field name header at the top of the user grid.3. Highlight the users to be updated. Use Shift or Cmd-click to select multiple.4. Right-click or Ctrl-click and select Batch Update User(s).
5. In the window that opens, select the license type, then select Commit.
Permissions by license typeYour license type [560] defines your permissions, which determine your ability to create and edit itemsor access them as read-only.
Permissions can be granted or removed at different levels within Jama Connect. For example, a Crea-tor license allows you to create items, but you might only have permission to create items in a specificproject and read-only access to all other projects.
Jama Connect User Guide
562

** Permissions that are included with each license type.
NOTE Risk Management [374] requires additional licensing for your organization, as well ascreator, stakeholder or test runner licenses for all risk management participants. Con-tact your Jama Software account manager for more information.
Monitor license usage
NOTEYou must have system or organization administrator permissions to complete this task.
Jama Connect User Guide
563

1. Select Admin > Organization, then select License.2. In the center panel you can see a display of daily usage by floating license type for a particular time
period, as well as detail of current usage.You can view stats from the last 7, 30, or 90 days, including the number of float licenses beingused on a daily basis, the number of days where you reached your maximum threshold, and ifany users were denied access due to a lack of float license availability. Use the menus in the head-er to select the type of license and the time period you want displayed.Each gray bar represents the highest number of floating licenses that were concurrently in use on agiven day. By clicking on one of the gray bars, you are able to see an hourly breakdown of licenseusage throughout that day.
NOTEThis chart isn't a a live look at license usage. It provides an hourly snapshot of thelicenses that are in use at that time. The data is also stored in UTC time, so whenviewing the hourly breakdown you must adjust for your current time zone.
Scroll down to see all of your license information such as license type, expiration date, how manylicenses are owned, as well as any integrations the organization has purchased. For more informa-tion, see View license [565].
3. Select the gear icon in the upper right to open the Configure License Usage View window. Se-lect Notify me when this threshold is met and enter an email address to send notifications whenusage surpasses a specified threshold.
Jama Connect User Guide
564
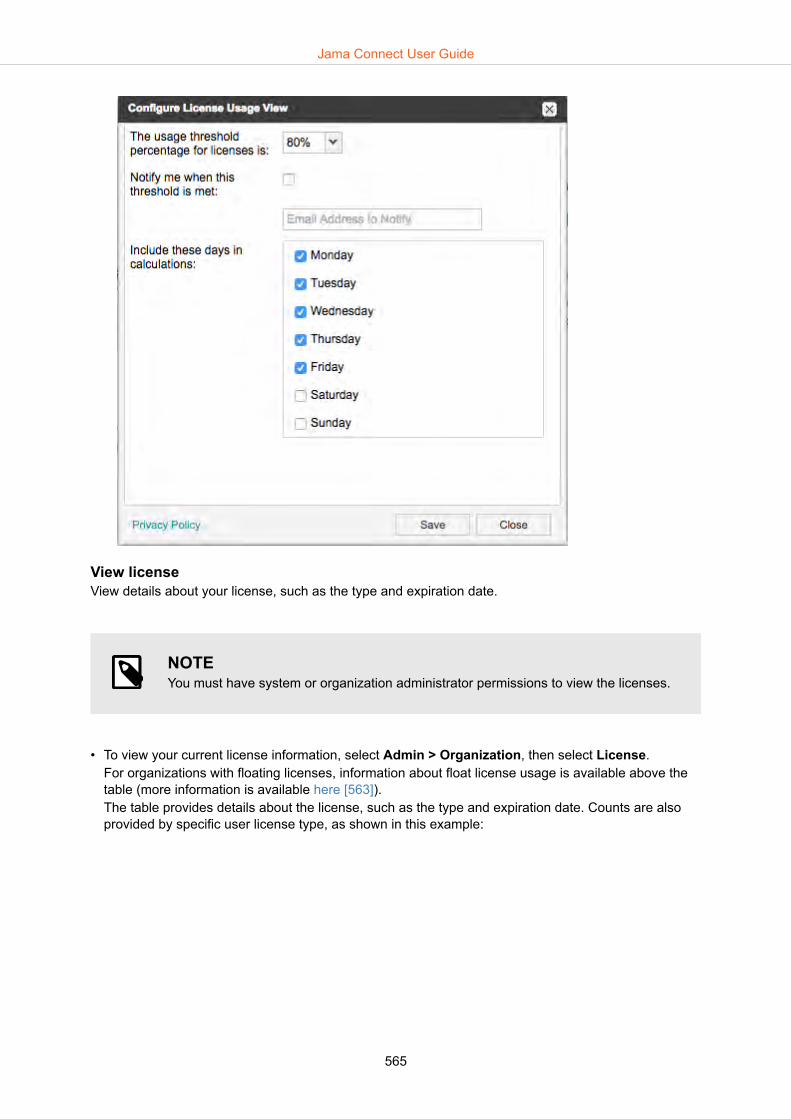
View licenseView details about your license, such as the type and expiration date.
NOTEYou must have system or organization administrator permissions to view the licenses.
• To view your current license information, select Admin > Organization, then select License.For organizations with floating licenses, information about float license usage is available above thetable (more information is available here [563]).The table provides details about the license, such as the type and expiration date. Counts are alsoprovided by specific user license type, as shown in this example:
Jama Connect User Guide
565

Grant permissionsPermissions allow users to do things such as access, modify, and delete items or perform other specifictasks. Permissions control how users experience Jama Connect by restricting actions they can performor content they can see.
NOTETo grant most permissions, you must be an organization or user administrator. A sys-tem administrator [504] grants limited permissions and a project administrator [638]grants only project-level permissions. Project administrators can access users outsideof their project to give access when the Organization detail configuration Allow projectadministrators access to all users and organization groups is enabled.
IMPORTANT Risk administrator permissions are managed separately [570].
Risk Management [374] requires additional licensing for your organization, as well ascreator, stakeholder or test runner licenses for all risk management participants. Con-tact your Jama Software account manager for more information.
1. Select Admin > Organization, then select Permissions.
Jama Connect User Guide
566

2. In Project Selector on the left, select the organization, an individual project, or container, dependingon the level you want to grant permissions.
TIPPermissions set at the organizational level are passed on to lower levels, butmight be overridden for individual projects, components or sets. For simplicity, werecommend setting permissions at the highest acceptable level.
Organization administrators can also grant project permissions in the configureproject window [638].
3. The main panel displays current permissions that were granted. Select Modify or Override to editcurrent user or group permissions. To add a new user or group, select Add permissions in the topright.
NOTEPermissions are inherited from higher levels in the organization structure. For ex-ample, if you assign a group access at the organization level, all projects, compo-nents, and sets within the organization inherit the permissions.
When a group or user's Inherited column contains the value "true" and is highligh-ted in green, that user or group has received its permissions from a higher level.Select Override to change their permissions.
Also, certain permissions are allowed with each license type [562]. You mightneed to assign the correct license type [558] to change permissions. Also, beaware of how permissions work with related items [265].
4. If you select Add Permissions, the Assign user permissions window opens, and you can selectthe groups or users you want to add.
Jama Connect User Guide
567

TIPBefore assigning permissions, consider setting up groups [551] to make this taskmore efficient.
You can also add a new group or user by selecting New user or New group in the top right cornerof the window. Then select the role or access permissions [639] you want to add at the bottom ofthe window and select Save.
NOTERoles [571] and access permissions can be granted at an organizational level.Project administrator permissions can be granted at a project level. Access per-missions can be granted at a container level and greater.
5. Alternatively, select Remove at the level that access was granted to remove access to a project,component, or set completely by unselecting all permissions.
IMPORTANTRemove functions differently at lower levels in the hierarchy. If the user or group'spermissions were previously overridden at that level, the Inherited column shows"false," and selecting Remove reverts the permissions back to the original inheri-ted permissions. If the user or group's permissions haven't been previously over-ridden, the Inherited column shows "false," and selecting Remove completely re-moves the group or user from a project or set. If the group or user's permissionsare inherited, the Inherited column reads "true" and permissions can only be re-moved at the higher level where they were assigned.
Jama Connect User Guide
568

NOTEIf a user is part of multiple user groups with conflicting permissions, the user's giventhe highest permissions that are set.
IMPORTANTWhile items within sets fall under the permission rules of the set, attachments to thoseitems don't. Attachments can still be accessed by outside users who have access per-mission to the project while adding attachments [133] or inserting rich text links [95].
Assign equation editor accessUsers with access to the WIRIS MathType Equations Editor can create complex equations in rich textfields. For more information, see Insert rich text equations [98].
The license for your organization can have an unlimited number of equation editor seats or a specificnumber of seats.
NOTEThe MathType Equations Editor requires a separate license. Contact your Jama Con-nect administrator or sales representative for information about purchasing this license.
To check if your organization's license includes access to WIRIS MathType Equation Editor:
1. Select Admin > Organization > License.2. In the Modules section, look for WIRIS Equations Editor, an expiration date, and the number of
seats.
To assign WIRIS MathType seats to new or existing users:
1. Select Admin > Organization > Permissions.• For an existing user, select Modify.• For a new user, select Add Permissions.
NOTEMathType access can only be added for users. Remove all selected groups.
2. Select MathType and click Save.A notification appears if seats aren't available.In the Permissions table, a check mark appears in the MathType column if the permission was add-ed.
Jama Connect User Guide
569
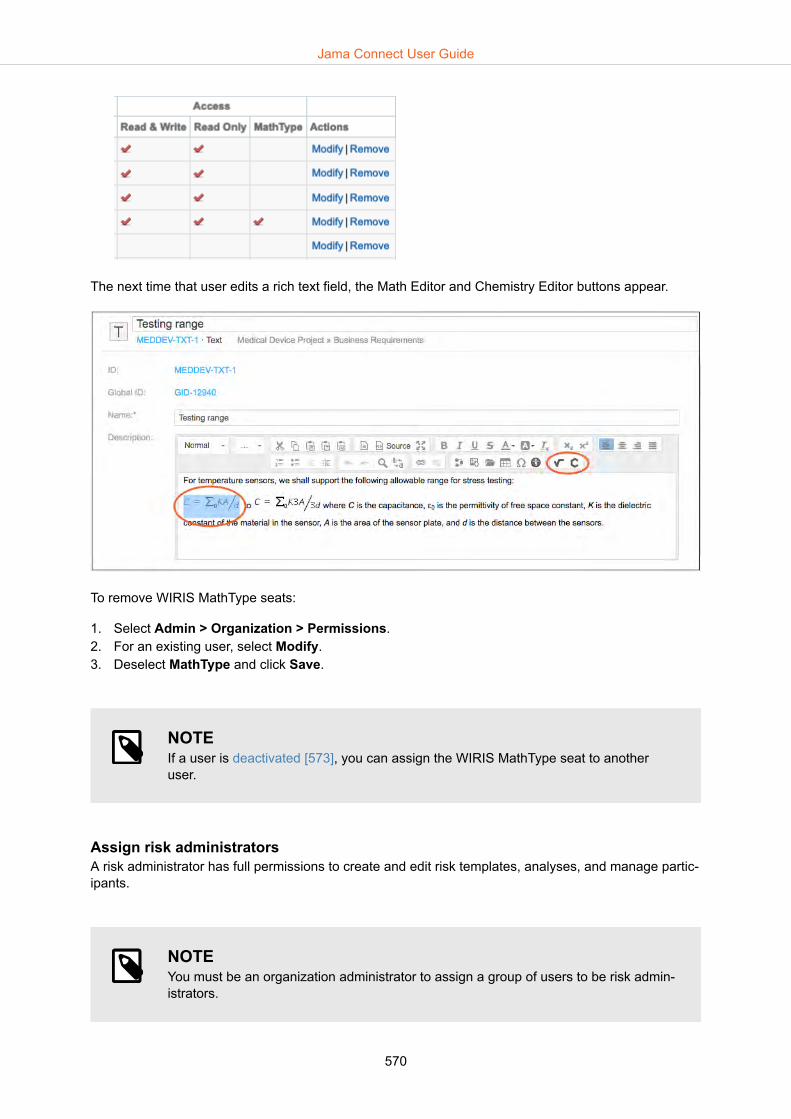
The next time that user edits a rich text field, the Math Editor and Chemistry Editor buttons appear.
To remove WIRIS MathType seats:
1. Select Admin > Organization > Permissions.2. For an existing user, select Modify.3. Deselect MathType and click Save.
NOTEIf a user is deactivated [573], you can assign the WIRIS MathType seat to anotheruser.
Assign risk administratorsA risk administrator has full permissions to create and edit risk templates, analyses, and manage partic-ipants.
NOTEYou must be an organization administrator to assign a group of users to be risk admin-istrators.
Jama Connect User Guide
570

A risk administrator [378]:
• Must have a creator license.• Has full permissions to create and edit risk templates and analyses and manage participants.• Can view and manage all risk analyses created in the system.
To assign risk administrators:
1. Choose an existing group (or first create a new group [551]) for risk administrators. 2. Select Admin > Organization, then select Risk management.
3. Select a group from the drop-down menu. You can grant risk administrator permissions to multiplegroups.The groups appear below the drop-down menu on the Risk management page.
RolesA role is a set of permissions granted to a user so that they can perform particular functions.
NOTEPermission roles are different than review roles [153], risk roles [401], and signer roles[227].
The permissions included with each role [642] can be granted by an administrator [639] to an individ-ual or a group.
These are the roles and the type of license they require:
• System administrator [482] The system administrator handles the overall installation, setup, and configuration of Jama Connect,and doesn't have access to projects. The system administrator is a special user and not a role thatcan be provided to other users. This user doesn't require a license and logs in to the system with theusername "root."
• Organization administrator [534]
Jama Connect User Guide
571

An organization administrator controls all aspects around the configuration of Jama Connect and theuser and groups. This is a role that can be assigned to an individual or a group.
• User administrator [550]The user administrator provides the ability to manage licenses, users, and groups. This is a role thatcan be assigned to an individual or a group. This user can see all users and organization groups inthe system.The user administrator can only set permissions for groups/users on projects where they are a projectadministrator. They are also limited to managing organization group membership for only groupswhere they are a member, which prevents a user admin from giving access to projects where theydon't have access.User administrators can't make changes or additions to users or groups that have been assigned toorganization and process administrators with the exception of activation/deactivation and licensemanagement.
• Process administrator [573]The process administrator role focuses on the configuration of content and connections within JamaConnect.• Item types• Pick lists• Relationship rules• Review Center• Risk management• Workflow
• Project administrator [618] A project administrator is a role that can be provided for all projects or on a specific project with afocus on permissions, project groups, and workflow customization.
• Add ProjectThe Add Project is a very specific role that is meant to exist between the organization administratorand the project administrator. With this role, a user can create a new project or duplicate an existingproject where that user is a project administrator.
• Review administrator [179] A review administrator is a role with the permissions needed to manage reviews.Review administrators can view all reviews and perform administration tasks for those reviews, re-gardless of whether they were invited to the review. A review administrator is the only one who candelete a review
• Reuse administrator [283] A reuse administrator is a role with the permissions needed to manage reuse.In addition to reuse permissions, a reuse administrator needs read access for visibility of anysynchronized items they are working with, and write permissions for making edits, synchronizing, re-using, or duplicating.
• Risk administrator [378]A risk administrator can create and edit risk templates, as well as manage analyses and participants.An organization administrator can grant risk administrator permissions [570].Risk Management [374] requires additional licensing for your organization, as well as creator, stake-holder or test runner licenses for all risk management participants. Contact your Jama Software ac-count manager for more information.
IMPORTANTUsers must have the license type [562] that allows for the permissions granted witheach role.
Jama Connect User Guide
572

Deactivate and reactivate usersYou must have organization administrator permissions to deactivate a user. When you deactivate auser, the user becomes inactive and frees up named assigned licenses associated with that user.
IMPORTANTUsers can't be deleted from Jama Connect.
1. Select Admin > Organization, then select Users.
2. In the Action column for the user you want to deactivate, select Deactivate.3. Deactivated users disappear from the list until you select View inactive users to view all users.4. Alternatively, to reactivate a deactivated user, select Activate.5. In the User license type window, select a license type and select Save.
Manage processBest practices are a great starting place, but every organization has unique needs and Jama Connectcan be configured to align your processes and artifacts. To address these needs, Jama Connect pro-vides the ability to control fields, picklists, relationships, templates, and workflow.
These settings tend to evolve over time as teams mature and new groups are brought into Jama Con-nect. An admin role is available to delegate these responsibilities to the appropriate users and groups.
• Item types [573]• Fields [582]• Set up editor templates [594]• Configure views [595]• Manage relationships [596]• Manage tests [604]
Item typesItem types are the templates for sets used within each project.
Jama Connect User Guide
573

While sets are unique to each project, item types can be used in projects [620] across the entire or-ganization. Item types cannot be customized for individual projects.
Each item type can be configured [574] to best fit your organization and methodology. The fewer itemtypes that your organization creates the easier it will be to manage items.
Additionally, every item type is automatically assigned an API ID for reporting purposes. That API IDcannot be specified or changed.
Add and edit item typesChanges to item types affect all projects in your instance of Jama Connect. You can define an item typeonce, and all projects have access to that type. Item types can't be customized for individual projects.
NOTEYou must have organization administrator permissions to add and edit item types.
You can create a new item type, add or delete fields [583] in an existing item type, or change the itemtype details.
Jama Connect User Guide
574

TIPThe fewer item types that your organization creates, the easier it is to manage itemsand report on the sets based on those item types.
Jama Connect comes with a set of core item types that cannot be deleted. You can tellwhich item types these are by selecting Admin > Organization > Item types andviewing which item types don't have a delete option.
You can see a list of core item type fields in Admin > Organization > Item Types >Core > Views > Projects List View -Mixed Item Types. Custom fields can't be selec-ted for visibility in mixed item type views.
Jama Connect User Guide
575

1. Select Admin > Organization, then select Item types.2. To add a new item type, select Add item type, or to edit an existing item type select Edit for the
item type you want to modify.
3. This opens the Add item type window where you can select or modify the following options:
Jama Connect User Guide
576

• DisplayDisplay name for a single item of this item type (Required).
• Display pluralDisplay name for multiple items of this item type (Required).
• DescriptionFor others who may at a later point want to know internally how this item type is used or how it isdistinguished from other item types.
• Type keyThis is the default ID Prefix that will be shown when creating a set using the item type. It can beoverwritten. (Required).
• Use asSelect an option only if you are using this item type for special use for test [310]. (If you are usingthe REST API to create an item type, it refers to this as a Category)
• WidgetsRead more about item type widgets [578] or how to enable or disable them [578].
• ImageDisplay icon to use for this item type (this is required). Icons are used as the set icon, the listview icon and the icon at the upper-left of the item view.
• API ID A new item type will automatically be assigned a reference ID for API reporting purposes.You can see this ID by selecting Admin > Item types, but it cannot be specified or changed.
4. Select Save.
Jama Connect User Guide
577

NOTEIn order to use item types in a particular project, a project or organization administratormust add the item type to the project [620].
IMPORTANTYou can delete an item type, however you will be asked to delete any existing items ofthat type prior to deletion. To delete, select the item type you want to delete and selectDelete.
Item type widgetsWidgets are small embedded applications that add functionality to item types. Available widgets include:
• Activities [210]• Attachments [133]• Change request [232]• Links [130]• Relationships [257]• Risk [417]• Synchronized items [285]• Tags [131]• Versions [230]
Enable or disable item widgets
NOTEYou must have organization administrator permissions to complete this task.
To enable or disable widgets:
1. Follow instructions to edit an item type [574].2. Enable widgets by selecting the widget's name [578] in the Inactive widgets column. It will move
over to the Active widgets column.
NOTEThe change request item type should only be used for change requests [232].
Jama Connect User Guide
578

NOTEAdding the relationship widget will automatically add the the Relationship StatusIndicator [266] as well. They can not be used separately.
3. In the Active widgets column, the links, tags, attachments and relationships widgets have a graysynchronize toggle button next to their name. To indicate whether or not each widget can besynchronized, use the synchronize toggle button for each item. When the button is darker, it indi-cates that the widget can be synchronized.
NOTEIf you disable synchronization for a specific widget, when an item of that type issynchronized, that widget will not be included in synchronization, nor will thatwidget be taken into account when sync status is calculated.
4. To disable a widget select the X next to the widget's name in the Active widgets column.
Use a different item type as a test case or defectYou can use any item type as a defect or a test case. By selecting test case, this adds test steps andtest case status to that item type.
Jama Connect User Guide
579

NOTEYou must have organization administrator permissions to complete this task.
1. Select Admin > Organization > Item types.2. In the same row as the item type you want to change to a test case, select Edit.3. In the Add/Edit item type window that pops up, select the pull-down menu next to the Use as field
and select one of the options. Select Test case or Defect.
4. Select Save.
Enable rich text in test steps
NOTEYou must have organization administrator permissions to complete this task.
Jama Connect User Guide
580

1. Select Admin > Organization > Item Types.2. Find the item type you want to use. You can use any item type that is a Test Case type (this may be
an item that's used as a Test Case [310]). Select Fields in that row.3. In the right panel, select the Steps field, then select the Edit pencil icon.
4. In the Edit field window, select Allow Rich Text and click Save.
IMPORTANTTo disable rich text in test steps, follow the same steps, unchecking the Allow rich textbox.
If you do so, no data will be lost, but images and rich text will be replaced with HTMLtags.
Users will not see any existing steps break and the content will still render. It is up tothe users to decided what formatting tags to remove. The application does not auto-matically strip tags, and renders correct HTML tags in steps with or without the rich textmode enabled.
Change a set keyYou can edit a set ID or renumber items in a set at any time.
Jama Connect User Guide
581

NOTEYou must have organization or project administrator permissions to complete this task.
1. Select Projects, right-click on the set you want to modify, then select Change set key.
2. In the Confirm Set Key Change window that opens, enter the new set key, which must be 1–16characters long, consisting of only letters, numbers, or underscores.
3. Select Regenerate Item IDs to reset the counter and apply new numbering to all existing items.Item counters start over at 1.
CAUTIONDon't select Regenerate Item IDs if you want to restart numbering on newly cre-ated items. Leave existing items as they are.
FieldsA field holds a basic unit of data in an item type.
Fields contain values. In List View, each column represents a different field. Individual users can config-ure which fields they see. For more information, see Configure Compare View for synchronized items[293] and Configure fields [51].
An organization administrator can add new fields to an item type [583] and configure the behavior forthose fields.
There are three types of fields in Jama Connect:
• Predefined fieldsAn organization administrator can add predefined fields [587]. They are indexed and canbe searched without using the database field name.
• Custom fieldsAn organization administrator can add custom fields [588]. They can be similar to predefined fields,or can be multi-select fields, URL fields, rollup, and item of type fields.
• System fieldsSystem fields (like, name, test steps [311], test case status [313] and review status [154]) are auto-matically created to provide system functionality and cannot be disabled or deleted.
Jama Connect User Guide
582
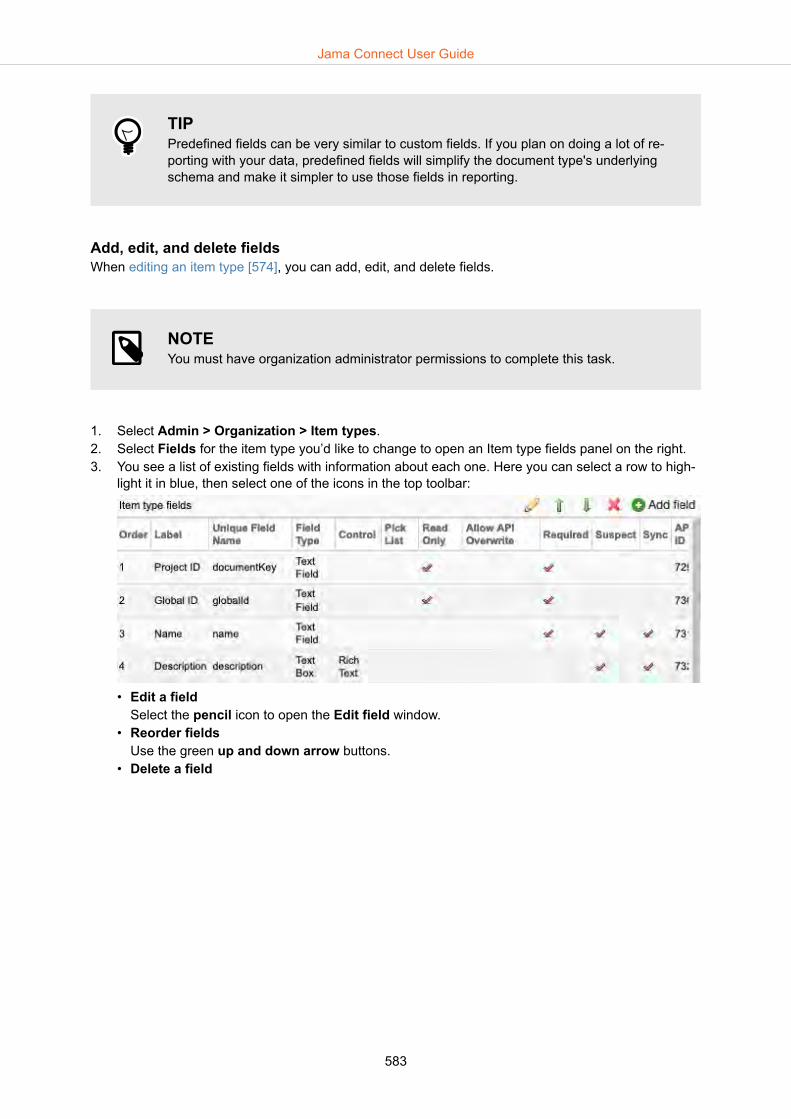
TIPPredefined fields can be very similar to custom fields. If you plan on doing a lot of re-porting with your data, predefined fields will simplify the document type's underlyingschema and make it simpler to use those fields in reporting.
Add, edit, and delete fieldsWhen editing an item type [574], you can add, edit, and delete fields.
NOTEYou must have organization administrator permissions to complete this task.
1. Select Admin > Organization > Item types. 2. Select Fields for the item type you’d like to change to open an Item type fields panel on the right.3. You see a list of existing fields with information about each one. Here you can select a row to high-
light it in blue, then select one of the icons in the top toolbar:
• Edit a fieldSelect the pencil icon to open the Edit field window.
• Reorder fieldsUse the green up and down arrow buttons.
• Delete a field
Jama Connect User Guide
583

CAUTIONPlease consider the following before deleting a field:
• Once a field is deleted, all values related to that field will be deleted from thedatabase and cannot be recovered.
• If the field was used to relate synced items (JIRA KEY, proxy, etc.), a dupli-cate item will be created if you try to create the sync again.
• If the field is mapped in an integration, that field will no longer update andcould cause errors in your integration tool.
• If filters used the field, filter results will become inaccurate. The filter shouldbe updated before removing the field.
• If the deleted field raised suspect links, relationships will be affected. Becausethe field no longer exists, users will not be able to see the changes that cre-ated the suspect link.
• If you attempt to restore a previous version of an item that still contains thedeleted field, the field's contents will not be restored. Even if you recreatethe field prior to the version rollback, data will not be restored.
• If you still want to delete a custom field, consider exporting a copy ofthose field values via a report or the API.
To delete a field select the field then select the red x icon.• Add a field
Select the green Add field icon to open the Add field window. 4. If you selected Add or Edit, a window will open where you can select the following options:
Jama Connect User Guide
584

• Select a field typeIf you are adding a new field, you must first indicate what type of field. Select either a predefinedfield or custom field. Both field types can be used in the same item type. (This section does notappear when editing fields).
IMPORTANTYou can only use the system predefined Release field to show items in the Re-leases tab. If you use a custom Release field to designate an item to a release,that item will not appear in the Releases tab.
• Field labelThis is the field name that users will see.
Jama Connect User Guide
585
CAUTIONWhen creating a new field, the application automatically uses the field label thatyou enter to name the unique field name in the database. Once it has beensaved, even though you can change the field label, you can't change theunique field name in the database.
Avoid leading with an underscore when naming fields. There are some uniquefield names that may conflict with Elasticsearch fields (like "_source" and "_ID")and prevent proper functioning.
• Unique field nameThis is the name of the field in the database.
• Read onlySelect this box to prevent users from editing the field.
• Allow API overwriteFields that are configured to be read-only have the option to be editable via the REST API. Sys-tem fields like modifiedDate or rollup do not allow the option to overwrite.
• Is requiredRequired fields are string, text or date fields that are configured so that the user must enter datainto the field before saving an item.
• Use to trigger suspectSuspect links [267] is triggered when specific fields update in an item. This option lets you deter-mine which field changes will flag an item as suspect.
• SynchronizeWhen items are synchronized to other items, a change in a field with this checkbox will flag thisitem as out of sync in the synced items window and in Single Item View [274].
• Text componentsIf you chose to add a text box field, you will need to choose if you want it to have rich-text capa-bilities.
Jama Connect User Guide
586

• Pick listIf you choose to add a field that controls user input with a lookup or pick list, you must select thepick list from the drop-down menu. If you have not already created a pick list, close the windowand add a pick list [592]before making the field.
5. Select Save. By default, new fields are added to the bottom of the item type fields list, but you canreorder using the green arrows.
Predefined fieldsAn organization administrator can add predefined fields [582]. They are indexed and canbe searched without using the database field name.
When you are adding fields [583], you must select the database location where the lookup value will bestored from predefined fields; this selection will not affect the users. However, custom report writers willneed to know the mapping of the fields to the database.
There are several predefined fields you can choose from including:
• TextOptionally, you can enable rich text in these fields.
• DatesEach field (date1 through date5) will limit the user entry to a valid date and will provide a pop-up cal-endar picker.
• IntegerThe fields originalEstimate, remainingEstimate and timeSpent all only allow the entry of whole num-ber positive integers.
Jama Connect User Guide
587

• FlagFlag fields will be displayed as check boxes to the users working with the item type. By default allflags are marked as No (False).
• StringIncludes the Predefined Fields: Short Name, ID, string1 through string15.
• Pick listFields such as status, priority and lookup 1-10 will prompt you for a pick list in the Add field window.If that option is not available, then you have selected a non-pick list type from the predefined fieldsdrop-down. Once a predefined field has been used for a pick list it will no longer be available in thelist. If additional fields are needed, use custom fields.
• ReleaseEach pick list is populated by the list of releases created within each individual project. Some itemtypes are configured with a release field [236] by default. If the release field is removed from the itemtype, it will become available in the predefined field list.
• UserItem types that include a user field will present the user with a pop-up list of users to select from. Theuser will only be allowed to select one user from the list.
Custom fieldsAn organization administrator can add custom fields that are unique to their organization. Custom fieldscan be similar to predefined, multi-select, URL, rollup, and item of type fields.
To find a field, search using the field name because they aren't indexed.
When adding a custom field [583], these are the types you can choose:
• Item of typeUse this to create a new pick list field that is populated by a list of existing items in the current projectthat are of the specified item type. Users can reference items of another type in this manner. Onlyone item can be selected in an item of type pick list.
• FlagFlag fields are displayed as checkboxes to those working with the item type. By default, all flags arelabeled No (False).
• IntegerAllows only the entry of whole number positive integers.
• ReleaseEach pick list is populated by the list of releases created within each individual project. Some itemtypes are configured with a release field by default. If the release field is removed from the item type,it's available in the predefined field list.
• Pick ListPick lists are a set of specific values that can be entered in a field.
• FloatUse float fields to accurately capture numeric values. The float field follows IEEE 754. These fieldscan be positive or negative.
• Multi-select pick listUse the multi-select pick list field to allow the user to select multiple values in a pick list.
• URLA URL field is similar to a regular text box. It performs some minor validation of text entered in thefield to check that it is a URL and will display the text as a link when submitted.
• TextA text field is designed to hold plain text strings with no line breaks. If line breaks are required, usethe text box field.
• Text boxA text box field is designed to hold more data than a typical text field. It can store plain text or rich textand can also have a template applied to it.
Jama Connect User Guide
588
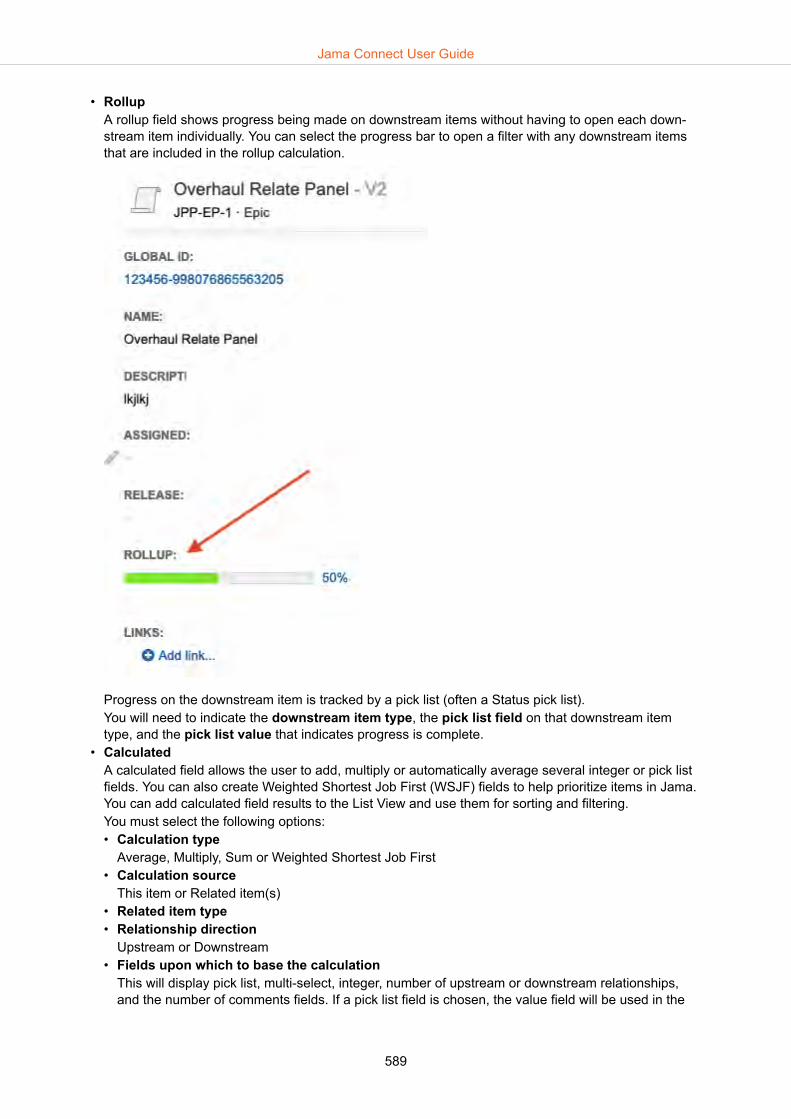
• RollupA rollup field shows progress being made on downstream items without having to open each down-stream item individually. You can select the progress bar to open a filter with any downstream itemsthat are included in the rollup calculation.
Progress on the downstream item is tracked by a pick list (often a Status pick list).You will need to indicate the downstream item type, the pick list field on that downstream itemtype, and the pick list value that indicates progress is complete.
• CalculatedA calculated field allows the user to add, multiply or automatically average several integer or pick listfields. You can also create Weighted Shortest Job First (WSJF) fields to help prioritize items in Jama.You can add calculated field results to the List View and use them for sorting and filtering.You must select the following options:• Calculation type
Average, Multiply, Sum or Weighted Shortest Job First• Calculation source
This item or Related item(s)• Related item type• Relationship direction
Upstream or Downstream• Fields upon which to base the calculation
This will display pick list, multi-select, integer, number of upstream or downstream relationships,and the number of comments fields. If a pick list field is chosen, the value field will be used in the
Jama Connect User Guide
589

calculation. If a multi-select field is chosen, the value used will be the sum of the value of each se-lected item
• Number of decimals to display (up to 4)• Whether to require all values to be present before the calculation is performed
If you do not select this option, the calculation will be performed each time a value is entered intoone of the selected fields.
NOTEAmerican or British-style decimals must be used in the fields from which the calcula-tions are derived. Errors will occur if non-American or British style decimals are en-tered.
If a calculation is based on a related item, the calculated field will not update until theitem containing the calculated field is edited.
Enable rich text in test steps
NOTEYou must have organization administrator permissions to complete this task.
1. Select Admin > Organization > Item Types.2. Find the item type you want to use. You can use any item type that is a Test Case type (this may be
an item that's used as a Test Case [310]). Select Fields in that row.3. In the right panel, select the Steps field, then select the Edit pencil icon.
4. In the Edit field window, select Allow Rich Text and click Save.
Jama Connect User Guide
590

IMPORTANTTo disable rich text in test steps, follow the same steps, unchecking the Allow rich textbox.
If you do so, no data will be lost, but images and rich text will be replaced with HTMLtags.
Users will not see any existing steps break and the content will still render. It is up tothe users to decided what formatting tags to remove. The application does not auto-matically strip tags, and renders correct HTML tags in steps with or without the rich textmode enabled.
Pick listsPick lists are a set of specific values that can be entered into a field.
This can be particularly useful when you want to be sure field content is entered exactly between users,or when you are creating calculated fields.
Each pick list can be assigned a name and a description. Descriptions can be useful to define how youare using that pick list.
Each option in a pick list can be assigned the following:
• OrderThis designates what order the option will appear in a field pull down.
• DisplayThis determines what words users see when selecting pick list options.
• DescriptionUseful to define what each option means internally or to other admins. For example a display of "High" could have a description of "over 5000 items", "625-750 degrees" or "at least 72 miles".
• ValueThis can put a numerical value or weight on each option and is useful in creating calculated fields.
• ColorColor can be used to visually distinguish pick list options at a glance and can be seen in differentviews across the application. For example the test case status [313] field is set to have a passingcolor of green, a failing status of red and a blocked status of orange.
• Default statusThis determines which value appears by default. A pick list can only have one default status.
Jama Connect User Guide
591

Manage pick list valuesA pick list can have multiple values that can be organized, color coded, and set as a default.
Important considerations
• Changing pick list values — Other fields might be affected if the value is included in a calculatedfield.
• Archiving a pick list value — Removes the option from a selectable option, but preserves the his-torical selection of the value. Archived pick lists can't be unarchived.
• Deleting a pick list value — Removes the selected value from all items in the system. Each item isversioned and updated with the replacement value. Previous versions retain the deleted value. Thedeleted value isn't available for filtering. Each pick list must retain at least one value and that valuecan't be deleted.
NOTEYou must have organization administrator permissions to change pick list values.
1. Select Admin > Organization > Pick lists.
2. In the Action column of the pick list you want to edit, select Values.
3. In the Pick List Items table, select the item row you want to modify, then select one of the followingoptions:
Jama Connect User Guide
592

• Add item (pencil icon) — Enter the name and an optional description, value, and color.• Edit item (plus icon) — Make your changes.• Archive item (box icon) — Add a character or word to the beginning of the name (for example,
*Information) to show that a file has been archived.• Remove item (X icon) — Select a replacement value, then click Delete.
The value is saved to items in the system where the deleted value is selected.4. Click Save.
The table is updated to reflect your changes.
Configure workflowWorkflows are not project-specific. When the organization administrator configures a workflow it appliesto the item type across projects.
NOTEYou must have organization or process administrator permissions to complete thistask.
Important considerations
• If the organization administrator selects Allow project managers to override workflows on aproject, the project administrator for each project can set up the workflows.
• If you disable a workflow, Jama Connect stores your settings for later use.• An organization administrator can disable a workflow from the Workflow Administration section.
1. Select Admin > Organization, then select Workflow. If you disable a workflow, Jama Connectstores your settings for later use.• Select Enable workflow for this organization.• (Optional) Select Allow project managers to override workflows on a project.
IMPORTANTIf you select or deselect either option, it could trigger a long transaction thatmight impact system performance.
Jama Connect User Guide
593

This enables workflow for all projects using this item type. It can't be disabled at a project level.2. In the Workflow Administration section, select Add/Edit to start a new workflow, or select an exist-
ing workflow and then Config in the Action column to edit it.
3. A project or organization administrator can continue setting up the workflow [627] from here.
Set up editor templatesEditor templates can be applied to any rich text field and must be configured before use.
NOTEYou must have system or organization administrator permissions to complete this task.
1. Select Admin > Organization, then select Editor templates.• To open the new template with a rich text editor, select Add editor template.• To edit templates, select an existing template, then select Edit.
2. Give the template a name and description.3. Create the template as you want it to appear in other items.4. Select Save.
The template is now available for other users [99].
Jama Connect User Guide
594

Configure viewsYou can configure the default fields in Projects List View, Projects Reading View, Reviews Single ItemView, and Reviews Reading View.
You can also configure views in Projects that contain mixed item types, such as views created from atag, filter, or component, by selecting Projects List View with mixed item types.
NOTEYou must have organization administrator permissions in order to configure defaultviews.
Configuring fields for a view [51] overrides the default and becomes the standard order of visible fieldsfor that user, in all similar views, for that item type.
1. Select Admin > Organization, then select Item types > Views.
2. In the Project List View window, select the view you want to configure.
Jama Connect User Guide
595

3. Double-click a field name or use the arrows to move fields between the Hidden and Visible col-umns. Select and drag field names up or down to reorder them.
4. Click Save.
NOTEYou can only select core item type fields when you configure List View for mixed itemtypes. For a list of core item type fields see Admin > Item types > Core > Views.
Manage relationshipsAs an organization administrator you can do the following to manage relationships:
• Edit relationship widget [578] in an item type• Set the relationship types [597]• Configure the Import Relationships Plugin [540]• Set up relationship rules [600] at an organizational level
Jama Connect User Guide
596

Configure relationships
NOTEYou must have organization administrator permissions to complete this task.
1. Select Admin > Organization, then select Relationships > Edit.
2. To change the relationship options from No to Yes, select the checkbox next to each option:• Show Status in Relationship Grid?• Show Note in Relationship Grid?Note and Status columns are added to the table in the bottom panel.
3. Configure Relationship types:The Note and Status fields are only editable when the Relationship type is set to ShowNote and Show Status. In the Relationships widget of an item, double-click on a relationship toedit its type, direction, status, and note.• Use the toolbar at the top of this panel to edit, add, or delete types.• Include a description to specify how and when this type is to be used.
4. Set up relationship rules [600].
Set relationship types
NOTEYou must have organization administrator permissions to set relationship types.
1. Select Admin > Organization, then select Relationships.2. Under Relationship Types use the buttons to add, edit, delete or reorder relationship types.
Jama Connect User Guide
597

3. When adding a new relationship type you can enter a display name, description. The description isonly visible in this edit window.
If you select Show note and Show status users who create a new relationship using this relation-ship type will be given the option to enter a note and a status for that relationship.
Jama Connect User Guide
598

TIPStatus and notes are visible any time you reopen the Add/edit relationship win-dow.
Also, when notes and status are enabled under Relationship options in Admin >Relationships...
... you will see them in the bottom panel of Single Item View when Relationshipsis selected.
You can also filter by status or note in an impact analysis [270].
Jama Connect User Guide
599

4. If you delete a relationship type, you will be asked to choose a replacement type for affected rela-tionships.
Set up relationship rules
NOTEYou must have organization administrator permissions to complete this task.
Relationship rules help maintain the project structure by preventing problems with relationships [257].The rules help users know when relationships are required and in which directions.
When these rules are set up, the Relationship Status Indicator [266] alerts users to easily see whentheir relationships do not match the relationship rules.
Rule sets are created at the organization level, and can then be applied to one or more projects.
1. Decide with your team what relationships will be included, the relationship types, as well as wheth-er the rules should be exclusive and included in coverage calculations for the project.
2. Select Admin > Organization > Relationships and scroll down to the section labeled Relation-ship rule configuration to see any previously created rule sets.
Jama Connect User Guide
600

3. Scroll to the bottom and select Add rule set.
4. Select New Rule Set and edit the name to describe your set.
5. Add a rule by selecting the Upstream item type, Downstream item type, Relationship type fromthe drop-down menus. Select the box under For coverage if this relationship should be inclu-ded for coverage.
NOTEConfigure the same rule set across projects that share relationships. If you relateitems across projects with different rule sets, the source project's rule set is ap-plied.
6. Select Save to save the rule. As the rule is saved, it is added to the diagram to show the relation-ship visually. Select Add another relationship if you want another for this rule set.
Jama Connect User Guide
601

7. As rules are created, the diagram is updated to show the relationships. Solid lines between itemsindicate a coverage (required) relationship. Dashed lines indicate relationships that are not for cov-erage.
TIPOnce you have set relationship rules for a project, you can also view the relation-ship rules diagram in Single Item View or on the dashboard [148].
8. To delete a rule, select the X at the end of the rule's row. To delete an entire rule set, select the X atthe top right of the rule set. After editing or deleting a rule, the rule set diagram will update with anychanges made.
9. Select Add project to apply the rule set to one or more projects. If a rule set is applied to a projectwith existing items, nothing will change in that project, even if the existing relationships break thenew rules. Only future relationships will be required to conform with the rule set.
IMPORTANTA project can only have one rule set. If a rule set has already been applied to aproject and you attempt to apply a second rule set, the application will remove thefirst rule set from the project and apply the second one instead.
10. If you select the box next to Allow any item type not mentioned in this rule set to be related toany item type including those in the rule set, users can create relationships outside of the ruleset you applied to the project.Rules are between item types. If you do not define a rule for a particular item type, that item typecan have a relationship with anything, or nothing if the user chooses, even if the rule set is exclu-sive.
Configure Import Relationships Plugin
NOTEYou must have organization administrator permissions to complete this task.
The Import Relationships Plugin helps you batch create relationships between existing items in the ap-plication.
Jama Connect User Guide
602

1. Select Admin > Organization, then select Plugins > Add entry.2. In the Add plugin entry window, enter the following information and select Save:
• Name: Import Relationships (or whatever name you want visible to users)• Enabled: Check this box to make the plugin available to users.• Class (case sensitive): Enter the name of the object defined in the source code. For a single
project enter:
com.jamasoftware.contour.plugin.jama.ImportRelationships
For cross-project imports enter:
com.jamasoftware.contour.plugin.jama.ImportRelationshipsCrossProject
• Type: Import• Parameters: Set relationship parameters [541]• Plugin notes: Add any notes you have here. This will not be visible to end users.
3. When the information is correct, select Save.
Jama Connect User Guide
603

Manage testsAs an organization administrator you can do the following to manage tests:
• Include unexecuted test runs in status calculations [604]• Enable rich text in test steps [580]• Use an item type as a test case or defect [579]
Manage collaborationCollaboration includes emails [197], electronic signatures [225], the stream [205], reviews [153], andworkflows [200].
Configure organization detail
NOTEYou must have organization administrator permissions to complete this task.
1. Select Admin > Organization, then select Details.
Jama Connect User Guide
604

2. Make selections for the following details:• Organization name
The name of your company or team. Each instance of Jama Connect can have only one organi-zation. Organization name is also used for reports.
• DescriptionAdditional information about your company.
• Return emailUsed as a return address for email notifications. Typically the organization administrator's emailaddress is used or a [email protected].
• Base URLEmail notifications usually include links to items. The base URL is used to create the URL's sentin the email notifications. Enter the base URL for your Jama Connect installation. Example -http://localhost:8080/contour. Note that attachments (images etc) are dependent on this settingbeing accurate.
• Rich text image max width (px)Maximum pixel width setting that will shrink all images embedded into rich text fields. Default of 0means no max width will be applied.
• Rich text image max height (px)Maximum pixel height setting that will shrink all images embedded into rich text fields. Default of0 means no max height will be applied.
IMPORTANTImages will retain their ratio when adjusted to fit the maximum setting for heightor width. The adjustment only happens during an upload or document import.Images that already exist on the server aren't adjusted. Compression occursbased on the width and height settings.
• Allow users to subscribe othersAllows users to subscribe other users to items.
• Allow users to mute subscriptionsThis feature allows users to mute (turn off) a subscription that has been subscribed to them byanother user.
Jama Connect User Guide
605

• Allow non-administrators to delete items/containersWhen enabled, this setting grants users with create/edit permissions the ability to delete items.When disabled, only organization administrators can delete items.
• Include unexecuted test runs in status calculations (not retroactive)Jama Connect uses all associated test runs to automatically calculate test case status.Select this box to include unexecuted test runs in the calculation of test case status (default).If you don't include unexecuted test runs, and there are no executed test runs, the system defersto including unexecuted test runs.
NOTEFor test cases associated with a single plan, test case status will reflect the sta-tus of the test run with the most recent activity, which would include unexecutedtests if this is enabled.
When the case is associated with multiple plans, the most urgent status is chos-en, in this priority order: unexecuted, failed, blocked, scheduled, passed.
Uncheck this box to remove unexecuted test runs from that priority order.
• Allow multiple items with the same global ID in a single project• Math and Chemical symbols use SVG format• Java Date Time Format
The default setting is month/day/year, but can be changed to year/month/day or day/month/year.• Change global ID [535]
Edit user or group subscriptionsUsers can subscribe to email notifications. Administrators don't have control over a user's own subscrip-tions, only to subscriptions added by others. Only the user can control their subscriptions.
NOTEYou must have organization or project administrator permissions to complete this task.
1. Select Admin > Organization, then select Users.2. Select Edit subscriptions in a user row to open the Edit Subscriptions window.
Jama Connect User Guide
606

3. Select the user you want to edit from the left column. On the right you see a list of their currentsubscriptions.
4. If you're an organization administrator, select Unsubscribe in the Action column or to remove mul-tiple subscriptions, select the subscriptions you want to remove, then select Unsubscribe selec-ted. If you're a project administrator, select the items you want to mute and select Mute subscrip-tions.
TIPOrganization administrators can also edit group subscriptions by selecting Admin >Organization > User groups > Subscriptions.
Manage stream comments
NOTEYou must have organization administrator permissions to complete this task.
1. Select Admin > Organization, then select Stream.
Jama Connect User Guide
607

NOTEYou must separate domains with a comma and avoid adding a space between thecomma and next domain.
2. Configure settings as needed:• Select Disable Stream and project comments to turn off the stream.• Select Enable new comments in global Stream for new comments from the global Stream
page to appear when you access the stream from the header.• Select Allow users to invite new users to Jama Connect by email if you want users to be
able to @mention and invite others who are not registered Jama Software users to their discus-sion.Those who accept invitations automatically receive a temporary license [560] but only have rightsto view the discussion threads to which they have been invited. Organization administrators cangive them more rights, but will need to change the license type to a permanent one before their30 day license expires. An organization has unlimited temporary licenses, which have full crea-tor permissions.
• Enter a domain in the field below this to restrict invitations to email addresses within a specificdomain. Enter the domain(s) separated by commas (for example, jamasoftware.com, yourcom-pany.com).
• Enter a number of seconds in the Comment update frequency to control how often the streamis updated with new comments.
3. Select Save settings.
Manage reviewsAs an organization administrator, you can do the following to manage reviews:
• Grant permissions to a review administrator [566] to view any review and perform certain administra-tive tasks whether or not they were invited to the review.
• Assign reviewer licenses [558]
IMPORTANTUsers with reviewer, test runner, collaborator and stakeholder licenses can partici-pate in reviews, but cannot create reviews. If a user is invited to participate in a re-view they automatically get a reviewer license. Reviewer licenses do not automati-cally grant read or write access to project data.
• Configure access to reviews [608]• Configure item workflow for Approval Reviews [610]• Determine which default fields are visible in reviews [595]• Manage permissions by license type [562]
Configure review accessYou must be an organization administrators to configure review settings.
For information about license types and reviewer roles, see Permission by license types [562].
1. Select Admin > Organization, then select Review center.2. Select the options you want and select Save settings.
• Disable reviews Check this box to disable access to reviews.
• Reviews can be public
Jama Connect User Guide
608

IMPORTANT• Reviews created before Jama Connect 8.61.x with the setting Reviews can
be public disabled and later enabled, those reviews become public.• Reviews created after Jama Connect 8.61.x with the setting Reviews can be
public disabled and later enabled, those reviews will remain private.To change the visibility of one review, see Settings [160].
Check this box to allow users with review access to have read-only access to any review markedpublic. This is the default. If enabled, you must select who can see public reviews.• Anyone with access to reviews
Anyone, regardless of project permissions, can see all items in the review.• Only those with permission to ALL items in the review
This option only lets users see a public review if they have access to all items in the review.• Enable review moderators to invite users outside their project
Review moderators can give users who don't have permission to particular items in a project ac-cess, so they can review of those items.
• Allow approvers to add other reviewers and approversCheck this box so that moderators can allow approvers to add more approvers or reviewers. Thisis the default option.
• Allow approvers to delegate their approvalCheck this box so that moderators can allow approvers to delegate their approval role to anotherreviewer. This is the default option.
• Allow review moderators to invite new users to Jama by emailCheck this box so that moderators can invite people without Jama Connect accounts to partici-pate in reviews. If they accept, they are automatically granted a reviewer license.• Only allow email addresses with these email domains
Jama Connect User Guide
609
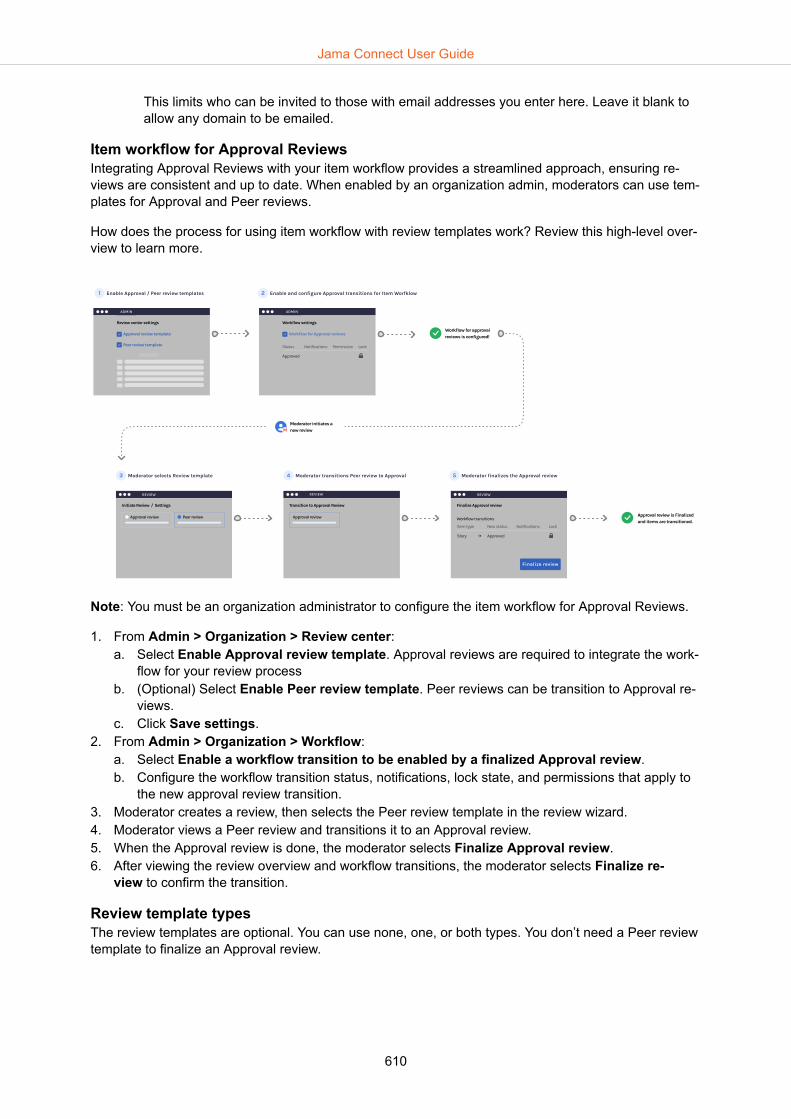
This limits who can be invited to those with email addresses you enter here. Leave it blank toallow any domain to be emailed.
Item workflow for Approval ReviewsIntegrating Approval Reviews with your item workflow provides a streamlined approach, ensuring re-views are consistent and up to date. When enabled by an organization admin, moderators can use tem-plates for Approval and Peer reviews.
How does the process for using item workflow with review templates work? Review this high-level over-view to learn more.
Note: You must be an organization administrator to configure the item workflow for Approval Reviews.
1. From Admin > Organization > Review center:a. Select Enable Approval review template. Approval reviews are required to integrate the work-
flow for your review processb. (Optional) Select Enable Peer review template. Peer reviews can be transition to Approval re-
views.c. Click Save settings.
2. From Admin > Organization > Workflow:a. Select Enable a workflow transition to be enabled by a finalized Approval review.b. Configure the workflow transition status, notifications, lock state, and permissions that apply to
the new approval review transition.3. Moderator creates a review, then selects the Peer review template in the review wizard.4. Moderator views a Peer review and transitions it to an Approval review.5. When the Approval review is done, the moderator selects Finalize Approval review.6. After viewing the review overview and workflow transitions, the moderator selects Finalize re-
view to confirm the transition.
Review template typesThe review templates are optional. You can use none, one, or both types. You don’t need a Peer reviewtemplate to finalize an Approval review.
Jama Connect User Guide
610

NOTEBy default, the review templates are disabled. You must enable the Approval and Peerreview templates to use them.
• Approval review template — Use when you want to collect signatures and need a review signed off.If workflow is enabled, you can batch update items [112] to an approved state.
• Peer review template — Use when you have a review with ongoing itera-tions and when changes to items are always in the “ready for approval” state.
Organize projectsA project is a way of organizing your data in Jama Connect and is made up of items, filters, base-lines, releases, reports and tests.
As an organization administrator you can grant project administrator permissions to someone [618]who will manage a particular project and its users. Alternatively, an organization administrator can alsocomplete the project-level tasks of a project administrator.
However, there are some tasks related to projects, that must be done by an organization administrator,such as:
• Add a project [612] (available for project admins with Add Project role)• Duplicate a project [613] (available for project admins with Add Project role)• Archive a project [615]• Grant project permissions [638] (if disabled for project administrators)• Add or delete groups [551] (if disabled for project administrators)• Set up projects workflow [627]• Set up relationship rules [600]
Jama Connect User Guide
611

Add a projectIf your organization has a lot of projects or products, create a folder called "Product Line" with projectsfor major releases. You can also create a project to hold a library of common requirements or docu-ments that you can reuse [275].
NOTEYou must be an organization admin or project admin with the Add Project role to com-plete this task.
1. Select Admin > Project, then select Add project.
2. (Optional) Add a folder to organize your projects.3. Set up relationship rules for the project. [600] Only one rule set can be applied to each project.4. Set up project's workflow [627] as needed.
Edit project details
NOTEYou must have project or organization administrator permissions to edit project details.
1. Select Admin > Project, then select Details > Edit.
2. Make your changes, then click Save.
Jama Connect User Guide
612

NOTEThe Project Summary widget on the project dashboard uses the End date in theProject Details window to calculate the number of days until the project is complete.
Change a project keyUpdating a project key regenerates the ID for all items in the project.
NOTEYou must have project or organization administrator permissions to change a projectkey.
1. Select Admin > Project, navigate to the project with key you want to change, then select Details >Change project key.
2. Enter the new project key. Keys must be 1–16 characters long, consisting of letters, numbers, andunderscores.
3. Select Submit. Unique ID [622] of all items within that project are updated to contain the new key.
Once the project key is updated, the Unique ID [622] of all items within that project are updated to con-tain the new key.
Duplicate a projectYou can duplicate a project to reuse requirements, permission settings, tags and attachments, or start anew project from a template.
NOTEYou must be an organization admin or a project admin with the Add Project role to du-plicate projects.
1. Select Admin > Project, then select the project you want to duplicate.2. Select Actions > Duplicate Project.
Jama Connect User Guide
613
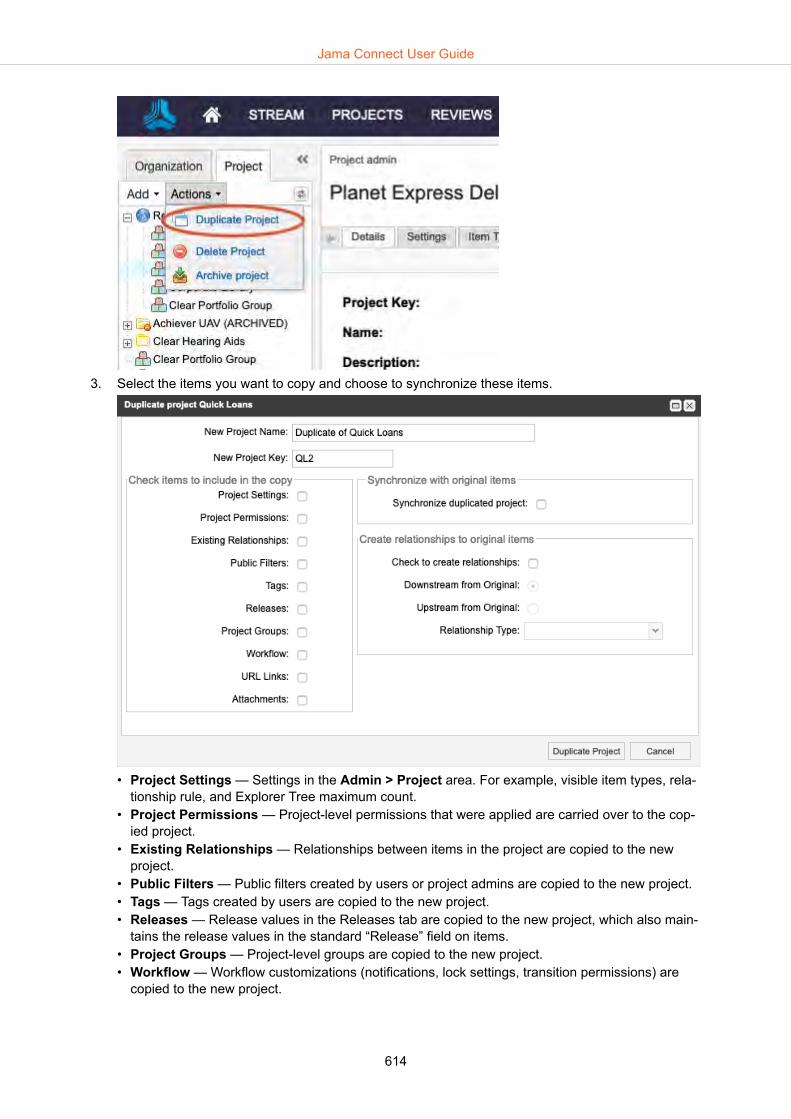
3. Select the items you want to copy and choose to synchronize these items.
• Project Settings — Settings in the Admin > Project area. For example, visible item types, rela-tionship rule, and Explorer Tree maximum count.
• Project Permissions — Project-level permissions that were applied are carried over to the cop-ied project.
• Existing Relationships — Relationships between items in the project are copied to the newproject.
• Public Filters — Public filters created by users or project admins are copied to the new project.• Tags — Tags created by users are copied to the new project.• Releases — Release values in the Releases tab are copied to the new project, which also main-
tains the release values in the standard “Release” field on items.• Project Groups — Project-level groups are copied to the new project.• Workflow — Workflow customizations (notifications, lock settings, transition permissions) are
copied to the new project.
Jama Connect User Guide
614

• URL Links and Attachments — Hyperlinks and attachments to items, using the links/attach-ments widget, are copied to the new project.
• Synchronize Duplicated Project — All copied items receive a new project ID but maintain thesame Global ID as the original project. This allows teams to compare differences between thesource project and copied project. Common use cases are for parallel development of variantproducts or branches of a products release.
• Create Relationships — All copied items include a trace relationship to the original item. Youcan set the direction and relationship type.
4. Click Duplicate Project.
A message appears confirming the project was successfully duplicated.
Archive a projectArchiving a project hides it from immediate view from most users, but organization administrators stillsee the archived project in the project tree with "(ARCHIVED)" in the title. Archiving a project doesn'tremove it from the database.
NOTEYou must have organization administrator permissions to complete this task.
1. Select Admin > Project, then select the project you want to archive.
2. Select Actions > Archive project.
Jama Connect User Guide
615

3. Select Yes.
Tips and more
• Archived projects and their content don't appear in filters or search results. When a project is ar-chived, all releases associated with the project are archived.
• Project groups aren't deleted when a project is archived. If no longer needed, delete project before aproject is archived.
• Select Actions > Unarchive to unarchive a project.
Delete a projectOnce a project is deleted, there's no way to restore the project. When a project is deleted, all the data inthat project is deleted. However, this doesn't automatically free up space in the database. A databaseadministrator must manually compact the database.
NOTEYou must have organization administrator permissions to delete a project.
Quick tips
• Archive a project to clean up your workspace or remove a project from view.• Delete a project to completely remove the project and all its data.• Projects can be stored in empty folders.• Project folders must be empty before they can be deleted.
1. Select Admin > Project, then select the project you want to delete.
2. Select Actions > Delete Project.
Jama Connect User Guide
616

3. Review the list of items, confirm the deletion, then select Delete Project.
The project slowly deletes in the background, so you can continue working. You receive an email whenthe deletion is finished.
NOTEThe project isn’t removed immediately. A daily task runs at midnight UTC to perma-nently remove data from the database. Once the project is permanently removed fromthe database, you can remove item types associated with that project.
IntegrationsIn an effort to best support product development teams, we offer a number of integration platforms forcustomers to connect to other application lifecycle management (ALM) software. Jama Software cur-rently offers OpsHub Integration Manager (OIM) and Tasktop Integration Hub (TIH) which are able toprovide the necessary platform to create configuration that will manage the integration. These integra-tions hubs will manage information between Jama Connect and the third-party applications of yourchoice in a bi-directional manner.
For more information on integrations visit the Community.
These solutions can be managed on-premises or, in the case of the OIM, hosted by OpsHub in theircloud. If you have questions or are interested in purchasing either of these solutions please con-tact <[email protected]>
Jama Connect User Guide
617

Project administratorA project administrator is a role that can be provided for all projects or on a specific project with a focuson permissions, project groups, and workflow customization.
Select Admin > Project to configure your projects.
As administrator, all your projects are available from the Project tab. The last project you viewed is se-lected by default.
As a project administrator you can:
• Manage project releases [624]• Configure project item types [620]• Manage project users [635]• Manage project groups [635]• Manage project permissions [638]• Manage project attachments [625]• Manage project tags [626]• Perform a project cleanup [633]• Index project data [634]
Monitoring changes with the Admin Activity stream (project admin)The Admin Activity stream provides an audit trail of updates made by project administrators.
To open the Activity stream panel:
1. Select Admin > Project, then select the project you want to view.2. Select the Activity stream button on the right side of the panel.
The Activity stream opens. You can search for activities by entering a search term.
Jama Connect User Guide
618

The Project admin Activity stream includes the following actions:
Tab Available information
Settings Changes in version items; maximum number of items displayed in the Explorer Tree; where tosave test run defects.
Item Types Item types that transition from visible to hidden and from hidden to visible.
Release List What was added, edited, deleted, archived, and unarchived in a project release.
Project Permissions Modifications to inherited permissions; added and removed permissions at the project level.
Workflow Overriden items and who overrode them; removed and configured workflows per item type in aproject.
Attachments Attachments added from the Attachments tab of the Project admin panel.
Tag Management What was added, deleted, and edited to a tag in a project.
Index When a project level index was initiated.
Clean up When project cleanup and project baselines cleanup are initiated.
Manage projectsAs project administrator you have permissions to modify, set up, and organize various aspects of theproject and content. You can also manage users [635] that participate in the project.
You can also choose to manage the project dashboard [353], although that doesn't require project ad-ministrator permissions.
Edit project details
NOTEYou must have project or organization administrator permissions to edit project details.
Jama Connect User Guide
619

1. Select Admin > Project, then select Details > Edit.
2. Make your changes, then click Save.
NOTEThe Project Summary widget on the project dashboard uses the End date in theProject Details window to calculate the number of days until the project is complete.
Configure project item typesA hidden item type prevents users from creating new items or sets of that type. Sets or items that arecreated under a visible item type, and are then hidden, are still functional in Jama Connect.
Quick tips
• By default, a moved item type places itself at the end of the list. Drag and drop item types to reorderthem.
• An organization administrator can also configure views [595] for all projects, and an individual usercan configure fields [51] for their personal settings.
IMPORTANTYou must have organization or project administrator permissions to configure projectitem types.
You can hide item types from a particular project with the following steps:
1. Select Admin > Project, then select Item Types.
Jama Connect User Guide
620

2. Double-click on any item type to move it between the Hidden item types and Visible item typescolumns.
3. Click Apply to save your changes.
Configure default Explorer Tree settings
IMPORTANTYou must have organization or project administrator permissions to configure defaultExplorer Tree settings.
1. Select the gear icon at the top of the Explorer Tree.
2. Select the Default settings tab, then select the default settings.• Show item IDs
This displays the unique ID [622] (as in PROJ-REQ-25) before each item.• Display global ID
This displays the global ID (as in GID-8845) before each item. This can be helpful if the item iscopied and synchronized.
Jama Connect User Guide
621

• Show only folders / hide itemsThis hides items from view in the Explorer Tree. Components, sets, and folders are still dis-played. This can improve performance when your project has a large number of items.
• Show outline numberingThis displays a number scheme of order and depth in the Explorer Tree. Root level items havenumbers like 1, 2, or 3. Child items contain the parent item number as well as its own number,like 1.1, 1.2, or 1.1.5.
• Show relationships in Explorer TreeThis displays downstream relationships of items in the Explorer Tree. Select the green down-stream arrow to open the related items in List View.
CAUTIONIf you relate items back to themselves, you might create an infinite loop thatcauses the Explorer Tree to expand. To avoid this, don't relate items in a waythat creates an infinite loop.
3. Select Apply and Close to give other users the option to select these default settings.
Project keyThe project key is a unique identifier, automatically created with each project, that makes up the firstpart of each item's Unique ID.
Project or organization administrators can change a project key. [613]
Unique IDUnique IDs, or item IDs, identify an item with a project key, set key and a set counter. Unique IDs re-main the same even if item name or content is changed. They can't be edited or duplicated.
• Project keyA project key identifies which project an item belongs to. Project keys must be unique to each project,and must be 1–16 characters long, consisting of letters, numbers, or underscores. A project or organ-ization administrator can change the project key [613], but that doesn't reset the numbering of items.
• Set keyA set key identifies item sets for each project. You can use the same set key across sets or projects.Project or organization administrators can change a set key [581] to better meet your organization'sneeds.
Jama Connect User Guide
622

• Set counterThe set counter is a number automatically added to the item. Unlike the Global ID counter, you canreset the set counter when you change the set key.
NOTEIt's possible to use the set key across multiple sets of the same item type. However,keep in mind that the set counter is shared across all items using the same set key.
Change a project keyUpdating a project key regenerates the ID for all items in the project.
NOTEYou must have project or organization administrator permissions to change a projectkey.
1. Select Admin > Project, navigate to the project with key you want to change, then select Details >Change project key.
2. Enter the new project key. Keys must be 1–16 characters long, consisting of letters, numbers, andunderscores.
3. Select Submit. Unique ID [622] of all items within that project are updated to contain the new key.
Once the project key is updated, the Unique ID [622] of all items within that project are updated to con-tain the new key.
Change a set keyYou can edit a set ID or renumber items in a set at any time.
NOTEYou must have organization or project administrator permissions to complete this task.
Jama Connect User Guide
623

1. Select Projects, right-click on the set you want to modify, then select Change set key.
2. In the Confirm Set Key Change window that opens, enter the new set key, which must be 1–16characters long, consisting of only letters, numbers, or underscores.
3. Select Regenerate Item IDs to reset the counter and apply new numbering to all existing items.Item counters start over at 1.
CAUTIONDon't select Regenerate Item IDs if you want to restart numbering on newly cre-ated items. Leave existing items as they are.
Manage releasesA release is a group of items that are developed together and mapped to a specific completion date.Users can view releases and use them to assign items to a release.
NOTEYou must have project or organization administrator permissions to manage releases.
Project and organization administrators can set up and manage releases that others use. The releasesin the release list are used to populate the pick list for the Release field on an item. Releases are auto-matically sorted by release date in the release list and in pick lists.
1. Select Admin > Project, then select Release List.
2. Select the option you need:• Add a release
Jama Connect User Guide
624

Select the green Add release button in the toolbar to open the Add/edit release window. Addthe name, description, release date, then select Save.
TIPYou can also add a release from the Releases tab at the top of the left panel.
• Edit a releaseSelect Edit in the Action column for the release you want to edit. This opens the Add/edit re-lease window where you can edit the name, description and release date and select Save.
• Delete a releaseSelect Delete in the Action column for the release you want to delete. Select Yes to confirm.Releases can't be deleted if any items are assigned to them. To remove all assigned items, se-lect the Releases tab and move all assigned items from that release to another release.
• Archive a releaseSelect Archive in the Action column for the release you want to archive. Select Yes to confirm.You can view archived releases by selecting View archived releases in the toolbar where youcan select Unarchive.Archived releases don't appear in filters or search results, but items assigned to any archived re-lease do. The Release field for these items is populated and has "(Archived)" appended to therelease's version field.
NOTEAdministrators can also configure default release settings [237] that show how re-leases are displayed.
Manage attachments
NOTEYou must have project or organization administrator permissions to manage attach-ments.
1. Select Admin > Project, then select Attachments.
Jama Connect User Guide
625

2. From the toolbar, you can add, edit, or delete attachments.
3. In the Add/Edit File Attachment window, add or edit information about that attachment. Select theHistory bar at the bottom of the window to pull up a version history for that attachment to compareversions.
4. Select Upload and Save.
From Single Item View, any user can now add that attachment [133].
Manage tagsFrom the Tag Management tab, you can view, edit, and create tags.
NOTEYou must have project or organization administrator permissions to manage tags.
• Select Admin > Project, then select Tag Management to add, edit, or delete tags.
From Single Item View, any user can add that tag [133].
Jama Connect User Guide
626
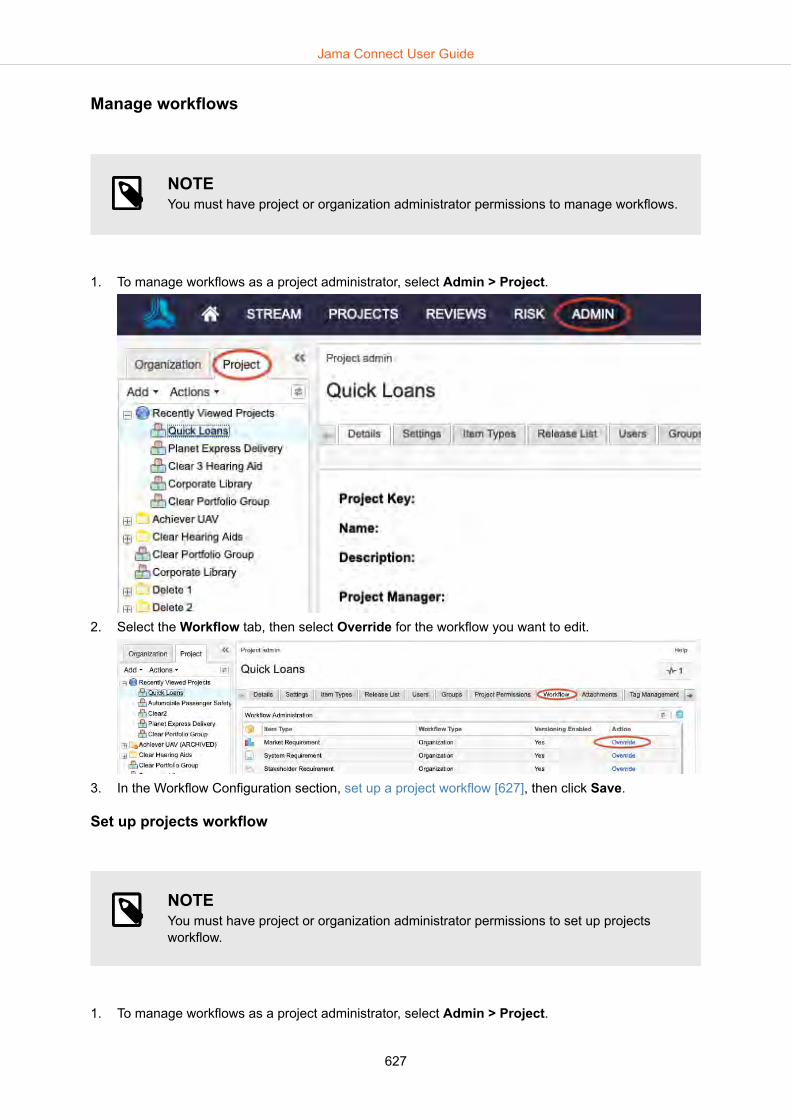
Manage workflows
NOTEYou must have project or organization administrator permissions to manage workflows.
1. To manage workflows as a project administrator, select Admin > Project.
2. Select the Workflow tab, then select Override for the workflow you want to edit.
3. In the Workflow Configuration section, set up a project workflow [627], then click Save.
Set up projects workflow
NOTEYou must have project or organization administrator permissions to set up projectsworkflow.
1. To manage workflows as a project administrator, select Admin > Project.
Jama Connect User Guide
627

2. Select the Workflow tab, then select Override for the workflow you want to edit.If the organization administrator has configured it [593], select Override to make changes to anyworkflow.
You are prompted to confirm the changes.3. In the Workflow Configuration section, select the following options for the workflow you're creating.
• Enable workflow for this organization• Allow project managers to override workflows on a project
Important: If you don't enable this option, performance might be impacted and it could trigger along transaction if the organization has over 10 workflows.
• Workflow for Item Type• What picklist field should workflow apply to• Version items on workflow status change
Jama Connect User Guide
628

NOTEYou can only associate one pick list field per item type. The field you associatemust be a pick list field; multi-select lists don't work.
4. In the first row of the Current Status table, specify an initial state for the item when it's created. Thisis the default status of the item, and it overwrites the default field status if one is set.
5. In the following rows, specify the workflow, who is allowed to make those transitions, and the ac-tions that occur when an item changes status. For example, like locking the item or sending anemail.
TIPUse the pull-down to move the current status to a new status and trigger relatedactions or notifications.
Jama Connect User Guide
629
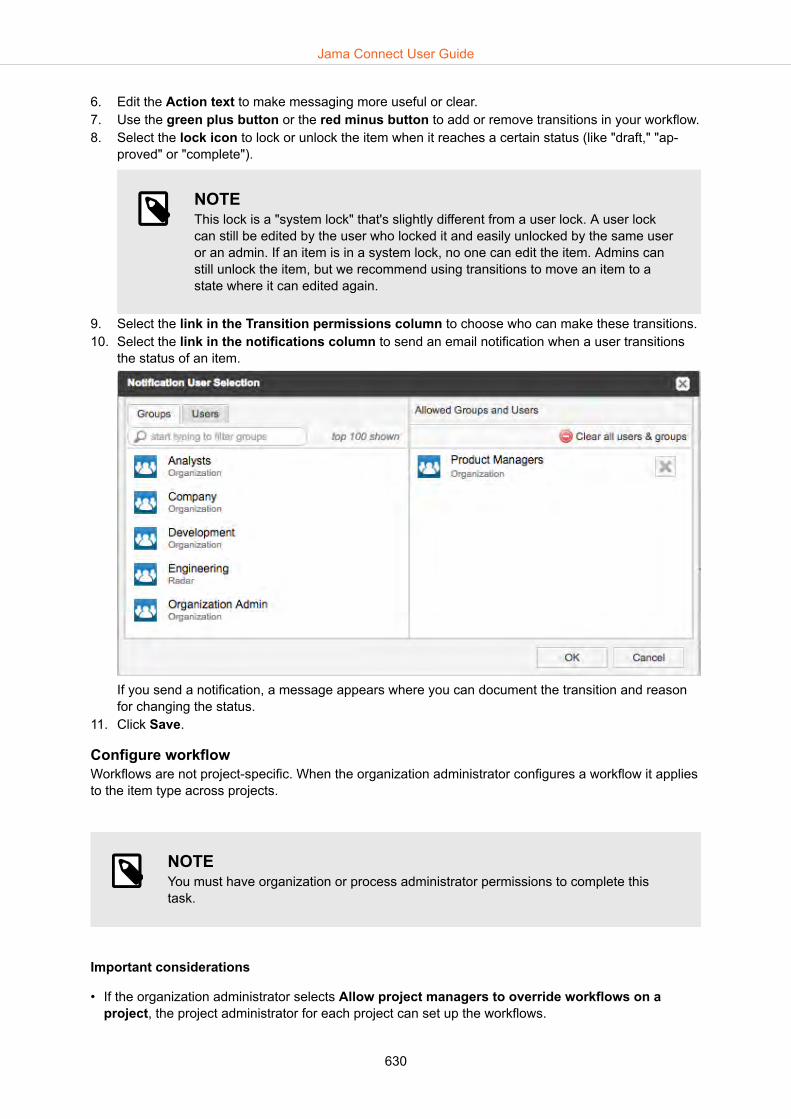
6. Edit the Action text to make messaging more useful or clear.7. Use the green plus button or the red minus button to add or remove transitions in your workflow.8. Select the lock icon to lock or unlock the item when it reaches a certain status (like "draft," "ap-
proved" or "complete").
NOTEThis lock is a "system lock" that's slightly different from a user lock. A user lockcan still be edited by the user who locked it and easily unlocked by the same useror an admin. If an item is in a system lock, no one can edit the item. Admins canstill unlock the item, but we recommend using transitions to move an item to astate where it can edited again.
9. Select the link in the Transition permissions column to choose who can make these transitions. 10. Select the link in the notifications column to send an email notification when a user transitions
the status of an item.
If you send a notification, a message appears where you can document the transition and reasonfor changing the status.
11. Click Save.
Configure workflowWorkflows are not project-specific. When the organization administrator configures a workflow it appliesto the item type across projects.
NOTEYou must have organization or process administrator permissions to complete thistask.
Important considerations
• If the organization administrator selects Allow project managers to override workflows on aproject, the project administrator for each project can set up the workflows.
Jama Connect User Guide
630

• If you disable a workflow, Jama Connect stores your settings for later use.• An organization administrator can disable a workflow from the Workflow Administration section.
1. Select Admin > Organization, then select Workflow. If you disable a workflow, Jama Connectstores your settings for later use.• Select Enable workflow for this organization.• (Optional) Select Allow project managers to override workflows on a project.
IMPORTANTIf you select or deselect either option, it could trigger a long transaction thatmight impact system performance.
This enables workflow for all projects using this item type. It can't be disabled at a project level.2. In the Workflow Administration section, select Add/Edit to start a new workflow, or select an exist-
ing workflow and then Config in the Action column to edit it.
3. A project or organization administrator can continue setting up the workflow [627] from here.
Lock items in a workflowLocking items in a workflow can help avoid unwanted changes. For example, a project administratormight want to leave items unlocked while in "draft" status, but lock them when they reach "approved"status.
NOTEYou must have organization or project administrator permissions to configure workflow.
Jama Connect User Guide
631
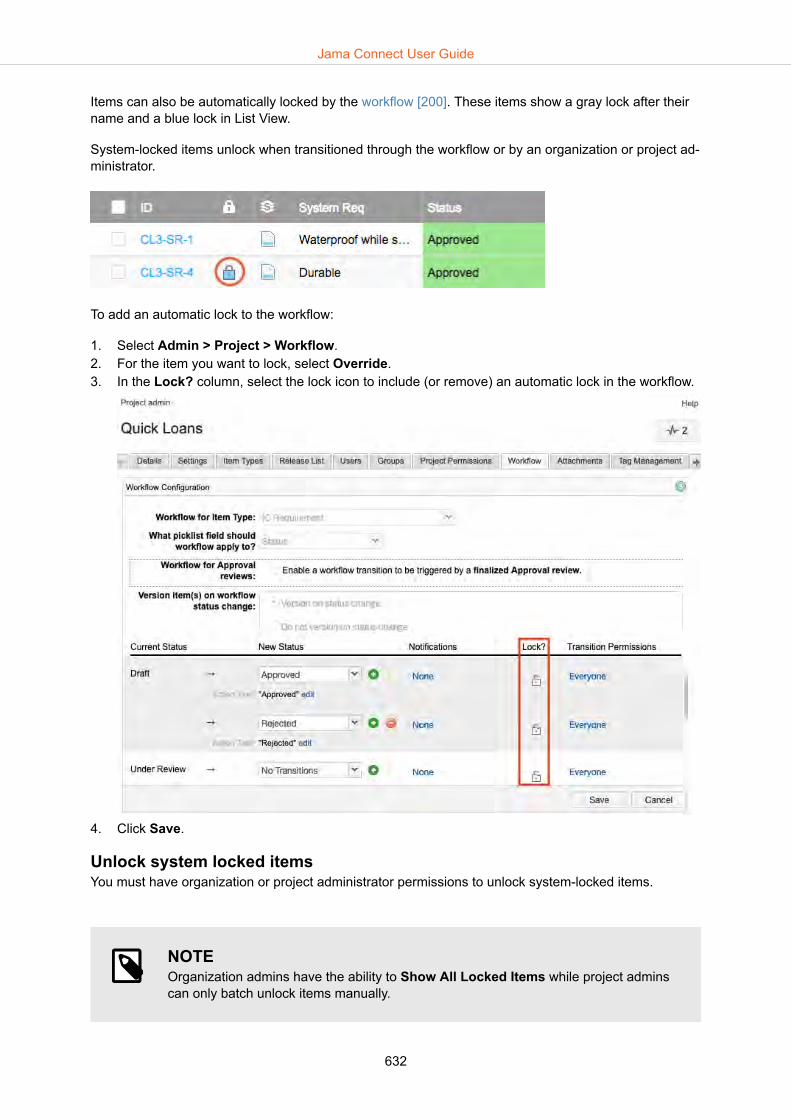
Items can also be automatically locked by the workflow [200]. These items show a gray lock after theirname and a blue lock in List View.
System-locked items unlock when transitioned through the workflow or by an organization or project ad-ministrator.
To add an automatic lock to the workflow:
1. Select Admin > Project > Workflow.2. For the item you want to lock, select Override.3. In the Lock? column, select the lock icon to include (or remove) an automatic lock in the workflow.
4. Click Save.
Unlock system locked itemsYou must have organization or project administrator permissions to unlock system-locked items.
NOTEOrganization admins have the ability to Show All Locked Items while project adminscan only batch unlock items manually.
Jama Connect User Guide
632
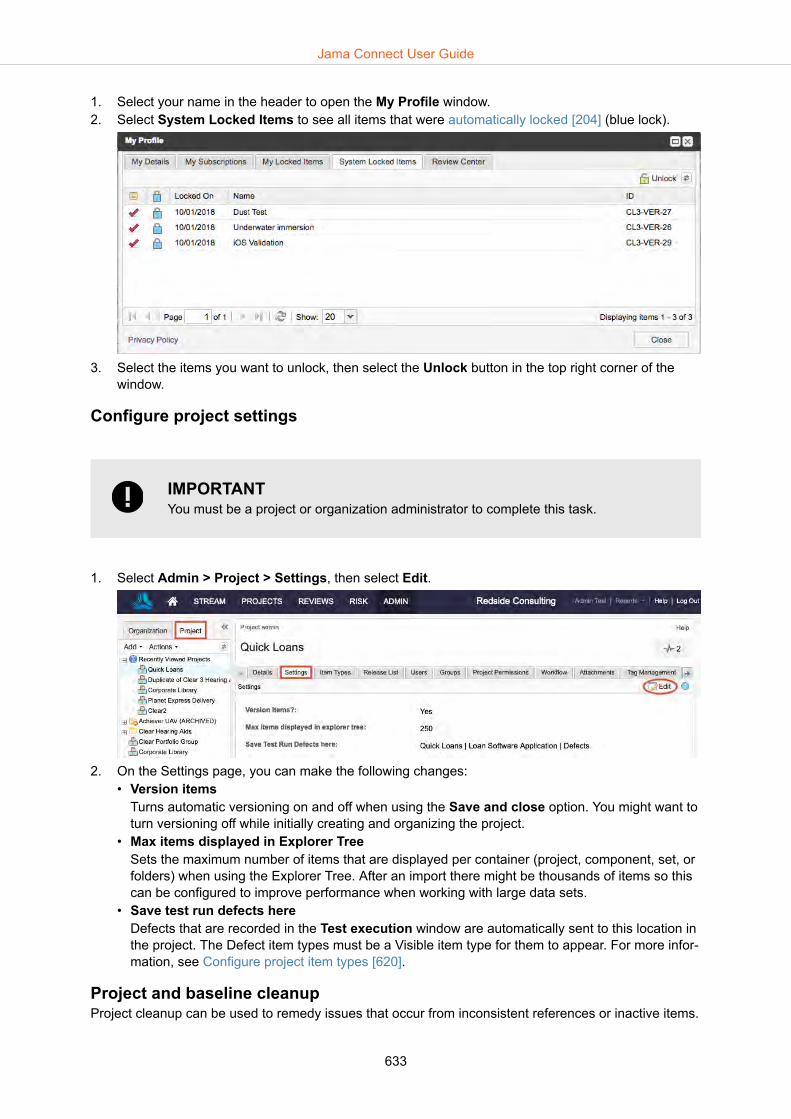
1. Select your name in the header to open the My Profile window.2. Select System Locked Items to see all items that were automatically locked [204] (blue lock).
3. Select the items you want to unlock, then select the Unlock button in the top right corner of thewindow.
Configure project settings
IMPORTANTYou must be a project or organization administrator to complete this task.
1. Select Admin > Project > Settings, then select Edit.
2. On the Settings page, you can make the following changes:• Version items
Turns automatic versioning on and off when using the Save and close option. You might want toturn versioning off while initially creating and organizing the project.
• Max items displayed in Explorer TreeSets the maximum number of items that are displayed per container (project, component, set, orfolders) when using the Explorer Tree. After an import there might be thousands of items so thiscan be configured to improve performance when working with large data sets.
• Save test run defects hereDefects that are recorded in the Test execution window are automatically sent to this location inthe project. The Defect item types must be a Visible item type for them to appear. For more infor-mation, see Configure project item types [620].
Project and baseline cleanupProject cleanup can be used to remedy issues that occur from inconsistent references or inactive items.
Jama Connect User Guide
633

For example, users might experience inconsistencies between the Explorer Tree, List View, filter re-sults, or see these messages:
• "This item was deleted."• "You don't have permission to perform this action."
Project cleanup recalculates sort orders and compares them with the database to solve these problems.It doesn't require re-indexing or downtime.
TIPPerform a cleanup at a time of low usage.
• Select Admin > Project > Clean Up, then select Clean up project or Clean up project baselines.
A confirmation message appears when the process is finished.Self-hosted customers can ask a system administrator to verify the results in the log.
Index project itemsSometimes project indexes get out of sync due to field configuration changes, large batch updates, APIupdates, and various other functions.
Index project data if you see data that's incorrect or doesn't exist. For example, failed batch updates, oran item that shows a value in a field, but a search for that field value doesn't return the item.
NOTEYou must have project or organization administration permissions to index projectitems.
• As a project administrator, select Project > Index and click Index items.
Jama Connect User Guide
634
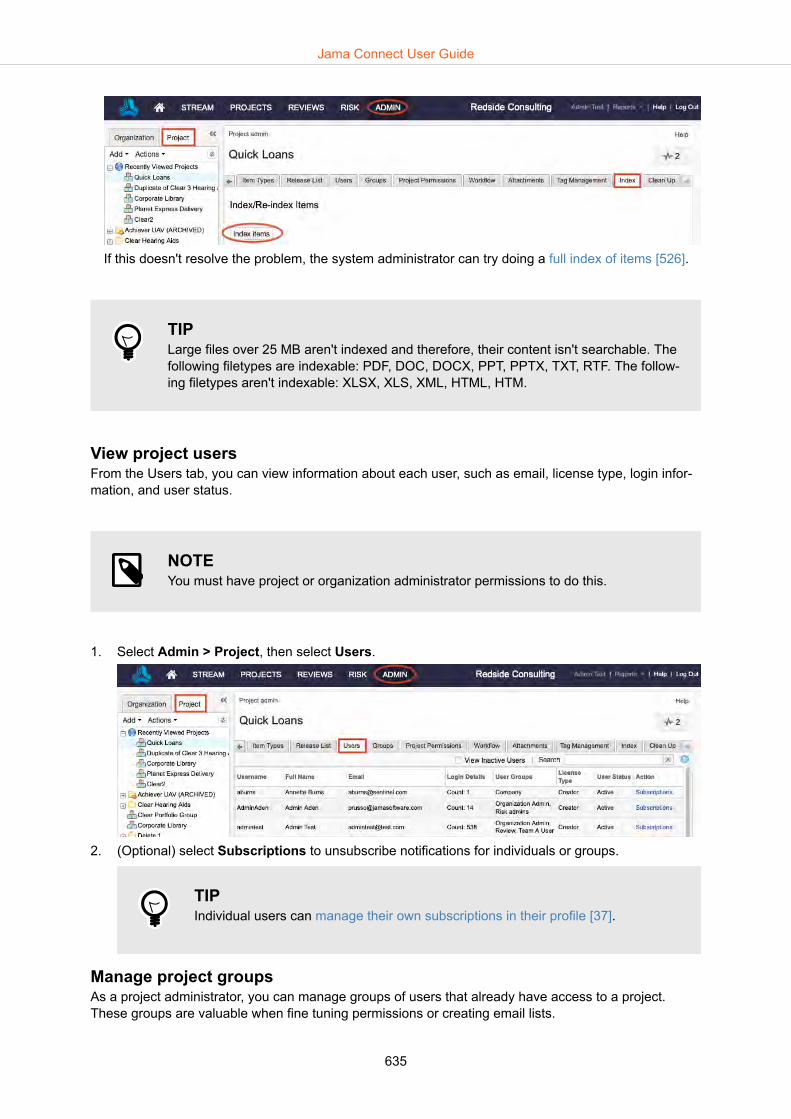
If this doesn't resolve the problem, the system administrator can try doing a full index of items [526].
TIPLarge files over 25 MB aren't indexed and therefore, their content isn't searchable. Thefollowing filetypes are indexable: PDF, DOC, DOCX, PPT, PPTX, TXT, RTF. The follow-ing filetypes aren't indexable: XLSX, XLS, XML, HTML, HTM.
View project usersFrom the Users tab, you can view information about each user, such as email, license type, login infor-mation, and user status.
NOTEYou must have project or organization administrator permissions to do this.
1. Select Admin > Project, then select Users.
2. (Optional) select Subscriptions to unsubscribe notifications for individuals or groups.
TIPIndividual users can manage their own subscriptions in their profile [37].
Manage project groupsAs a project administrator, you can manage groups of users that already have access to a project.These groups are valuable when fine tuning permissions or creating email lists.
Jama Connect User Guide
635

NOTEYou must have project administrator permissions to manage groups at a project level.You must have organization administrator permissions to add, delete or edit groups[551] at an organizational level.
1. Select Admin > Project, then select Groups.
2. Select Add Group in the top right toolbar.3. In the window that opens, give the group a name and description, then select users for the group
and select Save.4. For project level groups, you can edit the group name, description, or members, as well as editing
a group's subscriptions. You can also delete the group. Use the buttons in the Actions column ofthe group you want to edit.
NOTEA system administrator can disable or enable the project administrator's ability to addgroups [507].
Jama Connect User Guide
636

Edit user or group subscriptionsUsers can subscribe to email notifications. Administrators don't have control over a user's own subscrip-tions, only to subscriptions added by others. Only the user can control their subscriptions.
NOTEYou must have organization or project administrator permissions to complete this task.
1. Select Admin > Organization, then select Users.2. Select Edit subscriptions in a user row to open the Edit Subscriptions window.
3. Select the user you want to edit from the left column. On the right you see a list of their currentsubscriptions.
4. If you're an organization administrator, select Unsubscribe in the Action column or to remove mul-tiple subscriptions, select the subscriptions you want to remove, then select Unsubscribe selec-ted. If you're a project administrator, select the items you want to mute and select Mute subscrip-tions.
TIPOrganization administrators can also edit group subscriptions by selecting Admin >Organization > User groups > Subscriptions.
Jama Connect User Guide
637

Grant project permissions
NOTEYou must have at least project administrator permissions to complete this task. An or-ganization administrator [566] or system administrator [504] can also grant permissionsat an organization or project level. A system administrator can enable or disable theproject administrator's ability to grant project permissions [507].
1. Select Project > Project Permissions.
2. Select the project, component, set or item for which you want grant permissions in the project se-lector on the left. From here, you can use the toolbar to: • Select Add permissions to add a new user or group.• Select Modify in the row of a user or group you want to edit.• Select Remove in the row of any user or group for which you want to delete permissions.• Select Override to override the inherited permissions for this user or group.
TIPWhen a row contains the value True in the Inherited column and is highlightedin green, this means the group or individual has received its permissions from ahigher level. Select Override in the Actions column to change these inheritedpermissions.
3. In the Add/Edit access window, you can grant the set of permissions that come with the role ofproject administrator, or you can grant access permissions for the selected item, set, component.Select Save.
4. Alternatively, select Remove to take away all permissions from the user or group for that project,set, or folder.
Jama Connect User Guide
638

Reference
Use these tools to help find quick answers whether you're a new or experienced user:
• Glossary of terms [649]• Quick find [144]• Best practices and guardrails [646]• Keyboard shortcuts [647]• Permissions by license type [562]• Get help [648]
PermissionsPermissions allow users to do things such as access, modify, and delete items or perform other specifictasks.
The permissions that a user has depends on:
• The license type [562] they are assigned• The roles [642] (permission sets) they're granted• The access permissions [645] (read/write or read only) to specific projects or containers they're
granted
You can grant permissions if you are:
• System administrator [504]• Organization administrator [566]• Project administrator [638]
License typesThe license type limits the possible permissions and roles that can be granted to a user. For example,creator, stakeholder, test runner, and reviewer.
Each user, regardless of license type, has a unique login (username and password). Organization ad-ministrators can view the current license [565] or assign users license types [558]. You can also see atable of permissions that are included with each license type [562].
All licenses can be named or float licenses, except for test runner and stakeholder which are namedonly.
These are the available user license types:
• CreatorA creator license is a named or floating license that gives full read and edit rights, and full access toreviews, for those who are active users managing items and projects on a daily basis.
• Test runnerA test runner license is a named license that includes basic permissions to read and review, as wellas the additional ability to create test plans and defects, and execute test runs. They can also addattachments to test runs during execution.
• CollaboratorA collaborator license is a named or floating license that gives read-only privileges to those who needvisibility into a project, but don’t need editing rights. These users can view items, provide comments,participate in (but not create) reviews, execute test runs and log defects.
• Stakeholder
Jama Connect User Guide
639
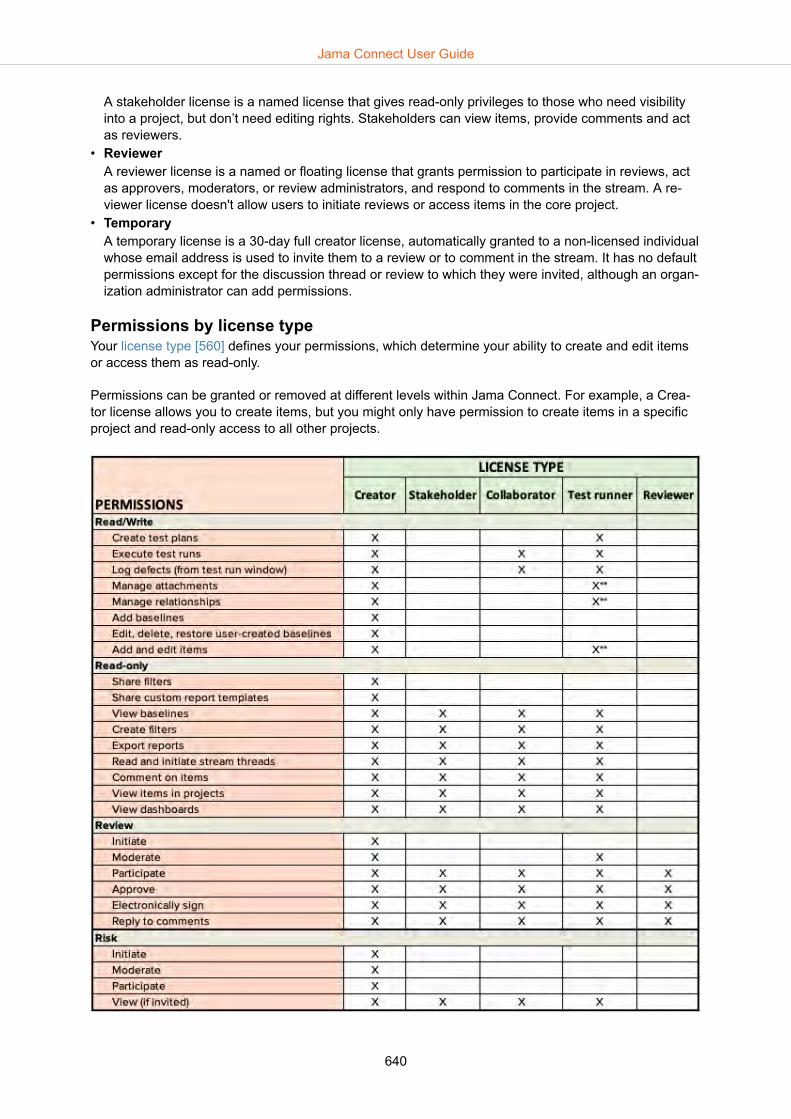
A stakeholder license is a named license that gives read-only privileges to those who need visibilityinto a project, but don’t need editing rights. Stakeholders can view items, provide comments and actas reviewers.
• ReviewerA reviewer license is a named or floating license that grants permission to participate in reviews, actas approvers, moderators, or review administrators, and respond to comments in the stream. A re-viewer license doesn't allow users to initiate reviews or access items in the core project.
• TemporaryA temporary license is a 30-day full creator license, automatically granted to a non-licensed individualwhose email address is used to invite them to a review or to comment in the stream. It has no defaultpermissions except for the discussion thread or review to which they were invited, although an organ-ization administrator can add permissions.
Permissions by license typeYour license type [560] defines your permissions, which determine your ability to create and edit itemsor access them as read-only.
Permissions can be granted or removed at different levels within Jama Connect. For example, a Crea-tor license allows you to create items, but you might only have permission to create items in a specificproject and read-only access to all other projects.
Jama Connect User Guide
640

** Permissions that are included with each license type.
NOTE Risk Management [374] requires additional licensing for your organization, as well ascreator, stakeholder or test runner licenses for all risk management participants. Con-tact your Jama Software account manager for more information.
RolesA role is a set of permissions granted to a user so that they can perform particular functions.
NOTEPermission roles are different than review roles [153], risk roles [401], and signer roles[227].
The permissions included with each role [642] can be granted by an administrator [639] to an individu-al or a group.
These are the roles and the type of license they require:
• System administrator [482] The system administrator handles the overall installation, setup, and configuration of Jama Connect,and doesn't have access to projects. The system administrator is a special user and not a role thatcan be provided to other users. This user doesn't require a license and logs in to the system with theusername "root."
• Organization administrator [534] An organization administrator controls all aspects around the configuration of Jama Connect and theuser and groups. This is a role that can be assigned to an individual or a group.
• User administrator [550]The user administrator provides the ability to manage licenses, users, and groups. This is a role thatcan be assigned to an individual or a group. This user can see all users and organization groups inthe system.The user administrator can only set permissions for groups/users on projects where they are a projectadministrator. They are also limited to managing organization group membership for only groupswhere they are a member, which prevents a user admin from giving access to projects where theydon't have access.User administrators can't make changes or additions to users or groups that have been assigned toorganization and process administrators with the exception of activation/deactivation and licensemanagement.
• Process administrator [573]The process administrator role focuses on the configuration of content and connections within JamaConnect.• Item types• Pick lists• Relationship rules• Review Center
Jama Connect User Guide
641
• Risk management• Workflow
• Project administrator [618] A project administrator is a role that can be provided for all projects or on a specific project with afocus on permissions, project groups, and workflow customization.
• Add ProjectThe Add Project is a very specific role that is meant to exist between the organization administratorand the project administrator. With this role, a user can create a new project or duplicate an existingproject where that user is a project administrator.
• Review administrator [179] A review administrator is a role with the permissions needed to manage reviews.Review administrators can view all reviews and perform administration tasks for those reviews, re-gardless of whether they were invited to the review. A review administrator is the only one who candelete a review
• Reuse administrator [283] A reuse administrator is a role with the permissions needed to manage reuse.In addition to reuse permissions, a reuse administrator needs read access for visibility of anysynchronized items they are working with, and write permissions for making edits, synchronizing, re-using, or duplicating.
• Risk administrator [378]A risk administrator can create and edit risk templates, as well as manage analyses and participants.An organization administrator can grant risk administrator permissions [570].Risk Management [374] requires additional licensing for your organization, as well as creator, stake-holder or test runner licenses for all risk management participants. Contact your Jama Software ac-count manager for more information.
IMPORTANTUsers must have the license type [562] that allows for the permissions granted witheach role.
Permissions by rolesSome permissions are included with the user's license type [562]. In addition, users can be as-signed roles [571] that grant them additional permissions shown in this table.
Jama Connect User Guide
642

Users must have the required license type for role-related permissions to work.
NOTERisk Management [374] requires additional licensing for your organization, as well ascreator, stakeholder or test runner licenses for all risk management participants. Con-tact your Jama Software account manager for more information.
Roles and permissionsPermissions and roles control how users experience Jama Connect by restricting the actions they per-form or content they can see.
Jama Connect User Guide
643
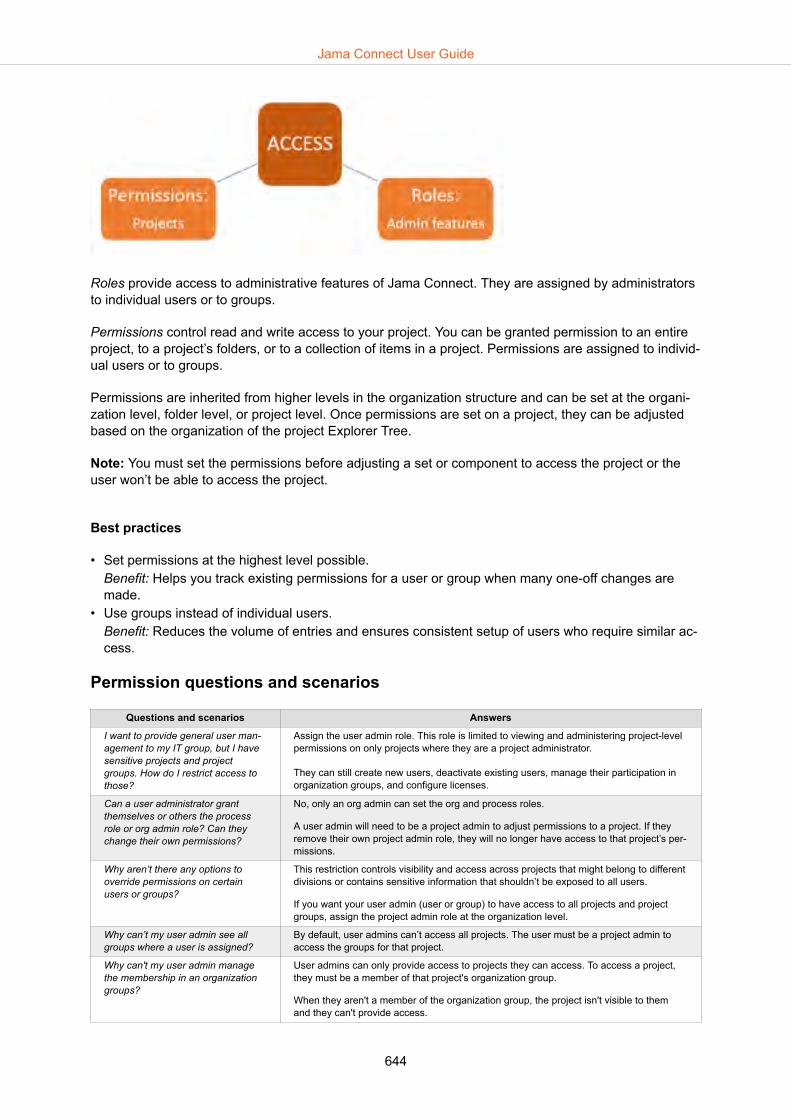
Roles provide access to administrative features of Jama Connect. They are assigned by administratorsto individual users or to groups.
Permissions control read and write access to your project. You can be granted permission to an entireproject, to a project’s folders, or to a collection of items in a project. Permissions are assigned to individ-ual users or to groups.
Permissions are inherited from higher levels in the organization structure and can be set at the organi-zation level, folder level, or project level. Once permissions are set on a project, they can be adjustedbased on the organization of the project Explorer Tree.
Note: You must set the permissions before adjusting a set or component to access the project or theuser won’t be able to access the project.
Best practices
• Set permissions at the highest level possible.Benefit: Helps you track existing permissions for a user or group when many one-off changes aremade.
• Use groups instead of individual users.Benefit: Reduces the volume of entries and ensures consistent setup of users who require similar ac-cess.
Permission questions and scenarios
Questions and scenarios Answers
I want to provide general user man-agement to my IT group, but I havesensitive projects and projectgroups. How do I restrict access tothose?
Assign the user admin role. This role is limited to viewing and administering project-levelpermissions on only projects where they are a project administrator.
They can still create new users, deactivate existing users, manage their participation inorganization groups, and configure licenses.
Can a user administrator grantthemselves or others the processrole or org admin role? Can theychange their own permissions?
No, only an org admin can set the org and process roles.
A user admin will need to be a project admin to adjust permissions to a project. If theyremove their own project admin role, they will no longer have access to that project’s per-missions.
Why aren’t there any options tooverride permissions on certainusers or groups?
This restriction controls visibility and access across projects that might belong to differentdivisions or contains sensitive information that shouldn’t be exposed to all users.
If you want your user admin (user or group) to have access to all projects and projectgroups, assign the project admin role at the organization level.
Why can’t my user admin see allgroups where a user is assigned?
By default, user admins can’t access all projects. The user must be a project admin toaccess the groups for that project.
Why can't my user admin managethe membership in an organizationgroups?
User admins can only provide access to projects they can access. To access a project,they must be a member of that project's organization group.
When they aren't a member of the organization group, the project isn't visible to themand they can't provide access.
Jama Connect User Guide
644

Questions and scenarios Answers
Why am I getting a no permissionserror when attempting to add a userto a group?
The group might have permission to access projects that you do not.
Why can’t my process admin see allprojects when assigning relationshiprules?
Some projects might contain sensitive information, so access is restricted. The list ofprojects is filtered to show only projects where the process admin is also a project admin.
If you want your process admin (user or group) to have access to all projects and projectgroups, assign the project admin role at the organization level.
Is there a way to limit the item typesthat a process admin can see?
Not at this time. This is a future option under consideration.
Why is this user I’ve just made anorg admin still unable to access cer-tain projects?
The option to override an org admins access is no longer available. Previously this wasan option, however it did not ultimately restrict the org admin from seeing the projectsand giving themselves access directly or through another group.
We did not want to remove or alter any permissions as part of introducing the new roles.We recommend removing any overrides on org admin users/groups made in the past toremove confusion.
Does the process admin have ac-cess to all projects and users?
The process admin only has access to the projects where they are a project admin.
The process admin does have access to users and organization groups for assignedworkflow transitions.
The @mention feature isn’t workingfor my users, regardless of projectpermissions on the Stream page.
The top-level option to create new comments has a new configuration that disables thisoption by default. We’ve determined that context free comments (not made from a projector item) were creating confusion and exposing users and groups that all users in the sys-tem should not have access to.
The @mention from the Stream page is now limited to include only users and groups thatalign with the commentor’s project permissions. This change tightens security and elimi-nates accidental exposure of users or groups.
As a project administrator, why can’tI add users to my project if they arein the system?
Your organization has configured the settings for Jama Connect to restrict project ad-mins’ visibility of users and groups to only their project’s permissions.
If you want to your project admins to have access to all users and groups, your organiza-tion admin can configure the setting on the Organization Detail page.
I’ve given a user with read/write per-missions access to a set in myproject, but they still can’t see theproject?
Permissions must first be set on the project. Once the user has read or read/write per-missions on the project, they can access the set. You can provide or remove permissionsto other sets or components in the project to modify access.
I need my team leads to be able tocreate new projects, but I can’t makethem organization admins. What do Ido?
The Add Project role lets users create new projects and duplicate any projects wherethey have project admin access.
I’ve removed a user’s access to aComponent, why can they still seeit?
Users receive the highest level of rights assigned to them. If a user is part of a group thathas permissions to a component, you can make one of the following changes:
• Change that group’s permissions to exclude the component.• Remove the user from the group so the individual entry is now the highest level of
rights assigned.
Access permissionsAccess permissions allow a user to create, read, and edit items.
Access permissions have two levels:
• Read/WriteA user with these access permissions can read write edit and delete
• Read-onlyA user with these permissions can read, but not create or edit items.
An organization administrator can grant access permissions at an organizational level [566]. A projectadministrator can grant access permissions at a project level [638].
Jama Connect User Guide
645

Access permissions and relationshipsHow you interact with relationships depends on the access permissions you have for each of the relateditems. Read more about permissions [562].
If you have theseaccess permis-
sions for the cur-rent item...
and these ac-cess permis-
sions for the re-lated item...
you can....
Read/Write Read only ... view trace relationships as well as the ID and name of the related item. You canmodify relationships and create new ones. You can also navigate to the relateditem and clear suspect links.
Read only orRead/Write
No permission ... view trace relationships, but not modify or create new relationships. You can seethe ID and name, but can't navigate to the related item.
Read only Read/Write ... view trace relationships. You can modify relationships and create new ones. Youcan also navigate to the related item and clear suspect links.
Read/Write Read/Write ... create, modify, or delete relationships as well as navigate to related items.
Read only Read only ... view trace relationships and navigate to related items. You can't create or modifyrelationships between the two items.
NOTEFor information about MathType permissions, see Assign equation editor access [569].
Best practices and guardrailsExplorer Tree settings
To improve performance when your project has a large number of items, you can set the Explorer Treesettings to only show folders and components [43].
Filters
Filters that run against all projects find and display results for all items in your Jama Connect applica-tion. Filters like these can return large data sets and degrade performance. To assure quality perform-ance, make filters more specific to return only the results you need.
Items and attachments
When working with large numbers of items (more than 1,000 per folder), hide items in the Explorer Tree[43] and work with them in List View [47] in the center panel. To move multiple items, rather than multi-select in the Explorer Tree, multi-select in the List View and drag them to their new location in the Ex-plorer Tree.
Large files over 25 MB aren't indexed and therefore, their content isn't searchable. The following file-types are indexable: PDF, DOC, DOCX, PPT, PPTX, TXT, RTF. The following filetypes aren't indexable:XLSX, XLS, XML, HTML, HTM.
Field content
Typically, item fields contain fewer than 10,000 characters (2,000 words). When you compare reviewversions, the applications might skip fields with lengthy content.
Reuse and synchronization of hundreds of items can affect system performance, causing it to feel slow-er than usual for users and decrease performance for other processes such as exporting.
Jama Connect User Guide
646
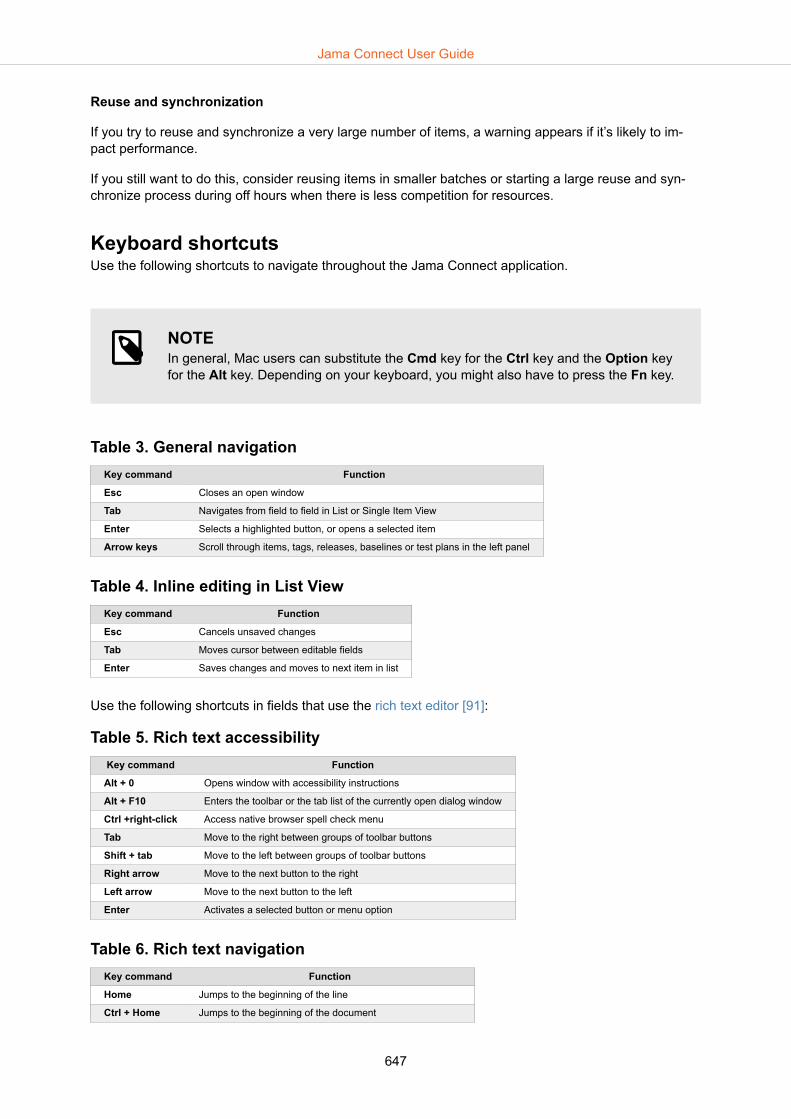
Reuse and synchronization
If you try to reuse and synchronize a very large number of items, a warning appears if it’s likely to im-pact performance.
If you still want to do this, consider reusing items in smaller batches or starting a large reuse and syn-chronize process during off hours when there is less competition for resources.
Keyboard shortcutsUse the following shortcuts to navigate throughout the Jama Connect application.
NOTEIn general, Mac users can substitute the Cmd key for the Ctrl key and the Option keyfor the Alt key. Depending on your keyboard, you might also have to press the Fn key.
Table 3. General navigationKey command Function
Esc Closes an open window
Tab Navigates from field to field in List or Single Item View
Enter Selects a highlighted button, or opens a selected item
Arrow keys Scroll through items, tags, releases, baselines or test plans in the left panel
Table 4. Inline editing in List ViewKey command Function
Esc Cancels unsaved changes
Tab Moves cursor between editable fields
Enter Saves changes and moves to next item in list
Use the following shortcuts in fields that use the rich text editor [91]:
Table 5. Rich text accessibilityKey command Function
Alt + 0 Opens window with accessibility instructions
Alt + F10 Enters the toolbar or the tab list of the currently open dialog window
Ctrl +right-click Access native browser spell check menu
Tab Move to the right between groups of toolbar buttons
Shift + tab Move to the left between groups of toolbar buttons
Right arrow Move to the next button to the right
Left arrow Move to the next button to the left
Enter Activates a selected button or menu option
Table 6. Rich text navigationKey command Function
Home Jumps to the beginning of the line
Ctrl + Home Jumps to the beginning of the document
Jama Connect User Guide
647

Key command Function
End Jumps to the end of the line
Ctrl + End Jumps to the end of the document
PgDn Scrolls down the document by the length of the editing area
PgUp Scrolls up the document by the length of the editing area
Ctrl + L Opens the link window
Table 7. Rich text writing and formattingKey command Function
Shift + Enter Adds a line break
Ctrl + Z Undo the last change
Ctrl + Y Redo the last change
Ctrl + C Copies a text fragment to the clipboard
Ctrl + V, Shift + Insert Pastes a text fragment from the clipboard
Ctrl + X, Shift + Del Cuts a text fragment to the clipboard
Ctrl + B Applies or removes bold formatting
Ctrl + I Applies or removes italic formatting
Ctrl + U Applies or removes underline
Ctrl + A Selects all field contents
Shift + Arrow Selects text letter by letter
Ctrl + Shift + Arrow Selects text word by word
Shift + End Selects a text fragment from the cursor to the end of the line.
Shift + Home Selects a text fragment from the beginning of the line to the cursor.
Ctrl + Shift + End Selects a text fragment from the cursor to the end of the document
Ctrl + Shift + Home Selects a text fragment from the beginning of the document to the cursor
Shift + PgDn Selects a text fragment of approximately the length of the editing area, starting from the cursor and go-ing down
Shift + PgUp Selects a text fragment of approximately the length of the editing area, starting from the cursor and go-ing up
Table 8. Review navigationKey command Function
Tab Move from one highlighted comment to another
Get help Do you have a question that's not covered in the Jama Connect User Guide?
Visit our Support Community where you can find answers, start discussions, share ideas, and accessdeveloper documentation.
As part of your contract, your organization can get additional help from our support staff. Your organiza-tion's named support contact can submit tickets directly to our support staff.
If you have a large team to train quickly, need to integrate Jama Connect with other tools, or want to gobeyond the basics, Jama Software offers training courses and other professional services to help yoube more successful.
• Education and Tutorials• How-To Videos and other Resources• Business Services
Let us know how we can help you.
Jama Connect User Guide
648

Glossaryactions Actions help clarify and surface important conversations in the stream
by identifying a comment as one of three types: decision, question, orissue.
approver An approver reviews content against a standard and approves or re-jects an item for correctness or completeness.
attachment Attachments are external files such as images, documents and spread-sheets that can be attached to an item.
baseline A baseline captures the state of selected items and their relationshipswithin a project at a certain point in time.
Baseline Compared to Cur-rent Report
The Baseline Compared to Current Report displays a side-by-sidecomparison of items and relationships in a baseline and their currentversions.
Baseline Comparison Re-port
The Baseline Comparison Report displays a side-by-side comparisonof items and relationships in two baselines.
baseline ID Baseline IDs are unique IDs assigned to each baseline. Baseline IDsare automatically generated and numbered sequentially in the orderthey were created. They can't be edited or duplicated.
batch transitions With batch transitions, you can select multiple items of the same itemtype and transition them to a different workflow status.
Bidirectional TraceabilityReport
The Bidirectional Traceability Report displays upstream and down-stream relationships for a selected container of items.
bookmarks Bookmarks are links to content you view frequently at the top of yourhomepage.
bottom panel This panel slides in from the bottom of the center panel to give moredetail on items such as relationships, the activity stream, version histo-ry, and merged items.
change request Change requests are items that call for a change to a specific productor system.
child item An item that falls hierarchically below a parent item of the same itemtype.
collaborator license A collaborator license is a named or floating license that gives read-on-ly privileges to those who need visibility into a project, but don’t needediting rights. These users can view items, provide comments, partici-pate in (but not create) reviews, execute test runs and log defects.
comments Comments are user-created messages found in the stream or in re-views.
Compare View Compare View shows side by side content so you can compare differ-ences between different item versions.
component A component is a structural container used to organize a project intomore manageable pieces.
Jama Connect User Guide
649
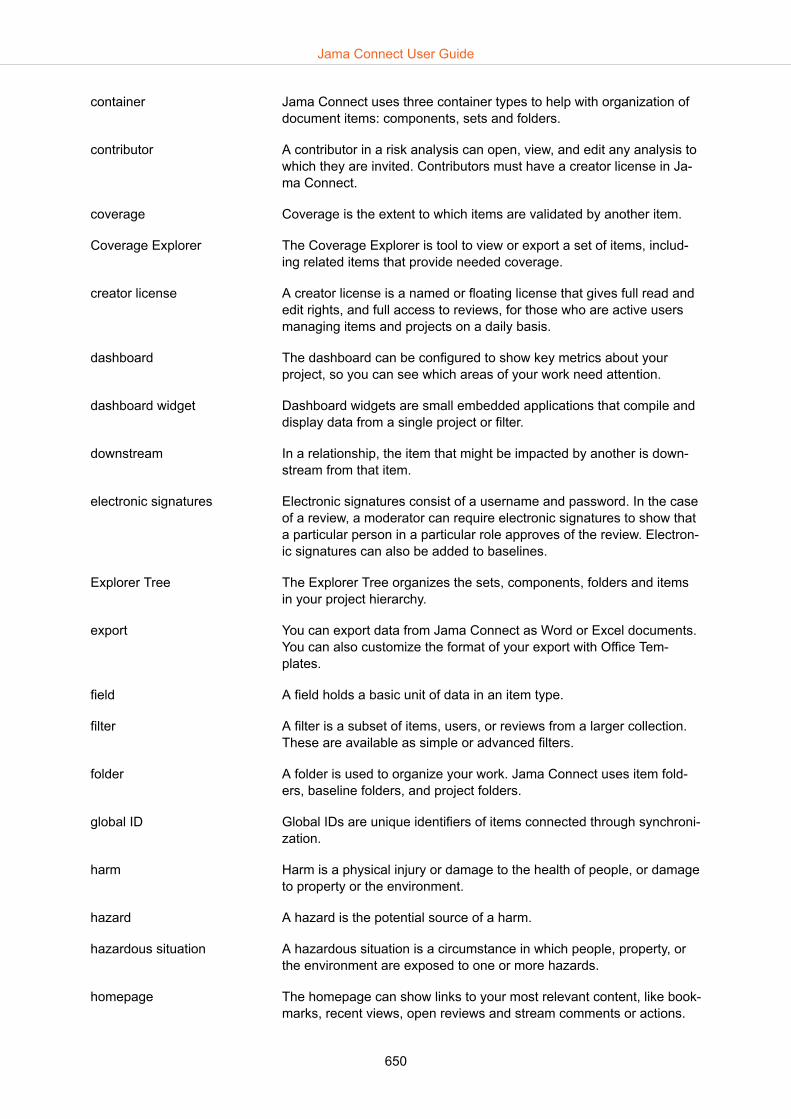
container Jama Connect uses three container types to help with organization ofdocument items: components, sets and folders.
contributor A contributor in a risk analysis can open, view, and edit any analysis towhich they are invited. Contributors must have a creator license in Ja-ma Connect.
coverage Coverage is the extent to which items are validated by another item.
Coverage Explorer The Coverage Explorer is tool to view or export a set of items, includ-ing related items that provide needed coverage.
creator license A creator license is a named or floating license that gives full read andedit rights, and full access to reviews, for those who are active usersmanaging items and projects on a daily basis.
dashboard The dashboard can be configured to show key metrics about yourproject, so you can see which areas of your work need attention.
dashboard widget Dashboard widgets are small embedded applications that compile anddisplay data from a single project or filter.
downstream In a relationship, the item that might be impacted by another is down-stream from that item.
electronic signatures Electronic signatures consist of a username and password. In the caseof a review, a moderator can require electronic signatures to show thata particular person in a particular role approves of the review. Electron-ic signatures can also be added to baselines.
Explorer Tree The Explorer Tree organizes the sets, components, folders and itemsin your project hierarchy.
export You can export data from Jama Connect as Word or Excel documents.You can also customize the format of your export with Office Tem-plates.
field A field holds a basic unit of data in an item type.
filter A filter is a subset of items, users, or reviews from a larger collection.These are available as simple or advanced filters.
folder A folder is used to organize your work. Jama Connect uses item fold-ers, baseline folders, and project folders.
global ID Global IDs are unique identifiers of items connected through synchroni-zation.
harm Harm is a physical injury or damage to the health of people, or damageto property or the environment.
hazard A hazard is the potential source of a harm.
hazardous situation A hazardous situation is a circumstance in which people, property, orthe environment are exposed to one or more hazards.
homepage The homepage can show links to your most relevant content, like book-marks, recent views, open reviews and stream comments or actions.
Jama Connect User Guide
650

Impact Analysis Impact Analysis shows you the entire picture of all upstream and down-stream related items that might be affected by changes.
import You can import data into Jama Connect from Microsoft Word, Excel,and IBM Doors.
Import Relationships Plugin The Import Relationships Plugin helps you batch create relationshipsbetween existing items in the application.
index The index is a list of information about each item that ensures properdisplay, sorting, filtering, and searching of data.
item Items are the building blocks of Jama Connect. Projects are made upof items. Items are made up of fields. Items can be containers (sets,folders, components or parent items) or documents (features, require-ments, test cases, tasks, defects).
item counter The item counter automatically assigns numbers to items as part oftheir ID.
item ID Item IDs are unique identifiers for each item that, unlike a Global IDs,can't be duplicated.
Items in a Set Report The Items in a Set Report displays a tabular list of items in a set.
item types Item types are the templates for sets used within each project.
item widget Item widgets add functionality to item types (for example, add links, at-tachments, relationships and tags)
left panel The left panel is where you can find and organize your data. It containsthe Explorer Tree, advanced filters, releases, baselines, tests andtags.
license The license gives permission to an organization to install and run theJama Connect application.
license type The license type limits the possible permissions and roles that can begranted to a user (for example, creator, stakeholder, test runner and re-viewer).
List View List View shows data from multiple items in a table with a different fieldin each column so you can sort, select and compare items at a glance.
lock A lock makes items read-only. Locks can be set automatically or man-ually.
moderator A review moderator is a user who creates and manages a review. Arisk moderator is a user who creates and manages a risk analysis.Moderators must have a creator license type.
notifications Notifications are optional emails sent to groups or individuals alert youwhen certain changes are made.
Office Templates Microsoft Office Templates are Word documents and Excel spread-sheets that allow you to add formatting to your exports.
organization An organization represents the entire group of users who have accessto your instance of Jama Connect as well as all the projects, items, anddata.
Jama Connect User Guide
651
organization administrator An organization administrator has administrative control of the JamaConnect application. An organization might have one or more organi-zation administrators.
P1 The probability that a hazardous situation occurs.
P2 The probability that a hazardous situation results in harm.
permissions Permissions allow users to do things such as access, modify and de-lete items or perform other specific tasks.
pick lists Pick lists are a set of specific values that can be entered into a field.
project A project is a way of organizing your data in Jama Connect and ismade up of items, filters, baselines, releases, reports and tests.
project administrator A project administrator is a role that has the necessary permissions tomanage a particular project.
project key The project key is a unique identifier, automatically created with eachproject, that makes up the first part of each item's Unique ID.
Projects workflow You can set up a workflow in Projects, so that users at your organiza-tion can move items in your project along a similar path as they pro-gress.
Reading View Reading View shows text and images for a particular group of items soyou can read through selected items like a document.
relationship Relationships link items together and can help assess the impact anitem or group of items can have on other items.
Relationship Status Indica-tor
The Relationship Status Indicator shows how many relationships anitem has, as well as whether those relationships meet the project's re-lationship rules.
release A release is a group of items that are developed together and mappedto a specific completion date.
Release Status Report The Release Status Report displays the current state of the items with-in a particular release.
Replicated snapshots Replicated snapshots are backups of the admin console settings,Docker containers and the Jama Connect license.
report A report is a document that helps you analyze the current status andprogress in your work. Reports can include graphs, tabular data, met-rics and other roll-ups.
required fields Required fields are string, text or date fields that are configured so thatthe user must enter data into the field before saving an item.
REST API Jama Software REST API is an application program interface to assistdevelopers in a clean, straightforward integration with the application.
reuse Reuse is the duplication of an item within a project or to a differentproject where it can be modified without affecting the original item.
reuse administrator A reuse administrator is a role with the permissions needed to managereuse.
Jama Connect User Guide
652

review Reviews help teams, stakeholders and customers collaborate in JamaConnect discuss, review, revise and approve information.
review administrator A review administrator is a role with the permissions needed to man-age reviews.
Review Center Stats Report The Review Center Stats Report displays the progress of a specific re-view.
reviewer A reviewer participates in a review to provide feedback.
reviewer license A reviewer license is a named or floating license that grants permissionto participate in reviews, act as approvers, moderators, or review ad-ministrators, and respond to comments in the stream. A reviewer li-cense doesn't allow users to initiate reviews or access items in thecore project.
Reviews workflow A reviews workflow is a tool for moderators to update the status of re-viewed items. When configured, the reviews workflow automatically up-dates field values for review items of the same type and review status.
right panel The right panel slides out to provide more specific information aboutthe data you selected.
risk administrator A risk administrator has full permissions to create and edit risk tem-plates and analyses and manage participants.
risk control measures The procedures or requirements implemented to reduce risk levels.
risk control options The means by which a risk is reduced.
risk control verification Confirmation that specified requirements were fulfilled.
risk ID Risk IDs are unique IDs assigned to each row in an analysis. Risk IDsare automatically generated across all analyses and numbered se-quentially in the order they were created.
risk management Risk management is the systematic application of management poli-cies, procedures and practices to the tasks of analyzing, evaluating,controlling and monitoring risk. (ISO 14971)
role A role is a set of permissions granted to a user so that they can per-form a particular job.
search You can search an index of all database fields, as well as text withinWord, PDF or text attachments, to bring up a list of resulting items.
sequence of events The events that lead to a hazardous situation.
set A structural container with configurable access rights, used to groupitems of the same type. It can also contain folders, text Items, child textitems and child items of the same type.
set key The set key identifies item sets within your project and doesn't have tobe unique across sets or projects.
severity Severity is the measure of the possible consequences of a hazard.
signature meaning Signature meaning is a system setting that states the meaning of theelectronic signature. It's required for FDA 21 CFR Part 11 compliance.
Jama Connect User Guide
653

In Jama Connect, it defaults to "I approve this review" and can't bemodified. The signature meaning is visible in review invitations.
signer role A signer role indicates the capacity in which an approver provided theirelectronic signature in a review. Signer roles are created from usergroup names.
Single Item View Single Item View displays the information about one item in the centerpanel.
stakeholder license A stakeholder license is a named license that gives read-only privileg-es to those who need visibility into a project, but don’t need editingrights. Stakeholders can view items, provide comments and act as re-viewers.
stream The stream is a collection of the most recent comments and activities(adds, deletes, or edits).
suspect links Suspect links on an item mean it might no longer be correct or com-plete, because changes were made to items upstream.
synchronization Synchronization monitors for differences between reused items andcontainers. When differences exist, users can update the data forthose items or containers.
system administrator The system administrator handles the overall installation, setup, andconfiguration of Jama Connect, and doesn't have access to projects.They don't require a special license and are the only user who can login to the system as "root user."
system fields System fields (like, name, test steps, test case status, and review sta-tus) are automatically created to provide system functionality and can'tbe disabled or deleted.
system health report The system health report is an optional feature that notifies administra-tors of areas of the application that can affect performance and userexperience.
tags Tags are labels you can attach to items that can help you find itemsthat have something in common.
Task List with Estimates Re-port
The Task List with Estimates Report displays all item types and sumstheir estimates if applicable.
temporary license A temporary license is a 30-day full creator license, automatically gran-ted to a non-licensed individual whose email address is used to invitethem to a review or to comment in the stream. It has no default permis-sions except for the discussion thread or review to which they were in-vited, although an organization administrator can add permissions.
test case Test cases are items that contain the tests needed to validate or verifyproduct features or systems.
test case status Test case status is an automatically calculated status that indicates thestate of the last edited test run associated with that test case.
test cycle Test cycles convert groups of test cases into a series of test runs thatare ready for execution.
Jama Connect User Guide
654
test group Test groups let you combine and label similar tests in a test plan.
test plan A test plan is an item that documents the overall strategy for validatingor verifying that a product or system meets its design specificationsand requirements.
Test Plan Detail Report The Test Plan Detail Report displays the details of a test plan.
test run A test run is an item used to record results for a test case you ranagainst your product.
test runner license A test runner license is a named license that includes basic permis-sions to read and review, as well as the additional ability to create testplans and defects, and execute test runs.
test run status Test run status indicates the current state of a test run, and is used incalculating test case status.
test steps Test steps are distinct steps used to run a test.
text item Text items are unique; some rules apply while others do not. They liveoutside the boundary of other item types and aren't designed to func-tion as a full feature. For example, text items can be used as part of amixed item set, unlike other types.
thread dumps A thread dump is a snapshot of the state of your application instances'processes at a point in time.
toolbar The toolbar is located at the top of the center panel.
traceability Traceability shows the relationship between items that depend uponand define each other. You can always travel upstream or downstreamto get more context and trace product definition from high level require-ments all the way through final tests.
trace matrix The trace matrix is a visual representation of relationships within aproject.
Trace Relationships Report The Trace Relationships Report displays items with their downstreamrelationships.
Trace View Trace View shows related upstream and downstream items, missingrelationships, and item details in context of their relationship.
trial license A trial license is a 30-day license granted to new users who sign up fora trial of Jama Connect on jamasoftware.com.
unique ID Unique IDs, or item IDs, identify an item with a project key, set key, anda set counter. Unique IDs remain the same even if item name or con-tent is changed. They can't be edited or duplicated.
upstream In a relationship, the item that can impact another item is said to be up-stream from that item.
user A user is a basic role associated with a unique Jama Connect login.Each user has their own license type, groups, and permissions.
user group User groups are an efficient way to manage notifications, permissions,access, and actions for multiple users at a time.
Jama Connect User Guide
655
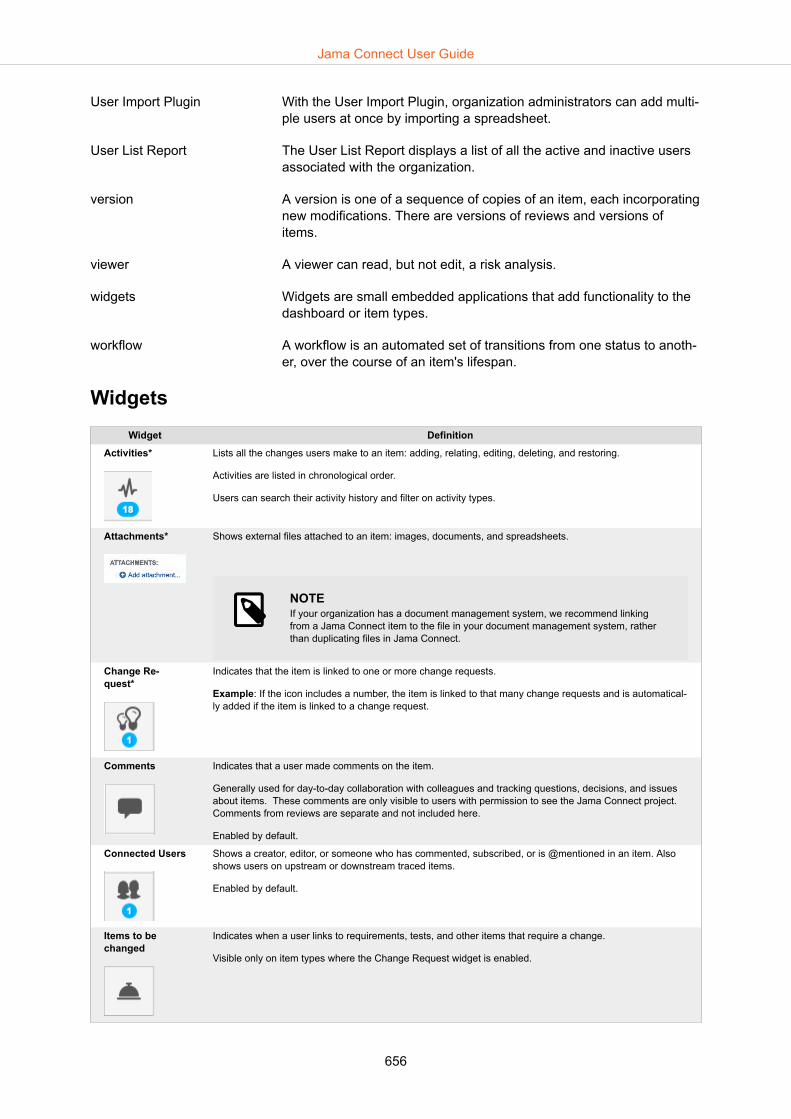
User Import Plugin With the User Import Plugin, organization administrators can add multi-ple users at once by importing a spreadsheet.
User List Report The User List Report displays a list of all the active and inactive usersassociated with the organization.
version A version is one of a sequence of copies of an item, each incorporatingnew modifications. There are versions of reviews and versions ofitems.
viewer A viewer can read, but not edit, a risk analysis.
widgets Widgets are small embedded applications that add functionality to thedashboard or item types.
workflow A workflow is an automated set of transitions from one status to anoth-er, over the course of an item's lifespan.
WidgetsWidget Definition
Activities* Lists all the changes users make to an item: adding, relating, editing, deleting, and restoring.
Activities are listed in chronological order.
Users can search their activity history and filter on activity types.
Attachments* Shows external files attached to an item: images, documents, and spreadsheets.
NOTEIf your organization has a document management system, we recommend linkingfrom a Jama Connect item to the file in your document management system, ratherthan duplicating files in Jama Connect.
Change Re-quest*
Indicates that the item is linked to one or more change requests.
Example: If the icon includes a number, the item is linked to that many change requests and is automatical-ly added if the item is linked to a change request.
Comments Indicates that a user made comments on the item.
Generally used for day-to-day collaboration with colleagues and tracking questions, decisions, and issuesabout items. These comments are only visible to users with permission to see the Jama Connect project.Comments from reviews are separate and not included here.
Enabled by default.
Connected Users Shows a creator, editor, or someone who has commented, subscribed, or is @mentioned in an item. Alsoshows users on upstream or downstream traced items.
Enabled by default.
Items to bechanged
Indicates when a user links to requirements, tests, and other items that require a change.
Visible only on item types where the Change Request widget is enabled.
Jama Connect User Guide
656
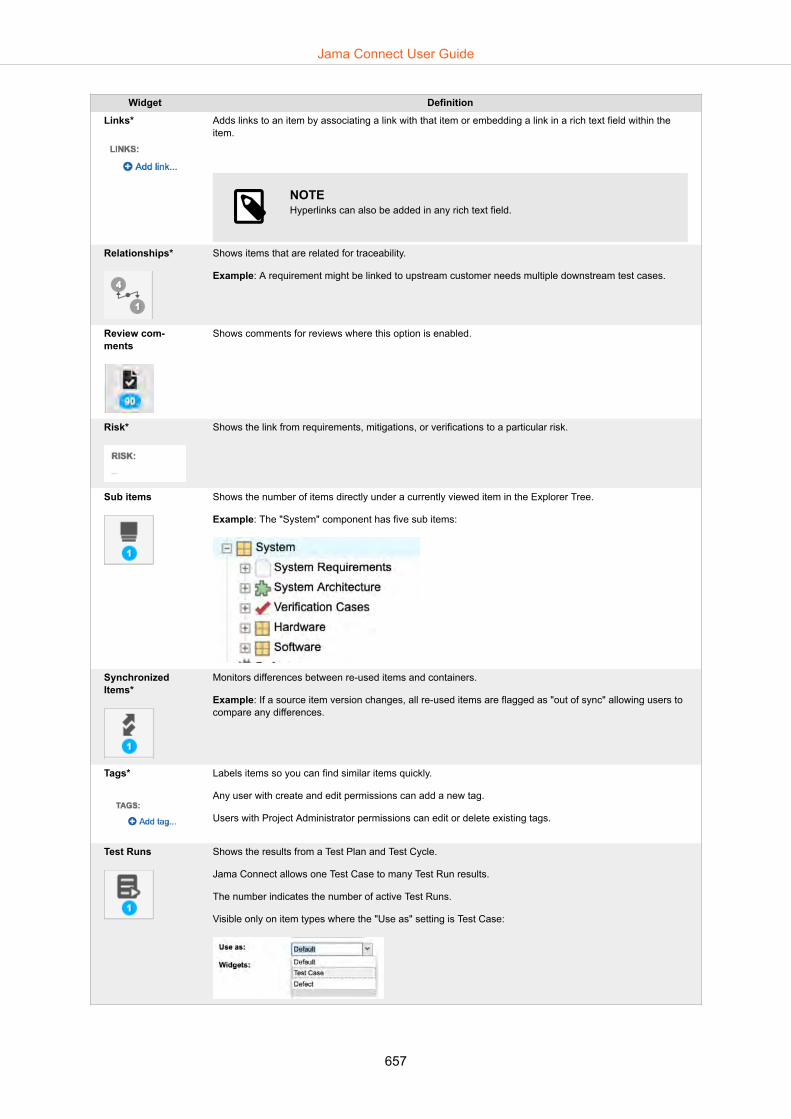
Widget Definition
Links* Adds links to an item by associating a link with that item or embedding a link in a rich text field within theitem.
NOTEHyperlinks can also be added in any rich text field.
Relationships* Shows items that are related for traceability.
Example: A requirement might be linked to upstream customer needs multiple downstream test cases.
Review com-ments
Shows comments for reviews where this option is enabled.
Risk* Shows the link from requirements, mitigations, or verifications to a particular risk.
Sub items Shows the number of items directly under a currently viewed item in the Explorer Tree.
Example: The "System" component has five sub items:
SynchronizedItems*
Monitors differences between re-used items and containers.
Example: If a source item version changes, all re-used items are flagged as "out of sync" allowing users tocompare any differences.
Tags* Labels items so you can find similar items quickly.
Any user with create and edit permissions can add a new tag.
Users with Project Administrator permissions can edit or delete existing tags.
Test Runs Shows the results from a Test Plan and Test Cycle.
Jama Connect allows one Test Case to many Test Run results.
The number indicates the number of active Test Runs.
Visible only on item types where the "Use as" setting is Test Case:
Jama Connect User Guide
657
Widget Definition
Versions* Shows the number of versions.
A new version is created each time you change an item. You can compare versions or revert to a past item.
* Widget is only visible on item types where a system administrator has enabled [578] it.
Recommended
At minimum, enable these widgets:
• Activities• Relationships• Synchronized items• Versions
Jama Connect User Guide
658