SINEMA Remote Connect - Server - RealPars
160
SIMATIC NET Industrial Remote Communication - Remote Networks SINEMA Remote Connect - Server Operating Instructions 01/2021 C79000-G8976-C383-09 Preface Application and properties 1 Requirements for operation 2 Installation and commissioning 3 Configuring with Web Based Management 4 Upkeep and maintenance 5 Appendix A A Appendix B B Appendix C C Appendix D D
-
Upload
khangminh22 -
Category
Documents
-
view
3 -
download
0
Transcript of SINEMA Remote Connect - Server - RealPars

SIMATIC NET
Industrial Remote Communication - Remote Networks SINEMA Remote Connect - Server
Operating Instructions
01/2021 C79000-G8976-C383-09
Preface
Application and properties 1
Requirements for operation 2
Installation and commissioning
3
Configuring with Web Based Management
4
Upkeep and maintenance 5
Appendix A A
Appendix B B
Appendix C C
Appendix D D
Siemens AG Digital Industries Postfach 48 48 90026 NÜRNBERG GERMANY
Document order number: C79000-G8976-C383 Ⓟ 01/2021 Subject to change
Copyright © Siemens AG 2014 - 2021. All rights reserved
Legal information Warning notice system
This manual contains notices you have to observe in order to ensure your personal safety, as well as to prevent damage to property. The notices referring to your personal safety are highlighted in the manual by a safety alert symbol, notices referring only to property damage have no safety alert symbol. These notices shown below are graded according to the degree of danger.
DANGER indicates that death or severe personal injury will result if proper precautions are not taken.
WARNING
indicates that death or severe personal injury may result if proper precautions are not taken.
CAUTION indicates that minor personal injury can result if proper precautions are not taken.
NOTICE
indicates that property damage can result if proper precautions are not taken. If more than one degree of danger is present, the warning notice representing the highest degree of danger will be used. A notice warning of injury to persons with a safety alert symbol may also include a warning relating to property damage.
Qualified Personnel The product/system described in this documentation may be operated only by personnel qualified for the specific task in accordance with the relevant documentation, in particular its warning notices and safety instructions. Qualified personnel are those who, based on their training and experience, are capable of identifying risks and avoiding potential hazards when working with these products/systems.
Proper use of Siemens products Note the following:
WARNING Siemens products may only be used for the applications described in the catalog and in the relevant technical documentation. If products and components from other manufacturers are used, these must be recommended or approved by Siemens. Proper transport, storage, installation, assembly, commissioning, operation and maintenance are required to ensure that the products operate safely and without any problems. The permissible ambient conditions must be complied with. The information in the relevant documentation must be observed.
Trademarks All names identified by ® are registered trademarks of Siemens AG. The remaining trademarks in this publication may be trademarks whose use by third parties for their own purposes could violate the rights of the owner.
Disclaimer of Liability We have reviewed the contents of this publication to ensure consistency with the hardware and software described. Since variance cannot be precluded entirely, we cannot guarantee full consistency. However, the information in this publication is reviewed regularly and any necessary corrections are included in subsequent editions.

SINEMA Remote Connect - Server
Operating Instructions, 01/2021, C79000-G8976-C383-09 3
Preface
Purpose of this documentation This manual supports you when installing, configuring and operating the application SINEMA RC Server.
Validity of this documentation This manual is valid for the following software version:
• SINEMA Remote Connect as of version V3.0
Licenses The following licenses are available for the product: Product name Article number of licenses Number of configurable par-
ticipants (users and devices) SINEMA Remote Connect 6GK1720-1AH01-0BV0 4 SINEMA Remote Connect 64 6GK1722-1JH01-0BV0 +64 SINEMA Remote Connect 256 6GK1722-1MH01-0BV0 +256 SINEMA Remote Connect 1024 6GK1722-1QH01-0BV0 +1024
The following products are available for activating the connection to the SINEMA Remote Connect Server: Product name Article number KEY-PLUG SINEMA RC (SCALANCE M-800, SCALANCE S615) 6GK5908-0PB00 SINEMA RC UMC license 6GK1724-2VH03-0BV0 SINEMA RC Client (1 VPN client) license 6GK1721-1XG03-0AA0 SINEMA RC Client (OSD) license 6GK1721-1XG03-0AK0 SINEMA RC API license 6GK1724-3VH03-0BV0
The following licenses are available for the connection to UMC: Software/License Article number TIA Portal User Management Component (UMC) Rental License for 100 user accounts and 365 days Certificate of License for download
6ES7823-1UE30-0YA0
TIA Portal User Management Component (UMC) Rental License for 4000 user accounts and 365 days Certificate of License for download
6ES7823-1UE10-0YA0

Preface
SINEMA Remote Connect - Server
4 Operating Instructions, 01/2021, C79000-G8976-C383-09
Supported products In the "Connectable nodes (Page 24)" section, you can find information about the nodes supported.
Abbreviations/acronyms and terminology • SINEMA RC
In the remainder of the manual, the "SINEMA Remote Connect" software is abbreviated to "SINEMA RC".
• SCALANCE M-800
This abbreviation applies to the following devices if the content of the description applies equally to these devices in the relevant context:
– SCALANCE M874-2
– SCALANCE M874-3
– SCALANCE M876-3
– SCALANCE M876-4
– SCALANCE M812
– SCALANCE M816
• UMC
This abbreviation is used for "User Management Component", a database for the central administration of user data.
• API
This abbreviation stands for "Application Programming Interface", an HTTP-based AP interface via which you can configure the WBM of the SINEMA RC server.
New in this release • IPv6 address for the SINEMA RC server
• HTTP-based AP interface
• New structure of the "System" menu
• New "Services" menu
• Cloud-based connection
• Support of DHCP
• Logging the firewall events
• Downloading the SINEMA RC Client software from the SINEMA RC server
• Displaying the customer-specific information texts on the server login screen
• Applying the customer-specific logo to the screen of the SINEMA RC Client

Preface
SINEMA Remote Connect - Server
Operating Instructions, 01/2021, C79000-G8976-C383-09 5
Required experience To be able to configure and operate the system described in this document, you require experience of the following products, systems and technologies:
• SIMATIC NET - Remote Networks
• IP-based communication
• STEP 7 Basic / Professional
• SIMATIC S7
Further documentation • Operating instructions "SINEMA Remote Connect Client"
This manual supports you when installing, configuring and operating the application SINEMA RC Client.
• Getting Started "SINEMA Remote Connect"
Based on an example, the configuration of SINEMA Remote Connect is shown.
• Getting Started "SINEMA Remote Connect API server"
This manual supports you with the WBM configuration of the SINEMA RC server via the AP interface.
• Getting Started "SINEMA RC Cloud Installation
This manual supports you with the SINEMA RC installation in a cloud.
You will find the manual on the Internet pages of Siemens Industry Online Support
• "UMC Web UI User Manual"
This manual supports you when creating and managing user accounts in the UMC.
Current manuals and further information You will find the current manuals and further information on remote networks products on the Internet pages of Siemens Industry Online Support:
• Using the search function:
Link to Siemens Industry Online Support (https://support.industry.siemens.com/cs/ww/en/ps/21816)
Enter the entry ID of the relevant manual as the search item.
• via the navigation in the "Remote Networks" area:
Link to the "Remote Networks" area (https://support.industry.siemens.com/cs/ww/en/ps/21778)
Go to the required product group and make the following settings: "Entry list" tab, Entry type "Manuals"

Preface
SINEMA Remote Connect - Server
6 Operating Instructions, 01/2021, C79000-G8976-C383-09
You will find the documentation for the products relevant here on the data storage medium that ships with some products:
• Product CD / product DVD
• SIMATIC NET Manual Collection
License conditions
Note Open source software
Read the license conditions for open source software carefully before using the product.
You will find license conditions in the following documents on the supplied data medium:
• OSS_SINEMA-RC_86.pdf
Security information Siemens provides products and solutions with industrial security functions that support the secure operation of plants, systems, machines, and networks.
In order to protect plants, systems, machines and networks against cyber threats, it is necessary to implement – and continuously maintain – a holistic, state-of-the-art industrial security concept. Siemens’ products and solutions form one element of such a concept.
Customers are responsible for preventing unauthorized access to their plants, systems, machines and networks. These systems, machines and components should only be connected to the enterprise network or the Internet if and only to the extent necessary and with appropriate security measures (firewalls and/or network segmentation) in place.
You can find more information on protective measures in the area of industrial security by visiting: https://www.siemens.com/industrialsecurity (https://www.siemens.com/industrialsecurity).
Siemens’ products and solutions undergo continuous development to make them more secure. Siemens strongly recommends performing product updates as soon as they are available and using only the latest product versions. Use of product versions that are no longer supported, and failure to apply latest updates may increase customer’s exposure to cyber threats.
To stay informed about product updates, subscribe to the Siemens Industrial Security RSS Feed under https://www.siemens.com/industrialsecurity (https://www.siemens.com/industrialsecurity).
Decommissioning Shut down the device properly to prevent unauthorized persons from accessing confidential data in the device memory.
To do this, restore the factory settings on the device.
Preface
SINEMA Remote Connect - Server
Operating Instructions, 01/2021, C79000-G8976-C383-09 7
Also restore the factory settings on the storage medium.
Training, Service & Support You will find information on Training, Service & Support in the multi-language document "DC_support_99.pdf" on the data medium supplied with the documentation.
SIMATIC NET glossary Explanations of many of the specialist terms used in this documentation can be found in the SIMATIC NET glossary.
You will find the SIMATIC NET glossary here:
• SIMATIC NET Manual Collection or product DVD
The DVD ships with certain SIMATIC NET products.
• On the Internet under the following entry ID:
50305045 (https://support.industry.siemens.com/cs/ww/en/view/50305045)
Trademarks The following and possibly other names not identified by the registered trademark sign ® are registered trademarks of Siemens AG:
SINEMA, SCALANCE

Preface
SINEMA Remote Connect - Server
8 Operating Instructions, 01/2021, C79000-G8976-C383-09

SINEMA Remote Connect - Server
Operating Instructions, 01/2021, C79000-G8976-C383-09 9
Table of contents
Preface ................................................................................................................................................... 3
1 Application and properties .................................................................................................................. 13
1.1 Application ........................................................................................................................ 13
1.2 Overview of functions ........................................................................................................ 14
1.3 User concept...................................................................................................................... 15
1.4 Configuration example ...................................................................................................... 17 1.4.1 TeleControl with SINEMA RC .............................................................................................. 17
1.5 Automatic distribution of certificates and firmware ............................................................ 19 1.5.1 Automatic updating of certificates and firmware ................................................................ 19 1.5.2 Updating certificates with fallback connection .................................................................... 21
2 Requirements for operation ................................................................................................................ 23
2.1 Requirements .................................................................................................................... 23
2.2 Connectable nodes ............................................................................................................ 24
2.3 License information ........................................................................................................... 26
2.4 Permitted characters .......................................................................................................... 27
2.5 Performance data .............................................................................................................. 28
3 Installation and commissioning .......................................................................................................... 29
3.1 Security recommendations................................................................................................. 29
3.2 Installing SINEMA RC Server ............................................................................................... 33
3.3 Initial commissioning of end devices using the WBM .......................................................... 35
4 Configuring with Web Based Management ........................................................................................ 37
4.1 Opening Web Based Management ...................................................................................... 37
4.2 Starting the WBM ............................................................................................................... 37 4.2.1 Logon with user name and password ................................................................................. 37 4.2.2 Logging on with UMC ........................................................................................................ 39 4.2.3 Logon with the Smartcard / user certificates ....................................................................... 41
4.3 Layout of the window ........................................................................................................ 44
4.4 Language selection ............................................................................................................ 47
4.5 System .............................................................................................................................. 47 4.5.1 Overview ........................................................................................................................... 47 4.5.2 Log .................................................................................................................................... 48 4.5.2.1 Log messages .................................................................................................................... 48 4.5.2.2 Log archives ...................................................................................................................... 50 4.5.2.3 Firewall Log ....................................................................................................................... 50

Table of contents
SINEMA Remote Connect - Server
10 Operating Instructions, 01/2021, C79000-G8976-C383-09
4.5.3 Network configuration ....................................................................................................... 51 4.5.3.1 Interfaces .......................................................................................................................... 51 4.5.3.2 DNS ................................................................................................................................... 53 4.5.3.3 Web server ........................................................................................................................ 54 4.5.3.4 Ping ................................................................................................................................... 55 4.5.3.5 Static routes ...................................................................................................................... 55 4.5.4 Address spaces .................................................................................................................. 56 4.5.4.1 Network address space ...................................................................................................... 56 4.5.4.2 VPN address spaces ............................................................................................................ 57 4.5.5 Date & Time ....................................................................................................................... 58 4.5.6 SMS messages and e-mails ................................................................................................. 59 4.5.6.1 SMS gateway provider ....................................................................................................... 59 4.5.6.2 E-mail settings ................................................................................................................... 60 4.5.7 Licenses ............................................................................................................................. 62 4.5.7.1 Overview ........................................................................................................................... 62 4.5.7.2 Online Licenses .................................................................................................................. 63 4.5.7.3 Offline Licenses ................................................................................................................. 64 4.5.8 Update .............................................................................................................................. 65 4.5.9 Backing up & restoring ....................................................................................................... 67 4.5.9.1 Backup copies .................................................................................................................... 67 4.5.9.2 Settings ............................................................................................................................. 69 4.5.10 Power Management........................................................................................................... 70 4.5.10.1 Power Management........................................................................................................... 70 4.5.10.2 Boot Partition..................................................................................................................... 70 4.5.11 Settings ............................................................................................................................. 71 4.5.11.1 Server Information ............................................................................................................. 71 4.5.11.2 Auto Logout ...................................................................................................................... 72
4.6 Remote connections .......................................................................................................... 72 4.6.1 Managing devices .............................................................................................................. 72 4.6.1.1 Overview of device management ....................................................................................... 72 4.6.1.2 Creating a new device ........................................................................................................ 75 4.6.1.3 Updating devices ............................................................................................................... 80 4.6.2 Participant groups .............................................................................................................. 81 4.6.3 Communication relations ................................................................................................... 82 4.6.4 Assigning a node to a group ............................................................................................... 84
4.7 User accounts .................................................................................................................... 84 4.7.1 Overview of the user accounts ........................................................................................... 84 4.7.2 Managing roles and rights.................................................................................................. 86 4.7.3 Create a new user .............................................................................................................. 88 4.7.4 User agreement ................................................................................................................. 92 4.7.5 Client Software .................................................................................................................. 92 4.7.5.1 Client Software .................................................................................................................. 92 4.7.5.2 Client Settings ................................................................................................................... 93 4.7.5.3 Client Licenses ................................................................................................................... 94
4.8 Services ............................................................................................................................. 94 4.8.1 API .................................................................................................................................... 94 4.8.2 UMC settings ..................................................................................................................... 95 4.8.3 Server upload .................................................................................................................... 96 4.8.4 Syslog client ...................................................................................................................... 97 4.8.5 Debug login ....................................................................................................................... 98

Table of contents
SINEMA Remote Connect - Server
Operating Instructions, 01/2021, C79000-G8976-C383-09 11
4.9 Security ........................................................................................................................... 100 4.9.1 Managing certificates....................................................................................................... 100 4.9.1.1 Overview of certificate management ................................................................................ 100 4.9.1.2 CA certificate ................................................................................................................... 101 4.9.1.3 Server certificate .............................................................................................................. 102 4.9.1.4 Importing the Web server certificate ................................................................................. 103 4.9.1.5 Device certificate ............................................................................................................. 105 4.9.1.6 Making settings for certificates......................................................................................... 106 4.9.2 VPN connections .............................................................................................................. 107 4.9.2.1 Making VPN basic settings ................................................................................................ 107 4.9.2.2 Making OpenVPN settings ................................................................................................ 107 4.9.2.3 Making the IPsec settings ................................................................................................. 108 4.9.2.4 Creating IPsec profiles ...................................................................................................... 110 4.9.3 PKI Certificate Management ............................................................................................. 111 4.9.3.1 PKI CA certificate .............................................................................................................. 111 4.9.3.2 Locking out Smartcard / user certificate ............................................................................ 112 4.9.4 Syslog Certificate Management ........................................................................................ 114 4.9.4.1 Syslog CA Certificates ....................................................................................................... 114 4.9.4.2 Syslog Certificates ............................................................................................................ 116 4.9.4.3 Revoking Syslog Certificates ............................................................................................. 117
4.10 My account ...................................................................................................................... 119 4.10.1 User certificate................................................................................................................. 119 4.10.2 Change password ............................................................................................................ 120 4.10.3 Download client software ................................................................................................ 120
5 Upkeep and maintenance.................................................................................................................. 123
5.1 Backing up and restoring the system configuration ........................................................... 123
5.2 System update V1.2 > V1.3 .............................................................................................. 125
5.3 System Update V2.0 > V2.1 .............................................................................................. 130
5.4 System Update V2.1 > V3.0 .............................................................................................. 133
A Appendix A ........................................................................................................................................ 135
A.1 OpenVPN connection to an iOS device.............................................................................. 135
B Appendix B ......................................................................................................................................... 137
B.1 Enabling the e-mail address ............................................................................................. 137
B.2 Monitoring and time response of wake-up SMS messages ................................................ 138
C Appendix C......................................................................................................................................... 139
C.1 Syslog messages .............................................................................................................. 139 C.1.1 Tags in Syslog Messages .................................................................................................. 139 C.1.2 List of Syslog Messages .................................................................................................... 140 C.1.2.1 Identification and authentication of human users ............................................................. 140 C.1.2.2 User account management .............................................................................................. 140 C.1.2.3 Management of the identifiers ......................................................................................... 143 C.1.2.4 Unsuccessful logon attempts ........................................................................................... 144 C.1.2.5 Access via untrusted networks ......................................................................................... 145 C.1.2.6 Identification and authentication of devices ..................................................................... 146 C.1.2.7 Nonrepudiation ............................................................................................................... 146 C.1.2.8 Data backup in automation system (backup) .................................................................... 147

Table of contents
SINEMA Remote Connect - Server
12 Operating Instructions, 01/2021, C79000-G8976-C383-09
C.1.2.9 Restoration of the automation system .............................................................................. 148 C.1.2.10 Network and IT security settings....................................................................................... 151 C.1.2.11 System status .................................................................................................................. 152
D Appendix D ........................................................................................................................................ 153
D.1 Ciphers Used.................................................................................................................... 153
Index .................................................................................................................................................. 157

SINEMA Remote Connect - Server
Operating Instructions, 01/2021, C79000-G8976-C383-09 13
Application and properties 1 1.1 Application
Use of the SINEMA Remote Connect server The SINEMA RC Server provides end-to-end connection management of distributed networks via the Internet. This also includes secure remote access to underlying networks for maintenance, control and diagnostics purposes. The communication between SINEMA RC Server and the remote participants is via a VPN tunnel taking into account the stored access rights. The connection is established encoded using IPsec or OpenVPN.
The SINEMA RC Server can be configured via the Web Based Management (WBM).
The connection to the WBM via the Internet/WAN takes place over the HTTPS protocol. To establish a connection to the WBM of the server, users must log in by entering a user name and password or with a smart card.
Supported products The following products are suitable for connecting to the SINEMA RC Server:
• SCALANCE M874, SCALANCE M876, SCALANCE M816, SCALANCE M826, SCALANCE M804PB
• SCALANCE S615
• SINEMA RC Client
• SCALANCE S602, SCALANCE S612, SCALANCE S623, SCALANCE S627-2M
• SCALANCE SC632-2C, SCALANCE SC636-2C, SCALANCE SC642-2C, SCALANCE SC646-2C
• CP 1200
• CP 1543-1, CP 1543-1SP
• RM 1224
• RTU3010C, RTU3030C, RTU3031C, RTU3041C
In the section "Connectable nodes (Page 24)" you will find information about which product versions and SINEMA RC versions are compatible with each other.

Application and properties 1.2 Overview of functions
SINEMA Remote Connect - Server
14 Operating Instructions, 01/2021, C79000-G8976-C383-09
Protection concept To protect the SINEMA RC Server from unauthorized access, system access is protected in several ways:
• Authentication
– Access is password-protected by entering the user name and password, see section "Create a new user (Page 88)".
– Access is achieved using a smart card with a PIN procedure (Personal Identification Number). To check the identity a certificate is used.
• User rights and roles
The task-dependent access rights are specified using roles and user rights. For more detailed information, refer to the section "Managing roles and rights (Page 86)".
1.2 Overview of functions
Configuring the SINEMA Remote Connect Server The SINEMA RC Server can be configured via a Web Based Management (WBM). In addition, via the HTTP-based AP interface, you can access the WBM of the SINEMA RC server and configure API requests with it. To do this, you need an API license with which you can enable the API server on the SINEMA RC server. You can find additional information in the section "API (Page 94)".
Configuration of the SINEMA RC Server
In the WBM, you can use the following functions:
• Basic settings of the system
– Settings of the system and address parameters
– Language of the WBM
• Specifying users, groups and their rights
– Creation of users and devices including password assignment
– Creation and assignment of roles and rights
– Assignment of participant groups
• Configuration of connections
– Creation of communication relations between the participant groups
Commissioning/configuration of end devices
• You can create partial configurations globally for the end devices. This includes, for example, configuration of NAT etc.
• Via the server, configuration information can be loaded on the end device.

Application and properties 1.3 User concept
SINEMA Remote Connect - Server
Operating Instructions, 01/2021, C79000-G8976-C383-09 15
Management of the server
• Changing settings of the system or participants
• Activating / deactivating connections between participants
Connection management
• Display of all connections available online and offline
• Connection configuration with creation of certificates
• Establishment and termination of connections
• Sending a wake-up SMS message to a device, for example to establish a secure connection
1.3 User concept SINEMA RC Server has an extensive system of access rights. This system allows the administrator to grant or deny user access to certain program objects individually and according to need. During configuration, you should take into account the following criteria in the role:
• Network security
• IT experience of the users
• The necessity for certain functions
• User friendliness
Note The management of rights is one of the most important tasks of an administrator
This should therefore be planned and configured to meet the specific requirements while taking into account security-relevant aspects. We strongly advise you to familiarize yourself with the user and roles concept of SINEMA RC Server. New or modified settings should always be checked in terms of their intended effect.
Basics The access rights in SINEMA RC are specified using the following objects:
• Users
• Roles
• Rights
• Participant groups
In principle, the following applies:
Every user can be assigned certain rights.
Every role can be assigned various rights that are transferred automatically to all its members (users, participant groups).

Application and properties 1.3 User concept
SINEMA Remote Connect - Server
16 Operating Instructions, 01/2021, C79000-G8976-C383-09
Each user can have several roles and be a member of several participant groups.
Users So that a created user can create and manage other users, the user must have the user right "Manage users" assigned.
"admin" user
As default, after the installation the predefined user "admin" is available. With this user name, you can log in once after the installation. After this you will be prompted to create a new user. The "administrator" role is assigned automatically to this newly created user.
The administrator has the right to access all functions and can set up the system. This includes creating users and assigning roles and rights to them. For more detailed information, refer to the section "Managing roles and rights (Page 86)".
The administrator is listed with the user accounts and can neither be edited nor deleted. The "admin" user name is no longer available.
UMC users SINEMA RC provides the possibility to use the user data stored centrally on a UMC server. In addition, the UMC server can connect to the Windows Active Directory and access its user data. Using the UMC user data means it is not necessary to create individual user accounts locally on the SINEMA RC. The administrator only needs to configure a connection to the UMC on the SINEMA RC server and enter the name of the UMC user group in the role settings for the affected role. The names of the UMC user groups in SINEMA RC must match exactly the names of the UMC user groups in UMC. When a UMC user logs on with UMC, SINEMA RC establishes a connection to the UMC server, accesses the user account via the UMC user group and creates a temporary user with the assigned role.
You can find information on creating and managing user accounts in UMC in the "UMC Web UI User Manual".
Licensing on SINEMA RC
You need a UMC license to be able to use the UMC server.
• Trial license
With the trial license, you have unrestricted use of UMC for 14 days for test and evaluation purposes, but not for productive use. All liability claims are excluded. After the trial license has expired, you need to procure a rental license.
• Rental license
With an activated rental license, you can use UMC without restrictions in SINEMA RC. The rental license is available directly as Certificate of License (CoL).

Application and properties 1.4 Configuration example
SINEMA Remote Connect - Server
Operating Instructions, 01/2021, C79000-G8976-C383-09 17
Logging on The following options are available for logging on:
• Locally to the WBM
– Logon with user name and password
– Logon with the Smartcard
– Logon with PKI certificate
• Via a UMC server
– Logon with user name and password
Roles In SINEMA Server, there are two predefined roles available with corresponding access rights. Standard role Description admin The role has all access rights and does not belong to a participant group. vpn_user The role has no access rights and is assigned to the participant group automati-
cally. The role may only establish VPN connections to the participants that belong to the participant group vpn_user_group.
Participant group in SINEMA RC Server, there is a predefined participant group available. Standard partici-pant group
Description
vpn_user_group The communication between the nodes is not permitted.
1.4 Configuration example
1.4.1 TeleControl with SINEMA RC In this configuration, the remote maintenance master station is a connected to the Internet/intranet via the SINEMA RC Server. The plants communicate via SCALANCE M or the SCALANCE S615 that establish a VPN tunnel to the SINEMA RC Server. In the master station, the SINEMA RC Client establishes a VPN tunnel to the SINEMA RC Server. To establish the VPN tunnel, OpenVPN is used.
The devices must log on to the SINEMA RC server. For this, a WBM is available. The VPN tunnel between the device and the SINEMA RC Server is established only after successful authentication. Depending on the configured communication relations and the security settings, the SINEMA RC server connects the individual VPN tunnels.

Application and properties 1.4 Configuration example
SINEMA Remote Connect - Server
18 Operating Instructions, 01/2021, C79000-G8976-C383-09
Procedure To be able to access a plant via a remote maintenance master station, follow the steps below:
1. Establish the Ethernet connection between the device and the connected configuration PC.
2. Establish a connection to the WAN.
3. Log the new device on to the SINEMA RC Server.
4. Set up the connection to the SINEMA RC Server on the device.
5. Put the new device into operation.
You will find instructions on the procedure in the Getting Started for SINEMA Remote Connect.

Application and properties 1.5 Automatic distribution of certificates and firmware
SINEMA Remote Connect - Server
Operating Instructions, 01/2021, C79000-G8976-C383-09 19
1.5 Automatic distribution of certificates and firmware
1.5.1 Automatic updating of certificates and firmware If a connection is established between the SINEMA RC Server and the SCALANCE router, the router automatically requests firmware and certificate updates. This request is made cyclically at specified time intervals, which you can set as the "Autoenrollment Interval" parameter on the router. For the SCALANCE S615/M-800/SC-600, configure the parameter in the WBM under "System > SINEMA RC".
You can find additional information about this in the configuration manual of the respective device.
Procedure
1. If firmware and certificate updates are available, the SINEMA RC Server renews them automatically or the user can renew them manually.
2. After a time configured in the router, the SCALANCE router cyclically asks the server whether a newer firmware file is available or whether a new certificate is available. The default polling interval is 60 minutes.
3. If the firmware or the certificate has been renewed on the server, the autoconfiguration starts: The OpenVPN connection is terminated briefly.
4. The SCALANCE router initiates the https connection to the SINEMA RC Server.

Application and properties 1.5 Automatic distribution of certificates and firmware
SINEMA Remote Connect - Server
20 Operating Instructions, 01/2021, C79000-G8976-C383-09
5. The SINEMA RC Server sends a configuration file to the SCALANCE router. The SCALANCE router receives the new firmware and certificates and stores them.
6. The SCALANCE router load the complete VPN configuration and establishes the OpenVPN tunnel to the server.
Result
The VPN connection between the SINEMA RC Server and the SCALANCE router is set up.

Application and properties 1.5 Automatic distribution of certificates and firmware
SINEMA Remote Connect - Server
Operating Instructions, 01/2021, C79000-G8976-C383-09 21
1.5.2 Updating certificates with fallback connection Due to expired or invalid certificates, it is not possible to establish a connection via https. As a result, the SCALANCE router cannot automatically update the relevant certificates. To be able to establish the connection between the server and the router despite expired or invalid certificates, the fallback connection takes over during this time.
Procedure
1. Before the certificates expire, the SINEMA RC Server renews them automatically or the user
renews them manually.
2. The SCALANCE router tries to establish an https connection so that automatic configuration is possible. However, the connection is rejected because the certificate of the SCALANCE router is invalid or has expired.
3. The SCALANCE router then starts a fallback connection. The fallback connection is an https connection through a separate https port (port 6220),

Application and properties 1.5 Automatic distribution of certificates and firmware
SINEMA Remote Connect - Server
22 Operating Instructions, 01/2021, C79000-G8976-C383-09
via which the server sends a fallback certificate to the router for verification. The router can now authenticate the server with the fallback certificate.
4. An https connection to the server is established.
5. The SCALANCE router can receive the new certificates and stores them under Certificates. The invalid certificates are automatically deleted. The fallback connection is now complete.
6. The connection to the SINEMA RC Server is now established as usual, but with the new certificates. The SCALANCE router establishes an https connection to the SINEMA RC Server for this purpose. The server identifies itself with its Web server certificate. The router authenticates itself on the server using a fingerprint or CA certificate.
7. The server now starts the automatic configuration for the router. The router receives a configuration file with the required parameters and certificates for setting up the VPN tunnel, including the device certificate and the fallback certificate.
8. The SCALANCE router load the complete VPN configuration and establishes the OpenVPN tunnel to the server.
Result
The VPN connection between the SINEMA RC Server and the SCALANCE router is set up.

SINEMA Remote Connect - Server
Operating Instructions, 01/2021, C79000-G8976-C383-09 23
Requirements for operation 2 2.1 Requirements
Hardware requirements Component Minimum
requirements Recommended requirements
Recommended requirements for the maximum configura-tion limits (see below)
Processor Dual Core CPU 2.4 GHz
Quad Core CPU 2.66 GHz
Quad Core CPU 3.6 GHz 4 threads and hyperthreading disabled
RAM 2 GB 4 GB 8 GB Network adapter 1x 1x
Note: SINEMA RC Server supports up to four network adapt-ers.
1x Gbps Ethernet Note: SINEMA RC Server sup-ports up to four network adapt-ers.
Hard disk > 20 GB > 60 GB 250 GB SSD
Virtualization platforms The SINEMA RC Server application can also be installed in a virtual machine (VM).
• VMware vSphere Hypervisor (ESXi) 6.5
• VMWare Workstation 14
If you want to install the SINEMA RC Server application on a virtual machine, create a partition for a 64-bit Ubuntu system. SINEMA RC itself is an application that already brings the 64-bit Ubuntu system with it as the operating system and installs it like an operating system.
Maximum configuration limits Maximum overall data transfer for all devices: 800 Mbps
Maximum number of devices and users connected simultaneously for one subnet per device: 1024
User/device combinations can be freely selected up to the maximum overall quantity structure.
As the number of subnets is also dependent on the communication relationships permitted among one another, for example, these must be checked/questioned and restricted, where necessary. If devices do not need to communicate with each other, you should suppress communication in order to ensure optimal behavior of the devices.

Requirements for operation 2.2 Connectable nodes
SINEMA Remote Connect - Server
24 Operating Instructions, 01/2021, C79000-G8976-C383-09
2.2 Connectable nodes The connection to SINEMA RC can be established via various media such as mobile wireless, DSL or existing private network infrastructures.
The following SCALANCE products have been tested for connection to SINEMA RC:
SINEMA RC Client
SINEMA RC Client version
1.0 1.0 SP1 1.0 SP2 1.0 SP3 + SP4
2.0 2.1 3.0
SINEMA RC server ver-sion
1.0 ✓ - - - - - - 1.1 - ✓ - - - - - 1.2 - - ✓ - - - - 1.3 - - - ✓ - - - 2.0 - - - - ✓ - - 2.1 - - - - - ✓ - 3.0 - - - - - - ✓
Connectable nodes Device type Node Article number Firmware
version Connection establishment to the
SINEMA RC Server Sub-nets
(vlan) Wake-up
SMS
Digi-tal
input
Per-ma-nent
IPsec Open-VPN
SCALANCE S615
S615 6GK5615-0AA00-2AA2 As of 4.0 - ✓ ✓ ✓ ✓ 16
SCALANCE SC632-2C 6GK5632-2GS00-2AC2 as of 1.0 - ✓ ✓ - ✓ 1) 257

Requirements for operation 2.2 Connectable nodes
SINEMA Remote Connect - Server
Operating Instructions, 01/2021, C79000-G8976-C383-09 25
Device type Node Article number Firmware version
Connection establishment to the SINEMA RC Server
Sub-nets
(vlan) Wake-up
SMS
Digi-tal
input
Per-ma-nent
IPsec Open-VPN
SC-600 SC636-2C 6GK5636-2GS00-2AC2 as of 1.0 - ✓ ✓ - ✓ 1) 257 SC642-2C 6GK5642-2GS00-2AC2 as of 1.0 - ✓ ✓ ✓ ✓ 1) 257 SC646-2C 6GK5646-2GS00-2AC2 as of 1.0 - ✓ ✓ ✓ ✓ 1) 257
SCALANCE S600 2)
S612 6GK5612-0BA10-2AA3 As of 4.0.1.1
- - ✓ ✓ -
S623 6GK5623-0BA10-2AA3 As of 4.0.1.1
- - ✓ ✓ -
S627-M 6GK5627-2BA10-2AA3 As of 4.0.1.1
- - ✓ ✓ -
SCALANCE M800 Mobile
M874-2 6GK5874-2AA00-2AA2 As of 4.1 ✓ ✓ ✓ ✓ ✓ 16 M874-3 6GK5874-3AA00-2AA2 As of 4.1 ✓ ✓ ✓ ✓ ✓ 16 M876-3 6GK5876-3AA02-2BA2 As of 4.1 ✓ ✓ ✓ ✓ ✓ 16 M876-4 6GK5876-4AA00-2BA2
(EU) 6GK5876-4AA00-2DA2 (NAM) 3)
As of 4.1 ✓ ✓ ✓ ✓ ✓ 16
SCALANCE M816 Modems
M816-1 6GK5816-1AA00-2AA2 (EU) 6GK5816-1BA00-2AA2 (NAM) 3)
As of 4.2 - ✓ ✓ ✓ ✓ 16
SCALANCE M804 PB
M804PB 6GK5804-0AP00-2AA2 As of 6.0 - ✓ ✓ ✓ ✓ 16
SIMATIC CP1200
CP 1243-1 6GK7243-1BX30-0XE0 As of 3.1 - - ✓ - ✓ CP 1243-7 LTE
6GK7243-7KX30-0XE0 (EU) 6GK7243-7SX30-0XE0 (NAM) 3)
As of 3.1 - - ✓ - ✓
CP 1243-8 IRC
6GK7243-8RX30-0XE0 As of 3.1 - - ✓ - ✓
SIMATIC CP 1543-1
CP 1543-1 6GK7543-1AX00-0XE0 - - ✓ ✓ - 1
SIMATIC ET 200SP CPs
CP 1543SP-1 6GK7543-6WX00-0XE0 As of 2.0 - - ✓ - ✓ CP 1542SP-1 IRC
6GK7542-6VX00-0XE0 As of 2.0 - - ✓ ✓ ✓
SIMATIC RTU 3010C
RTU3010C 6NH3112-0BA00-0XX0 - - 4) ✓ - ✓
SIMATIC RTU 303XC
RTU3031C 6NH3112-3BB00-0XX0 ✓ - 4) ✓ - ✓ RTU3030C 6NH3112-3BA00-0XX0 ✓ - 4) ✓ - ✓

Requirements for operation 2.3 License information
SINEMA Remote Connect - Server
26 Operating Instructions, 01/2021, C79000-G8976-C383-09
Device type Node Article number Firmware version
Connection establishment to the SINEMA RC Server
Sub-nets
(vlan) Wake-up
SMS
Digi-tal
input
Per-ma-nent
IPsec Open-VPN
SIMATIC RTU 3040C
RTU3041C 6NH3112-4BB00-0XX0 ✓ - 4) ✓ - ✓
RUGGEDCOM RM1224
RM1224 LTE(4G)
6GK6108-4AM00-2BA2 (EU) 6GK6108-4AM00-2DA2 (NAM) 3)
As of 4.1 ✓ ✓ ✓ ✓ ✓ 16
1) The OpenVPN connection can only be established to the SINEMA RC Server. 2) The configuration can only be performed via SCT (IPsec) with the export/import functions. Autoconfiguration with Open-
VPN is not possible. 3) North America 4) The digital input on the device is not used to establish a connection to the SINEMA RC Server.
2.3 License information
Licenses We distinguish between the following license types. The behavior of the software differs depending on the license type: License types
Description
Demo The following licenses are already included in the installation of the SINEMA RC server: • SINEMA Remote Connect 4: 4 participants • SINEMA Remote Connect Client 1 The Certificate of License determines the type of use.
Update Usage is limited to the specified number of participants or clients With multiple licenses, the participants or clients under "Number" are added. The number of participants can be increased with the following connection licenses: • SINEMA Remote Connect 64: This license supports up to +64 participants. • SINEMA Remote Connect 256: This license supports up to +256 participants. • SINEMA Remote Connect 1024: This license supports up to +1024 participants The number of SINEMA RC Clients can be increased with the following licenses: • SINEMA Remote Connect Client SW, +1 VPN
Trial The use of UMC, API and other client connections is limited to 30 days from the first day of usage. The software may only be used for test and validation purposes.
Single The use of UMC (Page 39) and API (Page 3) is not time-limited.
You can find the article numbers of the licenses in the section "Preface (Page 3)".

Requirements for operation 2.4 Permitted characters
SINEMA Remote Connect - Server
Operating Instructions, 01/2021, C79000-G8976-C383-09 27
License update To expand the license to a higher number of participants/clients, you require an update to a new license. To be able to make a license update, you need to obtain a new license key and enter the corresponding license number in the WBM.
The procedure for activating the license in the WBM is described in the section "Overview (Page 62)".
How many connections can actually be established simultaneously depends on the performance of the server platform.
2.4 Permitted characters
Passwords When creating or changing the passwords, remember the following rules: Allowed characters of a character set according to ANSI X 3.4-1986
0123456789 A...Z a...z !#$%&()*+,-./:;<=>?@[]_{|}~^
Characters not allowed " ' ` Length of the password at least 8 characters and maximum 128 characters
Note Passwords
To improve security, make sure that passwords are as long as possible.
Passwords must be at least 8 characters long and contain special characters, upper and lowercase characters as well as numbers.
Role names When creating or changing the role names, remember the following rules: Allowed characters of a character set
0123456789 A...Z a...z _ - . +
Characters not allowed " ' ` Length of the role name 1 to 80 characters

Requirements for operation 2.5 Performance data
SINEMA Remote Connect - Server
28 Operating Instructions, 01/2021, C79000-G8976-C383-09
Group names When creating or changing the group names, remember the following rules: Allowed characters of a character set
0123456789 A...Z a...z _ . @ + -
Characters not allowed " ' ` Length of the group name 1 to 50 characters
User names and device names When creating or changing the names, remember the following rules: Allowed characters of a character set
0123456789 A...Z a...z _
Characters not allowed " ' `!#$%&()*+,-./:;<=>?@[〵]_{|}~^ Not allowed for user names admin Not allowed for device names conn Length of the name 1 to 30 characters
Note User names
To improve security, make sure that user names are as long as possible.
Hostname Allowed characters of a character set according to ANSI X 3.4-1986
0123456789 A...Z a...z -.
2.5 Performance data Maximum number of participant groups Not limited Maximum number of participants per participant group
Not limited
Maximum number of local backup copies 30 Maximum number of log archives 100

SINEMA Remote Connect - Server
Operating Instructions, 01/2021, C79000-G8976-C383-09 29
Installation and commissioning 3 3.1 Security recommendations
Keep to the following security recommendations to prevent unauthorized access to the system.
General • You should make regular checks to make sure that the device meets these
recommendations and other internal security guidelines if applicable.
• Evaluate your plant as a whole in terms of security. Use a cell protection concept with suitable products (https://www.industry.siemens.com/topics/global/en/industrial-security/network-security/Pages/Default.aspx).
• Do not connect the device directly to the Internet. Operate the device within a protected network area.
Access to the server • Restrict physical access to the SINEMA RC Server to qualified personnel.
The SINEMA RC Server has an extensive system of access rights. This system allows you to grant or deny access to certain program objects individually and according to need.
Physical access • Restrict physical access to the device to qualified personnel. Use the security mechanisms
of SINEMA RC.
• Protect the SINEMA RC Server from unauthorized access by installing it in racks / control cabinets / in control rooms that can be locked.
Security functions of the software • Keep the software up to date.
– Check regularly for security updates for the product. You can find information on this at (https://support.industry.siemens.com/cs/ww/en/ps/21713/dl).
The update file is signed. This ensures that only an update file created by Siemens can be downloaded.
– Inform yourself regularly about security recommendations by published by Siemens ProductCERT (https://www.siemens.com/global/en/home/produkte/services/cert.html).
• The SINEMA RC Server includes an automatic logging function. Check this information regularly for unauthorized access.

Installation and commissioning 3.1 Security recommendations
SINEMA Remote Connect - Server
30 Operating Instructions, 01/2021, C79000-G8976-C383-09
Passwords • Define rules for the use of devices and assignment of passwords.
• Regularly update the passwords to increase security.
• Only use passwords with a high password strength.
• Make sure that all passwords are protected and inaccessible to unauthorized personnel.
• A password must be changed if it is known or suspected to be known by unauthorized persons.
• Do not use one password for different users and systems.
Keys and certificates This section deals with the security keys and certificates you require to establish a connection.
• The device contains a pre-installed X.509 certificate with key. Replace this certificate with a self-made certificate with key. We recommend that you use a certificate signed by a reliable external or internal certification authority.
• Use a certification authority including key revocation and management to sign the certificates.
• Make sure that user-defined private keys are protected and inaccessible to unauthorized persons.
• Verify certificates and fingerprints on the server and client to prevent "man in the middle" attacks.
• It is recommended that you use password-protected certificates in the PKCS#12 format
• Change keys and certificates immediately if there is a suspicion of compromise.
• We recommend that you use certificates with a key length of 4096 bits.
• The product supports RSA 1024 - 8192 bits key length.
Available protocols The following list provides you with an overview of all used services of the product.
Keep this in mind when configuring a firewall.
The table includes the following columns:
• Protocol
• All protocols that the device supports

Installation and commissioning 3.1 Security recommendations
SINEMA Remote Connect - Server
Operating Instructions, 01/2021, C79000-G8976-C383-09 31
• Port number
Port number assigned to the protocol
• Port status
– Open
The port is always open and cannot be closed. To use it, authentication is necessary.
– Open (when configured)
The port is open if it has been configured. To use it, authentication is necessary. Service Protocol
Port number
Preset port status
Configurable Authentica-tion
Encryption
Ser-vice
Port
HTTPS TCP 443 Open -- ✓ ✓ -- HTTPS for certifi-cate auto enroll-ment
TCP 6220 Open -- ✓ ✓ --
OpenVPN UDP 1194 Open ✓ ✓ ✓ -- TCP 5443 Open ✓ ✓ ✓
IPsec ESP n/a Open ✓ -- ✓ -- IPsec encapsulat-ed
UDP 500 Open ✓ -- ✓ --
IPsec encapsulat-ed NAPT
UDP 4500 Open ✓ -- ✓ --
SSH TCP 22 Open (when configured)
-- ✓ ✓ ✓
Syslog over TLS UDP TCP
514 Outgoing only
-- ✓ ✓ ✓
Table 3- 1 Services available
Protocol Port number Port status Port changeable
Authentica-tion
HTTPS TCP 443 Open ✓ ✓ HTTPS for certifi-cate auto enroll-ment
TCP 6220 Open ✓ ✓
OpenVPN UDP 1194 Open ✓ ✓ TCP 5443 Open ✓ ✓
IPsec ESP n/a Open -- ✓ IPsec encapsulated UDP 500 Open -- ✓ IPsec encapsulated NAPT
UDP 4500 Open -- ✓
SSH TCP 22 Open (when config-ured)
✓ ✓

Installation and commissioning 3.1 Security recommendations
SINEMA Remote Connect - Server
32 Operating Instructions, 01/2021, C79000-G8976-C383-09
Protocol Port number Port status Port changeable
Authentica-tion
Licensing TCP UDP
22350 Open with activa-tion of the online license of the product
-- ✓
Syslog UDP TCP
514 Outgoing only ✓ ✓
-- ✓
Table 3- 2 Services used
Protocol Port num-ber
Port status
NTP UDP 123 Outgoing when configured DNS TCP 53 Outgoing when configured E-mail client TCP 25 or other Outgoing HTTPS - CRL retrieval TCP according
to URL Outgoing
HTTPS - license activa-tion
TCP 443 Outgoing with activation of the online license of the product

Installation and commissioning 3.2 Installing SINEMA RC Server
SINEMA Remote Connect - Server
Operating Instructions, 01/2021, C79000-G8976-C383-09 33
3.2 Installing SINEMA RC Server
Note Keyboard layout during installation
During installation the keyboard layout "English (USA, International)" is set.
Requirement • In the startup order, the CD/DVD is set as the first boot medium.
• The hardware requirements are met.
New installation
NOTICE
Re-installation formats the hard disk
The new installation of the SINEMA RC server includes its own operating system, based on Ubuntu 18.04 LTS. If you use a PC on which an operating system already exists, the hard disk will be formatted. This means that existing data is lost. Make sure that all important data on the PC has been backed up.
1. Insert the data medium in the drive.
2. Switch on the PC or restart the server. Installation starts automatically.
3. In the following dialog, select the entry "Install/Update SINEMA Remote Connect Server". Confirm the selection with the ENTER key.
If a version is already installed, select "Install - Fresh installation" in the following dialog. The previous configurations of the SINEMA RC Server are not adopted.
4. Follow the further instructions on the screen.
During the installation, specify the IP address, the network mask and the gateway for the WAN interface. Alternatively, select dynamic assignment of the IP address via DHCP.
Result
The SINEMA RC Server is installed. Login with the predefined user "admin".
Note SINEMA RC server with cloud connection
If you download the server into the cloud and want to set up multiple servers from one image, you need to log in with "admin" directly after the installation and do this. This is the only way to guarantee that each server has its own certificates.

Installation and commissioning 3.2 Installing SINEMA RC Server
SINEMA Remote Connect - Server
34 Operating Instructions, 01/2021, C79000-G8976-C383-09
Before you can configure further settings using WBM, you are prompted to create a new user and check the network configuration. Note that login with "admin" is no longer possible after this.
Upgrading the server version The update must be performed in the correct order: V1.0 > V1.1 > V1.2 > V1.3 > V2.0 > V2.1 > V3.0.
Note System update V1.2 > V1.3
Due to changes in the basic installation, an update from V1.2 to V 1.3 is only possible using the installation CD; see section "System update V1.2 > V1.3 (Page 125)".
Note System Update V2.0 > V2.1
Before you update the software version, you need to release the licenses for "SINEMA RC (2.0)" and reactivate them in server version V2.1. The procedure is described in the section "System Update V2.0 > V2.1 (Page 130)".
Procedure
1. In the navigation, select "System > Update".
2. Click the "Select file" button.
3. Navigate to the storage directory and select File *.tar.gz.
Confirm your selection with the "Open" button.
4. Click the "Import" button.
Result
The system is updated. Depending on the type of update, individual functions, or the entire system is restarted. To check the version following the restart, in the navigation click "System > Overview" and check the displayed software version.
You can find more detailed information in the section "Update (Page 65)".
See also Connectable nodes (Page 24)

Installation and commissioning 3.3 Initial commissioning of end devices using the WBM
SINEMA Remote Connect - Server
Operating Instructions, 01/2021, C79000-G8976-C383-09 35
3.3 Initial commissioning of end devices using the WBM
Commissioning the node via the WBM Procedure
1. Configure the new device on the SINEMA RC Server. For more detailed information, refer to the section "Device settings (Page 75)".
– Specify the required device information. e.g. device name, manufacturer, location etc.
– Configure the VPN connection mode
– Enter the password to identify the end device during the logon.
– Assign the device to a participant group. For more detailed information, refer to the section "Assigning a node to a group (Page 84)".
When the device is configured, the certificate is created automatically. For more detailed information, refer to the section "Overview of certificate management (Page 100)".
2. Transfer the configuration settings of the SINEMA RC Server to the device.
– To identify the device to the SINEMA RC Server, transfer the certificate to the device and enter the password.
– Enter the IP address of the SINEMA RC Server.
3. Put the device into operation.
Result
The device connects to the SINEMA RC Server. When the connection has been successfully established, a virtual IP address for example is transferred.
If necessary, perform further configuration steps:
1. At the device end, for example, configure firewall rules, NAT, etc. You can find precise step-by-step instructions in the Getting Started for SINEMA Remote Connect and in the Getting Started of the relevant device.

Installation and commissioning 3.3 Initial commissioning of end devices using the WBM
SINEMA Remote Connect - Server
36 Operating Instructions, 01/2021, C79000-G8976-C383-09

SINEMA Remote Connect - Server
Operating Instructions, 01/2021, C79000-G8976-C383-09 37
Configuring with Web Based Management 4 4.1 Opening Web Based Management
Calling the start page of the WBM 1. Open the Web browser.
2. In the address line of the browser, enter https://<IP address> of the SINEMA RC Server. You specified the IP address during the installation.
If you use a port other than 443 as the HTTPS standard port, enter the port number along with the IP address. A colon ":" must be entered between the IP address and the port number as a delimiter e.g.: https://192.168.234.1:6443.
Note
You set the port for access to the Web server in the "System > Network configuration > Web server settings" tab.
Result
The start page of the WBM opens.
4.2 Starting the WBM
4.2.1 Logon with user name and password
Procedure 1. Enter a configured user name.
You can find information on the first login in the following section "Logging on after the new installation".
2. Enter the corresponding password.
You can find information on the first login in the following section "Logging on after the new installation".
3. Click the "Log on" button. The start page of the WBM opens. A user agreement may be displayed, see section "User agreement (Page 92)". If you click the "Accept" button, the start page appears.

Configuring with Web Based Management 4.2 Starting the WBM
SINEMA Remote Connect - Server
38 Operating Instructions, 01/2021, C79000-G8976-C383-09
Changing the current password
As a logged-on user, you can change your current password; refer to the section "Changing the current password (Page 120)".
Logging on after installing new 1. After a new installation, enter "admin" as the user name and password.
2. Click the "Log on" button. The WBM page "Change password" opens.
3. Specify the user name and the password for the administrator. The new password must be at least 8 characters long and contain special characters, upper and lowercase characters as well as numbers, refer to the section "Permitted characters (Page 27)". The "admin" user name is not permitted. The "administrator" role is assigned automatically to this newly created user.
The administrator has the right to access all functions and can set up the system. This includes creating users and assigning roles and rights to them.
4. Click the "Save" button. After saving, you are automatically logged on with the newly created administrator. The "admin" user is no longer available.
Once you have logged on successfully, the start page appears. A user agreement may be displayed, see section "User agreement (Page 92)". If you click the "Accept" button, the start page appears.
Note Password change after first login of a user
After the first login, a configured user is forwarded automatically to a page on which to change the password. Without this process, login to the SINEMA RC Client is not possible.
Entering the wrong user name or password If you enter a user name that is not configured, an error message is displayed regardless of the password entered. A user name or a variety of incorrect user names can be entered any number of times without the system being locked.
Note Loss of the administrator password
Note down a newly assigned or modified administrator password and keep this in a safe place.
If only one administrator is set up, the loss of the administrator password means that no more administrator tasks can be performed.
There is no possibility of resetting the assigned administrator password.

Configuring with Web Based Management 4.2 Starting the WBM
SINEMA Remote Connect - Server
Operating Instructions, 01/2021, C79000-G8976-C383-09 39
Note Incorrect entry of the password
If you enter an incorrect password with the user name an error message is displayed.
If you enter an incorrect password, a lock out time begins that is extended with each attempt to logon with an incorrect password.
4.2.2 Logging on with UMC UMC (User Management Component) is a database for the central administration of user data. UMC offers efficient user management that reduces the workload for maintaining user data in the plant. UMC can optionally be part of the AD domain so that the user data can be directly read out from a Microsoft Active Directory.
If a UMC server is configured on SINEMA RC, a user created on the UMC can log onto SINEMA RC with their UMC access data.
How it works First, a UMC user is created on the UMC server and assigned to one or multiple UMC user groups. The name of the UMC user group is found later in SINEMA RC.
The administrator configures the connection to the UMC server on the SINEMA RC server and also creates a role for which the name of the UMC user group associated with the UMC user is entered in addition.
When a UMC user logs onto SINEMA RC using their UMC login, the SINEMA RC establishes a connection to the UMC server. SINEMA RC checks whether the user is assigned to a UMC user group entered on SINEMA RC and enabled for the connection.
Data exchange between the two servers is only possible when the names of the UMC user groups in SINEMA RC match exactly the names of the UMC user groups in UMC.
Note Labeling of a UMC user with prefix
Every UMC user receives the prefix "Umcuser_". The backslash "〵" in the user name of the user of a UMC server is converted to an underscore "_" in SINEMA RC.
Licensing on UMC server • The UMC server is part of the SINEMA RC Client program download/program DVD.
• With the installation of the software, you can manage up to 10 user accounts without a license. For more user accounts, you require a license.

Configuring with Web Based Management 4.2 Starting the WBM
SINEMA Remote Connect - Server
40 Operating Instructions, 01/2021, C79000-G8976-C383-09
• You can cumulate this license. If you have multiple licenses, the permissible configuration limit for user accounts is derived from the sum of the licenses.
• The license is required for the ring server of the User Management Component domain. The license is offered as Rental License for 365 days. The Certificate of License can be downloaded directly.
Software/License Article number TIA Portal User Management Component (UMC) Rental License for 100 user accounts and 365 days Certificate of License for download
6ES7823-1UE30-0YA0
TIA Portal User Management Component (UMC) Rental License for 4000 user accounts and 365 days Certificate of License for download
6ES7823-1UE10-0YA0
Requirements on the SINEMA RC server • A user is created on the UMC and assigned to a UMC user group.
• A valid SINEMA RC UMC license (MLFB 6GK1724-2VH03-0BV0) or trial license is activated on SINEMA RC.
• The connection to the UMC server is set up on the SINEMA RC, see section "UMC Settings (Page 95)".
• A role is created on the SINEMA RC and uses the same name for the UMC user group to which the relevant user is assigned in UMC, section "Managing roles and rights (Page 86)".
Procedure 1. Select the "UMC Login" tab on the SINEMA RC login Web page.
2. Enter the UMC user name.
3. Enter the corresponding password.
4. Click the "Log on" button.
Note Changing the data of a UMC user
UMC users logged onto SINEMA RC cannot edit their access data and their profile in SINEMA RC.
The administrator only has the rights to delete a UMC user from the user list or assign the name of a UMC user group to a role.

Configuring with Web Based Management 4.2 Starting the WBM
SINEMA Remote Connect - Server
Operating Instructions, 01/2021, C79000-G8976-C383-09 41
4.2.3 Logon with the Smartcard / user certificates Logging on with the smart card corresponds to a two-level security system.
The 1st level is possession of the card and the 2nd level is the personal identification number (PIN) for unlocking the smart card. On the smart card there must be the PKI certificate and the private key belonging to it.
As an alternative the PKI certificate can also be on the hard disk of the SINEMA RC client. The private key is then, however, not protected by the Smartcard, but must be protected by a different suitable measure, e.g. encryption of the private key, integrated measures in the Web browser.
Chain of certificates to the root certificate The certificates of a PKI are often organized hierarchically:
At the tip of the hierarchy are the root certificates. These are certificates that are not certified by a higher-level certification authority. Certificate owner and certificate issuer of root certificates are identical. Root certificates are fully trusted, they are the "anchor" of trust and must therefore be known by the recipient as trustworthy certificates. They are stored in an area intended for trustworthy certificates.
Depending on the PKI, the function of root certificates can be, for example, to sign certificates of lower-level certification authorities, so called intermediate certificates. This transfer the trust from the root certificate to the intermediate certificate. An intermediate certificate can sign a certificate just like a root certificate. Therefore, both are called "CA certificates". CA is the acronym for "Certification Authority".
This hierarchy can continue over several intermediate certificates as far as the end entity certificate. The end entity certificate is the certificate of the user to be identified. In the remaining description the end entity certificate will be known as PKI certificate
During validation the hierarchy is run through in the opposite direction. As described above the certificate issuer is identified, the signature checked with the public key, then the certificate of the higher-level certificate issuer is identified until the trust chain has been run through as far as the root certificate.
Summary: The chain of intermediate certificates as far as the root certificate (the certificate path) must exist on the SINEMA RC server to allow validation of the PKI certificate of the user.
How it works After the chain of certificates has been installed on the SINEMA RC Server, the user can log on with his or her PKI certificate. After successfully logging on, a check is made to establish whether the contained PKI certificate of the user is valid.
Then a check is made as to whether the attributes of the PKI DN filter rules are included in the PKI certificate.

Configuring with Web Based Management 4.2 Starting the WBM
SINEMA Remote Connect - Server
42 Operating Instructions, 01/2021, C79000-G8976-C383-09
There are the following types of logon:
• User identification
if the PKI DN filter rule applies to a user, this user is logged on with the SINEMA RC Server with the user name, see section "Creating new users (Page 88)".
• Temporary users
If the PKI filter rule applies to a role, a temporary user is created. pkiuser _X is used as the user name. The temporary user receives the right and the access to the participant groups assigned to the role. This user is listed in "User accounts > Users & Roles".
In the role, you also specify when the temporary user will be deleted, see section "Managing role and rights (Page 86)".
Logging on with Smartcard
Requirement
• A card reader on the PC or notebook
• The card reader is connected according to the manufacturer's instructions and the driver belonging to it is installed.
• The PKI CA certificate chain is installed on the SINEMA RC Server, see section "PKI CA certificate (Page 111)".
• A smart card with a valid PKI certificate derived from one of the PKI CA certificates imported into SINEMA RC.
• PKI DN filter rules have been created.
• For the user, the corresponding login method has been set, see section "Create a new user (Page 88)".
• The client software (Web browser or SINEMA RC client) is capable of communicating with the card reader.
– Internet Explorer, Microsoft Edge and Google Chrome: Use Windows Crypto API which automatically recognizes an attached card reader.
– Firefox and SINEMA RC client: The suitable PKCS11-DLL must be selected for the card reader and smartcard.
Procedure
1. Insert your smart card in the reader device.
2. Click the card symbol.
3. Enter your PIN and click on "Log on". A user agreement may be displayed, see section "User agreement (Page 92)". If you click the "Accept" button, the start page appears.
Configuring with Web Based Management 4.2 Starting the WBM
SINEMA Remote Connect - Server
Operating Instructions, 01/2021, C79000-G8976-C383-09 43
Logon with a user certificate
Requirement
• The PKI CA certificate chain is installed on the SINEMA RC Server, see section "PKI CA certificate (Page 111)".
• The valid user certificate derived from one of the PKI CA certificates imported into SINEMA RC exists on the PC.
• PKI DN filter rules have been created.
• For the user, the corresponding login method has been set, see section "Create a new user (Page 88)".
Procedure
1. Navigate to the storage directory of the PKI certificate.
2. Select the certificate file and click the "Open" button.
If the file is password protected, enter the password.
3. Click the "Log on" button. A user agreement may be displayed, see section "User agreement (Page 92)". If you click the "Accept" button, the start page appears.
Result During the logon, a check is made to establish whether the PKI certificate is valid. Then a check is made as to whether the attributes of the PKI DN filter rules are included in the PKI certificate.
• User identification
If the PKI DN filter rule applies precisely to a user, the PKI card with this user name is logged on with the SINEMA RC Server, see section "Creating a new user (Page 88)".
• Temporary users
If the PKI DN filter rule applies to a role, a temporary user "carduser_X" is created. The temporary user is listed in "User accounts > Users & Roles". The user receives the rights and the access to the participant groups assigned to the role.
In the role, you also specify when the temporary user will be deleted, see section "Managing role and rights". You can also delete the temporary user in "User accounts > Users & Roles".
Locking out Smartcard / user certificate To lock out users, you have the following options:
• Revocation list
• PKI DN blacklist
• Expired user certificate
• Automatic blocking of the Smartcard after entering the wrong PIN several times. Only the issuer of the Smartcard can release this again.

Configuring with Web Based Management 4.3 Layout of the window
SINEMA Remote Connect - Server
44 Operating Instructions, 01/2021, C79000-G8976-C383-09
You will find more information on the certificate revocation list and PKI DN blacklist in the section "Locking out Smartcard / user certificate".
PKI DN filter rules The attributes of the names (Distinguished Name acc. to the X.509 standard) are used as filter criteria for the filter rules.
You specify the PKI DN filter rules for the user and the role.
The following table shows several examples: PKI DN filter rule Description For the user "JohnDoe" the following filter rule is defined: CN = max johndoe, OU = PD, O = Siemens, C = DE
The attribute values exist in the user certificate. The system signals the smart card user as user "JohnDoe" who is assigned the "admin" role. The role has all access rights.
For the role "Service" the following filter rule is defined: CN = *, OU = Service_Group_Plant_1, O = Siemens, C = DE
Only PKI card users obtain access for whom the relevant attribute values exist for OU, O and C. This restricts access to a certain service group. The system creates a temporary user who receives the rights assigned to the "Service" role. This user is listed in "User accounts > Users & Roles".
For the role "Service" the following filter rule is defined: CN = *, OU = *, O = *, C = DE
In this case, there is only the restriction to C = DE. As placeholder the "*" character is used.
4.3 Layout of the window
View of the Start page If you enter the IP address of the SINEMA Remote Connect, the start page is displayed after successful login. You cannot configure anything on this page.
General layout of the WBM page The following areas are generally available on every WBM page:
• Header area (1): Top area
• Display area (2): Top area
• Navigation area (3): Left-hand area
• Content area (4): Middle area

Configuring with Web Based Management 4.3 Layout of the window
SINEMA Remote Connect - Server
Operating Instructions, 01/2021, C79000-G8976-C383-09 45
Header area ① The following is available in the header area:
• Logo of Siemens AG
• Product name
Display area ② The left part of the display area contains the following fields:
• System time and date
You can change the content of this display with "System > System time".
The right part of the display area contains the following fields and buttons:
• Display of the user name under which you are logged in.
• Drop-down list for language selection.
The current language of the WBM is shown.
• Logout
Button for logging out of the WBM. You can log out from any WBM page.
•
Opens the online help in a new browser window.

Configuring with Web Based Management 4.3 Layout of the window
SINEMA Remote Connect - Server
46 Operating Instructions, 01/2021, C79000-G8976-C383-09
Navigation area ③ In the navigation area, you have various menus available. Click the individual menus to display the submenus. The submenus contain pages on which information is available to you or with which you can create configurations. These pages are always displayed in the content area.
Note
Not all submenus may be available since this depends on the rights assigned to you. For more detailed information on the user concept, refer to the section "User concept (Page 15)".
Content area ④ The content area includes pages with input or display fields that are displayed depending on the menus clicked in the navigation area.
• In the navigation area, click a menu to display the pages of the WBM in the content area.
Buttons you require often The pages of the WBM contain the following standard buttons:
• Exiting the submenu with "Exit dialog"
To exit a submenu again and to return to the main menu, use the "Exit dialog" button.
• Changing settings with "Save"
WBM pages on which you can make settings have the "Save" button. Click the button to save data you have entered.
Note
To change settings, you require suitable user rights that are described in the section "Managing roles and rights (Page 86)".
Note
The changes take immediate effect. It can, however, take some time before changes are saved in the configuration.
• Creating entries with "Create"
WBM pages on which you can create new entries have the "Create" button. Click this button to create a new entry.
• Creating entries with "Copy"
WBM pages on which you can copy entries have the "Copy" button. Click on this button to copy the desired entry.
• Deleting entries with "Delete"
WBM pages on which you can delete entries have the "Delete" button. Click this button to delete the previously selected entries. Deleting also results in an update of the page in the WBM.

Configuring with Web Based Management 4.4 Language selection
SINEMA Remote Connect - Server
Operating Instructions, 01/2021, C79000-G8976-C383-09 47
• Searching within a list
In the overview lists of the devices, users, roles and participant groups, you can search for certain entries. To do this, enter the name or part of the name in the search box . Then press the ENTER key on your keyboard.
• Page down with "Next" The number of data records that can be displayed on a page is limited. Click the "Next" button to page forward through the data records.
• Page back with "Prev" The number of data records that can be displayed on a page is limited. Click the "Prev" button to page back through the data records.
• "Show all" button You can show all entries in pages with a large number of data records. Click "Show all" to display all entries on the page. Note that displaying all messages can take some time.
• Drop-down list for selecting the number of displayed entries
You can set the number of displayed entries for pages with a large number of data records. Select the desired number of entries from the drop-down list to display them.
4.4 Language selection
Set language 1. In the header area on the right, open the drop-down list for the language setting.
2. Select the required language.
Result
The user interface of the SINEMA RC Server is displayed in the selected language regardless of the Web browser being used.
If the language is not changed immediately, use the "F5" function key.
4.5 System
4.5.1 Overview After logging in to the WBM, the system overview appears. This page contains a configuration overview of the device.
Calling the Web page In the navigation, select "System > Overview".

Configuring with Web Based Management 4.5 System
SINEMA Remote Connect - Server
48 Operating Instructions, 01/2021, C79000-G8976-C383-09
Displayed entries The following entries are displayed: Field Meaning Order ID Displays the article number of the current software. Software version Displays the version number of the current software. Software download Shows the link to download the current software version.
Clicking this link takes you to the Siemens Industry Online Support page with the current software version. Here you can check whether your software version is up-to-date or download the cur-rent version.
Connection license usage (allo-cated / total)
Displays the number of currently active participants and how many participants can be configured in total.
Client license usage (allocated / total)
Displays the number of currently active SINEMA RC Client connec-tions and how many client connections are possible in total.
Configured users Displays the number of users created in the project. Configured devices Displays the number of devices created in the project. Active VPN connections Displays the number of active VPN connections. Users Displays the number of active VPN connections to the users creat-
ed in the project. Devices Display the number of active VPN connections to the devices cre-
ated in the project.
4.5.2 Log
4.5.2.1 Log messages System events that have occurred are saved in the log messages. These include:
• Logons to the system
• Changes to the configuration
• Connection establishment
• Interruption of connections
• Operational messages
Calling the Web page In the navigation, select "System > Logfile" and the "Log messages" tab.

Configuring with Web Based Management 4.5 System
SINEMA Remote Connect - Server
Operating Instructions, 01/2021, C79000-G8976-C383-09 49
Displayed entries The following entries are displayed: Field Meaning Date Shows the date and time. Message level The following message levels are possible:
• Emergency • Alert • Critical • Error e.g. when exporting the server certificate fails • Warning, e.g. when a CA is deleted • Notice, e.g. when a CA is created • Info, e.g. when a user has logged on • Debug
Function Displays the coded operating status. Category Displays the category of the log message. Message Displays information about the event that occurred.
Filtering log entries 1. Enter the desired period in the fields "From" / "To".
2. Select the required level from the "Message level" drop-down list.
3. Select the required category in the "Category" drop-down list.
4. Click on the "Apply filter" button.
Result
The display is updated according to the selected filter settings. Only the selected entries are displayed.
Saving log entries
Note Saving log entries
The log is saved in the log archive after reaching 1,000,000 entries. In addition to this a week log is saved and archived on a weekly basis.
To export the log entries, click on the Export button. Navigate to the storage directory and save the current log file in *.csv format. All the entries are exported even if you have filtered the entries.

Configuring with Web Based Management 4.5 System
SINEMA Remote Connect - Server
50 Operating Instructions, 01/2021, C79000-G8976-C383-09
You can, for example, send the data with a support request.
Note Protecting exported log files from unauthorized access
Exported log files can contain information relevant for security. You should therefore make sure that these files are protected from unauthorized access. Remember this particularly when passing on the files.
4.5.2.2 Log archives The log is saved in the log archive after reaching 1,000,000 log messages. A maximum of 100 log archives are possible.
Calling the Web page In the navigation, select "System > Log" the "Log archive" tab.
Displayed entries The following entries are displayed: Field Meaning Date Shows the date and time. Size Displays the size of the log archive. Actions You can manage log archive entries using the following buttons:
• Export and save the selected log archive as a file. • Remove the selected log archive from the list.
4.5.2.3 Firewall Log On this page, you can enable the events to be entered in a log file for the firewall. This information may be helpful to you when troubleshooting connection problems through a firewall.
Calling the Web page In the navigation, select "System > Logfile" and the "Firewall Log" tab.

Configuring with Web Based Management 4.5 System
SINEMA Remote Connect - Server
Operating Instructions, 01/2021, C79000-G8976-C383-09 51
Displayed entries Make the following settings. Then click the "Save" button: Field Meaning File name Shows the file name of the firewall log. The "firewall.log" file name is
stored in the system and cannot be changed here. You can rename the file during the export.
Protocol dropped packages When enabled, information about discarded packets is output. Protocol successful connec-tions
When enabled, information about successful connections is output.
Protocol rejected packages When enabled, information about rejected packages is output.
Exporting Firewall Logs With the "Export" button, you can download the log file to your PC, for example in order to send it with a support request.
1. Click the "Export" button.
A dialog to save the current log file opens.
2. Navigate to the directory where you want to save the file and confirm with "Save".
4.5.3 Network configuration
4.5.3.1 Interfaces
Note IPv4 addresses and subnet mask according to RFC 1918
The factory IPv4 addresses and subnet masks can be changed as required, but must comply with the specification RFC 1918.

Configuring with Web Based Management 4.5 System
SINEMA Remote Connect - Server
52 Operating Instructions, 01/2021, C79000-G8976-C383-09
Note
So that the SINEMA RC can be reached via the Internet router, on the router, port forwarding needs to be set up for the following ports: • For the WBM, see Web server settings (Page 54).
– for HTTPS TCP port 443 (preset, can be changed) • For the establishment of the OpenVPN tunnel, see OpenVPN settings (Page 107)
– the UDP port 1194 (preset, can be changed) – the TCP port 5443 (preset, can be changed)
• For the certificate update the TCP port 6220 (fallback port preset, can be changed) • For the establishment of the IPsec VPN tunnel
– UDP port 500 (cannot be changed) and UDP port 4500 (cannot be changed) – IP protocol ESP (layer 3 protocol)
Calling the Web page In the navigation, select "System > Network configuration" and the "Interfaces" tab.
Configuring an interface Make the following settings and then click "Save": Field Meaning Activate the interface The WAN interface cannot be deactivated.
The LAN interfaces are optional and can be disabled. Interface Select the interface to be configured.
If you select the WAN interface, additional entries are required, see table "Additional settings of the WAN interface".
MAC address Displays the MAC address of the selected interface. Is entered auto-matically by the system.
MTU MTU (Maximum Transmission Unit) specifies the maximum size of the packet. If packets are longer than the set MTU, they are fragmented. The maximum size is 1500 bytes. Enter a value ≤ 1 500.
Use DHCP Enables the assignment of an IP address of the interface via the DHCP server.
IP address Enter the IPv4 address of the interface. The IP address must be unique. Input is possible when the "Use DHCP" option is disabled.
Network mask Enter the subnet mask of the subnet you are creating. Input is possi-ble when the "Use DHCP" option is disabled.
Masquerading Enables masquerading for a LAN interface.

Configuring with Web Based Management 4.5 System
SINEMA Remote Connect - Server
Operating Instructions, 01/2021, C79000-G8976-C383-09 53
Additional settings for the WAN interface Field Meaning Setting for IPv4 Default gateway When operating a VPN over the Internet, additional IPv4 addresses are
generally required for the Internet gateways such as DSL routers. In the VPN, the individual modules must know the public IP addresses of the partner modules to be reached via the Internet. Enter the IP address for the gateway.
SINEMA Remote Connect is located behind a NAT device with a fixed IP address
If you select the check box, you can enter the external WAN IPv4 address of the Internet gateway.
WAN IP address The WAN IPv4 address via which SINEMA RC can be reached. This can, for example, be the WAN IPv4 address of a DSL router via which SINEMA RC is connected to the Internet.
Settings for IPv6 Activate IPv6 Also activates IPv6 at the WAN interface. Use SLAAC for IPv6 Uses Stateless Address Autoconfiguration (SLAAC) for IPv6. IPv6 address Enter an IPv6 address of the interface. Link-local IPv6 address If "Use SLAAC for IPv6" is activated on the interface, a link local IPv6
address is formed automatically Subnet prefix length The IPv6 prefix represents the subnet identifier.
Enter the number of left-hand bits belonging to the prefix. Prefixes and IPv6 addresses are specified in the same way as with the CIDR notation (Classless Inter-Domain Routing) for IPv4. Example: 2001:0db8:1234::1111/48
Default gateway Enter the IPv6 address of the gateway via which this network address is reachable.
4.5.3.2 DNS VPN clients can also reach the SINEMA RC Server using a host name. To do this, specify a host name, e.g. sinemarc.example.org
For the name resolution, specify the DNS server. This setting is adopted in the VPN configuration of the clients.
The setting is also required for licensing.
Calling the Web page In the navigation panel, select "System > Network configuration" and the "DNS" tab.

Configuring with Web Based Management 4.5 System
SINEMA Remote Connect - Server
54 Operating Instructions, 01/2021, C79000-G8976-C383-09
Creating a new DNS server Make the following settings and then click "Save": Field Meaning Hostname Enter the host name under which SINEMA RC can be reached, e.g.
sinemarc.example.org Externally resolvable host name
When activated, the host name is included in the VPN configuration and in the configuration of the VPN clients.
Primary DNS server Enter the IPv4 address of the primary DNS server. Secondary DNS server Enter the IPv4 address of the secondary DNS server that is then used if
the primary DNS server is not reachable.
4.5.3.3 Web server
Calling the Web page In the navigation, select "System > Network configuration" and the "Web server" tab.
Configuring the Web server Make the following settings and then click "Save": Field Meaning HTTPS port Specify via which port HTTPS remote access to the WBM will take
place. HTTPS default port 443
Fallback port Specify the fallback port. This port is used by OpenVPN devices that update the configurations using the auto enrollment mechanism (update interval). If these devices cannot be accessed via the HTTPS port, the update takes place via the fallback port. Fallback default port 6220
Block Webserver access from WAN interface
When enabled, remote access to the WBM is denied.
Changing port numbers If you change port numbers, use ports from the number range 1024 ... 65535.
Select a free port that is not otherwise being used, e.g. by the TCP port in OpenVPN
Ports 0 ... 1023 are standardized (well known ports). From the registered ports as of 1024, for example no. 1024 is reserved.
If you use another port as the default port 443, the port number along with the IP address must be entered. A colon ":" must be entered between the IP address and the port number as a delimiter.

Configuring with Web Based Management 4.5 System
SINEMA Remote Connect - Server
Operating Instructions, 01/2021, C79000-G8976-C383-09 55
Example:
If SINEMA RC can be reached via the Internet at the IP address 192.144.112.5, and when in addition to this port number 6443 was specified for remote access, the following information must be specified for the remote station in the Web browser:
• https://192.144.112.5:6443
4.5.3.4 Ping On this page, you check with a ping whether a specific device can be reached in the network.
Calling the Web page In the navigation, select "System > Network configuration" and the "Ping" tab.
Set ping Make the following settings: Field Meaning IP address Enter the IP address of the device. Repeat Enter the number of ping retries. Timeout Enter the waiting time within which the ping checks the device. Ping Output Shows whether the device can be reached via the specified address.
Click the "Ping" button to start the ping.
Result
Ping sends ping requests to the IP address to be checked and receives responses from the target device, if it can be reached. After the timeout has elapsed, you receive a status message.
4.5.3.5 Static routes On this page, you define static routes for communication between subnets.
Requirement • The user has been assigned the right "Edit system parameters".
Calling the Web page In the navigation, select "System > Network configuration" and the "Static Routes Settings" tab.

Configuring with Web Based Management 4.5 System
SINEMA Remote Connect - Server
56 Operating Instructions, 01/2021, C79000-G8976-C383-09
Creating static routes Make the following settings and then click "Save": Field Meaning Destination Net-work
Enter the network address of the destination that can be reached via this route.
Network mask Enter the network mask of the destination. Gateway Enter the IP address of the gateway via which this network address is reachable. Interface Specify the interface via which the network address of the destination is reached.
Result
The static route for communication is configured. The route is entered in the following table.
Note
Only the static routes with the LAN interface are forwarded to the devices, unlike those with the WAN interface.
Displayed entries The following entries are displayed: Field Meaning Destination Network
Shows the destination address of the route.
Network mask Shows the network mask of the route. Gateway Shows the gateway for the route. Interface Shows the interface of the route.
4.5.4 Address spaces
4.5.4.1 Network address space You define the address space for the virtual local LAN on this page.
Note
The first IP address of the address space is always assigned to the SINEMA RC Server.
Calling the Web page In the navigation, select "Remote connections > Address spaces > Virtual subnet".

Configuring with Web Based Management 4.5 System
SINEMA Remote Connect - Server
Operating Instructions, 01/2021, C79000-G8976-C383-09 57
Manage address space 1. Click on "Activate network address space" to set the virtual subnet settings.
2. Configure the address space for the virtual subnet:
Field Meaning Start address Start address of the address space. Network mask The network mask belonging to the address space. End address End address of the address space
The address space is limited by the start address and the network mask. The end address must be within this range.
Available networks (in total)
Displays the number of available networks determined from the start address and the end address.
3. Click the "Save" button.
4.5.4.2 VPN address spaces You define the address spaces for TCP, UDP and IPsec on this page. When a VPN client logs into SINEMA RC Server, it receives an IP address from the address space for the duration of the connection.
Note • The first IP address of the address space is always assigned to the SINEMA RC Server. • The maximum possible address space comprises 65535 addresses. The start address of the
address space must be selected in such a way that at least two addresses from the address space are used.
Calling the Web page In the navigation, select "Remote connections > Address spaces".
Manage address space In the "OpenVPN" and "IPsec" tabs, you can make the following settings for the address spaces: Field Meaning Start IP address Start address of the address space. Network mask The network mask belonging to the address space. End IP address End address of the address space
The end address is calculated from the network mask and the start address and cannot be configured.
Use (assigned IPs / of total)
The following values are displayed: • Number of assigned IP addresses • Number of available IP addresses

Configuring with Web Based Management 4.5 System
SINEMA Remote Connect - Server
58 Operating Instructions, 01/2021, C79000-G8976-C383-09
Field Meaning Activate fixed IP address space
When enabled the device can be assigned a fixed IP address from the ad-dress space.
Fixed IP protocol Only with OpenVPN: • TCP: Applies to OpenVPN connections via TCP • UDP: Applies to OpenVPN connections via UDP
Location of the fixed IP address space
• First: The fixed IP addresses are from the start area of the address space. The first IP address is reserved for the SINEMA RC Server.
The first fixed IP address is always the second IP address after the start IP address.
• Last: The fixed IP addresses are from the end area of the address space. The last fixed IP address is always the end IP address.
Length of the fixed IP address space
Number of fixed IP addresses
4.5.5 Date & Time To check the validity of certificates and for the time stamps of log entries, the current date and time are kept. You can set the system time yourself manually or have it synchronized automatically with an NTP server. Only one method can be active at any one time.
Calling the Web page In the navigation, select "System > Date & Time".
Setting the time manually Make the following settings in the "Manual" tab: Field Meaning System time Shows the current system time in the format "DD.MM.YYYY HH:MM".
The display depends on the language that is set. Use PC time Click the button to use the time setting of the PC.
Automatic time-of-day setting with NTP For time-of-day synchronization via NTP, you make the following settings in the "NTP" tab: Field Meaning Activate If enabled, automatic time synchronization is performed via NTP. System time Shows the current system time in the format "DD.MM.YYYY HH:MM".
The display depends on the language that is set.

Configuring with Web Based Management 4.5 System
SINEMA Remote Connect - Server
Operating Instructions, 01/2021, C79000-G8976-C383-09 59
Field Meaning Last Synchronization Time Shows the last synchronization time.
• Time in "DD.MM.YYYY HH:MM" format Or • not synchronized
Time zone Enter the time zone you are using in the format "+/- HH:MM". The time zone relates to UTC standard world time.
Primary NTP server Enter the IP address or host name of the primary NTP server. Secondary NTP server Enter the IP address or host name of the primary secondary NTP serv-
er.
To apply the selected settings, click on the "Save" button:
4.5.6 SMS messages and e-mails
4.5.6.1 SMS gateway provider To wake a station, the SINEMA RC Server sends an e-mail. The e-mail is sent to an SMS gateway. The SMS gateway converts the e-mail into an SMS message and transfers this to the device, e.g. an M87x . When the SMS message is accepted, the device establishes the connection to the SINEMA RC Server.
The requirement is that the SIM card in the device is prepared to receive the SMS message. You will find further information on this in the configuration manual of the device.
Note
The time at which the wake-up SMS message will be sent to the station cannot be predicted precisely and depends on the current network load. Due to special events, an SMS message can take a long time to arrive. Take this into account when you send the wake-up SMS message, see section “Monitoring and time response of wake-up SMS messages (Page 138)”.
Calling the Web page In the navigation, select "System > SMS & E-mail > SMS gateway provider".

Configuring with Web Based Management 4.5 System
SINEMA Remote Connect - Server
60 Operating Instructions, 01/2021, C79000-G8976-C383-09
Displayed entries A list of the already existing SMS gateway providers is displayed. As default the data of four network providers is already set Field Meaning Name Name of the SMS gateway provider Address Email address of the recipient of the SMS message
The e-mail address is generally made up of the call number of the SIM card and the SMS gateway name. The requirement is that the e-mail address is activated, "Activating the e-mail address (Page 137)" Check with your network provider whether or not it is necessary to send an activation SMS message. With the placeholder $SMS-NO the phone number the device is used automatically.
Sender num-ber
Identification that is transferred in the e-mail.
Subject Subject of the e-mail CC E-mail address of another recipient
The recipient receives only an e-mail. This could, for example, be a service technician who always wants to be informed when a certain device is woken.
Text $MSG - The message text of the wake-up SMS message is entered automatically. Depending on the network provider either the text from the subject or the text box is sent as the SMS message. You can obtain more detailed information on this from your network provider.
Actions Open the overview for changing the SMS gateway provider.
Creating an SMS gateway provider 1. Click the "Create" button.
2. In the following dialog, enter a name.
3. Under "Address", enter the recipient's e-mail address. For the phone number, use the placeholder "$SMS-NO".
4. For "Subject" or "Text", enter a "$MSG" placeholder. This depends on your network provider.
5. Click the "Create" button.
4.5.6.2 E-mail settings On this page, you specify whether an e-mail is forwarded directly to the recipient or via an SMTP relay server. You can also specify that the transfer of the e-mail takes place via an encrypted connection.
Note Sending via an SMTP relay server
To send the e-mail it is recommended that you use an SMTP relay server. If you use the "Direct" transmission method, it is possible that the e-mail will be classified as not being secure. The e-mail is then blocked and does not arrive.

Configuring with Web Based Management 4.5 System
SINEMA Remote Connect - Server
Operating Instructions, 01/2021, C79000-G8976-C383-09 61
Calling the Web page In the navigation, select "System > SMS & E-mail > Settings".
Configuring the SMTP client Select the "Enable E-mail client" check box and make the following settings. Then click the "Save" button: Field Meaning Method of delivery Direct: The e-mail is forwarded directly to the SMTP server.
Via relay server: The e-mail is forwarded via an SMTP relay server to the recip-ient. Make the additional settings listed in the following table.
Maximum life in the queue(s)
Maximum time in seconds that the sender waits for a reply from the mail server. When the time elapses, the transfer of the e-mail is aborted.
Sender The E-mail address specified as the sender when transferring to the mail serv-er. With the "Via relay server" method of delivery, the e-mail address of the user account of the respective SMTP relay server is specified.
Additional settings for the "Via relay server" method of delivery Enter the following additional access data of the SMTP server: Field Meaning SMTP relay serv-er
Enter the name or the IP address of the SMTP relay server that is intended to for-ward the received e-mails.
SMTP relay serv-er port
Specify the port on which the SMTP relay server accepts connections. As default port 587 is set so that mail is received only from authenticated users.
Transport Layer Security (TLS)
Specify whether the e-mails are to be transmitted encrypted via TLS: • Opportunistic: The transmission of the e-mail can be encrypted via TLS. If the
receiving mail server does not support encrypted transfer, the e-mail is for-warded via an unencrypted connection.
This setting is used automatically if you have selected "Direct" as the method of delivery.
• Binding: The transmission of the e-mail is encrypted via TLS. If the receiving mail server does not support encrypted transfer, the e-mail is not forwarded.
The server re-quires authenti-cation
Some SMTP relay servers require a login. Enter the user name and the password. Some providers use the e-mail address as the user name. You will obtain more detailed information from your provider.
User name User name for access to the SMTP relay server Password Password for access to the SMTP relay server
Sending a test e-mail After configuration, you can send a test e-mail in the "Test e-mail" tab. To do this, enter the Recipient, the Subject and a text. Then click the "Send" button.

Configuring with Web Based Management 4.5 System
SINEMA Remote Connect - Server
62 Operating Instructions, 01/2021, C79000-G8976-C383-09
4.5.7 Licenses
4.5.7.1 Overview On this page you obtain an overview of the existing licenses. You can activate new license packages on the "Online Activation" and "Offline Activation" tabs. You will find an overview of the available licenses in the section "License information (Page 26)".
Calling the Web page In the navigation area, select "System > Licenses".
Displayed entries A list of the existing licenses is displayed on the "Overview" tab: Field Meaning Number Numbers of licenses that are currently activated.
In this field, you can reduce the number of activated licenses if required. The released licenses are booked back onto the license number.
License type Name of the license package License number License number used when the license was activated. Activation date Date on which the license was activated. License value Number of currently activated participants / number of activated licenses.
The number of activated licenses determines how many participants can be configured in total.
Status • Active: The license is activated and is being used. • Locked: The license is invalid or damaged, e.g. if you have changed the
hardware equipment.
Actions
You obtain an overview of the license information. This is also displayed for users with the right "read only".
Releasing the online license You can release unused licenses or partial licenses in order to activate them on another system, for example.
Note
Before changing systems, you need to return online licenses because they are not included in a backup.

Configuring with Web Based Management 4.5 System
SINEMA Remote Connect - Server
Operating Instructions, 01/2021, C79000-G8976-C383-09 63
Requirements
• There is a connection to the Internet.
• A valid DNS server is configured. You configure the DNS server in "System > Network > DNS".
• The license or partial license is not used.
Procedure
1. Click on the "Overview" tab.
2. Select the check box for the relevant online license and enter the number of activated licenses, if applicable.
3. Click the "Release license" button.
The client licenses are released as follows: The number of licenses that are released is the difference between the last value and the current value. The released licenses are booked back onto the license number. The license value is updated.
Result
The licenses are free again and can be activated again on this system or another system.
4.5.7.2 Online Licenses On this page, you can activate online license packages.
Calling the Web page In the navigation, select "System > Licenses" and the "Online Activation".
Online license activation Requirements
• There is a connection to the Internet.
• A valid DNS server is configured. You configure the DNS server in "System > Network > DNS".
Procedure
1. Enter the license number belonging to the online license.
2. Click the "Check license" button.
The system checks whether the license number is valid and which license package is activated. After a successful check, the license type and the license value are displayed. The license value shows the number of available licenses.
3. For client licenses in addition: Enter the number of licenses to be activated in the "Number" field.
4. Click the "Activate license" button to confirm the activation of the online license.
The license value in the overview table is updated to the number of licenses activated in this step.

Configuring with Web Based Management 4.5 System
SINEMA Remote Connect - Server
64 Operating Instructions, 01/2021, C79000-G8976-C383-09
Result
The license is activated and is displayed on the "Overview" tab.
To deactivate online licenses, change the number of activated licenses on the "Overview (Page 62)" tab.
4.5.7.3 Offline Licenses On this page, you can activate new offline license packages and deactivate existing licenses.
Calling the Web page In the navigation, select "System > Licenses" and the "Online Activation".
Offline license
Activate offline license
1. Click on the "Export License Container" button.
2. Navigate to the storage directory where the file "sinemarc.WibuCmRaC" is stored.
3. Contact Customer Support via:
– Support Request (https://support.industry.siemens.com/cs/my?lc=en-US)
Create a new support request. Enter "SINEMA License" in the search bar and click "Find". Under "Authorization", select the "SINEMA License" check box and click "Next".
Fill in the "Problem description" form. Provide the license number of the license package and attach the file "sinemarc.WibuCmRaC". Click "Next".
Enter your contact data and click "Send".
– E-mail ([email protected])
Enter the "SINEMA License" keyword in the subject line. Provide the license number of the license package in the e-mail and attach the file "sinemarc.WibuCmRaC".
– Phone (+49 911 895 7222)
Have the license number of the license package to hand.
4. If the license package is activated, you will receive the offline license "sinemarc.WibuCmRaU" by e-mail. Save the file in your storage directory.
5. Click the "Select file" button.
6. Navigate to the storage directory and select the "sinemarc.WibuCmRaU" file.
7. Confirm your selection with the "Open" button and click the "Import license update" button.
Result
The license is imported and it is displayed in the overview of existing licenses.

Configuring with Web Based Management 4.5 System
SINEMA Remote Connect - Server
Operating Instructions, 01/2021, C79000-G8976-C383-09 65
Note
With offline activation, all licenses are always activated. Specification of the number to be activated is not possible.
Deactivate offline license
1. Contact Customer Support by e-mail ([email protected]).
Enter the "SINEMA License" keyword in the subject line. Include the license number of the license package to be activated in the e-mail. You can also contact Customer Support using a Support Request or by telephone; see the procedure for "Offline license activation".
2. Select the required offline license.
3. Click the "Release license" button.
Result
Offline license is deactivated. To activate the offline license on a new system, take the steps in "Activate offline license".
4.5.8 Update If a new version is available for the SINEMA RC Server, you can find the update on the Internet pages of Siemens Industry Online Support under the following ID: 21816 (https://support.industry.siemens.com/cs/ww/en/ps/21816/dl)
Update files
The update files are signed and encrypted. This ensures that only update files created by Siemens can be downloaded to the device. Automatic update is not possible, the update files are only provided via SIOS.
The update must be performed in the correct order: V1.0 > V1.1 > V1.2 > V1.3 > V2.0 > V2.1 > V3.0
Note System update V1.2 > V1.3
Due to changes in the basic installation an update from V1.2 to V 1.3 is only possible using the installation CD.
Note System Update V2.0 > V2.1
Before you update the software version, you need to release the licenses for "SINEMA RC (2.0)" and reactivate them in server version V2.1. The procedure is described in the section "System Update V2.0 > V2.1 (Page 130)".

Configuring with Web Based Management 4.5 System
SINEMA Remote Connect - Server
66 Operating Instructions, 01/2021, C79000-G8976-C383-09
Calling the Web page In the navigation, select "System > Update > System update".
Requirement • The user has been assigned the right "Edit system parameters".
• The latest version of SINEMA RC has been downloaded. The update file has the format *.tar.gz.
• The user has access to the storage directory.
System update Procedure
1. Click the "Select file" button.
2. Navigate to the storage directory and select the file *.tar.gz.
3. Confirm your selection with the "Open" button.
4. Click the "Import" button.

Configuring with Web Based Management 4.5 System
SINEMA Remote Connect - Server
Operating Instructions, 01/2021, C79000-G8976-C383-09 67
Result
The system is updated. Depending on the type of update, individual functions, or the entire system is restarted. To check the version following the restart, in the navigation click "System > Overview" and check the displayed software version.
4.5.9 Backing up & restoring
4.5.9.1 Backup copies You can make up to 30 backup copies of the system settings of the SINEMA RC Server and reload these when necessary. The individual backup copies are saved in the format *.backup and can be imported into another system with the same SINEMA RC version.
You can find additional information
• In the section "Maintenance and service".
• On the Internet under the following entry ID: 109748144 (https://support.industry.siemens.com/cs/ww/de/view/109748144/en)
Requirement for creating backup copies • The user has been assigned the right "Create backup copies".
• The settings for the backup copy are configured.
Calling the Web page In the navigation, select "System > Backup & Restore > Backup copies".
Displayed entries In the "Backup copies" tab, a list of the existing backup copies is displayed: Field Meaning Date Date on which the backup copy was created Name of the creator
Name of the user who created the backup copy
Size File size of the backup copy Comment Comment on the backup copy. The text can be entered when creating or importing a
backup copy.

Configuring with Web Based Management 4.5 System
SINEMA Remote Connect - Server
68 Operating Instructions, 01/2021, C79000-G8976-C383-09
Field Meaning Status • Done The backup copy has been created.
• Restore: The system settings from the selected backup copy are restored.
Actions
For this action, you require the user right "Restore the system". SINEMA RC Server takes the system settings from the selected backup copy and continues working with these. All settings made up to this point that have not been saved in a backup copy are lost.
Exporting and saving the selected backup copy as a file (*.backup).
Creating a new backup copy Requirement
• The settings for the backup copies are configured.
With this function, you create a new backup copy with the current settings of the system.
1. Click the "Create new backup copy" button.
2. In the dialog that follows, if required enter a comment on the backup copy.
3. Click the "Finish" button.
Result
The backup copy is created and displayed in the list of backup copies.
Note Settings that are not taken
The following settings are not backed up: • Network settings (exception: HTTPS port) • Log messages
Importing the backup
Note
The coding key must be identical on both systems. A backup copy coded with the key (x) cannot be imported on a system with the key (y).
With this function, a previously created backup copy that was saved as a file is loaded.
1. Click the "Import backup copy" button.
2. In the dialog that follows, if required enter a comment on the backup copy.
3. Click the "Select file" button.
4. Select the required file in the format *.backup and confirm your selection with the "Open" button.

Configuring with Web Based Management 4.5 System
SINEMA Remote Connect - Server
Operating Instructions, 01/2021, C79000-G8976-C383-09 69
5. Click the "Finish" button.
6. In "Actions" click on the "Restore" button to adopt the system configuration of the selected backup copy.
Result
SINEMA RC Server takes the system settings from the selected backup copy and continues working with these settings. All settings made up to this point that have not been saved in a backup copy are lost.
See also Settings (Page 69)
4.5.9.2 Settings Use this page to set the settings for the backup copies.
Calling the Web page In the navigation, select "System > Backup & restore > Settings".
Displayed entries In the "Settings" tab, you configure data for the backup copy: Field Meaning Maximum number of local backup copies
Maximum number of local backup copies allowed An entry between 10 and 30 is permitted. When the maximum number is reached, the oldest backup copy is overwritten.
Automatic backup inter-val
Enables automatic backup if the system is to be backed up at regular intervals. The following entries are possible: • Disabled • Daily • Every Sunday • Every Saturday • Every first day of the month
Automatic backup time (UTC)
Time information for automatic saving
Encryption key
Encryption key for encrypting a backup copy The encryption key must have at least 8 characters and include special characters, upper and lowercase characters as well as numbers, refer to the section "Permitted characters".
Confirm en-cryption key
The encryption key must be entered twice.

Configuring with Web Based Management 4.5 System
SINEMA Remote Connect - Server
70 Operating Instructions, 01/2021, C79000-G8976-C383-09
Configuring settings for backup copies Requirement
• The user has been assigned the right "Edit system parameters".
Procedure
1. Enter the number of permitted backup copies.
2. Select the suitable entry in the "Automatic backup interval" drop-down list to create backup copies automatically.
3. Enter the time for the automatic backup.
4. Enter a "Coding key" with which the backup copy is encrypted.
5. Confirm the "encryption key".
6. Click the "Save" button.
4.5.10 Power Management
4.5.10.1 Power Management The system can be restarted or shut down on this page. You can also define a boot partition for the restart.
Calling the Web page In the navigation, select "System > Power Management".
Power management The system can be restarted or shut down using the following buttons:
• Restart system
• System shutdown
4.5.10.2 Boot Partition This page is available as of version 3.0 and shows the currently installed SINEMA RC server version. As of version 3.1, the two most recently installed SINEMA RC server versions are always available: the current version and the previous version. The previous version serves as a backup copy.
Calling the Web page In the navigation, select "System > Power Management > Boot Partition".

Configuring with Web Based Management 4.5 System
SINEMA Remote Connect - Server
Operating Instructions, 01/2021, C79000-G8976-C383-09 71
Defining the Boot Partition 1. Click on the check box for the version with which the operating system should start.
2. Save your selection with "Save".
Result
The selected partition is started after the next system restart.
4.5.11 Settings
4.5.11.1 Server Information On this page, you can create your own information text which is displayed on the SINEMA RC server login screen.
Calling the Web page Select "System > Settings > Server Information" in the navigation.
Requirement • The user has been assigned the right "Edit system parameters".
Creating a server information text 1. Select the check box "Show server information text on login screen".
2. Enter the text and confirm your entry with "Save". The text can be up to a maximum of 250 characters long.
The text is displayed above the login screen of the SINEMA RC server. This text can be displayed in server info box on the SINEMA RC Client.

Configuring with Web Based Management 4.6 Remote connections
SINEMA Remote Connect - Server
72 Operating Instructions, 01/2021, C79000-G8976-C383-09
4.5.11.2 Auto Logout You can define the session time on this page.
Calling the Web page Select "System > Settings > Auto Logout" in the navigation.
Requirement • The user has been assigned the right "Edit system parameters".
Setting the time interval 1. Enter the time in minutes. The entered value must be between 1 and 60.
2. Confirm the entry with "Save".
After the time expires, the server ends the session.
4.6 Remote connections
4.6.1 Managing devices
4.6.1.1 Overview of device management The existing device entries are listed in tabular form on this page. The most important information for each device is displayed in different columns. Use the button above the table to show or hide the columns and change their order.
When you create the device, you can use participant groups to restrict access to specific nodes. Prior to creating the devices, it therefore makes sense to create the individual groups first (refer to the section "Creating participant groups (Page 81)").
Note
Note that a device should be assigned to at least one participant group.
If the device is not assigned to any participant group, this can only be edited by users with the "Manage devices" right.
Requirement • The user has been assigned the right "Manage devices".

Configuring with Web Based Management 4.6 Remote connections
SINEMA Remote Connect - Server
Operating Instructions, 01/2021, C79000-G8976-C383-09 73
Calling the Web page In the navigation, select "Remote connections > Device".
Displayed entries Field Meaning Device name Shows the device name. Device ID The device ID is created automatically when the device is created. Required to log in to the SINEMA RC
Server. VPN address The IP address of the device used during communication via VPN. The address is automatically assigned
by SINEMA RC. If communication via VPN is not active, "none" is displayed. Remote subnet The IP address of the remote subnet. If the option "Connected local subnets" is not enabled, "none" is
displayed, refer to the section "Creating a new device (Page 75)". If several IP addresses are created, they are displayed one under the other.
Virtual subnet The subnet matching the NAT IP address of the device. If the option "NAT for local subnet" is not ena-bled, "none" is displayed, refer to the section "Creating a new device (Page 75)". If several IP addresses are created, they are displayed one under the other.
Status
The device is connected to SINEMA RC server via VPN.
The device is not connected to SINEMA RC server via VPN.
Disabled The device is disabled. Last login Indicates when the device was last logged in. Location Location of the device. This can, for example, be the installation location of the device. Type of connec-tion
Shows when the connection will be established. • Permanent:
The VPN connection exists permanently. • Digital input:
The VPN connection is established as soon as a signal is present at the "digital input" of the device. • Wake-up SMS (M-800) or Wake-up SMS (RTU 3030)
Sends an SMS to the device. The connection is established as soon as the device receives the SMS. • Wake-up SMS / Digital input (M-800)
The connection is established either via the digital input or via a command SMS. Device type Shows the type designation of the device. Vendor Displays the manufacturer of the device. VPN protocol Shows which protocol is being used for the VPN connection.
1. OpenVPN: The connection will be established via OpenVPN. 2. IPsec: The connection will be established via IPsec.
SMS gateway provider
Only for M800 Mobile, RTU 303xC, RM1224 Displays the SMS gateway provider. You can configure the SMS gateway provider under "System > E-mail & SMS".

Configuring with Web Based Management 4.6 Remote connections
SINEMA Remote Connect - Server
74 Operating Instructions, 01/2021, C79000-G8976-C383-09
Field Meaning Comment Displays the comment. Actions
You obtain an overview of the device information. The device information contains the device ID and the fingerprint. These two pieces of information need to be entered on the device. During connection establishment, the device authenticates itself with the SINEMA RC Server using this information.
Edit device settings
The configuration file with the OpenVPN settings for this device is created and can be saved. The file can be exported to the end device.
A password protected PKCS#12 file is created and can be saved. The certificate is derived from the last valid CA. The file contains the private key of the device with the corresponding certificate. The file can be exported to the end device. When the pass-word is queried, enter the password you specified when you created the device (refer to the section "Creating a new device (Page 75)").
The certificate and the key are stored as Base64-coded ASCII text.
Deactivate device • If the device is connected, the existing connection is also deactivated. • If the device attempts to establish a VPN connection, the device is ignored by the
SINEMA RC Server.
Activate device. The device can establish a VPN connection to the SINEMA RC Server.
Only available with the type of connection "Wake-up SMS" or "Digital input & Wake-up SMS". • If the device is not connected, the SINEMA RC Server sends the wake-up SMS mes-
sage to the device.
Creating a device Click the "Create" button and configure the required settings, see Creating a new device (Page 75).
Filtering entries 1. Select an entry in "Search filter".
2. Enter a search term or part of the search term in the search box.
3. To limit the search further, select the "Precise match" check box.
When this is selected, case is taken into account and the entire search word is searched for.
The search results will match the entered search term exactly.
4. Click on the "Apply filter" button.

Configuring with Web Based Management 4.6 Remote connections
SINEMA Remote Connect - Server
Operating Instructions, 01/2021, C79000-G8976-C383-09 75
Result
The list is updated based on the settings made. To show all entries again, click the "Show all" button.
4.6.1.2 Creating a new device
Device settings
You set the settings for the desired device on this page. The settings are divided into areas that can be collapsed and expanded for clarity.
Calling the Web page In the navigation, select "Remote connections > Device".
Procedure 1. Click the "Create" button.
2. Configure the General device information:
Field Meaning Device name Enter a name.
The name must meet the following conditions: • It must be unique • it must start with a letter. • The following characters are permitted: a-z, A-Z, 0-9 and _ • "conn" cannot be used as a name.
Password Enter a password and confirm this password. See also the guidelines in the section "Permitted characters (Page 27)". Confirm password
Vendor You can enter the manufacturer of the device. Type Select the type of node from the list.
If your device type is not shown or you do not know it, select "Other". All functions are now enabled.
SMS gateway provider Only for M800 Mobile, RTU 303xC, RM1224 Select the SMS gateway provider. You can configure the SMS gateway provider under "System > E-mail & SMS".
GSM number Only for M800 Mobile, RTU 303xC, RM1224 Enter the phone number of the node to which the wake-up SMS is sent.

Configuring with Web Based Management 4.6 Remote connections
SINEMA Remote Connect - Server
76 Operating Instructions, 01/2021, C79000-G8976-C383-09
Field Meaning Sender ID Only with RTU 303xC
This ID identifies the SINEMA RC server to the RTU. The ID must also be configured in the RTU.
Location You can enter the installation location of the device. Comment You can enter a comment.
3. Configure the VPN settings:
Field Meaning VPN protocol Specify which protocol will be used for the VPN connection. The selec-
tion depends on the selected device type. • OpenVPN: The connection will be established via OpenVPN. You
configure the settings in "Security > VPN basic settings > Open-VPN".
• IPsec: The connection will be established via IPsec.
Type of connection Specify when the VPN connection is to be established. The selection depends on the selected device type. • Permanent
The device establishes a VPN connection to the SINEMA RC Server. The VPN tunnel is maintained permanently.
• Digital input
Establishing the connection is controlled via the digital input (DI) of the device.
• Wake-up SMS (SCALANCE M-800) / Wake-up SMS (RTU)
When the device receives a wake-up SMS, it establishes a connec-tion to the SINEMA RC Server.
• Digital input / wake-up SMS (SCALANCE M-800)
Establishing the connection is controlled either via the digital input or via a wake-up SMS.
Request VPN address When this option is enabled, a VPN address is requested during con-nection establishment. • OpenVPN: The setting is always selected and cannot be changed. • IPsec: Enable or disable the option.
Use fixed VPN address If this option is selected, you can assign a fixed VPN address to the device. Via the VPN connection, the device can always be reached at this VPN address. This is only possible when the parameter "Activate fixed IP address space" is enabled. The parameter depends on the VPN connection mode. • OpenVPN: Remote connections > Address spaces > OpenVPN • IPsec: Remote connections > Address spaces > IPsec
Fixed VPN address Enter the desired VPN address.

Configuring with Web Based Management 4.6 Remote connections
SINEMA Remote Connect - Server
Operating Instructions, 01/2021, C79000-G8976-C383-09 77
4. Configure additional parameters for the VPN connection. The configuration mask depends on the selected VPN protocol.
– OpenVPN connection
To configure the parameters, enable "Connection parameters".
Field Meaning IP address IP address of the connection
Enter the IP address via which the SINEMA RC Server can be reached.
Port Enter the port at which the SINEMA RC Server receives the OpenVPN connection.
Protocol Specify whether the OpenVPN connection goes via TCP or UDP.
– IPsec connection
Field Meaning IPsec profile Can only be selected in the "IPsec" connection mode. You configure
the IPsec profiles in "Security > VPN basic settings > IPsec profile". Certificate • Default certificate
The CA certificate of the SINEMA Remote Connect Server is used for authentication. You must export the certificate, since it is re-quired for the configuration of the devices. You export the cer-tificate via "Security > Certificate management > CA certificate".
• Imported certificates
Only imported certificates can be selected with IPsec VPN. You can import certificates via "Security > Certificate management > Device certificate".
Local ID The local ID and the remote ID are used by IPsec to uniquely identify the partners (VPN end point) during establishment of a VPN connec-tion. Only required if the VPN tunnel partner evaluates the entry.
Remote ID
5. Configure All access.
The subnets and nodes accessible via the device are members of this participant group. You can assign one or more participant groups.
Select the desired user group and click on the "Add" button. To delete, click on .
6. If you do not need any further network settings, click "Quick Finish".
If you need further network settings, click "Next". The prerequisite is that the device supports subnets.

Configuring with Web Based Management 4.6 Remote connections
SINEMA Remote Connect - Server
78 Operating Instructions, 01/2021, C79000-G8976-C383-09
Network settings This page is only available for device types that support the subnets. You can find information about your device in the section "Connectable nodes (Page 24)".
On this page, you define the subnets and nodes that can be reached via the device and who can access them.
Requirement • The device supports subnets.
Procedure 1. If the device is a gateway, activate "Device is a network gateway". If the device does not
function as a network gateway, a source NAT is forced on the device with this setting.
2. In the "Subnet name" input box, enter a valid name and click "Add".
The "Subnet name [Subnet name]" area is created. To delete, click on .
3. Configure the subnet:
Field Meaning Participant groups Select the participant group that has access to the subnet and click
the "Add" button. You can assign one or more participant groups. To delete, click on .
Subnet IP Enter the IPv4 address of the subnet accessible from the device. Subnet mask Specify the network mask of the subnet.
4. Specify the NAT mechanism for "NAT mode":
– Without For transparent IP communication through the OpenVPN tunnel without NAT. The devices communicating with each other always use the explicit IP address of the communication partner.
– 1:1 NAT The network IP address of the remote subnet is represented by a virtual network IP address. The network IP addresses are converted in the remote device. The host IP address remains unchanged. The virtual IP address must be used to address a node in the remote subnet.
– NAT for local hosts The IP address of the device in the remote subnet is hidden behind a dedicated IP address. The device IP addresses are converted in the remote device. You can specify the dedicated virtual IP address to address a node in the remote subnet.

Configuring with Web Based Management 4.6 Remote connections
SINEMA Remote Connect - Server
Operating Instructions, 01/2021, C79000-G8976-C383-09 79
5. If you have enabled NAT mode, configure the virtual subnet:
Field Meaning Virtual subnet IP Specify the IP address for the virtual subnet. If the network address
space is enabled, the start address is entered automatically. You can customize this address.
Virtual subnet mask Only available with "NAT for local hosts": Enter the network mask of the virtual subnet.
6. Enter a unique name for "Node name" and click "Add".
The "Node [node name]" area is created. To delete, click on .
7. Configure the node:
Field Meaning Node name Displays the name you assigned to the node. Terminal device IP Specify the IP address of the node. The IP address must be in the
configured subnet. Virtual terminal device IP • 1:1 NAT
The virtual IP address is entered automatically. • NAT for local hosts
Specify the translated NAT IPv4 addresses. Participant group Select the remote participant group that has access to the device
and click "Add". You can assign one or more participant groups. To delete, click on .
8. Click the "Save" button.
Setting up a template with network settings To transfer the same network settings to other devices, you can create a template in "Template settings" and use it. Button Meaning Save settings as template To save network settings to a template, click the "Save settings as
template" button. Note: When a new template is saved, the existing template is over-written with new values.
Load settings from template To copy network settings from the template, click on the "Load set-tings from template" button. Note: When the template is loaded, all new settings are overwritten with the template values without warning. Newly created subnets are deleted if the template does not contain them.
When creating the template, note that only the last saved template is available. The following values are entered in the template:
• Setting for "Device is a network gateway".
• Subnet name and assignment of participant groups

Configuring with Web Based Management 4.6 Remote connections
SINEMA Remote Connect - Server
80 Operating Instructions, 01/2021, C79000-G8976-C383-09
• Subnet IP address and subnet mask If NAT mode is set to "without", this information must be unique. Adapt the information before saving the network settings.
• Selected NAT mode
• Virtual subnet IP and virtual subnet mask If the virtual subnet is activated, these values are not taken from the template, but automatically filled with the next free address. If NAT is not enabled, enter the values before saving the network settings.
• Node name
• Terminal device IP
• Virtual terminal device IP Calculation continues automatically with the next free IP address.
• Assignment of the participant groups
4.6.1.3 Updating devices You can find information about the status of the loaded firmware on this page.
Calling the Web page In the navigation, select "Remote connections > Device update > Devices".
Displayed entries A list of information about the installed firmware version is displayed. Field Meaning Device name Shows the device name. Last known firm-ware version
The firmware version that the device transferred to the SINEMA RC Server.
Last known re-quest of the firmware
Information on when the device last requested the firmware.
Status
Online: The device is connected to SINEMA RC Server via VPN.
Offline: The device is not connected to SINEMA RC Server via VPN.
Disabled The device is disabled. Actions
Deactivate device • If the device is connected, the existing connection is also deac-
tivated. • If the device attempts to establish a VPN connection, the device
is ignored by the SINEMA RC Server.
Activate the device again.

Configuring with Web Based Management 4.6 Remote connections
SINEMA Remote Connect - Server
Operating Instructions, 01/2021, C79000-G8976-C383-09 81
Updating firmware 1. Click on the "Firmware file" tab.
2. Click the "Select file" button.
3. Navigate to the storage directory and select the update file (*.swf). Confirm your selection with the "Open" button.
4. Click the "Import" button.
5. Click on the "Devices" tab.
6. Select the devices to be updated.
7. Click the "Save" button.
Result:
After saving, the SINEMA RC Server sends the request to the device to load the new firmware. The device downloads the firmware and restarts.
The current firmware version is entered in the table under "Last known firmware version".
Each device update is documented in the "Logfile messages" under "System > Logfile".
4.6.2 Participant groups Users, devices, end devices and subnets can be grouped together into participant groups. The nodes can also be assigned to several participant groups. You also specify whether the communication between the participants of an individual group is permitted or forbidden.
Once the participant groups have been created, you can define communication relations between the groups; see section "Communication relations (Page 82)".
Requirement for creating participant groups • The user has been assigned the right "Manage remote connections".
Calling the Web page In the navigation, select "Remote connections > Participant groups".
Displayed entries A list of the participant groups that have already been created is displayed: Field Meaning Group Name Name of the group Members may com-municate
Indicates that members of this group may communicate with each other.
Reachable Ethernet interfaces
Shows the LAN interface via which the VPN tunnel can be reached.
Number of users Number of users assigned to the group.

Configuring with Web Based Management 4.6 Remote connections
SINEMA Remote Connect - Server
82 Operating Instructions, 01/2021, C79000-G8976-C383-09
Field Meaning Number of devices Number of devices assigned to the group. Number of subnets Number of subnets assigned to the group. Number of nodes Number of nodes assigned to the group. Number of roles Number of roles assigned to the group. Actions
Open member list. In the list, all the devices and users belonging to the participant group and their status (online or offline) are displayed.
Open the overview for changing the settings for the participant groups.
Open the overview for changing the communication relations.
Create new participant group 1. Click the "Create" button.
2. Enter a group name and optionally a description in the following dialog.
3. Specify whether the group members are allowed to communicate with each other.
4. Specify which LAN interface can be reached via the VPN tunnel.
5. Click the "Save" button.
Result
The participant group has been created. You have specified whether communication between the members of this group is permitted or forbidden.
Changing the settings of the participant groups 1. Change the relevant participant group settings.
2. Then click the "Save" button.
Filtering entries 1. Select an entry in "Search filter".
2. Enter a name or part of the name in the search box.
3. Click on the "Apply filter" button.
Result
The list is updated based on the settings made. To show all entries again, click the "Show all" button.
4.6.3 Communication relations You define the communication relationships between the groups on this page.

Configuring with Web Based Management 4.6 Remote connections
SINEMA Remote Connect - Server
Operating Instructions, 01/2021, C79000-G8976-C383-09 83
Requirement • The user has been assigned the right "Manage remote connections".
• Participant groups have been created.
Calling the Web page In the navigation, select "Remote connections > Communication relations".
Displayed entries A list of the communication relations already created is displayed: Field Meaning Source group Name of the source group Destination group Names of the destination groups whose members are allowed to communi-
cate with the members of the source group. Actions
Open the overview for changing the settings for the participant groups.
Creating communication relations between the participant groups 1. Specify the source group. For this group, click on the icon .
2. On the following page, you define the destination groups to which connections are allowed from the source group.
3. Click the "Save" button.
Result
The communication between the participant groups is specified. You have specified whether communication between the members of this group is permitted or forbidden.
Changing communication relations between the participant groups 1. In the navigation, select "Remote connections > Communication relations".
2. Click on the icon. Change the relevant communication relations and then click the "Save" button.
Filtering entries 1. Select an entry in "Search filter".
2. Enter a name or part of the name in the search box.
3. Click on the "Apply filter" button.
Result
The list is updated based on the settings made. To show all entries again, click the "Show all" button.

Configuring with Web Based Management 4.7 User accounts
SINEMA Remote Connect - Server
84 Operating Instructions, 01/2021, C79000-G8976-C383-09
4.6.4 Assigning a node to a group
Assign users to one or more groups 1. Click on the icon in the user overview.
The participant groups that have already been created are displayed.
2. Select the group/groups to which the participant will be assigned.
3. Click the "Save" button.
Assign devices, subnets, or nodes to one or more groups. 1. Click on the icon in the device overview.
The general device settings open.
2. Under "All access", select the desired user group and click the "Add" button.
3. Click the "Save" button.
4. If the device supports subnets, you can assign the subnets and nodes accessible via the device to participant groups in the network settings.
Select the participant group that has access to the subnet or node and click the "Add" button.
5. Click the "Save" button.
4.7 User accounts
4.7.1 Overview of the user accounts
Requirement for creating and changing users The user has been assigned the right "Manage users".
Calling the Web page In the navigation, select "User accounts > Users & Roles".

Configuring with Web Based Management 4.7 User accounts
SINEMA Remote Connect - Server
Operating Instructions, 01/2021, C79000-G8976-C383-09 85
Displayed entries A list of the users that have already been created along with their status is displayed. In addition, the temporary users are shown that are created when logging on with Smartcard or the PKI certificate. Field Meaning User name The name assigned to the user. The user name must be unique throughout the
system and can be changed. Refer to the note in the section "Create a new user (Page 88)".
VPN address The IP address of the device used during communication via VPN. The address is automatically assigned by SINEMA RC. If communication via VPN is not active, "none" is displayed.
First name First name of the user Last name Last name of the user Account created Date and time at which this user account was created Last login Date and time of the last login Status
The user is logged on to SINEMA RC.
The user is not logged on to SINEMA RC.
Disabled The user is disabled. VPN protocol Shows which protocol is being used for the VPN connection. Actions
Overview of the user settings. The user settings are also displayed for users with the right "read only".
Change user settings. This includes changing the contact data, assigning new roles and rights and changing the password.
Edit participant group that the selected user is assigned to. The user can be assigned to one or more groups.
Deactivate user. If the user is online, the existing VPN connection is also deactivated. When the user attempts to log on, the message "Account is deac-tivated" is displayed.
Activate the user again. The user can log on to the SINEMA RC serv-er again.
Filtering entries 1. Select an entry in the "Search filter" pop-up menu.
2. Enter a search term or part of the search term in the search box.
3. To limit the search further, select the "Precise match" check box.
When this is selected, case is taken into account and the entire search word is searched for.
The search results will match the entered search term exactly.
4. Click the "Apply filter" button.
Result

Configuring with Web Based Management 4.7 User accounts
SINEMA Remote Connect - Server
86 Operating Instructions, 01/2021, C79000-G8976-C383-09
The list is updated based on the settings made. To show all entries again, click the "Show all" button.
4.7.2 Managing roles and rights
Requirement for creating roles The user has been assigned the right "Manage users".
Displayed entries A list of the created roles is displayed.
Field Meaning Calling the Web page Role name Name of the role - Manage address spaces Edit parameters of the address spaces Remote connections > Address
spaces Create backup copies Create, delete, export and import a backup copy System > Backup & Restore Restore System Restore the system based on the saved system file System > Backup Copy and System
Restore Force comment When the VPN tunnel between SINEMA RC Client and
server is ended, the user is requested to enter a com-ment. Only then can the current session be closed. The comment is entered in the log of the SINEMA RC Server.
SINEMA RC Client
Manage firmware updates Load the update file with the new firmware on the device and start the update process.
System > Devices-Update
Manage devices Create new devices; edit and delete devices already created; create participant groups and assign devices to them; create and download configuration file with VPN settings for the device
Remote connections > Devices
Manage remote connections Define communication relations: Communication between participants within a participant group and participant groups with one another
Remote connections > Participant groups Remote connections > Communica-tion relations
Edit system parameters Read, create and delete system parameters. The sys-tem parameters include: • Overview • Event log • Web server • Licenses • Network • System update • Date and time of day • VPN • Maximum number and coding key for backup
copies

Configuring with Web Based Management 4.7 User accounts
SINEMA Remote Connect - Server
Operating Instructions, 01/2021, C79000-G8976-C383-09 87
Field Meaning Calling the Web page Certificate management Create new CA certificates and server certificates; edit
and delete existing certificates Security > Certificates
Manage users and roles Create new users and roles, edit and delete existing users and roles; assign rights and change your own assigned rights
User accounts > Users and roles
Download client software Download SINEMA RC Client software User accounts > Client Software Password policy Guideline for the assignment of passwords PKI policy Guideline for the PKI certificate UMC policy Shows whether access to the UMC is activated or not
Creating a new role 1. Open the "Roles" tab.
2. Click the "Create" button.
3. Enter a role name.
4. Assign rights to the role according to the next table. Click the "Next" button.
5. Activate the relevant group memberships. Click the "Next" button.
6. Specify the password policy:
Field Description Password expires (in days) Specifies that the password expires after a certain period.
• Never (set as default) • 30 days • 90 days • 360 days 14 days before expiry the user receives an e-mail. Requirement: • An e-mail address is configured for the user. • The SMTP client is configured.
Reusing the same password • 0: The setting is disabled • 1 - 5: If, for example, you enter 3, the current password can be
reused only after 3 different passwords. As default, 3 is set.
User must change password after first login
Specifies whether a user needs to change their password after the first login.

Configuring with Web Based Management 4.7 User accounts
SINEMA Remote Connect - Server
88 Operating Instructions, 01/2021, C79000-G8976-C383-09
7. Specify the settings for the logon with the PKI certificate.
Field Description PKI DN filter rule Filter criteria according to which a check is made at the logon.
The attributes of the names (Distinguished Name acc. to the X.509 standard) are used as filter criteria. This requires that the attributes are included in the PKI certificate of the user. For more detailed information, refer to the section "Logon with the Smartcard / PKI certificates".
Delete temporary users (in hours)
• 0: The setting is disabled. The temporary user must be deleted manually.
• 1 - 72 hours: When the time expires, the temporary user is de-leted.
8. If this role is to be activated for UMC logins, select the "Activated" check box and define the following settings:
Field Description UMC user group Enter the name of the UMC user group. The entered name should
match the name on the UMC server. Delete temporary users (in hours)
• 1 - 9999 hours: When the time expires, the temporary user is deleted.
9. Click the "Finish" button.
4.7.3 Create a new user
Create a new user 1. Open the "Users" tab.
2. Click the "Create" button.

Configuring with Web Based Management 4.7 User accounts
SINEMA Remote Connect - Server
Operating Instructions, 01/2021, C79000-G8976-C383-09 89
3. Configure the contact data
– Enter the necessary information in the "Contact data" tab. A mandatory box is the "User name".
– The remaining contact information is optional and can be entered and modified by the users themselves.
Note
User names
The user name must meet the following conditions: • It must be unique • it must start with a letter. • The following characters are permitted: a-z, A-Z, 0-9 and _ • The following user name is not allowed: admin User names: admin
As default, after the installation the predefined user "admin" is available. • admin: You can log in once after the installation using this user name and the
password "admin". After this you will be prompted to create a new user. The "admin" role is assigned to this user automatically. This administrator has the right to access all functions and can set up the system. This includes creating users and assigning roles and rights to them. The "admin" user is no longer available.
Changing a user name
You can change the user name later. If you change the user name, you must either change the password or the user must log in to generate a new certificate and a new PKCS#12 file.

Configuring with Web Based Management 4.7 User accounts
SINEMA Remote Connect - Server
90 Operating Instructions, 01/2021, C79000-G8976-C383-09
– Specify how the user can log in to the SINEMA RC Server:
Field Meaning Login method • Password
Login with user name and password • PKI
Login only with PKI certificate
PKI DN filter rule Only required when logging in with PKI certificate. Filter criteria according to which a check is made at the logon. The attributes of the names (Distinguished Name acc. to the X.509 standard) are used as filter criteria. This requires that the attributes are included in the end entity certificate of the user. As placeholder use the "*" character.
– Click the "Next" button.
4. Assign rights and roles
– Assignment of rights via role assignment:
Click and select the required role in the drop down list. Click "Add".
The user receives the rights assigned to the role. To assign additional rights to the user, click on the check box in front of the respective right.
To cancel the role assignment, click the check box for the role again.
– Assignment of rights without role assignment:
If you have not selected a role, enable the corresponding rights by clicking on the check box.
– Click the "Next" button.
5. Create Group memberships
– Select one or more participant groups to which the device will be assigned. You will find information on creating participant groups in the section "Creating participant groups (Page 81)".
– Click the "Next" button.

Configuring with Web Based Management 4.7 User accounts
SINEMA Remote Connect - Server
Operating Instructions, 01/2021, C79000-G8976-C383-09 91
6. Configure the VPN connection mode
Set the following parameters:
Field Meaning Request virtual IP address
When enabled, a virtual IP address is requested during connection estab-lishment.
Fixed IP address The IP address that is always assigned to the user. This is only possible when the parameter "Activate fixed IP address space" is enabled. • OpenVPN: Remote connections > Address spaces > OpenVPN
OpenVPN connec-tion parameters
Only necessary when the WAN IP address of the SINEMA RC Server is trans-lated with NAT. • IP address of the connection
Enter the IP address via which the SINEMA RC Server can be reached. • Port of the connection
Enter the port at which the SINEMA RC Server receives the OpenVPN connection.
• IP protocol Specify whether the OpenVPN connection runs via TCP or UDP.
• Actions To delete, click on for actions.
7. Specifying the password
Enter a password and confirm it. The assigned password can be changed later by the relevant user, refer to the section "Changing the current password (Page 120)".
8. Click the "Finish" button.
Changing user settings Change the corresponding user settings. Then click the "Save" button.
Note Changing the login method
If you change the login method from password to PKI, the configured password is deleted.

Configuring with Web Based Management 4.7 User accounts
SINEMA Remote Connect - Server
92 Operating Instructions, 01/2021, C79000-G8976-C383-09
4.7.4 User agreement On this page you can enter a user agreement. Field Meaning Display option • Never
The user agreement is not displayed. • First login
When the user logs in for the first time, the user agreement is displayed. After accepting the user agreement, the user can access the WBM of the SINEMA RC Server.
• Every login Each time the user logs in, the user agreement is displayed. After accepting the user agreement, the user can access the WBM of the SINEMA RC Server.
Message In the editor, enter the text for the user agreement. In the toolbar there are tools available for formatting the text. The symbols provide brief information in the form of a tooltip. After making your entry, click the "Save" button.
Export Exports the selected version of the user agreement.
Note Changed user agreement
If you change the user agreement while users are logged into the SINEMA RC Client, this change does not take immediate effect for these users. These users remain logged on after the change is made to the user agreement.
The changed user agreement is displayed only when these users log in again. After accepting the user agreement, these users can access the WBM of the SINEMA RC Server.
4.7.5 Client Software
4.7.5.1 Client Software On this page, you can upload the installation software of the SINEMA RC Client to the SINEMA RC server.
Requirement • The user has access to the storage directory.
Calling the Web page In the navigation, select "User Accounts > Client Software".

Configuring with Web Based Management 4.7 User accounts
SINEMA Remote Connect - Server
Operating Instructions, 01/2021, C79000-G8976-C383-09 93
Importing client software Procedure
1. Click "Select file" on the "Client Software" tab.
2. Navigate to the storage directory and select the file to be loaded (*.exe). Confirm your selection with the "Open" button.
3. Click the "Import" button.
Result
The SINEMA RC Client software is uploaded to the SINEMA RC server. The file name and the fingerprint with SHA256 are displayed. Check the displayed fields.
4.7.5.2 Client Settings On the "Client Settings" tab, you can load your own logo image in PNG, JPEG or BMP format. This image is shown in the client interface instead of the SIEMENS logo. To avoid image distortions or cropping, use images with an aspect ratio of 2 : 1 (height x width), e.g. 200 x 100px or 600 x 300px.
Requirement • The user has access to the storage directory.
Calling the Web page In the navigation, select "User Accounts > Client Software" and the "Client Settings" tab.
Client settings 1. Click "Select file" on the "Client Settings" tab.
2. Navigate to the storage directory and select the image file to be loaded. Confirm your selection with the "Open" button.
3. Click the "Import" button.
Result
The image is uploaded to the SINEMA RC server. The file name and the miniature view are displayed. The logo is applied next time the client starts. You can switch back to the standard image with the "Reset to default logo" button.

Configuring with Web Based Management 4.8 Services
SINEMA Remote Connect - Server
94 Operating Instructions, 01/2021, C79000-G8976-C383-09
4.7.5.3 Client Licenses On the "Client Licenses" tab, you receive an overview of client logins. You can also manage these entries.
For connections from two SINEMA RC Clients, you need the SINEMA RC Client license (MLFB 6GK1721-1XG03-0AA0 or 6GK1721-1XG03-0AK0 for OSD).
Calling the Web page In the navigation, select "User Accounts > Client Software" and the "Client Licenses" tab.
Management of client licenses An overview of client logins is shown on the "Client Licenses" tab: Field Meaning Client system ID Shows the client system ID on the server. Client device name Shows the PC name from which the client logged into the server. Last login Shows the time stamp of the client login with the date and time. Last connected user Displays the name of the user that last established the connection from the
client to the server.
To delete a table entry, select the check box in front of the entry to be deleted and click the "Delete" button.
4.8 Services
4.8.1 API On this page, you set up the SINEMA RC API server, which answers the API requests of the API client.
Requirement To be able to use this function, you need the SINEMA RC API license (MLFB 6GK1724-3VH03-0BV0).
You can test the function for free for a period of 14 days. For this purpose, you need to activate the trial license. You can find additional information in section "Overview (Page 62)" and in the "SINEMA Remote Connect API server" Getting Started manual.
Calling the Web page In the navigation, select "Services > API".

Configuring with Web Based Management 4.8 Services
SINEMA Remote Connect - Server
Operating Instructions, 01/2021, C79000-G8976-C383-09 95
Setting up the API server Select the "API server" check box and make the following setting: Field Meaning API Token expire time in days Enter the expiry time of the authentication token.
Click "Save" to save the settings.
Result
The API server is set up. Via the API, you can access the WBM of the SINEMA RC server to configure it.
You can find more information on configuring the WBM of the SINEMA RC server with API in the "SINEMA RC API server" Getting Started.
4.8.2 UMC settings On this page, you set up the connection to the UMC server.
Requirement To be able to use this function, you need the SINEMA RC UMC license (order no. 6GK1724-2VH03-0BV0).
You can test the function for free for a period of 14 days. For this purpose, you need to activate the trial license. You can find additional information in the section "Logging on with UMC (Page 39)".
Calling the Web page In the navigation, select "Services > UMC Settings".
Setting up the connection to the UMC server Select the "UMC server" check box and make the following settings: Field Meaning UMC server IP address Enter the IP address of the UMC server. UMC server port Enter the port number of the UMC server.
Click "Save" to save the settings.
Result
The connection to the UMC server is established when a UMC user logs in.

Configuring with Web Based Management 4.8 Services
SINEMA Remote Connect - Server
96 Operating Instructions, 01/2021, C79000-G8976-C383-09
4.8.3 Server upload This page provides you with the option of uploading configuration files or logfile messages to an SFTP server. SFTP stands for Secure File Transfer Protocol, but this is often confused with Simple File Transfer Protocol. The SFTP server uses a separate protocol which enables the transfer of files via a secure SSH connection.
Calling the Web page In the navigation, select "Services > Upload Server".
Displayed entries Make the following settings in the "Upload Server Settings" tab. Then click the "Save" button. Field Meaning Automatic file upload When activated, the newly generated files are uploaded to the SFTP
server. Files for upload Specify which file types are to be uploaded:
• Configuration • Log files • Configuration and log files
SFTP server name IP address or FQDN of the SFTP server If you use a port other than the standard port 22, enter the port num-ber along with the IP address. A colon ":" is entered as separator between the IP address and the port number, e.g.: 192.168.234.1:622.
Fingerprint SFTP server Display of the current fingerprint (last working connection) If the fingerprint changes e.g. after renewing the fingerprint, the function is disabled and a warning message to this effect is entered in the log. To be able to upload files to the SFTP server again, you need to enable the automatic file upload and check whether the new fingerprint matches that of the SFTP server.
Upload directory The user is assigned a storage directory, the so-called home directory. If you do not enter anything, the file is uploaded directly to the home directory. To upload the file to a subdirectory, specify the subdirecto-ry. Provided that the subdirectory is created in the home directory.
User name User name for access to the SFTP server Password Password for access to the SFTP server Upload old files Button for uploading all currently present files to the SFTP server
After the configuration is saved, newly generated files are automatically transferred to the SFTP server.
To upload currently present files to the SFTP server, click the "Upload old files" button.

Configuring with Web Based Management 4.8 Services
SINEMA Remote Connect - Server
Operating Instructions, 01/2021, C79000-G8976-C383-09 97
4.8.4 Syslog client On this page, you set up the Syslog client on the SINEMA RC server to establish the connection to the Syslog server and check its connection status.
Calling the Web page In the navigation, select "Services > Syslog Client".
Establishing a connection to the Syslog server Make the following settings and then click "Save & check connection": Field Meaning Client ID (host name) Enter the IP address of the SINEMA RC server.
With this IP address, SINEMA RC identifies itself as Syslog client on the Syslog server.
Syslog server IP ad-dress
Enter the IP address of the Syslog server.
Syslog server port Enter the port number of the Syslog server. Protocol Select the desired IP protocol (TCP (TLS) or UDP) from the list. Syslog server requests client authentication
When enabled, the Syslog server requires client authentication. A connection certificate should be specified in the field below for this purpose. This setting is used for mutual authentication between the Syslog client and the Syslog server (server and client authentication) and is only relevant for the selected protocol TCP (TLS). This check box cannot be activated for the select-ed UDP protocol.
Connection certificate Select the certificate of the Syslog server with which the connection is estab-lished. You can import certificates via the Web page "Security > Syslog certificate management"; see section "Syslog Certificate Management (Page 114)".
Note No suitable certificate for connection
If no suitable certificate is found in the Syslog certificate management, the Syslog server certificate is displayed.
In this case, you have the option to add this to SINEMA RC with "Accept" and to authorize the Syslog connection with "Save & check connection".
With "Refuse", you deny the use of the respective certificate.
Result
The connection to the newly created Syslog server is established. The connection parameters and the status are displayed in a table.

Configuring with Web Based Management 4.8 Services
SINEMA Remote Connect - Server
98 Operating Instructions, 01/2021, C79000-G8976-C383-09
Displayed entries The following entries are displayed: Field Meaning IP address of the connection
Shows the IP address of the Syslog server.
Connection port Shows the number of the connection port. IP protocol Shows the IP protocol used. Status Shows the connection status to the Syslog server.
The following statuses are possible: • Connections over UDP:
– "-" Connection monitoring via UDP is not possible.
• Connections over TCP (TLS): – Online
Establishing a connection to the Syslog server. – Offline
An established connection to the Syslog server is interrupted, e.g. if the Syslog server is no longer available.
– Rejected If it transpires during a connection check, e.g. using the button, that a certificate is invalid or has expired or the Syslog server is not re-sponding.
– Disabled The connection to the Syslog server is disabled.
– Certificate deleted A Syslog certificate based on which the connection is established is de-leted.
Actions
Check connection to the Syslog server (only with connections over TCP (TLS)).
Download Syslog client certificate from SINEMA RC.
Click this button to disable the Syslog server.
The Syslog server is disabled and no messages are sent to it. Click this button to enable the Syslog server.
Remove the Syslog server from the list. The Syslog server configuration is deleted immediately.
4.8.5 Debug login You can grant your Siemens contact access to the SINEMA RC Server for a certain period of time via the debug logon.
The contact at Siemens can only access the data if you provide information on the port and password and enable the function.

Configuring with Web Based Management 4.8 Services
SINEMA Remote Connect - Server
Operating Instructions, 01/2021, C79000-G8976-C383-09 99
Calling the Web page In the navigation, select "Services > Debug Login".
Setting up the debug login 1. Select the "Enable debug login" check box and make the following settings:
Field Meaning Debug login timeout (minutes)
Specify the duration of the access. When this time elapses user is automatically logged off.
Debug login port Specify the TCP port via which the system of the SINEMA RC Server is accessed. You may need to set up PORT forwarding to SINEMA RC on the Internet router.
Debug login password Enter the password. The new password must be at least 8 characters long and contain special characters, upper and lowercase characters as well as num-bers, refer to the section "Permitted characters (Page 27)".
Confirm debug login pass-word
Confirm this password.
2. Click "Save" to save the settings.
When the settings are saved, the remaining time is displayed in the "Remaining time (minutes)" box.
Deactivating Debug login 1. Disable "Enable Debug login".
2. Click the "Save" button.
The settings are returned to the default values and the password is deleted.

Configuring with Web Based Management 4.9 Security
SINEMA Remote Connect - Server
100 Operating Instructions, 01/2021, C79000-G8976-C383-09
4.9 Security
4.9.1 Managing certificates
4.9.1.1 Overview of certificate management
Certificate types SINEMA RC uses different certificates to authenticate the various nodes when establishing a VPN connection. These include:
Certificate Is used for ... File
type Description in sec-tion ...
CA certificate The CA certificate is a certificate issued by the "Certificate Au-thority" from which certificates are derived. So that a certificate is derived, a private key belongs to every CA certificate. The derived certificates are signed with the private key. The signature of the derived certificate is checked with the public key of the CA certificate. When SINEMA RC Server is installed a CA certificate is generated. When necessary the CA certificate can be renewed. The server, device and user certificates are derived from the currently valid CA certificate. The key exchange between the device and the VPN gateway of the partner takes place automatically when establishing the OpenVPN connection. No manual exchange of key files is neces-sary.
*.crt CA certificate (Page 101)
Server certificate Server certificates are required to establish secure communica-tion (e.g. HTTPS, VPN...) between the device and another net-work participant. The server certificate is an encrypted SSL certificate.
*.p12 Server certificate (Page 102)
Device certificate Device certificates and corresponding keys are only created when the user has the appropriate rights. For each created device, SINEMA RC Server creates a device cer-tificate.
*.p12 Overview of device management (Page 72)
User certificate SINEMA RC Server creates a personal certificate for each created user. You obtain an overview of the user certificate on the page "My Account > User Certificate".
*.p12 *.pem
User certificate (Page 119)
PKI CA certificate For the logon with the PKI certificate. The PKI CA certificate is created by an external certification au-thority.
*.pem PKI CA certificate (Page 111)
Syslog server CA certifi-cate
For authentication on the Syslog server. *.crt Syslog CA Certifi-cates (Page 114)

Configuring with Web Based Management 4.9 Security
SINEMA Remote Connect - Server
Operating Instructions, 01/2021, C79000-G8976-C383-09 101
File types File type Description *.crt File that contains the certificate. *.p12 *.pfx
The formats *.p12 and *.pfx are used to save the certificate along with the private key. The private key with the corresponding certificate is stored password protected. The CA creates a certificate file (PKCS12) for both ends of a VPN connection with the file extension ".p12". This certificate file contains the public and private key of the local station, the signed certificate of the CA and the public key of the CA.
*.pem Certificate and/or key as Base64-coded ASCII text. *.key Unprotected Base64-coded private key
Additional functions In addition, in conjunction with certificates the following functions are also available:
• Exporting used certificates
• Importing certificates
• Renewal of expired certificates
• Replacing existing certificate authorities
Note Current date and current time of day on the devices
When using secure communication (for example HTTPS, VPN...), make sure that the devices involved have the current time of day and the current date. Otherwise the certificates used will not be evaluated as invalid and the secure communication will not work.
4.9.1.2 CA certificate
Calling the Web page In the navigation, select "Security > Certificates".
Displayed entries In the "CA certificates" tab, you can see an overview of the CA certificates:
Field Meaning CA certificate name
The name of the CA is generated automatically by the system.
Expiry time Shows how long the CA certificate is valid. You can specify the validity date in the "Settings" tab. There, you can also set how many days before expiry of the CA certificate it is automatically renewed.

Configuring with Web Based Management 4.9 Security
SINEMA Remote Connect - Server
102 Operating Instructions, 01/2021, C79000-G8976-C383-09
Field Meaning Status Active: The CA certificate is valid.
Out of service: A newer CA certificate was generated or the CA certificate has expired. Actions
Calling up CA information You obtain information on the selected CA. This is also displayed for users with the right "read only".
Exporting a CA certificate By clicking on the icon, the CA certificate (*.crt) is exported. The file is, for example, exported to the end device or to the destination server.
Renewing a CA certificate With the "New CA certificate" button, you can when necessary, e.g. with compromised certificates, generate a new certificate.
Deleting a CA certificate CA certificates with the "Out of service" status can be deleted. For this purpose, select the relevant certificate in the overview and click the "Delete" button.
4.9.1.3 Server certificate
Calling the Web page In the navigation, select "Security > Certificates".
Displayed entries In the "Web server certificate" and "VPN server certificate" tabs, you can see an overview of the certificates:
Field Meaning Serial number Number to identify the certificate. The serial number is automatically incremented by
one when the certificate is created. Common name The name is taken from the network configuration:
• The DNS name when you have activated the option "Externally resolvable host name" and have entered a value (see section "DNS (Page 53)").
• The IP address of the WAN or LAN interface, see section "Interfaces (Page 51)".
Issuer Display of the certificate authority that issued the certificate. Valid from Date from which the certificate is valid. Valid to Date on which the certificate expires. Key length (bits) Key length that was set in "Settings" when this certificate was generated. Signature method Signature method with corresponding signature key ("hash value") that was set in "Set-
tings" when this certificate was generated. SHA1 fingerprint Fingerprint with SHA1 as hash algorithm

Configuring with Web Based Management 4.9 Security
SINEMA Remote Connect - Server
Operating Instructions, 01/2021, C79000-G8976-C383-09 103
Field Meaning SHA256 fingerprint Fingerprint with SHA256 (SH2) as hash algorithm Alternative names • IP: The IP address of the WAN interface, see section "Interfaces (Page 51)".
• IP: The WAN IP address when you have activated the function "SINEMA Remote Con-nect is located behind a NAT device" and have entered an IP address, refer to the section "Interfaces (Page 51)".
• DNS: The DNS name when you have activated the option "Externally resolvable host name" and have entered a value (see section "DNS (Page 53)").
Renewing the Web server certificate and VPN server certificate With the "Renew" button, you can when necessary, e.g. with compromised certificates, generate a new certificate. The certificates are derived from the currently valid CA certificate. The serial number is automatically incremented by one.
Importing the Web server certificate With the "Import" button, you can import CA certificates for the encryption of the data traffic.
4.9.1.4 Importing the Web server certificate If you do not want to use the Web server certificate issued by SINEMA RC, here you can import a Web server certificate from an external certification authority. The Web server certificate can, for example, be issued by a company internal certification authority or by a public certification authority.
Note Supported encryption
SINEMA RC supports Web server certificates encrypted according to RSA (Rivest, Shamir und Adleman).

Configuring with Web Based Management 4.9 Security
SINEMA Remote Connect - Server
104 Operating Instructions, 01/2021, C79000-G8976-C383-09
To import the Web server certificate, you require the following files:
• Certificate file
Examples of the content of a certificate file (.crt, .pem)
-----BEGIN CERTIFICATE----- .... -----END CERTIFICATE-----
-----BEGIN X509 CERTIFICATE----- .... -----END X509 CERTIFICATE-----
• Key file
The RSA key file that belongs to the certificate file.
Examples of the content of a certificate file of a key file (.pem, .key)
Encrypted:
-----BEGIN ENCRYPTED PRIVATE KEY----- ... -----END ENCRYPTED PRIVATE KEY-----
Unencrypted:
-----BEGIN PRIVATE KEY----- ... -----END RSA PRIVATE KEY-----
-----BEGIN RSA PRIVATE KEY----- ... -----END RSA PRIVATE KEY-----
• CA chain file
This file contains the certificates of all certification authorities involved. Base on the certificate chain the validity of the Web server certificate is checked.
Examples of the content of a CA chain file (.crt, .pem):
Several certificate blocks one after the other:
-----BEGIN CERTIFICATE----- ... -----END CERTIFICATE-----
-----BEGIN CERTIFICATE----- ... -----END CERTIFICATE-----
-----BEGIN CERTIFICATE----- ... -----END CERTIFICATE-----
Procedure 1. To import the certificate, click the "Select file" button in "Select the certificate file".
2. Select the certificate file and confirm your selection with the "Open" button.
3. Click the "Select file" button in "Select the key file".
4. Select the corresponding key file and confirm your selection with the "Open" button.
5. To import the certificate of a higher ranking certification authority, click the "Select file" button in "Select the CA chain file".
6. Select the CA certificate file and confirm your selection with the "Open" button.
7. For password-protected files, enter the password specified for the file and repeat the entry.

Configuring with Web Based Management 4.9 Security
SINEMA Remote Connect - Server
Operating Instructions, 01/2021, C79000-G8976-C383-09 105
8. Click the "Next" button.
Details of the signed certificate are displayed on the "Activate certificate" tab. You can, for example, check whether the certificate is still valid.
Field Meaning Serial number Number to identify the certificate. The serial number is automatically
incremented by one when the certificate is created. Common name Name of the applicant Issuer Display of the certificate authority that issued the certificate. Valid from Date from which the certificate is valid. Valid to Date on which the certificate expires. Key length Specifies the key length being used. Signature method Specifies which digital signature method with the corresponding
signature key ("hash value") was used for the certificate.
9. To finally import the files, click the "Import" button.
4.9.1.5 Device certificate
Calling the Web page In the navigation, select "Security > Certificates" and the "Device Certificate" tab.
Displayed entries On the "Device Certificate" tab, you can see an overview of the imported certificates:
Field Meaning Type Type of the loaded file. For more information, refer to the section "Overview of certifi-
cate management (Page 100)". Common name Name of the applicant Status Display of whether the certificate is valid or has already expired. Subject Display of the owner obtained from the common name (CN). Issuer Display of the certificate authority that issued the certificate. Valid from Date from which the certificate is valid. Valid to Date on which the certificate expires. Use The function that uses the certificate.
Importing device certificates 1. To import device certificates, click the "Import" button.
2. Select the PKCS12 file (*.p12) and confirm your selection with the "Open" button.
3. The files are password protected. To load the files into the device, enter the password and repeat the input.

Configuring with Web Based Management 4.9 Security
SINEMA Remote Connect - Server
106 Operating Instructions, 01/2021, C79000-G8976-C383-09
4. Click the "Next" button.
Details of the CA certificate are displayed on the "Activate certificate" tab. You can, for example, check whether the certificate is still valid.
Field Meaning Serial number Number to identify the certificate. The serial number is automatically
incremented by one when the certificate is created. Common name Name of the applicant Issued by Display of the certificate authority that issued the certificate. Valid from Date from which the certificate is valid. Valid to Date on which the certificate expires. Key length Specifies the key length being used. Signature method Specifies which digital signature method with the corresponding
signature key ("hash value") was used for the certificate.
5. To load the files on the SINEMA RC Server, click the "Import" button.
Result:
The PKCS12 file is imported onto the SINEMA RC Server. This certificate file contains the participant certificate and the signed certificate of the certification authority.
4.9.1.6 Making settings for certificates
Calling the Web page In the navigation, select "Security > Certificates".
Changing settings The changes made in the "Settings" tab are used only used when renewing the server certificate: The changes do not apply to existing certificates. On the tabs "Web server certificate" and "VPN server certificate" you can use the "Renew" button to generate a new server certificate.
Field Meaning Preferred key length (bits) Select the number of bits of the various possible keys for the procedure. Preferred hash method Select the hash method for the certificate: SHA256 or SHA512
CA certificate renewal (days be-fore expiry)
Specify how many days before it expires the certificate will be automatically renewed. As default, the CA certificate of the server is valid for 10 years. If, for example, you spec-ify 365 days, a new CA certificate will be generated after 9 years. The previous CA certificate is then "Out of service" but is valid for another 365 days. The clients that use this CA certificate can continue to log on with it for another 365 days. After this time, the CA certificate counts as being "Expired" and the clients need to use the new CA certificate.
Validity of client certificates (days)
Specify for how many days the certificate will be valid. A certificate whose CA has al-ready expired can no longer be used.

Configuring with Web Based Management 4.9 Security
SINEMA Remote Connect - Server
Operating Instructions, 01/2021, C79000-G8976-C383-09 107
4.9.2 VPN connections
4.9.2.1 Making VPN basic settings
VPN basic settings OpenVPN is a program for establishing an encrypted TLS connection. OpenSSL is used for the encryption.
OpenVPN file When a device or user is created, a configuration file with the extension *.ovpn is generated automatically. The file contains various parameters required for a connection to the server. These include e.g. the certificates; refer to the section "Overview of certificate management (Page 100)".
The file must be loaded on the participant in the remote network to which the SINEMA RC Server establishes a VPN connection.
The SINEMA RC Client always fetches this data automatically. The S615 either fetches the data automatically or the file must be loaded. This depends on the configuration.
Downloading an OpenVPN file For devices, the file is called in the device list; refer to the section "Overview of device management (Page 72)".
For users, the file is called in the personal user account (see section "User certificate (Page 119)").
4.9.2.2 Making OpenVPN settings
Requirement for changing the OpenVPN settings The user has been assigned the right "Edit system parameters".
Calling the Web page In the navigation, select "Security > OpenVPN".
Configuring OpenVPN Configure the following settings that are valid for all OpenVPN connections after you have saved:
Field Meaning Activate When enabled, OpenVPN is used. Status Shows whether OpenVPN is enabled or disabled.

Configuring with Web Based Management 4.9 Security
SINEMA Remote Connect - Server
108 Operating Instructions, 01/2021, C79000-G8976-C383-09
Field Meaning TCP port Specify the port on which the SINEMA RC Server accepts TCP connections. Assuming that
TCP frames can be sent to this port. In a preconnected DSL router, for example, port for-warding must be entered.
UDP port Specify the port on which the SINEMA RC Server accepts UDP connections. Assuming that UDP frames can be sent to this port. In a preconnected DSL router, for example, port for-warding must be entered.
Keep alive interval (s) Enter the interval in seconds at which connection partners send keep alive packets. This setting is automatically transferred to the client when the connection is established. The keep alive packets are sent only when there was no communication during the last interval. If there is no response to the packet, the communications partner assumes an interruption on the connection or that the communications partner is not functioning. Measures are taken according to the "Connection timeout" setting.
Connection timeout (s) Specify the maximum time in seconds that the communications partner waits for a response from the server before the connection is considered to be interrupted. This setting is auto-matically transferred to the client when the connection is established. Detection of a connection interruption is achieved with keep alive packets (see setting "Keep alive interval"). If the client detects a connection interruption, it reacts by re-establishing the connection when the connection timeout has elapsed. On the server the set connection timeout is doubled. After the doubled connection timeout has elapsed, the server considers the connection to the client as being interrupted.
DH key length Select the Diffie-Hellman key exchange protocol to be used between the communications partners.
Cipher Selection of the algorithm for encryption of the transferred data. The following are availa-ble: • AES-128, 192, 256: Advanced Encryption Standard (128, 192 or 256 bit key length,
mode CBC) • DES-EDE, DES-EDE3: Data Encryption Standard (128 or 192 bit key length, mode CBC)
Hash method Selection of the authentication algorithm: SHA-1, 256, 512: Secure Hash Algorithm 1, 256 or 512
Min. TLS version Specify the TLS version. Interface The interface that forms the local VPN endpoint. Via this interface, the OpenVPN connection
to the OpenVPN partner (SINEMA RC Client, device) is established. • WAN: Connection only via the WAN interface • LAN 1-n: Connection via available LAN interfaces: • WAN + LAN 1-n: Connection via all interfaces
4.9.2.3 Making the IPsec settings
Requirement for changing the IPsec VPN settings The user has been assigned the right "Edit system parameters".
Calling the Web page In the navigation, select "Security > IPsec".

Configuring with Web Based Management 4.9 Security
SINEMA Remote Connect - Server
Operating Instructions, 01/2021, C79000-G8976-C383-09 109
Configuring the IPsec basic settings On the "IPsec" tab, configure the following settings that are valid for all IPsec VPN profiles after you have saved: Field Meaning Activate When activated, IPsec is used. Status Shows whether IPsec is enabled or disabled. Interval after DPD query (s)
Period after which DPD queries are sent. These queries test whether or not the remote station is still reachable.
Timeout after DPD query (s)
If there is no response to the DPD query, the VPN connection to the remote station is declared to be invalid after this time interval has elapsed.
Interface The interface is the local endpoint of the VPN connection. Via this inter-face, the VPN connection to the VPN partner (SINEMA RC Client, device) is established. • WAN: Connection only via the WAN interface • LAN 1-n: Connection via available LAN interfaces • WAN + LAN 1-n: Connection via all interfaces
IPsec profiles The devices and users are assigned IPsec profiles. The profiles contain the settings of phase 1 and phase 2.
A list of the IPsec profiles that have already been created along with their status is displayed on the "IPsec Profiles" tab: Field Meaning Profile name The name assigned to the IPsec profile. The name must be unique throughout the
system and cannot be changed, refer to the section "Creating IPsec profiles (Page 110)"
Key exchange Key exchange method IKE Settings of Phase 1 - IKE (KE/Key exchange) ESP Settings of Phase 2 - ESP (authentication) Actions
Overview of the IPsec profile. This is also displayed for users with the right "read only".
Changing an IPsec profile. This also includes changing the settings for Phase 1 and Phase 2.
Using the "Create" button, you can create new IPsec profiles, see "Creating IPsec profiles (Page 110)".
With the "Copy" button, you create a copy of the selected profile in which you adapt parameters and which you can save as new IPsec profile. You delete created IPsec profiles with "Delete".

Configuring with Web Based Management 4.9 Security
SINEMA Remote Connect - Server
110 Operating Instructions, 01/2021, C79000-G8976-C383-09
4.9.2.4 Creating IPsec profiles
Requirement for changing the IPsec VPN settings The user has been assigned the right "Edit system parameters".
Creating a new IPsec profile 1. Open the "IPsec profile" tab
2. Click the "Create" button.
3. Enter a name for the IPsec profile.
4. In Key exchange method specify whether IKEv2 or IKEv1 will be used.
5. Make the settings of Phase 1 - IKE (SA/Key exchange):
Field Meaning Encryption algorithm: The selection depends on the phase und the key exchange method
(IKE) Hash algorithm Selection of the authentication algorithm:
SHA 1, 256, 384, 512 Key derivation Select the required Diffie-Hellmann group (DH) from which a key will
be generated. Lifetime The lifetime of the authentication. When the time has elapsed, the
VPN endpoints involved must authenticate themselves with each other again and generate a new key
6. Make the settings of Phase 2 - ESP (authentication):
Field Meaning Protocol Selection of the protocol
AH: The IP Authentication Header (AH) handles the authentication and identification of the source. ESP: The Encapsulation Security Payload (ESP) encrypts the data.
Encryption algorithm: The selection depends on the phase und the key exchange method (IKE)
Hash algorithm Selection of the authentication algorithm: SHA 1, 256, 384, 512
Key derivation Select the required Diffie-Hellmann group (DH) from which a key will be generated.
Lifetime The lifetime of the authentication. When the time has elapsed, the VPN endpoints involved must authenticate themselves with each other again and generate a new key.
7. Click "Create".
Changing an IPsec profile Change the corresponding user settings. Then click the "Save" button.

Configuring with Web Based Management 4.9 Security
SINEMA Remote Connect - Server
Operating Instructions, 01/2021, C79000-G8976-C383-09 111
Encryption algorithm Phase 1 Phase 2
IKEv1 IKEv2 IKEv1 IKEv2 3DES x x x x AES128 CBC x x x x AES192 CBC x x x x AES256 CBC x x x x AES128 CTR - x x x AES192 CTR - x x x AES256 CTR - x x x AES128 CCM 16 - x x x AES192 CCM 16 - x x x AES256 CCM 16 - x x x AES128 GCM 16 - x x x AES192 GCM 16 - x x x AES256 GCM 16 - x x x x: is supported
-: is not supported
4.9.3 PKI Certificate Management
4.9.3.1 PKI CA certificate
Calling the Web page In the navigation, select "Security > PKI".
Displayed entries On the "PKI CA Certificates" tab, you can see an overview of the imported certificates: Field Meaning Common name Name of the applicant, e.g. the user name Status Shows whether the certificate is valid or has already expired. Certificate type Type of imported certificate Subject Owner of the private key assigned in the certificate Issuer Display of the certificate authority that issued the certificate. Valid from Date from which the certificate is valid. Valid to Date on which the certificate expires. Fingerprint Checksum of the certificate to ensure integrity
To delete a PKI CA certificate, select the check box in front of the certificate to be deleted and click the "Delete" button.

Configuring with Web Based Management 4.9 Security
SINEMA Remote Connect - Server
112 Operating Instructions, 01/2021, C79000-G8976-C383-09
Importing PKI CA certificates 1. To import PKI CA certificates, click the "Import" button.
2. Select the CA certificate file (*.crl) and confirm your selection with the "Open" button.
3. To load the file on the SINEMA RC Server, click the "Save" button.
Result:
The certificate file is imported onto the SINEMA RC server. The PKI CA certificate is displayed on the following tab "PKI CA certificate".
4.9.3.2 Locking out Smartcard / user certificate To lock out users, you have two options:
• Certificate Revocation List (CRL)
• PKI DN blacklist
Calling the Web page In the navigation, select "Security > PKI".
Certificate revocation list The output certificates that are no longer valid are listed in a certificate revocation list. If, for example, employees leave the company, their certificates are called back and included in the list. Logging in with this certificate is then no longer possible.
So that the revocation list is used, activate the CRL check on the "Settings" tab.
On the "Revocation list" tab, you can see an overview of the available revocation lists: Field Meaning Issuer Display of the certification authority that issued the certificate revoca-
tion list. Revoked serial numbers Shows the revoked serial numbers. Last update Date on which the certificate revocation list was last updated. Next update Date on which the certificate revocation list will next be updated. Origin Shows where the certificate revocation list originates from:
File: The certificate revocation list was imported URL: The certificate revocation list is stored at the distribution point.
Importing or deleting the certificate revocation list
Import
1. In the "Revocation List" tab, click the "Import" button.
2. Click the "Select file" button and select the certificate revocation list. Generally, the file has the extension *.crl.
Confirm your selection with the "Open" button.
3. To import the certificate revocation list, click the "Save" button.

Configuring with Web Based Management 4.9 Security
SINEMA Remote Connect - Server
Operating Instructions, 01/2021, C79000-G8976-C383-09 113
Delete
1. Select the check box in front of the certificate revocation list to be deleted.
2. Click the "Delete" button.
Obtaining the certificate revocation list automatically
In a certificate according to the X.509v3 standard, you can specify a certificate revocation list distribution point. To do this, specify a URL in the attribute "CRL Distribution Point" at which the current CRL of this certification authority is stored. To use this function, the attribute must exist in the PKI CA certificate.
At certain intervals, SINEMA RC downloads the file and uses it. You specify the interval on the "Settings" tab.
Settings of the certificate revocation list Field Meaning Activate CRL checking When enabled, the validity of the user certificate is checked based on
the certificate revocation list. CRL update interval (min) Specify the intervals at which the certificate revocation list is checked for
changes. If there are changes, the certificate revocation list is down-loaded from the distribution point.
Allow missing CRL • Disabled
Every PKI CA certificate requires a valid certificate revocation list. If this is missing, the user certificates derived from the PKI CA certifi-cate are invalid.
• Enabled:
When enabled, the absence of the certificate revocation list is al-lowed. Please note that if the certificate revocation list is missing, all the user certificates derived from the PKI CA certificate are permitted.
PKI DN blacklist The user is blocked if a corresponding PKI DN filter rule exists in the PKI DN blacklist.
1. Click on the "PKI DN blacklist" tab.
2. Enter the corresponding filter rule in "PKI DN". The attributes of the names (Distinguished Name acc. to the X.509 standard) are used as filter criteria. This requires that the attributes are included in the PKI certificate of the user. For more detailed information, refer to the section "Logon with the Smartcard / PKI certificates".
3. Click "Add".
Result:
The created entries are listed on the page: Field Meaning DN filter Shows the PKI DN filter rule. Deactivated user Displays the users to whom the rule applies and who are therefore
blocked.

Configuring with Web Based Management 4.9 Security
SINEMA Remote Connect - Server
114 Operating Instructions, 01/2021, C79000-G8976-C383-09
To delete a PKI DN filter rule, select the check box in front of the entry to be deleted and click the "Delete" button.
4.9.4 Syslog Certificate Management
4.9.4.1 Syslog CA Certificates You can import the CA certificate required for the Syslog server authentication on this page.
Note Importing the CA certificates
Import Syslog server CA certificates first. If you load Syslog certificates later, it will not be possible to run some functions, such as chain inspection or certificate revocation list. Connection without imported Syslog server CA certificates is possible, however.
Types of Syslog authentication During a Syslog server authentication, the Syslog client checks the identity of the Syslog server using the CA Syslog server certificate.
As an option, mutual authentication between the client and the server can take place (server and client authentication). In this case, the Syslog server requests the certificate of the Syslog client after Syslog server authentication in order to check the identity of the Syslog client. The certificate check takes place according to RFC 5280. For server and client authentication, the Syslog client certificate must be imported; see "Importing Syslog certificates". These certificates can be selected as connection certificates for the Syslog client, see "Syslog client (Page 97)".
Requirement
• The user has been assigned the right "Certificate management".
Calling the Web page In the navigation, select "Security > Syslog".

Configuring with Web Based Management 4.9 Security
SINEMA Remote Connect - Server
Operating Instructions, 01/2021, C79000-G8976-C383-09 115
Displayed entries On the "Syslog CA certificate management" tab, you can see an overview of the imported CA certificates: Field Meaning Common name Name of the applicant, e.g. the user name Status Shows whether the certificate is valid or has already expired Certificate type Type of imported certificate Subject Owner of the private key assigned in the certificate Issuer Display of the certificate authority that issued the certificate Valid from Date from which the certificate is valid Valid to Date on which the certificate expires Fingerprint Checksum of the certificate to ensure integrity Actions
Export certificate
Importing Syslog certificates 1. To import Syslog certificates, click the "Import" button.
The dialog page for importing certificates is displayed. You can load the following files:
– Syslog server CA certificate (required)
– Syslog client certificate (optional)
– Syslog client private key (optional)
2. Click the "Select file" button for the certificate type to be imported. Navigate to the storage directory and select the relevant file. Confirm your selection with the "Open" button.
3. To load the files onto the SINEMA RC server, click the "Save" button.
Result
The certificate file is imported onto the SINEMA RC server. The Syslog certificate is shown in the table.
Note Incorrect parameters of the server certificate
The encrypted connection between the server and the client fails if the "commonName" or the parameter of the server certificate "subject_alt_name" does not contain either the host name or the IP address of the server (e.g. CN = 192.168.10.10).
Note Renewing certificates
SINEMA RC does not renew the certificates automatically. To avoid certificate problems, update the expired certificate files manually on the Syslog server and the SINEMA RC server.
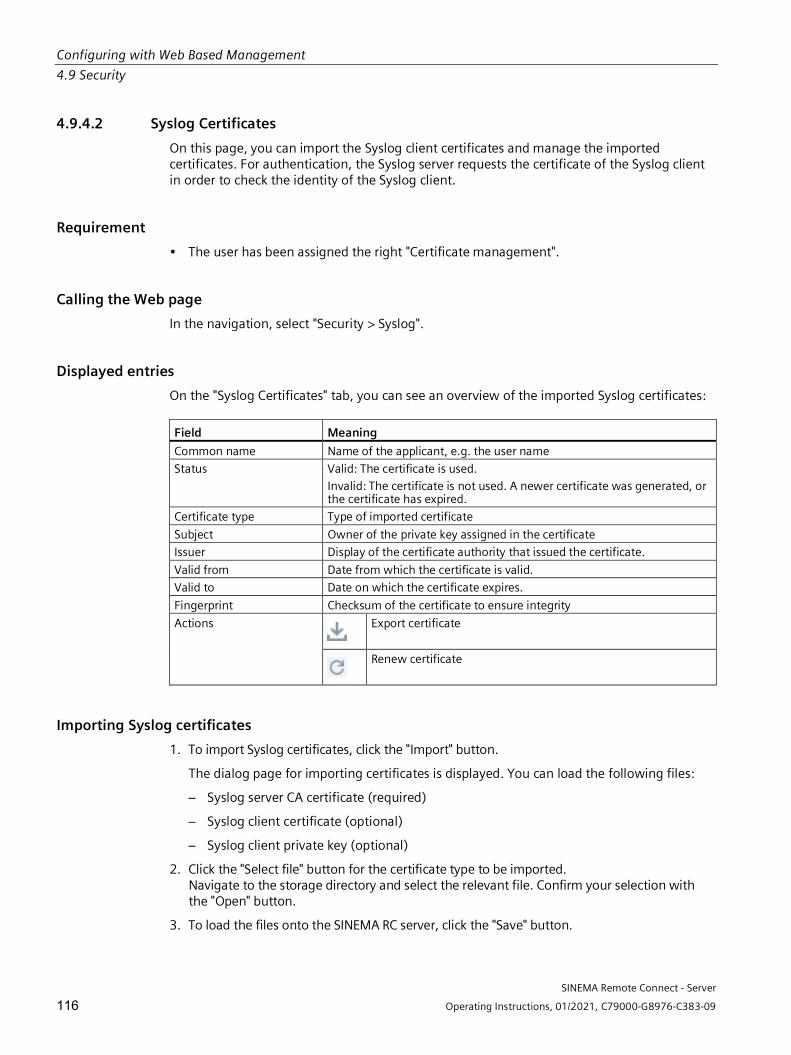
Configuring with Web Based Management 4.9 Security
SINEMA Remote Connect - Server
116 Operating Instructions, 01/2021, C79000-G8976-C383-09
4.9.4.2 Syslog Certificates On this page, you can import the Syslog client certificates and manage the imported certificates. For authentication, the Syslog server requests the certificate of the Syslog client in order to check the identity of the Syslog client.
Requirement • The user has been assigned the right "Certificate management".
Calling the Web page In the navigation, select "Security > Syslog".
Displayed entries On the "Syslog Certificates" tab, you can see an overview of the imported Syslog certificates: Field Meaning Common name Name of the applicant, e.g. the user name Status Valid: The certificate is used.
Invalid: The certificate is not used. A newer certificate was generated, or the certificate has expired.
Certificate type Type of imported certificate Subject Owner of the private key assigned in the certificate Issuer Display of the certificate authority that issued the certificate. Valid from Date from which the certificate is valid. Valid to Date on which the certificate expires. Fingerprint Checksum of the certificate to ensure integrity Actions
Export certificate
Renew certificate
Importing Syslog certificates 1. To import Syslog certificates, click the "Import" button.
The dialog page for importing certificates is displayed. You can load the following files:
– Syslog server CA certificate (required)
– Syslog client certificate (optional)
– Syslog client private key (optional)
2. Click the "Select file" button for the certificate type to be imported. Navigate to the storage directory and select the relevant file. Confirm your selection with the "Open" button.
3. To load the files onto the SINEMA RC server, click the "Save" button.

Configuring with Web Based Management 4.9 Security
SINEMA Remote Connect - Server
Operating Instructions, 01/2021, C79000-G8976-C383-09 117
Result
The certificate file is imported onto the SINEMA RC server. The Syslog certificate is shown in the table.
Note Incorrect parameters of the server certificate
The encrypted connection between the server and the client fails if the "commonName" or the parameter of the server certificate "subject_alt_name" does not contain either the host name or the IP address of the server (e.g. CN = 192.168.10.10).
Note Renewing certificates
SINEMA RC does not renew the certificates automatically. To avoid certificate problems, update the expired certificate files manually on the Syslog server and the SINEMA RC server.
Deleting Syslog certificates You can delete expired certificates using the "Delete" button.
1. Select the check box of the certificate to be deleted.
2. Click the "Delete" button.
4.9.4.3 Revoking Syslog Certificates You can revoke users by means of the Syslog Certificate Revocation List (CRL).
Calling the Web page In the navigation, select "Security > Syslog > Syslog Revocation List".
Certificate revocation list The output certificates that are no longer valid are listed in a certificate revocation list. If, for example, employees leave the company, their certificates are called back and included in the list. Logging in with this certificate is then no longer possible.
So that the revocation list is used, activate the CRL check on the "Settings" tab.
On the "Syslog revocation list" tab, you can see an overview of the available revocation lists: Field Meaning Issuer Display of the certification authority that issued the certificate revoca-
tion list. Revoked serial numbers Shows the revoked serial numbers. Last update Date on which the certificate revocation list was last updated.

Configuring with Web Based Management 4.9 Security
SINEMA Remote Connect - Server
118 Operating Instructions, 01/2021, C79000-G8976-C383-09
Field Meaning Next update Date on which the certificate revocation list will next be updated. Origin Shows where the certificate revocation list originates from:
File: The certificate revocation list was imported URL: The certificate revocation list is stored at the distribution point.
Importing or deleting the certificate revocation list
Import
1. In the "Syslog revocation list" tab, click the "Import" button.
2. Click the "Select file" button and select the certificate revocation list. Generally, the file has the extension *.crl.
Confirm your selection with the "Open" button.
3. To import the certificate revocation list, click the "Save" button.
Delete
1. Select the check box in front of the certificate revocation list to be deleted.
2. Click the "Delete" button.
Obtaining the certificate revocation list automatically
In a certificate according to the X.509v3 standard, you can specify a certificate revocation list distribution point. To do this, specify a URL in the attribute "CRL Distribution Point" at which the current CRL of this certification authority is stored. To use this function, the attribute must exist in the Syslog certificate.
At certain intervals SINEMA RC downloads the file and uses it. You specify the interval on the "Settings" tab.
Settings of the certificate revocation list Field Meaning Activate CRL checking When enabled, the validity of the user certificate is checked based on
the certificate revocation list. CRL update interval (min) Specify the intervals at which the certificate revocation list is checked for
changes. If there are changes, the certificate revocation list is down-loaded from the distribution point.
Allow missing CRL • Disabled Each Syslog certificate requires a valid certificate revocation list. If this is missing, the user certificates derived from the Syslog certifi-cate are invalid.
• Enabled When enabled, the absence of the certificate revocation list is al-lowed. Please note that if the certificate revocation list is missing, all the user certificates derived from the Syslog certificate are permitted.

Configuring with Web Based Management 4.10 My account
SINEMA Remote Connect - Server
Operating Instructions, 01/2021, C79000-G8976-C383-09 119
4.10 My account
4.10.1 User certificate
Calling the Web page In the navigation, select "My account > User certificate".
Displayed entries In the "Details" tab, you will see an overview of the user certificate derived from the CA certificate:
Field Meaning Serial number Number to identify the certificate. The serial number is assigned automatically when the
certificate is created. Common name The name used is generated automatically by the system. Issuer Display of the certificate authority that issued the certificate. The system uses the last
valid CA certificate. Valid from Date from which the certificate is valid. Valid to Date on which the certificate expires. Key length (bits) Specifies the key length being used.
The value can be set in the menu "Security > Certificates", "Settings" tab under "Pre-ferred key length".
Signature method Specifies which digital signature method with the corresponding signature key ("hash value") was used for the certificate. The value can be set in the menu "Security > Certificates", "Settings" tab under "Pre-ferred hash method".
Renewing a user certificate
Note Only renew valid certificates
You cannot renew a certificate that has already expired. If you attempt to renew an expired certificate, the certificate authority will reject the request. When a certificate has already expired, instead of renewing the existing certificate, you need to request a new certificate.
With the "Renew" button, you can when necessary, e.g. with compromised certificates, generate a new certificate.
To do this enter the relevant user password. The serial number is automatically incremented by one.

Configuring with Web Based Management 4.10 My account
SINEMA Remote Connect - Server
120 Operating Instructions, 01/2021, C79000-G8976-C383-09
Exporting a user certificate You can download the personal certificate in the "Export" tab. These include:
Field Meaning PKCS#12 Download a container in the Personal Information Exchange format (PFX). PEM Download certificate and key as Base64-coded ASCII text. OVPN Download OpenVPN configuration for user.
4.10.2 Change password
Changing the current password As a logged-on user, you can change your current password:
1. In the navigation, select "My account > Change password".
2. Enter the old password.
3. Enter the new password and confirm it.
The new must be at least 8 characters long and contain special characters, upper and lowercase characters as well as numbers. See also the section "Permitted characters (Page 27)".
4.10.3 Download client software On this page, you can download the SINEMA RC Client from the SINEMA RC server to your PC.
Requirement • The user has been assigned the right "Download client software".
• A client software package was loaded to the server.
Calling the Web page In the navigation, select "My Account > Client Software".

Configuring with Web Based Management 4.10 My account
SINEMA Remote Connect - Server
Operating Instructions, 01/2021, C79000-G8976-C383-09 121
Download client software Procedure
1. Check the displayed software version of the SINEMA RC Client and the fingerprint.
2. Click the "Download" button.
A dialog for opening and saving files opens. Follow the instructions in the dialog to save the client software on the user PC.
Result
The SINEMA RC Client is downloaded onto your PC.
Depending on the setting, the file can also be loaded to the download folder.


SINEMA Remote Connect - Server
Operating Instructions, 01/2021, C79000-G8976-C383-09 123
Upkeep and maintenance 5 5.1 Backing up and restoring the system configuration
In the backup copy, the current system settings of the SINEMA RC Server are backed up, e.g. configured devices, users.
Note Settings that are not taken
The following settings are not backed up: • Network settings • Log messages
With the backup copy, you can restore the system settings of the server within a SINEMA RC version or transfer them to another server. A backup copy created on a SINEMA RC version e.g. 1.2 cannot be read into a system with SINEMA RC version V1.3.
You can find additional information on the Internet with the following entry ID: 109748144 (https://support.industry.siemens.com/cs/ww/de/view/109748144/en)
Configuring settings Requirement:
• The user has been assigned the right "Edit system parameters".
Procedure
1. In the navigation panel "System > Backup & restore" select the "Settings" tab.
Enter the number of permitted backup copies.
An entry between 10 and 30 is permitted. When the maximum number is reached, the oldest backup copy is overwritten.
2. If the system should be backed up at regular intervals, specify the interval and the time for the backup.
3. Enter a "encryption key".
The coding key must be at least 8 characters long and contain special characters, upper and lowercase characters as well as numbers, refer to the section "Permitted characters (Page 27)".
4. Confirm the coding key.
5. Click the "Save" button.

Upkeep and maintenance 5.1 Backing up and restoring the system configuration
SINEMA Remote Connect - Server
124 Operating Instructions, 01/2021, C79000-G8976-C383-09
Backing up configurations Requirement
• The user has been assigned the right "Create backup copies".
• The settings for the backup copy are configured.
Procedure
1. In the navigation panel, select "System > > Backup & restore".
2. Click the "Create new backup copy" button.
3. In the dialog that follows, enter a comment on the backup copy.
4. Click the "Finish" button.
Result
A backup copy (*.backup) with the system settings of the SINEMA RC Server has been created.
Restoring the configuration Requirement
• On the system, the SINEMA RC version is installed with which the backup copy was created.
Importing the backup
1. In the navigation panel "System > Backup & restore" select the "Settings" tab.
2. Enter the same coding key with which the backup was created and save the settings.
3. Click the "Import backup copy" button.
4. Click the "Browse" button.
5. Select the required file in the format *.backup and confirm your selection with the "Open" button.
6. Click the "Finish" button. The backup is displayed in the overview.
7. Click on the "Restore" button to adopt the system configuration of the selected backup copy.
Click the "Restore" button in the next dialog.
Result
• Backup copy was imported into the same server / hardware with existing installation SINEMA RC Server takes the system settings from the selected backup copy and continues working with them. All settings made up to this point that have not been saved in a backup copy are lost.
• Backup copy was imported into another server / hardware with new installation and same network settings After successful transfer, the system is restarted and the login page of the SINEMA RC Server opens. The backed up certificates are imported.
• Backup was imported into a different server / hardware and a new installation with different network settings.

Upkeep and maintenance 5.2 System update V1.2 > V1.3
SINEMA Remote Connect - Server
Operating Instructions, 01/2021, C79000-G8976-C383-09 125
After the restart, the login page of the SINEMA RC Server opens. The certificates are not imported but created new.
5.2 System update V1.2 > V1.3
Procedure 1. Back up your configuration using SINEMA RC Server V1.2 WBM and export this backup file to
your PC or SFTP server. You can find more detailed information on this in the sections "Backup & Restore" and "Upload Server (Page 96)".
2. Insert the V1.3 data medium into the drive.
3. Navigate to the WBM menu "System > Update (Page 65)". Restart via the "Energy management (Page 65)". Installation starts automatically.
4. Select the "Install/Update SINEMA Remote Connect Server" entry in the following dialog. Confirm the selection with the ENTER key.

Upkeep and maintenance 5.2 System update V1.2 > V1.3
SINEMA Remote Connect - Server
126 Operating Instructions, 01/2021, C79000-G8976-C383-09
5. In the next dialog, select the entry "Update - Update an existing SINEMA Remote Connect" and click on the < OK > button.
The SINEMA RC server was updated to version V1.3. After this update installation, two boot partitions are available. One partition still contains your operational server version V1.2. Another partition now contains an operational server version V1.3 with the identical server configuration including devices, users and certificates. However, your SINEMA RC Server license was not automatically transferred to V1.3. To enable it on your new V1.3 server, you first need to release the license in version V1.2.
6. Remove the V1.3 disk from the drive and click the < OK > button.
Restart the server. In the boot menu, you can see the partitions of both server versions V1.2 and V1.3.

Upkeep and maintenance 5.2 System update V1.2 > V1.3
SINEMA Remote Connect - Server
Operating Instructions, 01/2021, C79000-G8976-C383-09 127
7. Select "SINEMA RC (1.2.0)" from the boot menu and confirm your selection with the ENTER key.
8. Log in with your user credentials and navigate to the menu "System > Licenses (Page 62)".
Release the licenses to reactivate them in server version V1.3.

Upkeep and maintenance 5.2 System update V1.2 > V1.3
SINEMA Remote Connect - Server
128 Operating Instructions, 01/2021, C79000-G8976-C383-09
Note
If it is not possible to deactivate the license in WBM (e.g. no connection to the license server), contact Customer Support via a Support Request (https://support.industry.siemens.com/cs/my?lc=en-US). All further steps are then coordinated with Customer Support to reactivate the license.
9. Navigate to the WBM menu "System > Update (Page 65)". Perform a restart via the "Energy Management (Page 65)".

Upkeep and maintenance 5.2 System update V1.2 > V1.3
SINEMA Remote Connect - Server
Operating Instructions, 01/2021, C79000-G8976-C383-09 129
10. Select "SINEMA RC (1.3.0)" from the boot menu and confirm your selection with the ENTER key.
11. Log in with your user credentials and navigate again to the menu "System > Licenses
(Page 62)". Activate the licenses. You can select between offline or online activation. You can find additional information on this in the section "Managing licenses (Page 62)" .

Upkeep and maintenance 5.3 System Update V2.0 > V2.1
SINEMA Remote Connect - Server
130 Operating Instructions, 01/2021, C79000-G8976-C383-09
Result
The SINEMA RC server and its license have been updated to version V1.3. The previous configurations of the server are retained. In addition to this updated server version, there is another partition on the PC with the original server version V1.2 as backup. Server version V1.2 can still be started from the boot menu of the PC if the update needs to be undone. No further devices or users can be created in server version V1.2. When you restart the server, the last partition that was started is always used.
5.3 System Update V2.0 > V2.1
Procedure 1. Back up your configuration using SINEMA RC server V2.0 WBM and export this backup file to
your PC or SFTP server. You can find more detailed information on this in the sections "Backup & Restore" and "Upload Server (Page 96)".
2. Navigate to the WBM menu "System > Update (Page 65)". Restart via the "Energy management (Page 65)". Installation starts automatically.
3. Select the "Install/Update SINEMA Remote Connect Server" entry in the following dialog. Confirm the selection with the ENTER key.

Upkeep and maintenance 5.3 System Update V2.0 > V2.1
SINEMA Remote Connect - Server
Operating Instructions, 01/2021, C79000-G8976-C383-09 131
4. In the next dialog, select the entry "Update - Update an existing SINEMA Remote Connect" and click on the < OK > button.
5. Select "SINEMA RC (2.0)" from the boot menu and confirm your selection with the ENTER
key.
6. Log in with your user credentials and navigate to the menu "System > Licenses (Page 62)". Release the licenses for "SINEMA RC (2.0)" to reactivate them afterwards in server version V2.1.
Note
If it is not possible to deactivate the license in WBM (e.g. no connection to the license server), contact Customer Support via a Support Request (https://support.industry.siemens.com/cs/my?lc=en-US). All further steps are then coordinated with Customer Support to reactivate the license.

Upkeep and maintenance 5.3 System Update V2.0 > V2.1
SINEMA Remote Connect - Server
132 Operating Instructions, 01/2021, C79000-G8976-C383-09
7. Navigate to the WBM menu "System > Update (Page 65)". Perform a restart via the "Energy Management (Page 65)".

Upkeep and maintenance 5.4 System Update V2.1 > V3.0
SINEMA Remote Connect - Server
Operating Instructions, 01/2021, C79000-G8976-C383-09 133
8. Select "SINEMA RC (2.1)" from the boot menu and confirm your selection with the ENTER key.
9. Log in with your user credentials and navigate again to the menu "System > Licenses (Page 62)". Activate the licenses. You can select between offline or online activation. You can find additional information on this in the section "Managing licenses (Page 62)" .
Result
The SINEMA RC server and its license have been updated to version 2.1. The previous configurations of the server are retained.
5.4 System Update V2.1 > V3.0 On the "System > Update" page, you can update SINEMA RC server V2.1 to Version V3.0. After the update, you restart the server. The previous configurations of the server are retained. You can find additional information in the section "Update (Page 65)".


SINEMA Remote Connect - Server
Operating Instructions, 01/2021, C79000-G8976-C383-09 135
Appendix A A A.1 OpenVPN connection to an iOS device
To establish an OpenVPN connection to an iOS device, follow the steps below:
1. Log on to the SINEMA RC Server with your user data.
2. In the navigation, select "My account > User certificate" and click on the "Exports" tab.
3. Export the following files to a local directory on your PC:
– PEM: Certificate and key as Base64-coded ASCII text
– OVPN: OpenVPN configuration for user
When you click on the files, they are downloaded immediately.
4. Open the pem file with an editor, e.g. Notepad++, and select everything with the shortcut "CTRL + A".
Copy the selected text to the clipboard using the shortcut "CTRL + C".
5. Open the opvn file and click on the free line in front of the tag "<pkcs12>". Paste the contents from the clipboard at this location with the shortcut "CTRL + V".
6. Click the "Show all characters" button to hide the formatting characters.
7. Remove the superfluous spaces and line breaks after the tag "</ca>".
8. Save the changes in the opvn file.
9. Load the opvn file into the iOS device. You can also send yourself the file in an e-mail.
10. When you open the opvn file, you are asked whether you want to open it with the app. Confirm this. The new configuration is offered for applying in the "OpenVPN-Connect" app. Click the green plus icon. You need to confirm that you allow the OpenVPN app to set up VPN connections with your iPad code.
11. The profile opens. The password for the certificate is required. In the corresponding field, enter the password which you defined for the new user in the SINEMA Remote Connect Server.
12. If all components are configured, the VPN tunnel can be initialized between the tablet ("OpenVPN-Connect" app) and the SINEMA Remote Connect Server.
13. When the connection is established, you can access the WBM of SINEMA RC.

Appendix A A.1 OpenVPN connection to an iOS device
SINEMA Remote Connect - Server
136 Operating Instructions, 01/2021, C79000-G8976-C383-09

SINEMA Remote Connect - Server
Operating Instructions, 01/2021, C79000-G8976-C383-09 137
Appendix B B B.1 Enabling the e-mail address
To receive the e-mail, with some network providers the e-mail address for the recipient of the SMS message first needs to be enabled.
To enable the e-mail address, you normally send a special activation text to an abbreviated number of your network provider. You will find several examples in the following table "Activation and deactivation SMS".
You will receive a reply SMS with the e-mail address containing the phone number and the SMS gateway name of your network operator:
12345@<Domain of the SMS provider>.<Top-level domain>
Note
Check with your network provider whether or not it is necessary to send activation and deactivation SMS messages. Your network provider will inform you of the texts and short number.
Table B- 1 Activation and deactivation SMS (examples)
E-Plus O2 Germany T-Mobile Vodafone SMS gateway name
smsmail.eplus.de o2online.de t-mobile-sms.de vodafone-sms.de
Enabling Send SMS with text to short number
Text: START Short number: 7676245
Text: OPEN Short number: 6245
Text: OPEN Short number: 8000
Text: OPEN Short number: 3400
Deactivating Send SMS with text to short number
Text: STOP Short number: 7676245
Text: STOP Short number: 6245
Text: CLOSE Short number: 8000
Text: CLOSE Short number: 3400
See also SMS gateway provider (Page 59)

Appendix B B.2 Monitoring and time response of wake-up SMS messages
SINEMA Remote Connect - Server
138 Operating Instructions, 01/2021, C79000-G8976-C383-09
B.2 Monitoring and time response of wake-up SMS messages
Possible causes for unsuccessful wake-up attempts If a station cannot be woken up, there are different possible reasons for this.
• Time blocks of SMS gateway providers
To trigger a wake-up SMS message, click in "Remote connections > Manage devices".
As a defense against spam, some network providers filter out SMS messages with the same content sent to the same subscriber within a limited time, for example 1 minute.
If you repeatedly try to wake up a device because it does not establish a connection within a short time, wait a suitable time between repetitions. Check the log entries. Messages such as "Mail appeared to be SPAM or forget" indicate that this is the case.
If necessary, check with your network provider.
• Not executed
The wake-up job was transferred to SINEMA RC but not executed. Check the connections of SINEMA RC Server, including the connection to the Internet.
• Negative reply
The SMS gateway has not received the message.
The success of sending a wake-up e-mail to the SMS gateway can be detected via a log message. If the acknowledgement is not received and this status is displayed, there is a disruption on the path between the SINEMA RC Server and the SMS gateway.

SINEMA Remote Connect - Server
Operating Instructions, 01/2021, C79000-G8976-C383-09 139
Appendix C C C.1 Syslog messages
Event Viewer The Syslog messages are saved locally in the Microsoft Windows Event Viewer and not sent to a Syslog server.
1. Enter "Event Viewer" in the search line of the start menu.
2. Click the "Event Viewer" entry to start the Event Viewer.
3. Click the "Siemens Automation" entry for "Application and Services Logs".
The log entries are listed in tabular form. When you click on an entry, the detail view opens in the bottom window area.
C.1.1 Tags in Syslog Messages The Syslog messages can contain variables that are filled dynamically with the data of the respective event. These variables are displayed within curly brackets {variable} in the "Message text" field in section "List of Syslog Messages (Page 140)".
The following variables occur in Syslog messages: Parameter Description Format Possible values or
example User name String that identifies the authenticated user
based on his/her name without spaces
%s Peter_Maier
IP address IPv4 or IPv6 address IP address according to RFC1035 or RFC4291 Section 2.2
192.168.10.128
Destination user name String for the name of the destination user. This is not the authenticated user.
%s Peter_Maier
Device name String for the name of the device %s S615_1 Temp user name String for the name of the temporary user %s Peter_Maier Cert parameters String for the certificate parameters %s Role String for the name of the group role %s Technical_Consulting Group String for the name of the group %s IT_Service CN Name String for the parameter host name of the serv-
er "commonName" %s Server1
192.168.10.10 Config detail String for the configuration
with spaces %s the DNS settings
the backup settings etc.

Appendix C C.1 Syslog messages
SINEMA Remote Connect - Server
140 Operating Instructions, 01/2021, C79000-G8976-C383-09
Parameter Description Format Possible values or example
File name String for the file name %s 2019_04_03_09_53_23.backup
File version String for the file version %s 2019_06_13_23_00_01.backup
Software version String for the installed software version %s V3.0.0.0-01.01.00.04 Target software ver-sion
String for the loaded software version %s V3.0.0-01.01.00.01
Source software ver-sion
String for the installed software version %s V2.0.1.0-01.01.00.04
Version number String for the version of the user agreement %d 1
C.1.2 List of Syslog Messages
C.1.2.1 Identification and authentication of human users Message text {User name} has logged in Example "Peter_Maier" has logged in Explanation A user has successfully logged into the server via the Web interface. Severity Info Facility local0 Standard IEC 62443-3-3 Reference: SR 1.1
Message text Authentication request from {IP address} has failed Example Authentication request from 192.168.0.1 has failed Explanation Login to the server via the Web interface failed. Incorrect user name or incorrect password entered
during remote login. Severity Error Facility local0 Standard IEC 62443-3-3 Reference: SR 1.1
Message text {User name} has logged out Example "Peter_Meier" has logged out Explanation A user logged out via the Web interface, either manually or automatically due to a timeout. User
session completed - logged out. Severity Info Facility local0 Standard IEC 62443-3-3 Reference: SR 1.1
C.1.2.2 User account management Message text {User name} has deactivated the user: {Destination user name} Example "Admin" has deactivated the user "Peter_Maier"

Appendix C C.1 Syslog messages
SINEMA Remote Connect - Server
Operating Instructions, 01/2021, C79000-G8976-C383-09 141
Explanation A user has disabled a user account. Severity Notice Facility local0 Standard IEC 62443-3-3 Reference: SR 1.3
Message text {User name} has deactivated the device {Device name} Example "Admin" has deactivated the device "S615_1" Explanation A user has disabled a device account. Severity Notice Facility local0 Standard IEC 62443-3-3 Reference: SR 1.3
Message text {User name} has created the user {Destination user name} Example "Admin" has created the user "Peter_Maier" Explanation A user has created a user account. Severity Notice Facility local0 Standard IEC 62443-3-3 Reference: SR 1.3
Message text {Temp user name} has been created with {Cert parameters} Example "temp_user" has been created with DN= "xxxx" Explanation A temporary user account was created. Severity Info Facility local0 Standard IEC 62443-3-3 Reference: SR 1.3
Message text {User name} has created the device {Device name} Example "Admin" has created the device "S615_1" Explanation A user created a device account. Severity Notice Facility local0 Standard IEC 62443-3-3 Reference: SR 1.3
Message text {User name} has edited the user {Destination user name} Example "Admin" has edited the user "Peter_Maier" Explanation A user has changed an existing user account or assigned a different role to this account. Severity Notice Facility local0 Standard IEC 62443-3-3 Reference: SR 1.3
Message text {User name} has edited the device: {Device name} Example "Admin" has edited the device: "S_615" Explanation A user has changed an existing device account. Severity Notice Facility local0 Standard IEC 62443-3-3 Reference: SR 1.3

Appendix C C.1 Syslog messages
SINEMA Remote Connect - Server
142 Operating Instructions, 01/2021, C79000-G8976-C383-09
Message text {User name} has deleted the user {Destination user name} Example "Admin" has deleted the user "Peter_Maier" Explanation A user has deleted an existing user account. Severity Notice Facility local0 Standard IEC 62443-3-3 Reference: SR 1.3
Message text {User name} has deleted the device {Device name} Example "Admin" has deleted the device "S615_1" Explanation A user has deleted an existing device account. Severity Notice Facility local0 Standard IEC 62443-3-3 Reference: SR 1.3
Message text Temporary user {User name} is deleted Example Temporary user "Temp_User" is deleted Explanation An existing temporary user account was deleted. Severity Info Facility local0 Standard IEC 62443-3-3 Reference: SR 1.3
Message text Temporary user(s) {User name} associated with role(s) {Role} deleted by {User name} Example Temporary user(s) "Temp_User" associated with role(s) "Support" deleted by "Admin" Explanation A user has deleted an existing user account. Severity Info Facility local0 Standard IEC 62443-3-3 Reference: SR 1.3
Message text {User name} changed the password of device: {Device name} Example "Admin" changed the password of the device: "S615_1" Explanation A user has changed the password of a device. Severity Notice Facility local0 Standard IEC 62443-3-3 Reference: SR 1.3

Appendix C C.1 Syslog messages
SINEMA Remote Connect - Server
Operating Instructions, 01/2021, C79000-G8976-C383-09 143
Message text Debug user password changed Example Debug user password changed Explanation An authenticated user changed the password for the debug account. Severity Notice Facility local0 Standard IEC 62443-3-3 Reference: SR 1.3
Message text {User name} has activated the user: {Destination user name} Example "Admin" has activated the user: "Peter_Maier" Explanation A user has activated the account of another user. Severity Notice Facility local0 Standard IEC 62443-3-3 Reference: SR 1.3
Message text {User name} has activated the device {Device name} Example "Admin" has activated the device "S615_1" Explanation A user has enabled a device account. Severity Notice Facility local0 Standard IEC 62443-3-3 Reference: SR 1.3
C.1.2.3 Management of the identifiers Message text User {User name} has created the role {Role} Example User "Admin" has created the role "Technical_Consulting" Explanation The user created a new role. Severity Notice Facility local0 Standard IEC 62443-3-3 Reference: SR 1.3
Message text User {User name} has deleted the role {Role} Example User "Admin" has deleted the role "Technical_Consulting" Explanation The user has deleted an existing role. Severity Notice Facility local0 Standard IEC 62443-3-3 Reference: SR 1.3
Message text User {User name} has edited the role {Role} Example User "Admin" has edited the role "Technical_Consulting" Explanation The user has changed the role. Severity Notice Facility local0 Standard IEC 62443-3-3 Reference: SR 1.3
Message text User {user name} has created the group {Group} Example User "Admin" has created the group "IT_Service"

Appendix C C.1 Syslog messages
SINEMA Remote Connect - Server
144 Operating Instructions, 01/2021, C79000-G8976-C383-09
Explanation The user has created a user group. Severity Notice Facility local0 Standard IEC 62443-3-3 Reference: SR 1.4
Message text User {user name} has deleted the group {Group} Example User "Admin" has deleted the group "IT_Service" Explanation The user has deleted the user group. Severity Notice Facility local0 Standard IEC 62443-3-3 Reference: SR 1.4
Message text User {user name} has edited the group {Group} Example User "Admin" has edited the group "IT_Service" Explanation The user has changed the user group. Severity Notice Facility local0 Standard IEC 62443-3-3 Reference: SR 1.4
Message text User {user name} has edited the communication destinations of the group {Group} Example User "Admin" has edited the communication destinations of the group "IT_Service" Explanation The user changed the communication targets of the user group. Severity Notice Facility local0 Standard IEC 62443-3-3 Reference: SR 1.4
C.1.2.4 Unsuccessful logon attempts Message text Brute force blocking is activated for {User name} Example Brute force blocking is activated for "Peter_Maier" Explanation After multiple failed login attempts, the corresponding user account is locked for a specific time.
The default setting for the number of failed login attempts after which the user account is locked is 10.
Severity Warning Facility local0 Standard IEC 62443-3-3 Reference: SR 1.11

Appendix C C.1 Syslog messages
SINEMA Remote Connect - Server
Operating Instructions, 01/2021, C79000-G8976-C383-09 145
Message text Brute force blocking is deactivated for {User name} Example Brute force blocking is deactivated for "Peter_Maier" Explanation The user account is unlocked. Severity Warning Facility local0 Standard IEC 62443-3-3 Reference: SR 1.11
C.1.2.5 Access via untrusted networks Message text {User name} rejected due to unsupported client version Example "Peter_Maier" rejected due to unsupported client version Explanation The client user login was rejected due to a version conflict. Severity Notice Facility local0 Standard IEC 62443-3-3 Reference: SR 1.11
Message text {Name} connected via OpenVPN Example [email protected] connected via OpenVPN Explanation The OpenVPN connection to a device or user is established. Severity Info Facility local0 Standard IEC 62443-3-3 Reference: n/a (NERC-CIP 005-R1)
Message text {Name} disconnected via OpenVPN Example [email protected] disconnected via OpenVPN Explanation The OpenVPN connection to a device or user is closed. Severity Info Facility local0 Standard IEC 62443-3-3 Reference: n/a (NERC-CIP 005-R1)
Message text {Device name} connected via IPsec Example "S615_1" connected via IPsec Explanation The IPsec connection to a device is established. Severity Info Facility local0 Standard IEC 62443-3-3 Reference: n/a (NERC-CIP 005-R1)
Message text {Device name} disconnected via IPsec Example "S615_1" disconnected via IPsec Explanation The IPsec connection to a device is closed. Severity Info Facility local0 Standard IEC 62443-3-3 Reference: n/a (NERC-CIP 005-R1)

Appendix C C.1 Syslog messages
SINEMA Remote Connect - Server
146 Operating Instructions, 01/2021, C79000-G8976-C383-09
C.1.2.6 Identification and authentication of devices Message text No valid client with CN {CN Name} Example No valid client with CN Device1 Explanation Device authentication failed. Severity Error Facility local0 Standard IEC 62443-3-3 Reference: SR 1.2
Message text Participiant with CN {CN name} is not allowed to establish OpenVPN connection Example Participiant with CN Device1 is not allowed to establish OpenVPN connection Explanation Device authentication failed. Severity Warning Facility local0 Standard IEC 62443-3-3 Reference: SR 1.2
C.1.2.7 Nonrepudiation Message text {User name} has changed {Config detail} Examples "Admin" has changed the system time to 04/03/2019, 11:44:46
"Admin" has changed the settings of the network interface "Admin" has changed the DNS settings "Admin" has changed the settings of the Upload Server "Admin" has changed the backup settings
Explanation The user changed certain configuration data. Any settings can be specified in the server as config-uration details.
Severity Notice Facility local0 Standard IEC 62443-3-3 Reference: SR 2.12
Message text {User name} restarts the system Examples "Admin" restarts the system Explanation The user restarts the system. Severity Notice Facility local0 Standard IEC 62443-3-3 Reference: SR 2.12
Message text {User name} has exported the log messages Examples "Admin" has exported the log messages Explanation The user exported log messages. Severity Notice Facility local0 Standard IEC 62443-3-3 Reference: SR 2.12
Message text Connection check to syslog server {IP address} successful Examples Connection check to syslog server "172.168.16.10" successful

Appendix C C.1 Syslog messages
SINEMA Remote Connect - Server
Operating Instructions, 01/2021, C79000-G8976-C383-09 147
Explanation The check of the connection to the Syslog server was completed successfully. Severity Info Facility local0 Standard IEC 62443-3-3 Reference: SR 2.12
Message text Connection check to syslog server {IP address} failed Examples Connection check to syslog server "172.168.16.10" failed Explanation The check of the connection to the Syslog server failed. Severity Info Facility local0 Standard IEC 62443-3-3 Reference: SR 2.12
C.1.2.8 Data backup in automation system (backup) Message text {User name} has created the backup copy: {File name} Example "Admin" has created the backup copy: "2019_04_03_09_53_23.backup" Explanation The user has created a backup copy on the server. Severity Notice Facility local0 Standard IEC 62443-3-3 Reference: SR7.3
Message text Automatic backup copy has been created: {File name} Example Automatic backup copy has been created: "2019_04_03_09_53_23.backup" Explanation An automatic backup copy was created on the server. Severity Info Facility local0 Standard IEC 62443-3-3 Reference: SR7.3
Message text {User name} has imported the backup copy: {File name} Example "Admin" has imported the backup copy: "2019_04_03_09_53_23.backup" Explanation The user imported a backup copy. Severity Notice Facility local0 Standard IEC 62443-3-3 Reference: SR7.3
Message text {User name} has deleted the backup copy: {File name} Example "Admin" has deleted the backup copy: "2019_04_03_09_53_23.backup" Explanation The user has deleted a backup copy on the server. Severity Notice Facility local0 Standard IEC 62443-3-3 Reference: SR7.3

Appendix C C.1 Syslog messages
SINEMA Remote Connect - Server
148 Operating Instructions, 01/2021, C79000-G8976-C383-09
C.1.2.9 Restoration of the automation system Message text Restore backup failed Example Restore backup failed Explanation The system could not use the backup file for the restore. Severity Error Facility local0 Standard IEC 62443-3-3 Reference: SR 7.4
Message text Invalid backup loaded, rejecting… Example Invalid backup loaded, rejecting… Explanation The restore failed. The loaded backup file is not compatible with the system. Severity Warning Facility local0 Standard IEC 62443-3-3 Reference: SR7.4
Message text License resource count is not enough to restore Example License resource count is not enough to restore Explanation The restore failed due to missing licenses. Severity Warning Facility local0 Standard IEC 62443-3-3 Reference: SR 7.4
Message text {User name} has started the restoration of the backup copy: {File name} Example "Admin" has started the restoration of the backup copy: "2019_06_13_23_00_01.backup" Explanation The user started the restore of a backup copy. Severity Notice Facility local0 Standard IEC 62443-3-3 Reference: SR7.4
Message text Restored backup version: {File version} Example Restored backup version: "2019_06_13_23_00_01.backup" Explanation Shows the version information of the loaded backup file. Severity Notice Facility local0 Standard IEC 62443-3-3 Reference: SR7.4
Message text Import of firmware successful: {File name} Example Import of firmware successful: "SCALANCE_M800_S615_V06.02.00_30.01_estc.sfw" Explanation The device firmware was successfully imported by the user. Severity Info Facility local0 Standard IEC 62443-3-3 Reference: SR 7.4
Message text {Device name} requests the firmware Example "S615_1" requests the firmware Explanation The device requested the firmware.

Appendix C C.1 Syslog messages
SINEMA Remote Connect - Server
Operating Instructions, 01/2021, C79000-G8976-C383-09 149
Severity Notice Facility local0 Standard IEC 62443-3-3 Reference: SR 7.4
Message text {Device name} has started downloading the firmware Example "S615_1" has started downloading the firmware Explanation The device is downloading the firmware. Severity Notice Facility local0 Standard IEC 62443-3-3 Reference: SR 7.4
Message text {Device name} has completed downloading the firmware Example "S615_1" has completed downloading the firmware Explanation The device completed downloading the firmware. Severity Notice Facility local0 Standard IEC 62443-3-3 Reference: SR 7.4
Message text Import of firmware failed: Unknown firmware file type! Example Import of firmware failed: Unknown firmware file type! Explanation The firmware import failed due to the invalid firmware file type. Severity Error Facility local0 Standard IEC 62443-3-3 Reference: SR 7.4
Message text Import of firmware failed: Integrity check failed! Example Import of firmware failed: Integrity check failed! Explanation The firmware import failed during the integrity check. Severity Error Facility local0 Standard IEC 62443-3-3 Reference: SR 7.4
Message text No imported firmware file in store Example No imported firmware file in store Explanation Cannot start updating the device because no firmware file has been imported. Severity Error Facility local0 Standard IEC 62443-3-3 Reference: SR 7.4

Appendix C C.1 Syslog messages
SINEMA Remote Connect - Server
150 Operating Instructions, 01/2021, C79000-G8976-C383-09
Message text {User name} has uploaded the Update Example "Admin" has uploaded the Update. Explanation The user has uploaded a server update. Severity Notice Facility local0 Standard IEC 62443-3-3 Reference: SR 7.4
Message text Upgrading SINEMA RC to version: {Software version} Example Upgrading SINEMA RC to version: 2.0.1.0-01.01.00.04 Explanation The server is being updated to the specified version. Severity Info Facility local0 Standard IEC 62443-3-3 Reference: SR 7.4
Message text Update applied successfully Example Update applied successfully Explanation The server was updated successfully. Severity Info Facility local0 Standard IEC 62443-3-3 Reference: SR 7.4
Message text The update package is not applicable. The target version(s) is {Target software version}, while
installed version is {Source software version} Example The update package is not applicable. The target version(s) is V1.3.0.0-01.01.00.38, V2.0.0.0-
01.01.00.21, while installed version is V2.0.1.0-01.01.00.04 Explanation The software activation failed. The loaded software update is not compatible with the installed
version. Severity Warning Facility local0 Standard IEC 62443-3-3 Reference: SR 7.4
Message text Failed to apply system update! Example Failed to apply system update! Explanation The server update failed. Severity Error Facility local0 Standard IEC 62443-3-3 Reference: SR 7.4

Appendix C C.1 Syslog messages
SINEMA Remote Connect - Server
Operating Instructions, 01/2021, C79000-G8976-C383-09 151
C.1.2.10 Network and IT security settings Message text Device information sent to {User name} Example Device information sent to "Peter_Maier" Explanation Device information is sent to the client user via the automatic configuration mechanism. Severity Notice Facility local0 Standard IEC 62443-3-3 Reference: SR 1.11
Message text The OpenVPN configuration was sent to {User name} Example The OpenVPN configuration was sent to "Peter_Maier" Explanation Die OpenVPN-Konfiguration wird über den automatischen Konfigurationsmechanismus an den
Client-Benutzer gesendet. Severity Notice Facility local0 Standard IEC 62443-3-3 Reference: SR 1.11
Message text User {User name} failed to login to client from {IP address}: User was not found Example HTTPS: User "Admin" failed to login to client from "192.168.1.105": User was not found Explanation The client user cannot log in to the server. Severity Error Facility local0 Standard IEC 62443-3-3 Reference: SR 1.13
Message text Sending route update to {IP address} Example Sending route update to 192.168.1.20 Explanation The route update was sent to a device or a user due to configuration changes. Severity Info Facility local0 Standard IEC 62443-3-3 Reference: SR 1.11
Message text Successfully uploaded file(s) {File names} to folder at {IP address} Example Successfully uploaded file(s) "2019_04_03_09_53_23.backup, 2019_04_03_09_53_23.backup" to
folder at "192.168.1.110" Explanation The files were successfully uploaded to the upload server (SFTP server). Severity Notice Facility local0 Standard IEC 62443-3-3 Reference: SR7.3
Message text {Protocol}: Upload failed! Upload Server is not reachable Example Upload failed! Server is not reachable Explanation The file could not be uploaded to the upload server (SFTP server). Severity Error Facility local0 Standard IEC 62443-3-3 Reference: SR7.3

Appendix C C.1 Syslog messages
SINEMA Remote Connect - Server
152 Operating Instructions, 01/2021, C79000-G8976-C383-09
Message text Failed to upload file(s) {File name} to folder at {IP address} Example Failed to upload file(s) "2019_04_03_09_53_23.backup, 2019_04_03_09_53_23.backup" to folder
at "192.168.10.10" Explanation The file could not be uploaded to the upload server (SFTP server). Severity Error Facility local0 Standard IEC 62443-3-3 Reference: SR7.3
Message text {User name} has accepted the user agreement {Version number} Example "Peter_Maier" has accepted the user agreement 1 Explanation The user accepted the user agreement. Severity Info Facility local0 Standard IEC 62443-3-3: SR 7.6
Message text {User name} has refused the user agreement {Version number}. Example "Peter_Maier" has refused the user agreement 1 Explanation The user rejected the user agreement. Severity Info Facility local0 Standard IEC 62443-3-3 Reference: SR 7.6
C.1.2.11 System status Message text Syslog server {IP Address} connection status "Online" Example Syslog server 192.168.50.10 connection status "Online" Explanation The status of a Syslog server was changed. Severity Info Facility local0 Standard IEC 62443-3-3
Message text Syslog server {IP Address} connection status "Online" Example Syslog server 192.168.50.10 connection status "Online" Explanation The status of a Syslog server was changed. Severity Info Facility local0 Standard IEC 62443-3-3

SINEMA Remote Connect - Server
Operating Instructions, 01/2021, C79000-G8976-C383-09 153
Appendix D D D.1 Ciphers Used
Encryption suites that the SINEMA RC server uses are listed in the following tables.
Security mechanisms supported for WBM authentication
Configuration name of the cipher in SINEMA RC
RFC-compliant name Encryption method
DHE-RSA-AES256-GCM-SHA384
TLS_DHE_RSA_WITH_AES_256_GCM_SHA384
AES according to RFC3268, TLS v1.2
DHE-RSA-AES256-SHA TLS_DHE_RSA_WITH_AES_256_CBC_SHA256
AES according to RFC3268, TLS v1.2
AES256-GCM-SHA384 TLS_RSA_WITH_AES_256_GCM_SHA384
AES according to RFC3268, TLS v1.2
AES256-SHA TLS_RSA_WITH_AES_256_CBC_SHA256 AES according to RFC3268, TLS v1.2
DHE-RSA-AES128-GCM-SHA256
TLS_DHE_RSA_WITH_AES_128_GCM_SHA256
AES according to RFC3268, TLS v1.2
DHE-RSA-AES128-SHA TLS_DHE_RSA_WITH_AES_128_CBC_SHA256
AES according to RFC3268, TLS v1.2
AES128-GCM-SHA256 TLS_RSA_WITH_AES_128_GCM_SHA256
AES according to RFC3268, TLS v1.2
AES128-SHA TLS_RSA_WITH_AES_128_CBC_SHA256 AES according to RFC3268, TLS v1.2
Security mechanisms supported for SSH authentication (debug login) • DIFFIE-HELLMAN-GROUP-EXCHANGE-SHA256
• SSH-RSA
• RSA-SHA2-512
• RSA-SHA2-256
• AES256-CTR
Security mechanisms supported for SFTP authentication • AES128-CTR
• AES192-CTR
• AES256-CTR
• AES128-CBC

Appendix D D.1 Ciphers Used
SINEMA Remote Connect - Server
154 Operating Instructions, 01/2021, C79000-G8976-C383-09
• 3DES-CBC
• HMAC-MD5
• HMAC-SHA1
Security mechanisms supported for SMTP (e-mail), client and Syslog authentication Configuration name of the cipher in SINEMA RC
RFC-compliant name Encryption method
AES128-SHA TLS_RSA_WITH_AES_128_CBC_SHA AES according to RFC3268, TLS v1.0
AES256-SHA TLS_RSA_WITH_AES_256_CBC_SHA AES according to RFC3268, TLS v1.1
DHE-RSA-AES128-SHA TLS_DHE_RSA_WITH_AES_128_CBC_SHA AES according to RFC3268, TLS v1.10
DHE-RSA-AES256-SHA TLS_DHE_RSA_WITH_AES_256_CBC_SHA AES according to RFC3268, TLS v1.11
ECDHE-RSA-CHACHA20-POLY1305 TLS_ECDHE_RSA_WITH_CHACHA20_POLY1305_SHA256
ChaCha20-Poly1305, TLS v1.2
ECDHE-ECDSA-CHACHA20-POLY1305
TLS_ECDHE_ECDSA_WITH_CHACHA20_POLY1305_SHA256
ChaCha20-Poly1305, TLS v1.3
DHE-RSA-CHACHA20-POLY1305 TLS_DHE_RSA_WITH_CHACHA20_POLY1305_SHA256
ChaCha20-Poly1305, TLS v1.4
PSK-CHACHA20-POLY1305 TLS_PSK_WITH_CHACHA20_POLY1305_SHA256 ChaCha20-Poly1305, TLS v1.5 ECDHE-PSK-CHACHA20-POLY1305 TLS_ECDHE_PSK_WITH_CHACHA20_POLY1305_
SHA256 ChaCha20-Poly1305, TLS v1.6
DHE-PSK-CHACHA20-POLY1305 TLS_DHE_PSK_WITH_CHACHA20_POLY1305_SHA256
ChaCha20-Poly1305, TLS v1.7
RSA-PSK-CHACHA20-POLY1305 TLS_RSA_PSK_WITH_CHACHA20_POLY1305_SHA256
ChaCha20-Poly1305, TLS v1.8
ECDHE-ECDSA-AES128-SHA TLS_ECDHE_ECDSA_WITH_AES_128_CBC_SHA Elliptic curve cipher suites ECDHE-ECDSA-AES256-SHA TLS_ECDHE_ECDSA_WITH_AES_256_CBC_SHA Elliptic curve cipher suites ECDHE-RSA-AES128-SHA TLS_ECDHE_RSA_WITH_AES_128_CBC_SHA Elliptic curve cipher suites ECDHE-RSA-AES256-SHA TLS_ECDHE_RSA_WITH_AES_256_CBC_SHA Elliptic curve cipher suites DHE-PSK-AES128-CBC-SHA DHE_PSK_WITH_AES_128_CBC_SHA Pre-shared keying (PSK) DHE-PSK-AES128-CBC-SHA256 DHE_PSK_WITH_AES_128_CBC_SHA256 Pre-shared keying (PSK) DHE-PSK-AES128-GCM-SHA256 DHE_PSK_WITH_AES_128_GCM_SHA256 Pre-shared keying (PSK) DHE-PSK-AES256-CBC-SHA DHE_PSK_WITH_AES_256_CBC_SHA Pre-shared keying (PSK) DHE-PSK-AES256-CBC-SHA384 DHE_PSK_WITH_AES_256_CBC_SHA384 Pre-shared keying (PSK) DHE-PSK-AES256-GCM-SHA384 DHE_PSK_WITH_AES_256_GCM_SHA384 Pre-shared keying (PSK) ECDHE-PSK-AES128-CBC-SHA ECDHE_PSK_WITH_AES_128_CBC_SHA Pre-shared keying (PSK) ECDHE-PSK-AES128-CBC-SHA256 ECDHE_PSK_WITH_AES_128_CBC_SHA256 Pre-shared keying (PSK) ECDHE-PSK-AES256-CBC-SHA ECDHE_PSK_WITH_AES_256_CBC_SHA Pre-shared keying (PSK) ECDHE-PSK-AES256-CBC-SHA384 ECDHE_PSK_WITH_AES_256_CBC_SHA384 Pre-shared keying (PSK) PSK-AES128-CBC-SHA PSK_WITH_AES_128_CBC_SHA Pre-shared keying (PSK) PSK-AES128-CBC-SHA256 PSK_WITH_AES_128_CBC_SHA256 Pre-shared keying (PSK) PSK-AES128-GCM-SHA256 PSK_WITH_AES_128_GCM_SHA256 Pre-shared keying (PSK) PSK-AES256-CBC-SHA PSK_WITH_AES_256_CBC_SHA Pre-shared keying (PSK)

Appendix D D.1 Ciphers Used
SINEMA Remote Connect - Server
Operating Instructions, 01/2021, C79000-G8976-C383-09 155
Configuration name of the cipher in SINEMA RC
RFC-compliant name Encryption method
PSK-AES256-CBC-SHA384 PSK_WITH_AES_256_CBC_SHA384 Pre-shared keying (PSK) PSK-AES256-GCM-SHA384 PSK_WITH_AES_256_GCM_SHA384 Pre-shared keying (PSK) RSA-PSK-AES128-CBC-SHA RSA_PSK_WITH_AES_128_CBC_SHA Pre-shared keying (PSK) RSA-PSK-AES128-CBC-SHA256 RSA_PSK_WITH_AES_128_CBC_SHA256 Pre-shared keying (PSK) RSA-PSK-AES128-GCM-SHA256 RSA_PSK_WITH_AES_128_GCM_SHA256 Pre-shared keying (PSK) RSA-PSK-AES256-CBC-SHA RSA_PSK_WITH_AES_256_CBC_SHA Pre-shared keying (PSK) RSA-PSK-AES256-CBC-SHA384 RSA_PSK_WITH_AES_256_CBC_SHA384 Pre-shared keying (PSK) RSA-PSK-AES256-GCM-SHA384 RSA_PSK_WITH_AES_256_GCM_SHA384 Pre-shared keying (PSK) SRP-AES-128-CBC-SHA TLS_SRP_SHA_WITH_AES_128_CBC_SHA SRP ciphers SRP-AES-256-CBC-SHA SRP_SHA_WITH_AES_256_CBC_SHA SRP ciphers SRP-RSA-AES-128-CBC-SHA TLS_SRP_SHA_RSA_WITH_AES_128_CBC_SHA SRP ciphers SRP-RSA-AES-256-CBC-SHA TLS_SRP_SHA_RSA_WITH_AES_256_CBC_SHA SRP ciphers AES128-GCM-SHA256 TLS_RSA_WITH_AES_128_GCM_SHA256 TLS v1.2 AES128-SHA256 TLS_RSA_WITH_AES_128_CBC_SHA256 TLS v1.2 AES256-GCM-SHA384 TLS_RSA_WITH_AES_256_GCM_SHA384 TLS v1.2 AES256-SHA256 TLS_RSA_WITH_AES_256_CBC_SHA256 TLS v1.2 DHE-RSA-AES128-GCM-SHA256 TLS_DHE_RSA_WITH_AES_128_GCM_SHA256 TLS v1.2 DHE-RSA-AES128-SHA256 TLS_DHE_RSA_WITH_AES_128_CBC_SHA256 TLS v1.2 DHE-RSA-AES256-GCM-SHA384 TLS_DHE_RSA_WITH_AES_256_GCM_SHA384 TLS v1.2 DHE-RSA-AES256-SHA256 TLS_DHE_RSA_WITH_AES_256_CBC_SHA256 TLS v1.2 ECDHE-ECDSA-AES128-GCM-SHA256
TLS_ECDHE_ECDSA_WITH_AES_128_GCM_SHA256
TLS v1.2
ECDHE-ECDSA-AES128-SHA256 TLS_ECDHE_ECDSA_WITH_AES_128_CBC_SHA256
TLS v1.2
ECDHE-ECDSA-AES256-GCM-SHA384
TLS_ECDHE_ECDSA_WITH_AES_256_GCM_SHA384
TLS v1.2
ECDHE-ECDSA-AES256-SHA384 TLS_ECDHE_ECDSA_WITH_AES_256_CBC_SHA384
TLS v1.2
ECDHE-RSA-AES128-GCM-SHA256 TLS_ECDHE_RSA_WITH_AES_128_GCM_SHA256 TLS v1.2 ECDHE-RSA-AES128-SHA256 TLS_ECDHE_RSA_WITH_AES_128_CBC_SHA256 TLS v1.2 ECDHE-RSA-AES256-GCM-SHA384 TLS_ECDHE_RSA_WITH_AES_256_GCM_SHA384 TLS v1.2 ECDHE-RSA-AES256-SHA384 TLS_ECDHE_RSA_WITH_AES_256_CBC_SHA384 TLS v1.2 TLS_AES_256_GCM_SHA384 TLS_AES_256_GCM_SHA384 TLS v1.3 TLS_AES_128_GCM_SHA256 TLS_AES_128_GCM_SHA256 TLS v1.3 TLS_CHACHA20_POLY1305_SHA256
TLS_CHACHA20_POLY1305_SHA256 TLS v1.3

Appendix D D.1 Ciphers Used
SINEMA Remote Connect - Server
156 Operating Instructions, 01/2021, C79000-G8976-C383-09

SINEMA Remote Connect - Server
Operating Instructions, 01/2021, C79000-G8976-C383-09 157
Index
A Abbreviations/acronyms, 4 Administrator password, 38
Loss, 38 API server
Set up, 95 Article number, 3
B Backup copy
Creating, 68, 124 Importing, 68 Maximum number, 70
Boot Partition, 71
C CA, 101 CA certificate, 100
Exporting, 102 Certification authority, 101 Change language, 47 Change participant group, 82 Create participant group, 82 Creating an SMS gateway provider, 60
D Definition of terms, 4 Deleting a CA certificate, 102 Device
Creating, 75 Device certificate, 100
Generating, 74 Device name
Permitted characters and length, 28 DNS, 53, 103 Downloading the configuration file, 74, 107, 120
E Entries
Creating, 46
Deleting, 46 Saving, 46
Event log Firewall Log, 51 Log archives, 50 Log messages, 49
F Filter
Device list, 74, 82 User list, 85
Firewall Log, 50 Firmware update, 80
G Glossary, 7 Group name
Permitted characters and length, 27
H Hash method, 106 Hostname
Guidelines, 28 https, 37
I IPsec
Configure address space, 57 IPsec profiles
Creating, 110
K Key length, 106
L License
Existing licenses, 62 License number, 62 License update, 27

Index
SINEMA Remote Connect - Server
158 Operating Instructions, 01/2021, C79000-G8976-C383-09
Licenses (TCSB), 3 Log files, 50
M Maximum Transmission Unit, 52 Minimum requirements, 23 MTU, 52
N Network
Configuring, 78 Interface, 52
Network adapter, 23 NTP, 58
O Offline license
Activate, 64 Release, 64
Online license Activate, 63 Release, 62
OpenVPN, 107, 108 Configuration file, 107 Configuration file (device), 74 Configuration file (user), 120 Configure address space, 57 Downloading the configuration file, 107
OpenVPN file, 120
P Participant group
VPN user, 17 Participant groups, 15 Password
Administrator, 38 Guideline, Fehler! Textmarke nicht definiert. Invalid entry, 38 Loss, 38 Users, 14, 91
Permitted characters, 28 Ping
Setting, 55 PKI CA certificates, 111 Processor, 23 Protection concept, 14
R RAM, 23 Recommended requirements, 23, 23 Renewing a CA certificate, 102 Rights, 15 Role
Administrator, 17 VPN user, 17
Role name Permitted characters and length, 27
Roles, 15 Running a search, 47
S Server
Uploading files, 96 Server certificate, 100, 102
Renewing, 103 Server certificate, 100, 102 Server Information, 71 Service & Support, 7 SHA256, 106 SHA512, 106 SIMATIC NET glossary, 7 SIMATIC NET manual, 5 Start page, 44 Static routes, 56 Syslog certificate, 115
Deleting, 117 Syslog Certificates, 116 Syslog messages
Variables, 139 Syslog server
Connection parameters, 97 System
Restart, 70 Settings, 71 Shut down, 70
System overview, 47
T Ticket number, 62 Time, 101
manually, 58 NTP, 58
Training, 7

Index
SINEMA Remote Connect - Server
Operating Instructions, 01/2021, C79000-G8976-C383-09 159
U UMC
Create UMC user group, 88 Logging on, 39
UMC server Connection parameters, 95
User certificate, 100 Exporting, 120 Overview, 119 Renewing, 119
User name Guideline, Fehler! Textmarke nicht definiert.
User name: Invalid entry, User rights, 86
Manage devices, 86 Managing a device, 72 Managing users, 87
Users, 15 Rights, 14 Roles, 14 User rights, 14
V Virtual subnet
Configure address space, 57 VPN
OpenVPN, 107, 108
W Wake-up SMS
Unsuccessful attempts, 138 WAN IP address, 103
external, 53 WBM
Buttons, 46 Layout of the window, 44
Web user interface, 37 Wrong entry, user name, 38

Index
SINEMA Remote Connect - Server
160 Operating Instructions, 01/2021, C79000-G8976-C383-09