Ivor Horton's Beginning Visual C++ 2008
1394
-
Upload
khangminh22 -
Category
Documents
-
view
0 -
download
0
Transcript of Ivor Horton's Beginning Visual C++ 2008

Ivor Horton’sBeginning
Visual C++®2008
Ivor Horton
25905ffirs.qxd:WroxPro 2/21/08 8:27 AM Page iii
Ivor Horton’sBeginning
Visual C++®2008
Introduction . . . . . . . . . . . . . . . . . . . . . . . . . . . . . . . . . . . . . . . . . . . . . . . . . . . . . xxvChapter 1: Programming with Visual C++ 2008 . . . . . . . . . . . . . . . . . . . . . . . 1Chapter 2: Data, Variables, and Calculations. . . . . . . . . . . . . . . . . . . . . . . . . 35Chapter 3: Decisions and Loops . . . . . . . . . . . . . . . . . . . . . . . . . . . . . . . . . 117Chapter 4: Arrays, Strings, and Pointers . . . . . . . . . . . . . . . . . . . . . . . . . . . 161Chapter 5: Introducing Structure into Your Programs . . . . . . . . . . . . . . . . . 239Chapter 6: More about Program Structure . . . . . . . . . . . . . . . . . . . . . . . . . 279Chapter 7: Defining Your Own Data Types . . . . . . . . . . . . . . . . . . . . . . . . . . 331Chapter 8: More on Classes. . . . . . . . . . . . . . . . . . . . . . . . . . . . . . . . . . . . 409Chapter 9: Class Inheritance and Virtual Functions. . . . . . . . . . . . . . . . . . . 507Chapter 10: The Standard Template Library . . . . . . . . . . . . . . . . . . . . . . . . 601Chapter 11: Debugging Techniques . . . . . . . . . . . . . . . . . . . . . . . . . . . . . . 695Chapter 12: Windows Programming Concepts . . . . . . . . . . . . . . . . . . . . . . 743Chapter 13: Windows Programming with the Microsoft Foundation Classes . . 779Chapter 14: Working with Menus and Toolbars . . . . . . . . . . . . . . . . . . . . . . 805Chapter 15: Drawing in a Window. . . . . . . . . . . . . . . . . . . . . . . . . . . . . . . . 847Chapter 16: Creating the Document and Improving the View. . . . . . . . . . . . 909Chapter 17: Working with Dialogs and Controls . . . . . . . . . . . . . . . . . . . . . 985Chapter 18: Storing and Printing Documents . . . . . . . . . . . . . . . . . . . . . . 1047Chapter 19: Writing Your Own DLLs . . . . . . . . . . . . . . . . . . . . . . . . . . . . . 1093Chapter 20: Connecting to Data Sources . . . . . . . . . . . . . . . . . . . . . . . . . 1113Chapter 21: Updating Data Sources . . . . . . . . . . . . . . . . . . . . . . . . . . . . . 1167Chapter 22: More on Windows Forms Applications . . . . . . . . . . . . . . . . . . 1217Chapter 23: Accessing Data Sources in a Windows Forms Application . . . 1265Appendix A: C++ Keywords . . . . . . . . . . . . . . . . . . . . . . . . . . . . . . . . . . . . 1307Appendix B: ASCII Codes. . . . . . . . . . . . . . . . . . . . . . . . . . . . . . . . . . . . . . 1309Appendix C: Windows Message Types . . . . . . . . . . . . . . . . . . . . . . . . . . . . 1317Index . . . . . . . . . . . . . . . . . . . . . . . . . . . . . . . . . . . . . . . . . . . . . . . . . . . 1319
25905ffirs.qxd:WroxPro 2/21/08 8:27 AM Page i

25905ffirs.qxd:WroxPro 2/21/08 8:27 AM Page ii

Ivor Horton’sBeginning
Visual C++®2008
Ivor Horton
25905ffirs.qxd:WroxPro 2/21/08 8:27 AM Page iii

Ivor Horton’s Beginning Visual C++®2008Published byWiley Publishing, Inc.10475 Crosspoint BoulevardIndianapolis, IN 46256www.wiley.com
Copyright © 2008 by Ivor Horton
Published by Wiley Publishing, Inc., Indianapolis, Indiana
Published simultaneously in Canada
ISBN: 978-0-470-22590-5
Manufactured in the United States of America
10 9 8 7 6 5 4 3 2 1
Library of Congress Cataloging-in-Publication Data is available from the publisher.
No part of this publication may be reproduced, stored in a retrieval system or transmitted in any form or by any means,electronic, mechanical, photocopying, recording, scanning or otherwise, except as permitted under Sections 107 or 108 of the 1976 United States Copyright Act, without either the prior written permission of the Publisher, or authorizationthrough payment of the appropriate per-copy fee to the Copyright Clearance Center, 222 Rosewood Drive, Danvers,MA 01923, (978) 750-8400, fax (978) 646-8600. Requests to the Publisher for permission should be addressed to the LegalDepartment, Wiley Publishing, Inc., 10475 Crosspoint Blvd., Indianapolis, IN 46256, (317) 572-3447, fax (317) 572-4355, oronline at http://www.wiley.com/go/permissions.
Limit of Liability/Disclaimer of Warranty: The publisher and the author make no representations or warranties withrespect to the accuracy or completeness of the contents of this work and specifically disclaim all warranties, includingwithout limitation warranties of fitness for a particular purpose. No warranty may be created or extended by sales orpromotional materials. The advice and strategies contained herein may not be suitable for every situation. This work issold with the understanding that the publisher is not engaged in rendering legal, accounting, or other professional serv-ices. If professional assistance is required, the services of a competent professional person should be sought. Neither thepublisher nor the author shall be liable for damages arising herefrom. The fact that an organization or Website is referredto in this work as a citation and/or a potential source of further information does not mean that the author or the pub-lisher endorses the information the organization or Website may provide or recommendations it may make. Further,readers should be aware that Internet Websites listed in this work may have changed or disappeared between whenthis work was written and when it is read.
For general information on our other products and services please contact our Customer Care Department within theUnited States at (800) 762-2974, outside the United States at (317) 572-3993 or fax (317) 572-4002.
Trademarks: Wiley, the Wiley logo, Wrox, the Wrox logo, Wrox Programmer to Programmer, and related trade dress aretrademarks or registered trademarks of John Wiley & Sons, Inc. and/or its affiliates, in the United States and other coun-tries, and may not be used without written permission. Visual C++ is a registered trademark of Microsoft Corporationin the United States and/or other countries. All other trademarks are the property of their respective owners. WileyPublishing, Inc., is not associated with any product or vendor mentioned in this book.
Wiley also publishes its books in a variety of electronic formats. Some content that appears in print may not be avail-able in electronic books.
25905ffirs.qxd:WroxPro 2/21/08 8:27 AM Page iv

This book is dedicated to Isabella Williams, who joined the growing band of beautiful girls in my life in January 2007.
About the AuthorIvor Horton graduated as a mathematician and was lured into information technology by promises ofgreat rewards for very little work. In spite of the reality being usually a great deal of work for relativelymodest rewards, he has continued to work with computers to the present day. He has been engaged atvarious times in programming, systems design, consultancy, and the management of the implementa-tion of projects of considerable complexity.
Horton has many years of experience in the design and implementation of computer systems applied to engineering design and to manufacturing operations in a variety of industries. He has considerableexperience developing occasionally useful applications in a wide variety of programming languages,and teaching primarily scientists and engineers to do likewise. He has been writing books on program-ming for more than 10 years now, and his currently published works include tutorials on C, C++, andJava. At the present time, when he is not writing programming books or providing advice to others, hespends his time fishing, traveling, and trying to speak better French.
AcknowledgmentsI’d like to acknowledge the efforts and support of the John Wiley & Sons and Wrox Press editorial andproduction team in the production of this book, especially my development editor, Ed Connor, who hasbeen there from way back at the beginning and has stayed through to the end. I’d also like to thank mytechnical editor, John Mueller, once again for doing such an outstanding job of reviewing the text andchecking out all the examples in the book; his many constructive comments undoubtedly helped makethe book a much better tutorial.
As always, the love and support of my wife, Eve, have been fundamental to making it possible for me towrite this book. She has pandered to my every need throughout and has remained patient and cheerfulin spite of the hours I spend locked away in my office and my intermittent grumblings about the work-load I imposed upon myself.
25905ffirs.qxd:WroxPro 2/21/08 8:27 AM Page v

CreditsExecutive EditorRobert Elliott
Development EditorEd Connor
Technical EditorJohn Mueller
Copy EditorMildred Sanchez
Editorial ManagerMary Beth Wakefield
Production ManagerTim Tate
Vice President and Executive Group PublisherRichard Swadley
Vice President and Executive PublisherJoseph B. Wikert
Project Coordinator, CoverLynsey Stanford
CompositorLaurie Stewart, Happenstance Type-O-Rama
ProofreadersJeremy BagaiSheilah LedwidgeCarrie HunterLee EwertWill DeRooy
IndexerJack Lewis
25905ffirs.qxd:WroxPro 2/21/08 8:27 AM Page vi
Contents
Acknowledgments vIntroduction xxv
Chapter 1: Programming with Visual C++ 2008 1
The .NET Framework 2The Common Language Runtime (CLR) 2Writing C++ Applications 3Learning Windows Programming 4
Learning C++ 5The C++ Standards 5Attributes 6Console Applications 6Windows Programming Concepts 7
What Is the Integrated Development Environment? 9Components of the System 9
Using the IDE 10Toolbar Options 11Dockable Toolbars 12Documentation 13Projects and Solutions 13Setting Options in Visual C++ 2008 26Creating and Executing Windows Applications 27Creating a Windows Forms Application 30
Summary 33
Chapter 2: Data, Variables, and Calculations 35
The Structure of a C++ Program 36The main() Function 44Program Statements 44Whitespace 46Statement Blocks 47Automatically Generated Console Programs 47
Defining Variables 48Naming Variables 49
25905ftoc.qxd:WroxPro 2/21/08 8:29 AM Page vii

viii
Contents
Declaring Variables 50Initial Values for Variables 51
Fundamental Data Types 51Integer Variables 52Character Data Types 53Integer Type Modifiers 54The Boolean Type 55Floating-Point Types 55Literals 57Defining Synonyms for Data Types 58Variables with Specific Sets of Values 58
Basic Input/Output Operations 60Input from the Keyboard 60Output to the Command Line 60Formatting the Output 61Escape Sequences 63
Calculating in C++ 65The Assignment Statement 65Arithmetic Operations 65Calculating a Remainder 70Modifying a Variable 71The Increment and Decrement Operators 72The Sequence of Calculation 74
Variable Types and Casting 76Rules for Casting Operands 76Casts in Assignment Statements 77Explicit Casts 78Old-Style Casts 79
The Bitwise Operators 79The Bitwise AND 80The Bitwise OR 82The Bitwise Exclusive OR 83The Bitwise NOT 84The Bitwise Shift Operators 84
Understanding Storage Duration and Scope 86Automatic Variables 86Positioning Variable Declarations 89Global Variables 89Static Variables 93
Namespaces 93Declaring a Namespace 94Multiple Namespaces 96
25905ftoc.qxd:WroxPro 2/21/08 8:29 AM Page viii

ix
Contents
C++/CLI Programming 97C++/CLI Specific: Fundamental Data Types 98C++/CLI Output to the Command Line 102C++/CLI Specific — Formatting the Output 103C++/CLI Input from the Keyboard 106Using safe_cast 107C++/CLI Enumerations 107
Summary 112Exercises 114
Chapter 3: Decisions and Loops 117
Comparing Values 117The if Statement 119Nested if Statements 120Nested if-else Statements 124Logical Operators and Expressions 126The Conditional Operator 130The switch Statement 131Unconditional Branching 134
Repeating a Block of Statements 135What Is a Loop? 135Variations on the for Loop 138The while Loop 146The do-while Loop 148Nested Loops 149
C++/CLI Programming 153The for each Loop 156
Summary 159Exercises 159
Chapter 4: Arrays, Strings, and Pointers 161
Handling Multiple Data Values of the Same Type 162Arrays 162Declaring Arrays 163Initializing Arrays 166Character Arrays and String Handling 168Multidimensional Arrays 171
Indirect Data Access 174What Is a Pointer? 174Declaring Pointers 175
25905ftoc.qxd:WroxPro 2/21/08 8:29 AM Page ix

x
Contents
Using Pointers 176Initializing Pointers 178The sizeof Operator 183Constant Pointers and Pointers to Constants 185Pointers and Arrays 187
Dynamic Memory Allocation 194The Free Store, Alias the Heap 194The new and delete Operators 195Allocating Memory Dynamically for Arrays 195Dynamic Allocation of Multidimensional Arrays 198
Using References 199What Is a Reference? 199Declaring and Initializing References 199
Native C++ Library Functions for Strings 200Finding the Length of a Null-Terminated String 200Joining Null-Terminated Strings 201Copying Null-Terminated Strings 203Comparing Null-Terminated Strings 204Searching Null-Terminated Strings 204
C++/CLI Programming 206Tracking Handles 207CLR Arrays 209Strings 224Tracking References 233Interior Pointers 233
Summary 236Exercises 238
Chapter 5: Introducing Structure into Your Programs 239
Understanding Functions 239Why Do You Need Functions? 241Structure of a Function 241Using a Function 243
Passing Arguments to a Function 247The Pass-by-value Mechanism 247Pointers as Arguments to a Function 249Passing Arrays to a Function 251References as Arguments to a Function 255Use of the const Modifier 257
25905ftoc.qxd:WroxPro 2/21/08 8:29 AM Page x

xi
Contents
Arguments to main() 258Accepting a Variable Number of Function Arguments 260
Returning Values from a Function 263Returning a Pointer 263Returning a Reference 266Static Variables in a Function 269
Recursive Function Calls 271Using Recursion 273
C++/CLI Programming 274Functions Accepting a Variable Number of Arguments 274Arguments to main() 275
Summary 277Exercises 277
Chapter 6: More about Program Structure 279
Pointers to Functions 279Declaring Pointers to Functions 280A Pointer to a Function as an Argument 283Arrays of Pointers to Functions 285
Initializing Function Parameters 285Exceptions 287
Throwing Exceptions 289Catching Exceptions 290Exception Handling in the MFC 291
Handling Memory Allocation Errors 292Function Overloading 293
What Is Function Overloading? 294When to Overload Functions 296
Function Templates 296Using a Function Template 297
An Example Using Functions 299Implementing a Calculator 299Eliminating Blanks from a String 302Evaluating an Expression 303Getting the Value of a Term 305Analyzing a Number 306Putting the Program Together 309Extending the Program 311Extracting a Substring 312Running the Modified Program 314
25905ftoc.qxd:WroxPro 2/21/08 8:29 AM Page xi

xii
Contents
C++/CLI Programming 315Understanding Generic Functions 316A Calculator Program for the CLR 322
Summary 328Exercises 329
Chapter 7: Defining Your Own Data Types 331
The struct in C++ 332What Is a struct? 332Defining a struct 332Initializing a struct 333Accessing the Members of a struct 333IntelliSense Assistance with Structures 337The struct RECT 338Using Pointers with a struct 338
Data Types, Objects, Classes, and Instances 340First Class 342Operations on Classes 342Terminology 343
Understanding Classes 343Defining a Class 344Declaring Objects of a Class 344Accessing the Data Members of a Class 345Member Functions of a Class 347Positioning a Member Function Definition 349Inline Functions 350
Class Constructors 351What Is a Constructor? 351The Default Constructor 353Assigning Default Parameter Values in a Class 355Using an Initialization List in a Constructor 358
Private Members of a Class 358Accessing private Class Members 361The friend Functions of a Class 362The Default Copy Constructor 364
The Pointer this 366const Objects of a Class 368
const Member Functions of a Class 369Member Function Definitions Outside the Class 370
Arrays of Objects of a Class 371
25905ftoc.qxd:WroxPro 2/21/08 8:29 AM Page xii
xiii
Contents
Static Members of a Class 373Static Data Members of a Class 373Static Function Members of a Class 376
Pointers and References to Class Objects 376Pointers to Class Objects 376References to Class Objects 379
C++/CLI Programming 381Defining Value Class Types 381Defining Reference Class Types 386Defining a Copy Constructor for a Reference Class Type 389Class Properties 390initonly Fields 403Static Constructors 405
Summary 405Exercises 406
Chapter 8: More on Classes 409
Class Destructors 409What Is a Destructor? 409The Default Destructor 410Destructors and Dynamic Memory Allocation 412
Implementing a Copy Constructor 415Sharing Memory Between Variables 417
Defining Unions 417Anonymous Unions 419Unions in Classes and Structures 419
Operator Overloading 420Implementing an Overloaded Operator 420Implementing Full Support for a Comparison Operator 424Overloading the Assignment Operator 427Overloading the Addition Operator 432Overloading the Increment and Decrement Operators 436
Class Templates 438Defining a Class Template 438Creating Objects from a Class Template 441Class Templates with Multiple Parameters 444
Using Classes 446The Idea of a Class Interface 446Defining the Problem 446Implementing the CBox Class 447
25905ftoc.qxd:WroxPro 2/21/08 8:29 AM Page xiii
xiv
Contents
Organizing Your Program Code 468Naming Program Files 470
Native C++ Library Classes for Strings 471Creating String Objects 471Concatenating Strings 473Accessing and Modifying Strings 476Comparing Strings 480Searching Strings 484
C++/CLI Programming 494Overloading Operators in Value Classes 494Overloading the Increment and Decrement Operators 499Overloading Operators in Reference Classes 500Implementing the Assignment Operator for Reference Types 503
Summary 503Exercises 504
Chapter 9: Class Inheritance and Virtual Functions 507
Basic Ideas of OOP 507Inheritance in Classes 509
What Is a Base Class? 509Deriving Classes from a Base Class 510
Access Control Under Inheritance 513Constructor Operation in a Derived Class 516Declaring Class Members to Be Protected 519The Access Level of Inherited Class Members 522
The Copy Constructor in a Derived Class 524Class Members as Friends 528
Friend Classes 530Limitations on Class Friendship 530
Virtual Functions 530What Is a Virtual Function? 532Using Pointers to Class Objects 535Using References with Virtual Functions 537Pure Virtual Functions 538Abstract Classes 539Indirect Base Classes 542Virtual Destructors 544
Casting Between Class Types 550Nested Classes 550C++/CLI Programming 553
Boxing and Unboxing 554
25905ftoc.qxd:WroxPro 2/21/08 8:29 AM Page xiv
xv
Contents
Inheritance in C++/CLI Classes 555Interface Classes 561Defining Interface Classes 561Classes and Assemblies 565Functions Specified as new 570Delegates and Events 571Destructors and Finalizers in Reference Classes 583Generic Classes 585
Summary 596Exercises 597
Chapter 10: The Standard Template Library 601
What Is the Standard Template Library? 601Containers 602Container Adapters 603Iterators 604Algorithms 605Function Objects 605Function Adapters 606
The Range of STL Containers 606Sequence Containers 607
Creating Vector Containers 608The Capacity and Size of a Vector Container 611Accessing the Elements in a Vector 615Inserting and Deleting Elements in a Vector 616Storing Class Objects in a Vector 618Sorting Vector Elements 623Storing Pointers in a Vector 624Double-Ended Queue Containers 626Using List Containers 630Using Other Sequence Containers 640
Associative Containers 651Using Map Containers 652Using a Multimap Container 664
More on Iterators 665Using Input Stream Iterators 665Using Inserter Iterators 669Using Output Stream Iterators 670
More on Function Objects 672More on Algorithms 674
fill() 674
25905ftoc.qxd:WroxPro 2/21/08 8:29 AM Page xv

xvi
Contents
replace() 674find() 675transform() 675
The STL for C++/CLI Programs 676STL/CLR Containers 677Using Sequence Containers 677Using Associative Containers 685
Summary 692Exercises 693
Chapter 11: Debugging Techniques 695
Understanding Debugging 695Program Bugs 696Common Bugs 697
Basic Debugging Operations 698Setting Breakpoints 700Setting Tracepoints 702Starting Debugging 703Changing the Value of a Variable 707
Adding Debugging Code 708Using Assertions 708Adding Your Own Debugging Code 709
Debugging a Program 715The Call Stack 715Step Over to the Error 716
Testing the Extended Class 720Finding the Next Bug 722
Debugging Dynamic Memory 723Functions Checking the Free Store 723Controlling Free Store Debug Operations 725Free Store Debugging Output 726
Debugging C++/CLI Programs 731Using the Debug and Trace Classes 732Getting Trace Output in Windows Forms Applications 741
Summary 741
Chapter 12: Windows Programming Concepts 743
Windows Programming Basics 744Elements of a Window 744Windows Programs and the Operating System 746
25905ftoc.qxd:WroxPro 2/21/08 8:29 AM Page xvi

xvii
Contents
Event-Driven Programs 746Windows Messages 747The Windows API 747Windows Data Types 748Notation in Windows Programs 749
The Structure of a Windows Program 750The WinMain() Function 751Message Processing Functions 763A Simple Windows Program 768
Windows Program Organization 769The Microsoft Foundation Classes 770
MFC Notation 771How an MFC Program Is Structured 771
Using Windows Forms 775Summary 778
Chapter 13: Windows Programming with the Microsoft Foundation Classes 779
The Document/View Concept in MFC 780What Is a Document? 780Document Interfaces 780What Is a View? 780Linking a Document and Its Views 781Your Application and MFC 783
Creating MFC Applications 784Creating an SDI Application 786The Output from the MFC Application Wizard 790Creating an MDI Application 801
Summary 803Exercises 803
Chapter 14: Working with Menus and Toolbars 805
Communicating with Windows 805Understanding Message Maps 806Message Categories 809Handling Messages in Your Program 810
Extending the Sketcher Program 811Elements of a Menu 812
Creating and Editing Menu Resources 812Adding Handlers for Menu Messages 816
Choosing a Class to Handle Menu Messages 817Creating Menu Message Functions 817
25905ftoc.qxd:WroxPro 2/21/08 8:29 AM Page xvii
xviii
Contents
Coding Menu Message Functions 820Adding Message Handlers to Update the User Interface 824
Adding Toolbar Buttons 827Editing Toolbar Button Properties 829Exercising the Toolbar Buttons 830Adding Tooltips 831
Menu and Toolbars in a C++/CLI Program 831Understanding Windows Forms 831Understanding Windows Forms Applications 832Adding a Menu to CLR Sketcher 836Adding Event Handlers for Menu Items 838Implementing Event Handlers 839Setting Menu Item Checks 840Adding a Toolbar 842
Summary 845Exercises 846
Chapter 15: Drawing in a Window 847
Basics of Drawing in a Window 847The Window Client Area 848The Windows Graphical Device Interface 848
The Drawing Mechanism in Visual C++ 851The View Class in Your Application 851The CDC Class 852
Drawing Graphics in Practice 861Programming the Mouse 863
Messages from the Mouse 864Mouse Message Handlers 865Drawing Using the Mouse 867
Exercising Sketcher 892Running the Example 892Capturing Mouse Messages 893
Drawing with the CLR 895Drawing on a Form 895Adding Mouse Event Handlers 895Defining C++/CLI Element Classes 897Implementing the MouseMove Event Handler 904Implementing the MouseUp Event Handler 905Implementing the Paint Event Handler for the Form 905
Summary 906Exercises 907
25905ftoc.qxd:WroxPro 2/21/08 8:29 AM Page xviii

xix
Contents
Chapter 16: Creating the Document and Improving the View 909
The MFC Collection Classes 909Types of Collection 910The Type-Safe Collection Classes 911Collections of Objects 911The Typed Pointer Collections 920
Using the CList Template Class 923Drawing a Curve 924Defining the CCurve Class 925Implementing the CCurve Class 927Exercising the CCurve Class 929
Creating the Sketch Document 929Using a CTypedPtrList Template 929
Improving the View 935Updating Multiple Views 935Scrolling Views 937Using MM_LOENGLISH Mapping Mode 941
Deleting and Moving Shapes 943Implementing a Context Menu 943
Associating a Menu with a Class 945Choosing a Context Menu 946Highlighting Elements 952Servicing the Menu Messages 956
Dealing with Masked Elements 964Extending CLRSketcher 965
Coordinate System Transformations 965Defining a Curve 967Defining a Sketch Class 969Drawing the Sketch in the Paint Event Handler 971Implementing Element Highlighting 972Creating Context Menus 976
Summary 981Exercises 983
Chapter 17: Working with Dialogs and Controls 985
Understanding Dialogs 985Understanding Controls 986
Common Controls 988Creating a Dialog Resource 988
Adding Controls to a Dialog Box 988
25905ftoc.qxd:WroxPro 2/21/08 8:29 AM Page xix

xx
Contents
Programming for a Dialog 990Adding a Dialog Class 990Modal and Modeless Dialogs 992Displaying a Dialog 992
Supporting the Dialog Controls 995Initializing the Controls 996Handling Radio Button Messages 997
Completing Dialog Operations 998Adding Pen Widths to the Document 998Adding Pen Widths to the Elements 999Creating Elements in the View 1000Exercising the Dialog 1001
Using a Spin Button Control 1001Adding the Scale Menu Item and Toolbar Button 1002Creating the Spin Button 1003Generating the Scale Dialog Class 1004Displaying the Spin Button 1007
Using the Scale Factor 1008Scaleable Mapping Modes 1008Setting the Document Size 1009Setting the Mapping Mode 1010Implementing Scrolling with Scaling 1012
Working with Status Bars 1013Adding a Status Bar to a Frame 1014
Using a List Box 1018Removing the Scale Dialog 1018Creating a List Box Control 1019
Using an Edit Box Control 1021Creating an Edit Box Resource 1022Creating the Dialog Class 1023Adding the Text Menu Item 1025Defining a Text Element 1026Implementing the CText Class 1027Creating a Text Element 1028
Dialogs and Controls in CLR Sketcher 1030Adding a Dialog 1031Creating Text Elements 1037
Summary 1044Exercises 1045
25905ftoc.qxd:WroxPro 2/21/08 8:29 AM Page xx
xxi
Contents
Chapter 18: Storing and Printing Documents 1047
Understanding Serialization 1047Serializing a Document 1048
Serialization in the Document Class Definition 1048Serialization in the Document Class Implementation 1049Functionality of CObject-Based Classes 1052How Serialization Works 1053How to Implement Serialization for a Class 1054
Applying Serialization 1055Recording Document Changes 1055Serializing the Document 1056Serializing the Element Classes 1058
Exercising Serialization 1061Moving Text 1062Printing a Document 1064
The Printing Process 1065Implementing Multipage Printing 1068
Getting the Overall Document Size 1068Storing Print Data 1069Preparing to Print 1070Cleaning Up After Printing 1072Preparing the Device Context 1072Printing the Document 1073Getting a Printout of the Document 1077
Serialization and Printing in CLR Sketcher 1078Understanding Binary Serialization 1078Serializing a Sketch 1083Printing a Sketch 1089
Summary 1090Exercises 1091
Chapter 19: Writing Your Own DLLs 1093
Understanding DLLs 1093How DLLs Work 1095Contents of a DLL 1098DLL Varieties 1098
Deciding What to Put in a DLL 1099
25905ftoc.qxd:WroxPro 2/21/08 8:30 AM Page xxi

xxii
Contents
Writing DLLs 1100Writing and Using an Extension DLL 1100Exporting Variables and Functions from a DLL 1108Importing Symbols into a Program 1109Implementing the Export of Symbols from a DLL 1109
Summary 1112Exercises 1112
Chapter 20: Connecting to Data Sources 1113
Database Basics 1113A Little SQL 1116
Retrieving Data Using SQL 1116Joining Tables Using SQL 1118Sorting Records 1120
Database Support in MFC 1120MFC Classes Supporting ODBC 1121
Creating a Database Application 1122Registering an ODBC Database 1122Generating an MFC ODBC Program 1124Understanding the Program Structure 1127Exercising the Example 1138
Sorting a Recordset 1138Modifying the Window Caption 1139
Using a Second Recordset Object 1140Adding a Recordset Class 1141Adding a View Class for the Recordset 1143Customizing the Recordset 1147Accessing Multiple Table Views 1150Viewing Orders for a Product 1156
Viewing Customer Details 1156Adding the Customer Recordset 1156Creating the Customer Dialog Resource 1157Creating the Customer View Class 1158Adding a Filter 1160Implementing the Filter Parameter 1162Linking the Order Dialog to the Customer Dialog 1163Exercising the Database Viewer 1165
Summary 1166Exercises 1166
25905ftoc.qxd:WroxPro 2/21/08 8:30 AM Page xxii
xxiii
Contents
Chapter 21: Updating Data Sources 1167
Update Operations 1167CRecordset Update Operations 1168Transactions 1170
A Simple Update Example 1172Customizing the Application 1173
Managing the Update Process 1175Implementing Update Mode 1177
Adding Rows to a Table 1186The Order Entry Process 1187Creating the Resources 1187Creating the Recordsets 1188Creating the Recordset Views 1188Adding Controls to the Dialog Resources 1193Implementing Dialog Switching 1197Creating an Order ID 1200Storing the Order Data 1205Selecting Products for an Order 1207Adding a New Order 1209
Summary 1214Exercises 1215
Chapter 22: More on Windows Forms Applications 1217
Creating the Application GUI 1217Adding a Tab Control 1220Using GroupBox Controls 1222Using Button Controls 1224Using the WebBrowser Control 1226Operation of the Winning Application 1227Adding a Context Menu 1228Creating Event Handlers 1228Handling Events for the Limits Menu 1235Creating a Dialog Box 1235Using the Dialog Box 1240Adding the Second Dialog 1245Implementing the Help > About Menu Item 1253Handling a Button Click 1253Responding to the Context Menu 1256
Summary 1263Exercises 1264
25905ftoc.qxd:WroxPro 2/21/08 8:30 AM Page xxiii
xxiv
Contents
Chapter 23: Accessing Data Sources in a Windows Forms Application 1265
Working with Data Sources 1266Accessing and Displaying Data 1267Using a DataGridView Control 1267Using a DataGridView Control in Unbound Mode 1269Customizing a DataGridView Control 1275
Customizing Header Cells 1276Customizing Non-Header Cells 1277Dynamically Setting Cell Styles 1284
Using Bound Mode 1290The BindingSource Component 1290Using the BindingNavigator Control 1296Binding to Individual Controls 1299Working with Multiple Tables 1302Summary 1304Exercises 1305
Appendix A: C++ Keywords 1307
Appendix B: ASCII Codes 1309
Appendix C: Windows Message Types 1317
Index 1319
25905ftoc.qxd:WroxPro 2/21/08 8:30 AM Page xxiv
Introduction
Welcome to Beginning Visual C++® 2008. With this book you can become an effective C++ programmer. Thelatest development system from Microsoft, Visual Studio 2008, supports two distinct but closely related fla-vors of the C++ language; it fully supports the original ISO/ANSI standard C++, and you also get supportfor a new version of C++ called C++/CLI that was developed by Microsoft and is now an ECMA standard.These two versions of C++ are complementary and fulfill different roles. ISO/ANSI C++ is there for thedevelopment of high-performance applications that run natively on your computer whereas C++/CLI hasbeen developed specifically for writing applications that target the .NET Framework. This book will teachyou how to write applications in both versions of C++.
You get quite a lot of assistance from automatically generated code when writing ISO/ANSI C++ pro-grams, but you still need to write a lot of C++ yourself. You need a solid understanding of object-orientedprogramming techniques, as well as a good appreciation of what’s involved in programming for Windows.Although C++/CLI targets the .NET Framework, it also is the vehicle for the development of WindowsForms applications that you can develop with little or in some cases no explicit code writing. Of course,when you do have to add code to a Windows Forms application, even though it may be a very small proportion of the total, you still need an in-depth knowledge of the C++/CLI language. ISO/ANSI C++remains the language of choice for many professionals, but the speed of development that C++/CLI andWindows Forms applications bring to the table make that essential, too. For this reason I cover both flavorsof C++ in this book.
Whom This Book Is ForThis book is aimed at teaching you how to write C++ applications for the Microsoft Windows operatingsystem using Visual C++ 2008 or any edition of Visual Studio 2008. I make no assumptions about priorknowledge of any particular programming language. This tutorial is for you if:
❑ You have a little experience programming in some other language, such as BASIC for example,and you are keen to learn C++ and develop practical Microsoft Windows programming skills.
❑ You have some experience in C or C++, but not in a Microsoft Windows context and want to extend your skills to program for the Windows environment using the latest tools and technologies.
❑ You have some knowledge of C++ and you want to extend your C++ skills to include C++/CLI.
❑ You are a newcomer to programming and sufficiently keen to jump in the deep end with C++.To be successful you need to have at least a rough idea of how your computer works, includingthe way in which the memory is organized and how data and instructions are stored.
25905flast.qxd:WroxPro 2/21/08 8:28 AM Page xxv

What This Book CoversMy objective with this book is to teach you the essentials of C++ programming using both of the tech-nologies supported by Visual C++ 2008. The book provides a detailed tutorial on both flavors of the C++language, on native ISO/ANSI C++ Windows application development using the Microsoft FoundationClasses (MFC), and on the development of C++/CLI Windows applications using Windows Forms.
Because of the importance and pervasiveness of database technology today, the book also includes intro-ductions to the techniques you can use for accessing data sources in both MFC and Windows Forms appli-cations. MFC applications are relatively coding-intensive compared to Windows Forms applications. Thisis because you create the latter using a highly developed design capability in Visual C++ 2008 that enablesyou to assemble the entire graphical user interface (GUI) for an application graphically and have all thecode that creates it generated automatically. For this reason, there are more pages in the book devoted toMFC programming than to Windows Forms programming.
How This Book Is StructuredThe contents of this book are structured as follows:
❑ Chapter 1 introduces you to the basic concepts you need to understand for programming inC++ for native applications and for .NET Framework applications, together with the mainideas embodied in the Visual C++ 2008 development environment. It describes how you usethe capabilities of Visual C++ 2008 for creating the various kinds of C++ applications you learnabout in the rest of the book.
❑ Chapters 2 to 9 are dedicated to teaching you both versions of the C++ language. The content of each of the Chapters 2 through 9 is structured in a similar way; the first half of each chapterdeals with ISO/ANSI C++ topics, and the second half deals with C++/CLI.
❑ Chapter 10 teaches you how you use the Standard Template Library (STL), which is a powerfuland extensive set of tools for organizing and manipulating data in your native C++ programs. TheSTL is application-neutral so you will be able to apply it in a wide range of contexts. Chapter 10also teaches you the STL/CLR, which is new in Visual C++ 2008. This is a version of the STL forC++/CLI applications.
❑ Chapter 11 introduces you to techniques for finding errors in your C++ programs.
❑ Chapter 12 discusses how Microsoft Windows applications are structured and describes anddemonstrates the essential elements that are present in every Windows application. The chapterexplains elementary examples of Windows applications using ISO/ANSI C++ and the WindowsAPI and the MFC, as well as an example of a basic Windows Forms application in C++/CLI.
❑ Chapters 13 to 18 describe in detail the capabilities provided by the MFC for building a GUI andhow you use the equivalent facilities in a program for the .NET Framework. You learn how youcreate and use common controls to build the graphical user interface for your application andhow you handle the events that result from user interactions with your program. In the process,you create a substantial working application in native C++, and a program with essentially thesame functionality in C++/CLI. In addition to the techniques you learn for building a GUI, theapplications that you develop also show you how you print documents and how you save themon disk.
Introduction
xxvi
25905flast.qxd:WroxPro 2/21/08 8:28 AM Page xxvi
Introduction
xxvii
❑ Chapter 19 teaches you the essentials you need to know for creating your own libraries usingMFC. You learn about the different kinds of libraries you can create, and you develop workingexamples of these that work with the application that you have evolved over the preceding sixchapters.
❑ In Chapters 20 and 21, you learn about accessing data sources in an MFC application. You gainexperience in accessing a database in read-only mode; then you learn the fundamental program-ming techniques for updating a database using MFC. The examples use the Northwind databasethat can be downloaded from the Web, but you can also apply the techniques described to yourown data source.
❑ In Chapter 22 you work with Windows Forms and C++/CLI to build an example that teachesyou how to create, customize, and use more Windows Forms controls in an application. Yougain practical experience by building a second C++/CLI application incrementally throughoutthe chapter.
❑ Chapter 23 builds on the knowledge you gain in Chapter 22 and shows how the controls avail-able for accessing data sources work, and how you customize them. You also learn how you cancreate an application for accessing a database with virtually no coding at all on your part.
All chapters include numerous working examples that demonstrate the programming techniques that arediscussed. Every chapter concludes with a summary of the key points that were covered, and most chap-ters include a set of exercises at the end that you can attempt to apply what you have learned. Solutions tothe exercises, together with all the code from the book, are available for download from the publisher’sWeb site (see the “Source Code” section later in this Introduction for more details).
The tutorial on the C++ language uses examples that are console programs with simple command-lineinput and output. This approach enables you to learn the various capabilities of C++ without gettingbogged down in the complexities of Windows GUI programming. Programming for Windows is reallyonly practicable after you have a thorough understanding of the programming language.
If you want to keep things as simple as possible, you can just learn ISO/ANSI C++ programming in thefirst instance. Each of the chapters that cover the C++ language (Chapters 2 to 9) first discusses particu-lar aspects of the capabilities of ISO/ANSI C++, followed by the new features introduced by C++/CLI in the same context. The reason for organizing things this way is that C++/CLI is defined as an exten-sion to the ISO/ANSI standard language, so an understanding of C++/CLI is predicated on knowledgeof ISO/ANSI C++. Thus, you can just read the ISO/ANSI topics in each of Chapters 2 to 21 and ignore theC++/CLI sections that follow. You then can progress to Windows application development with ISO/ANSIC++ without having to keep the two versions of the language in mind. You can return to C++/CLI whenyou are comfortable with ISO/ANSI C++. Of course, you can also work straight through and add to yourknowledge of both versions of the C++ language incrementally.
What You Need to Use This BookTo use this book you need any of Visual Studio 2008 Standard Edition, Visual Studio 2008 ProfessionalEdition, or Visual Studio 2008 Team System. Note that Visual C++ Express 2008 is not sufficient becausethe MFC is not included.
Visual Studio 2008 requires Windows XP (x86 or x64) with Service Pack 2 or later, Windows Server 2003with Service Pack 1 or later, or any edition of Windows Vista except Starter Edition. To install any of the
25905flast.qxd:WroxPro 2/21/08 8:28 AM Page xxvii

Introduction
xxviii
three Visual Studio 2008 editions identified you need to have a 1.6 GHz processor with at least 384MB ofmemory (at least 768MB for Windows Vista) and at least 2.2GB of hard-disk space available. To install thefull MSDN documentation that comes with the product you’ll need an additional 1.8GB available on theinstallation drive.
The database examples in the book use the Northwind Traders database. You can find the download forthis database by searching for “Northwind Traders” on http://msdn.microsoft.com. Of course, youcan also adapt the examples to work with a database of your choice.
Most importantly, to get the most out of this book you need a willingness to learn, and a determinationto master the most powerful programming tool for Windows applications presently available. You needthe dedication to type in and work through all the examples and try out the exercises in the book. Thissounds more difficult than it is, and I think you’ll be surprised how much you can achieve in a relativelyshort period of time. Keep in mind that everybody who learns programming gets bogged down from timeto time, but if you keep at it, things become clearer and you’ll get there eventually. This book helps you tostart experimenting on your own and, from there, to become a successful C++ programmer.
Using the Windows Classic ThemeIf you’re working in Windows Vista with Visual Studio 2008, you may have noticed that the view looksamazing. The transparency offered by the Aero Glass interface is quite breathtaking at first glance (andeven many glances afterward). When you add in all of the visual effects that Vista has to offer, youmight wonder why anyone would object to such a nice work environment. However, after a few hoursof watching windows bursting forth and seeing the display dazzle your vision, you may prefer a set-ting that is less likely to cause eye fatigue. More importantly, you may notice a significant drop in yourproductivity because all of this eye candy robs your system of important processing cycles.
Eye candy is nice, but isn’t it nicer to get home on time after a long day writing code? That’s one reasonwhy this book uses the Windows Classic theme to show Visual Studio 2008 windows. Another reason isthat if you are still using Windows XP, the fancy Vista windows would not mean very much to you. TheWindows Classic theme is common to both operating systems so it will fit with whatever operating sys-tem you are using, and it’s definitely friendlier to your eyes than the Aero Glass interface.
If you are using Vista, I encourage you to try the various themes that Vista offers to see if they work foryou. However, if you’d like to use the same theme in Vista as I have used for this book, then you can fol-low these steps to obtain it.
1. Right-click the Desktop and choose Personalize from the context menu. The Personalize windowis shown in Figure I-1. This window provides access to all of the display settings you need toobtain the Windows Classic view.
2. Click Theme to display the Theme Settings dialog box shown in Figure I-2.
3. Choose Windows Classic in the Theme field and click OK. At this point, your display will beginlooking very much like mine. Of course, you still have all of those special effects to consider.The next set of steps will get rid of the special effects.
4. Close the Personalize window.
25905flast.qxd:WroxPro 2/21/08 8:28 AM Page xxviii

Figure I-1
Figure I-2
5. Open the System applet in the Control Panel to display the System window shown in Figure I-3.
Introduction
xxix
25905flast.qxd:WroxPro 2/21/08 8:28 AM Page xxix

Figure I-3
6. Click Advanced System Settings to display the Advanced tab of the System Properties dialogbox shown in Figure I-4.
Figure I-4
Introduction
xxx
25905flast.qxd:WroxPro 2/21/08 8:28 AM Page xxx

7. Click Settings in the Performance area to display the Performance Options dialog box shown inFigure I-5.
Figure I-5
8. Choose the Adjust for Best Performance option as shown in Figure I-5. Click OK twice to closeboth dialog boxes. At this point, your system is adjusted to provide the same view that I’m usingand also for best graphic performance.
You may also want to use the Classic Start menu to make it easier to locate applications and to per-form other tasks. To set your system up for the Classic Start menu, right-click the taskbar and chooseProperties. Select the Start menu tab. Choose the Classic Start menu option, make any required cus-tomizations by clicking Customize, and click OK. You now have an optimal environment for workingwith Visual Studio.
Of course, if you are using Windows XP and you want your screen images to look like those in the book,you can use the Classic theme here, too. Just right-click on the Windows desktop, and select Propertiesfrom the pop-up menu to display the dialog shown in Figure I-6.
On the Themes tab in the Display Properties dialog, select Windows Classic from the drop-down list ofthemes. Click the OK button and you are in business.
Introduction
xxxi
25905flast.qxd:WroxPro 2/21/08 8:28 AM Page xxxi
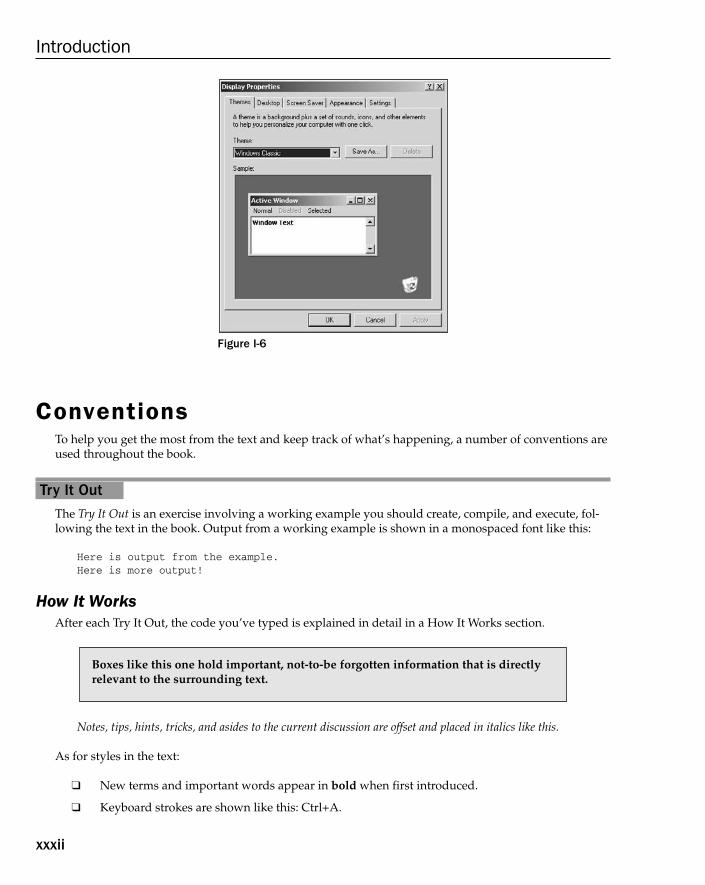
Figure I-6
ConventionsTo help you get the most from the text and keep track of what’s happening, a number of conventions areused throughout the book.
Try It OutThe Try It Out is an exercise involving a working example you should create, compile, and execute, fol-lowing the text in the book. Output from a working example is shown in a monospaced font like this:
Here is output from the example.Here is more output!
How It WorksAfter each Try It Out, the code you’ve typed is explained in detail in a How It Works section.
Notes, tips, hints, tricks, and asides to the current discussion are offset and placed in italics like this.
As for styles in the text:
❑ New terms and important words appear in bold when first introduced.
❑ Keyboard strokes are shown like this: Ctrl+A.
Boxes like this one hold important, not-to-be forgotten information that is directlyrelevant to the surrounding text.
Introduction
xxxii
25905flast.qxd:WroxPro 2/21/08 8:28 AM Page xxxii

❑ File names, URLs, and code within the text appear like so: persistence.properties.
❑ Code is presented in two different ways:
Monofont type with no highlighting is used for code that you have seen before orfor code that was created automatically for you.Gray highlighting is used to show code that’s new or modified.
Source CodeAs you work through the examples in this book, you may choose either to type in all the code manuallyor to use the source code files that accompany the book. All of the source code used in this book is avail-able for download at http://www.wrox.com. At the site, simply locate the book’s title (either by usingthe Search box or by using one of the title lists) and click the Download Code link on the book’s detailpage to obtain all the source code for the book.
While just using the downloaded code is an option, I strongly recommend that you type the code forexamples manually and only turn to the code download as a last resort. This will not only be very effec-tive in helping you learn and remember the language syntax, but will also give you valuable experiencein making and hopefully correcting mistakes in your code.
Because many books have similar titles, you may find it easiest to search by ISBN; this book’s ISBN is978-0-470-22590-5.
After you download the code, just decompress it with your favorite compression tool. Alternatively, you can go to the main Wrox code download page at http://www.wrox.com/dynamic/books/download.aspx to see the code available for this book and all other Wrox books.
ErrataWe make every effort to ensure that there are no errors in the text or in the code. However, no one isperfect, and mistakes do occur. If you find an error in one of our books, like a spelling mistake or faultypiece of code, we would be very grateful for your feedback. By sending in errata you may save anotherreader hours of frustration, and at the same time you will be helping us provide even higher qualityinformation.
To find the errata page for this book, go to http://www.wrox.com and locate the title using theSearch box or one of the title lists. Then, on the book details page, click the Book Errata link. On thispage you can view all errata that has been submitted for this book and posted by Wrox editors. A complete book list including links to each book’s errata is also available at www.wrox.com/misc-pages/booklist.shtml.
If you don’t spot “your” error on the Book Errata page, go to www.wrox.com/contact/techsupport.shtml and complete the form there to send us the error you have found. We’ll check the informationand, if appropriate, post a message to the book’s errata page and fix the problem in subsequent editionsof the book.
Introduction
xxxiii
25905flast.qxd:WroxPro 2/21/08 8:28 AM Page xxxiii
p2p.wrox.comFor author and peer discussion, join the P2P forums at p2p.wrox.com. The forums are a Web-based sys-tem for you to post messages relating to Wrox books and related technologies and interact with otherreaders and technology users. The forums offer a subscription feature to e-mail you topics of interest ofyour choosing when new posts are made to the forums. Wrox authors, editors, other industry experts,and your fellow readers are present on these forums.
At http://p2p.wrox.com you will find a number of different forums that will help you not only as youread this book, but also as you develop your own applications. To join the forums, just follow these steps:
1. Go to p2p.wrox.com and click the Register link.
2. Read the terms of use and click Agree.
3. Complete the required information to join as well as any optional information you wish to provide and click Submit.
4. You will receive an e-mail with information describing how to verify your account and complete the joining process.
You can read messages in the forums without joining P2P but in order to post your own messages, you must join.
After you join, you can post new messages and respond to messages other users post. You can read mes-sages at any time on the Web. If you would like to have new messages from a particular forum e-mailedto you, click the Subscribe to this Forum icon by the forum name in the forum listing.
For more information about how to use the Wrox P2P, be sure to read the P2P FAQs for answers to ques-tions about how the forum software works as well as many common questions specific to P2P and Wroxbooks. To read the FAQs, click the FAQ link on any P2P page.
Introduction
xxxiv
25905flast.qxd:WroxPro 2/21/08 8:28 AM Page xxxiv

1Programming
with Visual C++ 2008
Windows programming isn’t difficult. In fact, Microsoft Visual C++ 2008 makes it remarkably easy,as you’ll see throughout the course of this book. There’s just one obstacle in your path: Before you getto the specifics of Windows programming, you have to be thoroughly familiar with the capabilitiesof the C++ programming language, particularly the object-oriented aspects of the language. Object-oriented techniques are central to the effectiveness of all the tools that are provided by Visual C++2008 for Windows programming, so it’s essential that you gain a good understanding of them. That’sexactly what this book provides.
This chapter gives you an overview of the essential concepts involved in programming applicationsin C++. You’ll take a rapid tour of the Integrated Development Environment (IDE) that comes withVisual C++ 2008. The IDE is straightforward and generally intuitive in its operation, so you’ll be ableto pick up most of it as you go along. The best approach to getting familiar with it is to work throughthe process of creating, compiling, and executing a simple program. By the end of this chapter, youwill have learned:
❑ What the principal components of Visual C++ 2008 are
❑ What the .NET Framework consists of and the advantages it offers
❑ What solutions and projects are and how you create them
❑ About console programs
❑ How to create and edit a program
❑ How to compile, link, and execute C++ console programs
❑ How to create and execute basic Windows programs
So power up your PC, start Windows, load the mighty Visual C++ 2008, and begin your journey.
25905c01.qxd:WroxPro 2/21/08 8:35 AM Page 1

The .NET FrameworkThe .NET Framework is a central concept in Visual C++ 2008 as well as in all the other .NET developmentproducts from Microsoft. The .NET Framework consists of two elements: the Common Language Runtime(CLR) in which your application executes, and a set of libraries called the .NET Framework class libraries.The .NET Framework class libraries provide the functional support your code will need when executingwith the CLR, regardless of the programming language used, so .NET programs written in C++, C#, or anyof the other languages that support the .NET Framework all use the same .NET libraries.
There are two fundamentally different kinds of C++ applications you can develop with Visual C++ 2008.You can write applications that natively execute on your computer. These applications will be referredto as native C++ programs. You write native C++ programs in the version of C++ that is defined by theISO/ANSI (International Standards Organization/American National Standards Institute) language stan-dard. You can also write applications to run under the control of the CLR in an extended version of C++called C++/CLI. These programs will be referred to as CLR programs, or C++/CLI programs.
The .NET Framework is not strictly part of Visual C++ 2008 but rather a component of the Windows oper-ating system that makes it easier to build software applications and Web services. The .NET Frameworkoffers substantial advantages in code reliability and security, as well as the ability to integrate your C++code with code written in over 20 other programming languages that target the .NET Framework. A slightdisadvantage of targeting the .NET Framework is that there is a small performance penalty, but you won’tnotice this in the majority of circumstances.
The Common Language Runtime (CLR)The CLR is a standardized environment for the execution of programs written in a wide range of high-levellanguages including Visual Basic, C#, and of course C++. The specification of the CLR is now embodiedin the European Computer Manufacturers Association (ECMA) standard for the Common LanguageInfrastructure (CLI), ECMA-335, and also in the equivalent ISO standard, ISO/IEC 23271, so the CLR is an implementation of this standard. You can see why C++ for the CLR is referred to as C++/CLI —it’s C++ for the Common Language Infrastructure, so you are likely to see C++/CLI compilers on otheroperating systems that implement the CLI.
Note that information on all ECMA standards is available from www.ecma-international.org andECMA-335 is currently available as a free download.
The CLI is essentially a specification for a virtual machine environment that enables applications writtenin diverse high-level programming languages to be executed in different system environments withoutchanging or recompiling the original source code. The CLI specifies a standard intermediate language forthe virtual machine to which the high-level language source code is compiled. With the .NET Framework,this intermediate language is referred to as Microsoft Intermediate Language (MSIL). Code in the interme-diate language is ultimately mapped to machine code by a just-in-time (JIT) compiler when you execute aprogram. Of course, code in the CLI intermediate language can be executed within any other environmentthat has a CLI implementation.
2
Chapter 1: Programming with Visual C++ 2008
25905c01.qxd:WroxPro 2/21/08 8:35 AM Page 2

The CLI also defines a common set of data types called the Common Type System (CTS) that should beused for programs written in any programming language targeting a CLI implementation. The CTS speci-fies how data types are used within the CLR and includes a set of predefined types. You may also defineyour own data types, and these must be defined in a particular way to be consistent with the CLR, as you’llsee. Having a standardized type system for representing data allows components written in different pro-gramming languages to handle data in a uniform way and makes it possible to integrate components writ-ten in different languages into a single application.
Data security and program reliability is greatly enhanced by the CLR, in part because dynamic memoryallocation and release for data is fully automatic but also because the MSIL code for a program is compre-hensively checked and validated before the program executes. The CLR is just one implementation of theCLI specification that executes under Microsoft Windows on a PC; there will undoubtedly be other imple-mentations of the CLI for other operating system environments and hardware platforms. You’ll sometimesfind that the terms CLI and CLR are used interchangeably, although it should be evident that they are notthe same thing. The CLI is a standard specification; the CLR is Microsoft’s implementation of the CLI.
Writing C++ ApplicationsYou have tremendous flexibility in the types of applications and program components that you can developwith Visual C++ 2008. As noted earlier in this chapter, you have two basic options for Windows applica-tions: You can write code that executes with the CLR, and you can also write code that compiles directlyto machine code and thus executes natively. For window-based applications targeting the CLR, you useWindows Forms as the base for the GUI provided by the .NET Framework libraries. Using Windows Formsenables rapid GUI development because you assemble the GUI graphically from standard componentsand have the code generated completely automatically. You then just need to customize the code that hasbeen generated to provide the functionality you require.
For natively executing code, you have several ways to go. One possibility is to use the Microsoft Founda -tion Classes (MFC) for programming the graphical user interface for your Windows application. The MFCencapsulates the Windows operating system Application Programming Interface (API) for GUI creationand control and greatly eases the process of program development. The Windows API originated longbefore the C++ language arrived on the scene so it has none of the object-oriented characteristics thatwould be expected if it were written today; however, you are not obliged to use the MFC. If you want the ultimate in performance, you can write your C++ code to access the Windows API directly.
C++ code that executes with the CLR is described as managed C++ because data and code is managed bythe CLR. In CLR programs, the release of memory that you have allocated dynamically for storing data istaken care of automatically, thus eliminating a common source of error in native C++ applications. C++code that executes outside of the CLR is sometimes described by Microsoft as unmanaged C++ becausethe CLR is not involved in its execution. With unmanaged C++ you must take care of all aspects of allocat-ing and releasing memory during execution of your program yourself, and you also forego the enhancedsecurity provided by the CLR. You’ll also see unmanaged C++ referred to as native C++ because it com-piles directly to native machine code.
Figure 1-1 shows the basic options you have for developing C++ applications.
3
Chapter 1: Programming with Visual C++ 2008
25905c01.qxd:WroxPro 2/21/08 8:35 AM Page 3

Figure 1-1
Figure 1-1 is not the whole story. An application can consist partly of managed C++ and partly of nativeC++, so you are not obliged to stick to one environment or the other. Of course, you do lose out some-what by mixing the code, so you would choose to follow this approach only when necessary, such aswhen you want to convert an existing native C++ application to run with the CLR. You obviously won’tget the benefits inherent in managed C++ in the native C++ code, and there can also be appreciable over-head involved in communications between the managed and unmanaged code components. The abilityto mix managed and unmanaged code can be invaluable, however, when you need to develop or extendexisting unmanaged code but also want to obtain the advantages of using the CLR. Of course, for newapplications you should decide whether you want to create a managed C++ application or a native C++application at the outset.
Learning Windows ProgrammingThere are always two basic aspects to interactive applications executing under Windows: You need code tocreate the Graphical User Interface (the GUI) with which the user interacts, and you need code to processthese interactions to provide the functionality of the application. Visual C++ 2008 provides you with a greatdeal of assistance in both aspects of Windows application development. As you’ll see later in this chapter,you can create a working Windows program with a GUI without writing any code yourself at all. All thebasic code to create the GUI can be generated automatically by Visual C++ 2008; however, it’s essential to understand how this automatically generated code works because you need to extend and modify it tomake it do what you want, and to do that you need a comprehensive understanding of C++.
MFCNative C++
Native C++
Operating System
Framework Classes
Common Language Runtime
Managed C++
Hardware
4
Chapter 1: Programming with Visual C++ 2008
25905c01.qxd:WroxPro 2/21/08 8:35 AM Page 4
For this reason, you’ll first learn C++ — both the native C++ and C++/CLI versions of the language —without getting involved in Windows programming considerations. After you’re comfortable with C++,you’ll learn how you develop fully-fledged Windows applications using native C++ and C++/CLI. Thismeans that while you are learning C++, you’ll be working with programs that just involve commandline input and output. By sticking to this rather limited input and output capability, you’ll be able to con-centrate of the specifics of how the C++ language works and avoid the inevitable complications involvedin GUI building and control. After you become comfortable with C++, you’ll find that it’s an easy andnatural progression to applying C++ to the development of Windows application programs.
Learning C++Visual C++ 2008 fully supports two versions of C++ defined by two separate standards:
❑ The ISO/ANSI C++ standard is for implementing native applications — unmanaged C++. Thisversion of C++ is supported on the majority of computer platforms.
❑ The C++/CLI standard is designed specifically for writing programs that target the CLR and isan extension to the ISO/ANSI C++.
Chapters 2 through 9 of this book teach you the C++ language. Because C++/CLI is an extension ofISO/ANSI C++, the first part of each chapter introduces elements of the ISO/ANSI C++ language; thesecond part explains the additional features that C++/CLI introduces.
Writing programs in C++/CLI allows you to take full advantage of the capabilities of the .NET Framework,something that is not possible with programs written in ISO/ANSI C++. Although C++/CLI is an exten-sion of ISO/ANSI C++, to be able to execute your program fully with the CLR means that it must conformto the requirements of the CLR. This implies that there are some features of ISO/ANSI C++ that you cannotuse in your CLR programs. One example of this that you might deduce from what I have said up to nowis that the dynamic memory allocation and release facilities offered by ISO/ANSI C++ are not compatiblewith the CLR; you must use the CLR mechanism for memory management and this implies that you mustuse C++/CLI classes, not native C++ classes.
The C++ StandardsThe ISO/ANSI standard is defined by the document ISO/IEC 14882 that is published by the AmericanNational Standards Institute (ANSI). ISO/ANSI standard C++ is the well-established version of C++that has been around since 1998 and is supported by compilers on the majority of computer hardwareplatforms and operating systems. Programs that you write in ISO/ANSI C++ can be ported from onesystem environment to another reasonably easily, although the library functions that a program uses —particularly those related to building a graphical user interface — are a major determinant of how easyor difficult it will be. ISO/ANSI standard C++ has been the first choice of many professional programdevelopers because it is so widely supported, and because it is one of the most powerful programminglanguages available today.
The ISO/ANSI standard for C++ can be purchased from www.iso.org.
C++/CLI is a version of C++ that extends the ISO/ANSI standard for C++ to better support the CommonLanguage Infrastructure (CLI) that is defined by the standard ECMA-355. The first draft of this standard
5
Chapter 1: Programming with Visual C++ 2008
25905c01.qxd:WroxPro 2/21/08 8:35 AM Page 5

appeared in 2003 and was developed from an initial technical specification that was produced by Microsoftto support the execution of C++ programs with the .NET Framework. Thus both the CLI and C++/CLIwere originated by Microsoft in support of the .NET Framework. Of course, standardizing the CLI andC++/CLI greatly increases the likelihood of implementations in environments other than Windows. It’simportant to appreciate that although C++/CLI is an extension of ISO/ANSI C++, there are features ofISO/ANSI C++ that you must not use when you want your program to execute fully under the control ofthe CLR. You’ll learn what these are as you progress through the book.
The CLR offers substantial advantages over the native environment. By targeting your C++ programs atthe CLR, your programs will be more secure and not prone to the potential errors you can make whenusing the full power of ISO/ANSI C++. The CLR also removes the incompatibilities introduced by vari-ous high-level languages by standardizing the target environment to which they are compiled and thuspermits modules written in C++ to be combined with modules written in other languages such as C# orVisual Basic.
AttributesAttributes are an advanced feature of programming with C++/CLI that allow you to add descriptivedeclarations to your code. At the simplest level, you can use attributes to annotate particular program-ming elements in your program but there’s more to attributes than just additional descriptive data.Attributes can affect how your code behaves at run time by modifying the way the code is compiled or by causing extra code to be generated that supports additional capabilities. A range of standardattributes is available for C++/CLI and it is also possible to create your own.
A detailed discussion of attributes is beyond the scope of this book but I mention them here because youwill make use of attributes in one or two places in the book, particularly in Chapter 18 where you learnhow to write objects to a file.
Console ApplicationsAs well as developing Windows applications, Visual C++ 2008 also allows you to write, compile, andtest C++ programs that have none of the baggage required for Windows programs — that is, applica-tions that are essentially character-based, command-line programs. These programs are called consoleapplications in Visual C++ 2008 because you communicate with them through the keyboard and thescreen in character mode.
Writing console applications might seem as though you are being sidetracked from the main objective ofWindows programming, but when it comes to learning C++ (which you do need to do before embarkingon Windows-specific programming), it’s the best way to proceed. There’s a lot of code in even a simpleWindows program, and it’s very important not to be distracted by the complexities of Windows whenlearning the ins and outs of C++. Therefore, in the early chapters of the book where you are concernedwith how C++ works, you’ll spend time walking with a few lightweight console applications before youget to run with the heavyweight sacks of code in the world of Windows.
6
Chapter 1: Programming with Visual C++ 2008
25905c01.qxd:WroxPro 2/21/08 8:35 AM Page 6

While you’re learning C++, you’ll be able to concentrate on the language features without worrying aboutthe environment in which you’re operating. With the console applications that you’ll write, you have onlya text interface, but this will be quite sufficient for understanding all of C++ because there’s no graphicalcapability within the definition of the language. Naturally, I will provide extensive coverage of graphicaluser interface programming when you come to write programs specifically for Windows using MicrosoftFoundation Classes (MFC) in native C++ applications and Windows Forms with the CLR.
There are two distinct kinds of console applications and you’ll be using both. Win32 console applicationscompile to native code, and you’ll be using these to try out the capabilities of ISO/ANSI C++. CLR consoleapplications target the CLR so you’ll be using these when you are working with the features of C++/CLI.
Windows Programming ConceptsOur approach to Windows programming is to use all the tools that Visual C++ 2008 provides. The projectcreation facilities that are provided with Visual C++ 2008 can generate skeleton code for a wide variety ofnative C++ application programs automatically, including basic Windows programs. For Windows applica-tions that you develop for the CLR you get even more automatic code generation. You can create completeapplications using Windows Forms that only require a small amount of customizing code to be written byyou and sometimes no additional code at all. Creating a project is the starting point for all applications andcomponents that you develop with Visual C++ 2008, and to get a flavor of how this works, you’ll look atthe mechanics of creating some examples, including an outline Windows program, later in this chapter.
A Windows program, whether a native C++ program or a program written for the CLR, has a differentstructure from that of the typical console program you execute from the command line, and it’s morecomplicated. In a console program, you can get input from the keyboard and write output back to thecommand line directly, whereas a Windows program can access the input and output facilities of thecomputer only by way of functions supplied by the host environment; no direct access to the hardwareresources is permitted. Because several programs can be active at one time under Windows, Windowshas to determine which application a given raw input such as a mouse click or the pressing of a key onthe keyboard is destined for and signal the program concerned accordingly. Thus the Windows operat-ing system has primary control of all communications with the user.
Also, the nature of the interface between a user and a Windows application is such that a wide range ofdifferent inputs is usually possible at any given time. A user may select any of a number of menu options,click a toolbar button, or click the mouse somewhere in the application window. A well-designed Windowsapplication has to be prepared to deal with any of the possible types of input at any time because thereis no way of knowing in advance which type of input is going to occur. These user actions are receivedby the operating system in the first instance and are all regarded by Windows as events. An event thatoriginates with the user interface for your application will typically result in a particular piece of yourprogram code being executed. How program execution proceeds is therefore determined by the sequenceof user actions. Programs that operate in this way are referred to as event-driven programs and are differ-ent from traditional procedural programs that have a single order of execution. Input to a proceduralprogram is controlled by the program code and can occur only when the program permits it; therefore, aWindows program consists primarily of pieces of code that respond to events caused by the action of theuser, or by Windows itself. This sort of program structure is illustrated in Figure 1-2.
7
Chapter 1: Programming with Visual C++ 2008
25905c01.qxd:WroxPro 2/21/08 8:35 AM Page 7

Figure 1-2
Each square block in Figure 1-2 represents a piece of code written specifically to deal with a particularevent. The program may appear to be somewhat fragmented because of the number of disjointed blocksof code, but the primary factor welding the program into a whole is the Windows operating system itself.You can think of your program as customizing Windows to provide a particular set of capabilities.
Of course, the modules servicing various external events, such as selecting a menu or clicking the mouse,all typically have access to a common set of application-specific data in a particular program. This appli-cation data contains information that relates to what the program is about — for example, blocks of text inan editor or player scoring records in a program aimed at tracking how your baseball team is doing —as well as information about some of the events that have occurred during execution of the program.This shared collection of data allows various parts of the program that look independent to communi-cate and operate in a coordinated and integrated fashion. I will go into this in much more detail laterin the book.
KeyboardInput
Press LeftMouseButton
Press RightMouseButton
ProcessKeyboard
Input
ProcessLeft Mouse
Button
ProcessRight
MouseButton
WINDOWS
Program Data
Your Program
Events:
8
Chapter 1: Programming with Visual C++ 2008
25905c01.qxd:WroxPro 2/21/08 8:35 AM Page 8

Even an elementary Windows program involves several lines of code, and with Windows programs that aregenerated by the Application Wizards that come with Visual C++ 2008, “several” turns out to be “many.” Tosimplify process of understanding how C++ works, you need a context that is as uncomplicated as possible.Fortunately, Visual C++ 2008 comes with an environment that is ready-made for the purpose.
What Is the Integrated Development Environment?
The Integrated Development Environment (IDE) that comes with Visual C++ 2008 is a completely self-contained environment for creating, compiling, linking, and testing your C++ programs. It also happensto be a great environment in which to learn C++ (particularly when combined with a great book).
Visual C++ 2008 incorporates a range of fully integrated tools designed to make the whole process of writ-ing C++ programs easy. You will see something of these in this chapter, but rather than grind through aboring litany of features and options in the abstract, first take a look at the basics to get a view of how theIDE works and then pick up the rest in context as you go along.
Components of the SystemThe fundamental parts of Visual C++ 2008, provided as part of the IDE, are the editor, the compiler, thelinker, and the libraries. These are the basic tools that are essential to writing and executing a C++ pro-gram. Their functions are as follows.
The EditorThe editor provides an interactive environment for you to create and edit C++ source code. As well asthe usual facilities, such as cut and paste, which you are certainly already familiar with, the editor alsoprovides color cues to differentiate between various language elements. The editor automatically recog-nizes fundamental words in the C++ language and assigns a color to them according to what they are.This not only helps to make your code more readable but also provides a clear indicator of when youmake errors in keying such words.
The CompilerThe compiler converts your source code into object code, and detects and reports errors in the compilationprocess. The compiler can detect a wide range of errors that are due to invalid or unrecognized programcode, as well as structural errors, where, for example, part of a program can never be executed. The objectcode output from the compiler is stored in files called object files. There are two types of object code thatthe compiler produces. These object codes usually have names with the extension .obj.
The LinkerThe linker combines the various modules generated by the compiler from source code files, adds requiredcode modules from program libraries supplied as part of C++, and welds everything into an executablewhole. The linker can also detect and report errors — for example, if part of your program is missing or anon-existent library component is referenced.
9
Chapter 1: Programming with Visual C++ 2008
25905c01.qxd:WroxPro 2/21/08 8:35 AM Page 9
The LibrariesA library is simply a collection of pre-written routines that supports and extends the C++ languageby providing standard professionally produced code units that you can incorporate into your pro-grams to carry out common operations. The operations that are implemented by routines in the various libraries provided by Visual C++ 2008 greatly enhance productivity by saving you the effort of writing and testing the code for such operations yourself. I have already mentioned the .NETFramework library, and there are a number of others — too many to enumerate here — but I’ll mention the most important ones.
The Standard C++ Library defines a basic set of routines common to all ISO/ANSI C++ compilers. Itcontains a wide range of routines including numerical functions such as calculating square roots andevaluating trigonometrical functions, character and string processing routines such as classifying char-acters and comparing character strings, and many others. You’ll get to know quite a number of theseas you develop your knowledge of ISO/ANSI C++. There are also libraries that support the C++/CLIextensions to ISO/ANSI C++.
Native window-based applications are supported by a library called the Microsoft Foundation Classes(MFC). The MFC greatly reduces the effort needed to build the graphical user interface for an application.You’ll see a lot more of the MFC when you finish exploring the nuances of the C++ language. Anotherlibrary contains a set of facilities called Windows Forms that are roughly the equivalent of the MFC forwindow-based applications that are executed with the .NET Framework. You’ll be seeing how you makeuse of Windows Forms to develop applications, too.
Using the IDEAll program development and execution in this book is performed from within the IDE. When you startVisual C++ 2008, notice an application window similar to that shown in Figure 1-3.
Figure 1-3 shows the Visual Studio 2008 windows using the Classic theme. If you are not using the Windows Classic theme, your window will look different, especially if you have Windows Vistainstalled. All the screen images in the book use the Windows Classic theme for commonality betweenVista and XP, and if you want to make the windows display the same on your machine, follow theinstructions in the “Using the Windows Classic Theme” section in the Introduction.
The window to the left in Figure 1-3 is the Solution Explorer window, the top-right window presentlyshowing the Start page is the Editor window, and the tab visible in the window at the bottom is theCode Definition window. The Solution Explorer window enables you to navigate through your pro-gram files and display their contents in the Editor window and to add new files to your program. TheSolution Explorer window has an additional tab (only three are shown in Figure 1-3) that displays theResource View for your application, and you can select which tabs are to be displayed from the Viewmenu. The Editor window is where you enter and modify source code and other components of yourapplication. The Code Definition window displays the definition of a symbol selected in the Editor win-dow. There are two tabs displayed alongside the Code Definition tab, the Call Browser window thatenables you to search your code for function calls, and the Output window that displays messages thatresult from compiling and linking your program.
10
Chapter 1: Programming with Visual C++ 2008
25905c01.qxd:WroxPro 2/21/08 8:35 AM Page 10
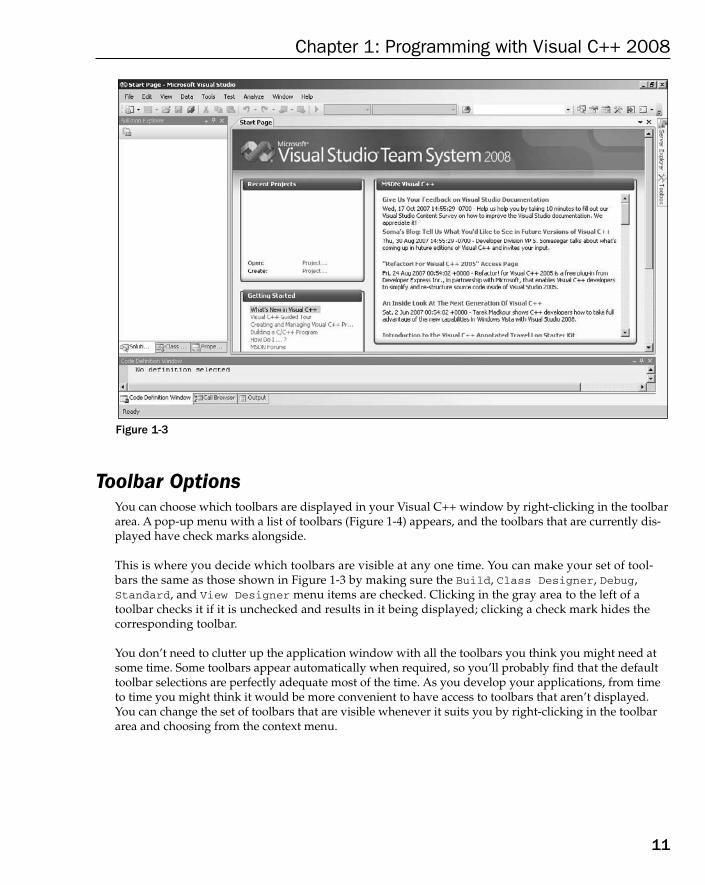
Figure 1-3
Toolbar OptionsYou can choose which toolbars are displayed in your Visual C++ window by right-clicking in the toolbararea. A pop-up menu with a list of toolbars (Figure 1-4) appears, and the toolbars that are currently dis-played have check marks alongside.
This is where you decide which toolbars are visible at any one time. You can make your set of tool-bars the same as those shown in Figure 1-3 by making sure the Build, Class Designer, Debug,Standard, and View Designer menu items are checked. Clicking in the gray area to the left of a toolbar checks it if it is unchecked and results in it being displayed; clicking a check mark hides thecorresponding toolbar.
You don’t need to clutter up the application window with all the toolbars you think you might need atsome time. Some toolbars appear automatically when required, so you’ll probably find that the defaulttoolbar selections are perfectly adequate most of the time. As you develop your applications, from timeto time you might think it would be more convenient to have access to toolbars that aren’t displayed.You can change the set of toolbars that are visible whenever it suits you by right-clicking in the toolbararea and choosing from the context menu.
11
Chapter 1: Programming with Visual C++ 2008
25905c01.qxd:WroxPro 2/21/08 8:35 AM Page 11

Figure 1-4
Similar to many other Windows applications, the toolbars that make up Visual C++ 2008 come complete with tooltips. Just let the mouse pointer linger over a toolbar button for a second or two and a white label displays the function of that button.
Dockable ToolbarsA dockable toolbar is one that you can drag around with the mouse to position at a convenient place in the window. When it is placed in any of the four borders of the application, it is said to be docked andlooks similar to the toolbars you see at the top of the application window. The toolbar on the upper lineof toolbar buttons that contains the disk icons and the text box to the right of a pair of binoculars is theStandard toolbar. You can drag this away from the toolbar by placing the cursor on it and dragging itwith the mouse while you hold down the left mouse button. It then appears as a separate window youcan position anywhere.
If you drag any dockable toolbar away from its docked position, it looks like the Standard toolbar you seein Figure 1-5, enclosed in a little window — with a different caption. In this state, it is called a floating tool-bar. All the toolbars that you see in Figure 1-3 are dockable and can be floating, so you can experiment withdragging any of them around. You can position them in docked positions where they revert to their normaltoolbar appearance. You can dock a dockable toolbar at any side of the main window.
12
Chapter 1: Programming with Visual C++ 2008
25905c01.qxd:WroxPro 2/21/08 8:35 AM Page 12

Figure 1-5
You’ll become familiar with many of the toolbar icons that Visual C++ 2008 uses from other Windowsapplications, but you may not appreciate exactly what these icons do in the context of Visual C++, so I’lldescribe them as we use them.
Because you’ll use a new project for every program you develop, looking at what exactly a project is andunderstanding how the mechanism for defining a project works is a good place to start finding out aboutVisual C++ 2008.
DocumentationThere will be plenty of occasions when you’ll want to find out more information about Visual C++ 2008.The Microsoft Development Network (MSDN) Library provides comprehensive reference material onall the capabilities on Visual C++ 2008 and more besides. When you install Visual C++ 2008 onto yourmachine, there is an option to install part or all of the MSDN documentation. If you have the disk spaceavailable I strongly recommend that you install the MSDN Library.
Press the F1 function to browse the MSDN Library. The Help menu also provides various routes into thedocumentation. As well as offering reference documentation, the MSDN Library is a useful tool whendealing with errors in your code, as you’ll see later in this chapter.
Projects and SolutionsA project is a container for all the things that make up a program of some kind — it might be a consoleprogram, a window-based program, or some other kind of program — and it usually consists of one ormore source files containing your code plus possibly other files containing auxiliary data. All the filesfor a project are stored in the project folder and detailed information about the project is stored in anXML file with the extension .vcproj that is also in the project folder. The project folder also containsother folders that are used to store the output from compiling and linking your project.
The idea of a solution is expressed by its name, in that it is a mechanism for bringing together all the pro-grams and other resources that represent a solution to a particular data processing problem. For example, a distributed order entry system for a business operation might be composed of several different programsthat could each be developed as a project within a single solution; therefore, a solution is a folder in whichall the information relating to one or more projects is stored, so one or more project folders are subfoldersof the solution folder. Information about the projects in a solution is stored in two files with the extensions.sln and .suo. When you create a project, a new solution is created automatically unless you elect to addthe project to an existing solution.
When you create a project along with a solution, you can add further projects to the same solution. Youcan add any kind of project to an existing solution, but you would usually add only a project that wasrelated in some way to the existing project or projects in the solution. Generally, unless you have a good
13
Chapter 1: Programming with Visual C++ 2008
25905c01.qxd:WroxPro 2/21/08 8:35 AM Page 13

reason to do otherwise, each of your projects should have its own solution. Each example you create withthis book will be a single project within its own solution.
Defining a ProjectThe first step in writing a Visual C++ 2008 program is to create a project for it using the File > New >Project menu option from the main menu or you can press Ctrl+Shift+N; you can also simply clickProject... adjacent to Create: in the Recent Projects pane. As well as containing files that define all thecode and any other data that goes to make up your program, the project XML file in the project folderalso records the Visual C++ 2008 options you’re using. Although you don’t need to concern yourselfwith the project file — it is entirely maintained by the IDE — you can browse it if you want to see whatthe contents are, but take care not to modify it accidentally.
That’s enough introductory stuff for the moment. It’s time to get your hands dirty.
Try It Out Creating a Project for a Win32 Console ApplicationYou’ll now take a look at creating a project for a console application. First select File > New > Projector use one of the other possibilities mentioned earlier to bring up the New Project dialog box, shown inFigure 1-6.
Figure 1-6
The left pane in the New Project dialog box displays the types of projects you can create; in this case,click Win32. This also identifies an Application Wizard that creates the initial contents for the project.The right pane displays a list of templates available for the project type you have selected in the leftpane. The template you select is used by the Application Wizard when creating the files that make up the project. In the next dialog box, you have an opportunity to customize the files that are created
14
Chapter 1: Programming with Visual C++ 2008
25905c01.qxd:WroxPro 2/21/08 8:35 AM Page 14

when you click the OK button in this dialog box. For most of the type/template options, a basic set ofprogram source modules are created automatically.
You can now enter a suitable name for your project by typing into the Name: edit box — for example, youcould call this one Ex1_01, or you can choose your own project name. Visual C++ 2008 supports long filenames, so you have a lot of flexibility. The name of the solution folder appears in the bottom edit box and,by default, the solution folder has the same name as the project. You can change this if you want. The dia-log box also allows you to modify the location for the solution that contains your project — this appears inthe Location: edit box. If you simply enter a name for your project, the solution folder is automaticallyset to a folder with that name, with the path shown in the Location: edit box. By default the solutionfolder is created for you if it doesn’t already exist. If you want to specify a different path for the solutionfolder, just enter it in the Location: edit box. Alternatively, you can use the Browse button to selectanother path for your solution. Clicking the OK button displays the Win32 Application Wizard dialogbox shown in Figure 1-7.
Figure 1-7
This dialog box explains the settings currently in effect. If you click the Finish button, the wizard cre-ates all the project files based on this. In this case you can click Application Settings on the left todisplay the Application Settings page of the wizard shown in Figure 1-8.
The Application Settings page allows you to choose options that you want to apply to the project.For most of the projects you’ll be creating when you are learning the C++ language, you select the Emptyproject checkbox, but here you can leave things as they are and click the Finish button. The ApplicationWizard then creates the project with all the default files.
15
Chapter 1: Programming with Visual C++ 2008
25905c01.qxd:WroxPro 2/21/08 8:35 AM Page 15
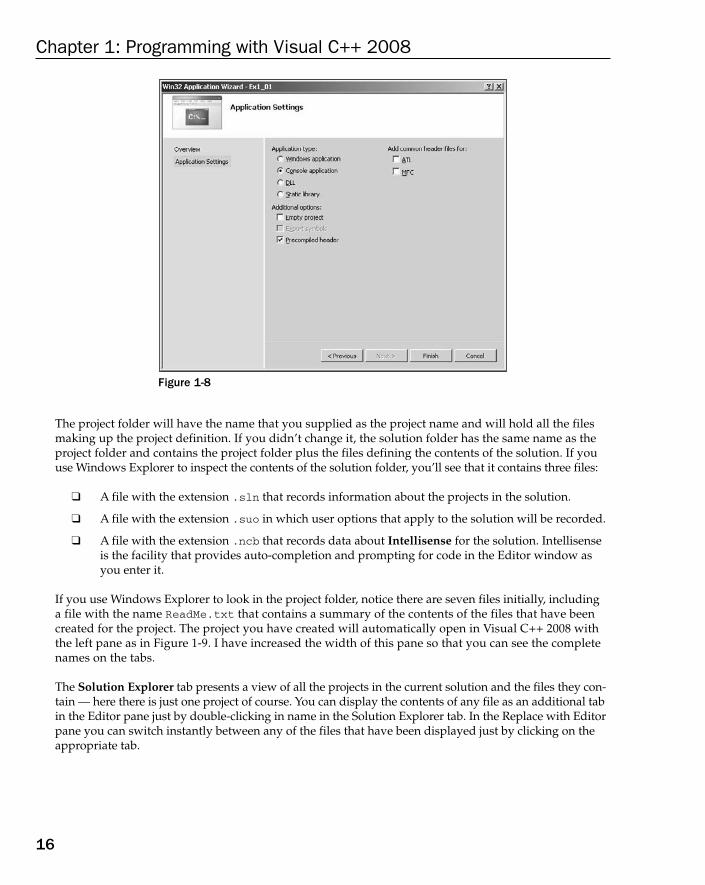
Figure 1-8
The project folder will have the name that you supplied as the project name and will hold all the filesmaking up the project definition. If you didn’t change it, the solution folder has the same name as theproject folder and contains the project folder plus the files defining the contents of the solution. If youuse Windows Explorer to inspect the contents of the solution folder, you’ll see that it contains three files:
❑ A file with the extension .sln that records information about the projects in the solution.
❑ A file with the extension .suo in which user options that apply to the solution will be recorded.
❑ A file with the extension .ncb that records data about Intellisense for the solution. Intellisenseis the facility that provides auto-completion and prompting for code in the Editor window asyou enter it.
If you use Windows Explorer to look in the project folder, notice there are seven files initially, including a file with the name ReadMe.txt that contains a summary of the contents of the files that have beencreated for the project. The project you have created will automatically open in Visual C++ 2008 withthe left pane as in Figure 1-9. I have increased the width of this pane so that you can see the completenames on the tabs.
The Solution Explorer tab presents a view of all the projects in the current solution and the files they con-tain — here there is just one project of course. You can display the contents of any file as an additional tabin the Editor pane just by double-clicking in name in the Solution Explorer tab. In the Replace with Editorpane you can switch instantly between any of the files that have been displayed just by clicking on theappropriate tab.
16
Chapter 1: Programming with Visual C++ 2008
25905c01.qxd:WroxPro 2/21/08 8:36 AM Page 16

Figure 1-9
The Class View tab displays the classes defined in your project and also shows the contents of each class.You don’t have any classes in this application, so the view is empty. When we discuss classes, you will seethat you can use the Class View tab to move around the code relating to the definition and implementa-tion of all your application classes quickly and easily.
The Property Manager tab shows the properties that have been set for the Debug and Release versionsof your project. I’ll explain these versions a little later in this chapter. You can change any of the prop-erties shown by right-clicking a property and selecting Properties from the context menu; this displaysa dialog box where you can set the project property. You can also press Alt+F7 to display the proper-ties dialog box at any time; I’ll also discuss this in more detail when we go into the Debug and Releaseversions of a program.
The Resource View shows the dialog boxes, icons, menus toolbars, and other resources that are used bythe program. Because this is a console program, no resources are used; however, when you start writingWindows applications, you’ll see a lot of things here. Through this tab you can edit or add to the resourcesavailable to the project.
Like most elements of the Visual C++ 2008 IDE, the Solution Explorer and other tabs provide context-sensitive pop-up menus when you right-click items displayed in the tab and in some cases in the emptyspace in the tab, too. If you find that the Solution Explorer pane gets in your way when writing code,you can hide it by clicking the Autohide icon. To redisplay it, click the name tab on the left of the IDEwindow.
Modifying the Source CodeThe Application Wizard generates a complete Win32 console program that you can compile and execute.Unfortunately, the program doesn’t do anything as it stands, so to make it a little more interesting youneed to change it. If it is not already visible in the Editor pane, double-click Ex1_01.cpp in the Solution
17
Chapter 1: Programming with Visual C++ 2008
25905c01.qxd:WroxPro 2/21/08 8:36 AM Page 17

Explorer pane. This file is the main source file for the program that the Application Wizard generatedand it looks like that shown in Figure 1-10.
Figure 1-10
If the line numbers are not displayed on your system, select Tools > Options from the main menu todisplay the Options dialog box. If you extend the C/C++ option in the TextEditor subtree in the rightpane and select General from the extended tree, you can select Line Numbers in the right pane of thedialog box. I’ll first give you a rough guide to what this code in Figure 1-10 does, and you’ll see moreon all of these later.
The first two lines are just comments. Anything following “//” in a line is ignored by the compiler. Whenyou want to add descriptive comments in a line, precede your text by “//”.
Line 4 is an #include directive that adds the contents of the file stdafx.h to this file in place of this#include directive. This is the standard way of adding the contents of .h source files to a .cpp sourcefile a in a C++ program.
Line 7 is the first line of the executable code in this file and the beginning of the function _tmain(). Afunction is simply a named unit of executable code in a C++ program; every C++ program consists of atleast one — and usually many more — functions.
Lines 8 and 10 contain left and right braces, respectively, that enclose all the executable code in the function_tmain(). The executable code is, therefore, just the single line 10 and all this does is end the program.
Now you can add the following two lines of code in the Editor window:
// Ex1_01.cpp : Defines the entry point for the console application.//
#include “stdafx.h”#include <iostream>
18
Chapter 1: Programming with Visual C++ 2008
25905c01.qxd:WroxPro 2/21/08 8:36 AM Page 18

int _tmain(int argc, _TCHAR* argv[]){std::cout << “Hello world!\n”;return 0;
}
The unshaded lines are the ones generated for you. The new lines you should add are shown shaded. Tointroduce each new line, place the cursor at the end on the text on the preceding line and press Enter tocreate an empty line in which you can type the new code. Make sure it is exactly as shown in the preced-ing example; otherwise, the program may not compile.
The first new line is an #include directive that adds the contents of one of the standard libraries forISO/ANSI C++ to the source file. The <iostream> library defines facilities for basic I/O operations, andthe one you are using in the second line that you added writes output to the command line. std::coutis the name of the standard output stream and you write the string “Hello world!\n” to std::cout inthe second addition statement. Whatever appears between the pair of double quote characters is writtento the command line.
Building the SolutionTo build the solution, press F7 or select the Build > Build Solution menu item. Alternatively, youcan click the toolbar button corresponding to this menu item. The toolbar buttons for the Build menumay not display, but you can easily fix this by right-clicking in the toolbar area and selecting the Buildtoolbar from those in the list. The program should then compile successfully. If there are errors, ensurethat you didn’t make an error while entering the new code, so check the two new lines very carefully.
Files Created by Building a Console ApplicationAfter the example has been built without error, take a look in the project folder by using Windows Explorerto see a new subfolder to the solution folder Ex1_01 called Debug. This folder contains the output of thebuild you just performed on the project. Notice that this folder contains three files.
Other than the .exe file, which is your program in executable form, you don’t need to know much aboutwhat’s in these files. In case you’re curious, however, the .ilk file is used by the linker when you rebuildyour project. It enables the linker to incrementally link the object files produced from the modified sourcecode into the existing .exe file. This avoids the need to re-link everything each time you change yourprogram, and the .pdb file contains debugging information that is used when you execute the programin debug mode. In this mode, you can dynamically inspect information that is generated during programexecution.
There’s a Debug subdirectory to the Ex1_01 project file, too. This contains ten more files that were createdduring the build process and you can see what kind of information they contain from the Type descriptionin Windows Explorer.
19
Chapter 1: Programming with Visual C++ 2008
25905c01.qxd:WroxPro 2/21/08 8:36 AM Page 19

Debug and Release Versions of Your ProgramYou can set a range of options for a project through the Project > Ex1_01 Properties menu item.These options determine how your source code is processed during the compile and link stages. The set of options that produces a particular executable version of your program is called a configuration. Whenyou create a new project workspace, Visual C++ 2008 automatically creates configurations for producingtwo versions of your application. One version, called the Debug version, includes information that helpsyou debug the program. With the Debug version of your program you can step through the code whenthings go wrong, checking on the data values in the program. The other, called the Release version, hasno debug information included and has the code optimization options for the compiler turned on toprovide you with the most efficient executable module. These two configurations are sufficient for yourneeds throughout this book, but when you need to add other configurations for an application, you cando so through the Build > Configuration Manager menu. Note that this menu item won’t appear ifyou haven’t got a project loaded. This is obviously not a problem, but might be confusing if you’re justbrowsing through the menus to see what’s there.
You can choose which configuration of your program to work with by selecting the configuration fromthe Active solution configuration drop-down list in the Configuration Manager dialog box, as shown in Figure 1-11.
Figure 1-11
Select the configuration you want to work with from the list and then click the Close button. Whileyou’re developing an application, you’ll work with the debug configuration. After your application hasbeen tested using the debug configuration and appears to be working correctly, you typically rebuildthe program as a release version; this produces optimized code without the debug and trace capability,so the program runs faster and occupies less memory.
Executing the ProgramAfter you have successfully compiled the solution, you can execute your program by pressing Ctrl+F5.You should see the window shown in Figure 1-12.
20
Chapter 1: Programming with Visual C++ 2008
25905c01.qxd:WroxPro 2/21/08 8:36 AM Page 20

Figure 1-12
As you see, you get the text that was between the double quotes written to the command line. The “\n”that appeared at the end of the text string is a special sequence called an escape sequence that denotes a newline character. Escape sequences are used to represent characters in a text string that you cannotenter directly from the keyboard.
Try It Out Creating an Empty Console ProjectThe previous project contained a certain amount of excess baggage that you don’t need when workingwith simple C++ language examples. The precompiled headers option chosen by default resulted in thestdafx.h file being created in the project. This is a mechanism for making the compilation process moreefficient when there are a lot of files in a program but this won’t be necessary for many of our examples.In these instances you start with an empty project to which you can add your own source files. You cansee how this works by creating a new project in a new solution for a Win32 console program with thename Ex1_02. After you have entered the project name and clicked the OK button, click ApplicationsSettings on the right side of the dialog box that follows. You can then select Empty project from theadditional options, as Figure 1-13 shows.
Figure 1-13
21
Chapter 1: Programming with Visual C++ 2008
25905c01.qxd:WroxPro 2/21/08 8:36 AM Page 21
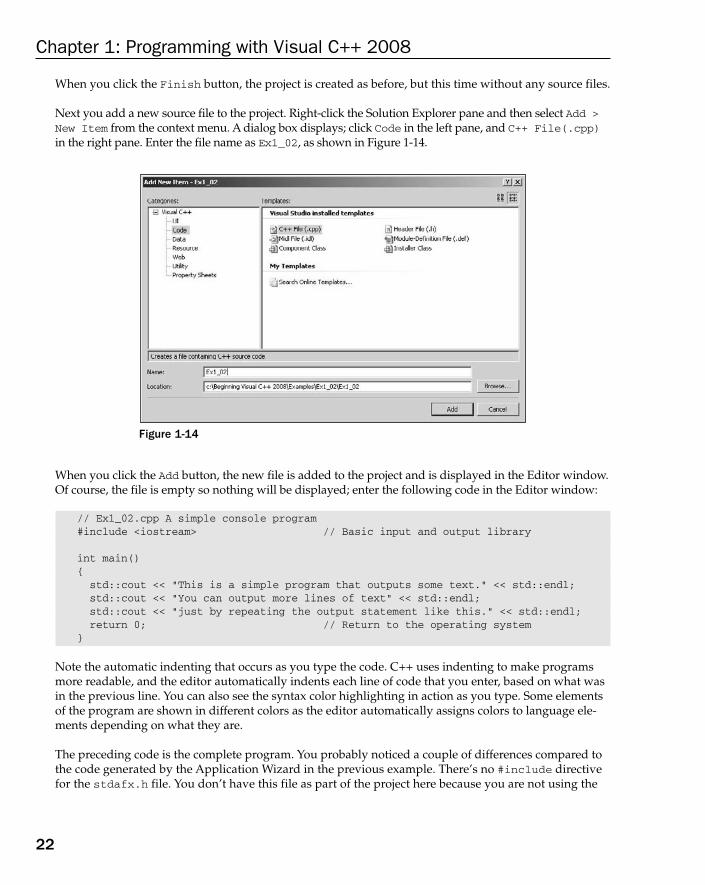
When you click the Finish button, the project is created as before, but this time without any source files.
Next you add a new source file to the project. Right-click the Solution Explorer pane and then select Add >New Item from the context menu. A dialog box displays; click Code in the left pane, and C++ File(.cpp)in the right pane. Enter the file name as Ex1_02, as shown in Figure 1-14.
Figure 1-14
When you click the Add button, the new file is added to the project and is displayed in the Editor window.Of course, the file is empty so nothing will be displayed; enter the following code in the Editor window:
// Ex1_02.cpp A simple console program#include <iostream> // Basic input and output library
int main(){std::cout << “This is a simple program that outputs some text.” << std::endl;std::cout << “You can output more lines of text” << std::endl;std::cout << “just by repeating the output statement like this.” << std::endl;return 0; // Return to the operating system
}
Note the automatic indenting that occurs as you type the code. C++ uses indenting to make programsmore readable, and the editor automatically indents each line of code that you enter, based on what wasin the previous line. You can also see the syntax color highlighting in action as you type. Some elementsof the program are shown in different colors as the editor automatically assigns colors to language ele-ments depending on what they are.
The preceding code is the complete program. You probably noticed a couple of differences compared tothe code generated by the Application Wizard in the previous example. There’s no #include directivefor the stdafx.h file. You don’t have this file as part of the project here because you are not using the
22
Chapter 1: Programming with Visual C++ 2008
25905c01.qxd:WroxPro 2/21/08 8:36 AM Page 22

precompiled headers facility. The name of the function here is main; before it was _tmain. In fact allISO/ANSI C++ programs start execution in a function called main(). Microsoft also provides for thisfunction to be called wmain when Unicode characters are used and the name _tmain is defined to beeither main or wmain, depending on whether or not the program is going to use Unicode characters. Forthe previous example, the name _tmain is defined behind the scenes to be main. You use the name mainin all the ISO/ANSI C++ examples.
The output statements are a little different. The first statement in main() is:
std::cout << “This is a simple program that outputs some text.” << std::endl;
You have two occurrences of the << operator, and each one sends whatever follows to std::cout,which is the standard output stream. First the string between double quotes is sent to the stream andthen std::endl where std::endl is defined in the standard library as a newline character. Earlier youused the escape sequence \n for a newline character within a string between double quotes. You couldhave written the preceding statement as:
std::cout << “This is a simple program that outputs some text.\n”;
I should explain why the line is shaded, where the previous line of code is not. Where I repeat a line of codefor explanation purposes I show it unshaded. The preceding line of code is new and does not appear earlierso I have shown it shaded.
You can now build this project in the same way as the previous example. Note that any open source filesin the Editor pane are saved automatically if you have not already saved them. When you have compiledthe program successfully, press Ctrl+F5 to execute it. The window shown in Figure 1-15 displays.
Figure 1-15
Dealing with ErrorsOf course, if you didn’t type the program correctly, you get errors reported. To show how this works,you could deliberately introduce an error into the program. If you already have errors of your own, youcan use those to perform this exercise. Go back to the Editor pane and delete the semicolon at the end ofthe second-to-last line between the braces (line 8); then rebuild the source file. The Output pane at thebottom of the application window includes the error message:
C2143: syntax error : missing ‘;’ before ‘return’
Every error message during compilation has an error number that you can look up in the documentation.Here, the problem is obvious; however, in more obscure cases, the documentation may help you figureout what is causing the error. To get the documentation on an error, click the line in the Output pane that
23
Chapter 1: Programming with Visual C++ 2008
25905c01.qxd:WroxPro 2/21/08 8:36 AM Page 23

contains the error number and then press F1. A new window displays containing further informationabout the error. You can try it with this simple error, if you like.
When you have corrected the error, you can then rebuild the project. The build operation works efficientlybecause the project definition keeps track of the status of the files making up the project. During a normalbuild, Visual C++ 2008 recompiles only the files that have changed since the program was last compiledor built. This means that if your project has several source files and you’ve edited only one of the filessince the project was last built, only that file is recompiled before linking to create a new .exe file.
You’ll also use CLR console programs, so the next section shows you what a CLR console project looks like.
Try It Out Creating a CLR Console ProjectPress Ctrl+Shift+N to display the New Project dialog box; then select the project type as CLR and thetemplate as CLR Console Application, as shown in Figure 1-16.
Figure 1-16
Enter the name as Ex1_03. When you click the OK button, the files for the project are created. There areno options for a CLR console project, so you always start with the same set of files in a project with thistemplate. If you want an empty project — something you won’t need with this book — there’s a separatetemplate for this.
If you look at the Solution Explorer pane shown in Figure 1-17, you see there are some extra filescompared to a Win32 console project.
There are a couple of files in the virtual Resource Files folder. The .ico file stores an icon for the applicationthat is displayed when the program is minimized; the .rc file records the resources for the application —just the icon in this case.
24
Chapter 1: Programming with Visual C++ 2008
25905c01.qxd:WroxPro 2/21/08 8:36 AM Page 24

Figure 1-17
There is also a file with the name AssemblyInfo.cpp. Every CLR program consists of one or moreassemblies where an assembly is a collection of code and resources that form a functional unit. Anassembly also contains extensive data for the CLR; there are specifications of the data types that arebeing used, versioning information about the code, and information that determines if the contents ofthe assembly can be accessed from another assembly. In short, an assembly is a fundamental buildingblock in all CLR programs.
If the source code in the Ex1_03.cpp file is not displayed in the Editor window, double-click the filename in the Solution Explorer pane. It should look like Figure 1-18.
Figure 1-18
It has the same #include directive as the default native C++ console program because CLR programsuse precompiled headers for efficiency. The next line is new:
using namespace System;
The .NET library facilities are all defined within a namespace, and all the standard sort of stuff you arelikely to use is in a namespace with the name System. This statement indicates the program code thatfollows uses the System namespace, but what exactly is a namespace?
25
Chapter 1: Programming with Visual C++ 2008
25905c01.qxd:WroxPro 2/21/08 8:36 AM Page 25
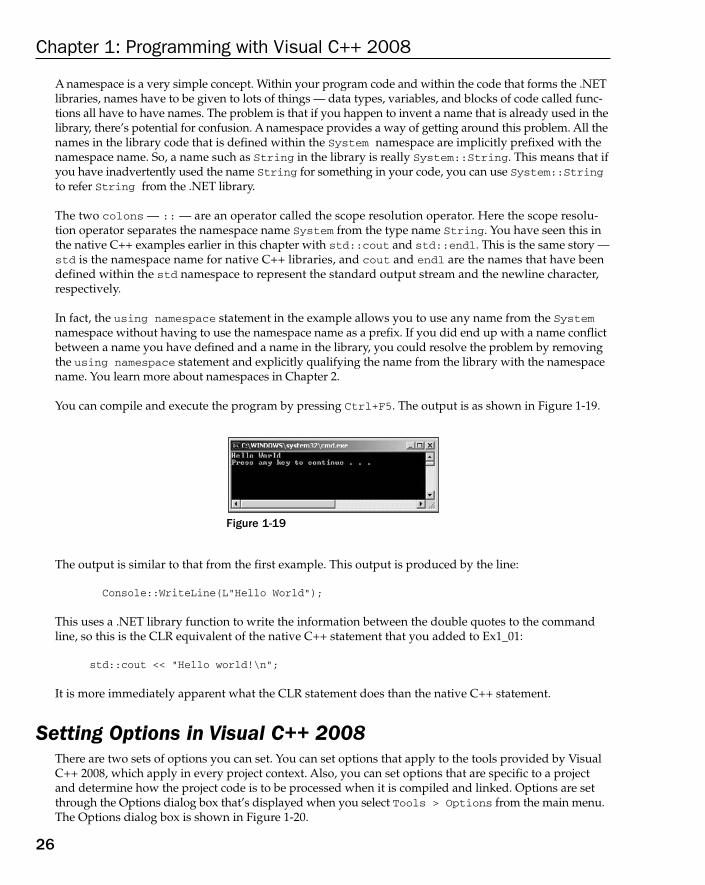
A namespace is a very simple concept. Within your program code and within the code that forms the .NETlibraries, names have to be given to lots of things — data types, variables, and blocks of code called func-tions all have to have names. The problem is that if you happen to invent a name that is already used in thelibrary, there’s potential for confusion. A namespace provides a way of getting around this problem. All thenames in the library code that is defined within the System namespace are implicitly prefixed with thenamespace name. So, a name such as String in the library is really System::String. This means that ifyou have inadvertently used the name String for something in your code, you can use System::Stringto refer String from the .NET library.
The two colons — :: — are an operator called the scope resolution operator. Here the scope resolu-tion operator separates the namespace name System from the type name String. You have seen this inthe native C++ examples earlier in this chapter with std::cout and std::endl. This is the same story —std is the namespace name for native C++ libraries, and cout and endl are the names that have beendefined within the std namespace to represent the standard output stream and the newline character,respectively.
In fact, the using namespace statement in the example allows you to use any name from the Systemnamespace without having to use the namespace name as a prefix. If you did end up with a name conflictbetween a name you have defined and a name in the library, you could resolve the problem by removingthe using namespace statement and explicitly qualifying the name from the library with the namespacename. You learn more about namespaces in Chapter 2.
You can compile and execute the program by pressing Ctrl+F5. The output is as shown in Figure 1-19.
Figure 1-19
The output is similar to that from the first example. This output is produced by the line:
Console::WriteLine(L”Hello World”);
This uses a .NET library function to write the information between the double quotes to the commandline, so this is the CLR equivalent of the native C++ statement that you added to Ex1_01:
std::cout << “Hello world!\n”;
It is more immediately apparent what the CLR statement does than the native C++ statement.
Setting Options in Visual C++ 2008There are two sets of options you can set. You can set options that apply to the tools provided by VisualC++ 2008, which apply in every project context. Also, you can set options that are specific to a projectand determine how the project code is to be processed when it is compiled and linked. Options are setthrough the Options dialog box that’s displayed when you select Tools > Options from the main menu.The Options dialog box is shown in Figure 1-20.
26
Chapter 1: Programming with Visual C++ 2008
25905c01.qxd:WroxPro 2/21/08 8:36 AM Page 26

Clicking the plus sign (+) for any of the items in the left pane displays a list of subtopics. Figure 1-20 showsthe options for the General subtopic under Projects and Solutions. The right pane displays theoptions you can set for the topic you have selected in the left pane. You should concern yourself with only afew of these at this time, but you’ll find it useful to spend a little time browsing the range of options avail-able to you. Clicking the Help button (with the ?) at the top right of the dialog box displays an explanationof the current options.
You probably want to choose a path to use as a default when you create a new project, and you can dothis through the first option shown in Figure 1-20. Just set the path to the location where you want yourprojects and solutions stored.
You can set options that apply to every C++ project by selecting the Projects and Solutions > VC++Project Settings topic in the left pane. You can also set options specific to the current project throughthe Project > Properties menu item in the main menu. This menu item label is tailored to reflect thename of the current project.
Figure 1-20
Creating and Executing Windows ApplicationsJust to show how easy it’s going to be, you can now create two working Windows applications. You’ll create a native C++ application using MFC and then you’ll create a Windows Forms application that runswith the CLR. I’ll defer discussion of the programs that you generate until I’ve covered the necessaryground for you to understand it in detail. You will see, though, that the processes are straightforward.
Creating an MFC ApplicationTo start with, if an existing project is active — as indicated by the project name appearing in the title bar ofthe Visual C++ 2008 main window — you can select Close Solution from the File menu. Alternatively,you can create a new project and have the current solution closed automatically.
To create the Windows program select New > Project from the File menu or press Ctrl+Shift+N;then choose the project type as MFC and select MFC Application as the project template. You can thenenter the project name as Ex1_04, as shown in Figure 1-21.
27
Chapter 1: Programming with Visual C++ 2008
25905c01.qxd:WroxPro 2/21/08 8:36 AM Page 27
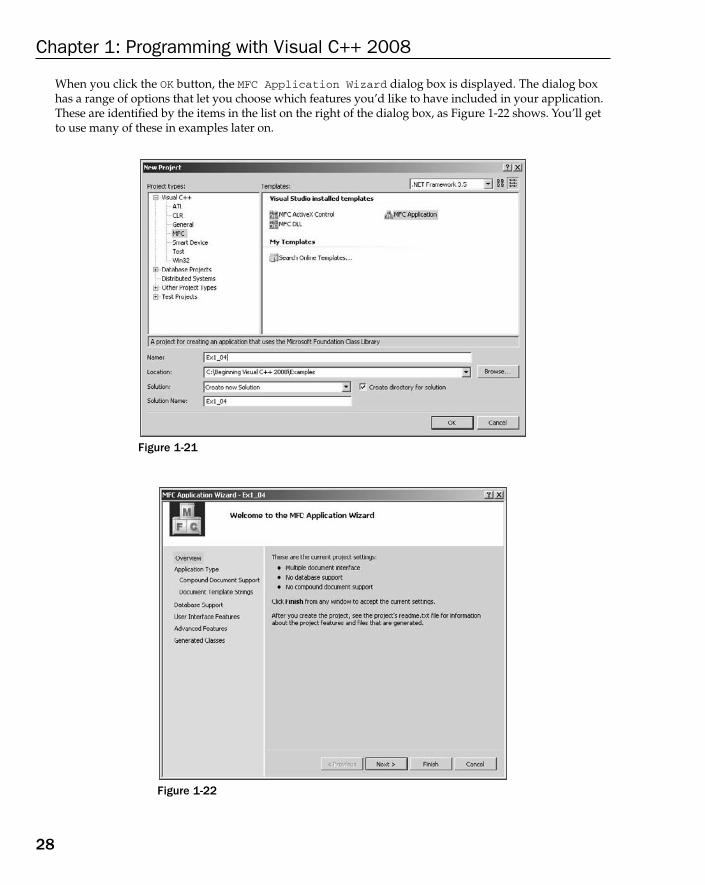
When you click the OK button, the MFC Application Wizard dialog box is displayed. The dialog boxhas a range of options that let you choose which features you’d like to have included in your application.These are identified by the items in the list on the right of the dialog box, as Figure 1-22 shows. You’ll getto use many of these in examples later on.
Figure 1-21
Figure 1-22
28
Chapter 1: Programming with Visual C++ 2008
25905c01.qxd:WroxPro 2/21/08 8:36 AM Page 28

You can ignore all these options in this instance and just accept the default settings, so click the Finishbutton to create the project with the default settings. The Solution Explorer pane in the IDE window lookslike Figure 1-23.
Figure 1-23
Note that I have hidden the Property Manager tab by right-clicking it and selecting Hide, so it doesn’tappear in Figure 1-23. The list shows a large number of files that have been created. You need plentyof space on your hard drive when writing Windows programs! The files with the extension .cpp con-tain executable C++ source code, and the .h files contain C++ code consisting of definitions that areused by the executable code. The .ico files contain icons. The files are grouped into the subfoldersyou can see for ease of access. These aren’t real folders, though, and they won’t appear in the projectfolder on your disk.
If you now take a look at the Ex1_04 solution folder using Windows Explorer or whatever else you mayhave handy for looking at the files on your hard disk, notice that you have generated a total of 26 files.Three of these are in the solution folder, a further 19 are in the project folder and four more are in a sub-folder, res, to the project folder. The files in the res subfolder contain the resources used by the pro-gram — such as the menus and icons used in the program. You get all this as a result of just entering the name you want to assign to the project. You can see why, with so many files and file names beingcreated automatically, a separate directory for each project becomes more than just a good idea.
One of the files in the Ex1_04 project directory is ReadMe.txt, and this provides an explanation of thepurpose of each of the files that the MFC Application Wizard has generated. You can take a look at it ifyou want, using Notepad, WordPad, or even the Visual C++ 2008 editor. To view it in the Editor window,double-click it in the Solution Explorer pane.
29
Chapter 1: Programming with Visual C++ 2008
25905c01.qxd:WroxPro 2/21/08 8:36 AM Page 29

Building and Executing the MFC ApplicationBefore you can execute the program, you have to build the project — meaning, compile the source codeand link the program modules. You do this in exactly the same way that you did with the console applica-tion example. To save time, press Ctrl+F5 to get the project built and then executed in a single operation.
After the project has been built, the Output window indicates that there are no errors and the executablestarts running. The window for the program you’ve generated is shown in Figure 1-24.
Figure 1-24
As you see, the window is complete with menus and a toolbar. Although there is no specific functionalityin the program — that’s what you need to add to make it your program — all the menus work. You can trythem out. You can even create further windows by selecting New from the File menu.
I think you’ll agree that creating a Windows program with the MFC Application Wizard hasn’t stressedtoo many brain cells. You’ll need to get a few more ticking away when you come to developing the basicprogram you have here into a program that does something more interesting, but it won’t be that hard.Certainly, for many people, writing a serious Windows program the old-fashioned way, without the aidof Visual C++ 2008, required at least a couple of months on a fish diet before making the attempt. That’swhy so many programmers used to eat sushi. That’s all gone now with Visual C++ 2008. You never know,however, what’s around the corner in programming technology. If you like sushi, it’s best to continue withit to be on the safe side.
Creating a Windows Forms ApplicationThis is a job for another Application Wizard. So create yet another new project, but this time select the typeas CLR in the left pane of the New Project dialog box and the template as Windows Forms Application.You can then enter the project name as Ex1_05, as shown in Figure 1-25.
There are no options to choose from in this case, so click the OK button to create the project.
The Solution Explorer pane in Figure 1-26 shows the files that have been generated for this project.
30
Chapter 1: Programming with Visual C++ 2008
25905c01.qxd:WroxPro 2/21/08 8:36 AM Page 30
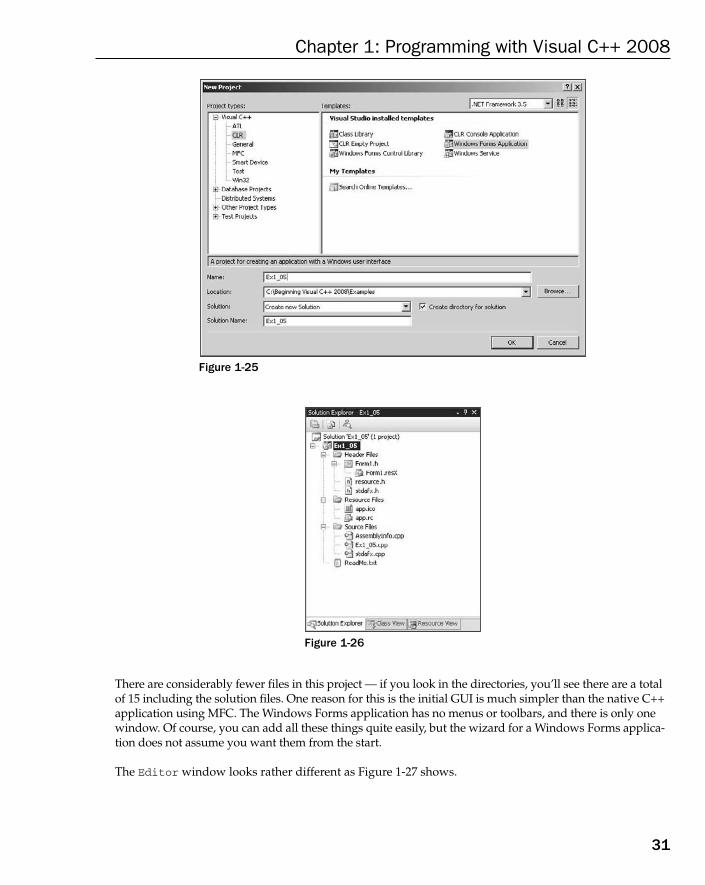
Figure 1-25
Figure 1-26
There are considerably fewer files in this project — if you look in the directories, you’ll see there are a totalof 15 including the solution files. One reason for this is the initial GUI is much simpler than the native C++application using MFC. The Windows Forms application has no menus or toolbars, and there is only onewindow. Of course, you can add all these things quite easily, but the wizard for a Windows Forms applica-tion does not assume you want them from the start.
The Editor window looks rather different as Figure 1-27 shows.
31
Chapter 1: Programming with Visual C++ 2008
25905c01.qxd:WroxPro 2/21/08 9:36 AM Page 31

Figure 1-27
The Editor window shows an image of the application window rather than code. The reason for this isthat developing the GUI for a Windows Forms is oriented towards a graphical design approach ratherthan a coding approach. You add GUI components to the application window by dragging or placingthem there graphically, and Visual C++ 2008 automatically generates the code to display them. If youpress Ctrl+Alt+X or select View > Toolbox, you’ll see an additional window displayed showing alist of GUI components as in Figure 1-28.
Figure 1-28
32
Chapter 1: Programming with Visual C++ 2008
25905c01.qxd:WroxPro 2/21/08 8:36 AM Page 32
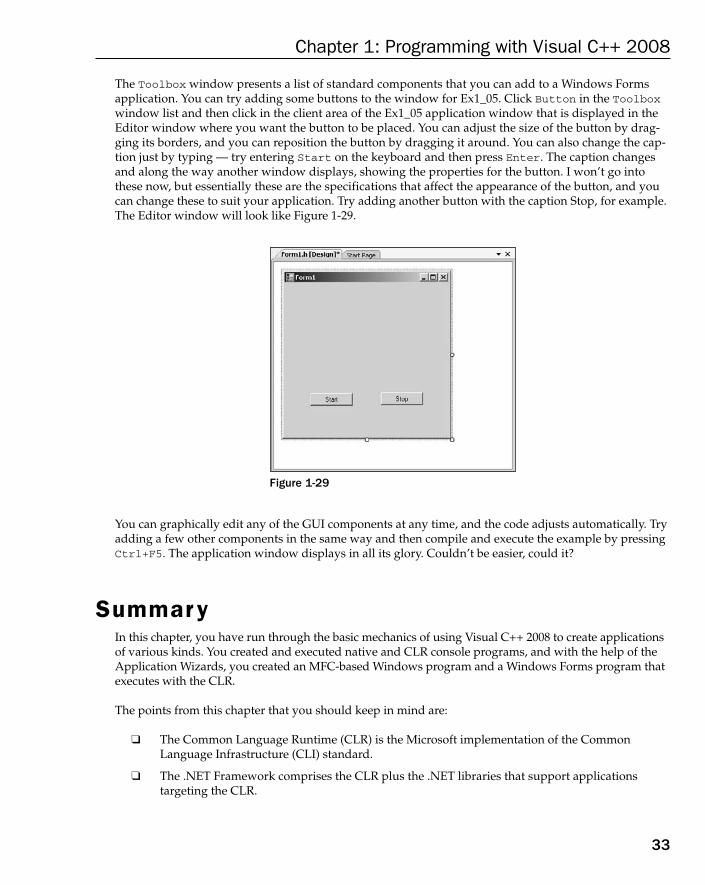
The Toolbox window presents a list of standard components that you can add to a Windows Formsapplication. You can try adding some buttons to the window for Ex1_05. Click Button in the Toolboxwindow list and then click in the client area of the Ex1_05 application window that is displayed in theEditor window where you want the button to be placed. You can adjust the size of the button by drag-ging its borders, and you can reposition the button by dragging it around. You can also change the cap-tion just by typing — try entering Start on the keyboard and then press Enter. The caption changesand along the way another window displays, showing the properties for the button. I won’t go intothese now, but essentially these are the specifications that affect the appearance of the button, and youcan change these to suit your application. Try adding another button with the caption Stop, for example.The Editor window will look like Figure 1-29.
Figure 1-29
You can graphically edit any of the GUI components at any time, and the code adjusts automatically. Tryadding a few other components in the same way and then compile and execute the example by pressingCtrl+F5. The application window displays in all its glory. Couldn’t be easier, could it?
SummaryIn this chapter, you have run through the basic mechanics of using Visual C++ 2008 to create applicationsof various kinds. You created and executed native and CLR console programs, and with the help of theApplication Wizards, you created an MFC-based Windows program and a Windows Forms program thatexecutes with the CLR.
The points from this chapter that you should keep in mind are:
❑ The Common Language Runtime (CLR) is the Microsoft implementation of the CommonLanguage Infrastructure (CLI) standard.
❑ The .NET Framework comprises the CLR plus the .NET libraries that support applications targeting the CLR.
33
Chapter 1: Programming with Visual C++ 2008
25905c01.qxd:WroxPro 2/21/08 8:36 AM Page 33

❑ Native C++ applications are written the ISO/ANSI C++ language.
❑ Programs written in the C++/CLI language execute with the CLR.
❑ Attributes can provide additional information to the compiler to instruct it to modify or extendparticular programming elements in a program.
❑ A solution is a container for one or more projects that form a solution to an information-processingproblem of some kind.
❑ A project is a container for the code and resource elements that make up a functional unit in aprogram.
❑ An assembly is a fundamental unit in a CLR program. All CLR programs are made up of one ormore assemblies.
Starting with the next chapter, you’ll use console applications extensively throughout the first half of the book. All the examples illustrating how C++ language elements are used are executed using eitherWin32 or CLR console applications. You will return to the Application Wizard for MFC-based programsand Windows Forms applications as soon as you have finished delving into the secrets of C++.
34
Chapter 1: Programming with Visual C++ 2008
25905c01.qxd:WroxPro 2/21/08 8:36 AM Page 34

2Data, Variables, and Calculations
In this chapter, you’ll get down to the essentials of programming in C++. By the end of the chapteryou’ll be able to write a simple C++ program of the traditional form: input-process-output. As I saidin the previous chapter, I’ll first discuss the ANSI/ISO C++ language features and then cover anyadditional or different aspects of the C++/CLI language.
As you explore aspects of the language using working examples, you’ll have an opportunity toget some additional practice with the Visual C++ Development Environment. You should createa project for each of the examples before you build and execute them. Remember that when youare defining projects in this chapter and the following chapters through to Chapter 11, they areall console applications.
In this chapter you will learn about:
❑ C++ program structure
❑ Namespaces
❑ Variables in C++
❑ Defining variables and constants
❑ Basic input from the keyboard and output to the screen
❑ Performing arithmetic calculations
❑ Casting operands
❑ Variable scope
25905c02.qxd:WroxPro 2/21/08 8:38 AM Page 35

The Structure of a C++ ProgramPrograms that will run as console applications under Visual C++ 2008 are programs that read datafrom the command line and output the results to the command line. To avoid having to dig into thecomplexities of creating and managing application windows before you have enough knowledge tounderstand how they work, all the examples that you’ll write to understand how the C++ languageworks will be console programs, either Win32 console programs or .NET console programs. This willenable you to focus entirely on the C++ language in the first instance; once you have mastered that,you’ll be ready to deal with creating and managing application windows. You’ll first look at how console programs are structured.
A program in C++ consists of one or more functions. In Chapter 1, you saw an example that was aWin32 console program consisting simply of the function main(), where main is the name of the func-tion. Every ANSI/ISO standard C++ program contains the function main(), and all C++ programs of any size consist of several functions — the main() function where execution of the program starts, plus a number of other functions. A function is simply a self-contained block of code with a uniquename that you invoke for execution by using the name of the function. As you saw in Chapter 1, aWin32 console program that is generated by the Application Wizard has a main function with the name _tmain. This is a programming device to allow the name to be main or wmain depending onwhether or not the program is using Unicode characters. The names wmain and _tmain are Microsoft-specific. The name for the main function conforming to the ISO/ANSI standard for C++ is main. I’ll use the name main for all our ISO/ANSI C++ examples because this is the most portable option. If you only intend to compile your code with Microsoft Visual C++, then it is advantageous to use theMicrosoft-specific names for main.
A typical command line program might be structured as shown in Figure 2-1.
Figure 2-1 illustrates that execution of the program shown starts at the beginning of the functionmain(). From main(), execution transfers to a function input_names(), which returns execution to theposition immediately following the point where it was called in main(). The sort_names()function isthen called from main(), and, once control returns to main(), the final function output_names() iscalled. Eventually, once output has been completed, execution returns once again to main() and theprogram ends.
Of course, different programs may have radically different functional structures, but they all start exe-cution at the beginning of main(). The principal advantage of having a program broken up into func-tions is that you can write and test each piece separately. There is a further advantage in that functionswritten to perform a particular task can be re-used in other programs. The libraries that come withC++ provide a lot of standard functions that you can use in your programs. They can save you a greatdeal of work.
You’ll see more about creating and using functions in Chapter 5.
36
Chapter 2: Data, Variables, and Calculations
25905c02.qxd:WroxPro 2/21/08 8:38 AM Page 36
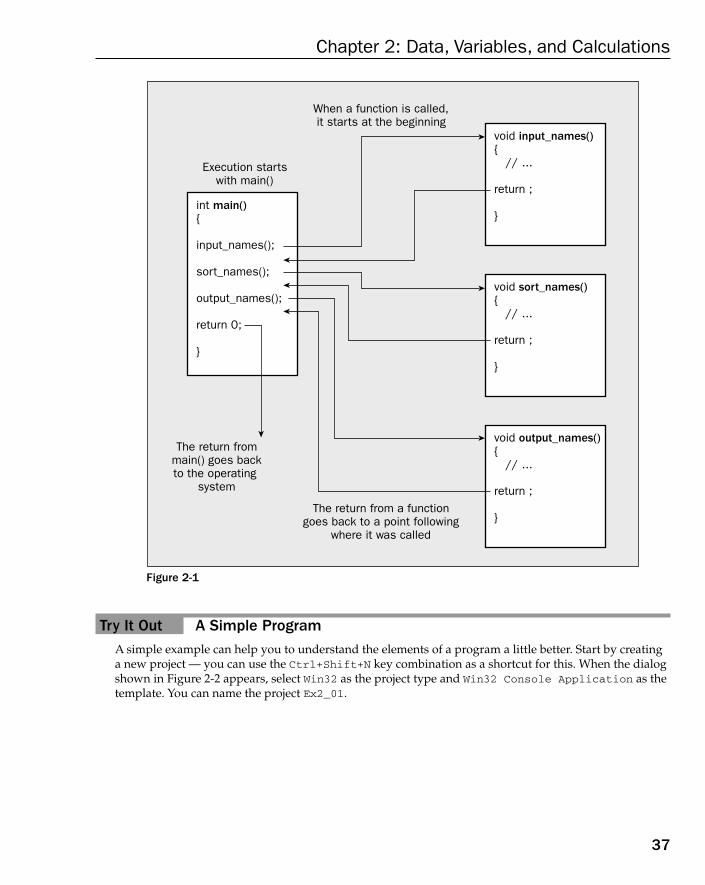
Figure 2-1
Try It Out A Simple ProgramA simple example can help you to understand the elements of a program a little better. Start by creatinga new project — you can use the Ctrl+Shift+N key combination as a shortcut for this. When the dialogshown in Figure 2-2 appears, select Win32 as the project type and Win32 Console Application as thetemplate. You can name the project Ex2_01.
int main() { input_names(); sort_names(); output_names(); return 0; }
The return from main() goes back to the operating
system
Execution starts with main()
When a function is called, it starts at the beginning
The return from a function goes back to a point following
where it was called
void input_names() { // ... return ; }
void sort_names() { // ... return ; }
void output_names() { // ... return ; }
37
Chapter 2: Data, Variables, and Calculations
25905c02.qxd:WroxPro 2/21/08 8:38 AM Page 37

Figure 2-2
If you click the OK button, you’ll see a new dialog in the form shown in Figure 2-3 that shows an overviewof what the Application Wizard will generate.
Figure 2-3
If you now click Application Settings on the left of this dialog, you’ll see further options for a Win32application displayed, as shown in Figure 2-4.
38
Chapter 2: Data, Variables, and Calculations
25905c02.qxd:WroxPro 2/21/08 8:38 AM Page 38
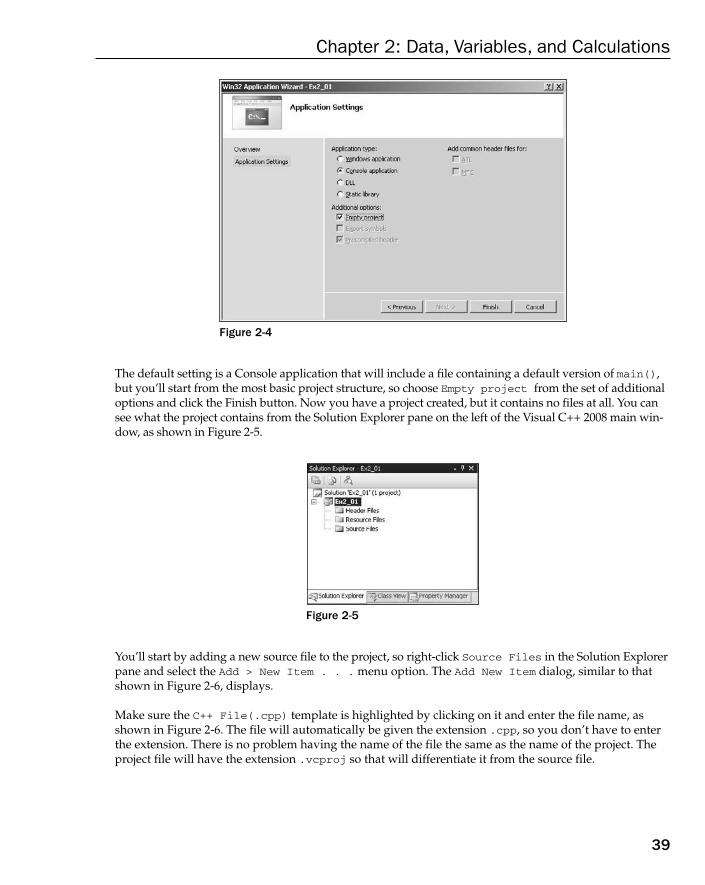
Figure 2-4
The default setting is a Console application that will include a file containing a default version of main(),but you’ll start from the most basic project structure, so choose Empty project from the set of additionaloptions and click the Finish button. Now you have a project created, but it contains no files at all. You cansee what the project contains from the Solution Explorer pane on the left of the Visual C++ 2008 main win-dow, as shown in Figure 2-5.
Figure 2-5
You’ll start by adding a new source file to the project, so right-click Source Files in the Solution Explorerpane and select the Add > New Item . . . menu option. The Add New Item dialog, similar to thatshown in Figure 2-6, displays.
Make sure the C++ File(.cpp) template is highlighted by clicking on it and enter the file name, asshown in Figure 2-6. The file will automatically be given the extension .cpp, so you don’t have to enterthe extension. There is no problem having the name of the file the same as the name of the project. Theproject file will have the extension .vcproj so that will differentiate it from the source file.
39
Chapter 2: Data, Variables, and Calculations
25905c02.qxd:WroxPro 2/21/08 8:38 AM Page 39

Figure 2-6
Click the Add button to create the file. You can then type the following code in the Editor pane of theIDE window:
// Ex2_01.cpp// A Simple Example of a Program#include <iostream>
using std::cout;using std::endl;
int main(){
int apples, oranges; // Declare two integer variablesint fruit; // ...then another one
apples = 5; oranges = 6; // Set initial valuesfruit = apples + oranges; // Get the total fruit
cout << endl; // Start output on a new linecout << “Oranges are not the only fruit... “ << endl
<< “- and we have “ << fruit << “ fruits in all.”;cout << endl; // Output a new line character
return 0; // Exit the program}
The preceding example is intended to illustrate some of the ways in which you can write C++ state-ments and is not a model of good programming style.
Since the file is identified by its extension as a file containing C++ code, the keywords in the code thatthe editor recognizes will be colored to identify them. You will be able to see if you have entered Int
40
Chapter 2: Data, Variables, and Calculations
25905c02.qxd:WroxPro 2/21/08 8:38 AM Page 40
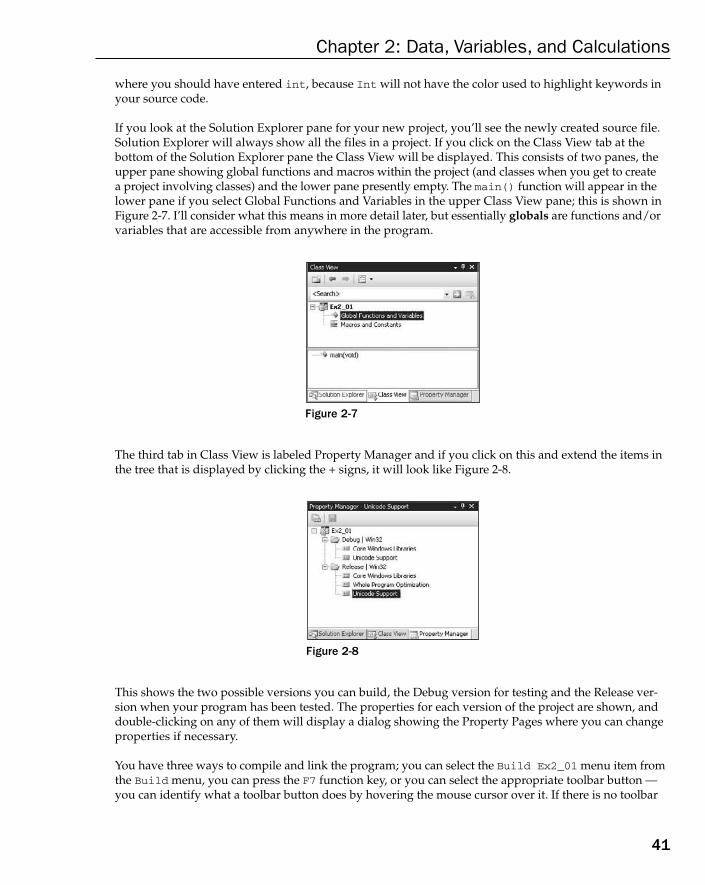
where you should have entered int, because Int will not have the color used to highlight keywords inyour source code.
If you look at the Solution Explorer pane for your new project, you’ll see the newly created source file.Solution Explorer will always show all the files in a project. If you click on the Class View tab at the bottom of the Solution Explorer pane the Class View will be displayed. This consists of two panes, theupper pane showing global functions and macros within the project (and classes when you get to create a project involving classes) and the lower pane presently empty. The main() function will appear in thelower pane if you select Global Functions and Variables in the upper Class View pane; this is shown inFigure 2-7. I’ll consider what this means in more detail later, but essentially globals are functions and/orvariables that are accessible from anywhere in the program.
Figure 2-7
The third tab in Class View is labeled Property Manager and if you click on this and extend the items inthe tree that is displayed by clicking the + signs, it will look like Figure 2-8.
Figure 2-8
This shows the two possible versions you can build, the Debug version for testing and the Release ver-sion when your program has been tested. The properties for each version of the project are shown, anddouble-clicking on any of them will display a dialog showing the Property Pages where you can changeproperties if necessary.
You have three ways to compile and link the program; you can select the Build Ex2_01 menu item fromthe Build menu, you can press the F7 function key, or you can select the appropriate toolbar button —you can identify what a toolbar button does by hovering the mouse cursor over it. If there is no toolbar
41
Chapter 2: Data, Variables, and Calculations
25905c02.qxd:WroxPro 2/21/08 8:38 AM Page 41
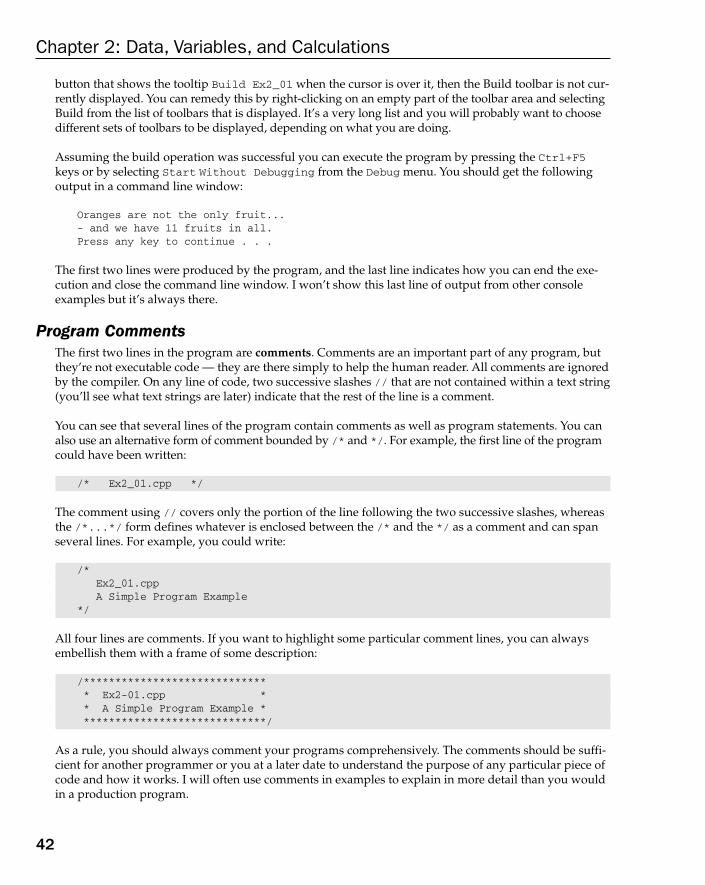
button that shows the tooltip Build Ex2_01 when the cursor is over it, then the Build toolbar is not cur-rently displayed. You can remedy this by right-clicking on an empty part of the toolbar area and selectingBuild from the list of toolbars that is displayed. It’s a very long list and you will probably want to choosedifferent sets of toolbars to be displayed, depending on what you are doing.
Assuming the build operation was successful you can execute the program by pressing the Ctrl+F5keys or by selecting Start Without Debugging from the Debug menu. You should get the followingoutput in a command line window:
Oranges are not the only fruit...- and we have 11 fruits in all.Press any key to continue . . .
The first two lines were produced by the program, and the last line indicates how you can end the exe-cution and close the command line window. I won’t show this last line of output from other consoleexamples but it’s always there.
Program CommentsThe first two lines in the program are comments. Comments are an important part of any program, butthey’re not executable code — they are there simply to help the human reader. All comments are ignoredby the compiler. On any line of code, two successive slashes // that are not contained within a text string(you’ll see what text strings are later) indicate that the rest of the line is a comment.
You can see that several lines of the program contain comments as well as program statements. You canalso use an alternative form of comment bounded by /* and */. For example, the first line of the programcould have been written:
/* Ex2_01.cpp */
The comment using // covers only the portion of the line following the two successive slashes, whereasthe /*...*/ form defines whatever is enclosed between the /* and the */ as a comment and can spanseveral lines. For example, you could write:
/*Ex2_01.cppA Simple Program Example
*/
All four lines are comments. If you want to highlight some particular comment lines, you can alwaysembellish them with a frame of some description:
/****************************** Ex2-01.cpp ** A Simple Program Example ******************************/
As a rule, you should always comment your programs comprehensively. The comments should be suffi-cient for another programmer or you at a later date to understand the purpose of any particular piece ofcode and how it works. I will often use comments in examples to explain in more detail than you wouldin a production program.
42
Chapter 2: Data, Variables, and Calculations
25905c02.qxd:WroxPro 2/21/08 8:38 AM Page 42
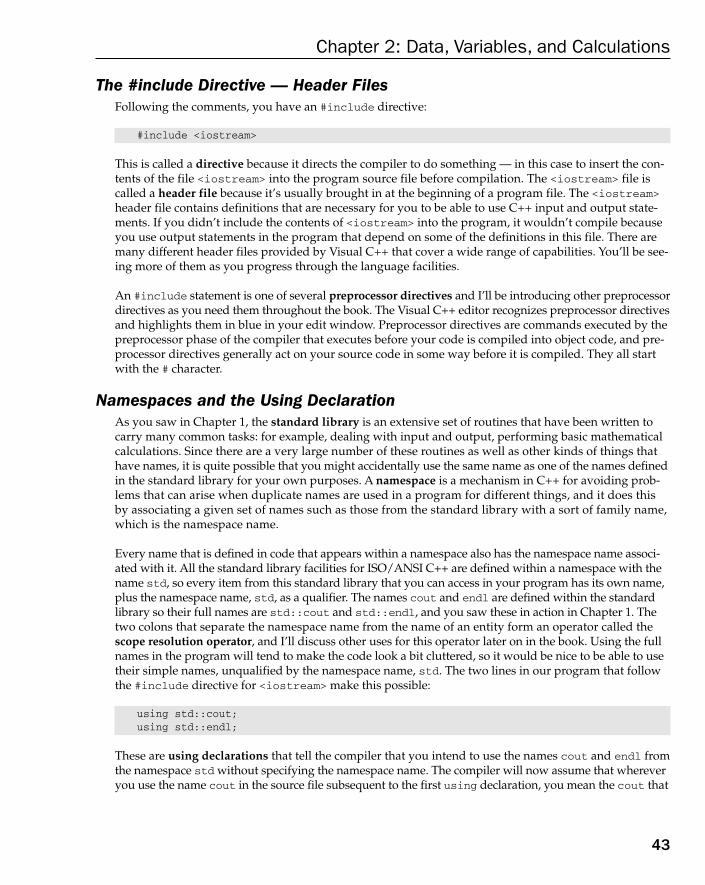
The #include Directive — Header FilesFollowing the comments, you have an #include directive:
#include <iostream>
This is called a directive because it directs the compiler to do something — in this case to insert the con-tents of the file <iostream> into the program source file before compilation. The <iostream> file iscalled a header file because it’s usually brought in at the beginning of a program file. The <iostream>header file contains definitions that are necessary for you to be able to use C++ input and output state-ments. If you didn’t include the contents of <iostream> into the program, it wouldn’t compile becauseyou use output statements in the program that depend on some of the definitions in this file. There aremany different header files provided by Visual C++ that cover a wide range of capabilities. You’ll be see-ing more of them as you progress through the language facilities.
An #include statement is one of several preprocessor directives and I’ll be introducing other preprocessordirectives as you need them throughout the book. The Visual C++ editor recognizes preprocessor directivesand highlights them in blue in your edit window. Preprocessor directives are commands executed by thepreprocessor phase of the compiler that executes before your code is compiled into object code, and pre-processor directives generally act on your source code in some way before it is compiled. They all startwith the # character.
Namespaces and the Using DeclarationAs you saw in Chapter 1, the standard library is an extensive set of routines that have been written tocarry many common tasks: for example, dealing with input and output, performing basic mathematicalcalculations. Since there are a very large number of these routines as well as other kinds of things thathave names, it is quite possible that you might accidentally use the same name as one of the names definedin the standard library for your own purposes. A namespace is a mechanism in C++ for avoiding prob-lems that can arise when duplicate names are used in a program for different things, and it does thisby associating a given set of names such as those from the standard library with a sort of family name,which is the namespace name.
Every name that is defined in code that appears within a namespace also has the namespace name associ-ated with it. All the standard library facilities for ISO/ANSI C++ are defined within a namespace with thename std, so every item from this standard library that you can access in your program has its own name,plus the namespace name, std, as a qualifier. The names cout and endl are defined within the standardlibrary so their full names are std::cout and std::endl, and you saw these in action in Chapter 1. Thetwo colons that separate the namespace name from the name of an entity form an operator called thescope resolution operator, and I’ll discuss other uses for this operator later on in the book. Using the fullnames in the program will tend to make the code look a bit cluttered, so it would be nice to be able to usetheir simple names, unqualified by the namespace name, std. The two lines in our program that followthe #include directive for <iostream> make this possible:
using std::cout;using std::endl;
These are using declarations that tell the compiler that you intend to use the names cout and endl fromthe namespace std without specifying the namespace name. The compiler will now assume that whereveryou use the name cout in the source file subsequent to the first using declaration, you mean the cout that
43
Chapter 2: Data, Variables, and Calculations
25905c02.qxd:WroxPro 2/21/08 8:38 AM Page 43

is defined in the standard library. The name cout represents the standard output stream that by defaultcorresponds to the command line and the name endl represents the newline character.
You’ll learn more about namespaces, including how you define your own namespaces, a little later thischapter.
The main() FunctionThe function main() in the example consists of the function header defining it as main() plus everythingfrom the first opening curly brace ({) to the corresponding closing curly brace (}). The braces enclose theexecutable statements in the function, which are referred to collectively as the body of the function.
As you’ll see, all functions consist of a header that defines (amongst other things) the function name, fol-lowed by the function body that consists of a number of program statements enclosed between a pair ofbraces. The body of a function may contain no statements at all, in which case it doesn’t do anything.
A function that doesn’t do anything may seem somewhat superfluous, but when you’re writing a largeprogram, you may map out the complete program structure in functions initially but omit the code formany of the functions leaving them with empty or minimal bodies. Doing this means that you can com-pile and execute the whole program with all its functions at any time and add detailed coding for thefunctions incrementally.
Program StatementsThe program statements making up the function body of main() are each terminated with a semicolon.It’s the semicolon that marks the end of a statement, not the end of the line. Consequently a statementcan be spread over several lines when this makes the code easier to follow and several statements canappear in a single line. The program statement is the basic unit in defining what a program does. This isa bit like a sentence in a paragraph of text, where each sentence stands by itself in expressing an actionor an idea, but relates to and combines with the other sentences in the paragraph in expressing a moregeneral idea. A statement is a self-contained definition of an action that the computer is to carry out, butthat can be combined with other statements to define a more complex action or calculation.
The action of a function is always expressed by a number of statements, each ending with a semicolon.Take a quick look at each of the statements in the example just written, just to get a general feel for howit works. I will discuss each type of statement more fully later in this chapter.
The first statement in the body of the main() function is:
int apples, oranges; // Declare two integer variables
This statement declares two variables, apples and oranges. A variable is just a named bit of computermemory that you can use to store data, and a statement that introduces the names of one or more variablesis called a variable declaration. The keyword int in the preceding statement indicates that the variableswith the names apples and oranges are to store values that are whole numbers, or integers. Wheneveryou introduce the name of a variable into a program, you always specify what kind of data it will store,and this is called the type of the variable.
44
Chapter 2: Data, Variables, and Calculations
25905c02.qxd:WroxPro 2/21/08 8:38 AM Page 44

The next statement declares another integer variable, fruit:
int fruit; // ...then another one
While you can declare several variables in the same statement, as you did in the preceding statement forapples and oranges, it is generally a good idea to declare each variable in a separate statement on itsown line as this enables you to comment them individually to explain how you intend to use them.
The next line in the example is:
apples = 5; oranges = 6; // Set initial values
This line contains two statements, each terminated by a semicolon. I put this here just to demonstrate thatyou can put more than one statement in a line. While it isn’t obligatory, it’s generally good programmingpractice to write only one statement on a line as it makes the code easier to understand. Good program-ming practice is about adopting approaches to coding that make your code easy to follow, and minimizethe likelihood of errors.
The two statements in the preceding line store the values 5 and 6 in the variables apples and oranges,respectively. These statements are called assignment statements because they assign a new value to avariable and the = is the assignment operator.
The next statement is:
fruit = apples + oranges; // Get the total fruit
This is also an assignment statement but is a little different because you have an arithmetic expressionto the right of the assignment operator. This statement adds together the values stored in the variablesapples and oranges and stores the result in the variable fruit.
The next three statements are:
cout << endl; // Start output on a new linecout << “Oranges are not the only fruit... “ << endl
<< “- and we have “ << fruit << “ fruits in all.”;cout << endl; // Start output on a new line
These are all output statements. The first statement is the first line here, and it sends a newline character,denoted by the word endl, to the command line on the screen. In C++, a source of input or a destinationfor output is referred to as a stream. The name cout specifies the “standard” output stream, and the opera-tor << indicates that what appears to the right of the operator is to be sent to the output stream, cout. The<< operator “points” in the direction that the data flows — from the variable or string that appears on theright of the operator to the output destination on the left. Thus in the first statement the value representedby the name endl — which represents a newline character — is sent to the stream identified by the namecout — and data transferred to cout is written to the command line.
The meaning of the name cout and the operator << are defined in the standard library header file<iostream>, which you added to the program code by means of the #include directive at the beginning
45
Chapter 2: Data, Variables, and Calculations
25905c02.qxd:WroxPro 2/21/08 8:38 AM Page 45

of the program. cout is a name in the standard library and therefore is within the namespace std.Without the using directive it would not be recognized unless you used its fully qualified name,which is std::cout, as I mentioned earlier. Because cout has been defined to represent the standardoutput stream, you shouldn’t use the name cout for other purposes so you can’t use it as the name of a variable in your program for example. Obviously, using the same name for different things is likely to cause confusion.
The second output statement of the three is spread over two lines:
cout << “Oranges are not the only fruit... “ << endl<< “- and we have “ << fruit << “ fruits in all.”;
As I said earlier, you can spread each statement in a program over as many lines as you wish if it helpsto make the code clearer. The end of a statement is always signaled by a semicolon, not the end of a line.Successive lines are read and combined into a single statement by the compiler until it finds the semi-colon that defines the end of the statement. Of course, this means that if you forget to put a semicolon at the end of a statement, the compiler will assume the next line is part of the same statement and jointhem together. This usually results in something the compiler cannot understand, so you’ll get an errormessage.
The statement sends the text string “Oranges are not the only fruit... “ to the command line,followed by another newline character (endl), then another text string, “- and we have “, followedby the value stored in the variable fruit, then finally another text string, “ fruits in all.”. There is no problem stringing together a sequence of things that you want to output in this way. The statementexecutes from left to right, with each item being sent to cout in turn. Note that each item to be sent tocout is preceded by its own << operator.
The third and last output statement just sends another newline character to the screen, and the threestatements produce the output from the program that you see.
The last statement in the program is:
return 0; // Exit the program
This terminates execution of the main() function, which stops execution of the program. Control returnsto the operating system, and the 0 is a return code that tells the operating system that the application ter-minated successfully after completing its task. I’ll discuss all of these statements in more detail later on.
The statements in a program are executed in the sequence in which they are written, unless a statementspecifically causes the natural sequence to be altered. In Chapter 3, you’ll look at statements that alter thesequence of execution.
WhitespaceWhitespace is the term used in C++ to describe blanks, tabs, newline characters, form feed characters,and comments. Whitespace serves to separate one part of a statement from another and enables thecompiler to identify where one element in a statement, such as int, ends and the next element begins.Otherwise, whitespace is ignored and has no effect.
46
Chapter 2: Data, Variables, and Calculations
25905c02.qxd:WroxPro 2/21/08 8:38 AM Page 46

Look at this statement for example:
int fruit; // ...then another one
There must be at least one whitespace character (usually a space) between int and fruit for the com-piler to be able to distinguish them but if you add more whitespace characters they will be ignored. Thecontent of the line following the semicolon is all whitespace and is therefore ignored.
On the other hand, look at this statement:
fruit = apples + oranges; // Get the total fruit
No whitespace characters are necessary between fruit and =, or between = and apples, although youare free to include some if you wish. This is because the = is not alphabetic or numeric, so the compilercan separate it from its surroundings. Similarly, no whitespace characters are necessary on either side ofthe + sign but you can include some if you want to aid the readability of your code.
As I said, apart from its use as a separator between elements in a statement that might otherwise be con-fused, whitespace is ignored by the compiler (except, of course, in a string of characters between quotes).You can therefore include as much whitespace as you like to make your program more readable, as youdid when you spread an output statement in the last example over several lines. Remember that in C++the end of a statement is wherever the semicolon occurs.
Statement BlocksYou can enclose several statements between a pair of braces, in which case they become a block, or acompound statement. The body of a function is an example of a block. Such a compound statement canbe thought of as a single statement (as you’ll see when you look at the decision-making possibilities inC++ in Chapter 3). In fact, wherever you can put a single statement in C++, you could equally well put ablock of statements between braces. As a consequence, blocks can be placed inside other blocks. In fact,blocks can be nested, one within another, to any depth.
A statement block also has important effects on variables, but I will defer discussion of this until later inthis chapter when I discuss something called variable scope.
Automatically Generated Console ProgramsIn the last example you opted to produce the project as an empty project with no source files, and thenyou added the source file subsequently. If you just allow the Application Wizard to generate the project as you did in Chapter 1, the project will contain several files, and you should explore their contents in alittle more depth. Create a new Win32 console project with the name Ex2_01A and this time just allow theApplication Wizard to finish without choosing to set any of the options in the Application Settingsdialog. The project will have three files containing code: the Ex2_01A.cpp and stdafx.cpp source files,and the stdafx.h header file. This is to provide for basic capability that you might need in a console pro-gram and represents a working program at it stands, which does nothing. If you have a project open, youcan close it by selecting the File > Close Solution item on the main menu. You can create a newproject with an existing project open, in which case the old project will be closed automatically unlessyou elect to add it to the same solution.
47
Chapter 2: Data, Variables, and Calculations
25905c02.qxd:WroxPro 2/21/08 8:38 AM Page 47
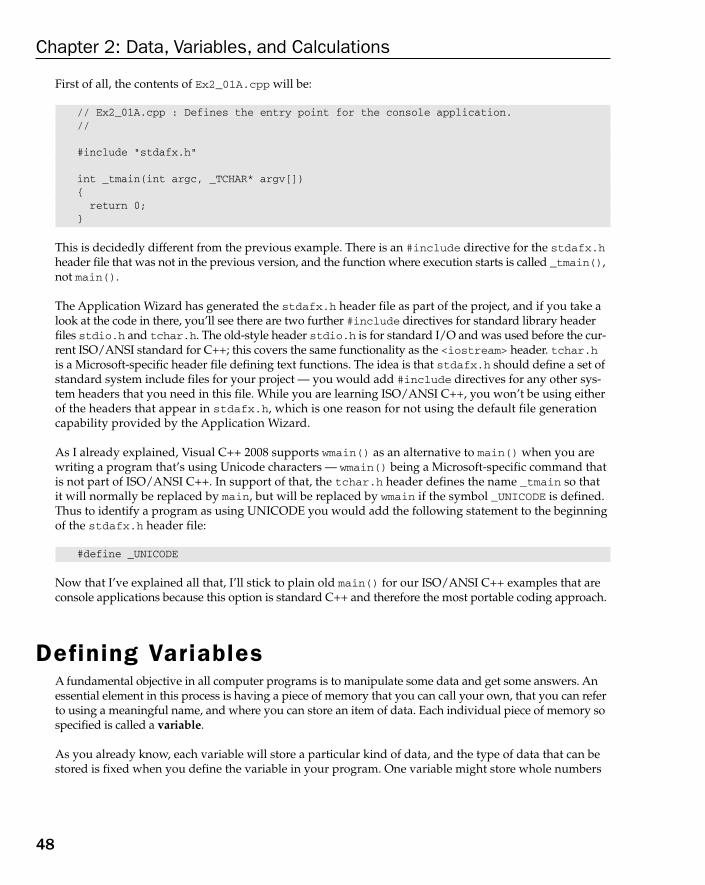
First of all, the contents of Ex2_01A.cpp will be:
// Ex2_01A.cpp : Defines the entry point for the console application.//
#include “stdafx.h”
int _tmain(int argc, _TCHAR* argv[]){return 0;
}
This is decidedly different from the previous example. There is an #include directive for the stdafx.hheader file that was not in the previous version, and the function where execution starts is called _tmain(),not main().
The Application Wizard has generated the stdafx.h header file as part of the project, and if you take alook at the code in there, you’ll see there are two further #include directives for standard library headerfiles stdio.h and tchar.h. The old-style header stdio.h is for standard I/O and was used before the cur-rent ISO/ANSI standard for C++; this covers the same functionality as the <iostream> header. tchar.his a Microsoft-specific header file defining text functions. The idea is that stdafx.h should define a set ofstandard system include files for your project — you would add #include directives for any other sys-tem headers that you need in this file. While you are learning ISO/ANSI C++, you won’t be using eitherof the headers that appear in stdafx.h, which is one reason for not using the default file generationcapability provided by the Application Wizard.
As I already explained, Visual C++ 2008 supports wmain() as an alternative to main() when you arewriting a program that’s using Unicode characters — wmain() being a Microsoft-specific command thatis not part of ISO/ANSI C++. In support of that, the tchar.h header defines the name _tmain so that it will normally be replaced by main, but will be replaced by wmain if the symbol _UNICODE is defined.Thus to identify a program as using UNICODE you would add the following statement to the beginningof the stdafx.h header file:
#define _UNICODE
Now that I’ve explained all that, I’ll stick to plain old main() for our ISO/ANSI C++ examples that areconsole applications because this option is standard C++ and therefore the most portable coding approach.
Defining VariablesA fundamental objective in all computer programs is to manipulate some data and get some answers. Anessential element in this process is having a piece of memory that you can call your own, that you can referto using a meaningful name, and where you can store an item of data. Each individual piece of memory sospecified is called a variable.
As you already know, each variable will store a particular kind of data, and the type of data that can bestored is fixed when you define the variable in your program. One variable might store whole numbers
48
Chapter 2: Data, Variables, and Calculations
25905c02.qxd:WroxPro 2/21/08 8:38 AM Page 48
(that is, integers), in which case you couldn’t use it to store numbers with fractional values. The valuethat each variable contains at any point is determined by the statements in your program, and of course,its value will usually change many times as the program calculation progresses.
The next section looks first at the rules for naming a variable when you introduce it into a program.
Naming VariablesThe name you give to a variable is called an identifier, or more conveniently a variable name. Variablenames can include the letters A–z (upper- or lowercase), the digits 0–9, and the underscore character.No other characters are allowed, and if you happen to use some other character, you will typically get anerror message when you try to compile the program. Variable names must also begin with either a letteror an underscore. Names are usually chosen to indicate the kind of information to be stored.
Because variable names in Visual C++ 2008 can be up to 2048 characters long, you have a reasonableamount of flexibility in what you call your variables. In fact, as well as variables, there are quite a fewother things that have names in C++ and they too can have names of up to 2048 characters, with thesame definition rules as a variable name. Using names of the maximum length allowed can make yourprograms a little difficult to read, and unless you have amazing keyboard skills, they are the very devilto type in. A more serious consideration is that not all compilers support such long names. If you antici-pate compiling your code in other environments, it’s a good idea to limit names to a maximum of 31characters; this will usually be adequate for devising meaningful names and will avoid problems ofcompiler name length constraints in most instances.
Although you can use variable names that begin with an underscore, for example _this and _that, thisis best avoided because of potential clashes with standard system variables that have the same form. Youshould also avoid using names starting with a double underscore for the same reason.
Examples of good variable names are:
❑ price
❑ discount
❑ pShape
❑ value_
❑ COUNT
8_Ball, 7Up, and 6_pack are not legal. Neither is Hash! or Mary-Ann. This last example is a commonmistake, although Mary_Ann with an underscore in place of the hyphen would be quite acceptable. Ofcourse, Mary Ann would not be, because blanks are not allowed in variable names. Note that the variablenames republican and Republican are quite different, as names are case-sensitive so upper- and lower-case letters are differentiated. Of course, whitespace characters in general cannot appear within a name,and if you inadvertently include whitespace characters, you will have two or more names instead of one,which will usually cause the compiler to complain.
A convention that is often adopted in C++ is to reserve names beginning with a capital letter for namingclasses and use names beginning with a lowercase letter for variables. I’ll discuss classes in Chapter 8.
49
Chapter 2: Data, Variables, and Calculations
25905c02.qxd:WroxPro 2/21/08 8:38 AM Page 49
Keywords in C++There are reserved words in C++ called keywords that have special significance within the language. Theywill be highlighted with a particular color by the Visual C++ 2008 editor as you enter your program — inmy system the default color is blue. If a keyword you type does not appear highlighted, then you haveentered the keyword incorrectly. Incidentally, if you don’t like the default colors used by the text editor,you can change them by selecting Options from the Tools menu and making changes when you selectEnvironment/Fonts and Colors in the dialog.
Remember that keywords, like the rest of the C++ language, are case-sensitive. For example, the pro-gram that you entered earlier in the chapter contained the keywords int and return; if you write Intor Return, these are not keywords and therefore will not be recognized as such. You will see many moreas you progress through the book. You must ensure that the names you choose for entities in your pro-gram, such as variables, are not the same as any of the keywords in C++. A complete list of the key-words used in Visual C++ 2008 appears in Appendix A.
Declaring VariablesAs you saw earlier, a variable declaration is a program statement that specifies the name of a variable ofa given type. For example:
int value;
This declares a variable with the name value that can store integers. The type of data that can be storedin the variable value is specified by the keyword int, so you can only use value to store data of typeint. Because int is a keyword, you can’t use int as a name for one of your variables.
Note that a variable declaration always ends with a semicolon.
A single declaration can specify the names of several variables but, as I have said, it is generally better to declare variables in individual statements, one per line. I’ll deviate from this from time to time in thisbook, but only in the interests of not spreading code over too many pages.
In order to store data (for example, the value of an integer), you not only need to have defined the name ofthe variable, you also need to have associated a piece of the computer’s memory with the variable name.This process is called variable definition. In C++, a variable declaration is also a definition (except in a fewspecial cases, which we shall come across during the book). In the course of a single statement, we intro-duce the variable name, and also tie it to an appropriately sized piece of memory.
So, the statement
int value;
is both a declaration and a definition. You use the variable name value that you have declared, to accessthe piece of the computer’s memory that you have defined and that can store a single value of type int.
You use the term declaration when you introduce a name into your program, with information on whatthe name will be used for. The term definition refers to the allotment of computer memory to the name.In the case of variables, you can declare and define in a single statement, as in the preceding line. Thereason for this apparently pedantic differentiation between a declaration and a definition is that you will meet statements that are declarations but not definitions.
50
Chapter 2: Data, Variables, and Calculations
25905c02.qxd:WroxPro 2/21/08 8:38 AM Page 50

You must declare a variable at some point between the beginning of your program and when the variableis used for the first time. In C++, it is good practice to declare variables close to their first point of use.
Initial Values for VariablesWhen you declare a variable, you can also assign an initial value to it. A variable declaration that assignsan initial value to a variable is called an initialization. To initialize a variable when you declare it, youjust need to write an equals sign followed by the initializing value after the variable name. You can writethe following statements to give each of the variables an initial value:
int value = 0;int count = 10;int number = 5;
In this case, value will have the value 0, count will have the value 10, and number will have the value 5.
There is another way of writing the initial value for a variable in C++ called functional notation. Insteadof an equals sign and the value, you can simply write the value in parentheses following the variable name.So you could rewrite the previous declarations as:
int value(0);int count(10);int number(5);
Generally it’s a good idea to use either one notation or the other consistently when you are initializingvariables. However, I’ll use one notation in some examples and the other notation in others so you getused to seeing both of them in working code.
If you don’t supply an initial value for a variable, then it will usually contain whatever garbage was leftin the memory location it occupies by the previous program you ran (there is an exception to this thatyou will meet later in this chapter). Wherever possible, you should initialize your variables when youdeclare them. If your variables start out with known values, it makes it easier to work out what is hap-pening when things go wrong. And one thing you can be sure of — things will go wrong.
Fundamental Data TypesThe sort of information that a variable can hold is determined by its data type. All data and variables in yourprogram must be of some defined type. ISO/ANSI standard C++ provides you with a range of fundamentaldata types, specified by particular keywords. Fundamental data types are so called because they store val-ues of types that represent fundamental data in your computer, essentially numerical values, which alsoincludes characters because a character is represented by a numerical character code. You have alreadyseen the keyword int for defining integer variables. C++/CLI also defines fundamental data types thatare not part of ISO/ANSI C++, and I’ll go into those a little later in this chapter.
As part of the object-oriented aspects of the language, you can also create your own data types, as you’llsee later, and of course the various libraries that you have at your disposal with Visual C++ 2008 alsodefine further data types. For the moment, explore the elementary numerical data types that ISO/ANSIC++ provides. The fundamental types fall into three categories: types that store integers, types that store
51
Chapter 2: Data, Variables, and Calculations
25905c02.qxd:WroxPro 2/21/08 8:38 AM Page 51
non-integral values — which are called floating-point types — and the void type that specifies an emptyset of values or no type.
Integer VariablesAs I have said, integer variables are variables that can have only values that are whole numbers. The num-ber of players in a football team is an integer, at least at the beginning of the game. You already know thatyou can declare integer variables using the keyword int. Variables of type int occupy 4 bytes in memoryand can store both positive and negative integer values. The upper and lower limits for the values of a vari-able of type int correspond to the maximum and minimum signed binary numbers, which can be repre-sented by 32 bits. The upper limit for a variable of type int is 231–1 which is 2,147,483,647, and the lowerlimit is –(231), which is –2,147,483,648. Here’s an example of defining a variable of type int:
int toeCount = 10;
In Visual C++ 2008, the keyword short also defines an integer variable, this time occupying two bytes.The keyword short is equivalent to short int, and you could define two variables of type short withthe following statements:
short feetPerPerson = 2;short int feetPerYard = 3;
Both variables are of the same type here because short means exactly the same as short int. I usedboth forms of the type name to show them in use, but it would be best to stick to one representation ofthe type in your programs and short is used most often.
C++ also provides another integer type, long, which can also be written as long int. Here’s how youdeclare variables of type long:
long bigNumber = 1000000L;long largeValue = 0L;
Of course, you could also use functional notation when specifying the initial values:
long bigNumber(1000000L);long largeValue(0L);
These statements declare the variables bigNumber and largeValue with initial values 1000000 and 0,respectively. The letter L appended to the end of the literals specifies that they are integers of type long.You can also use the small letter l for the same purpose, but it has the disadvantage that it is easily con-fused with the numeral 1. Integer literals without an L appended are of type int.
You must not include commas when writing large numeric values in a program. In text you mightwrite the number 12,345, but in your program code you must write this as 12345.
Integer variables declared as long in Visual C++ 2008 occupy 4 bytes and can have values from–2,147,483,648 to 2,147,483,647. This is the same range as for variables declared as int.
52
Chapter 2: Data, Variables, and Calculations
25905c02.qxd:WroxPro 2/21/08 8:38 AM Page 52

With other C++ compilers, variables of type long (which is the same as type long int) may not be thesame as type int, so if you expect your programs to be compiled in other environments, don’t assumethat long and int are equivalent. For truly portable code, you should not even assume that an int is 4 bytes (for example, under older 16-bit versions of Visual C++ a variable of type int was 2 bytes).
Character Data TypesThe char data type serves a dual purpose. It specifies a one-byte variable that you can use to store integerswithin a given range or to store the code for a single ASCII character, which is the American Standard Codefor Information Interchange. The codes in the ASCII character set appears in Appendix B. You can declare achar variable with this statement:
char letter = ‘A’;
Or you could write this as:
char letter(‘A’);
This declares the variable with the name letter and initializes it with the constant ‘A’. Note that youspecify a value that is a single character between single quotes, rather than the double quotes used pre-viously for defining a string of characters to be displayed. A string of characters is a series of values of typechar that are grouped together into a single entity called an array. I’ll discuss arrays and how strings arehandled in C++ in Chapter 4.
Because the character ‘A’ is represented in ASCII by the decimal value 65, you could have written thestatement as:
char letter = 65; // Equivalent to A
This produces the same result as the previous statement. The range of integers that can be stored in avariable of type char with Visual C++ is from –128 to 127.
Note that the ISO/ANSI C++ standard does not require that type char should represent signed 1-byteintegers. It is the compiler implementer’s choice as to whether type char represents signed integers inthe range –128 to +127 or unsigned integers in the range 0 to 255. You need to keep this in mind if youare porting your C++ code to a different environment.
The type wchar_t is so called because it is a wide character type, and variables of this type store 2-bytecharacter codes with values in the range from 0 to 65,535. Here’s an example of defining a variable oftype wchar_t:
wchar_t letter = L’Z’; // A variable storing a 16-bit character code
This defines a variable, letter, that is initialized with the 16-bit code for the letter Z. The L precedingthe character constant, ‘Z’, tells the compiler that this is a 16-bit character code value. A wchar_t vari-able stores Unicode code values.
53
Chapter 2: Data, Variables, and Calculations
25905c02.qxd:WroxPro 2/21/08 8:38 AM Page 53

You could have used functional notation here, too:
wchar_t letter(L’Z’); // A variable storing a 16-bit character code
You can also use hexadecimal constants to initialize char variables (and other integer types), and it isobviously going to be easier to use this notation when character codes are available as hexadecimal val-ues. A hexadecimal number is written using the standard representation for hexadecimal digits: 0 to 9,and A to F (or a to f) for digits with values from 10 to 15. It’s also preceded by 0x (or 0X) to distinguish itfrom a decimal value. Thus, to get exactly the same result again, you could rewrite the last statement asfollows:
wchar_t letter(0x5A); // A variable storing a 16-bit character code
Don’t write decimal integer values with a leading zero. The compiler will interpret such values as octal(base 8), so a value written as 065 will be equivalent to 53 in normal decimal notation.
Notice that Windows XP provides a Character Map utility that enables you to locate characters from anyof the fonts available to Windows. It will show the character code in hexadecimal and tell you the key-stroke to use for entering the character. You’ll find the Character map utility if you click on the Startbutton and look in the System Tools folder that is within the Accessories folder.
Integer Type ModifiersVariables of the integral types char, int, short, or long store signed integer values by default, so youcan use these types to store either positive or negative values. This is because these types are assumed to have the default type modifier signed. So, wherever you wrote int or long you could have writtensigned int or signed long, respectively.
You can also use the signed keyword by itself to specify the type of a variable, in which case it meanssigned int. For example:
signed value = -5; // Equivalent to signed int
This usage is not particularly common, and I prefer to use int, which makes it more obvious what ismeant.
The range of values that can be stored in a variable of type char is from –128 to +127, which is the same asthe range of values you can store in a variable of type signed char. In spite of this, type char and typesigned char are different types, so you should not make the mistake of assuming they are the same.
If you are sure that you don’t need to store negative values in a variable (for example, if you were record-ing the number of miles you drive in a week), then you can specify a variable as unsigned:
unsigned long mileage = 0UL;
Here, the minimum value that can be stored in the variable mileage is zero, and the maximum value is 4,294,967,295 (that’s 232–1). Compare this to the range of –2,147,483,648 to 2,147,483,647 for a signedlong. The bit that is used in a signed variable to determine the sign of the value is used in an unsignedvariable as part of the numeric value instead. Consequently, an unsigned variable has a larger range of
54
Chapter 2: Data, Variables, and Calculations
25905c02.qxd:WroxPro 2/21/08 8:38 AM Page 54

positive values, but it can’t represent a negative value. Note how a U (or u) is appended to unsignedconstants. In the preceding example I also have L appended to indicate that the constant is long. Youcan use either upper- or lowercase for U and L, and the sequence is unimportant. However, it’s a goodidea to adopt a consistent way of specifying such values.
You can also use unsigned by itself as the type specification for a variable, in which case you are speci-fying the variable to be of type unsigned int.
Remember, both signed and unsigned are keywords, so you can’t use them as variable names.
The Boolean TypeBoolean variables are variables can have only two values: a value called true and a value called false.The type for a logical variable is bool, named after George Boole, who developed Boolean algebra, andtype bool is regarded as an integer type. Boolean variables are also referred to as logical variables. Variablesof type bool are used to store the results of tests that can be either true or false, such as whether one valueis equal to another.
You could declare the name of a variable of type bool with the statement:
bool testResult;
Of course, you can also initialize variables of type bool when you declare them:
bool colorIsRed = true;
Or like this:
bool colorIsRed(true);
You will find that the values TRUE and FALSE are used quite extensively with variables of numerictype, and particularly of type int. This is a hangover from the time before variables of type bool wereimplemented in C++ when variables of type int were typically used to represent logical values. In thiscase a zero value is treated as false and a non-zero value as true. The symbols TRUE and FALSE are stillused within the MFC where they represent a non-zero integer value and 0, respectively. Note that TRUEand FALSE — written with capital letters — are not keywords in C++; they are just symbols definedwithin the MFC. Note also that TRUE and FALSE are not legal bool values, so don’t confuse truewith TRUE.
Floating-Point TypesValues that aren’t integral are stored as floating-point numbers. A floating-point number can be expressedas a decimal value such as 112.5, or with an exponent such as 1.125E2 where the decimal part is multipliedby the power of 10 specified after the E (for Exponent). Our example is, therefore, 1.125 × 10², which is 112.5.
A floating-point constant must contain a decimal point, or an exponent, or both. Ifyou write a numerical value with neither, you have an integer.
55
Chapter 2: Data, Variables, and Calculations
25905c02.qxd:WroxPro 2/21/08 8:38 AM Page 55

You can specify a floating-point variable using the keyword double, as in this statement:
double in_to_mm = 25.4;
A variable of type double occupies 8 bytes of memory and stores values accurate to approximately 15decimal digits. The range of values stored is much wider than that indicated by the 15 digits accuracy,being from 1.7 × 10-308 to 1.7 × 10308, positive and negative.
If you don’t need 15 digits precision, and you don’t need the massive range of values provided by doublevariables, you can opt to use the keyword float to declare floating-point variables occupying 4 bytes. Forexample:
float pi = 3.14159f;
This statement defines a variable pi with the initial value 3.14159. The f at the end of the constant specifiesthat it is of type float. Without the f, the constant would have been of type double. Variables that youdeclare as float have approximately 7 decimal digits of precision and can have values from 3.4 × 10-38 to3.4 × 1038, positive and negative.
The ISO/ANSI standard for C++ also defines the long double floating-point type, which in VisualC++ 2008 is implemented with the same range and precision as type double. With some compilerslong double corresponds to a 16-byte floating-point value with a much greater range and precisionthan type double.
Fundamental Types in ISO/ANSI C++The following table contains a summary of all the fundamental types in ISO/ANSI C++ and the range ofvalues that are supported for these in Visual C++ 2008.
Type Size in Bytes Range of Values
bool 1 true or false
char 1 By default the same as type signed char: –128 to +127Optionally you can make char the same range as typeunsigned char.
signed char 1 –128 to +127
unsigned char 1 0 to 255
wchar_t 2 0 to 65,535
short 2 –32,768 to +32,767
unsigned short 2 0 to 65,535
int 4 –2,147,483,648 to 2,147,483,647
unsigned int 4 0 to 4,294,967,295
56
Chapter 2: Data, Variables, and Calculations
25905c02.qxd:WroxPro 2/21/08 8:38 AM Page 56
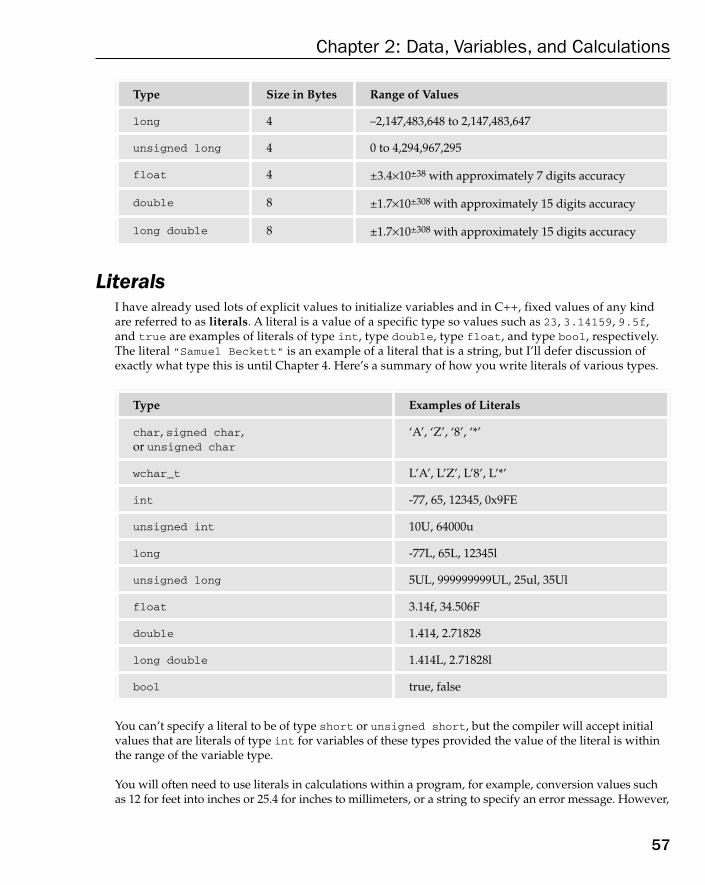
LiteralsI have already used lots of explicit values to initialize variables and in C++, fixed values of any kindare referred to as literals. A literal is a value of a specific type so values such as 23, 3.14159, 9.5f,and true are examples of literals of type int, type double, type float, and type bool, respectively.The literal “Samuel Beckett” is an example of a literal that is a string, but I’ll defer discussion ofexactly what type this is until Chapter 4. Here’s a summary of how you write literals of various types.
You can’t specify a literal to be of type short or unsigned short, but the compiler will accept initialvalues that are literals of type int for variables of these types provided the value of the literal is withinthe range of the variable type.
You will often need to use literals in calculations within a program, for example, conversion values suchas 12 for feet into inches or 25.4 for inches to millimeters, or a string to specify an error message. However,
Type Examples of Literals
char, signed char, or unsigned char
‘A’, ‘Z’, ‘8’, ‘*’
wchar_t L’A’, L’Z’, L’8’, L’*’
int -77, 65, 12345, 0x9FE
unsigned int 10U, 64000u
long -77L, 65L, 12345l
unsigned long 5UL, 999999999UL, 25ul, 35Ul
float 3.14f, 34.506F
double 1.414, 2.71828
long double 1.414L, 2.71828l
bool true, false
Type Size in Bytes Range of Values
long 4 –2,147,483,648 to 2,147,483,647
unsigned long 4 0 to 4,294,967,295
float 4 ±3.4×10±38 with approximately 7 digits accuracy
double 8 ±1.7×10±308 with approximately 15 digits accuracy
long double 8 ±1.7×10±308 with approximately 15 digits accuracy
57
Chapter 2: Data, Variables, and Calculations
25905c02.qxd:WroxPro 2/21/08 8:38 AM Page 57
you should avoid using numeric literals within programs explicitly where their significance is notobvious. It is not necessarily apparent to everyone that when you use the value 2.54, it is the numberof centimeters in an inch. It is better to declare a variable with a fixed value corresponding to your literalinstead — you might name the variable inchesToCentimeters, for example. Then wherever you useinchesToCentimeters in your code, it will be quite obvious what it is. You will see how to fix thevalue of a variable a little later on in this chapter.
Defining Synonyms for Data TypesThe typedef keyword enables you to define your own type name for an existing type. Using typedef, youcould define the type name BigOnes as equivalent to the standard long int type with the declaration:
typedef long int BigOnes; // Defining BigOnes as a type name
This defines BigOnes as an alternative type specifier for long int, so you could declare a variable mynumas long int with the declaration:
BigOnes mynum = 0L; // Define a long int variable
There’s no difference between this declaration and the one using the built-in type name. You could equallywell use
long int mynum = 0L; // Define a long int variable
for exactly the same result. In fact, if you define your own type name such as BigOnes, you can use bothtype specifiers within the same program for declaring different variables that will end up as having thesame type.
Since typedef only defines a synonym for an existing type, it may appear to be a bit superficial, but it isnot at all. You’ll see later that it fulfills a very useful role in enabling you to simplify more complex dec-larations by defining a single name that represents a somewhat convoluted type specification, and thiscan make your code much more readable.
Variables with Specific Sets of ValuesYou will sometimes be faced with the need for variables that have a limited set of possible values that canbe usefully referred to by labels — the days of the week, for example, or months of the year. There is a spe-cific facility in C++ to handle this situation, called an enumeration. Take one of the examples I have justmentioned — a variable that can assume values corresponding to days of the week. You can define this asfollows:
enum Week{Mon, Tues, Wed, Thurs, Fri, Sat, Sun} thisWeek;
This declares an enumeration type with the name Week and the variable thisWeek, which is an instanceof the enumeration type Week that can assume only the constant values specified between the braces. Ifyou try to assign to thisWeek anything other than one of the set of values specified, it will cause an error.The symbolic names listed between the braces are known as enumerators. In fact, each of the names ofthe days will be automatically defined as representing a fixed integer value. The first name in the list,Mon, will have the value 0, Tues will be 1, and so on.
58
Chapter 2: Data, Variables, and Calculations
25905c02.qxd:WroxPro 2/21/08 8:38 AM Page 58

You could assign one of the enumeration constants as the value of the variable thisWeek like this:
thisWeek = Thurs;
Note that you do not need to qualify the enumeration constant with the name of the enumeration. Thevalue of thisWeek will be 3 because the symbolic constants that an enumeration defines are assignedvalues of type int by default in sequence starting with 0.
By default, each successive enumerator is one larger than the value of the previous one, but if you wouldprefer the implicit numbering to start at a different value, you can just write:
enum Week {Mon = 1, Tues, Wed, Thurs, Fri, Sat, Sun} thisWeek;
Now the enumeration constants will be equivalent to 1 through 7. The enumerators don’t even need tohave unique values. You could define Mon and Tues as both having the value 1, for example, with thestatement:
enum Week {Mon = 1, Tues = 1, Wed, Thurs, Fri, Sat, Sun} thisWeek;
As the type of the variable thisWeek is type int, it will occupy four bytes, as will all variables that areof an enumeration type.
Note that you are not allowed to use functional notation for initializing enumerators. You must use theassignment operator as in the examples you have seen.
Having defined the form of an enumeration, you can define another variable thus:
enum Week nextWeek;
This defines a variable nextWeek as an enumeration that can assume the values previously specified.You can also omit the enum keyword in declaring a variable, so, instead of the previous statement, youcould write:
Week next_week;
If you wish, you can assign specific values to all the enumerators. For example, you could define thisenumeration:
enum Punctuation {Comma = ‘,’, Exclamation = ‘!’, Question = ‘?’} things;
Here you have defined the possible values for the variable things as the numerical equivalents of theappropriate symbols. If you look in the ASCII table in Appendix B, you will see that the symbols are 44,33 and 63, respectively, in decimal. As you can see, the values assigned don’t have to be in ascendingorder. If you don’t specify all the values explicitly, each enumerator will be assigned a value increment-ing by 1 from the last specified value, as in our second Week example.
You can omit the enumeration type if you don’t need to define other variables of this type later. Forexample:
enum {Mon, Tues, Wed, Thurs, Fri, Sat, Sun} thisWeek, nextWeek, lastWeek;
59
Chapter 2: Data, Variables, and Calculations
25905c02.qxd:WroxPro 2/21/08 8:38 AM Page 59

Here you have three variables declared that can assume values from Mon to Sun. Because the enumera-tion type is not specified, you cannot refer to it. Note that you cannot define other variables for this enu-meration at all, because you would not be permitted to repeat the definition. Doing so would imply thatyou were redefining values for Mon to Sun, and this isn’t allowed.
Basic Input/Output OperationsHere, you will only look at enough of native C++ input and output to get you through learning aboutC++. It’s not that it’s difficult — quite the opposite in fact — but for Windows programming you won’tneed it at all. C++ input/output revolves around the notion of a data stream, where you can insert datainto an output stream or extract data from an input stream. You have already seen that the ISO/ANSIC++ standard output stream to the command line on the screen is referred to as cout. The complemen-tary input stream from the keyboard is referred to as cin.
Input from the KeyboardYou obtain input from the keyboard through the stream cin, using the extractor operator for a stream>>. To read two integer values from the keyboard into integer variables num1 and num2, you can writethis statement:
cin >> num1 >> num2;
The extraction operator, >>, “points” in the direction that data flows — in this case, from cin to each ofthe two variables in turn. Any leading whitespace is skipped, and the first integer value you key in is readinto num1. This is because the input statement executes from left to right. Any whitespace following num1is ignored and the second integer value that you enter is read into num2. There has to be some whitespacebetween successive values though, so that they can be differentiated. The stream input operation endswhen you press the Enter key, and execution then continues with the next statement. Of course, errorscan arise if you key in the wrong data, but I will assume that you always get it right!
Floating-point values are read from the keyboard in exactly the same way as integers and, of course, youcan mix the two. The stream input and operations automatically deal with variables and data of any ofthe fundamental types. For example, in the statements,
int num1 = 0, num2 = 0;double factor = 0.0;cin >> num1 >> factor >> num2;
the last line will read an integer into num1, then a floating-point value into factor and, finally, an integerinto num2.
Output to the Command LineYou have already seen output to the command line, but I want to revisit it anyway. Writing information to the display operates in a complementary fashion to input. As you have seen, the stream is called cout,and you use the insertion operator, << to transfer data to the output stream. This operator also “points” in the direction of data movement. You have already used this operator to output a text string betweenquotes. I can demonstrate the process of outputting the value of a variable with a simple program.
60
Chapter 2: Data, Variables, and Calculations
25905c02.qxd:WroxPro 2/21/08 8:38 AM Page 60

Try It Out Output to the Command LineI’ll assume that you’ve got the hang of creating a new empty project by adding a new source file to the project and building it into an executable. Here’s the code that you need to put in the source file onceyou have created the Ex2_02 project:
// Ex2_02.cpp// Exercising output#include <iostream>
using std::cout;using std::endl;
int main(){
int num1 = 1234, num2 = 5678;cout << endl; // Start on a new linecout << num1 << num2; // Output two valuescout << endl; // End on a new linereturn 0; // Exit program
}
How It WorksThe first statement in the body of main() declares and initializes two integer variables, num1 and num2.This is followed by two output statements, the first of which moves the screen cursor position to a newline. Because output statements execute from left to right, the second output statement displays the valueof num1 followed by the value of num2.
When you compile and execute this, you will get the output:
12345678
The output is correct, but it’s not exactly helpful. You really need the two output values to be separatedby at least one space. The default for stream output is to just output the digits in the output value, whichdoesn’t provide for spacing successive output values out nicely so they can be differentiated. As it is, youhave no way to tell where the first number ends and the second number begins.
Formatting the OutputYou can fix the problem of there being no spaces between items of data quite easily, though, just by out-putting a space between the two values. You can do this by replacing the following line in your originalprogram:
cout << num1 << num2; // Output two values
Just substitute the statement:
cout << num1 << ‘ ‘ << num2; // Output two values
61
Chapter 2: Data, Variables, and Calculations
25905c02.qxd:WroxPro 2/21/08 8:38 AM Page 61
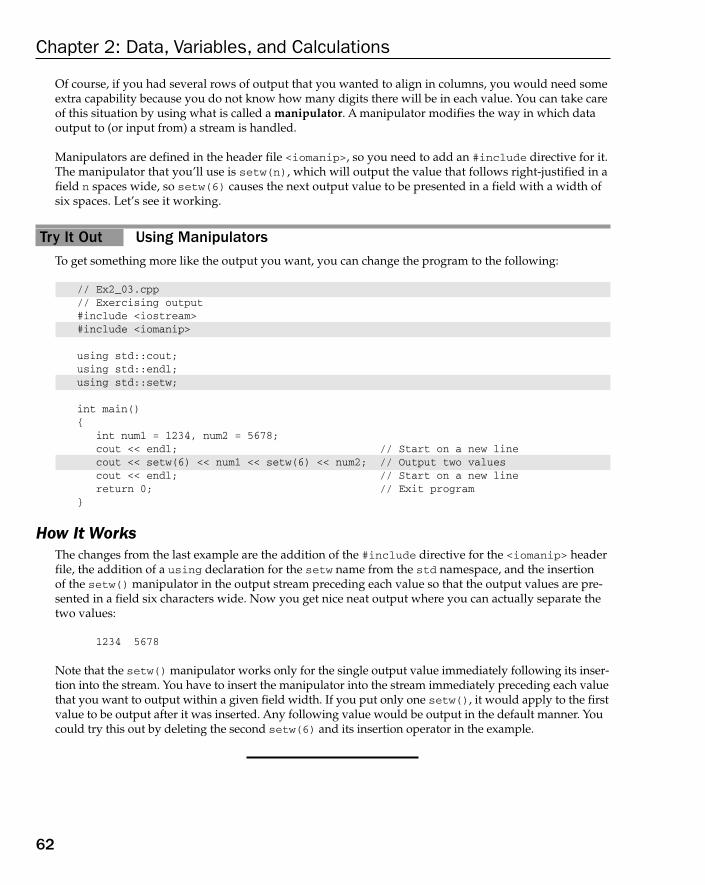
Of course, if you had several rows of output that you wanted to align in columns, you would need someextra capability because you do not know how many digits there will be in each value. You can take careof this situation by using what is called a manipulator. A manipulator modifies the way in which dataoutput to (or input from) a stream is handled.
Manipulators are defined in the header file <iomanip>, so you need to add an #include directive for it.The manipulator that you’ll use is setw(n), which will output the value that follows right-justified in afield n spaces wide, so setw(6) causes the next output value to be presented in a field with a width ofsix spaces. Let’s see it working.
Try It Out Using ManipulatorsTo get something more like the output you want, you can change the program to the following:
// Ex2_03.cpp// Exercising output#include <iostream>#include <iomanip>
using std::cout;using std::endl;using std::setw;
int main(){
int num1 = 1234, num2 = 5678;cout << endl; // Start on a new linecout << setw(6) << num1 << setw(6) << num2; // Output two valuescout << endl; // Start on a new linereturn 0; // Exit program
}
How It WorksThe changes from the last example are the addition of the #include directive for the <iomanip> headerfile, the addition of a using declaration for the setw name from the std namespace, and the insertion of the setw() manipulator in the output stream preceding each value so that the output values are pre-sented in a field six characters wide. Now you get nice neat output where you can actually separate thetwo values:
1234 5678
Note that the setw() manipulator works only for the single output value immediately following its inser-tion into the stream. You have to insert the manipulator into the stream immediately preceding each valuethat you want to output within a given field width. If you put only one setw(), it would apply to the firstvalue to be output after it was inserted. Any following value would be output in the default manner. Youcould try this out by deleting the second setw(6) and its insertion operator in the example.
62
Chapter 2: Data, Variables, and Calculations
25905c02.qxd:WroxPro 2/21/08 8:38 AM Page 62

Escape SequencesWhen you write a character string between double quotes, you can include special characters calledescape sequences in the string They are called escape sequences because they allow characters to beincluded in a string that otherwise could not be represented by escaping from the default interpretationof the characters. An escape sequence starts with a backslash character, \, and the backslash charactercues the compiler to interpret the character that follows in a special way. For example, a tab character iswritten as \t, so the t is understood by the compiler to represent a tab in the string, and not the letter t.Look at these two output statements:
cout << endl << “This is output.”;cout << endl << “\tThis is output after a tab.”;
They will produce these lines:
This is output.This is output after a tab.
The \t in the second output statement causes the output text to be indented to the first tab position.
In fact, instead of using endl you could use the escape sequence for the newline character, \n, in eachstring, so you could rewrite the preceding statements as follows:
cout << “\nThis is output.”;cout << “\n\tThis is output after a tab.”;
Here are some escape sequences that may be particularly useful:
Obviously, if you want to be able to include a backslash or a double quote as a character to appear in astring, you must use the appropriate escape sequences to represent them. Otherwise, the backslash wouldbe interpreted as the start of another escape sequence, and the double quote would indicate the end of thecharacter string.
Escape Sequence What It Does
\a sounds a beep
\n newline
\’ single quote
\\ backslash
\b backspace
\t tab
\” double quote
\? question mark
63
Chapter 2: Data, Variables, and Calculations
25905c02.qxd:WroxPro 2/21/08 8:38 AM Page 63

You can also use characters specified by escape sequences in the initialization of variables of type char.For example:
char Tab = ‘\t’; // Initialize with tab character
Because a character literal is delimited by single quote characters, you must use an escape sequence tospecify a character literal that is a single quote, thus ‘\’’.
Try It Out Using Escape SequencesHere’s a program that uses some of the escape sequences in the table in the previous section:
// Ex2_04.cpp// Using escape sequences#include <iostream>#include <iomanip>
using std::cout;
int main(){
char newline = ‘\n’; // Newline escape sequencecout << newline; // Start on a new linecout << “\”We\’ll make our escapes in sequence\”, he said.”;cout << “\n\tThe program\’s over, it\’s time take make a beep beep.\a\a”;cout << newline; // Start on a new linereturn 0; // Exit program
}
If you compile and execute this example it will produce the following output:
“We’ll make our escapes in sequence”, he said.The program’s over, it’s time take make a beep beep.
How It WorksThe first line in main() defines the variable newline and initializes it with a character defined by theescape sequence for a new line. You can then use newline instead of endl from the standard library.
After writing newline to cout you output a string that uses the escape sequences for a double quote(\”) and a single quote (\’). You don’t have to use the escape sequence for a single quote here becausethe string is delimited by double quotes and the compile would recognize a single quote character as justthat, and not a delimiter. You must use the escape sequences for the double quotes in the string though.The string starts with a newline escape sequence followed by a tab escape sequence, so the output line isindented by the tab distance. The string also ends with two instances of the escape sequence for a beep,so you should here a double beep from your PC’s speaker.
64
Chapter 2: Data, Variables, and Calculations
25905c02.qxd:WroxPro 2/21/08 8:38 AM Page 64

Calculating in C++This is where you actually start doing something with the data that you enter. You know how to carryout simple input and output; now you are beginning the bit in the middle, the “processing” part of aC++ program. Almost all of the computational aspects of C++ are fairly intuitive, so you should slicethrough this like a hot knife through butter.
The Assignment StatementYou have already seen examples of the assignment statement. A typical assignment statement looks like this:
whole = part1 + part2 + part3;
The assignment statement enables you to calculate the value of an expression which appears on the right-hand side of the equals sign, in this case the sum of part1, part2, and part3, and store the result in thevariable specified on the left-hand side, in this case the variable with the name whole. In this statement,the whole is exactly the sum of its parts, and no more.
Note how the statement, as always, ends with a semicolon.
You can also write repeated assignments such as:
a = b = 2;
This is equivalent to assigning the value 2 to b and then assigning the value of b to a, so both variableswill end up storing the value 2.
Understanding Lvalues and RvaluesAn lvalue is something that refers to an address in memory, and is so called because any expression thatresults in an lvalue can appear on the left of the equals sign in an assignment statement. Most variablesare lvalues, because they specify a place in memory. However, as you’ll see, there are variables that aren’tlvalues and can’t appear on the left of an assignment because their values have been defined as constant.
The variables a and b that appear in the preceding paragraph are lvalues, whereas the result of evaluat-ing the expression a+b would not be, because its result doesn’t determine an address in memory where a value might be stored. The result of an expression that is not an lvalue is referred to as an rvalue.
Lvalues will pop up at various times throughout the book, sometimes where you least expect them, sokeep the idea in mind.
Arithmetic OperationsThe basic arithmetic operators you have at your disposal are addition, subtraction, multiplication, anddivision, represented by the symbols +, -, *, and /, respectively. These operate generally as you would
65
Chapter 2: Data, Variables, and Calculations
25905c02.qxd:WroxPro 2/21/08 8:38 AM Page 65
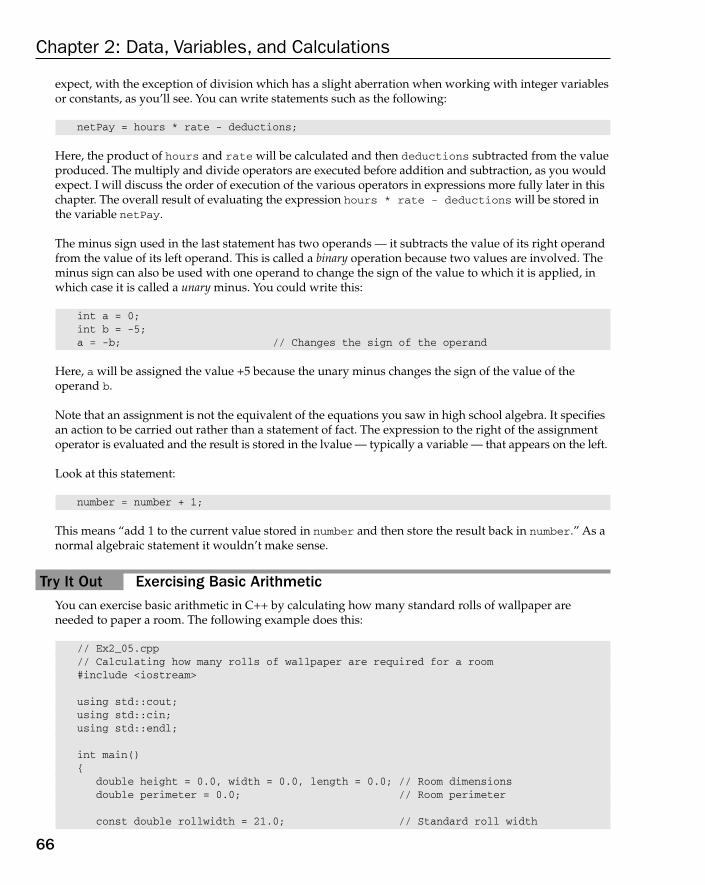
expect, with the exception of division which has a slight aberration when working with integer variablesor constants, as you’ll see. You can write statements such as the following:
netPay = hours * rate - deductions;
Here, the product of hours and rate will be calculated and then deductions subtracted from the valueproduced. The multiply and divide operators are executed before addition and subtraction, as you wouldexpect. I will discuss the order of execution of the various operators in expressions more fully later in thischapter. The overall result of evaluating the expression hours * rate - deductions will be stored inthe variable netPay.
The minus sign used in the last statement has two operands — it subtracts the value of its right operandfrom the value of its left operand. This is called a binary operation because two values are involved. Theminus sign can also be used with one operand to change the sign of the value to which it is applied, inwhich case it is called a unary minus. You could write this:
int a = 0;int b = -5;a = -b; // Changes the sign of the operand
Here, a will be assigned the value +5 because the unary minus changes the sign of the value of theoperand b.
Note that an assignment is not the equivalent of the equations you saw in high school algebra. It specifiesan action to be carried out rather than a statement of fact. The expression to the right of the assignmentoperator is evaluated and the result is stored in the lvalue — typically a variable — that appears on the left.
Look at this statement:
number = number + 1;
This means “add 1 to the current value stored in number and then store the result back in number.” As anormal algebraic statement it wouldn’t make sense.
Try It Out Exercising Basic ArithmeticYou can exercise basic arithmetic in C++ by calculating how many standard rolls of wallpaper areneeded to paper a room. The following example does this:
// Ex2_05.cpp// Calculating how many rolls of wallpaper are required for a room#include <iostream>
using std::cout;using std::cin;using std::endl;
int main(){
double height = 0.0, width = 0.0, length = 0.0; // Room dimensionsdouble perimeter = 0.0; // Room perimeter
const double rollwidth = 21.0; // Standard roll width
66
Chapter 2: Data, Variables, and Calculations
25905c02.qxd:WroxPro 2/21/08 8:38 AM Page 66
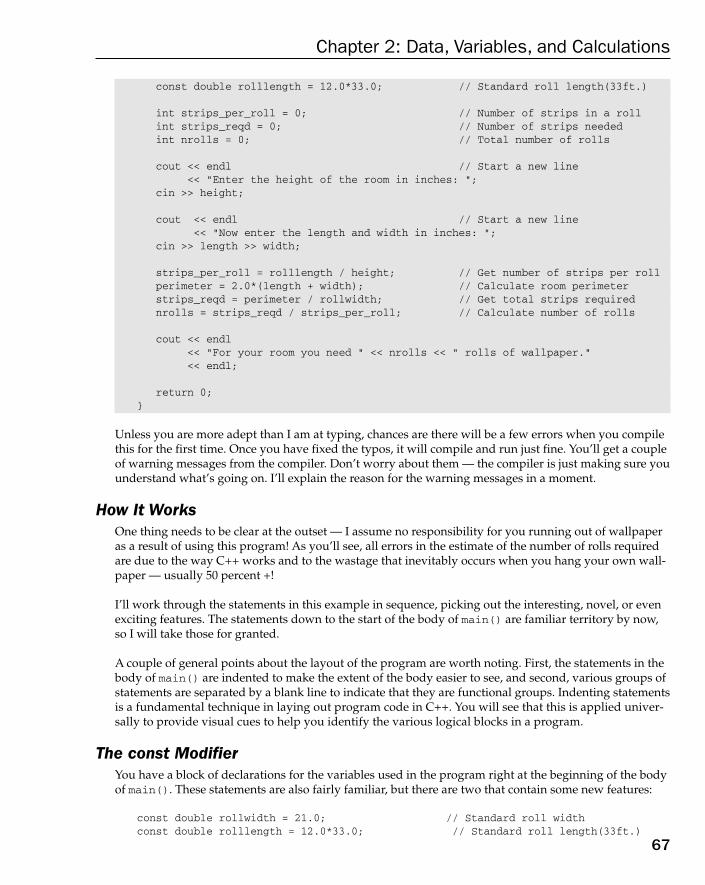
const double rolllength = 12.0*33.0; // Standard roll length(33ft.)
int strips_per_roll = 0; // Number of strips in a rollint strips_reqd = 0; // Number of strips neededint nrolls = 0; // Total number of rolls
cout << endl // Start a new line<< “Enter the height of the room in inches: “;
cin >> height;
cout << endl // Start a new line<< “Now enter the length and width in inches: “;
cin >> length >> width;
strips_per_roll = rolllength / height; // Get number of strips per rollperimeter = 2.0*(length + width); // Calculate room perimeterstrips_reqd = perimeter / rollwidth; // Get total strips requirednrolls = strips_reqd / strips_per_roll; // Calculate number of rolls
cout << endl<< “For your room you need “ << nrolls << “ rolls of wallpaper.”<< endl;
return 0;}
Unless you are more adept than I am at typing, chances are there will be a few errors when you compilethis for the first time. Once you have fixed the typos, it will compile and run just fine. You’ll get a coupleof warning messages from the compiler. Don’t worry about them — the compiler is just making sure youunderstand what’s going on. I’ll explain the reason for the warning messages in a moment.
How It WorksOne thing needs to be clear at the outset — I assume no responsibility for you running out of wallpaperas a result of using this program! As you’ll see, all errors in the estimate of the number of rolls requiredare due to the way C++ works and to the wastage that inevitably occurs when you hang your own wall-paper — usually 50 percent +!
I’ll work through the statements in this example in sequence, picking out the interesting, novel, or evenexciting features. The statements down to the start of the body of main() are familiar territory by now,so I will take those for granted.
A couple of general points about the layout of the program are worth noting. First, the statements in thebody of main() are indented to make the extent of the body easier to see, and second, various groups ofstatements are separated by a blank line to indicate that they are functional groups. Indenting statementsis a fundamental technique in laying out program code in C++. You will see that this is applied univer-sally to provide visual cues to help you identify the various logical blocks in a program.
The const ModifierYou have a block of declarations for the variables used in the program right at the beginning of the bodyof main(). These statements are also fairly familiar, but there are two that contain some new features:
const double rollwidth = 21.0; // Standard roll widthconst double rolllength = 12.0*33.0; // Standard roll length(33ft.)
67
Chapter 2: Data, Variables, and Calculations
25905c02.qxd:WroxPro 2/21/08 8:38 AM Page 67

They both start out with a new keyword: const. This is a type modifier that indicates that the variablesare not just of type double, but are also constants. Because you effectively tell the compiler that these areconstants, the compiler will check for any statements that attempt to change the values of these variables,and if it finds any, it will generate an error message. A variable declared as const is not an lvalue and,therefore, can’t legally be placed on the left of an assignment operation.
You could check this out by adding, anywhere after the declaration of rollwidth, a statement such as:
rollwidth = 0;
You will find the program no longer compiles, returning ‘error C2166: l-value specifies constobject’.
It can be very useful to define constants that you use in a program by means of const variable types, par-ticularly when you use the same constant several times in a program. For one thing, it is much better thansprinkling literals throughout your program that may not have blindingly obvious meanings; with thevalue 42 in a program you could be referring to the meaning of life, the universe, and everything, but ifyou use a const variable with the name myAge that has a value of 42, it becomes obvious that you are not.For another thing, if you need to change the value of a const variable that you are using, you will need to change its definition only in a source file to ensure that the change automatically appears throughout.You’ll see this technique used quite often.
Constant ExpressionsThe const variable rolllength is also initialized with an arithmetic expression (12.0*33.0). Being ableto use constant expressions to initialize variables saves having to work out the value yourself. It can alsobe more meaningful, as it is in this case because 33 feet times 12 inches is a much clearer expression ofwhat the value represents than simply writing 396. The compiler will generally evaluate constant expres-sions accurately, whereas if you do it yourself, depending on the complexity of the expression and yourability to number-crunch, there is a finite probability that it may be wrong.
You can use any expression that can be calculated as a constant at compile time, including const objectsthat you have already defined. So, for instance, if it was useful in the program to do so, you could declarethe area of a standard roll of wallpaper as:
const double rollarea = rollwidth*rolllength;
This statement would need to be placed after the declarations for the two const variables used in theinitialization of rollarea because all the variables that appear in a constant expression must be knownto the compiler at the point in the source file where the constant expression appears.
Program InputAfter declaring some integer variables, the next four statements in the program handle input from thekeyboard:
cout << endl // Start a new line<< “Enter the height of the room in inches: “;
cin >> height;
cout << endl // Start a new line
68
Chapter 2: Data, Variables, and Calculations
25905c02.qxd:WroxPro 2/21/08 8:38 AM Page 68

<< “Now enter the length and width in inches: “;cin >> length >> width;
Here you have written text to cout to prompt for the input required and then read the input from thekeyboard using cin, which is the standard input stream. You first obtain the value for the room heightand then read the length and width successively. In a practical program, you would need to checkfor errors and possibly make sure that the values that are read are sensible, but you don’t have enoughknowledge to do that yet!
Calculating the ResultYou have four statements involved in calculating the number of standard rolls of wallpaper required forthe size of room given:
strips_per_roll = rolllength / height; // Get number of strips in a rollperimeter = 2.0*(length + width); // Calculate room perimeterstrips_reqd = perimeter / rollwidth; // Get total strips requirednrolls = strips_reqd / strips_per_roll; // Calculate number of rolls
The first statement calculates the number of strips of paper with a length corresponding to the heightof the room that you can get from a standard roll, by dividing one into the other. So, if the room is 8 feet high, you divide 96 into 396, which would produce the floating-point result 4.125. There is a sub-tlety here, however. The variable where you store the result, strips_per_roll, was declared as int,so it can store only integer values. Consequently, any floating-point value to be stored as an integer isrounded down to the nearest integer, 4 in this case, and this value is stored. This is actually the resultthat you want here because, although they may fit under a window or over a door, fractions of a stripare best ignored when estimating.
The conversion of a value from one type to another is called casting. This particular example is called animplicit cast, because the code doesn’t explicitly state that a cast is needed, and the compiler has to workit out for itself. The two warnings you got during compilation were issued because the implicit casts thatwere inserted implied information could be lost due to the conversion from one type to another.
You should beware when using implicit casts. Compilers do not always supply a warning that animplicit cast is being made, and if you are assigning a value of one type to a variable of a type with alesser range of values, then there is always a danger that you will lose information. If there are implicitcasts in your program that you have included accidentally, then they may represent bugs that may bedifficult to locate.
Where such an assignment is unavoidable, you can specify the conversion explicitly to demonstrate thatit is no accident and that you really meant to do it. You do this by making an explicit cast of the value onthe right of the assignment to int, so the statement would become:
strips_per_roll = static_cast<int>(rolllength / height); // Get number of strips// in a roll
The addition of static_cast<int> with the parentheses around the expression on the right tells the com-piler explicitly that you want to convert the value of the expression to int. Although this means that youstill lose the fractional part of the value, the compiler assumes that you know what you are doing and willnot issue a warning. You’ll see more about static_cast<>() and other types of explicit casting, later inthis chapter.
69
Chapter 2: Data, Variables, and Calculations
25905c02.qxd:WroxPro 2/21/08 8:38 AM Page 69
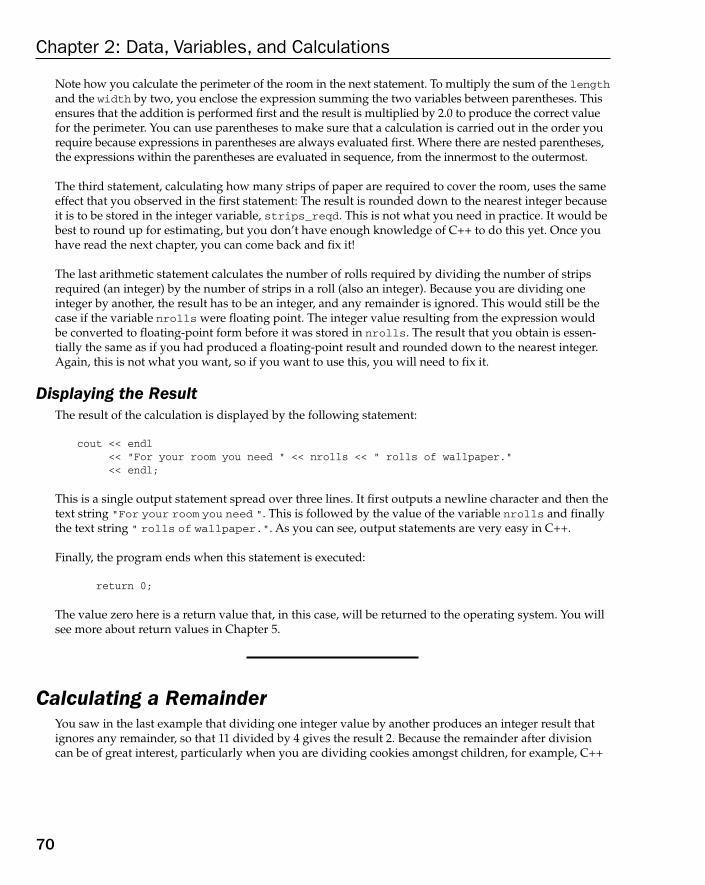
Note how you calculate the perimeter of the room in the next statement. To multiply the sum of the lengthand the width by two, you enclose the expression summing the two variables between parentheses. Thisensures that the addition is performed first and the result is multiplied by 2.0 to produce the correct valuefor the perimeter. You can use parentheses to make sure that a calculation is carried out in the order yourequire because expressions in parentheses are always evaluated first. Where there are nested parentheses,the expressions within the parentheses are evaluated in sequence, from the innermost to the outermost.
The third statement, calculating how many strips of paper are required to cover the room, uses the sameeffect that you observed in the first statement: The result is rounded down to the nearest integer becauseit is to be stored in the integer variable, strips_reqd. This is not what you need in practice. It would bebest to round up for estimating, but you don’t have enough knowledge of C++ to do this yet. Once youhave read the next chapter, you can come back and fix it!
The last arithmetic statement calculates the number of rolls required by dividing the number of stripsrequired (an integer) by the number of strips in a roll (also an integer). Because you are dividing oneinteger by another, the result has to be an integer, and any remainder is ignored. This would still be thecase if the variable nrolls were floating point. The integer value resulting from the expression wouldbe converted to floating-point form before it was stored in nrolls. The result that you obtain is essen-tially the same as if you had produced a floating-point result and rounded down to the nearest integer.Again, this is not what you want, so if you want to use this, you will need to fix it.
Displaying the ResultThe result of the calculation is displayed by the following statement:
cout << endl<< “For your room you need “ << nrolls << “ rolls of wallpaper.”<< endl;
This is a single output statement spread over three lines. It first outputs a newline character and then thetext string “For your room you need “. This is followed by the value of the variable nrolls and finallythe text string “ rolls of wallpaper.”. As you can see, output statements are very easy in C++.
Finally, the program ends when this statement is executed:
return 0;
The value zero here is a return value that, in this case, will be returned to the operating system. You willsee more about return values in Chapter 5.
Calculating a RemainderYou saw in the last example that dividing one integer value by another produces an integer result thatignores any remainder, so that 11 divided by 4 gives the result 2. Because the remainder after divisioncan be of great interest, particularly when you are dividing cookies amongst children, for example, C++
70
Chapter 2: Data, Variables, and Calculations
25905c02.qxd:WroxPro 2/21/08 8:38 AM Page 70

provides a special operator, %, for this. So you can write the following statements to handle the cookie-sharing problem:
int residue = 0, cookies = 19, children = 5;residue = cookies % children;
The variable residue will end up with the value 4, the number left after dividing 19 by 5. To calculatehow many cookies each child receives, you just need to use division, as in the statement:
each = cookies / children;
Modifying a VariableIt’s often necessary to modify the existing value of a variable, such as by incrementing it or doubling it.You could increment a variable called count using the statement:
count = count + 5;
This simply adds 5 to the current value stored in count and stores the result back in count, so if countstarted out at 10, it would end up as 15.
You also have an alternative, shorthand way of writing the same thing in C++:
count += 5;
This says, “Take the value in count, add 5 to it, and store the result back in count.” We can also use otheroperators with this notation. For example,
count *= 5;
has the effect of multiplying the current value of count by 5 and storing the result back in count. Ingeneral, you can write statements of the form,
lhs op= rhs;
lhs stands for any legal expression for the left-hand side of the statement and is usually (but not neces-sarily) a variable name. rhs stands for any legal expression on the right-hand side of the statement. opis any of the following operators:
You have already met the first five of these operators, and you’ll see the others, which are the shift andlogical operators, later in this chapter.
+ - * / %
<< >> & ^ |
71
Chapter 2: Data, Variables, and Calculations
25905c02.qxd:WroxPro 2/21/08 8:38 AM Page 71

The general form of the statement is equivalent to this:
lhs = lhs op (rhs);
The parentheses around rhs imply that this expression is evaluated first, and the result becomes theright operand for op.
This means that you can write statements such as:
a /= b + c;
This will be identical in effect to this statement:
a = a/(b + c);
Thus, the value of a will be divided by the sum of b and c, and the result will be stored back in a.
The Increment and Decrement OperatorsI will now introduce some unusual arithmetic operators called the increment and decrement operators,as you will find them to be quite an asset once you get further into applying C++ in earnest. These areunary operators that you use to increment or decrement the value stored in a variable that holds an inte-gral value. For example, assuming the variable count is of type int, the following three statements allhave exactly the same effect:
count = count + 1; count += 1; ++count;
They each increment the variable count by 1. The last form, using the increment operator, is clearly themost concise.
The increment operator not only changes the value of the variable to which you apply it, but also resultsin a value. Thus, using the increment operator to increase the value of a variable by 1 can also appear aspart of a more complex expression. If incrementing a variable using the ++ operator, as in ++count, is con-tained within another expression, then the action of the operator is to first increment the value of the vari-able and then use the incremented value in the expression. For example, suppose count has the value 5,and you have defined a variable total of type int. Suppose you write the following statement:
total = ++count + 6;
This results in count being incremented to 6, and this result is added to 6, so total is assigned thevalue 12.
So far, you have written the increment operator, ++, in front of the variable to which it applies. This is calledthe prefix form of the increment operator. The increment operator also has a postfix form, where the opera-tor is written after the variable to which it applies; the effect of this is slightly different. The variable to whichthe operator applies is incremented only after its value has been used in context. For example, reset countto the value 5 and rewrite the previous statement as:
total = count++ + 6;
72
Chapter 2: Data, Variables, and Calculations
25905c02.qxd:WroxPro 2/21/08 8:38 AM Page 72

Then total is assigned the value 11, because the initial value of count is used to evaluate the expres-sion before the increment by 1 is applied. The preceding statement is equivalent to the two statements:
total = count + 6;++count;
The clustering of ‘+’ signs, in the example of the preceding postfix form, is likely to lead to confusion.Generally, it isn’t a good idea to write the increment operator in the way that I have written it here. Itwould be clearer to write:
total = 6 + count++;
Where you have an expression such as a++ + b, or even a+++b, it becomes less obvious what is meant orwhat the compiler will do. They are actually the same, but in the second case you might really have meanta + ++b, which is different. It evaluates to one more than the other two expressions.
Exactly the same rules that I have discussed in relation to the increment operator apply to the decrementoperator, --. For example, if count has the initial value 5, then the statement
total = --count + 6;
results in total having the value 10 assigned, whereas,
total = 6 + count--;
sets the value of total to 11. Both operators are usually applied to integers, particularly in the context of loops, as you will see in Chapter 3. You will see in later chapters that they can also be applied to otherdata types in C++, notably variables that store addresses.
Try It Out The Comma OperatorThe comma operator allows you to specify several expressions where normally only one might occur.This is best understood by looking at an example that demonstrates how it works:
// Ex2_06.cpp// Exercising the comma operator#include <iostream>
using std::cout;using std::endl;
int main(){
long num1(0L), num2(0L), num3(0L), num4(0L);
num4 = (num1 = 10L, num2 = 20L, num3 = 30L);cout << endl
<< “The value of a series of expressions “<< “is the value of the rightmost: “<< num4;
cout << endl;
73
Chapter 2: Data, Variables, and Calculations
25905c02.qxd:WroxPro 2/21/08 8:38 AM Page 73
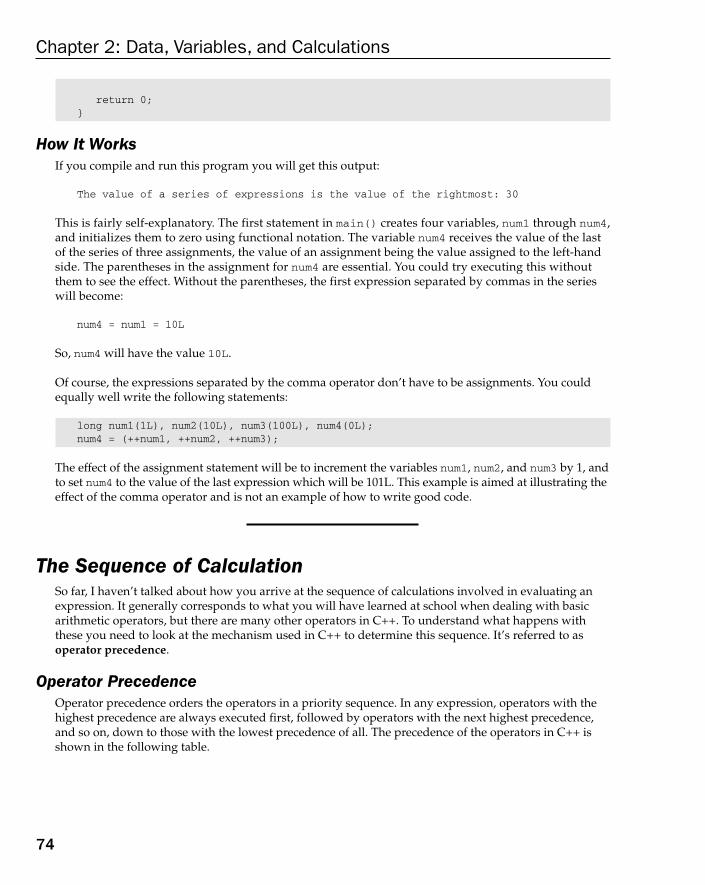
return 0;}
How It WorksIf you compile and run this program you will get this output:
The value of a series of expressions is the value of the rightmost: 30
This is fairly self-explanatory. The first statement in main() creates four variables, num1 through num4,and initializes them to zero using functional notation. The variable num4 receives the value of the lastof the series of three assignments, the value of an assignment being the value assigned to the left-handside. The parentheses in the assignment for num4 are essential. You could try executing this withoutthem to see the effect. Without the parentheses, the first expression separated by commas in the serieswill become:
num4 = num1 = 10L
So, num4 will have the value 10L.
Of course, the expressions separated by the comma operator don’t have to be assignments. You couldequally well write the following statements:
long num1(1L), num2(10L), num3(100L), num4(0L);num4 = (++num1, ++num2, ++num3);
The effect of the assignment statement will be to increment the variables num1, num2, and num3 by 1, andto set num4 to the value of the last expression which will be 101L. This example is aimed at illustrating theeffect of the comma operator and is not an example of how to write good code.
The Sequence of CalculationSo far, I haven’t talked about how you arrive at the sequence of calculations involved in evaluating anexpression. It generally corresponds to what you will have learned at school when dealing with basicarithmetic operators, but there are many other operators in C++. To understand what happens withthese you need to look at the mechanism used in C++ to determine this sequence. It’s referred to asoperator precedence.
Operator PrecedenceOperator precedence orders the operators in a priority sequence. In any expression, operators with thehighest precedence are always executed first, followed by operators with the next highest precedence,and so on, down to those with the lowest precedence of all. The precedence of the operators in C++ isshown in the following table.
74
Chapter 2: Data, Variables, and Calculations
25905c02.qxd:WroxPro 2/21/08 8:38 AM Page 74

There are a lot of operators here that you haven’t seen yet, but you will know them all by the end of thebook. Rather than spreading them around, I have put all the C++ operators in the precedence table so thatyou can always refer back to it if you are uncertain about the precedence of one operator relative to another.
Operators with the highest precedence appear at the top of the table. All the operators that appear in thesame cell in the table have equal precedence. If there are no parentheses in an expression, operators withequal precedence are executed in a sequence determined by their associativity. Thus, if the associativity is“left,” the left-most operator in an expression is executed first, progressing through the expression to theright-most. This means that an expression such as a + b + c + d is executed as though it was written(((a + b) + c) + d) because binary + is left-associative.
Operators Associativity
:: Left
() [] -> . Left
! ~ +(unary) -(unary) ++ -- &(unary) *(unary) (typecast)static_cast const_cast dynamic_cast reinterpret_castsizeof new delete typeid
Right
.*(unary) ->* Left
* / % Left
+ - Left
<< >> Left
< <= > >= Left
== != Left
& Left
^ Left
| Left
&& Left
|| Left
?:(conditional operator) Right
= *= /= %= += -= &= ^= |= <<= >>= Right
, Left
75
Chapter 2: Data, Variables, and Calculations
25905c02.qxd:WroxPro 2/21/08 8:38 AM Page 75

Note that where an operator has a unary (working with one operand) and a binary (working with twooperands) form, the unary form is always of a higher precedence and is, therefore, executed first.
Variable Types and CastingCalculations in C++ can be carried out only between values of the same type. When you write an expres-sion involving variables or constants of different types, for each operation to be performed the compilerhas to convert the type of one of the operands to match that of the other. This conversion process is calledcasting. For example, if you want to add a double value to a value of an integer type, the integer value isfirst converted to double, after which the addition is carried out. Of course, the variable that contains thevalue to be cast is itself not changed. The compiler will store the converted value in a temporary memorylocation, which will be discarded when the calculation is finished.
There are rules that govern the selection of the operand to be converted in any operation. Any expres-sion to be calculated breaks down into a series of operations between two operands. For example, theexpression 2*3-4+5 amounts to the series 2*3 resulting in 6, 6-4 resulting in 2, and finally 2+5 result-ing in 7. Thus, the rules for casting operands where necessary need to be defined only in terms of deci-sions about pairs of operands. So, for any pair of operands of different types, the following rules arechecked in the order that they are written. When one applies, that rule is used.
Rules for Casting Operands1. If either operand is of type long double, the other is converted to long double.
2. If either operand is of type double, the other is converted to double.
3. If either operand is of type float, the other is converted to float.
4. Any operand of type char, signed char, unsigned char, short, or unsigned short is converted to type int.
5. An enumeration type is converted to the first of int, unsigned int, long, or unsigned longthat accommodates the range of the enumerators.
6. If either operand is of type unsigned long, the other is converted to unsigned long.
7. If one operand is of type long and the other is of type unsigned int, then both operands areconverted to type unsigned long.
8. If either operand is of type long, the other is converted to type long.
This looks and reads as though it is incredibly complicated, but the basic principle is to always convert thevalue that has the type that is of a more limited range to the type of the other value. This maximizes the
You can always override the precedence of operators by using parentheses. Becausethere are so many operators in C++, it’s sometimes hard to be sure what takes prece-dence over what. It is a good idea to insert parentheses to make sure. A further plusis that parentheses often make the code much easier to read.
76
Chapter 2: Data, Variables, and Calculations
25905c02.qxd:WroxPro 2/21/08 8:38 AM Page 76

likelihood of being able to accommodate the result. You could try these rules on a hypothetical expressionto see how they work. Suppose that you have a sequence of variable declarations as follows:
double value = 31.0;int count = 16;float many = 2.0f;char num = 4;
Also suppose that you have the following rather arbitrary arithmetic statement:
value = (value - count)*(count - num)/many + num/many;
You can now work out what casts the compiler will apply in the execution of the statement.
The first operation is to calculate (value - count). Rule 1 doesn’t apply but Rule 2 does, so the value ofcount is converted to double and the double result 15.0 is calculated.
Next (count - num) must be evaluated, and here the first rule in sequence that applies is Rule 4, so numis converted from char to int and the result 12 is produced as a value of type int.
The next calculation is the product of the first two results, a double 15.0 and an int 12. Rule 2 applieshere, and the 12 is converted to 12.0 as double, and the double result 180.0 is produced.
This result now has to be divided by many, so Rule 2 applies again, and the value of many is converted todouble before generating the double result 90.0.
The expression num/many is calculated next, and here Rule 3 applies to produce the float value 2.0fafter converting the type of num from char to float.
Lastly, the double value 90.0 is added to the float value 2.0f for which Rule 2 applies, so after convert-ing the 2.0f to 2.0 as double, the final result of 92.0 is stored in value.
In spite of the preceding sequence reading a bit like The Auctioneer’s Song, you should get the general idea.
Casts in Assignment StatementsAs you saw in example Ex2_05.cpp earlier in this chapter, you can cause an implicit cast by writing anexpression on the right-hand side of an assignment that is of a different type from the variable on the left-hand side. This can cause values to be changed and information to be lost. For instance, if you assign afloat or double value to a variable of type int or a long, the fractional part of the float or doublewill be lost and just the integer part will be stored. (You may lose even more information if your float-ing-point variable exceeds the range of values available for the integer type concerned.)
For example, after executing the following code fragment,
int number = 0;float decimal = 2.5f;number = decimal;
77
Chapter 2: Data, Variables, and Calculations
25905c02.qxd:WroxPro 2/21/08 8:38 AM Page 77

the value of number will be 2. Note the f at the end of the constant 2.5f. This indicates to the compiler thatthis constant is single precision floating point. Without the f, the default would have been type double.Any constant containing a decimal point is floating point. If you don’t want it to be double precision, youneed to append the f. A capital letter F would do the job just as well.
Explicit CastsWith mixed expressions involving the basic types, your compiler automatically arranges casting wherenecessary, but you can also force a conversion from one type to another by using an explicit cast. To castthe value of an expression to a given type, you write the cast in the form:
static_cast<the_type_to_convert_to>(expression)
The keyword static_cast reflects the fact that the cast is checked statically — that is, when your pro-gram is compiled. No further checks are made when you execute the program to see if this cast is safeto apply. Later, when you get to deal with classes, you will meet dynamic_cast, where the conversionis checked dynamically — that is, when the program is executing. There are also two other kinds ofcast — const_cast for removing the const-ness of an expression and reinterpret_cast, which isan unconditional cast — but I’ll say no more about these here.
The effect of the static_cast operation is to convert the value that results from evaluating expressionto the type that you specify between the angled brackets. The expression can be anything from a singlevariable to a complex expression involving lots of nested parentheses.
Here’s a specific example of the use of static_cast<>():
double value1 = 10.5;double value2 = 15.5;int whole_number = static_cast<int>(value1) + static_cast<int>(value2);
The initializing value for the variable whole_number is the sum of the integral parts of value1 andvalue2, so they are each explicitly cast to type int. The variable whole_number will therefore havethe initial value 25. The casts do not affect the values stored in value1 and value2, which will remainas 10.5 and 15.5, respectively. The values 10 and 15 produced by the casts are just stored temporarilyfor use in the calculation and then discarded. Although both casts cause a loss of information in thecalculation, the compiler will always assume that you know what you are doing when you specify acast explicitly.
Also, as I described in Ex2_05.cpp relating to assignments involving different types, you can alwaysmake it clear that you know the cast is necessary by making it explicit:
strips_per_roll = static_cast<int>(rolllength / height); //Get number of strips// in a roll
You can write an explicit cast for a numerical value to any numeric type, but you should be conscious of thepossibility of losing information. If you cast a value of type float or double to type long, for example, youwill lose the fractional part of the value when it is converted, so if the value started out as less than 1.0, theresult will be 0. If you cast a value of type double to type float, you will lose accuracy because a floatvariable has only 7 digits precision, whereas double variables maintain 15. Even casting between integer
78
Chapter 2: Data, Variables, and Calculations
25905c02.qxd:WroxPro 2/21/08 8:38 AM Page 78
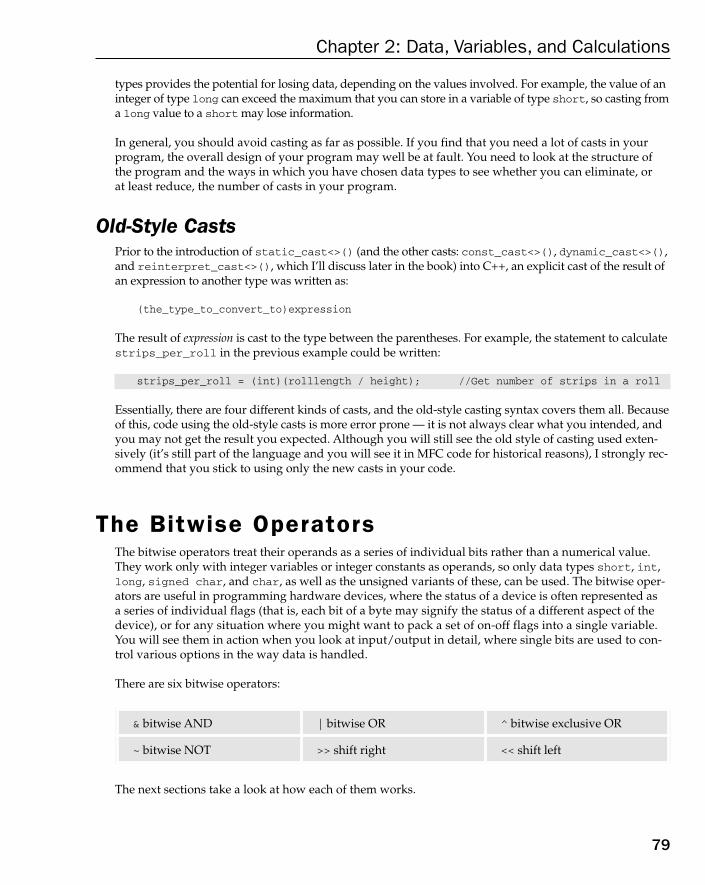
types provides the potential for losing data, depending on the values involved. For example, the value of aninteger of type long can exceed the maximum that you can store in a variable of type short, so casting froma long value to a short may lose information.
In general, you should avoid casting as far as possible. If you find that you need a lot of casts in yourprogram, the overall design of your program may well be at fault. You need to look at the structure ofthe program and the ways in which you have chosen data types to see whether you can eliminate, or at least reduce, the number of casts in your program.
Old-Style CastsPrior to the introduction of static_cast<>() (and the other casts: const_cast<>(), dynamic_cast<>(),and reinterpret_cast<>(), which I’ll discuss later in the book) into C++, an explicit cast of the result ofan expression to another type was written as:
(the_type_to_convert_to)expression
The result of expression is cast to the type between the parentheses. For example, the statement to calculatestrips_per_roll in the previous example could be written:
strips_per_roll = (int)(rolllength / height); //Get number of strips in a roll
Essentially, there are four different kinds of casts, and the old-style casting syntax covers them all. Becauseof this, code using the old-style casts is more error prone — it is not always clear what you intended, andyou may not get the result you expected. Although you will still see the old style of casting used exten-sively (it’s still part of the language and you will see it in MFC code for historical reasons), I strongly rec-ommend that you stick to using only the new casts in your code.
The Bitwise OperatorsThe bitwise operators treat their operands as a series of individual bits rather than a numerical value.They work only with integer variables or integer constants as operands, so only data types short, int,long, signed char, and char, as well as the unsigned variants of these, can be used. The bitwise oper-ators are useful in programming hardware devices, where the status of a device is often represented as a series of individual flags (that is, each bit of a byte may signify the status of a different aspect of thedevice), or for any situation where you might want to pack a set of on-off flags into a single variable.You will see them in action when you look at input/output in detail, where single bits are used to con-trol various options in the way data is handled.
There are six bitwise operators:
The next sections take a look at how each of them works.
& bitwise AND | bitwise OR ^ bitwise exclusive OR
~ bitwise NOT >> shift right << shift left
79
Chapter 2: Data, Variables, and Calculations
25905c02.qxd:WroxPro 2/21/08 8:38 AM Page 79

The Bitwise ANDThe bitwise AND, &, is a binary operator that combines corresponding bits in its operands in a particularway. If both corresponding bits are 1, the result is a 1 bit, and if either or both bits are 0, the result is a 0 bit.
The effect of a particular binary operator is often shown using what is called a truth table. This shows,for various possible combinations of operands, what the result is. The truth table for & is as follows:
For each row and column combination, the result of & combining the two is the entry at the intersectionof the row and column. You can see how this works in an example:
char letter1 = ‘A’, letter2 = ‘Z’, result = 0;result = letter1 & letter2;
You need to look at the bit patterns to see what happens. The letters ‘A’ and ‘Z’ correspond to hexadec-imal values 0x41 and 0x5A, respectively (see Appendix B for ASCII codes). The way in which the bitwiseAND operates on these two values is shown in Figure 2-9.
Figure 2-9
You can confirm this by looking at how corresponding bits combine with & in the truth table. After theassignment, result will have the value 0x40, which corresponds to the character ‘@’.
Bitwise AND 0 1
0 0 0
1 0 1
80
Chapter 2: Data, Variables, and Calculations
25905c02.qxd:WroxPro 2/21/08 9:42 AM Page 80

Because the & produces zero if either bit is zero, you can use this operator to make sure that unwantedbits are set to 0 in a variable. You achieve this by creating what is called a “mask” and combining withthe original variable using &. You create the mask by specifying a value that has 1 where you want tokeep a bit, and 0 where you want to set a bit to zero. The result of ANDing the mask with another inte-ger will be 0 bits where the mask bit is 0, and the same value as the original bit in the variable where themask bit is 1. Suppose you have a variable letter of type char where, for the purposes of illustration,you want to eliminate the high order 4 bits, but keep the low order 4 bits. This is easily done by settingup a mask as 0x0F and combining it with the value of letter using & like this:
letter = letter & 0x0F;
or, more concisely:
letter &= 0x0F;
If letter started out as 0x41, it would end up as 0x01 as a result of either of these statements. Thisoperation is shown in Figure 2-10.
Figure 2-10
The 0 bits in the mask cause corresponding bits in letter to be set to 0, and the 1 bits in the mask causecorresponding bits in letter to be kept as they are.
Similarly, you can use a mask of 0xF0 to keep the 4 high order bits, and zero the 4 low order bits.Therefore, this statement,
letter &= 0xF0;
will result in the value of letter being changed from 0x41 to 0x40.
&
=
0letter: 0×41
mask: 0×0F
result: 0×01
0
0
&
=
1
0
0
&
=
0
0
0
&
=
0
0
0
&
=
0
1
0
&
=
0
1
0
&
=
0
1
0
&
=
1
1
1
81
Chapter 2: Data, Variables, and Calculations
25905c02.qxd:WroxPro 2/21/08 8:38 AM Page 81
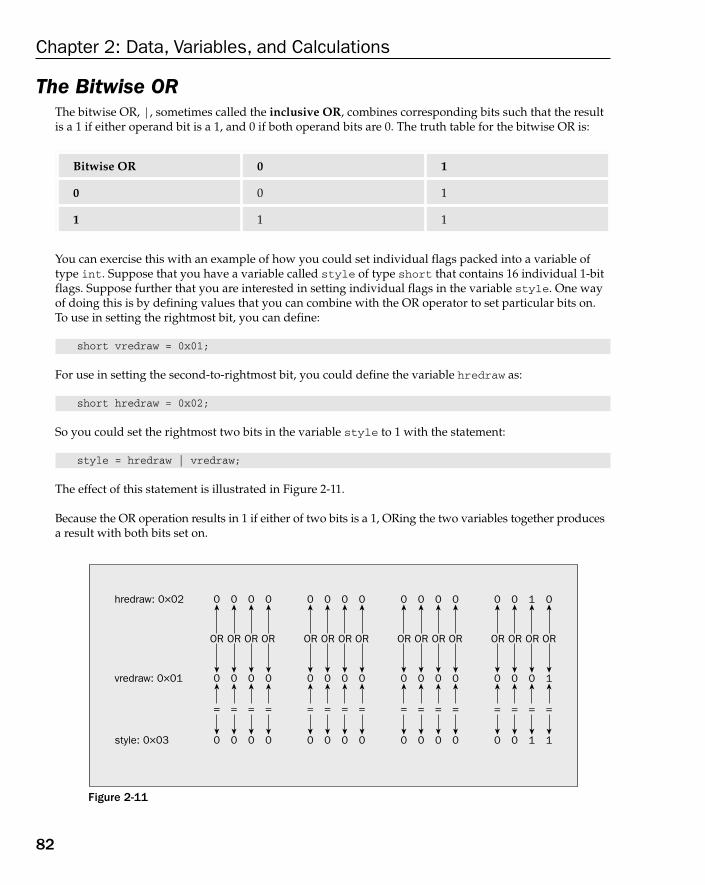
The Bitwise ORThe bitwise OR, |, sometimes called the inclusive OR, combines corresponding bits such that the resultis a 1 if either operand bit is a 1, and 0 if both operand bits are 0. The truth table for the bitwise OR is:
You can exercise this with an example of how you could set individual flags packed into a variable oftype int. Suppose that you have a variable called style of type short that contains 16 individual 1-bitflags. Suppose further that you are interested in setting individual flags in the variable style. One wayof doing this is by defining values that you can combine with the OR operator to set particular bits on.To use in setting the rightmost bit, you can define:
short vredraw = 0x01;
For use in setting the second-to-rightmost bit, you could define the variable hredraw as:
short hredraw = 0x02;
So you could set the rightmost two bits in the variable style to 1 with the statement:
style = hredraw | vredraw;
The effect of this statement is illustrated in Figure 2-11.
Because the OR operation results in 1 if either of two bits is a 1, ORing the two variables together producesa result with both bits set on.
Figure 2-11
OR OR OR OR OR OR OR OR OR OR OR OR OR OR OR OR
=
0hredraw: 0×02
vredraw: 0×01
style: 0×03
0
0
=
0
0
0
=
0
0
0
=
0
0
0
=
0
0
0
=
0
0
0
=
0
0
0
=
0
0
0
=
0
0
0
=
0
0
0
=
0
0
0
=
0
0
0
=
0
0
0
=
0
0
0
=
1
0
1
=
0
1
1
Bitwise OR 0 1
0 0 1
1 1 1
82
Chapter 2: Data, Variables, and Calculations
25905c02.qxd:WroxPro 2/21/08 8:38 AM Page 82

A very common requirement is to be able to set flags in a variable without altering any of the others whichmay have been set elsewhere. You can do this quite easily with a statement such as:
style |= hredraw | vredraw;
This statement will set the two rightmost bits of the variable style to 1, leaving the others at whateverthey were before the execution of this statement.
The Bitwise Exclusive ORThe exclusive OR, ^, is so called because it operates similarly to the inclusive OR but produces 0 whenboth operand bits are 1. Therefore, its truth table is as follows:
Using the same variable values that we used with the AND, you can look at the result of the followingstatement:
result = letter1 ^ letter2;
This operation can be represented as:
letter1 0100 0001
letter2 0101 1010
EORed together produce:
result 0001 1011
The variable result is set to 0x1B, or 27 in decimal notation.
The ^ operator has a rather surprising property. Suppose that you have two char variables, first withthe value ‘A’, and last with the value ‘Z’, corresponding to binary values 0100 0001 and 0101 1010. Ifyou write the statements
first ^= last; // Result first is 0001 1011last ^= first; // Result last is 0100 0001first ^= last; // Result first is 0101 1010
the result of these is that first and last have exchanged values without using any intermediate mem-ory location. This works with any integer values.
Bitwise EOR 0 1
0 0 1
1 1 0
83
Chapter 2: Data, Variables, and Calculations
25905c02.qxd:WroxPro 2/21/08 8:38 AM Page 83

The Bitwise NOTThe bitwise NOT, ~, takes a single operand for which it inverts the bits: 1 becomes 0, and 0 becomes 1.Thus, if you execute the statement
result = ~letter1;
if letter1 is 0100 0001, the variable result will have the value 1011 1110, which is 0xBE, or 190 as adecimal value.
The Bitwise Shift OperatorsThese operators shift the value of an integer variable a specified number of bits to the left or right. Theoperator >> is for shifts to the right, while << is the operator for shifts to the left. Bits that “fall off” eitherend of the variable are lost. Figure 2-12 shows the effect of shifting the 2-byte variable left and right, withthe initial value shown.
Figure 2-12
You declare and initialize a variable called number with the statement:
unsigned short number = 16387U;
As you saw earlier in this chapter, you write unsigned integer literals with a letter U or u appended tothe number. You can shift the contents of this variable to the left with the statement:
number <<= 2; // Shift left two bit positions
0 1 0 0 0 0 0 0 0 0 0 0 0 0 1 1
0 1 0 0 0 0 0 0 0 0 0 0 0 0 1 1
0 0 0 0 0 0 0 0 0 0 0 0 1 1 0 0
0 1 0 0 0 0 0 0 0 0 0 0 0 0 1 1
0 0 0 1 0 0 0 0 0 0 0 0 0 0 0 0
Decimal 16,387 in binary is:
Shift left 2:
Shift right 2:
These twobits areshifted outand lost
These twobits areshifted outand lost
Zeros are shiftedin from the left
Zeros are shiftedin from the right
– – – – – – – – – –
– – – – – – – – – –
=12
= 4096
84
Chapter 2: Data, Variables, and Calculations
25905c02.qxd:WroxPro 2/21/08 8:38 AM Page 84

The left operand of the shift operator is the value to be shifted, and the number of bit positions that thevalue is to be shifted is specified by the right operand. The illustration shows the effect of the operation.As you can see, shifting the value 16,387 two positions to the left produces the value 12. The rather dras-tic change in the value is the result of losing the high order bit when it is shifted out.
You can also shift the value to the right. Let’s reset the value of number to its initial value of 16,387. Thenyou can write:
number >>= 2; // Shift right two bit positions
This shifts the value 16,387 two positions to the right, storing the value 4,096. Shifting right two bits iseffectively dividing the value by 4 (without remainder). This is also shown in the illustration.
As long as bits are not lost, shifting n bits to the left is equivalent to multiplying the value by 2, n times.In other words, it is equivalent to multiplying by 2n. Similarly, shifting right n bits is equivalent to divid-ing by 2n. But beware: as you saw with the left shift of the variable number, if significant bits are lost, theresult is nothing like what you would expect. However, this is no different from the multiply operation.If you multiplied the 2-byte number by 4 you would get the same result, so shifting left and multiplyare still equivalent. The problem of accuracy arises because the value of the result of the multiplicationis outside the range of a 2-byte integer.
You might imagine that confusion could arise between the operators that you have been using for inputand output and the shift operators. As far as the compiler is concerned, the meaning will always be clearfrom the context. If it isn’t, the compiler will generate a message, but you need to be careful. For example,if you want to output the result of shifting a variable number left by 2 bits, you could write the followingstatement:
cout << (number << 2);
Here, the parentheses are essential. Without them, the shift operator will be interpreted by the compileras a stream operator, so you won’t get the result that you intended; the output will be the value of num-ber followed by the value 2.
In the main, the right shift operation is similar to the left shift. For example, suppose the variable numberhas the value 24, and you execute the following statement:
number >>= 2;
This will result in number having the value 6, effectively dividing the original value by 4. However, theright shift operates in a special way with signed integer types that are negative (that is, the sign bit,which is the leftmost bit, is 1). In this case, the sign bit is propagated to the right. For example, declareand initialize a variable number of type char with the value -104 in decimal:
char number = -104; // Binary representation is 1001 1000
Now you can shift it right 2 bits with the operation:
number >>= 2; // Result 1110 0110
85
Chapter 2: Data, Variables, and Calculations
25905c02.qxd:WroxPro 2/21/08 8:38 AM Page 85

The decimal value of the result is -26, as the sign bit is repeated. With operations on unsigned integertypes, of course, the sign bit is not repeated and zeros appear.
You may be wondering how the shift operators, << and >>, can be the same as the operators used withthe standard streams for input and output. These operators can have different meanings in the two con-texts because cin and cout are stream objects, and because they are objects it is possible to redefine themeaning of operators in context by a process called operator overloading. Thus the >> operator hasbeen redefined for input stream objects such as cin so you can use it in the way you have seen. The << operator has also been redefined for use with output stream objects such as cout. You will learnabout operator overloading in Chapter 8.
Understanding Storage Duration and ScopeAll variables have a finite lifetime when your program executes. They come into existence from the pointat which you declare them and then, at some point, they disappear — at the latest, when your programterminates. How long a particular variable lasts is determined by a property called its storage duration.There are three different kinds of storage duration that a variable can have:
❑ Automatic storage duration
❑ Static storage duration
❑ Dynamic storage duration
Which of these a variable will have depends on how you create it. I will defer discussion of variableswith dynamic storage duration until Chapter 4, but you will be exploring the characteristics of the othertwo in this chapter.
Another property that variables have is scope. The scope of a variable is simply that part of your programover which the variable name is valid. Within a variable’s scope you can legally refer to it, either to setits value or to it in an expression. Outside of the scope of a variable, you cannot refer to its name — anyattempt to do so will cause a compiler error. Note that a variable may still exist outside of its scope, eventhough you cannot refer to it by name. You will see examples of this situation a little later in this discussion.
All of the variables that you have declared up to now have had automatic storage duration, and aretherefore called automatic variables. Let’s take a closer look at these first.
Automatic VariablesThe variables that you have declared so far have been automatic declared within a block — that is, withinthe extent of a pair of braces. These are called automatic variables and are said to have local scope or blockscope. An automatic variable is “in scope” from the point at which it is declared until the end of the blockcontaining its declaration. The space that an automatic variable occupies is allocated automatically in amemory area called the stack that is set aside specifically for this purpose. The default size for the stack is1MB, which is adequate for most purposes, but if it should turn out to be insufficient, you can increase thesize of the stack by setting the /STACK option for the project to a value of your choosing.
An automatic variable is “born” when it is defined and space for it is allocated on the stack, and it auto-matically ceases to exist at the end of the block containing the definition of the variable. This will be at
86
Chapter 2: Data, Variables, and Calculations
25905c02.qxd:WroxPro 2/21/08 8:38 AM Page 86
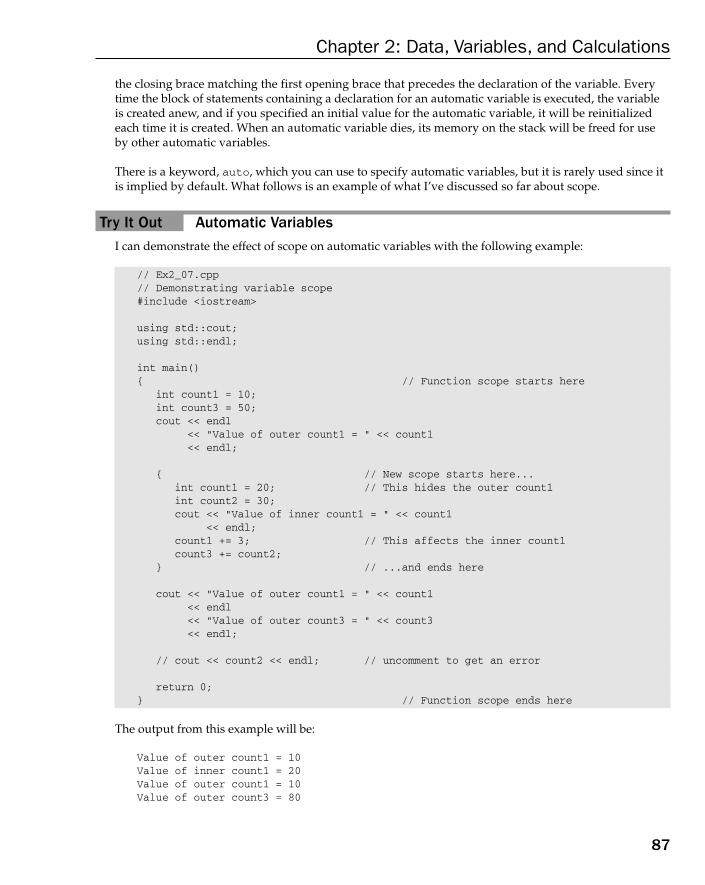
the closing brace matching the first opening brace that precedes the declaration of the variable. Everytime the block of statements containing a declaration for an automatic variable is executed, the variableis created anew, and if you specified an initial value for the automatic variable, it will be reinitializedeach time it is created. When an automatic variable dies, its memory on the stack will be freed for useby other automatic variables.
There is a keyword, auto, which you can use to specify automatic variables, but it is rarely used since itis implied by default. What follows is an example of what I’ve discussed so far about scope.
Try It Out Automatic VariablesI can demonstrate the effect of scope on automatic variables with the following example:
// Ex2_07.cpp// Demonstrating variable scope#include <iostream>
using std::cout;using std::endl;
int main(){ // Function scope starts here
int count1 = 10;int count3 = 50;cout << endl
<< “Value of outer count1 = “ << count1<< endl;
{ // New scope starts here...int count1 = 20; // This hides the outer count1int count2 = 30;cout << “Value of inner count1 = “ << count1
<< endl;count1 += 3; // This affects the inner count1count3 += count2;
} // ...and ends here
cout << “Value of outer count1 = “ << count1<< endl<< “Value of outer count3 = “ << count3<< endl;
// cout << count2 << endl; // uncomment to get an error
return 0;} // Function scope ends here
The output from this example will be:
Value of outer count1 = 10Value of inner count1 = 20Value of outer count1 = 10Value of outer count3 = 80
87
Chapter 2: Data, Variables, and Calculations
25905c02.qxd:WroxPro 2/21/08 8:38 AM Page 87
How It WorksThe first two statements declare and define two integer variables, count1 and count3, with initial valuesof 10 and 50, respectively. Both these variables exist from this point to the closing brace at the end of theprogram. The scope of these variables also extends to the closing brace at the end of main().
Remember that the lifetime and scope of a variable are two different things. It’s important not to getthese two ideas confused. The lifetime is the period during execution from when the variable is first created to when it is destroyed and the memory it occupies is freed for other uses. The scope of a variable is the region of program code over which the variable may be accessed.
Following the variable definitions, the value of count1 is output to produce the first of the lines shownabove. There is then a second brace, which starts a new block. Two variables, count1 and count2, are defined within this block, with values 20 and 30 respectively. The count1 declared here is differentfrom the first count1. The first count1 still exists, but its name is masked by the second count1. Anyuse of the name count1 following the declaration within the inner block refers to the count1 declaredwithin that block.
I used a duplicate of the variable name count1 here only to illustrate what happens. Although this codeis legal, it isn’t a good approach to programming in general. In a real-world programming environmentit would be confusing, and if you use duplicate names it makes it very easy to hide variables defined inan outer scope accidentally.
The value shown in the second output line shows that within the inner block, you are using the count1in the inner scope — that is, inside the innermost braces:
cout << “Value of inner count1 = “ << count1<< endl;
Had you still been using the outer count1, then this would display the value 10. The variable count1 isthen incremented by the statement:
count1 += 3; // This affects the inner count1
The increment applies to the variable in the inner scope, since the outer one is still hidden. However,count3, which was defined in the outer scope, is incremented in the next statement without any problem:
count3 += count2;
This shows that the variables that were declared at the beginning of the outer scope are accessible fromwithin the inner scope. (Note that if count3 had been declared after the second of the inner pair of braces,then it would still be within the outer scope, but in that case count3 would not exist when the above state-ment is executed.)
After the brace ending the inner scope, count2 and the inner count1 cease to exist. The variables count1and count3 are still there in the outer scope and the values displayed show that count3 was indeed incre-mented in the inner scope.
If you uncomment the line
// cout << count2 << endl; // uncomment to get an error
88
Chapter 2: Data, Variables, and Calculations
25905c02.qxd:WroxPro 2/21/08 8:38 AM Page 88
the program will no longer compile correctly because it attempts to output a non-existent variable. Youwill get an error message something like,
c:\microsoft visual studio\myprojects\Ex2_07\Ex2_07.cpp(29) : error C2065: ‘count2’: undeclared identifier
This is because count2 is out of scope at this point.
Positioning Variable DeclarationsYou have great flexibility in where you place the declarations for your variables. The most importantaspect to consider is what scope the variables need to have. Beyond that, you should generally place adeclaration close to where the variable is to be first used in a program. You should write your programswith a view to making them as easy as possible for another programmer to understand, and declaring avariable at its first point of use can be helpful in achieving that.
It is possible to place declarations for variables outside of all of the functions that make up a program.The next section looks what effect that has on the variables concerned.
Global VariablesVariables that are declared outside of all blocks and classes (I will discuss classes later in the book) arecalled globals and have global scope (which is also called global namespace scope or file scope). Thismeans that they are accessible throughout all the functions in the file, following the point at which theyare declared. If you declare them at the very top of your program, they will be accessible from anywherein the file.
Globals also have static storage duration by default. Global variables with static storage duration will exist from the start of execution of the program until execution of the program ends. If you do not specify an initial value for a global variable, it will be initialized with 0 by default. Initialization of global variables takes place before the execution of main() begins, so they are always ready to beused within any code that is within the variable’s scope.
Figure 2-13 shows the contents of a source file, Example.cpp, and the arrows indicate the scope of eachof the variables.
The variable value1, which appears at the beginning of the file, is declared at global scope, as is value4,which appears after the function main(). The scope of each global variable extends from the point at whichit is defined to the end of the file. Even though value4 exists when execution starts, it cannot be referredto in main() because main() is not within the variable’s scope. For main() to use value4, you wouldneed to move its declaration to the beginning of the file. Both value1 and value4 will be initialized with0 by default, which is not the case for the automatic variables. Note that the local variable called value1in function() hides the global variable of the same name.
Since global variables continue to exist for as long as the program is running, this might raise the questionin your mind, “Why not make all variables global and avoid this messing about with local variables thatdisappear?” This sounds very attractive at first, but as with the Sirens of mythology, there are serious sideeffects that completely outweigh any advantages you may gain.
89
Chapter 2: Data, Variables, and Calculations
25905c02.qxd:WroxPro 2/21/08 8:38 AM Page 89

Figure 2-13
Real programs are generally composed of a large number of statements, a significant number of functions,and a great many variables. Declaring all variables at the global scope greatly magnifies the possibility ofaccidental erroneous modification of a variable, as well as making the job of naming them sensibly quiteintractable. They will also occupy memory for the duration of program execution. By keeping variableslocal to a function or a block, you can be sure they have almost complete protection from external effects,they will only exist and occupy memory from the point at which they are defined to the end of the enclos-ing block, and the whole development process becomes much easier to manage.
If you take a look at the Class View pane on the right of the IDE window for any of the examples that youhave created so far and extend the class tree for the project by clicking on the +, you will see an entry calledGlobal Functions and Variables. If you click on this, you will see a list of everything in your program thathas global scope. This will include all the global functions, as well as any global variables that you havedeclared.
long value1;
int value4;
int main(){ int value2; … { int value3; … }}
int function(int n){ long value5; int value1; … }
value3value2
value1
value4
value1
value5
90
Chapter 2: Data, Variables, and Calculations
25905c02.qxd:WroxPro 2/21/08 8:38 AM Page 90

Try It Out The Scope Resolution OperatorAs you have seen, a global variable can be hidden by a local variable with the same name. However, it’sstill possible to get at the global variable by using the scope resolution operator (::), which you saw inChapter 1 when I was discussing namespaces. I can demonstrate how this works with a revised versionof the last example:
// Ex2_08.cpp// Demonstrating variable scope#include <iostream>
using std::cout;using std::endl;
int count1 = 100; // Global version of count1
int main(){ // Function scope starts here
int count1 = 10;int count3 = 50;cout << endl
<< “Value of outer count1 = “ << count1<< endl;
cout << “Value of global count1 = “ << ::count1 // From outer block<< endl;
{ // New scope starts here...int count1 = 20; //This hides the outer count1int count2 = 30;cout << “Value of inner count1 = “ << count1
<< endl;cout << “Value of global count1 = “ << ::count1 // From inner block
<< endl;
count1 += 3; // This affects the inner count1count3 += count2;
} // ...and ends here.
cout << “Value of outer count1 = “ << count1<< endl<< “Value of outer count3 = “ << count3<< endl;
//cout << count2 << endl; // uncomment to get an errorreturn 0;
} // Function scope ends here
91
Chapter 2: Data, Variables, and Calculations
25905c02.qxd:WroxPro 2/21/08 8:38 AM Page 91

If you compile and run this example, you’ll get the following output:
Value of outer count1 = 10Value of global count1 = 100Value of inner count1 = 20Value of global count1 = 100Value of outer count1 = 10Value of outer count3 = 80
How It WorksThe shaded lines of code indicate the changes I have made to the previous example; I just need to discussthe effects of those. The declaration of count1 prior to the definition of the function main() is global, soin principle it is available anywhere through the function main(). This global variable is initialized withthe value of 100:
int count1 = 100; // Global version of count1
However, you have two other variables called count1, which are defined within main(), so throughoutthe program the global count1 is hidden by the local count1 variables. The first new output statement is:
cout << “Value of global count1 = “ << ::count1 // From outer block<< endl;
This uses the scope resolution operator (::) to make it clear to the compiler that you want to referencethe global variable count1, not the local one. You can see that this works from the value displayed in theoutput.
In the inner block, the global count1 is hidden behind two variables called count1: the inner count1and the outer count1. We can see the global scope resolution operator doing its stuff within the innerblock, as you can see from the output generated by the statement we have added there:
cout << “Value of global count1 = “ << ::count1 // From inner block<< endl;
This outputs the value 100, as before — the long arm of the scope resolution operator used in this fashionalways reaches a global variable.
You have seen earlier that you can refer to a name in the std namespace by qualifying the name withthe namespace name, such as with std::cout or std::endl. The compiler searches the namespacethat has the name specified by the left operand of the scope resolution operator for the name that youspecify as the right operand. In the preceding example, you are using the scope resolution operator tosearch the global namespace for the variable count1. By not specifying a namespace name in front ofthe operator, you are telling the compiler to search the global namespace for the name that follows it.
You’ll see a lot more of this operator when you get to explore object-oriented programming in Chapter 9where it is used extensively.
92
Chapter 2: Data, Variables, and Calculations
25905c02.qxd:WroxPro 2/21/08 8:38 AM Page 92

Static VariablesIt’s conceivable that you might want to have a variable that’s defined and accessible locally, but whichalso continues to exist after exiting the block in which it is declared. In other words, you need to declarea variable within a block scope, but to give it static storage duration. The static specifier provides youwith the means of doing this, and the need for this will become more apparent when we come to deal withfunctions in Chapter 5.
In fact, a static variable will continue to exist for the life of a program even though it is declared within ablock and available only from within that block (or its sub-blocks). It still has block scope, but it has staticstorage duration. To declare a static integer variable called count you would write:
static int count;
If you don’t provide an initial value for a static variable when you declare it, then it will be initialized foryou. The variable count declared here will be initialized with 0. The default initial value for a static vari-able is always 0, converted to the type applicable to the variable. Remember that this is not the case withautomatic variables.
If you don’t initialize your automatic variables, they will contain junk values left over from the programthat last used the memory they occupy.
NamespacesI have mentioned namespaces several times, so it’s time you got a better idea of what they are about. Theyare not used in the libraries supporting MFC, but the libraries that support the CLR and Windows formsuse namespaces extensively, and of course the ANSI C++ standard library does, too.
You know already that all the names used in the ISO/ANSI C++ standard library are defined in a name-space with the name std. This means that all the names used in the standard library have an additionalqualifying name, std, so cout for example is really std::cout. You can see fully qualified names in usewith this trivial example:
// Ex2_09.cpp// Demonstrating namespace names#include <iostream>
int value = 0;
int main(){std::cout << “enter an integer: “;std::cin >> value;std::cout << “\nYou entered “ << value
<< std:: endl;return 0;
}
93
Chapter 2: Data, Variables, and Calculations
25905c02.qxd:WroxPro 2/21/08 8:38 AM Page 93

The declaration for the variable value is outside of the definition of main(). This declaration is said tobe at global namespace scope, because the variable declaration does not appear within a namespace.The variable is accessible from anywhere within main() as well as from within any other function defini-tions that you might have in the same source file. I have put the declaration for value outside of main()just so I can demonstrate in the next section how it could be in a namespace.
Note the absence of using declarations for cout and endl. It isn’t necessary in this case because you arefully qualifying the names you are using from the namespace std. It would be silly to do so, but you coulduse cout as the name of the integer variable here, and there would be no confusion because cout by itselfis different from std::cout. Thus namespaces provide a way to separate the names used in one part of aprogram from those used in another. This is invaluable with large projects involving several teams of pro-grammers working on different parts of the program. Each team can have its own namespace name, andworries about two teams accidentally using the same name for different functions disappear.
Look at this line of code:
using namespace std;
This statement is a using directive.
The effect of this is to import all the names from the std namespace into the source file so you can referto anything that is defined in this namespace without qualifying the name in your program. Thus you canwrite the name cout instead of std::cout and endl instead of std::endl. The downside of this blanketusing directive is that it effectively negates the primary reason for using a namespace — that is, prevent-ing accidental name clashes. There are two ways to access names from a namespace without negating itsintended effect. One way is to qualify each name explicitly with the namespace name; unfortunately,this tends to make the code very verbose and reduce its readability. The other possibility that I men-tioned early on in this chapter is to introduce just the names that you use in your code with using decla-rations, like this for example:
using std::cout; // Allows cout usage without qualificationusing std::endl; // Allows endl usage without qualification
These statements are called using declarations. Each statement introduces a single name from the spec-ified namespace and allows it to be used unqualified within the program code that follows. This pro-vides a much better way of importing names from a namespace as you only import the names that youactually use in your program. Because Microsoft has set the precedent of importing all names from theSystem namespace with C+/CLI code, I will continue with that in the C++/CLI examples. In general Irecommend that you use using declarations in your own code rather than using directives when youare writing programs of any significant size.
Of course, you can define your own namespace that has a name that you choose. The next section showshow that’s done.
Declaring a NamespaceYou use the keyword namespace to declare a namespace — like this:
namespace myStuff{
94
Chapter 2: Data, Variables, and Calculations
25905c02.qxd:WroxPro 2/21/08 8:38 AM Page 94

// Code that I want to have in the namespace myStuff...}
This defines a namespace with the name myStuff. All name declarations in the code between the braceswill be defined within the myStuff namespace, so to access any such name from a point outside thisnamespace, the name must be qualified by the namespace name, myStuff, or have a using declarationthat identifies that the name is from the myStuff namespace.
You can’t declare a namespace inside a function. It’s intended to be used the other way round; you use anamespace to contain functions, global variables, and other named entities such as classes in your program.You must not put the definition of main() in a namespace, though. The function main() is where execu-tion starts and it must always be at global namespace scope, otherwise the compiler won’t recognize it.
You could put the variable value in the previous example in a namespace:
// Ex2_10.cpp// Declaring a namespace#include <iostream>
namespace myStuff{
int value = 0;}
int main(){
std::cout << “enter an integer: “;std::cin >> myStuff::value;std::cout << “\nYou entered “ << myStuff::value
<< std:: endl;return 0;
}
The myStuff namespace defines a scope, and everything within the namespace scope is qualified withthe namespace name. To refer to a name declared within a namespace from outside, you must qualify itwith the namespace name. Inside the namespace scope any of the names declared within it can be referredto without qualification — they are all part of the same family. Now you must qualify the name valuewith myStuff, the name of our namespace. If not, the program will not compile. The function main()now refers to names in two different namespaces, and in general you can have as many namespaces inyour program as you need. You could remove the need to qualify value by adding a using directive:
// Ex2_11.cpp// Using a using directive#include <iostream>
namespace myStuff{
int value = 0;}
using namespace myStuff; // Make all the names in myStuff available
int main()
95
Chapter 2: Data, Variables, and Calculations
25905c02.qxd:WroxPro 2/21/08 8:38 AM Page 95
{std::cout << “enter an integer: “;std::cin >> value;std::cout << “\nYou entered “ << value
<< std:: endl;return 0;
}
You could also have a using directive for std as well, so you wouldn’t need to qualify standard librarynames either, but as I said, this defeats the whole purpose of namespaces. Generally, if you use namespacesin your program, you should not add using directives all over your program; otherwise, you might as wellnot bother with namespaces in the first place. Having said that, I will add a using directive for std in someof our examples to keep the code less cluttered and easier for you to read. When you are starting out with anew programming language, you can do without clutter, no matter how useful it is in practice.
Multiple NamespacesA real-world program is likely to involve multiple namespaces. You can have multiple declarations of anamespace with a given name and the contents of all namespace blocks with a given name are withinthe same namespace. For example, you might have a program file with two namespaces:
namespace sortStuff{
// Everything in here is within sortStuff namespace}
namespace calculateStuff{// Everything in here is within calculateStuff namespace// To refer to names from sortStuff they must be qualified
}
namespace sortStuff{// This is a continuation of the namespace sortStuff// so from here you can refer to names in the first sortStuff namespace// without qualifying the names
}
A second declaration of a namespace with a given name is just a continuation of the first, so you can ref-erence names in the first namespace block from the second without having to qualify them. They are allin the same namespace. Of course, you would not usually organize a source file in this way deliberately,but in can arise quite naturally with header files that you include into a program. For example, you mighthave something like this:
#include <iostream> // Contents are in namespace std#include “myheader.h” // Contents are in namespace myStuff#include <string> // Contents are in namespace std
96
Chapter 2: Data, Variables, and Calculations
25905c02.qxd:WroxPro 2/21/08 8:38 AM Page 96
// and so on...
Here, <iostream> and string are ISO/ANSI C++ standard library headers, and myheader.h repre-sents a header file that contains our program code. You have a situation with the namespaces that is anexact parallel of the previous illustration.
This has given you a basic idea of how namespaces work. There is a lot more to namespaces than I havediscussed here, but if you grasp this bit you should be able to find out more about it without difficulty, ifthe need arises.
Note that the two forms of #include directive in the previous code fragment cause the compiler tosearch for the file in different ways. When you specify the file to be included between angled brackets,you are indicating to the compiler that it should search for the file along the path specified by the /Icompiler option, and failing that along the path specified by the INCLUDE environment variable. Thesepaths locate the C+ library files, which is why this form is reserved for library headers. The INCLUDEenvironment variable points to the folder holding the library header and the /I option allows an addi-tional directory containing library headers to be specified. When the file name is between double quotes, the compiler will search the folder that contains the file in which the #include directive appears. If the file is not found it will search in any directories that #include the current file. If that fails to find the file it will search the library directories.
C++/CLI ProgrammingC++/CLI provides a number of extensions and additional capabilities to what I have discussed in thischapter up to now. I’ll first summarize these additional capabilities before going into details. The addi-tional C++/CLI capabilities are:
❑ All of the ISO/ANSI fundamental data types can be used as I have described in a C++/CLI program, but they have some extra properties in certain contexts that I’ll come to.
❑ C++/CLI provides its own mechanism for keyboard input and output to the command line in a console program.
❑ C++/CLI introduces the safe_cast operator that ensures that a cast operation results in verifi-able code being generated.
❑ C++/CLI provides an alternative enumeration capability that is class-based and offers moreflexibility than the ISO/ANSI C++ enum declaration you have seen.
You’ll learn more about CLR reference class types beginning in Chapter 4, but because I have introducedglobal variables for native C++ I’ll mention now that variables of CLR reference class types cannot be globalvariables.
I want to begin by looking at fundamental data types in C++/CLI.
97
Chapter 2: Data, Variables, and Calculations
25905c02.qxd:WroxPro 2/21/08 8:38 AM Page 97

C++/CLI Specific: Fundamental Data TypesYou can and should use the ISO/ANSI C++ fundamental data type names in your C++/CLI programs,and with arithmetic operations they work exactly as you have seen in native C++. In addition C++/CLIdefines two additional integer types:
To specify literals of type long long you append LL or lowercase ll to the integer value. For example:
long long big = 123456789LL;
A literal of type unsigned long long you append ULL or ull to the integer value:
unsigned long long huge = 999999999999999ULL;
Although all the operations with fundamental types you have seen work in the same way in C++/CLI,the fundamental type names in a C++/CLI program have a different meaning and introduce additionalcapabilities in certain situations. A fundamental type in a C++/CLI program is a value class type and canbehave either as an ordinary value or as an object if the circumstances require it.
Within the C++/CLI language, each ISO/ANSI fundamental type name maps to a value class type that isdefined in the System namespace. Thus in a C++/CLI program the ISO/ANSI fundamental type namesare shorthand for the associated value class type. This enables the value of a fundamental type to betreated simply as a value or be automatically converted to an object of its associated value class type whennecessary. The fundamental types, the memory they occupy, and the corresponding value class types areshown in the following table:
Fundamental Type Size(bytes) CLI Value Class
bool 1 System::Boolean
char 1 System::SByte
signed char 1 System::SByte
unsigned char 1 System::Byte
short 2 System::Int16
unsigned short 2 System::UInt16
int 4 System::Int32
Type Size(bytes) Range of Values
long long 8 From -9,223,372,036,854,775,808 to9,223,372,036,854,775,807
unsigned long long 8 From 0 to 18,446,744,073,709,551,615
98
Chapter 2: Data, Variables, and Calculations
25905c02.qxd:WroxPro 2/21/08 8:38 AM Page 98
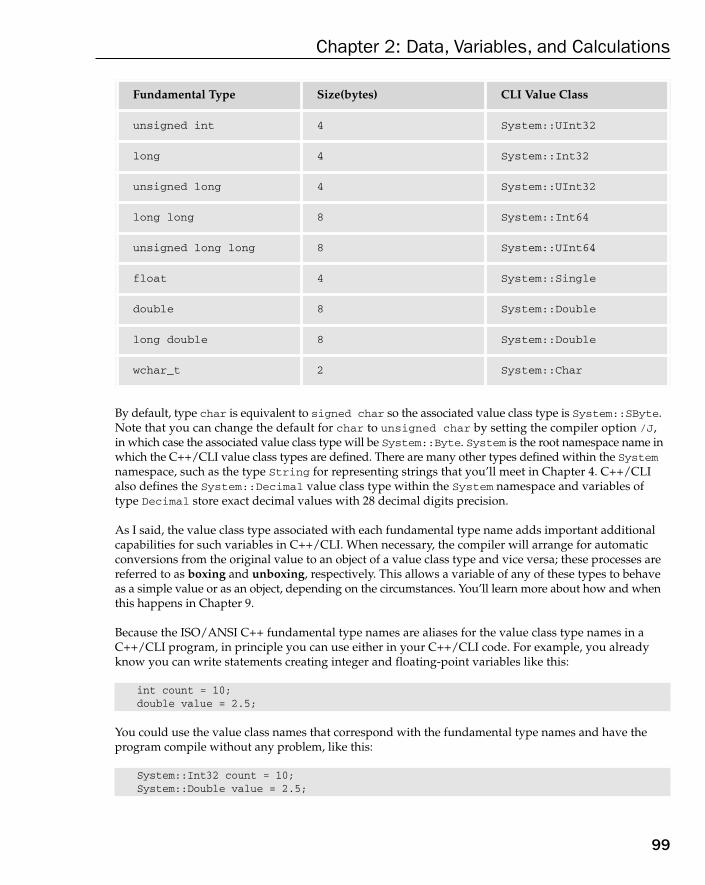
By default, type char is equivalent to signed char so the associated value class type is System::SByte.Note that you can change the default for char to unsigned char by setting the compiler option /J, in which case the associated value class type will be System::Byte. System is the root namespace name inwhich the C++/CLI value class types are defined. There are many other types defined within the Systemnamespace, such as the type String for representing strings that you’ll meet in Chapter 4. C++/CLI also defines the System::Decimal value class type within the System namespace and variables of type Decimal store exact decimal values with 28 decimal digits precision.
As I said, the value class type associated with each fundamental type name adds important additionalcapabilities for such variables in C++/CLI. When necessary, the compiler will arrange for automatic conversions from the original value to an object of a value class type and vice versa; these processes arereferred to as boxing and unboxing, respectively. This allows a variable of any of these types to behaveas a simple value or as an object, depending on the circumstances. You’ll learn more about how and whenthis happens in Chapter 9.
Because the ISO/ANSI C++ fundamental type names are aliases for the value class type names in aC++/CLI program, in principle you can use either in your C++/CLI code. For example, you alreadyknow you can write statements creating integer and floating-point variables like this:
int count = 10;double value = 2.5;
You could use the value class names that correspond with the fundamental type names and have theprogram compile without any problem, like this:
System::Int32 count = 10;System::Double value = 2.5;
Fundamental Type Size(bytes) CLI Value Class
unsigned int 4 System::UInt32
long 4 System::Int32
unsigned long 4 System::UInt32
long long 8 System::Int64
unsigned long long 8 System::UInt64
float 4 System::Single
double 8 System::Double
long double 8 System::Double
wchar_t 2 System::Char
99
Chapter 2: Data, Variables, and Calculations
25905c02.qxd:WroxPro 2/21/08 8:38 AM Page 99

Note that this is not exactly the same as using the fundamental type names such as int and double inyour code, rather than the value class names System::Int32 and System::Double. The reason is thatthe mapping between fundamental type names and value class types I have described applies to theVisual C++ 2008 compiler; other compilers are not obliged to implement the same mapping. Type longin Visual C++ 2008 maps to type Int32, but it is quite possible that it could map to type Int64 on someother implementation. On the other hand, the representations of the value class type that are equivalents to the fundamental native C++ types are fixed; for example, type System::Int32 will always be a 32-bitsigned integer on any C++/CLI implementation.
Having data of the fundamental types being represented by objects of a value class type is an importantfeature of C++/CLI. In ISO/ANSI C++ fundamental types and class types are quite different, whereas in C++/CLR all data is stored as objects of a class type, either as a value class type or as a reference classtype. You’ll learn about reference class types in Chapter 7.
Next, you’ll try a CLR console program.
Try It Out A Fruity CLR Console ProgramCreate a new project and select the project type as CLR and the template as CLR Console Application.You can then enter the project name as Ex2_12, as shown in Figure 2-14.
Figure 2-14
When you click on the OK button, the Application Wizard will generate the project containing the fol-lowing code:
// Ex2_12.cpp : main project file.
#include “stdafx.h”
100
Chapter 2: Data, Variables, and Calculations
25905c02.qxd:WroxPro 2/21/08 8:38 AM Page 100

using namespace System;
int main(array<System::String ^> ^args){
Console::WriteLine(L”Hello World”);return 0;
}
I’m sure you noticed the extra stuff between the parentheses following main. This is concerned withpassing values to the function main() when you initiate execution of the program from the commandline, and you’ll learn more about this when you explore functions in detail. If you compile and executethe default project it will write “Hello World” to the command line. Now, you’ll convert this program to a CLR version of Ex2_02 so you can see how similar it is. To do this you can modify the code inEx2_12.cpp as follows:
// Ex2_12.cpp : main project file.#include “stdafx.h”
using namespace System;
int main(array<System::String ^> ^args){
int apples, oranges; // Declare two integer variablesint fruit; // ...then another one
apples = 5; oranges = 6; // Set initial valuesfruit = apples + oranges; // Get the total fruit
Console::WriteLine(L”\nOranges are not the only fruit...”);Console::Write(L”- and we have “);Console::Write(fruit);Console::Write(L” fruits in all.\n”);return 0;
}
The new lines are shown shaded and those in the lower block replace the two lines in the automaticallygenerated version of main(). You can now compile and execute the project. The program should producethe following output:
Oranges are not the only fruit...- and we have 11 fruits in all.
How It WorksThe only significant difference is in how the output is produced. The definitions for the variables and thecomputation are the same. Although you are using the same type names as in the ISO/ANSI C++ ver-sion of the example, the effect is not the same. The variables apples, oranges, and fruit will be of theC++/CLI type, System::Int32, that is specified by type int, and they have some additional capabilitiescompared to the ISO/ANSI type. The variables here can act as objects in some circumstances or as simplevalues as they do here. If you want to confirm that Int32 is the same as int in this case, you could replacethe int type name with Int32 and recompile the example. It should work in exactly the same way.
101
Chapter 2: Data, Variables, and Calculations
25905c02.qxd:WroxPro 2/21/08 8:38 AM Page 101
Evidently the following line of code produces the first line of output:
Console::WriteLine(L”\nOranges are not the only fruit...”);
The WriteLine() function is a C++/CLI function that is defined in the Console class in the Systemnamespace. You’ll learn about classes in detail in Chapter 6, but for now the Console class represents thestandard input and output streams that correspond to the keyboard and the command line in a commandline window. Thus the WriteLine() function writes whatever is between the parentheses following thefunction name to the command line and then writes a newline character to move the cursor to the next lineready for the next output operation. Thus the preceding statement writes the text “\nOranges are notthe only fruit...” between the double quotes to the command line. The L that precedes the stringindicates that it is a wide-character string where each character occupies two bytes.
The Write() function in the Console class is essentially the same as the WriteLine() function, theonly difference being that it does not automatically write a newline character following the output thatyou specify. You can therefore use the Write() function when you want to write two or more items ofdata to the same line in individual output statements.
Values that you place between the parentheses that follow the name of a function are called arguments.Depending on how a function was written, it will accept zero, one, or more arguments when it is called.When you need to supply more than one argument they must be separated by commas. There’s more to the output functions in the Console class, so I want to explore Write() and WriteLine() in a littlemore depth.
C++/CLI Output to the Command LineYou saw in the previous example how you can use the Console::Write() and Console::WriteLine()methods to write a string or other items of data to the command line. You can put a variable of any of thetypes you have seen between the parentheses following the function name and the value will be writtento the command line. For example, you could write the following statements to output information abouta number of packages:
int packageCount = 25; // Number of packagesConsole::Write(L”There are “); // Write string - no newlineConsole::Write(packageCount); // Write value -no newlineConsole::WriteLine(L” packages.”); // Write string followed by newline
Executing these statements will produce the output:
There are 25 packages.
The output is all on the same line because the first two output statements use the Write() function, whichdoes not output a newline character after writing the data. The last statement uses the WriteLine() func-tion, which does write a newline after the output so any subsequent output will be on the next line.
It looks a bit of a laborious process having to use three statements to write one line of output, and it willbe no surprise to you that there is a better way. That capability is bound up with formatting the outputto the command line in a .NET Framework program so you’ll explore that a little next.
102
Chapter 2: Data, Variables, and Calculations
25905c02.qxd:WroxPro 2/21/08 8:38 AM Page 102

C++/CLI Specific — Formatting the OutputBoth the Console::Write() and Console::WriteLine() functions have a facility for you to controlthe format of the output, and the mechanism works in exactly the same way with both. The easiest wayto understand it is through some examples. First look at how you can get the output that was producedby the three output statements in the previous section with a single statement:
int packageCount = 25;Console::WriteLine(L”There are {0} packages.”, packageCount);
The second statement here will output the same output as you saw in the previous section. The firstargument to the Console::WriteLine() function here is the string L”There are {0} packages.”,and the bit that determines that the value of the second should be placed in the string is “{0}”. Thebraces enclose a format string that applies to the second argument to the function although in thisinstance the format string is about as simple as it could get, being just a zero. The arguments that fol-low the first argument to the Console::WriteLine() function are numbered in sequence startingwith zero, like this:
referenced by: 0 1 2 etc.Console::WriteLine(“Format string”, arg2, arg3, arg4,... );
Thus the zero between the braces in the previous code fragment indicates that the value of thepackageCount argument should replace the {0} in the string that is to be written to the command line.
If you want to output the weight as well as the number of packages, you could write this:
int packageCount = 25;double packageWeight = 7.5;Console::WriteLine(L”There are {0} packages weighing {1} pounds.”,
packageCount, packageWeight);
The output statement now has three arguments, and the second and third arguments are referenced by 0 and 1, respectively, between the braces. So, this will produce the output:
There are 25 packages weighing 7.5 pounds.
You could also write the statement with the last two arguments in reverse sequence, like this:
Console::WriteLine(L”There are {1} packages weighing {0} pounds.”,packageWeight, packageCount);
The packageWeight variable is now referenced by 0 and packageCount by 1 in the format string, andthe output will be the same as previously.
You also have the possibility to specify how the data is to be presented on the command line. Supposethat you wanted the floating-point value packageWeight to be output with two places of decimals. Youcould do that with the following statement:
Console::WriteLine(L”There are {0} packages weighing {1:F2} pounds.”,packageCount, packageWeight);
103
Chapter 2: Data, Variables, and Calculations
25905c02.qxd:WroxPro 2/21/08 8:38 AM Page 103

In the substring {1:F2}, the colon separates the index value, 1, that identifies the argument to be selectedfrom the format specification that follows, F2. The F in the format specification indicates that the outputshould be in the form “±ddd.dd…” (where d represents a digit) and the 2 indicates that you want to havetwo decimal places after the point. The output produced by the statement will be:
There are 25 packages weighing 7.50 pounds.
In general you can write the format specification in the form {n,w : Axx} where the n is an index valueselecting the argument following the format string, w is an optional field width specification, the A is asingle letter specifying how the value should be formatted, and the xx is an optional one or two digitsspecifying the precision for the value. The field width specification is a signed integer. The value will beright-justified in the field if w is positive and left-justified when it is negative. If the value occupies lessthan the number of positions specified by w the output is padded with spaces; if the value requires morepositions than that specified by w the width specification is ignored. Here’s another example:
Console::WriteLine(L”Packages:{0,3} Weight: {1,5:F2} pounds.”,packageCount, packageWeight);
The package count is output with a field width of 3 and the weight in a field width of 5, so the outputwill be:
Packages: 25 Weight: 7.50 pounds.
There are other format specifiers that enable you to present various types of data in different ways. Hereare some of the most useful format specifications:
Format Specifier Description
C or c Outputs the value as a currency amount.
D or d Outputs an integer as a decimal value. If you specify the precision to bemore than the number of digits the number will be padded with zeroes tothe left.
E or e Outputs a floating-point value in scientific notation, that is, with an expo-nent. The precision value will indicate the number of digits to be output fol-lowing the decimal point.
F or f Outputs a floating-point value as a fixed-point number of the form±dddd.dd. . . .
G or g Outputs the value in the most compact form depending on the type of thevalue and whether you have specified the precision. If you don’t specify theprecision, a default precision value will be used.
N or n Outputs the value as a fixed-point decimal value using comma separatorsbetween each group of three digits when necessary.
X or x Output an integer as a hexadecimal value. Upper or lowercase hexadecimaldigits will be output depending on whether you specify X or x.
104
Chapter 2: Data, Variables, and Calculations
25905c02.qxd:WroxPro 2/21/08 8:38 AM Page 104

That gives you enough of a toehold in output to continue with more C++/CLI examples. Now, you’lltake a quick look at some of this in action.
Try It Out Formatted OutputHere’s an example that calculates the price of a carpet in order to demonstrate output in a CLR consoleprogram:
// Ex2_13.cpp : main project file.// Calculating the price of a carpet#include “stdafx.h”
using namespace System;
int main(array<System::String ^> ^args){double carpetPriceSqYd = 27.95;double roomWidth = 13.5; // In feetdouble roomLength = 24.75; // In feetconst int feetPerYard = 3;double roomWidthYds = roomWidth/feetPerYard;double roomLengthYds = roomLength/feetPerYard;double carpetPrice = roomWidthYds*roomLengthYds*carpetPriceSqYd;
Console::WriteLine(L”Room size is {0:F2} yards by {1:F2} yards”,roomLengthYds, roomWidthYds);
Console::WriteLine(L”Room area is {0:F2} square yards”,roomLengthYds*roomWidthYds);
Console::WriteLine(L”Carpet price is ${0:F2}”, carpetPrice);return 0;
}
The output should be:
Room size is 8.25 yards by 4.50 yardsRoom area is 37.13 square yardsCarpet price is $1037.64
How It WorksThe dimensions of the room are specified in feet whereas the carpet is priced per square yard so youhave defined a constant, feetPerYard, to use in the conversion from feet to yards. In the expressionto convert each dimension you are dividing a value of type double by a value of type int. The compilerwill insert code to convert the value of type int to type double before carrying out the multiplication.After converting the room dimensions to yards you calculate the price of the carpet by multiplyingthe dimensions in yards to obtain the area in square yards and multiplying that by the price persquare yard.
The output statements use the F2 format specification to limit the output values to two decimal places.Without this there would be more decimal places in the output that would be inappropriate, especiallyfor the price. You could try removing the format specification to see the difference.
105
Chapter 2: Data, Variables, and Calculations
25905c02.qxd:WroxPro 2/21/08 8:38 AM Page 105

Note that the statement to output the area has an arithmetic expression as the second argument to theWriteLine() function. The compiler will arrange to first evaluate the expression, and then the resultwill be passed as the actual argument to the function. In general you can always use an expression as an argument to a function as long as the result of evaluating the expression is of a type that is consistentwith the function parameter type.
C++/CLI Input from the KeyboardThe keyboard input capabilities that you have with a .NET Framework console program are somewhatlimited. You can read a complete line of input as a string using the Console::ReadLine() function, oryou can read a single character using the Console::Read() function. You can also read which key waspressed using the Console::ReadKey() function.
You would use the Console::ReadLine() function like this:
String^ line = Console::ReadLine();
This reads a complete line of input text that is terminated when you press the Enter key. The variable line is of type String^ and stores a reference to the string that results from executing theConsole::ReadLine() function; the little hat character, ^, following the type name, String, indi-cates that this is a handle that references an object of type String. You’ll learn more about typeString and handles for String objects in Chapter 4.
A statement that reads a single character from the keyboard looks like this:
char ch = Console::Read();
With the Read() function you could read input data character by character and then analyze the charac-ters read and convert the input to a corresponding numeric value.
The Console::ReadKey() function returns the key that was pressed as an object of type ConsoleKeyInfo,which is a value class type defined in the System namespace. Here’s a statement to read a key press:
ConsoleKeyInfo keyPress = Console::ReadKey(true);
The argument true to the ReadKey() function results in the key press not being displayed on the com-mand line. An argument value of false (or omitting the argument) will cause the character correspondingthe key pressed being displayed. The result of executing the function will be stored in keyPress. To iden-tify the character corresponding to the key (or keys) pressed, you use the expression keyPress.KeyChar.Thus you could output a message relating to a key press with the following statement:
Console::WriteLine(L”The key press corresponds to the character: {0}”,keyPress.KeyChar);
The key that was pressed is identified by the expression keyPress.Key. This expression refers to avalue of a C++/CLI enumeration (which you’ll learn about very soon) that identifies the key that waspressed. There’s more to the ConsoleKeyInfo objects than I have described. You’ll meet them againlater in the book.
106
Chapter 2: Data, Variables, and Calculations
25905c02.qxd:WroxPro 2/21/08 8:38 AM Page 106
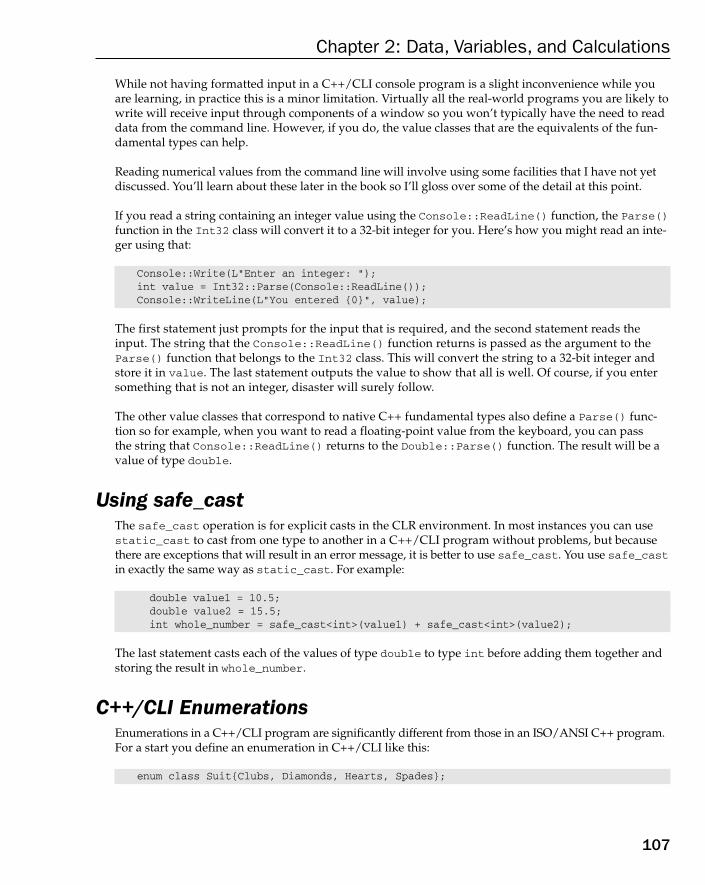
While not having formatted input in a C++/CLI console program is a slight inconvenience while youare learning, in practice this is a minor limitation. Virtually all the real-world programs you are likely towrite will receive input through components of a window so you won’t typically have the need to readdata from the command line. However, if you do, the value classes that are the equivalents of the fun-damental types can help.
Reading numerical values from the command line will involve using some facilities that I have not yetdiscussed. You’ll learn about these later in the book so I’ll gloss over some of the detail at this point.
If you read a string containing an integer value using the Console::ReadLine() function, the Parse()function in the Int32 class will convert it to a 32-bit integer for you. Here’s how you might read an inte-ger using that:
Console::Write(L”Enter an integer: “);int value = Int32::Parse(Console::ReadLine());Console::WriteLine(L”You entered {0}”, value);
The first statement just prompts for the input that is required, and the second statement reads theinput. The string that the Console::ReadLine() function returns is passed as the argument to theParse() function that belongs to the Int32 class. This will convert the string to a 32-bit integer andstore it in value. The last statement outputs the value to show that all is well. Of course, if you entersomething that is not an integer, disaster will surely follow.
The other value classes that correspond to native C++ fundamental types also define a Parse() func-tion so for example, when you want to read a floating-point value from the keyboard, you can pass the string that Console::ReadLine() returns to the Double::Parse() function. The result will be avalue of type double.
Using safe_castThe safe_cast operation is for explicit casts in the CLR environment. In most instances you can usestatic_cast to cast from one type to another in a C++/CLI program without problems, but becausethere are exceptions that will result in an error message, it is better to use safe_cast. You use safe_castin exactly the same way as static_cast. For example:
double value1 = 10.5;double value2 = 15.5;int whole_number = safe_cast<int>(value1) + safe_cast<int>(value2);
The last statement casts each of the values of type double to type int before adding them together andstoring the result in whole_number.
C++/CLI EnumerationsEnumerations in a C++/CLI program are significantly different from those in an ISO/ANSI C++ program.For a start you define an enumeration in C++/CLI like this:
enum class Suit{Clubs, Diamonds, Hearts, Spades};
107
Chapter 2: Data, Variables, and Calculations
25905c02.qxd:WroxPro 2/21/08 8:38 AM Page 107
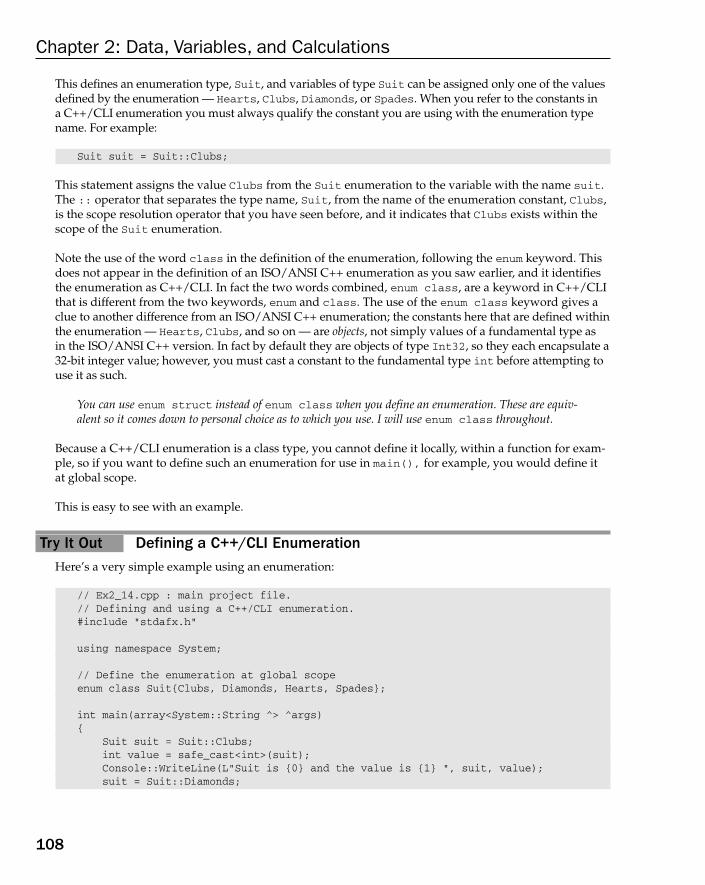
This defines an enumeration type, Suit, and variables of type Suit can be assigned only one of the valuesdefined by the enumeration — Hearts, Clubs, Diamonds, or Spades. When you refer to the constants in a C++/CLI enumeration you must always qualify the constant you are using with the enumeration typename. For example:
Suit suit = Suit::Clubs;
This statement assigns the value Clubs from the Suit enumeration to the variable with the name suit.The :: operator that separates the type name, Suit, from the name of the enumeration constant, Clubs,is the scope resolution operator that you have seen before, and it indicates that Clubs exists within thescope of the Suit enumeration.
Note the use of the word class in the definition of the enumeration, following the enum keyword. Thisdoes not appear in the definition of an ISO/ANSI C++ enumeration as you saw earlier, and it identifiesthe enumeration as C++/CLI. In fact the two words combined, enum class, are a keyword in C++/CLIthat is different from the two keywords, enum and class. The use of the enum class keyword gives aclue to another difference from an ISO/ANSI C++ enumeration; the constants here that are defined withinthe enumeration — Hearts, Clubs, and so on — are objects, not simply values of a fundamental type as in the ISO/ANSI C++ version. In fact by default they are objects of type Int32, so they each encapsulate a32-bit integer value; however, you must cast a constant to the fundamental type int before attempting touse it as such.
You can use enum struct instead of enum class when you define an enumeration. These are equiv-alent so it comes down to personal choice as to which you use. I will use enum class throughout.
Because a C++/CLI enumeration is a class type, you cannot define it locally, within a function for exam-ple, so if you want to define such an enumeration for use in main(), for example, you would define itat global scope.
This is easy to see with an example.
Try It Out Defining a C++/CLI EnumerationHere’s a very simple example using an enumeration:
// Ex2_14.cpp : main project file.// Defining and using a C++/CLI enumeration.#include “stdafx.h”
using namespace System;
// Define the enumeration at global scopeenum class Suit{Clubs, Diamonds, Hearts, Spades};
int main(array<System::String ^> ^args){
Suit suit = Suit::Clubs;int value = safe_cast<int>(suit);Console::WriteLine(L”Suit is {0} and the value is {1} “, suit, value);suit = Suit::Diamonds;
108
Chapter 2: Data, Variables, and Calculations
25905c02.qxd:WroxPro 2/21/08 8:38 AM Page 108

value = safe_cast<int>(suit);Console::WriteLine(L”Suit is {0} and the value is {1} “, suit, value);suit = Suit::Hearts;value = safe_cast<int>(suit);Console::WriteLine(L”Suit is {0} and the value is {1} “, suit, value);suit = Suit::Spades;value = safe_cast<int>(suit);Console::WriteLine(L”Suit is {0} and the value is {1} “, suit, value);return 0;
}
This example will produce the following output:
Suit is Clubs and the value is 0Suit is Diamonds and the value is 1Suit is Hearts and the value is 2Suit is Spades and the value is 3
How It WorksBecause it is a class type, the Suit enumeration cannot be defined within the function main(), so its defini-tion appears before the definition of main() and is therefore defined at global scope. The example defines avariable, suit, of type Suit and allocates the value Suit::Clubs to it initially with the statement:
Suit suit = Suit::Clubs;
The qualification of the constant name Clubs with the type name Suit is essential; without it Clubswould not be recognized by the compiler.
If you look at the output, the value of suit is displayed as the name of the corresponding constant —”Clubs” in the first instance. This is quite different from what happens with native enums. To obtainthe constant value that corresponds to the object in a C++/CLI enum, you must explicitly cast the valueto the underlying type, type int in this instance:
value = safe_cast<int>(suit);
You can see from the output that the enumeration constants have been assigned values starting from 0.In fact you can change the type that is used for the enumeration constants. The next section looks at howthat’s done.
Specifying a Type for Enumeration ConstantsThe constants in a C++/CLI enumeration can be any of the following types:
short int long long long signed char char
unsigned unsigned unsigned unsigned unsigned boolshort int long long long char
109
Chapter 2: Data, Variables, and Calculations
25905c02.qxd:WroxPro 2/21/08 8:38 AM Page 109

To specify the type for the constants in an enumeration, you write the type after the enumeration typename, but separated from it by a colon, just as with the native C++ enum. For example, to specify theenumeration constant type as char, you could write:
enum class Face : char {Ace, Two, Three, Four, Five, Six, Seven,Eight, Nine, Ten, Jack, Queen, King};
The constants in this enumeration will be of type System::Sbyte and the underlying fundamental typewill be type char. The first constant will correspond to code value 0 by default, and the subsequent valueswill be assigned in sequence. To get at the underlying value you must explicitly cast the value to the type.
Specifying Values for Enumeration ConstantsYou don’t have to accept the default for the underlying values. You can explicitly assign values to any orall of the constants defined by an enumeration. For example:
enum class Face : char {Ace = 1, Two, Three, Four, Five, Six, Seven,Eight, Nine, Ten, Jack, Queen, King};
This will result in Ace having the value 1, Two having the value 2, an so on with King having the value 13.If you wanted the values to reflect the relative face card values with Ace high, you could write the enu-meration as:
enum class Face : char {Ace = 14, Two = 2, Three, Four, Five, Six, Seven,Eight, Nine, Ten, Jack, Queen, King};
In this case Two will have the value 2, and successive constants will have values in sequence so King willstill be 13. Ace will be 14, the value you have explicitly assigned.
The values you assign to enumeration constants do not have to be unique. This provides the possibilityof using the values of the constants to convey some additional property. For example:
enum class WeekDays : bool { Mon =true, Tues = true, Wed = true,Thurs = true, Fri = true, Sat = false, Sun = false };
This defines the enumeration WeekDays where the enumeration constants are of type bool. The under-lying values have been assigned to identify which represent work days as opposed to rest days. In theparticular case of enumerators of type bool, you must supply all enumerators with explicit values.
Operations on Enumeration ConstantsYou can increment or decrement variables of an enum type using ++ or --, providing the enumerationconstants are of an integral type other than bool. For example, consider this fragment using the Facetype from the previous section:
Face card = Face::Ten;++card;Console::WriteLine(L”Card is {0}”, card);
Here you initialize the card variable to Face::Ten and then increment it. The output from the last state-ment will be:
Card is Jack
110
Chapter 2: Data, Variables, and Calculations
25905c02.qxd:WroxPro 2/21/08 8:38 AM Page 110

Incrementing or decrementing an enum variable does not involve any validation of the result, so it is upto you to ensure that the result corresponds to one of the enumerators so that it makes sense.
You can also use the + or – operators with enum values:
card = card – Face::Two;
This is not a very likely statement in practice but the effect is to reduce the value of card by 2 becausethat is the value of Face::Two. Note that you cannot write:
card = card – 2; // Wrong! Will not compile.
This will not compile because the operands for the subtraction operator are of different types and thereis no automatic conversion here. To make this work you must use a cast:
card = card - safe_cast<Face>(2); //OK!
Casting the integer to type Face allows card to be decremented by 2.
You can also use the bitwise operators ^, |, &, and ~ with enum values but these are typically used withenums that represent flags, which I’ll discuss in the next section. As with the arithmetic operations, theenum type must have enumeration constants of an integral type other than bool.
Finally you can compare enum values using the relational operators:
== != < <= > >=
I’ll be discussing the relational operators in the next chapter. For now these operators compare twooperands and result in a value of type bool. This allows you to use expressions such as card ==Face::Eight, which will result in the value true if card is equal to Face::Eight.
Using Enumerators as FlagsIt is possible to use an enumeration in quite a different way from what you have seen up to now. You candefine an enumeration such that the enumeration constants represent flags or status bits for something.Most hardware storage devices use status bits to indicate the status of the device before or after an I/Ooperation for example and you can also use status bits or flags in your programs to record events of onekind or another.
Defining an enumeration to represent flags involves using an attribute. Attributes are additional infor-mation that you add to program statements to instruct the compiler to modify the code in some way orto insert code. This is rather an advanced topic for this book so I won’t discuss attributes in general butI’ll make an exception in this case. Here’s an example of an enum defining flags:
[Flags] enum class FlagBits{ Ready = 1, ReadMode = 2, WriteMode = 4,EOF = 8, Disabled = 16};
The [Flags] part of this statement is the attribute and it tells the compiler that the enumeration constantsare single bit values; note the choice of explicit values for the constants. It also tells the compiler to treat avariable of type FlagBits as a collection of flag bits rather than a single value, for example:
FlagBits status = FlagBits::Ready | FlagBits::ReadMode | FlagBits::EOF;
111
Chapter 2: Data, Variables, and Calculations
25905c02.qxd:WroxPro 2/21/08 8:38 AM Page 111

The status variable will have the value
0000 0000 0000 0000 0000 0000 0000 1011
with bits set to 1 corresponding to the enumerations constants that have been ORed together. This corre-sponds to the decimal value 11. If you now output the value of status with the following statement:
Console::WriteLine(L”Current status: {0}”, status);
the output will be:
Current status: Ready, ReadMode, EOF
The conversion of the value of status to a string is not considering status as an integer value, but as acollection of bits, and the output is the names of the flags that have been set in the variable separated bycommas.
To reset one of the bits in a FlagBits variable, you use the bitwise operators. Here’s how you couldswitch off the Ready bit in status:
status = status & ~ FlagBits::Ready;
The expression ~FlagBits::Ready results in a value with all bits set to 1 except the bit correspondingto FlagBits::Ready. When you AND this with status only the FlagBits::Ready bit in status will beset to 0; all other bits in status will be left at their original setting.
Note that the op= operators are not defined for enum values so you cannot write:
status &= ~ FlagBits::Ready; // Wrong! Will not compile.
Native Enumerations in a C++/CLI ProgramYou can use the same syntax as native C++ enumerations in a C++/CLI program and they will behave thesame as they do in a native C++ program. The syntax for native C++ enums is extended in a C++/CLI pro-gram to allow you to specify the type for the enumeration constants explicitly. I recommend that you stickto C++/CLI enums in your code, unless you have a good reason to do otherwise.
SummaryIn this chapter, I have covered the basics of computation in C++. You have learned about all of the ele-mentary types of data provided for in the language, and all the operators that manipulate these typesdirectly. The essentials of what I have discussed up to now are as follows:
❑ A program in C++ consists of at least one function called main().
❑ The executable part of a function is made up of statements contained between braces.
❑ A statement in C++ is terminated by a semicolon.
112
Chapter 2: Data, Variables, and Calculations
25905c02.qxd:WroxPro 2/21/08 8:38 AM Page 112
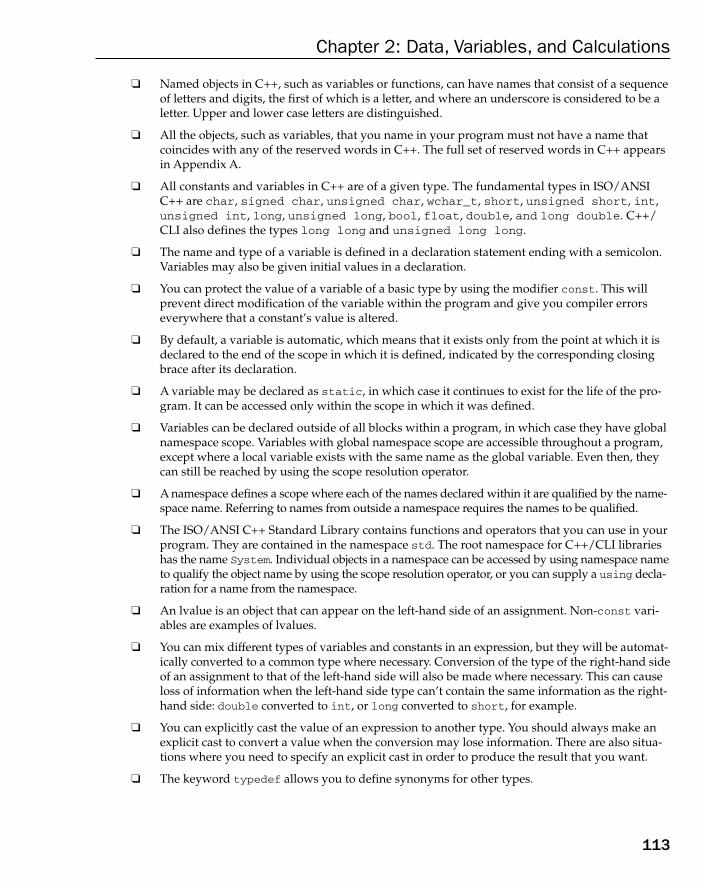
❑ Named objects in C++, such as variables or functions, can have names that consist of a sequenceof letters and digits, the first of which is a letter, and where an underscore is considered to be aletter. Upper and lower case letters are distinguished.
❑ All the objects, such as variables, that you name in your program must not have a name thatcoincides with any of the reserved words in C++. The full set of reserved words in C++ appearsin Appendix A.
❑ All constants and variables in C++ are of a given type. The fundamental types in ISO/ANSIC++ are char, signed char, unsigned char, wchar_t, short, unsigned short, int,unsigned int, long, unsigned long, bool, float, double, and long double. C++/CLI also defines the types long long and unsigned long long.
❑ The name and type of a variable is defined in a declaration statement ending with a semicolon.Variables may also be given initial values in a declaration.
❑ You can protect the value of a variable of a basic type by using the modifier const. This willprevent direct modification of the variable within the program and give you compiler errorseverywhere that a constant’s value is altered.
❑ By default, a variable is automatic, which means that it exists only from the point at which it isdeclared to the end of the scope in which it is defined, indicated by the corresponding closingbrace after its declaration.
❑ A variable may be declared as static, in which case it continues to exist for the life of the pro-gram. It can be accessed only within the scope in which it was defined.
❑ Variables can be declared outside of all blocks within a program, in which case they have globalnamespace scope. Variables with global namespace scope are accessible throughout a program,except where a local variable exists with the same name as the global variable. Even then, theycan still be reached by using the scope resolution operator.
❑ A namespace defines a scope where each of the names declared within it are qualified by the name-space name. Referring to names from outside a namespace requires the names to be qualified.
❑ The ISO/ANSI C++ Standard Library contains functions and operators that you can use in yourprogram. They are contained in the namespace std. The root namespace for C++/CLI librarieshas the name System. Individual objects in a namespace can be accessed by using namespace nameto qualify the object name by using the scope resolution operator, or you can supply a using decla-ration for a name from the namespace.
❑ An lvalue is an object that can appear on the left-hand side of an assignment. Non-const vari-ables are examples of lvalues.
❑ You can mix different types of variables and constants in an expression, but they will be automat-ically converted to a common type where necessary. Conversion of the type of the right-hand sideof an assignment to that of the left-hand side will also be made where necessary. This can causeloss of information when the left-hand side type can’t contain the same information as the right-hand side: double converted to int, or long converted to short, for example.
❑ You can explicitly cast the value of an expression to another type. You should always make anexplicit cast to convert a value when the conversion may lose information. There are also situa-tions where you need to specify an explicit cast in order to produce the result that you want.
❑ The keyword typedef allows you to define synonyms for other types.
113
Chapter 2: Data, Variables, and Calculations
25905c02.qxd:WroxPro 2/21/08 8:38 AM Page 113
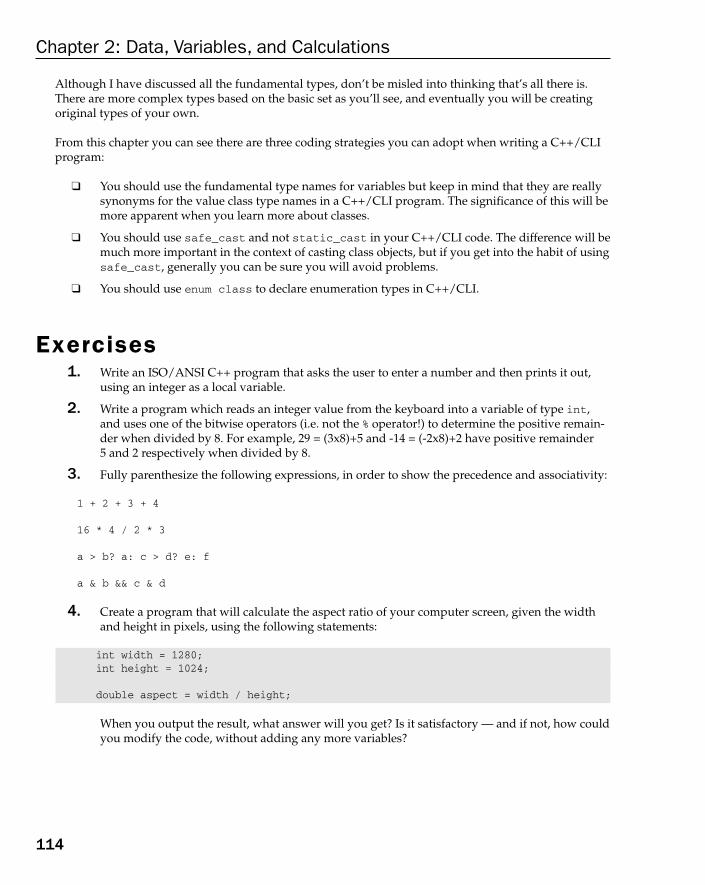
Although I have discussed all the fundamental types, don’t be misled into thinking that’s all there is.There are more complex types based on the basic set as you’ll see, and eventually you will be creatingoriginal types of your own.
From this chapter you can see there are three coding strategies you can adopt when writing a C++/CLIprogram:
❑ You should use the fundamental type names for variables but keep in mind that they are reallysynonyms for the value class type names in a C++/CLI program. The significance of this will bemore apparent when you learn more about classes.
❑ You should use safe_cast and not static_cast in your C++/CLI code. The difference will bemuch more important in the context of casting class objects, but if you get into the habit of usingsafe_cast, generally you can be sure you will avoid problems.
❑ You should use enum class to declare enumeration types in C++/CLI.
Exercises1. Write an ISO/ANSI C++ program that asks the user to enter a number and then prints it out,
using an integer as a local variable.
2. Write a program which reads an integer value from the keyboard into a variable of type int,and uses one of the bitwise operators (i.e. not the % operator!) to determine the positive remain-der when divided by 8. For example, 29 = (3x8)+5 and -14 = (-2x8)+2 have positive remainder 5 and 2 respectively when divided by 8.
3. Fully parenthesize the following expressions, in order to show the precedence and associativity:
1 + 2 + 3 + 4
16 * 4 / 2 * 3
a > b? a: c > d? e: f
a & b && c & d
4. Create a program that will calculate the aspect ratio of your computer screen, given the widthand height in pixels, using the following statements:
int width = 1280;int height = 1024;
double aspect = width / height;
When you output the result, what answer will you get? Is it satisfactory — and if not, how couldyou modify the code, without adding any more variables?
114
Chapter 2: Data, Variables, and Calculations
25905c02.qxd:WroxPro 2/21/08 8:38 AM Page 114
5. (Advanced) Without running it, can you work out what value the following code is going tooutput, and why?
unsigned s = 555;
int i = (s >> 4) & ~(~0 << 3);cout << i;
6. Write a C++/CLI console program that uses an enumeration to identify months in the yearwith the values associated with the months running from 1 to 12. The program should outputeach enumeration constants and its underlying value.
7. Write a C++/CLI program that will calculate the areas of three rooms to the nearest number ofwhole square feet that have the following dimensions in feet:
Room1: 10.5 by 17.6 Room2: 12.7 by 18.9 Room3: 16.3 by 15.4
The program should also calculate and output the average area of the three rooms and the totalarea; in each case the result should be to the nearest whole number of square feet.
115
Chapter 2: Data, Variables, and Calculations
25905c02.qxd:WroxPro 2/21/08 8:38 AM Page 115

25905c02.qxd:WroxPro 2/21/08 8:38 AM Page 116

3Decisions and Loops
In this chapter, you will look at how to add decision-making capabilities to your C++ programs. You’llalso learn how to make your programs repeat a set of actions until a specific condition is met. This willenable you to handle variable amounts of input, as well as make validity checks on the data that youread in. You will also be able to write programs that can adapt their actions depending on the inputdata and to deal with problems where logic is fundamental to the solution. By the end of this chapter,you will have learned:
❑ How to compare data values
❑ How to alter the sequence of program execution based on the result
❑ How to apply logical operators and expressions
❑ How to deal with multiple choice situations
❑ How to write and use loops in your programs
I’ll start with one of the most powerful and fundamental tools in programming: the ability tocompare variables and expressions with other variables and expressions and, based on the out-come, execute one set of statements or another.
Comparing ValuesUnless you want to make decisions on a whim, you need a mechanism for comparing things. Thisinvolves some new operators called relational operators. Because all information in your com-puter is ultimately represented by numerical values (in the last chapter you saw how character
25905c03.qxd:WroxPro 2/21/08 8:46 AM Page 117

information is represented by numeric codes), comparing numerical values is the essence of practicallyall decision making. You have six fundamental operators for comparing two values available:
The “equal to” comparison operator has two successive ‘=’ signs. This is not the same as the assignmentoperator, which consists only of a single ‘=’ sign. It’s a common mistake to use the assignment operatorinstead of the comparison operator, so watch out for this potential cause of confusion.
Each of these operators compares the values of two operands and returns one of the two possible valuesof type bool: true if the comparison is true, or false if it is not. You can see how this works by havinga look at a few simple examples of comparisons. Suppose you have created integer variables i and j withthe values 10 and –5, respectively. The expressions,
i > j i != j j > -8 i <= j + 15
all return the value true.
Further assume that you have defined the following variables:
char first = ‘A’, last = ‘Z’;
Here are some examples of comparisons using these character variables:
first == 65 first < last ‘E’ <= first first != last
All four expressions involve comparing ASCII code values. The first expression returns true because firstwas initialized with ‘A’, which is the equivalent of decimal 65. The second expression checks whether thevalue of first, which is ‘A’, is less than the value of last, which is ‘Z’. If you check the ASCII codes forthese characters in Appendix B, notice that the capital letters are represented by an ascending sequence ofnumerical values from 65 to 90, 65 representing ‘A’ and 90 representing ‘Z’, so this comparison also returnsthe value true. The third expression returns the value false because ‘E’ is greater than the value of first.The last expression returns true because ‘A’ is definitely not equal to ‘Z’.
Consider some slightly more complicated numerical comparisons. With variables defined by the statements
int i = -10, j = 20;double x = 1.5, y = -0.25E-10;
take a look at the following:
-1 < y j < (10 - i) 2.0*x >= (3 + y)
As you can see, you can use expressions that result in a numerical value as operands in comparisons. Ifyou check with the precedence table for operators that you saw in Chapter 2, you see that none of the
< less than <= less than or equal to
> greater than >= greater than or equal to
== equal to != not equal to
118
Chapter 3: Decisions and Loops
25905c03.qxd:WroxPro 2/21/08 8:46 AM Page 118
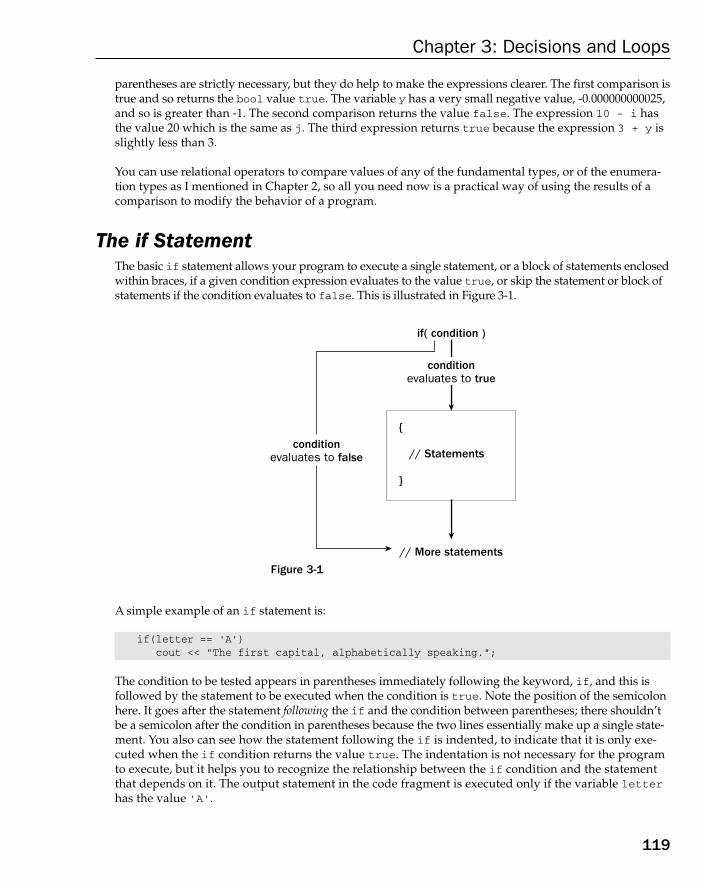
parentheses are strictly necessary, but they do help to make the expressions clearer. The first comparison istrue and so returns the bool value true. The variable y has a very small negative value, -0.000000000025,and so is greater than -1. The second comparison returns the value false. The expression 10 - i hasthe value 20 which is the same as j. The third expression returns true because the expression 3 + y isslightly less than 3.
You can use relational operators to compare values of any of the fundamental types, or of the enumera-tion types as I mentioned in Chapter 2, so all you need now is a practical way of using the results of acomparison to modify the behavior of a program.
The if StatementThe basic if statement allows your program to execute a single statement, or a block of statements enclosedwithin braces, if a given condition expression evaluates to the value true, or skip the statement or block ofstatements if the condition evaluates to false. This is illustrated in Figure 3-1.
Figure 3-1
A simple example of an if statement is:
if(letter == ‘A’)cout << “The first capital, alphabetically speaking.”;
The condition to be tested appears in parentheses immediately following the keyword, if, and this isfollowed by the statement to be executed when the condition is true. Note the position of the semicolonhere. It goes after the statement following the if and the condition between parentheses; there shouldn’tbe a semicolon after the condition in parentheses because the two lines essentially make up a single state -ment. You also can see how the statement following the if is indented, to indicate that it is only exe-cuted when the if condition returns the value true. The indentation is not necessary for the programto execute, but it helps you to recognize the relationship between the if condition and the statementthat depends on it. The output statement in the code fragment is executed only if the variable letterhas the value ‘A’.
{
// Statements
}
if( condition )
conditionevaluates to true
// More statements
conditionevaluates to false
119
Chapter 3: Decisions and Loops
25905c03.qxd:WroxPro 2/21/08 8:46 AM Page 119

You could extend this example to change the value of letter if it contains the value ‘A’:
if(letter == ‘A’){
cout << “The first capital, alphabetically speaking.”;letter = ‘a’;
}
The block of statements that is controlled by the if statement is delimited by the curly braces. Here youexecute the statements in the block only if the condition (letter == ‘A’) evaluates to true. Withoutthe braces, only the first statement would be the subject of the if, and the statement assigning the value‘a’ to letter would always be executed. Note that there is a semicolon after each of the statements inthe block, not after the closing brace at the end of the block. There can be as many statements as you likewithin the block. Now, as a result of letter having the value ‘A’, you change its value to ‘a’ after out-putting the same message as before. If the condition returns false, neither of these statements is executed.
Nested if StatementsThe statement to be executed when the condition in an if statement is true can also be an if. Thisarrangement is called a nested if. The condition for the inner if is only tested if the condition for theouter if is true. An if that is nested inside another can also contain a nested if. You can generallycontinue nesting ifs one inside the other like this for as long as you know what you are doing.
Try It Out Using Nested IfsThe following is the nested if with a working example.
// Ex3_01.cpp// A nested if demonstration#include <iostream>
using std::cin;using std::cout;using std::endl;
int main(){
char letter = 0; // Store input in here
cout << endl<< “Enter a letter: “; // Prompt for the input
cin >> letter; // then read a character
if(letter >= ‘A’) // Test for ‘A’ or largerif(letter <= ‘Z’) // Test for ‘Z’ or smaller{
cout << endl<< “You entered a capital letter.”<< endl;
return 0;}
120
Chapter 3: Decisions and Loops
25905c03.qxd:WroxPro 2/21/08 8:46 AM Page 120

if(letter >= ‘a’) // Test for ‘a’ or largerif(letter <= ‘z’) // Test for ‘z’ or smaller{
cout << endl<< “You entered a small letter.”<< endl;
return 0;}
cout << endl << “You did not enter a letter.” << endl;return 0;
}
How It WorksThis program starts with the usual comment lines; then the #include statement for the headerfile supporting input/output and the using declarations for cin, cout, and endl that are thestd namespace. The first action in the body of main() is to prompt for a letter to be entered.This is stored in the char variable with the name letter.
The if statement that follows the input checks whether the character entered is ‘A’ or larger.Because the ASCII codes for lowercase letters (97 to 122) are greater than those for uppercaseletters (65 to 90), entering a lowercase letter causes the program to execute the first if block,as (letter >= ‘A’) returns true for all letters. In this case, the nested if, which checks foran input of ‘Z’ or less, is executed. If it is ‘Z’ or less, you know that you have a capital letter,the message is displayed, and you are done, so you execute a return statement to end theprogram. Both statements are enclosed between braces, so they are both executed when thenested if condition returns true.
The next if checks whether the character entered is lowercase, using essentially the same mech-anism as the first if, displays a message and returns.
If the character entered is not a letter, the output statement following the last if block is executed.This displays a message to the effect that the character entered was not a letter. The return is thenexecuted.
You can see that the relationship between the nested ifs and the output statement is much easierto follow because of the indentation applied to each.
A typical output from this example is:
Enter a letter: TYou entered a capital letter.
You could easily arrange to change uppercase to lowercase by adding just one extra statement tothe if, checking for uppercase:
if(letter >= ‘A’) // Test for ‘A’ or largerif(letter <= ‘Z’) // Test for ‘Z’ or smaller{
cout << endl<< “You entered a capital letter.”;<< endl;
letter += ‘a’ - ‘A’; // Convert to lowercasereturn 0;
}
121
Chapter 3: Decisions and Loops
25905c03.qxd:WroxPro 2/21/08 8:46 AM Page 121
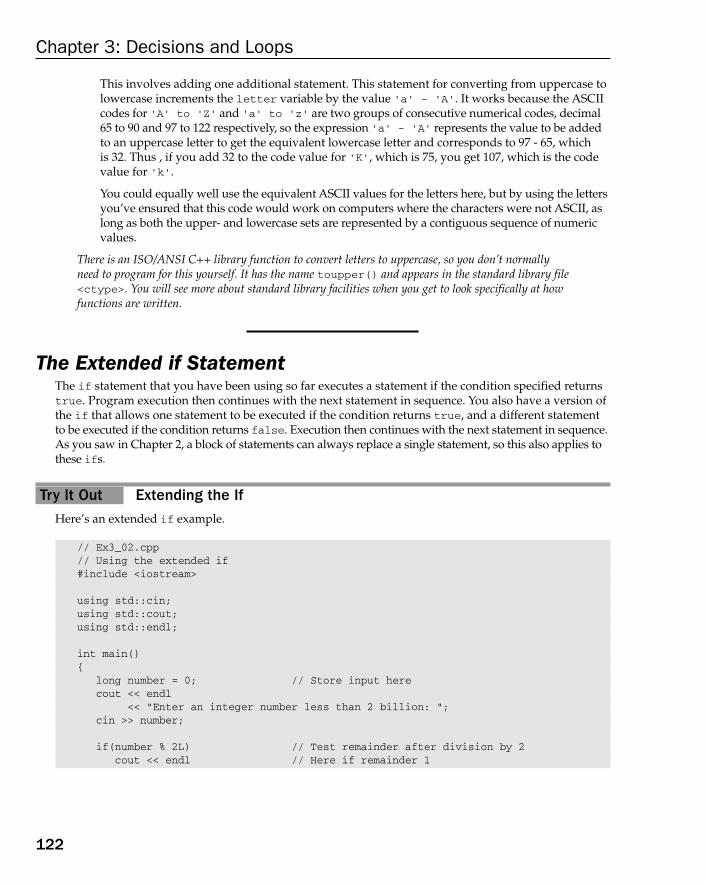
This involves adding one additional statement. This statement for converting from uppercase tolowercase increments the letter variable by the value ‘a’ - ‘A’. It works because the ASCIIcodes for ‘A’ to ‘Z’ and ‘a’ to ‘z’ are two groups of consecutive numerical codes, decimal65 to 90 and 97 to 122 respectively, so the expression ‘a’ - ‘A’ represents the value to be addedto an uppercase letter to get the equivalent lowercase letter and corresponds to 97 - 65, which is 32. Thus , if you add 32 to the code value for ‘K’, which is 75, you get 107, which is the codevalue for ‘k’.
You could equally well use the equivalent ASCII values for the letters here, but by using the lettersyou’ve ensured that this code would work on computers where the characters were not ASCII, aslong as both the upper- and lowercase sets are represented by a contiguous sequence of numericvalues.
There is an ISO/ANSI C++ library function to convert letters to uppercase, so you don’t normally need to program for this yourself. It has the name toupper() and appears in the standard library file<ctype>. You will see more about standard library facilities when you get to look specifically at howfunctions are written.
The Extended if StatementThe if statement that you have been using so far executes a statement if the condition specified returnstrue. Program execution then continues with the next statement in sequence. You also have a version ofthe if that allows one statement to be executed if the condition returns true, and a different statementto be executed if the condition returns false. Execution then continues with the next statement in sequence.As you saw in Chapter 2, a block of statements can always replace a single statement, so this also applies tothese ifs.
Try It Out Extending the IfHere’s an extended if example.
// Ex3_02.cpp// Using the extended if#include <iostream>
using std::cin;using std::cout;using std::endl;
int main(){
long number = 0; // Store input herecout << endl
<< “Enter an integer number less than 2 billion: “;cin >> number;
if(number % 2L) // Test remainder after division by 2cout << endl // Here if remainder 1
122
Chapter 3: Decisions and Loops
25905c03.qxd:WroxPro 2/21/08 8:46 AM Page 122

<< “Your number is odd.” << endl;else
cout << endl // Here if remainder 0<< “Your number is even.” << endl;
return 0;}
Typical output from this program is:
Enter an integer less than 2 billion: 123456Your number is even,
How It WorksAfter reading the input value into number, the value is tested by taking the remainder after division bytwo (using the remainder operator % that you saw in the last chapter) and using that as the condition forthe if. In this case, the condition of the if statement returns an integer, not a Boolean. The if statementinterprets a non-zero value returned by the condition as true, and interprets zero as false. In other words,the condition expression for the if statement
(number % 2L)
is equivalent to
(number % 2L != 0)
If the remainder is 1, the condition is true, and the statement immediately following the if is executed. Ifthe remainder is 0, the condition is false, and the statement following the else keyword is executed. It’sobvious here what the if expression is doing, but with more complicated expressions it’s better to add theextra few characters needed for the comparison with zero to ensure that the code is easily understood.
In an if statement, the condition can be an expression that results in a value of any of the funda-mental data types that you saw in Chapter 2. When the condition expression evaluates to a numericalvalue rather than the bool value required by the if statement, the compiler inserts an automatic cast ofthe result of the expression to type bool. A non-zero value that is cast to type bool results in true, anda zero value results in false.
Because the remainder from the division of an integer by two can only be one or zero, I have commentedthe code to indicate this fact. After either outcome, the return statement is executed to end the program.
The else keyword is written without a semicolon, similar to the if part of the statement. Again, inden-tation is used as a visible indicator of the relationship between various statements. You can clearly seewhich statement is executed for a true or non-zero result, and which for a false or zero result. Youshould always indent the statements in your programs to show their logical structure.
The if-else combination provides a choice between two options. The general logic of the if-else isshown in Figure 3-2.
123
Chapter 3: Decisions and Loops
25905c03.qxd:WroxPro 2/21/08 8:46 AM Page 123

Figure 3-2
The arrows in the diagram indicate the sequence in which statements are executed, depending onwhether the if condition returns true or false.
Nested if-else StatementsAs you have seen, you can nest if statements within if statements. You can also nest if-else statementswithin ifs, ifs within if-else statements, and if-else statements within if-else statements. This pro-vides considerable room for confusion, so take a look at a few examples. The following is an example of anif-else nested within an if.
if(coffee == ‘y’)if(donuts == ‘y’)
cout << “We have coffee and donuts.”;else
cout << “We have coffee, but not donuts”;
{
// Statements
}
if( condition )
conditionevaluates to true
else
// Even morestatements
conditionevaluates to false
{
// More statements
}
124
Chapter 3: Decisions and Loops
25905c03.qxd:WroxPro 2/21/08 8:46 AM Page 124

The test for donuts is executed only if the result of the test for coffee returns true, so the messagesreflect the correct situation in each case; however, it is easy to get this confused. If you write much thesame thing with incorrect indentation, you can be trapped into the wrong conclusion:
if(coffee == ‘y’)if(donuts == ‘y’)
cout << “We have coffee and donuts.”;else // This else is indented incorrectly
cout << “We have no coffee...”; // Wrong!
The mistake is easy to see here, but with more complicated if structures you need to keep in mind therule about which if owns which else.
An else always belongs to the nearest preceding if that is not already spoken for by another else.
Whenever things look a bit complicated, you can apply this rule to sort things out. When you are writingyour own programs you can always use braces to make the situation clearer. It isn’t really necessary insuch a simple case, but you could write the last example as follows:
if(coffee == ‘y’){
if(donuts == ‘y’)cout << “We have coffee and donuts.”;
elsecout << “We have coffee, but not donuts”;
}
and it should be absolutely clear. Now that you know the rules, understanding the case of an if nestedwithin an if-else becomes easy.
if(coffee == ‘y’){
if(donuts == ‘y’)cout << “We have coffee and donuts.”;
}else
if(tea == ‘y’)cout << “We have tea, but not coffee”;
Here the braces are essential. If you leave them out, the else would belong to the second if, which islooking out for donuts. In this kind of situation, it is easy to forget to include them and create an errorthat may be hard to find. A program with this kind of error compiles fine and even produces the rightresults some of the time.
If you removed the braces in this example, you get the correct results only as long as coffee and donutsare both equal to ‘y’ so that the if(tea == ‘y’) check wouldn’t be executed.
125
Chapter 3: Decisions and Loops
25905c03.qxd:WroxPro 2/21/08 8:46 AM Page 125
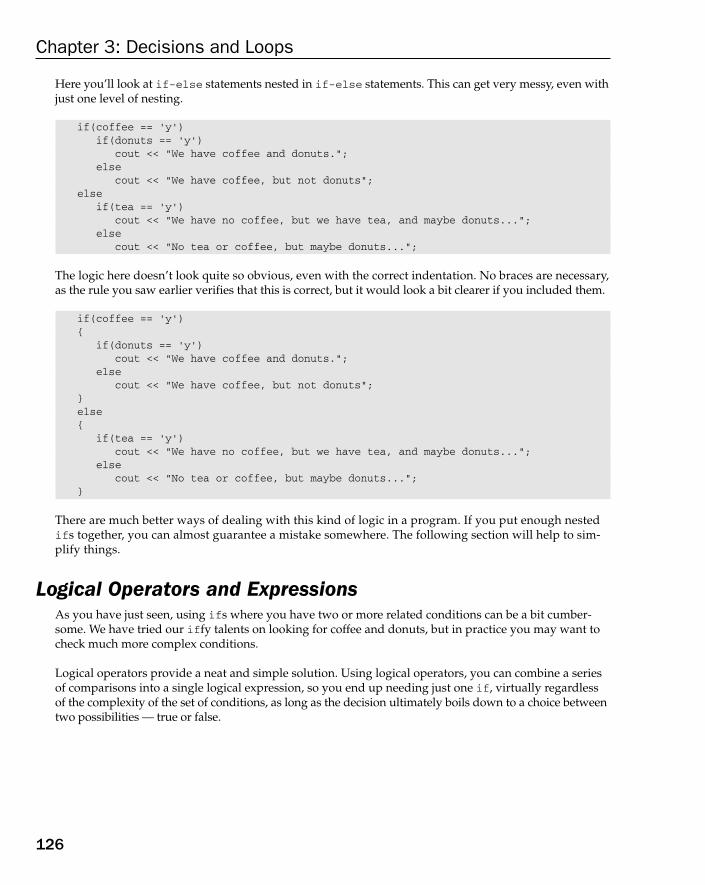
Here you’ll look at if-else statements nested in if-else statements. This can get very messy, even withjust one level of nesting.
if(coffee == ‘y’)if(donuts == ‘y’)
cout << “We have coffee and donuts.”;else
cout << “We have coffee, but not donuts”;else
if(tea == ‘y’)cout << “We have no coffee, but we have tea, and maybe donuts...”;
elsecout << “No tea or coffee, but maybe donuts...”;
The logic here doesn’t look quite so obvious, even with the correct indentation. No braces are necessary,as the rule you saw earlier verifies that this is correct, but it would look a bit clearer if you included them.
if(coffee == ‘y’){
if(donuts == ‘y’)cout << “We have coffee and donuts.”;
elsecout << “We have coffee, but not donuts”;
}else{
if(tea == ‘y’)cout << “We have no coffee, but we have tea, and maybe donuts...”;
elsecout << “No tea or coffee, but maybe donuts...”;
}
There are much better ways of dealing with this kind of logic in a program. If you put enough nestedifs together, you can almost guarantee a mistake somewhere. The following section will help to sim-plify things.
Logical Operators and ExpressionsAs you have just seen, using ifs where you have two or more related conditions can be a bit cumber-some. We have tried our iffy talents on looking for coffee and donuts, but in practice you may want tocheck much more complex conditions.
Logical operators provide a neat and simple solution. Using logical operators, you can combine a seriesof comparisons into a single logical expression, so you end up needing just one if, virtually regardlessof the complexity of the set of conditions, as long as the decision ultimately boils down to a choice betweentwo possibilities — true or false.
126
Chapter 3: Decisions and Loops
25905c03.qxd:WroxPro 2/21/08 8:46 AM Page 126
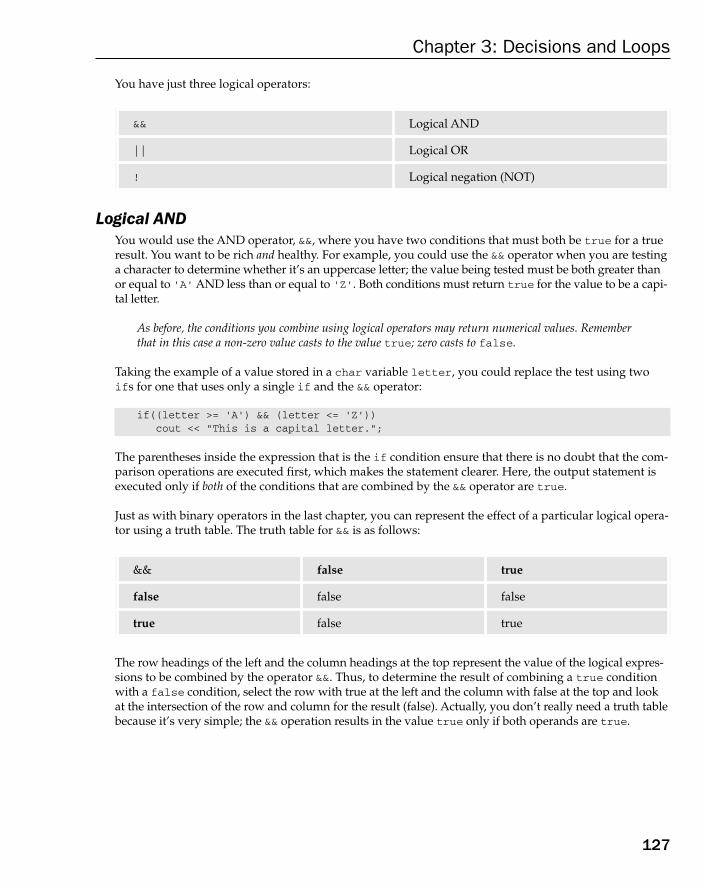
You have just three logical operators:
Logical ANDYou would use the AND operator, &&, where you have two conditions that must both be true for a trueresult. You want to be rich and healthy. For example, you could use the && operator when you are testinga character to determine whether it’s an uppercase letter; the value being tested must be both greater thanor equal to ‘A’AND less than or equal to ‘Z’. Both conditions must return true for the value to be a capi-tal letter.
As before, the conditions you combine using logical operators may return numerical values. Rememberthat in this case a non-zero value casts to the value true; zero casts to false.
Taking the example of a value stored in a char variable letter, you could replace the test using twoifs for one that uses only a single if and the && operator:
if((letter >= ‘A’) && (letter <= ‘Z’))cout << “This is a capital letter.”;
The parentheses inside the expression that is the if condition ensure that there is no doubt that the com-parison operations are executed first, which makes the statement clearer. Here, the output statement isexecuted only if both of the conditions that are combined by the && operator are true.
Just as with binary operators in the last chapter, you can represent the effect of a particular logical opera-tor using a truth table. The truth table for && is as follows:
The row headings of the left and the column headings at the top represent the value of the logical expres-sions to be combined by the operator &&. Thus, to determine the result of combining a true conditionwith a false condition, select the row with true at the left and the column with false at the top and lookat the intersection of the row and column for the result (false). Actually, you don’t really need a truth tablebecause it’s very simple; the && operation results in the value true only if both operands are true.
&& false true
false false false
true false true
&& Logical AND
|| Logical OR
! Logical negation (NOT)
127
Chapter 3: Decisions and Loops
25905c03.qxd:WroxPro 2/21/08 8:46 AM Page 127
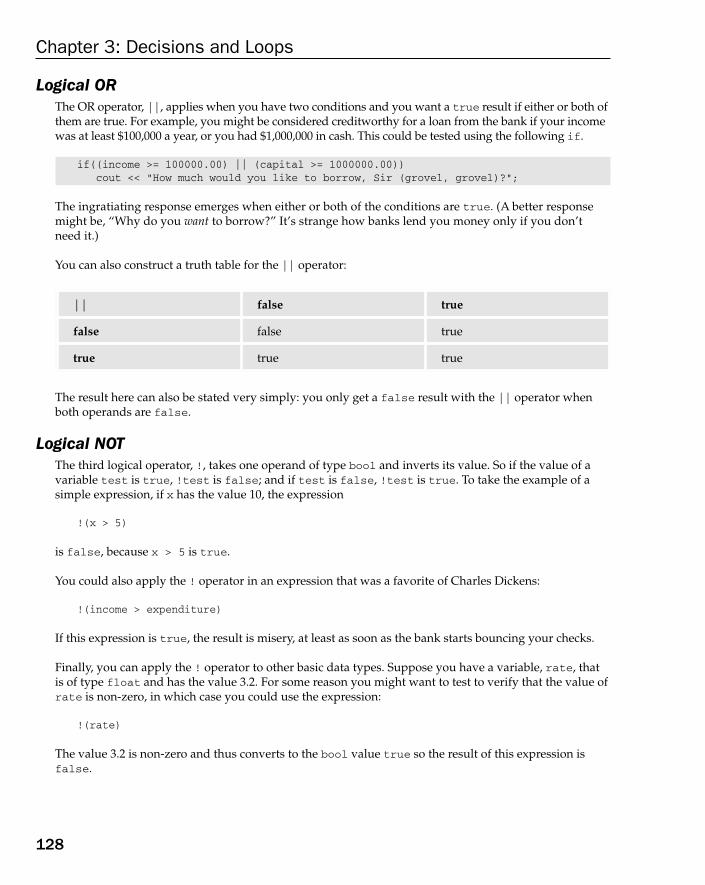
Logical ORThe OR operator, ||, applies when you have two conditions and you want a true result if either or both ofthem are true. For example, you might be considered creditworthy for a loan from the bank if your incomewas at least $100,000 a year, or you had $1,000,000 in cash. This could be tested using the following if.
if((income >= 100000.00) || (capital >= 1000000.00))cout << “How much would you like to borrow, Sir (grovel, grovel)?”;
The ingratiating response emerges when either or both of the conditions are true. (A better responsemight be, “Why do you want to borrow?” It’s strange how banks lend you money only if you don’tneed it.)
You can also construct a truth table for the || operator:
The result here can also be stated very simply: you only get a false result with the || operator whenboth operands are false.
Logical NOTThe third logical operator, !, takes one operand of type bool and inverts its value. So if the value of avariable test is true, !test is false; and if test is false, !test is true. To take the example of asimple expression, if x has the value 10, the expression
!(x > 5)
is false, because x > 5 is true.
You could also apply the ! operator in an expression that was a favorite of Charles Dickens:
!(income > expenditure)
If this expression is true, the result is misery, at least as soon as the bank starts bouncing your checks.
Finally, you can apply the ! operator to other basic data types. Suppose you have a variable, rate, thatis of type float and has the value 3.2. For some reason you might want to test to verify that the value ofrate is non-zero, in which case you could use the expression:
!(rate)
The value 3.2 is non-zero and thus converts to the bool value true so the result of this expression isfalse.
|| false true
false false true
true true true
128
Chapter 3: Decisions and Loops
25905c03.qxd:WroxPro 2/21/08 8:46 AM Page 128

Try It Out Combining Logical OperatorsYou can combine conditional expressions and logical operators to any degree that you feel comfortablewith. For example, you could construct a test for whether a variable contained a letter just using a singleif. Let’s write it as a working example:
// Ex3_03.cpp// Testing for a letter using logical operators#include <iostream>
using std::cin;using std::cout;using std::endl;
int main(){
char letter = 0; // Store input in here
cout << endl<< “Enter a character: “;
cin >> letter;
if(((letter >= ‘A’) && (letter <= ‘Z’)) ||((letter >= ‘a’) && (letter <= ‘z’))) // Test for alphabeticcout << endl
<< “You entered a letter.” << endl;else
cout << endl<< “You didn’t enter a letter.” << endl;
return 0;}
How It WorksThis example starts out in the same way as Ex3_01.cpp by reading a character after a prompt for input.The interesting part of the program is in the if statement condition. This consists of two logical expres-sions combined with the || (OR) operator, so that if either is true, the condition returns true and themessage
You entered a letter.
is displayed. If both logical expressions are false, the else statement is executed, which displays themessage
You didn’t enter a letter.
Each of the logical expressions combines a pair of comparisons with the operator && (AND), so bothcomparisons must return true if the logical expression is to be true. The first logical expression returnstrue if the input is an uppercase letter, and the second returns true if the input is a lowercase letter.
129
Chapter 3: Decisions and Loops
25905c03.qxd:WroxPro 2/21/08 8:46 AM Page 129
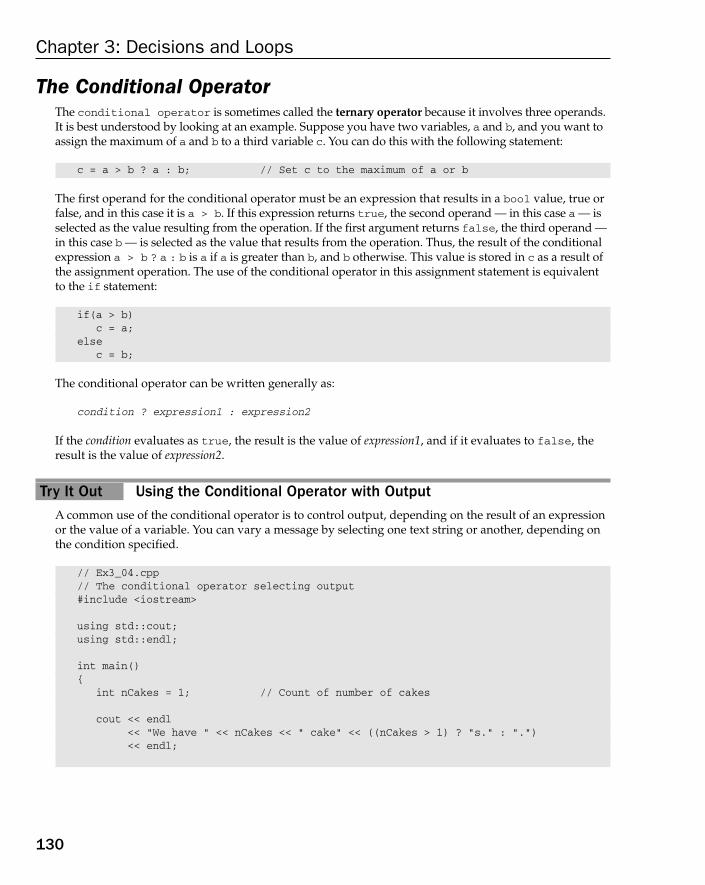
The Conditional OperatorThe conditional operator is sometimes called the ternary operator because it involves three operands.It is best understood by looking at an example. Suppose you have two variables, a and b, and you want toassign the maximum of a and b to a third variable c. You can do this with the following statement:
c = a > b ? a : b; // Set c to the maximum of a or b
The first operand for the conditional operator must be an expression that results in a bool value, true orfalse, and in this case it is a > b. If this expression returns true, the second operand — in this case a — isselected as the value resulting from the operation. If the first argument returns false, the third operand —in this case b — is selected as the value that results from the operation. Thus, the result of the conditionalexpression a > b ? a : b is a if a is greater than b, and b otherwise. This value is stored in c as a result ofthe assignment operation. The use of the conditional operator in this assignment statement is equivalentto the if statement:
if(a > b)c = a;
elsec = b;
The conditional operator can be written generally as:
condition ? expression1 : expression2
If the condition evaluates as true, the result is the value of expression1, and if it evaluates to false, theresult is the value of expression2.
Try It Out Using the Conditional Operator with OutputA common use of the conditional operator is to control output, depending on the result of an expressionor the value of a variable. You can vary a message by selecting one text string or another, depending onthe condition specified.
// Ex3_04.cpp// The conditional operator selecting output#include <iostream>
using std::cout;using std::endl;
int main(){
int nCakes = 1; // Count of number of cakes
cout << endl<< “We have “ << nCakes << “ cake” << ((nCakes > 1) ? “s.” : “.”)<< endl;
130
Chapter 3: Decisions and Loops
25905c03.qxd:WroxPro 2/21/08 8:46 AM Page 130

++nCakes;
cout << endl<< “We have “ << nCakes << “ cake” << ((nCakes > 1) ? “s.” : “.”)<< endl;
return 0;}
The output from this program is:
We have 1 cake.We have 2 cakes.
How It WorksYou first initialize the nCakes variable with the value 1; then you have an output statement that showsthe number of cakes. The part that uses the conditional operator simply tests the variable to determinewhether you have a singular cake or several cakes:
((nCakes>1) ? “s.” : “.”)
This expression evaluates to “s.” if nCakes is greater than 1, or “.” otherwise. This enables you to usethe same output statement for any number of cakes and get grammatically correct output. You show thisin the example by incrementing the nCakes variable and repeating the output statement.
There are many other situations where you can apply this sort of mechanism; selecting between “is”and “are”, for example.
The switch StatementThe switch statement enables you to select from multiple choices based on a set of fixed values for agiven expression. It operates like a physical rotary switch in that you can select one of a fixed number ofchoices; some makes of washing machine provide a means of choosing an operation for processing yourlaundry in this way. There are a given number of possible positions for the switch, such as cotton, wool,synthetic fiber, and so on, and you can select any one of them by turning the knob to point to the optionyou want.
In the switch statement, the selection is determined by the value of an expression that you specify. Youdefine the possible switch positions by one or more case values, a particular one being selected if thevalue of the switch expression is the same as the particular case value. There is one case value for eachpossible choice in the switch and all the case values must be distinct.
If the value of the switch expression does not match any of the case values, the switch automaticallyselects the default case. You can, if you want, specify the code for the default case, as you will do below;otherwise, the default is to do nothing.
131
Chapter 3: Decisions and Loops
25905c03.qxd:WroxPro 2/21/08 8:46 AM Page 131

Try It Out The Switch StatementYou can examine how the switch statement works with the following example.
// Ex3_05.cpp// Using the switch statement#include <iostream>
using std::cin;using std::cout;using std::endl;
int main(){
int choice = 0; // Store selection value here
cout << endl<< “Your electronic recipe book is at your service.” << endl<< “You can choose from the following delicious dishes: “<< endl<< endl << “1 Boiled eggs”<< endl << “2 Fried eggs”<< endl << “3 Scrambled eggs”<< endl << “4 Coddled eggs”<< endl << endl << “Enter your selection number: “;
cin >> choice;
switch(choice){
case 1: cout << endl << “Boil some eggs.” << endl;break;
case 2: cout << endl << “Fry some eggs.” << endl;break;
case 3: cout << endl << “Scramble some eggs.” << endl;break;
case 4: cout << endl << “Coddle some eggs.” << endl;break;
default: cout << endl <<”You entered a wrong number, try raw eggs.”<< endl;
}
return 0;}
How It WorksAfter defining your options in the stream output statement and reading a selection number into the vari-able choice, the switch statement is executed with the condition specified as simply choice in paren-theses, immediately following the keyword switch. The possible options in the switch are enclosedbetween braces and are each identified by a case label. A case label is the keyword case, followed bythe value of choice that corresponds to this option, and terminated by a colon.
As you can see, the statements to be executed for a particular case are written following the colon at theend of the case label, and are terminated by a break statement. The break transfers execution to the
132
Chapter 3: Decisions and Loops
25905c03.qxd:WroxPro 2/21/08 8:46 AM Page 132
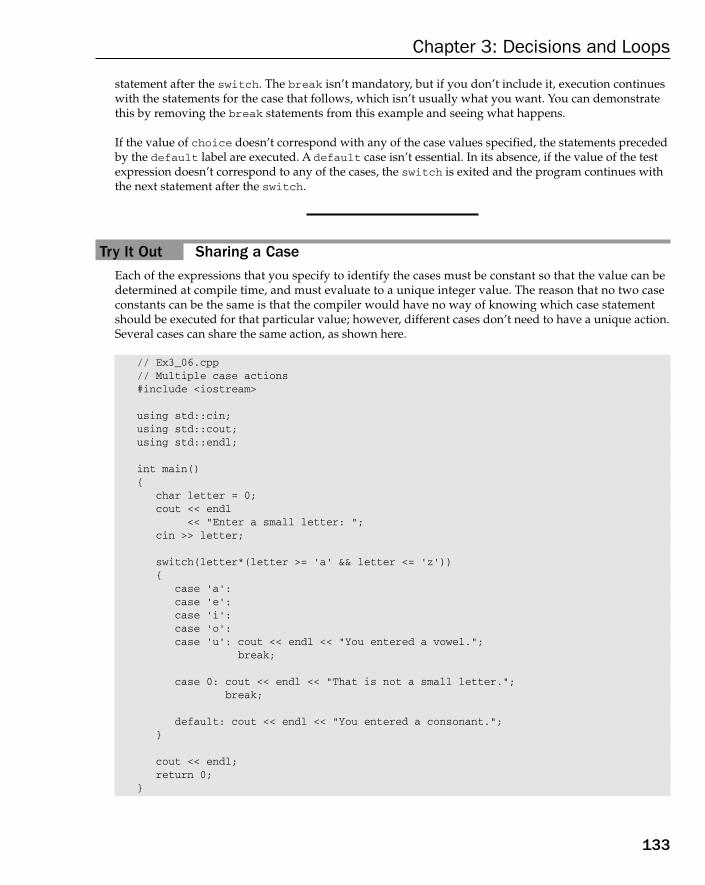
statement after the switch. The break isn’t mandatory, but if you don’t include it, execution continueswith the statements for the case that follows, which isn’t usually what you want. You can demonstratethis by removing the break statements from this example and seeing what happens.
If the value of choice doesn’t correspond with any of the case values specified, the statements precededby the default label are executed. A default case isn’t essential. In its absence, if the value of the testexpression doesn’t correspond to any of the cases, the switch is exited and the program continues withthe next statement after the switch.
Try It Out Sharing a CaseEach of the expressions that you specify to identify the cases must be constant so that the value can bedetermined at compile time, and must evaluate to a unique integer value. The reason that no two caseconstants can be the same is that the compiler would have no way of knowing which case statementshould be executed for that particular value; however, different cases don’t need to have a unique action.Several cases can share the same action, as shown here.
// Ex3_06.cpp// Multiple case actions#include <iostream>
using std::cin;using std::cout;using std::endl;
int main(){
char letter = 0;cout << endl
<< “Enter a small letter: “;cin >> letter;
switch(letter*(letter >= ‘a’ && letter <= ‘z’)){
case ‘a’:case ‘e’:case ‘i’:case ‘o’:case ‘u’: cout << endl << “You entered a vowel.”;
break;
case 0: cout << endl << “That is not a small letter.”;break;
default: cout << endl << “You entered a consonant.”;}
cout << endl;return 0;
}
133
Chapter 3: Decisions and Loops
25905c03.qxd:WroxPro 2/21/08 8:46 AM Page 133

How It WorksIn this example, you have a more complex expression in the switch. If the character entered isn’t a lower-case letter, the expression
(letter >= ‘a’ && letter <= ‘z’)
results in the value false; otherwise it evaluates to true. Because letter is multiplied by this expres-sion, the value of the logical expression is cast to an integer — 0 if the logical expression is false and 1 if it is true. Thus the switch expression evaluates to 0 if a lowercase letter was not entered and to thevalue of letter if it was. The statements following the case label case 0 are executed whenever thecharacter code stored in letter does not represent a lowercase case letter.
If a lowercase letter was entered, the switch expression evaluates to the same value as letter so for all values corresponding to vowels, the output statement following the sequence of case labels that havecase values that are vowels. The same statement executes for any vowel because when any of these caselabels is chosen successive statements are executed until the break statement is reached. You can seethat a single action can be taken for a number of different cases by writing each of the case labels oneafter the other before the statements to be executed. If a lowercase letter that is a consonant is entered asprogram input, the default case label statement is executed.
Unconditional BranchingThe if statement provides you with the flexibility to choose to execute one set of statements or another,depending on a specified condition, so the statement execution sequence is varied depending on the val-ues of the data in the program. The goto statement, in contrast, is a blunt instrument. It enables you tobranch to a specified program statement unconditionally. The statement to be branched to must be iden-tified by a statement label which is an identifier defined according to the same rules as a variable name.This is followed by a colon and placed before the statement requiring labeling. Here is an example of alabeled statement.
myLabel: cout << “myLabel branch has been activated” << endl;
This statement has the label myLabel, and an unconditional branch to this statement would be writtenas follows:
goto myLabel;
Whenever possible, you should avoid using gotos in your program. They tend to encourage convolutedcode that can be extremely difficult to follow.
Because the goto is theoretically unnecessary in a program — there’s always an alternative approach tousing goto — a significant cadre of programmers say you should never use it. I don’t subscribe to suchan extreme view. It is a legal statement after all, and there are occasions when it can be convenient suchas when you must exit from a deeply nested set of loops (you learn about loops in the next section). I do,however, recommend that you only use it where you can see an obvious advantage over other optionsthat are available; otherwise, you may end up with convoluted error-prone code that is hard to under-stand and even harder to maintain.
134
Chapter 3: Decisions and Loops
25905c03.qxd:WroxPro 2/21/08 8:46 AM Page 134
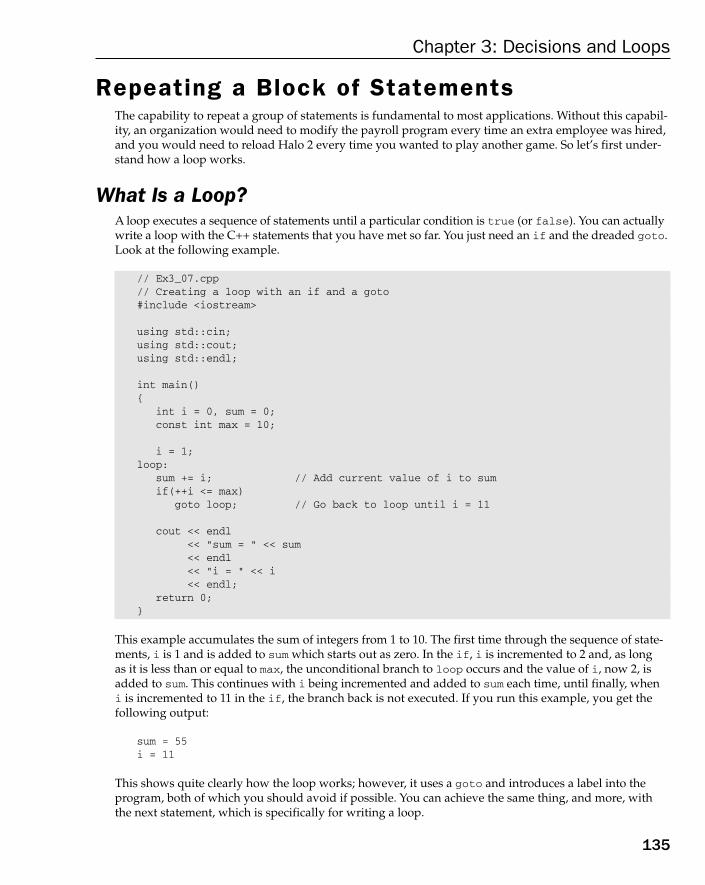
Repeating a Block of StatementsThe capability to repeat a group of statements is fundamental to most applications. Without this capabil-ity, an organization would need to modify the payroll program every time an extra employee was hired,and you would need to reload Halo 2 every time you wanted to play another game. So let’s first under-stand how a loop works.
What Is a Loop?A loop executes a sequence of statements until a particular condition is true (or false). You can actuallywrite a loop with the C++ statements that you have met so far. You just need an if and the dreaded goto.Look at the following example.
// Ex3_07.cpp// Creating a loop with an if and a goto#include <iostream>
using std::cin;using std::cout;using std::endl;
int main(){
int i = 0, sum = 0;const int max = 10;
i = 1;loop:
sum += i; // Add current value of i to sumif(++i <= max)
goto loop; // Go back to loop until i = 11
cout << endl<< “sum = “ << sum<< endl<< “i = “ << i<< endl;
return 0;}
This example accumulates the sum of integers from 1 to 10. The first time through the sequence of state-ments, i is 1 and is added to sum which starts out as zero. In the if, i is incremented to 2 and, as long as it is less than or equal to max, the unconditional branch to loop occurs and the value of i, now 2, isadded to sum. This continues with i being incremented and added to sum each time, until finally, when i is incremented to 11 in the if, the branch back is not executed. If you run this example, you get the following output:
sum = 55i = 11
This shows quite clearly how the loop works; however, it uses a goto and introduces a label into theprogram, both of which you should avoid if possible. You can achieve the same thing, and more, withthe next statement, which is specifically for writing a loop.
135
Chapter 3: Decisions and Loops
25905c03.qxd:WroxPro 2/21/08 8:46 AM Page 135

Try It Out Using the for LoopYou can rewrite the last example using what is known as a for loop.
// Ex3_08.cpp// Summing integers with a for loop#include <iostream>
using std::cin;using std::cout;using std::endl;
int main(){
int i = 0, sum = 0;const int max = 10;
for(i = 1; i <= max; i++) // Loop specificationsum += i; // Loop statement
cout << endl<< “sum = “ << sum<< endl<< “i = “ << i<< endl;
return 0;}
How It WorksIf you compile and run this, you get exactly the same output as the previous example, but the code ismuch simpler here. The conditions determining the operation of the loop appear in parentheses after thekeyword for. There are three expressions that appear within the parentheses separated by semicolons:
❑ The first expression executes once at the outset and sets the initial conditions for the loop. In thiscase, it sets i to 1.
❑ The second expression is a logical expression that determines whether the loop statement (orblock of statements) should continue to be executed. If the second expression is true, the loopcontinues to execute; when it is false, the loop ends and execution continues with the statementthat follows the loop. In this case the loop statement on the following line is executed as long asi is less than or equal to max.
❑ The third expression is evaluated after the loop statement (or block of statements) executes,and in this case increments i each iteration. After this expression has been evaluated the sec-ond expression is evaluated once more to see whether the loop should continue.
Actually, this loop is not exactly the same as the version in Ex3_07.cpp. You can demonstrate this if youset the value of max to 0 in both programs and run them again; then, you will find that the value of sumis 1 in Ex3_07.cpp and 0 in Ex3_08.cpp, and the value of i differs too. The reason for this is that the if version of the program always executes the loop at least once because you don’t check the conditionuntil the end. The for loop doesn’t do this, because the condition is actually checked at the beginning.
136
Chapter 3: Decisions and Loops
25905c03.qxd:WroxPro 2/21/08 8:46 AM Page 136
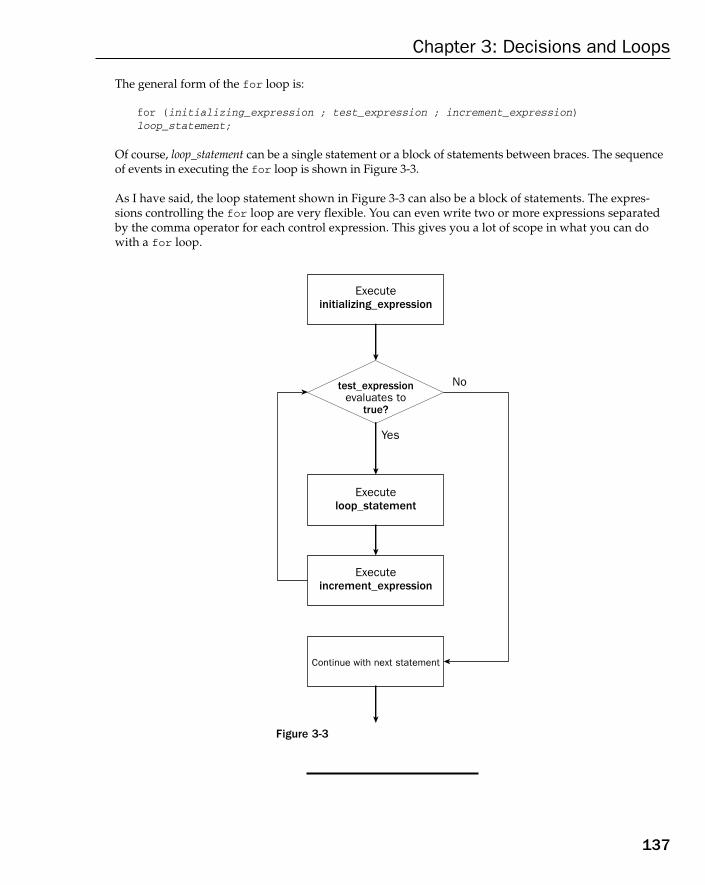
The general form of the for loop is:
for (initializing_expression ; test_expression ; increment_expression)loop_statement;
Of course, loop_statement can be a single statement or a block of statements between braces. The sequenceof events in executing the for loop is shown in Figure 3-3.
As I have said, the loop statement shown in Figure 3-3 can also be a block of statements. The expres-sions controlling the for loop are very flexible. You can even write two or more expressions separatedby the comma operator for each control expression. This gives you a lot of scope in what you can dowith a for loop.
Figure 3-3
Executeinitializing_expression
No
Yes
test_expressionevaluates to
true?
Executeloop_statement
Executeincrement_expression
Continue with next statement
137
Chapter 3: Decisions and Loops
25905c03.qxd:WroxPro 2/21/08 8:46 AM Page 137

Variations on the for LoopMost of the time, the expressions in a for loop are used in a fairly standard way: the first for initializingone or more loop counters, the second to test if the loop should continue, and the third to increment ordecrement one or more loop counters. You are not obliged to use these expressions in this way, however,and quite a few variations are possible.
The initialization expression in a for loop can also include a declaration for a loop variable. In the previ-ous example you could have written the loop to include the declaration for the loop counter i in the firstcontrol expression.
for(int i = 1; i <= max; i++) // Loop specificationsum += i; // Loop statement
Naturally, the original declaration for i would need to be omitted in the program. If you make this changeto the last example, you will find that it now does not compile because the loop variable, i, ceases to existafter the loop so you cannot refer to it in the output statement. A loop has a scope which extends from thefor expression to the end of the body of the loop, which of course can be a block of code between braces,as well as just a single statement. The counter i is now declared within the loop scope, so you cannot referto it in the output statement because this is outside the scope of the loop. By default the C++ compilerenforces the ISO/ANSI C++ standard by insisting that a variable defined within a loop condition cannotbe reference outside the loop. If you need to use the value in the counter after the loop has executed, youmust declare the counter variable outside the scope of the loop.
You can omit the initialization expression altogether from the loop. If you initialize i appropriately in thedeclaration statement for it, you can write the loop as:
int i = 1;for(; i <= max; i++) // Loop specification
sum += i; // Loop statement
You still need the semicolon that separates the initialization expression from the test condition for the loop.In fact, both semicolons must always be present regardless of whether any or all of the control expressionsare omitted. If you omit the first semicolon, the compiler is unable to decide which expression has beenomitted or even which semicolon is missing.
The loop statement can be empty. For example, you could place the loop statement in for loop from theprevious example inside the increment expression; in this case the loop becomes
for(i = 1; i <= max; sum += i++); // The whole loop
You still need the semicolon after the closing parentheses, to indicate that the loop statement is nowempty. If you omit this, the statement immediately following this line is interpreted as the loop state-ment. Sometimes you’ll see the empty loop statement written on a separate line like the following:
for(i = 1; i <= max; sum += i++) // The whole loop;
138
Chapter 3: Decisions and Loops
25905c03.qxd:WroxPro 2/21/08 8:46 AM Page 138
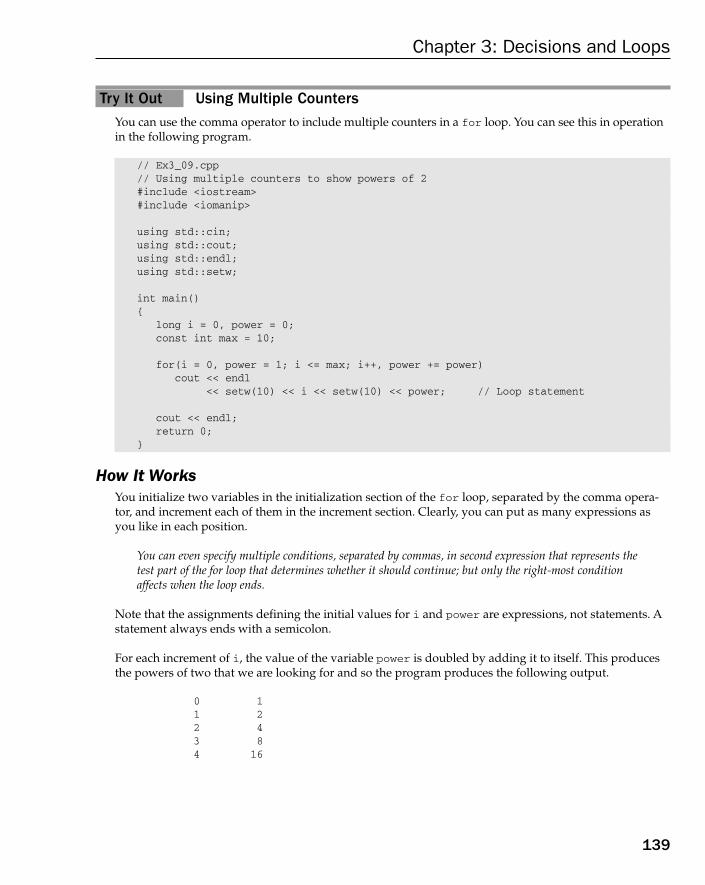
Try It Out Using Multiple CountersYou can use the comma operator to include multiple counters in a for loop. You can see this in operationin the following program.
// Ex3_09.cpp// Using multiple counters to show powers of 2#include <iostream>#include <iomanip>
using std::cin;using std::cout;using std::endl;using std::setw;
int main(){
long i = 0, power = 0;const int max = 10;
for(i = 0, power = 1; i <= max; i++, power += power)cout << endl
<< setw(10) << i << setw(10) << power; // Loop statement
cout << endl;return 0;
}
How It WorksYou initialize two variables in the initialization section of the for loop, separated by the comma opera-tor, and increment each of them in the increment section. Clearly, you can put as many expressions asyou like in each position.
You can even specify multiple conditions, separated by commas, in second expression that represents thetest part of the for loop that determines whether it should continue; but only the right-most conditionaffects when the loop ends.
Note that the assignments defining the initial values for i and power are expressions, not statements. Astatement always ends with a semicolon.
For each increment of i, the value of the variable power is doubled by adding it to itself. This producesthe powers of two that we are looking for and so the program produces the following output.
0 11 22 43 84 16
139
Chapter 3: Decisions and Loops
25905c03.qxd:WroxPro 2/21/08 8:46 AM Page 139

5 326 647 1288 2569 51210 1024
The setw() manipulator that you saw in the previous chapter is used to align the output nicely. Youhave included <iomanip> header file and added a using declaration for the name in the std namespaceso you can use setw() without qualifying the name.
Try It Out The Indefinite for LoopIf you omit the second control expression that specifies the test condition for a for loop, the value isassumed to be true, so the loop continues indefinitely unless you provide some other means of exitingfrom it. In fact, if you like, you can omit all the expressions in the parentheses after for. This may notseem to be useful; in fact, however, quite the reverse is true. You will often come across situations whereyou want to execute a loop a number of times, but you do not know in advance how many iterations youwill need. Have a look at the following:
// Ex3_10.cpp// Using an infinite for loop to compute an average#include <iostream>
using std::cin;using std::cout;using std::endl;
int main(){
double value = 0.0; // Value entered stored heredouble sum = 0.0; // Total of values accumulated hereint i = 0; // Count of number of valueschar indicator = ‘n’; // Continue or not?
for(;;) // Infinite loop{
cout << endl<< “Enter a value: “;
cin >> value; // Read a value++i; // Increment countsum += value; // Add current input to total
cout << endl<< “Do you want to enter another value (enter n to end)? “;
cin >> indicator; // Read indicatorif ((indicator == ‘n’) || (indicator == ‘N’))
break; // Exit from loop}
140
Chapter 3: Decisions and Loops
25905c03.qxd:WroxPro 2/21/08 8:46 AM Page 140
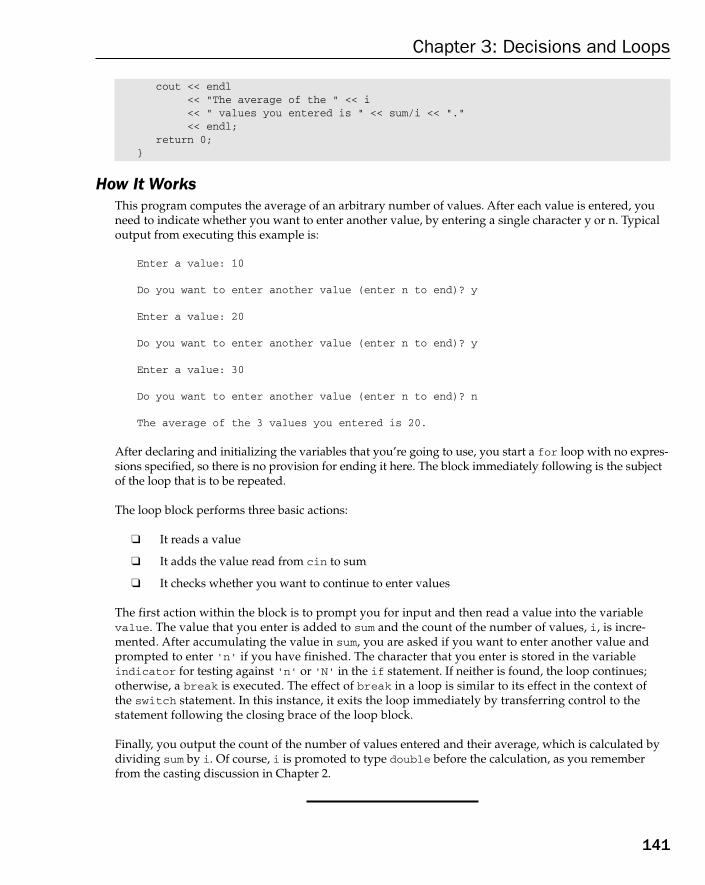
cout << endl<< “The average of the “ << i<< “ values you entered is “ << sum/i << “.”<< endl;
return 0;}
How It WorksThis program computes the average of an arbitrary number of values. After each value is entered, youneed to indicate whether you want to enter another value, by entering a single character y or n. Typicaloutput from executing this example is:
Enter a value: 10
Do you want to enter another value (enter n to end)? y
Enter a value: 20
Do you want to enter another value (enter n to end)? y
Enter a value: 30
Do you want to enter another value (enter n to end)? n
The average of the 3 values you entered is 20.
After declaring and initializing the variables that you’re going to use, you start a for loop with no expres-sions specified, so there is no provision for ending it here. The block immediately following is the subjectof the loop that is to be repeated.
The loop block performs three basic actions:
❑ It reads a value
❑ It adds the value read from cin to sum
❑ It checks whether you want to continue to enter values
The first action within the block is to prompt you for input and then read a value into the variablevalue. The value that you enter is added to sum and the count of the number of values, i, is incre-mented. After accumulating the value in sum, you are asked if you want to enter another value andprompted to enter ‘n’ if you have finished. The character that you enter is stored in the variableindicator for testing against ‘n’ or ‘N’ in the if statement. If neither is found, the loop continues;otherwise, a break is executed. The effect of break in a loop is similar to its effect in the context of the switch statement. In this instance, it exits the loop immediately by transferring control to thestatement following the closing brace of the loop block.
Finally, you output the count of the number of values entered and their average, which is calculated bydividing sum by i. Of course, i is promoted to type double before the calculation, as you rememberfrom the casting discussion in Chapter 2.
141
Chapter 3: Decisions and Loops
25905c03.qxd:WroxPro 2/21/08 8:46 AM Page 141

Using the continue StatementThere is another statement, besides break, used to affect the operation of a loop: the continue statement.This is written simply as:
continue;
Executing continue within a loop starts the next loop iteration immediately, skipping over any statementsremaining in the current iteration. I can demonstrate how this works with the following code:
#include <iostream>
using std::cin;using std::cout;using std::endl;
int main(){
int i = 0, value = 0, product = 1;
for(i = 1; i <= 10; i++){cout << “Enter an integer: “;cin >> value;
if(value == 0) // If value is zerocontinue; // skip to next iteration
product *= value;}
cout << “Product (ignoring zeros): “ << product<< endl;
return 0; // Exit from loop}
This loop reads 10 values with the intention of producing the product of the values entered. The if checkseach value entered, and if it is zero, the continue statement skips to the next iteration. This is so that youdon’t end up with a zero product if one of the values is zero. Obviously, if a zero value occurred on the lastiteration, the loop would end. There are clearly other ways of achieving the same result, but continue pro-vides a very useful capability, particularly with complex loops where you may need to skip to the end ofthe current iteration from various points in the loop.
The effect of the break and continue statements on the logic of a for loop is illustrated in Figure 3-4.
Obviously, in a real situation, you would use the break and continue statements with some condition-testing logic to determine when the loop should be exited, or when an iteration of the loop should beskipped. You can also use the break and continue statements with the other kinds of loop, which I’lldiscuss later on in this chapter, where they work in exactly the same way.
142
Chapter 3: Decisions and Loops
25905c03.qxd:WroxPro 2/21/08 8:46 AM Page 142

Figure 3-4
Try It Out Using Other Types in LoopsSo far, you have only used integers to count loop iterations. You are in no way restricted as to what typeof variable you use to count iterations. Look at the following example:
// Ex3_11.cpp// Display ASCII codes for alphabetic characters#include <iostream>#include <iomanip>
Executeinitializing_expression
test_expressionevaluates to true?
continue;
break;
Executeincrement_expression
Continue with next statement
Succeeding statements in the loop are omitted
The loop is exited directly
No
Yes
143
Chapter 3: Decisions and Loops
25905c03.qxd:WroxPro 2/21/08 8:46 AM Page 143

using std::cout;using std::endl;using std::hex;using std::dec;using std::setw;
int main(){
for(char capital = ‘A’, small = ‘a’; capital <= ‘Z’; capital++, small++)cout << endl
<< “\t” << capital // Output capital as a character<< hex << setw(10) << static_cast<int>(capital) // and as hexadecimal<< dec << setw(10) << static_cast<int>(capital) // and as decimal<< “ “ << small // Output small as a character<< hex << setw(10) << static_cast<int>(small) // and as hexadecimal<< dec << setw(10) << static_cast<int>(small); // and as decimal
cout << endl;return 0;
}
How It WorksYou have using declarations for the names of some new manipulators that are used in the program toaffect how the output is presented.
The loop in this example is controlled by the char variable capital, which you declare along with thevariable small in the initializing expression. You also increment both variables in the third control expres-sion for the loop so that the value of capital varies from ‘A’ to ‘Z’, and the value of small correspond-ingly varies from ‘a’ to ‘z’.
The loop contains just one output statement spread over seven lines. The first line is:
cout << endl
This starts a new line on the screen.
The next three lines are:
<< “\t” << capital // Output capital as a character<< hex << setw(10) << static_cast<int>(capital) // and as hexadecimal<< dec << setw(10) << static_cast<int>(capital) // and as decimal
On each iteration, after outputting a tab character, the value of capital is displayed three times: as acharacter, as a hexadecimal value, and as a decimal value.
When you insert the manipulator hex into the cout stream, this causes subsequent data values to be dis-played as hexadecimal values rather than the default decimal representation for integer values so the sec-ond output of capital is as a hexadecimal representation of the character code.
You then insert the dec manipulator into the stream to cause succeeding values to be output as decimalonce more. By default a variable of type char is interpreted by the stream as a character, not a numerical
144
Chapter 3: Decisions and Loops
25905c03.qxd:WroxPro 2/21/08 8:46 AM Page 144

value. You get the char variable capital to output as a numerical value by casting its value to typeint, using the static_cast<>() operator that you saw in the previous chapter in the discussion fol-lowing the Try It Out – Exercising Basic Arithmetic example.
The value of small is output in a similar way by the next three lines of the output statement:
<< “ “ << small // Output small as a character<< hex << setw(10) << static_cast<int>(small) // and as hexadecimal<< dec << setw(10) << static_cast<int>(small); // and as decimal
As a result, the program generates the following output:
A 41 65 a 61 97B 42 66 b 62 98C 43 67 c 63 99D 44 68 d 64 100E 45 69 e 65 101F 46 70 f 66 102G 47 71 g 67 103H 48 72 h 68 104I 49 73 i 69 105J 4a 74 j 6a 106K 4b 75 k 6b 107L 4c 76 l 6c 108M 4d 77 m 6d 109N 4e 78 n 6e 110O 4f 79 o 6f 111P 50 80 p 70 112Q 51 81 q 71 113R 52 82 r 72 114S 53 83 s 73 115T 54 84 t 74 116U 55 85 u 75 117V 56 86 v 76 118W 57 87 w 77 119X 58 88 x 78 120Y 59 89 y 79 121Z 5a 90 z 7a 122
Floating-Point Loop CountersYou can also use a floating-point value as a loop counter. Here’s an example of a for loop with this kindof counter:
double a = 0.3, b = 2.5;for(double x = 0.0; x <= 2.0; x += 0.25)
cout << “\n\tx = “ << x<< “\ta*x + b = “ << a*x + b;
This code fragment calculates the value of a*x+b for values of x from 0.0 to 2.0 in steps of 0.25; however, youneed to take care when using a floating-point counter in a loop. Many decimal values cannot be represented
145
Chapter 3: Decisions and Loops
25905c03.qxd:WroxPro 2/21/08 8:46 AM Page 145
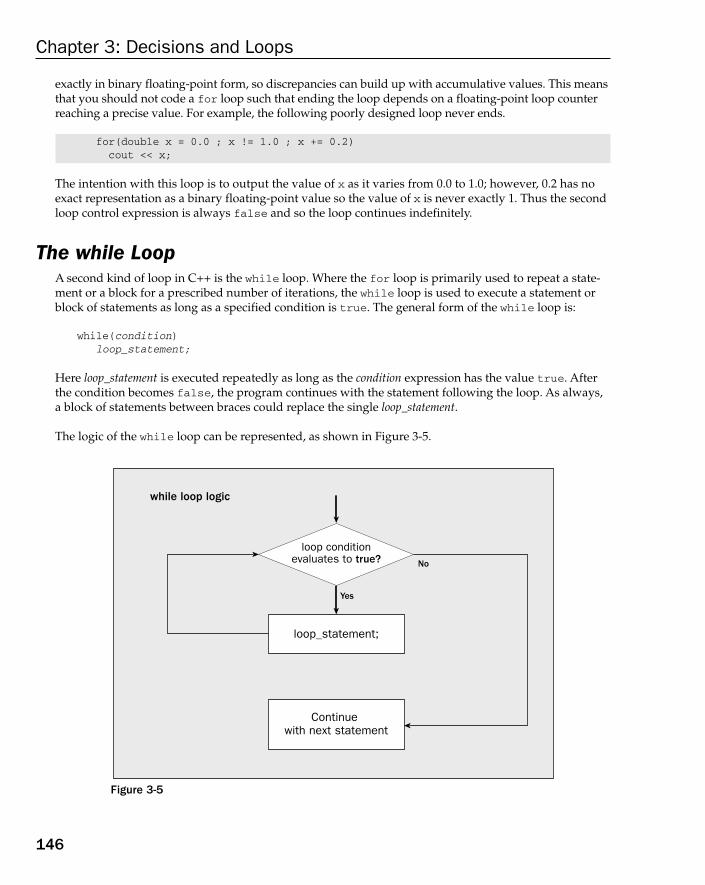
exactly in binary floating-point form, so discrepancies can build up with accumulative values. This meansthat you should not code a for loop such that ending the loop depends on a floating-point loop counterreaching a precise value. For example, the following poorly designed loop never ends.
for(double x = 0.0 ; x != 1.0 ; x += 0.2)cout << x;
The intention with this loop is to output the value of x as it varies from 0.0 to 1.0; however, 0.2 has noexact representation as a binary floating-point value so the value of x is never exactly 1. Thus the secondloop control expression is always false and so the loop continues indefinitely.
The while LoopA second kind of loop in C++ is the while loop. Where the for loop is primarily used to repeat a state-ment or a block for a prescribed number of iterations, the while loop is used to execute a statement orblock of statements as long as a specified condition is true. The general form of the while loop is:
while(condition)loop_statement;
Here loop_statement is executed repeatedly as long as the condition expression has the value true. Afterthe condition becomes false, the program continues with the statement following the loop. As always,a block of statements between braces could replace the single loop_statement.
The logic of the while loop can be represented, as shown in Figure 3-5.
Figure 3-5
loop conditionevaluates to true?
loop_statement;
while loop logic
Continue with next statement
No
Yes
146
Chapter 3: Decisions and Loops
25905c03.qxd:WroxPro 2/21/08 8:46 AM Page 146
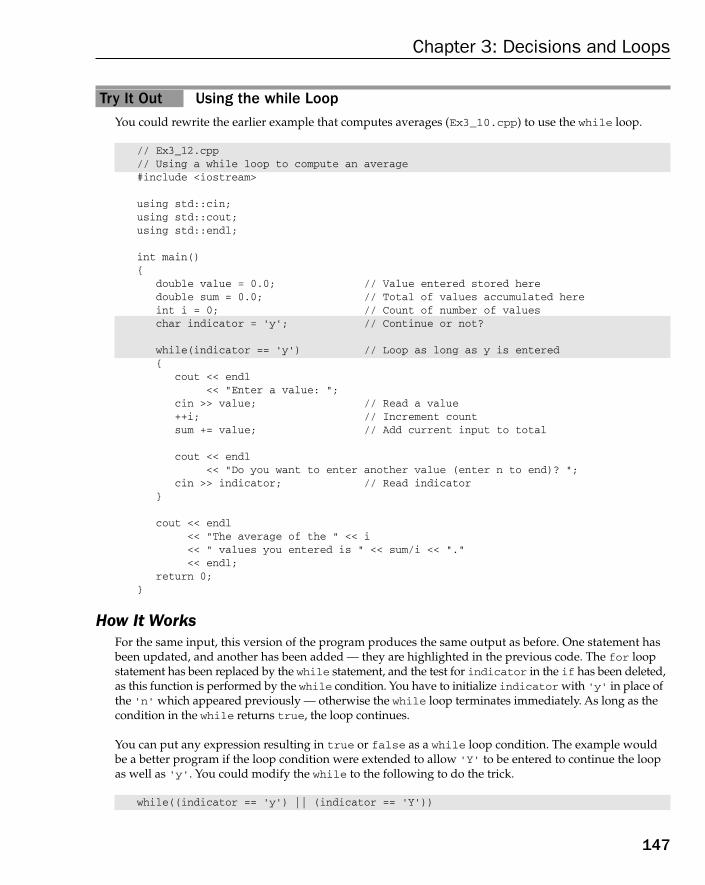
Try It Out Using the while LoopYou could rewrite the earlier example that computes averages (Ex3_10.cpp) to use the while loop.
// Ex3_12.cpp// Using a while loop to compute an average#include <iostream>
using std::cin;using std::cout;using std::endl;
int main(){
double value = 0.0; // Value entered stored heredouble sum = 0.0; // Total of values accumulated hereint i = 0; // Count of number of valueschar indicator = ‘y’; // Continue or not?
while(indicator == ‘y’) // Loop as long as y is entered{
cout << endl<< “Enter a value: “;
cin >> value; // Read a value++i; // Increment countsum += value; // Add current input to total
cout << endl<< “Do you want to enter another value (enter n to end)? “;
cin >> indicator; // Read indicator}
cout << endl<< “The average of the “ << i<< “ values you entered is “ << sum/i << “.”<< endl;
return 0;}
How It WorksFor the same input, this version of the program produces the same output as before. One statement hasbeen updated, and another has been added — they are highlighted in the previous code. The for loopstatement has been replaced by the while statement, and the test for indicator in the if has been deleted,as this function is performed by the while condition. You have to initialize indicator with ‘y’ in place ofthe ‘n’ which appeared previously — otherwise the while loop terminates immediately. As long as thecondition in the while returns true, the loop continues.
You can put any expression resulting in true or false as a while loop condition. The example wouldbe a better program if the loop condition were extended to allow ‘Y’ to be entered to continue the loopas well as ‘y’. You could modify the while to the following to do the trick.
while((indicator == ‘y’) || (indicator == ‘Y’))
147
Chapter 3: Decisions and Loops
25905c03.qxd:WroxPro 2/21/08 8:46 AM Page 147
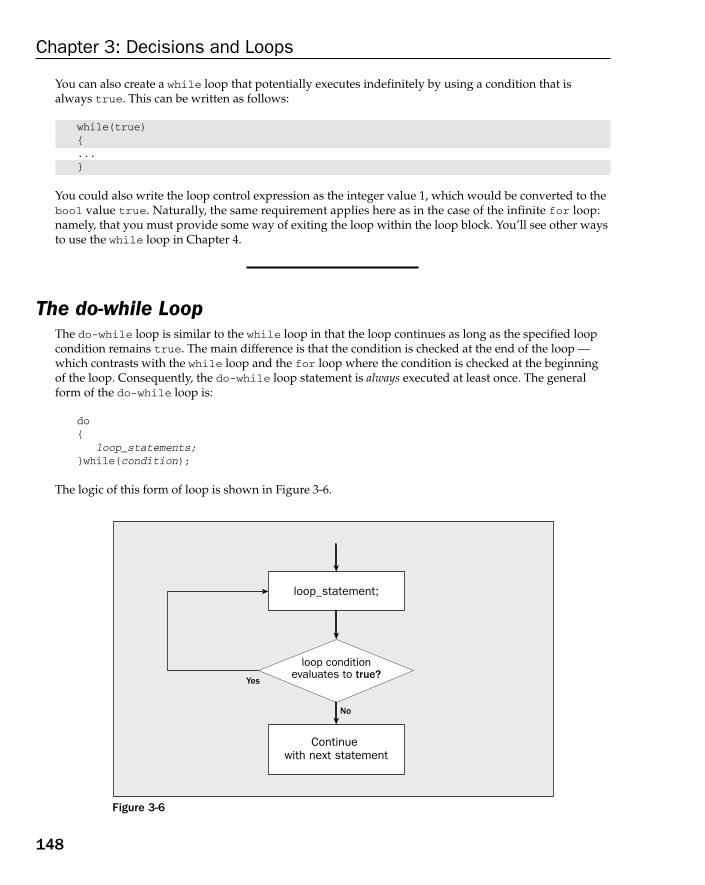
You can also create a while loop that potentially executes indefinitely by using a condition that isalways true. This can be written as follows:
while(true){...}
You could also write the loop control expression as the integer value 1, which would be converted to thebool value true. Naturally, the same requirement applies here as in the case of the infinite for loop:namely, that you must provide some way of exiting the loop within the loop block. You’ll see other waysto use the while loop in Chapter 4.
The do-while LoopThe do-while loop is similar to the while loop in that the loop continues as long as the specified loopcondition remains true. The main difference is that the condition is checked at the end of the loop —which contrasts with the while loop and the for loop where the condition is checked at the beginningof the loop. Consequently, the do-while loop statement is always executed at least once. The generalform of the do-while loop is:
do{
loop_statements;}while(condition);
The logic of this form of loop is shown in Figure 3-6.
Figure 3-6
loop conditionevaluates to true?
loop_statement;
Continue with next statement
No
Yes
148
Chapter 3: Decisions and Loops
25905c03.qxd:WroxPro 2/21/08 8:46 AM Page 148

You could replace the while loop in the last version of the program to calculate an average with a do-while loop:
do{
cout << endl<< “Enter a value: “;
cin >> value; // Read a value++i; // Increment countsum += value; // Add current input to total
cout << “Do you want to enter another value (enter n to end)?”;cin >> indicator; // Read indicator
} while((indicator == ‘y’) || (indicator == ‘Y’));
There’s little to choose between the two versions of the loop, except that this version doesn’t depend onthe initial value set in indicator for correct operation. As long as you want to enter at least one value,which is not unreasonable for the calculation in question, this version of the loop is preferable.
Nested LoopsYou can nest one loop inside another. In Chapter 4, the usual application of this will become moreapparent — it’s typically applied to repeating actions at different levels of classification. An examplemight be calculating the total marks for each student in a class and then repeating the process for eachclass in a school.
Try It Out Nested LoopsYou can see the effects of nesting one loop inside another by calculating the values of a simple formula.A factorial of an integer is the product of all the integers from 1 to the integer in question; so the factorialof 3, for example, is 1 times 2 times 3, which is 6. The following program computes the factorial of integersthat you enter (until you’ve had enough):
// Ex3_13.cpp// Demonstrating nested loops to compute factorials#include <iostream>
using std::cin;using std::cout;using std::endl;
int main(){
char indicator = ‘n’;long value = 0,
factorial = 0;
do{
cout << endl<< “Enter an integer value: “;
cin >> value;
149
Chapter 3: Decisions and Loops
25905c03.qxd:WroxPro 2/21/08 8:46 AM Page 149

factorial = 1;for(int i = 2; i <= value; i++)
factorial *= i;
cout << “Factorial “ << value << “ is “ << factorial;cout << endl
<< “Do you want to enter another value (y or n)? “;cin >> indicator;
} while((indicator == ‘y’) || (indicator == ‘Y’));
return 0;}
If you compile and execute this example, the typical output produced is:
Enter an integer value: 5Factorial 5 is 120Do you want to enter another value (y or n)? y
Enter an integer value: 10Factorial 10 is 3628800Do you want to enter another value (y or n)? y
Enter an integer value: 13Factorial 13 is 1932053504Do you want to enter another value (y or n)? y
Enter an integer value: 22Factorial 22 is -522715136Do you want to enter another value (y or n)? n
How It WorksFactorial values grow very fast. In fact, 12 is the largest input value for which this example produces a cor-rect result. The factorial of 13 is actually 6,227,020,800, not 1,932,053,504 as the program tells you. If yourun it with even larger input values, leading digits are lost in the result stored in the variable factorial,and you may well get negative values for the factorial as you do when you ask for the factorial of 22.
This situation doesn’t cause any error messages, so it is of paramount importance that you are sure thatthe values you’re dealing with in a program can be contained in the permitted range of the type of vari-able you’re using. You also need to consider the effects of incorrect input values. Errors of this kind,which occur silently, can be very hard to find.
The outer of the two nested loops is the do-while loop, which controls when the program ends. As longas you keep entering y or Y at the prompt, the program continues to calculate factorial values. The facto-rial for the integer entered is calculated in the inner for loop. This is executed value times to multiplythe variable factorial (with an initial value of 1) with successive integers from 2 to value.
150
Chapter 3: Decisions and Loops
25905c03.qxd:WroxPro 2/21/08 8:46 AM Page 150

Try It Out Another Nested LoopNested loops can be a little confusing, so let’s try another example. This program generates a multiplica-tion table of a given size.
// Ex3_14.cpp// Using nested loops to generate a multiplication table#include <iostream>#include <iomanip>
using std::cout;using std::endl;using std::setw;
int main(){
const int size = 12; // Size of tableint i = 0, j = 0; // Loop counters
cout << endl // Output table title<< size << “ by “ << size<< “ Multiplication Table” << endl << endl;
cout << endl << “ |”;
for(i = 1; i <= size; i++) // Loop to output column headingscout << setw(3) << i << “ “;
cout << endl; // Newline for underlines
for(i = 0; i <= size; i++)cout << “_____”; // Underline each heading
for(i = 1; i <= size; i++) // Outer loop for rows{
cout << endl<< setw(3) << i << “ |”; // Output row label
for(j = 1; j <= size; j++) // Inner loop for the rest of the rowcout << setw(3) << i*j << “ “; // End of inner loop
} // End of outer loopcout << endl;
return 0;}
151
Chapter 3: Decisions and Loops
25905c03.qxd:WroxPro 2/21/08 8:46 AM Page 151

The output from this example is:
12 by 12 Multiplication Table
| 1 2 3 4 5 6 7 8 9 10 11 12_________________________________________________________________1 | 1 2 3 4 5 6 7 8 9 10 11 122 | 2 4 6 8 10 12 14 16 18 20 22 243 | 3 6 9 12 15 18 21 24 27 30 33 364 | 4 8 12 16 20 24 28 32 36 40 44 485 | 5 10 15 20 25 30 35 40 45 50 55 606 | 6 12 18 24 30 36 42 48 54 60 66 727 | 7 14 21 28 35 42 49 56 63 70 77 848 | 8 16 24 32 40 48 56 64 72 80 88 969 | 9 18 27 36 45 54 63 72 81 90 99 108
10 | 10 20 30 40 50 60 70 80 90 100 110 12011 | 11 22 33 44 55 66 77 88 99 110 121 13212 | 12 24 36 48 60 72 84 96 108 120 132 144
How It WorksThe table title is produced by the first output statement in the program. The next output statement, com-bined with the loop following it, generates the column headings. Each column is five characters wide, sothe heading value is displayed in a field width of three specified by the setw(3) manipulator, followedby two blanks. The output statement preceding the loop outputs four spaces and a vertical bar above thefirst column which contains the row headings. A series of underline characters is then displayed beneaththe column headings.
The nested loop generates the main table contents. The outer loop repeats once for each row, so i is therow number. The output statement
cout << endl<< setw(3) << i << “ |”; // Output row label
goes to a new line for the start of a row and then outputs the row heading given by the value of i in afield width of three, followed by a space and a vertical bar.
A row of values is generated by the inner loop:
for(j = 1; j <= size; j++) // Inner loop for the rest of the rowcout << setw(3) << i*j << “ “; // End of inner loop
This loop outputs values i*j corresponding to the product of the current row value i, and each of thecolumn values in turn by varying j from 1 to size. So for each iteration of the outer loop, the inner loopexecutes size iterations. The values are positioned in the same way as the column headings.
When the outer loop is completed, the return is executed to end the program.
152
Chapter 3: Decisions and Loops
25905c03.qxd:WroxPro 2/21/08 8:46 AM Page 152

C++/CLI ProgrammingEverything I have discussed in this chapter applies equally well in a C++/CLI program. Just to illustratethe point we can look at some examples of CLR console programs that demonstrate some of what youhave learned so far in this chapter. The following is a CLR program that’s a slight variation on Ex3_01.
Try It Out A CLR Program Using Nested if StatementsCreate a CLR console program with the default code and modify the main() function like this:
// Ex3_15.cpp : main project file.
#include “stdafx.h”
using namespace System;
int main(array<System::String ^> ^args){wchar_t letter; // Corresponds to the C++/CLI Char typeConsole::Write(L”Enter a letter: “);letter = Console::Read();
if(letter >= ‘A’) // Test for ‘A’ or largerif(letter <= ‘Z’) // Test for ‘Z’ or smaller{Console::WriteLine(L”You entered a capital letter.”);return 0;
}
if(letter >= ‘a’) // Test for ‘a’ or largerif(letter <= ‘z’) // Test for ‘z’ or smaller{Console::WriteLine(L”You entered a small letter.”);return 0;
}
Console::WriteLine(L”You did not enter a letter.”);return 0;
}
As always, the shaded lines are the new code you should add.
How It WorksThe logic is exactly the same as in the Ex3_01 example — in fact all the statements are the same exceptfor those producing the output and the declaration of letter. I changed the type to wchar_t becausetype System::Char has some extra facilities that I’ll mention. The Console::Read() function reads asingle character from the keyboard. Because you use the Console::Write() function to output the ini-tial prompt there is no newline character issued so you can enter the letter on the same line as the prompt.
153
Chapter 3: Decisions and Loops
25905c03.qxd:WroxPro 2/21/08 8:46 AM Page 153

The .NET Framework provides its own functions for converting character codes to upper- or lowercasewithin the Char class. These are the functions Char::ToUpper() and Char::ToLower() and you putthe character to be converted between the parentheses as the argument to the function. For example:
wchar_t uppcaseLetter = Char::ToUpper(letter);
Of course, you could store the result of the conversion back in the original variable, similar to the following:
letter = Char::ToUpper(letter);
The Char class also provides IsUpper() and IsLower() functions that test whether a letter is upper- or lowercase. You pass the letter to be tested as the argument to the function and the function returns abool value as a result. You could use these to code the main() function quite differently.
wchar_t letter; // Corresponds to the C++/CLI Char typeConsole::Write(L”Enter a letter: “);letter = Console::Read();wchar_t upper = Char::ToUpper(letter);if(upper >= ‘A’ && upper <= ‘Z’) // Test for between ‘A’ and ‘Z’Console::WriteLine(L”You entered a {0} letter.”,
Char::IsUpper(letter) ? “capital” : “small”);elseConsole::WriteLine(L”You did not enter a letter.”);
return 0;
This simplifies the code considerably. After converting a letter to uppercase, you test the uppercase valueto check whether it’s ‘A’ to ‘Z’. If it is, you output a message that depends on the result of the conditionaloperator expression that forms the second argument to the WriteLine() function. The conditional opera-tor expression evaluates to “capital” if letter is uppercase and “small” if it is not, and this result isinserted in the output as determined by the position of the format string {0}.
Try another CLR example that uses the Console::ReadKey() function in a loop and explores theConsoleKeyInfo class a little more.
Try It Out Reading Key PressesCreate a CLR console program and add the following code to main():
// Ex3_16.cpp : main project file.// Testing key presses in a loop.
#include “stdafx.h”using namespace System;
int main(array<System::String ^> ^args){Console::WriteLine(L”Press a key combination - press Escape to quit.”);
154
Chapter 3: Decisions and Loops
25905c03.qxd:WroxPro 2/21/08 8:46 AM Page 154

ConsoleKeyInfo keyPress;
do{keyPress = Console::ReadKey(true);Console::Write(L”You pressed”);if(safe_cast<int>(keyPress.Modifiers)>0)Console::Write(L” {0},”, keyPress.Modifiers);
Console::WriteLine(L” {0} which is the {1} character”,keyPress.Key, keyPress.KeyChar);
}while(keyPress.Key != ConsoleKey::Escape);return 0;
}
The following is some sample output from this program:
Press a key combination - press Escape to quit.You pressed Shift, B which is the B characterYou pressed Shift, Control, N which is the ? characterYou pressed Shift, Control, Oem1 which is the characterYou pressed Oem1 which is the ; characterYou pressed Oem3 which is the ‘ characterYou pressed Shift, Oem3 which is the @ characterYou pressed Shift, Oem7 which is the ~ characterYou pressed Shift, Oem6 which is the } characterYou pressed D3 which is the 3 characterYou pressed Shift, D3 which is the ? characterYou pressed Shift, D5 which is the % characterYou pressed Oem8 which is the ` characterYou pressed Escape which is the ? character
Of course, there are key combinations that do not represent a displayable character so in these casesthere is no character in the output. The program also ends if you press Ctrl+C because the operatingsystem recognizes this as the command to end the program.
How It WorksKey presses are tested in the do-while loop and this loop continues until the Escape key is pressed. Withinthe loop the Console::ReadKey() function is called and the result is stored in the variable keyPress,which is of type ConsoleKeyInfo. The ConsoleKeyInfo class has three properties that you can access to help identify the key or keys that were pressed — the Key property identifies the key that was pressed,the KeyChar property represents the Unicode character code for the key, and the Modifiers property is a bitwise combination of ConsoleModifiers constants that represent the Shift, Alt, and Ctrl keys.ConsoleModifiers is an enumeration that is defined in the System library and the constants defined in the enumeration have the names Alt, Shift, and Control.
As you can see from the arguments to the WriteLine() function in the last output statement, to access a property for an object you place the property name following the object name, separated by a period;the period is referred to as the member access operator. To access the KeyChar property for the objectkeyPress, you write keyPress.KeyChar.
155
Chapter 3: Decisions and Loops
25905c03.qxd:WroxPro 2/21/08 8:46 AM Page 155

The operation of the program is very simple. Within the loop you call the ReadKey() function to read akey press and the result is stored in the variable keyPress. Next you write the initial part of the outputto the command line using the Write() function; because no newline is written in this case, the nextoutput statement writes to the same line. You then test whether the Modifiers property is greater thanzero. If it is, modifier keys were pressed and you output them; otherwise, you skip the output for modi-fier keys. You will probably remember that a C++/CLI enumeration constant is an object that you mustexplicitly cast to an integer type before you can use it as a numerical value — hence the cast to type intin the if expression.
The output of the Modifiers value is interesting. As you can see from the output, when more than onemodifier key was pressed, you get all the modifier keys from the single output statement. This is becausethe Modifiers enumeration is defined with bit flags. As you saw in Chapter 2, this allows a variableof the enumeration type to consist of several flags ORed together, and the individual flags recognizedand output by the Write() or WriteLine() functions.
The loop continues as long as the condition keyPress.Key != ConsoleKey::Escape is true. It isfalse when the keyPress.Key property is equal to ConsoleKey::Escape, which is when the Escapekey is pressed.
The for each LoopAll the loop statements I have discussed apply equally well to C++/CLI programs and the C++/CLI language provides you with the luxury of an additional kind of loop called the for each loop. Thisloop is specifically for iterating through all the objects in a particular kind of set of objects and becauseyou haven’t learned about these yet, I’ll just introduce the for each loop briefly here, and elaborate onit some more a bit later in the book.
One thing that you do know a little about is a String object which represents a set of characters, so youcan use a for each loop to iterate through all the characters in a string. Let’s try an example of that.
Try It Out Using a for each Loop to Access the Characters in a StringCreate a new CLR console program project with the name Ex3_17 and modify the code to the following:
// Ex3_17.cpp : main project file.// Analyzing a string using a for each loop
#include “stdafx.h”using namespace System;
int main(array<System::String ^> ^args){int vowels = 0;int consonants = 0;String^ proverb = L”A nod is as good as a wink to a blind horse.”;
156
Chapter 3: Decisions and Loops
25905c03.qxd:WroxPro 2/21/08 8:46 AM Page 156
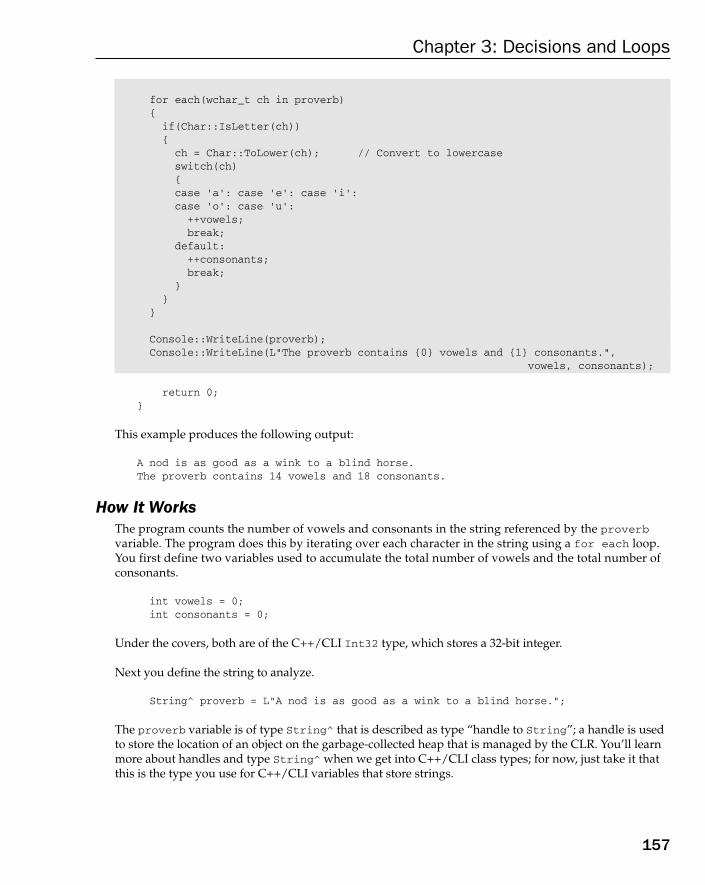
for each(wchar_t ch in proverb){if(Char::IsLetter(ch)){ch = Char::ToLower(ch); // Convert to lowercaseswitch(ch){case ‘a’: case ‘e’: case ‘i’:case ‘o’: case ‘u’:++vowels;break;
default:++consonants;break;
}}
}
Console::WriteLine(proverb);Console::WriteLine(L”The proverb contains {0} vowels and {1} consonants.”,
vowels, consonants);
return 0;}
This example produces the following output:
A nod is as good as a wink to a blind horse.The proverb contains 14 vowels and 18 consonants.
How It WorksThe program counts the number of vowels and consonants in the string referenced by the proverbvariable. The program does this by iterating over each character in the string using a for each loop.You first define two variables used to accumulate the total number of vowels and the total number ofconsonants.
int vowels = 0;int consonants = 0;
Under the covers, both are of the C++/CLI Int32 type, which stores a 32-bit integer.
Next you define the string to analyze.
String^ proverb = L”A nod is as good as a wink to a blind horse.”;
The proverb variable is of type String^ that is described as type “handle to String”; a handle is usedto store the location of an object on the garbage-collected heap that is managed by the CLR. You’ll learnmore about handles and type String^ when we get into C++/CLI class types; for now, just take it thatthis is the type you use for C++/CLI variables that store strings.
157
Chapter 3: Decisions and Loops
25905c03.qxd:WroxPro 2/21/08 8:46 AM Page 157

The for each loop that iterates over the characters in the string referenced by proverb is of this form:
for each(wchar_t ch in proverb){// Process the current character stored in ch…
}
The characters in the proverb string are Unicode characters so you use a variable of type wchar_t(equivalent to type Char) to store them. The loop successively stores characters from the proverb stringin the loop variable ch, which is of the C++/CLI type Char. This variable is local to the loop — in otherwords, it exists only within the loop block. On the first iteration ch contains the first character from thestring, on the second iteration it contains the second character, on the third iteration the third character,and so on until all the characters have been processed and the loop ends.
Within the loop you determine whether the character is a letter in the if expression:
if(Char::IsLetter(ch))
The Char::IsLetter() function returns the value true if the argument — ch in this case — is a letter,and false otherwise. Thus the block following the if only executes if ch contains a letter. This is neces-sary because you don’t want punctuation characters to be processed as though they were letters.
Having established that ch is indeed a letter you convert it to lowercase with the following statement:
ch = Char::ToLower(ch); // Convert to lowercase
This uses the Char::ToLower() function from the .NET Framework library, which returns the lower-case equivalent of the argument — ch in this case. If the argument is already lowercase, the function justreturns the same character code. By converting the character to lowercase, you avoid having to test sub-sequently for both upper- and lowercase vowels.
You determine whether ch contains a vowel or a consonant within the switch statement.
switch(ch){case ‘a’: case ‘e’: case ‘i’:case ‘o’: case ‘u’:
++vowels;break;
default:++consonants;break;
}
For any of the five cases where ch is a vowel, you increment the value stored in vowels; otherwise, youincrement the value stored in consonants. This switch is executed for each character in proverb sowhen the loop finishes, vowels contain the number of vowels in the string and consonants containthe number of consonants. You then output the result with the following statements:
Console::WriteLine(proverb);Console::WriteLine(L”The proverb contains {0} vowels and {1} consonants.”,
vowels, consonants);
158
Chapter 3: Decisions and Loops
25905c03.qxd:WroxPro 2/21/08 8:46 AM Page 158
In the last statement, the value of vowels replaces the “{0}” in the string and the value of consonantsreplaces the “{1}”. This is because the arguments that follow the first format string argument are refer-enced by index values starting from 0.
SummaryIn this chapter, you learned all of the essential mechanisms for making decisions in C++ programs. Youhave also gone through all the facilities for repeating a group of statements. The essentials of what I’vediscussed are as follows:
❑ The basic decision-making capability is based on the set of relational operators, which allowexpressions to be tested and compared, and yield a bool value as the result — true or false.
❑ You can also make decisions based on conditions that return non-bool values. Any non-zerovalue is cast to true when a condition is tested; zero casts to false.
❑ The primary decision-making capability in C++ is provided by the if statement. Further flexi-bility is provided by the switch statement, and by the conditional operator.
❑ There are three basic methods provided in ISO/ANSI C++ for repeating a block of statements:the for loop, the while loop and the do-while loop. The for loop allows the loop to repeat agiven number of times. The while loop allows a loop to continue as long as a specified condi-tion returns true. Finally, do-while executes the loop at least once and allows continuation ofthe loop as long as a specified condition returns true.
❑ C++/CLI has the for each loop statement in addition to the three loop statements defined inISO/ANSI C++.
❑ Any kind of loop may be nested within any other kind of loop.
❑ The keyword continue allows you to skip the remainder of the current iteration in a loop andgo straight to the next iteration.
❑ The keyword break provides an immediate exit from a loop. It also provides an exit from aswitch at the end of the statements for a case.
ExercisesYou can download the source code for the examples in the book and the solutions to the following exer-cises from http://www.wrox.com.
1. Write a program that reads numbers from cin and then sums them, stopping when 0 has beenentered. Construct three versions of this program, using the while, do-while, and for loops.
2. Write an ISO/ANSI C++ program to read characters from the keyboard and count the vowels.Stop counting when a Q (or a q) is encountered. Use a combination of an indefinite loop to getthe characters, and a switch statement to count them.
159
Chapter 3: Decisions and Loops
25905c03.qxd:WroxPro 2/21/08 8:46 AM Page 159
3. Write a program to print out the multiplication tables from 2 to 12 in columns.
4. Imagine that in a program you want to set a ‘file open mode’ variable based on two attributes:the file type, which can be text or binary, and the way in which you want to open the file to reador write it or append data to it. Using the bitwise operators (& and |) and a set of flags, devisea method to allow a single integer variable to be set to any combination of the two attributes.Write a program that sets such a variable and then decodes it, printing out its setting, for allpossible combinations of the attributes.
5. Repeat Ex3_2 as a C++/CLI program — you can use Console::ReadKey() to read charactersfrom the keyboard.
6. Write a CLR console program that defines a string (as type String^) and then analyzes thecharacters in the string to discover the number of uppercase letters, the number of lowercaseletters, the number of non-alphabetic characters, and the total number of characters in thestring.
160
Chapter 3: Decisions and Loops
25905c03.qxd:WroxPro 2/21/08 8:46 AM Page 160

4Arrays, Strings,
and Pointers
So far, you have covered all the fundamental data types of consequence and you have a basic knowl-edge of how to perform calculations and make decisions in a program. This chapter is about broad-ening the application of the basic programming techniques that you have learned so far, from usingsingle items of data to working with whole collections of data items. In this chapter, you will learnabout:
❑ Arrays and how you use them
❑ How to declare and initialize arrays of different types
❑ How to declare and use multidimensional arrays
❑ Pointers and how you use them
❑ How to declare and initialize pointers of different types
❑ The relationship between arrays and pointers
❑ References, how they are declared, and some initial ideas on their uses
❑ How to allocate memory for variables dynamically in a native C++ program
❑ How dynamic memory allocation works in a Common Language Runtime (CLR) program
❑ Tracking handles and tracking references and why you need them in a CLR program
❑ How to work with strings and arrays in C++/CLI programs
❑ What interior pointers are and how you can create and use them
In this chapter you’ll be using objects more extensively although you have not yet explored thedetails of how they are created so don’t worry if everything is not completely clear. You’ll learnabout classes and objects in detail starting in Chapter 7.
25905c04.qxd:WroxPro 2/21/08 8:47 AM Page 161
Handling Multiple Data Values of the Same Type
You already know how to declare and initialize variables of various types that each holds a single itemof information; I’ll refer to single items of data as data elements. You know how to create a single char-acter in a variable of type char or type wchar_t, a single integer in a variable of type short, type int,type long, or a single floating point number in a variable of type float or of type double. The mostobvious extension to these ideas is to be able to reference several data elements of a particular type witha single variable name. This would enable you to handle applications of a much broader scope.
Here’s an example of where you might need this. Suppose that you needed to write a payroll program.Using a separately named variable for each individual’s pay, their tax liability, and so on, would be anuphill task to say the least. A much more convenient way to handle such a problem would be to refer-ence an employee by some kind of generic name — employeeName to take an imaginative example —and to have other generic names for the kinds of data related to each employee, such as pay, tax, and so on. Of course, you would also need some means of picking out a particular employee from the wholebunch, together with the data from the generic variables associated with them. This kind of requirementarises with any collection of like entities that you want to handle in your program, whether they’re base-ball players or battleships. Naturally, C++ provides you with a way to deal with this.
ArraysThe basis for the solution to all of these problems is provided by the array in ISO/ANSI C++. An array issimply a number of memory locations called array elements or simply elements, each of which can storean item of data of the same given data type and which are all referenced through the same variable name.The employee names in a payroll program could be stored in one array, the pay for each employee inanother, and the tax due for each employee could be stored in a third array.
Individual items in an array are specified by an index value which is simply an integer representing thesequence number of the elements in the array, the first having the sequence number 0, the second 1, and soon. You can also envisage the index value of an array element as being an offset from the first element in anarray. The first element has an offset of 0 and therefore an index of 0, and an index value of 3 will refer tothe fourth element of an array. For the payroll, you could arrange the arrays so that if an employee’s namewas stored in the employeeName array at a given index value, then the arrays pay and tax would store theassociated data on pay and tax for the same employee in the array positions referenced by the same indexvalue.
The basic structure of an array is illustrated in Figure 4-1.
Figure 4-1 shows an array. The name height has six elements, each storing a different value. These mightbe the heights of the members of a family, for instance, recorded to the nearest inch. Because there are six ele-ments, the index values run from 0 through 5. To refer to a particular element, you write the array name, fol-lowed by the index value of the particular element between square brackets. The third element is referred toas height[2], for example. If you think of the index as being the offset from the first element, it’s easy to seethat the index value for the fourth element will be 3, for example.
The amount of memory required to store each element is determined by its type, and all the elements ofan array are stored in a contiguous block of memory.
162
Chapter 4: Arrays, Strings, and Pointers
25905c04.qxd:WroxPro 2/21/08 8:47 AM Page 162
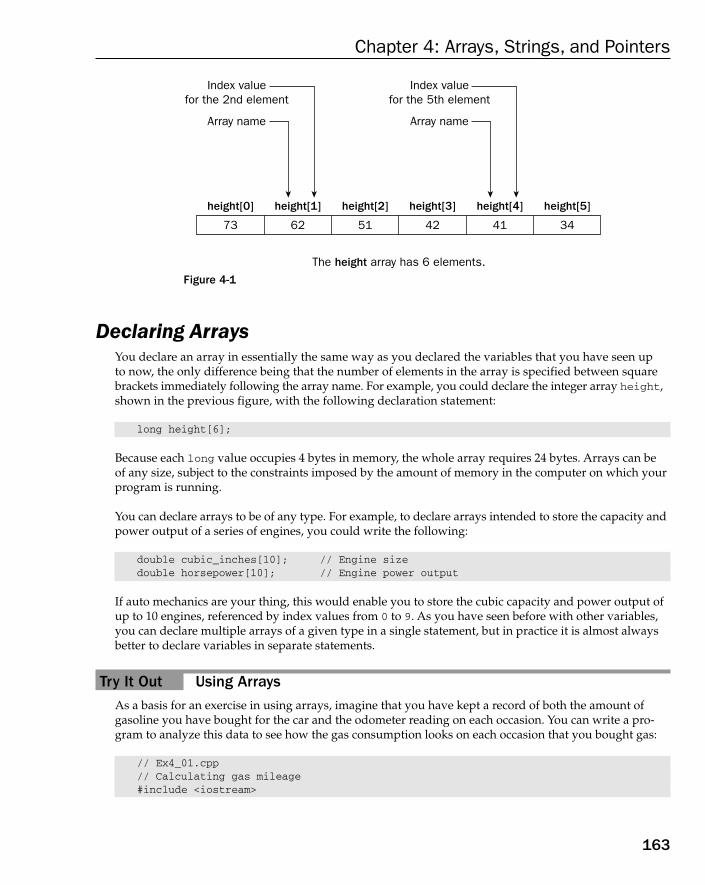
Figure 4-1
Declaring ArraysYou declare an array in essentially the same way as you declared the variables that you have seen up to now, the only difference being that the number of elements in the array is specified between squarebrackets immediately following the array name. For example, you could declare the integer array height,shown in the previous figure, with the following declaration statement:
long height[6];
Because each long value occupies 4 bytes in memory, the whole array requires 24 bytes. Arrays can be of any size, subject to the constraints imposed by the amount of memory in the computer on which yourprogram is running.
You can declare arrays to be of any type. For example, to declare arrays intended to store the capacity andpower output of a series of engines, you could write the following:
double cubic_inches[10]; // Engine sizedouble horsepower[10]; // Engine power output
If auto mechanics are your thing, this would enable you to store the cubic capacity and power output ofup to 10 engines, referenced by index values from 0 to 9. As you have seen before with other variables,you can declare multiple arrays of a given type in a single statement, but in practice it is almost alwaysbetter to declare variables in separate statements.
Try It Out Using ArraysAs a basis for an exercise in using arrays, imagine that you have kept a record of both the amount ofgasoline you have bought for the car and the odometer reading on each occasion. You can write a pro-gram to analyze this data to see how the gas consumption looks on each occasion that you bought gas:
// Ex4_01.cpp// Calculating gas mileage#include <iostream>
73
height[0]
62
height[1]
The height array has 6 elements.
Index value for the 2nd element
Array name
Index value for the 5th element
Array name
51 42 41 34
height[2] height[3] height[4] height[5]
163
Chapter 4: Arrays, Strings, and Pointers
25905c04.qxd:WroxPro 2/21/08 8:47 AM Page 163

#include <iomanip>
using std::cin;using std::cout;using std::endl;using std::setw;
int main(){
const int MAX = 20; // Maximum number of valuesdouble gas[ MAX ]; // Gas quantity in gallonslong miles[ MAX ]; // Odometer readingsint count = 0; // Loop counterchar indicator = ‘y’; // Input indicator
while( (indicator == ‘y’ || indicator == ‘Y’) && count < MAX ){
cout << endl<< “Enter gas quantity: “;
cin >> gas[count]; // Read gas quantitycout << “Enter odometer reading: “;cin >> miles[count]; // Read odometer value
++count;cout << “Do you want to enter another(y or n)? “;cin >> indicator;
}
if(count <= 1) // count = 1 after 1 entry completed{ // ... we need at least 2
cout << endl<< “Sorry - at least two readings are necessary.”;
return 0;}
// Output results from 2nd entry to last entryfor(int i = 1; i < count; i++)cout << endl
<< setw(2) << i << “.” // Output sequence number<< “Gas purchased = “ << gas[i] << “ gallons” // Output gas<< “ resulted in “ // Output miles per gallon<< (miles[i] - miles[i - 1])/gas[i] << “ miles per gallon.”;
cout << endl;return 0;
}
The program assumes that you fill the tank each time so the gas bought was the amount consumed bydriving the distance recorded. Here’s an example of the output produced by this example:
Enter gas quantity: 12.8Enter odometer reading: 25832Do you want to enter another(y or n)? y
164
Chapter 4: Arrays, Strings, and Pointers
25905c04.qxd:WroxPro 2/21/08 8:47 AM Page 164

Enter gas quantity: 14.9Enter odometer reading: 26337Do you want to enter another(y or n)? y
Enter gas quantity: 11.8Enter odometer reading: 26598Do you want to enter another(y or n)? n
1.Gas purchased = 14.9 gallons resulted in 33.8926 miles per gallon.2.Gas purchased = 11.8 gallons resulted in 22.1186 miles per gallon.
How It WorksBecause you need to take the difference between two odometer readings to calculate the miles coveredfor the gas used, you use the odometer reading only from the first pair of input values — you ignore thegas bought in the first instance as that would have been consumed during miles driven earlier.
During the second period shown in the output, the traffic must have been really bad — or maybe theparking brake was always on.
The dimensions of the two arrays gas and miles used to store the input data are determined by the valueof the constant with the name MAX. By changing the value of MAX, you can change the program to accom-modate a different maximum number of input values. This technique is commonly used to make a pro-gram flexible in the amount of information that it can handle. Of course, all the program code must bewritten to take account of the array dimensions, or of any other parameters being specified by constvariables. This presents little difficulty in practice, however, so there’s no reason why you should notadopt this approach. You’ll also see later how to allocate memory for storing data as the program exe-cutes, so that you don’t need to fix the amount of memory allocated for data storage in advance.
Entering the DataThe data values are read in the while loop. Because the loop variable count can run from 0 to MAX - 1,we haven’t allowed the user of our program to enter more values than the array can handle. You initial-ize the variables count and indicator to 0 and ‘y’ respectively, so that the while loop is entered atleast once. There’s a prompt for each input value required and the value is read into the appropriate arrayelement. The element used to store a particular value is determined by the variable count, which is 0 forthe first input. The array element is specified in the cin statement by using count as an index, and countis then incremented ready for the next value.
After you enter each value, the program prompts for confirmation that another value is to be entered.The character entered is read into the variable indicator and then tested in the loop condition. Theloop will terminate unless ‘y’ or ‘Y’ is entered and the variable count is less than the specified maxi-mum value, MAX.
After the input loop ends (by whatever means), the value of count contains one more than the indexvalue of the last element entered in each array. (Remember, you increment it after you enter each newelement). This is checked in order to verify that at least two pairs of values were entered. If this wasn’tthe case, the program ends with a suitable message because two odometer values are necessary to cal-culate a mileage value.
165
Chapter 4: Arrays, Strings, and Pointers
25905c04.qxd:WroxPro 2/21/08 8:47 AM Page 165
Producing the ResultsThe output is generated in the for loop. The control variable i runs from 1 to count-1, allowingmileage to be calculated as the difference between the current element, miles[i] and the previouselement, miles[i - 1]. Note that an index value can be any expression evaluating to an integer thatrepresents a legal index for the array in question, which is an index value from 0 to one less than thenumber of elements in the array.
If the value of an index expression lies outside of the range corresponding to legitimate array elements,you will reference a spurious data location that may contain other data, garbage, or even program code.If the reference to such an element appears in an expression, you will use some arbitrary data value inthe calculation, which certainly produces a result that you did not intend. If you are storing a result in an array element using an illegal index value, you will overwrite whatever happens to be in that loca-tion. When this is part of your program code, the results are catastrophic. If you use illegal index values,there are no warnings produced either by the compiler or at runtime. The only way to guard against thisis to code your program to prevent it happening.
The output is generated by a single cout statement for all values entered, except for the first. A linenumber is also generated for each line of output using the loop control variable i. The miles per gallonare calculated directly in the output statement. You can use array elements in exactly the same way asany other variables in an expression.
Initializing ArraysTo initialize an array in its declaration, you put the initializing values separated by commas betweenbraces, and you place the set of initial values following an equals sign after the array name. Here’s anexample of how you can declare and initialize an array:
int cubic_inches[5] = { 200, 250, 300, 350, 400 };
The array has the name cubic_inches and has five elements that each store a value of type int. Thevalues in the initializing list between the braces correspond to successive index values of the array, so inthis case cubic_inches[0] has the value 200, cubic_inches[1] the value 250, cubic_inches[2] thevalue 300, and so on.
You must not specify more initializing values than there are elements in the array, but you can includefewer. If there are fewer, the values are assigned to successive elements, starting with the first element —which is the one corresponding to the index value 0. The array elements for which you didn’t provide aninitial value are initialized with zero. This isn’t the same as supplying no initializing list. Without an ini-tializing list, the array elements contain junk values. Also, if you include an initializing list, there mustbe at least one initializing value in it; otherwise the compiler generates an error message. I can illustratethis with the following rather limited example.
Try It Out Initializing an Array// Ex4_02.cpp// Demonstrating array initialization#include <iostream>#include <iomanip>
166
Chapter 4: Arrays, Strings, and Pointers
25905c04.qxd:WroxPro 2/21/08 8:47 AM Page 166
using std::cout;using std::endl;using std::setw;
int main(){
int value[5] = { 1, 2, 3 };int junk [5];
cout << endl;for(int i = 0; i < 5; i++)
cout << setw(12) << value[i];
cout << endl;for(int i = 0; i < 5; i++)
cout << setw(12) << junk[i];
cout << endl;return 0;
}
In this example, you declare two arrays, the first of which, value, you initialize in part, and the second,junk, you don’t initialize at all. The program generates two lines of output, which on my computer looklike this:
1 2 3 0 0-858993460 -858993460 -858993460 -858993460 -858993460
The second line (corresponding to values of junk[0] to junk[4]) may well be different on your computer.
How It WorksThe first three values of the array value are the initializing values and the last two have the default valueof 0. In the case of junk, all the values are spurious because you didn’t provide any initial values at all.The array elements contain whatever values were left there by the program that last used these memorylocations.
A convenient way to initialize a whole array to zero is simply to specify a single initializing value as 0.For example:
long data[100] = {0}; // Initialize all elements to zero
This statement declares the array data, with all one hundred elements initialized with 0. The first ele-ment is initialized by the value you have between the braces and the remaining elements are initializedto zero because you omitted values for these.
You can also omit the dimension of an array of numeric type, providing you supply initializing values.The number of elements in the array is determined by the number of initializing values you specify. Forexample, the array declaration
int value[] = { 2, 3, 4 };
defines an array with three elements that have the initial values 2, 3, and 4.
167
Chapter 4: Arrays, Strings, and Pointers
25905c04.qxd:WroxPro 2/21/08 8:47 AM Page 167
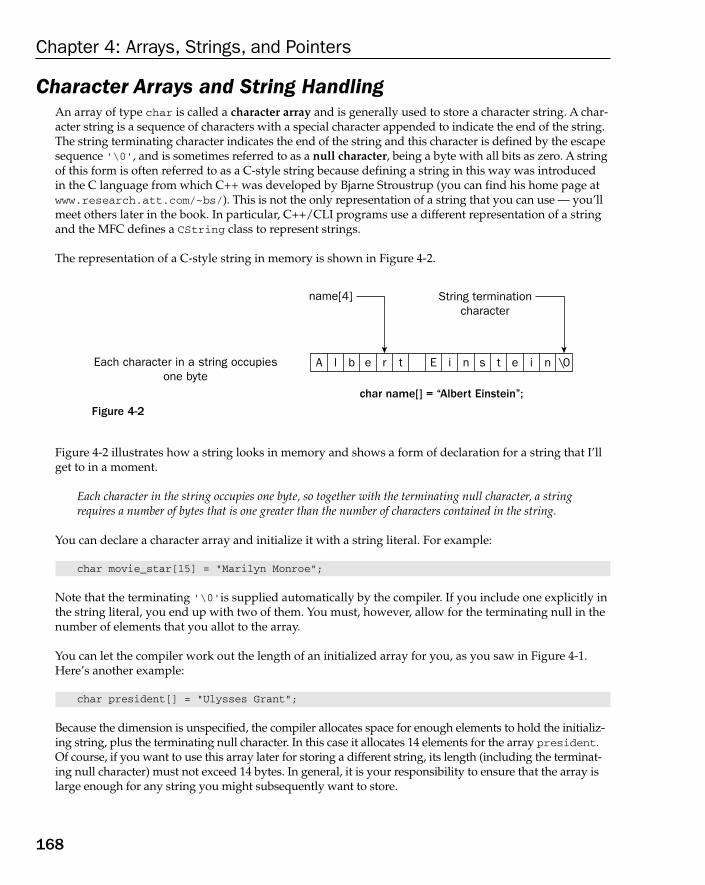
Character Arrays and String HandlingAn array of type char is called a character array and is generally used to store a character string. A char-acter string is a sequence of characters with a special character appended to indicate the end of the string.The string terminating character indicates the end of the string and this character is defined by the escapesequence ‘\0’, and is sometimes referred to as a null character, being a byte with all bits as zero. A stringof this form is often referred to as a C-style string because defining a string in this way was introduced in the C language from which C++ was developed by Bjarne Stroustrup (you can find his home page atwww.research.att.com/~bs/). This is not the only representation of a string that you can use — you’llmeet others later in the book. In particular, C++/CLI programs use a different representation of a stringand the MFC defines a CString class to represent strings.
The representation of a C-style string in memory is shown in Figure 4-2.
Figure 4-2
Figure 4-2 illustrates how a string looks in memory and shows a form of declaration for a string that I’llget to in a moment.
Each character in the string occupies one byte, so together with the terminating null character, a stringrequires a number of bytes that is one greater than the number of characters contained in the string.
You can declare a character array and initialize it with a string literal. For example:
char movie_star[15] = “Marilyn Monroe”;
Note that the terminating ‘\0’is supplied automatically by the compiler. If you include one explicitly inthe string literal, you end up with two of them. You must, however, allow for the terminating null in thenumber of elements that you allot to the array.
You can let the compiler work out the length of an initialized array for you, as you saw in Figure 4-1.Here’s another example:
char president[] = “Ulysses Grant”;
Because the dimension is unspecified, the compiler allocates space for enough elements to hold the initializ-ing string, plus the terminating null character. In this case it allocates 14 elements for the array president.Of course, if you want to use this array later for storing a different string, its length (including the terminat-ing null character) must not exceed 14 bytes. In general, it is your responsibility to ensure that the array islarge enough for any string you might subsequently want to store.
Each character in a string occupies one byte
name[4] String termination character
char name[] = “Albert Einstein”;
A l b e r t E i n s t e i n \0
168
Chapter 4: Arrays, Strings, and Pointers
25905c04.qxd:WroxPro 2/21/08 8:47 AM Page 168

You can also create strings that comprise Unicode characters, the characters in the string being of typewchar_t. Here’s a statement that creates a Unicode string:
wchar_t president[] = L”Ulysses Grant”;
The L prefix indicates that the string literal is a wide character string, so each character in the string, includ-ing the terminating null character, will occupy two bytes. Of course, indexing the string references charac-ters, not bytes, so president[2] corresponds to the character L’y’.
String InputThe <iostream> header file contains definitions of a number of functions for reading characters fromthe keyboard. The one that you’ll look at here is the function getline(), which reads a sequence ofcharacters entered through the keyboard and stores it in a character array as a string terminated by \0.You typically use the getline() function statements like this:
const int MAX = 80; // Maximum string length including \0char name[MAX]; // Array to store a stringcin.getline(name, MAX, ‘\n’); // Read input line as a string
These statements first declare a char array name with MAX elements and then read characters from cinusing the function getline(). The source of the data, cin, is written as shown, with a period separatingit from the function name. The period indicates that the getline() function you are calling is the onebelonging to the cin object. The significance of the arguments to the getline() function is shown inFigure 4-3.
Because the last argument to the getline() function is ‘\n’(newline or end line character) and the sec-ond argument is MAX, characters are read from cin until the ‘\n’ character is read, or when MAX - 1characters have been read, whichever occurs first. The maximum number of characters read is MAX - 1rather than MAX to allow for the ‘\0’ character to be appended to the sequence of characters stored inthe array. The ‘\n’ character is generated when you press the Return key on your keyboard and is there-fore usually the most convenient character to end input. You can, however, specify something else bychanging the last argument. The ‘\n’ isn’t stored in the input array name, but as I said, a ‘\0’ is addedat the end of the input string in the array.
You will learn more about this form of syntax when classes are discussed later on. Meanwhile, you’ll justtake it for granted and use it in an example.
Figure 4-3
The maximum number of charactersto be read. When the specifiedmaximum has been read, input stops.
The character that is to stop theinput process. You can specifyany character here, and the firstoccurance of that character willstop the input process.
The name of the array of typechar[] in which the charactersread from cin are to be stored.
cin.getline( name , MAX, ‘\n’ );
169
Chapter 4: Arrays, Strings, and Pointers
25905c04.qxd:WroxPro 2/21/08 10:02 AM Page 169

Try It Out Programming with StringsYou now have enough knowledge to write a simple program to read a string and then count how manycharacters it contains.
// Ex4_03.cpp// Counting string characters#include <iostream>using std::cin;using std::cout;using std::endl;
int main(){
const int MAX = 80; // Maximum array dimensionchar buffer[MAX]; // Input bufferint count = 0; // Character count
cout << “Enter a string of less than 80 characters:\n”;cin.getline(buffer, MAX, ‘\n’); // Read a string until \n
while(buffer[count] != ‘\0’) // Increment count as long ascount++; // the current character is not null
cout << endl<< “The string \”” << buffer<< “\” has “ << count << “ characters.”;
cout << endl;return 0;
}
Typical output from this program is as follows:
Enter a string of less than 80 characters:Radiation fades your genesThe string “Radiation fades your genes” has 26 characters.
How It WorksThis program declares a character array buffer and reads a character string into the array from the key-board after displaying a prompt for the input. Reading from the keyboard ends when the user pressesReturn, or when MAX-1 characters have been read.
A while loop is used to count the number of characters read. The loop continues as long as the currentcharacter referenced with buffer[count] is not ‘\0’. This sort of checking on the current characterwhile stepping through an array is a common technique in native C++. The only action in the loop is toincrement count for each non-null character.
There is a library function, strlen() that will do what this loop does and you’ll learn about it later inthis chapter.
170
Chapter 4: Arrays, Strings, and Pointers
25905c04.qxd:WroxPro 2/21/08 10:09 AM Page 170
Finally in the example, the string and the character count is displayed with a single output statement.Note the use of the escape character ‘\”’ to output a double quote.
Multidimensional ArraysThe arrays that you have defined so far with one index are referred to as one-dimensional arrays. Anarray can also have more than one index value, in which case it is called a multidimensional array.Suppose you have a field in which you are growing bean plants in rows of 10, and the field contains 12 such rows (so there are 120 plants in all). You could declare an array to record the weight of beansproduced by each plant using the following statement:
double beans[12][10];
This declares the two-dimensional array beans, the first index being the row number, and the second indexthe number within the row. To refer to any particular element requires two indices. For example, you couldset the value of the element reflecting the fifth plant in the third row with the following statement:
beans[2][4] = 10.7;
Remember that the index values start from zero, so the row index value is 2 and the index for the fifthplant within the row is 4.
Being a successful bean farmer, you might have several identical fields planted with beans in the samepattern. Assuming that you have eight fields, you could use a three-dimensional array to record dataabout these, declared thus:
double beans[8][12][10];
This records production for all of the plants in each of the fields, the leftmost index referencing a particu-lar field. If you ever get to bean farming on an international scale, you are able to use a four-dimensionalarray, with the extra dimension designating the country. Assuming that you’re as good a salesman as youare a farmer, growing this quantity of beans to keep up with the demand may well start to affect theozone layer.
Arrays are stored in memory such that the rightmost index value varies most rapidly. Thus the arraydata[3][4] is three one-dimensional arrays of four elements each. The arrangement of this array isillustrated in Figure 4-4.
The elements of the array are stored in a contiguous block of memory, as indicated by the arrows inFigure 4-4. The first index selects a particular row within the array and the second index selects an ele-ment within the row.
Note that a two-dimensional array in native C++ is really a one-dimensional array of one-dimensional arrays.A native C++ array with three dimensions is actually a one-dimensional array of elements where each ele-ment is a one-dimensional array of one-dimensional arrays. This is not something you need to worry aboutmost of the time, but as you will see later, C++/CLI arrays are not the same as this. It also implies that for thearray in Figure 4-4 the expressions data[0], data[1], and data[2], represent one-dimensional arrays.
171
Chapter 4: Arrays, Strings, and Pointers
25905c04.qxd:WroxPro 2/21/08 8:47 AM Page 171

Figure 4-4
Initializing Multidimensional ArraysTo initialize a multidimensional array, you use an extension of the method used for a one-dimensionalarray. For example, you can initialize a two-dimensional array, data, with the following declaration:
long data[2][4] = {{ 1, 2, 3, 5 },{ 7, 11, 13, 17 }
};
Thus, the initializing values for each row of the array are contained within their own pair of braces. Becausethere are four elements in each row, there are four initializing values in each group, and because there aretwo rows, there are two groups between braces, each group of initializing values being separated from thenext by a comma.
You can omit initializing values in any row, in which case the remaining array elements in the row arezero. For example:
long data[2][4] = {{ 1, 2, 3 },{ 7, 11 }
};
I have spaced out the initializing values to show where values have been omitted. The elementsdata[0][3], data[1][2], and data[1][3] have no initializing values and are therefore zero.
If you wanted to initialize the whole array with zeros you could simply write:
long data[2][4] = {0};
data[0][0] data[0][1] data[0][2] data[0][3]
data[1][0] data[1][1] data[1][2] data[1][3]
data[2][0] data[2][1]
The array elements are stored in contiguous locations in memory.
data[2][2] data[2][3]
172
Chapter 4: Arrays, Strings, and Pointers
25905c04.qxd:WroxPro 2/21/08 8:47 AM Page 172
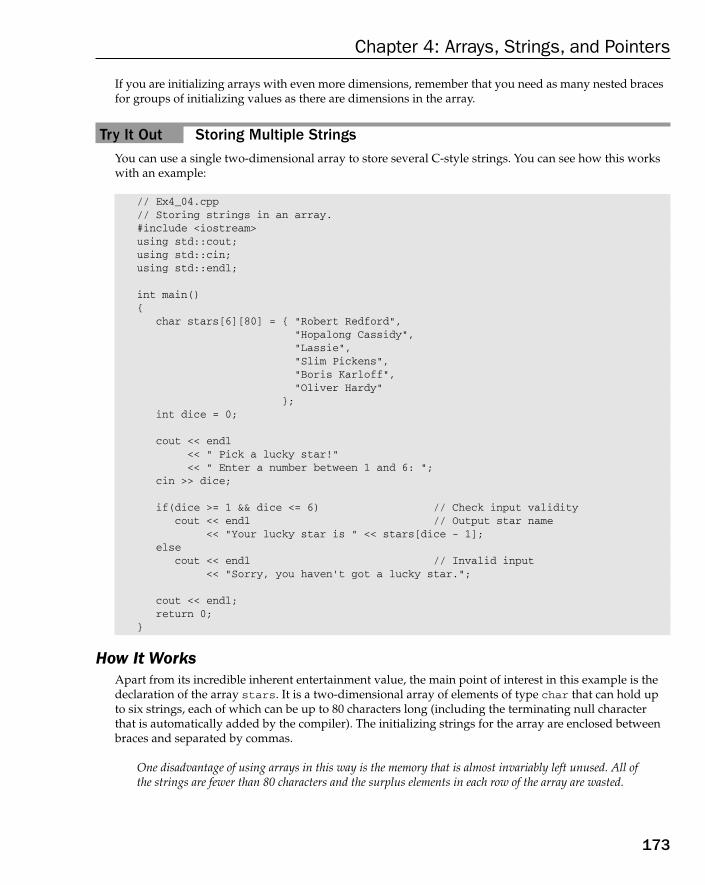
If you are initializing arrays with even more dimensions, remember that you need as many nested bracesfor groups of initializing values as there are dimensions in the array.
Try It Out Storing Multiple StringsYou can use a single two-dimensional array to store several C-style strings. You can see how this workswith an example:
// Ex4_04.cpp// Storing strings in an array.#include <iostream>using std::cout;using std::cin;using std::endl;
int main(){
char stars[6][80] = { “Robert Redford”,“Hopalong Cassidy”,“Lassie”,“Slim Pickens”,“Boris Karloff”,“Oliver Hardy”
};int dice = 0;
cout << endl<< “ Pick a lucky star!”<< “ Enter a number between 1 and 6: “;
cin >> dice;
if(dice >= 1 && dice <= 6) // Check input validitycout << endl // Output star name
<< “Your lucky star is “ << stars[dice - 1];else
cout << endl // Invalid input<< “Sorry, you haven’t got a lucky star.”;
cout << endl;return 0;
}
How It WorksApart from its incredible inherent entertainment value, the main point of interest in this example is thedeclaration of the array stars. It is a two-dimensional array of elements of type char that can hold upto six strings, each of which can be up to 80 characters long (including the terminating null characterthat is automatically added by the compiler). The initializing strings for the array are enclosed betweenbraces and separated by commas.
One disadvantage of using arrays in this way is the memory that is almost invariably left unused. All ofthe strings are fewer than 80 characters and the surplus elements in each row of the array are wasted.
173
Chapter 4: Arrays, Strings, and Pointers
25905c04.qxd:WroxPro 2/21/08 8:47 AM Page 173
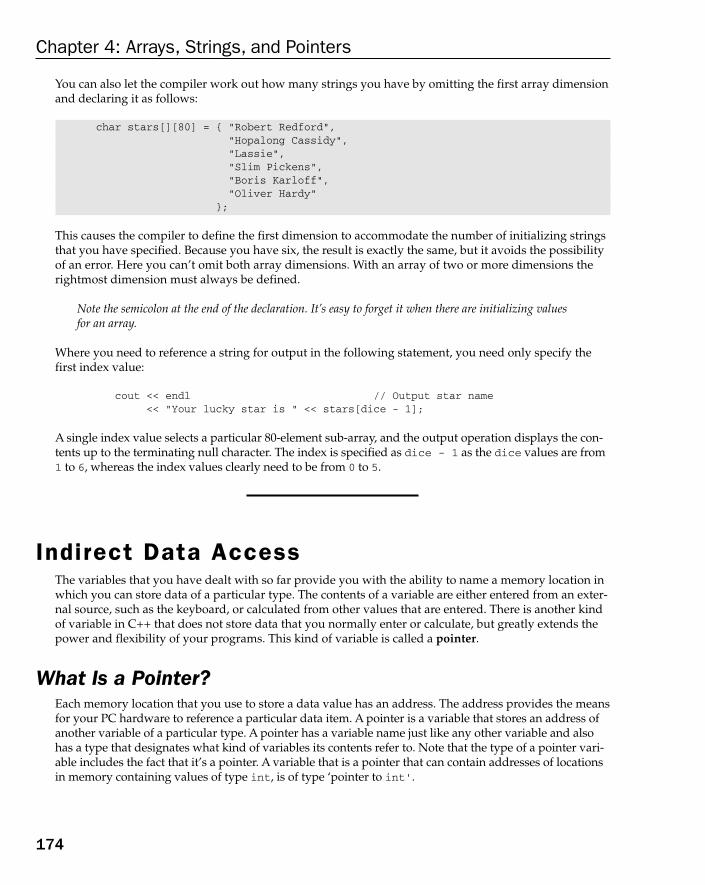
You can also let the compiler work out how many strings you have by omitting the first array dimensionand declaring it as follows:
char stars[][80] = { “Robert Redford”,“Hopalong Cassidy”,“Lassie”,“Slim Pickens”,“Boris Karloff”,“Oliver Hardy”
};
This causes the compiler to define the first dimension to accommodate the number of initializing stringsthat you have specified. Because you have six, the result is exactly the same, but it avoids the possibilityof an error. Here you can’t omit both array dimensions. With an array of two or more dimensions therightmost dimension must always be defined.
Note the semicolon at the end of the declaration. It’s easy to forget it when there are initializing valuesfor an array.
Where you need to reference a string for output in the following statement, you need only specify thefirst index value:
cout << endl // Output star name<< “Your lucky star is “ << stars[dice - 1];
A single index value selects a particular 80-element sub-array, and the output operation displays the con-tents up to the terminating null character. The index is specified as dice - 1 as the dice values are from1 to 6, whereas the index values clearly need to be from 0 to 5.
Indirect Data AccessThe variables that you have dealt with so far provide you with the ability to name a memory location inwhich you can store data of a particular type. The contents of a variable are either entered from an exter-nal source, such as the keyboard, or calculated from other values that are entered. There is another kindof variable in C++ that does not store data that you normally enter or calculate, but greatly extends thepower and flexibility of your programs. This kind of variable is called a pointer.
What Is a Pointer?Each memory location that you use to store a data value has an address. The address provides the meansfor your PC hardware to reference a particular data item. A pointer is a variable that stores an address ofanother variable of a particular type. A pointer has a variable name just like any other variable and alsohas a type that designates what kind of variables its contents refer to. Note that the type of a pointer vari-able includes the fact that it’s a pointer. A variable that is a pointer that can contain addresses of locationsin memory containing values of type int, is of type ‘pointer to int’.
174
Chapter 4: Arrays, Strings, and Pointers
25905c04.qxd:WroxPro 2/21/08 8:47 AM Page 174

Declaring PointersThe declaration for a pointer is similar to that of an ordinary variable, except that the pointer name hasan asterisk in front of it to indicate that it’s a variable that is a pointer. For example, to declare a pointerpnumber of type long, you could use the following statement:
long* pnumber;
This declaration has been written with the asterisk close to the type name. If you want, you can alsowrite it as:
long *pnumber;
The compiler won’t mind at all; however, the type of the variable pnumber is ‘pointer to long’, which is often indicated by placing the asterisk close to the type name. Whichever way you choose to write apointer type, be consistent.
You can mix declarations of ordinary variables and pointers in the same statement. For example:
long* pnumber, number = 99;
This declares the pointer pnumber of type ‘pointer to long’ as before, and also declares the variablenumber, of type long. On balance, it’s probably better to declare pointers separately from other vari-ables; otherwise, the statement can appear misleading as to the type of the variables declared, particu-larly if you prefer to place the * adjacent to the type name. The following statements certainly lookclearer and putting declarations on separate lines enables you to add comments for them individually,making for a program that is easier to read.
long number = 99; // Declaration and initialization of long variablelong* pnumber; // Declaration of variable of type pointer to long
It’s a common convention in C++ to use variable names beginning with p to denote pointers. This makes iteasier to see which variables in a program are pointers, which in turn can make a program easier to follow.
Let’s take an example to see how this works, without worrying about what it’s for. I will get to how youuse pointers very shortly. Suppose you have the long integer variable number because you declared itabove containing the value 99. You also have the pointer, pnumber, of type pointer to long, which youcould use to store the address of the variable number. But how do you obtain the address of a variable?
The Address-Of OperatorWhat you need is the address-of operator, &. This is a unary operator that obtains the address of a vari-able. It’s also called the reference operator, for reasons I will discuss later in this chapter. To set up thepointer that I have just discussed, you could write this assignment statement:
pnumber = &number; // Store address of number in pnumber
The result of this operation is illustrated in Figure 4-5.
175
Chapter 4: Arrays, Strings, and Pointers
25905c04.qxd:WroxPro 2/21/08 8:47 AM Page 175

Figure 4-5
You can use the operator & to obtain the address of any variable, but you need a pointer of the appropri-ate type to store it. If you want to store the address of a double variable for example, the pointer musthave been declared as type double*, which is type ‘pointer to double’.
Using PointersTaking the address of a variable and storing it in a pointer is all very well, but the really interesting aspectis how you can use it. Fundamental to using a pointer is accessing the data value in the variable to whicha pointer points. This is done using the indirection operator, *.
The Indirection OperatorYou use the indirection operator, *, with a pointer to access the contents of the variable that it points to.The name ‘indirection operator’ stems from the fact that the data is accessed indirectly. It is also calledthe dereference operator, and the process of accessing the data in the variable pointed to by a pointer istermed de-referencing the pointer.
One aspect of this operator that can seem confusing is the fact that you now have several different usesfor the same symbol, *. It is the multiply operator, it also serves as the indirection operator, and it is usedin the declaration of a pointer. Each time you use *, the compiler is able to distinguish its meaning by thecontext. When you multiply two variables, A*B for instance, there’s no meaningful interpretation of thisexpression for anything other than a multiply operation.
Why Use Pointers?A question that usually springs to mind at this point is, “Why use pointers at all?” After all, taking theaddress of a variable you already know and sticking it in a pointer so that you can dereference it seemslike an overhead you can do without. There are several reasons why pointers are important.
As you will see shortly, you can use pointer notation to operate on data stored in an array, which oftenexecutes faster than if you use array notation. Also, when you get to define your own functions later inthe book, you will see that pointers are used extensively for enabling access within a function to largeblocks of data, such as arrays, that are defined outside the function. Most importantly, however, you willalso see later that you can allocate space for variables dynamically, that is, during program execution.This sort of capability allows your program to adjust its use of memory depending on the input to the
pnumber
&number
pnumber = &number;
Address: 1008
1008 number
99
176
Chapter 4: Arrays, Strings, and Pointers
25905c04.qxd:WroxPro 2/21/08 8:47 AM Page 176

program. Because you don’t know in advance how many variables you are going to create dynamically,a primary way you have for doing this is by using pointers — so make sure you get the hang of this bit.
Try It Out Using PointersYou can try out various aspects of pointer operations with an example:
//Ex4_05.cpp// Exercising pointers#include <iostream>using std::cout;using std::endl;using std::hex;using std::dec;
int main(){
long* pnumber = NULL; // Pointer declaration & initializationlong number1 = 55, number2 = 99;
pnumber = &number1; // Store address in pointer*pnumber += 11; // Increment number1 by 11cout << endl
<< “number1 = “ << number1<< “ &number1 = “ << hex << pnumber;
pnumber = &number2; // Change pointer to address of number2number1 = *pnumber*10; // 10 times number2
cout << endl<< “number1 = “ << dec << number1<< “ pnumber = “ << hex << pnumber<< “ *pnumber = “ << dec << *pnumber;
cout << endl;return 0;
}
On my computer, this example generates the following output:
number1 = 66 &number1 = 0012FEC8number1 = 990 pnumber = 0012FEBC *pnumber = 99
How It WorksThere is no input to this example. All operations are carried out with the initializing values for the vari-ables. After storing the address of number1 in the pointer pnumber, the value of number1 is incrementedindirectly through the pointer in this statement:
*pnumber += 11; // Increment number1 by 11
Note that when you first declared the pointer pnumber, you initialized it to NULL. I’ll discuss pointerinitialization in the next section.
177
Chapter 4: Arrays, Strings, and Pointers
25905c04.qxd:WroxPro 2/21/08 8:47 AM Page 177
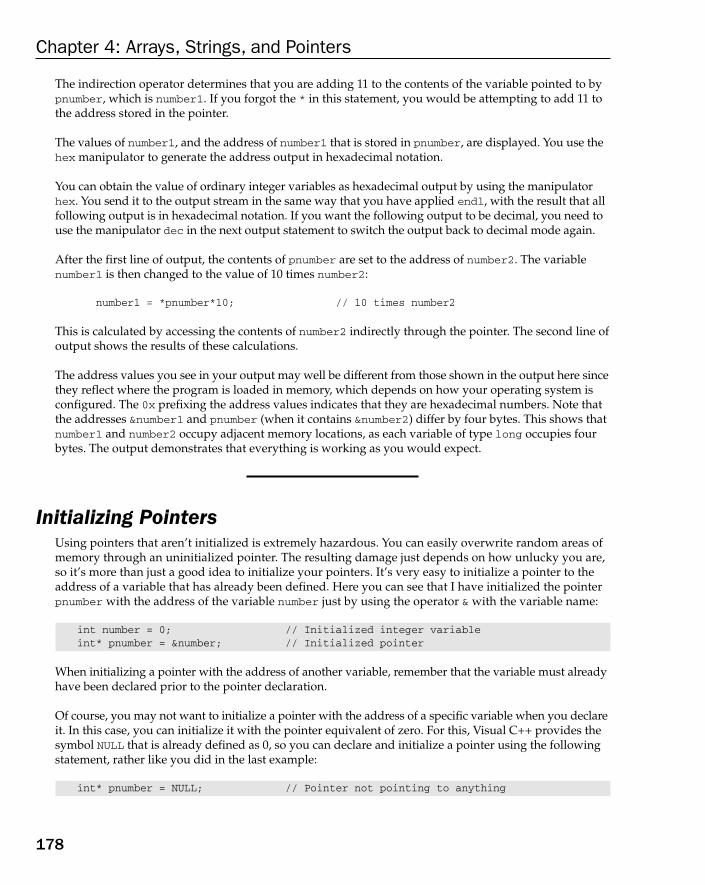
The indirection operator determines that you are adding 11 to the contents of the variable pointed to bypnumber, which is number1. If you forgot the * in this statement, you would be attempting to add 11 tothe address stored in the pointer.
The values of number1, and the address of number1 that is stored in pnumber, are displayed. You use thehex manipulator to generate the address output in hexadecimal notation.
You can obtain the value of ordinary integer variables as hexadecimal output by using the manipulatorhex. You send it to the output stream in the same way that you have applied endl, with the result that allfollowing output is in hexadecimal notation. If you want the following output to be decimal, you need touse the manipulator dec in the next output statement to switch the output back to decimal mode again.
After the first line of output, the contents of pnumber are set to the address of number2. The variablenumber1 is then changed to the value of 10 times number2:
number1 = *pnumber*10; // 10 times number2
This is calculated by accessing the contents of number2 indirectly through the pointer. The second line ofoutput shows the results of these calculations.
The address values you see in your output may well be different from those shown in the output here sincethey reflect where the program is loaded in memory, which depends on how your operating system isconfigured. The 0x prefixing the address values indicates that they are hexadecimal numbers. Note thatthe addresses &number1 and pnumber (when it contains &number2) differ by four bytes. This shows thatnumber1 and number2 occupy adjacent memory locations, as each variable of type long occupies fourbytes. The output demonstrates that everything is working as you would expect.
Initializing PointersUsing pointers that aren’t initialized is extremely hazardous. You can easily overwrite random areas ofmemory through an uninitialized pointer. The resulting damage just depends on how unlucky you are,so it’s more than just a good idea to initialize your pointers. It’s very easy to initialize a pointer to theaddress of a variable that has already been defined. Here you can see that I have initialized the pointerpnumber with the address of the variable number just by using the operator & with the variable name:
int number = 0; // Initialized integer variableint* pnumber = &number; // Initialized pointer
When initializing a pointer with the address of another variable, remember that the variable must alreadyhave been declared prior to the pointer declaration.
Of course, you may not want to initialize a pointer with the address of a specific variable when you declareit. In this case, you can initialize it with the pointer equivalent of zero. For this, Visual C++ provides thesymbol NULL that is already defined as 0, so you can declare and initialize a pointer using the followingstatement, rather like you did in the last example:
int* pnumber = NULL; // Pointer not pointing to anything
178
Chapter 4: Arrays, Strings, and Pointers
25905c04.qxd:WroxPro 2/21/08 8:47 AM Page 178

This ensures that the pointer doesn’t contain an address that will be accepted as valid and provides thepointer with a value that you can check in an if statement, such as:
if(pnumber == NULL)cout << endl << “pnumber is null.”;
Of course, you can also initialize a pointer explicitly with 0, which also ensures that it is assigned a valuethat doesn’t point to anything. No object can be allocated the address 0, so in effect 0 used as an addressindicates that the pointer has no target. In spite of it being arguably somewhat less legible, if you expectto run your code with other compilers, it is preferable to use 0 as an initializing value for a pointer thatyou want to be null. I’ll use 0 rather than NULL in ISO/ANSI C++ examples.
This is also more consistent with the current ‘good practice’ in ISO/ANSI C++, the argument beingthat if you have an object with a name in C++, it should have a type; however, NULL does not have atype — it’s an alias for 0. As you’ll see later in this chapter, things are a little different in C++/CLI.
To use 0 as the initializing value for a pointer you simply write:
int* pnumber = 0; // Pointer not pointing to anything
To check whether a pointer contains a valid address, you could use the statement:
if(pnumber == 0)cout << endl << “pnumber is null.”;
Equally well, you could use the statement:
if(!pnumber)cout << endl << “pnumber is null.”;
This statement does exactly the same as the previous example.
Of course, you can also use the form:
if(pnumber != 0)// Pointer is valid, so do something useful
The address pointed to by the NULL pointer contains a junk value. You should never attempt to derefer-ence a null pointer, because it will cause your program to end immediately.
Pointers to charA pointer of type char* has the interesting property that it can be initialized with a string literal. Forexample, you can declare and initialize such a pointer with the statement:
char* proverb = “A miss is as good as a mile.”;
This looks similar to initializing a char array, but it’s slightly different. This creates a string literal (actu-ally an array of type const char) with the character string appearing between the quotes and terminat-ing with /0, and stores the address of the literal in the pointer proverb. The address of the literal will bethe address of its first character. This is shown in Figure 4-6.
179
Chapter 4: Arrays, Strings, and Pointers
25905c04.qxd:WroxPro 2/21/08 8:47 AM Page 179

Figure 4-6
Try It Out Lucky Stars With PointersYou could rewrite the lucky stars example using pointers instead of an array to see how that would work:
// Ex4_06.cpp// Initializing pointers with strings#include <iostream>using std::cin;using std::cout;using std::endl;
int main(){
char* pstr1 = “Robert Redford”;char* pstr2 = “Hopalong Cassidy”;char* pstr3 = “Lassie”;char* pstr4 = “Slim Pickens”;char* pstr5 = “Boris Karloff”;char* pstr6 = “Oliver Hardy”;char* pstr = “Your lucky star is “;
int dice = 0;
cout << endl<< “ Pick a lucky star!”<< “ Enter a number between 1 and 6: “;
cin >> dice;
cout << endl;switch(dice){
case 1: cout << pstr << pstr1;break;
case 2: cout << pstr << pstr2;break;
Address: 1000
proverb
1. The pointer proverb is created.
2. The constant string is created, terminated with \0.
3. The address of the string is stored in the pointer.
1000
A m i s s a si s g o o d a s a m i l e . \0
180
Chapter 4: Arrays, Strings, and Pointers
25905c04.qxd:WroxPro 2/21/08 8:47 AM Page 180
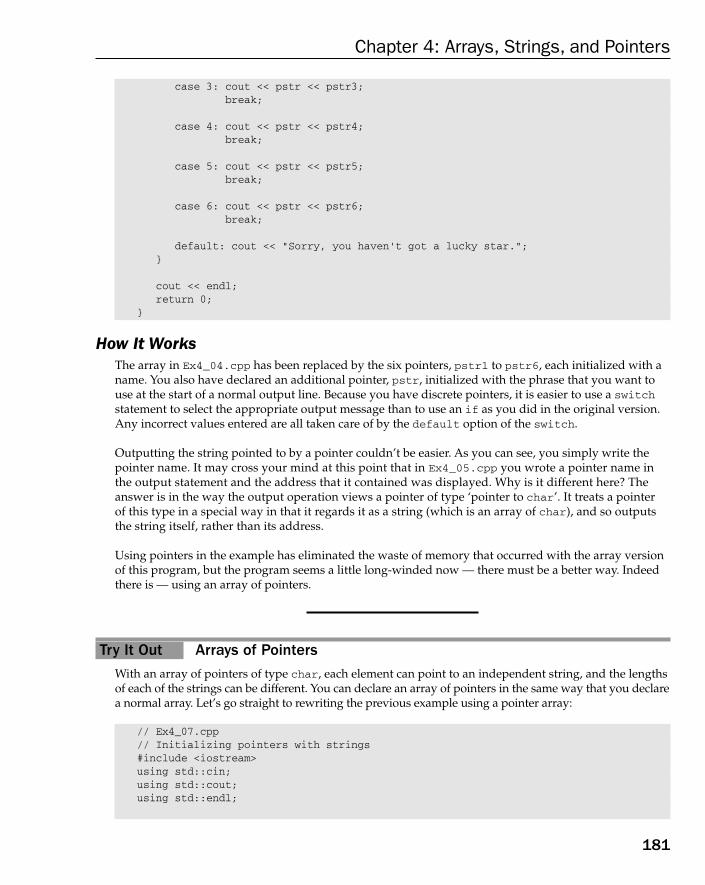
case 3: cout << pstr << pstr3;break;
case 4: cout << pstr << pstr4;break;
case 5: cout << pstr << pstr5;break;
case 6: cout << pstr << pstr6;break;
default: cout << “Sorry, you haven’t got a lucky star.”;}
cout << endl;return 0;
}
How It WorksThe array in Ex4_04.cpp has been replaced by the six pointers, pstr1 to pstr6, each initialized with aname. You also have declared an additional pointer, pstr, initialized with the phrase that you want touse at the start of a normal output line. Because you have discrete pointers, it is easier to use a switchstatement to select the appropriate output message than to use an if as you did in the original version.Any incorrect values entered are all taken care of by the default option of the switch.
Outputting the string pointed to by a pointer couldn’t be easier. As you can see, you simply write thepointer name. It may cross your mind at this point that in Ex4_05.cpp you wrote a pointer name inthe output statement and the address that it contained was displayed. Why is it different here? Theanswer is in the way the output operation views a pointer of type ‘pointer to char’. It treats a pointer of this type in a special way in that it regards it as a string (which is an array of char), and so outputsthe string itself, rather than its address.
Using pointers in the example has eliminated the waste of memory that occurred with the array versionof this program, but the program seems a little long-winded now — there must be a better way. Indeedthere is — using an array of pointers.
Try It Out Arrays of PointersWith an array of pointers of type char, each element can point to an independent string, and the lengthsof each of the strings can be different. You can declare an array of pointers in the same way that you declarea normal array. Let’s go straight to rewriting the previous example using a pointer array:
// Ex4_07.cpp// Initializing pointers with strings#include <iostream>using std::cin;using std::cout;using std::endl;
181
Chapter 4: Arrays, Strings, and Pointers
25905c04.qxd:WroxPro 2/21/08 8:47 AM Page 181

int main(){
char* pstr[] = { “Robert Redford”, // Initializing a pointer array“Hopalong Cassidy”,“Lassie”,“Slim Pickens”,“Boris Karloff”,“Oliver Hardy”
};char* pstart = “Your lucky star is “;
int dice = 0;
cout << endl<< “ Pick a lucky star!”<< “ Enter a number between 1 and 6: “;
cin >> dice;
cout << endl;if(dice >= 1 && dice <= 6) // Check input validity
cout << pstart << pstr[dice - 1]; // Output star name
elsecout << “Sorry, you haven’t got a lucky star.”; // Invalid input
cout << endl;return 0;
}
How It WorksIn this case, you are nearly getting the best of all possible worlds. You have a one-dimensional array ofpointers to type char declared such that the compiler works out what the dimension should be from thenumber of initializing strings. The memory usage that results from this is illustrated in Figure 4-7.
Compared to using a ‘normal’ array, the pointer array normally carries less overhead in terms of space.With an array, you would need to make each row the length of the longest string, and six rows of seventeenbytes each is 102 bytes, so by using a pointer array you have saved a whole -1 bytes! What’s gone wrong?The simple truth is that for this small number of relatively short strings, the size of the extra array of point-ers is significant. You would make savings if you were dealing with more strings that were longer and hadmore variable lengths.
Space saving isn’t the only advantage that you get by using pointers. In a lot of circumstances you savetime too. Think of what happens if you want to move “Oliver Hardy” to the first position and “RobertRedford” to the end. With the pointer array as above you just need to swap the pointers — the stringsthemselves stay where they are. If you had stored these simply as strings, as you did in Ex4_04.cpp, agreat deal of copying would be necessary — you need to copy the whole string “Robert Redford” to atemporary location while you copied “Oliver Hardy” in its place, and then you need to copy “RobertRedford” to the end position. This requires significantly more computer time to execute.
Because you are using pstr as the name of the array, the variable holding the start of the output messageneeds to be different; it is called pstart. You select the string that you want to output by means of a verysimple if statement, similar to that of the original version of the example. You either display a star selec-tion or a suitable message if the user enters an invalid value.
182
Chapter 4: Arrays, Strings, and Pointers
25905c04.qxd:WroxPro 2/21/08 8:47 AM Page 182

Figure 4-7
One weakness of the way the program is written is that the code assumes there are six options, eventhough the compiler is allocating the space for the pointer array from the number of initializing stringsthat you supply. So if you add a string to the list, you have to alter other parts of the program to takeaccount of this. It would be nice to be able to add strings and have the program automatically adapt tohowever many strings there are.
The sizeof OperatorA new operator can help us here. The sizeof operator produces an integer value of type size_t thatgives the number of bytes occupied by its operand where size_t is a type defined by the standardlibrary. Many standard library functions return a value of type size_t and the size_t type is definedwithin the standard library using a typedef statement to be equivalent to one of the fundamental types,usually unsigned int. The reason for using size_t rather than a fundamental type directly is that itallows flexibility in what the actual type is in different C++ implementations. The C++ standard permitsthe range of values accommodated by a fundamental type to vary to make the best of a given hardwarearchitecture, and size_t can be defined to be the equivalent of the most suitable fundamental type in thecurrent machine environment.
Look at this statement that refers to the variable dice from the previous example:
cout << sizeof dice;
15 bytes
pstr[0] pstr[1] pstr[2] pstr[3] pstr[4] pstr[5]
Pointer array 24 bytes
Total Memory is 103 bytes
17 bytes
7 bytes
13 bytes
14 bytes
13 bytes
R o b e r t R e d f o r d \0
H o p a l o n g C a s s i d y \0
L a s s i e \0
S l i m P i c k e n s \0
B o r i s K a r l o f f \0
O l i v e r H a r d y \0
183
Chapter 4: Arrays, Strings, and Pointers
25905c04.qxd:WroxPro 2/21/08 8:47 AM Page 183

The value of the expression sizeof dice is 4 because dice was declared as type int and thereforeoccupies 4 bytes. Thus this statement outputs the value 4.
The sizeof operator can be applied to an element in an array or to the whole array. When the operator isapplied to an array name by itself, it produces the number of bytes occupied by the whole array, whereaswhen it is applied to a single element with the appropriate index value or values, it results in the numberof bytes occupied by that element. Thus, in the last example, you could output the number of elements inthe pstr array with the expression:
cout << (sizeof pstr)/(sizeof pstr[0]);
The expression (sizeof pstr)/(sizeof pstr[0]) divides the number of bytes occupied by the wholepointer array by the number of bytes occupied by the first element of the array. Because each element inthe array occupies the same amount of memory, the result is the number of elements in the array.
Remember that pstr is an array of pointers — using the sizeof operator on the array or on individ-ual elements will not tell us anything about the memory occupied by the text strings.
You can also apply the sizeof operator to a type name rather than a variable, in which case the result is the number of bytes occupied by a variable of that type. In this case the type name should be enclosedbetween parentheses. For example, after executing the statement,
size_t long_size = sizeof(long);
the variable long_size will have the value 4. The variable long_size is declared to be of type size_tto match the type of the value produced by the sizeof operator. Using a different integer type forlong_size may result in a warning message from the compiler.
Try It Out Using the sizeof OperatorYou can amend the last example to use the sizeof operator so that the code automatically adapts to anarbitrary number of string values from which to select:
// Ex4_08.cpp// Flexible array management using sizeof#include <iostream>using std::cin;using std::cout;using std::endl;
int main(){
char* pstr[] = { “Robert Redford”, // Initializing a pointer array“Hopalong Cassidy”,“Lassie”,“Slim Pickens”,“Boris Karloff”,“Oliver Hardy”
};char* pstart = “Your lucky star is “;
184
Chapter 4: Arrays, Strings, and Pointers
25905c04.qxd:WroxPro 2/21/08 8:47 AM Page 184

int count = (sizeof pstr)/(sizeof pstr[0]); // Number of array elements
int dice = 0;
cout << endl<< “ Pick a lucky star!”<< “ Enter a number between 1 and “ << count << “: “;
cin >> dice;
cout << endl;if(dice >= 1 && dice <= count) // Check input validity
cout << pstart << pstr[dice - 1]; // Output star nameelse
cout << “Sorry, you haven’t got a lucky star.”; // Invalid input
cout << endl;return 0;
}
How It WorksAs you can see, the changes required in the example are very simple. You just calculate the number ofelements in the pointer array pstr and store the result in count. Then, wherever the total number of ele-ments in the array was referenced as 6, you just use the variable count. You could now just add a fewmore names to the list of lucky stars and everything affected in the program is adjusted automatically.
Constant Pointers and Pointers to ConstantsThe array pstr in the last example is clearly not intended to be modified in the program, and nor are thestrings being pointed to, nor the variable count. It would be a good idea to ensure that these didn’t getmodified by mistake in the program. You could very easily protect the variable count from accidentalmodification by writing this:
const int count = (sizeof pstr)/(sizeof pstr[0]);
However, the array of pointers deserves closer examination. You declared the array like this:
char* pstr[] = { “Robert Redford”, // Initializing a pointer array“Hopalong Cassidy”,“Lassie”,“Slim Pickens”,“Boris Karloff”,“Oliver Hardy”
};
Each pointer in the array is initialized with the address of a string literal, “Robert Redford”, “HopalongCassidy”, and so on. The type of a string literal is ‘array of const char’ so you are storing the addressof a const array in a non-const pointer. The reason the compiler allows us to use a string literal to ini-tialize an element of an array of char* is for reasons of backward compatibility with existing code.
185
Chapter 4: Arrays, Strings, and Pointers
25905c04.qxd:WroxPro 2/21/08 8:47 AM Page 185

If you try to alter the character array with a statement like this:
*pstr[0] = “Stan Laurel”;
the program does not compile.
If you were to reset one of the elements of the array to point to a character using a statement like this:
*pstr[0] = ‘X’;
the program compiles but crashes when this statement is executed.
You don’t really want to have unexpected behavior like the program crashing at run time, and you canprevent it. A far better way of writing the declaration is as follows:
const char* pstr[] = { “Robert Redford”, // Array of pointers“Hopalong Cassidy”, // to constants“Lassie”,“Slim Pickens”,“Boris Karloff”,“Oliver Hardy”
};
In this case, there is no ambiguity about the const-ness of the strings pointed to by the elements of thepointer array. If you now attempt to change these strings, the compiler flags this as an error at compile time.
However, you could still legally write this statement:
pstr[0] = pstr[1];
Those lucky individuals due to be awarded Mr. Redford would get Mr. Cassidy instead because bothpointers now point to the same name. Note that this isn’t changing the values of the objects pointed toby the pointer array element — it is changing the value of the pointer stored in pstr[0]. You shouldtherefore inhibit this kind of change as well because some people may reckon that good old Hoppy may not have the same sex appeal as Robert. You can do this with the following statement:
// Array of constant pointers to constantsconst char* const pstr[] = { “Robert Redford”,
“Hopalong Cassidy”,“Lassie”,“Slim Pickens”,“Boris Karloff”,“Oliver Hardy”
};
To summarize, you can distinguish three situations relating to const, pointers and the objects to whichthey point:
❑ A pointer to a constant object
❑ A constant pointer to an object
❑ A constant pointer to a constant object
186
Chapter 4: Arrays, Strings, and Pointers
25905c04.qxd:WroxPro 2/21/08 8:47 AM Page 186
In the first situation, the object pointed to cannot be modified, but you can set the pointer to point tosomething else:
const char* pstring = “Some text”;
In the second, the address stored in the pointer can’t be changed, but the object pointed to can be:
char* const pstring = “Some text”;
Finally, in the third situation, both the pointer and the object pointed to have been defined as constantand, therefore, neither can be changed:
const char* const pstring = “Some text”;
Of course, all this applies to pointers to any type. A pointer to type char is used here purely for illustra-tive purposes.
Pointers and ArraysArray names can behave like pointers under some circumstances. In most situations, if you use the nameof a one-dimensional array by itself, it is automatically converted to a pointer to the first element of thearray. Note that this is not the case when the array name is used as the operand of the sizeof operator.
If you have these declarations,
double* pdata;double data[5];
you can write this assignment:
pdata = data; // Initialize pointer with the array address
This is assigning the address of the first element of the array data to the pointer pdata. Using the arrayname by itself refers to the address of the array. If you use the array name data with an index value, it refers to the contents of the element corresponding to that index value. So, if you want to store theaddress of that element in the pointer, you have to use the address-of operator:
pdata = &data[1];
Here, the pointer pdata contains the address of the second element of the array.
Pointer ArithmeticYou can perform arithmetic operations with pointers. You are limited to addition and subtraction in terms ofarithmetic, but you can also perform comparisons of pointer values to produce a logical result. Arithmeticwith a pointer implicitly assumes that the pointer points to an array, and that the arithmetic operation is onthe address contained in the pointer. For the pointer pdata for example, you could assign the address of thethird element of the array data to a pointer with this statement:
pdata = &data[2];
187
Chapter 4: Arrays, Strings, and Pointers
25905c04.qxd:WroxPro 2/21/08 8:47 AM Page 187

In this case, the expression pdata+1 would refer to the address of data[3], the fourth element of thedata array, so you could make the pointer point to this element by writing this statement:
pdata += 1; // Increment pdata to the next element
This statement increments the address contained in pdata by the number of bytes occupied by one ele-ment of the array data. In general, the expression pdata+n, where n can be any expression resulting in an integer, adds n*sizeof(double) to the address contained in the pointer pdata because it wasdeclared to be of type pointer to double. This is illustrated in Figure 4-8.
Figure 4-8
In other words, incrementing or decrementing a pointer works in terms of the type of the object pointedto. Increasing a pointer to long by one changes its contents to the next long address and so incrementsthe address by four. Similarly, incrementing a pointer to short by one increments the address by two.The more common notation for incrementing a pointer is using the increment operator. For example:
pdata++; // Increment pdata to the next element
This is equivalent to (and more common than) the += form. However, I used the preceding += form tomake it clear that although the increment value is actually specified as one, the effect is usually an incre-ment greater than one, except in the case of a pointer to type char.
The address resulting from an arithmetic operation on a pointer can be a value ranging from the addressof the first element of the array to the address that is one beyond the last element. Outside of these limits,the behavior of the pointer is undefined.
You can, of course, dereference a pointer on which you have performed arithmetic (there wouldn’t bemuch point to it otherwise). For example, assuming that pdata is still pointing to data[2], this statement,
*(pdata + 1) = *(pdata + 2);
data[0]
pdata+1
pdata = &data[2];
pdata+2
Each element occupies 8 bytes Address
data[1] data[2]
double data[5];
data[3] data[4]
188
Chapter 4: Arrays, Strings, and Pointers
25905c04.qxd:WroxPro 2/21/08 8:47 AM Page 188
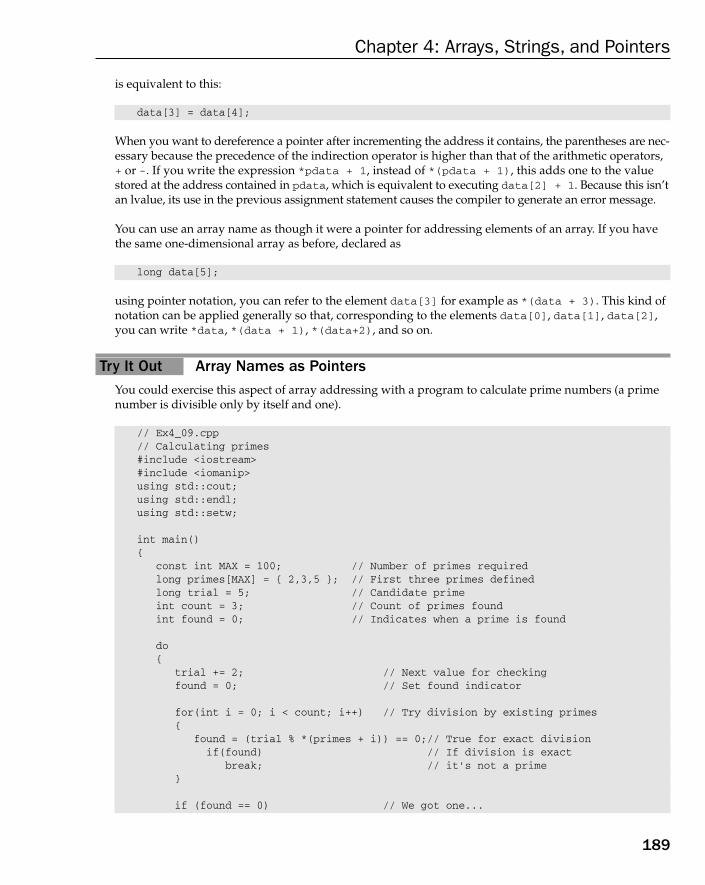
is equivalent to this:
data[3] = data[4];
When you want to dereference a pointer after incrementing the address it contains, the parentheses are nec-essary because the precedence of the indirection operator is higher than that of the arithmetic operators,+ or -. If you write the expression *pdata + 1, instead of *(pdata + 1), this adds one to the valuestored at the address contained in pdata, which is equivalent to executing data[2] + 1. Because this isn’tan lvalue, its use in the previous assignment statement causes the compiler to generate an error message.
You can use an array name as though it were a pointer for addressing elements of an array. If you havethe same one-dimensional array as before, declared as
long data[5];
using pointer notation, you can refer to the element data[3] for example as *(data + 3). This kind ofnotation can be applied generally so that, corresponding to the elements data[0], data[1], data[2],you can write *data, *(data + 1), *(data+2), and so on.
Try It Out Array Names as PointersYou could exercise this aspect of array addressing with a program to calculate prime numbers (a primenumber is divisible only by itself and one).
// Ex4_09.cpp// Calculating primes#include <iostream>#include <iomanip>using std::cout;using std::endl;using std::setw;
int main(){
const int MAX = 100; // Number of primes requiredlong primes[MAX] = { 2,3,5 }; // First three primes definedlong trial = 5; // Candidate primeint count = 3; // Count of primes foundint found = 0; // Indicates when a prime is found
do{
trial += 2; // Next value for checkingfound = 0; // Set found indicator
for(int i = 0; i < count; i++) // Try division by existing primes{
found = (trial % *(primes + i)) == 0;// True for exact divisionif(found) // If division is exact
break; // it’s not a prime}
if (found == 0) // We got one...
189
Chapter 4: Arrays, Strings, and Pointers
25905c04.qxd:WroxPro 2/21/08 8:47 AM Page 189
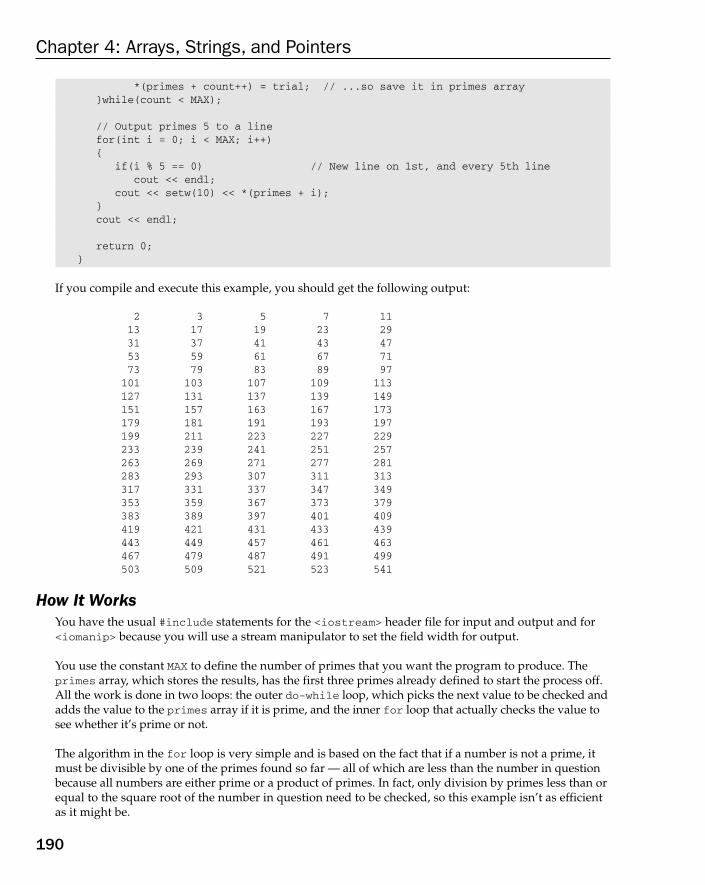
*(primes + count++) = trial; // ...so save it in primes array}while(count < MAX);
// Output primes 5 to a linefor(int i = 0; i < MAX; i++){
if(i % 5 == 0) // New line on 1st, and every 5th linecout << endl;
cout << setw(10) << *(primes + i);}cout << endl;
return 0;}
If you compile and execute this example, you should get the following output:
2 3 5 7 1113 17 19 23 2931 37 41 43 4753 59 61 67 7173 79 83 89 97101 103 107 109 113127 131 137 139 149151 157 163 167 173179 181 191 193 197199 211 223 227 229233 239 241 251 257263 269 271 277 281283 293 307 311 313317 331 337 347 349353 359 367 373 379383 389 397 401 409419 421 431 433 439443 449 457 461 463467 479 487 491 499503 509 521 523 541
How It WorksYou have the usual #include statements for the <iostream> header file for input and output and for<iomanip> because you will use a stream manipulator to set the field width for output.
You use the constant MAX to define the number of primes that you want the program to produce. Theprimes array, which stores the results, has the first three primes already defined to start the process off.All the work is done in two loops: the outer do-while loop, which picks the next value to be checked andadds the value to the primes array if it is prime, and the inner for loop that actually checks the value tosee whether it’s prime or not.
The algorithm in the for loop is very simple and is based on the fact that if a number is not a prime, itmust be divisible by one of the primes found so far — all of which are less than the number in questionbecause all numbers are either prime or a product of primes. In fact, only division by primes less than orequal to the square root of the number in question need to be checked, so this example isn’t as efficientas it might be.
190
Chapter 4: Arrays, Strings, and Pointers
25905c04.qxd:WroxPro 2/21/08 8:47 AM Page 190

found = (trial % *(primes + i)) == 0; // True for exact division
This statement sets the variable found to be 1 if there’s no remainder from dividing the value in trialby the current prime *(primes + i) (remember that this is equivalent to primes[i]), and 0 otherwise.The if statement causes the for loop to be terminated if found has the value 1 because the candidate intrial can’t be a prime in that case.
After the for loop ends (for whatever reason), it’s necessary to decide whether or not the value in trialwas prime. This is indicated by the value in the indicator variable found.
*(primes + count++) = trial; // ...so save it in primes array
If trial does contain a prime, this statement stores the value in primes[count] and then incrementscount through the postfix increment operator.
After MAX number of primes have been found, they are output with a field width of 10 characters, 5 to aline, as a result of this statement:
if(i % 5 == 0) // New line on 1st, and every 5th linecout << endl;
This starts a new line when i has the values 0, 5, 10, and so on.
Try It Out Counting Characters RevisitedTo see how handling strings works in pointer notation, you could produce a version of the program youlooked at earlier for counting the characters in a string:
// Ex4_10.cpp// Counting string characters using a pointer#include <iostream>using std::cin;using std::cout;using std::endl;
int main(){
const int MAX = 80; // Maximum array dimensionchar buffer[MAX]; // Input bufferchar* pbuffer = buffer; // Pointer to array buffer
cout << endl // Prompt for input<< “Enter a string of less than “<< MAX << “ characters:”<< endl;
cin.getline(buffer, MAX, ‘\n’); // Read a string until \n
while(*pbuffer) // Continue until \0pbuffer++;
191
Chapter 4: Arrays, Strings, and Pointers
25905c04.qxd:WroxPro 2/21/08 8:47 AM Page 191

cout << endl<< “The string \”” << buffer<< “\” has “ << pbuffer - buffer << “ characters.”;
cout << endl;
return 0;}
Here’s an example of typical output from this example:
Enter a string of less than 80 characters:The tigers of wrath are wiser than the horses of instruction.The string “The tigers of wrath are wiser than the horses of instruction.” has 61characters.
How It WorksHere the program operates using the pointer pbuffer rather than the array name buffer. You don’t needthe count variable because the pointer is incremented in the while loop until ‘\0’ is found. When the‘\0’ character is found, pbuffer will contain the address of that position in the string. The count of thenumber of characters in the string entered is therefore the difference between the address stored in thepointer pbuffer and the address of the beginning of the array denoted by buffer.
You could also have incremented the pointer in the loop by writing the loop like this:
while(*pbuffer++); // Continue until \0
Now the loop contains no statements, only the test condition. This would work adequately, except forthe fact that the pointer would be incremented after ‘\0’ was encountered, so the address would be onemore than the last position in the string. You would therefore need to express the count of the number ofcharacters in the string as pbuffer – buffer - 1.
Note that you can’t use the array name here in the same way that you have used the pointer. The expres-sion buffer++ is strictly illegal because you can’t modify the address value that an array name repre-sents. Even though you can use an array name in an expression as though it is a pointer, it isn’t a pointer,because the address value that it represents is fixed.
Using Pointers with Multidimensional ArraysUsing a pointer to store the address of a one-dimensional array is relatively straightforward, but withmultidimensional arrays, things can get a little complicated. If you don’t intend to do this, you can skipthis section as it’s a little obscure; however, if you have previous experience with C, this section is wortha glance.
If you have to use a pointer with multidimensional arrays, you need to keep clear in your mind what ishappening. By way of illustration, you can use an array beans, declared as follows:
double beans[3][4];
192
Chapter 4: Arrays, Strings, and Pointers
25905c04.qxd:WroxPro 2/21/08 8:47 AM Page 192
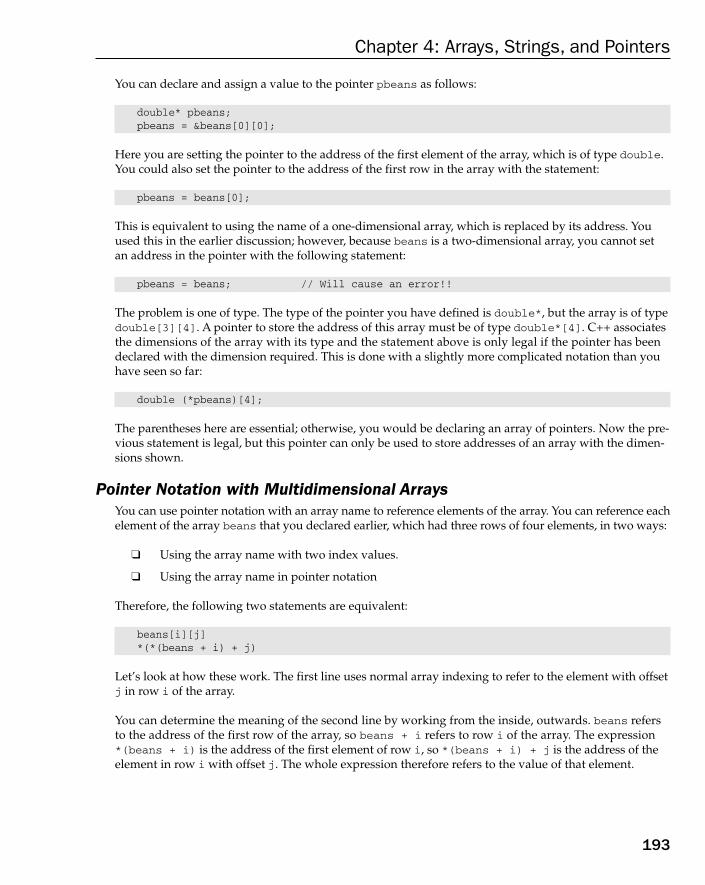
You can declare and assign a value to the pointer pbeans as follows:
double* pbeans;pbeans = &beans[0][0];
Here you are setting the pointer to the address of the first element of the array, which is of type double.You could also set the pointer to the address of the first row in the array with the statement:
pbeans = beans[0];
This is equivalent to using the name of a one-dimensional array, which is replaced by its address. Youused this in the earlier discussion; however, because beans is a two-dimensional array, you cannot set an address in the pointer with the following statement:
pbeans = beans; // Will cause an error!!
The problem is one of type. The type of the pointer you have defined is double*, but the array is of typedouble[3][4]. A pointer to store the address of this array must be of type double*[4]. C++ associatesthe dimensions of the array with its type and the statement above is only legal if the pointer has beendeclared with the dimension required. This is done with a slightly more complicated notation than youhave seen so far:
double (*pbeans)[4];
The parentheses here are essential; otherwise, you would be declaring an array of pointers. Now the pre-vious statement is legal, but this pointer can only be used to store addresses of an array with the dimen-sions shown.
Pointer Notation with Multidimensional ArraysYou can use pointer notation with an array name to reference elements of the array. You can reference eachelement of the array beans that you declared earlier, which had three rows of four elements, in two ways:
❑ Using the array name with two index values.
❑ Using the array name in pointer notation
Therefore, the following two statements are equivalent:
beans[i][j]*(*(beans + i) + j)
Let’s look at how these work. The first line uses normal array indexing to refer to the element with offsetj in row i of the array.
You can determine the meaning of the second line by working from the inside, outwards. beans refersto the address of the first row of the array, so beans + i refers to row i of the array. The expression*(beans + i) is the address of the first element of row i, so *(beans + i) + j is the address of theelement in row i with offset j. The whole expression therefore refers to the value of that element.
193
Chapter 4: Arrays, Strings, and Pointers
25905c04.qxd:WroxPro 2/21/08 8:47 AM Page 193

If you really want to be obscure — and it isn’t recommended that you should be — the following twostatements, where you have mixed array and pointer notation, are also legal references to the same ele-ment of the array:
*(beans[i] + j)(*(beans + i))[j]
There is yet another aspect to the use of pointers that is really the most important of all: the ability toallocate memory for variables dynamically. You’ll look into that next.
Dynamic Memory AllocationWorking with a fixed set of variables in a program can be very restrictive. The need often arises within anapplication to decide the amount of space to be allocated for storing different types of variables at execu-tion time, depending on the input data for the program. With one set of data it may be appropriate to usea large integer array in a program, whereas with a different set of input data, a large floating-point arraymay be required. Any program that involves reading and processing a number of data items that is notknown in advance can take advantage of the ability to allocate memory to store the data at run time. Forexample, if you need to implement a program to store information about the students in a class, thenumber of students is not fixed and their names will vary in length so to deal with the data most effi-ciently, you’ll want to allocate space dynamically at execution time.
Obviously, because any dynamically allocated variables can’t have been defined at compile time, they can’tbe named in your source program. When they are created, they are identified by their address in memory,which is contained within a pointer. With the power of pointers and the dynamic memory managementtools in Visual C++ 2008, writing your programs to have this kind of flexibility is quick and easy.
The Free Store, Alias the HeapIn most instances, when your program is executed, there is unused memory in your computer. This unusedmemory is called the heap in C++, or sometimes the free store. You can allocate space within the free storefor a new variable of a given type using a special operator in C++ that returns the address of the space allo-cated. This operator is new, and it’s complemented by the operator delete, which de-allocates memorypreviously allocated by new.
You can allocate space in the free store for some variables in one part of a program, and then release theallocated space and return it to the free store after you have finished with the variables concerned. Thismakes the memory available for reuse by other dynamically allocated variables, later in the same program.
You would want to use memory from the free store whenever you need to allocate memory for items thatcan only be determined at runtime. One example of this might be allocating memory to hold a stringentered by the user of your application. There is no way you can know in advance how large this stringneeds to be, so you would allocate the memory for the string at run time, using the new operator. Later,you’ll look at an example of using the free store to dynamically allocate memory for an array, where thedimensions of the array are determined by the user at run time.
This can be a very powerful technique; it enables you to use memory very efficiently, and in many cases,it results in programs that can handle much larger problems, involving considerably more data than other-wise might be possible.
194
Chapter 4: Arrays, Strings, and Pointers
25905c04.qxd:WroxPro 2/21/08 8:47 AM Page 194
The new and delete OperatorsSuppose that you need space for a double variable. You can define a pointer to type double and thenrequest that the memory be allocated at execution time. You can do this using the operator new with thefollowing statements:
double* pvalue = NULL; // Pointer initialized with nullpvalue = new double; // Request memory for a double variable
This is a good moment to recall that all pointers should be initialized. Using memory dynamically typicallyinvolves a number of pointers floating around, so it’s important that they should not contain spuriousvalues. You should try to arrange that if a pointer doesn’t contain a legal address value, it is set to 0.
The new operator in the second line of code above should return the address of the memory in the freestore allocated to a double variable, and this address is stored in the pointer pvalue. You can then usethis pointer to reference the variable using the indirection operator as you have seen. For example:
*pvalue = 9999.0;
Of course, the memory may not have been allocated because the free store had been used up, or becausethe free store is fragmented by previous usage, meaning that there isn’t a sufficient number of contigu-ous bytes to accommodate the variable for which you want to obtain space. You don’t have to worry toomuch about this, however. With ANSI standard C++, the new operator will throw an exception if the mem-ory cannot be allocated for any reason, which terminates your program. Exceptions are a mechanism forsignaling errors in C++ and you learn about these in Chapter 6.
You can also initialize a variable created by new. Taking the example of the double variable that was allo-cated by new and the address stored in pvalue, you could have set the value to 999.0 as it was created withthis statement:
pvalue = new double(999.0); // Allocate a double and initialize it
When you no longer need a variable that has been dynamically allocated, you can free up the memorythat it occupies in the free store with the delete operator:
delete pvalue; // Release memory pointed to by pvalue
This ensures that the memory can be used subsequently by another variable. If you don’t use delete,and subsequently store a different address value in the pointer pvalue, it will be impossible to free upthe memory or to use the variable that it contains because access to the address is lost. In this situation,you have what is referred to as a memory leak, especially when this situation recurs in your program.
Allocating Memory Dynamically for ArraysAllocating memory for an array dynamically is very straightforward. If you wanted to allocate an arrayof type char, assuming pstr is a pointer to char, you could write the following statement:
pstr = new char[20]; // Allocate a string of twenty characters
This allocates space for a char array of 20 characters and stores its address in pstr.
195
Chapter 4: Arrays, Strings, and Pointers
25905c04.qxd:WroxPro 2/21/08 8:47 AM Page 195
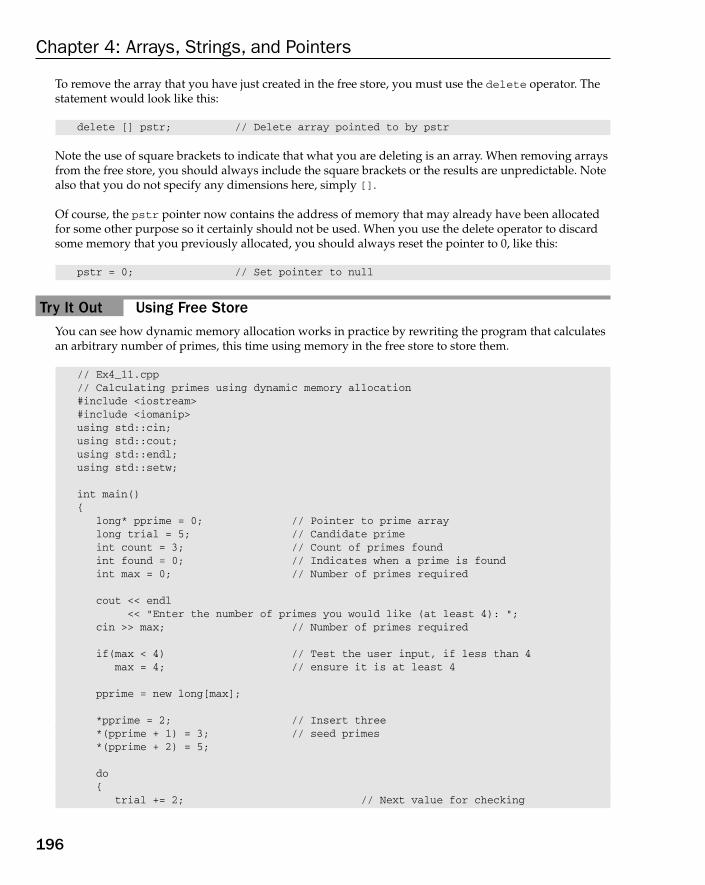
To remove the array that you have just created in the free store, you must use the delete operator. Thestatement would look like this:
delete [] pstr; // Delete array pointed to by pstr
Note the use of square brackets to indicate that what you are deleting is an array. When removing arraysfrom the free store, you should always include the square brackets or the results are unpredictable. Notealso that you do not specify any dimensions here, simply [].
Of course, the pstr pointer now contains the address of memory that may already have been allocatedfor some other purpose so it certainly should not be used. When you use the delete operator to discardsome memory that you previously allocated, you should always reset the pointer to 0, like this:
pstr = 0; // Set pointer to null
Try It Out Using Free StoreYou can see how dynamic memory allocation works in practice by rewriting the program that calculatesan arbitrary number of primes, this time using memory in the free store to store them.
// Ex4_11.cpp// Calculating primes using dynamic memory allocation#include <iostream>#include <iomanip>using std::cin;using std::cout;using std::endl;using std::setw;
int main(){
long* pprime = 0; // Pointer to prime arraylong trial = 5; // Candidate primeint count = 3; // Count of primes foundint found = 0; // Indicates when a prime is foundint max = 0; // Number of primes required
cout << endl<< “Enter the number of primes you would like (at least 4): “;
cin >> max; // Number of primes required
if(max < 4) // Test the user input, if less than 4max = 4; // ensure it is at least 4
pprime = new long[max];
*pprime = 2; // Insert three*(pprime + 1) = 3; // seed primes*(pprime + 2) = 5;
do{
trial += 2; // Next value for checking
196
Chapter 4: Arrays, Strings, and Pointers
25905c04.qxd:WroxPro 2/21/08 8:47 AM Page 196

found = 0; // Set found indicator
for(int i = 0; i < count; i++) // Division by existing primes{
found =(trial % *(pprime + i)) == 0;// True for exact divisionif(found) // If division is exact
break; // it’s not a prime}
if (found == 0) // We got one...*(pprime + count++) = trial; // ...so save it in primes array
} while(count < max);
// Output primes 5 to a linefor(int i = 0; i < max; i++){
if(i % 5 == 0) // New line on 1st, and every 5th linecout << endl;
cout << setw(10) << *(pprime + i);}
delete [] pprime; // Free up memorypprime = 0; // and reset the pointercout << endl;return 0;
}
Here’s an example of the output from this program:
Enter the number of primes you would like (at least 4): 202 3 5 7 1113 17 19 23 2931 37 41 43 4753 59 61 67 71
How It WorksIn fact, the program is similar to the previous version. After receiving the number of primes required inthe int variable max, you allocate an array of that size in the free store using the operator new. Note thatyou have made sure that max can be no less than 4. This is because the program requires space to beallocated in the free store for at least the three seed primes, plus one new one. You specify the size of thearray that is required by putting the variable max between the square brackets following the array typespecification:
pprime = new long[max];
You store the address of the memory area that is allocated by new in the pointer pprime. The programwould terminate at this point if the memory could not be allocated.
After the memory that stores the prime values has been successfully allocated, the first three array elementsare set to the values of the first three primes:
*pprime = 2; // Insert three
197
Chapter 4: Arrays, Strings, and Pointers
25905c04.qxd:WroxPro 2/21/08 8:47 AM Page 197

*(pprime + 1) = 3; // seed primes*(pprime + 2) = 5;
You are using the dereference operator to access the first three elements of the array. As you saw earlier,the parentheses in the second and third statements are because the precedence of the * operators is higherthan that of the + operator.
You can’t specify initial values for elements of an array that you allocate dynamically. You have to useexplicit assignment statements if you want to set initial values for elements of the array.
The calculation of the prime numbers is exactly as before; the only change is that the name of the pointeryou have here, pprime, is substituted for the array name, primes, that you used in the previous version.Equally, the output process is the same. Acquiring space dynamically is really not a problem at all. Afterit has been allocated, it in no way affects how the computation is written.
After you finish with the array, you remove it from the free store using the delete operator, rememberingto include the square brackets to indicate that it is an array you are deleting.
delete [] pprime; // Free up memory
Although it’s not essential here, you also set the pointer to 0:
pprime = 0; // and reset the pointer
All memory allocated in the free store is released when your program ends, but it is good to get into thehabit of resetting pointers to 0 when they no longer point to valid memory areas.
Dynamic Allocation of Multidimensional ArraysAllocating memory in the free store for a multidimensional array involves using the new operator in aslightly more complicated form than that for a one-dimensional array. Assuming that you have alreadydeclared the pointer pbeans appropriately, to obtain the space for the array beans[3][4] that you usedearlier in this chapter, you could write this:
pbeans = new double [3][4]; // Allocate memory for a 3x4 array
You just specify both array dimensions between square brackets after the type name for the array elements.
Allocating space for a three-dimensional array simply requires that you specify the extra dimension withnew, as in this example:
pBigArray = new double [5][10][10]; // Allocate memory for a 5x10x10 array
However many dimensions there are in the array that has been created, to destroy it and release thememory back to the free store you write the following:
delete [] pBigArray; // Release memory for array
198
Chapter 4: Arrays, Strings, and Pointers
25905c04.qxd:WroxPro 2/21/08 8:47 AM Page 198
You always use just one pair of square brackets following the delete operator, regardless of the dimen-sionality of the array with which you are working.
You have already seen that you can use a variable as the specification of the dimension of a one-dimensionalarray to be allocated by new. This extends to two or more dimensions but with the restriction that only theleftmost dimension may be specified by a variable. All the other dimensions must be constants or constantexpressions. So you could write this:
pBigArray = new double[max][10][10];
where max is a variable; however, specifying a variable for any dimension other than the left most causesan error message to be generated by the compiler.
Using ReferencesA reference appears to be similar to a pointer in many respects, which is why I’m introducing it here,but it really isn’t the same thing at all. The real importance of references becomes apparent only whenyou get to explore their use with functions, particularly in the context of object-oriented programming.Don’t be misled by its simplicity and what might seem to be a trivial concept. As you will see later, ref-erences provide some extraordinarily powerful facilities and in some contexts enable you to achieveresults that would be impossible without using them.
What Is a Reference?A reference is an alias for another variable. It has a name that can be used in place of the original variablename. Because it is an alias and not a pointer, the variable for which it is an alias has to be specified whenthe reference is declared, and unlike a pointer, a reference can’t be altered to represent another variable.
Declaring and Initializing ReferencesSuppose that you have declared a variable as follows:
long number = 0;
You can declare a reference for this variable using the following declaration statement:
long& rnumber = number; // Declare a reference to variable number
The ampersand following the type name long and preceding the variable name rnumber, indicates thata reference is being declared and the variable name it represents, number, is specified as the initializingvalue following the equals sign; therefore, the variable rnumber is of type ‘reference to long’. You cannow use the reference in place of the original variable name. For example, this statement,
rnumber += 10;
has the effect of incrementing the variable number by 10.
199
Chapter 4: Arrays, Strings, and Pointers
25905c04.qxd:WroxPro 2/21/08 8:47 AM Page 199

Let’s contrast the reference rnumber with the pointer pnumber, declared in this statement:
long* pnumber = &number; // Initialize a pointer with an address
This declares the pointer pnumber, and initializes it with the address of the variable number. This thenallows the variable number to be incremented with a statement such as:
*pnumber += 10; // Increment number through a pointer
There is a significant distinction between using a pointer and using a reference. The pointer needs to bedereferenced and whatever address it contains is used to access the variable to participate in the expres-sion. With a reference, there is no need for de-referencing. In some ways, a reference is like a pointer thathas already been dereferenced, although it can’t be changed to reference another variable. The referenceis the complete equivalent of the variable for which it is a reference. A reference may seem like just analternative notation for a given variable, and here it certainly appears to behave like that. However,you’ll see when I discuss functions in C++ that this is not quite true and that it can provide some veryimpressive extra capabilities.
Native C++ Librar y Functions for StringsThe standard library provides the <cstring> header that contains functions that operate on null-terminatedstrings. These are a set of functions that are specified to the C++ standard. There are also alternatives tosome of these that are not standard, but which provide a more secure implementation of the functionthan the original versions. In general I’ll mention both where they exist in the <cstring> header but I’lluse the more secure versions in examples. Let’s explore some of the most useful functions provided bythe <cstring> header.
Note that the <string> standard header for native C++ defines the string and wstring classesthat represent character strings. The string class represents strings of characters of type char and thewstring class represents strings of characters of type wchar_t. Both are defined in the <string>header as template classes that are instances of the basic_string<T> class template. A class templateis a parameterized class (with parameter T in this case) that you can use to create new classes to handledifferent types of data. I won’t be discussing templates and the string and wstring classes untilChapter 8, but I thought I’d mention them here because there have some features in common with thefunctions provided by the String type that you’ll be using in C++/CLI programs later in this chapter. If you are really interested to see how they compare, you could always have a quick look at the section inChapter 8 that has the same title as this section. It should be reasonably easy to follow at this point, evenwithout knowledge of templates and classes.
Finding the Length of a Null-Terminated StringThe strlen() function returns the length of the argument string of type char* as a value of type size_t.The type size_t is an implementation defined type that corresponds to an unsigned integer type that isused generally to represent the lengths of sequences of various kinds. The wcslen() function does thesame thing for strings of type wchar_t*.
200
Chapter 4: Arrays, Strings, and Pointers
25905c04.qxd:WroxPro 2/21/08 8:47 AM Page 200

Here’s how you use the strlen() function:
char * str(“A miss is as good as a mile.”);cout << “The string contains “ << strlen(str) << “ characters.” << endl;
The output produced when this fragment executes is:
The string contains 28 characters.
As you can see from the output, the length value that is returned does not include the terminating null. Itis important to keep this in mind, especially when you are using the length of one string to create anotherof the same length.
Both strlen() and wcslen() find the length by looking for the null at the end. If there isn’t one, thefunctions will happily continue beyond the end of the string checking throughout memory in the hopeof finding a null. For this reason these functions represent a security risk when you are working withdata from an untrusted external source. In this situation you can use the strnlen() and wcsnlen()functions, both of which require a second argument that specifies the length of the buffer in which thestring specified by the first argument is stored.
Joining Null-Terminated StringsThe strcat() function concatenates two null-terminated strings. The string specified by the secondargument is appended to the string specified by the first argument. Here’s an example of how youmight use it:
char str1[30]= “Many hands”;char* str2(“ make light work.”);strcat(str1, str2);cout << str1 << endl;
Note that the first string is stored in the array str1 of 30 characters, which is far more than the length of the initializing string, “Many hands”. The string specified by the first argument must have sufficientspace to accommodate the two strings when they are joined. If it doesn’t, disaster will surely result becausethe function will then try to overwrite the area beyond the end of the first string.
Figure 4-9
w o r k
char str1[30] = "Many hands";
strcat(str1, str2)
char* str2( " make light work.");
M a n y h a n d s \ 0
m a k e l i g h t . \ 0
201
Chapter 4: Arrays, Strings, and Pointers
25905c04.qxd:WroxPro 2/21/08 8:47 AM Page 201

As Figure 4-9 shows, the first character of the string specified by the second argument overwrites the ter-minating null of the first argument and all the remaining characters of the second string are copied across,including the terminating null. Thus the output from the fragment will be:
Many hands make light work.
The strcat() function returns the pointer that is the first argument so you could combine the last twostatements in the fragment above into one:
cout << strcat(str1, str2) << endl;
The wcscat() function concatenates wide-character strings but otherwise works exactly the same as thestrcat() function.
With the strncat() function you can append part of one null-terminated string to another. The firsttwo arguments are the destination and source strings respectively, and the third argument is a count ofthe number of characters from the source string that are to be appended. With the strings as defined inFigure 4-9, here’s an example of using strncat():
cout << strncat(str1, str2, 11) << endl;
After executing this statement, str1 contains the string “Many hands make light”. The operationappends 11 characters from str2 to str1, overwriting the terminating ‘\0’ in str1, and then appends afinal ‘\0’ character. The wcsncat() provides the same capability as strncat() but for wide-characterstrings.
All the functions for concatenating strings that I have introduced up to now rely on finding the terminat-ing nulls in the strings to work properly so they are also insecure when it comes to dealing with untrusteddata. The strcat_s(), wcscat_s(), strncat_s(), and wcsncat_s() functions in <cstring> providesecure alternatives. Just to take one example, here’s how you could use strcat_s() to carry out the oper-ation shown in Figure 4-9:
const size_t count = 30;char str1[count]= “Many hands”;char* str2(“ make light work.”);
errno_t error = strcat_s(str1, count, str2);
if(error == 0)cout << “ Strings joined successfully.” << endl;
else if(error == EINVAL)cout << “Error” Source or destination string is NULL.” << endl;
else if(error == ERANGE)cout << “ Error! Destination string too small.” << endl;
For convenience I defined the array size as the constant, count. The first argument to strcat_s() is thedestination string to which the source string specified by the third argument is to be appended. The secondargument is the total number of bytes available at the destination. The function returns an integer value of
202
Chapter 4: Arrays, Strings, and Pointers
25905c04.qxd:WroxPro 2/21/08 8:47 AM Page 202
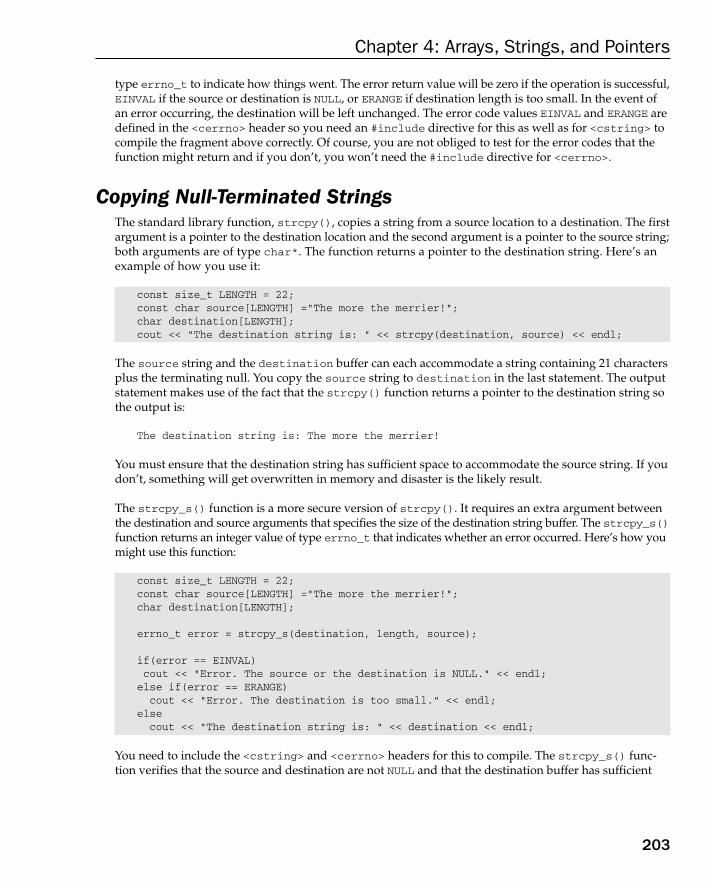
type errno_t to indicate how things went. The error return value will be zero if the operation is successful,EINVAL if the source or destination is NULL, or ERANGE if destination length is too small. In the event ofan error occurring, the destination will be left unchanged. The error code values EINVAL and ERANGE aredefined in the <cerrno> header so you need an #include directive for this as well as for <cstring> tocompile the fragment above correctly. Of course, you are not obliged to test for the error codes that thefunction might return and if you don’t, you won’t need the #include directive for <cerrno>.
Copying Null-Terminated StringsThe standard library function, strcpy(), copies a string from a source location to a destination. The firstargument is a pointer to the destination location and the second argument is a pointer to the source string;both arguments are of type char*. The function returns a pointer to the destination string. Here’s anexample of how you use it:
const size_t LENGTH = 22;const char source[LENGTH] =”The more the merrier!”;char destination[LENGTH];cout << “The destination string is: “ << strcpy(destination, source) << endl;
The source string and the destination buffer can each accommodate a string containing 21 charactersplus the terminating null. You copy the source string to destination in the last statement. The outputstatement makes use of the fact that the strcpy() function returns a pointer to the destination string sothe output is:
The destination string is: The more the merrier!
You must ensure that the destination string has sufficient space to accommodate the source string. If youdon’t, something will get overwritten in memory and disaster is the likely result.
The strcpy_s() function is a more secure version of strcpy(). It requires an extra argument betweenthe destination and source arguments that specifies the size of the destination string buffer. The strcpy_s()function returns an integer value of type errno_t that indicates whether an error occurred. Here’s how youmight use this function:
const size_t LENGTH = 22;const char source[LENGTH] =”The more the merrier!”;char destination[LENGTH];
errno_t error = strcpy_s(destination, length, source);
if(error == EINVAL)cout << “Error. The source or the destination is NULL.” << endl;else if(error == ERANGE)cout << “Error. The destination is too small.” << endl;
elsecout << “The destination string is: “ << destination << endl;
You need to include the <cstring> and <cerrno> headers for this to compile. The strcpy_s() func-tion verifies that the source and destination are not NULL and that the destination buffer has sufficient
203
Chapter 4: Arrays, Strings, and Pointers
25905c04.qxd:WroxPro 2/21/08 8:47 AM Page 203
space to accommodate the source string. When either or both the source and destination are NULL, thefunction returns the value EINVAL. If the destination buffer is too small, the function returns ERANGE. Ifthe copy is successful, the return value is 0.
You have analogous wide-character versions of these copy functions; these are wcscpy() andwcscpy_s().
Comparing Null-Terminated StringsThe strcmp() function compares two null-terminated strings that you specify by arguments that arepointers of type char*. The function returns a value of type int that is -1, 0, or 1 depending on whetherthe string pointed to by the first argument is less than, equal to, or greater than the string pointed to bythe second argument. Here’s an example:
char* str1(“Jill”);char* str2(“Jacko”);char* comp[] = { “less than “, “equal to “, “greater than “};cout << str1 << “ is “ << comp[strcmp(str1, str2) + 1] << str2 << ‘.’ << endl;
This fragment compares the strings str1 and str2. The comp array contains the three strings you maywant to use in the output and the return value from the strcmp() function is used to select from thisarray. By adding 1 to the value strcmp() returns, you conveniently get 0, 1, or 2 so you can use this toselect the appropriate phrase from comp.
Comparing the strings works by comparing the character codes of successive pairs of correspondingcharacters. The first pair of characters that are different determines whether the first string is less thanor greater than the second string. Two strings are equal if they contain the same number of charactersand corresponding characters are identical. Of course, the output is:
Jill is greater than Jacko.
The wstrcmp() function is the wide-character string equivalent of strcmp().
Searching Null-Terminated StringsThe strspn() function searches a string for the first character that is not contained in a given set andreturns the index of the character found. The first argument is a pointer to the string to be searched andthe second argument is a pointer to a string containing the set of characters. You could search for thefirst character that is not a vowel like this:
char* str = “I agree with everything.”;char* vowels = “aeiouAEIOU “;size_t index = strspn(str, vowels);cout << “The first character that is not a vowel is ‘“ << str[index]
<< “‘ at position “ << index << endl;
This searches str for the first character that is not in vowels. Note that I included a space in the vowelsset so a space will be ignored so far as the search is concerned. The output from this fragment is:
The first character that is not a vowel is ‘g’ at position 3
204
Chapter 4: Arrays, Strings, and Pointers
25905c04.qxd:WroxPro 2/21/08 8:47 AM Page 204

Another way of looking at the value the strspn() function returns is that it represents the length of thesubstring starting from the first character in the first argument string that consists entirely of charactersin the second argument string. In the example it is the first three characters “I a”.
The wcsspn() function is the wide-character string equivalent of strspn().
The strstr() functions return a pointer to the position in the first argument of a substring specified bythe second argument. Here’s a fragment that shows this in action:
char* str = “I agree with everything.”;char* substring = “ever”;char* psubstr = strstr(str, substring);
if(!psubstr)cout << “\”” << substring << “\” not found in \”” << str << “\”” << endl;
elsecout << “The first occurrence of \”” << substring
<< “\” in \”” << str << “\” is at position “<< psubstr-str << endl;
The third statement calls the strstr() function to search str for the first occurrence of substring. Thefunction returns a pointer to the position of the substring if it is found or NULL when it is not found. Theif statement outputs a message depending on whether or not substring was found in str. The expres-sion psubstr-str gives the index position of the first character in the substring. The output produced bythis fragment is:
The first occurrence of “ever” in “I agree with everything.” is at position 13
Try It Out Searching Null-Terminated StringsThis example searches a given string to determine the number of occurrences of a given substring.Here’s the code:
//Ex4_12.cpp// Searching a string#include <iostream>#include <cstring>using std::cout;using std::endl;using std::strlen;using std::strstr;
int main(){char* str = “Smith, where Jones had had \”had had\” had had \”had\”.”
“\n\”Had had\” had had the examiners’ approval.”;char* word = “had”;cout << “The string to be searched is: “
<< endl << str << endl;
int count = 0; // Number of occurrences of word in strchar* pstr = str; // Pointer to search start positionchar* found = 0; // Pointer to occurrence of word in str
205
Chapter 4: Arrays, Strings, and Pointers
25905c04.qxd:WroxPro 2/21/08 8:47 AM Page 205

while(true){found = strstr(pstr, word);if(!found)break;
++count;pstr = found+strlen(word); // Set next search start as 1 past the word found
}
cout << “\”” << word << “\” was found “<< count << “ times in the string.” << endl;
return 0;}
The output from this example is:
The string to be searched is: Smith, where Jones had had “had had” had had “had”.“Had had” had had the examiners’ approval.“had” was found 10 times in the string.
How It WorksAll the action takes place in the indefinite while loop:
while(true){
found = strstr(pstr, word);if(!found)
break;++count;pstr = found+strlen(word); // Set next search start as 1 past the word found
}
The first step is to search the string for word starting at position pstr, which initially is the beginning ofthe string. You store the address that strstr() returns in found; this will be null if word was not foundin str so the if statement ends the loop in that case.
If found is not null, you increment the count of the number of occurrences of word and update the pstrpointer so it points to one character past the word instance that was found in str. This will be the start-ing point for the search on the next loop iteration.
From the output you can see that word was found ten times in str. Of course “Had” doesn’t countbecause it starts with an uppercase letter.
C++/CLI ProgrammingDynamic memory allocation works differently with the CLR, and the CLR maintains its own memoryheap that is independent of the native C++ heap. The CLR automatically deletes memory that you allo-cate on the CLR heap when it is no longer required, so you do not need to use the delete operator in aprogram written for the CLR. The CLR may also compact heap memory to avoid fragmentation from time to
206
Chapter 4: Arrays, Strings, and Pointers
25905c04.qxd:WroxPro 2/21/08 8:47 AM Page 206

time. Thus at a stroke, the CLR greatly reduces the possibility of memory leaks and memory fragmentation.The management and clean-up of the heap that the CLR provides is described as garbage collection — thegarbage being your discarded variables and objects, and the heap that is managed by the CLR is called thegarbage-collected heap. You use the gcnew operator instead of new to allocate memory in a C++/CLI, pro-gram and the ‘gc’ prefix is a cue to the fact that you are allocating memory on the garbage-collected heapand not the native C++ heap where all the housekeeping is down to you.
The CLR garbage collector is able to delete objects and release the memory that they occupy when they areno longer required. An obvious question arises: How does the garbage collector know when an object onthe heap is no longer required? The answer is quite simple; the CLR keeps track of every variable that refer-ences each object in the heap and when there are no variables containing the address of a given object, theobject can no longer be referred to in a program and therefore can be deleted.
Because the garbage collection process can involve compacting of the heap memory area to remove frag-mented unused blocks of memory, the addresses of data item that you have stored in the heap can change.Consequently you cannot use ordinary native C++ pointers with the garbage-collected heap because if the location of the data pointed to changes, the pointer will no longer be valid. You need a way to accessobjects on the heap that enables the address to be updated when the garbage collector relocates the dataitem in the heap. This capability is provided in two ways: by a tracking handle (also referred to simply asa handle) that is analogous to a pointer in native C++ and by a tracking reference that provides the equiv-alent of a native C++ reference in a CLR program.
Tracking HandlesA tracking handle has similarities to a native C++ pointer but there are significant differences, too. A track-ing handle does store an address, and the address it contains is automatically updated by the garbage col-lector if the object it references is moved during compaction of the heap. However, you cannot performaddress arithmetic with a tracking handle as you can with a native pointer, and casting of a tracking handleis not permitted.
You use tracking handles to reference objects created in the CLR heap. All objects that are reference classtypes are stored in the heap and therefore the variables you create to refer to such objects must be trackinghandles. For instance, the String class type is a reference class type so variables that reference Stringobjects must be tracking handles. The memory for value class types is allocated on the stack by default, butyou can choose to store values in the heap by using the gcnew operator. This is also a good time to remindyou of a point I mentioned in Chapter 2 — that variables allocated on the CLR heap, which includes allCLR reference types, cannot be declared at global scope.
Declaring Tracking HandlesYou specify a handle for a type by placing the ^ symbol (commonly referred to as a ‘hat’) following thetype name. For example, here’s how you could declare a tracking handle with the name proverb thatcan store the address of a String object:
String^ proverb;
This defines the variable proverb to be a tracking handle of type String^. When you declare a handleit is automatically initialized with null, so it will not refer to anything. To explicitly set a handle to nullyou use the keyword nullptr like this:
proverb = nullptr; // Set handle to null
207
Chapter 4: Arrays, Strings, and Pointers
25905c04.qxd:WroxPro 2/21/08 8:47 AM Page 207
Note that you cannot use 0 to represent null here, as you can with native pointers. If you initialize a handlewith 0, the value 0 is converted to the type of object that the handle references and the address of this newobject is stored in the handle.
Of course, you can initialize a handle explicitly when you declare it. Here’s another statement that definesa handle to a String object:
String^ saying = L”I used to think I was indecisive but now I’m not so sure”;
This statement creates a String object on the heap that contains the string on the right of the assignment;the address of the new object is stored in saying. Note that the type of the string literal is const wchar_t*,not type String. The way the String class has been defined makes it possible for such a literal to be usedto create an object of type String.
Here’s how you could create a handle for a value type:
int^ value = 99;
This statement creates the handle value of type int^ and the value it points to on the heap is initializedto 99. Remember that you have created a kind of pointer so value cannot participate in arithmetic oper-ations without dereferencing it. To dereference a tracking handle, you use the * operator in the same wayas for native pointers. For example, here is a statement that uses the value pointed to by a tracking handlein an arithmetic operation:
int result = 2*(*value)+15;
The expression *value between the parentheses accesses the integer stored at the address held in thetracking handle so the variable result is set to 213.
Note that when you use a handle on the left of an assignment, there’s no need to explicitly dereference itto store a result; the compiler takes care of it for you. For example:
int^ result = 0;result = 2*(*value)+15;
Here you first create the handle result that points to a value 0 on the heap. Note that this results in awarning from the compiler because it deduces that you might intend to initialize the handle to null andthis is not the way to do that. Because result appears on the left of an assignment in the next statementand the right hand side produces a value, the compiler is able to determine that result must be derefer-enced to store the value. Of course, you could write it explicitly like this:
*result = 2*(*value)+15;
Note that this works only if result has actually been defined. If result has only been declared, whenyou execute the code you get a runtime error. For example:
int^ result; // Declaration but no definition*result = 2*(*value)+15; // Error message - unhandled exception
208
Chapter 4: Arrays, Strings, and Pointers
25905c04.qxd:WroxPro 2/21/08 8:47 AM Page 208

Because you are dereferencing result in the second statement, you are implying that the object pointed toalready exists. Because this is not the case you get a runtime error. The first statement is a declaration of thehandle, result, and this is set to null by default and you cannot dereference a null handle. If you don’texplicitly dereference result in the second statement, everything works as it should because the result ofthe expression on the right of the assignment is a value class type and its address is stored in result.
CLR ArraysCLR arrays are different from the native C++ arrays. Memory for a CLR array is allocated on the garbage-collected heap, but there’s more to it than that. CLR arrays have built-in functionality that you don’t get withnative C++ arrays, as you’ll see shortly. You specify an array variable type using the keyword array. Youmust also specify the type for the array elements between angled brackets following the array keyword, sothe general form the type of for a variable to reference a one-dimensional array is array<element_type>^.Because a CLR array is created on the heap, an array variable is always a tracking handle. Here’s an exampleof a declaration for an array variable:
array<int>^ data;
The array variable, data, can store a reference to any one-dimensional array of elements of type int.
You can create a CLR array using the gcnew operator at the same time you declare the array variable:
array<int>^ data = gcnew array<int>(100); // Create an array to store 100 integers
This statement creates a one-dimensional array with the name data — note that an array variable is atracking handle, so you must not forget the hat following the element type specification between theangled brackets. The number of elements appears between parentheses following the array type specifica-tion so this array contains 100 elements each of which can store a value of type int.
Similar to native C++ arrays, CLR array elements are indexed from zero so you could set values for theelements in the data array like this:
for(int i = 0 ; i<100 ; i++)data[i] = 2*(i+1);
This loop sets the values of the elements to 2, 4, 6, and so on up to 200. Elements in a CLR array areobjects so here you are storing objects of type Int32 in the array. Of course, these behave like ordinaryintegers in arithmetic expressions so the fact that they are objects is transparent in such situations.
In the previous loop, the number of elements appears in the loop as a literal value. It would be better touse the Length property of the array that records the number of elements, like this:
for(int i = 0 ; i < data->Length ; i++)data[i] = 2*(i+1);
To access the Length property, you use the -> operator because data is a tracking handle and workslike a pointer. The Length property records the number of values as a 32-bit integer value. If you need it, you can get the array length as a 64-bit value through the LongLength property.
209
Chapter 4: Arrays, Strings, and Pointers
25905c04.qxd:WroxPro 2/21/08 8:47 AM Page 209

You can also iterate over all the elements in an array using the for each loop:
array<int>^ values = { 3, 5, 6, 8, 6};for each(int item in values){item = 2*item + 1;Console::Write(“{0,5}”,item);
}
Within the loop, item references each of the elements in the values array in turn. The first statement inthe body of the loop replaces the current element’s value by twice the value plus 1. The second statementin the loop outputs the new value right-justified in a field width of five characters so the output producedby this code fragment is:
7 11 13 17 13
An array variable can store the address of any array of the same rank (the rank being the number ofdimensions, which in the case of the data array is 1) and element type. For example:
data = gcnew array<int>(45);
This statement creates a new one-dimensional array of 45 elements of type int and stores its address indata. The original array is discarded.
You can also create an array from a set of initial values for the elements:
array<double>^ samples = { 3.4, 2.3, 6.8, 1.2, 5.5, 4.9. 7.4, 1.6};
The size of the array is determined by the number of initial values between the braces, in this case eight,and the values are assigned to the elements in sequence.
Of course, the elements in an array can be of any type, so you can easily create an array of strings:
array<String^>^ names = { “Jack”, “Jane”, “Joe”, “Jessica”, “Jim”, “Joanna”};
The elements of this array are initialized with the strings that appear between the braces, and the num-ber of strings determines the number of elements in the array. String objects are created on the CLRheap so the element type is a tracking handle type, String^.
If you declare the array variable without initializing it, you must explicitly create the array if you wantto use a list of initial values. For example:
array<String^>^ names; // Declare the array variablenames = gcnew array<String^>{ “Jack”, “Jane”, “Joe”, “Jessica”, “Jim”, “Joanna”};
The second statement creates the array and initializes it with the strings between the braces. Without theexplicit gcnew definition the statement will not compile.
You can use the static Clear() function that is defined in the Array class to set any sequence of numericelements in an array to zero. You call a static function using the class name and you’ll learn more about
210
Chapter 4: Arrays, Strings, and Pointers
25905c04.qxd:WroxPro 2/21/08 8:47 AM Page 210
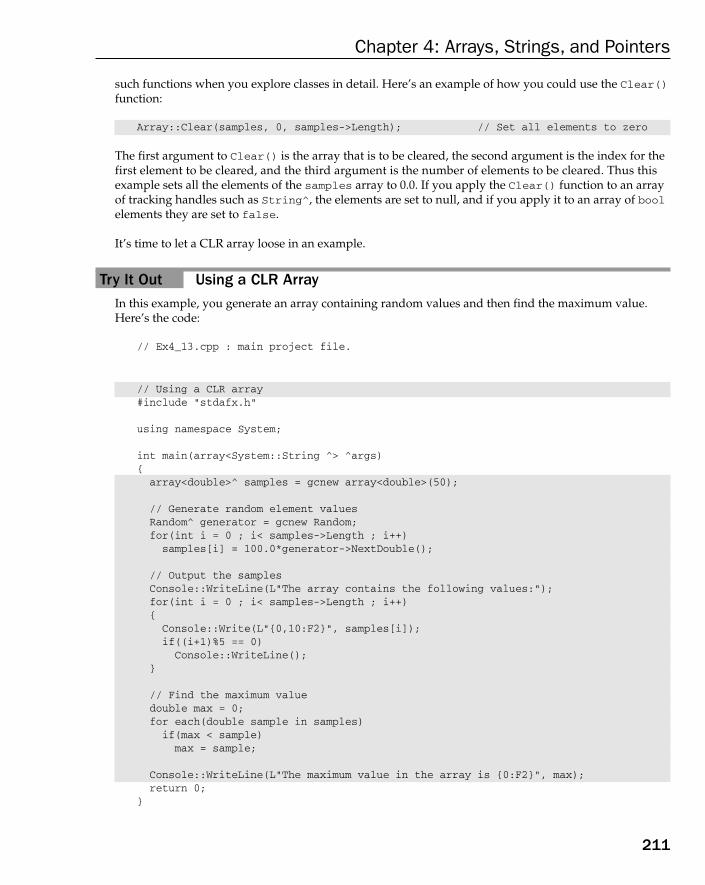
such functions when you explore classes in detail. Here’s an example of how you could use the Clear()function:
Array::Clear(samples, 0, samples->Length); // Set all elements to zero
The first argument to Clear() is the array that is to be cleared, the second argument is the index for thefirst element to be cleared, and the third argument is the number of elements to be cleared. Thus thisexample sets all the elements of the samples array to 0.0. If you apply the Clear() function to an arrayof tracking handles such as String^, the elements are set to null, and if you apply it to an array of boolelements they are set to false.
It’s time to let a CLR array loose in an example.
Try It Out Using a CLR ArrayIn this example, you generate an array containing random values and then find the maximum value.Here’s the code:
// Ex4_13.cpp : main project file.
// Using a CLR array#include “stdafx.h”
using namespace System;
int main(array<System::String ^> ^args){array<double>^ samples = gcnew array<double>(50);
// Generate random element valuesRandom^ generator = gcnew Random;for(int i = 0 ; i< samples->Length ; i++)samples[i] = 100.0*generator->NextDouble();
// Output the samplesConsole::WriteLine(L”The array contains the following values:”);for(int i = 0 ; i< samples->Length ; i++){Console::Write(L”{0,10:F2}”, samples[i]);if((i+1)%5 == 0)Console::WriteLine();
}
// Find the maximum valuedouble max = 0;for each(double sample in samples)if(max < sample)max = sample;
Console::WriteLine(L”The maximum value in the array is {0:F2}”, max);return 0;
}
211
Chapter 4: Arrays, Strings, and Pointers
25905c04.qxd:WroxPro 2/21/08 8:47 AM Page 211

Typical output from this example looks like this:
The array contains the following values:30.38 73.93 29.82 93.00 78.1489.53 75.87 5.98 45.29 89.835.25 53.86 11.40 3.34 83.3969.94 82.43 43.05 32.87 59.5058.89 96.69 34.67 18.81 72.9989.60 25.53 34.00 97.35 55.2652.64 90.85 10.35 46.14 82.0355.46 93.26 92.96 85.11 10.5550.50 8.10 29.32 82.98 76.4883.94 56.95 15.04 21.94 24.81
The maximum value in the array is 97.35
How It WorksYou first create an array that stores 50 values of type double:
array<double>^ samples = gcnew array<double>(50);
The array variable, samples, must be a tracking handle because CLR arrays are created on the garbage-collected heap.
You populate the array with pseudo-random values of type double with the following statements:
Random^ generator = gcnew Random;for(int i = 0 ; i< samples->Length ; i++)
samples[i] = 100.0*generator->NextDouble();
The first statement creates an object of type Random on the CLR heap. A Random object has functions that will generate pseudo-random values. Here you use the NextDouble() function in the loop, which returns a random value of type double that lies between 0.0 and 1.0. By multiplying this by 100.0 you get a value between 0.0 and 100.0. The for loop stores a random value in each element of the samples array.
A Random object also has a Next() function that returns a random non-negative value of type int.If you supply an integer argument when you call the Next() function, it will return a random non-negative integer less than the argument value. You can also supply two integer arguments that repre-sent the minimum and maximum values for the random integer to be returned.
The next loop outputs the contents of the array five elements to a line:
Console::WriteLine(L”The array contains the following values:”);for(int i = 0 ; i< samples->Length ; i++){
Console::Write(L”{0,10:F2}”, samples[i]);if((i+1)%5 == 0)
Console::WriteLine();}
Within the loop you write the value each element with a field width of 10 and 2 decimal places.Specifying the field width ensures the values align in columns. You also write a newline character to
212
Chapter 4: Arrays, Strings, and Pointers
25905c04.qxd:WroxPro 2/21/08 8:47 AM Page 212

the output whenever the expression (i+1)%5 is zero, which is after every fifth element value so you getfive to a line in the output.
Finally you figure out what the maximum element value is:
double max = 0;for each(double sample in samples)
if(max < sample)max = sample;
This uses a for each loop just to show that you can. The loop compares max with each element value inturn and whenever the element is greater than the current value in max, max is set to that value so you endup with the maximum element value in max.
You could use a for loop here if you also wanted to record the index position of the maximum elementas well as its value — for example:
double max = 0;int index = 0;for (int i = 0 ; i < sample->Length ; i++)if(max < samples[i]){max = samples[i];index = i;
}
Sorting One-Dimensional ArraysThe Array class in the System namespace defines a Sort() function that sorts the elements of a one-dimensional array so that they are in ascending order. To sort an array you just pass the array handle to the Sort() function. Here’s an example:
array<int>^ samples = { 27, 3, 54, 11, 18, 2, 16};Array::Sort(samples); // Sort the array elements
for each(int value in samples) // Output the array elementsConsole::Write(L”{0, 8}”, value);
Console::WriteLine();
The call to the Sort() function rearranges the values of the elements in the samples array so they are inascending sequence. The result of executing this code fragment is:
2 3 11 16 18 27 54
You can also sort a range of elements in an array by supplying two more arguments to the Sort()function specifying the index for the first element of those to be sorted and the number of elements to be sorted. For example:
array<int>^ samples = { 27, 3, 54, 11, 18, 2, 16};Array::Sort(samples, 2, 3); // Sort elements 2 to 4
213
Chapter 4: Arrays, Strings, and Pointers
25905c04.qxd:WroxPro 2/21/08 8:47 AM Page 213
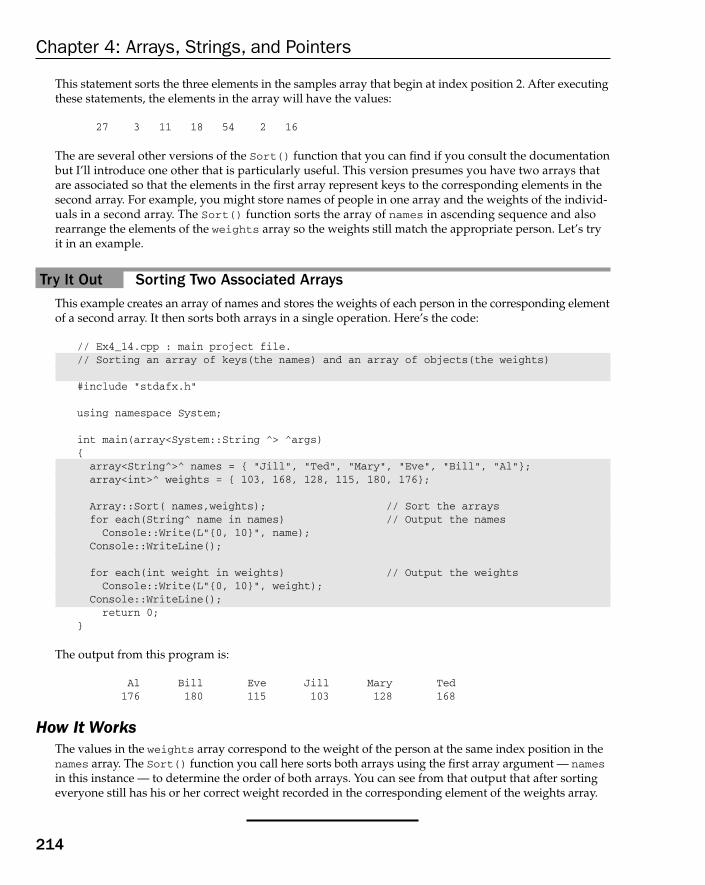
This statement sorts the three elements in the samples array that begin at index position 2. After executingthese statements, the elements in the array will have the values:
27 3 11 18 54 2 16
The are several other versions of the Sort() function that you can find if you consult the documentationbut I’ll introduce one other that is particularly useful. This version presumes you have two arrays thatare associated so that the elements in the first array represent keys to the corresponding elements in thesecond array. For example, you might store names of people in one array and the weights of the individ-uals in a second array. The Sort() function sorts the array of names in ascending sequence and alsorearrange the elements of the weights array so the weights still match the appropriate person. Let’s tryit in an example.
Try It Out Sorting Two Associated ArraysThis example creates an array of names and stores the weights of each person in the corresponding elementof a second array. It then sorts both arrays in a single operation. Here’s the code:
// Ex4_14.cpp : main project file.// Sorting an array of keys(the names) and an array of objects(the weights)
#include “stdafx.h”
using namespace System;
int main(array<System::String ^> ^args){array<String^>^ names = { “Jill”, “Ted”, “Mary”, “Eve”, “Bill”, “Al”};array<int>^ weights = { 103, 168, 128, 115, 180, 176};
Array::Sort( names,weights); // Sort the arraysfor each(String^ name in names) // Output the namesConsole::Write(L”{0, 10}”, name);
Console::WriteLine();
for each(int weight in weights) // Output the weightsConsole::Write(L”{0, 10}”, weight);
Console::WriteLine();return 0;
}
The output from this program is:
Al Bill Eve Jill Mary Ted176 180 115 103 128 168
How It WorksThe values in the weights array correspond to the weight of the person at the same index position in thenames array. The Sort() function you call here sorts both arrays using the first array argument — namesin this instance — to determine the order of both arrays. You can see from that output that after sortingeveryone still has his or her correct weight recorded in the corresponding element of the weights array.
214
Chapter 4: Arrays, Strings, and Pointers
25905c04.qxd:WroxPro 2/21/08 8:47 AM Page 214

Searching One-Dimensional ArraysThe Array class also provides functions that search the elements of a one-dimensional array. Versions ofthe BinarySearch() function uses a binary search algorithm to find the index position of a given elementin the entire array, or from a given range of elements. The binary search algorithm requires that the elementsare ordered if it is to work, so you need to sort the elements before searching an array.
Here’s how you could search an entire array:
array<int>^ values = { 23, 45, 68, 94, 123, 127, 150, 203, 299};int toBeFound = 127;int position = Array::BinarySearch(values, toBeFound);if(position<0)Console::WriteLine(L”{0} was not found.”, toBeFound);
elseConsole::WriteLine(L”{0} was found at index position {1}.”, toBeFound, position);
The value to be found is stored in the toBeFound variable. The first argument to the BinarySearch()function is the handle of the array to be searched and the second argument specifies what you are look-ing for. The result of the search is returned by the BinarySearch() function as a value of type int. Ifthe second argument to the function is found in the array specified by the first argument, its index posi-tion is returned; otherwise a negative integer is returned. Thus you must test the value returned to deter-mine whether or not the search target was found. Because the values in the values array are already inascending sequence there is no need to sort the array before searching it. This code fragment would pro-duce the output:
127 was found at index position 5.
To search a given range of elements in an array you use a version of the BinarySearch() function thataccepts four arguments. The first argument is the handle of the array to be searched, the second argumentis the index position of the element where the search should start, the third argument is the number of ele-ments to be searched, and the fourth argument is what you are looking for. Here’s how you might use that:
array<int>^ values = { 23, 45, 68, 94, 123, 127, 150, 203, 299};int toBeFound = 127;int position = Array::BinarySearch(values, 3, 6, toBeFound);
This searches the values array from the fourth array element through to the last. As with the previousversion of BinarySearch(), the function returns the index position found or a negative integer if thesearch fails.
Let’s try a searching example.
Try It Out Searching ArraysThis is a variation on the previous example with a search operation added:
// Ex4_15.cpp : main project file.// Searching an array
#include “stdafx.h”
215
Chapter 4: Arrays, Strings, and Pointers
25905c04.qxd:WroxPro 2/21/08 8:47 AM Page 215
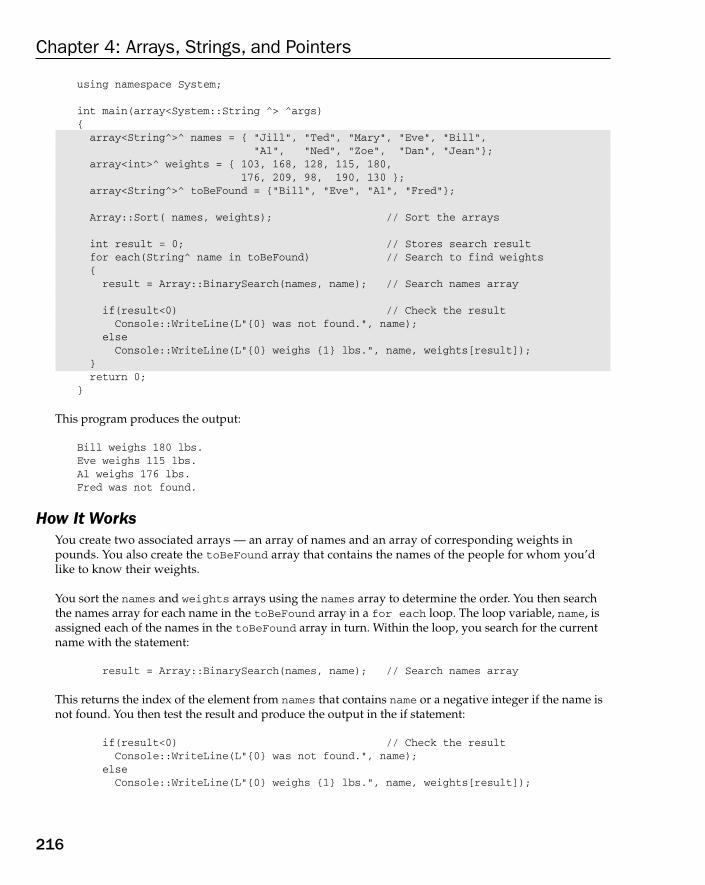
using namespace System;
int main(array<System::String ^> ^args){array<String^>^ names = { “Jill”, “Ted”, “Mary”, “Eve”, “Bill”,
“Al”, “Ned”, “Zoe”, “Dan”, “Jean”};array<int>^ weights = { 103, 168, 128, 115, 180,
176, 209, 98, 190, 130 };array<String^>^ toBeFound = {“Bill”, “Eve”, “Al”, “Fred”};
Array::Sort( names, weights); // Sort the arrays
int result = 0; // Stores search resultfor each(String^ name in toBeFound) // Search to find weights{result = Array::BinarySearch(names, name); // Search names array
if(result<0) // Check the resultConsole::WriteLine(L”{0} was not found.”, name);
elseConsole::WriteLine(L”{0} weighs {1} lbs.”, name, weights[result]);
}return 0;
}
This program produces the output:
Bill weighs 180 lbs.Eve weighs 115 lbs.Al weighs 176 lbs.Fred was not found.
How It WorksYou create two associated arrays — an array of names and an array of corresponding weights inpounds. You also create the toBeFound array that contains the names of the people for whom you’dlike to know their weights.
You sort the names and weights arrays using the names array to determine the order. You then searchthe names array for each name in the toBeFound array in a for each loop. The loop variable, name, isassigned each of the names in the toBeFound array in turn. Within the loop, you search for the currentname with the statement:
result = Array::BinarySearch(names, name); // Search names array
This returns the index of the element from names that contains name or a negative integer if the name isnot found. You then test the result and produce the output in the if statement:
if(result<0) // Check the resultConsole::WriteLine(L”{0} was not found.”, name);
elseConsole::WriteLine(L”{0} weighs {1} lbs.”, name, weights[result]);
216
Chapter 4: Arrays, Strings, and Pointers
25905c04.qxd:WroxPro 2/21/08 8:47 AM Page 216

Because the ordering of the weights array was determined by the ordering of the names array, you areable to index the weights array with result, the index position in the names array where name was found.You can see from the output that “Fred” was not found in the names array.
When the binary search operation fails, the value returned is not just any old negative value. It is in factthe bitwise complement of the index position of the first element that is greater than the object you aresearching for, or the bitwise complement of the Length property of the array if no element is greaterthan the object sought. Knowing this you can use the BinarySearch() function to work out where youshould insert a new object in an array and still maintain the order of the elements. Suppose you wanted to insert “Fred” in the names array. You can find the index position where it should be inserted withthese statements:
array<String^>^ names = { “Jill”, “Ted”, “Mary”, “Eve”, “Bill”,“Al”, “Ned”, “Zoe”, “Dan”, “Jean”};
Array::Sort(names); // Sort the arrayString^ name = L”Fred”;int position = Array::BinarySearch(names, name);if(position<0) // If it is negativeposition = ~position; // flip the bits to get the insert index
If the result of the search is negative, flipping all the bits gives you the index position of where the newname should be inserted. If the result is positive, the new name is identical to the name at this position,so you can use the result as the new position directly.
You can now copy the names array into a new array that has one more element and use the position valueto insert name at the appropriate place:
array<String^>^ newNames = gcnew array<String^>(names->Length+1);
// Copy elements from names to newNamesfor(int i = 0 ; i<position ; i++)newNames[i] = names[i];
newNames[position] = name; // Copy the new element
if(position<names->Length) // If any elements remain in namesfor(int i = position ; i<names->Length ; i++)newNames[i+1] = names[i]; // copy them to newNames
This creates a new array with a length one greater than the old array. You then copy all the elements fromthe old to the new up to index position position-1. You then copy the new name followed by the remain-ing elements from the old array. To discard the old array, you would just write:
names = nullptr;
Multidimensional ArraysYou can create arrays that have two or more dimensions; the maximum number of dimensions an arraycan have is 32, which should accommodate most situations. You specify the number of dimensions thatyour array has between the angled brackets immediately following the element type and separated from
217
Chapter 4: Arrays, Strings, and Pointers
25905c04.qxd:WroxPro 2/21/08 8:47 AM Page 217
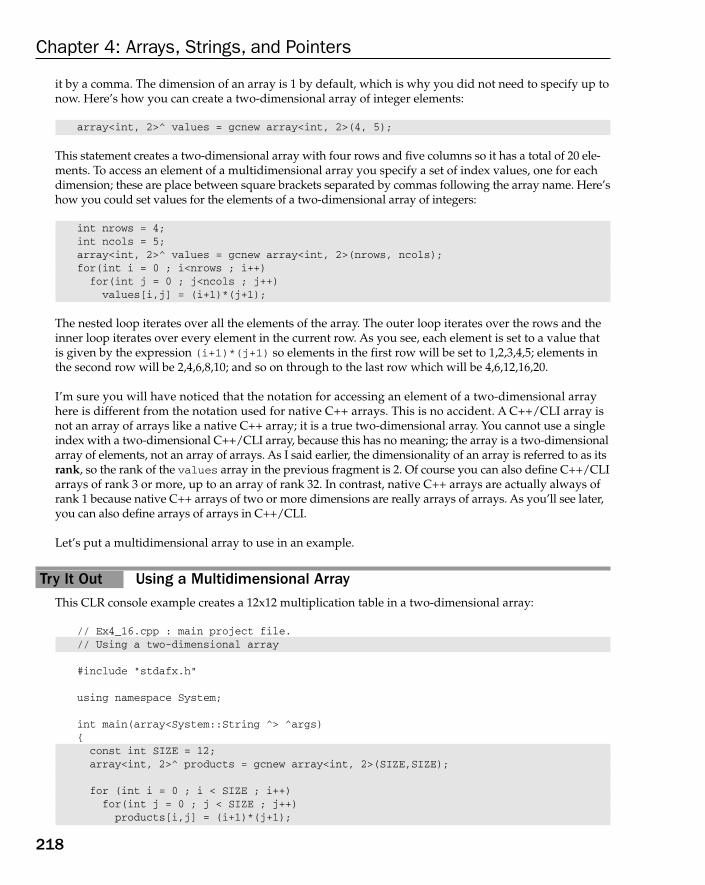
it by a comma. The dimension of an array is 1 by default, which is why you did not need to specify up tonow. Here’s how you can create a two-dimensional array of integer elements:
array<int, 2>^ values = gcnew array<int, 2>(4, 5);
This statement creates a two-dimensional array with four rows and five columns so it has a total of 20 ele-ments. To access an element of a multidimensional array you specify a set of index values, one for eachdimension; these are place between square brackets separated by commas following the array name. Here’show you could set values for the elements of a two-dimensional array of integers:
int nrows = 4;int ncols = 5;array<int, 2>^ values = gcnew array<int, 2>(nrows, ncols);for(int i = 0 ; i<nrows ; i++)for(int j = 0 ; j<ncols ; j++)values[i,j] = (i+1)*(j+1);
The nested loop iterates over all the elements of the array. The outer loop iterates over the rows and theinner loop iterates over every element in the current row. As you see, each element is set to a value thatis given by the expression (i+1)*(j+1) so elements in the first row will be set to 1,2,3,4,5; elements inthe second row will be 2,4,6,8,10; and so on through to the last row which will be 4,6,12,16,20.
I’m sure you will have noticed that the notation for accessing an element of a two-dimensional arrayhere is different from the notation used for native C++ arrays. This is no accident. A C++/CLI array isnot an array of arrays like a native C++ array; it is a true two-dimensional array. You cannot use a singleindex with a two-dimensional C++/CLI array, because this has no meaning; the array is a two-dimensionalarray of elements, not an array of arrays. As I said earlier, the dimensionality of an array is referred to as itsrank, so the rank of the values array in the previous fragment is 2. Of course you can also define C++/CLIarrays of rank 3 or more, up to an array of rank 32. In contrast, native C++ arrays are actually always ofrank 1 because native C++ arrays of two or more dimensions are really arrays of arrays. As you’ll see later,you can also define arrays of arrays in C++/CLI.
Let’s put a multidimensional array to use in an example.
Try It Out Using a Multidimensional ArrayThis CLR console example creates a 12x12 multiplication table in a two-dimensional array:
// Ex4_16.cpp : main project file.// Using a two-dimensional array
#include “stdafx.h”
using namespace System;
int main(array<System::String ^> ^args){const int SIZE = 12;array<int, 2>^ products = gcnew array<int, 2>(SIZE,SIZE);
for (int i = 0 ; i < SIZE ; i++)for(int j = 0 ; j < SIZE ; j++)products[i,j] = (i+1)*(j+1);
218
Chapter 4: Arrays, Strings, and Pointers
25905c04.qxd:WroxPro 2/21/08 8:47 AM Page 218
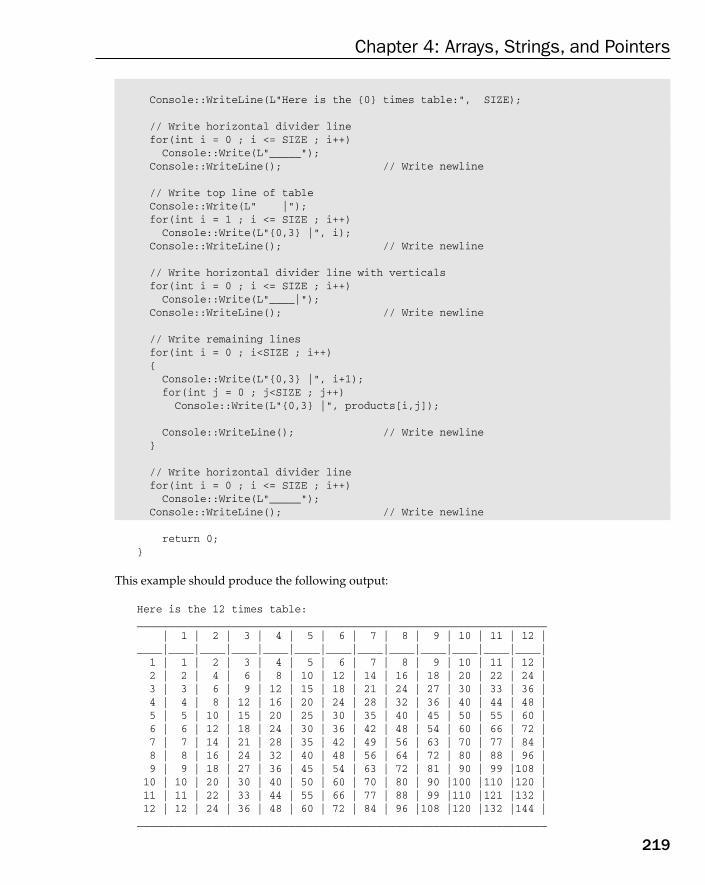
Console::WriteLine(L”Here is the {0} times table:”, SIZE);
// Write horizontal divider linefor(int i = 0 ; i <= SIZE ; i++)Console::Write(L”_____”);
Console::WriteLine(); // Write newline
// Write top line of tableConsole::Write(L” |”);for(int i = 1 ; i <= SIZE ; i++)Console::Write(L”{0,3} |”, i);
Console::WriteLine(); // Write newline
// Write horizontal divider line with verticalsfor(int i = 0 ; i <= SIZE ; i++)Console::Write(L”____|”);
Console::WriteLine(); // Write newline
// Write remaining linesfor(int i = 0 ; i<SIZE ; i++){Console::Write(L”{0,3} |”, i+1);for(int j = 0 ; j<SIZE ; j++)Console::Write(L”{0,3} |”, products[i,j]);
Console::WriteLine(); // Write newline}
// Write horizontal divider linefor(int i = 0 ; i <= SIZE ; i++)Console::Write(L”_____”);
Console::WriteLine(); // Write newline
return 0;}
This example should produce the following output:
Here is the 12 times table:_________________________________________________________________
| 1 | 2 | 3 | 4 | 5 | 6 | 7 | 8 | 9 | 10 | 11 | 12 |____|____|____|____|____|____|____|____|____|____|____|____|____|
1 | 1 | 2 | 3 | 4 | 5 | 6 | 7 | 8 | 9 | 10 | 11 | 12 |2 | 2 | 4 | 6 | 8 | 10 | 12 | 14 | 16 | 18 | 20 | 22 | 24 |3 | 3 | 6 | 9 | 12 | 15 | 18 | 21 | 24 | 27 | 30 | 33 | 36 |4 | 4 | 8 | 12 | 16 | 20 | 24 | 28 | 32 | 36 | 40 | 44 | 48 |5 | 5 | 10 | 15 | 20 | 25 | 30 | 35 | 40 | 45 | 50 | 55 | 60 |6 | 6 | 12 | 18 | 24 | 30 | 36 | 42 | 48 | 54 | 60 | 66 | 72 |7 | 7 | 14 | 21 | 28 | 35 | 42 | 49 | 56 | 63 | 70 | 77 | 84 |8 | 8 | 16 | 24 | 32 | 40 | 48 | 56 | 64 | 72 | 80 | 88 | 96 |9 | 9 | 18 | 27 | 36 | 45 | 54 | 63 | 72 | 81 | 90 | 99 |108 |10 | 10 | 20 | 30 | 40 | 50 | 60 | 70 | 80 | 90 |100 |110 |120 |11 | 11 | 22 | 33 | 44 | 55 | 66 | 77 | 88 | 99 |110 |121 |132 |12 | 12 | 24 | 36 | 48 | 60 | 72 | 84 | 96 |108 |120 |132 |144 |_________________________________________________________________
219
Chapter 4: Arrays, Strings, and Pointers
25905c04.qxd:WroxPro 2/21/08 10:07 AM Page 219
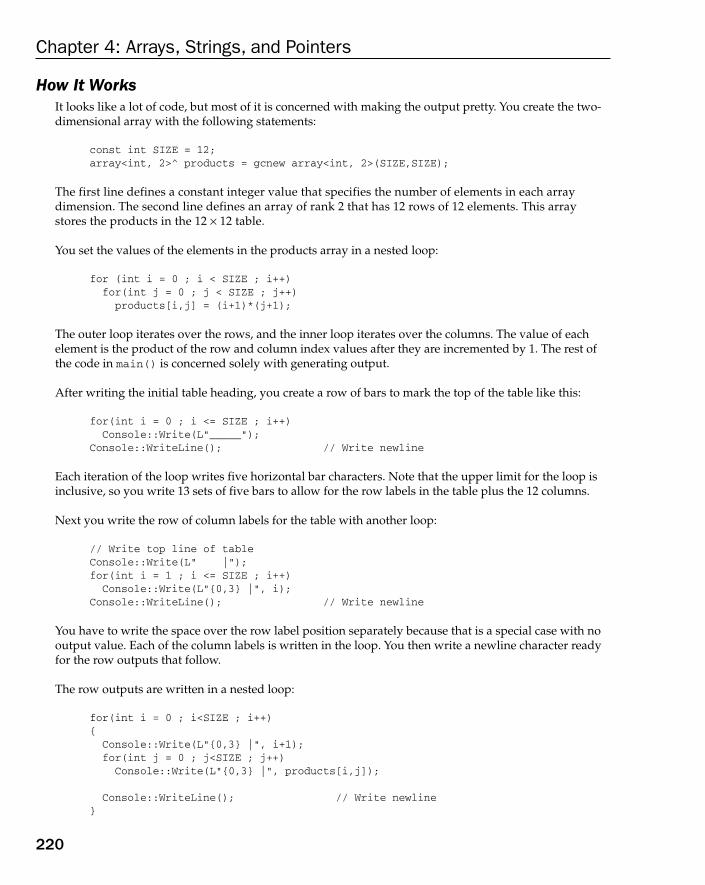
How It WorksIt looks like a lot of code, but most of it is concerned with making the output pretty. You create the two-dimensional array with the following statements:
const int SIZE = 12;array<int, 2>^ products = gcnew array<int, 2>(SIZE,SIZE);
The first line defines a constant integer value that specifies the number of elements in each arraydimension. The second line defines an array of rank 2 that has 12 rows of 12 elements. This arraystores the products in the 12 × 12 table.
You set the values of the elements in the products array in a nested loop:
for (int i = 0 ; i < SIZE ; i++)for(int j = 0 ; j < SIZE ; j++)
products[i,j] = (i+1)*(j+1);
The outer loop iterates over the rows, and the inner loop iterates over the columns. The value of eachelement is the product of the row and column index values after they are incremented by 1. The rest ofthe code in main() is concerned solely with generating output.
After writing the initial table heading, you create a row of bars to mark the top of the table like this:
for(int i = 0 ; i <= SIZE ; i++)Console::Write(L”_____”);
Console::WriteLine(); // Write newline
Each iteration of the loop writes five horizontal bar characters. Note that the upper limit for the loop isinclusive, so you write 13 sets of five bars to allow for the row labels in the table plus the 12 columns.
Next you write the row of column labels for the table with another loop:
// Write top line of tableConsole::Write(L” |”);for(int i = 1 ; i <= SIZE ; i++)
Console::Write(L”{0,3} |”, i);Console::WriteLine(); // Write newline
You have to write the space over the row label position separately because that is a special case with nooutput value. Each of the column labels is written in the loop. You then write a newline character readyfor the row outputs that follow.
The row outputs are written in a nested loop:
for(int i = 0 ; i<SIZE ; i++){
Console::Write(L”{0,3} |”, i+1);for(int j = 0 ; j<SIZE ; j++)
Console::Write(L”{0,3} |”, products[i,j]);
Console::WriteLine(); // Write newline}
220
Chapter 4: Arrays, Strings, and Pointers
25905c04.qxd:WroxPro 2/21/08 8:47 AM Page 220

The outer loop iterates over the rows and the code inside the outer loop writes a complete row, includingthe row label on the left. The inner loop writes the values from the products array that correspond to theith row, with the values separated by vertical bars.
The remaining code writes more horizontal bars to finish off the bottom of the table.
Arrays of ArraysArray elements can be of any type, so you can create arrays where the elements are tracking handles thatreference arrays. This gives you the possibility of creating so-called jagged arrays because each handle ref-erencing an array can have a different number of elements. This is most easily understood by looking atan example. Suppose you want to store the names of children in a class grouped by the grade they scored,where there are five classifications corresponding to grades A, B, C, D, and E. You could first create anarray of five elements where each element stores an array of names. Here’s the statement that will do that:
array< array< String^ >^ >^ grades = gcnew array< array< String^ >^ >(5);
Don’t let all the hats confuse you — it’s simpler than it looks. The array variable, grades, is a handle oftype array<type>^. Each element in the array is also a handle to an array, so the type of the array ele-ments is of the same form — array<type>^ so this has to go between the angled brackets in the originalarray type specification, which results in array< array<type>^ >^. The elements stored in the arrayare also handles to String objects so you must replace type in the last expression by String^; thus youend up with the array type being array< array< String^ >^ >^.
With the array of arrays worked out, you can now create the arrays of names. Here’s an example of whatthat might look like:
grades[0] = gcnew array<String^>{“Louise”, “Jack”}; // Grade Agrades[1] = gcnew array<String^>{“Bill”, “Mary”, “Ben”, “Joan”}; // Grade Bgrades[2] = gcnew array<String^>{“Jill”, “Will”, “Phil”}; // Grade Cgrades[3] = gcnew array<String^>{“Ned”, “Fred”, “Ted”, “Jed”, “Ed”}; // Grade Dgrades[4] = gcnew array<String^>{“Dan”, “Ann”}; // Grade E
The expression grades[n] accesses the nth element of the grades array, and of course this is a handle toan array of String^ handles in each case. Thus each of the five statements creates an array of Stringobject handles and stores the address in one of the elements of the grades array. As you see, the arraysof strings vary in length, so clearly you can manage a set of arrays with arbitrary lengths in this way.
You could create and initialize the whole array of arrays in a single statement:
array< array< String^ >^ >^ grades = gcnew array< array< String^ >^ >{gcnew array<String^>{“Louise”, “Jack”}, // Grade Agcnew array<String^>{“Bill”, “Mary”, “Ben”, “Joan”}, // Grade Bgcnew array<String^>{“Jill”, “Will”, “Phil”}, // Grade Cgcnew array<String^>{“Ned”, “Fred”, “Ted”, “Jed”, “Ed”}, // Grade Dgcnew array<String^>{“Dan”, “Ann”} // Grade E
};
The initial values for the elements are between the braces.
221
Chapter 4: Arrays, Strings, and Pointers
25905c04.qxd:WroxPro 2/21/08 8:47 AM Page 221

Let’s put this in a working example that demonstrates how you can process arrays of arrays.
Try It Out Using an Array of ArraysCreate a CLR console program project and modify it as follows:
// Ex4_17.cpp : main project file.// Using an array of arrays
#include “stdafx.h”
using namespace System;
int main(array<System::String ^> ^args){array< array< String^ >^ >^ grades = gcnew array< array< String^ >^ >
{gcnew array<String^>{“Louise”, “Jack”}, // Grade Agcnew array<String^>{“Bill”, “Mary”, “Ben”, “Joan”}, // Grade Bgcnew array<String^>{“Jill”, “Will”, “Phil”}, // Grade Cgcnew array<String^>{“Ned”, “Fred”, “Ted”, “Jed”, “Ed”}, // Grade Dgcnew array<String^>{“Dan”, “Ann”} // Grade E
};
wchar_t gradeLetter = ‘A’;
for each(array< String^ >^ grade in grades){Console::WriteLine(L”Students with Grade {0}:”, gradeLetter++);
for each( String^ student in grade)Console::Write(L”{0,12}”,student); // Output the current name
Console::WriteLine(); // Write a newline}return 0;
}
This example produces the following output:
Students with Grade A:Louise Jack
Students with Grade B:Bill Mary Ben Joan
Students with Grade C:Jill Will Phil
Students with Grade D:Ned Fred Ted Jed Ed
Students with Grade E:Dan Ann
How It WorksThe array definition is exactly as you saw in the previous section. Next you define the gradeLettervariable as type wchar_t with the initial value ‘A’. This is to be used to present the grade classificationin the output.
222
Chapter 4: Arrays, Strings, and Pointers
25905c04.qxd:WroxPro 2/21/08 8:47 AM Page 222

The students and their grades are listed by the nested loops. The outer for each loop iterates over theelements in the grades array:
for each(array< String^ >^ grade in grades){
// Process students in the current grade...}
The loop variable, grade, is of type array< String^ >^ because that’s the element type in the gradesarray. The variable grade references each of the arrays of String^ handles in turn, so first time aroundthe loop references the array of grade A student names, second time around it references grade B studentnames, and so on until the last loop iteration when it references the grade E student names.
On each iteration of the outer loop, you execute the following code:
Console::WriteLine(L”Students with Grade {0}:”, gradeLetter++);
for each( String^ student in grade)Console::Write(L”{0,12}”,student); // Output the current name
Console::WriteLine(); // Write a newline
The first statement writes a line that includes the current value of gradeLetter, which starts out as‘A’. The statement also increments gradeLetter so it will be, ‘B’, ‘C’, ‘D’, and ‘E’ successively onsubsequent iterations of the outer loop.
Next you have the inner for each loop that iterates over each of the names in the current grade array inturn. The output statement uses the Console::Write() function so all the names appear on the sameline. The names are presented right-justified in the output in a field width of 12, so the names in the linesof output are aligned. After the loop, the WriteLine() just writes a newline to the output so the nextgrade output starts on a new line.
You could have used a for loop for the inner loop:
for (int i = 0 ; i < grade->Length ; i++)Console::Write(L”{0,12}”,grade[i]); // Output the current name
The loop is constrained by the Length property of the current array of names that is referenced by thegrade variable.
You could also have used a for loop for the outer loop as well, in which case the inner loop needs to bechanged further and the nested loop looks like this:
for (int j = 0 ; j < grades->Length ; j++){Console::WriteLine(L”Students with Grade {0}:”, gradeLetter+j);for (int i = 0 ; i < grades[j]->Length ; i++)Console::Write(L”{0,12}”,grades[j][i]); // Output the current name
Console::WriteLine();}
Now grades[j] references the jth array of names so the expression grades[j][i] references the ithname in the jth array of names.
223
Chapter 4: Arrays, Strings, and Pointers
25905c04.qxd:WroxPro 2/21/08 8:47 AM Page 223

StringsYou have already seen that the String class type that is defined in the System namespace represents astring in C++/CLI — in fact a string consists of Unicode characters. To be more precise it represents a stringconsisting of a sequence of characters of type System::Char. You get a huge amount of powerful function-ality with String class objects so it makes string processing very easy. Let’s start at the beginning withstring creation.
You can create a String object like this:
System::String^ saying = L”Many hands make light work.”;
The variable, saying, is a tracking handle that references the String object that is initialized with thestring that appears on the right of the =. You must always use a tracking handle to store a reference to aString object. The string literal here is a wide character string because it has the prefix L. If you omit theL prefix, you have a string literal containing 8-bit characters, but the compiler ensures it is converted to awide-character string.
You can access individual characters in a string by using a subscript just like an array, and the first char-acter in the string has an index value of 0. Here’s how you could output the third character in the stringsaying:
Console::WriteLine(L”The third character in the string is {0}”, saying[2]);
Note that you can only retrieve a character from a string using an index value; you cannot update thestring in this way. String objects are immutable and therefore cannot be modified.
You can obtain the number of characters in a string by accessing its Length property. You could outputthe length of saying with this statement:
Console::WriteLine(L”The string has {0} characters.”, saying->Length);
Because saying is a tracking handle — which as you know is a kind of pointer — you must use the ->operator to access the Length property (or any other member of the object). You’ll learn more aboutproperties when you get to investigate C++/CLI classes in detail.
Joining StringsYou can use the + operator to join strings to form a new String object. Here’s an example:
String^ name1 = L”Beth”;String^ name2 = L”Betty”;String^ name3 = name1 + L” and “ + name2;
After executing these statements, name3 contains the string “Beth and Betty”. Note how you can usethe + operator to join String objects with string literals. You can also join String objects with numericalvalues or bool values and have the values converted automatically to a string before the join operation.The following statements illustrate this:
String^ str = L”Value: “;String^ str1 = str + 2.5; // Result is new string “Value: 2.5”
224
Chapter 4: Arrays, Strings, and Pointers
25905c04.qxd:WroxPro 2/21/08 8:47 AM Page 224

String^ str2 = str + 25; // Result is new string L”Value: 25”String^ str3 = str + true; // Result is new string L”Value: True”
You can also join a string and a character, but the result depends on the type of character:
char ch = ‘Z’;wchar_t wch = L’Z’;String^ str4 = str + ch; // Result is new string L”Value: 90”String^ str5 = str + wch; // Result is new string L”Value: Z”
The comments show the results of the operations. A character of type char is treated as a numerical valueso you get the character code value joined to the string. The wchar_t character is of the same type as thecharacters in the String object (type Char) so the character is appended to the string.
Don’t forget that String objects are immutable; once created, they cannot be changed. This means thatall operations that apparently modify String objects always result in new String objects being created.
The String class also defines a Join() function that you use when you want to join a series of stringsstored in an array into a single string with separators between the original strings. Here’s how you couldjoin names together in a single string with the names separated by commas:
array<String^>^ names = { L”Jill”, L”Ted”, L”Mary”, L”Eve”, L”Bill”};String^ separator = L“, “;String^ joined = String::Join(separator, names);
After executing these statements, joined references the string L”Jill, Ted, Mary, Eve, Bill”. Theseparator string has been inserted between each of the original strings in the names array. Of course,the separator string can be anything you like — it could be L” and “, for example, which results in thestring L”Jill and Ted and Mary and Eve and Bill”.
Let’s try a full example of working with String objects.
Try It Out Working with StringsSuppose you have an array of integer values that you want to output aligned in columns. You want thevalues aligned but you want the columns to be just sufficiently wide to accommodate the largest valuein the array with a space between columns. This program does that.
// Ex4_18.cpp : main project file.// Creating a custom format string
#include “stdafx.h”
using namespace System;
int main(array<System::String ^> ^args){array<int>^ values = { 2, 456, 23, -46, 34211, 456, 5609, 112098,234, -76504, 341, 6788, -909121, 99, 10};
String^ formatStr1 = L”{0,” // 1st half of format stringString^ formatStr2 = L”}”; // 2nd half of format string
225
Chapter 4: Arrays, Strings, and Pointers
25905c04.qxd:WroxPro 2/21/08 8:47 AM Page 225
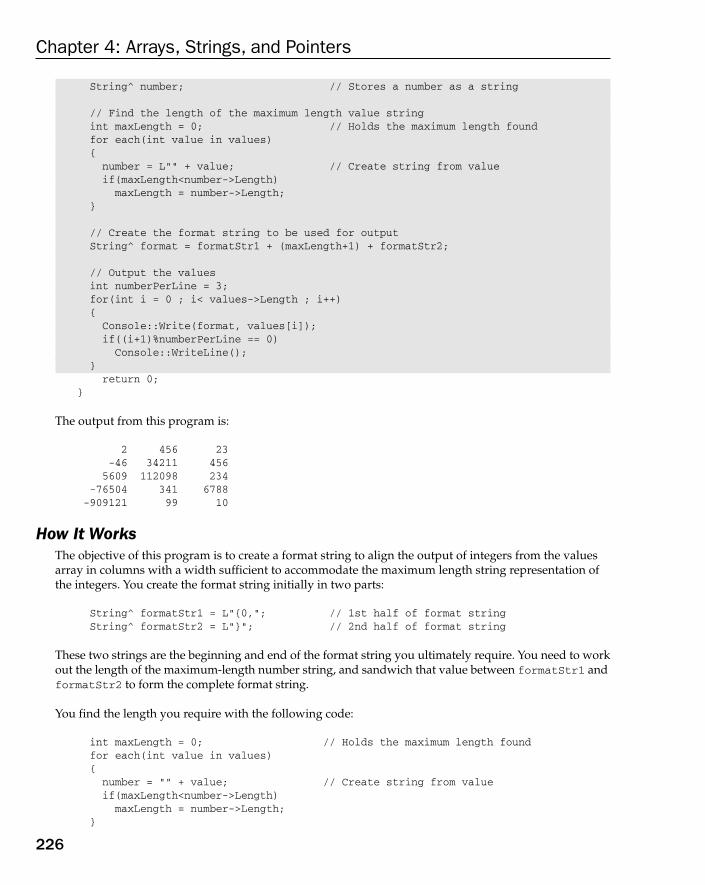
String^ number; // Stores a number as a string
// Find the length of the maximum length value stringint maxLength = 0; // Holds the maximum length foundfor each(int value in values){number = L”” + value; // Create string from valueif(maxLength<number->Length)maxLength = number->Length;
}
// Create the format string to be used for outputString^ format = formatStr1 + (maxLength+1) + formatStr2;
// Output the valuesint numberPerLine = 3;for(int i = 0 ; i< values->Length ; i++){Console::Write(format, values[i]);if((i+1)%numberPerLine == 0)Console::WriteLine();
}return 0;
}
The output from this program is:
2 456 23-46 34211 4565609 112098 234
-76504 341 6788-909121 99 10
How It WorksThe objective of this program is to create a format string to align the output of integers from the valuesarray in columns with a width sufficient to accommodate the maximum length string representation ofthe integers. You create the format string initially in two parts:
String^ formatStr1 = L”{0,”; // 1st half of format stringString^ formatStr2 = L”}”; // 2nd half of format string
These two strings are the beginning and end of the format string you ultimately require. You need to workout the length of the maximum-length number string, and sandwich that value between formatStr1 andformatStr2 to form the complete format string.
You find the length you require with the following code:
int maxLength = 0; // Holds the maximum length foundfor each(int value in values){
number = “” + value; // Create string from valueif(maxLength<number->Length)
maxLength = number->Length;}
226
Chapter 4: Arrays, Strings, and Pointers
25905c04.qxd:WroxPro 2/21/08 8:47 AM Page 226
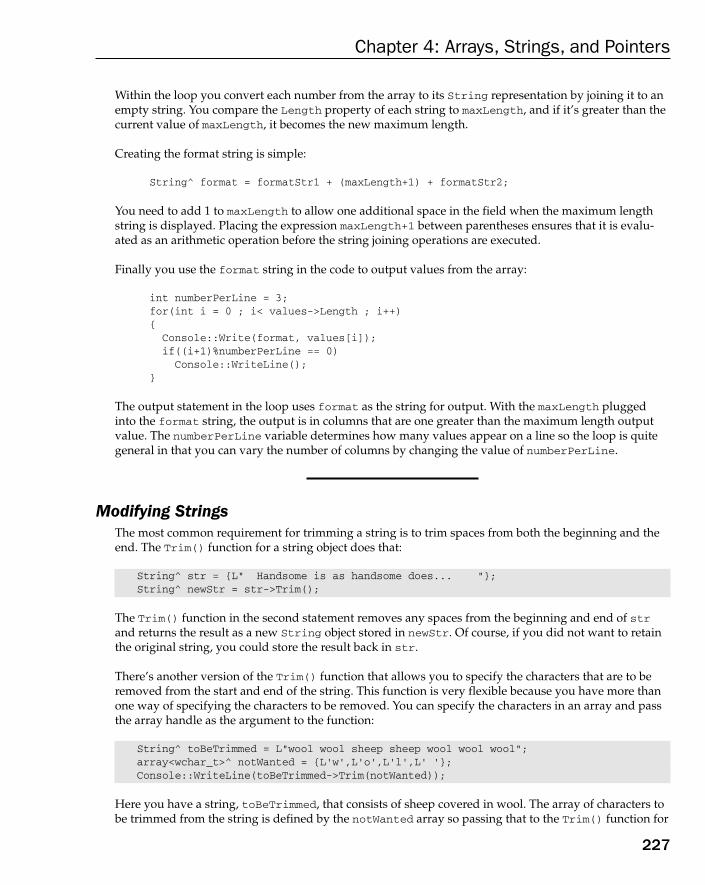
Within the loop you convert each number from the array to its String representation by joining it to anempty string. You compare the Length property of each string to maxLength, and if it’s greater than thecurrent value of maxLength, it becomes the new maximum length.
Creating the format string is simple:
String^ format = formatStr1 + (maxLength+1) + formatStr2;
You need to add 1 to maxLength to allow one additional space in the field when the maximum lengthstring is displayed. Placing the expression maxLength+1 between parentheses ensures that it is evalu-ated as an arithmetic operation before the string joining operations are executed.
Finally you use the format string in the code to output values from the array:
int numberPerLine = 3;for(int i = 0 ; i< values->Length ; i++){
Console::Write(format, values[i]);if((i+1)%numberPerLine == 0)
Console::WriteLine();}
The output statement in the loop uses format as the string for output. With the maxLength pluggedinto the format string, the output is in columns that are one greater than the maximum length outputvalue. The numberPerLine variable determines how many values appear on a line so the loop is quitegeneral in that you can vary the number of columns by changing the value of numberPerLine.
Modifying StringsThe most common requirement for trimming a string is to trim spaces from both the beginning and theend. The Trim() function for a string object does that:
String^ str = {L” Handsome is as handsome does... “};String^ newStr = str->Trim();
The Trim() function in the second statement removes any spaces from the beginning and end of strand returns the result as a new String object stored in newStr. Of course, if you did not want to retainthe original string, you could store the result back in str.
There’s another version of the Trim() function that allows you to specify the characters that are to beremoved from the start and end of the string. This function is very flexible because you have more thanone way of specifying the characters to be removed. You can specify the characters in an array and passthe array handle as the argument to the function:
String^ toBeTrimmed = L”wool wool sheep sheep wool wool wool”;array<wchar_t>^ notWanted = {L’w’,L’o’,L’l’,L’ ‘};Console::WriteLine(toBeTrimmed->Trim(notWanted));
Here you have a string, toBeTrimmed, that consists of sheep covered in wool. The array of characters tobe trimmed from the string is defined by the notWanted array so passing that to the Trim() function for
227
Chapter 4: Arrays, Strings, and Pointers
25905c04.qxd:WroxPro 2/21/08 8:47 AM Page 227
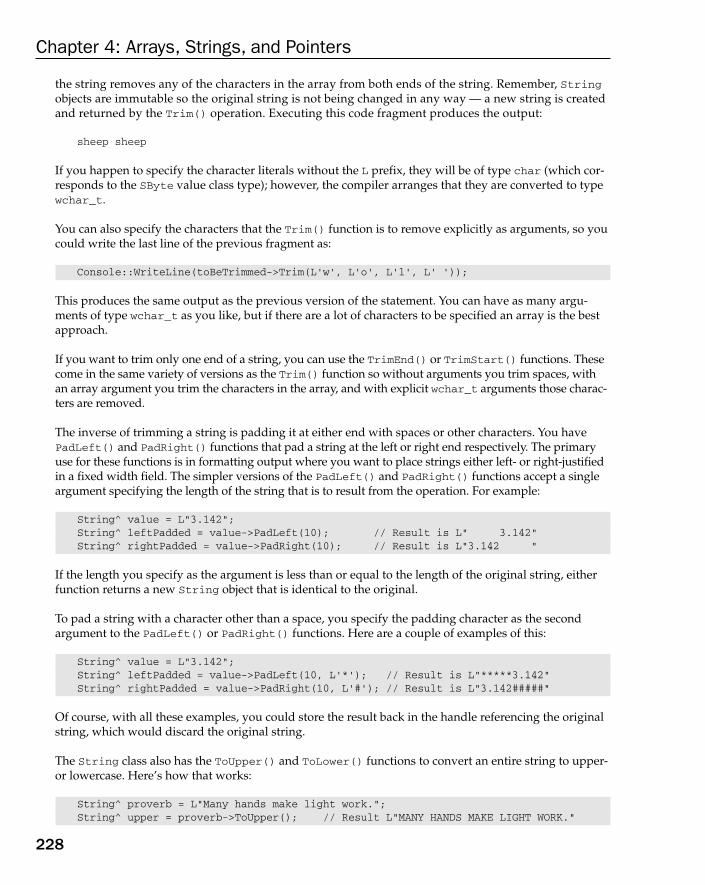
the string removes any of the characters in the array from both ends of the string. Remember, Stringobjects are immutable so the original string is not being changed in any way — a new string is createdand returned by the Trim() operation. Executing this code fragment produces the output:
sheep sheep
If you happen to specify the character literals without the L prefix, they will be of type char (which cor-responds to the SByte value class type); however, the compiler arranges that they are converted to typewchar_t.
You can also specify the characters that the Trim() function is to remove explicitly as arguments, so youcould write the last line of the previous fragment as:
Console::WriteLine(toBeTrimmed->Trim(L’w’, L’o’, L’l’, L’ ‘));
This produces the same output as the previous version of the statement. You can have as many argu-ments of type wchar_t as you like, but if there are a lot of characters to be specified an array is the bestapproach.
If you want to trim only one end of a string, you can use the TrimEnd() or TrimStart() functions. Thesecome in the same variety of versions as the Trim() function so without arguments you trim spaces, withan array argument you trim the characters in the array, and with explicit wchar_t arguments those charac-ters are removed.
The inverse of trimming a string is padding it at either end with spaces or other characters. You havePadLeft() and PadRight() functions that pad a string at the left or right end respectively. The primaryuse for these functions is in formatting output where you want to place strings either left- or right-justifiedin a fixed width field. The simpler versions of the PadLeft() and PadRight() functions accept a singleargument specifying the length of the string that is to result from the operation. For example:
String^ value = L”3.142”;String^ leftPadded = value->PadLeft(10); // Result is L” 3.142”String^ rightPadded = value->PadRight(10); // Result is L“3.142 “
If the length you specify as the argument is less than or equal to the length of the original string, eitherfunction returns a new String object that is identical to the original.
To pad a string with a character other than a space, you specify the padding character as the secondargument to the PadLeft() or PadRight() functions. Here are a couple of examples of this:
String^ value = L”3.142”;String^ leftPadded = value->PadLeft(10, L’*’); // Result is L“*****3.142”String^ rightPadded = value->PadRight(10, L’#’); // Result is L“3.142#####”
Of course, with all these examples, you could store the result back in the handle referencing the originalstring, which would discard the original string.
The String class also has the ToUpper() and ToLower() functions to convert an entire string to upper-or lowercase. Here’s how that works:
String^ proverb = L”Many hands make light work.”;String^ upper = proverb->ToUpper(); // Result L“MANY HANDS MAKE LIGHT WORK.”
228
Chapter 4: Arrays, Strings, and Pointers
25905c04.qxd:WroxPro 2/21/08 8:47 AM Page 228

The ToUpper() function returns a new string that is the original string converted to uppercase.
You use the Insert() function to insert a string at a given position in an existing string. Here’s anexample of doing that:
String^ proverb = L”Many hands make light work.”;String^ newProverb = proverb->Insert(5, L”deck “);
The function inserts the string specified by the second argument starting at the index position in the oldstring specified by the first argument. The result of this operation is a new string containing:
Many deck hands make light work.
You can also replace all occurrences of a given character in a string with another character or all occur-rences of a given substring with another substring. Here’s a fragment that shows both possibilities:
String^ proverb = L”Many hands make light work.”;Console::WriteLine(proverb->Replace(L’ ‘, L’*’);Console::WriteLine(proverb->Replace(L”Many hands”, L”Pressing switch”);
Executing this code fragment produces the output:
Many*hands*make*light*work.Pressing switch make light work.
The first argument to the Replace() function specifies the character or substring to be replaced and thesecond argument specifies the replacement.
Comparing StringsYou can compare two String objects using the Compare() function in the String class. The functionreturns an integer that is less than zero, equal to zero, or greater than zero, depending on whether thefirst argument is less than, equal to, or greater than the second argument. Here’s an example:
String^ him(L”Jacko”);String^ her(L”Jillo”);int result = String::Compare(him, her);if(result < 0)Console::WriteLine(L“{0} is less than {1}.”, him, her);
else if(result > 0)Console::WriteLine(L“{0} is greater than {1}.”, him, her);
elseConsole::WriteLine(L“{0} is equal to {1}.”, him, her);
You store the integer that the Compare() function returns in result and use that in the if statement todecide the appropriate output. Executing this fragment produces the output:
Jacko is less than Jillo.
There’s another version of Compare() that requires a third argument of type bool. If the third argumentis true, then the strings referenced by the first two arguments are compared ignoring case; if the thirdargument is false then the behavior is the same as the previous version of Compare().
229
Chapter 4: Arrays, Strings, and Pointers
25905c04.qxd:WroxPro 2/21/08 8:47 AM Page 229

Searching StringsPerhaps the simplest search operation is to test whether a string starts or ends with a given substring. TheStartsWith() and EndsWith() functions do that. You supply a handle to the substring you are lookingfor as the argument to either function, and the function returns a bool value that indicates whether or notthe substring is present. Here’s a fragment showing how you might use the StartsWith() function:
String^ sentence = L”Hide, the cow’s outside.”;if(sentence->StartsWith(L”Hide”))Console::WriteLine(L“The sentence starts with ‘Hide’.”);
Executing this fragment results in the output:
The sentence starts with ‘Hide’.
Of course, you could also apply the EndsWith() function to the sentence string:
Console::WriteLine(L“The sentence does{0] end with ‘outside’.”,sentence->EndsWith(L”outside”) ? L”” : L” not”);
The result of the conditional operator expression is inserted in the output string. This is an empty stringif EndsWith() returns true and “ not” if it returns false. In this instance the function returns false(because of the period at the end of the sentence string).
The IndexOf() function searches a string for the first occurrence of a specified character or a substringand returns the index if it is present or -1 if it is not found. You specify the character or the substring youare looking for as the argument to the function. For example:
String^ sentence = L”Hide, the cow’s outside.”;int ePosition = sentence->IndexOf(L’e’); // Returns 3int thePosition = sentence->IndexOf(L”the”); // Returns 6
The first search is for the letter ‘e’ and the second is for the word “the”. The values returned by theIndexOf() function are indicated in the comments.
More typically you will want to find all occurrences of a given character or substring and another versionof the IndexOf() function is designed to be used repeatedly to enable you to do that. In this case yousupply a second argument specifying the index position where the search is to start. Here’s an example ofhow you might use the function in this way:
int index = 0;int count = 0;while((index = words->IndexOf(word,index)) >= 0){index += word->Length;++count;
}Console::WriteLine(L”’{0}’ was found {1} times in:\n{2}”, word, count, words);
This fragment counts the number of occurrences of “wool” in the words string. The search operationappears in the while loop condition and the result is stored in index. The loop continues as long asindex is non-negative so when IndexOf() returns -1 the loop ends. Within the loop body, the value
230
Chapter 4: Arrays, Strings, and Pointers
25905c04.qxd:WroxPro 2/21/08 8:47 AM Page 230
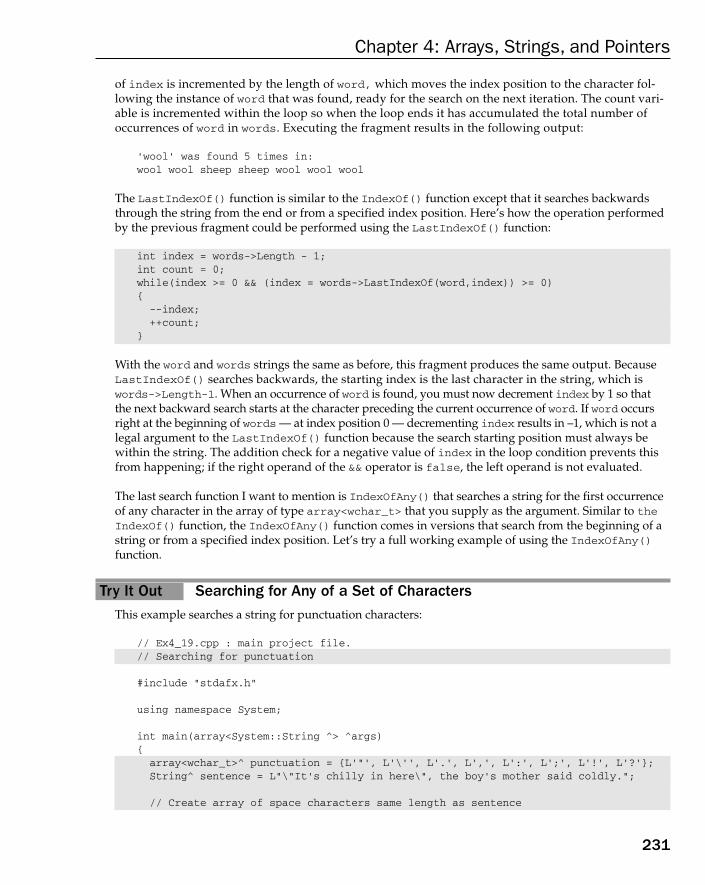
of index is incremented by the length of word, which moves the index position to the character fol-lowing the instance of word that was found, ready for the search on the next iteration. The count vari-able is incremented within the loop so when the loop ends it has accumulated the total number ofoccurrences of word in words. Executing the fragment results in the following output:
‘wool’ was found 5 times in:wool wool sheep sheep wool wool wool
The LastIndexOf() function is similar to the IndexOf() function except that it searches backwardsthrough the string from the end or from a specified index position. Here’s how the operation performedby the previous fragment could be performed using the LastIndexOf() function:
int index = words->Length - 1;int count = 0;while(index >= 0 && (index = words->LastIndexOf(word,index)) >= 0){--index;++count;
}
With the word and words strings the same as before, this fragment produces the same output. BecauseLastIndexOf() searches backwards, the starting index is the last character in the string, which iswords->Length-1. When an occurrence of word is found, you must now decrement index by 1 so that the next backward search starts at the character preceding the current occurrence of word. If word occursright at the beginning of words — at index position 0 — decrementing index results in –1, which is not alegal argument to the LastIndexOf() function because the search starting position must always bewithin the string. The addition check for a negative value of index in the loop condition prevents thisfrom happening; if the right operand of the && operator is false, the left operand is not evaluated.
The last search function I want to mention is IndexOfAny() that searches a string for the first occurrenceof any character in the array of type array<wchar_t> that you supply as the argument. Similar to theIndexOf() function, the IndexOfAny() function comes in versions that search from the beginning of astring or from a specified index position. Let’s try a full working example of using the IndexOfAny()function.
Try It Out Searching for Any of a Set of CharactersThis example searches a string for punctuation characters:
// Ex4_19.cpp : main project file.// Searching for punctuation
#include “stdafx.h”
using namespace System;
int main(array<System::String ^> ^args){array<wchar_t>^ punctuation = {L’”’, L’\’’, L’.’, L’,’, L’:’, L’;’, L’!’, L’?’};String^ sentence = L”\”It’s chilly in here\”, the boy’s mother said coldly.”;
// Create array of space characters same length as sentence
231
Chapter 4: Arrays, Strings, and Pointers
25905c04.qxd:WroxPro 2/21/08 8:47 AM Page 231

array<wchar_t>^ indicators = gcnew array<wchar_t>(sentence->Length){L’ ‘};
int index = 0; // Index of character foundint count = 0; // Count of punctuation characterswhile((index = sentence->IndexOfAny(punctuation, index)) >= 0){indicators[index] = L’^’; // Set marker++index; // Increment to next character++count; // Increase the count
}Console::WriteLine(L”There are {0} punctuation characters in the string:”,
count);Console::WriteLine(L”\n{0}\n{1}”, sentence, gcnew String(indicators));return 0;
}
This example should produce the following output:
There are 6 punctuation characters in the string:
“It’s chilly in here”, the boy’s mother said coldly.^ ^ ^^ ^ ^
How It WorksYou first create an array containing the characters to be found and the string to be searched:
array<wchar_t>^ punctuation = {L’”’, L’\’’, L’.’, L’,’, L’:’, L’;’, L’!’, L’?’};String^ sentence = L”\”It’s chilly in here\”, the boy’s mother said coldly.”;
Note that you must specify a single quote character using an escape sequence because a single quote is adelimiter in a character literal. You can use a double quote explicitly in a character literal because there’sno risk of it being interpreted as a delimiter in this context.
Next you define an array of characters with the elements initialized to a space character:
array<wchar_t>^ indicators = gcnew array<wchar_t>(sentence->Length){L’ ‘};
This array has as many elements as the sentence string has characters. You’ll be using this array inthe output to mark where punctuation characters occur in the sentence string. You’ll just change the appropriate array element to ‘^’ whenever a punctuation character is found. Note how a singleinitializer between the braces following the array specification can be used to initialize all the elements in the array.
The search takes place in the while loop:
while((index = sentence->IndexOfAny(punctuation, index)) >= 0){
indicators[index] = L’^’; // Set marker++index; // Increment to next character++count; // Increase the count
}
232
Chapter 4: Arrays, Strings, and Pointers
25905c04.qxd:WroxPro 2/21/08 8:47 AM Page 232
The loop condition is essentially the same as you have seen in earlier code fragments. Within the loop bodyyou update the indicators array element at position index to be a ‘^’ character before incrementingindex ready for the next iteration. When the loop ends, count contains the number of punctuation charac-ters that were found, and indicators will contain ‘^’ characters at the positions in sentence where suchcharacters were found.
The output is produced by the statements:
Console::WriteLine(L”There are {0} punctuation characters in the string:”,count);
Console::WriteLine(L”\n{0}\n{1}” sentence, gcnew String(indicators));
The second statement creates a new String object on the heap from the indicators array by passing thearray to the String class constructor. A class constructor is a function that will create a class object whenit is called. You’ll learn more about constructors when you get into defining your own classes.
Tracking ReferencesA tracking reference provides a similar capability to a native C++ reference in that it represents an alias forsomething on the CLR heap. You can create tracking references to value types on the stack and to handlesin the garbage-collected heap; the tracking references themselves are always created on the stack. A track-ing reference is automatically updated if the object referenced is moved by the garbage collector.
You define a tracking reference using the % operator. For example, here’s how you could create a trackingreference to a value type:
int value = 10;int% trackValue = value;
The second statement defines stackValue to be a tracking reference to the variable value, which hasbeen created on the stack. You can now modify value using stackValue:
trackValue *= 5;Console::WriteLine(value);
Because trackValue is an alias for value, the second statement outputs 50.
Interior PointersAlthough you cannot perform arithmetic on the address in a tracking handle, C++/CLI does provide aform of pointer with which it is possible to apply arithmetic operations; it’s called an interior pointer and isdefined using the keyword interior_ptr. The address stored in an interior pointer can be updated auto-matically by the CLR garbage collection when necessary. An interior point is always an automatic variablethat is local to a function.
Here’s how you could define an interior point containing the address of the first element in an array:
array<double>^ data = {1.5, 3.5, 6.7, 4.2, 2.1};interior_ptr<double> pstart = &data[0];
233
Chapter 4: Arrays, Strings, and Pointers
25905c04.qxd:WroxPro 2/21/08 8:47 AM Page 233

You specify the type of object pointed to by the interior pointer between angled brackets following theinterior_ptr keyword. In the second statement here you initialize the pointer with the address of thefirst element in the array using the & operator, just as you would with a native C++ pointer. If you donot provide an initial value for an interior pointer, it is initialized with nullptr by default. An array is always allocated on the CLR heap so here’s a situation where the garbage collector may adjust theaddress contained in an interior pointer.
There are constraints on the type specification for an interior pointer. An interior pointer can contain theaddress of a value class object on the stack or the address of a handle to an object on the CLR heap; itcannot contain the address of a whole object on the CLR heap. An interior pointer can also point to anative class object or a native pointer.
You can also use an interior pointer to hold the address of a value class object that is part of an object on the heap, such as an element of a CLR array. This way you can create an interior pointer that can store theaddress of a tracking handle to a System::String object but you cannot create an interior pointer to storethe address of the String object itself. For example:
interior_ptr<String^> pstr1; // OK - pointer to a handleinterior_ptr<String> pstr2; // Will not compile - pointer to a String object
All the arithmetic operations that you can apply to a native C++ pointer you can also apply to an interiorpointer. You can increment and decrement an interior pointer to change the address it contains to refer tothe following or preceding data item. You can also add or subtract integer values and compare interiorpoints. Let’s put together an example that does some of that.
Try It Out Creating and Using Interior PointersThis example exercises interior pointers with numerical values and strings:
// Ex4_20.cpp : main project file.// Creating and using interior pointers
#include “stdafx.h”
using namespace System;
int main(array<System::String ^> ^args){// Access array elements through a pointerarray<double>^ data = {1.5, 3.5, 6.7, 4.2, 2.1};interior_ptr<double> pstart = &data[0];interior_ptr<double> pend = &data[data->Length - 1];double sum = 0.0;while(pstart <= pend)sum += *pstart++;
Console::WriteLine(L”Total of data array elements = {0}\n”, sum);
// Just to show we can - access strings through an interior pointerarray<String^>^ strings = { L”Land ahoy!”,
L”Splice the mainbrace!”,L”Shiver me timbers!”,
234
Chapter 4: Arrays, Strings, and Pointers
25905c04.qxd:WroxPro 2/21/08 8:47 AM Page 234

L”Never throw into the wind!”};
for(interior_ptr<String^> pstrings = &strings[0] ;pstrings-&strings[0] < strings->Length ; ++pstrings)
Console::WriteLine(*pstrings);
return 0;}
The output from this example is:
Total of data array elements = 18Land ahoy!Splice the mainbrace!Shiver me timbers!Never throw into the wind!
How It WorksAfter creating the data array of elements of type double, you define two interior pointers:
interior_ptr<double> pstart = &data[0];interior_ptr<double> pend = &data[data->Length - 1];
The first statement creates pstart as a pointer to type double and initializes it with the address of thefirst element in the array, data[0]. The interior pointer, pend, is initialized with the address of the lastelement in the array, data[data->Length - 1]. Because data->Length is the number of elements inthe array, subtracting 1 from this value produces the index for the last element.
The while loop accumulates the sum of the elements in the array:
while(pstart <= pend)sum += *pstart++;
The loop continues as long as the interior pointer, pstart, contains an address that is not greater thanthe address in pend. You could equally well have expressed the loop condition as !pstart > pend.
Within the loop, pstart starts out containing the address of the first array element. The value of the firstelement is obtained by dereferencing the pointer with the expression *pstart and the result of this isadded to sum. The address in the pointer is then incremented using the ++ operator. On the last loop iter-ation, pstart contains the address of the last element which is the same as the address value that pendcontains, so incrementing pstart makes the loop condition false because pstart is then greater thanpend. After the loop ends the value of sum is written out so you can confirm that the while loop is work-ing as it should.
Next you create an array of four strings:
array<String^>^ strings = { L”Land ahoy!”,L”Splice the mainbrace!”,L”Shiver me timbers!”,
235
Chapter 4: Arrays, Strings, and Pointers
25905c04.qxd:WroxPro 2/21/08 8:47 AM Page 235

L”Never throw into the wind!”};
The for loop then outputs each string to the command line:
for(interior_ptr<String^> pstrings = &strings[0] ;pstrings-&strings[0] < strings->Length ; ++pstrings)
Console::WriteLine(*pstrings);
The first expression in the for loop condition declares the interior pointer, pstrings, and initializes it withthe address of the first element in the strings array. The second expression determines whether the forloop continues:
pstrings-&strings[0] < strings->Length
As long as pstrings contains the address of a valid array element, the difference between the address inpstrings and the address of the first element in the array is less than the number of elements in the array,given by the expression strings->Length. Thus when this difference equals the length of the array, theloop ends. You can see from the output that everything works as expected.
The most frequent use of an interior pointer is to reference objects that are part of a CLR heap object, andyou’ll see more about this later in the book.
SummaryYou are now familiar with all of the basic types of values in C++, how to create and use arrays of those types,and how to create and use pointers. You have also been introduced to the idea of a reference. However, wehave not exhausted all of these topics. I’ll come back to the topics of arrays, pointers, and references later inthe book. The important points discussed in this chapter relating to native C++ programming are:
❑ An array allows you to manage a number of variables of the same type using a single name.Each dimension of an array is defined between square brackets following the array name in the declaration of the array.
❑ Each dimension of an array is indexed starting from zero. Thus the fifth element of a one-dimensional array has the index value 4.
❑ Arrays can be initialized by placing the initializing values between curly braces in the declaration.
❑ A pointer is a variable that contains the address of another variable. A pointer is declared as a‘pointer to type’ and may only be assigned addresses of variables of the given type.
236
Chapter 4: Arrays, Strings, and Pointers
25905c04.qxd:WroxPro 2/21/08 8:47 AM Page 236

❑ A pointer can point to a constant object. Such a pointer can be reassigned to another object. Apointer may also be defined as const, in which case it can’t be reassigned.
❑ A reference is an alias for another variable, and can be used in the same places as the variable it references. A reference must be initialized in its declaration.
❑ A reference can’t be reassigned to another variable.
❑ The operator sizeof returns the number of bytes occupied by the object specified as its argu-ment. Its argument may be a variable or a type name between parentheses.
❑ The operator new allocates memory dynamically in the free store in a native C++ application.When memory has been assigned as requested, it returns a pointer to the beginning of the memory area provided. If memory cannot be assigned for any reason, an exception is thrown that by default causes the program to terminate.
The pointer mechanism is sometimes a bit confusing because it can operate at different levels within thesame program. Sometimes it is operating as an address, and at other times it can be operating with thevalue stored at an address. It’s very important that you feel at ease with the way pointers are used, so ifyou find that they are in any way unclear, try them out with a few examples of your own until you feelconfident about applying them.
The key points that you learned about in relation to programming for the CLR are:
❑ In CLR program, you allocate memory of the garbage-collected heap using the gcnewoperator.
❑ Reference class objects in general and String objects in particular are always allocated on theCLR heap.
❑ You use String objects when working with strings in a CLR program.
❑ The CLR has its own array types with more functionality that native array types.
❑ CLR arrays are created on the CLR heap.
❑ A tracking handle is a form of pointer used to reference variables defined on the CLR heap. Atracking handle is automatically updated if what it refers to is relocated in the heap by thegarbage collector.
❑ Variable that reference objects and arrays on the heap are always tracking handles.
❑ A tracking reference is similar to a native reference except that the address it contains is auto-matically updated if the object referenced is moved by the garbage collector.
❑ An interior pointer is a C++/CLI pointer type to which you can apply the same operation as anative pointer.
❑ The address contained in an interior pointer can be modified using arithmetic operations andstill maintain an address correctly even when referring to something stored in the CLR heap.
237
Chapter 4: Arrays, Strings, and Pointers
25905c04.qxd:WroxPro 2/21/08 8:47 AM Page 237

ExercisesYou can download the source code for the examples in the book and the solutions to the following exercisesfrom www.wrox.com.
1. Write a native C++ program that allows an unlimited number of values to be entered and storedin an array allocated in the free store. The program should then output the values five to a linefollowed by the average of the values entered. The initial array size should be five elements. Theprogram should create a new array with five additional elements when necessary and copy val-ues from the old array to the new.
2. Repeat the previous exercise but use pointer notation throughout instead of arrays.
3. Declare a character array, and initialize it to a suitable string. Use a loop to change every othercharacter to uppercase.
Hint: In the ASCII character set, values for uppercase characters are 32 less than their lowercasecounterparts.
4. Write a C++/CLI program that creates an array with a random number of elements of type int.The array should have from 10 to 20 elements. Set the array elements to random values between100 and 1000. Output the elements five to a line in ascending sequence without sorting the array;for example find the smallest element and output that, then the next smallest, and so on.
5. Write a C++/CLI program that will generate a random integer greater than 10,000. Output theinteger and then output the digits in the integer in words. For example, if the integer generatedwere 345678, then the output should be:
The value is 345678three four five six seven eight
6. Write a C++/CLI program that creates an array containing the following strings:
“Madam I’m Adam.”“Don’t cry for me, Marge and Tina.”“Lid off a daffodil.”“Red lost soldier.”“Cigar? Toss it in a can. It is so tragic.”
The program should examine each string in turn, output the string and indicate whether it is oris not a palindrome (that is, the same sequence of letters reading backward or forward, ignoringspaces and punctuation).
238
Chapter 4: Arrays, Strings, and Pointers
25905c04.qxd:WroxPro 2/21/08 8:47 AM Page 238

5Introducing Structure
into Your Programs
Up to now, you haven’t really been able to structure your program code in a modular fashion becauseyou have only been able to construct a program as a single function, main(); but you have been usinglibrary functions of various kinds as well as functions belonging to objects. Whenever you write aC++ program, you should have a modular structure in mind from the outset and, as you’ll see, agood understanding of how to implement functions is essential to object-oriented programming inC++. In this chapter, you’ll learn:
❑ How to declare and write your own C++ functions
❑ How function arguments are defined and used
❑ How arrays can be passed to and from a function
❑ What pass-by-value means
❑ How to pass pointers to functions
❑ How to use references as function arguments, and what pass-by-reference means
❑ How the const modifier affects function arguments
❑ How to return values from a function
❑ How recursion can be used
There’s quite a lot to structuring your C++ programs, so to avoid indigestion, you won’t try to swal-low the whole thing in one gulp. After you have chewed over and gotten the full flavor of thesemorsels, you’ll move on to the next chapter, where you will get further into the meat of the topic.
Understanding FunctionsFirst take a look at the broad principles of how a function works. A function is a self-containedblock of code with a specific purpose. A function has a name that both identifies it and is used to
25905c05.qxd:WroxPro 2/21/08 8:48 AM Page 239

call it for execution in a program. The name of a function is global but is not necessarily unique in C++,as you’ll see in the next chapter; however, functions that perform different actions should generally havedifferent names.
The name of a function is governed by the same rules as those for a variable. A function name is, therefore,a sequence of letters and digits, the first of which is a letter, where an underscore (_) counts as a letter. Thename of a function should generally reflect what it does, so for example, you might call a function thatcounts beans count_beans().
You pass information to a function by means of arguments specified when you invoke it. These argumentsneed to correspond with parameters that appear in the definition of the function. The arguments that youspecify replace the parameters used in the definition of the function when the function executes. The codein the function then executes as though it was written using your argument values. Figure 5-1 illustratesthe relationship between arguments in the function call and the parameters specified in the definition ofthe function.
Figure 5-1
In this example, the function returns the sum of the two arguments passed to it. In general, a functionreturns either a single value to the point in the program where it was called, or nothing at all, dependingon how the function is defined. You might think that returning a single value from a function is a constraint,but the single value returned can be a pointer that might contain the address of an array, for example. Youwill see more about how data is returned from a function a little later in this chapter.
int add_ints( int i, int j ) { return i + j ; }
cout << add_ints( 2 , 3 );
Argument values replace corresponding parameters in the function definition
Value 5 returned
Function Definition
Parameters
Arguments
240
Chapter 5: Introducing Structure into Your Programs
25905c05.qxd:WroxPro 2/21/08 8:48 AM Page 240

Why Do You Need Functions?One major advantage that a function offers is that it can be executed as many times as necessary from dif-ferent points in a program. Without the ability to package a block of code into a function, programs wouldend up being much larger because you would typically need to replicate the same code at various points inthem. But the real reason that you need functions is to break up a program into easily manageable chunksfor development and testing; small blocks of code are easier to understand than large blocks of code.
Imagine a really big program — let’s say a million lines of code. A program of this size would be virtu-ally impossible to write without functions. Functions enable you to segment a program so that you canwrite the code piecemeal, and test each piece independently before bringing it together with the otherpieces. It also allows the work to be divided among members of a programming team, with each teammember taking responsibility for a tightly specified piece of the program, with a well-defined functionalinterface to the rest of the code.
Structure of a FunctionAs you have seen when writing the function main(), a function consists of a function header that iden-tifies the function, followed by the body of the function between curly braces containing the executablecode for the function. Let’s look at an example. You could write a function to raise a value to a givenpower, that is, to compute the result of multiplying the value x by itself n times, which is xn:
// Function to calculate x to the power n, with n greater than or equal to 0double power(double x, int n) // Function header{ // Function body starts here...
double result = 1.0; // Result stored herefor(int i = 1; i <= n; i++)result *= x;
return result;} // ...and ends here
The Function HeaderLet’s first examine the function header in this example. The following is the first line of the function.
double power(double x, int n) // Function header
It consists of three parts:
❑ The type of the return value (double in this case)
❑ The name of the function (power in this case)
❑ The parameters of the function enclosed between parentheses (x and n in this case, of typesdouble and int respectively)
The return value is returned to the calling function when the function is executed, so when the functionis called, it results in a value of type double in the expression in which it appears.
Our function has two parameters: x, the value to be raised to a given power which is of type double, andthe value of the power, n, which is of type int. The computation that the function performs is written using
241
Chapter 5: Introducing Structure into Your Programs
25905c05.qxd:WroxPro 2/21/08 8:48 AM Page 241
these parameter variables together with another variable, result, declared in the body of the function.The parameter names and any variables defined in the body of the function are local to the function.
Note that no semicolon is required at the end of the function header or after the closing brace for the function body.
The General Form of a Function HeaderThe general form of a function header can be written as follows:
return_type function_name(parameter_list)
The return_type can be any legal type. If the function does not return a value, the return type is specifiedby the keyword void. The keyword void is also used to indicate the absence of parameters, so a functionthat has no parameters and doesn’t return a value would have the following function header.
void my_function(void)
An empty parameter list also indicates that a function takes no arguments, so you could omit the keywordvoid between the parentheses like:
void my_function()
A function with a return type specified as void should not be used in an expression in the calling program. Because it doesn’t return a value, it can’t sensibly be part of an expression, so using it in this way causes the compiler to generate an error message.
The Function BodyThe desired computation in a function is performed by the statements in the function body following thefunction header. The first of these in our example declares a variable result that is initialized with thevalue 1.0. The variable result is local to the function, as are all automatic variables declared within thefunction body. This means that the variable result ceases to exist after the function has completed exe-cution. What might immediately strike you is that if result ceases to exist on completing execution ofthe function, how is it returned? The answer is that a copy of the value being returned is made automati-cally, and this copy is available to the return point in the program.
The calculation is performed in the for loop. A loop control variable i is declared in the for loop whichassumes successive values from 1 to n. The variable result is multiplied by x once for each loop itera-tion, so this occurs n times to generate the required value. If n is 0, the statement in the loop won’t beexecuted at all because the loop continuation condition immediately fails, and so result is left as 1.0.
As I’ve said, the parameters and all the variables declared within the body of a function are local to thefunction. There is nothing to prevent you from using the same names for variables in other functionsfor quite different purposes. Indeed, it’s just as well this is so because it would be extremely difficult toensure variables names were always unique within a program containing a large number of functions,particularly if the functions were not all written by the same person.
The scope of variables declared within a function is determined in the same way that I have already dis-cussed. A variable is created at the point at which it is defined and ceases to exist at the end of the blockcontaining it. There is one type of variable that is an exception to this — variables declared as static.I’ll discuss static variables a little later in this chapter.
242
Chapter 5: Introducing Structure into Your Programs
25905c05.qxd:WroxPro 2/21/08 8:48 AM Page 242

Be careful about masking global variables with local variables of the same name. You first met this situation back in Chapter 2 where you saw how you could use the scope resolution operator :: toaccess global variables.
The return StatementThe return statement returns the value of result to the point where the function was called. The generalform of the return statement is
return expression;
where expression must evaluate to a value of the type specified in the function header for the returnvalue. The expression can be any expression you want, as long as you end up with a value of the requiredtype. It can include function calls — even a call of the same function in which it appears, as you’ll see laterin this chapter.
If the type of return value has been specified as void, there must be no expression appearing in thereturn statement. It must be written simply as:
return;
Using a FunctionAt the point at which you use a function in a program, the compiler must know something about it tocompile the function call. It needs enough information to be able to identify the function, and to verifythat you are using it correctly. Unless the definition of the function that you intend to use appears earlierin the same source file, you must declare the function using a statement called a function prototype.
Function PrototypesA prototype of a function provides the basic information that the compiler needs to check that you areusing a function correctly. It specifies the parameters to be passed to the function, the function name,and the type of the return value — basically, it contains the same information as appears in the functionheader, with the addition of a semicolon. Clearly, the number of parameters and their types must be thesame in the function prototype as they are in the function header in the definition of the function.
The prototypes for the functions that you call from within another function must appear before the state-ments doing the calling and are usually placed at the beginning of the program source file. The headerfiles that you’ve been including for standard library functions contain the prototypes of the functionsprovided by the library, amongst other things.
For the power() function example, you could write the prototype as:
double power(double value, int index);
Don’t forget that a semicolon is required at the end of a function prototype. Without it, you get errormessages from the compiler.
Note that I have specified names for the parameters in the function prototype that are different fromthose I used in the function header when I defined the function. This is just to indicate that it’s possible.Most often, the same names are used in the prototype and in the function header in the definition of the
243
Chapter 5: Introducing Structure into Your Programs
25905c05.qxd:WroxPro 2/21/08 8:48 AM Page 243

function, but this doesn’t have to be so. You can use longer more expressive parameter names in the func-tion prototype to aid understanding of the significance of the parameters and then use shorter parameternames in the function definition where the longer names would make the code in the body of the func-tion less readable.
If you like, you can even omit the names altogether in the prototype, and just write:
double power(double, int);
This provides enough information for the compiler to do its job; however, it’s better practice to use somemeaningful name in a prototype because it aids readability and, in some cases, makes all the differencebetween clear code and confusing code. If you have a function with two parameters of the same type(suppose our index was also of type double in the function power(), for example), the use of suitablenames indicates which parameter appears first and which second.
Try It Out Using a FunctionYou can see how all this goes together in an example exercising the power() function.
// Ex5_01.cpp// Declaring, defining, and using a function#include <iostream>using std::cout;using std::endl;
double power(double x, int n); // Function prototype
int main(void){
int index = 3; // Raise to this powerdouble x = 3.0; // Different x from that in function powerdouble y = 0.0;
y = power(5.0, 3); // Passing constants as argumentscout << endl
<< “5.0 cubed = “ << y;
cout << endl<< “3.0 cubed = “<< power(3.0, index); // Outputting return value
x = power(x, power(2.0, 2.0)); // Using a function as an argumentcout << endl // with auto conversion of 2nd parameter
<< “x = “ << x;
cout << endl;return 0;
}
// Function to compute positive integral powers of a double value// First argument is value, second argument is power indexdouble power(double x, int n)
244
Chapter 5: Introducing Structure into Your Programs
25905c05.qxd:WroxPro 2/21/08 8:48 AM Page 244
{ // Function body starts here...double result = 1.0; // Result stored herefor(int i = 1; i <= n; i++)
result *= x;return result;
} // ...and ends here
This program shows some of the ways in which you can use the function power(), specifying the argu-ments to the function in a variety of ways. If you run this example, you get the following output:
5.0 cubed = 1253.0 cubed = 27x = 81
How It WorksAfter the usual #include statement for input/output and the using declarations, you have the proto-type for the function power(). If you were to delete this and try recompiling the program, the compilerwouldn’t be able to process the calls to the function in main() and would instead generate a whole seriesof error messages:
error C3861: ‘power’: identifier not found
and the error message:
error C2365: ‘power’ : redefinition; previous definition was ‘formerly unknownidentifier’
In a change from previous examples, I’ve used the new keyword void in the function main() where theparameter list would usually appear to indicate that no parameters are to be supplied. Previously, I leftthe parentheses enclosing the parameter list empty, which is also interpreted in C++ as indicating thatthere are no parameters; but it’s better to specify the fact by using the keyword void. As you saw, thekeyword void can also be used as the return type for a function to indicate that no value is returned. Ifyou specify the return type of a function as void, you must not place a value in any return statementwithin the function; otherwise, you get an error message from the compiler.
You gathered from some of the previous examples that using a function is very simple. To use the func-tion power() to calculate 5.03 and store the result in a variable y in our example, you have the followingstatement:
y = power(5.0, 3);
The values 5.0 and 3 here are the arguments to the function. They happen to be constants, but you can useany expression as an argument, as long as a value of the correct type is ultimately produced. The argumentsto the power() function substitute for the parameters x and n, which were used in the definition of the func-tion. The computation is performed using these values and then a copy of the result, 125, is returned to thecalling function, main(), which is then stored in y. You can think of the function as having this value in thestatement or expression in which it appears. You then output the value of y:
cout << endl<< “5.0 cubed = “ << y;
245
Chapter 5: Introducing Structure into Your Programs
25905c05.qxd:WroxPro 2/21/08 8:48 AM Page 245

The next call of the function is used within the output statement:
cout << endl<< “3.0 cubed = “<< power(3.0, index); // Outputting return value
Here, the value returned by the function is transferred directly to the output stream. Because you haven’tstored the returned value anywhere, it is otherwise unavailable to you. The first argument in the call ofthe function here is a constant; the second argument is a variable.
The function power() is used next in this statement:
x = power(x, power(2.0, 2.0)); // Using a function as an argument
Here the power() function is called twice. The first call to the function is the rightmost in the expression,and the result supplies the value for the second argument to the leftmost call. Although the arguments in the sub-expression power(2.0, 2.0) are both specified as the double literal 2.0, the function is actu-ally called with the first argument as 2.0 and the second argument as the integer literal, 2. The compilerconverts the double value specified for the second argument to type int because it knows from thefunction prototype (shown again below) that the type of the second parameter has been specified as int.
double power(double x, int n); // Function prototype
The double result 4.0 is returned by the first call to the power() function, and after conversion to typeint, the value 4 is passed as the second argument in the next call of the function, with x as the first argu-ment. Because x has the value 3.0, the value of 3.04 is computed and the result, 81.0, stored in x. Thissequence of events is illustrated in Figure 5-2.
Figure 5-2
x = power( x , power( 2.0 , 2.0 ));
power( 2.0 , 2 )
initial value 3.0
1
result stored back in x
Convertedto type int
Converted to type int
4.0 (type double)
81.0 (type double)
power( 3.0 , 4 )
2
3
4
5
246
Chapter 5: Introducing Structure into Your Programs
25905c05.qxd:WroxPro 2/21/08 8:48 AM Page 246
This statement involves two implicit conversions from type double to type int that were inserted bythe compiler. There’s a possible loss of data when converting from type double to type int so the com-piler issues warning message when this occurs, even though the compiler has itself inserted this conver-sion. Generally relying on automatic conversions where there is potential for data loss is a dangerousprogramming practice, and it is not at all obvious from the code that this conversion is intended. It is farbetter to be explicit in your code by using the static_cast operator when necessary. The statement inthe example is much better written as:
x = power(x, static_cast<int>(power(2.0, 2)));
Coding the statement like this avoids both the compiler warning messages that the original version caused.Using a static cast does not remove the possibility of losing data in the conversion of data from one typeto another. Because you specified it though, it is clear that this is what you intended, recognizing that dataloss might occur.
Passing Arguments to a FunctionIt’s very important to understand how arguments are passed to a function, as it affects how you writefunctions and how they ultimately operate. There are also a number of pitfalls to be avoided, so we’lllook at the mechanism for this quite closely.
The arguments you specify when a function is called should usually correspond in type and sequenceto the parameters appearing in the definition of the function. As you saw in the last example, if thetype of an argument specified in a function call doesn’t correspond with the type of parameter in thefunction definition, (where possible) it converts to the required type, obeying the same rules as thosefor casting operands that were discussed in Chapter 2. If this proves not to be possible, you get anerror message from the compiler; however, even if the conversion is possible and the code compiles,it could well result in the loss of data (for example from type long to type short) and should there-fore be avoided.
There are two mechanisms used generally in C++ to pass arguments to functions. The first mechanismapplies when you specify the parameters in the function definition as ordinary variables (not references).This is called the pass-by-value method of transferring data to a function so let’s look into that first of all.
The Pass-by-value MechanismWith this mechanism, the variables or constants that you specify as arguments are not passed to a functionat all. Instead, copies of the arguments are created and these copies are used as the values to be transferred.Figure 5-3 shows this in a diagram using the example of our power() function.
Each time you call the function power(), the compiler arranges for copies of the arguments that youspecify to be stored in a temporary location in memory. During execution of the functions, all referencesto the function parameters are mapped to these temporary copies of the arguments.
247
Chapter 5: Introducing Structure into Your Programs
25905c05.qxd:WroxPro 2/21/08 8:48 AM Page 247

Figure 5-3
Try It Out Passing-by-valueOne consequence of the pass-by-value mechanism is that a function can’t directly modify the argumentspassed. You can demonstrate this by deliberately trying to do so in an example:
// Ex5_02.cpp// A futile attempt to modify caller arguments#include <iostream>using std::cout;using std::endl;
int incr10(int num); // Function prototype
int main(void){
int num = 3;
cout << endl<< “incr10(num) = “ << incr10(num)<< endl
int index = 2; double value = 10.0; double result = power(value, index);
Temporary copies of the arguments are made for use in the function
The original arguments are not accessible here, only the copies.
double power ( double x , int n ) { ... }
copy of value copy of index
index 2
10.0 value
2 10.0
248
Chapter 5: Introducing Structure into Your Programs
25905c05.qxd:WroxPro 2/21/08 8:48 AM Page 248

<< “num = “ << num;cout << endl;return 0;
}
// Function to increment a variable by 10int incr10(int num) // Using the same name might help...{
num += 10; // Increment the caller argument – hopefully
return num; // Return the incremented value}
Of course, this program is doomed to failure. If you run it, you get this output:
incr10(num) = 13num = 3
How It WorksThe output confirms that the original value of num remains untouched. The incrementing occurred onthe copy of num that was generated and was eventually discarded on exiting from the function.
Clearly, the pass-by-value mechanism provides you with a high degree of protection from having yourcaller arguments mauled by a rogue function, but it is conceivable that you might actually want to arrangeto modify caller arguments. Of course, there is a way to do this. Didn’t you just know that pointers wouldturn out to be incredibly useful?
Pointers as Arguments to a FunctionWhen you use a pointer as an argument, the pass-by-value mechanism still operates as before; however,a pointer is an address of another variable, and if you take a copy of this address, the copy still points tothe same variable. This is how specifying a pointer as a parameter enables your function to get at a callerargument.
Try It Out Pass-by-pointerYou can change the last example to use a pointer to demonstrate the effect:
// Ex5_03.cpp// A successful attempt to modify caller arguments#include <iostream>using std::cout;using std::endl;
int incr10(int* num); // Function prototype
int main(void){
249
Chapter 5: Introducing Structure into Your Programs
25905c05.qxd:WroxPro 2/21/08 8:48 AM Page 249

int num = 3;
int* pnum = # // Pointer to num
cout << endl<< “Address passed = “ << pnum;
int result = incr10(pnum);cout << endl
<< “incr10(pnum) = “ << result;
cout << endl<< “num = “ << num;
cout << endl;return 0;
}
// Function to increment a variable by 10int incr10(int* num) // Function with pointer argument{
cout << endl<< “Address received = “ << num;
*num += 10; // Increment the caller argument// - confidently
return *num; // Return the incremented value}
The output from this example is:
Address passed = 0012FF6CAddress received = 0012FF6Cincr10(pnum) = 13num = 13
The address values produced by your computer may be different from those shown above, but the twovalues should be identical to each other.
How It WorksIn this example, the principal alterations from the previous version relate to passing a pointer, pnum, inplace of the original variable, num. The prototype for the function now has the parameter type specifiedas a pointer to int, and the main() function has the pointer pnum declared and initialized with the addressof num. The function main(), and the function incr10(), output the address sent and the address receivedrespectively, to verify that the same address is indeed being used in both places. Because the incr10() func-tion is writing to cout, you now call it before the output statement and store the return value in result:
int result = incr10(pnum);cout << endl
<< “incr10(pnum) = “ << result;
250
Chapter 5: Introducing Structure into Your Programs
25905c05.qxd:WroxPro 2/21/08 8:48 AM Page 250
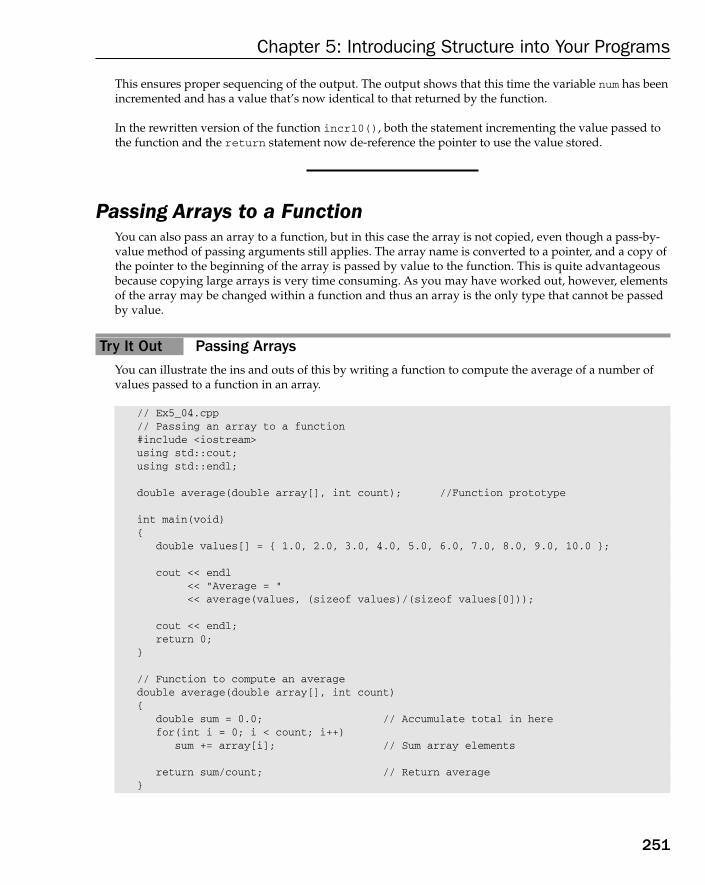
This ensures proper sequencing of the output. The output shows that this time the variable num has beenincremented and has a value that’s now identical to that returned by the function.
In the rewritten version of the function incr10(), both the statement incrementing the value passed tothe function and the return statement now de-reference the pointer to use the value stored.
Passing Arrays to a FunctionYou can also pass an array to a function, but in this case the array is not copied, even though a pass-by-value method of passing arguments still applies. The array name is converted to a pointer, and a copy ofthe pointer to the beginning of the array is passed by value to the function. This is quite advantageousbecause copying large arrays is very time consuming. As you may have worked out, however, elementsof the array may be changed within a function and thus an array is the only type that cannot be passedby value.
Try It Out Passing ArraysYou can illustrate the ins and outs of this by writing a function to compute the average of a number ofvalues passed to a function in an array.
// Ex5_04.cpp// Passing an array to a function#include <iostream>using std::cout;using std::endl;
double average(double array[], int count); //Function prototype
int main(void){
double values[] = { 1.0, 2.0, 3.0, 4.0, 5.0, 6.0, 7.0, 8.0, 9.0, 10.0 };
cout << endl<< “Average = “<< average(values, (sizeof values)/(sizeof values[0]));
cout << endl;return 0;
}
// Function to compute an averagedouble average(double array[], int count){
double sum = 0.0; // Accumulate total in herefor(int i = 0; i < count; i++)
sum += array[i]; // Sum array elements
return sum/count; // Return average}
251
Chapter 5: Introducing Structure into Your Programs
25905c05.qxd:WroxPro 2/21/08 8:48 AM Page 251

The program produces the following output:
Average = 5.5
How It WorksThe average()function is designed to work with an array of any length. As you can see from the proto-type, it accepts two arguments: the array and a count of the number of elements. Because you want it towork with arrays of arbitrary length, the array parameter appears without a dimension specified.
The function is called in main() in this statement,
cout << endl<< “Average = “<< average(values, (sizeof values)/(sizeof values[0]));
The function is called with the first argument as the array name, values, and the second argument as anexpression that evaluates to the number of elements in the array.
You’ll recall this expression, using the operator sizeof, from when you looked at arrays in Chapter 4.
Within the body of the function, the computation is expressed in the way you would expect. There’s no significant difference between this and the way you would write the same computation if you implemented it directly in main().
The output confirms that everything works as we anticipated.
Try It Out Using Pointer Notation When Passing ArraysYou haven’t exhausted all the possibilities here. As you determined at the outset, the array name is passedas a pointer — to be precise, as a copy of a pointer — so within the function you are not obliged to workwith the data as an array at all. You could modify the function in the example to work with pointer nota-tion throughout, in spite of the fact that you are using an array.
// Ex5_05.cpp// Handling an array in a function as a pointer#include <iostream>using std::cout;using std::endl;
double average(double* array, int count); //Function prototype
int main(void){
double values[] = { 1.0, 2.0, 3.0, 4.0, 5.0, 6.0, 7.0, 8.0, 9.0, 10.0 };
cout << endl<< “Average = “<< average(values, (sizeof values)/(sizeof values[0]));
252
Chapter 5: Introducing Structure into Your Programs
25905c05.qxd:WroxPro 2/21/08 8:48 AM Page 252

cout << endl;return 0;
}
// Function to compute an averagedouble average(double* array, int count){
double sum = 0.0; // Accumulate total in herefor(int i = 0; i < count; i++)
sum += *array++; // Sum array elements
return sum/count; // Return average}
The output is exactly the same as in the previous example.
How It WorksAs you can see, the program needed very few changes to make it work with the array as a pointer. Theprototype and the function header have been changed, although neither change is absolutely necessary.If you change both back to the original version with the first parameter specified as a double array andleave the function body written in terms of a pointer, it works just as well. The most interesting aspect ofthis version is the body of the for loop statement:
sum += *array++; // Sum array elements
Here you apparently break the rule about not being able to modify an address specified as an array namebecause you are incrementing the address stored in array. In fact, you aren’t breaking the rule at all.Remember that the pass-by-value mechanism makes a copy of the original array address and passes thatto the function, so you are just modifying the copy here — the original array address is quite unaffected.As a result, whenever you pass a one-dimensional array to a function, you are free to treat the value passedas a pointer in every sense, and change the address in any way that you want.
Passing Multidimensional Arrays to a FunctionPassing a multidimensional array to a function is quite straightforward. The following statementdeclares a two dimensional array, beans:
double beans[2][4];
You could then write the prototype of a hypothetical function, yield(), like this:
double yield(double beans[2][4]);
You may be wondering how the compiler can know that this is defining an array of the dimensionsshown as an argument, and not a single array element. The answer is simple — you can’t write a single array element as a parameter in a function definition or prototype, although you can pass one as an argument when you call a function. For a parameter accepting a single element of an array as an argument, the parameter would have just a variable name. The array context doesn’t apply.
253
Chapter 5: Introducing Structure into Your Programs
25905c05.qxd:WroxPro 2/21/08 8:48 AM Page 253

When you are defining a multi-dimensional array as a parameter, you can also omit the first dimensionvalue. Of course, the function needs some way of knowing the extent of the first dimension. For example,you could write this:
double yield(double beans[][4], int index);
Here, the second parameter would provide the necessary information about the first dimension. Thefunction can operate with a two-dimensional array with the value for the first dimension specified bythe second argument to the function and with the second dimension fixed at 4.
Try It Out Passing Multidimensional ArraysYou define such a function in the following example:
// Ex5_06.cpp// Passing a two-dimensional array to a function#include <iostream>using std::cout;using std::endl;
double yield(double array[][4], int n);
int main(void){
double beans[3][4] = { { 1.0, 2.0, 3.0, 4.0 },{ 5.0, 6.0, 7.0, 8.0 },{ 9.0, 10.0, 11.0, 12.0 } };
cout << endl<< “Yield = “ << yield(beans, sizeof beans/sizeof beans[0]);
cout << endl;return 0;
}
// Function to compute total yielddouble yield(double beans[][4], int count){
double sum = 0.0;for(int i = 0; i < count; i++) // Loop through number of rows
for(int j = 0; j < 4; j++) // Loop through elements in a rowsum += beans[i][j];
return sum;}
The output from this example is:
Yield = 78
How It WorksI have used different names for the parameters in the function header from those in the prototype, just to remind you that this is possible — but in this case, it doesn’t really improve the program at all. Thefirst parameter is defined as an array of an arbitrary number of rows, each row having four elements.
254
Chapter 5: Introducing Structure into Your Programs
25905c05.qxd:WroxPro 2/21/08 8:48 AM Page 254

You actually call the function using the array beans with three rows. The second argument is specifiedby dividing the total size of the array in bytes by the size of the first row. This evaluates to the numberof rows in the array.
The computation in the function is simply a nested for loop with the inner loop summing elements of asingle row and the outer loop repeating this for each row.
Using a pointer in a function rather than a multidimensional array as an argument doesn’t really applyparticularly well in this example. When the array is passed, it passes an address value which points toan array of four elements (a row). This doesn’t lend itself to an easy pointer operation within the func-tion. You would need to modify the statement in the nested for loop to the following:
sum += *(*(beans + i) + j);
So the computation is probably clearer in array notation.
References as Arguments to a FunctionWe now come to the second of the two mechanisms for passing arguments to a function. Specifying aparameter to a function as a reference changes the method of passing data for that parameter. The methodused is not pass-by-value, where an argument is copied before being transferred to the function, but pass-by-reference where the parameter acts as an alias for the argument passed. This eliminates any copyingand allows the function to access the caller argument directly. It also means that the de-referencing, whichis required when passing and using a pointer to a value, is also unnecessary.
Try It Out Pass-by-referenceLet’s go back to a revised version of a very simple example, Ex5_03.cpp, to see how it would workusing reference parameters:
// Ex5_07.cpp// Using a reference to modify caller arguments#include <iostream>using std::cout;using std::endl;
int incr10(int& num); // Function prototype
int main(void){
int num = 3;int value = 6;
int result = incr10(num);cout << endl
<< “incr10(num) = “ << result;
cout << endl<< “num = “ << num;
255
Chapter 5: Introducing Structure into Your Programs
25905c05.qxd:WroxPro 2/21/08 8:48 AM Page 255

result = incr10(value);cout << endl
<< “incr10(value) = “ << result;
cout << endl<< “value = “ << value;
cout << endl;return 0;
}
// Function to increment a variable by 10int incr10(int& num) // Function with reference argument{
cout << endl<< “Value received = “ << num;
num += 10; // Increment the caller argument// - confidently
return num; // Return the incremented value}
This program produces the output:
Value received = 3incr10(num) = 13num = 13Value received = 6incr10(value) = 16value = 16
How It WorksYou should find the way this works quite remarkable. This is essentially the same as Ex5_03.cpp, exceptthat the function uses a reference as a parameter. The prototype has been changed to reflect this. When thefunction is called, the argument is specified just as though it was a pass-by-value operation, so it’s used inthe same way as the earlier version. The argument value isn’t passed to the function. The function param-eter is initialized with the address of the argument, so whenever the parameter num is used in the function,it accesses the caller argument directly.
Just to reassure you that there’s nothing fishy about the use of the identifier num in main() as well as inthe function, the function is called a second time with the variable value as the argument. At first sight,this may give you the impression that it contradicts what I said was a basic property of a reference —that after declared and initialized, it couldn’t be reassigned to another variable. The reason it isn’t con-tradictory is that a reference as a function parameter is created and initialized each time the function iscalled and is destroyed when the function ends, so you get a completely new reference created each timeyou use the function.
Within the function, the value received from the calling program is displayed onscreen. Although thestatement is essentially the same as the one used to output the address stored in a pointer, because numis now a reference, you obtain the data value rather than the address.
256
Chapter 5: Introducing Structure into Your Programs
25905c05.qxd:WroxPro 2/21/08 8:48 AM Page 256
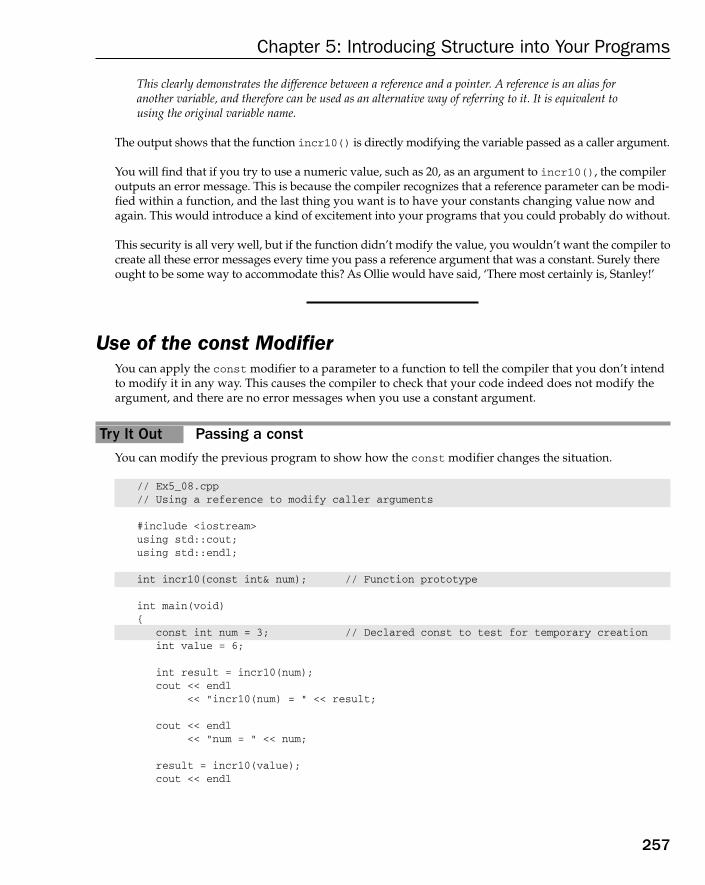
This clearly demonstrates the difference between a reference and a pointer. A reference is an alias foranother variable, and therefore can be used as an alternative way of referring to it. It is equivalent tousing the original variable name.
The output shows that the function incr10() is directly modifying the variable passed as a caller argument.
You will find that if you try to use a numeric value, such as 20, as an argument to incr10(), the compileroutputs an error message. This is because the compiler recognizes that a reference parameter can be modi-fied within a function, and the last thing you want is to have your constants changing value now andagain. This would introduce a kind of excitement into your programs that you could probably do without.
This security is all very well, but if the function didn’t modify the value, you wouldn’t want the compiler tocreate all these error messages every time you pass a reference argument that was a constant. Surely thereought to be some way to accommodate this? As Ollie would have said, ‘There most certainly is, Stanley!’
Use of the const ModifierYou can apply the const modifier to a parameter to a function to tell the compiler that you don’t intendto modify it in any way. This causes the compiler to check that your code indeed does not modify theargument, and there are no error messages when you use a constant argument.
Try It Out Passing a constYou can modify the previous program to show how the const modifier changes the situation.
// Ex5_08.cpp// Using a reference to modify caller arguments
#include <iostream>using std::cout;using std::endl;
int incr10(const int& num); // Function prototype
int main(void){
const int num = 3; // Declared const to test for temporary creationint value = 6;
int result = incr10(num);cout << endl
<< “incr10(num) = “ << result;
cout << endl<< “num = “ << num;
result = incr10(value);cout << endl
257
Chapter 5: Introducing Structure into Your Programs
25905c05.qxd:WroxPro 2/21/08 8:48 AM Page 257
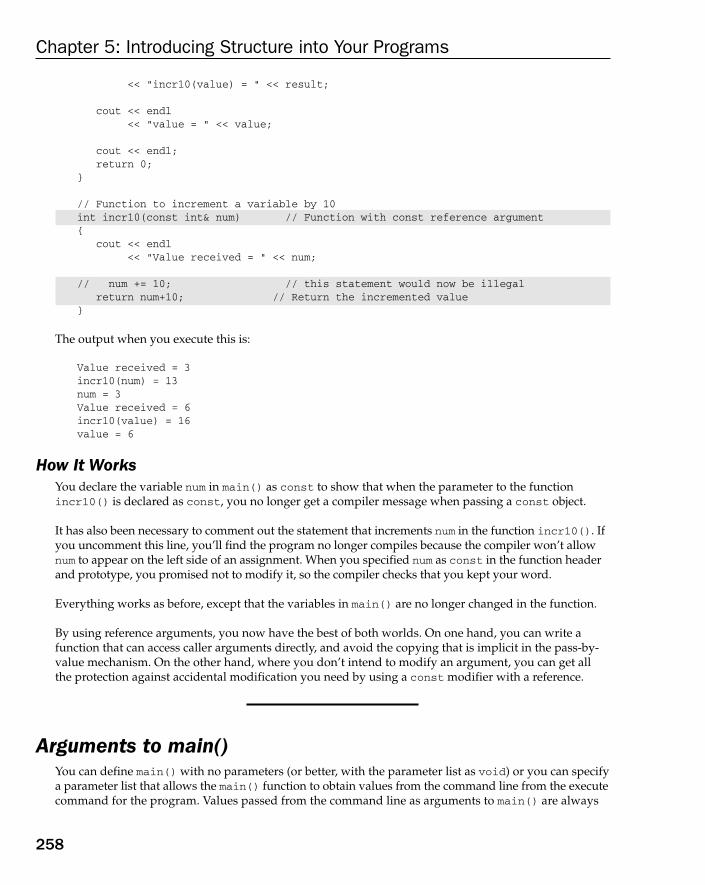
<< “incr10(value) = “ << result;
cout << endl<< “value = “ << value;
cout << endl;return 0;
}
// Function to increment a variable by 10int incr10(const int& num) // Function with const reference argument{
cout << endl<< “Value received = “ << num;
// num += 10; // this statement would now be illegalreturn num+10; // Return the incremented value
}
The output when you execute this is:
Value received = 3incr10(num) = 13num = 3Value received = 6incr10(value) = 16value = 6
How It WorksYou declare the variable num in main() as const to show that when the parameter to the functionincr10() is declared as const, you no longer get a compiler message when passing a const object.
It has also been necessary to comment out the statement that increments num in the function incr10(). Ifyou uncomment this line, you’ll find the program no longer compiles because the compiler won’t allownum to appear on the left side of an assignment. When you specified num as const in the function headerand prototype, you promised not to modify it, so the compiler checks that you kept your word.
Everything works as before, except that the variables in main() are no longer changed in the function.
By using reference arguments, you now have the best of both worlds. On one hand, you can write afunction that can access caller arguments directly, and avoid the copying that is implicit in the pass-by-value mechanism. On the other hand, where you don’t intend to modify an argument, you can get allthe protection against accidental modification you need by using a const modifier with a reference.
Arguments to main()You can define main() with no parameters (or better, with the parameter list as void) or you can specifya parameter list that allows the main() function to obtain values from the command line from the executecommand for the program. Values passed from the command line as arguments to main() are always
258
Chapter 5: Introducing Structure into Your Programs
25905c05.qxd:WroxPro 2/21/08 8:48 AM Page 258

interpreted as strings. If you want to get data into main() from the command line, you must define itlike this:
int main(int argc, char* argv[]){
// Code for main()…}
The first parameter is the count of the number of strings found on the command line including the programname, and the second parameter is an array that contains pointers to these strings plus an additional ele-ment that is null. Thus argc is always at least 1 because you at least must enter the name of the program.The number of arguments received depends on what you enter on the command line to execute the pro-gram. For example, suppose that you execute the DoThat program with the command:
DoThat.exe
There is just the name of the .exe file for the program so argc is 1 and the argv array contains two ele-ments — argv[0] pointing to the string “DoThat.exe” and argv[1] that contains null.
Suppose you enter this on the command line:
DoThat or else “my friend” 999.9
Now argc is 5 and argv contains six elements, the last element being 0 and the first five pointing to thestrings:
“DoThat” “or” “else” “my friend” “999.9”
You can see from this that if you want to have a string that includes spaces received as a single stringyou must enclose it between double quotes. You can also see that numerical values are read as stringsso if you want conversion to the numerical value that is up to you.
Let’s see it working.
Try It Out Receiving Command-Line ArgumentsThis program just lists the arguments it receives from the command line.
// Ex5_09.cpp// Reading command line arguments#include <iostream>using std::cout;using std::endl;
int main(int argc, char* argv[]){cout << endl << “argc = “ << argc << endl;cout << “Command line arguments received are:” << endl;for(int i = 0 ; i <argc ; i++)cout << “argument “ << (i+1) << “: “ << argv[i] << endl;
return 0;}
259
Chapter 5: Introducing Structure into Your Programs
25905c05.qxd:WroxPro 2/21/08 8:48 AM Page 259

You have two choices when entering the command-line arguments. After you build the example in theIDE, you can open a command window at the folder containing the .exe file and then enter the programname followed by the command-line arguments. Alternatively, you can specify the command-line argu-ments in the IDE before you execute the program. Just open the project properties window by selectingProject > Properties from the main menu and then extend the Configuration Properties tree in the left pane by clicking the plus sign (+). Click the Debugging folder to see where you can enter com-mand line values in the right pane.
I enter the following in the command window with the current directory containing the .exe file for theprogram:
Ex5_09 trying multiple “argument values” 4.5 0.0
Here is the output from resulting from my input:
argc = 6Command line arguments received are:argument 1: Ex5_09argument 2: tryingargument 3: multipleargument 4: argument valuesargument 5: 4.5argument 6: 0.0
How It WorksThe program first outputs the value of argc and then the values of each argument from the argvarray in the for loop. You can see from the output that the first argument value is the program name.“argument values” is treated as a single argument because of the enclosing double quotes.
You could make use of the fact that the last element in argv is null and code the output of the command-line argument values like this:
int i = 0;while(argv[i] != 0)cout << “argument “ << (i+1) << “: “ << argv[i++] << endl;
The while loop ends when argv[argc] is reached because that element is null.
Accepting a Variable Number of Function ArgumentsYou can define a function so that it allows any number of arguments to be passed to it. You indicate thata variable number of arguments can be supplied when a function is called by placing an ellipsis (whichis three periods, ...) at the end of the parameter list in the function definition. For example:
int sumValues(int first,...){
260
Chapter 5: Introducing Structure into Your Programs
25905c05.qxd:WroxPro 2/21/08 8:48 AM Page 260

//Code for the function}
There must be at least one ordinary parameter, but you can have more. The ellipsis must always be placedat the end of the parameter list.
Obviously there is no information about the type or number of arguments in the variable list, so your codemust figure out what is passed to the function when it is called. The native C++ library defines va_start,va_arg, and va_end macros in the <cstdarg> header to help you do this. It’s easiest to show how theseare used with an example.
Try It Out Receiving a Variable Number of ArgumentsThis program uses a function that just sums the values of a variable number of arguments passed to it.
// Ex5_10.cpp// Handling a variable number of arguments#include <iostream>#include <cstdarg>using std::cout;using std::endl;
int sum(int count, ...){if(count <= 0)return 0;
va_list arg_ptr; // Declare argument list pointerva_start(arg_ptr, count); // Set arg_ptr to 1st optional argument
int sum =0;for(int i = 0 ; i<count ; i++)sum += va_arg(arg_ptr, int); // Add int value from arg_ptr and increment
va_end(arg_ptr); // Reset the pointer to nullreturn sum;
}
int main(int argc, char* argv[]){cout << sum(6, 2, 4, 6, 8, 10, 12) << endl;cout << sum(9, 11, 22, 33, 44, 55, 66, 77, 66, 99) << endl;
}
This example produces the following output:
42473
261
Chapter 5: Introducing Structure into Your Programs
25905c05.qxd:WroxPro 2/21/08 8:48 AM Page 261

How It WorksThe main() function calls the sum() function in the two output statements, in the first instance withseven arguments and in the second with ten arguments. The first argument in each case specifies thenumber of arguments that follow. It’s important not to forget this because if you omit the first countargument, the result will be rubbish.
The sum() function has a single normal parameter of type int that represents the count of the numberof arguments that follow. The ellipsis in the parameter list indicates an arbitrary number of argumentscan be passed. Basically you have two ways of determining how many arguments there are when thefunction is called — you can require that the number of arguments is specified by a fixed parameter asin the case of sum(), or you can require that the last argument has a special marker value that you cancheck for and recognize.
To start processing the variable argument list you declare a pointer of type va_list:
va_list arg_ptr; // Declare argument list pointer
The va_list type is defined in the <cstdarg> header file and the pointer is used to point to each argu-ment in turn.
The va_start macro is used to initialize arg_ptr so that it points to the first argument in the list:
va_start(arg_ptr, count); // Set arg_ptr to 1st optional argument
The second argument to the macro is the name of the fixed parameter that precedes the ellipsis in theparameter, and this is used by the macro to determine where the first variable argument is.
You retrieve the values of the arguments in the list in the for loop:
int sum =0;for(int i = 0 ; i<count ; i++)
sum += va_arg(arg_ptr, int); // Add int value from arg_ptr and increment
The va_arg macro returns the value of the argument at the location specified by arg_ptr and incre-ments arg_ptr to point to the next argument value. The second argument to the va_arg macro is theargument type, and this determines the value that you get as well as how arg_ptr increments so if this is not correct you get chaos; the program probably executes, but the values you retrieve are rubbish andarg_ptr is incremented incorrectly to access more rubbish.
When you are finished retrieving argument values, you reset arg_ptr with the statement:
va_end(arg_ptr); // Reset the pointer to null
The va_end macro resets the pointer of type va_list that you pass as the argument to it to null. It’s agood idea to always do this because after processing the arguments arg_ptr points to a location thatdoes not contain valid data.
262
Chapter 5: Introducing Structure into Your Programs
25905c05.qxd:WroxPro 2/21/08 8:48 AM Page 262

Returning Values from a FunctionAll the example functions that you have created have returned a single value. Is it possible to return any-thing other than a single value? Well, not directly, but as I said earlier, the single value returned needn’tbe a numeric value; it could also be an address, which provides the key to returning any amount of data.You simply use a pointer. Unfortunately, this also is where the pitfalls start, so you need to keep yourwits about you for the adventure ahead.
Returning a PointerReturning a pointer value is easy. A pointer value is just an address, so if you want to return the addressof some variable value, you can just write the following:
return &value; // Returning an address
As long as the function header and function prototype indicate the return type appropriately, you haveno problem — or at least no apparent problem. Assuming that the variable value is of type double, theprototype of a function called treble, which might contain the above return statement, could be asfollows:
double* treble(double data);
I have defined the parameter list arbitrarily here.
So let’s look at a function that returns a pointer. It’s only fair that I warn you in advance — this functiondoesn’t work, but it is educational. Let’s assume that you need a function that returns a pointer to a mem-ory location containing three times its argument value. Our first attempt the implement such a functionmight look like this:
// Function to treble a value - mark 1double* treble(double data){
double result = 0.0;
result = 3.0*data;return &result;
}
Try It Out Returning a Bad PointerYou could create a little test program to see what happens (remember that the treble function won’twork as expected):
// Ex5_11.cpp#include <iostream>using std::cout;using std::endl;
double* treble(double); // Function prototype
263
Chapter 5: Introducing Structure into Your Programs
25905c05.qxd:WroxPro 2/21/08 8:48 AM Page 263
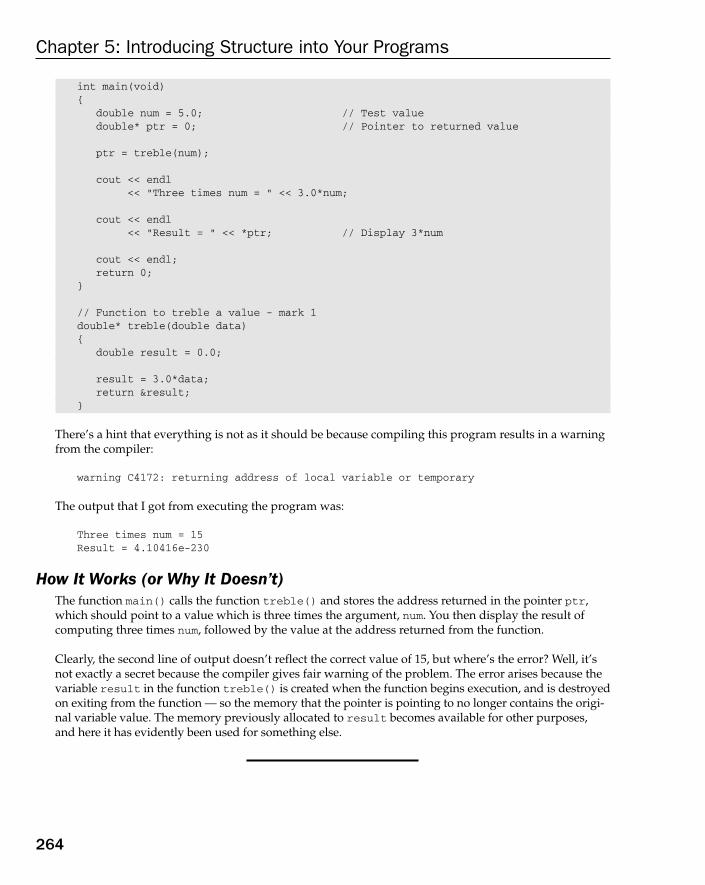
int main(void){
double num = 5.0; // Test valuedouble* ptr = 0; // Pointer to returned value
ptr = treble(num);
cout << endl<< “Three times num = “ << 3.0*num;
cout << endl<< “Result = “ << *ptr; // Display 3*num
cout << endl;return 0;
}
// Function to treble a value - mark 1double* treble(double data){
double result = 0.0;
result = 3.0*data;return &result;
}
There’s a hint that everything is not as it should be because compiling this program results in a warningfrom the compiler:
warning C4172: returning address of local variable or temporary
The output that I got from executing the program was:
Three times num = 15Result = 4.10416e-230
How It Works (or Why It Doesn’t)The function main() calls the function treble() and stores the address returned in the pointer ptr,which should point to a value which is three times the argument, num. You then display the result ofcomputing three times num, followed by the value at the address returned from the function.
Clearly, the second line of output doesn’t reflect the correct value of 15, but where’s the error? Well, it’snot exactly a secret because the compiler gives fair warning of the problem. The error arises because thevariable result in the function treble() is created when the function begins execution, and is destroyedon exiting from the function — so the memory that the pointer is pointing to no longer contains the origi-nal variable value. The memory previously allocated to result becomes available for other purposes,and here it has evidently been used for something else.
264
Chapter 5: Introducing Structure into Your Programs
25905c05.qxd:WroxPro 2/21/08 8:48 AM Page 264

A Cast Iron Rule for Returning AddressesThere is an absolutely cast iron rule for returning addresses:
Never ever return the address of a local automatic variable from a function.
You obviously can’t use a function that doesn’t work, so what can you do to rectify that? You could use areference parameter and modify the original variable, but that’s not what you set out to do. You are try-ing to return a pointer to some useful data so that, ultimately, you can return more than a single item ofdata. One answer lies in dynamic memory allocation (you saw this in action in the last chapter). With theoperator new, you can create a new variable in the free store that continues to exist until it is eventuallydestroyed by delete — or until the program ends. With this approach, the function looks like this:
// Function to treble a value - mark 2double* treble(double data){
double* result = new double(0.0);*result = 3.0*data;return result;
}
Rather than declaring result as of type double, you now declare it to be of type double* and store in it the address returned by the operator new. Because the result is a pointer, the rest of the function ischanged to reflect this, and the address contained in the result is finally returned to the calling program.You could exercise this version by replacing the function in the last working example with this version.
You need to remember that with dynamic memory allocation from within a native C++ function such as this, more memory is allocated each time the function is called. The onus is on the calling program todelete the memory when it’s no longer required. It’s easy to forget to do this in practice, with the resultthat the free store is gradually eaten up until, at some point, it is exhausted and the program fails. Asmentioned before, this sort of problem is referred to as a memory leak.
Here you can see how the function would be used. The only necessary change to the original code is touse delete to free the memory as soon as you have finished with the pointer returned by the treble()function.
#include <iostream>
using std::cout;using std::endl;
double* treble(double); // Function prototype
int main(void){
double num = 5.0; // Test valuedouble* ptr = 0; // Pointer to returned value
ptr = treble(num);
cout << endl
265
Chapter 5: Introducing Structure into Your Programs
25905c05.qxd:WroxPro 2/21/08 8:48 AM Page 265

<< “Three times num = “ << 3.0*num;
cout << endl<< “Result = “ << *ptr; // Display 3*num
delete ptr; // Don’t forget to free the memory
cout << endl;return 0;
}
// Function to treble a value - mark 2double* treble(double data){
double* result = new double(0.0);*result = 3.0*data;return result;
}
Returning a ReferenceYou can also return a reference from a function. This is just as fraught with potential errors as returning apointer, so you need to take care with this too. Because a reference has no existence in its own right (it’salways an alias for something else), you must be sure that the object that it refers to still exists after thefunction completes execution. It’s very easy to forget this when you use references in a function becausethey appear to be just like ordinary variables.
References as return types are of primary significance in the context of object-oriented programming. Asyou will see later in the book, they enable you to do things that would be impossible without them. (Thisparticularly applies to “operator overloading,” which I’ll come to in Chapter 8). The principal characteristicof a reference-type return value is that it’s an lvalue. This means that you can use the result of a functionthat returns a reference on the left side of an assignment statement.
Try It Out Returning a ReferenceNext, look at one example that illustrates the use of reference return types, and also demonstrates how a function can be used on the left of an assignment operation when it returns an lvalue. This exampleassumes that you have an array containing a mixed set of values. Whenever you want to insert a newvalue into the array, you want to replace the element with the lowest value.
// Ex5_12.cpp// Returning a reference#include <iostream>#include <iomanip>using std::cout;using std::endl;using std::setw;
double& lowest(double values[], int length); // Prototype of function// returning a reference
int main(void){
266
Chapter 5: Introducing Structure into Your Programs
25905c05.qxd:WroxPro 2/21/08 8:48 AM Page 266
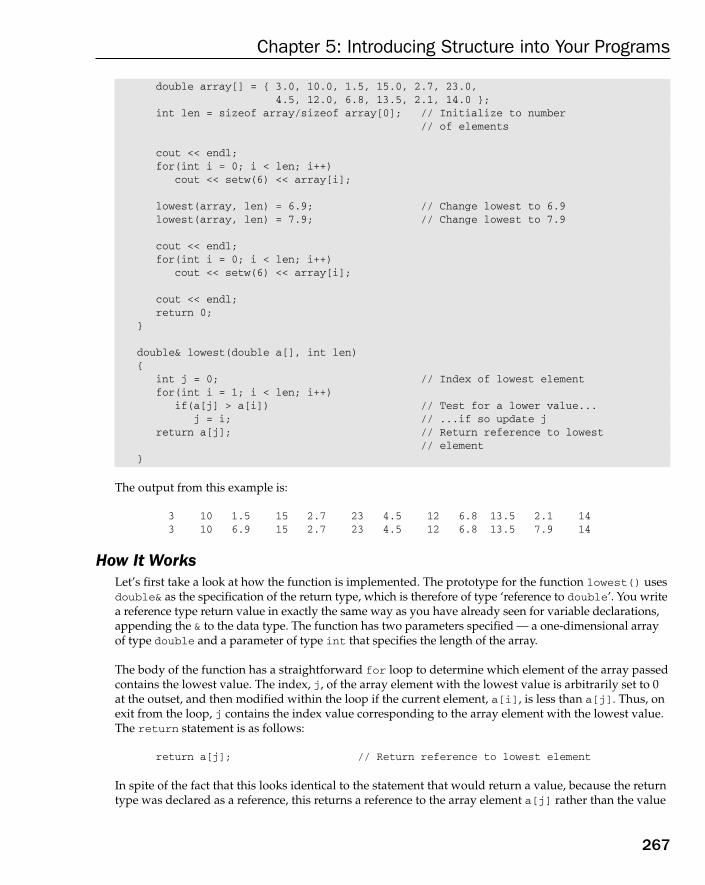
double array[] = { 3.0, 10.0, 1.5, 15.0, 2.7, 23.0,4.5, 12.0, 6.8, 13.5, 2.1, 14.0 };
int len = sizeof array/sizeof array[0]; // Initialize to number// of elements
cout << endl;for(int i = 0; i < len; i++)
cout << setw(6) << array[i];
lowest(array, len) = 6.9; // Change lowest to 6.9lowest(array, len) = 7.9; // Change lowest to 7.9
cout << endl;for(int i = 0; i < len; i++)
cout << setw(6) << array[i];
cout << endl;return 0;
}
double& lowest(double a[], int len){
int j = 0; // Index of lowest elementfor(int i = 1; i < len; i++)
if(a[j] > a[i]) // Test for a lower value...j = i; // ...if so update j
return a[j]; // Return reference to lowest// element
}
The output from this example is:
3 10 1.5 15 2.7 23 4.5 12 6.8 13.5 2.1 143 10 6.9 15 2.7 23 4.5 12 6.8 13.5 7.9 14
How It WorksLet’s first take a look at how the function is implemented. The prototype for the function lowest() usesdouble& as the specification of the return type, which is therefore of type ‘reference to double’. You writea reference type return value in exactly the same way as you have already seen for variable declarations,appending the & to the data type. The function has two parameters specified — a one-dimensional arrayof type double and a parameter of type int that specifies the length of the array.
The body of the function has a straightforward for loop to determine which element of the array passedcontains the lowest value. The index, j, of the array element with the lowest value is arbitrarily set to 0at the outset, and then modified within the loop if the current element, a[i], is less than a[j]. Thus, onexit from the loop, j contains the index value corresponding to the array element with the lowest value.The return statement is as follows:
return a[j]; // Return reference to lowest element
In spite of the fact that this looks identical to the statement that would return a value, because the returntype was declared as a reference, this returns a reference to the array element a[j] rather than the value
267
Chapter 5: Introducing Structure into Your Programs
25905c05.qxd:WroxPro 2/21/08 8:48 AM Page 267

that the element contains. The address of a[j] is used to initialize the reference to be returned. This ref-erence is created by the compiler because the return type was declared as a reference.
Don’t confuse returning &a[j] with returning a reference. If you write &a[j] as the return value, youare specifying the address of a[j], which is a pointer. If you do this after having specified the return typeas a reference, you get an error message from the compiler. Specifically, you get this:
error C2440: ‘return’ : cannot convert from ‘double *__w64 ‘ to ‘double &’
The function main(), which exercises the lowest()function, is very simple. An array of type double isdeclared and initialized with 12 arbitrary values, and an int variable len is initialized to the length ofthe array. The initial values in the array are output for comparison purposes.
Again, the program uses the stream manipulator setw() to space the values uniformly, requiring the#include directive for <iomanip>.
The function main() then calls the function lowest() on the left side of an assignment to change thelowest value in the array. This is done twice to show that it does actually work and is not an accident.The contents of the array are then output to the display again, with the same field width as before, socorresponding values line up.
As you can see from the output with the first call to lowest(), the third element of the array, array[2],contained the lowest value, so the function returned a reference to it and its value was changed to 6.9.Similarly, on the second call, array[10] was changed to 7.9. This demonstrates quite clearly that return-ing a reference allows the use of the function on the left side of an assignment statement. The effect is asif the variable specified in the return statement appeared on the left of the assignment.
Of course, if you want to, you can also use it on the right side of an assignment, or in any other suitableexpression. If you had two arrays, X and Y, with the number of array elements specified by lenx andleny respectively, you could set the lowest element in the array x to twice the lowest element in thearray y with this statement:
lowest(x, lenx) = 2.0*lowest(y, leny);
This statement would call your lowest()function twice — once with arguments y and leny in the expres-sion on the right side of the assignment and once with arguments x and lenx to obtain the address wherethe result of the right-hand expression is to be stored.
A Teflon-Coated Rule: Returning ReferencesA similar rule to the one concerning the return of a pointer from a function also applies to returning references:
Never ever return a reference to a local variable from a function.
I’ll leave the topic of returning a reference from a function for now, but I haven’t finished with it yet. Iwill come back to it again in the context of user-defined types and object-oriented programming, whenyou will unearth a few more magical things that you can do with references.
268
Chapter 5: Introducing Structure into Your Programs
25905c05.qxd:WroxPro 2/21/08 8:48 AM Page 268
Static Variables in a FunctionThere are some things you can’t do with automatic variables within a function. You can’t count howmany times a function is called, for example, because you can’t accumulate a value from one call to thenext. There’s more than one way to get around this if you need to. For instance, you could use a referenceparameter to update a count in the calling program, but this wouldn’t help if the function was called fromlots of different places within a program. You could use a global variable that you incremented from withinthe function, but globals are risky things to use, as they can be accessed from anywhere in a program, whichmakes it very easy to change them accidentally.
Global variables are also risky in applications that have multiple threads of execution that access them,and you must take special care to manage how the globals are accessed from different threads. The basicproblem that has to be addressed when more than one thread can access a global variable is that onethread can change the value of a global variable while another thread is working with it. The best solu-tion in such circumstances is to avoid the use of global variables altogether.
To create a variable whose value persists from one call of a function to the next, you can declare a variablewithin a function as static. You use exactly the same form of declaration for a static variable that yousaw in Chapter 2. For example, to declare a variable count as static you could use this statement:
static int count = 0;
This also initializes the variable to zero.
Initialization of a static variable within a function only occurs the first time that the function is called.In fact, on the first call of a function, the static variable is created and initialized. It then continues toexist for the duration of program execution, and whatever value it contains when the function is exitedis available when the function is next called.
Try It Out Using Static Variables in FunctionsYou can demonstrate how a static variable behaves in a function with the following simple example:
// Ex5_13.cpp// Using a static variable within a function#include <iostream>using std::cout;using std::endl;
void record(void); // Function prototype, no arguments or return value
int main(void){
record();
for(int i = 0; i <= 3; i++)record();
cout << endl;return 0;
269
Chapter 5: Introducing Structure into Your Programs
25905c05.qxd:WroxPro 2/21/08 8:48 AM Page 269

}
// A function that records how often it is calledvoid record(void){
static int count = 0;cout << endl
<< “This is the “ << ++count;if((count > 3) && (count < 21)) // All this....
cout <<”th”;else
switch(count%10) // is just to get...{
case 1: cout << “st”;break;
case 2: cout << “nd”;break;
case 3: cout << “rd”;break;
default: cout << “th”; // the right ending for...} // 1st, 2nd, 3rd, 4th, etc.
cout << “ time I have been called”;return;
}
Our function here serves only to record the fact that it was called. If you build and execute it, you getthis output:
This is the 1st time I have been calledThis is the 2nd time I have been calledThis is the 3rd time I have been calledThis is the 4th time I have been calledThis is the 5th time I have been called
How It WorksYou initialize the static variable count with 0 and increment it in the first output statement in the function.Because the increment operation is prefixed, the incremented value is displayed by the output statement. It will be 1 on the first call, 2 on the second, and so on. Because the variable count is static, it continues toexist and retain its value from one call of the function to the next.
The remainder of the function is concerned with working out when ‘st’, ‘nd’, ‘rd’, or ‘th’ should beappended to the value of count that is displayed. It’s surprisingly irregular. (I guess 101 should be101st rather than 101th, shouldn’t it?)
Note the return statement. Because the return type of the function is void, to include a value wouldcause a compiler error. You don’t actually need to put a return statement in this particular case as run-ning off the closing brace for the body of the function is equivalent to the return statement without avalue. The program would compile and run without error even if you didn’t include the return.
270
Chapter 5: Introducing Structure into Your Programs
25905c05.qxd:WroxPro 2/21/08 8:48 AM Page 270

Recursive Function CallsWhen a function contains a call to itself it’s referred to as a recursive function. A recursive function callcan also be indirect, where a function fun1 calls a function fun2, which in turn calls fun1.
Recursion may seem to be a recipe for an indefinite loop, and if you aren’t careful it certainly can be. Anindefinite loop will lock up your machine and require Ctrl+Alt+Del to end the program, which is alwaysa nuisance. A prerequisite for avoiding an indefinite loop is that the function contains some means ofstopping the process.
Unless you have come across the technique before, the sort of things to which recursion may be appliedmay not be obvious. In physics and mathematics there are many things that can be thought of as involv-ing recursion. A simple example is the factorial of an integer which for a given integer N, is the product1x2x3...xN. This is very often the example given to show recursion in operation. Recursion can also beapplied to the analysis of programs during the compilation process; however, you will look at somethingeven simpler.
Try It Out A Recursive FunctionAt the start of this chapter (see Ex5_01.cpp), you produced a function to compute the integral powerof a value, that is, to compute xn. This is equivalent to x multiplied by itself n times. You can implementthis as a recursive function as an elementary illustration of recursion in action. You can also improve theimplementation of the function to deal with negative index values, where x-n is equivalent to 1/xn.
// Ex5_14.cpp (based on Ex5_01.cpp)// A recursive version of x to the power n#include <iostream>using std::cout;using std::endl;
double power(double x, int n); // Function prototype
int main(void){double x = 2.0; // Different x from that in function powerdouble result = 0.0;
// Calculate x raised to powers -3 to +3 inclusivefor(int index = -3 ; index<=3 ; index++)cout << x << “ to the power “ << index << “ is “ << power(x, index)<< endl;
return 0;}
// Recursive function to compute integral powers of a double value// First argument is value, second argument is power indexdouble power(double x, int n){
if(n < 0)
271
Chapter 5: Introducing Structure into Your Programs
25905c05.qxd:WroxPro 2/21/08 8:48 AM Page 271

{x = 1.0/x;n = -n;
}if(n > 0)
return x*power(x, n-1);else
return 1.0;}
The output from this program is:
2 to the power -3 is 0.1252 to the power -2 is 0.252 to the power -1 is 0.52 to the power 0 is 12 to the power 1 is 22 to the power 2 is 42 to the power 3 is 8
How It WorksThe function now supports positive and negative powers of x, so the first action is to check whether thevalue for the power that x is to be raised to, n, is negative:
if(n < 0){
x = 1.0/x;n = -n;
}
Supporting negative powers is easy; it just uses the fact that x-n can be evaluated as (1/x)n. Thus if n isnegative, you set x to be 1.0/x and change the sign of n so it’s positive.
The next if statement decides whether or not the power() function should call itself once more:
if(n > 0)return x*power(x, n-1);
elsereturn 1.0;
The if statement provides for the value 1.0 being returned if n is zero, and in all other cases it returnsthe result of the expression, x*power(x, n-1). This causes a further call to the function power() withthe index value reduced by 1. Thus the else clause in the if statement provides the essential mecha-nism necessary to avoid an indefinite sequence of recursive function calls.
Clearly, within the function power(), if the value of n is other than zero, a further call to the functionpower()occurs. In fact, for any given value of n other than 0, the function calls itself n times, ignoringthe sign of n. The mechanism is illustrated in Figure 5-4, where the value 3 for the index argument isassumed.
272
Chapter 5: Introducing Structure into Your Programs
25905c05.qxd:WroxPro 2/21/08 8:48 AM Page 272

Figure 5-4
As you see, the power() function is called a total of four times to generate x3, three of the calls beingrecursive where the function is calling itself.
Using RecursionUnless you have a problem that particularly lends itself to using recursive functions, or if you have noobvious alternative, it’s generally better to use a different approach, such as a loop. This is much moreefficient than using recursive function calls. Think about what happens with our last example to evaluatea simple product, x*x*...x, n times. On each call, the compiler generates copies of the two arguments tothe function, and also has to keep track of the location to return to when each return is executed. It’s alsonecessary to arrange to save the contents of various registers in your computer so that they can be usedwithin the function power(), and of course these need to be restored to their original state at each returnfrom the function. With a quite modest depth of recursive call, the overhead can be considerably greaterthan if you use a loop.
double power( double x, int n ) { ... return x*power( x , n - 1 ); ... }
x*x*x
Result: x3 power( x , 3 )
x*x
x
1.0
double power( double x, int n ) { ... return x*power( x , n - 1 ); ... }
double power( double x, int n ) { ... return x*power( x , n - 1 ); ... }
double power( double x, int n ) { ... return 1.0; ... }
2
1
0
273
Chapter 5: Introducing Structure into Your Programs
25905c05.qxd:WroxPro 2/21/08 8:48 AM Page 273

This is not to say you should never use recursion. Where the problem suggests the use of recursive func-tion calls as a solution, it can be an immensely powerful technique, greatly simplifying the code. You’llsee an example where this is the case in the next chapter.
C++/CLI ProgrammingFor the most part, functions in a C++/CLI program work in exactly the same way as in a native program.Of course, you deal in handles and tracking references when programming for the CLR, not native pointersand references, and that introduces some differences. There are a few other things that are a little different,so let’s itemize them.
❑ Function parameters and return values in a CLR program can be value class types, trackinghandles, tracking references, and interior pointers.
❑ When a parameter is an array there no need to have a separate parameter for the size of thearray because C++/CLI arrays have the size built into the Length property.
❑ You cannot do address arithmetic with array parameters in a C++/CLI program as you can in a native C++ program so you must always use array indexing.
❑ Returning a handle to memory you have allocated on the CLR heap is not a problem becausethe garbage collector takes care of releasing the memory when it is no longer in use.
❑ The mechanism for accepting a variable number of arguments in C++/CLI is different from thenative C++ mechanism.
❑ Accessing command line arguments in main() in a C++/CLI program is also different from thenative C++ mechanism.
Let’s look at the last two differences in more detail.
Functions Accepting a Variable Number of ArgumentsThe C++/CLI language provides for a variable number of arguments by allowing you to specify theparameter list as an array with the array specification preceded by an ellipsis. Here’s an example of afunction with this parameter list:
int sum(... array<int>^ args){// Code for sum
}
The sum() function here accepts any number of arguments of type int. To process the arguments youjust access the elements of the array args. Because it is a CLR array, the number of elements is recordedas its Length property, so you have no problem determining the number of arguments in the body of the function. This mechanism is also an improvement over the native C++ mechanism you saw earlierbecause it is type-safe. The arguments clearly have to be of type int to be accepted by this function.Let’s try a variation on Ex5_10 to see the CLR mechanism working.
274
Chapter 5: Introducing Structure into Your Programs
25905c05.qxd:WroxPro 2/21/08 8:48 AM Page 274

Try It Out A Variable Number of Function ArgumentsHere’s the code for this CLR project.
// Ex5_15.cpp : main project file.// Passing a variable number of arguments to a function
#include “stdafx.h”
using namespace System;
double sum(... array<double>^ args){double sum = 0.0;for each(double arg in args)sum += arg;
return sum;}
int main(array<System::String ^> ^args){Console::WriteLine(sum(2.0, 4.0, 6.0, 8.0, 10.0, 12.0));Console::WriteLine(sum(1.1, 2.2, 3.3, 4.4, 5.5, 6.6, 7.7, 8.8, 9.9));return 0;
}
This example produces the following output:
4249.5
How It WorksThe sum() function here has been implemented to accept arguments of type double. The ellipsis preced-ing the array parameter tells the compiler to expect an arbitrary number of arguments and the argumentvalues should be stored in an array of elements of type double. Of course, without the ellipsis, the func-tion would expect just one argument when it was called that was a tracking handle for an array.
Compared to the native version in Ex5_10 the definition of the sum() function is remarkably simple. Allthe problems associated with the type and the number of arguments have disappeared in the C++/CLIversion. The sum is accumulated in a simple for each loop that iterates over all the elements in the array.
Arguments to main()You can see from the previous example that there is only one parameter to the main() function in aC++/CLI program and it is an array of elements of type String^. Accessing and processing command-line arguments in a C++/CLI program boils down to just accessing the elements in the array parameter.You can try it out.
275
Chapter 5: Introducing Structure into Your Programs
25905c05.qxd:WroxPro 2/21/08 8:48 AM Page 275

Try It Out Accessing Command-Line ArgumentsHere’s a C++/CLI version of Ex5_09.
// Ex5_16.cpp : main project file.// Receiving multiple command liner arguments.
#include “stdafx.h”
using namespace System;
int main(array<System::String ^> ^args){Console::WriteLine(L”There were {0} command line arguments.”,args->Length);
Console::WriteLine(L”Command line arguments received are:”);int i = 1;
for each(String^ str in args)Console::WriteLine(L”Argument {0}: {1}”, i++, str);
return 0;}
You can enter the command-line arguments in the command window or through the project propertieswindow as described earlier in the chapter. I entered the following on the command line:
Ex5_16 trying multiple “argument values” 4.5 0.0
I got the following output:
There were 5 command line arguments.Command line arguments received are:Argument 1: tryingArgument 2: multipleArgument 3: argument valuesArgument 4: 4.5Argument 5: 0.0
How It WorksFrom the output, you can see that one difference between this and the native C++ version is that youdon’t get the program name passed to main() as an argument — not really a great disadvantage, reallya positive feature in most circumstances. Accessing the command-line arguments is now a trivial exerciseinvolving just iterating through the elements in the args array.
276
Chapter 5: Introducing Structure into Your Programs
25905c05.qxd:WroxPro 2/21/08 8:48 AM Page 276

SummaryIn this chapter, you learned about the basics of program structure. You should have a good grasp of howfunctions are defined, how data can be passed to a function, and how results are returned to a callingprogram. Functions are fundamental to programming in C++, so everything you do from here on willinvolve using multiple functions in a program. The key points that you should keep in mind aboutwriting your own functions are these:
❑ Functions should be compact units of code with a well-defined purpose. A typical program willconsist of a large number of small functions, rather than a small number of large functions.
❑ Always provide a function prototype for each function defined in your program, positionedbefore you call that function.
❑ Passing values to a function using a reference can avoid the copying implicit in the call-by-valuetransfer of arguments. Parameters that are not modified in a function should be specified as const.
❑ When returning a reference or a pointer from a native C++ function, ensure that the object beingreturned has the correct scope. Never return a pointer or a reference to an object that is local to anative C++ function.
❑ In a C++/CLI program there is no problem with returning a handle to memory that has beenallocated dynamically because the garbage collector takes care of deleting it when it is no longerrequired.
❑ When you pass a C++/CLI array to a function, there is no need for another parameter for thelength of the array, as the number of elements is available in the function body as the Lengthproperty for the array.
The use of references as arguments is a very important concept, so make sure you are confident aboutusing them. You’ll see a lot more about references as arguments to functions when you look into object-oriented programming.
ExercisesYou can download the source code for the examples in the book and the solutions to the following exercisesfrom www.wrox.com.
1. The factorial of 4 (written as 4!) is 4*3*2*1 = 24, and 3! is 3*2*1 = 6, so it follows that 4! = 4*3!, ormore generally:
fact(n) = n*fact(n - 1)
The limiting case is when n is 1, in which case 1! = 1. Write a recursive function that calculatesfactorials, and test it.
277
Chapter 5: Introducing Structure into Your Programs
25905c05.qxd:WroxPro 2/21/08 8:48 AM Page 277
2. Write a function that swaps two integers, using pointers as arguments. Write a program thatuses this function and test that it works correctly.
3. The trigonometry functions (sin(), cos(), and tan()) in the standard <cmath> library takearguments in radians. Write three equivalent functions, called sind(), cosd(), and tand(),which take arguments in degrees. All arguments and return values should be type double.
4. Write a native C++ program that reads a number (an integer) and a name (less than 15 charac-ters) from the keyboard. Design the program so that the data entry is done in one function, andthe output in another. Keep the data in the main program. The program should end when zerois entered for the number. Think about how you are going to pass the data between functions —by value, by pointer, or by reference?
5. (Advanced) Write a function that, when passed a string consisting of words separated by singlespaces, returns the first word; calling it again with an argument of NULL returns the second word,and so on, until the string has been processed completely, when NULL is returned. This is a sim-plified version of the way the native C++ run-time library routine strtok() works. So, whenpassed the string ‘one two three’, the function returns you ‘one’, then ‘two’, and finally ‘three’.Passing it a new string results in the current string being discarded before the function starts onthe new string.
278
Chapter 5: Introducing Structure into Your Programs
25905c05.qxd:WroxPro 2/21/08 8:48 AM Page 278
6More about
Program Structure
In the previous chapter, you learned about the basics of defining functions and the various ways inwhich data can be passed to a function. You also saw how results are returned to a calling program.
In this chapter, you will explore the further aspects of how functions can be put to good use,including:
❑ What a pointer to a function is
❑ How to define and use pointers to functions
❑ How to define and use arrays of pointers to functions
❑ What an exception is and how to write exception handlers that deal with them
❑ How to write multiple functions with a single name to handle different kinds of dataautomatically
❑ What function templates are and how you define and use them
❑ How to write a substantial native C++ program example using several functions
❑ What generic functions are in C++/CLI
❑ How to write a substantial C++/CLI program example using several functions
Pointers to FunctionsA pointer stores an address value that, up to now, has been the address of another variable with thesame basic type as the pointer. This has provided considerable flexibility in allowing you to use dif-ferent variables at different times through a single pointer. A pointer can also point to the addressof a function. This enables you to call a function through a pointer, which will be the function atthe address that was last assigned to the pointer.
25905c06.qxd:WroxPro 2/21/08 8:49 AM Page 279
Obviously, a pointer to a function must contain the memory address of the function that you want to call.To work properly, however, the pointer must also maintain information about the parameter list for thefunction it points to, as well as the return type. Therefore, when you declare a pointer to a function, youhave to specify the parameter types and the return type of the functions that it can point to, in addition to the name of the pointer. Clearly, this is going to restrict what you can store in a particular pointer to afunction. If you have declared a pointer to functions that accept one argument of type int and return avalue of type double, you can only store the address of a function that has exactly the same form. If youwant to store the address of a function that accepts two arguments of type int and returns type char, you must define another pointer with these characteristics.
Declaring Pointers to FunctionsYou can declare a pointer pfun that you can use to point to functions that take two arguments, of typechar* and int, and return a value of type double. The declaration would be as follows:
double (*pfun)(char*, int); // Pointer to function declaration
At first you may find that the parentheses make this look a little weird. This statement declares a pointerwith the name pfun that can point to functions that accept two arguments of type pointer to char and of type int, and return a value of type double. The parentheses around the pointer name, pfun, and theasterisk are necessary; without them, the statement would be a function declaration rather than a pointerdeclaration. In this case, it would look like this:
double *pfun(char*, int); // Prototype for a function// returning type double*
This statement is a prototype for a function pfun() that has two parameters, and returns a pointer to adouble value. Because you intended to declare a pointer, this is clearly not what you want at the moment.
The general form of a declaration of a pointer to a function looks like this:
return_type (*pointer_name)(list_of_parameter_types);
The pointer can only point to functions with the same return_type andlist_of_parameter_types specified in the declaration.
This shows that the declaration of a pointer to a function consists of three components:
❑ The return type of the functions that can be pointed to
❑ The pointer name preceded by an asterisk to indicate it is a pointer
❑ The parameter types of the functions that can be pointed to
If you attempt to assign a function to a pointer that does not conform to the types in the pointer declara-tion, the compiler generates an error message.
280
Chapter 6: More about Program Structure
25905c06.qxd:WroxPro 2/21/08 8:49 AM Page 280
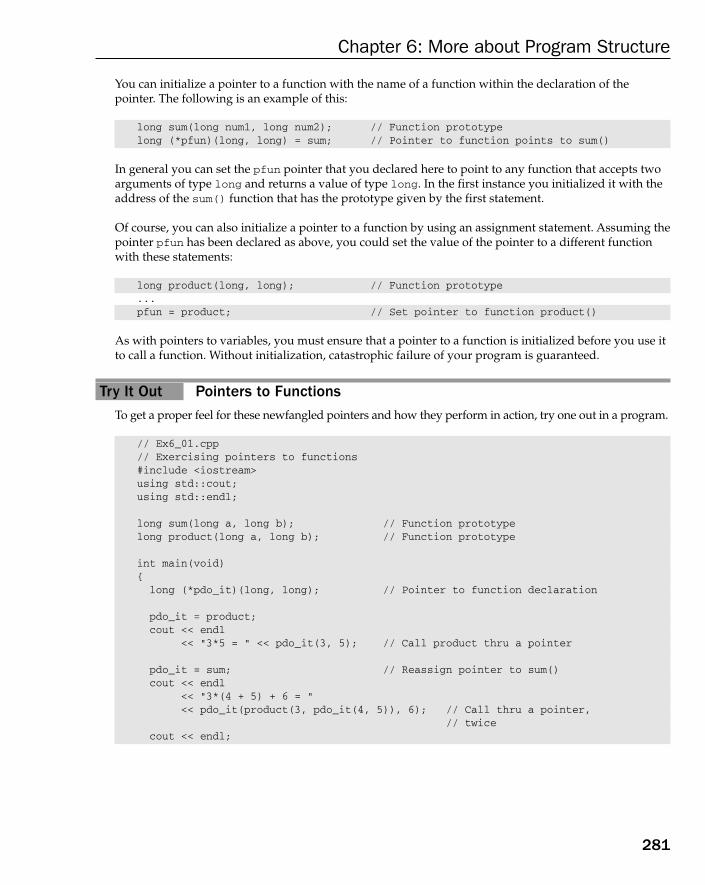
You can initialize a pointer to a function with the name of a function within the declaration of thepointer. The following is an example of this:
long sum(long num1, long num2); // Function prototypelong (*pfun)(long, long) = sum; // Pointer to function points to sum()
In general you can set the pfun pointer that you declared here to point to any function that accepts twoarguments of type long and returns a value of type long. In the first instance you initialized it with theaddress of the sum() function that has the prototype given by the first statement.
Of course, you can also initialize a pointer to a function by using an assignment statement. Assuming thepointer pfun has been declared as above, you could set the value of the pointer to a different functionwith these statements:
long product(long, long); // Function prototype...pfun = product; // Set pointer to function product()
As with pointers to variables, you must ensure that a pointer to a function is initialized before you use itto call a function. Without initialization, catastrophic failure of your program is guaranteed.
Try It Out Pointers to FunctionsTo get a proper feel for these newfangled pointers and how they perform in action, try one out in a program.
// Ex6_01.cpp// Exercising pointers to functions#include <iostream>using std::cout;using std::endl;
long sum(long a, long b); // Function prototypelong product(long a, long b); // Function prototype
int main(void){long (*pdo_it)(long, long); // Pointer to function declaration
pdo_it = product;cout << endl
<< “3*5 = “ << pdo_it(3, 5); // Call product thru a pointer
pdo_it = sum; // Reassign pointer to sum()cout << endl
<< “3*(4 + 5) + 6 = “<< pdo_it(product(3, pdo_it(4, 5)), 6); // Call thru a pointer,
// twicecout << endl;
281
Chapter 6: More about Program Structure
25905c06.qxd:WroxPro 2/21/08 8:49 AM Page 281

return 0;}
// Function to multiply two valueslong product(long a, long b){return a*b;
}
// Function to add two valueslong sum(long a, long b){return a + b;
}
This example produces the output:
3*5 = 153*(4 + 5) + 6 = 33
How It WorksThis is hardly a useful program, but it does show very simply how a pointer to a function is declared,assigned a value, and subsequently used to call a function.
After the usual preamble, you declare a pointer to a function, pdo_it, which can point to either of theother two functions that you have defined, sum() or product(). The pointer is given the address of the function product() in this assignment statement:
pdo_it = product;
You just supply the name of the function as the initial value for the pointer and no parentheses or otheradornments are required. The function name is automatically converted to an address, which is stored in the pointer.
The function product() is called indirectly through the pointer pdo_it in the output statement.
cout << endl<< “3*5 = “ << pdo_it(3, 5); // Call product thru a pointer
You use the name of the pointer just as if it was a function name, followed by the arguments betweenparentheses exactly as they would appear if you were using the original function name directly.
Just to show that you can do it, you change the pointer to point to the function sum().
pdo_it = sum; // Reassign pointer to sum()
You then use it again in a ludicrously convoluted expression to do some simple arithmetic:
cout << endl<< “3*(4 + 5) + 6 = “<< pdo_it(product(3, pdo_it(4, 5)), 6); // Call thru a pointer,
// twice
282
Chapter 6: More about Program Structure
25905c06.qxd:WroxPro 2/21/08 8:49 AM Page 282

This shows that a pointer to a function can be used in exactly the same way as the function that it pointsto. The sequence of actions in the expression is shown in Figure 6-1.
Figure 6-1
A Pointer to a Function as an ArgumentBecause ‘pointer to a function’ is a perfectly reasonable type, a function can also have a parameter that isa pointer to a function. The function can then call the function pointed to by the argument. Because thepointer can be made to point at different functions in different circumstances, this allows the particularfunction that is to be called from inside a function to be determined in the calling program. In this case,you can pass a function explicitly as an argument.
Try It Out Passing a Function PointerYou can look at this with an example. Suppose you need a function that processes an array of numbers byproducing the sum of the squares of each of the numbers on some occasions, and the sum of the cubes onother occasions. One way of achieving this is by using a pointer to a function as an argument.
// Ex6_02.cpp// A pointer to a function as an argument
sum ( 4 , 5 )
sum ( 27 , 6 ) 33
product ( 3 , 9 )
pdo_it ( 27 , 6 )
pdo_it ( product ( 3 , pdo_it ( 4 , 5 ) ) , 6)
results in
results in
equivalent to
equivalent to
produces
283
Chapter 6: More about Program Structure
25905c06.qxd:WroxPro 2/21/08 8:49 AM Page 283

#include <iostream>using std::cout;using std::endl;
// Function prototypesdouble squared(double);double cubed(double);double sumarray(double array[], int len, double (*pfun)(double));
int main(void){double array[] = { 1.5, 2.5, 3.5, 4.5, 5.5, 6.5, 7.5 };int len = sizeof array/sizeof array[0];
cout << endl<< “Sum of squares = “<< sumarray(array, len, squared);
cout << endl<< “Sum of cubes = “<< sumarray(array, len, cubed);
cout << endl;return 0;
}
// Function for a square of a valuedouble squared(double x){return x*x;
}
// Function for a cube of a valuedouble cubed(double x){return x*x*x;
}
// Function to sum functions of array elementsdouble sumarray(double array[], int len, double (*pfun)(double)){double total = 0.0; // Accumulate total in here
for(int i = 0; i < len; i++)total += pfun(array[i]);
return total;}
If you compile and run this code, you should see the following output:
Sum of squares = 169.75Sum of cubes = 1015.88
284
Chapter 6: More about Program Structure
25905c06.qxd:WroxPro 2/21/08 8:49 AM Page 284

How It WorksThe first statement of interest is the prototype for the function sumarray(). Its third parameter is apointer to a function that has a parameter of type double, and returns a value of type double.
double sumarray(double array[], int len, double (*pfun)(double));
The function sumarray() processes each element of the array passed as its first argument with what-ever function is pointed to by its third argument. The function then returns the sum of the processedarray elements.
You call the function sumarray() twice in main(), the first time with the function name squaredas the third argument, and the second time using cubed. In each case, the address corresponding tothe function name that you use as the argument is substituted for the function pointer in the body of the function sumarray(), so the appropriate function is called within the for loop.
There are obviously easier ways of achieving what this example does, but using a pointer to a functionprovides you with a lot of generality. You could pass any function to sumarray() that you care to defineas long as it takes one double argument and returns a value of type double.
Arrays of Pointers to FunctionsIn the same way as with regular pointers, you can declare an array of pointers to functions. You can alsoinitialize them in the declaration. Here is an example of declaring an array of pointers.
double sum(double, double); // Function prototypedouble product(double, double); // Function prototypedouble difference(double, double); // Function prototypedouble (*pfun[3])(double,double) =
{ sum, product, difference }; // Array of function pointers
Each of the elements in the array is initialized by the corresponding function address appearing in theinitializing list between braces. To call the function product() using the second element of the pointerarray, you would write:
pfun[1](2.5, 3.5);
The square brackets that select the function pointer array element appear immediately after the array nameand before the arguments to the function being called. Of course, you can place a function call through an ele-ment of a function pointer array in any appropriate expression that the original function might legitimatelyappear in, and the index value selecting the pointer can be any expression producing a valid index value.
Initializing Function ParametersWith all the functions you have used up to now, you have had to take care to provide an argumentcorresponding to each parameter in a function call. It can be quite handy to be able to omit one or morearguments in a function call and have some default values for the arguments that you leave out sup-plied automatically. You can arrange this by initializing the parameters to a function in its prototype.
285
Chapter 6: More about Program Structure
25905c06.qxd:WroxPro 2/21/08 8:49 AM Page 285
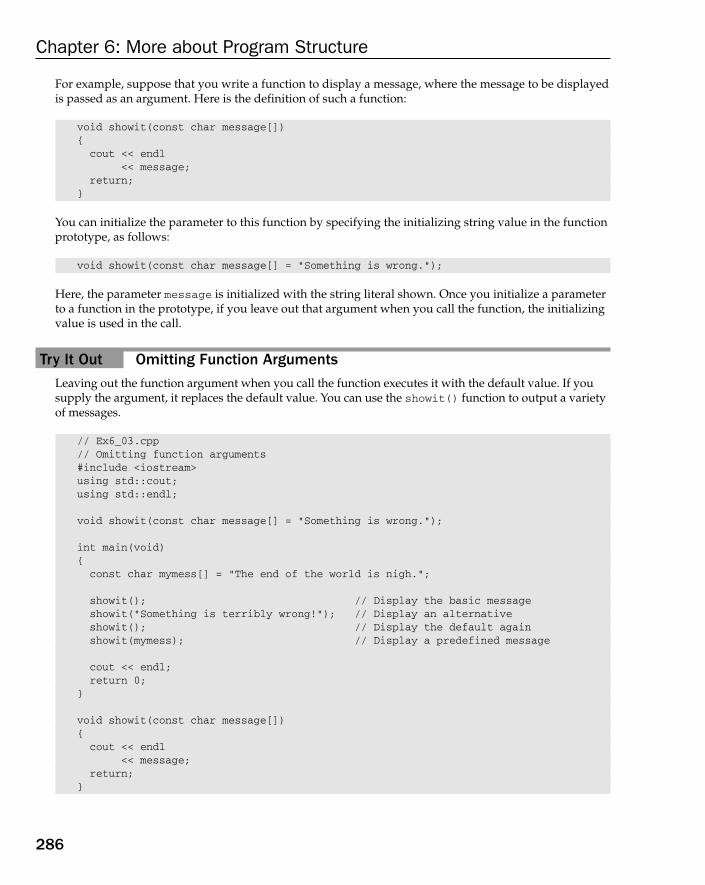
For example, suppose that you write a function to display a message, where the message to be displayedis passed as an argument. Here is the definition of such a function:
void showit(const char message[]){cout << endl
<< message;return;
}
You can initialize the parameter to this function by specifying the initializing string value in the functionprototype, as follows:
void showit(const char message[] = “Something is wrong.”);
Here, the parameter message is initialized with the string literal shown. Once you initialize a parameterto a function in the prototype, if you leave out that argument when you call the function, the initializingvalue is used in the call.
Try It Out Omitting Function ArgumentsLeaving out the function argument when you call the function executes it with the default value. If yousupply the argument, it replaces the default value. You can use the showit() function to output a varietyof messages.
// Ex6_03.cpp// Omitting function arguments#include <iostream>using std::cout;using std::endl;
void showit(const char message[] = “Something is wrong.”);
int main(void){const char mymess[] = “The end of the world is nigh.”;
showit(); // Display the basic messageshowit(“Something is terribly wrong!”); // Display an alternativeshowit(); // Display the default againshowit(mymess); // Display a predefined message
cout << endl;return 0;
}
void showit(const char message[]){cout << endl
<< message;return;
}
286
Chapter 6: More about Program Structure
25905c06.qxd:WroxPro 2/21/08 8:49 AM Page 286
If you execute this example, it produces the following apocalyptic output:
Something is wrong.Something is terribly wrong!Something is wrong.The end of the world is nigh.
How It WorksAs you can see, you get the default message specified in the function prototype whenever the argumentis left out; otherwise, the function behaves normally.
If you have a function with several arguments, you can provide initial values for as many of them as youlike. If you want to omit more than one argument to take advantage of a default value, all arguments tothe right of the leftmost argument that you omit must also be left out. For example, suppose you havethis function:
int do_it(long arg1 = 10, long arg2 = 20, long arg3 = 30, long arg4 = 40);
and you want to omit one argument in a call to it. You can omit only the last one, arg4. If you want toomit arg3, you must also omit arg4. If you omit arg2, arg3 and arg4 must also be omitted, and if youwant to use the default value for arg1, you have to omit all of the arguments in the function call.
You can conclude from this that you need to put the arguments which have default values in the functionprototype together in sequence at the end of the parameter list, with the argument most likely to be omit-ted appearing last.
ExceptionsIf you’ve had a go at the exercises that appear at the end of the previous chapters, you’ve more thanlikely come across compiler errors and warnings, as well as errors that occur while the program is running. Exceptions are a way of flagging errors or unexpected conditions that occur in your C++ programs, and you already know that the new operator throws an exception if the memory you request cannot be allocated.
So far, you have typically handled error conditions in your programs by using an if statement to testsome expression, and then executing some specific code to deal with the error. C++ also provides another,more general mechanism for handling errors that allows you to separate the code that deals with theseconditions from the code that executes when such conditions do not arise. It is important to realize thatexceptions are not intended to be used as an alternative to the normal data checking and validating thatyou might do in a program. The code that is generated when you use exceptions carries quite a bit of over-head with it, so exceptions are really intended to be applied in the context of exceptional, near catastrophicconditions that might arise, but are not normally expected to occur in the normal course of events. An errorreading from a disk might be something that you use exceptions for. An invalid data item being entered isnot a good candidate for using exceptions.
287
Chapter 6: More about Program Structure
25905c06.qxd:WroxPro 2/21/08 8:49 AM Page 287
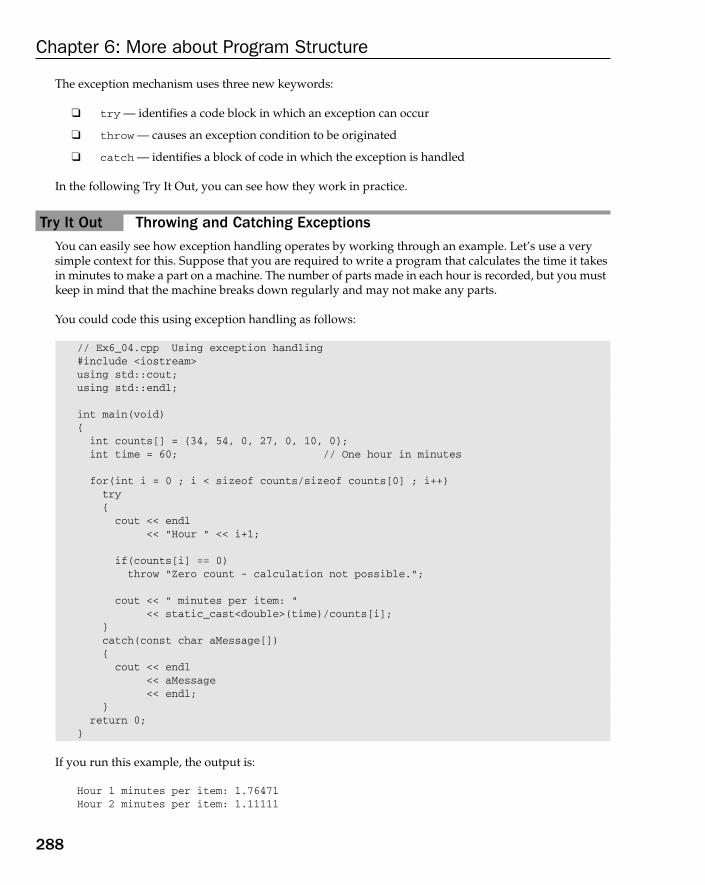
The exception mechanism uses three new keywords:
❑ try — identifies a code block in which an exception can occur
❑ throw — causes an exception condition to be originated
❑ catch — identifies a block of code in which the exception is handled
In the following Try It Out, you can see how they work in practice.
Try It Out Throwing and Catching ExceptionsYou can easily see how exception handling operates by working through an example. Let’s use a verysimple context for this. Suppose that you are required to write a program that calculates the time it takesin minutes to make a part on a machine. The number of parts made in each hour is recorded, but you mustkeep in mind that the machine breaks down regularly and may not make any parts.
You could code this using exception handling as follows:
// Ex6_04.cpp Using exception handling#include <iostream>using std::cout;using std::endl;
int main(void){int counts[] = {34, 54, 0, 27, 0, 10, 0};int time = 60; // One hour in minutes
for(int i = 0 ; i < sizeof counts/sizeof counts[0] ; i++)try{cout << endl
<< “Hour “ << i+1;
if(counts[i] == 0)throw “Zero count - calculation not possible.”;
cout << “ minutes per item: “<< static_cast<double>(time)/counts[i];
}catch(const char aMessage[]){cout << endl
<< aMessage<< endl;
}return 0;
}
If you run this example, the output is:
Hour 1 minutes per item: 1.76471Hour 2 minutes per item: 1.11111
288
Chapter 6: More about Program Structure
25905c06.qxd:WroxPro 2/21/08 8:49 AM Page 288

Hour 3Zero count - calculation not possible.
Hour 4 minutes per item: 2.22222Hour 5Zero count - calculation not possible.
Hour 6 minutes per item: 6Hour 7Zero count - calculation not possible.
How It WorksThe code in the try block is executed in the normal sequence. The try block serves to define where anexception can be raised. You can see from the output that when an exception is thrown, the sequence ofexecution continues with the catch block and after the code in the catch block has been executed, execu-tion continues with the next loop iteration. Of course, when no exception is thrown, the catch block isnot executed. Both the try block and the catch block are regarded as a single unit by the compiler, sothey both form the for loop block and the loop continues after an exception is thrown.
The division is carried out in the output statement that follows the if statement checking the divisor. Whena throw statement is executed, control passes immediately to the first statement in the catch block, so thestatement that performs the division is bypassed when an exception is thrown. After the statement in thecatch block executes, the loop continues with the next iteration if there is one.
Throwing ExceptionsExceptions can be thrown anywhere within a try block, and the operand of the throw statements deter-mines a type for the exception — the exception thrown in the example is a string literal and therefore oftype const char[]. The operand following the throw keyword can be any expression, and the type ofthe result of the expression determines the type of exception thrown.
Exceptions can also be thrown in functions called from within a try block and caught by a catch blockfollowing the try block. You could add a function to the previous example to demonstrate this, with thedefinition:
void testThrow(void){throw “ Zero count - calculation not possible.”;
}
You place a call to this function in the previous example in place of the throw statement:
if(counts[i] == 0)testThrow(); // Call a function that throws an exception
The exception is thrown by the testThrow() function and caught by the catch block whenever thearray element is zero, so the output is the same as before. Don’t forget the function prototype if you addthe definition of testThrow() to the end of the source code.
289
Chapter 6: More about Program Structure
25905c06.qxd:WroxPro 2/21/08 8:49 AM Page 289

Catching ExceptionsThe catch block following the try block in our example catches any exception of type const char[].This is determined by the parameter specification that appears in parentheses following the keywordcatch. You must supply at least one catch block for a try block, and the catch blocks must immediatelyfollow the try block. A catch block catches all exceptions (of the correct type) that occur anywhere in thecode in the immediately preceding try block, including those thrown in any functions called directly orindirectly within the try block.
If you want to specify that a catch block is to handle any exception thrown in a try block, you must putan ellipsis (...) between the parentheses enclosing the exception declaration:
catch (...){// code to handle any exception
}
This catch block must appear last if you have other catch blocks defined for the try block.
Try It Out Nested try BlocksYou can nest try blocks one within another. With this situation, if an exception is thrown from within aninner try block that is not followed by a catch block corresponding to the type of exception thrown, thecatch handlers for the outer try block are searched. You can demonstrate this with the following example:
// Ex6_05.cpp// Nested try blocks#include <iostream>using std::cin;using std::cout;using std::endl;
int main(void){int height = 0;const double inchesToMeters = 0.0254;char ch = ‘y’;
try // Outer try block{while(ch == ‘y’||ch ==’Y’){cout << “Enter a height in inches: “;cin >> height; // Read the height to be converted
try // Defines try block in which{ // exceptions may be thrownif(height > 100)
throw “Height exceeds maximum”; // Exception thrownif(height < 9)
throw height; // Exception thrown
290
Chapter 6: More about Program Structure
25905c06.qxd:WroxPro 2/21/08 8:49 AM Page 290
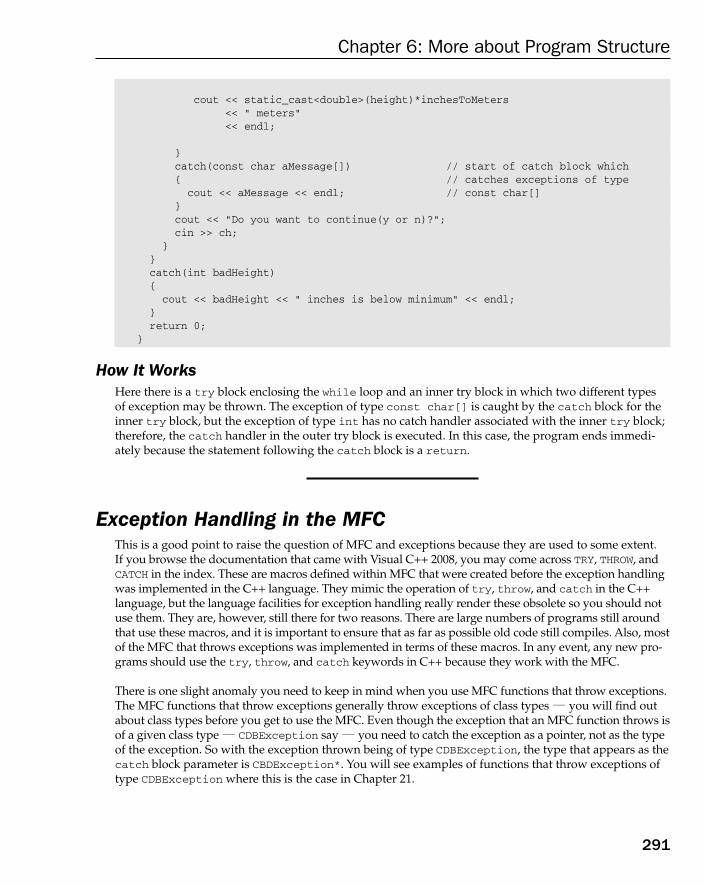
cout << static_cast<double>(height)*inchesToMeters<< “ meters”<< endl;
}catch(const char aMessage[]) // start of catch block which{ // catches exceptions of typecout << aMessage << endl; // const char[]
}cout << “Do you want to continue(y or n)?”;cin >> ch;
}}catch(int badHeight){cout << badHeight << “ inches is below minimum” << endl;
}return 0;
}
How It WorksHere there is a try block enclosing the while loop and an inner try block in which two different types of exception may be thrown. The exception of type const char[] is caught by the catch block for theinner try block, but the exception of type int has no catch handler associated with the inner try block;therefore, the catch handler in the outer try block is executed. In this case, the program ends immedi-ately because the statement following the catch block is a return.
Exception Handling in the MFCThis is a good point to raise the question of MFC and exceptions because they are used to some extent. If you browse the documentation that came with Visual C++ 2008, you may come across TRY, THROW, andCATCH in the index. These are macros defined within MFC that were created before the exception handlingwas implemented in the C++ language. They mimic the operation of try, throw, and catch in the C++language, but the language facilities for exception handling really render these obsolete so you should notuse them. They are, however, still there for two reasons. There are large numbers of programs still aroundthat use these macros, and it is important to ensure that as far as possible old code still compiles. Also, mostof the MFC that throws exceptions was implemented in terms of these macros. In any event, any new pro-grams should use the try, throw, and catch keywords in C++ because they work with the MFC.
There is one slight anomaly you need to keep in mind when you use MFC functions that throw exceptions.The MFC functions that throw exceptions generally throw exceptions of class types — you will find outabout class types before you get to use the MFC. Even though the exception that an MFC function throws isof a given class type — CDBException say — you need to catch the exception as a pointer, not as the typeof the exception. So with the exception thrown being of type CDBException, the type that appears as thecatch block parameter is CBDException*. You will see examples of functions that throw exceptions oftype CDBException where this is the case in Chapter 21.
291
Chapter 6: More about Program Structure
25905c06.qxd:WroxPro 2/21/08 8:49 AM Page 291

Handling Memory Allocation ErrorsWhen you used the operator new to allocate memory for our variables (as you saw in Chapters 4 and5), you ignored the possibility that the memory might not be allocated. If the memory isn’t allocated,an exception is thrown that results in the termination of the program. Ignoring this exception is quiteacceptable in most situations because having no memory left is usually a terminal condition for a pro-gram that you can usually do nothing about. However, there can be circumstances where you might be able to do something about it if you had the chance or you might want to report the problem inyour own way. In this situation, you can catch the exception that the new operator throws. Let’s con-trive an example to show this happening.
Try It Out Catching an Exception Thrown by the new OperatorThe exception that the new operator throws when memory cannot be allocated is of type bad_alloc.bad_alloc is a class type defined in the <new> standard header file, so you’ll need an #include direc-tive for that. Here’s the code:
// Ex6_06.cpp// Catching an exception thrown by new#include<new> // For bad_alloc type#include<iostream>using std::bad_alloc;using std::cout;using std::endl;
int main( ){char* pdata = 0;size_t count = ~static_cast<size_t>(0)/2;try{pdata = new char[count];cout << “Memory allocated.” << endl;
}catch(bad_alloc &ex){cout << “Memory allocation failed.” << endl
<< “The information from the exception object is: “<< ex.what() << endl;
}delete[] pdata;return 0;
}
On my machine this example produces the following output:
Memory allocation failed.The information from the exception object is: bad allocation
If you are in the fortunate position of having many gigabytes of memory in your computer, you may notget the exception thrown.
292
Chapter 6: More about Program Structure
25905c06.qxd:WroxPro 2/21/08 8:49 AM Page 292
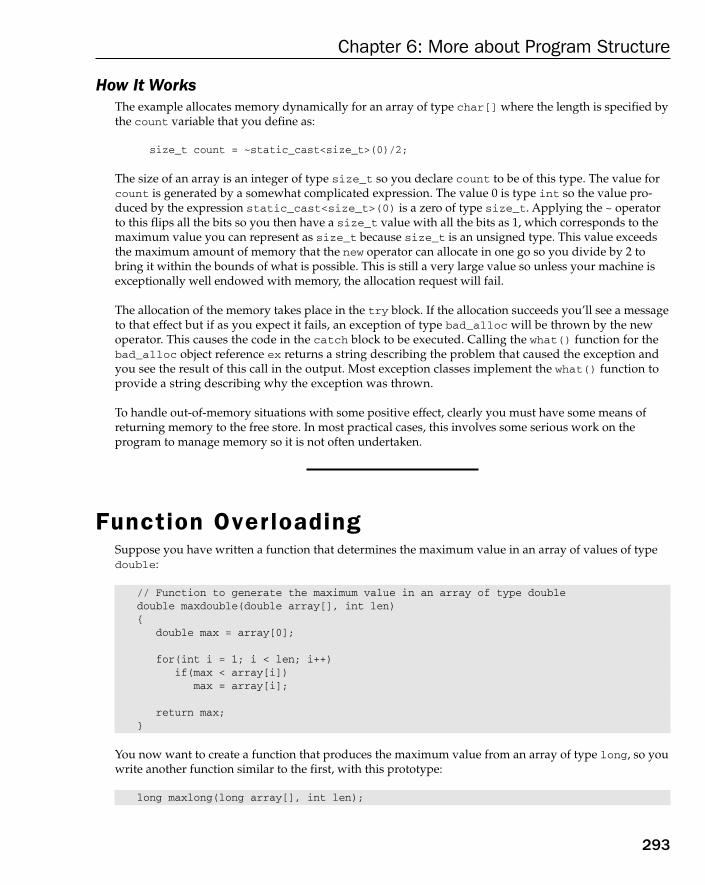
How It WorksThe example allocates memory dynamically for an array of type char[] where the length is specified bythe count variable that you define as:
size_t count = ~static_cast<size_t>(0)/2;
The size of an array is an integer of type size_t so you declare count to be of this type. The value forcount is generated by a somewhat complicated expression. The value 0 is type int so the value pro-duced by the expression static_cast<size_t>(0) is a zero of type size_t. Applying the ~ operatorto this flips all the bits so you then have a size_t value with all the bits as 1, which corresponds to themaximum value you can represent as size_t because size_t is an unsigned type. This value exceedsthe maximum amount of memory that the new operator can allocate in one go so you divide by 2 tobring it within the bounds of what is possible. This is still a very large value so unless your machine isexceptionally well endowed with memory, the allocation request will fail.
The allocation of the memory takes place in the try block. If the allocation succeeds you’ll see a messageto that effect but if as you expect it fails, an exception of type bad_alloc will be thrown by the newoperator. This causes the code in the catch block to be executed. Calling the what() function for thebad_alloc object reference ex returns a string describing the problem that caused the exception andyou see the result of this call in the output. Most exception classes implement the what() function toprovide a string describing why the exception was thrown.
To handle out-of-memory situations with some positive effect, clearly you must have some means ofreturning memory to the free store. In most practical cases, this involves some serious work on the program to manage memory so it is not often undertaken.
Function Over loadingSuppose you have written a function that determines the maximum value in an array of values of typedouble:
// Function to generate the maximum value in an array of type doubledouble maxdouble(double array[], int len){
double max = array[0];
for(int i = 1; i < len; i++)if(max < array[i])
max = array[i];
return max;}
You now want to create a function that produces the maximum value from an array of type long, so youwrite another function similar to the first, with this prototype:
long maxlong(long array[], int len);
293
Chapter 6: More about Program Structure
25905c06.qxd:WroxPro 2/21/08 8:49 AM Page 293

You have chosen the function name to reflect the particular task in hand, which is OK for two functions,but you may also need the same function for several other types of argument. It seems a pity that youhave to keep inventing names. Ideally, you would use the same function name max() regardless of theargument type, and have the appropriate version executed. It probably won’t be any surprise to you thatyou can indeed do this, and the C++ mechanism that makes it possible is called function overloading.
What Is Function Overloading?Function overloading allows you to use the same function name for defining several functions as longas they each have different parameter lists. When the function is called, the compiler chooses the cor-rect version for the job based on the list of arguments you supply. Obviously, the compiler must always be able to decide unequivocally which function should be selected in any particular instance of a func-tion call, so the parameter list for each function in a set of overloaded functions must be unique.Following on from the max() function example, you could create overloaded functions with the fol-lowing prototypes:
int max(int array[], int len); // Prototypes forlong max(long array[], int len); // a set of overloadeddouble max(double array[], int len); // functions
These functions share a common name, but have a different parameter list. In general, overloaded func-tions can be differentiated by having corresponding parameters of different types, or by having a differ-ent number of parameters.
Note that a different return type does not distinguish a function adequately. You can’t add the followingfunction to the previous set:
double max(long array[], int len); // Not valid overloading
The reason is that this function would be indistinguishable from the function that has this prototype:
long max(long array[], int len);
If you define functions like this, it causes the compiler to complain with the following error:
error C2556: ‘double max(long [],int)’ : overloaded function differs only by returntype from ‘long max(long [],int)’
and the program does not compile. This may seem slightly unreasonable, until you remember that youcan write statements such as these:
long numbers[] = {1, 2, 3, 3, 6, 7, 11, 50, 40};int len = sizeof numbers/sizeof numbers[0];max(numbers, len);
The fact that the call for the max() function doesn’t make much sense here because you discard the resultdoes not make it illegal. If the return type were permitted as a distinguishing feature, the compiler wouldbe unable to decide whether to choose the version with a long return type or a double return type in theinstance of the preceding code. For this reason the return type is not considered to be a differentiating fea-ture of overloaded functions.
294
Chapter 6: More about Program Structure
25905c06.qxd:WroxPro 2/21/08 8:49 AM Page 294
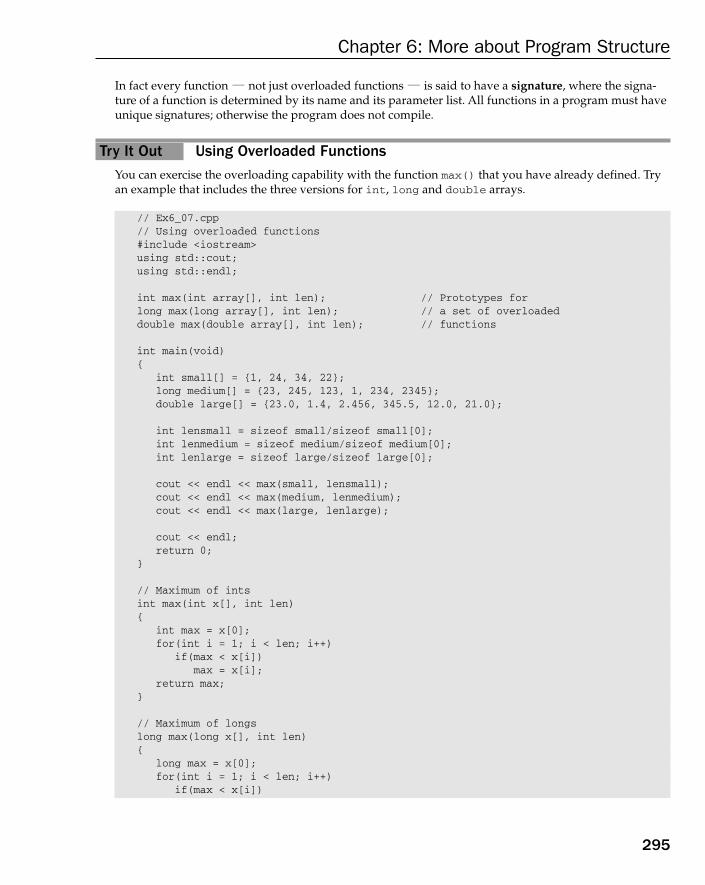
In fact every function — not just overloaded functions — is said to have a signature, where the signa-ture of a function is determined by its name and its parameter list. All functions in a program must haveunique signatures; otherwise the program does not compile.
Try It Out Using Overloaded FunctionsYou can exercise the overloading capability with the function max() that you have already defined. Tryan example that includes the three versions for int, long and double arrays.
// Ex6_07.cpp// Using overloaded functions#include <iostream>using std::cout;using std::endl;
int max(int array[], int len); // Prototypes forlong max(long array[], int len); // a set of overloadeddouble max(double array[], int len); // functions
int main(void){
int small[] = {1, 24, 34, 22};long medium[] = {23, 245, 123, 1, 234, 2345};double large[] = {23.0, 1.4, 2.456, 345.5, 12.0, 21.0};
int lensmall = sizeof small/sizeof small[0];int lenmedium = sizeof medium/sizeof medium[0];int lenlarge = sizeof large/sizeof large[0];
cout << endl << max(small, lensmall);cout << endl << max(medium, lenmedium);cout << endl << max(large, lenlarge);
cout << endl;return 0;
}
// Maximum of intsint max(int x[], int len){
int max = x[0];for(int i = 1; i < len; i++)
if(max < x[i])max = x[i];
return max;}
// Maximum of longslong max(long x[], int len){
long max = x[0];for(int i = 1; i < len; i++)
if(max < x[i])
295
Chapter 6: More about Program Structure
25905c06.qxd:WroxPro 2/21/08 8:49 AM Page 295
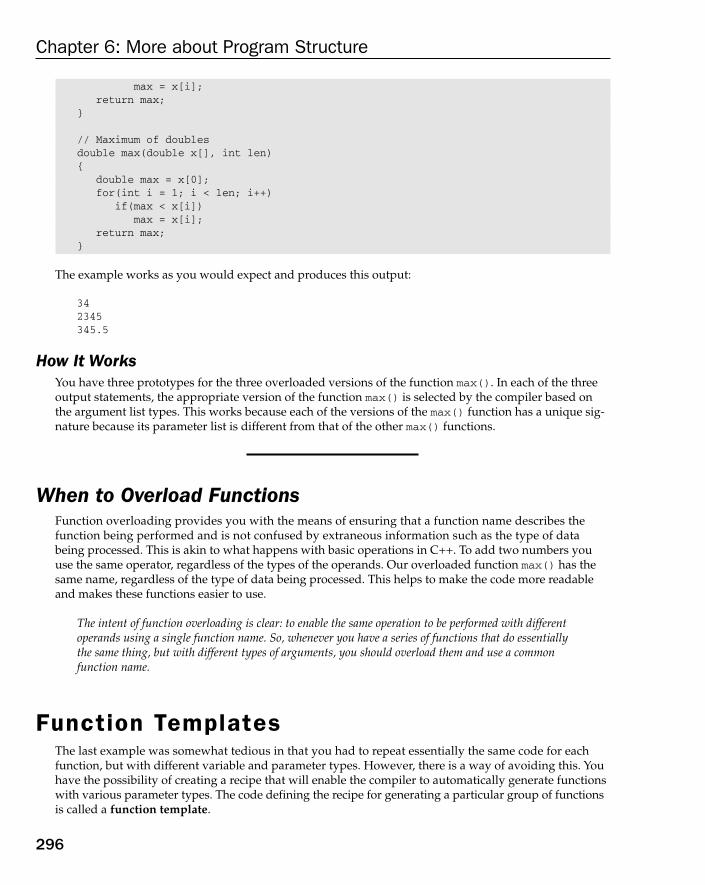
max = x[i];return max;
}
// Maximum of doublesdouble max(double x[], int len){
double max = x[0];for(int i = 1; i < len; i++)
if(max < x[i])max = x[i];
return max;}
The example works as you would expect and produces this output:
342345345.5
How It WorksYou have three prototypes for the three overloaded versions of the function max(). In each of the threeoutput statements, the appropriate version of the function max() is selected by the compiler based onthe argument list types. This works because each of the versions of the max() function has a unique sig-nature because its parameter list is different from that of the other max() functions.
When to Overload FunctionsFunction overloading provides you with the means of ensuring that a function name describes thefunction being performed and is not confused by extraneous information such as the type of databeing processed. This is akin to what happens with basic operations in C++. To add two numbers youuse the same operator, regardless of the types of the operands. Our overloaded function max() has thesame name, regardless of the type of data being processed. This helps to make the code more readableand makes these functions easier to use.
The intent of function overloading is clear: to enable the same operation to be performed with differentoperands using a single function name. So, whenever you have a series of functions that do essentiallythe same thing, but with different types of arguments, you should overload them and use a commonfunction name.
Function TemplatesThe last example was somewhat tedious in that you had to repeat essentially the same code for eachfunction, but with different variable and parameter types. However, there is a way of avoiding this. Youhave the possibility of creating a recipe that will enable the compiler to automatically generate functionswith various parameter types. The code defining the recipe for generating a particular group of functionsis called a function template.
296
Chapter 6: More about Program Structure
25905c06.qxd:WroxPro 2/21/08 8:49 AM Page 296
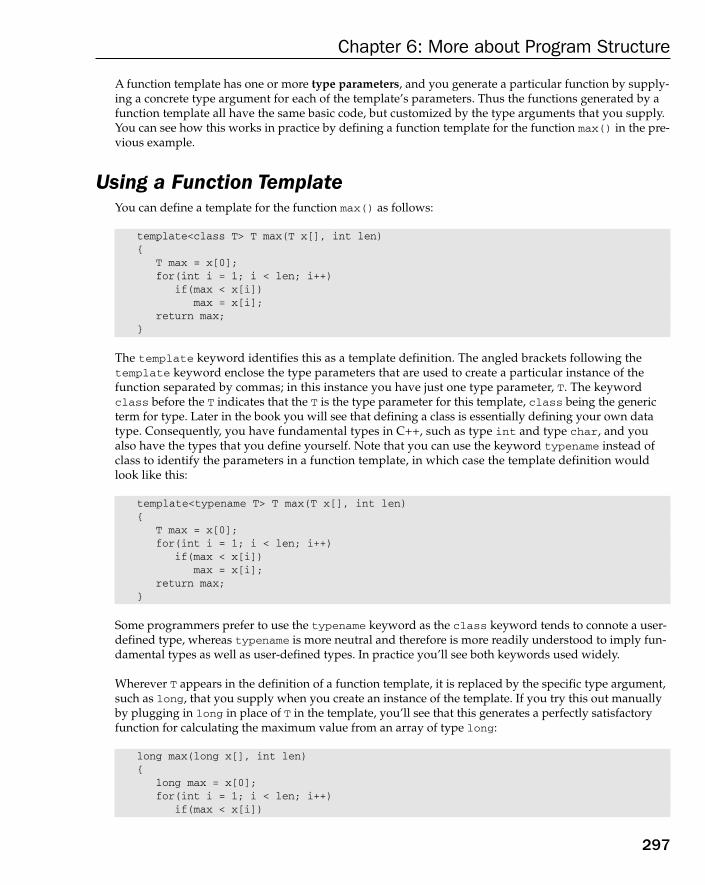
A function template has one or more type parameters, and you generate a particular function by supply-ing a concrete type argument for each of the template’s parameters. Thus the functions generated by afunction template all have the same basic code, but customized by the type arguments that you supply.You can see how this works in practice by defining a function template for the function max() in the pre-vious example.
Using a Function TemplateYou can define a template for the function max() as follows:
template<class T> T max(T x[], int len){
T max = x[0];for(int i = 1; i < len; i++)
if(max < x[i])max = x[i];
return max;}
The template keyword identifies this as a template definition. The angled brackets following thetemplate keyword enclose the type parameters that are used to create a particular instance of thefunction separated by commas; in this instance you have just one type parameter, T. The keywordclass before the T indicates that the T is the type parameter for this template, class being the genericterm for type. Later in the book you will see that defining a class is essentially defining your own datatype. Consequently, you have fundamental types in C++, such as type int and type char, and youalso have the types that you define yourself. Note that you can use the keyword typename instead ofclass to identify the parameters in a function template, in which case the template definition wouldlook like this:
template<typename T> T max(T x[], int len){
T max = x[0];for(int i = 1; i < len; i++)
if(max < x[i])max = x[i];
return max;}
Some programmers prefer to use the typename keyword as the class keyword tends to connote a user-defined type, whereas typename is more neutral and therefore is more readily understood to imply fun-damental types as well as user-defined types. In practice you’ll see both keywords used widely.
Wherever T appears in the definition of a function template, it is replaced by the specific type argument,such as long, that you supply when you create an instance of the template. If you try this out manuallyby plugging in long in place of T in the template, you’ll see that this generates a perfectly satisfactoryfunction for calculating the maximum value from an array of type long:
long max(long x[], int len){
long max = x[0];for(int i = 1; i < len; i++)
if(max < x[i])
297
Chapter 6: More about Program Structure
25905c06.qxd:WroxPro 2/21/08 8:49 AM Page 297
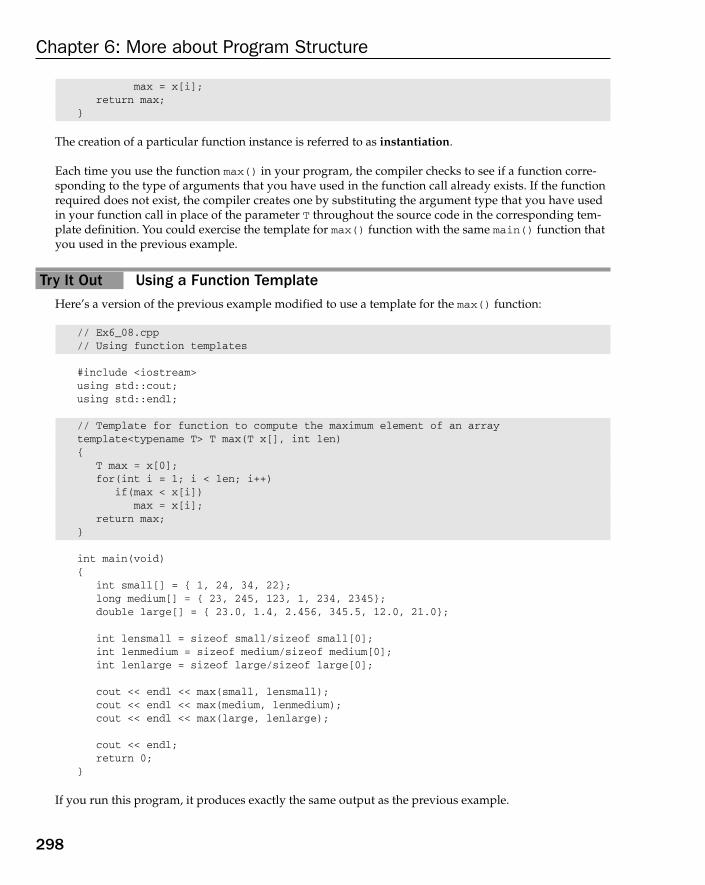
max = x[i];return max;
}
The creation of a particular function instance is referred to as instantiation.
Each time you use the function max() in your program, the compiler checks to see if a function corre-sponding to the type of arguments that you have used in the function call already exists. If the functionrequired does not exist, the compiler creates one by substituting the argument type that you have usedin your function call in place of the parameter T throughout the source code in the corresponding tem-plate definition. You could exercise the template for max() function with the same main() function thatyou used in the previous example.
Try It Out Using a Function TemplateHere’s a version of the previous example modified to use a template for the max() function:
// Ex6_08.cpp// Using function templates
#include <iostream>using std::cout;using std::endl;
// Template for function to compute the maximum element of an arraytemplate<typename T> T max(T x[], int len){
T max = x[0];for(int i = 1; i < len; i++)
if(max < x[i])max = x[i];
return max;}
int main(void){
int small[] = { 1, 24, 34, 22};long medium[] = { 23, 245, 123, 1, 234, 2345};double large[] = { 23.0, 1.4, 2.456, 345.5, 12.0, 21.0};
int lensmall = sizeof small/sizeof small[0];int lenmedium = sizeof medium/sizeof medium[0];int lenlarge = sizeof large/sizeof large[0];
cout << endl << max(small, lensmall);cout << endl << max(medium, lenmedium);cout << endl << max(large, lenlarge);
cout << endl;return 0;
}
If you run this program, it produces exactly the same output as the previous example.
298
Chapter 6: More about Program Structure
25905c06.qxd:WroxPro 2/21/08 8:49 AM Page 298
How It WorksFor each of the statements outputting the maximum value in an array, a new version of max() is instan-tiated using the template. Of course, if you add another statement calling the function max() with one of the types used previously, no new version of the code is generated.
Note that using a template doesn’t reduce the size of your compiled program in any way. The compilergenerates a version of the source code for each function that you require. In fact, using templates can gen-erally increase the size of your program, as functions can be created automatically even though an existingversion might satisfactorily be used by casting the argument accordingly. You can force the creation ofparticular instances of a template by explicitly including a declaration for it. For example, if you wantedto ensure that an instance of the template for the function max() was created corresponding to the typefloat, you could place the following declaration after the definition of the template:
float max(float, int);
This forces the creation of this version of the function template. It does not have much value in the caseof our program example, but it can be useful when you know that several versions of a template functionmight be generated, but you want to force the generation of a subset that you plan to use with argumentscast to the appropriate type where necessary.
An Example Using FunctionsYou have covered a lot of ground in C++ up to now and a lot on functions in this chapter alone. Afterwading through a varied menu of language capabilities, it’s not always easy to see how they relate toone another. Now would be a good point to see how some of this goes together to produce somethingwith more meat than a simple demonstration program.
Let’s work through a more realistic example to see how a problem can be broken down into functions.The process involves defining the problem to be solved, analyzing the problem to see how it can beimplemented in C++, and finally writing the code. The approach here is aimed at illustrating how various functions go together to make up the final result, rather than providing a tutorial on how todevelop a program.
Implementing a CalculatorSuppose you need a program that acts as a calculator; not one of these fancy devices with lots of buttonsand gizmos designed for those who are easily pleased, but one for people who know where they are going,arithmetically speaking. You can really go for it and enter a calculation from the keyboard as a single arith-metic expression, and have the answer displayed immediately. An example of the sort of thing that youmight enter is:
2*3.14159*12.6*12.6 / 2 + 25.2*25.2
To avoid unnecessary complications for the moment, you won’t allow parentheses in the expression andthe whole computation must be entered in a single line; however, to allow the user to make the input lookattractive, you will allow spaces to be placed anywhere. The expression entered may contain the operators
299
Chapter 6: More about Program Structure
25905c06.qxd:WroxPro 2/21/08 8:50 AM Page 299
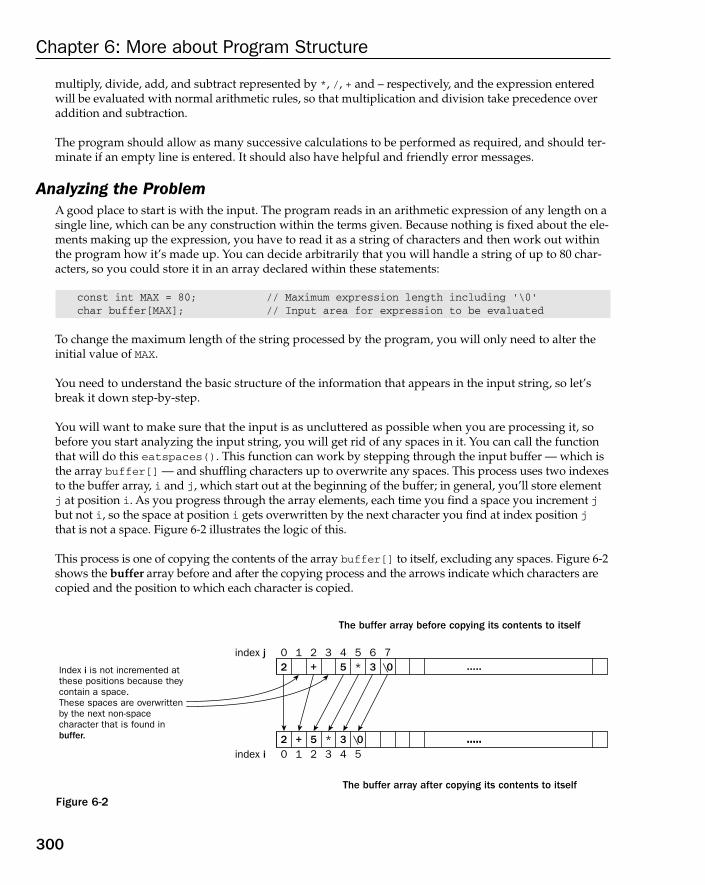
multiply, divide, add, and subtract represented by *, /, + and – respectively, and the expression enteredwill be evaluated with normal arithmetic rules, so that multiplication and division take precedence overaddition and subtraction.
The program should allow as many successive calculations to be performed as required, and should ter-minate if an empty line is entered. It should also have helpful and friendly error messages.
Analyzing the ProblemA good place to start is with the input. The program reads in an arithmetic expression of any length on asingle line, which can be any construction within the terms given. Because nothing is fixed about the ele-ments making up the expression, you have to read it as a string of characters and then work out withinthe program how it’s made up. You can decide arbitrarily that you will handle a string of up to 80 char-acters, so you could store it in an array declared within these statements:
const int MAX = 80; // Maximum expression length including ‘\0’char buffer[MAX]; // Input area for expression to be evaluated
To change the maximum length of the string processed by the program, you will only need to alter theinitial value of MAX.
You need to understand the basic structure of the information that appears in the input string, so let’sbreak it down step-by-step.
You will want to make sure that the input is as uncluttered as possible when you are processing it, sobefore you start analyzing the input string, you will get rid of any spaces in it. You can call the functionthat will do this eatspaces(). This function can work by stepping through the input buffer — which isthe array buffer[] — and shuffling characters up to overwrite any spaces. This process uses two indexesto the buffer array, i and j, which start out at the beginning of the buffer; in general, you’ll store elementj at position i. As you progress through the array elements, each time you find a space you increment jbut not i, so the space at position i gets overwritten by the next character you find at index position jthat is not a space. Figure 6-2 illustrates the logic of this.
This process is one of copying the contents of the array buffer[] to itself, excluding any spaces. Figure 6-2shows the buffer array before and after the copying process and the arrows indicate which characters arecopied and the position to which each character is copied.
Figure 6-2
The buffer array before copying its contents to itself
Index i is not incremented at these positions because they contain a space. These spaces are overwritten by the next non-space character that is found in buffer.
The buffer array after copying its contents to itself
21 2 3 40index j
index i
5
1 2 3 40 5
6 7
2
.....
.....
+
+
5 * 3 \0
5 * 3 \0 .....
300
Chapter 6: More about Program Structure
25905c06.qxd:WroxPro 2/21/08 8:50 AM Page 300
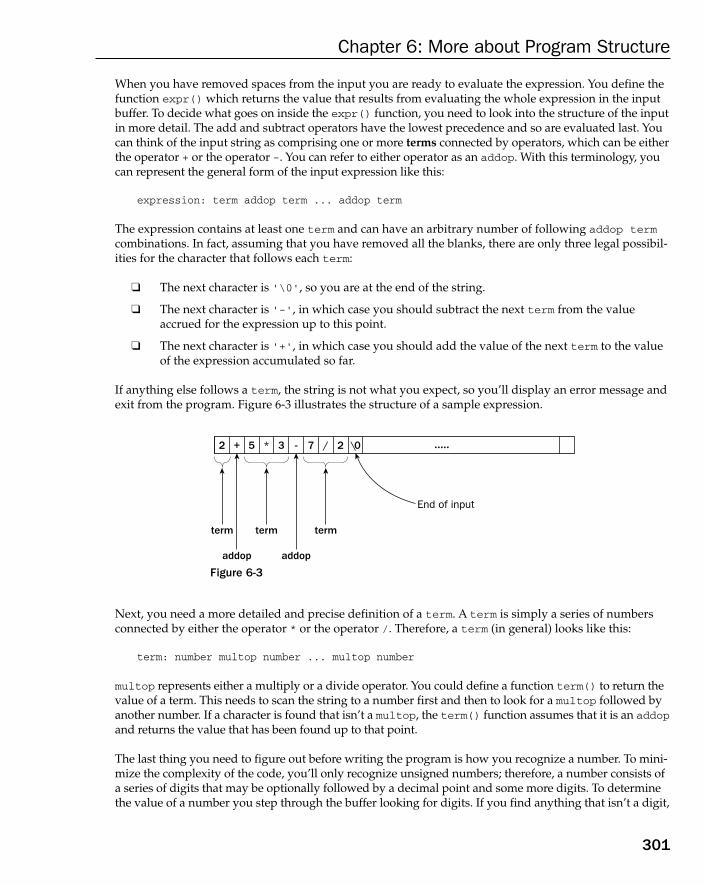
When you have removed spaces from the input you are ready to evaluate the expression. You define thefunction expr() which returns the value that results from evaluating the whole expression in the inputbuffer. To decide what goes on inside the expr() function, you need to look into the structure of the inputin more detail. The add and subtract operators have the lowest precedence and so are evaluated last. Youcan think of the input string as comprising one or more terms connected by operators, which can be eitherthe operator + or the operator -. You can refer to either operator as an addop. With this terminology, youcan represent the general form of the input expression like this:
expression: term addop term ... addop term
The expression contains at least one term and can have an arbitrary number of following addop termcombinations. In fact, assuming that you have removed all the blanks, there are only three legal possibil-ities for the character that follows each term:
❑ The next character is ‘\0’, so you are at the end of the string.
❑ The next character is ‘-’, in which case you should subtract the next term from the valueaccrued for the expression up to this point.
❑ The next character is ‘+’, in which case you should add the value of the next term to the valueof the expression accumulated so far.
If anything else follows a term, the string is not what you expect, so you’ll display an error message andexit from the program. Figure 6-3 illustrates the structure of a sample expression.
Figure 6-3
Next, you need a more detailed and precise definition of a term. A term is simply a series of numbersconnected by either the operator * or the operator /. Therefore, a term (in general) looks like this:
term: number multop number ... multop number
multop represents either a multiply or a divide operator. You could define a function term() to return thevalue of a term. This needs to scan the string to a number first and then to look for a multop followed byanother number. If a character is found that isn’t a multop, the term() function assumes that it is an addopand returns the value that has been found up to that point.
The last thing you need to figure out before writing the program is how you recognize a number. To mini-mize the complexity of the code, you’ll only recognize unsigned numbers; therefore, a number consists ofa series of digits that may be optionally followed by a decimal point and some more digits. To determinethe value of a number you step through the buffer looking for digits. If you find anything that isn’t a digit,
term term term
End of input
addop addop
2 + / 2* ..... 5 3 - 7 \0
301
Chapter 6: More about Program Structure
25905c06.qxd:WroxPro 2/21/08 8:50 AM Page 301

you check whether it’s a decimal point. If it’s not a decimal point it has nothing to do with a number, so youreturn what you have got. If you find a decimal point, you look for more digits. As soon as you find any-thing that’s not a digit, you have the complete number and you return that. Imaginatively, you’ll call thefunction to recognize a number and return its value number(). Figure 6-4 shows an example of how anexpression breaks down into terms and numbers.
You now have enough understanding of the problem to write some code. You can work through the func-tions you need and then write a main() function to tie them all together. The first and perhaps easiest func-tion to write is eatspaces(), which is going to eliminate the blanks from the input string.
Figure 6-4
Eliminating Blanks from a StringYou can write the prototype for the eatspaces() function as follows:
void eatspaces(char* str); // Function to eliminate blanks
The function doesn’t need to return any value because the blanks can be eliminated from the string in situ,modifying the original string directly through the pointer that is passed as the argument. The process foreliminating blanks is a very simple one. You copy the string to itself, overwriting any spaces as you sawearlier in this chapter.
You can define the function to do this as follows:
// Function to eliminate spaces from a stringvoid eatspaces(char* str){int i = 0; // ‘Copy to’ index to stringint j = 0; // ‘Copy from’ index to string
while((*(str + i) = *(str + j++)) != ‘\0’) // Loop while character is not \0if(*(str + i) != ‘ ‘) // Increment i as long asi++; // character is not a space
return;}
2
digit digit
number number numbermultop
term
expressionThe value of the expression is returned by the expr()function
The value of each term is returned by the term() function
The value of each number is returned by the number()function
End of input
addop addop termterm
number
digit point digit digit digit digit digit
3 * 13 ..... + . - 1 25 7 \0
302
Chapter 6: More about Program Structure
25905c06.qxd:WroxPro 2/21/08 8:50 AM Page 302
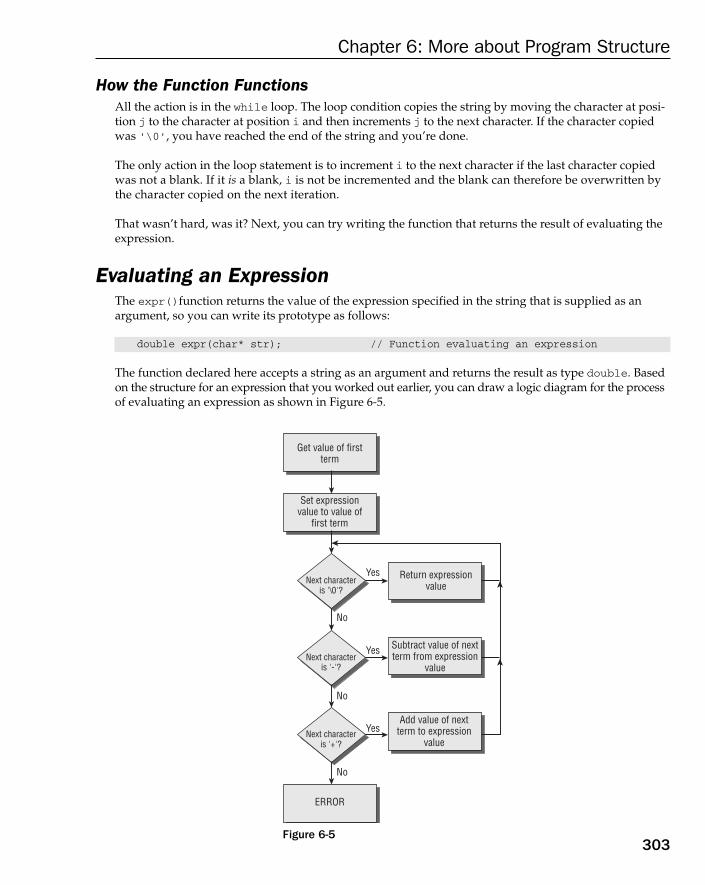
How the Function FunctionsAll the action is in the while loop. The loop condition copies the string by moving the character at posi-tion j to the character at position i and then increments j to the next character. If the character copiedwas ‘\0’, you have reached the end of the string and you’re done.
The only action in the loop statement is to increment i to the next character if the last character copiedwas not a blank. If it is a blank, i is not be incremented and the blank can therefore be overwritten bythe character copied on the next iteration.
That wasn’t hard, was it? Next, you can try writing the function that returns the result of evaluating theexpression.
Evaluating an ExpressionThe expr()function returns the value of the expression specified in the string that is supplied as anargument, so you can write its prototype as follows:
double expr(char* str); // Function evaluating an expression
The function declared here accepts a string as an argument and returns the result as type double. Basedon the structure for an expression that you worked out earlier, you can draw a logic diagram for the processof evaluating an expression as shown in Figure 6-5.
Figure 6-5
Get value of first term
Set expression value to value of
first term
Return expressionvalue
Subtract value of nextterm from expression
value
Add value of next term to expression
value
ERROR
Next characteris '\0'?
No
Yes
Yes
Yes
No
No
Next characteris '-'?
Next characteris '+'?
303
Chapter 6: More about Program Structure
25905c06.qxd:WroxPro 2/21/08 8:50 AM Page 303
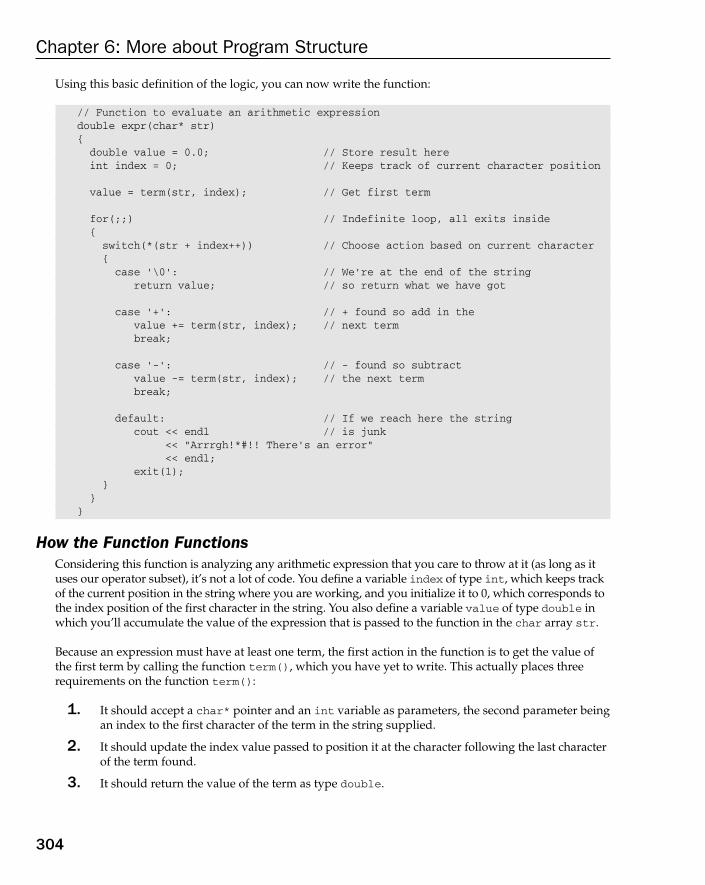
Using this basic definition of the logic, you can now write the function:
// Function to evaluate an arithmetic expressiondouble expr(char* str){double value = 0.0; // Store result hereint index = 0; // Keeps track of current character position
value = term(str, index); // Get first term
for(;;) // Indefinite loop, all exits inside{switch(*(str + index++)) // Choose action based on current character{case ‘\0’: // We’re at the end of the string
return value; // so return what we have got
case ‘+’: // + found so add in thevalue += term(str, index); // next termbreak;
case ‘-’: // - found so subtractvalue -= term(str, index); // the next termbreak;
default: // If we reach here the stringcout << endl // is junk
<< “Arrrgh!*#!! There’s an error”<< endl;
exit(1);}
}}
How the Function FunctionsConsidering this function is analyzing any arithmetic expression that you care to throw at it (as long as ituses our operator subset), it’s not a lot of code. You define a variable index of type int, which keeps trackof the current position in the string where you are working, and you initialize it to 0, which corresponds tothe index position of the first character in the string. You also define a variable value of type double inwhich you’ll accumulate the value of the expression that is passed to the function in the char array str.
Because an expression must have at least one term, the first action in the function is to get the value ofthe first term by calling the function term(), which you have yet to write. This actually places threerequirements on the function term():
1. It should accept a char* pointer and an int variable as parameters, the second parameter beingan index to the first character of the term in the string supplied.
2. It should update the index value passed to position it at the character following the last characterof the term found.
3. It should return the value of the term as type double.
304
Chapter 6: More about Program Structure
25905c06.qxd:WroxPro 2/21/08 8:50 AM Page 304

The rest of the program is an indefinite for loop. Within the loop, the action is determined by a switchstatement, which is controlled by the current character in the string. If it is a ‘+’, you call the term()func-tion to get the value of the next term in the expression and add it to the variable value. If it is a ‘-’, yousubtract the value returned by term() from the variable value. If it is a ‘\0’, you are at the end of thestring, so you return the current contents of the variable value to the calling program. If it is any othercharacter, it shouldn’t be there, so after remonstrating with the user you end the program!
As long as either a ‘+’ or a ‘-’ is found, the loop continues. Each call to term() moves the value ofthe index variable to the character following the term that was evaluated, and this should be should beeither another ‘+’ or ‘-’, or the end of string character ‘\0’. Thus, the function either terminates nor-mally when ‘\0’ is reached, or abnormally by calling exit(). You need to remember the #includedirective for <cstdlib> header file that provides the definition of the function exit() when you come to put the whole program together.
You also could also analyze an arithmetic expression using a recursive function. If you think about the defi-nition of an expression slightly differently, you could specify it as being either a term, or a term followed byan expression. The definition here is recursive (i.e. the definition involves the item being defined), and thisapproach is very common in defining programming language structures. This definition provides justas much flexibility as the first, but using it as the base concept, you could arrive at a recursive version of expr() instead of using a loop as you did in the implementation above. You might want to try thisalternative approach as an exercise after you have completed the first version.
Getting the Value of a TermThe term() function returns a value for a term as type double and receives two arguments: the stringbeing analyzed and an index to the current position in the string. There are other ways of doing this, butthis arrangement is quite straightforward. You can, therefore, write the prototype of the function term()as follows:
double term(char* str, int& index); // Function analyzing a term
You have specified the second parameter as a reference. This is because you want the function to be ableto modify the value of the variable index in the calling program to position it at the character followingthe last character of the term found in the input string. You could return index as a value, but then youwould need to return the value of the term in some other way, so this arrangement seems quite natural.
The logic for analyzing a term is going to be similar in structure to that for an expression. A term is a num-ber, potentially followed by one or more combinations of a multiply or a divide operator and anothernumber. You can write the definition of the term() function as follows:
// Function to get the value of a termdouble term(char* str, int& index){double value = 0.0; // Somewhere to accumulate
// the result
value = number(str, index); // Get the first number in the term
// Loop as long as we have a good operatorwhile((*(str + index) == ‘*’) || (*(str + index) == ‘/’))
305
Chapter 6: More about Program Structure
25905c06.qxd:WroxPro 2/21/08 8:50 AM Page 305

{
if(*(str + index) == ‘*’) // If it’s multiply,value *= number(str, ++index); // multiply by next number
if(*(str + index) == ‘/’) // If it’s divide,value /= number(str, ++index); // divide by next number
}return value; // We’ve finished, so return what
// we’ve got}
How the Function FunctionsYou first declare a local double variable, value, in which you’ll accumulate the value of the currentterm. Because a term must contain at least one number, the first action in the function is to obtain thevalue of the first number by calling the number() function and storing the result in value. You implic-itly assume that the function number()accepts the string and an index to a position in the string asarguments, and returns the value of the number found. Because the number() function must alsoupdate the index to the string to the position after the number that was found, you’ll again specify the second parameter as a reference when you come to define that function.
The rest of the term() function is a while loop that continues as long as the next character is ‘*’ or‘/’. Within the loop, if the character found at the current position is ‘*’, you increment the variableindex to position it at the beginning of the next number, call the function number() to get the value ofthe next number, and then multiply the contents of value by the value returned. In a similar manner, ifthe current character is ‘/’, you increment the index variable and divide the contents of value by thevalue returned from number(). Because the function number() automatically alters the value of thevariable index to the character following the number found, index is already set to select the nextavailable character in the string on the next iteration.
The loop terminates when a character other than a multiply or divide operator is found, whereupon thecurrent value of the term accumulated in the variable value is returned to the calling program.
The last analytical function that you require is number(), which determines the numerical value of anynumber appearing in the string.
Analyzing a NumberBased on the way you have used the number() function within the term() function, you need todeclare it with this prototype:
double number(char* str, int& index); // Function to recognize a number
The specification of the second parameter as a reference allows the function to update the argument inthe calling program directly, which is what you require.
You can make use of a function provided in a standard C++ library here. The <cctype> header file pro-vides definitions for a range of functions for testing single characters. These functions return values of
306
Chapter 6: More about Program Structure
25905c06.qxd:WroxPro 2/21/08 8:50 AM Page 306
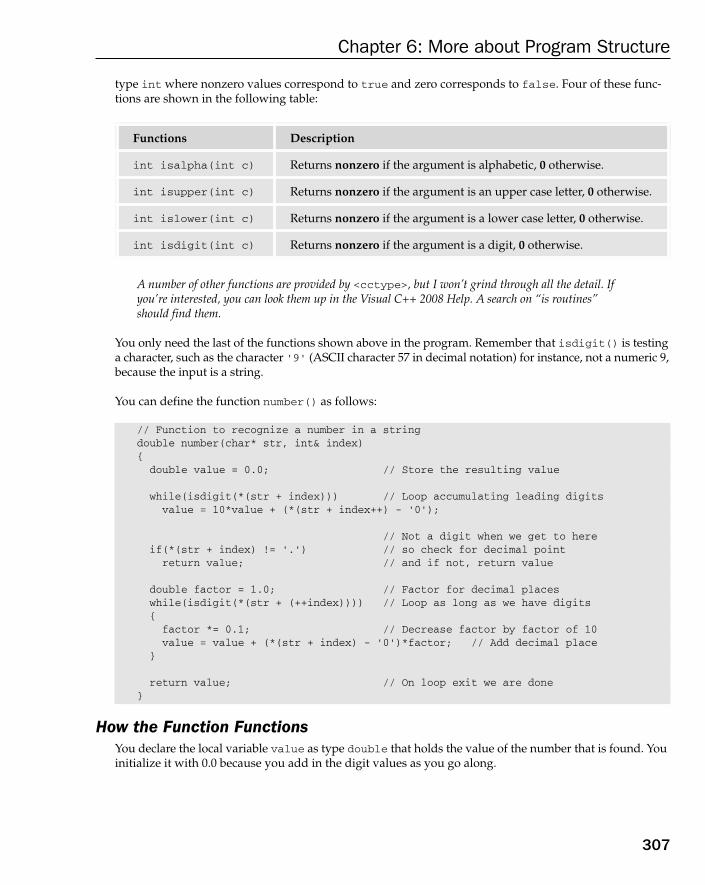
type int where nonzero values correspond to true and zero corresponds to false. Four of these func-tions are shown in the following table:
A number of other functions are provided by <cctype>, but I won’t grind through all the detail. Ifyou’re interested, you can look them up in the Visual C++ 2008 Help. A search on “is routines” should find them.
You only need the last of the functions shown above in the program. Remember that isdigit() is testinga character, such as the character ‘9’ (ASCII character 57 in decimal notation) for instance, not a numeric 9,because the input is a string.
You can define the function number() as follows:
// Function to recognize a number in a stringdouble number(char* str, int& index){double value = 0.0; // Store the resulting value
while(isdigit(*(str + index))) // Loop accumulating leading digitsvalue = 10*value + (*(str + index++) - ‘0’);
// Not a digit when we get to hereif(*(str + index) != ‘.’) // so check for decimal pointreturn value; // and if not, return value
double factor = 1.0; // Factor for decimal placeswhile(isdigit(*(str + (++index)))) // Loop as long as we have digits{factor *= 0.1; // Decrease factor by factor of 10value = value + (*(str + index) - ‘0’)*factor; // Add decimal place
}
return value; // On loop exit we are done}
How the Function FunctionsYou declare the local variable value as type double that holds the value of the number that is found. Youinitialize it with 0.0 because you add in the digit values as you go along.
Functions Description
int isalpha(int c) Returns nonzero if the argument is alphabetic, 0 otherwise.
int isupper(int c) Returns nonzero if the argument is an upper case letter, 0 otherwise.
int islower(int c) Returns nonzero if the argument is a lower case letter, 0 otherwise.
int isdigit(int c) Returns nonzero if the argument is a digit, 0 otherwise.
307
Chapter 6: More about Program Structure
25905c06.qxd:WroxPro 2/21/08 8:50 AM Page 307

As the number in the string is a series of digits as ASCII characters, the function steps through the stringaccumulating the value of the number digit by digit. This occurs in two phases — the first phase accumu-lates digits before the decimal point; then if you find a decimal point, the second phase accumulates thedigits after it.
The first step is in the while loop that continues as long as the current character selected by the variableindex is a digit. The value of the digit is extracted and added to the variable value in the loop statement:
value = 10*value + (*(str + index++) - ‘0’);
The way this is constructed bears a closer examination. A digit character has an ASCII value between 48,corresponding to the digit 0, and 57 corresponding to the digit 9. Thus, if you subtract the ASCII codefor ‘0’ from the code for a digit, you convert it to its equivalent numeric digit value from 0 to 9. Youhave parentheses around the subexpression *(str + index++) - ‘0’; these are not essential, butthey do make what’s going on a little clearer. The contents of the variable value are multiplied by 10to shift the value one decimal place to the left before adding in the digit value because you’ll find digitsfrom left to right — that is, the most significant digit first. This process is illustrated in Figure 6-6.
Figure 6-6
As soon as you come across something other than a digit, it is either a decimal point or something else. Ifit’s not a decimal point, you’ve finished, so you return the current contents of the variable value to thecalling program. If it is a decimal point, you accumulate the digits corresponding to the fractional part ofthe number in the second loop. In this loop, you use the factor variable, which has the initial value 1.0,to set the decimal place for the current digit, and consequently factor is multiplied by 0.1 for each digitfound. Thus, the first digit after the decimal point is multiplied by 0.1, the second by 0.01, the third by0.001, and so on. This process is illustrated in Figure 6-7.
53 49 51
5 1
digits in number
ASCII codes as decimal values
Intial value = 0
1st digit
2nd digit
3rd digit
value = 10*value + (53 - 48) = 10*0.0 + 5 = 5.0
value = 10*value + (49 - 48) = 10*5.0 + 1 = 51.0
value = 10*value + (51 - 48) = 10*51.0 + 3 = 513.0
3
308
Chapter 6: More about Program Structure
25905c06.qxd:WroxPro 2/21/08 8:50 AM Page 308
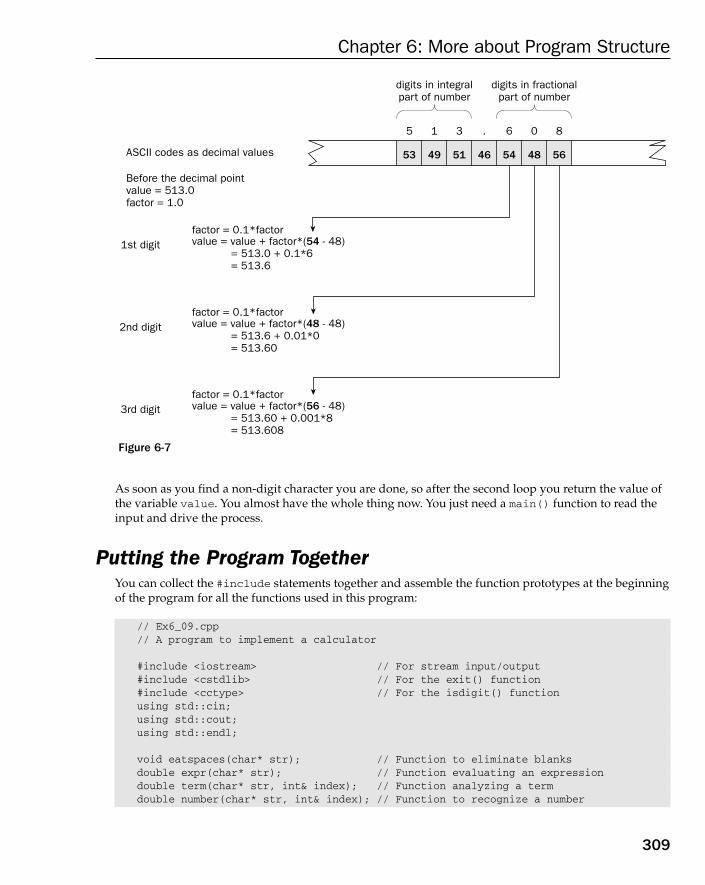
Figure 6-7
As soon as you find a non-digit character you are done, so after the second loop you return the value ofthe variable value. You almost have the whole thing now. You just need a main() function to read theinput and drive the process.
Putting the Program TogetherYou can collect the #include statements together and assemble the function prototypes at the beginningof the program for all the functions used in this program:
// Ex6_09.cpp// A program to implement a calculator
#include <iostream> // For stream input/output#include <cstdlib> // For the exit() function#include <cctype> // For the isdigit() functionusing std::cin;using std::cout;using std::endl;
void eatspaces(char* str); // Function to eliminate blanksdouble expr(char* str); // Function evaluating an expressiondouble term(char* str, int& index); // Function analyzing a termdouble number(char* str, int& index); // Function to recognize a number
53 49 51
5 1
digits in integralpart of number
digits in fractionalpart of number
ASCII codes as decimal values
Before the decimal pointvalue = 513.0factor = 1.0
1st digit
2nd digit
3rd digit
value = value + factor*(54 - 48) = 513.0 + 0.1*6 = 513.6
value = value + factor*(48 - 48) = 513.6 + 0.01*0 = 513.60
value = value + factor*(56 - 48) = 513.60 + 0.001*8 = 513.608
factor = 0.1*factor
factor = 0.1*factor
factor = 0.1*factor
3 6. 0 8
46 54 48 56
309
Chapter 6: More about Program Structure
25905c06.qxd:WroxPro 2/21/08 8:50 AM Page 309
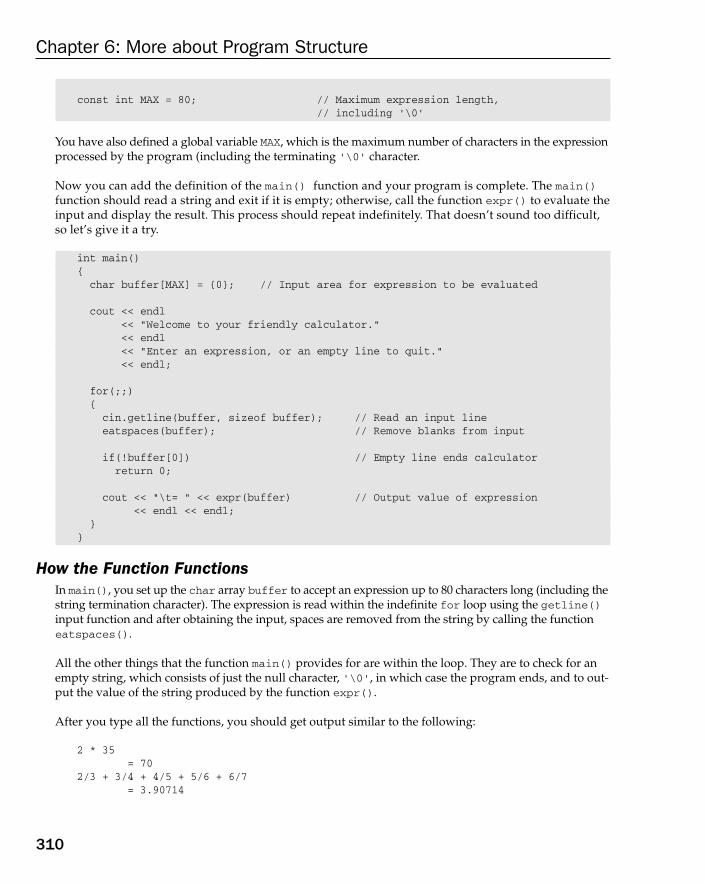
const int MAX = 80; // Maximum expression length,// including ‘\0’
You have also defined a global variable MAX, which is the maximum number of characters in the expressionprocessed by the program (including the terminating ‘\0’ character.
Now you can add the definition of the main() function and your program is complete. The main()function should read a string and exit if it is empty; otherwise, call the function expr() to evaluate theinput and display the result. This process should repeat indefinitely. That doesn’t sound too difficult,so let’s give it a try.
int main(){char buffer[MAX] = {0}; // Input area for expression to be evaluated
cout << endl<< “Welcome to your friendly calculator.”<< endl<< “Enter an expression, or an empty line to quit.”<< endl;
for(;;){cin.getline(buffer, sizeof buffer); // Read an input lineeatspaces(buffer); // Remove blanks from input
if(!buffer[0]) // Empty line ends calculatorreturn 0;
cout << “\t= “ << expr(buffer) // Output value of expression<< endl << endl;
}}
How the Function FunctionsIn main(), you set up the char array buffer to accept an expression up to 80 characters long (including thestring termination character). The expression is read within the indefinite for loop using the getline()input function and after obtaining the input, spaces are removed from the string by calling the functioneatspaces().
All the other things that the function main() provides for are within the loop. They are to check for anempty string, which consists of just the null character, ‘\0’, in which case the program ends, and to out-put the value of the string produced by the function expr().
After you type all the functions, you should get output similar to the following:
2 * 35= 70
2/3 + 3/4 + 4/5 + 5/6 + 6/7= 3.90714
310
Chapter 6: More about Program Structure
25905c06.qxd:WroxPro 2/21/08 8:50 AM Page 310
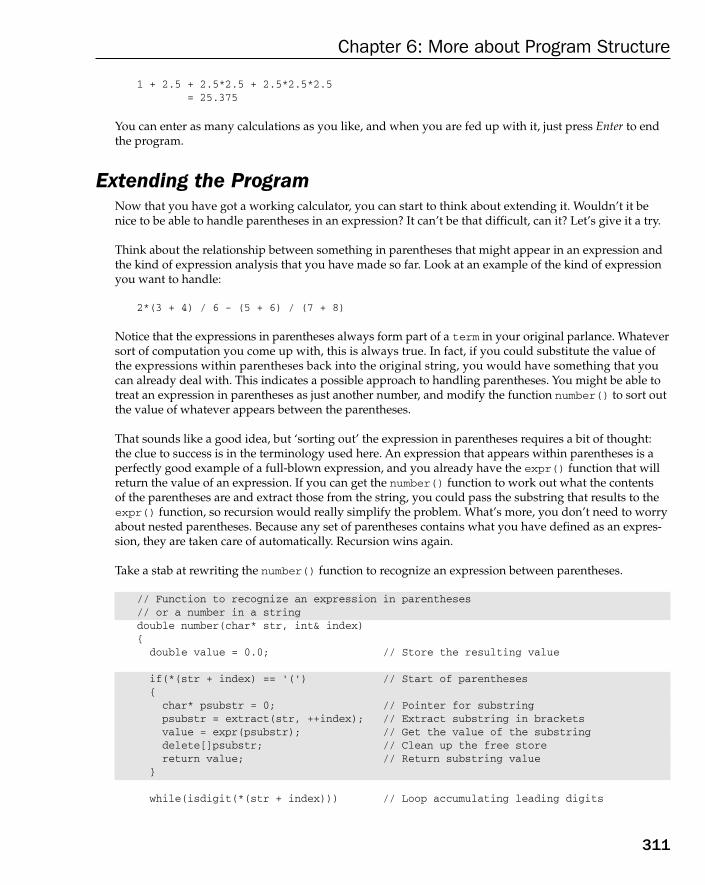
1 + 2.5 + 2.5*2.5 + 2.5*2.5*2.5= 25.375
You can enter as many calculations as you like, and when you are fed up with it, just press Enter to endthe program.
Extending the ProgramNow that you have got a working calculator, you can start to think about extending it. Wouldn’t it benice to be able to handle parentheses in an expression? It can’t be that difficult, can it? Let’s give it a try.
Think about the relationship between something in parentheses that might appear in an expression andthe kind of expression analysis that you have made so far. Look at an example of the kind of expressionyou want to handle:
2*(3 + 4) / 6 - (5 + 6) / (7 + 8)
Notice that the expressions in parentheses always form part of a term in your original parlance. Whateversort of computation you come up with, this is always true. In fact, if you could substitute the value ofthe expressions within parentheses back into the original string, you would have something that youcan already deal with. This indicates a possible approach to handling parentheses. You might be able totreat an expression in parentheses as just another number, and modify the function number() to sort outthe value of whatever appears between the parentheses.
That sounds like a good idea, but ‘sorting out’ the expression in parentheses requires a bit of thought:the clue to success is in the terminology used here. An expression that appears within parentheses is aperfectly good example of a full-blown expression, and you already have the expr() function that willreturn the value of an expression. If you can get the number() function to work out what the contents of the parentheses are and extract those from the string, you could pass the substring that results to theexpr() function, so recursion would really simplify the problem. What’s more, you don’t need to worryabout nested parentheses. Because any set of parentheses contains what you have defined as an expres-sion, they are taken care of automatically. Recursion wins again.
Take a stab at rewriting the number() function to recognize an expression between parentheses.
// Function to recognize an expression in parentheses// or a number in a stringdouble number(char* str, int& index){
double value = 0.0; // Store the resulting value
if(*(str + index) == ‘(‘) // Start of parentheses{char* psubstr = 0; // Pointer for substringpsubstr = extract(str, ++index); // Extract substring in bracketsvalue = expr(psubstr); // Get the value of the substringdelete[]psubstr; // Clean up the free storereturn value; // Return substring value
}
while(isdigit(*(str + index))) // Loop accumulating leading digits
311
Chapter 6: More about Program Structure
25905c06.qxd:WroxPro 2/21/08 8:50 AM Page 311
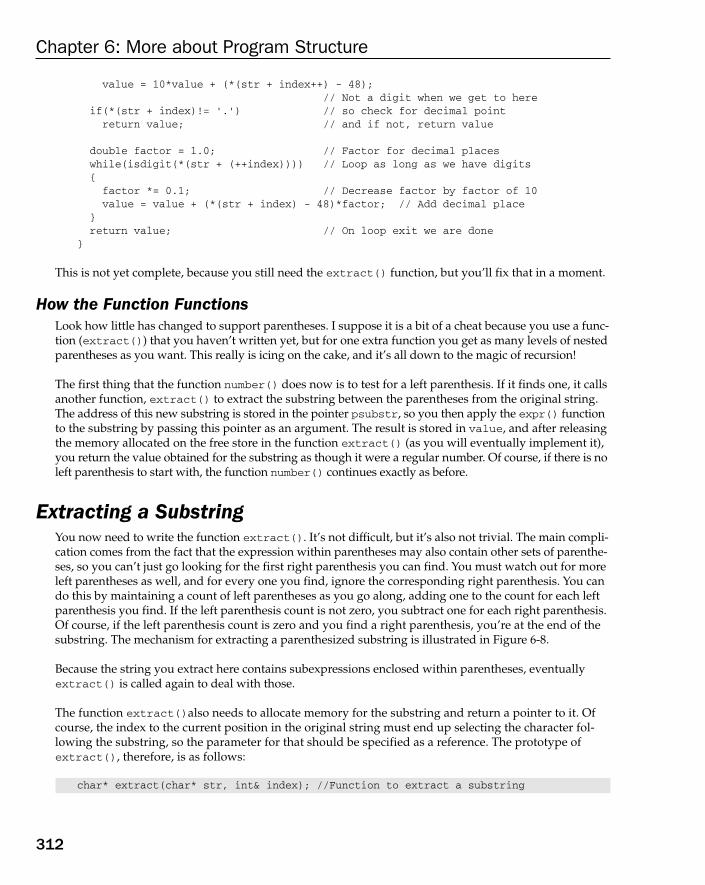
value = 10*value + (*(str + index++) - 48);// Not a digit when we get to here
if(*(str + index)!= ‘.’) // so check for decimal pointreturn value; // and if not, return value
double factor = 1.0; // Factor for decimal placeswhile(isdigit(*(str + (++index)))) // Loop as long as we have digits{factor *= 0.1; // Decrease factor by factor of 10value = value + (*(str + index) - 48)*factor; // Add decimal place
}return value; // On loop exit we are done
}
This is not yet complete, because you still need the extract() function, but you’ll fix that in a moment.
How the Function FunctionsLook how little has changed to support parentheses. I suppose it is a bit of a cheat because you use a func-tion (extract()) that you haven’t written yet, but for one extra function you get as many levels of nestedparentheses as you want. This really is icing on the cake, and it’s all down to the magic of recursion!
The first thing that the function number() does now is to test for a left parenthesis. If it finds one, it callsanother function, extract() to extract the substring between the parentheses from the original string.The address of this new substring is stored in the pointer psubstr, so you then apply the expr() functionto the substring by passing this pointer as an argument. The result is stored in value, and after releasingthe memory allocated on the free store in the function extract() (as you will eventually implement it),you return the value obtained for the substring as though it were a regular number. Of course, if there is noleft parenthesis to start with, the function number() continues exactly as before.
Extracting a SubstringYou now need to write the function extract(). It’s not difficult, but it’s also not trivial. The main compli-cation comes from the fact that the expression within parentheses may also contain other sets of parenthe-ses, so you can’t just go looking for the first right parenthesis you can find. You must watch out for moreleft parentheses as well, and for every one you find, ignore the corresponding right parenthesis. You cando this by maintaining a count of left parentheses as you go along, adding one to the count for each leftparenthesis you find. If the left parenthesis count is not zero, you subtract one for each right parenthesis.Of course, if the left parenthesis count is zero and you find a right parenthesis, you’re at the end of thesubstring. The mechanism for extracting a parenthesized substring is illustrated in Figure 6-8.
Because the string you extract here contains subexpressions enclosed within parentheses, eventuallyextract() is called again to deal with those.
The function extract()also needs to allocate memory for the substring and return a pointer to it. Ofcourse, the index to the current position in the original string must end up selecting the character fol-lowing the substring, so the parameter for that should be specified as a reference. The prototype ofextract(), therefore, is as follows:
char* extract(char* str, int& index); //Function to extract a substring
312
Chapter 6: More about Program Structure
25905c06.qxd:WroxPro 2/21/08 8:50 AM Page 312

Figure 6-8
You can now have a shot at the definition of the function.
// Function to extract a substring between parentheses// (requires <cstring> header file)char* extract(char* str, int& index){char buffer[MAX]; // Temporary space for substringchar* pstr = 0; // Pointer to new string for returnint numL = 0; // Count of left parentheses foundint bufindex = index; // Save starting value for index
do{buffer[index - bufindex] = *(str + index);switch(buffer[index - bufindex]){case ‘)’:if(numL == 0){buffer[index - bufindex] = ‘\0’; // Replace ‘)’ with ‘\0’++index;pstr = new char[index - bufindex];if(!pstr){cout << “Memory allocation failed,”
<< “ program terminated.”;exit(1);
}strcpy_s(pstr, index-bufindex, buffer); // Copy substring to new memoryreturn pstr; // Return substring in new memory
}else
( 2 5 -3+ * ) / 2( 2 * ( 9 )11 +
0
Signals start of substringFinding ')' with the '(' count at zero
indicates the end of the parenthesizedsubstring has been reached
Original expression string
Substring that was between parentheses
'(' count: 0 0 0 0 1 1 1 1 0 0 0 0 1 1 1 1 1 0
)
2 5 -3+ * ) / 2( 2 * ( 9 )11 + \0
copy replacewith '\0'
313
Chapter 6: More about Program Structure
25905c06.qxd:WroxPro 2/21/08 8:50 AM Page 313

numL--; // Reduce count of ‘(‘ to be matchedbreak;
case ‘(‘:numL++; // Increase count of ‘(‘ to be
// matchedbreak;
}} while(*(str + index++) != ‘\0’); // Loop - don’t overrun end of string
cout << “Ran off the end of the expression, must be bad input.”<< endl;
exit(1);return pstr;
}
How the Function FunctionsYou declare a char array to temporarily hold the substring. You don’t know how long the substring willbe, but it can’t be more than MAX characters. You can’t return the address of buffer to the calling functionbecause it is local and will be destroyed on exit from the function; therefore, you need to allocate somememory on the free store when you know how long the string is. You do this by declaring a variable pstrof type ‘pointer to char’, which you return by value when you have the substring safe and sound in thefree store memory.
You declare a counter numL to keep track of left parentheses in the substring (as I discussed earlier). Theinitial value of index (when the function begins execution) is stored in the variable bufindex. You usethis in combination with incremented values of index to index the array buffer.
The executable part of the function is basically one big do-while loop. The substring is copied from strto buffer one character on each loop iteration, with a check for left or right parentheses during each cycle.If a left parenthesis is found, numL is incremented, and if a right parenthesis is found and numL is non-zero,it is decremented. When you find a right parenthesis and numL is zero, you have found the end of the sub-string. The ‘)’ in the substring in buffer is then replaced by ‘\0’, and sufficient memory is obtained onthe free store to hold the substring. The substring in buffer is then copied to the memory you obtainedthrough the operator new by using the strcpy_s() function that is declared in the<cstring> header file;this is a safe version of the old strcpy() function that is declared in the same header. This function copiesthe string specified by the third argument, buffer, to the address specified by the first argument, pstr.The second argument is the length of the destination string, pstr.
If you fall through the bottom of the loop, it means that you hit the ‘\0’ at the end of the expression in strwithout finding the complementary right bracket, so you display a message and terminate the program.
Running the Modified ProgramAfter replacing the number() function in the old version of the program, adding the #include statementfor <cstring>, and incorporating the prototype and the definition for the new extract() function you
314
Chapter 6: More about Program Structure
25905c06.qxd:WroxPro 2/21/08 8:50 AM Page 314
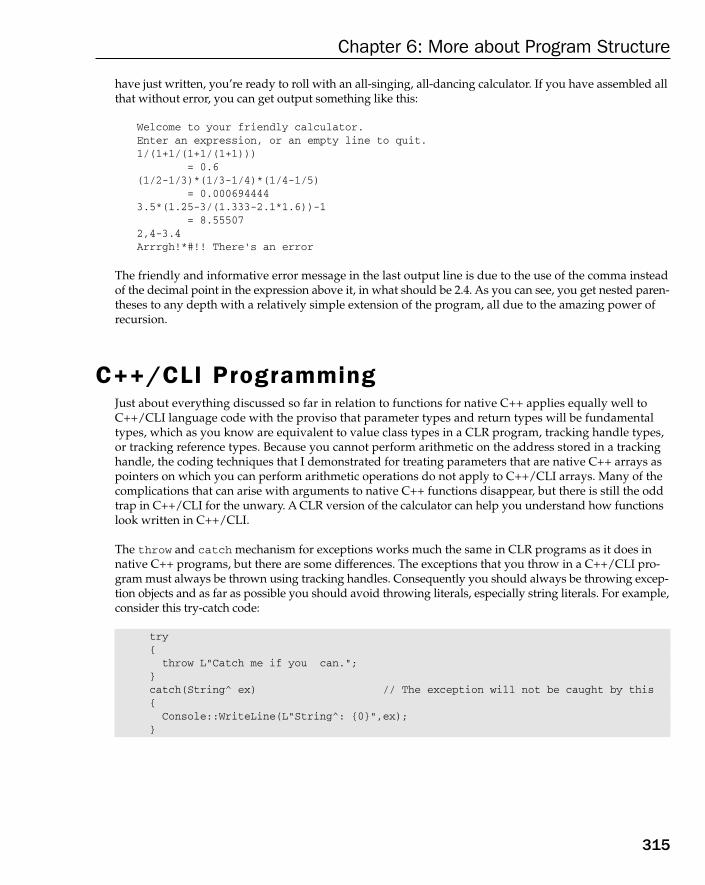
have just written, you’re ready to roll with an all-singing, all-dancing calculator. If you have assembled allthat without error, you can get output something like this:
Welcome to your friendly calculator.Enter an expression, or an empty line to quit.1/(1+1/(1+1/(1+1)))
= 0.6(1/2-1/3)*(1/3-1/4)*(1/4-1/5)
= 0.0006944443.5*(1.25-3/(1.333-2.1*1.6))-1
= 8.555072,4-3.4Arrrgh!*#!! There’s an error
The friendly and informative error message in the last output line is due to the use of the comma insteadof the decimal point in the expression above it, in what should be 2.4. As you can see, you get nested paren-theses to any depth with a relatively simple extension of the program, all due to the amazing power ofrecursion.
C++/CLI ProgrammingJust about everything discussed so far in relation to functions for native C++ applies equally well toC++/CLI language code with the proviso that parameter types and return types will be fundamentaltypes, which as you know are equivalent to value class types in a CLR program, tracking handle types,or tracking reference types. Because you cannot perform arithmetic on the address stored in a trackinghandle, the coding techniques that I demonstrated for treating parameters that are native C++ arrays aspointers on which you can perform arithmetic operations do not apply to C++/CLI arrays. Many of thecomplications that can arise with arguments to native C++ functions disappear, but there is still the oddtrap in C++/CLI for the unwary. A CLR version of the calculator can help you understand how functionslook written in C++/CLI.
The throw and catch mechanism for exceptions works much the same in CLR programs as it does innative C++ programs, but there are some differences. The exceptions that you throw in a C++/CLI pro-gram must always be thrown using tracking handles. Consequently you should always be throwing excep-tion objects and as far as possible you should avoid throwing literals, especially string literals. For example,consider this try-catch code:
try{throw L”Catch me if you can.”;
}catch(String^ ex) // The exception will not be caught by this{Console::WriteLine(L”String^: {0}”,ex);
}
315
Chapter 6: More about Program Structure
25905c06.qxd:WroxPro 2/21/08 8:50 AM Page 315
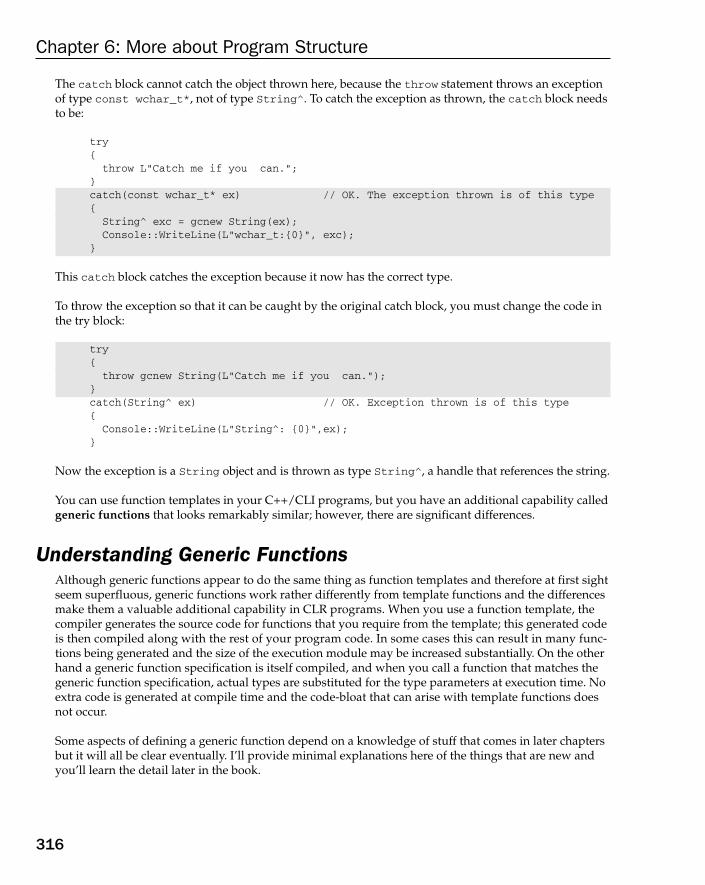
The catch block cannot catch the object thrown here, because the throw statement throws an exceptionof type const wchar_t*, not of type String^. To catch the exception as thrown, the catch block needsto be:
try{
throw L”Catch me if you can.”;}catch(const wchar_t* ex) // OK. The exception thrown is of this type{String^ exc = gcnew String(ex);Console::WriteLine(L”wchar_t:{0}”, exc);
}
This catch block catches the exception because it now has the correct type.
To throw the exception so that it can be caught by the original catch block, you must change the code inthe try block:
try{throw gcnew String(L”Catch me if you can.”);
}catch(String^ ex) // OK. Exception thrown is of this type{
Console::WriteLine(L”String^: {0}”,ex);}
Now the exception is a String object and is thrown as type String^, a handle that references the string.
You can use function templates in your C++/CLI programs, but you have an additional capability calledgeneric functions that looks remarkably similar; however, there are significant differences.
Understanding Generic FunctionsAlthough generic functions appear to do the same thing as function templates and therefore at first sightseem superfluous, generic functions work rather differently from template functions and the differencesmake them a valuable additional capability in CLR programs. When you use a function template, thecompiler generates the source code for functions that you require from the template; this generated codeis then compiled along with the rest of your program code. In some cases this can result in many func-tions being generated and the size of the execution module may be increased substantially. On the otherhand a generic function specification is itself compiled, and when you call a function that matches thegeneric function specification, actual types are substituted for the type parameters at execution time. Noextra code is generated at compile time and the code-bloat that can arise with template functions doesnot occur.
Some aspects of defining a generic function depend on a knowledge of stuff that comes in later chaptersbut it will all be clear eventually. I’ll provide minimal explanations here of the things that are new andyou’ll learn the detail later in the book.
316
Chapter 6: More about Program Structure
25905c06.qxd:WroxPro 2/21/08 8:50 AM Page 316
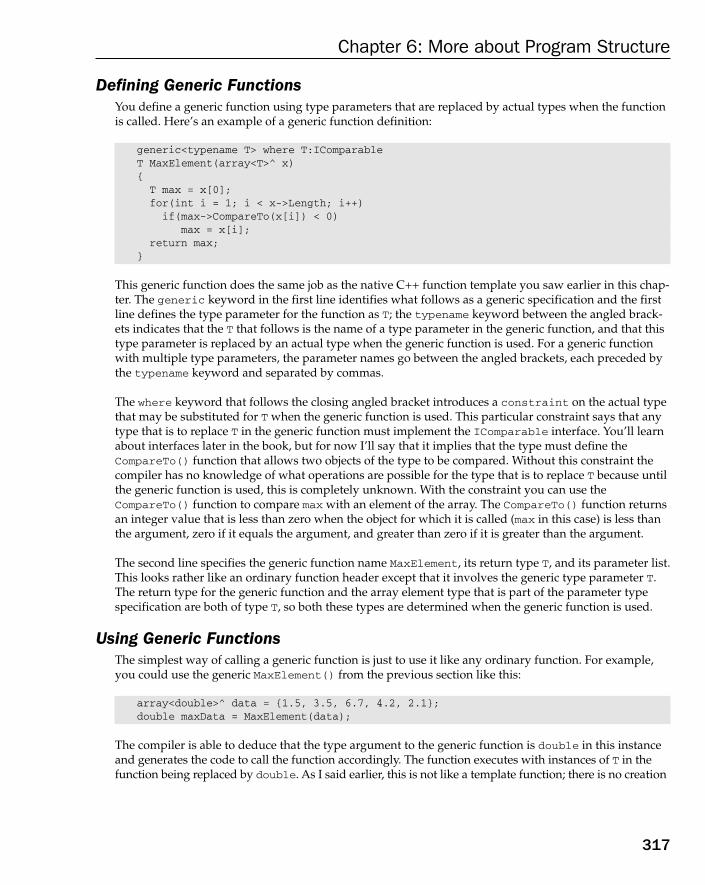
Defining Generic FunctionsYou define a generic function using type parameters that are replaced by actual types when the functionis called. Here’s an example of a generic function definition:
generic<typename T> where T:IComparableT MaxElement(array<T>^ x){T max = x[0];for(int i = 1; i < x->Length; i++)if(max->CompareTo(x[i]) < 0)
max = x[i];return max;
}
This generic function does the same job as the native C++ function template you saw earlier in this chap-ter. The generic keyword in the first line identifies what follows as a generic specification and the firstline defines the type parameter for the function as T; the typename keyword between the angled brack-ets indicates that the T that follows is the name of a type parameter in the generic function, and that thistype parameter is replaced by an actual type when the generic function is used. For a generic functionwith multiple type parameters, the parameter names go between the angled brackets, each preceded bythe typename keyword and separated by commas.
The where keyword that follows the closing angled bracket introduces a constraint on the actual typethat may be substituted for T when the generic function is used. This particular constraint says that anytype that is to replace T in the generic function must implement the IComparable interface. You’ll learnabout interfaces later in the book, but for now I’ll say that it implies that the type must define theCompareTo() function that allows two objects of the type to be compared. Without this constraint thecompiler has no knowledge of what operations are possible for the type that is to replace T because untilthe generic function is used, this is completely unknown. With the constraint you can use theCompareTo() function to compare max with an element of the array. The CompareTo() function returnsan integer value that is less than zero when the object for which it is called (max in this case) is less thanthe argument, zero if it equals the argument, and greater than zero if it is greater than the argument.
The second line specifies the generic function name MaxElement, its return type T, and its parameter list.This looks rather like an ordinary function header except that it involves the generic type parameter T.The return type for the generic function and the array element type that is part of the parameter typespecification are both of type T, so both these types are determined when the generic function is used.
Using Generic FunctionsThe simplest way of calling a generic function is just to use it like any ordinary function. For example,you could use the generic MaxElement() from the previous section like this:
array<double>^ data = {1.5, 3.5, 6.7, 4.2, 2.1};double maxData = MaxElement(data);
The compiler is able to deduce that the type argument to the generic function is double in this instanceand generates the code to call the function accordingly. The function executes with instances of T in thefunction being replaced by double. As I said earlier, this is not like a template function; there is no creation
317
Chapter 6: More about Program Structure
25905c06.qxd:WroxPro 2/21/08 8:50 AM Page 317

of function instances at compile time. The compiled generic function is able to handle type argumentsubstitutions when it is called.
Note that if you pass a string literal as an argument to a generic function, the compiler deduces that thetype argument is String^, regardless of whether the string literal is a narrow string constant such as“Hello!” or a wide string constant such as L”Hello!”.
It is possible that the compiler may not be able to deduce the type argument from a call of a generic func-tion. In these instances you can specify the type argument(s) explicitly between angled brackets followingthe function name in the call. For example, you could write the call in the previous fragment as:
double maxData = MaxElement<double>(data);
With an explicit type argument specified there is no possibility of ambiguity.
There are limitations on what types you can supply as a type argument to a generic function. A type argu-ment cannot be a native C++ class type, nor a native pointer or reference, nor a handle to a value class typesuch as int^. Thus only value class types such as int or double and tracking handles such as String^are allowed (but not a handle to a value class type).
Let’s try a working example.
Try It Out Using a Generic FunctionHere’s an example that defines and uses three generic functions:
// Ex6_10.cpp : main project file.// Defining and using generic functions
#include “stdafx.h”
using namespace System;
// Generic function to find the maximum element in an arraygeneric<typename T> where T:IComparableT MaxElement(array<T>^ x){T max = x[0];for(int i = 1; i < x->Length; i++)if(max->CompareTo(x[i]) < 0)
max = x[i];return max;
}
// Generic function to remove an element from an arraygeneric<typename T> where T:IComparablearray<T>^ RemoveElement(T element, array<T>^ data){array<T>^ newData = gcnew array<T>(data->Length - 1);int index = 0; // Index to elements in newData arraybool found = false; // Indicates that the element to remove was foundfor each(T item in data)
318
Chapter 6: More about Program Structure
25905c06.qxd:WroxPro 2/21/08 8:50 AM Page 318

{// Check for invalid index or element foundif((!found) && item->CompareTo(element) == 0){found = true;continue;
}else{if(index == newData->Length){Console::WriteLine(L”Element to remove not found”);return data;
}newData[index++] = item;
}}return newData;
}
// Generic function to list an arraygeneric<typename T> where T:IComparablevoid ListElements(array<T>^ data){for each(T item in data)Console::Write(L”{0,10}”, item);
Console::WriteLine();}
int main(array<System::String ^> ^args){array<double>^ data = {1.5, 3.5, 6.7, 4.2, 2.1};Console::WriteLine(L”Array contains:”);ListElements(data);Console::WriteLine(L”\nMaximum element = {0}\n”, MaxElement(data));array<double>^ result = RemoveElement(MaxElement(data), data);Console::WriteLine(L” After removing maximum, array contains:”);ListElements(result);
array<int>^ numbers = {3, 12, 7, 0, 10,11};Console::WriteLine(L”\nArray contains:”);ListElements(numbers);Console::WriteLine(L”\nMaximum element = {0}\n”, MaxElement(numbers));Console::WriteLine(L”\nAfter removing maximum, array contains:”);ListElements(RemoveElement(MaxElement(numbers), numbers));
array<String^>^ strings = {L”Many”, L”hands”, L”make”, L”light”, L”work”};Console::WriteLine(L”\nArray contains:”);ListElements(strings);Console::WriteLine(L”\nMaximum element = {0}\n”, MaxElement(strings));Console::WriteLine(L”\nAfter removing maximum, array contains:”);ListElements(RemoveElement(MaxElement(strings), strings));return 0;
}
319
Chapter 6: More about Program Structure
25905c06.qxd:WroxPro 2/21/08 8:50 AM Page 319
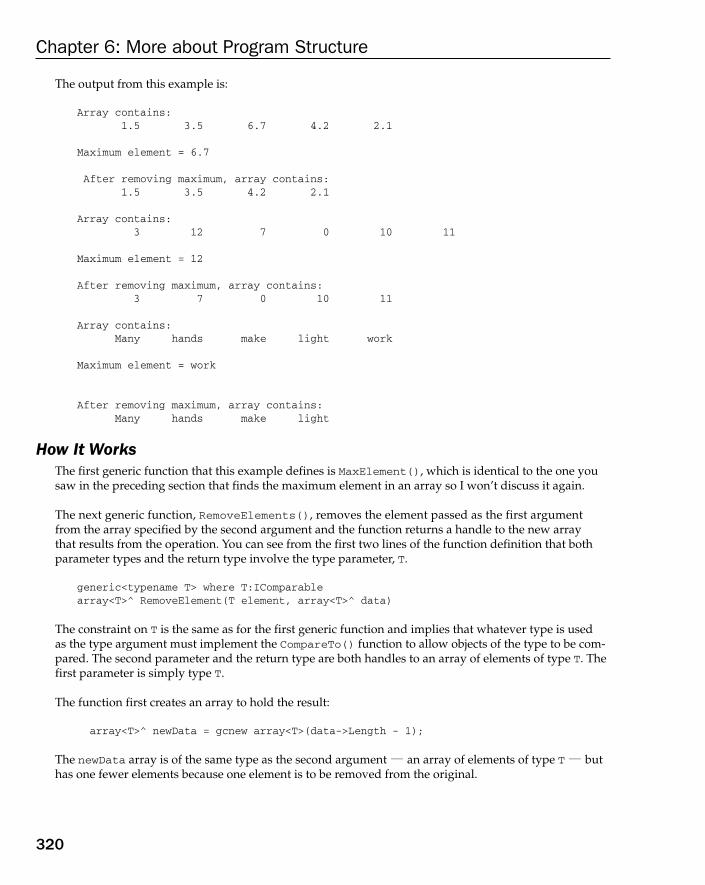
The output from this example is:
Array contains:1.5 3.5 6.7 4.2 2.1
Maximum element = 6.7
After removing maximum, array contains:1.5 3.5 4.2 2.1
Array contains:3 12 7 0 10 11
Maximum element = 12
After removing maximum, array contains:3 7 0 10 11
Array contains:Many hands make light work
Maximum element = work
After removing maximum, array contains:Many hands make light
How It WorksThe first generic function that this example defines is MaxElement(), which is identical to the one yousaw in the preceding section that finds the maximum element in an array so I won’t discuss it again.
The next generic function, RemoveElements(), removes the element passed as the first argumentfrom the array specified by the second argument and the function returns a handle to the new array that results from the operation. You can see from the first two lines of the function definition that bothparameter types and the return type involve the type parameter, T.
generic<typename T> where T:IComparablearray<T>^ RemoveElement(T element, array<T>^ data)
The constraint on T is the same as for the first generic function and implies that whatever type is used as the type argument must implement the CompareTo() function to allow objects of the type to be com-pared. The second parameter and the return type are both handles to an array of elements of type T. Thefirst parameter is simply type T.
The function first creates an array to hold the result:
array<T>^ newData = gcnew array<T>(data->Length - 1);
The newData array is of the same type as the second argument — an array of elements of type T — buthas one fewer elements because one element is to be removed from the original.
320
Chapter 6: More about Program Structure
25905c06.qxd:WroxPro 2/21/08 8:50 AM Page 320

The elements are copied from the data array to the newData array in the for each loop:
int index = 0; // Index to elements in newData arraybool found = false; // Indicates that element to remove was foundfor each(T item in data){
// Check for invalid index or element foundif((!found) && item->CompareTo(element) == 0){
found = true;continue;
}else{
if(index == newData->Length){
Console::WriteLine(L”Element to remove not found”);return data;
}newData[index++] = item;
}}
All elements are copied except the one identified by the first argument to the function. You use the indexvariable to select the next newData array element that is to receive the next element from the data array.Each element from data is copied unless it is equal to element, in which case found is set to true andthe continue statement skips to the next iteration. It is quite possible that an array could have more thanone element equal to the first argument and the found variable prevents subsequent elements that are thesame as element from being skipped in the loop.
You also have a check for the index variable exceeding the legal limit for indexing elements in newData.This could arise if there is no element in the data array equal to the first argument to the function. In thiseventuality, you just return the handle to the original array.
The third generic function just lists the elements from an array of type array<T>:
generic<typename T>void ListElements(array<T>^ data){
for each(T item in data)Console::Write(L”{0,10}”, item);
Console::WriteLine();}
This is one of the few occasions where no constraint on the type parameter is needed. There is very littleyou can do with objects that are of a completely unknown type so typically generic function type param-eters will have constraints. The operation of the function is very simple — each element from the array is written to the command line in an output field with a width of 10 in the for each loop. If you want,you could add a little sophistication by adding a parameter for the field width and creating the formatstring to be used as the first argument to the Write() function in the Console class. You could also addlogic to the loop to write a specific number of elements per line based on the field width.
321
Chapter 6: More about Program Structure
25905c06.qxd:WroxPro 2/21/08 8:50 AM Page 321
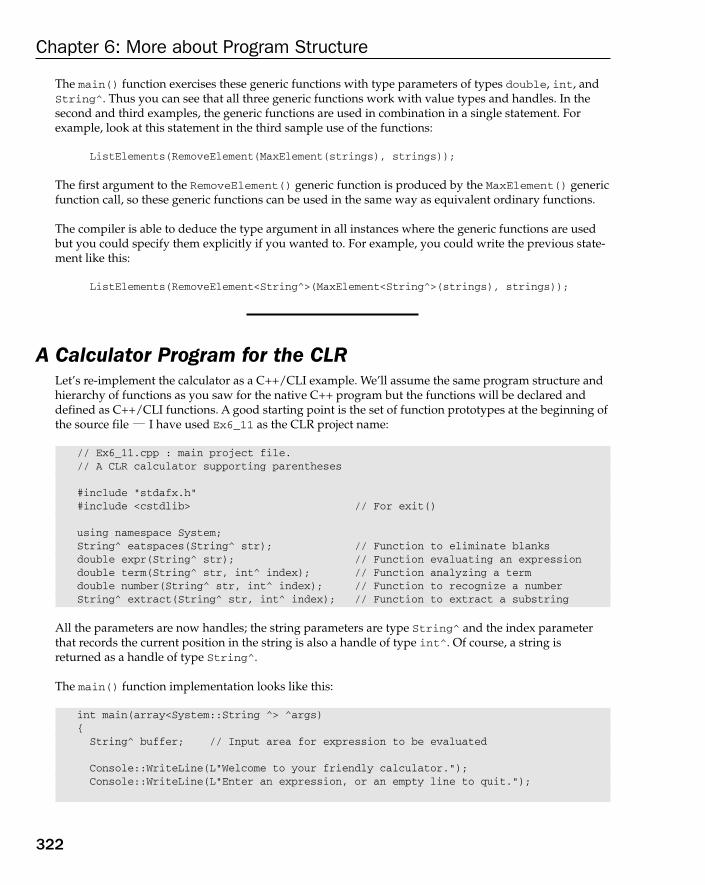
The main() function exercises these generic functions with type parameters of types double, int, andString^. Thus you can see that all three generic functions work with value types and handles. In thesecond and third examples, the generic functions are used in combination in a single statement. Forexample, look at this statement in the third sample use of the functions:
ListElements(RemoveElement(MaxElement(strings), strings));
The first argument to the RemoveElement() generic function is produced by the MaxElement() genericfunction call, so these generic functions can be used in the same way as equivalent ordinary functions.
The compiler is able to deduce the type argument in all instances where the generic functions are usedbut you could specify them explicitly if you wanted to. For example, you could write the previous state-ment like this:
ListElements(RemoveElement<String^>(MaxElement<String^>(strings), strings));
A Calculator Program for the CLRLet’s re-implement the calculator as a C++/CLI example. We’ll assume the same program structure andhierarchy of functions as you saw for the native C++ program but the functions will be declared anddefined as C++/CLI functions. A good starting point is the set of function prototypes at the beginning ofthe source file — I have used Ex6_11 as the CLR project name:
// Ex6_11.cpp : main project file.// A CLR calculator supporting parentheses
#include “stdafx.h”#include <cstdlib> // For exit()
using namespace System;String^ eatspaces(String^ str); // Function to eliminate blanksdouble expr(String^ str); // Function evaluating an expressiondouble term(String^ str, int^ index); // Function analyzing a termdouble number(String^ str, int^ index); // Function to recognize a numberString^ extract(String^ str, int^ index); // Function to extract a substring
All the parameters are now handles; the string parameters are type String^ and the index parameterthat records the current position in the string is also a handle of type int^. Of course, a string isreturned as a handle of type String^.
The main() function implementation looks like this:
int main(array<System::String ^> ^args){String^ buffer; // Input area for expression to be evaluated
Console::WriteLine(L”Welcome to your friendly calculator.”);Console::WriteLine(L”Enter an expression, or an empty line to quit.”);
322
Chapter 6: More about Program Structure
25905c06.qxd:WroxPro 2/21/08 8:50 AM Page 322

for(;;){buffer = eatspaces(Console::ReadLine()); // Read an input line
if(String::IsNullOrEmpty(buffer)) // Empty line ends calculatorreturn 0;
Console::WriteLine(L” = {0}\n\n”,expr(buffer)); // Output value of expression}return 0;
}
The function is a lot shorter and easier to read. Within the indefinite for loop you call the String classfunction, IsNullOrEmpty(). This function returns true if the string passed as the argument is null orof zero length so it does exactly what you want here.
Removing Spaces from the Input StringThe function to remove spaces is also simpler and shorter:
// Function to eliminate spaces from a stringString^ eatspaces(String^ str){// Array to hold string without spacesarray<wchar_t>^ chars = gcnew array<wchar_t>(str->Length);int length = 0; // Number of chars in array
// Copy non-space characters to chars arrayfor each(wchar_t ch in str)if(ch != ‘ ‘)chars[length++] = ch;
// Return chars array as stringreturn gcnew String(chars, 0, length);
}
You first create an array to accommodate the string when the spaces have been removed. This is an arrayof elements of type wchar_t because strings in C++/CLI are Unicode characters. The process for remov-ing the spaces is very simple — you copy all the characters that are not spaces from the string str to thearray, chars, keeping track of the number of characters copied in the length variable. You finally createa new String object using a String class constructor that creates the object from elements in an array.The first argument to the constructor is the array that is the source of characters for the string, the secondargument is the index position for the first character from the array that forms the string, and the thirdargument is the total number of characters from the array that are to be used. The String class defines arange of constructors for creating strings in various ways.
Evaluating an Arithmetic ExpressionYou can implement the function to evaluate an expression like this:
// Function to evaluate an arithmetic expressiondouble expr(String^ str){
323
Chapter 6: More about Program Structure
25905c06.qxd:WroxPro 2/21/08 8:50 AM Page 323

int^ index = 0; // Keeps track of current character position
double value = term(str, index); // Get first term
while(*index < str->Length){switch(str[*index]) // Choose action based on current character{case ‘+’: // + found so
++(*index); // increment index and addvalue += term(str, index); // the next termbreak;
case ‘-’: // - found so++(*index); // decrement index and add
value -= term(str, index); // the next termbreak;
default: // If we reach here the string is junkConsole::WriteLine(L”Arrrgh!*#!! There’s an error.\n”);exit(1);
}}return value;
}
The index variable is declared as a handle because you want to pass it to the term() function and allowthe term() function to modify the original variable. If you declared index simply as type int, the term()function would receive a copy of the value and could not refer to the original variable to change it.
The declaration of index results in a warning message from the compiler because the statement relies onautoboxing of the value 0 to produce the Int32 value class object that the handle references, and the warn-ing is because people often write the statement like this but intend to initialize the handle to null. Of course,to do this you must use nullptr as the initial value in place of 0. If you want to eliminate the warning, youcould rewrite the statement as:
int^ index = gcnew int(0);
This statement uses a constructor explicitly to create the object and initialize it with 0 so there’s no warn-ing from the compiler.
After processing the initial term by calling the term() function, the while loop steps through the stringlooking for + or - operators followed by another term. The switch statement identifies and processesthe operators. If you have been using native C++ for a while, you might be tempted to write the casestatements in the switch a little differently — for example:
// Incorrect code!! Does not work!!case ‘+’: // + found so
value += term(str, ++(*index)); // increment index & add the next termbreak;
Of course, this would typically be written without the first comment. This code is wrong, but why is itwrong? The term() function expects a handle in type int^ as the second argument and that is what is
324
Chapter 6: More about Program Structure
25905c06.qxd:WroxPro 2/21/08 8:50 AM Page 324

supplied here although maybe not as you expect. The compiler arranges for the expression ++(*index)to be evaluated and the result stored in a temporary location. The expression indeed updates the value ref-erenced by index, but the handle that is passed to the term() function is a handle to the temporary loca-tion holding the result of evaluating the expression, not the handle index. This handle is produced byautoboxing the value stored in the temporary location. When the term() function updates, the value refer-enced by the handle that is passed to it the temporary location is updated, not the location referenced byindex; thus all the updates to the index position of the string made in the term() function are lost. If youexpect a function to update a variable in the calling program, you must not use an expression as the func-tion argument — you must always use the handle variable name.
Obtaining the Value of a TermAs in the native C++ version, the term() function steps through the string that is passed as the firstargument, starting at the character position referenced by the second argument:
// Function to get the value of a termdouble term(String^ str, int^ index){double value = number(str, index); // Get the first number in the term
// Loop as long as we have characters and a good operatorwhile(*index < str->Length){if(str[*index] == L’*’) // If it’s multiply,{++(*index); // increment index andvalue *= number(str, index); // multiply by next number
}else if( str[*index] == L’/’) // If it’s divide{++(*index); // increment index andvalue /= number(str, index); // divide by next number
}elsebreak; // Exit the loop
}// We’ve finished, so return what we’ve gotreturn value;
}
After calling the number() function to get the value of the first number or parenthesized expression in a term, the function steps through the string in the while loop. The loop continues while there are stillcharacters in the input string, as long as a * or / operator followed by another number or parenthesizedexpression is found.
Evaluating a NumberThe number function extracts and evaluates a parenthesized expression if there is one; otherwise, itdetermines the value of the next number in the input:
// Function to recognize a numberdouble number(String^ str, int^ index){double value = 0.0; // Store for the resulting value
325
Chapter 6: More about Program Structure
25905c06.qxd:WroxPro 2/21/08 8:50 AM Page 325

// Check for expression between parenthesesif(str[*index] == L’(‘ ) // Start of parentheses{++(*index);String^ substr = extract(str, index); // Extract substring in bracketsreturn expr(substr); // Return substring value
}
// Loop accumulating leading digitswhile((*index < str->Length) && Char::IsDigit(str, *index)){value = 10.0*value + Char::GetNumericValue(str[(*index)]);++(*index);
}
// Not a digit when we get to hereif((*index == str->Length) || str[*index] != ‘.’) // so check for decimal pointreturn value; // and if not, return value
double factor = 1.0; // Factor for decimal places++(*index); // Move to digit
// Loop as long as we have digitswhile((*index < str->Length) && Char::IsDigit(str, *index)){factor *= 0.1; // Decrease factor by factor of 10value = value + Char::GetNumericValue(str[*index])*factor; // Add decimal place++(*index);
}
return value; // On loop exit we are done}
As in the native C++ version, the extract() function is used to extract a parenthesized expression andthe substring that results is passed to the expr() function to be evaluated. If there’s no parenthesizedexpression — indicated by the absence of an opening parenthesis, the input is scanned for a number,which is a sequence of zero or more digits followed by an optional decimal point plus fractional digits.The IsDigit() function in the Char class returns true if a character is a digit and false otherwise. Thecharacter here is in the string passed as the first argument to the function at the index position specifiedby the second argument. There’s another version if the IsDigit() function that accepts a single argu-ment of type wchar_t so you could use this with the argument str[*index]. The GetNumericValue()function in the Char class returns the value of a Unicode digit character that you pass as the argument asa value of type double. There’s another version of this function to which you can pass a string handle andan index position to specify the character.
326
Chapter 6: More about Program Structure
25905c06.qxd:WroxPro 2/21/08 8:50 AM Page 326
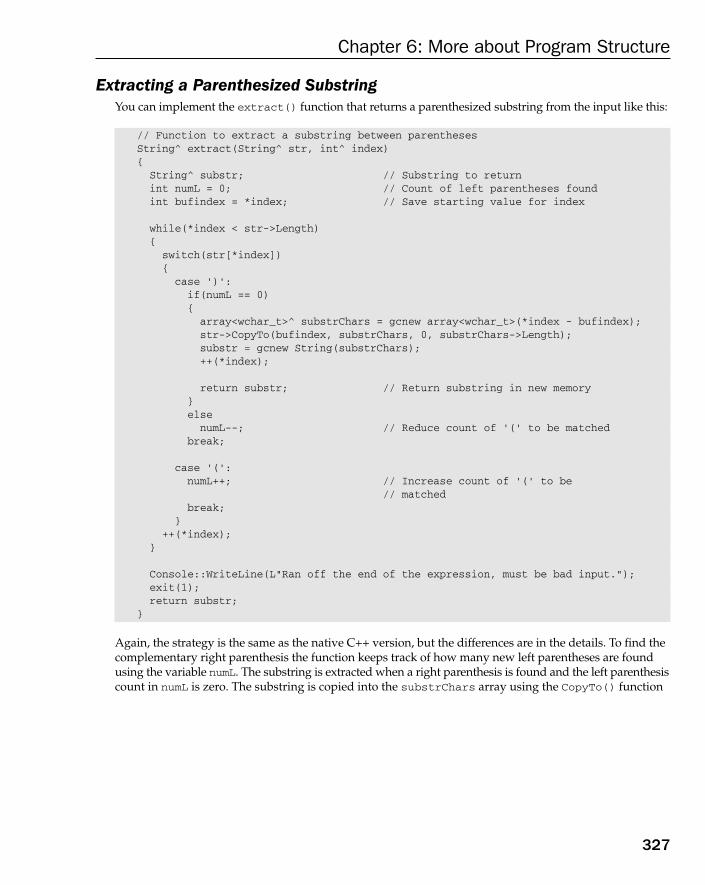
Extracting a Parenthesized SubstringYou can implement the extract() function that returns a parenthesized substring from the input like this:
// Function to extract a substring between parenthesesString^ extract(String^ str, int^ index){String^ substr; // Substring to returnint numL = 0; // Count of left parentheses foundint bufindex = *index; // Save starting value for index
while(*index < str->Length){switch(str[*index]){case ‘)’:if(numL == 0){array<wchar_t>^ substrChars = gcnew array<wchar_t>(*index - bufindex);str->CopyTo(bufindex, substrChars, 0, substrChars->Length);substr = gcnew String(substrChars);++(*index);
return substr; // Return substring in new memory}elsenumL--; // Reduce count of ‘(‘ to be matched
break;
case ‘(‘:numL++; // Increase count of ‘(‘ to be
// matchedbreak;
}++(*index);
}
Console::WriteLine(L”Ran off the end of the expression, must be bad input.”);exit(1);return substr;
}
Again, the strategy is the same as the native C++ version, but the differences are in the details. To find thecomplementary right parenthesis the function keeps track of how many new left parentheses are foundusing the variable numL. The substring is extracted when a right parenthesis is found and the left parenthesiscount in numL is zero. The substring is copied into the substrChars array using the CopyTo() function
327
Chapter 6: More about Program Structure
25905c06.qxd:WroxPro 2/21/08 8:50 AM Page 327
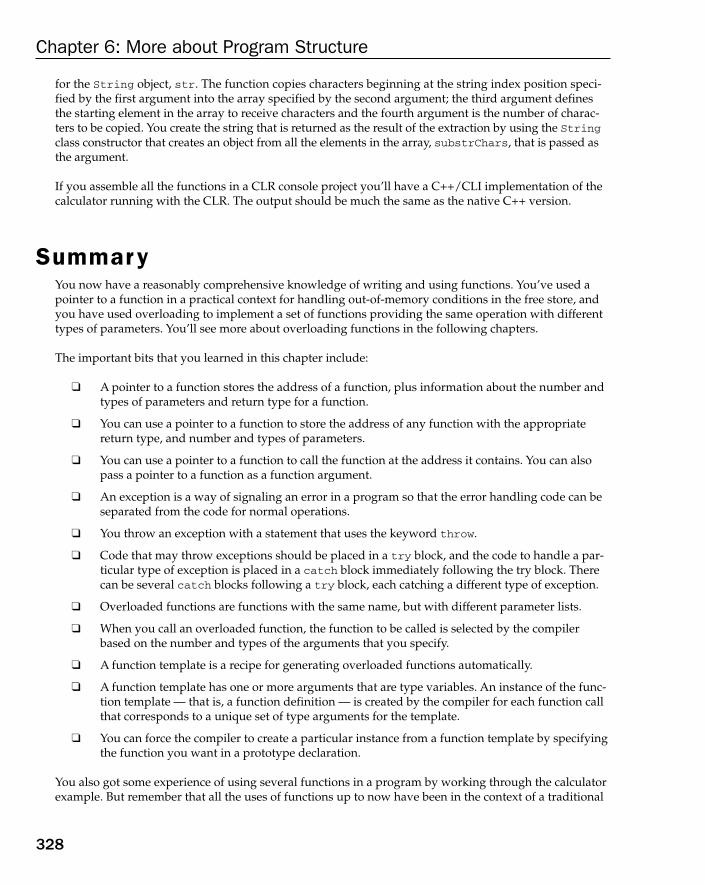
for the String object, str. The function copies characters beginning at the string index position speci-fied by the first argument into the array specified by the second argument; the third argument definesthe starting element in the array to receive characters and the fourth argument is the number of charac-ters to be copied. You create the string that is returned as the result of the extraction by using the Stringclass constructor that creates an object from all the elements in the array, substrChars, that is passed asthe argument.
If you assemble all the functions in a CLR console project you’ll have a C++/CLI implementation of thecalculator running with the CLR. The output should be much the same as the native C++ version.
SummaryYou now have a reasonably comprehensive knowledge of writing and using functions. You’ve used apointer to a function in a practical context for handling out-of-memory conditions in the free store, andyou have used overloading to implement a set of functions providing the same operation with differenttypes of parameters. You’ll see more about overloading functions in the following chapters.
The important bits that you learned in this chapter include:
❑ A pointer to a function stores the address of a function, plus information about the number andtypes of parameters and return type for a function.
❑ You can use a pointer to a function to store the address of any function with the appropriatereturn type, and number and types of parameters.
❑ You can use a pointer to a function to call the function at the address it contains. You can alsopass a pointer to a function as a function argument.
❑ An exception is a way of signaling an error in a program so that the error handling code can beseparated from the code for normal operations.
❑ You throw an exception with a statement that uses the keyword throw.
❑ Code that may throw exceptions should be placed in a try block, and the code to handle a par-ticular type of exception is placed in a catch block immediately following the try block. Therecan be several catch blocks following a try block, each catching a different type of exception.
❑ Overloaded functions are functions with the same name, but with different parameter lists.
❑ When you call an overloaded function, the function to be called is selected by the compilerbased on the number and types of the arguments that you specify.
❑ A function template is a recipe for generating overloaded functions automatically.
❑ A function template has one or more arguments that are type variables. An instance of the func-tion template — that is, a function definition — is created by the compiler for each function callthat corresponds to a unique set of type arguments for the template.
❑ You can force the compiler to create a particular instance from a function template by specifyingthe function you want in a prototype declaration.
You also got some experience of using several functions in a program by working through the calculatorexample. But remember that all the uses of functions up to now have been in the context of a traditional
328
Chapter 6: More about Program Structure
25905c06.qxd:WroxPro 2/21/08 8:50 AM Page 328
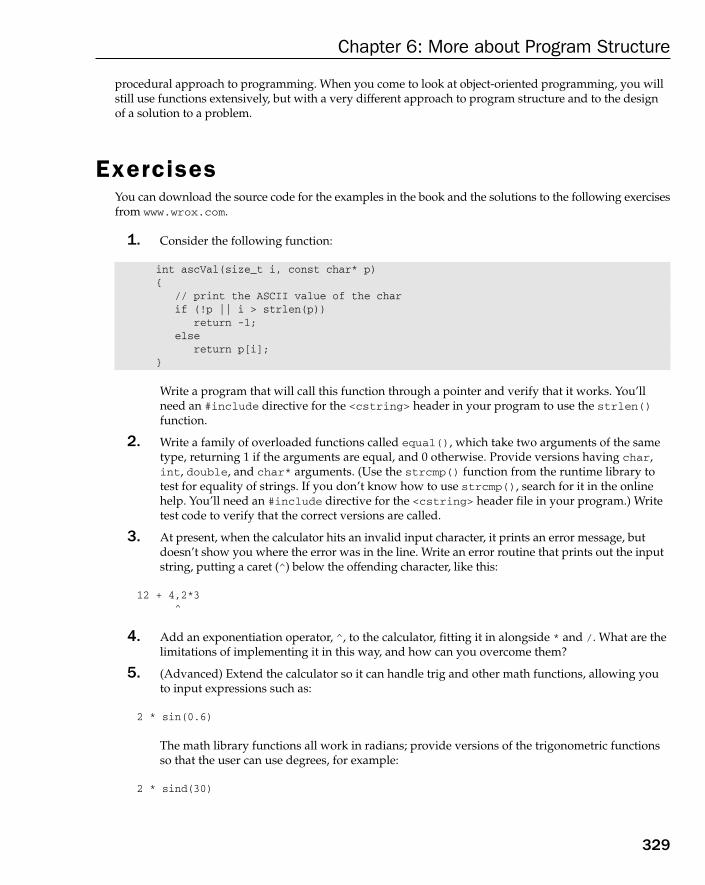
procedural approach to programming. When you come to look at object-oriented programming, you willstill use functions extensively, but with a very different approach to program structure and to the designof a solution to a problem.
ExercisesYou can download the source code for the examples in the book and the solutions to the following exercisesfrom www.wrox.com.
1. Consider the following function:
int ascVal(size_t i, const char* p){
// print the ASCII value of the charif (!p || i > strlen(p))
return -1;else
return p[i];}
Write a program that will call this function through a pointer and verify that it works. You’llneed an #include directive for the <cstring> header in your program to use the strlen()function.
2. Write a family of overloaded functions called equal(), which take two arguments of the sametype, returning 1 if the arguments are equal, and 0 otherwise. Provide versions having char,int, double, and char* arguments. (Use the strcmp() function from the runtime library totest for equality of strings. If you don’t know how to use strcmp(), search for it in the onlinehelp. You’ll need an #include directive for the <cstring> header file in your program.) Writetest code to verify that the correct versions are called.
3. At present, when the calculator hits an invalid input character, it prints an error message, butdoesn’t show you where the error was in the line. Write an error routine that prints out the inputstring, putting a caret (^) below the offending character, like this:
12 + 4,2*3^
4. Add an exponentiation operator, ^, to the calculator, fitting it in alongside * and /. What are thelimitations of implementing it in this way, and how can you overcome them?
5. (Advanced) Extend the calculator so it can handle trig and other math functions, allowing youto input expressions such as:
2 * sin(0.6)
The math library functions all work in radians; provide versions of the trigonometric functionsso that the user can use degrees, for example:
2 * sind(30)
329
Chapter 6: More about Program Structure
25905c06.qxd:WroxPro 2/21/08 8:50 AM Page 329

25905c06.qxd:WroxPro 2/21/08 8:50 AM Page 330

7Defining Your
Own Data Types
This chapter is about creating your own data types to suit your particular problem. It’s also aboutcreating objects, the building blocks of object-oriented programming. An object can seem a bit mys-terious to the uninitiated but, as you will see in this chapter, an object can be just an instance of oneof your own data types.
In this chapter, you will learn about:
❑ Structures and how they are used
❑ Classes and how they are used
❑ The basic components of a class and how you define class types
❑ Creating and using objects of a class
❑ Controlling access to members of a class
❑ Constructors and how to create them
❑ The default constructor
❑ References in the context of classes
❑ The copy constructor and how it is implemented
❑ How C++/CLI classes differ from native C++ classes
❑ Properties in a C++/CLI class and how you define and use them
❑ Literal fields and how you define and use them
❑ initonly fields and how you define and use them
❑ What a static constructor is
25905c07.qxd:WroxPro 2/21/08 8:51 AM Page 331

The struct in C++A structure is a user-defined type that you define using the keyword struct, so it is often referred to as a struct. The struct originated back in the C language, and C++ incorporates and expands on the C struct. A struct in C++ is functionally replaceable by a class insofar as anything you can do with a struct you can also achieve by using a class; however, because Windows was written in C before C++became widely used, the struct appears pervasively in Windows programming. It is also widely usedtoday, so you really need to know something about structs. We’ll first take a look at (C-style) structs in this chapter before exploring the more extensive capabilities offered by classes.
What Is a struct?Almost all the variables that you have seen up to now have been able to store a single type of entity — anumber of some kind, a character, or an array of elements of the same type. The real world is a bit morecomplicated than that, and just about any physical object you can think of needs several items of data todescribe it even minimally. Think about the information that might be needed to describe something assimple as a book. You might consider title, author, publisher, date of publication, number of pages, price,topic or classification, and ISBN number just for starters, and you can probably come up with a fewmore without too much difficulty. You could specify separate variables to contain each of the parame-ters that you need to describe a book, but ideally you would want to have a single data type, BOOK say,which embodied all of these parameters. I’m sure you won’t be surprised to hear that this is exactlywhat a struct can do for you.
Defining a structLet’s stick with the notion of a book, and suppose that you just want to include the title, author, publisher,and year of publication within your definition of a book. You could declare a structure to accommodatethis as follows:
struct BOOK{char Title[80];char Author[80];char Publisher[80];int Year;
};
This doesn’t define any variables, but it actually creates a new type for variables and the name of the typeis BOOK. The keyword struct defines BOOK as such, and the elements making up an object of this type aredefined within the braces. Note that each line defining an element in the struct is terminated by a semi-colon, and that a semicolon also appears after the closing brace. The elements of a struct can be of anytype, except the same type as the struct being defined. You couldn’t have an element of type BOOKincluded in the structure definition for BOOK, for example. You may think this to be a limitation, butnote that you could include a pointer to a variable of type BOOK, as you’ll see a little later on.
The elements Title, Author, Publisher, and Year enclosed between the braces in the definition abovemay also be referred to as members or fields of the BOOK structure. Each object of type BOOK contains the
332
Chapter 7: Defining Your Own Data Types
25905c07.qxd:WroxPro 2/21/08 8:51 AM Page 332
members Title, Author, Publisher, and Year. You can now create variables of type BOOK in exactly thesame way that you create variables of any other type:
BOOK Novel; // Declare variable Novel of type BOOK
This declares a variable with the name Novel that you can now use to store information about a book.All you need now is to understand how you get data into the various members that make up a variableof type BOOK.
Initializing a structThe first way to get data into the members of a struct is to define initial values in the declaration.Suppose you wanted to initialize the variable Novel to contain the data for one of your favorite books,Paneless Programming, published in 1981 by the Gutter Press. This is a story of a guy performing heroiccode development while living in an igloo, and as you probably know, inspired the famous Hollywoodbox office success, Gone with the Window. It was written by I.C. Fingers, who is also the author of thatseminal three-volume work, The Connoisseur’s Guide to the Paper Clip. With this wealth of informationyou can write the declaration for the variable Novel as:
BOOK Novel ={“Paneless Programming”, // Initial value for Title“I.C. Fingers”, // Initial value for Author“Gutter Press”, // Initial value for Publisher1981 // Initial value for Year
};
The initializing values appear between braces, separated by commas, in much the same way that youdefined initial values for members of an array. As with arrays, the sequence of initial values obviouslyneeds to be the same as the sequence of the members of the struct in its definition. Each member of thestructure Novel has the corresponding value assigned to it, as indicated in the comments.
Accessing the Members of a structTo access individual members of a struct, you can use the member selection operator, which is a period;this is sometimes referred to as the member access operator. To refer to a particular member, you write thestruct variable name, followed by a period, followed by the name of the member that you want to access.To change the Year member of the Novel structure, you could write:
Novel.Year = 1988;
This would set the value of the Year member to 1988. You can use a member of a structure in exactly thesame way as any other variable of the same type as the member. To increment the member Year by two,for example, you can write:
Novel.Year += 2;
This increments the value of the Year member of the struct, just like any other variable.
333
Chapter 7: Defining Your Own Data Types
25905c07.qxd:WroxPro 2/21/08 8:51 AM Page 333

Try It Out Using structsYou can use another console application example to exercise a little further how referencing the membersof a struct works. Suppose you want to write a program to deal with some of the things you might findin a yard, such as those illustrated in the professionally landscaped yard in Figure 7-1.
Figure 7-1
I have arbitrarily assigned the coordinates 0,0 to the top-left corner of the yard. The bottom-right cornerhas the coordinates 100,120. Thus, the first coordinate value is a measure of the horizontal position rela-tive to the top-left corner, with values increasing from left to right, and the second coordinate is a meas-ure of the vertical position from the same reference point, with values increasing from top to bottom.Figure 7-1 also shows the position of the pool and that of the two huts relative to the top-left corner ofthe yard. Because the yard, huts, and pool are all rectangular, you could define a struct type to repre-sent any of these objects:
struct RECTANGLE{
House
Pool
Position 0,0
Position 100,120
Hut
70
30
10
25
25
70
90
11
0
40
80
10
30
Hut
334
Chapter 7: Defining Your Own Data Types
25905c07.qxd:WroxPro 2/21/08 10:15 AM Page 334

int Left; // Top-left pointint Top; // coordinate pair
int Right; // Bottom-right pointint Bottom; // coordinate pair
};
The first two members of the RECTANGLE structure type correspond to the coordinates of the top-left pointof a rectangle, and the next two to the coordinates of the bottom-right point. You can use this in an elemen-tary example dealing with the objects in the yard as follows:
// Ex7_01.cpp// Exercising structures in the yard#include <iostream>using std::cout;using std::endl;
// Definition of a struct to represent rectanglesstruct RECTANGLE{int Left; // Top-left pointint Top; // coordinate pair
int Right; // Bottom-right pointint Bottom; // coordinate pair
};
// Prototype of function to calculate the area of a rectanglelong Area(RECTANGLE& aRect);
// Prototype of a function to move a rectanglevoid MoveRect(RECTANGLE& aRect, int x, int y);
int main(void){RECTANGLE Yard = { 0, 0, 100, 120 };RECTANGLE Pool = { 30, 40, 70, 80 };RECTANGLE Hut1, Hut2;
Hut1.Left = 70;Hut1.Top = 10;Hut1.Right = Hut1.Left + 25;Hut1.Bottom = 30;
Hut2 = Hut1; // Define Hut2 the same as Hut1MoveRect(Hut2, 10, 90); // Now move it to the right position
cout << endl<< “Coordinates of Hut2 are “<< Hut2.Left << “,” << Hut2.Top << “ and “<< Hut2.Right << “,” << Hut2.Bottom;
cout << endl<< “The area of the yard is “<< Area(Yard);
335
Chapter 7: Defining Your Own Data Types
25905c07.qxd:WroxPro 2/21/08 8:51 AM Page 335
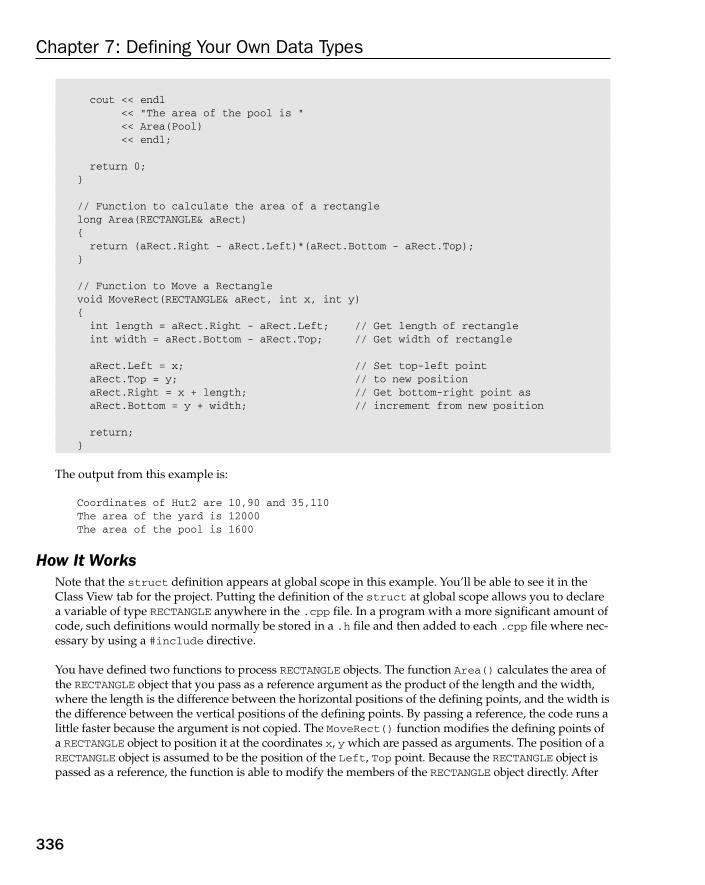
cout << endl<< “The area of the pool is “<< Area(Pool)<< endl;
return 0;}
// Function to calculate the area of a rectanglelong Area(RECTANGLE& aRect){return (aRect.Right - aRect.Left)*(aRect.Bottom - aRect.Top);
}
// Function to Move a Rectanglevoid MoveRect(RECTANGLE& aRect, int x, int y){int length = aRect.Right - aRect.Left; // Get length of rectangleint width = aRect.Bottom - aRect.Top; // Get width of rectangle
aRect.Left = x; // Set top-left pointaRect.Top = y; // to new positionaRect.Right = x + length; // Get bottom-right point asaRect.Bottom = y + width; // increment from new position
return;}
The output from this example is:
Coordinates of Hut2 are 10,90 and 35,110The area of the yard is 12000The area of the pool is 1600
How It WorksNote that the struct definition appears at global scope in this example. You’ll be able to see it in theClass View tab for the project. Putting the definition of the struct at global scope allows you to declarea variable of type RECTANGLE anywhere in the .cpp file. In a program with a more significant amount ofcode, such definitions would normally be stored in a .h file and then added to each .cpp file where nec-essary by using a #include directive.
You have defined two functions to process RECTANGLE objects. The function Area() calculates the area ofthe RECTANGLE object that you pass as a reference argument as the product of the length and the width,where the length is the difference between the horizontal positions of the defining points, and the width isthe difference between the vertical positions of the defining points. By passing a reference, the code runs alittle faster because the argument is not copied. The MoveRect() function modifies the defining points ofa RECTANGLE object to position it at the coordinates x, y which are passed as arguments. The position of aRECTANGLE object is assumed to be the position of the Left, Top point. Because the RECTANGLE object ispassed as a reference, the function is able to modify the members of the RECTANGLE object directly. After
336
Chapter 7: Defining Your Own Data Types
25905c07.qxd:WroxPro 2/21/08 8:51 AM Page 336

calculating the length and width of the RECTANGLE object passed, the Left and Top members are set to xand y respectively, and the new Right and Bottom members are calculated by incrementing x and y bythe length and width of the original RECTANGLE object.
In the main() function, you initialize the Yard and Pool RECTANGLE variables with their coordinatepositions, as shown in Figure 7-1. The variable Hut1 represents the hut at the top-right in the illustrationand its members are set to the appropriate values using assignment statements. The variable Hut2, cor-responding to the hut at the bottom-left of the yard, is first set to be the same as Hut1 in the assignmentstatement:
Hut2 = Hut1; // Define Hut2 the same as Hut1
This statement results in the values of the members of Hut1 being copied to the corresponding membersof Hut2. You can only assign a struct of a given type to another of the same type. You can’t increment astruct directly or use a struct in an arithmetic expression.
To alter the position of Hut2 to its place at the bottom-left of the yard, you call the MoveRect() functionwith the coordinates of the required position as arguments. This roundabout way of getting the coordi-nates of Hut2 is totally unnecessary and serves only to show how you can use a struct as an argumentto a function.
IntelliSense Assistance with StructuresYou’ve probably noticed that the editor in Visual C++ 2008 is quite intelligent — it knows the types of vari-ables, for instance. This is because of the IntelliSense feature. If you hover the mouse cursor over a variablename in the editor window, it pops up a little box showing its definition. It also can help a lot with struc-tures (and classes, as you will see) because not only does it know the types of ordinary variables, it alsoknows the members that belong to a variable of a particular structure type. If your computer is reasonablyfast, as you type the member selection operator following a structure variable name, the editor pops a win-dow showing the list of members. If you click one of the members, it shows the comment that appeared inthe original definition of the structure, so you know what it is. This is shown in Figure 7-2 using a fragmentof the previous example.
Figure 7-2
337
Chapter 7: Defining Your Own Data Types
25905c07.qxd:WroxPro 2/21/08 8:51 AM Page 337

Now there’s a real incentive to add comments, and to keep them short and to the point. If you double-clickon a member in the list or press the Enter key when the item is highlighted, it is automatically insertedafter the member selection operator, thus eliminating one source of typos in your code. Great, isn’t it?
You can turn any or all of the IntelliSense features off if you want to via the Text Editor folder that youget to by clicking the Tools > Options menu item, but I guess the only reason you would want to is ifyour machine is too slow to make them useful. You can turn the statement-completion features on or offon the C/C++ editor page that you select in the right options pane. If you turn them off, you can still callthem up when you want too, either through the Edit menu or through the keyboard. Pressing Ctrl+J,for example, pops up the members for an object under the cursor. The editor also shows the parameterlist for a function when you are typing the code to call it — it pops up as soon as you enter the left paren-thesis for the argument list. This is particularly helpful with library functions as its tough to rememberthe parameter list for all of them. Of course, the #include directive for the header file must already bethere in the source code for this to work. Without it the editor has no idea what the library function is.You will see more things that the editor can help with as you learn more about classes.
After that interesting little diversion, let’s get back to structures.
The struct RECTRectangles are used a great deal in Windows programs. For this reason, there is a RECT structure prede-fined in the header file windows.h. Its definition is essentially the same as the structure that you definedin the last example:
struct RECT{int left; // Top-left pointint top; // coordinate pair
int right; // Bottom-right pointint bottom; // coordinate pair
};
This struct is usually used to define rectangular areas on your display for a variety of purposes. BecauseRECT is used so extensively, windows.h also contains prototypes for a number of functions to manipulateand modify rectangles. For example, windows.h provides the function InflateRect() to increase thesize of a rectangle and the function EqualRect() to compare two rectangles.
MFC also defines a class called CRect, which is the equivalent of a RECT structure. After you understandclasses, you will be using this in preference to the RECT structure. The CRect class provides a very exten-sive range of functions for manipulating rectangles, and you will be using a number of these when youare writing Windows programs using MFC.
Using Pointers with a structAs you might expect, you can create a pointer to a variable of a structure type. In fact, many of the func-tions declared in windows.h that work with RECT objects require pointers to a RECT as arguments becausethis avoids the copying of the whole structure when a RECT argument is passed to a function. To define apointer to a RECT object for example, the declaration is what you might expect:
RECT* pRect = NULL; // Define a pointer to RECT
338
Chapter 7: Defining Your Own Data Types
25905c07.qxd:WroxPro 2/21/08 8:51 AM Page 338

Assuming that you have defined a RECT object, aRect, you can set the pointer to the address of this vari-able in the normal way, using the address-of operator:
pRect = &aRect; // Set pointer to the address of aRect
As you saw when the idea of a struct was introduced, a struct can’t contain a member of the same typeas the struct being defined, but it can contain a pointer to a struct, including a pointer to a struct ofthe same type. For example, you could define a structure like this:
struct ListElement{RECT aRect; // RECT member of structureListElement* pNext; // Pointer to a list element
};
The first element of the ListElement structure is of type RECT, and the second element is a pointer to astructure of type ListElement — the same type as that being defined. (Remember that this element isn’tof type ListElement, it’s of type ‘pointer to ListElement’.) This allows objects of type ListElement tobe daisy-chained together, where each ListElement can contain the address of the next ListElementobject in a chain, the last in the chain having the pointer as zero. This is illustrated in Figure 7-3.
Figure 7-3
Each box in the diagram represents an object of type ListElement and the pNext member of eachobject stores the address of the next object in the chain, except for the last object where pNext is 0. Thiskind of arrangement is usually referred to as a linked list. It has the advantage that as long as you knowthe first element in the list, you can find all the others. This is particularly important when variables arecreated dynamically, since a linked list can be used to keep track of them all. Every time a new one is cre-ated, it’s simply added to the end of the list by storing its address in the pNext member of the last objectin the chain.
Accessing Structure Members through a PointerConsider the following statements:
RECT aRect = {0, 0, 100, 100};RECT* pRect = &aRect;
LE1
members: aRect pnext = &LE2
LE4
members: aRect pnext = &LE5
LE2
members: aRect pnext = &LE3
LE3
members: aRect pnext = &LE4
LE5
No nextelement
members: aRect pnext = 0
339
Chapter 7: Defining Your Own Data Types
25905c07.qxd:WroxPro 2/21/08 8:51 AM Page 339
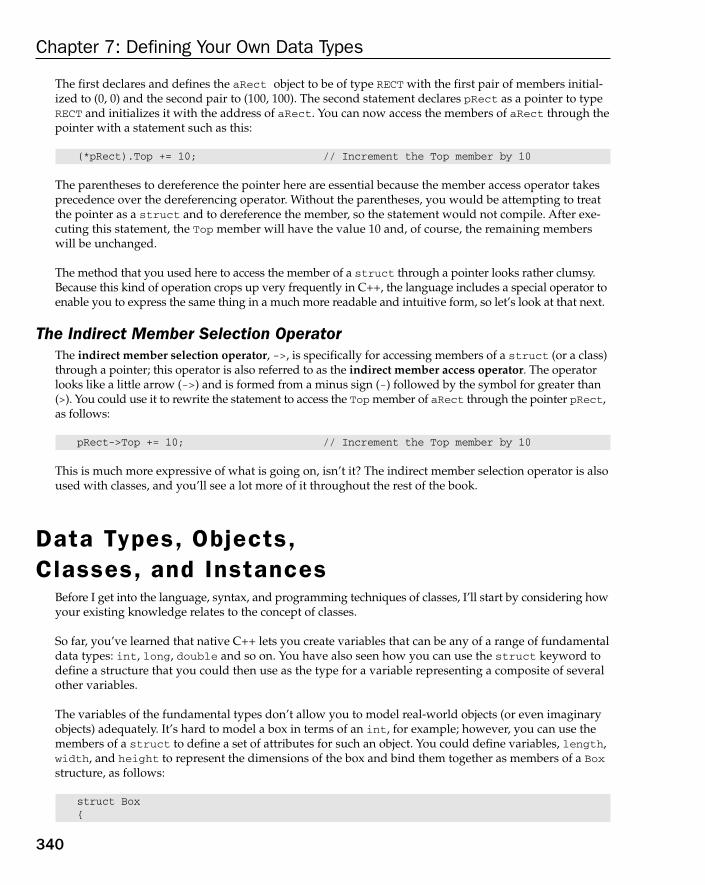
The first declares and defines the aRect object to be of type RECT with the first pair of members initial-ized to (0, 0) and the second pair to (100, 100). The second statement declares pRect as a pointer to typeRECT and initializes it with the address of aRect. You can now access the members of aRect through thepointer with a statement such as this:
(*pRect).Top += 10; // Increment the Top member by 10
The parentheses to dereference the pointer here are essential because the member access operator takesprecedence over the dereferencing operator. Without the parentheses, you would be attempting to treatthe pointer as a struct and to dereference the member, so the statement would not compile. After exe-cuting this statement, the Top member will have the value 10 and, of course, the remaining memberswill be unchanged.
The method that you used here to access the member of a struct through a pointer looks rather clumsy.Because this kind of operation crops up very frequently in C++, the language includes a special operator toenable you to express the same thing in a much more readable and intuitive form, so let’s look at that next.
The Indirect Member Selection OperatorThe indirect member selection operator, ->, is specifically for accessing members of a struct (or a class)through a pointer; this operator is also referred to as the indirect member access operator. The operatorlooks like a little arrow (->) and is formed from a minus sign (-) followed by the symbol for greater than(>). You could use it to rewrite the statement to access the Top member of aRect through the pointer pRect,as follows:
pRect->Top += 10; // Increment the Top member by 10
This is much more expressive of what is going on, isn’t it? The indirect member selection operator is alsoused with classes, and you’ll see a lot more of it throughout the rest of the book.
Data Types, Objects, Classes, and Instances
Before I get into the language, syntax, and programming techniques of classes, I’ll start by considering howyour existing knowledge relates to the concept of classes.
So far, you’ve learned that native C++ lets you create variables that can be any of a range of fundamentaldata types: int, long, double and so on. You have also seen how you can use the struct keyword todefine a structure that you could then use as the type for a variable representing a composite of severalother variables.
The variables of the fundamental types don’t allow you to model real-world objects (or even imaginaryobjects) adequately. It’s hard to model a box in terms of an int, for example; however, you can use themembers of a struct to define a set of attributes for such an object. You could define variables, length,width, and height to represent the dimensions of the box and bind them together as members of a Boxstructure, as follows:
struct Box{
340
Chapter 7: Defining Your Own Data Types
25905c07.qxd:WroxPro 2/21/08 8:51 AM Page 340
double length;double width;double height;
};
With this definition of a new data type called Box, you define variables of this type just as you did withvariables of the basic types. You can then create, manipulate, and destroy as many Box objects as youneed to in your program. This means that you can model objects using structs and write your pro-grams around them. So — that’s object-oriented programming all wrapped up then?
Well, not quite. You see, object-oriented programming (OOP) is based on a number of foundations(famously encapsulation, polymorphism, and inheritance) and what you have seen so far doesn’t quite fitthe bill. Don’t worry about what these terms mean for the moment — you’ll explore that in the rest ofthis chapter and throughout the book.
The notion of a struct in C++ goes far beyond the original concept of struct in C — it incorporates theobject-oriented notion of a class. This idea of classes, from which you can create your own data types anduse them just like the native types, is fundamental to C++, and the new keyword class was introducedinto the language to describe this concept. The keywords struct and class are almost identical in C++,except for the access control to the members, which you will find out more about later in this chapter. Thekeyword struct is maintained for backwards compatibility with C, but everything that you can do witha struct and more, you can achieve with a class.
Take a look at how you might define a class representing boxes:
class CBox{public:double m_Length;double m_Width;double m_Height;
};
When you define CBox as a class you are essentially defining a new data type, similar to when you definedthe Box structure. The only differences here are the use of the keyword class instead of struct, and theuse of the keyword public followed by a colon that precedes the definition of the members of the class.The variables that you define as part of the class are called data members of the class, because they arevariables that store data.
You have also called the class CBox instead of Box. You could have called the class Box, but the MFCadopts the convention of using the prefix C for all class names, so you might as well get used to it.MFC also prefixes data members of classes with m_ to distinguish them from other variables, so I’ll use this convention, too. Remember though that in other contexts where you might use C++ and inC++/CLI in particular, this will not be the case; in some instances the convention for naming classesand their members may be different, and in others there may be no particular convention adopted fornaming entities.
The public keyword is a clue as to the difference between a structure and a class. It just defines themembers of the class as being generally accessible, in the same way as the members of a structure are.The members of a struct, however, are public by default. As you’ll see a little later in the chapter,though, it’s also possible to place restrictions on the accessibility of the class members.
341
Chapter 7: Defining Your Own Data Types
25905c07.qxd:WroxPro 2/21/08 8:51 AM Page 341

You can declare a variable, bigBox say, which represents an instance of the CBox class type like this:
CBox bigBox;
This is exactly the same as declaring a variable for a struct, or indeed for any other variable type. Afteryou have defined the class CBox, declarations for variables of this type are quite standard.
First ClassThe notion of class was invented by an Englishman to keep the general population happy. It derivesfrom the theory that people who knew their place and function in society would be much more secureand comfortable in life than those who did not. The famous Dane, Bjarne Stroustrup, who invented C++,undoubtedly acquired a deep knowledge of class concepts while at Cambridge University in Englandand appropriated the idea very successfully for use in his new language.
Class in C++ is similar to the English concept, in that each class usually has a very precise role and a per-mitted set of actions. However, it differs from the English idea because class in C++ has largely socialistovertones, concentrating on the importance of working classes. Indeed, in some ways it is the reverse ofthe English ideal, because, as you will see, working classes in C++ often live on the backs of classes thatdo nothing at all.
Operations on ClassesIn C++ you can create new data types as classes to represent whatever kinds of objects you like. As you’llcome to see, classes (and structures) aren’t limited to just holding data; you can also define member func-tions or even operations that act between objects of your classes using the standard C++ operators. Youcan define the class CBox, for example, so that the following statements work and have the meanings youwant them to have:
CBox box1;CBox box2;
if(box1 > box2) // Fill the larger boxbox1.fill();
elsebox2.fill();
You could also implement operations as part of the CBox class for adding, subtracting or even multiply-ing boxes — in fact, almost any operation to which you could ascribe a sensible meaning in the contextof boxes.
I’m talking about incredibly powerful medicine here and it constitutes a major change in the approachthat you can take to programming. Instead of breaking down a problem in terms of what are essentiallycomputer-related data types (integer numbers, floating point numbers and so on) and then writing a pro-gram, you’re going to be programming in terms of problem-related data types, in other words classes.These classes might be named CEmployee, or CCowboy, or CCheese, or CChutney, each defined specifi-cally for the kind of problem that you want to solve, complete with the functions and operators that arenecessary to manipulate instances of your new types.
342
Chapter 7: Defining Your Own Data Types
25905c07.qxd:WroxPro 2/21/08 8:51 AM Page 342
Program design now starts with deciding what new application-specific data types you need to solve theproblem in hand and writing the program in terms of operations on the specifics that the problem is con-cerned with, be it CCoffins or CCowpokes.
TerminologyI’ll first summarize some of the terminology that I will be using when discussing classes in C++:
❑ A class is a user-defined data type.
❑ Object-oriented programming (OOP) is the programming style based on the idea of definingyour own data types as classes.
❑ Declaring an object of a class type is sometimes referred to as instantiation because you are creating an instance of a class.
❑ Instances of a class are referred to as objects.
❑ The idea of an object containing the data implicit in its definition, together with the functionsthat operate on that data, is referred to as encapsulation.
When I get into the detail of object-oriented programming, it may seem a little complicated in places, butgetting back to the basics of what you’re doing can often help to make things clearer, so always keep inmind what objects are really about. They are about writing programs in terms of the objects that are spe-cific to the domain of your problem. All the facilities around classes in C++ are there to make this as com-prehensive and flexible as possible. Let’s get down to the business of understanding classes.
Understanding ClassesA class is specification of a data type that you define. It can contain data elements that can either be vari-ables of the basic types in C++, or of other user-defined types. The data elements of a class may be singledata elements, arrays, pointers, arrays of pointers of almost any kind, or objects of other classes, so youhave a lot of flexibility in what you can include in your data type. A class also can contain functions thatoperate on objects of the class by accessing the data elements that they include. So, a class combines boththe definition of the elementary data that makes up an object and the means of manipulating the datathat belongs to individual objects of the class.
The data and functions within a class are called members of the class. Oddly enough, the members of aclass that are data items are called data members and the members that are functions are called functionmembers or member functions. The member functions of a class are also sometimes referred to as methods;I will not use this term in this book but keep it in mind as you may see it used elsewhere. The data membersare also referred to as fields, and this terminology is used with C++/CLI, so I will be using this terminologyfrom time to time.
When you define a class, you define a blueprint for a data type. This doesn’t actually define any data butit does define what the class name means, that is, what an object of the class will consist of and what oper-ations can be performed on such an object. It’s much the same as if you wrote a description of the basictype double. This wouldn’t be an actual variable of type double, but a definition of how it’s made upand how it operates. To create a variable of a basic data type, you need to use a declaration statement.It’s exactly the same with classes, as you will see.
343
Chapter 7: Defining Your Own Data Types
25905c07.qxd:WroxPro 2/21/08 8:51 AM Page 343

Defining a ClassTake a look again at the class example mentioned earlier — a class of boxes. You defined the CBox datatype using the keyword class as follows:
class CBox{public:double m_Length; // Length of a box in inchesdouble m_Width; // Width of a box in inchesdouble m_Height; // Height of a box in inches
};
The name of the class appears following the class keyword, and the three data members are definedbetween the curly braces. The data members are defined for the class using the declaration statements thatyou already know and love and the whole class definition is terminated with a semicolon. The names ofall the members of a class are local to the class. You can therefore use the same names elsewhere in a pro-gram without causing any problems.
Access Control in a ClassThe public keyword looks a bit like a label, but in fact it is more than that. It determines the accessattributes of the members of the class that follow it. Specifying the data members as public means thatthese members of an object of the class can be accessed anywhere within the scope of the class object towhich they belong. You can also specify the members of a class as private or protected. In fact, if youomit the access specification altogether, the members have the default attribute, private. (This is theonly difference between a class and a struct in C++ — the default access specifier for a struct is public.)You will look into the effect of these keywords in a class definition a bit later.
Remember that all you have defined so far is a class, which is a data type. You haven’t declared any objectsof the class type. When I talk about accessing a class member, say m_Height, I’m talking about accessingthe data member of a particular object, and that object needs to be defined somewhere.
Declaring Objects of a ClassYou declare objects of a class with exactly the same sort of declaration that you use to declare objects ofbasic types, so you could declare objects of the CBox class type with these statements:
CBox box1; // Declare box1 of type CBoxCBox box2; // Declare box2 of type CBox
Both of the objects box1 and box2 will, of course, have their own data members. This is illustrated inFigure 7-4.
Figure 7-4
box1
m_Length
8 bytes 8 bytes 8 bytes
m_Width m_Height
box2
m_Length
8 bytes 8 bytes 8 bytes
m_Width m_Height
344
Chapter 7: Defining Your Own Data Types
25905c07.qxd:WroxPro 2/21/08 8:51 AM Page 344

The object name box1 embodies the whole object, including its three data members. They are not initial-ized to anything, however — the data members of each object will simply contain junk values, so you needto look at how you can access them for the purpose of setting them to some specific values.
Accessing the Data Members of a ClassYou can refer to the data members of objects of a class using the direct member selection operator thatyou used to access members of a struct. So, to set the value of the data member m_Height of the objectbox2 to, say, 18.0, you could write this assignment statement:
box2.m_Height = 18.0; // Setting the value of a data member
You can only access the data member in this way in a function that is outside the class because the m_Heightmember was specified as having public access. If it wasn’t defined as public, this statement would notcompile. You’ll see more about this shortly.
Try It Out Your First Use of ClassesVerify that you can use your class in the same way as the structure. Try it out in the following consoleapplication:
// Ex7_02.cpp// Creating and using boxes#include <iostream>using std::cout;using std::endl;
class CBox // Class definition at global scope{public:double m_Length; // Length of a box in inchesdouble m_Width; // Width of a box in inchesdouble m_Height; // Height of a box in inches
};
int main(){CBox box1; // Declare box1 of type CBoxCBox box2; // Declare box2 of type CBox
double boxVolume = 0.0; // Stores the volume of a box
box1.m_Height = 18.0; // Define the valuesbox1.m_Length = 78.0; // of the members ofbox1.m_Width = 24.0; // the object box1
box2.m_Height = box1.m_Height - 10; // Define box2box2.m_Length = box1.m_Length/2.0; // members inbox2.m_Width = 0.25*box1.m_Length; // terms of box1
// Calculate volume of box1boxVolume = box1.m_Height*box1.m_Length*box1.m_Width;
345
Chapter 7: Defining Your Own Data Types
25905c07.qxd:WroxPro 2/21/08 8:51 AM Page 345

cout << endl<< “Volume of box1 = “ << boxVolume;
cout << endl<< “box2 has sides which total “<< box2.m_Height+ box2.m_Length+ box2.m_Width<< “ inches.”;
cout << endl // Display the size of a box in memory<< “A CBox object occupies “<< sizeof box1 << “ bytes.”;
cout <<endl;return 0;
}
As you type in the code for main(), you should see the editor prompting you with a list of member nameswhenever you enter a member selection operator following the name of a class object. You can then selectthe member you want from the list by double-clicking it. Hovering the mouse cursor for a moment overany of the variables in your code will result in the type being displayed.
How It WorksBack to console application examples again for the moment, so the project should be defined accordingly.Everything here works, as you would have expected from your experience with structures. The definitionof the class appears outside of the function main() and, therefore, has global scope. This enables you todeclare objects in any function in the program and causes the class to show up in the Class View tab oncethe program has been compiled.
You have declared two objects of type CBox within the function main(), box1 and box2. Of course, aswith variables of the basic types, the objects box1 and box2 are local to main(). Objects of a class typeobey the same rules with respect to scope as variables declared as one of the basic types (such as thevariable boxVolume used in this example).
The first three assignment statements set the values of the data members of box1. You define the val-ues of the data members of box2 in terms of the data members of box1 in the next three assignmentstatements.
You then have a statement that calculates the volume of box1 as the product of its three data mem-bers, and this value is output to the screen. Next, you output the sum of the data members of box2by writing the expression for the sum of the data members directly in the output statement. The finalaction in the program is to output the number of bytes occupied by box1, which is produced by theoperator sizeof.
If you run this program, you should get this output:
Volume of box1 = 33696box2 has sides which total 66.5 inches.A CBox object occupies 24 bytes.
346
Chapter 7: Defining Your Own Data Types
25905c07.qxd:WroxPro 2/21/08 8:51 AM Page 346
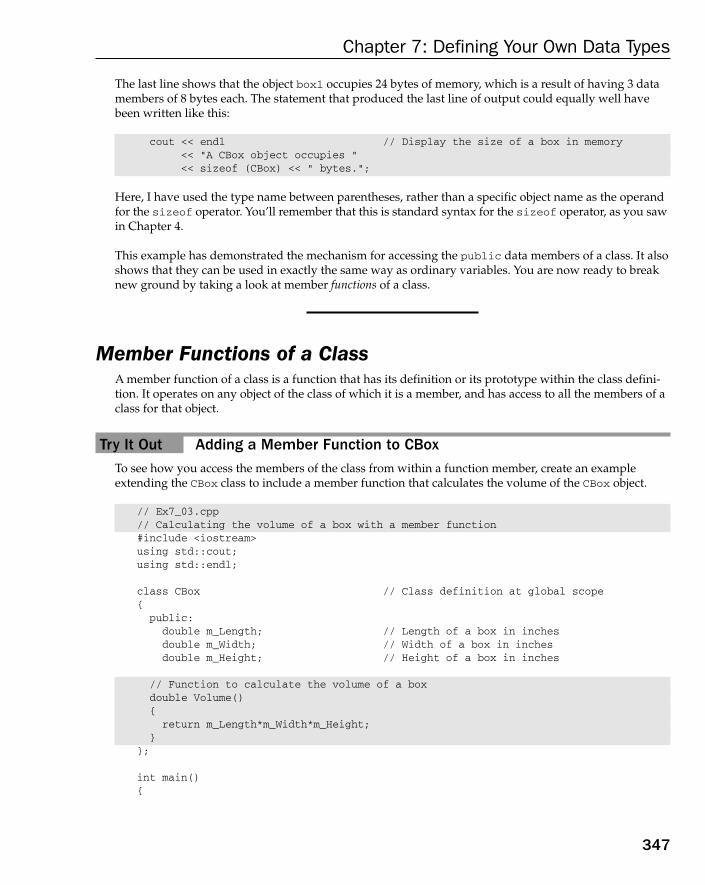
The last line shows that the object box1 occupies 24 bytes of memory, which is a result of having 3 datamembers of 8 bytes each. The statement that produced the last line of output could equally well havebeen written like this:
cout << endl // Display the size of a box in memory<< “A CBox object occupies “<< sizeof (CBox) << “ bytes.”;
Here, I have used the type name between parentheses, rather than a specific object name as the operandfor the sizeof operator. You’ll remember that this is standard syntax for the sizeof operator, as you sawin Chapter 4.
This example has demonstrated the mechanism for accessing the public data members of a class. It alsoshows that they can be used in exactly the same way as ordinary variables. You are now ready to breaknew ground by taking a look at member functions of a class.
Member Functions of a ClassA member function of a class is a function that has its definition or its prototype within the class defini-tion. It operates on any object of the class of which it is a member, and has access to all the members of aclass for that object.
Try It Out Adding a Member Function to CBoxTo see how you access the members of the class from within a function member, create an exampleextending the CBox class to include a member function that calculates the volume of the CBox object.
// Ex7_03.cpp// Calculating the volume of a box with a member function#include <iostream>using std::cout;using std::endl;
class CBox // Class definition at global scope{
public:double m_Length; // Length of a box in inchesdouble m_Width; // Width of a box in inchesdouble m_Height; // Height of a box in inches
// Function to calculate the volume of a boxdouble Volume(){return m_Length*m_Width*m_Height;
}};
int main(){
347
Chapter 7: Defining Your Own Data Types
25905c07.qxd:WroxPro 2/21/08 8:51 AM Page 347
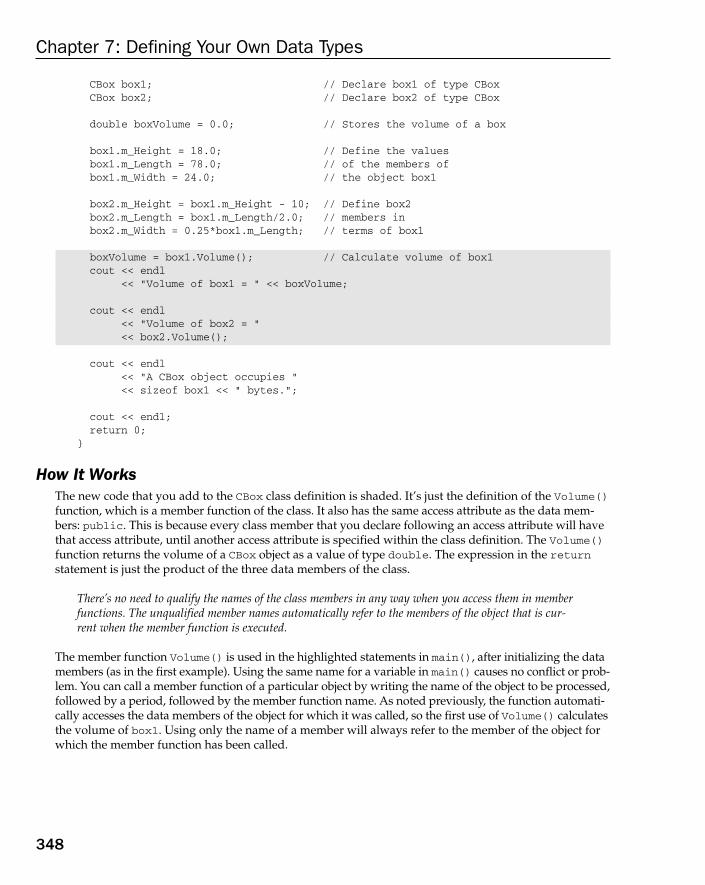
CBox box1; // Declare box1 of type CBoxCBox box2; // Declare box2 of type CBox
double boxVolume = 0.0; // Stores the volume of a box
box1.m_Height = 18.0; // Define the valuesbox1.m_Length = 78.0; // of the members ofbox1.m_Width = 24.0; // the object box1
box2.m_Height = box1.m_Height - 10; // Define box2box2.m_Length = box1.m_Length/2.0; // members inbox2.m_Width = 0.25*box1.m_Length; // terms of box1
boxVolume = box1.Volume(); // Calculate volume of box1cout << endl
<< “Volume of box1 = “ << boxVolume;
cout << endl<< “Volume of box2 = “<< box2.Volume();
cout << endl<< “A CBox object occupies “<< sizeof box1 << “ bytes.”;
cout << endl;return 0;
}
How It WorksThe new code that you add to the CBox class definition is shaded. It’s just the definition of the Volume()function, which is a member function of the class. It also has the same access attribute as the data mem-bers: public. This is because every class member that you declare following an access attribute will havethat access attribute, until another access attribute is specified within the class definition. The Volume()function returns the volume of a CBox object as a value of type double. The expression in the returnstatement is just the product of the three data members of the class.
There’s no need to qualify the names of the class members in any way when you access them in memberfunctions. The unqualified member names automatically refer to the members of the object that is cur-rent when the member function is executed.
The member function Volume() is used in the highlighted statements in main(), after initializing the datamembers (as in the first example). Using the same name for a variable in main() causes no conflict or prob-lem. You can call a member function of a particular object by writing the name of the object to be processed,followed by a period, followed by the member function name. As noted previously, the function automati-cally accesses the data members of the object for which it was called, so the first use of Volume() calculatesthe volume of box1. Using only the name of a member will always refer to the member of the object forwhich the member function has been called.
348
Chapter 7: Defining Your Own Data Types
25905c07.qxd:WroxPro 2/21/08 8:51 AM Page 348

The member function is used a second time directly in the output statement to produce the volume ofbox2. If you execute this example, it produces this output:
Volume of box1 = 33696Volume of box2 = 6084A CBox object occupies 24 bytes.
Note that the CBox object is still the same number of bytes. Adding a function member to a class doesn’taffect the size of the objects. Obviously, a member function has to be stored in memory somewhere,but there’s only one copy regardless of how many class objects you create, and the memory occupiedby member functions isn’t counted when the sizeof operator produces the number of bytes that anobject occupies.
The names of the class data members in the member function automatically refer to the data members ofthe specific object used to call the function, and the function can only be called for a particular object of theclass. In this case, this is done by using the direct member access operator with the name of an object.
If you try to call a member function without specifying an object name, your program will not compile.
Positioning a Member Function DefinitionA member function definition need not be placed inside the class definition. If you want to put it outsidethe class definition, you need to put the prototype for the function inside the class. If you rewrite the pre-vious class with the function definition outside, the class definition looks like this:
class CBox // Class definition at global scope{public:double m_Length; // Length of a box in inchesdouble m_Width; // Width of a box in inchesdouble m_Height; // Height of a box in inchesdouble Volume(void); // Member function prototype
};
Now you need to write the function definition, but because it appears outside the definition of the class,there has to be some way of telling the compiler that the function belongs to the class CBox. This is doneby prefixing the function name with the name of the class and separating the two with the scope resolu-tion operator, ::, which is formed from two successive colons. The function definition would now looklike this:
// Function to calculate the volume of a boxdouble CBox::Volume(){return m_Length*m_Width*m_Height;
}
349
Chapter 7: Defining Your Own Data Types
25905c07.qxd:WroxPro 2/21/08 8:51 AM Page 349
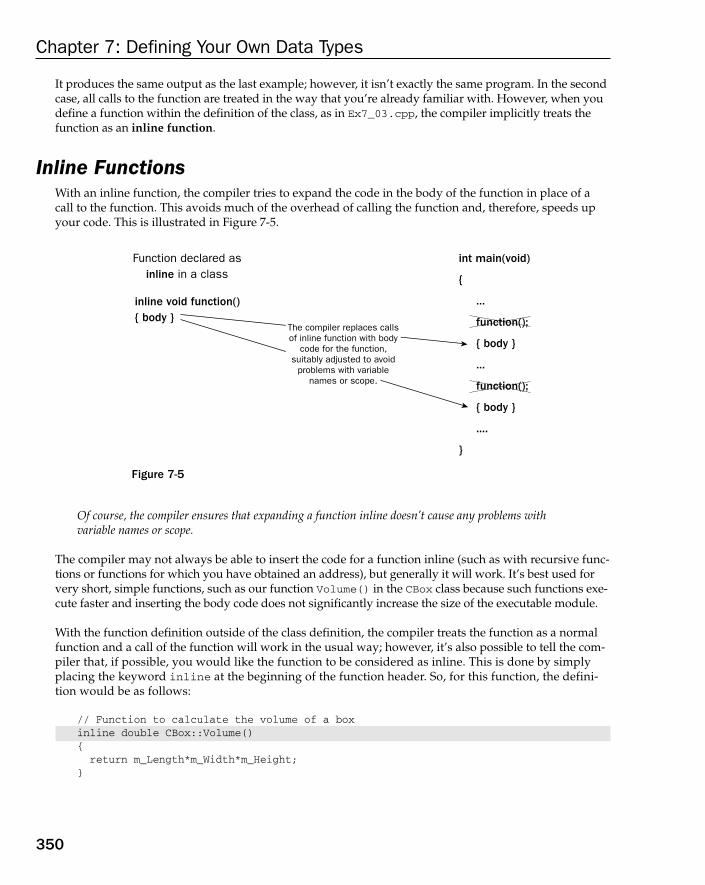
It produces the same output as the last example; however, it isn’t exactly the same program. In the secondcase, all calls to the function are treated in the way that you’re already familiar with. However, when youdefine a function within the definition of the class, as in Ex7_03.cpp, the compiler implicitly treats thefunction as an inline function.
Inline FunctionsWith an inline function, the compiler tries to expand the code in the body of the function in place of acall to the function. This avoids much of the overhead of calling the function and, therefore, speeds upyour code. This is illustrated in Figure 7-5.
Figure 7-5
Of course, the compiler ensures that expanding a function inline doesn’t cause any problems with variable names or scope.
The compiler may not always be able to insert the code for a function inline (such as with recursive func-tions or functions for which you have obtained an address), but generally it will work. It’s best used forvery short, simple functions, such as our function Volume() in the CBox class because such functions exe-cute faster and inserting the body code does not significantly increase the size of the executable module.
With the function definition outside of the class definition, the compiler treats the function as a normalfunction and a call of the function will work in the usual way; however, it’s also possible to tell the com-piler that, if possible, you would like the function to be considered as inline. This is done by simplyplacing the keyword inline at the beginning of the function header. So, for this function, the defini-tion would be as follows:
// Function to calculate the volume of a boxinline double CBox::Volume(){return m_Length*m_Width*m_Height;
}
int main(void)
{
...
function();
{ body }
...
function();
{ body }
....
}
Function declared as inline in a class
inline void function() { body }
The compiler replaces callsof inline function with body
code for the function,suitably adjusted to avoid
problems with variablenames or scope.
350
Chapter 7: Defining Your Own Data Types
25905c07.qxd:WroxPro 2/21/08 8:51 AM Page 350

With this definition for the function, the program would be exactly the same as the original. This enablesyou to put the member function definitions outside of the class definition, if you so choose, and still retainthe execution performance benefits of inlining.
You can apply the keyword inline to ordinary functions in your program that have nothing to do withclasses and get the same effect. Remember, however, that it’s best used for short, simple functions.
You now need to understand a little more about what happens when you declare an object of a class.
Class ConstructorsIn the previous program example, you declared the CBox objects, box1 and box2, and then laboriouslyworked through each of the data members for each object in order to assign an initial value to it. This isunsatisfactory from several points of view. First of all, it would be easy to overlook initializing a datamember, particularly with a class that had many more data members than our CBox class. Initializing the data members of several objects of a complex class could involve pages of assignment statements.The final constraint on this approach arises when you get to defining data members of a class that don’thave the attribute public — you won’t be able to access them from outside the class anyway. There hasto be a better way, and of course there is — it’s known as the class constructor.
What Is a Constructor?A class constructor is a special function in a class that is responsible for creating new objects whenrequired. A constructor therefore provides the opportunity to initialize objects as they are created and to ensure that data members only contain valid values. A class may have several constructors enablingyou to create objects in various ways.
You have no leeway in naming the constructors in a class — they always have the same name as the classin which they are defined. The function CBox(), for example, is a constructor for our class CBox. It also hasno return type. It’s wrong to specify a return type for a constructor; you must not even write it as void. Theprimary purpose of a class constructor is to assign initial values to the data elements of the class, and noreturn type for a constructor is necessary or permitted. If you inadvertently specify a return type for a con-structor, the compiler will report it as an error with error number C2380.
Try It Out Adding a Constructor to the CBox classLet’s extend our CBox class to incorporate a constructor.
// Ex7_04.cpp// Using a constructor#include <iostream>using std::cout;using std::endl;
class CBox // Class definition at global scope{
351
Chapter 7: Defining Your Own Data Types
25905c07.qxd:WroxPro 2/21/08 8:51 AM Page 351
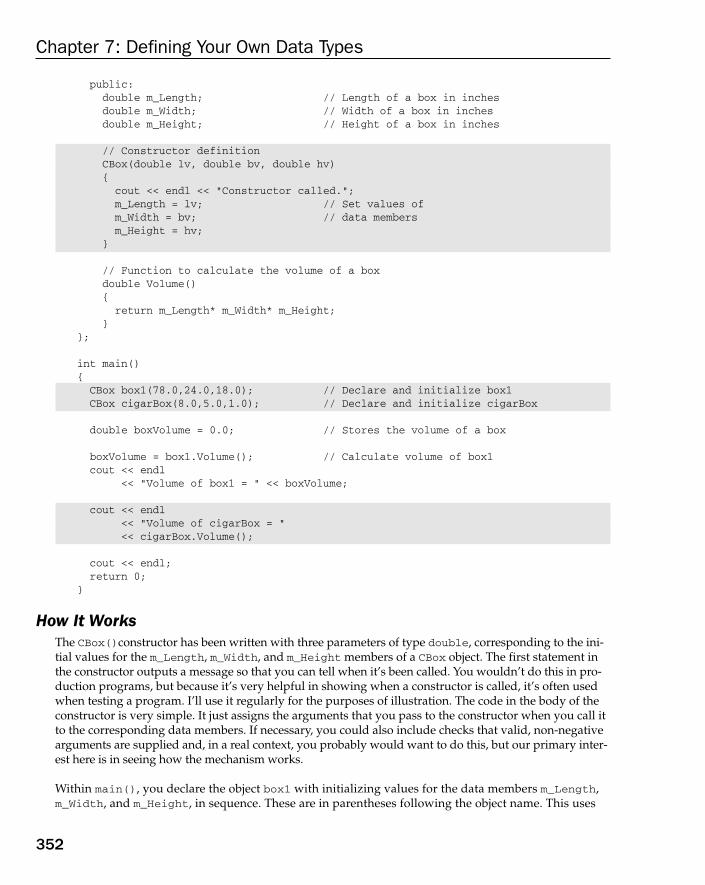
public:double m_Length; // Length of a box in inchesdouble m_Width; // Width of a box in inchesdouble m_Height; // Height of a box in inches
// Constructor definitionCBox(double lv, double bv, double hv){cout << endl << “Constructor called.”;m_Length = lv; // Set values ofm_Width = bv; // data membersm_Height = hv;
}
// Function to calculate the volume of a boxdouble Volume(){
return m_Length* m_Width* m_Height;}
};
int main(){CBox box1(78.0,24.0,18.0); // Declare and initialize box1CBox cigarBox(8.0,5.0,1.0); // Declare and initialize cigarBox
double boxVolume = 0.0; // Stores the volume of a box
boxVolume = box1.Volume(); // Calculate volume of box1cout << endl
<< “Volume of box1 = “ << boxVolume;
cout << endl<< “Volume of cigarBox = “<< cigarBox.Volume();
cout << endl;return 0;
}
How It WorksThe CBox()constructor has been written with three parameters of type double, corresponding to the ini-tial values for the m_Length, m_Width, and m_Height members of a CBox object. The first statement inthe constructor outputs a message so that you can tell when it’s been called. You wouldn’t do this in pro-duction programs, but because it’s very helpful in showing when a constructor is called, it’s often usedwhen testing a program. I’ll use it regularly for the purposes of illustration. The code in the body of theconstructor is very simple. It just assigns the arguments that you pass to the constructor when you call itto the corresponding data members. If necessary, you could also include checks that valid, non-negativearguments are supplied and, in a real context, you probably would want to do this, but our primary inter-est here is in seeing how the mechanism works.
Within main(), you declare the object box1 with initializing values for the data members m_Length,m_Width, and m_Height, in sequence. These are in parentheses following the object name. This uses
352
Chapter 7: Defining Your Own Data Types
25905c07.qxd:WroxPro 2/21/08 8:51 AM Page 352

the functional notation for initialization that, as you saw in Chapter 2, can also be applied to initializingordinary variables of basic types. You also declare a second object of type CBox, called cigarBox, whichalso has initializing values.
The volume of box1 is calculated using the member function Volume() as in the previous example andis then displayed on the screen. You also display the value of the volume of cigarBox. The output fromthe example is:
Constructor called.Constructor called.Volume of box1 = 33696Volume of cigarBox = 40
The first two lines are output from the two calls of the constructor CBox(), once for each objectdeclared. The constructor that you have supplied in the class definition is automatically called when aCBox object is declared, so both CBox objects are initialized with the initializing values appearing in thedeclaration. These are passed to the constructor as arguments, in the sequence that they are written in the declaration. As you can see, the volume of box1 is the same as before and cigarBox has a volumelooking suspiciously like the product of its dimensions, which is quite a relief.
The Default ConstructorTry modifying the last example by adding the declaration for box2 that you had previously in Ex7_03.cpp:
CBox box2; // Declare box2 of type CBox
Here, you’ve left box2 without initializing values. When you rebuild this version of the program, youget the error message:
error C2512: ‘CBox’: no appropriate default constructor available
This means that the compiler is looking for a default constructor for box2 (also referred to as the noargconstructor because it doesn’t require arguments when it is called) because you haven’t supplied anyinitializing values for the data members. A default constructor is one that does not require any argumentsto be supplied, which can be either a constructor that has no parameters specified in the constructordefinition, or one whose arguments are all optional. Well, this statement was perfectly satisfactory inEx7_02.cpp, so why doesn’t it work now?
The answer is that the previous example used a default no-argument constructor that was supplied by thecompiler, and the compiler provided this constructor because you didn’t supply one. Because in this exam-ple you did supply a constructor, the compiler assumed that you were taking care of everything and didn’tsupply the default. So, if you still want to use declarations for CBox objects that aren’t initialized, you haveto include the default constructor yourself. What exactly does the default constructor look like? In the sim-plest case, it’s just a constructor that accepts no arguments; it doesn’t even need to do anything:
CBox() // Default constructor{} // Totally devoid of statements
You can see such a constructor in action.
353
Chapter 7: Defining Your Own Data Types
25905c07.qxd:WroxPro 2/21/08 8:51 AM Page 353

Try It Out Supplying a Default ConstructorLet’s add our version of the default constructor to the last example, along with the declaration for box2,plus the original assignments for the data members of box2. You must enlarge the default constructorjust enough to show that it is called. Here is the next version of the program:
// Ex7_05.cpp// Supplying and using a default constructor#include <iostream >using std::cout;using std::endl;
class CBox // Class definition at global scope{public:double m_Length; // Length of a box in inchesdouble m_Width; // Width of a box in inchesdouble m_Height; // Height of a box in inches
// Constructor definitionCBox(double lv, double bv, double hv){
cout << endl << “Constructor called.”;m_Length = lv; // Set values ofm_Width = bv; // data membersm_Height = hv;
}
// Default constructor definitionCBox(){cout << endl << “Default constructor called.”;
}
// Function to calculate the volume of a boxdouble Volume(){
return m_Length*m_Width*m_Height;}
};
int main(){CBox box1(78.0,24.0,18.0); // Declare and initialize box1CBox box2; // Declare box2 - no initial valuesCBox cigarBox(8.0, 5.0, 1.0); // Declare and initialize cigarBox
double boxVolume = 0.0; // Stores the volume of a box
boxVolume = box1.Volume(); // Calculate volume of box1cout << endl
<< “Volume of box1 = “ << boxVolume;
354
Chapter 7: Defining Your Own Data Types
25905c07.qxd:WroxPro 2/21/08 8:51 AM Page 354

box2.m_Height = box1.m_Height - 10; // Define box2box2.m_Length = box1.m_Length / 2.0; // members inbox2.m_Width = 0.25*box1.m_Length; // terms of box1
cout << endl<< “Volume of box2 = “<< box2.Volume();
cout << endl<< “Volume of cigarBox = “<< cigarBox.Volume();
cout << endl;return 0;
}
How It WorksNow that you have included your own version of the default constructor, there are no error messagesfrom the compiler and everything works. The program produces this output:
Constructor called.Default constructor called.Constructor called.Volume of box1 = 33696Volume of box2 = 6084Volume of cigarBox = 40
All that the default constructor does is display a message. Evidently, it was called when you declared theobject box2. You also get the correct value for the volumes of all three CBox objects, so the rest of the pro-gram is working as it should.
One aspect of this example that you may have noticed is that you now know you can overload construc-tors just as you overloaded functions in Chapter 6. You have just executed an example with two constructorsthat differ only in their parameter list. One has three parameters of type double and the other has no param-eters at all.
Assigning Default Parameter Values in a ClassWhen discussing functions, you saw how you could specify default values for the parameters to a func-tion in the function prototype. You can also do this for class member functions, including constructors. Ifyou put the definition of the member function inside the class definition, you can put the default valuesfor the parameters in the function header. If you include only the prototype of a function in the class def-inition, the default parameter values should go in the prototype.
If you decided that the default size for a CBox object was a unit box with all sides of length 1, you couldalter the class definition in the last example to this:
class CBox // Class definition at global scope{
355
Chapter 7: Defining Your Own Data Types
25905c07.qxd:WroxPro 2/21/08 8:51 AM Page 355

public:double m_Length; // Length of a box in inchesdouble m_Width; // Width of a box in inchesdouble m_Height; // Height of a box in inches
// Constructor definitionCBox(double lv = 1.0, double bv = 1.0, double hv = 1.0){
cout << endl << “Constructor called.”;m_Length = lv; // Set values ofm_Width = bv; // data membersm_Height = hv;
}
// Default constructor definitionCBox(){
cout << endl << “Default constructor called.”;}
// Function to calculate the volume of a boxdouble Volume(){
return m_Length*m_Width*m_Height;}
};
If you make this change to the last example, what happens? You get another error message from thecompiler, of course. Amongst a lot of other stuff, you get these useful comments from the compiler:
warning C4520: ‘CBox’: multiple default constructors specifiederror C2668: ‘CBox::CBox’: ambiguous call to overloaded function
This means that the compiler can’t work out which of the two constructors to call — the one for whichyou have set default values for the parameters or the constructor that doesn’t accept any parameters.This is because the declaration of box2 requires a constructor without parameters and either constructorcan now be called without parameters. The immediately obvious solution to this is to get rid of the con-structor that accepts no parameters. This is actually beneficial. Without this constructor, any CBox objectdeclared without being explicitly initialized will automatically have its members initialized to 1.
Try It Out Supplying Default Values for Constructor ArgumentsYou can demonstrate this with the following simplified example:
// Ex7_06.cpp// Supplying default values for constructor arguments#include <iostream>using std::cout;using std::endl;
class CBox // Class definition at global scope{
356
Chapter 7: Defining Your Own Data Types
25905c07.qxd:WroxPro 2/21/08 8:51 AM Page 356

public:double m_Length; // Length of a box in inchesdouble m_Width; // Width of a box in inchesdouble m_Height; // Height of a box in inches
// Constructor definitionCBox(double lv = 1.0, double bv = 1.0, double hv = 1.0){cout << endl << “Constructor called.”;m_Length = lv; // Set values ofm_Width = bv; // data membersm_Height = hv;
}
// Function to calculate the volume of a boxdouble Volume(){return m_Length*m_Width*m_Height;
}};
int main(){CBox box2; // Declare box2 - no initial values
cout << endl<< “Volume of box2 = “<< box2.Volume();
cout << endl;return 0;
}
How It WorksYou only declare a single uninitialized CBox variable — box2 — because that’s all you need for demon-stration purposes. This version of the program produces the following output:
Constructor called.Volume of box2 = 1
This shows that the constructor with default parameter values is doing its job of setting the values ofobjects that have no initializing values specified.
You should not assume from this that this is the only, or even the recommended, way of implementingthe default constructor. There will be many occasions where you won’t want to assign default values inthis way, in which case you’ll need to write a separate default constructor. There will even be times whenyou don’t want to have a default constructor operating at all, even though you have defined another con-structor. This would ensure that all declared objects of a class must have initializing values explicitly spec-ified in their declaration.
357
Chapter 7: Defining Your Own Data Types
25905c07.qxd:WroxPro 2/21/08 8:51 AM Page 357

Using an Initialization List in a ConstructorPreviously, you initialized the members of an object in the class constructor using explicit assignment.You could also have used a different technique, using what is called an initialization list. I can demon-strate this with an alternative version of the constructor for the class CBox:
// Constructor definition using an initialization listCBox(double lv = 1.0, double bv = 1.0, double hv = 1.0):
m_Length(lv), m_Width(bv), m_Height(hv){cout << endl << “Constructor called.”;
}
The way this constructor definition is written assumes that it appears within the body of the class defini-tion. Now the values of the data members are not set in assignment statements in the body of the construc-tor. As in a declaration, they are specified as initializing values using functional notation and appear in theinitializing list as part of the function header. The member m_Length is initialized by the value of lv, forexample. This can be more efficient than using assignments as you did in the previous version. If you sub-stitute this version of the constructor in the previous example, you will see that it works just as well.
Note that the initializing list for the constructor is separated from the parameter list by a colon and eachof the initializers is separated by a comma. This technique for initializing parameters in a constructor isimportant, because, as you will see later, it’s the only way of setting values for certain types of data mem-bers of an object. The MFC also relies heavily on the initialization list technique.
Private Members of a ClassHaving a constructor that sets the values of the data members of a class object but still admits the pos -sibility of any part of a program being able to mess with what are essentially the guts of an object isalmost a contradiction in terms. To draw an analogy, after you have arranged for a brilliant surgeonsuch as Dr. Kildare, whose skills were honed over years of training, to do things to your insides, let-ting the local plumber or bricklayer have a go hardly seems appropriate. You need some protection for your class data members.
You can get the security you need by using the keyword private when you define the class members.Class members that are private can, in general, be accessed only by member functions of a class. There’sone exception, but we’ll worry about that later. A normal function has no direct means of accessing theprivate members of a class. This is shown in Figure 7-6.
Having the possibility of specifying class members as private also enables you to separate the interfaceto the class from its internal implementation. The interface to a class is composed of the public membersand the public member functions in particular because they can provide indirect access to all the mem-bers of a class, including the private members. By keeping the internals of a class private, you can latermodify them to improve performance for example without necessitating modifications to the code thatuses the class through its public interface. To keep data and function members of a class safe from unnec-essary meddling, it’s good practice to declare those that don’t need to be exposed as private. Only makepublic what is essential to the use of your class.
358
Chapter 7: Defining Your Own Data Types
25905c07.qxd:WroxPro 2/21/08 8:51 AM Page 358

Figure 7-6
Try It Out Private Data MembersYou can rewrite the CBox class to make its data members private.
// Ex7_07.cpp// A class with private members#include <iostream>using std::cout;using std::endl;
class CBox // Class definition at global scope{public:// Constructor definition using an initialisation listCBox(double lv = 1.0, double bv = 1.0, double hv = 1.0):
m_Length(lv), m_Width(bv), m_Height(hv){cout << endl << “Constructor called.”;
}
// Function to calculate the volume of a box
Class Object
public Data Members
public Function Members
private Data Members
private Function Members
Normal Function that is not in the Class
Error No Access
Error
Free access to all mem
bers by any mem
ber function
OK
OK
No
No
359
Chapter 7: Defining Your Own Data Types
25905c07.qxd:WroxPro 2/21/08 8:51 AM Page 359

double Volume(){return m_Length*m_Width*m_Height;
}
private:double m_Length; // Length of a box in inchesdouble m_Width; // Width of a box in inchesdouble m_Height; // Height of a box in inches
};
int main(){CBox match(2.2, 1.1, 0.5); // Declare match boxCBox box2; // Declare box2 - no initial values
cout << endl<< “Volume of match = “<< match.Volume();
// Uncomment the following line to get an error// box2.m_Length = 4.0;
cout << endl<< “Volume of box2 = “<< box2.Volume();
cout << endl;
return 0;}
How It WorksThe definition of the CBox class now has two sections. The first is the public section containing the con-structor and the member function Volume(). The second section is specified as private and contains thedata members. Now the data members can only be accessed by the member functions of the class. Youdon’t have to modify any of the member functions — they can access all the data members of the class any-way. If you uncomment the statement in the function main() that assigns a value to the m_Length memberof the object box2, however, you’ll get a compiler error message confirming that the data member is inac-cessible. If you haven’t already done so, take a look at the members of the CBox class in Class View; you’llsee that the icon alongside each member indicates its accessibility; a small padlock in the icon shows whena member is private.
A point to remember is that using a constructor or a member function is now the only way to get a valueinto a private data member of an object. You have to make sure that all the ways in which you might wantto set or modify private data members of a class are provided for through member functions.
You can also put functions into the private section of a class. In this case, they can only be called by otherfunction members of the same class. If you put the function Volume() in the private section, you will geta compiler error from the statements that attempt to use it in the function main(). If you put the construc-tor in the private section, you won’t be able to declare any objects of the class type.
360
Chapter 7: Defining Your Own Data Types
25905c07.qxd:WroxPro 2/21/08 8:51 AM Page 360
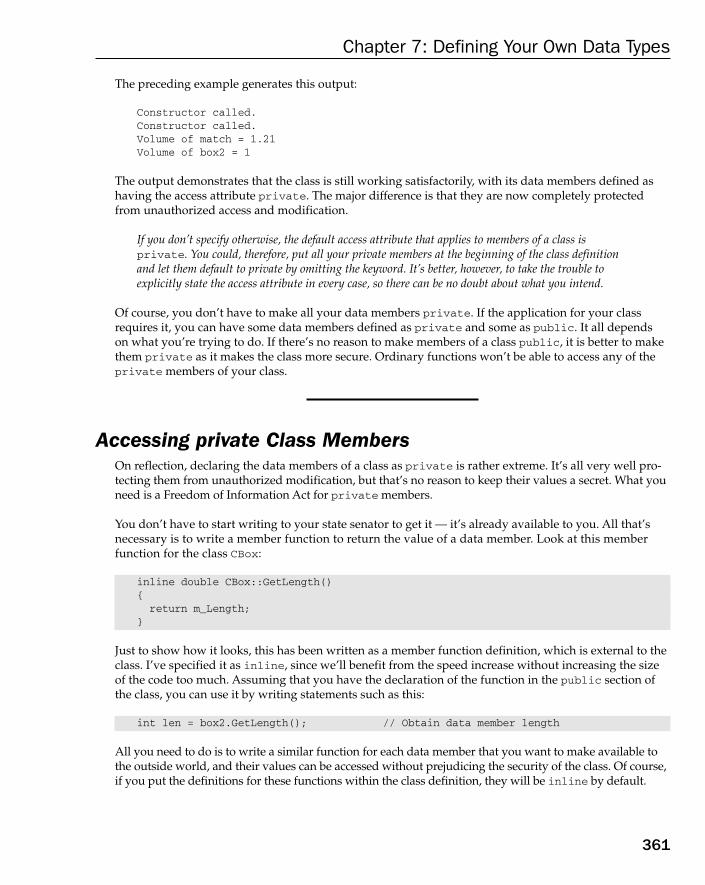
The preceding example generates this output:
Constructor called.Constructor called.Volume of match = 1.21Volume of box2 = 1
The output demonstrates that the class is still working satisfactorily, with its data members defined ashaving the access attribute private. The major difference is that they are now completely protectedfrom unauthorized access and modification.
If you don’t specify otherwise, the default access attribute that applies to members of a class isprivate. You could, therefore, put all your private members at the beginning of the class definitionand let them default to private by omitting the keyword. It’s better, however, to take the trouble toexplicitly state the access attribute in every case, so there can be no doubt about what you intend.
Of course, you don’t have to make all your data members private. If the application for your classrequires it, you can have some data members defined as private and some as public. It all depends on what you’re trying to do. If there’s no reason to make members of a class public, it is better to makethem private as it makes the class more secure. Ordinary functions won’t be able to access any of theprivate members of your class.
Accessing private Class MembersOn reflection, declaring the data members of a class as private is rather extreme. It’s all very well pro-tecting them from unauthorized modification, but that’s no reason to keep their values a secret. What youneed is a Freedom of Information Act for private members.
You don’t have to start writing to your state senator to get it — it’s already available to you. All that’snecessary is to write a member function to return the value of a data member. Look at this memberfunction for the class CBox:
inline double CBox::GetLength(){return m_Length;
}
Just to show how it looks, this has been written as a member function definition, which is external to theclass. I’ve specified it as inline, since we’ll benefit from the speed increase without increasing the sizeof the code too much. Assuming that you have the declaration of the function in the public section ofthe class, you can use it by writing statements such as this:
int len = box2.GetLength(); // Obtain data member length
All you need to do is to write a similar function for each data member that you want to make available tothe outside world, and their values can be accessed without prejudicing the security of the class. Of course,if you put the definitions for these functions within the class definition, they will be inline by default.
361
Chapter 7: Defining Your Own Data Types
25905c07.qxd:WroxPro 2/21/08 8:51 AM Page 361

The friend Functions of a ClassThere may be circumstances when, for one reason or another, you want certain selected functions whichare not members of a class to, nonetheless, be able to access all the members of a class — a sort of elitegroup with special privileges. Such functions are called friend functions of a class and are defined usingthe keyword friend. You can either include the prototype of a friend function in the class definition, oryou can include the whole function definition. Functions that are friends of a class and are defined withinthe class definition are also by default inline.
Friend functions are not members of the class, and therefore the access attributes do not apply to them.They are just ordinary global functions with special privileges.
Imagine that you want to implement a friend function in the CBox class to compute the surface area of aCBox object.
Try It Out Using a friend to Calculate the Surface AreaYou can see how a friend function works in the following example:
// Ex7_08.cpp// Creating a friend function of a class#include <iostream>using std::cout;using std::endl;
class CBox // Class definition at global scope{public:
// Constructor definitionCBox(double lv = 1.0, double bv = 1.0, double hv = 1.0){
cout << endl << “Constructor called.”;m_Length = lv; // Set values ofm_Width = bv; // data membersm_Height = hv;
}
// Function to calculate the volume of a boxdouble Volume(){
return m_Length*m_Width*m_Height;}
private:double m_Length; // Length of a box in inchesdouble m_Width; // Width of a box in inchesdouble m_Height; // Height of a box in inches
// Friend functionfriend double BoxSurface(CBox aBox);
362
Chapter 7: Defining Your Own Data Types
25905c07.qxd:WroxPro 2/21/08 8:51 AM Page 362
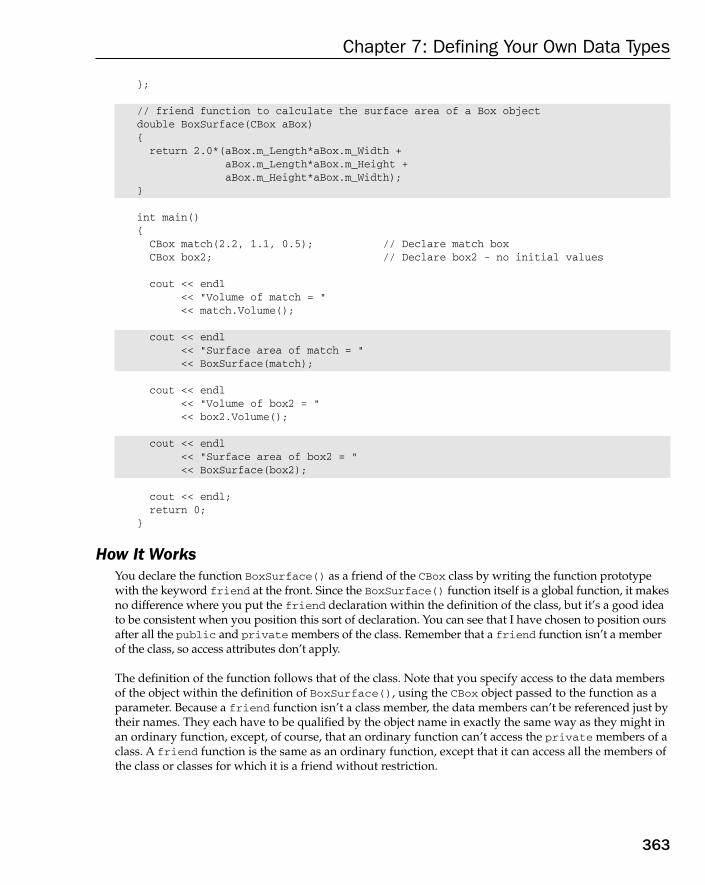
};
// friend function to calculate the surface area of a Box objectdouble BoxSurface(CBox aBox){return 2.0*(aBox.m_Length*aBox.m_Width +
aBox.m_Length*aBox.m_Height +aBox.m_Height*aBox.m_Width);
}
int main(){
CBox match(2.2, 1.1, 0.5); // Declare match boxCBox box2; // Declare box2 - no initial values
cout << endl<< “Volume of match = “<< match.Volume();
cout << endl<< “Surface area of match = “<< BoxSurface(match);
cout << endl<< “Volume of box2 = “<< box2.Volume();
cout << endl<< “Surface area of box2 = “<< BoxSurface(box2);
cout << endl;return 0;
}
How It WorksYou declare the function BoxSurface() as a friend of the CBox class by writing the function prototypewith the keyword friend at the front. Since the BoxSurface() function itself is a global function, it makesno difference where you put the friend declaration within the definition of the class, but it’s a good ideato be consistent when you position this sort of declaration. You can see that I have chosen to position oursafter all the public and private members of the class. Remember that a friend function isn’t a memberof the class, so access attributes don’t apply.
The definition of the function follows that of the class. Note that you specify access to the data membersof the object within the definition of BoxSurface(), using the CBox object passed to the function as aparameter. Because a friend function isn’t a class member, the data members can’t be referenced just bytheir names. They each have to be qualified by the object name in exactly the same way as they might inan ordinary function, except, of course, that an ordinary function can’t access the private members of aclass. A friend function is the same as an ordinary function, except that it can access all the members ofthe class or classes for which it is a friend without restriction.
363
Chapter 7: Defining Your Own Data Types
25905c07.qxd:WroxPro 2/21/08 8:51 AM Page 363

The example produces the following output:
Constructor called.Constructor called.Volume of match = 1.21Surface area of match = 8.14Volume of box2 = 1Surface area of box2 = 6
This is exactly what you would expect. The friend function is computing the surface area of the CBoxobjects from the values of the private members.
Placing friend Function Definitions Inside the ClassYou could have combined the definition of the function with its declaration as a friend of the CBox classwithin the class definition and the code would run as before. The function definition in the class would be:
friend double BoxSurface(CBox aBox){return 2.0*(aBox.m_Length*aBox.m_Width +
aBox.m_Length*aBox.m_Height +aBox.m_Height*aBox.m_Width);
}
However, this has a number of disadvantages relating to the readability of the code. Although the func-tion would still have global scope, this might not be obvious to readers of the code, because the functionwould be hidden in the body of the class definition.
The Default Copy ConstructorSuppose that you declare and initialize a CBox object box1 with this statement:
CBox box1(78.0, 24.0, 18.0);
You now want to create another CBox object, identical to the first. You would like to initialize the secondCBox object with box1. Let’s try it.
Try It Out Copying Information Between InstancesThe following example shows this in action:
// Ex7_09.cpp// Initializing an object with an object of the same class#include <iostream>using std::cout;using std::endl;
class CBox // Class definition at global scope{
364
Chapter 7: Defining Your Own Data Types
25905c07.qxd:WroxPro 2/21/08 8:51 AM Page 364
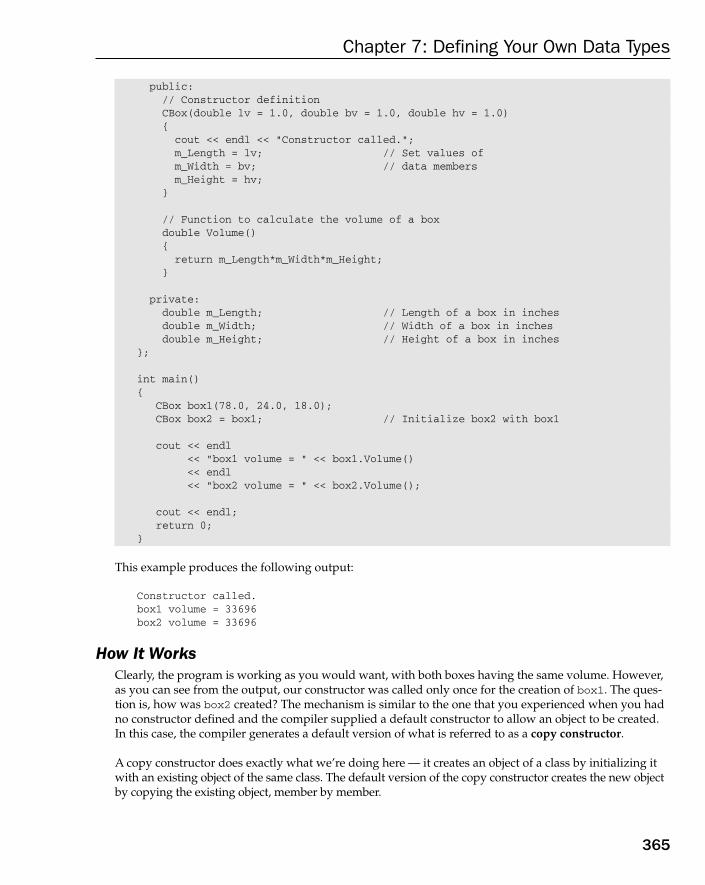
public:// Constructor definitionCBox(double lv = 1.0, double bv = 1.0, double hv = 1.0){cout << endl << “Constructor called.”;m_Length = lv; // Set values ofm_Width = bv; // data membersm_Height = hv;
}
// Function to calculate the volume of a boxdouble Volume(){return m_Length*m_Width*m_Height;
}
private:double m_Length; // Length of a box in inchesdouble m_Width; // Width of a box in inchesdouble m_Height; // Height of a box in inches
};
int main(){
CBox box1(78.0, 24.0, 18.0);CBox box2 = box1; // Initialize box2 with box1
cout << endl<< “box1 volume = “ << box1.Volume()<< endl<< “box2 volume = “ << box2.Volume();
cout << endl;return 0;
}
This example produces the following output:
Constructor called.box1 volume = 33696box2 volume = 33696
How It WorksClearly, the program is working as you would want, with both boxes having the same volume. However,as you can see from the output, our constructor was called only once for the creation of box1. The ques-tion is, how was box2 created? The mechanism is similar to the one that you experienced when you hadno constructor defined and the compiler supplied a default constructor to allow an object to be created.In this case, the compiler generates a default version of what is referred to as a copy constructor.
A copy constructor does exactly what we’re doing here — it creates an object of a class by initializing itwith an existing object of the same class. The default version of the copy constructor creates the new objectby copying the existing object, member by member.
365
Chapter 7: Defining Your Own Data Types
25905c07.qxd:WroxPro 2/21/08 8:51 AM Page 365

This is fine for simple classes such as CBox, but for many classes — classes that have pointers or arraysas members for example — it won’t work properly. Indeed, with such classes the default copy construc-tor can create serious errors in your program. In these cases, you must create your own class copy con-structor. This requires a special approach that you’ll look into more fully towards the end of this chapterand again in the next chapter.
The Pointer thisIn the CBox class, you wrote the Volume() function in terms of the class member names in the definitionof the class. Of course, every object of type CBox that you create contains these members so there has tobe a mechanism for the function to refer to the members of the particular object for which the function is called.
When any member function executes, it automatically contains a hidden pointer with the name this,which points to the object used with the function call. Therefore, when the member m_Length is accessedin the Volume() function during execution, it’s actually referring to this>m_Length, which is the fullyspecified reference to the object member that is being used. The compiler takes care of adding the neces-sary pointer name this to the member names in the function.
If you need to, you can use the pointer this explicitly within a member function. You might, for example,want to return a pointer to the current object.
Try It Out Explicit Use of thisYou could add a public function to the CBox class that compares the volume of two CBox objects.
// Ex7_10.cpp// Using the pointer this#include <iostream>using std::cout;using std::endl;
class CBox // Class definition at global scope{public:// Constructor definitionCBox(double lv = 1.0, double bv = 1.0, double hv = 1.0){
cout << endl << “Constructor called.”;m_Length = lv; // Set values ofm_Width = bv; // data membersm_Height = hv;
}
// Function to calculate the volume of a boxdouble Volume(){
366
Chapter 7: Defining Your Own Data Types
25905c07.qxd:WroxPro 2/21/08 8:51 AM Page 366
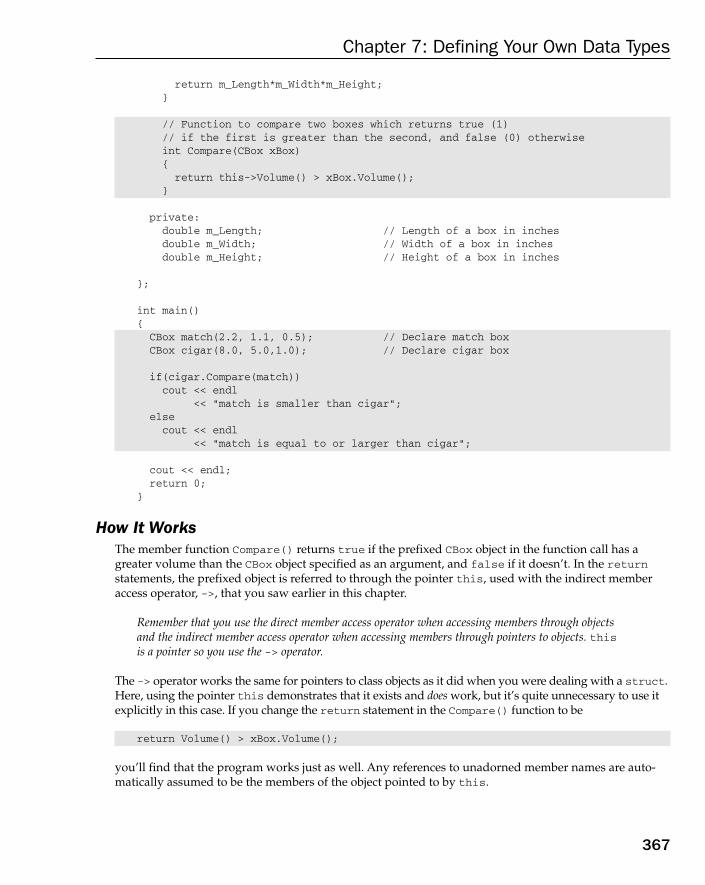
return m_Length*m_Width*m_Height;}
// Function to compare two boxes which returns true (1)// if the first is greater than the second, and false (0) otherwiseint Compare(CBox xBox){return this->Volume() > xBox.Volume();
}
private:double m_Length; // Length of a box in inchesdouble m_Width; // Width of a box in inchesdouble m_Height; // Height of a box in inches
};
int main(){CBox match(2.2, 1.1, 0.5); // Declare match boxCBox cigar(8.0, 5.0,1.0); // Declare cigar box
if(cigar.Compare(match))cout << endl
<< “match is smaller than cigar”;elsecout << endl
<< “match is equal to or larger than cigar”;
cout << endl;return 0;
}
How It WorksThe member function Compare() returns true if the prefixed CBox object in the function call has agreater volume than the CBox object specified as an argument, and false if it doesn’t. In the returnstatements, the prefixed object is referred to through the pointer this, used with the indirect memberaccess operator, ->, that you saw earlier in this chapter.
Remember that you use the direct member access operator when accessing members through objects and the indirect member access operator when accessing members through pointers to objects. thisis a pointer so you use the -> operator.
The -> operator works the same for pointers to class objects as it did when you were dealing with a struct.Here, using the pointer this demonstrates that it exists and does work, but it’s quite unnecessary to use itexplicitly in this case. If you change the return statement in the Compare() function to be
return Volume() > xBox.Volume();
you’ll find that the program works just as well. Any references to unadorned member names are auto-matically assumed to be the members of the object pointed to by this.
367
Chapter 7: Defining Your Own Data Types
25905c07.qxd:WroxPro 2/21/08 8:51 AM Page 367

You use the Compare() function in main() to check the relationship between the volumes of the objectsmatch and cigar. The output from the program is:
Constructor called.Constructor called.match is smaller than cigar
This confirms that the cigar object is larger than the match object.
It also wasn’t essential to define the Compare() function as a class member. You could just as well havewritten it as an ordinary function with the objects as arguments. Note that this isn’t true of the functionVolume(), because it needs to access the private data members of the class. Of course, if you imple-mented the Compare() function as an ordinary function, it wouldn’t have access to the pointer this,but it would still be very simple:
// Comparing two CBox objects - ordinary function versionint Compare(CBox B1, CBox B2){
return B1.Volume() > B2.Volume();}
This has both objects as arguments and returns true if the volume of the first is greater than the last.You would use this function to perform the same function as in the last example with this statement:
if(Compare(cigar, match))cout << endl
<< “match is smaller than cigar”;else
cout << endl<< “match is equal to or larger than cigar”;
If anything, this looks slightly better and easier to read than the original version; however, there’s a muchbetter way to do this, which you will learn about in the next chapter.
const Objects of a ClassThe Volume() function that you defined for the CBox class does not alter the object for which it is called;neither does a function such as getHeight() that returns the value of the m_Height member. Likewise,the Compare() function in the previous example didn’t change the class objects at all. This may seem atfirst sight to be a mildly interesting but largely irrelevant observation, but it isn’t — it’s quite important.Let’s think about it.
You will undoubtedly want to create class objects that are fixed from time to time, just like values suchas pi or inchesPerFoot that you might declare as const double. Suppose you wanted to define aCBox object as const — because it was a very important standard sized box, for instance. You mightdefine it with the following statement:
const CBox standard(3.0, 5.0, 8.0);
368
Chapter 7: Defining Your Own Data Types
25905c07.qxd:WroxPro 2/21/08 8:51 AM Page 368

Now that you have defined your standard box having dimensions 3 × 5 × 8, you don’t want it messedabout with. In particular, you don’t want to allow the values stored in its data members to be altered.How can you be sure they won’t be?
Well, you already are. If you declare an object of a class as const, the compiler will not allow any mem-ber function to be called for it that might alter it. You can demonstrate this quite easily by modifying thedeclaration for the object, cigar, in the previous example to:
const CBox cigar(8.0, 5.0,1.0); // Declare cigar box
If you try recompiling the program with this change, it won’t compile. You see the error message:
error C2662: ‘compare’ : cannot convert ‘this’ pointer from ‘const class CBox’ to‘class CBox &’ Conversion loses qualifiers
This is produced for the if statement that calls the Compare() member of cigar. An object that you declareas const will always have a this pointer that is const, so the compiler will not allow any member func-tion to be called that does not assume the this pointer that is passed to it is const. You need to find outhow to make the this pointer in a member function const.
const Member Functions of a ClassTo make the this pointer in a member function const, you must declare the function as const withinthe class definition. Take a look at how you do that with the Compare() member of CBox. The class defi-nition needs to be modified to the following:
class CBox // Class definition at global scope{
public:// Constructor definitionCBox(double lv = 1.0, double bv = 1.0, double hv = 1.0){
cout << endl << “Constructor called.”;m_Length = lv; // Set values ofm_Width = bv; // data membersm_Height = hv;
}
// Function to calculate the volume of a boxdouble Volume(){
return m_Length*m_Width*m_Height;}
// Function to compare two boxes which returns true (1)// if the first is greater than the second, and false (0) otherwiseint Compare(CBox xBox) const{
return this->Volume() > xBox.Volume();}
private:
369
Chapter 7: Defining Your Own Data Types
25905c07.qxd:WroxPro 2/21/08 8:51 AM Page 369
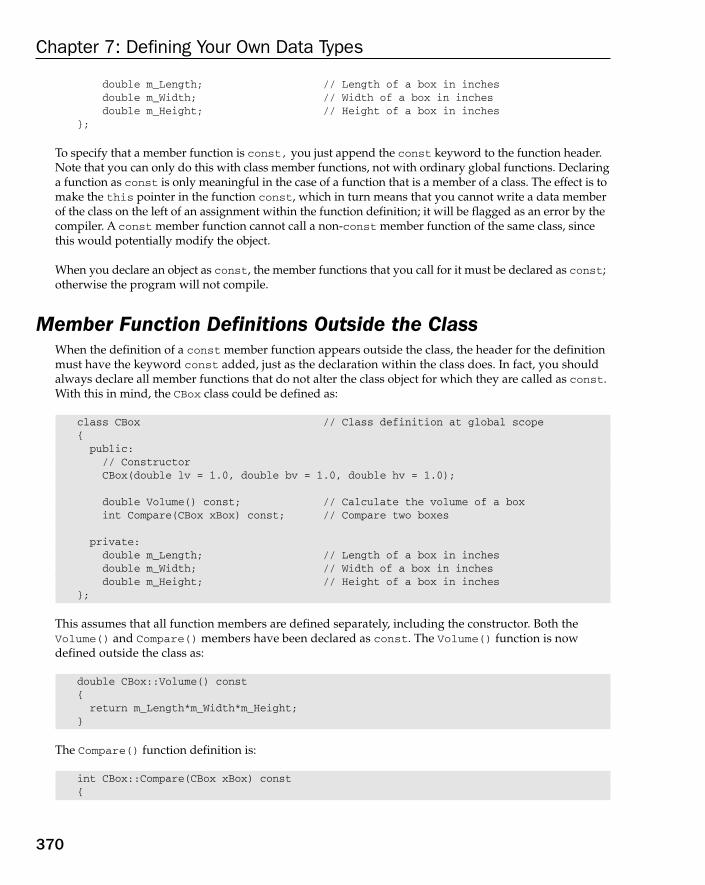
double m_Length; // Length of a box in inchesdouble m_Width; // Width of a box in inchesdouble m_Height; // Height of a box in inches
};
To specify that a member function is const, you just append the const keyword to the function header.Note that you can only do this with class member functions, not with ordinary global functions. Declaringa function as const is only meaningful in the case of a function that is a member of a class. The effect is tomake the this pointer in the function const, which in turn means that you cannot write a data memberof the class on the left of an assignment within the function definition; it will be flagged as an error by thecompiler. A const member function cannot call a non-const member function of the same class, sincethis would potentially modify the object.
When you declare an object as const, the member functions that you call for it must be declared as const;otherwise the program will not compile.
Member Function Definitions Outside the ClassWhen the definition of a const member function appears outside the class, the header for the definitionmust have the keyword const added, just as the declaration within the class does. In fact, you shouldalways declare all member functions that do not alter the class object for which they are called as const.With this in mind, the CBox class could be defined as:
class CBox // Class definition at global scope{public:// ConstructorCBox(double lv = 1.0, double bv = 1.0, double hv = 1.0);
double Volume() const; // Calculate the volume of a boxint Compare(CBox xBox) const; // Compare two boxes
private:double m_Length; // Length of a box in inchesdouble m_Width; // Width of a box in inchesdouble m_Height; // Height of a box in inches
};
This assumes that all function members are defined separately, including the constructor. Both theVolume() and Compare() members have been declared as const. The Volume() function is nowdefined outside the class as:
double CBox::Volume() const{return m_Length*m_Width*m_Height;
}
The Compare() function definition is:
int CBox::Compare(CBox xBox) const{
370
Chapter 7: Defining Your Own Data Types
25905c07.qxd:WroxPro 2/21/08 8:51 AM Page 370

return this->Volume() > xBox.Volume();}
As you can see, the const modifier appears in both definitions. If you leave it out, the code will not com-pile. A function with a const modifier is a different function from one without, even though the name andparameters are exactly the same. Indeed you can have both const and non-const versions of a function ina class, and sometimes this can be very useful.
With the class declared as shown, the constructor also needs to be defined separately, like this:
CBox::CBox(double lv, double bv, double hv):m_Length(lv), m_Width(bv), m_Height(hv)
{cout << endl << “Constructor called.”;
}
Arrays of Objects of a ClassYou can declare an array of objects of a class in exactly the same way that you have declared an ordinaryarray where the elements were one of the built-in types. Each element of an array of class objects causesthe default constructor to be called.
Try It Out Arrays of Class ObjectsWe can use the class definition of CBox from the last example but modified to include a specific defaultconstructor:
// Ex7_11.cpp// Using an array of class objects#include <iostream>using std::cout;using std::endl;
class CBox // Class definition at global scope{
public:// Constructor definitionCBox(double lv, double bv = 1.0, double hv = 1.0){
cout << endl << “Constructor called.”;m_Length = lv; // Set values ofm_Width = bv; // data membersm_Height = hv;
}
CBox() // Default constructor{cout << endl
<< “Default constructor called.”;m_Length = m_Width = m_Height = 1.0;
371
Chapter 7: Defining Your Own Data Types
25905c07.qxd:WroxPro 2/21/08 8:51 AM Page 371

}
// Function to calculate the volume of a boxdouble Volume() const{
return m_Length*m_Width*m_Height;}
private:double m_Length; // Length of a box in inchesdouble m_Width; // Width of a box in inchesdouble m_Height; // Height of a box in inches
};
int main(){CBox boxes[5]; // Array of CBox objects declaredCBox cigar(8.0, 5.0, 1.0); // Declare cigar box
cout << endl<< “Volume of boxes[3] = “ << boxes[3].Volume()<< endl<< “Volume of cigar = “ << cigar.Volume();
cout << endl;return 0;
}
The program produces this output:
Default constructor called.Default constructor called.Default constructor called.Default constructor called.Default constructor called.Constructor called.Volume of boxes[3] = 1Volume of cigar = 40
How It WorksYou have modified the constructor-accepting arguments so that only two default values are supplied, andyou have added a default constructor that initializes the data members to 1 after displaying a message thatit was called. You are now able to see which constructor was called when. The constructors now have quitedistinct parameter lists, so there’s no possibility of the compiler confusing them.
You can see from the output that the default constructor was called five times, once for each element of theboxes array. The other constructor was called to create the cigar object. It’s clear from the output that thedefault constructor initialization is working satisfactorily, as the volume of the array element is 1.
372
Chapter 7: Defining Your Own Data Types
25905c07.qxd:WroxPro 2/21/08 8:51 AM Page 372
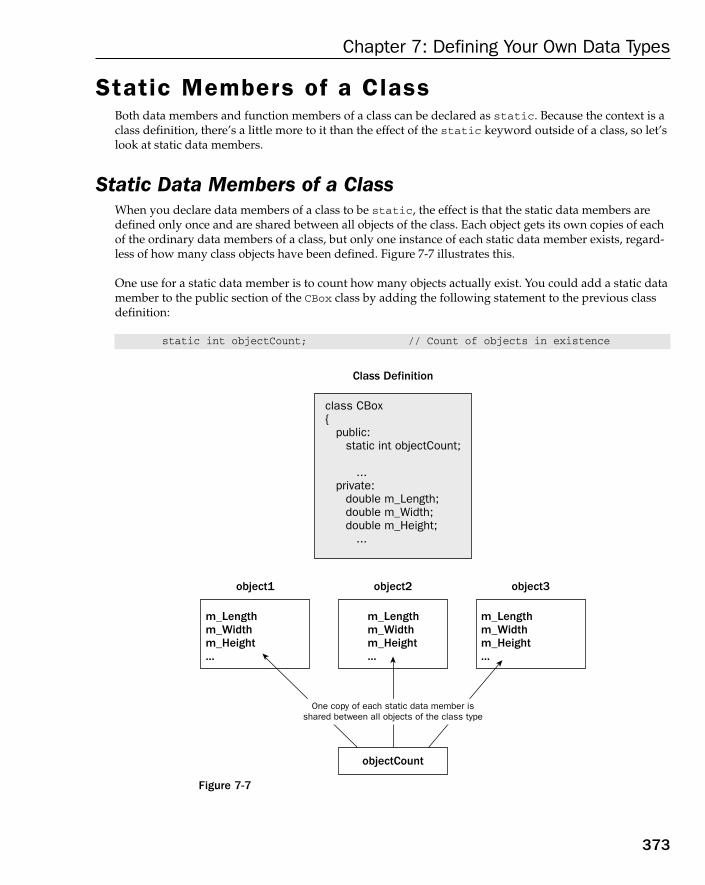
Static Members of a ClassBoth data members and function members of a class can be declared as static. Because the context is aclass definition, there’s a little more to it than the effect of the static keyword outside of a class, so let’slook at static data members.
Static Data Members of a ClassWhen you declare data members of a class to be static, the effect is that the static data members aredefined only once and are shared between all objects of the class. Each object gets its own copies of eachof the ordinary data members of a class, but only one instance of each static data member exists, regard-less of how many class objects have been defined. Figure 7-7 illustrates this.
One use for a static data member is to count how many objects actually exist. You could add a static datamember to the public section of the CBox class by adding the following statement to the previous classdefinition:
static int objectCount; // Count of objects in existence
Figure 7-7
Class Definition
class CBox { public: static int objectCount; ... private: double m_Length; double m_Width; double m_Height; ...
object1
m_Length m_Width m_Height ...
object2
objectCount
m_Length m_Width m_Height ...
object3
m_Length m_Width m_Height ...
One copy of each static data member is shared between all objects of the class type
373
Chapter 7: Defining Your Own Data Types
25905c07.qxd:WroxPro 2/21/08 8:51 AM Page 373
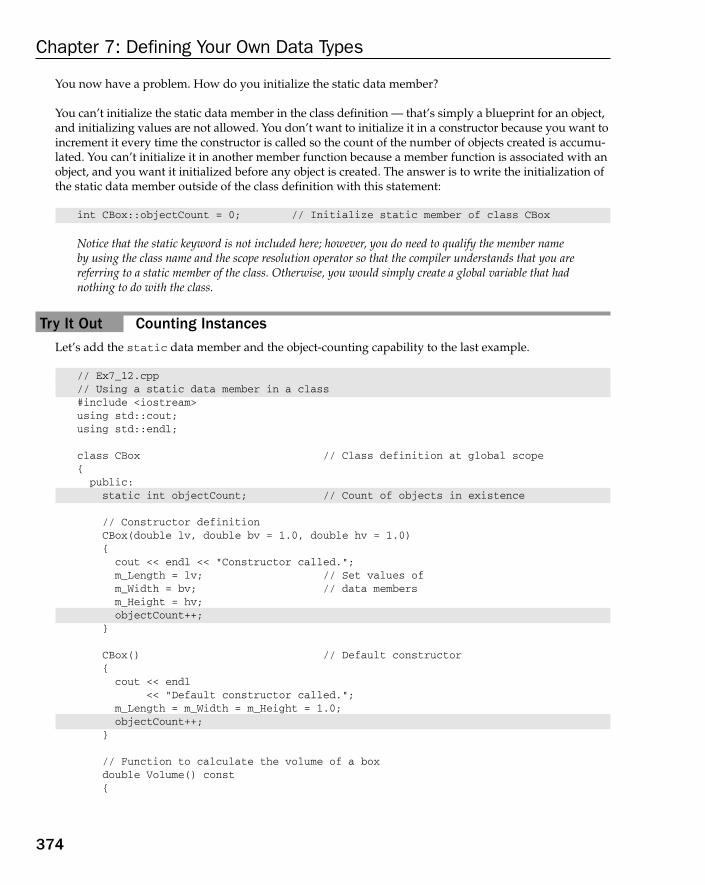
You now have a problem. How do you initialize the static data member?
You can’t initialize the static data member in the class definition — that’s simply a blueprint for an object,and initializing values are not allowed. You don’t want to initialize it in a constructor because you want toincrement it every time the constructor is called so the count of the number of objects created is accumu-lated. You can’t initialize it in another member function because a member function is associated with anobject, and you want it initialized before any object is created. The answer is to write the initialization ofthe static data member outside of the class definition with this statement:
int CBox::objectCount = 0; // Initialize static member of class CBox
Notice that the static keyword is not included here; however, you do need to qualify the member name by using the class name and the scope resolution operator so that the compiler understands that you arereferring to a static member of the class. Otherwise, you would simply create a global variable that hadnothing to do with the class.
Try It Out Counting InstancesLet’s add the static data member and the object-counting capability to the last example.
// Ex7_12.cpp// Using a static data member in a class#include <iostream>using std::cout;using std::endl;
class CBox // Class definition at global scope{public:static int objectCount; // Count of objects in existence
// Constructor definitionCBox(double lv, double bv = 1.0, double hv = 1.0){
cout << endl << “Constructor called.”;m_Length = lv; // Set values ofm_Width = bv; // data membersm_Height = hv;objectCount++;
}
CBox() // Default constructor{
cout << endl<< “Default constructor called.”;
m_Length = m_Width = m_Height = 1.0;objectCount++;
}
// Function to calculate the volume of a boxdouble Volume() const{
374
Chapter 7: Defining Your Own Data Types
25905c07.qxd:WroxPro 2/21/08 8:51 AM Page 374

return m_Length*m_Width*m_Height;}
private:double m_Length; // Length of a box in inchesdouble m_Width; // Width of a box in inchesdouble m_Height; // Height of a box in inches
};
int CBox::objectCount = 0; // Initialize static member of CBox class
int main(){CBox boxes[5]; // Array of CBox objects declaredCBox cigar(8.0, 5.0, 1.0); // Declare cigar box
cout << endl << endl<< “Number of objects (through class) = “<< CBox::objectCount;
cout << endl<< “Number of objects (through object) = “<< boxes[2].objectCount;
cout << endl;return 0;
}
This example produces the following output:
Default constructor called.Default constructor called.Default constructor called.Default constructor called.Default constructor called.Constructor called.Number of objects (through class) = 6Number of objects (through object) = 6
How It WorksThis code shows that it doesn’t matter how you refer to the static member ObjectCount (whether throughthe class itself or any of the objects of that class). The value is the same and it is equal to the number ofobjects of that class that have been created. The six objects are obviously the five elements of the Boxesarray, plus the cigar object. It’s interesting to note that static members of a class exist even though theremay be no members of the class in existence. This is evidently the case, because you initialized the staticmember ObjectCount before any class objects were declared.
Static data members are automatically created when your program begins, and they will be initializedwith 0 unless you initialize them with some other value. Thus you need only to initialize static datamembers of a class if you want them to start out with a value other than 0.
375
Chapter 7: Defining Your Own Data Types
25905c07.qxd:WroxPro 2/21/08 8:51 AM Page 375

Static Function Members of a ClassBy declaring a function member as static, you make it independent of any particular object of the class.Referencing members of the class from within a static function must be done using qualified names (asyou would do with an ordinary global function accessing a public data member). The static memberfunction has the advantage that it exists, and can be called, even if no objects of the class exist. In this case,only static data members can be used because they are the only ones that exist. Thus, you can call a staticfunction member of a class to examine static data members, even when you do not know for certain thatany objects of the class exist. You could, therefore, use a static member function to determine whethersome objects of the class have been created or, indeed, how many have been created.
Of course, after the objects have been defined, a static member function can access private as well aspublic members of class objects. A static function might have this prototype:
static void Afunction(int n);
A static function can be called in relation to a particular object by a statement such as the following:
aBox.Afunction(10);
where aBox is an object of the class. The same function could also be called without reference to an object.In this case, the statement would take the following form,
CBox::Afunction(10);
where CBox is the class name. Using the class name and the scope resolution operator serves to tell thecompiler to which class the function Afunction() belongs.
Pointers and References to Class ObjectsUsing pointers, and particularly references to class objects, is very important in object-oriented program-ming and in particular in the specification of function parameters. Class objects can involve considerableamounts of data, so using the pass-by-value mechanism by specifying parameters to a function to be objectscan be very time-consuming and inefficient because each argument object will be copied. There are alsosome techniques involving the use of references that are essential to some operations with classes. As you’llsee, you can’t write a copy constructor without using a reference parameter.
Pointers to Class ObjectsYou declare a pointer to a class object in the same way that you declare other pointers. For example, apointer to objects of the class CBox is declared in this statement:
CBox* pBox = 0; // Declare a pointer to CBox
You can now use this to store the address of a CBox object in an assignment in the usual way, using theaddress operator:
pBox = &cigar; // Store address of CBox object cigar in pBox
376
Chapter 7: Defining Your Own Data Types
25905c07.qxd:WroxPro 2/21/08 8:51 AM Page 376

As you saw when you used the this pointer in the definition of the Compare() member function, youcan call a function using a pointer to an object. You can call the function Volume() for the pointer pBoxin a statement like this:
cout << pBox->Volume(); // Display volume of object pointed to by pBox
Again, this uses the indirect member selection operator. This is the typical notation used by most pro-grammers for this kind of operation, so from now on I’ll use it universally.
Try It Out Pointers to ClassesLet’s try exercising the indirect member access operator a little more. We will use the example Ex7_10.cppas a base, but change it a little.
// Ex7_13.cpp// Exercising the indirect member access operator#include <iostream>using std::cout;using std::endl;
class CBox // Class definition at global scope{
public:// Constructor definitionCBox(double lv = 1.0, double bv = 1.0, double hv = 1.0){
cout << endl << “Constructor called.”;m_Length = lv; // Set values ofm_Width = bv; // data membersm_Height = hv;
}
// Function to calculate the volume of a boxdouble Volume() const{
return m_Length*m_Width*m_Height;}
// Function to compare two boxes which returns true (1)// if the first is greater that the second, and false (0) otherwiseint Compare(CBox* pBox) const{return this->Volume() > pBox->Volume();
}
private:double m_Length; // Length of a box in inchesdouble m_Width; // Width of a box in inchesdouble m_Height; // Height of a box in inches
};
int main(){
377
Chapter 7: Defining Your Own Data Types
25905c07.qxd:WroxPro 2/21/08 8:51 AM Page 377

CBox boxes[5]; // Array of CBox objects declaredCBox match(2.2, 1.1, 0.5); // Declare match boxCBox cigar(8.0, 5.0, 1.0); // Declare cigar BoxCBox* pB1 = &cigar; // Initialize pointer to cigar object addressCBox* pB2 = 0; // Pointer to CBox initialized to null
cout << endl<< “Address of cigar is “ << pB1 // Display address<< endl<< “Volume of cigar is “<< pB1->Volume(); // Volume of object pointed to
pB2 = &match;if(pB2->Compare(pB1)) // Compare via pointerscout << endl
<< “match is greater than cigar”;elsecout << endl
<< “match is less than or equal to cigar”;
pB1 = boxes; // Set to address of arrayboxes[2] = match; // Set 3rd element to matchcout << endl // Now access thru pointer
<< “Volume of boxes[2] is “ << (pB1 + 2)->Volume();
cout << endl;return 0;
}
If you run the example, the output looks something like that shown here:
Constructor called.Constructor called.Constructor called.Constructor called.Constructor called.Constructor called.Constructor called.Address of cigar is 0012FE20Volume of cigar is 40match is less than or equal to cigarVolume of boxes[2] is 1.21
Of course, the value of the address for the object cigar may well be different on your PC.
How It WorksThe only change to the class definition isn’t one of great substance. You have only modified the Compare()function to accept a pointer to a CBox object as an argument, and now you know about const memberfunctions. You declare it as const because it doesn’t alter the object. The function main() merely exercisespointers to CBox type objects in various, rather arbitrary, ways.
378
Chapter 7: Defining Your Own Data Types
25905c07.qxd:WroxPro 2/21/08 8:51 AM Page 378
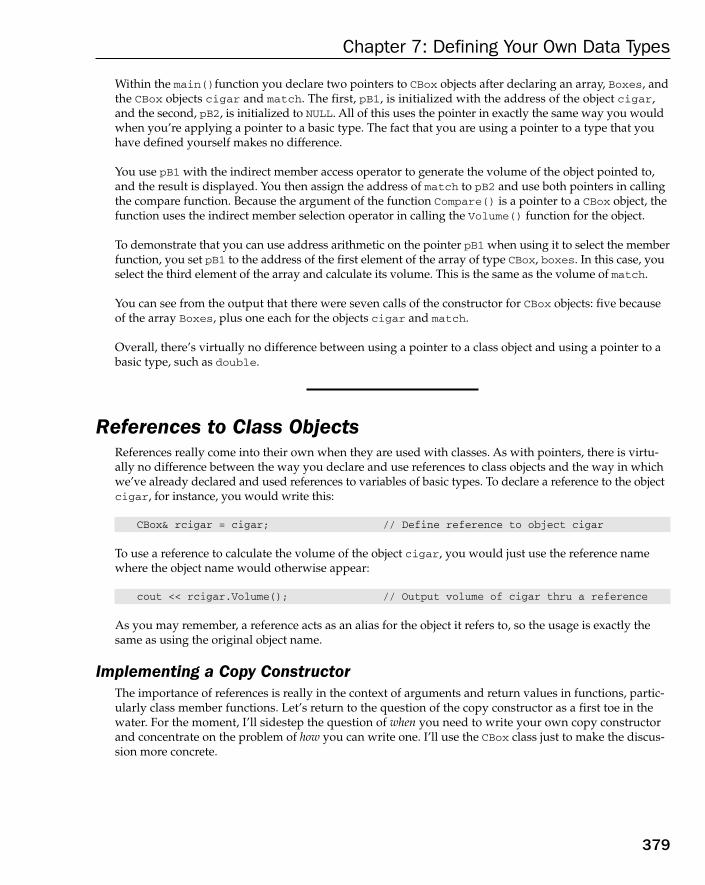
Within the main()function you declare two pointers to CBox objects after declaring an array, Boxes, andthe CBox objects cigar and match. The first, pB1, is initialized with the address of the object cigar,and the second, pB2, is initialized to NULL. All of this uses the pointer in exactly the same way you wouldwhen you’re applying a pointer to a basic type. The fact that you are using a pointer to a type that youhave defined yourself makes no difference.
You use pB1 with the indirect member access operator to generate the volume of the object pointed to,and the result is displayed. You then assign the address of match to pB2 and use both pointers in callingthe compare function. Because the argument of the function Compare() is a pointer to a CBox object, thefunction uses the indirect member selection operator in calling the Volume() function for the object.
To demonstrate that you can use address arithmetic on the pointer pB1 when using it to select the memberfunction, you set pB1 to the address of the first element of the array of type CBox, boxes. In this case, youselect the third element of the array and calculate its volume. This is the same as the volume of match.
You can see from the output that there were seven calls of the constructor for CBox objects: five becauseof the array Boxes, plus one each for the objects cigar and match.
Overall, there’s virtually no difference between using a pointer to a class object and using a pointer to abasic type, such as double.
References to Class ObjectsReferences really come into their own when they are used with classes. As with pointers, there is virtu-ally no difference between the way you declare and use references to class objects and the way in whichwe’ve already declared and used references to variables of basic types. To declare a reference to the objectcigar, for instance, you would write this:
CBox& rcigar = cigar; // Define reference to object cigar
To use a reference to calculate the volume of the object cigar, you would just use the reference namewhere the object name would otherwise appear:
cout << rcigar.Volume(); // Output volume of cigar thru a reference
As you may remember, a reference acts as an alias for the object it refers to, so the usage is exactly thesame as using the original object name.
Implementing a Copy ConstructorThe importance of references is really in the context of arguments and return values in functions, partic-ularly class member functions. Let’s return to the question of the copy constructor as a first toe in thewater. For the moment, I’ll sidestep the question of when you need to write your own copy constructorand concentrate on the problem of how you can write one. I’ll use the CBox class just to make the discus-sion more concrete.
379
Chapter 7: Defining Your Own Data Types
25905c07.qxd:WroxPro 2/21/08 8:51 AM Page 379

The copy constructor is a constructor that creates an object by initializing it with an existing object of thesame class. It therefore needs to accept an object of the class as an argument. You might consider writingthe prototype like this:
CBox(CBox initB);
Now consider what happens when this constructor is called. If you write this declaration:
CBox myBox = cigar;
this generates a call of the copy constructor as follows:
CBox::CBox(cigar);
This seems to be no problem, until you realize that the argument is passed by value. So, before the objectcigar can be passed, the compiler needs to arrange to make a copy of it. Therefore, it calls the copy con-structor to make a copy of the argument for the call of the copy constructor. Unfortunately, since it is passedby value, this call also needs a copy of its argument to be made, so the copy constructor is called, and so onand so on. You end up with an infinite number of calls to the copy constructor.
The solution, as I’m sure you have guessed, is to use a const reference parameter. You can write the pro-totype of the copy constructor like this:
CBox(const CBox& initB);
Now, the argument to the copy constructor doesn’t need to be copied. It is used to initialize the referenceparameter, so no copying takes place. As you remember from the discussion on references, if a parameterto a function is a reference, no copying of the argument occurs when the function is called. The functionaccesses the argument variable in the caller function directly. The const qualifier ensures that the argu-ment can’t be modified in the function.
This is another important use of the const qualifier. You should always declare a reference parameter of a function as const unless the function will modify it.
You could implement the copy constructor as follows:
CBox::CBox(const CBox& initB){m_Length = initB.m_Length;m_Width = initB.m_Width;m_Height = initB.m_Height;
}
This definition of the copy constructor assumes that it appears outside of the class definition. The con-structor name is therefore qualified with the class name using the scope resolution operator. Each datamember of the object being created is initialized with the corresponding member of the object passed asan argument. Of course, you could equally well use the initialization list to set the values of the object.
This case is not an example of when you need to write a copy constructor. As you have seen, the defaultcopy constructor works perfectly well with CBox objects. I will get to why and when you need to writeyour own copy constructor in the next chapter.
380
Chapter 7: Defining Your Own Data Types
25905c07.qxd:WroxPro 2/21/08 8:51 AM Page 380
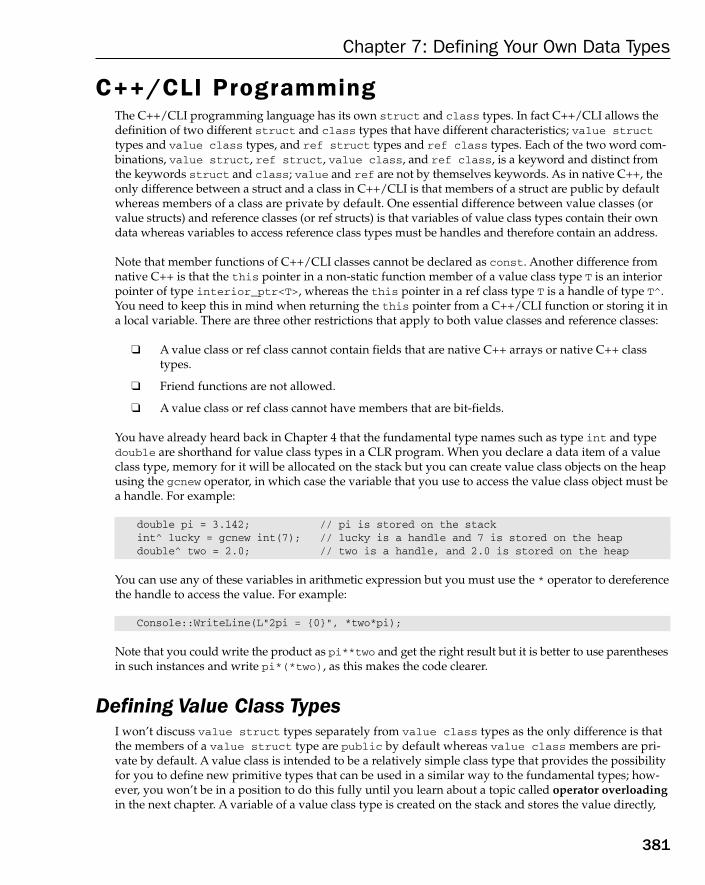
C++/CLI ProgrammingThe C++/CLI programming language has its own struct and class types. In fact C++/CLI allows thedefinition of two different struct and class types that have different characteristics; value structtypes and value class types, and ref struct types and ref class types. Each of the two word com-binations, value struct, ref struct, value class, and ref class, is a keyword and distinct fromthe keywords struct and class; value and ref are not by themselves keywords. As in native C++, theonly difference between a struct and a class in C++/CLI is that members of a struct are public by defaultwhereas members of a class are private by default. One essential difference between value classes (orvalue structs) and reference classes (or ref structs) is that variables of value class types contain their owndata whereas variables to access reference class types must be handles and therefore contain an address.
Note that member functions of C++/CLI classes cannot be declared as const. Another difference fromnative C++ is that the this pointer in a non-static function member of a value class type T is an interiorpointer of type interior_ptr<T>, whereas the this pointer in a ref class type T is a handle of type T^.You need to keep this in mind when returning the this pointer from a C++/CLI function or storing it ina local variable. There are three other restrictions that apply to both value classes and reference classes:
❑ A value class or ref class cannot contain fields that are native C++ arrays or native C++ classtypes.
❑ Friend functions are not allowed.
❑ A value class or ref class cannot have members that are bit-fields.
You have already heard back in Chapter 4 that the fundamental type names such as type int and typedouble are shorthand for value class types in a CLR program. When you declare a data item of a valueclass type, memory for it will be allocated on the stack but you can create value class objects on the heapusing the gcnew operator, in which case the variable that you use to access the value class object must bea handle. For example:
double pi = 3.142; // pi is stored on the stackint^ lucky = gcnew int(7); // lucky is a handle and 7 is stored on the heapdouble^ two = 2.0; // two is a handle, and 2.0 is stored on the heap
You can use any of these variables in arithmetic expression but you must use the * operator to dereferencethe handle to access the value. For example:
Console::WriteLine(L”2pi = {0}”, *two*pi);
Note that you could write the product as pi**two and get the right result but it is better to use parenthesesin such instances and write pi*(*two), as this makes the code clearer.
Defining Value Class TypesI won’t discuss value struct types separately from value class types as the only difference is thatthe members of a value struct type are public by default whereas value class members are pri-vate by default. A value class is intended to be a relatively simple class type that provides the possibilityfor you to define new primitive types that can be used in a similar way to the fundamental types; how-ever, you won’t be in a position to do this fully until you learn about a topic called operator overloadingin the next chapter. A variable of a value class type is created on the stack and stores the value directly,
381
Chapter 7: Defining Your Own Data Types
25905c07.qxd:WroxPro 2/21/08 8:51 AM Page 381

but as you have already seen, you can also use a tracking handle to reference a value class type stored onthe CLR heap.
Take an example of a simple value class definition:
// Class representing a heightvalue class Height{private:// Records the height in feet and inchesint feet;int inches;
public:// Create a height from inches valueHeight(int ins){feet = ins/12;inches = ins%12;
}
// Create a height from feet and inchesHeight(int ft, int ins) : feet(ft), inches(ins){}
};
This defines a value class type with the name Height. It has two private fields that are both of type intthat record a height in feet and inches. The class has two constructors — one to create a Height objectfrom a number of inches supplied as the argument, and the other to create a Height object from both afeet and inches specification. The latter should really check that the number of inches supplied as an argu-ment is less than 12, but I’ll leave you to add that as a fine point. To create a variable of type Height youcould write:
Height tall = Height(7, 8); // Height is 7 feet 8 inches
This creates the variable, tall, containing a Height object representing 7 feet 8 inches; this object is createdby calling the constructor with two parameters.
Height baseHeight;
This statement creates a variable, baseHeight, that will be automatically initialized to a height of zero.The Height class does not have a no-arg constructor specified and because it is a value class, you are notpermitted to supply one in the class definition. There will be a no-arg constructor included automaticallyin a value class that will initialize all value type fields to the equivalent of zero and all fields that are han-dles to nullptr and you cannot override the implicit constructor with your own version. It’s this defaultconstructor that will be used to create the value of baseHeight.
There are a couple of other restrictions on what a value class can contain:
❑ You must not include a copy constructor in a value class definition.
❑ You cannot override the assignment operator in a value class (I’ll discuss how you overrideoperators in a class in Chapter 8).
382
Chapter 7: Defining Your Own Data Types
25905c07.qxd:WroxPro 2/21/08 8:51 AM Page 382

Value class objects are always copied by just copying fields and the assignment of one value class objectto another is done in the same way. Value classes are intended to be used to represent simple objects definedby a limited amount of data, so for objects that don’t fit this specification or where the value class restrictionsare problematical you should use ref class types to represent them.
Let’s take the Height class for a test drive.
Try It Out Defining and Using a Value Class TypeHere’s the code to exercise the Height value class:
// Ex7_14.cpp : main project file.// Defining and using a value class type
#include “stdafx.h”
using namespace System;
// Class representing a heightvalue class Height{private:// Records the height in feet and inchesint feet;int inches;
public:// Create a height from inches valueHeight(int ins){feet = ins/12;inches = ins%12;
}
// Create a height from feet and inchesHeight(int ft, int ins) : feet(ft), inches(ins){}
};
int main(array<System::String ^> ^args){Height myHeight = Height(6,3);Height^ yourHeight = Height(70);Height hisHeight = *yourHeight;
Console::WriteLine(L”My height is {0}”, myHeight);Console::WriteLine(L”Your height is {0}”, yourHeight);Console::WriteLine(L”His height is {0}”, hisHeight);return 0;
}
Executing this program results in the following output:
My height is HeightYour height is HeightHis height is Height
383
Chapter 7: Defining Your Own Data Types
25905c07.qxd:WroxPro 2/21/08 8:51 AM Page 383

How It WorksWell, the output is a bit monotonous and perhaps less than we were hoping for, but let’s come back tothat a little later. In the main() function, you create three variables with the following statement:
Height myHeight = Height(6,3);Height^ yourHeight = Height(70);Height hisHeight = *yourHeight;
The first variable is of type Height so the object that represents a height of 6 feet 3 inches is allocated onthe stack. The second variable is a handle of type Height^ so the object representing a height of 5 feet 10inches is created on the CLR heap. The third variable is another stack variable that is a copy of the objectreferenced by yourHeight. Because yourHeight is a handle, you have to dereference it to assign it tothe hisHeight variable and the result is that hisHeight contains a duplicate of the object referenced byyourHeight. Variables of a value class type always contain a unique object so two such variables cannotreference the same object; assigning one variable of a value class type to another always involves copying.Of course, several handles can reference a single object and assigning the value of one handle to anothersimply copies the address (or nullptr) from one to the other so that both objects reference the same object.
The output is produced by the three calls of the Console::WriteLine() function. Unfortunately the out-put is not the values of the value class objects, but simply the class name. So how did this come about?It was optimistic to expect the values to be produced — after all, how is the compiler to know how theyshould be presented? Height objects contain two values — which one should be presented as the value?The class has to have a way to make the value available in this context.
The ToString() Function in a ClassEvery C++/CLI class that you define has a ToString() function — I’ll explain how this comes about inthe next chapter when I discuss class inheritance — that returns a handle to a string that is supposed torepresent the class object. The compiler arranges for the ToString() function for an object to be calledwhenever it recognizes that a string representation of an object is required and you can call it explicitly if necessary. For example, you could write this:
double pi = 3.142;Console::WriteLine(pi.ToString());
This outputs the value of pi as a string and it is the ToString() function that is defined in theSystem::Double class that provides the string. Of course, you would get the same output withoutexplicitly calling the ToString() function.
The default version of the ToString() function that you get in the Height class just outputs the classname because there is no way to know ahead of time what value should be returned as a string for anobject of your class type. To get an appropriate value output by the Console::WriteLine() function inthe previous example, you must add a ToString() function to the Height class that presents the valueof an object in the form that you want.
Here’s how the class looks with a ToString() function:
// Class representing a heightvalue class Height
384
Chapter 7: Defining Your Own Data Types
25905c07.qxd:WroxPro 2/21/08 8:51 AM Page 384

{private:
// Records the height in feet and inchesint feet;int inches;
public:// Create a height from inches valueHeight(int ins){
feet = ins/12;inches = ins%12;
}
// Create a height from feet and inchesHeight(int ft, int ins) : feet(ft), inches(ins){}
// Create a string representation of the objectvirtual String^ ToString() override{return feet + L” feet “+ inches + L” inches”;
}};
The combination of the virtual keyword before the return type for ToString() and the override key-word following the parameter list for the function indicates that this version of the ToString() functionoverrides the version of the function that is present in the class by default. You’ll hear a lot more aboutthis in Chapter 8. Our new version of the ToString() function now outputs a string expressing a heightin feet and inches. If you add this function to the class definition in the previous example, you get the fol-lowing output when you compile and execute the program:
My height is 6 feet 3 inchesYour height is 5 feet 10 inchesHis height is 5 feet 10 inches
This is more like what you were expecting to get before. You can see from the output that the WriteLine()function quite happily deals with an object on the CLR heap that you reference through the yourHeighthandle, as well as the myHeight and hisHeight objects that were created on the stack.
Literal FieldsThe factor 12 that you use to convert from feet to inches and vice versa is a little troubling. It is an exampleof what is called a “magic number,” where a person reading the code has to guess or deduce its signifi-cance and origin. In this case it’s fairly obvious what the 12 is but there will be many instances where theorigin of a numerical constant in a calculation is not so apparent. C++/CLI has a literal field facility forintroducing named constants into a class that will solve the problem in this case. Here’s how you caneliminate the magic number from the code in the single-argument constructor in the Height class:
value class Height{private:
// Records the height in feet and inchesint feet;int inches;
385
Chapter 7: Defining Your Own Data Types
25905c07.qxd:WroxPro 2/21/08 8:51 AM Page 385
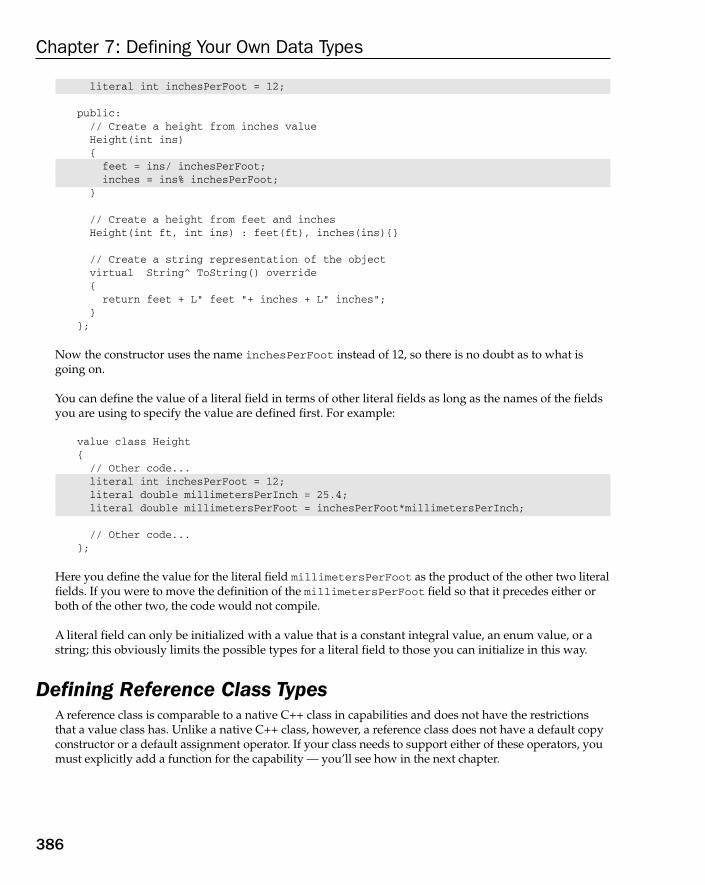
literal int inchesPerFoot = 12;
public:// Create a height from inches valueHeight(int ins){feet = ins/ inchesPerFoot;inches = ins% inchesPerFoot;
}
// Create a height from feet and inchesHeight(int ft, int ins) : feet(ft), inches(ins){}
// Create a string representation of the objectvirtual String^ ToString() override{return feet + L” feet “+ inches + L” inches”;
}};
Now the constructor uses the name inchesPerFoot instead of 12, so there is no doubt as to what isgoing on.
You can define the value of a literal field in terms of other literal fields as long as the names of the fieldsyou are using to specify the value are defined first. For example:
value class Height{// Other code...literal int inchesPerFoot = 12;literal double millimetersPerInch = 25.4;literal double millimetersPerFoot = inchesPerFoot*millimetersPerInch;
// Other code...};
Here you define the value for the literal field millimetersPerFoot as the product of the other two literalfields. If you were to move the definition of the millimetersPerFoot field so that it precedes either orboth of the other two, the code would not compile.
A literal field can only be initialized with a value that is a constant integral value, an enum value, or astring; this obviously limits the possible types for a literal field to those you can initialize in this way.
Defining Reference Class TypesA reference class is comparable to a native C++ class in capabilities and does not have the restrictionsthat a value class has. Unlike a native C++ class, however, a reference class does not have a default copyconstructor or a default assignment operator. If your class needs to support either of these operators, youmust explicitly add a function for the capability — you’ll see how in the next chapter.
386
Chapter 7: Defining Your Own Data Types
25905c07.qxd:WroxPro 2/21/08 8:51 AM Page 386
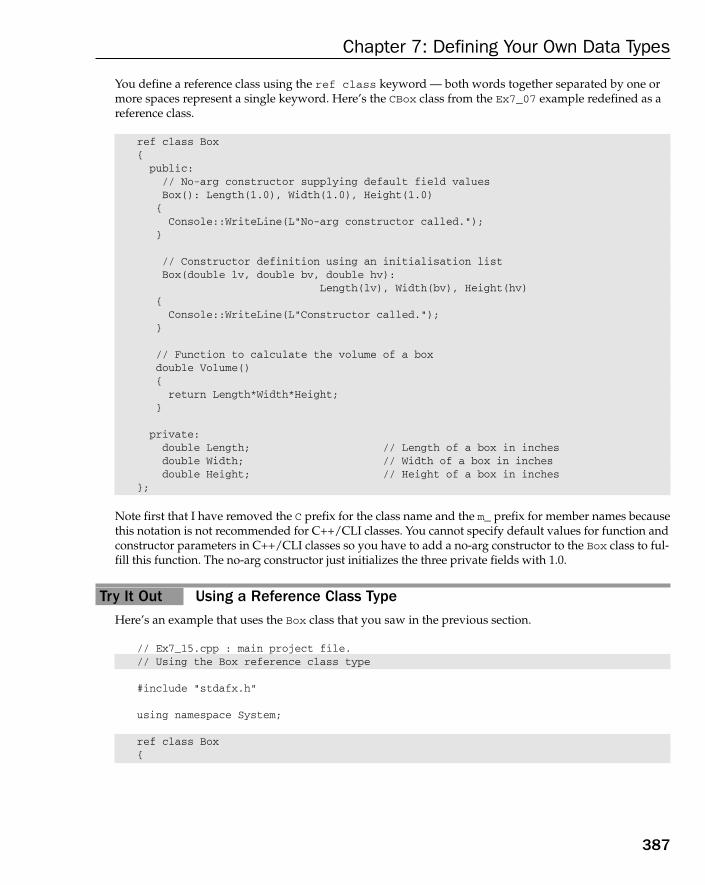
You define a reference class using the ref class keyword — both words together separated by one ormore spaces represent a single keyword. Here’s the CBox class from the Ex7_07 example redefined as areference class.
ref class Box{public:// No-arg constructor supplying default field valuesBox(): Length(1.0), Width(1.0), Height(1.0){Console::WriteLine(L”No-arg constructor called.”);
}
// Constructor definition using an initialisation listBox(double lv, double bv, double hv):
Length(lv), Width(bv), Height(hv){Console::WriteLine(L”Constructor called.”);
}
// Function to calculate the volume of a boxdouble Volume(){return Length*Width*Height;
}
private:double Length; // Length of a box in inchesdouble Width; // Width of a box in inchesdouble Height; // Height of a box in inches
};
Note first that I have removed the C prefix for the class name and the m_ prefix for member names becausethis notation is not recommended for C++/CLI classes. You cannot specify default values for function andconstructor parameters in C++/CLI classes so you have to add a no-arg constructor to the Box class to ful-fill this function. The no-arg constructor just initializes the three private fields with 1.0.
Try It Out Using a Reference Class TypeHere’s an example that uses the Box class that you saw in the previous section.
// Ex7_15.cpp : main project file.// Using the Box reference class type
#include “stdafx.h”
using namespace System;
ref class Box{
387
Chapter 7: Defining Your Own Data Types
25905c07.qxd:WroxPro 2/21/08 8:51 AM Page 387

public:// No-arg constructor supplying default field valuesBox(): Length(1.0), Width(1.0), Height(1.0){Console::WriteLine(L”No-arg constructor called.”);
}
// Constructor definition using an initialisation listBox(double lv, double bv, double hv):
Length(lv), Width(bv), Height(hv){Console::WriteLine(L”Constructor called.”);
}
// Function to calculate the volume of a boxdouble Volume(){return Length*Width*Height;
}
private:double Length; // Length of a box in inchesdouble Width; // Width of a box in inchesdouble Height; // Height of a box in inches
};
int main(array<System::String ^> ^args){Box^ aBox; // Handle of type Box^Box^ newBox = gcnew Box(10, 15, 20);aBox = gcnew Box; // Initialize with default BoxConsole::WriteLine(L”Default box volume is {0}”, aBox->Volume());Console::WriteLine(L”New box volume is {0}”, newBox->Volume());return 0;
}
The output from this example is:
Constructor called.No-arg constructor called.Default box volume is 1New box volume is 3000
How It WorksThe first statement in main() creates a handle to a Box object.
Box^ aBox; // Handle of type Box^
No object is created by this statement, just the tracking handle, aBox. The aBox variable is initialized bydefault with nullptr so it does not point to anything yet. In contrast, a variable of a value class typealways contains an object.
388
Chapter 7: Defining Your Own Data Types
25905c07.qxd:WroxPro 2/21/08 8:51 AM Page 388

The next statement creates a handle to a new Box object.
Box^ newBox = gcnew Box(10, 15, 20);
The constructor accepting three arguments is called to create the Box object on the heap and the addressis stored in the handle, newBox. As you know, objects of ref class types are always created on the CLRheap and are referenced generally using a handle.
You create a Box object by calling the no-arg constructor and store its address in aBox.
aBox = gcnew Box; // Initialize with default Box
This object has the Length, Width, and Height fields set to 1.0.
Finally you output the volumes of the two Box objects you have created.
Console::WriteLine(L”Default box volume is {0}”, aBox->Volume());Console::WriteLine(L”New box volume is {0}”, newBox->Volume());
Because aBox and newBox are handles, you use the -> operator to call the Volume() function for theobjects to which they refer.
Defining a Copy Constructor for a Reference Class TypeYou are unlikely to be doing it very often but if you do pass objects of a reference class type to a func-tion by value, you must implement a public copy constructor; this situation can arise with the StandardTemplate Library implementation for the CLR, which you will learn about in Chapter 10. The parame-ter to the copy constructor must be a const reference, so you would define the copy constructor for theBox class like this:
Box(const Box% box) : Length(box.Length), Width(box.Width), Height(box.Height){}
In general, the form of the copy constructor for a ref class T that allows a ref type object of type T to bepassed by value to a function is:
T(const T% t){if(*this != t){// Code to make the copy...
}return *this;
}
389
Chapter 7: Defining Your Own Data Types
25905c07.qxd:WroxPro 2/21/08 8:51 AM Page 389

Occasionally you may also need to implement a copy constructor that takes an argument that is a handle.Here’s how you could do that for the Box class:
Box(const Box^ box) : Length(box->Length), Width(box->Width), Height(box->Height){}
As you can see, there is little difference between this and the previous version.
Class PropertiesA property is a member of either a value class or a reference class that you access as though it were afield, but it really isn’t a field. The primary difference between a property and a field is that the name ofa field refers to a storage location whereas the name of a property does not — it calls a function. A prop-erty has get() and set() accessor functions to retrieve and set its value respectively so when you use aproperty name to obtain its value, behind the scenes you are calling the get() function for the propertyand when you use the name of a property on the right of an assignment statement you are calling itsset() function. If a property only provides a definition for the get() function, it is called a read-onlyproperty because the set() function is not available to set the property value. A property may just havethe set() function defined for it, in which case it is described as a write-only property.
A class can contain two different kinds of properties: scalar properties and indexed properties. Scalarproperties are a single value accessed using the property name whereas indexed properties are a set ofvalues that you access using an index between square brackets following the property name. The Stringclass has the scalar property, Length, that provides you with the number of characters in a string, and fora String object str you access the Length property using the expression str>Length because str is ahandle. Of course, to access a property with the name MyProp for a value class object store in the variableval, you would use the expression val.MyProp, just like accessing a field. The Length property for astring is an example of a read-only property because no set() function is defined for it — you cannot setthe length of a string as a String object is immutable. The String class also gives you access to individ-ual characters in the string as indexed properties. For a string handle, str, you can access the third indexedproperty with the expression str[2], which corresponds to the third character in the string.
Properties can be associated with, and specific to, a particular object, in which case the properties aredescribed as instance properties. The Length property for a String object is an example of an instanceproperty. You can also specify a property as static, in which case the property is associated with theclass and the property value will be the same for all objects of the class type. Let’s explore properties ina little more depth.
Defining Scalar PropertiesAs scalar property has a single value and you define a scalar property in a class using the property key-word. The get() function for a scalar property must have a return type that is the same as the propertytype and the set() function must have a parameter of the same type as the property. Here’s an exampleof a property in the Height value class that you saw earlier.
value class Height{private:// Records the height in feet and inchesint feet;
390
Chapter 7: Defining Your Own Data Types
25905c07.qxd:WroxPro 2/21/08 8:51 AM Page 390
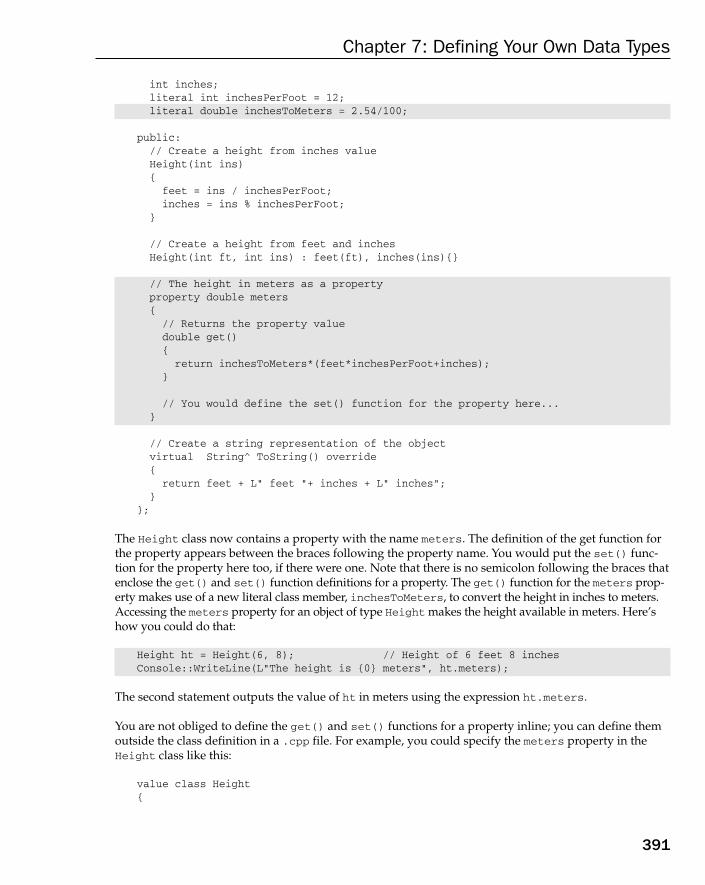
int inches;literal int inchesPerFoot = 12;literal double inchesToMeters = 2.54/100;
public:// Create a height from inches valueHeight(int ins){
feet = ins / inchesPerFoot;inches = ins % inchesPerFoot;
}
// Create a height from feet and inchesHeight(int ft, int ins) : feet(ft), inches(ins){}
// The height in meters as a propertyproperty double meters{// Returns the property valuedouble get(){return inchesToMeters*(feet*inchesPerFoot+inches);
}
// You would define the set() function for the property here...}
// Create a string representation of the objectvirtual String^ ToString() override{
return feet + L” feet “+ inches + L” inches”;}
};
The Height class now contains a property with the name meters. The definition of the get function forthe property appears between the braces following the property name. You would put the set() func-tion for the property here too, if there were one. Note that there is no semicolon following the braces thatenclose the get() and set() function definitions for a property. The get() function for the meters prop-erty makes use of a new literal class member, inchesToMeters, to convert the height in inches to meters.Accessing the meters property for an object of type Height makes the height available in meters. Here’show you could do that:
Height ht = Height(6, 8); // Height of 6 feet 8 inchesConsole::WriteLine(L”The height is {0} meters”, ht.meters);
The second statement outputs the value of ht in meters using the expression ht.meters.
You are not obliged to define the get() and set() functions for a property inline; you can define themoutside the class definition in a .cpp file. For example, you could specify the meters property in theHeight class like this:
value class Height{
391
Chapter 7: Defining Your Own Data Types
25905c07.qxd:WroxPro 2/21/08 8:51 AM Page 391

// Code as before...
public:// Code as before...
// The height in metersproperty double meters{double get(); // Returns the property value
// You would define the set() function for the property here...}
// Code as before...};
The get() function for the meters property is now declared but not defined in the Height class, so adefinition must be supplied outside the class definition. In the get() function definition in theHeight.cpp file the function name must be qualified by the class name and the property name so thedefinition looks like this:
Height::meters::get(){return inchesToMeters*(feet*inchesPerFoot+inches);
}
The Height qualifier indicates that this function definition belongs to the Height class and the metersqualifier indicates the function is for the meters property in the class.
Of course, you can define properties for a reference class. Here’s an example:
ref class Weight{private:int lbs;int oz;
public:property int pounds{int get() { return lbs; }void set(int value) { lbs = value; }
}
property int ounces{int get() { return oz; }void set(int value) { oz = value; }
}};
392
Chapter 7: Defining Your Own Data Types
25905c07.qxd:WroxPro 2/21/08 8:51 AM Page 392

Here the pounds and ounces properties are used to provide access to the values of the private fields, lbsand oz. You can set values for the properties of a Weight object and access them subsequently like this:
Weight^ wt = gcnew Weight;wt->pounds = 162;wt->ounces = 12;Console::WriteLine(L”Weight is {0} lbs {1} oz.”, wt->pounds, wt->ounces);
A variable accessing a ref class object is generally a handle so you must use the -> operator to accessproperties of an object of a reference class type.
Trivial Scalar PropertiesYou can define a scalar property for a class without providing definitions for the get() and set() func-tions, in which case it is called a trivial scalar property. To specify a trivial scalar property you just omitthe braces containing the get() and set() function definitions and end the property declaration with asemi-colon. Here’s an example of a value class with trivial scalar properties:
value class Point{public:property int x; // Trivial propertyproperty int y; // Trivial property
virtual String^ ToString() override{return L”(“ + x + L”,” + y + L”)”; // Returns “(x,y)”
}};
Default get() and set() function definitions are supplied automatically for each trivial scalar propertyand these return the property value and set the property value to the argument of the type specified forthe property. Private space is allocated to accommodate the property value behind the scenes.
Let’s see some scalar properties working.
Try It Out Using Scalar PropertiesThis example uses three classes, two value classes, and a ref class:
// Ex7_16.cpp : main project file.// Using scalar properties
#include “stdafx.h”
using namespace System;
// Class defining a person’s heightvalue class Height{
393
Chapter 7: Defining Your Own Data Types
25905c07.qxd:WroxPro 2/21/08 8:51 AM Page 393
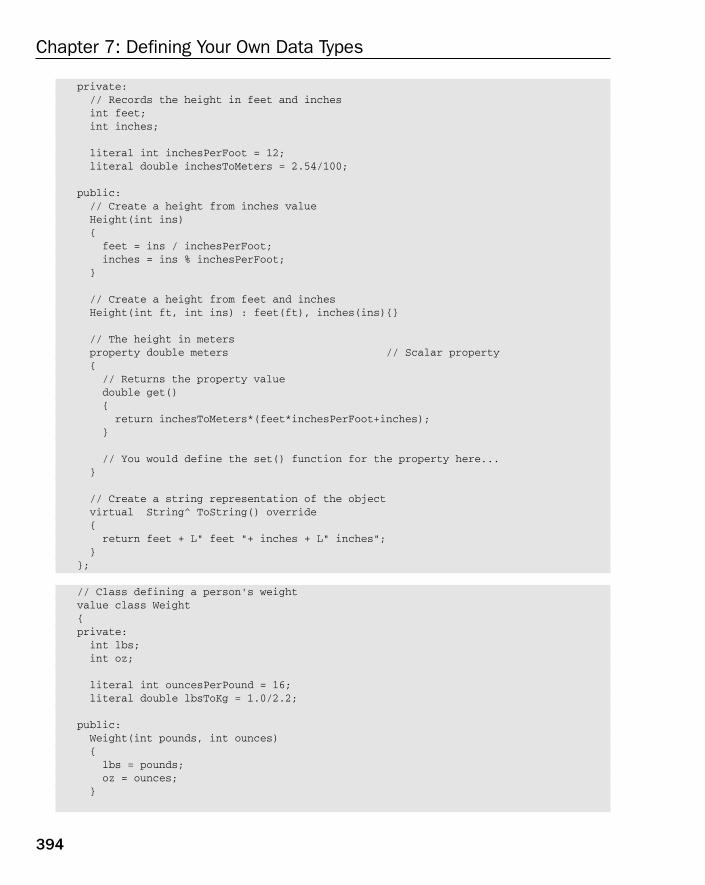
private:// Records the height in feet and inchesint feet;int inches;
literal int inchesPerFoot = 12;literal double inchesToMeters = 2.54/100;
public:// Create a height from inches valueHeight(int ins){feet = ins / inchesPerFoot;inches = ins % inchesPerFoot;
}
// Create a height from feet and inchesHeight(int ft, int ins) : feet(ft), inches(ins){}
// The height in metersproperty double meters // Scalar property{// Returns the property valuedouble get(){return inchesToMeters*(feet*inchesPerFoot+inches);
}
// You would define the set() function for the property here...}
// Create a string representation of the objectvirtual String^ ToString() override{return feet + L” feet “+ inches + L” inches”;
}};
// Class defining a person’s weightvalue class Weight{private:int lbs;int oz;
literal int ouncesPerPound = 16;literal double lbsToKg = 1.0/2.2;
public:Weight(int pounds, int ounces){lbs = pounds;oz = ounces;
}
394
Chapter 7: Defining Your Own Data Types
25905c07.qxd:WroxPro 2/21/08 8:51 AM Page 394

property int pounds // Scalar property{int get() { return lbs; }void set(int value) { lbs = value; }
}
property int ounces // Scalar property{int get() { return oz; }void set(int value) { oz = value; }
}
property double kilograms // Scalar property{double get() { return lbsToKg*(lbs + oz/ouncesPerPound); }
}
virtual String^ ToString() override{ return lbs + L” pounds “ + oz + L” ounces”; }
};
// Class defining a personref class Person{private:Height ht;Weight wt;
public:property String^ Name; // Trivial scalar propertyPerson(String^ name, Height h, Weight w) : ht(h), wt(w){Name = name;
}
Height getHeight(){ return ht; }Weight getWeight(){ return wt; }
};
int main(array<System::String ^> ^args){Weight hisWeight = Weight(185, 7);Height hisHeight = Height(6, 3);Person^ him = gcnew Person(L”Fred”, hisHeight, hisWeight);
Weight herWeight = Weight(105, 3);Height herHeight = Height(5, 2);Person^ her = gcnew Person(L”Freda”, herHeight, herWeight);
Console::WriteLine(L”She is {0}”, her->Name);Console::WriteLine(L”Her weight is {0:F2} kilograms.”,
her->getWeight().kilograms);Console::WriteLine(L”Her height is {0} which is {1:F2} meters.”,
her->getHeight(),her->getHeight().meters);
395
Chapter 7: Defining Your Own Data Types
25905c07.qxd:WroxPro 2/21/08 8:51 AM Page 395

Console::WriteLine(L”He is {0}”, him->Name);Console::WriteLine(L”His weight is {0}.”, him->getWeight());Console::WriteLine(L”His height is {0} which is {1:F2} meters.”,
him->getHeight(),him->getHeight().meters);return 0;
}
This example produces the following output:
She is FredaHer weight is 47.73 kilograms.Her height is 5 feet 2 inches which is 1.57 meters.He is FredHis weight is 185 pounds 7 ounces.His height is 6 feet 3 inches which is 1.91 meters.
How It WorksThe two value classes, Height and Weight, define the height and weight of a person. The Person classhas fields of type Height and Weight to store the height and weight of a person and the name of a per-son is stored in the Name property, which is a trivial property because no explicit get() and set() func-tions have been defined for it; it therefore has the default get() and set() functions.
The first two statements in main() define Height and Weight objects and these are then used to define him:
Weight hisWeight = Weight(185, 7);Height hisHeight = Height(6, 3);Person^ him = gcnew Person(L”Fred”, hisHeight, hisWeight);
Height and Weight are value classes so the variables of these types store the values directly. Person is a reference class so him is a handle. The first argument to the Person class constructor is a string literalso the compiler arranges for a String object to be created from this and the handle to this object is passedas the argument. The second and third arguments are the value class objects that you create in the first twostatements. Of course, copies of these are passed as arguments because of the pass-by-value mechanism forfunction arguments. Within the Person class constructor, the assignment statement sets the value of theName parameter and the values of the two fields, ht and wt, are set in the initialization list. The only way toset a property is through an implicit call of its set() function; a property cannot be initialized in the initial-izer list of a constructor.
There is a similar sequence of three statements to those for him that define her. With two Person objectscreated on the heap you first output information about her with these statements:
Console::WriteLine(L”She is {0}”, her->Name);Console::WriteLine(L”Her weight is {0:F2} kilograms.”,
her->getWeight().kilograms);Console::WriteLine(L”Her height is {0} which is {1:F2} meters.”,
her->getHeight(),her->getHeight().meters);
In the first statement, you access the Name property for the object referenced by the handle, her, with the expression her->Name; the result of executing this is a handle to the string that the property’s get()value returns, so it is of type String^.
396
Chapter 7: Defining Your Own Data Types
25905c07.qxd:WroxPro 2/21/08 8:51 AM Page 396
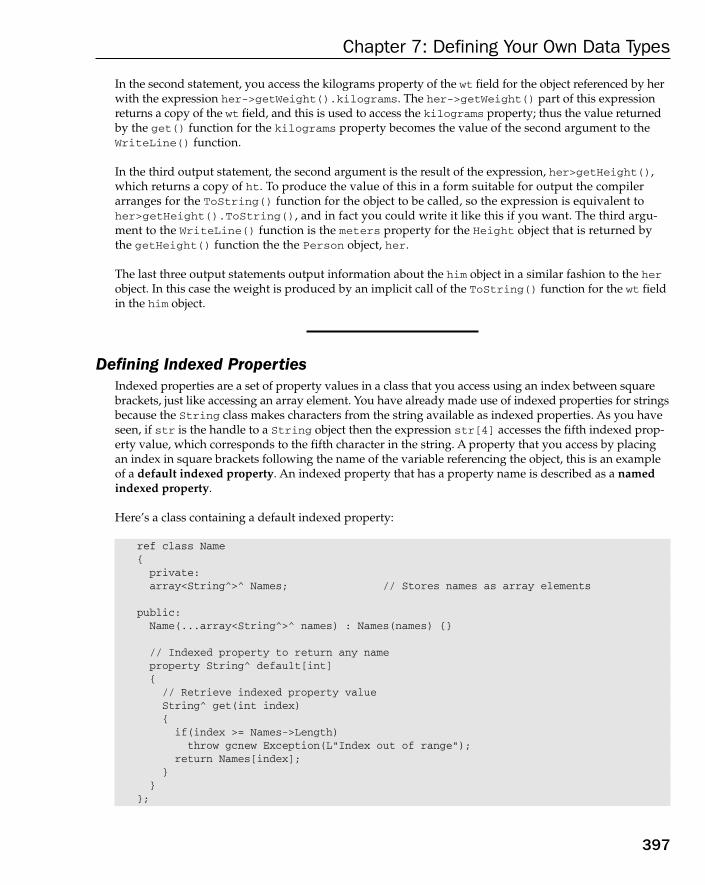
In the second statement, you access the kilograms property of the wt field for the object referenced by herwith the expression her->getWeight().kilograms. The her->getWeight() part of this expressionreturns a copy of the wt field, and this is used to access the kilograms property; thus the value returnedby the get() function for the kilograms property becomes the value of the second argument to theWriteLine() function.
In the third output statement, the second argument is the result of the expression, her>getHeight(),which returns a copy of ht. To produce the value of this in a form suitable for output the compilerarranges for the ToString() function for the object to be called, so the expression is equivalent toher>getHeight().ToString(), and in fact you could write it like this if you want. The third argu-ment to the WriteLine() function is the meters property for the Height object that is returned bythe getHeight() function the the Person object, her.
The last three output statements output information about the him object in a similar fashion to the herobject. In this case the weight is produced by an implicit call of the ToString() function for the wt fieldin the him object.
Defining Indexed PropertiesIndexed properties are a set of property values in a class that you access using an index between squarebrackets, just like accessing an array element. You have already made use of indexed properties for stringsbecause the String class makes characters from the string available as indexed properties. As you haveseen, if str is the handle to a String object then the expression str[4] accesses the fifth indexed prop-erty value, which corresponds to the fifth character in the string. A property that you access by placing an index in square brackets following the name of the variable referencing the object, this is an example of a default indexed property. An indexed property that has a property name is described as a namedindexed property.
Here’s a class containing a default indexed property:
ref class Name{private:array<String^>^ Names; // Stores names as array elements
public:Name(...array<String^>^ names) : Names(names) {}
// Indexed property to return any nameproperty String^ default[int]{// Retrieve indexed property valueString^ get(int index){if(index >= Names->Length)throw gcnew Exception(L”Index out of range”);
return Names[index];}
}};
397
Chapter 7: Defining Your Own Data Types
25905c07.qxd:WroxPro 2/21/08 8:51 AM Page 397
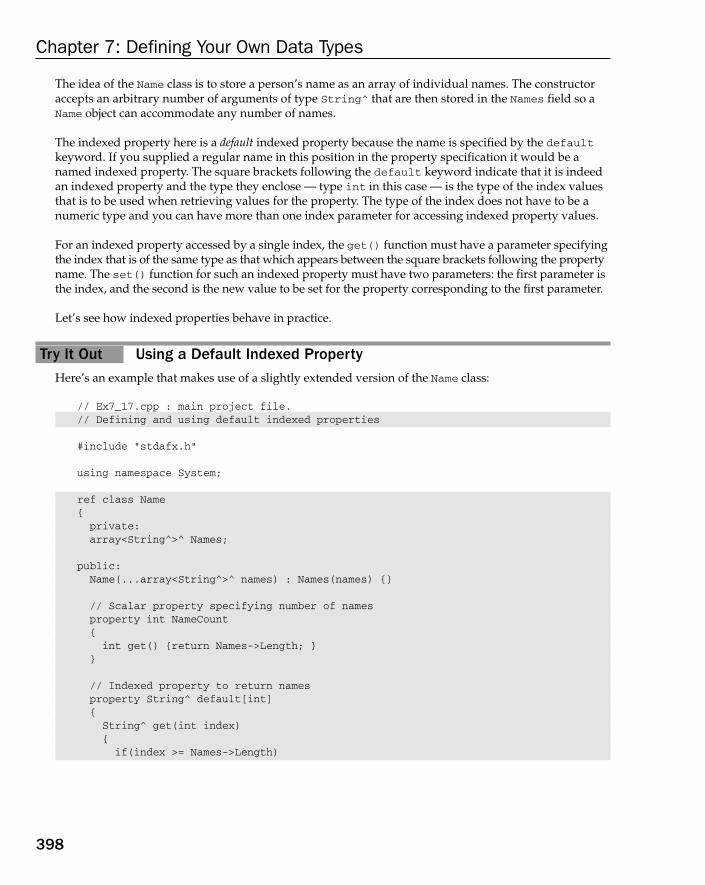
The idea of the Name class is to store a person’s name as an array of individual names. The constructoraccepts an arbitrary number of arguments of type String^ that are then stored in the Names field so aName object can accommodate any number of names.
The indexed property here is a default indexed property because the name is specified by the defaultkeyword. If you supplied a regular name in this position in the property specification it would be anamed indexed property. The square brackets following the default keyword indicate that it is indeedan indexed property and the type they enclose — type int in this case — is the type of the index valuesthat is to be used when retrieving values for the property. The type of the index does not have to be anumeric type and you can have more than one index parameter for accessing indexed property values.
For an indexed property accessed by a single index, the get() function must have a parameter specifyingthe index that is of the same type as that which appears between the square brackets following the propertyname. The set() function for such an indexed property must have two parameters: the first parameter isthe index, and the second is the new value to be set for the property corresponding to the first parameter.
Let’s see how indexed properties behave in practice.
Try It Out Using a Default Indexed PropertyHere’s an example that makes use of a slightly extended version of the Name class:
// Ex7_17.cpp : main project file.// Defining and using default indexed properties
#include “stdafx.h”
using namespace System;
ref class Name{private:array<String^>^ Names;
public:Name(...array<String^>^ names) : Names(names) {}
// Scalar property specifying number of namesproperty int NameCount{int get() {return Names->Length; }
}
// Indexed property to return namesproperty String^ default[int]{String^ get(int index){if(index >= Names->Length)
398
Chapter 7: Defining Your Own Data Types
25905c07.qxd:WroxPro 2/21/08 8:51 AM Page 398

throw gcnew Exception(L”Index out of range”);return Names[index];
}}
};
int main(array<System::String ^> ^args){Name^ myName = gcnew Name(L”Ebenezer”, L”Isaiah”, L”Ezra”, L”Inigo”,
L”Whelkwhistle”);
// List the namesfor(int i = 0 ; i < myName->NameCount ; i++)Console::WriteLine(L”Name {0} is {1}”, i+1, myName[i]);
return 0;}
This example produces the following output:
Name 1 is EbenezerName 2 is IsaiahName 3 is EzraName 4 is InigoName 5 is Whelkwhistle
How It WorksThe Name class in the example is basically the same as in the previous section but with a scalar propertywith the name NameCount added that returns the number of names in the Name object. In main() youfirst create a Name object with five names:
Name^ myName = gcnew Name(L”Ebenezer”, L”Isaiah”, L”Ezra”, L”Inigo”,L”Whelkwhistle”);
The parameter list for the constructor in the Name class starts with an ellipsis so it accepts any number ofarguments. The arguments that are supplied when it is called will be stored in the elements of the namesarray, so initializing the Names field with names makes Names reference the names array. In the previousstatement, you supply five arguments to the constructor, so the Names field in the object referenced bymyName is an array with five elements.
You access the properties for myName in a for loop to list the names the object contains:
for(int i = 0 ; i < myName->NameCount ; i++)Console::WriteLine(L”Name {0} is {1}”, i+1, myName[i]);
You use the NameCount property value to control the for loop. Without this property you would notknow how many names there are to be listed. Within the loop the last argument to the WriteLine()function accesses the ith indexed property. As you see, accessing the default indexed property justinvolves placing the index value in square brackets after the myName variable name. The output demon-strates that the indexed properties are working as expected.
399
Chapter 7: Defining Your Own Data Types
25905c07.qxd:WroxPro 2/21/08 8:51 AM Page 399
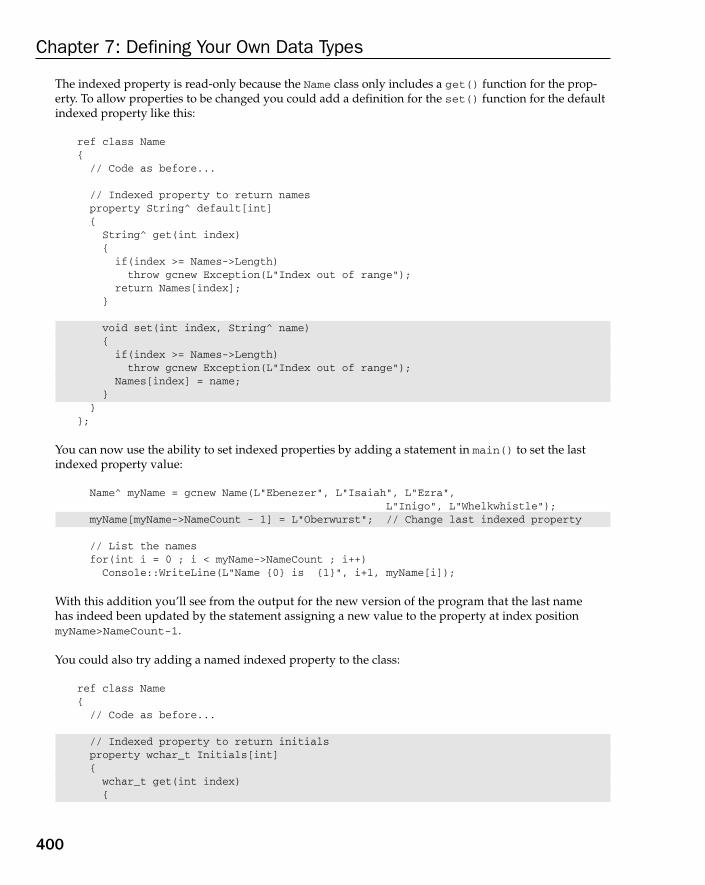
The indexed property is read-only because the Name class only includes a get() function for the prop-erty. To allow properties to be changed you could add a definition for the set() function for the defaultindexed property like this:
ref class Name{// Code as before...
// Indexed property to return namesproperty String^ default[int]{String^ get(int index){
if(index >= Names->Length)throw gcnew Exception(L”Index out of range”);
return Names[index];}
void set(int index, String^ name){if(index >= Names->Length)throw gcnew Exception(L”Index out of range”);
Names[index] = name;}
}};
You can now use the ability to set indexed properties by adding a statement in main() to set the lastindexed property value:
Name^ myName = gcnew Name(L”Ebenezer”, L”Isaiah”, L”Ezra”,L”Inigo”, L”Whelkwhistle”);
myName[myName->NameCount - 1] = L”Oberwurst”; // Change last indexed property
// List the namesfor(int i = 0 ; i < myName->NameCount ; i++)
Console::WriteLine(L”Name {0} is {1}”, i+1, myName[i]);
With this addition you’ll see from the output for the new version of the program that the last name has indeed been updated by the statement assigning a new value to the property at index positionmyName>NameCount-1.
You could also try adding a named indexed property to the class:
ref class Name{// Code as before...
// Indexed property to return initialsproperty wchar_t Initials[int]{wchar_t get(int index){
400
Chapter 7: Defining Your Own Data Types
25905c07.qxd:WroxPro 2/21/08 8:51 AM Page 400

if(index >= Names->Length)throw gcnew Exception(L”Index out of range”);
return Names[index][0];}
}};
The indexed property has the name Initials because its function is to return the initial of a name speci-fied by an index. You define a named indexed property in essentially the same way as a default indexedproperty but with the property name replacing the default keyword.
If you recompile the program and execute it once more, you see the following output.
Name 1 is EbenezerName 2 is IsaiahName 3 is EzraName 4 is InigoName 4 is OberwurstThe initials are: E.I.E.I.O.
The initials are produced by accessing the named indexed property in the for loop and the outputshows that they work as expected.
More Complex Indexed PropertiesAs mentioned, indexed properties can be defined so that more than one index is necessary to access avalue and the indexes need not be numeric. Here’s an example of a class with such an indexed property:
enum class Day{Monday, Tuesday, Wednesday,Thursday, Friday, Saturday, Sunday};
// Class defining a shopref class Shop{public:property String^ Opening[Day, String^] // Opening times{String^ get(Day day, String^ AmOrPm){switch(day){case Day::Saturday: // Saturday opening:if(AmOrPm == L”am”)return L”9:00”; // morning is 9 am
elsereturn L”14:30”; // afternoon is 2:30 pm
break;
case Day::Sunday: // Saturday opening:return L”closed”; // closed all daybreak;
401
Chapter 7: Defining Your Own Data Types
25905c07.qxd:WroxPro 2/21/08 8:51 AM Page 401

default:if(AmOrPm == L”am”) // Monday to Friday opening:return L”9:30”; // morning is 9:30 am
elsereturn L”14:00”; // afternoon is 2 pm
break;}
}}
};
The class representing a shop has an indexed property specifying opening times. The first index is anenumeration value of type Day that identifies the day of the week and the second index is a handle to a string that determines whether it is morning or afternoon. You could output the Opening propertyvalue for a Shop object like this:
Shop^ shop = gcnew Shop;Console::WriteLine(shop->Opening[Day::Saturday, L”pm”]);
The first statement creates the Shop object and the second displays the opening time for the shop forSaturday afternoon. As you see, you just place the two index values for the property between squarebrackets and separate them by a comma. The output from the second statement is the string “14:30”. Ifyou can dream up a reason why you need them, you could also define indexed properties with three ormore indexes in a class.
Static PropertiesStatic properties are similar to static class members in that they are defined for the class and are the samefor all objects of the class type. You define a static property by adding the static keyword in the defini-tion of the property. Here’s how you might define a static property in the Length class you saw earlier:
value class Length{// Code as before...
public:static property String^ Units{String^ get() { return L”feet and inches”; }
}};
This is a simple property that makes available the units assumed by the class as a string. You access a staticproperty by qualifying the property name with the name of the class, just as you would any other staticmember of the class:
Console::WriteLine(L”Class units are {0}.”, Length::Units);
Static class properties exist whether or not any objects of the class type have been created. This differs frominstance properties, which are specific to each object of the class type. Of course, if you have defined a class
402
Chapter 7: Defining Your Own Data Types
25905c07.qxd:WroxPro 2/21/08 8:51 AM Page 402

object, you can access a static property using the variable name. If you have created a Length object withthe name len for example, you could output the value of the static Units property with the statement:
Console::WriteLine(L”Class units are {0}.”, len.Units);
For accessing a static property in a reference class through a handle to an object of that type you woulduse the -> operator.
Reserved Property NamesAlthough properties are different from fields, the values for properties still have to be stored somewhereand the storage locations need to be identified somehow. Internally, properties have names created forthe storage locations that are needed, and such names are reserved in a class that has properties so youmust not use these names for other purposes.
If you define a scalar or named indexed property with the name NAME in a class, the names get_NAMEand set_NAME are reserved in the class so you must not use them for other purposes. Both names arereserved regardless of whether or not you define the get() and set() functions for the property. Whenyou define a default indexed property in a class, the names get_Item and set_Item are reserved. Thepossibility of there being reserved names that use underscore characters is a good reason for avoidingthe use of the underscore character in your own names in a C++/CLI program.
initonly FieldsLiteral fields are a convenient way of introducing constants into a class, but they have the limitation thattheir values must be defined when you compile the program. C++/CLI also provides initonly fields ina class that are constants that you can initialize in a constructor. Here’s an example of an initonly fieldin a skeleton version of the Length class:
value class Length{private:int feet;int inches;
public:initonly int inchesPerFoot; // initonly field
// ConstructorLength(int ft, int ins) :
feet(ft), inches(ins), // Initialize fieldsinchesPerFoot(12) // Initialize initonly field
{}};
Here the initonly field has the name inchesPerFoot and is initialized in the initializer list for the con-structor. This is an example of a non-static initonly field and each object will have its own copy, justlike the ordinary fields, feet and inches. Of course, the big difference between initonly fields and
403
Chapter 7: Defining Your Own Data Types
25905c07.qxd:WroxPro 2/21/08 8:51 AM Page 403

ordinary fields is that you cannot subsequently change the value of an initonly field — after it hasbeen initialized, it is fixed for all time. Note that you must not specify an initial value for a non-staticinitonly field when you declare it; this implies that you must initialize all non-static initonly fieldsin a constructor.
You don’t have to initialize non-static initonly fields in the constructor’s initializer list — you could doit in the body of the constructor:
Length(int ft, int ins) :feet(ft), inches(ins), // Initialize fields
{inchesPerFoot = 12; // Initialize initonly field
}
Now the field is initialized in the body of the constructor. You would typically pass the value for a non-static initonly field as an argument to the constructor rather than use an explicit literal as we have donehere because the point of such fields is that their values are instance specific. If the value is known whenyou write the code you might as well use a literal field.
You can also define an initonly field in a class to be static, in which case it is shared between allmembers of the class, and if it is a public initonly field it’s accessible by qualifying the field namewith the class name. The inchesPerFoot field would make much more sense as a static initonlyfield — the value really isn’t going to vary from one object to another. Here’s a new version of theLength class with a static initonly field:
value class Length{private:int feet;int inches;
public:initonly static int inchesPerFoot = 12; // Static initonly field
// ConstructorLength(int ft, int ins) :
feet(ft), inches(ins) // Initialize fields{}
};
Now the inchesPerFoot field is static, and it has its value specified in the declaration rather than in theconstructor initializer list. Indeed, you are not permitted to set values for static fields of any kind in theconstructor. If you think about it, this makes sense because static fields are shared among all objects ofthe class and therefore setting values for such fields each time a constructor is called would conflict withthis notion.
You now seem to be back with initonly fields only being initialized at compile time where literalfields could do the job anyway; however, you have another way to initialize static initonly fields atruntime — through a static constructor.
404
Chapter 7: Defining Your Own Data Types
25905c07.qxd:WroxPro 2/21/08 8:51 AM Page 404
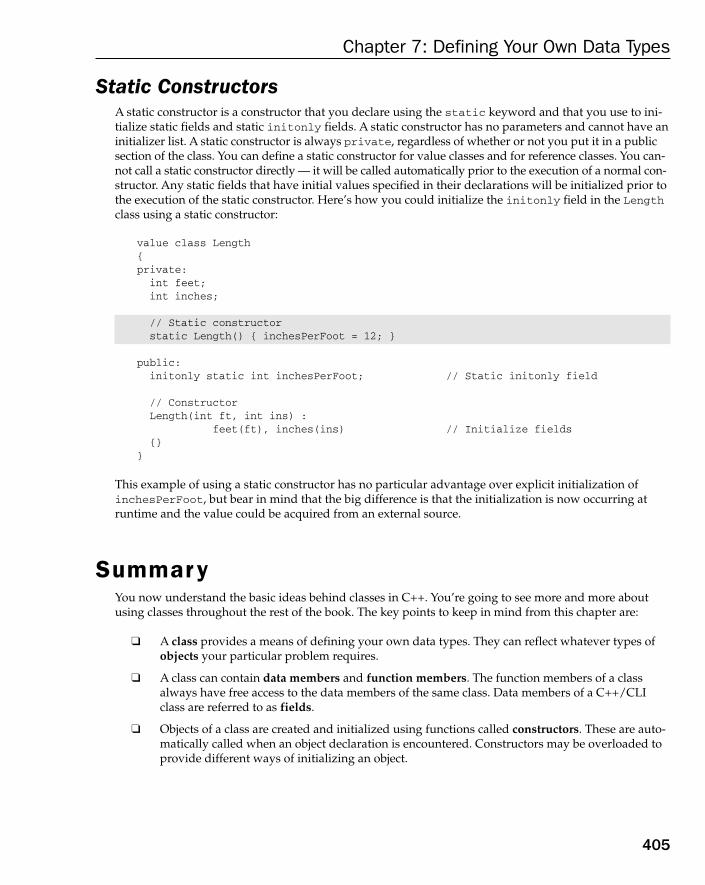
Static ConstructorsA static constructor is a constructor that you declare using the static keyword and that you use to ini-tialize static fields and static initonly fields. A static constructor has no parameters and cannot have aninitializer list. A static constructor is always private, regardless of whether or not you put it in a publicsection of the class. You can define a static constructor for value classes and for reference classes. You can-not call a static constructor directly — it will be called automatically prior to the execution of a normal con-structor. Any static fields that have initial values specified in their declarations will be initialized prior tothe execution of the static constructor. Here’s how you could initialize the initonly field in the Lengthclass using a static constructor:
value class Length{private:
int feet;int inches;
// Static constructorstatic Length() { inchesPerFoot = 12; }
public:initonly static int inchesPerFoot; // Static initonly field
// ConstructorLength(int ft, int ins) :
feet(ft), inches(ins) // Initialize fields{}
}
This example of using a static constructor has no particular advantage over explicit initialization ofinchesPerFoot, but bear in mind that the big difference is that the initialization is now occurring atruntime and the value could be acquired from an external source.
SummaryYou now understand the basic ideas behind classes in C++. You’re going to see more and more aboutusing classes throughout the rest of the book. The key points to keep in mind from this chapter are:
❑ A class provides a means of defining your own data types. They can reflect whatever types ofobjects your particular problem requires.
❑ A class can contain data members and function members. The function members of a classalways have free access to the data members of the same class. Data members of a C++/CLIclass are referred to as fields.
❑ Objects of a class are created and initialized using functions called constructors. These are auto-matically called when an object declaration is encountered. Constructors may be overloaded toprovide different ways of initializing an object.
405
Chapter 7: Defining Your Own Data Types
25905c07.qxd:WroxPro 2/21/08 8:51 AM Page 405

❑ Classes in a C++/CLI program can be value classes or ref class.
❑ Variables of a value class type store data directly whereas variables referencing ref class objectsare always handles.
❑ C++/CLI classes can have a static constructor defined that initializes the static members of aclass.
❑ Members of a class can be specified as public, in which case they are freely accessible by anyfunction in a program. Alternatively, they may be specified as private, in which case they mayonly be accessed by member functions or friend functions of the class.
❑ Members of a class can be defined as static. Only one instance of each static member of a classexists, which is shared amongst all instances of the class, no matter how many objects of theclass are created.
❑ Every non-static object of a class contains the pointer this, which points to the current objectfor which the function was called.
❑ In non-static function members of a value class type, the this pointer is an interior pointerwhereas in a ref class type it is a handle.
❑ A member function that is declared as const has a const this pointer, and therefore cannotmodify data members of the class object for which it is called. It also cannot call another mem-ber function that is not const.
❑ You can only call const member functions for a class object declared as const.
❑ Function members of value classes and ref classes cannot be declared as const.
❑ Using references to class objects as arguments to function calls can avoid substantial overheadsin passing complex objects to a function.
❑ A copy constructor, which is a constructor for an object initialized with an existing object of thesame class, must have its parameter specified as a const reference.
❑ You cannot define a copy constructor in a value class because copying value class objects isalways done by member-by-member copying.
ExercisesYou can download the source code for the examples in the book and the solutions to the following exercisesfrom www.wrox.com.
1. Define a struct Sample that contains two integer data items. Write a program which declarestwo object of type Sample, called a and b. Set values for the data items that belong to a and then check that you can copy the values into b by simple assignment.
2. Add a char* member to struct Sample in the previous exercise called sPtr. When you fill in thedata for a, dynamically create a string buffer initialized with “Hello World!” and make a.sptrpoint to it. Copy a into b. What happens when you change the contents of the character bufferpointed to by a.sPtr and then output the contents of the string pointed to by b.sPtr? Explainwhat is happening. How would you get around this?
406
Chapter 7: Defining Your Own Data Types
25905c07.qxd:WroxPro 2/21/08 8:51 AM Page 406
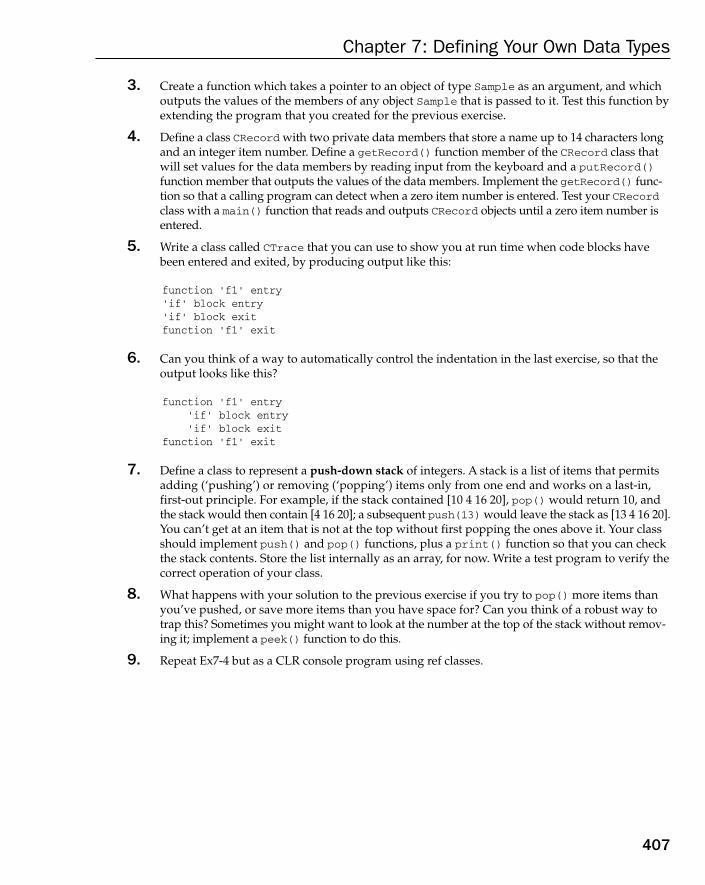
3. Create a function which takes a pointer to an object of type Sample as an argument, and whichoutputs the values of the members of any object Sample that is passed to it. Test this function byextending the program that you created for the previous exercise.
4. Define a class CRecord with two private data members that store a name up to 14 characters longand an integer item number. Define a getRecord() function member of the CRecord class thatwill set values for the data members by reading input from the keyboard and a putRecord()function member that outputs the values of the data members. Implement the getRecord() func-tion so that a calling program can detect when a zero item number is entered. Test your CRecordclass with a main() function that reads and outputs CRecord objects until a zero item number isentered.
5. Write a class called CTrace that you can use to show you at run time when code blocks havebeen entered and exited, by producing output like this:
function ‘f1’ entry‘if’ block entry‘if’ block exitfunction ‘f1’ exit
6. Can you think of a way to automatically control the indentation in the last exercise, so that theoutput looks like this?
function ‘f1’ entry‘if’ block entry‘if’ block exit
function ‘f1’ exit
7. Define a class to represent a push-down stack of integers. A stack is a list of items that permitsadding (‘pushing’) or removing (‘popping’) items only from one end and works on a last-in,first-out principle. For example, if the stack contained [10 4 16 20], pop() would return 10, andthe stack would then contain [4 16 20]; a subsequent push(13) would leave the stack as [13 4 16 20].You can’t get at an item that is not at the top without first popping the ones above it. Your classshould implement push() and pop() functions, plus a print() function so that you can checkthe stack contents. Store the list internally as an array, for now. Write a test program to verify thecorrect operation of your class.
8. What happens with your solution to the previous exercise if you try to pop() more items thanyou’ve pushed, or save more items than you have space for? Can you think of a robust way totrap this? Sometimes you might want to look at the number at the top of the stack without remov-ing it; implement a peek() function to do this.
9. Repeat Ex7-4 but as a CLR console program using ref classes.
407
Chapter 7: Defining Your Own Data Types
25905c07.qxd:WroxPro 2/21/08 8:51 AM Page 407

25905c07.qxd:WroxPro 2/21/08 8:51 AM Page 408
8More on Classes
In this chapter, you will extend your knowledge of classes by understanding how you can makeyour class objects work more like the basic types in C++. You will learn:
❑ What a class destructor is and when and why it is necessary
❑ How to implement a class destructor
❑ How to allocate data members of a native C++ class in the free store and how to deletethem when they are no longer required
❑ When you must write a copy constructor for a class
❑ What a union is and how it can be used
❑ How to make objects of your class work with C++ operators such as + or *
❑ What class templates are and how you define and use them
❑ How to use the standard string class for string operations in native C++ programs
❑ How to overload operators in C++/CLI classes
Class DestructorsAlthough this section heading refers to destructors, it’s also about dynamic memory allocation. Whenyou allocate memory in the free store for class members, you are invariably obliged to make use of adestructor, in addition to a constructor of course, and, as you’ll see later in this chapter, using dynami-cally allocated class members will also require you to write your own copy constructor.
What Is a Destructor?A destructor is a function that destroys an object when it is no longer required or when it goes outof scope. The class destructor is called automatically when an object goes out of scope. Destroyingan object involves freeing the memory occupied by the data members of the object (except for staticmembers which continue to exist even when there are no class objects in existence). The destructorfor a class is a member function with the same name as the class, preceded by a tilde (~). The class
25905c08.qxd:WroxPro 2/21/08 8:53 AM Page 409

destructor doesn’t return a value and doesn’t have parameters defined. For the CBox class, the prototypeof the class destructor is:
~CBox(); // Class destructor prototype
Because a destructor has no parameters, there can only ever be one destructor in a class.
It’s an error to specify a return value or parameters for a destructor.
The Default DestructorAll the objects that you have been using up to now have been destroyed automatically by the defaultdestructor for the class. The default destructor is always generated automatically by the compiler if youdo not define your own class destructor. The default destructor doesn’t delete objects or object membersthat have been allocated in the free store by the operator new. If space for class members has been allocateddynamically in a contructor, then you must define your own destructor that will explicitly use the deleteoperator to release the memory that has been allocated by the constructor using the operator new, just asyou would with ordinary variables. You need some practice in writing destructors, so let’s try it out.
Try It Out A Simple DestructorTo get an appreciation of when the destructor for a class is called, you can include a destructor in theclass CBox. Here’s the definition of the example including the CBox class with a destructor:
// Ex8_01.cpp// Class with an explicit destructor#include <iostream>using std::cout;using std::endl;
class CBox // Class definition at global scope{public:// Destructor definition~CBox(){cout << “Destructor called.” << endl;
}
// Constructor definitionCBox(double lv = 1.0, double wv = 1.0, double hv = 1.0):
m_Length(lv), m_Width(wv), m_Height(hv){cout << endl << “Constructor called.”;
}
// Function to calculate the volume of a boxdouble Volume() const{return m_Length*m_Width*m_Height;
}
// Function to compare two boxes which returns true
410
Chapter 8: More on Classes
25905c08.qxd:WroxPro 2/21/08 8:53 AM Page 410
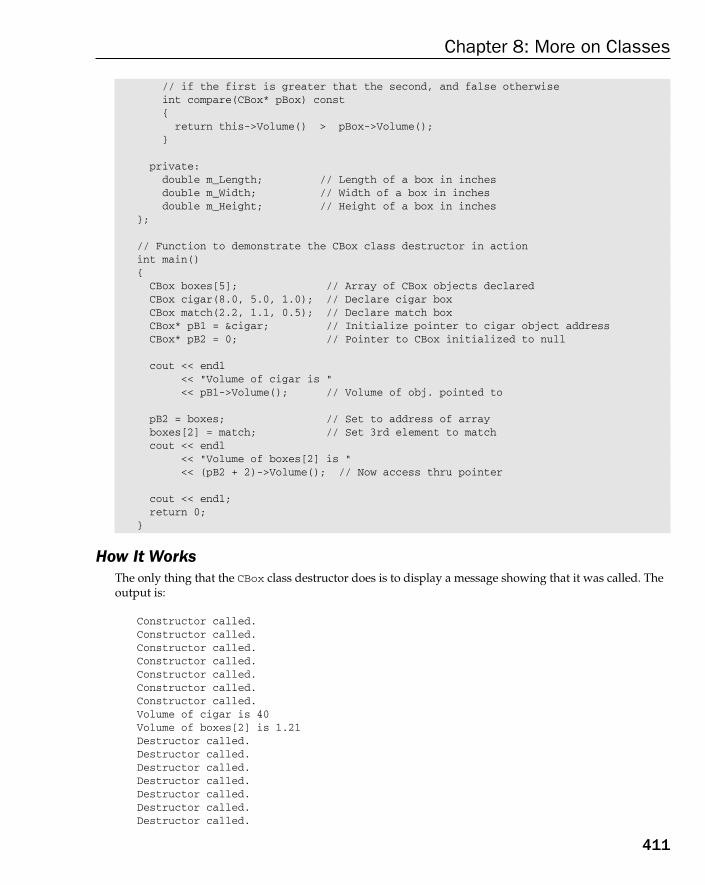
// if the first is greater that the second, and false otherwiseint compare(CBox* pBox) const{return this->Volume() > pBox->Volume();
}
private:double m_Length; // Length of a box in inchesdouble m_Width; // Width of a box in inchesdouble m_Height; // Height of a box in inches
};
// Function to demonstrate the CBox class destructor in actionint main(){CBox boxes[5]; // Array of CBox objects declaredCBox cigar(8.0, 5.0, 1.0); // Declare cigar boxCBox match(2.2, 1.1, 0.5); // Declare match boxCBox* pB1 = &cigar; // Initialize pointer to cigar object addressCBox* pB2 = 0; // Pointer to CBox initialized to null
cout << endl<< “Volume of cigar is “<< pB1->Volume(); // Volume of obj. pointed to
pB2 = boxes; // Set to address of arrayboxes[2] = match; // Set 3rd element to matchcout << endl
<< “Volume of boxes[2] is “<< (pB2 + 2)->Volume(); // Now access thru pointer
cout << endl;return 0;
}
How It WorksThe only thing that the CBox class destructor does is to display a message showing that it was called. Theoutput is:
Constructor called.Constructor called.Constructor called.Constructor called.Constructor called.Constructor called.Constructor called.Volume of cigar is 40Volume of boxes[2] is 1.21Destructor called.Destructor called.Destructor called.Destructor called.Destructor called.Destructor called.Destructor called.
411
Chapter 8: More on Classes
25905c08.qxd:WroxPro 2/21/08 8:53 AM Page 411
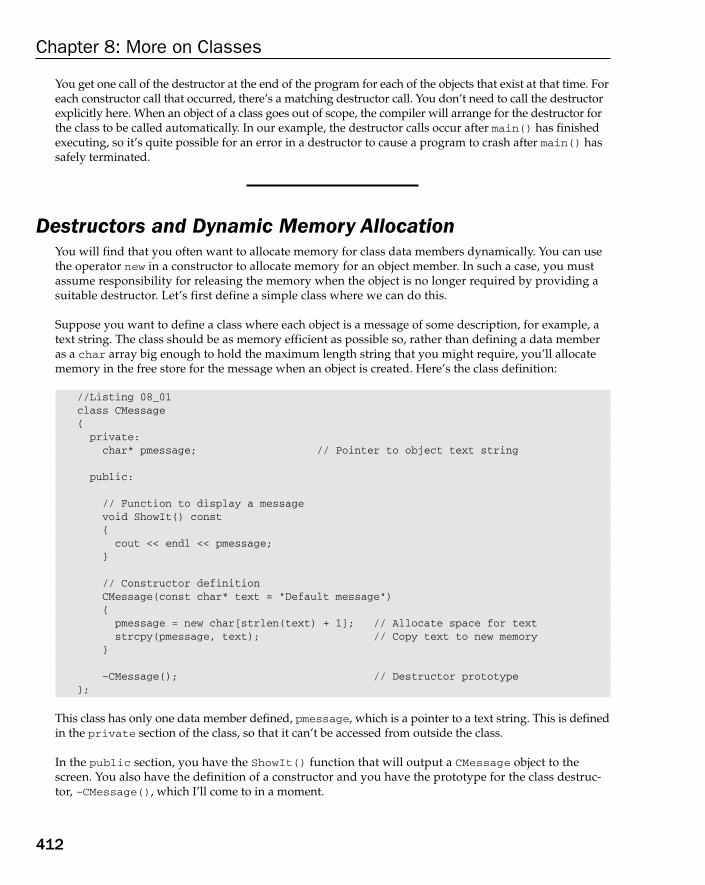
You get one call of the destructor at the end of the program for each of the objects that exist at that time. Foreach constructor call that occurred, there’s a matching destructor call. You don’t need to call the destructorexplicitly here. When an object of a class goes out of scope, the compiler will arrange for the destructor forthe class to be called automatically. In our example, the destructor calls occur after main() has finishedexecuting, so it’s quite possible for an error in a destructor to cause a program to crash after main() hassafely terminated.
Destructors and Dynamic Memory AllocationYou will find that you often want to allocate memory for class data members dynamically. You can usethe operator new in a constructor to allocate memory for an object member. In such a case, you mustassume responsibility for releasing the memory when the object is no longer required by providing asuitable destructor. Let’s first define a simple class where we can do this.
Suppose you want to define a class where each object is a message of some description, for example, atext string. The class should be as memory efficient as possible so, rather than defining a data member as a char array big enough to hold the maximum length string that you might require, you’ll allocatememory in the free store for the message when an object is created. Here’s the class definition:
//Listing 08_01class CMessage{private:char* pmessage; // Pointer to object text string
public:
// Function to display a messagevoid ShowIt() const{cout << endl << pmessage;
}
// Constructor definitionCMessage(const char* text = “Default message”){pmessage = new char[strlen(text) + 1]; // Allocate space for textstrcpy(pmessage, text); // Copy text to new memory
}
~CMessage(); // Destructor prototype};
This class has only one data member defined, pmessage, which is a pointer to a text string. This is definedin the private section of the class, so that it can’t be accessed from outside the class.
In the public section, you have the ShowIt() function that will output a CMessage object to thescreen. You also have the definition of a constructor and you have the prototype for the class destruc-tor, ~CMessage(), which I’ll come to in a moment.
412
Chapter 8: More on Classes
25905c08.qxd:WroxPro 2/21/08 8:53 AM Page 412

The constructor for the class requires a string as an argument, but if none is passed, it uses the defaultstring that is specified for the parameter. The constructor obtains the length of the string supplied as theargument, excluding the terminating NULL, by using the library function strlen(). For the constructor touse this library function, there must be an #include statement for the <cstring> header file. The construc-tor determines the number of bytes of memory necessary to store the string in the free store by adding 1 tothe value that the function strlen() returns.
Of course, if the memory allocation fails, an exception will be thrown that will terminate the program.If you want to manage such a failure to provide a more graceful end to the program, you would catchthe exception within the constructor code. (See Chapter 6 for information on handling out-of-memoryconditions.)
Having obtained the memory for the string using the operator new, you use the strcpy() library functionthat is also declared in the <cstring> header file to copy the string supplied as the argument to the con-structor into the memory allocated for it. The strcpy() function copies the string specified by the secondpointer argument to the address contained in the first pointer argument.
You now need to write a class destructor that will free up the memory allocated for a message. If you don’tprovide a destructor for the class, there’s no way to delete the memory allocated for an object. If you use thisclass as it stands in a program where a large number of CMessage objects are created, the free store will begradually eaten away until the program fails. It’s easy for this to occur in circumstances where it may not beobvious that it is happening. For example, if you create a temporary CMessage object in a function that iscalled many times in a program, you might assume that the objects are being destroyed at the return fromthe function. You’d be right about that, of course, but the free store memory will not be released. Thus foreach call of the function, more of the free store will be occupied by memory for discarded CMessage objects.
The code for the CMessage class destructor is as follows:
// Listing 08_02// Destructor to free memory allocated by newCMessage::~CMessage(){cout << “Destructor called.” // Just to track what happens
<< endl;delete[] pmessage; // Free memory assigned to pointer
}
Because you’re defining the destructor outside of the class definition, you must qualify the name of thedestructor with the class name, CMessage. All the destructor does is to first display a message so that youcan see what’s going on, and then use the delete operator to free the memory pointed to by the memberpmessage. Note that you have to include the square brackets with delete because you’re deleting anarray (of type char).
Try It Out Using the Message ClassYou can exercise the CMessage class with a little example:
// Ex8_02.cpp// Using a destructor to free memory#include <iostream> // For stream I/O#include <cstring> // For strlen() and strcpy()using std::cout;
413
Chapter 8: More on Classes
25905c08.qxd:WroxPro 2/21/08 8:53 AM Page 413
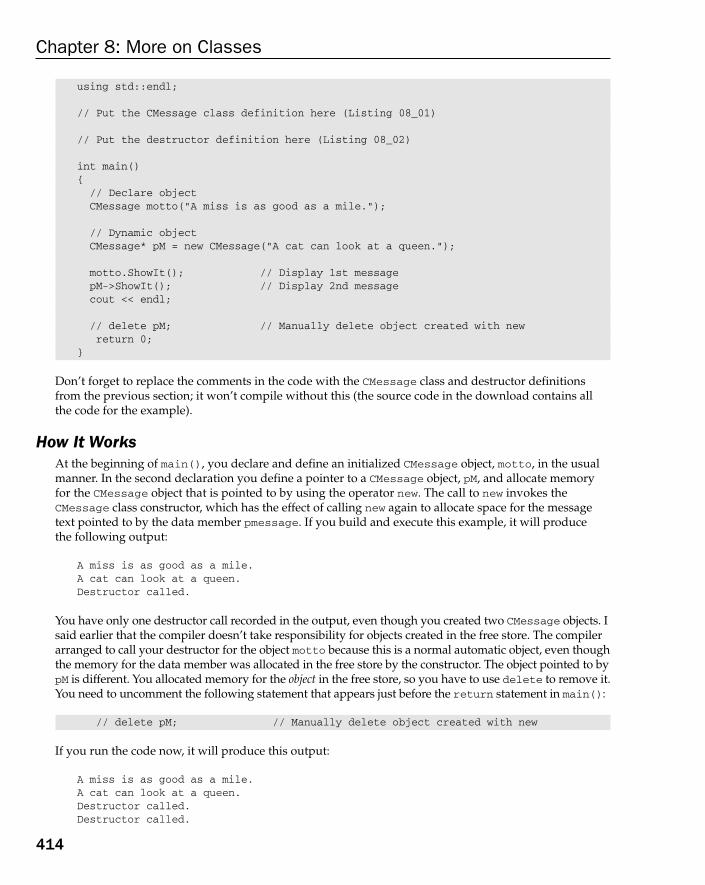
using std::endl;
// Put the CMessage class definition here (Listing 08_01)
// Put the destructor definition here (Listing 08_02)
int main(){// Declare objectCMessage motto(“A miss is as good as a mile.”);
// Dynamic objectCMessage* pM = new CMessage(“A cat can look at a queen.”);
motto.ShowIt(); // Display 1st messagepM->ShowIt(); // Display 2nd messagecout << endl;
// delete pM; // Manually delete object created with newreturn 0;
}
Don’t forget to replace the comments in the code with the CMessage class and destructor definitionsfrom the previous section; it won’t compile without this (the source code in the download contains allthe code for the example).
How It WorksAt the beginning of main(), you declare and define an initialized CMessage object, motto, in the usualmanner. In the second declaration you define a pointer to a CMessage object, pM, and allocate memoryfor the CMessage object that is pointed to by using the operator new. The call to new invokes theCMessage class constructor, which has the effect of calling new again to allocate space for the message text pointed to by the data member pmessage. If you build and execute this example, it will produce the following output:
A miss is as good as a mile.A cat can look at a queen.Destructor called.
You have only one destructor call recorded in the output, even though you created two CMessage objects. Isaid earlier that the compiler doesn’t take responsibility for objects created in the free store. The compilerarranged to call your destructor for the object motto because this is a normal automatic object, even thoughthe memory for the data member was allocated in the free store by the constructor. The object pointed to bypM is different. You allocated memory for the object in the free store, so you have to use delete to remove it.You need to uncomment the following statement that appears just before the return statement in main():
// delete pM; // Manually delete object created with new
If you run the code now, it will produce this output:
A miss is as good as a mile.A cat can look at a queen.Destructor called.Destructor called.
414
Chapter 8: More on Classes
25905c08.qxd:WroxPro 2/21/08 8:53 AM Page 414
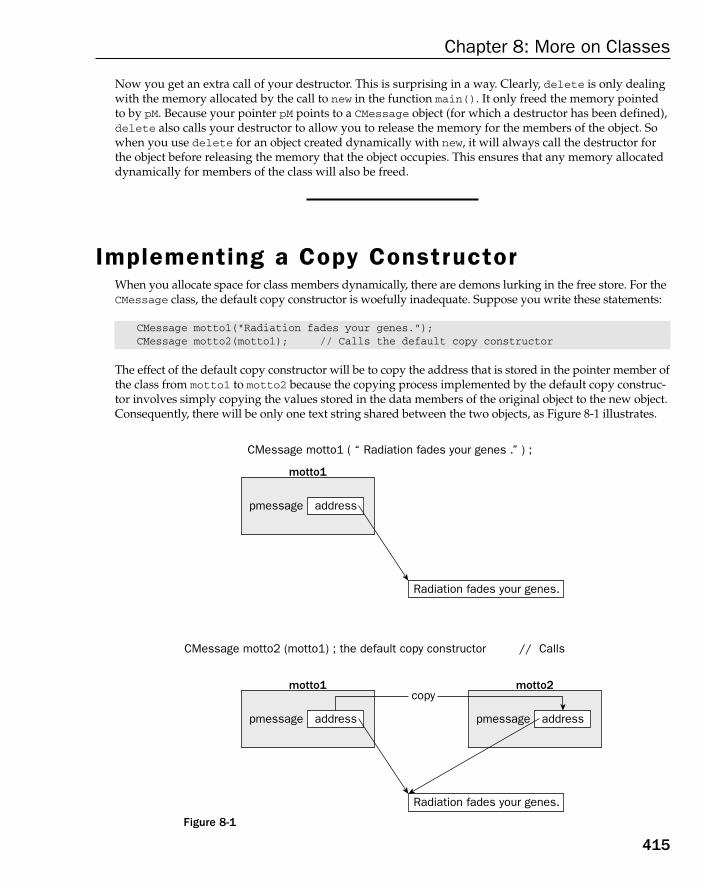
Now you get an extra call of your destructor. This is surprising in a way. Clearly, delete is only dealingwith the memory allocated by the call to new in the function main(). It only freed the memory pointedto by pM. Because your pointer pM points to a CMessage object (for which a destructor has been defined),delete also calls your destructor to allow you to release the memory for the members of the object. Sowhen you use delete for an object created dynamically with new, it will always call the destructor forthe object before releasing the memory that the object occupies. This ensures that any memory allocateddynamically for members of the class will also be freed.
Implementing a Copy ConstructorWhen you allocate space for class members dynamically, there are demons lurking in the free store. For theCMessage class, the default copy constructor is woefully inadequate. Suppose you write these statements:
CMessage motto1(“Radiation fades your genes.”);CMessage motto2(motto1); // Calls the default copy constructor
The effect of the default copy constructor will be to copy the address that is stored in the pointer member ofthe class from motto1 to motto2 because the copying process implemented by the default copy construc-tor involves simply copying the values stored in the data members of the original object to the new object.Consequently, there will be only one text string shared between the two objects, as Figure 8-1 illustrates.
Figure 8-1
motto1
address pmessage
CMessage motto1 ( “ Radiation fades your genes .” ) ;
CMessage motto2 (motto1) ; the default copy constructor // Calls
copy motto2
address
Radiation fades your genes.
pmessage
motto1
address pmessage
Radiation fades your genes.
415
Chapter 8: More on Classes
25905c08.qxd:WroxPro 2/21/08 8:53 AM Page 415

If the string is changed from either of the objects, it will be changed for the other object as well because bothobjects share the same string. If motto1 is destroyed, the pointer in motto2 will be pointing at a memoryarea that has been released, and may now be used for something else, so chaos will surely ensue. Of course,the same problem arises if motto2 is deleted; motto1 would then contain a member pointing to a nonexist-ent string.
The solution is to supply a class copy constructor to replace the default version. You could implement thisin the public section of the class as follows:
CMessage(const CMessage& initM) // Copy Constructor definition{// Allocate space for textpmessage = new char[ strlen(initM.pmessage) + 1 ];
// Copy text to new memorystrcpy(pmessage, initM.pmessage);
}
Remember from the previous chapter that, to avoid an infinite spiral of calls to the copy constructor, theparameter must be specified as a const reference. This copy constructor first allocates enough memoryto hold the string in the object initM, storing the address in the data member of the new object, and thencopies the text string from the initializing object. Now, the new object will be identical to, but quite inde-pendent of, the old one.
Just because you don’t initialize one CMessage class object with another, don’t think that you’re safe andneed not bother with the copy constructor. Another monster lurks in the free store that can emerge to biteyou when you least expect it. Consider the following statements:
CMessage thought(“Eye awl weighs yews my spell checker.”);DisplayMessage(thought); // Call a function to output a message
where the function DisplayMessage() is defined as:
void DisplayMessage(CMessage localMsg){cout << endl << “The message is: “
<< localMsg.ShowIt();return;
}
Looks simple enough doesn’t it? What could be wrong with that? A catastrophic error, that’s what! Whatthe function DisplayMessage() does is actually irrelevant. The problem lies with the parameter. Theparameter is a CMessage object so the argument in a call is passed by value. With the default copy con-structor, the sequence of events is as follows:
1. The object thought is created with the space for the message “Eye awl weighs yews myspell checker” allocated in the free store.
2. The function DisplayMessage() is called and, because the argument is passed by value, a copy,localMsg, is made using the default copy constructor. Now the pointer in the copy points to thesame string in the free store as the original object.
416
Chapter 8: More on Classes
25905c08.qxd:WroxPro 2/21/08 8:53 AM Page 416

3. At the end of the function, the local object goes out of scope, so the destructor for the CMessageclass is called. This deletes the local object (the copy) by deleting the memory pointed to by thepointer pmessage.
4. On return from the function DisplayMessage(), the pointer in the original object, thought,still points to the memory area that has just been deleted. Next time you try to use the originalobject (or even if you don’t, since it will need to be deleted sooner or later) your program willbehave in weird and mysterious ways.
Any call to a function that passes by value an object of a class that has a member defined dynamicallywill cause problems. So, out of this, you have an absolutely 100 percent, 24 carat golden rule:
If you allocate space for a member of a native C++ class dynamically, always implement a copy constructor.
Sharing Memory Between VariablesAs a relic of the days when 64KB was quite a lot of memory, you have a facility in C++ that allows morethan one variable to share the same memory (but obviously not at the same time). This is called a union,and there are four basic ways in which you can use one:
❑ You can use it so that a variable A occupies a block of memory at one point in a program, which islater occupied by another variable B of a different type, because A is no longer required. I recom-mend that you don’t do this. It’s not worth the risk of error that is implicit in such an arrangement.You can achieve the same effect by allocating memory dynamically.
❑ Alternatively, you could have a situation in a program where a large array of data is required, butyou don’t know in advance of execution what the data type will be — it will be determined by theinput data. I also recommend that you don’t use unions in this case, since you can achieve the sameresult using a couple of pointers of different types and again allocating the memory dynamically.
❑ A third possible use for a union is one that you may need now and again — when you want to interpret the same data in two or more different ways. This could happen when you have avariable that is of type long, and you want to treat it as two values of type short. Windows willsometimes package two short values in a single parameter of type long passed to a function.Another instance arises when you want to treat a block of memory containing numeric data as astring of bytes, just to move it around.
❑ You can use a union as a means of passing an object or a data value around where you don’tknow in advance what its type is going to be. The union can provide for storing any one of thepossible range of types that you might have.
Defining UnionsYou define a union using the keyword union. It is best understood by taking an example of a definition:
union shareLD // Sharing memory between long and double{double dval;long lval;
};
417
Chapter 8: More on Classes
25905c08.qxd:WroxPro 2/21/08 8:53 AM Page 417

This defines a union type shareLD that provides for the variables of type long and double to occupythe same memory. The union type name is usually referred to as a tag name. This statement is rather likea class definition, in that you haven’t actually defined a union instance yet, so you don’t have any vari-ables at this point. Once the union type has been defined, you can define instances of a union in a decla-ration. For example:
shareLD myUnion;
This defined an instance of the union type, shareLD, that you defined previously. You could also havedefined myUnion by including it in the union definition statement:
union shareLD // Sharing memory between long and double{double dval;long lval;
} myUnion;
To refer to a member of the union, you use the direct member selection operator (the period) with theunion instance name, just as you have done when accessing members of a class. So, you could set thelong variable lval to 100 in the union instance MyUnion with this statement:
myUnion.lval = 100; // Using a member of a union
Using a similar statement later in a program to initialize the double variable dval will overwrite lval.The basic problem with using a union to store different types of values in the same memory is that,because of the way a union works, you also need some means of determining which of the membervalues is current. This is usually achieved by maintaining another variable that acts as an indicator of the type of value stored.
A union is not limited to sharing between two variables. If you wish, you can share the same memorybetween several variables. The memory occupied by the union will be that which is required by itslargest member. For example, suppose you define this union:
union shareDLF{double dval;long lval;float fval;
} uinst = {1.5};
An instance of shareDLF will occupy 8 bytes, as illustrated in Figure 8-2.
In the example, you defined an instance of the union, uinst, as well as the tag name for the union. Youalso initialized the instance with the value 1.5.
You can only initialize the first member of the union when you declare an instance.
418
Chapter 8: More on Classes
25905c08.qxd:WroxPro 2/21/08 8:53 AM Page 418
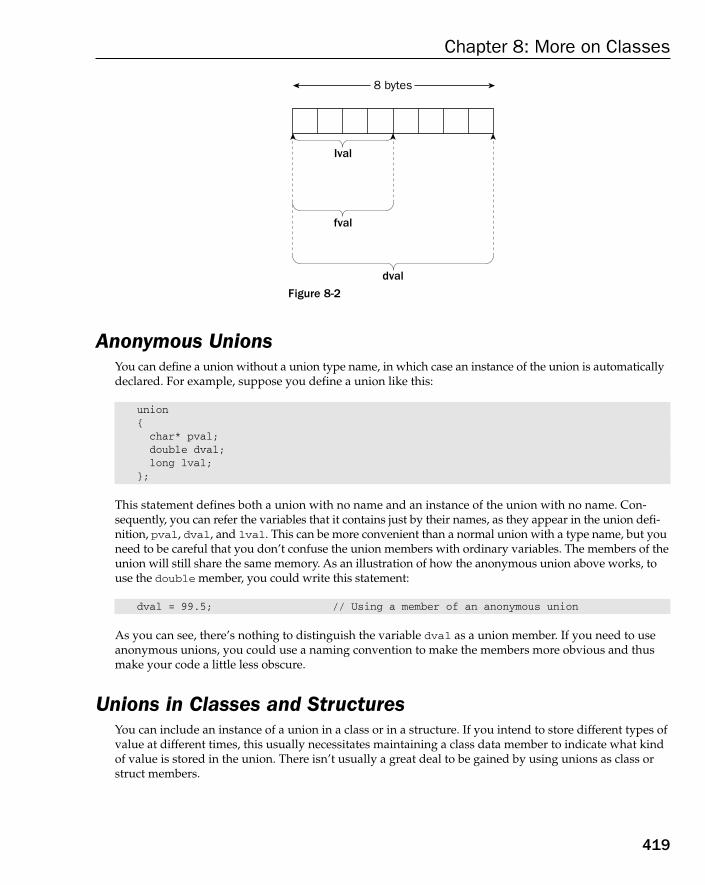
Figure 8-2
Anonymous UnionsYou can define a union without a union type name, in which case an instance of the union is automaticallydeclared. For example, suppose you define a union like this:
union{char* pval;double dval;long lval;
};
This statement defines both a union with no name and an instance of the union with no name. Con -sequently, you can refer the variables that it contains just by their names, as they appear in the union defi-nition, pval, dval, and lval. This can be more convenient than a normal union with a type name, but youneed to be careful that you don’t confuse the union members with ordinary variables. The members of theunion will still share the same memory. As an illustration of how the anonymous union above works, touse the double member, you could write this statement:
dval = 99.5; // Using a member of an anonymous union
As you can see, there’s nothing to distinguish the variable dval as a union member. If you need to useanonymous unions, you could use a naming convention to make the members more obvious and thusmake your code a little less obscure.
Unions in Classes and StructuresYou can include an instance of a union in a class or in a structure. If you intend to store different types ofvalue at different times, this usually necessitates maintaining a class data member to indicate what kindof value is stored in the union. There isn’t usually a great deal to be gained by using unions as class orstruct members.
8 bytes
Ival
fval
dval
419
Chapter 8: More on Classes
25905c08.qxd:WroxPro 2/21/08 8:53 AM Page 419
Operator Over loadingOperator overloading is a very important capability because it enables you to make standard C++ oper-ators, such as +, -, * and so on, work with objects of your own data types. It allows you to write a func-tion that redefines a particular operator so that it performs a particular action when it’s used with objectsof a class. For example, you could redefine the operator > so that, when it was used with objects of the classCBox that you saw earlier, it would return true if the first CBox argument had a greater volume than thesecond.
Operator overloading doesn’t allow you to invent new operators, nor can you change the precedence of anoperator, so your overloaded version of an operator will have the same priority in the sequence of evaluat-ing an expression as the original base operator. The operator precedence table can be found in Chapter 2 ofthis book and in the MSDN Library.
Although you can’t overload all the operators, the restrictions aren’t particularly oppressive. These arethe operators that you can’t overload:
Anything else is fair game, which gives you quite a bit of scope. Obviously, it’s a good idea to ensure thatyour versions of the standard operators are reasonably consistent with their normal usage, or at least reason-ably intuitive in their operation. It wouldn’t be a very sensible approach to produce an overloaded + opera-tor for a class that performed the equivalent of a multiply on class objects. The best way to understand howoperator overloading works is to work through an example, so let’s implement what I just referred to, thegreater-than operator, >, for the CBox class.
Implementing an Overloaded OperatorTo implement an overloaded operator for a class, you have to write a special function. Assuming that itis a member of the class CBox, the declaration for the function to overload the > operator within the classdefinition will be as follows:
class CBox{public:bool operator>(CBox& aBox) const; // Overloaded ‘greater than’
// Rest of the class definition...};
The scope resolution operator ::
The conditional operator ?:
The direct member selection operator .
The size-of operator sizeof
The de-reference pointer to class member operator .*
420
Chapter 8: More on Classes
25905c08.qxd:WroxPro 2/21/08 8:53 AM Page 420
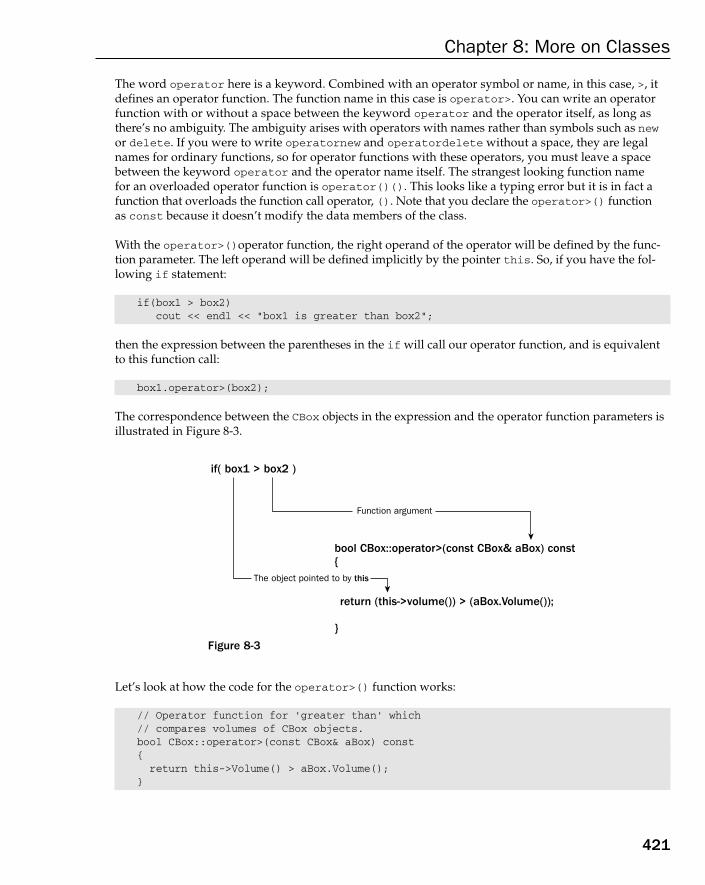
The word operator here is a keyword. Combined with an operator symbol or name, in this case, >, itdefines an operator function. The function name in this case is operator>. You can write an operatorfunction with or without a space between the keyword operator and the operator itself, as long asthere’s no ambiguity. The ambiguity arises with operators with names rather than symbols such as newor delete. If you were to write operatornew and operatordelete without a space, they are legalnames for ordinary functions, so for operator functions with these operators, you must leave a spacebetween the keyword operator and the operator name itself. The strangest looking function name for an overloaded operator function is operator()(). This looks like a typing error but it is in fact afunction that overloads the function call operator, (). Note that you declare the operator>() function as const because it doesn’t modify the data members of the class.
With the operator>()operator function, the right operand of the operator will be defined by the func-tion parameter. The left operand will be defined implicitly by the pointer this. So, if you have the fol-lowing if statement:
if(box1 > box2)cout << endl << “box1 is greater than box2”;
then the expression between the parentheses in the if will call our operator function, and is equivalentto this function call:
box1.operator>(box2);
The correspondence between the CBox objects in the expression and the operator function parameters isillustrated in Figure 8-3.
Figure 8-3
Let’s look at how the code for the operator>() function works:
// Operator function for ‘greater than’ which// compares volumes of CBox objects.bool CBox::operator>(const CBox& aBox) const{return this->Volume() > aBox.Volume();
}
bool CBox::operator>(const CBox& aBox) const{
return (this->volume()) > (aBox.Volume());
}
if( box1 > box2 )
The object pointed to by this
Function argument
421
Chapter 8: More on Classes
25905c08.qxd:WroxPro 2/21/08 8:53 AM Page 421

You use a reference parameter to the function to avoid unnecessary copying when the function is called.Because the function does not alter the object for which it is called, you can declare it as const. If youdon’t do this, you cannot use the operator to compare const objects of type CBox at all.
The return expression uses the member function Volume() to calculate the volume of the CBox objectpointed to by this, and compares the result with the volume of the object aBox using the basic opera-tor >. The basic > operator returns a value of type int (not a type bool) and thus, 1 is returned if theCBox object pointed to by the pointer this has a larger volume than the object aBox passed as a refer-ence argument, and 0 otherwise. The value that results from the comparison will be automatically con-verted to the return type of the operator function, type bool.
Try It Out Operator OverloadingYou can exercise the operator>() function with an example:
// Ex8_03.cpp// Exercising the overloaded ‘greater than’ operator#include <iostream> // For stream I/Ousing std::cout;using std::endl;
class CBox // Class definition at global scope{public:// Constructor definitionCBox(double lv = 1.0, double wv = 1.0, double hv = 1.0):
m_Length(lv), m_Width(wv), m_Height(hv){
cout << endl << “Constructor called.”;}
// Function to calculate the volume of a boxdouble Volume() const{
return m_Length*m_Width*m_Height;}
bool operator>(const CBox& aBox) const; // Overloaded ‘greater than’
// Destructor definition~CBox(){
cout << “Destructor called.” << endl;}
private:double m_Length; // Length of a box in inchesdouble m_Width; // Width of a box in inchesdouble m_Height; // Height of a box in inches
};
// Operator function for ‘greater than’ that// compares volumes of CBox objects.
422
Chapter 8: More on Classes
25905c08.qxd:WroxPro 2/21/08 8:53 AM Page 422

bool CBox::operator>(const CBox& aBox) const{return this->Volume() > aBox.Volume();
}
int main(){CBox smallBox(4.0, 2.0, 1.0);CBox mediumBox(10.0, 4.0, 2.0);CBox bigBox(30.0, 20.0, 40.0);
if(mediumBox > smallBox)cout << endl
<< “mediumBox is bigger than smallBox”;
if(mediumBox > bigBox)cout << endl
<< “mediumBox is bigger than bigBox”;elsecout << endl
<< “mediumBox is not bigger than bigBox”;
cout << endl;return 0;
}
How It WorksThe prototype of the operator>() operator function appears in the public section of the class. As thefunction definition is outside the class definition, it won’t default to inline. This is quite arbitrary. Youcould just as well have put the definition in place of the prototype in the class definition. In this case, youwouldn’t need to qualify the function name with CBox:: in front of it. As you’ll remember, this is neces-sary when you define a function member outside the class definition because this tells the compiler thatthe function is a member of the CBox class.
The function main() has two if statements using the operator > with class members. These automati-cally invoke the overloaded operator function. If you wanted to get confirmation of this, you could addan output statement to the operator function. The output from this example is:
Constructor called.Constructor called.Constructor called.mediumBox is bigger than smallBoxmediumBox is not bigger than bigBoxDestructor called.Destructor called.Destructor called.
The output demonstrates that the if statements work fine with our operator function, so being able to express the solution to CBox problems directly in terms of CBox objects is beginning to be a realisticproposition.
423
Chapter 8: More on Classes
25905c08.qxd:WroxPro 2/21/08 8:53 AM Page 423

Implementing Full Support for a Comparison OperatorWith the current version of the operator function operator>(), there are still a lot of things that youcan’t do. Specifying a problem solution in terms of CBox objects might well involve statements such asthe following:
if(aBox > 20.0)// Do something...
Our function won’t deal with that. If you try to use an expression comparing a CBox object with a numeri-cal value, you’ll get an error message. To support this capability, you would need to write another versionof the operator>()function as an overloaded function.
You can quite easily support the type of expression that you’ve just seen. The declaration of the memberfunction within the class would be:
// Compare a CBox object with a constantbool operator>(const double& value) const;
This would appear in the definition of the class and the right operand for the > operator corresponds to the function parameter here. The CBox object that is the left operand will be passed as the implicitpointer this.
The implementation of this overloaded operator is also easy. It’s just one statement in the body of thefunction:
// Function to compare a CBox object with a constantbool CBox::operator>(const double& value) const{return this->Volume() > value;
}
This couldn’t be much simpler, could it? But you still have a problem using the > operator with CBoxobjects. You may well want to write statements such as this:
if(20.0 > aBox)// do something...
You might argue that this could be done by implementing the operator<() operator function that accepteda right argument of type double and rewriting the statement above to use it, which is quite true. Indeed,implementing the < operator is likely to be a requirement for comparing CBox objects anyway, but an imple-mentation of support for an object type shouldn’t artificially restrict the ways in which you can use theobjects in an expression. The use of the objects should be as natural as possible. The problem is how to do it.
A member operator function always provides the left argument as the pointer this. Because the left argu-ment, in this case, is of type double, you can’t implement it as a member function. That leaves you withtwo choices: an ordinary function or a friend function. Because you don’t need to access the privatemembers of the class, it doesn’t need to be a friend function, so you can implement the overloaded > oper-ator with a left operand of type double as an ordinary function. The prototype, placed outside the classdefinition of course because it isn’t a member, would need to be:
bool operator>(const double& value, const CBox& aBox);
424
Chapter 8: More on Classes
25905c08.qxd:WroxPro 2/21/08 8:53 AM Page 424

The implementation would be this:
// Function comparing a constant with a CBox objectbool operator>(const double& value, const CBox& aBox){
return value > aBox.Volume();}
As you have seen already, an ordinary function (and a friend function too for that matter) accesses themembers of an object by using the direct member selection operator and the object name. Of course, anordinary function only has access to the public members. The member function Volume() is public, sothere’s no problem using it here.
If the class didn’t have the public function Volume(), you could either declare the operator function afriend function that could access the private data members directly, or you could provide a set of mem-ber functions to return the values of the private data members and use those in an ordinary function toimplement the comparison.
Try It Out Complete Overloading of the > OperatorWe can put all this together in an example to show how it works:
// Ex8_04.cpp// Implementing a complete overloaded ‘greater than’ operator#include <iostream> // For stream I/Ousing std::cout;using std::endl;
class CBox // Class definition at global scope{
public:// Constructor definitionCBox(double lv = 1.0, double wv = 1.0, double hv = 1.0):
m_Length(lv), m_Width(wv), m_Height(hv){
cout << endl << “Constructor called.”;}
// Function to calculate the volume of a boxdouble Volume() const{
return m_Length*m_Width*m_Height;}
// Operator function for ‘greater than’ that// compares volumes of CBox objects.bool operator>(const CBox& aBox) const{return this->Volume() > aBox.Volume();
}
// Function to compare a CBox object with a constantbool operator>(const double& value) const{
425
Chapter 8: More on Classes
25905c08.qxd:WroxPro 2/21/08 8:53 AM Page 425

return this->Volume() > value;}
// Destructor definition~CBox(){ cout << “Destructor called.” << endl;}
private:double m_Length; // Length of a box in inchesdouble m_Width; // Width of a box in inchesdouble m_Height; // Height of a box in inches
};
int operator>(const double& value, const CBox& aBox); // Function prototype
int main(){CBox smallBox(4.0, 2.0, 1.0);CBox mediumBox(10.0, 4.0, 2.0);
if(mediumBox > smallBox)cout << endl
<< “mediumBox is bigger than smallBox”;
if(mediumBox > 50.0)cout << endl
<< “mediumBox capacity is more than 50”;elsecout << endl
<< “mediumBox capacity is not more than 50”;
if(10.0 > smallBox)cout << endl
<< “smallBox capacity is less than 10”;elsecout << endl
<< “smallBox capacity is not less than 10”;
cout << endl;return 0;
}
// Function comparing a constant with a CBox objectint operator>(const double& value, const CBox& aBox){return value > aBox.Volume();
}
How It WorksNote the position of the prototype for the ordinary function version of operator>(). It needs to followthe class definition, because it refers to a CBox object in the parameter list. If you place it before the classdefinition, the example will not compile.
426
Chapter 8: More on Classes
25905c08.qxd:WroxPro 2/21/08 8:53 AM Page 426

There is a way to place it at the beginning of the program file following the #include statement: Use anincomplete class declaration. This would precede the prototype and would look like this:
class CBox; // Incomplete class declarationint operator>(const double& value, CBox& aBox); // Function prototype
The incomplete class declaration identifies CBox to the compiler as a class and is sufficient to allow thecompiler to process the prototype for the function properly, since the compiler now knows that CBox is a user-defined type to be specified later.
This mechanism is also essential in circumstances such as those where you have two classes, each ofwhich has a pointer to an object of the other class as a member. They will each require the other to bedeclared first. It is only possible to resolve such an impasse through the use of an incomplete class declaration.
The output from the example is:
Constructor called.Constructor called.mediumBox is bigger than smallBoxmediumBox capacity is more than 50smallBox capacity is less than 10Destructor called.Destructor called.
After the constructor messages due to the declarations of the objects smallBox and mediumBox, youhave the output lines from the three if statements, each of which is working as you would expect. Thefirst of these calls the operator function that is a class member and works with two CBox objects. Thesecond calls the member function that has a parameter of type double. The expression in the third ifstatement calls the operator function that you have implemented as an ordinary function.
As it happens, you could have made both the operator functions that are class members ordinary func-tions, because they only need access to the member function Volume(), which is public.
Any comparison operator can be implemented in much the same way as you have implemented these.They would only differ in the minor details and the general approach to implementing them would beexactly the same.
Overloading the Assignment OperatorIf you don’t provide an overloaded assignment operator function for your class, the compiler will providea default. The default version will simply provide a member-by-member copying process, similar to that ofthe default copy constructor. However, don’t confuse the default copy constructor with the default assign-ment operator. The default copy constructor is called by a declaration of a class object that’s initialized withan existing object of the same class, or by passing an object to a function by value. The default assignmentoperator, on the other hand, is called when the left side and the right side of an assignment statement areobjects of the same class type.
427
Chapter 8: More on Classes
25905c08.qxd:WroxPro 2/21/08 8:53 AM Page 427

For the CBox class, the default assignment operator works with no problem, but for any class which hasspace for members allocated dynamically, you need to look carefully at the requirements of the class inquestion. There may be considerable potential for chaos in your program if you leave the assignmentoperator out under these circumstances.
For a moment, let’s return to the CMessage class that you used when I was talking about copy construc-tors. You’ll remember it had a member, pmessage, that was a pointer to a string. Now consider the effectthat the default assignment operator could have. Suppose you had two instances of the class, motto1 andmotto2. You could try setting the members of motto2 equal to the members of motto1 using the defaultassignment operator, as follows:
motto2 = motto1; // Use default assignment operator
The effect of using the default assignment operator for this class is essentially the same as using the defaultcopy constructor: disaster will result! Since each object will have a pointer to the same string, if the string ischanged for one object, it’s changed for both. There’s also the problem that when one of the instances ofthe class is destroyed, its destructor will free the memory used for the string and the other object will beleft with a pointer to memory that may now be used for something else.
What you need the assignment operator to do is to copy the text to a memory area owned by the desti-nation object.
Fixing the ProblemYou can fix this with your own assignment operator function, which we will assume is defined withinthe class definition:
// Overloaded assignment operator for CMessage objectsCMessage& operator=(const CMessage& aMess){// Release memory for 1st operanddelete[] pmessage;pmessage = new char[ strlen(aMess.pmessage) + 1];
// Copy 2nd operand string to 1ststrcpy(this->pmessage, aMess.pmessage);
// Return a reference to 1st operandreturn *this;
}
An assignment might seem very simple, but there’s a couple of subtleties need further investigation. Firstof all, note that you return a reference from the assignment operator function. It may not be immediatelyapparent why this is so — after all, the function does complete the assignment operation entirely, and theobject on the right of the assignment will be copied to that on the left. Superficially this would suggestthat you don’t need to return anything, but you need to consider in a little more depth how the operatormight be used.
There’s a possibility that you might need to use the result of an assignment operation on the right handside of an expression. Consider a statement such as this:
motto1 = motto2 = motto3;
428
Chapter 8: More on Classes
25905c08.qxd:WroxPro 2/21/08 8:53 AM Page 428
Because the assignment operator is right-associative, the assignment of motto3 to motto2 will be carriedout first, so this will translate into the following statement:
motto1 = (motto2.operator=(motto3));
The result of the operator function call here is on the right of the equals sign, so the statement will finallybecome this:
motto1.operator=(motto2.operator=(motto3));
If this is to work, you certainly have to return something. The call of the operator=() function betweenthe parentheses must return an object that can be used as an argument to the other operator=() functioncall. In this case a return type of either CMessage or CMessage& would do it, so a reference is not manda-tory in this situation, but you must at least return a CMessage object.
However, consider the following example:
(motto1 = motto2) = motto3;
This is perfectly legitimate code — the parentheses serve to make sure the leftmost assignment is carriedout first. This translates into the following statement:
(motto1.operator=(motto2)) = motto3;
When you express the remaining assignment operation as the explicit overloaded function call this ulti-mately becomes:
(motto1.operator=(motto2)).operator=(motto3);
Now you have a situation where the object returned from the operator=() function is used to call theoperator=() function. If the return type is just CMessage, this will not be legal because a temporarycopy of the original object is actually returned, and the compiler will not allow a member function callusing a temporary object. In other words, the return value when the return type is CMessage is not anlvalue. The only way to ensure this sort of thing will compile and work correctly is to return a reference,which is an lvalue, so the only possible return type if want to allow fully flexible use of the assignmentoperator with your class objects is CMessage&.
Note that the native C++ language does not enforce any restrictions on the accepted parameter or returntypes for the assignment operator, but it makes sense to declare the operator in the way I have just describedif you want your assignment operator functions to support normal C++ usage of assignment.
The second subtlety you need to keep in mind is that each object already has memory for a string allo-cated, so the first thing that the operator function has to do is to delete the memory allocated to thefirst object and reallocate sufficient memory to accommodate the string belonging to the second object.Once this is done, the string from the second object can be copied to the new memory now owned bythe first.
There’s still a defect in this operator function. What if you were to write the following statement?
motto1 = motto1;
429
Chapter 8: More on Classes
25905c08.qxd:WroxPro 2/21/08 8:53 AM Page 429

Obviously, you wouldn’t do anything as stupid as this directly, but it could easily be hidden behind apointer, for instance, as in the following statement,
Motto1 = *pMess;
If the pointer pMess points to motto1 you essentially have the preceding assignment statement. In thiscase, the operator function as it stands would delete the memory for motto1, allocate some more memorybased on the length of the string that has already been deleted and try to copy the old memory which, bythen, could well have been corrupted. You can fix this with a check for identical left and right operands atthe beginning of the function, so now the definition of the operator=() function would become this:
// Overloaded assignment operator for CMessage objectsCMessage& operator=(const CMessage& aMess){if(this == &aMess) // Check addresses, if equalreturn *this; // return the 1st operand
// Release memory for 1st operanddelete[] pmessage;pmessage = new char[ strlen(aMess.pmessage) +1];
// Copy 2nd operand string to 1ststrcpy(this->pmessage, aMess.pmessage);
// Return a reference to 1st operandreturn *this;
}
This code assumes that the function definition appears within the class definition.
Try It Out Overloading the Assignment OperatorLet’s put this together in a working example. We’ll add a function, called Reset(), to the class at thesame time. This just resets the message to a string of asterisks.
// Ex8_05.cpp// Overloaded copy operator perfection#include <iostream>#include <cstring>using std::cout;using std::endl;
class CMessage{private:char* pmessage; // Pointer to object text string
public:// Function to display a messagevoid ShowIt() const{
cout << endl << pmessage;}
430
Chapter 8: More on Classes
25905c08.qxd:WroxPro 2/21/08 8:53 AM Page 430

//Function to reset a message to *void Reset(){char* temp = pmessage;while(*temp)*(temp++) = ‘*’;
}
// Overloaded assignment operator for CMessage objectsCMessage& operator=(const CMessage& aMess){if(this == &aMess) // Check addresses, if equalreturn *this; // return the 1st operand
// Release memory for 1st operanddelete[] pmessage;pmessage = new char[ strlen(aMess.pmessage) +1];
// Copy 2nd operand string to 1ststrcpy(this->pmessage, aMess.pmessage);
// Return a reference to 1st operandreturn *this;
}
// Constructor definitionCMessage(const char* text = “Default message”){
pmessage = new char[ strlen(text) +1 ]; // Allocate space for textstrcpy(pmessage, text); // Copy text to new memory
}
// Destructor to free memory allocated by new~CMessage(){
cout << “Destructor called.” // Just to track what happens<< endl;
delete[] pmessage; // Free memory assigned to pointer}
};
int main(){CMessage motto1(“The devil takes care of his own”);CMessage motto2;
cout << “motto2 contains - “;motto2.ShowIt();cout << endl;
motto2 = motto1; // Use new assignment operator
cout << “motto2 contains - “;motto2.ShowIt();
431
Chapter 8: More on Classes
25905c08.qxd:WroxPro 2/21/08 8:53 AM Page 431
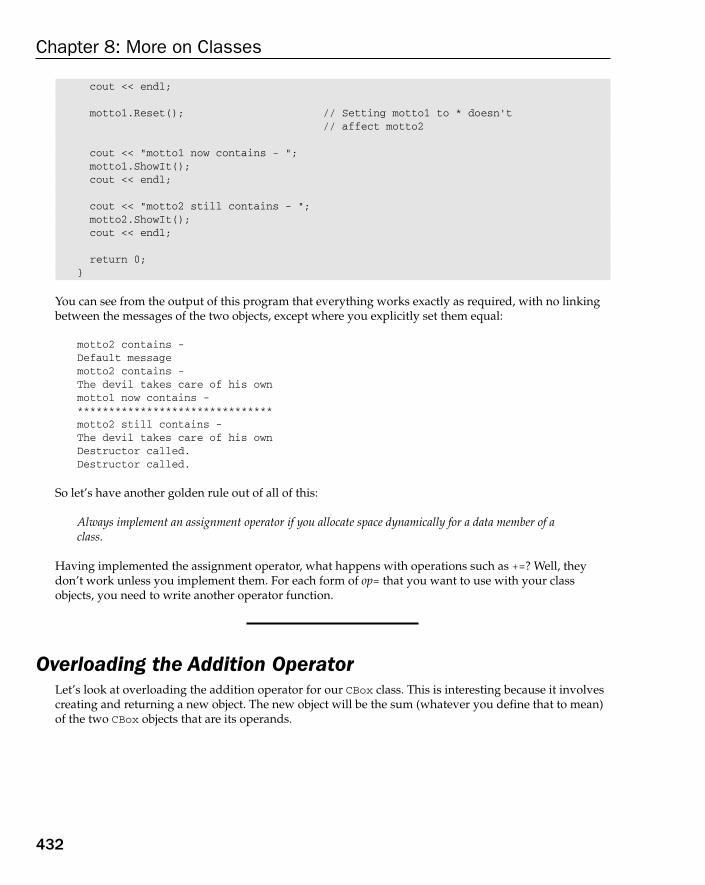
cout << endl;
motto1.Reset(); // Setting motto1 to * doesn’t// affect motto2
cout << “motto1 now contains - “;motto1.ShowIt();cout << endl;
cout << “motto2 still contains - “;motto2.ShowIt();cout << endl;
return 0;}
You can see from the output of this program that everything works exactly as required, with no linkingbetween the messages of the two objects, except where you explicitly set them equal:
motto2 contains -Default messagemotto2 contains -The devil takes care of his ownmotto1 now contains -*******************************motto2 still contains -The devil takes care of his ownDestructor called.Destructor called.
So let’s have another golden rule out of all of this:
Always implement an assignment operator if you allocate space dynamically for a data member of aclass.
Having implemented the assignment operator, what happens with operations such as +=? Well, theydon’t work unless you implement them. For each form of op= that you want to use with your classobjects, you need to write another operator function.
Overloading the Addition OperatorLet’s look at overloading the addition operator for our CBox class. This is interesting because it involvescreating and returning a new object. The new object will be the sum (whatever you define that to mean)of the two CBox objects that are its operands.
432
Chapter 8: More on Classes
25905c08.qxd:WroxPro 2/21/08 8:53 AM Page 432

So what do we want the sum of two boxes to mean? Well, there are quite a few legitimate possibilities butwe’ll keep it simple here. Let’s define the sum of two CBox objects as a CBox object that is large enough tocontain the other two boxes stacked on top of each other. You can do this by making the new object havean m_Length member that is the larger of the m_Length members of the objects being added, and anm_Width member derived in a similar way. The m_Height member will be the sum of the m_Heightmembers of the two operand objects, so that the resultant CBox object can contain the other two CBoxobjects. This isn’t necessarily an optimal solution, but it will be sufficient for our purposes. By alteringthe constructor, we’ll also arrange that the m_Length member of a CBox object is always greater than orequal to the m_Width member.
Our version of the addition operation for boxes is easier to explain graphically, so it’s illustrated inFigure 8-4.
Figure 8-4
box1
Sum ofheights
maximumwidth
maximumlength
box1+box2
box2W = 20
W = 25
W = 25
L = 30 L = 25
L = 30
H = 15 H = 10
H = 15+10 = 25
433
Chapter 8: More on Classes
25905c08.qxd:WroxPro 2/21/08 8:53 AM Page 433

Because you need to get at the members of an object directly, you will make the operator+() a memberfunction. The declaration of the function member within the class definition will be this:
CBox operator+(const CBox& aBox) const; // Function adding two CBox objects
You define the parameter as a reference to avoid unnecessary copying of the right argument when the func-tion is called, and you make it a const reference because the function does not modify the argument. If youdon’t declare the parameter as a const reference, the compiler will not allow a const object to be passed tothe function, so it would then not be possible for the right operand of + to be a const CBox object. You alsodeclare the function as const as it doesn’t change the object for which it is called. Without this, the leftoperand of + could not be a const CBox object.
The operator+() function definition would now be as follows:
// Function to add two CBox objectsCBox CBox::operator+(const CBox& aBox) const{// New object has larger length and width, and sum of heightsreturn CBox(m_Length > aBox.m_Length ? m_Length:aBox.m_Length,
m_Width > aBox.m_Width ? m_Width:aBox.m_Width,m_Height + aBox.m_Height);
}
You construct a local CBox object from the current object (*this) and the object that is passed as the argu-ment, aBox. Remember that the return process will make a temporary copy of the local object and that iswhat is passed back to the calling function, not the local object, which is discarded on return from thefunction.
Try It Out Exercising Our Addition OperatorYou’ll be able to see how the overloaded addition operator in the CBox class works in this example:
// Ex8_06.cpp// Adding CBox objects#include <iostream> // For stream I/Ousing std::cout;using std::endl;
class CBox // Class definition at global scope{public:// Constructor definitionCBox(double lv = 1.0, double wv = 1.0, double hv = 1.0): m_Height(hv){m_Length = lv > wv? lv: wv; // Ensure thatm_Width = wv < lv? wv: lv; // length >= width
}
// Function to calculate the volume of a boxdouble Volume() const
434
Chapter 8: More on Classes
25905c08.qxd:WroxPro 2/21/08 8:53 AM Page 434

{return m_Length*m_Width*m_Height;
}
// Operator function for ‘greater than’ which// compares volumes of CBox objects.int CBox::operator>(const CBox& aBox) const{
return this->Volume() > aBox.Volume();}
// Function to compare a CBox object with a constantint operator>(const double& value) const{
return Volume() > value;}
// Function to add two CBox objectsCBox operator+(const CBox& aBox) const{// New object has larger length & width, and sum of heightsreturn CBox(m_Length > aBox.m_Length? m_Length:aBox.m_Length,
m_Width > aBox.m_Width? m_Width:aBox.m_Width,m_Height + aBox.m_Height);
}
// Function to show the dimensions of a boxvoid ShowBox() const{cout << m_Length << “ “
<< m_Width << “ “<< m_Height << endl;
}
private:double m_Length; // Length of a box in inchesdouble m_Width; // Width of a box in inchesdouble m_Height; // Height of a box in inches
};
int operator>(const double& value, const CBox& aBox); // Function prototype
int main(){
CBox smallBox(4.0, 2.0, 1.0);CBox mediumBox(10.0, 4.0, 2.0);CBox aBox;CBox bBox;
aBox = smallBox + mediumBox;cout << “aBox dimensions are “;aBox.ShowBox();
435
Chapter 8: More on Classes
25905c08.qxd:WroxPro 2/21/08 8:53 AM Page 435
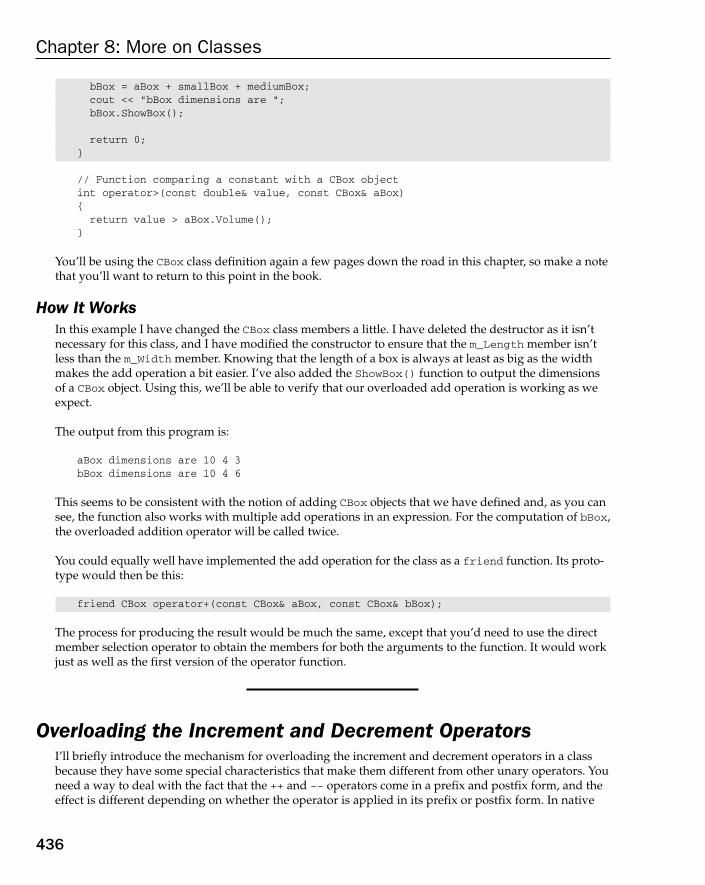
bBox = aBox + smallBox + mediumBox;cout << “bBox dimensions are “;bBox.ShowBox();
return 0;}
// Function comparing a constant with a CBox objectint operator>(const double& value, const CBox& aBox){return value > aBox.Volume();
}
You’ll be using the CBox class definition again a few pages down the road in this chapter, so make a notethat you’ll want to return to this point in the book.
How It WorksIn this example I have changed the CBox class members a little. I have deleted the destructor as it isn’tnecessary for this class, and I have modified the constructor to ensure that the m_Length member isn’tless than the m_Width member. Knowing that the length of a box is always at least as big as the widthmakes the add operation a bit easier. I’ve also added the ShowBox() function to output the dimensionsof a CBox object. Using this, we’ll be able to verify that our overloaded add operation is working as weexpect.
The output from this program is:
aBox dimensions are 10 4 3bBox dimensions are 10 4 6
This seems to be consistent with the notion of adding CBox objects that we have defined and, as you cansee, the function also works with multiple add operations in an expression. For the computation of bBox,the overloaded addition operator will be called twice.
You could equally well have implemented the add operation for the class as a friend function. Its proto-type would then be this:
friend CBox operator+(const CBox& aBox, const CBox& bBox);
The process for producing the result would be much the same, except that you’d need to use the directmember selection operator to obtain the members for both the arguments to the function. It would workjust as well as the first version of the operator function.
Overloading the Increment and Decrement OperatorsI’ll briefly introduce the mechanism for overloading the increment and decrement operators in a classbecause they have some special characteristics that make them different from other unary operators. Youneed a way to deal with the fact that the ++ and -- operators come in a prefix and postfix form, and theeffect is different depending on whether the operator is applied in its prefix or postfix form. In native
436
Chapter 8: More on Classes
25905c08.qxd:WroxPro 2/21/08 8:53 AM Page 436

C++ the overloaded operator is different for the prefix and postfix forms of the increment and decrementoperators. Here’s how they would be defined in a class with the name Length for example:
class Length{private:double len; // Length value for the class
public:Length& operator++(); // Prefix increment operatorconst Length operator++(int); // Postfix increment operator
Length& operator--(); // Prefix decrement operatorconst Length operator--(int); // Postfix decrement operator
// rest of the class...
}
This simple class assumes a length is stored just as a value of type double. You would probably in realitymake a length class more sophisticated than this but it will serve to illustrate how you overload the incre-ment and decrement operators.
The primary way the prefix and postfix forms of the overloaded operators are differentiated is by theparameter list; for the prefix form there are no parameters and for the postfix form there is a parameterof type int. The parameter in the postfix operator function is only to distinguish it from the prefix formand is otherwise unused in the function implementation.
The prefix increment and decrement operators increment or decrement the operand before its value isused in an expression, so you just return a reference to the current object after it has been incrementedor decremented. Here’s how an implementation of the prefix operator++() function would look forthe Length class:
Length& Length::operator++(){++(this->len);return *this;
}
With the postfix forms, the operand is incremented after its current value is used in an expression. Thisis achieved by creating a new object that is a copy of the current object before incrementing the currentobject and returning the copy after the current object has been modified. Here’s how you might imple-ment the function to overload the postfix ++ operator for the Length class:
const Length& Length::operator++(int){Length length = *this; // Copy the current object++*this; // Increment the current objectreturn length; // Return the original copy
}
After copying the current object, you increment it using the prefix ++ operator for the class. You thenreturn the original unincremented copy of the current object. Declaring the return value as const pre-vents expressions such as data++++ from compiling.
437
Chapter 8: More on Classes
25905c08.qxd:WroxPro 2/21/08 8:53 AM Page 437
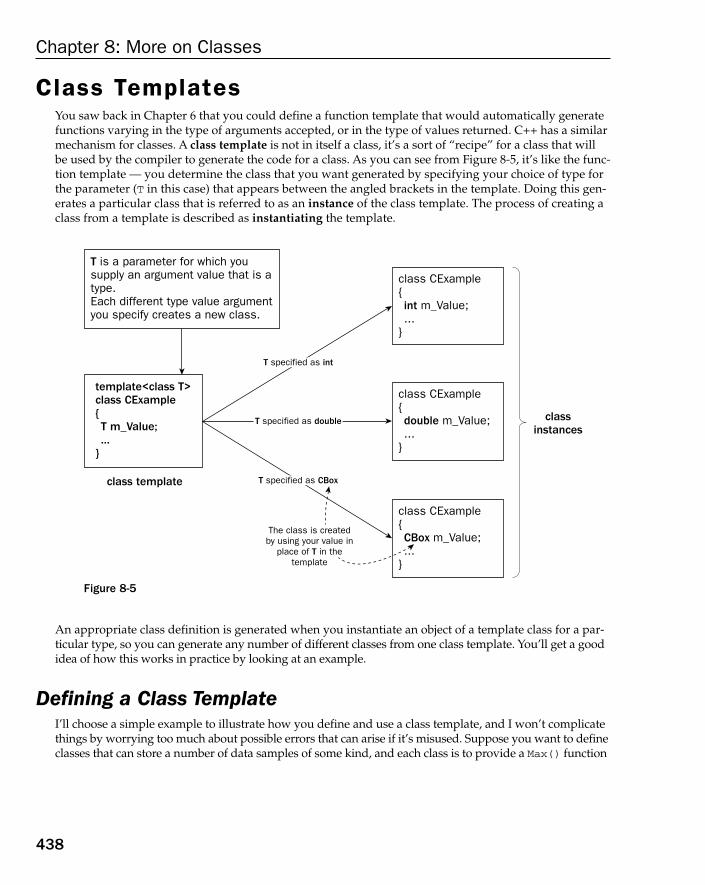
Class TemplatesYou saw back in Chapter 6 that you could define a function template that would automatically generatefunctions varying in the type of arguments accepted, or in the type of values returned. C++ has a similarmechanism for classes. A class template is not in itself a class, it’s a sort of “recipe” for a class that willbe used by the compiler to generate the code for a class. As you can see from Figure 8-5, it’s like the func-tion template — you determine the class that you want generated by specifying your choice of type forthe parameter (T in this case) that appears between the angled brackets in the template. Doing this gen-erates a particular class that is referred to as an instance of the class template. The process of creating aclass from a template is described as instantiating the template.
Figure 8-5
An appropriate class definition is generated when you instantiate an object of a template class for a par-ticular type, so you can generate any number of different classes from one class template. You’ll get a goodidea of how this works in practice by looking at an example.
Defining a Class TemplateI’ll choose a simple example to illustrate how you define and use a class template, and I won’t complicatethings by worrying too much about possible errors that can arise if it’s misused. Suppose you want to defineclasses that can store a number of data samples of some kind, and each class is to provide a Max() function
T is a parameter for which yousupply an argument value that is atype.Each different type value argumentyou specify creates a new class.
template<class T>class CExample{ T m_Value; ...}
class CExample{ int m_Value; ...}
classinstances
class template
class CExample{ double m_Value; ...}
class CExample{ CBox m_Value; ...}
The class is createdby using your value in
place of T in thetemplate
T specified as double
T specified as int
T specified as CBox
438
Chapter 8: More on Classes
25905c08.qxd:WroxPro 2/21/08 8:53 AM Page 438

to determine the maximum sample value of those stored. This function will be similar to the one you saw inthe function template discussion in Chapter 6. You can define a class template, which will generate a classCSamples to store samples of whatever type you want:
template <class T>class CSamples{public:// Constructor definition to accept an array of samplesCSamples(const T values[], int count){m_Free = count < 100? count:100; // Don’t exceed the arrayfor(int i = 0; i < m_Free; i++)m_Values[i] = values[i]; // Store count number of samples
}
// Constructor to accept a single sampleCSamples(const T& value){m_Values[0] = value; // Store the samplem_Free = 1; // Next is free
}
// Default constructorCSamples(){ m_Free = 0 } // Nothing stored, so first is free
// Function to add a samplebool Add(const T& value){bool OK = m_Free < 100; // Indicates there is a free placeif(OK)m_Values[m_Free++] = value; // OK true, so store the value
return OK;}
// Function to obtain maximum sampleT Max() const{// Set first sample or 0 as maximumT theMax = m_Free ? m_Values[0] : 0;
for(int i = 1; i < m_Free; i++) // Check all the samplesif(m_Values[i] > theMax)theMax = m_Values[i]; // Store any larger sample
return theMax;}
private:T m_Values[100]; // Array to store samplesint m_Free; // Index of free location in m_Values
};
439
Chapter 8: More on Classes
25905c08.qxd:WroxPro 2/21/08 8:53 AM Page 439

To indicate that you are defining a template rather than a straightforward class, you insert the templatekeyword and the type parameter, T, between angled brackets, just before the class keyword and the classname, CSamples. This is essentially the same syntax that you used to define a function template back inChapter 6. The parameter T is the type variable that will be replaced by a specific type when you declare a class object. Wherever the parameter T appears in the class definition, it will be replaced by the type thatyou specify in your object declaration; this creates a class definition corresponding to this type. You canspecify any type (a basic data type or a class type), but it has to make sense in the context of the class tem-plate, of course. Any class type that you use to instantiate a class from a template must have all the opera-tors defined that the member functions of the template will use with such objects. If your class hasn’timplemented operator>(), for example, it will not work with the CSamples class template above. Ingeneral, you can specify multiple parameters in a class template if you need them. I’ll come back to thispossibility a little later in the chapter.
Getting back to the example, the type of the array in which the samples will be stored is specified as T.The array will therefore be an array of whatever type you specify for T when you declare a CSamplesobject. As you can see, you also use the type T in two of the constructors for the class, as well as in theAdd() and Max() functions. Each of these occurrences will also be replaced when you instantiate a classobject using the template.
The constructors support the creation of an empty object, an object with a single sample, and an objectinitialized with an array of samples. The Add() function allows samples to be added to an object one at atime. You could also overload this function to add an array of samples. The class template includes someelementary provision to prevent the capacity of the m_Values array being exceeded in the Add() function,and in the constructor that accepts an array of samples.
As I said earlier, in theory you can create objects of CSamples classes that will handle any data type: typeint, type double, or any class type that you’ve defined. In practice, this doesn’t mean it will necessarilycompile and work as you expect. It all depends on what the template definition does, and usually a tem-plate will only work for a particular range of types. For example, the Max() function implicitly assumesthat the > operator is available for whatever type is being processed. If it isn’t, your program will notcompile. Clearly, you’ll usually be in the position of defining a template that works for some types butnot others, but there’s no way you can restrict what type is applied to a template.
Template Member FunctionsYou may want to place the definition of a class template member function outside of the template defini-tion. The syntax for this isn’t particularly obvious, so let’s look at how you do it. You put the function dec-laration in the class template definition in the normal way. For instance:
template <class T>class CSamples{// Rest of the template definition...T Max() const; // Function to obtain maximum sample// Rest of the template definition...
}
This declares the Max() function as a member of the class template but doesn’t define it. You now need tocreate a separate function template for the definition of the member function. You must use the template
440
Chapter 8: More on Classes
25905c08.qxd:WroxPro 2/21/08 8:53 AM Page 440
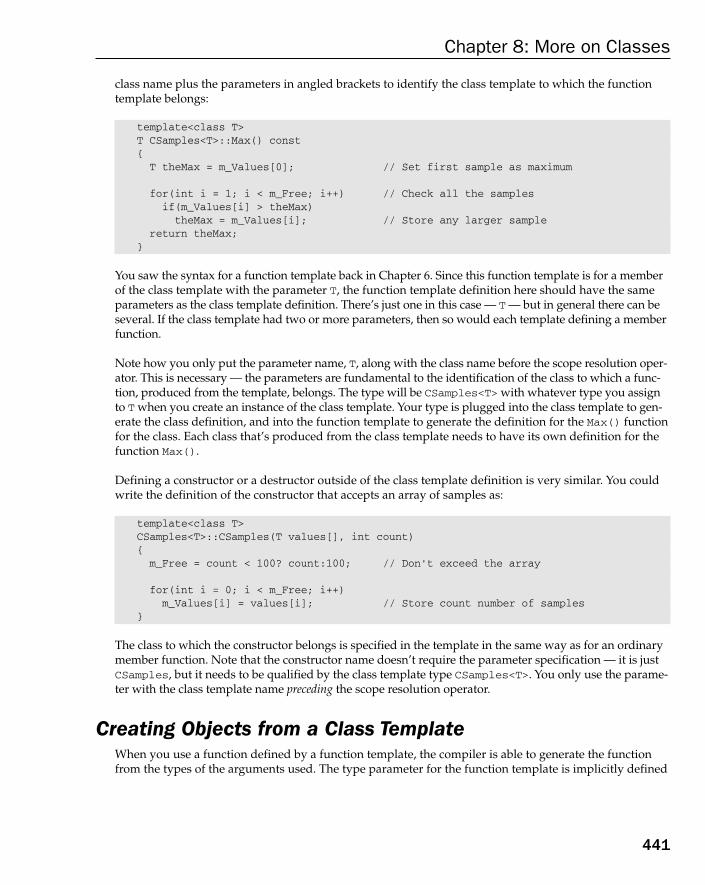
class name plus the parameters in angled brackets to identify the class template to which the functiontemplate belongs:
template<class T>T CSamples<T>::Max() const{T theMax = m_Values[0]; // Set first sample as maximum
for(int i = 1; i < m_Free; i++) // Check all the samplesif(m_Values[i] > theMax)theMax = m_Values[i]; // Store any larger sample
return theMax;}
You saw the syntax for a function template back in Chapter 6. Since this function template is for a memberof the class template with the parameter T, the function template definition here should have the sameparameters as the class template definition. There’s just one in this case — T — but in general there can beseveral. If the class template had two or more parameters, then so would each template defining a memberfunction.
Note how you only put the parameter name, T, along with the class name before the scope resolution oper-ator. This is necessary — the parameters are fundamental to the identification of the class to which a func-tion, produced from the template, belongs. The type will be CSamples<T> with whatever type you assignto T when you create an instance of the class template. Your type is plugged into the class template to gen-erate the class definition, and into the function template to generate the definition for the Max() functionfor the class. Each class that’s produced from the class template needs to have its own definition for thefunction Max().
Defining a constructor or a destructor outside of the class template definition is very similar. You couldwrite the definition of the constructor that accepts an array of samples as:
template<class T>CSamples<T>::CSamples(T values[], int count){m_Free = count < 100? count:100; // Don’t exceed the array
for(int i = 0; i < m_Free; i++)m_Values[i] = values[i]; // Store count number of samples
}
The class to which the constructor belongs is specified in the template in the same way as for an ordinarymember function. Note that the constructor name doesn’t require the parameter specification — it is justCSamples, but it needs to be qualified by the class template type CSamples<T>. You only use the parame-ter with the class template name preceding the scope resolution operator.
Creating Objects from a Class TemplateWhen you use a function defined by a function template, the compiler is able to generate the functionfrom the types of the arguments used. The type parameter for the function template is implicitly defined
441
Chapter 8: More on Classes
25905c08.qxd:WroxPro 2/21/08 8:53 AM Page 441

by the specific use of a particular function. Class templates are a little different. To create an object based ona class template, you must always specify the type parameter following the class name in the declaration.
For example, to declare a CSamples<> object to handle samples of type double, you could write thedeclaration as:
CSamples<double> myData(10.0);
This defines an object of type CSamples<double> that can store samples of type double, and the objectis created with one sample stored with the value 10.0.
Try It Out Class TemplatingYou could create an object from the CSamples<> template that stores CBox objects. This will work becausethe CBox class implements the operator>() function to overload the greater-than operator. You couldexercise the class template with the main() function in the following listing:
// Ex8_07.cpp// Using a class template#include <iostream>using std::cout;using std::endl;
// Put the CBox class definition from Ex8_06.cpp here...
// CSamples class template definitiontemplate <class T> class CSamples{public:// ConstructorsCSamples(const T values[], int count);CSamples(const T& value);CSamples(){ m_Free = 0; }
bool Add(const T& value); // Insert a valueT Max() const; // Calculate maximum
private:T m_Values[100]; // Array to store samplesint m_Free; // Index of free location in m_Values
};
// Constructor template definition to accept an array of samplestemplate<class T> CSamples<T>::CSamples(const T values[], int count){m_Free = count < 100? count:100; // Don’t exceed the arrayfor(int i = 0; i < m_Free; i++)m_Values[i] = values[i]; // Store count number of samples
}
// Constructor to accept a single sampletemplate<class T> CSamples<T>::CSamples(const T& value)
442
Chapter 8: More on Classes
25905c08.qxd:WroxPro 2/21/08 8:53 AM Page 442
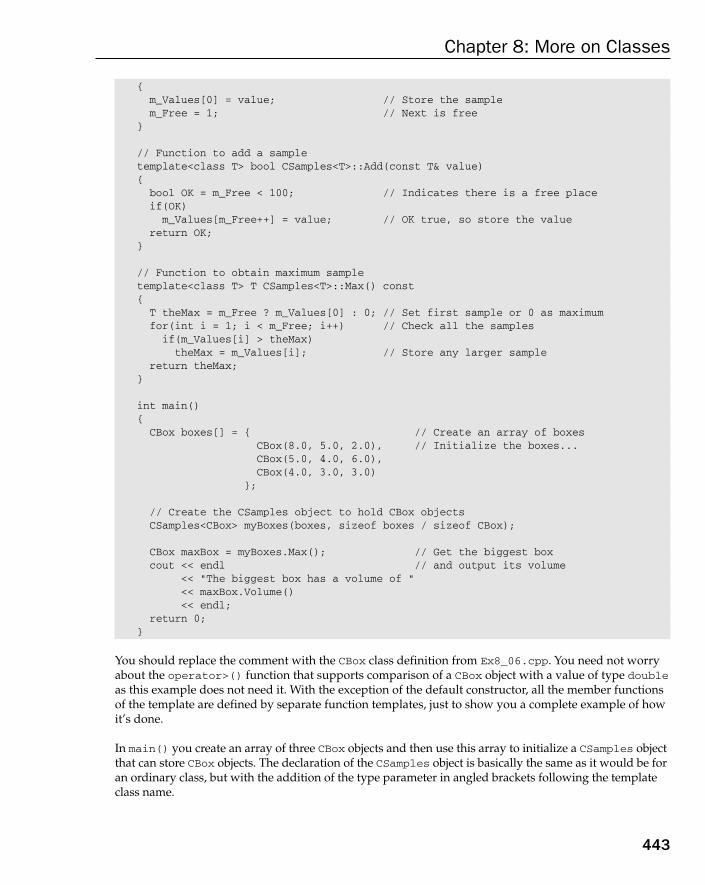
{m_Values[0] = value; // Store the samplem_Free = 1; // Next is free
}
// Function to add a sampletemplate<class T> bool CSamples<T>::Add(const T& value){bool OK = m_Free < 100; // Indicates there is a free placeif(OK)m_Values[m_Free++] = value; // OK true, so store the value
return OK;}
// Function to obtain maximum sampletemplate<class T> T CSamples<T>::Max() const{T theMax = m_Free ? m_Values[0] : 0; // Set first sample or 0 as maximumfor(int i = 1; i < m_Free; i++) // Check all the samplesif(m_Values[i] > theMax)theMax = m_Values[i]; // Store any larger sample
return theMax;}
int main(){CBox boxes[] = { // Create an array of boxes
CBox(8.0, 5.0, 2.0), // Initialize the boxes...CBox(5.0, 4.0, 6.0),CBox(4.0, 3.0, 3.0)
};
// Create the CSamples object to hold CBox objectsCSamples<CBox> myBoxes(boxes, sizeof boxes / sizeof CBox);
CBox maxBox = myBoxes.Max(); // Get the biggest boxcout << endl // and output its volume
<< “The biggest box has a volume of “<< maxBox.Volume()<< endl;
return 0;}
You should replace the comment with the CBox class definition from Ex8_06.cpp. You need not worryabout the operator>() function that supports comparison of a CBox object with a value of type doubleas this example does not need it. With the exception of the default constructor, all the member functionsof the template are defined by separate function templates, just to show you a complete example of howit’s done.
In main() you create an array of three CBox objects and then use this array to initialize a CSamples objectthat can store CBox objects. The declaration of the CSamples object is basically the same as it would be foran ordinary class, but with the addition of the type parameter in angled brackets following the templateclass name.
443
Chapter 8: More on Classes
25905c08.qxd:WroxPro 2/21/08 8:53 AM Page 443

The program will generate the following output:
The biggest box has a volume of 120
Note that when you create an instance of a class template, it does not follow that instances of the func-tion templates for function members will also be created. The compiler will only create instances of tem-plates for member functions that you actually call in your program. In fact, your function templates caneven contain coding errors, and as long as you don’t call the member function that the template gener-ates, the compiler will not complain. You can test this out with the example. Try introducing a few errorsinto the template for the Add() member. The program will still compile and run because it doesn’t callthe Add() function.
You could try modifying the example and perhaps seeing what happens when you instantiate classes by using the template with various other types.
You might be surprised at what happens if you add some output statements to the class constructors.The constructor for the CBox is being called 103 times! Look at what is happening in the main() func-tion. First you create an array of three CBox objects, so that’s three calls. You then create a CSamplesobject to hold them, but a CSamples object contains an array of 100 variables of type CBox, so you callthe default constructor another 100 times, once for each element in the array. Of course, the maxBox objectwill be created by the default copy constructor that is supplied by the compiler.
Class Templates with Multiple ParametersUsing multiple type parameters in a class template is a straightforward extension of the example using asingle parameter that you have just seen. You can use each of the type parameters wherever you want inthe template definition. For example, you could define a class template with two type parameters:
template<class T1, class T2>class CExampleClass{// Class data members
private:T1 m_Value1;T2 m_Value2;
// Rest of the template definition...};
The types of the two class data members shown will be determined by the types you supply for theparameters when you instantiate an object.
The parameters in a class template aren’t limited to types. You can also use parameters that require constantsor constant expressions to be substituted in the class definition. In our CSamples template, we arbitrarilydefined the m_Values array with 100 elements. You could, however, let the user of the template choosethe size of the array when the object is instantiated, by defining the template as:
template <class T, int Size> class CSamples{
444
Chapter 8: More on Classes
25905c08.qxd:WroxPro 2/21/08 8:53 AM Page 444
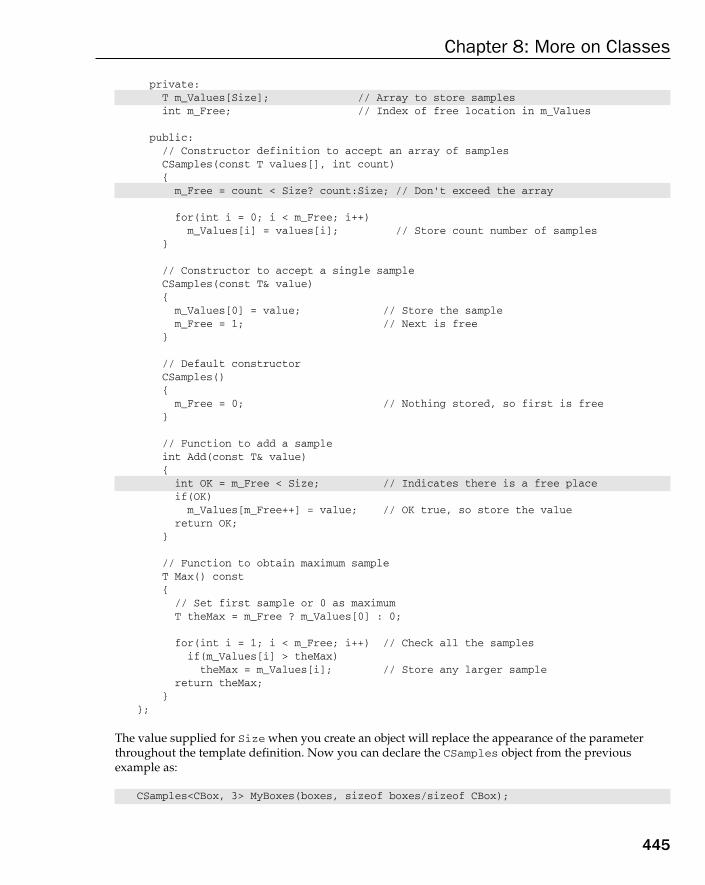
private:T m_Values[Size]; // Array to store samplesint m_Free; // Index of free location in m_Values
public:// Constructor definition to accept an array of samplesCSamples(const T values[], int count){m_Free = count < Size? count:Size; // Don’t exceed the array
for(int i = 0; i < m_Free; i++)m_Values[i] = values[i]; // Store count number of samples
}
// Constructor to accept a single sampleCSamples(const T& value){
m_Values[0] = value; // Store the samplem_Free = 1; // Next is free
}
// Default constructorCSamples(){
m_Free = 0; // Nothing stored, so first is free}
// Function to add a sampleint Add(const T& value){int OK = m_Free < Size; // Indicates there is a free placeif(OK)
m_Values[m_Free++] = value; // OK true, so store the valuereturn OK;
}
// Function to obtain maximum sampleT Max() const{
// Set first sample or 0 as maximumT theMax = m_Free ? m_Values[0] : 0;
for(int i = 1; i < m_Free; i++) // Check all the samplesif(m_Values[i] > theMax)
theMax = m_Values[i]; // Store any larger samplereturn theMax;
}};
The value supplied for Size when you create an object will replace the appearance of the parameterthroughout the template definition. Now you can declare the CSamples object from the previous example as:
CSamples<CBox, 3> MyBoxes(boxes, sizeof boxes/sizeof CBox);
445
Chapter 8: More on Classes
25905c08.qxd:WroxPro 2/21/08 8:53 AM Page 445

Because you can supply any constant expression for the Size parameter, you could also have writtenthis as:
CSamples<CBox, sizeof boxes/sizeof CBox>MyBoxes(boxes, sizeof boxes/sizeof CBox);
The example is a poor use of a template though — the original version was much more usable. A conse-quence of making Size a template parameter is that instances of the template that store the same typesof objects but have different size parameter values are totally different classes and cannot be mixed. Forinstance, an object of type CSamples<double, 10> cannot be used in an expression with an object oftype CSamples<double, 20>.
You need to be careful with expressions that involve comparison operators when instantiating templates.Look at this statement:
CSamples<aType, x > y ? 10 : 20 > MyType(); // Wrong!
This will not compile correctly because the > preceding y in the expression will be interpreted as a right-angled bracket. Instead, you should write this statement as:
CSamples<aType, (x > y ? 10 : 20) > MyType(); // OK
The parentheses ensure that the expression for the second template argument doesn’t get mixed up withthe angled brackets.
Using ClassesI’ve touched on most of the basic aspects of defining a native C++ class, so maybe we should look at howa class might be used to solve a problem. I’ll need to keep the problem simple in order to keep this bookdown to a reasonable number of pages, so we’ll consider problems in which we can use an extended ver-sion of the CBox class.
The Idea of a Class InterfaceThe implementation of an extended CBox class should incorporate the notion of a class interface.You aregoing to provide a tool kit for anyone wanting to work with CBox objects so you need to assemble a set offunctions that represents the interface to the world of boxes. Because the interface will represent the onlyway to deal with CBox objects, it needs to be defined to cover adequately the likely things one would wantto do with a CBox object, and be implemented, as far as possible, in a manner that protects against misuseor accidental errors.
The first question that you need to consider in designing a class is the nature of the problem you intendto solve and, from that, determine the kind of functionality you need to provide in the class interface.
Defining the ProblemThe principal function of a box is to contain objects of one kind or another so, in a word, the problem ispackaging. We’ll attempt to provide a class that eases packaging problems in general and then see howit might be used. We will assume that we’ll always be working on packing CBox objects into other CBox
446
Chapter 8: More on Classes
25905c08.qxd:WroxPro 2/21/08 8:53 AM Page 446
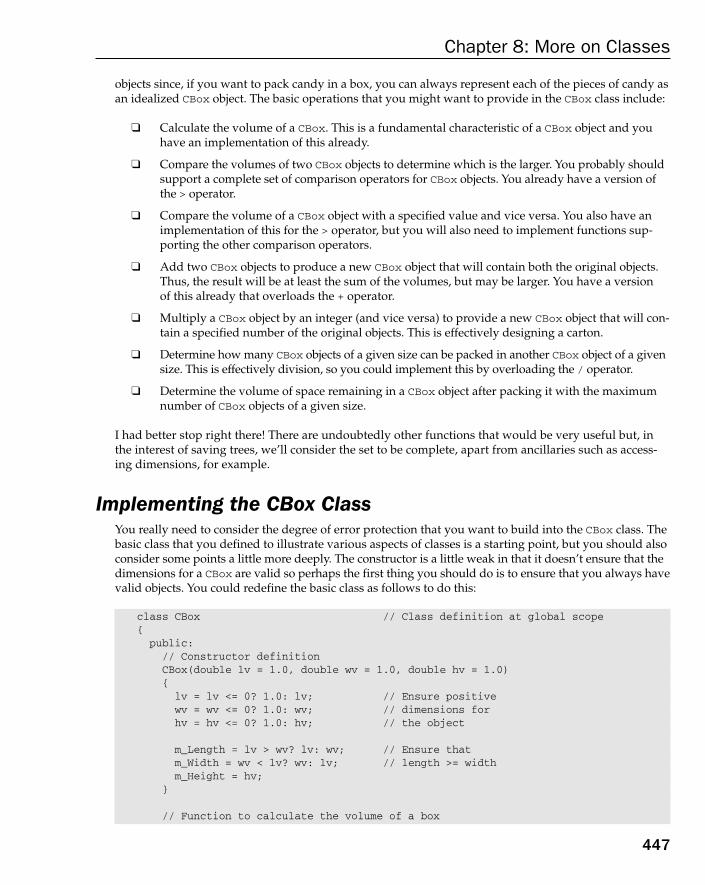
objects since, if you want to pack candy in a box, you can always represent each of the pieces of candy asan idealized CBox object. The basic operations that you might want to provide in the CBox class include:
❑ Calculate the volume of a CBox. This is a fundamental characteristic of a CBox object and youhave an implementation of this already.
❑ Compare the volumes of two CBox objects to determine which is the larger. You probably shouldsupport a complete set of comparison operators for CBox objects. You already have a version ofthe > operator.
❑ Compare the volume of a CBox object with a specified value and vice versa. You also have animplementation of this for the > operator, but you will also need to implement functions sup-porting the other comparison operators.
❑ Add two CBox objects to produce a new CBox object that will contain both the original objects.Thus, the result will be at least the sum of the volumes, but may be larger. You have a version of this already that overloads the + operator.
❑ Multiply a CBox object by an integer (and vice versa) to provide a new CBox object that will con-tain a specified number of the original objects. This is effectively designing a carton.
❑ Determine how many CBox objects of a given size can be packed in another CBox object of a givensize. This is effectively division, so you could implement this by overloading the / operator.
❑ Determine the volume of space remaining in a CBox object after packing it with the maximumnumber of CBox objects of a given size.
I had better stop right there! There are undoubtedly other functions that would be very useful but, inthe interest of saving trees, we’ll consider the set to be complete, apart from ancillaries such as access-ing dimensions, for example.
Implementing the CBox ClassYou really need to consider the degree of error protection that you want to build into the CBox class. Thebasic class that you defined to illustrate various aspects of classes is a starting point, but you should alsoconsider some points a little more deeply. The constructor is a little weak in that it doesn’t ensure that thedimensions for a CBox are valid so perhaps the first thing you should do is to ensure that you always havevalid objects. You could redefine the basic class as follows to do this:
class CBox // Class definition at global scope{public:// Constructor definitionCBox(double lv = 1.0, double wv = 1.0, double hv = 1.0){lv = lv <= 0? 1.0: lv; // Ensure positivewv = wv <= 0? 1.0: wv; // dimensions forhv = hv <= 0? 1.0: hv; // the object
m_Length = lv > wv? lv: wv; // Ensure thatm_Width = wv < lv? wv: lv; // length >= widthm_Height = hv;
}
// Function to calculate the volume of a box
447
Chapter 8: More on Classes
25905c08.qxd:WroxPro 2/21/08 8:53 AM Page 447
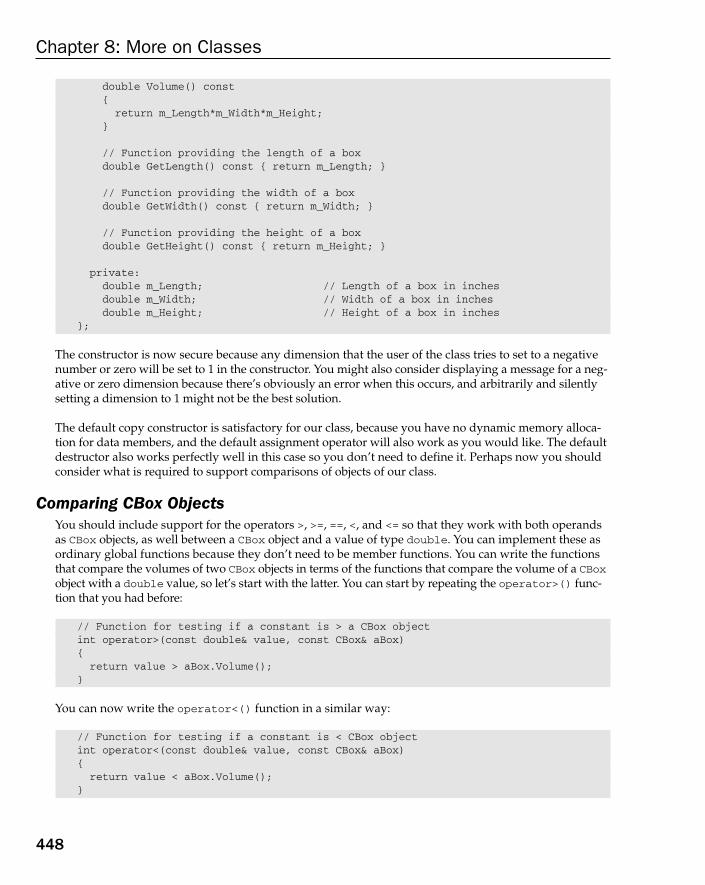
double Volume() const{return m_Length*m_Width*m_Height;
}
// Function providing the length of a boxdouble GetLength() const { return m_Length; }
// Function providing the width of a boxdouble GetWidth() const { return m_Width; }
// Function providing the height of a boxdouble GetHeight() const { return m_Height; }
private:double m_Length; // Length of a box in inchesdouble m_Width; // Width of a box in inchesdouble m_Height; // Height of a box in inches
};
The constructor is now secure because any dimension that the user of the class tries to set to a negativenumber or zero will be set to 1 in the constructor. You might also consider displaying a message for a neg-ative or zero dimension because there’s obviously an error when this occurs, and arbitrarily and silentlysetting a dimension to 1 might not be the best solution.
The default copy constructor is satisfactory for our class, because you have no dynamic memory alloca-tion for data members, and the default assignment operator will also work as you would like. The defaultdestructor also works perfectly well in this case so you don’t need to define it. Perhaps now you shouldconsider what is required to support comparisons of objects of our class.
Comparing CBox ObjectsYou should include support for the operators >, >=, ==, <, and <= so that they work with both operandsas CBox objects, as well between a CBox object and a value of type double. You can implement these asordinary global functions because they don’t need to be member functions. You can write the functionsthat compare the volumes of two CBox objects in terms of the functions that compare the volume of a CBoxobject with a double value, so let’s start with the latter. You can start by repeating the operator>() func-tion that you had before:
// Function for testing if a constant is > a CBox objectint operator>(const double& value, const CBox& aBox){return value > aBox.Volume();
}
You can now write the operator<() function in a similar way:
// Function for testing if a constant is < CBox objectint operator<(const double& value, const CBox& aBox){return value < aBox.Volume();
}
448
Chapter 8: More on Classes
25905c08.qxd:WroxPro 2/21/08 8:53 AM Page 448

You can code the implementations of the same operators with the arguments reversed in terms of thetwo functions you have just defined:
// Function for testing if CBox object is > a constantint operator>(const CBox& aBox, const double& value){ return value < aBox; }
// Function for testing if CBox object is < a constantint operator<(const CBox& aBox, const double& value){ return value > aBox; }
You just use the appropriate overloaded operator function that you wrote before, with the argumentsfrom the call to the new function switched.
The functions implementing the >= and <= operators will be the same as the first two functions but withthe <= operator replacing each use of <, and >= instead of >; there’s little point in reproducing them atthis stage. The operator==() functions are also very similar:
// Function for testing if constant is == the volume of a CBox objectint operator==(const double& value, const CBox& aBox){
return value == aBox.Volume();}
// Function for testing if CBox object is == a constantint operator==(const CBox& aBox, const double& value){
return value == aBox;}
You now have a complete set of comparison operators for CBox objects. Keep in mind that these will alsowork with expressions, as long as the expressions result in objects of the required type, so you will be ableto combine them with the use of other overloaded operators.
Combining CBox ObjectsNow you come to the question of overloading the operators +, *, /, and %. I will take them in order. Theadd operation that you already have from Ex8_06.cpp has this prototype:
CBox operator+(const CBox& aBox); // Function adding two CBox objects
Although the original implementation of this isn’t an ideal solution, let’s use it anyway to avoid overcom-plicating the class. A better version would need to examine whether the operands had any faces with thesame dimensions and if so, join along those faces, but coding that could get a bit messy. Of course, if thiswere a practical application, a better add operation could be developed later and substituted for the exist-ing version, and any programs written using the original would still run without change. The separationof the interface to a class from its implementation is crucial to good C++ programming.
Notice that I conveniently forgot the subtraction operator. This is a judicious oversight to avoid the com-plications inherent in implementing this. If you’re really enthusiastic about it, and you think it’s a sensibleidea, you can give it a try — but you need to decide what to do when the result has a negative volume. Ifyou allow the concept, you need to resolve which box dimension or dimensions are to be negative, andhow such a box is to be handled in subsequent operations.
449
Chapter 8: More on Classes
25905c08.qxd:WroxPro 2/21/08 8:53 AM Page 449

The multiply operation is very easy. It represents the process of creating a box to contain n boxes, wheren is the multiplier. The simplest solution would be to take the m_Length and m_Width of the object to be packed and multiply the height by n to get the new CBox object. You can make it a little cleverer bychecking whether or not the multiplier is even and, if it is, stack the boxes side by side by doubling them_Width value and only multiplying the m_Height value by half of n. This mechanism is illustrated inFigure 8-6.
Figure 8-6
Of course, you don’t need to check which is the larger of the length and width for the new object becausethe constructor will sort it out automatically. You can write the version of the operator*() function asa member function with the left operand as a CBox object:
// CBox multiply operator this*nCBox operator*(int n) const{if(n % 2)return CBox(m_Length, m_Width, n*m_Height); // n odd
elsereturn CBox(m_Length, 2.0*m_Width, (n/2)*m_Height); // n even
}
CBox Multiply: n odd: 3*aBox
CBox Multiply: n even: 6*aBox
Two stacks of three boxesside by side
L
L
W
2*W
3*H
3*H
L
W
H
aBox
450
Chapter 8: More on Classes
25905c08.qxd:WroxPro 2/21/08 8:53 AM Page 450

Here, you use the % operator to determine whether n is even or odd. If n is odd, the value of n % 2 is 1and the if statement is true. If it’s even, n % 2 is 0 and the statement is false.
You can now use the function you have just written in the implementation of the version with the leftoperand as an integer. You can write this as an ordinary non-member function:
// CBox multiply operator n*aBoxCBox operator*(int n, const CBox& aBox){return aBox*n;
}
This version of the multiply operation simply reverses the order of the operands so as to use the previousversion of the function directly. That completes the set of arithmetic operators for CBox objects that youdefined. You can finally look at the two analytical operator functions, operator/() and operator%().
Analyzing CBox ObjectsAs I have said, the division operation will determine how many CBox objects identical to that specified by the right operand can be contained in the CBox object specified by the left operand. To keep it relativelysimple, assume that all the CBox objects are packed the right way up, that is, with the height dimensionsvertical. Also assume that they are all packed the same way round, so that their length dimensions arealigned. Without these assumptions, it can get rather complicated.
The problem will then amount to determining how many of the right-operand objects can be placed in asingle layer, and then deciding how many layers you can get inside the left-operand CBox.
You can code this as a member function like this:
int operator/(const CBox& aBox){int tc1 = 0; // Temporary for number in horizontal plane this wayint tc2 = 0; // Temporary for number in a plane that way
tc1 = static_cast<int>((m_Length / aBox.m_Length))*static_cast<int>((m_Width / aBox.m_Width)); // to fit this way
tc2 = static_cast<int>((m_Length / aBox.m_Width))*static_cast<int>((m_Width / aBox.m_Length)); // and that way
//Return best fitreturn static_cast<int>((m_Height/aBox.m_Height)*(tc1>tc2 ? tc1 : tc2));
}
This function first determines how many of the right-operand CBox objects can fit in a layer with theirlengths aligned with the length dimension of the left-operand CBox. This is stored in tc1. You then cal-culate how many can fit in a layer with the lengths of the right-operand CBoxes lying in the width direc-tion of the left-operand CBox. Finally you multiply the larger of tc1 and tc2 by the number of layers youcan pack in, and return that value. This process is illustrated in Figure 8-7.
We look at two possibilities: fitting bBox into aBox with the length aligned with that of aBox, and thenwith the length of bBox aligned with the width of aBox. You can see from Figure 8-7 that the best pack-ing results from rotating bBox so that the width divides into the length of aBox.
451
Chapter 8: More on Classes
25905c08.qxd:WroxPro 2/21/08 8:53 AM Page 451

Figure 8-7
The other analytical operator function, operator%(), for obtaining the free volume in a packed aBoxis easier because you can use the operator you have just written to implement it. You can write it as anordinary global function because you don’t need access to the private members of the class.
// Operator to return the free volume in a packed boxdouble operator%(const CBox& aBox, const CBox& bBox){return aBox.Volume() - ((aBox/bBox)*bBox.Volume());
}
This computation falls out very easily using existing class functions. The result is the volume of the big box,aBox, minus the volume of the bBox boxes that can be stored in it. The number of bBox objects packed intoaBox is given by the expression aBox/bBox, which uses the previous overloaded operator. You multiply thisby the volume of bBox objects to get the volume to be subtracted from the volume of the large box, aBox.
That completes the class interface. Clearly, there are many more functions that might be required for aproduction problem solver but, as an interesting working model demonstrating how you can produce a class for solving a particular kind of problem, it will suffice. Now you can go ahead and try it out on areal problem.
bBox
aBox
bBoxbBox
bBoxbBox
bBoxbBox
bBoxbBox
bBox bBox
bBox bBox
bBox bBox
How aBox/bBox is calculated
L = 8
W = 6
H = 2
L = 3
W = 2
H = 1
There are two rectangular arrangements possible for fitting a number of bBox objects within aBox, as shown below.
With this configuration12 can be stored
With this configuration16 can be stored
8/3 = 2
6/2 = 3
2/1 = 2
8/2 = 4
6/3 = 2
2/1 = 2
Result is 16
452
Chapter 8: More on Classes
25905c08.qxd:WroxPro 2/21/08 8:53 AM Page 452

Try It Out A Multifile Project Using the CBox ClassBefore you can actually start writing the code to use the CBox class and its overloaded operators, first youneed to assemble the definition for the class into a coherent whole. You’re going to take a rather differentapproach from what you’ve seen previously, in that you’re going to write multiple files for the project.You’re also going to start using the facilities that Visual C++ 2008 provides for creating and maintainingcode for our classes. This will mean that you do rather less of the work, but it will also mean that the codewill be slightly different in places.
Start by creating a new WIN32 project for a console application called Ex8_08 and check the Emptyproject application option. If you select the Class View tab, you’ll see the window shown in Figure 8-8.
Figure 8-8
This shows a view of all the classes in a project but of course, there are none here for the moment.Although there are no classes defined — or anything else for that matter — Visual C++ 2008 has alreadymade provision for including some. You can use Visual C++ 2008 to create a skeleton for our CBox class,and the files that relate to it too. Right-click Ex8_08 in Class View and select Add/Class... from thepop-up menu that appears. You can then select C++ from the class categories in the left pane of the AddClass dialog that is displayed and the C++ Class template in the right pane and press Enter. You willthen be able to enter the name of the class that you want to create, CBox, in the Generic Class Wizard dialog, as shown in Figure 8-9.
The name of the file that’s indicated on the dialog, Box.cpp, will be used to contain the class implemen-tation, which consists of the definitions for the function members of the class. This is the executable codefor the class. You can change the name of this file if you want, but Box.cpp looks like a good name forthe file in this case. The class definition will be stored in a file called Box.h. This is the standard way ofstructuring a program. Code that consists of class definitions is stored in files with the extension .h, andcode that defines functions is stored in files with the extension .cpp. Usually, each class definition goesin its own .h file, and each class implementation goes in its own .cpp file.
453
Chapter 8: More on Classes
25905c08.qxd:WroxPro 2/21/08 8:53 AM Page 453
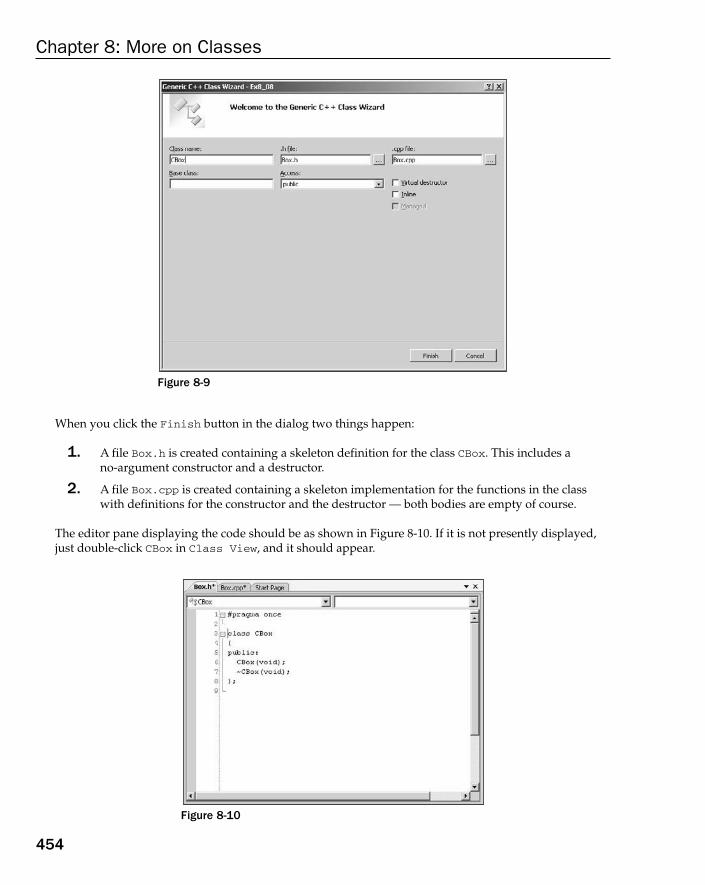
Figure 8-9
When you click the Finish button in the dialog two things happen:
1. A file Box.h is created containing a skeleton definition for the class CBox. This includes a no-argument constructor and a destructor.
2. A file Box.cpp is created containing a skeleton implementation for the functions in the classwith definitions for the constructor and the destructor — both bodies are empty of course.
The editor pane displaying the code should be as shown in Figure 8-10. If it is not presently displayed,just double-click CBox in Class View, and it should appear.
Figure 8-10
454
Chapter 8: More on Classes
25905c08.qxd:WroxPro 2/21/08 8:53 AM Page 454
As you can see, above the pane containing the code listing for the class there are two controls. The leftcontrol displays the current class name, CBox, and clicking the button to the right of the class name willdisplay the list of all the classes in the project. In general you can use this control to switch to another classby selecting it from the list, but here you have just one class defined. The control to the right relates to themembers defined in the .cpp file for the current class, and clicking its button will display the members ofthe class. Selecting a member from the list will cause its code to be visible in the pane below.
Let’s start developing the CBox class based on what Visual C++ has provided automatically for us.
Defining the CBox ClassIf you click the + to the left of Ex8_08 in the Class View, the tree will be expanded and you will see thatCBox is now defined for the project. All the classes in a project are displayed in this tree. You can view thesource code supplied for the definition of a class by double-clicking the class name in the tree, or by usingthe controls above the pane displaying the code as I described in the previous section.
The CBox class definition that was generated starts with a preprocessor directive:
#pragma once
The effect of this is to prevent the file from being opened and included into the source code more thanonce by the compiler in a build. Typically a class definition will be included into several files in a proj-ect because each file that references the name of a particular class will need access to its definition. Insome instances a header file may itself have #include directives for other header files. This can resultin the possibility of the contents of a header file appearing more than once in the source code. Havingmore than one definition of a class in a build is not allowed and will be flagged as an error. Having the#pragma once directive at the start of every header file will ensure this cannot happen.
Note that #pragma once is a Microsoft-specific directive that may not be supported in other developmentenvironments. If you are developing code that you anticipate may need to be compiled in other environ-ments you can use the following form of directive in a header file to achieve the same effect:
// Box.h header file#ifndef BOX_H#define BOX_H// Code that must not be included more than once// such as the CBox class definition#endif
The important lines are shaded and correspond to directives that are supported by any ISO/ANSI C++compiler. The lines following the #ifndef directive down to the #endif directive will be included in abuild as long as the symbol BOX_H is not defined. The line following #ifndef defines the symbol BOX_Hthus ensuring that the code in this header file will not be included a second time. Thus this has the sameeffect as placing the #pragma once directive at the beginning of a header file. Clearly the #pragma oncedirective is simpler and less cluttered so it’s better to use that when you only expect to be using your code
455
Chapter 8: More on Classes
25905c08.qxd:WroxPro 2/21/08 8:53 AM Page 455

in the Visual C++ 2008 development environment. You will sometimes see the #ifndef/#endif combi-nation written as:
#if !defined BOX_H#define BOX_H// Code that must not be included more than once// such as the CBox class definition#endif
The Box.cpp file that was generated by Class Wizard contains the following code:
#include “Box.h”
CBox::CBox(void){}
CBox::~CBox(void){}
The first line is an #include preprocessor directive that has the effect of including the contents of the Box.hfile — the class definition — into this file, Box.cpp. This is necessary because the code in Box.cpp refers tothe CBox class name and the class definition needs to be available to assign meaning to the name CBox.
Adding Data MembersFirst, you can add the private data members m_Length, m_Width, and m_Height. Right click CBox inClass View and select Add/Add Variable... from the pop-up menu. You can then specify the name,type, and access for the first data member that you want to add to the class in the Add Member VariableWizard dialog.
The way you specify a new data member in this dialog is quite self-explanatory. If you specify a lowerlimit for a data member, you must also specify an upper limit. When you specify limits, the constructordefinition in the .cpp file will be modified to add a default value for the data member corresponding tothe lower limit. You can add a comment in the lower input field if you wish. When you click the OK but-ton, the variable will be added to the class definition along with the comment if you have supplied one.You should repeat the process for the other two class data members, m_Width and m_Height. The classdefinition in Box.h will then be modified to look like this:
#pragma once
class CBox{public:CBox(void);
public:~CBox(void);
private:// Length of a box in inches
456
Chapter 8: More on Classes
25905c08.qxd:WroxPro 2/21/08 8:53 AM Page 456

double m_Length;// Width of a box in inchesdouble m_Width;// Height of a box in inchesdouble m_Height;
};
Of course, you’re quite free to enter the declarations for these members manually, directly into the code,if you want. You always have the choice of whether you use the automation provided by the IDE. You canalso manually delete anything that was generated automatically, but don’t forget that sometimes both the.h and .cpp file will need to be changed. It’s a good idea to save all the files whenever you make manualchanges as this will cause the information in Class View to be updated.
If you look in the Box.cpp file, you’ll see that the Wizard has also added an initialization list to the con-structor definition for the data members you have added, with each variable initialized to 0. You’ll modifythe constructor to do what you want next.
Defining the ConstructorYou need to change the declaration of the no-arg constructor in the class definition so that it has argumentswith default values, so modify it to:
CBox(double lv = 1.0, double wv = 1.0, double hv = 1.0);
Now you’re ready to implement it. Open the Box.cpp file if it isn’t open already and modify the construc-tor definition to:
CBox::CBox(double lv, double wv, double hv){lv = lv <= 0.0 ? 1.0 : lv; // Ensure positivewv = wv <= 0.0 ? 1.0 : wv; // dimensions forhv = hv <= 0.0 ? 1.0 : hv; // the object
m_Length = lv>wv ? lv : wv; // Ensure thatm_Width = wv<lv ? wv : lv; // length >= widthm_Height = hv;
}
Remember that the initializers for the parameters to a member function should only appear in the memberdeclaration in the class definition, not in the definition of the function. If you put them in the function defi-nition, your code will not compile. You’ve seen this code already, so I won’t discuss it again. It would be agood idea to save the file at this point by clicking on the Save toolbar button. Get into the habit of savingthe file you’re editing before you switch to something else. If you need to edit the constructor again, youcan get to it easily by either double-clicking its entry in the lower pane on the Class View tab or by selectingit from the right drop-down menu above the pane displaying the code.
You can also get to a member function’s definition in a .cpp file or to its declaration in a .h file directlyby right clicking its name in the Class View pane and selecting the appropriate item from the context menuthat appears.
457
Chapter 8: More on Classes
25905c08.qxd:WroxPro 2/21/08 8:53 AM Page 457

Adding Function MembersYou need to add all the functions you saw earlier to the CBox class. Previously, you defined several func-tion members within the class definition, so that these functions were automatically inline. You can achievethe same result by entering the code in the class definition for these functions manually, or you can use theAdd Member Function Wizard.
You might think that you can define each inline function in the .cpp file, and add the keyword inline tothe function definitions, but the problem here is that inline functions end up not being “real” functions.Because the code from the body of each function has to be inserted directly at the position it is called, thedefinitions of the functions need to be available when the file containing calls to the functions is compiled.If they’re not, you’ll get linker errors and your program will not run. If you want member functions to be inline, you must include the function definitions in the .h file for the class. They can be defined eitherwithin the class definition, or immediately following it in the .h file. You should put any global inlinefunctions you need into a .h file, and #include that file into any .cpp file that uses them.
To add the GetHeight() function as inline, right-click CBox on the Class View tab and select Add/AddFunction… from the context menu. You then can enter the data defining the function in the dialog that is displayed, as Figure 8-11 shows.
Figure 8-11
You can specify the return type to be double by selecting from the drop-down list, but you could equallywell type it in. Obviously for a type that does not appear in the list you would just enter it from the key-board. Selecting the inline checkbox ensures that GetHeight() will be created as an inline function.Note the other options to declare a function as static, virtual, or pure. As you know, a static member
458
Chapter 8: More on Classes
25905c08.qxd:WroxPro 2/21/08 8:53 AM Page 458

function exists independently of any objects of a class. You’ll get to virtual and pure virtual func-tions in Chapter 9. The GetHeight() function has no parameters so nothing further needs to be added.Clicking the OK button will add the function definition to the class definition in Box.h. If you repeat thisprocess for the GetWidth(), GetLength(), and Volume() member functions, the CBox class definitionin Box.h will look like this:
#pragma once
class CBox{public:
CBox(double lv = 1.0, double wv = 1.0, double hv = 1.0);~CBox(void);
private:// Length of a box in inchesdouble m_Length;// Width of a box in inchesdouble m_Width;// Height of a box in inchesdouble m_Height;
public:double GetHeight(void){return 0;
}
double GetWidth(void){return 0;
}
double CBox::GetLength(void){return 0;
}
// Calculate the volume of a boxdouble Volume(void){return 0;
}};
An additional public section has been added to the class definition that contains the inline function defi-nitions. You need to modify each of the definitions to provide the correct return value and to declare thefunctions to be const. For example, the code for GetHeight() function should be changed to:
double GetHeight(void) const{return m_Height;
}
459
Chapter 8: More on Classes
25905c08.qxd:WroxPro 2/21/08 8:53 AM Page 459
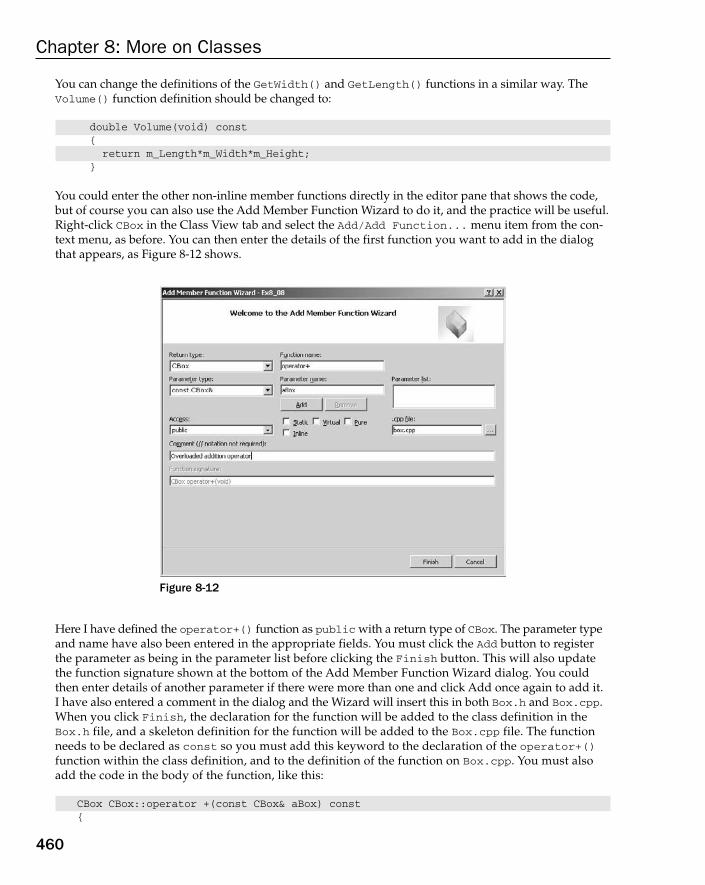
You can change the definitions of the GetWidth() and GetLength() functions in a similar way. TheVolume() function definition should be changed to:
double Volume(void) const{return m_Length*m_Width*m_Height;
}
You could enter the other non-inline member functions directly in the editor pane that shows the code,but of course you can also use the Add Member Function Wizard to do it, and the practice will be useful.Right-click CBox in the Class View tab and select the Add/Add Function... menu item from the con-text menu, as before. You can then enter the details of the first function you want to add in the dialogthat appears, as Figure 8-12 shows.
Figure 8-12
Here I have defined the operator+() function as public with a return type of CBox. The parameter typeand name have also been entered in the appropriate fields. You must click the Add button to registerthe parameter as being in the parameter list before clicking the Finish button. This will also updatethe function signature shown at the bottom of the Add Member Function Wizard dialog. You couldthen enter details of another parameter if there were more than one and click Add once again to add it. I have also entered a comment in the dialog and the Wizard will insert this in both Box.h and Box.cpp.When you click Finish, the declaration for the function will be added to the class definition in theBox.h file, and a skeleton definition for the function will be added to the Box.cpp file. The functionneeds to be declared as const so you must add this keyword to the declaration of the operator+()function within the class definition, and to the definition of the function on Box.cpp. You must alsoadd the code in the body of the function, like this:
CBox CBox::operator +(const CBox& aBox) const{
460
Chapter 8: More on Classes
25905c08.qxd:WroxPro 2/21/08 8:53 AM Page 460
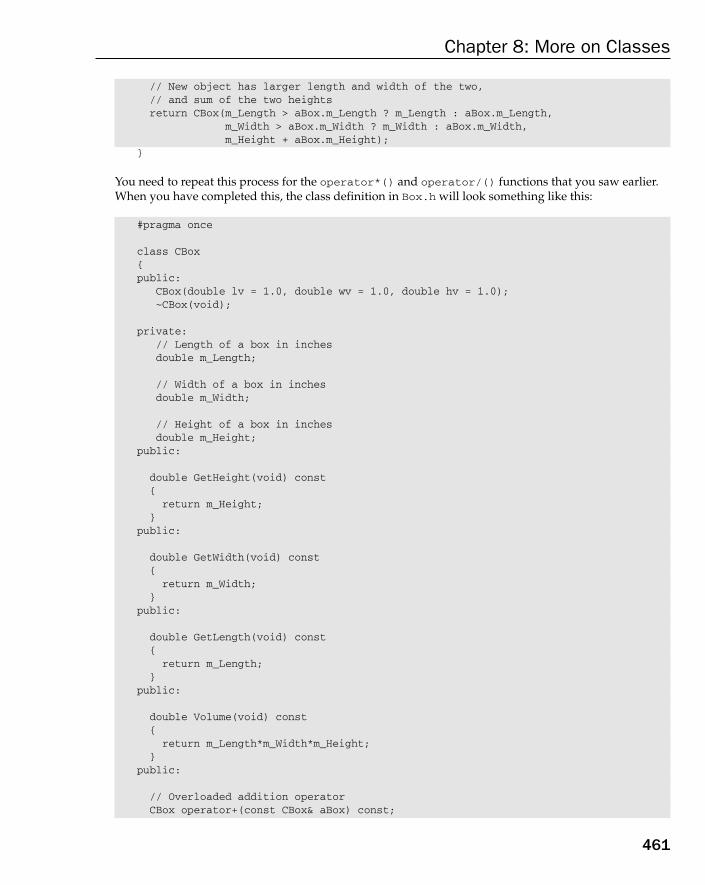
// New object has larger length and width of the two,// and sum of the two heightsreturn CBox(m_Length > aBox.m_Length ? m_Length : aBox.m_Length,
m_Width > aBox.m_Width ? m_Width : aBox.m_Width,m_Height + aBox.m_Height);
}
You need to repeat this process for the operator*() and operator/() functions that you saw earlier.When you have completed this, the class definition in Box.h will look something like this:
#pragma once
class CBox{public:
CBox(double lv = 1.0, double wv = 1.0, double hv = 1.0);~CBox(void);
private:// Length of a box in inchesdouble m_Length;
// Width of a box in inchesdouble m_Width;
// Height of a box in inchesdouble m_Height;
public:
double GetHeight(void) const{return m_Height;
}public:
double GetWidth(void) const{return m_Width;
}public:
double GetLength(void) const{return m_Length;
}public:
double Volume(void) const{return m_Length*m_Width*m_Height;
}public:
// Overloaded addition operatorCBox operator+(const CBox& aBox) const;
461
Chapter 8: More on Classes
25905c08.qxd:WroxPro 2/21/08 8:53 AM Page 461

public// Multiply a box by an integerCBox operator*(int n) const;
public:
// Divide one box into anotherint operator/(const CBox& aBox) const;
};
You can edit or rearrange the code in any way that you want — as long as it’s still correct of course. Ihave added a few empty lines to make the code a bit more readable.
The contents of the Box.cpp file ultimately look something like this:
#include “.\box.h”
CBox::CBox(double lv, double wv, double hv){lv = lv <= 0.0 ? 1.0 : lv; // Ensure positivewv = wv <= 0.0 ? 1.0 : wv; // dimensions forhv = hv <= 0.0 ? 1.0 : hv; // the object
m_Length = lv>wv ? lv : wv; // Ensure thatm_Width = wv<lv ? wv : lv; // length >= widthm_Height = hv;
}
CBox::~CBox(void){}
// Overloaded addition operatorCBox CBox::operator+(const CBox& aBox) const{// New object has larger length and width of the two,// and sum of the two heightsreturn CBox(m_Length > aBox.m_Length ? m_Length : aBox.m_Length,
m_Width > aBox.m_Width ? m_Width : aBox.m_Width,m_Height + aBox.m_Height);
}
// Multiply a box by an integerCBox CBox::operator*(int n) const{if(n%2)return CBox(m_Length, m_Width, n*m_Height); // n odd
elsereturn CBox(m_Length, 2.0*m_Width, (n/2)*m_Height); // n even
}
// Divide one box into anotherint CBox::operator/(const CBox& aBox) const{
462
Chapter 8: More on Classes
25905c08.qxd:WroxPro 2/21/08 8:53 AM Page 462

// Temporary for number in horizontal plane this wayint tc1 = 0;// Temporary for number in a plane that wayint tc2 = 0;
tc1 = static_cast<int>((m_Length/aBox.m_Length))*static_cast<int>((m_Width/aBox.m_Width)); // to fit this way
tc2 = static_cast<int>((m_Length/aBox.m_Width))*static_cast<int>((m_Width/aBox.m_Length)); // and that way
//Return best fitreturn static_cast<int>((m_Height/aBox.m_Height))*(tc1>tc2 ? tc1 : tc2);
}
The shaded lines are those that you should have modified or added manually.
The very short functions, particularly those that just return the value of a data member, have their defi-nitions within the class definition so that they are inline. If you take a look at ClassView by clicking onthe tab, and then click the + beside the CBox class name, you’ll see that all the members of the class areshown in the lower pane.
This completes the CBox class, but you still need to define the global functions that implement operatorsto compare the volume of a CBox object with a numerical value.
Adding Global FunctionsYou need to create a .cpp file that will contain the definitions for the global functions supporting opera-tions on CBox objects. The file also needs to be part of the project. Click the Solution Explorer tabto display it (you currently will have the Class View tab displayed) and right click the Source Filesfolder. Select Add | New Item... from the context menu to display the dialog. Choose the category asCode and the template as C++ File (.cpp) in the right pane of the dialog and enter the file name asBoxOperators.
You can now enter the following code in the editor pane:
// BoxOperators.cpp// CBox object operations that don’t need to access private members#include “Box.h”
// Function for testing if a constant is > a CBox objectbool operator>(const double& value, const CBox& aBox){ return value > aBox.Volume(); }
// Function for testing if a constant is < CBox objectbool operator<(const double& value, const CBox& aBox){ return value < aBox.Volume(); }
// Function for testing if CBox object is > a constantbool operator>(const CBox& aBox, const double& value){ return value < aBox; }
463
Chapter 8: More on Classes
25905c08.qxd:WroxPro 2/21/08 8:53 AM Page 463
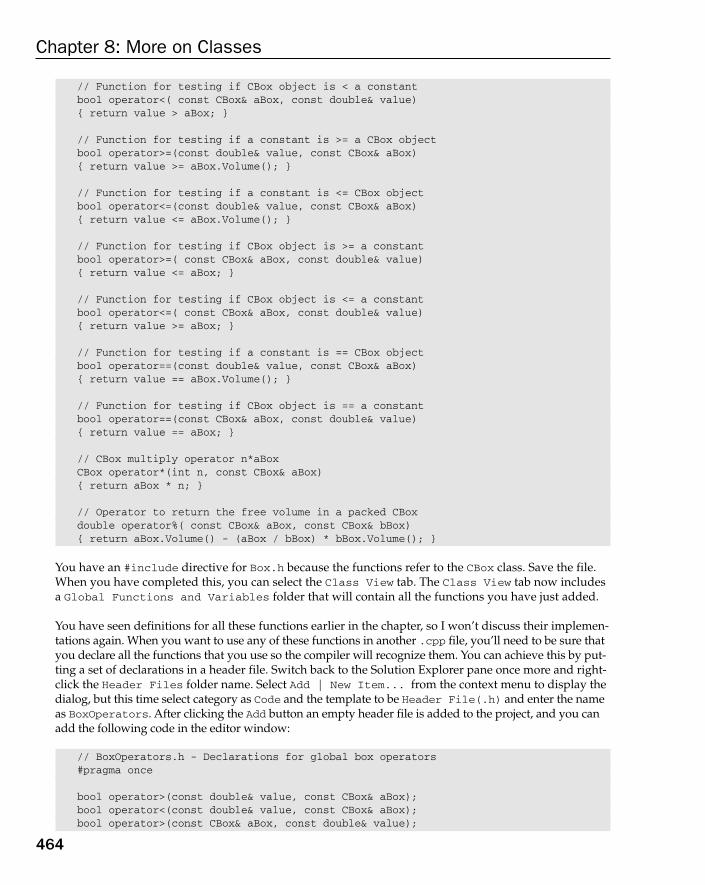
// Function for testing if CBox object is < a constantbool operator<( const CBox& aBox, const double& value){ return value > aBox; }
// Function for testing if a constant is >= a CBox objectbool operator>=(const double& value, const CBox& aBox){ return value >= aBox.Volume(); }
// Function for testing if a constant is <= CBox objectbool operator<=(const double& value, const CBox& aBox){ return value <= aBox.Volume(); }
// Function for testing if CBox object is >= a constantbool operator>=( const CBox& aBox, const double& value){ return value <= aBox; }
// Function for testing if CBox object is <= a constantbool operator<=( const CBox& aBox, const double& value){ return value >= aBox; }
// Function for testing if a constant is == CBox objectbool operator==(const double& value, const CBox& aBox){ return value == aBox.Volume(); }
// Function for testing if CBox object is == a constantbool operator==(const CBox& aBox, const double& value){ return value == aBox; }
// CBox multiply operator n*aBoxCBox operator*(int n, const CBox& aBox){ return aBox * n; }
// Operator to return the free volume in a packed CBoxdouble operator%( const CBox& aBox, const CBox& bBox){ return aBox.Volume() - (aBox / bBox) * bBox.Volume(); }
You have an #include directive for Box.h because the functions refer to the CBox class. Save the file.When you have completed this, you can select the Class View tab. The Class View tab now includesa Global Functions and Variables folder that will contain all the functions you have just added.
You have seen definitions for all these functions earlier in the chapter, so I won’t discuss their implemen-tations again. When you want to use any of these functions in another .cpp file, you’ll need to be sure thatyou declare all the functions that you use so the compiler will recognize them. You can achieve this by put-ting a set of declarations in a header file. Switch back to the Solution Explorer pane once more and right-click the Header Files folder name. Select Add | New Item... from the context menu to display thedialog, but this time select category as Code and the template to be Header File(.h) and enter the nameas BoxOperators. After clicking the Add button an empty header file is added to the project, and you canadd the following code in the editor window:
// BoxOperators.h - Declarations for global box operators#pragma once
bool operator>(const double& value, const CBox& aBox);bool operator<(const double& value, const CBox& aBox);bool operator>(const CBox& aBox, const double& value);
464
Chapter 8: More on Classes
25905c08.qxd:WroxPro 2/21/08 8:53 AM Page 464
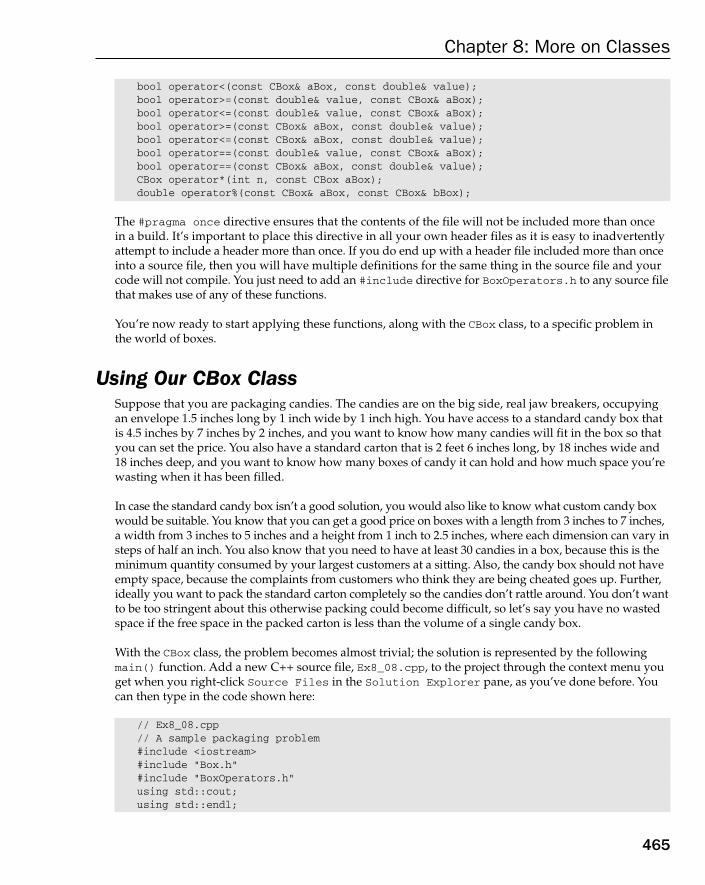
bool operator<(const CBox& aBox, const double& value);bool operator>=(const double& value, const CBox& aBox);bool operator<=(const double& value, const CBox& aBox);bool operator>=(const CBox& aBox, const double& value);bool operator<=(const CBox& aBox, const double& value);bool operator==(const double& value, const CBox& aBox);bool operator==(const CBox& aBox, const double& value);CBox operator*(int n, const CBox aBox);double operator%(const CBox& aBox, const CBox& bBox);
The #pragma once directive ensures that the contents of the file will not be included more than once in a build. It’s important to place this directive in all your own header files as it is easy to inadvertentlyattempt to include a header more than once. If you do end up with a header file included more than onceinto a source file, then you will have multiple definitions for the same thing in the source file and yourcode will not compile. You just need to add an #include directive for BoxOperators.h to any source filethat makes use of any of these functions.
You’re now ready to start applying these functions, along with the CBox class, to a specific problem inthe world of boxes.
Using Our CBox ClassSuppose that you are packaging candies. The candies are on the big side, real jaw breakers, occupyingan envelope 1.5 inches long by 1 inch wide by 1 inch high. You have access to a standard candy box thatis 4.5 inches by 7 inches by 2 inches, and you want to know how many candies will fit in the box so thatyou can set the price. You also have a standard carton that is 2 feet 6 inches long, by 18 inches wide and18 inches deep, and you want to know how many boxes of candy it can hold and how much space you’rewasting when it has been filled.
In case the standard candy box isn’t a good solution, you would also like to know what custom candy boxwould be suitable. You know that you can get a good price on boxes with a length from 3 inches to 7 inches,a width from 3 inches to 5 inches and a height from 1 inch to 2.5 inches, where each dimension can vary insteps of half an inch. You also know that you need to have at least 30 candies in a box, because this is theminimum quantity consumed by your largest customers at a sitting. Also, the candy box should not haveempty space, because the complaints from customers who think they are being cheated goes up. Further,ideally you want to pack the standard carton completely so the candies don’t rattle around. You don’t wantto be too stringent about this otherwise packing could become difficult, so let’s say you have no wastedspace if the free space in the packed carton is less than the volume of a single candy box.
With the CBox class, the problem becomes almost trivial; the solution is represented by the followingmain() function. Add a new C++ source file, Ex8_08.cpp, to the project through the context menu youget when you right-click Source Files in the Solution Explorer pane, as you’ve done before. Youcan then type in the code shown here:
// Ex8_08.cpp// A sample packaging problem#include <iostream>#include “Box.h”#include “BoxOperators.h”using std::cout;using std::endl;
465
Chapter 8: More on Classes
25905c08.qxd:WroxPro 2/21/08 8:53 AM Page 465

int main(){
CBox candy(1.5, 1.0, 1.0); // Candy definitionCBox candyBox(7.0, 4.5, 2.0); // Candy box definitionCBox carton(30.0, 18.0, 18.0); // Carton definition
// Calculate candies per candy boxint numCandies = candyBox/candy;
// Calculate candy boxes per cartonint numCboxes = carton/candyBox;
// Calculate wasted carton spacedouble space = carton%candyBox;
cout << endl<< “There are “ << numCandies<< “ candies per candy box”<< endl<< “For the standard boxes there are “ << numCboxes<< “ candy boxes per carton “ << endl << “with “<< space << “ cubic inches wasted.”;
cout << endl << endl << “CUSTOM CANDY BOX ANALYSIS (No Waste)”;
// Try the whole range of custom candy boxesfor(double length = 3.0 ; length <= 7.5 ; length += 0.5)
for(double width = 3.0 ; width <= 5.0 ; width += 0.5)for(double height = 1.0 ; height <= 2.5 ; height += 0.5){
// Create new box each cycleCBox tryBox(length, width, height);
if(carton%tryBox < tryBox.Volume() &&tryBox % candy == 0.0 && tryBox/candy >= 30)
cout << endl << endl<< “Trial Box L = “ << tryBox.GetLength()<< “ W = “ << tryBox.GetWidth()<< “ H = “ << tryBox.GetHeight()<< endl<< “Trial Box contains “ << tryBox / candy << “ candies”<< “ and a carton contains “ << carton / tryBox<< “ candy boxes.”;
}cout << endl;return 0;
}
Let’s first look at how the program is structured. You have divided it into a number of files, which iscommon when writing in C++. You will be able to see them if you look at the Solution Explorer tab,which will look as shown in Figure 8-13.
466
Chapter 8: More on Classes
25905c08.qxd:WroxPro 2/21/08 8:53 AM Page 466

Figure 8-13
The file Ex8_08.cpp contains the main()function and an #include directive for the file BoxOperators.hthat contains the prototypes for the functions in BoxOperators.cpp (which aren’t class members). It alsohas an #include directive for the definition of the class CBox in Box.h. A C++ console program is usuallydivided into a number of files that will each fall into one of three basic categories:
1. .h files containing library #include commands, global constants and variables, class definitionsand function prototypes — in other words, everything except executable code. They also containinline function definitions. Where a program has several class definitions, they are often placed inseparate .h files.
2. .cpp files containing the executable code for the program, plus #include commands for all thedefinitions required by the executable code.
3. Another .cpp file containing the function main().
The code in our main()function really doesn’t need a lot of explanation — it’s almost a direct expressionof the definition of the problem in words, because the operators in the class interface perform problem-oriented actions on CBox objects.
The solution to the question of the use of standard boxes is in the declaration statements, which also com-pute the answers we require as initializing values. You then output these values with some explanatorycomments.
The second part of the problem is solved using the three nested for loops iterating over the possibleranges of m_Length, m_Width and m_Height so that you evaluate all possible combinations. You couldoutput them all as well, but because this would involve 200 combinations, of which you might only beinterested in a few, you have an if statement which identifies the options that you’re actually interestedin. The if expression is only true if there’s no space wasted in the carton and the current trial candy boxhas no wasted space and it contains at least 30 candies.
467
Chapter 8: More on Classes
25905c08.qxd:WroxPro 2/21/08 8:53 AM Page 467

How It WorksHere’s the output from this program:
There are 42 candies per candy boxFor the standard boxes there are 144 candy boxes per cartonwith 648 cubic inches wasted.
CUSTOM CANDY BOX ANALYSIS (No Waste)
Trial Box L = 5 W = 4.5 H = 2Trial Box contains 30 candies and a carton contains 216 candy boxes.
Trial Box L = 5 W = 4.5 H = 2Trial Box contains 30 candies and a carton contains 216 candy boxes.
Trial Box L = 6 W = 4.5 H = 2Trial Box contains 36 candies and a carton contains 180 candy boxes.
Trial Box L = 6 W = 5 H = 2Trial Box contains 40 candies and a carton contains 162 candy boxes.
Trial Box L = 7.5 W = 3 H = 2Trial Box contains 30 candies and a carton contains 216 candy boxes.
You have a duplicate solution due to the fact that, in the nested loop, you evaluate boxes that have a lengthof 5 and a width of 4.5, as well as boxes that have a length of 4.5 and a width of 5. Because the CBox classconstructor ensures that the length is not less than the width, these two are identical. You could includesome additional logic to avoid presenting duplicates, but it hardly seems worth the effort. You could treatit as a small exercise if you like.
Organizing Your Program CodeIn example Ex8_08, you distributed the code among several files for the first time. Not only is this com-mon practice with C++ applications generally, but with Windows programming it is essential. The sheervolume of code involved in even the simplest program necessitates dividing it into workable chunks.
As I discussed in the previous section, there are basically two kinds of source code files in a C++ program,.h files and .cpp files. This is illustrated in Figure 8-14.
First of all, there’s the executable code that corresponds to the definitions of the functions that make upthe program. Second, there are definitions of various kinds that are necessary for the executable code tocompile correctly. These are global constants and variables; data types that include classes, structures, and unions; and function prototypes. The executable source code is stored in files with the extension.cpp, and the definitions are stored in files with the extension .h.
468
Chapter 8: More on Classes
25905c08.qxd:WroxPro 2/21/08 8:53 AM Page 468

Figure 8-14
From time to time, you might want to use code from existing files in a new project. In this case you onlyhave to add the .cpp files to the project, which you can do by using the Project | Add ExistingItem... menu option, or by right-clicking either Source Files or Header Files in the SolutionExplorer tab and selecting Add > Existing Item... from the context menu to add the file to yourproject. You don’t need to add .h files to your project, although you can if you want them to be shown in the Solution Explorer pane immediately. The code from .h files will be added at the beginning of the.cpp files that require them as a result of the #include directives that you specify. You need #includedirectives for header files containing standard library functions and other standard definitions, as wellas for your own header files. Visual C++ 2008 automatically keeps track of all these files, and enables
Function Definitions
Function Definitions
Function Definitions
Definition of main()
Source fileswith the extension .cpp
Class Definition
Class Definition
Global Constants
Global Constants
Header fileswith the extension .h
469
Chapter 8: More on Classes
25905c08.qxd:WroxPro 2/21/08 8:53 AM Page 469

you to view them in the Solution Explorer tab. As you saw in the last example, you can also view theclass definitions and global constants and variables in the Class View tab.
In a Windows program, there are other kinds of definitions for the specification of such things as menusand toolbar buttons. These are stored in files with extensions like .rc and .ico. Just like .h files, thesedo not need to be explicitly added to a project as they are created and tracked automatically by VisualC++ 2008 when you need them.
Naming Program FilesAs I have already said, for classes of any complexity, it’s usual to store the class definition in a .h file with afilename based on the class name, and to store the implementation of the function members of the class thatare defined outside the class definition in a .cpp file with the same name. On this basis, the definition of ourCBox class appeared in a file with the name Box.h. Similarly, the class implementation was stored in the fileBox.cpp. We didn’t follow this convention in the earlier examples in the chapter because the examples werevery short, and it was easier to reference the examples with names derived from the chapter number andthe sequence number of the example within the chapter. With programs of any size though it becomesessential to structure the code in this way, so it would be a good idea to get into the habit of creating .hand .cpp files to hold your program code from now on.
Segmenting a C++ program into .h and .cpp files is a very convenient approach, as it makes it easy foryou to find the definition or implementation of any class, particularly if you’re working in a developmentenvironment that doesn’t have all the tools that Visual C++ provides. As long as you know the class name,you can go directly to the file you want. This isn’t a rigid rule, however. It’s sometimes useful to groupthe definitions of a set of closely related classes together in a single file and assemble their implementa-tions similarly. However you choose to structure your files, the Class View still displays all the individ-ual classes, as well as all the members of each class, as you can see in Figure 8-15.
Figure 8-15
470
Chapter 8: More on Classes
25905c08.qxd:WroxPro 2/21/08 8:53 AM Page 470
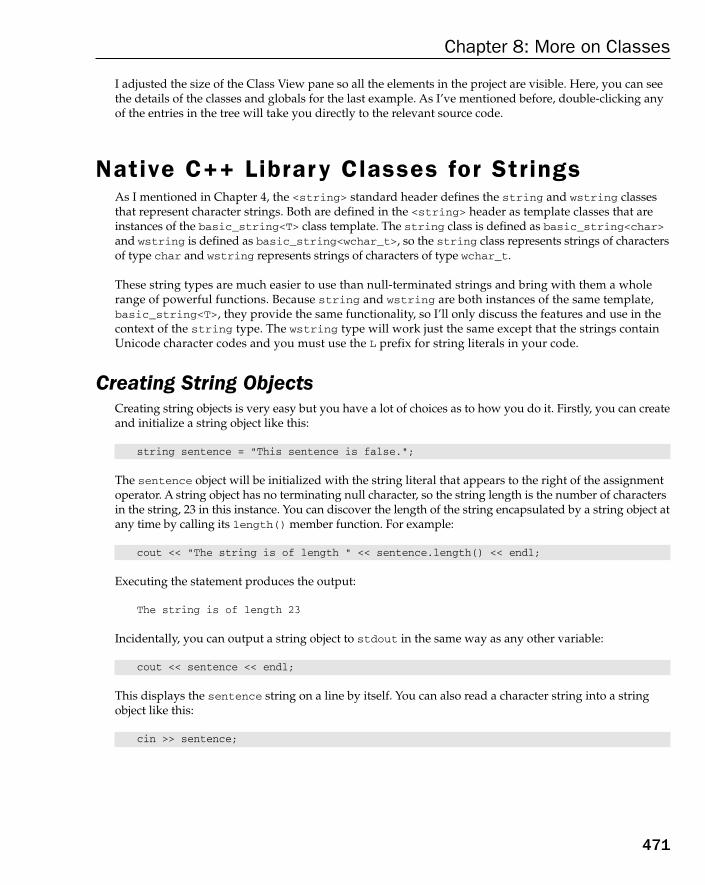
I adjusted the size of the Class View pane so all the elements in the project are visible. Here, you can seethe details of the classes and globals for the last example. As I’ve mentioned before, double-clicking anyof the entries in the tree will take you directly to the relevant source code.
Native C++ Librar y Classes for StringsAs I mentioned in Chapter 4, the <string> standard header defines the string and wstring classes that represent character strings. Both are defined in the <string> header as template classes that areinstances of the basic_string<T> class template. The string class is defined as basic_string<char>and wstring is defined as basic_string<wchar_t>, so the string class represents strings of charactersof type char and wstring represents strings of characters of type wchar_t.
These string types are much easier to use than null-terminated strings and bring with them a wholerange of powerful functions. Because string and wstring are both instances of the same template,basic_string<T>, they provide the same functionality, so I’ll only discuss the features and use in thecontext of the string type. The wstring type will work just the same except that the strings containUnicode character codes and you must use the L prefix for string literals in your code.
Creating String ObjectsCreating string objects is very easy but you have a lot of choices as to how you do it. Firstly, you can createand initialize a string object like this:
string sentence = “This sentence is false.”;
The sentence object will be initialized with the string literal that appears to the right of the assignmentoperator. A string object has no terminating null character, so the string length is the number of charactersin the string, 23 in this instance. You can discover the length of the string encapsulated by a string object atany time by calling its length() member function. For example:
cout << “The string is of length “ << sentence.length() << endl;
Executing the statement produces the output:
The string is of length 23
Incidentally, you can output a string object to stdout in the same way as any other variable:
cout << sentence << endl;
This displays the sentence string on a line by itself. You can also read a character string into a stringobject like this:
cin >> sentence;
471
Chapter 8: More on Classes
25905c08.qxd:WroxPro 2/21/08 8:53 AM Page 471

However, reading from stdin in this way ignores leading whitespace until a non-whitespace character isfound and also terminates input when you enter a space following one or more non-whitespace characters.You will often want to read text into a string object that includes spaces and may span several lines. In thiscase the getline()function template that is defined in the <string> header is much more convenient.For example:
getline(cin, sentence, ‘*’);
This function template is specifically for reading data from a stream into a string or wstring object. Thefirst argument is the stream that is the source of input — it doesn’t have to be cin; the second argumentis the object that is to receive the input, and the third argument is the character that terminates reading.Here I have specified the terminating character as ‘*’, so this statement will read text from cin, includ-ing spaces, into sentence, until the end of input is indicated by an asterisk being read from the inputstream.
Of course, you can also use functional notation to initialize a string object:
string sentence(“This sentence is false.”);
If you don’t specify an initial string literal when you create a string object, the object will contain anempty string:
string astring; // Create an empty string
Calling the length() of the string astring will result in zero.
Another possibility is to initialize a string object with a single character repeated a specified number oftimes:
string bees(7, ‘b’); // String is “bbbbbbb”
The first argument to the constructor is the number of repetitions of the character specified by the secondargument.
Finally you can initialize a string object with all or part of another string object. Here’s an example of usinganother string object as an initializer:
string letters(bees);
The letters object will be initialized with the string contained in bees.
To select part of a string object as initializer you call the string contructor with three arguments, the firstbeing the string object that is the source of the initializing string, the second is the index position of thefirst character to be selected, and the third argument is the number of characters to be selected. Here’s anexample:
string sentence(“This sentence is false.”);string part(sentence, 5, 11);
The part object will be initialized with 11 characters from sentence beginning with the sixth character(the first character is at index position 0). Thus part will contain the string “sentence is”.
472
Chapter 8: More on Classes
25905c08.qxd:WroxPro 2/21/08 8:53 AM Page 472
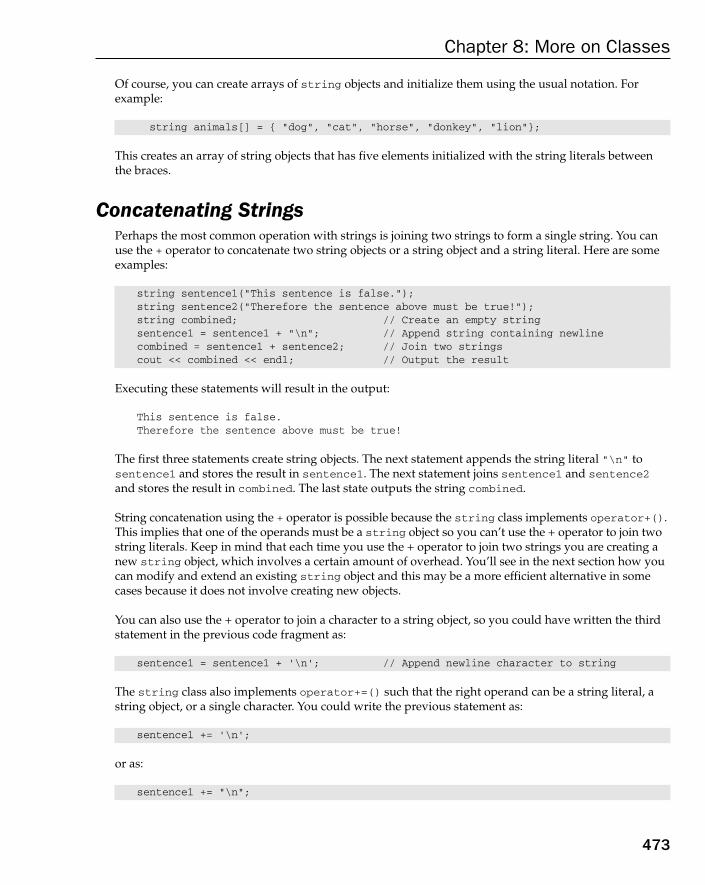
Of course, you can create arrays of string objects and initialize them using the usual notation. Forexample:
string animals[] = { “dog”, “cat”, “horse”, “donkey”, “lion”};
This creates an array of string objects that has five elements initialized with the string literals betweenthe braces.
Concatenating StringsPerhaps the most common operation with strings is joining two strings to form a single string. You canuse the + operator to concatenate two string objects or a string object and a string literal. Here are someexamples:
string sentence1(“This sentence is false.”);string sentence2(“Therefore the sentence above must be true!”);string combined; // Create an empty stringsentence1 = sentence1 + “\n”; // Append string containing newlinecombined = sentence1 + sentence2; // Join two stringscout << combined << endl; // Output the result
Executing these statements will result in the output:
This sentence is false.Therefore the sentence above must be true!
The first three statements create string objects. The next statement appends the string literal “\n” tosentence1 and stores the result in sentence1. The next statement joins sentence1 and sentence2and stores the result in combined. The last state outputs the string combined.
String concatenation using the + operator is possible because the string class implements operator+().This implies that one of the operands must be a string object so you can’t use the + operator to join twostring literals. Keep in mind that each time you use the + operator to join two strings you are creating anew string object, which involves a certain amount of overhead. You’ll see in the next section how youcan modify and extend an existing string object and this may be a more efficient alternative in somecases because it does not involve creating new objects.
You can also use the + operator to join a character to a string object, so you could have written the thirdstatement in the previous code fragment as:
sentence1 = sentence1 + ‘\n’; // Append newline character to string
The string class also implements operator+=() such that the right operand can be a string literal, astring object, or a single character. You could write the previous statement as:
sentence1 += ‘\n’;
or as:
sentence1 += “\n”;
473
Chapter 8: More on Classes
25905c08.qxd:WroxPro 2/21/08 8:53 AM Page 473

There is a difference between using the += operator and using the + operator. As I said, the + operator cre-ates a new string object containing the combined string. The += operator appends the string or characterthat is the right operand to the string object that is the left operand, so the string object is modifieddirectly and no new object is created.
Let’s exercise some of what I have described in an example.
Try It Out Creating and Joining StringsThis is a simple example that reads names and ages from the keyboard and then lists what you entered.Here’s the code:
// Ex8_09.cpp// Creating and joining string objects#include <iostream>#include <string>using std::cin;using std::cout;using std::endl;using std::string;using std::getline;
// List names and agesvoid listnames(string names[], string ages[], size_t count){size_t i = 0;cout << endl << “The names you entered are: “ << endl;while(i<count && !names[i].empty())cout << names[i] + “ aged “ + ages[i++] + ‘.’ << endl;
}
int main(){const size_t count = 100;string names[count];string ages[count];string firstname;string secondname;
for(size_t i = 0 ; i<count ; i++){cout << endl << “Enter a first name or press Enter to end: “;getline(cin, firstname, ‘\n’);if(firstname.empty()){listnames(names, ages, i);cout << “Done!!” << endl;return 0;
}
cout << “Enter a second name: “;getline(cin, secondname, ‘\n’);
474
Chapter 8: More on Classes
25905c08.qxd:WroxPro 2/21/08 8:53 AM Page 474

names[i] = firstname + ‘ ‘ + secondname;cout << “Enter “ + firstname + “‘s age: “;getline(cin, ages[i], ‘\n’);
}cout << “No space for more names.” << endl;listnames(names, ages, count);return 0;
}
This example produces output similar to the following:
Enter a first name or press Enter to end: MarilynEnter a second name: MunroeEnter Marilyn’s age: 26
Enter a first name or press Enter to end: TomEnter a second name: CrewsEnter Tom’s age: 45
Enter a first name or press Enter to end: ArnoldEnter a second name: WeisseneggarEnter Arnold’s age: 52
Enter a first name or press Enter to end:
The names you entered are:Marilyn Munroe aged 26.Tom Crews aged 45.Arnold Weisseneggar aged 52.Done!!
How It WorksThe listnames function lists names and ages stored in arrays that are passed as the first two argu-ments. The third argument is a count of the number of elements in the array. Listing of the data occurs in a loop:
while(i<count && !names[i].empty())cout << names[i] + “ aged “ + ages[i++] + ‘.’ << endl;
The loop condition is a belt and braces control mechanism in that it not only checks that the index i is lessthan the value of count that is passed as the third argument, but it also calls the empty() function for thecurrent element to verify that it is not an empty string. The single statement in the body of the loop con-catenates the current string in names[i] with the literal “ aged “, the ages[i] string and the character‘.’ using the + operator and writes the resultant string to cout. The expression concatenating the stringsis equivalent to:
((names[i].operator+(“ aged “)).operator+(ages[i++])).operator+(‘.’)
Each call of the operator+() function returns a string object that results from the operation, so threetemporary string objects are created in evaluating this expression. Thus the expression demonstratescombining a string object with a string literal, a string object with another string object, and a stringobject with a character literal.
475
Chapter 8: More on Classes
25905c08.qxd:WroxPro 2/21/08 8:53 AM Page 475

In main(), you first create two arrays of string objects of length count with the statements:
const size_t count = 100;string names[count];string ages[count];
The names and ages arrays will store names and corresponding age values that are entered from thekeyboard.
Within the for loop in main() you read the first and second names separately using the getline()func-tion template that is defined in the <string> header:
cout << endl << “Enter a first name or press Enter to end: “;getline(cin, firstname, ‘\n’);if(firstname.empty()){
listnames(names, ages, i);cout << “Done!!” << endl;return 0;
}
cout << “Enter a second name: “;getline(cin, secondname, ‘\n’);
The getline() function allows an empty string to be read, something you cannot do using the >> oper-ator with cin. The first argument to getline() is the stream that is the source of the input, the secondargument is the destination for the input, and the third argument is the character that signals the end onthe input operation. If you omit the third argument, entering ‘\n’ will terminate the input process soyou could have omitted it here. You use the ability to read an empty string here as you test for an emptystring in firstname by calling its empty() function. An empty string signals the end of input so you calllistnames() to output the data and end program execution.
When firstname is not empty, you continue with reading the second name into secondname, again usingthe getline() template function. You concatenate firstname and secondname using the + operator andstore the result in names[i], the currently unused element in the names array.
Finally in the loop you read a string for the age of the person and store the result in ages[i]. The forloop limits the number of entries to count, which corresponds to the number of elements in the arrays.If you fall through the end of the loop, the arrays are full so after displaying a message you output thedata that was entered.
Accessing and Modifying StringsYou can access any character in a string object to read it or overwrite it by using the subscript operator,[]. Here’s an example:
string sentence(“Too many cooks spoil the broth.”);for(size_t i = 0; i<sentence.length(); i++)if(sentence[i] == ‘ ‘)sentence[i] = ‘*’;
476
Chapter 8: More on Classes
25905c08.qxd:WroxPro 2/21/08 8:53 AM Page 476
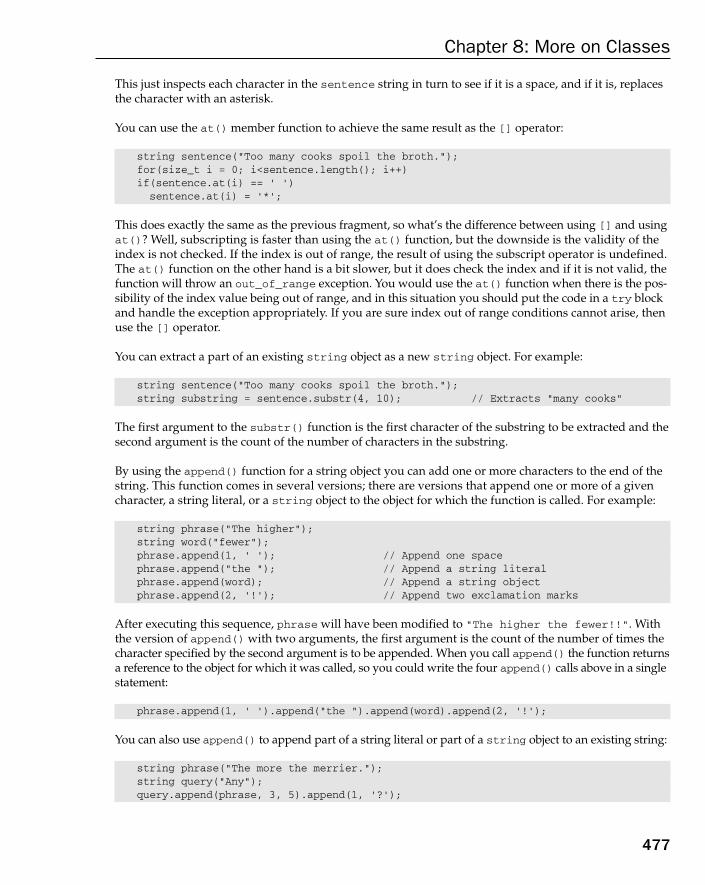
This just inspects each character in the sentence string in turn to see if it is a space, and if it is, replacesthe character with an asterisk.
You can use the at() member function to achieve the same result as the [] operator:
string sentence(“Too many cooks spoil the broth.”);for(size_t i = 0; i<sentence.length(); i++)if(sentence.at(i) == ‘ ‘)sentence.at(i) = ‘*’;
This does exactly the same as the previous fragment, so what’s the difference between using [] and usingat()? Well, subscripting is faster than using the at() function, but the downside is the validity of theindex is not checked. If the index is out of range, the result of using the subscript operator is undefined.The at() function on the other hand is a bit slower, but it does check the index and if it is not valid, thefunction will throw an out_of_range exception. You would use the at() function when there is the pos-sibility of the index value being out of range, and in this situation you should put the code in a try blockand handle the exception appropriately. If you are sure index out of range conditions cannot arise, thenuse the [] operator.
You can extract a part of an existing string object as a new string object. For example:
string sentence(“Too many cooks spoil the broth.”);string substring = sentence.substr(4, 10); // Extracts “many cooks”
The first argument to the substr() function is the first character of the substring to be extracted and thesecond argument is the count of the number of characters in the substring.
By using the append() function for a string object you can add one or more characters to the end of thestring. This function comes in several versions; there are versions that append one or more of a givencharacter, a string literal, or a string object to the object for which the function is called. For example:
string phrase(“The higher”);string word(“fewer”);phrase.append(1, ‘ ‘); // Append one spacephrase.append(“the “); // Append a string literalphrase.append(word); // Append a string objectphrase.append(2, ‘!’); // Append two exclamation marks
After executing this sequence, phrase will have been modified to “The higher the fewer!!”. Withthe version of append() with two arguments, the first argument is the count of the number of times thecharacter specified by the second argument is to be appended. When you call append() the function returnsa reference to the object for which it was called, so you could write the four append() calls above in a singlestatement:
phrase.append(1, ‘ ‘).append(“the “).append(word).append(2, ‘!’);
You can also use append() to append part of a string literal or part of a string object to an existing string:
string phrase(“The more the merrier.”);string query(“Any”);query.append(phrase, 3, 5).append(1, ‘?’);
477
Chapter 8: More on Classes
25905c08.qxd:WroxPro 2/21/08 8:53 AM Page 477

The result of executing these statements is that query will contain the string “Any more?”. In the laststatement, the first call to the append() function has three arguments:
❑ The first argument, phrase, is the string object from which characters are to be extracted andappended to query.
❑ The second argument, 3, is the index position of the first character to be extracted.
❑ The third argument, 5, is the count of the total number of characters to be appended.
Thus the substring “ more” is appended to query by this call. The second call for the append() functionappends a question mark to query.
When you want to append a single character to a string object, you could use the push_back() functionas an alternative to append(). Here’s how you would use that:
query.push_back(‘*’);
This appends an asterisk character to the end of the query string.
Sometimes adding characters to the end of a string just isn’t enough. There will be occasions when youwant to insert one or more characters at some position in the interior of a string. The various flavors ofthe insert() function will do that for you:
string saying(“A horse”);string word(“blind”);string sentence(“He is as good as gold.”);string phrase(“a wink too far”);saying.insert(1, “ “); // Insert a space charactersaying.insert(2, word); // Insert a string objectsaying.insert(2, “nodding”, 3); // Insert 3 characters of a string literalsaying.insert(5, sentence, 2, 15); // Insert part of a string at position 5saying.insert(20, phrase, 0, 9); // Insert part of a string at position 20saying.insert(29, “ “).insert(30, “a poor do”, 0, 2);
I’m sure you’ll be interested to know that after executing the statements above, saying will contain thestring “A nod is as good as a wink to a blind horse”. The parameters to the various versionsof insert()are:
Function Prototype Description
string& insert(size_t index,const char* pstring)
Inserts the null-terminated string pstring at positionindex.
string& insert(size_t index,const string astring)
Inserts the string object astring at position index.
string& insert(size_t index,const char* pstring,size_t count)
Inserts the first count characters from the null-terminated string pstring at position index.
478
Chapter 8: More on Classes
25905c08.qxd:WroxPro 2/21/08 8:53 AM Page 478
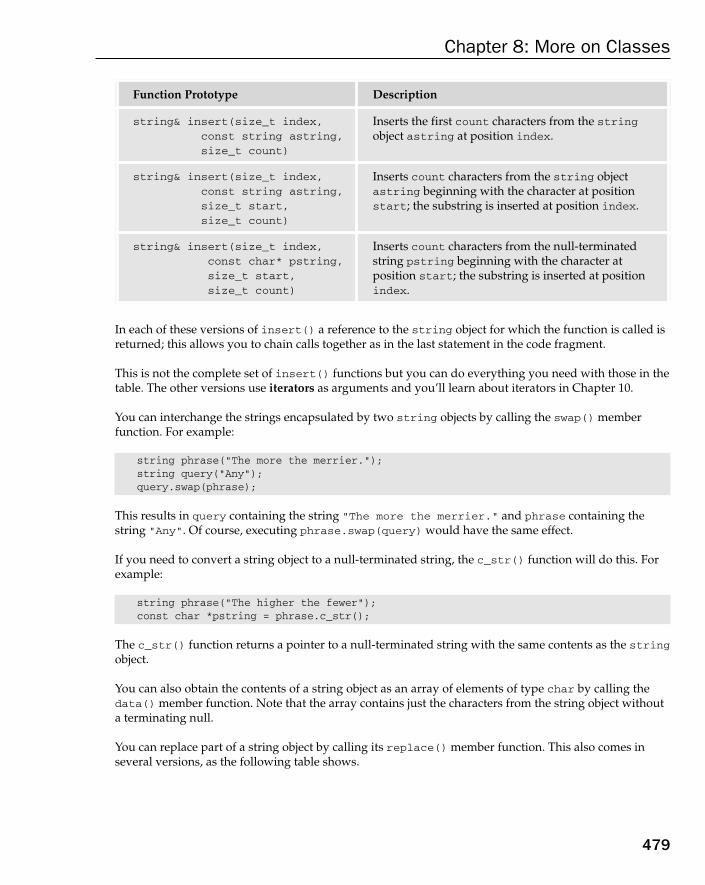
In each of these versions of insert() a reference to the string object for which the function is called isreturned; this allows you to chain calls together as in the last statement in the code fragment.
This is not the complete set of insert() functions but you can do everything you need with those in thetable. The other versions use iterators as arguments and you’ll learn about iterators in Chapter 10.
You can interchange the strings encapsulated by two string objects by calling the swap() memberfunction. For example:
string phrase(“The more the merrier.”);string query(“Any”);query.swap(phrase);
This results in query containing the string “The more the merrier.” and phrase containing thestring “Any”. Of course, executing phrase.swap(query) would have the same effect.
If you need to convert a string object to a null-terminated string, the c_str() function will do this. Forexample:
string phrase(“The higher the fewer”);const char *pstring = phrase.c_str();
The c_str() function returns a pointer to a null-terminated string with the same contents as the stringobject.
You can also obtain the contents of a string object as an array of elements of type char by calling thedata() member function. Note that the array contains just the characters from the string object withouta terminating null.
You can replace part of a string object by calling its replace() member function. This also comes in several versions, as the following table shows.
Function Prototype Description
string& insert(size_t index,const string astring,size_t count)
Inserts the first count characters from the stringobject astring at position index.
string& insert(size_t index,const string astring,size_t start,size_t count)
Inserts count characters from the string objectastring beginning with the character at positionstart; the substring is inserted at position index.
string& insert(size_t index,const char* pstring,size_t start,size_t count)
Inserts count characters from the null-terminatedstring pstring beginning with the character at position start; the substring is inserted at positionindex.
479
Chapter 8: More on Classes
25905c08.qxd:WroxPro 2/21/08 8:53 AM Page 479

In each case a reference to the string object for which the function is called is returned.
Here’s an example:
string proverb(“A nod is as good as a wink to a blind horse”);string sentence(“It’s bath time!”);proverb.replace(38, 5, sentence, 5, 3);
This fragment uses the fifth version of the replace() function from the preceding table to substitute“bat” in place of “horse” in the string proverb.
Comparing StringsYou have a full complement of operators for comparing two string objects or comparing a string objectwith a string literal. Operator overloading has been implemented in the string class for the followingoperators:
== != < <= > >=
Here’s an example of the use of these operators:
string dog1(“St Bernard”);string dog2(“Tibetan Mastiff”);
Function Prototype Description
string& replace(size_t index,size_t count,const char* pstring)
Replaces count characters starting at position indexwith the first count characters from pstring.
string& replace(size_t index,size_t count,const string astring)
Replaces count characters starting at position indexwith the first count characters from astring.
string& replace(size_t index,size_t count1,const char* pstring,size_t count2)
Replaces count1 characters starting at positionindex with up to count2 characters from pstring.This allows the replacement substring to be longer or shorter than the substring that is replaced.
string& replace(size_t index1,size_t count1,const string astring,size_t index2,size_t count2)
Replaces count1 characters starting at positionindex1 with count2 characters from astringstarting at position index2.
string& replace(size_t index,size_t count1,size_t count2,char ch)
Replaces count1 characters starting at index withcount2 occurrences of the character ch.
480
Chapter 8: More on Classes
25905c08.qxd:WroxPro 2/21/08 8:53 AM Page 480
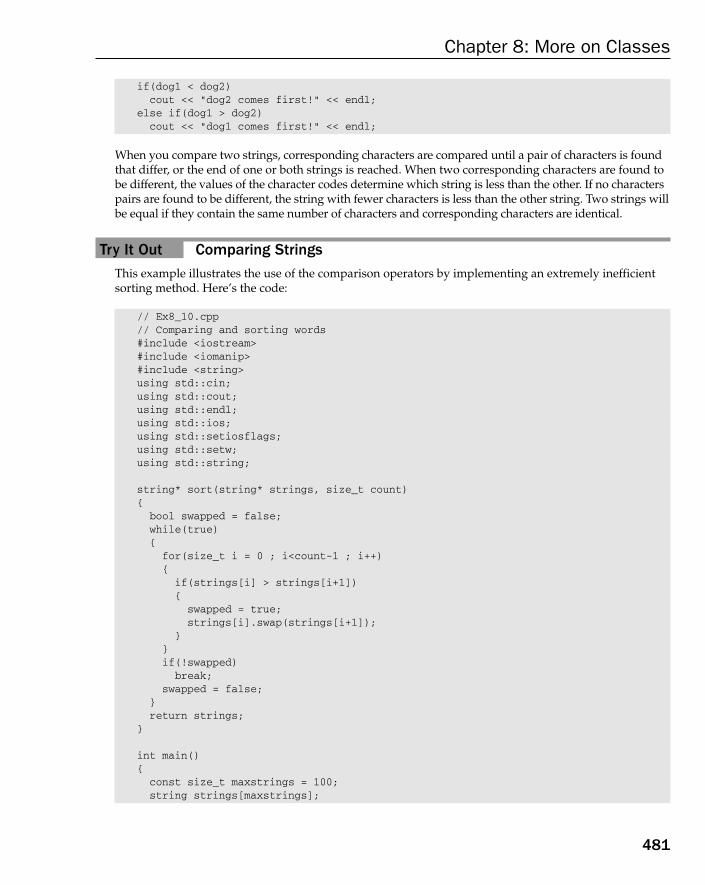
if(dog1 < dog2)cout << “dog2 comes first!” << endl;
else if(dog1 > dog2)cout << “dog1 comes first!” << endl;
When you compare two strings, corresponding characters are compared until a pair of characters is foundthat differ, or the end of one or both strings is reached. When two corresponding characters are found to be different, the values of the character codes determine which string is less than the other. If no characterspairs are found to be different, the string with fewer characters is less than the other string. Two strings willbe equal if they contain the same number of characters and corresponding characters are identical.
Try It Out Comparing StringsThis example illustrates the use of the comparison operators by implementing an extremely inefficientsorting method. Here’s the code:
// Ex8_10.cpp// Comparing and sorting words#include <iostream>#include <iomanip>#include <string>using std::cin;using std::cout;using std::endl;using std::ios;using std::setiosflags;using std::setw;using std::string;
string* sort(string* strings, size_t count){bool swapped = false;while(true){for(size_t i = 0 ; i<count-1 ; i++){if(strings[i] > strings[i+1]){swapped = true;strings[i].swap(strings[i+1]);
}}if(!swapped)break;
swapped = false;}return strings;
}
int main(){const size_t maxstrings = 100;string strings[maxstrings];
481
Chapter 8: More on Classes
25905c08.qxd:WroxPro 2/21/08 8:53 AM Page 481
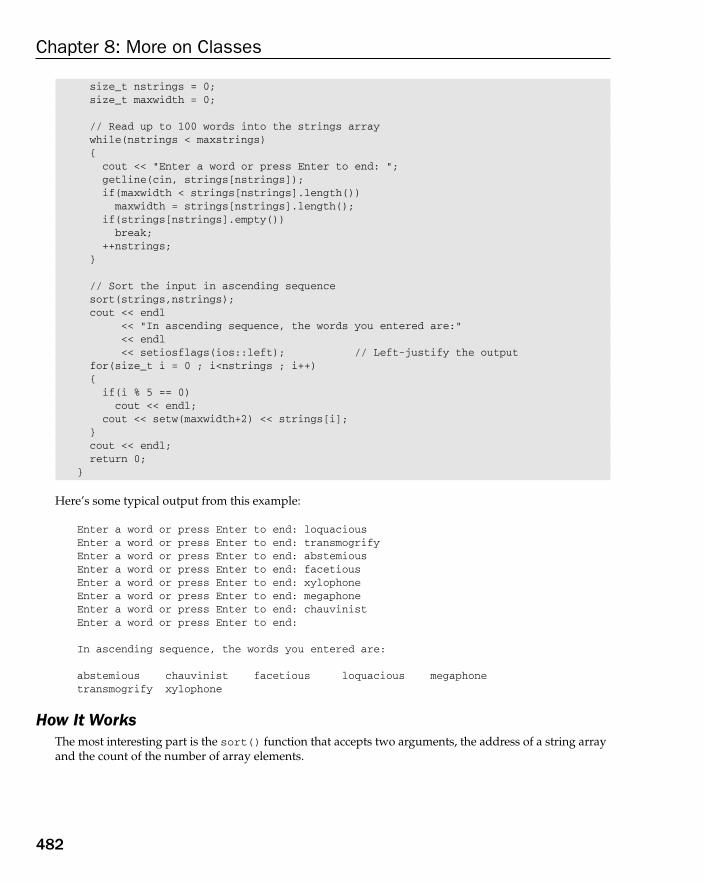
size_t nstrings = 0;size_t maxwidth = 0;
// Read up to 100 words into the strings arraywhile(nstrings < maxstrings){cout << “Enter a word or press Enter to end: “;getline(cin, strings[nstrings]);if(maxwidth < strings[nstrings].length())maxwidth = strings[nstrings].length();
if(strings[nstrings].empty())break;
++nstrings;}
// Sort the input in ascending sequencesort(strings,nstrings);cout << endl
<< “In ascending sequence, the words you entered are:”<< endl<< setiosflags(ios::left); // Left-justify the output
for(size_t i = 0 ; i<nstrings ; i++){if(i % 5 == 0)cout << endl;
cout << setw(maxwidth+2) << strings[i];}cout << endl;return 0;
}
Here’s some typical output from this example:
Enter a word or press Enter to end: loquaciousEnter a word or press Enter to end: transmogrifyEnter a word or press Enter to end: abstemiousEnter a word or press Enter to end: facetiousEnter a word or press Enter to end: xylophoneEnter a word or press Enter to end: megaphoneEnter a word or press Enter to end: chauvinistEnter a word or press Enter to end:
In ascending sequence, the words you entered are:
abstemious chauvinist facetious loquacious megaphonetransmogrify xylophone
How It WorksThe most interesting part is the sort() function that accepts two arguments, the address of a string arrayand the count of the number of array elements.
482
Chapter 8: More on Classes
25905c08.qxd:WroxPro 2/21/08 8:53 AM Page 482

The function implements the bubble sort, which works by scanning through the elements in sequencesand comparing successive elements. All the work is done in the while loop:
bool swapped = false;while(true){
for(size_t i = 0 ; i<count-1 ; i++){
if(strings[i] > strings[i+1]){
swapped = true;strings[i].swap(strings[i+1]);
}}if(!swapped)
break;swapped = false;
}
Successive elements in the strings array are compared using the > operator. If the first element is greaterthan the second in a pair, the elements are swapped. In this case the elements are interchanged by callingthe swap() function for one string object with the second string object as argument. Comparing suc-cessive elements and swapping when necessary continues for the entire array of elements. This process isrepeated until there is a pass through all the elements where no elements are swapped. The elements arethen in ascending sequence. The bool variable swapped acts as an indicator for whether swapping occurson any given pass. It is only set to true when two elements are swapped.
The main() function reads up to 100 words into the strings array in a loop:
while(nstrings < maxstrings){
cout << “Enter a word or press Enter to end: “;getline(cin, strings[nstrings]);if(maxwidth < strings[nstrings].length())
maxwidth = strings[nstrings].length();if(strings[nstrings].empty())
break;++nstrings;
}
The getline() function here reads characters from cin until ‘\n’ is read. The input is stored in thestring object specified by the second argument strings[nstrings]. Just pressing the Enter key will result in an empty() string so the loop is terminated when the empty() function for the last stringobject read returns true. The maxwidth variable is used to record the length of the longest string entered.This will be used later in the output process after the input has been sorted.
Calling the sort() function sorts the contents of the strings array in ascending sequence. The result isoutput in a loop:
cout << endl<< “In ascending sequence, the words you entered are:”
483
Chapter 8: More on Classes
25905c08.qxd:WroxPro 2/21/08 8:53 AM Page 483
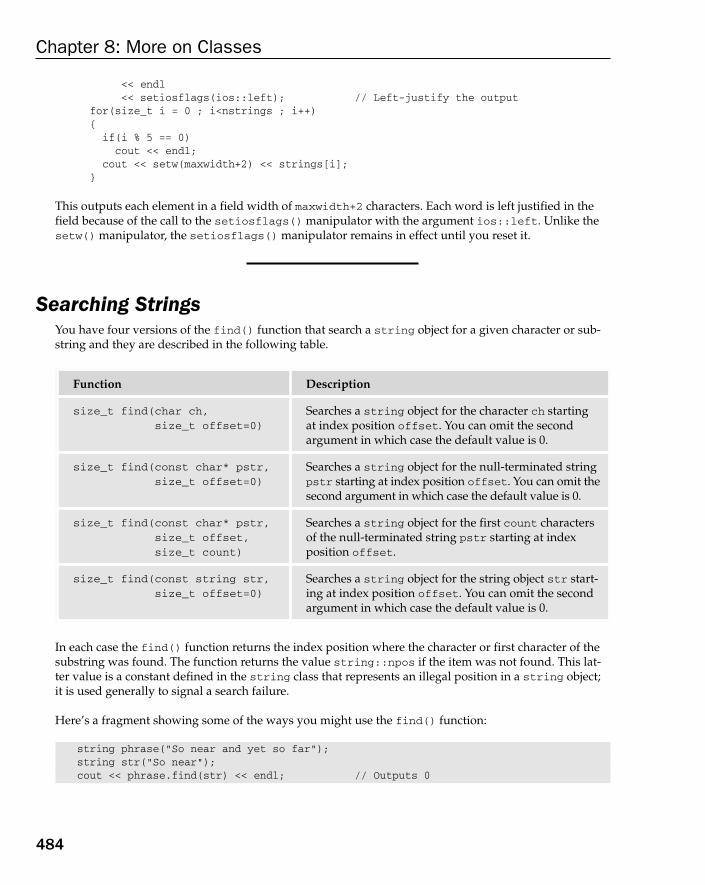
<< endl<< setiosflags(ios::left); // Left-justify the output
for(size_t i = 0 ; i<nstrings ; i++){
if(i % 5 == 0)cout << endl;
cout << setw(maxwidth+2) << strings[i];}
This outputs each element in a field width of maxwidth+2 characters. Each word is left justified in thefield because of the call to the setiosflags() manipulator with the argument ios::left. Unlike thesetw() manipulator, the setiosflags() manipulator remains in effect until you reset it.
Searching StringsYou have four versions of the find() function that search a string object for a given character or sub-string and they are described in the following table.
In each case the find() function returns the index position where the character or first character of thesubstring was found. The function returns the value string::npos if the item was not found. This lat-ter value is a constant defined in the string class that represents an illegal position in a string object;it is used generally to signal a search failure.
Here’s a fragment showing some of the ways you might use the find() function:
string phrase(“So near and yet so far”);string str(“So near”);cout << phrase.find(str) << endl; // Outputs 0
Function Description
size_t find(char ch,size_t offset=0)
Searches a string object for the character ch startingat index position offset. You can omit the secondargument in which case the default value is 0.
size_t find(const char* pstr,size_t offset=0)
Searches a string object for the null-terminated stringpstr starting at index position offset. You can omit thesecond argument in which case the default value is 0.
size_t find(const char* pstr,size_t offset,size_t count)
Searches a string object for the first count charactersof the null-terminated string pstr starting at indexposition offset.
size_t find(const string str,size_t offset=0)
Searches a string object for the string object str start-ing at index position offset. You can omit the secondargument in which case the default value is 0.
484
Chapter 8: More on Classes
25905c08.qxd:WroxPro 2/21/08 8:53 AM Page 484

cout << phrase.find(“so far”) << endl; // Outputs 16cout << phrase.find(“so near”) << endl; // Outputs string::npos = 4294967295
The value of string::npos can vary with different C++ compiler implementations, so to test for it youshould always use string::npos and not the explicit value.
Here’s another example that scans the same string repeatedly searching for occurrences of a particularsubstring:
string str( “Smith, where Jones had had \”had had\”, \”had had\” had.”“ \”Had had\” had had the examiners’ approval.”);
string substr(“had”);
cout << “The string to be searched is:”<< endl << str << endl;
size_t offset = 0;size_t count = 0;size_t increment = substr.length();
while(true){offset = str.find(substr, offset);if(offset == string::npos)break;
offset += increment;++count;
}cout << endl << “ The string \”” << substr
<< “\” was found “ << count << “ times in the string above.”<< endl;
Here you search the string str to see how many times “had” appears. The search is done in the whileloop where offset records the position found, and is also used as the start position for the search. Thesearch starts at index position 0, the start of the string, and each time the substring is found, the new start-ing position for the next search is set to the found position plus the length of the substring. This ensuresthat the substring that was found is bypassed. Every time the substring is found, count is incremented.If find() returns string::npos, then the substring was not found and the search ends. Executing thisfragment produces the output:
The string to be searched is:Smith, where Jones had had “had had”, “had had” had. “Had had” had had theexaminers’ approval.
The string “had” was found 10 times in the string above.
Of course, “Had” is not a match for the substring “had” so 10 is the correct result.
The find_first_of() and find_last_of() member functions search a string object for an occurrenceof any character from a given set. You could search a string to find spaces or punctuation characters forexample, which would allow you to break a string up into individual words. Both functions come in sev-eral flavors, as the following table shows.
485
Chapter 8: More on Classes
25905c08.qxd:WroxPro 2/21/08 8:53 AM Page 485

Function Description
find_first_of(char ch,size_t offset = 0)
Searches a string object for the first occurrence of thecharacter, ch, starting at position offset, and returnsthe index position where the character is found as a valueof type size_t. If you omit the second argument, thedefault value of offset is 0.
find_first_of(char* pstr,size_t offset = 0)
Searches a string object for the first occurrence of anycharacter in the null-terminated string, pstring, start-ing at position offset, and returns the index positionwhere the character is found as a value of type size_t.If you omit the second argument, the default value ofoffset is 0.
find_first_of(char* pstr,size_t offset,size_t count)
Searches a string object for the first occurrence of any character in the first count characters of the null-terminated string, pstring, starting at position offset,and returns the index position where the character isfound as a value of type size_t.
find_first_of(string str,size_t offset = 0)
Searches a string object for the first occurrence of anycharacter in the string, pstring, starting at positionoffset, and returns the index position where the char-acter is found as a value of type size_t. If you omit thesecond argument, the default value of offset is 0.
find_last_of(char ch,size_t offset=npos)
Searches backward through a string object for the last occurrence of the character, ch, starting at positionoffset, and returns the index position where the char-acter is found as a value of type size_t. If you omit thesecond argument, the default value of offset is npos,which is the end of the string.
find_last_of(char* pstr,size_t offset=npos)
Searches backward through a string object for the lastoccurrence of any character in the null-terminated string,pstr, starting at position offset, and returns the indexposition where the character is found as a value of typesize_t. If you omit the second argument, the defaultvalue of offset is npos, which is the end of the string.
find_last_of(char* pstr,size_t offset,size_t count)
Searches backward through a string object for the lastoccurrence of any of the first count characters in the null-terminated string, pstr, starting at position offset, andreturns the index position where the character is found asa value of type size_t.
486
Chapter 8: More on Classes
25905c08.qxd:WroxPro 2/21/08 8:53 AM Page 486
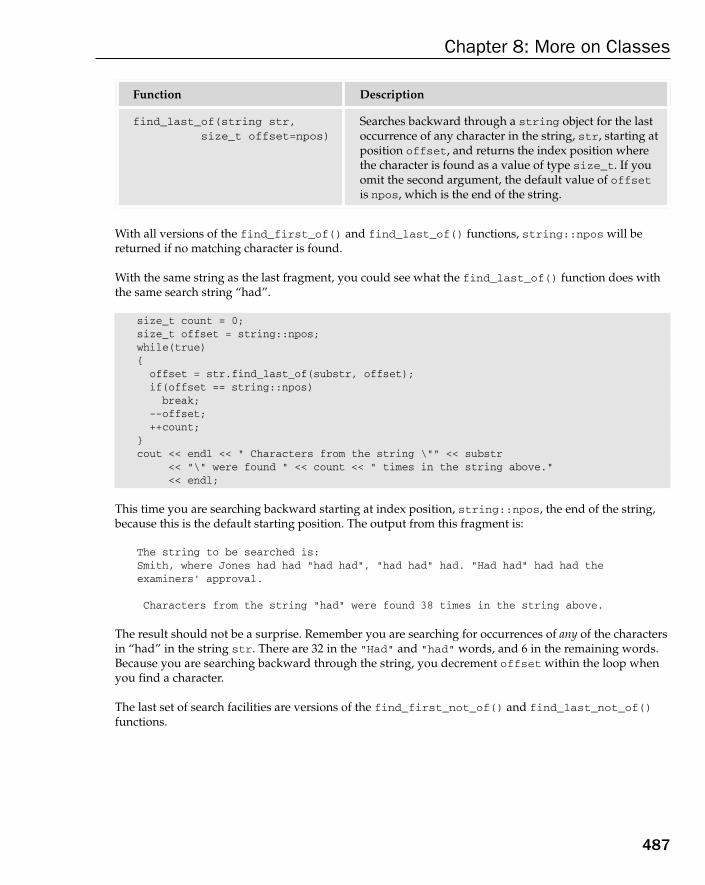
With all versions of the find_first_of() and find_last_of() functions, string::npos will bereturned if no matching character is found.
With the same string as the last fragment, you could see what the find_last_of() function does withthe same search string “had”.
size_t count = 0;size_t offset = string::npos;while(true){offset = str.find_last_of(substr, offset);if(offset == string::npos)break;
--offset;++count;
}cout << endl << “ Characters from the string \”” << substr
<< “\” were found “ << count << “ times in the string above.”<< endl;
This time you are searching backward starting at index position, string::npos, the end of the string,because this is the default starting position. The output from this fragment is:
The string to be searched is:Smith, where Jones had had “had had”, “had had” had. “Had had” had had theexaminers’ approval.
Characters from the string “had” were found 38 times in the string above.
The result should not be a surprise. Remember you are searching for occurrences of any of the charactersin “had” in the string str. There are 32 in the “Had” and “had” words, and 6 in the remaining words.Because you are searching backward through the string, you decrement offset within the loop whenyou find a character.
The last set of search facilities are versions of the find_first_not_of() and find_last_not_of()functions.
Function Description
find_last_of(string str,size_t offset=npos)
Searches backward through a string object for the lastoccurrence of any character in the string, str, starting atposition offset, and returns the index position wherethe character is found as a value of type size_t. If youomit the second argument, the default value of offsetis npos, which is the end of the string.
487
Chapter 8: More on Classes
25905c08.qxd:WroxPro 2/21/08 8:53 AM Page 487
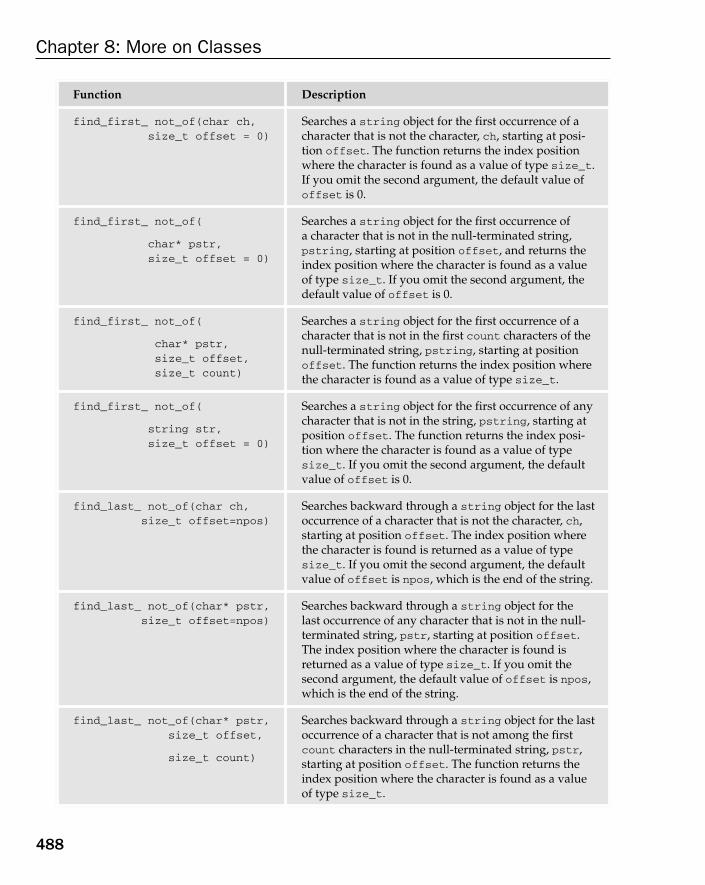
Function Description
find_first_ not_of(char ch,size_t offset = 0)
Searches a string object for the first occurrence of acharacter that is not the character, ch, starting at posi-tion offset. The function returns the index positionwhere the character is found as a value of type size_t.If you omit the second argument, the default value ofoffset is 0.
find_first_ not_of(
char* pstr,size_t offset = 0)
Searches a string object for the first occurrence of a character that is not in the null-terminated string,pstring, starting at position offset, and returns theindex position where the character is found as a valueof type size_t. If you omit the second argument, thedefault value of offset is 0.
find_first_ not_of(
char* pstr,size_t offset,size_t count)
Searches a string object for the first occurrence of acharacter that is not in the first count characters of thenull-terminated string, pstring, starting at positionoffset. The function returns the index position wherethe character is found as a value of type size_t.
find_first_ not_of(
string str,size_t offset = 0)
Searches a string object for the first occurrence of anycharacter that is not in the string, pstring, starting atposition offset. The function returns the index posi-tion where the character is found as a value of typesize_t. If you omit the second argument, the defaultvalue of offset is 0.
find_last_ not_of(char ch,size_t offset=npos)
Searches backward through a string object for the lastoccurrence of a character that is not the character, ch,starting at position offset. The index position wherethe character is found is returned as a value of typesize_t. If you omit the second argument, the defaultvalue of offset is npos, which is the end of the string.
find_last_ not_of(char* pstr,size_t offset=npos)
Searches backward through a string object for the last occurrence of any character that is not in the null-terminated string, pstr, starting at position offset.The index position where the character is found isreturned as a value of type size_t. If you omit the second argument, the default value of offset is npos,which is the end of the string.
find_last_ not_of(char* pstr,size_t offset,
size_t count)
Searches backward through a string object for the lastoccurrence of a character that is not among the firstcount characters in the null-terminated string, pstr,starting at position offset. The function returns theindex position where the character is found as a valueof type size_t.
488
Chapter 8: More on Classes
25905c08.qxd:WroxPro 2/21/08 8:53 AM Page 488

As with previous search functions, string::npos will be returned if the search does not find a character.These functions have many uses, typically finding tokens in a string that may be separated by charactersof various kinds. For example, text consists of words separated by spaces and punctuation characters, soyou could use these functions to find the words in a block of text. Let’s see that working in an example.
Try It Out Sorting Words from TextThis example will read a block of text, and then extract the words and output them in ascending sequence.I’ll use the somewhat inefficient bubble sort function that you saw in Ex8_10 here. In Chapter 10 you willuse a library function for sorting that would be much better, but you need to learn about some other stuffbefore you can use that. The program will also figure out how many times each word occurs and outputthe count for each word. Such an analysis is called a collocation. Here’s the code:
// Ex8_11.cpp// Extracting words from text#include <iostream>#include <iomanip>#include <string>using std::cin;using std::cout;using std::endl;using std::ios;using std::setiosflags;using std::resetiosflags;using std::setw;using std::string;
// Sort an array of string objectsstring* sort(string* strings, size_t count){bool swapped = false;while(true){for(size_t i = 0 ; i<count-1 ; i++){if(strings[i] > strings[i+1]){swapped = true;strings[i].swap(strings[i+1]);
}}if(!swapped)
Function Description
find_last_not_of(string str,size_t offset=npos)
Searches backward through a string object for the lastoccurrence of any character not in the string, str, start-ing at position offset. The function returns the indexposition where the character is found as a value of typesize_t. If you omit the second argument, the defaultvalue of offset is npos, which is the end of the string.
489
Chapter 8: More on Classes
25905c08.qxd:WroxPro 2/21/08 8:53 AM Page 489
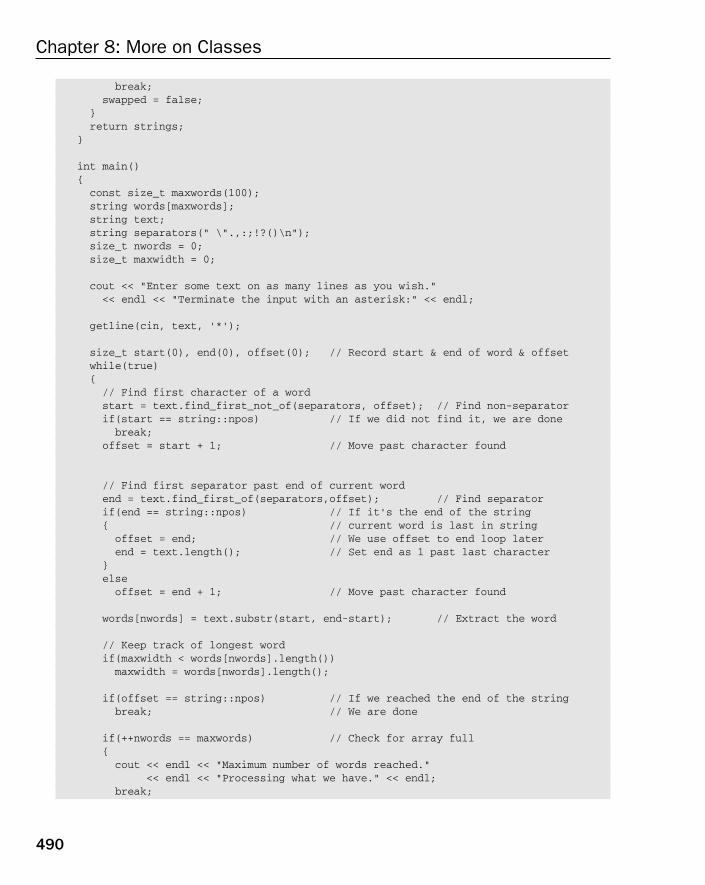
break;swapped = false;
}return strings;
}
int main(){const size_t maxwords(100);string words[maxwords];string text;string separators(“ \”.,:;!?()\n”);size_t nwords = 0;size_t maxwidth = 0;
cout << “Enter some text on as many lines as you wish.”<< endl << “Terminate the input with an asterisk:” << endl;
getline(cin, text, ‘*’);
size_t start(0), end(0), offset(0); // Record start & end of word & offsetwhile(true){// Find first character of a wordstart = text.find_first_not_of(separators, offset); // Find non-separatorif(start == string::npos) // If we did not find it, we are donebreak;
offset = start + 1; // Move past character found
// Find first separator past end of current wordend = text.find_first_of(separators,offset); // Find separatorif(end == string::npos) // If it’s the end of the string{ // current word is last in stringoffset = end; // We use offset to end loop laterend = text.length(); // Set end as 1 past last character
}elseoffset = end + 1; // Move past character found
words[nwords] = text.substr(start, end-start); // Extract the word
// Keep track of longest wordif(maxwidth < words[nwords].length())maxwidth = words[nwords].length();
if(offset == string::npos) // If we reached the end of the stringbreak; // We are done
if(++nwords == maxwords) // Check for array full{cout << endl << “Maximum number of words reached.”
<< endl << “Processing what we have.” << endl;break;
490
Chapter 8: More on Classes
25905c08.qxd:WroxPro 2/21/08 8:53 AM Page 490
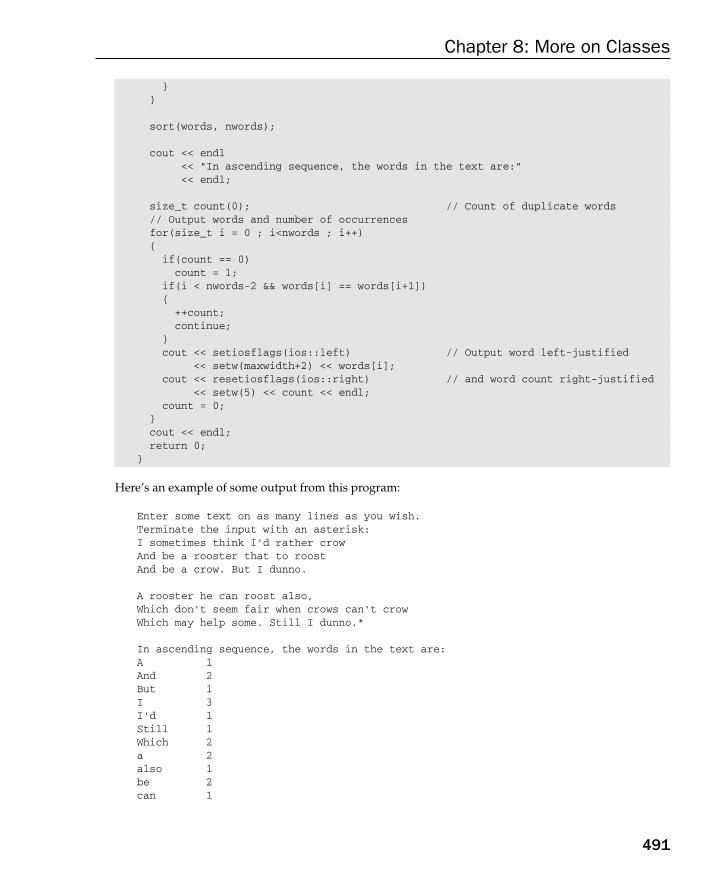
}}
sort(words, nwords);
cout << endl<< “In ascending sequence, the words in the text are:”<< endl;
size_t count(0); // Count of duplicate words// Output words and number of occurrencesfor(size_t i = 0 ; i<nwords ; i++){if(count == 0)count = 1;
if(i < nwords-2 && words[i] == words[i+1]){++count;continue;
}cout << setiosflags(ios::left) // Output word left-justified
<< setw(maxwidth+2) << words[i];cout << resetiosflags(ios::right) // and word count right-justified
<< setw(5) << count << endl;count = 0;
}cout << endl;return 0;
}
Here’s an example of some output from this program:
Enter some text on as many lines as you wish.Terminate the input with an asterisk:I sometimes think I'd rather crowAnd be a rooster that to roostAnd be a crow. But I dunno.
A rooster he can roost also,Which don't seem fair when crows can't crowWhich may help some. Still I dunno.*
In ascending sequence, the words in the text are:A 1And 2But 1I 3I'd 1Still 1Which 2a 2also 1be 2can 1
491
Chapter 8: More on Classes
25905c08.qxd:WroxPro 2/21/08 8:53 AM Page 491
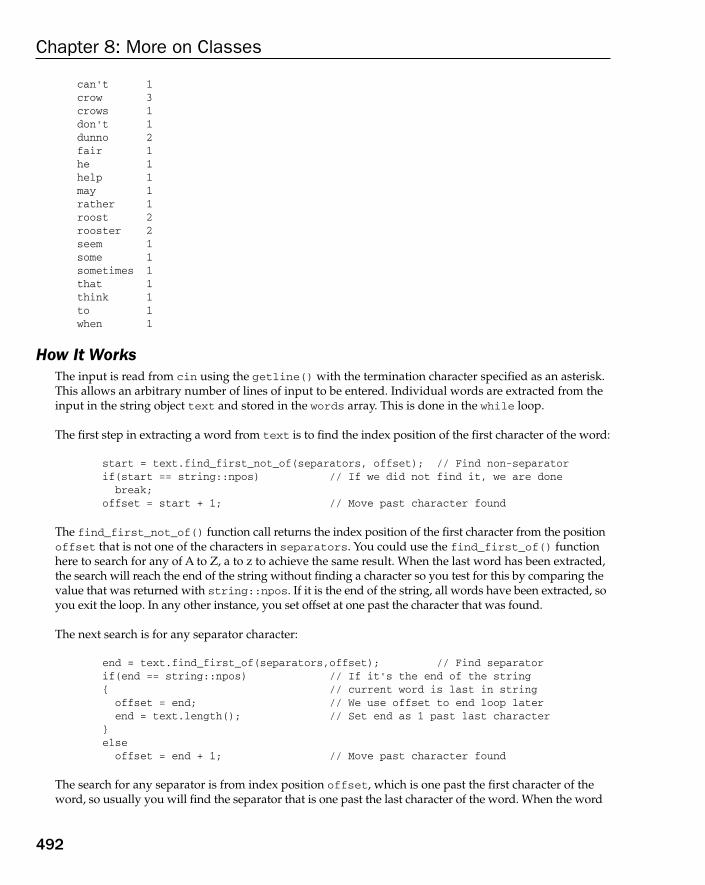
can't 1crow 3crows 1don't 1dunno 2fair 1he 1help 1may 1rather 1roost 2rooster 2seem 1some 1sometimes 1that 1think 1to 1when 1
How It WorksThe input is read from cin using the getline() with the termination character specified as an asterisk.This allows an arbitrary number of lines of input to be entered. Individual words are extracted from theinput in the string object text and stored in the words array. This is done in the while loop.
The first step in extracting a word from text is to find the index position of the first character of the word:
start = text.find_first_not_of(separators, offset); // Find non-separatorif(start == string::npos) // If we did not find it, we are done
break;offset = start + 1; // Move past character found
The find_first_not_of() function call returns the index position of the first character from the positionoffset that is not one of the characters in separators. You could use the find_first_of() functionhere to search for any of A to Z, a to z to achieve the same result. When the last word has been extracted,the search will reach the end of the string without finding a character so you test for this by comparing thevalue that was returned with string::npos. If it is the end of the string, all words have been extracted, soyou exit the loop. In any other instance, you set offset at one past the character that was found.
The next search is for any separator character:
end = text.find_first_of(separators,offset); // Find separatorif(end == string::npos) // If it’s the end of the string{ // current word is last in string
offset = end; // We use offset to end loop laterend = text.length(); // Set end as 1 past last character
}else
offset = end + 1; // Move past character found
The search for any separator is from index position offset, which is one past the first character of theword, so usually you will find the separator that is one past the last character of the word. When the word
492
Chapter 8: More on Classes
25905c08.qxd:WroxPro 2/21/08 8:53 AM Page 492
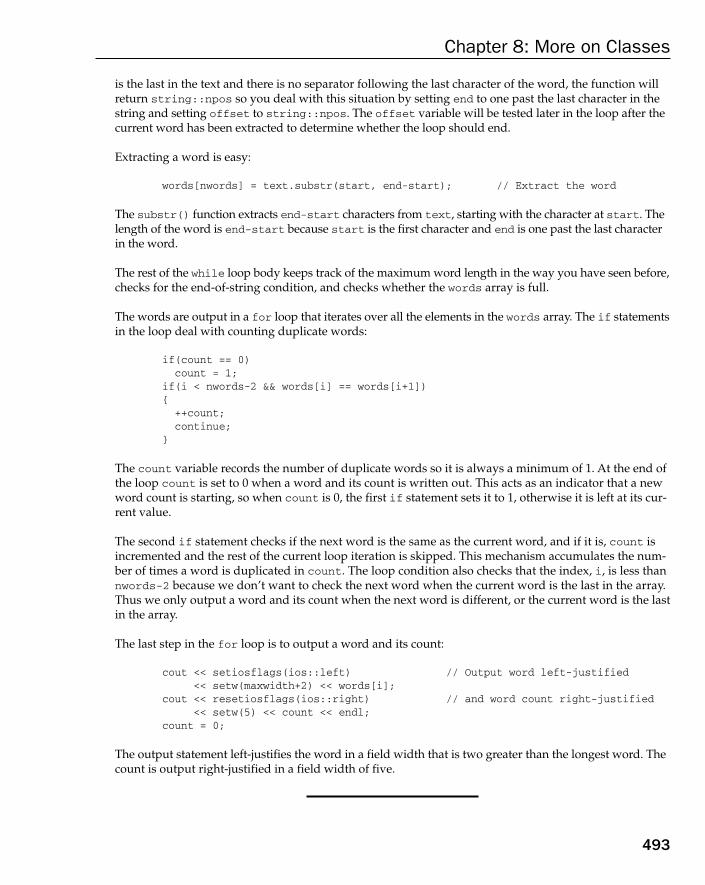
is the last in the text and there is no separator following the last character of the word, the function willreturn string::npos so you deal with this situation by setting end to one past the last character in thestring and setting offset to string::npos. The offset variable will be tested later in the loop after thecurrent word has been extracted to determine whether the loop should end.
Extracting a word is easy:
words[nwords] = text.substr(start, end-start); // Extract the word
The substr() function extracts end-start characters from text, starting with the character at start. Thelength of the word is end-start because start is the first character and end is one past the last characterin the word.
The rest of the while loop body keeps track of the maximum word length in the way you have seen before,checks for the end-of-string condition, and checks whether the words array is full.
The words are output in a for loop that iterates over all the elements in the words array. The if statementsin the loop deal with counting duplicate words:
if(count == 0)count = 1;
if(i < nwords-2 && words[i] == words[i+1]){
++count;continue;
}
The count variable records the number of duplicate words so it is always a minimum of 1. At the end ofthe loop count is set to 0 when a word and its count is written out. This acts as an indicator that a newword count is starting, so when count is 0, the first if statement sets it to 1, otherwise it is left at its cur-rent value.
The second if statement checks if the next word is the same as the current word, and if it is, count isincremented and the rest of the current loop iteration is skipped. This mechanism accumulates the num-ber of times a word is duplicated in count. The loop condition also checks that the index, i, is less thannwords-2 because we don’t want to check the next word when the current word is the last in the array.Thus we only output a word and its count when the next word is different, or the current word is the lastin the array.
The last step in the for loop is to output a word and its count:
cout << setiosflags(ios::left) // Output word left-justified<< setw(maxwidth+2) << words[i];
cout << resetiosflags(ios::right) // and word count right-justified<< setw(5) << count << endl;
count = 0;
The output statement left-justifies the word in a field width that is two greater than the longest word. Thecount is output right-justified in a field width of five.
493
Chapter 8: More on Classes
25905c08.qxd:WroxPro 2/21/08 8:53 AM Page 493
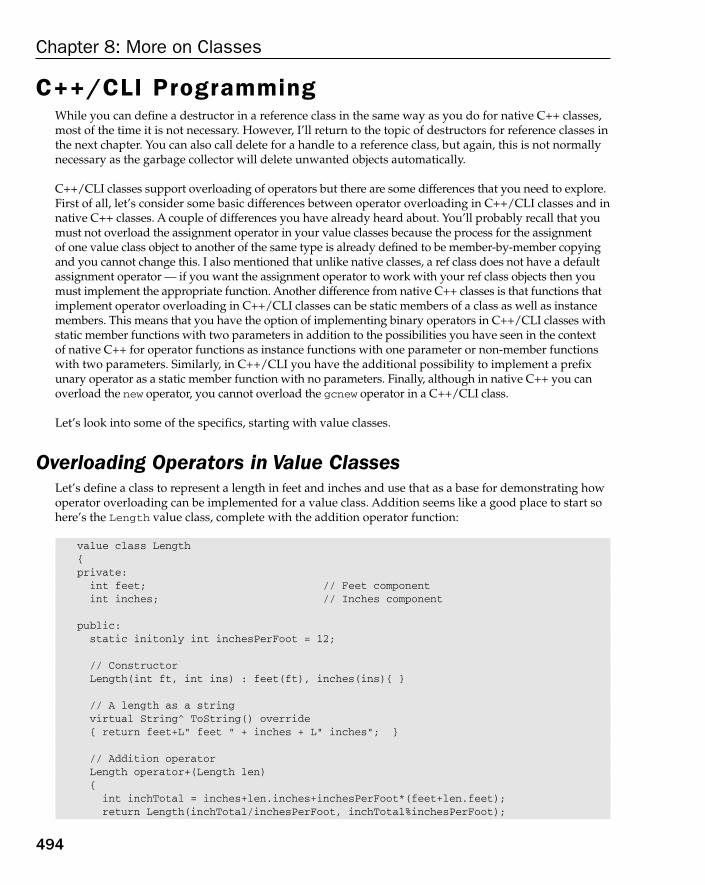
C++/CLI ProgrammingWhile you can define a destructor in a reference class in the same way as you do for native C++ classes,most of the time it is not necessary. However, I’ll return to the topic of destructors for reference classes inthe next chapter. You can also call delete for a handle to a reference class, but again, this is not normallynecessary as the garbage collector will delete unwanted objects automatically.
C++/CLI classes support overloading of operators but there are some differences that you need to explore.First of all, let’s consider some basic differences between operator overloading in C++/CLI classes and innative C++ classes. A couple of differences you have already heard about. You’ll probably recall that youmust not overload the assignment operator in your value classes because the process for the assignment of one value class object to another of the same type is already defined to be member-by-member copyingand you cannot change this. I also mentioned that unlike native classes, a ref class does not have a defaultassignment operator — if you want the assignment operator to work with your ref class objects then youmust implement the appropriate function. Another difference from native C++ classes is that functions thatimplement operator overloading in C++/CLI classes can be static members of a class as well as instancemembers. This means that you have the option of implementing binary operators in C++/CLI classes withstatic member functions with two parameters in addition to the possibilities you have seen in the context of native C++ for operator functions as instance functions with one parameter or non-member functionswith two parameters. Similarly, in C++/CLI you have the additional possibility to implement a prefixunary operator as a static member function with no parameters. Finally, although in native C++ you canoverload the new operator, you cannot overload the gcnew operator in a C++/CLI class.
Let’s look into some of the specifics, starting with value classes.
Overloading Operators in Value ClassesLet’s define a class to represent a length in feet and inches and use that as a base for demonstrating howoperator overloading can be implemented for a value class. Addition seems like a good place to start sohere’s the Length value class, complete with the addition operator function:
value class Length{private:int feet; // Feet componentint inches; // Inches component
public:static initonly int inchesPerFoot = 12;
// ConstructorLength(int ft, int ins) : feet(ft), inches(ins){ }
// A length as a stringvirtual String^ ToString() override{ return feet+L” feet “ + inches + L” inches”; }
// Addition operatorLength operator+(Length len){int inchTotal = inches+len.inches+inchesPerFoot*(feet+len.feet);return Length(inchTotal/inchesPerFoot, inchTotal%inchesPerFoot);
494
Chapter 8: More on Classes
25905c08.qxd:WroxPro 2/21/08 8:53 AM Page 494

}};
The constant, inchesPerFoot is static so it will be directly available to static and non-static functionmembers of the class. Declaring inchesPerFoot as initonly means that it cannot be modified so it canbe a public member of the class. There’s a ToString() function override defined for the class so you canwrite Length objects to the command line using the Console::WriteLine() function. The operator+()function implementation is very simple. The function returns a new Length object produced by combiningthe feet and inches component for the current object and the parameter, len. The calculation is done bycombining the two lengths in inches and then computing the arguments to the Length class constructor forthe new object from the value for the combined lengths in inches.
The following code fragment would exercise the new operator function for addition:
Length len1 = Length(6, 9);Length len2 = Length(7, 8);Console::WriteLine(L”{0} plus {1} is {2}”, len1, len2, len1+len2);
The last argument to the WriteLine() function is the sum of two Length objects so this will invoke theoperator+() function. The result will be a new Length object for which the compiler will arrange to callthe ToString() function so the last statement is really the following:
Console::WriteLine(L”{0} plus {1} is {2}”, len1, len2,len1.operator+(len2).ToString());
The execution of the code fragment will result in the following output:
6 feet 9 inches plus 7 feet 8 inches is 14 feet 5 inches
Of course, you could define the operator+() function as a static member of the Length class, like this:
static Length operator+(Length len1, Length len2){int inchTotal = len1.inches+len2.inches+inchesPerFoot*(len1.feet+len2.feet);return Length(inchTotal/inchesPerFoot, inchTotal%inchesPerFoot);
}}
The parameters are the two Length objects to be added together to produce a new Length object. Becausethis is a static member of the class, the operator+() function is fully entitled to access the private mem-bers, feet and inches, of both the Length objects passed as arguments. Friend functions are not allowedin C++/CLI classes and an external function would not have access to private members of the class so youhave no other possibilities for implementing the addition operator.
Because you are not working with areas multiplication for Length objects, it really only makes sense toprovide for multiplying a Length object by a numerical value. You can implement multiply operator over-loading as a static member of the class, but let’s define the function outside the class. The class would looklike this:
value class Length{private:
495
Chapter 8: More on Classes
25905c08.qxd:WroxPro 2/21/08 8:53 AM Page 495

int feet;int inches;
public:static initonly int inchesPerFoot = 12;
// ConstructorLength(int ft, int ins) : feet(ft), inches(ins){ }
// A length as a stringvirtual String^ ToString() override{ return feet+L” feet “ + inches + L” inches”; }
// Addition operatorLength operator+(Length len){
int inchTotal = inches+len.inches+inchesPerFoot*(feet+len.feet);return Length(inchTotal/inchesPerFoot, inchTotal%inchesPerFoot);
}
static Length operator*(double x, Length len); // Pre-multiply by a double valuestatic Length operator*(Length len, double x); // Post-multiply by a double value
};
The new function declarations in the class provide for overloaded * operator functions to pre- and post-multiply a Length object by a value of type double. The definition of the operator*() function outsidethe class for pre-multiplication would be:
Length Length::operator *(double x, Length len){int ins = safe_cast<int>(x*len.inches +x*len.feet*inchesPerFoot);return Length(ins/12, ins %12);
}
The post-multiplication version can now be implemented in terms of this:
Length Length::operator *(Length len, double x){ return operator*(x, len); }
This just calls the pre-multiply version with the arguments reversed. You could exercise these functionswith the following fragment:
double factor = 2.5;Console::WriteLine(L”{0} times {1} is {2}”, factor, len2, factor*len2);Console::WriteLine(L”{1} times {0} is {2}”, factor, len2, len2*factor);
Both lines of output from this code fragment should reflect the same result from multiplication — 19 feet2 inches. The argument expression factor*len2 is equivalent to:
Length::operator*(factor, len2).ToString()
The result of calling the static operator*() function is a new Length object and the ToString() functionfor that is called to produce the argument to the WriteLine() function. The expression len2*factor issimilar but calls the operator*() function that has the parameters reversed. Although the operator*()
496
Chapter 8: More on Classes
25905c08.qxd:WroxPro 2/21/08 8:53 AM Page 496

functions have been written to deal with a multiplier of type double, they will also work with integers.The compiler will automatically promote an integer values to type double when you use it in an expres-sion such as 12*(len1+len2).
We could expand a little further on overloaded operators in the Length class with a working example.
Try It Out A Value Class with Overloaded OperatorsThis example implements operator overloading for addition, multiplication and division for the Lengthclass:
// Ex8_12.cpp : main project file.// Overloading operators in the value class, Length#include “stdafx.h”using namespace System;
value class Length{private:int feet;int inches;
public:static initonly int inchesPerFoot = 12;
// ConstructorLength(int ft, int ins) : feet(ft), inches(ins){ }
// A length as a stringvirtual String^ ToString() override{ return feet+L” feet “ + inches + L” inches”; }
// Addition operatorLength operator+(Length len){int inchTotal = inches+len.inches+inchesPerFoot*(feet+len.feet);return Length(inchTotal/inchesPerFoot, inchTotal%inchesPerFoot);
}
// Division operatorstatic Length operator/(Length len, double x){int ins = safe_cast<int>((len.feet*inchesPerFoot + len.inches)/x);return Length(ins/inchesPerFoot, ins%inchesPerFoot);
}
static Length operator*(double x, Length len); // Pre-multiply by a double valuestatic Length operator*(Length len, double x); // Post-multiply by a double value
};
Length Length::operator *(double x, Length len){int ins = safe_cast<int>(x*len.inches +x*len.feet*inchesPerFoot);return Length(ins/inchesPerFoot, ins%inchesPerFoot);
497
Chapter 8: More on Classes
25905c08.qxd:WroxPro 2/21/08 8:53 AM Page 497

}
Length Length::operator *(Length len, double x){ return operator*(x, len); }
int main(array<System::String ^> ^args){Length len1 = Length(6, 9);Length len2 = Length(7, 8);double factor = 2.5;
Console::WriteLine(L”{0} plus {1} is {2}”, len1, len2, len1+len2);Console::WriteLine(L”{0} times {1} is {2}”, factor, len2, factor*len2);Console::WriteLine(L”{1} times {0} is {2}”, factor, len2, len2*factor);Console::WriteLine(L”The sum of {0} and {1} divided by {2} is {3}”,
len1, len2, factor, (len1+len2)/factor);return 0;
}
The output from the example is:
6 feet 9 inches plus 7 feet 8 inches is 14 feet 5 inches2.5 times 7 feet 8 inches is 19 feet 2 inches7 feet 8 inches times 2.5 is 19 feet 2 inchesThe sum of 6 feet 9 inches and 7 feet 8 inches divided by 2.5 is 5 feet 9 inches
How It WorksThe new operator overloading function in the Length class is for division and it allows division of aLength value by a value of type double. Dividing a double value by a Length object does not have anobvious meaning so there’s no need to implement this version. The operator/() function is implementedas another static member of the class and the definition appears within the body of the class definition tocontrast how that looks compared with the operator*() functions. You would normally define all thesefunctions inside the class definition.
Of course, you could define the operator/() function as a non-static class member like this:
Length operator/(double x){int ins = safe_cast<int>((feet*inchesPerFoot + inches)/x);return Length(ins/inchesPerFoot, ins%inchesPerFoot);
}
It now has one argument, which will be the right operand for the / operator. The left operand is the cur-rent object that is referenced by the this pointer (implicitly in this case).
The operators are exercised in the four output statements. Only the last one is new to you and this combinesthe use of the overloaded + operator for Length objects with the overloaded / operator. The last argumentto the Console::WriteLine() function in the fourth output statement is (len1+len2)/factor which isequivalent to the expression:
Length::operator/(len1.operator+(len2), factor) .ToString()
498
Chapter 8: More on Classes
25905c08.qxd:WroxPro 2/21/08 8:53 AM Page 498

The first argument to the static operator/() function is the Length object that is returned by theoperator+() function, and the second argument is the factor variable, which is the divisor. TheToString() function for the Length object returned by operator/() is called to produce the argu-ment string that is passed to the Console::WriteLine() function.
It is possible that you might want the capability to divide one Length object by another and have a valueof type int as the result. This would allow you to figure out how many 17 inch lengths you can cut from apiece of timber 12 feet 6 inches long for instance. You can implement this quite easily like this:
static int operator/(Length len1, Length len2){return(len1.feet*inchesPerFoot + len1.inches)/( len2.feet*inchesPerFoot + len2.inches);
}
This just returns the result of dividing the first length in inches by the second in inches.
To complete the set you could add a function to overload the % operator to tell you how much is left over.This could be implemented as:
static Length operator%(Length len1, Length len2){int ins = (len1.feet*inchesPerFoot + len1.inches)%
(len2.feet*inchesPerFoot + len2.inches);return Length(ins/inchesPerFoot, ins%inchesPerFoot);
}
You compute the residue in inches after dividing len1 by len2 and return it as a new Length object.
With all these operators you really can use your Length objects in arithmetic expressions. You can writestatements such as:
Length len1 = Length(2,6); // 2 feet 6 inchesLength len2 = Length(3,5); // 3 feet 5 inchesLength len3 = Length(14,6); // 14 feet 6 inchesLength total = 12*(len1 + len2 + len3) + (len3/Length(1,7))*len2;
The value of total will be 275 feet 9 inches. The last statement makes use of the assignment operatorthat comes with every value class as well as the operator*(), operator+(), and operator/() func-tions in the Length class. This operator overloading is not only powerful stuff, it really is easy isn’t it?
Overloading the Increment and Decrement OperatorsOverloading the increment and decrement operators is simpler in C++/CLI than in native C++. As long as you implement the operator function as a static class member, the same function will serve as both the prefix and postfix operator functions. Here’s how you could implement the increment operator for theLength class:
value class Length{public:
499
Chapter 8: More on Classes
25905c08.qxd:WroxPro 2/21/08 8:53 AM Page 499

// Code as before...
// Overloaded increment operator function - increment by 1 inchstatic Length operator++(Length len){++len.inches;len.feet += len.inches/len.inchesPerFoot;len.inches %= len.inchesPerFoot;return len;
}};
This implementation of the operator++() function increments a length by 1 inch. The following codewould exercise the function:
Length len = Length(1, 11); // 1 foot 11 inchesConsole::WriteLine(len++);Console::WriteLine(++len);
Executing this fragment will produce the output:
1 feet 11 inches2 feet 1 inches
Thus the prefix and postfix increment operations are working as they should using a single operatorfunction in the Length class. This occurs because the compiler is able to determine whether to use thevalue of the operand in a surrounding expression before or after the operand has been incremented and compile the code accordingly.
Overloading Operators in Reference ClassesOverloading operators in a reference class is essentially the same as overloading operators in a valueclass, the primary difference being that parameters and return values are typically handles. Let’s seehow the Length class looks implemented as a reference class, then you’ll be able to compare the twoversions.
Try It Out Overloaded Operators in a Reference ClassThis example defines Length as a reference class with the same set of overloaded operators as the valueclass version:
// Ex8_13.cpp : main project file.// Defining and using overloaded operator
#include “stdafx.h”using namespace System;
ref class Length{private:int feet;int inches;
500
Chapter 8: More on Classes
25905c08.qxd:WroxPro 2/21/08 8:53 AM Page 500
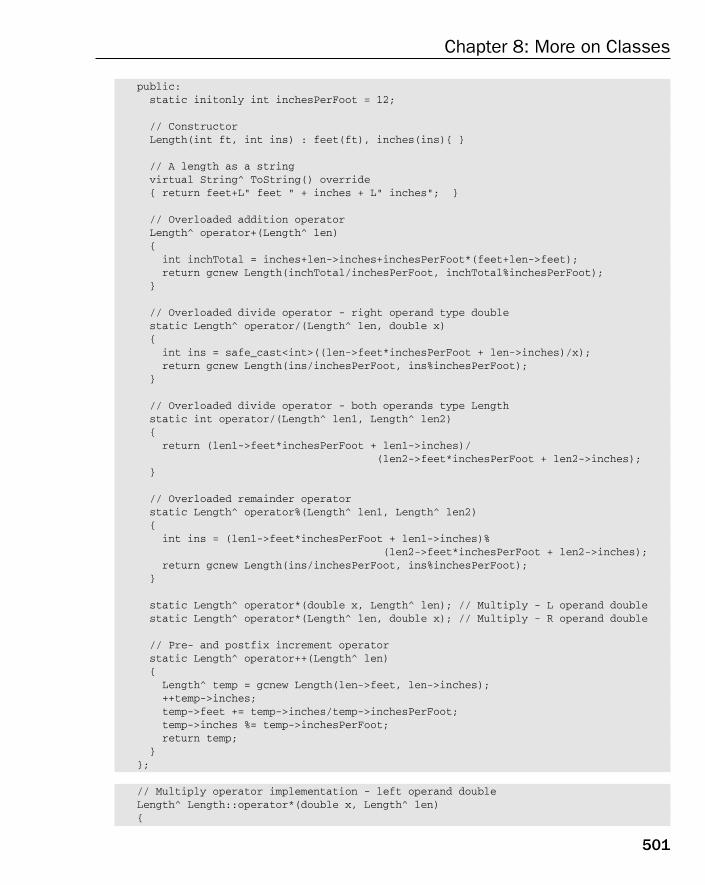
public:static initonly int inchesPerFoot = 12;
// ConstructorLength(int ft, int ins) : feet(ft), inches(ins){ }
// A length as a stringvirtual String^ ToString() override{ return feet+L” feet “ + inches + L” inches”; }
// Overloaded addition operatorLength^ operator+(Length^ len){int inchTotal = inches+len->inches+inchesPerFoot*(feet+len->feet);return gcnew Length(inchTotal/inchesPerFoot, inchTotal%inchesPerFoot);
}
// Overloaded divide operator - right operand type doublestatic Length^ operator/(Length^ len, double x){int ins = safe_cast<int>((len->feet*inchesPerFoot + len->inches)/x);return gcnew Length(ins/inchesPerFoot, ins%inchesPerFoot);
}
// Overloaded divide operator - both operands type Lengthstatic int operator/(Length^ len1, Length^ len2){return (len1->feet*inchesPerFoot + len1->inches)/
(len2->feet*inchesPerFoot + len2->inches);}
// Overloaded remainder operatorstatic Length^ operator%(Length^ len1, Length^ len2){int ins = (len1->feet*inchesPerFoot + len1->inches)%
(len2->feet*inchesPerFoot + len2->inches);return gcnew Length(ins/inchesPerFoot, ins%inchesPerFoot);
}
static Length^ operator*(double x, Length^ len); // Multiply - L operand doublestatic Length^ operator*(Length^ len, double x); // Multiply - R operand double
// Pre- and postfix increment operatorstatic Length^ operator++(Length^ len){Length^ temp = gcnew Length(len->feet, len->inches);++temp->inches;temp->feet += temp->inches/temp->inchesPerFoot;temp->inches %= temp->inchesPerFoot;return temp;
}};
// Multiply operator implementation - left operand doubleLength^ Length::operator*(double x, Length^ len){
501
Chapter 8: More on Classes
25905c08.qxd:WroxPro 2/21/08 8:53 AM Page 501
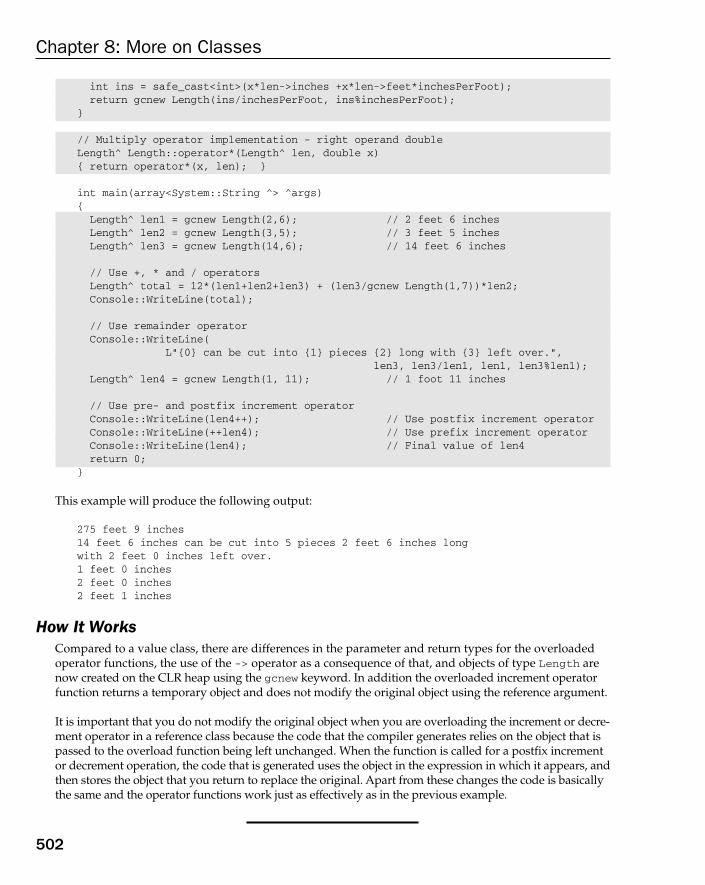
int ins = safe_cast<int>(x*len->inches +x*len->feet*inchesPerFoot);return gcnew Length(ins/inchesPerFoot, ins%inchesPerFoot);
}
// Multiply operator implementation - right operand doubleLength^ Length::operator*(Length^ len, double x){ return operator*(x, len); }
int main(array<System::String ^> ^args){Length^ len1 = gcnew Length(2,6); // 2 feet 6 inchesLength^ len2 = gcnew Length(3,5); // 3 feet 5 inchesLength^ len3 = gcnew Length(14,6); // 14 feet 6 inches
// Use +, * and / operatorsLength^ total = 12*(len1+len2+len3) + (len3/gcnew Length(1,7))*len2;Console::WriteLine(total);
// Use remainder operatorConsole::WriteLine(
L”{0} can be cut into {1} pieces {2} long with {3} left over.”,len3, len3/len1, len1, len3%len1);
Length^ len4 = gcnew Length(1, 11); // 1 foot 11 inches
// Use pre- and postfix increment operatorConsole::WriteLine(len4++); // Use postfix increment operatorConsole::WriteLine(++len4); // Use prefix increment operatorConsole::WriteLine(len4); // Final value of len4return 0;
}
This example will produce the following output:
275 feet 9 inches14 feet 6 inches can be cut into 5 pieces 2 feet 6 inches longwith 2 feet 0 inches left over.1 feet 0 inches2 feet 0 inches2 feet 1 inches
How It WorksCompared to a value class, there are differences in the parameter and return types for the overloadedoperator functions, the use of the -> operator as a consequence of that, and objects of type Length arenow created on the CLR heap using the gcnew keyword. In addition the overloaded increment operatorfunction returns a temporary object and does not modify the original object using the reference argument.
It is important that you do not modify the original object when you are overloading the increment or decre-ment operator in a reference class because the code that the compiler generates relies on the object that ispassed to the overload function being left unchanged. When the function is called for a postfix incrementor decrement operation, the code that is generated uses the object in the expression in which it appears, andthen stores the object that you return to replace the original. Apart from these changes the code is basicallythe same and the operator functions work just as effectively as in the previous example.
502
Chapter 8: More on Classes
25905c08.qxd:WroxPro 2/21/08 8:53 AM Page 502
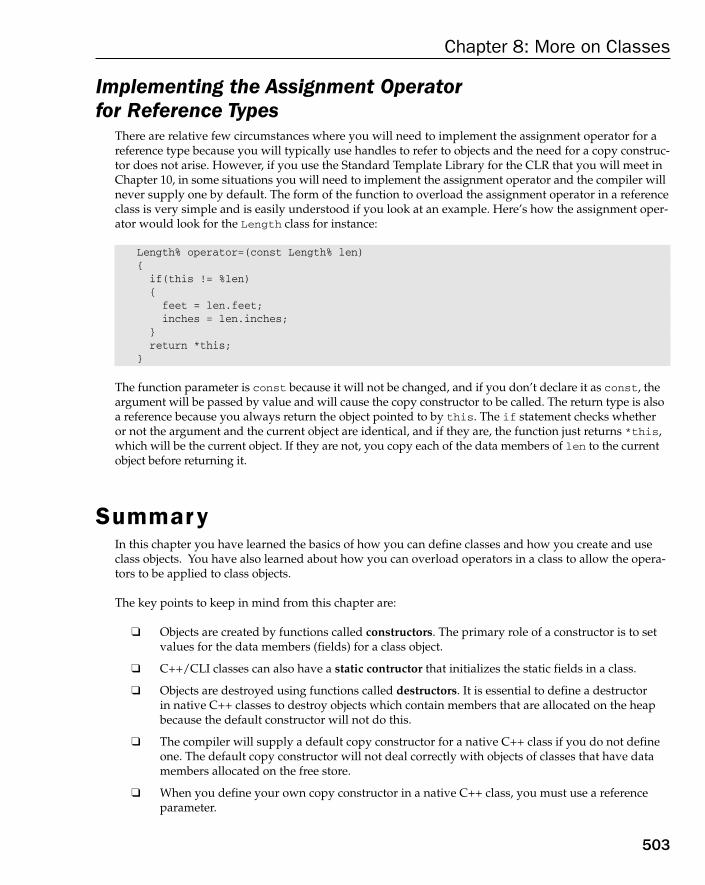
Implementing the Assignment Operator for Reference Types
There are relative few circumstances where you will need to implement the assignment operator for areference type because you will typically use handles to refer to objects and the need for a copy construc-tor does not arise. However, if you use the Standard Template Library for the CLR that you will meet inChapter 10, in some situations you will need to implement the assignment operator and the compiler willnever supply one by default. The form of the function to overload the assignment operator in a referenceclass is very simple and is easily understood if you look at an example. Here’s how the assignment oper-ator would look for the Length class for instance:
Length% operator=(const Length% len){if(this != %len){feet = len.feet;inches = len.inches;
}return *this;
}
The function parameter is const because it will not be changed, and if you don’t declare it as const, theargument will be passed by value and will cause the copy constructor to be called. The return type is alsoa reference because you always return the object pointed to by this. The if statement checks whether or not the argument and the current object are identical, and if they are, the function just returns *this,which will be the current object. If they are not, you copy each of the data members of len to the currentobject before returning it.
SummaryIn this chapter you have learned the basics of how you can define classes and how you create and useclass objects. You have also learned about how you can overload operators in a class to allow the opera-tors to be applied to class objects.
The key points to keep in mind from this chapter are:
❑ Objects are created by functions called constructors. The primary role of a constructor is to setvalues for the data members (fields) for a class object.
❑ C++/CLI classes can also have a static contructor that initializes the static fields in a class.
❑ Objects are destroyed using functions called destructors. It is essential to define a destructor in native C++ classes to destroy objects which contain members that are allocated on the heapbecause the default constructor will not do this.
❑ The compiler will supply a default copy constructor for a native C++ class if you do not defineone. The default copy constructor will not deal correctly with objects of classes that have datamembers allocated on the free store.
❑ When you define your own copy constructor in a native C++ class, you must use a referenceparameter.
503
Chapter 8: More on Classes
25905c08.qxd:WroxPro 2/21/08 8:53 AM Page 503
❑ You must not define a copy constructor in a value classes; copies of value class objects are alwayscreated by copying fields.
❑ No default copy constructor is supplied for a reference class although you can define your ownwhen this is necessary.
❑ If you do not define an assignment operator for your native C++ class, the compiler will supplya default version. As with the copy constructor, the default assignment operator will not workcorrectly with classes that have data members allocated on the free store.
❑ You must not define the assignment operator in a value class. Assignment of value class objectsis always done by copying fields.
❑ A default assignment operator is not provided for reference classes but you can define your ownassignment operator function when necessary.
❑ It is essential that you provide a destructor, a copy constructor, and an assignment operator fornative C++ classes that have members allocated by new.
❑ A union is a mechanism that allows two or more variables to occupy the same location in memory.
❑ C++/CLI classes can contain literal fields that define constants within a class. The can also con-tain initonly fields that cannot be modified once they have been initialized.
❑ Most basic operators can be overloaded to provide actions specific to objects of a class. Youshould only implement operator functions for your classes that are consistent with the normalinterpretation of the basic operators.
❑ The string class in the standard library for native C++ provides a powerful and superior wayto process strings in your programs.
❑ A class template is a pattern that you can use to create classes with the same structure, but whichsupport different data types.
❑ You can define a class template that has multiple parameters, including parameters that canassume constant values rather than types.
❑ You should put definitions for your programs in .h files, and executable code — function defini-tions — in .cpp files. You can then incorporate .h files into your .cpp files by using #includedirectives.
Exercises1. Define a native C++ class to represent an estimated integer, such as ‘about 40’. These are integers
whose value may be regarded as exact or estimated, so the class needs to have as data members a value and an ‘estimation’ flag. The state of the estimation flag affects arithmetic operations, sothat ‘2 * about 40’ is ‘about 80’. The state of variables should be switchable between ‘estimated’and ‘exact’.
Provide one or more constructors for such a class. Overload the + operator so that these integerscan be used in arithmetic expressions. Do you want the + operator to be a global or a memberfunction? Do you need an assignment operator? Provide a Print() member function so thatthey can be printed out, using a leading ‘E’ to denote that the ‘estimation’ flag is set. Write a pro-gram to test the operation of your class, checking especially that the operation of the estimationflag is correct.
504
Chapter 8: More on Classes
25905c08.qxd:WroxPro 2/21/08 8:53 AM Page 504
2. Implement a simple string class in native C++ that holds a char* and an integer length as privatedata members. Provide a constructor which takes an argument of type const char*, and imple-ment the copy constructor, assignment operator and destructor functions. Verify that your classworks. You will find it easiest to use the string functions from the <cstring> header file.
3. What other constructors might you want to supply for your string class? Make a list, and codethem up.
4. (Advanced) Does your class correctly deal with cases such as this?
string s1;...s1 = s1;
If not, how should it be modified?
5. (Advanced) Overload the + and += operators of your class for concatenating strings.
6. Modify the stack example from Exercise 7 in the previous chapter so that the size of the stack isspecified in the constructor and dynamically allocated. What else will you need to add? Test theoperation of your new class.
7. Define a Box ref class with the same functionality as the CBox class in Ex8_08.cpp and reimple-ment the example as a program for the CLR.
8. This exercise might be of use to someone working with sensitive documents. Write a native C++program that uses the string class that is declared in the <string> header to read a text stringof arbitrary length from the keyboard. The program should then prompt for entry of one or morewords that appears in the input text. All occurrences of the chosen words in the input text, regard-less of case, should be replaced with as many asterisks as there are letters in the word. Only wholewords should be replaced so if the string is “Our friend Wendy is at the end of theroad.” and the chosen word is “end”, the result should be “Our friend Wendy is at the*** of the road.”, not “Our fri*** W***y is at the *** of the road.”.
505
Chapter 8: More on Classes
25905c08.qxd:WroxPro 2/21/08 8:53 AM Page 505

25905c08.qxd:WroxPro 2/21/08 8:53 AM Page 506
9Class Inheritance and
Vir tual Functions
In this chapter, you’re going to look into a topic that lies at the heart of object-oriented program-ming: class inheritance. Simply put, inheritance is the means by which you can define a new classin terms of one you already have. This is fundamental to programming in C++ so it’s importantthat you understand how inheritance works.
In this chapter, you will learn about:
❑ How inheritance fits into the idea of object-oriented programming
❑ Defining a new class in terms of an existing one
❑ The use of the protected keyword to define a new access specification for class members
❑ How a class can be a friend to another class
❑ Virtual functions and how you can use them
❑ Pure virtual functions
❑ Abstract classes
❑ Virtual destructors and when to use them
Basic Ideas of OOPAs you have seen, a class is a data type that you define to suit your own application requirements.Classes in object-oriented programming also define the objects to which your program relates. Youprogram the solution to a problem in terms of the objects that are specific to the problem, using oper-ations that work directly with those objects. You can define a class to represent something abstract,such as a complex number, which is a mathematical concept, or a truck, which is decidedly physical(especially if you run into one on the highway). So, as well as being a data type, a class can also be adefinition of a set of real-world objects of a particular kind, at least to the degree necessary to solve agiven problem.
25905c09.qxd:WroxPro 2/21/08 8:54 AM Page 507
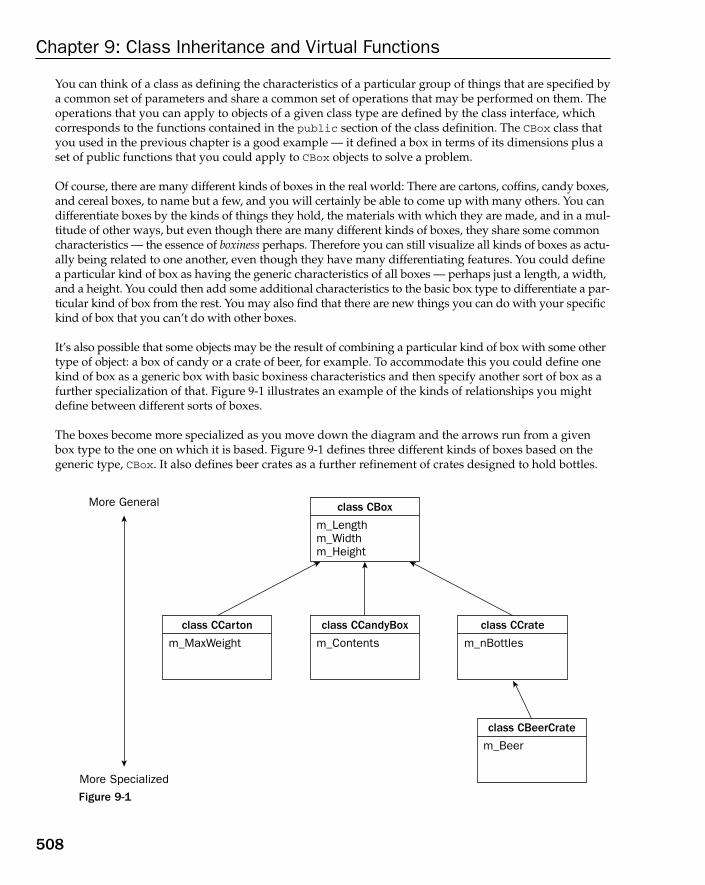
You can think of a class as defining the characteristics of a particular group of things that are specified bya common set of parameters and share a common set of operations that may be performed on them. Theoperations that you can apply to objects of a given class type are defined by the class interface, whichcorresponds to the functions contained in the public section of the class definition. The CBox class thatyou used in the previous chapter is a good example — it defined a box in terms of its dimensions plus aset of public functions that you could apply to CBox objects to solve a problem.
Of course, there are many different kinds of boxes in the real world: There are cartons, coffins, candy boxes,and cereal boxes, to name but a few, and you will certainly be able to come up with many others. You candifferentiate boxes by the kinds of things they hold, the materials with which they are made, and in a mul-titude of other ways, but even though there are many different kinds of boxes, they share some commoncharacteristics — the essence of boxiness perhaps. Therefore you can still visualize all kinds of boxes as actu-ally being related to one another, even though they have many differentiating features. You could definea particular kind of box as having the generic characteristics of all boxes — perhaps just a length, a width,and a height. You could then add some additional characteristics to the basic box type to differentiate a par-ticular kind of box from the rest. You may also find that there are new things you can do with your specifickind of box that you can’t do with other boxes.
It’s also possible that some objects may be the result of combining a particular kind of box with some othertype of object: a box of candy or a crate of beer, for example. To accommodate this you could define onekind of box as a generic box with basic boxiness characteristics and then specify another sort of box as afurther specialization of that. Figure 9-1 illustrates an example of the kinds of relationships you mightdefine between different sorts of boxes.
The boxes become more specialized as you move down the diagram and the arrows run from a givenbox type to the one on which it is based. Figure 9-1 defines three different kinds of boxes based on thegeneric type, CBox. It also defines beer crates as a further refinement of crates designed to hold bottles.
Figure 9-1
class CBox
m_Length m_Width m_Height
More General
class CCandyBox
m_Contents
class CCrate
m_nBottles
class CBeerCrate
m_Beer
class CCarton
m_MaxWeight
More Specialized
508
Chapter 9: Class Inheritance and Virtual Functions
25905c09.qxd:WroxPro 2/21/08 8:54 AM Page 508

Thus a good way to approximate the real world relatively well using classes in C++ is through the abilityto define classes that are interrelated. A candy box can be considered to be a box with all the characteris-tics of a basic box, plus a few characteristics of its own. This precisely illustrates the relationship betweenclasses in C++ when one class is defined based on another. A more specialized class has all the characteris-tics of the class on which it is based, plus a few characteristics of its own that identify what makes it special.Let’s look at how this works in practice.
Inheritance in ClassesWhen you define one class based on another, the former is referred to as a derived class. A derived classautomatically contains all the data members of the class that you used to define it and, with some restric-tions, the function members as well. The class is said to inherit the data members and function membersof the class on which it is based.
The only members of a base class that are not inherited by a derived class are the destructor, the construc-tors, and any member functions overloading the assignment operator. All other function members, togetherwith all the data members of a base class, are inherited by a derived class. Of course, the reason for certainbase members not being inherited is that a derived class always has its own constructors and destructor. Ifthe base class has an assignment operator, the derived class provides its own version. When I say these func-tions are not inherited, I mean that they don’t exist as members of a derived class object. However, they stillexist for the base class part of an object, as you will see.
What Is a Base Class?A base class is any class that you use as a basis for defining another class. For example, if you define aclass B directly in terms of a class A, A is said to be a direct base class of B. In Figure 9-1 the CCrate class isa direct base class of CBeerCrate. When a class such as CBeerCrate is defined in terms of another classCCrate, CBeerCrate is said to be derived from CCrate. Because CCrate is itself defined in terms of theclass CBox, CBox is said to be an indirect base class of CBeerCrate. You’ll see how this is expressed in the class definition in a moment. Figure 9-2 illustrates the way in which base class members are inheritedin a derived class.
Figure 9-2
Derived Class
Data Members Function Members Other Overloaded Operators Own Data Members Own Function Members Own Constructors Own Destructors
Base Class
Data Members Function Members Constructors Destructor Overloaded = operator Other Overloaded Operators
/ No
Inherited Members
/ No / No
509
Chapter 9: Class Inheritance and Virtual Functions
25905c09.qxd:WroxPro 2/21/08 8:54 AM Page 509

Just because member functions are inherited doesn’t mean that you won’t want to replace them in thederived class with new versions, and, of course, you can do that when necessary.
Deriving Classes from a Base ClassLet’s go back to the original CBox class with public data members that you saw at the beginning of theprevious chapter:
// Header file Box.h in project Ex9_01#pragma once
class CBox{public:double m_Length;double m_Width;double m_Height;
CBox(double lv = 1.0, double wv = 1.0, double hv = 1.0):m_Length(lv), m_Width(wv), m_Height(hv){}
};
Create a new empty WIN32 console project with the name Ex9_01 and save this code in a new header filein the project with the name Box.h. The #pragma once directive ensures the definition of CBox appearsonly once in a build. There’s a constructor in the class so that you can initialize objects when you declarethem. Suppose you now need another class of objects, CCandyBox, that are the same as CBox objects butalso have another data member — a pointer to a text string — that identifies the contents of the box.
You can define CCandyBox as a derived class with the CBox class as the base class, as follows:
// Header file CandyBox.h in project Ex9_01#pragma once#include “Box.h”class CCandyBox: CBox{public:char* m_Contents;
CCandyBox(char* str = “Candy”) // Constructor{m_Contents = new char[ strlen(str) + 1 ];strcpy_s(m_Contents, strlen(str) + 1, str);
}
~CCandyBox() // Destructor{ delete[] m_Contents; };
};
Add this header file to the project Ex9_01. You need the #include directive for the Box.h header filebecause you refer to the CBox class in the code. If you were to leave this directive out, CBox would beunknown to the compiler so the code would not compile. The base class name, CBox, appears after the
510
Chapter 9: Class Inheritance and Virtual Functions
25905c09.qxd:WroxPro 2/21/08 8:54 AM Page 510

name of the derived class CCandyBox and is separated from it by a colon. In all other respects, it lookslike a normal class definition. You have added the new member, m_Contents, and, because it is a pointerto a string, you need a constructor to initialize it and a destructor to release the memory for the string. Youhave also put a default value for the string describing the contents of a CCandyBox object in the constructor.Objects of the CCandyBox class type contain all the members of the base class, CBox, plus the additionaldata member, m_Contents.
Note the use of the strcpy_s() function that you first saw in Chapter 6. Here there are three arguments —the destination for the copy operation, the length of the destination buffer, and the source. If both arrayswere static — that is, not allocated on the heap — you could omit the second argument and just supply thedestination and source pointers. This is possible because the strcpy_s() function is also available as a tem-plate function that can infer the length of the destination string automatically. You can therefore call the func-tion just with the destination and source strings as arguments when you are working with static strings.
Try It Out Using a Derived ClassNow you’ll see how the derived class works in an example. Add the following code to the Ex9_01 projectas the source file Ex9_01.cpp:
// Ex9_01.cpp// Using a derived class#include <iostream> // For stream I/O#include <cstring> // For strlen() and strcpy()#include “CandyBox.h” // For CBox and CCandyBoxusing std::cout;using std::endl;
int main(){CBox myBox(4.0, 3.0, 2.0); // Create CBox objectCCandyBox myCandyBox;CCandyBox myMintBox(“Wafer Thin Mints”); // Create CCandyBox object
cout << endl<< “myBox occupies “ << sizeof myBox // Show how much memory<< “ bytes” << endl // the objects require<< “myCandyBox occupies “ << sizeof myCandyBox<< “ bytes” << endl<< “myMintBox occupies “ << sizeof myMintBox<< “ bytes”;
cout << endl<< “myBox length is “ << myBox.m_Length;
myBox.m_Length = 10.0;
// myCandyBox.m_Length = 10.0; // uncomment this for an error
cout << endl;return 0;
}
511
Chapter 9: Class Inheritance and Virtual Functions
25905c09.qxd:WroxPro 2/21/08 8:54 AM Page 511
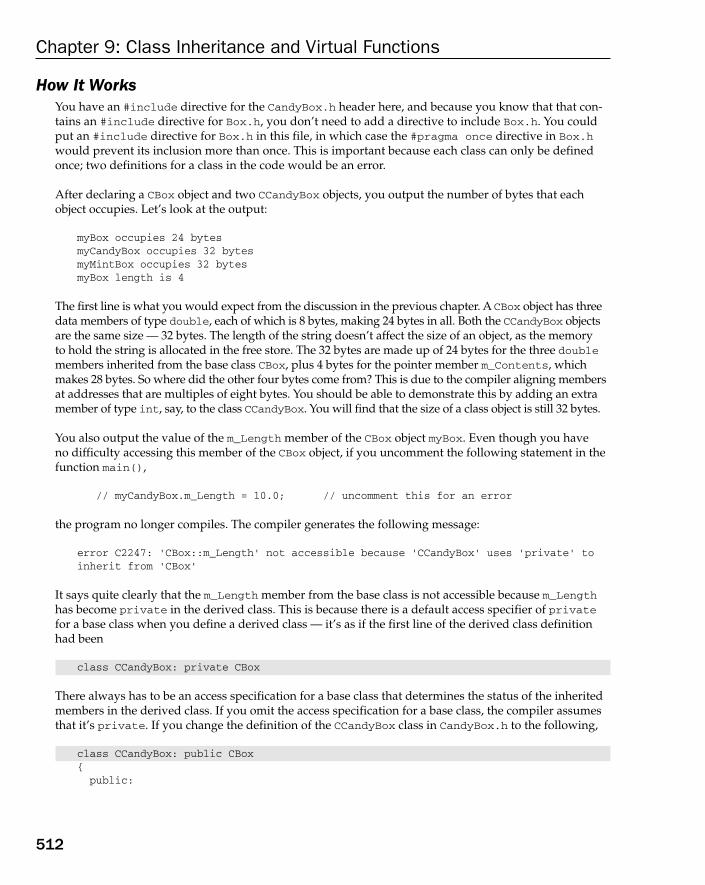
How It WorksYou have an #include directive for the CandyBox.h header here, and because you know that that con-tains an #include directive for Box.h, you don’t need to add a directive to include Box.h. You couldput an #include directive for Box.h in this file, in which case the #pragma once directive in Box.hwould prevent its inclusion more than once. This is important because each class can only be definedonce; two definitions for a class in the code would be an error.
After declaring a CBox object and two CCandyBox objects, you output the number of bytes that eachobject occupies. Let’s look at the output:
myBox occupies 24 bytesmyCandyBox occupies 32 bytesmyMintBox occupies 32 bytesmyBox length is 4
The first line is what you would expect from the discussion in the previous chapter. A CBox object has threedata members of type double, each of which is 8 bytes, making 24 bytes in all. Both the CCandyBox objectsare the same size — 32 bytes. The length of the string doesn’t affect the size of an object, as the memory to hold the string is allocated in the free store. The 32 bytes are made up of 24 bytes for the three doublemembers inherited from the base class CBox, plus 4 bytes for the pointer member m_Contents, whichmakes 28 bytes. So where did the other four bytes come from? This is due to the compiler aligning membersat addresses that are multiples of eight bytes. You should be able to demonstrate this by adding an extramember of type int, say, to the class CCandyBox. You will find that the size of a class object is still 32 bytes.
You also output the value of the m_Length member of the CBox object myBox. Even though you have no difficulty accessing this member of the CBox object, if you uncomment the following statement in thefunction main(),
// myCandyBox.m_Length = 10.0; // uncomment this for an error
the program no longer compiles. The compiler generates the following message:
error C2247: ‘CBox::m_Length’ not accessible because ‘CCandyBox’ uses ‘private’ toinherit from ‘CBox’
It says quite clearly that the m_Length member from the base class is not accessible because m_Lengthhas become private in the derived class. This is because there is a default access specifier of privatefor a base class when you define a derived class — it’s as if the first line of the derived class definitionhad been
class CCandyBox: private CBox
There always has to be an access specification for a base class that determines the status of the inheritedmembers in the derived class. If you omit the access specification for a base class, the compiler assumesthat it’s private. If you change the definition of the CCandyBox class in CandyBox.h to the following,
class CCandyBox: public CBox{public:
512
Chapter 9: Class Inheritance and Virtual Functions
25905c09.qxd:WroxPro 2/21/08 8:54 AM Page 512

char* m_Contents;
CCandyBox(char* str = “Candy”) // Constructor{
m_Contents = new char[ strlen(str) + 1 ];strcpy_s(m_Contents, strlen(str) + 1, str);
}
~CCandyBox() // Destructor{ delete[] m_Contents; };
};
the m_Length member is inherited in the derived class as public and is accessible in the function main().With the access specifier public for the base class, all the inherited members originally specified as publicin the base class have the same access level in the derived class.
Access Control Under InheritanceThe whole question of the access of inherited members in a derived class needs to be looked at more closely.Consider the status of the private members of a base class in a derived class.
There was a good reason to choose the version of the class CBox with public data members in the previ-ous example, rather than the later, more secure version with private data members. The reason wasthat although private data members of a base class are also members of a derived class, they remainprivate to the base class in the derived class so member functions added to the derived class cannotaccess them. They are only accessible in the derived class through function members of the base classthat are not in the private section of the base class. You can demonstrate this very easily by changingall the CBox class data members to private and putting a Volume()function in the derived classCCandyBox, so that the class definition is as follows:
// Version of the classes that will not compileclass CBox{public:
CBox(double lv = 1.0, double wv = 1.0, double hv = 1.0):m_Length(lv), m_Width(wv), m_Height(hv){}
private:double m_Length;double m_Width;double m_Height;
};
class CCandyBox: public CBox{public:char* m_Contents;
513
Chapter 9: Class Inheritance and Virtual Functions
25905c09.qxd:WroxPro 2/21/08 8:54 AM Page 513

// Function to calculate the volume of a CCandyBox objectdouble Volume() const // Error - members not accessible{ return m_Length*m_Width*m_Height; }
CCandyBox(char* str = “Candy”) // Constructor{m_Contents = new char[ strlen(str) + 1 ];strcpy_s(m_Contents, strlen(str) + 1, str);
}
~CCandyBox() // Destructor{ delete[] m_Contents; }
};
A program using these classes does not compile. The function Volume() in the class CCandyBox attemptsto access the private members of the base class, which is not legal so the compile will flag each instancewith error number C2248.
Try It Out Accessing Private Members of the Base ClassIt is, however, legal to use the Volume() function in the base class, so if you move the definition of thefunction Volume() to the public section of the base class, CBox, not only will the program compile but you can use the function to obtain the volume of a CCandyBox object. Create a new WIN32 project,Ex9_02, with the Box.h contents as the following:
// Box.h in Ex9_02#pragma once
class CBox{public:CBox(double lv = 1.0, double wv = 1.0, double hv = 1.0):
m_Length(lv), m_Width(wv), m_Height(hv){}
//Function to calculate the volume of a CBox objectdouble Volume() const{ return m_Length*m_Width*m_Height; }
private:double m_Length;double m_Width;double m_Height;
};
The CandyBox.h header in the project contains:
// Header file CandyBox.h in project Ex9_02#pragma once#include “Box.h”class CCandyBox: public CBox{public:
514
Chapter 9: Class Inheritance and Virtual Functions
25905c09.qxd:WroxPro 2/21/08 8:54 AM Page 514

char* m_Contents;
CCandyBox(char* str = “Candy”) // Constructor{
m_Contents = new char[ strlen(str) + 1 ];strcpy_s(m_Contents, strlen(str) + 1, str);
}
~CCandyBox() // Destructor{ delete[] m_Contents; };
};
The Ex9_02.cpp file in the project contains:
// Ex9_02.cpp// Using a function inherited from a base class#include <iostream> // For stream I/O#include <cstring> // For strlen() and strcpy()#include “CandyBox.h” // For CBox and CCandyBoxusing std::cout;using std::endl;
int main(){
CBox myBox(4.0,3.0,2.0); // Create CBox objectCCandyBox myCandyBox;CCandyBox myMintBox(“Wafer Thin Mints”); // Create CCandyBox object
cout << endl<< “myBox occupies “ << sizeof myBox // Show how much memory<< “ bytes” << endl // the objects require<< “myCandyBox occupies “ << sizeof myCandyBox<< “ bytes” << endl<< “myMintBox occupies “ << sizeof myMintBox << “ bytes”;
cout << endl << “myMintBox volume is “ << myMintBox.Volume(); // Get volume of a
// CCandyBox object cout << endl;return 0;
}
This example produces the following output:
myBox occupies 24 bytesmyCandyBox occupies 32 bytesmyMintBox occupies 32 bytesmyMintBox volume is 1
How It WorksThe interesting additional output is the last line. This shows the value produced by the function Volume(),which is now in the public section of the base class. Within the derived class, it operates on the members
515
Chapter 9: Class Inheritance and Virtual Functions
25905c09.qxd:WroxPro 2/21/08 8:54 AM Page 515

of the derived class that are inherited from the base. It is a full member of the derived class, so it can beused freely with objects of the derived class.
The value for the volume of the derived class object is 1 because, in creating the CCandyBox object, theCBox()default constructor was called first to create the base class part of the object, and this sets defaultCBox dimensions to 1.
Constructor Operation in a Derived ClassAlthough I said the base class constructors are not inherited in a derived class, they still exist in the baseclass and are used for creating the base part of a derived class object. This is because creating the base classpart of a derived class object is really the business of a base class constructor, not the derived class construc-tor. After all, you have seen that private members of a base class are inaccessible in a derived class object,even though they are inherited, so responsibility for these has to lie with the base class constructors.
The default base class constructor was called automatically in the last example to create the base part of thederived class object, but this doesn’t have to be the case. You can arrange to call a particular base class con-structor from the derived class constructor. This enables you to initialize the base class data members witha constructor other than the default, or indeed to choose to call a particular class constructor, depending onthe data supplied to the derived class constructor.
Try It Out Calling ConstructorsYou can see this in action through a modified version of the previous example. To make the class usable,you really need to provide a constructor for the derived class that allows you to specify the dimensionsof the object. You can add an additional constructor in the derived class to do this, and call the base classconstructor explicitly to set the values of the data members that are inherited from the base class.
In the Ex9_03 project, Box.h contains:
// Box.h in Ex9_03#pragma once#include <iostream>using std::cout;using std::endl;
class CBox{public:// Base class constructorCBox(double lv = 1.0, double wv = 1.0, double hv = 1.0):
m_Length(lv), m_Width(wv), m_Height(hv){ cout << endl << “CBox constructor called”; }
//Function to calculate the volume of a CBox objectdouble Volume() const{ return m_Length*m_Width*m_Height; }
private:double m_Length;
516
Chapter 9: Class Inheritance and Virtual Functions
25905c09.qxd:WroxPro 2/21/08 8:54 AM Page 516

double m_Width;double m_Height;
};
The CandyBox.h header file should contain:
// CandyBox.h in Ex9_03#pragma once#include <iostream>#include “Box.h”using std::cout;using std::endl;
class CCandyBox: public CBox{
public:char* m_Contents;
// Constructor to set dimensions and contents// with explicit call of CBox constructorCCandyBox(double lv, double wv, double hv, char* str = “Candy”)
:CBox(lv, wv, hv){cout << endl <<”CCandyBox constructor2 called”;m_Contents = new char[ strlen(str) + 1 ];strcpy_s(m_Contents, strlen(str) + 1, str);
}
// Constructor to set contents// calls default CBox constructor automaticallyCCandyBox(char* str = “Candy”){cout << endl << “CCandyBox constructor1 called”;m_Contents = new char[ strlen(str) + 1 ];strcpy_s(m_Contents, strlen(str) + 1, str);
}
~CCandyBox() // Destructor{ delete[] m_Contents; }
};
The #include directive for the <iostream> header and the two using declarations are not strictly nec-essary here because Box.h contains the same code, but it does no harm to put them in. On the contrary,putting these statements in here also means that if you were to remove this code from Box.h because itwas no longer required there, CandyBox.h still compiles.
The contents of Ex9_03.cpp is:
// Ex9_03.cpp// Calling a base constructor from a derived class constructor#include <iostream> // For stream I/O#include <cstring> // For strlen() and strcpy()#include “CandyBox.h” // For CBox and CCandyBoxusing std::cout;
517
Chapter 9: Class Inheritance and Virtual Functions
25905c09.qxd:WroxPro 2/21/08 8:54 AM Page 517
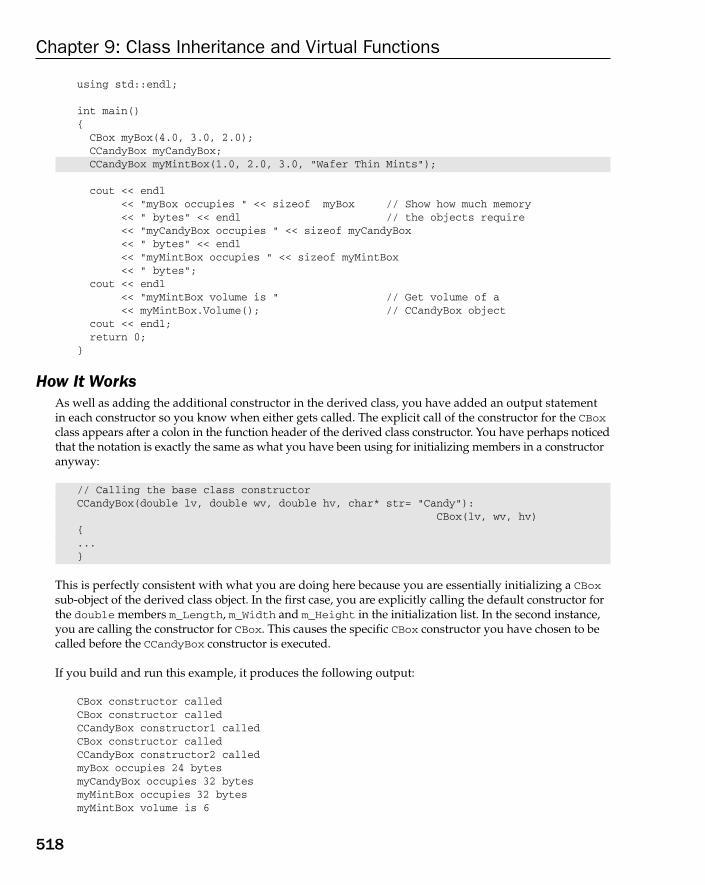
using std::endl;
int main(){CBox myBox(4.0, 3.0, 2.0);CCandyBox myCandyBox;CCandyBox myMintBox(1.0, 2.0, 3.0, “Wafer Thin Mints”);
cout << endl<< “myBox occupies “ << sizeof myBox // Show how much memory<< “ bytes” << endl // the objects require<< “myCandyBox occupies “ << sizeof myCandyBox<< “ bytes” << endl<< “myMintBox occupies “ << sizeof myMintBox<< “ bytes”;
cout << endl<< “myMintBox volume is “ // Get volume of a<< myMintBox.Volume(); // CCandyBox object
cout << endl;return 0;
}
How It WorksAs well as adding the additional constructor in the derived class, you have added an output statementin each constructor so you know when either gets called. The explicit call of the constructor for the CBoxclass appears after a colon in the function header of the derived class constructor. You have perhaps noticedthat the notation is exactly the same as what you have been using for initializing members in a constructoranyway:
// Calling the base class constructorCCandyBox(double lv, double wv, double hv, char* str= “Candy”):
CBox(lv, wv, hv){...}
This is perfectly consistent with what you are doing here because you are essentially initializing a CBoxsub-object of the derived class object. In the first case, you are explicitly calling the default constructor forthe double members m_Length, m_Width and m_Height in the initialization list. In the second instance,you are calling the constructor for CBox. This causes the specific CBox constructor you have chosen to becalled before the CCandyBox constructor is executed.
If you build and run this example, it produces the following output:
CBox constructor calledCBox constructor calledCCandyBox constructor1 calledCBox constructor calledCCandyBox constructor2 calledmyBox occupies 24 bytesmyCandyBox occupies 32 bytesmyMintBox occupies 32 bytesmyMintBox volume is 6
518
Chapter 9: Class Inheritance and Virtual Functions
25905c09.qxd:WroxPro 2/21/08 8:54 AM Page 518
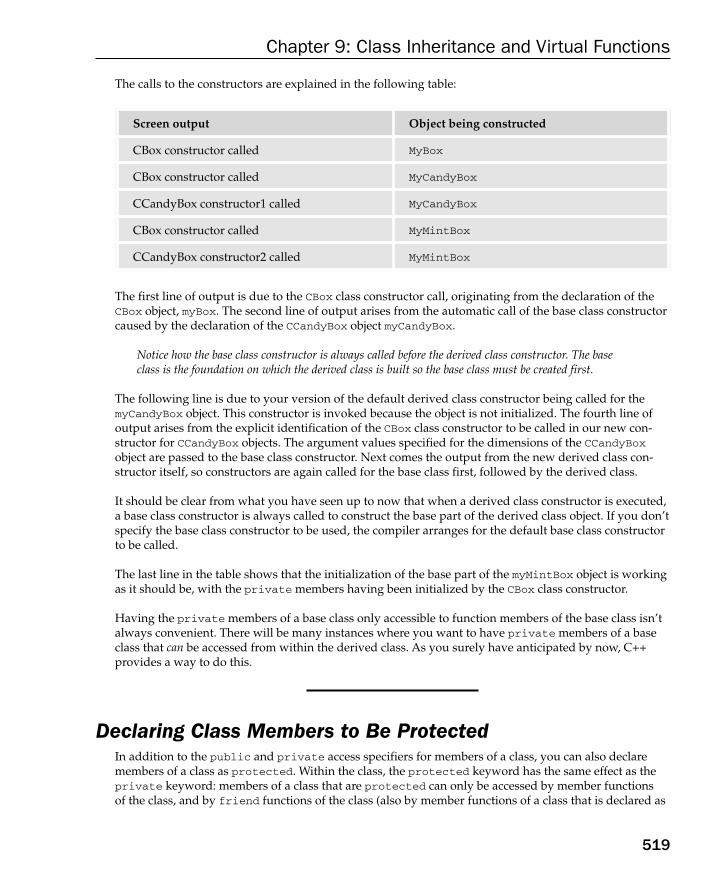
The calls to the constructors are explained in the following table:
The first line of output is due to the CBox class constructor call, originating from the declaration of theCBox object, myBox. The second line of output arises from the automatic call of the base class constructorcaused by the declaration of the CCandyBox object myCandyBox.
Notice how the base class constructor is always called before the derived class constructor. The baseclass is the foundation on which the derived class is built so the base class must be created first.
The following line is due to your version of the default derived class constructor being called for themyCandyBox object. This constructor is invoked because the object is not initialized. The fourth line ofoutput arises from the explicit identification of the CBox class constructor to be called in our new con-structor for CCandyBox objects. The argument values specified for the dimensions of the CCandyBoxobject are passed to the base class constructor. Next comes the output from the new derived class con-structor itself, so constructors are again called for the base class first, followed by the derived class.
It should be clear from what you have seen up to now that when a derived class constructor is executed,a base class constructor is always called to construct the base part of the derived class object. If you don’tspecify the base class constructor to be used, the compiler arranges for the default base class constructorto be called.
The last line in the table shows that the initialization of the base part of the myMintBox object is workingas it should be, with the private members having been initialized by the CBox class constructor.
Having the private members of a base class only accessible to function members of the base class isn’talways convenient. There will be many instances where you want to have private members of a baseclass that can be accessed from within the derived class. As you surely have anticipated by now, C++provides a way to do this.
Declaring Class Members to Be ProtectedIn addition to the public and private access specifiers for members of a class, you can also declaremembers of a class as protected. Within the class, the protected keyword has the same effect as theprivate keyword: members of a class that are protected can only be accessed by member functions of the class, and by friend functions of the class (also by member functions of a class that is declared as
Screen output Object being constructed
CBox constructor called MyBox
CBox constructor called MyCandyBox
CCandyBox constructor1 called MyCandyBox
CBox constructor called MyMintBox
CCandyBox constructor2 called MyMintBox
519
Chapter 9: Class Inheritance and Virtual Functions
25905c09.qxd:WroxPro 2/21/08 8:54 AM Page 519

a friend of the class — you will learn about friend classes later in this chapter). Using the protectedkeyword, you could redefine the CBox class as follows:
// Box.h in Ex9_04#pragma once#include <iostream>using std::cout;using std::endl;
class CBox{public:// Base class constructorCBox(double lv = 1.0, double wv = 1.0, double hv = 1.0):
m_Length(lv), m_Width(wv), m_Height(hv){ cout << endl << “CBox constructor called”; }
// CBox destructor - just to track calls~CBox(){ cout << “CBox destructor called” << endl; }
protected:double m_Length;double m_Width;double m_Height;
};
Now the data members are still effectively private, in that they can’t be accessed by ordinary globalfunctions, but they’ll still be accessible to member functions of a derived class.
Try It Out Using Protected MembersYou can demonstrate the use of protected data members by using this version of the class CBox toderive a new version of the class CCandyBox, which accesses the members of the base class through itsown member function, Volume():
// CandyBox.h in Ex9_04#pragma once#include “Box.h”#include <iostream>using std::cout;using std::endl;
class CCandyBox: public CBox{public:char* m_Contents;
// Derived class function to calculate volumedouble Volume() const{ return m_Length*m_Width*m_Height; }
520
Chapter 9: Class Inheritance and Virtual Functions
25905c09.qxd:WroxPro 2/21/08 8:54 AM Page 520
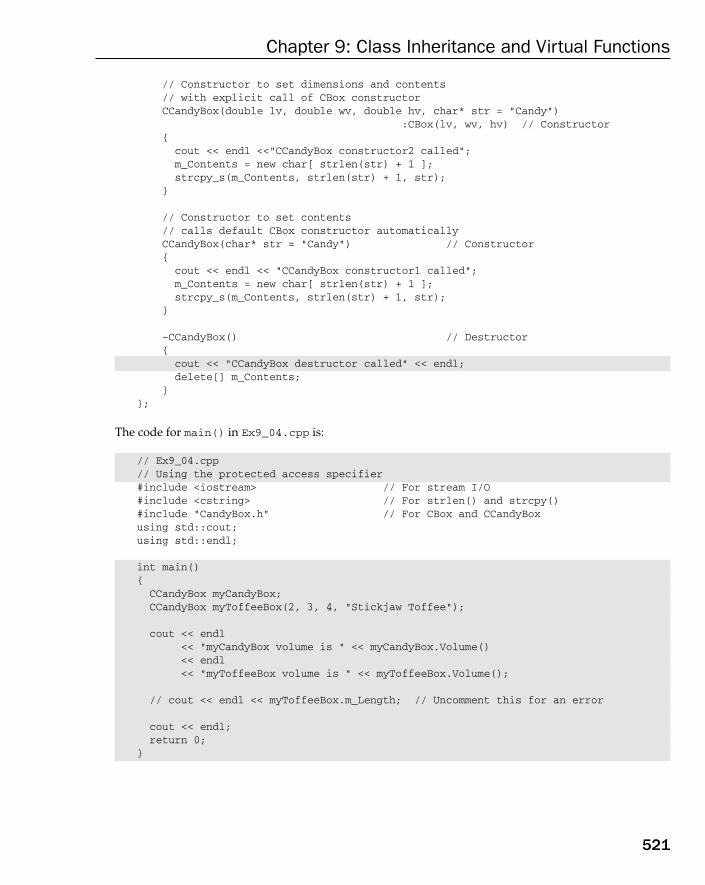
// Constructor to set dimensions and contents// with explicit call of CBox constructorCCandyBox(double lv, double wv, double hv, char* str = “Candy”)
:CBox(lv, wv, hv) // Constructor{
cout << endl <<”CCandyBox constructor2 called”;m_Contents = new char[ strlen(str) + 1 ];strcpy_s(m_Contents, strlen(str) + 1, str);
}
// Constructor to set contents// calls default CBox constructor automaticallyCCandyBox(char* str = “Candy”) // Constructor{
cout << endl << “CCandyBox constructor1 called”;m_Contents = new char[ strlen(str) + 1 ];strcpy_s(m_Contents, strlen(str) + 1, str);
}
~CCandyBox() // Destructor{cout << “CCandyBox destructor called” << endl;delete[] m_Contents;
}};
The code for main() in Ex9_04.cpp is:
// Ex9_04.cpp// Using the protected access specifier#include <iostream> // For stream I/O#include <cstring> // For strlen() and strcpy()#include “CandyBox.h” // For CBox and CCandyBoxusing std::cout;using std::endl;
int main(){CCandyBox myCandyBox;CCandyBox myToffeeBox(2, 3, 4, “Stickjaw Toffee”);
cout << endl<< “myCandyBox volume is “ << myCandyBox.Volume()<< endl<< “myToffeeBox volume is “ << myToffeeBox.Volume();
// cout << endl << myToffeeBox.m_Length; // Uncomment this for an error
cout << endl;return 0;
}
521
Chapter 9: Class Inheritance and Virtual Functions
25905c09.qxd:WroxPro 2/21/08 8:54 AM Page 521

How It WorksIn this example you calculate the volumes of the two CCandyBox objects by invoking the Volume()function that is a member of the derived class. This function accesses the inherited members m_Length,m_Width, and m_Height to produce the result. The members are declared as protected in the baseclass and remain protected in the derived class. The program produces the output shown as follows:
CBox constructor calledCCandyBox constructor1 calledCBox constructor calledCCandyBox constructor2 calledmyCandyBox volume is 1myToffeeBox volume is 24CCandyBox destructor calledCBox destructor calledCCandyBox destructor calledCBox destructor called
The output shows that the volume is being calculated properly for both CCandyBox objects. The firstobject has the default dimensions produced by calling the default CBox constructor, so the volume is 1,and the second object has the dimensions defined as initial values in its declaration.
The output also shows the sequence of constructor and destructor calls, and you can see how each derivedclass object is destroyed in two steps.
Destructors for a derived class object are called in the reverse order to the constructors for the object.This is a general rule that always applies. Constructors are invoked starting with the base class con-structor and then the derived class constructor, whereas the destructor for the derived class is called first when an object is destroyed, followed by the base class destructor.
You can demonstrate that the protected members of the base class remain protected in the derivedclass by uncommenting the statement preceding the return statement in the function main(). If you do this, you get the following error message from the compiler,
error C2248: ‘m_Length’: cannot access protected member declared in class ‘CBox’
which indicates quite clearly that the member m_Length is inaccessible.
The Access Level of Inherited Class MembersYou know that if you have no access specifier for the base class in the definition of a derived class, thedefault specification is private. This has the effect of causing the inherited public and protectedmembers of the base class to become private in the derived class. The private members of the baseclass remain private to the base and therefore inaccessible to member functions of the derived class. In fact, they remain private to the base class regardless of how the base class is specified in the derivedclass definition.
You have also used public as the specifier for a base class. This leaves the members of the base class withthe same access level in the derived class as they had in the base, so public members remain public andprotected members remain protected.
522
Chapter 9: Class Inheritance and Virtual Functions
25905c09.qxd:WroxPro 2/21/08 8:54 AM Page 522

The last possibility is that you declare a base class as protected. This has the effect of making the inher-ited public members of the base protected in the derived class. The protected (and private) inheritedmembers retain their original access level in the derived class. This is summarized in Figure 9-3.
Figure 9-3
This may look a little complicated, but you can reduce it to the following three points about the inheritedmembers of a derived class:
❑ Members of a base class that are declared as private are never accessible in a derived class.
❑ Defining a base class as public doesn’t change the access level of its members in the derivedclass.
❑ Defining a base class as protected changes its public members to protected in the derivedclass.
Being able to change the access level of inherited members in a derived class gives you a degree of flexi-bility, but don’t forget that you cannot relax the level specified in the base class; you can only make theaccess level more stringent. This suggests that your base classes need to have public members if youwant to be able to vary the access level in derived classes. This may seem to run contrary to the idea ofencapsulating data in a class in order to protect it from unauthorized access, but, as you’ll see, it is oftenthe case that you define base classes in such a manner that their only purpose is to act as a base for otherclasses, and they aren’t intended to be used for instantiating objects in their own right.
inherited as
inherited as
public:
public:
protected:
protected: protected:
protected:
private:
private:
private:
inherited as
No access - ever.
class CBox
class CCBox:private CBox
class CBBox:protected CBox
class CABox:public CBox
inherited as
inherited as
inherited as
•••
•••
•••
•••
•••
•••
•••
•••
••• }
{
{
}
{
}
{
}
523
Chapter 9: Class Inheritance and Virtual Functions
25905c09.qxd:WroxPro 2/21/08 8:54 AM Page 523

The Copy Constructor in a Derived ClassRemember that the copy constructor is called automatically when you declare an object that is initializedwith an object of the same class. Look at these statements:
CBox myBox(2.0, 3.0, 4.0); // Calls constructorCBox copyBox(myBox); // Calls copy constructor
The first statement calls the constructor that accepts three arguments of type double, and the secondcalls the copy constructor. If you don’t supply your own copy constructor, the compiler supplies onethat copies the initializing object member by member to the corresponding members of the new object.So that you can see what is going on during execution, you can add your own version of a copy con-structor to the class CBox. You can then use this class as a base for defining the CCandyBox class.
// Box.h in Ex9_05#pragma once#include <iostream>using std::cout;using std::endl;
class CBox // Base class definition{public:// Base class constructorCBox(double lv = 1.0, double wv = 1.0, double hv = 1.0):
m_Length(lv), m_Width(wv), m_Height(hv){ cout << endl << “CBox constructor called”; }
// Copy constructorCBox(const CBox& initB){cout << endl << “CBox copy constructor called”;m_Length = initB.m_Length;m_Width = initB.m_Width;m_Height = initB.m_Height;
}
// CBox destructor - just to track calls~CBox(){ cout << “CBox destructor called” << endl; }
protected:double m_Length;double m_Width;double m_Height;
};
Also recall that the copy constructor must have its parameter specified as a reference to avoid an infinitenumber of calls to itself, which would otherwise result from the need to copy an argument that is trans-ferred by value. When the copy constructor in our example is invoked, it outputs a message to the screen,so you’ll be able to see from the output when this is happening.
524
Chapter 9: Class Inheritance and Virtual Functions
25905c09.qxd:WroxPro 2/21/08 8:54 AM Page 524

We will use the version of CCandyBox class from Ex9_04.cpp, shown again here:
// CandyBox.h in Ex9_05#pragma once#include “Box.h”#include <iostream>using std::cout;using std::endl;
class CCandyBox: public CBox{
public:char* m_Contents;
// Derived class function to calculate volumedouble Volume() const{ return m_Length*m_Width*m_Height; }
// Constructor to set dimensions and contents// with explicit call of CBox constructorCCandyBox(double lv, double wv, double hv, char* str = “Candy”)
:CBox(lv, wv, hv) // Constructor{
cout << endl <<”CCandyBox constructor2 called”;m_Contents = new char[ strlen(str) + 1 ];strcpy_s(m_Contents, strlen(str) + 1, str);
}
// Constructor to set contents// calls default CBox constructor automaticallyCCandyBox(char* str = “Candy”) // Constructor{
cout << endl << “CCandyBox constructor1 called”;m_Contents = new char[ strlen(str) + 1 ];strcpy_s(m_Contents, strlen(str) + 1, str);
}
~CCandyBox() // Destructor{
cout << “CCandyBox destructor called” << endl;delete[] m_Contents;
}};
This doesn’t have a copy constructor added yet, so you’ll be relying on the compiler-generated version.
Try It Out The Copy Constructor in Derived ClassesYou can exercise the copy constructor that you have just defined with the following example:
// Ex9_05.cpp// Using a derived class copy constructor#include <iostream> // For stream I/O#include <cstring> // For strlen() and strcpy()#include “CandyBox.h” // For CBox and CCandyBox
525
Chapter 9: Class Inheritance and Virtual Functions
25905c09.qxd:WroxPro 2/21/08 8:54 AM Page 525

using std::cout;using std::endl;
int main(){CCandyBox chocBox(2.0, 3.0, 4.0, “Chockies”); // Declare and initializeCCandyBox chocolateBox(chocBox); // Use copy constructor
cout << endl<< “Volume of chocBox is “ << chocBox.Volume()<< endl<< “Volume of chocolateBox is “ << chocolateBox.Volume()<< endl;
return 0;}
How It Works (or Why It Doesn’t)When you run the Debug version of this example, in addition to the expected output, you’ll see the dialogshown in Figure 9-4 displayed.
Click Abort to clear the dialog box and you’ll see the output in the console window that you might expect.The output shows that the compiler-generated copy constructor for the derived class automatically calledthe copy constructor for the base class.
However, as you’ve probably realized, all is not as it should be. In this particular case, the compiler-generated copy constructor causes problems because the memory pointed to by the m_Contents mem-ber of the derived class in the second object declared points to the same memory as the one in the firstobject. When one object is destroyed (when it goes out of scope at the end of main()), it releases thememory occupied by the text. When the second object is destroyed, the destructor attempts to releasesome memory that has already been freed by the destructor call for the previous object — and that’sthe reason for the error message in the dialog box.
The way to fix this is to supply a copy constructor for the derived class that allocates some additionalmemory for the new object.
Figure 9-4
526
Chapter 9: Class Inheritance and Virtual Functions
25905c09.qxd:WroxPro 2/21/08 8:55 AM Page 526
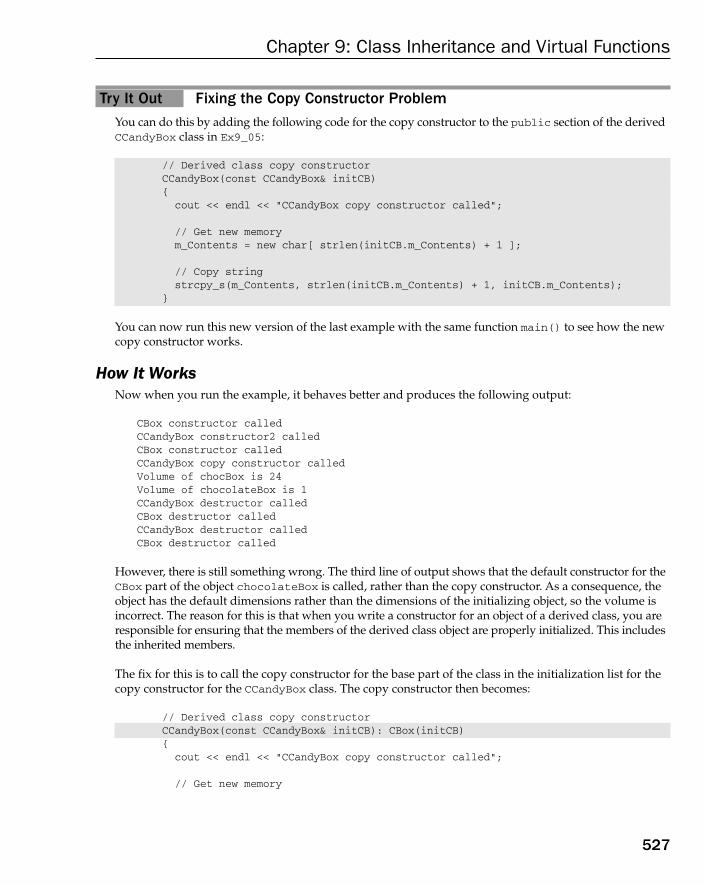
Try It Out Fixing the Copy Constructor ProblemYou can do this by adding the following code for the copy constructor to the public section of the derivedCCandyBox class in Ex9_05:
// Derived class copy constructorCCandyBox(const CCandyBox& initCB){cout << endl << “CCandyBox copy constructor called”;
// Get new memorym_Contents = new char[ strlen(initCB.m_Contents) + 1 ];
// Copy stringstrcpy_s(m_Contents, strlen(initCB.m_Contents) + 1, initCB.m_Contents);
}
You can now run this new version of the last example with the same function main() to see how the newcopy constructor works.
How It WorksNow when you run the example, it behaves better and produces the following output:
CBox constructor calledCCandyBox constructor2 calledCBox constructor calledCCandyBox copy constructor calledVolume of chocBox is 24Volume of chocolateBox is 1CCandyBox destructor calledCBox destructor calledCCandyBox destructor calledCBox destructor called
However, there is still something wrong. The third line of output shows that the default constructor for theCBox part of the object chocolateBox is called, rather than the copy constructor. As a consequence, theobject has the default dimensions rather than the dimensions of the initializing object, so the volume isincorrect. The reason for this is that when you write a constructor for an object of a derived class, you areresponsible for ensuring that the members of the derived class object are properly initialized. This includesthe inherited members.
The fix for this is to call the copy constructor for the base part of the class in the initialization list for thecopy constructor for the CCandyBox class. The copy constructor then becomes:
// Derived class copy constructorCCandyBox(const CCandyBox& initCB): CBox(initCB){
cout << endl << “CCandyBox copy constructor called”;
// Get new memory
527
Chapter 9: Class Inheritance and Virtual Functions
25905c09.qxd:WroxPro 2/21/08 8:55 AM Page 527

m_Contents = new char[ strlen(initCB.m_Contents) + 1 ];
// Copy stringstrcpy_s(m_Contents, strlen(initCB.m_Contents) + 1, initCB.m_Contents);
}
Now the CBox class copy constructor is called with the initCB object. Only the base part of the object ispassed to it, so everything works out. If you modify the last example by adding the base copy constructorcall, the output is as follows:
CBox constructor calledCCandyBox constructor2 calledCBox copy constructor calledCCandyBox copy constructor calledVolume of chocBox is 24Volume of chocolateBox is 24CCandyBox destructor calledCBox destructor calledCCandyBox destructor calledCBox destructor called
The output shows that all the constructors and destructors are called in the correct sequence and thecopy constructor for the CBox part of chocolateBox is called before the CCandyBox copy constructor.The volume of the object chocolateBox of the derived class is now the same as that of its initializingobject, which is as it should be.
You have, therefore, another golden rule to remember:
If you write any kind of constructor for a derived class, you are responsible for the initialization of allmembers of the derived class object, including all its inherited members.
Class Members as FriendsYou saw in Chapter 7 how a function can be declared as a friend of a class. This gives the friend func-tion the privilege of free access to any of the class members. Of course, there is no reason why a friendfunction cannot be a member of another class.
Suppose you define a CBottle class to represent a bottle:
class CBottle{public:CBottle(double height, double diameter){m_Height = height;m_Diameter = diameter;
}
528
Chapter 9: Class Inheritance and Virtual Functions
25905c09.qxd:WroxPro 2/21/08 8:55 AM Page 528
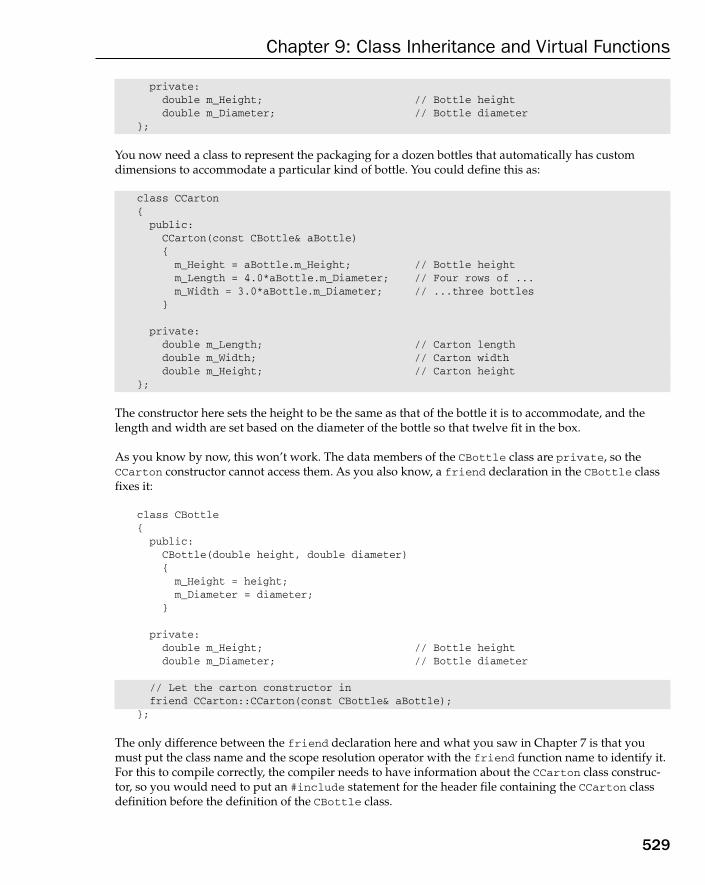
private:double m_Height; // Bottle heightdouble m_Diameter; // Bottle diameter
};
You now need a class to represent the packaging for a dozen bottles that automatically has customdimensions to accommodate a particular kind of bottle. You could define this as:
class CCarton{public:CCarton(const CBottle& aBottle){m_Height = aBottle.m_Height; // Bottle heightm_Length = 4.0*aBottle.m_Diameter; // Four rows of ...m_Width = 3.0*aBottle.m_Diameter; // ...three bottles
}
private:double m_Length; // Carton lengthdouble m_Width; // Carton widthdouble m_Height; // Carton height
};
The constructor here sets the height to be the same as that of the bottle it is to accommodate, and thelength and width are set based on the diameter of the bottle so that twelve fit in the box.
As you know by now, this won’t work. The data members of the CBottle class are private, so theCCarton constructor cannot access them. As you also know, a friend declaration in the CBottle classfixes it:
class CBottle{
public:CBottle(double height, double diameter){
m_Height = height;m_Diameter = diameter;
}
private:double m_Height; // Bottle heightdouble m_Diameter; // Bottle diameter
// Let the carton constructor infriend CCarton::CCarton(const CBottle& aBottle);
};
The only difference between the friend declaration here and what you saw in Chapter 7 is that youmust put the class name and the scope resolution operator with the friend function name to identify it.For this to compile correctly, the compiler needs to have information about the CCarton class construc-tor, so you would need to put an #include statement for the header file containing the CCarton classdefinition before the definition of the CBottle class.
529
Chapter 9: Class Inheritance and Virtual Functions
25905c09.qxd:WroxPro 2/21/08 8:55 AM Page 529

Friend ClassesYou can also allow all the function members of one class to have access to all the data members of anotherby declaring it as a friend class. You could define the CCarton class as a friend of the CBottle class byadding a friend declaration within the CBottle class definition:
friend CCarton;
With this declaration in the CBottle class, all function members of the CCarton class now have freeaccess to all the data members of the CBottle class.
Limitations on Class FriendshipClass friendship is not reciprocated. Making the CCarton class a friend of the CBottle class does notmean that the CBottle class is a friend of the CCarton class. If you want this to be so, you must add afriend declaration for the CBottle class to the CCarton class.
Class friendship is also not inherited. If you define another class with CBottle as a base, members of the CCarton class will not have access to its data members, not even those inherited from CBottle.
Vir tual FunctionsLook more closely at the behavior of inherited member functions and their relationship with derivedclass member functions. You could add a function to the CBox class to output the volume of a CBoxobject. The simplified class then becomes:
// Box.h in Ex9_06#pragma once#include <iostream>using std::cout;using std::endl;
class CBox // Base class{public:
// Function to show the volume of an objectvoid ShowVolume() const{cout << endl
<< “CBox usable volume is “ << Volume(); }
// Function to calculate the volume of a CBox objectdouble Volume() const{ return m_Length*m_Width*m_Height; }
// ConstructorCBox(double lv = 1.0, double wv = 1.0, double hv = 1.0)
:m_Length(lv), m_Width(wv), m_Height(hv) {}
530
Chapter 9: Class Inheritance and Virtual Functions
25905c09.qxd:WroxPro 2/21/08 8:55 AM Page 530
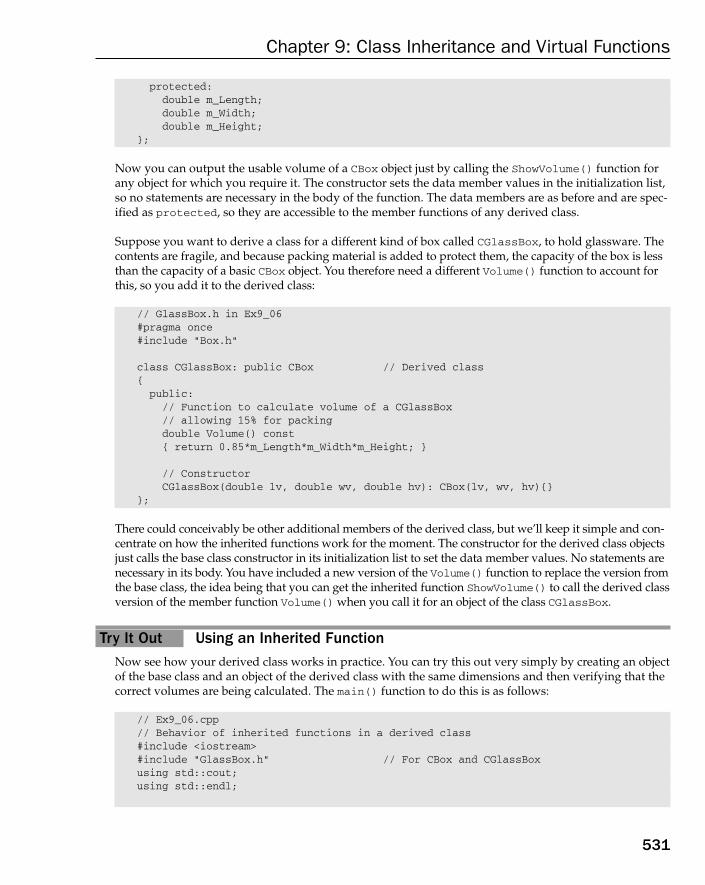
protected:double m_Length;double m_Width;double m_Height;
};
Now you can output the usable volume of a CBox object just by calling the ShowVolume() function forany object for which you require it. The constructor sets the data member values in the initialization list,so no statements are necessary in the body of the function. The data members are as before and are spec-ified as protected, so they are accessible to the member functions of any derived class.
Suppose you want to derive a class for a different kind of box called CGlassBox, to hold glassware. Thecontents are fragile, and because packing material is added to protect them, the capacity of the box is lessthan the capacity of a basic CBox object. You therefore need a different Volume() function to account forthis, so you add it to the derived class:
// GlassBox.h in Ex9_06#pragma once#include “Box.h”
class CGlassBox: public CBox // Derived class{public:// Function to calculate volume of a CGlassBox// allowing 15% for packingdouble Volume() const{ return 0.85*m_Length*m_Width*m_Height; }
// ConstructorCGlassBox(double lv, double wv, double hv): CBox(lv, wv, hv){}
};
There could conceivably be other additional members of the derived class, but we’ll keep it simple and con-centrate on how the inherited functions work for the moment. The constructor for the derived class objectsjust calls the base class constructor in its initialization list to set the data member values. No statements arenecessary in its body. You have included a new version of the Volume() function to replace the version fromthe base class, the idea being that you can get the inherited function ShowVolume() to call the derived classversion of the member function Volume() when you call it for an object of the class CGlassBox.
Try It Out Using an Inherited FunctionNow see how your derived class works in practice. You can try this out very simply by creating an objectof the base class and an object of the derived class with the same dimensions and then verifying that thecorrect volumes are being calculated. The main() function to do this is as follows:
// Ex9_06.cpp// Behavior of inherited functions in a derived class#include <iostream>#include “GlassBox.h” // For CBox and CGlassBoxusing std::cout;using std::endl;
531
Chapter 9: Class Inheritance and Virtual Functions
25905c09.qxd:WroxPro 2/21/08 8:55 AM Page 531

int main(){CBox myBox(2.0, 3.0, 4.0); // Declare a base boxCGlassBox myGlassBox(2.0, 3.0, 4.0); // Declare derived box - same size
myBox.ShowVolume(); // Display volume of base boxmyGlassBox.ShowVolume(); // Display volume of derived box
cout << endl;return 0;
}
How It WorksIf you run this example, it produces the following output:
CBox usable volume is 24CBox usable volume is 24
This isn’t only dull and repetitive, but it’s also disastrous. It isn’t working the way you want at all, and theonly interesting thing about it is why. Evidently, the fact that the second call is for an object of the derivedclass CGlassBox is not being taken into account. You can see this from the incorrect result for the volumein the output. The volume of a CGlassBox object should definitely be less than that of a basic CBox withthe same dimensions.
The reason for the incorrect output is that the call of the Volume() function in the function ShowVolume()is being set once and for all by the compiler as the version defined in the base class. ShowVolume() is abase class function and when CBox is compiled the call to Volume() is resolved at that time to the baseclass Volume() function; the compiler has no knowledge of any other Volume() function. This is calledstatic resolution of the function call since the function call is fixed before the program is executed. This isalso sometimes called early binding because the particular Volume() function chosen is bound to the callfrom the function ShowVolume() during the compilation of the program.
What we were hoping for in this example was that the question of which Volume() function call to use inany given instance would be resolved when the program was executed. This sort of operation is referredto as dynamic linkage, or late binding. We want the actual version of the function Volume() called byShowVolume() to be determined by the kind of object being processed, and not arbitrarily fixed by thecompiler before the program is executed.
No doubt you’ll be less than astonished that C++ does, in fact, provide you with a way to do this,because this whole discussion would have been futile otherwise! You need to use something called avirtual function.
What Is a Virtual Function?A virtual function is a function in a base class that is declared using the keyword virtual. If you specifya function in a base class as virtual and there is another definition of the function in a derived class,
532
Chapter 9: Class Inheritance and Virtual Functions
25905c09.qxd:WroxPro 2/21/08 8:55 AM Page 532
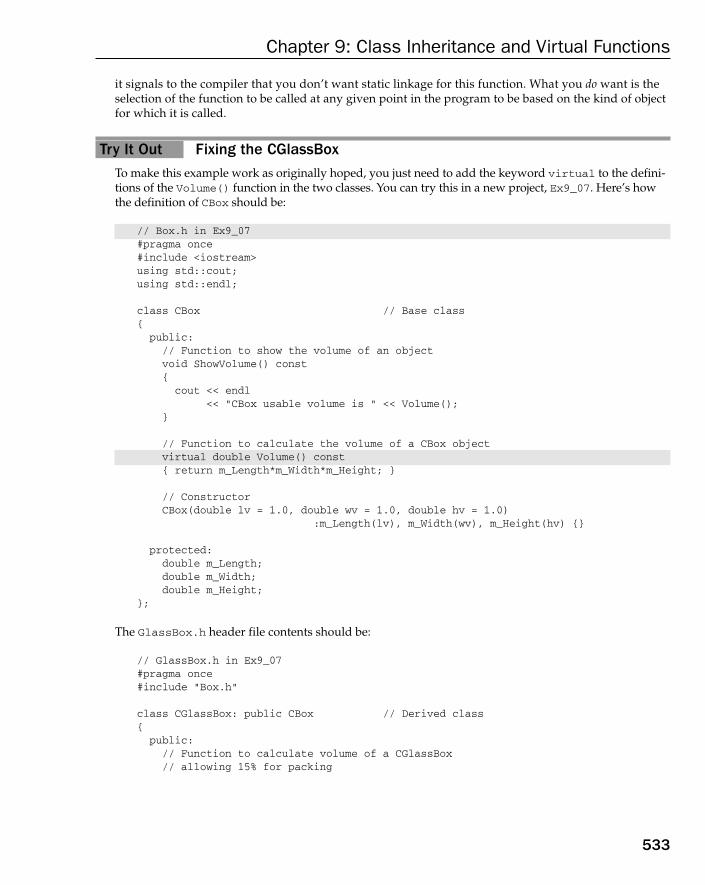
it signals to the compiler that you don’t want static linkage for this function. What you do want is theselection of the function to be called at any given point in the program to be based on the kind of objectfor which it is called.
Try It Out Fixing the CGlassBoxTo make this example work as originally hoped, you just need to add the keyword virtual to the defini-tions of the Volume() function in the two classes. You can try this in a new project, Ex9_07. Here’s howthe definition of CBox should be:
// Box.h in Ex9_07#pragma once#include <iostream>using std::cout;using std::endl;
class CBox // Base class{
public:// Function to show the volume of an objectvoid ShowVolume() const{
cout << endl<< “CBox usable volume is “ << Volume();
}
// Function to calculate the volume of a CBox objectvirtual double Volume() const{ return m_Length*m_Width*m_Height; }
// ConstructorCBox(double lv = 1.0, double wv = 1.0, double hv = 1.0)
:m_Length(lv), m_Width(wv), m_Height(hv) {}
protected:double m_Length;double m_Width;double m_Height;
};
The GlassBox.h header file contents should be:
// GlassBox.h in Ex9_07#pragma once#include “Box.h”
class CGlassBox: public CBox // Derived class{
public:// Function to calculate volume of a CGlassBox// allowing 15% for packing
533
Chapter 9: Class Inheritance and Virtual Functions
25905c09.qxd:WroxPro 2/21/08 8:55 AM Page 533

virtual double Volume() const{ return 0.85*m_Length*m_Width*m_Height; }
// ConstructorCGlassBox(double lv, double wv, double hv): CBox(lv, wv, hv){}
};
The Ex9_07.cpp file version of main() is the same as for the previous example:
// Ex9_07.cpp (the same as Ex9_06.cpp)// Using a virtual function #include <iostream>#include “GlassBox.h” // For CBox and CGlassBoxusing std::cout;using std::endl;
int main(){CBox myBox(2.0, 3.0, 4.0); // Declare a base boxCGlassBox myGlassBox(2.0, 3.0, 4.0); // Declare derived box - same size
myBox.ShowVolume(); // Display volume of base boxmyGlassBox.ShowVolume(); // Display volume of derived box
cout << endl;return 0;
}
How It WorksIf you run this version of the program with just the little word virtual added to the definitions ofVolume(), it produces this output:
CBox usable volume is 24CBox usable volume is 20.4
This is now clearly doing what you wanted in the first place. The first call to the function ShowVolume()with the CBox object myBox calls the CBox class version of Volume(). The second call with the CGlassBoxobject myGlassBox calls the version defined in the derived class.
Note that although you have put the keyword virtual in the derived class definition of the functionVolume(), it’s not essential to do so. The definition of the base version of the function as virtual is suf-ficient. However, I recommend that you do specify the keyword for virtual functions in derived classesbecause it makes it clear to anyone reading the derived class definition that they are virtual functionsand that they are selected dynamically.
For a function to behave as virtual, it must have the same name, parameter list, and return type in anyderived class as the function has in the base class, and if the base class function is const, the derived classfunction must be, too. If you try to use different parameters or return types, or declare one as const and
534
Chapter 9: Class Inheritance and Virtual Functions
25905c09.qxd:WroxPro 2/21/08 8:55 AM Page 534

the other not, the virtual function mechanism won’t work. The function operates with static linkage estab-lished and fixed at compile time.
The operation of virtual functions is an extraordinarily powerful mechanism. You may have heard the termpolymorphism in relation to object-oriented programming, and this refers to the virtual function capability.Something that is polymorphic can appear in different guises, like a werewolf, or Dr. Jekyll, or a politicianbefore and after an election for example. Calling a virtual function produces different effects depending onthe kind of object for which it is being called.
Note that the Volume() function in the derived CGlassBox class actually hides the base class versionfrom the view of derived class functions. If you wanted to call the base version of Volume() from aderived class function, you would need to use the scope resolution operator to refer to the function asCBox::Volume().
Using Pointers to Class ObjectsUsing pointers with objects of a base class and of a derived class is an important technique. A pointer to a base class object can be assigned the address of a derived class object as well as that of the base. Youcan thus use a pointer of the type ‘pointer to base’ to obtain different behavior with virtual functions,depending on what kind of object the pointer is pointing to. You can see how this works more clearlyby looking at an example.
Try It Out Pointers to Base and Derived ClassesYou’ll use the same classes as in the previous example, but make a small modification to the function main() so that it uses a pointer to a base class object. Create the Ex9_08 project with Box.h and GlassBox.h header files the same as in the previous example. You can copy the Box.hand Glassbox.h files from the Ex9_07 project to this project folder. Adding an existing file to a proj-ect is quite easy; you right-click Ex9_08 in the Solution Explorer tab, select Add > New Itemfrom the pop-up menu; then select a header file to add it to the project. When you have added the headers, modify Ex9_08.cpp to the following:
// Ex9_08.cpp// Using a base class pointer to call a virtual function#include <iostream>#include “GlassBox.h” // For CBox and CGlassBoxusing std::cout;using std::endl;
int main(){
CBox myBox(2.0, 3.0, 4.0); // Declare a base boxCGlassBox myGlassBox(2.0, 3.0, 4.0); // Declare derived box of same sizeCBox* pBox = 0; // Declare a pointer to base class objects
535
Chapter 9: Class Inheritance and Virtual Functions
25905c09.qxd:WroxPro 2/21/08 8:55 AM Page 535

pBox = &myBox; // Set pointer to address of base objectpBox->ShowVolume(); // Display volume of base boxpBox = &myGlassBox; // Set pointer to derived class objectpBox->ShowVolume(); // Display volume of derived box
cout << endl;return 0;
}
How It WorksThe classes are the same as in example Ex9_07.cpp, but the function main() has been altered to use apointer to call the function ShowVolume(). Because you are using a pointer, you use the indirect mem-ber selection operator, ->, to call the function. The function ShowVolume() is called twice, and both callsuse the same pointer to base class objects, pBox. On the first occasion, the pointer contains the address ofthe base object, myBox, and on the occasion of the second call, it contains the address of the derived classobject, myGlassBox.
The output produced is as follows:
CBox usable volume is 24CBox usable volume is 20.4
This is exactly the same as that from the previous example where you used explicit objects in the func-tion call.
You can conclude from this example that the virtual function mechanism works just as well through apointer to a base class, with the specific function being selected based on the type of object being pointedto. This is illustrated in Figure 9-5.
Figure 9-5
classCBox
virtual double Volume () const {...}
pBox->ShowVolume()
void ShowVolume() const { cout << endl << “CBox usable volume is ” << Volume(); }
Pointer this is set to pBox
classCGlassBox
virtual double Volume () const {...}
pBox pointing toCBox object
pBox pointing toCGlassBox object
536
Chapter 9: Class Inheritance and Virtual Functions
25905c09.qxd:WroxPro 2/21/08 8:55 AM Page 536

This means that, even when you don’t know the precise type of the object pointed to by a base classpointer in a program (when a pointer is passed to a function as an argument, for example), the virtualfunction mechanism ensures that the correct function is called. This is an extraordinarily powerfulcapability, so make sure you understand it. Polymorphism is a fundamental mechanism in C++ thatyou will find yourself using again and again.
Using References with Virtual FunctionsIf you define a function with a reference to a base class as a parameter, you can pass an object of a derivedclass to it as an argument. When your function executes, the appropriate virtual function for the objectpassed is selected automatically. We could see this happening by modifying the function main() in thelast example to call a function that has a reference as a parameter.
Try It Out Using References with Virtual FunctionsLet’s move the call to ShowVolume() to a separate function and call that separate function from main():
// Ex9_09.cpp// Using a reference to call a virtual function#include <iostream>#include “GlassBox.h” // For CBox and CGlassBoxusing std::cout;using std::endl;
void Output(const CBox& aBox); // Prototype of function
int main(){
CBox myBox(2.0, 3.0, 4.0); // Declare a base boxCGlassBox myGlassBox(2.0, 3.0, 4.0); // Declare derived box of same size
Output(myBox); // Output volume of base class objectOutput(myGlassBox); // Output volume of derived class object
cout << endl;return 0;
}
void Output(const CBox& aBox){aBox.ShowVolume();
}
Box.h and GlassBox.h for this example have the same contents as the previous example.
How It WorksThe function main() now basically consists of two calls of the function Output(), the first with anobject of the base class as an argument and the second with an object of the derived class. Because theparameter is a reference to the base class, Output() accepts objects of either class as an argument and
537
Chapter 9: Class Inheritance and Virtual Functions
25905c09.qxd:WroxPro 2/21/08 8:55 AM Page 537

the appropriate version of the virtual function Volume() is called, depending on the object that is initial-izing the reference.
The program produces exactly the same output as the previous example, demonstrating that the virtualfunction mechanism does indeed work through a reference parameter.
Incomplete Class DefinitionsAt the beginning of the previous example, you have the prototype declaration for the Output() function.To process this declaration the compiler needs to have access to the definition of the CBox class because theparameter is of type CBox&. In this case the definition of the CBox class is available at this point becauseyou have an #include directive for GlassBox.h that has its own #include directive for Box.h.
However, there may be situations where you have such a declaration and the class definition cannot beincluded in this way, in which case you would need some other way to at least identify that the name CBoxrefers to a class type. In this situation you could provide an incomplete definition of the class CBox preced-ing the prototype of the output function. The statement that provides an incomplete definition of the CBoxclass is simply:
class CBox;
The statement just identifies that the name CBox refers to a class that is not defined at this point, but thisis sufficient for the compiler know of that CBox is the name of a class, and this allows it to process theprototype of the function Output(). Without some indication that CBox is a class, the prototype causesan error message to be generated.
Pure Virtual FunctionsIt’s possible that you’d want to include a virtual function in a base class so that it may be redefined in aderived class to suit the objects of that class, but that there is no meaningful definition you could give for the function in the base class.
For example, you could conceivably have a class CContainer, which could be used as a base for definingthe CBox class, or a CBottle class, or even a CTeapot class. The CContainer class wouldn’t have datamembers, but you might want to provide a virtual member function Volume() for any derived classes.Because the CContainer class has no data members, and therefore no dimensions, there is no sensibledefinition that you can write for the Volume() function. You can still define the class, however, includingthe member function Volume(), as follows:
// Container.h for Ex9_10#pragma once#include <iostream>using std::cout;using std::endl;
class CContainer // Generic base class for specific containers{public:
538
Chapter 9: Class Inheritance and Virtual Functions
25905c09.qxd:WroxPro 2/21/08 8:55 AM Page 538

// Function for calculating a volume - no content// This is defined as a ‘pure’ virtual function, signified by ‘= 0’virtual double Volume() const = 0;
// Function to display a volumevirtual void ShowVolume() const{cout << endl
<< “Volume is “ << Volume();}
};
The statement for the virtual function Volume() defines it as having no content by placing the equals signand zero in the function header. This is called a pure virtual function. Any class derived from this class musteither define the Volume() function or redefine it as a pure virtual function. Because you have declaredVolume() as const, its implementation in any derived class must also be const. Remember that const andnon-const varieties of a function with the same name and parameter list are different functions. In otherwords you can overload a function using const.
The class also contains the function ShowVolume(), which displays the volume of objects of derivedclasses. Because this is declared as virtual, it can be replaced in a derived class, but if it isn’t, the baseclass version that you see here is called.
Abstract ClassesA class containing a pure virtual function is called an abstract class. It’s called abstract because youcan’t define objects of a class containing a pure virtual function. It exists only for the purpose of defin-ing classes that are derived from it. If a class derived from an abstract class still defines a pure virtualfunction of the base as pure, it too is an abstract class.
You should not conclude, from the previous example of the CContainer class, that an abstract class can’thave data members. An abstract class can have both data members and function members. The presenceof a pure virtual function is the only condition that determines that a given class is abstract. In the samevein, an abstract class can have more than one pure virtual function. In this case, a derived class musthave definitions for every pure virtual function in its base; otherwise, it too will be an abstract class. If youforget to make the derived class version of the Volume() function const, the derived class will still beabstract because it contains the pure virtual Volume() member function that is const, as well as the non-const Volume() function that you have defined.
Try It Out An Abstract ClassYou could implement a CCan class, representing beer or cola cans perhaps, together with the originalCBox class and derive both from the CContainer class that you defined in the previous section. Thedefinition of the CBox class as a subclass of CContainer is as follows:
// Box.h for Ex9_10#pragma once#include “Container.h” // For CContainer definition#include <iostream>using std::cout;
539
Chapter 9: Class Inheritance and Virtual Functions
25905c09.qxd:WroxPro 2/21/08 8:55 AM Page 539
using std::endl;
class CBox: public CContainer // Derived class{public:
// Function to show the volume of an objectvirtual void ShowVolume() const{
cout << endl<< “CBox usable volume is “ << Volume();
}
// Function to calculate the volume of a CBox objectvirtual double Volume() const{ return m_Length*m_Width*m_Height; }
// ConstructorCBox(double lv = 1.0, double wv = 1.0, double hv = 1.0)
:m_Length(lv), m_Width(wv), m_Height(hv){}
protected:double m_Length;double m_Width;double m_Height;
};
The unshaded lines are the same as in the previous version of the CBox class. The CBox class is essen-tially as we had it in the previous example, except this time you have specified that it is derived fromthe CContainer class. The Volume() function is fully defined within this class (as it must be if thisclass is to be used to define objects). The only other option would be to specify it as a pure virtual func-tion, since it is pure in the base class, but then we couldn’t create CBox objects.
You could define the CCan class in the Can.h header file like this:
// Can.h for Ex9_10#pragma once#include “Container.h” // For CContainer definitionextern const double PI; // PI is defined elsewhere
class CCan: public CContainer{public:// Function to calculate the volume of a canvirtual double Volume() const{ return 0.25*PI*m_Diameter*m_Diameter*m_Height; }
// ConstructorCCan(double hv = 4.0, double dv = 2.0): m_Height(hv), m_Diameter(dv){}
protected:double m_Height;double m_Diameter;
};
540
Chapter 9: Class Inheritance and Virtual Functions
25905c09.qxd:WroxPro 2/21/08 8:55 AM Page 540

The CCan class also defines a Volume() function based on the formula hπr2, where h is the height of acan and r is the radius of the cross-section of a can. The volume is calculated as the height multiplied bythe area of the base. The expression in the function definition assumes a global constant PI is defined, sowe have the extern statement indicating that PI is a global variable of type const double that isdefined elsewhere — in this program it is defined in the Ex9_10.cpp file. Also notice that we redefinedthe ShowVolume() function in the CBox class, but not in the CCan class. You can see what effect this haswhen we get some program output.
You can exercise these classes with the following source file containing the main() function:
// Ex9_10.cpp// Using an abstract class#include “Box.h” // For CBox and CContainer#include “Can.h” // For CCan (and CContainer)#include <iostream> // For stream I/Ousing std::cout;using std::endl;
const double PI= 3.14159265; // Global definition for PI
int main(void){// Pointer to abstract base class// initialized with address of CBox objectCContainer* pC1 = new CBox(2.0, 3.0, 4.0);
// Pointer to abstract base class// initialized with address of CCan objectCContainer* pC2 = new CCan(6.5, 3.0);
pC1->ShowVolume(); // Output the volumes of the twopC2->ShowVolume(); // objects pointed tocout << endl;
delete pC1; // Now clean up the free storedelete pC2; // ....
return 0;}
How It WorksIn this program, you declare two pointers to the base class, CContainer. Although you can’t defineCContainer objects (because CContainer is an abstract class), you can still define a pointer to aCContainer, which you can then use to store the address of a derived class object; in fact you can use it to store the address of any object whose type is a direct or indirect subclass of CContainer. Thepointer pC1 is assigned the address of a CBox object created in the free store by the operator new. The second pointer is assigned the address of a CCan object in a similar manner.
Of course, because the derived class objects were created dynamically, you must use the delete operatorto clean up the free store when you have finished with them. You learned about the delete operatorback in Chapter 4.
541
Chapter 9: Class Inheritance and Virtual Functions
25905c09.qxd:WroxPro 2/21/08 8:55 AM Page 541
The output produced by this example is as follows:
CBox usable volume is 24Volume is 45.9458
Because you have defined ShowVolume() in the CBox class, the derived class version of the function iscalled for the CBox object. You did not define this function in the CCan class, so the base class version thatthe CCan class inherits is invoked for the CCan object. Because Volume() is a virtual function implementedin both derived classes (necessarily, because it is a pure virtual function in the base class), the call to it isresolved when the program is executed by selecting the version belonging to the class of the object beingpointed to. Thus, for the pointer pC1, the version from the class CBox is called and, for the pointer pC2,the version in the class CCan is called. In each case, therefore, you obtain the correct result.
You could equally well have used just one pointer and assigned the address of the CCan object to it (aftercalling the Volume() function for the CBox object). A base class pointer can contain the address of anyderived class object, even when several different classes are derived from the same base class, and soyou can have automatic selection of the appropriate virtual function across a whole range of derivedclasses. Impressive stuff, isn’t it?
Indirect Base ClassesAt the beginning of this chapter, I said that a base class for a subclass could in turn be derived fromanother, ‘more’ base class. A small extension of the last example provides you with an illustration ofthis, as well as demonstrates the use of a virtual function across a second level of inheritance.
Try It Out More Than One Level of InheritanceAll you need to do is add the class CGlassBox to the classes you have from the previous example. Therelationship between the classes you now have is illustrated in Figure 9-6.
The class CGlassBox is derived from the CBox class exactly as before, but we omit the derived class ver-sion of ShowVolume() to show that the base class version still propagates through the derived classes.With the class hierarchy shown above, the class CContainer is an indirect base of the class CGlassBox,and a direct base of the classes CBox and CCan.
The GlassBox.h header file for the example contains:
// GlassBox.h for Ex9_11#pragma once#include “Box.h” // For CBox
class CGlassBox: public CBox // Derived class{public:
// Function to calculate volume of a CGlassBox// allowing 15% for packingvirtual double Volume() const{ return 0.85*m_Length*m_Width*m_Height; }
542
Chapter 9: Class Inheritance and Virtual Functions
25905c09.qxd:WroxPro 2/21/08 8:55 AM Page 542
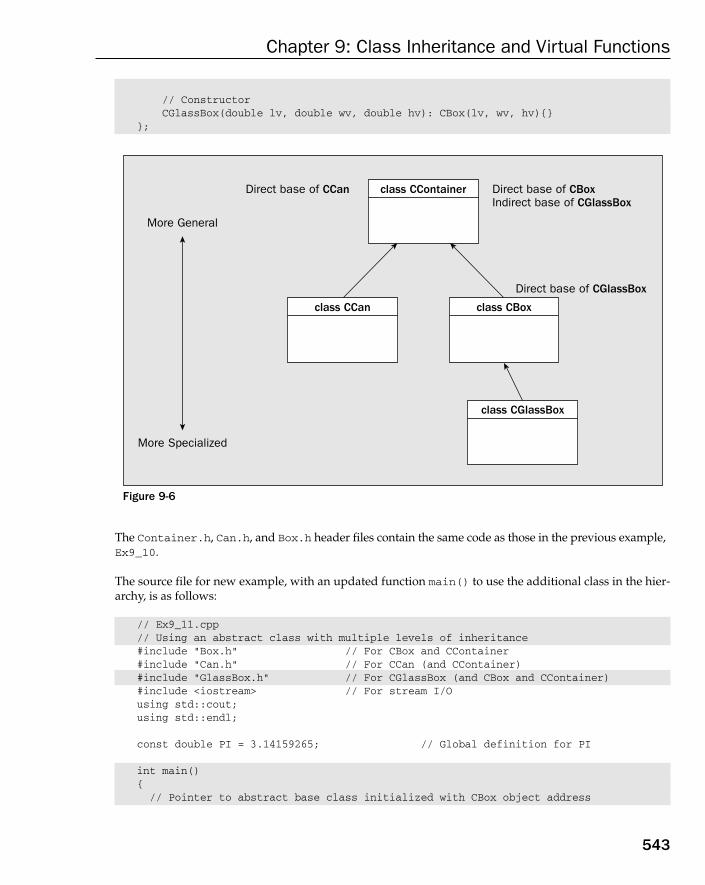
// ConstructorCGlassBox(double lv, double wv, double hv): CBox(lv, wv, hv){}
};
Figure 9-6
The Container.h, Can.h, and Box.h header files contain the same code as those in the previous example,Ex9_10.
The source file for new example, with an updated function main() to use the additional class in the hier-archy, is as follows:
// Ex9_11.cpp// Using an abstract class with multiple levels of inheritance#include “Box.h” // For CBox and CContainer#include “Can.h” // For CCan (and CContainer)#include “GlassBox.h” // For CGlassBox (and CBox and CContainer)#include <iostream> // For stream I/Ousing std::cout;using std::endl;
const double PI = 3.14159265; // Global definition for PI
int main(){// Pointer to abstract base class initialized with CBox object address
class CContainer Direct base of CBox Indirect base of CGlassBox
Direct base of CCan
Direct base of CGlassBox
More General
class CBox
class CGlassBox
class CCan
More Specialized
543
Chapter 9: Class Inheritance and Virtual Functions
25905c09.qxd:WroxPro 2/21/08 8:55 AM Page 543

CContainer* pC1 = new CBox(2.0, 3.0, 4.0);
CCan myCan(6.5, 3.0); // Define CCan objectCGlassBox myGlassBox(2.0, 3.0, 4.0); // Define CGlassBox object
pC1->ShowVolume(); // Output the volume of CBoxdelete pC1; // Now clean up the free store
// initialized with address of CCan objectpC1 = &myCan; // Put myCan address in pointerpC1->ShowVolume(); // Output the volume of CCan
pC1 = &myGlassBox; // Put myGlassBox address in pointerpC1->ShowVolume(); // Output the volume of CGlassBox
cout << endl;return 0;
}
How It WorksYou have the three-level class hierarchy shown in Figure 9-6 with CContainer as an abstract baseclass because it contains the pure virtual function, Volume(). The main()function now calls theShowVolume()function three times using the same pointer to the base class, but with the pointer containing the address of an object of a different class each time. Because ShowVolume() is not defined in any of the derived classes you have here, the base class version is called in each instance. A separate branch from the base CContainer defines the derived class CCan.
The example produces this output:
CBox usable volume is 24Volume is 45.9458CBox usable volume is 20.4
The output shows that one of the three different versions of the function Volume() is selected for execu-tion according to the type of object involved.
Note that you must delete the CBox object from the free store before you assign another address value tothe pointer. If you don’t do this, you won’t be able to clean up the free store, because you would have norecord of the address of the original object. This is an easy mistake to make when reassigning pointersand using the free store.
Virtual DestructorsOne problem that arises when dealing with objects of derived classes using a pointer to the base class isthat the correct destructor may not be called. You can see this effect by modifying the last example.
544
Chapter 9: Class Inheritance and Virtual Functions
25905c09.qxd:WroxPro 2/21/08 8:55 AM Page 544
Try It Out Calling the Wrong DestructorYou just need to add a destructor to each of the classes in the example that outputs a message so thatyou can track which destructor is called when the objects are destroyed. The Container.h file for thisexample is:
// Container.h for Ex9_12#pragma once#include <iostream>using std::cout;using std::endl;
class CContainer // Generic base class for specific containers{
public:// Destructor~CContainer(){ cout << “CContainer destructor called” << endl; }
// Function for calculating a volume - no content// This is defined as a ‘pure’ virtual function, signified by ‘= 0’virtual double Volume() const = 0;
// Function to display a volumevirtual void ShowVolume() const{
cout << endl<< “Volume is “ << Volume();
}};
The contents of Can.h in the example is:
// Can.h for Ex9_12#pragma once#include “Container.h” // For CContainer definitionextern const double PI;
class CCan: public CContainer{
public:// Destructor~CCan(){ cout << “CCan destructor called” << endl; }
// Function to calculate the volume of a canvirtual double Volume() const{ return 0.25*PI*m_Diameter*m_Diameter*m_Height; }
// Constructor
545
Chapter 9: Class Inheritance and Virtual Functions
25905c09.qxd:WroxPro 2/21/08 8:55 AM Page 545
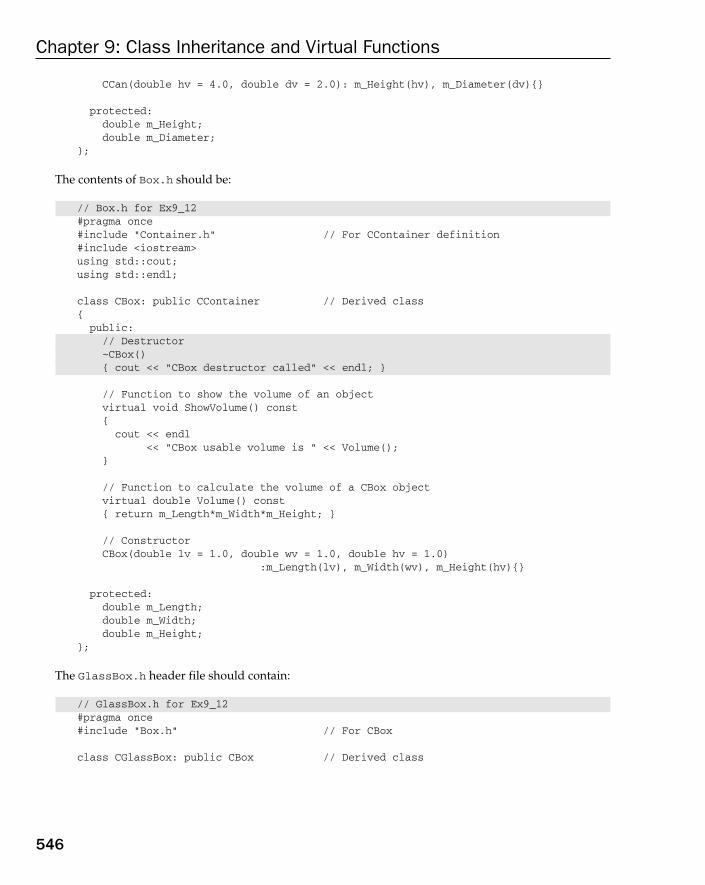
CCan(double hv = 4.0, double dv = 2.0): m_Height(hv), m_Diameter(dv){}
protected:double m_Height;double m_Diameter;
};
The contents of Box.h should be:
// Box.h for Ex9_12#pragma once#include “Container.h” // For CContainer definition#include <iostream>using std::cout;using std::endl;
class CBox: public CContainer // Derived class{public:// Destructor~CBox(){ cout << “CBox destructor called” << endl; }
// Function to show the volume of an objectvirtual void ShowVolume() const{
cout << endl<< “CBox usable volume is “ << Volume();
}
// Function to calculate the volume of a CBox objectvirtual double Volume() const{ return m_Length*m_Width*m_Height; }
// ConstructorCBox(double lv = 1.0, double wv = 1.0, double hv = 1.0)
:m_Length(lv), m_Width(wv), m_Height(hv){}
protected:double m_Length;double m_Width;double m_Height;
};
The GlassBox.h header file should contain:
// GlassBox.h for Ex9_12#pragma once#include “Box.h” // For CBox
class CGlassBox: public CBox // Derived class
546
Chapter 9: Class Inheritance and Virtual Functions
25905c09.qxd:WroxPro 2/21/08 8:55 AM Page 546
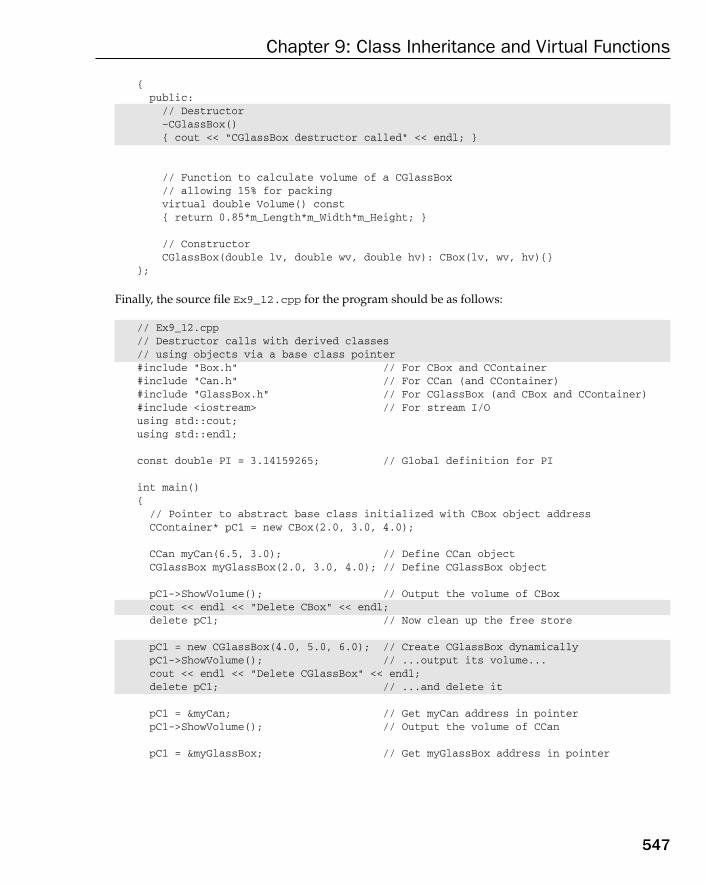
{public:// Destructor~CGlassBox(){ cout << “CGlassBox destructor called” << endl; }
// Function to calculate volume of a CGlassBox// allowing 15% for packingvirtual double Volume() const{ return 0.85*m_Length*m_Width*m_Height; }
// ConstructorCGlassBox(double lv, double wv, double hv): CBox(lv, wv, hv){}
};
Finally, the source file Ex9_12.cpp for the program should be as follows:
// Ex9_12.cpp// Destructor calls with derived classes// using objects via a base class pointer#include “Box.h” // For CBox and CContainer#include “Can.h” // For CCan (and CContainer)#include “GlassBox.h” // For CGlassBox (and CBox and CContainer)#include <iostream> // For stream I/Ousing std::cout;using std::endl;
const double PI = 3.14159265; // Global definition for PI
int main(){
// Pointer to abstract base class initialized with CBox object addressCContainer* pC1 = new CBox(2.0, 3.0, 4.0);
CCan myCan(6.5, 3.0); // Define CCan objectCGlassBox myGlassBox(2.0, 3.0, 4.0); // Define CGlassBox object
pC1->ShowVolume(); // Output the volume of CBoxcout << endl << “Delete CBox” << endl;delete pC1; // Now clean up the free store
pC1 = new CGlassBox(4.0, 5.0, 6.0); // Create CGlassBox dynamicallypC1->ShowVolume(); // ...output its volume...cout << endl << “Delete CGlassBox” << endl;delete pC1; // ...and delete it
pC1 = &myCan; // Get myCan address in pointerpC1->ShowVolume(); // Output the volume of CCan
pC1 = &myGlassBox; // Get myGlassBox address in pointer
547
Chapter 9: Class Inheritance and Virtual Functions
25905c09.qxd:WroxPro 2/21/08 8:55 AM Page 547
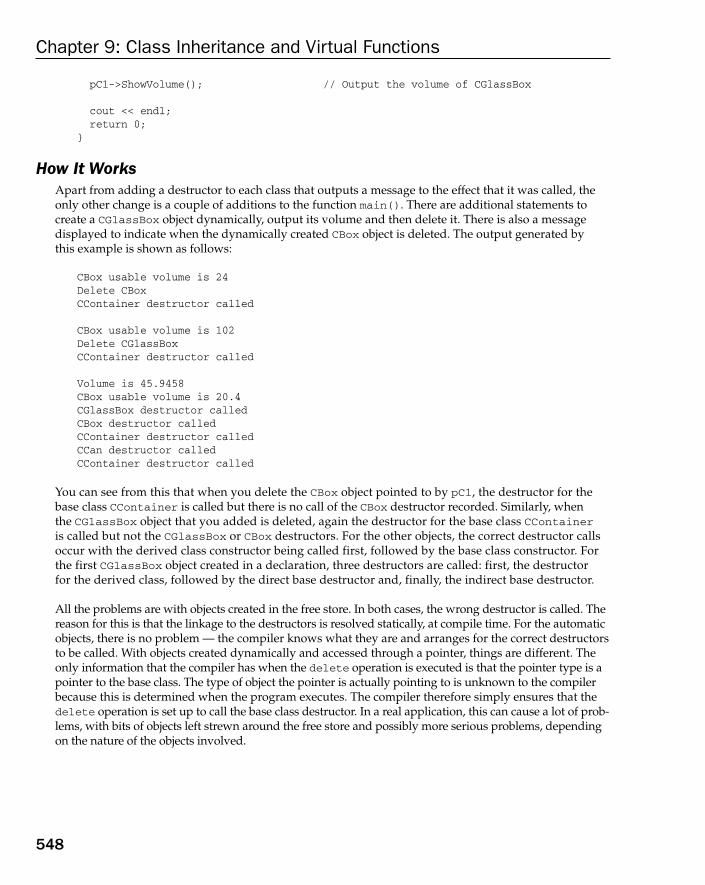
pC1->ShowVolume(); // Output the volume of CGlassBox
cout << endl;return 0;
}
How It WorksApart from adding a destructor to each class that outputs a message to the effect that it was called, theonly other change is a couple of additions to the function main(). There are additional statements to create a CGlassBox object dynamically, output its volume and then delete it. There is also a message displayed to indicate when the dynamically created CBox object is deleted. The output generated by this example is shown as follows:
CBox usable volume is 24Delete CBoxCContainer destructor called
CBox usable volume is 102Delete CGlassBoxCContainer destructor called
Volume is 45.9458CBox usable volume is 20.4CGlassBox destructor calledCBox destructor calledCContainer destructor calledCCan destructor calledCContainer destructor called
You can see from this that when you delete the CBox object pointed to by pC1, the destructor for thebase class CContainer is called but there is no call of the CBox destructor recorded. Similarly, when the CGlassBox object that you added is deleted, again the destructor for the base class CContaineris called but not the CGlassBox or CBox destructors. For the other objects, the correct destructor callsoccur with the derived class constructor being called first, followed by the base class constructor. Forthe first CGlassBox object created in a declaration, three destructors are called: first, the destructor for the derived class, followed by the direct base destructor and, finally, the indirect base destructor.
All the problems are with objects created in the free store. In both cases, the wrong destructor is called. Thereason for this is that the linkage to the destructors is resolved statically, at compile time. For the automaticobjects, there is no problem — the compiler knows what they are and arranges for the correct destructorsto be called. With objects created dynamically and accessed through a pointer, things are different. Theonly information that the compiler has when the delete operation is executed is that the pointer type is apointer to the base class. The type of object the pointer is actually pointing to is unknown to the compilerbecause this is determined when the program executes. The compiler therefore simply ensures that thedelete operation is set up to call the base class destructor. In a real application, this can cause a lot of prob-lems, with bits of objects left strewn around the free store and possibly more serious problems, dependingon the nature of the objects involved.
548
Chapter 9: Class Inheritance and Virtual Functions
25905c09.qxd:WroxPro 2/21/08 8:55 AM Page 548
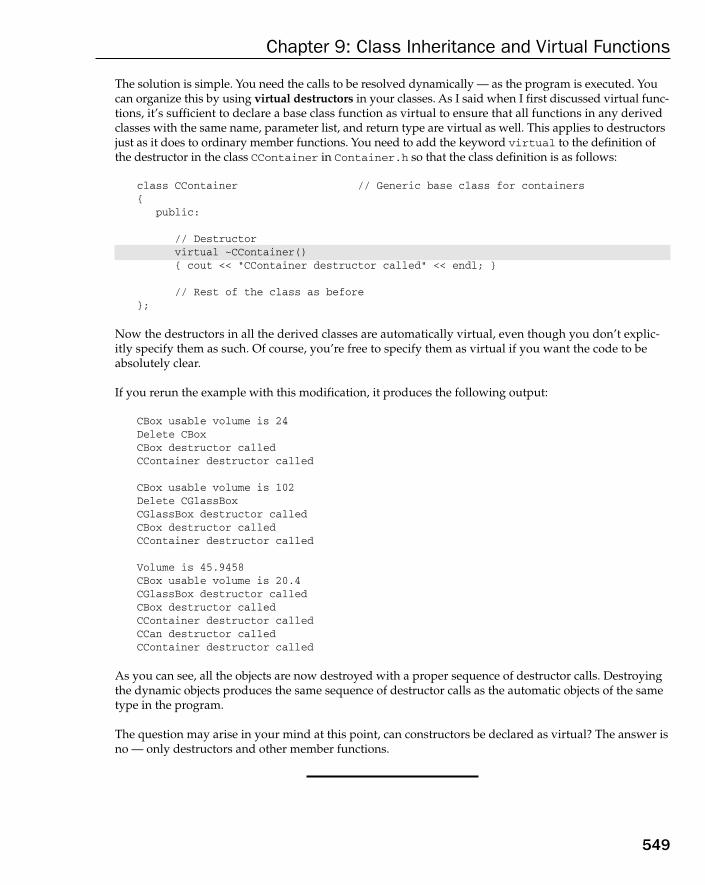
The solution is simple. You need the calls to be resolved dynamically — as the program is executed. Youcan organize this by using virtual destructors in your classes. As I said when I first discussed virtual func-tions, it’s sufficient to declare a base class function as virtual to ensure that all functions in any derivedclasses with the same name, parameter list, and return type are virtual as well. This applies to destructorsjust as it does to ordinary member functions. You need to add the keyword virtual to the definition ofthe destructor in the class CContainer in Container.h so that the class definition is as follows:
class CContainer // Generic base class for containers{
public:
// Destructorvirtual ~CContainer(){ cout << “CContainer destructor called” << endl; }
// Rest of the class as before};
Now the destructors in all the derived classes are automatically virtual, even though you don’t explic-itly specify them as such. Of course, you’re free to specify them as virtual if you want the code to beabsolutely clear.
If you rerun the example with this modification, it produces the following output:
CBox usable volume is 24Delete CBoxCBox destructor calledCContainer destructor called
CBox usable volume is 102Delete CGlassBoxCGlassBox destructor calledCBox destructor calledCContainer destructor called
Volume is 45.9458CBox usable volume is 20.4CGlassBox destructor calledCBox destructor calledCContainer destructor calledCCan destructor calledCContainer destructor called
As you can see, all the objects are now destroyed with a proper sequence of destructor calls. Destroyingthe dynamic objects produces the same sequence of destructor calls as the automatic objects of the sametype in the program.
The question may arise in your mind at this point, can constructors be declared as virtual? The answer isno — only destructors and other member functions.
549
Chapter 9: Class Inheritance and Virtual Functions
25905c09.qxd:WroxPro 2/21/08 8:55 AM Page 549

It’s a good idea always to declare your base class destructor as virtual as a matter of course when usinginheritance. There is a small overhead in the execution of the class destructors, but you won’t notice itin the majority of circumstances. Using virtual destructors ensures that your objects will be properlydestroyed and avoids potential program crashes that might otherwise occur.
Casting Between Class TypesYou have seen how you can store the address of a derived class object in a variable of a base class type so a variable of type CContainer* can store the address of a CBox object for example. So if you have anaddress stored in a pointer of type CContainer* can you cast it to type CBox*? Indeed you can and thedynamic_cast operator is specifically intended for this kind of operation. Here’s how it works:
CContainer* pContainer = new CGlassBox(2.0, 3.0, 4.0);CBox* pBox = dynamic_cast<CBox*>( pContainer); CGlassBox* pGlassBox = dynamic_cast<CGlassBox*>( pContainer);
The first statement stores the address of the CGlassBox object created on the heap in a base class pointerof type CContainer*. The second statement casts pContainer up the class hierarchy to type CBox*. Thethird statement casts the address in pContainer to its actual type, CGlassBox*.
You can apply the dynamic_cast operator to references as well as pointers. The difference betweendynamic_cast and static_cast is that the dynamic_cast operator checks the validity of a cast atrun-time whereas the static_cast operator does not. If a dynamic_cast operation is not valid, theresult is null. The compiler relies on the programmer for the validity of a static_cast operation soyou should always use dynamic_cast for casting up and down a class hierarchy and check for a nullresult if you want to avoid abrupt termination of your program as a result of using a null pointer.
Nested ClassesYou can put the definition of one class inside the definition of another, in which case you have defined anested class. A nested class has the appearance of being a static member of the class that encloses it and issubject to the member access specifiers, just like any other member of the class. If you place the definitionof a nested class in the private section of the class, the class can only be referenced from within the scope ofthe enclosing class. If you specify a nested class as public, the class is accessible from outside the enclosingclass but the nested class name must be qualified by the outer class name in such circumstances.
A nested class has free access to all the static members of the enclosing class. All the instance members canbe accessed through an object of the enclosing class type, or a pointer or reference to an object. The enclos-ing class can only access the public members of the nested class, but in a nested class that is private in theenclosing class the members are frequently declared as public to provide free access to the entire nestedclass from functions in the enclosing class.
A nested class is particularly useful when you want to define a type that is only to be used within anothertype, whereupon the nested class can be declared as private. Here’s an example of that:
// A push-down stack to store Box objects
550
Chapter 9: Class Inheritance and Virtual Functions
25905c09.qxd:WroxPro 2/21/08 8:55 AM Page 550

class CStack{private:// Defines items to store in the stackstruct CItem{CBox* pBox; // Pointer to the object in this nodeCItem* pNext; // Pointer to next item in the stack or null
// ConstructorCItem(CBox* pB, CItem* pN): pBox(pB), pNext(pN){}
};
CItem* pTop; // Pointer to item that is at the top
public:// Push a Box object on to the stackvoid Push(CBox* pBox){pTop = new CItem(pBox, pTop); // Create new Item and make it the top
}
// Pop an object off the stackCBox* Pop(){ if(pTop == 0) // If the stack is emptyreturn 0; // return null
CBox* pBox = pTop->pBox; // Get box from itemCItem* pTemp = pTop; // Save address of the top ItempTop = pTop->pNext; // Make next item the top delete pTemp; // Delete old top Item from the heapreturn pBox;
}};
The CStack class defines a push-down stack for storing CBox objects. To be absolutely precise it storespointers to CBox objects so the objects pointed to are still the responsibility of the code making use of the Stack class. The nested struct, CItem, defines the items that are held in the stack. I chose to defineItem as a nested struct rather than a nested class because members of a struct are public by default.You could define CItem as a class and then specify the members as public so they can be accessed fromthe functions in the CStack class. The stack is implemented as a set of CItem objects where each CItemobject stores a pointer to a CBox object plus the address of the next CItem object down in the stack. ThePush() function in the CStack class pushes a CBox object on to the top of the stack and the Pop() func-tion pops an object off the top of the stack.
Pushing an object on to the stack involves creating a new CItem object that stores the address of the objectto be stored plus the address of the previous item that was on the top of the stack — this is null the firsttime you push an object on to the stack. Popping an object off the stack returns the address of the object inthe item, pTop. The top item is deleted and the next item becomes the item at the top of the stack. Let’s seeif it works.
551
Chapter 9: Class Inheritance and Virtual Functions
25905c09.qxd:WroxPro 2/21/08 8:55 AM Page 551

Try It Out Using a Nested ClassThis example uses CContainer, CBox, and CGlassBox classes from Ex9_12 so create an emptyWIN32 console project, Ex9_13, and add the header files containing those class definitions to it. Then add Stack.h to the project containing the definition of the CStack class from the previous section, and add Ex9_13.cpp to the project with the following contents:
// Ex9_13.cpp// Using a nested class to define a stack#include “Box.h” // For CBox and CContainer#include “GlassBox.h” // For CGlassBox (and CBox and CContainer)#include “Stack.h” // For the stack class with nested struct Item
#include <iostream> // For stream I/Ousing std::cout;using std::endl;
int main(){CBox* pBoxes[] = { new CBox(2.0, 3.0, 4.0),
new CGlassBox(2.0, 3.0, 4.0),new CBox(4.0, 5.0, 6.0),new CGlassBox(4.0, 5.0, 6.0)
};
cout << “The array of boxes have the following volumes:”;for (int i = 0 ; i<4 ; i++)pBoxes[i]->ShowVolume(); // Output the volume of a box
cout << endl << endl<< “Now pushing the boxes on the stack...”<< endl;
CStack* pStack = new CStack; // Create the stackfor (int i = 0 ; i<4 ; i++)pStack->Push(pBoxes[i]);
cout << “Popping the boxes off the stack presents them in reverse order:”;for (int i = 0 ; i<4 ; i++)pStack->Pop()->ShowVolume();
cout << endl;return 0;
}
The output from this example is:
The array of boxes have the following volumes:CBox usable volume is 24CBox usable volume is 20.4CBox usable volume is 120CBox usable volume is 102
Now pushing the boxes on the stack...
552
Chapter 9: Class Inheritance and Virtual Functions
25905c09.qxd:WroxPro 2/21/08 8:55 AM Page 552
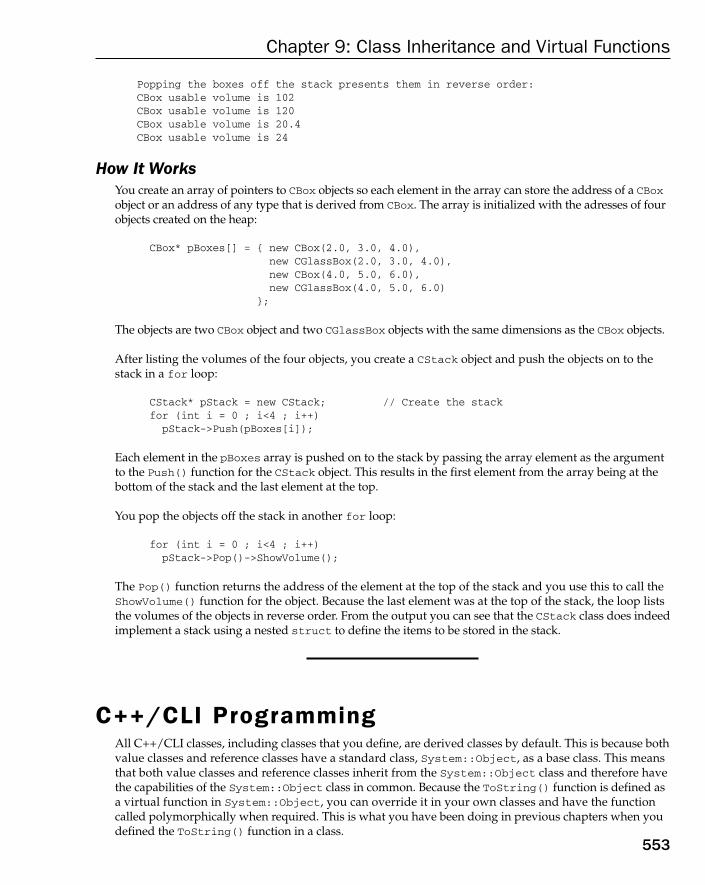
Popping the boxes off the stack presents them in reverse order:CBox usable volume is 102CBox usable volume is 120CBox usable volume is 20.4CBox usable volume is 24
How It WorksYou create an array of pointers to CBox objects so each element in the array can store the address of a CBoxobject or an address of any type that is derived from CBox. The array is initialized with the adresses of fourobjects created on the heap:
CBox* pBoxes[] = { new CBox(2.0, 3.0, 4.0),new CGlassBox(2.0, 3.0, 4.0),new CBox(4.0, 5.0, 6.0),new CGlassBox(4.0, 5.0, 6.0)
};
The objects are two CBox object and two CGlassBox objects with the same dimensions as the CBox objects.
After listing the volumes of the four objects, you create a CStack object and push the objects on to thestack in a for loop:
CStack* pStack = new CStack; // Create the stackfor (int i = 0 ; i<4 ; i++)
pStack->Push(pBoxes[i]);
Each element in the pBoxes array is pushed on to the stack by passing the array element as the argumentto the Push() function for the CStack object. This results in the first element from the array being at thebottom of the stack and the last element at the top.
You pop the objects off the stack in another for loop:
for (int i = 0 ; i<4 ; i++)pStack->Pop()->ShowVolume();
The Pop() function returns the address of the element at the top of the stack and you use this to call theShowVolume() function for the object. Because the last element was at the top of the stack, the loop liststhe volumes of the objects in reverse order. From the output you can see that the CStack class does indeedimplement a stack using a nested struct to define the items to be stored in the stack.
C++/CLI ProgrammingAll C++/CLI classes, including classes that you define, are derived classes by default. This is because bothvalue classes and reference classes have a standard class, System::Object, as a base class. This meansthat both value classes and reference classes inherit from the System::Object class and therefore havethe capabilities of the System::Object class in common. Because the ToString() function is defined asa virtual function in System::Object, you can override it in your own classes and have the functioncalled polymorphically when required. This is what you have been doing in previous chapters when youdefined the ToString() function in a class.
553
Chapter 9: Class Inheritance and Virtual Functions
25905c09.qxd:WroxPro 2/21/08 8:55 AM Page 553

Because System::Object is a base class for all C++/CLI classes, the handle type System::Object^fulfils a similar role to the void* type in native C++ in that it can be used to reference any type of object.
Boxing and UnboxingThe System::Object base class for all value class types is also responsible for enabling the boxing andunboxing of values of the fundamental types. Boxing a value type instance converts it to an object on thegarbage-collected heap, so it will carry full type information along with the basic value. Unboxing is thereverse of boxing. The boxing/unboxing capability means that values of the fundamental types can behaveas objects, but can participate in numerical operations without carrying the overhead of being objects. Valuesof the fundamental types are stored on the stack just as values for the purposes of normal operations and areonly converted to an object on the heap that is referenced by a handle of type System::Object^ when theyneed to behave as objects. For example, if you pass an unboxed value to a function with a parameter that isan appropriate value class type, the compiler will arrange for the value to be converted to an object on theheap; this is achieved by creating a new object on the heap containing the value. Thus you get implicit box-ing and the argument value will be boxed automatically.
Of course, explicit boxing is also possible. You can force a value to be boxed by assigning it to a variableof type Object^. For example:
double value = 3.14159265;Object^ boxedValue = value;
The second statement forces the boxing of value and the boxed representation is referenced by the handleboxedValue.
You can also force boxing of a value using gcnew to create a boxed value on the garbage-collected heap,for example:
long^ number = gcnew(999999L);
This statement implicitly boxes the value 999999L and stores it on the heap in a location referenced bythe handle number.
You can unbox a value type using the dereference operator, for example:
Console::WriteLine(*number);
The value pointed to by the handle number is unboxed and then passed as a value to the WriteLine()function.
Finally you can unbox a boxed value using safe_cast:
long n = safe_cast<long>(number);
This statement unboxes number and stores the value in n. Note that without the safe_cast, this state-ment will not compile because there is no implicit conversion in this situation.
554
Chapter 9: Class Inheritance and Virtual Functions
25905c09.qxd:WroxPro 2/21/08 8:55 AM Page 554

Inheritance in C++/CLI ClassesAlthough value classes always have the System::Object class as a base, you cannot derive a valueclass from an existing class. To put it another way, when you define a value class you are not allowed tospecify a base class. This implies that polymorphism in value classes is limited to the functions that aredefined as virtual in the System::Object class. These are the virtual functions that all value classesinherit from System::Object:
Of course, because System::Object is also a base class for reference classes you may want to overridethese functions in reference classes, too.
You can derive a reference class from an existing reference class in the same way as you define a derivedclass in native C++. Let’s re-implement Ex9_12 as a C++/CLI program as this also demonstrates nestedclasses in a CLR program. We can start by defining the Container class:
// Container.h for Ex9_14#pragma onceusing namespace System;
// Abstract base class for specific containersref class Container abstract {public:// Function for calculating a volume - no content// This is defined as an ‘abstract’ virtual function,// indicated by the ‘abstract’ keyword
Function Description
String^ ToString() Returns a String representation of an object and the imple-mentation in the System::Object class returns the class nameas a string. You would typically override this function in yourown classes to return a string representation of the value of anobject.
bool Equals(Object^ obj) Compares the current object to obj and returns true if they areequal and false otherwise. Equal in this case means referentialequality — that is the objects are one and the same. Typicallyyou would override this function in your own classes to returntrue when the current object is the same value as the argu-ment — in other words, when the fields are equal.
int GetHashCode() Returns an integer that is a hash code for the current object.Hash codes are used as keys to store objects in a collection thatstores (key,object) pairs. Objects are subsequently retrievedfrom such a collection by supplying the key that was usedwhen the object was stored.
555
Chapter 9: Class Inheritance and Virtual Functions
25905c09.qxd:WroxPro 2/21/08 8:55 AM Page 555

virtual double Volume() abstract;
// Function to display a volumevirtual void ShowVolume() {Console::WriteLine(L”Volume is {0}”, Volume());
}};
The first thing to note is the abstract keyword following the class name. If a C++/CLI class contains thenative C++ equivalent of a pure virtual function, you must specify the class as abstract. You can, however,also specify a class as abstract that does not contain any abstract functions, which prevents you from creat-ing objects of that class type. The abstract keyword also appears at the end of the Volume() functionmember declaration to indicate that it is be defined for this class. You could also add the “ = 0” to the endof the member declaration for Volume() as you would for a native C++ member, but it is not required.
Both the Volume() and ShowVolume() functions are virtual here so they can be called polymorphicallyfor objects of class types that are derived from Container.
You can define the Box class like this:
// Box.h for Ex9_14#pragma once#include “Container.h” // For Container definition
ref class Box : Container // Derived class{public:// Function to show the volume of an objectvirtual void ShowVolume() override{Console::WriteLine(L”Box usable volume is {0}”, Volume());
}
// Function to calculate the volume of a Box objectvirtual double Volume() override{ return m_Length*m_Width*m_Height; }
// ConstructorBox() : m_Length(1.0), m_Width(1.0), m_Height(1.0){}
// ConstructorBox(double lv, double wv, double hv)
: m_Length(lv), m_Width(wv), m_Height(hv){}
protected:double m_Length;double m_Width;double m_Height;
};
A base class for a ref class is always public and the public keyword is assumed by default. You can spec-ify the base class explicitly as public but it is not necessary to do so. A base class to a ref class cannot bespecified as anything other than public. Because you cannot supply default values for parameters as in
556
Chapter 9: Class Inheritance and Virtual Functions
25905c09.qxd:WroxPro 2/21/08 8:55 AM Page 556
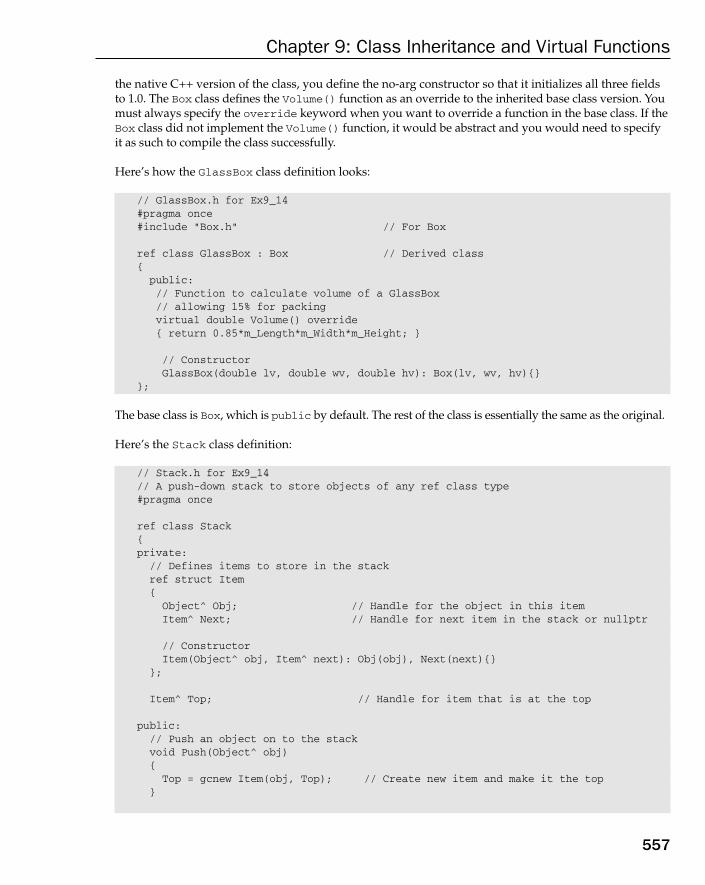
the native C++ version of the class, you define the no-arg constructor so that it initializes all three fieldsto 1.0. The Box class defines the Volume() function as an override to the inherited base class version. Youmust always specify the override keyword when you want to override a function in the base class. If theBox class did not implement the Volume() function, it would be abstract and you would need to specifyit as such to compile the class successfully.
Here’s how the GlassBox class definition looks:
// GlassBox.h for Ex9_14#pragma once#include “Box.h” // For Box
ref class GlassBox : Box // Derived class{public:// Function to calculate volume of a GlassBox// allowing 15% for packingvirtual double Volume() override { return 0.85*m_Length*m_Width*m_Height; }
// ConstructorGlassBox(double lv, double wv, double hv): Box(lv, wv, hv){}
};
The base class is Box, which is public by default. The rest of the class is essentially the same as the original.
Here’s the Stack class definition:
// Stack.h for Ex9_14// A push-down stack to store objects of any ref class type#pragma once
ref class Stack{private:// Defines items to store in the stackref struct Item{Object^ Obj; // Handle for the object in this itemItem^ Next; // Handle for next item in the stack or nullptr
// ConstructorItem(Object^ obj, Item^ next): Obj(obj), Next(next){}
};
Item^ Top; // Handle for item that is at the top
public:// Push an object on to the stackvoid Push(Object^ obj){Top = gcnew Item(obj, Top); // Create new item and make it the top
}
557
Chapter 9: Class Inheritance and Virtual Functions
25905c09.qxd:WroxPro 2/21/08 8:55 AM Page 557
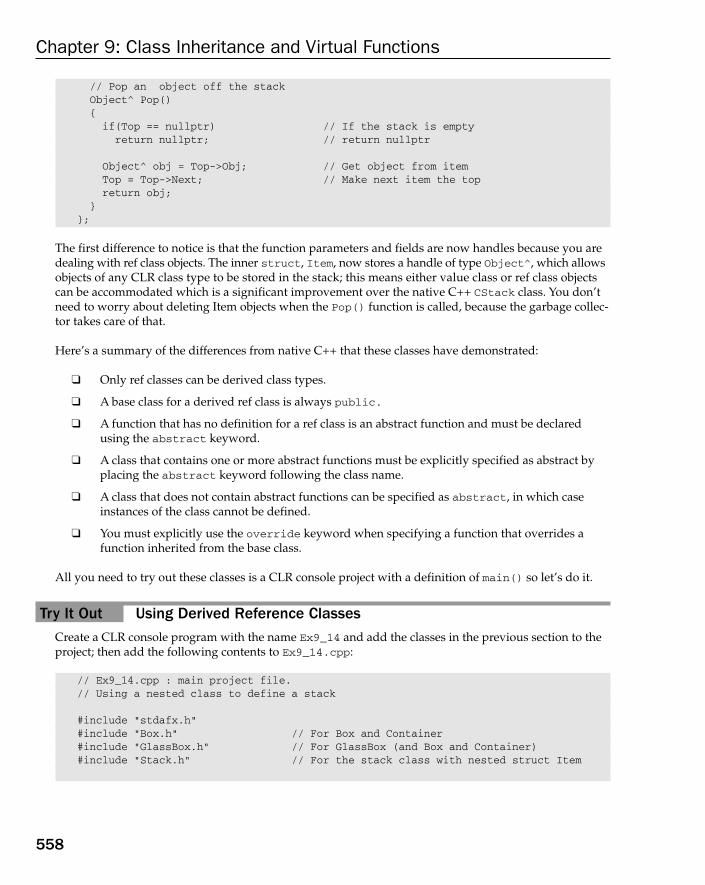
// Pop an object off the stackObject^ Pop(){ if(Top == nullptr) // If the stack is emptyreturn nullptr; // return nullptr
Object^ obj = Top->Obj; // Get object from itemTop = Top->Next; // Make next item the top return obj;
}};
The first difference to notice is that the function parameters and fields are now handles because you aredealing with ref class objects. The inner struct, Item, now stores a handle of type Object^, which allowsobjects of any CLR class type to be stored in the stack; this means either value class or ref class objectscan be accommodated which is a significant improvement over the native C++ CStack class. You don’tneed to worry about deleting Item objects when the Pop() function is called, because the garbage collec-tor takes care of that.
Here’s a summary of the differences from native C++ that these classes have demonstrated:
❑ Only ref classes can be derived class types.
❑ A base class for a derived ref class is always public.
❑ A function that has no definition for a ref class is an abstract function and must be declaredusing the abstract keyword.
❑ A class that contains one or more abstract functions must be explicitly specified as abstract byplacing the abstract keyword following the class name.
❑ A class that does not contain abstract functions can be specified as abstract, in which caseinstances of the class cannot be defined.
❑ You must explicitly use the override keyword when specifying a function that overrides afunction inherited from the base class.
All you need to try out these classes is a CLR console project with a definition of main() so let’s do it.
Try It Out Using Derived Reference ClassesCreate a CLR console program with the name Ex9_14 and add the classes in the previous section to theproject; then add the following contents to Ex9_14.cpp:
// Ex9_14.cpp : main project file.// Using a nested class to define a stack
#include “stdafx.h”#include “Box.h” // For Box and Container#include “GlassBox.h” // For GlassBox (and Box and Container)#include “Stack.h” // For the stack class with nested struct Item
558
Chapter 9: Class Inheritance and Virtual Functions
25905c09.qxd:WroxPro 2/21/08 8:55 AM Page 558

using namespace System;
int main(array<System::String ^> ^args){array<Box^>^ boxes = { gcnew Box(2.0, 3.0, 4.0),
gcnew GlassBox(2.0, 3.0, 4.0),gcnew Box(4.0, 5.0, 6.0),gcnew GlassBox(4.0, 5.0, 6.0)
};
Console::WriteLine(L”The array of boxes have the following volumes:”);for each(Box^ box in boxes)box->ShowVolume(); // Output the volume of a box
Console::WriteLine(L”\nNow pushing the boxes on the stack...”);
Stack^ stack = gcnew Stack; // Create the stackfor each(Box^ box in boxes)stack->Push(box);
Console::WriteLine(L”Popping the boxes off the stack presents them in reverse order:”);
Object^ item;while((item = stack->Pop()) != nullptr)safe_cast<Container^>(item)->ShowVolume();
Console::WriteLine(L”\nNow pushing integers on to the stack:”);for(int i = 2 ; i<=12 ; i += 2){ Console::Write(L”{0,5}”,i);stack->Push(i);
}
Console::WriteLine(L”\n\nPopping integers off the stack produces:”);while((item = stack->Pop()) != nullptr)Console::Write(L”{0,5}”,item);
Console::WriteLine();return 0;
}
The output from this example is:
The array of boxes have the following volumes:Box usable volume is 24Box usable volume is 20.4Box usable volume is 120Box usable volume is 102
Now pushing the boxes on the stack...Popping the boxes off the stack presents them in reverse order:Box usable volume is 102
559
Chapter 9: Class Inheritance and Virtual Functions
25905c09.qxd:WroxPro 2/21/08 8:55 AM Page 559
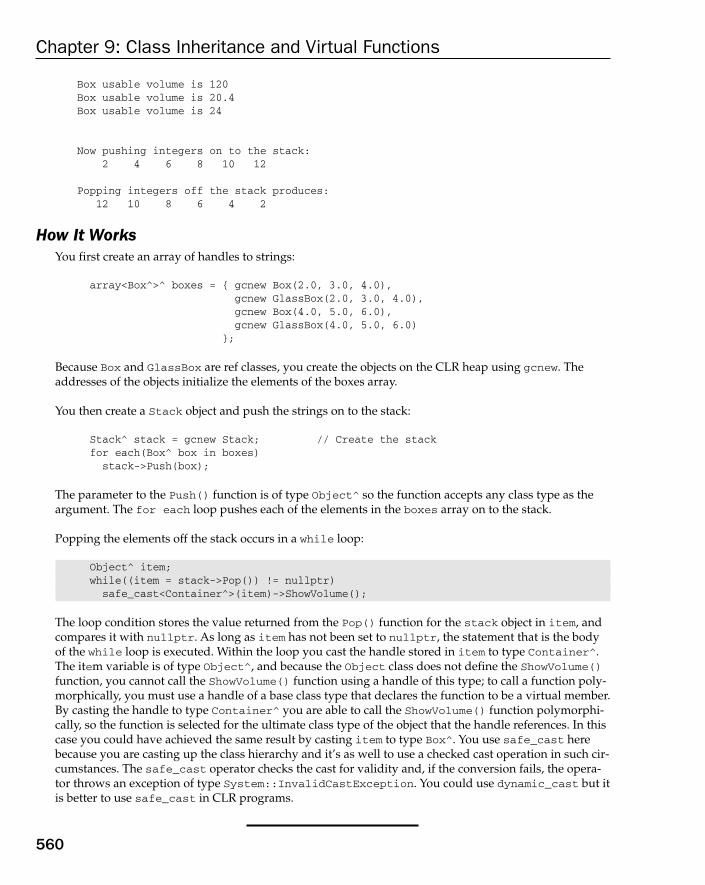
Box usable volume is 120Box usable volume is 20.4Box usable volume is 24
Now pushing integers on to the stack:2 4 6 8 10 12
Popping integers off the stack produces:12 10 8 6 4 2
How It WorksYou first create an array of handles to strings:
array<Box^>^ boxes = { gcnew Box(2.0, 3.0, 4.0),gcnew GlassBox(2.0, 3.0, 4.0),gcnew Box(4.0, 5.0, 6.0),gcnew GlassBox(4.0, 5.0, 6.0)
};
Because Box and GlassBox are ref classes, you create the objects on the CLR heap using gcnew. Theaddresses of the objects initialize the elements of the boxes array.
You then create a Stack object and push the strings on to the stack:
Stack^ stack = gcnew Stack; // Create the stackfor each(Box^ box in boxes)
stack->Push(box);
The parameter to the Push() function is of type Object^ so the function accepts any class type as theargument. The for each loop pushes each of the elements in the boxes array on to the stack.
Popping the elements off the stack occurs in a while loop:
Object^ item;while((item = stack->Pop()) != nullptr)safe_cast<Container^>(item)->ShowVolume();
The loop condition stores the value returned from the Pop() function for the stack object in item, andcompares it with nullptr. As long as item has not been set to nullptr, the statement that is the bodyof the while loop is executed. Within the loop you cast the handle stored in item to type Container^.The item variable is of type Object^, and because the Object class does not define the ShowVolume()function, you cannot call the ShowVolume() function using a handle of this type; to call a function poly-morphically, you must use a handle of a base class type that declares the function to be a virtual member.By casting the handle to type Container^ you are able to call the ShowVolume() function polymorphi-cally, so the function is selected for the ultimate class type of the object that the handle references. In thiscase you could have achieved the same result by casting item to type Box^. You use safe_cast herebecause you are casting up the class hierarchy and it’s as well to use a checked cast operation in such cir-cumstances. The safe_cast operator checks the cast for validity and, if the conversion fails, the opera-tor throws an exception of type System::InvalidCastException. You could use dynamic_cast but itis better to use safe_cast in CLR programs.
560
Chapter 9: Class Inheritance and Virtual Functions
25905c09.qxd:WroxPro 2/21/08 8:55 AM Page 560

Interface ClassesThe definition of an interface class looks quite similar to the definition of a ref class but it is quite a dif-ferent concept. An interface is a class that specifies a set of functions that are to be implemented by otherclasses to provide a standardized way of providing some specific functionality. Both value classes andref classes can implement interfaces. An interface does not define any of its function members — theseare defined by each class that implements the interface.
You have already met the System::IComparable interface in the context of generic functions where you specified the IComparable interface as a constraint. The IComparable interface specifiesthe CompareTo() function for comparing objects so all classes that implement this interface have the same mechanism for comparing objects. You specify an interface a class implements in the sameway as a base class. For example, here’s how you could make the Box class from the previous exampleimplement the System::IComparable interface:
ref class Box : Container, IComparable // Derived class{
public:// The function specified by IComparable interfacevirtual int CompareTo(Object^ obj) {if(Volume() < safe_cast<Box^>(obj)->Volume())return -1;
else if(Volume() > safe_cast<Box^>(obj)->Volume())return 1;
elsereturn 0;
}
// Rest of the class as before...};
The name of the interface follows the name of the base class, Container. If there were no base class, theinterface name alone would appear here. A ref class can only have one base class but it can implement as many interfaces as you want. The class must define every function specified by each of the interfacesthat it claims to implement. The IComparable interface only specifies one function but there can be asmany functions in an interface as you want. The Box class now defines the CompareTo() function withthe same signature as the IComparable interface specifies for the function. Because the parameter to theCompareTo() function is of type Object^, you have to cast it to type Box^ before you can access mem-bers of the Box object it references.
Defining Interface ClassesYou define an interface class using either of the keywords interface class or interface struct.Regardless of whether you use the interface class or the interface struct keyword to define an interface, all the members of an interface are always public by default and you cannot specify themto be otherwise. The members of an interface can be functions including operator functions, properties,static fields, and events, all of which you’ll learn about later in this chapter. An interface can also specifya static constructor and can contain a nested class definition of any kind. In spite of all that potential
561
Chapter 9: Class Inheritance and Virtual Functions
25905c09.qxd:WroxPro 2/21/08 8:55 AM Page 561
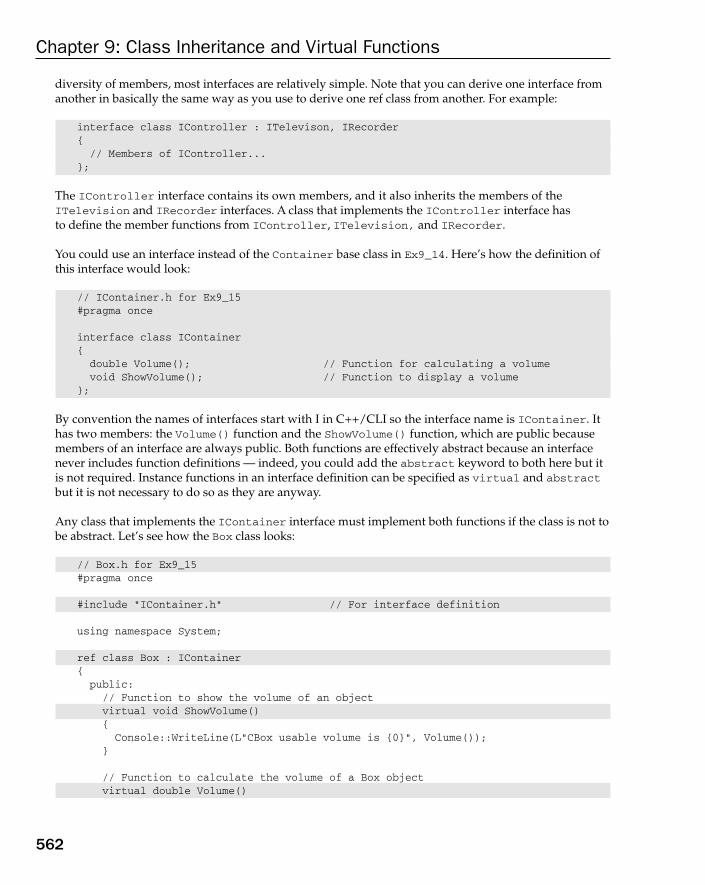
diversity of members, most interfaces are relatively simple. Note that you can derive one interface fromanother in basically the same way as you use to derive one ref class from another. For example:
interface class IController : ITelevison, IRecorder{// Members of IController...
};
The IController interface contains its own members, and it also inherits the members of theITelevision and IRecorder interfaces. A class that implements the IController interface has to define the member functions from IController, ITelevision, and IRecorder.
You could use an interface instead of the Container base class in Ex9_14. Here’s how the definition ofthis interface would look:
// IContainer.h for Ex9_15 #pragma once
interface class IContainer{double Volume(); // Function for calculating a volumevoid ShowVolume(); // Function to display a volume
};
By convention the names of interfaces start with I in C++/CLI so the interface name is IContainer. Ithas two members: the Volume() function and the ShowVolume() function, which are public becausemembers of an interface are always public. Both functions are effectively abstract because an interfacenever includes function definitions — indeed, you could add the abstract keyword to both here but itis not required. Instance functions in an interface definition can be specified as virtual and abstractbut it is not necessary to do so as they are anyway.
Any class that implements the IContainer interface must implement both functions if the class is not tobe abstract. Let’s see how the Box class looks:
// Box.h for Ex9_15#pragma once
#include “IContainer.h” // For interface definition
using namespace System;
ref class Box : IContainer {public:// Function to show the volume of an objectvirtual void ShowVolume(){
Console::WriteLine(L”CBox usable volume is {0}”, Volume()); }
// Function to calculate the volume of a Box objectvirtual double Volume()
562
Chapter 9: Class Inheritance and Virtual Functions
25905c09.qxd:WroxPro 2/21/08 8:55 AM Page 562

{ return m_Length*m_Width*m_Height; }
// ConstructorBox() : m_Length(1.0), m_Width(1.0), m_Height(1.0){}
// ConstructorBox(double lv, double wv, double hv)
: m_Length(lv), m_Width(wv), m_Height(hv){}
protected:double m_Length;double m_Width;double m_Height;
};
The name of the interface goes after the colon in the first line of the class definition, just as if it were abase class. Of course, there could also be a base class, in which case the interface name would followthe base class name separated from it by a comma. A class can implement multiple interfaces in whichcase the names of the interfaces are separated by commas.
The Box class must implement both function members of the IContainer interface class; otherwise, itwould be an abstract class and would need to be declared as such. The definitions for these functions in the Box class do not have the override keyword appended because you are not overriding existingfunction definitions here; you are implementing them for the first time.
The GlassBox class is derived from the Box class and therefore inherits the implementation ofIContainer. The GlassBox class definition needs no changes at all to accommodate the introduction of the IContainer interface class.
The IContainer interface class has the same role as a base class in polymorphism. You can use a handleof type IContainer to store the address of an object of any class type that implements the interface. Thusa handle of type IContainer can be used to reference objects of type Box or type GlassBox and obtainpolymorphic behavior when calling the functions that are members of the interface class. Let’s try it.
Try It Out Implementing an Interface ClassCreate the CLR console project Ex9_15 and add the IContainer.h and Box.h header files with thecontents from the previous section. You should also add copies of the Stack.h and GlassBox.h headerfiles from Ex9_14 to the project. Finally, modify the contents of Ex9_15.cpp to the following:
// Ex9_15.cpp : main project file.// Implementing an interface class#include “stdafx.h”#include “Box.h” // For Box and IContainer#include “GlassBox.h” // For GlassBox (and Box and IContainer)#include “Stack.h” // For the stack class with nested struct Item
using namespace System;
int main(array<System::String ^> ^args){array<IContainer^>^ containers = { gcnew Box(2.0, 3.0, 4.0),
563
Chapter 9: Class Inheritance and Virtual Functions
25905c09.qxd:WroxPro 2/21/08 8:55 AM Page 563

gcnew GlassBox(2.0, 3.0, 4.0),gcnew Box(4.0, 5.0, 6.0),gcnew GlassBox(4.0, 5.0, 6.0)
};
Console::WriteLine(L”The array of containers have the following volumes:”);for each(IContainer^ container in containers)container->ShowVolume(); // Output the volume of a box
Console::WriteLine(L”\nNow pushing the containers on the stack...”);
Stack^ stack = gcnew Stack; // Create the stackfor each(IContainer^ container in containers)stack->Push(container);
Console::WriteLine(L”Popping the containers off the stack presents them in reverse order:”);
Object^ item;while((item = stack->Pop()) != nullptr)safe_cast<IContainer^>(item)->ShowVolume();
Console::WriteLine();return 0;
}
This example produces the following output:
The array of containers have the following volumes:CBox usable volume is 24CBox usable volume is 20.4CBox usable volume is 120CBox usable volume is 102
Now pushing the containers on the stack...Popping the containers off the stack presents them in reverse order:CBox usable volume is 102CBox usable volume is 120CBox usable volume is 20.4CBox usable volume is 24
How It WorksYou create an array of elements of type IContainer^ and initialize the elements with the addresses ofBox and GlassBox objects:
array<IContainer^>^ containers = { gcnew Box(2.0, 3.0, 4.0),gcnew GlassBox(2.0, 3.0, 4.0),gcnew Box(4.0, 5.0, 6.0),gcnew GlassBox(4.0, 5.0, 6.0)
};
The Box and GlassBox classes implement the IContainer interface so you can store addresses of objectsof these types in variables of type handle to IContainer. The advantage of doing this is that you’ll be ableto call the function members of the IContainer interface class polymorphically.
564
Chapter 9: Class Inheritance and Virtual Functions
25905c09.qxd:WroxPro 2/21/08 8:55 AM Page 564
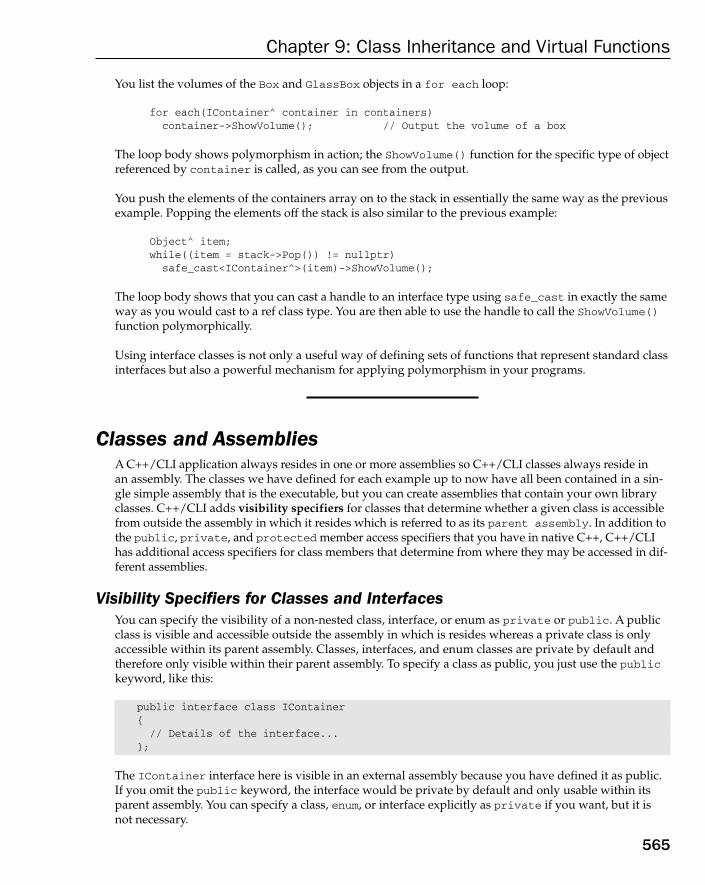
You list the volumes of the Box and GlassBox objects in a for each loop:
for each(IContainer^ container in containers)container->ShowVolume(); // Output the volume of a box
The loop body shows polymorphism in action; the ShowVolume() function for the specific type of objectreferenced by container is called, as you can see from the output.
You push the elements of the containers array on to the stack in essentially the same way as the previousexample. Popping the elements off the stack is also similar to the previous example:
Object^ item;while((item = stack->Pop()) != nullptr)
safe_cast<IContainer^>(item)->ShowVolume();
The loop body shows that you can cast a handle to an interface type using safe_cast in exactly the sameway as you would cast to a ref class type. You are then able to use the handle to call the ShowVolume()function polymorphically.
Using interface classes is not only a useful way of defining sets of functions that represent standard classinterfaces but also a powerful mechanism for applying polymorphism in your programs.
Classes and AssembliesA C++/CLI application always resides in one or more assemblies so C++/CLI classes always reside in an assembly. The classes we have defined for each example up to now have all been contained in a sin-gle simple assembly that is the executable, but you can create assemblies that contain your own libraryclasses. C++/CLI adds visibility specifiers for classes that determine whether a given class is accessiblefrom outside the assembly in which it resides which is referred to as its parent assembly. In addition tothe public, private, and protected member access specifiers that you have in native C++, C++/CLIhas additional access specifiers for class members that determine from where they may be accessed in dif-ferent assemblies.
Visibility Specifiers for Classes and InterfacesYou can specify the visibility of a non-nested class, interface, or enum as private or public. A publicclass is visible and accessible outside the assembly in which is resides whereas a private class is onlyaccessible within its parent assembly. Classes, interfaces, and enum classes are private by default andtherefore only visible within their parent assembly. To specify a class as public, you just use the publickeyword, like this:
public interface class IContainer{// Details of the interface...
};
The IContainer interface here is visible in an external assembly because you have defined it as public.If you omit the public keyword, the interface would be private by default and only usable within itsparent assembly. You can specify a class, enum, or interface explicitly as private if you want, but it isnot necessary.
565
Chapter 9: Class Inheritance and Virtual Functions
25905c09.qxd:WroxPro 2/21/08 8:55 AM Page 565
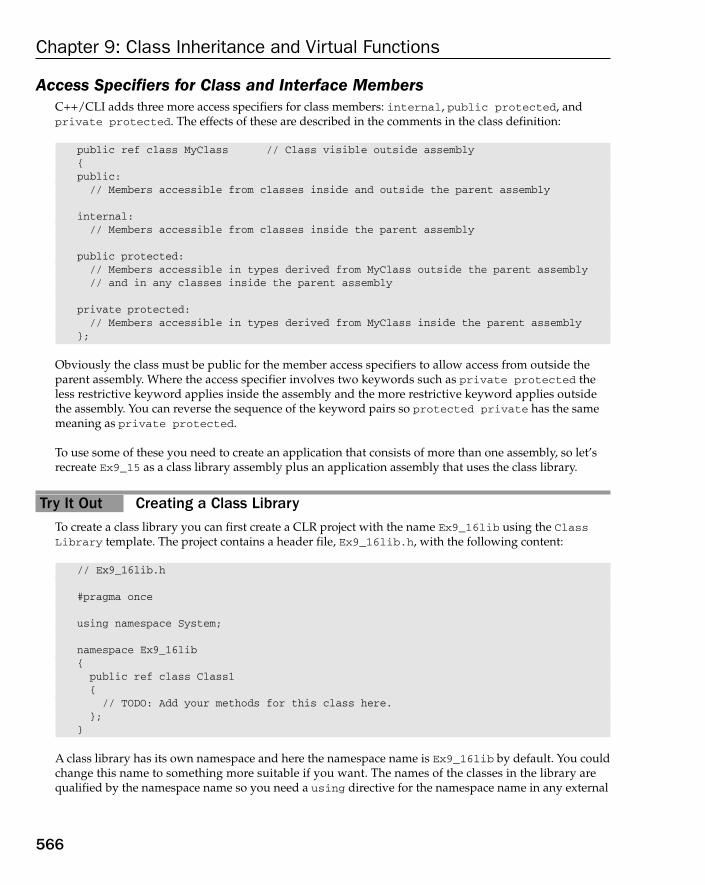
Access Specifiers for Class and Interface MembersC++/CLI adds three more access specifiers for class members: internal, public protected, andprivate protected. The effects of these are described in the comments in the class definition:
public ref class MyClass // Class visible outside assembly{public:// Members accessible from classes inside and outside the parent assembly
internal:// Members accessible from classes inside the parent assembly
public protected:// Members accessible in types derived from MyClass outside the parent assembly// and in any classes inside the parent assembly
private protected:// Members accessible in types derived from MyClass inside the parent assembly
};
Obviously the class must be public for the member access specifiers to allow access from outside theparent assembly. Where the access specifier involves two keywords such as private protected theless restrictive keyword applies inside the assembly and the more restrictive keyword applies outsidethe assembly. You can reverse the sequence of the keyword pairs so protected private has the samemeaning as private protected.
To use some of these you need to create an application that consists of more than one assembly, so let’srecreate Ex9_15 as a class library assembly plus an application assembly that uses the class library.
Try It Out Creating a Class LibraryTo create a class library you can first create a CLR project with the name Ex9_16lib using the ClassLibrary template. The project contains a header file, Ex9_16lib.h, with the following content:
// Ex9_16lib.h
#pragma once
using namespace System;
namespace Ex9_16lib{public ref class Class1{// TODO: Add your methods for this class here.
};}
A class library has its own namespace and here the namespace name is Ex9_16lib by default. You couldchange this name to something more suitable if you want. The names of the classes in the library arequalified by the namespace name so you need a using directive for the namespace name in any external
566
Chapter 9: Class Inheritance and Virtual Functions
25905c09.qxd:WroxPro 2/21/08 8:55 AM Page 566
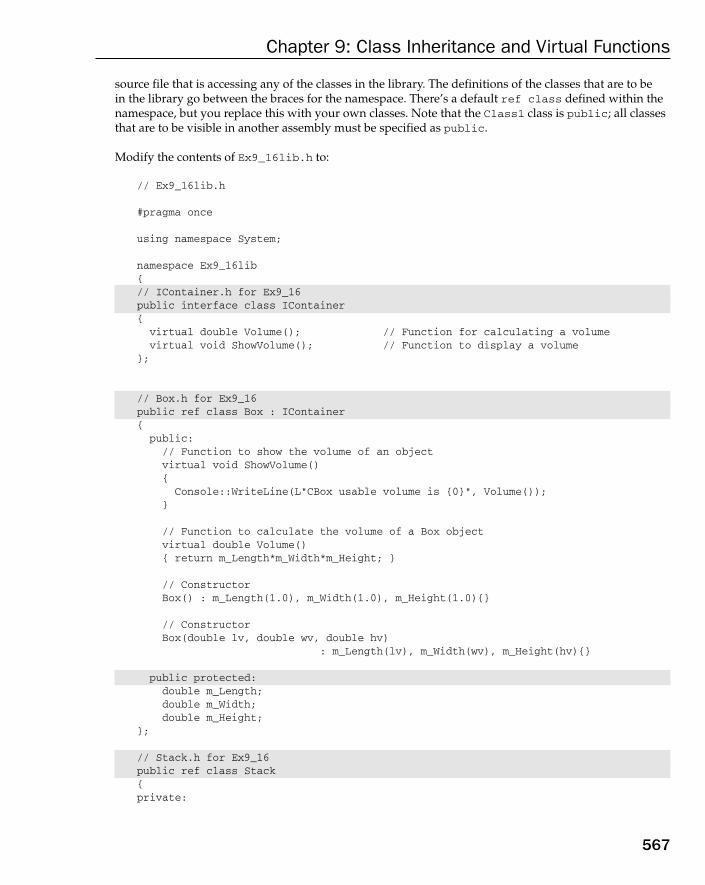
source file that is accessing any of the classes in the library. The definitions of the classes that are to be in the library go between the braces for the namespace. There’s a default ref class defined within thenamespace, but you replace this with your own classes. Note that the Class1 class is public; all classesthat are to be visible in another assembly must be specified as public.
Modify the contents of Ex9_16lib.h to:
// Ex9_16lib.h
#pragma once
using namespace System;
namespace Ex9_16lib{// IContainer.h for Ex9_16 public interface class IContainer{
virtual double Volume(); // Function for calculating a volumevirtual void ShowVolume(); // Function to display a volume
};
// Box.h for Ex9_16public ref class Box : IContainer {
public:// Function to show the volume of an objectvirtual void ShowVolume(){
Console::WriteLine(L"CBox usable volume is {0}", Volume()); }
// Function to calculate the volume of a Box objectvirtual double Volume(){ return m_Length*m_Width*m_Height; }
// ConstructorBox() : m_Length(1.0), m_Width(1.0), m_Height(1.0){}
// ConstructorBox(double lv, double wv, double hv)
: m_Length(lv), m_Width(wv), m_Height(hv){}
public protected:double m_Length;double m_Width;double m_Height;
};
// Stack.h for Ex9_16public ref class Stack{private:
567
Chapter 9: Class Inheritance and Virtual Functions
25905c09.qxd:WroxPro 2/21/08 8:55 AM Page 567
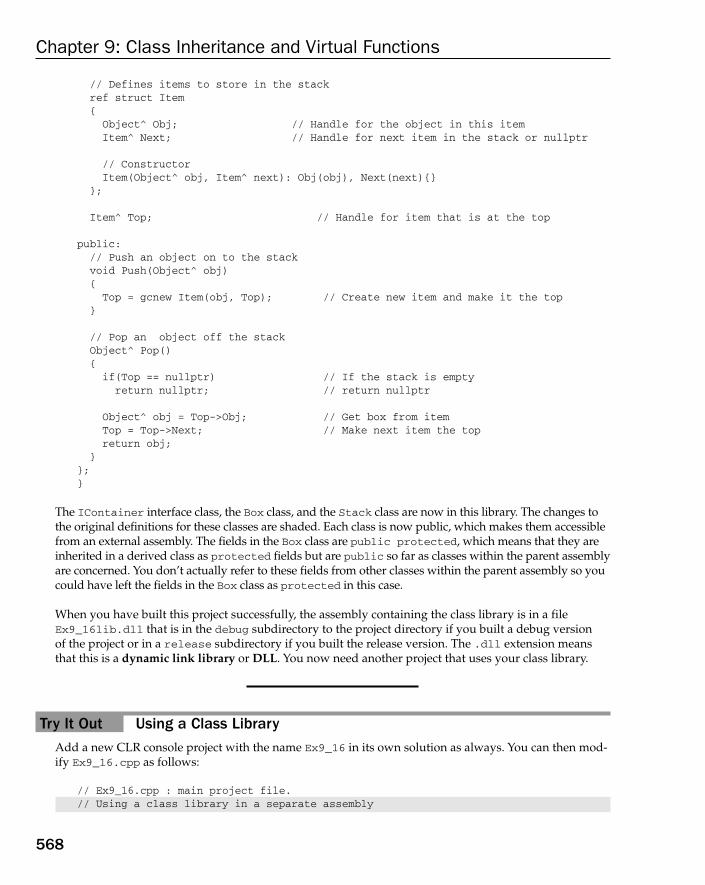
// Defines items to store in the stackref struct Item{
Object^ Obj; // Handle for the object in this itemItem^ Next; // Handle for next item in the stack or nullptr
// ConstructorItem(Object^ obj, Item^ next): Obj(obj), Next(next){}
};
Item^ Top; // Handle for item that is at the top
public:// Push an object on to the stackvoid Push(Object^ obj){Top = gcnew Item(obj, Top); // Create new item and make it the top
}
// Pop an object off the stackObject^ Pop(){ if(Top == nullptr) // If the stack is empty
return nullptr; // return nullptr
Object^ obj = Top->Obj; // Get box from itemTop = Top->Next; // Make next item the top return obj;
}};}
The IContainer interface class, the Box class, and the Stack class are now in this library. The changes tothe original definitions for these classes are shaded. Each class is now public, which makes them accessiblefrom an external assembly. The fields in the Box class are public protected, which means that they areinherited in a derived class as protected fields but are public so far as classes within the parent assemblyare concerned. You don’t actually refer to these fields from other classes within the parent assembly so youcould have left the fields in the Box class as protected in this case.
When you have built this project successfully, the assembly containing the class library is in a fileEx9_16lib.dll that is in the debug subdirectory to the project directory if you built a debug version of the project or in a release subdirectory if you built the release version. The .dll extension meansthat this is a dynamic link library or DLL. You now need another project that uses your class library.
Try It Out Using a Class LibraryAdd a new CLR console project with the name Ex9_16 in its own solution as always. You can then mod-ify Ex9_16.cpp as follows:
// Ex9_16.cpp : main project file.// Using a class library in a separate assembly
568
Chapter 9: Class Inheritance and Virtual Functions
25905c09.qxd:WroxPro 2/21/08 8:55 AM Page 568
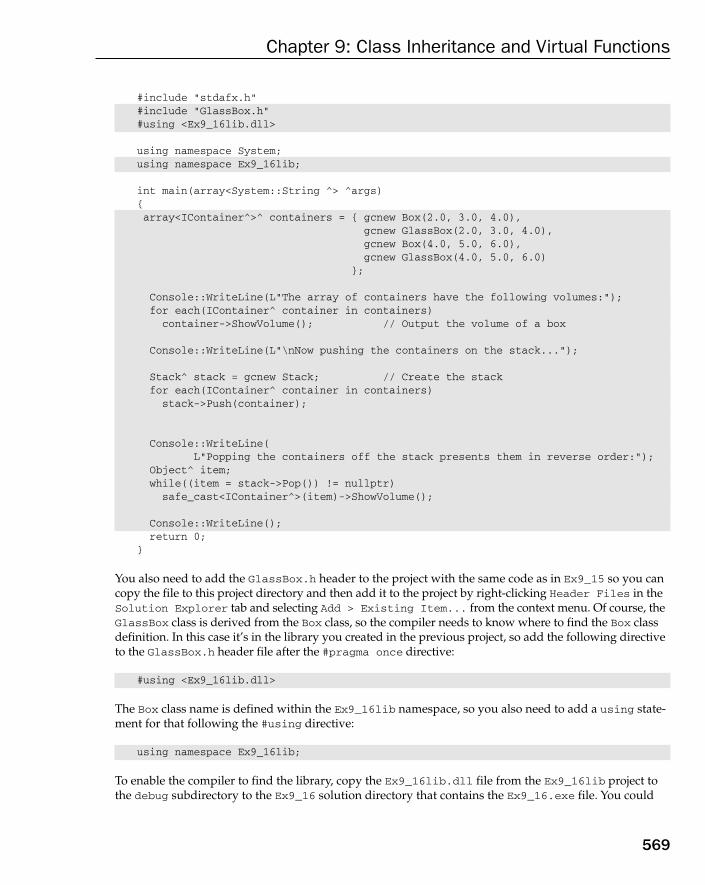
#include “stdafx.h”#include “GlassBox.h”#using <Ex9_16lib.dll>
using namespace System;using namespace Ex9_16lib;
int main(array<System::String ^> ^args){array<IContainer^>^ containers = { gcnew Box(2.0, 3.0, 4.0),
gcnew GlassBox(2.0, 3.0, 4.0),gcnew Box(4.0, 5.0, 6.0),gcnew GlassBox(4.0, 5.0, 6.0)
};
Console::WriteLine(L”The array of containers have the following volumes:”);for each(IContainer^ container in containers)container->ShowVolume(); // Output the volume of a box
Console::WriteLine(L”\nNow pushing the containers on the stack...”);
Stack^ stack = gcnew Stack; // Create the stackfor each(IContainer^ container in containers)stack->Push(container);
Console::WriteLine(L”Popping the containers off the stack presents them in reverse order:”);
Object^ item;while((item = stack->Pop()) != nullptr)safe_cast<IContainer^>(item)->ShowVolume();
Console::WriteLine();return 0;
}
You also need to add the GlassBox.h header to the project with the same code as in Ex9_15 so you cancopy the file to this project directory and then add it to the project by right-clicking Header Files in theSolution Explorer tab and selecting Add > Existing Item... from the context menu. Of course, theGlassBox class is derived from the Box class, so the compiler needs to know where to find the Box classdefinition. In this case it’s in the library you created in the previous project, so add the following directiveto the GlassBox.h header file after the #pragma once directive:
#using <Ex9_16lib.dll>
The Box class name is defined within the Ex9_16lib namespace, so you also need to add a using state-ment for that following the #using directive:
using namespace Ex9_16lib;
To enable the compiler to find the library, copy the Ex9_16lib.dll file from the Ex9_16lib project tothe debug subdirectory to the Ex9_16 solution directory that contains the Ex9_16.exe file. You could
569
Chapter 9: Class Inheritance and Virtual Functions
25905c09.qxd:WroxPro 2/21/08 8:55 AM Page 569

specify the full path to the assembly in the #using directive, but it is more usual to put any class librariesthat a project uses in the directory that contains the executable for an application. It’s easy to get the direc-tories muddled here. The Ex9_16lib.dll file is in the debug subdirectory to the Ex9_16lib solutiondirectory, not the debug subdirectory to the Ex9_16lib project directory. You are copying the libraryfile to the debug subdirectory of the Ex9_16 solution directory. Make sure you copy the .dll file to the correct directory or the library won’t be found.
Because the classes in the external assembly are in their own namespace, you have a using directive for the Ex9_16lib namespace name. Without this you would have to qualify the IContainer, Box, and Stack names with the namespace name so you would write Ex9_16lib::Box instead of just Boxfor example.
The remainder of the code is exactly the same as in the main() function for Ex9_15; no changes are nec-essary because you are now using classes from an external assembly. If you execute the program, you’llsee the output is the same as that from Ex9_15.
Functions Specified as newYou have seen how you use the override keyword to override a function in a base class. You can alsospecify a function in a derived class as new, in which case it hides the function in the base class that hasthe same signature and the new function does not participate in polymorphic behavior. To define theVolume() function as new in a class NewBox that is derived from Box you code it like this:
ref class NewBox : Box // Derived class{public:// New function to calculate the volume of a NewBox objectvirtual double Volume() new{ return 0.5*m_Length*m_Width*m_Height; }
// ConstructorNewBox(double lv, double wv, double hv): Box(lv, wv, hv){}
};
This version of the function hides the version of the Volume() function that is defined in Box, so if youcall the Volume() function using a handle of type NewBox^ the new version is called. For example:
NewBox^ newBox = gcnew NewBox(2.0, 3.0,4.0);Console::WriteLine(newBox->Volume()); // Output is 12
The result is 12 because the new Volume() function hides the polymorphic version that the NextBoxclass inherits from Box.
The new Volume() function is not a polymorphic function so for polymorphic calls using a handle to abase class type, the new version is not called. For example:
Box^ newBox = gcnew NewBox(2.0, 3.0,4.0);Console::WriteLine(newBox->Volume()); // Output is 24
570
Chapter 9: Class Inheritance and Virtual Functions
25905c09.qxd:WroxPro 2/21/08 8:55 AM Page 570

The only polymorphic Volume() function in the NewBox class is the one that is inherited from the Boxclass so that is the function that is called in this case.
Delegates and EventsAn event is a member of a class that enables an object to signal when a particular event has occurred,and the signaling process for an event involves a delegate that provides the mechanism for respondingto the event is some way. A mouse click is a typical example of an event and the object that originatedthe mouse click event would signal that the event has occurred by calling one or more functions that areresponsible for dealing with the event; a delegate would provide the means to access the function that isto respond to the event. Let’s look at delegates first and return to events a little later in this chapter.
The idea of a delegate is very simple — it’s an object that can encapsulate one or more pointers to func-tions that have a given parameter list and return type. A function that a delegate points to will deal witha particular kind of event. Thus a delegate provides a similar facility in C++/CLI to a function pointer innative C++. Although the idea of a delegate is simple, however, the detail of creating and using delegatescan get a little confusing so it’s time to concentrate.
Declaring Delegates The declaration for a delegate looks like a function prototype preceded by the delegate keyword but in reality it defines two things: the reference type name for a delegate object, and the parameter list andreturn type of the functions that can be associated with the delegate. A delegate reference type has theSystem::Delegate class as a base class so a delegate type always inherits the member of this class. The declaration for a delegate looks like a function prototype preceded by the delegate keyword but in reality it defines a reference type for the delegate, and the signature of the functions that can be associ-ated with the delegate. Here’s an example of a declaration for a delegate:
public delegate void Handler(int value); // Delegate declaration
This defines a delegate reference type Handler where the Handler type is derived fromSystem::Delegate. An object of type Handler can contain pointers to one or more functions that have a single parameter of type int and a return type that is void. The functions pointed to by a delegate can be instance functions or static functions.
Creating DelegatesHaving defined the delegate type, you can now create delegate objects of this type. You have a choice of twoconstructors for a delegate: one that accepts a single argument and another that accepts two arguments.
The argument to the delegate constructor that accepts one argument must be a static function member of aclass or a global function that has the return type and parameter list specified in the delegate declaration.Suppose you define a class with the name HandlerClass like this:
public ref class HandlerClass{public:static void Fun1(int m) { Console::WriteLine(L”Function1 called with value {0}”, m); }
571
Chapter 9: Class Inheritance and Virtual Functions
25905c09.qxd:WroxPro 2/21/08 8:55 AM Page 571

static void Fun2(int m) { Console::WriteLine(L”Function2 called with value {0}”, m); }
void Fun3(int m) { Console::WriteLine(L”Function3 called with value {0}”, m+value); }
void Fun4(int m) { Console::WriteLine(L”Function3 called with value {0}”, m+value); }
HandlerClass():value(1){}
HandlerClass(int m):value(m){}protected:int value;
};
The class has four functions with a parameter of type int and a return type of void. Two of these arestatic functions and two are instance functions. It also has two constructors including a no-arg construc-tor. This class doesn’t do much except produce output where you’ll be able to determine which functionwas called and for instance functions what the object was.
You could create a Handler delegate like this:
Handler^ handler = gcnew Handler(HandlerClass::Fun1); // Delegate object
The handler object contains the address of the static function, Fun1, in the HandlerClass class. If youcall the delegate, the HandlerClass::Fun1() function is called with the argument the same as youpass in the delegate call. You can write the delegate call like this:
handler->Invoke(90);
This calls all the functions in the invocation list for the handler delegate. In this case there is just onefunction in the invocation list, HandlerClass::Fun1(), so the output is:
Function1 called with value 90
You could also call the delegate with the following statement:
handler(90);
This is shorthand for the previous statement that explicitly called the Invoke() function and this is theform of delegate call you see generally.
The + operator is overloaded for delegate types to combine the invocation lists for two delegates into a new delegate object. For example, you could apparently modify the invocation list for the handlerdelegate with this statement:
handler += gcnew Handler(HandlerClass::Fun2);
The handler variable now references a delegate object with an invocation list containing two functions: Fun1and Fun2. However, this is a new delegate object. The invocation list for a delegate cannot be changed so
572
Chapter 9: Class Inheritance and Virtual Functions
25905c09.qxd:WroxPro 2/21/08 8:55 AM Page 572

the + operator works in a similar way to the way it works with String objects — you always get a newobject created. You could invoke the delegate again with this statement:
handler(80);
Now you get the output:
Function1 called with value 80Function2 called with value 80
Both functions in the invocation list are called and they are called in the sequence in which they wereadded to the delegate object.
You can effectively remove an entry from the invocation list for a delegate by using the — operator:
handler -= gcnew Handler(HandlerClass::Fun1);
This creates a new delegate object that contains just HandlerClass::Fun2() in its invocation list. Theeffect of using the -= operator is to remove the functions that are in the invocation list on the right side(HandlerClass::Fun1) from the list for the handler and create a new object pointing to the functionsthat remain.
Note that the invocation list for a delegate must contain at least one function pointer. If you remove all the function pointers using the subtraction operator then the result will be nullptr.
When you use the delegate constructor that has two parameters, the first argument is a reference to anobject on the CLR heap and the second object is the address of an instance function for that object’s type.Thus this constructor creates a delegate that contains a pointer to the instance function specified by thesecond argument for the object specified by the first argument. Here’s how you can create such a delegate:
HandlerClass^ obj = gcnew HandlerClass;Handler^ handler2 = gcnew Handler (obj, &HandlerClass::Fun3);
The first statement creates an object and the second statement creates a delegate pointing to the Fun3()function for the HandlerClass object obj. The delegate expects an argument of type int so you caninvoke it with the statement:
handler2(70);
This results in Fun3() for obj being called with an argument value of 70, so the output is:
Function3 called with value 71
The value stored in the value field for obj is 1 because you create the object using the default construc-tor. The statement in the body of Fun3() adds the value field to the function argument — hence the 71in the output.
Because they are both of the same type, you could combine the invocation list for handler with the listfor the handler2 delegate:
Handler^ handler = gcnew Handler(HandlerClass::Fun1); // Delegate object
573
Chapter 9: Class Inheritance and Virtual Functions
25905c09.qxd:WroxPro 2/21/08 8:55 AM Page 573

handler += gcnew Handler(HandlerClass::Fun2);
HandlerClass^ obj = gcnew HandlerClass;Handler^ handler2 = gcnew Handler (obj, &HandlerClass::Fun3);handler += handler2;
Here you recreate handler to reference a delegate that contains pointers to the static Fun1() and Fun2()functions. You then create a new delegate referenced by handler that contains the static functions plusthe Fun3() instance function for obj. You can now invoke the delegate with the statement:
handler(50);
This results in the following output:
Function1 called with value 50Function2 called with value 50Function3 called with value 51
As you see, invoking the delegate calls the two static functions plus the Fun3() member of obj, so youcan combine static and non-static functions with a single invocation list for a delegate.
Let’s put some of the fragments together in an example to make sure it does really work.
Try It Out Creating and Calling DelegatesHere’s a potpourri of what you have seen so far about delegates:
// Ex9_17.cpp : main project file.// Creating and calling delegates
#include “stdafx.h”
using namespace System;
public ref class HandlerClass{public:static void Fun1(int m) { Console::WriteLine(L”Function1 called with value {0}”, m); }
static void Fun2(int m) { Console::WriteLine(L”Function2 called with value {0}”, m); }
void Fun3(int m) { Console::WriteLine(L”Function3 called with value {0}”, m+value); }
void Fun4(int m) { Console::WriteLine(L”Function3 called with value {0}”, m+value); }
HandlerClass():value(1){}
HandlerClass(int m):value(m){}
574
Chapter 9: Class Inheritance and Virtual Functions
25905c09.qxd:WroxPro 2/21/08 8:55 AM Page 574

protected:int value;
};
public delegate void Handler(int value); // Delegate declaration
int main(array<System::String ^> ^args){Handler^ handler = gcnew Handler(HandlerClass::Fun1); // Delegate objectConsole::WriteLine(L”Delegate with one pointer to a static function:”);handler->Invoke(90);
handler += gcnew Handler(HandlerClass::Fun2);Console::WriteLine(L”\nDelegate with two pointers to static functions:”);handler->Invoke(80);
HandlerClass^ obj = gcnew HandlerClass;Handler^ handler2 = gcnew Handler (obj, &HandlerClass::Fun3);handler += handler2;Console::WriteLine(L”\nDelegate with three pointers to functions:”);handler(70);
Console::WriteLine(L”\nShortening the invocation list...”);handler -= gcnew Handler(HandlerClass::Fun1);Console::WriteLine
(L”\nDelegate with pointers to one static and one instance function:”);handler(60);
}
This example produces the following output:
Delegate with one pointer to a static function:Function1 called with value 90
Delegate with two pointers to static functions:Function1 called with value 80Function2 called with value 80
Delegate with three pointers to functions:Function1 called with value 70Function2 called with value 70Function3 called with value 71
Shortening the invocation list...
Delegate with pointers to one static and one instance function:Function2 called with value 60Function3 called with value 61
How It WorksYou saw all the operations that appear in main() in the previous section. You invoke a delegate usingthe Invoke() function explicitly and by just using the delegate handle followed by its argument list.You can see from the output that everything works as it should.
575
Chapter 9: Class Inheritance and Virtual Functions
25905c09.qxd:WroxPro 2/21/08 8:55 AM Page 575

Although the example shows a delegate that can contain pointers to functions with a single argument, a delegate can point to functions with as many arguments as you want. For example, you could declare adelegate type like this:
delegate void MyHandler(double x, String^ description);
This statement declares the MyHandler delegate type that can only point to functions with a void returntype and two parameters, the first of type double and the second of type String^.
Unbound DelegatesThe delegates you have seen up to now have been examples of bound delegates. They are called bound del-egates because they each have a fixed set of functions in their invocation list. You can also create unbounddelegates; an unbound delegate points to an instance function with a given parameter list and return typefor a given type of object. Thus the same delegate can invoke the instance function for any object of thespecified type. Here’s an example of declaring an unbound delegate:
public delegate void UBHandler(ThisClass^, int value);
The first argument specifies the type of the this pointer for which a delegate of type UBHandler can callan instance function; the function must have a single parameter of type int and a return type of void.Thus a delegate of type UBHandler can only call a function for an object of type ThisClass but for anyobject of that type. This may sound a bit restrictive but turns out to be quite useful; you could use thedelegate to call a function for each element of type ThisClass^ in an array for example.
You can create a delegate of type UBHandler like this:
UBHandler^ ubh = gcnew UBHandler(&ThisClass::Sum);
The argument to the constructor is the address of a function in the ThisClass class that has the requiredparameter list and return type.
Here’s a definition for ThisClass:
public ref class ThisClass{public:void Sum(int n, String^ str){ Console::WriteLine(L”Sum result = {0}”, value + n); }
void Product(int n, String^ str){ Console::WriteLine(L”Product result = {0}”, value*n); }
ThisClass(double v) : value(v){}
private:double value;
};
576
Chapter 9: Class Inheritance and Virtual Functions
25905c09.qxd:WroxPro 2/21/08 8:55 AM Page 576

The Sum() function is a public instance member of the ThisClass class, so invoking the ubh delegatewill call the Sum() function for any object of this class type.
When you call an unbound delegate, the first argument is the object for which the functions in the invo-cation list are to be called, and the subsequent arguments are the arguments to those functions. Here’show you might call the ubh delegate:
ThisClass^ obj = gcnew ThisClass(99.0);ubh(obj, 5);
The first argument is a handle to a ThisClass object that you created on the CLR heap by passing thevalue 99.0 to the class constructor. The second argument to the ubh call is 5, so it results in the Sum()function being called with an argument of 5 for the object referenced by obj.
You can combine unbound delegates using the + operator to create a delegate that calls multiple func-tions. Of course, all the functions must be compatible with the delegate, so for ubh they must be instancefunctions in the ThisClass class that have one parameter of type int and a void return type. Here’s anexample:
ubh += gcnew UBHandler(&ThisClass::Product);
Invoking the new delegate referenced by ubh calls both the Sum() and Product() functions for an objectof type ThisClass. Let’s see it in action.
Try It Out Using an Unbound DelegateThis example uses the code fragments from the previous section to demonstrate the operation of anunbound delegate:
// Ex9_18.cpp : main project file.// Using an unbound delegate
#include “stdafx.h”
using namespace System;
public ref class ThisClass{public:void Sum(int n){ Console::WriteLine(L”Sum result = {0} “, value+n); }
void Product(int n){ Console::WriteLine(L”product result = {0} “, value*n); }
ThisClass(double v) : value(v){}
private:double value;
577
Chapter 9: Class Inheritance and Virtual Functions
25905c09.qxd:WroxPro 2/21/08 8:55 AM Page 577

};
public delegate void UBHandler(ThisClass^, int value);
int main(array<System::String ^> ^args){array<ThisClass^>^ things = { gcnew ThisClass(5.0),gcnew ThisClass(10.0),
gcnew ThisClass(15.0),gcnew ThisClass(20.0),gcnew ThisClass(25.0)
};
UBHandler^ ubh = gcnew UBHandler(&ThisClass::Sum); // Create a delegate object
// Call the delegate for each things array elementfor each(ThisClass^ thing in things)ubh(thing, 3);
ubh += gcnew UBHandler(&ThisClass::Product); // Add a function to the delegate
// Call the new delegate for each things array elementfor each(ThisClass^ thing in things)ubh(thing, 2);
return 0;}
This example produces the following output:
Sum result = 8Sum result = 13Sum result = 18Sum result = 23Sum result = 28Sum result = 7product result = 10Sum result = 12product result = 20Sum result = 17product result = 30Sum result = 22product result = 40Sum result = 27product result = 50
How It WorksThe UBHandler delegate type is declared by the following statement.
public delegate void UBHandler(ThisClass^, int value);
UBHandler delegate objects are unbound delegates that can call instance functions for objects of typeThisClass as long as they have a single parameter of type int and a return type of void.
578
Chapter 9: Class Inheritance and Virtual Functions
25905c09.qxd:WroxPro 2/21/08 8:55 AM Page 578

The ThisClass class definition in the example is the same as you saw in the previous section. It has twoinstance functions — Sum() and Product() — that have a parameter type of int and a return type ofvoid so either or both may be called by a delegate of type UBHandler.
You create an array of handles to ThisClass objects in main() with the statement:
array<ThisClass^>^ things = { gcnew ThisClass(5.0),gcnew ThisClass(10.0),gcnew ThisClass(15.0),gcnew ThisClass(20.0),gcnew ThisClass(25.0)
};
The five objects in the initialization list each encapsulate a different value of type double, so for Sum()and Product() function calls the object involved will be easy to identify in the output.
You create a delegate object with the statement:
UBHandler^ ubh = gcnew UBHandler(&ThisClass::Sum); // Create a delegate object
Invoking the delegate object referenced by the handle ubh calls the Sum() function for any object of typeThisClass, and you do this for each object in the things array:
for each(ThisClass^ thing in things)ubh(thing, 3);
The for each loop iterates over each element in the things array so in the loop body you call the del-egate with an element from the array as the first argument. This causes the Sum() function to be calledfor the thing object with an argument of 3. Thus this loop produces the first five output lines.
Next you create a new delegate:
ubh += gcnew UBHandler(&ThisClass::Product); // Add a function to the delegate
This statement creates a new UBHandler delegate that points to the Product() function and combinesthis with the existing delegate referenced by ubh. The result is another delegate that has pointers to boththe Sum() and Product() functions in its invocation list.
The last loop calls the ubh delegate for each element in the things array with the argument value 2. Theresult will be that both Sum() and Product() will be called for each ThisClass object with the argumentvalue 2, so the loop produces the next ten lines of output.
Although you have used unbound delegates in a very simple way, here they provide immense flexibilityin your programs. You could pass an unbound delegate as an argument to a function, for example, toenable the same function to call different combinations of instance functions at different times so the del-egate becomes a kind of function selector. The sequence in which functions are called by a delegate is thesequence that they appear in the invocation list so a delegate provides you with the means of controllingthe sequence in which functions are called.
579
Chapter 9: Class Inheritance and Virtual Functions
25905c09.qxd:WroxPro 2/21/08 8:55 AM Page 579

Creating Events As I said earlier, the signaling of an event involves a delegate and the delegate contains pointers to thefunctions that are to be called when the event occurs. Most of the events you work with in your programsare events associated with controls such as buttons or menu items and these events arise from user inter-actions with your program, but you can also define and trigger events in your own program code.
An event is a member of a reference class that you define using the event keyword and a delegateclass name:
public delegate void DoorHandler(String^ str);
// Class with an event memberpublic ref class Door{public:// An event that will call functions associated// with an DoorHandler delegate objectevent DoorHandler^ Knock;
// Function to trigger eventsvoid TriggerEvents(){Knock(“Fred”);Knock(“Jane”);
}};
The Door class has an event member with the name Knock that corresponds to a delegate of typeDoorHandler. Knock is an instance member of the class, but you can specify an event as a static classmember using the static keyword. You can also declare an event to be virtual. When a Knockevent is triggered, it can call functions with the parameter list and return type that are specified by the DoorHandler delegate.
The Door class also has a public function, TriggerEvent() that triggers two Knock events, each withdifferent arguments. The arguments are passed to the functions that have been registered to receive noti-fication of the Knock event. As you see, triggering an event is essentially the same as calling a delegate.
You could define a class that might handle Knock events like this:
public ref class AnswerDoor{public:void ImIn(String^ name){Console::WriteLine(L”Come in {0}, it’s open.”,name);
}
void ImOut(String^ name){Console::WriteLine(L”Go away {0}, I’m out.”,name);
}};
580
Chapter 9: Class Inheritance and Virtual Functions
25905c09.qxd:WroxPro 2/21/08 8:55 AM Page 580

The AnswerDoor class has two public function members that potentially could handle a Knock eventbecause they both have the parameter list and return type identified in the declaration of the DoorHandlerdelegate.
Before you can register functions that are to receive notifications of Knock events, you need to create aDoor object. You can create a Door object like this:
Door^ door = gcnew Door;
Now you can register a function to receive notification of the Knock event in the Cap Door object like this:
AnswerDoor^ answer = gcnew AnswerDoor;door->Knock += gcnew DoorHandler(answer, &AnswerDoor::ImIn);
The first statement creates an object of type AnswerDoor — you need this because the ImIn() andImOut() functions are not static class members. You then add an instance of the DoorHandler delegatetype to the Knock member of Cap Door. This exactly parallels the process of adding function pointersto a delegate and you could add further handler functions to be called when a Knock event is triggeredin the same way. We can see it operating in an example.
Try It Out Handling EventsThis example uses the classes from the preceding section to define, trigger, and handle events:
// Ex9_19.cpp : main project file.// Defining, triggering and handling events.#include “stdafx.h”
using namespace System;
public delegate void DoorHandler(String^ str);
// Class with an event memberpublic ref class Door{public:// An event that will call functions associated// with an DoorHandler delegate objectevent DoorHandler^ Knock;
// Function to trigger eventsvoid TriggerEvents(){Knock(L”Fred”);Knock(L”Jane”);
}};
// Class defining handler functions for Knock eventspublic ref class AnswerDoor{public:void ImIn(String^ name)
581
Chapter 9: Class Inheritance and Virtual Functions
25905c09.qxd:WroxPro 2/21/08 8:55 AM Page 581
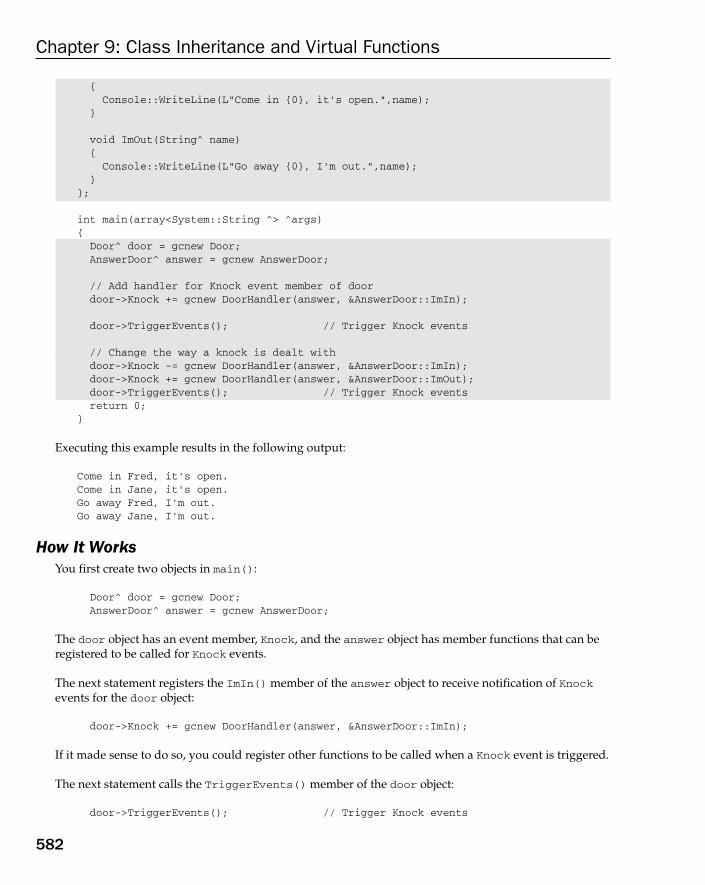
{Console::WriteLine(L”Come in {0}, it’s open.”,name);
}
void ImOut(String^ name){Console::WriteLine(L”Go away {0}, I’m out.”,name);
}};
int main(array<System::String ^> ^args){Door^ door = gcnew Door;AnswerDoor^ answer = gcnew AnswerDoor;
// Add handler for Knock event member of doordoor->Knock += gcnew DoorHandler(answer, &AnswerDoor::ImIn);
door->TriggerEvents(); // Trigger Knock events
// Change the way a knock is dealt withdoor->Knock -= gcnew DoorHandler(answer, &AnswerDoor::ImIn);door->Knock += gcnew DoorHandler(answer, &AnswerDoor::ImOut);door->TriggerEvents(); // Trigger Knock eventsreturn 0;
}
Executing this example results in the following output:
Come in Fred, it’s open.Come in Jane, it’s open.Go away Fred, I’m out.Go away Jane, I’m out.
How It WorksYou first create two objects in main():
Door^ door = gcnew Door;AnswerDoor^ answer = gcnew AnswerDoor;
The door object has an event member, Knock, and the answer object has member functions that can beregistered to be called for Knock events.
The next statement registers the ImIn() member of the answer object to receive notification of Knockevents for the door object:
door->Knock += gcnew DoorHandler(answer, &AnswerDoor::ImIn);
If it made sense to do so, you could register other functions to be called when a Knock event is triggered.
The next statement calls the TriggerEvents() member of the door object:
door->TriggerEvents(); // Trigger Knock events
582
Chapter 9: Class Inheritance and Virtual Functions
25905c09.qxd:WroxPro 2/21/08 8:55 AM Page 582
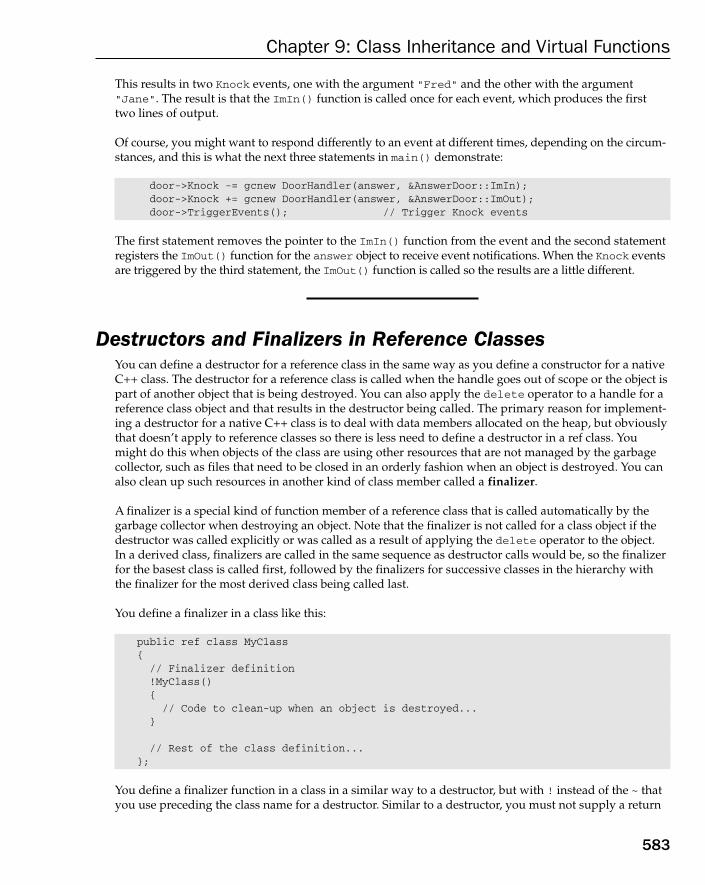
This results in two Knock events, one with the argument “Fred” and the other with the argument“Jane”. The result is that the ImIn() function is called once for each event, which produces the first two lines of output.
Of course, you might want to respond differently to an event at different times, depending on the circum-stances, and this is what the next three statements in main() demonstrate:
door->Knock -= gcnew DoorHandler(answer, &AnswerDoor::ImIn);door->Knock += gcnew DoorHandler(answer, &AnswerDoor::ImOut);door->TriggerEvents(); // Trigger Knock events
The first statement removes the pointer to the ImIn() function from the event and the second statementregisters the ImOut() function for the answer object to receive event notifications. When the Knock eventsare triggered by the third statement, the ImOut() function is called so the results are a little different.
Destructors and Finalizers in Reference ClassesYou can define a destructor for a reference class in the same way as you define a constructor for a nativeC++ class. The destructor for a reference class is called when the handle goes out of scope or the object ispart of another object that is being destroyed. You can also apply the delete operator to a handle for areference class object and that results in the destructor being called. The primary reason for implement-ing a destructor for a native C++ class is to deal with data members allocated on the heap, but obviouslythat doesn’t apply to reference classes so there is less need to define a destructor in a ref class. Youmight do this when objects of the class are using other resources that are not managed by the garbagecollector, such as files that need to be closed in an orderly fashion when an object is destroyed. You canalso clean up such resources in another kind of class member called a finalizer.
A finalizer is a special kind of function member of a reference class that is called automatically by thegarbage collector when destroying an object. Note that the finalizer is not called for a class object if thedestructor was called explicitly or was called as a result of applying the delete operator to the object. In a derived class, finalizers are called in the same sequence as destructor calls would be, so the finalizerfor the basest class is called first, followed by the finalizers for successive classes in the hierarchy withthe finalizer for the most derived class being called last.
You define a finalizer in a class like this:
public ref class MyClass{// Finalizer definition!MyClass(){// Code to clean-up when an object is destroyed...
}
// Rest of the class definition...};
You define a finalizer function in a class in a similar way to a destructor, but with ! instead of the ~ thatyou use preceding the class name for a destructor. Similar to a destructor, you must not supply a return
583
Chapter 9: Class Inheritance and Virtual Functions
25905c09.qxd:WroxPro 2/21/08 8:55 AM Page 583
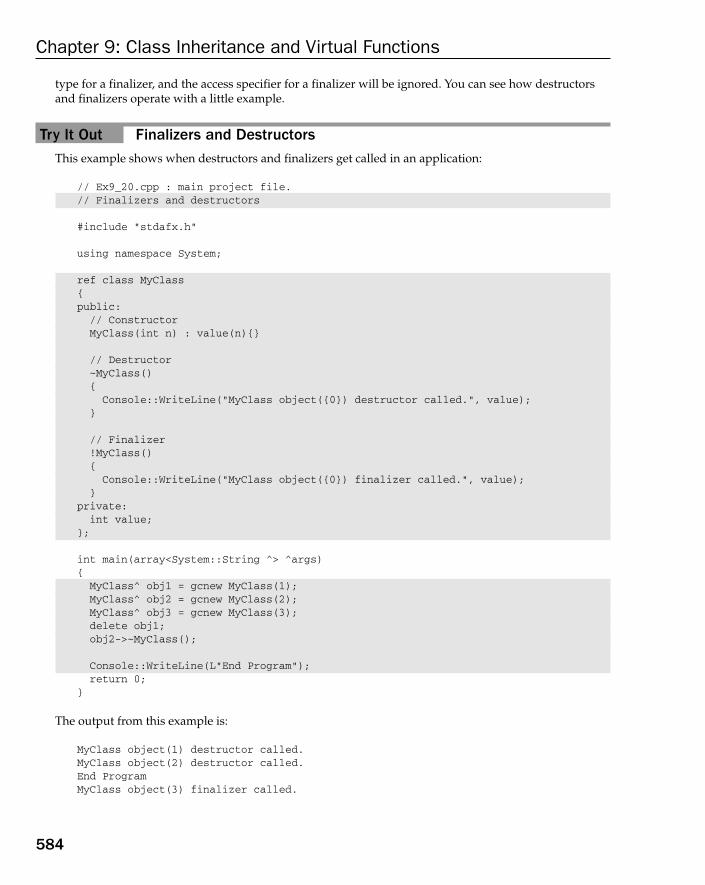
type for a finalizer, and the access specifier for a finalizer will be ignored. You can see how destructorsand finalizers operate with a little example.
Try It Out Finalizers and DestructorsThis example shows when destructors and finalizers get called in an application:
// Ex9_20.cpp : main project file.// Finalizers and destructors
#include “stdafx.h”
using namespace System;
ref class MyClass {public:// ConstructorMyClass(int n) : value(n){}
// Destructor~MyClass(){ Console::WriteLine(“MyClass object({0}) destructor called.”, value);
}
// Finalizer!MyClass(){ Console::WriteLine(“MyClass object({0}) finalizer called.”, value);
}private:int value;
};
int main(array<System::String ^> ^args){MyClass^ obj1 = gcnew MyClass(1);MyClass^ obj2 = gcnew MyClass(2);MyClass^ obj3 = gcnew MyClass(3);delete obj1;obj2->~MyClass();
Console::WriteLine(L”End Program”);return 0;
}
The output from this example is:
MyClass object(1) destructor called.MyClass object(2) destructor called.End ProgramMyClass object(3) finalizer called.
584
Chapter 9: Class Inheritance and Virtual Functions
25905c09.qxd:WroxPro 2/21/08 8:55 AM Page 584
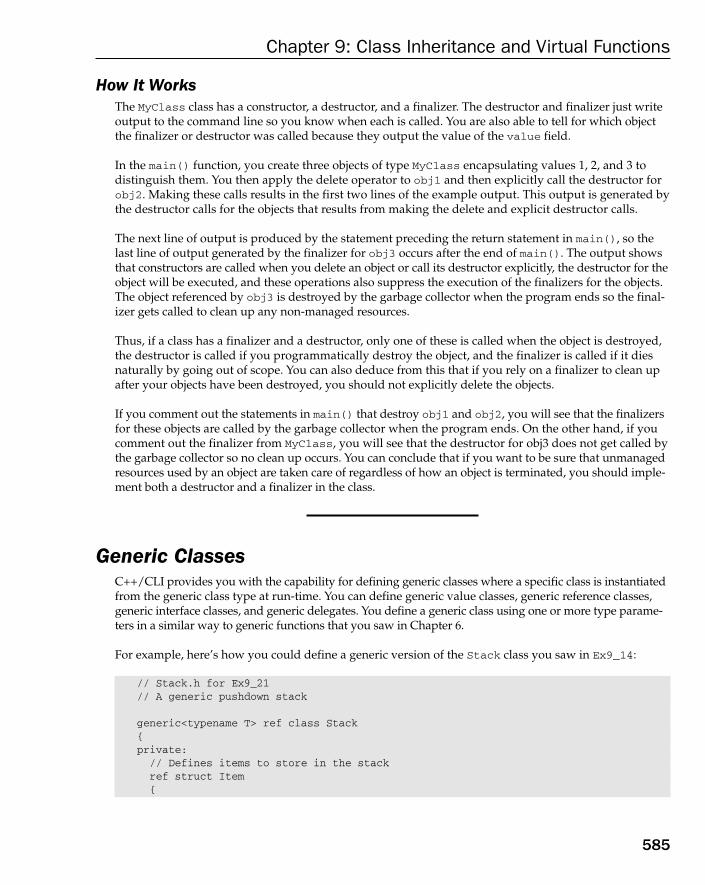
How It WorksThe MyClass class has a constructor, a destructor, and a finalizer. The destructor and finalizer just writeoutput to the command line so you know when each is called. You are also able to tell for which objectthe finalizer or destructor was called because they output the value of the value field.
In the main() function, you create three objects of type MyClass encapsulating values 1, 2, and 3 to distinguish them. You then apply the delete operator to obj1 and then explicitly call the destructor forobj2. Making these calls results in the first two lines of the example output. This output is generated bythe destructor calls for the objects that results from making the delete and explicit destructor calls.
The next line of output is produced by the statement preceding the return statement in main(), so thelast line of output generated by the finalizer for obj3 occurs after the end of main(). The output showsthat constructors are called when you delete an object or call its destructor explicitly, the destructor for theobject will be executed, and these operations also suppress the execution of the finalizers for the objects.The object referenced by obj3 is destroyed by the garbage collector when the program ends so the final-izer gets called to clean up any non-managed resources.
Thus, if a class has a finalizer and a destructor, only one of these is called when the object is destroyed,the destructor is called if you programmatically destroy the object, and the finalizer is called if it diesnaturally by going out of scope. You can also deduce from this that if you rely on a finalizer to clean upafter your objects have been destroyed, you should not explicitly delete the objects.
If you comment out the statements in main() that destroy obj1 and obj2, you will see that the finalizersfor these objects are called by the garbage collector when the program ends. On the other hand, if youcomment out the finalizer from MyClass, you will see that the destructor for obj3 does not get called bythe garbage collector so no clean up occurs. You can conclude that if you want to be sure that unmanagedresources used by an object are taken care of regardless of how an object is terminated, you should imple-ment both a destructor and a finalizer in the class.
Generic ClassesC++/CLI provides you with the capability for defining generic classes where a specific class is instantiatedfrom the generic class type at run-time. You can define generic value classes, generic reference classes,generic interface classes, and generic delegates. You define a generic class using one or more type parame-ters in a similar way to generic functions that you saw in Chapter 6.
For example, here’s how you could define a generic version of the Stack class you saw in Ex9_14:
// Stack.h for Ex9_21// A generic pushdown stack
generic<typename T> ref class Stack{private:// Defines items to store in the stackref struct Item{
585
Chapter 9: Class Inheritance and Virtual Functions
25905c09.qxd:WroxPro 2/21/08 8:55 AM Page 585

T Obj; // Handle for the object in this itemItem^ Next; // Handle for next item in the stack or nullptr
// ConstructorItem(T obj, Item^ next): Obj(obj), Next(next){}
};
Item^ Top; // Handle for item that is at the top
public:// Push an object on to the stackvoid Push(T obj){Top = gcnew Item(obj, Top); // Create new item and make it the top
}
// Pop an object off the stackT Pop(){ if(Top == nullptr) // If the stack is emptyreturn T(); // return null equivalent
T obj = Top->Obj; // Get object from itemTop = Top->Next; // Make next item the top return obj;
}};
The generic version of the class now has a type parameter, T. Note that you could use the class key-word instead of the typename keyword when specifying the parameter — there is no difference betweenthem in this context. A type argument replaces T when the generic class type is used; T is replaced by thetype argument through the definition of the class so a major advantage over the original version is thatthe generic class type is much safer without losing any of its flexibility. The Push() member of the origi-nal class accepts any handle, so you could happily push a mix of objects of type MyClass^, String^, orindeed any handle type onto the same stack, whereas an instance of the generic type accepts only objectsof the type specified as the type argument of objects of a type that have the type argument as a base.
Look at the implementation of the Pop() function. The original version returned nullptr if the top itemin the stack was null, but you can’t return nullptr for a type parameter because the type argument couldbe a value type. The solution is to return T(), which is a no-arg constructor call for type T. This results inthe equivalent of 0 for a value type and nullptr for a handle.
Note that you can specify constraints on a generic class type parameter using the where keyword in thesame way as you did for generic functions in Chapter 6.
You could create a stack from the Stack<> generic type that stores handles to Box objects like this:
Stack<Box^>^ stack = gcnew Stack<Box^>;
The type argument Box^ goes between the angled brackets and the statement creates a Stack<Box^>object on the CLR heap. This object allows handles of type Box^ to be pushed onto the stack as well ashandles of any type that have Box as a direct or indirect base class. You can try this out with a revisedversion of Ex9_14.
586
Chapter 9: Class Inheritance and Virtual Functions
25905c09.qxd:WroxPro 2/21/08 8:55 AM Page 586
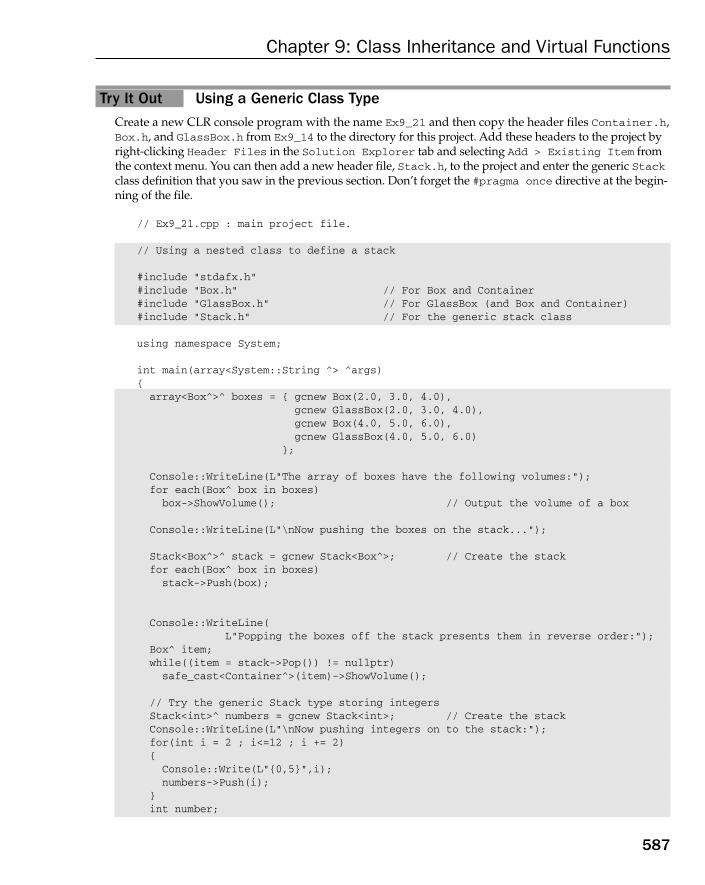
Try It Out Using a Generic Class TypeCreate a new CLR console program with the name Ex9_21 and then copy the header files Container.h,Box.h, and GlassBox.h from Ex9_14 to the directory for this project. Add these headers to the project byright-clicking Header Files in the Solution Explorer tab and selecting Add > Existing Item fromthe context menu. You can then add a new header file, Stack.h, to the project and enter the generic Stackclass definition that you saw in the previous section. Don’t forget the #pragma once directive at the begin-ning of the file.
// Ex9_21.cpp : main project file.
// Using a nested class to define a stack
#include “stdafx.h”#include “Box.h” // For Box and Container#include “GlassBox.h” // For GlassBox (and Box and Container)#include “Stack.h” // For the generic stack class
using namespace System;
int main(array<System::String ^> ^args){array<Box^>^ boxes = { gcnew Box(2.0, 3.0, 4.0),
gcnew GlassBox(2.0, 3.0, 4.0),gcnew Box(4.0, 5.0, 6.0),gcnew GlassBox(4.0, 5.0, 6.0)
};
Console::WriteLine(L”The array of boxes have the following volumes:”);for each(Box^ box in boxes)box->ShowVolume(); // Output the volume of a box
Console::WriteLine(L”\nNow pushing the boxes on the stack...”);
Stack<Box^>^ stack = gcnew Stack<Box^>; // Create the stackfor each(Box^ box in boxes)stack->Push(box);
Console::WriteLine(L”Popping the boxes off the stack presents them in reverse order:”);
Box^ item;while((item = stack->Pop()) != nullptr)safe_cast<Container^>(item)->ShowVolume();
// Try the generic Stack type storing integersStack<int>^ numbers = gcnew Stack<int>; // Create the stackConsole::WriteLine(L”\nNow pushing integers on to the stack:”);for(int i = 2 ; i<=12 ; i += 2){ Console::Write(L”{0,5}”,i);numbers->Push(i);
}int number;
587
Chapter 9: Class Inheritance and Virtual Functions
25905c09.qxd:WroxPro 2/21/08 8:55 AM Page 587

Console::WriteLine(L”\n\nPopping integers off the stack produces:”);while((number = numbers->Pop()) != 0)Console::Write(L”{0,5}”,number);
Console::WriteLine();return 0;
}
This example produces the following output:
The array of boxes have the following volumes:CBox usable volume is 24CBox usable volume is 20.4CBox usable volume is 120CBox usable volume is 102
Now pushing the boxes on the stack...Popping the boxes off the stack presents them in reverse order:CBox usable volume is 102CBox usable volume is 120CBox usable volume is 20.4CBox usable volume is 24
Now pushing integers on to the stack:2 4 6 8 10 12
Popping integers off the stack produces:12 10 8 6 4 2
How It WorksThe stack to store Box object handles is defined in the statement:
Stack<Box^>^ stack = gcnew Stack<Box^>; // Create the stack
The type parameter is Box^ so the stack stores handles to Box objects or handles to GlassBox objects. Thecode to push objects on to the stack and to pop them off again is exactly the same as in Ex9_14 and theoutput is the same, too. The difference here is that you could not push an object on to the stack if the typedid not have Box as a direct or indirect base class so the generic type guarantees that all the objects areBox objects.
Storing integers now requires a new Stack<> object:
Stack<int>^ numbers = gcnew Stack<int>; // Create the stack
The original version used the same non-generic Stack object to store Box object references and integersthus demonstrating how type safety was completely lacking in the operation of the stack. Here you spec-ify the type argument for the generic class as the value type int, so only objects of this type are acceptedby the Push() function.
The loops that pop objects off the stack demonstrate that returning T() in the Pop() function does indeedreturn 0 for type int and nullptr for the handle type Box^.
588
Chapter 9: Class Inheritance and Virtual Functions
25905c09.qxd:WroxPro 2/21/08 8:55 AM Page 588
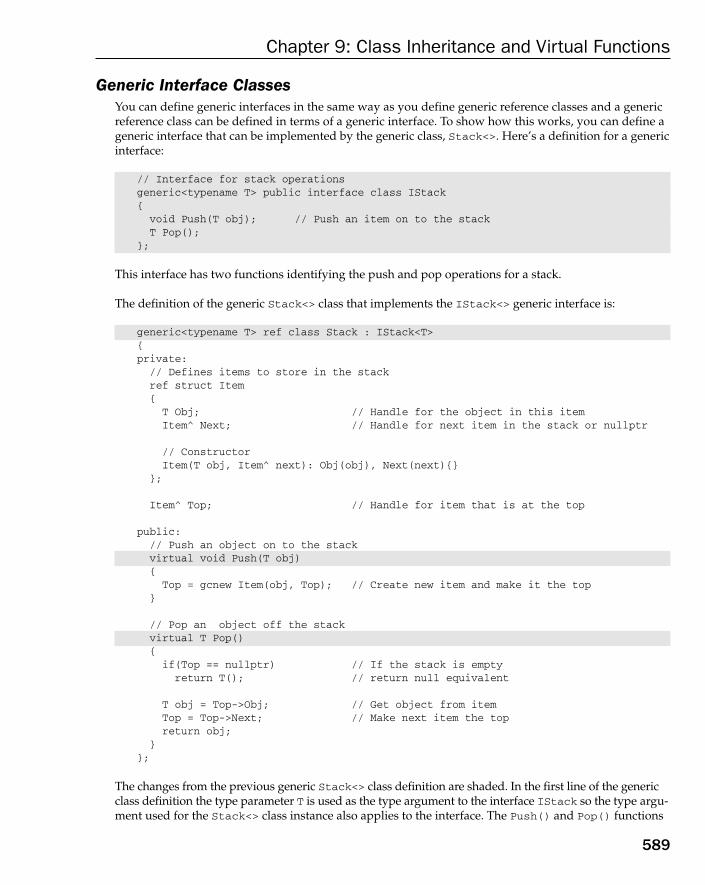
Generic Interface ClassesYou can define generic interfaces in the same way as you define generic reference classes and a genericreference class can be defined in terms of a generic interface. To show how this works, you can define ageneric interface that can be implemented by the generic class, Stack<>. Here’s a definition for a genericinterface:
// Interface for stack operationsgeneric<typename T> public interface class IStack{void Push(T obj); // Push an item on to the stackT Pop();
};
This interface has two functions identifying the push and pop operations for a stack.
The definition of the generic Stack<> class that implements the IStack<> generic interface is:
generic<typename T> ref class Stack : IStack<T>{private:
// Defines items to store in the stackref struct Item{
T Obj; // Handle for the object in this itemItem^ Next; // Handle for next item in the stack or nullptr
// ConstructorItem(T obj, Item^ next): Obj(obj), Next(next){}
};
Item^ Top; // Handle for item that is at the top
public:// Push an object on to the stackvirtual void Push(T obj){
Top = gcnew Item(obj, Top); // Create new item and make it the top}
// Pop an object off the stackvirtual T Pop(){
if(Top == nullptr) // If the stack is emptyreturn T(); // return null equivalent
T obj = Top->Obj; // Get object from itemTop = Top->Next; // Make next item the top return obj;
}};
The changes from the previous generic Stack<> class definition are shaded. In the first line of the genericclass definition the type parameter T is used as the type argument to the interface IStack so the type argu-ment used for the Stack<> class instance also applies to the interface. The Push() and Pop() functions
589
Chapter 9: Class Inheritance and Virtual Functions
25905c09.qxd:WroxPro 2/21/08 8:55 AM Page 589
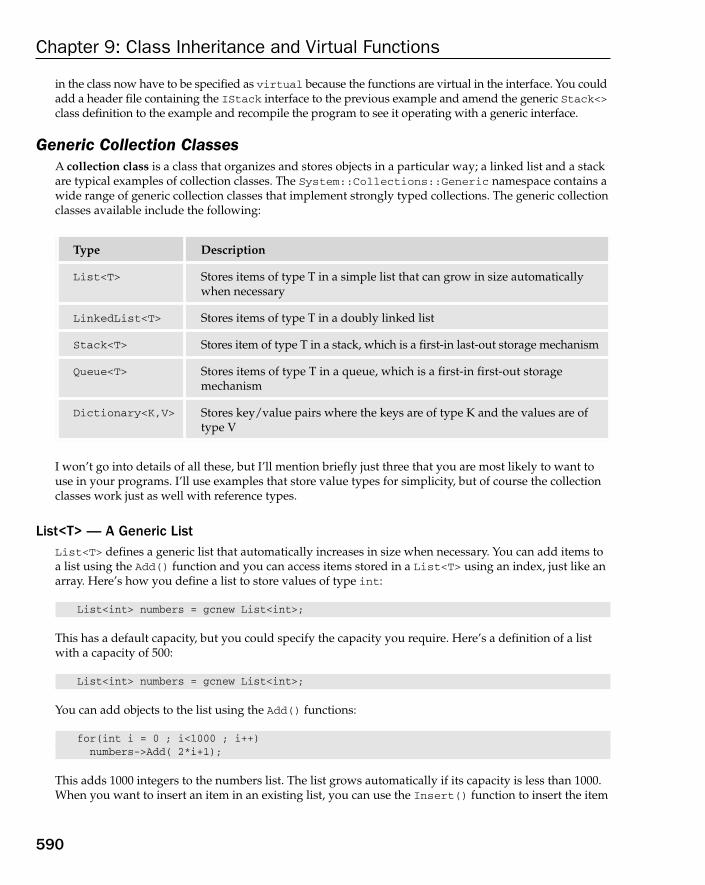
in the class now have to be specified as virtual because the functions are virtual in the interface. You couldadd a header file containing the IStack interface to the previous example and amend the generic Stack<>class definition to the example and recompile the program to see it operating with a generic interface.
Generic Collection ClassesA collection class is a class that organizes and stores objects in a particular way; a linked list and a stackare typical examples of collection classes. The System::Collections::Generic namespace contains awide range of generic collection classes that implement strongly typed collections. The generic collectionclasses available include the following:
I won’t go into details of all these, but I’ll mention briefly just three that you are most likely to want touse in your programs. I’ll use examples that store value types for simplicity, but of course the collectionclasses work just as well with reference types.
List<T> — A Generic ListList<T> defines a generic list that automatically increases in size when necessary. You can add items toa list using the Add() function and you can access items stored in a List<T> using an index, just like anarray. Here’s how you define a list to store values of type int:
List<int> numbers = gcnew List<int>;
This has a default capacity, but you could specify the capacity you require. Here’s a definition of a listwith a capacity of 500:
List<int> numbers = gcnew List<int>;
You can add objects to the list using the Add() functions:
for(int i = 0 ; i<1000 ; i++)numbers->Add( 2*i+1);
This adds 1000 integers to the numbers list. The list grows automatically if its capacity is less than 1000.When you want to insert an item in an existing list, you can use the Insert() function to insert the item
Type Description
List<T> Stores items of type T in a simple list that can grow in size automaticallywhen necessary
LinkedList<T> Stores items of type T in a doubly linked list
Stack<T> Stores item of type T in a stack, which is a first-in last-out storage mechanism
Queue<T> Stores items of type T in a queue, which is a first-in first-out storage mechanism
Dictionary<K,V> Stores key/value pairs where the keys are of type K and the values are oftype V
590
Chapter 9: Class Inheritance and Virtual Functions
25905c09.qxd:WroxPro 2/21/08 8:55 AM Page 590

specified by the second argument at the index position specified by the first argument. Items in a list areindexed from zero like an array.
You could sum the contents of the list like this:
int sum = 0;for(int i = 0 ; i<numbers->Count ; i++)sum += numbers[i];
Count is a property that returns the current number of items in the list. The items in the list may beaccessed through the default indexed property and you can get and set values in this way. Note thatyou cannot increase the capacity of a list using the default indexed property. If you use an index out-side the current range of items in the list, an exception is thrown.
You could also sum the items in the list like this:
for each(int n in numbers)sum +=n;
You have a wide range of other functions you can apply to a list including functions for removing elements,and sorting and searching the contents of the list.
LinkedList<T> — A Generic Doubly Linked ListLinkedList<T> defines a linked list with forward and backward pointers so you can iterate through thelist in either direction. You could define a linked list that stores floating-point values like this:
LinkedList<double>^ values = gcnew LinkedList<double>;
You could add values to the list like this:
for(int i = 0 ; i<1000 ; i++)values->AddLast(2.5*i);
The AddLast() function adds an item to the end of the list. You can add items to the beginning of thelist by using the AddFirst() function. Alternatively, you can use the AddHead() and AddTail() func-tions to do the same things.
The Find() function returns a handle of type LinkedListNode<T>^ to a node in the list containing the value you pass as the argument to Find(). You could use this handle to insert a new value before or after the node that you found. For example:
LinkedListNode<double>^ node = values->Find(20.0); // Find node containing 20.0if(node != nullptr)values->AddBefore(node, 19.9); // Insert 19.1 before node
The first statement finds the node containing the value 20.0. If it does not exist, the Find() functionreturns nullptr. The last statement executed if node is not null adds a new value of 19.9 before node.You could use the AddAfter() function to add a new value after a given node. Searching a linked list is relatively slow because it is necessary to iterate through the elements sequentially.
591
Chapter 9: Class Inheritance and Virtual Functions
25905c09.qxd:WroxPro 2/21/08 8:55 AM Page 591
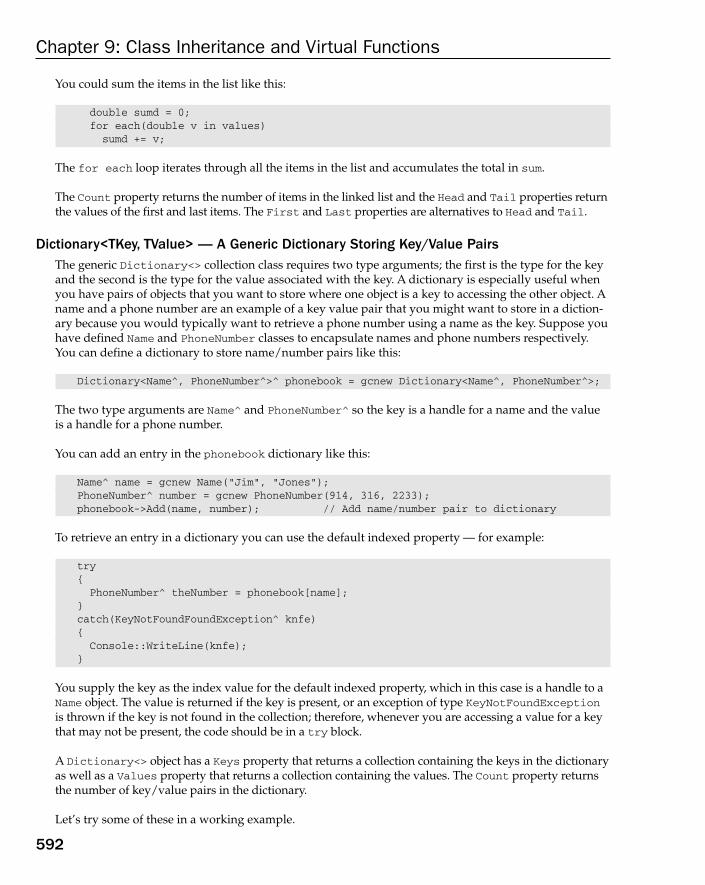
You could sum the items in the list like this:
double sumd = 0;for each(double v in values)sumd += v;
The for each loop iterates through all the items in the list and accumulates the total in sum.
The Count property returns the number of items in the linked list and the Head and Tail properties returnthe values of the first and last items. The First and Last properties are alternatives to Head and Tail.
Dictionary<TKey, TValue> — A Generic Dictionary Storing Key/Value PairsThe generic Dictionary<> collection class requires two type arguments; the first is the type for the keyand the second is the type for the value associated with the key. A dictionary is especially useful whenyou have pairs of objects that you want to store where one object is a key to accessing the other object. Aname and a phone number are an example of a key value pair that you might want to store in a diction-ary because you would typically want to retrieve a phone number using a name as the key. Suppose youhave defined Name and PhoneNumber classes to encapsulate names and phone numbers respectively.You can define a dictionary to store name/number pairs like this:
Dictionary<Name^, PhoneNumber^>^ phonebook = gcnew Dictionary<Name^, PhoneNumber^>;
The two type arguments are Name^ and PhoneNumber^ so the key is a handle for a name and the valueis a handle for a phone number.
You can add an entry in the phonebook dictionary like this:
Name^ name = gcnew Name(“Jim”, “Jones”);PhoneNumber^ number = gcnew PhoneNumber(914, 316, 2233);phonebook->Add(name, number); // Add name/number pair to dictionary
To retrieve an entry in a dictionary you can use the default indexed property — for example:
try{PhoneNumber^ theNumber = phonebook[name];
}catch(KeyNotFoundFoundException^ knfe){Console::WriteLine(knfe);
}
You supply the key as the index value for the default indexed property, which in this case is a handle to aName object. The value is returned if the key is present, or an exception of type KeyNotFoundExceptionis thrown if the key is not found in the collection; therefore, whenever you are accessing a value for a keythat may not be present, the code should be in a try block.
A Dictionary<> object has a Keys property that returns a collection containing the keys in the dictionaryas well as a Values property that returns a collection containing the values. The Count property returnsthe number of key/value pairs in the dictionary.
Let’s try some of these in a working example.
592
Chapter 9: Class Inheritance and Virtual Functions
25905c09.qxd:WroxPro 2/21/08 8:55 AM Page 592

Try It Out Using Generic Collection ClassesThis example exercises the three collection classes you have seen:
// Ex9_22.cpp : main project file.// Using generic collection classes
#include “stdafx.h”
using namespace System;using namespace System::Collections::Generic; // For generic collections
// Class encapsulating a nameref class Name{public:Name(String^ name1, String^ name2) : First(name1),Second(name2){}virtual String^ ToString() override{ return First + L” “ + Second;}
private:String^ First;String^ Second;
};
// Class encapsulating a phone numberref class PhoneNumber{public:PhoneNumber(int area, int local, int number):
Area(area),Local(local), Number(number){}virtual String^ ToString() override{ return Area + L” “ + Local + L” “ + Number; }
private:int Area;int Local;int Number;
};
int main(array<System::String ^> ^args){// Using List<T>Console::WriteLine(L”Creating a List<T> of integers:”);List<int>^ numbers = gcnew List<int>;for(int i = 0 ; i<1000 ; i++)numbers->Add(2*i+1);
// Sum the contents of the listint sum = 0;for(int i = 0 ; i<numbers->Count ; i++)sum += numbers[i];
Console::WriteLine(L”Total = {0}”, sum);
// Using LinkedList<T>Console::WriteLine(L”\nCreating a LinkedList<T> of double values:”);
593
Chapter 9: Class Inheritance and Virtual Functions
25905c09.qxd:WroxPro 2/21/08 8:55 AM Page 593
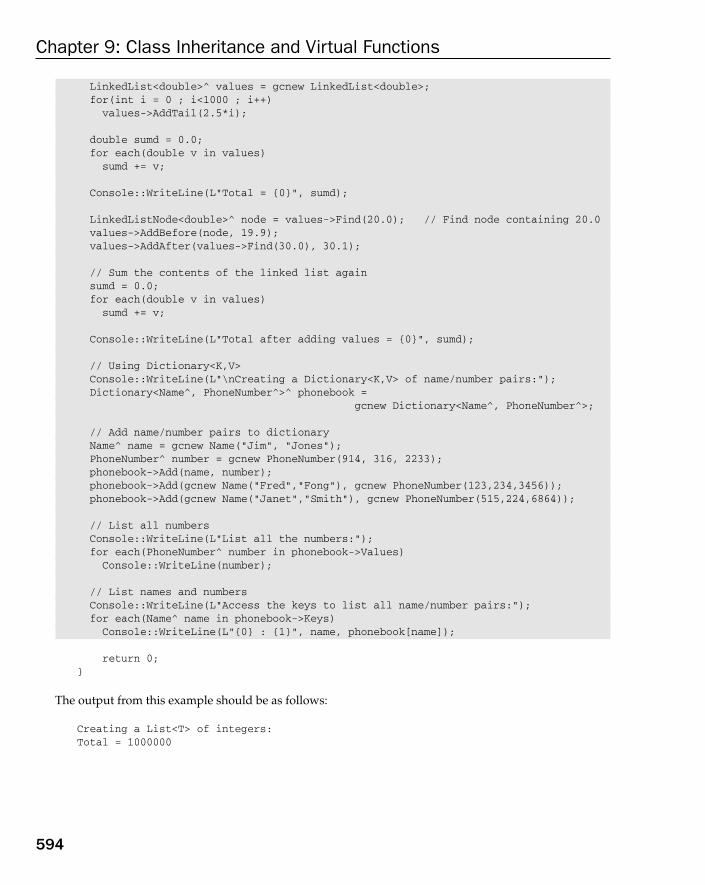
LinkedList<double>^ values = gcnew LinkedList<double>;for(int i = 0 ; i<1000 ; i++)values->AddTail(2.5*i);
double sumd = 0.0;for each(double v in values)sumd += v;
Console::WriteLine(L”Total = {0}”, sumd);
LinkedListNode<double>^ node = values->Find(20.0); // Find node containing 20.0values->AddBefore(node, 19.9);values->AddAfter(values->Find(30.0), 30.1);
// Sum the contents of the linked list againsumd = 0.0;for each(double v in values)sumd += v;
Console::WriteLine(L”Total after adding values = {0}”, sumd);
// Using Dictionary<K,V>Console::WriteLine(L”\nCreating a Dictionary<K,V> of name/number pairs:”);Dictionary<Name^, PhoneNumber^>^ phonebook =
gcnew Dictionary<Name^, PhoneNumber^>;
// Add name/number pairs to dictionaryName^ name = gcnew Name(“Jim”, “Jones”);PhoneNumber^ number = gcnew PhoneNumber(914, 316, 2233);phonebook->Add(name, number); phonebook->Add(gcnew Name(“Fred”,”Fong”), gcnew PhoneNumber(123,234,3456)); phonebook->Add(gcnew Name(“Janet”,”Smith”), gcnew PhoneNumber(515,224,6864));
// List all numbersConsole::WriteLine(L”List all the numbers:”);for each(PhoneNumber^ number in phonebook->Values)Console::WriteLine(number);
// List names and numbersConsole::WriteLine(L”Access the keys to list all name/number pairs:”);for each(Name^ name in phonebook->Keys)Console::WriteLine(L”{0} : {1}”, name, phonebook[name]);
return 0;}
The output from this example should be as follows:
Creating a List<T> of integers:Total = 1000000
594
Chapter 9: Class Inheritance and Virtual Functions
25905c09.qxd:WroxPro 2/21/08 8:55 AM Page 594

Creating a LinkedList<T> of double values:Total = 1248750Total after adding values = 1248800
Creating a Dictionary<K,V> of name/number pairs:List all the numbers:914 316 2233123 234 3456515 224 6864Access the keys to list all name/number pairs:Jim Jones : 914 316 2233Fred Fong : 123 234 3456Janet Smith : 515 224 6864
How It WorksNote the using namespace directive for the System::Collections::Generic namespace; this is essen-tial when you want to use the generic collections classes without specifying fully qualified class names.
The first block of code in main() uses the List<> collection using the code from the previous section. Itcreates a class that stores integers in a list and then stores 1000 values in it. The loop that sums the con-tents of the list uses the default indexed property to retrieve the values. This could also be written as afor each loop. Don’t forget — the default indexed property only accesses items already in the list. Youcan change the value of an existing item using the default indexed property, but you cannot add newitems this way. To add an item to the end of the list, you use the Add() function; you can also use theInsert() function to insert an item at a given index position.
The next block of code in main() demonstrates the use of the LinkedList<> collection to sort values of type double. Values of type double are added to the end of the linked list using the AddTail() func-tion in a for loop. You could equally well use the AddLast() function to do the same thing. Values areretrieved and summed in a for each loop. Note that there is no default indexed property for accessingitems in a linked list. The code also shows the use of the Find() and AddBefore() and AddAfter()functions to add new elements at a specific position in the linked list.
The last block of code in main() shows a Dictionary<> collection being used to store phone num-bers with names as keys. The Name and Phone number classes implement an override to the inheritedToString() function to enable the Console::WriteLine() function to output suitable representa-tions of objects of these types. Three name/number pairs are added to the phonebook dictionary. Thecode then lists the numbers in the dictionary by using a for each loop to iterate over the values con-tained in the collection object that are returned by the Values property for phonebook. The last loopiterates over the names in the collection returned by the Keys property and uses the default indexedproperty for phonebook to access the values. No try block is necessary here because you are certainthat all the keys in the Keys collection are present in the dictionary — if they are not, there’s a seriousproblem with the implementation of the Dictionary<> generic class!
595
Chapter 9: Class Inheritance and Virtual Functions
25905c09.qxd:WroxPro 2/21/08 8:55 AM Page 595

SummaryThis chapter covered the principal ideas involved in using inheritance for native C++ classes andC++/CLI classes. The fundamentals that you should keep in mind are:
❑ A derived class inherits all the members of a base class except for constructors, the destructor,and the overloaded assignment operator.
❑ Members of a base class declared as private in the base class are not accessible in any derivedclass. To obtain the effect of the keyword private but allow access in a derived class, you shoulduse the keyword protected in place of private.
❑ A base class can be specified for a derived class with the keyword public, private, or protected. If none is specified, the default is private. Depending on the keyword specified for a base, the access level of the inherited members may be modified.
❑ If you write a derived class constructor, you must arrange for data members of the base class to be initialized properly, as well as those of the derived class.
❑ A function in a base class may be declared as virtual. This allows other definitions of the function appearing in derived classes to be selected at execution time, depending on the type of object for which the function call is made.
❑ You should declare the destructor in a native C++ base class that contains a virtual function asvirtual. This ensures correct selection of a destructor for dynamically-created derived classobjects.
❑ A native C++ class may be designated as a friend of another class. In this case, all the functionmembers of the friend class may access all the members of the other class. If class A is a friendof B, class B is not a friend of A unless it has been declared as such.
❑ A virtual function in a native C++ base class can be specified as pure by placing = 0 at the end of the function declaration. The class then is an abstract class for which no objects can be created.In any derived class, all the pure virtual functions must be defined; if not, it, too, becomes anabstract class.
❑ A C++/CLI reference class can be derived from another reference classes. Value classes cannotbe derived classes.
❑ An interface class declares a set of public functions that represent a specific capability that canbe implemented by a reference class. An interface class can contain public functions, events, andproperties. An interface can also define static data members, functions, events, and properties, andthese are inherited in a class that implements the interface.
❑ An interface class can be derived from another interface class and the derived interface containsthe members of both interfaces.
❑ A delegate is an object that encapsulates one or more pointers to functions that have the samereturn type and parameter list. Invoking a delegate calls all the functions pointed to by the delegate.
❑ An event member of a class can signal when the event occurs by calling one or more handlerfunctions that have been registered with the event.
❑ A generic class is a parameterized type that is instantiated at run-time. The arguments you sup-ply for type parameters when you instantiate a generic type can be value class types or referenceclass types.
596
Chapter 9: Class Inheritance and Virtual Functions
25905c09.qxd:WroxPro 2/21/08 8:55 AM Page 596

❑ The System::Collections::Generic namespace contains generic collection classes thatdefine typesafe collections of objects of any C++/CLI type.
❑ You can create a C++/CLI class library in a separate assembly and the class library resides in a .dll file.
You have now gone through all of the important language features of ISO/ANSI C++ and C++/CLI. It’s important that you feel comfortable with the mechanisms for defining and deriving classes and theprocess of inheritance in both language versions. Windows programming with Visual C++ 2008 involvesextensive use of all these concepts.
ExercisesYou can download the source code for the examples in the book and the solutions to the following exercisesfrom www.wrox.com.
1. What’s wrong with the following code?
class CBadClass{private:
int len;char* p;
public:CBadClass(const char* str): p(str), len(strlen(p)) {}CBadClass(){}
};
2. Suppose you have a class CBird, as follows, that you want to use as a base class for deriving ahierarchy of bird classes:
class CBird{protected:
int wingSpan;int eggSize;int airSpeed;int altitude;
public:virtual void fly() { altitude = 100; }
};
Is it reasonable to create a CHawk by deriving from CBird? How about a COstrich? Justify youranswers. Derive an avian hierarchy that can cope with both of these birds.
3. Given the following class:
class CBase{protected:
int m_anInt;
597
Chapter 9: Class Inheritance and Virtual Functions
25905c09.qxd:WroxPro 2/21/08 8:55 AM Page 597

public:CBase(int n): m_anInt(n) { cout << “Base constructor\n”; }virtual void Print() const = 0;
};
What sort of class is CBase and why? Derive a class from CBase which sets its inherited integervalue, m_anInt, when constructed, and prints it on request. Write a test program to verify thatyour class is correct.
4. A binary tree is a structure made up of nodes where each node contains a pointer to a “left” nodeand a pointer to a “right” node plus a data item, as shown in Figure 9-7.
Figure 9-7
The tree starts with a root node, and this is the starting point for accessing the nodes in the tree.Either or both pointers in a node can be null. Figure 9-7 shows an ordered binary tree, which is atree organized so that the value of each node is always greater than or equal to the value of theleft node and less than or equal to the value of the right node.
Value = 120
right node pointer
left node pointer
Root Node
Value = 437
right node pointer
left node pointer
Node
Value = 43
right node pointer
left node pointer
Node
Value = 88
null null
Node
Value = 24
null null
Node
Value = 766
null null
Node
Value = 57
right node pointer null
Node
Value = 17
right node pointer
null
Node
598
Chapter 9: Class Inheritance and Virtual Functions
25905c09.qxd:WroxPro 2/21/08 8:55 AM Page 598
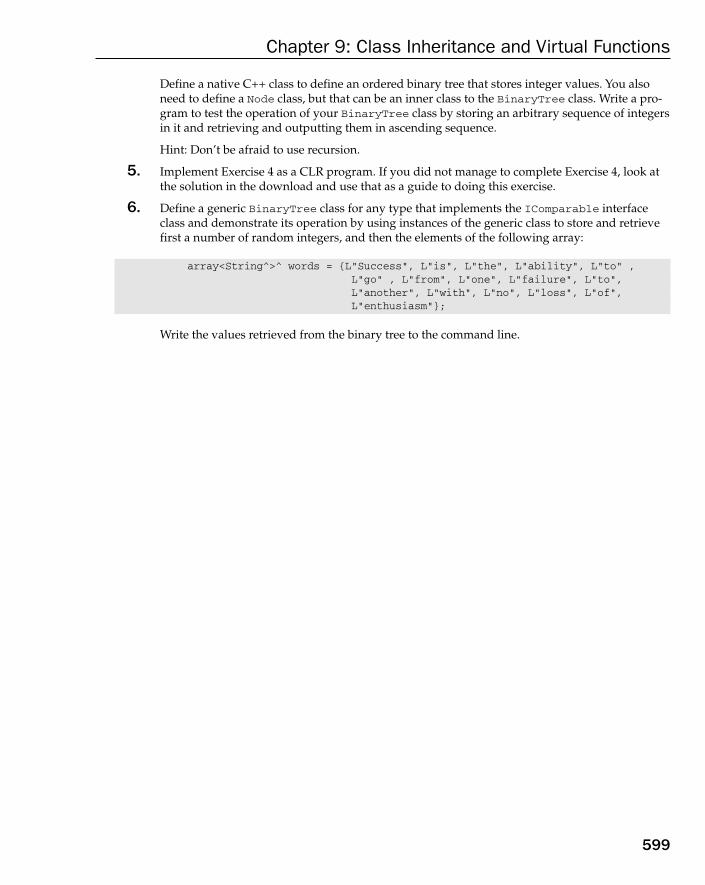
Define a native C++ class to define an ordered binary tree that stores integer values. You alsoneed to define a Node class, but that can be an inner class to the BinaryTree class. Write a pro-gram to test the operation of your BinaryTree class by storing an arbitrary sequence of integersin it and retrieving and outputting them in ascending sequence.
Hint: Don’t be afraid to use recursion.
5. Implement Exercise 4 as a CLR program. If you did not manage to complete Exercise 4, look atthe solution in the download and use that as a guide to doing this exercise.
6. Define a generic BinaryTree class for any type that implements the IComparable interfaceclass and demonstrate its operation by using instances of the generic class to store and retrievefirst a number of random integers, and then the elements of the following array:
array<String^>^ words = {L”Success”, L”is”, L”the”, L”ability”, L”to” , L”go” , L”from”, L”one”, L”failure”, L”to”,L”another”, L”with”, L”no”, L”loss”, L”of”,L”enthusiasm”};
Write the values retrieved from the binary tree to the command line.
599
Chapter 9: Class Inheritance and Virtual Functions
25905c09.qxd:WroxPro 2/21/08 8:55 AM Page 599

25905c09.qxd:WroxPro 2/21/08 8:55 AM Page 600

10The Standard
Template Library
At its name implies, the Standard Template Library (STL) is a library of standard class and functiontemplates. You can use these templates to create a wide range of powerful general-purpose classesfor organizing your data as well as functions for processing that data in various ways. The STL isdefined by the standard for native C++ and is therefore always available with a conforming com-piler. Because of its broad applicability, the STL can greatly simplify programming in many of yourC++ applications.
Of course, the STL for native C++ does not work with C++/CLI class types but in Visual C++ 2008you have an additional version of the STL available that contains templates and generic functionsthat you can instantiate with C++/CLI class types.
In this chapter you will learn:
❑ What capabilities are offered by the STL
❑ What containers are and how you create and use them
❑ What iterators are and how you use them with containers
❑ The types of algorithms that are available with the STL and how you can apply the more common ones
❑ What function objects are and how they are used with the STL
❑ How to use the STL version that supports C++/CLI class types
What Is the Standard Template Librar y?The STL is a large collection of class and function templates that is provided with your native C++compiler. I’ll first explain in general terms the kinds of resources the STL provides and how theyinteract with one another before diving into the detail of working examples. The STL contains sixkinds of components: containers, container adapters, iterators, algorithms, function objects, andfunction adapters. Because they are part of the standard library, the names of the STL componentsare all defined within the std namespace.
25905c10.qxd:WroxPro 2/21/08 9:11 AM Page 601

The STL is a very large library, some of which is highly specialized, and to cover the contents fully wouldrequire a book in its own right. In this chapter, I’ll introduce the fundamentals of how you use the STLand describe the more commonly used capabilities. Before getting into containers in depth, I’ll introduceyou to the primary components, concepts and terminology you will find in the STL.
ContainersContainers are objects that you use to store and organize other objects. A class that implements a linkedlist is an example of a container. You create a container class from an STL template by supplying thetype of the object that you intend to store. For example, vector<T> is a template for a container that isa linear array that automatically increases in size when necessary. T is the type parameter that specifiesthe type of objects to be stored. Here are a couple of statements that are examples of creatingvector<T> containers:
vector<string> strings; // Stores object of type stringvector<double> data; // Stores values of type double
I chose the vector container as the example because it is probably used the most often. The first statementcreates the container class, strings, that stores objects of type string while the second statement createsthe data that stores values of type double.
You can store items of a fundamental type or of any class type in a container. If your type argument for an STL container template is a class type, the container can store objects of that type, or objects of anyderived class type. Typically, containers store copies of the objects that you store in them and they allocateand manage the memory that the objects occupy automatically. When a container object is destroyed, thecontainer takes care of deleting the objects it contains and freeing the memory they occupied. One advan-tage of using STL containers to store your objects is that it relieves you of the chore of managing the mem-ory for them.
The templates for the STL container classes are defined in the standard headers shown in the followingtable.
Header File Contents
<vector> A vector<T> container represents an array that can increase in capacity auto-matically when required. You can only add new elements to the end of a vectorcontainer.
<deque> A deque<T> container implements a double-ended queue. This is equivalent to avector but with the additional capability for you to add elements to the beginning.
<list> A list<T> container is a doubly-linked list.
<map> A map<K, T> is an associative container that stores each object (of type T) with an associated key (of type K) that determines where the key/object pair is located. The value of each key in a map must be unique.This header also defines the multimap<K,T> container where the keys in thekey/object pairs do not need to be unique.
602
Chapter 10: The Standard Template Library
25905c10.qxd:WroxPro 2/21/08 9:11 AM Page 602

The containers in this table represent the complete set that is available with the STL and all the templatenames are defined within the std namespace. T is the template type parameter for the type of elementsstored in a container and where keys are used, K is the type of key.
Microsoft Visual C++ also includes the headers <hash_map> and <hash_set> that define templatesfor the hash_map<K, T> and hash_set<K, T> containers. These are non-standard variations on the map<K, T> and set<K, T> containers and because they are not standard they are defined in thestdext namespace rather than std. The standard map and set containers use an ordering mechanismto locate entries whereas the non-standard hash_map and hash_set containers use a hashing mechanism.
Container AdaptersThe STL also defines container adapters. A container adapter is a template class that wraps an existingSTL container class to provide a different, and typically more restricted, capability. The container adaptersare defined in the headers in the following table.
Header File Contents
<queue> A queue<T> container is defined by an adapter from a deque<T> container bydefault, but you could define it using a list<T> container. You can only accessthe first and last elements in a queue and you can only add elements at the backand remove them from the front. Thus a queue<T> container works more or lesslike the queue in your local coffee shop.This header also defines a priority_queue<T> container, which is a queue thatorders the elements it contains so the largest element is always at the front. Onlythe element at the front can be accessed or removed. A priority queue is definedby an adapter from a vector<T> by default, but you could use a deque<T> asthe base container.
<stack> A stack container is defined by an adapter from a deque<T> container by default,but you could define it using a vector<T> or a list<T> container. A stack is afirst-in first-out container so adding or removing elements always occurs at thetop and you can only access the top element.
Header File Contents
<set> A set<T> container is a map where each object serves as its own key. All objectsin a set must be unique. A consequence of using an object as its own key is thatyou cannot change an object in a set; to change an object you must delete it andthen insert the modified version.This header also defines the multiset<T> container, which is like a set con-tainer except that the entries do not need to be unique.
<bitset> Defines the bitset<T> class template that represents a fixed number of bits.This is used typically to store flags that represent a set of states or conditions.
603
Chapter 10: The Standard Template Library
25905c10.qxd:WroxPro 2/21/08 9:11 AM Page 603

IteratorsIterators are objects that behave like pointers and are very important for accessing the contents of allSTL containers except for those defined by a container adapter; container adapters do not support itera-tors. You can obtain an iterator from a container that you can use to access the objects that you havepreviously stored. You can also create iterators that will allow input and output of objects or data items of a given type from or to a native C++ stream. Although basically all iterators behave like pointers,not all iterators provide the same functionality. However, they do share a base level of capability.Given two iterators, iter1 and iter2, accessing the same set of objects, the comparison operationsiter1 == iter2, iter1 != iter2, and the assignment iter1 = iter2 are always possible, regard-less of the types of iter1 and iter2.
There are four different categories of iterators and each category supports a different range of operations,as shown in the following table. The operations described for each category are in addition to the threeoperations that I mentioned in the previous paragraph.
Iterator Category Description
Input and output iterators These iterators read or write a sequence of objects and may only be used once. To read or write a second time you must obtain a newiterator. You can perform the following operations on these iterators:++iter or iter++*iterFor the dereferencing operation, only read access is allowed in thecase of an input iterator and only write access for an output iterator.
Forward iterators Forward iterators incorporate the capabilities of both input and out-put iterators so you can apply the operations shown above to themand you can use them for access and store operations. Forward iter-ators can also be reused to traverse a set of objects in a forwarddirection as many times as you want.
Bidirectional iterators Bidirectional iterators provide the same capabilities as forward iter-ators and additionally allow the operations --iter and iter--.This means you can traverse backward through a sequence ofobjects as well as forward.
Random access iterators Random access iterators have the same capabilities as bidirectionaliterators but also allow the following operations:iter+n or iter-niter += n or iter -= niter1 - iter2iter1 < iter2 or iter1 > iter2iter1 <= iter2 or iter1 >= iter2iter[n]Being able to increment or decrement an iterator by an arbitraryvalue n allows random access to the set of objects. The last opera-tion using the [] operator is equivalent to *(iter + n).
604
Chapter 10: The Standard Template Library
25905c10.qxd:WroxPro 2/21/08 9:11 AM Page 604

Thus iterators in the four successive categories provide a progressively greater range of functionality.Where an algorithm requires an iterator with a given level of functionality, you can use any iterator thatprovides the required level of capability. For example, if a forward iterator is required, you must use atleast a forward iterator; an input or an output operator will not do. On the other hand you could alsouse a bidirectional iterator or a random access iterator because they both have the capability providedby a forward iterator.
Note that when you obtain an iterator to access the contents of a container, the kind of iterator you getwill depend on the sort of container you are using.
AlgorithmsAlgorithms are STL function templates that operate on a set of objects that are provided to them by aniterator. Because the objects are supplied by an iterator, the algorithm needs no knowledge of the sourceof the objects to be processed. The objects could be retrieved by the iterator from a container or even from a stream. Because iterators work like pointers, all STL template functions that accept an iterator as an argu-ment will work equally well with a regular pointer.
As you’ll see, you will frequently use containers, iterators, and algorithms in concert in the manner illus-trated in Figure 10-1.
Figure 10-1
When you apply an algorithm to the contents of a container, you supply iterators that point to objectswithin the container. The algorithm uses these iterators to access objects within the container and to writethem back when this is appropriate. For example, when you apply the sort() algorithm to the contentsof a vector, you pass two iterators to the sort() function. One points to the first object, and the otherpoints to the position that is one past the last element in the vector. The sort() function uses these itera-tors to access objects for comparison and to write the objects back to the container to establish the order-ing. You see this working in an example later in this chapter.
Algorithms are defined in two standard header files, the <algorithm> header and the <numeric>header.
Function ObjectsFunction objects are objects of a class type that overloads the () operator, which means that the classimplements the operator()() function. Function object types are defined in the STL as templates soyou can create a function object where the overloaded () operator function works with your object type.
T obj T obj T obj T obj T obj T obj T obj
Container
vector<T>
T obj
Algorithm
sort()Iterators
Process objects
605
Chapter 10: The Standard Template Library
25905c10.qxd:WroxPro 2/21/08 9:11 AM Page 605
For example, the STL defines the template less<T>. If you instantiate the template as less<myClass>you have a type for function objects that implement operator()() to provide the less-than comparisonfor objects of type myClass.
Many algorithms make use of function objects to specify binary operations to be carried out, or to spec-ify predicates that determine how or whether a particular operation is to be carried out. A predicate is a function that returns a value of type bool and because a function object is an object of a type thatimplements the operator()() member function to return a value of type bool, a function object is also a predicate. For example, suppose you have defined a class type Comp that implements theoperator()() function to compare its two arguments and return a bool value. If you create an object f of type Comp, the expression f(a,b) returns a bool value that results from comparing a and b, and thus acts as a predicate.
Predicates come in two flavors, binary predicates that involve two operands, and unary predicates thatrequire one operand. For example, comparisons such as less-than and equal-to and logical operationssuch as AND and OR are implemented as binary predicates that are members of function objects; logi-cal negation, NOT, is implemented as a unary predicate member of a function object.
Function object templates are defined in the <functional> header and you can also define your ownfunction objects when necessary. You’ll see function objects in action with algorithms and some con-tainer class functions in this chapter.
Function AdaptersFunction adapters are function templates the allow function objects to be combined to produce a morecomplex function object. A simple example is the not1 function adapter. This takes an existing functionobject that provides a unary predicate and inverts it, so if the function object function returns true, thefunction that results from applying not1 to it will be false. I won’t be discussing function adapters indepth, not because they are terribly difficult to understand — they aren’t; it’s just that there’s a limit tohow much I can cram into a single chapter.
The Range of STL ContainersThe STL provides templates for a variety of container classes that you can use in a wide range applica-tion contexts. Sequence containers are containers in which you store objects of a given type in a linearfashion, either as a dynamic array or as a list. Associative containers store objects based on a key thatyou supply with each object to be stored and the key is used to locate the object within the container. In a typical application you might be storing phone numbers in an associative container using names as the keys. This would enable you to retrieve a particular number from the container just by supplying theappropriate name.
I’ll first introduce you to sequence containers, and then I’ll delve into associative containers and whatyou can do with them.
606
Chapter 10: The Standard Template Library
25905c10.qxd:WroxPro 2/21/08 9:11 AM Page 606
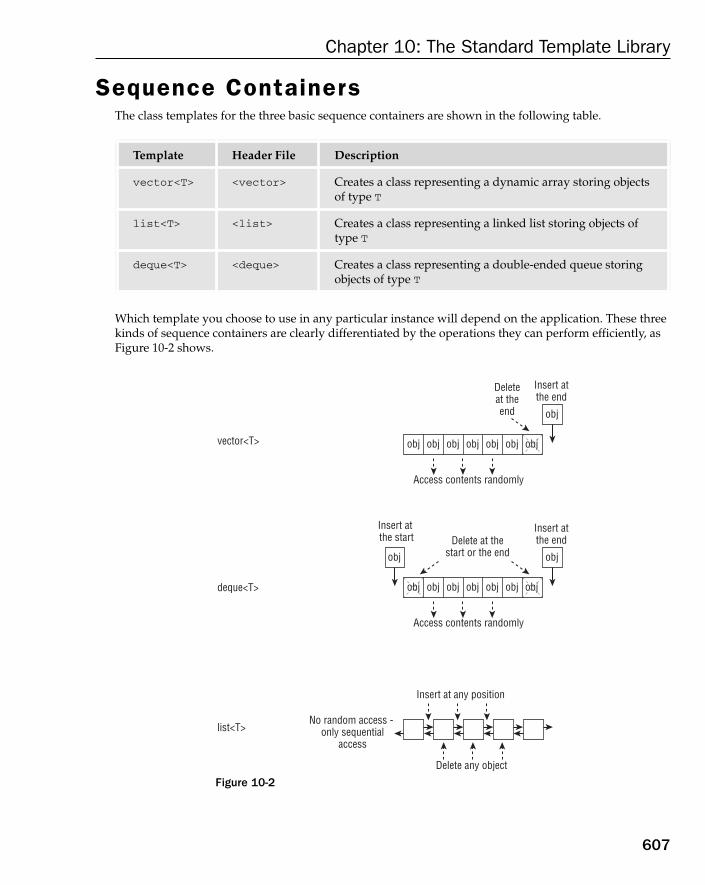
Sequence ContainersThe class templates for the three basic sequence containers are shown in the following table.
Which template you choose to use in any particular instance will depend on the application. These threekinds of sequence containers are clearly differentiated by the operations they can perform efficiently, asFigure 10-2 shows.
Figure 10-2
deque<T>
vector<T>
list<T>
Insert at the start Delete at the
start or the end
Insert atthe end
Deleteat theend
obj obj obj obj obj obj obj
obj
Access contents randomly
Insert atthe end
obj obj obj obj obj obj
objobj
Access contents randomly
Insert at any position
No random access - only sequential
access
Delete any object
obj
Template Header File Description
vector<T> <vector> Creates a class representing a dynamic array storing objectsof type T
list<T> <list> Creates a class representing a linked list storing objects oftype T
deque<T> <deque> Creates a class representing a double-ended queue storingobjects of type T
607
Chapter 10: The Standard Template Library
25905c10.qxd:WroxPro 2/21/08 9:11 AM Page 607
If you need random access to the contents of the container and you are happy to always add or deleteobjects at the end of a sequence, then vector<T> is the container template to choose. It is possible to add or delete objects randomly within a vector but the process will be very slow because all the objects past theinsertion or deletion point will have to be moved. A deque<T> container is very similar to a vector<T>and supports the same operations, but it has the additional capability to add and delete at the beginning of the sequence. A list<T> container is a doubly-linked list, so adding and deleting at any position is effi-cient. The downside of a list is that there is no random access to the contents; the only way to access anobject that is internal to the list is to traverse the contents from the beginning, or to run backward throughthe contents from the end.
Let’s look at sequence containers in more detail and try some examples. I’ll be introducing the use of someiterators, algorithms, and function objects along the way.
Creating Vector ContainersThe simplest way to create a vector container is like this:
vector<int> mydata;
This creates a container that will store values of type int. The initial capacity to store elements is zero, soyou will be allocating more memory right from the outset when you insert the first value. The push_back()function adds a new element to the end of a vector so to store a value in this vector you would write:
mydata.push_back(99);
The argument to the push_back() function is the item to be stored. This statement stores the value 99 inthe vector so after executing this statement the vector contains one element.
Here’s another way to create a vector to store integers:
vector<int> mydata(100);
This creates a vector that contains 100 elements that are all initialized to 0. If you add new elements tothis vector, the memory allocated for storage in the vector will be increased automatically, so obviouslyit’s a good idea to choose a reasonably accurate value for the number of integers you are likely to wantto store. This vector already contains 100 elements and you can use it just like an array. For example, tostore a value in the third element you can write:
mydata[2] = 999;
Of course, you can only use an index value to access elements within a vector that is within the range ofelements that exist. You can’t add new elements in this way though. To add a new element, you shoulduse the push_back() function.
You can initialize the elements in a vector to a different value when you create it by using this statement:
vector<int> mydata(100, -1);
The second argument to the constructor is the initial value to be used, so all 100 elements in the vectorwill be set to -1.
608
Chapter 10: The Standard Template Library
25905c10.qxd:WroxPro 2/21/08 9:11 AM Page 608

If you don’t want to create elements when you create the container, you can increase the capacity after youcreate it by calling its reserve() function:
vector<int> mydata;mydata.reserve(100);
The argument to the reserve() function is the minimum number of elements to be accommodated. Ifthe argument is less than the current capacity of the vector, then calling reserve() will have no effect.In this code fragment, calling reserve() causes the vector container to allocate sufficient memory for atotal of 100 elements.
You can also create a vector with initial values for elements from an external array. For example:
double data[] = {1.5, 2.5, 3.5, 4.5, 5.5, 6.5, 7.5, 8.5, 9.5, 10.5};vector<double> mydata(data, data+8);
Here the data array is created with 10 elements of type double with the initial values shown. The sec-ond statement creates a vector storing elements of type double with eight elements initially having thevalues corresponding to data[0] through data[7]. The arguments to the vector<double> constructorare pointers (and can also be iterators), where the first pointer points to the first initializing element inthe array and the second points to one past the last initializing element. Thus the mydata vector willcontain eight elements with initial values 1.5, 2.5, 3.5, 4.5, 5.5, 6.5, 7.5, and 8.5.
Because the constructor in the previous fragment can accept either pointer or iterator arguments, youcan initialize a vector when you create it with values from another vector that contains elements of thesame type. You just supply the constructor with an iterator pointing to the first element you want to useas an initializer, plus a second iterator pointing to one past the last element you want to use. Here’s anexample:
vector<double> values(mydata.begin(), mydata.end());
After executing this statement, the values vector will have elements that are duplicates of the mydatavector. As Figure 10-3 illustrates, the begin() function returns a random access iterator that points tothe first element in the vector for which it is called and the end() function returns a random access itera-tor pointing to one past the last element. A sequence of elements is typically specified in the STL by twoiterators, one pointing to the first element in the sequence and the other pointing to one past the last ele-ment in the sequence, so you’ll see this time and time again.
Figure 10-3
obj obj obj obj obj obj obj obj
v.begin() v.end()
v.begin()+2 v.end()-1
Iterators for a vector v
609
Chapter 10: The Standard Template Library
25905c10.qxd:WroxPro 2/21/08 9:11 AM Page 609

Because the begin() and end() functions for a vector container return random access iterators, you canmodify what they point to when you use them. The type of the iterators that the begin() and end()function return is vector<T>::iterator, where T is the type of object stored in the vector.
Here’s a statement that creates a vector that is initialized with the third through the seventh elementsfrom the mydata vector:
vector<double> values(mydata.begin()+2, mydata.end()-1);
Adding 2 to the first iterator makes it point to the third element in mydata. Subtracting 1 from the seconditerator makes it point to the last element in mydata; remember the second argument to the constructor isan iterator that points to a position that is one past the element to be used as the last initializer, so the objectthat the second iterator points to is not included in the set.
As I said earlier, it is pretty much standard practice in the STL to indicate a sequence of elements in a con-tainer by a begin iterator that points to the first element and an end iterator that points to one past the lastelement. This method allows you to iterate over all the elements in the sequence by incrementing the beginiterator until it equals the end iterator. This means that the iterators only need to support the equalityoperator to allow you to walk through the sequence.
Occasionally you may want to access the contents of a vector in reverse order. Calling the rbegin()function for a vector returns an iterator that points to the last element, and rend() points to one past the first element(that is, the position preceding the first element), as Figure 10-4 illustrates.
Figure 10-4
The iterators returned by rbegin() and rend() are called reverse iterators because they present the ele-ments in reverse sequence. Reverse iterators are of type vector<T>::reverse_iterator. Figure 10-4shows how adding a positive integer to the rbegin() iterator moves back through the sequence and sub-tracting an integer from rend() moves forward through the sequence.
Here’s how you could create a vector containing the contents of another vector in reverse order:
double data[] = {1.5, 2.5, 3.5, 4.5, 5.5, 6.5, 7.5, 8.5, 9.5, 10.5};vector<double> mydata(data, data+8);vector<double> values(mydata.rbegin(), mydata.rend());
Because you are using reverse iterators as arguments to the constructor in the last statement, the valuesvector will contain the elements from mydata in reverse order.
obj obj obj obj obj obj obj obj
v.rend() v.rbegin()
v.rend()-2 v.rbegin()+1
Reverse Iterators for a vector v
610
Chapter 10: The Standard Template Library
25905c10.qxd:WroxPro 2/21/08 10:23 AM Page 610

The Capacity and Size of a Vector ContainerIt’s about time I explained the difference between the capacity and the size of a vector container. Thecapacity is the maximum number of objects a container can accommodate currently without allocatingmore memory. The size is the number of objects actually stored in the container so the size cannot begreater than the capacity.
You can obtain both the size and capacity of a container, data, at any time by calling the size() andcapacity() member functions. For example:
cout << endl << “The current capacity of the container is: “ << data.capacity()<< endl << “The current size of the container is: “ << data.size() << endl;
Calling the capacity() function for a vector returns the current capacity and calling its size() func-tion returns the current size, both values being returned as type vector<T>::size_type, which is animplementation-defined integer type that is defined within the vector<T> class template by a typedef.To create a variable to store the value returned from the size() or capacity() function you specify itto be of type vector<T>::size_type, where you replace T by the type of object stored in the container.The following fragment illustrates this:
vector<double> values;vector<double>::size_type cap = values.capacity();
The Microsoft Visual C++ library implementation of STL defines the vector<T>::size_type typeas size_t. size_t is an unsigned integer type that is also a type of the result of the sizeof operatorand the value returned by the new operator.
If the value returned by the size() function is zero, then clearly the vector contains no elements; thusyou can use this as a test for an empty vector. You can also call the empty() function for a vector to testfor this:
if(values.empty())cout << “No more elements in the vector.”
The empty() function returns a value of type bool that is true when the vector is empty and falseotherwise.
You are unlikely to need it very often but you can discover the maximum possible number of elementsin a vector by calling its max_size() function. For example:
vector<string> strings;cout << “Maximum length of strings vector: “ << strings.max_size();
Executing this fragment produces the output:
Maximum length of strings vector: 153391689
The maximum length is returned by the max_size() function as a value in this case of typevector<string>::size_type. Note that the maximum length of a vector will depend on the type of element stored in the vector. If you try this out with a vector storing values of type int, you will get 1073741823 as the maximum length, and for a vector storing value of type double it is 536870911.
611
Chapter 10: The Standard Template Library
25905c10.qxd:WroxPro 2/21/08 9:11 AM Page 611

You can change the size of a vector by calling its resize() function, which can either increase or decreasethe size of the vector. If you specify a new size that is less than the current size, sufficient elements will bedeleted from the end of the vector to reduce it to its new size. If the new size is greater than the old, newelements will be added to the end of the vector to increase its length to the new size. Here’s code illustrat-ing this:
vector<int> values(5, 66); // Contains 66 66 66 66 66values.resize(7, 88); // Contains 66 66 66 66 66 88 88values.resize(10); // Contains 66 66 66 66 66 88 88 0 0 values.resize(4); // Contains 66 66 66 66
The first argument to resize() is the new size for the vector. The second argument, when it is present, isthe value to be used for new elements that need to be added to make up the new size. If you are increas-ing the size and you don’t specify a value to be used for new elements, the default value will be used. Inthe case of a vector storing objects of a class type, the default value will be the object produced by the no-arg constructor for the class.
You could explore the size and capacity of a vector through a working example.
Try It Out Exploring the Size and Capacity of a VectorIn this example you will try out some of the ways you have seen for creating a vector, and you’ll also seehow the capacity changes as you add elements.
// Ex10-01.cpp// Exploring the size and capacity of a vector
#include <iostream>#include <vector>using std::cout;using std::endl;using std::vector;
// Template function to display the size and capacity of any vectortemplate<class T>void listInfo(vector<T> &v){cout << “Container capacity: “ << v.capacity()
<< “ size: “ << v.size() << endl;}
int main(){// Basic vector creationvector<double> data;listInfo(data);
cout << endl << “After calling reserve(100):” << endl;data.reserve(100);listInfo(data);
// Create a vector with 10 elements and initialize itvector<int> numbers(10,-1);cout << endl << “The initial values are:”;
612
Chapter 10: The Standard Template Library
25905c10.qxd:WroxPro 2/21/08 9:11 AM Page 612

for(vector<int>::size_type i = 0; i<numbers.size(); i++)cout << “ “ << numbers[i];
// See how adding elements affects capacity incrementsvector<int>::size_type oldC = numbers.capacity(); // Old capacityvector<int>::size_type newC = oldC; // New capacity after adding elementcout << endl << endl;listInfo(numbers);for(int i = 0; i<1000 ; i++){numbers.push_back(2*i);newC = numbers.capacity();if(oldC < newC){oldC = newC;listInfo(numbers);
}}return 0;
}
This example produces the following output:
Container capacity: 0 size: 0
After calling reserve(100):Container capacity: 100 size: 0
The initial values are: -1 -1 -1 -1 -1 -1 -1 -1 -1 -1
Container capacity: 10 size: 10Container capacity: 15 size: 11Container capacity: 22 size: 16Container capacity: 33 size: 23Container capacity: 49 size: 34Container capacity: 73 size: 50Container capacity: 109 size: 74Container capacity: 163 size: 110Container capacity: 244 size: 164Container capacity: 366 size: 245Container capacity: 549 size: 367Container capacity: 823 size: 550Container capacity: 1234 size: 824
How It WorksThe #include directive for the <vector> header adds the definition for the vector<T> template to thesource file.
Following the using statement for the std namespace, you have a definition of the listInfo() functiontemplate:
template<class T>void listInfo(vector<T> &v){
613
Chapter 10: The Standard Template Library
25905c10.qxd:WroxPro 2/21/08 9:11 AM Page 613
cout << “Container capacity: “ << v.capacity()<< “ size: “ << v.size() << endl;
}
This function outputs the current capacity and size of any vector container. You will often find it is con-venient to write function templates when working with STL. The example shows how easy it is. The Tparameter determines the type of argument the function expects. You can call this function with a vectorcontainer as the argument. Specifying the parameter as the reference type, vector<T>&, enables the codein the function body to access directly the container you pass as the argument to the function. If you speci-fied the parameter as type vector<T>, then the argument would be copied each time the function is calledand this could be a time-consuming process with a large vector container.
The first action in main() is to create a vector and output its size and capacity:
vector<double> data;listInfo(data);
You can see from the output that the size and the capacity are zero for this container. Adding an elementrequires more space to be allocated.
Next you call the reserve() function for the container:
data.reserve(100);
You can see from the output that the capacity is now 100 and the size is zero. To put it another way, thecontainer contains no elements but has memory allocated to accommodate up to 100 elements. Onlywhen you add the 101st element will the capacity be increased automatically.
Next you create another container with this statement:
vector<int> numbers(10,-1);
This creates a container that contains 10 elements at the outset, each initialized with -1. To demonstratethis is indeed the case, you output the elements in the container with the following loop:
for(vector<int>::size_type i = 0; i<numbers.size(); i++)cout << “ “ << numbers[i];
The upper limit for the loop variable, i, is the value returned by the size() function for the container,the number of elements currently stored. As you see, within the loop you access the container elementsin the same way as an ordinary array.
You could also use an iterator to access the elements. A loop to output the elements using an iteratorlooks like this:
for(vector<int>::iterator iter = numbers.begin(); iter < numbers.end(); iter++)cout << “ “ << *iter;
The loop variable is an iterator, iter, that you initialize to the iterator returned by the begin() function.This is incremented on each loop iteration and the loop ends when it reaches numbers.end(), whichpoints to one past the last element. Note how you dereference the iterator just like a pointer to get at thevalue of the element.
614
Chapter 10: The Standard Template Library
25905c10.qxd:WroxPro 2/21/08 9:11 AM Page 614

The remaining statements in main() demonstrate how the capacity of a vector is increased as you addelements. The first two statements set up variables that store the current capacity and the new capacityafter adding an element:
vector<int>::size_type oldC = numbers.capacity(); // Old capacityvector<int>::size_type newC = oldC; // New capacity after adding element
After displaying the initial size and capacity, you execute the following loop:
for(int i = 0; i<1000 ; i++){
numbers.push_back(2*i);newC = numbers.capacity();if(oldC < newC){
oldC = newC;listInfo(numbers);
}}
This loop calls the push_back() function for the numbers vector to add 1000 elements. We are only inter-ested in seeing output when the capacity increases, so the if condition ensures that we only display thecapacity and size when the capacity increases.
The output shows an interesting pattern in the way additional space is allocated in the container. Asyou would expect with the initial size and capacity at 10, the first capacity increase occurs when youadd the 11th element. The increase in this case is half the capacity so the capacity increases to 15. Thenext capacity increase is when the size reaches 15 and the increase is to 22 so the increment is againhalf the capacity. This process continues with each capacity increase being half the current capacity.Thus you automatically get larger chunks of memory space allocated when required, the more ele-ments the vector contains. On the one hand this mechanism ensures that once the initial memory allo-cation in a container is occupied, you don’t cause more memory to be allocated every time you add anew element. On the other hand, this also implies that you should take care when reserving space fora large number of elements in a vector. If you set up a container that provides initially for 100,000 ele-ments for example, exceeding this by one element will cause space for another 50,000 to be allocated.In this sort of situation you could check for reaching the capacity, and use reserve() to increase theavailable memory by a more appropriate and less extravagant amount.
Accessing the Elements in a VectorYou have already seen that you can access the elements in a vector by using the subscript operator, justas you would for an array. You can also use the at() function where the argument is the index positionof the element you want to access. Here’s how you could list the contents of the numbers vector of inte-ger elements in the previous example:
for(vector<int>::size_type i = 0; i<numbers.size(); i++)cout << “ “ << numbers.at(i);
615
Chapter 10: The Standard Template Library
25905c10.qxd:WroxPro 2/21/08 9:11 AM Page 615

So how does the at() function differ from using the subscript operator, []? Well, if you use a subscriptwith the subscript operator that is outside the valid range, the result is undefined. If you do the same withthe at() function then an exception of type out_of_range will be thrown. If there’s the potential forsubscript values outside the legal range to arise in a program, it’s generally better to use the at() func-tion and catch the exception than allow the possibility for undefined results.
To access the first or last element in a vector container you can call the front() or back() functionrespectively:
cout << “The value of the first element is: “ << numbers.front() << endl; cout << “The value of the last element is: “ << numbers.back() << endl;
Both functions come in two versions; one returns a reference to the object stored and the other returns aconst reference to the object stored. The latter option enables you to explicitly prevent modification ofthe object:
const int& firstvalue = numbers.front(); // firstvalue cannot be changedint& lastvalue = numbers.back(); // lastvalue can be changed
Storing the reference that is returned in a const variable automatically selects the version of the functionthat returns a const reference.
Inserting and Deleting Elements in a VectorIn addition to the push_back() function you have seen, a vector container supports the pop_back()operation that deletes the last element. Both operations execute in constant time, that is, the time to exe-cute will be the same, regardless of the number of elements in the vector. The pop_back() function isvery simple to use:
vec.pop_back();
This statement removes the last element from the vector, vec, and reduces the size by 1. If the vectorcontains no elements, then calling pop_back() has no effect.
You could remove all the elements in a vector by calling the pop_back() function repeatedly, but theclear() function does this much more simply:
vec.clear();
This statement removes all the elements from vec so the size will be zero. Of course, the capacity will beleft unchanged.
You can call the insert() function to insert one or more new elements anywhere in a vector but thisoperation will execute in linear time, which means that the time will increase in proportion to the num-ber of elements in the container. This is because inserting new elements involves moving the existing ele-ments. The simplest version of the insert() function inserts a single new element at a specific positionin the vector, where the first argument is an iterator specifying the position where the element is to beinserted and the second argument is the element to be inserted. For example:
vector<int> vec(5, 99);vec.insert(vec.begin()+1, 88);
616
Chapter 10: The Standard Template Library
25905c10.qxd:WroxPro 2/21/08 9:11 AM Page 616
The first statement creates a vector with five integer elements all initialized to 99. The second statementinserts 88 after the first element so after executing this, the vector will contain:
99 88 99 99 99 99
You can also insert several identical elements, starting from a given position:
vec.insert(vec.begin()+2, 3, 77);
The first argument is an iterator specifying the position where the first element is to be inserted, the secondargument is the number of elements to be inserted, and the third argument is the element to be inserted.After executing this statement, vec will contain:
99 88 77 77 77 99 99 99 99
You have yet another version of the insert() function that inserts a sequence of elements at a given posi-tion. The first argument is an iterator pointing to the position where the first element is to be inserted. Thesecond and third arguments are input iterators specifying the range of elements to be inserted from somesource. Here’s an example:
vector<int> newvec(5, 22);newvec.insert(newvec.begin()+1, vec.begin()+1, vec.begin()+5);
The first statement creates a vector with five integer elements initialized to 22. The second statement insertsfour elements from vec starting with the second. After executing these statements, newvec will contain:
22 88 77 77 77 22 22 22 22
Don’t forget that the second iterator in the interval specifies the position that is one past the last element,so the element it points to is not included.
The erase() function can delete one or more elements from any position within a vector, but this alsois a linear time function and will typically be slow. Here’s how you erase a single element at a givenposition:
newvec.erase(newvec.end()-2);
The argument is an iterator that points to the element to be erased, so this statement removes the secondto last element from newvec.
To delete several elements, you supply two iterator arguments specifying the interval. For example:
newvec.erase(newvec.begin()+1, newvec.begin()+4);
This will delete the second, third, and fourth elements from newvec. The element that the second iteratorargument points to is not included in the operation.
As I said, both the erase() and insert() operations are slow so you should use them sparingly whenworking with a vector. If you find you need to use them often in your application, a list<T> is likely tobe a better choice of container.
617
Chapter 10: The Standard Template Library
25905c10.qxd:WroxPro 2/21/08 9:11 AM Page 617

The swap() function enables you to swap the contents of two vectors, provided of course the elementsin the two vectors are of the same type. Here’s a code fragment showing an example of how this works:
vector<int> first(5, 77); // Contains 77 77 77 77 77vector<int> second(8, -1); // Contains -1 -1 -1 -1 -1 -1 -1 -1first.swap(second);
After executing the last statement, the contents of the vectors first and second will have interchanged.Note that the capacities of the vectors are swapped as well as the contents and of course the size.
The assign() function enables you to replace the entire contents of a vector with another sequence, orto replace the contents with a given number of instances of an object. Here’s how you could replace thecontents of one vector with a sequence from another:
vector<double> values;for(int i = 1 ; i <= 50 ; i++)values.push_back(2.5*i);
vector<double> newdata(5, 3.5);newdata.assign(values.begin()+1, values.end()-1);
This code fragment creates the values vector and stores 50 elements that have the values 2.5, 5.0, 7.5,...125.0. The newdata vector is created with five elements each having the value 3.5. The last statementcalls the assign() function for newdata, which deletes all elements from newdata and then insertscopies of all the elements from values, except for the first and the last. You specify the new sequence tobe inserted by two iterators, the first pointing to the first element to be inserted and the second pointing to one past the last element to be inserted. Because you specify the new elements to be inserted by twoiterators, the source of the data can be from any sequence, not just a vector. The assign() function willalso work with regular pointers so you could also insert elements from an array of double elements.
Here’s how you use the assign() function to replace the contents of a vector with a sequence ofinstances of the same element:
newdata.assign(30, 99.5);
The first argument is the count of elements in the replacement sequence and the second argument is the element to be used. This statement will cause the contents of newdata to be deleted and replaced by 30 elements each having the value 99.5.
Storing Class Objects in a VectorSo far you have only seen vectors storing numerical values. You can store objects of any class type in avector but the class must meet certain minimum criteria. Here’s a minimum specification for a givenclass T to be compatible with a vector, or in fact any sequence container:
class T{public:T(); // default constructorT(const T& t); // Copy constructor~T(); // DestructorT& operator=(const T& t); // Assignment operator
};
618
Chapter 10: The Standard Template Library
25905c10.qxd:WroxPro 2/21/08 9:11 AM Page 618

Of course, the compiler will supply default versions of these class members if you don’t supply them so it’snot difficult for a class to meet these requirements. The important thing to note is that they are required andare likely to be used, so when the default implementation that the compiler supplies will not suffice, youmust provide your own implementation.
Let’s try an example.
Try It Out Storing Objects in a VectorIn this example you create Person objects that represent individuals by their name. Just to make it moreinteresting, I’m going to assume you have never heard of the string class, so you are stuck with usingnull-terminated strings to store names. This means you have to take care how you implement the class ifyou want to store objects in a vector<Person> container. In general such a class might have lots of dif-ferent data members relating to a person, but I’ll keep it simple with just their first and second names.
Here’s the definition of the Person class:
// Person.h// A class defining people by their names#pragma once#include <cstring>#include <iostream>using std::cout;using std::endl;
class Person{public:// Constructor, includes no-arg constructorPerson(char* first = “John”, char* second = “Doe”){size_t length = strlen(first)+1;firstname = new char[length];strcpy_s(firstname, length, first);length = strlen(second)+1;secondname = new char[length];strcpy_s(secondname, length, second);
}
// Copy constructorPerson(const Person& p){size_t length = strlen(p.firstname)+1;firstname = new char[length];strcpy_s(firstname, length, p.firstname);length = strlen(p.secondname)+1;secondname = new char[length];strcpy_s(secondname, length, p.secondname);
}
// Destructor~Person(){delete[] firstname;
619
Chapter 10: The Standard Template Library
25905c10.qxd:WroxPro 2/21/08 9:11 AM Page 619

delete[] secondname;}
// Assignment operatorPerson& operator=(const Person& p){// Deal with p = p assignment situationif(&p == this)return *this;
delete[] firstname;delete[] secondname;size_t length = strlen(p.firstname)+1;firstname = new char[length];strcpy_s(firstname, length, p.firstname);length = strlen(p.secondname)+1;secondname = new char[length];strcpy_s(secondname, length, p.secondname);return *this;
}
// Less-than operatorbool operator<(const Person& p) const{int result = strcmp(secondname, p.secondname);if(result < 0 || result == 0 && strcmp(firstname, p.firstname) < 0)return true;
return false;}
// Output a personvoid showPerson() const{cout << firstname << “ “ << secondname << endl;
}
private:char* firstname;char* secondname;
};
The #pragma once directive is there to ensure that the header does not get included more than once into aprogram. Because the Person class allocates memory dynamically to store the first and second names of aperson, you must implement the destructor to release the memory when an object is destroyed. You mustalso implement the assignment operator because this involves more memory allocation. Note the code atthe beginning for dealing with the a = a assignment situation. Assigning an object to itself can arise inways that are less than obvious, and can cause problems if you don’t implement the operator=() func-tion to take account of this.
The showPerson() function is a convenience function for outputting an entire name. It is declared asconst to allow it to work with const and non-const Person objects. The operator<() function isthere for use later.
620
Chapter 10: The Standard Template Library
25905c10.qxd:WroxPro 2/21/08 9:11 AM Page 620

The program to store Person objects in a vector looks like this:
// Ex10-02.cpp// Storing objects in a vector
#include <iostream>#include <vector>#include “Person.h”
using std::cin;using std::cout;using std::endl;using std::vector;
int main(){vector<Person> people; // Vector of Person objectsconst size_t maxlength = 50;char firstname[maxlength];char secondname[maxlength];
// Input all the peoplewhile(true){cout << “Enter a first name or press Enter to end: “;cin.getline(firstname, maxlength, ‘\n’); if(strlen(firstname) == 0)break;
cout << “Enter the second name: “;cin.getline(secondname, maxlength, ‘\n’); people.push_back(Person(firstname, secondname));
}
// Output the contents of the vectorcout << endl;vector<Person>::iterator iter = people.begin(); while(iter != people.end())iter++->showPerson();
return 0;}
Here’s an example of some output from this program:
Enter a first name or press Enter to end: JaneEnter the second name: FondaEnter a first name or press Enter to end: BillEnter the second name: CosbyEnter a first name or press Enter to end: SallyEnter the second name: FieldEnter a first name or press Enter to end: MaeEnter the second name: WestEnter a first name or press Enter to end: Oliver
621
Chapter 10: The Standard Template Library
25905c10.qxd:WroxPro 2/21/08 9:11 AM Page 621

Enter the second name: HardyEnter a first name or press Enter to end:
Jane FondaBill CosbySally FieldMae WestOliver Hardy
How It WorksYou create a vector to store Person objects like this:
vector<Person> people; // Vector of Person objects
You then create two arrays of type char[] that you’ll use as working storage when reading names fromthe standard input stream:
const size_t maxlength = 50;char firstname[maxlength];char secondname[maxlength];
Each array accommodates a name up to maxlength characters long, including the terminating null.
You read names from the standard input stream in an indefinite loop:
while(true){
cout << “Enter a first name or press Enter to end: “;cin.getline(firstname, maxlength, ‘\n’); if(strlen(firstname) == 0)
break;cout << “Enter the second name: “;cin.getline(secondname, maxlength, ‘\n’); people.push_back(Person(firstname, secondname));
}
You read each name using the getline() member function for cin. This reads characters until a new-line character is read, or until maxlength-1 characters have been read. This ensures that you don’t over-run the capacity of the input array because both arrays have maxlength elements, allowing for stringsup to maxlength-1 characters plus the terminating NULL. When an empty string is entered for the firstname, the loop ends.
You create the Person object in the expression that is the argument to the push_back() function. Thisadds the objects to the end of the vector.
The last step is to output the contents of the vector:
cout << endl;vector<Person>::iterator iter = people.begin(); while(iter != people.end())
iter++->showPerson();
622
Chapter 10: The Standard Template Library
25905c10.qxd:WroxPro 2/21/08 9:11 AM Page 622

Here you use an iterator to output the elements of the vector. Within the body of the while loop, you out-put the element that the iterator points to and then you increment the iterator using the postfix incrementoperator. The loop continues as long as iter is not equal to the iterator returned by end().
Sorting Vector ElementsThe sort() function template that is defined in the <algorithm> header will sort a sequence of objectsidentified by two random access iterators that point the first and one past the last objects in the sequence.Note that random access iterators are essential; iterators with lesser capability will not suffice. The sort()function template uses the < operator to order the elements. Thus you can use the sort() template to sortthe contents of any container that provides random access iterators as long as the objects it contains can becompared using the less-than operator.
In the previous example you implemented operator<() in the Person class, so you can sort a sequenceof Person objects. Here’s how you could sort the contents of the vector<Person> container:
sort(people.begin(), people.end());
This sorts the contents of the vector in ascending sequence. You can add an #include directive for<algorithm> and put the statement in main() before the output loop to see the sort in action. You’llalso need a using declaration for std::sort.
Note that you can use the sort() template function to sort() arrays. The only requirement is that the< operator should work with the type of elements stored in the array. Here’s a code fragment showinghow you could use it to sort an array of integers:
const size_t max = 100;int data[max];cout << “Enter up to “ << max << “ non-zero integers. Enter 0 to end.” << endl;int value = 0;size_t count = 0;for(size_t i = 0 ; i<max ; i++) // Read up to max integers{cin >> value; // Read a valueif(value == 0) // If it is zero, break; // We are done
data[count++] = value;}sort(data, data+count); // Sort the integers
Note how the pointer marking the end of the sequence of elements that are to be sorted must still be onepast the last element.
When you need to sort a sequence in descending order, you can use a version of the sort() algorithm thataccepts a function object that is a binary predicate as the third argument to the function. The <functional>header defines a complete set of types for comparison predicates:
less<T> less_equal<T> equal<T> greater_equal<T> greater<T>
623
Chapter 10: The Standard Template Library
25905c10.qxd:WroxPro 2/21/08 9:11 AM Page 623

Each of these templates creates a class type for function objects that you can use with sort() and otheralgorithms. The sort() function used in the previous fragment uses a less<int> function object bydefault. To specify a different function object to be used as the sort criteria, you add it as a third argu-ment, like this:
sort(data, data+count, greater<int>()); // Sort the integers
The expression that is the third argument to the function calls the constructor for the greater<int>type, so you are passing an object of this type to the sort() function. This statement will sort the con-tents of the data array in descending sequence. If you are trying these fragments out, don’t forget thatyou need the <functional> header to be included for the function object and the greater name is definedin the std namespace.
Storing Pointers in a VectorA vector container, like other containers, makes a copy of the objects you add to it. This has tremendousadvantages in most circumstances but it could be very inconvenient in some situations. For example, ifyour objects are large, there could be considerable overhead in copying each object as you add it to thecontainer. This is an occasion where you might be better off storing pointers to the objects in the containerrather than the objects themselves, and managing the objects externally. You could create a new version ofthe Ex10_02.cpp example to store pointers to Person objects in a container.
Try It Out Storing Pointers in a VectorThe Person class definition is exactly the same as before. Here’s a revised version of the other sourcefile:
// Ex10_03.cpp// Storing pointers to objects in a vector
#include <iostream>#include <vector>#include “Person.h”
using std::cin;using std::cout;using std::endl;using std::vector;
int main(){vector<Person*> people; // Vector of Person objectsconst size_t maxlength = 50;char firstname[maxlength];char secondname[maxlength];while(true){
cout << “Enter a first name or press Enter to end: “;cin.getline(firstname, maxlength, ‘\n’); if(strlen(firstname) == 0)
624
Chapter 10: The Standard Template Library
25905c10.qxd:WroxPro 2/21/08 9:11 AM Page 624
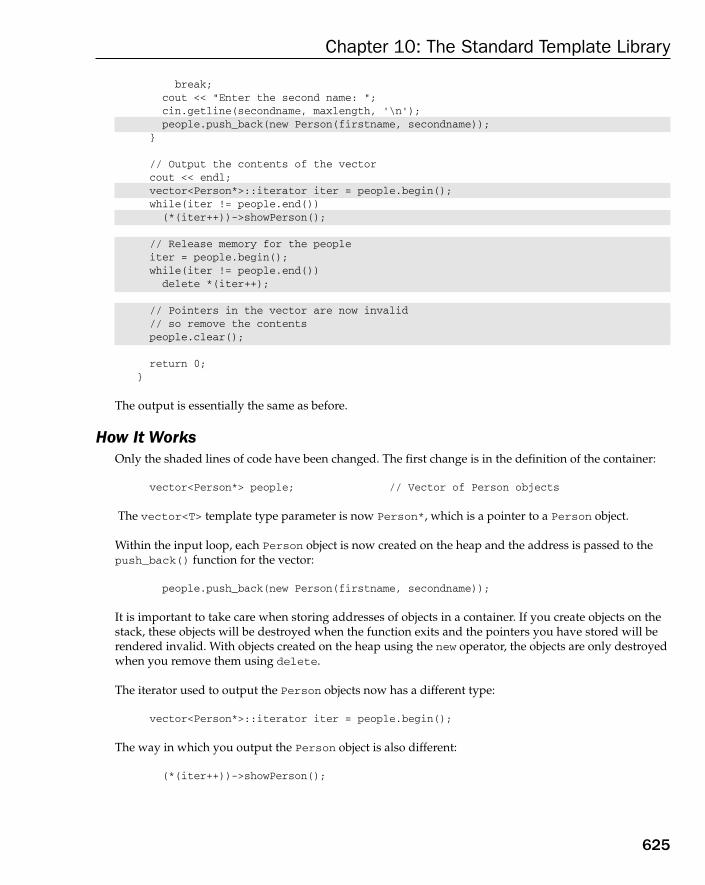
break;cout << “Enter the second name: “;cin.getline(secondname, maxlength, ‘\n’); people.push_back(new Person(firstname, secondname));
}
// Output the contents of the vectorcout << endl;vector<Person*>::iterator iter = people.begin(); while(iter != people.end())(*(iter++))->showPerson();
// Release memory for the peopleiter = people.begin();while(iter != people.end())delete *(iter++);
// Pointers in the vector are now invalid// so remove the contentspeople.clear();
return 0;}
The output is essentially the same as before.
How It WorksOnly the shaded lines of code have been changed. The first change is in the definition of the container:
vector<Person*> people; // Vector of Person objects
The vector<T> template type parameter is now Person*, which is a pointer to a Person object.
Within the input loop, each Person object is now created on the heap and the address is passed to thepush_back() function for the vector:
people.push_back(new Person(firstname, secondname));
It is important to take care when storing addresses of objects in a container. If you create objects on thestack, these objects will be destroyed when the function exits and the pointers you have stored will berendered invalid. With objects created on the heap using the new operator, the objects are only destroyedwhen you remove them using delete.
The iterator used to output the Person objects now has a different type:
vector<Person*>::iterator iter = people.begin();
The way in which you output the Person object is also different:
(*(iter++))->showPerson();
625
Chapter 10: The Standard Template Library
25905c10.qxd:WroxPro 2/21/08 9:11 AM Page 625

The iterator now points to a pointer, so you must dereference the iterator to get to the pointer and thenuse the pointer to call the showPerson() function for the Person object to produce the output. Notethat the outer parentheses are essential because of operator precedence.
Because you created Person objects on the heap, you are responsible for deleting them:
iter = people.begin();while(iter != people.end())
delete *(iter++);
You obtain another random access iterator pointing to the first element in the vector and then use this inthe loop to delete each of the Person objects. Of course, you have to dereference the iterator to get theaddress of the object to be deleted.
Finally, because all the objects have been deleted, the pointers in the vector are now not valid, so youempty the vector by calling its clear() function. This simply deletes everything stored in the container.
Double-Ended Queue ContainersThe double-ended queue container template, deque<T>, is defined in the <deque> header. A double-endedqueue container is very similar to a vector in that it can do everything a vector container can and includesthe same function members, but you can also add and delete elements efficiently at the beginning of thesequence as well as at the end. You could replace the vector used in Ex10_02.cpp with a double-endedqueue and it would work just as well:
deque<Person> people; // Double-ended queue of Person objects
Of course, you would need to change the #include directive to include the <deque> header instead of<vector>.
The function to add an element to the front of the container is push_front() and you can delete thefirst element by calling the pop_front() function. Thus if you were using a deque<Person> containerin Ex10_02.cpp, you could add elements at the front instead of the back:
people.push_front(Person(firstname, secondname));
The only difference in using this statement to add elements to the container would be that the order ofthe elements in the double-ended queue would be the reverse of what they would be in the vector.
The range of constructors available for a deque<T> container is the same as for vector<T>. Here areexamples of each of them:
deque<string> strings; // Create an empty containerdeque<int> items(50); // A container of 50 elements initialized to default valuedeque<double> values(5, 0.5); // A container with 5 elements 0.5deque<int> data(items.begin(), items.end()); // Initialized with a sequence
626
Chapter 10: The Standard Template Library
25905c10.qxd:WroxPro 2/21/08 9:11 AM Page 626

Although a double-ended queue is very similar to a vector and does everything a vector can do, as wellas allowing you to add to the front of the sequence efficiently, it does have one disadvantage comparedto a vector. Because of the additional capability it offers, the memory management for a double-endedqueue is more complicated than for a vector, so it will be slightly slower. Unless you need the ability toadd elements to the front of the container, a vector is a better choice. Let’s see a double-ended queue inaction.
Try It Out Using a Double-Ended QueueThis example stores an arbitrary number of integers in a double-ended queue and then operates onthem. Here’s the code:
// Ex10_04.cpp// Using a double-ended queue
#include <iostream>#include <deque>#include <algorithm> #include <numeric>
using std::cin;using std::cout;using std::endl;using std::deque;using std::sort;using std::accumulate;
int main(){deque<int> data;deque<int>::iterator iter; // Stores an iteratordeque<int>::reverse_iterator riter; // Stores a reverse iteraotr
// Read the data cout << “Enter a series of non-zero integers separated by spaces.”
<< “ Enter 0 to end.” << endl;int value = 0;while(cin >> value, value != 0)data.push_front(value);
// Output the data using an iteratorcout << endl << “The values you entered are:” << endl;for(iter = data.begin() ; iter != data.end() ; iter++)cout << *iter << “ “;
cout << endl;
// Output the data using a reverse iteratorcout << endl << “In reverse order the values you entered are:” << endl;for(riter = data.rbegin() ; riter != data.rend() ; riter++)cout << *riter << “ “;
// Sort the data in descending sequence
627
Chapter 10: The Standard Template Library
25905c10.qxd:WroxPro 2/21/08 9:11 AM Page 627

cout << endl;cout << endl << “In descending sequence the values you entered are:” << endl;sort(data.rbegin(), data.rend());for(iter = data.begin() ; iter != data.end() ; iter++)cout << *iter << “ “;
cout << endl;
// Calculate the sum of the elementscout << endl << “The sum of the elements in the queue is:”
<< accumulate(data.begin(), data.end(), 0) << endl;
return 0;}
Here is some sample output from this program:
Enter a series of non-zero integers separated by spaces. Enter 0 to end.405 302 1 23 67 34 56 111 56 99 77 82 3 23 34 111 89 0
The values you entered are:89 111 34 23 3 82 77 99 56 111 56 34 67 23 1 302 405
In reverse order the values you entered are:405 302 1 23 67 34 56 111 56 99 77 82 3 23 34 111 89
In descending sequence the values you entered are:405 302 111 111 99 89 82 77 67 56 56 34 34 23 23 3 1
The sum of the elements in the queue is:1573
How It WorksYou create the double-ended queue container and two iterator variables at the beginning of main():
deque<int> data;deque<int>::iterator iter; // Stores an iteratordeque<int>::reverse_iterator riter; // Stores a reverse iterator
The data container is empty to start with. You will be using the iter variable for storing an iterator thataccesses the queue elements in a forward direction and the riter variable for storing a reverse iterator.iter and riter are of different types but they are both random access iterators in the case of a deque<T>container. This means you can increment or decrement them or add or subtract integer values. The iteratortypes are defined within the container class so you always get the type of iterator that is suited to the organi-zation of the container. For vector and double-ended queue containers you get random access iterators.
The input is read in a while loop:
int value = 0;while(cin >> value, value != 0)
data.push_front(value);
The while loop condition makes use of the comma operator to separate two expressions, one that readsan integer from cin into value and another that tests for the value read being non-zero. You saw inChapter 2 that the value of a series of expressions separated by commas is the value of the rightmost
628
Chapter 10: The Standard Template Library
25905c10.qxd:WroxPro 2/21/08 9:11 AM Page 628
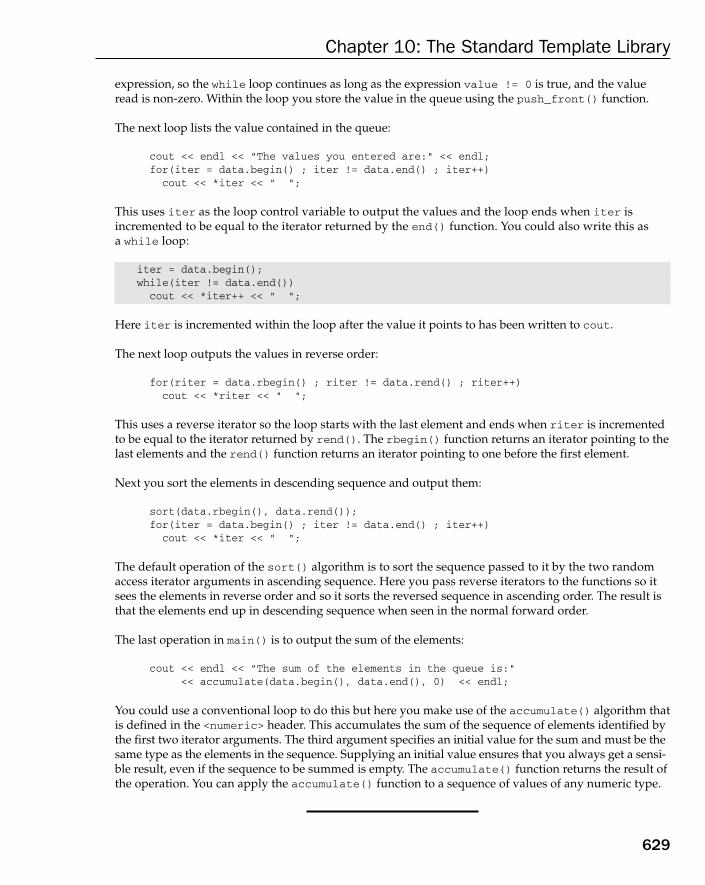
expression, so the while loop continues as long as the expression value != 0 is true, and the valueread is non-zero. Within the loop you store the value in the queue using the push_front() function.
The next loop lists the value contained in the queue:
cout << endl << “The values you entered are:” << endl;for(iter = data.begin() ; iter != data.end() ; iter++)
cout << *iter << “ “;
This uses iter as the loop control variable to output the values and the loop ends when iter is incremented to be equal to the iterator returned by the end() function. You could also write this as a while loop:
iter = data.begin();while(iter != data.end())cout << *iter++ << “ “;
Here iter is incremented within the loop after the value it points to has been written to cout.
The next loop outputs the values in reverse order:
for(riter = data.rbegin() ; riter != data.rend() ; riter++)cout << *riter << “ “;
This uses a reverse iterator so the loop starts with the last element and ends when riter is incrementedto be equal to the iterator returned by rend(). The rbegin() function returns an iterator pointing to thelast elements and the rend() function returns an iterator pointing to one before the first element.
Next you sort the elements in descending sequence and output them:
sort(data.rbegin(), data.rend());for(iter = data.begin() ; iter != data.end() ; iter++)
cout << *iter << “ “;
The default operation of the sort() algorithm is to sort the sequence passed to it by the two randomaccess iterator arguments in ascending sequence. Here you pass reverse iterators to the functions so itsees the elements in reverse order and so it sorts the reversed sequence in ascending order. The result isthat the elements end up in descending sequence when seen in the normal forward order.
The last operation in main() is to output the sum of the elements:
cout << endl << “The sum of the elements in the queue is:” << accumulate(data.begin(), data.end(), 0) << endl;
You could use a conventional loop to do this but here you make use of the accumulate() algorithm thatis defined in the <numeric> header. This accumulates the sum of the sequence of elements identified bythe first two iterator arguments. The third argument specifies an initial value for the sum and must be thesame type as the elements in the sequence. Supplying an initial value ensures that you always get a sensi-ble result, even if the sequence to be summed is empty. The accumulate() function returns the result ofthe operation. You can apply the accumulate() function to a sequence of values of any numeric type.
629
Chapter 10: The Standard Template Library
25905c10.qxd:WroxPro 2/21/08 9:11 AM Page 629
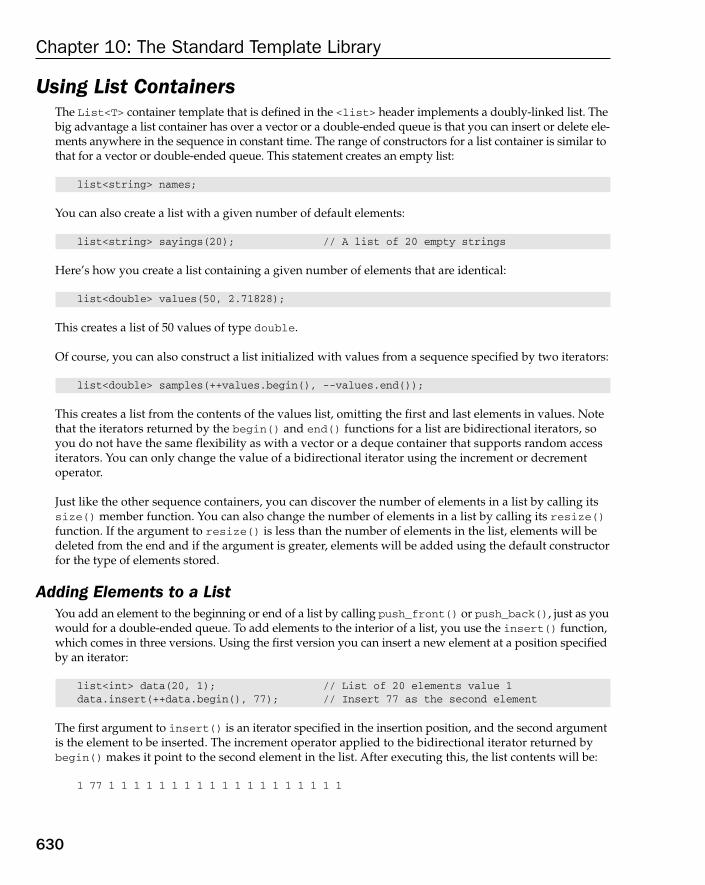
Using List ContainersThe List<T> container template that is defined in the <list> header implements a doubly-linked list. Thebig advantage a list container has over a vector or a double-ended queue is that you can insert or delete ele-ments anywhere in the sequence in constant time. The range of constructors for a list container is similar tothat for a vector or double-ended queue. This statement creates an empty list:
list<string> names;
You can also create a list with a given number of default elements:
list<string> sayings(20); // A list of 20 empty strings
Here’s how you create a list containing a given number of elements that are identical:
list<double> values(50, 2.71828);
This creates a list of 50 values of type double.
Of course, you can also construct a list initialized with values from a sequence specified by two iterators:
list<double> samples(++values.begin(), --values.end());
This creates a list from the contents of the values list, omitting the first and last elements in values. Notethat the iterators returned by the begin() and end() functions for a list are bidirectional iterators, soyou do not have the same flexibility as with a vector or a deque container that supports random accessiterators. You can only change the value of a bidirectional iterator using the increment or decrementoperator.
Just like the other sequence containers, you can discover the number of elements in a list by calling itssize() member function. You can also change the number of elements in a list by calling its resize()function. If the argument to resize() is less than the number of elements in the list, elements will bedeleted from the end and if the argument is greater, elements will be added using the default constructorfor the type of elements stored.
Adding Elements to a ListYou add an element to the beginning or end of a list by calling push_front() or push_back(), just as youwould for a double-ended queue. To add elements to the interior of a list, you use the insert() function,which comes in three versions. Using the first version you can insert a new element at a position specifiedby an iterator:
list<int> data(20, 1); // List of 20 elements value 1data.insert(++data.begin(), 77); // Insert 77 as the second element
The first argument to insert() is an iterator specified in the insertion position, and the second argumentis the element to be inserted. The increment operator applied to the bidirectional iterator returned bybegin() makes it point to the second element in the list. After executing this, the list contents will be:
1 77 1 1 1 1 1 1 1 1 1 1 1 1 1 1 1 1 1 1 1
630
Chapter 10: The Standard Template Library
25905c10.qxd:WroxPro 2/21/08 9:11 AM Page 630

You can see that the list now contains 21 elements and the elements from the insertion point on are simplydisplaced to the right.
You can also insert a number of copies of the same element at a given position:
list<int>::iterator iter = data.begin();for(int i = 0 ; i<9 ; i++)++iter;
data.insert(iter, 3, 88); // Insert 3 copies of 88 starting at the 10th
The first argument to the insert() function here is an iterator specifying the position, the second argumentis the number of elements to be inserted, and the third argument is the element to be inserted repeatedly. Toget to the 10 element you increment the iterator nine times in the for loop. Thus this fragment inserts threecopies of 88 in the list, starting at the tenth element. Now the contents of the list will be:
1 77 1 1 1 1 1 1 1 88 88 88 1 1 1 1 1 1 1 1 1 1 1 1
Now the list contains 24 elements.
Here’s how you can insert a sequence of elements into a list:
vector<int> numbers(10, 5); // Vector of 10 elements with value 5data.insert(--(--data.end()), numbers.begin(), numbers.end());
The first argument to insert() is an iterator pointing to the second to last element position. The sequenceto be inserted is specified by the second and third arguments to the insert() function, so this will insertall the elements from the vector into the list starting at the second to last element position. After executingthis, the contents of the list will be:
1 77 1 1 1 1 1 1 1 88 88 88 1 1 1 1 1 1 1 1 1 1 5 5 5 5 5 5 5 5 5 5 1 1
Inserting the 10 elements from numbers in the second to last element position displaces the last twoelements in the list to the right. The list now contains 34 elements.
Accessing Elements in a ListYou can obtain a reference to the first or last element in a list by calling the front() or back() functionfor the list. To access elements interior to the list you must use an iterator and increment or decrement theiterator to get to the element you want. As you have seen, the begin() and end() functions return a bidi-rectional iterator pointing at the first element or one past the last element respectively. The rbegin() andrend() functions return bidirectional iterators and enable you to iterate through the elements in reversesequence.
Let’s try out some of what we have seen in an example.
Try It Out Working with a ListIn this example you read sentences from the keyboard and store them in a list. Here’s the code:
// Ex10_05.cpp// Working with a list
631
Chapter 10: The Standard Template Library
25905c10.qxd:WroxPro 2/21/08 9:11 AM Page 631
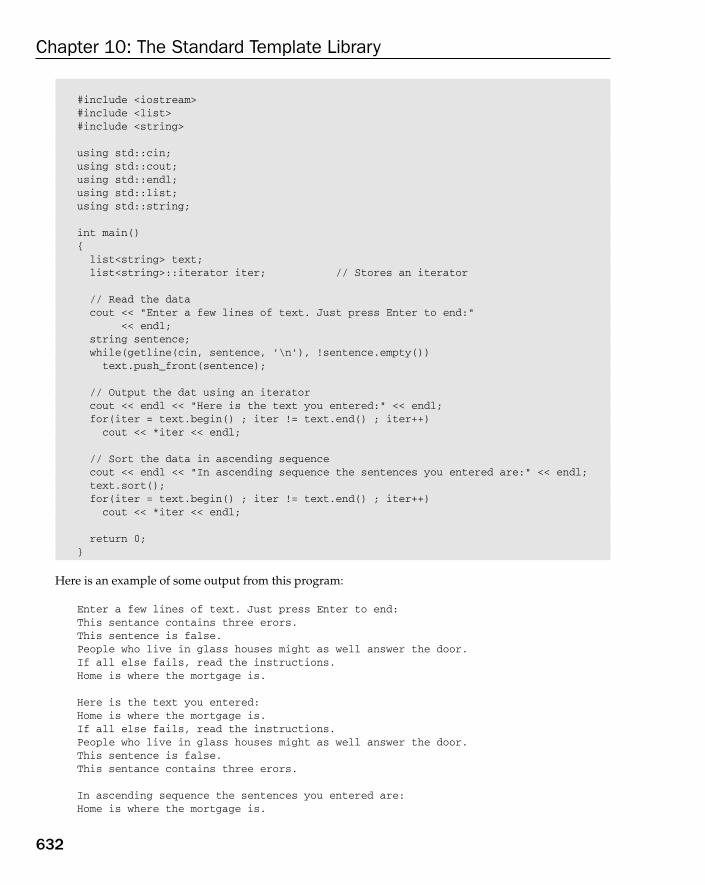
#include <iostream>#include <list>#include <string>
using std::cin;using std::cout;using std::endl;using std::list;using std::string;
int main(){list<string> text;list<string>::iterator iter; // Stores an iterator
// Read the data cout << “Enter a few lines of text. Just press Enter to end:”
<< endl;string sentence;while(getline(cin, sentence, ‘\n’), !sentence.empty())text.push_front(sentence);
// Output the dat using an iteratorcout << endl << “Here is the text you entered:” << endl;for(iter = text.begin() ; iter != text.end() ; iter++)cout << *iter << endl;
// Sort the data in ascending sequencecout << endl << “In ascending sequence the sentences you entered are:” << endl;text.sort();for(iter = text.begin() ; iter != text.end() ; iter++)cout << *iter << endl;
return 0;}
Here is an example of some output from this program:
Enter a few lines of text. Just press Enter to end:This sentance contains three erors.This sentence is false.People who live in glass houses might as well answer the door.If all else fails, read the instructions.Home is where the mortgage is.
Here is the text you entered:Home is where the mortgage is.If all else fails, read the instructions.People who live in glass houses might as well answer the door.This sentence is false.This sentance contains three erors.
In ascending sequence the sentences you entered are:Home is where the mortgage is.
632
Chapter 10: The Standard Template Library
25905c10.qxd:WroxPro 2/21/08 9:11 AM Page 632

If all else fails, read the instructions.People who live in glass houses might as well answer the door.This sentance contains three erors.This sentence is false.
How It WorksYou first create a list container to hold strings followed by an iterator variable for use in outputting thecontents of the list:
list<string> text;list<string>::iterator iter; // Stores an iterator
You then read an arbitrary number of text inputs from the standard input stream, cin:
string sentence;while(getline(cin, sentence, ‘\n’), !sentence.empty())
text.push_front(sentence);
This uses the same idiom for input as the previous example. The second expression in the while loopcondition determines when the loop ends, which will be when calling empty() for sentence returnstrue. You add each input to the list using the push_front() function but you could equally well usepush_back(). The only difference would be that the order of elements in the list would be reversed.
You output the contents of the list in a loop:
for(iter = text.begin() ; iter != text.end() ; iter++)cout << *iter << endl;
This is exactly the same mechanism that you have used for a vector but remember: A list does not supportrandom access to the elements so the iterators are bidirectional iterators, not random access iterators.
Lastly you sort the contents of the list and output it:
text.sort();for(iter = text.begin() ; iter != text.end() ; iter++)
cout << *iter << endl;
This uses the sort() member of the list<string> object to sort the contents. Because a list<T> con-tainer does not provide random access iterators, you cannot use the sort() function that is defined inthe <algorithm> header. This is why the list<T> template defines its own sort() function member.
Other Operations on ListsThe clear() function deletes all the elements from a list. The erase() function allows you to deleteeither a single element specified by a single iterator, or a sequence of elements specified by a pair of iter-ators in the usual fashion — the first in the sequence and one past the last.
int data[] = {10, 22, 4, 56, 89, 77, 13, 9};list<int> numbers(data, data+8);
633
Chapter 10: The Standard Template Library
25905c10.qxd:WroxPro 2/21/08 9:11 AM Page 633

numbers.erase(++numbers.begin()); // Remove the second element
// Remove all except the first and the last twonumbers.erase(++numbers.begin(), --(--numbers.end()));
Initially the list will contain all the values from the data array. The first erase() operation deletes thesecond element so the list will contain:
10 4 56 89 77 13 9
For the second erase() operation the first argument is the iterator returned by begin() incremented by1 so it points to the second element. The second argument is the iterator returned by end() decrementedtwice, so it points to the second to last element. Of course, this is one past the end of the sequence so theelement that this iterator points to is not included in the set to be deleted, so the list contents after thisoperation will be:
10 13 9
The remove() function removes the elements from a list that match a particular value. With the numberslist defined as in the previous fragment, you could remove all elements equal to 22 with the followingstatement:
numbers.remove(22);
The assign() function removes all the elements from a list and copies either a single object into the lista given number of times, or copies a sequence of objects specified by two iterators. Here’s an example:
int data[] = {10, 22, 4, 56, 89, 77, 13, 9};list<int> numbers(data, data+8);
numbers.assign(10, 99); // Replace contents by 10 copies of 99
// Remove all except the first and the last twonumbers.assign(data+1, data+4); // Replace contents by 22 4 56
The assign() function comes in the two overloaded versions illustrated here. The arguments to thefirst are the count of the number of replacement elements, and the replacement element value. Thearguments to the second version are two iterators or two pointers specifying a sequence in the wayyou have already seen.
The unique() function will eliminate adjacent duplicate elements from a list so if you sort the contentsfirst, applying the function ensures that all elements are unique. Here’s an example:
int data[] = {10, 22, 4, 10, 89, 22, 89, 10};list<int> numbers(data, data+8); // 10 22 4 10 89 22 89 10numbers.sort(); // 4 10 10 10 22 22 89 89numbers.unique(); // 4 10 22 89
The result of each operation is shown in the comments.
634
Chapter 10: The Standard Template Library
25905c10.qxd:WroxPro 2/21/08 9:11 AM Page 634

The splice() function allows you to remove all or part of one list and insert it in another. Obviously,both lists must store elements of the same type. Here’s the simplest way you could use the splice()function:
int data[] = {1, 2, 3, 4, 5, 6, 7, 8};list<int> numbers(data, data+3); // 1 2 3list<int> values(data+4, data+8); // 5 6 7 8numbers.splice(++numbers.begin(), values); // 1 5 6 7 8 2 3
The first argument to the splice() function is an iterator specifying where the elements should beinserted and the second argument is the list that is the source of the elements to be inserted. This opera-tion removes all the elements from the values list and inserts them immediately preceding the secondelement in the numbers list.
Here’s another version of the splice() function that removes elements from a given position in a sourcelist and inserts them at a given position in the destination list:
int data[] = {1, 2, 3, 4, 5, 6, 7, 8};list<int> numbers(data, data+3); // 1 2 3list<int> values(data+4, data+8); // 5 6 7 8numbers.splice(numbers.begin(), values, --values.end()); // 8 1 2 3
In this version, the first two arguments to the splice() function are the same as the previous version ofthe function. The third argument is an iterator specifying the position of the first element to be selectedfrom the source list; all elements from this position to the end are removed from the source and insertedin the destination list. After executing this code fragment, values will contain 5 6 7.
The third version of splice() requires four arguments and selects a range of elements from the source list:
int data[] = {1, 2, 3, 4, 5, 6, 7, 8};list<int> numbers(data, data+3); // 1 2 3list<int> values(data+4, data+8); // 5 6 7 8numbers.splice(++numbers.begin(), values, ++values.begin(), --values.end());
// 1 6 7 2 3
The first three arguments to the version of splice() are the same as the previous version and the lastargument is one past the last element to be removed from the source, values. After executing this,values will contain 5 8.
The merge() function removes elements from the list that you supply as an argument and inserts them in the list for which the function is called. The function then sorts the contents of the extended list intoascending order by default, or some other order determined by a function object that you supply as a sec-ond argument to the merge() function. Both lists must be ordered appropriately before you call merge();in other words the lists must be ordered in the way that you want the final combined list to be ordered.Here’s a fragment showing how you might use it:
int data[] = {1, 2, 3, 4, 5, 6, 7, 8};list<int> numbers(data, data+3); // 1 2 3list<int> values(data+1, data+8); // 2 3 4 5 6 7 8numbers.merge(values); // 1 2 2 3 3 4 5 6 7 8
635
Chapter 10: The Standard Template Library
25905c10.qxd:WroxPro 2/21/08 9:11 AM Page 635

This merges the contents of values into numbers so values will be empty after this operation. Themerge() function that accepts a single argument orders the result in ascending sequence by default, andbecause the values in both lists are already ordered, you don’t need to sort them. To merge the same listsin descending sequence, the code would be like this:
numbers.sort(greater<int>()); // 3 2 1numbers.sort(greater<int>()); // 8 7 6 5 4 3 2numbers.merge(values, greater<int>()); // 8 7 6 5 4 3 3 2 2 1
Here you use the greater<int>() function object that is defined in the <functional> header to specifythat the lists should be sorted in descending sequence and they should be merged in the same sequence.
The remove_if() function removes elements from a list based on the result of applying a unary predi-cate; I’m sure you’ll recall that a unary predicate is a function object that applies to a single argumentand returns a bool value, true or false. If the result of applying the predicate to an element is true,then the element will be deleted from the list. Typically you would define your own predicate to do this.This involves defining your own class template for the function object that you want and the STL definesthe unary_function<T, R> base template for use in this context. This template just defines types thatwill be inherited by your derived class that specifies your function object type. The base class template isdefined as follows:
template<class _Arg, class _Result>struct unary_function{ // base class for unary functionstypedef _Arg argument_type;typedef _Result result_type;
};
This defines argument_type and result_type as standardized types for use in your definition of theoperator()() function. You must use this base template if you want to use your predicates with func-tion adapters.
The way in which you can use the remove_if() function is best explained with a specific application,so let’s try this in a working example.
Try It Out Defining a Predicate for Filtering a ListHere’s how you could define a template for a function object based on the helper template from the STLthat you could use to remove negative values from a list:
// function_object.h// Unary predicate to identify negative values#pragma once#include <functional>
template <class T> class is_negative: public std::unary_function<T, bool>{public:result_type operator()(argument_type& value){return value < 0;
}};
636
Chapter 10: The Standard Template Library
25905c10.qxd:WroxPro 2/21/08 9:11 AM Page 636
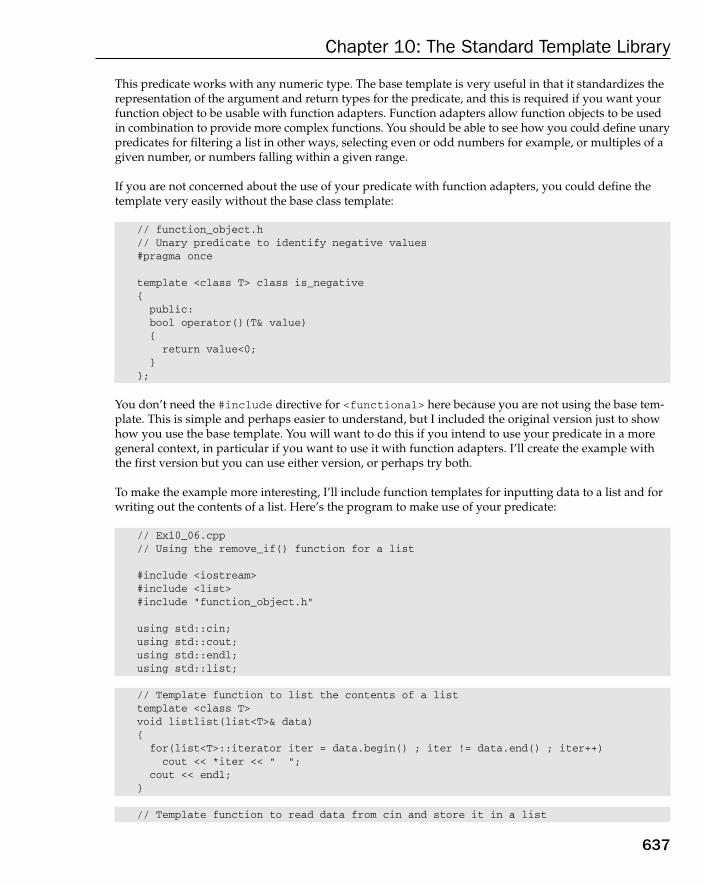
This predicate works with any numeric type. The base template is very useful in that it standardizes therepresentation of the argument and return types for the predicate, and this is required if you want yourfunction object to be usable with function adapters. Function adapters allow function objects to be usedin combination to provide more complex functions. You should be able to see how you could define unarypredicates for filtering a list in other ways, selecting even or odd numbers for example, or multiples of agiven number, or numbers falling within a given range.
If you are not concerned about the use of your predicate with function adapters, you could define thetemplate very easily without the base class template:
// function_object.h// Unary predicate to identify negative values#pragma once
template <class T> class is_negative{public:bool operator()(T& value){return value<0;
}};
You don’t need the #include directive for <functional> here because you are not using the base tem-plate. This is simple and perhaps easier to understand, but I included the original version just to showhow you use the base template. You will want to do this if you intend to use your predicate in a moregeneral context, in particular if you want to use it with function adapters. I’ll create the example withthe first version but you can use either version, or perhaps try both.
To make the example more interesting, I’ll include function templates for inputting data to a list and forwriting out the contents of a list. Here’s the program to make use of your predicate:
// Ex10_06.cpp// Using the remove_if() function for a list
#include <iostream>#include <list>#include “function_object.h”
using std::cin;using std::cout;using std::endl;using std::list;
// Template function to list the contents of a listtemplate <class T>void listlist(list<T>& data){for(list<T>::iterator iter = data.begin() ; iter != data.end() ; iter++)cout << *iter << “ “;
cout << endl;}
// Template function to read data from cin and store it in a list
637
Chapter 10: The Standard Template Library
25905c10.qxd:WroxPro 2/21/08 9:11 AM Page 637

template<class T>void loadlist(list<T>& data){T value = 0;while(cin >> value , value != 0) //Read non-zero valuesdata.push_back(value);
}
int main(){// Process integerslist<int> numbers;cout << “Enter non-zero integers separated by spaces. Enter 0 to end.”
<< endl;loadlist(numbers);cout << “The list contains:” << endl;listlist(numbers);numbers.remove_if(is_negative<int>()); cout << “After applying the remove_if() function the list contains:”
<< endl;listlist(numbers);
// Process floating-point valueslist<double> values;cout << endl
<< “Enter non-zero values separated by spaces. Enter 0 to end.” << endl;
loadlist(values);cout << “The list contains:” << endl;listlist(values);values.remove_if(is_negative<double>()); cout << “After applying the remove_if() function the list contains:” << endl;listlist(values);
return 0;}
Here’s a sample of output from this program:
Enter non-zero integers separated by spaces. Enter 0 to end.23 -4 -5 66 67 89 -1 22 34 -34 78 62 -9 99 -19 0The list contains:23 -4 -5 66 67 89 -1 22 34 -34 78 62 -9 99 -19After applying the remove_if() function the list contains:23 66 67 89 22 34 78 62 99
Enter non-zero values separated by spaces. Enter 0 to end.2.5 -3.1 5.5 100 -99 -.075 1.075 13 -12.1 13.2 0The list contains:2.5 -3.1 5.5 100 -99 -0.075 1.075 13 -12.1 13.2After applying the remove_if() function the list contains:2.5 5.5 100 1.075 13 13.2
638
Chapter 10: The Standard Template Library
25905c10.qxd:WroxPro 2/21/08 9:11 AM Page 638

How It WorksThe output shows the predicate works for values of type int and type double. The remove_if() func-tion applies the predicate to each element in a list in turn, and deletes the elements for which the predi-cate returns true.
The body of the loadlist<T>() template function that reads the input is:
T value = 0;while(cin >> value , value != 0) //Read non-zero values
data.push_back(value);
The local variable value is defined as type T, the type parameter for the template, so this will be of what-ever type you use to instantiate the function. The input is read in the while loop and values continue tobe read until you enter zero, in which case the last expression in the while loop condition will be false,thus ending the loop.
The body of the listlist<T>() function template is also very straightforward:
for(list<T>::iterator iter = data.begin() ; iter != data.end() ; iter++)cout << *iter << “ “;
cout << endl;
This uses the type list<T>::iterator for the for loop control variable, which maps to the type requiredfor the iterator for the list container that is passed as the argument. The output is produced by dereferenc-ing the iterator in the way you have seen before.
If you wanted to try out the merge() function within this example, you could add the following codebefore the return statement in main():
// Another list to use in mergelist<double> morevalues;cout << endl
<< “Enter non-zero values separated by spaces. Enter 0 to end.” << endl;
loadlist(morevalues);cout << “The list contains:” << endl;listlist(morevalues);values.remove_if(is_negative<double>()); cout << “After applying the remove_if() function the list contains:” << endl;listlist(morevalues);
// Merge the last two listsvalues.sort(greater<double>());morevalues.sort(greater<double>());values.merge(morevalues, greater<double>());listlist(values);
Don’t forget you need an #include directive for <functional> and a using directive for std::greaterfor this to compile.
639
Chapter 10: The Standard Template Library
25905c10.qxd:WroxPro 2/21/08 9:11 AM Page 639

Using Other Sequence ContainersThe remaining sequence containers are implemented through container adapters that I introduced at thebeginning of this chapter. I’ll discuss each of them briefly and illustrate their operation with an example.
Queue ContainersA queue<T> container implements a first-in first-out storage mechanism through an adapter. You canonly add to the end of the queue and remove from the front. Here’s one way you can create a queue:
queue<string> names;
This creates a queue that can store elements of type string. By default the queue<T> adapter class usesa deque<T> container as the base, but you can specify a different sequence container as a base as long asit supports the operations front(), back(), push_back(), and pop_front(). These four functions areused to operate the queue. Thus a queue can be based on a list or a vector container. You specify the alter-nate container as a second template parameter. Here’s how you would create a queue based on a list:
queue< string, list<string> > names;
The second type parameter to the adapter template specifies the underlying sequence container that is to be used. The queue adapter class acts as a wrapper for the underlying container class and essentiallyrestricts the range of operations you can carry out to those described in the following table.
Note that there are no functions in the table that make iterators available for a queue container. The onlyway to access the contents of a queue is via the back() or front() functions.
Try It Out Using a Queue ContainerIn this example you read a succession of one or more sayings, store them in a queue, and then retrievethe sayings and output them. Here’s the code:
// Ex10_07.cpp// Exercising a queue container
Function Description
back() Returns a reference to the element at the back of the queue. There are two versionsof the function, one returning a const reference and the other returning a non-const reference. If the queue is empty, then the value returned is undefined.
front() Returns a reference to the element at the front of the queue. There are two versionsof the function, one returning a const reference and the other returning a non-const reference. If the queue is empty, then the value returned is undefined.
push() Adds the element specified by the argument to the back of the queue.
pop() Removes the element at the front of the queue.
size() Returns the number of elements in the queue.
empty() Returns true if the queue is empty and false otherwise.
640
Chapter 10: The Standard Template Library
25905c10.qxd:WroxPro 2/21/08 9:11 AM Page 640
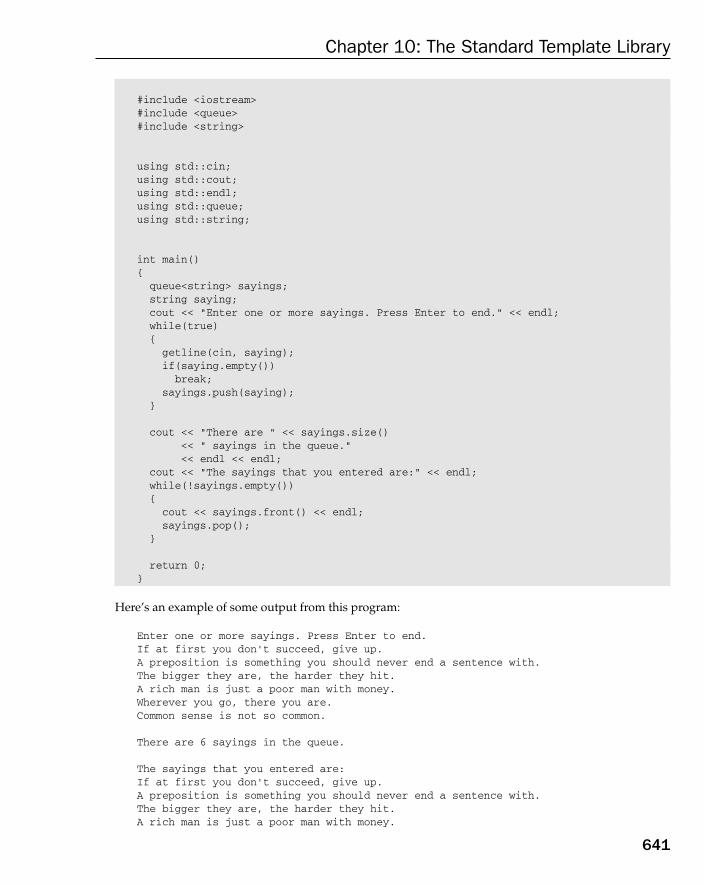
#include <iostream>#include <queue>#include <string>
using std::cin;using std::cout;using std::endl;using std::queue;using std::string;
int main(){queue<string> sayings;string saying;cout << “Enter one or more sayings. Press Enter to end.” << endl;while(true){getline(cin, saying);if(saying.empty())break;
sayings.push(saying);}
cout << “There are “ << sayings.size()<< “ sayings in the queue.” << endl << endl;
cout << “The sayings that you entered are:” << endl;while(!sayings.empty()){cout << sayings.front() << endl;sayings.pop();
}
return 0;}
Here’s an example of some output from this program:
Enter one or more sayings. Press Enter to end.If at first you don’t succeed, give up.A preposition is something you should never end a sentence with.The bigger they are, the harder they hit.A rich man is just a poor man with money.Wherever you go, there you are.Common sense is not so common.
There are 6 sayings in the queue.
The sayings that you entered are:If at first you don’t succeed, give up.A preposition is something you should never end a sentence with.The bigger they are, the harder they hit.A rich man is just a poor man with money.
641
Chapter 10: The Standard Template Library
25905c10.qxd:WroxPro 2/21/08 9:11 AM Page 641

Wherever you go, there you are.Common sense is not so common.
How It WorksYou first create a queue container that stores string objects:
queue<string> sayings;
You read sayings from the standard input stream and store them in the queue container in a while loop:
while(true){
getline(cin, saying);if(saying.empty())
break;sayings.push(saying);
}
This version of the getline()function reads text from cin into the string object, saying, until a new-line character is recognized. Newline is the default input termination character and when you want tooverride this, you specify the termination character as the third argument to getline(). The loop contin-ues until the empty() function for saying in the if statement returns true, which indicates an empty linewas entered. When the input in saying is not empty, you store it in the sayings queue container by call-ing its push() function.
When input is complete, you output the count of the number of sayings that were stored in the queue:
cout << “There are “ << sayings.size()<< “ sayings in the queue.” << endl << endl;
The size() function returns the number of elements in the queue.
You list the contents of the queue in another while loop:
while(!sayings.empty()){
cout << sayings.front() << endl;sayings.pop();
}
The front() function returns a reference to the object at the front of the queue but it remains there. Becauseyou want to access each of the elements in the queue in turn, you have to call the pop() function after listingeach element to remove it from the queue.
The process of listing the elements in the queue also deletes them, so after the loop ends the queue willbe empty. What if you wanted to retain the elements in the queue? Well, one possibility is that you couldput each saying back in the queue after you have listed it. Here’s how you could do that:
for(int i = 0 ; i < sayings.size() ; i++){
642
Chapter 10: The Standard Template Library
25905c10.qxd:WroxPro 2/21/08 9:11 AM Page 642

saying = sayings.front();cout << saying << endl;sayings.pop();sayings.push(saying);
}
Here you make use of the value returned by size() to iterate over the number of sayings in the queue.After writing each saying to cout, you remove it from the queue by calling pop(), and then you returnit to the back of the queue by calling push(). When the loop ends the queue will be left in its originalstate. Of course, if you don’t want to remove the elements when you access them you could always use a different kind of container.
Priority Queue ContainersA priority_queue<T> container is a queue that always has the largest or highest priority element at thetop. Here’s one way to define a priority queue container:
priority_queue<int> numbers;
The default criterion for determining the relative priority of elements as you add them to the queue isthe standard less<T> function object template. You add an element to the priority queue using thepush() function:
numbers.push(99); // Add 99 to the queue
When you add an element to the queue, if the queue is not empty the function will use the less<T>()predicate to decide where to insert the new object. This will result in elements being ordered in ascend-ing sequence from the back of the queue to the front. You cannot modify elements while they are in apriority queue as this could invalidate the ordering that has been established.
The complete set of operations for a priority queue is shown in the following table.
Function Description
top() Returns a const reference to the element at the front of the priority queue, whichwill be the largest or highest priority element in the container. If the priority queueis empty, then the value returned is undefined.
push() Adds the element specified by the argument to the priority queue at a positiondetermined by the predicate for the container, which by default is less<T>.
pop() Removes the element at the front of the priority queue, which will be the largest orhighest priority element in the container.
size() Returns the number of elements in the priority queue.
empty() Returns true if the priority queue is empty and false otherwise.
643
Chapter 10: The Standard Template Library
25905c10.qxd:WroxPro 2/21/08 9:11 AM Page 643
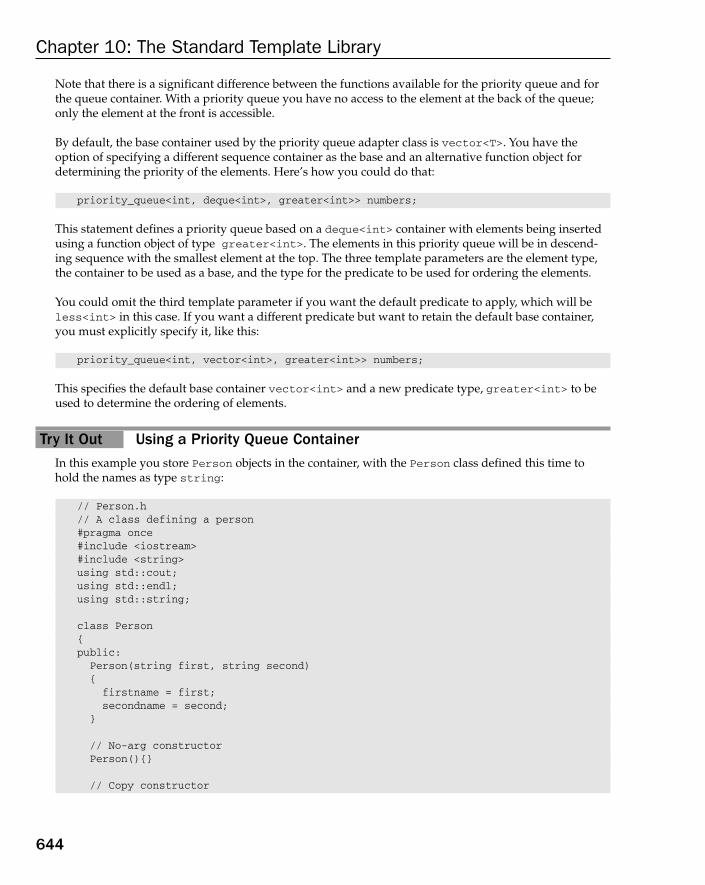
Note that there is a significant difference between the functions available for the priority queue and forthe queue container. With a priority queue you have no access to the element at the back of the queue;only the element at the front is accessible.
By default, the base container used by the priority queue adapter class is vector<T>. You have theoption of specifying a different sequence container as the base and an alternative function object fordetermining the priority of the elements. Here’s how you could do that:
priority_queue<int, deque<int>, greater<int>> numbers;
This statement defines a priority queue based on a deque<int> container with elements being insertedusing a function object of type greater<int>. The elements in this priority queue will be in descend-ing sequence with the smallest element at the top. The three template parameters are the element type,the container to be used as a base, and the type for the predicate to be used for ordering the elements.
You could omit the third template parameter if you want the default predicate to apply, which will beless<int> in this case. If you want a different predicate but want to retain the default base container,you must explicitly specify it, like this:
priority_queue<int, vector<int>, greater<int>> numbers;
This specifies the default base container vector<int> and a new predicate type, greater<int> to beused to determine the ordering of elements.
Try It Out Using a Priority Queue ContainerIn this example you store Person objects in the container, with the Person class defined this time tohold the names as type string:
// Person.h// A class defining a person#pragma once#include <iostream>#include <string>using std::cout;using std::endl;using std::string;
class Person{public:Person(string first, string second){firstname = first;secondname = second;
}
// No-arg constructorPerson(){}
// Copy constructor
644
Chapter 10: The Standard Template Library
25905c10.qxd:WroxPro 2/21/08 9:11 AM Page 644

Person(const Person& p){firstname = p.firstname;secondname = p.secondname;
}
// Less-than operatorbool operator<(const Person& p)const{if(secondname < p.secondname ||((secondname == p.secondname) && (firstname < p.firstname)))return true;
return false;}
// Greater-than operatorbool operator>(const Person& p)const{return p < *this;
}
// Output a personvoid showPerson() const{cout << firstname << “ “ << secondname << endl;
}
private:string firstname;string secondname;
};
Note that the > operator is overloaded here. This will make it possible to put objects in a priority queuethat is ordered in ascending or descending sequence.
Here’s the program that stores Person objects in a priority queue:
// Ex10_08.cpp// Exercising a priority queue container
#include <iostream>#include <vector>#include <queue>#include <functional>#include “Person.h”
using std::cin;using std::cout;using std::endl;using std::vector;using std::priority_queue;using std::greater;
645
Chapter 10: The Standard Template Library
25905c10.qxd:WroxPro 2/21/08 9:11 AM Page 645

int main(){priority_queue<Person, vector<Person>, greater<Person>> people;string first, second;;while(true){cout << “Enter a first name or press Enter to end: “ ;getline(cin, first);if(first.empty())break;
cout << “Enter a second name: “ ;getline(cin, second);people.push(Person(first, second));
}
cout << endl << “There are “ << people.size()<< “ people in the queue.” << endl << endl;
cout << “The names that you entered are:” << endl;while(!people.empty()){people.top().showPerson();people.pop();
}
return 0;}
Typical output from this example looks like this:
Enter a first name or press Enter to end: OliverEnter a second name: HardyEnter a first name or press Enter to end: StanEnter a second name: LaurelEnter a first name or press Enter to end: HaroldEnter a second name: LloydEnter a first name or press Enter to end: MelEnter a second name: GibsonEnter a first name or press Enter to end: BradEnter a second name: PittEnter a first name or press Enter to end:
There are 5 people in the queue.
The names that you entered are:Mel GibsonOliver HardyStan LaurelHarold LloydBrad Pitt
646
Chapter 10: The Standard Template Library
25905c10.qxd:WroxPro 2/21/08 9:11 AM Page 646

How It WorksThe Person class is simpler than the earlier version because the names are stored as string objects andno dynamic memory allocation is necessary. You no longer need to define the assignment operator, as thedefault will be fine. Defining the < operator function is sufficient to allow Person objects to be stored in a default priority queue and the overloaded > operator will permit Person objects to be ordered usingthe greater<Person> predicate type.
You define the priority queue in main() like this:
priority_queue< Person, vector<Person>, greater<Person>> people;
Because you want to specify the third template type parameter, you must supply all three, even thoughthe base container type is the default. Incidentally, don’t confuse the type argument you are using in thetemplate instantiation here, greater<Person>, with the object, greater<Person>(), that you mightsupply as an argument to the sort() algorithm.
Of course, the third parameter to the priority queue template that defines the predicate for ordering theobjects does not have to be a template type. You could use your own function object type as long as it hasa suitable implementation of operator()() in the class:
// function_object.h#pragma once#include <functional>#include “Person.h”using std::binary_function;
class PersonComp: binary_function<Person, Person, bool>{public:result_type operator()(const first_argument_type& p1,
const second_argument_type& p2) const{return p1 > p2;
}};
For function objects that work with the STL, a binary predicate must implement operator()() withtwo parameters, and if you want the predicate to work with function adapters, your function object typemust have an instance of the binary_function<Arg1Type, Arg2Type, ResultType> template as abase. Although you will typically make both arguments to a binary predicate of the same type, the baseclass does not require this to be so, so when it is meaningful your predicates can apply to arguments ofdifferent types.
If you don’t want to use your function objects with function adapters, you could define the type as:
// function_object.h#pragma once#include “Person.h”
class PersonComp
647
Chapter 10: The Standard Template Library
25905c10.qxd:WroxPro 2/21/08 9:11 AM Page 647
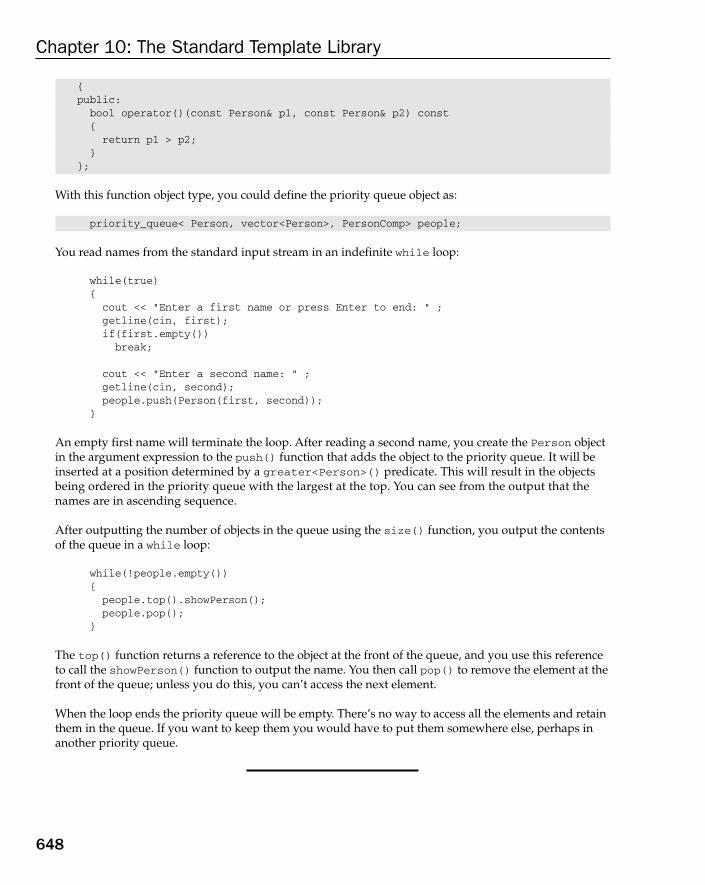
{public:bool operator()(const Person& p1, const Person& p2) const{return p1 > p2;
}};
With this function object type, you could define the priority queue object as:
priority_queue< Person, vector<Person>, PersonComp> people;
You read names from the standard input stream in an indefinite while loop:
while(true){
cout << “Enter a first name or press Enter to end: “ ;getline(cin, first);if(first.empty())
break;
cout << “Enter a second name: “ ;getline(cin, second);people.push(Person(first, second));
}
An empty first name will terminate the loop. After reading a second name, you create the Person objectin the argument expression to the push() function that adds the object to the priority queue. It will beinserted at a position determined by a greater<Person>() predicate. This will result in the objectsbeing ordered in the priority queue with the largest at the top. You can see from the output that thenames are in ascending sequence.
After outputting the number of objects in the queue using the size() function, you output the contentsof the queue in a while loop:
while(!people.empty()){
people.top().showPerson();people.pop();
}
The top() function returns a reference to the object at the front of the queue, and you use this referenceto call the showPerson() function to output the name. You then call pop() to remove the element at thefront of the queue; unless you do this, you can’t access the next element.
When the loop ends the priority queue will be empty. There’s no way to access all the elements and retainthem in the queue. If you want to keep them you would have to put them somewhere else, perhaps inanother priority queue.
648
Chapter 10: The Standard Template Library
25905c10.qxd:WroxPro 2/21/08 9:11 AM Page 648

Stack ContainersThe stack<T> container adapter template is defined in the <stack> header and implements a push-down stack based on a deque<T> container by default. A pushdown stack is a last-in first-out storagemechanism where only the object that was added most recently to the stack is accessible.
Here’s how you can define a stack:
stack<Person> people;
This defines a stack to store Person objects.
The base container can be any sequence container that supports the operations back(), push_back(),and pop_back(). You could define a stack base on a list like this:
stack<string, list<string>> names;
The template type argument is the element type, as before, and the second is the container type to beused as a base for the stack.
There are only five operations available with a stack<T> container and they are shown in the followingtable.
As with the other containers provided through container adapters, you cannot use iterators to access thecontents of a stack.
Let’s see a stack working in another example.
Try It Out Using a Stack ContainerThis example stores Person objects in a stack. The Person class is the same as in the previous example,so I won’t repeat the code here. Here’s the program:
// Ex10_09.cpp// Exercising a stack container
Function Description
top() Returns a reference to the element at the top of the stack. If the stack is empty, thenthe value returned is undefined. You can assign the reference returned to a constor non-const reference and if it is assigned to the latter, you can modify the objectin the stack.
push() Adds the element specified by the argument to the top of the stack.
pop() Removes the element at the top of the stack.
size() Returns the number of elements in the stack.
empty() Returns true if the stack is empty and false otherwise.
649
Chapter 10: The Standard Template Library
25905c10.qxd:WroxPro 2/21/08 9:11 AM Page 649
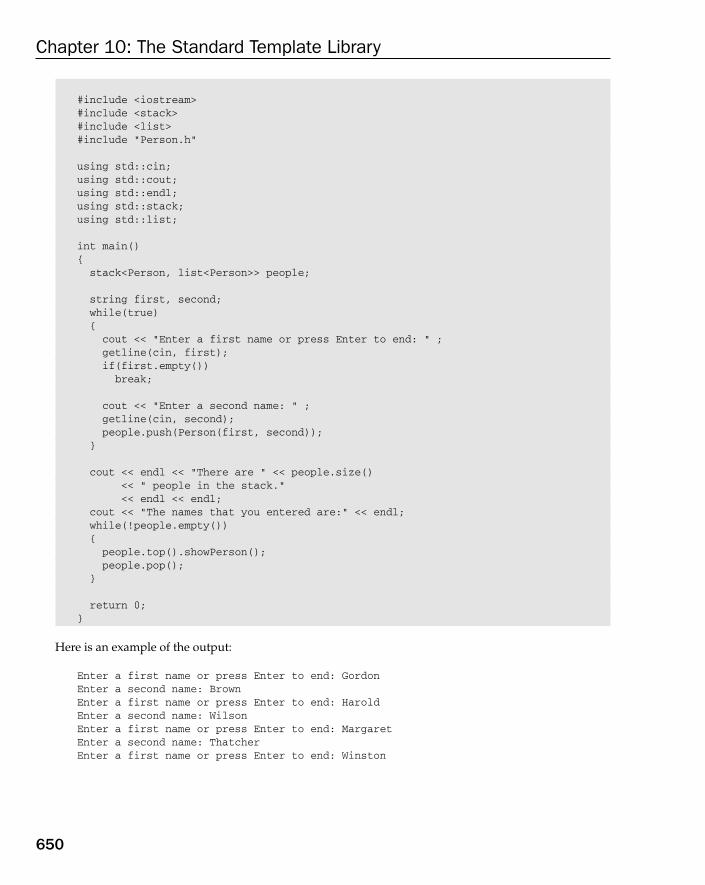
#include <iostream>#include <stack>#include <list>#include “Person.h”
using std::cin;using std::cout;using std::endl;using std::stack;using std::list;
int main(){ stack<Person, list<Person>> people;
string first, second;while(true){cout << “Enter a first name or press Enter to end: “ ;getline(cin, first);if(first.empty())break;
cout << “Enter a second name: “ ;getline(cin, second);people.push(Person(first, second));
}
cout << endl << “There are “ << people.size()<< “ people in the stack.” << endl << endl;
cout << “The names that you entered are:” << endl;while(!people.empty()){people.top().showPerson();people.pop();
}
return 0;}
Here is an example of the output:
Enter a first name or press Enter to end: GordonEnter a second name: BrownEnter a first name or press Enter to end: HaroldEnter a second name: WilsonEnter a first name or press Enter to end: MargaretEnter a second name: ThatcherEnter a first name or press Enter to end: Winston
650
Chapter 10: The Standard Template Library
25905c10.qxd:WroxPro 2/21/08 9:11 AM Page 650

Enter a second name: ChurchillEnter a first name or press Enter to end: DavidEnter a second name: Lloyd-GeorgeEnter a first name or press Enter to end:
There are 5 people in the stack.
The names that you entered are:David Lloyd-GeorgeWinston ChurchillMargaret ThatcherHarold WilsonGordon Brown
How It WorksThe code in main() is more or less the same as in the previous example. Only the container definition issignificantly different:
stack<Person, list<Person>> people;
The stack container stores Person objects and is based on a list<T> container in this instance. Youcould also use a vector<T> container and if you omit the second type parameter, the stack will use adeque<T> container as a base.
The output demonstrates that a stack is indeed a last-in first-out container as the order of names in theoutput is the reverse of the input.
Associative ContainersThe most significant feature of the associative containers such as map<K, T> is that you can retrieve aparticular object without searching. The location of an object of type T within an associative container is determined from a key of type K that you supply along with the object, so you can retrieve any objectrapidly by just supplying the appropriate key. The key is actually a sort key that determines the order ofthe entries in the map.
For set<T> and multiset<T> containers, objects act as their own keys. You might be wondering what theuse of a container is where before you can retrieve an object you have to have the object available. After all,if you already have the object, why would you need to retrieve it? The point of set and multiset containersis not so much to store objects for later retrieval, but to create an aggregation of objects that you can test tosee whether or not a given object is already a member.
In this section I’ll concentrate on map containers. The set and multiset containers are used somewhat lessfrequently and their operations are very similar to the map and multimap containers, so you should havelittle difficulty using these once you have learned how to apply the map containers.
651
Chapter 10: The Standard Template Library
25905c10.qxd:WroxPro 2/21/08 9:11 AM Page 651
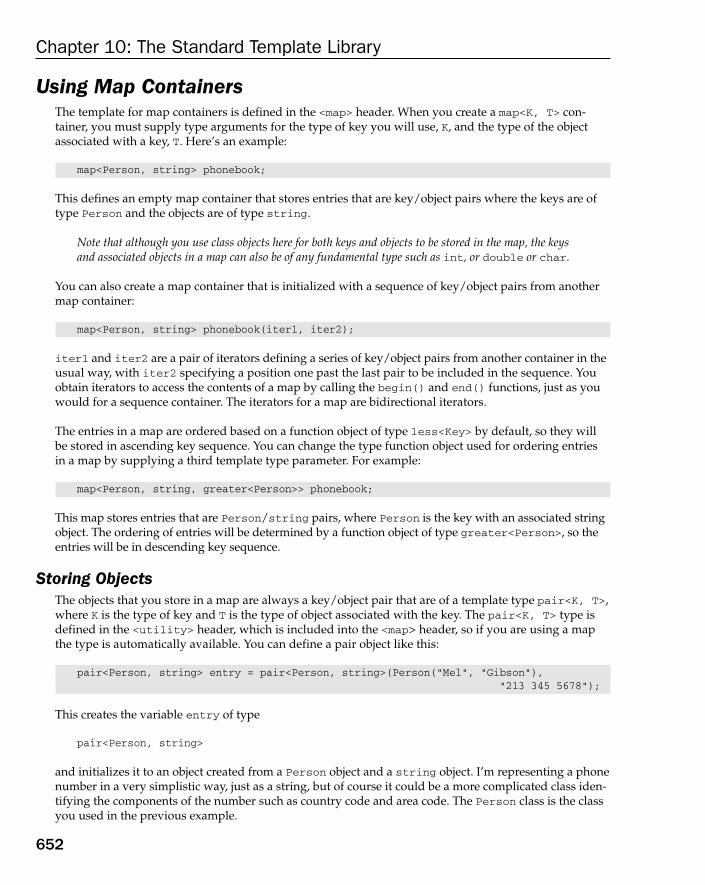
Using Map ContainersThe template for map containers is defined in the <map> header. When you create a map<K, T> con-tainer, you must supply type arguments for the type of key you will use, K, and the type of the objectassociated with a key, T. Here’s an example:
map<Person, string> phonebook;
This defines an empty map container that stores entries that are key/object pairs where the keys are oftype Person and the objects are of type string.
Note that although you use class objects here for both keys and objects to be stored in the map, the keysand associated objects in a map can also be of any fundamental type such as int, or double or char.
You can also create a map container that is initialized with a sequence of key/object pairs from anothermap container:
map<Person, string> phonebook(iter1, iter2);
iter1 and iter2 are a pair of iterators defining a series of key/object pairs from another container in theusual way, with iter2 specifying a position one past the last pair to be included in the sequence. Youobtain iterators to access the contents of a map by calling the begin() and end() functions, just as youwould for a sequence container. The iterators for a map are bidirectional iterators.
The entries in a map are ordered based on a function object of type less<Key> by default, so they willbe stored in ascending key sequence. You can change the type function object used for ordering entriesin a map by supplying a third template type parameter. For example:
map<Person, string, greater<Person>> phonebook;
This map stores entries that are Person/string pairs, where Person is the key with an associated stringobject. The ordering of entries will be determined by a function object of type greater<Person>, so theentries will be in descending key sequence.
Storing ObjectsThe objects that you store in a map are always a key/object pair that are of a template type pair<K, T>,where K is the type of key and T is the type of object associated with the key. The pair<K, T> type isdefined in the <utility> header, which is included into the <map> header, so if you are using a mapthe type is automatically available. You can define a pair object like this:
pair<Person, string> entry = pair<Person, string>(Person(“Mel”, “Gibson”), “213 345 5678”);
This creates the variable entry of type
pair<Person, string>
and initializes it to an object created from a Person object and a string object. I’m representing a phonenumber in a very simplistic way, just as a string, but of course it could be a more complicated class iden-tifying the components of the number such as country code and area code. The Person class is the classyou used in the previous example.
652
Chapter 10: The Standard Template Library
25905c10.qxd:WroxPro 2/21/08 9:11 AM Page 652
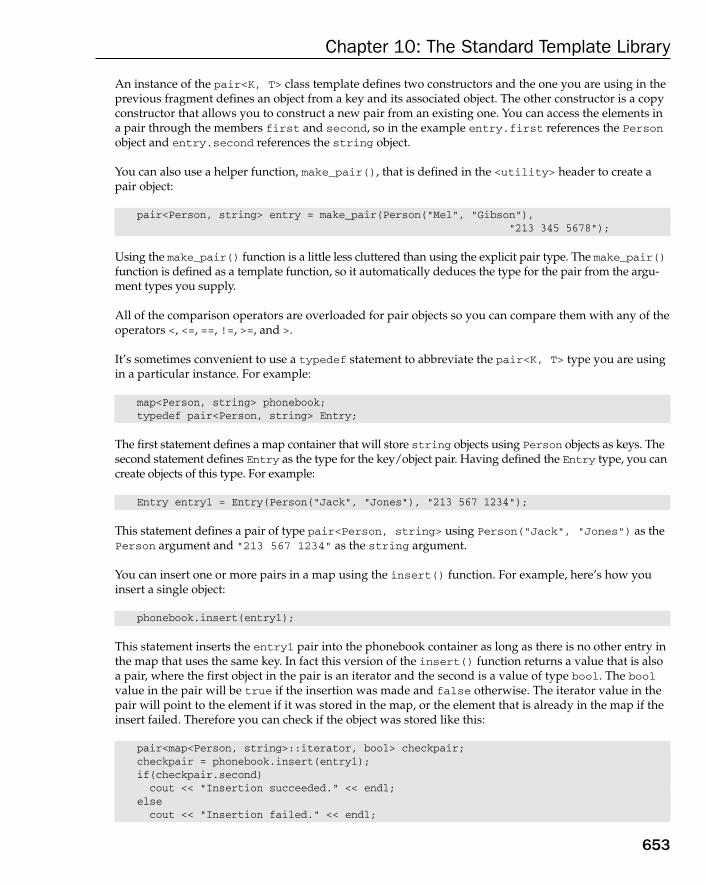
An instance of the pair<K, T> class template defines two constructors and the one you are using in theprevious fragment defines an object from a key and its associated object. The other constructor is a copyconstructor that allows you to construct a new pair from an existing one. You can access the elements ina pair through the members first and second, so in the example entry.first references the Personobject and entry.second references the string object.
You can also use a helper function, make_pair(), that is defined in the <utility> header to create apair object:
pair<Person, string> entry = make_pair(Person(“Mel”, “Gibson”), “213 345 5678”);
Using the make_pair() function is a little less cluttered than using the explicit pair type. The make_pair()function is defined as a template function, so it automatically deduces the type for the pair from the argu-ment types you supply.
All of the comparison operators are overloaded for pair objects so you can compare them with any of theoperators <, <=, ==, !=, >=, and >.
It’s sometimes convenient to use a typedef statement to abbreviate the pair<K, T> type you are usingin a particular instance. For example:
map<Person, string> phonebook;typedef pair<Person, string> Entry;
The first statement defines a map container that will store string objects using Person objects as keys. Thesecond statement defines Entry as the type for the key/object pair. Having defined the Entry type, you cancreate objects of this type. For example:
Entry entry1 = Entry(Person(“Jack”, “Jones”), “213 567 1234”);
This statement defines a pair of type pair<Person, string> using Person(“Jack”, “Jones”) as thePerson argument and “213 567 1234” as the string argument.
You can insert one or more pairs in a map using the insert() function. For example, here’s how youinsert a single object:
phonebook.insert(entry1);
This statement inserts the entry1 pair into the phonebook container as long as there is no other entry inthe map that uses the same key. In fact this version of the insert() function returns a value that is alsoa pair, where the first object in the pair is an iterator and the second is a value of type bool. The boolvalue in the pair will be true if the insertion was made and false otherwise. The iterator value in thepair will point to the element if it was stored in the map, or the element that is already in the map if theinsert failed. Therefore you can check if the object was stored like this:
pair<map<Person, string>::iterator, bool> checkpair;checkpair = phonebook.insert(entry1);if(checkpair.second)cout << “Insertion succeeded.” << endl;
elsecout << “Insertion failed.” << endl;
653
Chapter 10: The Standard Template Library
25905c10.qxd:WroxPro 2/21/08 9:11 AM Page 653

The pair that the insert() function returns is stored in checkpair. The type for checkpair is a pairencapsulating an iterator for our map of type map<Person, Number>::iterator, which you could accessas checkpair.first, and a value of type bool, which you access in the code as checkpair.second.
Dereferencing the iterator in the pair returned by the insert() function will give you access to the pairthat is stored in the map and you can use the first and second members of that pair to access the key andobject respectively. This can be a little tricky so let’s see what it looks like for checkpair in the code above:
cout << “The key for the entry is:” << endl;checkpair.first->first.showPerson();
The expression checkpair.first references the first member of the checkpair pair, which is an itera-tor, so you are accessing a pointer to the object in the map with this expression. The object in the map isanother pair, so the expression checkpair.first->first accesses the first member of that pair, whichis the Person object. You use this to call the showPerson() member to output the name. You could accessthe object in the pair in a similar way with the expression checkpair.first->second.
You have another version of the insert() function for inserting a series of pairs in a map. The pairs aredefined by two iterator arguments and the series would typically be from another map container.
The map<K,T> template defines the operator[]() function, so you can also use the subscript operatorto insert an object. Here’s how you could insert the entry1 object in the phonebook map:
phonebook[Person(“Jack”, “Jones”)] = “213 567 1234”;
The subscript value is the key to be used to store the object that appears on the right of the assignmentoperator. This is perhaps a somewhat more intuitive way to store objects in a map. The only disadvantagecompared to the insert() function is that you lose the ability to discover whether the key was already inthe map.
Accessing ObjectsYou can use the subscript operator to retrieve the object from a map that corresponds to a given key. Forexample:
string number = phonebook[Person(“Jack”, “Jones”)];
This stores the object corresponding to the key
Person(“Jack”, “Jones”)
in number. If the key is not in the map, then a pair entry will be inserted into the map for this key withthe object as the default for the object type, so here the no-arg Person class constructor will be called tocreate the object for this key if the entry is not there.
Of course, you may not want a default object inserted when you attempt to retrieve an object correspon-ding to a given key. In this case you could use the find() function to check if there’s an entry for a givenkey and then retrieve it:
string number;Person key = Person(“Jack”, “Jones”);
654
Chapter 10: The Standard Template Library
25905c10.qxd:WroxPro 2/21/08 9:11 AM Page 654

map<Person, string>::iterator iter = phonebook.find(key);
if(iter != phonebook.end()){number = iter->second;cout << “The number is “ << number << endl;
}else{cout << “No number for the key “;key.showPerson();
}
The find() function returns an iterator that points to the object corresponding to the key if the key ispresent in the map, or to one past the last entry in the map, which corresponds to the iterator returnedby the end() function. Thus if iter is not equal to the iterator returned by end(), the entry is presentand you can access the object through the second member of the pair. This fragment defines the iteratoras type map<Person, Number>::iterator. If you want to prevent the object in the map from beingmodified, you could define the iterator as type map<Person, Number>::const_iterator.
Calling the count() function for a map with a key as the argument will return a count of the number ofentries found corresponding to the key. For a map the value returned can only be 0 or 1 because each keyin a map must be unique. A multimap container allows multiple entries for a given key, so in this caseother values are possible for the return value from count().
Other Map OperationsThe erase() function enables you to remove a single entry or a range of entries from a map. You havetwo versions of erase() that will remove a single entry. One version requires an iterator as the argu-ment pointing to the entry to be erased, and the other requires a key corresponding to the entry to beerased. For example:
Person key = Person(“Jack”, “Jones”);map<Person, string>::size_type count = phonebook.erase(key);if(count == 0)cout << “Entry was not found.” << endl;
When you supply a key to the erase() function, it returns a count of the number of entries that wereerased. With a map container, the value returned can only be 0 or 1. A multimap container can have sev-eral entries with the same key in which case the erase() function may return a value greater than 1.
You can also supply an iterator as an argument to erase():
Person key = Person(“Jack”, “Jones”);map<Person, string>::iterator iter = phonebook.find(key);iter = phonebook.erase(iter);if(iter == phonebook.end())cout << “End of the map reached.” << endl;
In this case the erase() function returns an iterator that points to the entry that remains in the mapbeyond the entry that was erased, or a pointer to the ends of the map if no such element is present.
655
Chapter 10: The Standard Template Library
25905c10.qxd:WroxPro 2/21/08 9:11 AM Page 655

The following table shows the other operations available with a map container.
The lower_bound(), upper_bound(), and equal_range() functions are not very useful with a mapcontainer. However, they come into their own with a multimap container when you want to find all theelements with the same key.
Let’s see a map in action.
Try It Out Using a Map ContainerIn this example you use a map container to store phone numbers and provide a mechanism for finding aphone number for a person. You use a variation on the Person class in this example:
// Person.h// A class defining a person#pragma once
Function Description
begin() Returns a bidirectional iterator pointing to the first entry in the map.
end() Returns a bidirectional iterator pointing to one past the last entry in the map.
rbegin() Returns a reverse iterator pointing to the last entry in the map.
rend() Returns a reverse iterator pointing to one past the first entry in the map.
lower_bound() Accepts a key as an argument and returns an iterator pointing to the firstentry with a key that is greater than or equal to (the lower bound of) thespecified key. If the key is not present, the iterator pointing to one past thelast entry will be returned.
upper_bound() Accepts a key as an argument and returns an iterator pointing to the firstentry with a key that is greater than (the upper bound of) the specified key.If the key is not present, the iterator pointing to one past the last entry willbe returned.
equal_range() Accepts a key as an argument and returns a pair object containing two itera-tors. The first member of the pair points to the lower bound of the specifiedkey and the second member points to the upper bound of the specified key.If the key is not present, both iterators in the pair will point to one past thelast entry in the map.
swap() Interchanges the entries in the map you pass as the argument with theentries in the map for which the function is called.
clear() Erases all entries in the map.
size() Returns the number of elements in the map.
empty() Returns true if the map is empty and false otherwise.
656
Chapter 10: The Standard Template Library
25905c10.qxd:WroxPro 2/21/08 9:11 AM Page 656
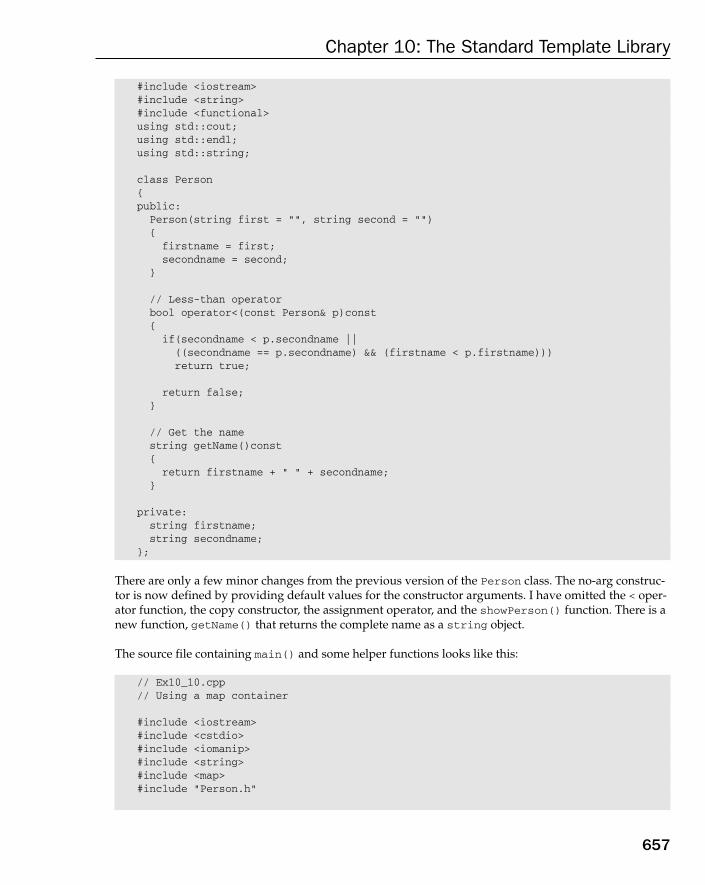
#include <iostream>#include <string>#include <functional>using std::cout;using std::endl;using std::string;
class Person{public:Person(string first = “”, string second = “”){firstname = first;secondname = second;
}
// Less-than operatorbool operator<(const Person& p)const{if(secondname < p.secondname ||((secondname == p.secondname) && (firstname < p.firstname)))return true;
return false;}
// Get the name string getName()const{return firstname + “ “ + secondname;
}
private:string firstname;string secondname;
};
There are only a few minor changes from the previous version of the Person class. The no-arg construc-tor is now defined by providing default values for the constructor arguments. I have omitted the < oper-ator function, the copy constructor, the assignment operator, and the showPerson() function. There is anew function, getName() that returns the complete name as a string object.
The source file containing main() and some helper functions looks like this:
// Ex10_10.cpp// Using a map container
#include <iostream>#include <cstdio>#include <iomanip>#include <string>#include <map>#include “Person.h”
657
Chapter 10: The Standard Template Library
25905c10.qxd:WroxPro 2/21/08 9:11 AM Page 657

using std::cin;using std::cout;using std::endl;using std::setw;using std::ios;using std::string;using std::pair;using std::map;using std::make_pair;
// Read a person from cinPerson getPerson(){string first;string second;cout << “Enter a first name: “ ;getline(cin, first);cout << “Enter a second name: “ ;getline(cin, second);return Person(first, second);
}
// Add a new entry to a phone bookvoid addEntry(map<Person, string>& book){pair<Person, string> entry; // Stores a phone book entrystring number;Person person = getPerson();
cout << “Enter the phone number for “<< person.getName() << “: “;getline(cin, number);entry = make_pair(person, number);pair<map<Person,string>::iterator, bool> pr = book.insert(entry);
if(pr.second)cout << “Entry successful.” << endl;
else{cout << “Entry exists for “ << person.getName()
<< “. The number is “ << pr.first->second << endl;}
}
// List the contents of a phone bookvoid listEntries(map<Person, string>& book){if(book.empty()){cout << “The phone book is empty.” << endl;return;
}map<Person, string>::iterator iter;cout << setiosflags(ios::left); // Left justify outputfor(iter = book.begin() ; iter != book.end() ; iter++)
658
Chapter 10: The Standard Template Library
25905c10.qxd:WroxPro 2/21/08 9:11 AM Page 658
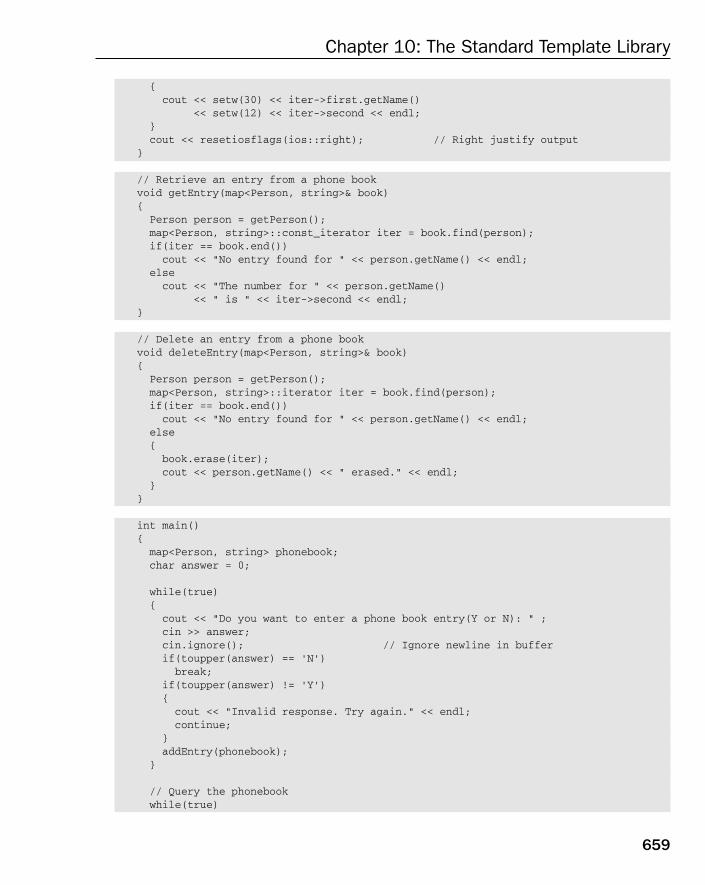
{cout << setw(30) << iter->first.getName()
<< setw(12) << iter->second << endl; }cout << resetiosflags(ios::right); // Right justify output
}
// Retrieve an entry from a phone bookvoid getEntry(map<Person, string>& book){Person person = getPerson();map<Person, string>::const_iterator iter = book.find(person);if(iter == book.end())cout << “No entry found for “ << person.getName() << endl;
elsecout << “The number for “ << person.getName()
<< “ is “ << iter->second << endl;}
// Delete an entry from a phone bookvoid deleteEntry(map<Person, string>& book){Person person = getPerson();map<Person, string>::iterator iter = book.find(person);if(iter == book.end())cout << “No entry found for “ << person.getName() << endl;
else{book.erase(iter);cout << person.getName() << “ erased.” << endl;
}}
int main(){ map<Person, string> phonebook;char answer = 0;
while(true){cout << “Do you want to enter a phone book entry(Y or N): “ ;cin >> answer;cin.ignore(); // Ignore newline in bufferif(toupper(answer) == ‘N’)break;
if(toupper(answer) != ‘Y’){cout << “Invalid response. Try again.” << endl;continue;
}addEntry(phonebook);
}
// Query the phonebookwhile(true)
659
Chapter 10: The Standard Template Library
25905c10.qxd:WroxPro 2/21/08 9:11 AM Page 659
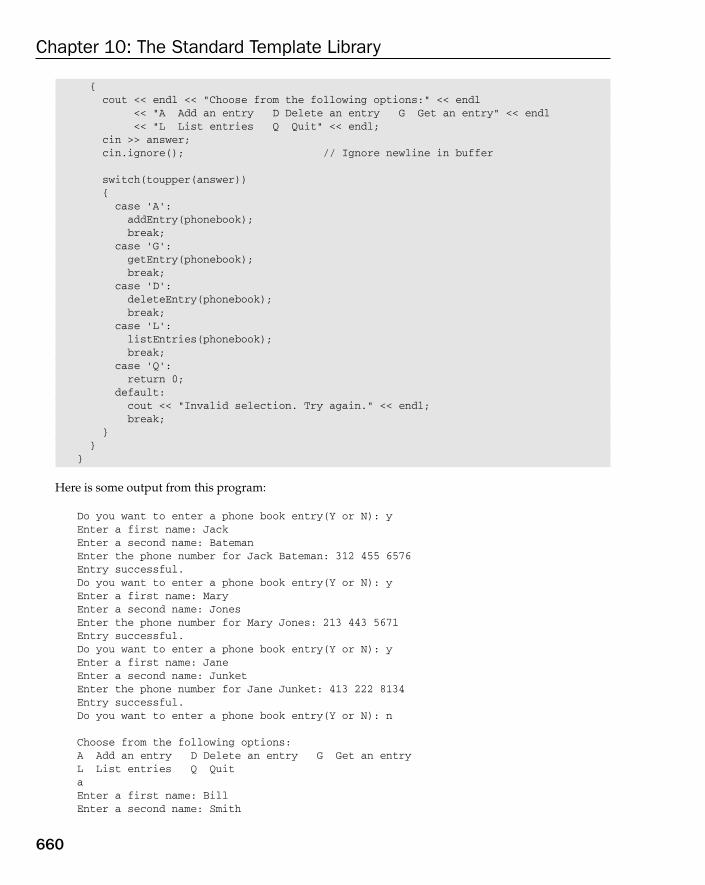
{cout << endl << “Choose from the following options:” << endl
<< “A Add an entry D Delete an entry G Get an entry” << endl<< “L List entries Q Quit” << endl;
cin >> answer;cin.ignore(); // Ignore newline in buffer
switch(toupper(answer)){case ‘A’:addEntry(phonebook);break;
case ‘G’:getEntry(phonebook);break;
case ‘D’:deleteEntry(phonebook);break;
case ‘L’:listEntries(phonebook);break;
case ‘Q’:return 0;
default:cout << “Invalid selection. Try again.” << endl;break;
}}
}
Here is some output from this program:
Do you want to enter a phone book entry(Y or N): yEnter a first name: JackEnter a second name: BatemanEnter the phone number for Jack Bateman: 312 455 6576Entry successful.Do you want to enter a phone book entry(Y or N): yEnter a first name: MaryEnter a second name: JonesEnter the phone number for Mary Jones: 213 443 5671Entry successful.Do you want to enter a phone book entry(Y or N): yEnter a first name: JaneEnter a second name: JunketEnter the phone number for Jane Junket: 413 222 8134Entry successful.Do you want to enter a phone book entry(Y or N): n
Choose from the following options:A Add an entry D Delete an entry G Get an entryL List entries Q QuitaEnter a first name: BillEnter a second name: Smith
660
Chapter 10: The Standard Template Library
25905c10.qxd:WroxPro 2/21/08 9:11 AM Page 660

Enter the phone number for Bill Smith: 213 466 7688Entry successful.
Choose from the following options:A Add an entry D Delete an entry G Get an entryL List entries Q QuitgEnter a first name: MaryEnter a second name: MillerNo entry found for Mary Miller
Choose from the following options:A Add an entry D Delete an entry G Get an entryL List entries Q QuitgEnter a first name: MaryEnter a second name: JonesThe number for Mary Jones is 213 443 5671
Choose from the following options:A Add an entry D Delete an entry G Get an entryL List entries Q QuitdEnter a first name: MaryEnter a second name: JonesMary Jones erased.
Choose from the following options:A Add an entry D Delete an entry G Get an entryL List entries Q QuitLJack Bateman 312 455 6576Jane Junket 413 222 8134Bill Smith 213 466 7688
Choose from the following options:A Add an entry D Delete an entry G Get an entryL List entries Q Quitq
How It WorksYou define a map container in main() like this:
map<Person, string> phonebook;
The object in an entry in the map is a string containing a phone number and the key is a Person object.
You load up the map initially in a while loop:
while(true){
cout << “Do you want to enter a phone book entry(Y or N): “ ;cin >> answer;cin.ignore(); // Ignore newline in buffer
661
Chapter 10: The Standard Template Library
25905c10.qxd:WroxPro 2/21/08 9:11 AM Page 661

if(toupper(answer) == ‘N’)break;
if(toupper(answer) != ‘Y’){
cout << “Invalid response. Try again.” << endl;continue;
}addEntry(phonebook);
}
You check whether an entry is to be read by reading a character from the standard input stream. Readinga character from cin leaves a newline character in the buffer and this can cause problems for subsequentinput. Calling ignore() for cin ignores the next character so subsequent input will work properly. If‘n’ or ‘N’ is entered, the loop is terminated. When ‘y’ or ‘Y’ is entered, an entry is created by callingthe helper function addEntry() that is coded like this:
void addEntry(map<Person, string>& book){pair<Person, string> entry; // Stores a phone book entrystring number;Person person = getPerson();
cout << “Enter the phone number for “<< person.getName() << “: “;getline(cin, number);entry = make_pair(person, number);pair<map<Person,string>::iterator, bool> pr = book.insert(entry);
if(pr.second)cout << “Entry successful.” << endl;
else{
cout << “Entry exists for “ << person.getName()<< “. The number is “ << pr.first->second << endl;
}}
Note that the parameter for addEntry() is a reference. The function modifies the container that is passedas the argument, so the function must have access to the original object. In any event, even if only accessto the container argument was needed, it is important not to allow potentially very large objects such as amap container to be passed by value because this can seriously degrade performance.
The process for adding an entry is essentially as you have seen in the previous section. The getPerson()helper function reads a first name and a second name and then returns a Person object that is createdusing the names. The getName() member of the Person class returns a name as a string object so youuse this in the prompt for a number. Calling the make_pair() function returns a pair<Person, string>object that you store in entry. You then call insert() for the container object and store the object returnedin pr. The pr object enables you to check that the entry was successfully inserted into the map by testing itsbool member. The first member of pr provides access to the entry, whether it’s an existing entry or the newentry, and you use this to output a message when insertion fails.
After initial input is complete, a while loop provides the mechanism for querying and modifying thephone book. The switch statement in the body of the loop decides the action to be taken based on the
662
Chapter 10: The Standard Template Library
25905c10.qxd:WroxPro 2/21/08 9:11 AM Page 662

character that is entered and stored in answer. Querying the phone book is managed by the getEntry()function:
void getEntry(map<Person, string>& book){
Person person = getPerson();map<Person, string>::const_iterator iter = book.find(person);if(iter == book.end())
cout << “No entry found for “ << person.getName() << endl;else
cout << “The number for “ << person.getName()<< “ is “ << iter->second << endl;
}
A Person object is created from a name that is read from the standard input stream by calling thegetPerson() function. The Person object is then used as the argument to the find() function for the map object. This returns an iterator that either points to the required entry, or points to one past thelast entry in the map. If an entry is found, accessing the second member of the pair pointed to by the iterator provides the number corresponding to the Person object key.
The deleteEntry() function deletes an entry from the map. The process is similar to that used in thegetEntry() function, the difference being that when an entry is found by the find() function, theerase() function is called to remove it. You could use another version of erase() to do this, in whichcase the code would be like this:
void deleteEntry(map<Person, string>& book){Person person = getPerson();if(book.erase(person))cout << person.getName() << “ erased.” << endl;
elsecout << “No entry found for “ << person.getName() << endl;
}
The code turns out to be much simpler if you pass the key to the erase() function.
The listEntries() function lists the contents of a phone book:
void listEntries(map<Person, string>& book){
if(book.empty()){
cout << “The phone book is empty.” << endl;return;
}map<Person, string>::iterator iter;cout << setiosflags(ios::left); // Left justify outputfor(iter = book.begin() ; iter != book.end() ; iter++){
cout << setw(30) << iter->first.getName() << setw(12) << iter->second << endl;
}cout << resetiosflags(ios::right); // Right justify output
}
663
Chapter 10: The Standard Template Library
25905c10.qxd:WroxPro 2/21/08 9:11 AM Page 663

After an initial check for an empty map, the entries are listed in a for loop using an iterator. The outputis left-justified by the setiosflags manipulator to produce tidy output. This remains in effect untilresetiosflags manipulator is used to restore right-justification.
Using a Multimap ContainerA multimap container works very much like the map container in that it supports the same range offunctions except for the subscript operator, which you cannot use with a multimap. The principle dif-ference between a map and a multimap is that you can have multiple entries with the same key in amultimap and this affects the way some of the functions behave. Obviously, with the possibility of several keys having the same value, overloading the operator[]() function would not make muchsense for a multimap.
The insert() function flavors for a multimap are a little different from the function for a map. The sim-plest version of insert() that accepts a pair<K, T> object as an argument returns an iterator pointingto the entry that was inserted in the multimap. The equivalent function for a map returns a pair objectbecause this provides an indication of when the key already exists in the map and the insertion is notpossible; of course, this cannot arise with a multimap. A multimap also has a version of insert() withtwo arguments, the second being the pair to be inserted, the first being an iterator pointing to the posi-tion in the multimap to start searching for an insertion point. This gives you some control over where apair will be inserted when the same key already exists. This version of insert() also returns an iteratorpointing to the element that was inserted. The third version of insert() accepts two iterator argumentsthat specify a range of elements to be inserted from some other source.
When you pass a key to the erase() function for a multimap, it erases all entries with the same key andthe value returned indicates how many entries were deleted. The significance of having another versionof erase() available that accepts an iterator as an argument should now be apparent — it allows you todelete a single element.
The find() function can only find the first element with a given key in a multimap. You really need a wayto find several elements with the same key and the lower_bound(), upper_bound(), and equal_range()functions provide you with a way to do this. For example, given a phonebook object that is type
multimap<Person, string>
rather than type map<Person, string>, you could list the phone numbers corresponding to a givenkey like this:
Person person = Person(“Jack”, “Jones”);multimap<Person, string>::iterator iter = phonebook.lower_bound(person);if(iter == phonebook.end())cout << “The are no entries for “ << person.getName() << endl;
else{cout << “The following numbers are listed for “ << person.getName() << “:” << endl;for( ; iter != phonebook.upper_bound(person) ; iter++)
cout << iter->second << endl;}
664
Chapter 10: The Standard Template Library
25905c10.qxd:WroxPro 2/21/08 9:11 AM Page 664
It’s important to check the iterator returned by the lower_bound() function. If you don’t, you could endup trying to reference an entry one beyond the last entry.
More on IteratorsThe <iterator> header defines several templates for iterators for transferring data from a source to adestination. Stream iterators act as pointers to a stream for input or output and they enable you to trans-fer data between a stream and any source or destination that works with iterators, such as an algorithm.Inserter interators can transfer data into a basic sequence container. The <iterator> header defines twostream iterator templates, istream_iterator<T> for input streams and ostream_iterator<T> foroutput streams, where T is the type of object to be extracted from, or written to, the stream. The headeralso defines three inserter templates, inserter<T>, back_inserter<T> and front_inserter<T>,where T is the type of sequence container in which data is to be inserted.
Let’s explore some of these iterators in a little more depth.
Using Input Stream IteratorsHere’s an example of how you create an input stream iterator:
istream_iterator<int> numbersInput(cin);
This creates the iterator numbersInput of type istream_iterator<int> that can point to objects oftype int in a stream. The argument to the constructor specifies the actual stream to which the iteratorrelates, so this is an iterator that can read integers from cin, the standard input stream.
The default istream_iterator<T> constructor creates an end-of-stream iterator, which will be the equiv-alent to the end iterator for a container that you have been obtaining by calling the end() function. Here’show you could create an end-of-stream iterator for cin complementing the numbersInput iterator:
istream_iterator<int> numbersEnd;
Now you have a pair of iterators that define a sequence of values of type int from cin. You could usethese to load values from cin into a vector<int> container for example:
vector<int> numbers;istream_iterator<int> numbersInput(cin), numbersEnd;cout << “Enter integers separated by spaces then a letter to end:” << endl;while(numbersInput != numbersEnd)numbers.pushback(*numbersIn++);
After defining the vector container to hold values of type int, you create two input stream iterators:numbersIn is an input stream iterator reading values of type int from cin, and numbersEnd is anend-of-stream iterator for the same input stream. The while loop continues as long as numbersEnd isnot equal to the end-of-stream iterator, numbersEnd. When you execute this fragment, input continuesuntil end-of-stream is recognized for cin, but what produces that condition? The end-of-stream condi-tion will arise if you enter Ctrl+Z to close the input stream, or you enter an invalid character such as a letter.
665
Chapter 10: The Standard Template Library
25905c10.qxd:WroxPro 2/21/08 9:11 AM Page 665
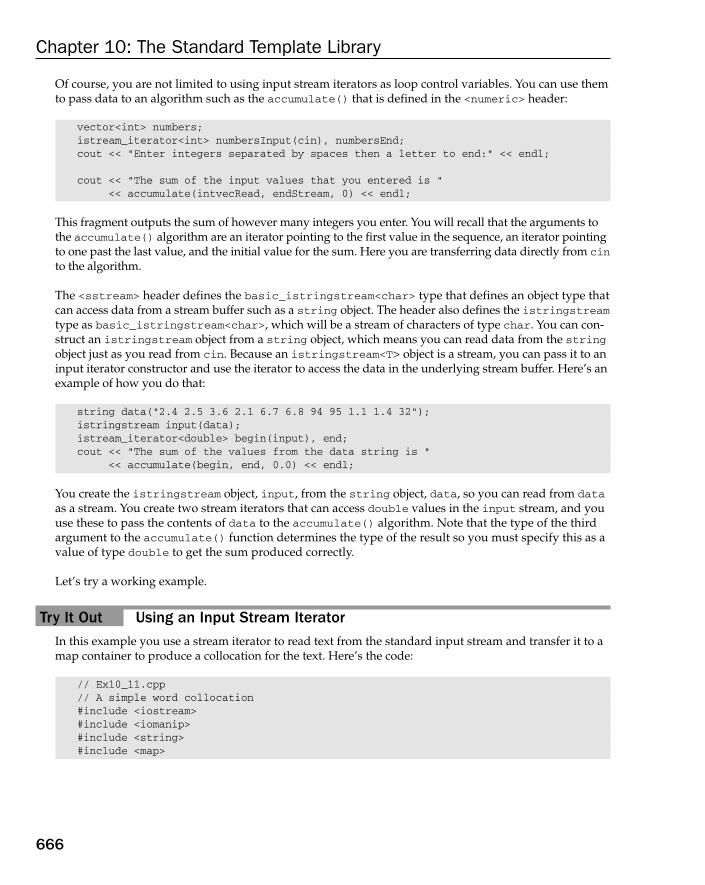
Of course, you are not limited to using input stream iterators as loop control variables. You can use themto pass data to an algorithm such as the accumulate() that is defined in the <numeric> header:
vector<int> numbers;istream_iterator<int> numbersInput(cin), numbersEnd;cout << “Enter integers separated by spaces then a letter to end:” << endl;
cout << “The sum of the input values that you entered is “<< accumulate(intvecRead, endStream, 0) << endl;
This fragment outputs the sum of however many integers you enter. You will recall that the arguments tothe accumulate() algorithm are an iterator pointing to the first value in the sequence, an iterator pointingto one past the last value, and the initial value for the sum. Here you are transferring data directly from cinto the algorithm.
The <sstream> header defines the basic_istringstream<char> type that defines an object type thatcan access data from a stream buffer such as a string object. The header also defines the istringstreamtype as basic_istringstream<char>, which will be a stream of characters of type char. You can con-struct an istringstream object from a string object, which means you can read data from the stringobject just as you read from cin. Because an istringstream<T> object is a stream, you can pass it to aninput iterator constructor and use the iterator to access the data in the underlying stream buffer. Here’s anexample of how you do that:
string data(“2.4 2.5 3.6 2.1 6.7 6.8 94 95 1.1 1.4 32”);istringstream input(data);istream_iterator<double> begin(input), end;cout << “The sum of the values from the data string is “
<< accumulate(begin, end, 0.0) << endl;
You create the istringstream object, input, from the string object, data, so you can read from dataas a stream. You create two stream iterators that can access double values in the input stream, and youuse these to pass the contents of data to the accumulate() algorithm. Note that the type of the thirdargument to the accumulate() function determines the type of the result so you must specify this as avalue of type double to get the sum produced correctly.
Let’s try a working example.
Try It Out Using an Input Stream IteratorIn this example you use a stream iterator to read text from the standard input stream and transfer it to amap container to produce a collocation for the text. Here’s the code:
// Ex10_11.cpp// A simple word collocation#include <iostream>#include <iomanip>#include <string>#include <map>
666
Chapter 10: The Standard Template Library
25905c10.qxd:WroxPro 2/21/08 9:11 AM Page 666
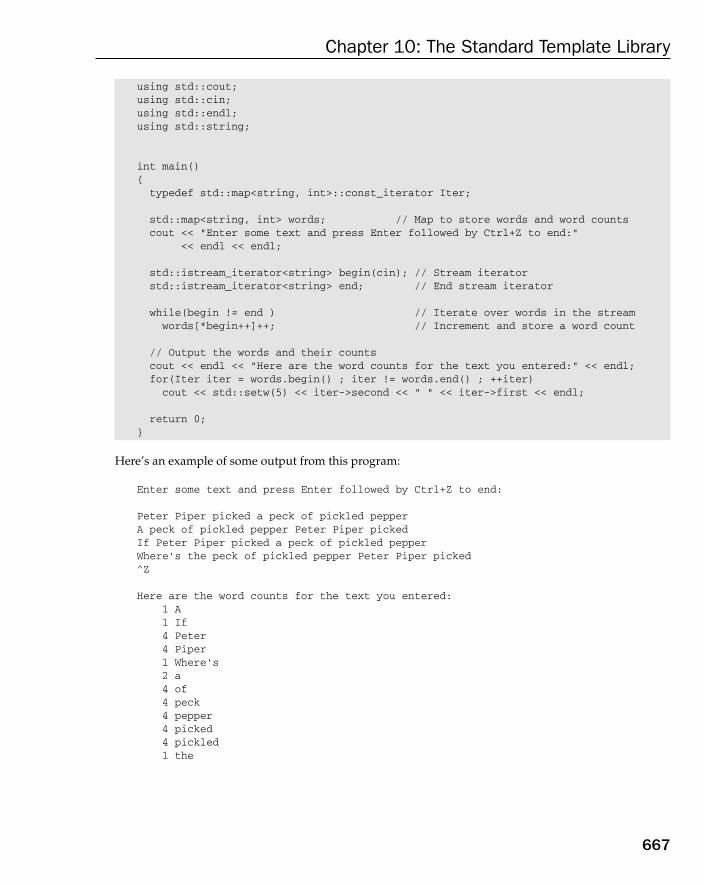
using std::cout;using std::cin;using std::endl;using std::string;
int main() {typedef std::map<string, int>::const_iterator Iter;
std::map<string, int> words; // Map to store words and word countscout << “Enter some text and press Enter followed by Ctrl+Z to end:”
<< endl << endl;
std::istream_iterator<string> begin(cin); // Stream iterator std::istream_iterator<string> end; // End stream iterator
while(begin != end ) // Iterate over words in the stream words[*begin++]++; // Increment and store a word count
// Output the words and their countscout << endl << “Here are the word counts for the text you entered:” << endl;for(Iter iter = words.begin() ; iter != words.end() ; ++iter) cout << std::setw(5) << iter->second << “ “ << iter->first << endl;
return 0;}
Here’s an example of some output from this program:
Enter some text and press Enter followed by Ctrl+Z to end:
Peter Piper picked a peck of pickled pepperA peck of pickled pepper Peter Piper pickedIf Peter Piper picked a peck of pickled pepperWhere’s the peck of pickled pepper Peter Piper picked^Z
Here are the word counts for the text you entered:1 A1 If4 Peter4 Piper1 Where’s2 a4 of4 peck4 pepper4 picked4 pickled1 the
667
Chapter 10: The Standard Template Library
25905c10.qxd:WroxPro 2/21/08 9:11 AM Page 667

How It WorksYou first define a type for a const iterator for the map container:
typedef std::map<string, int>::const_iterator Iter;
Using this typedef statement to define the Iter type will make the loop statement that outputs thecontents of the map much more readable.
Next you define a map container to store the words and the word counts:
std::map<string, int> words; // Map to store words and word counts
This container stores each word count of type int using the word of type string as the key. This willmake it easy to accumulate the count for each word when you read from the input stream using streamiterators.
std::istream_iterator<string> begin(cin); // Stream iterator std::istream_iterator<string> end; // End stream iterator
The begin iterator is a stream iterator for the standard input stream and end is an end-of-stream iteratorthat you can use to detect when the end of the input is reached.
You read the words and accumulate the counts in a loop:
while(begin != end ) // Iterate over words in the stream words[*begin++]++; // Increment and store a word count
This simple while loop does a great deal of work. The loop control expression will iterate over the wordsentered via the standard input stream until the end-of-stream state is reached. The stream iterator readswords from cin delimited by whitespace, just like the overloaded >> operator for cin. Within the loopyou use the subscript operator for the map container to store a count with the word as the key; remem-ber, the argument to the subscript operator for a map is the key. The expression *begin accesses a wordand the expression *begin++ increments the iterator after accessing the word.
The first time a word is read, it will not be in the map, so the expression words[*begin++] will store anew entry with the count having the default value 0, and increment the begin iterator to the next word,ready for the next loop iteration. The whole expression words[*begin++]++ will increment the countfor the entry, regardless of whether it is a new entry or not. Thus an existing entry will just get its countincremented whereas a new entry will be created and then its count incremented from 0 to 1.
Finally you output the count for each word in a for loop:
for(Iter iter = words.begin() ; iter != words.end() ; ++iter) cout << std::setw(5) << iter->second << “ “ << iter->first << endl;
This uses the iterator for the container in the way you have seen several times before. The loop controlexpressions are very much easier to read because of the typedef for Iter.
668
Chapter 10: The Standard Template Library
25905c10.qxd:WroxPro 2/21/08 9:11 AM Page 668
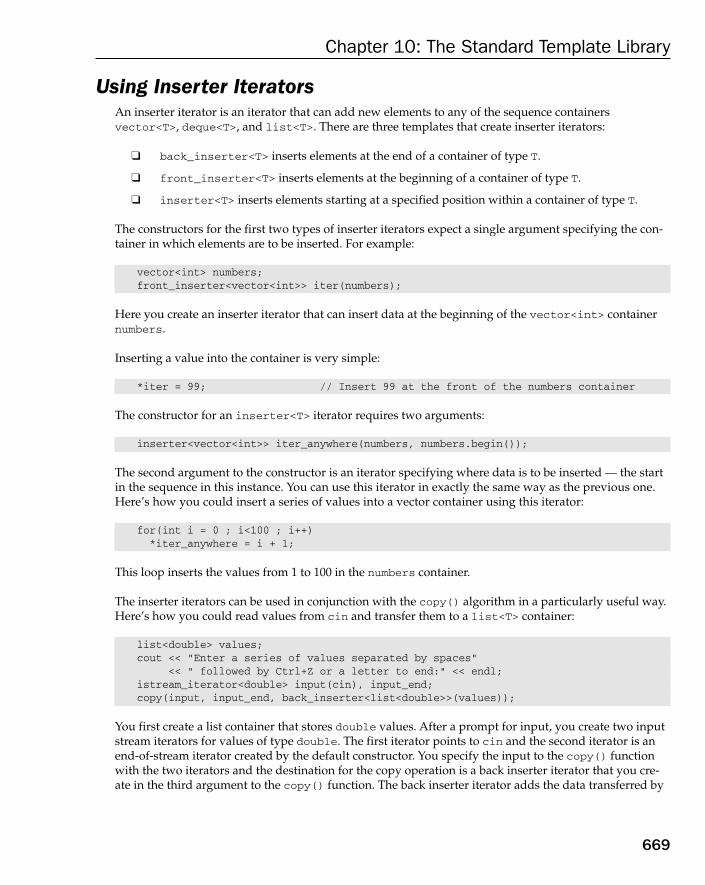
Using Inserter IteratorsAn inserter iterator is an iterator that can add new elements to any of the sequence containersvector<T>, deque<T>, and list<T>. There are three templates that create inserter iterators:
❑ back_inserter<T> inserts elements at the end of a container of type T.
❑ front_inserter<T> inserts elements at the beginning of a container of type T.
❑ inserter<T> inserts elements starting at a specified position within a container of type T.
The constructors for the first two types of inserter iterators expect a single argument specifying the con-tainer in which elements are to be inserted. For example:
vector<int> numbers;front_inserter<vector<int>> iter(numbers);
Here you create an inserter iterator that can insert data at the beginning of the vector<int> containernumbers.
Inserting a value into the container is very simple:
*iter = 99; // Insert 99 at the front of the numbers container
The constructor for an inserter<T> iterator requires two arguments:
inserter<vector<int>> iter_anywhere(numbers, numbers.begin());
The second argument to the constructor is an iterator specifying where data is to be inserted — the startin the sequence in this instance. You can use this iterator in exactly the same way as the previous one.Here’s how you could insert a series of values into a vector container using this iterator:
for(int i = 0 ; i<100 ; i++)*iter_anywhere = i + 1;
This loop inserts the values from 1 to 100 in the numbers container.
The inserter iterators can be used in conjunction with the copy() algorithm in a particularly useful way.Here’s how you could read values from cin and transfer them to a list<T> container:
list<double> values;cout << “Enter a series of values separated by spaces”
<< “ followed by Ctrl+Z or a letter to end:” << endl;istream_iterator<double> input(cin), input_end;copy(input, input_end, back_inserter<list<double>>(values));
You first create a list container that stores double values. After a prompt for input, you create two inputstream iterators for values of type double. The first iterator points to cin and the second iterator is anend-of-stream iterator created by the default constructor. You specify the input to the copy() functionwith the two iterators and the destination for the copy operation is a back inserter iterator that you cre-ate in the third argument to the copy() function. The back inserter iterator adds the data transferred by
669
Chapter 10: The Standard Template Library
25905c10.qxd:WroxPro 2/21/08 9:11 AM Page 669

the copy operation to the list container, values. This is quite powerful stuff. If you ignore the prompt, inthree statements you can read an arbitrary number of values from the standard input stream and trans-fer them to a list container.
Using Output Stream IteratorsComplementing the input stream iterator template, the ostream_iterator<T> template provides out-put stream iterators for writing objects of type T to an output stream. There are two constructors for aninstance of the output stream iterator template. One creates an iterator that just transfers data to the des-tination stream:
ostream_iterator<int> out(cout);
The type argument, int, to the template specifies the type of data to be handled and the constructorargument, cout, specifies the stream that will be the destination for data so the out iterator can writevalue of type int to the standard output stream. Here’s how you might use this iterator:
int data[] = {1, 2, 3, 4, 5, 6, 7, 8, 9};vector<int> numbers(data, data+9); // Contents 1 2 3 4 5 6 7 8 9copy(numbers.begin(), numbers.end(), out);
The copy() algorithm that is defined in the <algorithm> header copies the sequence of objects speci-fied by the first two iterator arguments to the output iterator specified by the third argument. Here thefunction copies the elements from the numbers vector to the out iterator, which will write the elementsto cout. The result of executing this fragment will be:
123456789
As you can see, the values are written to the standard output stream with no spaces between. The secondoutput stream iterator constructor can improve on this:
ostream_iterator<int> out(cout, “, “);
The second argument to the constructor is a string to be used as a delimiter for output values. If you usethis iterator as the third argument to the copy() function in the previous fragment, the output will be:
1, 2, 3, 4, 5, 6, 7, 8, 9,
The delimiter string that you specify as a second constructor argument is written to the stream followingeach value that is written out.
Let’s see how an output stream iterator works in practice.
Try It Out Using an Inserter IteratorSuppose you want to read a series of integer values from cin and store them in a vector. You then wantto output the values and their sum. Here’s how you could do this with the STL:
// Ex10_12.cpp// Using stream and inserter iterators#include <iostream>
670
Chapter 10: The Standard Template Library
25905c10.qxd:WroxPro 2/21/08 9:11 AM Page 670

#include <numeric>#include <vector>using std::cout;using std::cin;using std::endl;using std::vector;using std::istream_iterator;using std::ostream_iterator;using std::back_inserter;using std::accumulate;
int main(){vector<int> numbers;cout << “Enter a series of integers separated by spaces”
<< “ followed by Ctrl+Z or a letter:” << endl;
istream_iterator<int> input(cin), input_end;ostream_iterator<int> out(cout, “ “);
copy(input, input_end, back_inserter<vector<int>>(numbers));
cout << “You entered the following values:” << endl;copy(numbers.begin(), numbers.end(), out);
cout << endl << “The sum of these values is “ << accumulate(numbers.begin(), numbers.end(), 0) << endl;
return 0;}
Here’s an example of some output:
Enter a series of integers separated by spaces followed by Ctrl+Z or a letter:1 2 3 4 5 6 7 8 9 10 11 12 13 14 15 ^ZYou entered the following values:1 2 3 4 5 6 7 8 9 10 11 12 13 14 15The sum of these values is 120
How It WorksAfter creating the numbers vector to store integers and issuing a prompt for input, you create threestream iterators:
istream_iterator<int> input(cin), input_end;ostream_iterator<int> out(cout, “ “);
The first statement creates two input stream iterators for reading values of type int from the standardinput stream, input and input_end, the latter being an end-of-stream iterator. The second statementcreates an output stream iterator for transferring values of type int to the standard output stream withthe delimiter following each output value being a single space.
Data is read from cin and transferred to the vector container using the copy() algorithm:
copy(input, input_end, back_inserter<vector<int>>(numbers));
671
Chapter 10: The Standard Template Library
25905c10.qxd:WroxPro 2/21/08 9:11 AM Page 671

You specify the source of data for the copy operation by the two input stream iterators, input andinput_end, and the destination for the copy operation is a back inserter iterator for the numbers con-tainer. Thus the copy operation will transfer data values from cin to the numbers container via theback inserter.
You output the values that have been stored in the container using another copy operation:
copy(numbers.begin(), numbers.end(), out);
Here the source for the copy is specified by the begin() and end() iterators for the container, and thedestination is the output stream iterator, out. This operation will therefore write the data from numbersto cout with the values separated by a space.
Finally you calculate the sum of the values in the numbers container in the output statement using theaccumulate() algorithm:
cout << endl << “The sum of these values is “ << accumulate(numbers.begin(), numbers.end(), 0) << endl;
You specify the range of values to be summed by the begin() and end() iterators for the container andthe initial value for the sum is zero. If you wanted the average rather than the sum, this is easy too, beinggiven by the expression:
accumulate(numbers.begin(), numbers.end(), 0)/numbers.size()
More on Function ObjectsThe <functional> header defines an extensive set of templates for creating function objects that youcan use with algorithms and containers. I won’t discuss them in detail but I’ll summarize the most use-ful ones. The function objects for comparisons are shown in the following table.
Function Object Template Description
less<T> Creates a binary predicate representing the < operation betweenobjects of type T. For example, less<string>() defines a functionobject for comparing objects of type string.
less_equal<T> Creates a binary predicate representing the <= operation betweenobjects of type T. For example, less_equal<double>() defines afunction object for comparing objects of type double.
equal<T> Creates a binary predicate representing the == operation betweenobjects of type T.
not_equal<T> Creates a binary predicate representing the!= operation betweenobjects of type T.
672
Chapter 10: The Standard Template Library
25905c10.qxd:WroxPro 2/21/08 9:11 AM Page 672

Here’s how you could use the not2<B> template to define a binary predicate for use with the sort()algorithm:
sort(v.begin(), v.end(), not2(greater<string>()));
The argument to the not2 constructor is greater<string>(), which is a call to the constructor for thegreater<string> class type, so the sort() function will sort using “not greater than” as the compari-son between objects in the container, v.
The <functional> header also defines function objects for performing arithmetic operations on elements.You would typically use these to apply operations to sequences of numerical values using the transform()algorithm that is defined in the <algorithm> header. These function objects are described in the followingtable where the parameter T specifies the type of the operands.
To make use of these you need to apply the transform() function, and I’ll explain how this works inthe next section.
Function Object Template Description
plus<T> Calculates the sum of two elements of type T.
minus<T> Calculates the difference between two elements of type T by sub-tracting the second operand from the first.
multiplies<T> Calculates the product of two elements of type T.
divides<T> Divides the first operand of type T by the second operand of type T.
modulus<T> Calculates the remainder after dividing the first operand of type Tby the second.
negate<T> Returns the negative of its operand of type T.
Function Object Template Description
greater_equal<T> Creates a binary predicate representing the >= operation betweenobjects of type T.
greater<T> Creates a binary predicate representing the > operation betweenobjects of type T.
not2<B> Creates a binary predicate that is the negation of a binary predicate oftype B. For example, not2(less<int>) creates a binary predicate forcomparing objects of type int that returns true if the left operand isnot less than the right operand. The template type parameter value Bis deduced from the type of the constructor argument.
673
Chapter 10: The Standard Template Library
25905c10.qxd:WroxPro 2/21/08 9:11 AM Page 673
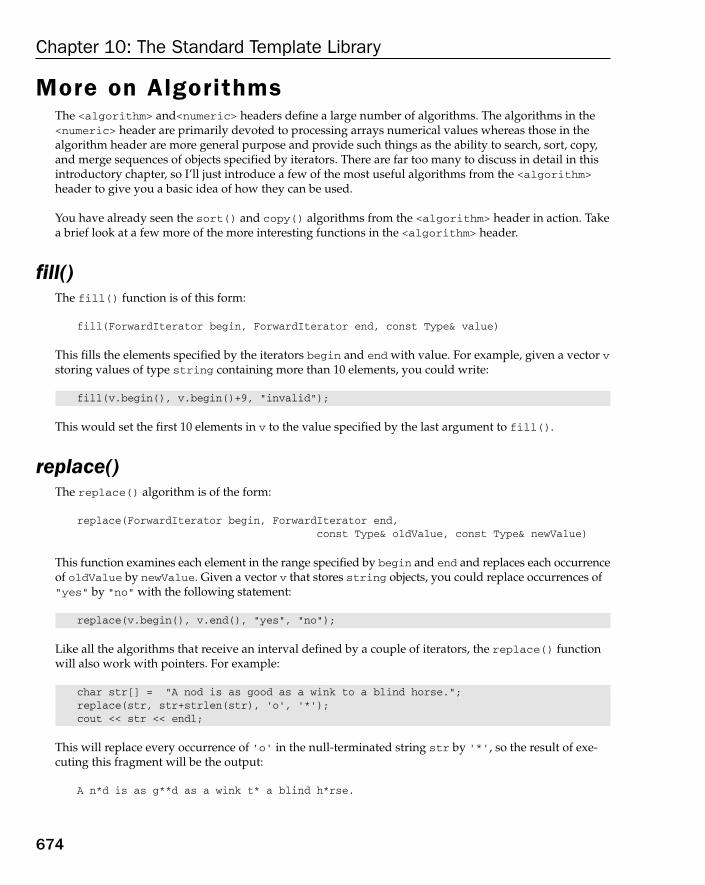
More on AlgorithmsThe <algorithm> and<numeric> headers define a large number of algorithms. The algorithms in the<numeric> header are primarily devoted to processing arrays numerical values whereas those in thealgorithm header are more general purpose and provide such things as the ability to search, sort, copy,and merge sequences of objects specified by iterators. There are far too many to discuss in detail in thisintroductory chapter, so I’ll just introduce a few of the most useful algorithms from the <algorithm>header to give you a basic idea of how they can be used.
You have already seen the sort() and copy() algorithms from the <algorithm> header in action. Takea brief look at a few more of the more interesting functions in the <algorithm> header.
fill()The fill() function is of this form:
fill(ForwardIterator begin, ForwardIterator end, const Type& value)
This fills the elements specified by the iterators begin and end with value. For example, given a vector vstoring values of type string containing more than 10 elements, you could write:
fill(v.begin(), v.begin()+9, “invalid”);
This would set the first 10 elements in v to the value specified by the last argument to fill().
replace()The replace() algorithm is of the form:
replace(ForwardIterator begin, ForwardIterator end,const Type& oldValue, const Type& newValue)
This function examines each element in the range specified by begin and end and replaces each occurrenceof oldValue by newValue. Given a vector v that stores string objects, you could replace occurrences of“yes” by “no” with the following statement:
replace(v.begin(), v.end(), “yes”, “no”);
Like all the algorithms that receive an interval defined by a couple of iterators, the replace() functionwill also work with pointers. For example:
char str[] = “A nod is as good as a wink to a blind horse.”;replace(str, str+strlen(str), ‘o’, ‘*’);cout << str << endl;
This will replace every occurrence of ‘o’ in the null-terminated string str by ‘*’, so the result of exe-cuting this fragment will be the output:
A n*d is as g**d as a wink t* a blind h*rse.
674
Chapter 10: The Standard Template Library
25905c10.qxd:WroxPro 2/21/08 9:11 AM Page 674

find()The find() function is of the form:
find(InputIterator begin, InputIterator end, const Type& value)
This function searches the sequence specified by the first two arguments for the first occurrence of value.For example, given a vector v containing values of type int, you could write:
vector<int>::iterator iter = find(v.begin(), v.end(), 21);
Obviously by using iter as the starting point for a new search, you could use the find() algorithmrepeatedly to find all occurrences of a given value. Perhaps like this:
vector<int>::iterator iter = v.begin();int value = 21, count = 0;while((iter = find(iter, v.end(), value)) != v.end()){iter++;count++;
}cout << “The vector contains “ << count << “ occurrences of “ << value << endl;
This fragment searches the vector v for all occurrences of value. On the first loop iteration, the searchstarts at v.begin(). On subsequent iterations, the search starts at one past the previous position thatwas found. The loop will accumulate the total number of occurrences of value in v. You could also codethe loop as a for loop:
for((iter = find(v.begin(), v.end(), value)); iter != v.end() ;(iter = find(iter, v.end(), value))++, count++);
Now the find operation is in the third loop control expression and you increment iter after the resultfrom the find() function is stored. In my view the while loop is a better solution because it’s easier tounderstand.
transform()The transform() function comes in two versions. The first version applies an operation specified by aunary function object to a set of elements specified by a pair of iterators, and is of the form:
transform(InputIterator begin, InputIterator end,OutputIterator result, UnaryFunction f)
This version of transform() applies the unary function f to all elements in the range specified by the iter-ators begin and end and stores the results beginning at the position specified by the iterator result. Theresult iterator can be the same as begin, in which case the results will replace the original elements. Thefunction returns an iterator that is one past the last result stored.
Here’s an example:
double values[] = { 2.5, -3.5, 4.5, -5.5, 6.5, -7.5};
675
Chapter 10: The Standard Template Library
25905c10.qxd:WroxPro 2/21/08 9:11 AM Page 675

vector<double> data(values, values+6);transform(data.begin(),data.end(),data.begin(), negate<double>());
The transform() function call applies a negate<double> function object to all the elements in the vec-tor, data. The results are stored back in data and overwrite the original values; so after this operation thevector will contain:
-2.5, 3.5, -4.5, 5.5, -6.5, 7.5
Because the operation writes the results back to the data vector, the transform() function will returnthe iterator data.end().
The second version of transform() applies a binary function with the operands coming from two rangesspecified by iterators. The function is of the form:
transform(InputIterator1 begin1, InputIterator1 end1, InputIterator2 begin2,OutputIterator result, BinaryFunction f)
The range specified by begin1 and end1 represents the set of left operands for the binary function f thatis specified by the last argument. The range representing the right operands starts at the position specifiedby the begin2 iterator; an end iterator does not need to be supplied for this range because there must bethe same number of elements as in the range specified by begin1 and end1. The results will be stored in the range starting at the result iterator position. The result iterator can be the same as begin1 ifyou want the results stored back in that range but it must not be any other position between begin1 andend1. Here’s an example of how you might use this version of the transform() algorithm:
double values[] = { 2.5, -3.5, 4.5, -5.5, 6.5, -7.5};vector<double> data(values, values+6);vector<double> squares(data.size());transform(data.begin(),data.end(),data.begin(),
squares.begin(), multiplies<double>());ostream_iterator<double> out(cout, “ “);copy(data.begin(), data.end(), out);
You initialize the data vector with the contents of the values array. You then create a vector squaresto store the results of the transform() operation with the same number of elements as data. Thetransform() function uses the multiplies<double>() function object to multiply each element of data by itself. The results are stored in the squares vector. The last two statements use an outputstream iterator to list the contents of squares, which will be:
6.25 12.25 20.25 30.25 42.25 56.25
The STL for C++/CLI ProgramsThe STL/CLR library is an implementation of the STL for use with C++/CLI programs and the CLR. TheSTL/CLR library covers all the capability that I have described for the STL for standard C++, so I won’tgo over the same ground again. I’ll simply highlight some of the differences and illustrate how you usethe STL/CLR with examples.
676
Chapter 10: The Standard Template Library
25905c10.qxd:WroxPro 2/21/08 9:11 AM Page 676

The STL/CLR library is contained within the cliext namespace so all STL names are qualified by cliextrather than std. There are cliext include subdirectories that are equivalents for each of the standard C++STL headers, including those for container adapters, algorithms and function objects and the STL/CLRsubdirectory name is the same in every case. Thus the C++/CLI equivalents to the templates defined in a standard STL header such as <functional> can be found in <cliext/functional>. So for example,if you want to use vector containers in your C++/CLI program you need an #include directive for<cliext/vector>, and to use the queue<T> adapter the include file is <cliext/queue>.
STL/CLR ContainersSTL/CLR containers can store reference types, handles to reference types, and unboxed value types;they cannot store boxed value types. Most of the time, you will use STL/CLR containers with handlesor value types. If you do choose to store reference types in a container, they will be passed by value,and the requirements for storing such objects in an STL/CLR container are essentially the same as for a native STL container. Any reference type stored in an STL/CLR container must at least implement apublic copy constructor, a public assignment operator, and a public destructor. These requirements donot apply when you are storing value types or handles to reference types in an STL/CLR container.
Don’t forget that the compiler does not supply default versions of the copy constructor and assignmentoperator for reference types so when they are needed, you must always define them in your ref classes.Just to remind you, for a type T, in a C++/CLI class these functions will be of the form:
T(const T% t) // Copy constructor{
// Function body...}
T% operator=(const T% t) // Assignement operator{
// Function body...}
~T() // Destructor{
// Function body...}
Some container operations also require a no-arg constructor and the operator==() function to be defined.A no-arg constructor may be used when space for elements in a container need to be allocated when thecontainer is storing objects rather than handles. If you are storing handles to reference types or value typesin an associative container such as a set or a map, they must overload at least one comparison operator —the default requirement is for operator<().
Using Sequence ContainersAll the sequence containers provided by STL for native C++ are also available with the STL/CLR. TheSTL/CLR implements all the operations that the native STL containers support, so the differences tend to be notational arising from the use of C++/CLI types. Let’s explore the differences throughsome examples.
677
Chapter 10: The Standard Template Library
25905c10.qxd:WroxPro 2/21/08 9:11 AM Page 677
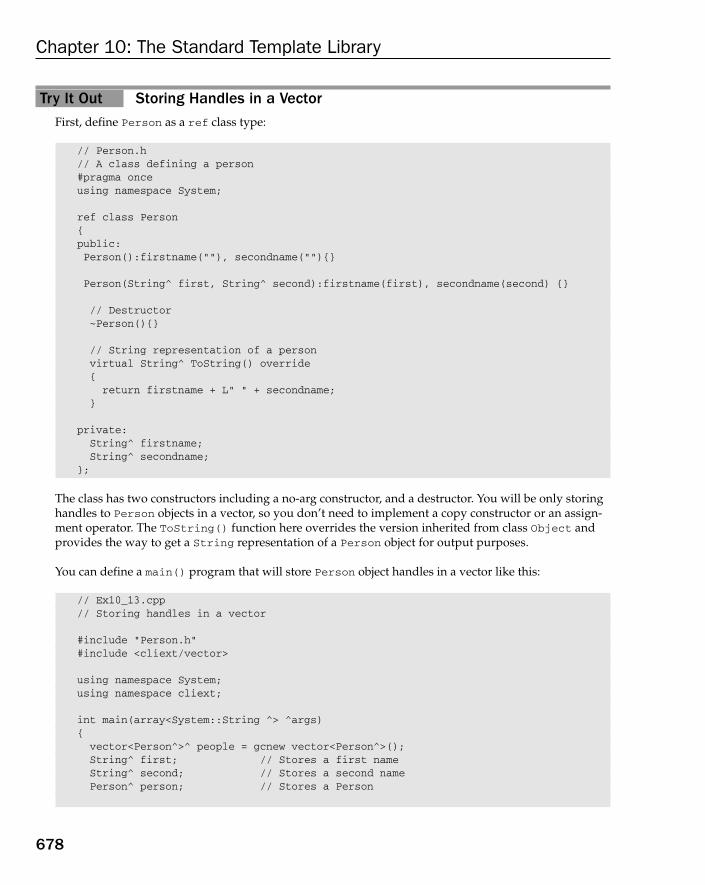
Try It Out Storing Handles in a VectorFirst, define Person as a ref class type:
// Person.h// A class defining a person#pragma onceusing namespace System;
ref class Person{public:Person():firstname(“”), secondname(“”){}
Person(String^ first, String^ second):firstname(first), secondname(second) {}
// Destructor~Person(){}
// String representation of a personvirtual String^ ToString() override{return firstname + L” “ + secondname;
}
private:String^ firstname;String^ secondname;
};
The class has two constructors including a no-arg constructor, and a destructor. You will be only storinghandles to Person objects in a vector, so you don’t need to implement a copy constructor or an assign-ment operator. The ToString() function here overrides the version inherited from class Object andprovides the way to get a String representation of a Person object for output purposes.
You can define a main() program that will store Person object handles in a vector like this:
// Ex10_13.cpp// Storing handles in a vector
#include “Person.h”#include <cliext/vector>
using namespace System;using namespace cliext;
int main(array<System::String ^> ^args){vector<Person^>^ people = gcnew vector<Person^>(); String^ first; // Stores a first nameString^ second; // Stores a second namePerson^ person; // Stores a Person
678
Chapter 10: The Standard Template Library
25905c10.qxd:WroxPro 2/21/08 9:11 AM Page 678

while(true){Console::Write(L”Enter a first name or press Enter to end: “);first = Console::ReadLine();if(first->Length == 0)break;
Console::Write(L”Enter a second name: “);second = Console::ReadLine();person = gcnew Person(first->Trim(),second->Trim());people->push_back(person);
}
// Output the contents of the vectorConsole::WriteLine(L”\nThe persons in the vector are:”);for each(Person^ person in people)Console::WriteLine(“{0}”,person);
return 0;}
Here is a sample of output from this program:
Enter a first name or press Enter to end: MarilynEnter a second name: MonroeEnter a first name or press Enter to end: NicoleEnter a second name: KidmanEnter a first name or press Enter to end: JudyEnter a second name: DenchEnter a first name or press Enter to end: SallyEnter a second name: FieldEnter a first name or press Enter to end:
The persons in the vector are:Marilyn MonroeNicole KidmanJudy DenchSally Field
How It WorksYou create the vector container on the CLR heap like this:
vector<Person^>^ people = gcnew vector<Person^>();
The template type argument is Person^, which is a handle to a Person object. The container is alsocreated on the CLR heap so the people variable is a handle of type vector<Person^>^.
You create three handles for use as working storage in the input process:
String^ first; // Stores a first nameString^ second; // Stores a second namePerson^ person; // Stores a Person
The first two refer to String objects and the third is a handle to a Person object.
679
Chapter 10: The Standard Template Library
25905c10.qxd:WroxPro 2/21/08 9:11 AM Page 679

You read names from the standard input stream and create Person objects in an indefinite while loop:
while(true){
Console::Write(L”Enter a first name or press Enter to end: “);first = Console::ReadLine();if(first->Length == 0)
break;Console::Write(L”Enter a second name: “);second = Console::ReadLine();person = gcnew Person(first->Trim(),second->Trim());people->push_back(person);
}
After prompting for the input, the Console::ReadLine() function reads a name from the standardinput stream and stores it in first. If just the Enter key was pressed, the length of the string will bezero so you test for this to decide when to exit the loop. If the first name read is not of zero length, youread the second name. You then create a Person object on the CLR heap and store the handle in person.For each String^ argument to the constructor, you call the Trim() function to remove any leading ortrailing spaces. Calling the push_back() function for the people container stores the person handle inthe vector.
The objects exist independently of the container, so if you were to discard the container (by assigningnullptr to people for example) it would not necessarily destroy the objects pointed to by the handles it contains. In our example, we do not retain any handles to the objects, so in this case destroying thecontainer would result in the objects not being referenced anywhere so eventually the garbage collectorwould get around to destroying them and freeing the memory they occupy on the CLR heap.
After the input loop ends, you output the contents of a vector in a for each loop:
for each(Person^ person in people)Console::WriteLine(“{0}”,person);
The for each loop works directly with sequence containers so you can use this to iterate over all thehandles stored in the people vector. The Console::WriteLine() function calls the ToString()function for each Person object to produce the string to be inserted in the first argument string.
It is not normal usage but let’s look at another working example to explore how you can store ref classobjects in a sequence container, rather than handles.
Try It Out Storing Reference Class Objects in a Double-Ended QueueYou will use Person object again but this time you will sort the contents of the container before you generate the output. Here’s the new version of the Person class:
// Person.h// A class defining a person#pragma once
680
Chapter 10: The Standard Template Library
25905c10.qxd:WroxPro 2/21/08 9:11 AM Page 680

using namespace System;
ref class Person{public:Person():firstname(“”), secondname(“”){}
Person(String^ first, String^ second):firstname(first), secondname(second){}
// Copy constructorsPerson(const Person% p):firstname(p.firstname),secondname(p.secondname){}Person(Person^ p):firstname(p->firstname), secondname(p->secondname){}
// Destructor~Person(){}
// Assignment operatorPerson% operator=(const Person% p){if(this != %p){firstname = p.firstname;secondname = p.secondname;
}return *this;
}
// Less-than operatorbool operator<(Person^ p){if(String::Compare(secondname, p->secondname) < 0 ||
(String::Compare(secondname, p->secondname)== 0 &&String::Compare(firstname, p->firstname) < 0))
return true;return false;
}
// String representation of a personvirtual String^ ToString() override{return firstname + L” “ + secondname;
}
private:String^ firstname;String^ secondname;
};
You now have two copy constructors for Person objects, one accepting a Person object as an argumentand the other accepting a handle to a Person object. A sequence container requires both copy construc-tors if it is to compile. You also have the assignment operator for Person objects, which is also requiredby the container. The operator<() function is needed for the sort() algorithm.
681
Chapter 10: The Standard Template Library
25905c10.qxd:WroxPro 2/21/08 9:11 AM Page 681
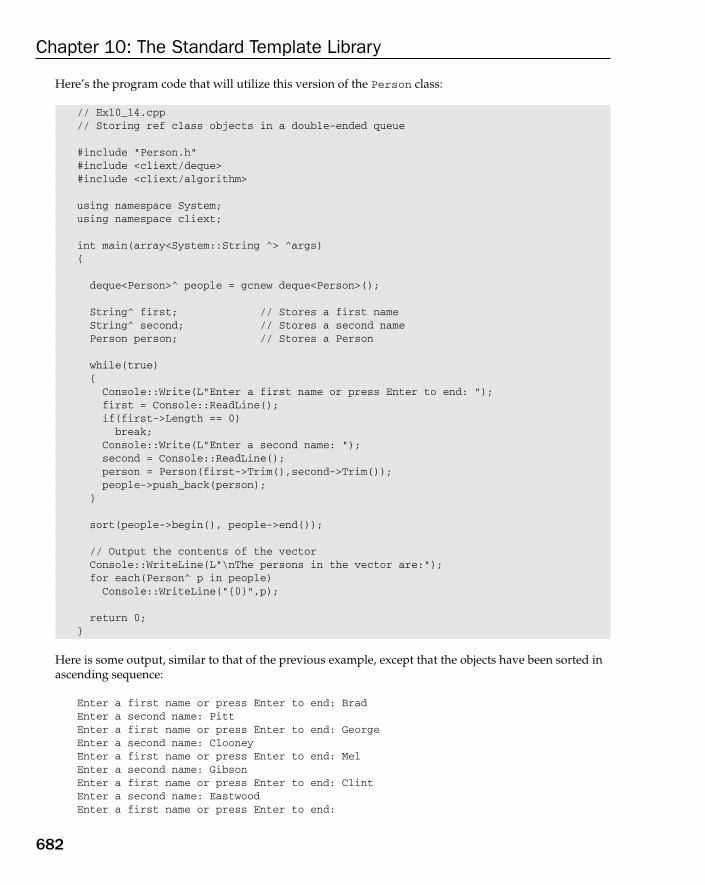
Here’s the program code that will utilize this version of the Person class:
// Ex10_14.cpp// Storing ref class objects in a double-ended queue
#include “Person.h”#include <cliext/deque>#include <cliext/algorithm>
using namespace System;using namespace cliext;
int main(array<System::String ^> ^args){
deque<Person>^ people = gcnew deque<Person>();
String^ first; // Stores a first nameString^ second; // Stores a second namePerson person; // Stores a Person
while(true){Console::Write(L”Enter a first name or press Enter to end: “);first = Console::ReadLine();if(first->Length == 0)break;
Console::Write(L”Enter a second name: “);second = Console::ReadLine();person = Person(first->Trim(),second->Trim());people->push_back(person);
}
sort(people->begin(), people->end());
// Output the contents of the vectorConsole::WriteLine(L”\nThe persons in the vector are:”);for each(Person^ p in people)Console::WriteLine(“{0}”,p);
return 0;}
Here is some output, similar to that of the previous example, except that the objects have been sorted inascending sequence:
Enter a first name or press Enter to end: BradEnter a second name: PittEnter a first name or press Enter to end: GeorgeEnter a second name: ClooneyEnter a first name or press Enter to end: MelEnter a second name: GibsonEnter a first name or press Enter to end: ClintEnter a second name: EastwoodEnter a first name or press Enter to end:
682
Chapter 10: The Standard Template Library
25905c10.qxd:WroxPro 2/21/08 9:11 AM Page 682
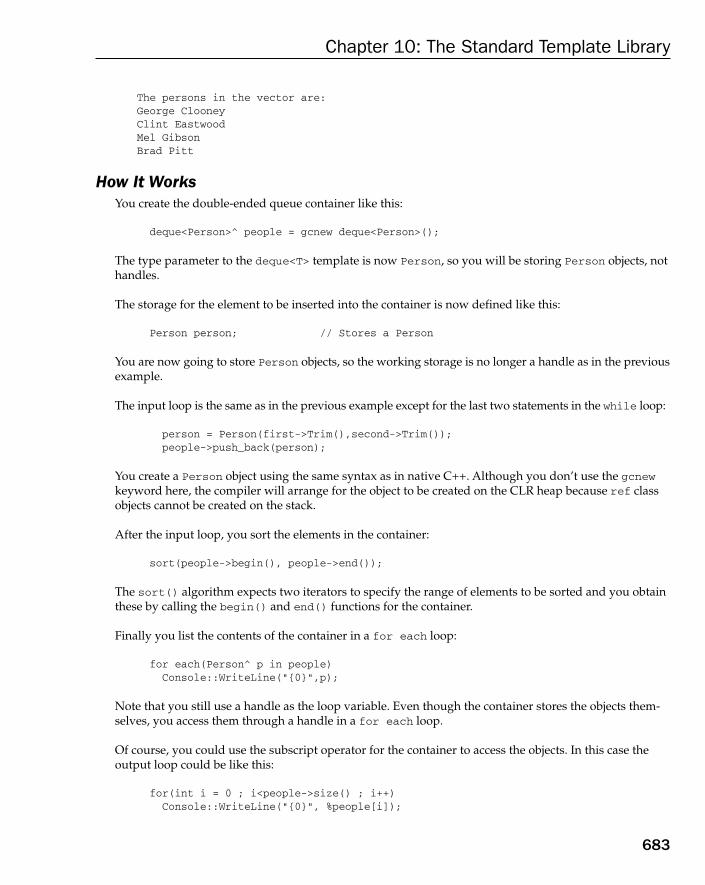
The persons in the vector are:George ClooneyClint EastwoodMel GibsonBrad Pitt
How It WorksYou create the double-ended queue container like this:
deque<Person>^ people = gcnew deque<Person>();
The type parameter to the deque<T> template is now Person, so you will be storing Person objects, nothandles.
The storage for the element to be inserted into the container is now defined like this:
Person person; // Stores a Person
You are now going to store Person objects, so the working storage is no longer a handle as in the previousexample.
The input loop is the same as in the previous example except for the last two statements in the while loop:
person = Person(first->Trim(),second->Trim());people->push_back(person);
You create a Person object using the same syntax as in native C++. Although you don’t use the gcnewkeyword here, the compiler will arrange for the object to be created on the CLR heap because ref classobjects cannot be created on the stack.
After the input loop, you sort the elements in the container:
sort(people->begin(), people->end());
The sort() algorithm expects two iterators to specify the range of elements to be sorted and you obtainthese by calling the begin() and end() functions for the container.
Finally you list the contents of the container in a for each loop:
for each(Person^ p in people)Console::WriteLine(“{0}”,p);
Note that you still use a handle as the loop variable. Even though the container stores the objects them-selves, you access them through a handle in a for each loop.
Of course, you could use the subscript operator for the container to access the objects. In this case theoutput loop could be like this:
for(int i = 0 ; i<people->size() ; i++)Console::WriteLine(“{0}”, %people[i]);
683
Chapter 10: The Standard Template Library
25905c10.qxd:WroxPro 2/21/08 9:11 AM Page 683
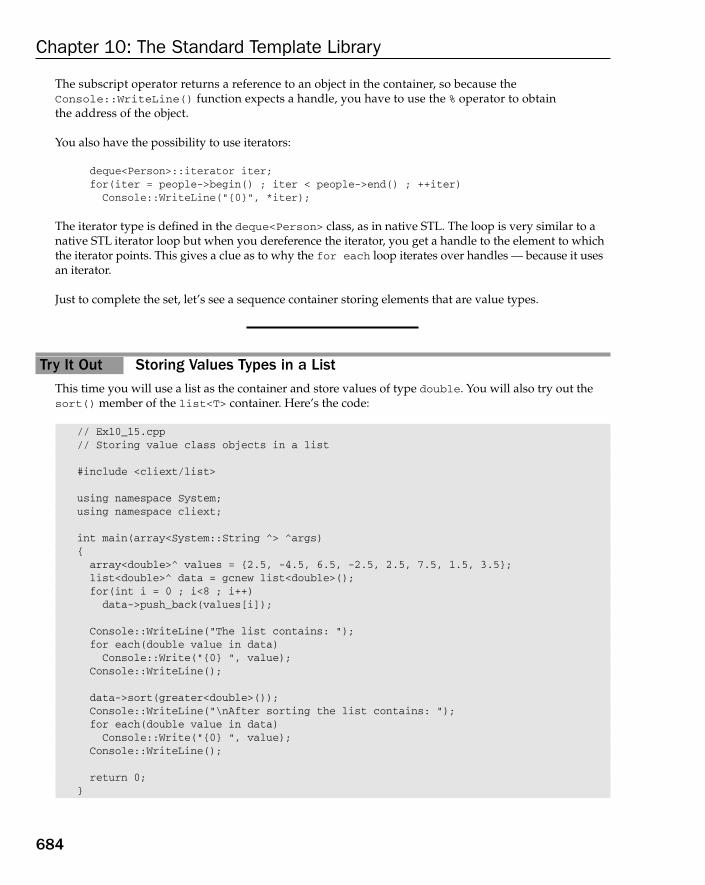
The subscript operator returns a reference to an object in the container, so because theConsole::WriteLine() function expects a handle, you have to use the % operator to obtain the address of the object.
You also have the possibility to use iterators:
deque<Person>::iterator iter;for(iter = people->begin() ; iter < people->end() ; ++iter)
Console::WriteLine(“{0}”, *iter);
The iterator type is defined in the deque<Person> class, as in native STL. The loop is very similar to anative STL iterator loop but when you dereference the iterator, you get a handle to the element to whichthe iterator points. This gives a clue as to why the for each loop iterates over handles — because it usesan iterator.
Just to complete the set, let’s see a sequence container storing elements that are value types.
Try It Out Storing Values Types in a ListThis time you will use a list as the container and store values of type double. You will also try out thesort() member of the list<T> container. Here’s the code:
// Ex10_15.cpp// Storing value class objects in a list
#include <cliext/list>
using namespace System;using namespace cliext;
int main(array<System::String ^> ^args){array<double>^ values = {2.5, -4.5, 6.5, -2.5, 2.5, 7.5, 1.5, 3.5}; list<double>^ data = gcnew list<double>(); for(int i = 0 ; i<8 ; i++)data->push_back(values[i]);
Console::WriteLine(“The list contains: “);for each(double value in data)Console::Write(“{0} “, value);
Console::WriteLine();
data->sort(greater<double>());Console::WriteLine(“\nAfter sorting the list contains: “);for each(double value in data)Console::Write(“{0} “, value);
Console::WriteLine();
return 0;}
684
Chapter 10: The Standard Template Library
25905c10.qxd:WroxPro 2/21/08 9:11 AM Page 684
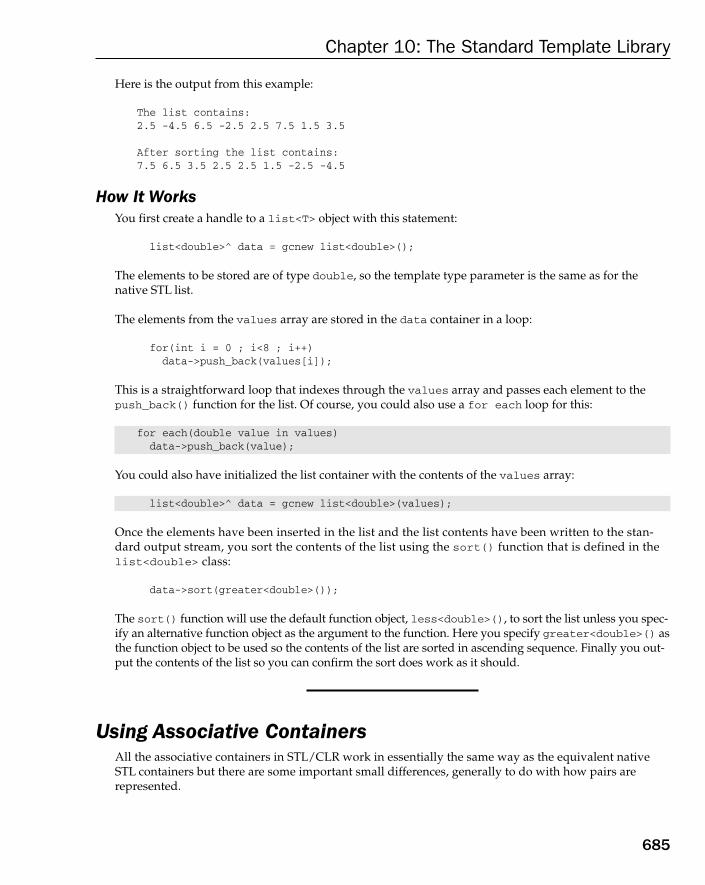
Here is the output from this example:
The list contains:2.5 -4.5 6.5 -2.5 2.5 7.5 1.5 3.5
After sorting the list contains:7.5 6.5 3.5 2.5 2.5 1.5 -2.5 -4.5
How It WorksYou first create a handle to a list<T> object with this statement:
list<double>^ data = gcnew list<double>();
The elements to be stored are of type double, so the template type parameter is the same as for thenative STL list.
The elements from the values array are stored in the data container in a loop:
for(int i = 0 ; i<8 ; i++)data->push_back(values[i]);
This is a straightforward loop that indexes through the values array and passes each element to thepush_back() function for the list. Of course, you could also use a for each loop for this:
for each(double value in values)data->push_back(value);
You could also have initialized the list container with the contents of the values array:
list<double>^ data = gcnew list<double>(values);
Once the elements have been inserted in the list and the list contents have been written to the stan-dard output stream, you sort the contents of the list using the sort() function that is defined in thelist<double> class:
data->sort(greater<double>());
The sort() function will use the default function object, less<double>(), to sort the list unless you spec-ify an alternative function object as the argument to the function. Here you specify greater<double>() asthe function object to be used so the contents of the list are sorted in ascending sequence. Finally you out-put the contents of the list so you can confirm the sort does work as it should.
Using Associative ContainersAll the associative containers in STL/CLR work in essentially the same way as the equivalent nativeSTL containers but there are some important small differences, generally to do with how pairs are represented.
685
Chapter 10: The Standard Template Library
25905c10.qxd:WroxPro 2/21/08 9:11 AM Page 685

First, the type of an element that you store in a map of type
map<K, T>
in native STL is of type pair<K, T>, but in an STL/CLR map container it is of typemap<K,T>::value_type, which is a value type. This implies that you can no longer use themake_pair() function to create a map entry in STL/CLR. Instead you use the static make_value()function that is defined in the map<K, T> class.
Second, the insert() function that inserts a single element in a map<K, T> returns a value of typepair<map<K, T>::iterator, bool> for a native STL container, whereas for a STL/CLR map<K, T>container the insert() function returns an object of type
map<K, T>::pair_iter_bool
which is a reference type. An object of type map<K, T>::pair_iter_bool has two public fields, firstand second. first is a handle to an iterator of type
map<K, T>::iterator^
and second is of type bool. If second has the value true, then first points to the newly inserted element;otherwise it points to an element that already exists in the map with the same key.
I’ll take one example to illustrate how associative containers in the STL/CLR work, and reproduceEx10_12 as a C++/CLI program.
Try It Out Implementing a Phone Book Using a MapThis example works in more or less the same way as the native STL example you saw earlier, Ex10_10.First you must define a suitable version of the ref class Person that will represent keys in the map:
// Person.h// A class defining a person#pragma onceusing namespace System;
ref class Person{public:Person():firstname(L””), secondname(L””){}
Person(String^ first, String^ second):firstname(first), secondname(second) {}
// Destructor~Person(){}
// Less-than operatorbool operator<(Person^ p){if(String::Compare(secondname, p->secondname) < 0 ||
686
Chapter 10: The Standard Template Library
25905c10.qxd:WroxPro 2/21/08 9:11 AM Page 686
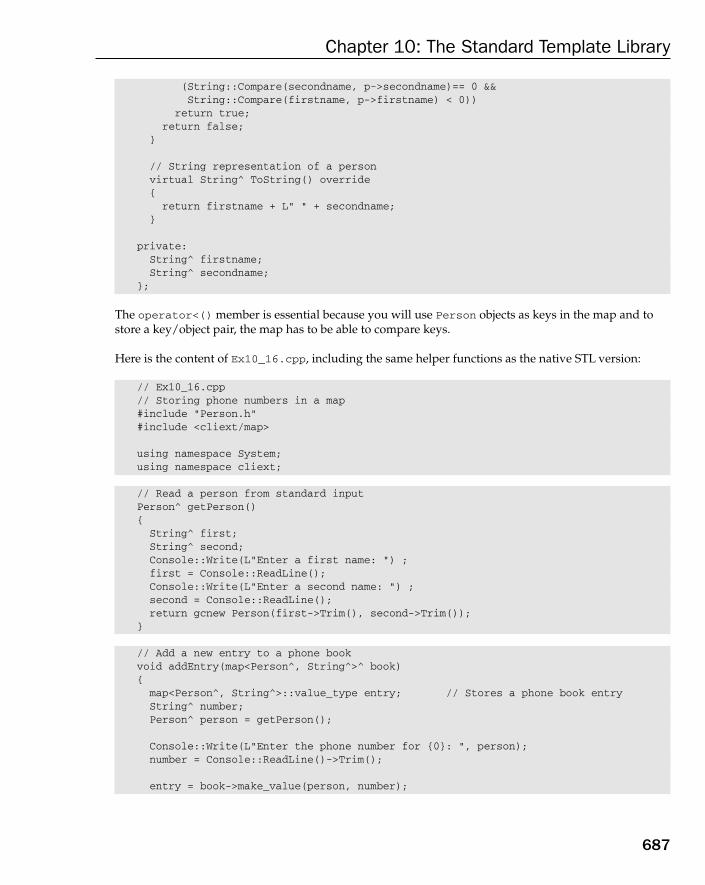
(String::Compare(secondname, p->secondname)== 0 &&String::Compare(firstname, p->firstname) < 0))
return true;return false;
}
// String representation of a personvirtual String^ ToString() override{return firstname + L” “ + secondname;
}
private:String^ firstname;String^ secondname;
};
The operator<() member is essential because you will use Person objects as keys in the map and tostore a key/object pair, the map has to be able to compare keys.
Here is the content of Ex10_16.cpp, including the same helper functions as the native STL version:
// Ex10_16.cpp// Storing phone numbers in a map#include “Person.h”#include <cliext/map>
using namespace System;using namespace cliext;
// Read a person from standard inputPerson^ getPerson(){String^ first;String^ second;Console::Write(L”Enter a first name: “) ;first = Console::ReadLine();Console::Write(L”Enter a second name: “) ;second = Console::ReadLine();return gcnew Person(first->Trim(), second->Trim());
}
// Add a new entry to a phone bookvoid addEntry(map<Person^, String^>^ book){map<Person^, String^>::value_type entry; // Stores a phone book entryString^ number;Person^ person = getPerson();
Console::Write(L”Enter the phone number for {0}: “, person);number = Console::ReadLine()->Trim();
entry = book->make_value(person, number);
687
Chapter 10: The Standard Template Library
25905c10.qxd:WroxPro 2/21/08 9:11 AM Page 687
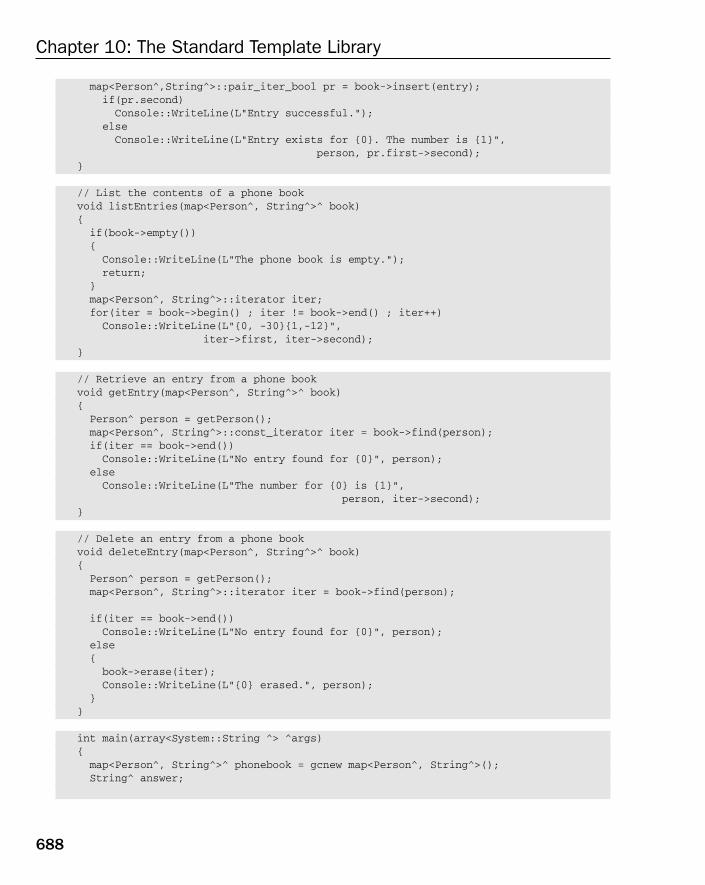
map<Person^,String^>::pair_iter_bool pr = book->insert(entry);if(pr.second)Console::WriteLine(L”Entry successful.”);
elseConsole::WriteLine(L”Entry exists for {0}. The number is {1}”,
person, pr.first->second);}
// List the contents of a phone bookvoid listEntries(map<Person^, String^>^ book){if(book->empty()){Console::WriteLine(L”The phone book is empty.”);return;
}map<Person^, String^>::iterator iter;for(iter = book->begin() ; iter != book->end() ; iter++)Console::WriteLine(L”{0, -30}{1,-12}”,
iter->first, iter->second); }
// Retrieve an entry from a phone bookvoid getEntry(map<Person^, String^>^ book){Person^ person = getPerson();map<Person^, String^>::const_iterator iter = book->find(person);if(iter == book->end())Console::WriteLine(L”No entry found for {0}”, person);
elseConsole::WriteLine(L”The number for {0} is {1}”,
person, iter->second);}
// Delete an entry from a phone bookvoid deleteEntry(map<Person^, String^>^ book){Person^ person = getPerson();map<Person^, String^>::iterator iter = book->find(person);
if(iter == book->end())Console::WriteLine(L”No entry found for {0}”, person);
else{book->erase(iter);Console::WriteLine(L”{0} erased.”, person);
}}
int main(array<System::String ^> ^args){map<Person^, String^>^ phonebook = gcnew map<Person^, String^>();String^ answer;
688
Chapter 10: The Standard Template Library
25905c10.qxd:WroxPro 2/21/08 9:12 AM Page 688

while(true){Console::Write(L”Do you want to enter a phone book entry(Y or N): “) ;answer = Console::ReadLine()->Trim();if(Char::ToUpper(answer[0]) == L’N’)break;
addEntry(phonebook);}
// Query the phonebookwhile(true){Console::WriteLine(L”\nChoose from the following options:”);Console::WriteLine(L”A Add an entry D Delete an entry G Get an entry”);Console::WriteLine(L”L List entries Q Quit”); answer = Console::ReadLine()->Trim();
switch(Char::ToUpper(answer[0])){case L’A’:addEntry(phonebook);break;
case L’G’:getEntry(phonebook);break;
case L’D’:deleteEntry(phonebook);break;
case L’L’:listEntries(phonebook);break;
case L’Q’:return 0;
default:Console::WriteLine(L”Invalid selection. Try again.”);break;
}}
return 0;}
Here’s a sample of output from this example:
Do you want to enter a phone book entry(Y or N): yEnter a first name: JackEnter a second name: BatemanEnter the phone number for Jack Bateman: 312 455 6576Entry successful.Do you want to enter a phone book entry(Y or N): yEnter a first name: MaryEnter a second name: JonesEnter the phone number for Mary Jones: 213 443 5671
689
Chapter 10: The Standard Template Library
25905c10.qxd:WroxPro 2/21/08 9:12 AM Page 689
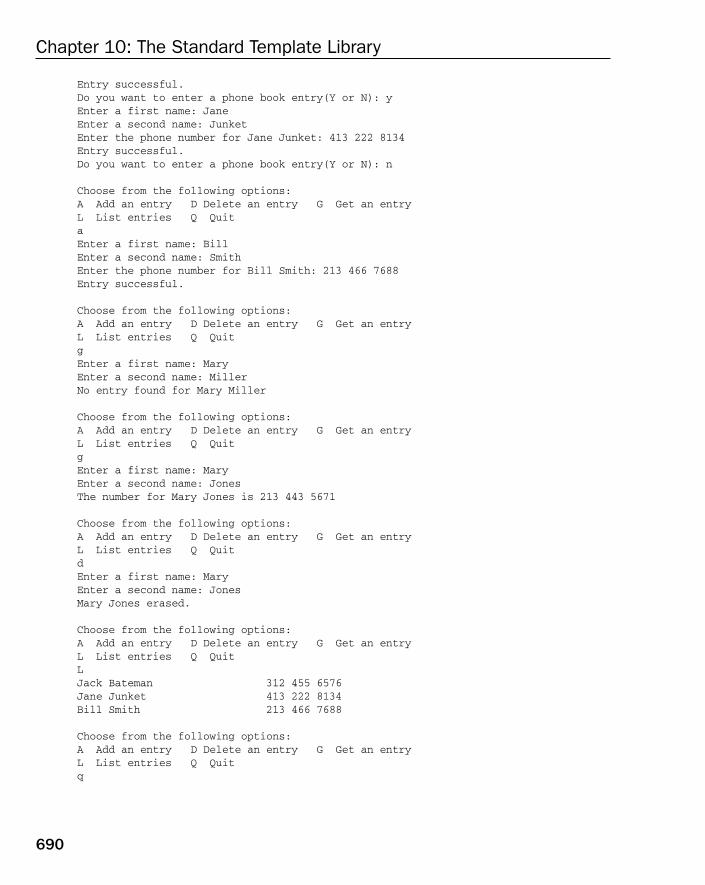
Entry successful.Do you want to enter a phone book entry(Y or N): yEnter a first name: JaneEnter a second name: JunketEnter the phone number for Jane Junket: 413 222 8134Entry successful.Do you want to enter a phone book entry(Y or N): n
Choose from the following options:A Add an entry D Delete an entry G Get an entryL List entries Q QuitaEnter a first name: BillEnter a second name: SmithEnter the phone number for Bill Smith: 213 466 7688Entry successful.
Choose from the following options:A Add an entry D Delete an entry G Get an entryL List entries Q QuitgEnter a first name: MaryEnter a second name: MillerNo entry found for Mary Miller
Choose from the following options:A Add an entry D Delete an entry G Get an entryL List entries Q QuitgEnter a first name: MaryEnter a second name: JonesThe number for Mary Jones is 213 443 5671
Choose from the following options:A Add an entry D Delete an entry G Get an entryL List entries Q QuitdEnter a first name: MaryEnter a second name: JonesMary Jones erased.
Choose from the following options:A Add an entry D Delete an entry G Get an entryL List entries Q QuitLJack Bateman 312 455 6576Jane Junket 413 222 8134Bill Smith 213 466 7688
Choose from the following options:A Add an entry D Delete an entry G Get an entryL List entries Q Quitq
690
Chapter 10: The Standard Template Library
25905c10.qxd:WroxPro 2/21/08 9:12 AM Page 690

How It WorksThe first action in main() is to define a suitable map object:
map<Person^, String^>^ phonebook = gcnew map<Person^, String^>();
This map stores an object that combines a handle to a Person object as the key and a handle to aString object as the associated object. Because this is an STL/CLR map, elements in the map are of typemap<Person^, String^>::value_type; for a native STL map the elements would typically be of typepair<Person, string>.
Next you define somewhere to store an input response:
String^ answer;
The Console::ReadLine() function that you will use to obtain input from the standard input streamalways reads a line of input as a String object, so it’s convenient to store a response as type String^.
Within the while loop that loads the map with new entries, you obtain a response to the first promptlike this:
answer = Console::ReadLine()->Trim();
The Console::ReadLine() call reads a line of input as a String object and you call the Trim() functionfor the object returned to eliminate leading and railing spaces. The result is stored in answer and the firstcharacter will be the input response.
You check for L’n’ or L’N’ being entered as the response like this:
if(Char::ToUpper(answer[0]) == L’N’)break;
This uses the ToUpper() function in the Char class to convert the first character in answer to uppercasebefore comparing it to L’N’. If the response is negative, you exit the loop. As it is coded, entering anyresponse other than L’n’ or L’N’ is interpreted as L’Y’. To remove this anomaly you could add this ifstatement following the one above:
if(Char::ToUpper(answer[0]) != L’Y’){Console::WriteLine(L”’{0}’ response is not valid. Try again.”, answer[0]);continue;
}
With this amendment, you output a message and go to the next iteration if an invalid response is entered.
If the response in answer is not in the negative, you call the addEntry() helper function to add a new entryto the map. The first statement in addEntry() defines a variable you will use to store a new map entry:
map<Person^, String^>::value_type entry; // Stores a phone book entry
691
Chapter 10: The Standard Template Library
25905c10.qxd:WroxPro 2/21/08 9:12 AM Page 691

The value_type type is defined in the map<K,T> template and is the equivalent of a pair in native STL.
You obtain a handle to a new Person object by calling the getPerson() helper function. This usesConsole::ReadLine() to read the names and creates the Person object on the CLR heap. The phonenumber corresponding to the Person object is read in the getEntry() function, and you call themake_value() function for the map with person and number as arguments to create the new mapentry. You insert the new entry using this statement:
map<Person^,String^>::pair_iter_bool pr = book->insert(entry);
The insert() function returns an object of type pair_iter_bool, which is similar to the pair objectreturned by the native STL version of the function. The first field in the pr object is a handle to an itera-tor and the second field is a bool value that indicates whether or not the insert operation was successful.You use the second field in pr to output a suitable message, depending on how effective the insert oper-ation was.
When the input loop ends, you prompt for operations on the map using a switch, as in the native versionof the program. All the code for these operations is very similar to that in the native version. Note that theoutput in the listEntries() function could be coded like this:
for each(map<Person^, String^>::value_type entry in book)Console::WriteLine(L”{0, -30}{1,-12}”, entry->first, entry->second);
This iterates over all the entries in the map using a for each loop. You access the key and object in eachentry via the first and second fields.
SummaryThis chapter introduced the capabilities of the STL in native C++ and how the same facilities are providedby STL/CLR for use in your C++/CLI programs. The important points discussed in this chapter are:
❑ The STL and STL/CLR capabilities include templates for containers, iterators, algorithms, andfunction objects.
❑ A container is a class object for storing and organizing other objects. Sequence containers storeobjects in a sequence, like an array. Associative containers store elements that are key/objectpairs, where the key determines where the pair is stored in the container.
❑ Iterators are objects that behave like pointers. Iterators are used in pairs to define a set of objectsby a semi-open interval, where the first iterator points to the first object in the series and the sec-ond iterator points to a position one past the last object in the series.
❑ Stream iterators are iterators that allow you to access or modify the contents of a stream.
❑ There are four categories of iterators: input and output iterators, forward iterators, bidirectionaliterators, and random access iterators. Each successive category of iterator provides more func-tionality than the previous one, so input and output iterators provide the least functionality andrandom access iterators provide the most.
692
Chapter 10: The Standard Template Library
25905c10.qxd:WroxPro 2/21/08 9:12 AM Page 692
❑ Algorithms are template functions that operate on a sequence of objects specified by a pair ofiterators.
❑ Function objects are objects of a type that overloads the () operator (by implementing the func-tion operator()() in the class). The STL and STL/CLR define a wide range of standard itera-tors for use with containers and algorithms, and you can also write your own classes to definefunction objects.
My objective in this chapter was to introduce enough of the details of the STL and STL/CLR to enableyou to explore the rest on your own. There’s a great deal more there than I was able to discuss here, so Iencourage you to browse the documentation.
Exercises1. Write a native C++ program that will read some text from the standard input stream, possibly
involving several lines of input, and store the letters from the text in a list<T> container. Sortthe letters in ascending sequence and output them.
2. Use a priority_queue<T> container from the native STL to achieve the same result as Exercise 1.
3. Implement Exercise 2 as a C++/CLI program.
4. Modify Ex10_10.cpp so that it allows multiple phone numbers to be stored for a given name.The functionality in the program should reflect this, so the getEntry() function should displayall numbers for a given name and the deleteEntry() function should delete a particular person/number combination.
5. Modify Ex10_16.cpp to use an STL/CLR multimap to support multiple phone numbers for aperson in the phone book.
6. Write a native C++ program to implement a phone book capability that will allow a name to beentered to retrieve one or more numbers or a number to be entered to retrieve a name.
7. Implement the previous exercise solution as a C++/CLI program.
693
Chapter 10: The Standard Template Library
25905c10.qxd:WroxPro 2/21/08 9:12 AM Page 693

25905c10.qxd:WroxPro 2/21/08 9:12 AM Page 694

11Debugging Techniques
If you have been doing the exercises in the previous chapters, you have most likely been battlingwith bugs in your code. In this chapter you will explore how the basic debugging capabilities builtinto Visual C++ 2008 can help with this. You will also investigate some additional tools that you canuse to find and eliminate errors from your programs, and see some of the ways in which you canequip your programs with specific code to check for errors.
In this chapter, you will learn about:
❑ How to run your program under the control of the Visual C++ 2008 debugger
❑ How to step through your program a statement at a time
❑ How to monitor or change the values of variables in your programs
❑ How to monitor the value of an expression in your program
❑ The call stack
❑ Assertions and how to use them to check your code
❑ How to add debugging specific code to a program
❑ How to detect memory leaks in a native C++ program
❑ How to use the execution tracing facilities and generate debugging output in C++/CLIprograms
Understanding DebuggingBugs are errors in your program and debugging is the process of finding and eliminating them. Youare undoubtedly aware by now that debugging is an integral part of the programming process — itgoes with the territory as they say. The facts about bugs in your programs are rather depressing:
❑ Every program you write that is more than trivial will contain bugs that you need to try toexpose, find, and eliminate if your program is to be reliable and effective. Note the threephases here — a program bug is not necessarily apparent; even when it is apparent you maynot know where it is in your source code; and even when you know roughly where it is, itmay not be easy to determine what exactly is causing the problem and thus eliminate it.
25905c11.qxd:WroxPro 2/21/08 9:12 AM Page 695
❑ Many programs that you write will contain bugs even after you think you have fully tested them.
❑ Program bugs can remain hidden in a program that is apparently operating correctly — some-times for years. They generally become apparent at the most inconvenient moment.
❑ Programs beyond a certain size and complexity always contain bugs, no matter how much timeand effort you expend testing them. (The measure of size and complexity that guarantees thepresence of bugs is not precisely defined, but Visual C++ 2008 and your operating system cer-tainly come into this category!)
It is unwise to dwell on this last point if you are of a nervous disposition, especially if you fly a lot orregularly are in the vicinity of any process dependent on computers for proper operation that can bedamaging to your health in the event of failure.
Many potential bugs are eliminated during the compile and link phases, but there are still quite a fewleft even after you manage to produce an executable module for your program. Unfortunately, despitethe fact that program bugs are as inevitable as death and taxes, debugging is not an exact science; how-ever, you can still adopt a structured approach to eliminating bugs. There are four broad strategies youcan adopt to make debugging as painless as possible:
❑ Don’t re-invent the wheel. Understand and use the library facilities provided as part of VisualC++ 2008 (or other commercial software components you have access to) so that your programuses as much pre-tested code as possible. Note that while this will reduce the likelihood of bugsin your code, libraries, operating systems, and commercial software, components will still con-tain bugs in general, so your code can share those bugs.
❑ Develop and test your code incrementally. By testing each significant class and function individ-ually, and gradually assembling separate code components after testing them, you can make thedevelopment process much easier, with fewer obscure bugs occurring along the way.
❑ Code defensively — which means writing code to guard against potential errors. For example,declare member functions of native C++ classes that don’t modify an object as const. Use constparameters where appropriate. Don’t use ‘magic numbers’ in your code — define const objectswith the required values.
❑ Include debugging code that checks and validates data and conditions in your program fromthe outset. This is something you will look at in detail later in this chapter.
Because of the importance of ending up with programs that are as bug-free as is humanly possible, VisualC++ 2008 provides you with a powerful armory of tools for finding bugs. Before you get into the detailedmechanics, however, look a little closer at how bugs arise.
Program BugsOf course, the primary originator of bugs in your program is you and the mistakes you make. Thesemistakes range from simple typos — just pressing the wrong key — to getting the logic completelywrong. I, too, find it hard to believe that I can make such silly mistakes so often, but no one has yetmanaged to come up with a credible alternative as to how bugs get into your code — so it must betrue! Humans are creatures of habit so you will probably find yourself making some mistakes timeand time again. Frustratingly, many errors are glaringly obvious to others, but invisible to you — this
696
Chapter 11: Debugging Techniques
25905c11.qxd:WroxPro 2/21/08 9:12 AM Page 696

is just your computer’s way of teaching you a bit of humility. Broadly there are two kinds of errorsyou can make in your code that result in program bugs:
❑ Syntactic errors — These are errors that result from statements that are not of the correct form; forexample, if you miss a semicolon from the end of a statement or use a colon where you should put a comma. You don’t have to worry too much about syntactic errors. The compiler recognizes allsyntactic errors, and you generally get a fairly good indication of what the error is so it’s easy to fix.
❑ Semantic errors — These are errors where the code is syntactically correct, but it does not dowhat you intended. The compiler cannot know what you intended to achieve with your pro-gram, so it cannot detect semantic errors; however, you will often get an indication that some-thing is wrong because the program terminates abnormally. The debugging facilities in VisualC++ 2008 are aimed at helping you find semantic errors. Semantic errors can be very subtle and difficult to find, for example, where the program occasionally produces the wrong results or crashes infrequently. Perhaps the most difficult of such bugs arise in multi-threaded pro-grams where concurrent paths of execution are not managed properly.
Of course, there are bugs in the system environment that you are using (Visual C++ 2008 included) but thisshould be the last place you suspect when your program doesn’t work. Even when you do conclude that itmust be the compiler or the operating system, nine times out of ten you will be wrong. There are certainlybugs in Visual C++ 2008, however, and if you want to keep up with those identified to date, together withany fixes available, you can search the information provided on the Microsoft Web site related to Visual C++( http://msdn2.microsoft.com/en-us/visualc/default.aspx), or better still, if you can afford a sub-scription to Microsoft Developer Network, you get quarterly updates on the latest bugs and fixes.
It can be helpful to make a checklist of bugs you find in your code for future reference. By examiningnew code that you write for the kinds of errors you have made in the past, you can often reduce the time needed to debug new projects.
From the nature of programming, bugs are virtually infinite in their variety, but there are some kinds thatare particularly common. You may be well aware of most of these, but take a quick look at them anyway.
Common BugsA useful way of cataloguing bugs is to relate them to the symptoms they cause because this is how you experience them in the first instance. The following list of five common symptoms is by no meansexhaustive, and you are certainly able to add to it as you gain programming experience:
Continued
Symptom Possible Causes
Data corrupted Failure to initialize variableExceeding integer type rangeInvalid pointerError in array index expressionLoop condition errorError in size of dynamically allocated arrayFailing to implement class copy constructor, assignment operator,or destructor
697
Chapter 11: Debugging Techniques
25905c11.qxd:WroxPro 2/21/08 9:12 AM Page 697

Look at how many different kinds of errors can be caused by invalid pointers and the myriad symptomsthat bad pointers can generate. This is possibly the most frequent cause of those bugs that are hard to find,so always double-check your pointer operations. If you are conscious of the ways in which bad pointersarise, you can avoid many of the pitfalls. The common ways in which bad pointers arise are:
❑ Failing to initialize a pointer when you declare it
❑ Failing to set a pointer to free store memory to null when you delete the space allocated
❑ Returning the address of a local variable from a function
❑ Failing to implement the copy constructor and assignment operator for classes that allocate freestore memory
Even if you do all this, there will still be bugs in your code, so now look at the tools that Visual C++ 2008provides to assist debugging.
Basic Debugging OperationsSo far, although you have been creating debug versions of the program examples, you haven’t beenusing the debugger. The debugger is a program that controls the execution of your program in such away that you can step through the source code one line at a time, or run to a particular point in the pro-gram. At each point in your code where the debugger stops, you can inspect or even change the values ofvariables before continuing. You can also change the source code, recompile, and then restart the programfrom the beginning. You can even change the source code in the middle of stepping through a program.When you move to the next step after modifying the code, the debugger automatically recompiles beforeexecuting the next statement.
Symptom Possible Causes
Unhandled exceptions Invalid pointer or referenceMissing catch handler
Program hangs or crashes Failure to initialize variableInfinite loopInvalid pointerFreeing the same free store memory twiceFailure to implement, or error in, class destructorFailure to process unexpected user input properly
Stream input data incorrect Reading using the extraction operator and the getline() function
Incorrect results Typographical error: = instead of ==, or i instead of j etc.Failure to initialize a variableExceeding the range of an integer type Invalid pointerOmitting break in a switch statement
698
Chapter 11: Debugging Techniques
25905c11.qxd:WroxPro 2/21/08 9:12 AM Page 698
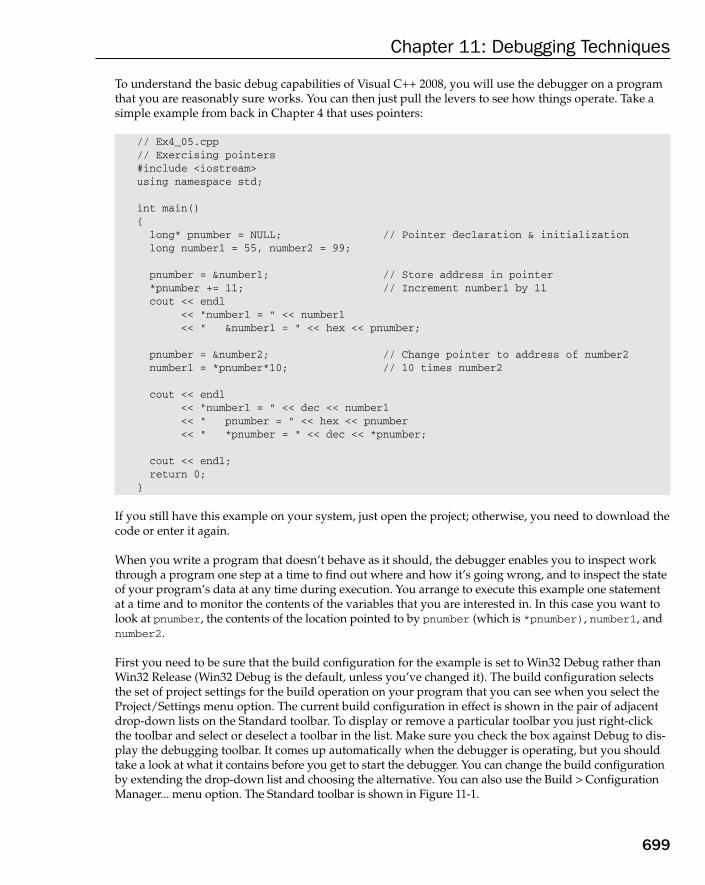
To understand the basic debug capabilities of Visual C++ 2008, you will use the debugger on a programthat you are reasonably sure works. You can then just pull the levers to see how things operate. Take asimple example from back in Chapter 4 that uses pointers:
// Ex4_05.cpp// Exercising pointers#include <iostream>using namespace std;
int main(){long* pnumber = NULL; // Pointer declaration & initializationlong number1 = 55, number2 = 99;
pnumber = &number1; // Store address in pointer*pnumber += 11; // Increment number1 by 11cout << endl
<< “number1 = “ << number1<< “ &number1 = “ << hex << pnumber;
pnumber = &number2; // Change pointer to address of number2number1 = *pnumber*10; // 10 times number2
cout << endl<< “number1 = “ << dec << number1<< “ pnumber = “ << hex << pnumber<< “ *pnumber = “ << dec << *pnumber;
cout << endl;return 0;
}
If you still have this example on your system, just open the project; otherwise, you need to download thecode or enter it again.
When you write a program that doesn’t behave as it should, the debugger enables you to inspect workthrough a program one step at a time to find out where and how it’s going wrong, and to inspect the stateof your program’s data at any time during execution. You arrange to execute this example one statementat a time and to monitor the contents of the variables that you are interested in. In this case you want tolook at pnumber, the contents of the location pointed to by pnumber (which is *pnumber), number1, andnumber2.
First you need to be sure that the build configuration for the example is set to Win32 Debug rather thanWin32 Release (Win32 Debug is the default, unless you’ve changed it). The build configuration selectsthe set of project settings for the build operation on your program that you can see when you select theProject/Settings menu option. The current build configuration in effect is shown in the pair of adjacentdrop-down lists on the Standard toolbar. To display or remove a particular toolbar you just right-clickthe toolbar and select or deselect a toolbar in the list. Make sure you check the box against Debug to dis-play the debugging toolbar. It comes up automatically when the debugger is operating, but you shouldtake a look at what it contains before you get to start the debugger. You can change the build configurationby extending the drop-down list and choosing the alternative. You can also use the Build > ConfigurationManager... menu option. The Standard toolbar is shown in Figure 11-1.
699
Chapter 11: Debugging Techniques
25905c11.qxd:WroxPro 2/21/08 9:13 AM Page 699

Figure 11-1
You can find out what the toolbar buttons are for by letting the mouse cursor linger over a toolbar button.A tool tip for that button appears that identifies its function.
The Debug configuration in a project causes additional information to be included in your executable pro-gram when you compile it so that the debugging facilities can be used. This extra information is stored inthe .pdb file that will be in the Debug folder for your project. The ‘release’ configuration omits this infor-mation as it represents overhead that you wouldn’t want in a fully tested program. With the Professionalversion of Visual C++ 2008, the compiler also optimizes the code when compiling the release version of aprogram. Optimization is inhibited when the debug version is compiled because the optimization processcan involve resequencing code to make it more efficient, or even omitting redundant code altogether.Because this destroys the one-to-one mapping between the source code and corresponding blocks ofmachine code, optimization makes stepping through a program potentially confusing to say the least.
The Debug toolbar is shown in Figure 11-2.
Figure 11-2
If you inspect the tooltips for the buttons on this toolbar, you get a preliminary idea of what they do —you will use some of them shortly. With the example from Chapter 4, you won’t use all the debuggingfacilities available to you, but you will try out some of the more important features. After you are famil-iar with stepping through a program using the debugger, you explore more of the features with a pro-gram that has bugs.
You can start the debugger by clicking the leftmost button on the Debug toolbar, by selecting the Debug >Start Debugging menu item, or by pressing F5. I suggest that you use the toolbar for the example. Thedebugger has two primary modes of operation — it works through the code by single stepping (which isessentially executing one statement at a time), or runs to a particular point in the source code. The pointin the source where the debugger is to stop is determined either by where you have placed the cursor or,more usefully, at a designated stopping point called a breakpoint. Check out how you define breakpoints.
Setting BreakpointsA breakpoint is a point in your program where the debugger automatically suspends execution when indebugging mode. You can specify multiple breakpoints so that you can run your program, stopping atpoints of interest that you select along the way. At each breakpoint you can look at variables within theprogram and change them if they don’t have the values they should. You are going to execute the Ex4_05program one statement at a time, but with a large program this would be impractical. Usually, you will onlywant to look at a particular area of the program where you think there might be an error. Consequently, youwould usually set breakpoints where you think the error is and run the program so that it halts at the firstbreakpoint. You can then single step from that point if you want, where a single step implies executing asingle source code statement.
700
Chapter 11: Debugging Techniques
25905c11.qxd:WroxPro 2/21/08 9:13 AM Page 700

To set a breakpoint at the beginning of a line of source code, you simply click in the grayed-out columnto the left of the line number for the statement where you want execution to stop. A red circular symbolcalled a glyph appears showing the presence of the breakpoint at that line and you can remove a break-point by double-clicking the glyph. Figure 11-3 shows the Editor pane with a couple of breakpoints setfor Ex4_05.
Figure 11-3
When debugging, you would normally set several breakpoints, each chosen to show when the variablesthat you think are causing a problem are changing. Execution stops before the statement indicated by thebreakpoint is executed. Execution of the program can only break before a complete statement and nothalfway through it. If you place a cursor in a line that doesn’t contain any code (for example, the lineabove the second breakpoint in Figure 11-3), the breakpoint is set on that line, and the program stops atthe beginning of the next executable line.
As I said, you can remove a breakpoint by double-clicking the red dot. You can also disable a breakpointby right-clicking the line containing the breakpoint and selecting from the pop-up. You can remove allthe breakpoints in the active project by selecting the Debug > Delete All Breakpoints menu item or bypressing Ctrl+Shift+F9. Note that this removes breakpoints from all files in the project, even if they’renot currently open in the Editor pane. You can also disable all breakpoints by selecting the Debug >Disable All Breakpoints menu item.
Advanced BreakpointsA more advanced way of specifying breakpoints is provided through a window you can display by press-ing Alt+F9 or by selecting Breakpoints from the list displayed when you select the Windows button on theDebug toolbar — its at the right end. This window is shown in Figure 11-4.
701
Chapter 11: Debugging Techniques
25905c11.qxd:WroxPro 2/21/08 9:13 AM Page 701

Figure 11-4
The Columns button on the toolbar enables you to add more columns to be displayed in the window.For example, you can display the source file name or the function name where the breakpoint is, or youcan display what happens when the statement is reached.
You can set further options for a breakpoint by right-clicking the breakpoint line in the Breakpoints win-dow and selecting from the pop-up. As well as setting a breakpoint at a location other than the begin-ning of a statement, you can set a breakpoint when a particular Boolean expression evaluates to true.This is a powerful tool but it does introduce very substantial overhead in a program, as the expressionneeds to be re-evaluated continuously. Consequently, execution is slow, even on the fastest machines.You can also arrange that execution only breaks when the hit count, which is when the number of thepoint has been reached, reaches a given value. This is most useful for code inside a loop where you won’twant to break execution on every iteration. If you set any condition on a breakpoint, the glyph changes sothat a + appears in the center.
Setting TracepointsA tracepoint is a special kind of breakpoint that has a custom action associated with it. You create a tra-cepoint by right-clicking the line where you want the tracepoint to be set and selecting the Breakpoint >When Hit menu item from the pop-up. You’ll see the dialog window shown in Figure 11-5.
Figure 11-5
702
Chapter 11: Debugging Techniques
25905c11.qxd:WroxPro 2/21/08 9:13 AM Page 702

As you see, the tracepoint action can be to print a message and/or run a macro and you can choose whetherexecution stops or continues at the tracepoint. The presence of a tracepoint on a source code line where exe-cution does not stop is indicated by a red diamond-shaped glyph. The dialog text explains how to specifythe message to be printed. For instance, you could print the name of the current function and the value ofpnumber by specifying the following in the text box:
$FUNCTION, The value of pnumber is {pnumber}
The output produced by this when the tracepoint is reached is displayed in the Output pane in theVisual Studio application window.
When you check the Run a macro: checkbox, you’ll be able to choose from a long list of standardmacros that are available.
Starting DebuggingThere are five ways of starting your application in debug mode from the options on the Debug menu,shown in Figure 11-6.
Figure 11-6
1. The Start Debugging option (also available from a button on the Debug toolbar) simply exe-cutes a program up to the first breakpoint (if any) where execution will halt. After you’ve exam-ined all you need to at a breakpoint, selecting the same menu item or toolbar button again willcontinue execution up to the next breakpoint. In this way, you can move through a program frombreakpoint to breakpoint, and at each halt in execution have a look at critical variables, changingtheir values if you need to. If there are no breakpoints, starting the debugger in this way executesthe entire program without stopping. Of course, just because you started debugging in this waydoesn’t mean that you have to continue using it; at each halt in execution, you can choose any ofthe possible ways of moving through your code.
2. The Start With Application Verifier option is for run-time verification of native C++ code. TheApplication Verifier is an advanced tool for identifying errors due to incorrect handle and criti-cal section usage and corruption of the heap. I won’t be discussing this in detail in this book.
703
Chapter 11: Debugging Techniques
25905c11.qxd:WroxPro 2/21/08 9:13 AM Page 703

3. The Attach to Process option on the Debug menu enables you to debug a program that is alreadyrunning. This option displays a list of the processes that are running on your machine and youcan select the process you want to debug. This is really for advanced users and you should avoidexperimenting with it unless you are quite certain that you know what you are doing. You caneasily lock up your machine or cause other problems if you interfere with critical operating sys-tem processes.
4. The Step Into menu item (also available as a button on the Debug toolbar) executes your programone statement at a time, stepping into every code block — which includes every function that iscalled. This would be something of a nuisance if you used it throughout the debugging processbecause, for example, it would also execute all the code in the library functions for stream output— you’re not really interested in this as you didn’t write these routines. Quite a few of the libraryfunctions are written in Assembler language — including some of those supporting stream input/output. Assembler language functions execute one machine instruction at a time, which can berather time consuming as you might imagine.
5. The Step Over menu item (also available as a button on the Debug toolbar) simply executes thestatements in your program one at a time and run all the code used by functions that might becalled within a statement such as stream operations without stopping.
You have a sixth option for starting in debug mode that does not appear on the Debug menu. You canright-click any line of code and select Run to Cursor from the Context menu. This does precisely whatit says — it runs the program up to the line where the cursor is and then breaks execution to allow you to inspect or change variables in the program. Whatever way you choose to start the debuggingprocess, you can continue execution using any of the five options you have available from any inter-mediate breakpoint.
It’s time to try it with the example. Start the program using the Step Into option, click the appropriatemenu item or toolbar button, or press F11 to begin. After a short pause (assuming that you’ve alreadybuilt the project), Visual C++ 2008 switches to debugging mode.
When the debugger starts, two tabbed windows appear below the Editor window. You can choose whatis displayed at any time in either window by selecting one of the tabs. You can choose which windowsappear when the debugger is started and they can be customized. The complete list of windows is shownon the Debug | Windows menu drop-down. The Autos window on the left shows current values forautomatic variables in the context of the function that is currently executing. The Call Stack window on the right identifies the function calls currently in progress but the Output tab in the same window isprobably more interesting in this example. In the Editor pane, you’ll see that the opening brace of yourmain() function is highlighted by an arrow to indicate that this is the current point in the program’sexecution. This is shown in Figure 11-7.
You can also see the breakpoint at line 11 and the tracepoint at line 17. At this point in the execution ofthe program, you can’t choose any variables to look at because none exist at present. Until a declarationof a variable has been executed, you cannot look at its value or change it.
To avoid having to step through all the code in the stream functions that deal with I/O, you’ll use theStep Over facility to continue execution to the next breakpoint. This simply executes the statements in
704
Chapter 11: Debugging Techniques
25905c11.qxd:WroxPro 2/21/08 9:13 AM Page 704

your main()function one at a time, and runs all the code used by the stream operations (or any otherfunctions that might be called within a statement) without stopping.
Figure 11-7
Inspecting Variable ValuesDefining a variable that you want to inspect is referred to as setting a watch for the variable. Before youcan set any watches, you must get some variables declared in the program. You can execute the declara-tion statements by invoking Step Over three times. Use the Step Over menu item, the toolbar icon, or pressF10 three times so that the arrow now appears at the start of the line 11:
pnumber = &number1; // Store address in pointer
If you look at the Autos window now, it should appear as shown in Figure 11-8 (although the value for&number1 may be different on your system as it represents a memory location). Note that the values for&number1 and pnumber are not equal to each other because the line in which pnumber is set to the addressof number1 (the line that the arrow is pointing at) hasn’t yet been executed. You initialized pnumber as anull pointer in the first line of the function, which is why the address it contains is zero. If you had not ini-tialized the pointer, it would contain a junk value that still could be zero on occasion, of course, because itcontains whatever value was left by the last program to use these particular four bytes of memory.
705
Chapter 11: Debugging Techniques
25905c11.qxd:WroxPro 2/21/08 9:13 AM Page 705

Figure 11-8
The Autos window has five tabs, including the Autos tab that is currently displayed, and the informationthey show is as follows:
❑ The Autos tab shows the automatic variables in use in the current statement and its immediatepredecessor (in other words, the statement pointed to by the arrow in the Editor pane and theone before it).
❑ The Locals tab shows the values of the variables local to the current function. In general, new variables come into scope as you trace through a program and then go out of scope as you exit the block in which they are defined. In this case, this window always shows values for number1,number2 and pnumber because you have only one function, main(), consisting of a single codeblock.
❑ The Threads tab allows you to inspect and control threads in advanced applications.
❑ The Modules tab lists details of the code modules currently executing. If your applicationcrashes, you can determine in which module the crash happened by comparing the addresswhen the crash occurred with the range of addresses in the Address column on this tab.
❑ You can add variables to the Watch1 tab that you want to watch. Click a line in the window andtype the variable name. You can also watch the value of a C++ expression that you enter in thesame way as a variable. You can add up to three additional Watch windows via the Debug >Windows > Watch menu item.
Notice that pnumber has a plus sign to the left of its name in the Autos window. A plus sign appears forany variable for which additional information can be displayed, such as for an array, or a pointer, or aclass object. In this case, you can expand the view for the pointer variables by clicking the plus sign. Ifyou press F10 twice more and click the + adjacent to pnumber, the debugger displays the value storedat the memory address contained in the pointer, as shown in Figure 11-9.
Figure 11-9
706
Chapter 11: Debugging Techniques
25905c11.qxd:WroxPro 2/21/08 9:13 AM Page 706
The Autos window automatically provides you with all the information you need, displaying both thememory address and the data value stored at that address. Integer values can be displayed as decimalor hexadecimal. To toggle between the two, right-click anywhere on the Autos tab and select from thepop-up menu. You can view the variables that are local to the current function by selecting the Localstab. There are also other ways that you can inspect variables using the debugging facilities of VisualC++ 2008.
Viewing Variables in the Edit WindowIf you need to look at the value of a single variable, and that variable is visible in the Text Editor win-dow, the easiest way to look at its value is to position the cursor over the variable for a second. A tooltip pops up showing the current value of the variable. You can also look at more complicated expres-sions by highlighting them and resting the cursor over the highlighted area. Again, a tool tip pops up todisplay the value. Try highlighting the expression *pnumber*10 a little lower down. Hovering the cur-sor over the highlighted expression results in the current value of the expression being displayed. Notethat this won’t work if the expression is not complete; if you miss the * that dereferences pnumber out ofthe highlighted text for instance, or you just highlight *pnumber*, the value won’t be displayed.
Changing the Value of a VariableThe Watch windows also allow you to change the values of the variables you are watching. You woulduse this in situations where a value displayed is clearly wrong, perhaps because there are bugs in yourprogram, or maybe all the code is not there yet. If you set the “correct” value, your program staggers on so that you can test out more of it and perhaps pick up a few more bugs. If your code involves a loopwith a large number of iterations, say 30000, you could set the loop counter to 29995 to step through thelast few to verify that the loop terminates correctly. It sure beats pressing F10 30,000 times! Another use-ful application of the ability to set values for variable during execution is to set values that cause errors.This enables you to check out the error handling code in your program, something almost impossibleotherwise.
To change the value of a variable in a Watch window, double-click the variable value that is displayed,and type the new value. If the variable you want to change is an array element, you need to expand thearray by clicking the + box alongside the array name and then changing the element value. To change thevalue for a variable displayed in hexadecimal notation, you can either enter a hexadecimal number, orenter a decimal value prefixed by 0n (zero followed by n), so you could enter a value as A9, or as 0n169. Ifyou just enter 169 it is interpreted as a hexadecimal value. Naturally, you should be cautious about fling-ing new values into your program willy-nilly. Unless you are sure you know what effect your changes aregoing to have, you may end up with a certain amount of erratic program behavior, which is unlikely toget you closer to a working program.
You’ll probably find it useful to run a few more of the examples you have seen in previous chapters indebug mode. It will enable you to get a good feel for how the debugger operates under various condi-tions. Monitoring variables and expressions is a considerable help in sorting out problems with your code, but there’s a great deal more assistance available for seeking out and destroying bugs. Take a look at how you can add code to a program that provides more information about when and why things go wrong.
707
Chapter 11: Debugging Techniques
25905c11.qxd:WroxPro 2/21/08 9:13 AM Page 707

Adding Debugging CodeFor a program involving a significant amount of code, you certainly need to add code that is aimed athighlighting bugs wherever possible and providing tracking output to help you pin down where thebugs are. You don’t want to be in the business of single stepping through code before you have any ideaof what bugs there are, or which part of the code is involved. Code that does this sort of thing is onlyrequired while you are testing a program. You won’t need it after you believe the program is fully work-ing, and you won’t want to carry the overhead of executing it or the inconvenience of seeing all the out-put in a finished product. For this reason, code that you add for debugging only operates in the debugversion of a program, not in the release version (provided you implement it in the right way, of course).
The output produced by debug code should provide clues as to what is causing a problem, and if youhave done a good job of building debug code into your program, it will give you a good idea of whichpart of your program is in error. You can then use the debugger to find the precise nature and location of the bug, and fix it.
The first way you can check the behavior of your program that you will look at is provided by a C++library function.
Using AssertionsThe standard library header <cassert> declares the assert()function that you can use to check logicalconditions within your program when a special preprocessor symbol, NDEBUG, is not defined. The functionis declared as:
void assert(int expression);
The argument to the function specifies the condition to be checked, but the effect of the assert() func-tion is suppressed if a special preprocessor symbol, NDEBUG, is defined. The symbol NDEBUG is automati-cally defined in the release version of a program, but not in the debug version. Thus an assertion checks itsargument in the debug version of a program but does nothing in a release version. If you want to switch offassertions in the debug version of a program, you can define NDEBUG explicitly yourself using a #definedirective. To be effective, you must place the #define directive for NDEBUG preceding the #include direc-tive for the <cassert> header in the source file:
#define NDEBUG // Switch off assertions in the code#include <cassert> // Declares assert()
If the expression passed as an argument to assert() is non-zero (i.e. true), the function does nothing. Ifthe expression is 0 (false in other words) and NDEBUG are not defined, a diagnostic message is outputshowing the expression that failed, the source file name, and the line number in the source file where thefailure occurred. After displaying the diagnostic message, the assert() function calls abort() to endthe program. Here’s an example of an assertion used in a function:
char* append(char* pStr, const char* pAddStr){// Verify non-null pointersassert(pStr != 0);assert(pAddStr != 0);
// Code to append pAddStr to pStr...}
708
Chapter 11: Debugging Techniques
25905c11.qxd:WroxPro 2/21/08 9:13 AM Page 708

Calling the append() function with a null pointer argument in a simple program produced the followingdiagnostic message on my machine:
Assertion failed: pStr != 0, file c:\beginning visual c++.net\examples\testassert\testassert \ testassert.cpp, line 11
The assertion also displays a message box offering you the three options shown in Figure 11-10.
Figure 11-10
Clicking the Abort button ends the program immediately. The Retry button starts the Visual C++ 2008debugger so you can step through the program to find out more about why the assertion failed. In prin-ciple, the Ignore button allows the program to continue in spite of the error, but this is usually an unwisechoice as the results are likely to be unpredictable.
You can use any kind of logical expression as an argument to assert(). You can compare values, checkpointers, validate object types, or whatever is a useful check on the correct operation of your code. Gettinga message when some logical condition fails helps a little, but in general you will need considerably moreassistance than that to detect and fix bugs. Now take a look at how you can add diagnostic code of a moregeneral nature.
Adding Your Own Debugging CodeUsing preprocessor directives, you can arrange to add any code you like to your program so that it is only compiled and executed in the debug version. Your debug code is omitted completely from the release version, so it does not affect the efficiency of the tested program at all. You could use theabsence of the NDEBUG symbol as the control mechanism for the inclusion of debugging code; that’s thesymbol used to control the assert() function operation in the standard library, as discussed in thelast section. Alternatively, for a better and more positive control mechanism, you can use another pre-processor symbol, _DEBUG, that is always defined automatically in Visual C++ in the debug version of a program, but is not defined in the release version. You simply enclose code that you only want com-piled and executed when you are debugging between a preprocessor #ifdef/#endif pair of direc-tives, with the test applied to the _DEBUG symbol, as follows:
#ifdef _DEBUG
// Code for debugging purposes...
#endif // _DEBUG
709
Chapter 11: Debugging Techniques
25905c11.qxd:WroxPro 2/21/08 9:13 AM Page 709
The code between the #ifdef and the #endif is compiled only if the symbol _DEBUG is defined. Thismeans that once your code is fully tested, you can produce the release version completely free of anyoverhead from your debugging code. The debug code can do anything that is helpful to you in thedebugging process, from simply outputting a message to trace the sequence of execution (each functionmight record that it was called for example) to providing additional calculations to verify and validatedata, or calling functions providing debug output.
Of course, you can have as many blocks of debug code like this in a source file as you want. You also havethe possibility of using your own preprocessor symbols to provide more selectivity as to what debug codeis included. One reason for doing this is if some of your debug code produced voluminous output, so youwould only want to generate this when it was really necessary. Another is to provide granularity in yourdebug output, so you can pick and choose which output is produced on each run. But even in theseinstances it is still a good idea to use the _DEBUG symbol to provide overall control because this automati-cally ensures that the release version of a program is completely free of the overhead of debugging code.
Consider a simple case. Suppose you used two symbols of your own to control debug code: MYDEBUGthat managed “normal” debugging code and VOLUMEDEBUG that you use to control code that produced a lot more output, and that you only wanted some of the time. You can arrange that these symbols aredefined only if _DEBUG is defined:
#ifdef _DEBUG
#define MYDEBUG#define VOLUMEDEBUG
#endif
To prevent volume debugging output you just need to comment out the definition of VOLUMEDEBUG, andneither symbol is defined if _DEBUG is not defined. Where your program has several source files, youwill probably find it convenient to place your debug control symbols together in a header file and then#include the header into each file that contains debugging code.
Examine a simple example to see how adding debugging code to a program might work in practice.
Try It Out Adding Code for DebuggingTo explore these and some general debugging approaches, take an example of a program that, while sim-ple, still contains quite a few bugs that you can find and eliminate. Thus you must regard all the code in theremainder of this chapter as suspect, particularly because it will not necessarily reflect good programmingpractice.
For experimenting with debugging operations, start by defining a class that represents a person’s nameand then proceed to test it in action. There is a lot wrong with this code, so resist the temptation to fix theobviously erroneous code here; the idea is to exercise the debugging operations to find them. However,in practice a great many bugs are very evident as soon as you run a program. You don’t necessarily needthe debugger or additional code to spot them.
Create an empty Win32 console application, Ex11_01. Next, add a header file, Name.h, to which you’ll addthe definition of the Name class. The class represents a name by two data members that are pointers tostrings storing a person’s first and second names. If you want to be able to declare arrays of Name objects
710
Chapter 11: Debugging Techniques
25905c11.qxd:WroxPro 2/21/08 9:13 AM Page 710

you must provide a default constructor in addition to any other constructors. You want to be able to com-pare Name objects, so you should include overloaded operators in the class to do this. You also want to beable to retrieve the complete name as a single string for convenience. You can add a definition of the Nameclass to the Name.h file as follows:
// Name.h – Definition of the Name class#pragma once
// Class defining a person’s nameclass Name{public:Name(); // Default constructorName(const char* pFirst, const char* pSecond); // Constructor
char* getName(char* pName) const; // Get the complete namesize_t getNameLength() const; // Get the complete name length
// Comparison operators for names bool operator<(const Name& name) const;bool operator==(const Name& name) const;bool operator>(const Name& name) const;
private:char* pFirstname;char* pSurname;
};
You can now add a Name.cpp file to the project to hold the definitions for the member functions of Name.The constructor definitions are shown here:
// Name.cpp – Implementation of the Name class#include “Name.h” // Name class definitions#include “DebugStuff.h” // Debugging code control#include <cstring> // For C-style string functions#include <cassert> // For assertions#include <iostream>using namespace std;
// Default constructorName::Name(){#ifdef CONSTRUCTOR_TRACE// Trace constructor callscerr << “\nDefault Name constructor called.”;
#endifpFirstname = pSurname = “\0”;
}
// ConstructorName::Name(const char* pFirst, const char* pSecond):
pFirstname(pFirst), pSurname(pSecond){
711
Chapter 11: Debugging Techniques
25905c11.qxd:WroxPro 2/21/08 9:13 AM Page 711
// Verify that arguments are not nullassert(pFirst != 0);assert(pSecond != 0);
#ifdef CONSTRUCTOR_TRACE// Trace constructor callscout << “\nName constructor called.”;
#endif}
Of course, you don’t particularly want to have Name objects that have null pointers as members, so thedefault constructor assigns empty strings for the names. You have used your own debug control symbol,CONSTRUCTOR_TRACE, to control output that traces constructor calls. You can add the definition of thissymbol to the DebugStuff.h header a little later. You could put anything at all as debug code here, suchas displaying argument values, but it is usually best to keep it as simple as your debugging requirementsallow; otherwise, your debug code may introduce further bugs. Here you just identify the constructorwhen it is called.
You have two assertions in the constructor to check for null pointers being passed as arguments. Youcould have combined these into one, but by using a separate assertion for each argument, you can iden-tify which pointer is null (unless they both are, of course).
You might also want to check that the strings are not empty in an application by counting the charactersprior to the terminating ‘\0’ for instance. However, you should not use an assertion to flag this. Thissort of thing could arise as a result of user input, so ordinary program checking code should be added todeal with errors that may arise in the normal course of events. It is important to recognize the differencebetween bugs (errors in the code) and error conditions that can be expected to arise during normal oper-ation of a program. The constructor should never be passed a null pointer, but a zero length name couldeasily arise under normal operating conditions (from keyboard input, for example). In this case it wouldprobably be better if the code reading the names were to check for this before calling the Name class con-structor. You want errors that arise during normal use of a program to be handled within the release ver-sion of the code.
The getName() function requires the caller to supply the address of an array that accommodates the name:
// Return a complete name as a string containing first name, space, surname// The argument must be the address of a char array sufficient to hold the namechar* Name::getName(char* pName) const{assert(pName != 0); // Verify non-null argument
#ifdef FUNCTION_TRACE// Trace function callscout << “\nName::getName() called.”;
#endif
strcpy(pName, pFirstname); // copy first namepName[strlen(pName)] = ‘ ‘; // Append a space
// Append second name and return totalreturn strcpy(pName+strlen(pName)+1, pSurname);
}
712
Chapter 11: Debugging Techniques
25905c11.qxd:WroxPro 2/21/08 9:13 AM Page 712
Here you have an assertion to check that the pointer argument passed is not null. Note that you have noway to check that the pointer is to an array with sufficient space to hold the entire name. You must relyon the calling function to do that. You also have debug code to trace when the function is called. Havinga record of the complete sequence of calls up to the point where catastrophe strikes can sometimes pro-vide valuable insights as to why and how the problem arose.
The getNameLength() member is a helper function that enables the user of a Name object to determinehow much space must be allocated to accommodate a complete name:
// Returns the total length of a namesize_t Name::getNameLength() const{#ifdef FUNCTION_TRACE// Trace function callscout << “\nName::getNameLength() called.”;
#endifreturn strlen(pFirstname)+strlen(pSurname);
}
A function that intends to call getName() is able use the value returned by getNameLength() todetermine how much space is needed to accommodate a complete name. You also have trace code inthis member function.
In the interests of developing the class incrementally, you can omit the definitions for the overloadedcomparison operators. Definitions are only required for member functions that you actually use in yourprogram, and in your initial test program you keep it very simple.
You can define the preprocessor symbols control whether or not the debug code is executed in theDebugStuff.h header:
// DebugStuff.h - Debugging control#pragma once
#ifdef _DEBUG
#define CONSTRUCTOR_TRACE // Output constructor call trace#define FUNCTION_TRACE // Trace function calls
#endif
Your control symbols are defined only if _DEBUG is defined, so none of the debug code is included in arelease version of the program.
You can now try out the Name class with the following main() function:
// Ex11_01.cpp : Including debug code in a program
#include <iostream>using namespace std;#include “Name.h”
713
Chapter 11: Debugging Techniques
25905c11.qxd:WroxPro 2/21/08 9:13 AM Page 713

int main(int argc, char* argv[]){Name myName(“Ivor”, “Horton”); // Try a single object
// Retrieve and store the name in a local char array char theName[10];cout << “\nThe name is “ << myName.getName(theName);
// Store the name in an array in the free storechar* pName = new char[myName.getNameLength()+1]; cout << “\nThe name is “ << myName.getName(pName);
cout << endl;return 0;
}
Now that all the code has been entered, double-checked, and is completely correct, all you have to do isrun it to make sure. Hardly seems necessary.
How It WorksWell it doesn’t — it doesn’t even compile, does it? The major problem is the Name constructor. The param-eters are const, as they should be, but the data members are not. You could declare the data members asconst, but anyway, you should be copying the name strings, not just copying the pointers. Amend theconstructor definition to:
// ConstructorName::Name(const char* pFirst, const char* pSecond){// Verify that arguments are not nullassert(pFirst != 0);assert(pSecond != 0);
#ifdef CONSTRUCTOR_TRACE// Trace constructor callscout << “\nName constructor called.”;
#endifpFirstname = new char[strlen(pFirst)+1];strcpy(pFirstname, pFirst);pFirstname = new char[strlen(pSecond)+1];strcpy(pSurname, pSecond);
}
Now you are copying the strings so you should be OK now, shouldn’t you?
When you recompile the program there are some warnings about the strcpy() function being deprecatedbecause it’s much better to use strcpy_s() but strcpy() does work so ignore these in this exercise.However, when you rerun the program it fails almost immediately. You can see from the Console windowthat you got a message from the constructor, so you know roughly how far the execution went. Restart theprogram under the control of the debugger and you can see what happened.
714
Chapter 11: Debugging Techniques
25905c11.qxd:WroxPro 2/21/08 9:13 AM Page 714

Debugging a ProgramWhen the debugger starts, you get a message box indicating you have an unhandled exception. In thedebugger, you have a comprehensive range of facilities for stepping through your code and tracing thesequence of events. Click Break in the dialog that indicates there is an unhandled exception to halt exe-cution. The program is at the point where the exception occurred and the code currently executing is in the Editor window. The exception is caused by referring to a memory location way outside the realmof the program, so a rogue pointer in our program is the immediate suspect.
The Call StackThe call stack stores information about functions that have been called and are still executing becausethey have not returned yet. As you saw earlier, the Call Stack window shows the sequence of functioncalls outstanding at the current point in the program. Refer to Figure 11-11.
Figure 11-11
The sequence of function calls outstanding runs from the most recent call at the top, the library functionstrcat(), down to the Kernel32 calls at the bottom of the window in Figure 11-11. Each function wascalled directly or indirectly by the one below it, and none of those displayed have yet executed a return.The Kernel32 lines are all system routines that start executing prior to our main() function. Your interestis the role of your code in this, and you can see from the second line down in the window that the Nameclass constructor was still in execution (had not returned) when the exception was thrown. If you double-click on that line, the Editor window displays the code for that function, and indicates the line in the sourcecode being executed when the problem arose, which in this case is:
strcpy(pSurname, pSecond);
This call caused the unhandled exception to be thrown — but why? The original problem is not neces-sarily here; it just became apparent here. This is typical of errors involving pointers. Take a look at thewindow showing the values in the variables in the context of the Name constructor that is presently dis-played in the Editor pane. Figure 11-12 shows how it looks.
Figure 11-12
715
Chapter 11: Debugging Techniques
25905c11.qxd:WroxPro 2/21/08 9:13 AM Page 715

Because the context is a function that is a member of the Name class, the Autos window displays the thispointer that contains the address of the current object. The pSurname pointer contains a weird address,0xcccccccc, and it has been flagged with <Bad Ptr>.The debugger recognizes that pSurname has gotto be a rogue pointer and has marked it as such. If you look at pFirstname, this is also in a mess. At thepoint where you are in the code (copying the surname) the first name should already have been copied,but the contents are rubbish.
The culprit is in the preceding line. Hasty copying of code has resulted in allocating memory forpFirstname for a second time, instead of allocating space for pSurname. The copy is to a junk address,and this causes the exception to be thrown. Don’t you wish you had checked what you did, properly? The line should be:
pSurname = new char[strlen(pSecond)+1];
It is typically the case that the code causing a bad pointer address is not the code where the error makesitself felt. In general it may be very far away. Just examining the pointer or pointers involved in the state-ment causing the error can often lead you directly to the problem, but sometimes it can involve a lot ofsearching. You can always add more debug code if you get really stuck.
Change the statement in the Editor window to what it should be and recompile the project with thechange included. You can then restart the program inside the debugger after it has been recompiled byclicking the button on the Debug toolbar, but surprise, surprise you get another unhandled exception.This undoubtedly means more pointer trouble, and you can see from the output in the Console windowthat the last function call was to getNameLength():
Name constructor called.Name::getName() called.The name is HortonName::getNameLength() called.
The output for the name is definitely not right; however, you don’t know where exactly the problem is.Restarting and stepping through the program once more should provide some clues.
Note that you can change the way numeric values are displayed in the Debugger windows. The defaultis to display values in hexadecimal format but you can change this to a decimal by right-clicking in aDebugger window and unchecking Hexadecimal Display. The change will apply to all Debugger windows.
Step Over to the ErrorThe getNameLength() function is currently displayed in the Editor pane and the debugger has indicatedthat the following line is where the problem arose:
return strlen(pFirstname)+strlen(pSurname)+1;
In the Call Stack window, you can see that the program is in the getNameLength() function member,which merely calls the strlen() library function to get the overall length of the name. The strlen()function is unlikely to be at fault, so this must mean there is something wrong with part of the object.The Autos window showing the variables in the context of this function shows that the current objecthas been corrupted, as you can see in Figure 11-13.
716
Chapter 11: Debugging Techniques
25905c11.qxd:WroxPro 2/21/08 9:13 AM Page 716
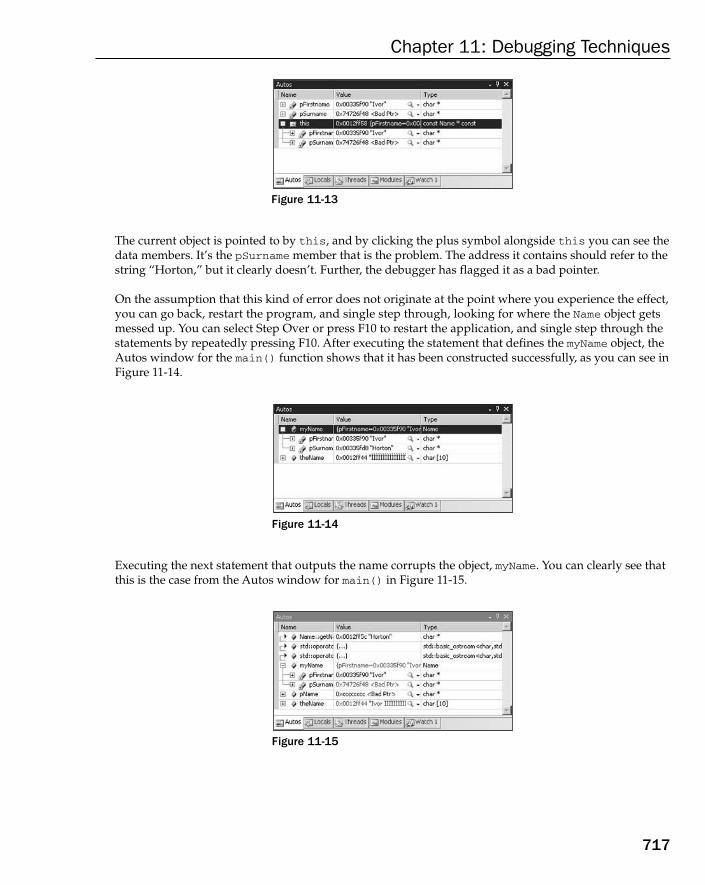
Figure 11-13
The current object is pointed to by this, and by clicking the plus symbol alongside this you can see thedata members. It’s the pSurname member that is the problem. The address it contains should refer to thestring “Horton,” but it clearly doesn’t. Further, the debugger has flagged it as a bad pointer.
On the assumption that this kind of error does not originate at the point where you experience the effect,you can go back, restart the program, and single step through, looking for where the Name object getsmessed up. You can select Step Over or press F10 to restart the application, and single step through thestatements by repeatedly pressing F10. After executing the statement that defines the myName object, theAutos window for the main() function shows that it has been constructed successfully, as you can see inFigure 11-14.
Figure 11-14
Executing the next statement that outputs the name corrupts the object, myName. You can clearly see thatthis is the case from the Autos window for main() in Figure 11-15.
Figure 11-15
717
Chapter 11: Debugging Techniques
25905c11.qxd:WroxPro 2/21/08 9:13 AM Page 717
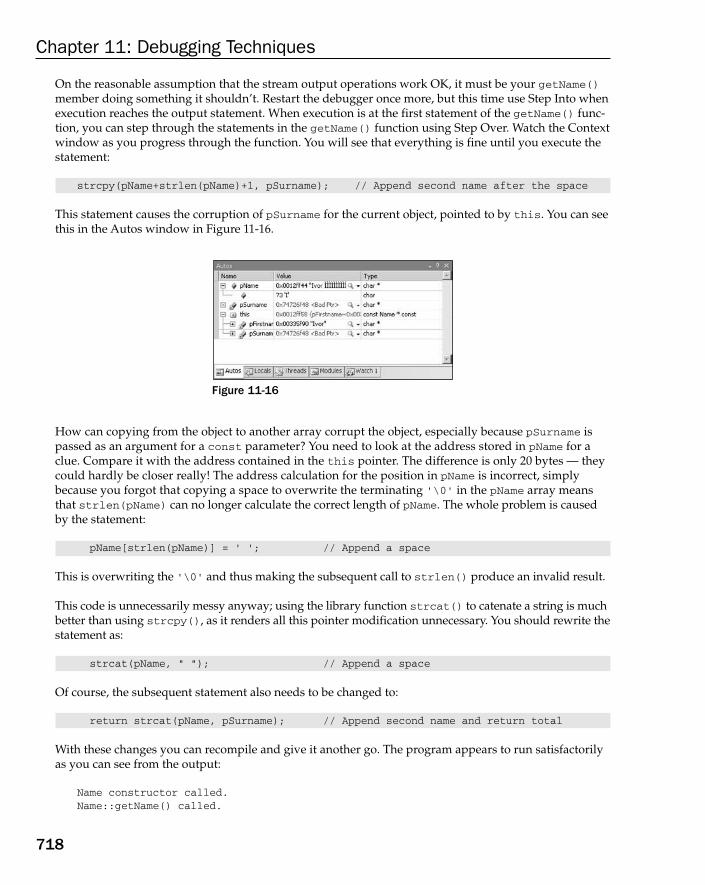
On the reasonable assumption that the stream output operations work OK, it must be your getName()member doing something it shouldn’t. Restart the debugger once more, but this time use Step Into whenexecution reaches the output statement. When execution is at the first statement of the getName() func-tion, you can step through the statements in the getName() function using Step Over. Watch the Contextwindow as you progress through the function. You will see that everything is fine until you execute thestatement:
strcpy(pName+strlen(pName)+1, pSurname); // Append second name after the space
This statement causes the corruption of pSurname for the current object, pointed to by this. You can seethis in the Autos window in Figure 11-16.
Figure 11-16
How can copying from the object to another array corrupt the object, especially because pSurname ispassed as an argument for a const parameter? You need to look at the address stored in pName for aclue. Compare it with the address contained in the this pointer. The difference is only 20 bytes — theycould hardly be closer really! The address calculation for the position in pName is incorrect, simplybecause you forgot that copying a space to overwrite the terminating ‘\0’ in the pName array meansthat strlen(pName) can no longer calculate the correct length of pName. The whole problem is causedby the statement:
pName[strlen(pName)] = ‘ ‘; // Append a space
This is overwriting the ‘\0’ and thus making the subsequent call to strlen() produce an invalid result.
This code is unnecessarily messy anyway; using the library function strcat() to catenate a string is muchbetter than using strcpy(), as it renders all this pointer modification unnecessary. You should rewrite thestatement as:
strcat(pName, “ “); // Append a space
Of course, the subsequent statement also needs to be changed to:
return strcat(pName, pSurname); // Append second name and return total
With these changes you can recompile and give it another go. The program appears to run satisfactorilyas you can see from the output:
Name constructor called.Name::getName() called.
718
Chapter 11: Debugging Techniques
25905c11.qxd:WroxPro 2/21/08 9:13 AM Page 718

The name is Ivor HortonName::getNameLength() called.Name::getName() called.The name is Ivor Horton
Getting the right output does not always mean that all is well, and it certainly isn’t in this case. You get themessage box displayed by the debug library shown in Figure 11-17 indicating that the stack is corrupted.
Figure 11-17
The following code shows where the problem lies:
int main(int argc, char* argv[]){
Name myName(“Ivor”, “Horton”); // Try a single object
// Retrieve and store the name in a local char array char theName[10];cout << “\nThe name is “ << myName.getName(theName);
// Store the name in an array in the free storechar* pName = new char[myName.getNameLength()]; cout << “\nThe name is “ << myName.getName(pName);
cout << endl;return 0;
}
Both the shaded lines are in error. The first shaded line provides an array of 10 characters to store thename. In fact, 12 are required: 10 for the two names, one for the space, and one for ‘\0’ at the end. Thesecond shaded line should add 1 to the value returned by the getNameLength() function to allow forthe ‘\0’ at the end. Thus, the code in main() should be:
int main(int argc, char* argv[]){
Name myName(“Ivor”, “Horton”); // Try a single object
// Retrieve and store the name in a local char array char theName[12];cout << “\nThe name is “ << myName.getName(theName);
// Store the name in an array in the free storechar* pName = new char[myName.getNameLength()+1];
719
Chapter 11: Debugging Techniques
25905c11.qxd:WroxPro 2/21/08 9:13 AM Page 719

cout << “\nThe name is “ << myName.getName(pName);
cout << endl;return 0;
}
There’s a more serious problem in the definition getNameLength() member of the class. It omits to add 1for the space between the first and second names, so the value returned is always one short. The definitionshould be:
int Name::getNameLength() const{#ifdef FUNCTION_TRACE// Trace function callscout << “\nName::getNameLength() called.”;
#endifreturn strlen(pFirstname)+strlen(pSurname)+1;
}
That’s not the end of it by any means. You may have already spotted that your class still has seriouserrors, but press on with testing to see if they come out in the wash.
Testing the Extended ClassBased on the output, everything is working, so its time to add the definitions for the overloaded compari-son operators to the Name class. I’ll assume this is a new Win32 console project, Ex11_02. To implement thecomparison operators for Name objects you can use the comparison functions declared in the <cstring>header. Start with the ‘less than’ operator:
// Less than operatorbool Name::operator<(const Name& name) const{int result = strcmp(pSurname, name.pSurname);if(result < 0)return true;
if(result == 0 && strcmp(pFirstname, name.pFirstname) < 0)return true;
elsereturn false;
}
You can now define the > operator very easily in terms of the < operator:
// Greater than operatorbool Name::operator>(const Name& name) const{return name > *this;
}
720
Chapter 11: Debugging Techniques
25905c11.qxd:WroxPro 2/21/08 9:13 AM Page 720

For determining equal names you use the strcmp() function from the standard library again:
// Equal to operatorbool Name::operator==(const Name& name) const{if(strcmp(pSurname, name.pSurname) == 0 &&
strcmp(pFirstname, name.pFirstname) == 0)return true;
elsereturn false;
}
Now extend the test program. You can create an array of Name objects, initialize them in some arbitraryway, and then compare the elements of the array using your comparison operators for a Name object.Here’s main() along with a function, init(), to initialize a Name array:
// Ex11_02.cpp : Extending the test operation
#include <iostream>using namespace std;#include “Name.h”
// Function to initialize an array of random namesvoid init(Name* names, int count){char* firstnames[] = { “Charles”, “Mary”, “Arthur”, “Emily”, “John”};int firstsize = sizeof (firstnames)/sizeof(firstnames[0]);char* secondnames[] = { “Dickens”, “Shelley”, “Miller”, “Bronte”, “Steinbeck”};int secondsize = sizeof (secondnames)/sizeof(secondnames[0]);char* first = firstnames[0];char* second = secondnames[0];
for(int i = 0 ; i<count ; i++){if(i%2)first = firstnames[i%firstsize];
elsesecond = secondnames[i%secondsize];
names[i] = Name(first, second);}
}
int main(int argc, char* argv[]){
Name myName(“Ivor”, “Horton”); // Try a single object
// Retrieve and store the name in a local char array char theName[12];cout << “\nThe name is “ << myName.getName(theName);
// Store the name in an array in the free storechar* pName = new char[myName.getNameLength()+1];
721
Chapter 11: Debugging Techniques
25905c11.qxd:WroxPro 2/21/08 9:13 AM Page 721
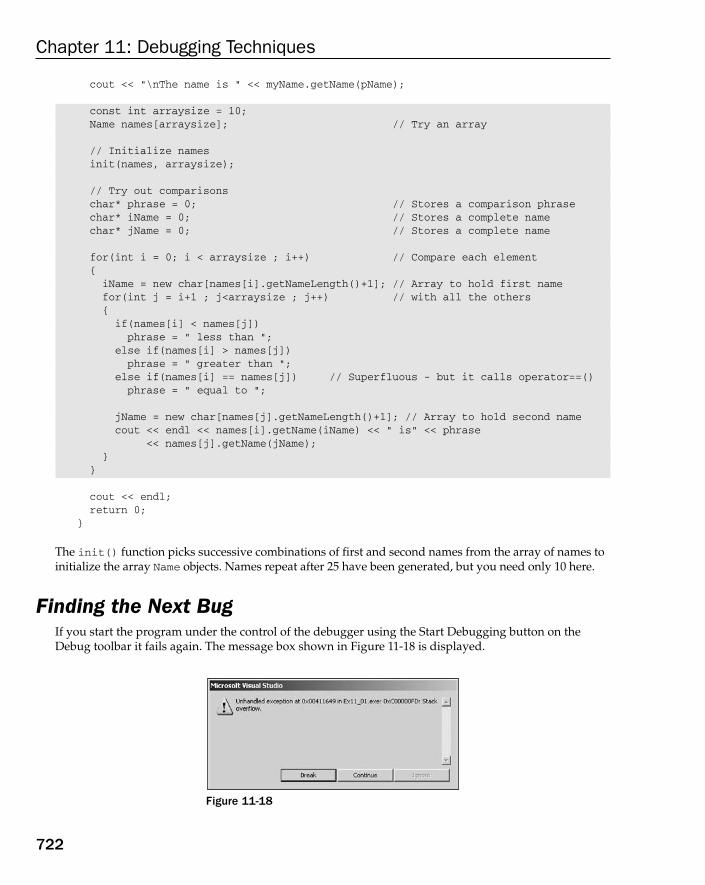
cout << “\nThe name is “ << myName.getName(pName);
const int arraysize = 10;Name names[arraysize]; // Try an array
// Initialize namesinit(names, arraysize);
// Try out comparisonschar* phrase = 0; // Stores a comparison phrasechar* iName = 0; // Stores a complete name char* jName = 0; // Stores a complete name
for(int i = 0; i < arraysize ; i++) // Compare each element{iName = new char[names[i].getNameLength()+1]; // Array to hold first namefor(int j = i+1 ; j<arraysize ; j++) // with all the others{if(names[i] < names[j])phrase = “ less than “;
else if(names[i] > names[j])phrase = “ greater than “;
else if(names[i] == names[j]) // Superfluous - but it calls operator==() phrase = “ equal to “;
jName = new char[names[j].getNameLength()+1]; // Array to hold second namecout << endl << names[i].getName(iName) << “ is” << phrase
<< names[j].getName(jName);}
}
cout << endl;return 0;
}
The init() function picks successive combinations of first and second names from the array of names toinitialize the array Name objects. Names repeat after 25 have been generated, but you need only 10 here.
Finding the Next BugIf you start the program under the control of the debugger using the Start Debugging button on theDebug toolbar it fails again. The message box shown in Figure 11-18 is displayed.
Figure 11-18
722
Chapter 11: Debugging Techniques
25905c11.qxd:WroxPro 2/21/08 9:13 AM Page 722

The message box indicates you have exceeded the capacity of the stack memory available and if youselect the Break button the Call Stack window tells you what is wrong. You have successive calls of theoperator>() function so it must be calling itself. If you look at the code, you can see why: a typo. Thesingle line in the body of the function should be:
bool Name::operator>(const Name& name) const{return name < *this;
}
You can fix that, recompile, and try again. This time it works correctly, but unfortunately the class is stilldefective. It has a memory leak that exhibits no symptoms here, but in another context could cause may-hem. Memory leaks are hard to detect ordinarily, but you can get some extra help from Visual C++ 2008.
Debugging Dynamic MemoryAllocating memory dynamically is a potent source of bugs and perhaps the most common bugs in thiscontext are memory leaks. Just to remind you, a memory leak arises when you use the new operator to allocate memory, but you never use the delete operator to free it again when you are done with it.Apart from just forgetting to delete memory that you have allocated, you should particularly be awarethat non-virtual destructors in a class hierarchy can also cause the problem because they can cause thewrong destructor to be called when an object is destroyed, as you have seen. Of course, when yourprogram ends, all the memory is freed; however, while it is running, it remains allocated to your pro-gram. Memory leaks present no obvious symptoms much of the time, maybe never in some cases, butmemory leaks are detrimental to the performance of your machine because memory is being occupiedto no good purpose. Sometimes, it can result in a catastrophic failure of the program when all availablememory has been allocated.
For checking your program’s use of the free store, Visual C++ 2008 provides a range of diagnostic routines;these use a special debug version of the free store. These are declared in the header crtdbg.h. All calls to these routines are automatically removed from the release version of your program, so you don’t need toworry about adding preprocessor controls for them.
Functions Checking the Free StoreHere’s an overview of what’s involved in checking free store operations and how memory leaks can bedetected. The functions declared in ctrdbg.h check the free store using a record of its status stored in astructure of type _CrtMemState. This structure is relatively simple and is defined as:
typedef struct _CrtMemState{struct _CrtMemBlockHeader* pBlockHeader; // Ptr to most recently allocated blockunsigned long lCounts[_MAX_BLOCKS]; // Counter for each type of blockunsigned long lSizes[_MAX_BLOCKS];// Total bytes allocated in each block typeunsigned long lHighWaterCount; // The most bytes allocated at a time up to nowunsigned long lTotalCount; // The total bytes allocated at present
} _CrtMemState;
723
Chapter 11: Debugging Techniques
25905c11.qxd:WroxPro 2/21/08 9:13 AM Page 723

You won’t be concerned directly with the details of the state of the free store because you are using func-tions that present the information in a more readable form. There are quite a few functions involved intracking free store operations but you will only look at the five most interesting ones. These provide youwith the following capabilities:
❑ To record the state of the free store at any point
❑ To determine the difference between two states of the free store
❑ To output state information
❑ To output information about objects in the free store
❑ To detect memory leaks
Here are the declarations of these functions together with a brief description of what they do:
void _CrtMemCheckpoint(_CrtMemState* state);
This stores the current state of the free store in a _CrtMemState structure. The argument you pass to thefunction is a pointer to a _CrtMemState structure in which the state is to be recorded.
int _CrtMemDifference(_CrtMemState* stateDiff,const _CrtMemState* oldState,const _CrtMemState* newState);
This function compares the state specified by the third argument, with a previous state that you specifyin the second argument. The difference is stored in a _CrtMemState structure that you specify in thefirst argument. If the states are different, the function returns a non-zero value (true); otherwise, 0(false) is returned.
void _CrtMemDumpStatistics(const _CrtMemState* state);
This dumps information about the free store state specified by the argument to an output stream. Thestate structure pointed to by the argument can be a state that you recorded using _CrtMemCheckpoint()or the difference between two states produced by _CrtMemDifference().
void _CrtMemDumpAllObjectsSince(const _CrtMemState* state);
This function dumps information on objects allocated in the free store, since the state of the free store speci-fied by the argument; this has been recorded by an earlier call in your program to _CrtMemCheckpoint().If you pass null to the function, it dumps information on all objects allocated since the start of execution ofyour program.
int _CrtDumpMemoryLeaks();
This is the function you need for the example as it checks for memory leaks and dumps information onany leak that is detected. You can call this function at any time, but a very useful mechanism can causethe function to be called automatically when your program ends. If you enable this mechanism, you getautomatic detection of any memory leaks that occurred during program execution, so see how you cando that.
724
Chapter 11: Debugging Techniques
25905c11.qxd:WroxPro 2/21/08 9:13 AM Page 724
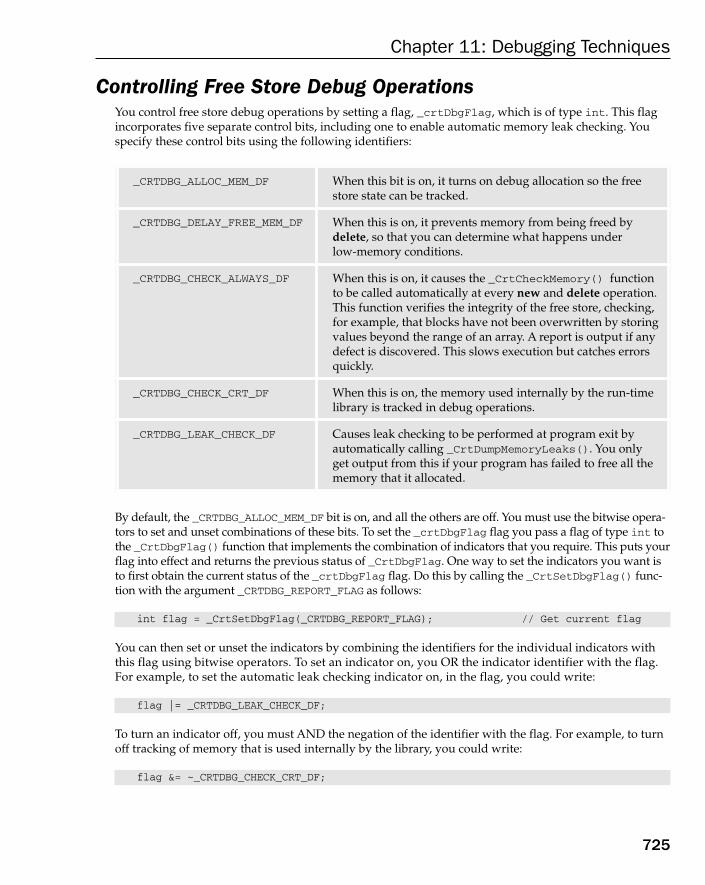
Controlling Free Store Debug OperationsYou control free store debug operations by setting a flag, _crtDbgFlag, which is of type int. This flagincorporates five separate control bits, including one to enable automatic memory leak checking. Youspecify these control bits using the following identifiers:
By default, the _CRTDBG_ALLOC_MEM_DF bit is on, and all the others are off. You must use the bitwise opera-tors to set and unset combinations of these bits. To set the _crtDbgFlag flag you pass a flag of type int tothe _CrtDbgFlag() function that implements the combination of indicators that you require. This puts yourflag into effect and returns the previous status of _CrtDbgFlag. One way to set the indicators you want isto first obtain the current status of the _crtDbgFlag flag. Do this by calling the _CrtSetDbgFlag() func-tion with the argument _CRTDBG_REPORT_FLAG as follows:
int flag = _CrtSetDbgFlag(_CRTDBG_REPORT_FLAG); // Get current flag
You can then set or unset the indicators by combining the identifiers for the individual indicators withthis flag using bitwise operators. To set an indicator on, you OR the indicator identifier with the flag.For example, to set the automatic leak checking indicator on, in the flag, you could write:
flag |= _CRTDBG_LEAK_CHECK_DF;
To turn an indicator off, you must AND the negation of the identifier with the flag. For example, to turnoff tracking of memory that is used internally by the library, you could write:
flag &= ~_CRTDBG_CHECK_CRT_DF;
_CRTDBG_ALLOC_MEM_DF When this bit is on, it turns on debug allocation so the freestore state can be tracked.
_CRTDBG_DELAY_FREE_MEM_DF When this is on, it prevents memory from being freed bydelete, so that you can determine what happens under low-memory conditions.
_CRTDBG_CHECK_ALWAYS_DF When this is on, it causes the _CrtCheckMemory() functionto be called automatically at every new and delete operation.This function verifies the integrity of the free store, checking,for example, that blocks have not been overwritten by storingvalues beyond the range of an array. A report is output if anydefect is discovered. This slows execution but catches errorsquickly.
_CRTDBG_CHECK_CRT_DF When this is on, the memory used internally by the run-timelibrary is tracked in debug operations.
_CRTDBG_LEAK_CHECK_DF Causes leak checking to be performed at program exit byautomatically calling _CrtDumpMemoryLeaks(). You onlyget output from this if your program has failed to free all thememory that it allocated.
725
Chapter 11: Debugging Techniques
25905c11.qxd:WroxPro 2/21/08 9:13 AM Page 725

To put your new flag into effect, you just call _CrtSetDbgFlag() with your flag as the argument:
_CrtSetDbgFlag(flag);
Alternatively, you can OR all the identifiers for the indicators that you want together, and pass theresult as the argument to _CrtSetDbgFlag(). If you just want to leak check when the program exits,you could write:
_CrtSetDbgFlag(_CRTDBG_LEAK_CHECK_DF|_CRTDBG_ALLOC_MEM_DF);
If you need to set a particular combination of indicators, rather than setting or unsetting bits at variouspoints in your program, this is the easiest way to do it. You are almost at the point where you can applythe dynamic memory debugging facilities to our example. You just need to look at how you determinewhere free store debugging output goes.
Free Store Debugging OutputThe destination of the output from the free store debugging functions is not the standard output stream;by default it goes to the debug message window. If you want to see the output on stdout you must setthis up. There are two functions involved in this: _CrtSetReportMode(), which sets the general desti-nation for output, and _CrtSetReportFile(), which specifies a stream destination specifically. The_CrtSetReportMode() function is declared as:
int _CrtSetReportMode(int reportType, int reportMode);
There are three kinds of output produced by the free store debugging functions. Each call to the_CrtSetReportMode() function sets the destination specified by the second argument for the outputtype specified by the first argument. You specify the report type by one of the following identifiers:
The crtdbg.h header defines two macros, ASSERT and ASSERTE, that work in much the same way asthe assert() function in the standard library. The difference between these two macros is that ASSERTEreports the assertion expression when a failure occurs, whereas the ASSERT macro does not.
You specify the report mode by a combination of the following identifiers:
_CRTDBG_MODE_DEBUG This is the default mode, which sends output to a debugstring that you see in the Debug window when runningunder control of the debugger.
_CRTDBG_MODE_FILE Output is to be directed to an output stream.
_CRT_WARN Warning messages of various kinds. The output when amemory leak is detected is a warning.
_CRT_ERROR Catastrophic errors that report unrecoverable problems.
_CRT_ASSERT Output from assertions (not output from the assert()function that I discussed earlier).
726
Chapter 11: Debugging Techniques
25905c11.qxd:WroxPro 2/21/08 9:13 AM Page 726

To specify more than one destination, you simply OR the identifiers using the | operator. You set the des-tination for each output type with a separate call of the _CrtSetReportMode() function. To direct theoutput when a leak is detected to a file stream, you can set the report mode with the following statement:
CrtSetReportMode(_CRT_WARN, _CRTDBG_MODE_FILE);
This just sets the destination generically as a file stream. You still need to call the _CrtSetReportFile()function to specify the destination specifically.
The _CrtSetReportFile() function is declared as:
_HFILE _CrtSetReportFile(int reportType, _HFILE reportFile);
The second argument here can either be a pointer to a file stream (of type _HFILE), which I will not gointo further, or can be one of the following identifiers:
To set the leak detection output to the standard output stream, you can write:
_CrtSetReportFile(_CRT_WARN, _CRTDBG_FILE_STDOUT);
You now have enough knowledge of the free store debug routines to try out leak detection in yourexample.
Try It Out Memory Leak DetectionEven though you have set the project settings to direct the standard output stream to a file, it would be agood idea to reduce the volume of output, so reduce the size of the names array to five elements. Here’sthe new version of main() for Ex11_02 to use the free store debug facilities in general and leak detectionin particular:
int main(int argc, char* argv[]){// Turn on free store debugging and leak-checking bits_CrtSetDbgFlag( _CRTDBG_LEAK_CHECK_DF|_CRTDBG_ALLOC_MEM_DF );
// Direct warnings to stdout
_CRTDBG_FILE_STDERR Output is directed to the standard error stream, stderr.
_CRTDBG_FILE_STDOUT Output is directed to the standard output stream, stdout.
_CRTDBG_REPORT_FILE If you specify this argument, the _CrtSetReportFile()function will just return the current destination.
_CRTDBG_MODE_WNDW Output is presented in a message box.
_CRTDBG_REPORT_MODE If you specify this, the _CrtSetReportMode() function justreturns the current report mode.
727
Chapter 11: Debugging Techniques
25905c11.qxd:WroxPro 2/21/08 9:13 AM Page 727

_CrtSetReportMode(_CRT_WARN, _CRTDBG_MODE_FILE);_CrtSetReportFile(_CRT_WARN, _CRTDBG_FILE_STDOUT);
Name myName(“Ivor”, “Horton”); // Try a single object
// Retrieve and store the name in a local char array char theName[12];cout << “\nThe name is “ << myName.getName(theName);
// Store the name in an array in the free storechar* pName = new char[myName.getNameLength()+1]; cout << “\nThe name is “ << myName.getName(pName);
const int arraysize = 5;Name names[arraysize]; // Try an array
// Initialize namesinit(names, arraysize);
// Try out comparisonschar* phrase = 0; // Stores a comparison phrasechar* iName = 0; // Stores a complete name char* jName = 0; // Stores a complete name
for(int i = 0; i < arraysize ; i++) // Compare each element{
iName = new char[names[i].getNameLength()+1]; // Array to hold first namefor(int j = i+1 ; j<arraysize ; j++) // with all the others{
if(names[i] < names[j])phrase = “ less than “;
else if(names[i] > names[j])phrase = “ greater than “;
else if(names[i] == names[j]) // Superfluous - but it calls operator==()phrase = “ equal to “;
jName = new char[names[j].getNameLength()+1]; // Array to hold second namecout << endl << names[i].getName(iName) << “ is” << phrase
<< names[j].getName(jName);}
}cout << endl;return 0;
}
To reduce output further, you could switch off the trace output by commenting out the control symbolsin the DebugStuff.h header:
// DebugStuff.h - Debugging control#pragma once
#ifdef _DEBUG
728
Chapter 11: Debugging Techniques
25905c11.qxd:WroxPro 2/21/08 9:13 AM Page 728

//#define CONSTRUCTOR_TRACE // Output constructor call trace//#define FUNCTION_TRACE // Trace function calls#endif
You can recompile the example and run it again.
How It WorksIt works just as expected. You get a report that your program does indeed have memory leaks, and youget a list of the objects in the free store at the end of the program. The output generated by the free storedebug facility starts with:
Detected memory leaks!Dumping objects ->{143} normal block at 0x00355F08, 15 bytes long.Data: < > CD CD CD CD CD CD CD CD CD CD CD CD CD CD CD{142} normal block at 0x00355EC8, 15 bytes long.Data: <Emily Steinbeck> 45 6D 69 6C 79 20 53 74 65 69 6E 62 65 63 6B{141} normal block at 0x00355E90, 12 bytes long.Data: <Emily Miller> 45 6D 69 6C 79 20 4D 69 6C 6C 65 72...
and ends with:
...{120} normal block at 0x003559D8, 8 bytes long.Data: <Dickens > 44 69 63 6B 65 6E 73 00{119} normal block at 0x003559A0, 8 bytes long.Data: <Charles > 43 68 61 72 6C 65 73 00{118} normal block at 0x00355968, 11 bytes long.Data: <Ivor Horton> 49 76 6F 72 20 48 6F 72 74 6F 6E{117} normal block at 0x00355930, 7 bytes long.Data: <Horton > 48 6F 72 74 6F 6E 00{116} normal block at 0x003558F8, 5 bytes long.Data: <Ivor > 49 76 6F 72 00Object dump complete.
The objects reported as being left in the free store are presented with the most recently allocated first, and theearliest last. It is obvious from the output that the Name class is allocating memory for its data members, andnever releasing it. The last three objects dumped correspond to the pName array allocated in main(), and thedata members of the object, myName. The blocks for the complete names are allocated in main(), and theytoo are left lying about. The problem our class has is that we forgot the fundamental rules relating to classesthat allocate memory dynamically; they should always define a destructor, a copy constructor, and theassignment operator. The class should be declared as:
class Name{
public:Name(); // Default constructorName(const char* pFirst, const char* pSecond); // ConstructorName(const Name& rName); // Copy constructor
729
Chapter 11: Debugging Techniques
25905c11.qxd:WroxPro 2/21/08 9:13 AM Page 729

~Name(); // Destructor
char* getName(char* pName) const; // Get the complete nameint getNameLength() const; // Get the complete name length
// Comparison operators for names bool operator<(const Name& name) const;bool operator==(const Name& name) const;bool operator>(const Name& name) const;
Name& operator=(const Name& rName); // Assignment operator
private:char* pFirstname;char* pSurname;
};
You can define the copy constructor as:
Name:: Name(const Name& rName){pFirstname = new char[strlen(rName.pFirstname)+1]; // Allocate space for 1st namestrcpy(pFirstname, rName.pFirstname); // and copy it.pSurname = new char[strlen(rName.pSurname)+1]; // Same for the surname...strcpy(pSurname, rName.pSurname);
}
The destructor just needs to release the memory for the two data members:
Name::~Name(){delete[] pFirstname;delete[] pSurname;
}
In the assignment operator, you must make the usual provision for the left and right sides being identical:
Name& Name::operator=(const Name& rName){if(this == &rName) // If lhs equals rhsreturn *this; // just return the object
delete[] pFirstname;pFirstname = new char[strlen(rName.pFirstname)+1]; // Allocate space for 1st namestrcpy(pFirstname, rName.pFirstname); // and copy it.delete[] pSurname;pSurname = new char[strlen(rName.pSurname)+1]; // Same for the surname...strcpy(pSurname, rName.pSurname);return *this;
}
730
Chapter 11: Debugging Techniques
25905c11.qxd:WroxPro 2/21/08 9:13 AM Page 730
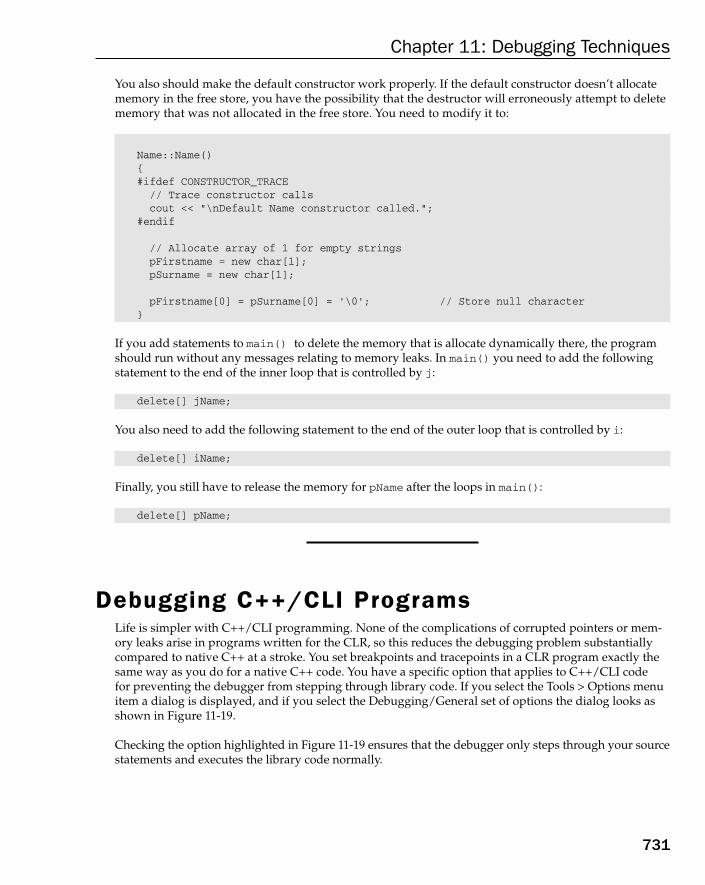
You also should make the default constructor work properly. If the default constructor doesn’t allocatememory in the free store, you have the possibility that the destructor will erroneously attempt to deletememory that was not allocated in the free store. You need to modify it to:
Name::Name(){#ifdef CONSTRUCTOR_TRACE// Trace constructor callscout << “\nDefault Name constructor called.”;
#endif
// Allocate array of 1 for empty stringspFirstname = new char[1];pSurname = new char[1];
pFirstname[0] = pSurname[0] = ‘\0’; // Store null character}
If you add statements to main() to delete the memory that is allocate dynamically there, the programshould run without any messages relating to memory leaks. In main() you need to add the followingstatement to the end of the inner loop that is controlled by j:
delete[] jName;
You also need to add the following statement to the end of the outer loop that is controlled by i:
delete[] iName;
Finally, you still have to release the memory for pName after the loops in main():
delete[] pName;
Debugging C++/CLI ProgramsLife is simpler with C++/CLI programming. None of the complications of corrupted pointers or mem-ory leaks arise in programs written for the CLR, so this reduces the debugging problem substantiallycompared to native C++ at a stroke. You set breakpoints and tracepoints in a CLR program exactly thesame way as you do for a native C++ code. You have a specific option that applies to C++/CLI code for preventing the debugger from stepping through library code. If you select the Tools > Options menuitem a dialog is displayed, and if you select the Debugging/General set of options the dialog looks asshown in Figure 11-19.
Checking the option highlighted in Figure 11-19 ensures that the debugger only steps through your sourcestatements and executes the library code normally.
731
Chapter 11: Debugging Techniques
25905c11.qxd:WroxPro 2/21/08 9:13 AM Page 731

Figure 11-19
Using the Debug and Trace ClassesThe Debug and Trace classes in the System::Diagnostics namespace are for tracing execution of aprogram for debugging purposes. The capabilities provided by the Debug and Trace classes are identi-cal; the difference between them is that Trace functions are compiled into release builds, whereas Debugfunctions are not. Thus you can use Debug class functions when you are just debugging your code, andTrace class functions when you want to obtain Trace information in release versions of your code forperformance monitoring or diagnostic and maintenance purposes. You also have control over whetherthe compile includes trace code in your program.
Because the functions and other members in the Debug and Trace classes are identical, I’ll just describethe capability in terms of the Debug class.
Generating OutputYou can produce output using the Debug::WriteLine() and Debug::Write() functions that writemessages to an output destination; the difference between these two functions is that the WriteLine()function writes a newline character after the output whereas the Write() function does not. They bothcome in four overloaded versions; I’ll use the Write() function as the example but WriteLine() ver-sions have the same parameter lists:
Function Description
Debug::Write(String^ message) Writes message to the output destination.
Debug::Write(String^ message,String^ category)
Writes categoryname followed by message to theoutput destination. A category name is used to organ-ize the output.
732
Chapter 11: Debugging Techniques
25905c11.qxd:WroxPro 2/21/08 9:13 AM Page 732

The WriteIf() and WriteLineIf() are conditional versions of the Write() and WriteLine() functionsin the Debug class:
As you see, the WriteIf() and WriteLineIf() functions have an extra parameter of type bool at thebeginning of the parameter list for the corresponding Write() or WriteLine() function and the argu-ment for this determines whether or not output occurs.
You can also write output using the Debug::Print() function that comes in two overloaded versions:
Function Description
Print(String^ message) This writes message to the output destination fol-lowed by a newline character.
Print(String^ format,...array<Object^>^ args)
This works in the same way as formatted output withthe Console::WriteLine() function. The formatstring determines how the arguments that follow itare presented in the output.
Function Description
Debug::WriteIf(bool condition,String^ message)
Writes message to the output destination if conditionis true; otherwise, no output is produced.
Debug::WriteIf(bool condition,String^ message,String^ category)
Writes category followed by message to the outputdestination if condition is true; otherwise, no out-put is produced.
Debug::WriteIf(bool condition,Object^ value)
Writes the string returned by value>ToString() tothe output destination if condition is true; other-wise, no output is produced.
Debug::WriteIf(bool condition,Object^ value,String^ category)
Writes category followed by the string returned by value->ToString() to the output destination ifcondition is true; otherwise, no output is produced.
Function Description
Debug::Write(Object^ value) Writes the string returned by value>ToString() tothe output destination.
Debug::Write(Object^ value,String^ category)
Writes categoryname followed by the string returnedby value->ToString() to the output destination.
733
Chapter 11: Debugging Techniques
25905c11.qxd:WroxPro 2/21/08 9:13 AM Page 733

Setting the Output DestinationBy default the output messages are sent to the Output window in the IDE, but you can change this byusing a listener, and a listener is an object that directs debug and trace output to one or more destina-tions. Here’s how you can create a listener and direct debug output to the standard output stream:
TextWriterTraceListener^ listener = gcnew TextWriterTraceListener( Console::Out);Debug::Listeners->Add(listener);
The first statement creates a TextWriterTraceListener object that directs the output to the standardoutput stream, which is returned by the static property, Out, in the Console class. (The In and Errorproperties in the Console class return the standard input stream and standard error stream respectively.)The Listeners property in the Debug class returns a collection of listeners for debug output so the state-ment adds the listener object to the collection. You could add other listeners that additionally directedoutput elsewhere (to a file perhaps).
Indenting the OutputYou can control the indenting of the debug and trace messages. This is particularly useful in situationswhere functions are called at various depths. By indenting the output at the beginning of a function andremoving the indent before leaving the function, the debug or trace output is easily identified and you’llbe able to see the depth of function call from the amount of indentation of the output.
To increase the current indent level for output by one (one indent unit is four spaces by default), you callthe static Indent() function in the Debug class like this:
Debug::Indent(); // Increase indent level by 1
To reduce the current indent level by one you call the static Unindent() function:
Debug::Unindent(); // Decrease indent level by 1
The current indent level is recorded in the static IndentLevel property in the Debug class so you can getor set the current indent level through this property. For example:
Debug::IndentLevel = 2*Debug::IndentLevel;
This statement doubles the current level of indentation for subsequent debug output.
The number of spaces in one indent unit is recorded in the static IndentSize property in the Debug class.You can retrieve the current indent size and change it to a different value. For example:
Console::WriteLine(L”Current indent unit = {0}”, Debug::IndentSize);Debug::IndentSize = 2; // Set indent unit to 2 spaces
The first statement simply outputs the indent size and the second statement sets it to a new value. Sub sequent calls to Indent()increases the current indentation by the new size, which is two spaces.
734
Chapter 11: Debugging Techniques
25905c11.qxd:WroxPro 2/21/08 9:13 AM Page 734
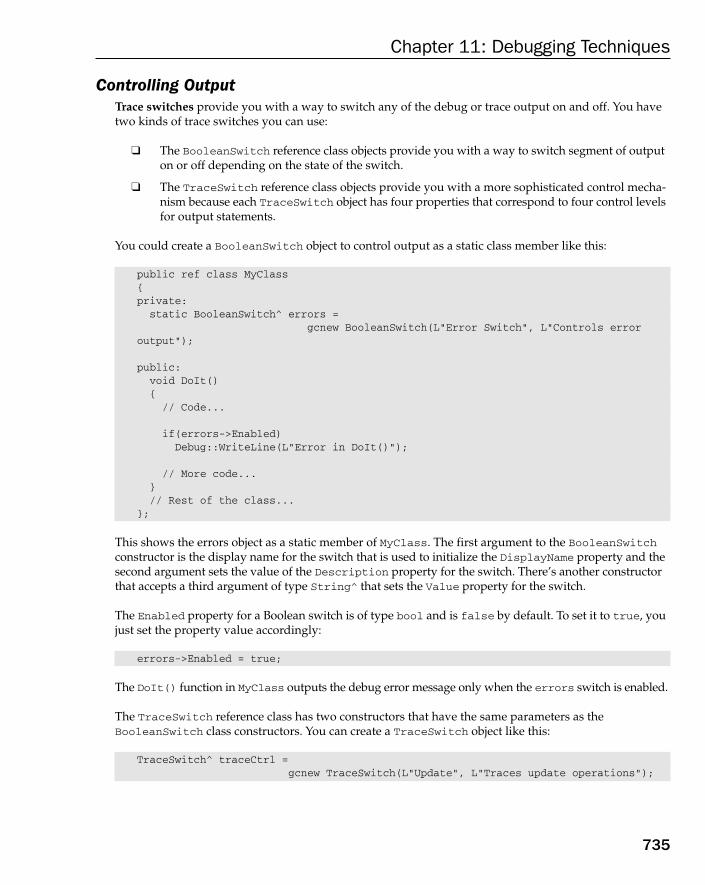
Controlling OutputTrace switches provide you with a way to switch any of the debug or trace output on and off. You havetwo kinds of trace switches you can use:
❑ The BooleanSwitch reference class objects provide you with a way to switch segment of outputon or off depending on the state of the switch.
❑ The TraceSwitch reference class objects provide you with a more sophisticated control mecha-nism because each TraceSwitch object has four properties that correspond to four control levelsfor output statements.
You could create a BooleanSwitch object to control output as a static class member like this:
public ref class MyClass{private:static BooleanSwitch^ errors =
gcnew BooleanSwitch(L”Error Switch”, L”Controls error output”);
public:void DoIt(){// Code...
if(errors->Enabled)Debug::WriteLine(L”Error in DoIt()”);
// More code...}// Rest of the class...
};
This shows the errors object as a static member of MyClass. The first argument to the BooleanSwitchconstructor is the display name for the switch that is used to initialize the DisplayName property and thesecond argument sets the value of the Description property for the switch. There’s another constructorthat accepts a third argument of type String^ that sets the Value property for the switch.
The Enabled property for a Boolean switch is of type bool and is false by default. To set it to true, youjust set the property value accordingly:
errors->Enabled = true;
The DoIt() function in MyClass outputs the debug error message only when the errors switch is enabled.
The TraceSwitch reference class has two constructors that have the same parameters as theBooleanSwitch class constructors. You can create a TraceSwitch object like this:
TraceSwitch^ traceCtrl =gcnew TraceSwitch(L”Update”, L”Traces update operations”);
735
Chapter 11: Debugging Techniques
25905c11.qxd:WroxPro 2/21/08 9:13 AM Page 735

The first argument to the constructor sets the value of the DisplayName property, and the second argumentsets the value of the Description property.
The Level property for a TraceSwitch object is an enum class type, TraceLevel, and you can set thisproperty to control trace output to any of the following values:
The value you set determines the output produced. To get all messages, you set the property as follows:
traceCtrl->Level = TraceLevel::Verbose;
You determine whether a particular message should be issued by your trace and debug code by testingthe state of one of four properties of type bool for the TraceSwitch object:
You can see from the significance of these property values that setting the Level property also sets the states of these properties. If you set the Level property to TraceLevel::Warning for instance,TraceWarning and TraceError is set to true and TraceVerbose and TraceInfo are set to false.
To decide whether to output a particular message, you just test the appropriate property:
if(traceCtrl->TraceWarning)Debug::WriteLine(L”This is your last warning!”);
The message is output only if the TraceWarning property for traceCtrl is true.
AssertionsThe Debug and Trace classes have static Assert() functions that provide a similar capability to thenative C++ assert() function. The first argument to the Debug::Assert() function is a bool value or
Property Description
TraceVerbose Returns the value true when all messages are to be output.
TraceInfo Returns the value true when information messages are to be output.
TraceWarning Returns the value true when warning messages are to be output.
TraceError Returns the value true when error messages are to be output.
Value Description
TraceLevel::Off No trace output.
TraceLevel::Info Output information, warning, and error messages.
TraceLevel::Warning Output warning and error messages.
TraceLevel::Error Output Error messages.
TraceLevel::Verbose Output all messages.
736
Chapter 11: Debugging Techniques
25905c11.qxd:WroxPro 2/21/08 9:13 AM Page 736

expression that causes the program to assert when the argument is false. The call stack is then displayedin a dialog as shown in Figure 11-20.
Figure 11-20
Figure 11-20 shows an assertion that is produced by the next example. When the program asserts the callstack presented in the dialog shows the line numbers in the code and the names of the functions that areexecuting at that point. Here there are four functions executing, including main().
You have three courses of action after an assertion. Clicking the Abort button ends the program immedi-ately; clicking the Ignore button allows the program to continue; and clicking the Retry button gives youthe option of executing the program in debug mode.
You have three overloaded versions of the Assert() function available:
Seeing it working is the best aid to understanding, so put together an example that demonstrates debugand trace code in action.
Try It Out Using Debug and TraceThis example is just an exercise for some of the trace and debug functions I have described. Create a CLRconsole project and modify it to the following:
// Ex11_03.cpp : main project file.// CLR trace and debug output
#include “stdafx.h”
using namespace System;
Function Description
Debug::Assert(bool condition) When condition is false, a dialog displays showingthe call stack at that point.
Debug::Assert(bool condition,String^ message)
As above but with message displayed in the dialogabove the call stack information.
Debug::Assert(bool condition,String^ message,String^ details)
As the preceding version but with details displayedadditionally in the dialog.
737
Chapter 11: Debugging Techniques
25905c11.qxd:WroxPro 2/21/08 9:13 AM Page 737

using namespace System::Diagnostics;
public ref class TraceTest{public:TraceTest(int n):value(n){}
property TraceLevel Level{void set(TraceLevel level) {sw->Level = level; }TraceLevel get(){return sw->Level; }
}
void FunA(){++value;Trace::Indent();Trace::WriteLine(L”Starting FunA”);if(sw->TraceInfo)Debug::WriteLine(L”FunA working...”);
FunB();Trace::WriteLine(L”Ending FunA”);Trace::Unindent();
}
void FunB(){Trace::Indent();Trace::WriteLine(L”Starting FunB”);if(sw->TraceWarning)Debug::WriteLine(L”FunB warning...”);
FunC();Trace::WriteLine(L”Ending FunB”);Trace::Unindent();
}
void FunC(){Trace::Indent();Trace::WriteLine(L”Starting FunC”);if(sw->TraceError)Debug::WriteLine(L”FunC error...”);
Debug::Assert(value < 4);Trace::WriteLine(L”Ending FunC”);Trace::Unindent();
}private:int value;static TraceSwitch^ sw =
gcnew TraceSwitch(L”Trace Switch”, L”Controls trace output”);};
int main(array<System::String ^> ^args){
738
Chapter 11: Debugging Techniques
25905c11.qxd:WroxPro 2/21/08 9:13 AM Page 738

// Direct output to the command lineTextWriterTraceListener^ listener = gcnew TextWriterTraceListener( Console::Out);Debug::Listeners->Add(listener);
Debug::IndentSize = 2; // Set the indent size
array<TraceLevel>^ levels = { TraceLevel::Off, TraceLevel::Error,TraceLevel::Warning ,TraceLevel::Verbose};
TraceTest^ obj = gcnew TraceTest(0);
Console::WriteLine(L”Starting trace and debug test...”);for each(TraceLevel level in levels){obj->Level = level; // Set level for messagesConsole::WriteLine(L”\nTrace level is {0}”, obj->Level);obj->FunA();
}return 0;}
This example results in an assertion dialog being displayed during execution. You can then choose tocontinue or abort execution or retry the program in debug mode by selecting the appropriate button inthe dialog.
Depending on what you do when the program asserts, this example produces the following output:
Starting trace and debug test...
Trace level is OffStarting FunA
Starting FunBStarting FunCEnding FunC
Ending FunBEnding FunA
Trace level is ErrorStarting FunA
Starting FunBStarting FunCFunC error...Ending FunC
Ending FunBEnding FunA
Trace level is WarningStarting FunA
Starting FunBFunB warning...
Starting FunCFunC error...Ending FunC
Ending FunB
739
Chapter 11: Debugging Techniques
25905c11.qxd:WroxPro 2/21/08 9:13 AM Page 739
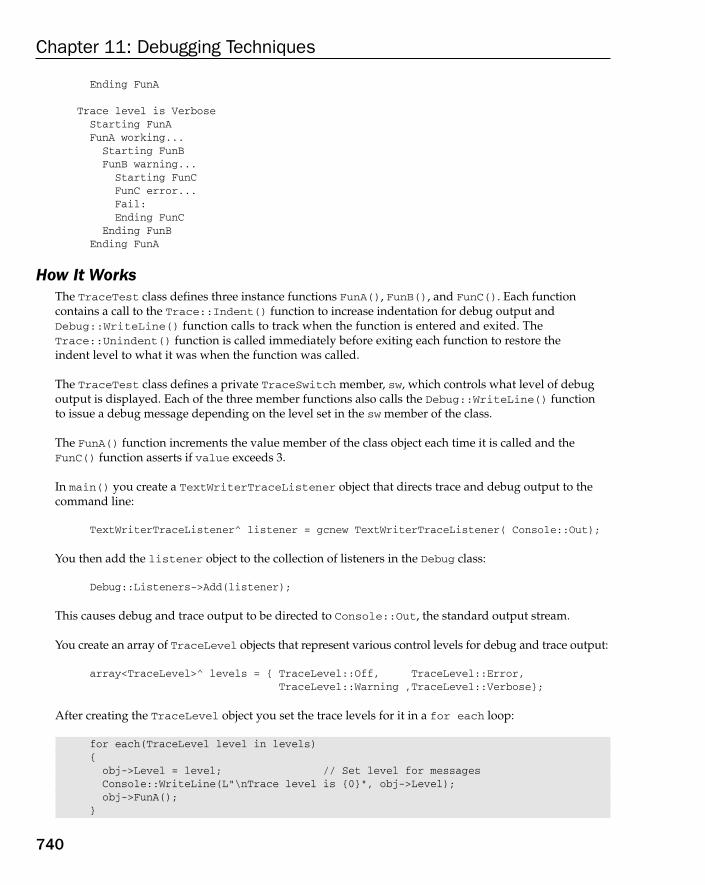
Ending FunA
Trace level is VerboseStarting FunAFunA working...
Starting FunBFunB warning...
Starting FunCFunC error...Fail:Ending FunC
Ending FunBEnding FunA
How It WorksThe TraceTest class defines three instance functions FunA(), FunB(), and FunC(). Each function contains a call to the Trace::Indent() function to increase indentation for debug output andDebug::WriteLine() function calls to track when the function is entered and exited. TheTrace::Unindent() function is called immediately before exiting each function to restore the indent level to what it was when the function was called.
The TraceTest class defines a private TraceSwitch member, sw, which controls what level of debugoutput is displayed. Each of the three member functions also calls the Debug::WriteLine() function to issue a debug message depending on the level set in the sw member of the class.
The FunA() function increments the value member of the class object each time it is called and theFunC() function asserts if value exceeds 3.
In main() you create a TextWriterTraceListener object that directs trace and debug output to thecommand line:
TextWriterTraceListener^ listener = gcnew TextWriterTraceListener( Console::Out);
You then add the listener object to the collection of listeners in the Debug class:
Debug::Listeners->Add(listener);
This causes debug and trace output to be directed to Console::Out, the standard output stream.
You create an array of TraceLevel objects that represent various control levels for debug and trace output:
array<TraceLevel>^ levels = { TraceLevel::Off, TraceLevel::Error,TraceLevel::Warning ,TraceLevel::Verbose};
After creating the TraceLevel object you set the trace levels for it in a for each loop:
for each(TraceLevel level in levels){obj->Level = level; // Set level for messagesConsole::WriteLine(L”\nTrace level is {0}”, obj->Level);obj->FunA();
}
740
Chapter 11: Debugging Techniques
25905c11.qxd:WroxPro 2/21/08 9:13 AM Page 740

The level is set through the Level property for obj. This sets the Level property in the TraceSwitchmember, sw, which is used in the instances functions to control output.
From the output you can see that the indent you set affects output from the static WriteLine() functionin both the Debug and Trace classes. You can also see how the level that you set in the TraceSwitchclass member affects the output. When the value member of the TraceTest class object, obj, reaches 4,the FunC() function asserts. You can rerun the example and try out the effects of the three buttons on theassertion dialog.
Getting Trace Output in Windows Forms ApplicationsIt’s often useful to be able to output trace information from a Windows Forms application. There’s acouple of barriers in the way of doing this: Firstly, the output can be voluminous, particularly if youwant to trace the execution of functions that executed very frequently such as those dealing with mouseevents, and secondly and more significantly, there is no console with a Windows Forms application toreceive the output. You can get over this by adding some code to the constructor of the class encapsulat-ing the form for the application, which reassigns output for Console::Out stream to a file. I won’texplain every detail of the class objects involved and how this code works at this point but just offer ithere as something you can plug into a Windows Forms application:
FileStream^ fs = gcnew FileStream(L”Trace.txt”, FileMode::Create);StreamWriter^ sw = gcnew StreamWriter(fs);sw->Autoflush = true;Console::SetOut(sw);
The first statement creates a stream that encapsulates the file Trace.txt that will be created in the currentdirectory. You can specify a full path if you want; just set the first argument to the FileStream constructoras L”C\Debug Output\MyTrace.txt” for example. The next two statements set up an object that canwrite to the stream, fs, and make it flush data to the stream automatically. The last statement reassignsConsole::Out to the StreamWriter object. To compile this code successfully you must add a usingdirective for the System::IO namespace to the header file containing the class definition for the form.
With this code in place you can put Console output statements anywhere in the code for the form totrace the execution sequence or to record data values. You can inspect the trace file with any simple texteditor such as Notepad.
SummaryDebugging is a big topic and Visual C++ 2008 provides many debugging facilities beyond what I havediscussed here. If you are comfortable with what I have covered in this chapter, you should have littletrouble expanding your knowledge of the debug capabilities through the Visual C++ 2008 documenta-tion. Searching on “debugging” should generate a rich list of further information.
The essential points introduced in this chapter were:
❑ You can use the assert() library function that is declared in the <cassert> header to checklogical conditions in your native C++ program that should always be true.
741
Chapter 11: Debugging Techniques
25905c11.qxd:WroxPro 2/21/08 9:13 AM Page 741

❑ The preprocessor symbol, _NDEBUG, is automatically defined in the debug version of a nativeC++program. It is not defined in the release version.
❑ You can add your own debugging code by enclosing it between an #ifdef/#endif pair ofdirectives testing for _NDEBUG. Your debug code is then included only in the debug version ofthe program.
❑ The crtdbg.h headers supplies declarations for functions to provide debugging of free storeoperations.
❑ By setting the _crtDbgFlag appropriately, you can enable automatic checking of your programfor memory leaks.
❑ To direct output messages from the free store debugging functions, you call the_CrtSetReportMode() and _CrtSetReportFile() functions.
❑ Debugging operations using breakpoints and trace points in C++/CLI programs are exactly the same as in native C++ programs.
❑ The Debug and Assert classes defined in the System::Diagnostics namespace provide functions for tracing execution and generating debugging output in CLR programs.
❑ The static Assert() function in the Debug and Trace classes provides an assertion capability in CLR programs.
With the basics of debugging added to your knowledge of C++, you are ready for the big one: Windowsprogramming!
742
Chapter 11: Debugging Techniques
25905c11.qxd:WroxPro 2/21/08 9:13 AM Page 742

12Windows Programming
Concepts
In this chapter, you take a look at the basic ideas that are involved in every Windows program in C++. You’ll first develop a very simple example that uses the Windows operating system API directly. This will enable you to understand how a Windows application works behinds the scenes, which will be useful to you when you are developing applications using the moresophisticated facilities provided by Visual C++ 2008. You then see what you get when you create a Windows program using the Microsoft Foundation Classes, better known as the MFC. Finally,you’ll create a basic program using Windows Forms that will execute with the CLR, so by theend of the chapter you’ll have an idea of what each of the three approaches to developing aWindows application involves.
By the end of this chapter, you will have learned about:
❑ The basic structure of a window
❑ The Windows API and how it is used
❑ Windows messages and how you deal with them
❑ The notation that is commonly used in Windows programs
❑ The basic structure of a Windows program
❑ How you create an elementary program using the Windows API and how it works
❑ Microsoft Foundation Classes
❑ The basic elements of an MFC-based program
❑ Windows Forms
❑ The basic elements of a Windows Forms application
25905c12.qxd:WroxPro 2/21/08 9:14 AM Page 743

Windows Programming BasicsWith Visual C++ 2008 you have three basic ways of creating an interactive Windows application:
❑ Using the Windows API. This is the fundamental interface that the Windows operating systemprovides for communications between itself and the applications that are executing under itscontrol.
❑ Using the Microsoft Foundation Classes, better known as the MFC. This is a set of C++ classesthat encapsulate the Windows API.
❑ Using Windows Forms. This is a forms-based development mechanism for creating applicationsthat execute with the CLR.
In a way these three approaches form a progression from the most programming intensive to the leastprogramming intensive. With the Windows API you are writing code throughout — all the elements thatmake up the GUI for your application must be created programmatically. With MFC applications there’ssome help with GUI build in that you can assemble controls on a dialog form graphically and just pro-gram the interactions with the user; however, you still are involved in a lot of coding. With a WindowsForms application you can build the complete GUI including the primary application window by assem-bling the controls that the user interacts with graphically. You just place the controls wherever you wantthem in a form window, and the code to create them is generated automatically. Using Windows Formsis by far the fastest and easiest mechanism for generating an application because the amount of code thatyou have to write is greatly reduced compared to the other two possibilities. The code for a WindowsForms application also gains all the benefits of executing with the CLR.
Using the MFC involves more programming effort than Windows Forms, but you have more control ofhow the GUI is created and you end up with a program that will execute natively on your PC. Becauseusing the Windows API directly is the most laborious method for developing an application I won’t gointo this in detail. However, you will put together a basic Windows API application so you’ll have anopportunity to understand the principles of the mechanism that all Windows applications use to workwith the operating system under the covers. You’ll explore the fundamentals involved in all three possi-bilities for Windows application development in this chapter and investigate using MFC and WindowsForms in more detail later in the book. Of course, it also is possible to develop applications in C++ thatdo not require the Windows operating system, and games programs often take this approach when theultimate in graphics performance is required. Although this is itself an interesting topic, it would require a whole book to do it justice so I won’t pursue this topic further.
Before you get into the examples in this chapter, I’ll review the terminology that is used to describe an application window. You have already created a Windows program in Chapter 1 without writing asingle line of code yourself and I’ll use the window generated by this to illustrate the various elementsthat go to make up a window.
Elements of a WindowYou will inevitably be familiar with most, if not all, of the principal elements of the user interface to aWindows program. However, I will go through them anyway just to be sure we have a common under-standing of what the terms mean. The best way to understand what the elements of a window can be isto look at one. An annotated version of the window displayed by the example that you saw in Chapter 1is shown in Figure 12-1.
744
Chapter 12: Windows Programming Concepts
25905c12.qxd:WroxPro 2/21/08 9:14 AM Page 744

Figure 12-1
The example actually generated two windows. The larger window with the menu and the tool bars is themain, or parent window, and the smaller window is a child window of the parent. Although the childwindow can be closed without closing the parent window by double-clicking the title bar icon that is inthe upper-left corner of the child window, closing the parent window automatically closes the child win-dow as well. This is because the child window is owned by, and dependent upon, the parent window. Ingeneral, a parent window may have a number of child windows, as you’ll see.
The most fundamental parts of a typical window are its border, the title bar that shows the name thatyou give to the window, the title bar icon that appears at the left end of the title bar, and the client area,which is the area in the center of the window not used by the title bar or borders. You can get all of thesecreated for free in a Windows program. As you will see, all you have to do is provide some text for thetitle bar.
The border defines the boundary of a window and may be fixed or resizable. If the border is resizable,you can drag it to alter the size of the window. The window also may possess a size grip, which you canuse to alter the size of a window while maintaining its aspect ratio — the ratio of the width to the height.When you define a window you can modify how the border behaves and appears if you want. Most win-dows will also have the maximize, minimize, and close buttons in the upper-right corner of the window.These allow the window to be increased to full screen size, reduced to an icon or closed.
When you click the title bar icon with the left mouse button, it provides a standard menu for altering orclosing the window called the system menu or control menu. The system menu also appears when youright-click the title bar of a window. Although it’s optional, it is a good idea always to include the title baricon in any main windows that your program generates. Including the title bar icon provides you with avery convenient way of closing the program when things don’t work during debugging.
The client area is the part of the window where you usually want your program to write text or graphics.You address the client area for this purpose in exactly the same way as the yard that you saw in Figure 7-1in Chapter 7. The upper-left corner of the client area has the coordinates (0, 0), with x increasing from leftto right, and y increasing from top to bottom.
Size grip
Child window client area
Parent window client area
Close buttonMaximize button
Minimize button
Child window icon
MIDI child window
MIDI parent window
Status bar
Toolbar
Title bar icon
Sizing border
Child window title bar text
Title bar text
Menu bar
745
Chapter 12: Windows Programming Concepts
25905c12.qxd:WroxPro 2/21/08 9:14 AM Page 745

The menu bar is optional in a window but is probably the most common way to control an application.Each menu in the menu bar displays a drop-down list of menu items when you click it. The contents of amenu and the physical appearance of many objects that are displayed in a window, such as the icons onthe toolbar that appear above, the cursor, and many others, are defined by a resource file. You will seemany more resource files when we get to write some more sophisticated Windows programs.
The toolbar provides a set of icons that usually act as alternatives to the menu options that you use mostoften. Because they give a pictorial clue to the function provided, they can often make a program easierand faster to use.
I’ll mention a caveat about terminology that you need to be conscious of before I move on. Users tend tothink of a window as the thing that appears on the screen with a border around it, and of course it is, butit is only one kind of window; however, in Windows a window is a generic term covering a whole rangeof entities. In fact almost any entity that is displayed is a window — for example, a dialog box is a windowand each button is also a window. I will generally use terminology to refer to objects that describe whatthey are, buttons, dialogs, and so on, but you need to have tucked in the back of your mind that they arewindows, too, because you can do things to them that you can do with a regular window — you can drawon a button for instance.
Windows Programs and the Operating SystemWhen you write a Windows program, your program is subservient to the operating system and Windowsis in control. Your program must not deal directly with the hardware and all communications with theoutside must pass through Windows. When you use a Windows program you are interacting primarilywith Windows, which then communicates with the application program on your behalf. Your Windowsprogram is the tail, Windows is the dog, and your program wags only when Windows tells it to.
There are a number of reasons why this is so. First and foremost, because your program is potentiallyalways sharing the computer with other programs that may be executing at the same time, Windows has to have primary control to manage the sharing of machine resources. If one application was allowed tohave primary control in a Windows environment this would inevitably make programming more com-plicated because of the need to provide for the possibility of other programs, and information intendedfor other applications could be lost. A second reason for Windows being in control is that Windowsembodies a standard user interface and needs to be in charge to enforce that standard. You can only dis-play information on the screen using the tools that Windows provides, and then only when authorized.
Event-Driven ProgramsYou have already seen, in Chapter 1, that a Windows program is event-driven, so a Windows programessentially waits around for something to happen. A significant part of the code required for a Windowsapplication is dedicated to processing events that are caused by external actions of the user, but activitiesthat are not directly associated with your application can nonetheless require that bits of your programcode are executed. For example, if the user drags the window of another application that is active along-side your program and this action uncovers part of the client area of the window devoted to your appli-cation, your application needs to redraw that part of the window.
746
Chapter 12: Windows Programming Concepts
25905c12.qxd:WroxPro 2/21/08 9:14 AM Page 746

Windows MessagesEvents in a Windows application are occurrences such as the user clicking the mouse or pressing a key, or a timer reaching zero. The Windows operating system records each event in a message and places themessage in a message queue for the program for which the message is intended. Thus a Windows mes-sage is simply a record of the data relating to an event, and the message queue for an application is just asequence of such messages waiting to be processed by the application. By sending a message Windowscan tell your program that something needs to be done, or that some information has become available, orthat an event such as a mouse click has occurred. If your program is properly organized, it will respond inthe appropriate way to the message. There are many different kinds of messages and they can occur veryfrequently — many times per second when the mouse is being dragged, for example.
A Windows program must contain a function specifically for handling these messages. The function isoften called WndProc() or WindowProc(), although it doesn’t have to have a particular name becauseWindows accesses the function through a pointer to a function that you supply. So the sending of amessage to your program boils down to Windows calling a function that you provide, typically calledWindowProc(), and passing any necessary data to your program by means of arguments to this func-tion. Within your WindowProc() function, it is up to you to work out what the message is from thedata supplied and what to do about it.
Fortunately, you don’t need to write code to process every message. You can filter out those that are of interest in your program, deal with those in whatever way you want, and pass the rest back toWindows. You pass a message back to Windows by calling a standard function provided by Windowscalled DefWindowProc(), which provides default message processing.
The Windows APIAll of the communications between any Windows application and Windows itself uses the Windows appli-cation programming interface, otherwise known as the Windows API. This consists of literally hundreds offunctions that are provided as a standard with the Windows operating system that provides the means bywhich an application communicates with Windows, and vice versa. The Windows API was developed inthe days when C was the primary language in use, long before the advent of C++, and for this reason struc-tures rather than classes are frequently used for passing some kinds of data between Windows and yourapplication program.
The Windows API covers all aspects of the communications between Windows and your application.Because there is such a large number of functions in the API, using them in the raw can be very difficult —just understanding what they all are is a task in itself. This is where Visual C++ 2008 makes the life of theapplication developer very much easier. Visual C++ 2008 packages the Windows API in a way that struc-tures the API functions in an object-oriented manner, and provides an easier way to use the interface inC++ with more default functionality. This takes the form of the Microsoft Foundation Classes, MFC. Also,for applications targeting the CLR you have a facility called Windows Forms where the code necessary to create a GUI is all created automatically. All you have to do is supply the code necessary to handle theevents in the way that your application requires. You’ll be creating a Windows Forms application a littlelater in this chapter and you’ll explore the use of Windows Forms in more detail in Chapter 23.
747
Chapter 12: Windows Programming Concepts
25905c12.qxd:WroxPro 2/21/08 9:14 AM Page 747
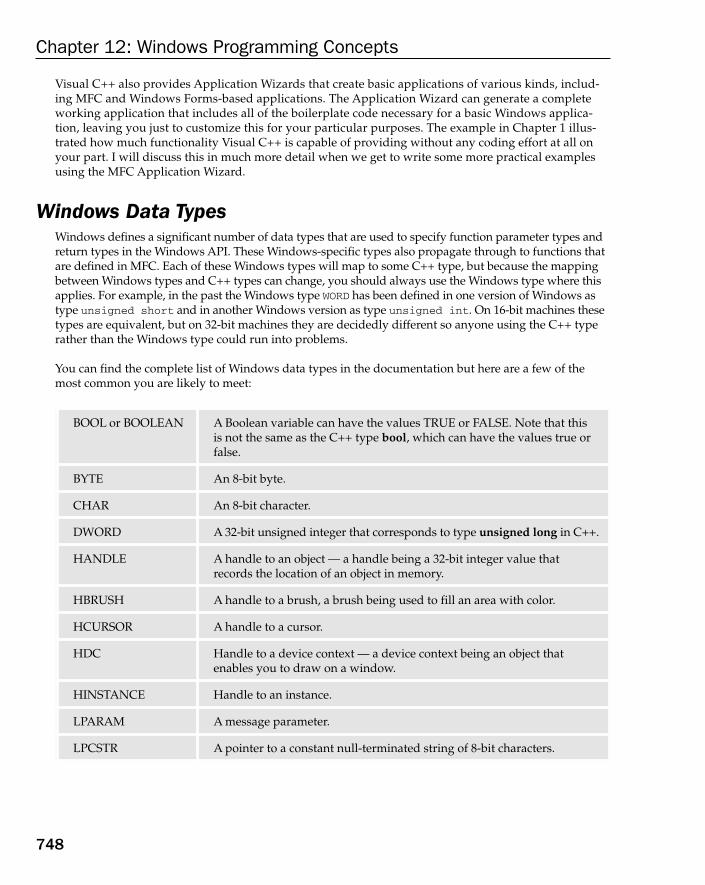
Visual C++ also provides Application Wizards that create basic applications of various kinds, includ-ing MFC and Windows Forms-based applications. The Application Wizard can generate a completeworking application that includes all of the boilerplate code necessary for a basic Windows applica-tion, leaving you just to customize this for your particular purposes. The example in Chapter 1 illus-trated how much functionality Visual C++ is capable of providing without any coding effort at all onyour part. I will discuss this in much more detail when we get to write some more practical examplesusing the MFC Application Wizard.
Windows Data TypesWindows defines a significant number of data types that are used to specify function parameter types andreturn types in the Windows API. These Windows-specific types also propagate through to functions thatare defined in MFC. Each of these Windows types will map to some C++ type, but because the mappingbetween Windows types and C++ types can change, you should always use the Windows type where thisapplies. For example, in the past the Windows type WORD has been defined in one version of Windows astype unsigned short and in another Windows version as type unsigned int. On 16-bit machines thesetypes are equivalent, but on 32-bit machines they are decidedly different so anyone using the C++ typerather than the Windows type could run into problems.
You can find the complete list of Windows data types in the documentation but here are a few of themost common you are likely to meet:
BOOL or BOOLEAN A Boolean variable can have the values TRUE or FALSE. Note that this is not the same as the C++ type bool, which can have the values true orfalse.
BYTE An 8-bit byte.
CHAR An 8-bit character.
DWORD A 32-bit unsigned integer that corresponds to type unsigned long in C++.
HANDLE A handle to an object — a handle being a 32-bit integer value thatrecords the location of an object in memory.
HBRUSH A handle to a brush, a brush being used to fill an area with color.
HCURSOR A handle to a cursor.
HDC Handle to a device context — a device context being an object thatenables you to draw on a window.
HINSTANCE Handle to an instance.
LPARAM A message parameter.
LPCSTR A pointer to a constant null-terminated string of 8-bit characters.
748
Chapter 12: Windows Programming Concepts
25905c12.qxd:WroxPro 2/21/08 9:14 AM Page 748

I’ll introduce any other Windows types we are using in examples as the need arises. All the types usedby Windows, as well as the prototypes of the Windows API functions, are contained in the header filewindows.h, so you need to include this header file when you put your basic Windows program together.
Notation in Windows ProgramsIn many Windows programs variable names have a prefix, which indicates what kind of value the vari-able holds and how it is used. There are quite a few prefixes and they are often used in combination. Forexample, the prefix lpfn signifies a long pointer to a function. A sample of the prefixes you might comeacross is:
Prefix Meaning
b a logical variable of type BOOL, equivalent to int
by type unsigned char; a byte
c type char
dw type DWORD, which is unsigned long
fn a function
h a handle, used to reference something.
i type int
l type long
lp long pointer
n type int
p a pointer
s a string
sz a zero terminated string
w type WORD, which is unsigned short
LPHANDLE A pointer to a handle.
LRESULT A signed value that results from processing a message.
WORD A 16-bit unsigned integer so it corresponds to type unsigned short in C++.
749
Chapter 12: Windows Programming Concepts
25905c12.qxd:WroxPro 2/21/08 9:14 AM Page 749
This use of these prefixes is called Hungarian notation. It was introduced to minimize the possibility ofmisusing a variable by interpreting it differently from how it was defined or intended to be used. Suchmisinterpretation was easily done in the C language, a precursor of C++. With C++ and its stronger typechecking you don’t need to make such a special effort with your notation to avoid such problems. Thecompiler always flags an error for type inconsistencies in your program, and many of the kinds of bugsthat plagued earlier C programs can’t occur with C++.
On the other hand, Hungarian notation can still help to make programs easier to understand, particu-larly when you are dealing with a lot of variables of different types that are arguments to WindowsAPI functions. Because Windows programs are still written in C, and of course because parameters for Windows API functions are still defined using Hungarian notation, the method is still used quitewidely. You can find out more about Hungarian notation at http://web.umr.edu/~cpp/common/hungarian.html.
You can make up your own mind as to the extent to which you want to use Hungarian notation, as it is byno means obligatory. You may choose not to use it at all, but in any event, if you have an idea of how itworks, you will find it easier to understand what the arguments to the Windows API functions are. Thereis a small caveat, however. As Windows has developed, the types of some of the API function argumentshave changed slightly, but the variable names that are used remain the same. As a consequence, the prefixmay not be quite correct in specifying the variable type.
The Structure of a Windows ProgramFor a minimal Windows program that just uses the Windows API, you will write two functions. Theseare a WinMain() function, where execution of the program begins and basic program initialization iscarried out, and a WindowProc() function that is called by Windows to process messages for the appli-cation. The WindowProc() part of a Windows program is usually the larger portion because this iswhere most of the application-specific code is, responding to messages caused by user input of onekind or another.
Although these two functions make up a complete program, they are not directly connected. WinMain()does not call WindowProc(), Windows does. In fact, Windows also calls WinMain(). This is illustratedin Figure 12-2.
The function WinMain() communicates with Windows by calling some of the Windows API functions. Thesame applies to WindowProc(). The integrating factor in your Windows program is Windows itself,which links to both WinMain() and WindowProc(). You will take a look at what the pieces are thatmake up WinMain() and WindowProc() and then assemble the parts into a working example of a simple Windows program.
750
Chapter 12: Windows Programming Concepts
25905c12.qxd:WroxPro 2/21/08 9:14 AM Page 750

Figure 12-2
The WinMain() FunctionThe WinMain() function is the equivalent of the main() function in a console program. It’s where execution starts and where the basic initialization for the rest of the program is carried out. To allow
Windows API
WINDOWS
Your Program
WinMain() WindowProc()P
rogram Start
Messages
751
Chapter 12: Windows Programming Concepts
25905c12.qxd:WroxPro 2/21/08 9:14 AM Page 751
Windows to pass data to it, WinMain() has four parameters and a return value of type int. Its proto-type is:
int WINAPI WinMain(HINSTANCE hInstance,HINSTANCE hPrevInstance,LPSTR lpCmdLine,int nCmdShow);
Following the return type specifier, int, you have a specification for the function, WINAPI, which isnew to you. This is a Windows-defined macro that causes the function name and arguments to be han-dled in a special way, which happens to correspond to the way that a function is handled in the Pascaland Fortran languages. This is different from the way functions are normally handled in C++. The pre-cise details are unimportant — this is simply the way Windows requires things to be, so you need to put the WINAPI macro name in front of the names of functions called by Windows.
The four arguments that are passed by Windows to your WinMain() function contain important data. Thefirst argument, hInstance, is of type HINSTANCE which is a handle to an instance — an instance here beinga running program. A handle is an integer value which identifies an object of some kind — in this case, theinstance of the application. The actual integer value of a handle is not important. There can be several pro-grams in execution under Windows at any given instant. This raises the possibility of several copies of thesame application being active at once, and this needs to be recognized. Hence, the hInstance handle identi-fies a particular copy. If you start more than one copy of a program, each one has its own unique hInstancevalue. As you will see shortly, handles are also used to identify all sorts of other things. Of course, all han-dles in a particular context — application instance handles for example — need to be different from oneanother.
The next argument passed to your WinMain() function, hPrevInstance, is a legacy from the 16-bitversions of the Windows operating system. Under Windows 3.x, this parameter gave you the handle to the previous instance of the program, if there was one. If hPrevInstance was NULL, you knew thatthere was no previous instance of the program, so this must be the only copy of the program executing(at the moment, anyway). This information was necessary in many cases, because programs runningunder Windows 3.x share the same address space and multiple copies of a program executing simulta-neously could cause complications. For this reason, programmers often limited their applications toonly one running instance at a time and having the hPrevInstance argument passed to WinMain()allowed them to provide for this very easily by testing it in an if statement.
Under 32-bit versions of Windows the hPrevInstance parameter is completely irrelevant because eachapplication runs in its own address space, and one application has no direct knowledge of the existenceof another that is executing concurrently. This parameter is always NULL, even if another instance of anapplication is running.
The next argument, lpCmdLine, is a pointer to a string containing the command line that started the pro-gram. For instance, if you started it using the Run command from the Start button menu of Windows, thestring contains everything that appears in the Open box. Having this pointer allows you to pick up anyparameter values that may appear in the command line. The type LPSTR is another Windows type, speci-fying a 32-bit (long) pointer to a string.
752
Chapter 12: Windows Programming Concepts
25905c12.qxd:WroxPro 2/21/08 9:14 AM Page 752

The last argument, nCmdShow, determines how the window is to look when it is created. It could be dis-played normally or it might need to be minimized; for example, the shortcut for the program might specifythat the program should be minimized when it starts. This argument can take one of a fixed set of val-ues that are defined by symbolic constants such as SW_SHOWNORMAL and SW_SHOWMINNOACTIVE. Thereare a number of other constants like these that define the way a window is to be displayed and they allbegin SW_. Other examples are SW_HIDE or SW_SHOWMAXIMIZED. You don’t usually need to examine thevalue of nCmdShow. You typically pass it directly to the Windows API function responsible for displayingyour application window.
If you want to know what all the other constants are that specify how a window displays, you can find a complete list of the possible values if you search for WinMain in the MSDN Library. You can access theMSDN library online at http://msdn2.microsoft.com/en-us/library/default.aspx.
The function WinMain() in your Windows program needs to do four things:
❑ Tell Windows what kind of window the program requires
❑ Create the program window
❑ Initialize the program window
❑ Retrieve Windows messages intended for the program
Take a look at each of these in turn and then create a complete WinMain() function.
Specifying a Program WindowThe first step in creating a window is to define just what sort of window it is that you want to create.Windows defines a special struct type called WNDCLASSEX to contain the data specifying a window.The data that is stored in an instance of the struct defines a window class, which determines the typeof window. Do not confuse this with a C++ class — the MFC defines a class that represents a windowbut this is not the same this at all. You need to create a variable of type WNDCLASSEX, and give valuesto each of its members (just like filling in a form). After you’ve filled in the variables, you can pass it toWindows (via a function that you’ll see later) to register the class. When that’s been done, wheneveryou want to create a window of that class, you can tell Windows to look up the class that you’vealready registered.
The definition of the WNDCLASSEX structure is as follows:
struct WNDCLASSEX{UINT cbSize; // Size of this object in bytesUINT style; // Window styleWNDPROC lpfnWndProc; // Pointer to message processing functionint cbClsExtra; // Extra byte after the window classint cbWndExtra; // Extra bytes after the window instanceHINSTANCE hInstance; // The application instance handleHICON hIcon; // The application iconHCURSOR hCursor; // The window cursor
753
Chapter 12: Windows Programming Concepts
25905c12.qxd:WroxPro 2/21/08 9:14 AM Page 753

HBRUSH hbrBackground; // The brush defining the background colorLPCTSTR lpszMenuName; // A pointer to the name of the menu resourceLPCTSTR lpszClassName; // A pointer to the class nameHICON hIconSm; // A small icon associated with the window
};
You construct an object of type WNDCLASSEX in the way that you saw when I discussed structures, forexample:
WNDCLASSEX WindowClass; // Create a window class object
All you need to do now is fill in values for the members of WindowClass.
Setting the value for the cbSize member of the struct is easy when you use the sizeof operator:
WindowClass.cbSize = sizeof(WNDCLASSEX);
The style member of the struct determines various aspects of the window’s behavior, in particular,the conditions under which the window should be redrawn. You can select from a number of options for this member’s value, each defined by a symbolic constant beginning CS_.
You’ll find all the possible constant values for style if you search for WNDCLASSEX in the MSDNLibrary that you’ll find at http://msdn2.microsoft.com/en-us/library.
Where two or more options are required, the constants can be combined to produce a composite valueusing the bitwise OR operator, |. For example:
WindowClass.style = CS_HREDRAW | CS_VREDRAW;
The option CS_HREDRAW indicates to Windows that the window is to be redrawn if its horizontal width isaltered, and CS_VREDRAW indicates that it is to be redrawn if the vertical height of the window is changed.In the preceding statement you have elected to have the window redrawn in either case. As a result,Windows sends a message to your program indicating that you should redraw the window whenever thewidth or height of the window is altered by the user. Each of the possible options for the window style isdefined by a unique bit in a 32-bit word being set to 1. That’s why the bitwise OR is used to combine them.These bits indicating a particular style are usually called flags. Flags are used very frequently, not only inWindows but also in C++ because they are an efficient way of representing and processing features that are either there or not or parameters that are either true or false.
The member lpfnWndProc stores a pointer to the function in your program that handles messages forthe window you create. The prefix to the name signifies that this is a long pointer to a function. If youfollowed the herd and called the function to handle messages for the application WindowProc(), youwould initialize this member with the statement:
WindowClass.lpfnWndProc = WindowProc;
The next two members, cbClsExtra and cbWndExtra, allow you to ask that extra space be providedinternally to Windows for your own use. An example of this could be when you want to associate addi-tional data with each instance of a window to assist in message handling for each window instance.
754
Chapter 12: Windows Programming Concepts
25905c12.qxd:WroxPro 2/21/08 9:14 AM Page 754
Normally you won’t need extra space allocated for you, in which case you must set the cbClsExtraand cbWndExtra members to zero.
The hInstance member holds the handle for the current application instance, so you should set this tothe hInstance value that was passed to WinMain() by Windows.
The members hIcon, hCursor, and hbrBackground are handles that in turn define the icon that repre-sents the application when minimized, the cursor the window uses, and the background color of theclient area of the window. (As you saw earlier, a handle is just a 32-bit integer used as an ID to representsomething.) These are set using Windows API functions. For example:
WindowClass.hIcon = LoadIcon(0, IDI_APPLICATION);WindowClass.hCursor = LoadCursor(0, IDC_ARROW);WindowClass.hbrBackground =
static_cast<HBRUSH>(GetStockObject(GRAY_BRUSH));
All three members are set to standard Windows values by these function calls. The icon is a default pro-vided by Windows and the cursor is the standard arrow cursor used by the majority of Windows appli-cations. A brush is a Windows object used to fill an area, in this case the client area of the window. Thefunction GetStockObject() returns a generic type for all stock objects, so you need to cast it to typeHBRUSH. In the preceding example it returns a handle to the standard gray brush, and the backgroundcolor for our window is thus set to gray. This function can also be used to obtain other standard objectsfor a window, such as fonts for example. You could also set the hIcon and hCursor members to null, inwhich case Windows would provide the default icon and cursor. If you set hbrBackground to null, yourprogram is expected to paint the window background and messages are sent to your application when-ever this becomes necessary.
The lpszMenuName member is set to the name of a resource defining the window menu, or to zero ifthere is no menu for the window. You will look into creating and using menu resources when you usethe AppWizard.
The lpszClassName member of the struct stores the name that you supply to identify this particularclass of window. You would usually use the name of the application for this. You need to keep track ofthis name because you will need it again when a window is created. This member would therefore betypically set with the statements:
static LPCTSTR szAppName = L”OFWin”; // Define window class nameWindowClass.lpszClassName = szAppName; // Set class name
I have defined szAppName as a Unicode string here. In fact the LPCTSTR type is defined as const wchar_t*if UNICODE is defined for the application, or const char* if it is not. Thus, the definition for szAppNamehere assumes a Unicode application.
The last member is hIconSm, which identifies a small icon associated with the window class. If you specifythis as null, Windows searches for a small icon related to the hIcon member and use that.
In fact, the WNDCLASSEX structure replaces another structure, WNDCLASS that was used for the same pur-pose. The old structure did not include the cbSize member that stores the size of the structure in bytes orthe hIconSm member.
755
Chapter 12: Windows Programming Concepts
25905c12.qxd:WroxPro 2/21/08 9:14 AM Page 755

Creating a Program WindowAfter all the members of your WNDCLASSEX structure have been set to the values required, the next stepis to tell Windows about it. You do this using the Windows API function RegisterClassEx(). Giventhat your structure is WindowClass, the statement to do this would be:
RegisterClassEx(&WindowClass);
Easy, isn’t it? The address of the struct is passed to the function, and Windows extracts and squirrelsaway all the values that you have set in the structure members. This process is called registering thewindow class. Just to remind you, the term class here is used in the sense of classification and is not thesame as the idea of a class in C++, so don’t confuse the two. Each instance of the application must makesure that it registers the window classes that it needs. If you were using the obsolete WNDCLASS structurethat I mentioned, you would have to use a different function here, RegisterClass().
After Windows knows the characteristics of the window that you want, and the function that is going tohandle messages for it, you can go ahead and create it. You use the function CreateWindow() for this.The window class that you’ve already created determines the broad characteristics of a window, andfurther arguments to the function CreateWindow() add additional characteristics. Because an applica-tion may have several windows in general, the function CreateWindow() returns a handle to the win-dow created that you can store to enable you to refer to that particular window later. There are manyAPI calls that require you to specify the window handle as a parameter if you want to use them. Youwill look at a typical use of the CreateWindow() function at this point. This might be:
HWND hWnd; // Window handle...hWnd = CreateWindow(
szAppName, // the window class name“A Basic Window the Hard Way”, // The window titleWS_OVERLAPPEDWINDOW, // Window style as overlappedCW_USEDEFAULT, // Default screen position of upper leftCW_USEDEFAULT, // corner of our window as x,y...CW_USEDEFAULT, // Default window size, width...CW_USEDEFAULT, // ...and height 0, // No parent window0, // No menuhInstance, // Program Instance handle0 // No window creation data
);
The variable hWnd of type HWND is a 32-bit integer handle to a window. You’ll use this variable to recordthe value that the CreateWindow() function returns that identifies the window. The first argument thatyou pass to the function is the class name. This is used by Windows to identify the WNDCLASSEX structthat you passed to it previously, in the RegisterClassEx() function call, so that the information fromthis struct can be used in the window creation process.
The second argument to CreateWindow() defines the text that is to appear on the title bar. The third argument specifies the style that the window has after it is created. The option specified here,
756
Chapter 12: Windows Programming Concepts
25905c12.qxd:WroxPro 2/21/08 9:14 AM Page 756

WS_OVERLAPPEDWINDOW, actually combines several options. It defines the window as having the WS_OVERLAPPED, WS_CAPTION, WS_SYSMENU, WS_THICKFRAME, WS_MINIMIZEBOX and WS_MAXIMIZEBOX styles. This results in an overlapped window, which is a window intended to be the main application window, with a title bar and a thick frame, which has a title bar icon, system menu, and maximize and minimize buttons. A window that you specify as having a thick frame has borders that can be resized.
The next four arguments determine the position and size of the window on the screen. The first two arethe screen coordinates of the upper-left corner of the window, and the second two define the width andheight of the window. The value CW_USEDEFAULT indicates that you want Windows to assign the defaultposition and size for the window. This tells Windows to arrange successive windows in cascading posi-tions down the screen. CW_USEDEFAULT only applies to windows specified as WS_OVERLAPPED.
The next argument value is zero, indicating that the window being created is not a child window (a windowthat is dependent on a parent window). If you wanted it to be a child window, you would set this argumentto the handle of the parent window. The next argument is also zero, indicating that no menu is required. Youthen specify the handle of the current instance of the program that was passed to the program by Windows.The last argument for window creation data is zero because you just want a simple window in the example.If you wanted to create a multiple-document interface (MDI) client window, the last argument would pointto a structure related to this. You’ll learn more about MDI windows later in the book.
After calling the CreateWindow() function, the window now exists but is not yet displayed on the screen.You need to call another Windows API function to get it displayed:
ShowWindow(hWnd, nCmdShow); // Display the window
Only two arguments are required here. The first identifies the window and is the handle returned by thefunction CreateWindow(). The second is the value nCmdShow that was passed to WinMain(), and thatindicates how the window is to appear onscreen.
Initializing the Program WindowAfter calling the function ShowWindow(), the window appears onscreen but still has no application con-tent, so you need to get your program to draw in the client area of the window. You could just put togethersome code to do this directly in the WinMain() function, but this would be most unsatisfactory: in thiscase, the contents of the client area are not considered to be permanent — if you want the client area con-tents to be retained, you can’t afford to output what you want and forget about it. Any action on the part ofthe user that modifies the window in some way, such as dragging a border or dragging the whole window,typically requires that the window and its client area are redrawn.
When the client area needs to be redrawn for any reason, Windows sends a particular message to your pro-gram and your WindowProc() function needs to respond by reconstructing the client area of the window.
Note that the Windows API also includes a CreateWindowEx() function that youuse to create a window with extended style information.
757
Chapter 12: Windows Programming Concepts
25905c12.qxd:WroxPro 2/21/08 9:14 AM Page 757

Therefore, the best way to get the client area drawn in the first instance is to put the code to draw the clientarea in the WindowProc() function and get Windows to send the message requesting that the client areabe redrawn to your program. Whenever you know in your program that the window should be redrawn(when you change something, for example), you need to tell Windows to send a message back to get thewindow redrawn.
You can ask Windows to send your program a message to redraw the client area of the window by callinganother Windows API function, UpdateWindow(). The statement to accomplish this is:
UpdateWindow(hWnd); // Cause window client area to be drawn
This function requires only one argument: the window handle hWnd, which identifies your particularprogram window. (In general there can be several windows in an application.) The result of the call isthat Windows sends a message to your program requesting that the client area be redrawn.
Dealing with Windows MessagesThe last task that WinMain() needs to address is dealing with the messages that Windows may havequeued for your application. This may seem a bit odd because I said earlier that you needed the functionWindowProc() to deal with messages, but let me explain a little further.
Queued and Non-Queued MessagesI oversimplified Windows messaging when I introduced the idea earlier. There are, in fact, two kinds ofWindows messages:
There are queued messages that Windows places in a queue, and the WinMain() function must extractthese messages from the queue for processing. The code in WinMain() that does this is called the messageloop. Queued messages include those arising from user input from the keyboard, moving the mouse andclicking the mouse buttons. Messages from a timer and the Windows message to request that a windowbe redrawn are also queued.
There are non-queued messages that result in the WindowProc() function being called directly byWindows. A lot of the non-queued messages arise as a consequence of processing queued messages.What you are doing in the message loop in WinMain() is retrieving a message that Windows hasqueued for your application and then asking Windows to invoke your WindowProc() function toprocess it. Why can’t Windows just call WindowProc() whenever necessary? Well, it could, but it justdoesn’t work this way. The reasons have to do with how Windows manages multiple applications executing simultaneously.
The Message LoopAs I said, retrieving messages from the message queue is done using a standard mechanism in Windowsprogramming called the message pump or message loop. The code for this would be:
MSG msg; // Windows message structurewhile(GetMessage(&msg, 0, 0, 0) == TRUE) // Get any messages{
758
Chapter 12: Windows Programming Concepts
25905c12.qxd:WroxPro 2/21/08 9:14 AM Page 758

TranslateMessage(&msg); // Translate the messageDispatchMessage(&msg); // Dispatch the message
}
This involves three steps in dealing with each message:
❑ GetMessage() — retrieves a message from the queue
❑ TranslateMessage() — performs any conversion necessary on the message retrieved
❑ DispatchMessage() — causes Windows to call the WindowProc() function in your applicationto deal with the message
The operation of GetMessage() is important because it has a significant contribution to the way Windowsworks with multiple applications so we should explore it in a little more detail.
The GetMessage() function retrieves a message queued for the application window and stores informa-tion about the message in the variable msg, pointed to by the first argument. The variable msg, which is a struct of type MSG, contains a number of different members that you are not accessing here. Still, forcompleteness, the definition of the structure looks like this:
struct MSG{
HWND hwnd; // Handle for the relevant windowUINT message; // The message IDWPARAM wParam; // Message parameter (32-bits)LPARAM lParam; // Message parameter (32-bits)DWORD time; // The time when the message was queuedPOINT pt; // The mouse position
};
The wParam member is an example of a slightly misleading Hungarian notation prefix that I mentionedwas now possible. You might assume that it was of type WORD (which is int), which used to be true inearlier Windows versions, but now it is of type WPARAM, which is a 32-bit integer value.
The exact contents of the wParam and lParam members are dependent on what kind of message it is. Themessage ID in the member message is an integer value and can be one of a set of values that are predefinedin the header file, windows.h, as symbolic constants. Message IDs for general windows all start with WM_and typical examples are WM_PAINT to redraw the screen and WM_QUIT to end the program. General win-dows messages cover a wide variety of events and include messages relating to mouse and menu events,keyboard input and window creation and management. The function GetMessage() always returns TRUEunless the message is WM_QUIT to end the program, in which case the value returned is FALSE, or unlessan error occurs, in which case the return value is -1. Thus, the while loop continues until a quit message isgenerated to close the application or until an error condition arises. In either case, you need to end the pro-gram by passing the wParam value back to Windows in a return statement.
Note that there are prefixes other than WM for messages destined for other types of windows than a general window. The various types of message prefixes are listed in Appendix C.
759
Chapter 12: Windows Programming Concepts
25905c12.qxd:WroxPro 2/21/08 9:14 AM Page 759

The second argument in the call to GetMessage() is the handle of the window for which you want toget messages. This parameter can be used to retrieve messages for one window separately from another.If this argument is 0, as it is here, GetMessage() retrieves all messages for an application. This is an easyway of retrieving all messages for an application regardless of how many windows it has. It is also thesafest way because you are sure of getting all the messages for your application. When the user of yourWindows program closes the application window, for example, the window is closed before the WM_QUITmessage is generated. Consequently, if you only retrieve messages by specifying a window handle to theGetMessage() function, you cannot retrieve the WM_QUIT message and your program is not able to termi-nate properly.
The last two arguments to GetMessage() are integers that hold minimum and maximum values for themessage IDs you want to retrieve from the queue. This allows messages to be retrieved selectively. Arange is usually specified by symbolic constants. Using WM_MOUSEFIRST and WM_MOUSELAST as thesetwo arguments would select just mouse messages, for example. If both arguments are zero, as you havethem here, all messages are retrieved.
MultitaskingIf there are no messages queued, the GetMessage() function does not come back to your program.Windows allows execution to pass to another application and you only get a value returned from call-ing GetMessage() when a message appears in the queue. This mechanism was fundamental in enablingmultiple applications to run under older versions of Windows and is referred to as cooperative multitask-ing because it depends on concurrent applications giving up their control of the processor from time totime. After your program calls GetMessage(), unless there is a message for your program, another appli-cation is executed and your program gets another opportunity to do something only if the other applica-tion releases the processor, perhaps by a call to GetMessage() when there are no messages queued for it,but this is not the only possibility.
With current versions of Windows, the operating system can interrupt an application after a period oftime and transfer control to another application. This mechanism is called pre-emptive multitaskingbecause an application can be interrupted in any event. With pre-emptive multitasking, however, youmust still program the message loop in WinMain() using GetMessage() as before, and make provisionfor relinquishing control of the processor to Windows from time to time in a long running calculation(this is usually done using the PeekMessage() API function). If you don’t do this, your applicationmay be unable to respond to messages to repaint the application window when these arise. This can be for reasons that are quite independent of your application — when an overlapping window foranother application is closed, for example.
The conceptual operation of the GetMessage() function is illustrated in Figure 12-3.
Within the while loop, the first function call to TranslateMessage() requests Windows to do some con-version work for keyboard related messages. Then the call to the function DispatchMessage() causesWindows to dispatch the message, or in other words, to call the WindowProc() function in your programto process the message. The return from DispatchMessage() does not occur until WindowProc() has fin-ished processing the message. The WM_QUIT message indicates that the program should end, so this resultsin FALSE being returned to the application that stops the message loop.
760
Chapter 12: Windows Programming Concepts
25905c12.qxd:WroxPro 2/21/08 9:14 AM Page 760

Figure 12-3
A Complete WinMain() FunctionYou have looked at all the bits that need to go into the function WinMain(). So now you can assemblethem into a complete function:
// Listing OFWIN_1int WINAPI WinMain(HINSTANCE hInstance, HINSTANCE hPrevInstance,
Message?
GetMessages()
WM_QUIT?
Get the Message
runanother
applicationreturnTRUE
returnFALSE
Windows
Your Program
WinMain()
while(GetMessages( ) ){ ...}
N
N
Y
Y
761
Chapter 12: Windows Programming Concepts
25905c12.qxd:WroxPro 2/21/08 9:14 AM Page 761

LPSTR lpCmdLine, int nCmdShow){WNDCLASSEX WindowClass; // Structure to hold our window’s attributes
static LPCTSTR szAppName = L”OFWin”; // Define window class nameHWND hWnd; // Window handleMSG msg; // Windows message structure
WindowClass.cbSize = sizeof(WNDCLASSEX); // Set structure size
// Redraw the window if the size changesWindowClass.style = CS_HREDRAW | CS_VREDRAW;
// Define the message handling functionWindowClass.lpfnWndProc = WindowProc;
WindowClass.cbClsExtra = 0; // No extra bytes after the window classWindowClass.cbWndExtra = 0; // structure or the window instance
WindowClass.hInstance = hInstance; // Application instance handle
// Set default application iconWindowClass.hIcon = LoadIcon(0, IDI_APPLICATION);
// Set window cursor to be the standard arrowWindowClass.hCursor = LoadCursor(0, IDC_ARROW);
// Set gray brush for background colorWindowClass.hbrBackground =
static_cast<HBRUSH>(GetStockObject(GRAY_BRUSH));
WindowClass.lpszMenuName = 0; // No menuWindowClass.lpszClassName = szAppName; // Set class nameWindowClass.hIconSm = 0; // Default small icon
// Now register our window classRegisterClassEx(&WindowClass);
// Now we can create the windowhWnd = CreateWindow(
szAppName, // the window class nameL”A Basic Window the Hard Way”, // The window titleWS_OVERLAPPEDWINDOW, // Window style as overlappedCW_USEDEFAULT, // Default screen position of upper leftCW_USEDEFAULT, // corner of our window as x,y...CW_USEDEFAULT, // Default window sizeCW_USEDEFAULT, // .... 0, // No parent window0, // No menuhInstance, // Program Instance handle0 // No window creation data
);
ShowWindow(hWnd, nCmdShow); // Display the windowUpdateWindow(hWnd); // Cause window client area to be drawn
762
Chapter 12: Windows Programming Concepts
25905c12.qxd:WroxPro 2/21/08 9:14 AM Page 762
// The message loopwhile(GetMessage(&msg, 0, 0, 0) == TRUE) // Get any messages{TranslateMessage(&msg); // Translate the messageDispatchMessage(&msg); // Dispatch the message
}
return static_cast<int>(msg.wParam); // End, so return to Windows}
How It WorksAfter declaring the variables you need in the function, all the members of the WindowClass structure areinitialized and the window is registered.
The next step is to call the CreateWindow() function to create the data for the physical appearance of thewindow, based on the arguments passed and the data established in the WindowClass structure that waspreviously passed to Windows using the RegisterClassEx() function. The call to ShowWindow() causesthe window to be displayed according to the mode specified by nCmdShow, and the UpdateWindow() func-tion signals that a message to draw the window client area should be generated.
Finally, the message loop continues to retrieve messages for the application until a WM_QUIT message isobtained, whereupon the GetMessage() function returns FALSE and the loop ends. The value of thewParam member of the msg structure is passed back to Windows in the return statement.
Message Processing FunctionsThe function WinMain() contained nothing that was application-specific beyond the general appearanceof the application window. All of the code that makes the application behave in the way that you wantis included in the message processing part of the program. This is the function WindowProc() that youidentify to Windows in the WindowClass structure. Windows calls this function each time a message foryour main application window is dispatched.
This example is simple, so you will be putting all the code to process messages in the one function,WindowProc(). More generally, though, the WindowProc() function is responsible for analyzing whata given message was and which window it was destined for and then calling one of a whole range offunctions, each of which would be geared to handling a particular message in the context of the partic-ular window concerned. However, the overall sequence of operations, and the way in which the func-tion WindowProc() analyses an incoming message, is much the same in most application contexts.
The WindowProc() FunctionThe prototype of our WindowProc() function is:
LRESULT CALLBACK WindowProc(HWND hWnd, UINT message,WPARAM wParam, LPARAM lParam);
The return type is LRESULT, which is a type defined by Windows and is normally equivalent to type long.Because the function is called by Windows through a pointer (you set the pointer up in WinMain() in theWNDCLASSEX structure), you need to qualify the function as CALLBACK. This is another specifier defined by
763
Chapter 12: Windows Programming Concepts
25905c12.qxd:WroxPro 2/21/08 9:14 AM Page 763

Windows that determines how the function arguments are handled. The four arguments that are passedprovide information about the particular message causing the function to be called. The meaning of eachof these arguments is described in the following table:
The window that the incoming message relates to is identified by the first argument, hWnd, which is passedto the function. In this case, you have only one window, so you can ignore it.
Messages are identified by the value message that is passed to WindowProc(). You can test this valueagainst predefined symbolic constants, each of which relates to a particular message. They all begin withWM_, and typical examples are WM_PAINT, which corresponds to a request to redraw part of the clientarea of a window, and WM_LBUTTONDOWN, which indicates that the left mouse button was pressed. Youcan find the whole set of these by searching for WM_ in the MSDN Library.
Decoding a Windows MessageThe process of decoding the message that Windows is sending is usually done using a switch statement inthe WindowProc() function, based on the value of message. Selecting the message types that you want toprocess is then just a question of putting a case statement for each case in the switch. The typical struc-ture of such a switch statement, with arbitrary cases included, is as follows:
switch(message){case WM_PAINT:// Code to deal with drawing the client areabreak;
case WM_LBUTTONDOWN:// Code to deal with the left mouse button being pressedbreak;
case WM_LBUTTONUP:// Code to deal with the left mouse button being releasedbreak;
case WM_DESTROY:// Code to deal with a window being destroyedbreak;
Argument Meaning
HWND hWnd A handle to the window in which the event causing the message occurred.
UINT message The message ID, which is a 32-bit value indicating the type of message.
WPARAM wParam A 32-bit value containing additional information depending on what sort ofmessage it is.
LPARAM lParam A 32-bit value containing additional information depending on what sort ofmessage it is.
764
Chapter 12: Windows Programming Concepts
25905c12.qxd:WroxPro 2/21/08 9:14 AM Page 764
default:// Code to handle any other messages
}
Every Windows program has something like this somewhere, although it may be hidden from sight inthe Windows programs that you will write later using MFC. Each case corresponds to a particular valuefor the message ID and provides suitable processing for that message. Any messages that a program doesnot want to deal with individually are handled by the default statement, which should hand the messagesback to Windows by calling DefWindowProc(). This is the Windows API function providing default mes-sage handling.
In a complex program dealing specifically with a wide range of possible Windows messages, this switchstatement can become large and rather cumbersome. When you get to use the Application Wizard to gener-ate a Windows application, you won’t have to worry about this because it is all taken care of for you andyou never see the WindowProc() function. All you need to do is to supply the code to process the particu-lar messages in which you are interested.
Drawing the Window Client AreaWindows sends a WM_PAINT message to the program to signal that the client area of an applicationshould be redrawn. So in your example, you need to draw the text in the window in response to theWM_PAINT message.
You can’t go drawing in the window willy-nilly. Before you can write to the application window, youneed to tell Windows that you want to do so, and get Windows’ authority to go ahead. You do this by calling the Windows API function BeginPaint(), which should only be called in response to aWM_PAINT message. It is used as follows:
HDC hDC; // A display context handlePAINTSTRUCT PaintSt; // Structure defining area to be redrawn
hDC = BeginPaint(hWnd, &PaintSt); // Prepare to draw in the window
The type HDC defines what is called a display context, or more generally a device context. A device con-text provides the link between the device-independent Windows API functions for outputting informa-tion to the screen or a printer, and the device drivers that support writing to the specific devices attachedto your PC. You can also regard a device context as a token of authority that is handed to you on requestby Windows and grants you permission to output some information. Without a device context, you sim-ply can’t generate any output.
The BeginPaint() function provides you with a display context as a return value and requires two argu-ments to be supplied. The window to which you want to write is identified by the window handle, hWnd,which you pass as the first argument. The second argument is the address of a PAINTSTRUCT variablePaintSt, in which Windows places information about the area to be redrawn in response to the WM_PAINTmessage. I will ignore the details of this because you are not going to use it. You will just redraw the wholeof the client area. You can obtain the coordinates of the client area in a RECT structure with the statements:
RECT aRect; // A working rectangleGetClientRect(hWnd, &aRect);
765
Chapter 12: Windows Programming Concepts
25905c12.qxd:WroxPro 2/21/08 9:14 AM Page 765

The GetClientRect() function supplies the coordinates of the upper-left and lower-right corners of the client area for the window specified by the first argument. These coordinates are stored in the RECTstructure aRect, which is passed through the second argument as a pointer. You can then use this defini-tion of the client area for your window when you write the text to the window using the DrawText()function. Because your window has a gray background, you should alter the background of the text tobe transparent, to allow the gray to show through; otherwise, the text appears against a white back-ground. You can do this with this API function call:
SetBkMode(hDC, TRANSPARENT); // Set text background mode
The first argument identifies the device context and the second sets the background mode. The defaultoption is OPAQUE.
You can now write the text with the statement:
DrawText(hDC, // Device context handleL”But, soft! What light through yonder window breaks?”,-1, // Indicate null terminated string&aRect, // Rectangle in which text is to be drawnDT_SINGLELINE| // Text format - single lineDT_CENTER| // - centered in the lineDT_VCENTER // - line centered in aRect
);
The first argument to the DrawText() function is your certificate of authority to draw on the window,the display context hDC. The next argument is the text string that you want to output. You could equallywell have defined this in a variable and passed the pointer to the text as the second argument in the func-tion call. The next argument, with the value -1, signifies that your string is terminated with a null character.If it weren’t, you would put the count of the number of characters in the string here. The fourth argument is a pointer to a RECT structure defining a rectangle in which you want to write the text. In this case it is thewhole client area of the window defined in aRect. The last argument defines the format for the text in therectangle. Here you have combined three specifications with a bitwise OR (|). The string is written as a sin-gle line with the text centered on the line and the line centered vertically within the rectangle. This places itnicely in the center of the window. There are also a number of other options, which include the possibilityto place text at the top or the bottom of the rectangle, and to left or right justify it.
After you have written all that you want to display, you must tell Windows that you have finished draw-ing the client area. For every BeginPaint() function call, there must be a corresponding EndPaint()function call. Thus, to end processing the WM_PAINT message, you need the statement:
EndPaint(hWnd, &PaintSt); // Terminate window redraw operation
The hWnd argument identifies your program window, and the second argument is the address of thePAINTSTRUCT structure that was filled in by the BeginPaint() function.
Ending the ProgramYou might assume that closing the window closes the application, but to get this behavior you actuallyhave to add some more code. The reason that the application won’t close by default when the window isclosed is that you may need to do some clearing up. It is also possible that the application may have morethan one window. When the user closes the window by double-clicking the title bar icon or clicking the
766
Chapter 12: Windows Programming Concepts
25905c12.qxd:WroxPro 2/21/08 9:14 AM Page 766

Close button, this causes a WM_DESTROY message to be generated. Therefore, to close the application, youneed to process the WM_DESTROY message in the WindowProc() function. You do this by generating aWM_QUIT message with the following statement:
PostQuitMessage(0);
The argument here is an exit code. This Windows API function does exactly what its name suggests — itposts a WM_QUIT message in the message queue for your application. This results in the GetMessage()function in WinMain() returning FALSE and ending the message loop, so ending the program.
A Complete WindowProc() FunctionYou have covered all the elements necessary to make up the complete WindowProc() function for yourexample. The code for the function is as follows:
// Listing OFWIN_2LRESULT WINAPI WindowProc(HWND hWnd, UINT message,
WPARAM wParam, LPARAM lParam){HDC hDC; // Display context handlePAINTSTRUCT PaintSt; // Structure defining area to be drawnRECT aRect; // A working rectangle
switch(message) // Process selected messages{case WM_PAINT: // Message is to redraw the windowhDC = BeginPaint(hWnd, &PaintSt);// Prepare to draw the window
// Get upper left and lower right of client areaGetClientRect(hWnd, &aRect);
SetBkMode(hDC, TRANSPARENT); // Set text background mode
// Now draw the text in the window client areaDrawText(
hDC, // Device context handleL”But, soft! What light through yonder window breaks?”,-1, // Indicate null terminated string&aRect, // Rectangle in which text is to be drawnDT_SINGLELINE| // Text format - single lineDT_CENTER| // - centered in the lineDT_VCENTER); // - line centered in aRect
EndPaint(hWnd, &PaintSt); // Terminate window redraw operationreturn 0;
case WM_DESTROY: // Window is being destroyedPostQuitMessage(0);return 0;
default: // Any other message - we don’t// want to know, so call// default message processing
767
Chapter 12: Windows Programming Concepts
25905c12.qxd:WroxPro 2/21/08 9:14 AM Page 767

return DefWindowProc(hWnd, message, wParam, lParam);}
}
How It WorksThe entire function body is just a switch statement. A particular case is selected, based on the messageID that is passed to the function through the message parameter. Because this example is simple, youneed to process only two different messages: WM_PAINT and WM_DESTROY. You hand all other messagesback to Windows by calling the DefWindowProc() function in the default case for the switch. Thearguments to DefWindowProc() are those that were passed to the function, so you are just passing themback as they are. Note the return statement at the end of processing each message type. For the messagesyou handle, a zero value is returned.
A Simple Windows ProgramBecause you have written WinMain() and WindowProc() to handle messages, you have enough to cre-ate a complete source file for a Windows program using just the Windows API. The complete source filesimply consists of an #include directive for the windows.h header file, a prototype for the WindowProcfunction and the WinMain and WindowProc functions that you have already seen:
// Ex12_01.cpp Native windows program to display text in a window#include <windows.h>
LRESULT WINAPI WindowProc(HWND hWnd, UINT message,WPARAM wParam, LPARAM lParam);
// Insert code for WinMain() here (Listing OFWIN_1)
// Insert code for WindowProc() here (Listing OFWIN_2)
Of course, you’ll need to create a project for this program, but instead of choosing Win32 Console Applica -tion as you’ve done up to now, you should create this project using the Win32 Project template. You shouldelect to create it as an empty project and then add the Ex12_01.cpp file to hold the code.
Try It Out A Simple Windows API ProgramIf you build and execute the example, it produces the window shown in Figure 12-4.
Note that the window has a number of properties provided by the operating system that require no pro-gramming effort on your part to manage. The boundaries of the window can be dragged to resize it, andthe whole window can be moved about onscreen. The maximize and minimize buttons also work. Ofcourse, all of these actions do affect the program. Every time you modify the position or size of the win-dow, a WM_PAINT message is queued and your program has to redraw the client area, but all the work ofdrawing and modifying the window itself is done by Windows.
The system menu and Close button are also standard features of your window because of the optionsthat you specified in the WindowClass structure. Again, Windows takes care of the management. Theonly additional effect on your program arising from this is the passing of a WM_DESTROY message if youclose the window, as previously discussed.
768
Chapter 12: Windows Programming Concepts
25905c12.qxd:WroxPro 2/21/08 9:14 AM Page 768

Figure 12-4
Windows Program OrganizationIn the previous example you saw an elementary Windows program that used the Windows API and dis-played a short quote from the Bard. It’s unlikely to win any awards, being completely free of any usefulfunctionality, but it does serve to illustrate the two essential components of a Windows program: theWinMain() function that provides initialization and setup, and the WindowProc() function that servicesWindows messages. The relationship between these is illustrated in Figure 12-5.
It may not always be obvious in the code that you will see, but this structure is at the heart of all Windowsprograms, including programs written for the CLR. Understanding how Windows applications are organ-ized can often be helpful when you are trying to determine why things are not working as they should bein an application. The WinMain() function is called by Windows at the start of execution of the programand the WindowProc() function, which you’ll sometimes see with the name WndProc(), is called by theoperating system whenever a message is to be passed to your application’s window. In general there typi-cally is a separate WindowProc() function in an application for each window in an application.
The WinMain() function does any initialization that’s necessary and sets up the window or windowsthat are the primary interface to the user. It also contains the message loop for retrieving messages thatare queued for the application.
The WindowProc() function handles all the messages for a given window that aren’t queued, whichincludes those initiated in the message loop in WinMain(). WindowProc(), therefore, ends up handlingboth kinds of messages. This is because the code in the message loop sorts out what kind of message ithas retrieved from the queue, and then dispatches it for processing by WindowProc(). WindowProc() iswhere you code your application-specific response to each Windows message, which should handle allthe communications with the user by processing the Windows messages generated by user actions, suchas moving or clicking the mouse or entering information at the keyboard.
769
Chapter 12: Windows Programming Concepts
25905c12.qxd:WroxPro 2/21/08 9:14 AM Page 769
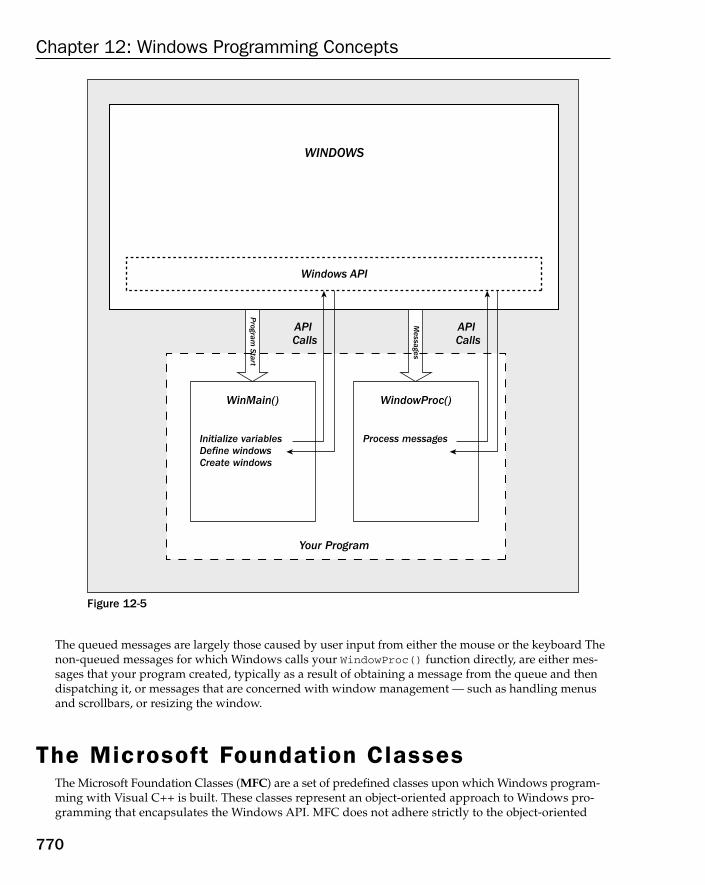
Figure 12-5
The queued messages are largely those caused by user input from either the mouse or the keyboard Thenon-queued messages for which Windows calls your WindowProc() function directly, are either mes-sages that your program created, typically as a result of obtaining a message from the queue and thendispatching it, or messages that are concerned with window management — such as handling menusand scrollbars, or resizing the window.
The Microsoft Foundation ClassesThe Microsoft Foundation Classes (MFC) are a set of predefined classes upon which Windows program-ming with Visual C++ is built. These classes represent an object-oriented approach to Windows pro-gramming that encapsulates the Windows API. MFC does not adhere strictly to the object-oriented
Windows API
API Calls
API Calls
WINDOWS
Your Program
WinMain()
Initialize variablesDefine windowsCreate windows
Process messages
WindowProc()
Program
Start
Messages
770
Chapter 12: Windows Programming Concepts
25905c12.qxd:WroxPro 2/21/08 9:14 AM Page 770
principles of encapsulation and data hiding, principally because much of the MFC code was writtenbefore such principles were well established.
The process of writing a Windows program involves creating and using MFC objects, or objects of classesderived from MFC. In the main, you’ll derive your own classes from MFC, with considerable assistancefrom the specialized tools in Visual C++ 2008 that make this easy. The objects of these MFC-based classtypes incorporate member functions for communicating with Windows, for processing Windows mes-sages, and for sending messages to each other. These derived classes, of course, inherit all of the membersof their base classes. These inherited functions do practically all of the general grunt work necessary for aWindows application to work. All you need to do is to add data and function members to customize theclasses to provide the application-specific functionality that you need in your program. In doing this, you’llapply most of the techniques that you’ve been grappling with in the preceding chapters, particularly thoseinvolving class inheritance and virtual functions.
MFC NotationAll the classes in MFC have names beginning with C, such as CDocument or CView. If you use the sameconvention when defining your own classes, or when deriving them from those in the MFC library, yourprograms will be easier to follow. Data members of an MFC class are prefixed with m_. I’ll also follow thisconvention in the examples that use MFC.
You’ll find that MFC uses Hungarian notation for many variable names, particularly those that originate inthe Windows API. As you recall, this involves using a prefix of p for a pointer, n for an int, l for long, hfor a handle, and so on. The name m_lpCmdLine, for example, refers to a data member of a class (becauseof the m_ prefix) that is of type ‘pointer to long’. This practice of explicitly showing the type of a variablein its name was important in the C environment because of the lack of type checking; because you coulddetermine the type from the name, you had a fair chance of not using or interpreting its value incorrectly.The downside is that the variable names can become quite cumbersome, making the code look more com-plicated than it really is. Because C++ has strong type checking that picks up the sort of misuse that usedto happen regularly in C, this kind of notation isn’t essential, so I won’t use it generally for variables inthe examples in the book. I will, however, retain the p prefix for pointers and some of the other simpletype denotations because this helps to make the code more readable.
How an MFC Program Is StructuredYou know from Chapter 1 that you can produce a Windows program using the Application Wizard with-out writing a single line of code. Of course, this uses the MFC library, but it’s quite possible to write aWindows program that uses MFC without using the Application wizard. If you first scratch the surfaceby constructing the minimum MFC-based program, you’ll get a clearer idea of the fundamental elementsinvolved.
The simplest program that you can produce using MFC is slightly less sophisticated than the examplethat you wrote earlier in this chapter using the raw Windows API. The example you’ll produce here hasa window, but no text displayed in it. This is sufficient to show the fundamentals, so try it out.
Try It Out A Minimal MFC ApplicationCreate a new project using the File > New > Project menu option, as you’ve done many times before. Youwon’t use the Application wizard that creates the basic code here, so select the template for the project asWin32 Project and choose Windows Application and the Empty project options in the second dialog.
771
Chapter 12: Windows Programming Concepts
25905c12.qxd:WroxPro 2/21/08 9:14 AM Page 771

After the project is created, select Project > Ex12_02 properties from the main menu, and on theGeneral sub-page from Configuration Properties, click the Use of MFC property to set its value to UseMFC in a Shared DLL.
With the project created you can create a new source file in the project as Ex12_02.cpp. So that you cansee all the code for the program in one place, put the class definitions you need together with their imple-mentations in this file. To achieve this, just add the code manually in the edit window — there isn’t verymuch of it.
To begin with, add a statement to include the header file afxwin.h, as this contains the definitions formany MFC classes. This allows you to derive your own classes from MFC.
#include <afxwin.h> // For the class library
To produce the complete program, you’ll only need to derive two classes from MFC: an application classand a window class. You won’t even need to write a WinMain() function, as you did in the previousexample in this chapter, because this is automatically provided by the MFC library behind the scenes.Take a look at how you define the two classes that you need.
The Application ClassThe class CWinApp is fundamental to any Windows program written using MFC. An object of this classincludes everything necessary for starting, initializing, running and closing the application. You need toproduce the application to derive your own application class from CWinApp. You will define a special-ized version of the class to suit your application needs. The code for this is as follows:
class COurApp: public CWinApp{
public:virtual BOOL InitInstance();
};
As you might expect for a simple example, there isn’t a great deal of specialization necessary in this case.You’ve only included one member in the definition of the class: the InitInstance() function. This func-tion is defined as a virtual function in the base class, so it’s not a new function in your derived class; youare simply redefining the base class function for your application class. All the other data and functionmembers that you need in the class you’ll inherit from CWinApp unchanged.
The application class is endowed with quite a number of data members defined in the base, many ofwhich correspond to variables used as arguments in Windows API functions. For example, the mem-ber m_pszAppName stores a pointer to a string that defines the name of the application. The memberm_nCmdShow specifies how the application window is to be shown when the application starts up. Youdon’t need to go into all the inherited data members now. You’ll see how they are used as the needarises in developing application-specific code.
In deriving your own application class from CWinApp, you must override the virtual functionInitInstance(). Your version is called by the version of WinMain() that’s provided for you by MFC,and you’ll include code in the function to create and display your application window. However, beforeyou write InitInstance(), I should introduce you to a class in the MFC library that defines a window.
772
Chapter 12: Windows Programming Concepts
25905c12.qxd:WroxPro 2/21/08 9:14 AM Page 772
The Window ClassYour MFC application needs a window as the interface to the user, referred to as a frame window. Youderive a window class for the application from the MFC class CFrameWnd, which is designed specifi-cally for this purpose. Because the CFrameWnd class provides everything for creating and managing awindow for your application, all you need to add to the derived window class is a constructor. Thisenables you to specify a title bar for the window to suit the application context:
class COurWnd: public CFrameWnd{public:// ConstructorCOurWnd(){Create(0, L”Our Dumb MFC Application”);
}};
The Create() function that you call in the constructor is inherited from the base class. It creates thewindow and attaches it to the COurWnd object that is being created. Note that the COurWnd object is notthe same thing as the window that displayed by Windows — the class object and the physical windoware distinct entities.
The first argument value for the Create() function, 0, specifies that you want to use the base classdefault attributes for the window — you’ll recall that you needed to define window attributes in theprevious example in this chapter that used the Windows API directly. The second argument specifiesthe window name that is used in the window title bar. You won’t be surprised to learn that there areother parameters to the function Create(), but they all have default values which are quite satisfac-tory, so you can afford to ignore them here.
Completing the ProgramHaving defined a window class for the application, you can write the InitInstance() function in ourCOurApp class:
BOOL COurApp::InitInstance(void){
// Construct a window object in the free storem_pMainWnd = new COurWnd;m_pMainWnd->ShowWindow(m_nCmdShow); // ...and display itreturn TRUE;
}
This overrides the virtual function defined in the base class CWinApp, and as I said previously, it is calledby the WinMain() function that’s automatically supplied by the MFC library. The InitInstance()function constructs a main window object for the application in the free store by using the operator new.You store the address that is returned in the variable m_pMainWnd, which is an inherited member of yourclass COurApp. The effect of this is that the window object is owned by the application object. You don’teven need to worry about freeing the memory for the object you have created — the supplied WinMain()function takes care of any cleanup necessary.
773
Chapter 12: Windows Programming Concepts
25905c12.qxd:WroxPro 2/21/08 9:14 AM Page 773

The only other item you need for a complete, albeit rather limited, program is to define an applicationobject. An instance of our application class, COurApp, must exist before WinMain() is executed, so youmust declare it at global scope with the statement:
COurApp AnApplication; // Define an application object
The reason that this object needs to exist at global scope is that it is the application, and the applicationneeds to exist before it can start executing. The WinMain() function that is provided by MFC calls theInitInstance() function member of the application object to construct the window object and, thus,implicitly assumes the application object already exists.
The Finished ProductNow that you’ve seen all the code, you can add it to the Ex12_02.cpp source file in the project. In aWindows program, the classes are usually defined in .h files, and the member functions that are notdefined within the class definitions are defined in .cpp files. Your application is so short, though, that you may as well put it all in a single .cpp file. The merit of this is that you can view the whole lottogether. The program code is structured as follows:
// Ex12_02.cpp// An elementary MFC program#include <afxwin.h> // For the class library
// Application class definitionclass COurApp:public CWinApp{
public:virtual BOOL InitInstance();
};
// Window class definitionclass COurWnd:public CFrameWnd{
public:// ConstructorCOurWnd(){
Create(0, L”Our Dumb MFC Application”);}
};
// Function to create an instance of the main application windowBOOL COurApp::InitInstance(void){
// Construct a window object in the free storem_pMainWnd = new COurWnd;m_pMainWnd->ShowWindow(m_nCmdShow); // ...and display itreturn TRUE;
}
// Application object definition at global scopeCOurApp AnApplication; // Define an application object
774
Chapter 12: Windows Programming Concepts
25905c12.qxd:WroxPro 2/21/08 9:14 AM Page 774
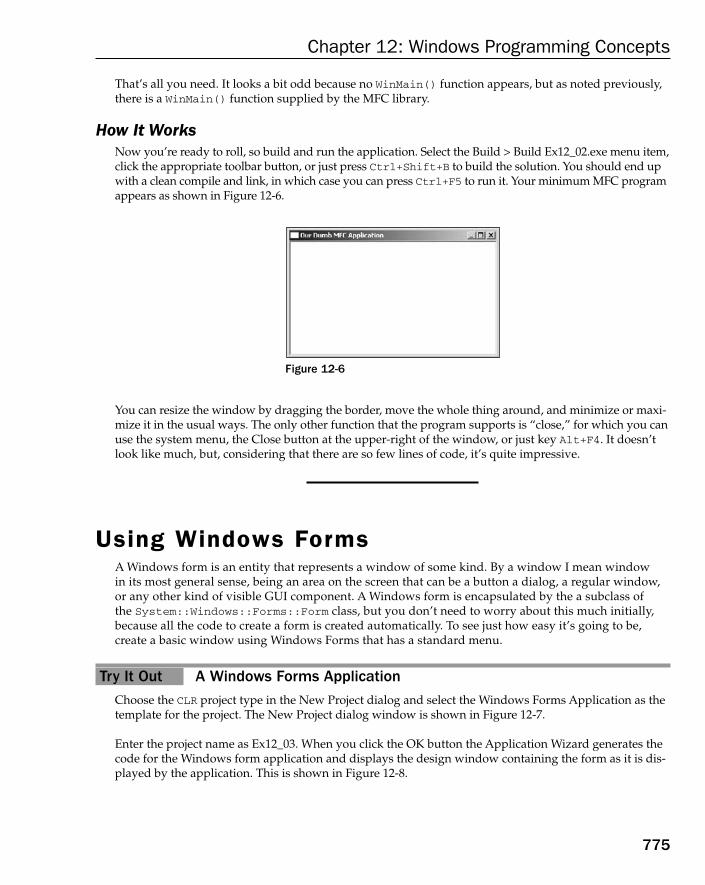
That’s all you need. It looks a bit odd because no WinMain() function appears, but as noted previously,there is a WinMain() function supplied by the MFC library.
How It WorksNow you’re ready to roll, so build and run the application. Select the Build > Build Ex12_02.exe menu item,click the appropriate toolbar button, or just press Ctrl+Shift+B to build the solution. You should end upwith a clean compile and link, in which case you can press Ctrl+F5 to run it. Your minimum MFC programappears as shown in Figure 12-6.
Figure 12-6
You can resize the window by dragging the border, move the whole thing around, and minimize or maxi-mize it in the usual ways. The only other function that the program supports is “close,” for which you canuse the system menu, the Close button at the upper-right of the window, or just key Alt+F4. It doesn’tlook like much, but, considering that there are so few lines of code, it’s quite impressive.
Using Windows FormsA Windows form is an entity that represents a window of some kind. By a window I mean window in its most general sense, being an area on the screen that can be a button a dialog, a regular window,or any other kind of visible GUI component. A Windows form is encapsulated by the a subclass of the System::Windows::Forms::Form class, but you don’t need to worry about this much initially,because all the code to create a form is created automatically. To see just how easy it’s going to be, create a basic window using Windows Forms that has a standard menu.
Try It Out A Windows Forms ApplicationChoose the CLR project type in the New Project dialog and select the Windows Forms Application as thetemplate for the project. The New Project dialog window is shown in Figure 12-7.
Enter the project name as Ex12_03. When you click the OK button the Application Wizard generates thecode for the Windows form application and displays the design window containing the form as it is dis-played by the application. This is shown in Figure 12-8.
775
Chapter 12: Windows Programming Concepts
25905c12.qxd:WroxPro 2/21/08 9:14 AM Page 775

Figure 12-7
Figure 12-8
You can now make changes to the form in the design pane graphically, and the changes are automaticallyreflected in the code that creates the form. For a start, you can drag the bottom corner of the form with themouse cursor to increase the size of the form window. You can also change the text in the title bar — right-click in the client area of the form and select Properties from the context menu. This displays the Properties
776
Chapter 12: Windows Programming Concepts
25905c12.qxd:WroxPro 2/21/08 9:14 AM Page 776

window that allows you to change the properties for the form. From the list of properties to the right of thedesign pane, select Text, and then enter the new title bar text in the adjacent column showing the propertyvalue — I entered A Simple Form Window. When you press the key, the new text appears in the title bar ofthe form.
Just to see how easy it really is to add to the form window, display the Toolbox pane by selecting the tabon the right of the window if it is present, or by pressing Ctrl+Alt+X or by selecting Toolbox from theView menu. Find the MenuStrip option in the Menus and Toolbars list and drag it on to the form windowin the Design tab pane. Right-click the MenuStrip1 that appears below the form window and select InsertStandard Items from the pop-up. You’ll then have the menu in the form window populated with the stan-dard File, Edit, Tools, Help menus, each complete with its drop-down list of menu items. The result of thisoperation is shown in Figure 12-9.
Figure 12-9
How It WorksIf you build the project by pressing the Ctrl+Shift+B and then execute it by pressing Ctrl+F5, you’ll seethe form window displayed complete with its menus. Naturally the menu items don’t do anything becauseyou haven’t added any code to deal with the events that result from clicking on them, but the icons at theright end of the title bar work so you can close the application. You’ll look into how to develop a WindowsForm application further, including handling events, later in the book.
777
Chapter 12: Windows Programming Concepts
25905c12.qxd:WroxPro 2/21/08 9:14 AM Page 777

SummaryIn this chapter you’ve seen three different ways of creating an elementary Windows application withVisual C++ 2008 and you should now have a feel for the essential differences between these threeapproaches. In the remaining chapters of the book, you’ll be exploring in more depth how youdevelop applications using the MFC and using Windows Forms.
The important points arising in the chapter include:
❑ The Windows API provides a standard programming interface by which an application communicates with the operating system.
❑ All Windows applications include a WinMain() function that is called by the operating system to begin execution of the application. The WinMain() function also includes code to retrievemessages from the operating system.
❑ The Windows operating system calls a particular function in an application to handle process-ing of specific messages. An application identifies the message processing function for eachwindow in an application by calling a Windows API function.
❑ The MFC consists of a set of classes that encapsulate the Windows API and simplify program-ming using the Windows API.
❑ A Windows Forms application executes with the CLR. The windows in a Windows Forms application can be created graphically with all the required code being generated automatically.
778
Chapter 12: Windows Programming Concepts
25905c12.qxd:WroxPro 2/21/08 9:14 AM Page 778

13Windows Programming
with the MicrosoftFoundation Classes
In this chapter, you start down the road of serious Windows application development using theMFC. You’ll get an appreciation of what code the Application wizard generates for a MicrosoftFoundation Class (MFC) program and what options you have for the features to be included inyour code.
In this chapter, you will learn about:
❑ The basic elements of an MFC-based program
❑ How Single Document Interface (SDI) applications and Multiple Document Interface(MDI) applications differ
❑ How to use the MFC Application Wizard to generate SDI and MDI programs
❑ What files are generated by the MFC Application Wizard and what their contents are
❑ How an MFC Application Wizard-generated program is structured
❑ The key classes in an MFC Application Wizard-generated program, and how they areinterconnected
❑ The general approach to customizing an MFC Application Wizard-generated program
You’ll be expanding the programs that you generate in this chapter by adding features and codeincrementally in subsequent chapters. You will eventually end up with a sizable, working Windowsprogram that incorporates almost all the basic user interface programming techniques you will havelearned along the way.
25905c13.qxd:WroxPro 2/21/08 9:15 AM Page 779

The Document/View Concept in MFCWhen you write applications using MFC, it implies acceptance of a specific structure for your program,with application data being stored and processed in a particular way. This may sound restrictive, but itreally isn’t for the most part, and the benefits in speed and ease of implementation you gain far outweighany conceivable disadvantages. The structure of an MFC program incorporates two application-orientedentities — a document and a view — so let’s look at what they are and how they’re used.
What Is a Document?A document is the name given to the collection of data in your application with which the user interacts.Although the word document seems to imply something of a textual nature, a document isn’t limited totext. It could be the data for a game, a geometric model, a text file, a collection of data on the distributionof orange trees in California or, indeed, anything you want. The term document is just a convenient labelfor the application data in your program, treated as a unit.
You won’t be surprised to hear that a document in your program is defined as an object of a documentclass. Your document class is derived from the CDocument class in the MFC library, and you’ll add yourown data members to store items that your application requires, and member functions to support pro-cessing of that data. Your application is not limited to a single document type; you can define multipledocument classes when there are several different kinds of document involved in your application.
Handling application data in this way enables standard mechanisms to be provided within MFC for man-aging a collection of application data as a unit and for storing and retrieving data contained in documentobjects to and from disk. These mechanisms are inherited by your document class from the base classdefined in the MFC library, so you get a broad range of functionality built in to your application automati-cally, without having to write any code.
Document InterfacesYou have a choice as to whether your program deals with just one document at a time, or with several.The Single Document Interface, abbreviated as SDI, is supported by the MFC library for programs thatonly require one document to be open at a time. A program using this interface is referred to as an SDIapplication.
For programs needing several documents to be open at one time, you can use the Multiple DocumentInterface, which is usually referred to as MDI. With the MDI, as well as being able to open multipledocuments of one type, your program can also be organized to handle documents of different typessimultaneously with each document displayed in its own window. Of course, you need to supply thecode to deal with processing whatever different kinds of documents you intend to support. With anMDI application, each document is displayed in a child window of the application window. You havean additional application variant called the multiple top-level document architecture where each doc-ument window is a child of the desktop.
What Is a View?A view always relates to a particular document object. As you’ve seen, a document contains a set of appli-cation data in your program, and a view is an object that provides a mechanism for displaying some or allof the data stored in a document. It defines how the data is to be displayed in a window and how the user
780
Chapter 13: Programming with the Microsoft Foundation Classes
25905c13.qxd:WroxPro 2/21/08 9:15 AM Page 780
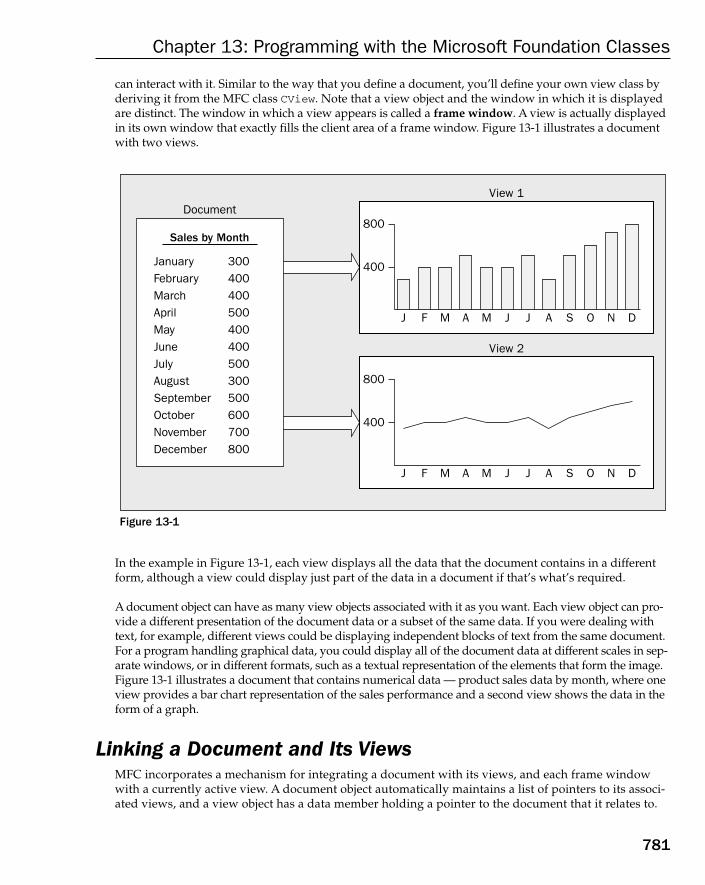
can interact with it. Similar to the way that you define a document, you’ll define your own view class byderiving it from the MFC class CView. Note that a view object and the window in which it is displayedare distinct. The window in which a view appears is called a frame window. A view is actually displayedin its own window that exactly fills the client area of a frame window. Figure 13-1 illustrates a documentwith two views.
Figure 13-1
In the example in Figure 13-1, each view displays all the data that the document contains in a differentform, although a view could display just part of the data in a document if that’s what’s required.
A document object can have as many view objects associated with it as you want. Each view object can pro-vide a different presentation of the document data or a subset of the same data. If you were dealing withtext, for example, different views could be displaying independent blocks of text from the same document.For a program handling graphical data, you could display all of the document data at different scales in sep-arate windows, or in different formats, such as a textual representation of the elements that form the image.Figure 13-1 illustrates a document that contains numerical data — product sales data by month, where oneview provides a bar chart representation of the sales performance and a second view shows the data in theform of a graph.
Linking a Document and Its ViewsMFC incorporates a mechanism for integrating a document with its views, and each frame windowwith a currently active view. A document object automatically maintains a list of pointers to its associ-ated views, and a view object has a data member holding a pointer to the document that it relates to.
View 1 Document
View 2
800
400
J
Sales by Month
January 300 February 400 March 400 April 500 May 400 June 400 July 500 August 300 September 500 October 600 November 700 December 800
F M A M J J A S O N D
800
400
J F M A M J J A S O N D
781
Chapter 13: Programming with the Microsoft Foundation Classes
25905c13.qxd:WroxPro 2/21/08 9:15 AM Page 781
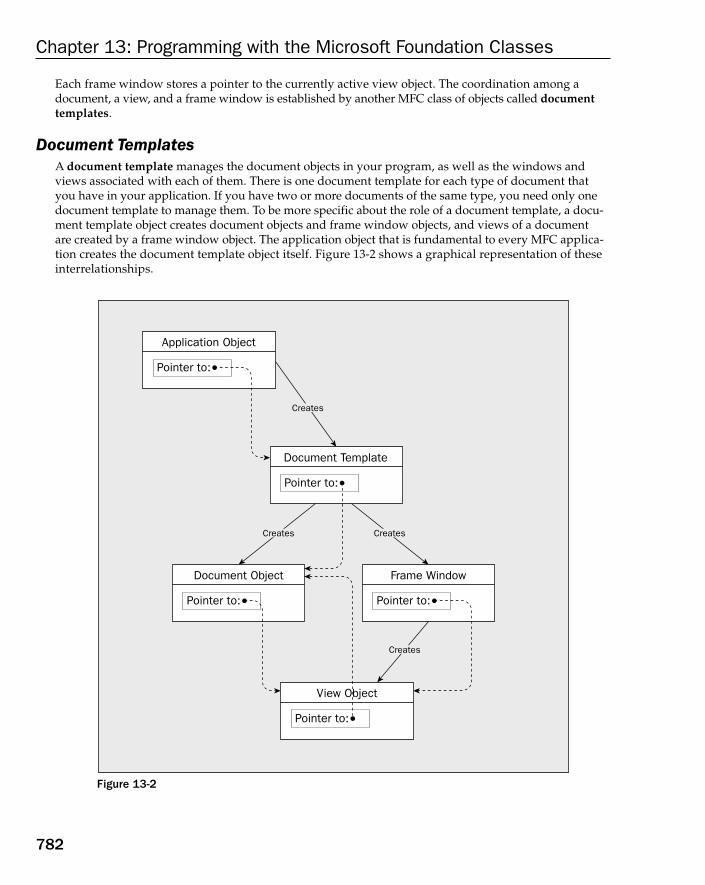
Each frame window stores a pointer to the currently active view object. The coordination among a document, a view, and a frame window is established by another MFC class of objects called documenttemplates.
Document TemplatesA document template manages the document objects in your program, as well as the windows andviews associated with each of them. There is one document template for each type of document thatyou have in your application. If you have two or more documents of the same type, you need only onedocument template to manage them. To be more specific about the role of a document template, a docu-ment template object creates document objects and frame window objects, and views of a document are created by a frame window object. The application object that is fundamental to every MFC applica-tion creates the document template object itself. Figure 13-2 shows a graphical representation of theseinterrelationships.
Figure 13-2
Application Object
Pointer to:
Document Template
Pointer to:
Frame Window
Pointer to:
View Object
Pointer to:
Document Object
Pointer to:
Creates Creates
Creates
Creates
782
Chapter 13: Programming with the Microsoft Foundation Classes
25905c13.qxd:WroxPro 2/21/08 9:15 AM Page 782

The diagram uses dashed arrows to show how pointers are used to relate objects. These pointers enablefunction members of one class object to access the public data or the function members in the interfaceof another object.
Document Template ClassesMFC has two classes for defining document templates. For SDI applications, the MFC library classCSingleDocTemplate is used. This is relatively straightforward because an SDI application has onlyone document and usually just one view. MDI applications are rather more complicated. They have multiple documents active at one time, so a different class, CMultiDocTemplate, is needed to define thedocument template. You’ll see more of these classes as we progress into developing application code.
Your Application and MFCFigure 13-3 shows the four basic classes that are going to appear in virtually all your MFC-basedWindows applications:
❑ The application class CMyApp
❑ The frame window class CMyWnd
❑ The view class CMyView, which defines how data contained in CMyDoc is to be displayed in the client area of a window created by a CMyWnd object
❑ The document class CMyDoc defining a document to contain the application data
The actual names for these classes are specific to a particular application, but the derivation from MFCis much the same, although there can be alternative base classes, particularly with the view class. Asyou’ll see a bit later, MFC provides several variations of the view class that provide a lot of functional-ity prepackaged for you, saving you lots of coding. You normally don’t need to extend the class thatdefines a document template for your application, so the standard MFC class CSingleDocTemplateusually suffices in an SDI program. When you’re creating an MDI program, your document templateclass is CMultiDocTemplate, which is also derived from CDocTemplate.
The arrows in the diagram point from a base class to a derived class. The MFC library classes shown hereform quite a complex inheritance structure, but in fact these are just a very small part of the complete MFCstructure. You need not be concerned about the details of the complete MFC hierarchy in the main, but itis important to have a general appreciation of it if you want to understand what the inherited membersof your classes are. You will not see any of the definitions of the base classes in your program, but theinherited members of a derived class in your program are accumulated from the direct base class, as wellas from each of the indirect base classes in the MFC hierarchy. To determine what members one of yourprogram’s classes has, you therefore need to know from which classes it inherits. After you know that,you can look up its members using the Help facility.
Another point you don’t need to worry about is remembering which classes you need to have in yourprogram and what base classes to use in their definition. As you’ll see next, all of this is taken care offor you by Visual C++ 2008.
783
Chapter 13: Programming with the Microsoft Foundation Classes
25905c13.qxd:WroxPro 2/21/08 9:15 AM Page 783
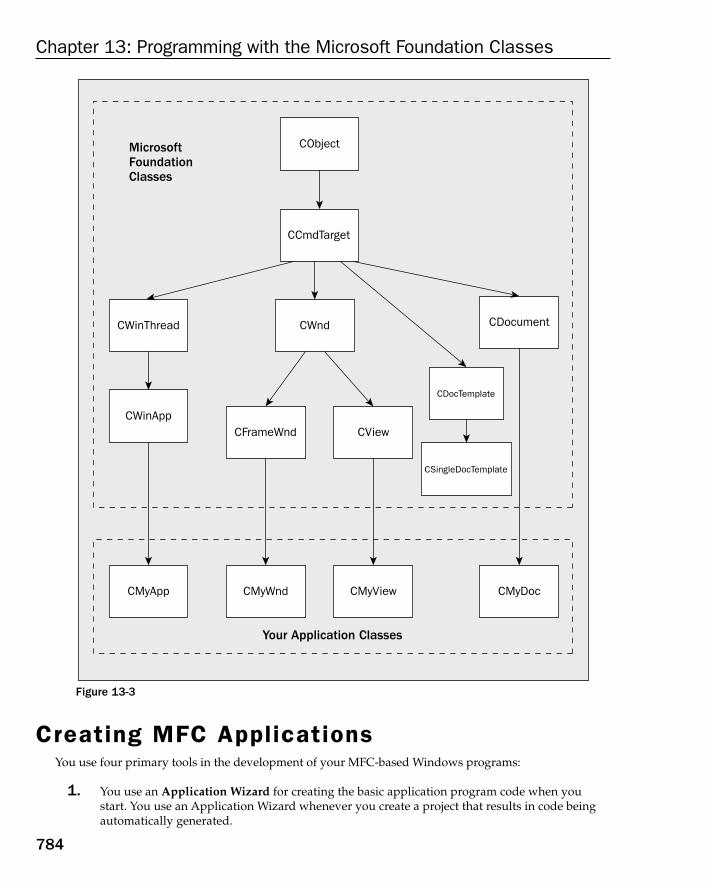
Figure 13-3
Creating MFC ApplicationsYou use four primary tools in the development of your MFC-based Windows programs:
1. You use an Application Wizard for creating the basic application program code when youstart. You use an Application Wizard whenever you create a project that results in code beingautomatically generated.
CWinThread CDocument
CDocTemplate
CSingleDocTemplate
CWinApp
CMyApp CMyWnd
CFrameWnd CView
CWnd
CCmdTarget
CObject
Your Application Classes
Microsoft Foundation Classes
CMyView CMyDoc
784
Chapter 13: Programming with the Microsoft Foundation Classes
25905c13.qxd:WroxPro 2/21/08 9:15 AM Page 784

2. You use the project context menu in ClassView to add new classes and resources to your proj-ect. You display this context menu by right-clicking the project name in ClassView and using theAdd/Class menu item to add a new class. Resources are things composed of non-executabledata such as bitmaps, icons, menus, and dialog boxes. The Add/Resource menu item from thesame context menu helps you to add a new resource.
3. You use the class context menu in ClassView for extending and customizing the existingclasses in your programs. You use the Add/Add Function and Add/Add Variable menuitems to do this.
4. You use a Resource Editor for creating or modifying such objects as menus and toolbars.
There are, in fact, several resource editors; the one used in any particular situation is selected dependingon the kind of resource that you’re editing. We’ll look at editing resources in the next chapter, but for nowlet’s jump in and create an MFC application.
The process for creating an MFC application is just as straightforward as that for creating a consoleprogram; there are just a few more choices along the way. As you have already seen, you start by creating a new project by selecting the File > New > Project menu item, or you can use the shortcut and press Ctrl+Shift+N. The New Project dialog box is displayed where you can thenchoose MFC as the project type and MFC Application as the template to be used. You also need toenter a name for the project that can be anything you want — I’ve used TextEditor, as shown inFigure 13-4. You won’t be developing this particular example into a serious application so you can use any name you like.
Figure 13-4
As you know, the name that you assign to the project — TextEditor, in this case — is used as the nameof the folder that contains all the project files, but it is also used as a basis for creating the names forclasses that the Application Wizard generates for your project. When you click OK in the New Projectdialog window, you’ll see the MFC Application Wizard dialog, where you can choose options for theapplication, as shown in Figure 13-5.
785
Chapter 13: Programming with the Microsoft Foundation Classes
25905c13.qxd:WroxPro 2/21/08 9:15 AM Page 785

Figure 13-5
As you can see, the dialog explains the project settings that are currently in effect, and on the right of thedialog you have a range of options you can select. You can select any of these to have a look if you want —you can always get back to the base dialog box for the Application Wizard by selecting the Previous but-ton. Selecting any of the options on the right presents you with a whole range of further choices, so thereare a lot of options in total. I won’t discuss all of them — I’ll just outline the ones that you are most likelyto be interested in and leave you to investigate the others. Initially, the Application Wizard allows you tochoose an SDI application, an MDI application, or a dialog box-based application. Let’s create an SDI appli-cation first of all and explore what some of the choices are as we go along.
Creating an SDI ApplicationSelect the Application Type option from the list to the right of the dialog window.
The default option selected is Multiple documents, which selects the multiple document interface —MDI, and the appearance of an MDI application is shown top-left in the dialog window so that you’llknow what to expect. Select the Single document option and the representation for the applicationthat is shown top-left changes to a single window, as shown in Figure 13-6.
Consider some of the other options you have here for the application type:
Option Description
Dialog based The application window is a dialog window rather than a framewindow.
Multiple top-level documents Documents are displayed in child windows of the desktop ratherthan child windows of the application as they are with an MDIapplication.
786
Chapter 13: Programming with the Microsoft Foundation Classes
25905c13.qxd:WroxPro 2/21/08 9:15 AM Page 786

Figure 13-6
You should uncheck the Use Unicode libraries option that is checked by default. If you leave itchecked, the application expects Unicode input and files are stored as Unicode characters. This makesthem unreadable in programs that expect ASCII text.
You also can choose between Windows Explorer and MFC standard for the project style. The formerimplements the application window with the client area divided into two panes; the left pane displaysdata in the form of a tree and the right pane displays straight text.
You can also choose how MFC library code is used in your program. The default choice of using theMFC library as a shared DLL (Dynamic Link Library) means that your program links to MFC libraryroutines at run time. This reduces the size of the executable file that you’ll generate, but requires theMFC DLL to be on the machine that’s running it. The two modules together (your application’s .exemodule and the MFC .dll) may be bigger than if you had statically linked the MFC library. If you opt
Option Description
Document/View architecturesupport
This option is selected by default so you get code built-in to sup-port the document/view architecture. If you uncheck this optionthe support is not provided and it’s up to you to implementwhatever you want.
Resource language The drop-down list box displays the choice of languages avail-able that applies to resources such as menus and text strings inyour application.
Use Unicode libraries Support for Unicode is provided through Unicode versions ofthe MFC libraries; if you want to use them, you must check thisoption.
787
Chapter 13: Programming with the Microsoft Foundation Classes
25905c13.qxd:WroxPro 2/21/08 9:15 AM Page 787
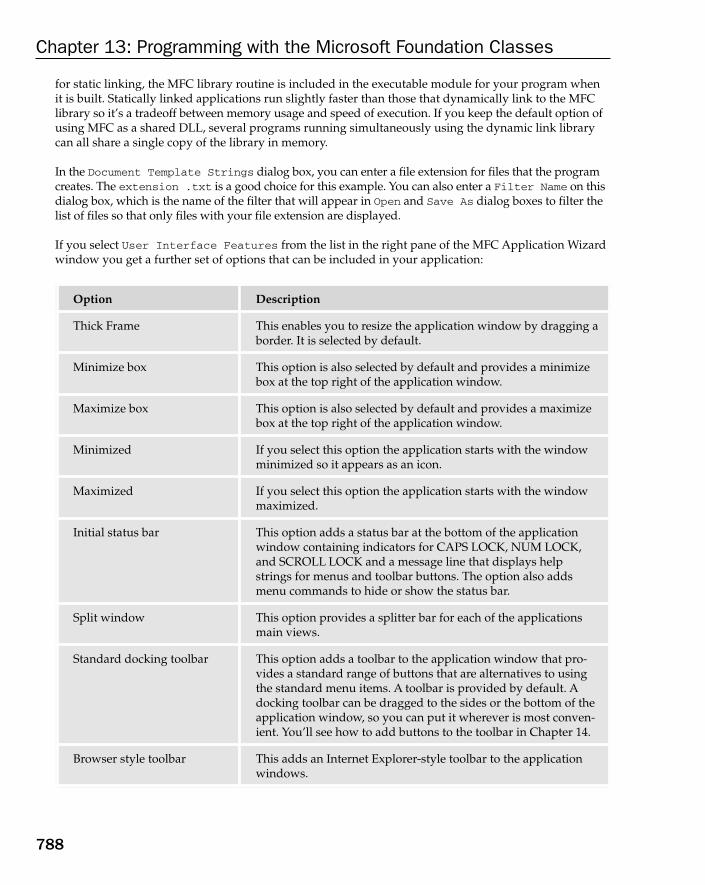
for static linking, the MFC library routine is included in the executable module for your program whenit is built. Statically linked applications run slightly faster than those that dynamically link to the MFClibrary so it’s a tradeoff between memory usage and speed of execution. If you keep the default option ofusing MFC as a shared DLL, several programs running simultaneously using the dynamic link librarycan all share a single copy of the library in memory.
In the Document Template Strings dialog box, you can enter a file extension for files that the programcreates. The extension .txt is a good choice for this example. You can also enter a Filter Name on thisdialog box, which is the name of the filter that will appear in Open and Save As dialog boxes to filter thelist of files so that only files with your file extension are displayed.
If you select User Interface Features from the list in the right pane of the MFC Application Wizardwindow you get a further set of options that can be included in your application:
Option Description
Thick Frame This enables you to resize the application window by dragging aborder. It is selected by default.
Minimize box This option is also selected by default and provides a minimizebox at the top right of the application window.
Maximize box This option is also selected by default and provides a maximizebox at the top right of the application window.
Minimized If you select this option the application starts with the windowminimized so it appears as an icon.
Maximized If you select this option the application starts with the windowmaximized.
Initial status bar This option adds a status bar at the bottom of the applicationwindow containing indicators for CAPS LOCK, NUM LOCK,and SCROLL LOCK and a message line that displays helpstrings for menus and toolbar buttons. The option also addsmenu commands to hide or show the status bar.
Split window This option provides a splitter bar for each of the applicationsmain views.
Standard docking toolbar This option adds a toolbar to the application window that pro-vides a standard range of buttons that are alternatives to usingthe standard menu items. A toolbar is provided by default. Adocking toolbar can be dragged to the sides or the bottom of theapplication window, so you can put it wherever is most conven-ient. You’ll see how to add buttons to the toolbar in Chapter 14.
Browser style toolbar This adds an Internet Explorer-style toolbar to the applicationwindows.
788
Chapter 13: Programming with the Microsoft Foundation Classes
25905c13.qxd:WroxPro 2/21/08 9:15 AM Page 788

There are a couple of features under the Advanced Features set of options of which you need to be aware.One is Printing and print preview, which is selected by default, and the other is Context-sensitivehelp, which you get if you check the box. Printing and print preview adds the standard Page Setup,Print Preview, and Print items to the File menu and the Application Wizard also provides code to supportthese functions. Enabling the Context-sensitive help option results in a basic set of facilities to sup-port context-sensitive help. You’ll obviously need to add the specific contents of the help files if you wantto use this feature.
If you select the Generated Classes option in the MFC Application Wizard dialog box, you’ll see a list ofthe classes that the Application wizard generates in your program code, as shown in Figure 13-7.
Figure 13-7
You can highlight any class in the list by clicking it and the boxes below show the name given to the class,the name of the header file in which the definition will be stored, the base class used, and the name of thefile containing the implementation of member functions in the class. The class definition is always con-tained in a .h file, and the member function source code is always included in a .cpp file.
In the case of the class CTextEditorDoc, you can alter everything except the base class; however, if youselect CTextEditorApp the only thing that you can alter is the class name. Try clicking the other classesin the list. For CMainFrame you can alter everything except the base class and for the CTextEditorViewclass shown in Figure 13-7 you can change the base class as well. Click the down arrow to display the listof other classes that you can have as a base class; the list appears in Figure 13-7. The capability built intoyour view class depends on which base class you select:
Continued
Base Class View Class Capability
CEditView Provides simple multiline text-editing capability, including find and replaceand printing.
789
Chapter 13: Programming with the Microsoft Foundation Classes
25905c13.qxd:WroxPro 2/21/08 9:15 AM Page 789
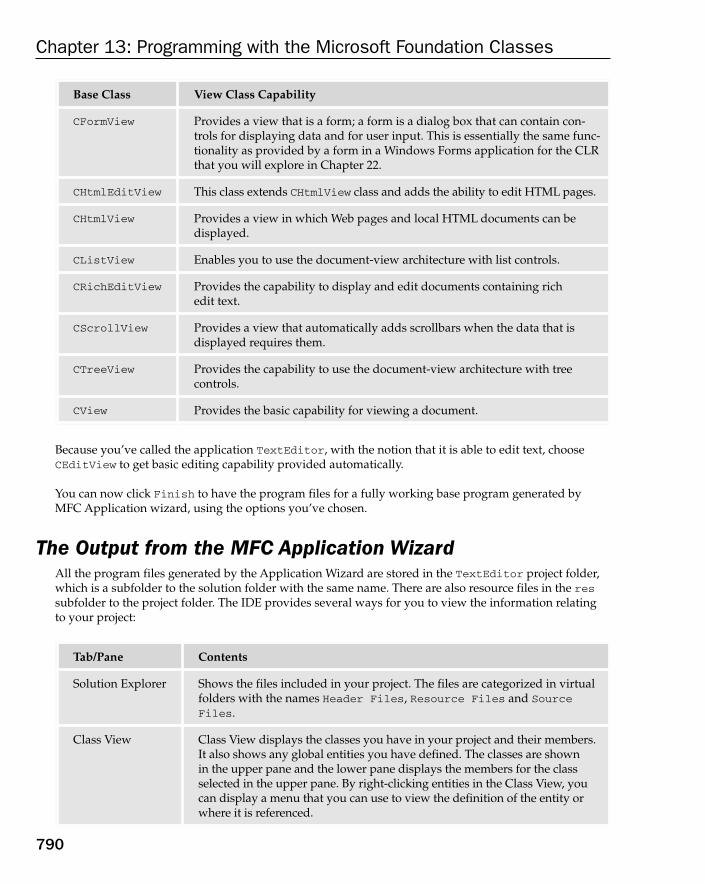
Because you’ve called the application TextEditor, with the notion that it is able to edit text, chooseCEditView to get basic editing capability provided automatically.
You can now click Finish to have the program files for a fully working base program generated byMFC Application wizard, using the options you’ve chosen.
The Output from the MFC Application WizardAll the program files generated by the Application Wizard are stored in the TextEditor project folder,which is a subfolder to the solution folder with the same name. There are also resource files in the ressubfolder to the project folder. The IDE provides several ways for you to view the information relating to your project:
Tab/Pane Contents
Solution Explorer Shows the files included in your project. The files are categorized in virtualfolders with the names Header Files, Resource Files and SourceFiles.
Class View Class View displays the classes you have in your project and their members.It also shows any global entities you have defined. The classes are shown in the upper pane and the lower pane displays the members for the classselected in the upper pane. By right-clicking entities in the Class View, youcan display a menu that you can use to view the definition of the entity orwhere it is referenced.
Base Class View Class Capability
CFormView Provides a view that is a form; a form is a dialog box that can contain con-trols for displaying data and for user input. This is essentially the same func-tionality as provided by a form in a Windows Forms application for the CLRthat you will explore in Chapter 22.
CHtmlEditView This class extends CHtmlView class and adds the ability to edit HTML pages.
CHtmlView Provides a view in which Web pages and local HTML documents can be displayed.
CListView Enables you to use the document-view architecture with list controls.
CRichEditView Provides the capability to display and edit documents containing rich edit text.
CScrollView Provides a view that automatically adds scrollbars when the data that is displayed requires them.
CTreeView Provides the capability to use the document-view architecture with tree controls.
CView Provides the basic capability for viewing a document.
790
Chapter 13: Programming with the Microsoft Foundation Classes
25905c13.qxd:WroxPro 2/21/08 9:15 AM Page 790

You can switch to view any of these by selecting from the view menu or clicking on a tab label. If youright-click TextEditor in the Solution Explorer pane and select Properties from the pop-up, the projectproperties window is displayed, as shown in Figure 13-8.
Figure 13-8
The left pane shows the property groups you can select to be displayed in the right pane. Currently theGeneral group of properties is displayed and you can change the value for a property in the right paneby clicking it and selecting a new value from the drop-down list box to the right of the property name orin some cases by entering a new value.
At the top of the property pages window, you can see the current project configuration and the targetplatform when the project is built. You can change these by selecting from the drop-down list for each.
Tab/Pane Contents
Resource View This displays the resources such as menu items and toolbar buttons used by your project. Right-clicking a resource displays a menu, enabling you toedit the resource or add new resources.
Property Manager This displays the versions you can build for your project. The debug versionincludes extra facilities to make debugging your code easier. The release ver-sion results in a smaller executable, and you build this version when yourcode is fully tested for production use. By right-clicking a version — eitherDebug or Release — you can display a context menu where you can add aproperty sheet or display the properties currently set for that version. Aproperty sheet enables you to set options for the compiler and linker.
791
Chapter 13: Programming with the Microsoft Foundation Classes
25905c13.qxd:WroxPro 2/21/08 9:15 AM Page 791
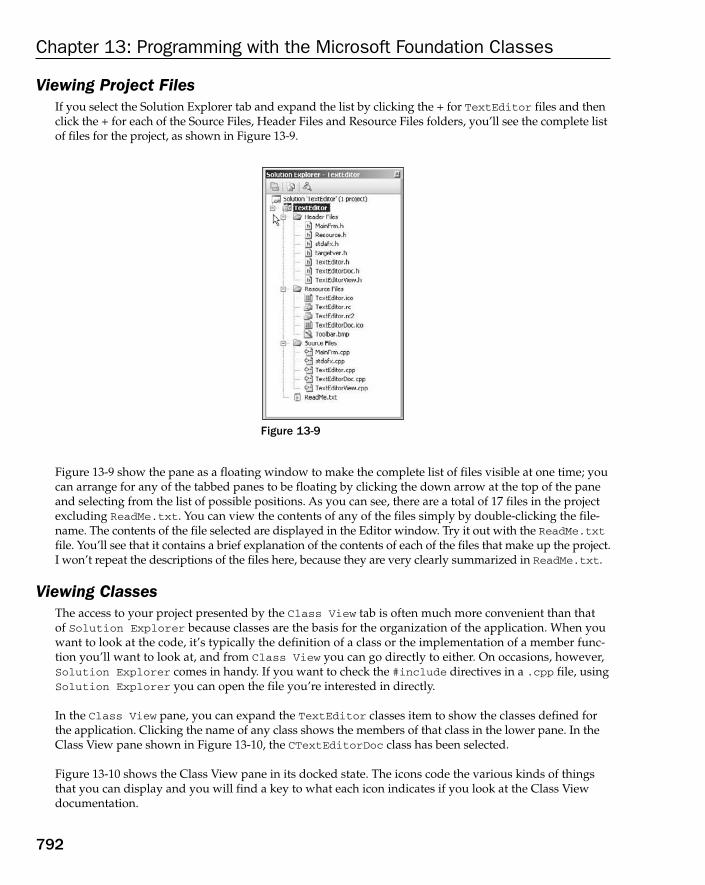
Viewing Project FilesIf you select the Solution Explorer tab and expand the list by clicking the + for TextEditor files and thenclick the + for each of the Source Files, Header Files and Resource Files folders, you’ll see the complete listof files for the project, as shown in Figure 13-9.
Figure 13-9
Figure 13-9 show the pane as a floating window to make the complete list of files visible at one time; youcan arrange for any of the tabbed panes to be floating by clicking the down arrow at the top of the paneand selecting from the list of possible positions. As you can see, there are a total of 17 files in the projectexcluding ReadMe.txt. You can view the contents of any of the files simply by double-clicking the file-name. The contents of the file selected are displayed in the Editor window. Try it out with the ReadMe.txtfile. You’ll see that it contains a brief explanation of the contents of each of the files that make up the project.I won’t repeat the descriptions of the files here, because they are very clearly summarized in ReadMe.txt.
Viewing ClassesThe access to your project presented by the Class View tab is often much more convenient than that of Solution Explorer because classes are the basis for the organization of the application. When youwant to look at the code, it’s typically the definition of a class or the implementation of a member func-tion you’ll want to look at, and from Class View you can go directly to either. On occasions, however,Solution Explorer comes in handy. If you want to check the #include directives in a .cpp file, usingSolution Explorer you can open the file you’re interested in directly.
In the Class View pane, you can expand the TextEditor classes item to show the classes defined forthe application. Clicking the name of any class shows the members of that class in the lower pane. In theClass View pane shown in Figure 13-10, the CTextEditorDoc class has been selected.
Figure 13-10 shows the Class View pane in its docked state. The icons code the various kinds of thingsthat you can display and you will find a key to what each icon indicates if you look at the Class Viewdocumentation.
792
Chapter 13: Programming with the Microsoft Foundation Classes
25905c13.qxd:WroxPro 2/21/08 9:15 AM Page 792

Figure 13-10
You can see that you have the four classes discussed earlier that are fundamental to an MFC application:CTextEditorApp for the application, CMainFrame for the application frame window, CTextEditorDocfor the document and CTextEditorView for the view. You also have a class CAboutDlg that defines objectsthat support the dialog box that appears when you select the menu item Help > About in the application. Ifyou highlight Global Functions and Variables, you’ll see that it contains two definitions: the applica-tion object theApp and indicators that is an array of indicators recording the status of caps lock, num lockand scroll lock that are displayed in the status bar.
To view the code for a class definition in the Editor pane you just double-click the class name in the tree inClass View. Similarly to view the code for a member function, double-click the function name. Note thatyou can drag the edges of any of the panes in an IDE window to view its contents or your code more easily.You can hide or show the Solution Explorer set of panes by clicking the Autohide button at the right end ofthe pane title bar.
The Class DefinitionsI won’t go into the classes in complete detail here — you’ll just get a feel for how they look and I’ll high-light a few important aspects. If you double-click the name of a class in the Class View, the code definingthe class is displayed. Take a look at the application class, CTextEditorApp first. The definition for thisclass is shown here:
// TextEditor.h : main header file for the TextEditor application//#pragma once
#ifndef __AFXWIN_H__#error “include ‘stdafx.h’ before including this file for PCH”
#endif
793
Chapter 13: Programming with the Microsoft Foundation Classes
25905c13.qxd:WroxPro 2/21/08 9:15 AM Page 793

#include “resource.h” // main symbols
// CTextEditorApp:// See TextEditor.cpp for the implementation of this class//
class CTextEditorApp : public CWinApp{public:CTextEditorApp();
// Overridespublic:virtual BOOL InitInstance();
// Implementationafx_msg void OnAppAbout();DECLARE_MESSAGE_MAP()
};
extern CTextEditorApp theApp;
The CTextEditorApp class derived from CWinApp and includes a constructor, a virtual functionInitInstance(), a function OnAppAbout(), and a macro DECLARE_MESSAGE_MAP().
A macro is not C++ code. It’s a name defined by a #define pre-processor directive that will be replacedby some text that will normally be C++ code, but could also be constants or symbols of some kind.
The DECLARE_MESSAGE_MAP() macro is concerned with defining which Windows messages are handledby which function members of the class. The macro appears in the definition of any class that may processWindows messages. Of course, our application class inherits a lot of functions and data members from thebase class, and you will be looking further into these as you expand the program examples. If you take alook at the beginning of the code for the class definition, you will notice that the #pragma once directiveprevents the file being included more than once. Following that is a group of preprocessor directives thatensure that the stdafx.h file is included before this file.
The application frame window for our SDI program is created by an object of the class CMainFrame,which is defined by the code shown here:
class CMainFrame : public CFrameWnd{
protected: // create from serialization onlyCMainFrame();DECLARE_DYNCREATE(CMainFrame)
// Attributespublic:
// Operations
794
Chapter 13: Programming with the Microsoft Foundation Classes
25905c13.qxd:WroxPro 2/21/08 9:15 AM Page 794

public:
// Overridespublic:virtual BOOL PreCreateWindow(CREATESTRUCT& cs);
// Implementationpublic:virtual ~CMainFrame();
#ifdef _DEBUGvirtual void AssertValid() const;virtual void Dump(CDumpContext& dc) const;
#endif
protected: // control bar embedded membersCStatusBar m_wndStatusBar;CToolBar m_wndToolBar;
// Generated message map functionsprotected:afx_msg int OnCreate(LPCREATESTRUCT lpCreateStruct);DECLARE_MESSAGE_MAP()
};
This class is derived from CFrameWnd, which provides most of the functionality required for our appli-cation frame window. The derived class includes two protected data members, m_wndStatusBar andm_wndToolBar, that are instances of the MFC classes CStatusBar and CToolBar respectively. Theseobjects create and manage the status bar that appears at the bottom of the application window, and thetoolbar that provides buttons to access standard menu functions.
The definition of the CTextEditorDoc class that was supplied by the MFC Application wizard is:
class CTextEditorDoc : public CDocument{protected: // create from serialization onlyCTextEditorDoc();DECLARE_DYNCREATE(CTextEditorDoc)
// Attributespublic:
// Operationspublic:
// Overridespublic:virtual BOOL OnNewDocument();virtual void Serialize(CArchive& ar);
// Implementationpublic:virtual ~CTextEditorDoc();
#ifdef _DEBUG
795
Chapter 13: Programming with the Microsoft Foundation Classes
25905c13.qxd:WroxPro 2/21/08 9:15 AM Page 795

virtual void AssertValid() const;virtual void Dump(CDumpContext& dc) const;
#endif
protected:
// Generated message map functionsprotected:DECLARE_MESSAGE_MAP()
};
As in the case of the previous classes, most of the meat comes from the base class and is therefore notapparent here. The macro DECLARE_DYNCREATE() that appears after the constructor (and was also usedin the CMainFrame class) enables an object of the class to be created dynamically by synthesizing it fromdata read from a file. When you save an SDI document object, the frame window that contains the viewis saved along with your data. This allows everything to be restored when you read it back. Reading andwriting a document object to a file is supported by a process called serialization. You will see how towrite your own documents to file using serialization and then reconstruct them from the file data in theexamples we will develop.
The document class also includes the macro DECLARE_MESSAGE_MAP() in its definition to enableWindows messages to be handled by class member functions if necessary.
The view class in our SDI application is defined as:
class CTextEditorView : public CEditView{protected: // create from serialization onlyCTextEditorView();DECLARE_DYNCREATE(CTextEditorView)
// Attributespublic:CTextEditorDoc* GetDocument() const;
// Operationspublic:
// Overridespublic:
virtual BOOL PreCreateWindow(CREATESTRUCT& cs);protected:virtual BOOL OnPreparePrinting(CPrintInfo* pInfo);virtual void OnBeginPrinting(CDC* pDC, CPrintInfo* pInfo);virtual void OnEndPrinting(CDC* pDC, CPrintInfo* pInfo);
// Implementationpublic:virtual ~CTextEditorView();
#ifdef _DEBUGvirtual void AssertValid() const;
796
Chapter 13: Programming with the Microsoft Foundation Classes
25905c13.qxd:WroxPro 2/21/08 9:15 AM Page 796

virtual void Dump(CDumpContext& dc) const;#endif
protected:
// Generated message map functionsprotected:DECLARE_MESSAGE_MAP()
};
#ifndef _DEBUG // debug version in TextEditorView.cppinline CTextEditorDoc* CTextEditorView::GetDocument() const
{ return reinterpret_cast<CTextEditorDoc*>(m_pDocument); }#endif
As you specified in the Application Wizard dialog box, the view class is derived from the class CEditView,which already includes basic text handling facilities. The GetDocument() function returns a pointer tothe document object corresponding to the view, and you will be using this to access data in the documentobject when you add your own extensions to the view class.
Creating an Executable ModuleTo compile and link the program, click Build > Build Solution, press Ctrl+Shift+B, or click the Buildicon in the toolbar.
There are two implementations of the CTextEditorView class member function GetDocument() in thecode generated by Application wizard. The one in the .cpp file for the CEditView class is used for thedebug version of the program. You will normally use this during program development because it pro-vides validation of the pointer value stored for the document. (This is stored in the inherited data mem-ber m_pDocument in the view class.) The version that applies to the release version of your program youcan find after the class definition in the TextEditorView.h file. This version is declared as inline andit does not validate the document pointer. The GetDocument() function just provides a link to the docu-ment object. You can call any of the functions in the interface to the document class using the pointer tothe document that the function returns.
By default, you have debug capability included in your program. As well as the special version ofGetDocument(), there are lots of checks in the MFC code that are included in this case. If you want tochange this, you can use the drop-down list box in the Build toolbar to choose the release configuration,which doesn’t contain all the debug code.
When compiling your program with debug switched on, the compiler doesn’t detect uninitialized variables, so it can be helpful to do the occasional release build even while you are still testing your program.
Precompiled Header FilesThe first time you compile and link a program, it will take some time. The second and subsequent times itshould be quite a bit faster because of a feature of Visual C++ 2008 called precompiled headers. Duringthe initial compilation, the compiler saves the output from compiling header files in a special file with theextension .pch. On subsequent builds, this file is reused if the source in the headers has not changed, thussaving the compilation time for the headers.
797
Chapter 13: Programming with the Microsoft Foundation Classes
25905c13.qxd:WroxPro 2/21/08 9:15 AM Page 797

You can determine whether or not precompiled headers are used and control how they are handledthrough the Properties tab. Right-click TextEditor and select Properties from the menu that is dis-played. If you expand the C/C++ node in the dialog box displayed, you can select PrecompiledHeaders to set this property.
Running the ProgramTo execute the program, press Ctrl+F5. Because you chose CEditView as the base class for theCTextEditorView class, the program is a fully functioning, simple text editor. You can enter text in the window, as shown in Figure 13-11.
Figure 13-11
Note that the application has scroll bars for viewing text outside the visible area within the window, andof course you can resize the window by dragging the boundaries. All the items under all menus are fullyoperational so you can save and retrieve files, you can cut and paste text, and you can print the text in thewindow — and all that without writing a single line of code! As you move the cursor over the toolbar but-tons or the menu options, prompts appear in the status bar describing the function that are invoked, andif you let the cursor linger on a toolbar button, a tooltip is displayed showing its purpose. (You’ll learnabout tooltips in more detail in Chapter 14.)
How the Program WorksAs in the trivial MFC example you looked at earlier in this chapter, the application object is created atglobal scope in our SDI program. You can see this if you expand the Global Functions and Variablesitem in the Class View, and then double-click theApp. In the Editor window you’ll see this statement:
CTextEditorApp theApp;
This declares the object theApp as an instance of our application class CTextEditorApp. The statementis in the file TextEditor.cpp, which also contains member function declarations for the application class,and the definition of the CAboutDlg class.
After the object theApp has been created, the MFC-supplied WinMain() function is called. This in turncalls two member functions of the theApp object. First it calls InitInstance(), which provides forany initialization of the application that is necessary, and then Run(), which provides initial handlingfor Windows messages. The WinMain() function does not appear explicitly in the project source codebecause it is supplied by the MFC class library and is called automatically when the application starts.
798
Chapter 13: Programming with the Microsoft Foundation Classes
25905c13.qxd:WroxPro 2/21/08 9:15 AM Page 798

The InitInstance() Function You can access the code for the InitInstance() function by double-clicking its entry in the Class Viewafter highlighting the CTextEditorApp class — or if you’re in a hurry, you can just look at the code imme-diately following the line defining the theApp object. The version created by the MFC Application wizardis as follows:
BOOL CTextEditorApp::InitInstance(){
// InitCommonControlsEx() is required on Windows XP if an application// manifest specifies use of ComCtl32.dll version 6 or later to enable// visual styles. Otherwise, any window creation will fail.INITCOMMONCONTROLSEX InitCtrls;InitCtrls.dwSize = sizeof(InitCtrls);// Set this to include all the common control classes you want to use// in your application.InitCtrls.dwICC = ICC_WIN95_CLASSES;InitCommonControlsEx(&InitCtrls);
CWinApp::InitInstance();
// Initialize OLE librariesif (!AfxOleInit()){
AfxMessageBox(IDP_OLE_INIT_FAILED);return FALSE;
}AfxEnableControlContainer();// Standard initialization// If you are not using these features and wish to reduce the size// of your final executable, you should remove from the following// the specific initialization routines you do not need// Change the registry key under which our settings are stored// TODO: You should modify this string to be something appropriate// such as the name of your company or organizationSetRegistryKey(_T(“Local AppWizard-Generated Applications”));LoadStdProfileSettings(4); // Load standard INI file options (including MRU)// Register the application’s document templates. Document templates// serve as the connection between documents, frame windows and viewsCSingleDocTemplate* pDocTemplate;pDocTemplate = new CSingleDocTemplate(IDR_MAINFRAME,RUNTIME_CLASS(CTextEditorDoc),RUNTIME_CLASS(CMainFrame), // main SDI frame windowRUNTIME_CLASS(CTextEditorView));
if (!pDocTemplate)return FALSE;
AddDocTemplate(pDocTemplate);
// Parse command line for standard shell commands, DDE, file openCCommandLineInfo cmdInfo;ParseCommandLine(cmdInfo);
// Dispatch commands specified on the command line. Will return FALSE if
799
Chapter 13: Programming with the Microsoft Foundation Classes
25905c13.qxd:WroxPro 2/21/08 9:15 AM Page 799

// app was launched with /RegServer, /Register, /Unregserver or /Unregister.if (!ProcessShellCommand(cmdInfo))
return FALSE;
// The one and only window has been initialized, so show and update itm_pMainWnd->ShowWindow(SW_SHOW);m_pMainWnd->UpdateWindow();// call DragAcceptFiles only if there’s a suffix// In an SDI app, this should occur after ProcessShellCommandreturn TRUE;
}
The bits of the code that I want to mention at this point are shaded. The string passed to theSetRegistryKey() function is used to define a registry key under which program information is stored. You can change this to whatever you want. If I changed the argument to “Horton”, information about our program would be stored under the registry key
HKEY_CURRENT_USER\Software\Horton\TextEditor\
All the application settings are stored under this key, including the list of files most recently used by theprogram. The call to the function LoadStdProfileSettings() loads the application settings that weresaved last time around. Of course, the first time you run the program, there aren’t any.
A document template object is created dynamically within InitInstance() by the statement:
pDocTemplate = new CSingleDocTemplate(IDR_MAINFRAME,RUNTIME_CLASS(CTextEditorDoc),RUNTIME_CLASS(CMainFrame), // main SDI frame windowRUNTIME_CLASS(CTextEditorView));
The first parameter to the CSingleDocTemplate constructor is a symbol, IDR_MAINFRAME, which definesthe menu and toolbar to be used with the document type. The following three parameters define the doc-ument, main frame window, and View Class objects that are to be bound together within the documenttemplate. Because you have an SDI application here, there is only one of each in the program, managedthrough one document template object. RUNTIME_CLASS() is a macro that enables the type of a classobject to be determined at run time.
There’s a lot of other stuff here for setting up the application instance that you need not worry about.You can add any initialization of your own that you need for the application to the InitInstance()function.
The Run() Function The CTextEditorApp class inherits the Run() function in from the application base class CWinApp.Because the function is declared as virtual, you can replace the base class version of the function Run()with one of your own, but this is not usually necessary so you don’t need to worry about it.
Run() acquires all the messages from Windows destined for the application and ensures that each mes-sage is passed to the function in the program designated to service it, if one exists. Therefore, this functioncontinues executing as long as the application is running. It terminates when you close the application.
800
Chapter 13: Programming with the Microsoft Foundation Classes
25905c13.qxd:WroxPro 2/21/08 9:15 AM Page 800

Thus, you can boil the operation of the application down to four steps:
1. Creating an application object, theApp
2. Executing WinMain(), which is supplied by MFC
3. WinMain() calling InitInstance(), which creates the document template, the main framewindow, the document, and the view
4. WinMain() calling Run(), which executes the main message loop to acquire and dispatchWindows messages
Creating an MDI ApplicationNow let’s create an MDI application using the MFC Application Wizard. Give it the project nameSketcher — and plan on keeping it, as you will be expanding it into a sketching program during sub-sequent chapters. You should have no trouble with this procedure because there are only three thingsthat you need to do differently from the process that you have just gone through for the SDI applica-tion. You should leave the default option, MDI, rather than changing to the SDI option but still opt out of using Unicode libraries. Under the Document Template Strings set of options in the ApplicationWizard dialog box you should specify the file extension as ske. You should also leave the base classfor the CSketcherView class as CView under the Generated Classes set of options.
You can see in the dialog box with Generated Classes selected that you get an extra class for yourapplication compared to the TextEditor example, as Figure 13-12 shows.
Figure 13-12
The extra class is CChildFrame, which is derived from the MFC class CMDIChildWnd. This class pro-vides a frame window for a view of the document that appears inside the application window created bya CMainFrame object. With an SDI application there is a single document with a single view, so the viewis displayed in the client area of the main frame window. In an MDI application, you can have multiple
801
Chapter 13: Programming with the Microsoft Foundation Classes
25905c13.qxd:WroxPro 2/21/08 9:15 AM Page 801
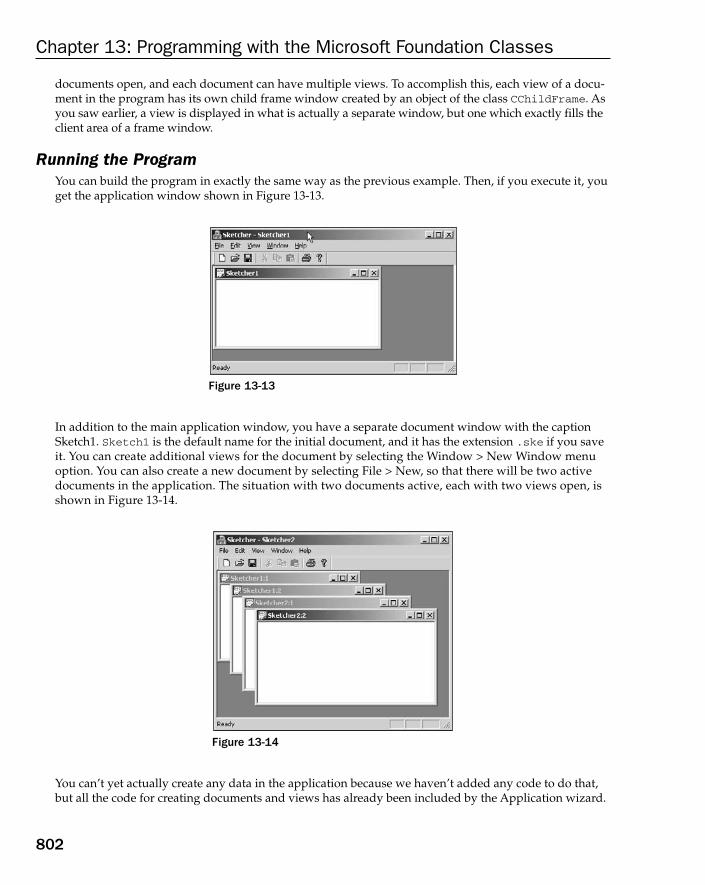
documents open, and each document can have multiple views. To accomplish this, each view of a docu-ment in the program has its own child frame window created by an object of the class CChildFrame. Asyou saw earlier, a view is displayed in what is actually a separate window, but one which exactly fills theclient area of a frame window.
Running the ProgramYou can build the program in exactly the same way as the previous example. Then, if you execute it, youget the application window shown in Figure 13-13.
Figure 13-13
In addition to the main application window, you have a separate document window with the captionSketch1. Sketch1 is the default name for the initial document, and it has the extension .ske if you saveit. You can create additional views for the document by selecting the Window > New Window menuoption. You can also create a new document by selecting File > New, so that there will be two activedocuments in the application. The situation with two documents active, each with two views open, isshown in Figure 13-14.
Figure 13-14
You can’t yet actually create any data in the application because we haven’t added any code to do that,but all the code for creating documents and views has already been included by the Application wizard.
802
Chapter 13: Programming with the Microsoft Foundation Classes
25905c13.qxd:WroxPro 2/21/08 9:15 AM Page 802

SummaryIn this chapter, you’ve been concerned mainly with the mechanics of using the MFC Application wizard.You have seen the basic components of the MFC programs the Application wizard generates for both SDIand MDI applications. All our MFC examples are created by the MFC Application wizard, so it’s a goodidea to keep the general structure and broad class relationships in mind. You probably won’t feel toocomfortable with the detail at this point, but don’t worry about that now. You’ll find that it becomesmuch clearer after you begin developing applications in the succeeding chapters.
The key points covered in this chapter are:
❑ The MFC Application wizard generates a complete, working, framework Windows applicationfor you to customize to your requirements.
❑ The Application wizard can generate single document interface (SDI) applications that workwith a single document and a single view, or multiple document interface (MDI) programs that can handle multiple documents with multiple views simultaneously.
❑ The four essential classes in an SDI application that are derived from the foundation classes are:
❑ The application class
❑ The frame window class
❑ The document class
❑ The view class
❑ A program can have only one application object. This is defined automatically by theApplication wizard at global scope.
❑ A document class object stores application-specific data and a view class object displays the contents of a document object.
❑ A document template class object is used to tie together a document, a view, and a window.For an SDI application, a CSingleDocTemplate class does this, and for an MDI application,the CDocTemplate class is used. These are both foundation classes and application-specificversions do not normally need to be derived.
ExercisesIt isn’t possible to give programming examples for this chapter, because it really just introduced thebasic mechanics of creating MFC applications. There aren’t solutions to all the exercises because youwill either see the answer for yourself on the screen, or be able to check your answer back with the text.
However, you can download the source code for the examples in the book and the solutions to otherexercises from www.wrox.com.
1. What is the relationship between a document and a view?
2. What is the purpose of the document template in an MFC Windows program?
3. Why do you need to be careful, and plan your program structure in advance, when using theApplication Wizard?
803
Chapter 13: Programming with the Microsoft Foundation Classes
25905c13.qxd:WroxPro 2/21/08 9:15 AM Page 803

4. Code up the simple text editor program. Build both debug and release versions, and examinethe types and sizes of the files produced in each case.
5. Generate the text editor application several times, trying different window styles from theAdvanced Options in Application Wizard.
804
Chapter 13: Programming with the Microsoft Foundation Classes
25905c13.qxd:WroxPro 2/21/08 9:15 AM Page 804

14Working with Menus
and Toolbars
In the last chapter, you saw how a simple framework application generated by the MFC ApplicationWizard is made up and how the parts interrelate. In this chapter, you’ll start customizing a MultipleDocument Interface (MDI) framework application called Sketcher with a view to making it into auseful program. The first step in this process is to understand how menus are defined in Visual C++2008, and how functions are created to service the application-specific menu items that you add toyour program. You’ll also see how to add toolbar buttons to the application. By the end of this chap-ter, you’ll have learned about:
❑ How an MFC-based program handles messages
❑ Menu resources, and how you can create and modify them
❑ Menu properties, and how you can create and modify them
❑ How to create a function to service the message generated when a menu item is selected
❑ How to add handlers to update menu properties
❑ How to add toolbar buttons and associate them with existing menu items
Communicating with WindowsAs you saw in Chapter 12, Windows communicates with your program by sending messages toit. Most of the drudgery of message handling is taken care of by MFC, so you don’t have to worryabout providing a WndProc() function at all. MFC enables you to provide functions to handle theindividual messages that you’re interested in and to ignore the rest. These functions are referred toas message handlers or just handlers. Because your application is MFC-based, a message handleris always a member function of one of your application’s classes.
The association between a particular message and the function in your program that is to service it is established by a message map — each class in your program that can handle Windows messages will have one. A message map for a class is simply a table of member functions that handle Windows
25905c14.qxd:WroxPro 2/21/08 9:16 AM Page 805
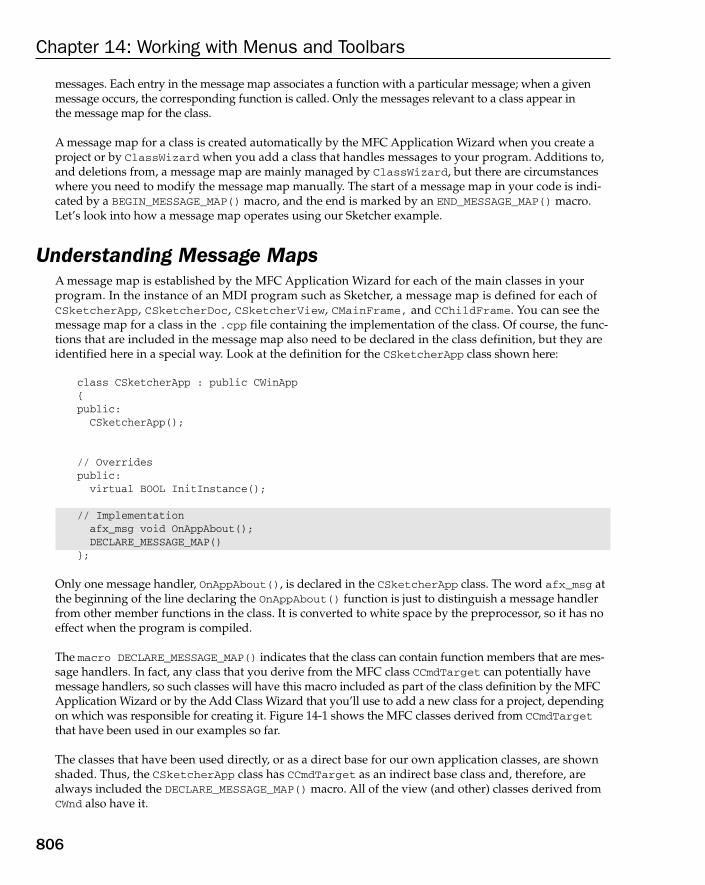
messages. Each entry in the message map associates a function with a particular message; when a givenmessage occurs, the corresponding function is called. Only the messages relevant to a class appear in the message map for the class.
A message map for a class is created automatically by the MFC Application Wizard when you create aproject or by ClassWizard when you add a class that handles messages to your program. Additions to,and deletions from, a message map are mainly managed by ClassWizard, but there are circumstanceswhere you need to modify the message map manually. The start of a message map in your code is indi-cated by a BEGIN_MESSAGE_MAP() macro, and the end is marked by an END_MESSAGE_MAP() macro.Let’s look into how a message map operates using our Sketcher example.
Understanding Message MapsA message map is established by the MFC Application Wizard for each of the main classes in your program. In the instance of an MDI program such as Sketcher, a message map is defined for each ofCSketcherApp, CSketcherDoc, CSketcherView, CMainFrame, and CChildFrame. You can see themessage map for a class in the .cpp file containing the implementation of the class. Of course, the func-tions that are included in the message map also need to be declared in the class definition, but they areidentified here in a special way. Look at the definition for the CSketcherApp class shown here:
class CSketcherApp : public CWinApp{public:CSketcherApp();
// Overridespublic:virtual BOOL InitInstance();
// Implementationafx_msg void OnAppAbout();DECLARE_MESSAGE_MAP()
};
Only one message handler, OnAppAbout(), is declared in the CSketcherApp class. The word afx_msg atthe beginning of the line declaring the OnAppAbout() function is just to distinguish a message handlerfrom other member functions in the class. It is converted to white space by the preprocessor, so it has noeffect when the program is compiled.
The macro DECLARE_MESSAGE_MAP() indicates that the class can contain function members that are mes-sage handlers. In fact, any class that you derive from the MFC class CCmdTarget can potentially havemessage handlers, so such classes will have this macro included as part of the class definition by the MFCApplication Wizard or by the Add Class Wizard that you’ll use to add a new class for a project, dependingon which was responsible for creating it. Figure 14-1 shows the MFC classes derived from CCmdTargetthat have been used in our examples so far.
The classes that have been used directly, or as a direct base for our own application classes, are shownshaded. Thus, the CSketcherApp class has CCmdTarget as an indirect base class and, therefore, arealways included the DECLARE_MESSAGE_MAP() macro. All of the view (and other) classes derived fromCWnd also have it.
806
Chapter 14: Working with Menus and Toolbars
25905c14.qxd:WroxPro 2/21/08 9:16 AM Page 806

Figure 14-1
If you are adding your own members to a class directly, it’s best to leave the DECLARE_MESSAGE_MAP()macro as the last line in the class definition. If you do add members after DECLARE_MESSAGE_MAP(),you’ll also need to include an access specifier for them: public, protected, or private.
Message Handler DefinitionsIf a class definition includes the macro DECLARE_MESSAGE_MAP(), the class implementation must includethe macros BEGIN_MESSAGE_MAP() and END_MESSAGE_MAP(). If you look in Sketcher.cpp, you’ll see thefollowing code as part of the implementation of CSketcherApp:
BEGIN_MESSAGE_MAP(CSketcherApp, CWinApp)ON_COMMAND(ID_APP_ABOUT, &CSketcherApp::OnAppAbout)// Standard file based document commandsON_COMMAND(ID_FILE_NEW, &CWinApp::OnFileNew)ON_COMMAND(ID_FILE_OPEN, &CWinApp::OnFileOpen)// Standard print setup commandON_COMMAND(ID_FILE_PRINT_SETUP, &CWinApp::OnFilePrintSetup)
END_MESSAGE_MAP()
This is a message map. The BEGIN_MESSAGE_MAP() and END_MESSAGE_MAP() macros define the bound-aries of the message map, and each of the message handlers in the class appears between these macros. Inthe preceding case, the code is only handling one category of message, the type of WM_COMMAND messagecalled a command message, which is generated when the user selects a menu option or enters an accel-erator key. (If that seems clumsy, it’s because there’s another kind of WM_COMMAND message called a con-trol notifications message, as you’ll see later in this chapter.)
CWinThread CDocument
CWinApp
CMDIChildWnd CMDIFrameWnd CCtrlView
CEditView
CFrameWnd CView
CWnd
CCmdTarget
807
Chapter 14: Working with Menus and Toolbars
25905c14.qxd:WroxPro 2/21/08 9:16 AM Page 807
The message map knows which menu or key is pressed by the identifier (ID) that’s included in themessage. There are four ON_COMMAND macros in the preceding code, one for each of the command messages to be handled. The first argument to this macro is an ID that is associated with one particu-lar command, and the ON_COMMAND macro ties the function name to the command specified by the ID. Thus, when a message corresponding to the identifier ID_APP_ABOUT is received, the functionOnAppAbout() is called. Similarly, for a message corresponding to the ID_FILE_NEW identifier, thefunction OnFileNew() is called. This handler is actually defined in the base class, CWinApp, as are the two remaining handlers.
The BEGIN_MESSAGE_MAP() macro has two arguments. The first argument identifies the current classname for which the message map is defined and the second provides a connection to the base class forfinding a message handler. If a handler isn’t found in the class defining the message map, the messagemap for the base class is then searched.
Note that command IDs such as ID_APP_ABOUT are standard IDs defined in MFC. These correspond tomessages from standard menu items and toolbar buttons. The ID_ prefix is used to identify a commandassociated with a menu item or a toolbar button, as you’ll see when I discuss resources later. For example,ID_FILE_NEW is the ID that corresponds to the File > New menu item being selected, and ID_APP_ABOUTcorresponds to the Help > About menu option.
There are more symbols besides WM_COMMAND that Windows uses to identify standard messages. Each of them is prefixed with WM_ for Windows Message. These symbols are defined in Winuser.h, which isincluded in Windows.h. If you want to look at them, you’ll find Winuser.h in the include sub-folder tothe VC folder containing your Visual C++ 2008 system.
There’s a nice shortcut for viewing a .h file. If the name of the file appears in the Editor window, you canjust right-click it, and select the menu item Open Document “Filename.h” from the pop-up menu. Thisworks with standard library headers, too.
Windows messages often have additional data values that are used to refine the identification of a particu-lar message specified by a given ID. The WM_COMMAND message, for instance, is sent for a whole range ofcommands, including those originating from selecting a menu item or a toolbar button.
Note that when you are adding message handlers manually you should not map a message (or in thecase of command messages, a command ID) to more than one message handler in a class. If you do, itwon’t break anything, but the second message handler is never called. Normally you add message han-dlers through the properties window and, in this case, you will not be able to map a message to morethan one message handler. If you want to see the properties window for a class, right-click a class namein Class View and select Properties from the pop-up menu. You add a message handler by selectingthe Messages button at the top of the Properties window that is displayed (Figure 14-2). You can figureout which button is the Messages button by hovering the mouse cursor over each button until thetooltip displays.
Clicking the Messages button brings up a list of message IDs; however, before I go into what you donext, I need to explain a little more about the types of messages you may be handling.
808
Chapter 14: Working with Menus and Toolbars
25905c14.qxd:WroxPro 2/21/08 9:16 AM Page 808

Figure 14-2
Message CategoriesThere are three categories of messages that your program may be dealing with, and the category towhich it belongs determines how a message is handled. The message categories are:
Message Category Description
Windows messages These are standard Windows messages that begin with the WM_ prefix,with the exception of WM_COMMAND messages that we shall come to in amoment. Examples of Windows messages are WM_PAINT, which indicatesthat you need to redraw the client area of a window, and WM_LBUTTONUP,which signals that the left mouse button has been released.
Control notificationmessages
These are WM_COMMAND messages sent from controls (such as a list box)to the window that created the control or from a child window to a par-ent window. Parameters associated with a WM_COMMAND message enablemessages from the controls in your application to be differentiated.
Command messages These are also WM_COMMAND messages that originate from the userinterface elements, such as menu items and toolbar buttons. MFCdefines unique identifiers for standard menu and toolbar commandmessages.
809
Chapter 14: Working with Menus and Toolbars
25905c14.qxd:WroxPro 2/21/08 9:16 AM Page 809
The standard Windows messages in the first category are identified by the WM_-prefixed IDs that Windowsdefines. You’ll be writing handlers for some of these messages in the next chapter. The messages in the sec-ond category are a particular group of WM_COMMAND messages that you’ll see in Chapter 17 when youwork with dialog boxes. You’ll deal with the last category, messages originating from menus and tool-bars, in this chapter. In addition to the message IDs defined by MFC for the standard menus and toolbars,you can define your own message IDs for the menus and toolbar buttons that you add to your pro-gram. If you don’t supply IDs for these items, MFC automatically generates IDs for you, based on the menu text.
Handling Messages in Your ProgramYou can’t put a handler for a message anywhere you like. The permitted sites for a handler depend onwhat kind of message is to be processed. The first two categories of message that you saw above, that is,standard Windows messages and control notification messages, are always handled by objects of classesderived from CWnd. Frame window classes and view classes, for example, are derived from CWnd, so theycan have member functions to handle Windows messages and control notification messages. Applicationclasses, document classes, and document template classes are not derived from CWnd, so they can’t handlethese messages.
Using the properties window for a class to add a handler solves the headache of remembering where toplace handlers, as it only offers you the IDs allowed for the class. For example, if you select CSketcherDocas the class, you won’t be offered any of the WM_ messages in the properties window for the class.
For standard Windows messages, the CWnd class provides default message handling. Thus, if your derivedclass doesn’t include a handler for a standard Windows message, it is processed by the default handlerdefined in the base class. If you do provide a handler in your class, you’ll sometimes still need to call thebase class handler as well, so that the message is processed properly. When you’re creating your own han-dler, a skeleton implementation of it is provided when you select the handler in the properties window fora class, and this includes a call to the base handler where necessary.
Handling command messages is much more flexible. You can put handlers for these in the applicationclass, the document and document template classes, and of course in the window and view classes inyour program. So, what happens when a command message is sent to your application, bearing in mindthere are a lot of options as to where it is handled?
How Command Messages Are ProcessedAll command messages are sent to the main frame window for the application. The main frame windowthen tries to get the message handled by routing it in a specific sequence to the classes in your program.If one class can’t process the message, it passes it on to the next.
For an SDI program, the sequence in which classes are offered an opportunity to handle a commandmessage is:
1. The view object
2. The document object
3. The document template object
4. The main frame window object
5. The application object
810
Chapter 14: Working with Menus and Toolbars
25905c14.qxd:WroxPro 2/21/08 9:16 AM Page 810
The view object is given the opportunity to handle a command message first and, if no handler has beendefined, the next class object has a chance to process it. If none of the classes has a handler defined, defaultWindows processing takes care of it, essentially throwing the message away.
For an MDI program, things are only a little more complicated. Although you have the possibility ofmultiple documents, each with multiple views, only the active view and its associated document areinvolved in the routing of a command message. The sequence for routing a command message in anMDI program is:
1. The active view object
2. The document object associated with the active view
3. The document template object for the active document
4. The frame window object for the active view
5. The main frame window object
6. The application object
It’s possible to alter the sequence for routing messages, but this is so rarely necessary that I won’t go intoit in this book.
Extending the Sketcher ProgramYou’re going to add code to the Sketcher program you created in the previous chapter to implement thefunctionality you need to create sketches. You’ll provide code for drawing lines, circles, rectangles, andcurves with various colors and line thicknesses, and for adding annotations to a sketch. The data for asketch is stored in a document, and you’ll also allow multiple views of the same document at differentscales.
It will take several chapters to learn how to add everything that you need, but a good starting pointwould be to add menu items to deal with the types of elements that you want to be able to draw, and to select a color for drawing. You’ll make both the element type and color selection persistent in the program, which means that having selected a color and an element type, both of these remain in effectuntil you change one or the other of them.
The steps that you’ll work through to add menus to Sketcher are:
❑ Define the menu items to appear on the main menu bar and in each of the menus.
❑ Decide which of the classes in our application should handle the message for each menu item.
❑ Add message handling functions to the classes for the menu messages.
❑ Add functions to the classes to update the appearance of the menus to show the current selection in effect.
❑ Add a toolbar button complete with tooltips for each of the menu items.
811
Chapter 14: Working with Menus and Toolbars
25905c14.qxd:WroxPro 2/21/08 9:16 AM Page 811

Elements of a MenuYou’ll be looking at two aspects of dealing with menus with the MFC: the creation and modification ofthe menu as it appears in your application and the processing necessary when a particular menu item isselected — the definition of a message handler for it. Let’s look first at how you create new menu items.
Creating and Editing Menu ResourcesMenus are defined external to the program code in a resource file and the specification of the menu isreferred to as a resource. There are several other kinds of resources that you can include in your applica-tion; typical examples are dialogs, toolbars, and toolbar buttons. You’ll be seeing more on these as youextend the Sketcher application.
Having a menu defined in a resource allows the physical appearance of the menu to be changed withoutaffecting the code that processes menu events. For example, you could change your menu items fromEnglish to French or Norwegian or whatever without having to modify or recompile the program code.The code to handle the message created when the user selects a menu item doesn’t need to be concernedwith how the menu looks, only with the fact that it was selected. Of course, if you do add items to the menu,you’ll need to add some code for each of them to ensure that they actually do something!
The Sketcher program already has a menu, which means that it already has a resource file. We can accessthe resource file contents for the Sketcher program by selecting the Resource View pane, or if you have theSolution Explorer pane displayed, you can double-click Sketcher.rc. This switches you to the ResourceView, which displays the resources. If you expand the menu resource by clicking on the + symbol, you’ll seethat there are two menus defined, indicated by the identifiers IDR_MAINFRAME and IDR_SketcherTYPE.The first of these applies when there are no documents open in the application, and the second when youhave one or more documents open. MFC uses the IDR_ prefix to identify a resource that defines a completemenu for a window.
You’re only going to be modifying the menu that has the identifier IDR_SketcherTYPE. You don’t needto look at IDR_MAINFRAME, as your new menu items will only be relevant when a document is open. Youcan invoke a resource editor for the menu by double-clicking its menu ID in Resource View. If you dothis for IDR_SketcherTYPE, the Editor pane appears as shown in Figure 14-3.
Figure 14-3
812
Chapter 14: Working with Menus and Toolbars
25905c14.qxd:WroxPro 2/21/08 9:16 AM Page 812
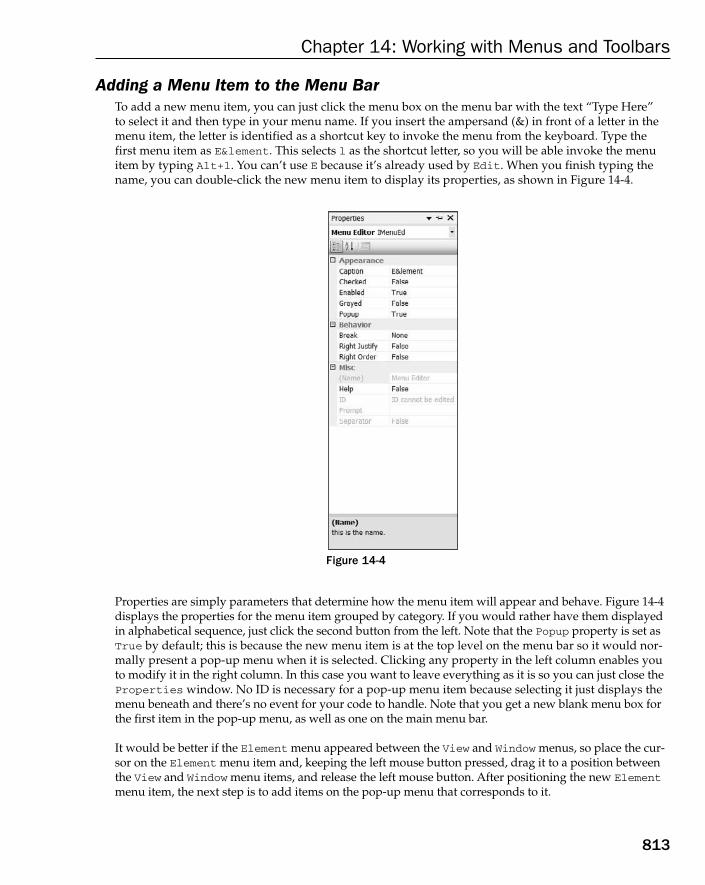
Adding a Menu Item to the Menu BarTo add a new menu item, you can just click the menu box on the menu bar with the text “Type Here” to select it and then type in your menu name. If you insert the ampersand (&) in front of a letter in themenu item, the letter is identified as a shortcut key to invoke the menu from the keyboard. Type thefirst menu item as E&lement. This selects l as the shortcut letter, so you will be able invoke the menuitem by typing Alt+l. You can’t use E because it’s already used by Edit. When you finish typing thename, you can double-click the new menu item to display its properties, as shown in Figure 14-4.
Figure 14-4
Properties are simply parameters that determine how the menu item will appear and behave. Figure 14-4displays the properties for the menu item grouped by category. If you would rather have them displayedin alphabetical sequence, just click the second button from the left. Note that the Popup property is set asTrue by default; this is because the new menu item is at the top level on the menu bar so it would nor-mally present a pop-up menu when it is selected. Clicking any property in the left column enables you to modify it in the right column. In this case you want to leave everything as it is so you can just close theProperties window. No ID is necessary for a pop-up menu item because selecting it just displays themenu beneath and there’s no event for your code to handle. Note that you get a new blank menu box forthe first item in the pop-up menu, as well as one on the main menu bar.
It would be better if the Element menu appeared between the View and Window menus, so place the cur-sor on the Element menu item and, keeping the left mouse button pressed, drag it to a position betweenthe View and Window menu items, and release the left mouse button. After positioning the new Elementmenu item, the next step is to add items on the pop-up menu that corresponds to it.
813
Chapter 14: Working with Menus and Toolbars
25905c14.qxd:WroxPro 2/21/08 9:16 AM Page 813
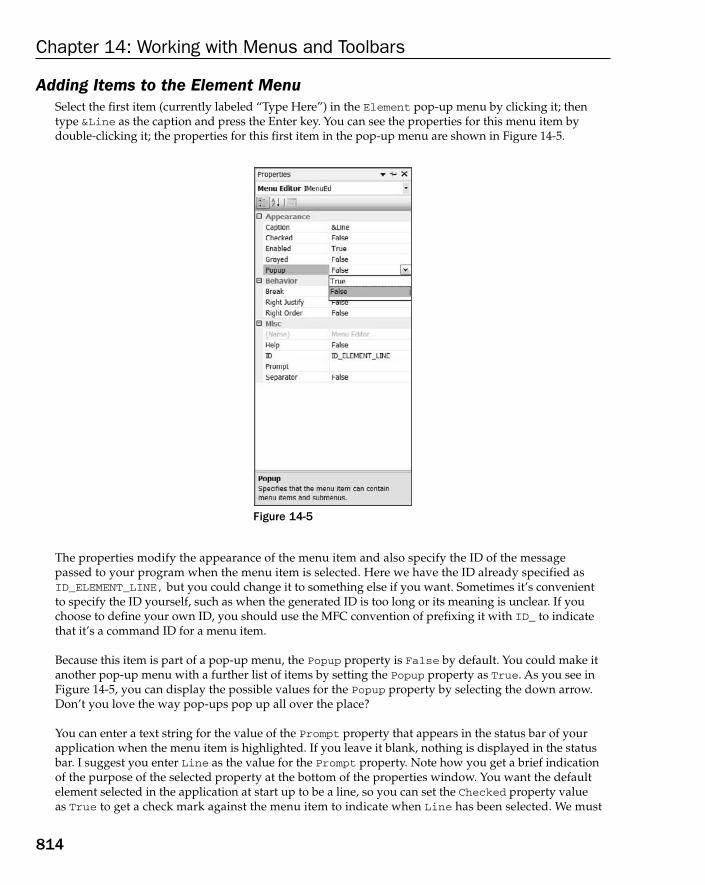
Adding Items to the Element MenuSelect the first item (currently labeled “Type Here”) in the Element pop-up menu by clicking it; thentype &Line as the caption and press the Enter key. You can see the properties for this menu item by double-clicking it; the properties for this first item in the pop-up menu are shown in Figure 14-5.
Figure 14-5
The properties modify the appearance of the menu item and also specify the ID of the message passed to your program when the menu item is selected. Here we have the ID already specified asID_ELEMENT_LINE, but you could change it to something else if you want. Sometimes it’s convenient to specify the ID yourself, such as when the generated ID is too long or its meaning is unclear. If youchoose to define your own ID, you should use the MFC convention of prefixing it with ID_ to indicatethat it’s a command ID for a menu item.
Because this item is part of a pop-up menu, the Popup property is False by default. You could make itanother pop-up menu with a further list of items by setting the Popup property as True. As you see inFigure 14-5, you can display the possible values for the Popup property by selecting the down arrow.Don’t you love the way pop-ups pop up all over the place?
You can enter a text string for the value of the Prompt property that appears in the status bar of yourapplication when the menu item is highlighted. If you leave it blank, nothing is displayed in the statusbar. I suggest you enter Line as the value for the Prompt property. Note how you get a brief indicationof the purpose of the selected property at the bottom of the properties window. You want the default element selected in the application at start up to be a line, so you can set the Checked property value as True to get a check mark against the menu item to indicate when Line has been selected. We must
814
Chapter 14: Working with Menus and Toolbars
25905c14.qxd:WroxPro 2/21/08 9:16 AM Page 814

remember to add code to update check marks for the menu items when a different selection is made.The Break property can alter the appearance of the pop-up by shifting the item into a new column.You don’t need that here, so leave it as it is. Close the Properties window to save the values that you have set.
Modifying Existing Menu ItemsIf you think you may have made a mistake and want to change an existing menu item, or even if youjust want to verify that you set the properties correctly, it’s very easy to go back to an item. Just double-click the item you’re interested in and the properties window for that item is displayed. You can thenchange the properties in any way that you want and close the window when you’re done. If the itemyou want to access is in a pop-up menu that isn’t displayed, just click the item on the menu bar to dis-play the pop-up.
Completing the MenuNow you can go through and create the remaining Element pop-up menu items that you need:&Rectangle, &Circle, and Cur&ve. Of course, all of these should have the Checked property left asFalse. You can’t use C as the hotkey for the last item, as hotkeys must be unique and you’ve alreadyassigned C to the menu item for a circle. You can accept the default IDs ID_ELEMENT_RECTANGLE,ID_ELEMENT_CIRCLE, and ID_ELEMENT_CURVE for these. You could also set the values for the Prompt property value as Rectangle, Circle, and Curve respectively.
You also need a Color menu on the menu bar, with pop-up menu items for Black, Red, Green, andBlue. You can create these, starting at the empty menu entry on the menu bar, using the same procedurethat you just went through. Set Black as checked so that is the default color. You can use the default IDs(ID_COLOR_BLACK, etc.) as the IDs for the menu items. You can also add the status bar prompt for eachas the value of the Prompt property. After you’ve finished, if you drag Color so that it’s just to the rightof Element, the menu should appear as shown in Figure 14-6.
Figure 14-6
Note that you need to take care not to use the same letter more than once as a shortcut in the pop-up, or in the main menu, for that matter. There’s no check made as you create new menu items, but if youright-click with the cursor on the menu bar when you’ve finished editing it, you’ll get a pop-up that contains an item Check Mnemonics. Selecting this checks your menu for duplicate shortcut keys. It’s a good idea to do this every time you edit a menu because it’s easy to create duplicates by accident.
That completes extending the menu for elements and colors. Don’t forget to save the file to make surethat the additions are safely stored away. Next, you need to decide in which classes you want to dealwith messages from your menu items, and add member functions to handle each of the messages. Forthat you’ll be using the Event Handler Wizard.
815
Chapter 14: Working with Menus and Toolbars
25905c14.qxd:WroxPro 2/21/08 9:16 AM Page 815
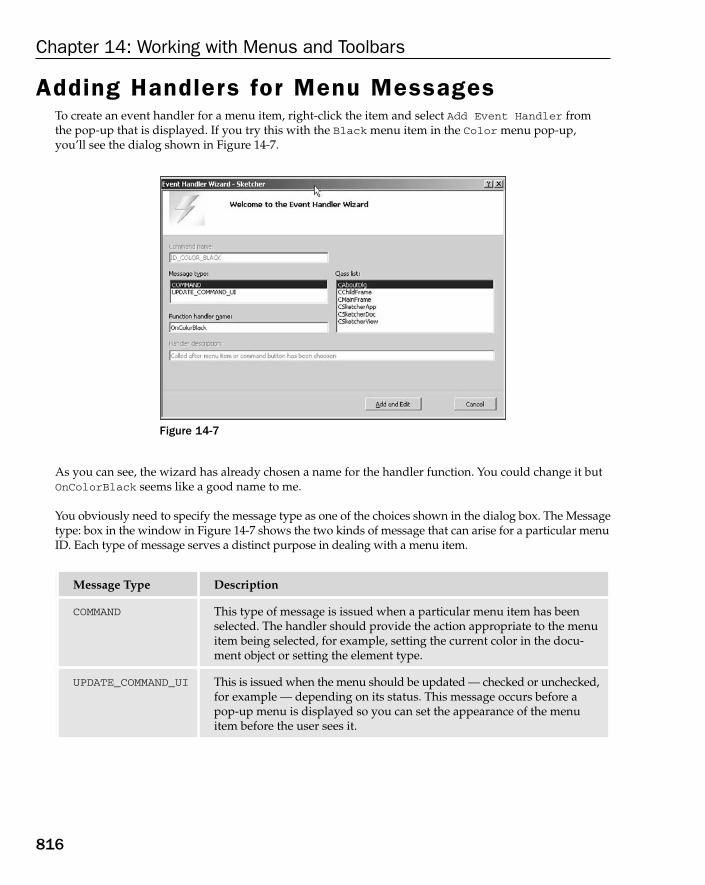
Adding Handlers for Menu MessagesTo create an event handler for a menu item, right-click the item and select Add Event Handler fromthe pop-up that is displayed. If you try this with the Black menu item in the Color menu pop-up, you’ll see the dialog shown in Figure 14-7.
Figure 14-7
As you can see, the wizard has already chosen a name for the handler function. You could change it butOnColorBlack seems like a good name to me.
You obviously need to specify the message type as one of the choices shown in the dialog box. The Messagetype: box in the window in Figure 14-7 shows the two kinds of message that can arise for a particular menuID. Each type of message serves a distinct purpose in dealing with a menu item.
Message Type Description
COMMAND This type of message is issued when a particular menu item has beenselected. The handler should provide the action appropriate to the menuitem being selected, for example, setting the current color in the docu-ment object or setting the element type.
UPDATE_COMMAND_UI This is issued when the menu should be updated — checked or unchecked,for example — depending on its status. This message occurs before apop-up menu is displayed so you can set the appearance of the menuitem before the user sees it.
816
Chapter 14: Working with Menus and Toolbars
25905c14.qxd:WroxPro 2/21/08 9:16 AM Page 816

The way these work is quite simple. When you click a menu item in the Menu bar, an UPDATE_COMMAND_UImessage is sent for each item in that menu before the menu is displayed. This provides the opportunity todo any necessary updating of the menu items’ properties before the user sees it. When these messages arehandled and any changes to the items’ properties are completed, the menu is drawn. When you then clickone of the items in the menu, a COMMAND message for that menu item is sent. I’ll deal with the COMMANDmessages now, and come back to the UPDATE_COMMAND_UI messages a little later in this chapter.
Because events for menu items result in command messages, you can choose to handle them in any of theclasses that are currently defined in the Sketcher application. So how do you decide where you shouldprocess a message for a menu item?
Choosing a Class to Handle Menu MessagesBefore you can decide which class should handle the messages for the menu items you’ve added, you needto decide what you want to do with the messages.
You want the element type and the element color to be modal — that is, whatever is set for the elementtype and element color should remain in effect until one or the other is changed. This allows you to createas many blue circles as you want, and when you want red circles, you just change the color. You have twobasic possibilities for handling the setting of a color and the selection of an element type: setting them byview or by document. You could set them by view, in which case, if there’s more than one view of a docu-ment, each view has its own color and element set. This means that you might draw a red circle in oneview, switch to another view, and find that you’re drawing a blue rectangle. This would be confusing andin conflict with how you would probably want them to work.
It would be better, therefore, to have the current color and element selection apply to a document. Youcan then switch from one view to another and continue drawing the same elements in the same color.There might be other differences between the views that you implement, such as the scale at which thedocument is displayed perhaps, but the drawing operation is consistent across multiple views.
This suggests that you should store the current color and element in the document object. These couldthen be accessed by any view object associated with the document object. Of course, if you had more thanone document active, each document would have its own color and element type settings. It would there-fore be sensible to handle the messages for your new menu items in the CSketcherDoc class and to storeinformation about the current selections in an object of this class. I think you’re ready to dive in and createa handler for the Black menu item.
Creating Menu Message FunctionsHighlight the CSketchDoc class name in the Event Handler Wizard dialog box by clicking it. You’ll alsoneed to click the COMMAND message type. You can then click the Add and Edit button. This closes thedialog box and the code for the handler you have created in the CSketcherDoc class is displayed in theedit window. The function looks like this:
void CSketcherDoc::OnColorBlack(){// TODO: Add your command handler code here
}
817
Chapter 14: Working with Menus and Toolbars
25905c14.qxd:WroxPro 2/21/08 9:16 AM Page 817

The highlighted line is where you’ll put your code that handles the event that results from the userselecting the Black menu item. The wizard also has updated the CSketcherDoc class definition:
class CSketcherDoc : public CDocument{protected: // create from serialization onlyCSketcherDoc();DECLARE_DYNCREATE(CSketcherDoc)
// Attributespublic:
// Operationspublic:
// Overridespublic:virtual BOOL OnNewDocument();virtual void Serialize(CArchive& ar);
// Implementationpublic:virtual ~CSketcherDoc();
#ifdef _DEBUGvirtual void AssertValid() const;virtual void Dump(CDumpContext& dc) const;
#endif
protected:
// Generated message map functionsprotected:DECLARE_MESSAGE_MAP()
public:afx_msg void OnColorBlack();
};
The OnColorBlack() method has been added as a public member of the class and the afx_msg prefixmarks it as a message handler.
You can now add COMMAND message handlers for the other color menu IDs and all the Element menuIDs in exactly the same way as this one. You can create each of the handler functions for the menu itemswith just four mouse clicks. Right-click the menu item, click the Add Event Handler menu item, clickthe CSketcherDoc class name in the dialog box for the Event Handler Wizard, and click the Add andEdit button for the dialog box.
The Event Handler Wizard should now have added the handlers to the CSketcherDoc class definition,which now looks like this:
class CSketcherDoc: public CDocument{...
818
Chapter 14: Working with Menus and Toolbars
25905c14.qxd:WroxPro 2/21/08 9:16 AM Page 818

protected:
// Generated message map functionsprotected:DECLARE_MESSAGE_MAP()
public:afx_msg void OnColorBlack();afx_msg void OnColorRed();afx_msg void OnColorGreen();afx_msg void OnColorBlue();afx_msg void OnElementLine();afx_msg void OnElementRectangle();afx_msg void OnElementCircle();afx_msg void OnElementCurve();};
A declaration has been added for each of the handlers that you’ve specified in the Event Handler Wizarddialog box. Each of the function declarations has been prefixed with afx_msg to indicate that it is a mes-sage handler.
The Event Handler Wizard also automatically updates the message map in your CSketcherDoc classimplementation with the new message handlers. If you take a look in the file SketcherDoc.cpp, you’llsee the message map as shown here:
BEGIN_MESSAGE_MAP(CSketcherDoc, CDocument)ON_COMMAND(ID_COLOR_BLACK, OnColorBlack)ON_COMMAND(ID_COLOR_RED, OnColorRed)ON_COMMAND(ID_COLOR_GREEN, OnColorGreen)ON_COMMAND(ID_COLOR_BLUE, OnColorBlue)ON_COMMAND(ID_ELEMENT_LINE, OnElementLine)ON_COMMAND(ID_ELEMENT_RECTANGLE, OnElementRectangle)ON_COMMAND(ID_ELEMENT_CIRCLE, OnElementCircle)ON_COMMAND(ID_ELEMENT_CURVE, OnElementCurve)
END_MESSAGE_MAP()
The Event Handler Wizard has added an ON_COMMAND() macro for each of the handlers that you haveidentified. This associates the handler name with the message ID, so, for example, the member functionOnColorBlack() is called to service a COMMAND message for the menu item with the ID ID_COLOR_BLACK.
Each of the handlers generated by the Event Handler Wizard is just a skeleton. For example, take a lookat the code provided for OnColorBlue(). This is also defined in the file SketcherDoc.cpp, so you canscroll down to find it, or go directly to it by switching to the Class View and double-clicking the functionname after expanding the tree for the class CSketcherDoc (make sure that the file is saved first):
void CSketcherDoc::OnColorBlue(){
// TODO: Add your command handler code here}
As you can see, the handler takes no arguments and returns nothing. It also does nothing at the moment,but this is hardly surprising, because the Event Handler Wizard has no way of knowing what you wantto do with these messages!
819
Chapter 14: Working with Menus and Toolbars
25905c14.qxd:WroxPro 2/21/08 9:16 AM Page 819

Coding Menu Message FunctionsNow consider what you should do with the COMMAND messages for our new menu items. I said earlierthat you want to record the current element and color in the document, so you need to add a data mem-ber to the CSketcherDoc class for each of these.
Adding Members to Store Color and Element ModeYou could add the data members that you need to the CSketcherDoc class definition just by editing theclass definition directly, but let’s use the Add Member Variable Wizard to do it. Display the dialog box forthe wizard by right-clicking the CSketcherDoc class name in the Class View and then selecting Add >Add Variable from the pop-up menu that appears. You then see the dialog box for the wizard, as shownin Figure 14-8.
Figure 14-8
I’ve already entered the information in the dialog box for the m_Element variable that stores the currentelement type to be drawn. I have selected protected as the access because it should not be accessibledirectly from outside the class. I have also selected the type as unsigned int because you use a positiveinteger to identify each type of element. When you click the Finish button, the variable is added to theclass definition in the CSketcherDoc.h file.
Add the CSketcherDoc class member to store the element color manually just to show that you can. Itsname is m_Color and its type is COLORREF, which is a type defined by the Windows API for representing acolor as a 32-bit integer. You can add the declaration for the m_Color member to the CSketcherDoc classlike this:
class CSketcherDoc : public CDocument{...// Generated message map functionsprotected:
820
Chapter 14: Working with Menus and Toolbars
25905c14.qxd:WroxPro 2/21/08 9:16 AM Page 820

DECLARE_MESSAGE_MAP()public:
afx_msg void OnColorBlack();afx_msg void OnColorRed();afx_msg void OnColorGreen();afx_msg void OnColorBlue();afx_msg void OnElementLine();afx_msg void OnElementRectangle();afx_msg void OnElementCircle();afx_msg void OnElementCurve();
protected:// Current element typeunsigned int m_Element;COLORREF m_Color; // Current drawing color
};
The m_Color member is also protected, as there’s no reason to allow public access. You can always addfunctions to access or change the values of protected or private class members with the advantage that youthen have complete control over what values can be set. Of course you could have used the Add MemberVariable Wizard dialog as you did for m_Element; the difference is that you would type COLORREF in theVariable type box rather than select from the drop-down list.
Initializing the New Class Data MembersYou need to decide how to represent an element type. You could just set m_Element to a unique numericvalue, but this would introduce “magic numbers” into the program, the significance of which would beless than obvious to anyone else looking at the code. A better way would be to define a set of constantsthat you can use to set values for the member variable, m_Element. In this way, you can use a standardmnemonic to refer to a given type of element. You could define the element types with the followingstatements:
// Element type definitions// Each type value must be uniqueconst unsigned int LINE = 101U;const unsigned int RECTANGLE = 102U;const unsigned int CIRCLE = 103U;const unsigned int CURVE = 104U;
The constants initializing the element types are arbitrary unsigned integers. You can choose differentvalues, if you like, as long as they are all distinct. If you want to add further types in the future, it willobviously be very easy to add definitions here.
For the color values, it would be a good idea if we used constant variables that are initialized with thevalues that Windows uses to define the color in question. You could do this with the following lines of code:
// Color values for drawingconst COLORREF BLACK = RGB(0,0,0);const COLORREF RED = RGB(255,0,0);const COLORREF GREEN = RGB(0,255,0);const COLORREF BLUE = RGB(0,0,255);
821
Chapter 14: Working with Menus and Toolbars
25905c14.qxd:WroxPro 2/21/08 9:16 AM Page 821

Each constant is initialized by RGB(), which is a standard macro defined in the Wingdi.h, header filethat is included as part of Windows.h. The three arguments to the macro define the red, green, and bluecomponents of the color value respectively. Each argument must be an integer between 0 and 255, wherethese limits correspond to no color component and the maximum color component. RGB(0,0,0) corre-sponds to black because there are no components of red, green, or blue. RGB(255,0,0) creates a colorvalue with a maximum red component, and no green or blue contribution. You can create other colorsby combining red, green, and blue components.
You need somewhere to put these constants, so let’s create a new header file and call it OurConstants.h.You can create a new file by right-clicking the Header Files folder in the Solution Explorer tab and select-ing the Add > Add New Item menu option from the pop-up. Enter the header file name OurConstantsin the dialog box that displays and then click the Open button. You’ll then be able to enter the constantdefinitions in the Editor window as shown here.
//Definitions of constants
#pragma once
// Element type definitions// Each type value must be uniqueconst unsigned int LINE = 101U;const unsigned int RECTANGLE = 102U;const unsigned int CIRCLE = 103U;const unsigned int CURVE = 104U;///////////////////////////////////
// Color values for drawingconst COLORREF BLACK = RGB(0,0,0);const COLORREF RED = RGB(255,0,0);const COLORREF GREEN = RGB(0,255,0);const COLORREF BLUE = RGB(0,0,255);///////////////////////////////////
As you’ll recall, the pre-processor directive #pragma once is there to ensure that the definitions cannotbe included more than once in a file. The statements in the header file are included into a source file onlyby an #include directive if it hasn’t been included previously. After the header has been included in afile, the statements will not be included again.
After saving the header file, you can add the following #include statement to the beginning of the fileSketcher.h:
#include “OurConstants.h”
Any .cpp file that has an #include directive for Sketcher.h has the constants available.
You can verify that the new constants are now part of the project by expanding Global Functionsand Variables in the Class View. You’ll see the names of the color and element types that have beenadded now appear along with the global variable theApp.
822
Chapter 14: Working with Menus and Toolbars
25905c14.qxd:WroxPro 2/21/08 9:16 AM Page 822

Modifying the Class ConstructorIt’s important to make sure that the data members you have added to the CSketcherDoc class are initial-ized appropriately when a document is created. You can add the code to do this to the class constructor asshown here:
CSketcherDoc::CSketcherDoc() : m_Element(LINE), m_Color(BLACK){
// TODO: add one-time construction code here}
The wizard already has arranged that the m_Element member will be initialized to 0 so change the initialvalue to LINE. You then need to add the initializer for the m_Color member with BLACK as the value sothat everything is consistent with the initial check marks that you specified for the menus.
Now you’re ready to add the code for the handler functions that you created for the Element and Color menu items. You can do this from the Class View. Click the name of the first handler function,OnColorBlack(). You just need to add one line to the function, so the code for it becomes:
void CSketcherDoc::OnColorBlack(){
m_Color = BLACK; // Set the drawing color to black}
The only job that the handler has to do is to set the appropriate color. In the interests of conciseness, thenew line replaces the comment provided originally. You can go through and add one line to each of theColor menu handlers setting the appropriate color value.
The element menu handlers are much the same. The handler for the Element > Line menu item is:
void CSketcherDoc::OnElementLine(){
m_Element = LINE; // Set element type as a line}
With this model, it’s not too difficult to write the other handlers for the Element menu. That’s eight message handlers completed. You can now rebuild the example and see how it works.
Running the Extended ExampleAssuming that there are no typos, the compiled and linked program should run without error. Whenyou run the program, you should see the window shown in Figure 14-9.
The new menus are in place on the menu bar, and you can see that the items you have added to the menuare all there, and you should see the Prompt message in the status bar that you provided in the propertiesbox when the mouse cursor is over a menu item. You could also verify that Alt+C and Alt+l work aswell. The things that don’t work are the check marks for the currently selected color and element, whichremain firmly stuck to their initial defaults. Let’s look at how you can fix that.
823
Chapter 14: Working with Menus and Toolbars
25905c14.qxd:WroxPro 2/21/08 9:16 AM Page 823
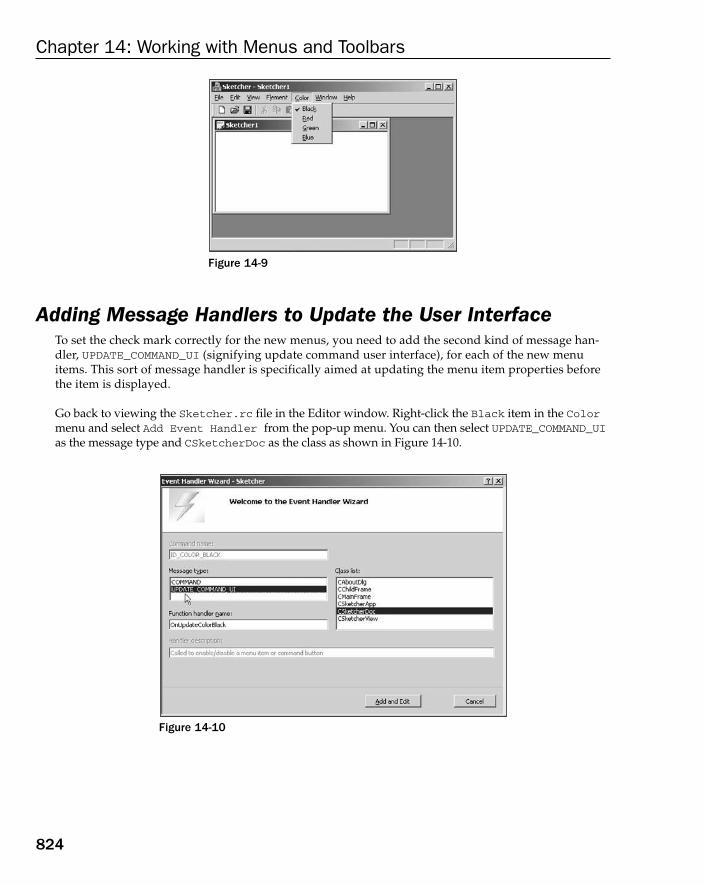
Figure 14-9
Adding Message Handlers to Update the User InterfaceTo set the check mark correctly for the new menus, you need to add the second kind of message han-dler, UPDATE_COMMAND_UI (signifying update command user interface), for each of the new menuitems. This sort of message handler is specifically aimed at updating the menu item properties beforethe item is displayed.
Go back to viewing the Sketcher.rc file in the Editor window. Right-click the Black item in the Colormenu and select Add Event Handler from the pop-up menu. You can then select UPDATE_COMMAND_UIas the message type and CSketcherDoc as the class as shown in Figure 14-10.
Figure 14-10
824
Chapter 14: Working with Menus and Toolbars
25905c14.qxd:WroxPro 2/21/08 9:16 AM Page 824

The name for the update function has been generated as OnUpdateColorBlack(). Because this seems areasonable name for the function you want, click the Add and Edit button and have the Event HandlerWizard generate it. As well as generating the skeleton function definition in SketcherDoc.cpp, its decla-ration is added to the class definition. An entry for it is also made in the message map that looks like this:
ON_UPDATE_COMMAND_UI(ID_COLOR_BLACK, OnUpdateColorBlack)
This uses the ON_UPDATE_COMMAND_UI() macro that identifies the function you have just generated asthe handler to deal with update messages corresponding to the ID shown. You could now enter the codefor the new handler but I’ll let you add command update handlers for each of the menu items for boththe Color and Element menus first.
Coding a Command Update HandlerYou can access the code for the OnUpdateColorBlack() handler in the CSketcherDoc class by selectingthe function in Class View. This is the skeleton code for the function:
void CSketcherDoc::OnUpdateColorBlack(CCmdUI* pCmdUI){
// TODO: Add your command update UI handler code here
}
The argument passed to the handler is a pointer to an object of the CCmdUI class type. This is an MFCclass that is only used with update handlers, but it applies to toolbar buttons as well as menu items. Thepointer points to an object that identifies the item that originated the update message so you use this tooperate on the item to update how it appears before it is displayed. The CCmdUI class has five memberfunctions that act on user interface items. The operations that each of these provides are as follows:
We’ll use the third function, SetCheck(), as that seems to do what we want. The function is declared inthe CCmdUI class as:
virtual void SetCheck(int nCheck = 1);
Function Description
ContinueRouting() Passes the message on to the next priority handler.
Enable() Enables or disables the relevant interface item.
SetCheck() Sets a check mark for the relevant interface item.
SetRadio() Sets a button in a radio group on or off.
SetText() Sets the text for the relevant interface item.
825
Chapter 14: Working with Menus and Toolbars
25905c14.qxd:WroxPro 2/21/08 9:16 AM Page 825
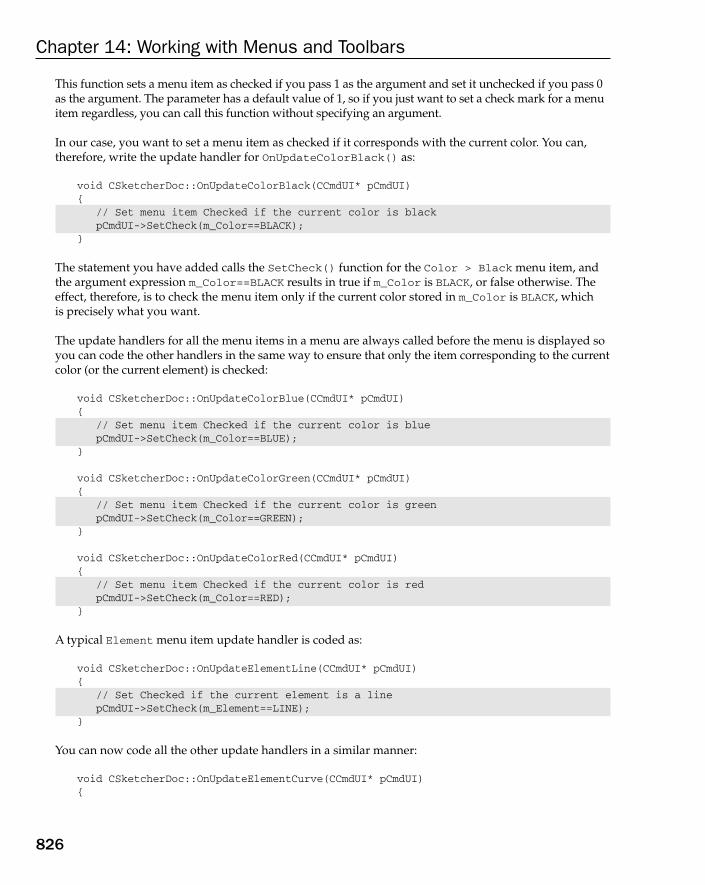
This function sets a menu item as checked if you pass 1 as the argument and set it unchecked if you pass 0as the argument. The parameter has a default value of 1, so if you just want to set a check mark for a menuitem regardless, you can call this function without specifying an argument.
In our case, you want to set a menu item as checked if it corresponds with the current color. You can,therefore, write the update handler for OnUpdateColorBlack() as:
void CSketcherDoc::OnUpdateColorBlack(CCmdUI* pCmdUI){
// Set menu item Checked if the current color is blackpCmdUI->SetCheck(m_Color==BLACK);
}
The statement you have added calls the SetCheck() function for the Color > Black menu item, andthe argument expression m_Color==BLACK results in true if m_Color is BLACK, or false otherwise. Theeffect, therefore, is to check the menu item only if the current color stored in m_Color is BLACK, which is precisely what you want.
The update handlers for all the menu items in a menu are always called before the menu is displayed soyou can code the other handlers in the same way to ensure that only the item corresponding to the currentcolor (or the current element) is checked:
void CSketcherDoc::OnUpdateColorBlue(CCmdUI* pCmdUI){
// Set menu item Checked if the current color is bluepCmdUI->SetCheck(m_Color==BLUE);
}
void CSketcherDoc::OnUpdateColorGreen(CCmdUI* pCmdUI){
// Set menu item Checked if the current color is greenpCmdUI->SetCheck(m_Color==GREEN);
}
void CSketcherDoc::OnUpdateColorRed(CCmdUI* pCmdUI){
// Set menu item Checked if the current color is redpCmdUI->SetCheck(m_Color==RED);
}
A typical Element menu item update handler is coded as:
void CSketcherDoc::OnUpdateElementLine(CCmdUI* pCmdUI){
// Set Checked if the current element is a linepCmdUI->SetCheck(m_Element==LINE);
}
You can now code all the other update handlers in a similar manner:
void CSketcherDoc::OnUpdateElementCurve(CCmdUI* pCmdUI){
826
Chapter 14: Working with Menus and Toolbars
25905c14.qxd:WroxPro 2/21/08 9:16 AM Page 826

// Set Checked if the current element is a curvepCmdUI->SetCheck(m_Element==CURVE);
}
void CSketcherDoc::OnUpdateElementCircle(CCmdUI *pCmdUI){
// Set Checked if the current element is a circlepCmdUI->SetCheck(m_Element==CIRCLE);
}
void CSketcherDoc::OnUpdateElementRectangle(CCmdUI* pCmdUI){
// Set Checked if the current element is a rectanglepCmdUI->SetCheck(m_Element==RECTANGLE);
}
After you get the idea, it’s easy, isn’t it?
Exercising the Update HandlersWhen you’ve added the code for all the update handlers, you can build and execute the Sketcher appli-cation again. Now, when you change a color or an element type selection, this is reflected in the menu, as shown in Figure 14-11.
Figure 14-11
You have completed all the code that you need for the menu items. Make sure that you have savedeverything before embarking onto the next stage. These days, toolbars are a must in any Windows pro-gram of consequence, so the next step is to take a look at how you can add toolbar buttons to supportour new menus.
Adding Toolbar ButtonsSelect the Resource View and extend the toolbar resource. You’ll see that it has the same ID as the mainmenu, IDR_MAINFRAME. If you double-click this ID, the Editor window appears as shown in Figure 14-12.
827
Chapter 14: Working with Menus and Toolbars
25905c14.qxd:WroxPro 2/21/08 9:16 AM Page 827

Figure 14-12
A toolbar button is a 16×15 array of pixels that contains a pictorial representation of the function it oper-ates. You can see in Figure 14-12 that the resource editor provides an enlarged view of a toolbar buttonso that you can see and manipulate individual pixels. If you click the new button at the right end ofthe row as indicated, you’ll be able to draw this button. Before starting the editing, drag the new buttonabout half a button width to the right. It separates from its neighbor on the left to start a new block.
You should keep the toolbar button blocks in the same sequence as the items on the menu bar, so you’llcreate the element type selection buttons first. You’ll be using the following editing buttons provided bythe resource editor that appear in the toolbar for the Visual C++ 2008 application window.
❑ Pencil for drawing individual pixels
❑ Eraser for erasing individual pixels
❑ Fill an area with the current color
❑ Zoom the view of the button
❑ Draw a rectangle
❑ Draw an ellipse
❑ Draw a curve
If it is not already visible, you can display the window for selecting a color by right-clicking a toolbarbutton and selecting Show Colors Window from the pop-up. Make sure that the black color is selectedand use the pencil tool to draw a diagonal line in the enlarged image of the new toolbar button. In fact, ifyou want it a bit bigger, you can use the Magnification Tool editing button to enlarge it up to eight timesits actual size. If you make a mistake, you can change to the Erase Tool editing button, but you need tomake sure that the color selected corresponds to the background color for the button you are editing.You can also erase individual pixels by clicking them using the right mouse button, but again you needto be sure that the background color is set correctly when you do this. To set the background color, justclick the appropriate color using the right mouse button. After you’re happy with what you’ve drawn,the next step is to edit the toolbar button properties.
828
Chapter 14: Working with Menus and Toolbars
25905c14.qxd:WroxPro 2/21/08 9:16 AM Page 828
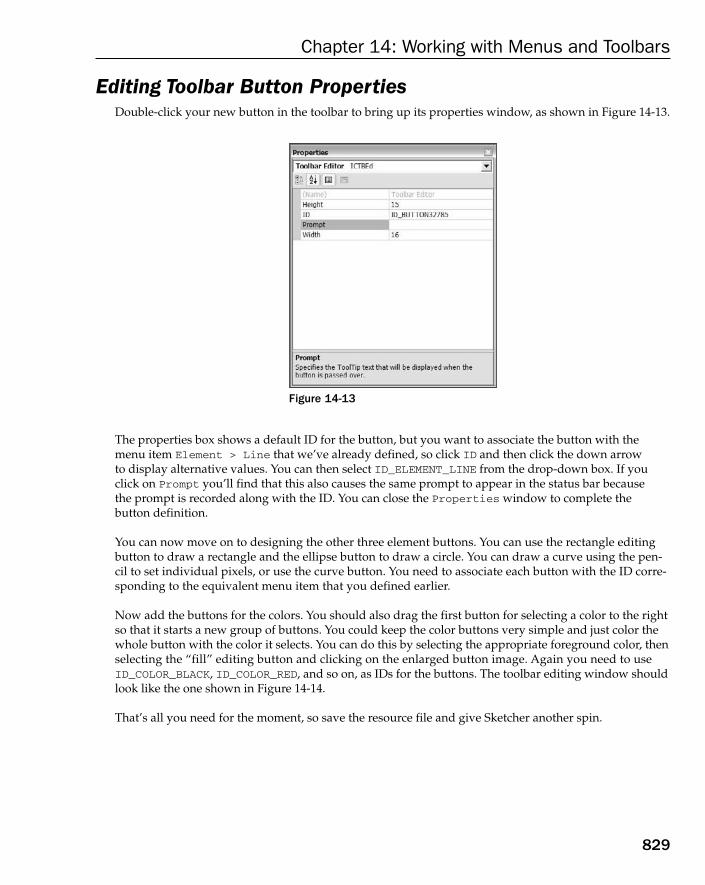
Editing Toolbar Button PropertiesDouble-click your new button in the toolbar to bring up its properties window, as shown in Figure 14-13.
Figure 14-13
The properties box shows a default ID for the button, but you want to associate the button with themenu item Element > Line that we’ve already defined, so click ID and then click the down arrow to display alternative values. You can then select ID_ELEMENT_LINE from the drop-down box. If youclick on Prompt you’ll find that this also causes the same prompt to appear in the status bar because the prompt is recorded along with the ID. You can close the Properties window to complete the button definition.
You can now move on to designing the other three element buttons. You can use the rectangle editingbutton to draw a rectangle and the ellipse button to draw a circle. You can draw a curve using the pen-cil to set individual pixels, or use the curve button. You need to associate each button with the ID corre-sponding to the equivalent menu item that you defined earlier.
Now add the buttons for the colors. You should also drag the first button for selecting a color to the rightso that it starts a new group of buttons. You could keep the color buttons very simple and just color thewhole button with the color it selects. You can do this by selecting the appropriate foreground color, thenselecting the “fill” editing button and clicking on the enlarged button image. Again you need to useID_COLOR_BLACK, ID_COLOR_RED, and so on, as IDs for the buttons. The toolbar editing window shouldlook like the one shown in Figure 14-14.
That’s all you need for the moment, so save the resource file and give Sketcher another spin.
829
Chapter 14: Working with Menus and Toolbars
25905c14.qxd:WroxPro 2/21/08 9:16 AM Page 829
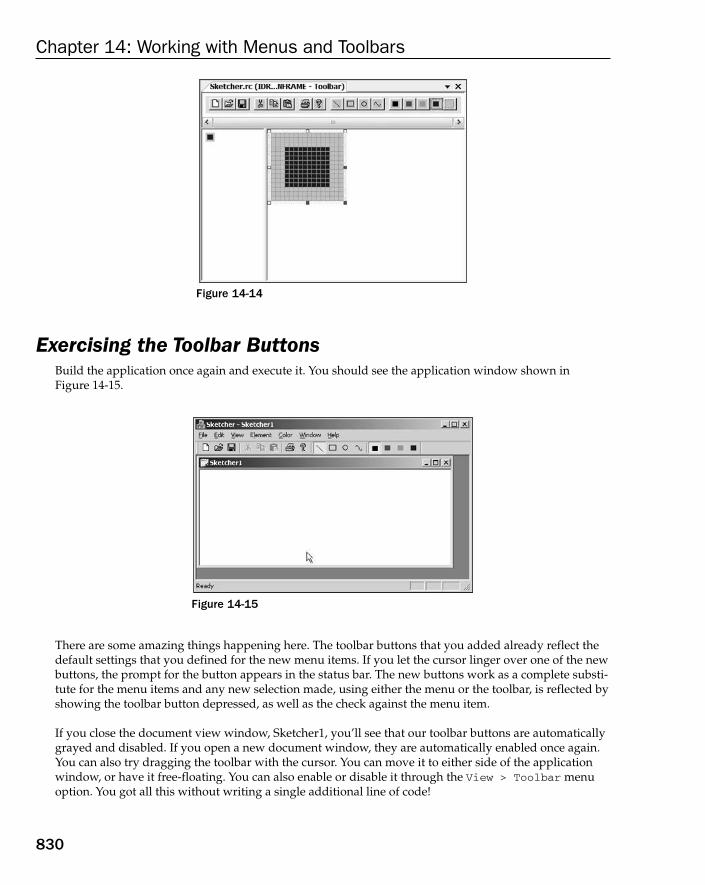
Figure 14-14
Exercising the Toolbar ButtonsBuild the application once again and execute it. You should see the application window shown inFigure 14-15.
Figure 14-15
There are some amazing things happening here. The toolbar buttons that you added already reflect thedefault settings that you defined for the new menu items. If you let the cursor linger over one of the newbuttons, the prompt for the button appears in the status bar. The new buttons work as a complete substi-tute for the menu items and any new selection made, using either the menu or the toolbar, is reflected byshowing the toolbar button depressed, as well as the check against the menu item.
If you close the document view window, Sketcher1, you’ll see that our toolbar buttons are automaticallygrayed and disabled. If you open a new document window, they are automatically enabled once again.You can also try dragging the toolbar with the cursor. You can move it to either side of the applicationwindow, or have it free-floating. You can also enable or disable it through the View > Toolbar menuoption. You got all this without writing a single additional line of code!
830
Chapter 14: Working with Menus and Toolbars
25905c14.qxd:WroxPro 2/21/08 9:16 AM Page 830

Adding TooltipsThere’s one further tweak that you can add to your toolbar buttons that is remarkably easy: addingtooltips. A tooltip is a small box that appears adjacent to the toolbar button when you let the cursorlinger on the button. The tooltip contains a text string that is an additional clue as to the purpose ofthe toolbar button.
To add tooltips, select the Resource View tab and, after expanding the resource list, click the String Tablefolder and double-click the resource. This contains the IDs and prompt strings associated with menu itemsand toolbar buttons. You should see the IDs for the menus that you added earlier together with the prompttext for each under the caption heading. To add a tooltip, you just need to add \n (the newline character),followed by the tooltip text to the end of the caption text. For the prompt text you have already entered youcan double-click text to enable editing of it and then add \n to the end of the prompt text in the caption col-umn, so you could change the existing caption for the ID_ELEMENT_LINE ID from Line to Line\nSetsline drawing mode, for example. Thus the caption text has two parts separated by \n, the first part beingthe prompt that appears in the status bar and the second is the tooltip text.
Add \n followed by a tooltip to the caption text for each of the IDs for the menu items in the Elementand Color menus — not forgetting to start each tooltip text with \n. That’s all you have to do. After sav-ing the String Table resource, you can now rebuild the application and execute it. Placing the cursorover one of the new toolbar buttons causes the tooltip to be displayed after a second or two.
Menu and Toolbars in a C++/CLI ProgramOf course, your C++/CLI programs can also have menus and toolbars. A good starting point for awindows-based C++/CLI program is to create a Windows Forms application. The Windows Formstechnology is oriented toward the development of applications that use the vast array of standard con-trols that are provided, but there’s no reason why you can’t do drawing with a form-based application.There is much less programming for you to do with a Windows Forms application because you addthe standard components for the GUI using the Windows Forms Designer capability and the code togenerate and service the GUI components will be added automatically. Your programming activitywill involve adding application-specific classes and customizing the behavior of the application byimplementing event handlers.
Understanding Windows FormsWindows Forms is a facility for creating Windows applications that execute with the CLR. A form is awindow that is the basis for an application window or a dialog window to which you can add other con-trols that the user can interact with. Visual C++ 2008 comes with a standard set of more than 60 controlsthat you can use with a form. Because there is a very large number of controls, you’ll get to grips onlywith a representative sample in this book, but that should give you enough of an idea of how they areused to explore the others for yourself. Many of the standard controls provide a straightforward interactivefunction, such as Button controls that represent buttons to be clicked or TextBox controls that allow text tobe entered. Some of the standard controls are containers, which means that they are controls that can con-tain other controls. For example, a GroupBox control can contain other controls such as Button controls orTextBox controls, and the function of a GroupBox control is simply to group the controls together for somepurpose and optionally provide a label for the group in the GUI. There are also a lot of third-party controls
831
Chapter 14: Working with Menus and Toolbars
25905c14.qxd:WroxPro 2/21/08 9:16 AM Page 831
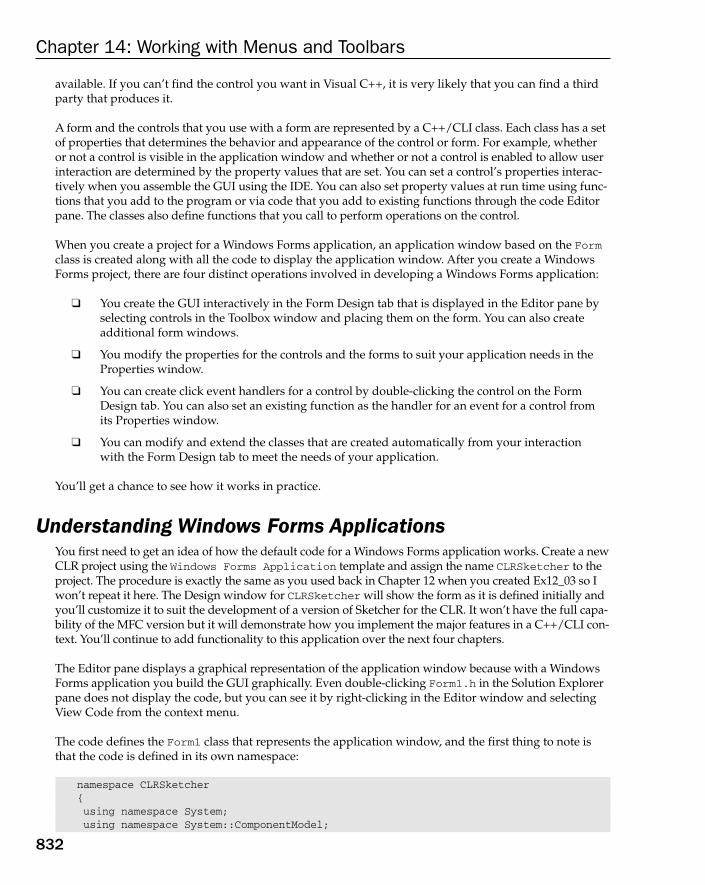
available. If you can’t find the control you want in Visual C++, it is very likely that you can find a thirdparty that produces it.
A form and the controls that you use with a form are represented by a C++/CLI class. Each class has a setof properties that determines the behavior and appearance of the control or form. For example, whetheror not a control is visible in the application window and whether or not a control is enabled to allow userinteraction are determined by the property values that are set. You can set a control’s properties interac-tively when you assemble the GUI using the IDE. You can also set property values at run time using func-tions that you add to the program or via code that you add to existing functions through the code Editorpane. The classes also define functions that you call to perform operations on the control.
When you create a project for a Windows Forms application, an application window based on the Formclass is created along with all the code to display the application window. After you create a WindowsForms project, there are four distinct operations involved in developing a Windows Forms application:
❑ You create the GUI interactively in the Form Design tab that is displayed in the Editor pane byselecting controls in the Toolbox window and placing them on the form. You can also createadditional form windows.
❑ You modify the properties for the controls and the forms to suit your application needs in theProperties window.
❑ You can create click event handlers for a control by double-clicking the control on the FormDesign tab. You can also set an existing function as the handler for an event for a control fromits Properties window.
❑ You can modify and extend the classes that are created automatically from your interaction with the Form Design tab to meet the needs of your application.
You’ll get a chance to see how it works in practice.
Understanding Windows Forms ApplicationsYou first need to get an idea of how the default code for a Windows Forms application works. Create a newCLR project using the Windows Forms Application template and assign the name CLRSketcher to theproject. The procedure is exactly the same as you used back in Chapter 12 when you created Ex12_03 so Iwon’t repeat it here. The Design window for CLRSketcher will show the form as it is defined initially andyou’ll customize it to suit the development of a version of Sketcher for the CLR. It won’t have the full capa-bility of the MFC version but it will demonstrate how you implement the major features in a C++/CLI con-text. You’ll continue to add functionality to this application over the next four chapters.
The Editor pane displays a graphical representation of the application window because with a WindowsForms application you build the GUI graphically. Even double-clicking Form1.h in the Solution Explorerpane does not display the code, but you can see it by right-clicking in the Editor window and selectingView Code from the context menu.
The code defines the Form1 class that represents the application window, and the first thing to note isthat the code is defined in its own namespace:
namespace CLRSketcher{using namespace System;using namespace System::ComponentModel;
832
Chapter 14: Working with Menus and Toolbars
25905c14.qxd:WroxPro 2/21/08 9:16 AM Page 832

using namespace System::Collections;using namespace System::Windows::Forms;using namespace System::Data;using namespace System::Drawing;
// rest of the code}
When you compile the project, it creates a new assembly, and the code for this assembly is within thenamespace CLRSketcher, which is the same as the project name. The namespace ensures that a type inanother assembly that has the same name as a type in this assembly is differentiated because each typename is qualified by its own namespace name.
There are also six using directives for .NET library namespaces, and these cover the library functionalityyou are most likely to need in your application. These namespaces are:
The Form1 class is derived from the Form class that is defined in the System::Windows::Forms name-space. The Form class represents either an application window or a dialog window, and the Form1 classthat defines the window for CLRSketcher inherits all the members of the Form class.
The section at the end of the Form1 class contains the definition of the InitializeComponent() func-tion. This function is called by the constructor to set up the application window and any components thatyou add to the form. The comments indicate that you must not modify this section of code using the codeeditor, and this code is updated automatically as you alter the application window interactively. It’s impor-tant when you do use Form Design that you do not ignore these comments and modify the automaticallygenerated code yourself; if you do, things are certain to go wrong at some point. Of course, you can write
Namespace Contents
System This namespace contains classes that define data types that areused in all CLR applications. It also contains classes for eventsand event handling, exceptions, and classes that support com-monly used functions.
System::ComponentModel This namespace contains classes that support the operation ofGUI components in a CLR application.
System::Collections This namespace contains collection classes for organizing data invarious ways, and includes classes to define lists, queues, diction-aries (maps), and stacks.
System::Windows::Forms This namespace contains the classes that support the use ofWindows Forms in an application.
System::Data This namespace contains classes that support ADO.NET, which isused for accessing and updating data sources. You’ll learn moreabout accessing data sources in a CLR application in the nextchapter.
System::Drawing Defines classes that support basic graphical operations such asdrawing on a form or a component.
833
Chapter 14: Working with Menus and Toolbars
25905c14.qxd:WroxPro 2/21/08 9:16 AM Page 833
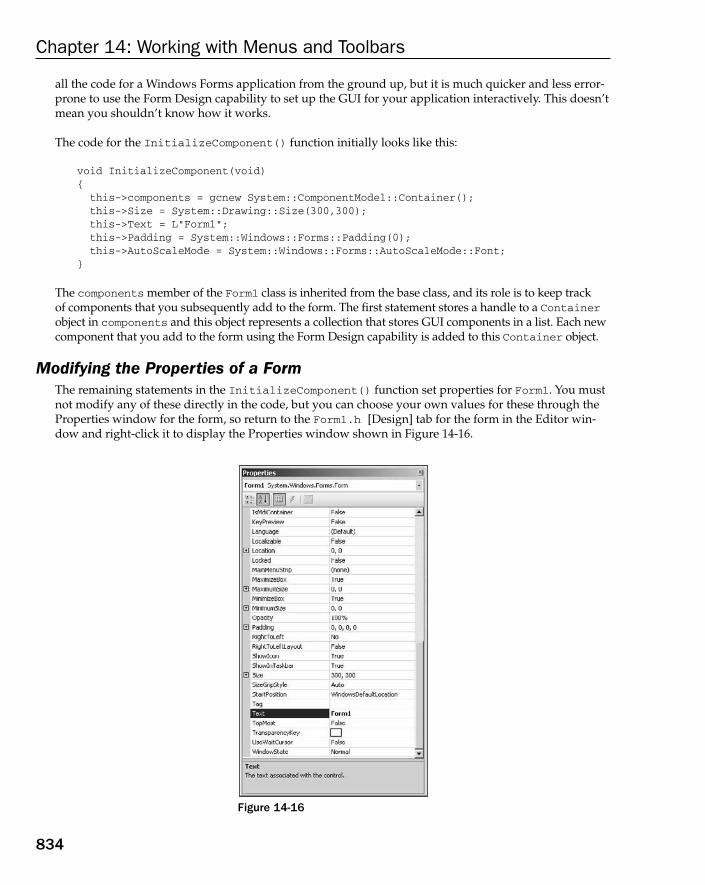
all the code for a Windows Forms application from the ground up, but it is much quicker and less error-prone to use the Form Design capability to set up the GUI for your application interactively. This doesn’tmean you shouldn’t know how it works.
The code for the InitializeComponent() function initially looks like this:
void InitializeComponent(void){this->components = gcnew System::ComponentModel::Container();this->Size = System::Drawing::Size(300,300);this->Text = L”Form1”;this->Padding = System::Windows::Forms::Padding(0);this->AutoScaleMode = System::Windows::Forms::AutoScaleMode::Font;
}
The components member of the Form1 class is inherited from the base class, and its role is to keep track of components that you subsequently add to the form. The first statement stores a handle to a Containerobject in components and this object represents a collection that stores GUI components in a list. Each newcomponent that you add to the form using the Form Design capability is added to this Container object.
Modifying the Properties of a FormThe remaining statements in the InitializeComponent() function set properties for Form1. You mustnot modify any of these directly in the code, but you can choose your own values for these through theProperties window for the form, so return to the Form1.h [Design] tab for the form in the Editor win-dow and right-click it to display the Properties window shown in Figure 14-16.
Figure 14-16
834
Chapter 14: Working with Menus and Toolbars
25905c14.qxd:WroxPro 2/21/08 9:16 AM Page 834
Figure 14-16 shows the properties for the form in alphabetical sequence. You can also display the proper-ties categorized by function by clicking the first button at the top of the window. It’s worth browsingthrough the list of properties for the form to get an idea of the possibilities. Clicking any of the propertiesdisplays a description at the bottom of the window. Figure 14-16 shows the Properties window with thewidth increased to make the descriptions visible. You can select the cell in the right column to modify theproperty value. The properties that have a + to the left have multiple values and clicking the + displaysthe values so you can change them individually. You can also display the properties in alphabetical orderby clicking a button. This is helpful when you know the name of the property you want to change, as itmakes it easier to find it.
You can make the form a little larger by changing the value for the Size property in the Layout group to 500,350. You don’t want to make it too large at this point because it will make it difficult to work withwhen you have several windows open in the IDE, so just size the form so it’s easy to work with on yourdisplay. You could also change the Text property (which is in the Appearance category if you are look-ing at that organization for the properties) to CLR Sketcher. This changes the text in the title bar for theapplication window. If you go back to the Form1.h tab in the Editor window, you’ll see that the code inthe InitializeComponent() function has been altered to reflect the property changes you have made.As you’ll see, the Properties window is a fundamental tool for implementing support for GUI compo-nents in a Forms-based application
Note that you can also arrange for the application window to be maximized when the program starts bysetting the value for the WindowState property. With the default Normal setting, the window is the sizeyou have specified, but you can set the property to Maximized or Minimized by selecting from the listof values for this property.
How the Application StartsExecution of the application begins, as always, in the main() function, and this is defined in theCLRSketcher.cpp file as:
int main(array<System::String ^> ^args){
// Enabling Windows XP visual effects before any controls are createdApplication::EnableVisualStyles();
// Create the main window and run itApplication::Run(gcnew Form1());return 0;
}
The main() function calls two static functions that are defined in the Application class that is definedin the System::Windows::Forms namespace. The static functions in the Application class are at theheart of every Windows Forms application. The EnableVisualStyles() function that is called first inmain() enables visual styles for the application. The Run() function starts a Windows message loop forthe application and makes the Form object that is passed as the argument visible. An application runningwith the CLR is still ultimately a Windows application, so it works with a message loop in the same wayas all other Windows applications.
835
Chapter 14: Working with Menus and Toolbars
25905c14.qxd:WroxPro 2/21/08 9:16 AM Page 835

Adding a Menu to CLR SketcherThe IDE provides you with a standard set of controls that you can add to your application interactivelythrough the Design window. Press Ctrl+Alt+X or select from the View menu to display the Toolboxwindow. The window containing the list of available controls is displayed, as shown in Figure 14-17.
Figure 14-17
The first block in the Toolbox window is labelled All Windows Forms and lists all the controls availablefor use with a form. You can click the plus sign for the All Windows Forms tab if it is not already expanded.You can collapse this block by clicking the minus sign to the left of the block heading, and you’ll see thatthe controls are also grouped by type in the list starting with the Common Controls block. You’ll proba-bly find it most convenient initially to use the group containing all the controls at the beginning of the list,but after you are familiar with what controls are available, you may find it easier to collapse the groupsand just have one group expanded at one time.
A Menu Strip is a container for menu items, so add one to the form by dragging a MenuStrip from theMenus & Toolbars group in the Toolbox window to the form; the menu strip attaches itself to the top of the form below the title bar. You’ll see a small arrow at the top left of the control. If you click this, apop-up window appears, as shown in Figure 14-18.
Figure 14-18
836
Chapter 14: Working with Menus and Toolbars
25905c14.qxd:WroxPro 2/21/08 9:16 AM Page 836
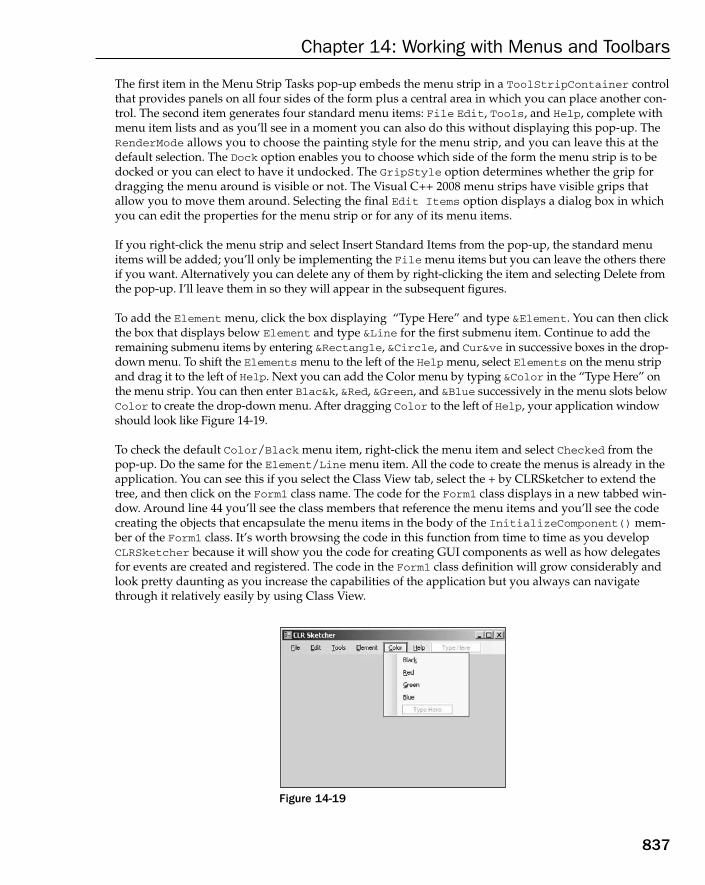
The first item in the Menu Strip Tasks pop-up embeds the menu strip in a ToolStripContainer controlthat provides panels on all four sides of the form plus a central area in which you can place another con-trol. The second item generates four standard menu items: File Edit, Tools, and Help, complete withmenu item lists and as you’ll see in a moment you can also do this without displaying this pop-up. TheRenderMode allows you to choose the painting style for the menu strip, and you can leave this at thedefault selection. The Dock option enables you to choose which side of the form the menu strip is to bedocked or you can elect to have it undocked. The GripStyle option determines whether the grip fordragging the menu around is visible or not. The Visual C++ 2008 menu strips have visible grips thatallow you to move them around. Selecting the final Edit Items option displays a dialog box in whichyou can edit the properties for the menu strip or for any of its menu items.
If you right-click the menu strip and select Insert Standard Items from the pop-up, the standard menuitems will be added; you’ll only be implementing the File menu items but you can leave the others thereif you want. Alternatively you can delete any of them by right-clicking the item and selecting Delete fromthe pop-up. I’ll leave them in so they will appear in the subsequent figures.
To add the Element menu, click the box displaying “Type Here” and type &Element. You can then clickthe box that displays below Element and type &Line for the first submenu item. Continue to add theremaining submenu items by entering &Rectangle, &Circle, and Cur&ve in successive boxes in the drop-down menu. To shift the Elements menu to the left of the Help menu, select Elements on the menu stripand drag it to the left of Help. Next you can add the Color menu by typing &Color in the “Type Here” onthe menu strip. You can then enter Blac&k, &Red, &Green, and &Blue successively in the menu slots belowColor to create the drop-down menu. After dragging Color to the left of Help, your application windowshould look like Figure 14-19.
To check the default Color/Black menu item, right-click the menu item and select Checked from thepop-up. Do the same for the Element/Line menu item. All the code to create the menus is already in theapplication. You can see this if you select the Class View tab, select the + by CLRSketcher to extend thetree, and then click on the Form1 class name. The code for the Form1 class displays in a new tabbed win-dow. Around line 44 you’ll see the class members that reference the menu items and you’ll see the codecreating the objects that encapsulate the menu items in the body of the InitializeComponent() mem-ber of the Form1 class. It’s worth browsing the code in this function from time to time as you developCLRSketcher because it will show you the code for creating GUI components as well as how delegatesfor events are created and registered. The code in the Form1 class definition will grow considerably andlook pretty daunting as you increase the capabilities of the application but you always can navigatethrough it relatively easily by using Class View.
Figure 14-19
837
Chapter 14: Working with Menus and Toolbars
25905c14.qxd:WroxPro 2/21/08 9:16 AM Page 837

You can add shortcut key combinations for menu items by setting the value of the ShortcutKeys prop-erty. Figure 14-20 shows this property for the Line menu item.
Select the modifier of modifiers by clicking the checkboxes and select the key from the drop-down list.Figure 14-20 shows Ctrl+Shift+L specified as the shortcut key combination. You can control whether ornot the shortcut key combination is displayed in the menu by setting the value of the ShowShortcutKeysproperty appropriately.
Figure 14-20
The next step is to add event handlers for the menu items.
Adding Event Handlers for Menu ItemsEvent handlers are delegates in a C++/CLI program, but you hardly need be aware of this in practicebecause all the functions that are delegates will be created automatically. Return to the Design tab byclicking on it. You can start by adding handlers for the items in the Element menu.
If it is not already visible, extend the Element drop-down menu on the form by clicking it, then right-click on the Line menu item and select Properties from the pop-up. Click on the events button in theProperties window (the one that looks like a lightning flash) and double-click the Click event at the top of the list. The IDE will switch to the code tab showing the delegate function for the menu item,which looks like this:
private: System::Void lineToolStripMenuItem_Click(System::Object^ sender,System::EventArgs^ e)
{
}
838
Chapter 14: Working with Menus and Toolbars
25905c14.qxd:WroxPro 2/21/08 9:16 AM Page 838
I have rearranged the code slightly to make it easier to read. This function will be called automaticallywhen you click the Line menu item in the application. The first parameter identifies the source of theevent, the menu item object in this case, and the second parameter provides information relating to theevent. You’ll learn more about EventArgs objects a little later in this chapter. This function has alreadybeen identified as the event handler for the menu item with the code:
this->lineToolStripMenuItem->Click += gcnew System::EventHandler(this, &Form1::lineToolStripMenuItem_Click);
This is in the InitializeComponent() function and is located at about line 369 in the Form1.h listingon my system, but if you deleted the surplus standard menu items it will be a different line; you’ll find it in the section labeled in comments as // lineToolStripMenuItem.
You can add event handlers for all the menu items in the Element and Color menus in the same way. If you switch back to the Design tab and you have not closed the Properties window, clicking on a newmenu item will display the properties for that in the window. You can then double-click the Click prop-erty to generate the handler function. Note that the names of the handler functions are created by default,but if you want to change the name you can edit it in the value field to the right of the event name in theProperties window. The default names are quite satisfactory in this instance though.
Implementing Event HandlersFollowing the model of the MFC version of Sketcher, you need a way to identify different element typesin the CLR version. An enum class will do nicely for this. Add the following line of code in the Form1.hfile following the using directives at the beginning of the file, and immediately before the commentspreceding the Form1 class definition:
enum class ElementType {LINE, RECTANGLE, CIRCLE, CURVE};
This defines the four constants you need to specify the four types of element in Sketcher. As soon as youhave entered this code, you see the new class appears in the Class View window as part of CLR Sketcher.
To identify the colors you can use objects of type System::Drawing::Color that represent colors. TheSystem::Drawing namespace defines a wide range of types for use in drawing operations and you’llbe using quite a number of them before CLRSketcher is finished. The Color structure defines a lot ofstandard colors, including Color::Black, Color::Red, Color::Green, and Color::Blue so youhave everything you need.
The element type and the drawing color are modal, so you should add variables to the Form1 class tostore the current element type and color. You can do this manually or use a code wizard to do it; let’s try the latter. Right-click on Form1 in Class View and select Add /Add Variable... from the pop-up.Select the Access as private, double-click the default variable type and enter ElementType and typethe variable name as elementType. You can also add a comment if you want, Current element type, and click Finish to add the variable to the class. Repeat the process for a private variable oftype Color with the name color.
The new variables need to be initialized when the Form1 constructor is called so double-click on theconstructor name, Form1(void), in the lower part of the Class View window (for the members of
839
Chapter 14: Working with Menus and Toolbars
25905c14.qxd:WroxPro 2/21/08 9:16 AM Page 839
Form1 to be displayed, Form1 must be selected in Class View). Modify the code for the constructor tothe following:
Form1(void) : elementType(ElementType::LINE), color(Color::Black){
InitializeComponent();////TODO: Add the constructor code here//
}
The new variables are initialized in the first line. You should see IntelliSense prompts for possible valuesfor the ElementType, and Color types as you type the initialization list. You now have enough in placeto implement the menu event handlers. You can find the Line menu item handler toward the end of thecode in Form1.h or double-click the Line menu item in the Design window to go directly to it. Modifythe handler code to the following:
private: System::Void lineToolStripMenuItem_Click(System::Object^ sender, System::EventArgs^ e)
{elementType = ElementType::LINE;
}
This just sets the current element type appropriately. You can do the same for the other three Elementmenu handlers. Simple, isn’t it?
The first Color menu handler should be modified as follows:
private: System::Void blackToolStripMenuItem_Click(System::Object^ sender, System::EventArgs^ e) {
color = Color::Black;}
The other Color menu handlers should set the value of color appropriately to Color::Red,Color::Green, or Color::Blue.
Setting Menu Item ChecksAt present, selecting element and color menu items sets the mode in the program but the checksshown on the menus remain stuck at the default. You don’t have the COMMAND and COMMAND_UI mes-sage types with a CLR program that you have with the MFC, so you need a different approach to setthe check mark against the element and color menu items that are in effect. You can handle messagesfor the Element and Color menu items on the menu strip when one or the other is selected and con-veniently the handler for one of the messages is called before the corresponding drop-down menu isdisplayed. Right-click on the Element menu item in the Design window and select Properties from the pop-up. When you select the Messages button in the Properties window, the window should looklike Figure 14-21.
840
Chapter 14: Working with Menus and Toolbars
25905c14.qxd:WroxPro 2/21/08 9:16 AM Page 840
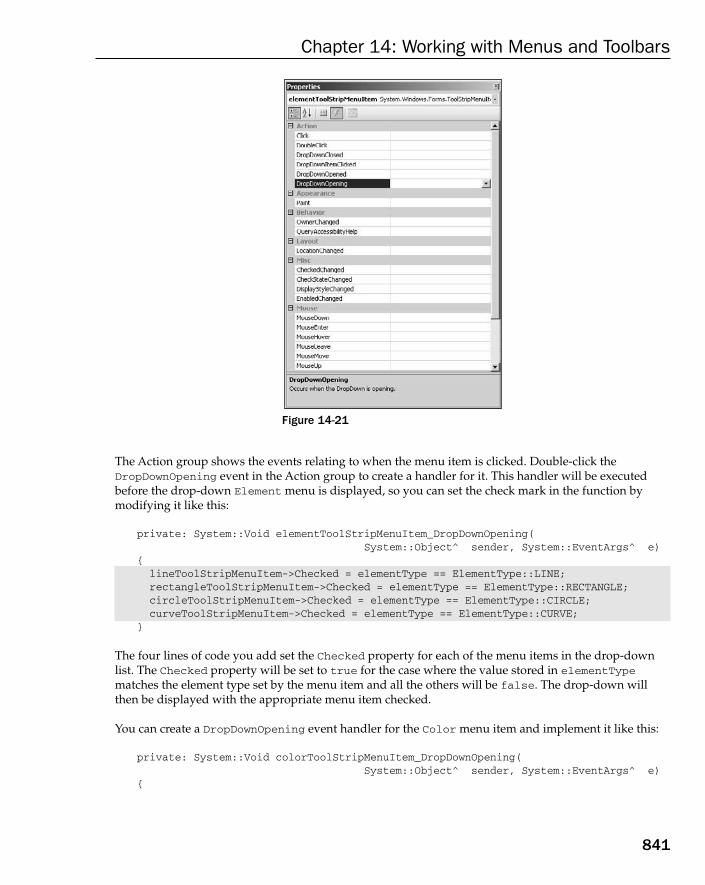
Figure 14-21
The Action group shows the events relating to when the menu item is clicked. Double-click theDropDownOpening event in the Action group to create a handler for it. This handler will be executedbefore the drop-down Element menu is displayed, so you can set the check mark in the function bymodifying it like this:
private: System::Void elementToolStripMenuItem_DropDownOpening(System::Object^ sender, System::EventArgs^ e)
{lineToolStripMenuItem->Checked = elementType == ElementType::LINE;rectangleToolStripMenuItem->Checked = elementType == ElementType::RECTANGLE;circleToolStripMenuItem->Checked = elementType == ElementType::CIRCLE;curveToolStripMenuItem->Checked = elementType == ElementType::CURVE;
}
The four lines of code you add set the Checked property for each of the menu items in the drop-downlist. The Checked property will be set to true for the case where the value stored in elementTypematches the element type set by the menu item and all the others will be false. The drop-down willthen be displayed with the appropriate menu item checked.
You can create a DropDownOpening event handler for the Color menu item and implement it like this:
private: System::Void colorToolStripMenuItem_DropDownOpening(System::Object^ sender, System::EventArgs^ e)
{
841
Chapter 14: Working with Menus and Toolbars
25905c14.qxd:WroxPro 2/21/08 9:16 AM Page 841
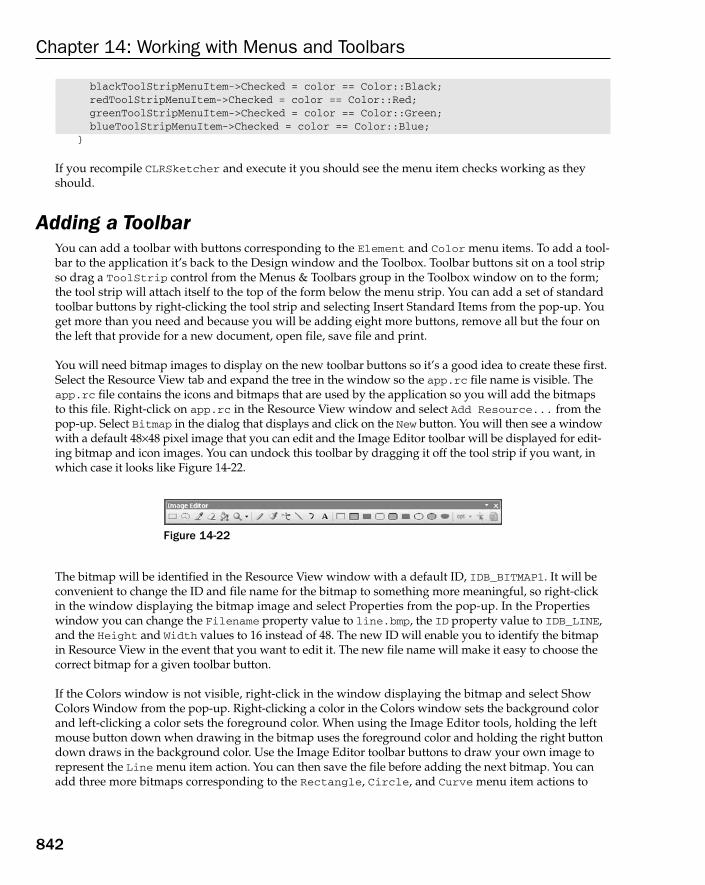
blackToolStripMenuItem->Checked = color == Color::Black;redToolStripMenuItem->Checked = color == Color::Red;greenToolStripMenuItem->Checked = color == Color::Green;blueToolStripMenuItem->Checked = color == Color::Blue;
}
If you recompile CLRSketcher and execute it you should see the menu item checks working as theyshould.
Adding a ToolbarYou can add a toolbar with buttons corresponding to the Element and Color menu items. To add a tool-bar to the application it’s back to the Design window and the Toolbox. Toolbar buttons sit on a tool stripso drag a ToolStrip control from the Menus & Toolbars group in the Toolbox window on to the form;the tool strip will attach itself to the top of the form below the menu strip. You can add a set of standardtoolbar buttons by right-clicking the tool strip and selecting Insert Standard Items from the pop-up. Youget more than you need and because you will be adding eight more buttons, remove all but the four onthe left that provide for a new document, open file, save file and print.
You will need bitmap images to display on the new toolbar buttons so it’s a good idea to create these first.Select the Resource View tab and expand the tree in the window so the app.rc file name is visible. Theapp.rc file contains the icons and bitmaps that are used by the application so you will add the bitmaps to this file. Right-click on app.rc in the Resource View window and select Add Resource... from thepop-up. Select Bitmap in the dialog that displays and click on the New button. You will then see a windowwith a default 48×48 pixel image that you can edit and the Image Editor toolbar will be displayed for edit-ing bitmap and icon images. You can undock this toolbar by dragging it off the tool strip if you want, inwhich case it looks like Figure 14-22.
Figure 14-22
The bitmap will be identified in the Resource View window with a default ID, IDB_BITMAP1. It will beconvenient to change the ID and file name for the bitmap to something more meaningful, so right-clickin the window displaying the bitmap image and select Properties from the pop-up. In the Propertieswindow you can change the Filename property value to line.bmp, the ID property value to IDB_LINE,and the Height and Width values to 16 instead of 48. The new ID will enable you to identify the bitmapin Resource View in the event that you want to edit it. The new file name will make it easy to choose thecorrect bitmap for a given toolbar button.
If the Colors window is not visible, right-click in the window displaying the bitmap and select ShowColors Window from the pop-up. Right-clicking a color in the Colors window sets the background colorand left-clicking a color sets the foreground color. When using the Image Editor tools, holding the leftmouse button down when drawing in the bitmap uses the foreground color and holding the right buttondown draws in the background color. Use the Image Editor toolbar buttons to draw your own image torepresent the Line menu item action. You can then save the file before adding the next bitmap. You canadd three more bitmaps corresponding to the Rectangle, Circle, and Curve menu item actions to
842
Chapter 14: Working with Menus and Toolbars
25905c14.qxd:WroxPro 2/21/08 9:16 AM Page 842
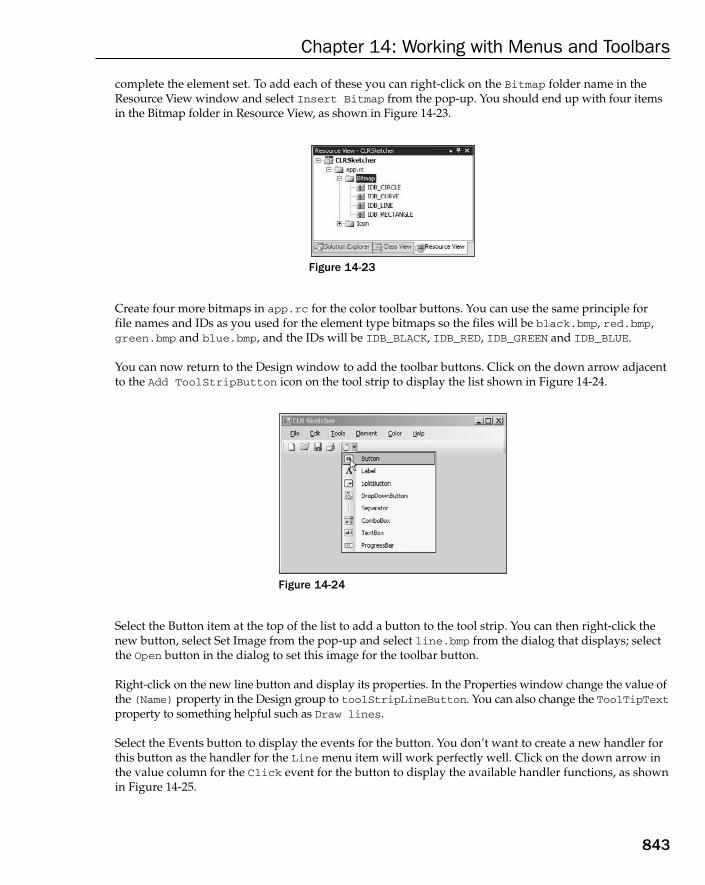
complete the element set. To add each of these you can right-click on the Bitmap folder name in theResource View window and select Insert Bitmap from the pop-up. You should end up with four itemsin the Bitmap folder in Resource View, as shown in Figure 14-23.
Figure 14-23
Create four more bitmaps in app.rc for the color toolbar buttons. You can use the same principle for file names and IDs as you used for the element type bitmaps so the files will be black.bmp, red.bmp,green.bmp and blue.bmp, and the IDs will be IDB_BLACK, IDB_RED, IDB_GREEN and IDB_BLUE.
You can now return to the Design window to add the toolbar buttons. Click on the down arrow adjacentto the Add ToolStripButton icon on the tool strip to display the list shown in Figure 14-24.
Figure 14-24
Select the Button item at the top of the list to add a button to the tool strip. You can then right-click thenew button, select Set Image from the pop-up and select line.bmp from the dialog that displays; selectthe Open button in the dialog to set this image for the toolbar button.
Right-click on the new line button and display its properties. In the Properties window change the value ofthe (Name) property in the Design group to toolStripLineButton. You can also change the ToolTipTextproperty to something helpful such as Draw lines.
Select the Events button to display the events for the button. You don’t want to create a new handler forthis button as the handler for the Line menu item will work perfectly well. Click on the down arrow inthe value column for the Click event for the button to display the available handler functions, as shownin Figure 14-25.
843
Chapter 14: Working with Menus and Toolbars
25905c14.qxd:WroxPro 2/21/08 9:16 AM Page 843

Figure 14-25
Select the lineToolStripMenuItem_Click handler from the list to register this function as the delegatefor the Click event for the button. Repeat this process to create buttons to create the element toolbar but-tons for drawing rectangles, circles, and curves and in each case set the Click event handler to be the cor-responding menu item Click event handler.
Before you add the buttons for element colors, click on the down arrow at the side of the AddToolStripButton icon on the toolbar and select Separator from the list; this inserts a separator to divide the element type button group from the colors group. You can now add the four buttons forcolors with the Click event handler being the same as the handler for the corresponding menu item.
If you now recompile CLRSketcher and execute it, you should see your version of the application similarto the window shown in Figure 14-26.
Figure 14-26
Figure 14-26 shows the tooltip text for the red button and you should find that the menu items checksare all working regardless of whether you use the toolbar or the menus to select the element type anddrawing color. You now have a CLR version of Sketcher that is essentially the same as the MFC versionyou developed earlier in this chapter. You won’t retain exact correspondence between MFC and CLRversions of Sketcher in subsequent chapters but the main features will be in both.
844
Chapter 14: Working with Menus and Toolbars
25905c14.qxd:WroxPro 2/21/08 9:16 AM Page 844
SummaryIn this chapter, you learned how MFC connects a message with a class member function to process it,and you wrote your first message handlers. Much of the work in writing a Windows program is writingmessage handlers, so it’s important to have a good grasp of what happens in the process. When we getto consider other message handlers, you’ll see that the process for adding them is just the same.
You have also extended the standard menu and the toolbar in the MFC Application Wizard-generatedprogram, which provides a good base for the application code that you add in the next chapter. Althoughthere’s no functionality under the covers yet, the menu and toolbar operation looks very professional,courtesy of the Application Wizard-generated framework and the Event Handler Wizard.
You learned about creating menus and toolbars in a CLR version of the Sketcher program and how youhandle events to provide equivalent function to the MFC version.
The important points that you’ve seen in this chapter are:
❑ MFC defines the message handlers for a class in a message map that appears in the .cpp file for the class.
❑ Command messages that arise from menus and toolbars can be handled in any class that’sderived from CCmdTarget. These include the application class, the frame and child frame window classes, the document class, and the view class.
❑ Messages other than command messages can only be handled in a class derived from CWnd. This includes frame window and view classes, but not application or document classes.
❑ MFC has a predefined sequence for searching the classes in your program to find a messagehandler for a command message.
❑ You should always use the Event Handler Wizard to add message handlers to your program.
❑ The physical appearances of menus and toolbars are defined in resource files, which are editedby the built-in resource editor.
❑ Items in a menu that can result in command messages are identified by a symbolic constant withthe prefix ID. These IDs are used to associate a handler with the message from the menu item.
❑ To associate a toolbar button with a particular menu item, you give it the same ID as that of themenu item.
❑ To add a tooltip for a toolbar button corresponding to a menu item, you add the tooltip text tothe entry for the ID for the menu item in the caption column in the String Table resource. Thetooltip text is separated from the menu prompt text by \n.
❑ You create menus and toolbars interactively in a CLR program through the Design window.Code is generated automatically to create menu items and toolbar buttons and display them on a form.
❑ You can create a delegate to handle a specific event for a control by double-clicking the eventtype in the Property window for the control. You can optionally select an existing delegate tohandle the event. This is particularly relevant to handling toolbar button events that are equiva-lent to existing menu items events.
845
Chapter 14: Working with Menus and Toolbars
25905c14.qxd:WroxPro 2/21/08 9:16 AM Page 845

In the next chapter, you’ll add the code necessary to both versions of Sketcher to draw elements in a view,and use the menus and toolbar buttons that you created here to select what to draw and in which color.This is where the Sketcher program begins to live up to its name.
ExercisesYou can download the source code for the examples in the book and the solutions to the following exer-cises from www.wrox.com. You’ll be developing both versions of Sketcher in subsequent chapters so youneed to retain the state of the program at the end of each chapter. The exercises involve modifying theexisting Sketcher versions but you can retain the original state quite easily by copying the entire contentsof the project folder to another folder, Save Sketcher say. When you have finished the exercises on theoriginal project, you can delete the contents of the project file (or save it somewhere else if you want tokeep it) and copy the contents of the Save Sketcher folder back to the original project directory.
1. Add a menu item Ellipse to the Element pop-up.
2. Implement the command and command update handlers for it in the document class.
3. Add a toolbar button corresponding to the Ellipse menu item and add a tooltip for the button.
4. Modify the command update handlers for the color menu items so that the currently selecteditem is displayed in uppercase, and the others are displayed in lowercase.
5. Add an Ellipse menu item and toolbar button with a tooltip to CLR Sketcher.
846
Chapter 14: Working with Menus and Toolbars
25905c14.qxd:WroxPro 2/21/08 9:16 AM Page 846
15Drawing in a Window
In this chapter, you will add some meat to the Sketcher application. You’ll focus on understandinghow you get graphical output displayed in the application window. By the end of this chapter, you’llbe able to draw all but one of the elements for which you have added menu items. I’ll leave the prob-lem of how to store them in a document until the next chapter. In this chapter, you will learn about:
❑ What coordinate systems Windows provides for drawing in a window
❑ Device context and why it is necessary
❑ How and when your program draws in a window
❑ How to define handlers for mouse messages
❑ How to define your own shape classes
❑ How to program the mouse to draw your shapes in a window
❑ How to get your program to capture the mouse
Basics of Drawing in a WindowBefore I go into drawing using MFC, it will be useful to get a better idea of what is happening underthe covers of the Windows operating system when you are drawing in a window. Similar to anyother operation under Windows, you write to a window on your display screen using Windows APIfunctions. There’s slightly more to it than that though; the way Windows works complicates the situ-ation somewhat.
For a start, you can’t just write to a window and forget it. There are many events that require thatyour application redraws the window — such as if the user resizes the window that you’re draw-ing in, for instance, or if part of your window that was previously hidden is exposed by the usermoving another window.
Fortunately, you don’t need to worry about the details of such occurrences, because Windows actu-ally manages all these events for you; however, it does mean that you can only write permanent datato a window when your application receives a specific Windows message requesting that you do so.It also means that you need to be able to reconstruct everything that you’ve drawn in the window atany time.
25905c15.qxd:WroxPro 2/21/08 9:17 AM Page 847
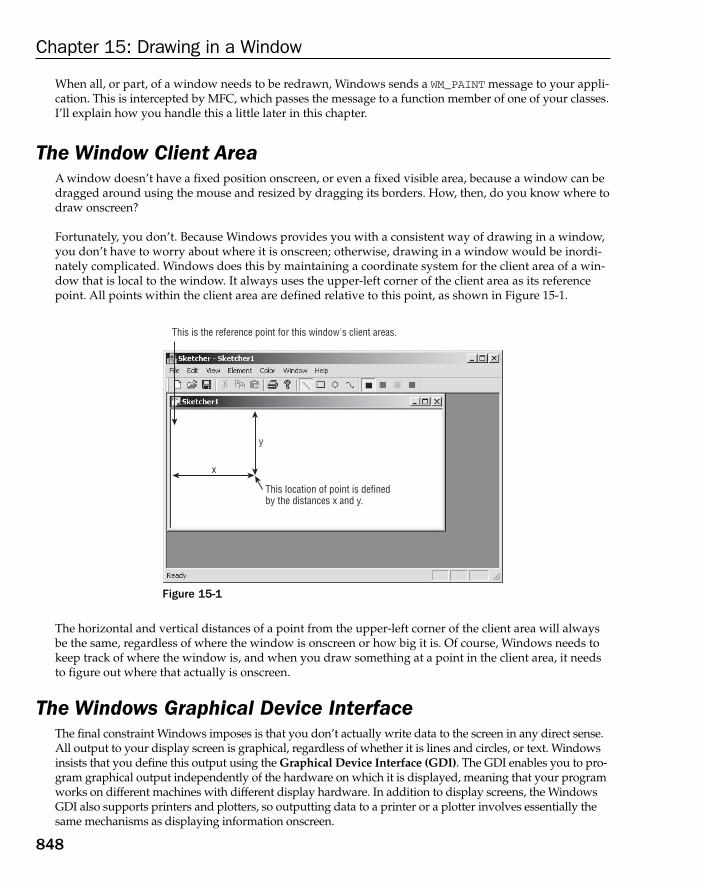
When all, or part, of a window needs to be redrawn, Windows sends a WM_PAINT message to your appli-cation. This is intercepted by MFC, which passes the message to a function member of one of your classes.I’ll explain how you handle this a little later in this chapter.
The Window Client AreaA window doesn’t have a fixed position onscreen, or even a fixed visible area, because a window can bedragged around using the mouse and resized by dragging its borders. How, then, do you know where todraw onscreen?
Fortunately, you don’t. Because Windows provides you with a consistent way of drawing in a window,you don’t have to worry about where it is onscreen; otherwise, drawing in a window would be inordi-nately complicated. Windows does this by maintaining a coordinate system for the client area of a win-dow that is local to the window. It always uses the upper-left corner of the client area as its referencepoint. All points within the client area are defined relative to this point, as shown in Figure 15-1.
Figure 15-1
The horizontal and vertical distances of a point from the upper-left corner of the client area will alwaysbe the same, regardless of where the window is onscreen or how big it is. Of course, Windows needs tokeep track of where the window is, and when you draw something at a point in the client area, it needsto figure out where that actually is onscreen.
The Windows Graphical Device InterfaceThe final constraint Windows imposes is that you don’t actually write data to the screen in any direct sense.All output to your display screen is graphical, regardless of whether it is lines and circles, or text. Windowsinsists that you define this output using the Graphical Device Interface (GDI). The GDI enables you to pro-gram graphical output independently of the hardware on which it is displayed, meaning that your programworks on different machines with different display hardware. In addition to display screens, the WindowsGDI also supports printers and plotters, so outputting data to a printer or a plotter involves essentially thesame mechanisms as displaying information onscreen.
This location of point is defined by the distances x and y.
x
y
This is the reference point for this window's client areas.
848
Chapter 15: Drawing in a Window
25905c15.qxd:WroxPro 2/21/08 9:17 AM Page 848

What Is a Device Context?When you want to draw something on a graphical output device such as the display screen, you must usea device context. A device context is a data structure that’s defined by Windows and contains informationthat allows Windows to translate your output requests, which are in the form of device-independent GDIfunction calls, into actions on the particular physical output device being used. A pointer to a device con-text is obtained by calling a Windows API function.
A device context provides you with a choice of coordinate systems called mapping modes, which are auto-matically converted to client coordinates. You can also alter many of the parameters that affect the outputto a device context by calling GDI functions; such parameters are called attributes. Examples of attributesthat you can change are the drawing color, the background color, the line thickness to be used when draw-ing, and the font for text output. There are also GDI functions that provide information about the physicaldevice with which you’re working such as the resolution and aspect ratio of a display.
Mapping ModesEach mapping mode in a device context is identified by an ID, in a manner similar to what you saw withWindows messages. Each symbol has the prefix MM_ to indicate that it defines a mapping mode. Themapping modes provided by Windows are:
You will not use all of these mapping modes with this book; however, the ones you will use form a goodcross-section of those available, so you won’t have any problem using the others when you need to.
Mapping Mode Description
MM_TEXT A logical unit is one device pixel with positive x from left to right, and posi-tive y from top to bottom of the window client area.
MM_LOENGLISH A logical unit is 0.01 inches with positive x from left to right, and positive yfrom the top of the client area upward.
MM_HIENGLISH A logical unit is 0.001 inches with the x and y directions as in MM_LOENGLISH.
MM_LOMETRIC A logical unit is 0.1 millimeters with the x and y directions as in MM_LOENGLISH.
MM_HIMETRIC A logical unit is 0.01 millimeters with the x and y directions as inMM_LOENGLISH.
MM_ISOTROPIC A logical unit is of arbitrary length, but the same along both the x and yaxes. The x and y directions are as in MM_LOENGLISH.
MM_ANISOTROPIC This mode is similar to MM_ISOTROPIC, but allows the length of a logicalunit on the x-axis to be different from that of a logical unit on the y-axis.
MM_TWIPS A logical unit is a TWIP where a TWIP is 0.05 of a point and a point is 1⁄72 ofan inch. Thus a TWIP corresponds to 1⁄1440 of an inch, which is 6.9*10-4 of aninch. (A point is a unit of measurement for fonts.) The x and y directions areas in MM_LOENGLISH.
849
Chapter 15: Drawing in a Window
25905c15.qxd:WroxPro 2/21/08 9:17 AM Page 849

MM_TEXT is the default mapping mode for a device context. If you need to use a different mapping mode,you have to take steps to change it. Note that the direction of the positive y-axis in the MM_TEXT mode isopposite to what you saw in high school coordinate geometry, as shown in Figure 15-2.
Figure 15-2
By default, the point at the upper-left corner of the client area has the coordinates (0, 0) in every mappingmode, although it’s possible to move the origin away from the upper-left corner of the client area if youwant to. For example, some applications that present data in graphical form move the origin to the centerof the client area to make plotting of the data easier. With the origin at the upper-left corner in MM_TEXTmode, a point 50 pixels from the left border and 100 pixels down from the top of the client area will havethe coordinates (50,100). Of course, because the units are pixels, the point will be nearer the upper-left cor-ner of the client area if your monitor is set to use a resolution of 1280×1024 than if it’s working with theresolution set as 1024×768. An object drawn in this mapping mode will be smaller at the 1280×1024 resolu-tion than it would be at the 1024×768 resolution. Note that the DPI setting for your display affects presen-tation in all mapping modes. The default settings assume 96 DPI, so if the DPI for your display is set to adifferent value, this affects how things look. Coordinates are always 32-bit signed integers unless you areprogramming for the old Windows 95/98 operating systems, in which case they are limited to 16 bits. Themaximum physical size of the total drawing varies with the physical length of a coordinate unit, which isdetermined by the mapping mode.
The directions of the x and y coordinate axes in MM_LOENGLISH and all the remaining mapping modes arethe same as each other, but different from MM_TEXT. The coordinate axes for MM_LOENGLISH are shown inFigure 15-3. Although positive y is consistent with what you learned in high school (y values increase asyou move up the screen), MM_LOENGLISH is still slightly odd because the origin is at the upper-left cornerof the client area, so for points within the visible client area, y is always negative.
Figure 15-3
Negative ydirection
MM_LOENGLISH mapping mode
Positive xdirection
Positive ydirection
MM_TEXT mapping mode
Positive xdirection
850
Chapter 15: Drawing in a Window
25905c15.qxd:WroxPro 2/21/08 9:17 AM Page 850

In the MM_LOENGLISH mapping mode, the units along the axes are 0.01 inches apiece, so a point at theposition (50, -100) is half an inch from the left border and one inch down from the top of the client area.An object is the same size in the client area, regardless of the resolution of the monitor on which it is dis-played. If you draw anything in the MM_LOENGLISH mode with negative x or positive y coordinates, it isoutside the client area and therefore not visible because the reference point (0,0) is the upper-left cornerby default. It’s possible to move the position of the reference point though, by calling the Windows APIfunction SetViewportOrg() (or the SetViewportOrg() member of the CDC MFC class encapsulating adevice context that I’ll discuss shortly).
The Drawing Mechanism in Visual C++MFC encapsulates the Windows interface to your screen and printer and relieves you of the need to worryabout much of the detail involved in programming graphical output. As you saw in the last chapter, theApplication Wizard-generated program already contains a class derived from the MFC class CView that’sspecifically designed to display document data onscreen.
The View Class in Your ApplicationThe MFC Application Wizard generated the class CSketcherView to display information from a docu-ment in the client area of a document window. The class definition includes overrides for several virtualfunctions, but the one of particular interest here is the function OnDraw(). This is called whenever theclient area of the document window needs to be redrawn. It’s the function that’s called by the applica-tion framework when a WM_PAINT message is received in your program.
The OnDraw() Member FunctionThe implementation of the OnDraw() member function that’s created by the MFC Application Wizardlooks like this:
void CSketcherView::OnDraw(CDC* /*pDC*/){
CSketcherDoc* pDoc = GetDocument();ASSERT_VALID(pDoc);if(!pDoc)return;
// TODO: add draw code for native data here}
A pointer to an object of the CDC class type is passed to the OnDraw() member of the view class. This objecthas member functions that call the Windows API functions and these allow you to draw in a device con-text. Note that the parameter name is commented out so you must uncomment the name or replace it withyour own name before you can use the pointer.
Because you’ll put all the code to draw the document in this function, the Application Wizard has includeda declaration for the pointer pDoc and initialized it using the function GetDocument(), which returns theaddress of the document object related to the current view:
CSketcherDoc* pDoc = GetDocument();
851
Chapter 15: Drawing in a Window
25905c15.qxd:WroxPro 2/21/08 9:17 AM Page 851
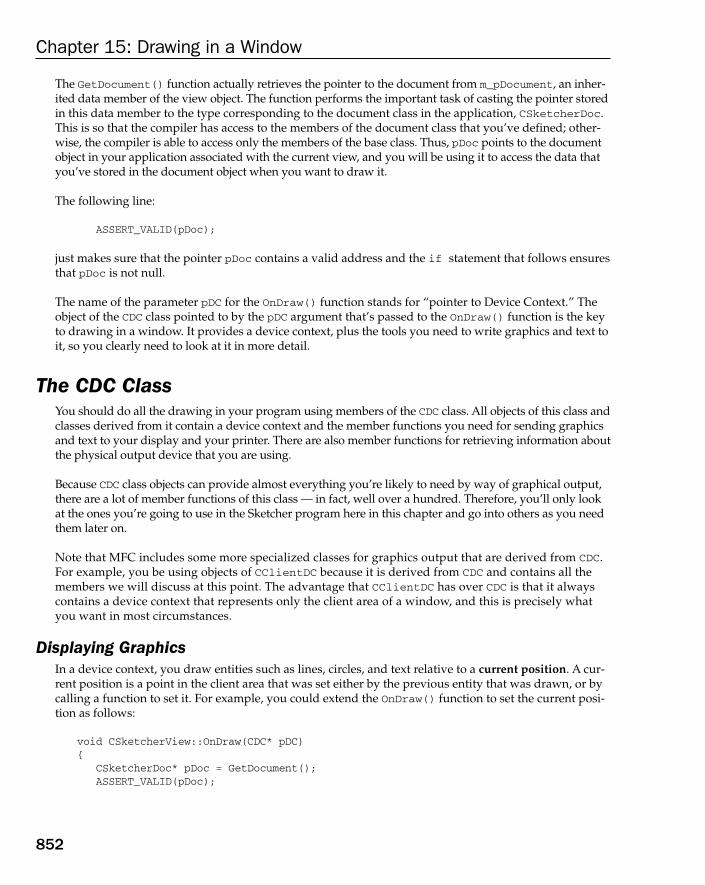
The GetDocument() function actually retrieves the pointer to the document from m_pDocument, an inher-ited data member of the view object. The function performs the important task of casting the pointer storedin this data member to the type corresponding to the document class in the application, CSketcherDoc.This is so that the compiler has access to the members of the document class that you’ve defined; other-wise, the compiler is able to access only the members of the base class. Thus, pDoc points to the documentobject in your application associated with the current view, and you will be using it to access the data thatyou’ve stored in the document object when you want to draw it.
The following line:
ASSERT_VALID(pDoc);
just makes sure that the pointer pDoc contains a valid address and the if statement that follows ensuresthat pDoc is not null.
The name of the parameter pDC for the OnDraw() function stands for “pointer to Device Context.” Theobject of the CDC class pointed to by the pDC argument that’s passed to the OnDraw() function is the keyto drawing in a window. It provides a device context, plus the tools you need to write graphics and text toit, so you clearly need to look at it in more detail.
The CDC ClassYou should do all the drawing in your program using members of the CDC class. All objects of this class andclasses derived from it contain a device context and the member functions you need for sending graphicsand text to your display and your printer. There are also member functions for retrieving information aboutthe physical output device that you are using.
Because CDC class objects can provide almost everything you’re likely to need by way of graphical output,there are a lot of member functions of this class — in fact, well over a hundred. Therefore, you’ll only lookat the ones you’re going to use in the Sketcher program here in this chapter and go into others as you needthem later on.
Note that MFC includes some more specialized classes for graphics output that are derived from CDC.For example, you be using objects of CClientDC because it is derived from CDC and contains all themembers we will discuss at this point. The advantage that CClientDC has over CDC is that it alwayscontains a device context that represents only the client area of a window, and this is precisely whatyou want in most circumstances.
Displaying GraphicsIn a device context, you draw entities such as lines, circles, and text relative to a current position. A cur-rent position is a point in the client area that was set either by the previous entity that was drawn, or bycalling a function to set it. For example, you could extend the OnDraw() function to set the current posi-tion as follows:
void CSketcherView::OnDraw(CDC* pDC){
CSketcherDoc* pDoc = GetDocument();ASSERT_VALID(pDoc);
852
Chapter 15: Drawing in a Window
25905c15.qxd:WroxPro 2/21/08 9:17 AM Page 852

if(!pDoc)return;
pDC->MoveTo(50, 50); // Set the current position as 50,50}
The shaded line calls the MoveTo() function for the CDC object pointed to by pDC. This member functionsimply sets the current position to the x and y coordinates you specify as arguments. As you saw earlier,the default mapping mode is MM_TEXT, so the coordinates are in pixels and the current position will beset to a point 50 pixels from the inside left border of the window, and 50 pixels down from the top of theclient area.
The CDC class overloads the MoveTo() function to provide flexibility over how you specify the positionthat you want to set as the current position. There are two versions of the function, declared in the CDCclass as:
CPoint MoveTo(int x, int y); // Move to position x,yCPoint MoveTo(POINT aPoint); // Move to position defined by aPoint
The first version accepts the x and y coordinates as separate arguments. The second accepts one argumentof type POINT, which is a structure defined as:
typedef struct tagPOINT{
LONG x;LONG y;
} POINT;
The coordinates are members of the struct and are of type LONG (which is type defined in the WindowsAPI corresponding to a 32-bit signed integer). You may prefer to use a class instead of a structure, inwhich case you can use objects of the class CPoint anywhere that a POINT object can be used. The classCPoint has data members x and y of type LONG, and using CPoint objects has the advantage that theclass also defines member functions that operate on CPoint and POINT objects. This may seem weirdbecause CPoint would seem to make POINT objects obsolete, but remember that the Windows API wasbuilt before MFC was around, and POINT objects are used in the Windows API and have to be dealtwith sooner or later. CPoint objects are used in examples, so you’ll have an opportunity to see some of the member functions in action.
The return value from the MoveTo() function is a CPoint object that specifies the current position as itwas before the move. You might think this a little odd, but consider the situation where you want to moveto a new position, draw something, and then move back. You may not know the current position beforethe move, and after the move occurs it would be lost so returning the position before the move makessure it’s available to you if you need it.
Drawing LinesYou can follow the call to MoveTo() in the OnDraw() function with a call to the function LineTo(),which draws a line in the client area from the current position to the point specified by the arguments to the LineTo() function, as illustrated in Figure 15-4.
853
Chapter 15: Drawing in a Window
25905c15.qxd:WroxPro 2/21/08 9:17 AM Page 853

Figure 15-4
The CDC class also defines two versions of the LineTo() function that have the following prototypes:
BOOL LineTo(int x, int y); // Draw a line to position x,yBOOL LineTo(POINT aPoint); // Draw a line to position defined by aPoint
This offers you the same flexibility in specifying the argument to the function as MoveTo(). You can usea CPoint object as an argument to the second version of the function. The function returns TRUE if theline was drawn and FALSE otherwise.
When the LineTo() function is executed, the current position is changed to the point specifying the endof the line. This allows you to draw a series of connected lines by just calling the LineTo() function foreach line. Look at the following version of the OnDraw() function:
void CSketcherView::OnDraw(CDC* pDC){
CSketcherDoc* pDoc = GetDocument();ASSERT_VALID(pDoc);if(!pDoc)return;
pDC->MoveTo(50,50); // Set the current positionpDC->LineTo(50,200); // Draw a vertical line down 150 unitspDC->LineTo(150,200); // Draw a horizontal line right 100 unitspDC->LineTo(150,50); // Draw a vertical line up 150 unitspDC->LineTo(50,50); // Draw a horizontal line left 100 units
}
If you plug this into the Sketcher program and execute it, it displays the document window shown inFigure 15-5.
The four calls to the LineTo() function draw the rectangle shown counterclockwise, starting with theupper-left corner. The first call uses the current position set by the MoveTo() function; the succeedingcalls use the current position set by the previous LineTo() function call. You can use this to draw anyfigure consisting of a sequence of lines, each connected to the previous line. Of course, you are also freeto use MoveTo() to change the current position at any time.
Units are pixels
Set the current position to here pDC->MoveTo(50,50);pDC->LineTo(150,100);Draw a line to here
X-Axis
Y-Axis
50,50
150,100
854
Chapter 15: Drawing in a Window
25905c15.qxd:WroxPro 2/21/08 9:17 AM Page 854
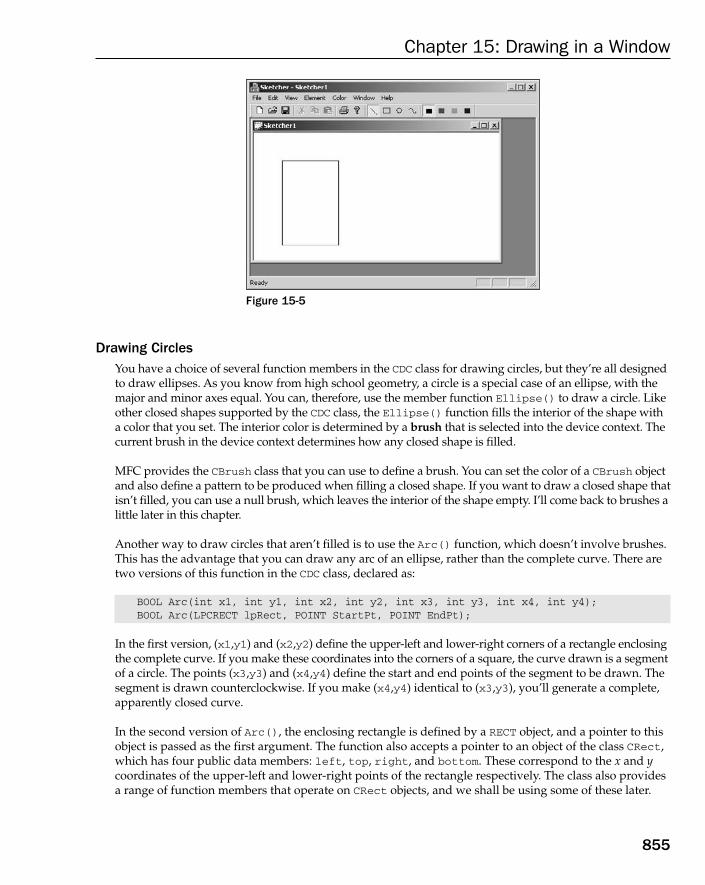
Figure 15-5
Drawing CirclesYou have a choice of several function members in the CDC class for drawing circles, but they’re all designedto draw ellipses. As you know from high school geometry, a circle is a special case of an ellipse, with themajor and minor axes equal. You can, therefore, use the member function Ellipse() to draw a circle. Likeother closed shapes supported by the CDC class, the Ellipse() function fills the interior of the shape witha color that you set. The interior color is determined by a brush that is selected into the device context. Thecurrent brush in the device context determines how any closed shape is filled.
MFC provides the CBrush class that you can use to define a brush. You can set the color of a CBrush objectand also define a pattern to be produced when filling a closed shape. If you want to draw a closed shape thatisn’t filled, you can use a null brush, which leaves the interior of the shape empty. I’ll come back to brushes alittle later in this chapter.
Another way to draw circles that aren’t filled is to use the Arc() function, which doesn’t involve brushes.This has the advantage that you can draw any arc of an ellipse, rather than the complete curve. There aretwo versions of this function in the CDC class, declared as:
BOOL Arc(int x1, int y1, int x2, int y2, int x3, int y3, int x4, int y4);BOOL Arc(LPCRECT lpRect, POINT StartPt, POINT EndPt);
In the first version, (x1,y1) and (x2,y2) define the upper-left and lower-right corners of a rectangle enclosingthe complete curve. If you make these coordinates into the corners of a square, the curve drawn is a segmentof a circle. The points (x3,y3) and (x4,y4) define the start and end points of the segment to be drawn. Thesegment is drawn counterclockwise. If you make (x4,y4) identical to (x3,y3), you’ll generate a complete,apparently closed curve.
In the second version of Arc(), the enclosing rectangle is defined by a RECT object, and a pointer to thisobject is passed as the first argument. The function also accepts a pointer to an object of the class CRect,which has four public data members: left, top, right, and bottom. These correspond to the x and ycoordinates of the upper-left and lower-right points of the rectangle respectively. The class also providesa range of function members that operate on CRect objects, and we shall be using some of these later.
855
Chapter 15: Drawing in a Window
25905c15.qxd:WroxPro 2/21/08 9:17 AM Page 855

The POINT objects StartPt and EndPt in the second version of Arc() define the start and end of the arcto be drawn.
Here’s some code that exercises both versions of the Arc() function:
void CSketcherView::OnDraw(CDC* pDC){
CSketcherDoc* pDoc = GetDocument();ASSERT_VALID(pDoc);if(!pDoc)return;
pDC->Arc(50,50,150,150,100,50,150,100); // Draw the 1st (large) circle
// Define the bounding rectangle for the 2nd (smaller) circleCRect* pRect = new CRect(250,50,300,100);CPoint Start(275,100); // Arc start pointCPoint End(250,75); // Arc end pointpDC->Arc(pRect,Start, End); // Draw the second circledelete pRect;
}
Note that you used a CRect class object instead of a RECT structure to define the bounding rectangle, andthat you used CPoint class objects instead of POINT structures. You’ll also be using CRect objects later,but they have some limitations, as you’ll see. The Arc() function doesn’t require a current position to beset, as the position and size of the arc are completely defined by the arguments you supply. The currentposition is unaffected by drawing an arc — it remains exactly wherever it was before the arc was drawn.Now try running Sketcher with this code in the OnDraw() function. You should get the results shown inFigure 15-6.
Figure 15-6
Try re-sizing the borders. The client area is automatically redrawn as you cover or uncover the arcs in thepicture. Remember that screen resolution affects the scale of what is displayed. The lower the screen reso-lution you’re using, the larger and further from the upper-left corner of the client area the arcs will be.
856
Chapter 15: Drawing in a Window
25905c15.qxd:WroxPro 2/21/08 9:17 AM Page 856

Drawing in ColorEverything that you’ve drawn so far has appeared on the screen in black. Drawing implies using a penobject that has a color and a thickness, and you’ve been using the default pen object that is provided in adevice context. You’re not obliged to do this, of course — you can create your own pen with a given thick-ness and color. MFC defines the class CPen to help you do this.
All closed curves that you draw are filled with the current brush in the device context. As mentionedearlier, you can define a brush as an instance of the class CBrush. Take a look at some of the features ofCPen and CBrush objects.
Creating a PenThe simplest way to create a pen object is first to declare an object of the CPen class:
CPen aPen; // Declare a pen object
This object now needs to be initialized with the properties you want. You do this using the class memberfunction CreatePen(), which is declared in the CPen class as:
BOOL CreatePen (int aPenStyle, int aWidth, COLORREF aColor);
The function returns TRUE as long as the pen is successfully initialized and FALSE otherwise. The firstargument defines the line style that you want to use when drawing. You must specify it with one of thefollowing symbolic values:
The second argument to the CreatePen() function defines the line width. If aWidth has the value 0, theline drawn is 1 pixel wide, regardless of the mapping mode in effect. For values of 1 or more, the pen width
Pen Style Description
PS_SOLID The pen draws a solid line.
PS_DASH The pen draws a dashed line. This line style is valid only when the penwidth is specified as 1.
PS_DOT The pen draws a dotted line. This line style is valid only when the penwidth is specified as 1.
PS_DASHDOT The pen draws a line with alternating dashes and dots. This line style isvalid only when the pen width is specified as 1.
PS_DASHDOTDOT The pen draws a line with alternating dashes and double dots. This linestyle is valid only when the pen width is specified as 1.
PS_NULL The pen doesn’t draw anything.
PS_INSIDEFRAME The pen draws a solid line, but unlike PS_SOLID, the points that specify theline occur on the edge of the pen rather than in the center, so that the drawnobject never extends beyond the enclosing rectangle.
857
Chapter 15: Drawing in a Window
25905c15.qxd:WroxPro 2/21/08 9:17 AM Page 857
is in the units determined by the mapping mode. For example, a value of 2 for aWidth in MM_TEXTmode is 2 pixels; in MM_LOENGLISH mode the pen width is 0.02 inches.
The last argument specifies the color to be used when drawing with the pen, so you could initialize a penwith the statement:
aPen.CreatePen(PS_SOLID, 2, RGB(255,0,0)); // Create a red solid pen
Assuming that the mapping mode is MM_TEXT, this pen draws a solid red line that is 2 pixels wide.
Using a PenTo use a pen, you must select it into the device context in which you are drawing. To do this, you use theCDC class member function SelectObject(). To select the pen you want to use, you call this functionwith a pointer to the pen object as an argument. The function returns a pointer to the previous pen objectbeing used, so that you can save it and restore the old pen when you have finished drawing. A typicalstatement selecting a pen is:
CPen* pOldPen = pDC->SelectObject(&aPen); // Select aPen as the pen
To restore the old pen when you’re done, you simply call the function again, passing the pointerreturned from the original call:
pDC->SelectObject(pOldPen); // Restore the old pen
You can see this in action if you amend the previous version of the OnDraw() function in theCSketcherView class to:
void CSketcherView::OnDraw(CDC* pDC){
CSketcherDoc* pDoc = GetDocument();ASSERT_VALID(pDoc);if(!pDoc)
return;
// Declare a pen object and initialize it as// a red solid pen drawing a line 2 pixels wideCPen aPen;aPen.CreatePen(PS_SOLID, 2, RGB(255, 0, 0));
CPen* pOldPen = pDC->SelectObject(&aPen); // Select aPen as the pen
pDC->Arc(50,50,150,150,100,50,150,100); // Draw the 1st circle
// Define the bounding rectangle for the 2nd circleCRect* pRect = new CRect(250,50,300,100);CPoint Start(275,100); // Arc start pointCPoint End(250,75); // Arc end pointpDC->Arc(pRect,Start, End); // Draw the second circledelete pRect;
pDC->SelectObject(pOldPen); // Restore the old pen}
858
Chapter 15: Drawing in a Window
25905c15.qxd:WroxPro 2/21/08 9:17 AM Page 858
If you build and execute the Sketcher application with this version of the OnDraw() function, you getthe same arcs drawn as before, but this time the lines will be thicker and they’ll be red. You could use-fully experiment with this example by trying different combinations of arguments to the CreatePen()function and seeing their effects. Note that we have ignored the value returned from the CreatePen()function, so you run the risk of the function failing and not detecting it in the program. It doesn’t matterhere, as the program is still trivial, but as you develop the program it becomes important to check forfailures of this kind.
Creating a BrushAn object of the CBrush class encapsulates a Windows brush. You can define a brush to be solid, hatched,or patterned. A brush is actually an 8x8 block of pixels that’s repeated over the region to be filled.
To define a brush with a solid color, you can specify the color when you create the brush object. For example,
CBrush aBrush(RGB(255,0,0)); // Define a red brush
This statement defines a red brush. The value passed to the constructor must be of type COLORREF, whichis the type returned by the RGB() macro, so this is a good way to specify the color.
Another constructor is available to define a hatched brush. It requires two arguments to be specified, thefirst defining the type of hatching, and the second specifying the color, as before. The hatching argumentcan be any of the following symbolic constants:
So, to obtain a red, 45-degree crosshatched brush, you could define the CBrush object with the statement:
CBrush aBrush(HS_DIAGCROSS, RGB(255,0,0));
You can also initialize a CBrush object in a similar manner to that for a CPen object, by using theCreateSolidBrush() member function of the class for a solid brush, and the CreateHatchBrush()member for a hatched brush. They require the same arguments as the equivalent constructors. For exam-ple, you could create the same hatched brush as before, with the statements:
CBrush aBrush; // Define a brush objectaBrush.CreateHatchBrush(HS_DIAGCROSS, RGB(255,0,0));
Hatching Style Description
HS_HORIZONTAL Horizontal hatching
HS_VERTICAL Vertical hatching
HS_BDIAGONAL Downward hatching from left to right at 45 degrees
HS_FDIAGONAL Upward hatching from left to right at 45 degrees
HS_CROSS Horizontal and vertical crosshatching
HS_DIAGCROSS Crosshatching at 45 degrees
859
Chapter 15: Drawing in a Window
25905c15.qxd:WroxPro 2/21/08 9:17 AM Page 859
Using a BrushTo use a brush, you select the brush into the device context by calling the SelectObject() member ofthe CDC class in a parallel fashion to that used for a pen. This member function is overloaded to supportselecting brush objects into a device context. To select the brush defined previously, you would simplywrite:
pDC->SelectObject(aBrush); // Select the brush into the device context
There are a number of standard brushes available. Each of the standard brushes is identified by a prede-fined symbolic constant, and there are seven that you can use. They are the following:
The names of these brushes are quite self-explanatory. To use one, you call the SelectStockObject()member of the CDC class, passing the symbolic name for the brush that you want to use as an argument.To select the null brush, which leaves the interior of a closed shape unfilled, you could write:
pDC->SelectStockObject(NULL_BRUSH);
Here, pDC is a pointer to a CDC object, as before. You can also use one of a range of standard pens throughthis function. The symbols for standard pens are BLACK_PEN, NULL_PEN (which doesn’t draw anything),and WHITE_PEN. The SelectStockObject() function returns a pointer to the object being replaced in thedevice context. This enables you to save it for restoring later when you have finished drawing.
Because the function works with a variety of objects — you’ve seen pens and brushes in this chapter, but italso works with fonts — the type of the pointer returned is CGdiObject*. The CGdiObject class is a baseclass for all the graphic device interface object classes and thus a pointer to this class can be used to store apointer to any object of these types. However, you need to cast the pointer value returned to the appropri-ate type so that you can select the old object back to restore it. This is because the SelectObject() func-tion you use to do this is overloaded for each of the kinds of object that can be selected. There’s no versionof SelectObject() that accepts a pointer to a CGdiObject as an argument, but there are versions thataccept an argument of type CBrush*, CPen*, and pointers to other GDI objects.
The typical pattern of coding for using a stock brush and later restoring the old brush when you’re done is:
CBrush* pOldBrush = (CBrush*)pDC->SelectStockObject(NULL_BRUSH);
// draw something...
pDC->SelectObject(pOldBrush); // Restore the old brush
You’ll be using this in your example later in the chapter.
GRAY_BRUSH LTGRAY_BRUSH DKGRAY_BRUSH
BLACK_BRUSH WHITE_BRUSH
HOLLOW_BRUSH NULL_BRUSH
860
Chapter 15: Drawing in a Window
25905c15.qxd:WroxPro 2/21/08 9:17 AM Page 860

Drawing Graphics in PracticeYou now know how to draw lines and arcs, so it’s about time to consider how the user is going todefine what they want drawn in Sketcher. In other words, you need to decide how the user interface is going to work.
Because the Sketcher program is to be a sketching tool, you don’t want the user to worry about coordi-nates. The easiest mechanism for drawing is using just the mouse. To draw a line, for instance, the usercould position the cursor and press the left mouse button where they wanted the line to start, and thendefine the end of the line by moving the cursor with the left button held down. It would be ideal if youcould arrange that the line was continuously drawn as the cursor was moved with the left button down(this is known as “rubber-banding” to graphic designers). The line would be fixed when the left mousebutton was released. This process is illustrated in Figure 15-7.
Figure 15-7
You could allow circles to be drawn in a similar fashion. The first press of the left mouse button woulddefine the center and, as the cursor was moved with the button down, the program would track it. Thecircle would be continuously redrawn, with the current cursor position defining a point on the circum-ference of the circle. As with drawing a line, the circle would be fixed when the left mouse button wasreleased. You can see this process illustrated in Figure 15-8.
You can draw a rectangle as easily as you draw a line, as illustrated in Figure 15-9.
Line is fixed when themouse button is released
Line is continuously updated as thecursor moves
Left mouse buttonup
Cursor movement
Left mouse buttondown
861
Chapter 15: Drawing in a Window
25905c15.qxd:WroxPro 2/21/08 9:17 AM Page 861

Figure 15-8
Figure 15-9
Rectangle is fixed when themouse button is released
Rectangle is continuously updated as thecursor moves
Left mouse buttonup
Cursor movement
Left mouse buttondown
Circle is continuously updated as thecursor moves
Circle is fixed when themouse button is released
Left mouse buttonup
Cursor movement
Left mouse buttondown
862
Chapter 15: Drawing in a Window
25905c15.qxd:WroxPro 2/21/08 9:17 AM Page 862
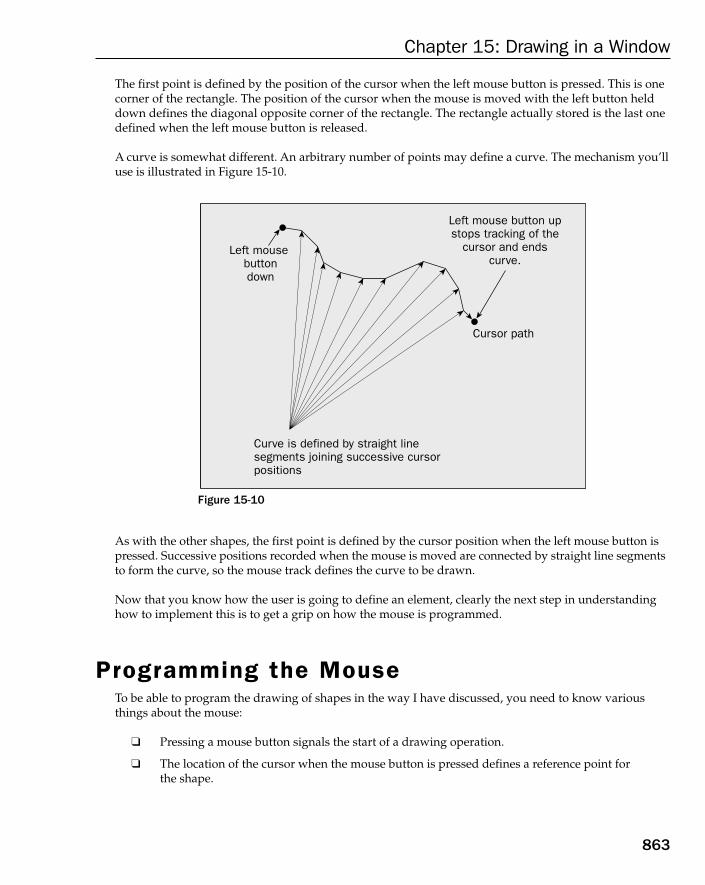
The first point is defined by the position of the cursor when the left mouse button is pressed. This is onecorner of the rectangle. The position of the cursor when the mouse is moved with the left button helddown defines the diagonal opposite corner of the rectangle. The rectangle actually stored is the last onedefined when the left mouse button is released.
A curve is somewhat different. An arbitrary number of points may define a curve. The mechanism you’lluse is illustrated in Figure 15-10.
Figure 15-10
As with the other shapes, the first point is defined by the cursor position when the left mouse button ispressed. Successive positions recorded when the mouse is moved are connected by straight line segmentsto form the curve, so the mouse track defines the curve to be drawn.
Now that you know how the user is going to define an element, clearly the next step in understandinghow to implement this is to get a grip on how the mouse is programmed.
Programming the MouseTo be able to program the drawing of shapes in the way I have discussed, you need to know variousthings about the mouse:
❑ Pressing a mouse button signals the start of a drawing operation.
❑ The location of the cursor when the mouse button is pressed defines a reference point for the shape.
Curve is defined by straight linesegments joining successive cursorpositions
Left mouse button upstops tracking of the
cursor and endscurve.
Cursor path
Left mouse buttondown
863
Chapter 15: Drawing in a Window
25905c15.qxd:WroxPro 2/21/08 9:17 AM Page 863
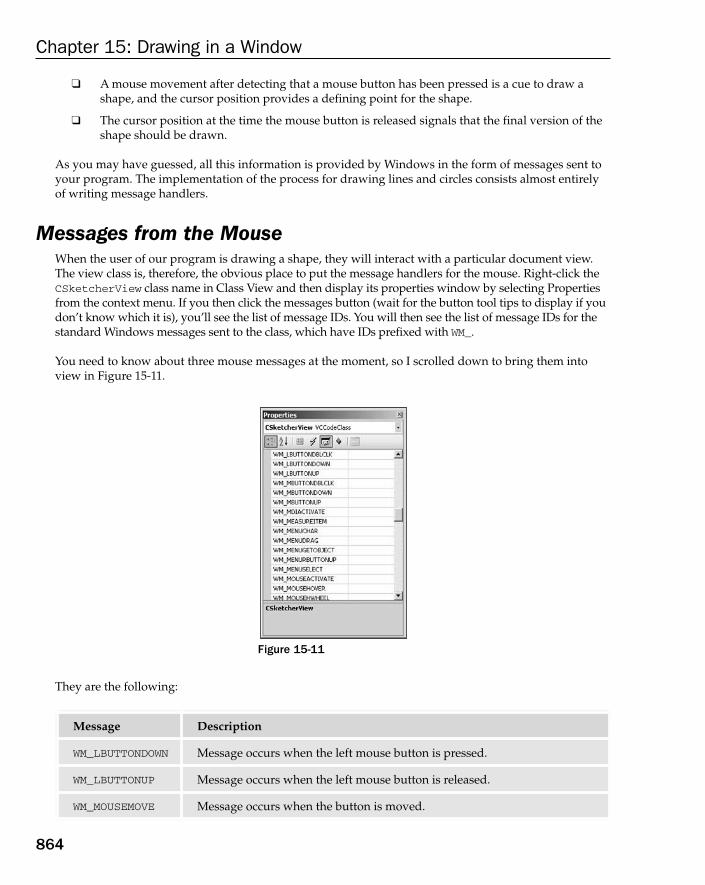
❑ A mouse movement after detecting that a mouse button has been pressed is a cue to draw ashape, and the cursor position provides a defining point for the shape.
❑ The cursor position at the time the mouse button is released signals that the final version of theshape should be drawn.
As you may have guessed, all this information is provided by Windows in the form of messages sent toyour program. The implementation of the process for drawing lines and circles consists almost entirelyof writing message handlers.
Messages from the MouseWhen the user of our program is drawing a shape, they will interact with a particular document view.The view class is, therefore, the obvious place to put the message handlers for the mouse. Right-click theCSketcherView class name in Class View and then display its properties window by selecting Propertiesfrom the context menu. If you then click the messages button (wait for the button tool tips to display if youdon’t know which it is), you’ll see the list of message IDs. You will then see the list of message IDs for thestandard Windows messages sent to the class, which have IDs prefixed with WM_.
You need to know about three mouse messages at the moment, so I scrolled down to bring them intoview in Figure 15-11.
Figure 15-11
They are the following:
Message Description
WM_LBUTTONDOWN Message occurs when the left mouse button is pressed.
WM_LBUTTONUP Message occurs when the left mouse button is released.
WM_MOUSEMOVE Message occurs when the button is moved.
864
Chapter 15: Drawing in a Window
25905c15.qxd:WroxPro 2/21/08 9:17 AM Page 864
These messages are quite independent of one another and are being sent to the document views in yourprogram even if you haven’t supplied handlers for them. It’s quite possible for a window to receive aWM_LBUTTONUP message without having previously received a WM_LBUTTONDOWN message. This can hap-pen if the button is pressed with the cursor over another window and then moved to your view windowbefore being released.
If you look at the list in the properties window you’ll see there are other mouse messages that can occur.You can choose to process any or all of the messages, depending on your application requirements. Definein general terms what you want to do with the three messages that you’re currently interested in, basedon the process for drawing shapes that you saw earlier:
WM_LBUTTONDOWNThis starts the process of drawing an element. So you will:
1. Note that the element drawing process has started.
2. Record the current cursor position as the first point for defining an element.
WM_MOUSEMOVEThis is an intermediate stage where you want to create and draw a temporary version of the current element but only if the left mouse button is down, so:
1. Check that the left button is down.
2. If it is, delete any previous version of the current element that was drawn.
3. If it isn’t, then exit.
4. Record the current cursor position as the second defining point for the current element.
5. Cause the current element to be drawn using the two defining points.
WM_LBUTTONUPThis indicates that the process for drawing an element is finished, so all you need to do is:
1. Store the final version of the element defined by the first point recorded, together with the position of the cursor when the button is released for the second point.
2. Record the end of the process of drawing an element.
Now generate handlers for these three mouse messages.
Mouse Message HandlersYou can create a handler for one of the mouse messages by clicking on the ID to select it and then selectingthe down arrow in the adjacent column position; try selecting <add> OnLButtonUp for the ID_LBUTTONUPmessage, for example. Repeat the process for each of the messages WM_LBUTTONDOWN and WM_MOUSEMOVE.The functions generated in the CSketcherView class are OnLButtonDown(), OnLButtonUp() andOnMouseMove(). You don’t get the option of changing the names of these functions because you’re addingoverrides for versions that are already defined in the base class for the CSketcherView class. Take a look athow you implement these handlers.
865
Chapter 15: Drawing in a Window
25905c15.qxd:WroxPro 2/21/08 9:17 AM Page 865

You can start by looking at the WM_LBUTTONDOWN message handler. This is the skeleton code that’s generated:
void CSketcherView::OnLButtonDown(UINT nFlags, CPoint point){// TODO: Add your message handler code here and/or call default
CView::OnLButtonDown(nFlags, point);}
You can see that there is a call to the base class handler in the skeleton version. This ensures that the basehandler is called if you don’t add any code here. In this case you don’t need to call the base class handlerwhen you handle the message yourself, although you can if you want to. Whether you need to call thebase class handler for a message depends on the circumstances.
Generally, the comment indicating where you should add your own code is a good guide. Where it sug-gests, as in the present instance, that calling the base class handler is optional, you can omit it when youadd your own message handling code. Note that the position of the comment in relation to the call of thebase class handler is also important, as sometimes you must call the base class message handler before yourcode, and other times afterwards. The comment indicates where your code should appear in relation to thebase class message handler call.
The handler in your class is passed two arguments: nFlags, which is of type UINT and contains a numberof status flags indicating whether various keys are down, and the CPoint object point, which defines thecursor position when the left mouse button was pressed. The UINT type is defined in the Windows APIand corresponds to a 32-bit unsigned integer.
The value of nFlags that is passed to the function can be any combination of the following symbolic values:
Being able to detect if a key is down in the message handler enables you to support different actions forthe message depending on what else you find. The value of nFlags may contain more than one of theseindicators, each of which corresponds to a particular bit in the word, so you can test for a particular keyusing the bitwise AND operator. For example, to test for the Ctrl key being pressed, you could write:
if(nFlags & MK_CONTROL)// Do something...
Flag Description
MK_CONTROL Corresponds to the Ctrl key being pressed.
MK_LBUTTON Corresponds to the left mouse button being down.
MK_MBUTTON Corresponds to the middle mouse button being down.
MK_RBUTTON Corresponds to the right mouse button being down.
MK_SHIFT Corresponds to the Shift key being pressed.
866
Chapter 15: Drawing in a Window
25905c15.qxd:WroxPro 2/21/08 9:17 AM Page 866

The expression nFlags & MK_CONTROL will only have the value true if the nFlags variable has the bitdefined by MK_CONTROL set. In this way, you can have different actions when the left mouse button ispressed, depending on whether or not the Ctrl key is also pressed. You use the bitwise AND operatorhere, so corresponding bits are ANDed together. Don’t confuse this with the logical AND, &&, whichwould not do what you want here.
The arguments passed to the other two message handlers are the same as those for the OnLButtonDown()function; the code generated for them is:
void CSketcherView::OnLButtonUp(UINT nFlags, CPoint point){// TODO: Add your message handler code here and/or call default
CView::OnLButtonUp(nFlags, point);}
void CSketcherView::OnMouseMove(UINT nFlags, CPoint point){// TODO: Add your message handler code here and/or call default
CView::OnMouseMove(nFlags, point);}
Apart from the function names, the skeleton code is the same for each.
If you take a look at the end of the code for the CSketcherView class definition, you’ll see that threefunction declarations have been added:
// Generated message map functionsprotected:
DECLARE_MESSAGE_MAP()public:afx_msg void OnLButtonDown(UINT nFlags, CPoint point);afx_msg void OnLButtonUp(UINT nFlags, CPoint point);afx_msg void OnMouseMove(UINT nFlags, CPoint point);
};
These identify the functions that you added as message handlers.
Now that you have an understanding of the information passed to the message handlers you have created,you can start adding your own code to make them do what you want.
Drawing Using the MouseFor the WM_LBUTTONDOWN message, you want to record the cursor position as the first point defining anelement. You also want to record the position of the cursor after a mouse move. The obvious place to storethese is in the CSketcherView class, so you can add data members to the class for these. Right-click theCSketcherView class name in Class View and select Add > Add Variable from the pop-up. You’ll thenbe able to add details of the variable to be added to the class, as Figure 15-12 shows.
867
Chapter 15: Drawing in a Window
25905c15.qxd:WroxPro 2/21/08 9:17 AM Page 867

Figure 15-12
The drop-down list of types only includes fundamental types so to enter the type as CPoint you just high-light the type displayed by double-clicking it and then key in the type name you want. The new data mem-ber should be protected to prevent direct modification of it from outside the class. When you click theFinish button the variable will be created and an initial value will be set arbitrarily as 0 in the initializationlist for the constructor. You’ll need to amend the initial value to CPoint(0,0) so the code is:
// CSketcherView construction/destruction
CSketcherView::CSketcherView():m_FirstPoint(CPoint(0,0))
{// TODO: add construction code here
}
This initializes the member to a CPoint object at position (0,0). You can now add m_SecondPoint as aprotected member of type CPoint to the CSketcherView class that stores the next point for an element.You should also amend the initialization list for the constructor to initialize it to CPoint(0,0).
You can now implement the handler for the WM_LBUTTONDOWN message as:
void CSketcherView::OnLButtonDown(UINT nFlags, CPoint point){
// TODO: Add your message handler code here and/or call defaultm_FirstPoint = point; // Record the cursor position
}
868
Chapter 15: Drawing in a Window
25905c15.qxd:WroxPro 2/21/08 9:17 AM Page 868
All it does is note the coordinates passed by the second argument. You can ignore the first argument inthis situation altogether.
You can’t complete WM_MOUSEMOVE message handler yet, but you can have a stab at writing the code forit in outline:
void CSketcherView::OnMouseMove(UINT nFlags, CPoint point){
// TODO: Add your message handler code here and/or call defaultif(nFlags & MK_LBUTTON) // Verify the left button is down{
m_SecondPoint = point; // Save the current cursor position
// Test for a previous temporary element{
// We get to here if there was a previous mouse move// so add code to delete the old element
}
// Add code to create new element// and cause it to be drawn
}}
It’s important to check that the left mouse button is down because you only want to handle the mousemove when this is the case. Without the check, you would be processing the event when the right buttonwas down or when the mouse was moved with no buttons pressed.
The first thing that the handler does after verifying the left mouse button is down is to save the currentcursor position. This is used as the second defining point for an element. The rest of the logic is clear ingeneral terms, but you need to establish a few more things before you can complete the function. Youhave no means of defining an element — you’ll want to define an element as an object of a class so someclasses must be defined. You also need to devise a way to delete an element and get one drawn when youcreate a new one. A brief digression is called for.
Getting the Client Area RedrawnDrawing or erasing elements involves redrawing all or part of the client area of a window. As you’vealready discovered, the client area gets drawn by the OnDraw() member function of the CSketcherViewclass, and this function is called when a WM_PAINT message is received by the Sketcher application. Alongwith the basic message to repaint the client area, Windows supplies information about the part of the clientarea that needs to be redrawn. This can save a lot of time when you’re displaying complicated imagesbecause only the area specified actually needs to be redrawn, which may be a very small proportion of thetotal area.
You can tell Windows that a particular area should be redrawn by calling the InvalidateRect() functionthat is an inherited member of your view class. The function accepts two arguments, the first of which is apointer to a RECT or CRect object that defines the rectangle in the client area to be redrawn. Passing null forthis parameter causes the whole client area to be redrawn. The second parameter is a BOOL value, which isTRUE if the background to the rectangle is to be erased and FALSE otherwise. This argument has a default
869
Chapter 15: Drawing in a Window
25905c15.qxd:WroxPro 2/21/08 9:17 AM Page 869

value of TRUE because you normally want the background erased before the rectangle is redrawn, so you canignore it most of the time. BOOL is a Windows API type representing Boolean values and can be assignedthe values TRUE or FALSE.
A typical situation in which you’d want to cause an area to be redrawn would be where something haschanged that necessitates the contents of the area being recreated — moving a displayed entity might bean example. In this case, you want to erase the background to remove the old representation of what wasdisplayed before you draw the new version. When you want to draw on top of an existing background,you just pass FALSE as the second argument to InvalidateRect().
Calling the InvalidateRect() function doesn’t directly cause any part of the window to be redrawn; it just communicates to Windows the rectangle that you would like to have it redraw at some time. Windowsmaintains an update region — actually a rectangle — that identifies the area in a window that needs to beredrawn. The area specified in your call to InvalidateRect() is added to the current update region, so thenew update region encloses the old region plus the new rectangle you have indicated as invalid. Eventuallya WM_PAINT message is sent to the window, and the update region is passed to the window along with it.When processing of the WM_PAINT message is complete, the update region is reset to the empty state.
Thus, all you have to do to get a newly created shape drawn is:
1. Make sure that the OnDraw() function in your view includes the newly created item when itredraws the window.
2. Call InvalidateRect() with a pointer to the rectangle bounding the shape to be redrawnpassed as the first argument.
Similarly, if you want a shape removed from the client area of a window, you need to do the following:
1. Remove the shape from the items that the OnDraw() function will draw.
2. Call InvalidateRect() with the first argument pointing to the rectangle bounding the shapethat is to be removed.
Because the background to the rectangle specified is automatically erased, as long as the OnDraw() func-tion doesn’t draw the shape again, the shape disappears. Of course, this means that you need to be ableto obtain the rectangle bounding any shape that you create, so you’ll include a function to provide thisas a member of the classes that define the elements that can be drawn by Sketcher.
Defining Classes for ElementsThinking ahead a bit, you will need to store elements in a document in some way. You must also to be ableto store the document in a file for retrieval subsequently if a sketch is to have any permanence. I’ll dealwith the details of file operations later on, but for now it’s enough to know that the MFC class CObjectincludes the tools for us to do this, so you’ll use CObject as a base class for the element classes.
You also have the problem that you don’t know in advance what sequence of element types the user willcreate. The Sketcher program must be able to handle any sequence of elements. This suggests that using abase class pointer for selecting a particular element class function might simplify things a bit. For example,you don’t need to know what an element is to draw it. As long as you are accessing the element through abase class pointer, you can always get an element to draw itself by using a virtual function. This is anotherexample of the polymorphism I talked about when I discussed virtual functions. All you need to do toachieve this is to make sure that the classes defining specific elements share a common base class and that
870
Chapter 15: Drawing in a Window
25905c15.qxd:WroxPro 2/21/08 9:17 AM Page 870

in this class you declare all the functions you want to be selected automatically at run time as virtual. Thisindicates that the element classes could be organized as shown in Figure 15-13.
The arrows in the diagram point toward the base class in each case. If you need to add another elementtype, all you need to do is derive another class from CElement. Because these classes are closely related,you’ll be putting the definitions for all these classes in a single new .h file that you can call Elements.h.You can create the new CElement class by right-clicking Sketcher in Class View and selecting Add > Classfrom the pop-up. Select the class category as MFC and the template as MFC Class. When you click theAdd button in the dialog, another dialog displays in which you can specify the class name, as shown inFigure 15-14.
Figure 15-13
Figure 15-14
CObject
CElement
CCircle CCurveCLine CRectangle
871
Chapter 15: Drawing in a Window
25905c15.qxd:WroxPro 2/21/08 9:17 AM Page 871
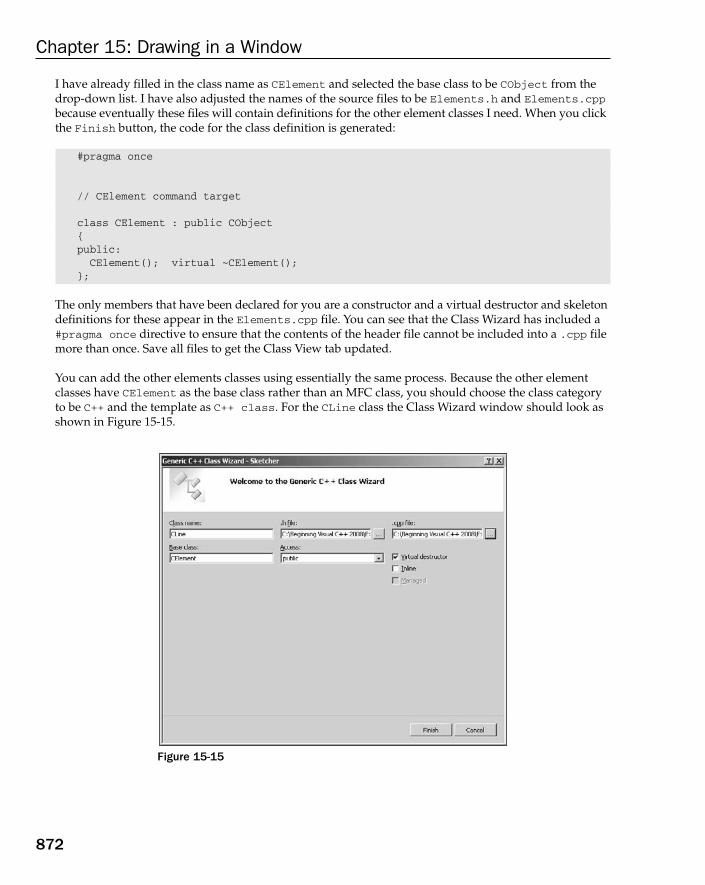
I have already filled in the class name as CElement and selected the base class to be CObject from thedrop-down list. I have also adjusted the names of the source files to be Elements.h and Elements.cppbecause eventually these files will contain definitions for the other element classes I need. When you clickthe Finish button, the code for the class definition is generated:
#pragma once
// CElement command target
class CElement : public CObject{public:CElement(); virtual ~CElement();
};
The only members that have been declared for you are a constructor and a virtual destructor and skeletondefinitions for these appear in the Elements.cpp file. You can see that the Class Wizard has included a#pragma once directive to ensure that the contents of the header file cannot be included into a .cpp filemore than once. Save all files to get the Class View tab updated.
You can add the other elements classes using essentially the same process. Because the other elementclasses have CElement as the base class rather than an MFC class, you should choose the class categoryto be C++ and the template as C++ class. For the CLine class the Class Wizard window should look asshown in Figure 15-15.
Figure 15-15
872
Chapter 15: Drawing in a Window
25905c15.qxd:WroxPro 2/21/08 9:17 AM Page 872
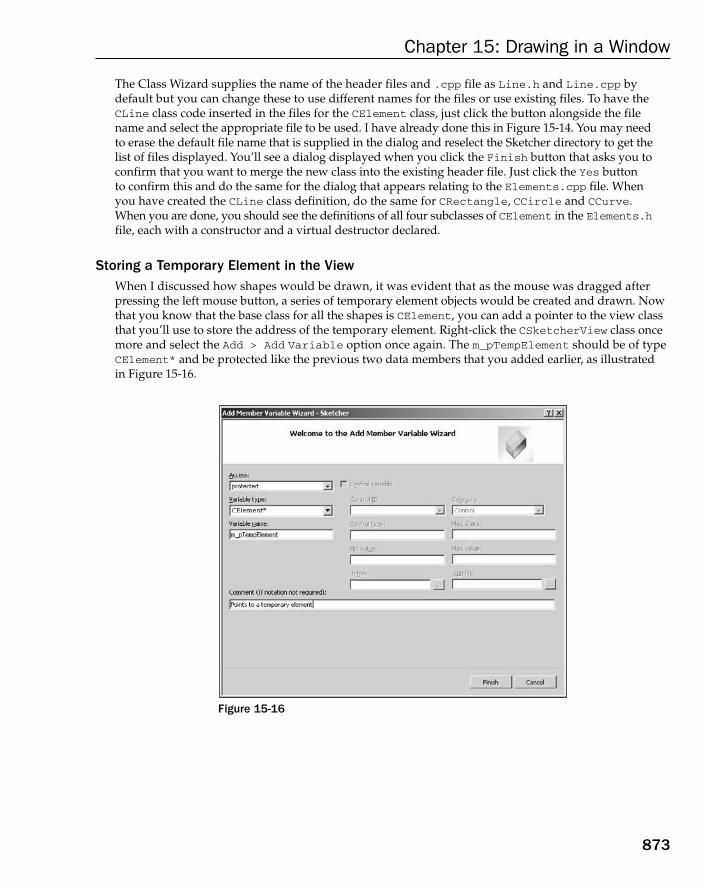
The Class Wizard supplies the name of the header files and .cpp file as Line.h and Line.cpp bydefault but you can change these to use different names for the files or use existing files. To have theCLine class code inserted in the files for the CElement class, just click the button alongside the filename and select the appropriate file to be used. I have already done this in Figure 15-14. You may need to erase the default file name that is supplied in the dialog and reselect the Sketcher directory to get thelist of files displayed. You’ll see a dialog displayed when you click the Finish button that asks you toconfirm that you want to merge the new class into the existing header file. Just click the Yes button to confirm this and do the same for the dialog that appears relating to the Elements.cpp file. When you have created the CLine class definition, do the same for CRectangle, CCircle and CCurve. When you are done, you should see the definitions of all four subclasses of CElement in the Elements.hfile, each with a constructor and a virtual destructor declared.
Storing a Temporary Element in the ViewWhen I discussed how shapes would be drawn, it was evident that as the mouse was dragged afterpressing the left mouse button, a series of temporary element objects would be created and drawn. Nowthat you know that the base class for all the shapes is CElement, you can add a pointer to the view classthat you’ll use to store the address of the temporary element. Right-click the CSketcherView class oncemore and select the Add > Add Variable option once again. The m_pTempElement should be of typeCElement* and be protected like the previous two data members that you added earlier, as illustrated in Figure 15-16.
Figure 15-16
873
Chapter 15: Drawing in a Window
25905c15.qxd:WroxPro 2/21/08 9:17 AM Page 873

The Add Member Variable Wizard ensures that the new variable is initialized when the view object isconstructed and the default value of NULL that is set will do nicely.
CSketcherView::CSketcherView():m_FirstPoint(CPoint(0,0)), m_SecondPoint(CPoint(0,0)), m_pTempElement(NULL){// TODO: add construction code here
}
You’ll be able to use the m_pTempElement pointer in the WM_MOUSEMOVE message handler as a test forprevious temporary elements because you’ll arrange for it to be null when there are none.
If you check what has been added to the SketcherView.h header file, you’ll see at the beginning thereis the line:
#include “atltypes.h”
This has been inserted because the wizard has assumed the CElement type is an ATL type. You can deletethis line as it is not required. For the CSketcherView class to compile correctly, you must add the follow-ing statement immediately following the #pragma once directive:
class CElement; // Forward class declaration
This just identifies the CElement identifier as the name of a class that is defined elsewhere so the compilerwill process it as such.
Because you are creating CElement class objects in the view class member functions, and you refer tothe CElement class in defining the data member that points to a temporary element, you should ensurethat the definition of the CElement class is included before the CSketcherView class definition wher-ever SketcherView.h is included into a .cpp file. You can do this for CSketcherView by adding an#include directive for Elements.h to the SketcherView.cpp file before the #include directive forSketcherView.h:
#include “Elements.h”#include “SketcherView.h”
Sketcher.cpp also has an #include directive for SketcherView.h, so you should add an #includefor Elements.h to this file too.
The CElement ClassYou can now start to fill out the element class definitions. You’ll be doing this incrementally as you addmore and more functionality to the Sketcher application — but what do you need right now? Some dataitems, such as color, are clearly common to all types of element so you can put those in the CElementclass so that they are inherited in each of the derived classes; however, the other data members in theclasses that define specific element properties will be quite disparate, so you’ll declare these membersin the particular derived class to which they belong.
874
Chapter 15: Drawing in a Window
25905c15.qxd:WroxPro 2/21/08 9:17 AM Page 874

Thus the CElement class contains only virtual functions that are replaced in the derived classes, plus dataand function members that are the same in all the derived classes. The virtual functions are those that areselected automatically for a particular object through a pointer. You could use the Add Member Wizardyou’ve used previously to do this, but modify the class manually for a change. For now, you can modifythe CElement class to the following:
class CElement: public CObject{
protected:COLORREF m_Color; // Color of an element
public:virtual ~CElement(); virtual void Draw(CDC* pDC) {} // Virtual draw operation
CRect GetBoundRect(); // Get the bounding rectangle for an element
protected:CElement(); // Here to prevent it being called
};
I have changed the access for the constructor from public to protected to prevent it from being calledfrom outside the class. At the moment, the members to be inherited by the derived classes are a data mem-ber storing the color, m_Color, and a member function that calculates the rectangle bounding an element,GetBoundRect(). This function returns a value of type CRect that is the rectangle bounding the shape.
You also have a virtual Draw() function that is implemented in the derived classes to draw the particu-lar object in question. The Draw() function needs a pointer to a CDC object passed to it to provide accessto the drawing functions that you saw earlier that allow drawing in a device context.
You might be tempted to declare the Draw() member as a pure virtual function in the CElement class —after all, it can have no meaningful content in this class. This would also force its definition in any derivedclass. Normally you would do this, but the CElement class inherits a facility from CObject called seriali-zation that you’ll use later for storing objects in a file, and this requires that an instance of the CElementclass can be created. A class with a pure virtual function member is an abstract class, and instances of anabstract class can’t be created. If you want to use MFC’s serialization capability for storing objects, yourclasses mustn’t be abstract. You must also supply a no-arg constructor for a class to be serializable.
Note that serialization is a general term for writing objects to a file. Serialization in a C++/CLI applica-tion will work differently to serialization in the MFC.
You might also be tempted to declare the GetBoundRect() function as returning a pointer to a CRectobject — after all, you’re going to pass a pointer to the InvalidateRect() member function in the viewclass; however, this could lead to problems. You’ll be creating the CRect object as local to the function, sothe pointer would be pointing to a nonexistent object on return from the GetBoundRect() function. Youcould get around this by creating the CRect object on the heap, but then you’d need to take care that it’sdeleted after use; otherwise, you’d be filling the heap with CRect objects — a new one for every call ofGetBoundRect(). A further possibility is that you could store the bounding rectangle for an element asa class member and generate it when the element is created. This is a reasonable alternative, but if youchanged an element subsequently, by moving it say, you would need to ensure the bounding rectanglewas recalculated.
875
Chapter 15: Drawing in a Window
25905c15.qxd:WroxPro 2/21/08 9:17 AM Page 875

The CLine ClassYou can amend the definition of the CLine class to:
class CLine: public CElement{
public:~CLine(void);virtual void Draw(CDC* pDC); // Function to display a line
// Constructor for a line objectCLine(CPoint Start, CPoint End, COLORREF aColor);
protected:CPoint m_StartPoint; // Start point of lineCPoint m_EndPoint; // End point of line
CLine(void); // Default constructoræshould not be used};
The data members that define a line are m_StartPoint and m_EndPoint, and these are both declared tobe protected. The class has a public constructor that has parameters for the values that define a line,and the no-arg default constructor has been moved to the protected section of the class to prevent itsuse externally.
Implementing the CLine ClassYou add the implementation of the member functions in the Elements.cpp that was created by the ClassWizard when you created the CElement class. The stdafx.h file was included in this file to make the defi-nitions of the standard system header files available in the file. You may need to add #include directivesfor the files containing definitions for Application Wizard-generated classes if you use any in the code.
Of course, you’ll have to add each of the member function definitions to this file manually because ClassWizard wasn’t involved in defining the classes. You’re now ready to add the constructor for the CLineclass to the Elements.cpp file.
The CLine Class ConstructorThe code for this is:
// CLine class constructorCLine::CLine(CPoint Start, CPoint End, COLORREF aColor){
m_StartPoint = Start; // Set line start pointm_EndPoint = End; // Set line start pointm_Color = aColor; // Set line color
}
You first store the start point in the m_StartPoint member that is inherited from the CElement class.Later you’ll add code to allow an element to be moved and to enable a line to be moved by just changingthe start point and the end point must be defined relative to the start point. You do this by subtracting thex and y coordinate values for Start from those for End. Both x and y are public members of the CPointclass so you can refer to them directly. Finally, you store the color in the m_Color member that is inheritedfrom the CElement class.
876
Chapter 15: Drawing in a Window
25905c15.qxd:WroxPro 2/21/08 9:17 AM Page 876
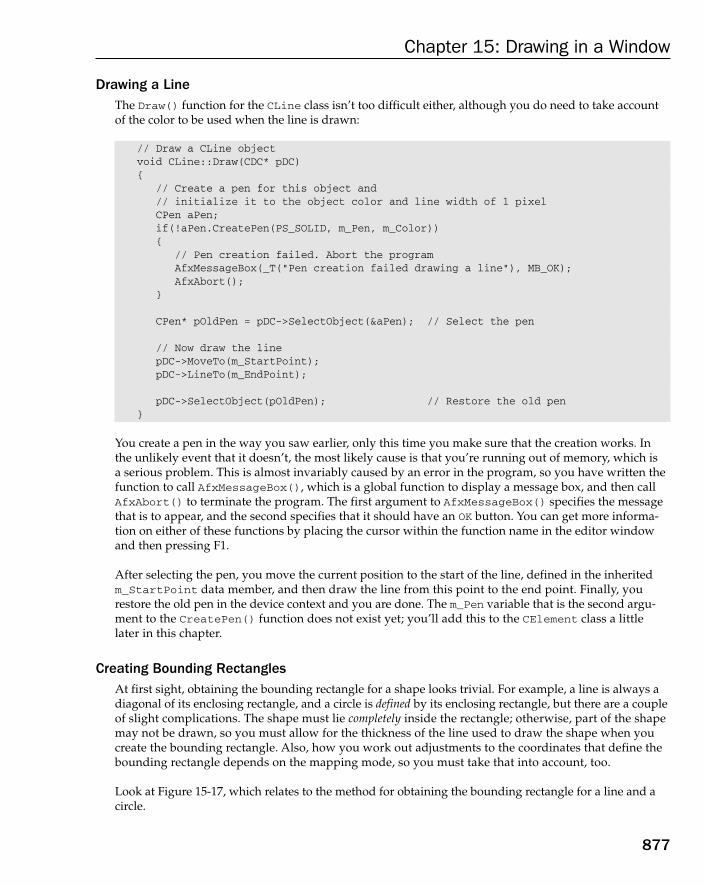
Drawing a LineThe Draw() function for the CLine class isn’t too difficult either, although you do need to take accountof the color to be used when the line is drawn:
// Draw a CLine objectvoid CLine::Draw(CDC* pDC){
// Create a pen for this object and// initialize it to the object color and line width of 1 pixelCPen aPen;if(!aPen.CreatePen(PS_SOLID, m_Pen, m_Color)){
// Pen creation failed. Abort the programAfxMessageBox(_T(“Pen creation failed drawing a line”), MB_OK);AfxAbort();
}
CPen* pOldPen = pDC->SelectObject(&aPen); // Select the pen
// Now draw the linepDC->MoveTo(m_StartPoint);pDC->LineTo(m_EndPoint);
pDC->SelectObject(pOldPen); // Restore the old pen}
You create a pen in the way you saw earlier, only this time you make sure that the creation works. Inthe unlikely event that it doesn’t, the most likely cause is that you’re running out of memory, which is a serious problem. This is almost invariably caused by an error in the program, so you have written thefunction to call AfxMessageBox(), which is a global function to display a message box, and then callAfxAbort() to terminate the program. The first argument to AfxMessageBox() specifies the messagethat is to appear, and the second specifies that it should have an OK button. You can get more informa-tion on either of these functions by placing the cursor within the function name in the editor windowand then pressing F1.
After selecting the pen, you move the current position to the start of the line, defined in the inheritedm_StartPoint data member, and then draw the line from this point to the end point. Finally, yourestore the old pen in the device context and you are done. The m_Pen variable that is the second argu-ment to the CreatePen() function does not exist yet; you’ll add this to the CElement class a littlelater in this chapter.
Creating Bounding RectanglesAt first sight, obtaining the bounding rectangle for a shape looks trivial. For example, a line is always adiagonal of its enclosing rectangle, and a circle is defined by its enclosing rectangle, but there are a coupleof slight complications. The shape must lie completely inside the rectangle; otherwise, part of the shapemay not be drawn, so you must allow for the thickness of the line used to draw the shape when youcreate the bounding rectangle. Also, how you work out adjustments to the coordinates that define thebounding rectangle depends on the mapping mode, so you must take that into account, too.
Look at Figure 15-17, which relates to the method for obtaining the bounding rectangle for a line and acircle.
877
Chapter 15: Drawing in a Window
25905c15.qxd:WroxPro 2/21/08 9:17 AM Page 877

Figure 15-17
I have called the rectangle that is used to draw a shape the ‘enclosing rectangle,’ while the rectangle thattakes into account the width of the pen I’ve called the ‘bounding rectangle’ to differentiate it. Figure 15-17shows the shapes with their enclosing rectangles, and their bounding rectangles offset by the line thickness.This is obviously exaggerated here so you can see what’s happening.
The differences in how you calculate the coordinates for the bounding rectangle in different mapping modesonly concerns the y coordinate; calculation of the x coordinate is the same for all mapping modes. To getthe corners of the bounding rectangle in the MM_TEXT mapping mode, subtract the line thickness from the ycoordinate of the upper-left corner of the defining rectangle, and add it to the y coordinate of the lower-rightcorner. However, in MM_LOENGLISH (and all the other mapping modes), the y-axis increases in the oppositedirection, so you need to add the line thickness to the y coordinate of the upper-left corner of the defining rec-tangle, and subtract it from the y coordinate of the lower-right corner. For all the mapping modes, you sub-tract the line thickness from the x coordinate of the upper-left corner of the defining rectangle, and add it tothe x coordinate of the lower-right corner.
To implement the element types as consistently as possible in Sketcher, you could store an enclosing rec-tangle for each shape in a member in the base class. The enclosing rectangle needs to be calculated whena shape is constructed. The job of the GetBoundRect() function in the base class will then be to calcu-late the bounding rectangle by offsetting the enclosing rectangle by the pen width. You can amend theCElement class definition by adding two data members, as follows:
class CElement: public CObject{
Positive Y-Axis
Negative X-Axis
MM_TEXT
Negative Y-Axis
Positive X-Axis
MM_LOENGLISH
Enclosing rectangle for the line Enclosing rectangle for the circle
Positive
Negative
Positive
Negative
Negative Positive
Bounding rectangles
Enclosing rectangle for the line Enclosing rectangle for the circle
Negative
Positive
Negative
Positive
Negative Positive
Bounding rectangles
878
Chapter 15: Drawing in a Window
25905c15.qxd:WroxPro 2/21/08 9:17 AM Page 878
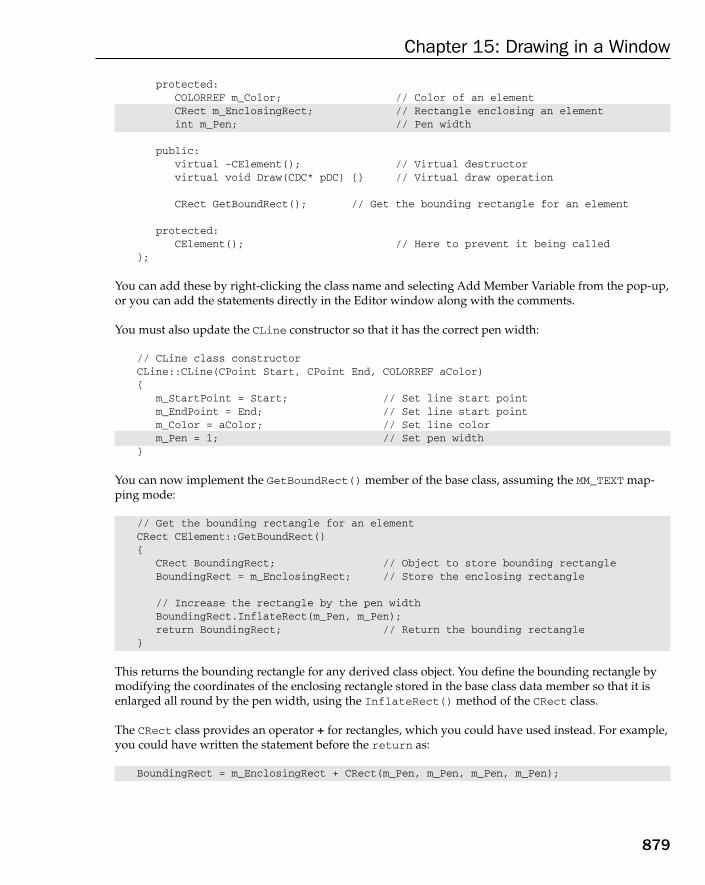
protected:COLORREF m_Color; // Color of an elementCRect m_EnclosingRect; // Rectangle enclosing an elementint m_Pen; // Pen width
public:virtual ~CElement(); // Virtual destructorvirtual void Draw(CDC* pDC) {} // Virtual draw operation
CRect GetBoundRect(); // Get the bounding rectangle for an element
protected:CElement(); // Here to prevent it being called
};
You can add these by right-clicking the class name and selecting Add Member Variable from the pop-up,or you can add the statements directly in the Editor window along with the comments.
You must also update the CLine constructor so that it has the correct pen width:
// CLine class constructorCLine::CLine(CPoint Start, CPoint End, COLORREF aColor){
m_StartPoint = Start; // Set line start pointm_EndPoint = End; // Set line start pointm_Color = aColor; // Set line colorm_Pen = 1; // Set pen width
}
You can now implement the GetBoundRect() member of the base class, assuming the MM_TEXT map-ping mode:
// Get the bounding rectangle for an elementCRect CElement::GetBoundRect(){
CRect BoundingRect; // Object to store bounding rectangleBoundingRect = m_EnclosingRect; // Store the enclosing rectangle
// Increase the rectangle by the pen widthBoundingRect.InflateRect(m_Pen, m_Pen);return BoundingRect; // Return the bounding rectangle
}
This returns the bounding rectangle for any derived class object. You define the bounding rectangle bymodifying the coordinates of the enclosing rectangle stored in the base class data member so that it isenlarged all round by the pen width, using the InflateRect() method of the CRect class.
The CRect class provides an operator + for rectangles, which you could have used instead. For example,you could have written the statement before the return as:
BoundingRect = m_EnclosingRect + CRect(m_Pen, m_Pen, m_Pen, m_Pen);
879
Chapter 15: Drawing in a Window
25905c15.qxd:WroxPro 2/21/08 9:17 AM Page 879

Equally, you could have simply added (or subtracted) the pen width for each of the x and y values thatmake up the rectangle. You could have replaced the assignment with the following statements:
BoundingRect = m_EnclosingRect;BoundingRect.top -= m_Pen;BoundingRect.left -= m_Pen;BoundingRect.bottom += m_Pen;BoundingRect.right += m_Pen;
As a reminder, the individual data members of a CRect object are left and top (storing the x and ycoordinates of the upper-left corner) and right and bottom (storing the coordinates of the lower-rightcorner). These are all public members, so you can access them directly. A commonly made mistake, espe-cially by me, is to write the coordinate pair as (top, left) instead of in the correct order (left, top).
The hazard with both this and the InflateRect() option is that there is a built-in assumption that themapping mode is MM_TEXT, which means that the positive y-axis is assumed to run from top to bottom.If you change the mapping mode, neither of these will work properly, although it’s not immediatelyobvious that they won’t.
Normalized RectanglesThe InflateRect() function works by subtracting the values that you give it from the top and leftmembers of the rectangle and adding the values to the bottom and right. This means that you mayfind your rectangle actually decreasing in size if you don’t make sure that the rectangle is normalized. Anormalized rectangle has a left value that is less than or equal to the right value, and a top value thatis less than or equal to the bottom value. You can make sure that a CRect object is normalized by callingthe NormalizeRect() member of the object. Most of the CRect member functions require the object tobe normalized for them to work as expected, so you need to make sure that when you store the enclos-ing rectangle in m_EnclosingRect, it is normalized.
Calculating the Enclosing Rectangle for a LineAll you need now is code in the constructor for a line to calculate the enclosing rectangle:
CLine::CLine(CPoint Start, CPoint End, COLORREF aColor){
m_StartPoint = Start; // Set line start pointm_EndPoint = End; // Set line end pointm_Color = aColor; // Set line colorm_Pen = 1; // Set pen width
// Define the enclosing rectanglem_EnclosingRect = CRect(Start, End);m_EnclosingRect.NormalizeRect();
}
The arguments to the CRect constructor you are using here are the start and end points of the line. Toensure that the bounding rectangle has the top value less than the bottom value, regardless of the rel-ative positions of the start and end points of the line, you call the NormalizeRect() member of them_EnclosingRect object.
880
Chapter 15: Drawing in a Window
25905c15.qxd:WroxPro 2/21/08 9:17 AM Page 880

The CRectangle ClassAlthough you’ll be defining a rectangle object by the same data that you use to define a line — a startpoint and an end point on a diagonal of the rectangle — you don’t need to store the defining points. Theenclosing rectangle in the data member inherited from the base class completely defines the shape, soyou don’t need any data members. You can therefore define the class like this:
// Class defining a rectangle objectclass CRectangle: public CElement{
public:~CRectangle(void);virtual void Draw(CDC* pDC); // Function to display a rectangle
// Constructor for a rectangle objectCRectangle(CPoint Start, CPoint End, COLORREF aColor);
protected:CRectangle(void); // Default constructor - should not be used
};
The no-arg constructor is now protected to prevent it from being used. The definition of the rectanglebecomes very simple — just a constructor, the virtual Draw() function, plus the no-arg constructor in theprotected section of the class.
The CRectangle Class ConstructorThe code for the new CRectangle class constructor is somewhat similar to that for a CLine constructor:
// CRectangle class constructorCRectangle:: CRectangle(CPoint Start, CPoint End, COLORREF aColor){
m_Color = aColor; // Set rectangle colorm_Pen = 1; // Set pen width
// Define the enclosing rectangle m_EnclosingRect = CRect(Start, End);m_EnclosingRect.NormalizeRect();
}
If you modified the CRectangle class definition manually, there is no skeleton definition for the construc-tor, so you just need to add the definition directly to Elements.cpp.
This is cheap code. Some minor alterations to a subset of the CLine constructor, fix the comments, andwe have a new constructor for CRectangle. It just stores the color and pen width and computes theenclosing rectangle from the points passed as arguments.
Drawing a RectangleThere is a member of the CDC class called Rectangle() that draws a rectangle. This function draws aclosed figure and fills it with the current brush. You may think that this isn’t quite what you want because
881
Chapter 15: Drawing in a Window
25905c15.qxd:WroxPro 2/21/08 9:17 AM Page 881
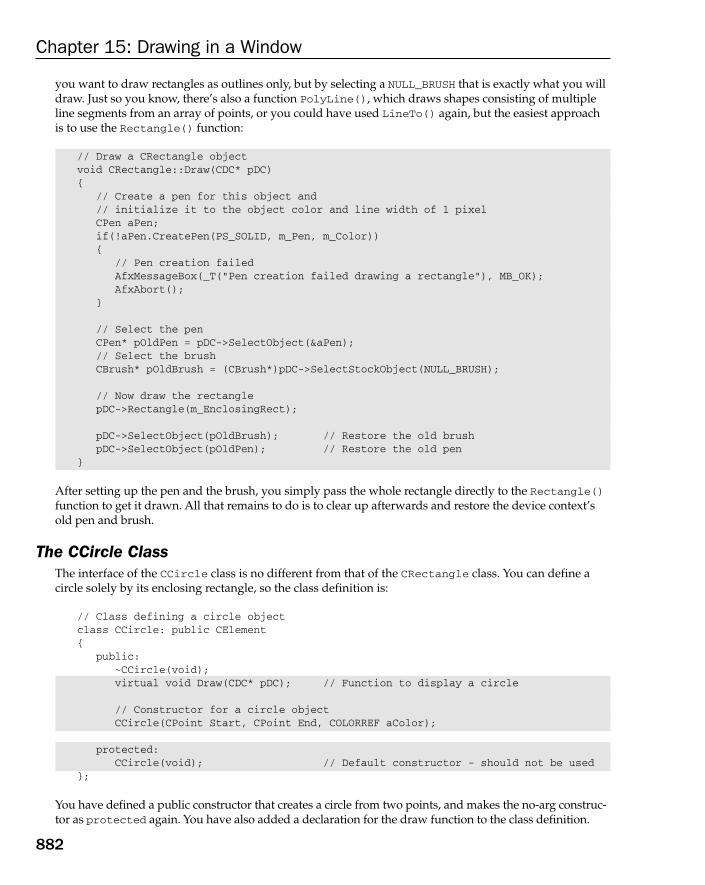
you want to draw rectangles as outlines only, but by selecting a NULL_BRUSH that is exactly what you willdraw. Just so you know, there’s also a function PolyLine(), which draws shapes consisting of multipleline segments from an array of points, or you could have used LineTo() again, but the easiest approachis to use the Rectangle() function:
// Draw a CRectangle objectvoid CRectangle::Draw(CDC* pDC){
// Create a pen for this object and// initialize it to the object color and line width of 1 pixelCPen aPen;if(!aPen.CreatePen(PS_SOLID, m_Pen, m_Color)){
// Pen creation failedAfxMessageBox(_T(“Pen creation failed drawing a rectangle”), MB_OK);AfxAbort();
}
// Select the penCPen* pOldPen = pDC->SelectObject(&aPen);// Select the brushCBrush* pOldBrush = (CBrush*)pDC->SelectStockObject(NULL_BRUSH);
// Now draw the rectanglepDC->Rectangle(m_EnclosingRect);
pDC->SelectObject(pOldBrush); // Restore the old brushpDC->SelectObject(pOldPen); // Restore the old pen
}
After setting up the pen and the brush, you simply pass the whole rectangle directly to the Rectangle()function to get it drawn. All that remains to do is to clear up afterwards and restore the device context’sold pen and brush.
The CCircle ClassThe interface of the CCircle class is no different from that of the CRectangle class. You can define acircle solely by its enclosing rectangle, so the class definition is:
// Class defining a circle objectclass CCircle: public CElement{
public:~CCircle(void);virtual void Draw(CDC* pDC); // Function to display a circle
// Constructor for a circle objectCCircle(CPoint Start, CPoint End, COLORREF aColor);
protected:CCircle(void); // Default constructor - should not be used
};
You have defined a public constructor that creates a circle from two points, and makes the no-arg construc-tor as protected again. You have also added a declaration for the draw function to the class definition.
882
Chapter 15: Drawing in a Window
25905c15.qxd:WroxPro 2/21/08 9:17 AM Page 882
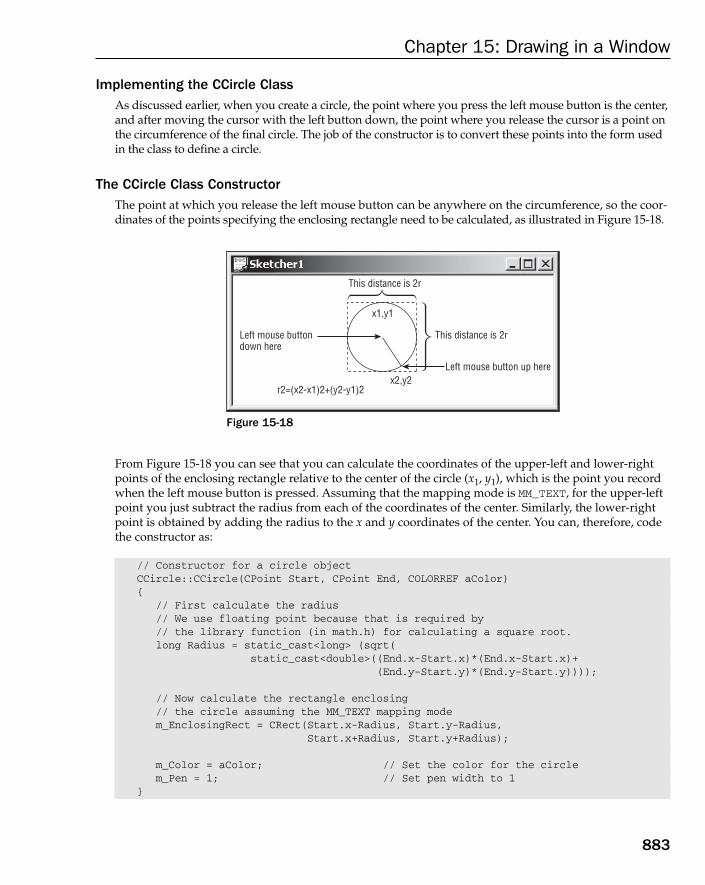
Implementing the CCircle ClassAs discussed earlier, when you create a circle, the point where you press the left mouse button is the center,and after moving the cursor with the left button down, the point where you release the cursor is a point onthe circumference of the final circle. The job of the constructor is to convert these points into the form usedin the class to define a circle.
The CCircle Class ConstructorThe point at which you release the left mouse button can be anywhere on the circumference, so the coor-dinates of the points specifying the enclosing rectangle need to be calculated, as illustrated in Figure 15-18.
Figure 15-18
From Figure 15-18 you can see that you can calculate the coordinates of the upper-left and lower-rightpoints of the enclosing rectangle relative to the center of the circle (x1, y1), which is the point you recordwhen the left mouse button is pressed. Assuming that the mapping mode is MM_TEXT, for the upper-leftpoint you just subtract the radius from each of the coordinates of the center. Similarly, the lower-rightpoint is obtained by adding the radius to the x and y coordinates of the center. You can, therefore, codethe constructor as:
// Constructor for a circle objectCCircle::CCircle(CPoint Start, CPoint End, COLORREF aColor){
// First calculate the radius// We use floating point because that is required by // the library function (in math.h) for calculating a square root.long Radius = static_cast<long> (sqrt(
static_cast<double>((End.x-Start.x)*(End.x-Start.x)+(End.y-Start.y)*(End.y-Start.y))));
// Now calculate the rectangle enclosing// the circle assuming the MM_TEXT mapping modem_EnclosingRect = CRect(Start.x-Radius, Start.y-Radius,
Start.x+Radius, Start.y+Radius);
m_Color = aColor; // Set the color for the circlem_Pen = 1; // Set pen width to 1
}
x2,y2
This distance is 2r
Left mouse buttondown here
This distance is 2r
Left mouse button up here
r2=(x2-x1)2+(y2-y1)2
x1,y1
883
Chapter 15: Drawing in a Window
25905c15.qxd:WroxPro 2/21/08 9:17 AM Page 883
To use the sqrt() function, you must add the line to the beginning of the Elements.cpp file:
#include <cmath>
You can place this after the #include directive for stdafx.h.
The maximum coordinate values are 32 bits, and the CPoint members x and y are declared as long,so evaluating the argument to the sqrt() function can safely be carried out as an integer. The resultof the square root calculation is of type double, so you cast it to long because you want to use it asan integer.
Drawing a CircleYou have already seen how to draw a circle using the Arc() function in the CDC class, so now use theEllipse() function here. The implementation of the Draw() function in the CCircle class is:
// Draw a circlevoid CCircle::Draw(CDC* pDC){
// Create a pen for this object and// initialize it to the object color and line width of 1 pixelCPen aPen;if(!aPen.CreatePen(PS_SOLID, m_Pen, m_Color)){
// Pen creation failedAfxMessageBox(_T(“Pen creation failed drawing a circle”), MB_OK);AfxAbort();
}
CPen* pOldPen = pDC->SelectObject(&aPen); // Select the pen
// Select a null brushCBrush* pOldBrush = (CBrush*)pDC->SelectStockObject(NULL_BRUSH);
// Now draw the circlepDC->Ellipse(m_EnclosingRect);
pDC->SelectObject(pOldPen); // Restore the old penpDC->SelectObject(pOldBrush); // Restore the old brush
}
After selecting a pen of the appropriate color and a null brush, the circle is drawn by calling the Ellipse()function. The only argument is a CRect object that encloses the circle you draw. This is another example ofcode that’s almost for free because it’s similar to the code you wrote earlier to draw a rectangle.
The CCurve ClassThe CCurve class is different from the others in that it needs to be able to deal with a variable number ofdefining points. This necessitates maintaining a list of some kind and although you could use the STLtemplate to define a list, this has the disadvantage that the list will not be serializable. Because you willlook at how you can create lists that are serializable in the next chapter, I’ll defer defining the detail of
884
Chapter 15: Drawing in a Window
25905c15.qxd:WroxPro 2/21/08 9:17 AM Page 884

this class until then. For now, you can include a class definition that provides dummy member functionsso you can compile and link code that contains calls to them. In Elements.h, you should have:
class CCurve: public CElement{
public:~CCurve(void);virtual void Draw(CDC* pDC); // Function to display a curve
// Constructor for a curve objectCCurve(COLORREF aColor);
protected:CCurve(void); // Default constructor - should not be used
};
And in Elements.cpp:
// Constructor for a curve objectCCurve::CCurve(COLORREF aColor){
m_Color = aColor;m_EnclosingRect = CRect(0,0,0,0);m_Pen = 1;
}
// Draw a curvevoid CCurve::Draw(CDC* pDC){}
Neither the constructor nor the Draw() member function does anything useful yet, and you have nodata members to define a curve. The constructor just sets the color, sets m_EnclosingRect to an emptyrectangle, and sets the pen width. You’ll expand the class into a working version in the next chapter.
Completing the Mouse Message HandlersYou can now come back to the WM_MOUSEMOVE message handler and fill out the detail. You can get to it through selecting CSketcherView in the Class View and double-clicking the handler name,OnMouseMove().
This handler is concerned only with drawing a succession of temporary versions of an element as youmove the cursor because the final element is created when you release the left mouse button. You cantherefore treat the drawing of temporary elements to provide rubber-banding as being entirely local tothis function, leaving the final version of the element that is created to be drawn by the OnDraw() func-tion member of the view. This approach results in the drawing of the rubber-banded elements beingreasonably efficient because it won’t involve the OnDraw() function that ultimately is responsible fordrawing the entire document.
You can do this best with the help of a member of the CDC class that is particularly effective in rubber-banding operations: SetROP2().
885
Chapter 15: Drawing in a Window
25905c15.qxd:WroxPro 2/21/08 9:17 AM Page 885

Setting the Drawing ModeThe SetROP2() function sets the drawing mode for all subsequent output operations in the devicecontext associated with a CDC object. The ‘ROP’ bit of the function name stands for Raster OPerationbecause the setting of drawing modes applies to raster displays. In case you’re wondering, ‘What’sSetROP1() then?’ — there isn’t one. The function name represents ‘Set Raster OPeration to’, not 2!
The drawing mode determines how the color of the pen that you use for drawing is to combine with thebackground color to produce the color of the entity you are displaying. You specify the drawing modewith a single argument to the function that can be any of the following values:
Drawing Mode Effect
R2_BLACK All drawing is in black.
R2_WHITE All drawing is in white.
R2_NOP Drawing operations do nothing.
R2_NOT Drawing is in the inverse of the screen color. This ensures the output is alwaysvisible because it prevents drawing in the same color as the background.
R2_COPYPEN Drawing is in the pen color. This is the default drawing mode if you don’tset it.
R2_NOTCOPYPEN Drawing is in the inverse of the pen color.
R2_MERGEPENNOT Drawing is in the color produced by ORing the pen color with the inverse ofthe background color.
R2_MASKPENNOT Drawing is in the color produced by ANDing the pen color with the inverseof the background color.
R2_MERGENOTPEN Drawing is in the color produced by ORing the background color with theinverse of the pen color.
R2_MASKNOTPEN Drawing is in the color produced by ANDing the background color with theinverse of the pen color.
R2_MERGEPEN Drawing is in the color produced by ORing the background color with thepen color.
R2_NOTMERGEPEN Drawing is in the color that is the inverse of the R2_MERGEPEN color.
R2_MASKPEN Drawing is in the color produced by ANDing the background color with thepen color.
R2_NOTMASKPEN Drawing is in the color that is the inverse of the R2_MASKPEN color.
R2_XORPEN Drawing is in the color produced by exclusive ORing the pen color and thebackground color.
R2_NOTXORPEN Drawing is in the color that is the inverse of the R2_XORPEN color.
886
Chapter 15: Drawing in a Window
25905c15.qxd:WroxPro 2/21/08 9:17 AM Page 886

Each of these symbols is predefined and corresponds to a particular drawing mode. There are a lot ofoptions here, but the one that can work some magic for us is the last of them, R2_NOTXORPEN.
When you set the mode as R2_NOTXORPEN, the first time you draw a particular shape on the default whitebackground, it is drawn normally in the pen color you specify. If you draw the same shape again, over-writing the first, the shape disappears because the color that the shape is drawn in corresponds to thatproduced by exclusive ORing the pen color with itself. The drawing color that results from this is white.You can see this more clearly by working through an example.
White is formed from equal proportions of the “maximum” amounts of red, blue, and green. For simplic-ity, this can be represented as 1,1,1 — the three values represent the RGB components of the color. In thesame scheme, red is defined as 1,0,0. These combine as follows:
So, the first time you draw a red line on a white background, it comes out red as the last line above indi-cates. If you now draw the same line a second time, overwriting the existing line, the background pixelsyou are writing over are red. The resultant drawing color works out as follows:
As the last line indicates the line comes out as white and because the rest of the background is white, theline disappears.
You need to take care to use the right background color here. You should be able to see that drawing with awhite pen on a red background is not going to work too well, as the first time you draw something it is red,and therefore invisible. The second time it appears as white. If you draw on a black background, thingsappear and disappear, as on a white background, but they are not drawn in the pen color you choose.
Coding the OnMouseMove() HandlerStart by adding the code that creates the element after a mouse move message. Because you are going to draw the element from the handler function, you need to create an object for the device context. The
R G B
Background — red 1 0 0
Pen — red 1 0 0
XORed 0 0 0
NOT XOR — produces white 1 1 1
R G B
Background — white 1 1 1
Pen — red 1 0 0
XORed 0 1 1
NOT XOR — produces red 1 0 0
887
Chapter 15: Drawing in a Window
25905c15.qxd:WroxPro 2/21/08 9:17 AM Page 887

most convenient class to use for this is CClientDC, which is derived from CDC. As I said earlier, the advan-tage of using this class rather than CDC is that it automatically takes care of creating the device context foryou and destroying it when you are done. The device context that it creates corresponds to the client area ofa window, which is exactly what you want. Add the following code to the outline handler that you definedearlier:
void CSketcherView::OnMouseMove(UINT nFlags, CPoint point){
// Define a Device Context object for the viewCClientDC aDC(this); // DC is for this viewaDC.SetROP2(R2_NOTXORPEN); // Set the drawing modeif(nFlags & MK_LBUTTON){
m_SecondPoint = point; // Save the current cursor position// Test for a previous temporary element{
// We get to here if there was a previous mouse move// so add code to delete the old element
}
// Create a temporary element of the type and color that// is recorded in the document object, and draw itm_pTempElement = CreateElement();// Create a new elementm_pTempElement->Draw(&aDC); // Draw the element
}}
The first new line of code creates a local CClientDC object. The this pointer that you pass to the construc-tor identifies the current view object, so the CClientDC object has a device context that corresponds to theclient area of the current view. As well as the characteristics I mentioned, this object has all the drawingfunctions you need because they are inherited from the CDC class. The first member function you use isSetROP2(), which sets the drawing mode to R2_NOTXORPEN.
To create a new element, you save the current cursor position in the data member m_SecondPoint, andthen call a view member function CreateElement(). (You’ll define the CreateElement() function assoon as you have finished this handler.) This function should create an element using the two points storedin the current view object, with the color and type specification stored in the document object, and returnthe address of the element. Save this in m_pTempElement.
Using the pointer to the new element, you call its Draw() member to get the object to draw itself. Theaddress of the CClientDC object is passed as an argument. Because you defined the Draw() function asvirtual in the base class, CElement, the function for whatever type of element m_pTempElement is point-ing to is automatically selected. The new element is drawn normally with the R2_NOTXORPEN because youare drawing it for the first time on a white background.
You can use the pointer m_pTempElement as an indicator of whether a previous temporary element exists.The code for this part of the handler is:
void CSketcherView::OnMouseMove(UINT nFlags, CPoint point){
// Define a Device Context object for the view
888
Chapter 15: Drawing in a Window
25905c15.qxd:WroxPro 2/21/08 9:17 AM Page 888
CClientDC aDC(this); // DC is for this viewaDC.SetROP2(R2_NOTXORPEN); // Set the drawing modeif(nFlags&MK_LBUTTON){
m_SecondPoint = point; // Save the current cursor position
if(m_pTempElement){
// Redraw the old element so it disappears from the viewm_pTempElement->Draw(&aDC);delete m_pTempElement; // Delete the old elementm_pTempElement = 0; // Reset the pointer to 0
}
// Create a temporary element of the type and color that// is recorded in the document object, and draw itm_pTempElement = CreateElement();// Create a new elementm_pTempElement->Draw(&aDC); // Draw the element
}}
A previous temporary element exists if the pointer m_pTempElement is not zero. You need to redraw theelement to which it points to remove it from the client area of the view. You then delete the element andreset the pointer to zero. The new element is then created and drawn by the code that you added previ-ously. This combination automatically rubber-bands the shape being created, so it appears to be attachedto the cursor position as it moves. You must not forget to reset the pointer m_pTempElement back to 0 inthe WM_LBUTTONUP message handler after you create the final version of the element.
Creating an ElementYou should add the CreateElement() function as a protected member to the ‘Operations’ section ofthe CSketcherView class:
class CSketcherView: public CView{
// Rest of the class definition as before...
// Operationspublic:
protected:CElement* CreateElement(void); // Create a new element on the heap
// Rest of the class definition as before...
};
To do this you can either amend the class definition directly by adding the shaded line, or you can right-click on the class name, CSketcherView, in Class View, and select Add > Add Function from the con-text menu. This opens the dialog shown in Figure 15-19.
889
Chapter 15: Drawing in a Window
25905c15.qxd:WroxPro 2/21/08 9:17 AM Page 889

Figure 15-19
Add the specifications of the function, as shown, and click the Finish button. A declaration for the func-tion member is added to the class definition and you are taken directly to a skeleton for the function inSketcherView.cpp. If you added the declaration to the class definition manually, you’ll need to addthe complete definition for the function to the .cpp file. This is:
// Create an element of the current typeCElement* CSketcherView::CreateElement(void){
// Get a pointer to the document for this viewCSketcherDoc* pDoc = GetDocument();ASSERT_VALID(pDoc); // Verify the pointer is good
// Now select the element using the type stored in the documentswitch(pDoc->GetElementType()){
case RECTANGLE:return new CRectangle(m_FirstPoint, m_SecondPoint,
pDoc->GetElementColor());
case CIRCLE:return new CCircle(m_FirstPoint, m_SecondPoint,
pDoc->GetElementColor());
case CURVE:return new CCurve(pDoc->GetElementColor());
case LINE:return new CLine(m_FirstPoint, m_SecondPoint,
pDoc->GetElementColor());
890
Chapter 15: Drawing in a Window
25905c15.qxd:WroxPro 2/21/08 9:17 AM Page 890

default:// Something’s gone wrongAfxMessageBox(_T(“Bad Element code”), MB_OK);AfxAbort();return NULL;
}}
The lines that aren’t shaded are those that will have been supplied automatically if you added the functionto the class using the Add > Add Function dialog. The first thing you do here is get a pointer to the docu-ment by calling GetDocument(), as you’ve seen before. For safety, you use the ASSERT_VALID() macro to ensure that a good pointer is returned. In the debug version of MFC that’s used in the debug version ofyour application, this macro calls the AssertValid() member of the object, which is specified as the argu-ment to the macro. This checks the validity of the current object, and if the pointer is NULL or the object isdefective in some way, an error message is displayed. In the release version of MFC, the ASSERT_VALID()macro does nothing.
The switch statement selects the element to be created based on the type returned by a function in thedocument class, GetElementType(). Another function in the document class is used to obtain the cur-rent element color. You can add the definitions for both these functions directly to the CSketcherDocclass definition because they are very simple:
class CSketcherDoc: public CDocument{
// Rest of the class definition as before...
// Operationspublic:
unsigned int GetElementType() // Get the element type{ return m_Element; }
COLORREF GetElementColor() // Get the element color{ return m_Color; }
// Rest of the class definition as before...
};
Each of the functions returns the value stored in the corresponding data member. Remember that put-ting a member function definition in the class definition is equivalent to a request to make the functioninline; so as well as being simple, these should be fast.
Dealing with WM_LBUTTONUP MessagesThe WM_LBUTTONUP message completes the process of creating an element. The job of the handler for thismessage is to pass the final version of the element that was created to the document object, and then cleanup the view object data members. You can access and edit the code for this handler in the same way as youdid for the previous one. Add the following lines to the function:
void CSketcherView::OnLButtonUp(UINT nFlags, CPoint point){
// Make sure there is an elementif(m_pTempElement)
891
Chapter 15: Drawing in a Window
25905c15.qxd:WroxPro 2/21/08 9:17 AM Page 891
{// Call a document class function to store the element// pointed to by m_pTempElement in the document object
delete m_pTempElement; // This code is temporarym_pTempElement = 0; // Reset the element pointer
}}
The if statement verifies that m_pTempElement is not zero before processing it. It’s always possible thatthe user could press and release the left mouse button without moving the mouse, in which case no ele-ment would have been created. As long as there is an element, the pointer to the element is passed to thedocument object; you’ll add the code for this in the next chapter. In the meantime, you just delete the ele-ment here so as not to pollute the heap. Finally, the m_pTempElement pointer is reset to 0, ready for thenext time the user draws an element.
Exercising SketcherBefore you can run the example with the mouse message handlers, you must update the OnDraw() func-tion in the CSketcherView class implementation to get rid of any old code that you added earlier.
To make sure that the OnDraw() function is clean, go to Class View and double-click the function name totake you to its implementation in SketcherView.cpp. Delete any old code that you added, but leave inthe first four lines that the wizard provided to get a pointer to the document object. You’ll need this laterto get to the elements when they’re stored in the document. The code for the function should now be:
void CSketcherView::OnDraw(CDC* pDC){
CSketcherDoc* pDoc = GetDocument();ASSERT_VALID(pDoc);if(!pDoc)
return;}
Because you have no elements in the document as yet, you don’t need to add anything to this function atthis point. When you start storing data in the document in the next chapter, you’ll add code to draw theelements in response to a WM_PAINT message. Without it, the elements just disappear whenever you resizethe view, as you’ll see.
Running the ExampleAfter making sure that you have saved all the source files, build the program. If you haven’t made anymistakes entering the code, you’ll get a clean compile and link, so you can execute the program. You candraw lines, circles and rectangles in any of the four colors the program supports. A typical window isshown in Figure 15-20.
Try experimenting with the user interface. Note that you can move the window around and that theshapes stay in the window as long as you don’t move it so far that they’re outside the borders of theapplication window. If you do, the elements do not reappear after you move it back. This is because
892
Chapter 15: Drawing in a Window
25905c15.qxd:WroxPro 2/21/08 9:17 AM Page 892

the existing elements are never redrawn. When the client area is covered and uncovered, Windowssends a WM_PAINT message to the application that causes the OnDraw() member of the view object tobe called. As you know, the OnDraw() function for the view doesn’t do anything at present. This getsfixed when you use the document to store the elements.
Figure 15-20
When you resize the view window, the shapes disappear immediately, but when you move the wholeview around, they remain (as long as they don’t slide beyond the application window border). Howcome? Well, when you resize the window, Windows invalidates the whole client area and expects yourapplication to redraw it in response to the WM_PAINT message. If you move the view around, Windowstakes care of relocating the client area as it is. You can demonstrate this by moving the view so that ashape is partially obscured. When you slide it back, you still have a partial shape, with the bit that wasobscured erased.
If you try drawing a shape while dragging the cursor outside the client view area, you’ll notice somepeculiar effects. Outside the view window, you lose track of the mouse, which tends to mess up the rubber-banding mechanism. What’s going on?
Capturing Mouse MessagesThe problem is caused by the fact that Windows is sending the mouse messages to the window under the cursor. As soon as the cursor leaves the client area of your application view window, theWM_MOUSEMOVE messages are being sent elsewhere. You can fix this by using some inherited members of the CSketcherView class.
The view class inherits a function, SetCapture(), which you can call to tell Windows that you want yourview window to get all the mouse messages until such time as you say otherwise, by calling another inher-ited function in the view class, ReleaseCapture(). You can capture the mouse as soon as the left button ispressed by modifying the handler for the WM_LBUTTONDOWN message:
// Handler for left mouse button down messagevoid CSketcherView::OnLButtonDown(UINT nFlags, CPoint point){
893
Chapter 15: Drawing in a Window
25905c15.qxd:WroxPro 2/21/08 9:17 AM Page 893

m_FirstPoint = point; // Record the cursor positionSetCapture(); // Capture subsequent mouse messages
}
Now you must call the ReleaseCapture() function in the WM_LBUTTONUP handler. If you don’t do this,other programs cannot receive any mouse messages as long as your program continues to run. Of course,you should only release the mouse if you’ve captured it earlier. The GetCapture() function that the viewclass inherits returns a pointer to the window that has captured the mouse, and this gives you a way oftelling whether or not you have captured mouse messages. You just need to add the following to the han-dler for WM_LBUTTONUP:
void CSketcherView::OnLButtonUp(UINT nFlags, CPoint point){
if(this == GetCapture())ReleaseCapture(); // Stop capturing mouse messages
// Make sure there is an elementif(m_pTempElement){
// Call a document class function to store the element// pointed to by m_pTempElement in the document object
delete m_pTempElement; // This code is temporarym_pTempElement = 0; // Reset the element pointer
}}
If the pointer returned by the GetCapture() function is equal to the pointer this, your view has capturedthe mouse, so you release it.
The final alteration you should make is to modify the WM_MOUSEMOVE handler so that it only deals withmessages that have been captured by the view. You can do this with one small change:
void CSketcherView::OnMouseMove(UINT nFlags, CPoint point){
// Define a Device Context object for the viewCClientDC aDC(this); // DC is for this viewaDC.SetROP2(R2_NOTXORPEN); // Set the drawing modeif((nFlags & MK_LBUTTON) && (this == GetCapture())){
m_SecondPoint = point; // Save the current cursor position
if(m_pTempElement){
// Redraw the old element so it disappears from the viewm_pTempElement->Draw(&aDC);delete m_pTempElement; // Delete the old elementm_pTempElement = 0; // Reset the pointer to 0
}
// Create a temporary element of the type and color that// is recorded in the document object, and draw it
894
Chapter 15: Drawing in a Window
25905c15.qxd:WroxPro 2/21/08 9:17 AM Page 894

m_pTempElement = CreateElement();// Create a new elementm_pTempElement->Draw(&aDC); // Draw the element
}}
The handler now processes only the message if the left button is down and the left button down handlerfor your view has been called, so that the mouse has been captured by your view window.
If you rebuild Sketcher with these additions, you’ll find that the problems that arose earlier when thecursor was dragged off the client area no longer occur.
Drawing with the CLRIt’s time to augment the CLRSketcher application from the previous chapter with some drawing capabil-ity. I won’t discuss the principles of drawing shapes using the mouse again because they are essentially thesame in both environments.
The MFC is a set of classes that wraps the Windows API, so inevitably most of the processes are verysimilar to the Windows API. Of course, the CLR is a virtual machine that insulates you from the hostenvironment, so there is no need for the CLR to follow the patterns for handling events and drawing ina window that are in the Windows API. There are significant differences as you’ll see, but it is not so farfrom the way that the MFC works that you will have any problems understanding it. Indeed, in a CLRprogram things are typically somewhat simpler.
Drawing on a FormIn a CLR program you have none of the complications of mapping modes when you are drawing on aform. The origin for drawing purposes is at the top left of the form with the positive x-axis running fromleft to right and the positive y-axis running from top to bottom. The classes that enable you to draw on aform are within the System::Drawing namespace and drawing on the form is carried out by a functionin the Form1 class that handles the Paint event. Right-click on the form in the Design window for CLRSketcher and select Properties from the pop-up. Select the Events button to display the events for the formand double-click the Paint event; it’s the only event in the Appearance group in the Properties window.This generates the Form1_Paint() function that will be called in response to a Paint event that occurswhen the form must be redrawn. You’ll implement this method to draw a sketch in the next chapter.
One thing you can do at this point is to change the background color for the form. By default the back-ground color is a shade of gray that is not ideal as a drawing background and it would be better ashade of white. Change the value of the BackColor property in the Properties window by selectingControlLightLight from the drop-down list to the right. The form will now display with a nicewhite background to draw on.
Adding Mouse Event HandlersAs I said, the drawing principles in CLR Sketcher are essentially the same as in MFC Sketcher so youneed handlers for the corresponding mouse events. If you scroll down the list of events in the Form1Properties window you can find the Mouse group of events, as shown in Figure 15-21.
895
Chapter 15: Drawing in a Window
25905c15.qxd:WroxPro 2/21/08 9:17 AM Page 895

Figure 15-21
The ones that are of particular interest for drawing operations are the MouseDown, MouseMove, andMouseUp events. The MouseDown event occurs when a mouse button is pressed and you determinewhich mouse button from information passed to the event handler. Similarly, the MouseUp event occurswhen any mouse button is released and the arguments passed to the handler for the event enable you to figure out which. You need handlers for these two events as well as the MouseMove event, so double-click each of these events in the Properties window to generate the event handler functions for them.The handler for the MouseDown event looks like this:
private: System::Void Form1_MouseDown(System::Object^ sender, System::Windows::Forms::MouseEventArgs^ e) {}
The first parameter identifies the source of the event and the second parameter provides informationabout the event itself. The MouseEventArgs object that is passed to this handler function (in fact all ofthe mouse event handlers have a parameter of this type) contains several properties that provide infor-mation you can use in handling the event, and these are described in the following table.
Property Name Description
Button A property of enum type System::Windows::Forms::MouseButtons thatidentifies which mouse button was pressed. The MouseButtons enumdefines the following possible values for the property:
MouseButtons::Left: The left mouse.MouseButtons::Right: The right mouse.MouseButtons::None: No mouse button was pressed.MouseButtons::Middle: The middle mouse button.MouseButtons::XButton1: The first XButton.MouseButtons::XButton2: The second XButton.
Location A property of type System::Drawing::Point that identifies the location ofthe mouse cursor. The X and Y properties of a Point object are the integer xand y coordinate values.
896
Chapter 15: Drawing in a Window
25905c15.qxd:WroxPro 2/21/08 9:17 AM Page 896

Following the same logic as you used in the MFC Sketcher program, the MouseDown event handlerneeds to check that the left mouse button is pressed and record the current cursor position somewherefor use in the MouseMove handler. It also should record that drawing an element is in progress. To sup-port this you can add two private data members to the Form1 class, a bool variable with the namedrawing to record when drawing an element is in progress, and a variable of type Point with thename firstPoint to record the initial mouse cursor position. You can do this manually, or from ClassView using the Add > Add Variable... capability. Make sure that the variables are initialized bythe Form1 constructor, drawing to false and firstPoint to 0; the wizard should insert this auto-matically. The Point class is defined in the System::Drawing namespace, so you should add the following using directive at the end of the others in Form1.h:
using namespace System::Drawing;
You can now add the code for the MouseDown delegate like this:
private: System::Void Form1_MouseDown(System::Object^ sender, System::Windows::Forms::MouseEventArgs^ e) {if(e->Button == System::Windows::Forms::MouseButtons::Left){drawing = true;firstPoint = e->Location;
}}
As long as the left mouse button is pressed, drawing an element has started so you set drawing to true.The Location property for the parameter e supplies the cursor location as a Point object so you canstore it directly in firstPoint.
The MouseMove event handler will take care of creating elements for the sketch and the MouseUp eventhandler will finalize the process, but before you complete the code for these two mouse event handlersyou need to take a little diversion to define the classes that encapsulate the elements you can draw.
Defining C++/CLI Element ClassesThe pattern for the classes that define elements will be similar to those in the MFC version of Sketcher;an Element base class with the specific element types defined by classes derived from Element. Go tothe Solution Explorer window, right-click on the Header Files folder and select Add > New Item...
Property Name Description
X The x coordinate of the mouse cursor as a value of type int.
Y The y coordinate of the mouse cursor as a value of type int.
Clicks A count of the number of times the mouse button was pressed and releasedas a value of type int.
Delta A signed count of the number of detents the mouse wheel has rotated as avalue of type int.
897
Chapter 15: Drawing in a Window
25905c15.qxd:WroxPro 2/21/08 9:17 AM Page 897

from the pop-up. Use the dialog to add a header file with the name Elements.h. Add the code forElement base class definition to Elements.h like this:
// Elements.h// Defines element types#pragma once
using namespace System;using namespace System::Drawing;
namespace CLRSketcher {
public ref class Element abstract{protected:Point position;Color color;System::Drawing::Rectangle boundRect;
public:virtual void Draw(Graphics^ g) abstract;
};}
You are using classes from the System and System::Drawing namespaces in the element class defi-nitions so there are using directives for both. The code for the application is defined within theCLRSketcher namespace, so you put the definitions for the element classes in the same namespace.The Element class and its subclasses have to be ref classes because value classes cannot be derivedclasses. The Element class also must be defined as abstract because there is no implementation for the Draw() function. The Draw() function will be overridden in each of the derived classes to draw a specific type of element and you will call the function polymorphically, just as you did in MFC Sketcher.
The position member is of type System::Drawing::Point, which is a value type that defines a pointobject with two members X and Y. The position, color, and boundRect members will be inherited inthe derived classes and will store the position of the element, the element color, and the bounding rectan-gle for the element. All elements will be drawn relative to the point position. For the moment you won’tworry about the distinction between a bounding rectangle and an enclosing rectangle. Incidentally, thetype name for the boundRect variable, System::Drawing::Rectangle, is fully qualified here becauseyou will add a derived class with the name Rectangle; without the qualified name here, the compilerwould assume you mean the Rectangle class in this header file, which is not what you want.
Defining a LineNext you can add an initial definition for the Line class to Elements.h. Make sure you add this codebefore the closing brace for the CLRSketcher namespace block:
public ref class Line : Element{protected:Point end;
public:
898
Chapter 15: Drawing in a Window
25905c15.qxd:WroxPro 2/21/08 9:17 AM Page 898

// ConstructorLine(Color color, Point start, Point end){this->color = color;position = start;this->end = end;boundRect = System::Drawing::Rectangle(Math::Min(position.X, end.X),
Math::Min(position.Y, end.Y),Math::Abs(position.X - end.X), Math::Abs(position.Y - end.Y));
// Provide for lines that are horizontal or vertical if(boundRect.Width < 2) boundRect.Width = 2;if(boundRect.Height < 2) boundRect.Height = 2;
}
// Function to draw a linevirtual void Draw(Graphics^ g) override{// Code to draw a line...
}};
The constructor sets the value for the color member that is inherited from the base class. It also stores thestart and end points of the line that are passed as arguments in the inherited position member and theend member respectively. The inherited boundRect member is initialized from the position and theend points. You have several ways to create a System::Drawing::Rectangle object. Here, the firsttwo arguments to the Rectangle constructor are the coordinates of the top-left corner of the rectangle.The third and fourth arguments are the width and height of the rectangle. You use the Min() functionfrom the System::Math class to obtain the minimum values of the coordinates of position and endand the Abs() function to obtain the absolute (positive) value for the difference between pairs of corre-sponding coordinates to get the width and height. The Math class defines several other static utilityfunctions that are very handy when you want to carry out basic mathematical operations.
If a line is exactly horizontal or vertical, the bounding rectangle will have a width or height that is zeroso the last two if statements in the constructor ensure that the rectangle always has a width and heightgreater than zero.
Defining a ColorSystem::Drawing::Color is a value class that encapsulates an ARGB color value. An ARGB color is a32-bit value comprising four 8-bit components, an alpha component that determines transparency andthree primary color components, red, green and blue. Each of the component values can be from 0 to 255where an alpha of 0 is completely transparent and an alpha of 255 is completely opaque; an 8-bit colorcomponent value represents the intensity of that color where 0 is zero intensity (i.e., no color) and 255 isthe maximum. A lot of the time you can make use of standard color constants that the Color class definessuch as Color::Blue or Color::Red. If you look at the documentation for members of the Color class,you’ll see the complete set.
Drawing LinesThe Draw() function will use the System::Drawing::Graphics object that is passed as the argumentto draw the line in the appropriate color. The Graphics class defines a large number of functions thatyou use for drawing shapes, including those in the following table.
899
Chapter 15: Drawing in a Window
25905c15.qxd:WroxPro 2/21/08 9:17 AM Page 899
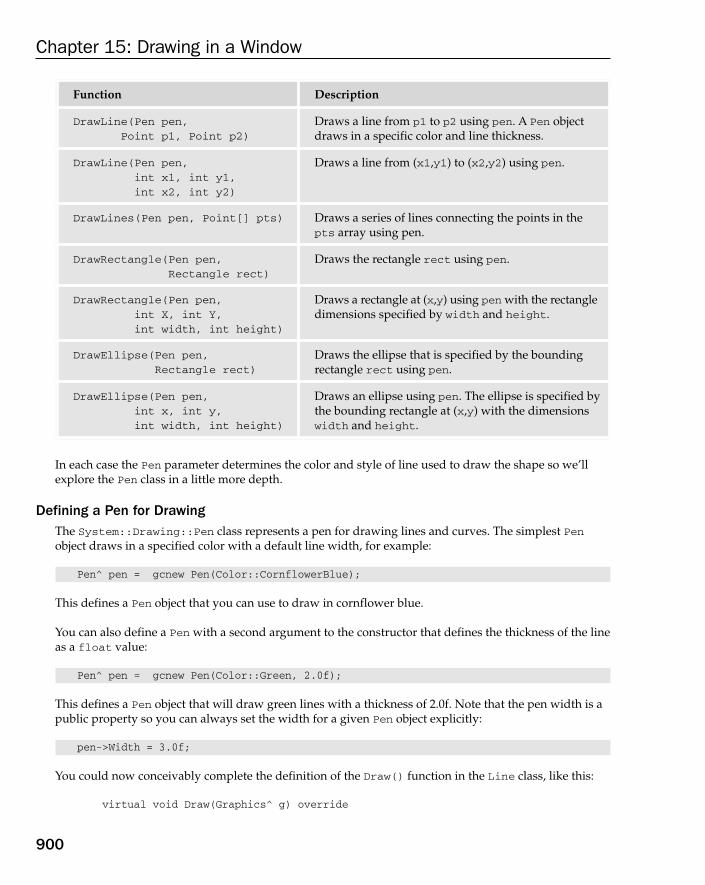
In each case the Pen parameter determines the color and style of line used to draw the shape so we’llexplore the Pen class in a little more depth.
Defining a Pen for DrawingThe System::Drawing::Pen class represents a pen for drawing lines and curves. The simplest Penobject draws in a specified color with a default line width, for example:
Pen^ pen = gcnew Pen(Color::CornflowerBlue);
This defines a Pen object that you can use to draw in cornflower blue.
You can also define a Pen with a second argument to the constructor that defines the thickness of the lineas a float value:
Pen^ pen = gcnew Pen(Color::Green, 2.0f);
This defines a Pen object that will draw green lines with a thickness of 2.0f. Note that the pen width is apublic property so you can always set the width for a given Pen object explicitly:
pen->Width = 3.0f;
You could now conceivably complete the definition of the Draw() function in the Line class, like this:
virtual void Draw(Graphics^ g) override
Function Description
DrawLine(Pen pen,Point p1, Point p2)
Draws a line from p1 to p2 using pen. A Pen objectdraws in a specific color and line thickness.
DrawLine(Pen pen,int x1, int y1,int x2, int y2)
Draws a line from (x1,y1) to (x2,y2) using pen.
DrawLines(Pen pen, Point[] pts) Draws a series of lines connecting the points in thepts array using pen.
DrawRectangle(Pen pen,Rectangle rect)
Draws the rectangle rect using pen.
DrawRectangle(Pen pen,int X, int Y,int width, int height)
Draws a rectangle at (x,y) using pen with the rectangledimensions specified by width and height.
DrawEllipse(Pen pen,Rectangle rect)
Draws the ellipse that is specified by the boundingrectangle rect using pen.
DrawEllipse(Pen pen,int x, int y,int width, int height)
Draws an ellipse using pen. The ellipse is specified bythe bounding rectangle at (x,y) with the dimensionswidth and height.
900
Chapter 15: Drawing in a Window
25905c15.qxd:WroxPro 2/21/08 9:17 AM Page 900

{g->DrawLine(gcnew Pen(color), position, end);
}
This implementation of the function draws a line from position to end with a default line width of 1and in the color specified by color. However, don’t add this to CLR Sketcher yet as there’s a betterapproach.
The default Pen object draws a continuous line of a default thickness of 1.0f but you can draw othertypes of line by setting properties for a Pen object; the following table shows Pen properties.
Pen Property Description
Color Gets or sets the color of the pen as a value of type System::Drawing::Color.For example, to set the drawing color for a Pen object, pen, to red, you set theproperty like this:
pen->Color = Color::Red;
Width Gets or sets the width of the line drawn by the pen as a value of type float.
DashPattern Gets or sets an array of float values specifying a dash pattern for a line. Thearray values specify the lengths of alternating dashes and spaces in a line. Forexample:
array<float>^ pattern = { 5.0f, 2.0f, 4.0f, 3.0f};pen->DashPattern = pattern;
This defines a pattern that will be a dash of length 5 followed by a space of length 2 followed by a dash of length 4 followed by a space of length 3; the pattern repeatsas often as necessary along a line.
DashOffset Specifies the distance from the start of a line to the beginning of a dash patternas a value of type float.
StartCap Specifies the cap style for the start of a line. Cap styles are defined by theSystem::Drawing::Drawing2D::LineCap enumeration that defines the following possible values:
Flat, Square, Round, Triangle, NoAnchor, SquareAnchor, RoundAnchor,DiamondAnchor, ArrowAnchor, Custom, AnchorMask
For example, to draw lines with a round line cap at the start you set the prop-erty like this:
pen->StartCap =System::Drawing::Drawing2D::LineCap::Round;
EndCap Specifies the cap style for the end of a line. The possible values for the cap stylefor the end of a line are the same as for StartCap.
901
Chapter 15: Drawing in a Window
25905c15.qxd:WroxPro 2/21/08 9:17 AM Page 901
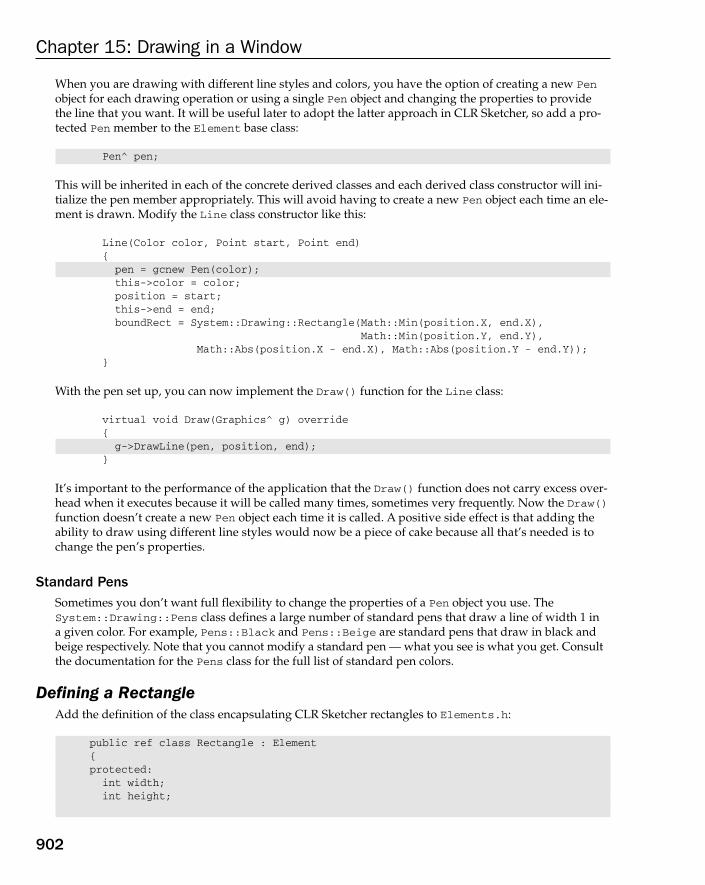
When you are drawing with different line styles and colors, you have the option of creating a new Penobject for each drawing operation or using a single Pen object and changing the properties to providethe line that you want. It will be useful later to adopt the latter approach in CLR Sketcher, so add a pro-tected Pen member to the Element base class:
Pen^ pen;
This will be inherited in each of the concrete derived classes and each derived class constructor will ini-tialize the pen member appropriately. This will avoid having to create a new Pen object each time an ele-ment is drawn. Modify the Line class constructor like this:
Line(Color color, Point start, Point end){pen = gcnew Pen(color);this->color = color;position = start;this->end = end;boundRect = System::Drawing::Rectangle(Math::Min(position.X, end.X),
Math::Min(position.Y, end.Y),Math::Abs(position.X - end.X), Math::Abs(position.Y - end.Y));
}
With the pen set up, you can now implement the Draw() function for the Line class:
virtual void Draw(Graphics^ g) override{g->DrawLine(pen, position, end);
}
It’s important to the performance of the application that the Draw() function does not carry excess over-head when it executes because it will be called many times, sometimes very frequently. Now the Draw()function doesn’t create a new Pen object each time it is called. A positive side effect is that adding theability to draw using different line styles would now be a piece of cake because all that’s needed is tochange the pen’s properties.
Standard PensSometimes you don’t want full flexibility to change the properties of a Pen object you use. TheSystem::Drawing::Pens class defines a large number of standard pens that draw a line of width 1 in a given color. For example, Pens::Black and Pens::Beige are standard pens that draw in black andbeige respectively. Note that you cannot modify a standard pen — what you see is what you get. Consultthe documentation for the Pens class for the full list of standard pen colors.
Defining a RectangleAdd the definition of the class encapsulating CLR Sketcher rectangles to Elements.h:
public ref class Rectangle : Element{protected:int width;int height;
902
Chapter 15: Drawing in a Window
25905c15.qxd:WroxPro 2/21/08 9:17 AM Page 902

public:Rectangle(Color color, Point p1, Point p2){pen = gcnew Pen(color);this->color = color;position = Point(Math::Min(p1.X, p2.X), Math::Min(p1.Y,p2.Y));width = Math::Abs(p1.X - p2.X);height = Math::Abs(p1.Y - p2.Y);boundRect = System::Drawing::Rectangle(position, Size(width, height));
}
virtual void Draw(Graphics^ g) override{g->DrawRectangle(pen, position.X, position.Y, width, height);
}};
A rectangle is defined by the top-left corner position and the width and height so you have defined classmembers to store these. As in the MFC version of Sketcher, you need to figure out the coordinates of thetop-left corner of the rectangle from the points supplied to the constructor. Here you define the value ofthe inherited boundRect member of the class as a System::Drawing::Rectangle using a constructorthat accepts a Point object specifying the top-left corner as the first argument. The second argument is aSystem::Drawing::Size object encapsulating the width and height of the rectangle. The Draw() func-tion draws the rectangle on the form using the DrawRectangle() function for the Graphics object, g,which is passed to the Draw() function.
Defining a CircleThe definition of the Circle class in Elements.h is also very straightforward:
public ref class Circle : Element{protected:int width;int height;
public:Circle(Color color, Point center, Point circum){pen = gcnew Pen(color);this->color = color;int radius = safe_cast<int>(Math::Sqrt(
(center.X-circum.X)*(center.X-circum.X) +(center.Y-circum.Y)*(center.Y-circum.Y)));
position = Point(center.X - radius, center.Y - radius);width = height = 2*radius;boundRect = System::Drawing::Rectangle(position, Size(width, height));
}
virtual void Draw(Graphics^ g) override{g->DrawEllipse(pen, position.X, position.Y, width,height);
}};
903
Chapter 15: Drawing in a Window
25905c15.qxd:WroxPro 2/21/08 9:17 AM Page 903

The two points that are passed to the constructor are the center and a point on the circumference of thecircle. The radius is the distance between these two points and the Math::Sqrt() function calculatesthis. You need the width and height of the rectangle enclosing the circle to draw it and the value of eachof these is twice the radius. To draw the circle you use the DrawEllipse() function for the Graphicsobject, g.
A class to represent a curve is a little trickier as you will draw it as a series of line segments joining a setof points. As in the MFC version of Sketcher, you need a way to store an arbitrary number of points in aCurve object, so let’s defer the problem for both versions of Sketcher and leave the Curve class definitionto the next chapter.
Implementing the MouseMove Event HandlerThe MouseMove event handler creates a temporary element object of the current type. Add a privatemember, tempElement, to the Form1 class of type Element^ to store the reference to the temporary ele-ment and initialize it to nullptr in the initialization list for the Form1 constructor. This temporary ele-ment will be stored eventually in the sketch by the MouseUp event handler because the MouseUp eventsignals the end of the drawing process for an element but you’ll deal with this in the next chapter. Don’tforget to add an #include directive for the Elements.h header at the beginning of the Form1.h headerfile, otherwise the compiler will not recognize the Element type and the code won’t compile.
You only want to create an element in the MouseMove event handler when the drawing member of theForm1 class is true because this is how the MouseDown event handler records that drawing an elementhas started. Here’s the code for implementing the MouseMove event handler that you added to the Form1class earlier:
private: System::Void Form1_MouseMove(System::Object^ sender,System::Windows::Forms::MouseEventArgs^ e) {if(drawing){switch(elementType){case ElementType::LINE:tempElement = gcnew Line(color, firstPoint, e->Location);break;
case ElementType::RECTANGLE:tempElement = gcnew Rectangle(color, firstPoint, e->Location);break;
case ElementType::CIRCLE:tempElement = gcnew Circle(color, firstPoint, e->Location);break;
case ElementType::CURVE:// Code to create a Curve element...break;
}Invalidate();}
}
904
Chapter 15: Drawing in a Window
25905c15.qxd:WroxPro 2/21/08 9:17 AM Page 904
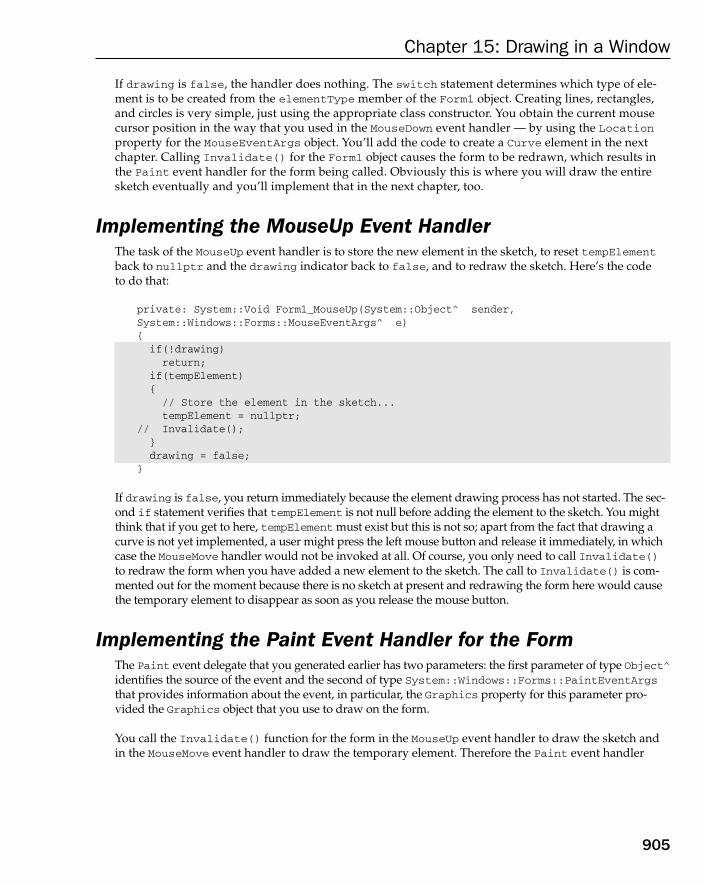
If drawing is false, the handler does nothing. The switch statement determines which type of ele-ment is to be created from the elementType member of the Form1 object. Creating lines, rectangles,and circles is very simple, just using the appropriate class constructor. You obtain the current mousecursor position in the way that you used in the MouseDown event handler — by using the Locationproperty for the MouseEventArgs object. You’ll add the code to create a Curve element in the nextchapter. Calling Invalidate() for the Form1 object causes the form to be redrawn, which results inthe Paint event handler for the form being called. Obviously this is where you will draw the entiresketch eventually and you’ll implement that in the next chapter, too.
Implementing the MouseUp Event HandlerThe task of the MouseUp event handler is to store the new element in the sketch, to reset tempElementback to nullptr and the drawing indicator back to false, and to redraw the sketch. Here’s the code to do that:
private: System::Void Form1_MouseUp(System::Object^ sender,System::Windows::Forms::MouseEventArgs^ e) {if(!drawing)return;
if(tempElement){// Store the element in the sketch...tempElement = nullptr;
// Invalidate();}drawing = false;
}
If drawing is false, you return immediately because the element drawing process has not started. The sec-ond if statement verifies that tempElement is not null before adding the element to the sketch. You mightthink that if you get to here, tempElement must exist but this is not so; apart from the fact that drawing acurve is not yet implemented, a user might press the left mouse button and release it immediately, in whichcase the MouseMove handler would not be invoked at all. Of course, you only need to call Invalidate()to redraw the form when you have added a new element to the sketch. The call to Invalidate() is com-mented out for the moment because there is no sketch at present and redrawing the form here would causethe temporary element to disappear as soon as you release the mouse button.
Implementing the Paint Event Handler for the FormThe Paint event delegate that you generated earlier has two parameters: the first parameter of type Object^identifies the source of the event and the second of type System::Windows::Forms::PaintEventArgsthat provides information about the event, in particular, the Graphics property for this parameter pro-vided the Graphics object that you use to draw on the form.
You call the Invalidate() function for the form in the MouseUp event handler to draw the sketch andin the MouseMove event handler to draw the temporary element. Therefore the Paint event handler
905
Chapter 15: Drawing in a Window
25905c15.qxd:WroxPro 2/21/08 9:17 AM Page 905
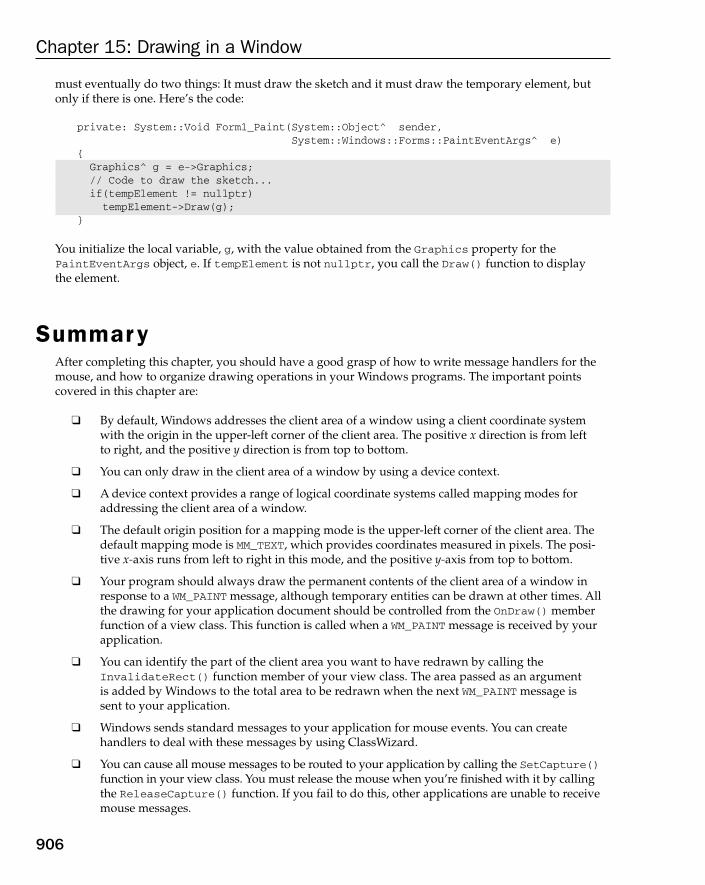
must eventually do two things: It must draw the sketch and it must draw the temporary element, butonly if there is one. Here’s the code:
private: System::Void Form1_Paint(System::Object^ sender,System::Windows::Forms::PaintEventArgs^ e)
{Graphics^ g = e->Graphics;// Code to draw the sketch...if(tempElement != nullptr)tempElement->Draw(g);
}
You initialize the local variable, g, with the value obtained from the Graphics property for thePaintEventArgs object, e. If tempElement is not nullptr, you call the Draw() function to display the element.
SummaryAfter completing this chapter, you should have a good grasp of how to write message handlers for themouse, and how to organize drawing operations in your Windows programs. The important points covered in this chapter are:
❑ By default, Windows addresses the client area of a window using a client coordinate systemwith the origin in the upper-left corner of the client area. The positive x direction is from left to right, and the positive y direction is from top to bottom.
❑ You can only draw in the client area of a window by using a device context.
❑ A device context provides a range of logical coordinate systems called mapping modes foraddressing the client area of a window.
❑ The default origin position for a mapping mode is the upper-left corner of the client area. Thedefault mapping mode is MM_TEXT, which provides coordinates measured in pixels. The posi-tive x-axis runs from left to right in this mode, and the positive y-axis from top to bottom.
❑ Your program should always draw the permanent contents of the client area of a window inresponse to a WM_PAINT message, although temporary entities can be drawn at other times. Allthe drawing for your application document should be controlled from the OnDraw() memberfunction of a view class. This function is called when a WM_PAINT message is received by yourapplication.
❑ You can identify the part of the client area you want to have redrawn by calling theInvalidateRect() function member of your view class. The area passed as an argument is added by Windows to the total area to be redrawn when the next WM_PAINT message is sent to your application.
❑ Windows sends standard messages to your application for mouse events. You can create handlers to deal with these messages by using ClassWizard.
❑ You can cause all mouse messages to be routed to your application by calling the SetCapture()function in your view class. You must release the mouse when you’re finished with it by callingthe ReleaseCapture() function. If you fail to do this, other applications are unable to receivemouse messages.
906
Chapter 15: Drawing in a Window
25905c15.qxd:WroxPro 2/21/08 9:17 AM Page 906
❑ You can implement rubber-banding when creating geometric entities by drawing them in themessage handler for mouse movements.
❑ The SetROP2() member of the CDC class enables you to set drawing modes. Selecting the rightdrawing mode greatly simplifies rubber-banding operations.
❑ GUI elements for a CLR program can be created interactively using the Form Design capability.Controls can be dragged directly from the Toolbox window on to the form. Of course, you canalso create GUI elements programmatically by adding suitable code manually.
❑ You customize GUI controls on a form by setting their properties.
❑ The Properties window for a GUI component also enables you to add event handler functionsautomatically.
❑ The Graphics class defines functions that enable you to draw on a form.
❑ The Pen class defines an object for drawing in a given color and line style.
ExercisesYou can download the source code for the examples in the book and the solutions to the following exercisesfrom www.wrox.com. Don’t forget to back up the MFC Sketcher and CLRSketcher projects before you mod-ify them for the exercises.
1. Add the menu item and Toolbar button to MFC Sketcher for an element of type ellipse, as in theexercises from Chapter 14, and define a class to support drawing ellipses defined by two pointson opposite corners of their enclosing rectangle.
2. Which functions now need to be modified to support drawing an ellipse? Modify the programto draw an ellipse.
3. Which functions must you modify in the example from the previous exercise so that the firstpoint defines the center of the ellipse, and the current cursor position defines a corner of theenclosing rectangle? Modify the example to work this way. (Hint — look up the CPoint classmembers in Help.)
4. Add a new menu pop-up to the IDR_SketcherTYPE menu for Pen Style, to allow solid, dashed,dotted, dash-dotted, and dash-dot-dotted lines to be specified.
5. Which parts of the program need to be modified to support the operation of the menu, and thedrawing of elements in these line types?
6. Implement support for the new menu pop-up and drawing elements in any of the line types.
7. Modify CLRSketcher to support drawing an ellipse defined by two points on opposite cornersof the enclosing rectangle. Add a toolbar button as well as a menu item to select ellipse mode.
8. Implement a Line Style menu in CLR Sketcher with menu items Solid, Dashed, and Dotted.Add toolbar buttons for the menu items with tooltips. Implement the capability in CLR Sketcherfor drawing elements in any of the three line styles in the new menu. Create your own represen-tation for the line styles by setting the DashPattern property for the pen appropriately.
907
Chapter 15: Drawing in a Window
25905c15.qxd:WroxPro 2/21/08 9:17 AM Page 907

25905c15.qxd:WroxPro 2/21/08 9:17 AM Page 908
16Creating the Document and Improving the View
In this chapter, you’ll look into the facilities offered by MFC for managing collections of data items;these are similar to the STL containers discussed in Chapter 10. You’ll use the MFC collection classesto complete the class definition and implementation for the curve element that was left open in MFCSketcher in the last chapter. You’ll extend the MFC Sketcher to make the document view more flexi-ble, introducing several new techniques in the process. You’ll also extend the MFC and CLR versionsof Sketcher to store elements in an object that encapsulates a complete sketch.
In this chapter, you’ll learn about:
❑ MFC collections and what you can do with them
❑ How to use an MFC List collection and an STL/CLR vector container to store point datafor a curve
❑ How to use an MFC List collection and an STL/CLR list container to store sketch data
❑ How to implement drawing a sketch in the MFC and CLR versions of Sketcher
❑ How to implement scrolling in a view in MFC Sketcher
❑ How to create a context menu at the cursor
❑ How to highlight the element nearest the cursor to provide feedback to the user for moving and deleting elements
❑ How to program the mouse to move and delete elements
The MFC Collection ClassesBy the nature of Windows programming, you’ll frequently need to handle collections of data itemswhere you have no advance knowledge of how many items you will need to manage, or even whatparticular type they are going to be. This is clearly illustrated by the Sketcher application where theuser can draw an arbitrary number of elements which can be lines, rectangles, circles and curves, and
25905c16.qxd:WroxPro 2/21/08 9:18 AM Page 909

in any sequence. Of course, the STL that you learned about in Chapter 10 provides a wide range of con-tainer class templates that do the sort of thing you want to do in Sketcher to store a sketch but the STLcontainers have one limitation.
Serialization is a process for transferring objects to and from files that you’ll learn about in Chapter 18where you will implement the capability to store sketches in a file; unfortunately the STL containers arenot supported by the serialization capability provided by the MFC. You could write your own code towrite the contents of an STL container to a file, but using MFC serialization saves a lot of work, so thereare considerable advantages to following that route.
MFC uses different terminology from the STL for container classes. MFC provides a group of what arecalled collection classes that provide similar capability to the STL containers — a collection being anaggregation of an arbitrary number of data items organized in a particular way. The major advantageoffered by the MFC collection classes over STL containers is that MFC collection class objects are serializ-able as long as the objects they store are serializable.
Types of CollectionMFC provides you with a large number of collection classes for managing data. You’ll use just a couple of them in Sketcher, but we’ll explore the scope of the types of collections available. MFC supports threekinds of collections, differentiated by the way in which the data items are organized. The way a collectionis organized is referred to as the shape of the collection. The three types of organization, or shape, are:
MFC collection classes provide two approaches to implementing each type of collection. One approachuses class templates and provides you with type-safe handling of data in a collection. Type-safe handlingmeans that the data passed to a function member of the collection class is checked to ensure that it’s of atype that can be processed by the function.
The other approach makes use of a range of concrete collection classes (rather than templates), but theseperform no data checking. If you want your collection classes to be type-safe, you have to include codeyourself to assure this. These latter classes were available in older versions of Visual C++ under Windowsbefore the template collection classes were introduced and are still around for compatibility reasons. I’llconcentrate on the template-based versions because these provide the best chance of avoiding errors inour application.
Shape How information is organized
Array An array in this context is just like the array you have seen in the C++ language.This is an ordered sequence of elements that is the equivalent of an STL sequencecontainer.
List This is a doubly linked list similar to an STL list container.
Map A map is an unordered collection of data items that are key/object pairs and isequivalent to an STL map.
910
Chapter 16: Creating the Document and Improving the View
25905c16.qxd:WroxPro 2/21/08 9:18 AM Page 910

The Type-Safe Collection ClassesThe template-based type-safe collection classes support collections of objects of any native C++ type, andcollections of pointers to objects of any native C++ type. Collections of objects are supported by the tem-plate classes CArray, CList and CMap, and collections of pointers to objects are supported by the templateclasses CTypedPtrArray, CTypedPtrList and CTypedPtrMap. I won’t go into the detail of all of these,just the two that you’ll use in the Sketcher program. You’ll use one to store objects and the other to storepointers to objects so you’ll get a feel for both sorts of collection.
Collections of ObjectsThe template classes for defining collections of objects are all derived from the MFC class CObject. Theyare defined this way so that they inherit the properties of the CObject class, which includes file input andoutput operations for objects, generally referred to as serialization.
These template classes can store and manage any kind of object, including all the C++ basic data types,plus any classes or structures that you or anybody else might define. Because these classes store objects,whenever you add an element to a list, an array, or a map, the class template object needs to make a copyof your object. Consequently, any class type that you want to store in any of these collections must have a copy constructor. The copy constructor for your class is used to create a duplicate of the object that youwant to store in the collection.
Take a look at the general properties of each of the template classes that provide type-safe management ofobjects. This is not an exhaustive treatment of all the member functions provided. Rather, it’s intended togive you a sufficient flavor of how they work to enable you to decide if you want to use them or not. Youcan get information on all of the member functions by using Help to get to the template class definition.
The CArray Template ClassYou can use this template to store any kind of object in an array and have the array automatically growto accommodate more elements when necessary. An array collection is illustrated in Figure 16-1.
As with the STL vector<T> containers, elements in array collections are indexed from 0. The declarationof an array collection takes two template arguments. The first argument is the type of the object to be storedso if your array collection is to store objects of type CPoint for example, you specify CPoint as the firsttemplate argument. The second argument is the type used in member function calls. To avoid the overheadin copying objects when passed by value, the second argument is usually a reference, so an example of anarray collection declaration to hold CPoint objects is:
CArray<CPoint, CPoint&> PointArray;
This defines the array collection class object, PointArray, that stores CPoint objects. When you call func-tion members of this object, the argument is a reference, so to add a CPoint object, you would write
PointArray.Add(aPoint);
and the argument aPoint is passed as a reference.
911
Chapter 16: Creating the Document and Improving the View
25905c16.qxd:WroxPro 2/21/08 9:18 AM Page 911

Figure 16-1
After you have declared an array collection, it’s important to call the SetSize() member function to fixthe initial number of elements that you require before you use it. It still works if you don’t do this, but theinitial allocation of elements and subsequent increments are small, resulting in inefficient operation andfrequent reallocation of memory for the array. The initial number of elements that you should specifydepends on the typical size of array you expect to need, and how variable the size is. If you expect that the minimum your program required is of the order of 400 to 500 elements, for example, but with expan-sion up to 700 or 800, an initial size of 600 is suitable.
To retrieve the contents of an element, you can use the GetAt() function, as shown in Figure 16-1. Tostore the third element of PointArray in a variable aPoint, you write:
aPoint = PointArray.GetAt(2);
The class also overloads the subscript operator ([]), so you could retrieve the third element of PointArrayby using PointArray[2]. For example, if aPoint is a variable of type CPoint, you could write:
aPoint = PointArray[2]; // Store a copy of the third element
For array collections that are not const, this notation can also be used instead of the SetAt() function toset the contents of an existing element. The following two statements are, therefore, equivalent:
PointArray.SetAt(3,NewPoint); // Store NewObject in the 4th elementPointArray[3] = NewPoint; // Same as previous line of code
Here, NewPoint is an object of the type used to declare the array. In both cases, the element must alreadyexist. You cannot extend the array by this means. To extend the array, you can use the Add() functionshown in the diagram, which adds a new element to the array. There is also a function Append() to addan array of elements to the end of the array.
Object1
Object2
Object3
Object5
AnObject
Object4
Object6
0
1
Index
GetAt(2)
Array Collection: CArray<ObjectType, ObjectType&> anArray
SetSize(5)Defines theinitial size
Increases areautomaticAdd (AnObject)
Object returned
Type of object to bestored
Argument type to be used
At this index
Stores the object
Index returned
2
4
6
3
5
912
Chapter 16: Creating the Document and Improving the View
25905c16.qxd:WroxPro 2/21/08 9:18 AM Page 912

Helper FunctionsWhenever you call the SetSize() function member of an array collection, a global function,ConstructElements(), is called to allocate memory for the number of elements you want to store in thearray collection initially. This is called a helper function because it helps in the process of setting the size ofthe array collection. The default version of this function sets the contents of the allocated memory to zeroand doesn’t call a constructor for your object class, so you’ll need to supply your own version of this helperfunction if this action isn’t appropriate for your objects. This is the case if space for data members of objectsof your class is allocated dynamically, or if there is other initialization required. ConstructElements() isalso called by the member function InsertAt(), which inserts one or more elements at a particular indexposition within the array.
Members of the CArray collection class that remove elements call the helper functionDestructElements(). The default version does nothing, so if your object construction allocates any memory on the heap, you must override this function to release the memory properly.
The CList collection template makes use of a helper function when searching the contents of a list for a par-ticular object. I’ll discuss this further in the next section. Another helper function, SerializeElements(), isused by the array, list, and map collection classes, and I’ll discuss this when I explain how you can write adocument to file.
The CList Template ClassTake a look at the list collection template in some detail because you’ll apply it in your Sketcher program.The parameters to the CList collection class template are the same as those for the CArray template:
CList<ObjectType, ObjectType&> aList;
You need to supply two arguments to the template when you declare a list collection: the type of objectto be stored, and the way an object is to be specified in function arguments. The example shows the sec-ond argument as a reference because this is used most frequently. It doesn’t necessarily have to be a ref-erence, though — you could use a pointer, or even the object type (so objects would be passed by value),but this would be slow.
You can use a list to manage a curve in the Sketcher program. You could declare a list collection to storethe points specifying a curve object with the statement:
CList<CPoint, CPoint&> PointList;
This declares a list called PointList that stores CPoint objects that are passed to functions in theclass by reference. You’ll come back to this when you fill out more detail of the Sketcher program inthis chapter.
Adding Elements to a ListYou can add objects at the beginning or at the end of the list by using the AddHead() or AddTail()member functions, as shown in Figure 16-2.
Figure 16-2 shows backward and forward pointers for each list element that “‘glue” the objects in the listtogether. These are internal links that you can’t access in any direct way, but you can do just about any-thing you want by using the functions provided in the public interface to the class.
913
Chapter 16: Creating the Document and Improving the View
25905c16.qxd:WroxPro 2/21/08 9:18 AM Page 913
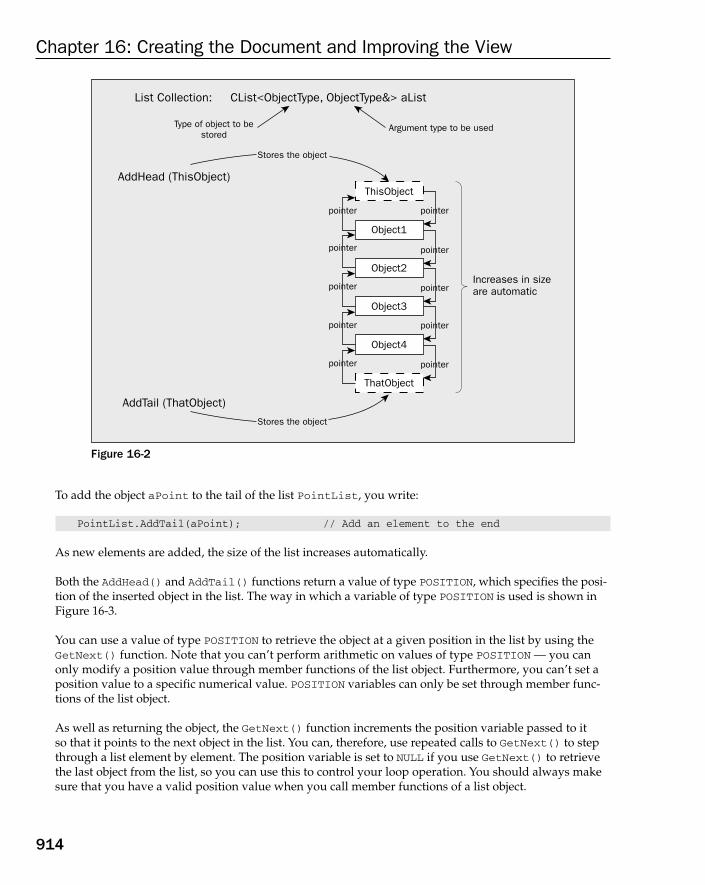
Figure 16-2
To add the object aPoint to the tail of the list PointList, you write:
PointList.AddTail(aPoint); // Add an element to the end
As new elements are added, the size of the list increases automatically.
Both the AddHead() and AddTail() functions return a value of type POSITION, which specifies the posi-tion of the inserted object in the list. The way in which a variable of type POSITION is used is shown inFigure 16-3.
You can use a value of type POSITION to retrieve the object at a given position in the list by using theGetNext() function. Note that you can’t perform arithmetic on values of type POSITION — you canonly modify a position value through member functions of the list object. Furthermore, you can’t set aposition value to a specific numerical value. POSITION variables can only be set through member func-tions of the list object.
As well as returning the object, the GetNext() function increments the position variable passed to it so that it points to the next object in the list. You can, therefore, use repeated calls to GetNext() to stepthrough a list element by element. The position variable is set to NULL if you use GetNext() to retrievethe last object from the list, so you can use this to control your loop operation. You should always makesure that you have a valid position value when you call member functions of a list object.
ThisObject
Object1
Object3
ThatObject
Object2
Object4
AddTail (ThatObject)
AddHead (ThisObject)
Stores the object
Stores the object
pointer
pointer
pointer
pointer
pointer
pointer
pointer
pointer
pointer
pointer
List Collection: CList<ObjectType, ObjectType&> aList
Increases in sizeare automatic
Type of object to bestored
Argument type to be used
914
Chapter 16: Creating the Document and Improving the View
25905c16.qxd:WroxPro 2/21/08 9:18 AM Page 914
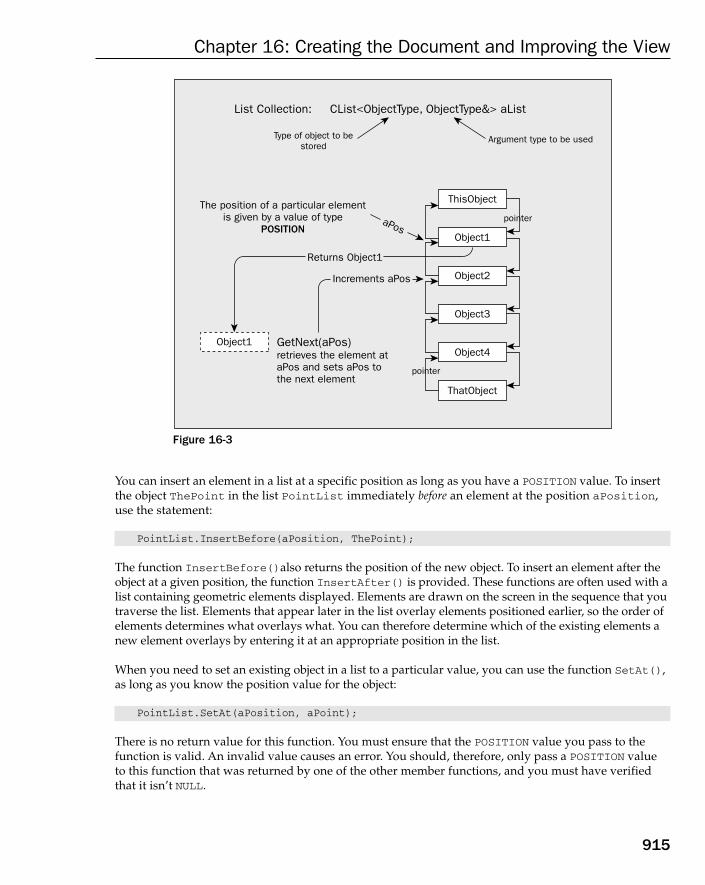
Figure 16-3
You can insert an element in a list at a specific position as long as you have a POSITION value. To insertthe object ThePoint in the list PointList immediately before an element at the position aPosition,use the statement:
PointList.InsertBefore(aPosition, ThePoint);
The function InsertBefore()also returns the position of the new object. To insert an element after theobject at a given position, the function InsertAfter() is provided. These functions are often used with alist containing geometric elements displayed. Elements are drawn on the screen in the sequence that youtraverse the list. Elements that appear later in the list overlay elements positioned earlier, so the order ofelements determines what overlays what. You can therefore determine which of the existing elements anew element overlays by entering it at an appropriate position in the list.
When you need to set an existing object in a list to a particular value, you can use the function SetAt(),as long as you know the position value for the object:
PointList.SetAt(aPosition, aPoint);
There is no return value for this function. You must ensure that the POSITION value you pass to thefunction is valid. An invalid value causes an error. You should, therefore, only pass a POSITION valueto this function that was returned by one of the other member functions, and you must have verifiedthat it isn’t NULL.
ThisObject
Object1
Object1
Object3
ThatObject
Object2
Object4
pointer
pointer
List Collection: CList<ObjectType, ObjectType&> aList
GetNext(aPos)
Type of object to bestored
The position of a particular elementis given by a value of type
POSITION
retrieves the element ataPos and sets aPos tothe next element
Returns Object1
aPos
Increments aPos
Argument type to be used
915
Chapter 16: Creating the Document and Improving the View
25905c16.qxd:WroxPro 2/21/08 9:18 AM Page 915

Iterating through a ListIf you want to get the POSITION value for the beginning or the end of the list, the class provides themember functions GetHeadPosition() and GetTailPosition(). Starting with the POSITION valuefor the head of the list, you can iterate through the complete list by calling GetNext() until the positionvalue is NULL. You can see the typical code to do this using the list of CPoint objects that you declaredearlier:
CPoint CurrentPoint(0,0);
// Get the position of the first list elementPOSITION aPosition = PointList.GetHeadPosition();
while(aPosition) // Loop while aPosition is not NULL{
CurrentPoint = PointList.GetNext(aPosition);// Process the current object...
}
You can work through the list backwards by using another member function, GetPrev(), which retrievesthe current object and then decrements the position indicator. Of course, in this case, you would start outby calling GetTailPosition().
After you know a position value for an object in a list, you can retrieve the object with the member functionGetAt(). You specify the position value as an argument and the object is returned. An invalid positionvalue causes an error.
Searching a ListYou can find the position of an element that’s stored in a list by using the member function Find():
POSITION aPosition = PointList.Find(ThePoint);
This searches for the object specified as an argument by calling a global template functionCompareElements() to compare the objects in the list with the argument. This is the helper function Ireferred to earlier that aids the search process. The default implementation of this function compares theaddress of the argument with the address of each object in the list. This implies that if the search is to besuccessful, the argument must actually be an element in the list — not a copy. If the object is found in thelist, the position of the element is returned. If it isn’t found, NULL is returned. You can specify a secondargument to define a position value where the search should begin.
If you want to search a list for an object that is equal to another object, you must implement your own ver-sion of CompareElements() that performs a proper comparison. The function template is of the form:
template<class TYPE, class ARG_TYPE> BOOL CompareElements(const TYPE* pElement1, const ARG_TYPE* pElement2);
where pElement1 and pElement2 are pointers to the objects to be compared. For the PointList collectionclass object, the prototype of the function generated by the template would be:
BOOL CompareElements(CPoint* pPoint1, CPoint* pPoint2);
916
Chapter 16: Creating the Document and Improving the View
25905c16.qxd:WroxPro 2/21/08 9:18 AM Page 916
To compare the CPoint objects, you could implement this as:
BOOL CompareElements(CPoint* pPoint1, CPoint* pPoint2){ return *pPoint1 == *pPoint2; }
This uses the operator==() function implemented in the CPoint class. In general you would need toimplement the operator==() function for your own class in this context. You could then use it to imple-ment the helper function CompareElements().
You can also obtain the position of an element in a list by using an index value. The index works in the sameway as for an array, with the first element being at index 0, the second at index 1, and so on. The functionFindIndex() takes an index value of type int as an argument and returns a value of type POSITION for theobject at the index position in the list. If you want to use an index value, you are likely to need to know howmany objects there are in a list. The GetCount() function returns this for you:
int ObjectCount = PointList.GetCount();
Here, the integer count of the number of elements in the list is stored in the variable ObjectCount.
Deleting Objects from a ListYou can delete the first element in a list using the member function RemoveHead(). This function will returnthe object that is the new head of the list. To remove the last object, you can use the function RemoveTail().Both of these functions require that there should be at least one object in the list, so you should use the func-tion IsEmpty() first, to verify that the list is not empty. For example:
if(!PointList.IsEmpty())PointList.RemoveHead();
The function IsEmpty() returns TRUE if the list is empty, and FALSE otherwise.
If you know the position value for an object that you want to delete from the list, you can do this directly:
PointList.RemoveAt(aPosition);
There’s no return value from this function. It’s your responsibility to ensure that the position value youpass as an argument is valid. If you want to delete the entire contents of a list, you use the member func-tion RemoveAll():
PointList.RemoveAll();
This function also frees the memory that was allocated for the elements in the list.
Helper Functions for a ListYou have already seen how the CompareElements() helper function is used by the Find() function fora list. Both the ConstructElements() and DestructElements() global helper functions are also usedby members of a CList template class. These are template functions that are declared using the objecttype you specify in your CList class declaration. The template prototypes for these functions are:
template< class TYPE > void ConstructElements(TYPE* pElements, int nCount);template< class TYPE > void DestructElements(TYPE* pElements, int nCount);
917
Chapter 16: Creating the Document and Improving the View
25905c16.qxd:WroxPro 2/21/08 9:18 AM Page 917

To obtain the function that’s specific to your list collection, just plug in the type for the objects you arestoring. For example, the prototypes for the PointList class for these are:
void ConstructElements(CPoint* pPoint, int PointCount);void DestructElements(CPoint* pPoint, int PointCount);
Note that the parameters here are pointers. I mentioned earlier that arguments to the PointList memberfunctions would be references, but this doesn’t apply to the helper functions. The parameters to both func-tions are the same: the first is a pointer to an array of CPoint objects, and the second is a count of the num-ber of objects in the array.
The ConstructElements() function is called whenever you enter an object in the list, and theDestructElements() function is called when you remove an object. As for the CArray template class,you need to implement your versions of these functions if the default operation is not suitable for yourobject class.
The CMap Template ClassBecause of the way they work, maps are particularly suited to applications where your objects obviouslyhave a unique key associated with them, such as a customer class where each customer has an associatedcustomer number or a name and address class where the name might be used as a key. The organizationof a map is shown in Figure 16-4.
Figure 16-4
Object1
Object3
Object2
Object4
Key1
Key3
Key2
Key4
Map Collection: CMap<KeyType, KeyType&, ObjectType, ObjectType&> aMap
aMap[Key2]=Object2;
LookUp(Key3,AnObject);
Type of object to bestored
Object argument type
Stores the object
Accesses the objectcorresponding to the key
Adds an object
Key argument type
Key argument type
918
Chapter 16: Creating the Document and Improving the View
25905c16.qxd:WroxPro 2/21/08 9:18 AM Page 918

A map stores an object and key combination. The key is used to determine where in the block of memoryallocated to the map the object is to be stored. The key, therefore, provides a means of going directly toan object stored, as long as the key is unique. The process of converting a key to an integer that can beused to calculate the address of an entry in a map is called hashing.
The hashing process applied to a key produces an integer called a hash value. This hash value is typicallyused as an offset to a base address to determine where to store the key and its associated object in the map.If the memory allocated to the map is at address Base, and each entry requires Length bytes, the entry pro-ducing the hash value HashValue is stored at Base+HashValue*Length.
The hashing process may not produce a unique hash value from a key, in which case an element — thekey together with the associated object — is entered and linked to whatever element or elements werepreviously stored with the same hashed key value (often as a list). Of course, the fewer unique hash val-ues generated, the less efficient the retrieval process from your map is because searching is required toretrieve elements that have the same hash value.
There are four arguments necessary when you declare a map:
CMap<LONG, LONG&, CPoint, CPoint&> PointMap;
The first two specify the key type and how it is passed as an argument. Usually, it is passed as a refer-ence. The second pair of arguments specifies the object type and how the object is passed as an argu-ment, as you have previously seen.
You can store an object in a map by using the [] operator, as shown in Figure 16-4. You can also use theSetAt() member function to store an object, where you supply the key value and the object as arguments.Note that you cannot use the [] operator on the right side of an assignment to retrieve an object, as thisversion of the operator is not implemented in the class.
To retrieve an object, use the LookUp() function shown in Figure 16-4. This retrieves the object corre-sponding to the key specified; the function returns TRUE if the object was found and FALSE otherwise.You can also iterate through all the objects in a map using a variable of type POSITION, although thesequence in which objects are retrieved is unrelated to the sequence in which they were added to themap. This is because objects are stored in a map in locations determined by the hash value, not by thesequence in which they were entered.
Helper Functions Used by CMapAs well as the helper functions that have been discussed in the context of arrays and lists, map collectionclasses also use a global function HashKey(), which is defined by this template:
template<class ARG_KEY>UINT HashKey(ARG_KEY key);
This function converts your key value to a hash value of type UINT, which is equivalent to unsigned int.The default version does this by simply shifting your key value right by 4 bit positions. You need to imple-ment your own version of this function if the default operation isn’t suited to your key type.
919
Chapter 16: Creating the Document and Improving the View
25905c16.qxd:WroxPro 2/21/08 9:18 AM Page 919
There are different techniques used for hashing that vary depending on the type of data being used as akey, and the number of elements you are likely to want to store in your map. The likely number of ele-ments to be stored indicates the number of unique hash values you need. A common method for hashinga numeric key value is to compute the hash value as the value of the key modulo N, where N is the num-ber of different values you want. For reasons it would take too long to explain here, N needs to be primefor this to work well. Didn’t you just know that program to calculate primes from way back in Chapter 4would turn out to be useful after all?
You can get an appreciation of the principles of the mechanism used here with a simple example. Supposeyou expect to store up to 100 different entries in a map using a key value, Key. You could hash the key withthe statement:
HashValue = Key%101;
This results in values for the HashValue between 0 and 100, which is exactly what you need to calculatethe address for an entry. Assuming your map is stored at some location in memory, Base, and the memoryrequired to store the object along with its key is Length bytes, then you can store an entry that producesthe hash value HashValue at the location Base+HashValue*Length. With the hashing process mentionedpreviously, you can accommodate up to 101 entries at unique positions in the map.
Where a key is a character string, the hashing process is rather more complicated, particularly with longor variable length strings; however, a method commonly used involves using numerical values derivedfrom characters in the string. This typically involves assigning a numerical value to each character, so ifyour string was lowercase letters plus spaces, you could assign each character a value between 0 and 26,with space as 0, a as 1, b as 2, and so on. The string can then be treated as the representation of a numberto some base, 32 say. The numerical value for the string ‘fred’, for instance, is
6*323+18*322+5*321+4*320
and, assuming you expected to store 500 strings, you could calculate the hashed value of the key as:
6*323+18*323+5*323+4*320 mod 503
The value of 503 for N is the smallest prime greater than the likely number of entries. The base chosen toevaluate a hash value for a string is usually a power of 2 that corresponds to the minimum value that isgreater than or equal to the number of possible different characters in a string. For long strings, this cangenerate very large numbers, so special techniques are used to compute the value modulo N. Detaileddiscussion of these techniques is beyond the scope of this book, but you can find numerous Web refer-ences by searching on “hashing.”
The Typed Pointer CollectionsThe typed pointer collection class templates store pointers to objects, rather than objects themselves. Thisis the primary difference between these class templates and the template classes just discussed. Take alook at how the CTypedPtrList class template is used, because you’ll use this as a basis for managingelements in your document class, CSketcherDoc.
920
Chapter 16: Creating the Document and Improving the View
25905c16.qxd:WroxPro 2/21/08 9:18 AM Page 920
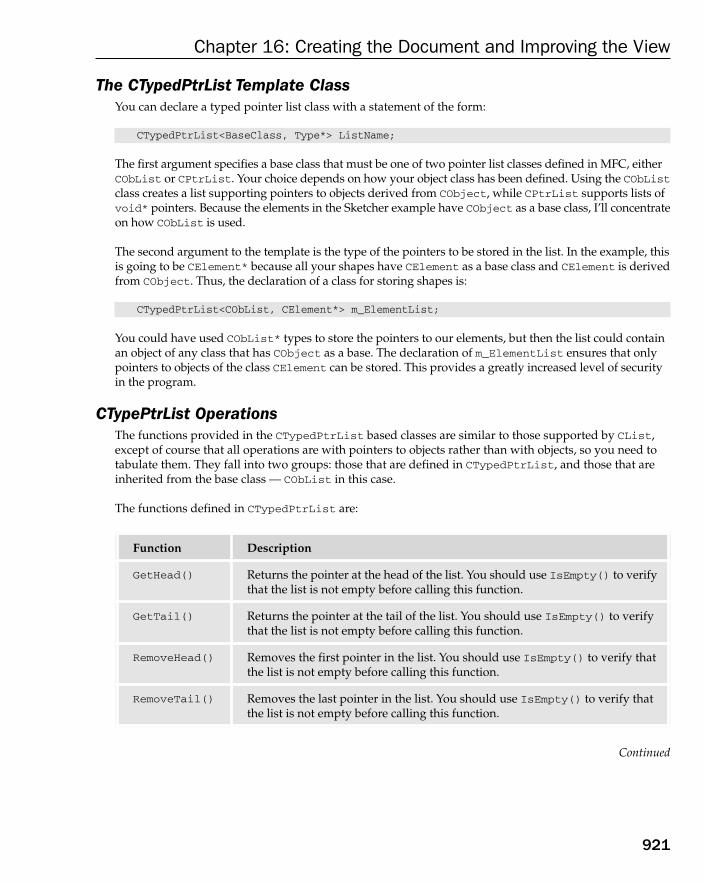
The CTypedPtrList Template ClassYou can declare a typed pointer list class with a statement of the form:
CTypedPtrList<BaseClass, Type*> ListName;
The first argument specifies a base class that must be one of two pointer list classes defined in MFC, eitherCObList or CPtrList. Your choice depends on how your object class has been defined. Using the CObListclass creates a list supporting pointers to objects derived from CObject, while CPtrList supports lists ofvoid* pointers. Because the elements in the Sketcher example have CObject as a base class, I’ll concentrateon how CObList is used.
The second argument to the template is the type of the pointers to be stored in the list. In the example, thisis going to be CElement* because all your shapes have CElement as a base class and CElement is derivedfrom CObject. Thus, the declaration of a class for storing shapes is:
CTypedPtrList<CObList, CElement*> m_ElementList;
You could have used CObList* types to store the pointers to our elements, but then the list could containan object of any class that has CObject as a base. The declaration of m_ElementList ensures that onlypointers to objects of the class CElement can be stored. This provides a greatly increased level of securityin the program.
CTypePtrList OperationsThe functions provided in the CTypedPtrList based classes are similar to those supported by CList,except of course that all operations are with pointers to objects rather than with objects, so you need totabulate them. They fall into two groups: those that are defined in CTypedPtrList, and those that areinherited from the base class — CObList in this case.
The functions defined in CTypedPtrList are:
Continued
Function Description
GetHead() Returns the pointer at the head of the list. You should use IsEmpty() to verifythat the list is not empty before calling this function.
GetTail() Returns the pointer at the tail of the list. You should use IsEmpty() to verifythat the list is not empty before calling this function.
RemoveHead() Removes the first pointer in the list. You should use IsEmpty() to verify thatthe list is not empty before calling this function.
RemoveTail() Removes the last pointer in the list. You should use IsEmpty() to verify thatthe list is not empty before calling this function.
921
Chapter 16: Creating the Document and Improving the View
25905c16.qxd:WroxPro 2/21/08 9:18 AM Page 921

The functions in CTypedPtrList inherited from CObList are:
Function Description
AddHead() Adds the pointer passed as an argument to the head of the list andreturns a value of type POSITION that corresponds to the new element.There is another version of this function that can add another list to thehead of the list.
AddTail() Adds the pointer passed as an argument to the tail of the list andreturns a value of type POSITION that corresponds to the new element.There is another version of this function that can add another list to thetail of the list.
RemoveAll() Removes all the elements from the list. Note that this doesn’t delete theobjects pointed to by elements in the list. You need to take care of thisyourself.
GetHeadPosition() Returns the position of the element at the head of the list.
GetTailPosition() Returns the position of the element at the tail of the list.
SetAt() Stores the pointer specified by the second argument at the position inthe list defined by the first argument. An invalid position value causesan error.
RemoveAt() Removes the pointer from the position in the list specified by the argu-ment of type POSITION. An invalid position value causes an error.
Function Description
GetNext() Returns the pointer at the position indicated by the variable of type POSITIONpassed as a reference argument. The variable is updated to indicate the nextelement in the list. When the end of the list is reached, the position variable is set to NULL. This function can be used to iterate forwards through all thepointers in the list.
GetPrev() Returns the pointer at the position indicated by the variable of type POSITIONpassed as a reference argument. The variable is updated to indicate the previ-ous element in the list. When the beginning of the list is reached, the positionvariable is set to NULL. This function can be used to iterate backwards throughall the pointers in the list.
GetAt() Returns the pointer stored at the position indicated by the variable of typePOSITION passed as an argument, which isn’t changed. Because the functionreturns a reference, as long as the list is not defined as const, this functioncan be used on the left of an assignment operator to modify a list entry.
922
Chapter 16: Creating the Document and Improving the View
25905c16.qxd:WroxPro 2/21/08 9:18 AM Page 922

You’ll see some of these member functions in action a little later in this chapter in the context of imple-menting the document class for the Sketcher program.
Using the CList Template ClassYou can use of the CList collection template in the definition of the curve object in our Sketcher applica-tion. A curve is defined by two or more points, so storing these in a list would be a good method of han-dling them. You first need to define a CList collection class object as a member of the CCurve class. You’lluse this collection to store points. You’ve already looked at the CList template class in some detail, so thisshould be easy.
The CList template class has two parameters, so the general form of declaring a collection class of thistype is:
CList<YourObjectType, FunctionArgType> ClassName;
The first argument, YourObjectType, specifies the type of object that you want to store in the list. Thesecond argument specifies the argument type to be used in function members of the collection class whenreferring to an object. This is usually specified as a reference to the object type to minimize copying ofarguments in a function call. Declare a collection class object to suit your needs in the CCurve class as:
class CCurve: public CElement{
// Rest of the class definition...
Function Description
InsertBefore() Inserts a new pointer specified by the second argument before the posi-tion specified by the first argument. The position of the new element isreturned.
InsertAfter() Inserts a new pointer specified by the second argument after the posi-tion specified by the first argument. The position of the new element isreturned.
Find() Searches for a pointer in the list that is identical to the pointer specifiedas an argument. Its position is returned if it is found. NULL is returnedotherwise.
FindIndex() Returns the position of a pointer in the list specified by a zero-basedinteger index argument.
GetCount() Returns the number of elements in the list.
IsEmpty() Returns TRUE if there are no elements in the list, and FALSE otherwise.
923
Chapter 16: Creating the Document and Improving the View
25905c16.qxd:WroxPro 2/21/08 9:18 AM Page 923

protected:CCurve(void); // Default constructor - should not be usedCList<CPoint, CPoint&> m_PointList; // Type safe point list
};
You can either add this manually to the class definition or use the Add > Add Variable menu item thatyou’ve used before from Class View. I have omitted the rest of the class definition here because you’re notconcerned with it for now. The collection declaration is shaded. It declares the collection m_PointListthat stores CPoint objects in the list, and its functions use reference arguments to CPoint objects.
The CPoint class doesn’t allocate memory dynamically, so you won’t need to implementConstructElements() or DestructElements(), and because you don’t need to use the Find()member function, you can forget about CompareElements() as well.
Drawing a CurveDrawing a curve is different from drawing a line or a circle. With a line or a circle, as you move the cursorwith the left button down, you are creating a succession of different line or circle elements that share acommon reference point — the point where the left mouse button was pressed. This is not the case whenyou draw a curve, as shown in Figure 16-5.
Figure 16-5
X-Axis
Drawing a curve with MM_TEXT mapping mode
The first two pointsdefine a basic curve
Each additional point definesanother segment
Minimum y
Maximum y
Minimum x Maximum x
Y-Axis
924
Chapter 16: Creating the Document and Improving the View
25905c16.qxd:WroxPro 2/21/08 9:18 AM Page 924

When you move the cursor while drawing a curve, you’re not creating a sequence of new curves but rather extending the same curve, so each successive point adds another segment to the curve’sdefinition. You therefore need to create a curve object as soon as you have the two points from theWM_LBUTTONDOWN message and the first WM_MOUSEMOVE message. Points defined with subsequentmouse move messages then define additional segments to the existing curve object. You’ll need toadd a function, AddSegment(), to the CCurve class to extend the curve once it has been created bythe constructor.
A further point to consider is how you are to calculate the enclosing rectangle. This is defined by get-ting the minimum x and minimum y pair from all the defining points to establish the upper-left corner of the rectangle, and the maximum x and maximum y pair for the bottom right. This involves goingthrough all the points in the list. You will, therefore, compute the enclosing rectangle incrementally in the AddSegment() function as points are added to the curve.
Defining the CCurve ClassWith the constructor and the AddSegment() function added, the complete definition of the CCurve class is:
class CCurve: public CElement{public:
~CCurve(void);virtual void Draw(CDC* pDC); // Function to display a curve
// Constructor for a curve objectCCurve(CPoint FirstPoint, CPoint SecondPoint, COLORREF aColor);
void AddSegment(CPoint& aPoint); //Add a segment to the curve
protected:CCurve(void); // Default constructor - should not be usedCList<CPoint, CPoint&> m_PointList; // Type safe point list
};
You should modify the definition of the class in Elements.h to correspond with the previous code. Theconstructor has the first two defining points and the color as parameters, so it only defines a curve withone segment. This is called in the CreateElement() function invoked by the OnMouseMove() functionin the view class the first time a WM_MOUSEMOVE message is received for a curve, so don’t forget to mod-ify the definition of the CreateElement() function in CSketcherView to call the CCurve class con-structor with the correct arguments. The statement using the CCurve constructor in the switch in theCreateElement() function should be changed to:
case CURVE:return new CCurve(m_FirstPoint, m_SecondPoint, pDoc->GetElementColor());
925
Chapter 16: Creating the Document and Improving the View
25905c16.qxd:WroxPro 2/21/08 9:18 AM Page 925
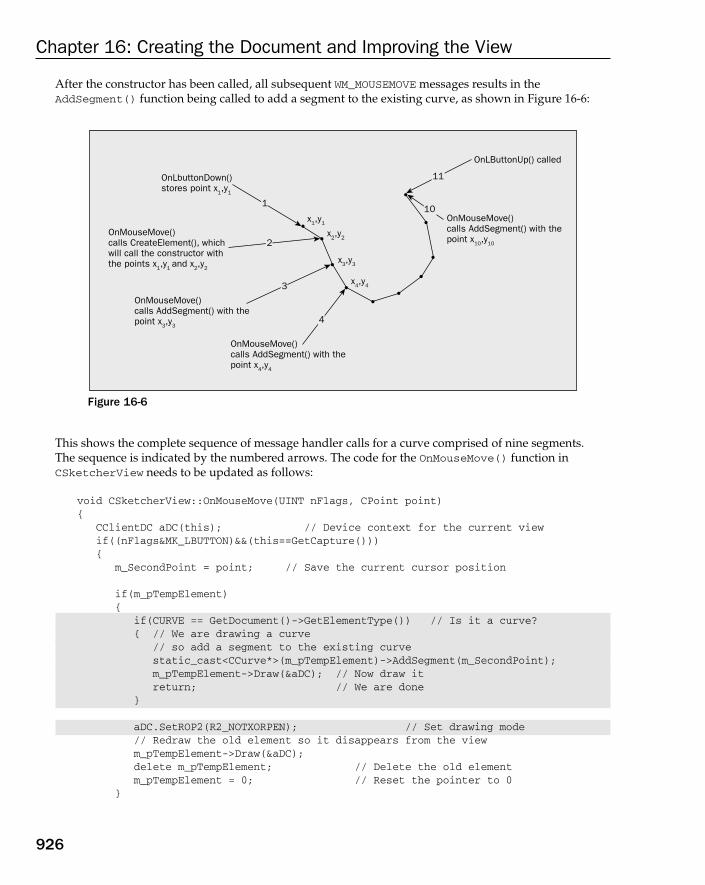
After the constructor has been called, all subsequent WM_MOUSEMOVE messages results in theAddSegment() function being called to add a segment to the existing curve, as shown in Figure 16-6:
Figure 16-6
This shows the complete sequence of message handler calls for a curve comprised of nine segments. The sequence is indicated by the numbered arrows. The code for the OnMouseMove() function inCSketcherView needs to be updated as follows:
void CSketcherView::OnMouseMove(UINT nFlags, CPoint point){
CClientDC aDC(this); // Device context for the current viewif((nFlags&MK_LBUTTON)&&(this==GetCapture())){
m_SecondPoint = point; // Save the current cursor position
if(m_pTempElement){
if(CURVE == GetDocument()->GetElementType()) // Is it a curve?{ // We are drawing a curve
// so add a segment to the existing curvestatic_cast<CCurve*>(m_pTempElement)->AddSegment(m_SecondPoint);m_pTempElement->Draw(&aDC); // Now draw itreturn; // We are done
}
aDC.SetROP2(R2_NOTXORPEN); // Set drawing mode// Redraw the old element so it disappears from the viewm_pTempElement->Draw(&aDC);delete m_pTempElement; // Delete the old elementm_pTempElement = 0; // Reset the pointer to 0
}
OnLbuttonDown()stores point x1,y1
x2,y2
x3,y3
x4,y4
x1,y1
OnMouseMove()calls CreateElement(), whichwill call the constructor withthe points x1,y1 and x2,y2
OnMouseMove()calls AddSegment() with thepoint x4,y4
OnMouseMove()calls AddSegment() with thepoint x10,y10
OnLButtonUp() called
OnMouseMove()calls AddSegment() with thepoint x3,y3
1
2
3
4
11
10
926
Chapter 16: Creating the Document and Improving the View
25905c16.qxd:WroxPro 2/21/08 9:18 AM Page 926

// Create an element of the type and color// recorded in the document objectm_pTempElement = CreateElement();m_pTempElement->Draw(&aDC);
}}
You have to treat an element of type CURVE as a special case after it has been created because on all sub-sequent calls of the OnMouseMove() handler, you want to call the AddSegment() function for the exist-ing element, rather than construct a new one in place of the old. You don’t want to set the drawing modein this instance because you don’t need to erase the previous curve each time. You take care of this bymoving the call to SetROP2() to a position after the code processing a curve.
Adding the curve segment and drawing the extended curve is taken care of within the if statementyou have added. Note that you must cast the m_pTempElement pointer to type CCurve* to use it to callAddSegment() for the old element because AddSegment() is not a virtual function. If you don’t addthe cast, you’ll get an error because the compiler tries to resolve the call statically to a member of theCElement class.
Implementing the CCurve ClassWrite the code for the constructor; this should be added to Elements.cpp in place of the temporary constructor that you used in the last chapter. It needs to store the two points passed as arguments in the CList data member, m_PointList:
CCurve::CCurve(CPoint FirstPoint,CPoint SecondPoint, COLORREF aColor){
m_PointList.AddTail(FirstPoint); // Add the 1st point to the listm_PointList.AddTail(SecondPoint); // Add the 2nd point to the listm_Color = aColor; // Store the colorm_Pen = 1; // Set the pen width
// Construct the enclosing rectangle assuming MM_TEXT modem_EnclosingRect = CRect(FirstPoint, SecondPoint);m_EnclosingRect.NormalizeRect();
}
The points are added to the list, m_PointList, by calling the AddTail() member of the CList templateclass. This function adds a copy of the point passed as an argument to the end of the list. The enclosingrectangle is defined in exactly the same way that that defined it for a line.
You can add the AddSegment() function to Elements.cpp next. This function is called when additionalcurve points are recorded, after the first version of a curve object has been created. This member functionis very simple:
void CCurve::AddSegment(CPoint& aPoint){
m_PointList.AddTail(aPoint); // Add the point to the end
// Modify the enclosing rectangle for the new pointm_EnclosingRect = CRect(min(aPoint.x, m_EnclosingRect.left),
927
Chapter 16: Creating the Document and Improving the View
25905c16.qxd:WroxPro 2/21/08 9:18 AM Page 927
min(aPoint.y, m_EnclosingRect.top),max(aPoint.x, m_EnclosingRect.right),max(aPoint.y, m_EnclosingRect.bottom));
}
The min() and max() functions you use here are standard macros that are the equivalent of using theconditional operator for choosing the minimum or maximum of two values. The new point is added tothe tail of the list in the same way as in the constructor. It’s important that each new point is added to thelist in a way that is consistent with the constructor because you’ll draw the segments using the points insequence, from the beginning to the end of the list. Each line segment is drawn from the end point of theprevious line to the new point. If the points are not in the right sequence, the line segments won’t bedrawn correctly. After adding the new point, the enclosing rectangle for the curve is redefined, takingaccount of the new point.
The last member function you need to define for the interface to the CCurve class is Draw():
void CCurve::Draw(CDC* pDC){
// Create a pen for this object and// initialize it to the object color and line width of 1 pixelCPen aPen;if(!aPen.CreatePen(PS_SOLID, m_Pen, m_Color)){
// Pen creation failed. Close the programAfxMessageBox(_T(“Pen creation failed drawing a curve”), MB_OK);AfxAbort();
}
CPen* pOldPen = pDC->SelectObject(&aPen); // Select the pen
// Now draw the curve// Get the position in the list of the first elementPOSITION aPosition = m_PointList.GetHeadPosition();
// As long as it’s good, move to that pointif(aPosition)
pDC->MoveTo(m_PointList.GetNext(aPosition));
// Draw a segment for each of the following pointswhile(aPosition)
pDC->LineTo(m_PointList.GetNext(aPosition));
pDC->SelectObject(pOldPen); // Restore the old pen}
You draw the CCurve object by iterating through all the points in the list from the beginning, drawing each segment as you go. You get a POSITION value for the first element by using the functionGetHeadPosition() and then use MoveTo() to set the first point as the current position in the device context. You then draw line segments in the while loop as long as aPosition is not NULL. The GetNext() function call that appears as the argument to the LineTo() function returns the current point and simultaneously increments aPosition to refer to the next point in the list.
928
Chapter 16: Creating the Document and Improving the View
25905c16.qxd:WroxPro 2/21/08 9:18 AM Page 928
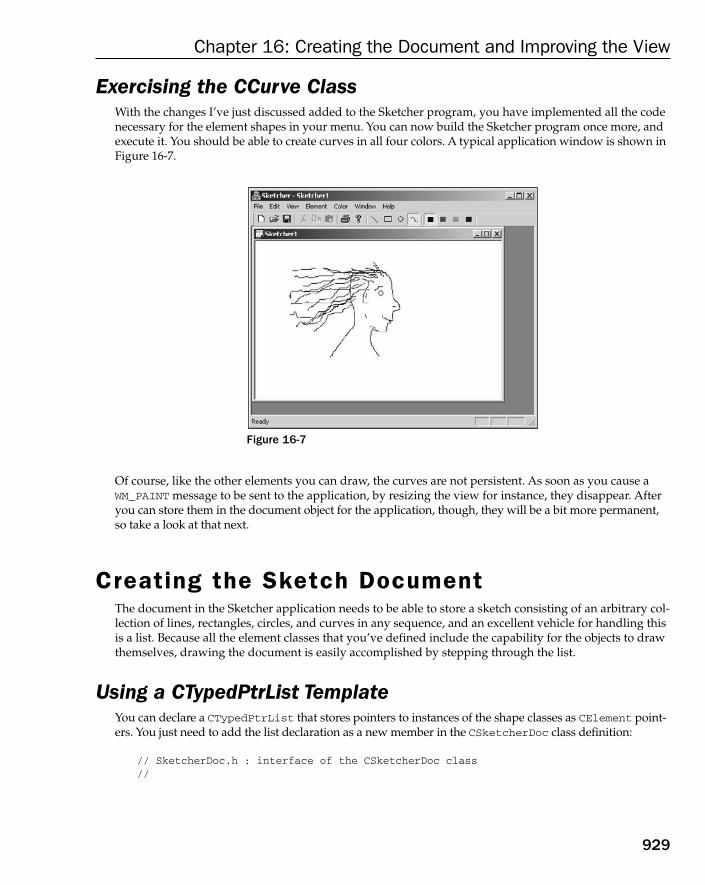
Exercising the CCurve ClassWith the changes I’ve just discussed added to the Sketcher program, you have implemented all the codenecessary for the element shapes in your menu. You can now build the Sketcher program once more, andexecute it. You should be able to create curves in all four colors. A typical application window is shown inFigure 16-7.
Figure 16-7
Of course, like the other elements you can draw, the curves are not persistent. As soon as you cause aWM_PAINT message to be sent to the application, by resizing the view for instance, they disappear. Afteryou can store them in the document object for the application, though, they will be a bit more permanent,so take a look at that next.
Creating the Sketch DocumentThe document in the Sketcher application needs to be able to store a sketch consisting of an arbitrary col-lection of lines, rectangles, circles, and curves in any sequence, and an excellent vehicle for handling thisis a list. Because all the element classes that you’ve defined include the capability for the objects to drawthemselves, drawing the document is easily accomplished by stepping through the list.
Using a CTypedPtrList TemplateYou can declare a CTypedPtrList that stores pointers to instances of the shape classes as CElement point-ers. You just need to add the list declaration as a new member in the CSketcherDoc class definition:
// SketcherDoc.h : interface of the CSketcherDoc class//
929
Chapter 16: Creating the Document and Improving the View
25905c16.qxd:WroxPro 2/21/08 9:18 AM Page 929

#pragma once
class CSketcherDoc: public CDocument{protected: // create from serialization only
CSketcherDoc();DECLARE_DYNCREATE(CSketcherDoc)
// Rest of the class as before...
protected:COLORREF m_Color; // Current drawing colorunsigned int m_Element; // Current element typeCTypedPtrList<CObList, CElement*> m_ElementList; // Element list
// Rest of the class as before...
};
The CSketcherDoc class now refers to the CElement class and normally a forward declaration of theCElement class before the CSketcherDoc class definition would be enough for Sketcher to compilecorrectly, but not in this case. The compiler needs to know about the base class for the CElement classto compile the CTypedPtrList template instance correctly. This is only possible if the definition of theCElement class is available at this point. You have two ways to achieve this. You can make sure thatevery #include directive for the SketcherDoc.h header is preceded by an #include directive forCElement, or you can simply add an #include directive for Elements.h before the CSketcherDocclass definition. The latter course is the easiest and saves you from hunting for #include directivesfor SketcherDoc.h in the source files.
You’ll also need a member function to add an element to the list and AddElement() is a good, if unoriginal,name for this. You create shape objects on the heap, so you can just pass a pointer to the function. Because allit does is add an element, you might just as well put the implementation in the class definition:
class CSketcherDoc: public CDocument{
// Rest of the class as before...
// Operationspublic:
unsigned int GetElementType() // Get the element type{ return m_Element; }
COLORREF GetElementColor() // Get the element color{ return m_Color; }
void AddElement(CElement* pElement) // Add an element to the list{ m_ElementList.AddTail(pElement); }
// Rest of the class as before...
};
930
Chapter 16: Creating the Document and Improving the View
25905c16.qxd:WroxPro 2/21/08 9:18 AM Page 930
Adding an element to the list only requires one statement that calls the AddTail() member function.That’s all you need to create the document, but you still have to consider what happens when a docu-ment is closed. You must ensure that the list of pointers and all the elements they point to are destroyedproperly. To do this, you need to add code to the destructor for CSketcherDoc objects.
Implementing the Document DestructorIn the destructor, you’ll first go through the list deleting the element pointed to by each entry. After thatis complete, you must delete the pointers from the list. The code to do this is:
CSketcherDoc::~CSketcherDoc(void){
// Get the position at the head of the listPOSITION aPosition = m_ElementList.GetHeadPosition();
// Now delete the element pointed to by each list entrywhile(aPosition)
delete m_ElementList.GetNext(aPosition);
m_ElementList.RemoveAll(); // Finally delete all pointers}
You use the GetHeadPosition() function to obtain the position value for the entry at the head of thelist, and initialize the variable aPosition with this value. You then use aPosition in the while loop towalk through the list and delete the object pointed to by each entry. The GetNext() function returns thecurrent pointer entry and updates the aPosition variable to refer to the next entry. When the last entry isretrieved, aPosition is set to NULL by the GetNext() function and the loop ends. After you have deletedall the element objects pointed to by the pointers in the list, you can delete the pointers themselves. Youdelete the whole lot in one go by calling the RemoveAll() function for the list object.
You should add this code to the definition of the destructor in SketcherDoc.cpp. You can go directly tothe code for the destructor through the Class View.
Drawing the DocumentAs the document owns the list of elements, and the list is protected, you can’t use it directly from the view.The OnDraw() member of the view does need to be able to call the Draw() member for each of the elementsin the list, though, so you need to consider how best to do this. Take a look at the options:
❑ You could make the list public, but this defeats the object of maintaining protected members ofthe document class because it exposes all the function members of the list object.
❑ You could add a member function to return a pointer to the list, but this effectively makes thelist public and also incurs overhead in accessing it.
❑ You could add a public function to the document that calls the Draw() member for each ele-ment. You could then call this member from the OnDraw() function in the view. This wouldn’tbe a bad solution because it produces what you want and still maintains the privacy of the list.The only thing against it is that the function needs access to a device context, and this is reallythe domain of the view.
931
Chapter 16: Creating the Document and Improving the View
25905c16.qxd:WroxPro 2/21/08 9:18 AM Page 931
❑ You could make the OnDraw() function a friend of CSketcherDoc, but this exposes all of themembers of the class, which isn’t desirable, particularly with a complex class.
❑ You could add a function to provide a POSITION value for the first list element, and a secondmember to iterate through the list elements. This doesn’t expose the list, but it makes the ele-ment pointers available.
The last option looks to be the best choice, so we will go with that. You can extend the document classdefinition to:
class CSketcherDoc: public CDocument{
// Rest of the class as before...
// Operationspublic:
unsigned int GetElementType() // Get the element type{ return m_Element; }
COLORREF GetElementColor() // Get the element color{ return m_Color; }
void AddElement(CElement* pElement) // Add an element to the list{ m_ElementList.AddTail(pElement); }
POSITION GetListHeadPosition() // return list head POSITION value{ return m_ElementList.GetHeadPosition(); }
CElement* GetNext(POSITION& aPos) // Return current element pointer{ return m_ElementList.GetNext(aPos); }
// Rest of the class as before...
};
By using the two functions you have added to the document class, the OnDraw() function for the viewwill be able to iterate through the list, calling the Draw() function for each element. The implementationof OnDraw() to do this is:
void CSketcherView::OnDraw(CDC* pDC){
CSketcherDoc* pDoc = GetDocument();ASSERT_VALID(pDoc);if(!pDoc)
return;
POSITION aPos = pDoc->GetListHeadPosition();while(aPos) // Loop while aPos is not null{
pDoc->GetNext(aPos)->Draw(pDC); // Draw the current element}
}
This implementation of the OnDraw() function always draws all the elements the document contains. Thestatement in the while loop first gets a pointer to an element from the document with the expressionpDoc->GetNext(). The pointer that is returned is used to call the Draw() function for that element. The
932
Chapter 16: Creating the Document and Improving the View
25905c16.qxd:WroxPro 2/21/08 9:18 AM Page 932

statement works this way without parentheses because of the left to right associativity of the -> opera-tor. The while loop plows through the list from beginning to end. You can do it better though, and makethe program more efficient.
Frequently, when a WM_PAINT message is sent to your program, only part of the window needs to beredrawn. When Windows sends the WM_PAINT message to a window, it also defines an area in the clientarea of the window, and only this area needs to be redrawn. The CDC class provides a member function,RectVisible(), which checks whether a rectangle that you supply to it as an argument overlaps thearea that Windows requires to be redrawn. You can use this to make sure you only draw the elementsthat are in the area Windows wants redrawn, thus improving the performance of the application:
void CSketcherView::OnDraw(CDC* pDC){
CSketcherDoc* pDoc = GetDocument();ASSERT_VALID(pDoc);if(!pDoc)
return;
POSITION aPos = pDoc->GetListHeadPosition();CElement* pElement = 0; // Store for an element pointerwhile(aPos) // Loop while aPos is not null{
pElement = pDoc->GetNext(aPos); // Get the current element pointer// If the element is visible...if(pDC->RectVisible(pElement->GetBoundRect()))
pElement->Draw(pDC); // ...draw it}
}
You get the position for the first entry in the list and store it in aPos. You use the value stored in aPos tocontrol the while loop that retrieves each pointer entry in turn so the loop continues until aPos is NULL.You retrieve the bounding rectangle for each element using the GetBoundRect() member of the objectand pass it to the RectVisible() function in the if statement. As a result, only elements that overlapthe area that Windows has identified as invalid are drawn. Drawing on the screen is a relatively expen-sive operation in terms of time, so checking for just the elements that need to be redrawn, rather thandrawing everything each time, improves performance considerably.
Adding an Element to the DocumentThe last thing you need to do to have a working document in our program is to add the code to theOnLButtonUp() handler in the CSketcherView class to add the temporary element to the document:
void CSketcherView::OnLButtonUp(UINT nFlags, CPoint point){
if(this == GetCapture())ReleaseCapture(); // Stop capturing mouse messages
// If there is an element, add it to the documentif(m_pTempElement){
GetDocument()->AddElement(m_pTempElement);InvalidateRect(0); // Redraw the current window
933
Chapter 16: Creating the Document and Improving the View
25905c16.qxd:WroxPro 2/21/08 9:18 AM Page 933

m_pTempElement = 0; // Reset the element pointer}
}
Of course, you must check that there really is an element before you add it to the document. The usermight just have clicked the left mouse button without moving the mouse. After adding the element to thelist in the document, you call InvalidateRect() to get the client area for the current view redrawn. Theargument of 0 invalidates the whole of the client area in the view. Because of the way the rubber-bandingprocess works, some elements may not be displayed properly if you don’t do this. If you draw a horizontalline, for instance, and then rubberband a rectangle with the same color so that its top or bottom edge over-laps the line, the overlapped bit of line disappears. This is because the edge being drawn is XORed with the line underneath, so you get the background color back. You also reset the pointer m_pTempElement toavoid confusion when another element is created.
Exercising the DocumentAfter saving all the modified files, you can build the latest version of Sketcher and execute it. You’ll nowbe able to produce art such as “the happy programmer” shown in Figure 16-8.
Figure 16-8
The program is now working more realistically. It stores a pointer to each element in the document object,so they’re all automatically redrawn as necessary. The program also does a proper cleanup of the documentdata when it’s deleted.
❑ There are still some limitations in the program that you can address. For instance: You can openanother view window by using the Window > New Window menu option in the program. Thiscapability is built in to an MDI application and opens a new view to an existing document, not a new document. If you draw in one window, however, the elements are not drawn in the otherwindow. Elements never appear in windows other than the one where they were drawn, unlessthe area they occupy needs to be redrawn for some other reason.
934
Chapter 16: Creating the Document and Improving the View
25905c16.qxd:WroxPro 2/21/08 9:18 AM Page 934
❑ You can only draw in the client area you can see. It would be nice to be able to scroll the viewand draw over a bigger area.
❑ Neither can you delete an element, so if you make a mistake, you either live with it or start overwith a new document.
These are all quite serious deficiencies that, together, make the program fairly useless as it stands. You’llovercome all of them before the end of this chapter.
Improving the ViewThe first item that you can try to fix is the updating of all the document windows that are displayed whenan element is drawn. The problem arises because only the view in which an element is drawn knows aboutthe new element. Each view is acting independently of the others and there is no communication betweenthem. You need to arrange for any view that adds an element to the document to let all the other viewsknow about it, and they need to take the appropriate action.
Updating Multiple ViewsThe document class conveniently contains a function UpdateAllViews() to help with this particularproblem. This function essentially provides a means for the document to send a message to all its views.You just need to call it from the OnLButtonUp() function in the CSketcherView class, whenever youhave added a new element to the document:
void CSketcherView::OnLButtonUp(UINT nFlags, CPoint point){
if(this == GetCapture())ReleaseCapture(); // Stop capturing mouse messages
// If there is an element, add it to the documentif(m_pTempElement){
GetDocument()->AddElement(m_pTempElement);GetDocument()->UpdateAllViews(0,0,m_pTempElement); // Tell all the viewsm_pTempElement = 0; // Reset the element pointer
}}
When the m_pTempElement pointer is not NULL, the specific action of the function has been extended to call the UpdateAllViews() member of your document class. This function communicates with theviews by causing the OnUpdate() member function in each view to be called. The three arguments toUpdateAllViews() are described in Figure 16-9.
The first argument to the UpdateAllViews() function call is often the this pointer for the current view.This suppresses the call of the OnUpdate() function for the current view. This is a useful feature when thecurrent view is already up to date. In the case of Sketcher, because you are rubber-banding you want to getthe current view redrawn as well, so by specifying the first argument as 0 you get the OnUpdate() functioncalled for all the views, including the current view. This removes the need to call InvalidateRect() asyou did before.
935
Chapter 16: Creating the Document and Improving the View
25905c16.qxd:WroxPro 2/21/08 9:18 AM Page 935

Figure 16-9
You don’t use the second argument to UpdateAllViews() here, but you do pass the pointer to the newelement through the third argument. Passing a pointer to the new element allows the views to figure outwhich bit of their client area needs to be redrawn.
To catch the information passed to the UpdateAllViews() function, you add the OnUpdate() memberfunction to the view class. You can do this from the Class wizard and looking at the properties forCSketcherView. As I’m sure you recall, you display the properties for a class by right-clicking the classname and selecting Properties from the pop-up. If you click the Overrides button in the Properties win-dow, you’ll be able to find OnUpdate in the list of functions you can override. Click the function name,then the <Add> OnUpdate option that shows in the drop-down list in the adjacent column. If you closethe Properties window, you’ll be able to edit the code for the OnUpdate() override you have added in the Editor pane. You only need to add the highlighted code below to the function definition:
void CSketcherView::OnUpdate(CView* pSender, LPARAM lHint, CObject* pHint){
// Invalidate the area corresponding to the element pointed to// if there is one, otherwise invalidate the whole client areaif(pHint)
InvalidateRect(((CElement*)pHint)->GetBoundRect());else
InvalidateRect(0);}
Note that you must uncomment the parameter names in the generated version of the function; otherwise,it won’t compile with the additional code here. The three arguments passed to the OnUpdate() functionin the view class correspond to the arguments that you passed in the UpdateAllViews() function call.Thus, pHint contains the address of the new element. However, you can’t assume that this is always the
void UpdateAllView( CView* pSender, LPARAM IHint = OL, CObject* pHint = NULL );
This argument is a pointerto the current view. It suppresses calling of theOnUpdate() memberfuntion for the view.
LPARAM is a 32-bitWindows type that canbe used to passinformation about theregion to be updated inthe client area
This argument is a pointerto an object that canprovide information aboutthe area in the region to beupdated in the client area.
These two argument values arepassed on to the OnUpdate()functions in the views
936
Chapter 16: Creating the Document and Improving the View
25905c16.qxd:WroxPro 2/21/08 9:18 AM Page 936

case. The OnUpdate() function is also called when a view is first created, but with a NULL pointer for thethird argument. Therefore, the function checks that the pHint pointer isn’t NULL and only then gets thebounding rectangle for the element passed as the third argument. It invalidates this area in the client areaof the view by passing the rectangle to the InvalidateRect() function. This area is redrawn by theOnDraw() function in this view when the next WM_PAINT message is sent to the view. If the pHint pointeris NULL, the whole client area is invalidated.
You might be tempted to consider redrawing the new element in the OnUpdate() function. This isn’t a good idea. You should only do permanent drawing in response to the Windows WM_PAINT message.This means that the OnDraw() function in the view should be the only place that’s initiating any draw-ing operations for document data. This ensures that the view is drawn correctly whenever Windowsdeems it necessary.
If you build and execute Sketcher with the new modifications included, you should find that all the viewsare updated to reflect the contents of the document.
Scrolling ViewsAdding scrolling to a view looks remarkably easy at first sight; the water is in fact deeper and murkierthat it at first appears, but jump in anyway. The first step is to change the base class for CSketcherViewfrom CView to CScrollView. This new base class has the scrolling functionality built in, so you can alterthe definition of the CSketcherView class to:
class CSketcherView: public CScrollView{
// Class definition as before...};
You must also modify two lines of code at the beginning of the SketcherView.cpp file, which refer tothe base class for CSketcherView. You need to replace CView with CScrollView as the base class:
IMPLEMENT_DYNCREATE(CSketcherView, CScrollView)
BEGIN_MESSAGE_MAP(CSketcherView, CScrollView)
However, this is still not quite enough. The new version of the view class needs to know some thingsabout the area you are drawing on, such as the size and how far the view is to be scrolled when you usethe scroller. This information has to be supplied before the view is first drawn. You can put the code todo this in the OnInitialUpdate() function in the view class.
You supply the information that is required by calling a function that is inherited from the CScrollViewclass: SetScrollSizes(). The arguments to this function are explained in Figure 16-10.
Scrolling a distance of one line occurs when you click on the up or down arrow on the scroll bar; a pagescroll occurs when you click on the scrollbar itself. You have an opportunity to change the mapping modehere. MM_LOENGLISH would be a good choice for the Sketcher application, but first get scrolling workingwith the MM_TEXT mapping mode because there are still some difficulties to be uncovered. (Mapping modesare introduced in Chapter 15.)
937
Chapter 16: Creating the Document and Improving the View
25905c16.qxd:WroxPro 2/21/08 9:18 AM Page 937
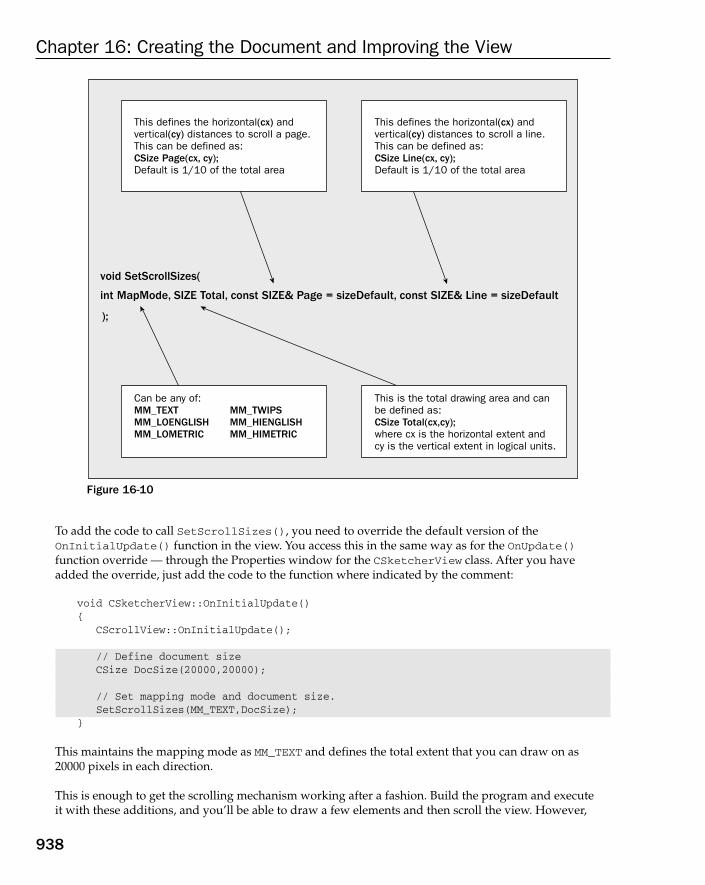
Figure 16-10
To add the code to call SetScrollSizes(), you need to override the default version of theOnInitialUpdate() function in the view. You access this in the same way as for the OnUpdate()function override — through the Properties window for the CSketcherView class. After you haveadded the override, just add the code to the function where indicated by the comment:
void CSketcherView::OnInitialUpdate(){
CScrollView::OnInitialUpdate();
// Define document sizeCSize DocSize(20000,20000);
// Set mapping mode and document size.SetScrollSizes(MM_TEXT,DocSize);
}
This maintains the mapping mode as MM_TEXT and defines the total extent that you can draw on as20000 pixels in each direction.
This is enough to get the scrolling mechanism working after a fashion. Build the program and execute it with these additions, and you’ll be able to draw a few elements and then scroll the view. However,
int MapMode, SIZE Total, const SIZE& Page = sizeDefault, const SIZE& Line = sizeDefault
void SetScrollSizes(
);
This defines the horizontal(cx) andvertical(cy) distances to scroll a page.This can be defined as:CSize Page(cx, cy);Default is 1/10 of the total area
This defines the horizontal(cx) andvertical(cy) distances to scroll a line.This can be defined as:CSize Line(cx, cy);Default is 1/10 of the total area
Can be any of:MM_TEXT MM_TWIPSMM_LOENGLISH MM_HIENGLISHMM_LOMETRIC MM_HIMETRIC
This is the total drawing area and canbe defined as:CSize Total(cx,cy);where cx is the horizontal extent andcy is the vertical extent in logical units.
938
Chapter 16: Creating the Document and Improving the View
25905c16.qxd:WroxPro 2/21/08 9:18 AM Page 938

although the window scrolls OK, if you try to draw more elements with the view scrolled, things don’twork as they should. The elements appear in a different position from where you draw them and they’renot displayed properly. What’s going on?
Logical Coordinates and Client CoordinatesThe problem is the coordinate systems that you’re using — and that plural is deliberate. You’ve actuallybeen using two coordinate systems in all the examples up to now, although you may not have noticed.As you saw in the previous chapter, when you call a function such as LineTo(), it assumes that the argu-ments passed are logical coordinates. The function is a member of the CDC class that defines a device con-text, and the device context has its own system of logical coordinates. The mapping mode, which is aproperty of the device context, determines what the unit of measurement is for the coordinates when youdraw something.
The coordinate data that you receive along with the mouse messages, on the other hand, has nothing todo with the device context or the CDC object — and outside of a device context, logical coordinates don’tapply. The points passed to the OnLButtonDown() and OnMouseMove() handlers have coordinates thatare always in device units, that is, pixels, and are measured relative to the upper-left corner of the clientarea. These are referred to as client coordinates. Similarly, when you call InvalidateRect(), the rectan-gle is assumed to be defined in terms of client coordinates.
In MM_TEXT mode, the client coordinates and the logical coordinates in the device context are both in unitsof pixels, and so they’re the same — as long as you don’t scroll the window. In all the previous examples therewas no scrolling, so everything worked without any problems. With the latest version of Sketcher, it allworks fine until you scroll the view, whereupon the logical coordinates origin (the 0,0 point) is moved bythe scrolling mechanism, so it’s no longer in the same place as the client coordinates origin. The units forlogical coordinates and client coordinates are the same here, but the origins for the two coordinates systemsare different. This situation is illustrated in Figure 16-11.
Figure 16-11
939
Chapter 16: Creating the Document and Improving the View
25905c16.qxd:WroxPro 2/21/08 9:18 AM Page 939

The left side shows the position in the client area where you draw, and the points that are the mouse posi-tions defining the line. These are recorded in client coordinates. The right side shows where the line is actu-ally drawn. Drawing is in logical coordinates, but you have been using client coordinate values. In the caseof the scrolled window, the line appears displaced due to the logical origin being relocated.
This means that you are actually using the wrong values to define elements in the Sketcher program, andwhen you invalidate areas of the client area to get them redrawn, the rectangles passed to the function arealso wrong — hence, the weird behavior of the program. With other mapping modes it gets worse, becausenot only are the units of measurement in the two coordinate systems different, but also the y axes may be inopposite directions!
Dealing with Client CoordinatesConsider what needs to be done to fix the problem. There are two things you may have to address:
❑ You need to convert the client coordinates that you got with mouse messages to logical coordi-nates before you can use them to create elements.
❑ You need to convert a bounding rectangle that you created in logical coordinates back to clientcoordinates if you want to use it in a call to InvalidateRect().
This amounts to making sure you always use logical coordinates when using device context functions,and always use client coordinates for other communications about the window. The functions you haveto apply to do the conversions are associated with a device context, so you need to obtain a device con-text whenever you want to convert from logical to client coordinates, or vice versa. You can use the coor-dinate conversion functions of the CDC class inherited by CClientDC to do the work.
The new version of the OnLButtonDown() handler incorporating this is:
// Handler for left mouse button down messagevoid CSketcherView::OnLButtonDown(UINT nFlags, CPoint point){
CClientDC aDC(this); // Create a device contextOnPrepareDC(&aDC); // Get origin adjustedaDC.DPtoLP(&point); // convert point to Logicalm_FirstPoint = point; // Record the cursor positionSetCapture(); // Capture subsequent mouse messages
}
You obtain a device context for the current view by creating a CClientDC object and passing the pointerthis to the constructor. The advantage of CClientDC is that it automatically releases the device contextwhen the object goes out of scope. It’s important that device contexts are not retained, as there are a limitednumber available from Windows and you could run out of them. If you use CClientDC, you’re always safe.
As you’re using CScrollView, the OnPrepareDC() member function inherited from that class must becalled to set the origin for the logical coordinate system in the device context to correspond with the scrolledposition. After you have set the origin by this call, you use the function DPtoLP(), which converts fromDevice Points to Logical Points, to convert the point value that’s passed to the handler to logical coordi-nates. You then store the converted point, ready for creating an element in the OnMouseMove() handler.
The new code for the OnMouseMove() handler is as follows:
void CSketcherView::OnMouseMove(UINT nFlags, CPoint point)
940
Chapter 16: Creating the Document and Improving the View
25905c16.qxd:WroxPro 2/21/08 9:18 AM Page 940
{CClientDC aDC(this); // Device context for the current viewOnPrepareDC(&aDC); // Get origin adjusted
if((nFlags&MK_LBUTTON)&&(this==GetCapture())){
aDC.DPtoLP(&point); // convert point to Logicalm_SecondPoint = point; // Save the current cursor position
// Rest of the function as before...}
The code for the conversion of the point value passed to the handler is essentially the same as in the previ-ous handler, and that’s all you need here for the moment. The last function that you must change is easyto overlook: the OnUpdate() function in the view class. This needs to be modified to:
void CSketcherView::OnUpdate(CView* pSender, LPARAM lHint, CObject* pHint){
// Invalidate the area corresponding to the element pointed to// if there is one, otherwise invalidate the whole client area if(pHint){
CClientDC aDC(this); // Create a device contextOnPrepareDC(&aDC); // Get origin adjusted
// Get the enclosing rectangle and convert to client coordinatesCRect aRect=((CElement*)pHint)->GetBoundRect();aDC.LPtoDP(aRect);InvalidateRect(aRect); // Get the area redrawn
}else
InvalidateRect(0); // Invalidate the client area}
The modification here creates a CClientDC object and uses the LPtoDP() function member to convert therectangle for the area that’s to be redrawn to client coordinates.
If you now compile and execute Sketcher with the modifications I have discussed and are lucky enoughnot to have introduced any typos, it will work correctly, regardless of the scroller position.
Using MM_LOENGLISH Mapping ModeNow look into what you need to do to use the MM_LOENGLISH mapping mode. This provides drawingsin logical units of 0.01 inches, and also ensures that the drawing size is consistent on displays at differentresolutions. This makes the application much more satisfactory from the users’ point of view.
You can set the mapping mode in the call to SetScrollSizes() made from the OnInitialUpdate()function in the view class. You also need to specify the total drawing area, so, if you define it as 3000 by3000, this provides a drawing area of 30 inches by 30 inches, which should be adequate. The default scrolldistances for a line and a page is satisfactory, so you don’t need to specify those. You can use Class Viewto get to the OnInitialUpdate() function and then change it to the following:
void CSketcherView::OnInitialUpdate(void)
941
Chapter 16: Creating the Document and Improving the View
25905c16.qxd:WroxPro 2/21/08 9:18 AM Page 941

{CScrollView::OnInitialUpdate();
// Define document size as 30x30ins in MM_LOENGLISHCSize DocSize(3000,3000);
// Set mapping mode and document size.SetScrollSizes(MM_LOENGLISH, DocSize);
}
You just alter the arguments in the call to SetScrollSizes() for the mapping mode and document thesize that you want. That’s all that’s necessary to enable the view to work in MM_LOENGLISH, but you stillneed to fix how you deal with rectangles.
Note that you are not limited to setting the mapping mode once and for all. You can change the mappingmode in a device context at any time and draw different parts of the image to be displayed using dif-ferent mapping modes. A function SetMapMode() is used to do this, but I won’t be going into this anyfurther here. You can get your application working just using MM_LOENGLISH. Whenever you create aCClientDC object for the view and call OnPrepareDC(), the device context that it owns has the map-ping mode you’ve set in the OnInitialUpdate() function.
The problem you have with rectangles is that the element classes all assume the mapping mode is MM_TEXT,and in MM_LOENGLISH the rectangles are upside down because of the reversal of the y-axis. When you applyLPtoDP() to a rectangle, it is assumed to be oriented properly with respect to the MM_LOENGLISH axes.Because yours are not, the function mirrors the rectangles in the x-axis. This creates a problem when you callInvalidateRect() to invalidate an area of a view because the mirrored rectangle in device coordinates isnot recognized by Windows as being inside the visible client area.
You have two options for dealing with this. You can modify the element classes so that the enclosing rec-tangles are the right way up for MM_LOENGLISH, or you can re-normalize the rectangle that you intend topass to the InvalidateRect() function. The latter is the easiest course because you only need to modifyone member of the view class, OnUpdate():
void CSketcherView::OnUpdate(CView* pSender, LPARAM lHint, CObject* pHint){
// Invalidate the area corresponding to the element pointed to// if there is one, otherwise invalidate the whole client area if(pHint){
CClientDC aDC(this); // Create a device contextOnPrepareDC(&aDC); // Get origin adjusted
// Get the enclosing rectangle and convert to client coordinatesCRect aRect=((CElement*)pHint)->GetBoundRect();aDC.LPtoDP(aRect);aRect.NormalizeRect();InvalidateRect(aRect); // Get the area redrawn
}else
InvalidateRect(0);}
942
Chapter 16: Creating the Document and Improving the View
25905c16.qxd:WroxPro 2/21/08 9:18 AM Page 942

That should do it for the program as it stands. If you rebuild Sketcher, you should have scrolling work-ing, with support for multiple views. You’ll need to remember to re-normalize any rectangle that youconvert to device coordinates for use with InvalidateRect() in the future. Any reverse conversionsare also affected.
Deleting and Moving ShapesBeing able to delete shapes is a fundamental requirement in a drawing program. One question relatingto this is how you’re going to select the element you want to delete. Of course, after you decide how toselect an element, this applies equally well if you want to move an element, so you can treat movingand deleting elements as related problems. But first consider how you’re going to bring move anddelete operations into the program.
A neat way of providing move and delete functions would be to have a pop-up context menu appear atthe cursor position when you click the right mouse button. You could then put Move and Delete as itemson the menu. A pop-up that works like this is a very handy facility that you can use in lots of differentsituations.
How should the pop-up be used? The standard way that context menus work is that the user moves themouse over a particular object and right-clicks on it. This selects the object and pops up a menu contain-ing a list of items, which relate to actions that can be performed on that object. This means that differentobjects can have different menus. You can see this in action in Developer Studio itself. When you right-click on a class icon in Class View, you get a menu that’s different from the one you get if you right-clickon the icon for a member function. The menu that appears is sensitive to the context of the cursor, hencethe term “context menu.” You have two contexts to consider in Sketcher. You could right-click with thecursor over an element, and you could right-click when there is no element under the cursor.
So, how can you implement this functionality in the Sketcher application? You can do it simply by creatingtwo menus: one for when you have an element under the cursor, and one for when you don’t. You can checkif there’s an element under the cursor when the user presses the right mouse button. If there is an elementunder the cursor, you can highlight the element so that the user knows exactly which element the contextpop-up is referring to.
Take a look at how you can create a pop-up at the cursor and, after that works, come back to how toimplement the detail of the move and delete operations.
Implementing a Context MenuThe first step is to create a menu containing two pop-ups: one containing Move and Delete as items, theother a combination of items from the Element and Color menus. So, change to Resource View and expandthe list of resources. Right-click on the Menu folder to bring up a context menu — another demonstration ofwhat you are now trying to create in the Sketcher application. Select Insert Menu to create a new menu.This has a default ID IDR_MENU1 assigned, but you can change this. Select the name of the new menu in the
943
Chapter 16: Creating the Document and Improving the View
25905c16.qxd:WroxPro 2/21/08 9:18 AM Page 943
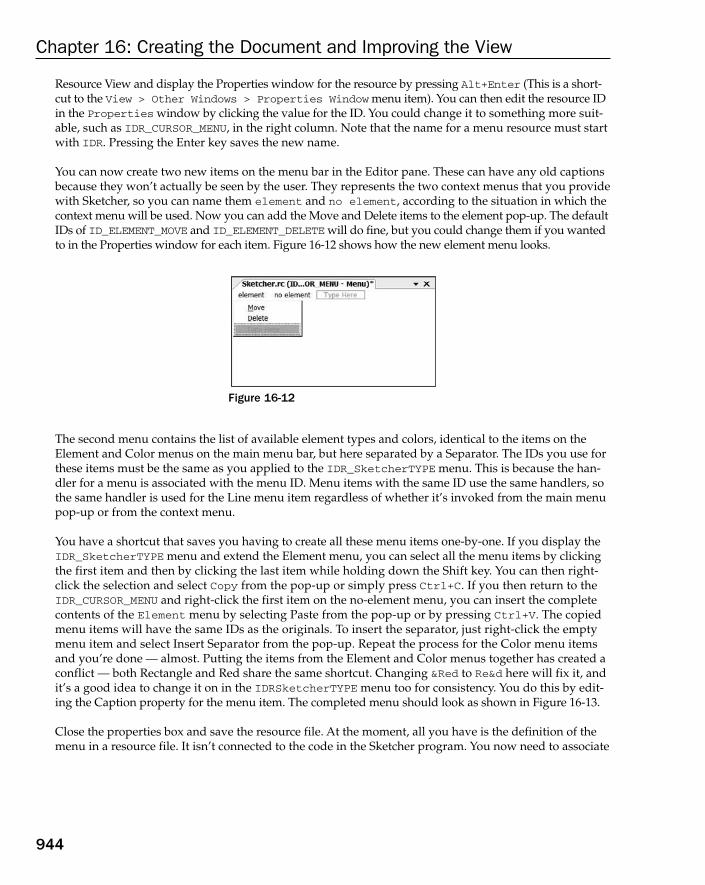
Resource View and display the Properties window for the resource by pressing Alt+Enter (This is a short-cut to the View > Other Windows > Properties Window menu item). You can then edit the resource IDin the Properties window by clicking the value for the ID. You could change it to something more suit-able, such as IDR_CURSOR_MENU, in the right column. Note that the name for a menu resource must startwith IDR. Pressing the Enter key saves the new name.
You can now create two new items on the menu bar in the Editor pane. These can have any old captionsbecause they won’t actually be seen by the user. They represents the two context menus that you providewith Sketcher, so you can name them element and no element, according to the situation in which thecontext menu will be used. Now you can add the Move and Delete items to the element pop-up. The defaultIDs of ID_ELEMENT_MOVE and ID_ELEMENT_DELETE will do fine, but you could change them if you wantedto in the Properties window for each item. Figure 16-12 shows how the new element menu looks.
Figure 16-12
The second menu contains the list of available element types and colors, identical to the items on theElement and Color menus on the main menu bar, but here separated by a Separator. The IDs you use forthese items must be the same as you applied to the IDR_SketcherTYPE menu. This is because the han-dler for a menu is associated with the menu ID. Menu items with the same ID use the same handlers, sothe same handler is used for the Line menu item regardless of whether it’s invoked from the main menupop-up or from the context menu.
You have a shortcut that saves you having to create all these menu items one-by-one. If you display theIDR_SketcherTYPE menu and extend the Element menu, you can select all the menu items by clickingthe first item and then by clicking the last item while holding down the Shift key. You can then right-click the selection and select Copy from the pop-up or simply press Ctrl+C. If you then return to theIDR_CURSOR_MENU and right-click the first item on the no-element menu, you can insert the completecontents of the Element menu by selecting Paste from the pop-up or by pressing Ctrl+V. The copiedmenu items will have the same IDs as the originals. To insert the separator, just right-click the emptymenu item and select Insert Separator from the pop-up. Repeat the process for the Color menu itemsand you’re done — almost. Putting the items from the Element and Color menus together has created aconflict — both Rectangle and Red share the same shortcut. Changing &Red to Re&d here will fix it, andit’s a good idea to change it on in the IDRSketcherTYPE menu too for consistency. You do this by edit-ing the Caption property for the menu item. The completed menu should look as shown in Figure 16-13.
Close the properties box and save the resource file. At the moment, all you have is the definition of themenu in a resource file. It isn’t connected to the code in the Sketcher program. You now need to associate
944
Chapter 16: Creating the Document and Improving the View
25905c16.qxd:WroxPro 2/21/08 9:18 AM Page 944
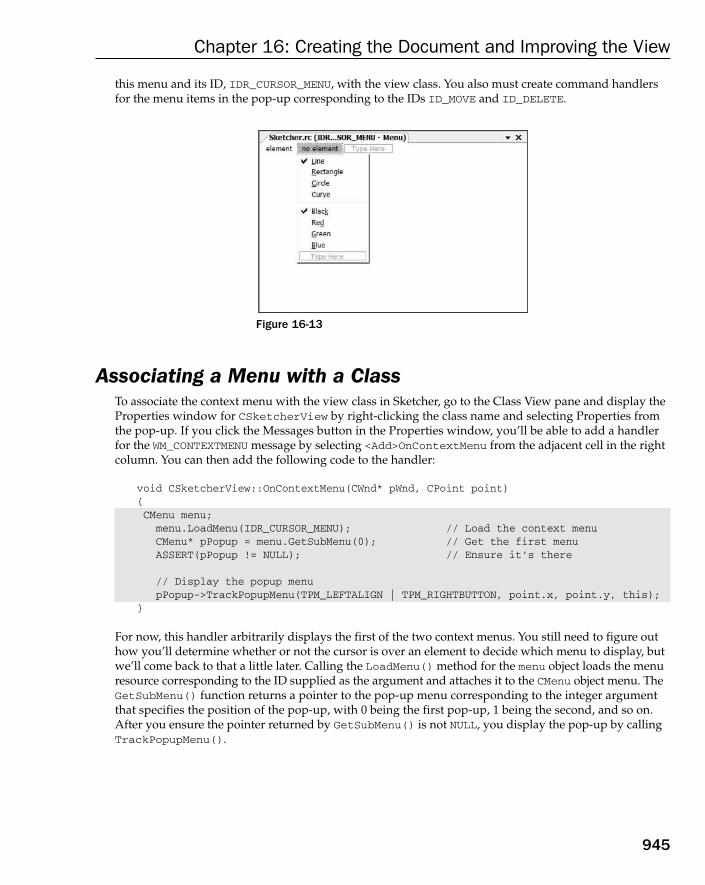
this menu and its ID, IDR_CURSOR_MENU, with the view class. You also must create command handlersfor the menu items in the pop-up corresponding to the IDs ID_MOVE and ID_DELETE.
Figure 16-13
Associating a Menu with a ClassTo associate the context menu with the view class in Sketcher, go to the Class View pane and display theProperties window for CSketcherView by right-clicking the class name and selecting Properties fromthe pop-up. If you click the Messages button in the Properties window, you’ll be able to add a handlerfor the WM_CONTEXTMENU message by selecting <Add>OnContextMenu from the adjacent cell in the rightcolumn. You can then add the following code to the handler:
void CSketcherView::OnContextMenu(CWnd* pWnd, CPoint point){CMenu menu;menu.LoadMenu(IDR_CURSOR_MENU); // Load the context menu CMenu* pPopup = menu.GetSubMenu(0); // Get the first menuASSERT(pPopup != NULL); // Ensure it’s there
// Display the popup menupPopup->TrackPopupMenu(TPM_LEFTALIGN | TPM_RIGHTBUTTON, point.x, point.y, this);
}
For now, this handler arbitrarily displays the first of the two context menus. You still need to figure outhow you’ll determine whether or not the cursor is over an element to decide which menu to display, butwe’ll come back to that a little later. Calling the LoadMenu() method for the menu object loads the menuresource corresponding to the ID supplied as the argument and attaches it to the CMenu object menu. TheGetSubMenu() function returns a pointer to the pop-up menu corresponding to the integer argumentthat specifies the position of the pop-up, with 0 being the first pop-up, 1 being the second, and so on.After you ensure the pointer returned by GetSubMenu() is not NULL, you display the pop-up by callingTrackPopupMenu().
945
Chapter 16: Creating the Document and Improving the View
25905c16.qxd:WroxPro 2/21/08 9:18 AM Page 945

The first argument to the TrackPopupMenu() function consists of two flags ORed together. One flagspecifies how the pop-up menu should be positioned and can be any of the following values:
The second flag specifies the mouse button and can be either of the following:
The next two arguments to the TrackPopupMenu() function specify the x and y coordinates of the pop-up menu on the screen respectively. The y coordinate determines to position of the top of the menu. Thefourth argument specifies the window that owns the menu and that should receive all WM_COMMAND mes-sages from the menu.
Now you can add the handlers for the items in the first pop-up menu. Return to the Resource View anddouble-click on IDR_CURSOR_MENU. Right-click the Move menu item and then select Add Event Handlerfrom the pop-up. You can then specify the handler in the dialog for the Event Handler wizard, as shownin Figure 16-14.
It’s a COMMAND handler and is to be created in the CSketcherView class. Click the Add and Edit buttonto create the handler function. You can follow the same procedure to create the hander for the Deletemenu item.
You don’t have to do anything for the second context menu, as you already have handlers written for themin the document class. These take care of the messages from the pop-up items automatically.
Choosing a Context MenuAt the moment, the OnContextMenu() handler only displays the first context pop-up, no matterwhere the right button is clicked in the view. This isn’t really what you want it to do. The first contextmenu applies specifically to an element, whereas the second context menu applies in general. Youwant to display the first menu if there is an element under the cursor and to display the second menu if there isn’t.
Flag Description
TPM_LEFTMOUSEBUTTON Specifies that the pop-up tracks the left mouse button.
TPM_RIGHTMOUSEBUTTON Specifies that the pop-up tracks the right mouse button.
Flag Description
TPM_CENTERALIGN Centers the pop-up horizontally relative to the x coordinate suppliedas the second argument to the function.
TPM_LEFTALIGN Positions the pop-up so that the left side of the menu is aligned withthe x coordinate supplied as the second argument to the function.
TPM_RIGHTALIGN Positions the pop-up so that the right side of the menu is aligned withthe x coordinate supplied as the second argument to the function.
946
Chapter 16: Creating the Document and Improving the View
25905c16.qxd:WroxPro 2/21/08 9:19 AM Page 946
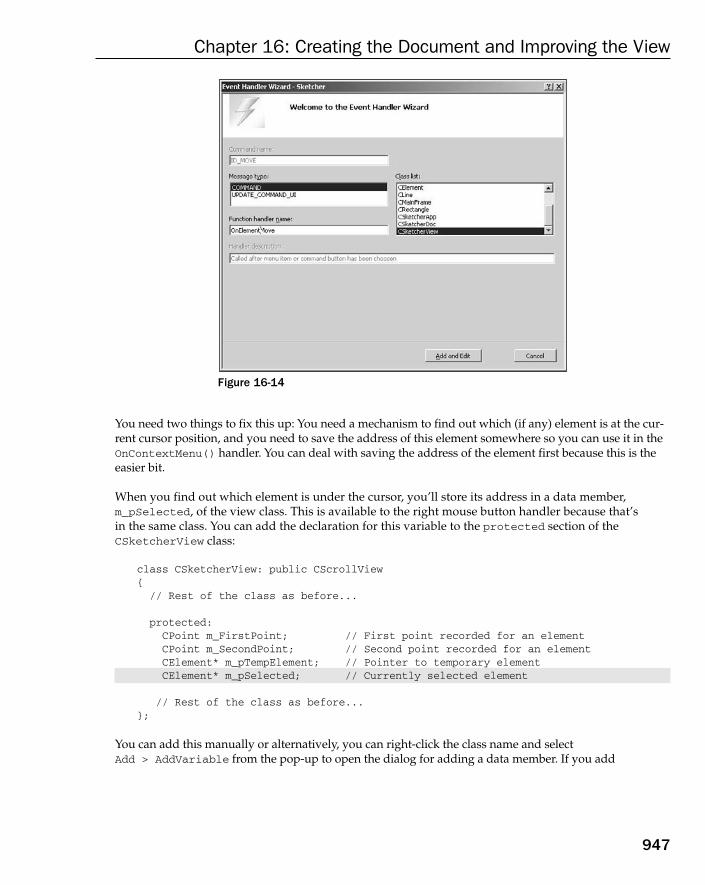
Figure 16-14
You need two things to fix this up: You need a mechanism to find out which (if any) element is at the cur-rent cursor position, and you need to save the address of this element somewhere so you can use it in theOnContextMenu() handler. You can deal with saving the address of the element first because this is theeasier bit.
When you find out which element is under the cursor, you’ll store its address in a data member,m_pSelected, of the view class. This is available to the right mouse button handler because that’s in the same class. You can add the declaration for this variable to the protected section of theCSketcherView class:
class CSketcherView: public CScrollView{
// Rest of the class as before...
protected:CPoint m_FirstPoint; // First point recorded for an elementCPoint m_SecondPoint; // Second point recorded for an elementCElement* m_pTempElement; // Pointer to temporary elementCElement* m_pSelected; // Currently selected element
// Rest of the class as before...};
You can add this manually or alternatively, you can right-click the class name and select Add > AddVariable from the pop-up to open the dialog for adding a data member. If you add
947
Chapter 16: Creating the Document and Improving the View
25905c16.qxd:WroxPro 2/21/08 9:19 AM Page 947
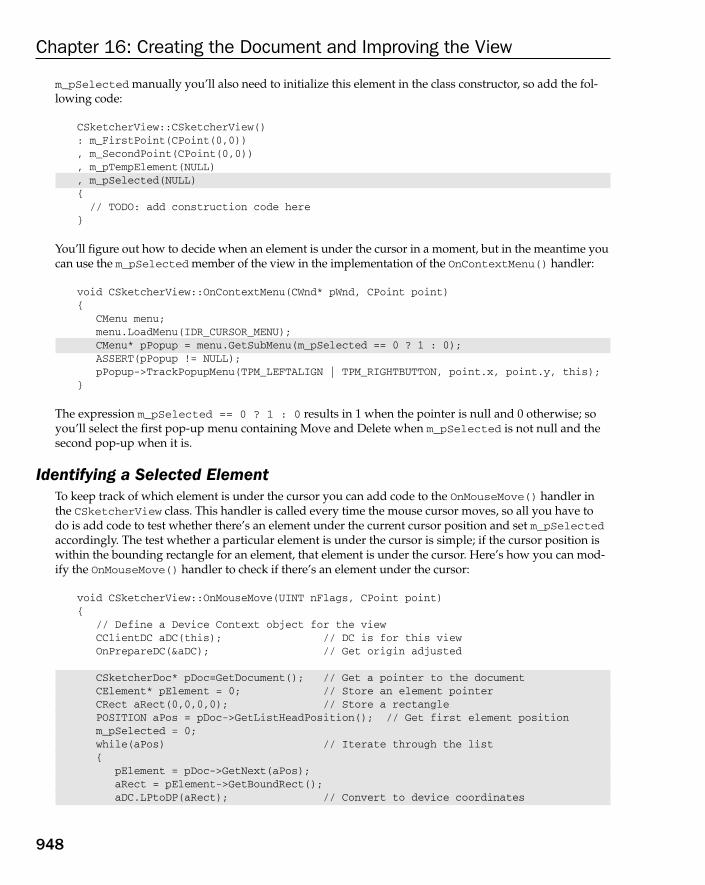
m_pSelected manually you’ll also need to initialize this element in the class constructor, so add the fol-lowing code:
CSketcherView::CSketcherView(): m_FirstPoint(CPoint(0,0)), m_SecondPoint(CPoint(0,0)), m_pTempElement(NULL), m_pSelected(NULL){// TODO: add construction code here
}
You’ll figure out how to decide when an element is under the cursor in a moment, but in the meantime youcan use the m_pSelected member of the view in the implementation of the OnContextMenu() handler:
void CSketcherView::OnContextMenu(CWnd* pWnd, CPoint point){
CMenu menu;menu.LoadMenu(IDR_CURSOR_MENU);CMenu* pPopup = menu.GetSubMenu(m_pSelected == 0 ? 1 : 0);ASSERT(pPopup != NULL);pPopup->TrackPopupMenu(TPM_LEFTALIGN | TPM_RIGHTBUTTON, point.x, point.y, this);
}
The expression m_pSelected == 0 ? 1 : 0 results in 1 when the pointer is null and 0 otherwise; soyou’ll select the first pop-up menu containing Move and Delete when m_pSelected is not null and thesecond pop-up when it is.
Identifying a Selected ElementTo keep track of which element is under the cursor you can add code to the OnMouseMove() handler inthe CSketcherView class. This handler is called every time the mouse cursor moves, so all you have to do is add code to test whether there’s an element under the current cursor position and set m_pSelectedaccordingly. The test whether a particular element is under the cursor is simple; if the cursor position iswithin the bounding rectangle for an element, that element is under the cursor. Here’s how you can mod-ify the OnMouseMove() handler to check if there’s an element under the cursor:
void CSketcherView::OnMouseMove(UINT nFlags, CPoint point){
// Define a Device Context object for the viewCClientDC aDC(this); // DC is for this viewOnPrepareDC(&aDC); // Get origin adjusted
CSketcherDoc* pDoc=GetDocument(); // Get a pointer to the documentCElement* pElement = 0; // Store an element pointerCRect aRect(0,0,0,0); // Store a rectanglePOSITION aPos = pDoc->GetListHeadPosition(); // Get first element positionm_pSelected = 0;while(aPos) // Iterate through the list{
pElement = pDoc->GetNext(aPos);aRect = pElement->GetBoundRect();aDC.LPtoDP(aRect); // Convert to device coordinates
948
Chapter 16: Creating the Document and Improving the View
25905c16.qxd:WroxPro 2/21/08 9:19 AM Page 948
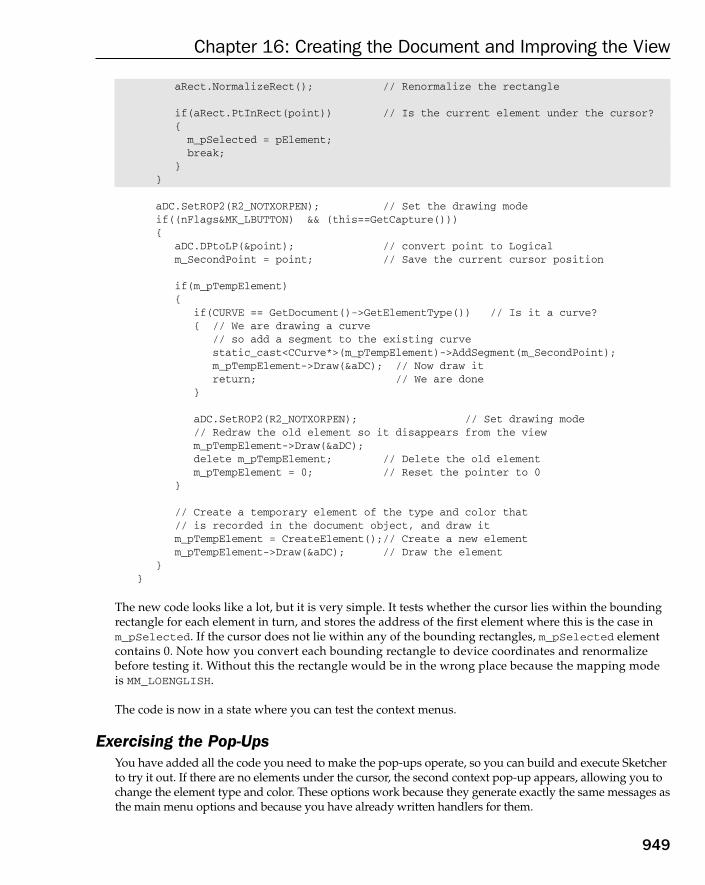
aRect.NormalizeRect(); // Renormalize the rectangle
if(aRect.PtInRect(point)) // Is the current element under the cursor?{m_pSelected = pElement;break;
}}
aDC.SetROP2(R2_NOTXORPEN); // Set the drawing modeif((nFlags&MK_LBUTTON) && (this==GetCapture())){
aDC.DPtoLP(&point); // convert point to Logicalm_SecondPoint = point; // Save the current cursor position
if(m_pTempElement){
if(CURVE == GetDocument()->GetElementType()) // Is it a curve?{ // We are drawing a curve
// so add a segment to the existing curvestatic_cast<CCurve*>(m_pTempElement)->AddSegment(m_SecondPoint); m_pTempElement->Draw(&aDC); // Now draw itreturn; // We are done
}
aDC.SetROP2(R2_NOTXORPEN); // Set drawing mode// Redraw the old element so it disappears from the viewm_pTempElement->Draw(&aDC);delete m_pTempElement; // Delete the old elementm_pTempElement = 0; // Reset the pointer to 0
}
// Create a temporary element of the type and color that// is recorded in the document object, and draw itm_pTempElement = CreateElement();// Create a new elementm_pTempElement->Draw(&aDC); // Draw the element
}}
The new code looks like a lot, but it is very simple. It tests whether the cursor lies within the boundingrectangle for each element in turn, and stores the address of the first element where this is the case inm_pSelected. If the cursor does not lie within any of the bounding rectangles, m_pSelected elementcontains 0. Note how you convert each bounding rectangle to device coordinates and renormalizebefore testing it. Without this the rectangle would be in the wrong place because the mapping modeis MM_LOENGLISH.
The code is now in a state where you can test the context menus.
Exercising the Pop-UpsYou have added all the code you need to make the pop-ups operate, so you can build and execute Sketcherto try it out. If there are no elements under the cursor, the second context pop-up appears, allowing you tochange the element type and color. These options work because they generate exactly the same messages asthe main menu options and because you have already written handlers for them.
949
Chapter 16: Creating the Document and Improving the View
25905c16.qxd:WroxPro 2/21/08 9:19 AM Page 949

If there is an element under the cursor, the first context menu will appear with Move and Delete on it. Itwon’t do anything at the moment, as you’ve yet to implement the handlers for the messages it generates.Try right button clicks outside of the view window. Messages for these are not passed to the documentview window in your application, so the pop-up is not displayed.
Note that the context menu to select elements and colors isn’t quite right — they set the right type or colorin the class but the check marks in the pop-up are not set properly. The document class handles the mes-sages from the menu, but the UPDATE_COMMAND_UI messages don’t apply to the context menu — they onlywork with the IDR_SketcherTYPE menu. Read on to see how you can fix that.
Checking the Context Menu ItemsChecking the items in the no element menu has to be done in the OnContextMenu() function in theCSketcherView class before the context menu is displayed. The CMenu class has a function designed to do exactly what you want. Its prototype is:
UINT CheckMenuItem(UINT nIDCheckItem, UINT nCheck);
This function checks or unchecks any item in the context menu. The first parameter selects which entryin the context pop-up is to be checked or unchecked; the second parameter is a combination of two flags,one of which determines how the first parameter specifies which item is to be checked, and the otherspecifies whether the menu item is to be checked or unchecked. Because each flag is a single bit in aUINT value, you combine the two using the bitwise OR.
The flag to determine how the item is identified can be one of two possible values:
Use MF_BYCOMMAND so you won’t have to worry about the sequence in which the menu items appear inthe pop-up, or even in which submenu they appear.
The possible flag values to check or uncheck an item are MF_CHECKED and MF_UNCHECKED, respectively.
The code for checking or unchecking a menu item is essentially the same for all the menu items in thesecond context pop-up. See how you can set the check for the menu item Black correctly. The first argu-ment to the CheckMenuItem() function will be the menu ID, ID_COLOR_BLACK. The second argument is MF_BYCOMMAND combined with either MF_CHECKED or MF_UNCHECKED, depending on the current colorselected. You can obtain the current color from the document using the GetElementColor() function,with the following statement:
COLORREF Color = GetDocument()->GetElementColor();
MF_BYPOSITION The first parameter is an index where 0 specifies the first item, 1 the second,and so on.
MF_BYCOMMAND The first parameter is a menu ID.
950
Chapter 16: Creating the Document and Improving the View
25905c16.qxd:WroxPro 2/21/08 9:19 AM Page 950

You can use the Color variable to select the appropriate flag using the conditional operator, and thencombine the result with the MF_BYCOMMAND flag to obtain the second argument to the CheckMenuItem()function, so the statement to set the check for the item is:
menu.CheckMenuItem(ID_COLOR_BLACK,(BLACK==Color ? MF_CHECKED : MF_UNCHECKED) | MF_BYCOMMAND);
You don’t need to specify the sub-menu here because the menu item is uniquely defined in the menu byits ID. You just need to change the ID and the color value in this statement to obtain the statement to setthe flags for each of the other color menu items.
Checking the element menu items is essentially the same. To check the Line menu item you can write:
unsigned int ElementType = GetDocument()->GetElementType();menu.CheckMenuItem(ID_ELEMENT_LINE,
(LINE==ElementType ? MF_CHECKED : MF_UNCHECKED) | MF_BYCOMMAND);
The complete code for the OnContextMenu() handler is:
void CSketcherView::OnContextMenu(CWnd* pWnd, CPoint point){
CMenu menu;menu.LoadMenu(IDR_CURSOR_MENU);
// Set check marks if it’s the no element menuif(m_pSelected == 0){
// Check color menu itemsCOLORREF Color = GetDocument()->GetElementColor();menu.CheckMenuItem(ID_COLOR_BLACK,
(BLACK==Color ? MF_CHECKED : MF_UNCHECKED) | MF_BYCOMMAND);menu.CheckMenuItem(ID_COLOR_RED,
(RED==Color ? MF_CHECKED : MF_UNCHECKED) | MF_BYCOMMAND);menu.CheckMenuItem(ID_COLOR_GREEN,
(GREEN==Color ? MF_CHECKED : MF_UNCHECKED) | MF_BYCOMMAND);menu.CheckMenuItem(ID_COLOR_BLUE,
(BLUE==Color ? MF_CHECKED : MF_UNCHECKED) | MF_BYCOMMAND);
// Check element menu itemsunsigned int ElementType = GetDocument()->GetElementType();menu.CheckMenuItem(ID_ELEMENT_LINE,
(LINE==ElementType ? MF_CHECKED : MF_UNCHECKED) | MF_BYCOMMAND);menu.CheckMenuItem(ID_ELEMENT_RECTANGLE,
(RECTANGLE==ElementType ? MF_CHECKED : MF_UNCHECKED) | MF_BYCOMMAND);menu.CheckMenuItem(ID_ELEMENT_CIRCLE,
(CIRCLE==ElementType ? MF_CHECKED : MF_UNCHECKED) | MF_BYCOMMAND);menu.CheckMenuItem(ID_ELEMENT_CURVE,
(CURVE==ElementType ? MF_CHECKED : MF_UNCHECKED) | MF_BYCOMMAND);}
951
Chapter 16: Creating the Document and Improving the View
25905c16.qxd:WroxPro 2/21/08 9:19 AM Page 951

CMenu* pPopup = menu.GetSubMenu(m_pSelected == 0 ? 1 : 0);ASSERT(pPopup != NULL);pPopup->TrackPopupMenu(TPM_LEFTALIGN | TPM_RIGHTBUTTON, point.x, point.y, this);
}
With this change, the context menu items should be checked correctly when you build and run Sketcheragain.
Highlighting ElementsIdeally, the user will want to know which element is under the cursor before they right-click to get the con-text menu. When you want to delete an element, you want to know which element you are operating on.Equally, when you want to use the other context menu — to change color, for example — you need to besure no element is under the cursor. To show precisely which element is under the cursor, you need tohighlight it in some way before a right button click occurs.
You can do this in the Draw() member function for an element. All you need to do is pass an argumentto the Draw() function to indicate when the element should be highlighted. If you pass the address of thecurrently-selected element that you save in the m_pSelected member of the view to the Draw() function,you will be able to compare it to the this pointer to see if it is the current element.
Highlights all work in the same way, so let’s take the CLine member as an example. You can add similarcode to each of the classes for the other element types. Before you start changing CLine, you must firstamend the definition of the base class CElement:
class CElement : public CObject{
protected:COLORREF m_Color; // Color of an elementCRect m_EnclosingRect; // Rectangle enclosing an elementint m_Pen; // Pen width
public:virtual ~CElement(void); // Virtual draw operationvirtual void Draw(CDC* pDC,CElement* pElement=0) {}
CRect GetBoundRect(); // Get the bounding rectangle for an element
protected:CElement(void); // Here to prevent it being called
};
The change is to add a second parameter to the virtual Draw() function. This is a pointer to an element. Thereason for initializing the second parameter to zero is to allow the use of the function with just one argu-ment; the second will be supplied as 0 by default.
You need to modify the declaration of the Draw() function in each of the classes derived from CElementin exactly the same way. For example, you should change the CLine class definition to:
class CLine :public CElement
952
Chapter 16: Creating the Document and Improving the View
25905c16.qxd:WroxPro 2/21/08 9:19 AM Page 952

{public:
~CLine(void);// Function to display a linevirtual void Draw(CDC* pDC, CElement* pElement=0);
// Constructor for a line objectCLine(CPoint Start, CPoint End, COLORREF aColor);
protected:CPoint m_StartPoint; // Start point of lineCPoint m_EndPoint; // End point of line
CLine(void); // Default constructor - should not be used};
The implementation for each of the Draw() functions for the classes derived from CElement all need tobe extended in the same way. The function for the CLine class is:
void CLine::Draw(CDC* pDC, CElement* pElement){
// Create a pen for this object and// initialize it to the object color and line width of 1 pixelCPen aPen;COLORREF aColor = m_Color; // Initialize with element colorif(this == pElement) // This element selected?
aColor = SELECT_COLOR; // Set highlight colorif(!aPen.CreatePen(PS_SOLID, m_Pen, aColor)){
// Pen creation failed. Abort the programAfxMessageBox(_T(“Pen creation failed drawing a line”), MB_OK);AfxAbort();
}
CPen* pOldPen = pDC->SelectObject(&aPen); // Select the pen
// Now draw the linepDC->MoveTo(m_StartPoint);pDC->LineTo(m_EndPoint);
pDC->SelectObject(pOldPen); // Restore the old pen}
This is a very simple change. You set the new local variable aColor to the current color stored inm_Color, and the if statement will reset the value of aColor to SELECT_COLOR when pElement isequal to this — which is the case when the current element and the selected element are the same. You also need to add the definition for SELECT_COLOR to the OurConstants.h file:
//Definitions of constants
#pragma once
// Element type definitions// Each type value must be unique
953
Chapter 16: Creating the Document and Improving the View
25905c16.qxd:WroxPro 2/21/08 9:19 AM Page 953

const unsigned int LINE = 101U;const unsigned int RECTANGLE = 102U;const unsigned int CIRCLE = 103U;const unsigned int CURVE = 104U;///////////////////////////////////
// Color values for drawingconst COLORREF BLACK = RGB(0,0,0);const COLORREF RED = RGB(255,0,0);const COLORREF GREEN = RGB(0,255,0);const COLORREF BLUE = RGB(0,0,255);const COLORREF SELECT_COLOR = RGB(255,0,180);///////////////////////////////////
Now you should add an #include directive for OurConstants.h to the CElements.cpp file to makethe definition of SELECT_COLOR available. You have nearly implemented the highlighting. The derivedclasses of the CElement class are now able to draw themselves as selected — you just need a mechanismto cause an element to be selected. So where should you do this? You determine which element, if any, is under the cursor in the OnMouseMove() handler in the CSketcherView class, so that’s obviously theplace to expedite the highlighting.
The amendments to the OnMouseMove() handler are:
void CSketcherView::OnMouseMove(UINT nFlags, CPoint point){// Define a Device Context object for the viewCClientDC aDC(this); // DC is for this viewOnPrepareDC(&aDC); // Get origin adjusted
aDC.SetROP2(R2_NOTXORPEN); // Set the drawing modeif((nFlags&MK_LBUTTON) && (this==GetCapture())){aDC.DPtoLP(&point); // convert point to Logicalm_SecondPoint = point; // Save the current cursor position
if(m_pTempElement){
if(CURVE == GetDocument()->GetElementType()) // Is it a curve?{ // We are drawing a curve
// so add a segment to the existing curvestatic_cast<CCurve*>(m_pTempElement)->AddSegment(m_SecondPoint); m_pTempElement->Draw(&aDC); // Now draw itreturn; // We are done
}
aDC.SetROP2(R2_NOTXORPEN); // Set drawing mode// Redraw the old element so it disappears from the viewm_pTempElement->Draw(&aDC);delete m_pTempElement; // Delete the old elementm_pTempElement = 0; // Reset the pointer to 0
}
// Create a temporary element of the type and color that// is recorded in the document object, and draw itm_pTempElement = CreateElement(); // Create a new element
954
Chapter 16: Creating the Document and Improving the View
25905c16.qxd:WroxPro 2/21/08 9:19 AM Page 954

m_pTempElement->Draw(&aDC); // Draw the element}else{ // We are not drawing an element so do highlighting...CSketcherDoc* pDoc=GetDocument(); // Get a pointer to the documentCElement* pElement = 0; // Store an element pointerCRect aRect(0,0,0,0); // Store a rectanglePOSITION aPos = pDoc->GetListHeadPosition(); // Get first element posnCElement* pOldSelection = m_pSelected; // Save old selected elementm_pSelected = 0;while(aPos) // Iterate through the list{pElement = pDoc->GetNext(aPos);aRect = pElement->GetBoundRect();aDC.LPtoDP(aRect);aRect.NormalizeRect();
// Select the first element that appears under the cursorif(aRect.PtInRect(point)){m_pSelected = pElement;break;
}}if(m_pSelected == pOldSelection) // If new selection is same as old return; // we are done
// Unhighlight old selection if there is oneif(pOldSelection != 0) // Verify there is one{aRect = pOldSelection->GetBoundRect();aDC.LPtoDP(aRect); // Convert to device coordsaRect.NormalizeRect(); // NormalizeInvalidateRect(aRect, FALSE); // Invalidate area
}
// Highlight new selection if there is oneif(m_pSelected != 0) // Verify there is one{aRect = m_pSelected->GetBoundRect();aDC.LPtoDP(aRect); // Convert to device coordsaRect.NormalizeRect(); // NormalizeInvalidateRect(aRect, FALSE); // Invalidate area
}}
}
You only want to deal with highlighting elements when you are not in the process of creating a new ele-ment. All the highlighting code can thus be added in a new else clause for the main if. This involvesmoving the code you had previously to determine the element under the cursor to the new else clauseand adding to it.
You must keep track of any previously highlighted element because if there’s a new one, you must un-highlight the old one. To do this you save the value of m_pSelected in pOldSelection. You then searchfor an element under the cursor and if there is one, you store its address in m_pSelected.
955
Chapter 16: Creating the Document and Improving the View
25905c16.qxd:WroxPro 2/21/08 9:19 AM Page 955

If pOldSelection and m_pSelected are equal then either they both contain the address of the sameelement or they are both zero. If they are the same and non-zero, what was already highlighted shouldstay highlighted so there’s nothing to be done. If they are both zero, nothing was highlighted and noth-ing needs to be highlighted so there’s nothing to do in this case too. Either way you just return from thefunction. If they are different, you may have to do something with both.
If pOldSelection is not null then you must un-highlight the old element. The mechanism is the same asbefore — get the bounding rectangle in device coordinates and pass it to the InvalidateRect() functionfor the device context. You then check m_pSelected and if it is not null then you have to highlight theelement whose address it contains. This again involves getting the bounding rectangle in device coordi-nates and pass it to the InvalidateRect() function.
Drawing Highlighted ElementsYou still need to arrange that the highlighted element is actually drawn highlighted. Somewhere, them_pSelected pointer must be passed to the draw function for each element. The only place to do this is in the OnDraw() function in the view:
void CSketcherView::OnDraw(CDC* pDC){CSketcherDoc* pDoc = GetDocument();ASSERT_VALID(pDoc);if(!pDoc)return;
POSITION aPos = pDoc->GetListHeadPosition();CElement* pElement = 0; // Store for an element pointerwhile(aPos) // Loop while aPos is not null{pElement = pDoc->GetNext(aPos); // Get the current element pointer// If the element is visible...if(pDC->RectVisible(pElement->GetBoundRect()))pElement->Draw(pDC, m_pSelected);// ...draw it
}}
You only need to change one line. The Draw() function for an element has the second argument addedto communicate the address of the element to be highlighted.
Exercising the HighlightsThis is all that’s required for the highlighting to work all the time. It wasn’t trivial but on the other handit wasn’t terribly difficult either. You can build and execute Sketcher to try it out. Any time there is anelement under the cursor, the element is drawn in magenta. This makes it obvious which element thecontext menu is going to act on before you right-click the mouse and means that you know in advancewhich context menu is displayed.
Servicing the Menu MessagesThe next step is to provide code in the bodies of the handlers for the Move and Delete menu items thatyou added earlier. You can add the code for Delete first, as that’s the simpler of the two.
956
Chapter 16: Creating the Document and Improving the View
25905c16.qxd:WroxPro 2/21/08 9:19 AM Page 956
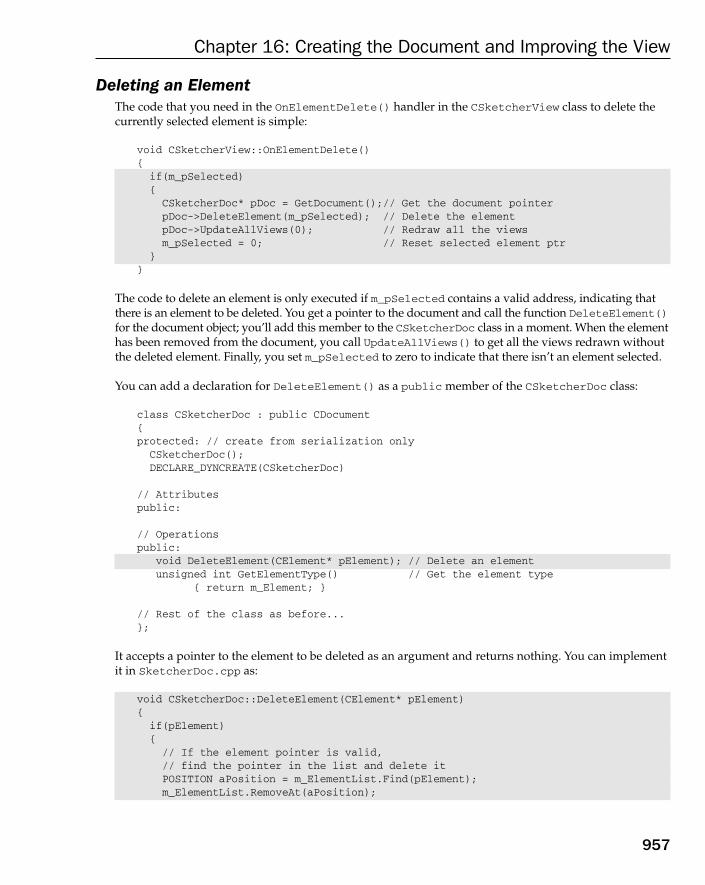
Deleting an ElementThe code that you need in the OnElementDelete() handler in the CSketcherView class to delete thecurrently selected element is simple:
void CSketcherView::OnElementDelete(){if(m_pSelected){CSketcherDoc* pDoc = GetDocument();// Get the document pointerpDoc->DeleteElement(m_pSelected); // Delete the elementpDoc->UpdateAllViews(0); // Redraw all the viewsm_pSelected = 0; // Reset selected element ptr
}}
The code to delete an element is only executed if m_pSelected contains a valid address, indicating thatthere is an element to be deleted. You get a pointer to the document and call the function DeleteElement()for the document object; you’ll add this member to the CSketcherDoc class in a moment. When the elementhas been removed from the document, you call UpdateAllViews() to get all the views redrawn withoutthe deleted element. Finally, you set m_pSelected to zero to indicate that there isn’t an element selected.
You can add a declaration for DeleteElement() as a public member of the CSketcherDoc class:
class CSketcherDoc : public CDocument{protected: // create from serialization only
CSketcherDoc();DECLARE_DYNCREATE(CSketcherDoc)
// Attributespublic:
// Operationspublic:
void DeleteElement(CElement* pElement); // Delete an elementunsigned int GetElementType() // Get the element type
{ return m_Element; }
// Rest of the class as before...};
It accepts a pointer to the element to be deleted as an argument and returns nothing. You can implementit in SketcherDoc.cpp as:
void CSketcherDoc::DeleteElement(CElement* pElement){if(pElement){// If the element pointer is valid,// find the pointer in the list and delete itPOSITION aPosition = m_ElementList.Find(pElement);m_ElementList.RemoveAt(aPosition);
957
Chapter 16: Creating the Document and Improving the View
25905c16.qxd:WroxPro 2/21/08 9:19 AM Page 957
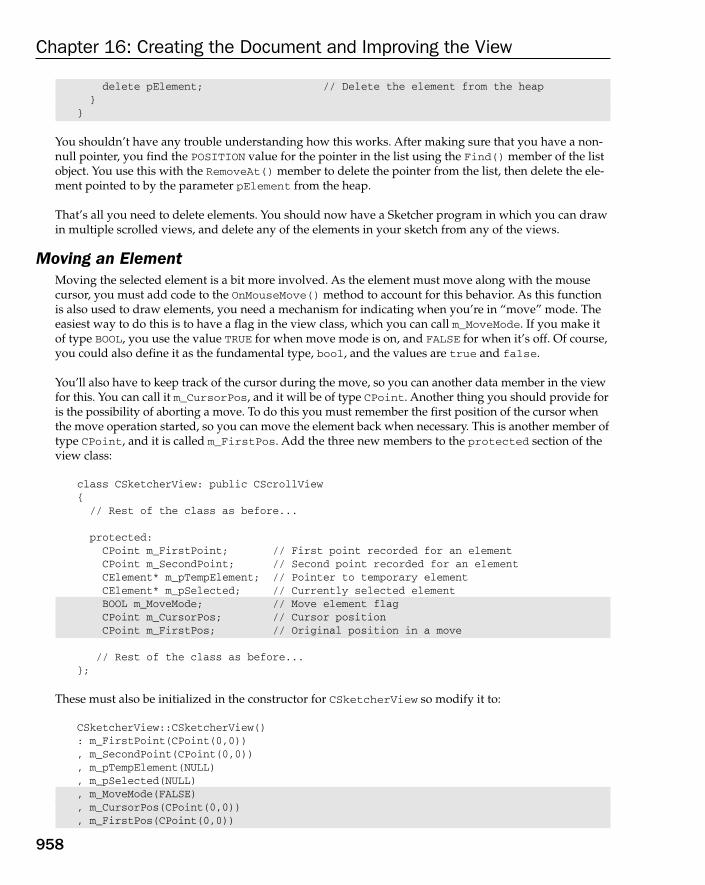
delete pElement; // Delete the element from the heap}
}
You shouldn’t have any trouble understanding how this works. After making sure that you have a non-null pointer, you find the POSITION value for the pointer in the list using the Find() member of the listobject. You use this with the RemoveAt() member to delete the pointer from the list, then delete the ele-ment pointed to by the parameter pElement from the heap.
That’s all you need to delete elements. You should now have a Sketcher program in which you can drawin multiple scrolled views, and delete any of the elements in your sketch from any of the views.
Moving an ElementMoving the selected element is a bit more involved. As the element must move along with the mousecursor, you must add code to the OnMouseMove() method to account for this behavior. As this functionis also used to draw elements, you need a mechanism for indicating when you’re in “move” mode. Theeasiest way to do this is to have a flag in the view class, which you can call m_MoveMode. If you make itof type BOOL, you use the value TRUE for when move mode is on, and FALSE for when it’s off. Of course,you could also define it as the fundamental type, bool, and the values are true and false.
You’ll also have to keep track of the cursor during the move, so you can another data member in the viewfor this. You can call it m_CursorPos, and it will be of type CPoint. Another thing you should provide foris the possibility of aborting a move. To do this you must remember the first position of the cursor whenthe move operation started, so you can move the element back when necessary. This is another member oftype CPoint, and it is called m_FirstPos. Add the three new members to the protected section of theview class:
class CSketcherView: public CScrollView{// Rest of the class as before...
protected:CPoint m_FirstPoint; // First point recorded for an elementCPoint m_SecondPoint; // Second point recorded for an elementCElement* m_pTempElement; // Pointer to temporary elementCElement* m_pSelected; // Currently selected elementBOOL m_MoveMode; // Move element flagCPoint m_CursorPos; // Cursor positionCPoint m_FirstPos; // Original position in a move
// Rest of the class as before...};
These must also be initialized in the constructor for CSketcherView so modify it to:
CSketcherView::CSketcherView(): m_FirstPoint(CPoint(0,0)), m_SecondPoint(CPoint(0,0)), m_pTempElement(NULL), m_pSelected(NULL), m_MoveMode(FALSE), m_CursorPos(CPoint(0,0)), m_FirstPos(CPoint(0,0))
958
Chapter 16: Creating the Document and Improving the View
25905c16.qxd:WroxPro 2/21/08 9:19 AM Page 958

{// TODO: add construction code here
}
The element move process starts when the Move menu item from the context menu is selected. Now youcan add the code to the message handler for the Move menu item to set up the conditions necessary forthe operation:
void CSketcherView::OnElementMove(){
CClientDC aDC(this);OnPrepareDC(&aDC); // Set up the device contextGetCursorPos(&m_CursorPos); // Get cursor position in screen coordsScreenToClient(&m_CursorPos); // Convert to client coordsaDC.DPtoLP(&m_CursorPos); // Convert to logicalm_FirstPos = m_CursorPos; // Remember first positionm_MoveMode = TRUE; // Start move mode
}
You are doing four things in this handler:
1. Getting the coordinate of the current position of the cursor because the move operation startsfrom this reference point.
2. Converting the cursor position to logical coordinates because your elements are defined in logical coordinates.
3. Remembering the initial cursor position in case the user wants to abort the move later.
4. Setting the move mode on as a flag for the OnMouseMove() handler to recognize.
The GetCursorPos() function is a Windows API function that stores the current cursor position inm_CursorPos. Note that you pass a pointer to this function. The cursor position is in screen coordinates(that is, coordinates relative to the upper-left corner of the screen). All operations with the cursor are inscreen coordinates. You want the position in logical coordinates, so you must do the conversion in twosteps. The ScreentoClient() function (which is an inherited member of the view class) converts fromscreen to client coordinates, and then you apply the DPtoLP() function member of the aDC object to theresult to convert to logical coordinates.
After saving the initial cursor position in m_FirstPos, set m_MoveMode to TRUE so that the OnMouseMove()handler can deal with moving the element.
Now you have set the move mode flag, it’s time to update the mouse move message handler to deal withmoving an element.
Modifying the WM_MOUSEMOVE HandlerMoving an element only occurs when move mode is on and the cursor is being moved. Therefore, allyou need to do in OnMouseMove() is to add code to handle moving an element in a block that only getsexecuted when m_MoveMode is TRUE. The new code to do this is as follows:
void CSketcherView::OnMouseMove(UINT nFlags, CPoint point){
CClientDC aDC(this); // DC is for this view
959
Chapter 16: Creating the Document and Improving the View
25905c16.qxd:WroxPro 2/21/08 9:19 AM Page 959

OnPrepareDC(&aDC); // Get origin adjusted
// If we are in move mode, move the selected element and returnif(m_MoveMode){aDC.DPtoLP(&point); // Convert to logical coordinatessMoveElement(aDC, point); // Move the elementreturn;
}
// Rest of the mouse move handler as before...}
This addition doesn’t need much explaining really, does it? The if statement verifies that you’re in movemode and then calls a function MoveElement(), which does what is necessary for the move. All you haveto do now is implement this function.
Add the declaration for MoveElement() as a protected member of the CSketcherView class by addingthe following at the appropriate point in the class definition:
void MoveElement(CClientDC& aDC, CPoint& point); // Move an element
As always, you can also right-click the class name in Class View to do this, if you want to. The functionneeds access to the object encapsulating a device context for the view, aDC, and the current cursor posi-tion, point, so both of these are reference parameters. The implementation of the function in theSketcherView.cpp file is:
void CSketcherView::MoveElement(CClientDC& aDC, CPoint& point){CSize Distance = point - m_CursorPos; // Get move distancem_CursorPos = point; // Set current point as 1st for next time
// If there is an element, selected, move itif(m_pSelected){aDC.SetROP2(R2_NOTXORPEN);m_pSelected->Draw(&aDC,m_pSelected); // Draw the element to erase itm_pSelected->Move(Distance); // Now move the elementm_pSelected->Draw(&aDC,m_pSelected); // Draw the moved element
}}
The distance to move the element currently selected is stored locally as a CSize object, Distance. TheCSize class is specifically designed to represent a relative coordinate position and has two public datamembers, cx and cy, which correspond to the x and y increments. These are calculated as the differ-ence between the current cursor position, stored in point, and the previous cursor position saved inm_CursorPos. This uses the — operator, which is overloaded in the CPoint class. The version you are using here returns a CSize object, but there is also a version that returns a CPoint object. You can usually operate on CSize and CPoint objects combined. You save the current cursor position inm_CursorPos for use the next time this function is called, which occurs if there is a further mousemove message during the current move operation.
960
Chapter 16: Creating the Document and Improving the View
25905c16.qxd:WroxPro 2/21/08 9:19 AM Page 960

You are going to implement moving an element in the view using the R2_NOTXORPEN drawing mode,because it’s easy and fast. This is exactly the same as what you have been using during the creation ofan element. You redraw the selected element in its current color (the selected color) to reset it to thebackground color, and then call the function Move() to relocate the element by the distance specified byDistance. You’ll add this function to the element classes in a moment. When the element has moveditself, you simply use the Draw() function once more to display it highlighted at the new position. Thecolor of the element will revert to normal when the move operation ends, as the OnLButtonUp() han-dler will redraw all the windows normally by calling UpdateAllViews().
Getting the Elements to Move ThemselvesAdd the Move() function as a virtual member of the base class, CElement. Modify the class definition to:
class CElement:public CObject{
protected:COLORREF m_Color; // Color of an elementCRect m_EnclosingRect; // Rectangle enclosing an elementint m_Pen; // Pen width
public:virtual ~CElement(void); // Virtual destructor
// Virtual draw operationvirtual void Draw(CDC* pDC, BOOL Select=FALSE){}virtual void Move(CSize& aSize){} // Move an elementCRect GetBoundRect(); // Get the bounding rectangle for an element
protected:CElement(void); // Here to prevent it being called
};
As discussed earlier in relation to the Draw() member, although an implementation of the Move()function here has no meaning, you can’t make it a pure virtual function because of the requirements of serialization.
You can now add a declaration for the Move() function as a public member of each of the classesderived from CElement. It is the same in each:
// Function to move an elementvirtual void Move(CSize& aSize);
Next you can implement the Move() function in the CLine class:
void CLine::Move(CSize& aSize){m_StartPoint += aSize; // Move the start pointm_EndPoint += aSize; // and the end pointm_EnclosingRect += aSize; // Move the enclosing rectangle
}
961
Chapter 16: Creating the Document and Improving the View
25905c16.qxd:WroxPro 2/21/08 9:19 AM Page 961
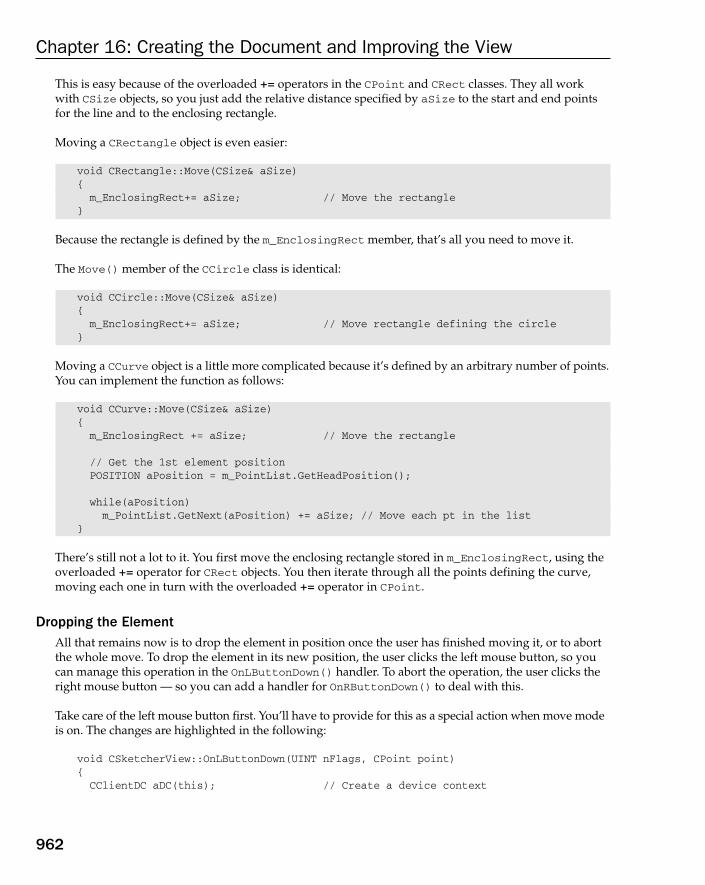
This is easy because of the overloaded += operators in the CPoint and CRect classes. They all workwith CSize objects, so you just add the relative distance specified by aSize to the start and end pointsfor the line and to the enclosing rectangle.
Moving a CRectangle object is even easier:
void CRectangle::Move(CSize& aSize){m_EnclosingRect+= aSize; // Move the rectangle
}
Because the rectangle is defined by the m_EnclosingRect member, that’s all you need to move it.
The Move() member of the CCircle class is identical:
void CCircle::Move(CSize& aSize){m_EnclosingRect+= aSize; // Move rectangle defining the circle
}
Moving a CCurve object is a little more complicated because it’s defined by an arbitrary number of points.You can implement the function as follows:
void CCurve::Move(CSize& aSize){m_EnclosingRect += aSize; // Move the rectangle
// Get the 1st element positionPOSITION aPosition = m_PointList.GetHeadPosition();
while(aPosition)m_PointList.GetNext(aPosition) += aSize; // Move each pt in the list
}
There’s still not a lot to it. You first move the enclosing rectangle stored in m_EnclosingRect, using theoverloaded += operator for CRect objects. You then iterate through all the points defining the curve,moving each one in turn with the overloaded += operator in CPoint.
Dropping the ElementAll that remains now is to drop the element in position once the user has finished moving it, or to abortthe whole move. To drop the element in its new position, the user clicks the left mouse button, so youcan manage this operation in the OnLButtonDown() handler. To abort the operation, the user clicks theright mouse button — so you can add a handler for OnRButtonDown() to deal with this.
Take care of the left mouse button first. You’ll have to provide for this as a special action when move modeis on. The changes are highlighted in the following:
void CSketcherView::OnLButtonDown(UINT nFlags, CPoint point) {CClientDC aDC(this); // Create a device context
962
Chapter 16: Creating the Document and Improving the View
25905c16.qxd:WroxPro 2/21/08 9:19 AM Page 962

OnPrepareDC(&aDC); // Get origin adjustedaDC.DPtoLP(&point); // convert point to Logical
if(m_MoveMode){// In moving mode, so drop the elementm_MoveMode = FALSE; // Kill move modem_pSelected = 0; // De-select the elementGetDocument()->UpdateAllViews(0); // Redraw all the views
}else{
m_FirstPoint = point; // Record the cursor positionSetCapture(); // Capture subsequent mouse messages
}}
The code is pretty simple. You first make sure that you’re in move mode. If this is the case, you just setthe move mode flag back to FALSE and then de-select the element. This is all that’s required becauseyou’ve been tracking the element with the mouse, so it’s already in the right place. Finally, to tidy up allthe views of the document, you call the document’s UpdateAllViews() function, causing all the viewsto be redrawn.
Add a handler for the WM_RBUTTONDOWN message to CSketcherView using the Properties window for theclass. The implementation for this must do two things: Move the element back to where it was and theturn off move mode. The code to do this is:
void CSketcherView::OnRButtonDown(UINT nFlags, CPoint point){
if(m_MoveMode){// In moving mode, so drop element back in original positionCClientDC aDC(this);OnPrepareDC(&aDC); // Get origin adjustedMoveElement(aDC, m_FirstPos); // Move element to orig positionm_MoveMode = FALSE; // Kill move modem_pSelected = 0; // De-select elementGetDocument()->UpdateAllViews(0); // Redraw all the viewsreturn; // We are done
}}
You first create a CClientDC object for use in the MoveElement() function. You then call theMoveElement() function to move the currently selected element the distance from the current cursorposition to the original cursor position that we saved in m_FirstPos. After the element has been reposi-tioned, you just turn off move mode, deselect the element, and get all the views redrawn.
Exercising the ApplicationEverything is now complete for the context pop-ups to work. If you build Sketcher, you can select the ele-ment type and color from one context menu, or if you are over an element, you can then move or deletethat element from the other context menu.
963
Chapter 16: Creating the Document and Improving the View
25905c16.qxd:WroxPro 2/21/08 9:19 AM Page 963

Dealing with Masked ElementsThere’s still a limitation that you might want to get over. If the element you want to move or delete is enclosed by the rectangle of another element that is drawn after the element you want, you won’t be able to highlight it because Sketcher always finds the outer element first. The outer element com-pletely masks the element it encloses. This is a result of the sequence of elements in the list. You couldfix this by adding a Send to Back item to the context menu that would move an element to the begin-ning of the list.
Add a separator and a menu item to the element drop-down in the IDR_CURSOR_MENU resource asshown in Figure 16-15.
Figure 16-15
You can add a handler for the item to the view class through the Properties window for the CSketcherViewclass. It’s best to handle it in the view because that’s where you record the selected element. Select the Messages toolbar button in the Properties window for the class and double-click the message ID ID_ELEMENT_SENDTOBACK. You’ll then be able to select COMMAND below and<Add>OnElementSendtoback in the right column. You can implement the handler as:
void CSketcherView:: OnElementSendtoback(){GetDocument()->SendToBack(m_pSelected); // Move element in list
}
You’ll get the document to do the work by passing the currently selected element pointer to a publicfunction SendToBack() that you implement in the CSketcherDoc class. Add it to the class definitionwith a void return type, and a parameter of type CElement*. You can implement this function as:
void CSketcherDoc::SendToBack(CElement* pElement){if(pElement){// If the element pointer is valid,// find the pointer in the list and remove the elementPOSITION aPosition = m_ElementList.Find(pElement);m_ElementList.RemoveAt(aPosition);
m_ElementList.AddTail(pElement); // Put it back to the end of the list}
}
964
Chapter 16: Creating the Document and Improving the View
25905c16.qxd:WroxPro 2/21/08 9:19 AM Page 964

After you have the POSITION value corresponding to the element, you remove the element from the list bycalling RemoveAt(). Of course, this does not delete the element from memory; it just removes the pointer toit from the list. You then add the element pointer back at the end of the list using the AddTail() function.
With the element moved to the end of the list, it cannot mask any of the others because you search fromthe beginning. You will always find one of the other elements first if the applicable bounding rectangleencloses the current cursor position. The Send to Back menu option is always able to resolve any elementmasking problem in the view.
Extending CLRSketcherIt’s time to extend CLR Sketcher by implementing the class representing a curve element and adding aclass encapsulating a complete sketch. You’ll also implement element highlighting and a context menuwith the ability to move and delete elements. You can adopt a different approach to drawing elements in this version of Sketcher that will make the move element operation easy to implement. Before youstart extending CLR Sketcher and working with the element classes, let’s explore another feature of theGraphics class that will be useful in the application.
Coordinate System TransformationsThe Graphics class contains functions that can move, rotate, and scale the entire drawing coordinate sys-tem. This is a very powerful capability that you can use in the element drawing operations in Sketcher.The following table describes the most useful functions that transform the coordinate system.
You will be using the TranslateTransform() function in the element drawing operations. To draw anelement you can translate the origin for the coordinate system to the position specified by the inheritedposition member of the Element class, draw the element relative to the origin, (0,0), and then restorethe coordinate system back to its original state. This process is illustrated in Figure 16-16, which showshow you draw a circle.
Transform Function Description
TranslateTransform(float dx,float dy)
Translate the coordinate system origin by dx in the x-direction and dy in the y-direction.
RotateTransform(float angle) Rotates the coordinate system about the origin by angledegrees. A positive value for angle represents rotationfrom the x-axis toward the y-axis, a clockwise rotation inother words.
ScaleTransform(float scaleX,float scaleY)
Scales the x-axis by multiplying by scaleX and scalesthe y-axis by multiplying by scaleY.
ResetTransform() Resets the current transform state for a Graphics objectso no transforms are in effect.
965
Chapter 16: Creating the Document and Improving the View
25905c16.qxd:WroxPro 2/21/08 9:19 AM Page 965

Figure 16-16
You can change the Draw() function in the Circle class to use the TranslateTransform() function:
virtual void Draw(Graphics^ g) override{g->TranslateTransform(safe_cast<float>(position.X),
safe_cast<float>(position.Y));g->DrawEllipse(pen, 0, 0, width,height);g->ResetTransform();
}
The TranslateTransform() function requires arguments of type float, so you cast the coordinates tothis type. This is not absolutely necessary but you will get warning messages from the compiler if youdon’t, so it is a good idea to always put the casts in.
Change the Draw() function in the Line class to the following:
966
Chapter 16: Creating the Document and Improving the View
25905c16.qxd:WroxPro 2/21/08 9:19 AM Page 966

virtual void Draw(Graphics^ g) override{g->TranslateTransform(safe_cast<float>(position.X),
safe_cast<float>(position.Y));g->DrawLine(pen, 0, 0, end.X-position.X, end.Y-position.Y);g->ResetTransform();
}
Because you are drawing the line relative to the origin with the DrawLine() function, you must specifythe end point relative to the origin. You subtract the coordinates of position from the coordinates ofend to do this.
The Draw() function for the Rectangle class is very similar to that in the Circle class:
virtual void Draw(Graphics^ g) override{g->TranslateTransform(safe_cast<float>(position.X),
safe_cast<float>(position.Y));g->DrawRectangle(pen, 0, 0, width, height);g->ResetTransform();
}
With the existing element classes updated, you are ready to tackle the Curve class.
Defining a CurveA class that represents a curve needs to have a member that can store an arbitrary number of points thatdefine the curve. An STL/CLR container looks to be a promising solution and a vector<Point> con-tainer is a good choice to store the points on a curve. Here’s how the Curve class definition looks basedon that:
public ref class Curve : Element{private:vector<Point>^ points;
public:Curve(Color color, Point p1, Point p2){pen = gcnew Pen(color);this->color = color;points = gcnew vector<Point>();position = p1;points->push_back(Point(p2.X-position.X, p2.Y-position.Y));
// Find the minimum and maximum coordinatesint minX = p1.X < p2.X ? p1.X : p2.X;int minY = p1.Y < p2.Y ? p1.Y : p2.Y;int maxX = p1.X > p2.X ? p1.X : p2.X;int maxY = p1.Y > p2.Y ? p1.Y : p2.Y;int width = Math::Max(2, maxX - minX);int height = Math::Max(2, maxY - minY);
967
Chapter 16: Creating the Document and Improving the View
25905c16.qxd:WroxPro 2/21/08 9:19 AM Page 967

boundRect = System::Drawing::Rectangle(minX, minY, width, height);}
void Add(Point p){points->push_back(Point(p.X-position.X, p.Y-position.Y));
// Modify the bounding rectangle to accommodate the new pointif(p.X < boundRect.X){boundRect.Width = boundRect.Right - p.X;boundRect.X = p.X;
}else if(p.X > boundRect.Right)boundRect.Width = p.X - boundRect.Left;
if(p.Y < boundRect.Y){boundRect.Height = boundRect.Bottom - p.Y;boundRect.Y = p.Y;
}else if(p.Y > boundRect.Bottom)boundRect.Height = p.Y - boundRect.Top;
}
virtual void Draw(Graphics^ g) override{Point previous = Point(0,0);for each(Point p in points){g->DrawLine(pen, previous, p);previous = p;
}}
};
Don’t forget to add an #include directive for the <cliext/vector> header to Elements.h. You willalso need a using directive for the cliext namespace.
You create a Curve object initially from the first two points on the curve. The first point, p1, defines theposition of the curve so you store it in position. Because you draw the curve relative to the origin, thesecond point must be specified relative to position so you store this in the points container. You addsubsequent points to the vector<Point> container by calling the Add() member function after modify-ing the coordinates of each point so it is defined relative to position.
The constructor creates the initial bounding rectangle for the curve from the first two points by obtainingthe minimum and maximum coordinate values and using these to determine the top left point coordinatesand the width and height of the rectangle. A curve could be a vertical or horizontal line that would result ina zero width or height, so the width and height are always set to at least 2. The Add() function updates theobject referenced by boundRect to accommodate the new point that it adds to the container. The Rightproperty of a System::Drawing::Rectangle object corresponds to the sum of the x-coordinate for thetop left position and the width and the Bottom property are the sum of the y-coordinate and the height;
968
Chapter 16: Creating the Document and Improving the View
25905c16.qxd:WroxPro 2/21/08 9:19 AM Page 968
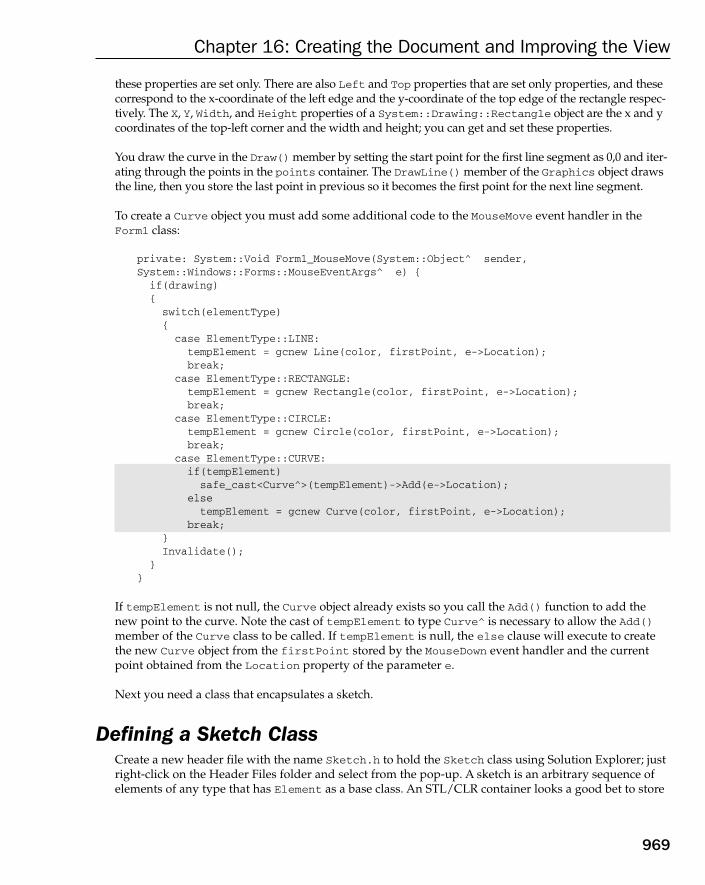
these properties are set only. There are also Left and Top properties that are set only properties, and thesecorrespond to the x-coordinate of the left edge and the y-coordinate of the top edge of the rectangle respec-tively. The X, Y, Width, and Height properties of a System::Drawing::Rectangle object are the x and ycoordinates of the top-left corner and the width and height; you can get and set these properties.
You draw the curve in the Draw() member by setting the start point for the first line segment as 0,0 and iter-ating through the points in the points container. The DrawLine() member of the Graphics object drawsthe line, then you store the last point in previous so it becomes the first point for the next line segment.
To create a Curve object you must add some additional code to the MouseMove event handler in theForm1 class:
private: System::Void Form1_MouseMove(System::Object^ sender,System::Windows::Forms::MouseEventArgs^ e) {
if(drawing){
switch(elementType){
case ElementType::LINE:tempElement = gcnew Line(color, firstPoint, e->Location);break;
case ElementType::RECTANGLE:tempElement = gcnew Rectangle(color, firstPoint, e->Location);break;
case ElementType::CIRCLE:tempElement = gcnew Circle(color, firstPoint, e->Location);break;
case ElementType::CURVE:if(tempElement)safe_cast<Curve^>(tempElement)->Add(e->Location);
elsetempElement = gcnew Curve(color, firstPoint, e->Location);
break;}Invalidate();
}}
If tempElement is not null, the Curve object already exists so you call the Add() function to add thenew point to the curve. Note the cast of tempElement to type Curve^ is necessary to allow the Add()member of the Curve class to be called. If tempElement is null, the else clause will execute to createthe new Curve object from the firstPoint stored by the MouseDown event handler and the currentpoint obtained from the Location property of the parameter e.
Next you need a class that encapsulates a sketch.
Defining a Sketch ClassCreate a new header file with the name Sketch.h to hold the Sketch class using Solution Explorer; justright-click on the Header Files folder and select from the pop-up. A sketch is an arbitrary sequence ofelements of any type that has Element as a base class. An STL/CLR container looks a good bet to store
969
Chapter 16: Creating the Document and Improving the View
25905c16.qxd:WroxPro 2/21/08 9:19 AM Page 969

the elements in a sketch and this time you can use a list<T> container. To allow any type of element tobe stored in the list you can define the container class as type list<Element^>. Specifying that the con-tainer stores references of type Element^ will allow you to store references to objects of any type that isderived from Element.
Initially, the Sketch class will need a constructor, an Add() function that adds a new element to a sketch,and a Draw() function to draw a sketch. Here’s what you need to put in Sketch.h:
// Sketch.h// Defines a sketch#pragma once#include <cliext/list>#include “Elements.h”
using namespace System;using namespace cliext;
namespace CLRSketcher {public ref class Sketch{private:list<Element^>^ elements;
public:Sketch(){elements = gcnew list<Element^>();}
void Add(Element^ element){elements->push_back(element);
}
void Draw(Graphics^ g){for each(Element^ element in elements)element->Draw(g);
}};}
The #include directive for the <cliext/list> header is necessary to access the STL/CLR list<T>container template and the #include for the Elements.h header enables you to reference the Elementbase class. The Sketch class is defined within the CLRSketcher namespace so it can be referenced with-out qualification from anywhere within the CLRSketcher application. The elements container that theconstructor creates stores the sketch. You add elements to a Sketch object by calling its Add() function,which calls the push_back() function for the elements container to store the new element. Drawing a sketch is very simple. The Draw() function for the Sketch object iterates over all the elements in theelements container and calls the Draw() function for each of them.
970
Chapter 16: Creating the Document and Improving the View
25905c16.qxd:WroxPro 2/21/08 9:19 AM Page 970

To make the current Sketch object a member of the Form1 class, add a member of type Sketch^ with thename sketch to the class. You can add the initialization for sketch to the Form1 constructor:
Form1(void) : drawing(false), firstPoint(0), elementType(ElementType::LINE), color(Color::Black), tempElement(nullptr), sketch(gcnew Sketch())
{InitializeComponent();////TODO: Add the constructor code here//
}
Don’t forget to add an #include directive for the Sketch.h header at the beginning of the Form1.hheader. Now you have the Sketch class defined, you can modify the MouseUp event handler in theForm1 class to add elements to the sketch:
private: System::Void Form1_MouseUp(System::Object^ sender, System::Windows::Forms::MouseEventArgs^ e)
{if(!drawing)
return;if(tempElement){sketch->Add(tempElement);tempElement = nullptr;Invalidate();
}drawing = false;
}
The function calls the Add() function for the sketch object when tempElement is not nullptr. Afterresetting tempElement back to nullptr you call the Invalidate() function to redraw the form. Thefinal piece of the jigsaw for creating a sketch is the implementation of the Paint event handler to drawthe sketch.
Drawing the Sketch in the Paint Event HandlerAmazingly you only need one extra line of code to draw an entire sketch:
private: System::Void Form1_Paint(System::Object^ sender,System::Windows::Forms::PaintEventArgs^ e)
{Graphics^ g = e->Graphics;sketch->Draw(g);if(tempElement != nullptr)
tempElement->Draw(g);}
You pass the Graphics object, g, to the Draw() function for the sketch object to draw the sketch. Thiswill result in g being passed to the Draw() function for each element in the sketch to enable each element
971
Chapter 16: Creating the Document and Improving the View
25905c16.qxd:WroxPro 2/21/08 9:19 AM Page 971

to draw itself. Finally, if tempElement is not nullptr, you call the Draw() function for that, too. With thePaint() event handler complete you should have a working version of CLR Sketcher capable of draw-ing sketches with the sort of quality shown in Figure 16-17.
Figure 16-17
A little later in this chapter you will add the capability to pop a context menu to allow elements to bemoved as in the MFC version of Sketcher, but first you need to get the element highlighting mechanismworking.
Implementing Element HighlightingYou want to highlight an element when the mouse cursor is within the element’s bounding rectangle,just like the MFC version of Sketcher. You will implement the mechanism to accomplish this in CLRSketcher in a slightly different way.
The MouseMove event handler in the Form1 is the prime mover in highlighting elements because it tracksthe movement of the cursor, but highlighting should only occur when there is not a drawing operation inprogress. The first thing you need to do before you can modify the MouseMove handler is to implement away for an element to draw itself in a highlight color when it is under the cursor. Add highlighted as apublic member of the Element class to record whether an element is highlighted or not. You can also adda protected member to the Element class to specify the highlight color for elements:
Color highlightColor;
Add a public constructor to the Element class to initialize the new members:
Element() : highlighted(false), highlightColor(Color::Magenta) {}
Now you can change the implementation of the Draw() function in each of the classes derived fromElement. Here’s how the function looks for the Line class:
virtual void Draw(Graphics^ g) override{pen->Color = highlighted ? highlightColor : color;g->TranslateTransform(safe_cast<float>(position.X),
972
Chapter 16: Creating the Document and Improving the View
25905c16.qxd:WroxPro 2/21/08 9:19 AM Page 972

safe_cast<float>(position.Y));g->DrawLine(pen, 0, 0, end.X-position.X, end.Y-position.Y);g->ResetTransform();
}
The extra statement sets the Color property for pen to highlightColor whenever highlighted istrue, or to color otherwise. You can add the same statement to the Draw() function for the other ele-ment classes.
To highlight an element you must discover which element, if any, is under the cursor at any given time.It would be helpful if an element could tell you if a given point is within the bounding rectangle. Thisprocess will be the same for all types of element, so you can add a public function to the Element baseclass to implement this:
bool Hit(Point p){return boundRect.Contains(p);
}
The Contains() member of the System::Drawing::Rectangle structure returns true if the Pointargument lies within the rectangle and false otherwise. There are two other versions of this function:One accepts two arguments of type int that specify the x and y coordinates of a point and the other acceptsan argument of type System::Drawing::Rectangle and returns true if the rectangle for which the func-tion is called contains the rectangle passed as an argument.
You can now add a public function to the Sketch class to determine if any element in the sketch is underthe cursor:
Element^ HitElement(Point p){for each(Element^ element in elements){if(element->Hit(p))return element;
}return nullptr;
}
This function iterates over the elements in the sketch and returns a reference to the first element for whichthe Hit() function returns true. If the Hit() function does not return true for any of the elements in thesketch, the HitElement() function returns nullptr. This provides a simple way to detect whether or notthere is an element under the cursor.
Add a protected member, highlightedElement, of type Element^ to the Form1 class to record the cur-rently highlighted element and initialize it to nullptr in the Form1 constructor. Now you can add codeto the MouseMove handler to make the highlighting work:
private: System::Void Form1_MouseMove(System::Object^ sender,System::Windows::Forms::MouseEventArgs^ e) {
if(drawing)
973
Chapter 16: Creating the Document and Improving the View
25905c16.qxd:WroxPro 2/21/08 9:19 AM Page 973

{switch(elementType){
case ElementType::LINE:tempElement = gcnew Line(color, firstPoint, e->Location);break;
case ElementType::RECTANGLE:tempElement = gcnew Rectangle(color, firstPoint, e->Location);break;
case ElementType::CIRCLE:tempElement = gcnew Circle(color, firstPoint, e->Location);break;
case ElementType::CURVE:if(tempElement)
safe_cast<Curve^>(tempElement)->Add(e->Location);else
tempElement = gcnew Curve(color, firstPoint, e->Location);break;
}Invalidate();
}else{// Reset any existing highlighted elementif(highlightedElement){highlightedElement->highlighted = false;highlightedElement = nullptr;
}// Find and set new highlighted element, if anyif(highlightedElement = sketch->HitElement(e->Location)){highlightedElement->highlighted = true;Invalidate();
}}
}
If drawing is false, you execute the highlighting code that is shaded. First you test for an existinghighlighted element and if there is one, you reset it by setting the value of its highlighted memberto false. You then set highlightedElement back to nullptr. To look for a new element to highlight,you call the HitElement() function for the sketch object with the current cursor location as the argu-ment. You store the value returned by HitElement() in highlightedElement and if this is not nullyou set the highlighted member for the element to true and call Invalidate() to redraw the form.
The highlight code will execute repeatedly for every movement of the mouse cursor so it needs to be effi-cient. At the moment, the code redraws the entire sketch to highlight an element when in fact only theregions occupied by the unhighlighted element and the newly highlighted element need to be redrawn.The Invalidate() member of the System::Windows::Forms::Form class has an overloaded versionthat accepts an argument of type System::Drawing::Rectangle to add the rectangle specified by theargument to the currently invalidated region for the form. Thus you can call Invalidate() repeatedly to accumulate a composite of rectangles to be redrawn.
974
Chapter 16: Creating the Document and Improving the View
25905c16.qxd:WroxPro 2/21/08 9:19 AM Page 974

Calling Invalidate() with a rectangle argument does not redraw the form, but you can get the invalidregion redrawn by calling the Update() function for the form. You must pass the enclosing rectangle foran element to Invalidate() rather than the bounding rectangle to get elements redrawn properly. Atpresent, the element classes define the bounding rectangle but you can get the enclosing rectangle for anelement quite easily by adding a public property to the Element class like this:
property System::Drawing::Rectangle Bound{System::Drawing::Rectangle get(){ return System::Drawing::Rectangle::Inflate(boundRect,1,1); }
}
The Bound property get() function calls the static Inflate() function in the Rectangle class to gener-ate the enclosing rectangle. The Inflate() function increases the size of the rectangle that you supply asthe first argument, and the second and third arguments specify the increases for the rectangle in the x andy directions respectively. By using the Invalidate() function with an enclosing rectangle argument youcan improve the performance of the highlighting code:
else{Element^ element = sketch->HitElement(e->Location);if(highlightedElement == element)return;
if(highlightedElement){Invalidate(highlightedElement->Bound);highlightedElement->highlighted = false;highlightedElement = nullptr;
}
if(element){highlightedElement = element;highlightedElement->highlighted = true;Invalidate(highlightedElement->Bound);
}Update();
}
If the Hit() member of the element classes returns a reference that is the same as the reference stored inhighlightedElement you do nothing; the references can both be nullptr or both reference the sameelement, but in either case there’s nothing to do. When the form display needs to be updated, the codeonly redraws the regions occupied by the two elements affected by a new element being highlighted.Overall the code will be faster than the previous version.
Of course, you can apply this technique to the code in the MouseMove handler that creates a temporaryelement, too:
if(drawing){
975
Chapter 16: Creating the Document and Improving the View
25905c16.qxd:WroxPro 2/21/08 9:19 AM Page 975

if(tempElement)Invalidate(tempElement->Bound); // The old element region
switch(elementType){
// Code to create a temporary element as before...}Invalidate(tempElement->Bound); // The new element regionUpdate();
}
The shaded if statement invalidates the region occupied by any existing temporary element and thetwo new lines at the end invalidate the region occupied by the new temporary element and redraw thetotal invalid region.
Creating Context MenusYou use the Design window to create context menus interactively by dragging a ContextMenuStripcontrol from the Toolbox window to the form. You need to display two different context menus, one forwhen there is an element under the cursor and one for when there isn’t, and you can arrange for bothpossibilities using a single context menu strip. First drag a ContextMenuStrip control from the Toolboxwindow to the form in the Design window; this will have the default name ContextMenuStrip1 butyou can change this if you want. To make the context menu strip display when the form is right-clicked,display the Properties window for the form and set the ContextMenuStrip property in the Behaviorgroup by selecting ContextMenuStrip1 from the drop-down in the value column.
The drop-down for the context menu is empty at present and you are going to control what menu items itcontains programmatically. When an element is under the cursor the element-specific menu items shoulddisplay, and when there is no element under the cursor, menu items equivalent to those from the Elementand Color menus should display. First add a Send-To-Back menu item, a Delete menu item, and a Movemenu item to the drop-down for the context menu by typing the entries in the design window. Change the (name) properties for the items to sendToBackContextMenuItem, deleteContextMenuItem, andmoveContextMenuItem. A menu item can only belong to one menu strip, so you need to add new onesmatching those from the Element and Color menus.Add a separator and then add menu items Line,Rectangle, Circle and Curve, and Black, Red, Green and Blue. Change the (name) property for eachin the same way as the others, to lineContextMenuItem, rectangleContextMenuItem, and so on. Alsochange the (name) property for the separator to contextSeparator so you can refer to it easily.
You need Click event handlers for all the menu items in the context menu, but the only new ones youneed to create are for the Move, Delete and Send-To-Back items; you can set the handlers for all theother menu items to be the same as the corresponding items in the Element and Color menus.
You can control what displays in the drop-down for the context menu in the Opening event handler for the context menu strip because this event handler is called before the drop-down displays. Open theProperties window for the context menu strip, click the Events button and double-click the Opening eventto add a handler. You are going to add a different set of menu items to the context menu strip dependingon whether or not an element is under the cursor; so how can you determine if anything is under the cur-sor? Well, the MouseMove handler for the form has already taken care of it. All you need to do is check tosee whether the reference contained in the highlightElement member of the form is nullptr or not.
976
Chapter 16: Creating the Document and Improving the View
25905c16.qxd:WroxPro 2/21/08 9:19 AM Page 976

You have added items to the drop-down for contextMenuStrip1 to add the code to create the objects in theForm1 class that encapsulate them, but you want to start with a clean slate for the drop-down menu whenit is to display so you can set it up the way you want. In the Opening event handler you want to removeany existing menu items before you add back the specific menu items you want. A ContextMenuStripobject that encapsulates a context menu stores its drop-down menu items in an Items property that is of type ToolStripItemsCollection^. To remove existing items from the drop-down you simply callClear() for the Items property. To add a menu item to the context menu you call the Add() function for the Items property with the menu item as the argument.
The implementation of the Opening handler for the context menu strip is as follows:
private: System::Void contextMenuStrip1_Opening(System::Object^ sender, System::ComponentModel::CancelEventArgs^ e)
{contextMenuStrip1->Items->Clear(); // Remove existing itemsif(highlightedElement){contextMenuStrip1->Items->Add(moveToolStripMenuItem);contextMenuStrip1->Items->Add(deleteToolStripMenuItem);contextMenuStrip1->Items->Add(sendToBackToolStripMenuItem);
}else{contextMenuStrip1->Items->Add(lineToolStripMenuItem);contextMenuStrip1->Items->Add(rectangleToolStripMenuItem);contextMenuStrip1->Items->Add(circleToolStripMenuItem);contextMenuStrip1->Items->Add(curveToolStripMenuItem);contextMenuStrip1->Items->Add(contextSeparator);contextMenuStrip1->Items->Add(lineToolStripMenuItem);contextMenuStrip1->Items->Add(blackToolStripMenuItem);contextMenuStrip1->Items->Add(redToolStripMenuItem);contextMenuStrip1->Items->Add(greenToolStripMenuItem);contextMenuStrip1->Items->Add(blueToolStripMenuItem);
// Set checks for the menu itemslineContextMenuItem->Checked = elementType == ElementType::LINE;rectangleContextMenuItem->Checked = elementType == ElementType::RECTANGLE;circleContextMenuItem->Checked = elementType == ElementType::CIRCLE;curveContextMenuItem->Checked = elementType == ElementType::CURVE;blackContextMenuItem->Checked = color == Color::Black;redContextMenuItem->Checked = color == Color::Red;greenContextMenuItem->Checked = color == Color::Green;blueContextMenuItem->Checked = color == Color::Blue;
}}
After clearing the context menu, you add items depending on whether or not highlightedElement isnull. You set the checks for the element and color menu items in the same way as you did for the mainmenu by setting the Checked property for each of the menu items.
All the element and color menu items in the context menu should now work, so try it out. All that remainsis to implement the element-specific operations. Let’s do the easiest one first.
977
Chapter 16: Creating the Document and Improving the View
25905c16.qxd:WroxPro 2/21/08 9:19 AM Page 977
Implementing the Element Delete OperationTo make it possible to delete an element from the sketch, you first must add a public function to theSketch class definition that will delete an element:
Element^ Delete(Element^ element){elements->remove(element);return element;
}
The Delete() function calls remove() for the list<Element^> object to remove the element that youpass as the argument and returns the reference to the deleted element as a convenience.
You use the Delete() function in the implementation of the Click event handler for the Deletemenu item:
private: System::Void deleteContextMenuItem_Click(System::Object^ sender,System::EventArgs^ e)
{if(highlightedElement){sketch->Delete(highlightedElement);Invalidate(highlightedElement->Bound);highlightedElement = nullptr;Update();
} }
As well as deleting the element from the sketch, the event handler also invalidates the region it occupiesto remove it from the display and resets highlightedElement back to nullptr.
Implementing the Send-To-Back operationThe Send-To-Back operation works in the same way as in MFC Sketcher. You remove the highlighted ele-ment from the list in the Sketch object and add it to the end of the list. Here’s the implementation of thehandler function:
private: System::Void sendToBackContextMenuItem_Click(System::Object^ sender,System::EventArgs^ e)
{if(highlightedElement){sketch->Add(sketch->Delete(highlightedElement));highlightedElement->highlighted = false;Invalidate(highlightedElement->Bound);highlightedElement = nullptr;Update();
}}
You pass the reference returned by the Delete() member of the sketch to the Add() member to add thedeleted element to the back of the list. You reset the highlighted member of the element to false andhighlightedElement to nullptr before calling Invalidate() for the form to redraw the region occu-pied by the previously highlighted element.
978
Chapter 16: Creating the Document and Improving the View
25905c16.qxd:WroxPro 2/21/08 9:19 AM Page 978
Implementing the Element Move OperationYou’ll move an element by dragging it with the left mouse button down. This implies that a move opera-tion needs a different set of functions to be carried out by the mouse event handlers from normal so amove will have to be modal, as in the MFC version of Sketcher. You can identify possible modes by anenum class that you can add following the ElementType enum in Form1.h:
enum class Mode {Normal, Move,};
This just defines two modes but you could add more if you wanted to implement other modal operations.You can now add a private member of type Mode with the name mode to the Form1 class. Initialize the newvariable to Mode::Normal in the Form1 constructor.
The only thing the Click event handler for the Move menu item has to do is set mode to Mode::Move:
private: System::Void moveContextMenuItem_Click(System::Object^ sender,System::EventArgs^ e)
{mode = Mode::Move;
}
The mouse event handlers for the form must take care of moving an element. Change the code for theMouseDown handler so it only sets drawing to true when mode is Mode::Normal:
private: System::Void Form1_MouseDown(System::Object^ sender,System::Windows::Forms::MouseEventArgs^ e)
{if(e->Button == System::Windows::Forms::MouseButtons::Left){if(mode == Mode::Normal)drawing = true;
firstPoint = e->Location;}
}
This sets drawing to true only when mode has the value Mode::Normal. If mode has a differentvalue, only the point is stored for use in the MouseMove event handler. The MouseMove event handlerwill not create elements when drawing is false so this functionality is switched off for all modesexcept Mode::Normal. The MouseUp event handler will restore mode back to Mode::Normal when a move operation is complete.
Moving an ElementBecause you now draw all elements relative to a given position, you can move an element just by chang-ing the inherited position member to reflect the new position and adjust the location of the boundingrectangle in a similar way. You can add a public Move() function to the Element base class to take careof this:
void Move(int dx, int dy){position.Offset(dx, dy);boundRect.X += dx;boundRect.Y += dy;
}
979
Chapter 16: Creating the Document and Improving the View
25905c16.qxd:WroxPro 2/21/08 9:19 AM Page 979
Calling the Offset() function for the Point object, position, adds dx and dy to the coordinates storedin the object. To adjust the location of boundRect, you just add dx to the Rectangle object’s X field anddy to its Y field.
The MouseMove event handler will expedite the moving process:
private: System::Void Form1_MouseMove(System::Object^ sender,System::Windows::Forms::MouseEventArgs^ e) {
if(drawing){if(tempElement)
Invalidate(tempElement->Bound); // The old element regionswitch(elementType){
// Code to create a temporary element as before...}Invalidate(tempElement->Bound); // The new element regionUpdate();
}else if(mode == Mode::Normal){
code to highlight the element under the cursor as before}else if(mode == Mode::Move &&
e->Button == System::Windows::Forms::MouseButtons::Left){ // Move the highlighted elementif(highlightedElement){
Invalidate(highlightedElement->Bound); // Region before movehighlightedElement->Move(e->X - firstPoint.X, e->Y - firstPoint.Y);firstPoint = e->Location;Invalidate(highlightedElement->Bound); // Region after moveUpdate();
}}
}
This event handler now provides three different functions: It creates an element when drawing is true,it does element highlighting when drawing is false and mode is Mode::Normal, and it moves the cur-rently highlighted element when mode is Mode::Move and the left mouse button is down.
The new else if clause executes only when mode has the value Mode::Move and the left button isdown. Without the button test, moving would occur if you moved the cursor after clicking the menuitem. This would happen without a MouseDown event occurring, which would create some confusion as firstPoint would not have been initialized. With the code as you have it here, the moving process is initiated when you click the menu item and release the left mouse button. You then press the leftmouse button and drag the cursor to move the highlighted element.
If there is a highlighted element, you invalidate its bounding rectangle before moving the element thedistance from firstPoint to the current cursor location. You then update firstPoint to the currentcursor position ready for the next move increment and invalidate the new region the highlighted ele-ment occupies. You finally call Update() to redraw the invalid regions of the form.
980
Chapter 16: Creating the Document and Improving the View
25905c16.qxd:WroxPro 2/21/08 9:19 AM Page 980
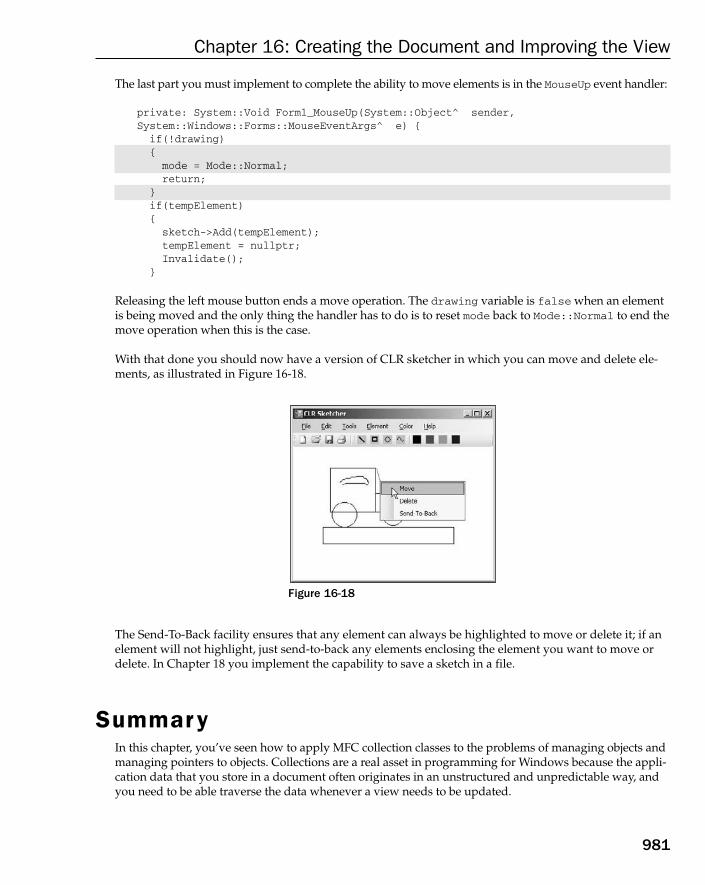
The last part you must implement to complete the ability to move elements is in the MouseUp event handler:
private: System::Void Form1_MouseUp(System::Object^ sender,System::Windows::Forms::MouseEventArgs^ e) {
if(!drawing){mode = Mode::Normal;return;
}if(tempElement){
sketch->Add(tempElement);tempElement = nullptr;Invalidate();
}
Releasing the left mouse button ends a move operation. The drawing variable is false when an elementis being moved and the only thing the handler has to do is to reset mode back to Mode::Normal to end themove operation when this is the case.
With that done you should now have a version of CLR sketcher in which you can move and delete ele-ments, as illustrated in Figure 16-18.
Figure 16-18
The Send-To-Back facility ensures that any element can always be highlighted to move or delete it; if anelement will not highlight, just send-to-back any elements enclosing the element you want to move ordelete. In Chapter 18 you implement the capability to save a sketch in a file.
SummaryIn this chapter, you’ve seen how to apply MFC collection classes to the problems of managing objects andmanaging pointers to objects. Collections are a real asset in programming for Windows because the appli-cation data that you store in a document often originates in an unstructured and unpredictable way, andyou need to be able traverse the data whenever a view needs to be updated.
981
Chapter 16: Creating the Document and Improving the View
25905c16.qxd:WroxPro 2/21/08 9:19 AM Page 981

You have also seen how to create document data and manage it in a pointer list in the document, and inthe context of the Sketcher application, how the views and the document communicate with each other.
You have improved the view capability in Sketcher in several ways. You’ve added scrolling to the viewsusing the MFC class CScrollView, and you’ve introduced a pop-up at the cursor for moving and delet-ing elements. You have also implemented an element highlighting feature to provide the user with feed-back when moving or deleting elements.
CLR Sketcher has most of the features of MFC Sketcher including drawing operations and a contextmenu, but you implemented some things a little differently because the characteristics of the CLR arenot the same as the MFC environment. The coding effort was considerably less than for MFC Sketcherbecause of the automatic code generation provided by the Forms Design capability. The downside ofusing Forms Design is that you can’t control how the code is organized and the Form1 class becomesrather unwieldy because of the sheer volume of code in the definition. However the Class View is agreat help in navigating around the class definition.
You have covered quite a lot of ground in this chapter, and some of the important points you need tokeep in mind are:
❑ The best choice of MFC collection class to manage your objects or pointers is one of the template-based collection classes because they provide type-safe operation in most cases.
❑ When you draw in a device context using the MFC, coordinates are in logical units that dependon the mapping mode set. Points in a window that are supplied along with Windows mousemessages are in client coordinates. The two coordinate systems are usually not the same.
❑ Coordinates that define the position of the cursor are in screen coordinates that are measured inpixels relative to the upper- left corner of the screen.
❑ Functions to convert between client coordinates and logical coordinates in a MFC applicationare available in the CDC class.
❑ Windows requests that a view is redrawn by sending a WM_PAINT message to your MFC appli-cation. This causes the OnDraw() member of the affected view to be called.
❑ You should always do any permanent drawing of a document in the OnDraw() member of theview class in your MFC application. This ensures that the window is drawn properly whenrequired by Windows.
❑ You can make your OnDraw() implementation more efficient by calling the RectVisible()member of the CDC class to check whether an entity needs to be drawn.
❑ To get multiple views updated when you change the document contents, you can call theUpdateAllViews() member of the document object. This causes the OnUpdate() member of each view to be called.
❑ You can pass information to the UpdateAllViews() function to indicate which area in the viewneeds to be redrawn. This makes redrawing the views faster.
❑ You can display a context menu at the cursor position in an MFC application in response to aright mouse click. This menu is created as a normal pop-up.
❑ You create menu strips, context menus and toolbars in a Windows Forms application by drag-ging the appropriate component from the Toolbox window to the form in the Forms Designer
982
Chapter 16: Creating the Document and Improving the View
25905c16.qxd:WroxPro 2/21/08 9:19 AM Page 982
window. You cause the context menu to be displayed on the form in response to right-clickingthe mouse by setting the ContextMenuStrip property for the form.
❑ You create event handlers for a component in a Windows Forms application through theProperties window for the component. You can change the name of the event handler functionthat is created by changing the value of its (name) property.
❑ Implementing the DropDownOpening event handler for a menu item enables you to modify thedrop-down before it displays.
ExercisesYou can download the source code for the examples in the book and the solutions to the following exercisesfrom www.wrox.com.
1. Implement the CCurve class so that points are added to the head of the list instead of the tail.
2. Implement the CCurve class in the Sketcher program using a typed pointer list, instead of a listof objects to represent a curve.
3. Look up the CArray template collection class in Help, and use it to store points in the CCurveclass in the Sketcher program.
4. Add the capability in CLR Sketcher to change the color of an existing element. Make this avail-able through the context menu.
983
Chapter 16: Creating the Document and Improving the View
25905c16.qxd:WroxPro 2/21/08 9:19 AM Page 983

25905c16.qxd:WroxPro 2/21/08 9:19 AM Page 984

17Working with Dialogs
and Controls
Dialogs and controls are basic tools for user communications in the Windows environment. In this chapter, you’ll learn how to implement dialogs and controls by applying them to extend theSketcher program. As you do so, you’ll learn about:
❑ Dialogs and how you can create dialog resources
❑ Controls and how to add them to a dialog
❑ Basic varieties of controls available to you
❑ How to create a dialog class to manage a dialog
❑ How to program the creation of a dialog box and how to get information back from thecontrols in it
❑ Modal and modeless dialogs
❑ How to implement and use direct data exchange and validation with controls
❑ How to implement view scaling
❑ How you can add a status bar to an application
Understanding DialogsOf course, dialog boxes are not new to you. Most Windows programs of consequence use dialogsto manage some of their data input. You click a menu item and up pops a dialog box with variouscontrols that you use for entering information. Just about everything that appears in a dialog boxis a control. A dialog box is actually a window and, in fact, each of the controls in a dialog is also a specialized window. Come to think of it, most things you see on the screen under Windows arewindows.
25905c17.qxd:WroxPro 2/21/08 9:20 AM Page 985

Although controls have a particular association with dialog boxes, you can also create and use them inother windows if you want to. A typical dialog box is illustrated in Figure 17-1.
Figure 17-1
This is the File > Open > File dialog in Visual C++ 2008. The annotations show the variety of con-trols used that combine to provide an intuitive interface for selecting a file to be opened. This makes thedialog easy to use, even though there’s a whole range of possibilities here.
There are two things needed to create and display a dialog box in an MFC program: the physical appear-ance of the dialog box, which is defined in a resource file, and a dialog class object used to manage theoperation of the dialog and its controls. MFC provides a class called CDialog for you to use after youhave defined your dialog resource.
Understanding ControlsThere are many different controls available to you in Windows, and in most cases there’s flexibility inhow they look and operate. Most of them fall into one of the six categories shown in the following table.
Control Type What They Do
Static Controls These are used to provide titles or descriptive information.
Button Controls Buttons provide a single-click input mechanism. There are basically three flavorsof button controls, simple push buttons, radio buttons where only one may be in a selected state at any one time, and checkboxes where several may be in aselected state at one time.
Buttons
Toolbar buttons
Combobox
List Box
Buttons
List Box
986
Chapter 17: Working with Dialogs and Controls
25905c17.qxd:WroxPro 2/21/08 9:20 AM Page 986

Figure 17-2 shows some examples of various types of controls.
Figure 17-2
A control may or may not be associated with a class object. Static controls don’t do anything directly, soan associated class object may seem superfluous; however, there’s an MFC class, CStatic, that providesfunctions to enable you to alter the appearance of static controls. Button controls can also be handled bythe dialog object in many cases, but again MFC does provide the CButton class for use in situations whereyou need a class object to manage a control. MFC also provides a full complement of classes to support theother controls. Because controls are windows, they are all derived from CWnd.
A list box presents a predefined list of items from which you can choose. The scroll bar need not be present for a short list. A list can also have multiple columns and be scrolled horizontally. A version of the list box is available that can display icons as well as text.
Comboboxes combine the capability of adropdown list from which you can selectwith the option of entering data yourself.The Save As... dialog uses a comboboxto enable you to enter the file name.
You have already seen scrollbars attached to the client
area of the Sketcher window.Scroll bars can also be free
standing.
This text box is thesimplest form of editcontrol that allows youto enter and/or edit aline of text. Moresophisticated editcontrols can displaymultiple lines of textand support scrollingof the text.
Static controls provide static information, such as titles or instructions, or simply
provide decoration in a dialog in the form of an icon or a filled rectangle.
Radio buttons areusually grouped so
that if one is checkedall the others are
unchecked.
Check boxes areindividually checked and
more than one can bechecked at one time.
Buttons can have labelsas here and they can
also display icons.
Control Type What They Do
Scrollbars Scrollbars are typically used to scroll text or images either horizontally or vertically within another control.
List Boxes These present a list of choices and one or more selections can be in effect atone time.
Edit Controls Edit controls allow text input or editing of text that is displayed.
Combo boxes Combo boxes present a list of choices from which you can select combinedwith the option of entering text yourself.
987
Chapter 17: Working with Dialogs and Controls
25905c17.qxd:WroxPro 2/21/08 9:20 AM Page 987

Common ControlsThe set of standard controls that are supported by MFC and the Resource editor are called common controls. Common controls include all of the controls you have just seen, as well as other more complexcontrols such as the animate control, for example, which has the capability to play an AVI (Audio VideoInterleaved) file, and the tree control that can display a hierarchy of items in a tree.
Another useful control in the set of common controls is the spin button. You can use this to increment ordecrement values in an associated edit control. To go into all of the possible controls that you might useis beyond the scope of this book, so I’ll just take a few illustrative examples (including an example thatuses a spin button) and implement them in the Sketcher program.
Creating a Dialog ResourceHere’s a concrete example. You could add a dialog to Sketcher to provide a choice of pen widths fordrawing elements. This ultimately involves modifying the current pen width in the document, as well as in the CElement class, and adding or modifying functions to deal with pen widths. You’ll deal withall that, though, after you’ve got the dialog together.
Display the Resource View, expand the resource tree for Sketcher, and right-click the Dialog folder in the tree; then click Insert Dialog from the pop-up to add a new dialog resource to Sketcher. This resultsin the Dialog Resource editor swinging into action and displaying the dialog in the Editor pane alongwith the Toolbox showing a list of controls that you can add. The dialog has OK and Cancel button con-trols already in place. Adding more controls to the dialog is simplicity itself; you can just drag the con-trol from the palette to the position where you want to place it in the dialog. Alternatively, you can click a control from the list to select it and then click in the dialog where you want the control to be positioned. When it appears you’ll still be able to move it around to set its exact position, and you’ll also be able to resize it by dragging handles on the boundaries.
The dialog has a default ID assigned that is IDD_DIALOG1, but it would be better to have an ID that wasa bit more meaningful. You can edit the ID by right-clicking the dialog name in the Resource View paneand selecting Properties from the pop-up. You can also display the dialog’s properties by right-clickingin the Dialog Editor pane and selecting from the pop-up. Change the ID to something that relates to thepurpose of the dialog such as IDD_PENWIDTH_DLG. At the same time, you could also change the Captionproperty value to Set Pen Width.
Adding Controls to a Dialog BoxTo provide a mechanism for entering a pen width, you can add controls to the basic dialog that’s initiallydisplayed until it looks like the one shown in Figure 17-3.
Figure 17-3 shows the grid that you can use to position controls. If the grid is not displayed, you can selectthe appropriate Toolbar button to display it; the Toolbar button toggles the grid on and off. Alternatively,you can display rules along the side and top of the dialog that you can use to create guide lines as shownin Figure 17-4.
988
Chapter 17: Working with Dialogs and Controls
25905c17.qxd:WroxPro 2/21/08 9:20 AM Page 988

You create a horizontal guide by clicking the appropriate rule. You can position a guide line by draggingthe arrow for it along the rule and then using one or more guides when positioning a control.
Figure 17-3
Figure 17-4
The dialog has six radio buttons that provide the pen width options. These are enclosed within a groupbox with the caption Pen Widths. The group box serves to enclose the radio buttons and make them oper-ate as a group, where only one member of the group can be checked at any given time. Each radio buttonhas an appropriate label to identify the pen width that is set when selected. There are also the default OKand Cancel buttons that close the dialog. Each of the controls in the dialog has its own set of propertiesthat you can access and modify in the same way as for the dialog box itself.
The next step is to add the group box. As I said, the group box serves to associate the radio buttons in agroup from an operational standpoint, and to provide a caption and a boundary for the group of buttons.Where you need more than one set of radio buttons, a means of grouping them is essential if they are towork properly. You can select the button corresponding to the group box from the common controls paletteby clicking it; then click the approximate position in the dialog box where you want the center of the groupbox. This places a group box of default size on to the dialog. You can then drag the borders of the group boxto enlarge it to accommodate the six radio buttons that you add. To set the caption for the group box, typethe caption you want (in this, case type Pen Widths).
The last step is to add the radio buttons. Select the radio button control by clicking it and then clicking on theposition in the dialog where you want to position a radio button within the group box. Do the same for all
989
Chapter 17: Working with Dialogs and Controls
25905c17.qxd:WroxPro 2/21/08 9:20 AM Page 989

six radio buttons. For each button you can select it by clicking it; then type in the caption to change it. Youcan also drag the border of the button to set its size, if necessary. To display the Properties window for a con-trol, select it by clicking it; then select Properties from the pop-up. You can change the ID for each radiobutton in the properties window for the control to correspond better with its purpose: IDC_PENWIDTH0for the 1 pixel pen width, IDC_PENWIDTH1 for the 0.01 inch width pen, IDC_PENWIDTH2 for the 0.02 inchpen, and so on.
You can position individual controls by dragging them around with the mouse. You can also select agroup of controls by selecting successive controls with the Shift key pressed, or by dragging the cursorwith the left button pressed to create a rectangle enclosing them. To align a group of controls, select theappropriate button from the Dialog Editor toolbar shown in Figure 17-5.
Figure 17-5
The toolbar is shown in its undocked state — that is, dragged away from the toolbar area at the top ofthe window. If the toolbar is not visible, you can show it by right-clicking in the toolbar area and select-ing it in the list of toolbars that is displayed. You also can align controls in the dialog by selecting fromthe Format menu.
Testing the DialogThe dialog resource is now complete. You can test it by selecting the Toolbar button that appears at theleft end of the toolbar in Figure 17-5 or by pressing Ctrl+T. This displays the dialog window with thebasic operations of the controls available, so you can try clicking on the radio buttons. When you have a group of radio buttons, only one can be selected. As you select one, any other that was previouslyselected is reset. Click either of the OK or Cancel buttons or even the Close icon in the title bar for dialogto end the test. After you have saved the dialog resource, you’re ready to add some code to support it.
Programming for a DialogThere are two aspects to programming for a dialog: getting it displayed, and handling the effects of itscontrols. Before you can display the dialog corresponding to the resource you’ve just created, you mustfirst define a dialog class for it. The Class Wizard helps with this.
Adding a Dialog ClassRight-click the dialog box that you just created in the Resource Editor pane and then select Add Classfrom the pop-up tool display the Class Wizard dialog. You’ll define a new dialog class derived from theMFC class CDialog, so select that class name from the Base Class: drop-down list box. You can enter theclass name as CPenDialog in the Class name: edit box. The Class Wizard dialog should look as shown inFigure 17-6.
Click the Finish button to create the new class.
990
Chapter 17: Working with Dialogs and Controls
25905c17.qxd:WroxPro 2/21/08 9:20 AM Page 990

Figure 17-6
The CDialog class is a window class (derived from the MFC class CWnd) that’s specifically for displayingand managing dialogs. The dialog resource that you have created automatically associates with an objectof type CPenDialog because the IDD class member is initialized with the ID of the dialog resource:
class CPenDialog : public CDialog{
DECLARE_DYNAMIC(CPenDialog)
public:CPenDialog(CWnd* pParent = NULL); // standard constructorvirtual ~CPenDialog();
// Dialog Dataenum { IDD = IDD_PENWIDTH_DLG };
protected:virtual void DoDataExchange(CDataExchange* pDX); // DDX/DDV support
DECLARE_MESSAGE_MAP()};
The highlighted statement defines IDD as a symbolic name for the dialog ID in the enumeration.Incidentally, using an enumeration is the only way you can get an initialized data member into a classdefinition. If you try putting an initial value for any regular data member declaration, it won’t compile.You will get an error message about illegal use of pure syntax. It works here because an enum defines asymbolic name for a value of type int. Unfortunately, you can only define values of type int in thisway. It’s not strictly necessary here because the initialization for IDD could be done in the constructor, but
991
Chapter 17: Working with Dialogs and Controls
25905c17.qxd:WroxPro 2/21/08 9:20 AM Page 991
this is how Class Wizard chooses to do it. This technique is more commonly used to define a symbol forthe dimension of an array (a member of a class), in which case using an enumeration is your only option.
Having your own dialog class derived from CDialog means that you get all the functionality that that classprovides. You can also customize the dialog class by adding data members and functions to suit your par-ticular needs. You’ll often want to handle messages from controls within the dialog class, although you canalso choose to handle them in a view or a document class if this is more convenient.
Modal and Modeless DialogsThere two different types of dialog, termed modal and modeless dialogs, and they work in completelydifferent ways. While a modal dialog remains in effect, all operations in the other windows in the appli-cation are suspended until the dialog box is closed, usually by clicking an OK or Cancel button. With amodeless dialog, you can move the focus back and forth between the dialog box and other windows inyour application just by clicking them, and you can continue to use the dialog box at any time until youclose it. Class wizard is an example of a modal dialog; the Properties window is modeless.
A modeless dialog box is created by calling the Create() function defined in the CDialog class, butbecause you’ll only be using modal dialogs in the Sketcher example, you’ll call the DoModal() functionfor the dialog object, as you’ll see shortly.
Displaying a DialogWhere you put the code to display a dialog in your program depends on the application. In the Sketcherprogram, it is convenient to add a menu item that, when selected, results in the pen width dialog beingdisplayed. You’ll put this in the IDR_SketcherTYPE menu bar. As both the width and the color are asso-ciated with a pen, you can rename the Color menu as Pen. You do this just by double-clicking the Colormenu item in the Resource Editor pane to open its Properties window and changing the value of theCaption property to &Pen. Closing the window puts the change into effect.
When you add the Width menu item to the Pen menu, you should separate it from the colors in the menu.You can add a separator after the last color menu item by right-clicking the empty menu item and selectingthe Insert Separator menu item from the pop-up. You can then enter the new Width item as the nextmenu item after the separator. The menu item ends with an ellipsis (three periods) to indicate that it dis-plays a dialog; this is a standard Windows convention. Double-click the menu to display the menu proper-ties for modification, as shown in Figure 17-7.
Enter ID_PENWIDTH as the ID for the menu item, as shown in Figure 17-7. You can also add a status barprompt for it and because you’ll also add a toolbar button, you can include text for the tool tip as well.Remember, you just put the tooltip text following the status bar prompt text, separated from it by “\n”.Here the value for the Prompt property is “Change pen width\nShow pen width options”. The menuwill look as shown in Figure 17-8.
To add the Toolbar button, open the toolbar resource by extending the Toolbar folder in the ResourceView and double-clicking IDR_MAINFRAME. You can add a toolbar button to represent a pen width. Theone shown in Figure 17-9 tries to represent a pen drawing a line.
To associate the new button with the menu item that you just added, open the properties box for the but-ton and specify its ID as ID_PENWIDTH, the same as that for the menu item.
992
Chapter 17: Working with Dialogs and Controls
25905c17.qxd:WroxPro 2/21/08 9:20 AM Page 992

Figure 17-7
Figure 17-8
Figure 17-9
993
Chapter 17: Working with Dialogs and Controls
25905c17.qxd:WroxPro 2/21/08 9:20 AM Page 993

Code to Display the DialogThe code to display the dialog goes in the handler for the Pen > Width menu item, so in which classshould you implement this handler? The view class is a candidate for dealing with pen widths, but fol-lowing the previous logic with colors and elements, it would be sensible to have the current pen widthselection in the document, so the handler should go in the CSketcherDoc class. Right-click the Widthmenu item in the Resource View pane for the ID_SketcherTYPE menu and select Add Event Handlerfrom the pop-up. You can then create a function for the COMMAND message handler corresponding toID_PENWIDTH in the CSketcherDoc class. Now edit this handler and enter the following code:
// Handler for the pen width menu itemvoid CSketcherDoc::OnPenwidth(){
CPenDialog aDlg; // Create a local dialog object
// Display the dialog as modalaDlg.DoModal();
}
There are just two statements in the handler at the moment. The first creates a dialog object that is auto-matically associated with your dialog resource. You then display the dialog by calling the DoModal()function for the aDlg object.
Because the handler declares a CPenDialog object, you must add a #include statement for PenDialog.hto the beginning of SketcherDoc.cpp (after the #include directives for stdafx.h and Sketcher.h);otherwise, you’ll get compilation errors when you build the program. After you’ve done that, you can buildSketcher and try out the dialog. It should appear when you click the Toolbar button or the Pen > Widthmenu item. Of course, if the dialog is to do anything, you still have to add the code to support the operationof the controls; to close the dialog, you can use either of the buttons or the Close icon in the title bar.
Code to Close the DialogThe OK and Cancel buttons (and the close icon on the title bar) already close the dialog. The handlers todeal with the BN_CLICKED event handlers for the OK and Cancel button controls have been implementedfor you. However, it’s useful to know how the action of closing the dialog is implemented in case you wantto do more before the dialog is finally closed or if you are working with a modeless dialog.
The CDialog class defines the OnOK() method that is called when you click the default OK button, whichhas IDOK as its ID. This function closes the dialog and causes the DoModal() method to return the ID ofthe default OK button, IDOK. The OnCancel() function is called when you click the default Cancel buttonin the dialog and this closes the dialog and DoModal() returns the button ID, which is IDCANCEL. You canoverride either or both of these functions in your dialog class to do what you want. You just need to makesure you call the corresponding base class function at the end of your function implementation. You’llprobably remember by now that you can add an override class by selecting the overrides button in theProperties window for the class.
For example, you could implement an override for the OnOK() function like this:
void CPenDialog::OnOK(){// Your code for data validation or other actions...
994
Chapter 17: Working with Dialogs and Controls
25905c17.qxd:WroxPro 2/21/08 9:20 AM Page 994

CDialog::OnOK(); // Close the dialog}
In a complicated dialog, you might want to verify that the options selected or the data that has been enteredis valid. You could put code here to check the state of the dialog and fix up the data or even leave the dialogopen if there are problems.
Calling the OnOK()function defined in the base class closes the dialog and causes the DoModal() functionto return IDOK. Thus you can use the value returned from DoModal() to detect when the dialog was closedby clicking the OK button.
As I said, you can also override the OnCancel() function in a similar way if you need to do extra clean-up operations before the dialog closes. Be sure to call the base class method at the end of your functionimplementation.
When you are using a modeless dialog you must implement the OnOK() and OnCancel() function over-rides so that they call the inherited DestroyWindow() to terminate the dialog. In this case, you must notcall the base class OnOK() or OnCancel() functions, because they do not destroy the dialog window,but merely render it invisible.
Suppor ting the Dialog ControlsFor the Pen dialog, you’ll store the selected pen width in a data member, m_PenWidth, of the CPenDialogclass. You can either add the data member by right-clicking the CPenDialog class name and selecting fromthe context menu, or you can add it directly to the class definition as follows:
class CPenDialog : public CDialog{// Constructionpublic:
CPenDialog(CWnd* pParent = NULL); // standard constructor
// Dialog Dataenum { IDD = IDD_PENWIDTH_DLG };
// Data stored in the dialogpublic:
int m_PenWidth; // Record the pen width
// Plus the rest of the class definition....
};
If you do use the context menu for the class to add m_PenWidth, be sure to add a comment to the classdefinition. This is a good habit to get into, even when the member name looks self-explanatory.
You’ll use the m_PenWidth data member to set the radio button corresponding to the current pen widthin the document as checked. You’ll also arrange that the pen width selected in the dialog is stored in this
995
Chapter 17: Working with Dialogs and Controls
25905c17.qxd:WroxPro 2/21/08 9:20 AM Page 995

member, so that you can retrieve it when the dialog closes. At this point you could arrange to initializem_PenWidth to 0 in the class constructor.
Initializing the ControlsYou can initialize the radio buttons by overriding the OnInitDialog() function that is defined in thebase class, CDialog. This function is called in response to a WM_INITDIALOG message, which is sent dur-ing the execution of DoModal() just before the dialog box is displayed. You can add the function to theCPenDialog class by selecting OnInitDialog in the list of overrides in the Properties window for theCPenDialog class, as shown in Figure 17-10.
Figure 17-10
The implementation for the new version of OnInitDialog() is:
BOOL CPenDialog::OnInitDialog(){
CDialog::OnInitDialog();
// Check the radio button corresponding to the pen widthswitch(m_PenWidth){
case 1:CheckDlgButton(IDC_PENWIDTH1,1);break;
case 2:CheckDlgButton(IDC_PENWIDTH2,1);break;
case 3:CheckDlgButton(IDC_PENWIDTH3,1);break;
case 4:CheckDlgButton(IDC_PENWIDTH4,1);break;
996
Chapter 17: Working with Dialogs and Controls
25905c17.qxd:WroxPro 2/21/08 9:20 AM Page 996
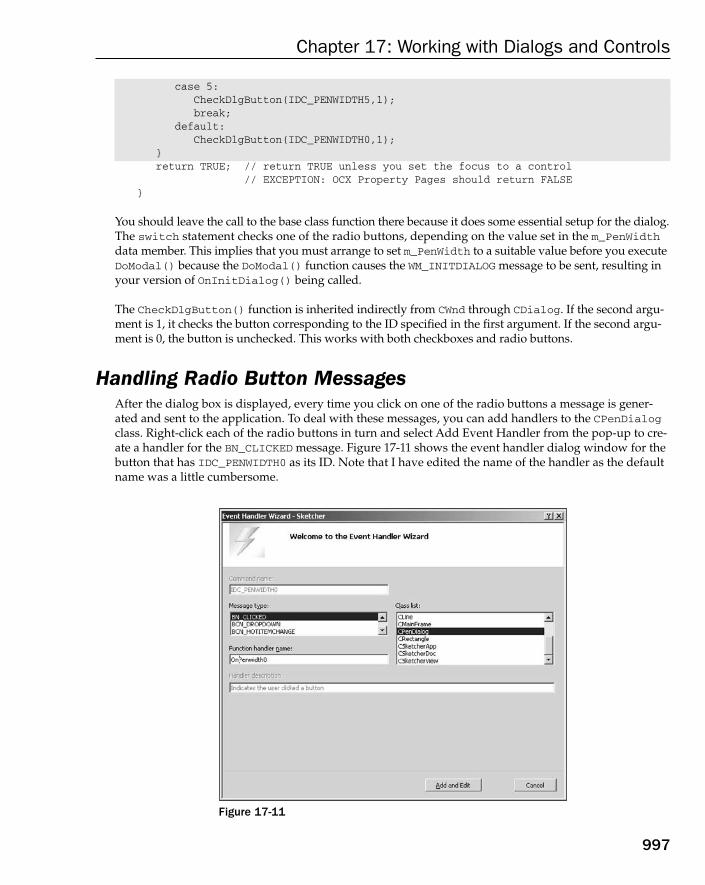
case 5:CheckDlgButton(IDC_PENWIDTH5,1);break;
default:CheckDlgButton(IDC_PENWIDTH0,1);
}return TRUE; // return TRUE unless you set the focus to a control
// EXCEPTION: OCX Property Pages should return FALSE}
You should leave the call to the base class function there because it does some essential setup for the dialog.The switch statement checks one of the radio buttons, depending on the value set in the m_PenWidthdata member. This implies that you must arrange to set m_PenWidth to a suitable value before you executeDoModal() because the DoModal() function causes the WM_INITDIALOG message to be sent, resulting inyour version of OnInitDialog() being called.
The CheckDlgButton() function is inherited indirectly from CWnd through CDialog. If the second argu-ment is 1, it checks the button corresponding to the ID specified in the first argument. If the second argu-ment is 0, the button is unchecked. This works with both checkboxes and radio buttons.
Handling Radio Button MessagesAfter the dialog box is displayed, every time you click on one of the radio buttons a message is gener-ated and sent to the application. To deal with these messages, you can add handlers to the CPenDialogclass. Right-click each of the radio buttons in turn and select Add Event Handler from the pop-up to cre-ate a handler for the BN_CLICKED message. Figure 17-11 shows the event handler dialog window for thebutton that has IDC_PENWIDTH0 as its ID. Note that I have edited the name of the handler as the defaultname was a little cumbersome.
Figure 17-11
997
Chapter 17: Working with Dialogs and Controls
25905c17.qxd:WroxPro 2/21/08 9:20 AM Page 997
The implementations of the BN_CLICKED event handlers for all of these radio buttons are similar becausethey each just set the pen width in the dialog object. As an example, the handler for IDC_PENWIDTH0 is:
void CPenDialog::OnPenwidth0(){
m_PenWidth = 0;}
You need to add the code for all six handlers to the CPenDialog class implementation, setting m_PenWidthto 1 in OnPenwidth1(), to 2 in OnPenwidth2(), and so on.
Completing Dialog OperationsYou must now modify the OnPenwidth() handler in CSketcherDoc to make the dialog effective. Addthe following code to the function:
// Handler for the pen width menu itemvoid CSketcherDoc::OnPenwidth(){
CPenDialog aDlg; // Create a local dialog object
// Set the pen width in the dialog to that stored in the documentaDlg.m_PenWidth = m_PenWidth;
// Display the dialog as modal// When closed with OK, get the pen widthif(aDlg.DoModal() == IDOK)
m_PenWidth = aDlg.m_PenWidth;}
The m_PenWidth member of the aDlg object is passed a pen width stored in the m_PenWidth member ofthe document; you’ve still got to add this member to CSketcherDoc. The call of the DoModal() functionnow occurs in the condition of the if statement, which is true if the DoModal() function returns IDOK. In this case, you retrieve the pen width stored in the aDlg object and store it in the m_PenWidth memberof the document. If the dialog box is closed using the Cancel button or the close icon, IDOK won’t bereturned by DoModal() and the value of m_PenWidth in the document is not changed.
Note that even though the dialog box is closed when DoModal() returns a value, the aDlg object still exists,so you can call its member functions without any problem. The aDlg object is destroyed automatically onreturn from OnPenwidth().
All that remains to do to support variable pen widths in your application is to update the affected classes:CSketcherDoc, CElement, and the four shape classes derived from CElement.
Adding Pen Widths to the DocumentYou need to add the m_PenWidth member to the document class, and the GetPenWidth() function to allow external access to the value stored. You should add the following shaded statements to theCSketcherDoc class definition:
class CSketcherDoc : public CDocument
998
Chapter 17: Working with Dialogs and Controls
25905c17.qxd:WroxPro 2/21/08 9:20 AM Page 998
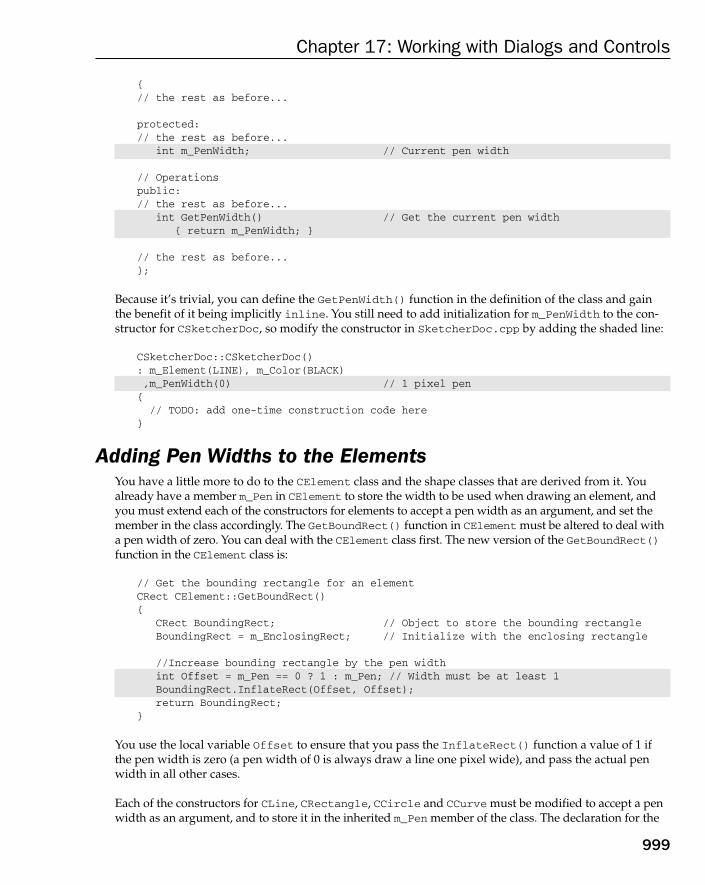
{// the rest as before...
protected:// the rest as before...
int m_PenWidth; // Current pen width
// Operationspublic:// the rest as before...
int GetPenWidth() // Get the current pen width{ return m_PenWidth; }
// the rest as before...};
Because it’s trivial, you can define the GetPenWidth() function in the definition of the class and gainthe benefit of it being implicitly inline. You still need to add initialization for m_PenWidth to the con-structor for CSketcherDoc, so modify the constructor in SketcherDoc.cpp by adding the shaded line:
CSketcherDoc::CSketcherDoc(): m_Element(LINE), m_Color(BLACK),m_PenWidth(0) // 1 pixel pen{
// TODO: add one-time construction code here}
Adding Pen Widths to the ElementsYou have a little more to do to the CElement class and the shape classes that are derived from it. Youalready have a member m_Pen in CElement to store the width to be used when drawing an element, andyou must extend each of the constructors for elements to accept a pen width as an argument, and set themember in the class accordingly. The GetBoundRect() function in CElement must be altered to deal witha pen width of zero. You can deal with the CElement class first. The new version of the GetBoundRect()function in the CElement class is:
// Get the bounding rectangle for an elementCRect CElement::GetBoundRect(){
CRect BoundingRect; // Object to store the bounding rectangleBoundingRect = m_EnclosingRect; // Initialize with the enclosing rectangle
//Increase bounding rectangle by the pen widthint Offset = m_Pen == 0 ? 1 : m_Pen; // Width must be at least 1BoundingRect.InflateRect(Offset, Offset);return BoundingRect;
}
You use the local variable Offset to ensure that you pass the InflateRect() function a value of 1 ifthe pen width is zero (a pen width of 0 is always draw a line one pixel wide), and pass the actual penwidth in all other cases.
Each of the constructors for CLine, CRectangle, CCircle and CCurve must be modified to accept a penwidth as an argument, and to store it in the inherited m_Pen member of the class. The declaration for the
999
Chapter 17: Working with Dialogs and Controls
25905c17.qxd:WroxPro 2/21/08 9:20 AM Page 999

constructor in each class definition needs to be modified to add the extra parameter. For example, in theCLine class, the constructor declaration becomes:
CLine(CPoint Start, CPoint End, COLORREF aColor, int PenWidth);
and the constructor implementation should be modified to:
CLine::CLine(CPoint Start, CPoint End, COLORREF aColor, int PenWidth):m_EndPoint(CPoint(0,0))
{m_StartPoint = Start; // Set line start pointm_EndPoint = End; // Set line end pointm_Color = aColor; // Set line colorm_Pen = PenWidth; // Set pen width
// Define the enclosing rectanglem_EnclosingRect = CRect(Start, End);m_EnclosingRect.NormalizeRect();
}
You should modify each of the class definitions and constructors for the shapes in the same way so thatthey each initialize m_Pen with the value passed as the last argument.
Creating Elements in the ViewThe last change you need to make is to the CreateElement() member of CSketcherView. Because youhave added the pen width as an argument to the constructors for each of the shapes, you must update thecalls to the constructors to reflect this. Change the definition of CSketcherView::CreateElement() to:
CElement* CSketcherView::CreateElement(){
// Get a pointer to the document for this viewCSketcherDoc* pDoc = GetDocument();ASSERT_VALID(pDoc); // Verify the pointer is good
// Now select the element using the type stored in the documentswitch(pDoc->GetElementType()){
case RECTANGLE:return new CRectangle(m_FirstPoint, m_SecondPoint,
pDoc->GetElementColor(), pDoc->GetPenWidth());case CIRCLE:
return new CCircle(m_FirstPoint, m_SecondPoint,pDoc->GetElementColor(), pDoc->GetPenWidth());
case CURVE:return new CCurve(m_FirstPoint, m_SecondPoint,
pDoc->GetElementColor(), pDoc->GetPenWidth());case LINE: // Always default to a line
return new CLine(m_FirstPoint, m_SecondPoint,pDoc->GetElementColor(), pDoc->GetPenWidth());
default: // Something’s gone wrongAfxMessageBox(“Bad Element code”, MB_OK);
1000
Chapter 17: Working with Dialogs and Controls
25905c17.qxd:WroxPro 2/21/08 9:20 AM Page 1000

AfxAbort();}
}
Each constructor call now passes the pen width as an argument. This is retrieved from the document usingthe GetPenWidth() function that you added to the document class.
Exercising the DialogYou can now build and run the latest version of Sketcher to see how the pen dialog works out. Selectingthe Pen > Width menu option or the associated Toolbar button displays the dialog box so that you canselect the pen width. The screen shown in Figure 17-12 is typical of what you might see when the Sketcherprogram is executing.
Figure 17-12
Note that the dialog box is a completely separate window. You can drag it around to position it whereyou want. You can even drag it outside the Sketcher application window.
Using a Spin Button ControlNow you can move on to looking at how the spin button can help in the Sketcher application. The spinbutton is particularly useful when you want to constrain an input within a given integer range. It’s nor-mally used in association with another control, called a buddy control, that displays the value that thespin button modifies. The associated control is usually an edit control, but it doesn’t have to be.
It would be nice to be able to draw at different scales in Sketcher. If you had a way to change the drawingscale, you could scale up whenever you wanted to fill in the fine detail in your masterpiece and scale
1001
Chapter 17: Working with Dialogs and Controls
25905c17.qxd:WroxPro 2/21/08 9:20 AM Page 1001

down again when working across the whole vista. You could apply the spin control to managing scalingin a document view. A drawing scale would be a view-specific property, and you would want the elementdrawing functions to take account of the current scale for a view. Altering the existing code to deal withview scaling requires rather more work than setting up the control, so first look at how you create a spinbutton and make it work.
Adding the Scale Menu Item and Toolbar ButtonBegin by providing a means of displaying the scale dialog. Go to Resource View and open theIDR_SketcherTYPE menu. You are going to add a Scale menu item to the end of the View menu. Enterthe caption for the unused menu item as Scale.... This item brings up the scale dialog, so you endthe caption with an ellipsis (three periods) to indicate that it displays a dialog. Next you can add a sepa-rator preceding the new menu item by right-clicking it and selecting Insert Separator from the pop-up.You can then verify that the properties for the menu item are as shown in Figure 17-13.
The menu should now look as shown in Figure 17-14.
Figure 17-13
Figure 17-14
1002
Chapter 17: Working with Dialogs and Controls
25905c17.qxd:WroxPro 2/21/08 9:20 AM Page 1002
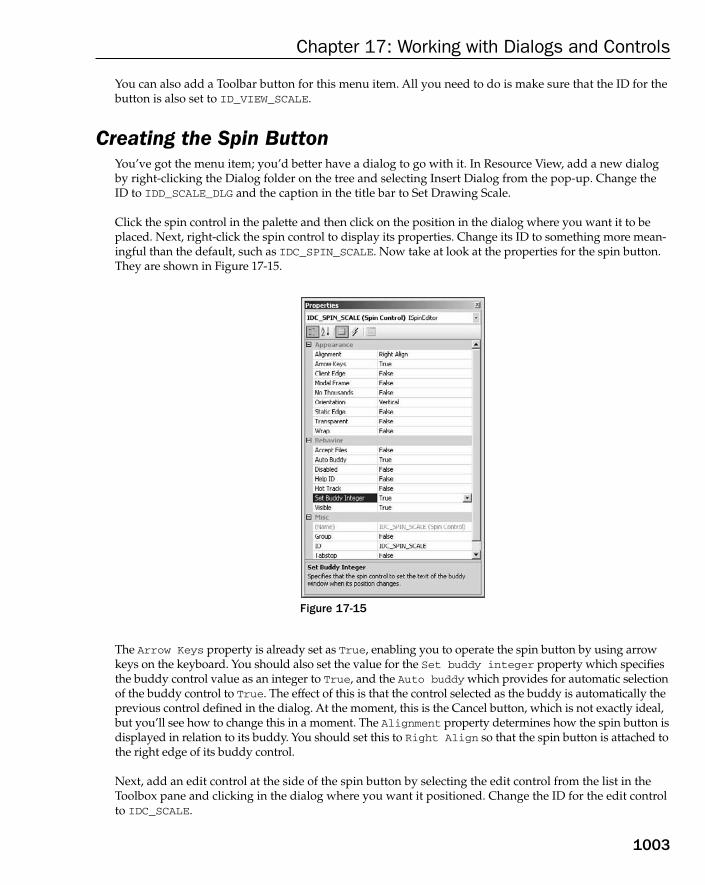
You can also add a Toolbar button for this menu item. All you need to do is make sure that the ID for thebutton is also set to ID_VIEW_SCALE.
Creating the Spin ButtonYou’ve got the menu item; you’d better have a dialog to go with it. In Resource View, add a new dialogby right-clicking the Dialog folder on the tree and selecting Insert Dialog from the pop-up. Change theID to IDD_SCALE_DLG and the caption in the title bar to Set Drawing Scale.
Click the spin control in the palette and then click on the position in the dialog where you want it to beplaced. Next, right-click the spin control to display its properties. Change its ID to something more mean-ingful than the default, such as IDC_SPIN_SCALE. Now take at look at the properties for the spin button.They are shown in Figure 17-15.
Figure 17-15
The Arrow Keys property is already set as True, enabling you to operate the spin button by using arrowkeys on the keyboard. You should also set the value for the Set buddy integer property which specifiesthe buddy control value as an integer to True, and the Auto buddy which provides for automatic selectionof the buddy control to True. The effect of this is that the control selected as the buddy is automatically theprevious control defined in the dialog. At the moment, this is the Cancel button, which is not exactly ideal,but you’ll see how to change this in a moment. The Alignment property determines how the spin button isdisplayed in relation to its buddy. You should set this to Right Align so that the spin button is attached tothe right edge of its buddy control.
Next, add an edit control at the side of the spin button by selecting the edit control from the list in theToolbox pane and clicking in the dialog where you want it positioned. Change the ID for the edit controlto IDC_SCALE.
1003
Chapter 17: Working with Dialogs and Controls
25905c17.qxd:WroxPro 2/21/08 9:20 AM Page 1003
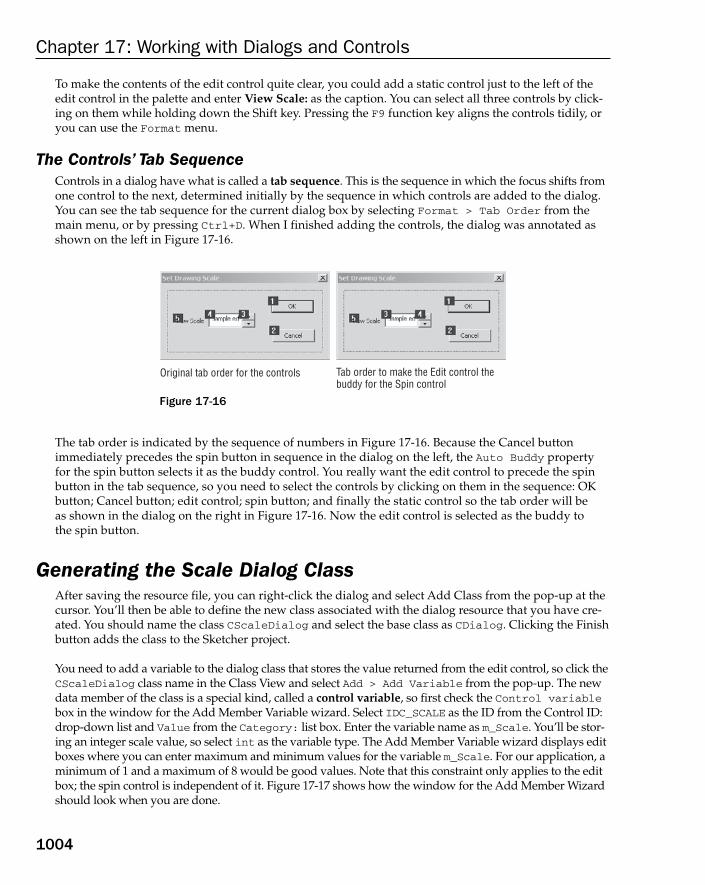
To make the contents of the edit control quite clear, you could add a static control just to the left of theedit control in the palette and enter View Scale: as the caption. You can select all three controls by click-ing on them while holding down the Shift key. Pressing the F9 function key aligns the controls tidily, oryou can use the Format menu.
The Controls’ Tab SequenceControls in a dialog have what is called a tab sequence. This is the sequence in which the focus shifts fromone control to the next, determined initially by the sequence in which controls are added to the dialog.You can see the tab sequence for the current dialog box by selecting Format > Tab Order from themain menu, or by pressing Ctrl+D. When I finished adding the controls, the dialog was annotated asshown on the left in Figure 17-16.
Figure 17-16
The tab order is indicated by the sequence of numbers in Figure 17-16. Because the Cancel buttonimmediately precedes the spin button in sequence in the dialog on the left, the Auto Buddy propertyfor the spin button selects it as the buddy control. You really want the edit control to precede the spinbutton in the tab sequence, so you need to select the controls by clicking on them in the sequence: OKbutton; Cancel button; edit control; spin button; and finally the static control so the tab order will be as shown in the dialog on the right in Figure 17-16. Now the edit control is selected as the buddy to the spin button.
Generating the Scale Dialog ClassAfter saving the resource file, you can right-click the dialog and select Add Class from the pop-up at thecursor. You’ll then be able to define the new class associated with the dialog resource that you have cre-ated. You should name the class CScaleDialog and select the base class as CDialog. Clicking the Finishbutton adds the class to the Sketcher project.
You need to add a variable to the dialog class that stores the value returned from the edit control, so click theCScaleDialog class name in the Class View and select Add > Add Variable from the pop-up. The newdata member of the class is a special kind, called a control variable, so first check the Control variablebox in the window for the Add Member Variable wizard. Select IDC_SCALE as the ID from the Control ID:drop-down list and Value from the Category: list box. Enter the variable name as m_Scale. You’ll be stor-ing an integer scale value, so select int as the variable type. The Add Member Variable wizard displays editboxes where you can enter maximum and minimum values for the variable m_Scale. For our application, aminimum of 1 and a maximum of 8 would be good values. Note that this constraint only applies to the editbox; the spin control is independent of it. Figure 17-17 shows how the window for the Add Member Wizardshould look when you are done.
Original tab order for the controls Tab order to make the Edit control the buddy for the Spin control
1004
Chapter 17: Working with Dialogs and Controls
25905c17.qxd:WroxPro 2/21/08 9:20 AM Page 1004

Figure 17-17
If you click the Finish button, the wizard takes care of entering the code necessary to support your newcontrol variable. The class definition you’ll end up with after the wizard has added the new member isas follows:
class CScaleDialog : public CDialog{
DECLARE_DYNAMIC(CScaleDialog)
public:CScaleDialog(CWnd* pParent = NULL); // standard constructorvirtual ~CScaleDialog();
// Dialog Dataenum { IDD = IDD_SCALE_DLG };
protected:virtual void DoDataExchange(CDataExchange* pDX); // DDX/DDV support
DECLARE_MESSAGE_MAP()public:
// Stores the current drawing scaleint m_Scale;
};
The interesting bits of the class definition are shaded. The class is associated with the dialog resourcethrough the enum statement initializing IDD with the ID of the resource. It contains the variable m_Scale,which is specified as a public member of the class, so you can set and retrieve its value in a CScaleDialogobject directly. There’s also some special code in the implementation of the class to deal with the newm_Scale member.
1005
Chapter 17: Working with Dialogs and Controls
25905c17.qxd:WroxPro 2/21/08 9:20 AM Page 1005

Dialog Data Exchange and ValidationA virtual function called DoDataExchange() has been included in the class by the Class Wizard. If youlook in the ScaleDialog.cpp file, you’ll find the implementation looks like this:
void CScaleDialog::DoDataExchange(CDataExchange* pDX){
CDialog::DoDataExchange(pDX);DDX_Text(pDX, IDC_SCALE, m_Scale);DDV_MinMaxInt(pDX, m_Scale, 1, 8);
}
This function is called by the framework to carry out the exchange of data between variables in a dialogand the dialog’s controls. This mechanism is called Dialog Data Exchange, usually abbreviated to DDX.This is a powerful mechanism that can provide automatic transfer of information between a dialog andits controls in most circumstances, thus saving you the effort of programming to get the data yourself, asyou did with the radio buttons in the pen width dialog.
In the scale dialog, DDX handles data transfers between the edit control and the variable m_Scale in theCScaleDialog class. The variable pDX passed to the DoDataExchange() function controls the directionin which data is transferred. After calling the base class DoDataExchange() function, the DDX_Text()function is called, which actually moves data between the variable, m_Scale, and the edit control.
The call to the DDV_MinMaxInt() function verifies that the value transferred is within the limits speci-fied. This mechanism is called Dialog Data Validation, or DDV. The DoDataExchange() function iscalled automatically before the dialog is displayed, to pass the value stored in m_Scale to the edit con-trol. When the dialog is closed with the OK button, it is automatically called again to pass the value inthe control back to the variable m_Scale in the dialog object. All this is taken care of for you. You needonly to ensure that the right value is stored in m_Scale before the dialog box is displayed, and arrangeto collect the result when the dialog box closes.
Initializing the DialogYou’ll use the OnInitDialog() function to initialize the dialog, just as you did for the pen width dialog.This time you’ll use it to set up the spin control. You’ll initialize the m_Scale member a little later whenyou create the dialog in the handler for a Scale menu item because it should be set to the value of the scalestored in the view. For now, add an override for the OnInitDialog() function to the CScaleDialog class,using the same mechanism that you used for the previous dialog, and add code to initialize the spin controlas follows:
BOOL CScaleDialog::OnInitDialog(){
CDialog::OnInitDialog();
// First get a pointer to the spin controlCSpinButtonCtrl* pSpin;pSpin = (CSpinButtonCtrl*)GetDlgItem(IDC_SPIN_SCALE);
// If you have not checked the auto buddy option in// the spin control’s properties, set the buddy control here
// Set the spin control range
1006
Chapter 17: Working with Dialogs and Controls
25905c17.qxd:WroxPro 2/21/08 9:20 AM Page 1006
pSpin->SetRange(1, 8);
return TRUE; // return TRUE unless you set the focus to a control// EXCEPTION: OCX Property Pages should return FALSE
}
There are only three lines of code to add, along with four lines of comments. The first line of code cre-ates a pointer to an object of the MFC class CSpinButtonCtrl. This class is specifically for managingspin buttons, and is initialized in the next statement to point to the control in our dialog. The functionGetDlgItem() is inherited from CWnd via CDialog, and it retrieves the address of any control from theID you pass as the argument. As you saw earlier, a control is just a specialized window, so the pointerreturned is of type CWnd*; you therefore have to cast it to the type appropriate to the particular control,which is CSpinButtonCtrl* in this case. The third statement that you’ve added sets the upper andlower limits for the spin button by calling the SetRange() member of the spin control object. Althoughyou have set the range limits for the edit control, this doesn’t affect the spin control directly. If you don’tlimit the values in the spin control here, you would be allowing the spin control to insert values in theedit control that were outside the limits, so there would be an error message from the edit control. Youcan demonstrate this by commenting out the statement that calls SetRange() here and trying outSketcher without it.
If you want to set the buddy control using code rather than setting the value of Auto buddy in the spinbutton’s properties to True, the CSpinButtonCtrl class has a function member to do this. You wouldneed to add the statement
pSpin->SetBuddy(GetDlgItem(IDC_SCALE));
at the point indicated by the comments.
Displaying the Spin ButtonThe dialog is to be displayed when the Scale menu option (or its associated toolbar button) is selected, so you need to add a COMMAND event handler to the CSketcherView class corresponding to theID_VIEW_SCALE message through the Properties window for the class. You can then add code as follows:
void CSketcherView::OnViewScale(){CScaleDialog aDlg; // Create a dialog objectaDlg.m_Scale = m_Scale; // Pass the view scale to the dialogif(aDlg.DoModal() == IDOK){m_Scale = aDlg.m_Scale; // Get the new scaleInvalidateRect(0); // Invalidate the whole window
}}
You create the dialog as a modal dialog in the same way as for the pen width dialog. Before the dialog boxis displayed by the DoModal() function call, you store the scale value provided by the m_Scale memberof CSketcherView in the dialog member with the same name; this ensures that the control displays thecurrent scale value when the dialog is displayed. If the dialog is closed with the OK button, you store thenew scale from the m_Scale member of the dialog object in the view member with the same name.
1007
Chapter 17: Working with Dialogs and Controls
25905c17.qxd:WroxPro 2/21/08 9:20 AM Page 1007
Because you have changed the view scale, you need to get the view redrawn with the new scale valueapplied. The call to InvalidateRect() does this.
Of course, you must not forget to add the m_Scale data member to the definition of CSketcherView, soadd the following line at the end of the other data members in the class definition:
int m_Scale; // Current view scale
You should also modify the CSketcherView constructor to initialize m_Scale to 1. This results in a viewalways starting out with a scale of one to one.
If you forget to do this, it’s unlikely that your program will work properly.
Because you are referring the CScaleDialog class in the CSketcherView class implementation, you mustadd an #include directive for ScaleDialog.h to the beginning of the SketcherView.cpp file. That’s allyou need to get the scale dialog and its spin control operational. You can build and run Sketcher to give it atrial spin before you add the code to use a view scale factor in the drawing process.
Using the Scale FactorScaling with Windows usually involves using one of the scaleable mapping modes, MM_ISOTROPIC orMM_ANISOTROPIC. By using one or other of these mapping modes, you can get Windows to do most ofthe work. Unfortunately, it’s not as simple as just changing the mapping mode, because neither of thesemapping modes is supported by CScrollView. If you can get around that, however, you’re home anddry. You’ll use MM_ANISOTROPIC for reasons that you’ll see in a moment, so let’s first understand what’sinvolved in using this mapping mode.
Scaleable Mapping ModesAs I’ve said, there are two mapping modes that allow the mapping between logical coordinates anddevice coordinates to be altered and these are the MM_ISOTROPIC and MM_ANISOTROPIC modes. TheMM_ISOTROPIC mode has the property that Windows will force the scaling factor for both the x and yaxes to be the same, which has the advantage that your circles will always be circles. The disadvantage is that you can’t map a document to fit into a rectangle of a different shape. The MM_ANISOTROPIC mode,on the other hand, permits scaling of each axis independently. Because it’s the more flexible mode of thetwo, you’ll use MM_ANISOTROPIC for scaling operations in Sketcher.
The way in which logical coordinates are transformed to device coordinates is dependent on the followingparameters, which you can set:
Parameter Description
Window Origin The logical coordinates of the upper-left corner of the window. This is setby calling the function CDC::SetWindowOrg().
Window Extent The size of the window specified in logical coordinates. This is set by call-ing the function CDC::SetWindowExt().
1008
Chapter 17: Working with Dialogs and Controls
25905c17.qxd:WroxPro 2/21/08 9:20 AM Page 1008

The viewport referred to here has no physical significance by itself; it serves only as a parameter fordefining how coordinates are transformed from logical coordinates to device coordinates.
Remember that:
❑ Logical coordinates (also referred to as page coordinates) are determined by the mapping mode.For example, the MM_LOENGLISH mapping mode has logical coordinates in units of 0.01 inches,with the origin in the upper-left corner of the client area, and the positive y-axis direction runningfrom bottom to top. These are used by the device context drawing functions.
❑ Device coordinates (also referred to as client coordinates in a window) are measured in pixelsin the case of a window, with the origin at the upper-left corner of the client area, and with thepositive y-axis direction from top to bottom. These are used outside of a device context, forexample for defining the position of the cursor in mouse message handlers.
❑ Screen coordinates are measured in pixels and have the origin at the upper-left corner of thescreen, with the positive y-axis direction from top to bottom. These are used when getting orsetting the cursor position.
The formulae used by Windows to convert from logical coordinates to device coordinates are:
With coordinate systems other than those provided by the MM_ISOTROPIC and MM_ANISOTROPIC map-ping modes, the window extent and the viewport extent are fixed by the mapping mode and you can’tchange them. Calling the functions SetWindowExt() or SetViewportExt() in the CDC object to changethem has no effect, although you can still move the position of (0,0) in your logical reference frame bycalling SetWindowOrg() or SetViewportOrg(). However, for a given document size expressed by thewindow extent in logical coordinate units, you can adjust the scale at which elements are displayed bysetting the viewport extent appropriately. By using and setting the window and viewport extents, youcan get the scaling done automatically.
Setting the Document SizeYou need to maintain the size of the document in logical units in the document object. You can add a pro-tected data member, m_DocSize, to the CSketcherDoc class definition to store the size of the document:
CSize m_DocSize; // Document size
y D e v i c e = yLogical – yWindowOrg ( ) *yWindowExtyViewportExt + yViewportOrg
x D e v i c e = xLogical – xWindowOrg ( ) *xWindowExtxViewportExt + xViewportOrg
Parameter Description
Viewport Origin The coordinates of the upper-left corner of the window in device coordi-nates (pixels). This is set by calling the functionCDC::SetViewportOrg().
Viewport Extent The size of the window in device coordinates (pixels). This is set by call-ing the function CDC::SetViewportExt().
1009
Chapter 17: Working with Dialogs and Controls
25905c17.qxd:WroxPro 2/21/08 9:20 AM Page 1009
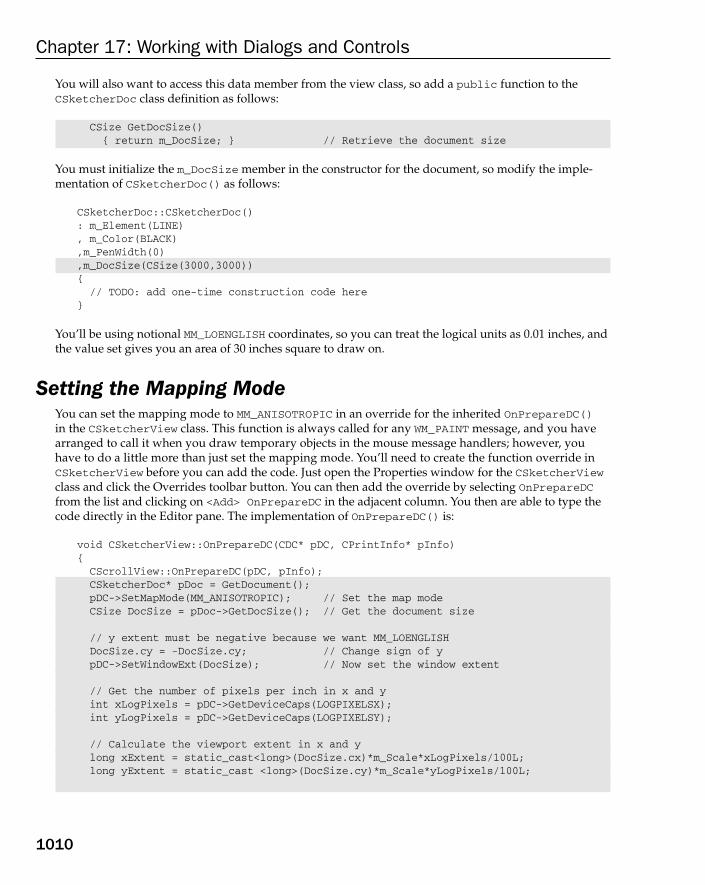
You will also want to access this data member from the view class, so add a public function to theCSketcherDoc class definition as follows:
CSize GetDocSize(){ return m_DocSize; } // Retrieve the document size
You must initialize the m_DocSize member in the constructor for the document, so modify the imple-mentation of CSketcherDoc() as follows:
CSketcherDoc::CSketcherDoc(): m_Element(LINE), m_Color(BLACK),m_PenWidth(0),m_DocSize(CSize(3000,3000)){// TODO: add one-time construction code here
}
You’ll be using notional MM_LOENGLISH coordinates, so you can treat the logical units as 0.01 inches, andthe value set gives you an area of 30 inches square to draw on.
Setting the Mapping ModeYou can set the mapping mode to MM_ANISOTROPIC in an override for the inherited OnPrepareDC()in the CSketcherView class. This function is always called for any WM_PAINT message, and you havearranged to call it when you draw temporary objects in the mouse message handlers; however, youhave to do a little more than just set the mapping mode. You’ll need to create the function override inCSketcherView before you can add the code. Just open the Properties window for the CSketcherViewclass and click the Overrides toolbar button. You can then add the override by selecting OnPrepareDCfrom the list and clicking on <Add> OnPrepareDC in the adjacent column. You then are able to type thecode directly in the Editor pane. The implementation of OnPrepareDC() is:
void CSketcherView::OnPrepareDC(CDC* pDC, CPrintInfo* pInfo){CScrollView::OnPrepareDC(pDC, pInfo);CSketcherDoc* pDoc = GetDocument();pDC->SetMapMode(MM_ANISOTROPIC); // Set the map modeCSize DocSize = pDoc->GetDocSize(); // Get the document size
// y extent must be negative because we want MM_LOENGLISHDocSize.cy = -DocSize.cy; // Change sign of ypDC->SetWindowExt(DocSize); // Now set the window extent
// Get the number of pixels per inch in x and yint xLogPixels = pDC->GetDeviceCaps(LOGPIXELSX);int yLogPixels = pDC->GetDeviceCaps(LOGPIXELSY);
// Calculate the viewport extent in x and ylong xExtent = static_cast<long>(DocSize.cx)*m_Scale*xLogPixels/100L;long yExtent = static_cast <long>(DocSize.cy)*m_Scale*yLogPixels/100L;
1010
Chapter 17: Working with Dialogs and Controls
25905c17.qxd:WroxPro 2/21/08 9:20 AM Page 1010
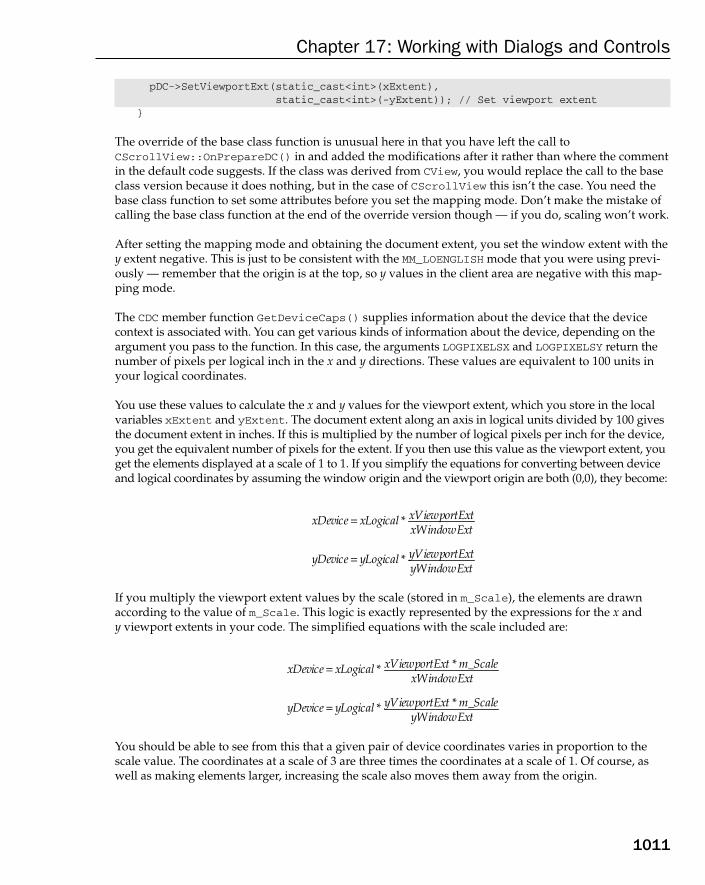
pDC->SetViewportExt(static_cast<int>(xExtent),static_cast<int>(-yExtent)); // Set viewport extent
}
The override of the base class function is unusual here in that you have left the call toCScrollView::OnPrepareDC() in and added the modifications after it rather than where the commentin the default code suggests. If the class was derived from CView, you would replace the call to the baseclass version because it does nothing, but in the case of CScrollView this isn’t the case. You need thebase class function to set some attributes before you set the mapping mode. Don’t make the mistake ofcalling the base class function at the end of the override version though — if you do, scaling won’t work.
After setting the mapping mode and obtaining the document extent, you set the window extent with they extent negative. This is just to be consistent with the MM_LOENGLISH mode that you were using previ-ously — remember that the origin is at the top, so y values in the client area are negative with this map-ping mode.
The CDC member function GetDeviceCaps() supplies information about the device that the devicecontext is associated with. You can get various kinds of information about the device, depending on theargument you pass to the function. In this case, the arguments LOGPIXELSX and LOGPIXELSY return thenumber of pixels per logical inch in the x and y directions. These values are equivalent to 100 units inyour logical coordinates.
You use these values to calculate the x and y values for the viewport extent, which you store in the localvariables xExtent and yExtent. The document extent along an axis in logical units divided by 100 givesthe document extent in inches. If this is multiplied by the number of logical pixels per inch for the device,you get the equivalent number of pixels for the extent. If you then use this value as the viewport extent, youget the elements displayed at a scale of 1 to 1. If you simplify the equations for converting between deviceand logical coordinates by assuming the window origin and the viewport origin are both (0,0), they become:
If you multiply the viewport extent values by the scale (stored in m_Scale), the elements are drawnaccording to the value of m_Scale. This logic is exactly represented by the expressions for the x and y viewport extents in your code. The simplified equations with the scale included are:
You should be able to see from this that a given pair of device coordinates varies in proportion to thescale value. The coordinates at a scale of 3 are three times the coordinates at a scale of 1. Of course, aswell as making elements larger, increasing the scale also moves them away from the origin.
y D e v i c e = y L o g i c a l * y W i n d o w E x t
y V i e w p o r t E x t * m _ S c a l e
x D e v i c e = x L o g i c a l * x W i n d o w E x t
x V i e w p o r t E x t * m _ S c a l e
y D e v i c e = y L o g i c a l * y W i n d o w E x t y V i e w p o r t E x t
x D e v i c e = x L o g i c a l * x W i n d o w E x t x V i e w p o r t E x t
1011
Chapter 17: Working with Dialogs and Controls
25905c17.qxd:WroxPro 2/21/08 9:20 AM Page 1011

That’s all you need to scale the view. Unfortunately, at the moment the scrolling won’t work with scaling,so you need to see what you can do about that.
Implementing Scrolling with ScalingCScrollView just won’t work with the MM_ANISOTROPIC mapping mode so clearly you must use anothermapping mode to set up the scrollbars. The easiest way to do this is to use MM_TEXT, because in this casethe logical coordinates are the same as the client coordinates — pixels, in other words. All you need to do,then, is to figure out how many pixels are equivalent to the logical document extent for the scale at whichyou are drawing, which is easier than you might think. You can add a function to CSketcherView to takecare of the scrollbars and implement everything in there. Right-click the CSketcherView class name inClass View and add a public function ResetScrollSizes() with a void return type and no parame-ters. Add the code to the implementation, as follows:
void CSketcherView::ResetScrollSizes(void){CClientDC aDC(this);OnPrepareDC(&aDC); // Set up the device contextCSize DocSize = GetDocument()->GetDocSize(); // Get the document sizeaDC.LPtoDP(&DocSize); // Get the size in pixelsSetScrollSizes(MM_TEXT, DocSize); // Set up the scrollbars
}
After creating a local CClientDC object for the view, you call OnPrepareDC() to set up theMM_ANISOTROPIC mapping mode. Because this takes account of the scaling, the LPtoDP() member ofthe aDC object converts the document size stored in the local variable DocSize to the correct number of pixels for the current logical document size and scale. The total document size in pixels defines howlarge the scrollbars must be in MM_TEXT mode — remember MM_TEXT logical coordinates are in pixels.You can then get the SetScrollSizes() member of CScrollView to set up the scrollbars based on this by specifying MM_TEXT as the mapping mode.
It may seem strange that you can change the mapping mode in this way, but it’s important to keep inmind that the mapping mode is nothing more than a definition of how logical coordinates are to be con-verted to device coordinates. Whatever mode (and therefore coordinate conversion algorithm) you’ve setup applies to all subsequent device context functions until you change it, and you can change it wheneveryou want. When you set a new mode, subsequent device context function calls just use the conversionalgorithm defined by the new mode. You figure how big the document is in pixels with MM_ANISOTROPICbecause this is the only way you can get the scaling into the process, and then switch to MM_TEXT to set up the scrollbars because you need units for this in pixels for it to work properly. Simple really, when you know how.
Setting Up the ScrollbarsYou must set up the scrollbars initially for the view in the OnInitialUpdate() member ofCSketcherView. Change the previous implementation of the function to:
void CSketcherView::OnInitialUpdate(){ResetScrollSizes(); // Set up the scrollbarsCScrollView::OnInitialUpdate();
}
1012
Chapter 17: Working with Dialogs and Controls
25905c17.qxd:WroxPro 2/21/08 9:20 AM Page 1012
All you do is call the ResetScrollSizes() function that you just added to the view. This takes care ofeverything — well, almost. The CScrollView object needs an initial extent to be set for OnPrepareDC()to work properly, so you need to add one statement to the CSketcherView constructor:
CSketcherView::CSketcherView(): m_FirstPoint(CPoint(0,0)) // Set 1st recorded point to 0,0, m_SecondPoint(CPoint(0,0)) // Set 2nd recorded point to 0,0, m_pTempElement(NULL) // Set temporary element pointer to 0, m_pSelected(NULL) // No element selected initially, m_MoveMode(FALSE) // Set move mode off, m_CursorPos(CPoint(0,0)) // Initialize as zero, m_FirstPos(CPoint(0,0)) // Initialize as zero, m_Scale(1) // Set scale to 1:1{
SetScrollSizes(MM_TEXT, CSize(0,0)); // Set arbitrary scrollers}
The additional statement just calls SetScrollSizes() with an arbitrary extent to get the scrollbars ini-tialized before the view is drawn. When the view is drawn for the first time, the ResetScrollSizes()function call in OnInitialUpdate()sets up the scrollbars properly.
Of course, each time the view scale changes, you need to update the scrollbars before the view is redrawn.You can take care of this in the OnViewScale() handler in the CSketcherView class:
void CSketcherView::OnViewScale(){
CScaleDialog aDlg; // Create a dialog objectaDlg.m_Scale = m_Scale; // Pass the view scale to the dialogif(aDlg.DoModal() == IDOK){
m_Scale = aDlg.m_Scale; // Get the new scaleResetScrollSizes(); // Adjust scrolling to the new scaleInvalidateRect(0); // Invalidate the whole window
}}
Using the ResetScrollSizes() function, taking care of the scrollbars isn’t complicated. Everything iscovered by the one additional line of code.
Now you can build the project and run the application. You’ll see that the scrollbars work just as theyshould. Note that each view maintains its own scale factor, independently of the other views.
Working with Status BarsWith each view now being scaled independently, it becomes necessary to have some indication of whatthe current scale in a view is. A convenient way to do this would be to display the scale in the status barthat was created by default in the Sketcher application. By default the status bar appears at the bottom of the application window, below the horizontal scrollbar, although you can arrange for it to be at thetop of the client area. The status bar is divided into segments called panes; the status bar in Sketcher hasfour panes. The one on the left contains the text Ready, and the other three are the recessed areas on theright that are used to record when CAPS lock, NUM lock, and SCROLL lock are in effect.
1013
Chapter 17: Working with Dialogs and Controls
25905c17.qxd:WroxPro 2/21/08 9:20 AM Page 1013

It’s possible for you to write to the status bar that the Application Wizard supplied by default, but youneed to get access to the m_wndStatusBar member of the CMainFrame object for the application as thisrepresents it. As it’s a protected member of the class, you must add a public member function to mod-ify the status bar from outside the class. You could add the following public function member to theCMainFrame class to do this:
void CMainFrame::SetPaneText(int Pane, LPCTSTR Text){
m_wndStatusBar.SetPaneText(Pane, Text);}
The implementation goes in the .cpp file and you must add a declaration for the function to the classdefinition. The SetPaneText() function sets the text specified by the second parameter, Text, in thepane identified by the first parameter, Pane, in the status bar object represented by m_wndStatusBar.The status bar panes are indexed from the left, starting at 0. Now you can write to the status bar fromanywhere outside the CMainFrame class using this function. For example:
CMainFrame* pFrame = (CMainFrame*)AfxGetApp()->m_pMainWnd;pFrame->SetPaneText(0, “Goodbye cruel world”);
This code fragment gets a pointer to the main window of the application and outputs the text string yousee to the left-most pane in the status bar. This is fine, but the main application window is no place fora view scale. You may well have several views in Sketcher, so you really want to associate displayingthe scale with each view. A better approach would be to give each child window its own status bar. Them_wndStatusBar in CMainFrame is an instance of the CStatusBar class. You can use the same class toimplement your own status bars.
Adding a Status Bar to a FrameThe CStatusBar class defines a control bar with multiple panes in which you can display information.Objects of type CStatusBar can also provide the same functionality as the Windows common status bar control through a member function GetStatusBarCtrl(). There is an MFC class that specificallyencapsulates each of the Windows common controls — the one for the common status bar control isCStatusBarCtrl. However, using this directly involves quite a bit of work to integrate it with the otherMFC classes, as the raw Windows control doesn’t connect to MFC. Using CStatusBar in our Sketcherprogram is easier and safer. The GetStatusBarCtrl() function returns a reference to a CStatusBarCtrlobject that provides all the functionality of the common control, and the CStatusBar object takes care ofthe communications to the rest of the MFC.
The first step to utilizing it is to add a data member for the status bar to the definition of CChildFrame,which is the frame window for a view, so add the following declaration to the public section of the class:
CStatusBar m_StatusBar; // Status bar object
A little clarification may be required at this point. Status bars should be part of the frame, not part ofthe view. You don’t want to be able to scroll the status bars or draw over them. They should just remainanchored to the bottom of the window. If you added a status bar to the view, it would appear inside thescrollbars and would be scrolled whenever you scrolled the view. Any drawing over the part of the viewcontaining the status bar would cause the bar to be redrawn, leading to an annoying flicker. Having thestatus bar as part of the frame avoids these problems.
1014
Chapter 17: Working with Dialogs and Controls
25905c17.qxd:WroxPro 2/21/08 9:20 AM Page 1014
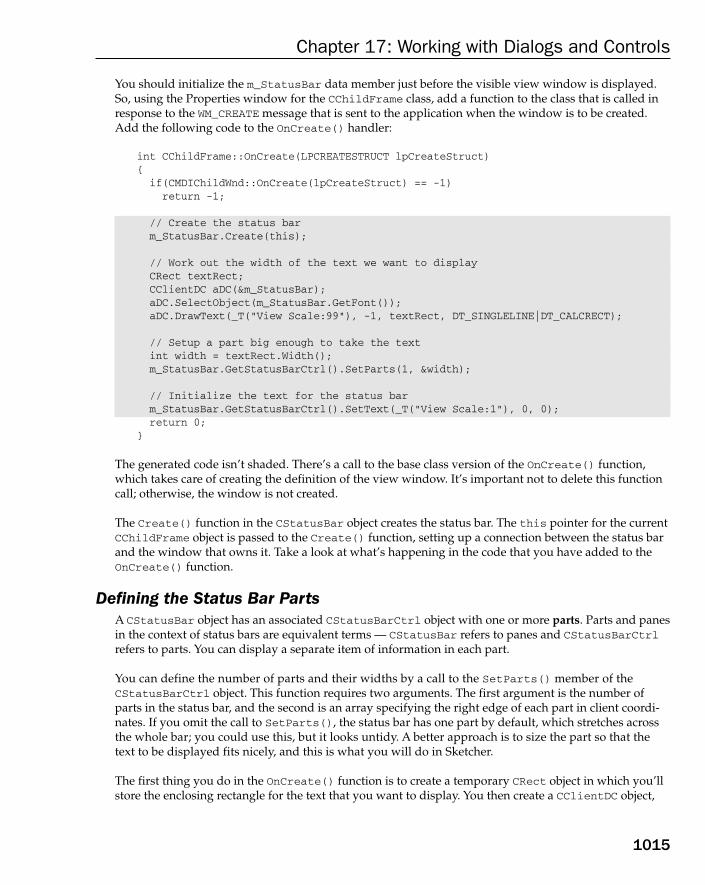
You should initialize the m_StatusBar data member just before the visible view window is displayed.So, using the Properties window for the CChildFrame class, add a function to the class that is called inresponse to the WM_CREATE message that is sent to the application when the window is to be created.Add the following code to the OnCreate() handler:
int CChildFrame::OnCreate(LPCREATESTRUCT lpCreateStruct){
if(CMDIChildWnd::OnCreate(lpCreateStruct) == -1)return -1;
// Create the status barm_StatusBar.Create(this);
// Work out the width of the text we want to displayCRect textRect;CClientDC aDC(&m_StatusBar);aDC.SelectObject(m_StatusBar.GetFont());aDC.DrawText(_T(“View Scale:99”), -1, textRect, DT_SINGLELINE|DT_CALCRECT);
// Setup a part big enough to take the textint width = textRect.Width();m_StatusBar.GetStatusBarCtrl().SetParts(1, &width);
// Initialize the text for the status barm_StatusBar.GetStatusBarCtrl().SetText(_T(“View Scale:1”), 0, 0);return 0;
}
The generated code isn’t shaded. There’s a call to the base class version of the OnCreate() function,which takes care of creating the definition of the view window. It’s important not to delete this functioncall; otherwise, the window is not created.
The Create() function in the CStatusBar object creates the status bar. The this pointer for the currentCChildFrame object is passed to the Create() function, setting up a connection between the status barand the window that owns it. Take a look at what’s happening in the code that you have added to theOnCreate() function.
Defining the Status Bar PartsA CStatusBar object has an associated CStatusBarCtrl object with one or more parts. Parts and panesin the context of status bars are equivalent terms — CStatusBar refers to panes and CStatusBarCtrlrefers to parts. You can display a separate item of information in each part.
You can define the number of parts and their widths by a call to the SetParts() member of theCStatusBarCtrl object. This function requires two arguments. The first argument is the number ofparts in the status bar, and the second is an array specifying the right edge of each part in client coordi-nates. If you omit the call to SetParts(), the status bar has one part by default, which stretches acrossthe whole bar; you could use this, but it looks untidy. A better approach is to size the part so that thetext to be displayed fits nicely, and this is what you will do in Sketcher.
The first thing you do in the OnCreate() function is to create a temporary CRect object in which you’llstore the enclosing rectangle for the text that you want to display. You then create a CClientDC object,
1015
Chapter 17: Working with Dialogs and Controls
25905c17.qxd:WroxPro 2/21/08 9:20 AM Page 1015

which contains a device context with the same extent as the status bar. This is possible because the statusbar, like all other controls, is just a window.
Next, the font used in the status bar (set up as part of the desktop properties) is selected into the devicecontext by calling the SelectObject() function. The GetFont() member of m_StatusBar returns apointer to a CFont object that represents the current font. Obviously, the particular font used determineshow much space the text that you want to display takes up.
You call the DrawText() member of the CClientDC object to calculate the enclosing rectangle for thetext you want to display. This function has four arguments:
❑ The text string you need drawn. You have passed a string containing the maximum number ofcharacters you would ever want to display, “View Scale:99”.
❑ The count of the number of characters in the string. You have specified this as -1, which indicatesyou are supplying a null-terminated string. In this case the function works out the character count.
❑ Your rectangle, textRect. The enclosing rectangle for the text is stored here in logical coordinates.
❑ One or more flags controlling the operation of the function.
You have specified a combination of two flags; DT_SINGLELINE specifies that the text is to be on a singleline, and DT_CALCRECT specifies that you want the function to calculate the size of the rectangle requiredto display the string and store it in the rectangle pointed to by the third argument. The DrawText() func-tion is normally used to output text, but in this instance the DT_CALCRECT flag stops the function fromactually drawing the string. There are a number of other flags that you can use with this function; you canfind details about them by looking up this function with Help.
The next statement sets up the parts for the status bar:
m_StatusBar.GetStatusBarCtrl().SetParts(1, &width);
The expression m_StatusBar.GetStatusBarCtrl() returns a reference to the CStatusBarCtrl objectthat belongs to m_StatusBar. The reference returned is used to call the SetParts() function for theobject. The first argument to SetParts() defines the number of parts for the status bar — which is 1 inthis case. The second argument is typically the address of an array of type int containing the x coordi-nate of the right hand edge of each part in client coordinates. The array has one element for each part inthe status bar. Because you have only one part, you pass the address of the single variable, width, whichcontains the width of the rectangle you stored in textRect. This is in client coordinates because thedevice context uses MM_TEXT by default.
Finally, you set the initial text in the status bar with a call to the SetText() member of CStatusBarCtrl.The first argument is the written text string, the second is the index position of the part that contains thetext string, and the third argument specifies the appearance of the part on the screen. The third argumentcan be any of those shown in the following table.
1016
Chapter 17: Working with Dialogs and Controls
25905c17.qxd:WroxPro 2/21/08 9:20 AM Page 1016

In your code, you specify the text with a border so that it appears recessed into the status bar. You couldtry the other options to see how they look.
Updating the Status BarIf you build and run the code now, the status bars appears, but they show only a scale factor of 1, no matterwhat scale factor is actually being used — not very useful. What you need to do is to add code somewherethat changes the text each time a different scale is chosen. This means modifying the OnViewScale()handler in CSketcherView to change the status bar for the frame. Only four additional lines of code arerequired:
void CSketcherView::OnViewScale(){
CScaleDialog aDlg; // Create a dialog objectaDlg.m_Scale = m_Scale; // Pass the view scale to the dialogif(aDlg.DoModal() == IDOK){
m_Scale = aDlg.m_Scale; // Get the new scale
// Get the frame window for this viewCChildFrame* viewFrame = static_cast<CChildFrame*>(GetParentFrame());
// Build the message stringCString StatusMsg(“View Scale:”);StatusMsg += static_cast<char>(‘0’ + m_Scale);
// Write the string to the status barviewFrame->m_StatusBar.GetStatusBarCtrl().SetText(StatusMsg, 0, 0);
ResetScrollSizes(); // Adjust scrolling to the new scaleInvalidateRect(0); // Invalidate the whole window
}}
Because you refer to the CChildFrame object here, you must add an #include directive for ChildFrm.hto the beginning of SketcherView.cpp after the existing #include directives.
Style Code Appearance
0 The text has a border that appears recessed into the status bar.
SBT_NOBORDERS The text is drawn without borders.
SBT_OWNERDRAW The text is drawn by the parent window.
SBT_POPOUT The text has a border that appears to stand out from the status bar.
1017
Chapter 17: Working with Dialogs and Controls
25905c17.qxd:WroxPro 2/21/08 9:20 AM Page 1017

The first line calls the GetParentFrame() member of CSketcherView that’s inherited from theCScrollView class. This returns a pointer to a CFrameWnd object to correspond to the frame window, so it has to be cast to CChildFrame* for it to be of any use to you.
The next two lines build the message that displays in the status bar. The CString class is used simplybecause it is more flexible than using a char array. I will discuss CString objects in greater depth a bitlater when you add a new element type to Sketcher. You get the character for the scale value by addingthe value of m_Scale (which will be from 1 to 8) to the character ‘0’. This generates a character from ‘1’to ‘8’.
Finally, you use the pointer to the child frame to get at the m_StatusBar member that you added earlier.You can then get its status bar control and use the SetText() member of the control to change the textthat it displays. The rest of the OnViewScale() function remains unchanged.
That’s all you need for the status bar. If you build Sketcher again, you should have multiple, scrolledwindows, each at different scales, with the scale displayed in a status bar in each view.
Using a List BoxOf course, you don’t have to use a spin button to set the scale. You could also use a list box, for example.The logic for handling a scale factor would be exactly the same, and only the dialog box and the code toextract the value for the scale factor from it would change. If you want to try this out without messingup the development of the Sketcher program, you can copy the complete Sketcher project to anotherfolder and make the modifications to the copy. Deleting part of a Class Wizard managed program can be a bit messy, so it’s useful experience for when you really need to do it.
Removing the Scale DialogYou first need to delete the definition and implementation of CScaleDialog from the new Sketcherproject, as well as the resource for the scale dialog. To do this, go to the Solution Explorer pane, selectScaleDialog.cpp and press Delete; then select ScaleDialog.h and press Delete to remove them fromthe project. In each instance you’ll see a dialog that gives you the option of just removing the files from the project or permanently deleting the files; click on the Delete button in the dialog to do that unless youwant to keep the code. Then go to Resource View, expand the Dialog folder, click on IDD_SCALE_DLG andpress the Delete key to remove the dialog resource. Delete the #include directive for ScaleDialog.hfrom SketcherView.cpp. At this stage, all references to the original dialog class have been removed fromthe project. Are you all done yet? Almost. The IDs for the resources should have been deleted for you. Toverify this, right-click Sketcher.rc in Resource View and select the Resource Symbols menu item fromthe pop-up; you can check that IDC_SCALE and IDC_SPIN_SCALE are no longer in the list. Of course, theOnViewScale() handler in the CSketcherView class still refers to CScaleDialog, so the Sketcher projectwon’t compile yet. You’ll fix that when you have added the list box control.
Select the Build > Clean Solution menu item to remove any intermediate files from the project thatmay contain references to CScaleDialog. After that’s done, you can start by recreating the dialog resourcefor entering a scale value.
1018
Chapter 17: Working with Dialogs and Controls
25905c17.qxd:WroxPro 2/21/08 9:20 AM Page 1018
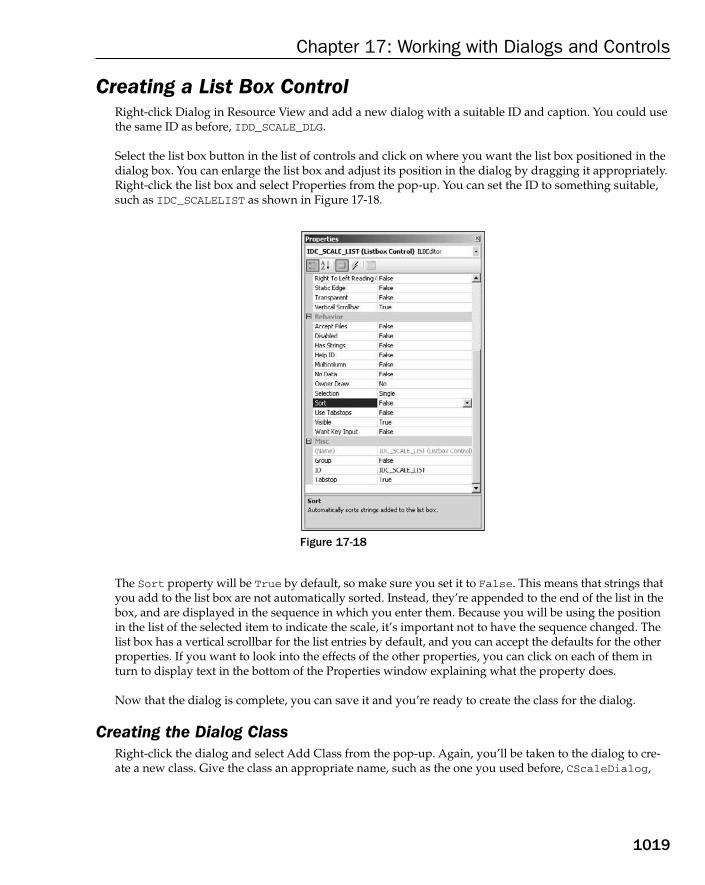
Creating a List Box ControlRight-click Dialog in Resource View and add a new dialog with a suitable ID and caption. You could usethe same ID as before, IDD_SCALE_DLG.
Select the list box button in the list of controls and click on where you want the list box positioned in thedialog box. You can enlarge the list box and adjust its position in the dialog by dragging it appropriately.Right-click the list box and select Properties from the pop-up. You can set the ID to something suitable,such as IDC_SCALELIST as shown in Figure 17-18.
Figure 17-18
The Sort property will be True by default, so make sure you set it to False. This means that strings thatyou add to the list box are not automatically sorted. Instead, they’re appended to the end of the list in thebox, and are displayed in the sequence in which you enter them. Because you will be using the positionin the list of the selected item to indicate the scale, it’s important not to have the sequence changed. Thelist box has a vertical scrollbar for the list entries by default, and you can accept the defaults for the otherproperties. If you want to look into the effects of the other properties, you can click on each of them inturn to display text in the bottom of the Properties window explaining what the property does.
Now that the dialog is complete, you can save it and you’re ready to create the class for the dialog.
Creating the Dialog ClassRight-click the dialog and select Add Class from the pop-up. Again, you’ll be taken to the dialog to cre-ate a new class. Give the class an appropriate name, such as the one you used before, CScaleDialog,
1019
Chapter 17: Working with Dialogs and Controls
25905c17.qxd:WroxPro 2/21/08 9:20 AM Page 1019
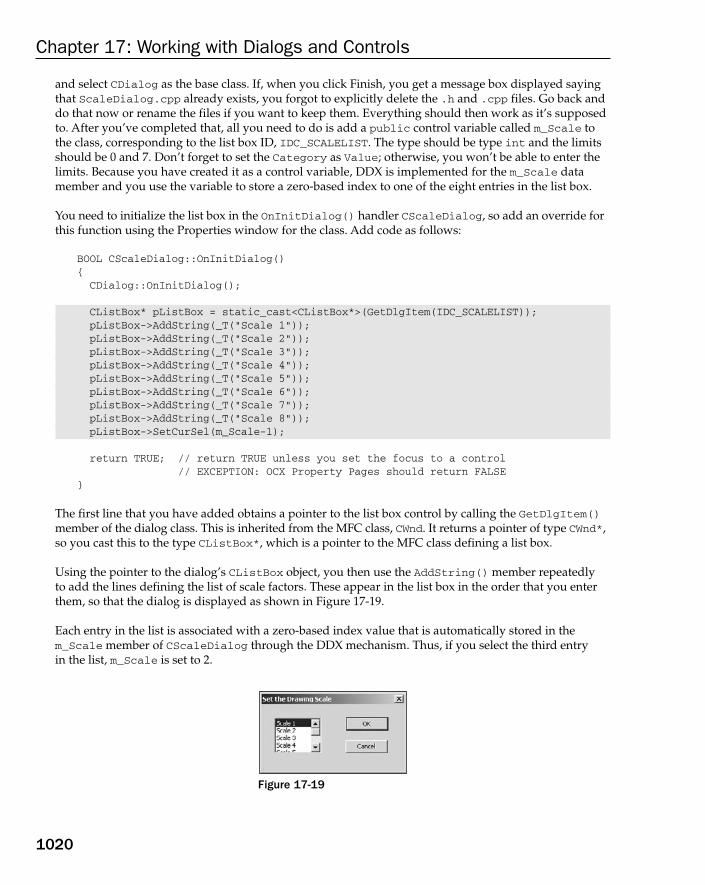
and select CDialog as the base class. If, when you click Finish, you get a message box displayed sayingthat ScaleDialog.cpp already exists, you forgot to explicitly delete the .h and .cpp files. Go back anddo that now or rename the files if you want to keep them. Everything should then work as it’s supposedto. After you’ve completed that, all you need to do is add a public control variable called m_Scale tothe class, corresponding to the list box ID, IDC_SCALELIST. The type should be type int and the limitsshould be 0 and 7. Don’t forget to set the Category as Value; otherwise, you won’t be able to enter thelimits. Because you have created it as a control variable, DDX is implemented for the m_Scale datamember and you use the variable to store a zero-based index to one of the eight entries in the list box.
You need to initialize the list box in the OnInitDialog() handler CScaleDialog, so add an override forthis function using the Properties window for the class. Add code as follows:
BOOL CScaleDialog::OnInitDialog(){CDialog::OnInitDialog();
CListBox* pListBox = static_cast<CListBox*>(GetDlgItem(IDC_SCALELIST));pListBox->AddString(_T(“Scale 1”));pListBox->AddString(_T(“Scale 2”));pListBox->AddString(_T(“Scale 3”));pListBox->AddString(_T(“Scale 4”));pListBox->AddString(_T(“Scale 5”));pListBox->AddString(_T(“Scale 6”));pListBox->AddString(_T(“Scale 7”));pListBox->AddString(_T(“Scale 8”));pListBox->SetCurSel(m_Scale-1);
return TRUE; // return TRUE unless you set the focus to a control// EXCEPTION: OCX Property Pages should return FALSE
}
The first line that you have added obtains a pointer to the list box control by calling the GetDlgItem()member of the dialog class. This is inherited from the MFC class, CWnd. It returns a pointer of type CWnd*,so you cast this to the type CListBox*, which is a pointer to the MFC class defining a list box.
Using the pointer to the dialog’s CListBox object, you then use the AddString() member repeatedly to add the lines defining the list of scale factors. These appear in the list box in the order that you enterthem, so that the dialog is displayed as shown in Figure 17-19.
Each entry in the list is associated with a zero-based index value that is automatically stored in them_Scale member of CScaleDialog through the DDX mechanism. Thus, if you select the third entry in the list, m_Scale is set to 2.
Figure 17-19
1020
Chapter 17: Working with Dialogs and Controls
25905c17.qxd:WroxPro 2/21/08 9:20 AM Page 1020

Displaying the DialogThe dialog is displayed by the OnViewScale() handler that you added to CSketcherView in the previousversion of Sketcher. You just need to amend this to deal with the new dialog using a list box. The code for itis as follows:
void CSketcherView::OnViewScale(){
CScaleDialog aDlg; // Create a dialog objectaDlg.m_Scale = m_Scale; // Pass the view scale to the dialogif(aDlg.DoModal() == IDOK){m_Scale = 1 + aDlg.m_Scale; // Get the new scale
// Get the frame that wraps this viewCChildFrame* viewFrame = static_cast<CChildFrame*>(GetParentFrame());
// Build the message stringCString StatusMsg(“View Scale:”);StatusMsg += static_cast<char>(‘1’ + m_Scale - 1);// Set the status bar viewFrame->m_StatusBar.GetStatusBarCtrl().SetText(StatusMsg, 0, 0);
ResetScrollSizes(); // Adjust scrolling to the new scaleInvalidateRect(0); // Invalidate the whole window
}}
Because the index value for the entry selected from the list is zero-based, you just need to add 1 to it to get the actual scale value to be stored in the view. The code to display this value in the view’s statusbar is exactly as before. The rest of the code to handle scale factors is already complete and requires nochanges. After you’ve added back the #include directive for ScaleDialog.h, you can build and exe-cute this version of Sketcher to see the list box in action.
Using an Edit Box ControlYou could use an edit box control to add annotations in Sketcher. You’ll need a new element type, CText,that corresponds to a text string, and an extra menu item to set a TEXT mode for creating elements. Becausea text element needs only one reference point, you can create it in the OnLButtonDown() handler in theview class. You’ll also need a new item in the Element menu to set TEXT mode. You’ll add this text capabil-ity to Sketcher in the following sequence:
1. Create the dialog box resource and its associated class.
2. Add the new menu item.
3. Add the code to open the dialog for creating an element.
4. Add the support for a CText class.
1021
Chapter 17: Working with Dialogs and Controls
25905c17.qxd:WroxPro 2/21/08 9:20 AM Page 1021

Creating an Edit Box ResourceCreate a new dialog resource in Resource View by right-clicking the Dialog folder and selecting InsertDialog from the pop-up. Change the ID for the new dialog to IDD_TEXT_DLG and the caption text toEnter Text.
To add an edit box, select the edit box icon from the list of controls palette and then click the position in the dialog where you want to place it. You can adjust the size of the edit box by dragging its borders,and you can alter its position in the dialog by dragging the whole thing around. You can display theproperties for the edit box by right-clicking it and selecting Properties from the pop-up. You could firstchange its ID to IDC_EDITTEXT, as shown in Figure 17-20.
Figure 17-20
Some of the properties for this control are of interest at this point. First, select the Multiline property.Setting the value for this as True creates a multiline edit box where the text you enter can span morethan one line. This enables you to enter a long line of text and still remain visible in its entirety in theedit box.
The Align text property determines how the text is to be positioned in the multiline edit box. Thevalue Left is fine here because you’ll be displaying the text as a single line anyway, but you also havethe options for Center and Right.
1022
Chapter 17: Working with Dialogs and Controls
25905c17.qxd:WroxPro 2/21/08 9:20 AM Page 1022

If you were to change the value for the Want return property to True, pressing Enter on the keyboardwhile entering the text in the control inserts a return character into the text string. This allows you toanalyze the string if you wanted to break it into multiple lines for display. You don’t want this effect, soleave the property value as False. In this state, pressing Enter has the effect of the default control (whichis the OK button) being selected, so pressing Enter closes the dialog.
If you set the value of the Auto HScroll property as False, there is an automatic spill to the next linein the edit box when you reach the edge of the control while entering text. However, this is just for visi-bility in the edit box — it has no effect on the contents of the string. You could also change the value ofthe Auto VScroll property to True to allow text to continue beyond the number of lines that are visiblein the control.
When you’ve finished setting the properties for the edit box, close its Properties window. Make sure thatthe edit box is first in the tab order by selecting the Format > Tab Order menu item or by pressingCtrl+D. You can then test the dialog by selecting the Test Dialog menu item or by pressing Ctrl+T.The dialog is shown in Figure 17-21.
Figure 17-21
You can even enter text into the dialog in test mode to see how it works. Clicking the OK or Cancel buttoncloses the dialog.
Creating the Dialog ClassAfter saving the dialog resource, you can create a suitable dialog class corresponding to the resource,which you could call CTextDialog. Right-click the dialog in Resource View and select Add Class fromthe pop-up to do this. The base class should be CDialog. Next you can add a control variable by right-clicking the class name in Class View and selecting Add > Add Variable from the pop-up. SelectIDC_EDITTEXT as the control ID and the category as Value. Call the new variable m_TextString andleave its type as CString — you’ll take a look at this class after you’ve finished the dialog class. You can also specify a maximum length for it in the Max chars: edit box, as shown in Figure 17-22.
A length of 100 is more than adequate for your needs. The variable that you have added here is automat-ically updated from the data entered into the control by the DDX mechanism. You can click Finish to cre-ate the variable in the CTextDialog class and close the Add Member Variable wizard.
1023
Chapter 17: Working with Dialogs and Controls
25905c17.qxd:WroxPro 2/21/08 9:20 AM Page 1023
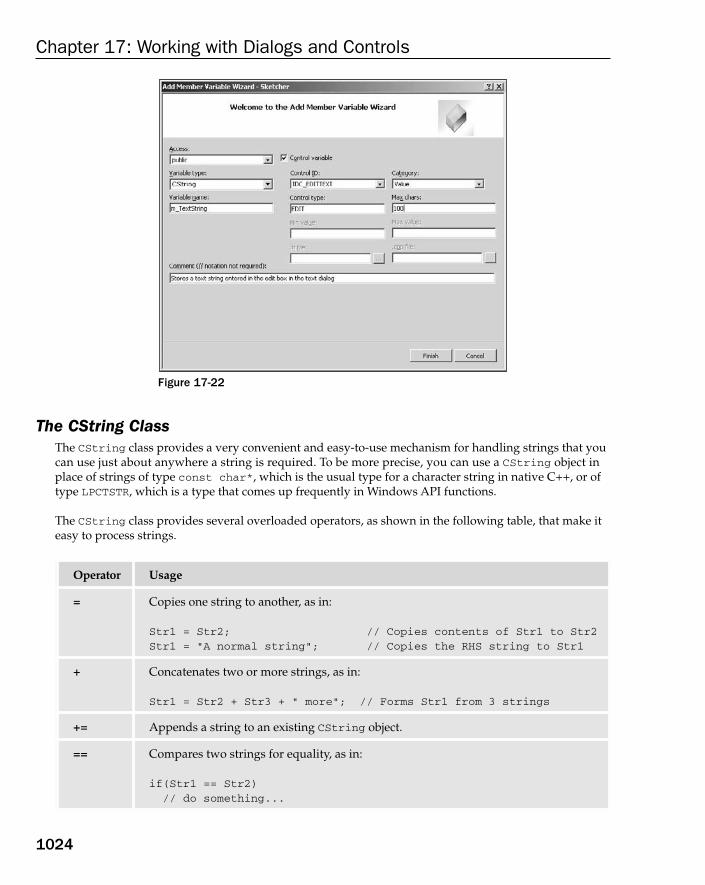
Figure 17-22
The CString ClassThe CString class provides a very convenient and easy-to-use mechanism for handling strings that youcan use just about anywhere a string is required. To be more precise, you can use a CString object inplace of strings of type const char*, which is the usual type for a character string in native C++, or oftype LPCTSTR, which is a type that comes up frequently in Windows API functions.
The CString class provides several overloaded operators, as shown in the following table, that make iteasy to process strings.
Operator Usage
= Copies one string to another, as in:
Str1 = Str2; // Copies contents of Str1 to Str2Str1 = “A normal string”; // Copies the RHS string to Str1
+ Concatenates two or more strings, as in:
Str1 = Str2 + Str3 + “ more”; // Forms Str1 from 3 strings
+= Appends a string to an existing CString object.
== Compares two strings for equality, as in:
if(Str1 == Str2)// do something...
1024
Chapter 17: Working with Dialogs and Controls
25905c17.qxd:WroxPro 2/21/08 9:20 AM Page 1024
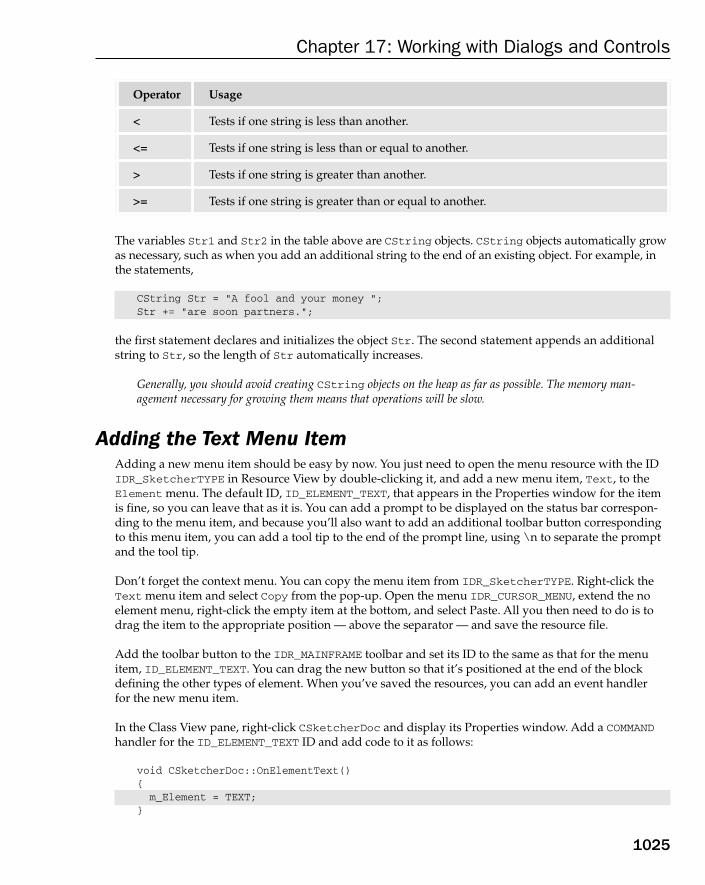
The variables Str1 and Str2 in the table above are CString objects. CString objects automatically growas necessary, such as when you add an additional string to the end of an existing object. For example, inthe statements,
CString Str = “A fool and your money “;Str += “are soon partners.”;
the first statement declares and initializes the object Str. The second statement appends an additionalstring to Str, so the length of Str automatically increases.
Generally, you should avoid creating CString objects on the heap as far as possible. The memory man-agement necessary for growing them means that operations will be slow.
Adding the Text Menu ItemAdding a new menu item should be easy by now. You just need to open the menu resource with the IDIDR_SketcherTYPE in Resource View by double-clicking it, and add a new menu item, Text, to theElement menu. The default ID, ID_ELEMENT_TEXT, that appears in the Properties window for the itemis fine, so you can leave that as it is. You can add a prompt to be displayed on the status bar correspon-ding to the menu item, and because you’ll also want to add an additional toolbar button correspondingto this menu item, you can add a tool tip to the end of the prompt line, using \n to separate the promptand the tool tip.
Don’t forget the context menu. You can copy the menu item from IDR_SketcherTYPE. Right-click theText menu item and select Copy from the pop-up. Open the menu IDR_CURSOR_MENU, extend the noelement menu, right-click the empty item at the bottom, and select Paste. All you then need to do is todrag the item to the appropriate position — above the separator — and save the resource file.
Add the toolbar button to the IDR_MAINFRAME toolbar and set its ID to the same as that for the menuitem, ID_ELEMENT_TEXT. You can drag the new button so that it’s positioned at the end of the blockdefining the other types of element. When you’ve saved the resources, you can add an event handler for the new menu item.
In the Class View pane, right-click CSketcherDoc and display its Properties window. Add a COMMANDhandler for the ID_ELEMENT_TEXT ID and add code to it as follows:
void CSketcherDoc::OnElementText(){m_Element = TEXT;
}
Operator Usage
< Tests if one string is less than another.
<= Tests if one string is less than or equal to another.
> Tests if one string is greater than another.
>= Tests if one string is greater than or equal to another.
1025
Chapter 17: Working with Dialogs and Controls
25905c17.qxd:WroxPro 2/21/08 9:20 AM Page 1025

Only one line of code is necessary to set the element type in the document to TEXT.
You also need to add a function to check the menu item if it is the current mode, so add anUPDATE_COMMAND_UI handler corresponding to the ID_ELEMENT_TEXT ID, and implement the code for it as follows:
void CSketcherDoc::OnUpdateElementText(CCmdUI* pCmdUI){// Set checked if the current element is textpCmdUI->SetCheck(m_Element == TEXT);
}
This operates in the same way as the other Element pop-up menu items.
You must also add a line to the OurConstants.h header file:
const unsigned int TEXT = 105U;
You can add this statement at the end of the other element type definitions in the header file. The nextstep is to define the CText class for an object of type TEXT.
Defining a Text ElementYou can derive the class CText from the CElement class as follows:
// Class defining a text objectclass CText: public CElement{public:// Function to display a text elementvirtual void Draw(CDC* pDC, CElement* pElement=0);
// Constructor for a text elementCText(CPoint Start, CPoint End, CString aString, COLORREF aColor);virtual void Move(CSize& aSize); // Move a text element
protected:CPoint m_StartPoint; // position of a text elementCString m_String; // Text to be displayedCText(){} // Default constructor
};
I added this manually, but I’ll leave it to you to decide how you want to do this. This definition shouldgo at the end of the Elements.h file following the other element types. This class definition declaresthe virtual Draw() and Move() functions, as the other element classes do. The data member m_Stringof type CString stores the text to be displayed, and m_StartPoint specifies the position of the string in the client area of a view.
1026
Chapter 17: Working with Dialogs and Controls
25905c17.qxd:WroxPro 2/21/08 9:20 AM Page 1026
Look at the constructor declaration in a little more detail. The CText constructor declaration defines fourparameters that provide the following essential information:
The pen width doesn’t apply to an item of text, because the appearance is determined by the font. Althoughyou do not need to pass a pen width as an argument to the constructor, the constructor needs to initializethe m_PenWidth member inherited from the base class because it is used in the computation of the bound-ing rectangle for the text.
Implementing the CText ClassYou have three functions to implement for the CText class:
❑ The constructor for a CText object.
❑ The virtual Draw() function to display it.
❑ The Move() function to support moving a text object by dragging it with the mouse.
I added these to the Elements.cpp file.
The CText ConstructorThe constructor for a CText object needs to initialize the class and base class data members:
CText::CText(CPoint Start, CPoint End, CString aString, COLORREF aColor){m_Pen = 1; // Set the pen widthm_Color = aColor; // Set the color for the textm_String = aString; // Make a copy of the stringm_StartPoint = Start; // Start point for string
m_EnclosingRect = CRect(Start, End);m_EnclosingRect.NormalizeRect();
}
This is all standard stuff, just like you’ve seen before for the other elements.
Parameter Defines
CPoint Start The position of the text in logical coordinates.
CPoint End The corner opposite Start that defines the rectangle enclosing the text.
CString aString The text string to be displayed as a CString object.
COLORREF aColor The color of the text.
1027
Chapter 17: Working with Dialogs and Controls
25905c17.qxd:WroxPro 2/21/08 9:20 AM Page 1027
Drawing a CText ObjectDrawing text in a device context is different to drawing a geometric figure. The implementation of theDraw() function for a CText object is as follows:
void CText::Draw(CDC* pDC, CElement* pElement){COLORREF Color(m_Color); // Initialize with element color
if(this==pElement)Color = SELECT_COLOR; // Set selected color
// Set the text color and output the textpDC->SetTextColor(Color);pDC->TextOut(m_StartPoint.x, m_StartPoint.y, m_String);
}
You don’t need a pen to display text. You just need to specify the text color using the SetTextColor()function member of the CDC object and then use the TextOut() member to output the text string. Thisdisplays the string using the default font.
Because the TextOut() function doesn’t use a pen, it isn’t affected by setting the drawing mode of thedevice context. This means that the raster operations (ROP) method that you use to move the elementsleaves temporary trails behind when applied to text. Remember that you used the SetROP2() function to specify the way in which the pen would logically combine with the background. By choosingR2_NOTXORPEN as the drawing mode, you could cause a previously drawn element to disappear byredrawing it — it would then revert to the background color and thus become invisible. Fonts aren’tdrawn using a pen, so it won’t work with the text elements. You’ll see how to fix this problem in the next chapter.
Moving a CText ObjectThe Move() function for a CText object is simple:
void CText::Move(CSize& aSize){m_StartPoint += aSize; // Move the start pointm_EnclosingRect += aSize; // Move the rectangle
}
All you need to do is alter the point defining the position of the string, and the data member defining theenclosing rectangle, by the distance specified in the aSize parameter.
Creating a Text ElementAfter the element type has been set to TEXT, a text object should be created at the cursor position when-ever you click the left mouse button and enter the text you want to display. You therefore need to openthe dialog that permits text to be entered in the OnLButtonDown() handler. Add the following code tothis handler in the CSketcherView class:
void CSketcherView::OnLButtonDown(UINT nFlags, CPoint point){CClientDC aDC(this); // Create a device context
1028
Chapter 17: Working with Dialogs and Controls
25905c17.qxd:WroxPro 2/21/08 9:20 AM Page 1028

OnPrepareDC(&aDC); // Get origin adjustedaDC.DPtoLP(&point); // convert point to Logical// In moving mode, so drop the elementif(m_MoveMode){
m_MoveMode = FALSE; // Kill move modem_pSelected = 0; // De-select elementGetDocument()->UpdateAllViews(0); // Redraw all the views
}else{CSketcherDoc* pDoc = GetDocument();// Get a document pointerif(pDoc->GetElementType() == TEXT){CTextDialog aDlg;if(aDlg.DoModal() == IDOK){// Exit OK so create a text element CSketcherDoc* pDoc = GetDocument();CSize TextExtent = aDC.GetTextExtent(aDlg.m_TextString);
// Get bottom right of text rectangle - MM_LOENGLISHCPoint BottomRt(point.x+TextExtent.cx, point.y-TextExtent.cy);CText* pTextElement = new CText(point, BottomRt,
aDlg.m_TextString, pDoc->GetElementColor());
// Add the element to the documentpDoc->AddElement(pTextElement);
// Get all views updatedpDoc->UpdateAllViews(0,0,pTextElement);
}return;
}
m_FirstPoint = point; // Record the cursor positionSetCapture(); // Capture subsequent mouse messages
}}
The code to be added is shaded. It creates a CTextDialog object and then opens the dialog using theDoModal() function call. The m_TextString member of aDlg is automatically set to the string enteredin the edit box, so you can use this data member to pass the string entered back to the CText constructorif the OK button is used to close the dialog. The color and pen width are obtained from the documentusing the GetElementColor() and GetPenWidth() members that you have used previously. The posi-tion of the text is the point value holding the cursor position that is passed to the handler.
You also need to calculate the opposite corner of the rectangle that bounds the text. Because the size of therectangle for the block of text depends on the font used in a device context, you use the GetTextExtent()function in the CClientDC object, aDC, to initialize the CSize object, TextExtent, with the width andheight of the text string in logical coordinates.
Calculating the rectangle for the text in this way is a bit of a cheat, which could cause a problem afteryou start saving documents in a file because it’s conceivable that a document could be read back into an
1029
Chapter 17: Working with Dialogs and Controls
25905c17.qxd:WroxPro 2/21/08 9:20 AM Page 1029

environment where the default font in a device context is larger than that in effect when the rectanglewas calculated. This shouldn’t arise very often, so no need to worry about it here, but as a hint — if youwant to pursue it — you could use an object of the class CFont in the CText definition to define a spe-cific font to be used. You could then use the characteristics of the font to calculate the enclosing rectanglefor the text string.
You could also use CFont to change the font size so that the text is also zoomed when the scale factor isincreased; however, you also need to devise a way to calculate the bounding rectangle based on the fontsize currently being used, which varies with the view scale.
The CText object is created on the heap because the list in the document only maintains pointers to the ele-ments. You add the new element to the document by calling the AddElement() member of CSketcherDoc,with the pointer to the new text element as an argument. Finally, UpdateAllViews() is called with the firstargument 0, which specifies that all views are to be updated.
For the program to compile successfully, you need to add a #include directive for TextDialog.h to theSketcherView.cpp file. You should now be able to produce annotated sketches using multiple scaledand scrolled views, such as the ones shown in Figure 17-23.
Figure 17-23
Dialogs and Controls in CLR SketcherThere is a full range of dialogs and controls available for use in a CLR program but the procedure foradding them to an application is often different from what you have seen in the MFC version of Sketcher.
1030
Chapter 17: Working with Dialogs and Controls
25905c17.qxd:WroxPro 2/21/08 9:20 AM Page 1030

Extending CLR Sketcher will allow you to try out some of the ways in which you can use dialogs andcontrols in a Windows Forms application. You will not necessarily end up with a GUI for CLR Sketcherthat you would want in practice because you will inevitably duplicate some functions in a way that isnot needed in the application.
Adding a DialogIt would be useful to add a dialog that you can use to enter pen widths to allow elements to be drawnwith lines of different thicknesses. Your first thought as to how to do this is likely to be the Design win-dow for the form and indeed, for some predefined dialogs this is the place to start. However, when youwant to create your own dialog from the ground up, the starting point is Solution Explorer.
To add a dialog, you actually add a form to the project that you then modify to make it a dialog window.In Solution Explorer, right-click your project, click the Add menu item, then click New Item. In the dialogthat displays, select the UI group in the left pane then select Windows Form in the right pane. Enter thename as PenDialog.cs and click the OK button. The .cs extension identifies that the dialog is for aC++/CLI program. A new Design window will display showing the dialog. In the Properties windowfor the dialog, change the FormBorderStyle property in the Appearance group to FixedDialog andset the ControlBox, MinimizeBox, and MaximizeBox properties in the Window Style group to false.Change the value of the Text property to Set Pen Width. You now have a modal dialog for setting thepen width so next you can add the controls you need to the dialog.
Customizing the DialogYou’ll use radio buttons to allow a pen width to be chosen and place them within a group box that servesto keep them in a group where only one radio button can be checked at one time. Drag a GroupBox con-trol from the Containers group in the Toolbox window on to the dialog you have created. Change thevalue of the Text property for the group box to Select Pen Width and change the value of the (name)property to penWidthGroupBox. Adjust the size of the group box by dragging its border so it fits nicelywithin the dialog frame. Drag six RadioButton controls from the Toolbox window to the group box andarrange them in a rectangular configuration as you did in the MFC Sketcher program. You’ll notice thatalignment guides to help you position the controls display automatically for each RadioButton controlafter the first. Change the text properties for the radio button controls to Pen Width 1, Pen Width 2through to Pen Width 6 and the corresponding (name) property values to penWidthButton1 throughpenWidthButton6. Change the value of the Checked property for penWidthButton1 to true.
Next you can add two buttons to the dialog and change their Text properties to OK and Cancel and the(name) properties to penWidthOK and penWidthCancel. Return to the dialog’s property window andset the AcceptButton and CancelButton property values to penWidthOK and penWidthCancel byselecting from the list in the values column. Verify that the DialogResult property values for the but-tons are OK and Cancel; this will cause the appropriate DialogResult value to be returned when thedialog is closed by clicking one or other button. You should now have a dialog in the Design windowthat looks similar to Figure 17-24.
The code for the dialog class is part of the project and is defined the PenDialog.h header file. However,there are no instances of the PenDialog class anywhere at the moment so to use the dialog you must createone. You will create a PenDialog object in the Form1 class so add an #include directive for PenDialog.hto Form1.h. Add a new private variable of type PenDialog^ to the Form1 class with the name penDialogand initialize it in the Form1 constructor to gcnew PenDialog().
1031
Chapter 17: Working with Dialogs and Controls
25905c17.qxd:WroxPro 2/21/08 9:20 AM Page 1031
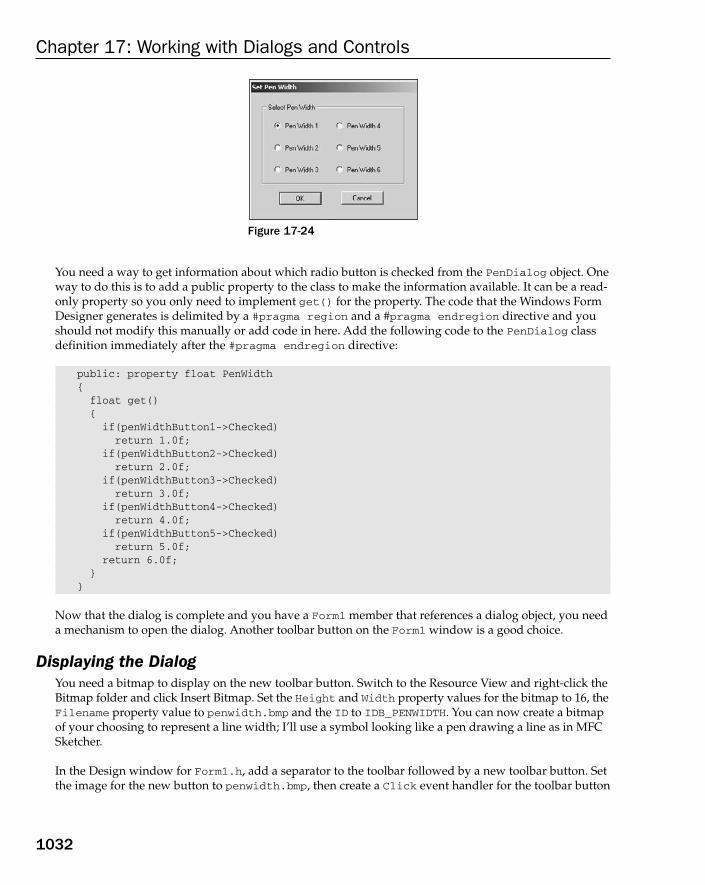
Figure 17-24
You need a way to get information about which radio button is checked from the PenDialog object. Oneway to do this is to add a public property to the class to make the information available. It can be a read-only property so you only need to implement get() for the property. The code that the Windows FormDesigner generates is delimited by a #pragma region and a #pragma endregion directive and youshould not modify this manually or add code in here. Add the following code to the PenDialog classdefinition immediately after the #pragma endregion directive:
public: property float PenWidth{float get(){if(penWidthButton1->Checked)return 1.0f;
if(penWidthButton2->Checked)return 2.0f;
if(penWidthButton3->Checked)return 3.0f;
if(penWidthButton4->Checked)return 4.0f;
if(penWidthButton5->Checked)return 5.0f;
return 6.0f;}
}
Now that the dialog is complete and you have a Form1 member that references a dialog object, you needa mechanism to open the dialog. Another toolbar button on the Form1 window is a good choice.
Displaying the DialogYou need a bitmap to display on the new toolbar button. Switch to the Resource View and right-click theBitmap folder and click Insert Bitmap. Set the Height and Width property values for the bitmap to 16, theFilename property value to penwidth.bmp and the ID to IDB_PENWIDTH. You can now create a bitmapof your choosing to represent a line width; I’ll use a symbol looking like a pen drawing a line as in MFCSketcher.
In the Design window for Form1.h, add a separator to the toolbar followed by a new toolbar button. Setthe image for the new button to penwidth.bmp, then create a Click event handler for the toolbar button
1032
Chapter 17: Working with Dialogs and Controls
25905c17.qxd:WroxPro 2/21/08 9:20 AM Page 1032

by double-clicking the Click event in its Properties window. Change the name of the handler functionto penWidthButton_Click. You can add code to the new event handler to display the pen dialog:
private: System::Void penWidthButton _Click(System::Object^ sender, System::EventArgs^ e)
{if(penDialog->ShowDialog() == System::Windows::Forms::DialogResult::OK){// Set the penwidth...
}}
Calling ShowDialog() for the PenDialog object displays the dialog. Because it is a modal dialog, it remainsvisible until a button is clicked to close it. The ShowDialog() function returns a value that is an enumeratorfrom the System::Windows::Forms::DialogResult enumeration. This enumeration defines the follow-ing enumerator values:
None, OK, Cancel, Abort, Retry, Ignore, Yes, No
These provide for a variety of buttons being identified to close a dialog and you can set any of these valuesfrom the drop-down list of values for the DialogResult property of a button.
You must fully qualify the DialogResult type name here because the Form1 class has an inherited memberwith the name DialogResult.
You need somewhere to record the current pen width in the Form1 class, so add a private penWidthvariable of type float to the class and initialize it to 1.0f in the constructor. You can now replace thecomment in the Click event handler above by:
penWidth = penDialog->PenWidth;
This will set the current pen width to the value returned by the PenWidth property for the dialog.
All that remains is to implement drawing elements with a given pen width.
Setting the Drawing Pen WidthThis will involve modifying the constructor in each of the derived element classes. The modifications areessentially the same in each class, so I’ll just show how the Line class constructor changes and you cando the rest. There’s something else to consider, too. At present the Bound property that you defined inthe Element base class returns a rectangle that is one pixel larger all round than the bounding rectanglefor an element. Drawing with thicker lines will mess this up. The Bound property should take account of the pen width so add a private member of type float to the Element class with the name penWidthand update the definition of the Bound property to the following:
property System::Drawing::Rectangle Bound{
System::Drawing::Rectangle get() {
int width = safe_cast<int>(penWidth);return System::Drawing::Rectangle::Inflate(boundRect,width,width);
1033
Chapter 17: Working with Dialogs and Controls
25905c17.qxd:WroxPro 2/21/08 9:20 AM Page 1033

}}
The changes to the Line class constructor to allow for different pen widths are as follows:
Line(Color color, Point start, Point end, float penWidth){this->penWidth = penWidth;pen = gcnew Pen(color, penWidth);// Rest of the code as before...
}
The only changes are to add an extra parameter to the Line constructor, to store the pen width in theinherited penWidth member, and to use the Pen constructor that accepts a second argument of typefloat that specifies the pen width. Make the same change to the constructors for the other elementclasses.
Because you have changed the parameter list for the element class constructors, you must change theMouseMove event handler that creates elements:
private: System::Void Form1_MouseMove(System::Object^ sender,System::Windows::Forms::MouseEventArgs^ e) {
if(drawing){if(tempElement)
Invalidate(tempElement->Bound); // The old element regionswitch(elementType){
case ElementType::LINE:tempElement = gcnew Line(color, firstPoint, e->Location, penWidth);break;
case ElementType::RECTANGLE:tempElement = gcnew Rectangle(color, firstPoint, e->Location, penWidth);break;
case ElementType::CIRCLE:tempElement = gcnew Circle(color, firstPoint, e->Location, penWidth);break;
case ElementType::CURVE:if(tempElement)
safe_cast<Curve^>(tempElement)->Add(e->Location);elsetempElement = gcnew Curve(color, firstPoint, e->Location, penWidth);
break;}// Rest of the code as before...
}
You should now have CLR Sketcher with pen widths fully working, as Figure 17-25 illustrates.
1034
Chapter 17: Working with Dialogs and Controls
25905c17.qxd:WroxPro 2/21/08 9:20 AM Page 1034
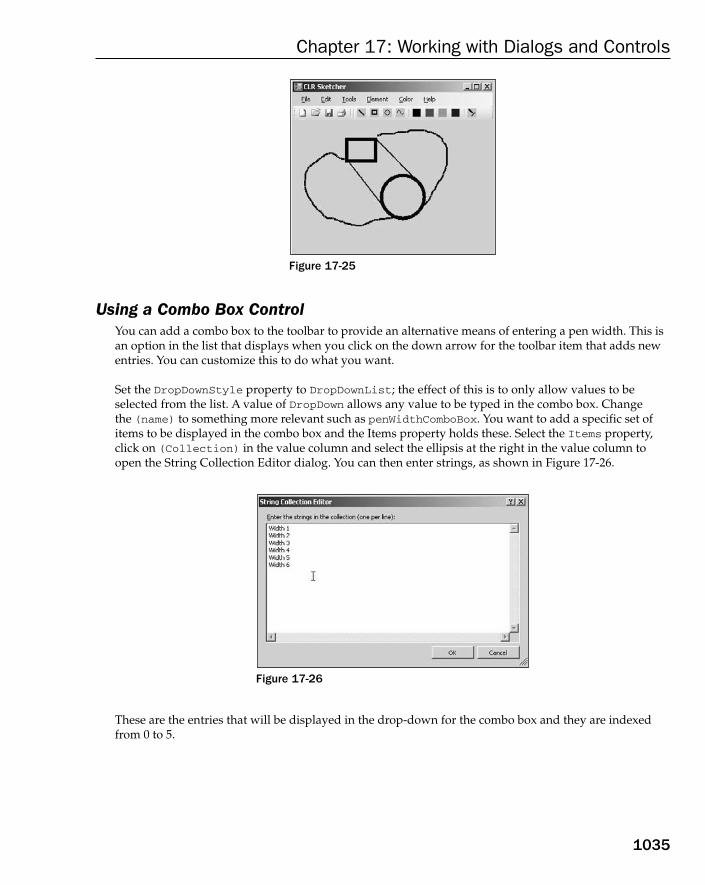
Figure 17-25
Using a Combo Box ControlYou can add a combo box to the toolbar to provide an alternative means of entering a pen width. This isan option in the list that displays when you click on the down arrow for the toolbar item that adds newentries. You can customize this to do what you want.
Set the DropDownStyle property to DropDownList; the effect of this is to only allow values to beselected from the list. A value of DropDown allows any value to be typed in the combo box. Change the (name) to something more relevant such as penWidthComboBox. You want to add a specific set ofitems to be displayed in the combo box and the Items property holds these. Select the Items property,click on (Collection) in the value column and select the ellipsis at the right in the value column toopen the String Collection Editor dialog. You can then enter strings, as shown in Figure 17-26.
Figure 17-26
These are the entries that will be displayed in the drop-down for the combo box and they are indexedfrom 0 to 5.
1035
Chapter 17: Working with Dialogs and Controls
25905c17.qxd:WroxPro 2/21/08 9:20 AM Page 1035

Because the default size for the combo box is wider than you need, change the value of the Size prop-erty to 80,25. You can also change the FlatStyle property to System so it will display recessed. Youcan also set the ToolTipText property to Select pen width.
At present the combo box will not show anything when it is first displayed but you can fix that in theForm1 constructor. Add the following line of code to the constructor after the // TODO comment:
penWidthComboBox = SelectedIndex = 0;
The SelectedIndex property determines which of the entries in the Items collection is displayed in thecombo box and because the entries in the combo box Items property collection are indexed from 0, thiscauses the first entry to be displayed initially. That will continue to be the entry displayed until you selecta new entry from the combo box, so the combo box will always show the currently selected pen width.
You need to know when an entry from the combo box is selected so you can update the penWidth mem-ber of the Form1 class. An easy way to do this is to add a handler for the SelectedIndexChanged eventfor the ComboBox object so add this handler through the Properties window and implement it like this:
private: System::Void penWidthComboBox_SelectedIndexChanged(System::Object^ sender, System::EventArgs^ e)
{penWidth = safe_cast<float>(penWidthComboBox->SelectedIndex + 1);
}
If you recompile CLR Sketcher and run it again, the combo box will allow you to select a new pen widthbut there’s a problem. If you display the pen width dialog by clicking the toolbar button to change the penwidth you’ll see it shows a different pen width selected. Clearly they are operating independently of oneanother so you need to synchronize the two controls. When the pen width is changed by the combo box,the radio buttons in the pen dialog need to be updated and vice versa. You don’t have a way to update theradio buttons, but adding a set() function for the PenWidth property in the PenDialog class will fix it:
public: property float PenWidth{float get(){// Code as before...
}
void set(float penWidth){if(penWidth = 1.0f)penWidthButton1->Checked = true;
else if(penWidth == 2.0f)penWidthButton2->Checked = true;
else if(penWidth == 3.0f)penWidthButton3->Checked = true;
else if(penWidth == 4.0f)penWidthButton4->Checked = true;
else if(penWidth == 5.0f)penWidthButton5->Checked = true;
else if(penWidth == 6.0f)penWidthButton6->Checked = true;
}}
1036
Chapter 17: Working with Dialogs and Controls
25905c17.qxd:WroxPro 2/21/08 9:20 AM Page 1036
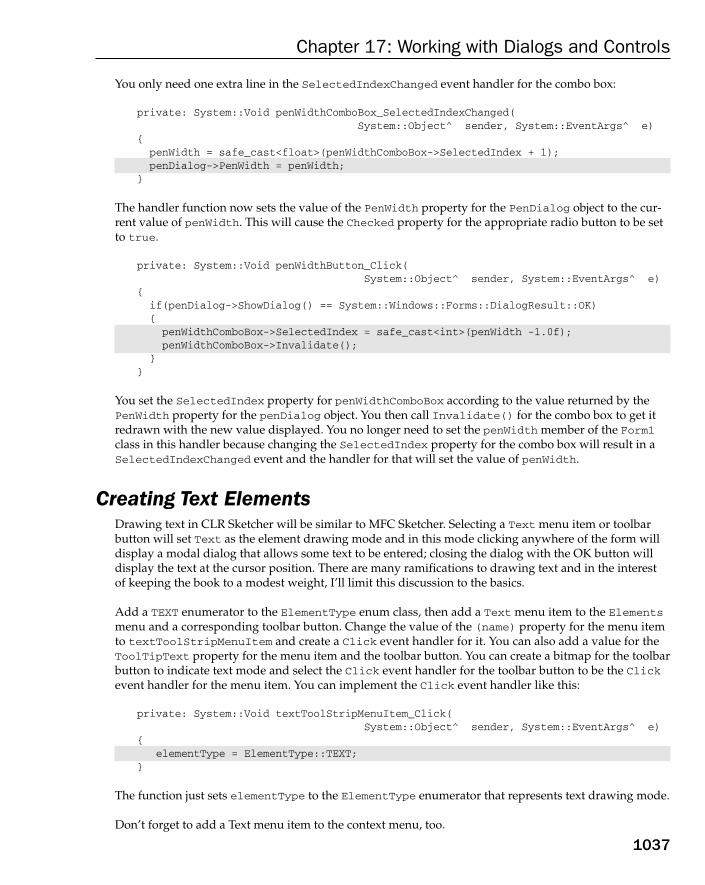
You only need one extra line in the SelectedIndexChanged event handler for the combo box:
private: System::Void penWidthComboBox_SelectedIndexChanged(System::Object^ sender, System::EventArgs^ e)
{penWidth = safe_cast<float>(penWidthComboBox->SelectedIndex + 1);penDialog->PenWidth = penWidth;
}
The handler function now sets the value of the PenWidth property for the PenDialog object to the cur-rent value of penWidth. This will cause the Checked property for the appropriate radio button to be setto true.
private: System::Void penWidthButton_Click(System::Object^ sender, System::EventArgs^ e)
{if(penDialog->ShowDialog() == System::Windows::Forms::DialogResult::OK){penWidthComboBox->SelectedIndex = safe_cast<int>(penWidth -1.0f);penWidthComboBox->Invalidate();
}}
You set the SelectedIndex property for penWidthComboBox according to the value returned by thePenWidth property for the penDialog object. You then call Invalidate() for the combo box to get itredrawn with the new value displayed. You no longer need to set the penWidth member of the Form1class in this handler because changing the SelectedIndex property for the combo box will result in aSelectedIndexChanged event and the handler for that will set the value of penWidth.
Creating Text ElementsDrawing text in CLR Sketcher will be similar to MFC Sketcher. Selecting a Text menu item or toolbarbutton will set Text as the element drawing mode and in this mode clicking anywhere of the form willdisplay a modal dialog that allows some text to be entered; closing the dialog with the OK button willdisplay the text at the cursor position. There are many ramifications to drawing text and in the interest of keeping the book to a modest weight, I’ll limit this discussion to the basics.
Add a TEXT enumerator to the ElementType enum class, then add a Text menu item to the Elementsmenu and a corresponding toolbar button. Change the value of the (name) property for the menu itemto textToolStripMenuItem and create a Click event handler for it. You can also add a value for theToolTipText property for the menu item and the toolbar button. You can create a bitmap for the toolbarbutton to indicate text mode and select the Click event handler for the toolbar button to be the Clickevent handler for the menu item. You can implement the Click event handler like this:
private: System::Void textToolStripMenuItem_Click(System::Object^ sender, System::EventArgs^ e)
{elementType = ElementType::TEXT;
}
The function just sets elementType to the ElementType enumerator that represents text drawing mode.
Don’t forget to add a Text menu item to the context menu, too.
1037
Chapter 17: Working with Dialogs and Controls
25905c17.qxd:WroxPro 2/21/08 9:20 AM Page 1037

Drawing TextThe Graphics class defines a DrawString() function for drawing text. There are several overloadedversions of this function, as described in the following table.
I’ll briefly introduce fonts and brushes before returning to creating Text elements.
Function Description
DrawString(String^ str,Font^ font,Brush^ brush,PointF point)
Draws str at the position point using fontwith the color determined by brush. TypeWindows::Drawing::PointF is a point representedby coordinates of type float. You can use a Pointobject as an argument in any of the functions for aPointF parameter.
DrawString(String^ str,Font^ font,Brush^ brush,float X, float Y)
Draws str at the position (X,Y) using font withthe color determined by brush. You can also usecoordinate arguments of type int when you call this function.
DrawString(String^ str,Font^ font,Brush^ brush,RectangleF rect)
Draws str within the rectangle rect using fontwith the color determined by brush. TypeWindows::Drawing::RectangleF is a rectanglewith its position width and height specified by values of type float. You can use a Rectangleobject as an argument in any of the functions for a RectangleF parameter.
DrawString(String^ str,Font^ font,Brush^ brush,PointF point,StringFormat^ format)
Draws str at the position point using font withthe color determined by brush and the formatting of the string specified by format. A StringFormatobject determines the alignment and other format-ting properties for a string.
DrawString(String^ str,Font^ font,Brush^ brush,float X, float Y,StringFormat^ format)
Draws str at the position (X,Y) using font withthe color determined by brush and the formatting of the string specified by format.
DrawString(String^ str,Font^ font,Brush^ brush,RectangleF rect,StringFormat^ format)
Draws str within the rectangle rect using fontwith the color determined by brush and the format-ting of the string determined by format.
1038
Chapter 17: Working with Dialogs and Controls
25905c17.qxd:WroxPro 2/21/08 9:20 AM Page 1038

Creating FontsYou specify the font to be used when you draw a string by a System::Drawing::Font object thatdefines the typeface, style, and size of the drawn characters. A System::Drawing::FontFamilydefines a group of fonts with a given typeface such as “Arial” or “Times New Roman”. TheSystem::Drawing::FontStyle enumeration defines possible font styles, which can be any of the following: Regular, Bold, Italic, Underline, Strikeout.
You can create create a Font object like this:
FontFamily^ family = gcnew FontFamily(L”Arial”);System::Drawing::Font^ font = gcnew System::Drawing::Font(family, 10,
FontStyle::Bold, GraphicsUnit::Point);
You create the FontFamily object by passing the name of the font to the constructor. The arguments tothe Font constructor are the font family, the size of the font, the font style, and an enumerator from theGraphicUnit enumeration that defines the units for the font size. The possible values are: World,Display, Pixel, Point, Inch, Document, Millimeter.
Thus the code fragment defines a 10-point bold Arial font. Note that the Font type name is fully quali-fied in the fragment because a form object in a Windows Forms application inherits a property with thename Font from the Form base class. The Font property identifies the default font for the form and youpass this as the font argument to the DrawString() function.
Windows Forms applications support TrueType fonts primarily so it is best not to choose OpenTypefonts. If you attempt to use a font that is not supported, or the font is not installed on your computer, the Microsoft Sans Serif font will be used.
Creating BrushesA System::Drawing::Brush object determines the color used when drawing a string with a given font;it is also used to specify the color and texture used to fill a shape. You can’t create a Brush object directlybecause Brush is an abstract class. You create brushes using the SolidBrush, the TextureBrush, andthe LinearGradientBrush class types that are derived from Brush. A SolidBrush object is a brush ofa single color, a TextureBrush object is a brush that uses an image to fill the interior of a shape and aLinearGradientBrush is a brush defining a color gradient blend usually between two colors but it isalso possible to define blends between several colors. You will use a SolidBrush object to draw text,which you create like this:
SolidBrush^ brush = gcnew SolidBrush(Color::Red);
This creates a solid brush that will draw text in red.
Choosing a FontYou can store a reference to the current Font object to be used when creating Text elements by adding avariable of type System::Drawing::Font^ and with the name textFont to the Form1 class. Initialize
1039
Chapter 17: Working with Dialogs and Controls
25905c17.qxd:WroxPro 2/21/08 9:20 AM Page 1039

textFont in the Form1 constructor to Font, which is a form property specifying the default font for theform. Be sure to do this in the body of the constructor following the // TODO: comment; if you attemptto initialize in the initialization list the program will fail because Font is not defined at this point.
You can add a toolbar button to allow the user to select a font for entering text, perhaps a button with a bitmap representation of F for font. Give the button a suitable value for the (name) property such asfontToolStripButton and add a Click event handler for it.
The Toolbox window has a standard dialog for choosing a font that will display all the fonts available on your system and allow selection of the font style and size. Select the Design window for Form1.hand drag a FontDialog control from the Toolbox window to the form. The Click event handler for the fontToolStripButton can display the font dialog:
private: System::Void fontToolStripButton_Click(System::Object^ sender, System::EventArgs^ e)
{if(fontDialog1->ShowDialog() == System::Windows::Forms::DialogResult::OK)textFont = fontDialog1->Font;
}
You display the dialog by calling its ShowDialog() function, as you did for the pen dialog. If the functionreturns DialogResult::OK, then you know the dialog was closed using the OK button. In this case youretrieve the chosen font from the Font property for the dialog object and store it in the textFont variablein the Form1 class object. You can try this out if you want. The font dialog will look like Figure 17-27.
Figure 17-27
You need a class to represent a Text element, so let’s define that next.
1040
Chapter 17: Working with Dialogs and Controls
25905c17.qxd:WroxPro 2/21/08 9:20 AM Page 1040

Defining the Text Element ClassThe TextElement element type will have Element as a base class like the other element types so youcan call the Draw() function polymorphically. Basic information about the location and color of the textelement will be recorded in the members inherited from the base class, but you need to add extra mem-bers to store the text and information relating to the font. Here’s the initial definition of the class:
public ref class TextElement : Element{private:String^ text;SolidBrush^ brush;Font^ font;
public:Text(Color color, Point p, String^ text, Font^ font){this->color = color;brush = gcnew SolidBrush(color);position = p;penWidth = 1;this->text = text;this->font = font;int height = font->Height;int width = height*text->Length;boundRect = System::Drawing::Rectangle(position, Size(width, height));
}
virtual void Draw(Graphics^ g) override{brush->Color = highlighted ? highlightColor : color;g->TranslateTransform(safe_cast<float>(position.X),
safe_cast<float>(position.Y));g->DrawString(text, font, brush, position);g->ResetTransform();
}};
I chose the TextElement type name rather than just Text to avoid confusion with a member of the Formclass with the name Text. A TextElement object has members to store the text string, and the font and thebrush to be used to draw the text. Even though you don’t use a Pen object in the Text class you must ini-tialize the inherited penWidth member because it is used to create the enclosing rectangle for the element.
Determining the bounding rectangle for a text element introduces a slight complication in that it dependson the point size of the font and you have to figure out the width and height from the font size. The heightis easy because the font object has a Height property that makes the height of the font available in pixels.This is the em height of the font (which is the height of the letter M), so you get a generous estimate of thewidth of the rectangle the string will occupy by multiplying the em height by the number of characters inthe string.
1041
Chapter 17: Working with Dialogs and Controls
25905c17.qxd:WroxPro 2/21/08 9:20 AM Page 1041

Creating the Text DialogYou’ll want to enter text from the keyboard when you create a TextElement element, so you need a dialogto manage this. Go to the Solution Explorer window and add a new form to CLR Sketcher by right-clickingthe project name, and clicking Add > New Item... from the menu. Enter the name as TextDialog.Change the Text property for the form to Create Text Element and change the properties to make ita dialog in the way you did for the PenDialog; this involves changing the FormBorderStyle propertyto FixedDialog and setting MaximizeBox, MinimizeBox, and ControlBox properties to false.
The next step is to add buttons to close the dialog. Add an OK button and a Cancel button to the textdialog with the DialogResult property values set appropriately. Change the (name) property values to textOKButton and textCancelButton respectively. Set the AcceptButton property value forTextDialog to textOKButton and the CancelButton property value to textCancelButton.
Using a Text BoxA TextBox control allows a single line or multiple lines of text to be entered, so it certainly covers whatyou want to do here. Add a TextBox to the text dialog by dragging it from the Toolbox window to thedialog in the Design window. By default a TextBox allows a single line of text to be entered and you can stick with that here. When you want to allow multiple lines of input, you click the down arrow tothe right on the TextBox in the Design window and click the checkbox to enable Multiline. The Textproperty for the TextBox provides access to the input and makes it available as a String object.
Ideally you want the text dialog to open with the text box for entering the text having the focus. Then youcan enter the text immediately after the dialog opens and press Enter to close it as if you selected the OKbutton. The control that has the focus initially is determined by the tab order of the controls on the dialog,which depends on the value for the TabIndex property for the controls. If you set the TabIndex prop-erty for the text box to 0 and the OK and Cancel buttons to 2 and 3, this will result in the text box havingthe focus when the dialog displays initially. The tab order also defines the sequence in which the focuschanges when you press the Tab key. You can display the tab order for the controls in the Design win-dow for the dialog by selecting View > Tab Order from the main menu; selecting the menu item againremoves the display of the tab order.
The TextBox1 control will store the string you enter but because this is a private member of the dialogobject, it is not accessible directly. You must add a mechanism to retrieve the string from the dialog object.Another problem is that the TextBox1 control will retain the text you enter and display it the next timethe dialog is opened. You probably don’t want this to occur, so you need a way to reset the Text propertyof TextBox1. You can add a public property to the TextDialog class that will deal with both difficulties.Add the following code to the TextDialog class definition following the #pragma endregion directive:
public: property String^ TextString{String^ get() {return textBox1->Text; }void set(String^ text) { textBox1->Text = text; }
}
The get() function for the TextString property makes the string you enter available and the set()function enables you to reset it.
1042
Chapter 17: Working with Dialogs and Controls
25905c17.qxd:WroxPro 2/21/08 9:20 AM Page 1042

You need some extra data members in the Form1 class to help you create text elements. Add a memberwith the name text of type String^ to store the string for a TextElement element. Add an #includedirective for TextDialog.h to Form1.h, then add a textDialog member of type TextDialog^. Youcan initialize it to gcnew TextDialog() in the initialization list for the Form1 class constructor.
Displaying the Dialog and Creating a Text ElementCreating an element that is text is different from the geometric elements and to understand the sequenceof events in the code, let’s describe the interactive process. Text element mode is in effect when you selectthe Text menu item or toolbar button. To create an element, you click at the position on the form whereyou want the top-left corner of the text string to be. This will display the text dialog and you type the textyou want in the text box and press Enter to close the dialog. The MouseMove handler is not involved in theprocess at all. Clicking the mouse to define the position of the element embodies the whole process. Thisimplies you must display the dialog and create the text element in the MouseDown event handler. Here’sthe code to do that:
private: System::Void Form1_MouseDown(System::Object^ sender,System::Windows::Forms::MouseEventArgs^ e) {
if(e->Button == System::Windows::Forms::MouseButtons::Left){
if(mode == Mode::Normal)drawing = true;
firstPoint = e->Location;if(elementType == ElementType::TEXT && mode == Mode::Normal){textDialog->TextString = L””; // Reset the text box string if(textDialog->ShowDialog() == System::Windows::Forms::DialogResult::OK){text = textDialog->TextString; tempElement = gcnew TextElement(color, firstPoint, text, textFont);sketch->Add(tempElement);Invalidate(tempElement->Bound); // The text element regiontempElement = nullptr;Update();
}drawing = false;
}}
}
You only create text elements when the elementType member of the form has the valueElementType::TEXT and mode is Mode::Normal; the second condition is essential to avoid displaying the dialog when you are in move mode. When the if condition is true, the first action is to reset the Textproperty for the TextBox1 control to an empty string by setting this as the value for the TextString prop-erty for the dialog. You then display the dialog by calling ShowDialog() in the if condition expression. If the ShowDialog() function returns DialogResult::OK, you retrieve the string from the dialog, createthe TextElement object, and add it to the sketch. You then invalidate the region occupied by the new ele-ment and call Update() to display it. You also reset tempElement to nullptr when you are done with it.Finally you set drawing to false to prevent the MouseMove handler from attempting to create an element.
1043
Chapter 17: Working with Dialogs and Controls
25905c17.qxd:WroxPro 2/21/08 9:20 AM Page 1043

If you recompile Sketcher you should be able to create text elements using a font of your choice. Not onlythat, but you can move and delete them, too. Figure 17-28 shows Sketcher displaying text elements.
Figure 17-28
SummaryIn this chapter, you’ve seen several different dialogs using a variety of controls. Although you haven’tcreated dialogs involving several different controls at once, the mechanism for handling them is thesame as you have seen because each control can operate independently of the others.
The most important points relating to MFC applications that you’ve seen in this chapter are:
❑ A dialog involves two components: a resource defining the dialog box and its controls, and aclass that is used to display and manage the dialog.
❑ Information can be extracted from controls in a dialog using the DDX mechanism. The data canbe validated using the DDV mechanism. To use DDX/DDV you need only to use the Add theControl Variable option for the Add Member Variable wizard to define variables in the dialogclass associated with the controls.
❑ A modal dialog retains the focus in the application until the dialog box is closed. As long as amodal dialog is displayed, all other windows in an application are inactive.
❑ A modeless dialog allows the focus to switch from the dialog box to other windows in the appli-cation and back again. A modeless dialog can remain displayed as long as the application is exe-cuting, if required.
❑ Common Controls are a set of standard Windows controls that are supported by MFC and theresource editing capabilities of Developer Studio.
❑ Although controls are usually associated with a dialog, you can add controls to any window.
1044
Chapter 17: Working with Dialogs and Controls
25905c17.qxd:WroxPro 2/21/08 9:20 AM Page 1044
You also learned about the following points in the context of programming for the CLR:
❑ You add a form to a Windows Forms application using the Solutions Explorer pane; you right-click the project name and select Add > New Item... from the menu.
❑ You can convert a form into a modal dialog window by changing the value of theFormBorderStyle property to FixedDialog, and changing the values of the MaximizeBox,MinimizeBox, and ControlBox properties to false.
❑ You populate a dialog with controls by dragging them from the Toolbox window on to the dialog in the Design pane.
❑ You display a dialog by calling its ShowDialog() function.
❑ The value that you set for the DialogResult property for a button in a dialog determines thevalue returned by the ShowDialog() function when that button is used to close the dialog.
❑ The Toolbox has several complete standard dialogs available including a dialog for choosing a font.
❑ You can draw a string on a form by calling the DrawString() function for the Graphicsobject that encapsulates the drawing surface of a form. A Font object argument to the functiondetermines the typeface, style, and size of the characters drawn and a Brush object argumentdetermines the color.
ExercisesYou can download the source code for the examples in the book and the solutions to the following exercisesfrom www.wrox.com.
1. Implement the scale dialog in MFC Sketcher using radio buttons.
2. Implement the pen width dialog in MFC Sketcher using a list box.
3. Implement the pen width dialog in MFC Sketcher as a combo box with the drop list typeselected on the Styles tab in the properties box. (The drop list type allows the user to select from a drop-down list but not to key alternative entries in the list.)
1045
Chapter 17: Working with Dialogs and Controls
25905c17.qxd:WroxPro 2/21/08 9:20 AM Page 1045

25905c17.qxd:WroxPro 2/21/08 9:20 AM Page 1046

18Storing and Printing
Documents
With what you have accomplished so far in the Sketcher program, you can create a reasonablycomprehensive document with views at various scales, but the information is transient becauseyou have no means of saving a document. In this chapter, you’ll remedy that by seeing how youcan store a document on disk. You’ll also investigate how you can output a document to a printer.
In this chapter, you’ll learn about:
❑ Serialization and how it works
❑ How to make objects of a class serializable
❑ The role of a CArchive object in serialization
❑ How to implement serialization in your own classes
❑ How to implement serialization in the Sketcher application
❑ How printing works with MFC
❑ What view class functions you can use to support printing
❑ What a CPrintInfo object contains and how it’s used in the printing process
❑ How to implement multipage printing in the Sketcher application
Understanding SerializationA document in an MFC-based program is not a simple entity — it’s a class object that can be verycomplicated. It typically contains a variety of objects, each of which may contain other objects, eachof which may contain still more objects… and that structure may continue for a number of levels.
You want to be able to save a document in a file, but writing a class object to a file represents some-thing of a problem because it isn’t the same as a basic data item like an integer or a character string.
25905c18.qxd:WroxPro 2/21/08 9:21 AM Page 1047

A basic data item consists of a known number of bytes, so to write it to a file only requires that the appro-priate number of bytes be written. Conversely, if you know a value of type int was written to a file, to getit back you just read the appropriate number of bytes.
Writing objects is different. Even if you write away all the data members of an object, that’s not enough to beable to get the original object back. Class objects contain function members as well as data members, and allthe members, both data and functions, have access specifiers; therefore, to record objects in an external file,the information written to the file must contain complete specifications of all the class structures involved.The read process must also be clever enough to synthesize the original objects completely from the data inthe file. MFC supports a mechanism called serialization to help you to implement input from and output todisk of your class objects with a minimum of time and trouble.
The basic idea behind serialization is that any class that’s serializable must take care of storing and retriev-ing itself. This means that for your classes to be serializable — in the case of the Sketcher application, thiswill include the CElement class and the shape classes you have derived from it — they must be able towrite themselves to a file. This implies that for a class to be serializable, all the class types that are used todeclare data members of the class must be serializable too.
Serializing a DocumentThis all sounds rather tricky, but the basic capability for serializing your document was built into the appli-cation by the Application Wizard right at the outset. The handlers for the File > Save, File > Save As,and File > Open menu items all assume that you want serialization implemented for your document,and already contain the code to support it. Take a look at the parts of the definition and implementation ofCSketcherDoc that relate to creating a document using serialization.
Serialization in the Document Class DefinitionThe code in the definition of CSketcherDoc that enables serialization of a document object is shownshaded in the following fragment:
class CSketcherDoc : public CDocument{protected: // create from serialization only
CSketcherDoc();DECLARE_DYNCREATE(CSketcherDoc)
// Rest of the class...
// Overridespublic:virtual BOOL OnNewDocument();virtual void Serialize(CArchive& ar);
// Rest of the class...
};
1048
Chapter 18: Storing and Printing Documents
25905c18.qxd:WroxPro 2/21/08 9:21 AM Page 1048
There are three things here that relate to serializing a document object:
1. The DECLARE_DYNCREATE() macro.
2. The Serialize() member function.
3. The default class constructor.
DECLARE_DYNCREATE() is a macro that enables objects of the CSketcherDoc class to be created dynami-cally by the application framework during the serialization input process. It’s matched by a complemen-tary macro, IMPLEMENT_DYNCREATE(), in the class implementation. These macros apply only to classesderived from CObject, but as you will see shortly, they aren’t the only pair of macros that can be used inthis context. For any class that you want to serialize, CObject must be a direct or indirect base because it adds the functionality that enables serialization to work. This is why the CElement class was derivedfrom CObject. Almost all MFC classes are derived from CObject and, as such, are serializable.
The Hierarchy Chart in the Microsoft Foundation Class Reference for Visual C++ 2008 shows thoseclasses, which aren’t derived from CObject. Note that CArchive is in this list.
The class definition also includes a declaration for a virtual function Serialize(). Every class that’sserializable must include this function. It’s called to perform both input and output serialization opera-tions on the data members of the class. The object of type CArchive that’s passed as an argument to thisfunction determines whether the operation that is to occur is input or output. You’ll explore this in moredetail when considering the implementation of serialization for the document class.
Note that the class explicitly defines a default constructor. This is also essential for serialization to workbecause the default constructor is used by the framework to synthesize an object when reading from afile, and the synthesized object is then filled out with the data from the file to set the values of the datamembers of the object.
Serialization in the Document Class ImplementationThere are two bits of the file containing the implementation of CSketcherDoc that relate to serialization.The first is the macro IMPLEMENT_DYNCREATE() that complements the DECLARE_DYNCREATE() macro:
// SketcherDoc.cpp : implementation of the CSketcherDoc class//
#include “stdafx.h”#include “Sketcher.h”#include “PenDialog.h”
#include “SketcherDoc.h”
#ifdef _DEBUG#define new DEBUG_NEW#endif
// CSketcherDoc
1049
Chapter 18: Storing and Printing Documents
25905c18.qxd:WroxPro 2/21/08 9:21 AM Page 1049

IMPLEMENT_DYNCREATE(CSketcherDoc, CDocument)
// Message maps and the rest of the file...
All this macro does is define the base class for CSketcherDoc as CDocument. This is required for theproper dynamic creation of a CSketcherDoc object, including members inherited from the base class.
The Serialize() FunctionThe class implementation also includes the definition of the Serialize() function:
void CSketcherDoc::Serialize(CArchive& ar){
if (ar.IsStoring()){
// TODO: add storing code here}else{
// TODO: add loading code here}
}
This function serializes the data members of the class. The argument passed to the function is a referenceto an object of the CArchive class, ar. The IsStoring() member of this class object returns TRUE if theoperation is to store data members in a file and FALSE if the operation is to read back data members froma previously stored document.
Because the Application Wizard has no knowledge of what data your document contains, the process of writing and reading this information is up to you, as indicated by the comments. To understand howthis is done, look a little more closely at the CArchive class.
The CArchive ClassThe CArchive class is the engine that drives the serialization mechanism. It provides an MFC-based equiva-lent of the stream operations in C++ that you used for reading from the keyboard and writing to the screenin the console program examples. An object of the MFC class CArchive provides a mechanism for stream-ing your objects out to a file, or recovering them again as an input stream, automatically reconstituting theobjects of your class in the process.
A CArchive object has a CFile object associated with it which provides disk input/output capabilityfor binary files, and provides the actual connection to the physical file. Within the serialization process,the CFile object takes care of all the specifics of the file input and output operations, and the CArchiveobject deals with the logic of structuring the object data to be written or reconstructing the objects fromthe information read. You need to worry about the details of the associated CFile object only if you areconstructing your own CArchive object. With the document in Sketcher, the framework has alreadytaken care of it and passes the CArchive object that it constructs, ar, to the Serialize() function inCSketcherDoc. You’ll be able to use the same object in each of the Serialize() functions you add tothe shape classes when you implement serialization for them.
1050
Chapter 18: Storing and Printing Documents
25905c18.qxd:WroxPro 2/21/08 9:21 AM Page 1050
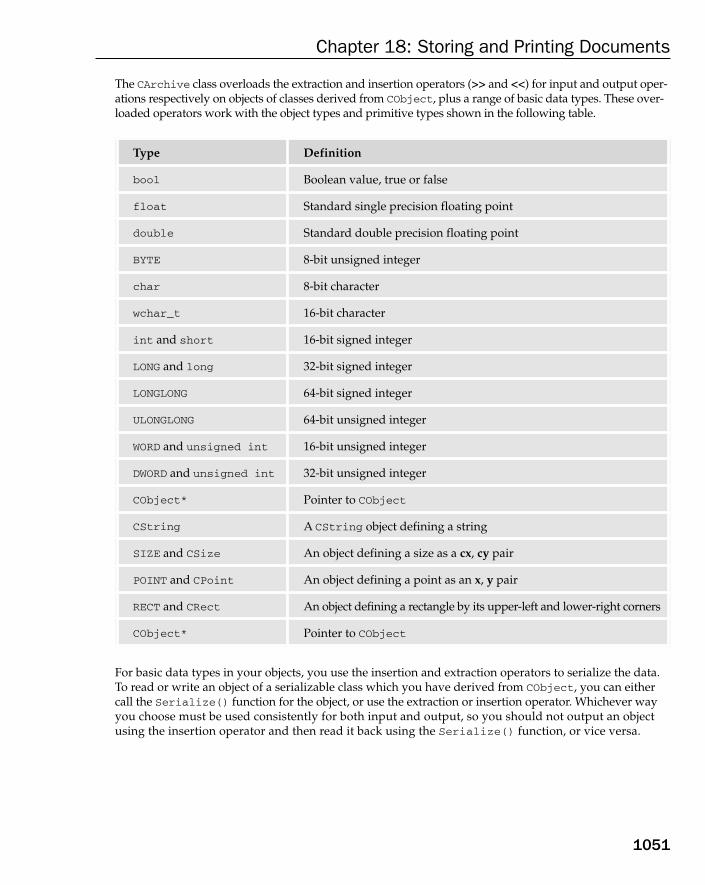
The CArchive class overloads the extraction and insertion operators (>> and <<) for input and output oper-ations respectively on objects of classes derived from CObject, plus a range of basic data types. These over-loaded operators work with the object types and primitive types shown in the following table.
For basic data types in your objects, you use the insertion and extraction operators to serialize the data.To read or write an object of a serializable class which you have derived from CObject, you can eithercall the Serialize() function for the object, or use the extraction or insertion operator. Whichever wayyou choose must be used consistently for both input and output, so you should not output an objectusing the insertion operator and then read it back using the Serialize() function, or vice versa.
Type Definition
bool Boolean value, true or false
float Standard single precision floating point
double Standard double precision floating point
BYTE 8-bit unsigned integer
char 8-bit character
wchar_t 16-bit character
int and short 16-bit signed integer
LONG and long 32-bit signed integer
LONGLONG 64-bit signed integer
ULONGLONG 64-bit unsigned integer
WORD and unsigned int 16-bit unsigned integer
DWORD and unsigned int 32-bit unsigned integer
CObject* Pointer to CObject
CString A CString object defining a string
SIZE and CSize An object defining a size as a cx, cy pair
POINT and CPoint An object defining a point as an x, y pair
RECT and CRect An object defining a rectangle by its upper-left and lower-right corners
CObject* Pointer to CObject
1051
Chapter 18: Storing and Printing Documents
25905c18.qxd:WroxPro 2/21/08 9:21 AM Page 1051

Where you don’t know the type of an object when you read it, as in the case of the pointers in the list of shapes in our document, for example, you must only use the Serialize() function. This brings thevirtual function mechanism into play, so the appropriate Serialize() function for the type of objectpointed to is determined at run time.
A CArchive object is constructed either for storing objects or for retrieving objects. The CArchive functionIsStoring()returns TRUE if the object is for output, and FALSE if the object is for input. You saw this usedin the if statement in the Serialize() member of the CSketcherDoc class.
There are many other member functions of the CArchive class which are concerned with the detailedmechanics of the serialization process, but you don’t usually need to know about them to use serializa-tion in your programs.
Functionality of CObject-Based ClassesThere are three levels of functionality available in your classes when they’re derived from the MFC classCObject. The level you get in your class is determined by which of three different macros you use in thedefinition of your class:
Each of these macros requires that a complementary macro, named with the prefix IMPLEMENT_ instead ofDECLARE_, be placed in the file containing the class implementation. As the table indicates, the macrosprovide progressively more functionality, so I’ll concentrate on the third macro, DECLARE_SERIAL(),because it provides everything that the preceding macros do and more. This is the macro you should useto enable serialization in your own classes. It requires that the macro IMPLEMENT_SERIAL()be added tothe file containing the class implementation.
You may be wondering why the document class uses DECLARE_DYNCREATE() and not DECLARE_SERIAL().The DECLARE_DYNCREATE() macro provides the capability for dynamic creation of the objects of the classin which it appears. The DECLARE_SERIAL() macro provides the capability for serialization of the class,plus the dynamic creation of objects of the class, so it incorporates the effects of DECLARE_DYNCREATE().Your document class doesn’t need serialization because the framework only has to synthesize the docu-ment object and then restore the values of its data members; however, the data members of a document do need to be serializable because this is the process used to store and retrieve them.
The Macros Adding Serialization to a ClassWith the DECLARE_SERIAL() macro in the definition of your CObject-based class, you get access tothe serialization support provided by CObject. This includes special new and delete operators that
Macro Functionality
DECLARE_DYNAMIC() Support for runtime class information
DECLARE_DYNCREATE() Support for runtime class information and dynamic object creation
DECLARE_SERIAL() Support for runtime class information, dynamic object creation, andserialization of objects
1052
Chapter 18: Storing and Printing Documents
25905c18.qxd:WroxPro 2/21/08 9:21 AM Page 1052
incorporate memory leak detection in debug mode. You don’t need to do anything to use this because itworks automatically.
The macro requires the class name to be specified as an argument, so for serialization of the CElementclass, you would add the following line to the class definition:
DECLARE_SERIAL(CElement)
There’s no semicolon required here because this is a macro, not a C++ statement.
It doesn’t matter where you put the macro within the class definition, but if you always put it as thefirst line, you’ll always be able to verify that it’s there, even when the class definition involves a lot oflines of code.
The IMPLEMENT_SERIAL() macro, which you place in the implementation file for the class, requires threearguments to be specified. The first argument is the name of the class, the second is the name of the directbase class, and the third argument is an unsigned 32-bit integer identifying a schema number, or versionnumber, for your program. This schema number allows the serialization process to guard against problemsthat can arise if you write objects with one version of a program and read them with another, in which theclasses may be different.
For example, you could add the following line to the implementation of the CElement class:
IMPLEMENT_SERIAL(CElement, CObject, 1)
If you subsequently modified the class definition, you would change the schema number to somethingdifferent, such as 2. If the program attempts to read data that was written with a different schema num-ber from that in the currently active program, an exception is thrown. The best place for this macro is asthe first line following the #include directives and any initial comments in the .cpp file.
Where CObject is an indirect base of a class, as in the case of the CLine class, for example, each class in the hierarchy must have the serialization macros added for serialization to work in the top level class.For serialization in CLine to work, the macros must also be added to CElement.
How Serialization WorksThe overall process of serializing a document is illustrated in a simplified form in Figure 18-1.
The Serialize() function in the document object calls the Serialize() function (or uses an overloadedinsertion operator) for each of its data members. Where a member is a class object, the Serialize() func-tion for that object serializes each of its data members in turn until ultimately basic data types are written tothe file. Because most classes in MFC ultimately derive from CObject, they contain serialization support,so you can almost always serialize objects of MFC classes.
The data that you’ll deal with in the Serialize() member functions of your classes and the applicationdocument object are, in each case, just the data members. The structure of the classes that are involvedand any other data necessary to reconstitute your original objects is automatically taken care of by theCArchive object.
1053
Chapter 18: Storing and Printing Documents
25905c18.qxd:WroxPro 2/21/08 9:21 AM Page 1053
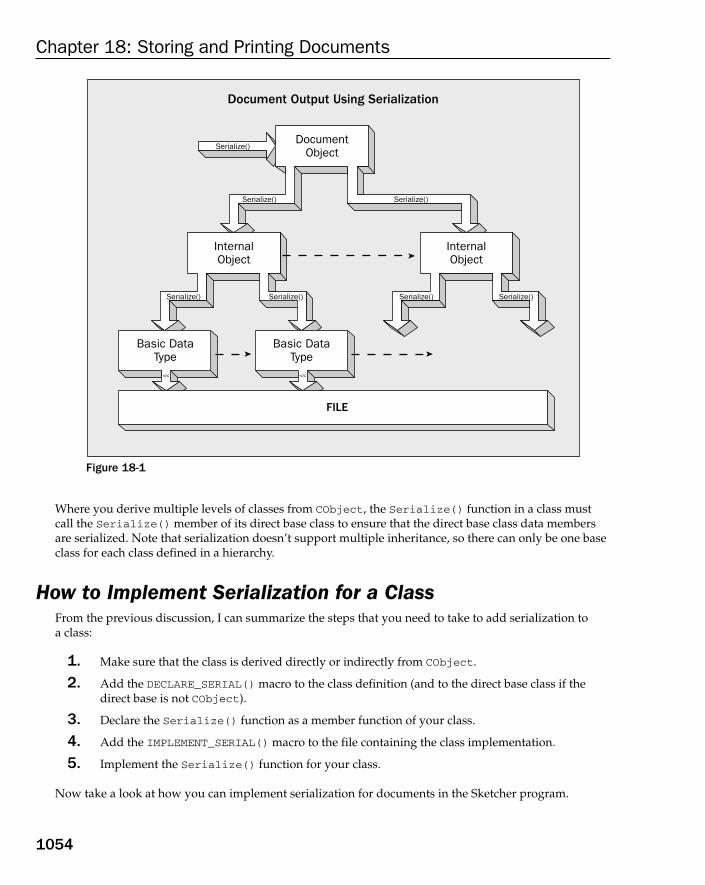
Figure 18-1
Where you derive multiple levels of classes from CObject, the Serialize() function in a class mustcall the Serialize() member of its direct base class to ensure that the direct base class data membersare serialized. Note that serialization doesn’t support multiple inheritance, so there can only be one baseclass for each class defined in a hierarchy.
How to Implement Serialization for a ClassFrom the previous discussion, I can summarize the steps that you need to take to add serialization to a class:
1. Make sure that the class is derived directly or indirectly from CObject.
2. Add the DECLARE_SERIAL() macro to the class definition (and to the direct base class if thedirect base is not CObject).
3. Declare the Serialize() function as a member function of your class.
4. Add the IMPLEMENT_SERIAL() macro to the file containing the class implementation.
5. Implement the Serialize() function for your class.
Now take a look at how you can implement serialization for documents in the Sketcher program.
FILE
Document Output Using Serialization
DocumentObject
InternalObject
InternalObject
Serialize()
Serialize() Serialize()
Serialize()Serialize()
<<<<
Serialize() Serialize()
Basic DataType
Basic DataType
1054
Chapter 18: Storing and Printing Documents
25905c18.qxd:WroxPro 2/21/08 9:21 AM Page 1054
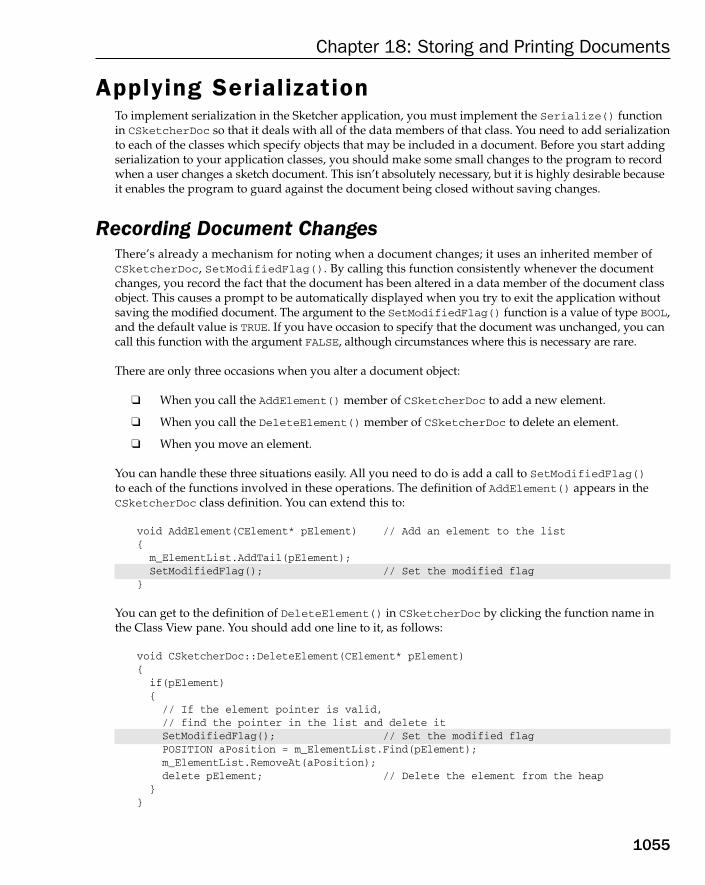
Applying SerializationTo implement serialization in the Sketcher application, you must implement the Serialize() functionin CSketcherDoc so that it deals with all of the data members of that class. You need to add serializationto each of the classes which specify objects that may be included in a document. Before you start addingserialization to your application classes, you should make some small changes to the program to recordwhen a user changes a sketch document. This isn’t absolutely necessary, but it is highly desirable becauseit enables the program to guard against the document being closed without saving changes.
Recording Document ChangesThere’s already a mechanism for noting when a document changes; it uses an inherited member ofCSketcherDoc, SetModifiedFlag(). By calling this function consistently whenever the documentchanges, you record the fact that the document has been altered in a data member of the document classobject. This causes a prompt to be automatically displayed when you try to exit the application withoutsaving the modified document. The argument to the SetModifiedFlag() function is a value of type BOOL,and the default value is TRUE. If you have occasion to specify that the document was unchanged, you cancall this function with the argument FALSE, although circumstances where this is necessary are rare.
There are only three occasions when you alter a document object:
❑ When you call the AddElement() member of CSketcherDoc to add a new element.
❑ When you call the DeleteElement() member of CSketcherDoc to delete an element.
❑ When you move an element.
You can handle these three situations easily. All you need to do is add a call to SetModifiedFlag()to each of the functions involved in these operations. The definition of AddElement() appears in theCSketcherDoc class definition. You can extend this to:
void AddElement(CElement* pElement) // Add an element to the list{
m_ElementList.AddTail(pElement);SetModifiedFlag(); // Set the modified flag
}
You can get to the definition of DeleteElement() in CSketcherDoc by clicking the function name inthe Class View pane. You should add one line to it, as follows:
void CSketcherDoc::DeleteElement(CElement* pElement){
if(pElement){
// If the element pointer is valid,// find the pointer in the list and delete itSetModifiedFlag(); // Set the modified flagPOSITION aPosition = m_ElementList.Find(pElement);m_ElementList.RemoveAt(aPosition);delete pElement; // Delete the element from the heap
}}
1055
Chapter 18: Storing and Printing Documents
25905c18.qxd:WroxPro 2/21/08 9:21 AM Page 1055
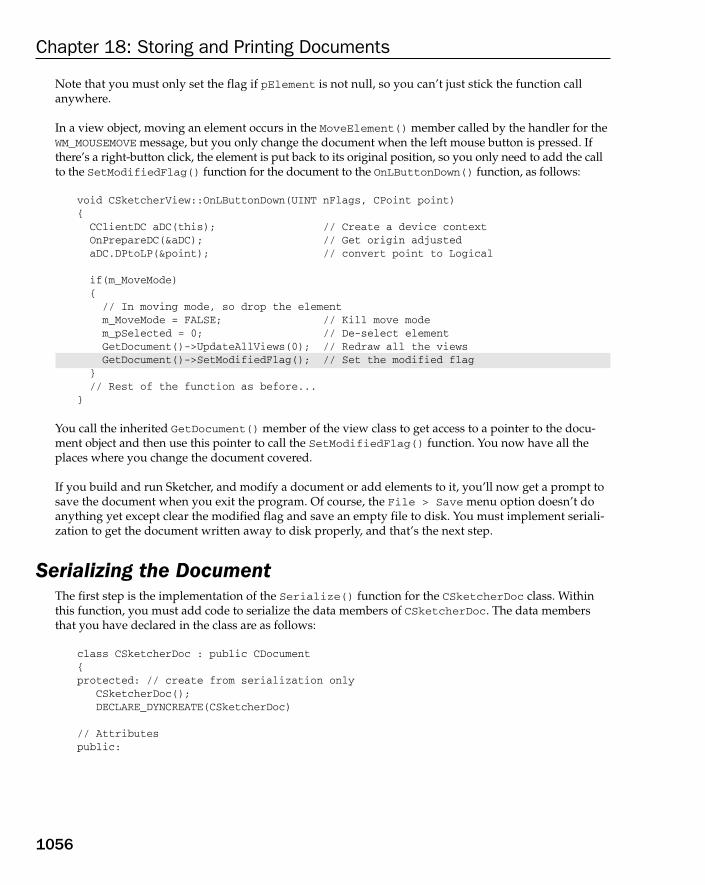
Note that you must only set the flag if pElement is not null, so you can’t just stick the function call anywhere.
In a view object, moving an element occurs in the MoveElement() member called by the handler for theWM_MOUSEMOVE message, but you only change the document when the left mouse button is pressed. Ifthere’s a right-button click, the element is put back to its original position, so you only need to add the callto the SetModifiedFlag() function for the document to the OnLButtonDown() function, as follows:
void CSketcherView::OnLButtonDown(UINT nFlags, CPoint point){CClientDC aDC(this); // Create a device contextOnPrepareDC(&aDC); // Get origin adjustedaDC.DPtoLP(&point); // convert point to Logical
if(m_MoveMode){// In moving mode, so drop the elementm_MoveMode = FALSE; // Kill move modem_pSelected = 0; // De-select elementGetDocument()->UpdateAllViews(0); // Redraw all the viewsGetDocument()->SetModifiedFlag(); // Set the modified flag
}// Rest of the function as before...
}
You call the inherited GetDocument() member of the view class to get access to a pointer to the docu-ment object and then use this pointer to call the SetModifiedFlag() function. You now have all theplaces where you change the document covered.
If you build and run Sketcher, and modify a document or add elements to it, you’ll now get a prompt tosave the document when you exit the program. Of course, the File > Save menu option doesn’t doanything yet except clear the modified flag and save an empty file to disk. You must implement seriali-zation to get the document written away to disk properly, and that’s the next step.
Serializing the DocumentThe first step is the implementation of the Serialize() function for the CSketcherDoc class. Withinthis function, you must add code to serialize the data members of CSketcherDoc. The data membersthat you have declared in the class are as follows:
class CSketcherDoc : public CDocument{protected: // create from serialization only
CSketcherDoc();DECLARE_DYNCREATE(CSketcherDoc)
// Attributespublic:
1056
Chapter 18: Storing and Printing Documents
25905c18.qxd:WroxPro 2/21/08 9:21 AM Page 1056

protected:COLORREF m_Color; // Current drawing colorunsigned int m_Element; // Current element typeCTypedPtrList<CObList, CElement*> m_ElementList; // Element listint m_PenWidth; // Current pen widthCSize m_DocSize; // Document size
// Rest of the class...};
Note that you don’t need to add any of the preceding code at this point as it’s there already. All that’snecessary is to insert the statements to store and retrieve these five data members in the Serialize()member of the class. You can do this with the following code:
void CSketcherDoc::Serialize(CArchive& ar){m_ElementList.Serialize(ar); // Serialize the element list
if (ar.IsStoring()){ar << m_Color // Store the current color
<< m_Element // the current element type,<< m_PenWidth // and the current pen width<< m_DocSize; // and the current document size
}else{ar >> m_Color // Retrieve the current color
>> m_Element // the current element type,>> m_PenWidth // and the current pen width>> m_DocSize; // and the current document size
}}
For four of the data members, you just use the extraction and insertion operators that are overloaded in the CArchive class. This works for the data member m_Color, even though its type is COLORREF,because type COLORREF is the same as type long. You can’t use the extraction and insertion operators form_ElementList, because its type isn’t supported by the operators, but as long as the CTypedPtrListclass is defined from the collection class template using CObList, as you have done in the declaration of m_ElementList, the class automatically supports serialization. You can, therefore, just call theSerialize() function for the object.
You don’t need to place calls to the Serialize() member of the object m_ElementList in the if-elsestatement because the kind of operation performed is determined automatically by the CArchive argu-ment, ar. The single statement calling the Serialize() member of m_ElementList takes care of bothinput and output.
That’s all you need for serializing the document class data members, but serializing the element list,m_ElementList, causes the Serialize() functions for the element classes to be called to store andretrieve the elements themselves, so you also need to implement serialization for those classes.
1057
Chapter 18: Storing and Printing Documents
25905c18.qxd:WroxPro 2/21/08 9:21 AM Page 1057
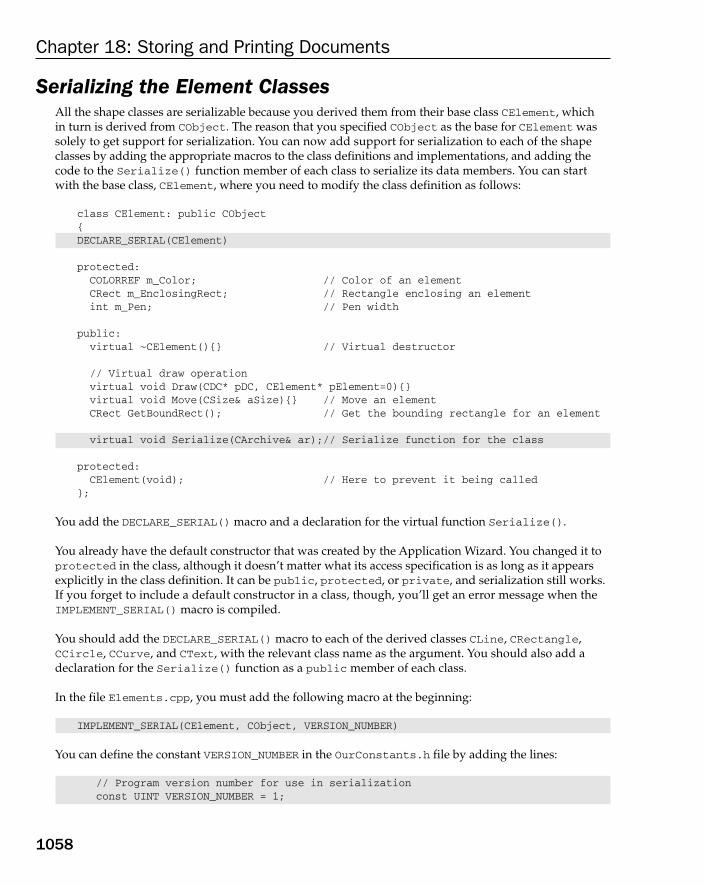
Serializing the Element ClassesAll the shape classes are serializable because you derived them from their base class CElement, which in turn is derived from CObject. The reason that you specified CObject as the base for CElement wassolely to get support for serialization. You can now add support for serialization to each of the shapeclasses by adding the appropriate macros to the class definitions and implementations, and adding thecode to the Serialize() function member of each class to serialize its data members. You can start with the base class, CElement, where you need to modify the class definition as follows:
class CElement: public CObject{DECLARE_SERIAL(CElement)
protected:COLORREF m_Color; // Color of an elementCRect m_EnclosingRect; // Rectangle enclosing an elementint m_Pen; // Pen width
public:virtual ~CElement(){} // Virtual destructor
// Virtual draw operationvirtual void Draw(CDC* pDC, CElement* pElement=0){}virtual void Move(CSize& aSize){} // Move an elementCRect GetBoundRect(); // Get the bounding rectangle for an element
virtual void Serialize(CArchive& ar);// Serialize function for the class
protected:CElement(void); // Here to prevent it being called
};
You add the DECLARE_SERIAL() macro and a declaration for the virtual function Serialize().
You already have the default constructor that was created by the Application Wizard. You changed it toprotected in the class, although it doesn’t matter what its access specification is as long as it appearsexplicitly in the class definition. It can be public, protected, or private, and serialization still works.If you forget to include a default constructor in a class, though, you’ll get an error message when theIMPLEMENT_SERIAL() macro is compiled.
You should add the DECLARE_SERIAL() macro to each of the derived classes CLine, CRectangle,CCircle, CCurve, and CText, with the relevant class name as the argument. You should also add a declaration for the Serialize() function as a public member of each class.
In the file Elements.cpp, you must add the following macro at the beginning:
IMPLEMENT_SERIAL(CElement, CObject, VERSION_NUMBER)
You can define the constant VERSION_NUMBER in the OurConstants.h file by adding the lines:
// Program version number for use in serializationconst UINT VERSION_NUMBER = 1;
1058
Chapter 18: Storing and Printing Documents
25905c18.qxd:WroxPro 2/21/08 9:21 AM Page 1058
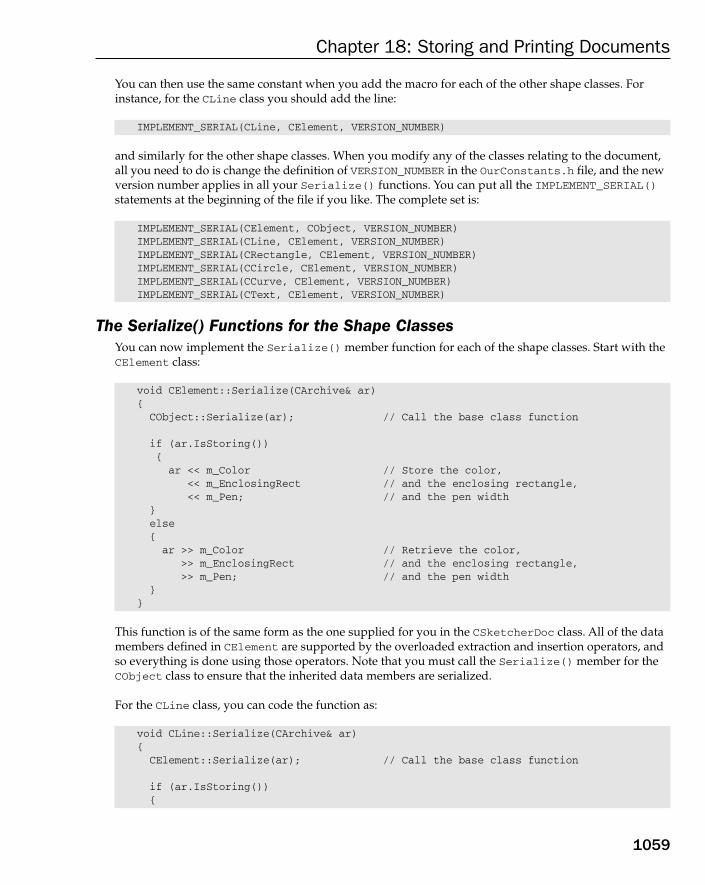
You can then use the same constant when you add the macro for each of the other shape classes. Forinstance, for the CLine class you should add the line:
IMPLEMENT_SERIAL(CLine, CElement, VERSION_NUMBER)
and similarly for the other shape classes. When you modify any of the classes relating to the document,all you need to do is change the definition of VERSION_NUMBER in the OurConstants.h file, and the newversion number applies in all your Serialize() functions. You can put all the IMPLEMENT_SERIAL()statements at the beginning of the file if you like. The complete set is:
IMPLEMENT_SERIAL(CElement, CObject, VERSION_NUMBER)IMPLEMENT_SERIAL(CLine, CElement, VERSION_NUMBER)IMPLEMENT_SERIAL(CRectangle, CElement, VERSION_NUMBER)IMPLEMENT_SERIAL(CCircle, CElement, VERSION_NUMBER)IMPLEMENT_SERIAL(CCurve, CElement, VERSION_NUMBER)IMPLEMENT_SERIAL(CText, CElement, VERSION_NUMBER)
The Serialize() Functions for the Shape ClassesYou can now implement the Serialize() member function for each of the shape classes. Start with theCElement class:
void CElement::Serialize(CArchive& ar){CObject::Serialize(ar); // Call the base class function
if (ar.IsStoring()){ar << m_Color // Store the color,
<< m_EnclosingRect // and the enclosing rectangle,<< m_Pen; // and the pen width
}else{ar >> m_Color // Retrieve the color,
>> m_EnclosingRect // and the enclosing rectangle,>> m_Pen; // and the pen width
}}
This function is of the same form as the one supplied for you in the CSketcherDoc class. All of the datamembers defined in CElement are supported by the overloaded extraction and insertion operators, andso everything is done using those operators. Note that you must call the Serialize() member for theCObject class to ensure that the inherited data members are serialized.
For the CLine class, you can code the function as:
void CLine::Serialize(CArchive& ar){CElement::Serialize(ar); // Call the base class function
if (ar.IsStoring()){
1059
Chapter 18: Storing and Printing Documents
25905c18.qxd:WroxPro 2/21/08 9:21 AM Page 1059
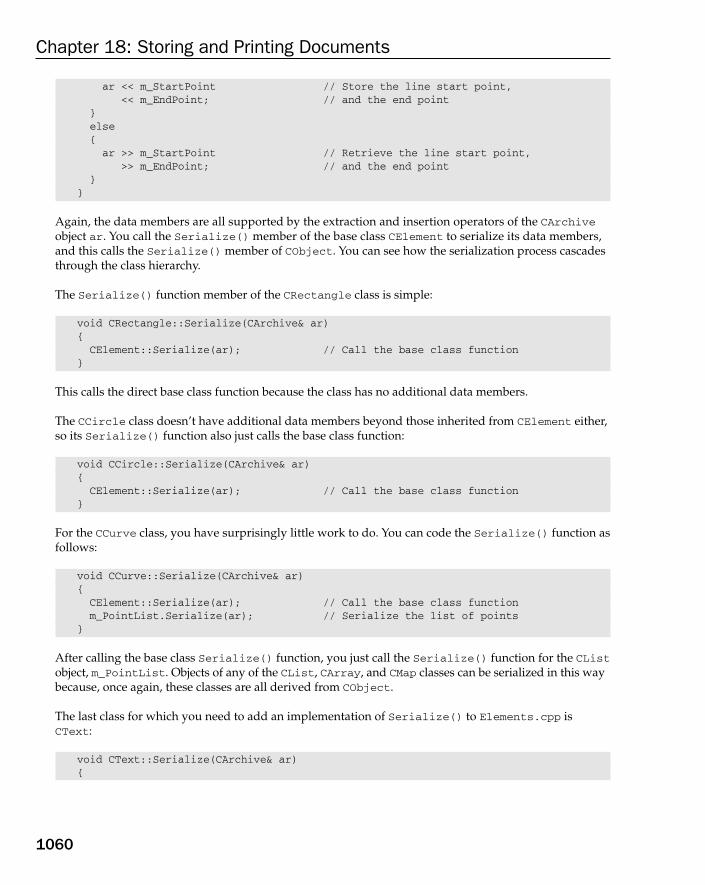
ar << m_StartPoint // Store the line start point,<< m_EndPoint; // and the end point
}else{ar >> m_StartPoint // Retrieve the line start point,
>> m_EndPoint; // and the end point}
}
Again, the data members are all supported by the extraction and insertion operators of the CArchiveobject ar. You call the Serialize() member of the base class CElement to serialize its data members,and this calls the Serialize() member of CObject. You can see how the serialization process cascadesthrough the class hierarchy.
The Serialize() function member of the CRectangle class is simple:
void CRectangle::Serialize(CArchive& ar){CElement::Serialize(ar); // Call the base class function
}
This calls the direct base class function because the class has no additional data members.
The CCircle class doesn’t have additional data members beyond those inherited from CElement either,so its Serialize() function also just calls the base class function:
void CCircle::Serialize(CArchive& ar){CElement::Serialize(ar); // Call the base class function
}
For the CCurve class, you have surprisingly little work to do. You can code the Serialize() function asfollows:
void CCurve::Serialize(CArchive& ar){CElement::Serialize(ar); // Call the base class functionm_PointList.Serialize(ar); // Serialize the list of points
}
After calling the base class Serialize() function, you just call the Serialize() function for the CListobject, m_PointList. Objects of any of the CList, CArray, and CMap classes can be serialized in this waybecause, once again, these classes are all derived from CObject.
The last class for which you need to add an implementation of Serialize() to Elements.cpp isCText:
void CText::Serialize(CArchive& ar){
1060
Chapter 18: Storing and Printing Documents
25905c18.qxd:WroxPro 2/21/08 9:21 AM Page 1060
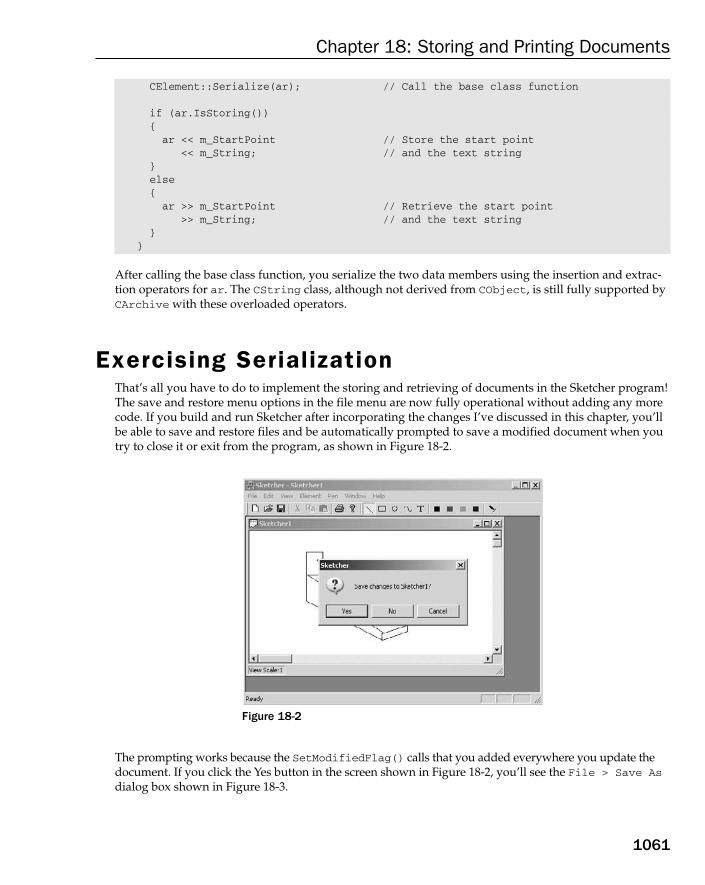
CElement::Serialize(ar); // Call the base class function
if (ar.IsStoring()){ar << m_StartPoint // Store the start point
<< m_String; // and the text string}else{ar >> m_StartPoint // Retrieve the start point
>> m_String; // and the text string}
}
After calling the base class function, you serialize the two data members using the insertion and extrac-tion operators for ar. The CString class, although not derived from CObject, is still fully supported byCArchive with these overloaded operators.
Exercising SerializationThat’s all you have to do to implement the storing and retrieving of documents in the Sketcher program!The save and restore menu options in the file menu are now fully operational without adding any morecode. If you build and run Sketcher after incorporating the changes I’ve discussed in this chapter, you’llbe able to save and restore files and be automatically prompted to save a modified document when youtry to close it or exit from the program, as shown in Figure 18-2.
Figure 18-2
The prompting works because the SetModifiedFlag() calls that you added everywhere you update thedocument. If you click the Yes button in the screen shown in Figure 18-2, you’ll see the File > Save Asdialog box shown in Figure 18-3.
1061
Chapter 18: Storing and Printing Documents
25905c18.qxd:WroxPro 2/21/08 9:21 AM Page 1061
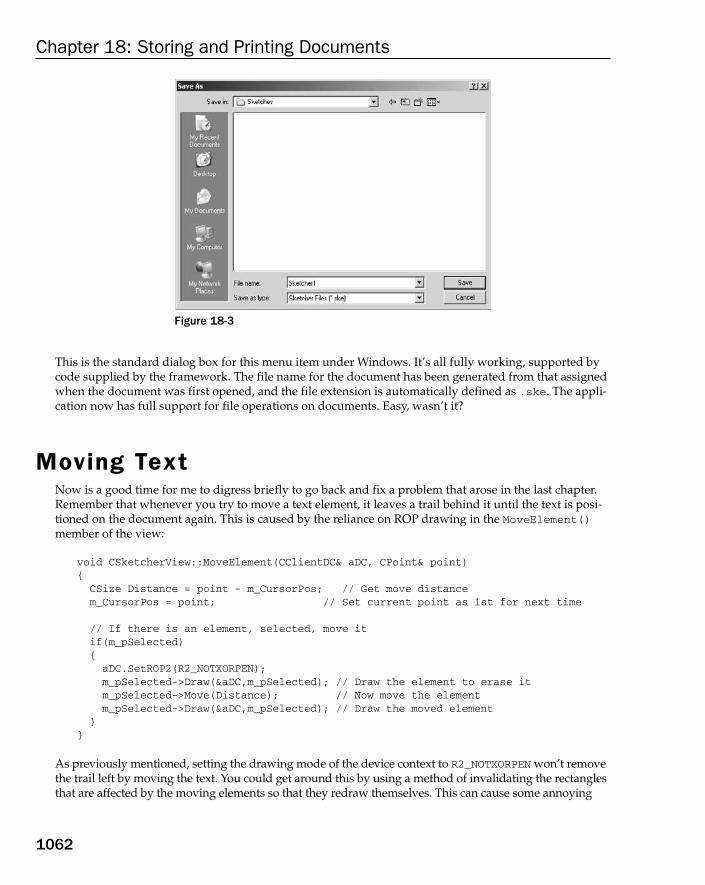
Figure 18-3
This is the standard dialog box for this menu item under Windows. It’s all fully working, supported bycode supplied by the framework. The file name for the document has been generated from that assignedwhen the document was first opened, and the file extension is automatically defined as .ske. The appli-cation now has full support for file operations on documents. Easy, wasn’t it?
Moving TextNow is a good time for me to digress briefly to go back and fix a problem that arose in the last chapter.Remember that whenever you try to move a text element, it leaves a trail behind it until the text is posi-tioned on the document again. This is caused by the reliance on ROP drawing in the MoveElement()member of the view:
void CSketcherView::MoveElement(CClientDC& aDC, CPoint& point){CSize Distance = point - m_CursorPos; // Get move distancem_CursorPos = point; // Set current point as 1st for next time
// If there is an element, selected, move itif(m_pSelected){aDC.SetROP2(R2_NOTXORPEN);m_pSelected->Draw(&aDC,m_pSelected); // Draw the element to erase itm_pSelected->Move(Distance); // Now move the elementm_pSelected->Draw(&aDC,m_pSelected); // Draw the moved element
}}
As previously mentioned, setting the drawing mode of the device context to R2_NOTXORPEN won’t removethe trail left by moving the text. You could get around this by using a method of invalidating the rectanglesthat are affected by the moving elements so that they redraw themselves. This can cause some annoying
1062
Chapter 18: Storing and Printing Documents
25905c18.qxd:WroxPro 2/21/08 9:21 AM Page 1062
flicker when an element is moving fast, however. A better solution is to use the invalidation method onlyfor the text elements, and the original ROP method for all the other elements, but how do you know whichclass the selected element belongs to? This is surprisingly simple: you can use an if statement, as follows:
if (m_pSelected->IsKindOf(RUNTIME_CLASS(CText))){// Code here will only be executed if the selected element is of class CText
}
This uses the RUNTIME_CLASS macro to get a pointer to an object of type CRuntimeClass, then passesthis pointer to the IsKindOf() member function of m_pSelected. This returns a non-zero result ifm_pSelected is of class CText, and returns zero otherwise. The only proviso is that the class you’rechecking for must be declared using DECLARE_DYNCREATE or DECLARE_SERIAL macros, which is why I left this fix until now.
There is another way of determining the class type using a facility that is built in to ISO/ANSI C++. Thetypeid() operator returns a reference to an object of type type_info that encapsulates a pointer to thename of the runtime type of the object or expression that you place between the parentheses. Becauseyou can compare type_info objects using the == operator (or the != operator), you could test whetherm_pSelected is of type CText like this:
if (typeid(m_pSelected) == typid(CText)){// Code here will only be executed if the selected element is of class CText
}
If you want to use a typeid() operator, you must add an #include directive for the <typinfo>ISO/ANSI C++ header. Of course, there is no requirement for the types to be declared using the MFCmacros noted for the previous method, although you must ensure that the /GR compiler option thatenables runtime type information is specified.
The final code for MoveElement() using the MFC RUNTIME_CLASS macro is as follows:
void CSketcherView::MoveElement(CClientDC& aDC, CPoint& point){
CSize Distance = point - m_CursorPos; // Get move distancem_CursorPos = point; // Set current point as 1st for next time
// If there is an element, selected, move itif(m_pSelected){// If the element is text use this method...if(m_pSelected->IsKindOf(RUNTIME_CLASS(CText))){CRect OldRect=m_pSelected->GetBoundRect(); // Get old bound rectm_pSelected->Move(Distance); // Move the elementCRect NewRect=m_pSelected->GetBoundRect(); // Get new bound rectOldRect.UnionRect(&OldRect,&NewRect); // Combine the bound rectsaDC.LPtoDP(OldRect); // Convert to client coordsOldRect.NormalizeRect(); // Normalize combined areaInvalidateRect(&OldRect); // Invalidate combined areaUpdateWindow(); // Redraw immediately
1063
Chapter 18: Storing and Printing Documents
25905c18.qxd:WroxPro 2/21/08 9:21 AM Page 1063
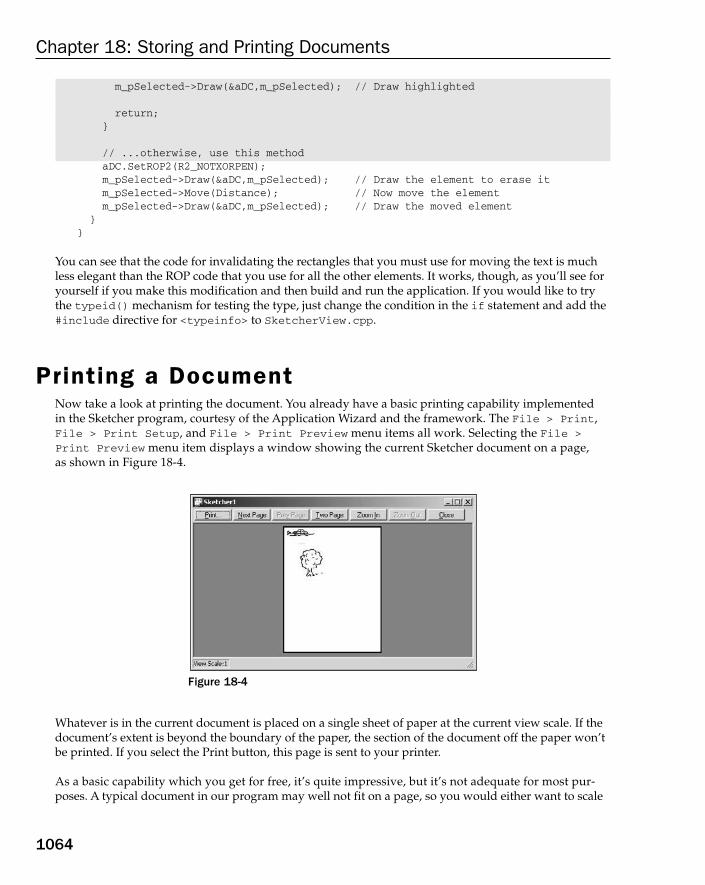
m_pSelected->Draw(&aDC,m_pSelected); // Draw highlighted
return;}
// ...otherwise, use this methodaDC.SetROP2(R2_NOTXORPEN);m_pSelected->Draw(&aDC,m_pSelected); // Draw the element to erase itm_pSelected->Move(Distance); // Now move the elementm_pSelected->Draw(&aDC,m_pSelected); // Draw the moved element
}}
You can see that the code for invalidating the rectangles that you must use for moving the text is muchless elegant than the ROP code that you use for all the other elements. It works, though, as you’ll see foryourself if you make this modification and then build and run the application. If you would like to trythe typeid() mechanism for testing the type, just change the condition in the if statement and add the#include directive for <typeinfo> to SketcherView.cpp.
Printing a DocumentNow take a look at printing the document. You already have a basic printing capability implemented in the Sketcher program, courtesy of the Application Wizard and the framework. The File > Print,File > Print Setup, and File > Print Preview menu items all work. Selecting the File >Print Preview menu item displays a window showing the current Sketcher document on a page, as shown in Figure 18-4.
Figure 18-4
Whatever is in the current document is placed on a single sheet of paper at the current view scale. If thedocument’s extent is beyond the boundary of the paper, the section of the document off the paper won’tbe printed. If you select the Print button, this page is sent to your printer.
As a basic capability which you get for free, it’s quite impressive, but it’s not adequate for most pur-poses. A typical document in our program may well not fit on a page, so you would either want to scale
1064
Chapter 18: Storing and Printing Documents
25905c18.qxd:WroxPro 2/21/08 9:21 AM Page 1064

the document to fit, or perhaps more conveniently, print the whole document over as many pages as nec-essary. You can add your own print processing code to extend the capability of the facilities provided bythe framework, but to implement this you first need to understand how printing has been implementedin MFC.
The Printing ProcessPrinting a document is controlled by the current view. The process is inevitably a bit messy because print-ing is inherently a messy business, and it potentially involves you in implementing your own versions ofquite a number of inherited functions in your view class.
Figure 18-5 shows the logic of the process and the functions involved.
Figure 18-5 shows how the sequence of events is controlled by the framework and how printing a docu-ment involves calling five inherited members of your view class, which you may need to override. TheCDC member functions shown on the left side of the diagram communicate with the printer device driverand are called automatically by the framework.
Figure 18-5
The
Fram
ewor
k
View Members
CDC::StartDoc()
CDC::StartPage()
CDC::EndPage()
CDC::EndDoc()
OnPreparePrinting()
OnBeginPrinting()
• Calculate page count• Call DoPreparePrinting()
loop while there are more pages
• Print headers/footers• Print current page
• Change viewpoint origin• Set DC attributes
• Allocate GDI resources
• De-Allocate GDI resources
OnPrepareDC()
OnPrint()
OnEndPrinting()
1
2
4
6
98
7
5
3
1065
Chapter 18: Storing and Printing Documents
25905c18.qxd:WroxPro 2/21/08 9:21 AM Page 1065
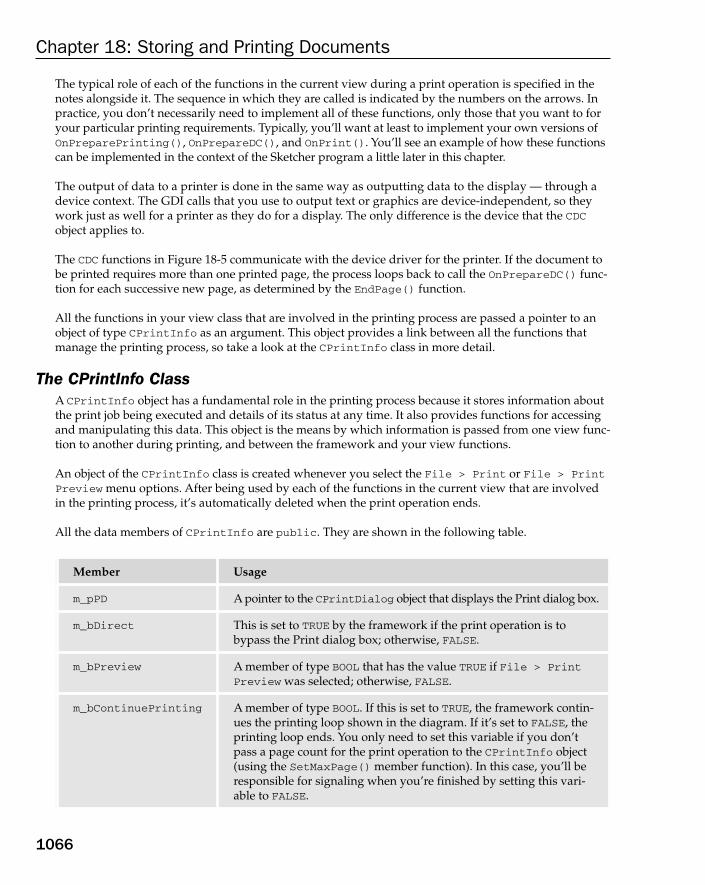
The typical role of each of the functions in the current view during a print operation is specified in thenotes alongside it. The sequence in which they are called is indicated by the numbers on the arrows. Inpractice, you don’t necessarily need to implement all of these functions, only those that you want to foryour particular printing requirements. Typically, you’ll want at least to implement your own versions ofOnPreparePrinting(), OnPrepareDC(), and OnPrint(). You’ll see an example of how these functionscan be implemented in the context of the Sketcher program a little later in this chapter.
The output of data to a printer is done in the same way as outputting data to the display — through adevice context. The GDI calls that you use to output text or graphics are device-independent, so theywork just as well for a printer as they do for a display. The only difference is the device that the CDCobject applies to.
The CDC functions in Figure 18-5 communicate with the device driver for the printer. If the document tobe printed requires more than one printed page, the process loops back to call the OnPrepareDC() func-tion for each successive new page, as determined by the EndPage() function.
All the functions in your view class that are involved in the printing process are passed a pointer to anobject of type CPrintInfo as an argument. This object provides a link between all the functions thatmanage the printing process, so take a look at the CPrintInfo class in more detail.
The CPrintInfo ClassA CPrintInfo object has a fundamental role in the printing process because it stores information aboutthe print job being executed and details of its status at any time. It also provides functions for accessingand manipulating this data. This object is the means by which information is passed from one view func-tion to another during printing, and between the framework and your view functions.
An object of the CPrintInfo class is created whenever you select the File > Print or File > PrintPreview menu options. After being used by each of the functions in the current view that are involvedin the printing process, it’s automatically deleted when the print operation ends.
All the data members of CPrintInfo are public. They are shown in the following table.
Member Usage
m_pPD A pointer to the CPrintDialog object that displays the Print dialog box.
m_bDirect This is set to TRUE by the framework if the print operation is tobypass the Print dialog box; otherwise, FALSE.
m_bPreview A member of type BOOL that has the value TRUE if File > PrintPreview was selected; otherwise, FALSE.
m_bContinuePrinting A member of type BOOL. If this is set to TRUE, the framework contin-ues the printing loop shown in the diagram. If it’s set to FALSE, theprinting loop ends. You only need to set this variable if you don’tpass a page count for the print operation to the CPrintInfo object(using the SetMaxPage() member function). In this case, you’ll beresponsible for signaling when you’re finished by setting this vari-able to FALSE.
1066
Chapter 18: Storing and Printing Documents
25905c18.qxd:WroxPro 2/21/08 9:21 AM Page 1066

A CPrintInfo object has the public member functions shown in the following table.
When you’re printing a document consisting of several pages, you need to figure out how many printedpages the document occupies, and store this information in the CPrintInfo object to make it available tothe framework. You can do this in your version of the OnPreparePrinting() member of the current view.
To set the number of the first page in the document, you need to call the function SetMinPage() in theCPrintInfo object, which accepts the page number as an argument of type UINT. There’s no returnvalue. To set the number of the last page in the document, you call the function SetMaxPage(), which
Function Description
SetMinPage(UINT nMinPage) The argument specifies the number of the first page of the document. There is no return value.
SetMaxPage(UINT nMaxPage) The argument specifies the number of the last page of the document. There is no return value.
GetMinPage() const Returns the number of the first page of the document as type UINT.
GetMaxPage() const Returns the number of the last page of the document as type UINT.
GetFromPage() const Returns the number of the first page of the document to beprinted as type UINT. This value is set through the print dialog.
GetToPage() const Returns the number of the last page of the document to beprinted as type UINT. This value is set through the print dialog.
Member Usage
m_nCurPage A value of type UINT that stores the page number of the currentpage. Pages are usually numbered starting from 1.
m_nNumPreviewPages A value of type UINT that specifies the number of pages displayed inthe Print Preview window. This can be 1 or 2.
m_lpUserData This is of type LPVOID and stores a pointer to an object that you create. This allows you to create an object to store additional infor-mation about the printing operation and associate it with theCPrintInfo object.
m_rectDraw A CRect object that defines the usable area of the page in logicalcoordinates.
m_strPageDesc A CString object containing a format string used by the frameworkto display page numbers during print preview.
1067
Chapter 18: Storing and Printing Documents
25905c18.qxd:WroxPro 2/21/08 9:21 AM Page 1067

also accepts the page number as an argument of type UINT and doesn’t return a value. If you later want toretrieve these values, you can call the GetMinPage() and GetMaxPage() functions for the CPrintInfoobject.
The page numbers that you supply are stored in the CPrintDialog object pointed to by the m_pPD mem-ber of CPrintInfo, and displayed in the dialog box that pops up when you select File > Print...from the menu. The user is then able to specify the numbers of the first and last pages that are printed,which you can retrieve by calling the GetFromPage() and GetToPage() members of the CPrintInfoobject. In each case, the values returned are of type UINT. The dialog automatically verifies that the num-bers of the first and last pages to be printed are within the range you supplied by specifying the minimumand maximum pages of the document.
You now know what functions you can implement in the view class to manage printing for yourself,with the framework doing most of the work. You also know what information is available through theCPrintInfo object passed to the functions concerned with printing. You’ll get a much clearer under-standing of the detailed mechanics of printing if you implement a basic multipage print capability forSketcher documents.
Implementing Multipage PrintingYou use the MM_LOENGLISH mapping mode in the Sketcher program to set things up and then switch toMM_ANISOTROPIC. This means that the shapes and the view extent are measured in terms of hundredthsof an inch. Of course, with the unit of size a fixed physical measure, ideally you want to print objects attheir actual size.
With the document size specified as 3000 by 3000 units, you can create documents up to 30 inches square,which spreads over quite a few sheets of paper if you fill the whole area. It requires a little more effort towork out the number of pages necessary to print a sketch than with a typical text document because inmost instances, you’ll need a two-dimensional array of pages to print a complete sketch document.
To avoid overcomplicating the problem, assume that you’re printing a normal sheet of paper (either A4size or 8 1⁄2 by 11 inches) and in portrait orientation (which means the long edge is vertical). With eitherpaper size, you’ll print the document in a central portion of the paper measuring 6 inches by 9 inches.With these assumptions, you don’t need to worry about the actual paper size; you just need to chop thedocument into 600 by 900 unit chunks. For a document larger than one page, you’ll divide up the docu-ment as illustrated in the example in Figure 18-6.
As you can see, you’ll be numbering the pages row-wise, so in this case pages 1 to 4 are in the first rowand pages 5 to 8 are in the second.
Getting the Overall Document SizeTo figure out how many pages a particular document occupies, you need to know how big the sketch is,and for this you want the rectangle that encloses everything in the document. You can do this easily byadding a function GetDocExtent() to the document class, CSketcherDoc. Add the following declara-tion to the public interface for CSketcherDoc:
CRect GetDocExtent(); // Get the bounding rectangle for the whole document
1068
Chapter 18: Storing and Printing Documents
25905c18.qxd:WroxPro 2/21/08 9:21 AM Page 1068

Figure 18-6
The implementation is no great problem. The code for it is:
// Get the rectangle enclosing the entire documentCRect CSketcherDoc::GetDocExtent(){CRect DocExtent(0,0,1,1); // Initial document extentCRect ElementBound(0,0,0,0); // Space for element bounding rectangle
POSITION aPosition = m_ElementList.GetHeadPosition();
while(aPosition) // Loop through all the elements in the list{// Get the bounding rectangle for the elementElementBound=(m_ElementList.GetNext(aPosition))->GetBoundRect();
// Make coordinates of document extent the outer limitsDocExtent.UnionRect(DocExtent, ElementBound);
}DocExtent.NormalizeRect();return DocExtent;
}
You can add this function definition to the SketcherDoc.cpp file, or simply add the code if you usedthe Add > Add Function capability from the pop-up in Class View. The process loops through everyelement in the document, using the aPosition variable to step through the list and getting the bound-ing rectangle for each element. The UnionRect() member of the CRect class calculates the smallest rec-tangle that contains the two rectangles passed as arguments, and puts that value in the CRect object forwhich the function is called. Therefore, DocExtent keeps increasing in size until all the elements arecontained within it. Note that you initialize DocExtent with (0,0,1,1) because the UnionRect() functiondoesn’t work properly with rectangles that have zero height or width.
Storing Print DataThe OnPreparePrinting() function in the view class is called by the application framework to enableyou to initialize the printing process for your document. The basic initialization that’s required is to
1069
Chapter 18: Storing and Printing Documents
25905c18.qxd:WroxPro 2/21/08 9:21 AM Page 1069

provide information about how many pages are in the document for the print dialog that displays. You’llneed to store information about the pages that your document requires so you can use it later in the otherview functions involved in the printing process. You’ll originate this in the OnPreparePrinting() mem-ber of the view class, too, store it in an object of your own class that you’ll define for this purpose, andstore a pointer to the object in the CPrintInfo object that the framework makes available. This approachis primarily to show you how this mechanism works; in most cases, you’ll find it easier just to store thedata in your view object, mainly because it makes the notation for referencing the data much simpler.
You’ll need to store the number of pages running the width of the document, m_nWidths, and the num-ber of rows of pages down the length of the document, m_nLengths. You’ll also store the upper-left cor-ner of the rectangle enclosing the document data as a CPoint object, m_DocRefPoint, because you’lluse this when you work out the position of a page to be printed from its page number. You can store thefile name for the document in a CString object, m_DocTitle, so that you can add it as a title to eachpage. The definition of the class to accommodate these is:
#pragma once
class CPrintData{public:UINT m_nWidths; // Page count for the width of the documentUINT m_nLengths; // Page count for the length of the documentCPoint m_DocRefPoint; // Top left corner of the document contentsCString m_DocTitle; // The name of the document
};
You can add a new header file with the name PrintData.h to the project by right-clicking the HeaderFiles folder in the Solution Explorer pane and then selecting Add > New Item from the pop-up. You can now enter the class definition in the new file.
You don’t need an implementation file for this class. The default constructor (which is automaticallygenerated) is quite adequate here. Because an object of this class is only going to be used transiently, you don’t need to use CObject as a base or to consider any other complication.
The printing process starts with a call to the view class member OnPreparePrinting(), so check outhow you should implement that.
Preparing to PrintThe Application Wizard added versions of OnPreparePrinting(), OnBeginPrinting(), andOnEndPrinting() to CSketcherView at the outset. The base code provided for OnPreparePrinting()calls DoPreparePrinting() in the return statement, as you can see:
BOOL CSketcherView::OnPreparePrinting(CPrintInfo* pInfo){
// default preparationreturn DoPreparePrinting(pInfo);
}
The DoPreparePrinting() function displays the Print dialog box using information about the numberof pages to be printed that’s defined in the CPrintInfo object. Whenever possible, you should calculatethe number of pages to be printed and store it in the CPrintInfo object before this call occurs. Of course,
1070
Chapter 18: Storing and Printing Documents
25905c18.qxd:WroxPro 2/21/08 9:21 AM Page 1070

in many circumstances you may need information from the device context for the printer before you cando this — when you’re printing a document where the number of pages is going to be affected by the sizeof font to be used, for example — in which case it won’t be possible to get the page count before you callOnPreparePrinting(). In this case, you can compute the number of pages in the OnBeginPrinting()member, which receives a pointer to the device context as an argument. This function is called by theframework after OnPreparePrinting(), so the information entered in the Print dialog box is available.This means that you can also take account of the paper size selected by the user in the Print dialog box.
Assume that the page size is large enough to accommodate a 6 inch by 9 inch area to draw the documentdata, so you can calculate the number of pages in OnPreparePrinting(). The code for it is:
BOOL CSketcherView::OnPreparePrinting(CPrintInfo* pInfo){pInfo->m_lpUserData = new CPrintData; // Create a print data object CSketcherDoc* pDoc = GetDocument(); // Get a document pointer
// Get the whole document areaCRect DocExtent = pDoc->GetDocExtent();
// Save the reference point for the whole document((CPrintData*)(pInfo->m_lpUserData))->m_DocRefPoint =
CPoint(DocExtent.left, DocExtent.bottom);
// Get the name of the document file and save it((CPrintData*)(pInfo->m_lpUserData))->m_DocTitle = pDoc->GetTitle();
// Calculate how many printed page widths of 600 units are required// to accommodate the width of the document((CPrintData*)(pInfo->m_lpUserData))->m_nWidths =
static_cast<UINT>(ceil((static_cast<double>(DocExtent.Width()))/600.0));
// Calculate how many printed page lengths of 900 units are required// to accommodate the document length((CPrintData*)(pInfo->m_lpUserData))->m_nLengths =
static_cast<UINT>(ceil((static_cast<double>(DocExtent.Height()))/900.0));
// Set the first page number as 1 and// set the last page number as the total number of pagespInfo->SetMinPage(1);pInfo->SetMaxPage((static_cast<CPrintData*>(pInfo->m_lpUserData))->m_nWidths *
(static_cast<CPrintData*>(pInfo->m_lpUserData))->m_nLengths);
return DoPreparePrinting(pInfo);}
You first create a CPrintData object on the heap and store its address in the pointer m_lpUserData in theCPrintInfo object passed to the function via the pointer pInfo. After getting a pointer to the document,you get the rectangle enclosing all of the elements in the document by calling the function GetDocExtent()that you added to the document class earlier in this chapter. You then store the corner of this rectangle in them_DocRefPoint member of the CPrintData object and put the name of the file that contains the documentin m_DocTitle.
Referencing the CPrintData object through the pointer in the CPrintInfo object is rather cumbersome.You get to the pointer with the expression pInfo->m_lpUserData, but because the pointer is of type void,
1071
Chapter 18: Storing and Printing Documents
25905c18.qxd:WroxPro 2/21/08 9:21 AM Page 1071

you must add a cast to type CPrintData* to get to the m_DocRefPoint member of the object. The fullexpression to access the reference point for the document is:
(static_cast<CPrintData*>(pInfo->m_lpUserData))->m_DocRefPoint
You have to use this approach for all references to members of the CPrintData object, so any expres-sions using them are festooned with this notation. If you put the data in the view class, you only needto use the name of the data member. Don’t forget to add an #include directive for PrintData.h to the SketcherView.cpp file.
The next two lines of code calculate the number of pages across the width of the document, and the num-ber of pages required to cover the length. The number of pages to cover the width is computed by divid-ing the width of the document by the width of the print area of a page, which is 600 units or 6 inches, androunding up to the next highest integer using the ceil() library function that is defined in the <cmath>header. An #include for this header file also needs to be added to SketcherView.cpp. For example,ceil(2.1) returns 3.0, ceil(2.9) also returns 3.0, and ceil(-2.1) returns -2.0. A similar calcula-tion to that for the number of pages across the width of a document produces the number to cover thelength. The product of these two values is the total number of pages to be printed, and this is the valuethat you’ll supply for the maximum page number.
Cleaning Up After PrintingBecause you created the CPrintData object on the heap, you must ensure that it’s deleted when you’redone with it. You do this by adding code to the OnEndPrinting() function:
void CSketcherView::OnEndPrinting(CDC* /*pDC*/, CPrintInfo* pInfo){
// Delete our print data objectdelete static_cast<CPrintData*>(pInfo->m_lpUserData);
}
That’s all that’s necessary for this function in the Sketcher program, but in some cases you’ll need to domore. Your one-time final cleanup should be done here. Make sure that you remove the comment delim-iters (/* */) from the second parameter name; otherwise, your function won’t compile. The default imple-mentation comments out the parameter names because you may not need to refer to them in your code.Because you use the pInfo parameter, you must uncomment it; otherwise, the compiler reports it asundefined.
You don’t need to add anything to the OnBeginPrinting() function in the Sketcher program, but you’dneed to add code to allocate any GDI resources, such as pens, if they were required throughout the print-ing process. You would then delete these as part of the clean up process in OnEndPrinting().
Preparing the Device ContextAt the moment, the Sketcher program calls OnPrepareDC(), which sets up the mapping mode asMM_ANISOTROPIC to take account of the scaling factor. You must make some additional changes so that the device context is properly prepared in the case of printing:
void CSketcherView::OnPrepareDC(CDC* pDC, CPrintInfo* pInfo){
1072
Chapter 18: Storing and Printing Documents
25905c18.qxd:WroxPro 2/21/08 9:21 AM Page 1072

int Scale = m_Scale; // Store the scale locallyif(pDC->IsPrinting())Scale = 1; // If we are printing, set scale to 1
CScrollView::OnPrepareDC(pDC, pInfo);CSketcherDoc* pDoc = GetDocument();pDC->SetMapMode(MM_ANISOTROPIC); // Set the map modeCSize DocSize = pDoc->GetDocSize(); // Get the document size
// y extent must be negative because we want MM_LOENGLISHDocSize.cy = -DocSize.cy; // Change sign of ypDC->SetWindowExt(DocSize); // Now set the window extent
// Get the number of pixels per inch in x and yint xLogPixels = pDC->GetDeviceCaps(LOGPIXELSX);int yLogPixels = pDC->GetDeviceCaps(LOGPIXELSY);
// Calculate the viewport extent in x and ylong xExtent = static_cast<long>(DocSize.cx)*Scale*xLogPixels/100L;long yExtent = static_cast<long>(DocSize.cy)*Scale*yLogPixels/100L;
pDC->SetViewportExt(static_cast<int>(xExtent),static_cast<int>(-yExtent)); // Set viewport extent
}
This function is called by the framework for output to the printer as well as to the screen. You should makesure that a scale of 1 is used to set the mapping from logical coordinates to device coordinates when you’reprinting. If you left everything as it was, the output would be at the current view scale, but you’d need totake account of the scale when calculating how many pages you needed, and how you set the origin foreach page.
You can determine whether you have a printer device context or not by calling the IsPrinting() mem-ber of the current CDC object, which returns TRUE if you are printing. All you need to do when you havea printer device context is set the scale to 1. Of course, you must change the statements lower downwhich use the scale value, so that they use the local variable Scale rather than the m_Scale member ofthe view. The values returned by the calls to GetDeviceCaps() with the arguments LOGPIXELSX andLOGPIXELSY return the number of logical points per inch in the x and y directions for your printer whenyou’re printing, and the equivalent values for your display when you’re drawing to the screen, so thisautomatically adapts the viewport extent to suit the device to which you’re sending the output.
Printing the DocumentYou can write the data to the printer device context in the OnPrint() function. This is called once for eachpage to be printed. You need to add an override for this function to CSketcherView, using the Propertieswindow for the class. Select OnPrint from the list of overrides and then click <Add> OnPrint in the rightcolumn.
You can obtain the page number of the current page from the m_nCurPage member of the CPrintInfoobject and use this value to work out the coordinates of the position in the document that corresponds to the upper-left corner of the current page. The way to do this is best understood using an example, soimagine that you are printing page seven of an eight-page document, as illustrated in Figure 18-7.
1073
Chapter 18: Storing and Printing Documents
25905c18.qxd:WroxPro 2/21/08 9:21 AM Page 1073
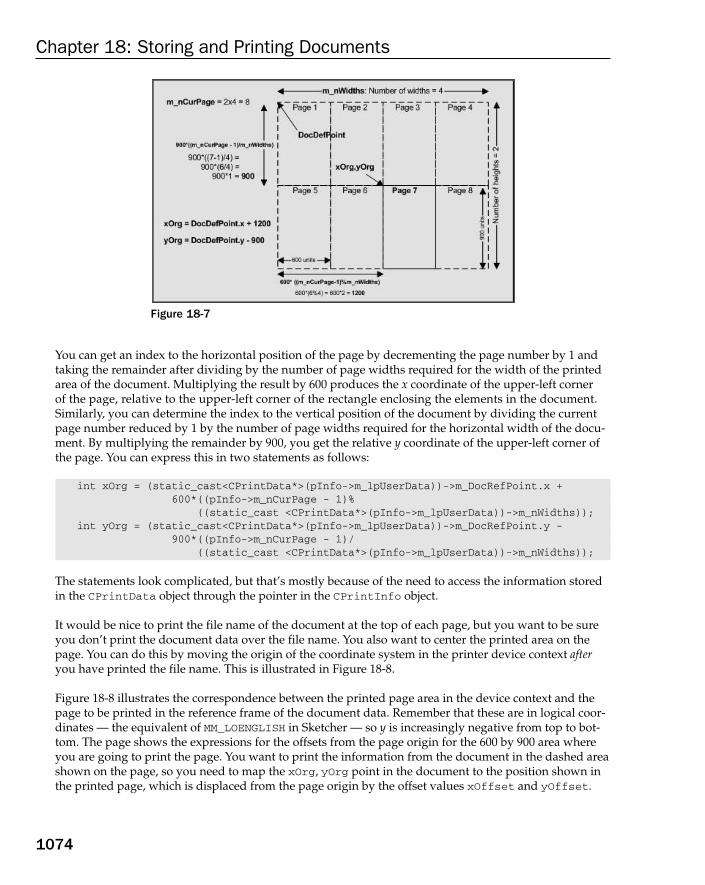
Figure 18-7
You can get an index to the horizontal position of the page by decrementing the page number by 1 andtaking the remainder after dividing by the number of page widths required for the width of the printedarea of the document. Multiplying the result by 600 produces the x coordinate of the upper-left corner of the page, relative to the upper-left corner of the rectangle enclosing the elements in the document.Similarly, you can determine the index to the vertical position of the document by dividing the currentpage number reduced by 1 by the number of page widths required for the horizontal width of the docu-ment. By multiplying the remainder by 900, you get the relative y coordinate of the upper-left corner ofthe page. You can express this in two statements as follows:
int xOrg = (static_cast<CPrintData*>(pInfo->m_lpUserData))->m_DocRefPoint.x +600*((pInfo->m_nCurPage - 1)%
((static_cast <CPrintData*>(pInfo->m_lpUserData))->m_nWidths));int yOrg = (static_cast<CPrintData*>(pInfo->m_lpUserData))->m_DocRefPoint.y -
900*((pInfo->m_nCurPage - 1)/((static_cast <CPrintData*>(pInfo->m_lpUserData))->m_nWidths));
The statements look complicated, but that’s mostly because of the need to access the information storedin the CPrintData object through the pointer in the CPrintInfo object.
It would be nice to print the file name of the document at the top of each page, but you want to be sureyou don’t print the document data over the file name. You also want to center the printed area on thepage. You can do this by moving the origin of the coordinate system in the printer device context afteryou have printed the file name. This is illustrated in Figure 18-8.
Figure 18-8 illustrates the correspondence between the printed page area in the device context and thepage to be printed in the reference frame of the document data. Remember that these are in logical coor-dinates — the equivalent of MM_LOENGLISH in Sketcher — so y is increasingly negative from top to bot-tom. The page shows the expressions for the offsets from the page origin for the 600 by 900 area whereyou are going to print the page. You want to print the information from the document in the dashed areashown on the page, so you need to map the xOrg, yOrg point in the document to the position shown inthe printed page, which is displaced from the page origin by the offset values xOffset and yOffset.
1074
Chapter 18: Storing and Printing Documents
25905c18.qxd:WroxPro 2/21/08 9:21 AM Page 1074

Figure 18-8
By default, the origin in the coordinate system that you use to define elements in the document is mappedto the origin of the device context, but you can change this. The CDC object provides a SetWindowOrg()function for this purpose. This enables you to define a point in the document’s logical coordinate systemthat you want to correspond to the origin in the device context. It’s important to save the old origin that’sreturned from the SetWindowOrg() function as a CPoint object. You must restore the old origin whenyou’ve finished drawing the current page; otherwise, the m_rectDraw member of the CPrintInfo objectis not set up correctly when you come to print the next page.
The point in the document that you want to map to the origin of the page has the coordinates xOrgxOffset,yOrg+yOffset. This may not be easy to visualize, but remember that by setting the window origin, you’redefining the point that maps to the viewport origin. If you think about it, you should see that the xOrg, yOrgpoint in the document is where you want it on the page.
The complete code for printing a page of the document is:
// Print a page of the documentvoid CSketcherView::OnPrint(CDC* pDC, CPrintInfo* pInfo){// Output the document file name
m_rectDraw.right
Document OriginDocRefPoint
The Document
The Printed Page
This distance is xOffset given by(m_rectDraw.right - 600)/2
This distance is yOffset given by- (m_rectDraw.bottom - 600)/2
The page origin in thedocument maps to here
File Name
Page 7
Page Origin
600
90
0
m_r
ectD
raw
.bot
tom
xOrg,yOrg
1075
Chapter 18: Storing and Printing Documents
25905c18.qxd:WroxPro 2/21/08 9:21 AM Page 1075

pDC->SetTextAlign(TA_CENTER); // Center the following textpDC->TextOut(pInfo->m_rectDraw.right/2, -20,
(static_cast<CPrintData*>(pInfo->m_lpUserData))->m_DocTitle);pDC->SetTextAlign(TA_LEFT); // Left justify text
// Calculate the origin point for the current pageint xOrg = (static_cast<CPrintData*>(pInfo->m_lpUserData))->m_DocRefPoint.x +
600*((pInfo->m_nCurPage - 1)%((static_cast<CPrintData*>(pInfo->m_lpUserData))->m_nWidths));
int yOrg = (static_cast<CPrintData*>(pInfo->m_lpUserData))->m_DocRefPoint.y -900*((pInfo->m_nCurPage - 1)/
((static_cast<CPrintData*>(pInfo->m_lpUserData))->m_nWidths));
// Calculate offsets to center drawing area on page as positive valuesint xOffset = (pInfo->m_rectDraw.right - 600)/2;int yOffset = -(pInfo->m_rectDraw.bottom + 900)/2;
// Change window origin to correspond to current page & save old originCPoint OldOrg = pDC->SetWindowOrg(xOrg-xOffset, yOrg+yOffset);
// Define a clip rectangle the size of the printed areapDC->IntersectClipRect(xOrg,yOrg,xOrg+600,yOrg-900);
OnDraw(pDC); // Draw the whole documentpDC->SelectClipRgn(NULL); // Remove the clip rectanglepDC->SetWindowOrg(OldOrg); // Restore old window origin
}
The first step is to output the file name that you squirreled away in the CPrintInfo object. TheSetTextAlign() function member of the CDC object allows you to define the alignment of subsequenttext output in relation to the reference point you supply for the text string in the TextOut() function.The alignment is determined by the constant passed as an argument to the function. You have three possibilities for specifying the alignment of the text, as shown in the following table.
You define the x coordinate of the file name on the page as half the page width, and the y coordinate as 20 units, which is 0.2 inches, from the top of the page. After outputting the name of the document file as centered text, you reset the text alignment to the default, TA_LEFT, for the text in the document.
Constant Alignment
TA_LEFT The point is at the left of the bounding rectangle for the text, so the text is tothe right of the point specified. This is default alignment.
TA_RIGHT The point is at the right of the bounding rectangle for the text, so the text is tothe left of the point specified.
TA_CENTER The point is at the center of the bounding rectangle for the text.
1076
Chapter 18: Storing and Printing Documents
25905c18.qxd:WroxPro 2/21/08 9:21 AM Page 1076

The SetTextAlign() function also allows you to change the position of the text vertically by ORing asecond flag with the justification flag. The second flag can be any of those shown in the following table.
The next action in OnPrint() uses the method that I discussed for mapping an area of the document tothe current page. You get the document drawn on the page by calling the OnDraw() function that is usedto display the document in the view. This potentially draws the entire document, but you can restrictwhat appears on the page by defining a clip rectangle. A clip rectangle encloses a rectangular area in thedevice context within which output appears. Output is suppressed outside of the clip rectangle. It’s alsopossible to define irregularly shaped areas for clipping called regions.
The initial default clipping area defined in the print device context is the page boundary. You define aclip rectangle which corresponds to the 600 by 900 area centered in the page. This ensures that you drawonly in this area, and the file name is not to be overwritten.
After the current page has been drawn, you call SetClipRgn() with a NULL argument to remove theclip rectangle. If you don’t do this, output of the document title is suppressed on all pages after the firstbecause it lies outside the clip rectangle that would otherwise remain in effect in the print process untilthe next time IntersectClipRect() gets called.
Your final action is to call SetWindowOrg() again to restore the window origin to its original location, as discussed earlier in this chapter.
Getting a Printout of the DocumentTo get your first printed Sketcher document, you just need to build the project and execute the program(once you’ve fixed any typos). If you try File > Print Preview, you should get something similar tothe window shown in Figure 18-9.
You get print preview functionality completely for free. The framework uses the code that you’vesupplied for the normal multipage printing operation to produce page images in the Print Previewwindow. What you see in the Print Preview window should be exactly the same as appears on theprinted page.
Constant Alignment
TA_TOP Aligns the top of the rectangle bounding the text with the point defining theposition of the text. This is the default.
TA_BOTTOM Aligns the bottom of the rectangle bounding the text with the point definingthe position of the text.
TA_BASELINE Aligns the baseline of the font used for the text with the point defining theposition of the text.
1077
Chapter 18: Storing and Printing Documents
25905c18.qxd:WroxPro 2/21/08 9:21 AM Page 1077

Figure 18-9
Serialization and Printing in CLR SketcherSerialization is the process of writing objects to a stream, and deserialization is the reverse: reconstruct-ing objects from a stream. The .NET Framework offers several different ways to serialize and deserializeyour C++/CLI class objects. XML serialization serializes objects into an XML stream that conforms to a particular XML schema. You can also serialize objects into XML streams that conform to the SimpleObject Access Protocol (SOAP) specification and this is referred to as SOAP serialization. A discussionof XML and SOAP is beyond the scope of this book, not because it’s difficult — it isn’t — but because to cover it adequately requires more pages than I can possibly include in this book. I’ll therefore showyou how to use the third and perhaps simplest form of serialization provided by the .NET Framework,binary serialization.
You’ll also investigate how you can print sketches from CLR Sketcher. With the help given by the FormDesigner, this is going to be easy.
Understanding Binary SerializationBefore you get into the specifics of serializing a sketch, let’s get an overview of what’s involved in binaryserialization of your class objects. For binary serialization of your class objects to be possible, you have
1078
Chapter 18: Storing and Printing Documents
25905c18.qxd:WroxPro 2/21/08 9:21 AM Page 1078

to make your classes serializable. You can make a ref class or value class serializable by marking it withthe Serializable attribute, like this:
[Serializable]public ref class MyClass{
// Class definition...};
Of course, in practice there may be a little more to it. For serialization to work with MyClass, all the classfields must be serializable too, and often there are fields that are not serializable by default, or fields thatit does not make sense to serialize because the data stored will not be valid when it is deserialized, orfields that you just don’t want serialized for security reasons. In this case special measures are necessaryto take care of the non-serializable class members.
Dealing with Fields That Are Not SerializableWhere a class has members that are not serializable, you can mark them with the NonSerialized attrib-ute to prevent them from being serialized. For example:
[Serializable]public ref class MyClass{
public:[NonSerialized]int value;// Rest of the class definition...
};
Here the serialization process will not attempt to serialize the value member of a MyClass object. Forthis to compile, you need a using declaration for the System::Runtime::Serialization namespace.
Although marking a data member as non-serializable avoids the possibility of the serialization processfailing with types you cannot serialize, it does not solve the problem of serializing the objects unless thenon-serialized data can be happily omitted when you come to reconstruct the object when it is deserial-ized. You will typically want to take some special action in relation to the non-serialized fields.
You use the OnSerializing attribute to mark a class function that you want to be called when the seri-alization of an object begins. This gives you an opportunity to do something about the non-serializedfields. For example:
[Serializable]public ref class MyClass{
public:[NonSerialized]int value;
1079
Chapter 18: Storing and Printing Documents
25905c18.qxd:WroxPro 2/21/08 9:21 AM Page 1079
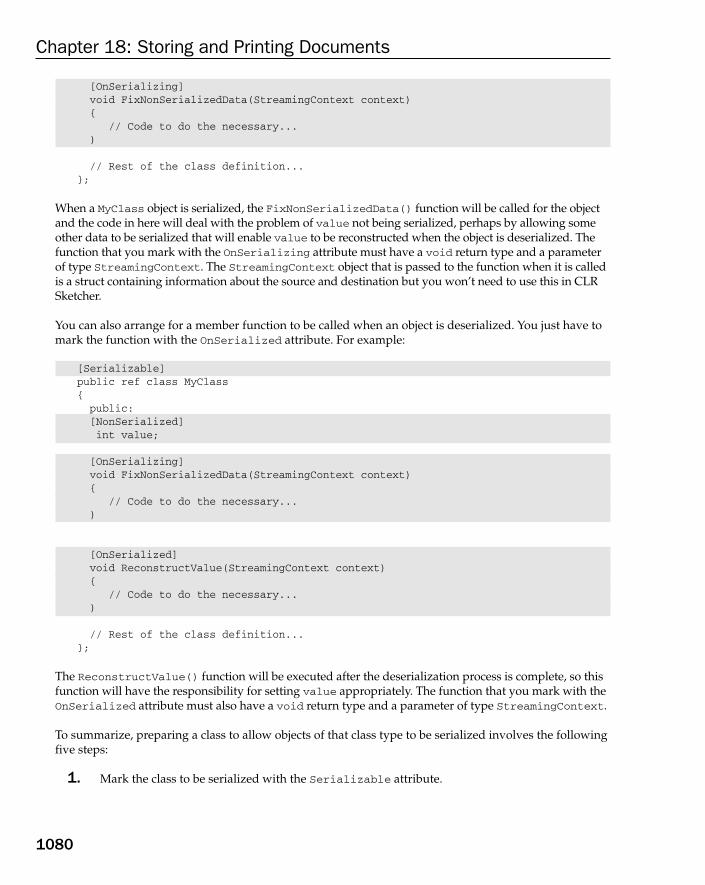
[OnSerializing]void FixNonSerializedData(StreamingContext context){
// Code to do the necessary...)
// Rest of the class definition...};
When a MyClass object is serialized, the FixNonSerializedData() function will be called for the objectand the code in here will deal with the problem of value not being serialized, perhaps by allowing someother data to be serialized that will enable value to be reconstructed when the object is deserialized. Thefunction that you mark with the OnSerializing attribute must have a void return type and a parameterof type StreamingContext. The StreamingContext object that is passed to the function when it is calledis a struct containing information about the source and destination but you won’t need to use this in CLRSketcher.
You can also arrange for a member function to be called when an object is deserialized. You just have tomark the function with the OnSerialized attribute. For example:
[Serializable]public ref class MyClass{public:[NonSerialized]int value;
[OnSerializing]void FixNonSerializedData(StreamingContext context){
// Code to do the necessary...)
[OnSerialized]void ReconstructValue(StreamingContext context){
// Code to do the necessary...)
// Rest of the class definition...};
The ReconstructValue() function will be executed after the deserialization process is complete, so thisfunction will have the responsibility for setting value appropriately. The function that you mark with theOnSerialized attribute must also have a void return type and a parameter of type StreamingContext.
To summarize, preparing a class to allow objects of that class type to be serialized involves the followingfive steps:
1. Mark the class to be serialized with the Serializable attribute.
1080
Chapter 18: Storing and Printing Documents
25905c18.qxd:WroxPro 2/21/08 9:21 AM Page 1080

2. Identify any data members that cannot or should not be serialized and mark them withNonSerialized attributes.
3. Add a public function with a return type of void and a single parameter of typeStreamingContext to deal with the non-serializable fields when an object is serialized andmark the function with the OnSerializing attribute.
4. Add a public function with a return type of void and a single parameter of typeStreamingContext to deal with the non-serialized fields when an object is deserialized andmark the function with the OnSerialized attribute.
5. Add a using declaration for the System::Runtime::Serialization namespace to theheader file containing the class.
Serializing an ObjectSerializing an object means writing it to a stream, so you first must define the stream that is the destina-tion for the data defining the object. A stream is represented by a System::IO::Stream class, which isan abstract ref class type. A stream can be any source or destination for data that is a sequence of bytes; afile, a TCP/IP socket, and a pipe that allows data to be passed between two processes are all examples ofstreams.
You will usually want to serialize your objects to a file and the System::IO::File class contains staticfunctions for creating objects that encapsulate files. You use the File::Open() function to create a newfile or open an existing file for reading and/or writing. The Open() function returns a reference of typeFileStream^ to an object that encapsulates the file. Because FileStream is a type that is derived fromStream, you can store the reference that the Open() function returns in a variable of type Stream^. TheOpen() function comes in three overloaded versions, and the version you will be using has the follow-ing form:
FileStream^ Open( String^ path, FileMode mode)
The path parameter is the path to the file that you want to open and can be a full path to the file, or justthe file name. If you just specify an argument that is just a file name, the file will be assumed to be in thecurrent directory.
The mode parameter controls whether the file is created if it does not exist, and whether the data can beoverwritten if the file does exist. The mode argument can be any of the FileMode enumeration valuesdescribed in the following table.
Continued
FileMode Enumerator Description
CreateNew Requests that a new file specified by path is created. If the file alreadyexists, an exception of type System::IO::IOException is thrown.You use this when you are writing a new file.
Truncate Requests that an existing file specified by path is opened and its con-tents discarded by truncating the size of the file to zero bytes. You usethis when you are writing an existing file.
1081
Chapter 18: Storing and Printing Documents
25905c18.qxd:WroxPro 2/21/08 9:21 AM Page 1081

Thus you could create a stream encapsulating a file in the current directory that you can write with thefollowing statement:
Stream^ stream = File::Open(L”sketch.dat”, FileMode::Create);
The file sketch.dat will be created in the current directory if it does not exist; if it exists the contentswill be overwritten.
The static OpenWrite() function in the File class will open the existing file that you specify by thestring argument with write access and return a FileStream^ reference to the stream you use to writethe file.
To serialize an object to a file encapsulated by a FileStream object that you have created, you use anobject of type System::Runtime::Serialization::Formatters::Binary::BinaryFormatterthat you create like this:
BinaryFormatter^ formatter = gcnew BinaryFormatter();
You need a using declaration for System::Runtime::Serialization::Formatters::Binary if thisstatement is to compile. The formatter object has a Serialize() function member that you use to seri-alize an object to a stream. The first argument to the function is a reference to the stream that is the desti-nation for the data and the second argument is a reference to the object to be serialized to the stream. Thusyou can write a sketch object to stream with the following statement:
formatter->Serialize(stream, sketch);
You read an object from a stream using the Deserialize() function for a BinaryFormatter object:
Sketch sketch = safe_cast<Sketch>(formatter->Deserialize(stream));
The argument to the Deserialize() function is a reference to the stream that is to be read. The functionreturns the object read from the stream as type Object^ so you must cast it to the appropriate type.
FileMode Enumerator Description
Create Specifies that if the file specified by path does not exist, it should becreated and if the file does exist it should be overwritten. You use thiswhen you are writing a file.
Open Specifies that the existing file specified by path should be opened. If the file does not exist, an exception of typeSystem::IO::FileNotFoundException is thrown. You use thiswhen you are reading a file.
OpenOrCreate Specifies that the file specified by path should be opened if it exists andcreated if it doesn’t. You can use this to read or write a file, dependingon the access argument.
Append The file specified by path is opened if it exists and the file position setto the end of the file; if the file does not exist, it will be created. You usethis to append data to an existing file or to write a new file.
1082
Chapter 18: Storing and Printing Documents
25905c18.qxd:WroxPro 2/21/08 9:21 AM Page 1082
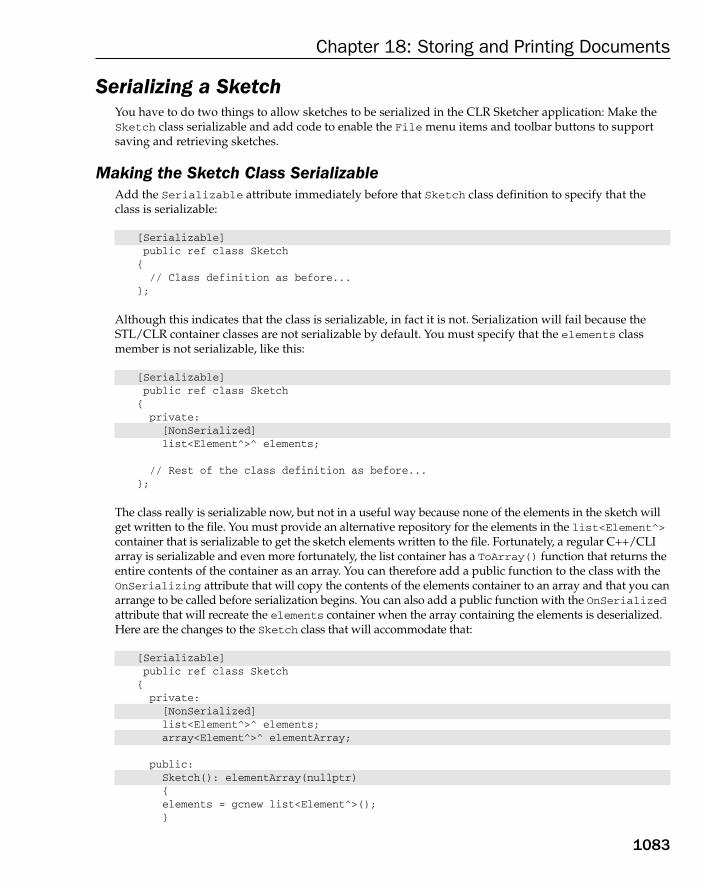
Serializing a SketchYou have to do two things to allow sketches to be serialized in the CLR Sketcher application: Make theSketch class serializable and add code to enable the File menu items and toolbar buttons to supportsaving and retrieving sketches.
Making the Sketch Class SerializableAdd the Serializable attribute immediately before that Sketch class definition to specify that theclass is serializable:
[Serializable]public ref class Sketch{
// Class definition as before...};
Although this indicates that the class is serializable, in fact it is not. Serialization will fail because theSTL/CLR container classes are not serializable by default. You must specify that the elements classmember is not serializable, like this:
[Serializable]public ref class Sketch{
private:[NonSerialized]list<Element^>^ elements;
// Rest of the class definition as before...};
The class really is serializable now, but not in a useful way because none of the elements in the sketch willget written to the file. You must provide an alternative repository for the elements in the list<Element^>container that is serializable to get the sketch elements written to the file. Fortunately, a regular C++/CLIarray is serializable and even more fortunately, the list container has a ToArray() function that returns theentire contents of the container as an array. You can therefore add a public function to the class with theOnSerializing attribute that will copy the contents of the elements container to an array and that you canarrange to be called before serialization begins. You can also add a public function with the OnSerializedattribute that will recreate the elements container when the array containing the elements is deserialized.Here are the changes to the Sketch class that will accommodate that:
[Serializable]public ref class Sketch{
private:[NonSerialized]list<Element^>^ elements;array<Element^>^ elementArray;
public:Sketch(): elementArray(nullptr){elements = gcnew list<Element^>();}
1083
Chapter 18: Storing and Printing Documents
25905c18.qxd:WroxPro 2/21/08 9:21 AM Page 1083

[OnSerializing]void ListToArray(StreamingContext context){elementArray = elements->to_array();
}
[OnDeserialized]void ArrayToList(StreamingContext context){elements = gcnew list<Element^>(elementArray);elementArray = nullptr;
}
// Rest of the class definition as before...};
You have a new private data member, elementArray, that holds all the elements in the sketch when it isserialized to a file. You initialize this to nullptr in the constructor. When a Sketch object is serialized,the ListToArray() function will be called first, and this function transfers the contents of the list con-tainer to the elementArray array before serialization of the object takes place. The Sketch object con-taining the elementArray object is then written to the file. When a sketch is read back from the file, the Sketch object is recreated containing the elementArray member, after which the ArrayToList()function is called to restore the contents of the elements container from the array. The array is no longerrequired, so you set it to nullptr in the function.
So far, so good but you are not quite there yet. For a sketch to be serializable, all the elements in thesketch must be serializable too, and there’s the small problem of the Curve class that has an STL/CLRcontainer as a member. First though, add the Serializable attribute to the Element class and all itssubclasses.
You can pull the same trick with the container in the Curve class as you did with the Sketch class con-tainer, so amend the class definition to the following:
[Serializable]public ref class Curve : Element{private:[NonSerialized]vector<Point>^ points;array<Point>^ pointsArray;
public:Curve(Color color, Point p1, Point p2, float penWidth) : pointsArray(nullptr){
this->penWidth = penWidth;pen = gcnew Pen(color, penWidth);this->color = color;points = gcnew vector<Point>();position = p1;points->push_back(Point(p2.X-position.X, p2.Y-position.Y));
// Find the minimum and maximum coordinates
1084
Chapter 18: Storing and Printing Documents
25905c18.qxd:WroxPro 2/21/08 9:21 AM Page 1084
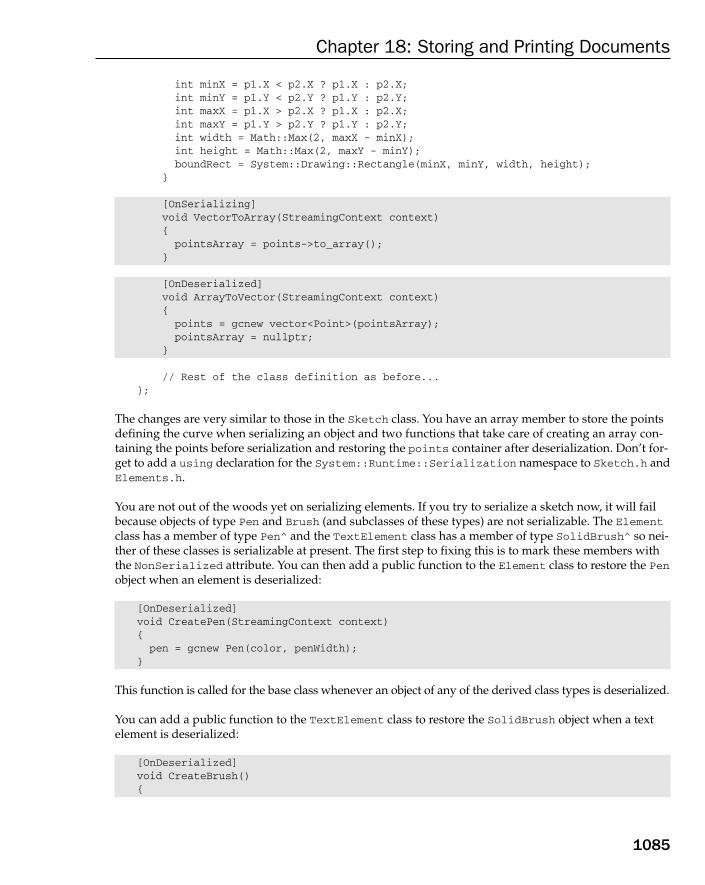
int minX = p1.X < p2.X ? p1.X : p2.X;int minY = p1.Y < p2.Y ? p1.Y : p2.Y;int maxX = p1.X > p2.X ? p1.X : p2.X;int maxY = p1.Y > p2.Y ? p1.Y : p2.Y;int width = Math::Max(2, maxX - minX);int height = Math::Max(2, maxY - minY);boundRect = System::Drawing::Rectangle(minX, minY, width, height);
}
[OnSerializing]void VectorToArray(StreamingContext context){pointsArray = points->to_array();
}
[OnDeserialized]void ArrayToVector(StreamingContext context){points = gcnew vector<Point>(pointsArray);pointsArray = nullptr;
}
// Rest of the class definition as before...};
The changes are very similar to those in the Sketch class. You have an array member to store the pointsdefining the curve when serializing an object and two functions that take care of creating an array con-taining the points before serialization and restoring the points container after deserialization. Don’t for-get to add a using declaration for the System::Runtime::Serialization namespace to Sketch.h andElements.h.
You are not out of the woods yet on serializing elements. If you try to serialize a sketch now, it will failbecause objects of type Pen and Brush (and subclasses of these types) are not serializable. The Elementclass has a member of type Pen^ and the TextElement class has a member of type SolidBrush^ so nei-ther of these classes is serializable at present. The first step to fixing this is to mark these members withthe NonSerialized attribute. You can then add a public function to the Element class to restore the Penobject when an element is deserialized:
[OnDeserialized]void CreatePen(StreamingContext context){pen = gcnew Pen(color, penWidth);
}
This function is called for the base class whenever an object of any of the derived class types is deserialized.
You can add a public function to the TextElement class to restore the SolidBrush object when a textelement is deserialized:
[OnDeserialized]void CreateBrush(){
1085
Chapter 18: Storing and Printing Documents
25905c18.qxd:WroxPro 2/21/08 9:21 AM Page 1085

brush = gcnew SolidBrush(color);}
This recreates the brush when a TextElement object is deserialized. All the classes involved in serializ-ing and deserializing a sketch should now be OK, so it’s time to implement the event handlers for themenu items.
Implementing File Operations for a SketchThe menu items and toolbar buttons for file operations are already in place in CLR Sketcher. If you double-click the Click event property in the Properties window for the File > Save, File > Save As... andFile > Open menu items, you’ll put the event handlers in place for all of them. Then just select the appro-priate event handler from the drop-down list of values for the Click event for each of the toolbar buttons.All you have to do now is supply the code to make them do what you want.
Creating Dialogs for File OperationsThe Toolbox has standard dialogs for opening and saving files and you can use both of these. Drag anOpenFileDialog and a SaveFileDialog from the Toolbox to the Design window for Form1. You canchange the (name) property values to saveFileDialog and openFileDialog. Change the values forthe Title properties for both dialogs to whatever you want displayed in the title bar. You can alsochange the FileName property in the openFileDialog to sketch; this is the default file name that willbe displayed when the dialog is first used. It’s a good idea to define a folder that will hold your sketchesso create one now; you could use something like C:\CLR Sketches. You can specify the default directoryas the value for the InitialDirectory property for both dialogs. Both dialogs have a Filter propertythat specifies the filters for the list of files that are displayed by the dialogs. You can set the value for theFilter property for both dialogs to “CLR Sketches|*.ske| All files|*.*”. The default value of 1for the FilterIndex property determines that the first file filter applies by default. If you want the sec-ond file filter to apply, set the value for FilterIndex to 2. Verify that the values for the ValidateNamesand OverwritePrompt properties for the saveFileDialog have default values of true; this results inthe user being prompted when an existing sketch is about to be overwritten.
Saving a SketchYou need a BinaryFormatter object to save a sketch and a good place to keep it is in the Form1 class.Add a using declaration for the System::Runtime::Serialization::Formatters::Binary name-space to Form1.h and add a new private member, formatter, of type BinaryFormatter^ to theForm1 class. You can initialize it to gcnew BinaryFormatter() in the initialization list for the Form1class constructor.
Before you get into implementing the event handler for the File > Save menu item, let’s considerwhat the logic is going to be. When you click the File > Save menu item, what happens depends onwhether the current sketch has been saved before. If the sketch has never been saved, you want the filesave dialog to be displayed; if the sketch has been saved previously, you just want to write the sketch to the file without displaying the dialog. To allow this to work, you need a way to record whether or notthe sketch has been saved. One way to do this is to add a public member of type bool with the nameSaved to the Sketch class. You can initialize it to false in the Sketch class constructor and set it totrue the first time the sketch is saved.
Before you implement the Click event handler, add a using declaration for the System.IO namespace tothe Form1.h header file. Add a private String^ member, sketchFilepath, to the Form1 class to store
1086
Chapter 18: Storing and Printing Documents
25905c18.qxd:WroxPro 2/21/08 9:21 AM Page 1086
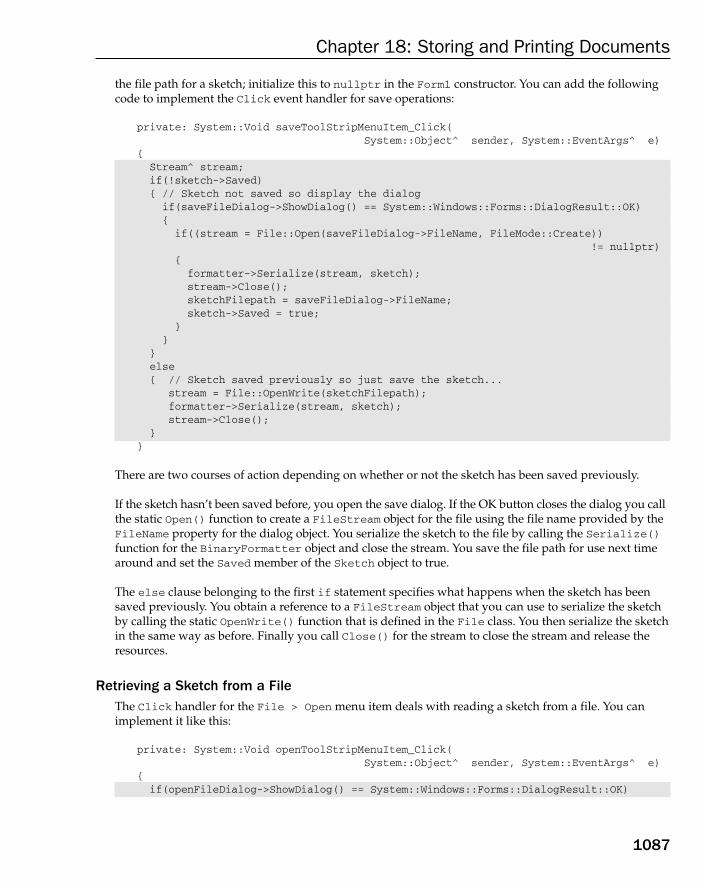
the file path for a sketch; initialize this to nullptr in the Form1 constructor. You can add the followingcode to implement the Click event handler for save operations:
private: System::Void saveToolStripMenuItem_Click(System::Object^ sender, System::EventArgs^ e)
{Stream^ stream;if(!sketch->Saved){ // Sketch not saved so display the dialogif(saveFileDialog->ShowDialog() == System::Windows::Forms::DialogResult::OK){if((stream = File::Open(saveFileDialog->FileName, FileMode::Create))
!= nullptr){formatter->Serialize(stream, sketch);stream->Close();sketchFilepath = saveFileDialog->FileName;sketch->Saved = true;
}}
}else{ // Sketch saved previously so just save the sketch...
stream = File::OpenWrite(sketchFilepath); formatter->Serialize(stream, sketch);stream->Close();
}}
There are two courses of action depending on whether or not the sketch has been saved previously.
If the sketch hasn’t been saved before, you open the save dialog. If the OK button closes the dialog you callthe static Open() function to create a FileStream object for the file using the file name provided by theFileName property for the dialog object. You serialize the sketch to the file by calling the Serialize()function for the BinaryFormatter object and close the stream. You save the file path for use next timearound and set the Saved member of the Sketch object to true.
The else clause belonging to the first if statement specifies what happens when the sketch has beensaved previously. You obtain a reference to a FileStream object that you can use to serialize the sketchby calling the static OpenWrite() function that is defined in the File class. You then serialize the sketchin the same way as before. Finally you call Close() for the stream to close the stream and release theresources.
Retrieving a Sketch from a FileThe Click handler for the File > Open menu item deals with reading a sketch from a file. You canimplement it like this:
private: System::Void openToolStripMenuItem_Click(System::Object^ sender, System::EventArgs^ e)
{if(openFileDialog->ShowDialog() == System::Windows::Forms::DialogResult::OK)
1087
Chapter 18: Storing and Printing Documents
25905c18.qxd:WroxPro 2/21/08 9:21 AM Page 1087

{Stream^ stream;if((stream = openFileDialog->OpenFile()) != nullptr){sketch = safe_cast<Sketch^>(formatter->Deserialize(stream));stream->Close();sketch->Saved = true;sketchFilepath = openFileDialog->FileName;Invalidate();
}}
}
The OpenFileDialog class provides an OpenFile() function that returns a reference to the stream encap-sulating the file selected in the dialog. You deserialize the sketch from the file by calling the Deserialize()function for the formatter object and close the stream. The sketch is obviously in a file so you set the Savedmember of the sketch to true. You store the file name in sketchFilepath for use by subsequent save oper-ations and call Invalidate() to get the form repainted to display the sketch you have just loaded.
Implementing the Save As OperationFor the Save As operation you always display a save dialog to allow a new file name to be entered. Youcan implement the Click event handler for the File > Save As... menu item like this:
private: System::Void saveAsToolStripMenuItem_Click(System::Object^ sender, System::EventArgs^ e)
{if(saveFileDialog->ShowDialog() == System::Windows::Forms::DialogResult::OK){Stream^ stream = File::Open(saveFileDialog->FileName, FileMode::Create); if(stream != nullptr){formatter->Serialize(stream, sketch);stream->Close();sketchFilepath = saveFileDialog->FileName;sketch->Saved = true;
}}
}
This is basically a simplified version of the save operation. You display the dialog; if the OK button closedthe dialog you create a Stream object for the file that was selected and deserialize it. You then close thestream, save the file path information, and set the Saved member of the sketch object to true.
You now have a version of CLR Sketcher with saving and retrieving operational.
1088
Chapter 18: Storing and Printing Documents
25905c18.qxd:WroxPro 2/21/08 9:21 AM Page 1088

Printing a SketchYou have a head start to printing a sketch because the Toolbox provides five components that supportprinting operations including a page setup dialog and print and print preview dialogs. To print a sketchyou create an instance of the PrintDocument component, implement a PrintPage event handler for thePrintDocument, and call the Print function for the PrintDocument object to actually print the sketch.Of course, you also need to create Click event handlers for the menu items that are involved and displaya few dialogs along the way, but let’s start with the PrintDocument component.
Using the PrintDocument ComponentDrag a PrintDocument component from the Toolbox window to the form in the Design window. Thisadds a PrintDocument member to the Form1 class. If you display the Properties window for thePrintDocument object, you can change the value of its (name) property to printDocument. Click theEvents button and double-click the PrintPage event to create a handler for it. The PrintPageEventArgs^parameter has a Graphics property that supplies a Graphics object that you can use to draw the sketchready for printing, like this:
private: System::Void printDocument_PrintPage(System::Object^ sender, System::Drawing::Printing::PrintPageEventArgs^ e)
{sketch->Draw(e->Graphics);
}
It couldn’t be much easier really, could it?
Implementing the Print OperationYou need a print dialog to allow the user to select the printer and initiate printing, so drag a PrintDialogcomponent from the Toolbox window to the form and change the (name) property value to printDialog.To associate the printDocument object with the dialog, select printDocument as the value of the Documentproperty from the drop-down in the value column. Add a Click event handler for the File > Print menuitem, and set this handler as the handler for the toolbar button for printing. All you have to do now is addcode to the handler to display the dialog to allow printing:
private: System::Void printToolStripMenuItem_Click(System::Object^ sender, System::EventArgs^ e)
{if(printDialog->ShowDialog() == System::Windows::Forms::DialogResult::OK)printDocument->Print();
}
You display the dialog and if the value returned from ShowDialog() is DialogResult::OK, you callthe Print() function for the printDocument object to print the sketch. That’s it! You added two lines of code here plus one line of code in the PrintPage event handler and a basic printing capability forsketches is working.
1089
Chapter 18: Storing and Printing Documents
25905c18.qxd:WroxPro 2/21/08 9:21 AM Page 1089

Displaying the print dialog allows the user to choose the printer and change preferences for the print jobbefore printing starts. Of course, you don’t have to display the dialog to print the sketch. If you wantedto print the sketch immediately without displaying the dialog, you could just call the Print() functionfor the PrintDocument object.
SummaryIn this chapter, you learned how to get a document stored on disk in a form that allows you to read itback and reconstruct its constituent objects using the serialization processes supported by MFC and the CLR. To implement serialization for MFC classes defining document data, you must:
1. Derive your class directly or indirectly from CObject.
2. Specify the DECLARE_SERIAL() macro in your class implementation.
3. Specify the IMPLEMENT_SERIAL() macro in your class definition.
4. Implement a default constructor in your class.
5. Declare the Serialize() function in your class.
6. Implement the Serialize() function in your class to serialize all the data members.
The serialization process uses a CArchive object to perform the input and output. You use the CArchiveobject passed to the Serialize() function to serialize the data members of the class.
To implement serialization for C++/CLI classes you must:
1. Mark the classes to be serialized with the Serializable attribute.
2. Identify any data members that cannot or should not be serialized and mark them withNonSerialized attributes.
3. Add a public function with a return type of void and a single parameter of typeStreamingContext to each class that has non-serializable fields. Implement the function to deal with the non-serializable fields when an object is serialized and mark the function with the OnSerializing attribute.
4. Add a public function with a return type of void and a single parameter of typeStreamingContext to each class that has non-serializable fields. Implement the function to deal with the non-serialized fields when an object is deserialized and mark the function with the OnSerialized attribute.
5. Add a using declaration for the System::Runtime::Serialization namespace to eachheader file containing classes you are making serializable.
You have also seen how MFC and the CLR support output to a printer. To add to the basic printing capa-bility provided by default with the MFC, you can implement your own versions of the view class func-tions involved in printing a document. The principal roles of each of these functions are shown in thefollowing table.
1090
Chapter 18: Storing and Printing Documents
25905c18.qxd:WroxPro 2/21/08 9:21 AM Page 1090

Information relating to the printing process is stored in an object of type CPrintInfo that’s created bythe framework. You can store additional information in the view, or in another object of your own. If youuse your own class object, you can keep track of it by storing a pointer to it in the CPrintInfo object.
To implement printing in a Windows Forms application, add a PrintDocument component to the formand implement the handler for the PrintPage event to print the form. Add a PrintDialog componentto the form and display it in the Click handler for the menu item/toolbar button that initiates printing.When the print dialog is closed using the OK button, call the Print() function for the PrintDocumentobject to print the form.
ExercisesYou can download the source code for the examples in the book and the solutions to the following exercisesfrom www.wrox.com.
1. Add some code to the OnPrint() function so that the page number is printed at the bottom ofeach page of the document in the form ‘Page n’. If you use the features of the CString class,you can do this with just three extra lines!
2. As a further enhancement to the CText class, change the implementation so that scaling worksproperly. (Hint — look up the CreatePointFont() function in the online help.)
3. Modify CLR Sketcher so that it displays the sketch file name in the title bar for the application.
4. Modify CLR Sketcher to implement the File > New menu item. Don’t forget to build in the logicso you don’t discard an existing sketch that has not been saved in its present state. There is a littlebit of work to this. (Hint: You will need to record in Sketch class when the sketch has been changedsince it was last saved. Exploring the documentation for the System::Windows::MessageBoxclass will be helpful, too.)
Function Role
OnPreparePrinting() Determine the number of pages in the document and call theDoPreparePrinting() member of the view.
OnBeginPrinting() Allocate the resources required in the printer device context that areneeded throughout the printing process, and determine the number ofpages in the document, where this is dependent on information fromthe device context.
OnPrepareDC() Set attributes in the printer device context as necessary.
OnPrint() Print the document.
OnEndPrinting() Delete any GDI resources created in OnBeginPrinting() and do anyother necessary cleanup.
1091
Chapter 18: Storing and Printing Documents
25905c18.qxd:WroxPro 2/21/08 9:21 AM Page 1091

25905c18.qxd:WroxPro 2/21/08 9:21 AM Page 1092

19Writing Your Own DLLs
Chapter 9 discussed how a C++/CLI class library is stored in a .dll file. Dynamic link libraries(DLLs) are also used extensively with native C++ applications. A complete discussion of DLLs innative C++ applications is outside the scope of a beginner’s book, but they are important enoughto justify including an introductory chapter on them. In this chapter, you will learn about:
❑ DLLs and how they work
❑ When you should consider implementing a DLL
❑ What varieties of DLL are possible and what they are used for
❑ How you can extend MFC using a DLL
❑ How to define what is accessible in a DLL
❑ How to access the contents of a DLL in your programs
Understanding DLLsAlmost all programming languages support libraries of standard code modules for commonly usedfunctions. In native C++ you’ve been using lots of functions that are stored in standard libraries, suchas the ceil() function that you used in the previous chapter, which is declared in the <cmath>header. The code for this function is stored in a library file with the extension .lib, and when theexecutable module for the Sketcher program was created, the linker retrieved the code for this stan-dard function from the library file and integrated a copy of it into the .exe file for the Sketcher pro-gram. If you write another program and use the same function, it will also have its own copy of theceil() function. The ceil() function is statically linked to each application and is an integral partof each executable module, as illustrated in Figure 19-1.
25905c19.qxd:WroxPro 2/21/08 9:22 AM Page 1093

Figure 19-1
Although this is a very convenient way of using a standard function with minimal effort on your part, it does have its disadvantages as a way for several concurrently executing programs to make use of thesame function in the Windows environment. A statically linked standard function being used by morethan one program concurrently is duplicated in memory for each program using it. This may not seemto matter much for the ceil() function, but some functions — input and output, for instance — areinvariably common to most programs and are likely to occupy sizable chunks of memory. Having thesestatically linked would be extremely inefficient.
Copy added to each program during linkeditLibraryfunction
Libraryfunction
Libraryfunction
Libraryfunction
ProgramA.exe
Static Library
ProgramB.exe ProgramC.exe
1094
Chapter 19: Writing Your Own DLLs
25905c19.qxd:WroxPro 2/21/08 9:22 AM Page 1094

Another consideration is that a standard function from a static library may be linked into hundreds ofprograms in your system, so identical copies of the code for them will be occupying disk space in the.exe file for each program. For these reasons, an additional library facility is supported by Windows forstandard functions. It’s called a dynamic link library, and it’s usually abbreviated to DLL. This allowsone copy of a function to be shared among several concurrently executing programs and avoids the need toincorporate a copy of the code for a library function into the executable module for a program that uses it.
How DLLs WorkA dynamic link library is a file containing a collection of modules that can be used by any number of differ-ent programs. The file usually has the extension .dll, but this isn’t obligatory. When naming a DLL, youcan assign any extension that you like, but this can affect how they’re handled by Windows. Windows auto-matically loads dynamic link libraries that have the extension .dll. If they have some other extension, youwill need to load them explicitly by adding code to do this to your program. Windows itself uses the exten-sion .exe for some of its DLLs. You have likely seen the extensions .vbx (Visual Basic Extension) and .ocx(OLE Custom Extension), which are applied to DLLs containing specific kinds of controls.
You might imagine that you have a choice about whether or not you use dynamic link libraries in yourprogram, but you don’t. The Win32 API is used by every Windows program, and the API is implementedin a set of DLLs. DLLs are fundamental to Windows programming.
Connecting a function in a DLL to a program is achieved differently from the process used with a staticallylinked library, where the code is incorporated once and for all when the program is linked to generate theexecutable module. A function in a DLL is connected only to a program that uses it when the application isrun, and this is done on each occasion the program is executed, as Figure 19-2 illustrates.
Figure 19-2 shows the sequence of events when three programs that use a function in a DLL are startedsuccessively and then all execute concurrently. No code from the DLL is included in the executable mod-ule of any of the programs. When one of the programs is executed, the program is loaded into memory,and if the DLL it uses isn’t already present, it too is loaded separately. The appropriate links between theprogram and the DLL are then established. If, when a program is loaded, the DLL is already there, allthat needs to be done is to link the program to the required function in the DLL.
Note particularly that when your program calls a function in a DLL, Windows will automatically loadthe DLL into memory. Any program subsequently loaded into memory that uses the same DLL can useany of the capabilities provided by the same copy of the DLL because Windows recognizes that the libraryis already in memory and just establishes the links between it and the program. Windows keeps track ofhow many programs are using each DLL that is resident in memory so that the library remains in mem-ory as long as at least one program is still using it. When a DLL is no longer used by any executing pro-gram, Windows automatically deletes it from memory.
MFC is provided in the form of a number of DLLs that your program can link to dynamically, as well asa library that your program can link to statically. By default, the Application Wizard generates programsthat link dynamically to the DLL form of MFC.
1095
Chapter 19: Writing Your Own DLLs
25905c19.qxd:WroxPro 2/21/08 9:22 AM Page 1095

Figure 19-2
Having a function stored in a DLL introduces the possibility of changing the function without affecting theprograms that use it. As long as the interface to the function in the DLL remains the same, the programscan use a new version of the function quite happily, without the need for recompiling or re-linking them.Unfortunately, this also has a downside: It’s easy to end up using the wrong version of a DLL with a pro-gram. This can be a particular problem with applications that install DLLs in the Windows System folder.Some commercial applications arbitrarily write the DLLs associated with the program to this folder with-out regard to the possibility of a DLL with the same name being overwritten. This can interfere with otherapplications that you have already installed and, in the worst case, can render them inoperable.
Function
ProgramA
1. ProgramA loaded
4. ProgramB loaded
2. .dll loaded
6. ProgramC loaded
Computer Memory
5. linkage to dll function
3. linkage to dll function
7. linkage to dll function
ProgramB ProgramC Library.dll
Library.dll
ProgramC.exe
ProgramB.exe
ProgramA.exe
1096
Chapter 19: Writing Your Own DLLs
25905c19.qxd:WroxPro 2/21/08 9:22 AM Page 1096

Runtime Dynamic LinkingThe DLL that you’ll create in this chapter is automatically loaded into memory when the program that usesit is loaded into memory for execution. This is referred to as load-time dynamic linking, or early binding,because the links to the functions used are established as soon as the program and DLL have been loadedinto memory. This kind of operation was illustrated in Figure 19-2; however, this isn’t the only choice avail-able. It’s also possible to cause a DLL to be loaded after execution of a program has started. This is calledruntime dynamic linking or late binding. The sequence of operations that occurs with this is illustrated inFigure 19-3.
Figure 19-3
Function
Program
1. Program is loaded but no DLL is loaded. The program may use any one of the three DLLs.
3. Library2.dll loaded at the request of the program.
2. At this point the program determines that Library2.dll is required and causes it to be loaded
4. The program obtains the address of a function from the DLL and uses it to call the function
Computer Memory
Library2.dll
Library1.dll
Library2.dll
Library3.dll
Program.exe
1097
Chapter 19: Writing Your Own DLLs
25905c19.qxd:WroxPro 2/21/08 9:22 AM Page 1097

Runtime dynamic linking enables a program to defer linking of a DLL until it’s certain that the functionsin a DLL are required. This allows you to write a program that can choose to load one or more of a num-ber of DLLs based upon input to the program so that only those functions that are necessary are actuallyloaded into memory. In some circumstances, this can drastically reduce the amount of memory requiredto run a program.
A program implemented to use runtime dynamic linking calls the Windows API function LoadLibrary()to load the DLL when it’s required. The address of a function within the DLL can then be obtained using afunction GetProcAddress(). When the program no longer has a need to use the DLL, it can detach itselffrom the DLL by calling the FreeLibrary() function. If no other program is using the DLL, it will bedeleted from memory. I won’t be going into further details of how this works in this book.
Contents of a DLLA dynamic link library isn’t limited to storing code for functions. You can also put resources into a DLL,including such things as bitmaps and fonts. The Solitaire game that comes with Windows uses a dynamiclink library called Cards.dll, which contains all the bitmap images of the cards and functions to manip-ulate them. If you wanted to write your own card game, you could conceivably use this DLL as a base andsave yourself the trouble of creating all the bitmaps needed to represent the cards. Of course, to use it, youwould need to know specifically which functions and resources are included in the DLL.
You can also define static global variables in a DLL, including C++ class objects, so that these can beaccessed by programs using it. The constructors for global static class objects are called automaticallywhen such objects are created. You should note that each program using a DLL gets its own copy of anystatic global objects defined in the DLL, even though they may not necessarily be used by a program.For global class objects, this involves the overhead of calling a constructor for each. You should, there-fore, avoid introducing such objects into a DLL unless they are absolutely essential.
The DLL InterfaceYou can’t access just anything that’s contained in a DLL. Only items specifically identified as exportedfrom a DLL are visible to the outside world. Functions, classes, global static variables, and resources canall be exported from a DLL, and those that are make up the interface to it. Anything that isn’t exportedcan’t be accessed from the outside. You’ll see how to export items from a DLL later in this chapter.
The DllMain() FunctionEven though a DLL isn’t executable as an independent program, it does contain a special variety of themain() function, called DllMain(). This is called by Windows when the DLL is first loaded into mem-ory to allow the DLL to do any necessary initialization before its contents are used. Windows will alsocall DllMain() just before it removes the DLL from memory to enable the DLL to clean up after itself ifnecessary. There are also other circumstances where DllMain() is called, but these situations are outsidethe scope of this book.
DLL VarietiesThere are three different kinds of DLL that you can build with Visual C++ 2008 using MFC: an MFCextension DLL, a regular DLL with MFC statically linked, and a regular DLL with MFC dynamicallylinked.
1098
Chapter 19: Writing Your Own DLLs
25905c19.qxd:WroxPro 2/21/08 9:22 AM Page 1098
MFC Extension DLLYou build this kind of DLL whenever it’s going to include classes derived from the MFC. Your derivedclasses in the DLL effectively extend the MFC. The MFC must be accessible in the environment whereyour DLL is used, so all the MFC classes are available together with your derived classes — hence thename “MFC extension DLL.” However, deriving your own classes from the MFC isn’t the only reason to use an MFC extension DLL. If you’re writing a DLL that includes functions that pass pointers to MFCclass objects to functions in a program using it or that receive such pointers from functions in the program,you must create it as an MFC extension DLL.
Accesses to classes in the MFC by an extension DLL are always resolved dynamically by linking to theshared version of MFC that is itself implemented in DLLs. An extension DLL is created using the sharedDLL version of the MFC, so when you use an extension DLL, the shared version of MFC must be avail-able. An MFC extension DLL can be used by a normal Application Wizard-generated application. Itrequires the option Use MFC in a Shared Dll to be selected under the General set of properties for theproject, which you access through the Project > Properties menu option. This is the default selec-tion with an Application Wizard-generated program. Because of the fundamental nature of the sharedversion of the MFC in an extension DLL, an MFC extension DLL can’t be used by programs that arestatically linked to MFC.
Regular DLL — Statically Linked to MFCThis is a DLL that uses MFC classes linked statically. Use of the DLL doesn’t require MFC to be availablein the environment in which it is used, because the code for all the classes it uses is incorporated into theDLL. This bulks up the size of the DLL, but the big advantage is that this kind of DLL can be used by anyWin32 program, regardless of whether or not it uses MFC.
Regular DLL — Dynamically Linked to MFCThis is a DLL that uses dynamically linked classes from MFC but doesn’t add classes of its own. Thiskind of DLL can be used by any Win32 program regardless of whether it uses MFC itself, but use of theDLL does require the MFC to be available in the environment.
You can use the Application Wizard to build all three types of DLL that use MFC. You can also create a proj-ect for a DLL that doesn’t involve MFC at all, by creating a Win32 project type using the Win32 Projecttemplate and selecting DLL in the application settings for the project.
Deciding What to Put in a DLLHow do you decide when you should use a DLL? In most cases, the use of a DLL provides a solution toa particular kind of programming problem, so if you have the problem, a DLL can be the answer. Thecommon denominator is often sharing code among a number of programs, but there are other instanceswhere a DLL provides advantages. The kinds of circumstance where putting code or resources in a DLLprovides a very convenient and efficient approach include the following:
❑ You have a set of functions or resources on which you want to standardize and which you will usein several different programs. The DLL is a particularly good solution for managing these, espe-cially if some of the programs using your standard facilities are likely to be executing concurrently.
1099
Chapter 19: Writing Your Own DLLs
25905c19.qxd:WroxPro 2/21/08 9:22 AM Page 1099

❑ You have a complex application that involves several programs and a lot of code but that hassets of functions or resources that may be shared among several of the programs in the applica-tion. Using a DLL for common functionality or common resources enables you to manage anddevelop these with a great deal of independence from the program modules that use them andcan simplify program maintenance.
❑ You have developed a set of standard application-oriented classes derived from MFC that youanticipate using in several programs. By packaging the implementation of these classes in anextension DLL, you can make using them in several programs very straightforward, and inthe process provide the possibility of being able to improve the internals of the classes with-out affecting the applications that use them.
❑ You have developed a brilliant set of functions that provide an easy-to-use but amazingly pow-erful tool kit for an application area that just about everybody wants to dabble in. You can read-ily package your functions in a regular DLL and distribute them in this form.
There are also other circumstances where you may choose to use DLLs, such as when you want to be ableto dynamically load and unload libraries, or to select different modules at run time. You could even usethem to ease the development and updating of your applications generally.
The best way of understanding how to use a DLL is to create one and try it out. Let’s do that now.
Writing DLLsThere are two aspects to writing a DLL that you’ll look at: how you actually write a DLL and how youdefine what’s to be accessible in the DLL to programs that use it. As a practical example of writing aDLL, you’ll create an extension DLL to add a set of application classes to the MFC. You’ll then extendthis DLL by adding variables available to programs using it.
Writing and Using an Extension DLLYou can create an MFC extension DLL to contain the shape classes for the Sketcher application. Althoughthis will not bring any major advantages to the program, it demonstrates how you can write an extensionDLL without involving you in the overhead of entering a lot of new code.
The starting point is Application Wizard, so create a new project by pressing Ctrl+Shift+N and choosingthe project type as MFC and the template as MFC DLL, as shown in Figure 19-4.
This selection identifies that you are creating a project for an MFC-based DLL with the nameExtDLLExample. Click the OK button and select Application Settings in the next window that is displayed. The window looks as shown in Figure 19-5.
Here, you can see three radio buttons corresponding to the three types of MFC-based DLL that I discussedearlier. You should choose the third option, as shown in the figure.
The two checkboxes below the first group of three radio buttons allow you to include code to supportAutomation and Windows Sockets in the DLL. These are both advanced capabilities within a Windowsprogram, so you don’t need either of them here. Automation provides the potential for hosting objects
1100
Chapter 19: Writing Your Own DLLs
25905c19.qxd:WroxPro 2/21/08 9:22 AM Page 1100

created and managed by one application inside another. Windows Sockets provides classes and func-tionality to enable your program to communicate over a network, but you won’t be getting into this asit’s beyond the scope of the book. You can click the Finish button and complete creation of the project.
When you first created the Sketcher application, you opted out of using Unicode. If the DLL is to workwith Sketcher it must be consistent with this. Click the Project > Properties... menu item andselect General in the Configuration Properties branch in the left pane of the dialog. Change the value ofthe Character Set option to “Use Multibyte Character Set” from the drop-down list in the value column.
Figure 19-4
Figure 19-5
1101
Chapter 19: Writing Your Own DLLs
25905c19.qxd:WroxPro 2/21/08 9:22 AM Page 1101

Now that the MFC DLL wizard has done its stuff, you can look into the code that has been generated onyour behalf. If you look at the contents of the project in the Solution Explorer pane, you’ll see that theMFC DLL wizard has generated several files, including a .txt file that contains a description of the otherfiles. You can read what they’re all for in the .txt file, but the two shown in the following table are theones of immediate interest in implementing our DLL.
When your DLL is loaded, the first thing that happens is that DllMain() is executed, so perhaps youshould take a look at that first.
Understanding DllMain()If you look at the contents of dllmain.cpp, you will see that the MFC DLL wizard has generated a versionof DllMain() for you, as shown here:
extern “C” int APIENTRYDllMain(HINSTANCE hInstance, DWORD dwReason, LPVOID lpReserved){
// Remove this if you use lpReservedUNREFERENCED_PARAMETER(lpReserved);
if (dwReason == DLL_PROCESS_ATTACH){
TRACE0(“EXTDLLEXAMPLE.DLL Initializing!\n”);
// Extension DLL one-time initializationif (!AfxInitExtensionModule(ExtDLLExampleDLL, hInstance))
return 0;
// Insert this DLL into the resource chain// NOTE: If this Extension DLL is being implicitly linked to by// an MFC Regular DLL (such as an ActiveX Control)// instead of an MFC application, then you will want to// remove this line from DllMain and put it in a separate// function exported from this Extension DLL. The Regular DLL// that uses this Extension DLL should then explicitly call that// function to initialize this Extension DLL. Otherwise,// the CDynLinkLibrary object will not be attached to the// Regular DLL’s resource chain, and serious problems will
Filename Contents
dllmain.cpp This contains the function DllMain() and is the primary source file forthe DLL.
ExtDLLExample.def The information in this file is used during compilation. It contains thename of the DLL, and you can also add to it the definitions of thoseitems in the DLL that are to be accessible to a program using the DLL.You’ll use an alternative and somewhat easier way of identifying suchitems in the example.
1102
Chapter 19: Writing Your Own DLLs
25905c19.qxd:WroxPro 2/21/08 9:22 AM Page 1102

// result.
new CDynLinkLibrary(ExtDLLExampleDLL);}else if (dwReason == DLL_PROCESS_DETACH){
TRACE0(“EXTDLLEXAMPLE.DLL Terminating!\n”);// Terminate the library before destructors are calledAfxTermExtensionModule(ExtDLLExampleDLL);
}return 1; // ok
}
There are three arguments passed to DllMain() when it is called. The first argument, hInstance, is a han-dle that has been created by Windows to identify the DLL. Every task under Windows has an instance han-dle which identifies it uniquely. The second argument, dwReason, indicates the reason why DllMain() isbeing called. You can see this argument being tested in the if statements in DllMain(). The first if testsfor the value DLL_PROCESS_ATTACH, which indicates that a program is about to use the DLL, and the sec-ond if tests for the value DLL_PROCESS_DETACH, which indicates that a program has finished using theDLL. The third argument is a pointer that’s reserved for use by Windows, so you can ignore it.
When the DLL is first used by a program, it’s loaded into memory, and the DllMain() function is executed with the argument dwReason set to DLL_PROCESS_ATTACH. This results in the Windows APIfunction AfxInitExtensionModule() being called to initialize the DLL and an object of the classCDynLinkLibrary created on the heap. Windows uses objects of this class to manage extension DLLs. If you need to add initialization of your own, you can add it to the end of this block. Any cleanup yourequire for your DLL can be added to the block for the second if statement.
Adding Classes to the Extension DLLYou’ll use the DLL to contain the implementation of the Sketcher shape classes, so move the filesElements.h and Elements.cpp from the folder containing the source for Sketcher to the folder con-taining the DLL. Be sure that you move rather than copy the files. Because the DLL is going to supply the shape classes for Sketcher, you don’t want to leave them in the source code for Sketcher.
You’ll also need to remove Elements.cpp from the Sketcher project. To do this, open the Sketcher proj-ect, highlight Elements.cpp in the Solution Explorer pane by clicking the file, and then press Delete. Ifyou don’t do this, the compiler complains that it can’t find the file when you try to compile the project.Follow the same procedure to get rid of Elements.h from the Header Files folder in the SolutionExplorer pane.
The shape classes use the constants that you have defined in the file OurConstants.h, so copy this filefrom the Sketcher project folder to the folder containing the DLL. Note that the variable VERSION_NUMBERis used exclusively by the IMPLEMENT_SERIAL() macros in the shape classes, so you could delete it fromthe OurConstants.h file used in the Sketcher program.
You now need to add Elements.cpp containing the implementation of our shape classes to the extensionDLL project, so open the ExtDLLExample project, select the menu option Project > Add ExistingItem and choose the file Elements.cpp from the list box in the dialog box, as shown in Figure 19-6.
1103
Chapter 19: Writing Your Own DLLs
25905c19.qxd:WroxPro 2/21/08 9:22 AM Page 1103

Figure 19-6
The project should also include the files containing the definitions of the shape classes and your con-stants, so repeat the process for Elements.h and OurConstants.h to add these to the project. You canadd multiple files in a single step by holding down the Ctrl key while you select from the list of files inthe Add Existing Item dialog box. You should eventually see all the files in the Solution Explorer paneand all the shape classes displayed in the Class View pane for the project.
Exporting Classes from the Extension DLLThe names of the classes defined in the DLL that are to be accessible in programs that use it must beidentified in some way so that the appropriate links can be established between a program and the DLL.As you saw earlier, one way of doing this is by adding information to the .def file for the DLL. Thisinvolves adding what are called decorated names to the DLL and associating the decorated name with aunique identifying numeric value called an ordinal. A decorated name for an object is a name generatedby the compiler, which adds an additional string to the name you gave to the object. This additional stringprovides information about the type of the object or, in the case of a function for example, informationabout the types of the parameters to the function. Among other things, it ensures that everything has aunique identifier and enables the linker to distinguish overloaded functions from each other.
Obtaining decorated names and assigning ordinals to export items from a DLL is a lot of work andisn’t the best or the easiest approach with Windows. A much easier way to identify the classes that youwant to export from the DLL is to modify the class definitions in Elements.h to include the keywordAFX_EXT_CLASS before each class name, as shown in the following for the CLine class:
// Class defining a line objectclass AFX_EXT_CLASS CLine: public CElement{DECLARE_SERIAL(CLine)
public:virtual void Draw(CDC* pDC, CElement* pElement=0); // Function to display a line
1104
Chapter 19: Writing Your Own DLLs
25905c19.qxd:WroxPro 2/21/08 9:22 AM Page 1104

virtual void Move(CSize& aSize); // Function to move an element
// Constructor for a line objectCLine(CPoint Start, CPoint End, COLORREF aColor, int PenWidth);
virtual void Serialize(CArchive& ar);// Serialize function for CLine
protected:CPoint m_StartPoint; // Start point of lineCPoint m_EndPoint; // End point of line
CLine(void); // Default constructor - should not be used};
The AFX_EXT_CLASS keyword indicates that the class is to be exported from the DLL. This has the effectof making the complete class available to any program using the DLL and automatically allows access to any of the data and functions in the public interface of the class. The collection of things in a DLL thatare accessible by a program using it is referred to as the interface to the DLL. The process of making anobject part of the interface to a DLL is referred to as exporting the object.
You need to add the keyword AFX_EXT_CLASS to all of the other shape classes, including the base classCElement. Why is it necessary to export CElement from the DLL? After all, programs create only objectsof the classes derived from CElement, and not objects of the class CElement itself. The reason is thatyou have declared public members of CElement which form part of the interface to the derived shapeclasses, and which are almost certainly going to be required by programs using the DLL. If you don’texport the CElement class, functions such as GetBoundRect()will not be available.
The final modification needed is to add the directive:
#include <afxtempl.h>
to stdafx.h in the DLL project so that the definition of CList is available.
You have done everything necessary to add the shape classes to the DLL. All that remains is for youcompile and link the project to create the DLL.
Building a DLLYou build the DLL in exactly the same way as you build any other project — by using the Build > BuildSolution menu option or selecting the corresponding toolbar button. The output produced is somewhatdifferent, though. You can see the files that are produced in the debug subfolder of the project folder for aDebug build, or in the release subfolder for a Release build. The executable code for the DLL is containedin the file ExtDLLExample.dll. This file needs to be available to execute a program that uses the DLL. Thefile ExtDLLExample.lib is an import library file that contains the definitions of the items that are exportedfrom the DLL, and it must be available to the linker when a program using the DLL is linked.
If you find the DLL build fails because Elements.cpp contains an #include directive forSketcher.h, just remove it. On my system the Class Wizard added this #include directive when creating the code for the CElement class, but it is not required.
1105
Chapter 19: Writing Your Own DLLs
25905c19.qxd:WroxPro 2/21/08 9:22 AM Page 1105
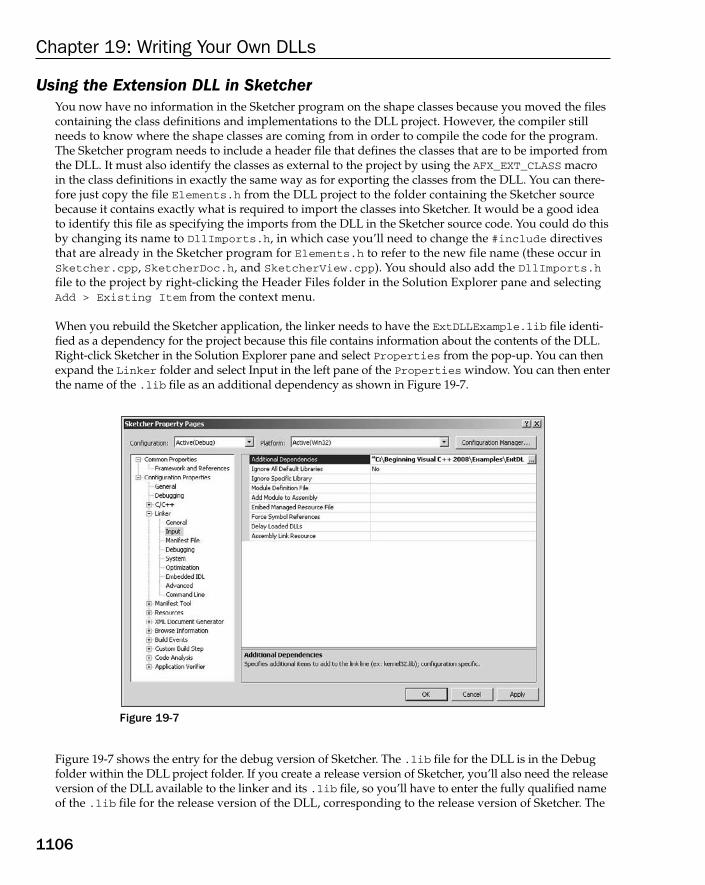
Using the Extension DLL in SketcherYou now have no information in the Sketcher program on the shape classes because you moved the filescontaining the class definitions and implementations to the DLL project. However, the compiler stillneeds to know where the shape classes are coming from in order to compile the code for the program.The Sketcher program needs to include a header file that defines the classes that are to be imported fromthe DLL. It must also identify the classes as external to the project by using the AFX_EXT_CLASS macroin the class definitions in exactly the same way as for exporting the classes from the DLL. You can there-fore just copy the file Elements.h from the DLL project to the folder containing the Sketcher sourcebecause it contains exactly what is required to import the classes into Sketcher. It would be a good ideato identify this file as specifying the imports from the DLL in the Sketcher source code. You could do thisby changing its name to DllImports.h, in which case you’ll need to change the #include directivesthat are already in the Sketcher program for Elements.h to refer to the new file name (these occur inSketcher.cpp, SketcherDoc.h, and SketcherView.cpp). You should also add the DllImports.hfile to the project by right-clicking the Header Files folder in the Solution Explorer pane and selectingAdd > Existing Item from the context menu.
When you rebuild the Sketcher application, the linker needs to have the ExtDLLExample.lib file identi-fied as a dependency for the project because this file contains information about the contents of the DLL.Right-click Sketcher in the Solution Explorer pane and select Properties from the pop-up. You can thenexpand the Linker folder and select Input in the left pane of the Properties window. You can then enterthe name of the .lib file as an additional dependency as shown in Figure 19-7.
Figure 19-7
Figure 19-7 shows the entry for the debug version of Sketcher. The .lib file for the DLL is in the Debugfolder within the DLL project folder. If you create a release version of Sketcher, you’ll also need the releaseversion of the DLL available to the linker and its .lib file, so you’ll have to enter the fully qualified nameof the .lib file for the release version of the DLL, corresponding to the release version of Sketcher. The
1106
Chapter 19: Writing Your Own DLLs
25905c19.qxd:WroxPro 2/21/08 9:22 AM Page 1106

file to which the properties apply is selected in the Configuration drop-down list box in the Propertieswindow. You have only one external dependency, but you can enter several when this is necessary byclicking the button to the right of the text box for input. Because the full path to the .lib file has beenentered here, the linker will know not only that ExtDLLExample.lib is an external dependency but alsowhere it is.
Be aware that if the complete path to the.lib file contains spaces (as in the example here), you’ll needto enclose it within quotation marks for the linker to recognize it correctly.
You can now build the Sketcher application once more, and everything should compile and link asusual. However, if you try to execute the program, you see the message box shown in Figure 19-8.
Figure 19-8
This is one of the less cryptic error messages — it’s fairly clear what’s gone wrong. To enable Windowsto load a DLL for a program, it’s usual to place the DLL in your \WINNT\System folder. If it’s not in thisfolder, Windows searches the folder containing the executable Sketcher.exe. If it isn’t there you get theerror message. Because you probably don’t want to clutter up your \WINNT\System folder unnecessar-ily, you can copy ExtDllExample.dll from the debug folder of the DLL project to the debug folder forSketcher. Sketcher should execute exactly as before, except that now it uses the shape classes in the DLLyou have created.
Files Required to Use a DLLFrom what you have just seen in the context of using the DLL you created in the Sketcher program, youcan conclude that three files must be available to use a DLL in a program, as shown in the followingtable.
If you plan to distribute program code in the form of a DLL for use by other programmers, you need to distribute all three files in the package. For applications that already use the DLL, just the .dll isrequired along with the .exe file.
Extension Contents
.h Defines those items that are exported from a DLL and enables the compiler to dealproperly with references to such items in the source code of a program using the DLL.The .h file needs to be added to the source code for the program using the DLL.
.lib Defines the items exported by a DLL in a form, which enables the linker to dealwith references to exported items when linking a program that uses a DLL.
.dll Contains the executable code for the DLL, which is loaded by Windows when aprogram using the DLL is executed.
1107
Chapter 19: Writing Your Own DLLs
25905c19.qxd:WroxPro 2/21/08 9:22 AM Page 1107

Exporting Variables and Functions from a DLLYou’ve seen how you can export classes from an extension DLL using the AFX_EXT_CLASS keyword.You can also export objects of classes that are defined in a DLL, as well as ordinary variables and func-tions. These can be exported from any kind of DLL by using the attribute dllexport to identify them.By using dllexport to identify class objects, variables, or functions that are to be exported from a DLL,you avoid getting involved in the complications of modifying the .def file and, as a consequence, youmake defining the interface to the DLL a straightforward matter.
Don’t be misled into thinking that the approach you’re taking to exporting things from your DLL makesthe .def file method redundant. The .def file approach is more complicated — which is why you’retaking the easy way out — but it offers distinct advantages in many situations over the approach you’retaking. This is particularly true in the context of products that are distributed widely, and are likely to be developed over time. One major plus is that a .def file enables you to define the ordinals that corre-spond to your exported functions. This allows you to add more exported functions later and assign newordinals to them, so the ordinals for the original set of functions remain the same. This means that some-one using a new version of the DLL with a program built to use the old version doesn’t have to relinktheir application.
You must use the dllexport attribute in conjunction with the keyword _declspec when you identifyan item to be exported. For example, the statement
_declspec(dllexport) double aValue = 1.5;
defines the variable aValue of type double with an initial value of 1.5 and identifies it as a variable thatis to be available to programs using the DLL. To export a function from a DLL, you use the dllexportattribute in a similar manner. For example:
_declspec(dllexport) CString FindWinner(CString* Teams);
This statement exports the function FindWinner() from the DLL.
To avoid the slightly cumbersome notation for specifying the dllexport attribute, you can simplify itby using a preprocessor directive:
#define DllExport _declspec(dllexport)
With this definition, you can rewrite the two previous examples as:
DllExport double aValue = 1.5;DllExport CString FindWinner(CString* Teams);
This notation is much more economical, as well as easier to read, so you may want to adopt this approachwhen coding your DLLs.
Obviously, only symbols that represent objects with global scope can be exported from a DLL. Variablesand class objects that are local to a function in a DLL cease to exist when execution of a function is com-pleted, in just the same way as in a function in a normal program. Attempting to export such symbolsresults in a compile-time error.
1108
Chapter 19: Writing Your Own DLLs
25905c19.qxd:WroxPro 2/21/08 9:22 AM Page 1108

Importing Symbols into a ProgramThe dllexport attribute identifies the symbols in a DLL that form part of the interface. If you want to usethese in a program, you must make sure that they are correspondingly identified as being imported fromthe DLL. This is done by using the dllimport keyword in declarations for the symbols to be imported ina .h file. You can simplify the notation by using the same technique you applied to the dllexport attrib-ute. Define DllImport with the directive:
#define DllImport _declspec(dllimport)
You can now import the aValue variable and the FindWinner() function into a program with thedeclarations:
DllImport double aValue;DllImport CString FindWinner(CString* Teams);
These statements would appear in a .h file that would be included into the .cpp files in the programthat referenced these symbols.
Implementing the Export of Symbols from a DLLYou could extend the extension DLL for Sketcher to make the symbols defining shape types and colorsavailable in the interface to it. You can then remove the definitions that you have in the Sketcher programand import the definitions of these symbols from the extension DLL.
You can modify the source code for the DLL first to add the symbols for shape element types and colorsto its interface. To export the element types and colors, they must be global variables. As global variables,it would be better if they appeared in a .cpp file, rather than a .h file, so move the definitions of these outof the OurConstants.h file to the beginning of Elements.cpp in the DLL source. You can then apply thedllexport attribute to their definitions in the Elements.cpp file, as follows:
// Definitions of constants and identification of symbols to be exported
#define DllExport __declspec(dllexport)
// Element type definitions// Each type value must be uniqueDllExport extern const unsigned int LINE = 101U;DllExport extern const unsigned int RECTANGLE = 102U;DllExport extern const unsigned int CIRCLE = 103U;DllExport extern const unsigned int CURVE = 104U;DllExport extern const unsigned int TEXT = 105U;///////////////////////////////////
// Color values for drawingDllExport extern const COLORREF BLACK = RGB(0,0,0);DllExport extern const COLORREF RED = RGB(255,0,0);DllExport extern const COLORREF GREEN = RGB(0,255,0);DllExport extern const COLORREF BLUE = RGB(0,0,255);DllExport extern const COLORREF SELECT_COLOR = RGB(255,0,180);///////////////////////////////////
1109
Chapter 19: Writing Your Own DLLs
25905c19.qxd:WroxPro 2/21/08 9:22 AM Page 1109

Add these to the beginning of Elements.cpp, after the #include directives. You first define the symbolDllExport to simplify the specification of the variables to be exported, as you saw earlier. You then assignthe attribute dllexport to each of the element types and colors.
Notice that the extern specifier has also been added to the definitions of these variables. The reason forthis is the effect of the const modifier, which indicates to the compiler that the values are constants andshouldn’t be modified in the program, which was what you wanted. However, by default the constkeyword also specifies the variables as having internal linkage, so they are local to the file in which theyappear. You want to export these variables to another program so you have to add the extern modifierto override the default linkage specification due to the const modifier and ensure that they have exter-nal linkage. Symbols that are assigned external linkage are global and so can be exported. Of course, if thevariables didn’t have the const modifier applied to them, you wouldn’t need to add extern because theywould be global automatically as long as they appeared at global scope.
The OurConstants.h file now contains only one definition:
// Definitions of constants#pragma once
// Define the program version number for use in serializationUINT VERSION_NUMBER = 1;
Of course, this is still required because it is used in the IMPLEMENT_SERIAL() macros in Elements.cpp.You can now build the DLL once again, so it’s ready to use in the Sketcher program. Don’t forget to copythe latest version of the .dll file to the Sketcher project Debug folder.
Using Exported SymbolsTo make the symbols exported from the DLL available in the Sketcher program, you need to specify themas imported from the DLL. You can do this by adding the identification of the imported symbols to the fileDllImports.h, which contains the definitions for the imported classes. In this way, you’ll have one filespecifying all the items imported from the DLL. The statements that appear in this file are as follows:
// Variables defined in the shape DLL ExtDLLExample.dll#pragma once
#define DllImport __declspec( dllimport )
// Import element type declarations// Each type value must be uniqueDllImport extern const unsigned int LINE;DllImport extern const unsigned int RECTANGLE;DllImport extern const unsigned int CIRCLE;DllImport extern const unsigned int CURVE;DllImport extern const unsigned int TEXT;///////////////////////////////////
// Import color values for drawingDllImport extern const COLORREF BLACK;DllImport extern const COLORREF RED;
1110
Chapter 19: Writing Your Own DLLs
25905c19.qxd:WroxPro 2/21/08 9:22 AM Page 1110

DllImport extern const COLORREF GREEN;DllImport extern const COLORREF BLUE;DllImport extern const COLORREF SELECT_COLOR;///////////////////////////////////
// Plus the definitions for the shape classes...
This defines and uses the DllImport symbol to simplify these declarations, in the way that you saw ear-lier. This means that the OurConstants.h file in the Sketcher project is now redundant, so you can deleteit, along with the #include for it in Sketcher.h and SketcherView.cpp.
It looks as though you’ve done everything necessary to use the new version of the DLL with Sketcher,but you haven’t. If you try to recompile Sketcher, you’ll get error messages for the switch statement inthe CreateElement() member of CSketcherView.
The values in the case statements must be constant, but although you have given the element type vari-ables the attribute const, the compiler has no access to these values because they are defined in the DLL,not in the Sketcher program. The compiler, therefore, can’t determine what these constant case valuesare, and flags an error. The simplest way round this problem is to replace the switch statement in theCreateElement() function by a series of if statements, as follows:
// Create an element of the current typeCElement* CSketcherView::CreateElement(){
// Get a pointer to the document for this viewCSketcherDoc* pDoc = GetDocument();ASSERT_VALID(pDoc); // Verify the pointer is good
// Now select the element using the type stored in the documentunsigned int ElementType = pDoc->GetElementType();COLORREF ElementColor = pDoc->GetElementColor(); int PenWidth = pDoc->GetPenWidth();if(ElementType == RECTANGLE)return new CRectangle(m_FirstPoint, m_SecondPoint, ElementColor, PenWidth);
if(ElementType == CIRCLE)return new CCircle(m_FirstPoint, m_SecondPoint, ElementColor, PenWidth);
if(ElementType == CURVE)return new CCurve(m_FirstPoint, m_SecondPoint, ElementColor, PenWidth);
else// Always default to a linereturn new CLine(m_FirstPoint, m_SecondPoint, ElementColor, PenWidth);
}
You’ve added local variables to store the current element type and color and the pen width that are retrievedfrom the document object. The element type is tested against the element types imported from the DLL inthe series of if statements. This does exactly the same job as the switch statement, but has no requirementfor the element type constants to be known explicitly. If you now build Sketcher with these changes added,it executes using the DLL, using the exported symbols as well as the exported shape classes.
1111
Chapter 19: Writing Your Own DLLs
25905c19.qxd:WroxPro 2/21/08 9:22 AM Page 1111
SummaryIn this chapter, you’ve learned the basics of how to construct and use a dynamic link library. The mostimportant points you have looked at in this context are:
❑ Dynamic link libraries provide a means of linking to standard functions dynamically when aprogram executes, rather than incorporating them into the executable module for a program.
❑ An Application Wizard-generated program links to a version of MFC stored in DLLs by default.
❑ A single copy of a DLL in memory can be used by several programs executing concurrently.
❑ An extension DLL is so called because it extends the set of classes in MFC. An extension DLLmust be used if you want to export MFC-based classes or objects of MFC classes from a DLL. An extension DLL can also export ordinary functions and global variables.
❑ A regular DLL can be used if you want to export only ordinary functions or global variables thataren’t instances of MFC classes.
❑ You can export classes from an extension DLL by using the keyword AFX_EXT_CLASS precedingthe class name in the DLL.
❑ You can export ordinary functions and global variables from a DLL by assigning the dllexportattribute to them using the _declspec keyword.
❑ You can import the classes exported from an extension DLL by using the .h file from the DLLthat contains the class definitions using the AFX_EXT_CLASS keyword.
❑ You can import ordinary functions and global variables that are exported from a DLL by assign-ing the dllimport attribute to their declarations in your program by using the _declspeckeyword.
ExercisesYou can download the source code for the examples in the book and the solutions to the following exercisefrom www.wrox.com.
1. This is the last time you’ll be amending this version of the Sketcher program, so try this. Usingthe DLL we’ve just created, implement a Sketcher document viewer — in other words, a pro-gram that simply opens a document created by Sketcher and displays the whole thing in a win-dow at once. You needn’t worry about editing, scrolling, or printing, but you will have to workout the scaling required to make a big picture fit in a little window!
1112
Chapter 19: Writing Your Own DLLs
25905c19.qxd:WroxPro 2/21/08 9:22 AM Page 1112
20Connecting to Data Sources
In this chapter, I will show you to how you can interface to a database using Visual C++ and theMFC and access the data from it. This is by no means a comprehensive discussion of the possibili-ties, because a full discussion of database application development using Visual C++ would occupy a very substantial book in its own right. In this chapter, however, you will look at how you canread from a database, and in the next chapter you will explore the basics of how you can update a database. Of course, you can access data sources in CLR applications, and you’ll look at this inChapter 23.
In this chapter, you will learn about:
❑ SQL and how it is used
❑ How to retrieve data using the SQL SELECT operation
❑ What database services are supported by MFC
❑ What a recordset object is, and how it links to a relational database table
❑ How a recordset object can retrieve information from a database
❑ How a record view can display information from a recordset
❑ How to create a project for a database program
❑ How to add recordsets to your program
❑ How to handle multiple record views
Database BasicsThis is not the place for a detailed dissertation on database technology, but I do need to make surethat we have a common understanding of database terminology. Databases come in a variety offlavors but the majority are relational databases these days. It is relational databases that I will betalking about throughout this chapter.
25905c20.qxd:WroxPro 2/21/08 9:23 AM Page 1113
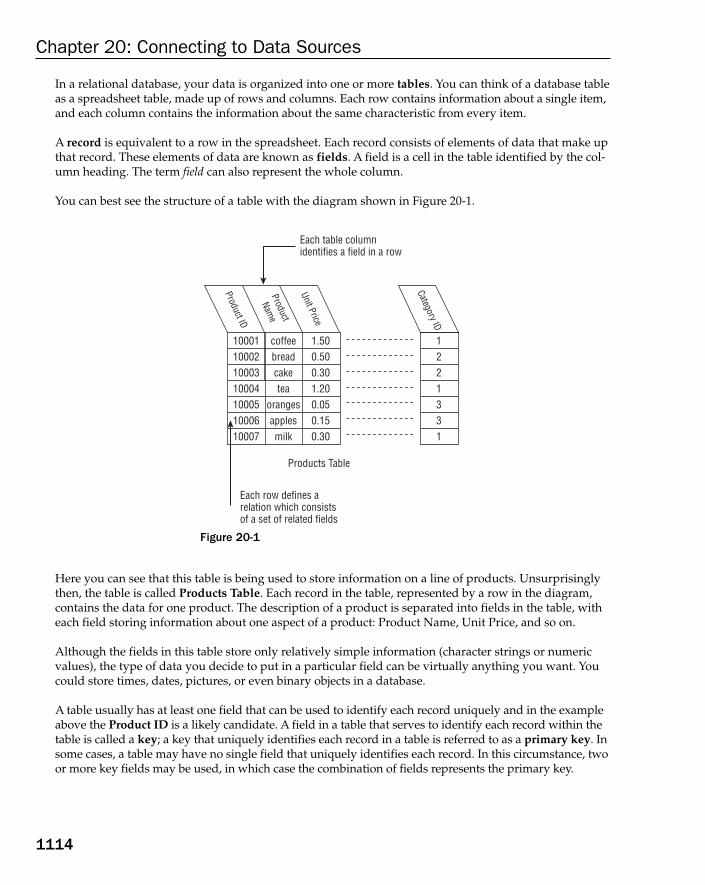
In a relational database, your data is organized into one or more tables. You can think of a database tableas a spreadsheet table, made up of rows and columns. Each row contains information about a single item,and each column contains the information about the same characteristic from every item.
A record is equivalent to a row in the spreadsheet. Each record consists of elements of data that make upthat record. These elements of data are known as fields. A field is a cell in the table identified by the col-umn heading. The term field can also represent the whole column.
You can best see the structure of a table with the diagram shown in Figure 20-1.
Figure 20-1
Here you can see that this table is being used to store information on a line of products. Unsurprisinglythen, the table is called Products Table. Each record in the table, represented by a row in the diagram,contains the data for one product. The description of a product is separated into fields in the table, witheach field storing information about one aspect of a product: Product Name, Unit Price, and so on.
Although the fields in this table store only relatively simple information (character strings or numericvalues), the type of data you decide to put in a particular field can be virtually anything you want. Youcould store times, dates, pictures, or even binary objects in a database.
A table usually has at least one field that can be used to identify each record uniquely and in the exampleabove the Product ID is a likely candidate. A field in a table that serves to identify each record within thetable is called a key; a key that uniquely identifies each record in a table is referred to as a primary key. Insome cases, a table may have no single field that uniquely identifies each record. In this circumstance, twoor more key fields may be used, in which case the combination of fields represents the primary key.
Products Table
Category ID
Product ID
Name
Unit Price
10001100021000310004100051000610007
coffeebreadcaketea
orangesapplesmilk
1.500.500.301.200.050.150.30
1221331
Product
Each row defines arelation which consistsof a set of related fields
Each table columnidentifies a field in a row
1114
Chapter 20: Connecting to Data Sources
25905c20.qxd:WroxPro 2/21/08 9:23 AM Page 1114
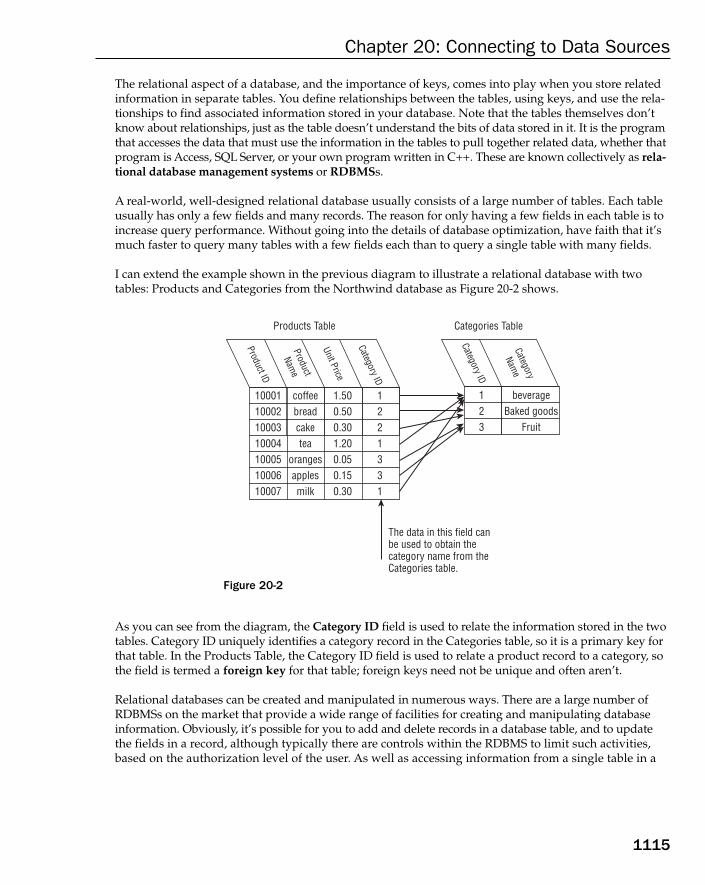
The relational aspect of a database, and the importance of keys, comes into play when you store relatedinformation in separate tables. You define relationships between the tables, using keys, and use the rela-tionships to find associated information stored in your database. Note that the tables themselves don’tknow about relationships, just as the table doesn’t understand the bits of data stored in it. It is the programthat accesses the data that must use the information in the tables to pull together related data, whether thatprogram is Access, SQL Server, or your own program written in C++. These are known collectively as rela-tional database management systems or RDBMSs.
A real-world, well-designed relational database usually consists of a large number of tables. Each tableusually has only a few fields and many records. The reason for only having a few fields in each table is toincrease query performance. Without going into the details of database optimization, have faith that it’smuch faster to query many tables with a few fields each than to query a single table with many fields.
I can extend the example shown in the previous diagram to illustrate a relational database with twotables: Products and Categories from the Northwind database as Figure 20-2 shows.
Figure 20-2
As you can see from the diagram, the Category ID field is used to relate the information stored in the twotables. Category ID uniquely identifies a category record in the Categories table, so it is a primary key forthat table. In the Products Table, the Category ID field is used to relate a product record to a category, sothe field is termed a foreign key for that table; foreign keys need not be unique and often aren’t.
Relational databases can be created and manipulated in numerous ways. There are a large number ofRDBMSs on the market that provide a wide range of facilities for creating and manipulating databaseinformation. Obviously, it’s possible for you to add and delete records in a database table, and to updatethe fields in a record, although typically there are controls within the RDBMS to limit such activities,based on the authorization level of the user. As well as accessing information from a single table in a
Products Table Categories Table
123
beverageBaked goods
Fruit
Category ID
Category ID
Product ID
Name
Unit Price
10001100021000310004100051000610007
coffeebreadcaketea
orangesapplesmilk
1.500.500.301.200.050.150.30
1221331
Product
Name
Category
The data in this field canbe used to obtain thecategory name from theCategories table.
1115
Chapter 20: Connecting to Data Sources
25905c20.qxd:WroxPro 2/21/08 9:23 AM Page 1115
database, you can combine records from two or more tables into a new table, based on their relation-ships, and retrieve information from that. Combining tables in this way is called a table join. To pro-gram all these kinds of operations for a relational database, you can use a language known as SQL,which is supported by most RDBMSs and programming languages.
A Little SQLSQL (often pronounced “sequel”) stands for Structured Query Language. It’s a relatively simple language,designed specifically for accessing and modifying information in relational databases. It was originallydeveloped at IBM in a mainframe environment, but is now used throughout the computing world. SQLdoesn’t actually exist as a software package by itself — it’s usually hosted by some other environment,whether that’s an RDBMS or as a library implemented for a programming language, such as VisualBasic.NET, Java or C++. The environment hosting SQL provides for mundane things such as regular I/O and talking to the operating system, while SQL is used to query the database.
MFC support for databases uses SQL to specify queries and other operations on database tables. Theseoperations are provided by a set of specialized classes. You’ll see how to use some of these in the examplethat you write later in this chapter.
SQL has statements to retrieve, sort, and update records from a table, to add and delete records and fields,to join tables and to compute totals, as well as a lot of other capabilities for creating and managing data-base tables. I won’t be going into all the possible programming options available in SQL, but I’ll discussthe details sufficiently to enable you to understand what’s happening in the examples that you write,even though you may not have seen any SQL before.
When you use SQL in an MFC-based program, you won’t need to write complete SQL statements for themost part because the framework takes care of assembling a complete statement and supplying it to thedatabase engine you’re using. Nevertheless, I’ll discuss how typical SQL statements are written in theirentirety, so that you get a feel for how the language statements are structured.
SQL statements are usually but not necessarily written with a terminating semicolon (just like C++ state-ments), and by convention keywords in the language are written in capital letters. Take a look at a fewexamples of SQL statements and see how they work.
Retrieving Data Using SQLTo retrieve data, you use the SELECT statement. In fact, it’s surprising how much of what you want to dowith a database is covered by the SELECT statement, which operates on one or more tables in your data-base. The result of executing a SELECT statement is always a recordset, a collection of data produced usingthe information from the tables you supply in the detail of the statement. The data in the recordset is organ-ized in the form of a table, with named columns that are from the tables you specified in the SELECT state-ment, and rows or records that are selected, based on conditions specified in the SELECT statement. Therecordset generated by a SELECT statement might have only one record, or might even be empty.
Perhaps the simplest retrieval operation on a database is to access all the records in a single table, so giventhat the database includes a table called Products, you can obtain all the records in this table with the fol-lowing SQL statement:
SELECT * FROM Products;
1116
Chapter 20: Connecting to Data Sources
25905c20.qxd:WroxPro 2/21/08 9:23 AM Page 1116

The * indicates that you want all the fields in the database. The parameter following the keyword FROMdefines the table from which the fields are to be selected. The records that are returned by the SELECTstatement are not constrained in any way, so you’ll get all of them. A little later you’ll see how to con-strain the records that are selected.
If you wanted all the records but needed to retrieve only specific fields in each record, you could specifythese by using the field names separated by commas in place of the asterisk in the previous example.Here’s an example of a statement that would do this:
SELECT ProductID,UnitPrice FROM Products;
This statement selects all the records from the Products table, but only the ProductID and UnitPricefields for each record. This produces a table with just the two fields specified here.
The field names that I’ve used here don’t contain spaces, but they could. Where a name contains spaces,standard SQL says that it has to be written between double quotes. If the fields had the names ProductID and Unit Price, you would write the SELECT statement as:
SELECT “Product ID”,”Unit Price” FROM Products;
Using double quotes with names, as I have done here, is a bit inconvenient in the C++ context, as you needto be able to pass SQL statements as strings. In C++, double quotes are already used as character stringdelimiters, so there would be confusion if you tried to enclose the names of database objects (tables orfields) in double quotes. For this reason, when you reference database table or field names that includespaces in the Visual C++ environment, you should enclose them within square brackets rather than doublequotes. Thus, you would write the field names from the example as [Product ID] and [Unit Price].You will see this notation in action in the database program that you’ll write later in this chapter.
Choosing RecordsUnlike fields, records in a table do not have names. The only way to choose particular records is by apply-ing some condition or restriction on the contents of one or more of the fields in a record, so that onlyrecords meeting the condition are selected. This is done by adding a WHERE clause to the SELECT state-ment. The parameter following the WHERE keyword defines the condition to be used to select records.
You could select the records in the Products table that have a particular value for the Category ID fieldwith the statement:
SELECT * FROM Products WHERE [Category ID] = 1;
This selects just those records where the Category ID field has the value 1, so from the table I illustratedearlier, you would get the records for coffee, tea, and milk. Note that a single equals sign is used to specifya check for equality in SQL, not == as you would use in C++.
You can use other comparison operators, such as <, >, <= and >=, to specify the condition in a WHEREclause. You can also combine logical expressions with AND and OR. To place a further restriction on therecords selected in the last example, you could write:
SELECT * FROM Products WHERE [Category ID] = 1 AND [Unit Price] > 0.5;
In this case, the resulting table just contains two records because milk would be out as it’s too cheap. Onlyrecords with a Category ID of 1 and a Unit Price value greater than 0.5 are selected by this statement.
1117
Chapter 20: Connecting to Data Sources
25905c20.qxd:WroxPro 2/21/08 9:23 AM Page 1117
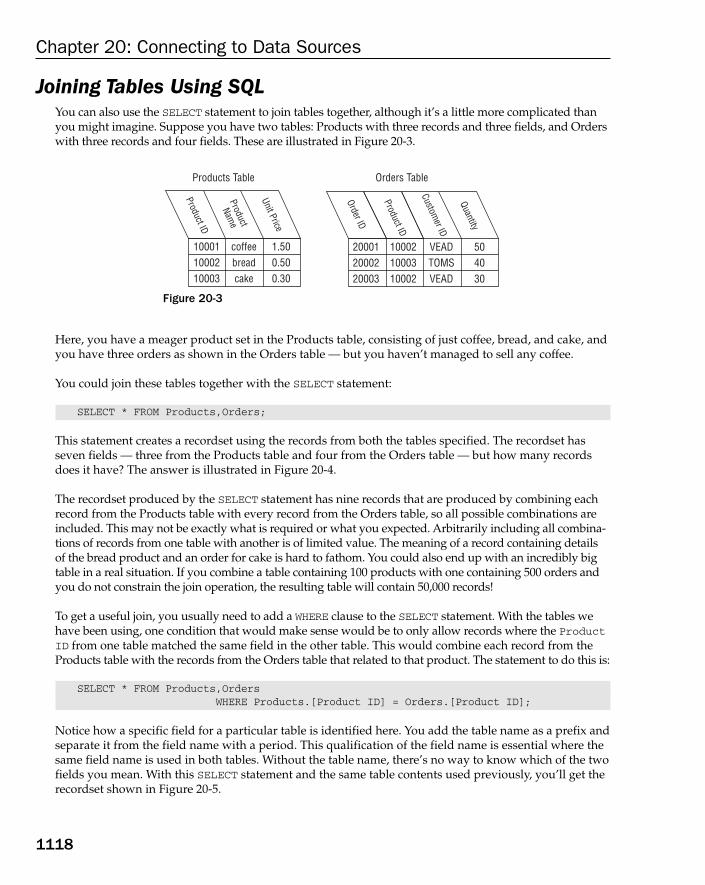
Joining Tables Using SQLYou can also use the SELECT statement to join tables together, although it’s a little more complicated thanyou might imagine. Suppose you have two tables: Products with three records and three fields, and Orderswith three records and four fields. These are illustrated in Figure 20-3.
Figure 20-3
Here, you have a meager product set in the Products table, consisting of just coffee, bread, and cake, andyou have three orders as shown in the Orders table — but you haven’t managed to sell any coffee.
You could join these tables together with the SELECT statement:
SELECT * FROM Products,Orders;
This statement creates a recordset using the records from both the tables specified. The recordset hasseven fields — three from the Products table and four from the Orders table — but how many recordsdoes it have? The answer is illustrated in Figure 20-4.
The recordset produced by the SELECT statement has nine records that are produced by combining eachrecord from the Products table with every record from the Orders table, so all possible combinations areincluded. This may not be exactly what is required or what you expected. Arbitrarily including all combina-tions of records from one table with another is of limited value. The meaning of a record containing detailsof the bread product and an order for cake is hard to fathom. You could also end up with an incredibly bigtable in a real situation. If you combine a table containing 100 products with one containing 500 orders andyou do not constrain the join operation, the resulting table will contain 50,000 records!
To get a useful join, you usually need to add a WHERE clause to the SELECT statement. With the tables wehave been using, one condition that would make sense would be to only allow records where the ProductID from one table matched the same field in the other table. This would combine each record from theProducts table with the records from the Orders table that related to that product. The statement to do this is:
SELECT * FROM Products,Orders WHERE Products.[Product ID] = Orders.[Product ID];
Notice how a specific field for a particular table is identified here. You add the table name as a prefix andseparate it from the field name with a period. This qualification of the field name is essential where thesame field name is used in both tables. Without the table name, there’s no way to know which of the twofields you mean. With this SELECT statement and the same table contents used previously, you’ll get therecordset shown in Figure 20-5.
Products Table Orders Table
100011000210003
coffeebreadcake
1.500.500.30
Product ID
Name
Product
Unit Price
200012000220003
100021000310002
VEADTOMSVEAD
504030
Order ID
Quantity
Product ID
Customer ID
1118
Chapter 20: Connecting to Data Sources
25905c20.qxd:WroxPro 2/21/08 9:23 AM Page 1118

Figure 20-4
Figure 20-5
Order ID
Product ID
Name
Product
Unit Price
Quantity
Product ID
Customer ID 10002
1000210003
breadbreadcake
0.500.500.30
200012000320002
100021000210003
VEADVEADTOMS
503040
Products Table Orders Table
Result of Join Operation with the condition:Products."Product ID" = Orders."Product ID"
100011000210003
coffeebreadcake
0.500.500.30
Product ID
Name
Product
Unit Price
200012000220003
100021000310002
VEADTOMSVEAD
504030
Order ID
Quantity
Product ID
Customer ID
Order ID
Product ID
Name
Product
Unit Price
Quantity
Product ID
Customer ID 10001
1000110001100021000210002100031000310003
coffeecoffeecoffeebreadbreadbreadcakecakecake
1.501.501.500.500.500.500.300.300.30
200012000220003200012000220003200012000220003
100021000310002100021000310002100021000310002
VEADTOMSVEADVEADTOMSVEADVEADTOMSVEAD
504030504030504030
Products Table Orders Table
Result of Join Operation
100011000210003
coffeebreadcake
1.500.500.30
Product ID
Name
Product
Unit Price
200012000220003
100021000310002
VEADTOMSVEAD
504030
Order ID
Quantity
Product ID
Customer ID
1119
Chapter 20: Connecting to Data Sources
25905c20.qxd:WroxPro 2/21/08 9:23 AM Page 1119

Of course, this may still be unsatisfactory because you have two fields containing the Product ID, butyou could easily remove this by specifying the field names you want, instead of the * in the SELECT state-ment. The columns with the same column name, however, would be distinguished by being qualified bythe names of the original table when they appear in the recordset.
Sorting RecordsWhen you retrieve data from a database using the SELECT statement, you will often want the recordssorted in a particular order. With the previous example, the tables shown are already ordered, but inpractice this is not necessarily the case. You might want to see the output of the last example sorted in adifferent way, depending on the circumstances. At one time, it might be convenient to have the recordsordered by Customer ID, and on another occasion perhaps ordered by Quantity within Product ID.The ORDER BY clause added to the SELECT statement will do this for you. For example, you could refinethe last SELECT statement by adding an ORDER BY clause:
SELECT * FROM Products,Orders WHERE Products.[Product ID] = Orders.[Product ID]ORDER BY [Customer ID];
The result of this is the same records that you obtained with the last example but with the records arrangedso that the Customer ID field is in ascending sequence. Because the kind of data stored in a given field isknown, the records are ordered according to the data type applicable to the field. In this case the order isalphabetical.
If you wanted to sort on two fields, Customer ID and Product ID say, and you wanted the recordsarranged in descending sequence, you would write:
SELECT * FROM Products,OrdersWHERE Products.[Product ID] = Orders.[Product ID]ORDER BY [Customer ID] DESC, Products.[Product ID] DESC;
You must use the qualified name, Products.[Product ID], in the ORDER BY clause to avoid ambiguity,as you do in the WHERE clause. The DESC keyword at the end of each field in the ORDER BY statement speci-fies descending sequence for the sort operation. There is a complementary keyword, ASC, for ascendingsequence, although this is usually omitted because it is the default condition.
This is by no means all there is to SQL or even all there is to the SELECT statement, but it’s enough to getyou through the database example that you will write.
Database Suppor t in MFCYou have a choice when you use MFC for database application development, because two principleapproaches are supported:
❑ OLE DB: Provides a way to access local and remote databases using COM, also referred to asActiveX. OLE DB is used by ActiveX Data Objects (ADO), which provides an efficient way ofaccessing local and remote databases without the overhead implicit in the MFC.
❑ ODBC: Open DataBase Connectivity, better known as ODBC, defines a standard function ori-ented interface for data access supported by a variety of database product vendors. I will beusing ODBC to illustrate database application techniques in this chapter and the next.
1120
Chapter 20: Connecting to Data Sources
25905c20.qxd:WroxPro 2/21/08 9:23 AM Page 1120
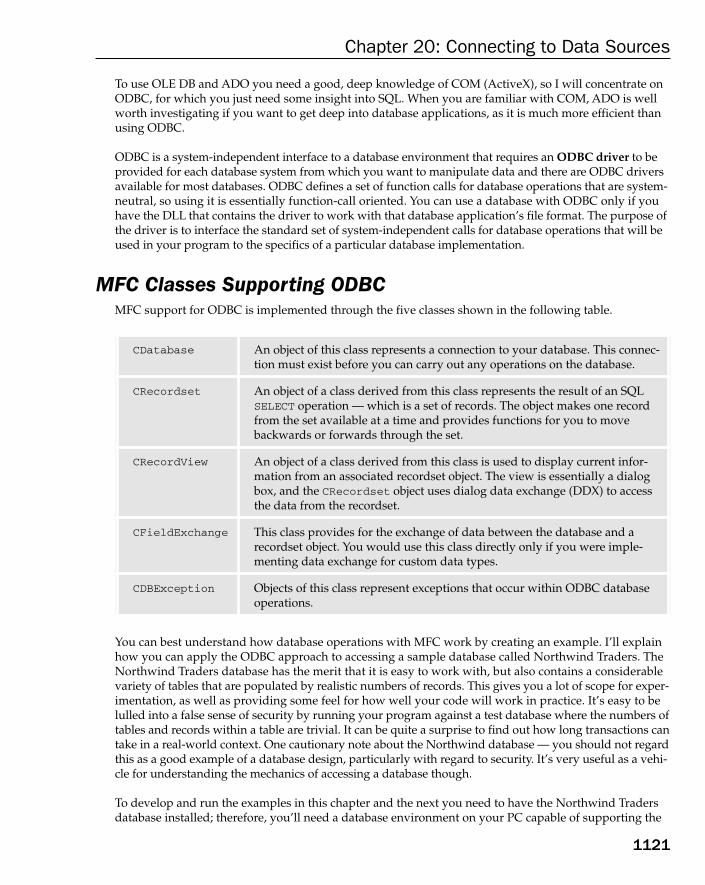
To use OLE DB and ADO you need a good, deep knowledge of COM (ActiveX), so I will concentrate onODBC, for which you just need some insight into SQL. When you are familiar with COM, ADO is wellworth investigating if you want to get deep into database applications, as it is much more efficient thanusing ODBC.
ODBC is a system-independent interface to a database environment that requires an ODBC driver to beprovided for each database system from which you want to manipulate data and there are ODBC driversavailable for most databases. ODBC defines a set of function calls for database operations that are system-neutral, so using it is essentially function-call oriented. You can use a database with ODBC only if youhave the DLL that contains the driver to work with that database application’s file format. The purpose ofthe driver is to interface the standard set of system-independent calls for database operations that will beused in your program to the specifics of a particular database implementation.
MFC Classes Supporting ODBCMFC support for ODBC is implemented through the five classes shown in the following table.
You can best understand how database operations with MFC work by creating an example. I’ll explainhow you can apply the ODBC approach to accessing a sample database called Northwind Traders. TheNorthwind Traders database has the merit that it is easy to work with, but also contains a considerablevariety of tables that are populated by realistic numbers of records. This gives you a lot of scope for exper-imentation, as well as providing some feel for how well your code will work in practice. It’s easy to belulled into a false sense of security by running your program against a test database where the numbers oftables and records within a table are trivial. It can be quite a surprise to find out how long transactions cantake in a real-world context. One cautionary note about the Northwind database — you should not regardthis as a good example of a database design, particularly with regard to security. It’s very useful as a vehi-cle for understanding the mechanics of accessing a database though.
To develop and run the examples in this chapter and the next you need to have the Northwind Tradersdatabase installed; therefore, you’ll need a database environment on your PC capable of supporting the
CDatabase An object of this class represents a connection to your database. This connec-tion must exist before you can carry out any operations on the database.
CRecordset An object of a class derived from this class represents the result of an SQLSELECT operation — which is a set of records. The object makes one recordfrom the set available at a time and provides functions for you to movebackwards or forwards through the set.
CRecordView An object of a class derived from this class is used to display current infor-mation from an associated recordset object. The view is essentially a dialogbox, and the CRecordset object uses dialog data exchange (DDX) to accessthe data from the recordset.
CFieldExchange This class provides for the exchange of data between the database and arecordset object. You would use this class directly only if you were imple-menting data exchange for custom data types.
CDBException Objects of this class represent exceptions that occur within ODBC databaseoperations.
1121
Chapter 20: Connecting to Data Sources
25905c20.qxd:WroxPro 2/21/08 9:23 AM Page 1121

Northwind database. There are versions available at the time of writing for SQL Server Express, SQLServer 2000, and Microsoft Access. You can locate these by visiting www.microsoft.com/downloads/details.aspx?FamilyID=06616212-0356-46A0-8DA2-EEBC53A68034. You’ll find documentation onhow to install the various versions available on the respective download page. The examples show theuse of the Microsoft Access version of the Northwind Traders database, but the code is essentially thesame whichever database system you are using.
If you don’t have Microsoft Access installed but you still want to try the example in this chapter you candownload a trial version by clicking Download a Free Trial at http://office.microsoft.com/en-us/access/default.aspx.
Creating a Database ApplicationFor the example, I’ll show how to use three related tables in the Northwind database.
In the first step, you’ll create a program to display records from the Products table in the database. Youwill then add code to allow you to examine all the orders for a given product using two other tables.Finally, you’ll access the Customers table to enable the customer details for an order to be displayed.Before you can start with the code, you need to identify the database to the operating system.
Registering an ODBC DatabaseBefore you can use an ODBC database, it needs to be registered. You do this through the Control Panelthat you access from the Windows Start menu. In the Control Panel, select the Administrative Tools iconthen select Data Sources (ODBC) from the list. You should see the dialog box shown in Figure 20-6.
This shows all the data sources that have been registered. You have the possibility of registering a data-base as a User DSN accessible only to you, as a System DSN accessible to all users on the machine, or asa File DSN that will be available generally, possibly over a network. I’ll describe how you register thedatabase as a User DSN.
Figure 20-6
1122
Chapter 20: Connecting to Data Sources
25905c20.qxd:WroxPro 2/21/08 9:23 AM Page 1122

When you then click the Add button in the ODBC Data Source Administrator dialog, you will see theCreate New Data Source dialog box shown in Figure 20-7.
Figure 20-7
Here you must select from the list of ODBC drivers the one that you are going to use — Microsoft AccessDriver (*.mdb) (or if you are using SQL Server, the driver for that). This should have been installed auto-matically with the typical setup when you installed Windows XP or Windows Vista. If you don’t see thedriver you want, you need to go back to Windows setup to install it. When you have selected the driver,click the Finish button. This takes you to yet another dialog box, as shown in Figure 20-8.
Figure 20-8
Enter the name of the database file as the Data Source Name, which is typically Northwind. You’ll usethis name to identify the database when you generate the application using an Application Wizard. Youshould now click the Select button to go to the final dialog box, which is the Select Database dialog, inwhich you can select the file in whichever directory it now sits. This last dialog to select the database isshown in Figure 20-9.
1123
Chapter 20: Connecting to Data Sources
25905c20.qxd:WroxPro 2/21/08 9:23 AM Page 1123
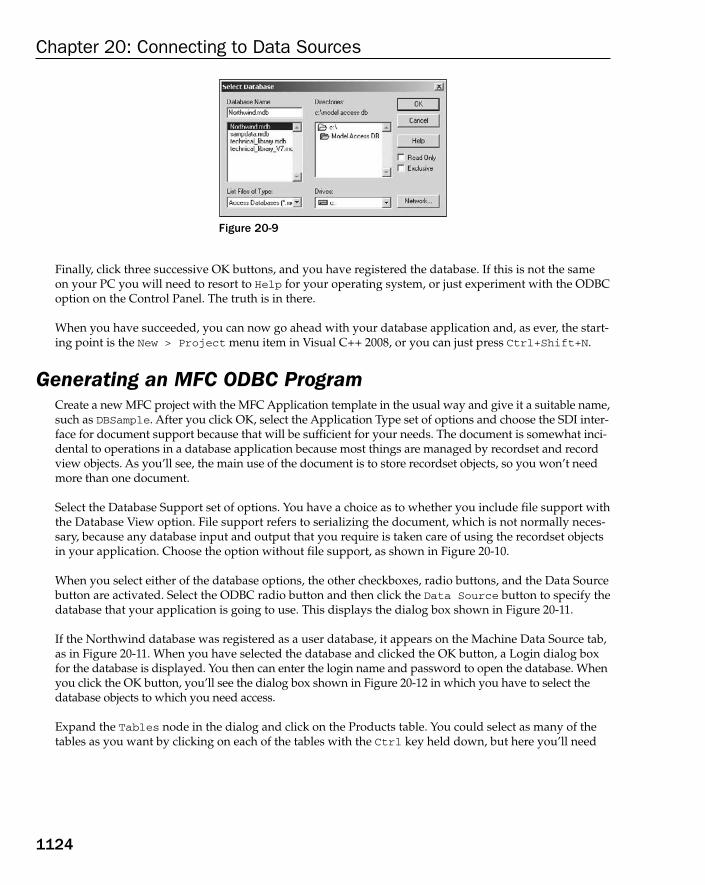
Figure 20-9
Finally, click three successive OK buttons, and you have registered the database. If this is not the sameon your PC you will need to resort to Help for your operating system, or just experiment with the ODBCoption on the Control Panel. The truth is in there.
When you have succeeded, you can now go ahead with your database application and, as ever, the start-ing point is the New > Project menu item in Visual C++ 2008, or you can just press Ctrl+Shift+N.
Generating an MFC ODBC ProgramCreate a new MFC project with the MFC Application template in the usual way and give it a suitable name,such as DBSample. After you click OK, select the Application Type set of options and choose the SDI inter-face for document support because that will be sufficient for your needs. The document is somewhat inci-dental to operations in a database application because most things are managed by recordset and recordview objects. As you’ll see, the main use of the document is to store recordset objects, so you won’t needmore than one document.
Select the Database Support set of options. You have a choice as to whether you include file support withthe Database View option. File support refers to serializing the document, which is not normally neces-sary, because any database input and output that you require is taken care of using the recordset objectsin your application. Choose the option without file support, as shown in Figure 20-10.
When you select either of the database options, the other checkboxes, radio buttons, and the Data Sourcebutton are activated. Select the ODBC radio button and then click the Data Source button to specify thedatabase that your application is going to use. This displays the dialog box shown in Figure 20-11.
If the Northwind database was registered as a user database, it appears on the Machine Data Source tab,as in Figure 20-11. When you have selected the database and clicked the OK button, a Login dialog boxfor the database is displayed. You then can enter the login name and password to open the database. Whenyou click the OK button, you’ll see the dialog box shown in Figure 20-12 in which you have to select thedatabase objects to which you need access.
Expand the Tables node in the dialog and click on the Products table. You could select as many of thetables as you want by clicking on each of the tables with the Ctrl key held down, but here you’ll need
1124
Chapter 20: Connecting to Data Sources
25905c20.qxd:WroxPro 2/21/08 9:23 AM Page 1124
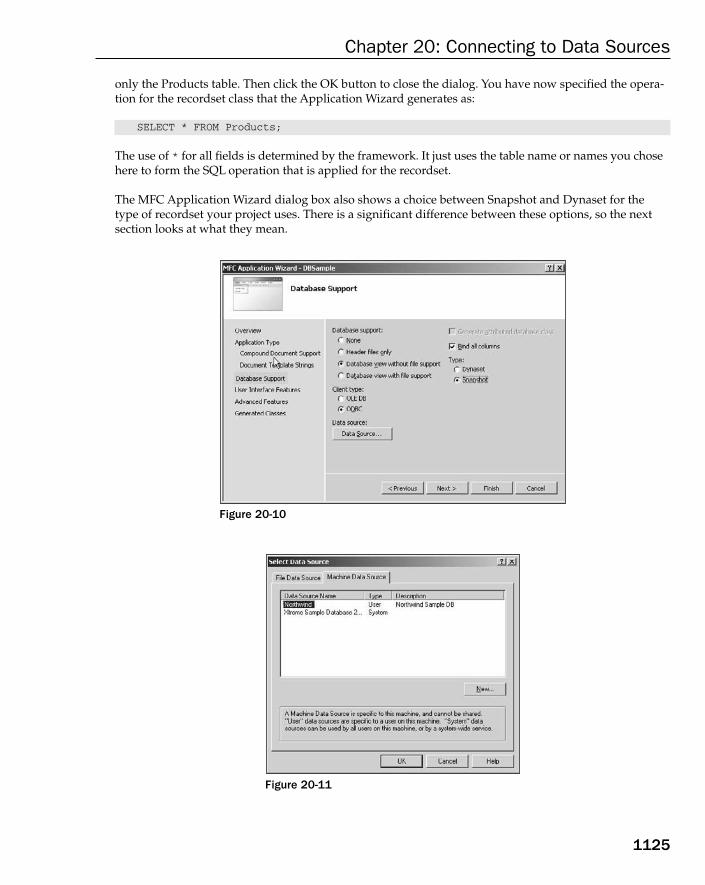
only the Products table. Then click the OK button to close the dialog. You have now specified the opera-tion for the recordset class that the Application Wizard generates as:
SELECT * FROM Products;
The use of * for all fields is determined by the framework. It just uses the table name or names you chosehere to form the SQL operation that is applied for the recordset.
The MFC Application Wizard dialog box also shows a choice between Snapshot and Dynaset for thetype of recordset your project uses. There is a significant difference between these options, so the nextsection looks at what they mean.
Figure 20-10
Figure 20-11
1125
Chapter 20: Connecting to Data Sources
25905c20.qxd:WroxPro 2/21/08 9:23 AM Page 1125
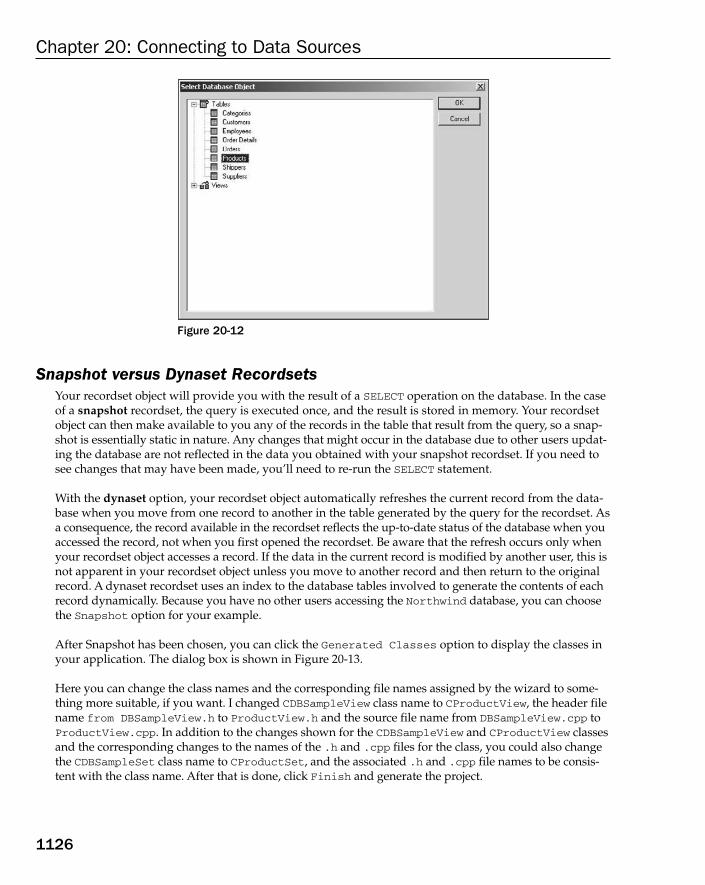
Figure 20-12
Snapshot versus Dynaset RecordsetsYour recordset object will provide you with the result of a SELECT operation on the database. In the caseof a snapshot recordset, the query is executed once, and the result is stored in memory. Your recordsetobject can then make available to you any of the records in the table that result from the query, so a snap-shot is essentially static in nature. Any changes that might occur in the database due to other users updat-ing the database are not reflected in the data you obtained with your snapshot recordset. If you need tosee changes that may have been made, you’ll need to re-run the SELECT statement.
With the dynaset option, your recordset object automatically refreshes the current record from the data-base when you move from one record to another in the table generated by the query for the recordset. Asa consequence, the record available in the recordset reflects the up-to-date status of the database when youaccessed the record, not when you first opened the recordset. Be aware that the refresh occurs only whenyour recordset object accesses a record. If the data in the current record is modified by another user, this isnot apparent in your recordset object unless you move to another record and then return to the originalrecord. A dynaset recordset uses an index to the database tables involved to generate the contents of eachrecord dynamically. Because you have no other users accessing the Northwind database, you can choosethe Snapshot option for your example.
After Snapshot has been chosen, you can click the Generated Classes option to display the classes inyour application. The dialog box is shown in Figure 20-13.
Here you can change the class names and the corresponding file names assigned by the wizard to some-thing more suitable, if you want. I changed CDBSampleView class name to CProductView, the header filename from DBSampleView.h to ProductView.h and the source file name from DBSampleView.cpp toProductView.cpp. In addition to the changes shown for the CDBSampleView and CProductView classesand the corresponding changes to the names of the .h and .cpp files for the class, you could also changethe CDBSampleSet class name to CProductSet, and the associated .h and .cpp file names to be consis-tent with the class name. After that is done, click Finish and generate the project.
1126
Chapter 20: Connecting to Data Sources
25905c20.qxd:WroxPro 2/21/08 9:23 AM Page 1126

Figure 20-13
Understanding the Program StructureThe basic structure of the program is as you have seen before, with an application class CDBSampleApp,a frame window class CMainFrame, a document class CDBSampleDoc, and a view class CProductView.A document template object is responsible for creating and relating the frame window, document, andview objects. This is done in a standard manner in the InitInstance() member of the applicationobject. The document class is standard, except that the MFC Application Wizard has added a data mem-ber, m_DBSampleSet, which is an object of the CProductSet class type. As a consequence, a recordsetobject is automatically created when the document object is created in the InitInstance() functionmember of the application object. The significant departures from a non-database program arise in thedetail of the CRecordset class, and in the CRecordView class, so take a look at those.
Understanding RecordsetsYou can look at the definition of the CProductSet class that the Application Wizard has generated piece-meal and see how each piece works. I’ll show the bits under discussion as shaded in the code fragments.
Recordset CreationThe first segment of the class definition that is of interest is:
class CProductSet : public CRecordset{public:
CProductSet(CDatabase* pDatabase = NULL);DECLARE_DYNAMIC(CProductSet)
// Plus more of the class definition...
// Overrides
1127
Chapter 20: Connecting to Data Sources
25905c20.qxd:WroxPro 2/21/08 9:23 AM Page 1127

// Wizard generated virtual function overridespublic:virtual CString GetDefaultConnect(); // Default connection stringvirtual CString GetDefaultSQL(); // default SQL for Recordsetvirtual void DoFieldExchange(CFieldExchange* pFX);// RFX support
// Plus some more standard stuff
};
The class has CRecordset as a base class and provides the functionality for retrieving data from the data-base. The constructor for the class accepts a pointer to a CDatabase object that is set to NULL as a default.The parameter to the constructor allows a CProductSet object to be created for a CDatabase object thatalready exists, which allows an existing connection to a database to be reused. Opening a connection to adatabase is a lengthy business, so it’s advantageous to re-use a database connection when you can.
If no pointer is passed to the constructor, as is the case for the m_DBSampleSet member of the documentclass CDBSampleDoc, the framework automatically creates a CDatabase object for you and calls theGetDefaultConnect() function member of CProductSet to define the connection. The ApplicationWizard provides the following implementation of this function:
CString CProductSet::GetDefaultConnect(){
return _T(“DSN=Northwind;DBQ=C:\\Model Access DB\\Northwind.mdb;DriverId=25;FIL=MS Access;MaxBufferSize=2048;PageTimeout=5;UID=admin;”);
}
The GetDefaultConnect() function is a pure virtual function in the base class, CRecordset, and so mustalways be implemented in a derived recordset class. The value returned from the function is a single stringbetween double quotes but I have shown it spread over several lines to make the contents of the stringmore apparent. The implementation provided by Application Wizard returns the text string shown to theframework. This identifies the database with its name and path plus values for the other parameters youcan see and enables the framework to create a CDatabase object that establishes the database connectionautomatically. The meaning of the arguments in the connection string is as shown in the following table.
Argument Description
DSN The data source name.
DBQ The database qualifier, which in this case is the path to the Access database file.
DriverId The ID of the ODBC driver for the database.
FIL The database file type.
1128
Chapter 20: Connecting to Data Sources
25905c20.qxd:WroxPro 2/21/08 9:23 AM Page 1128
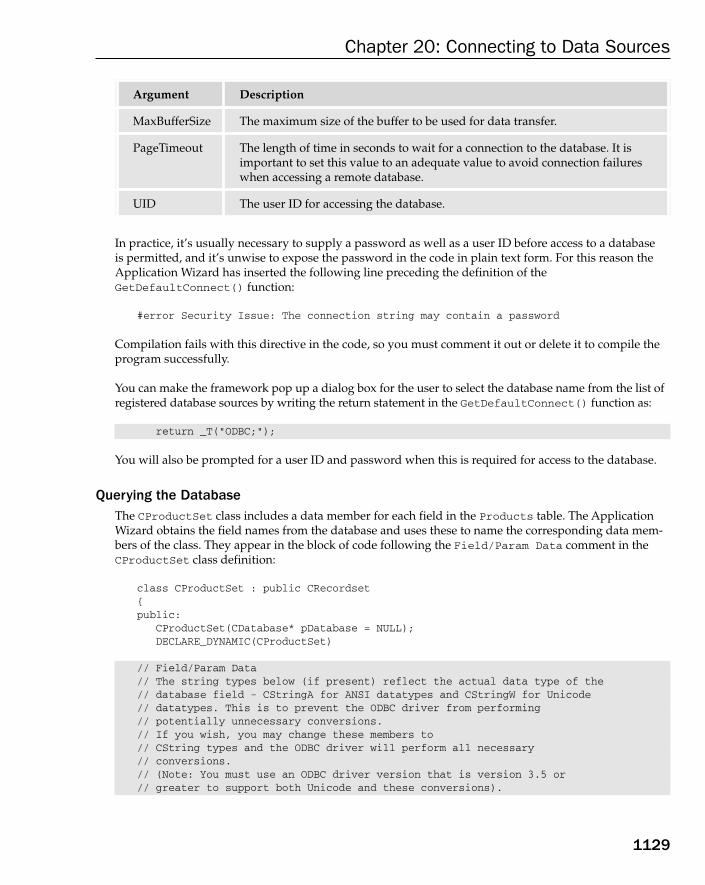
In practice, it’s usually necessary to supply a password as well as a user ID before access to a database is permitted, and it’s unwise to expose the password in the code in plain text form. For this reason theApplication Wizard has inserted the following line preceding the definition of theGetDefaultConnect() function:
#error Security Issue: The connection string may contain a password
Compilation fails with this directive in the code, so you must comment it out or delete it to compile theprogram successfully.
You can make the framework pop up a dialog box for the user to select the database name from the list ofregistered database sources by writing the return statement in the GetDefaultConnect() function as:
return _T(“ODBC;”);
You will also be prompted for a user ID and password when this is required for access to the database.
Querying the DatabaseThe CProductSet class includes a data member for each field in the Products table. The ApplicationWizard obtains the field names from the database and uses these to name the corresponding data mem-bers of the class. They appear in the block of code following the Field/Param Data comment in theCProductSet class definition:
class CProductSet : public CRecordset{public:
CProductSet(CDatabase* pDatabase = NULL);DECLARE_DYNAMIC(CProductSet)
// Field/Param Data// The string types below (if present) reflect the actual data type of the// database field - CStringA for ANSI datatypes and CStringW for Unicode// datatypes. This is to prevent the ODBC driver from performing // potentially unnecessary conversions. // If you wish, you may change these members to// CString types and the ODBC driver will perform all necessary // conversions.// (Note: You must use an ODBC driver version that is version 3.5 or // greater to support both Unicode and these conversions).
Argument Description
MaxBufferSize The maximum size of the buffer to be used for data transfer.
PageTimeout The length of time in seconds to wait for a connection to the database. It isimportant to set this value to an adequate value to avoid connection failureswhen accessing a remote database.
UID The user ID for accessing the database.
1129
Chapter 20: Connecting to Data Sources
25905c20.qxd:WroxPro 2/21/08 9:23 AM Page 1129

long m_ProductID; // Number automatically assigned to new product.CStringW m_ProductName;long m_SupplierID; // Same entry as in Suppliers table.long m_CategoryID; // Same entry as in Categories table.CStringW m_QuantityPerUnit; // (e.g., 24-count case, 1-liter bottle).double m_UnitPrice;int m_UnitsInStock;int m_UnitsOnOrder;int m_ReorderLevel; // Minimum units to maintain in stock.BOOL m_Discontinued; // Yes means item is no longer available.
// Overrides// Wizard generated virtual function overridespublic:virtual CString GetDefaultConnect(); // Default connection stringvirtual CString GetDefaultSQL(); // default SQL for Recordsetvirtual void DoFieldExchange(CFieldExchange* pFX); // RFX support
// Implementation#ifdef _DEBUG
virtual void AssertValid() const;virtual void Dump(CDumpContext& dc) const;
#endif
};
The type of each data member is set to correspond with the field type for the corresponding field in theProducts table. You may not want all these fields in practice, but you shouldn’t delete them willy-nillyin the class definition. As you will see shortly, they are referenced in other places, so you must ensurethat all references to a field are deleted, too. A further caveat is that you must not delete primary keys. Ifyou do, the recordset won’t work, so you need to be sure which fields are primary keys before choppingout what you don’t want.
Note that two of the fields have CStringW as the type. You haven’t seen this before, but the CStringWclass type just encapsulates a Unicode string rather than an ASCII string. It is more convenient whenyou are accessing the fields to use type CString, so change the type of the m_ProductName andm_QuantityPerUnit members to CString. This allows the strings to be handled as ASCII strings in the example. Clearly, if you are writing internationalized database applications, you would need to maintain any CStringW fields as such because they may contain characters that are not within the ASCII character set.
The SQL operation that applies to the recordset to populate these data members is specified in theGetDefaultSQL() function. The implementation that the Application Wizard has supplied for this is:
CString CProductSet::GetDefaultSQL(){
return _T(“[Products]”);}
1130
Chapter 20: Connecting to Data Sources
25905c20.qxd:WroxPro 2/21/08 9:23 AM Page 1130
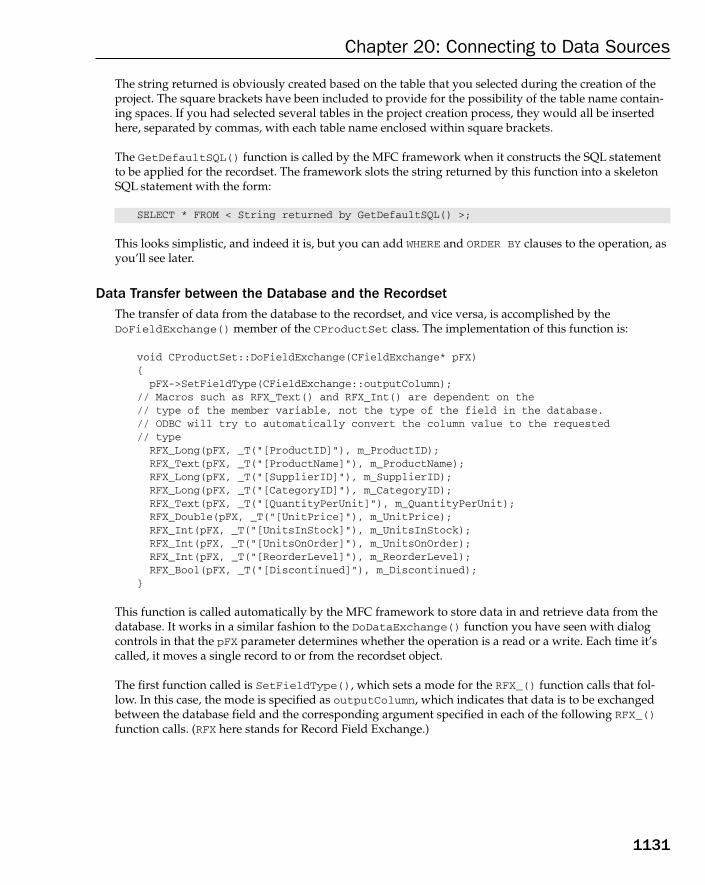
The string returned is obviously created based on the table that you selected during the creation of theproject. The square brackets have been included to provide for the possibility of the table name contain-ing spaces. If you had selected several tables in the project creation process, they would all be insertedhere, separated by commas, with each table name enclosed within square brackets.
The GetDefaultSQL() function is called by the MFC framework when it constructs the SQL statementto be applied for the recordset. The framework slots the string returned by this function into a skeletonSQL statement with the form:
SELECT * FROM < String returned by GetDefaultSQL() >;
This looks simplistic, and indeed it is, but you can add WHERE and ORDER BY clauses to the operation, asyou’ll see later.
Data Transfer between the Database and the RecordsetThe transfer of data from the database to the recordset, and vice versa, is accomplished by theDoFieldExchange() member of the CProductSet class. The implementation of this function is:
void CProductSet::DoFieldExchange(CFieldExchange* pFX){
pFX->SetFieldType(CFieldExchange::outputColumn);// Macros such as RFX_Text() and RFX_Int() are dependent on the// type of the member variable, not the type of the field in the database.// ODBC will try to automatically convert the column value to the requested// type
RFX_Long(pFX, _T(“[ProductID]”), m_ProductID);RFX_Text(pFX, _T(“[ProductName]”), m_ProductName);RFX_Long(pFX, _T(“[SupplierID]”), m_SupplierID);RFX_Long(pFX, _T(“[CategoryID]”), m_CategoryID);RFX_Text(pFX, _T(“[QuantityPerUnit]”), m_QuantityPerUnit);RFX_Double(pFX, _T(“[UnitPrice]”), m_UnitPrice);RFX_Int(pFX, _T(“[UnitsInStock]”), m_UnitsInStock);RFX_Int(pFX, _T(“[UnitsOnOrder]”), m_UnitsOnOrder);RFX_Int(pFX, _T(“[ReorderLevel]”), m_ReorderLevel);RFX_Bool(pFX, _T(“[Discontinued]”), m_Discontinued);
}
This function is called automatically by the MFC framework to store data in and retrieve data from thedatabase. It works in a similar fashion to the DoDataExchange() function you have seen with dialogcontrols in that the pFX parameter determines whether the operation is a read or a write. Each time it’scalled, it moves a single record to or from the recordset object.
The first function called is SetFieldType(), which sets a mode for the RFX_() function calls that fol-low. In this case, the mode is specified as outputColumn, which indicates that data is to be exchangedbetween the database field and the corresponding argument specified in each of the following RFX_()function calls. (RFX here stands for Record Field Exchange.)
1131
Chapter 20: Connecting to Data Sources
25905c20.qxd:WroxPro 2/21/08 9:23 AM Page 1131
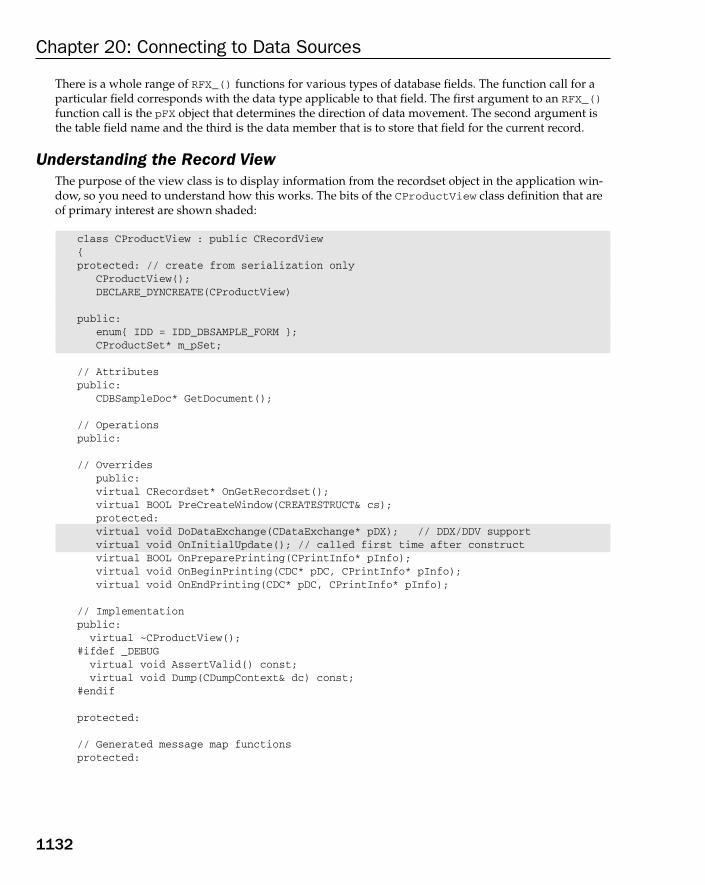
There is a whole range of RFX_() functions for various types of database fields. The function call for aparticular field corresponds with the data type applicable to that field. The first argument to an RFX_()function call is the pFX object that determines the direction of data movement. The second argument isthe table field name and the third is the data member that is to store that field for the current record.
Understanding the Record ViewThe purpose of the view class is to display information from the recordset object in the application win-dow, so you need to understand how this works. The bits of the CProductView class definition that areof primary interest are shown shaded:
class CProductView : public CRecordView{protected: // create from serialization only
CProductView();DECLARE_DYNCREATE(CProductView)
public:enum{ IDD = IDD_DBSAMPLE_FORM };CProductSet* m_pSet;
// Attributespublic:
CDBSampleDoc* GetDocument();
// Operationspublic:
// Overridespublic:virtual CRecordset* OnGetRecordset();virtual BOOL PreCreateWindow(CREATESTRUCT& cs);protected:virtual void DoDataExchange(CDataExchange* pDX); // DDX/DDV supportvirtual void OnInitialUpdate(); // called first time after constructvirtual BOOL OnPreparePrinting(CPrintInfo* pInfo);virtual void OnBeginPrinting(CDC* pDC, CPrintInfo* pInfo);virtual void OnEndPrinting(CDC* pDC, CPrintInfo* pInfo);
// Implementationpublic:virtual ~CProductView();
#ifdef _DEBUGvirtual void AssertValid() const;virtual void Dump(CDumpContext& dc) const;
#endif
protected:
// Generated message map functionsprotected:
1132
Chapter 20: Connecting to Data Sources
25905c20.qxd:WroxPro 2/21/08 9:23 AM Page 1132
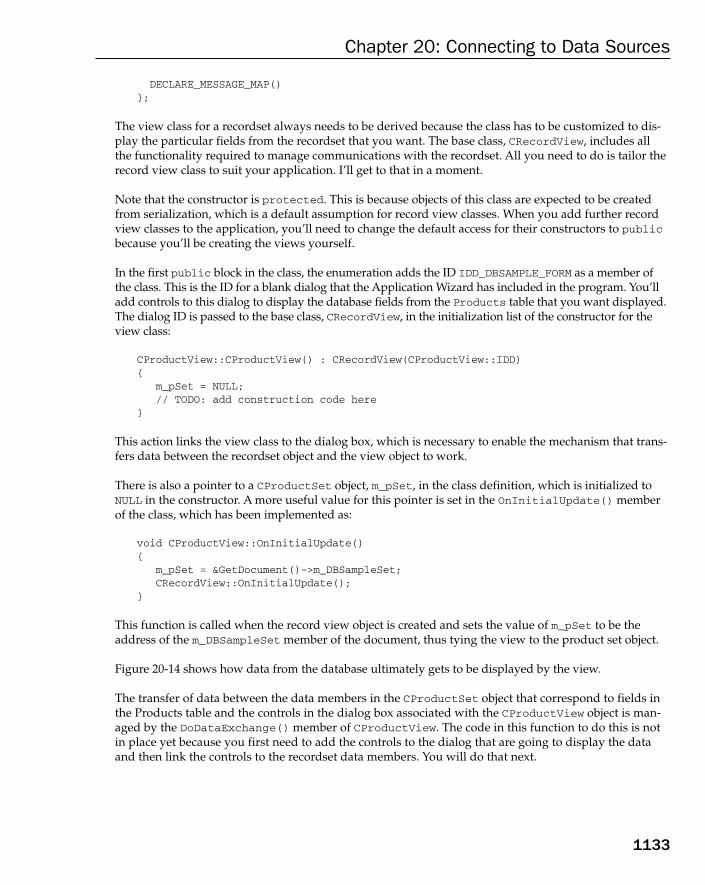
DECLARE_MESSAGE_MAP()};
The view class for a recordset always needs to be derived because the class has to be customized to dis-play the particular fields from the recordset that you want. The base class, CRecordView, includes all the functionality required to manage communications with the recordset. All you need to do is tailor therecord view class to suit your application. I’ll get to that in a moment.
Note that the constructor is protected. This is because objects of this class are expected to be createdfrom serialization, which is a default assumption for record view classes. When you add further recordview classes to the application, you’ll need to change the default access for their constructors to publicbecause you’ll be creating the views yourself.
In the first public block in the class, the enumeration adds the ID IDD_DBSAMPLE_FORM as a member ofthe class. This is the ID for a blank dialog that the Application Wizard has included in the program. You’lladd controls to this dialog to display the database fields from the Products table that you want displayed.The dialog ID is passed to the base class, CRecordView, in the initialization list of the constructor for theview class:
CProductView::CProductView() : CRecordView(CProductView::IDD){
m_pSet = NULL;// TODO: add construction code here
}
This action links the view class to the dialog box, which is necessary to enable the mechanism that trans-fers data between the recordset object and the view object to work.
There is also a pointer to a CProductSet object, m_pSet, in the class definition, which is initialized toNULL in the constructor. A more useful value for this pointer is set in the OnInitialUpdate() memberof the class, which has been implemented as:
void CProductView::OnInitialUpdate(){
m_pSet = &GetDocument()->m_DBSampleSet;CRecordView::OnInitialUpdate();
}
This function is called when the record view object is created and sets the value of m_pSet to be theaddress of the m_DBSampleSet member of the document, thus tying the view to the product set object.
Figure 20-14 shows how data from the database ultimately gets to be displayed by the view.
The transfer of data between the data members in the CProductSet object that correspond to fields inthe Products table and the controls in the dialog box associated with the CProductView object is man-aged by the DoDataExchange() member of CProductView. The code in this function to do this is notin place yet because you first need to add the controls to the dialog that are going to display the dataand then link the controls to the recordset data members. You will do that next.
1133
Chapter 20: Connecting to Data Sources
25905c20.qxd:WroxPro 2/21/08 9:23 AM Page 1133
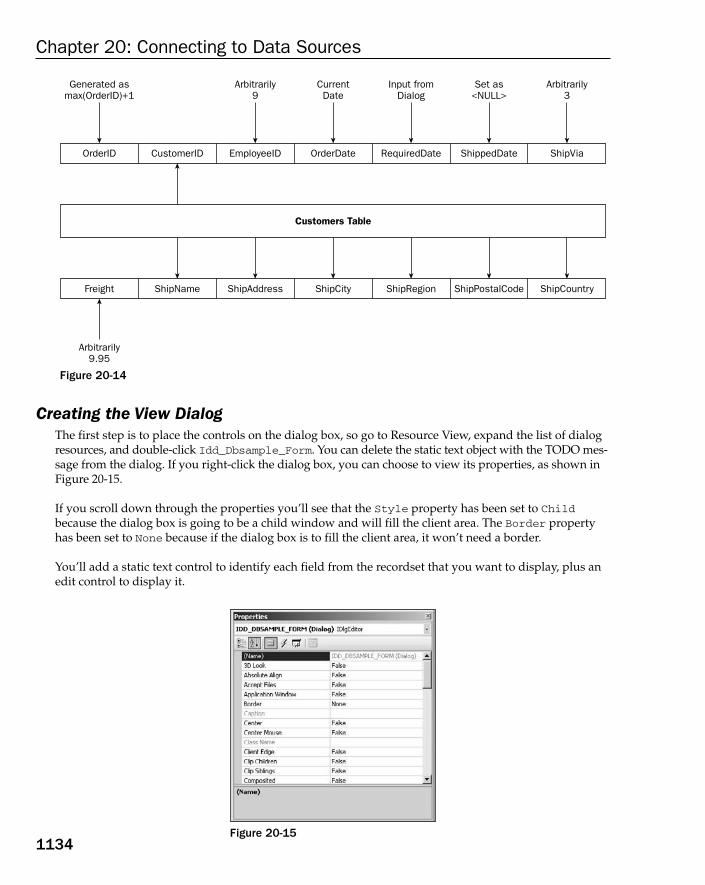
Figure 20-14
Creating the View DialogThe first step is to place the controls on the dialog box, so go to Resource View, expand the list of dialogresources, and double-click Idd_Dbsample_Form. You can delete the static text object with the TODO mes-sage from the dialog. If you right-click the dialog box, you can choose to view its properties, as shown inFigure 20-15.
If you scroll down through the properties you’ll see that the Style property has been set to Childbecause the dialog box is going to be a child window and will fill the client area. The Border propertyhas been set to None because if the dialog box is to fill the client area, it won’t need a border.
You’ll add a static text control to identify each field from the recordset that you want to display, plus anedit control to display it.
Figure 20-15
OrderID CustomerID EmployeeID OrderDate
Customers Table
RequiredDate ShippedDate ShipVia
Generated asmax(OrderID)+1
CurrentDate
Input fromDialog
Set as<NULL>
Arbitrarily3
Arbitrarily9
Arbitrarily9.95
Freight ShipName ShipAddress ShipCity ShipRegion ShipPostalCode ShipCountry
1134
Chapter 20: Connecting to Data Sources
25905c20.qxd:WroxPro 2/21/08 9:23 AM Page 1134
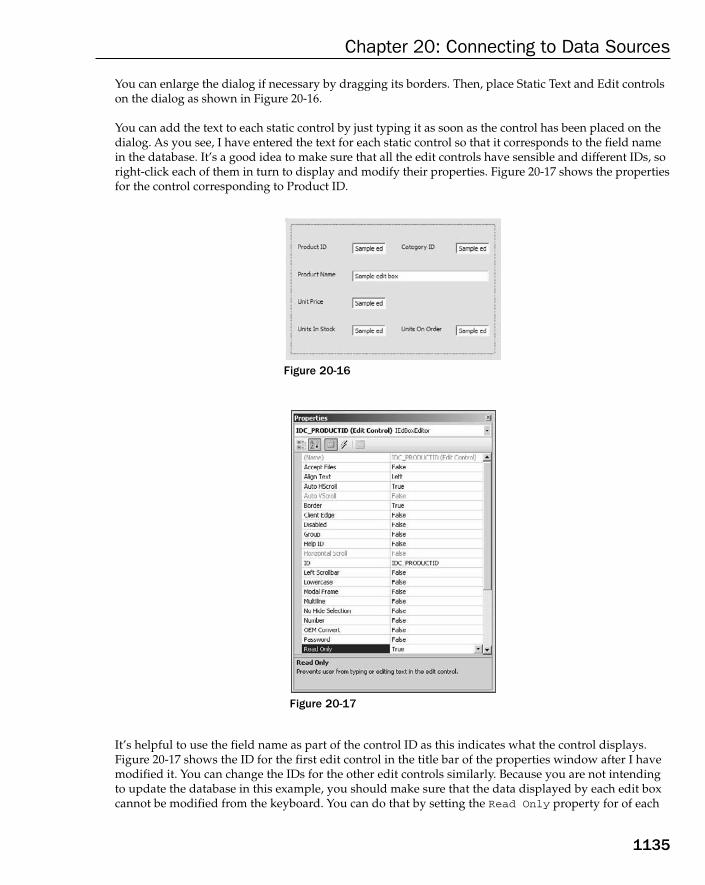
You can enlarge the dialog if necessary by dragging its borders. Then, place Static Text and Edit controlson the dialog as shown in Figure 20-16.
You can add the text to each static control by just typing it as soon as the control has been placed on thedialog. As you see, I have entered the text for each static control so that it corresponds to the field namein the database. It’s a good idea to make sure that all the edit controls have sensible and different IDs, soright-click each of them in turn to display and modify their properties. Figure 20-17 shows the propertiesfor the control corresponding to Product ID.
Figure 20-16
Figure 20-17
It’s helpful to use the field name as part of the control ID as this indicates what the control displays.Figure 20-17 shows the ID for the first edit control in the title bar of the properties window after I havemodified it. You can change the IDs for the other edit controls similarly. Because you are not intendingto update the database in this example, you should make sure that the data displayed by each edit boxcannot be modified from the keyboard. You can do that by setting the Read Only property for of each
1135
Chapter 20: Connecting to Data Sources
25905c20.qxd:WroxPro 2/21/08 9:23 AM Page 1135
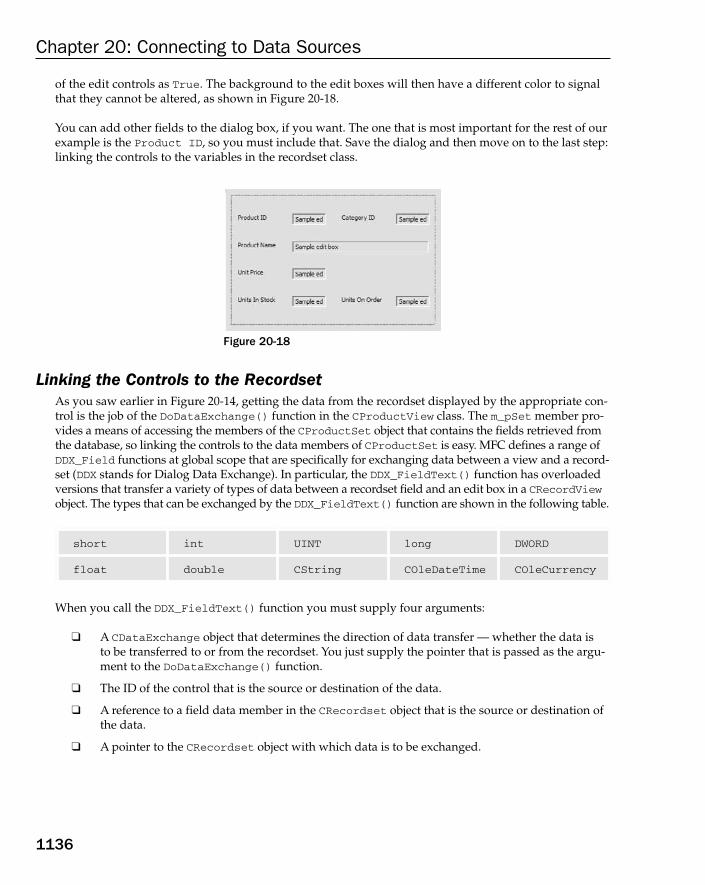
of the edit controls as True. The background to the edit boxes will then have a different color to signalthat they cannot be altered, as shown in Figure 20-18.
You can add other fields to the dialog box, if you want. The one that is most important for the rest of ourexample is the Product ID, so you must include that. Save the dialog and then move on to the last step:linking the controls to the variables in the recordset class.
Figure 20-18
Linking the Controls to the RecordsetAs you saw earlier in Figure 20-14, getting the data from the recordset displayed by the appropriate con-trol is the job of the DoDataExchange() function in the CProductView class. The m_pSet member pro-vides a means of accessing the members of the CProductSet object that contains the fields retrieved fromthe database, so linking the controls to the data members of CProductSet is easy. MFC defines a range ofDDX_Field functions at global scope that are specifically for exchanging data between a view and a record-set (DDX stands for Dialog Data Exchange). In particular, the DDX_FieldText() function has overloadedversions that transfer a variety of types of data between a recordset field and an edit box in a CRecordViewobject. The types that can be exchanged by the DDX_FieldText() function are shown in the following table.
When you call the DDX_FieldText() function you must supply four arguments:
❑ A CDataExchange object that determines the direction of data transfer — whether the data is to be transferred to or from the recordset. You just supply the pointer that is passed as the argu-ment to the DoDataExchange() function.
❑ The ID of the control that is the source or destination of the data.
❑ A reference to a field data member in the CRecordset object that is the source or destination ofthe data.
❑ A pointer to the CRecordset object with which data is to be exchanged.
short int UINT long DWORD
float double CString COleDateTime COleCurrency
1136
Chapter 20: Connecting to Data Sources
25905c20.qxd:WroxPro 2/21/08 9:23 AM Page 1136

So to implement the transfer of data between the recordset and the control for the Product ID field, insertthe following call of the DDX_FieldText() function in the body of the DoDataExchange() function:
DDX_FieldText(pDX, IDC_PRODUCTID, m_pSet->m_ProductID, m_pSet);
The first argument is the pDX argument that is passed to the DoDataExchange() function. The secondargument is the ID for the first edit control in the dialog box for the view, the third argument uses them_pSet member of the CProductView class to access the m_ProductID member of the recordset object,and the last argument is the pointer to the recordset object.
You can therefore fill out the code for the DoDataExchange() function in the CProductView class like this:
void CProductView::DoDataExchange(CDataExchange* pDX){
CRecordView::DoDataExchange(pDX);DDX_FieldText(pDX, IDC_PRODUCTID, m_pSet->m_ProductID, m_pSet);DDX_FieldText(pDX, IDC_PRODUCTNAME, m_pSet->m_ProductName, m_pSet);DDX_FieldText(pDX, IDC_UNITPRICE, m_pSet->m_UnitPrice, m_pSet);DDX_FieldText(pDX, IDC_UNITSINSTOCK, m_pSet->m_UnitsInStock, m_pSet);DDX_FieldText(pDX, IDC_CATEGORYID, m_pSet->m_CategoryID, m_pSet);DDX_FieldText(pDX, IDC_UNITSONORDER, m_pSet->m_UnitsOnOrder, m_pSet);
}
The programming mechanism for data transfer between the database and the dialog box owned by theCProductView object is illustrated in Figure 20-19.
Figure 20-19
1137
Chapter 20: Connecting to Data Sources
25905c20.qxd:WroxPro 2/21/08 9:23 AM Page 1137

The recordset class and the record view class cooperate to enable data to be transferred between the data-base and the controls in the dialog box. The CProductSet class handles transfers between the databaseand its data members and CProductView deals with transfers between the data members of CProductSetand the controls in the dialog.
Exercising the ExampleBelieve it or not you can now run the example. Just build it in the normal way and then execute it. Theapplication should display a window similar to the one shown in Figure 20-20.
Figure 20-20
The CRecordView base class automatically implements toolbar buttons that step from one record in therecordset to the next or to the previous record. There are also toolbar buttons to move directly to the firstor last record in the recordset. Of course, the products are displayed in a default sequence. It would benice to have them sorted in categories and in product ID sequence within each category. Next, you’llsee how you can do that.
Sor ting a RecordsetAs you saw earlier, the data is retrieved from the database by the recordset, using an SQL SELECT state-ment that is generated by the framework using the GetDefaultSQL() member. You can add an ORDER BYclause to the statement generated by setting a value in the m_strSort member of CProductSet, which isinherited from CRecordSet. This causes the output table from the query to be sorted, based on the stringstored in m_strSort. You need to set only the m_strSort member to a string that contains the field nameor names that you want to sort on; the framework provides the ORDER BY keywords. Where you have mul-tiple names, you separate them by commas. But where should you add the code to do this?
The transfer of data between the database and the recordset occurs when the Open() member of therecordset object is called. In your program, the Open() function member of the recordset object is called
1138
Chapter 20: Connecting to Data Sources
25905c20.qxd:WroxPro 2/21/08 9:23 AM Page 1138

by the OnInitialUpdate() member of the base class to the view class, CRecordView. You can, therefore,put the code for setting the sort specification in the OnInitialUpdate() member of the CProductViewclass, as follows:
void CProductView::OnInitialUpdate(){
m_pSet = &GetDocument()->m_productSet;m_pSet->m_strSort = “[CategoryID],[ProductID]”; // Set the sort fieldsCRecordView::OnInitialUpdate();
}
You just set m_strSort in the recordset to a string containing the name of the category ID field followedby the name of the product ID field. Square brackets are useful, even when there are no blanks in a name,because they differentiate strings containing these names from other strings, so you can immediately pickout the field names. They are, of course, optional if there are no blanks in the field name.
Modifying the Window CaptionThere is one other thing you could add to this function at this point. The caption for the window wouldbe better if it showed the name of the table being displayed. You can arrange for this to happen by addingcode to set the title in the document object:
void CProductView::OnInitialUpdate(){
m_pSet = &GetDocument()->m_productSet;m_pSet->m_strSort = “[CategoryID],[ProductID]”; // Set the sort fieldsCRecordView::OnInitialUpdate();
// Set the document title to the table nameif (m_pSet->IsOpen()) // Verify the recordset is open{CString strTitle = _T(“Table Name”); // Set basic title stringCString strTable = m_pSet->GetTableName();if(!strTable.IsEmpty()) // Verify we have a table namestrTitle += _T(“: “) + strTable; // and add to basic title
GetDocument()->SetTitle(strTitle); // Set the document title}
}
Note that the new code here must go after the call to the base class version of the OnInitialUpdate()function. After checking that the recordset is indeed open, you initialize a local CString object with a basictitle string. You then get the name of the table from the recordset object by calling its GetTableName()member. In general, you should check that you do get a string returned from the GetTableName() func-tion. Various conditions can arise that can prevent a table name from being set — for instance, there may be more than one table involved in the recordset. After appending a colon followed by the table name youhave retrieved to the basic title in strTitle, you set the result as the document title by calling the docu-ment’s SetTitle() member.
If you rebuild the application and run it again, it works as before but with a new window caption asFigure 20-21 shows. The product IDs are in ascending sequence within each category ID, with the cate-gory IDs in sequence, too.
1139
Chapter 20: Connecting to Data Sources
25905c20.qxd:WroxPro 2/21/08 9:23 AM Page 1139

Figure 20-21
Using a Second Recordset ObjectNow that you can view all the products in the database, a reasonable extension of the program would beto add the ability to view all the orders for any particular product. To do this, you’ll add another record-set class to handle order information from the database and a complementary view class to display someof the fields from the recordset. You’ll also add a button to the Products dialog to enable you to switch tothe Orders dialog when you want to view the orders for the current product. This enables you to operatewith the arrangement shown in Figure 20-22.
Figure 20-22
1140
Chapter 20: Connecting to Data Sources
25905c20.qxd:WroxPro 2/21/08 9:23 AM Page 1140
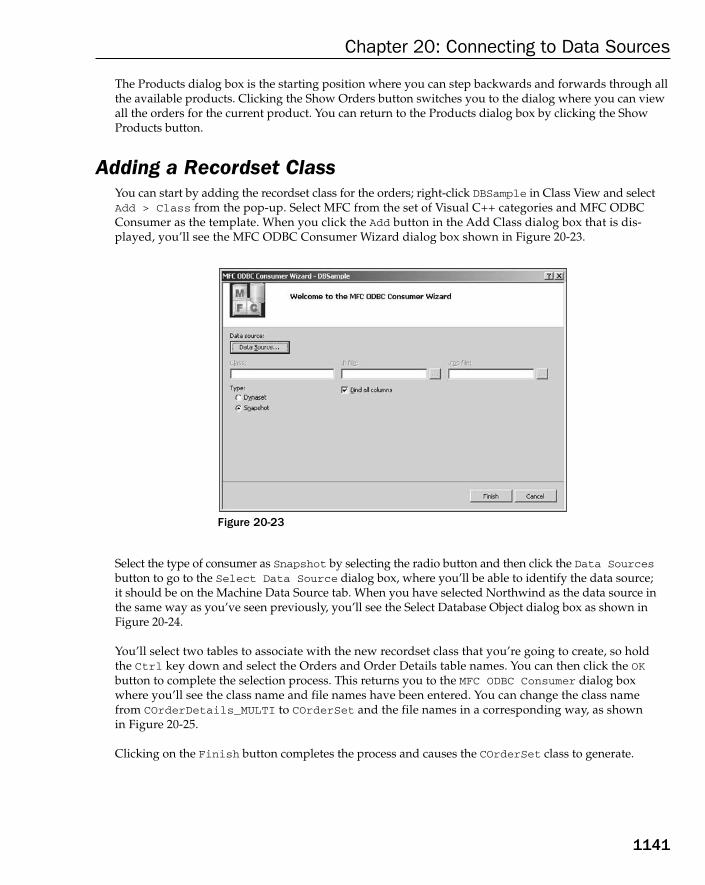
The Products dialog box is the starting position where you can step backwards and forwards through allthe available products. Clicking the Show Orders button switches you to the dialog where you can viewall the orders for the current product. You can return to the Products dialog box by clicking the ShowProducts button.
Adding a Recordset ClassYou can start by adding the recordset class for the orders; right-click DBSample in Class View and selectAdd > Class from the pop-up. Select MFC from the set of Visual C++ categories and MFC ODBCConsumer as the template. When you click the Add button in the Add Class dialog box that is dis-played, you’ll see the MFC ODBC Consumer Wizard dialog box shown in Figure 20-23.
Figure 20-23
Select the type of consumer as Snapshot by selecting the radio button and then click the Data Sourcesbutton to go to the Select Data Source dialog box, where you’ll be able to identify the data source; it should be on the Machine Data Source tab. When you have selected Northwind as the data source inthe same way as you’ve seen previously, you’ll see the Select Database Object dialog box as shown inFigure 20-24.
You’ll select two tables to associate with the new recordset class that you’re going to create, so hold the Ctrl key down and select the Orders and Order Details table names. You can then click the OKbutton to complete the selection process. This returns you to the MFC ODBC Consumer dialog boxwhere you’ll see the class name and file names have been entered. You can change the class name from COrderDetails_MULTI to COrderSet and the file names in a corresponding way, as shown in Figure 20-25.
Clicking on the Finish button completes the process and causes the COrderSet class to generate.
1141
Chapter 20: Connecting to Data Sources
25905c20.qxd:WroxPro 2/21/08 9:23 AM Page 1141
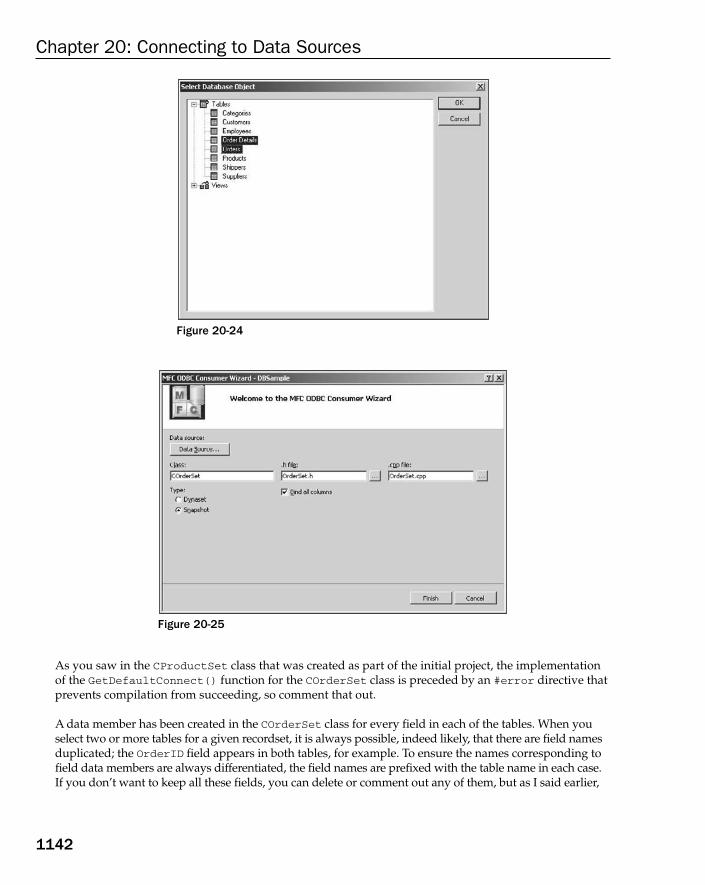
Figure 20-24
Figure 20-25
As you saw in the CProductSet class that was created as part of the initial project, the implementationof the GetDefaultConnect() function for the COrderSet class is preceded by an #error directive thatprevents compilation from succeeding, so comment that out.
A data member has been created in the COrderSet class for every field in each of the tables. When youselect two or more tables for a given recordset, it is always possible, indeed likely, that there are field namesduplicated; the OrderID field appears in both tables, for example. To ensure the names corresponding tofield data members are always differentiated, the field names are prefixed with the table name in each case.If you don’t want to keep all these fields, you can delete or comment out any of them, but as I said earlier,
1142
Chapter 20: Connecting to Data Sources
25905c20.qxd:WroxPro 2/21/08 9:23 AM Page 1142

you must take care not to delete any variables that are primary keys. When you delete a data member for atable field, you must also delete the initialization for it in the class constructor and the RFX_() call for it inthe DoFieldExchange() member function. You must also change the initial value for the m_nFields mem-ber in the COrderSet constructor so that it reflects the number of fields left in the class. The data membersthat you need to keep for this example are as follows: m_OrdersOrderID, m_OrderDetailsOrderID,m_OrderDetailsProductID, m_OrderDetailsQuantity, and m_OrdersCustomerID. If you keep justthese you should change the value assigned to m_nFields to 5. Change the members of type CStringW totype CString.
To hook the new recordset to the document, you need to add a data member to the definition of theCDBSampleDoc class, so right-click the class name in Class View and select Add > Add Variable fromthe pop-up. Specify the type as COrderSet and the variable name as m_OrderSet. You can leave it as apublic member of the class. Click OK to finish adding the data member to the document. The compilerhas to understand that COrderSet is a class before it begins compiling the CBSampleDoc class. If youtake a look at the contents of the DBSampleDoc.h header file, you will see that an #include statementhas already been added for you to the top of DBSampleDoc.h:
#pragma once#include “ProductSet.h”#include “orderset.h”class CDBSampleDoc : public CDocument{// Rest of class definition }
Adding a View Class for the RecordsetAt this point you might expect to be adding a class derived from CRecordView using the Add > Classmenu item in the Class View context menu to display the data from the COrderSet object. This usedto be possible in earlier versions of Visual C++, but unfortunately the Visual C++ 2008 product doesnot provide for this. The dialog box for adding a new class does not allow the possibility of selectingCRecordView as a base class at all, so you must always create classes that have CRecordView as abase manually.
You need to create another dialog resource before you create the view class so you have the ID for theresource that you can use in the definition of the view class.
Creating the Dialog ResourceSwitch to Resource View, right-click the Dialog folder, and select Insert Dialog from the context menu.You can delete both of the default buttons from the dialog. Now change the ID and styles for the dialog,so right-click it and display its properties by selecting Properties from the pop-up. Change the ID prop-erty to IDD_ORDERS_FORM. You also need to change the Style property to Child and the Border prop-erty to None.
You’re now ready to populate the dialog box with controls for the fields that you want to display fromthe Orders and Order Details tables. If you switch to Class View and select the COrderSet class name,you’ll be able to see the names of the variables concerned while you are working on the dialog. Add controls to the dialog box as shown in Figure 20-26.
1143
Chapter 20: Connecting to Data Sources
25905c20.qxd:WroxPro 2/21/08 9:23 AM Page 1143

Figure 20-26
Here, there are four edit controls for the OrderID, CustomerID, ProductID, and Quantity fields fromthe tables associated with the COrderSet class, together with static controls to identify them. You canadd controls to display a few more fields if you want, as long as you haven’t deleted the class members.Don’t forget to modify the IDs for the edit controls so that they are representative of the purpose of thecontrol. You can use the table field names prefixed by the table name to match the data member names.Finally, you need to make the edit controls read-only by setting the Read Only property to True for eachcontrol. Alternatively, you can set them all to read-only in one go by selecting each of them with theCtrl key held down and then setting the Read Only property to True.
The button control labeled Show Products is used to return to the Products table view, so modify theID for this button to IDC_PRODUCTS. When you have arranged everything to your liking, save the dialogresource.
Creating the Record View ClassCreate the OrderView.h file that will hold the COrderView class definition. To do this just right-clickDBSample in Solution Explorer and select Add > New Item from the list. Choose the template to createa .h file and enter the file name as OrderView. After you have created the file, you can add the code forthe class definition as:
#pragma once
class COrderSet; // Declare the class nameclass CDBSampleDoc; // Declare the class name
// COrderView form view
class COrderView : public CRecordView{DECLARE_DYNCREATE(COrderView)
protected:virtual ~COrderView(){}virtual void DoDataExchange(CDataExchange* pDX); // DDX/DDV supportvirtual void OnInitialUpdate();
public:enum { IDD = IDD_ORDERS_FORM };
1144
Chapter 20: Connecting to Data Sources
25905c20.qxd:WroxPro 2/21/08 9:23 AM Page 1144

COrderSet* m_pSet;
// Inline function definitionCDBSampleDoc* GetDocument() const{return reinterpret_cast<CDBSampleDoc*>(m_pDocument);
}
COrderSet* GetRecordset();virtual CRecordset* OnGetRecordset();COrderView(); // constructor now public
#ifdef _DEBUGvirtual void AssertValid() const;virtual void Dump(CDumpContext& dc) const;
#endif};
This code is based on the CProductView that was generated. The DECLARE_DYNCREATE macro enablesobjects of this class type to be created by the MFC framework at runtime. In general MFC document, view,and frame classes should define this macro. You will add the complementary IMPLEMENT_DYNCREATEmacro to the .cpp file a little later. I have omitted the debug version of the GetDocument() because theCProductView class contains a version of the function that validates the document object. The inlineversion in the COrderView class definition just assumes the cast to CDBSampleDoc* will be OK. I haveincluded declarations for AssertValid() and Dump() that is compiled only when debug mode is ineffect, so definition has to be included in the .cpp file for the class. The enumeration defines the ID forthe dialog and you will use this in the definition of the constructor. The m_pSet member will hold theaddress of the recordset object that supplies the data displayed by this view.
The implementation of the COrderView class goes in the OrderView.cpp file, so create that file withinthe project using the procedure you followed for the .h file. You can add the initial #include directivefor the classes you will need to reference:
#include “stdafx.h”#include “DBSample.h”#include “OrderView.h”#include “OrderSet.h” #include “DBSampleDoc.h”
This is not the complete set — you’ll be adding a couple more as you develop the class implementation.
You can add the macro to allow dynamic creation of COrderView objects next:
IMPLEMENT_DYNCREATE(COrderView, CRecordView)
The constructor just needs to initialize the m_pSet member to NULL:
COrderView::COrderView(): CRecordView(COrderView::IDD), m_pSet(NULL)
{}
1145
Chapter 20: Connecting to Data Sources
25905c20.qxd:WroxPro 2/21/08 9:23 AM Page 1145

Here you call the base class constructor with the dialog ID that you defined in an enumeration in the classas the argument. This identifies the dialog that is associated with the view.
Now add definitions for the two functions that may be used when you execute in debug mode:
// COrderView diagnostics
#ifdef _DEBUGvoid COrderView::AssertValid() const{CRecordView::AssertValid();
}
void COrderView::Dump(CDumpContext& dc) const{CRecordView::Dump(dc);
}#endif //_DEBUG
The DoDataExchange() function links the controls in the dialog to the fields in the recordset. The defi-nition of this function is:
void COrderView::DoDataExchange(CDataExchange* pDX){CRecordView::DoDataExchange(pDX);DDX_FieldText(pDX, IDC_ORDERDETAILS_ORDERID,
m_pSet->m_OrderDetailsOrderID, m_pSet);DDX_FieldText(pDX, IDC_ORDERS_CUSTOMERID,
m_pSet->m_OrdersCustomerID, m_pSet);DDX_FieldText(pDX, IDC_ORDERDETAILS_PRODUCTID,
m_pSet->m_OrderDetailsProductID, m_pSet);DDX_FieldText(pDX, IDC_ORDERDETAILS_QUANTITY,
m_pSet->m_OrderDetailsQuantity, m_pSet);}
You use the m_pSet member to access the fields in the COrderSet object that are to be displayed. Thesecond argument to each DDX_FieldText() method call identifies the control for the field identified bythe third argument. As you saw when you explored the CProductView class, the first argument deter-mines whether data is being transferred to or from the control. The last argument simply identifies therecordset that is involved in the process.
There are two functions to be defined that are involved in retrieving the recordset. You’ll call theGetRecordset() function to obtain a pointer to the COrderSet object encapsulating the recordset. You can implement this as follows:
COrderSet* COrderView::GetRecordset(){ASSERT(m_pSet != NULL);return m_pSet;
}
The m_pSet member contains a pointer to the recordset. The MFC ASSERT macro here aborts the programwith a message if the expression between the parentheses evaluates to 0. Thus, this just verifies that the
1146
Chapter 20: Connecting to Data Sources
25905c20.qxd:WroxPro 2/21/08 9:23 AM Page 1146

pointer to the COrderSet object is not NULL. The ASSERT macro has the advantage that it operates only ina debug version of the application. In a release version, it does nothing.
The OnGetRecordset() function is a pure virtual function in the base class, so you must define it here.You can implement it as.
CRecordset* COrderView::OnGetRecordset(){return m_pSet;
}
This just returns the address in m_pSet in this case. Obviously, in a situation where you needed to recreatethe recordset, the code would need to be more complicated.
You are not finished with the view class yet. The next step is to determine more precisely what the record-set for the orders contain.
Customizing the Recordset As it stands, the SQL SELECT operation for a COrderSet object produces a table that will contain allcombinations of records from the two tables involved. This could be a lot of records, so you must addthe equivalent of a WHERE clause to the query to restrict the records selected to those that make sense.But there is another problem, too: when you switch from the Products table display, you don’t want tolook at just any old orders. You want to see precisely those orders for the product ID we were lookingat, which amounts to selecting only those orders that have the same product ID as that contained in the current CProductSet record. This is also effected through a WHERE clause. In the MFC context, theWHERE clause for a SQL SELECT operation for a recordset is called a filter.
Adding a Filter to the RecordsetYou add a filter to the query by assigning a string to the m_strFilter member of the recordset object.This member is inherited from the base class, CRecordSet. As with the ORDER BY clause, which youadded by assigning a value to the m_strSort member of the recordset, the place to implement this is inthe OnInitialUpdate() member of the record view class, just before the base class function is called.
You want to set two conditions in the filter. One is to restrict the records generated in the recordset tothose where the OrderID field in the Orders table is equal to the field with the same name in the OrderDetails table. You can write this condition as:
[Orders].[OrderID] = [Order Details].[OrderID]
The other condition you want to apply is that, for the records meeting the first condition, you want onlythose with a ProductID field that is equal to the ProductID field in the current record in the recordsetobject displaying the Products table. This means that you need to have the ProductID field from theCOrderSet object compared to a variable value. The variable in this operation is called a parameter, andthe condition in the filter is written in a special way:
ProductID = ?
The question mark represents a parameter value for the filter, and the selected records are those wherethe ProductID field equals the parameter value. The value that is to replace the question mark is set in
1147
Chapter 20: Connecting to Data Sources
25905c20.qxd:WroxPro 2/21/08 9:23 AM Page 1147
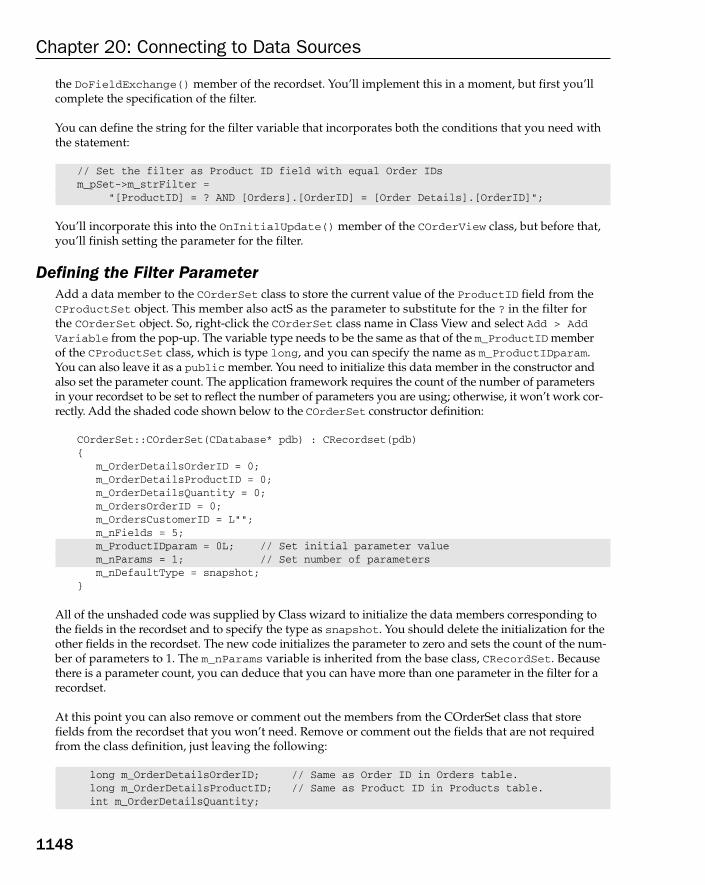
the DoFieldExchange() member of the recordset. You’ll implement this in a moment, but first you’llcomplete the specification of the filter.
You can define the string for the filter variable that incorporates both the conditions that you need withthe statement:
// Set the filter as Product ID field with equal Order IDsm_pSet->m_strFilter =
“[ProductID] = ? AND [Orders].[OrderID] = [Order Details].[OrderID]”;
You’ll incorporate this into the OnInitialUpdate() member of the COrderView class, but before that,you’ll finish setting the parameter for the filter.
Defining the Filter ParameterAdd a data member to the COrderSet class to store the current value of the ProductID field from theCProductSet object. This member also actS as the parameter to substitute for the ? in the filter for the COrderSet object. So, right-click the COrderSet class name in Class View and select Add > AddVariable from the pop-up. The variable type needs to be the same as that of the m_ProductID member of the CProductSet class, which is type long, and you can specify the name as m_ProductIDparam.You can also leave it as a public member. You need to initialize this data member in the constructor andalso set the parameter count. The application framework requires the count of the number of parameters in your recordset to be set to reflect the number of parameters you are using; otherwise, it won’t work cor-rectly. Add the shaded code shown below to the COrderSet constructor definition:
COrderSet::COrderSet(CDatabase* pdb) : CRecordset(pdb){
m_OrderDetailsOrderID = 0;m_OrderDetailsProductID = 0;m_OrderDetailsQuantity = 0;m_OrdersOrderID = 0;m_OrdersCustomerID = L””;m_nFields = 5;m_ProductIDparam = 0L; // Set initial parameter valuem_nParams = 1; // Set number of parametersm_nDefaultType = snapshot;
}
All of the unshaded code was supplied by Class wizard to initialize the data members corresponding tothe fields in the recordset and to specify the type as snapshot. You should delete the initialization for theother fields in the recordset. The new code initializes the parameter to zero and sets the count of the num-ber of parameters to 1. The m_nParams variable is inherited from the base class, CRecordSet. Becausethere is a parameter count, you can deduce that you can have more than one parameter in the filter for arecordset.
At this point you can also remove or comment out the members from the COrderSet class that storefields from the recordset that you won’t need. Remove or comment out the fields that are not requiredfrom the class definition, just leaving the following:
long m_OrderDetailsOrderID; // Same as Order ID in Orders table.long m_OrderDetailsProductID; // Same as Product ID in Products table.int m_OrderDetailsQuantity;
1148
Chapter 20: Connecting to Data Sources
25905c20.qxd:WroxPro 2/21/08 9:23 AM Page 1148

long m_OrdersOrderID; // Unique order number.CString m_OrdersCustomerID; // Same entry as in Customers table.long m_ProductIDparam;
To identify the m_ProductIDparam variable in the class as a parameter to be substituted in the filter forthe COrderSet object, you must also add some code to the DoFieldExchange() member of the class:
void COrderSet::DoFieldExchange(CFieldExchange* pFX){
pFX->SetFieldType(CFieldExchange::outputColumn);RFX_Long(pFX, _T(“[Order Details].[OrderID]”), m_OrderDetailsOrderID);RFX_Long(pFX, _T(“[Order Details].[ProductID]”),
m_OrderDetailsProductID);RFX_Int(pFX, _T(“[Order Details].[Quantity]”),
m_OrderDetailsQuantity);RFX_Long(pFX, _T(“[Orders].[OrderID]”), m_OrdersOrderID);RFX_Text(pFX, _T(“[Orders].[CustomerID]”), m_OrdersCustomerID);
// Set the field type as parameterpFX->SetFieldType(CFieldExchange::param);RFX_Long(pFX,_T(“ProductIDParam”), m_ProductIDparam);
}
The Class Wizard provided code to transfer data between the database and the field variables it has addedto the class. There will be one RFX_() function call for each data member of the recordset. You can deletethose that are not required in this application, leaving just those shown in the preceding code.
The first new line of code calls the SetFieldType() member of the pFX object to set the mode for the fol-lowing RFX_() call to param. The effect of this is to cause the third argument in any succeeding RFX_()calls to be interpreted as a parameter that is to replace a ? in the filter for the recordset. If you have morethan one parameter, the parameters substitute for the question marks in the m_strFilter string insequence from left to right, so it’s important to ensure that the RFX_() calls are in the right order whenthere are several. With the mode set to param, the second argument in the RFX_() call is ignored, so youcould put NULL here or some other string if you want.
Initializing the Record ViewYou can now implement the override for the OnInitialUpdate() function in the COrderView class.This function is called by the MFC framework before the view is initially displayed, so you can put codein this function to do any one-time initialization that you need. In this case you will specify the filter forthe recordset. Here’s the definition of the function to do this:
void COrderView::OnInitialUpdate(){BeginWaitCursor();CDBSampleDoc* pDoc = static_cast<CDBSampleDoc*>(GetDocument()); m_pSet = &pDoc->m_OrderSet; // Get a pointer to the recordset
// Use the DB that is open for products recordsetm_pSet->m_pDatabase = pDoc->m_DBSampleSet.m_pDatabase;
// Set the current product ID as parameter
1149
Chapter 20: Connecting to Data Sources
25905c20.qxd:WroxPro 2/21/08 9:23 AM Page 1149

m_pSet->m_ProductIDparam = pDoc->m_DBSampleSet.m_ProductID;
// Set the filter as product ID fieldm_pSet->m_strFilter =“[ProductID] = ? AND [Orders].[OrderID] = [Order Details].[OrderID]”;
CRecordView::OnInitialUpdate();EndWaitCursor();
}
Add this function definition to OrderView.cpp. The version of the COrderSet class that was implementedby the Class wizard doesn’t override the GetDocument() member because it isn’t associated with the doc-ument class initially. As a result, you must cast the pointer from the base class GetDocument() member toa pointer to a CDBSampleDoc object. Alternatively, you could add an override version of GetDocument()to COrderSet to do the cast. Clearly, you need a pointer to the document object because you need to accessthe members of the object.
The BeginWaitCursor() call at the start of the OnInitialUpdate() function displays the hourglasscursor while this function is executing. The reason for this is that this function can take an appreciabletime to execute, especially when multiple tables are involved. The processing of the query and the transferof data to the recordset all takes place in here. The cursor is returned to normal by the EndWaitCursor()call at the end of the function.
The first thing that the code does is to set the m_pDatabase member of the COrderSet object to the sameas that for the CProductSet object. If you don’t do this, the framework re-opens the database when theorders recordset is opened. Because the database has already been opened for the products recordset, thiswastes a lot of time.
Next, you set the value for the m_ProductIDparam parameter variable to the current value stored in them_ProductID member of the products recordset. This value replaces the question mark in the filter whenthe orders recordset is opened, so select the records you want; then set the filter for the orders recordset to the string you saw earlier.
Accessing Multiple Table ViewsBecause you have implemented the program with the single document interface, the application has onedocument and one view. The availability of just one view might appear to be a problem, but it isn’t inpractice. You can arrange for the frame window object in the application to create an instance of theCOrderView class and switch the current window to that when the orders recordset is to be displayed.
You’ll need to keep track of what the current window is, which you can do by assigning a unique ID toeach of the record view windows in the application. At the moment there are two views: the productsview and the orders view. To define IDs for these, create a new file called OurConstants.h and add thefollowing code to it:
// Definitions for our constants
#pragma once
// Arbitrary constants to identify record viewsconst unsigned int PRODUCT_VIEW = 1;const unsigned int ORDER_VIEW = 2;
1150
Chapter 20: Connecting to Data Sources
25905c20.qxd:WroxPro 2/21/08 9:23 AM Page 1150

You can now use one of these constants to identify each view and to record the ID of the current view inthe frame window object. To record the current view ID, add a public data member to the CMainFrameclass of type unsigned int and give it the name m_CurrentViewID. After you have done that, you caninitialize it in the constructor for CMainFrame by adding code as follows:
CMainFrame::CMainFrame() : m_CurrentViewID(PRODUCT_VIEW){}
The application starts with the Product View initially, so you initialize m_CurrentViewID to be consis-tent with that. Now add an #include directive for OurConstants.h to the beginning of MainFrm.cppso that the definition of PRODUCT_VIEW is accessible in the source file.
Switching ViewsTo enable the view switching mechanism, you add a public function member to the CMainFrame classwith the name SelectView() with a parameter specifying a view ID. This function switches from thecurrent view to whatever view is specified by the ID passed as an argument.
Right-click CMainFrame and select Add > Add Function from the pop-up to add a new public memberto the class. You can enter the return type as void and the function name as SelectView. The parametername can be ViewID, and the type is unsigned int. You can implement the function as follows:
void CMainFrame::SelectView(unsigned int ViewID){CView* pOldActiveView = GetActiveView(); // Get current view
// Get pointer to new view if it exists// if it doesn’t the pointer will be nullCView* pNewActiveView = static_cast<CView*>(GetDlgItem(ViewID));
// If this is 1st time around for the new view, // the new view won’t exist, so we must create itif (pNewActiveView == NULL){switch(ViewID){case ORDER_VIEW: // Create an Order viewpNewActiveView = new COrderView;break;
default:AfxMessageBox(L”Invalid View ID”);return;
}
// Switching the views// Obtain the current view context to apply to the new viewCCreateContext context;context.m_pCurrentDoc = pOldActiveView->GetDocument();pNewActiveView->Create(NULL, NULL, 0L, CFrameWnd::rectDefault,
this, ViewID, &context);pNewActiveView->OnInitialUpdate();
}SetActiveView(pNewActiveView); // Activate the new view
1151
Chapter 20: Connecting to Data Sources
25905c20.qxd:WroxPro 2/21/08 9:23 AM Page 1151
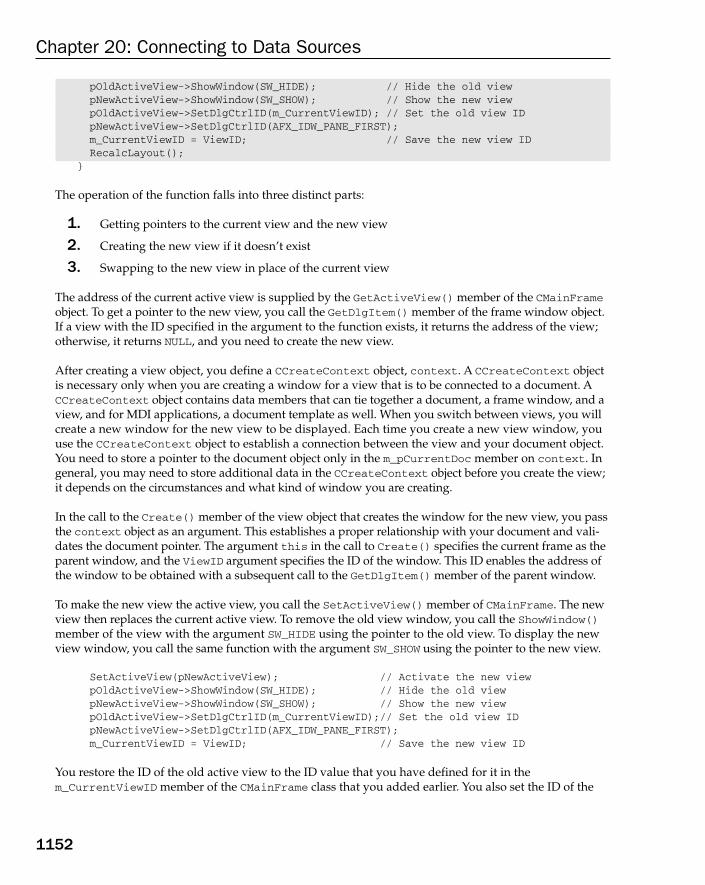
pOldActiveView->ShowWindow(SW_HIDE); // Hide the old viewpNewActiveView->ShowWindow(SW_SHOW); // Show the new viewpOldActiveView->SetDlgCtrlID(m_CurrentViewID); // Set the old view IDpNewActiveView->SetDlgCtrlID(AFX_IDW_PANE_FIRST);m_CurrentViewID = ViewID; // Save the new view IDRecalcLayout();
}
The operation of the function falls into three distinct parts:
1. Getting pointers to the current view and the new view
2. Creating the new view if it doesn’t exist
3. Swapping to the new view in place of the current view
The address of the current active view is supplied by the GetActiveView() member of the CMainFrameobject. To get a pointer to the new view, you call the GetDlgItem() member of the frame window object.If a view with the ID specified in the argument to the function exists, it returns the address of the view;otherwise, it returns NULL, and you need to create the new view.
After creating a view object, you define a CCreateContext object, context. A CCreateContext objectis necessary only when you are creating a window for a view that is to be connected to a document. ACCreateContext object contains data members that can tie together a document, a frame window, and aview, and for MDI applications, a document template as well. When you switch between views, you willcreate a new window for the new view to be displayed. Each time you create a new view window, youuse the CCreateContext object to establish a connection between the view and your document object.You need to store a pointer to the document object only in the m_pCurrentDoc member on context. Ingeneral, you may need to store additional data in the CCreateContext object before you create the view;it depends on the circumstances and what kind of window you are creating.
In the call to the Create() member of the view object that creates the window for the new view, you passthe context object as an argument. This establishes a proper relationship with your document and vali-dates the document pointer. The argument this in the call to Create() specifies the current frame as theparent window, and the ViewID argument specifies the ID of the window. This ID enables the address ofthe window to be obtained with a subsequent call to the GetDlgItem() member of the parent window.
To make the new view the active view, you call the SetActiveView() member of CMainFrame. The newview then replaces the current active view. To remove the old view window, you call the ShowWindow()member of the view with the argument SW_HIDE using the pointer to the old view. To display the newview window, you call the same function with the argument SW_SHOW using the pointer to the new view.
SetActiveView(pNewActiveView); // Activate the new viewpOldActiveView->ShowWindow(SW_HIDE); // Hide the old viewpNewActiveView->ShowWindow(SW_SHOW); // Show the new viewpOldActiveView->SetDlgCtrlID(m_CurrentViewID);// Set the old view IDpNewActiveView->SetDlgCtrlID(AFX_IDW_PANE_FIRST);m_CurrentViewID = ViewID; // Save the new view ID
You restore the ID of the old active view to the ID value that you have defined for it in them_CurrentViewID member of the CMainFrame class that you added earlier. You also set the ID of the
1152
Chapter 20: Connecting to Data Sources
25905c20.qxd:WroxPro 2/21/08 9:23 AM Page 1152
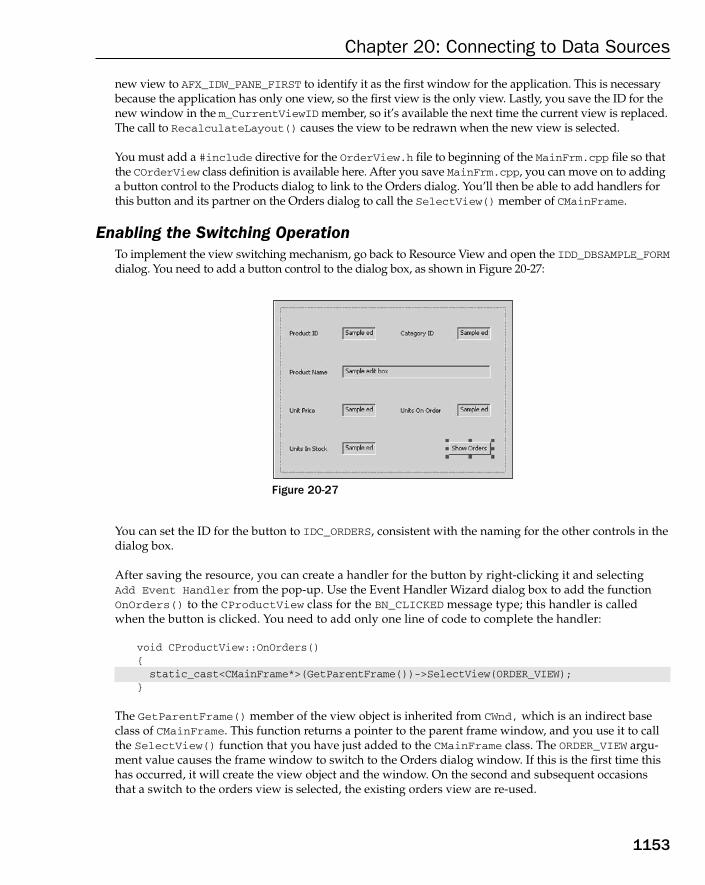
new view to AFX_IDW_PANE_FIRST to identify it as the first window for the application. This is necessarybecause the application has only one view, so the first view is the only view. Lastly, you save the ID for thenew window in the m_CurrentViewID member, so it’s available the next time the current view is replaced.The call to RecalculateLayout() causes the view to be redrawn when the new view is selected.
You must add a #include directive for the OrderView.h file to beginning of the MainFrm.cpp file so thatthe COrderView class definition is available here. After you save MainFrm.cpp, you can move on to addinga button control to the Products dialog to link to the Orders dialog. You’ll then be able to add handlers forthis button and its partner on the Orders dialog to call the SelectView() member of CMainFrame.
Enabling the Switching OperationTo implement the view switching mechanism, go back to Resource View and open the IDD_DBSAMPLE_FORMdialog. You need to add a button control to the dialog box, as shown in Figure 20-27:
Figure 20-27
You can set the ID for the button to IDC_ORDERS, consistent with the naming for the other controls in thedialog box.
After saving the resource, you can create a handler for the button by right-clicking it and selecting Add Event Handler from the pop-up. Use the Event Handler Wizard dialog box to add the functionOnOrders() to the CProductView class for the BN_CLICKED message type; this handler is calledwhen the button is clicked. You need to add only one line of code to complete the handler:
void CProductView::OnOrders(){static_cast<CMainFrame*>(GetParentFrame())->SelectView(ORDER_VIEW);
}
The GetParentFrame() member of the view object is inherited from CWnd, which is an indirect baseclass of CMainFrame. This function returns a pointer to the parent frame window, and you use it to callthe SelectView() function that you have just added to the CMainFrame class. The ORDER_VIEW argu-ment value causes the frame window to switch to the Orders dialog window. If this is the first time thishas occurred, it will create the view object and the window. On the second and subsequent occasionsthat a switch to the orders view is selected, the existing orders view are re-used.
1153
Chapter 20: Connecting to Data Sources
25905c20.qxd:WroxPro 2/21/08 9:23 AM Page 1153
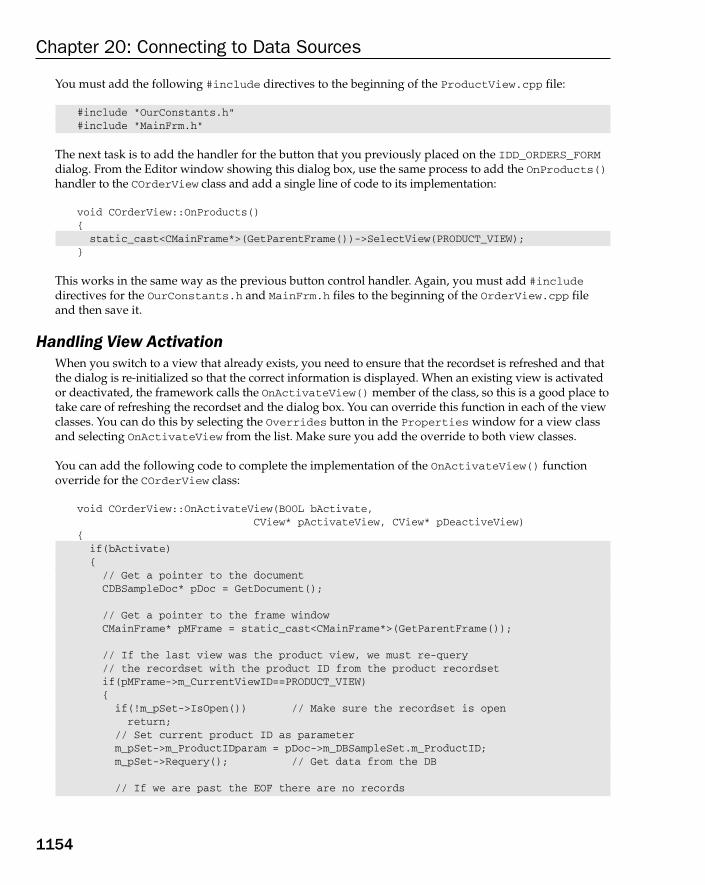
You must add the following #include directives to the beginning of the ProductView.cpp file:
#include “OurConstants.h”#include “MainFrm.h”
The next task is to add the handler for the button that you previously placed on the IDD_ORDERS_FORMdialog. From the Editor window showing this dialog box, use the same process to add the OnProducts()handler to the COrderView class and add a single line of code to its implementation:
void COrderView::OnProducts(){static_cast<CMainFrame*>(GetParentFrame())->SelectView(PRODUCT_VIEW);
}
This works in the same way as the previous button control handler. Again, you must add #includedirectives for the OurConstants.h and MainFrm.h files to the beginning of the OrderView.cpp fileand then save it.
Handling View ActivationWhen you switch to a view that already exists, you need to ensure that the recordset is refreshed and thatthe dialog is re-initialized so that the correct information is displayed. When an existing view is activatedor deactivated, the framework calls the OnActivateView() member of the class, so this is a good place totake care of refreshing the recordset and the dialog box. You can override this function in each of the viewclasses. You can do this by selecting the Overrides button in the Properties window for a view classand selecting OnActivateView from the list. Make sure you add the override to both view classes.
You can add the following code to complete the implementation of the OnActivateView() functionoverride for the COrderView class:
void COrderView::OnActivateView(BOOL bActivate,CView* pActivateView, CView* pDeactiveView)
{if(bActivate){// Get a pointer to the documentCDBSampleDoc* pDoc = GetDocument();
// Get a pointer to the frame windowCMainFrame* pMFrame = static_cast<CMainFrame*>(GetParentFrame());
// If the last view was the product view, we must re-query// the recordset with the product ID from the product recordsetif(pMFrame->m_CurrentViewID==PRODUCT_VIEW){if(!m_pSet->IsOpen()) // Make sure the recordset is openreturn;
// Set current product ID as parameterm_pSet->m_ProductIDparam = pDoc->m_DBSampleSet.m_ProductID;m_pSet->Requery(); // Get data from the DB
// If we are past the EOF there are no records
1154
Chapter 20: Connecting to Data Sources
25905c20.qxd:WroxPro 2/21/08 9:23 AM Page 1154

if(m_pSet->IsEOF())AfxMessageBox(L”No orders for the current product ID”);
}
// Set the window captionCString strTitle = _T(“Table Name: “);CString strTable = m_pSet->GetTableName();if(!strTable.IsEmpty())strTitle += strTable;
elsestrTitle += _T(“Orders - Multiple Tables”);
pDoc->SetTitle(strTitle);CRecordView::OnInitialUpdate(); // Update values in dialog
}
CRecordView::OnActivateView(bActivate, pActivateView, pDeactiveView);}
You execute the code only if the view is being activated, and when this is the case, the bActivate argu-ment will be TRUE. After getting pointers to the document and the parent frame, you verify that the pre-vious view was the Product View before re-querying the order set. This check is not necessary at presentbecause the previous view is always the Product View, but when you add another view to the application,this will not always be true so you might as well put the code in now.
To re-query the database, you set the parameter member of COrderSet, m_ProductIDparam, to the cur-rent value of the m_ProductID member of the product recordset. This causes the orders for the currentproduct to be selected. You don’t need to set the m_strFilter member of the recordset here becausethat was set in the OnInitialUpdate() function when the CRecordView object was first created. TheIsEOF() function member of the COrderSet object is inherited from CRecordSet and returns TRUE ifthe recordset is empty when it is re-queried.
Add the code for OnActivateView() function in the CProductView class as follows:
void CProductView::OnActivateView(BOOL bActivate,CView* pActivateView, CView* pDeactiveView)
{if(bActivate){
// Update the window captionCString strTitle = _T(“Table Name”);CString strTable = m_pSet->GetTableName();strTitle += _T(“: “) + strTable;GetDocument()->SetTitle(strTitle);
}CRecordView::OnActivateView(bActivate, pActivateView, pDeactiveView);
}
In this case, all you need to do if the view has been activated is to update the window caption. Becausethe Product View is the driving view for the rest of the application, you always want to return the viewto its state before it was deactivated. If you do nothing apart from updating the window caption, the viewis displayed in its previous state.
1155
Chapter 20: Connecting to Data Sources
25905c20.qxd:WroxPro 2/21/08 9:23 AM Page 1155
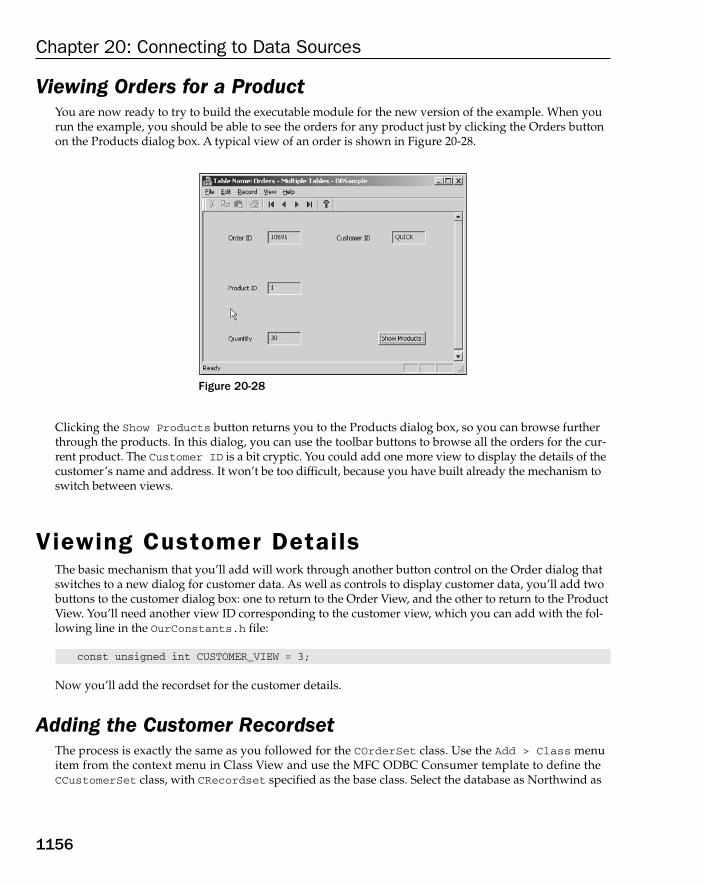
Viewing Orders for a ProductYou are now ready to try to build the executable module for the new version of the example. When yourun the example, you should be able to see the orders for any product just by clicking the Orders buttonon the Products dialog box. A typical view of an order is shown in Figure 20-28.
Figure 20-28
Clicking the Show Products button returns you to the Products dialog box, so you can browse furtherthrough the products. In this dialog, you can use the toolbar buttons to browse all the orders for the cur-rent product. The Customer ID is a bit cryptic. You could add one more view to display the details of thecustomer’s name and address. It won’t be too difficult, because you have built already the mechanism toswitch between views.
Viewing Customer DetailsThe basic mechanism that you’ll add will work through another button control on the Order dialog thatswitches to a new dialog for customer data. As well as controls to display customer data, you’ll add twobuttons to the customer dialog box: one to return to the Order View, and the other to return to the ProductView. You’ll need another view ID corresponding to the customer view, which you can add with the fol-lowing line in the OurConstants.h file:
const unsigned int CUSTOMER_VIEW = 3;
Now you’ll add the recordset for the customer details.
Adding the Customer RecordsetThe process is exactly the same as you followed for the COrderSet class. Use the Add > Class menuitem from the context menu in Class View and use the MFC ODBC Consumer template to define theCCustomerSet class, with CRecordset specified as the base class. Select the database as Northwind as
1156
Chapter 20: Connecting to Data Sources
25905c20.qxd:WroxPro 2/21/08 9:23 AM Page 1156
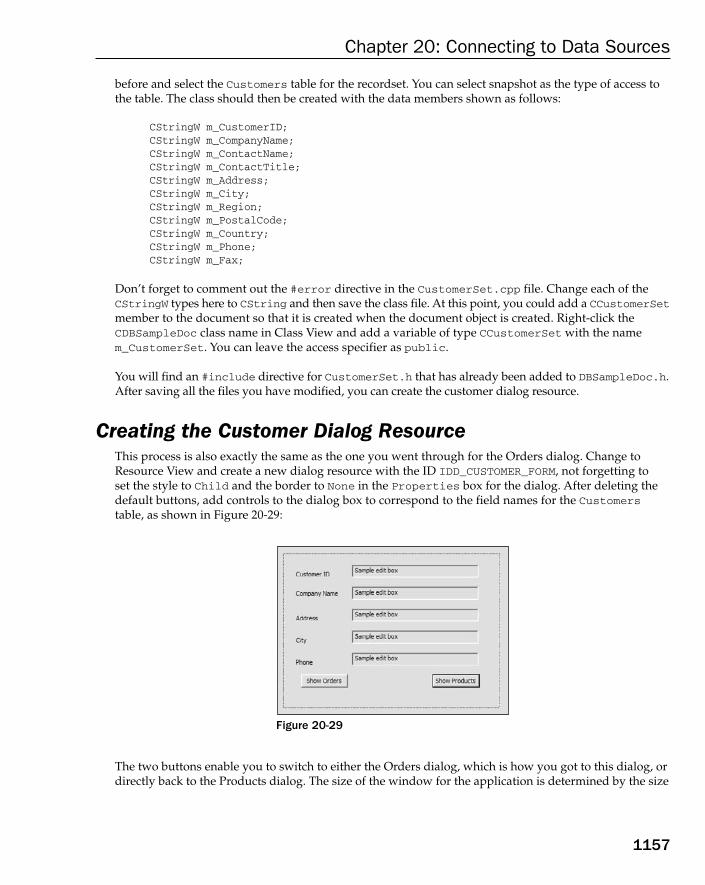
before and select the Customers table for the recordset. You can select snapshot as the type of access tothe table. The class should then be created with the data members shown as follows:
CStringW m_CustomerID;CStringW m_CompanyName;CStringW m_ContactName;CStringW m_ContactTitle;CStringW m_Address; CStringW m_City;CStringW m_Region; CStringW m_PostalCode;CStringW m_Country;CStringW m_Phone;CStringW m_Fax;
Don’t forget to comment out the #error directive in the CustomerSet.cpp file. Change each of theCStringW types here to CString and then save the class file. At this point, you could add a CCustomerSetmember to the document so that it is created when the document object is created. Right-click theCDBSampleDoc class name in Class View and add a variable of type CCustomerSet with the namem_CustomerSet. You can leave the access specifier as public.
You will find an #include directive for CustomerSet.h that has already been added to DBSampleDoc.h.After saving all the files you have modified, you can create the customer dialog resource.
Creating the Customer Dialog ResourceThis process is also exactly the same as the one you went through for the Orders dialog. Change toResource View and create a new dialog resource with the ID IDD_CUSTOMER_FORM, not forgetting to set the style to Child and the border to None in the Properties box for the dialog. After deleting thedefault buttons, add controls to the dialog box to correspond to the field names for the Customerstable, as shown in Figure 20-29:
Figure 20-29
The two buttons enable you to switch to either the Orders dialog, which is how you got to this dialog, ordirectly back to the Products dialog. The size of the window for the application is determined by the size
1157
Chapter 20: Connecting to Data Sources
25905c20.qxd:WroxPro 2/21/08 9:23 AM Page 1157
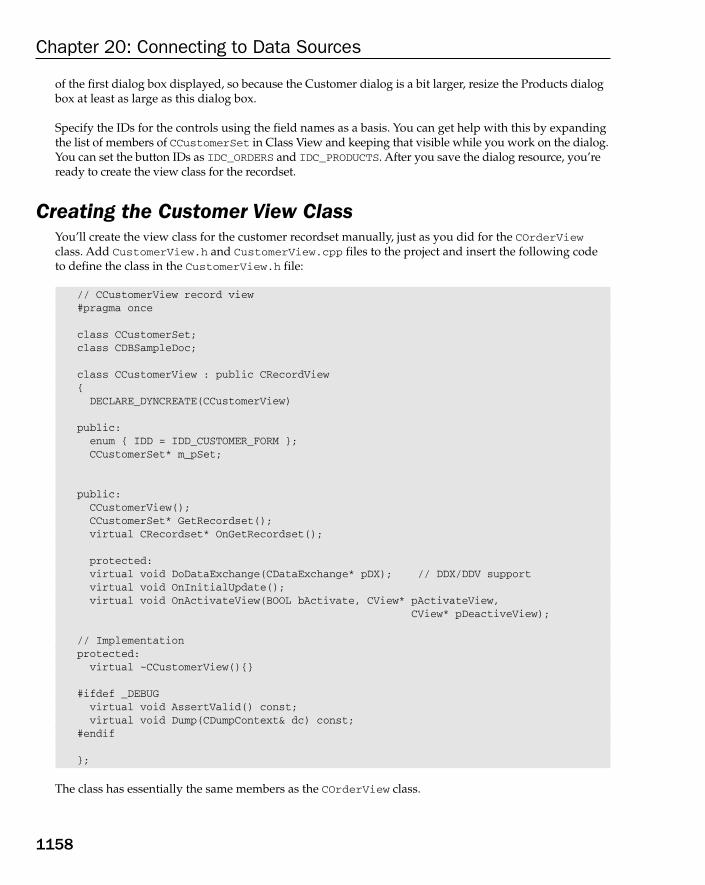
of the first dialog box displayed, so because the Customer dialog is a bit larger, resize the Products dialogbox at least as large as this dialog box.
Specify the IDs for the controls using the field names as a basis. You can get help with this by expandingthe list of members of CCustomerSet in Class View and keeping that visible while you work on the dialog.You can set the button IDs as IDC_ORDERS and IDC_PRODUCTS. After you save the dialog resource, you’reready to create the view class for the recordset.
Creating the Customer View ClassYou’ll create the view class for the customer recordset manually, just as you did for the COrderViewclass. Add CustomerView.h and CustomerView.cpp files to the project and insert the following codeto define the class in the CustomerView.h file:
// CCustomerView record view#pragma once
class CCustomerSet;class CDBSampleDoc;
class CCustomerView : public CRecordView{DECLARE_DYNCREATE(CCustomerView)
public:enum { IDD = IDD_CUSTOMER_FORM };CCustomerSet* m_pSet;
public:CCustomerView(); CCustomerSet* GetRecordset();virtual CRecordset* OnGetRecordset();
protected:virtual void DoDataExchange(CDataExchange* pDX); // DDX/DDV supportvirtual void OnInitialUpdate();virtual void OnActivateView(BOOL bActivate, CView* pActivateView,
CView* pDeactiveView);
// Implementationprotected:virtual ~CCustomerView(){}
#ifdef _DEBUGvirtual void AssertValid() const;virtual void Dump(CDumpContext& dc) const;
#endif
};
The class has essentially the same members as the COrderView class.
1158
Chapter 20: Connecting to Data Sources
25905c20.qxd:WroxPro 2/21/08 9:23 AM Page 1158

You can add the following initial code to the CustomerView.cpp:
// CCustomerView implementation#include “stdafx.h”#include “resource.h”
IMPLEMENT_DYNCREATE(CCustomerView, CRecordView)
CCustomerView::CCustomerView(): CRecordView(CCustomerView::IDD), m_pSet(NULL){}
CCustomerSet* CCustomerView::GetRecordset(){ASSERT(m_pSet != NULL);return m_pSet;
}
CRecordset* CCustomerView::OnGetRecordset(){return m_pSet;
}
// COrderView diagnostics
#ifdef _DEBUGvoid CCustomerView::AssertValid() const{CRecordView::AssertValid();
}
void CCustomerView::Dump(CDumpContext& dc) const{CRecordView::Dump(dc);
}#endif //_DEBUG
This is the same boilerplate code as in the COrderView class, and the functions are defined here as in theearlier class. The first #include directive is for the precompiled headers, and the second provides thedefinitions for the resource IDs.
You can process the button controls in the IDD_CUSTOMER_FORM dialog box in the same way as you did previously to add the OnOrders() and OnProducts() functions to the CCustomerView class;right-click each button and select the Add Event Handler from the pop-up. The code for these is similar to the corresponding functions in the other views. The code you need to add to OnOrders()in the CustomerView.cpp file is:
void CCustomerView::OnOrders(){static_cast<CMainFrame*>(GetParentFrame())->SelectView(ORDER_VIEW);
}
1159
Chapter 20: Connecting to Data Sources
25905c20.qxd:WroxPro 2/21/08 9:23 AM Page 1159
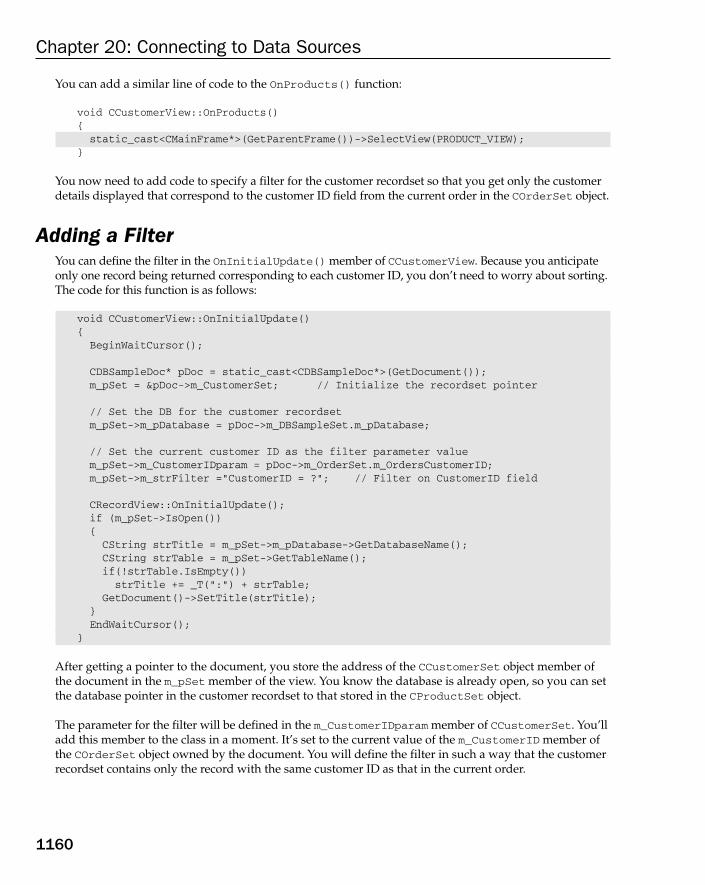
You can add a similar line of code to the OnProducts() function:
void CCustomerView::OnProducts(){static_cast<CMainFrame*>(GetParentFrame())->SelectView(PRODUCT_VIEW);
}
You now need to add code to specify a filter for the customer recordset so that you get only the customerdetails displayed that correspond to the customer ID field from the current order in the COrderSet object.
Adding a FilterYou can define the filter in the OnInitialUpdate() member of CCustomerView. Because you anticipateonly one record being returned corresponding to each customer ID, you don’t need to worry about sorting.The code for this function is as follows:
void CCustomerView::OnInitialUpdate(){BeginWaitCursor();
CDBSampleDoc* pDoc = static_cast<CDBSampleDoc*>(GetDocument());m_pSet = &pDoc->m_CustomerSet; // Initialize the recordset pointer
// Set the DB for the customer recordsetm_pSet->m_pDatabase = pDoc->m_DBSampleSet.m_pDatabase;
// Set the current customer ID as the filter parameter valuem_pSet->m_CustomerIDparam = pDoc->m_OrderSet.m_OrdersCustomerID;m_pSet->m_strFilter =”CustomerID = ?”; // Filter on CustomerID field
CRecordView::OnInitialUpdate();if (m_pSet->IsOpen()){CString strTitle = m_pSet->m_pDatabase->GetDatabaseName();CString strTable = m_pSet->GetTableName();if(!strTable.IsEmpty())strTitle += _T(“:”) + strTable;
GetDocument()->SetTitle(strTitle);}EndWaitCursor();
}
After getting a pointer to the document, you store the address of the CCustomerSet object member ofthe document in the m_pSet member of the view. You know the database is already open, so you can setthe database pointer in the customer recordset to that stored in the CProductSet object.
The parameter for the filter will be defined in the m_CustomerIDparam member of CCustomerSet. You’lladd this member to the class in a moment. It’s set to the current value of the m_CustomerID member ofthe COrderSet object owned by the document. You will define the filter in such a way that the customerrecordset contains only the record with the same customer ID as that in the current order.
1160
Chapter 20: Connecting to Data Sources
25905c20.qxd:WroxPro 2/21/08 9:23 AM Page 1160

The OnActivateView() function handles activation of the customer view, and you can implement it inCustomerView.cpp as follows:
void CCustomerView::OnActivateView(BOOL bActivate,CView* pActivateView, CView* pDeactiveView)
{if(bActivate){if(!m_pSet->IsOpen())return;
CDBSampleDoc* pDoc = static_cast<CDBSampleDoc*>(GetDocument());
// Set current customer ID as parameterm_pSet->m_CustomerIDparam = pDoc->m_OrderSet.m_OrdersCustomerID;m_pSet->Requery(); // Get data from the DBCRecordView::OnInitialUpdate(); // Redraw the dialog
// Check for empty recordsetif(m_pSet->IsEOF())AfxMessageBox(L”No customer details for the current customer ID”);
CString strTitle = _T(“Table Name:”);CString strTable = m_pSet->GetTableName();if(!strTable.IsEmpty())strTitle += strTable;
elsestrTitle += _T(“Multiple Tables”);
pDoc->SetTitle(strTitle);}CRecordView::OnActivateView(bActivate, pActivateView, pDeactiveView);
}
If this function is called because the view has been activated (rather than deactivated), bActivate has thevalue TRUE. In this case, you set the filter parameter from the order recordset and re-query the database.
The m_CustomerIDparam member for the CCustomerSet recordset object that is associated with thisview object is set to the customer ID from the orders recordset object that is stored in the document. Thiswill be the customer ID for the current order. The call to the Requery() function for the CCustomerSetobject retrieves records from the database using the filter you have set up. The result is that the detailsfor the customer for the current order are stored in the CCustomerSet object and then passed to theCCustomerView object for display in the dialog.
You will need to add the following #include statements to the beginning of the CustomerView.cpp file:
#include “ProductSet.h”#include “OrderSet.h”#include “CustomerSet.h”#include “DBSampleDoc.h”#include “OurConstants.h”#include “MainFrm.h”
1161
Chapter 20: Connecting to Data Sources
25905c20.qxd:WroxPro 2/21/08 9:23 AM Page 1161
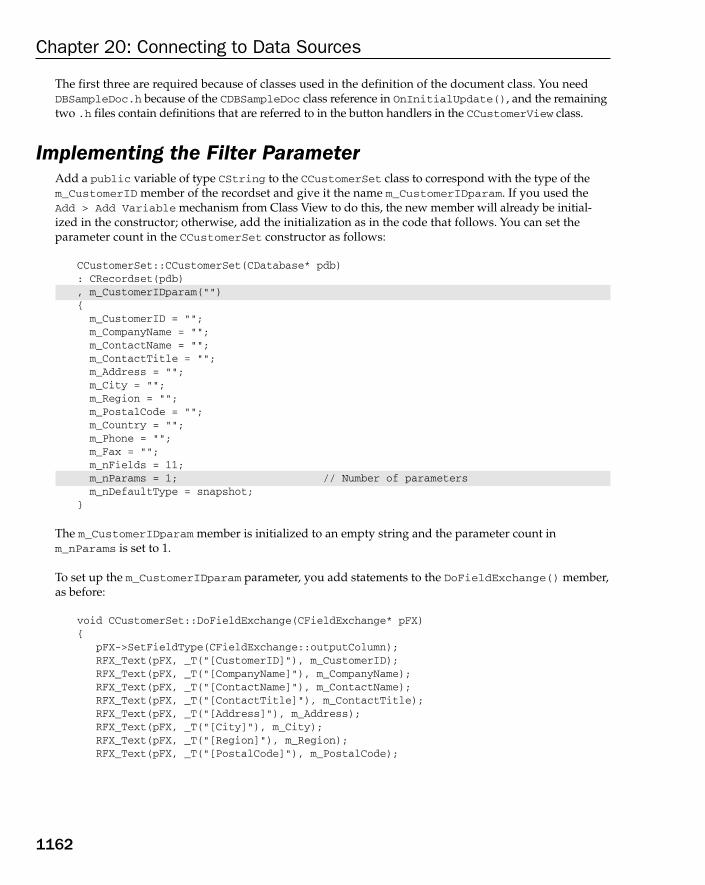
The first three are required because of classes used in the definition of the document class. You needDBSampleDoc.h because of the CDBSampleDoc class reference in OnInitialUpdate(), and the remainingtwo .h files contain definitions that are referred to in the button handlers in the CCustomerView class.
Implementing the Filter ParameterAdd a public variable of type CString to the CCustomerSet class to correspond with the type of them_CustomerID member of the recordset and give it the name m_CustomerIDparam. If you used theAdd > Add Variable mechanism from Class View to do this, the new member will already be initial-ized in the constructor; otherwise, add the initialization as in the code that follows. You can set theparameter count in the CCustomerSet constructor as follows:
CCustomerSet::CCustomerSet(CDatabase* pdb): CRecordset(pdb), m_CustomerIDparam(“”){m_CustomerID = “”;m_CompanyName = “”;m_ContactName = “”;m_ContactTitle = “”;m_Address = “”;m_City = “”;m_Region = “”;m_PostalCode = “”;m_Country = “”;m_Phone = “”;m_Fax = “”;m_nFields = 11;m_nParams = 1; // Number of parametersm_nDefaultType = snapshot;
}
The m_CustomerIDparam member is initialized to an empty string and the parameter count inm_nParams is set to 1.
To set up the m_CustomerIDparam parameter, you add statements to the DoFieldExchange() member,as before:
void CCustomerSet::DoFieldExchange(CFieldExchange* pFX){
pFX->SetFieldType(CFieldExchange::outputColumn);RFX_Text(pFX, _T(“[CustomerID]”), m_CustomerID);RFX_Text(pFX, _T(“[CompanyName]”), m_CompanyName);RFX_Text(pFX, _T(“[ContactName]”), m_ContactName);RFX_Text(pFX, _T(“[ContactTitle]”), m_ContactTitle);RFX_Text(pFX, _T(“[Address]”), m_Address);RFX_Text(pFX, _T(“[City]”), m_City);RFX_Text(pFX, _T(“[Region]”), m_Region);RFX_Text(pFX, _T(“[PostalCode]”), m_PostalCode);
1162
Chapter 20: Connecting to Data Sources
25905c20.qxd:WroxPro 2/21/08 9:23 AM Page 1162

RFX_Text(pFX, _T(“[Country]”), m_Country);RFX_Text(pFX, _T(“[Phone]”), m_Phone);RFX_Text(pFX, _pFX->SetFieldType(CFieldExchange::param); // Set parameter modeRFX_Text(pFX, _T(“CustomerIDParam”), m_CustomerIDparam);
}
I have omitted comment lines from the beginning of this function to save space. After setting the parammode by calling the SetFieldType() member of the pFX object, you call the RFX_Text() function topass the parameter value for substitution in the filter. You use RFX_Text() because the parameter vari-able is of type CString. There are various RFX_() functions supporting a range of parameter types.
After you have completed this modification, you can save the CustomerSet.cpp file.
Linking the Order Dialog to the Customer DialogTo permit a switch to the Customer dialog, you require a button control on the IDD_ORDERS_FORM dialog,so open it in Resource View and add an extra button, as shown in Figure 20-30.
Figure 20-30
I have rearranged the original controls a little — you can arrange them to please yourself. You can definethe ID for the new button control as IDC_CUSTOMER. After you save the dialog, you can add a handler forthe button by right-clicking it and select Add Event Handler from the pop-up. The handler requires onlyone line of code to be added to it, as follows:
void COrderView::OnCustomer(){static_cast<CMainFrame*>(GetParentFrame())->SelectView(CUSTOMER_VIEW);
}
This obtains the address of the frame window and uses it to call the SelectView() member ofCMainFrame to switch to a customer view. The penultimate step to complete the program is to add thecode to the SelectView() function that deals with the CUSTOMER_VIEW value being passed to it. Thisrequires just three additional lines of code, as follows:
void CMainFrame::SelectView(UINT ViewID){
1163
Chapter 20: Connecting to Data Sources
25905c20.qxd:WroxPro 2/21/08 9:23 AM Page 1163
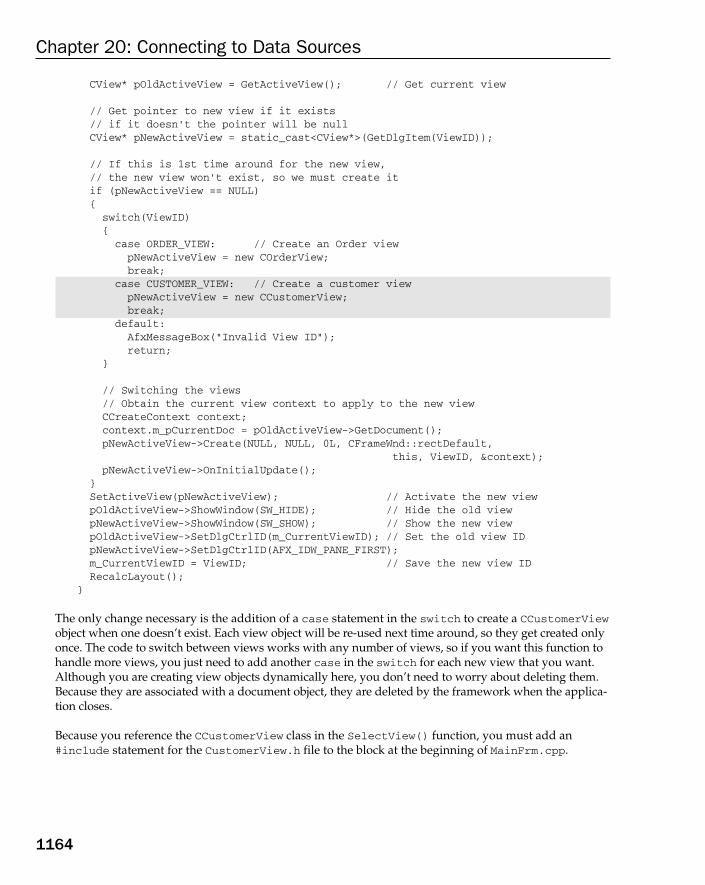
CView* pOldActiveView = GetActiveView(); // Get current view
// Get pointer to new view if it exists// if it doesn’t the pointer will be nullCView* pNewActiveView = static_cast<CView*>(GetDlgItem(ViewID));
// If this is 1st time around for the new view, // the new view won’t exist, so we must create itif (pNewActiveView == NULL){
switch(ViewID){
case ORDER_VIEW: // Create an Order viewpNewActiveView = new COrderView;break;
case CUSTOMER_VIEW: // Create a customer viewpNewActiveView = new CCustomerView;break;
default:AfxMessageBox(“Invalid View ID”);return;
}
// Switching the views// Obtain the current view context to apply to the new viewCCreateContext context;context.m_pCurrentDoc = pOldActiveView->GetDocument();pNewActiveView->Create(NULL, NULL, 0L, CFrameWnd::rectDefault,
this, ViewID, &context);pNewActiveView->OnInitialUpdate();
}SetActiveView(pNewActiveView); // Activate the new viewpOldActiveView->ShowWindow(SW_HIDE); // Hide the old viewpNewActiveView->ShowWindow(SW_SHOW); // Show the new viewpOldActiveView->SetDlgCtrlID(m_CurrentViewID); // Set the old view IDpNewActiveView->SetDlgCtrlID(AFX_IDW_PANE_FIRST);m_CurrentViewID = ViewID; // Save the new view IDRecalcLayout();
}
The only change necessary is the addition of a case statement in the switch to create a CCustomerViewobject when one doesn’t exist. Each view object will be re-used next time around, so they get created onlyonce. The code to switch between views works with any number of views, so if you want this function tohandle more views, you just need to add another case in the switch for each new view that you want.Although you are creating view objects dynamically here, you don’t need to worry about deleting them.Because they are associated with a document object, they are deleted by the framework when the applica-tion closes.
Because you reference the CCustomerView class in the SelectView() function, you must add an#include statement for the CustomerView.h file to the block at the beginning of MainFrm.cpp.
1164
Chapter 20: Connecting to Data Sources
25905c20.qxd:WroxPro 2/21/08 9:23 AM Page 1164

To complete the application you can add the implementation of the DoDataExchange() function for theCCustomerView class to CustomerView.cpp:
void CCustomerView::DoDataExchange(CDataExchange* pDX){CRecordView::DoDataExchange(pDX);DDX_FieldText(pDX, IDC_ADDRESS,
m_pSet->m_Address, m_pSet);DDX_FieldText(pDX, IDC_CITY,
m_pSet->m_City, m_pSet);DDX_FieldText(pDX, IDC_COMPANYNAME,
m_pSet->m_CompanyName, m_pSet);DDX_FieldText(pDX, IDC_PHONE,
m_pSet->m_Phone, m_pSet);DDX_FieldText(pDX, IDC_CUSTOMERID,
m_pSet->m_CustomerID, m_pSet);}
This uses the DDX_ functions as before to transfer data from the edit controls to the members of theCCustomerView class. You must add an #include directive for the CustomerSet.h header file for thisto compile correctly.
Exercising the Database ViewerAt this point, the program is complete. You can build the application and execute it. As before, the mainview of the database is the products view. As before, clicking Orders takes you to the Orders view. Thesecond button on this form should now be active, and clicking it takes you to the details of the customerfor the current order, as Figure 20-31 illustrates.
The two buttons take you back to the Orders view or the Products view, respectively.
Figure 20-31
1165
Chapter 20: Connecting to Data Sources
25905c20.qxd:WroxPro 2/21/08 9:23 AM Page 1165

SummaryYou should now be comfortable with the basics of how MFC links to your database using ODBC.
The key points you have seen in this chapter are:
❑ MFC provides OLE DB and ODBC support for accessing databases.
❑ To use a database with ODBC the database must be registered.
❑ A connection to a database is represented by a CDatabase or a CDaoDatabase object.
❑ A recordset object represents an SQL SELECT statement applied to a defined set of tables. Wherenecessary, the framework will automatically create a database object representing a connectionto a database when a recordset object is created.
❑ A WHERE clause can be added for a recordset object through its m_strFilter data member.
❑ An ORDER BY clause can be defined for a recordset through its m_strSort data member.
❑ A record view object is used to display the contents of a recordset object.
ExercisesYou can download the source code for the examples in the book and the solutions to the following exercisesfrom www.wrox.com.
1. Using the Products table again, add a “stock control” dialog box to the application. This shouldbe reachable through a button on the Products dialog box and must itself contain a button to goback to the Products dialog. The fields it should display are the product ID, product name, reorderlevel, unit price, and units in stock. Don’t worry about filtering or sorting at the moment; just getthe basic mechanism working.
2. Refine the preceding project so that the stock control dialog automatically displays informationabout the product that was being shown in the Products dialog box when the button was clicked.
3. Implement a system whereby the user of the database is warned in the stock control dialog aboutthe present stock being near or below the reorder level. You’ll have noticed by now that some ofthe stock reorder levels are set to zero; don’t display a warning in those cases.
1166
Chapter 20: Connecting to Data Sources
25905c20.qxd:WroxPro 2/21/08 9:23 AM Page 1166

21Updating Data Sources
In this chapter, you’ll build on what you learned about accessing a database via ODBC (OpenDataBase Connectivity) in the previous chapter, and try your hand at updating the NorthwindTraders database through the same mechanism.
By the end of this chapter, you will have learned about:
❑ Database transactions
❑ How to update a database using recordset objects
❑ How data is transferred from a recordset to the database in an update operation
❑ How to update an existing row in a table
❑ How to add a new row to a table
Update OperationsWhen you are just writing code to view information from a database, the only issue is whetheryou are authorized to access the data. As long as the database has the right kind of access protec-tion, the data in the database is safe. As soon as you start writing code to update a database, it’squite another kettle of fish. Because you are altering the contents of the database, such modifica-tions could destroy the integrity of the database and make nonsense of the contents of a table, oreven make it unusable. You always need to take great care to test your code properly with a testdatabase before letting it loose on the real thing.
A database update typically involves modifying one or more fields in a row in an existing table,modifying an order quantity for instance, or adding a new row — a new order perhaps in the con-text of the Northwind database. You’ll be developing examples of both of these, but first, considerthe implications.
Most of the complications that can arise with database update operations become apparent in thecontext of multi-user databases. Without proper control of the update process, concurrent accessby several users provides the potential for two kinds of problems. The first arises if one person is
25905c21.qxd:WroxPro 2/21/08 9:24 AM Page 1167
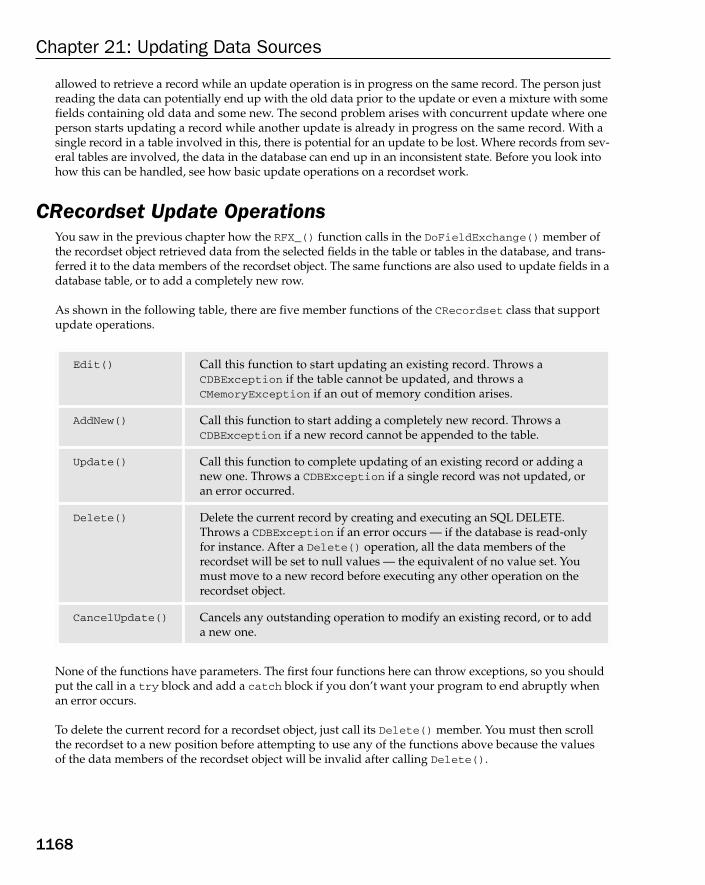
allowed to retrieve a record while an update operation is in progress on the same record. The person justreading the data can potentially end up with the old data prior to the update or even a mixture with somefields containing old data and some new. The second problem arises with concurrent update where oneperson starts updating a record while another update is already in progress on the same record. With asingle record in a table involved in this, there is potential for an update to be lost. Where records from sev-eral tables are involved, the data in the database can end up in an inconsistent state. Before you look intohow this can be handled, see how basic update operations on a recordset work.
CRecordset Update OperationsYou saw in the previous chapter how the RFX_() function calls in the DoFieldExchange() member ofthe recordset object retrieved data from the selected fields in the table or tables in the database, and trans-ferred it to the data members of the recordset object. The same functions are also used to update fields in adatabase table, or to add a completely new row.
As shown in the following table, there are five member functions of the CRecordset class that supportupdate operations.
None of the functions have parameters. The first four functions here can throw exceptions, so you shouldput the call in a try block and add a catch block if you don’t want your program to end abruptly whenan error occurs.
To delete the current record for a recordset object, just call its Delete() member. You must then scrollthe recordset to a new position before attempting to use any of the functions above because the values of the data members of the recordset object will be invalid after calling Delete().
Edit() Call this function to start updating an existing record. Throws aCDBException if the table cannot be updated, and throws aCMemoryException if an out of memory condition arises.
AddNew() Call this function to start adding a completely new record. Throws aCDBException if a new record cannot be appended to the table.
Update() Call this function to complete updating of an existing record or adding anew one. Throws a CDBException if a single record was not updated, oran error occurred.
Delete() Delete the current record by creating and executing an SQL DELETE.Throws a CDBException if an error occurs — if the database is read-onlyfor instance. After a Delete() operation, all the data members of therecordset will be set to null values — the equivalent of no value set. Youmust move to a new record before executing any other operation on therecordset object.
CancelUpdate() Cancels any outstanding operation to modify an existing record, or to adda new one.
1168
Chapter 21: Updating Data Sources
25905c21.qxd:WroxPro 2/21/08 9:24 AM Page 1168

Figure 21-1 illustrates the basic sequence of events in updating an existing record or adding a new one.
When you call AddNew() for a recordset to start adding a new record to a table, the function saves thecurrent values of all the data members of the recordset object that correspond to field values in a buffer,and then sets the data members to PSEUDO_NULL. This is not zero or null as in a pointer. It is a valuethat indicates the data member has not been set. When you call Update() to complete adding a record, theoriginal values of the data members of the recordset before AddNew() was called are restored. If you wantthe recordset to contain the values for the new record, you must call the Requery() member of the record-set object. This function returns TRUE (a value of the MFC type BOOL) if the operation was successful. Youalso call Requery() when you want to obtain a different view of the data where you will retrieve recordsusing a different SQL command or a different filter for the records.
The transfer of data between the recordset data members and the database always uses theDoFieldExchange() member of the recordset object, so the RFX_() functions provide a dual capability — writing to the database as well as reading from it.
Figure 21-1
Checking that Operations are LegalIt is a good idea to confirm that the operation you intend to carry out is legal with your recordset object. Itis all too easy to end up with a read-only recordset — just forgetting to reset the read-only attribute on theNorthwind.mdb file will do it! If you try to update a table that is read-only, an exception is thrown that isentirely avoidable if you just verify that the operation is possible. Using exceptions to catch errors thataren’t that unexpected is inefficient, and generally frowned upon. It’s better to check beforehand whenthis is possible, as it is in this case. That way, your exception handling code is truly reserved for excep-tional occurrences.
The CanUpdate() member of CRecordset returns TRUE if you can modify records in the table representedby the recordset object. When you want to add a new record, you can call the CanAppend() member ofCRecordset beforehand to check. This returns TRUE if adding new records to the table is permitted.
Record LockingRecord locking prevents other users from accessing the locked record while a table row is being updated.The extent to which a record is locked during an update is determined by the locking mode set in the
1169
Chapter 21: Updating Data Sources
25905c21.qxd:WroxPro 2/21/08 9:24 AM Page 1169
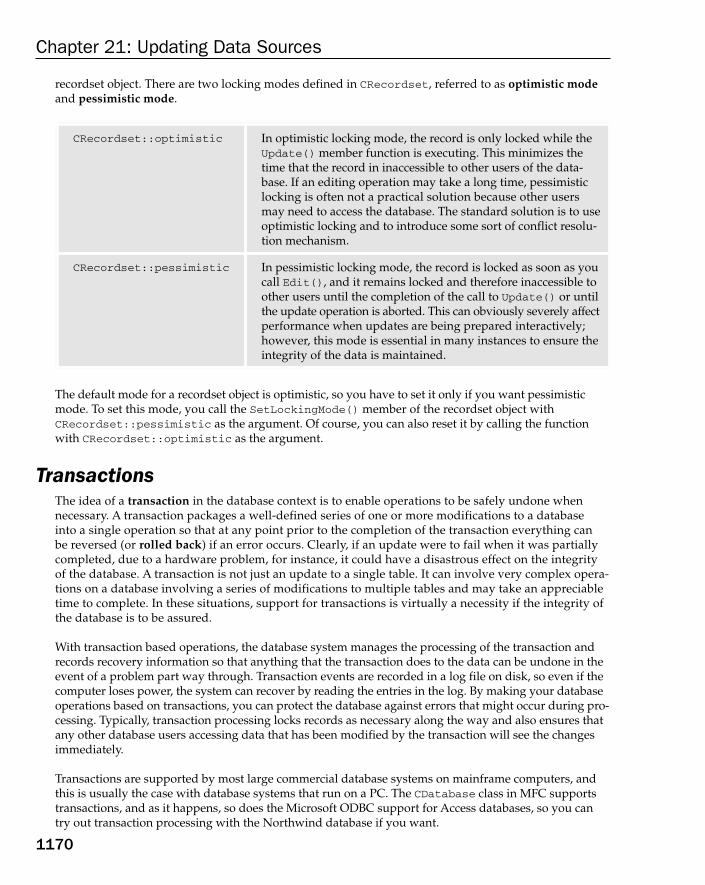
recordset object. There are two locking modes defined in CRecordset, referred to as optimistic modeand pessimistic mode.
The default mode for a recordset object is optimistic, so you have to set it only if you want pessimisticmode. To set this mode, you call the SetLockingMode() member of the recordset object withCRecordset::pessimistic as the argument. Of course, you can also reset it by calling the functionwith CRecordset::optimistic as the argument.
TransactionsThe idea of a transaction in the database context is to enable operations to be safely undone when necessary. A transaction packages a well-defined series of one or more modifications to a database into a single operation so that at any point prior to the completion of the transaction everything can be reversed (or rolled back) if an error occurs. Clearly, if an update were to fail when it was partiallycompleted, due to a hardware problem, for instance, it could have a disastrous effect on the integrityof the database. A transaction is not just an update to a single table. It can involve very complex opera-tions on a database involving a series of modifications to multiple tables and may take an appreciabletime to complete. In these situations, support for transactions is virtually a necessity if the integrity ofthe database is to be assured.
With transaction based operations, the database system manages the processing of the transaction andrecords recovery information so that anything that the transaction does to the data can be undone in theevent of a problem part way through. Transaction events are recorded in a log file on disk, so even if thecomputer loses power, the system can recover by reading the entries in the log. By making your databaseoperations based on transactions, you can protect the database against errors that might occur during pro-cessing. Typically, transaction processing locks records as necessary along the way and also ensures thatany other database users accessing data that has been modified by the transaction will see the changesimmediately.
Transactions are supported by most large commercial database systems on mainframe computers, andthis is usually the case with database systems that run on a PC. The CDatabase class in MFC supportstransactions, and as it happens, so does the Microsoft ODBC support for Access databases, so you cantry out transaction processing with the Northwind database if you want.
CRecordset::optimistic In optimistic locking mode, the record is only locked while theUpdate() member function is executing. This minimizes thetime that the record in inaccessible to other users of the data-base. If an editing operation may take a long time, pessimisticlocking is often not a practical solution because other users may need to access the database. The standard solution is to useoptimistic locking and to introduce some sort of conflict resolu-tion mechanism.
CRecordset::pessimistic In pessimistic locking mode, the record is locked as soon as youcall Edit(), and it remains locked and therefore inaccessible toother users until the completion of the call to Update() or untilthe update operation is aborted. This can obviously severely affectperformance when updates are being prepared interactively;however, this mode is essential in many instances to ensure theintegrity of the data is maintained.
1170
Chapter 21: Updating Data Sources
25905c21.qxd:WroxPro 2/21/08 9:24 AM Page 1170
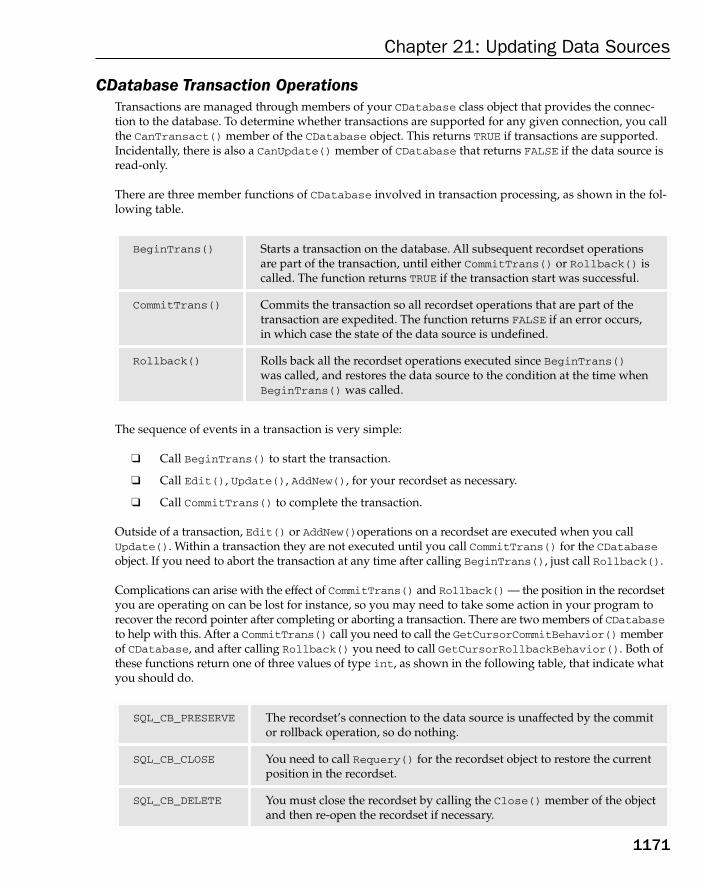
CDatabase Transaction OperationsTransactions are managed through members of your CDatabase class object that provides the connec-tion to the database. To determine whether transactions are supported for any given connection, you callthe CanTransact() member of the CDatabase object. This returns TRUE if transactions are supported.Incidentally, there is also a CanUpdate() member of CDatabase that returns FALSE if the data source isread-only.
There are three member functions of CDatabase involved in transaction processing, as shown in the fol-lowing table.
The sequence of events in a transaction is very simple:
❑ Call BeginTrans() to start the transaction.
❑ Call Edit(), Update(), AddNew(), for your recordset as necessary.
❑ Call CommitTrans() to complete the transaction.
Outside of a transaction, Edit() or AddNew()operations on a recordset are executed when you callUpdate(). Within a transaction they are not executed until you call CommitTrans() for the CDatabaseobject. If you need to abort the transaction at any time after calling BeginTrans(), just call Rollback().
Complications can arise with the effect of CommitTrans() and Rollback() — the position in the recordsetyou are operating on can be lost for instance, so you may need to take some action in your program torecover the record pointer after completing or aborting a transaction. There are two members of CDatabaseto help with this. After a CommitTrans() call you need to call the GetCursorCommitBehavior() memberof CDatabase, and after calling Rollback() you need to call GetCursorRollbackBehavior(). Both ofthese functions return one of three values of type int, as shown in the following table, that indicate whatyou should do.
SQL_CB_PRESERVE The recordset’s connection to the data source is unaffected by the commitor rollback operation, so do nothing.
SQL_CB_CLOSE You need to call Requery() for the recordset object to restore the currentposition in the recordset.
SQL_CB_DELETE You must close the recordset by calling the Close() member of the objectand then re-open the recordset if necessary.
BeginTrans() Starts a transaction on the database. All subsequent recordset operationsare part of the transaction, until either CommitTrans() or Rollback() iscalled. The function returns TRUE if the transaction start was successful.
CommitTrans() Commits the transaction so all recordset operations that are part of thetransaction are expedited. The function returns FALSE if an error occurs, in which case the state of the data source is undefined.
Rollback() Rolls back all the recordset operations executed since BeginTrans()was called, and restores the data source to the condition at the time whenBeginTrans() was called.
1171
Chapter 21: Updating Data Sources
25905c21.qxd:WroxPro 2/21/08 9:24 AM Page 1171

There are further complications with using transactions in practice because the particular drivers you are using can affect when you must open the recordset. With some drivers you must open the recordsetbefore you call BeginTrans(). With others, and the Microsoft Access ODBC drivers are a case in point,Rollback() will not work unless you open your recordset after you call BeginTrans(). You need to understand the particular drivers you intend to use before attempting to use transactions in yourapplication.
A Simple Update ExampleIt’s time to get some hands on experience with update operations in action starting with a very basicexample. This omits most of what I have discussed so far in this chapter initially, but you will be build-ing on this to apply some of what you have learned. You can create an application to update a databasetable with minimal effort using the MFC Application Wizard that you applied in the previous chapter.You’ll be creating a program to allow updating of certain fields in the Order Details table.
Create a project called DBSimpleUpdate using the MFC Application template. Elect to go for the DatabaseView without file support option with ODBC as the Client type option, as you did in the previous chap-ter. You are still going to use the Northwind database through ODBC, but this time you should choosedynaset as the recordset type. In a multiuser environment, a dynaset is automatically updated with anychanges made to a record while it is accessed by your program. This ensures the data you have in yourapplication is always up to date. For operations to modify an existing record or add new ones, you shouldchoose dynaset as the recordset type.
Because you plan to update the database, you must map the recordset to a single database table. Thedatabase classes in MFC do not support updating of recordsets that involve joining two or more tables.Choose the Order Details table for the default recordset, as shown in Figure 21-2.
If you select multiple tables here, updating the recordset is inhibited because the recordset is automati-cally made read-only. The database classes support only read-only access to joins of multiple tables, notupdating.
Figure 21-2
1172
Chapter 21: Updating Data Sources
25905c21.qxd:WroxPro 2/21/08 9:24 AM Page 1172

You can change the view and recordset class and associated file names to match the table you are dealingwith, as illustrated by the window shown in Figure 21-3.
Now all you need to do is click the Finish button and then customize the dialog resource to do what you want.
Figure 21-3
Customizing the ApplicationThe Order Details table contains five columns — Order ID, Product ID, Unit Price, Quantity, andDiscount. If you display Class View and look at the members of COrderDetailsSet, you will see thedata members corresponding to these. You need a static text control and an edit control for each ofthese on the dialog corresponding to the recordset. I arranged them as shown in Figure 21-4, but you canarrange them how you like.
Figure 21-4
1173
Chapter 21: Updating Data Sources
25905c21.qxd:WroxPro 2/21/08 9:24 AM Page 1173

Assign IDs to the edit controls to match the field name as you did in the previous chapter — the last oneis IDC_DISCOUNT, for example. The default style set for an edit control allows keyboard input, but onthe assumption you want to limit which recordset fields can be altered, you should set the first three editcontrols as read-only, using the styles tab in the Properties window. The value displayed in a read-onlycontrol can be set in the program, but a value cannot be entered in the control from the keyboard. Youcan set all these to read-only in a single step by selecting each of the three controls with the Ctrl key helddown and then right-clicking to display the pop-up menu and selecting Properties. Whatever youthen set in the Properties window is applied to all three. With the dialog arrangement shown, you willonly be able to enter data for Quantity and Discount.
The only other thing you need to do is to associate the edit controls with a corresponding data mem-ber of the recordset, and as you saw in the previous chapter, you just add a DDX_ function call to theDoDataExchange() function in the recordset view class, COrderDetailsView, for each data field inthe recordset. Here’s how that code looks:
void COrderDetailsView::DoDataExchange(CDataExchange* pDX){CRecordView::DoDataExchange(pDX);DDX_FieldText(pDX, IDC_ORDERID, m_pSet->m_OrderID, m_pSet);DDX_FieldText(pDX, IDC_PRODUCTID, m_pSet->m_ProductID, m_pSet);DDX_FieldText(pDX, IDC_UNITPRICE, m_pSet->m_UnitPrice, m_pSet);DDX_FieldText(pDX, IDC_QUANTITY, m_pSet->m_Quantity, m_pSet);DDX_FieldText(pDX, IDC_DISCOUNT, m_pSet->m_Discount, m_pSet);
}
Having done that, you will have completed the program to update the Order Details table, believe it or not.
Try It Out Updating a DatabaseThis should compile right off the bat if you have set up the controls correctly and remembered to com-ment out the #error directive that appears before the definition of the GetDefaultConnect() functionin the COrderDetailsSet class. This directive is there to ensure you consider security implications whenconnecting to the database. When the program executes, you will be able to move through the rows in thetable using the toolbar buttons. If you enter data into the edit controls for the Quantity or Discount for anorder, it is updated when you move backwards or forwards in the recordset. The application window isshown in Figure 21-5.
You can see here I have changed the quantity and discount values for the product with the ID 72 on theorder with the ID 10248 to some unlikely values.
How It WorksWhen you click one of the toolbar buttons to move to another record, the OnMove() handler provided bythe default base class, CRecordView, is called. This function writes out any changes that have been enteredinto the recordset before it moves to a new record in the recordset by calling the Move() member of theCRecordset class that is inherited in COrderDetailsSet. Remember there are two levels of data exchangegoing on here. The RFX_() functions called in the DoFieldExchange() member of the COrderDetailsSetclass transfer data between a row in the recordset from the database and the data members of the class. TheDDX_() functions called in the DoDataExchange() member of COrderDetailsView transfer data betweenthe edit controls and the data members of COrderDetailsSet. When you change the value in an edit con-trol, the new data is propagated through to the appropriate data member of the recordset object. When you
1174
Chapter 21: Updating Data Sources
25905c21.qxd:WroxPro 2/21/08 9:24 AM Page 1174
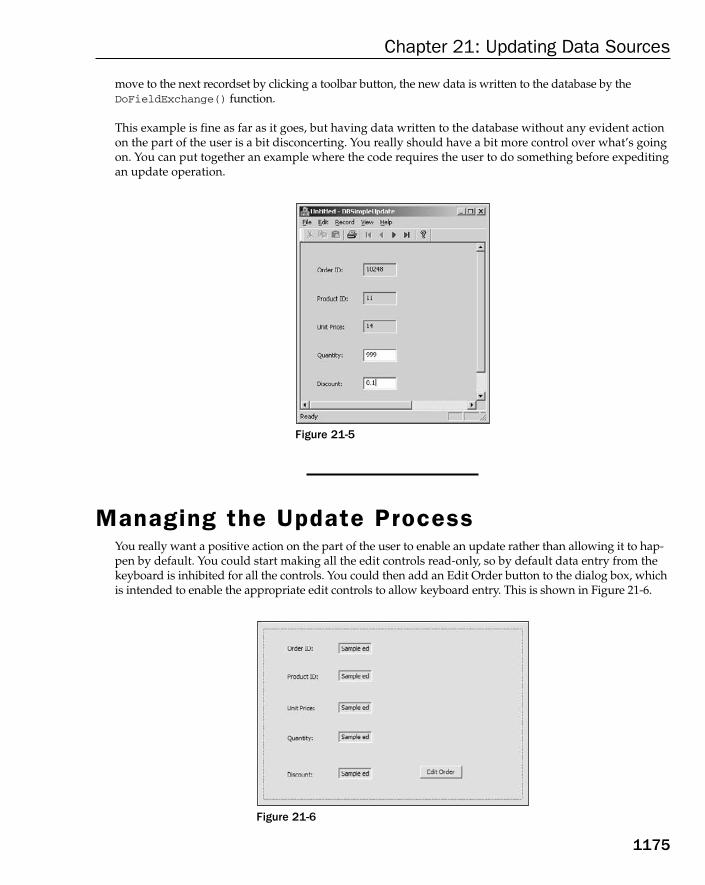
move to the next recordset by clicking a toolbar button, the new data is written to the database by theDoFieldExchange() function.
This example is fine as far as it goes, but having data written to the database without any evident actionon the part of the user is a bit disconcerting. You really should have a bit more control over what’s goingon. You can put together an example where the code requires the user to do something before expeditingan update operation.
Figure 21-5
Managing the Update ProcessYou really want a positive action on the part of the user to enable an update rather than allowing it to hap-pen by default. You could start making all the edit controls read-only, so by default data entry from thekeyboard is inhibited for all the controls. You could then add an Edit Order button to the dialog box, whichis intended to enable the appropriate edit controls to allow keyboard entry. This is shown in Figure 21-6.
Figure 21-6
1175
Chapter 21: Updating Data Sources
25905c21.qxd:WroxPro 2/21/08 9:24 AM Page 1175
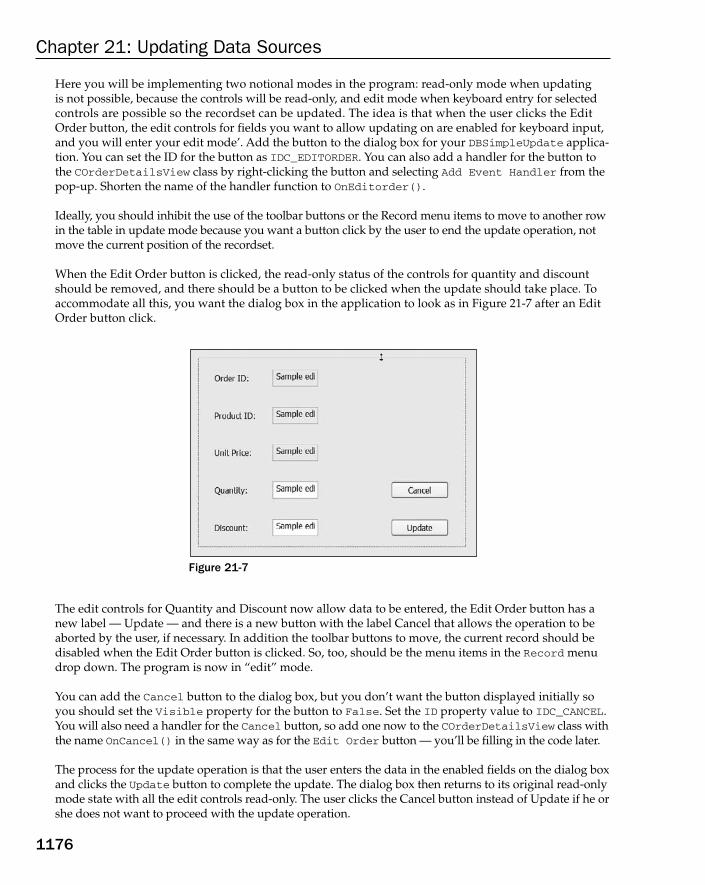
Here you will be implementing two notional modes in the program: read-only mode when updating is not possible, because the controls will be read-only, and edit mode when keyboard entry for selectedcontrols are possible so the recordset can be updated. The idea is that when the user clicks the EditOrder button, the edit controls for fields you want to allow updating on are enabled for keyboard input,and you will enter your edit mode’. Add the button to the dialog box for your DBSimpleUpdate applica-tion. You can set the ID for the button as IDC_EDITORDER. You can also add a handler for the button tothe COrderDetailsView class by right-clicking the button and selecting Add Event Handler from thepop-up. Shorten the name of the handler function to OnEditorder().
Ideally, you should inhibit the use of the toolbar buttons or the Record menu items to move to another rowin the table in update mode because you want a button click by the user to end the update operation, notmove the current position of the recordset.
When the Edit Order button is clicked, the read-only status of the controls for quantity and discountshould be removed, and there should be a button to be clicked when the update should take place. Toaccommodate all this, you want the dialog box in the application to look as in Figure 21-7 after an EditOrder button click.
Figure 21-7
The edit controls for Quantity and Discount now allow data to be entered, the Edit Order button has anew label — Update — and there is a new button with the label Cancel that allows the operation to beaborted by the user, if necessary. In addition the toolbar buttons to move, the current record should bedisabled when the Edit Order button is clicked. So, too, should be the menu items in the Record menudrop down. The program is now in “edit” mode.
You can add the Cancel button to the dialog box, but you don’t want the button displayed initially soyou should set the Visible property for the button to False. Set the ID property value to IDC_CANCEL.You will also need a handler for the Cancel button, so add one now to the COrderDetailsView class withthe name OnCancel() in the same way as for the Edit Order button — you’ll be filling in the code later.
The process for the update operation is that the user enters the data in the enabled fields on the dialog boxand clicks the Update button to complete the update. The dialog box then returns to its original read-onlymode state with all the edit controls read-only. The user clicks the Cancel button instead of Update if he orshe does not want to proceed with the update operation.
1176
Chapter 21: Updating Data Sources
25905c21.qxd:WroxPro 2/21/08 9:24 AM Page 1176

To achieve this mechanism, and to manage the update process effectively, you will need to do severalthings after the Edit Order button is clicked:
❑ Change the text on the Edit Order button to “Update” so it now becomes the button to completethe update operation.
❑ Cause the Cancel button to appear on the dialog box — make it visible in other words.
❑ Record in the class that edit mode has been entered. This is necessary because you will use thesame button for two purposes: flip-flopping the label between Edit Order and Update.
❑ Enable keyboard entry for the edit controls that show fields you want to allow updating on.
See how you can put the code together that will do what you want.
Implementing Update ModeLet’s start by providing for recording whether or not the application is in update mode. You can do thatby adding an enum declaration to the COrderDetailsView class together with a variable of the enum typethat reflect the current mode. Add the following two lines to the public section of the class:
enum Mode {READ_ONLY, UPDATE}; // Application modesMode m_Mode; // Records the current mode
The application is initially in READ_ONLY mode so you can initialize m_Mode in the constructor accordingly:
COrderDetailsView::COrderDetailsView(): CRecordView(COrderDetailsView::IDD),m_Mode(READ_ONLY)
{m_pSet = NULL;// TODO: add construction code here
}
You can do the switching of the button label and the program mode in the OnEditorder() handler thatyou added to the view class. In principle, a starting version of the function needs to implement capabilitysomething like this:
void COrderDetailsView::OnEditorder() {if(m_Mode == UPDATE){ // When button was clicked we were in update
// Disable input to edit controls// Change the Update button text to Edit Order // Make the Cancel button invisible// Enable Record menu items and toolbar buttons// Complete the updatem_Mode = READ_ONLY; // Change to read-only mode
}else{ // When button was clicked we were in read-only mode
1177
Chapter 21: Updating Data Sources
25905c21.qxd:WroxPro 2/21/08 9:24 AM Page 1177

// Enable input to edit controls// Change the Edit Order button text to Update // Make the Cancel button visible// Disable Record menu items and toolbar buttons// Start the updatem_Mode = UPDATE; // Switch to update mode
}}
The mode switching code is already there. At the moment all the function does is switch the m_Modemember between READ_ONLY and UPDATE to record the current mode. The rest of the functionality thatyou require is simply described in comments. Next, investigate how to implement each of the commentlines in turn.
Enabling and Disabling Edit ControlsTo modify the properties of a control, you need to call a function of some kind that relates to the control.This implies that you must have access to an object that represents the control. It’s very easy to add a con-trol variable to the view class; just right-click the control in the Design window for the dialog and selectAdd Variable from the pop-up menu. Figure 21-8 shows the dialog box that displays for the edit controlshowing the discount value.
Figure 21-8
I have entered the variable name as m_DiscountCtrl. Because the variable relates to an edit control thevariable is of type CEdit. Click Finish to add this variable to the View Class. Repeat this process for theedit control displaying the order quantity and give the variable the name m_QuantityCtrl.
1178
Chapter 21: Updating Data Sources
25905c21.qxd:WroxPro 2/21/08 9:24 AM Page 1178

With the two control variables added to the View Class you have access to the controls to update theirstyles, so you modify the OnEditorder() function as follows:
void COrderDetailsView::OnEditorder(){
if(m_Mode == UPDATE){ // When button was clicked we were in update
// Disable input to edit controlsm_QuantityCtrl.SetReadOnly(); m_DiscountCtrl.SetReadOnly();
// Change the Update button text to Edit Order // Make the Cancel button invisible// Enable Record menu items and toolbar buttons// Complete the updatem_Mode = READ_ONLY; // Change to read-only mode
}else{ // When button was clicked we were in read-only mode
// Enable input to edit controlsm_QuantityCtrl.SetReadOnly(FALSE); m_DiscountCtrl.SetReadOnly(FALSE);
// Change the Edit Order button text to Update // Make the Cancel button visible// Disable Record menu items and toolbar buttons// Start the updatem_Mode = UPDATE; // Switch to update mode
}}
The SetReadOnly() member of the CEdit class has a parameter of type BOOL that has the default valueTRUE. Thus calling the function with no argument implies the argument value is the default and the con-trol read-only property is set to true. Passing a FALSE value to the function when you call it sets the read-only property to false. Incidentally, you could reduce the code in the function by removing the calls toSetReadOnly() in the if-else statement and adding two statements after the if statement:
m_QuantityCtrl.SetReadOnly(m_Mode == UPDATE); m_DiscountCtrl.SetReadOnly(m_Mode == UPDATE);
The argument expression, m_Mode == UPDATE, is TRUE when m_Mode has the value UPDATE. This isFALSE otherwise, so these two calls to the SetReadOnly() function do the work of the original four.The downside is that it would not be quite as clear what was happening in the code.
Just to remind you — many of the MFC functions have parameters of type BOOL that can have values TRUEand FALSE because they were written before the availability of the bool type in C++. You can always use
1179
Chapter 21: Updating Data Sources
25905c21.qxd:WroxPro 2/21/08 9:24 AM Page 1179
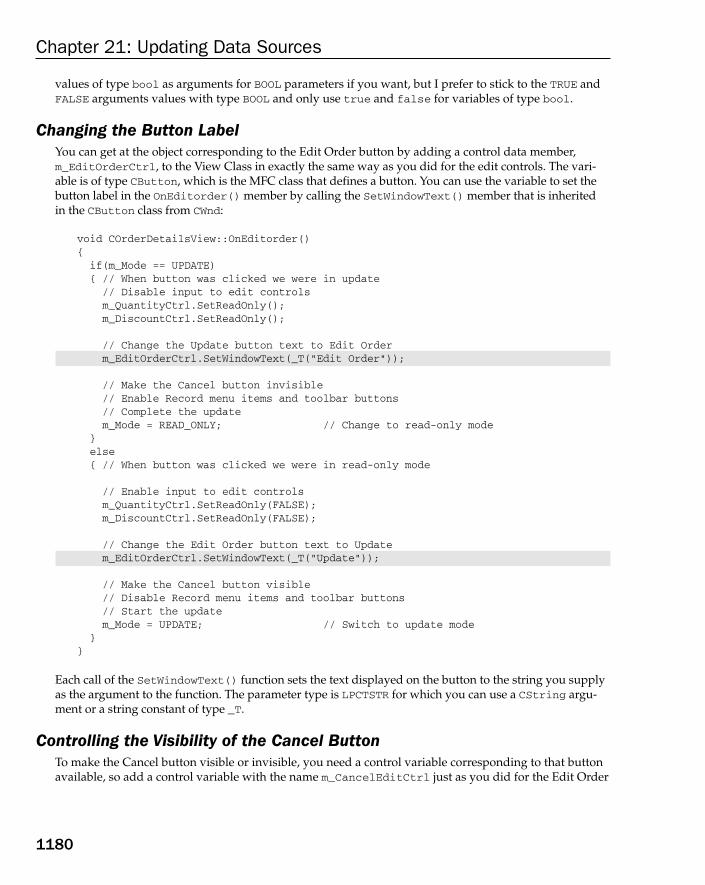
values of type bool as arguments for BOOL parameters if you want, but I prefer to stick to the TRUE andFALSE arguments values with type BOOL and only use true and false for variables of type bool.
Changing the Button LabelYou can get at the object corresponding to the Edit Order button by adding a control data member,m_EditOrderCtrl, to the View Class in exactly the same way as you did for the edit controls. The vari-able is of type CButton, which is the MFC class that defines a button. You can use the variable to set thebutton label in the OnEditorder() member by calling the SetWindowText() member that is inherited in the CButton class from CWnd:
void COrderDetailsView::OnEditorder(){if(m_Mode == UPDATE){ // When button was clicked we were in update// Disable input to edit controlsm_QuantityCtrl.SetReadOnly(); m_DiscountCtrl.SetReadOnly();
// Change the Update button text to Edit Order m_EditOrderCtrl.SetWindowText(_T(“Edit Order”));
// Make the Cancel button invisible// Enable Record menu items and toolbar buttons// Complete the updatem_Mode = READ_ONLY; // Change to read-only mode
}else{ // When button was clicked we were in read-only mode
// Enable input to edit controlsm_QuantityCtrl.SetReadOnly(FALSE); m_DiscountCtrl.SetReadOnly(FALSE);
// Change the Edit Order button text to Updatem_EditOrderCtrl.SetWindowText(_T(“Update”));
// Make the Cancel button visible// Disable Record menu items and toolbar buttons// Start the updatem_Mode = UPDATE; // Switch to update mode
}}
Each call of the SetWindowText() function sets the text displayed on the button to the string you supplyas the argument to the function. The parameter type is LPCTSTR for which you can use a CString argu-ment or a string constant of type _T.
Controlling the Visibility of the Cancel ButtonTo make the Cancel button visible or invisible, you need a control variable corresponding to that buttonavailable, so add a control variable with the name m_CancelEditCtrl just as you did for the Edit Order
1180
Chapter 21: Updating Data Sources
25905c21.qxd:WroxPro 2/21/08 9:24 AM Page 1180
button. Because the CButton class is derived from CWnd, you can call the inherited ShowWindow() mem-ber of the CButton object to set the button as visible or invisible, as follows:
void COrderDetailsView::OnEditorder(){
if(m_Mode == UPDATE){ // When button was clicked we were in update
// Disable input to edit controlsm_QuantityCtrl.SetReadOnly(); m_DiscountCtrl.SetReadOnly();
// Change the Edit Order button text to Update m_EditOrderCtrl.SetWindowText(_T(“Edit Order”));
// Make the Cancel button invisiblem_CancelEditCtrl.ShowWindow(SW_HIDE);
// Enable Record menu items and toolbar buttons// Complete the updatem_Mode = READ_ONLY; // Change to read-only mode
}else{ // When button was clicked we were in read-only mode
// Enable input to edit controlsm_QuantityCtrl.SetReadOnly(FALSE); m_DiscountCtrl.SetReadOnly(FALSE);
// Change the Edit Order button text to Updatem_EditOrderCtrl.SetWindowText(_T(“Update”));
// Make the Cancel button visiblem_CancelEditCtrl.ShowWindow(SW_SHOW);
// Disable Record menu items and toolbar buttons// Start the updatem_Mode = UPDATE; // Switch to update mode
}}
The ShowWindow() function that the CButton class inherits from CWnd requires an argument of typeint that must be one of a range of fixed values (see the documentation for the full set). You use the argument value SW_HIDE to make the button disappear if m_Mode has the value UPDATE, andSW_SHOW when the application is entering edit mode to make the button visible and activate it.
Disabling the Record MenuYou want to disable the menu items in the Record menu when the m_Mode member of the view has thevalue UPDATE. You won’t do this in the OnEditorder() handler, though, because there is an easier andbetter way as you will now see, so you can remove the two comment lines in the if statement in theOnEditorder() handler that relate to this.
1181
Chapter 21: Updating Data Sources
25905c21.qxd:WroxPro 2/21/08 9:24 AM Page 1181
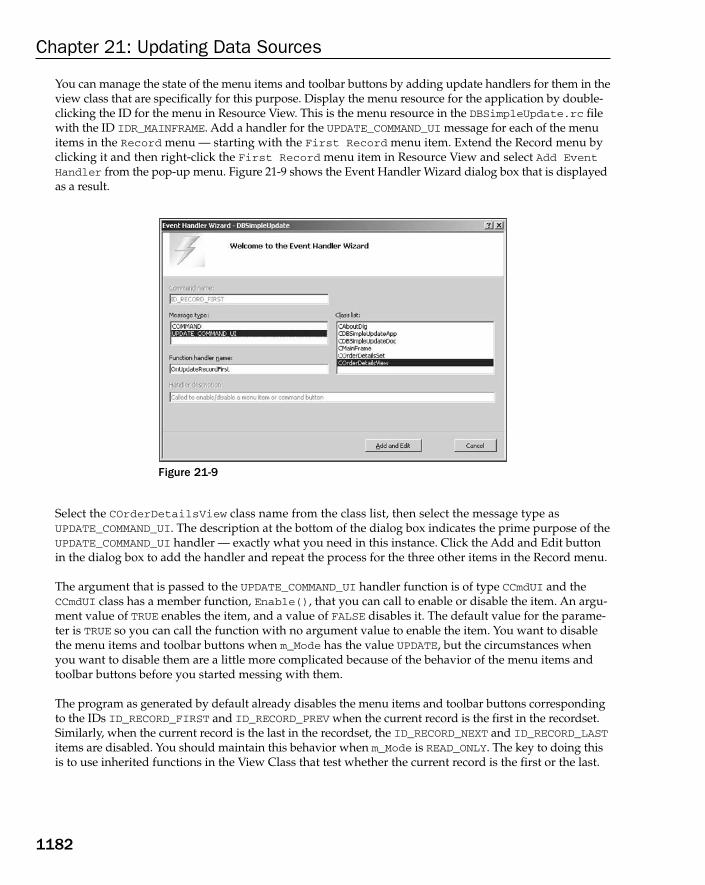
You can manage the state of the menu items and toolbar buttons by adding update handlers for them in theview class that are specifically for this purpose. Display the menu resource for the application by double-clicking the ID for the menu in Resource View. This is the menu resource in the DBSimpleUpdate.rc filewith the ID IDR_MAINFRAME. Add a handler for the UPDATE_COMMAND_UI message for each of the menuitems in the Record menu — starting with the First Record menu item. Extend the Record menu byclicking it and then right-click the First Record menu item in Resource View and select Add EventHandler from the pop-up menu. Figure 21-9 shows the Event Handler Wizard dialog box that is displayedas a result.
Figure 21-9
Select the COrderDetailsView class name from the class list, then select the message type asUPDATE_COMMAND_UI. The description at the bottom of the dialog box indicates the prime purpose of theUPDATE_COMMAND_UI handler — exactly what you need in this instance. Click the Add and Edit buttonin the dialog box to add the handler and repeat the process for the three other items in the Record menu.
The argument that is passed to the UPDATE_COMMAND_UI handler function is of type CCmdUI and theCCmdUI class has a member function, Enable(), that you can call to enable or disable the item. An argu-ment value of TRUE enables the item, and a value of FALSE disables it. The default value for the parame-ter is TRUE so you can call the function with no argument value to enable the item. You want to disablethe menu items and toolbar buttons when m_Mode has the value UPDATE, but the circumstances whenyou want to disable them are a little more complicated because of the behavior of the menu items andtoolbar buttons before you started messing with them.
The program as generated by default already disables the menu items and toolbar buttons correspondingto the IDs ID_RECORD_FIRST and ID_RECORD_PREV when the current record is the first in the recordset.Similarly, when the current record is the last in the recordset, the ID_RECORD_NEXT and ID_RECORD_LASTitems are disabled. You should maintain this behavior when m_Mode is READ_ONLY. The key to doing thisis to use inherited functions in the View Class that test whether the current record is the first or the last.
1182
Chapter 21: Updating Data Sources
25905c21.qxd:WroxPro 2/21/08 9:24 AM Page 1182

You only need add one line of code to each of these handlers to do what you want. It’s exactly the sameline of code for OnUpdateRecordFirst() and OnUpdateRecordPrev(). For example:
void COrderDetailsView::OnUpdateRecordFirst(CCmdUI* pCmdUI) {// Disable item if m_Mode is UPDATE // Enable item if m_Mode is READ_ONLY and it’s not the 1st recordpCmdUI->Enable((m_Mode == READ_ONLY) && !IsOnFirstRecord());
}
The IsOnFirstRecord() function returns TRUE if the view is on the first record in the recordset, and FALSEotherwise. This disables the items (the menu item and the corresponding toolbar button) if either m_Modehas the value UPDATE or the value returned by IsOnFirstRecord() member of COrderDetailsViewis TRUE. The item is enabled if m_Mode has the value READ_ONLY and the value returned by theIsOnFirstRecord() function is FALSE. This handler affects both the menu item and the toolbar buttonbecause they both have the same ID, ID_RECORD_FIRST.
The handlers corresponding to ID_RECORD_NEXT and ID_RECORD_LAST also require the same line of code:
void COrderDetailsView::OnUpdateRecordLast(CCmdUI* pCmdUI) {// Disable item if m_Mode is UPDATE // Enable item if m_Mode is READ_ONLY and it’s not the 1st recordpCmdUI->Enable((m_Mode == READ_ONLY) && !IsOnLastRecord());
}
This works in the same way as the previous handler.
Expediting the UpdateThe last piece you need is to actually carry out the update when the Update button is clicked. To updatea record, the user first clicks the Edit Order button, so at this point you must call the Edit() member ofthe recordset object to start the process of modifying the recordset. When the Update button is clicked,you need to call the Update() member of the recordset object to get the new data written to the recordin the database. You can implement it using the m_pSet member of the View Class like this:
void COrderDetailsView::OnEditorder() {if(m_pSet->CanUpdate()){try{
if(m_Mode == UPDATE){ // When button was clicked we were in update
// Disable input to edit controlsm_QuantityCtrl.SetReadOnly(); m_DiscountCtrl.SetReadOnly();
// Change the Update button text to Edit Order m_EditOrderCtrl.SetWindowText(_T(“Edit Order”));
1183
Chapter 21: Updating Data Sources
25905c21.qxd:WroxPro 2/21/08 9:24 AM Page 1183

// Make the Cancel button invisiblem_CancelEditCtrl.ShowWindow(SW_HIDE);
// Complete the updatem_pSet->Update(); m_Mode = READ_ONLY; // Change to read-only mode
}else{ // When button was clicked we were in read-only mode
// Enable input to edit controlsm_QuantityCtrl.SetReadOnly(FALSE); m_DiscountCtrl.SetReadOnly(FALSE);
// Change the Edit Order button text to Updatem_EditOrderCtrl.SetWindowText(_T(“Update”));
// Make the Cancel button visiblem_CancelEditCtrl.ShowWindow(SW_SHOW);
// Start the updatem_pSet->Edit();
m_Mode = UPDATE; // Switch to update mode}
}catch(CException* pEx){pEx->ReportError(); // Display the error message
}}elseAfxMessageBox(_T(“Recordset is not updatable.”));
}
As I discussed at the beginning of this chapter, the Edit() and Update() functions can throw an excep-tion if an error occurs, so you put the calls within a try block along with the rest of the code. Clearly, ifyou cannot update the recordset, there is no purpose to any of the processing in the OnEditorder() func-tion. If an exception is thrown, you call its ReportError() function to display an error message. Thecatch block exception parameter is a pointer to CException, so the catch block is executed for excep-tions objects of type CException, or any class derived from CException. You need this to accommodatethe CMemoryException that can be thrown by Edit(), as well as the CDBException that can be thrownby both Edit() and Update(). Note the use of the pointer as the catch block parameter. Recall that thisis because these are MFC exceptions thrown using the THROW macro, not C++ exceptions thrown using thekeyword throw. If they were the latter, you would use a reference as the catch block parameter type.
You also verify that the recordset is updateable by calling its CanUpdate() member. If this returns FALSE,you display an error message in a message box.
1184
Chapter 21: Updating Data Sources
25905c21.qxd:WroxPro 2/21/08 9:24 AM Page 1184

Implementing the Cancel OperationThe Cancel button should abort the update operation. All that is necessary to do this is to call theCancelUpdate() member of the COrderDetailsSet object. Of course, you have a little housekeepingto do, but this is exactly the same as if the Update() button was pressed, except that you don’t callEdit(). Here’s the code for the OnCancel() handler:
void COrderDetailsView::OnCancel() {m_pSet->CancelUpdate(); // Cancel the update operationm_EditOrderCtrl.SetWindowText(_T(“Edit”));// Switch button textm_CancelEditCtrl.ShowWindow(SW_HIDE); // Hide the Cancel buttonm_QuantityCtrl.SetReadOnly(TRUE); // Set state of quantity edit controlm_DiscountCtrl.SetReadOnly(TRUE); // Set state of discount edit controlm_Mode = READ_ONLY; // Switch the mode
}
The CancelUpdate() function ends the update operation and restores the recordset object’s fields towhat they were before Edit() was called. Because the Cancel button can only be clicked in edit mode,you can update the buttons and other controls in the same way as in the OnEditorder() handler. That’severything you need. You are ready for a trial run.
Try It Out Controlled UpdatingAssuming you have no typos in your code, when you compile and run the program, it should work asplanned. You can only enter data in the Quantity and Discount edit controls after you have clicked theEdit button. Figure 21-10 shows an example of the update operation window.
Figure 21-10
1185
Chapter 21: Updating Data Sources
25905c21.qxd:WroxPro 2/21/08 9:24 AM Page 1185

The buttons for moving to a new record are now disabled, as are the menu items for the Record menu.To complete the update after you have entered the new data, you click the Update button. This causesthe new data to be written to the database, and the application returns to the normal state — all editcontrols disabled and the buttons and menu restored to their original status.
Adding Rows to a TableNext, extend the example to implement the capability to add a new order to the Northwind database.This provides insight into some of the practical problems and complexities you will face in this kind ofoperation.
An order itself is not a simple record in a table in the Northwind database. Two tables are involved indefining a new order. The basic order data is in the Orders table, where information about the customeris stored. For each order, there is one or more records in the Order Details table and one for each productin the order, the link to the record in the Orders table being the Order ID. The relationship between thesetables is illustrated in Figure 21-11.
Figure 21-11
But there’s more than these two tables involved in the process for adding a new order. When creating a neworder you have to provide a way for the user to select a customer from the Customers table. The Orderstable includes a field identifying the employee, which needs to be one of the employees recorded in theEmployees table. After the information required for a new record in the Orders table has been established,
Order ID
Customer ID
Em
ployee ID
Order Date
… etc.
998 EDXY
Orders Table
Order ID
Product ID
Unit Price
Quantity
Discount
998998998
431171
2.509.9515.00
502530
0.10
0.15
Orders Details Table
The products correspondingto an order in the Orders
table are recorded in one ormore records of the Order
Details Table
5 columns in total
1186
Chapter 21: Updating Data Sources
25905c21.qxd:WroxPro 2/21/08 9:24 AM Page 1186

one or more products obviously will need to be selected from those defined in the Products table. With allthese tables involved, it’s going to be a somewhat messy business. You can simplify it slightly by making theEmployee ID field 1 by default. This avoids the need to deal with the Employees table in the example. Youneed to establish the overall logic first.
The Order Entry ProcessYou will be using two dialog forms in addition to the dialog form you already have that provides for view-ing and editing the details of existing orders. One deals with the selection of the customer for the order, andsetting the required delivery date, and the other takes care of entering the details of the products and quan-tities for the order. The dialog box to select the customer is associated with the Customers table in the data-base, and the dialog box for selecting products is associated with the Products table. Buttons on the dialogbox enable the transition from one dialog box to another. The basic logic is shown in Figure 21-12.
Figure 21-12
You will hold off creating a new record in the Orders table until you have the first Product Details recordentered. That way you will avoid ending up with an order that doesn’t order anything. Now you can puttogether the dialog resources you need and implement the code to support the operations.
Creating the ResourcesYou need an additional button on the dialog box that you have at present to initiate the process of creat-ing a new order, so add a button with the label New Order, and with the ID IDC_NEWORDER and use theFormat > Make Same Size > Both menu to make sure the new button is the same width and heightas the Cancel button. After you have done this, you can place the new button coincident with the Cancelbutton if you want because only one is visible at any given time, with the New Order button being visi-ble by default. On the other hand you could keep them distinct if you would prefer to avoid working withresources where one can mask another.
If you want the New Order button to appear on top when it is in the same position as the Cancel button,you need to make sure it follows the Cancel button in the tab order; you can check this by using theFormat > Tab Order menu item. Figure 21-13 shows the revised IDD_SIMPLEUPDATE_FORM dialogform with the New Order button overlaying and therefore masking the Cancel button.
1187
Chapter 21: Updating Data Sources
25905c21.qxd:WroxPro 2/21/08 9:24 AM Page 1187
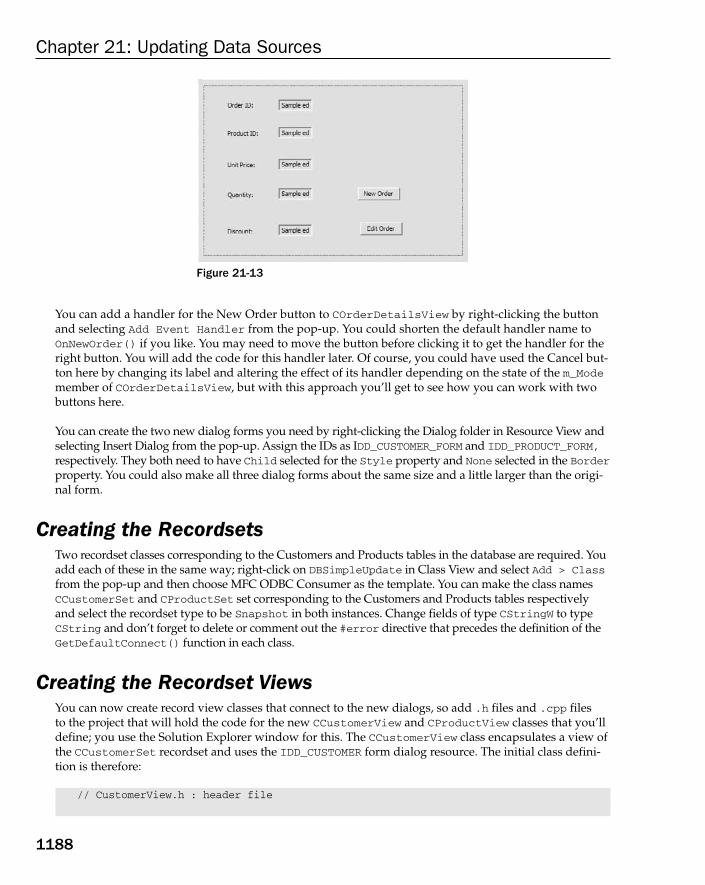
Figure 21-13
You can add a handler for the New Order button to COrderDetailsView by right-clicking the buttonand selecting Add Event Handler from the pop-up. You could shorten the default handler name toOnNewOrder() if you like. You may need to move the button before clicking it to get the handler for theright button. You will add the code for this handler later. Of course, you could have used the Cancel but-ton here by changing its label and altering the effect of its handler depending on the state of the m_Modemember of COrderDetailsView, but with this approach you’ll get to see how you can work with twobuttons here.
You can create the two new dialog forms you need by right-clicking the Dialog folder in Resource View andselecting Insert Dialog from the pop-up. Assign the IDs as IDD_CUSTOMER_FORM and IDD_PRODUCT_FORM,respectively. They both need to have Child selected for the Style property and None selected in the Borderproperty. You could also make all three dialog forms about the same size and a little larger than the origi-nal form.
Creating the RecordsetsTwo recordset classes corresponding to the Customers and Products tables in the database are required. Youadd each of these in the same way; right-click on DBSimpleUpdate in Class View and select Add > Classfrom the pop-up and then choose MFC ODBC Consumer as the template. You can make the class namesCCustomerSet and CProductSet set corresponding to the Customers and Products tables respectivelyand select the recordset type to be Snapshot in both instances. Change fields of type CStringW to typeCString and don’t forget to delete or comment out the #error directive that precedes the definition of theGetDefaultConnect() function in each class.
Creating the Recordset ViewsYou can now create record view classes that connect to the new dialogs, so add .h files and .cpp files to the project that will hold the code for the new CCustomerView and CProductView classes that you’lldefine; you use the Solution Explorer window for this. The CCustomerView class encapsulates a view ofthe CCustomerSet recordset and uses the IDD_CUSTOMER form dialog resource. The initial class defini-tion is therefore:
// CustomerView.h : header file
1188
Chapter 21: Updating Data Sources
25905c21.qxd:WroxPro 2/21/08 9:24 AM Page 1188
#pragma once
class CCustomerSet;
class CCustomerView : public CRecordView{public:CCustomerView(); virtual ~CCustomerView();
public:enum { IDD = IDD_CUSTOMER_FORM };// Form DataCCustomerSet* m_pSet;
// Operationspublic:CCustomerSet* GetRecordset();
#ifdef _DEBUGvirtual void AssertValid() const;virtual void Dump(CDumpContext& dc) const;
#endif
};
You can initialize the m_pSet member that stores the pointer to the recordset object in the constructor inthe CustomerView.cpp file:
#include “stdafx.h”#include “DBSimpleUpdate.h” // Main header file for the application#include “CustomerView.h”
// ConstructorCCustomerView::CCustomerView(): CRecordView(CCustomerView::IDD),m_pSet(NULL)
{}
The constructor also establishes IDD_CUSTOMER_FORM as the dialog box for this view by passing its ID to thebase class constructor. You need the #include directive for DBSimpleUpdate.h preceding the #includefor CustomerView.h, as without it the symbol IDD_CUSTOMER_FORM would not be recognized during com-pilation. DBSimpleUpdate.h has an #include directive for Resource.h that contains the definitions forthe IDs for the resources you have created.
Now add the definitions of the functions that are to be generated in debug mode to CustomerView.cpp:
// CCustomerView diagnostics
#ifdef _DEBUGvoid CCustomerView::AssertValid() const{
1189
Chapter 21: Updating Data Sources
25905c21.qxd:WroxPro 2/21/08 9:24 AM Page 1189
CRecordView::AssertValid();}
void CCustomerView::Dump(CDumpContext& dc) const{CRecordView::Dump(dc);
}#endif //_DEBUG
You probably won’t need these, but it’s good to have them defined — just in case something goes wrong.
You can now add overrides for the DoDataExchange(), OnGetRecordset(), and OnInitialUpdate()functions that are inherited from the base class. The example shows you how to customize these to workwith the recordset in the way that you want. Right-click the CCustomerView class name in Class Viewand select Properties from the pop-up. Click the overrides toolbar button (wait for the tooltips for the but-tons to display if you can’t remember which button it is) and for each override select the function name inthe left column and select the <Add> option in the cell to the right to add the function.
You can complete the implementation of the OnGetRecordset() function override right away:
CRecordset* CCustomerView::OnGetRecordset(){if(m_pSet == NULL) // If we don’t have the recordset address{m_pSet = new CCustomerSet(NULL); // create a new onem_pSet->Open(); // and open it
}return m_pSet; // Return the recordset address
}
If m_pSet is NULL you create a recordset and open it before returning its address. If m_pSet is not NULLthere is already a recordset created so you return the address that it contains. You must add an #includedirective for CCustomerSet.h to the .cpp file because you refer to the CCustomerSet class name here.
You can now implement the GetRecordset() function to use this function:
CCustomerSet* CCustomerView::GetRecordset(){return static_cast<CCustomerSet*>(OnGetRecordset());
}
The explicit cast is necessary here because the cast is down the class hierarchy from the base class to thederived class. You will be able to complete the detail of the other two overrides later.
Because you are creating the CCustomerSet object on the heap, you need to take care to delete it in theCCustomerView class destructor:
CCustomerView::~CCustomerView(){if (m_pSet)delete m_pSet;
}
1190
Chapter 21: Updating Data Sources
25905c21.qxd:WroxPro 2/21/08 9:24 AM Page 1190
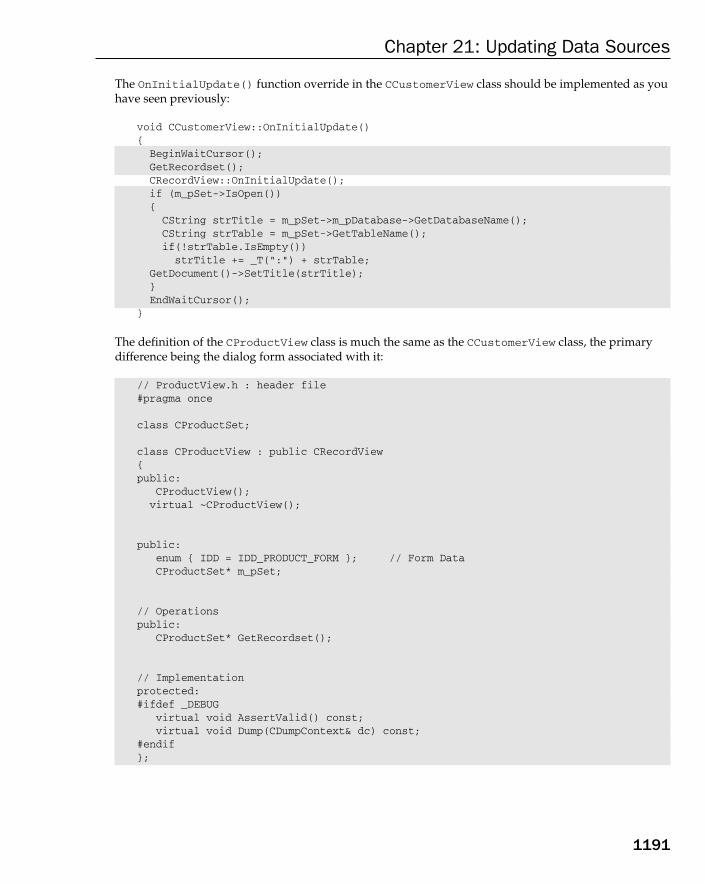
The OnInitialUpdate() function override in the CCustomerView class should be implemented as youhave seen previously:
void CCustomerView::OnInitialUpdate(){BeginWaitCursor();GetRecordset();CRecordView::OnInitialUpdate();if (m_pSet->IsOpen()){CString strTitle = m_pSet->m_pDatabase->GetDatabaseName();CString strTable = m_pSet->GetTableName();if(!strTable.IsEmpty())strTitle += _T(“:”) + strTable;
GetDocument()->SetTitle(strTitle);}EndWaitCursor();
}
The definition of the CProductView class is much the same as the CCustomerView class, the primarydifference being the dialog form associated with it:
// ProductView.h : header file#pragma once
class CProductSet;
class CProductView : public CRecordView{public:
CProductView();virtual ~CProductView();
public:enum { IDD = IDD_PRODUCT_FORM }; // Form DataCProductSet* m_pSet;
// Operationspublic:
CProductSet* GetRecordset();
// Implementationprotected:#ifdef _DEBUG
virtual void AssertValid() const;virtual void Dump(CDumpContext& dc) const;
#endif};
1191
Chapter 21: Updating Data Sources
25905c21.qxd:WroxPro 2/21/08 9:24 AM Page 1191
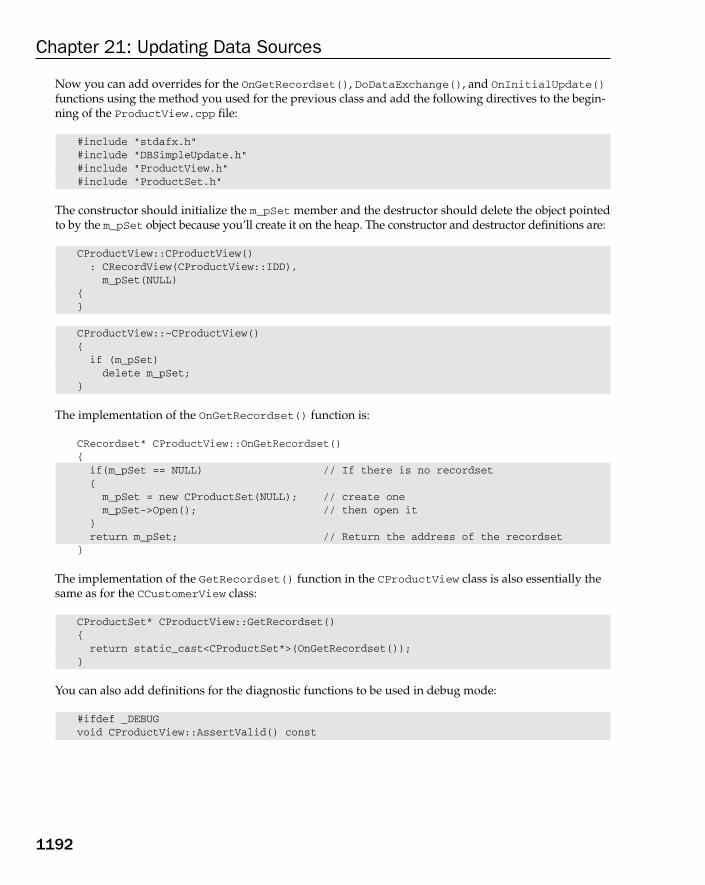
Now you can add overrides for the OnGetRecordset(), DoDataExchange(), and OnInitialUpdate()functions using the method you used for the previous class and add the following directives to the begin-ning of the ProductView.cpp file:
#include “stdafx.h”#include “DBSimpleUpdate.h”#include “ProductView.h”#include “ProductSet.h”
The constructor should initialize the m_pSet member and the destructor should delete the object pointedto by the m_pSet object because you’ll create it on the heap. The constructor and destructor definitions are:
CProductView::CProductView(): CRecordView(CProductView::IDD),m_pSet(NULL)
{}
CProductView::~CProductView(){if (m_pSet)delete m_pSet;
}
The implementation of the OnGetRecordset() function is:
CRecordset* CProductView::OnGetRecordset(){if(m_pSet == NULL) // If there is no recordset{m_pSet = new CProductSet(NULL); // create onem_pSet->Open(); // then open it
}return m_pSet; // Return the address of the recordset
}
The implementation of the GetRecordset() function in the CProductView class is also essentially thesame as for the CCustomerView class:
CProductSet* CProductView::GetRecordset(){return static_cast<CProductSet*>(OnGetRecordset());
}
You can also add definitions for the diagnostic functions to be used in debug mode:
#ifdef _DEBUGvoid CProductView::AssertValid() const
1192
Chapter 21: Updating Data Sources
25905c21.qxd:WroxPro 2/21/08 9:24 AM Page 1192
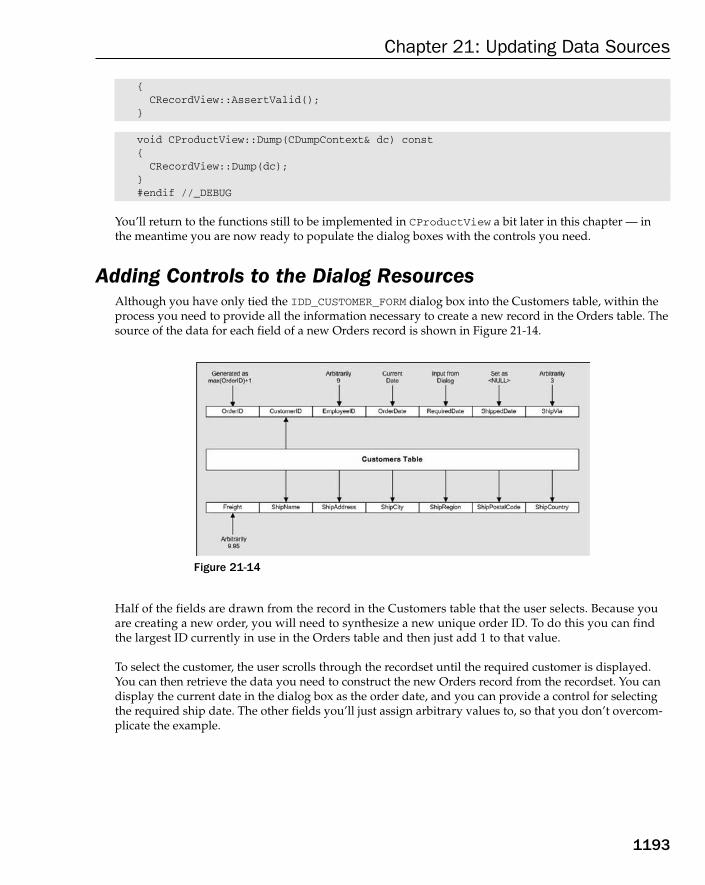
{CRecordView::AssertValid();
}
void CProductView::Dump(CDumpContext& dc) const{CRecordView::Dump(dc);
}#endif //_DEBUG
You’ll return to the functions still to be implemented in CProductView a bit later in this chapter — inthe meantime you are now ready to populate the dialog boxes with the controls you need.
Adding Controls to the Dialog ResourcesAlthough you have only tied the IDD_CUSTOMER_FORM dialog box into the Customers table, within theprocess you need to provide all the information necessary to create a new record in the Orders table. Thesource of the data for each field of a new Orders record is shown in Figure 21-14.
Figure 21-14
Half of the fields are drawn from the record in the Customers table that the user selects. Because youare creating a new order, you will need to synthesize a new unique order ID. To do this you can findthe largest ID currently in use in the Orders table and then just add 1 to that value.
To select the customer, the user scrolls through the recordset until the required customer is displayed.You can then retrieve the data you need to construct the new Orders record from the recordset. You candisplay the current date in the dialog box as the order date, and you can provide a control for selectingthe required ship date. The other fields you’ll just assign arbitrary values to, so that you don’t overcom-plicate the example.
1193
Chapter 21: Updating Data Sources
25905c21.qxd:WroxPro 2/21/08 9:24 AM Page 1193

Of course, you don’t need to display all the information from the Customers table in the dialog box — just the name is sufficient to identify the customer for selection purposes. You still need thedata in the recordset though. You can place controls on the IDD_CUSTOMER_FORM dialog as shown in Figure 21-15.
Figure 21-15
You can see from the diagram how the controls are to be used, and the IDs that you need to assign tothem. The date/time picker controls allow a date or time to be entered or selected. Whether it selects adate or a time depends on the value you choose for the Format property. The controls here use ShortDate format. The date is chosen by clicking the down arrow and choosing a date from the calendar thatpops up. Note that the control showing the order date is not accessible by the user because the datevalue is just today’s date. You set this state for the control by setting the Disabled property value toTrue. Note also that the edit controls for the order ID and customer name each have their Read Onlyproperty set to True to prevent modification of the values displayed.
You can add variables to the CCustomerView class to store values from the date/time picker controls.Right-click the order date edit control and select Add Variable from the pop-up. Figure 21-16 shows thedialog box.
You need to select the category as Value and the type as CTime because you want a variable that stores thevalue from the control rather than one that provides access to the control itself. You can give the memberthe name m_OrderDate. The Add Member Variable Wizard automatically adds initialization for the vari-able to the class constructor and adds a DDX_ function call to the DoDataExchange() function to effect dataexchange between the variable and the control. You can add a variable with the name m_RequiredDate ina similar way for the other date/time picker control.
1194
Chapter 21: Updating Data Sources
25905c21.qxd:WroxPro 2/21/08 9:24 AM Page 1194

Figure 21-16
Although this view is associated with a recordset corresponding to the Customers table, in fact only the editcontrol showing the customer name needs to be connected to the CCustomerSet recordset as you are onlydisplaying this field on the dialog box. You can add a DDX_ function call for this to the DoDataExchange()function in the CCustomerView class:
void CCustomerView::DoDataExchange(CDataExchange* pDX){
CRecordView::DoDataExchange(pDX);DDX_DateTimeCtrl(pDX, IDC_ORDERDATE, m_OrderDate);DDX_DateTimeCtrl(pDX, IDC_REQUIREDDATE, m_RequiredDate);DDX_FieldText(pDX, IDC_COMPANYNAME, m_pSet->m_CompanyName, m_pSet);
}
At this point you can also right-click each of the buttons and select Add Event Handler from the pop-up to add handlers to the CCustomerView class for them. You can short the default function names toOnSelectproducts() and OnCancelorder() if you want. You will fill in the code for these handlersand deal with the rest of the controls later.
The IDD_PRODUCT_FORM dialog selects the products to be ordered, after the customer has been selected.The application switches to this dialog box when the Select Products button is clicked on the customerselection dialog box. You need to show sufficient information on the dialog box to allow the product tobe chosen, and you must provide for the quantity and discount to be entered. The dialog box with itscontrols is shown in Figure 21-17.
Note that the edit controls here are read-only except for the two for quantity and discount because these twovalues are the only ones the user needs to supply. You can connect the edit control for the product name tothe recordset by adding a statement to the DoDataExchange() function in the CProductView class:
void CProductView::DoDataExchange(CDataExchange* pDX){
CRecordView::DoDataExchange(pDX);DDX_FieldText(pDX, IDC_PRODUCTNAME, m_pSet->m_ProductName, m_pSet);
}
1195
Chapter 21: Updating Data Sources
25905c21.qxd:WroxPro 2/21/08 9:24 AM Page 1195

Figure 21-17
The DDX_FieldText() function call interchanges data between the m_ProductSet member of theCProductSet object and the control with the ID IDD_PRODUCTNAME.
Add BN_CLICKED event handlers for the Select Product and Done buttons to the CProductViewusing the same technique you used for the previous dialog resource; you can give them the namesOnSelectproduct() and OnDone() to conform with the button labels.
The edit controls that display the order ID and the customer name must be initialized with values thatoriginate in the previous dialog, so you need class variables to hold the values for these controls. Right-click each of these two controls in the IDD_PRODUCT_FORM dialog and select Add Variable from the pop-up. You should select the Value category for both variables and they can both be public. Select type longfor the m_OrderID variable and type CString for the m_CustomerName variable.
The user enters values in the edit controls for quantity and discount, so you need variable for these tooin the CProductView class; both of these are Value category, too. Add a variable of type int with thename m_Quantity, to store the quantity and a variable of type float with the name m_Discount forthe discount value. You should now find that the variables are initialized in the constructor and theDoDataExchange() function looks like this:
void CProductView::DoDataExchange(CDataExchange* pDX){CRecordView::DoDataExchange(pDX);DDX_FieldText(pDX, IDC_PRODUCTNAME, m_pSet->m_ProductName, m_pSet);DDX_Text(pDX, IDC_NEWORDER, m_OrderID);DDX_Text(pDX, IDC_COMPANYNAME, m_CustomerName);DDX_Text(pDX, IDC_ORDERQUANTITY, m_Quantity);DDX_Text(pDX, IDC_ORDERDISCOUNT, m_Discount);
}
With the dialogs defined, you can implement the mechanism to switch between them.
1196
Chapter 21: Updating Data Sources
25905c21.qxd:WroxPro 2/21/08 9:24 AM Page 1196

Implementing Dialog SwitchingYou saw the basic logic for switching between dialogs in this program in Figure 21-12. A button click isthe mechanism for switching from one dialog to the next, so the button handlers will contain code tocause the switch to happen. You can first define view IDs to identify each of the three dialogs, so add aheader file, ViewConstants.h. This time you can try using an enum declaration to identify the views so the file should contain the following code:
// Definition of constants identifying the record views
#pragma once
enum ViewID{ ORDER_DETAILS, NEW_ORDER, SELECT_PRODUCT};
You need a variable of type ViewID in the CMainFrame class to record the ID of the current view, so addm_CurrentViewID by right-clicking on CMainFrame in Class View and selecting Add > Add Variablefrom the pop-up. You need to initialize this, so modify the CMainFrame constructor to:
CMainFrame::CMainFrame() : m_CurrentViewID(ORDER_DETAILS){
// TODO: add member initialization code here}
This identifies the view the application always starts with. An #include directive for ViewConstants.hwas added automatically to the MainFrm.h file so the definitions for the view IDs are available here in theMainFrm.cpp file.
You can now add a member function, SelectView(), to CMainFrame that performs switching betweendialogs. The return type is void and the single parameter is of type ViewID as the argument will be oneof the view IDs defined in the enum. The implementation of SelectView() is like this:
// Enables switching between views. The argument specifies the new viewvoid CMainFrame::SelectView(ViewID viewID){
CView* pOldActiveView = GetActiveView(); // Get current view
// Get pointer to new view if it exists// if it doesn’t the pointer will be nullCView* pNewActiveView = static_cast<CView*>(GetDlgItem(viewID));
// If this is first time around for the new view, the new view // won’t exist, so we must create it// The Order Details view is always created first so we don’t need// to provide for creating that.if (pNewActiveView == NULL){
switch(viewID){
case NEW_ORDER: // Create view to add new orderpNewActiveView = new CCustomerView;break;
case SELECT_PRODUCT: // Create view to add product to order
1197
Chapter 21: Updating Data Sources
25905c21.qxd:WroxPro 2/21/08 9:24 AM Page 1197

pNewActiveView = new CProductView;break;
default:AfxMessageBox(_T(“Invalid View ID”));return;
}
// Switching the views// Obtain the current view context to apply to the new viewCCreateContext context;context.m_pCurrentDoc = pOldActiveView->GetDocument();pNewActiveView->Create(NULL, NULL, 0L, CFrameWnd::rectDefault,
this, viewID, &context);pNewActiveView->OnInitialUpdate();
}SetActiveView(pNewActiveView); // Activate the new viewpOldActiveView->ShowWindow(SW_HIDE); // Hide the old viewpNewActiveView->ShowWindow(SW_SHOW); // Show the new viewpOldActiveView->SetDlgCtrlID(m_CurrentViewID); // Set the old view IDpNewActiveView->SetDlgCtrlID(AFX_IDW_PANE_FIRST);m_CurrentViewID = viewID; // Save the new view IDRecalcLayout();
}
The code here refers to the CCustomerView and CProductView classes, so #include directives forCustomerView.h and ProductView.h are necessary in the source file.
Switching from the order details dialog to the dialog starting new order creation is done in the handlerfor OnNeworder() in the COrderDetailsView class:
void COrderDetailsView::OnNeworder() {static_cast<CMainFrame*>(GetParentFrame())->SelectView(NEW_ORDER);
}
This gets a pointer to the parent frame for the view — the CMainFrame object for the application — andthen uses that to call SelectView() to select the new order processing dialog. An #include directivefor MainFrm.h is necessary in this source file to get at the definition of CMainFrame; MAinFrm.h has an#include directive for ViewConstants.h so NEW_ORDER is available here, too.
The Select Products button handler in the CCustomerView class switches to the dialog box forCProductsView:
void CCustomerView::OnSelectproducts() {static_cast<CMainFrame*>(GetParentFrame())->SelectView(SELECT_PRODUCT);
}
The Cancel button handler in the same class just switches back to the previous view:
void CCustomerView::OnCancelorder() {
1198
Chapter 21: Updating Data Sources
25905c21.qxd:WroxPro 2/21/08 9:24 AM Page 1198

static_cast<CMainFrame*>(GetParentFrame())->SelectView(ORDER_DETAILS);}
Don’t forget to add an #include directive for MainFrm.h in CustomerView.cpp.
The last switching operation to be implemented is in the OnDone() handler in the CProductView class:
void CProductView::OnDone() {static_cast<CMainFrame*>(GetParentFrame())->SelectView(ORDER_DETAILS);
}
This switches back to the original application view that allows browsing and editing of order details. Ofcourse, you could alternatively switch back to the CCustomerView dialog to provide a succession of orderentries if you wanted to. Don’t forget the #include directive for MainFrm.h once more.
The switching from the initial dialog box that allows you to browse order details to the dialog box forediting the details now has to control the visibility of the New Order button; otherwise, the Cancel but-ton is hidden by the New Order button in the editing dialog. Add a control variable, m_NewOrderCtrl,in COrderDetailsView corresponding to the IDC_NEWORDER ID. Then you can amend theOnEditorder() handler to:
void COrderDetailsView::OnEditorder(){
if(m_pSet->CanUpdate()){
try{
if(m_Mode == UPDATE){ // When button was clicked we were in update
// Disable input to edit controlsm_QuantityCtrl.SetReadOnly(); m_DiscountCtrl.SetReadOnly();
// Change the Update button text to Edit Order m_EditOrderCtrl.SetWindowText(_T(“Edit Order”));
// Make the Cancel button invisiblem_CancelEditCtrl.ShowWindow(SW_HIDE);
// Show the new order buttonm_NewOrderCtrl.ShowWindow(SW_SHOW);
// Complete the updatem_pSet->Update(); m_Mode = READ_ONLY; // Change to read-only mode
}else{ // When button was clicked we were in read-only mode
// Enable input to edit controlsm_QuantityCtrl.SetReadOnly(FALSE);
1199
Chapter 21: Updating Data Sources
25905c21.qxd:WroxPro 2/21/08 9:24 AM Page 1199
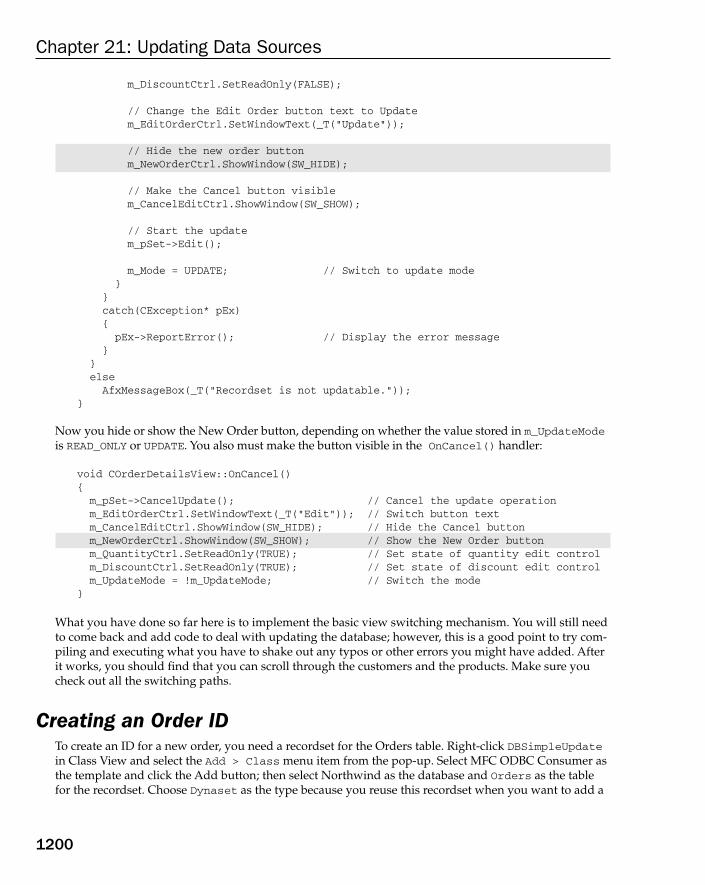
m_DiscountCtrl.SetReadOnly(FALSE);
// Change the Edit Order button text to Updatem_EditOrderCtrl.SetWindowText(_T(“Update”));
// Hide the new order buttonm_NewOrderCtrl.ShowWindow(SW_HIDE);
// Make the Cancel button visiblem_CancelEditCtrl.ShowWindow(SW_SHOW);
// Start the updatem_pSet->Edit();
m_Mode = UPDATE; // Switch to update mode}
}catch(CException* pEx){
pEx->ReportError(); // Display the error message}
}elseAfxMessageBox(_T(“Recordset is not updatable.”));
}
Now you hide or show the New Order button, depending on whether the value stored in m_UpdateModeis READ_ONLY or UPDATE. You also must make the button visible in the OnCancel() handler:
void COrderDetailsView::OnCancel() {m_pSet->CancelUpdate(); // Cancel the update operationm_EditOrderCtrl.SetWindowText(_T(“Edit”)); // Switch button textm_CancelEditCtrl.ShowWindow(SW_HIDE); // Hide the Cancel buttonm_NewOrderCtrl.ShowWindow(SW_SHOW); // Show the New Order buttonm_QuantityCtrl.SetReadOnly(TRUE); // Set state of quantity edit controlm_DiscountCtrl.SetReadOnly(TRUE); // Set state of discount edit controlm_UpdateMode = !m_UpdateMode; // Switch the mode
}
What you have done so far here is to implement the basic view switching mechanism. You will still needto come back and add code to deal with updating the database; however, this is a good point to try com-piling and executing what you have to shake out any typos or other errors you might have added. Afterit works, you should find that you can scroll through the customers and the products. Make sure youcheck out all the switching paths.
Creating an Order IDTo create an ID for a new order, you need a recordset for the Orders table. Right-click DBSimpleUpdatein Class View and select the Add > Class menu item from the pop-up. Select MFC ODBC Consumer asthe template and click the Add button; then select Northwind as the database and Orders as the tablefor the recordset. Choose Dynaset as the type because you reuse this recordset when you want to add a
1200
Chapter 21: Updating Data Sources
25905c21.qxd:WroxPro 2/21/08 9:24 AM Page 1200

new order. Enter the class name as COrderSet and the corresponding files names as OrderSet.h andOrderSet.cpp. Click the Finish button to create the class. You can change the CStringW members of thenew class to type CString and comment out the #error directive in the OrderSet.cpp class.
Storing the New Order IDIn this section I will go into operations with recordsets in a little more depth. You need to create a uniqueorder ID whenever you start creating a new order in the CCustomerView class, so you need to thinkabout where you can best do this and what the process should be. It really should be a COrderSet object’sresponsibility to create the new ID, even though the ID is displayed by one of the edit controls in the viewrepresented by the CCustomerView object because the new ID is essentially dependent on the data in thisrecordset. A good approach would be to add a variable in the CCustomerView class that sets the value ofthe ID in the edit control that can be set using a function belonging to a COrderSet object.
Go to the Design window for the IDD_CUSTOMER_FORM dialog form and right-click the edit control forthe order ID — the control has the ID IDC_NEWORDERID. Select Add Variable from the pop-up and thenenter the name. Choose the variable type and category as shown in Figure 21-18.
Figure 21-18
The type is CString by default, so make sure you set it to long. The DDX_Text() functions that transferdata to and from an edit control come in a number of flavors to accommodate the different data typesshown in the drop-down list in the dialog box.
Creating the New Order IDThe COrderSet object belongs in the document object, so add a public data member to theCDBSimpleUpdateDoc class with the name m_OrderSet to go along with the m_DBSimpleUpdateSetmember that was created by the Application Wizard. You do this as usual by right-clicking the classname in Class View and selecting Add > Add Variable from the pop-up. The COrderSet object iscreated automatically when the document object is created. With the object for the order set in the document, it is accessible in any of the view classes that need it.
1201
Chapter 21: Updating Data Sources
25905c21.qxd:WroxPro 2/21/08 9:24 AM Page 1201
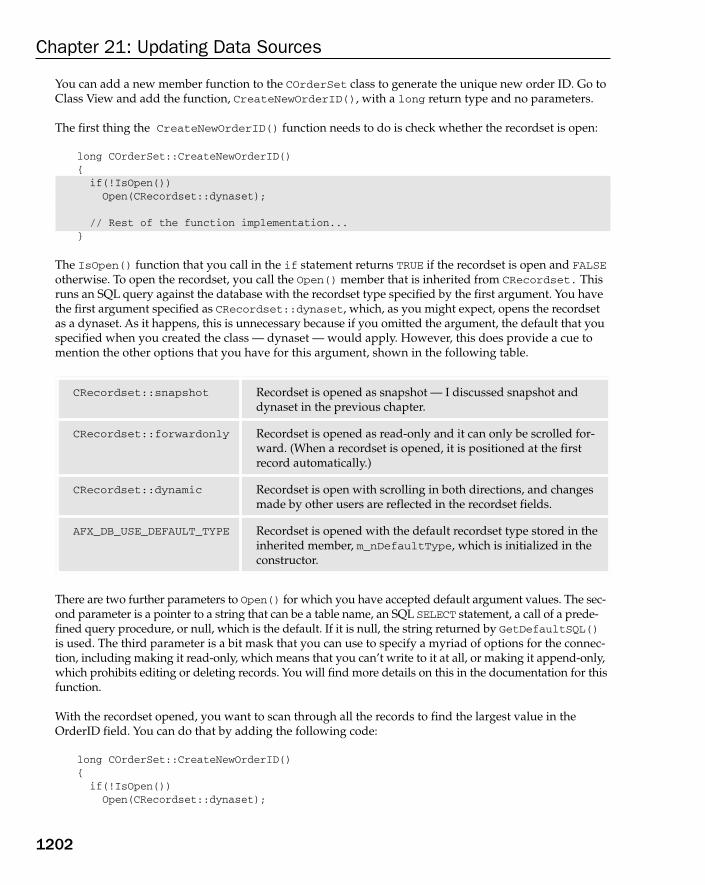
You can add a new member function to the COrderSet class to generate the unique new order ID. Go toClass View and add the function, CreateNewOrderID(), with a long return type and no parameters.
The first thing the CreateNewOrderID() function needs to do is check whether the recordset is open:
long COrderSet::CreateNewOrderID(){if(!IsOpen())Open(CRecordset::dynaset);
// Rest of the function implementation...}
The IsOpen() function that you call in the if statement returns TRUE if the recordset is open and FALSEotherwise. To open the recordset, you call the Open() member that is inherited from CRecordset. Thisruns an SQL query against the database with the recordset type specified by the first argument. You havethe first argument specified as CRecordset::dynaset, which, as you might expect, opens the recordsetas a dynaset. As it happens, this is unnecessary because if you omitted the argument, the default that youspecified when you created the class — dynaset — would apply. However, this does provide a cue tomention the other options that you have for this argument, shown in the following table.
There are two further parameters to Open() for which you have accepted default argument values. The sec-ond parameter is a pointer to a string that can be a table name, an SQL SELECT statement, a call of a prede-fined query procedure, or null, which is the default. If it is null, the string returned by GetDefaultSQL()is used. The third parameter is a bit mask that you can use to specify a myriad of options for the connec-tion, including making it read-only, which means that you can’t write to it at all, or making it append-only,which prohibits editing or deleting records. You will find more details on this in the documentation for thisfunction.
With the recordset opened, you want to scan through all the records to find the largest value in theOrderID field. You can do that by adding the following code:
long COrderSet::CreateNewOrderID(){if(!IsOpen())Open(CRecordset::dynaset);
CRecordset::snapshot Recordset is opened as snapshot — I discussed snapshot anddynaset in the previous chapter.
CRecordset::forwardonly Recordset is opened as read-only and it can only be scrolled for-ward. (When a recordset is opened, it is positioned at the firstrecord automatically.)
CRecordset::dynamic Recordset is open with scrolling in both directions, and changesmade by other users are reflected in the recordset fields.
AFX_DB_USE_DEFAULT_TYPE Recordset is opened with the default recordset type stored in theinherited member, m_nDefaultType, which is initialized in theconstructor.
1202
Chapter 21: Updating Data Sources
25905c21.qxd:WroxPro 2/21/08 9:24 AM Page 1202

// Check for no records in recordset long newOrderID = 0;if(!(IsBOF() && IsEOF())){ // We have recordsMoveFirst(); // so go to the firstwhile(!IsEOF()) // Compare with all the others{// Save order ID if its largerif(newOrderID < m_OrderID)
newOrderID = m_OrderID;
MoveNext(); // Go to next record}
}return ++newOrderID;
}
The IsBOF() and IsEOF() members of the recordset class return true if you are beyond the beginning orend of the records in the recordset respectively, in which case no record is currently active so you shouldbe using the fields. When a recordset is empty, both functions return TRUE. As long as there are records,you move to the first record by calling the MoveFirst() member function. There is also a MoveLast()member that goes to the last record in the recordset.
You create a local variable, newOrderID, with an initial value of 0 that eventually stores the maximum orderID in the table. The while loop moves through each of the records in the recordset using the MoveNext()member function, checking for a larger value for the m_OrderID member. Before calling any of the movemembers of a recordset, you must call either IsEOF() or IsBOF(), depending on which way you are going.If you call a move function when you are beyond the end or beginning of the recordset, the function throwsan exception of type CDBException.
In addition to the move functions you have used here, a recordset object provides you with three others,shown in the following table.
When the loop ends you have the maximum order ID stored in newOrderID, so you just need to incre-ment it by 1 before returning it.
MoveLast() Moves to the last record in the recordset. You must not use this function (orMoveFirst()) with forward-only recordset, otherwise an exception of typeCDBEception is thrown.
MovePrev() Moves to the record preceding the current record in the recordset. If there isn’tone, it moves to one position beyond the first record. After this the recordsetfields are not valid and IsBOF()returns true.
Move() This is used to move one or more records through a recordset. The first argu-ment, of type long, specifies the number of rows to move. The second argumentof type WORD determines the nature of the move operation. Four values for thesecond argument make the function equivalent to the other move functions wehave seen. You will find more details on this in the Visual C++ documentation.
1203
Chapter 21: Updating Data Sources
25905c21.qxd:WroxPro 2/21/08 9:24 AM Page 1203

The last step is to get the value transferred to the control so it appears in the IDD_CUSTOMER_FORM dialog.A call to UpdateData() for the recordset view object with an argument of FALSE does this. This function is inherited in the record view class from CWnd. An argument of FALSE causes the data to be transferredfrom the data member of the View Class to the controls in the dialog. A value of TRUE causes data to be retrieved from the controls and stored in the data members. In both cases this is achieved by causing the DoDataExchange() member of view to be called by the framework.
Initiating ID CreationThe customer view needs a new order ID to be available when it is first displayed. Add a public memberfunction, SetNewOrderID(), to the CCustomerView class and implement it as follows:
void CCustomerView::SetNewOrderID(void){// Get a new order ID from the COrderSet object in the documentm_NewOrderID = static_cast<CDBSimpleUpdateDoc*>
(GetDocument())->m_OrderSet.CreateNewOrderID();UpdateData(FALSE); // Transfer data to controls
}
The pointer returned by the inherited GetDocument() function is of type CDocument. You want to use this to access the m_OrderSet member of the derived class so you must cast the pointer to typeCDBSimpleUpdateDoc*. You then call the member function for the m_OrderSet member of the docu-ment class that returns the new order ID, and store the result in the m_NewOrderID member of theCCustomerView class. Calling the inherited UpdateData() member of the view transfers the data from the data members of the view to the controls. You must now add an #include directive forDBSimpleUpdateDoc.h to the source file because you refer to the CDBSimpleUpdateDoc class name.
Because you only ever create a single CCustomerView object and reuse it as necessary, you will want a newID to be available each time you switch to that view. The SelectView() member of the CMainFrame objectdeals with switching between dialogs and this is also where a CCustomerView object gets created first timearound. This is a good place to initiate the process for creating the new order ID. All you need to do is toadd some code to call the SetNewOrderID() member if the view corresponds to the CCustomerView.
void CMainFrame::SelectView(ViewID viewID){
CView* pOldActiveView = GetActiveView(); // Get current view
// Get pointer to new view if it exists// if it doesn’t the pointer will be nullCView* pNewActiveView = static_cast<CView*>(GetDlgItem(viewID));
// If this is first time around for the new view, the new view // won’t exist, so we must create it// The Order Details view is always created first so we don’t need// to provide for creating that.if (pNewActiveView == NULL){
switch(viewID){
case NEW_ORDER: // Create view to add new orderpNewActiveView = new CCustomerView;
1204
Chapter 21: Updating Data Sources
25905c21.qxd:WroxPro 2/21/08 9:24 AM Page 1204
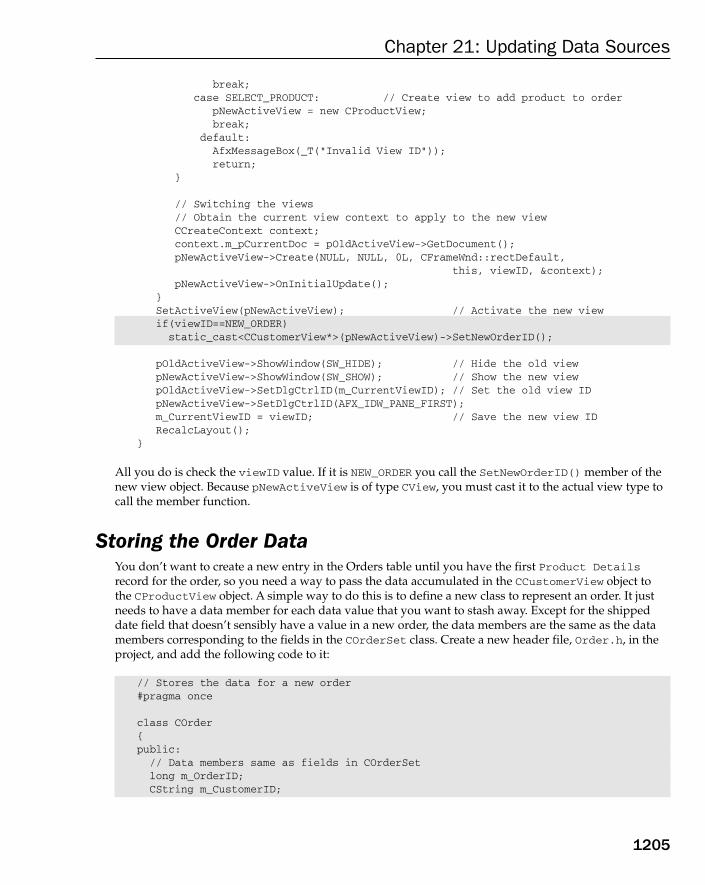
break;case SELECT_PRODUCT: // Create view to add product to order
pNewActiveView = new CProductView;break;
default:AfxMessageBox(_T(“Invalid View ID”));return;
}
// Switching the views// Obtain the current view context to apply to the new viewCCreateContext context;context.m_pCurrentDoc = pOldActiveView->GetDocument();pNewActiveView->Create(NULL, NULL, 0L, CFrameWnd::rectDefault,
this, viewID, &context);pNewActiveView->OnInitialUpdate();
}SetActiveView(pNewActiveView); // Activate the new viewif(viewID==NEW_ORDER)static_cast<CCustomerView*>(pNewActiveView)->SetNewOrderID();
pOldActiveView->ShowWindow(SW_HIDE); // Hide the old viewpNewActiveView->ShowWindow(SW_SHOW); // Show the new viewpOldActiveView->SetDlgCtrlID(m_CurrentViewID); // Set the old view IDpNewActiveView->SetDlgCtrlID(AFX_IDW_PANE_FIRST);m_CurrentViewID = viewID; // Save the new view IDRecalcLayout();
}
All you do is check the viewID value. If it is NEW_ORDER you call the SetNewOrderID() member of thenew view object. Because pNewActiveView is of type CView, you must cast it to the actual view type tocall the member function.
Storing the Order DataYou don’t want to create a new entry in the Orders table until you have the first Product Detailsrecord for the order, so you need a way to pass the data accumulated in the CCustomerView object tothe CProductView object. A simple way to do this is to define a new class to represent an order. It justneeds to have a data member for each data value that you want to stash away. Except for the shippeddate field that doesn’t sensibly have a value in a new order, the data members are the same as the datamembers corresponding to the fields in the COrderSet class. Create a new header file, Order.h, in theproject, and add the following code to it:
// Stores the data for a new order#pragma once
class COrder{public:// Data members same as fields in COrderSetlong m_OrderID;CString m_CustomerID;
1205
Chapter 21: Updating Data Sources
25905c21.qxd:WroxPro 2/21/08 9:24 AM Page 1205

long m_EmployeeID;CTime m_OrderDate;CTime m_RequiredDate;long m_ShipVia;double m_Freight;CString m_ShipName;CString m_ShipAddress;CString m_ShipCity;CString m_ShipRegion;CString m_ShipPostalCode;CString m_ShipCountry;
// Default constructorCOrder():
m_OrderID(0), // Will be set by CCustomerView objectm_EmployeeID(1), // Arbitrary employee ID assignedm_ShipVia(3), // Arbitrary shipping companym_CustomerID(_T(“”)), m_Freight(0.0), m_ShipName(_T(“”)),m_ShipAddress(_T(“”)), m_ShipCity(_T(“”)), m_ShipRegion(_T(“”)),m_ShipPostalCode(_T(“”)), m_ShipCountry(_T(“”))
{SYSTEMTIME Now;GetLocalTime(&Now); // Get current timem_OrderDate = m_RequiredDate = CTime(Now); // Set time as today
}};
In general it is not good practice to make all the data members of a class public like this, but becausethe recordset classes generated by the Class Wizard all have public members, there is little to be gainedby making them private in our class here.
If you add a data member, m_Order, of type COrder, to the CDBSimpleUpdateDoc class, you will be ableto use this to pass the order data to the CProductView object. All you have to do is get the CCustomerViewobject to load up the data members when the Select Products button is pressed, ready to be picked upby the CProductView object. You can implement the button handler in CCustomerView like this:
void CCustomerView::OnSelectproducts() {// Get a pointer to the document CDBSimpleUpdateDoc* pDoc = static_cast<CDBSimpleUpdateDoc*>(GetDocument());
// Set up order field values from CCustomerSet object pDoc->m_Order.m_CustomerID = m_pSet->m_CustomerID;pDoc->m_Order.m_ShipAddress = m_pSet->m_Address;pDoc-> m_Order.m_ShipCity = m_pSet->m_City;pDoc-> m_Order.m_ShipCountry = m_pSet->m_Country;pDoc-> m_Order.m_ShipName = m_pSet->m_CompanyName;pDoc-> m_Order.m_ShipPostalCode = m_pSet->m_PostalCode;pDoc-> m_Order.m_ShipRegion = m_pSet->m_Region;
// Set up order field values from CCustomerView dialog inputpDoc-> m_Order.m_OrderID = m_NewOrderID; // Generated new ID
1206
Chapter 21: Updating Data Sources
25905c21.qxd:WroxPro 2/21/08 9:24 AM Page 1206

pDoc-> m_Order.m_OrderDate = m_OrderDate; // From order date controlpDoc-> m_Order.m_RequiredDate = m_RequiredDate; // From required date control
static_cast<CMainFrame*>(GetParentFrame())->SelectView(SELECT_PRODUCT);}
This is straightforward stuff. You are just copying values from the recordset and record view objects tothe Order object that is a member of the document object.
Setting DatesThere is a small problem with the date picker controls on the CCustomerView dialog: The variables cor-responding to these, m_OrderDate and m_RequiredDate, are not initialized at the moment, so the con-trols do not display sensible values to start with. You want then to display the current date at the outset,so you should add some code to initialize them at the end of the OnInitialUpdate() member calledwhen the view object is first created:
void CCustomerView::OnInitialUpdate(){
BeginWaitCursor();GetRecordset();CRecordView::OnInitialUpdate();if (m_pSet->IsOpen()){
CString strTitle = m_pSet->m_pDatabase->GetDatabaseName();CString strTable = m_pSet->GetTableName();if(!strTable.IsEmpty())
strTitle += _T(“:”) + strTable;GetDocument()->SetTitle(strTitle);}EndWaitCursor();
// Initialize time values SYSTEMTIME Now;GetLocalTime(&Now); // Get current timem_OrderDate = m_RequiredDate = CTime(Now); // Set time as today
}
Here you set both CTime variables to the current time, just as you did in the constructor for the COrder class.
Now the CCustomerView object is in good shape. It displays the right date and it squirrels away all thevalue for the fields in a row in the Orders table, so you are ready to tackle the production selection process.
Selecting Products for an OrderWhen the view for selecting a product is displayed, you want to have the variables for the controls thatdisplay the order ID and the customer name already set up with appropriate values. You get these val-ues from the Order member of the document object. You can add a function to the CProductView classto do this. You can call it InitializeView() and the return type is void. You can call the function fromthe SelectView() member of the CMainFrame object for the application. That way you ensure that thecontrols are always initialized before the dialog box is displayed.
1207
Chapter 21: Updating Data Sources
25905c21.qxd:WroxPro 2/21/08 9:24 AM Page 1207

Before you implement InitializeView(), consider something else. The new Orders table record isadded only when the Select Product button is clicked to add a product to the order for the first time.Subsequent button clicks should just add another product to the order, so you need a way to determinewhether the Orders table has been appended to or not when the button is clicked. You can do this byadding a variable, m_OrderAdded, of type bool to CProductView that is false to start with and set totrue by the Select Product button handler. So add this variable to the class. You can initialize it in theInitializeView() member that you can implement as follows:
void CProductView::InitializeView(){// Get a pointer to the document CDBSimpleUpdateDoc* pDoc = static_cast<CDBSimpleUpdateDoc*>(GetDocument());
m_OrderID = pDoc->m_Order.m_OrderID;m_CustomerName = pDoc->m_Order.m_ShipName;m_Quantity = 1; // Must order at least 1m_Discount = 0; // No default discountm_OrderAdded = false; // Order not added initiallyUpdateData(FALSE); // Transfer data to controls
}
This initializes the view class members for the order ID and customer name controls by copying values fromthe appropriate member of the Order member of the document. This function is also an opportunity toensure that the controls for order quantity and discount start with suitable initial values. The order quantityfor any product has to be at least 1, and the discount is 0 by default. Calling the inherited UpdateData()member with an argument value FALSE causes the data to be transferred from the class variables to the con-trols, as you saw previously. You need to add an #include directive for DBSimpleUpdateDoc.h to thebeginning of the source file to make the document class definition available.
To put this into operation, you just need to call InitializeView() whenever you switch to the productselection dialog box. The obvious place to do this is in the SelectView() member of the CMainFrameclass:
void CMainFrame::SelectView(ViewID viewID){
CView* pOldActiveView = GetActiveView(); // Get current view
// Get pointer to new view if it exists// if it doesn’t the pointer will be nullCView* pNewActiveView = static_cast<CView*>(GetDlgItem(viewID));
// If this is first time around for the new view, the new view // won’t exist, so we must create it// The Order Details view is always created first so we don’t need// to provide for creating that.if (pNewActiveView == NULL){
switch(viewID){
case NEW_ORDER: // Create view to add new orderpNewActiveView = new CCustomerView;break;
case SELECT_PRODUCT: // Create view to add product to order
1208
Chapter 21: Updating Data Sources
25905c21.qxd:WroxPro 2/21/08 9:25 AM Page 1208
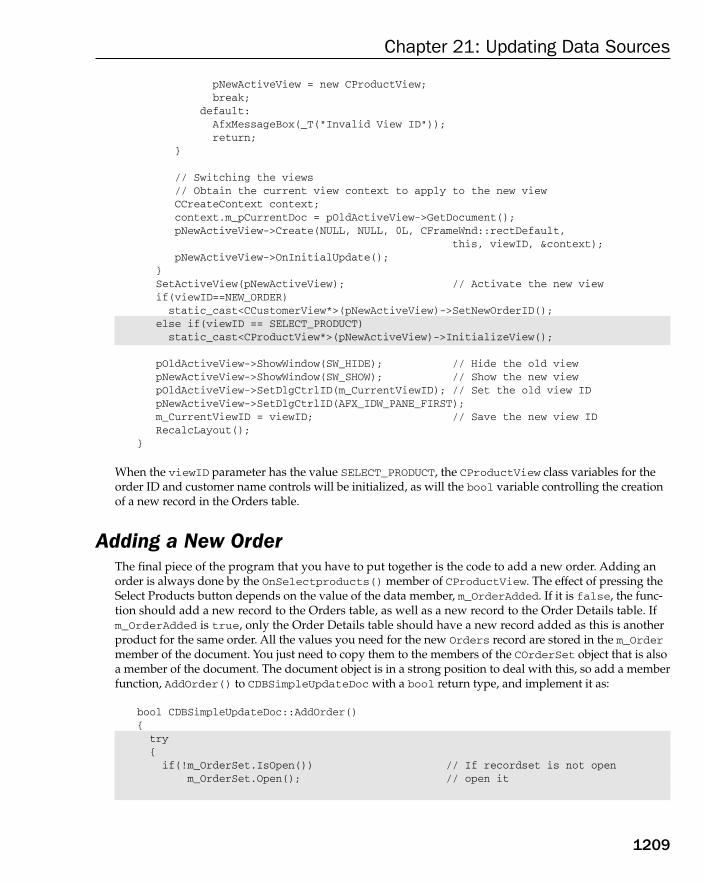
pNewActiveView = new CProductView;break;
default:AfxMessageBox(_T(“Invalid View ID”));return;
}
// Switching the views// Obtain the current view context to apply to the new viewCCreateContext context;context.m_pCurrentDoc = pOldActiveView->GetDocument();pNewActiveView->Create(NULL, NULL, 0L, CFrameWnd::rectDefault,
this, viewID, &context);pNewActiveView->OnInitialUpdate();
}SetActiveView(pNewActiveView); // Activate the new viewif(viewID==NEW_ORDER)
static_cast<CCustomerView*>(pNewActiveView)->SetNewOrderID();else if(viewID == SELECT_PRODUCT)static_cast<CProductView*>(pNewActiveView)->InitializeView();
pOldActiveView->ShowWindow(SW_HIDE); // Hide the old viewpNewActiveView->ShowWindow(SW_SHOW); // Show the new viewpOldActiveView->SetDlgCtrlID(m_CurrentViewID); // Set the old view IDpNewActiveView->SetDlgCtrlID(AFX_IDW_PANE_FIRST);m_CurrentViewID = viewID; // Save the new view IDRecalcLayout();
}
When the viewID parameter has the value SELECT_PRODUCT, the CProductView class variables for theorder ID and customer name controls will be initialized, as will the bool variable controlling the creationof a new record in the Orders table.
Adding a New OrderThe final piece of the program that you have to put together is the code to add a new order. Adding anorder is always done by the OnSelectproducts() member of CProductView. The effect of pressing theSelect Products button depends on the value of the data member, m_OrderAdded. If it is false, the func-tion should add a new record to the Orders table, as well as a new record to the Order Details table. Ifm_OrderAdded is true, only the Order Details table should have a new record added as this is anotherproduct for the same order. All the values you need for the new Orders record are stored in the m_Ordermember of the document. You just need to copy them to the members of the COrderSet object that is alsoa member of the document. The document object is in a strong position to deal with this, so add a memberfunction, AddOrder() to CDBSimpleUpdateDoc with a bool return type, and implement it as:
bool CDBSimpleUpdateDoc::AddOrder(){try{if(!m_OrderSet.IsOpen()) // If recordset is not open
m_OrderSet.Open(); // open it
1209
Chapter 21: Updating Data Sources
25905c21.qxd:WroxPro 2/21/08 9:25 AM Page 1209
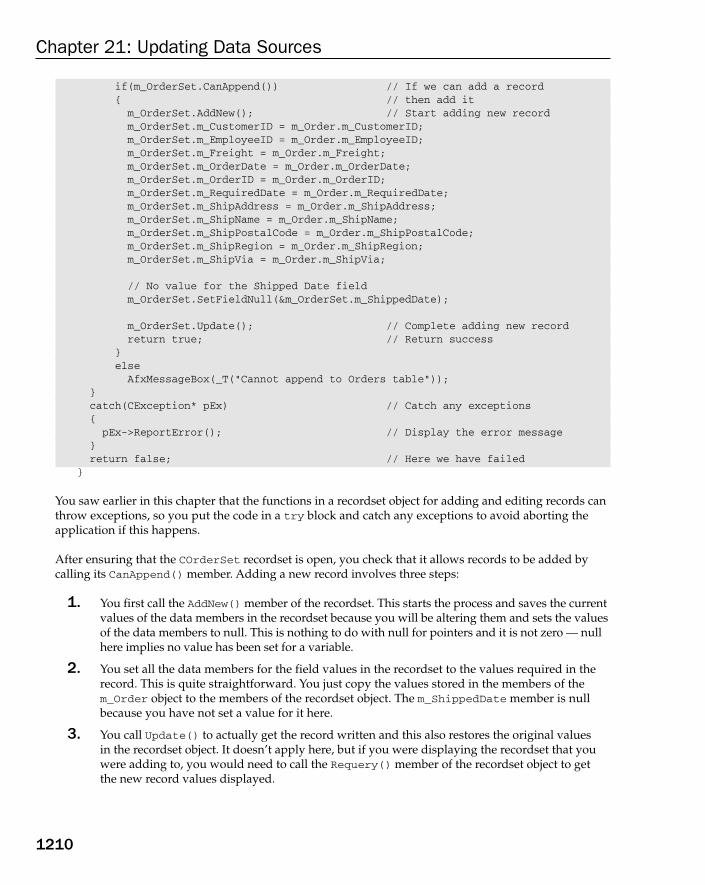
if(m_OrderSet.CanAppend()) // If we can add a record{ // then add itm_OrderSet.AddNew(); // Start adding new recordm_OrderSet.m_CustomerID = m_Order.m_CustomerID;m_OrderSet.m_EmployeeID = m_Order.m_EmployeeID;m_OrderSet.m_Freight = m_Order.m_Freight;m_OrderSet.m_OrderDate = m_Order.m_OrderDate;m_OrderSet.m_OrderID = m_Order.m_OrderID;m_OrderSet.m_RequiredDate = m_Order.m_RequiredDate;m_OrderSet.m_ShipAddress = m_Order.m_ShipAddress;m_OrderSet.m_ShipName = m_Order.m_ShipName;m_OrderSet.m_ShipPostalCode = m_Order.m_ShipPostalCode;m_OrderSet.m_ShipRegion = m_Order.m_ShipRegion;m_OrderSet.m_ShipVia = m_Order.m_ShipVia;
// No value for the Shipped Date fieldm_OrderSet.SetFieldNull(&m_OrderSet.m_ShippedDate);
m_OrderSet.Update(); // Complete adding new recordreturn true; // Return success
}elseAfxMessageBox(_T(“Cannot append to Orders table”));
}catch(CException* pEx) // Catch any exceptions{pEx->ReportError(); // Display the error message
}return false; // Here we have failed
}
You saw earlier in this chapter that the functions in a recordset object for adding and editing records canthrow exceptions, so you put the code in a try block and catch any exceptions to avoid aborting theapplication if this happens.
After ensuring that the COrderSet recordset is open, you check that it allows records to be added bycalling its CanAppend() member. Adding a new record involves three steps:
1. You first call the AddNew() member of the recordset. This starts the process and saves the currentvalues of the data members in the recordset because you will be altering them and sets the valuesof the data members to null. This is nothing to do with null for pointers and it is not zero — nullhere implies no value has been set for a variable.
2. You set all the data members for the field values in the recordset to the values required in therecord. This is quite straightforward. You just copy the values stored in the members of them_Order object to the members of the recordset object. The m_ShippedDate member is nullbecause you have not set a value for it here.
3. You call Update() to actually get the record written and this also restores the original values in the recordset object. It doesn’t apply here, but if you were displaying the recordset that youwere adding to, you would need to call the Requery() member of the recordset object to get the new record values displayed.
1210
Chapter 21: Updating Data Sources
25905c21.qxd:WroxPro 2/21/08 9:25 AM Page 1210

You can now put in the basic logic for the OnSelectproduct() handler for the CProductView class.You need to call UpdateData() for the view to get the data that was entered in the edit controls trans-ferred to data members of the view object. Here’s the outline code for the handler function:
void CProductView::OnSelectproduct() {UpdateData(TRUE); // Transfer data from controls
// Get a pointer to the document CDBSimpleUpdateDoc* pDoc = static_cast<CDBSimpleUpdateDoc*>(GetDocument());
if(!m_OrderAdded) // If order not addedm_OrderAdded = pDoc->AddOrder(); // then try to add it
if(m_OrderAdded)// Code to add new Order Details record...
}
After calling the UpdateData() for the CProductView object, you get a pointer to the document object.You need this to call the AddOrder() member of the document that will do the work. Next you check them_OrderAdded member. You only want to add a record to Orders when this is false. The AddOrder()member of the document object returns a bool value that is true if the order was added successfully, andfalse for any failure. You use this value to set the m_OrderAdded member of CProductView, and as anindicator for whether you can continue to add order details. You don’t need to display any message in thecase of failure. The AddOrder() function has already done that.
The code to add a record to the Order Details table is also probably best handled by the documentobject, but the document class member function to do it needs access to four values from members of theCProductView and CProductSet classes — for the product ID, the order quantity, the unit price, and the applicable discount. The order ID is available in the document class from its m_Order member, so youdon’t need to worry about that. You can add a function, AddOrderDetails(), to CDBSimpleUpdateDoc toadd a record to the Order Details table. The return type should be void and the function has four parame-ters the ID of type long, price of type double, quantity of type int, and discount of type float.
You can implement the function as follows:
void CDBSimpleUpdateDoc::AddOrderDetails(long ID, double price,int quantity, float discount){try{if(!m_DBSimpleUpdateSet.IsOpen()) // If recordset is not openm_DBSimpleUpdateSet.Open(); // open it
m_DBSimpleUpdateSet.AddNew(); // Start adding new record
// Set Product Details recordset data member values m_DBSimpleUpdateSet.m_OrderID = m_Order.m_OrderID;m_DBSimpleUpdateSet.m_Quantity = quantity; m_DBSimpleUpdateSet.m_Discount = discount;m_DBSimpleUpdateSet.m_ProductID = ID;m_DBSimpleUpdateSet.m_UnitPrice = price;
1211
Chapter 21: Updating Data Sources
25905c21.qxd:WroxPro 2/21/08 9:25 AM Page 1211

m_DBSimpleUpdateSet.Update(); // Complete adding new record}catch(CException* pEx) // Catch any exceptions{pEx->ReportError(); // Display the error message
}}
This sets up the values in the m_DBSimpleUpdateSet members and then updates the table in essentiallythe same way as for the Orders table. Again, you have to put the update code in a try block to catch anyexceptions that might be thrown by AddNew() or Update().
You want to call this function every time the Select Product button handler in the CProductView class iscalled, so you can modify the handler to do this:
void CProductView::OnSelectproduct() {UpdateData(TRUE); // Transfer data from controls
// Get a pointer to the document CDBSimpleUpdateDoc* pDoc = static_cast<CDBSimpleUpdateDoc*>(GetDocument());
if(!m_OrderAdded) // If order not addedm_OrderAdded = pDoc->AddOrder(); // then try to add it
if(m_OrderAdded){
pDoc->AddOrderDetails(m_pSet->m_ProductID,m_pSet->m_UnitPrice,m_Quantity,m_Discount);
// Now reset the values in the quantity and discount controlsm_Quantity = 1;m_Discount = 0;UpdateData(FALSE); // Transfer data to controls
}}
You use the m_DBSimpleUpdateSet object to update the Order Details table. This was used by the originalview in the application, and it is stored in the document object. You get the values for quantity and dis-count from the data members in the view object corresponding to the edit controls that provide for thesevalues to be entered. The order ID value was set when the dialog was displayed so that it would be dis-played for information only. The product ID and unit price values are retrieved from the CProductSetobject associated with this view. After calling Update() to write the record, reset the values for quantityand discount back to their defaults.
Try It Out Adding New OrdersAfter adding a number of other orders, as you might deduce from the order ID, I added the order shownin Figure 21-19.
1212
Chapter 21: Updating Data Sources
25905c21.qxd:WroxPro 2/21/08 9:25 AM Page 1212
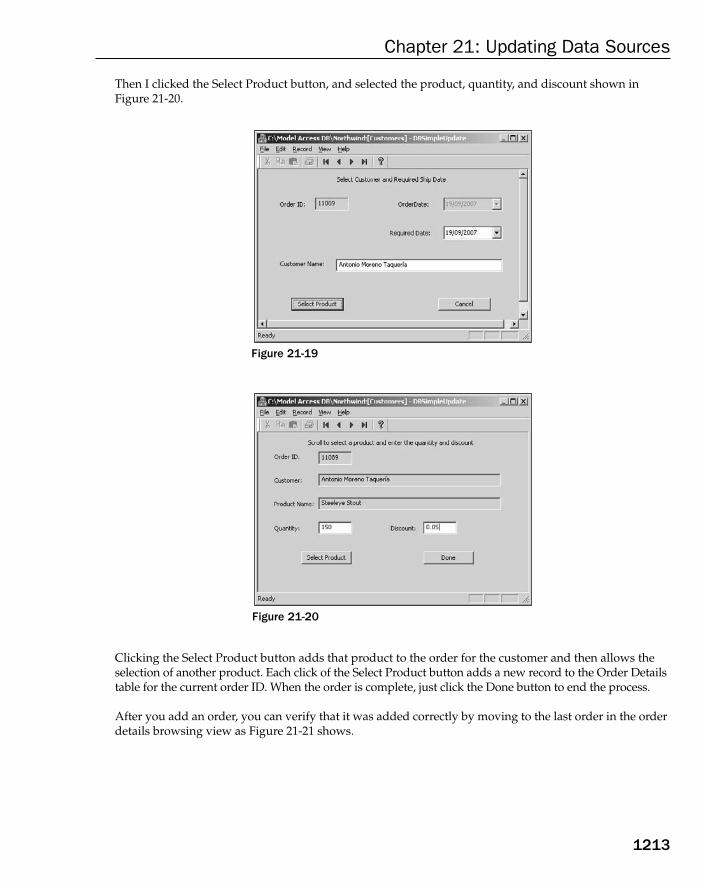
Then I clicked the Select Product button, and selected the product, quantity, and discount shown inFigure 21-20.
Figure 21-19
Figure 21-20
Clicking the Select Product button adds that product to the order for the customer and then allows theselection of another product. Each click of the Select Product button adds a new record to the Order Detailstable for the current order ID. When the order is complete, just click the Done button to end the process.
After you add an order, you can verify that it was added correctly by moving to the last order in the orderdetails browsing view as Figure 21-21 shows.
1213
Chapter 21: Updating Data Sources
25905c21.qxd:WroxPro 2/21/08 9:25 AM Page 1213
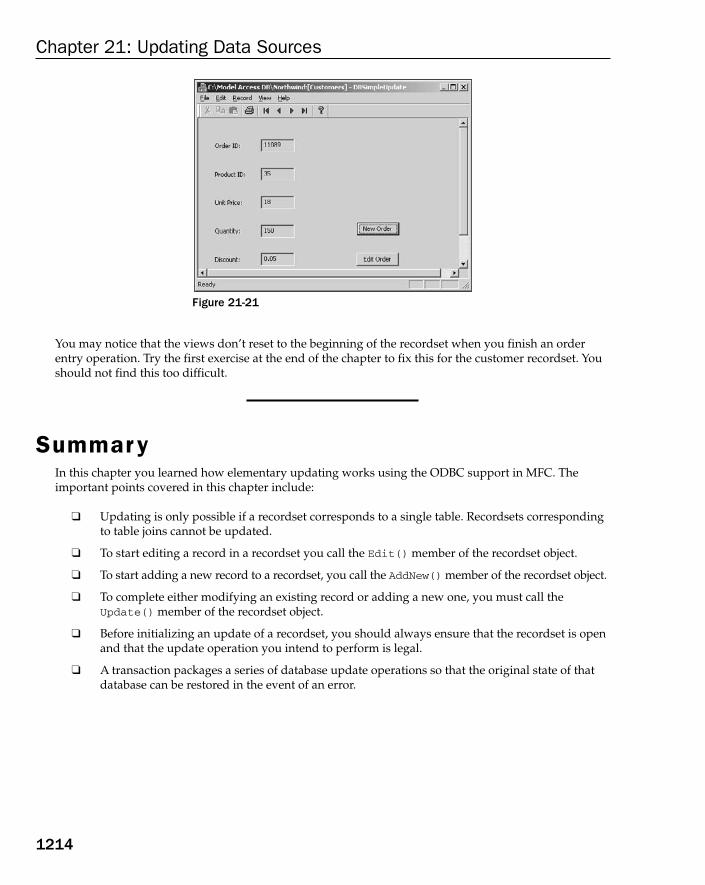
Figure 21-21
You may notice that the views don’t reset to the beginning of the recordset when you finish an orderentry operation. Try the first exercise at the end of the chapter to fix this for the customer recordset. Youshould not find this too difficult.
SummaryIn this chapter you learned how elementary updating works using the ODBC support in MFC. Theimportant points covered in this chapter include:
❑ Updating is only possible if a recordset corresponds to a single table. Recordsets correspondingto table joins cannot be updated.
❑ To start editing a record in a recordset you call the Edit() member of the recordset object.
❑ To start adding a new record to a recordset, you call the AddNew() member of the recordset object.
❑ To complete either modifying an existing record or adding a new one, you must call theUpdate() member of the recordset object.
❑ Before initializing an update of a recordset, you should always ensure that the recordset is openand that the update operation you intend to perform is legal.
❑ A transaction packages a series of database update operations so that the original state of thatdatabase can be restored in the event of an error.
1214
Chapter 21: Updating Data Sources
25905c21.qxd:WroxPro 2/21/08 9:25 AM Page 1214
ExercisesYou can download the source code for the examples in the book and the solutions to the following exercisesfrom www.wrox.com.
1. Modify the update application in this chapter so that the dialog box for adding a new order alwaysdisplays the customers in alphabetical order, and the dialog box always displays the first customereach time it is displayed.
2. Modify the example to display the total value of a new order on the view to select products forthe order (which corresponds to CProductView).
3. Extend the example in this chapter to enable the employee to be selected from the records in theEmployees table.
4. Extend the example further to allow the shipped via field in an order to be chosen from the recordsin the Shippers table.
1215
Chapter 21: Updating Data Sources
25905c21.qxd:WroxPro 2/21/08 9:25 AM Page 1215

25905c21.qxd:WroxPro 2/21/08 9:25 AM Page 1216

22More on Windows
Forms Applications
You already know quite a lot about the process of creating Windows Forms applications fromCLR Sketcher. In this chapter, you will explore some more controls that you can use in the GUI for a Windows Forms application. You’ll do this by assembling a single application incrementallythroughout the chapter, so by the end of the chapter you’ll have another Windows Forms programof a reasonable size.
In this chapter, you’ll learn:
❑ How to use a wider variety of controls to build an application GUI
❑ How to display a Web page in an application
❑ How to work with control containers
❑ How to create and display message boxes
Creating the Application GUICreate a new CLR project using the Windows Forms Application template and assign thename Ex22_01 to the project. You are going to develop Ex22_01 into a program to generate lot-tery entries. The program won’t be an ideal design because it includes controls that duplicatesome functions perhaps unnecessarily, but the benefit is that you get to try out various possibili-ties in a working application. I have chosen two lotteries with which I am familiar and for whichthe program generates entries; if these don’t match the lottery that you favor, you should be able to adjust the example quite easily.
25905c22.qxd:WroxPro 2/21/08 9:25 AM Page 1217

Let me make one point against entering a lottery — you would probably not choose the numbers 1 to 6 asyour entry because it is extremely unlikely that such an entry would win. Of course, the truth is that it’sjust as likely as any other more random-looking set of numbers you might choose, but the numbers 1 to 6have never come up as the winning entry in any lottery anywhere. So you can conclude that whateveryou choose — you lose.
First, display the Properties window for the form and change the value of its Text property to A WinningApplication. To display the controls that are available for use with the form, press Ctrl+Alt+X, or select theView > Toolbox menu item. Add a menu strip control to the top of the form by dragging a MenuStripfrom the Toolbox window to the form. Add three menu items to the menu strip with the text &Play,&Limits, and &Help. The & precedes the character that is the accelerator character for the menu item, soAlt+P is the accelerator for the Play menu. The Editor window containing the form with the menu stripshould now look as shown in Figure 22-1.
The Play menu won’t have a submenu but will cause a Click event to fire when it is clicked. Becauseyou’ll be handling the event, it is convenient to give the menu item a name that is shorter than the default.You can access the properties by right-clicking the control in the form and selecting Properties from thecontext menu, but this time try clicking menuStrip1 below the form and select Edit Items from the con-text menu. It displays the Items Collection Editor dialog box shown in Figure 22-2.
If you select the name in the left pane in the dialog box corresponding to the Play menu, the properties forit are displayed in the right pane. You can then edit the (Name) property value to make it playMenuItem.Figure 22-2 shows the dialog box after the change has been made. The advantage of using this dialog boxis that you can work through all the items on the menu strip adjusting the properties as necessary. You canalso add new items to the menu strip or rearrange the menu sequence by moving items up or down usingthe buttons to the right of the left pane.
Figure 22-1
1218
Chapter 22: More on Windows Forms Applications
25905c22.qxd:WroxPro 2/21/08 9:25 AM Page 1218
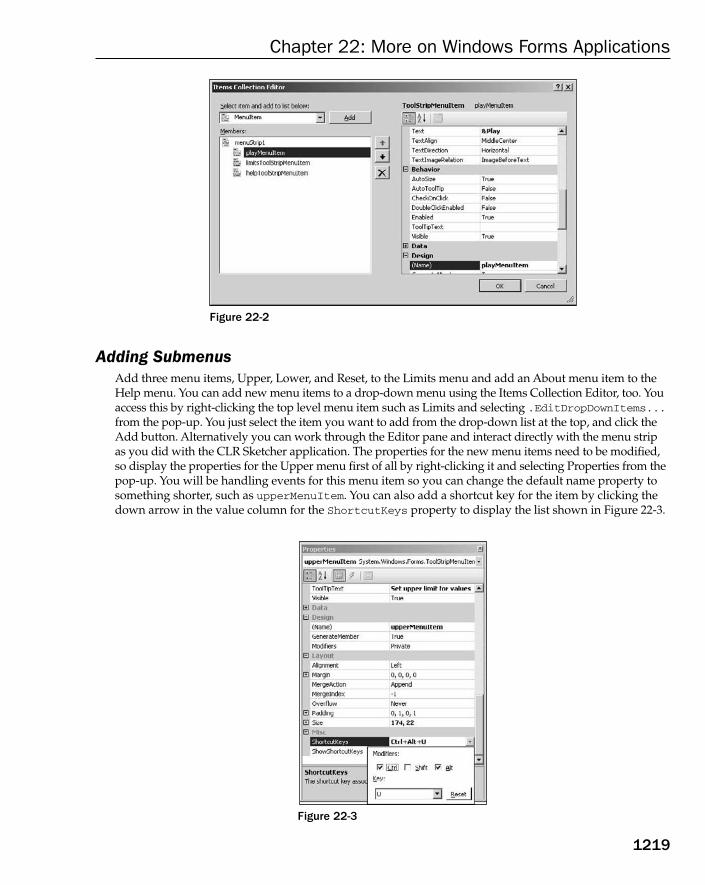
Figure 22-2
Adding SubmenusAdd three menu items, Upper, Lower, and Reset, to the Limits menu and add an About menu item to theHelp menu. You can add new menu items to a drop-down menu using the Items Collection Editor, too. Youaccess this by right-clicking the top level menu item such as Limits and selecting .EditDropDownItems...from the pop-up. You just select the item you want to add from the drop-down list at the top, and click theAdd button. Alternatively you can work through the Editor pane and interact directly with the menu stripas you did with the CLR Sketcher application. The properties for the new menu items need to be modified,so display the properties for the Upper menu first of all by right-clicking it and selecting Properties from thepop-up. You will be handling events for this menu item so you can change the default name property tosomething shorter, such as upperMenuItem. You can also add a shortcut key for the item by clicking thedown arrow in the value column for the ShortcutKeys property to display the list shown in Figure 22-3.
Figure 22-3
1219
Chapter 22: More on Windows Forms Applications
25905c22.qxd:WroxPro 2/21/08 9:25 AM Page 1219
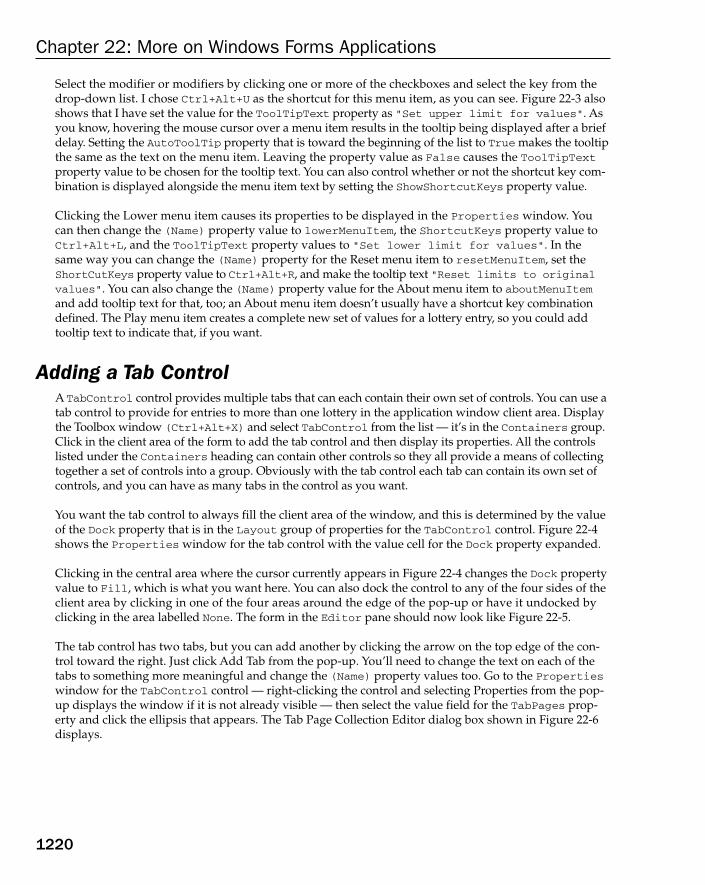
Select the modifier or modifiers by clicking one or more of the checkboxes and select the key from thedrop-down list. I chose Ctrl+Alt+U as the shortcut for this menu item, as you can see. Figure 22-3 alsoshows that I have set the value for the ToolTipText property as “Set upper limit for values”. Asyou know, hovering the mouse cursor over a menu item results in the tooltip being displayed after a briefdelay. Setting the AutoToolTip property that is toward the beginning of the list to True makes the tooltipthe same as the text on the menu item. Leaving the property value as False causes the ToolTipTextproperty value to be chosen for the tooltip text. You can also control whether or not the shortcut key com-bination is displayed alongside the menu item text by setting the ShowShortcutKeys property value.
Clicking the Lower menu item causes its properties to be displayed in the Properties window. You can then change the (Name) property value to lowerMenuItem, the ShortcutKeys property value toCtrl+Alt+L, and the ToolTipText property values to “Set lower limit for values”. In the same way you can change the (Name) property for the Reset menu item to resetMenuItem, set theShortCutKeys property value to Ctrl+Alt+R, and make the tooltip text “Reset limits to originalvalues”. You can also change the (Name) property value for the About menu item to aboutMenuItemand add tooltip text for that, too; an About menu item doesn’t usually have a shortcut key combinationdefined. The Play menu item creates a complete new set of values for a lottery entry, so you could addtooltip text to indicate that, if you want.
Adding a Tab ControlA TabControl control provides multiple tabs that can each contain their own set of controls. You can use atab control to provide for entries to more than one lottery in the application window client area. Displaythe Toolbox window (Ctrl+Alt+X) and select TabControl from the list — it’s in the Containers group.Click in the client area of the form to add the tab control and then display its properties. All the controlslisted under the Containers heading can contain other controls so they all provide a means of collectingtogether a set of controls into a group. Obviously with the tab control each tab can contain its own set ofcontrols, and you can have as many tabs in the control as you want.
You want the tab control to always fill the client area of the window, and this is determined by the valueof the Dock property that is in the Layout group of properties for the TabControl control. Figure 22-4shows the Properties window for the tab control with the value cell for the Dock property expanded.
Clicking in the central area where the cursor currently appears in Figure 22-4 changes the Dock propertyvalue to Fill, which is what you want here. You can also dock the control to any of the four sides of theclient area by clicking in one of the four areas around the edge of the pop-up or have it undocked byclicking in the area labelled None. The form in the Editor pane should now look like Figure 22-5.
The tab control has two tabs, but you can add another by clicking the arrow on the top edge of the con-trol toward the right. Just click Add Tab from the pop-up. You’ll need to change the text on each of thetabs to something more meaningful and change the (Name) property values too. Go to the Propertieswindow for the TabControl control — right-clicking the control and selecting Properties from the pop-up displays the window if it is not already visible — then select the value field for the TabPages prop-erty and click the ellipsis that appears. The Tab Page Collection Editor dialog box shown in Figure 22-6displays.
1220
Chapter 22: More on Windows Forms Applications
25905c22.qxd:WroxPro 2/21/08 9:25 AM Page 1220

Figure 22-4
Figure 22-5
The text on the tab should reflect the lottery name to which the controls on this tab relate, so I changedthe (Name) property value to lottoTab and the Text property value to Lotto, as shown in Figure 22-6.The (Name) property value is the name used in the Form1 class for the variable that references this tab,and the Text property value is the text on the tab.
1221
Chapter 22: More on Windows Forms Applications
25905c22.qxd:WroxPro 2/21/08 9:25 AM Page 1221

Figure 22-6
The tab labelled tabPage2 is for an entry to a second lottery, which in my case is called Euromillions.Again, you can choose whatever lottery you prefer. Click tabPage2 in the left pane to display the proper-ties for it in the right pane; after you select the new tab you should see that the name in the left pane fortabPage1 has been altered to lottoTab and the text on the first tab in the form has been updated. I setthe Text property value for tabPage2 as Euromillions and the (Name) property value as euroTab.You’ll use the third tab to display a Web page for entering a lottery so change the Text property value for tabPage3 to Web Page and the name property value to webTab. When you have completed that, you can click the OK button to close the dialog box.
Using GroupBox ControlsYou can use a GroupBox control to collect other controls together in a group. A GroupBox control alsodelineates the group with a line boundary and allows you to label the group if you want. A Lotto lotteryentry consists of six different numbers that are from 1 to 49 so you’ll want to group together the controlsthat will display these numbers. Add a GroupBox control to the Lotto tab by clicking the control in theToolbox window and then clicking in the Lotto tab. You can then modify the Text, (Name), and Dockproperty values for the GroupBox to the values shown in Figure 22-7.
The Text property value indicates the range of possible values for the lottery entry that is displayed onthis tab. The value for the Dock property makes the GroupBox control fill its container, which is the Lottotab on the Tab control. The (Name) property value determines the name of the variable in the Form1 classthat identifies this control.
The lottery entry on the Euromillions tab involves two groups of values, one group of five different valuesfrom 1 to 50 and a second group of two different “star” values each from 1 to 9. Numbers in the firstgroup can be the same as the two “star” values. Use yet another container in the Euromillions tab, so clickon SplitContainer in the Containers group in the Toolbox window and click in the Euromillions tabto place it there. To select a tab, first click the tab label at the top of the tab control — this selects the tabcontrol with the tab label you highlighted; you then click within the display area of the tab to select thehighlighted tab within the control. The Dock property value for the SplitContainer control is Fill bydefault so the control should fill the tab. The control has two panes that can each contain further controls.You can drag the divider between the panes to adjust the relative sizes of the panes.
1222
Chapter 22: More on Windows Forms Applications
25905c22.qxd:WroxPro 2/21/08 9:25 AM Page 1222

Figure 22-7
Display the Properties for the control and set the Orientation and (Name) properties, as shown inFigure 22-8.
The panes should now be separated by a horizontal divider, so drag this so that the lower pane is abouthalf the height of the upper pane. Then set the IsSplitterFixed property for the control to have thevalue True, as shown in Figure 22-8. This fixes the divider at the position you have set. If you leave theIsSplitterFixed property value as False, you allow the divider to be dragged to any position by theuser when the application is executing.
Figure 22-8
1223
Chapter 22: More on Windows Forms Applications
25905c22.qxd:WroxPro 2/21/08 9:25 AM Page 1223

You can group the contents of each pane in the SplitContainer control using a GroupBox control, soadd a GroupBox control to each of the panes. Set the Text, (Name), and Dock properties for the GroupBoxcontrol in the upper pane to have the values “Values 1 to 50”, euroValues, and Fill, respectively,and set the Text, (Name), and Dock properties for the GroupBox control in the lower pane to have thevalues “Values 1 to 9,” euroStars, and Fill, respectively. The Editor window should look likeFigure 22-9.
Figure 22-9
You have quite a hierarchy of controls now. The client area of the form contains a tab control and theEuromillions tab on the tab control contains a SplitContainer control and each of the panes in theSplitContainer control contains a GroupBox control. The next step is to add buttons to each of theGroupBox controls in the panes.
Using Button ControlsButton controls in the Common Controls group are regular buttons that typically appear in a dialogwindow. You’ll use a button control to house each value in a lottery entry. For the Euromillions lotteryyou’ll need seven buttons, five in the group box in the top pane with values from 1 to 50 and two in thegroup box in the bottom pane with values from 1 to 9.
Place five buttons in the group box in the upper pane on the Euromillions tab and add two more in thegroup box in the lower pane below to make an elegant arrangement. You can reposition any of the but-tons by dragging it with the mouse whereupon you should see vertical and/or horizontal alignmentguides displayed to help you align the control to the others. You can also use the Format > HorizontalSpacing > Make Equal menu item to make the spacing in a horizontal sequence of controls uniform.The other menu items in the Format menu are worth exploring; they provide for setting the vertical spac-ing, for aligning controls, for centering a selected group of controls in a form, and for adjusting the heightand width of the controls. You can select any number of controls by clicking them while holding the Ctrlkey down.
1224
Chapter 22: More on Windows Forms Applications
25905c22.qxd:WroxPro 2/21/08 9:25 AM Page 1224

Figure 22-10 shows my arrangement for the buttons on the Euromillions tab.
You’ll be generating values to display as the text on these buttons, so you need to change the propertiesfor each of them. I suggest you make the values for the Text property on the upper five buttons the val-ues 1, 2, 3, 4, and 5, and the values for the Text property on the two buttons in the lower pane 1 and 2.You can change the (Name) property for each button too. The buttons in the upper pane can have nameseuroValue1, euroValue2, through to euroValue5, and the two on the lower pane euroStar1 andeuroStar1. While you’re at it, you might like to change the BackColor property for each button thatdetermines the background color. I chose the color Silver for the top five buttons and Gold for the bot-tom two — where both colors are from the Web palette. When you have completed that, the applicationwindow with the Euromillions tab selected should look as shown in Figure 22-11.
Now you can return to the Lotto tab by clicking it in the Editor window. You can then add buttons tothat. The Lotto lottery is very simple: You just have to choose six different values from 1 to 49 for an entry.You therefore need to add six Button controls to the GroupBox that is already on the Lotto tab. After youhave arranged the buttons to your satisfaction, change the text on the buttons so they show the defaultvalues 1 to 6 and change the (Name) property for the buttons to lottoValue1, lottoValue2, through tolottoValue6. You can also set the BackColor property value for the buttons to a color of your choice —I chose the SkyBlue from the Web color palette. If you compile and execute the application, it shouldlook as shown in Figure 22-12.
Figure 22-10
Figure 22-11
1225
Chapter 22: More on Windows Forms Applications
25905c22.qxd:WroxPro 2/21/08 9:25 AM Page 1225
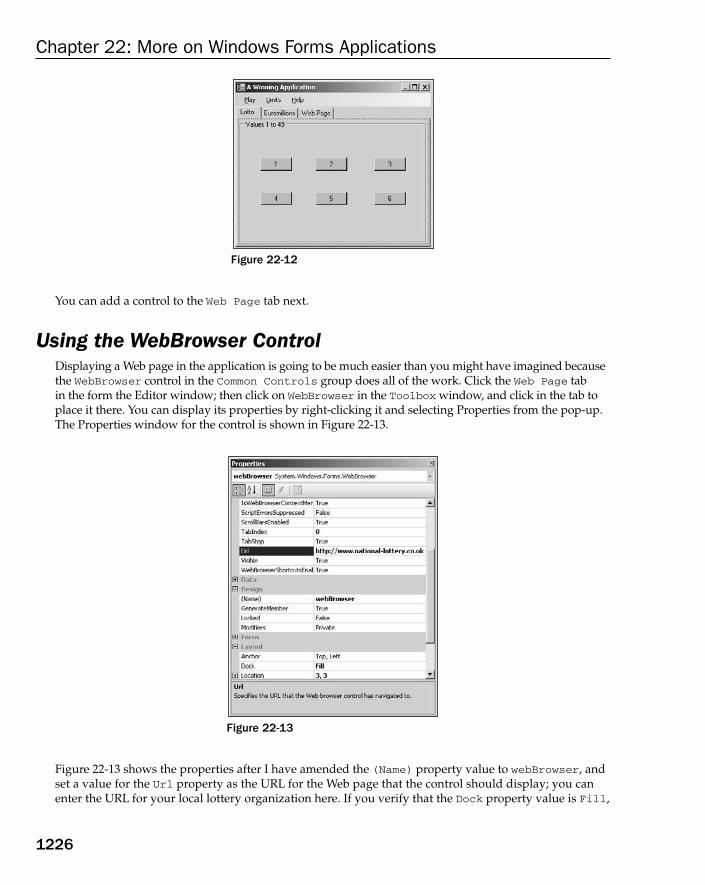
Figure 22-12
You can add a control to the Web Page tab next.
Using the WebBrowser ControlDisplaying a Web page in the application is going to be much easier than you might have imagined becausethe WebBrowser control in the Common Controls group does all of the work. Click the Web Page tab in the form the Editor window; then click on WebBrowser in the Toolbox window, and click in the tab toplace it there. You can display its properties by right-clicking it and selecting Properties from the pop-up.The Properties window for the control is shown in Figure 22-13.
Figure 22-13
Figure 22-13 shows the properties after I have amended the (Name) property value to webBrowser, andset a value for the Url property as the URL for the Web page that the control should display; you canenter the URL for your local lottery organization here. If you verify that the Dock property value is Fill,
1226
Chapter 22: More on Windows Forms Applications
25905c22.qxd:WroxPro 2/21/08 9:25 AM Page 1226

that’s all that’s required to get the Web page displayed on the tab. Of course, the page displays only if yourcomputer has an active Internet connection when you execute the program and the security settings foryour browser do not prevent it from being displayed. If you recompile the program an execute it oncemore, the Web Page tab should look more or less like Figure 22-14.
Figure 22-14
If the Web page doesn’t appear, it may be that your Internet connection is not active. Note how you getscrollbars by default in the WebBrowser control when they are necessary. You can also navigate by selectingactive links in the Web page. If the Web page looks scrambled, it may be because you have strict Internet set-tings, in which case adding the Web site to your Trusted Sites zone may fix the problem.
You have almost — but not quite — finished the GUI for the application. It’s time to review how theapplication is going to work in detail.
Operation of the Winning ApplicationClicking the Play menu item displays a complete entry on the tab that is currently visible in the applica-tion window; thus you can apply the Play item to the Lotto tab or the Euromillions tab. The valuesfor a lottery entry are displayed in ascending sequence. Switching to the Web Page tab displays the Webpage where you can enter a lottery.
After an entry has been created, you might want to be able to change a particular value — because youhave an irrational aversion to particular numbers, for instance, or because you don’t believe numbersover 30 are for you. Clicking a button could cause a new number to be generated to replace the numberon the button you clicked. Of course, the new number would have to be different from all the numbersin the current entry.
1227
Chapter 22: More on Windows Forms Applications
25905c22.qxd:WroxPro 2/21/08 9:25 AM Page 1227

Another possibility is that you might want to choose a specific number that you regard to be lucky — abirthday or a birth month, for example, or the number of peas you left on your plate at lunch today. Youcould arrange for this possibility by adding a context menu that displays when you right-click on a par-ticular button. A Choose menu item on the context menu could accommodate this. Dealing with theevent arising from clicking the context menu item needs a little work because you’ll have to providefor the entry of the data. The number that is entered also needs to be validated; the value must be withinthe permitted range, and it must not duplicate an existing value in the current group of buttons.
The Limits > Upper and Limits > Lower menu items allow a more constrained range of values to beused for generating an entry. There need to be checks here, too; the range must be inside the range that ispermitted for a given lottery, and the range must be wide enough to allow the required number of differ-ent values to be generated.
Finally the Help > About menu item should display a message box displaying information about theapplication.
The first step in implementing the application so that it operates as described previously is to add a contextmenu for the buttons that display lottery entry values. That’s surprisingly easy.
Adding a Context MenuAs you saw when developing CLR Sketcher, a context menu in a CLR Forms application is just anothercontrol. It’s the ContextMenuStrip control that is in the Menus & Toolbars group of controls in theToolbox window. Click the ContextMenuStrip control and then click in the grey area at the bottom of theEditor window to add the control to the application. The context menu displays in the form below theexisting menu. If you click in the first menu, you can insert the item name. You can enter &Choose for thetext for menu item, which makes Alt+C the accelerator for the item. It would be better to have a moremeaningful name for the context menu, so open the Properties window for the ContextMenuStripcontrol and change its (Name) property value to buttonContextMenu. You could also change the valuefor the (Name) property for the Choose menu item to chooseValue.
You can now enable the buttonContextMenu control as the context menu for each of the buttons on thetwo lottery entry tabs. To do this, set the value of the ContextMenuStrip property for each button to thename of the ContextMenuStrip control, buttonContextMenu. The name appears in the drop-down listin the value cell for the property so you just click it to set the value. You can do this for all the buttons on atab at once: Place the mouse cursor above and to the left of the group of buttons and drag the cursor so it’sbelow and to the right of the buttons before releasing it. This selects all the buttons and you change theContextMenuStrip property value in the Properties window for all the selected buttons.
Creating Event HandlersThe process of building the GUI graphically using the Form Design capability has automatically gener-ated code for the controls you have added. There is now a member of the Form1 class for every controlyou have added to the form, and code to initialize these has been added to the InitializeComponent()function. If you look at the function, you’ll see that it now contains a vast amount of code that sets proper-ties for individual controls and assembles controls into their containers. Creating the GUI graphically is abreeze — you’ll need a few more brain cells ticking over to move the application on from there.
1228
Chapter 22: More on Windows Forms Applications
25905c22.qxd:WroxPro 2/21/08 9:25 AM Page 1228

To make the program work the way that you want, you must create event handler functions for the eventsyou want the application to recognize and process, and implement these functions to make user interac-tions with the GUI do what you want. Although the code to handle the events cannot be generated auto-matically, the IDE can still help by generating the skeleton event handler functions and registering themwith the event delegates.
You can view the events for a control by clicking the events button in the Properties window for the control. This displays all the possible events for the control and you set the name of the function that is tohandle a particular event in the cell to the right of the event name. Of course, you identify handler func-tions only for the events you want to recognize and in most instances this is a very small proportion of the possible events for a control. You’ll want to create handler functions for the Click event for the menuitems for all the menu items and each of the buttons on the tabs. You did this in CLR Sketcher through the Properties window but there’s also a shortcut for creating a handler function for a control to respond to a Click event; you just double-click the control in the Editor window and the code is created and dis-played, and the function is registered as a handler for the event object. This creates a unique event handlerfor the control, but sometimes you’ll want to make a single function handle events of a given type for morethan one control. In this case, the Properties window route is the way to do it.
Event Handlers for Menu ItemsYou can start by creating an event handler function for the Play menu item. Double-clicking the menuitem creates the following handler function code:
private: System::Void playMenuItem_Click(System::Object^ sender,System::EventArgs^ e)
{}
This is a skeleton handler containing no code in the body of the function. Just to remind you of what youlearned with CLR Sketcher, the first parameter is a handle referencing the control from which the eventoriginated, and the second parameter provides information related to the event. The type of the first argu-ment when a handler is called corresponds to the type of the control that originated the event, and this isToolStripMenuItem^ in this case because the handler function is called when the Play menu item isclicked; the menu item handle is stored in the playMenuItem member of the Form1 class and you cancheck out its type in the class definition. Similarly, the actual type of the second argument to a Clickevent handler depends on the type of the control.
The handler function name that is generated by default is playMenuItem_Click. You must not changethe function name in the code. In fact, I recommend you do not change any names in the code that is auto-matically generated; always do it through the Properties window. If you don’t like the name that hasbeen created for the event handler function, you can change it through the Click event property value inthe Properties window for the control.
The name of the handler function has been registered with the event object by the following statement inthe InitializeComponent() function:
this->playMenuItem->Click += gcnew System::EventHandler(this, &Form1::playMenuItem_Click);
1229
Chapter 22: More on Windows Forms Applications
25905c22.qxd:WroxPro 2/21/08 9:25 AM Page 1229

This statement adds the function name to the Click delegate in the playMenuItem object that is a mem-ber of the Form1 class. You learned about delegates and how event handler functions are registered inChapter 9.
Adding Members to the Form1 ClassBefore you start implementing the handlers for the menu items, there are some additional fields thatyou’ll need to store data relating to the constraints on the values for the lottery entries. You know how toadd a new field to the Form1 class; it’s the way you have already used extensively to add members to aclass. Switch to Class View, right-click the Form1 class, and select Add > Add Variable from the con-text menu. Alternatively, you can just add the code manually, but be sure you don’t intrude on the regionof the class definition that is reserved for use by the Form Design operations. You’ll need to add the fol-lowing variables as private members:
private:int lottoValuesCount; // Number of values in Lotto entry int euroValuesCount; // Number of values in Euromillions entry int euroStarsCount; // Number of stars in Euromillions entry int lottoLowerLimit; // Minimum value allowed in Lotto int lottoUpperLimit; // Maximum value allowed in Lotto int lottoUserMinimum; // Lower lotto range limit from userint lottoUserMaximum; // Upper lotto range limit from user
int euroLowerLimit; // Minimum value allowed in Euromillions int euroUpperLimit; // Maximum value allowed in Euromillionsint euroStarsLowerLimit; // Minimum stars value allowed in Euromillions int euroStarsUpperLimit; // Maximum stars value allowed in Euromillions int euroUserMinimum; // Lower euro range limit from userint euroUserMaximum; // Upper euro range limit from userint euroStarsUserMinimum; // Lower euro stars range limit from userint euroStarsUserMaximum; // Upper euro stars range limit from user
You also need to add a private field of type Random to the Form1 class:
Random^ random; // Generates pseudo-random numbers
An object of type Random can generate pseudo-random values of various types. You’ll use this to generatethe values for a lottery entry.
All of these fields must be initialized in the class constructor. Make sure the Form1 constructor definitionlooks similar to this:
public ref class Form1 : public System::Windows::Forms::Form{public:
Form1(void): lottoValuesCount(6),euroValuesCount(5), euroStarsCount(2),lottoLowerLimit(1),lottoUpperLimit(49),lottoUserMinimum(lottoLowerLimit),lottoUserMaximum(lottoUpperLimit),euroLowerLimit(1), euroUpperLimit(50),euroStarsLowerLimit(1),euroStarsUpperLimit(9),
1230
Chapter 22: More on Windows Forms Applications
25905c22.qxd:WroxPro 2/21/08 9:25 AM Page 1230

euroUserMinimum(euroLowerLimit),euroUserMaximum(euroUpperLimit),euroStarsUserMinimum(euroStarsLowerLimit),euroStarsUserMaximum(euroStarsUpperLimit)
{InitializeComponent();//random = gcnew Random;
//}
That’s all the new class data members you need for now, so back to event handling.
Handling the Play Menu EventThe playMenuItem_Click() handler should create a new set of values on the buttons for the tab that iscurrently visible. Recall earlier in this chapter that you set the (Name) property values for the tabs in theTabControl control as lottoTab and euroTab. If you look in the lower pane of the Class View windowfor the now extensive Form1 class, you’ll find two variables of type TabPage^ with these names. Objectsof type TabPage have a Visible property of type bool that has the value true if the page is visible andfalse if it is not. This is just what you need to implement the handler for the Play menu item.
The outline logic for the handler can use the values of the Visible property for the tab pages like this:
private: System::Void playMenuItem_Click(System::Object^ sender,System::EventArgs^ e)
{if(lottoTab->Visible){// Generate and set values for Lotto entry
}else if(euroTab->Visible){// Generate and set values for Euromillions entry
}}
If the Visible property for the lottoTab page is true, you create a new Lotto lottery entry, and if theVisible property for the euroTab page is true, you create a Euromillions lottery entry. Although bothtabs cannot be visible at the same time, it’s as well to test positively for both tab pages because a usermight click the Play menu item when the Web Page tab is visible.
The process for generating a set of values for the two lotteries have some things in common. For lotto youmust generate six different random integers in a given range. For Euromillions you must generate five dif-ferent integers within a given range and then generate two different integers within another range. Ahelper function to generate an arbitrary number of integers within a given range would be useful. Youcould define such a function something like this:
void GetValues(array<int>^ values, int min, int max){// Fill the array with different random integers from min to max...
}
1231
Chapter 22: More on Windows Forms Applications
25905c22.qxd:WroxPro 2/21/08 9:25 AM Page 1231
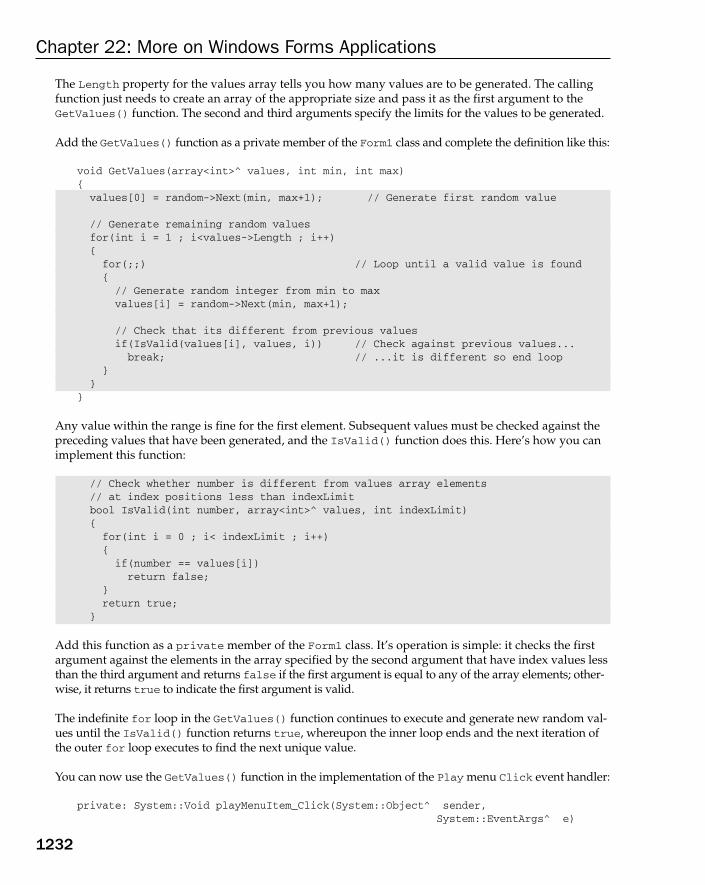
The Length property for the values array tells you how many values are to be generated. The callingfunction just needs to create an array of the appropriate size and pass it as the first argument to theGetValues() function. The second and third arguments specify the limits for the values to be generated.
Add the GetValues() function as a private member of the Form1 class and complete the definition like this:
void GetValues(array<int>^ values, int min, int max){values[0] = random->Next(min, max+1); // Generate first random value
// Generate remaining random valuesfor(int i = 1 ; i<values->Length ; i++){for(;;) // Loop until a valid value is found{// Generate random integer from min to maxvalues[i] = random->Next(min, max+1);
// Check that its different from previous valuesif(IsValid(values[i], values, i)) // Check against previous values...break; // ...it is different so end loop
}}
}
Any value within the range is fine for the first element. Subsequent values must be checked against thepreceding values that have been generated, and the IsValid() function does this. Here’s how you canimplement this function:
// Check whether number is different from values array elements// at index positions less than indexLimitbool IsValid(int number, array<int>^ values, int indexLimit){for(int i = 0 ; i< indexLimit ; i++){if(number == values[i])return false;
}return true;
}
Add this function as a private member of the Form1 class. It’s operation is simple: it checks the firstargument against the elements in the array specified by the second argument that have index values lessthan the third argument and returns false if the first argument is equal to any of the array elements; other-wise, it returns true to indicate the first argument is valid.
The indefinite for loop in the GetValues() function continues to execute and generate new random val-ues until the IsValid() function returns true, whereupon the inner loop ends and the next iteration ofthe outer for loop executes to find the next unique value.
You can now use the GetValues() function in the implementation of the Play menu Click event handler:
private: System::Void playMenuItem_Click(System::Object^ sender,System::EventArgs^ e)
1232
Chapter 22: More on Windows Forms Applications
25905c22.qxd:WroxPro 2/21/08 9:25 AM Page 1232

{array<int>^ values; // Variable to store a handle to array of integersif(lottoTab->Visible){// Generate and set values for Lotto entryvalues = gcnew array<int>(lottoValuesCount); // Create the arrayGetValues(values, lottoUserMinimum, lottoUserMaximum); // Generate valuesSetValues(values, lottoValues);
}else if(euroTab->Visible){// Generate and set values for Euromillions entryvalues = gcnew array<int>(euroValuesCount);GetValues(values, euroUserMinimum, euroUserMaximum);SetValues(values, euroValues);values = gcnew array<int>(euroStarsCount);GetValues(values, euroStarsUserMinimum, euroStarsUserMaximum);SetValues(values, euroStars);
}}
The Lotto entry is created in three steps:
1. Create the array to hold the values.
2. Generate the values by calling the GetValues() function.
3. Set the values as text on the buttons by calling the SetValues() function.
The sequence of steps is repeated twice for the Euromillions lottery entry: once for the set of five valuesand again for the set of two stars.
You can make use of the fact that the buttons are contained within a GroupBox control when imple-menting the SetValues() function. The Controls property for a GroupBox object returns a collectionon all the controls that have been added to the object. The collection that is returned by the Controlsproperty for a GroupBox itself has a default indexed property that accesses the controls in the collec-tion. The collection is first-in last-out like a stack, so index values for the property accesses the controlsin the reverse sequence from the sequence in which you added them to the group box. You can imple-ment the SetValues() function as a private member of the Form1 class like this:
// Set values as text on buttons in a GroupBox controlvoid SetValues(array<int>^ values, GroupBox^ groupBox){Array::Sort(values); // Sort values in ascending sequenceint count = values->Length - 1;for(int i = 0 ; i<groupBox->Controls->Count ; i++)safe_cast<Button^>(groupBox->Controls[i])->Text = values[count-i].ToString();
}
After sorting the array of values, you set the count variable as the index value for the last element in thearray. The loop then stores the string representation of the values in the Text property for each Button con-trol in reverse sequence. The expression groupBox->Controls[i] results in a handle of type Control^that references the control corresponding to index i in the collection, and you cast this to type Button^before accessing the Text property to set its value. The limitation of this approach is that the sequence in
1233
Chapter 22: More on Windows Forms Applications
25905c22.qxd:WroxPro 2/21/08 9:25 AM Page 1233

which you added buttons to the group box determines the sequence of buttons in the Controls collection.If this does not match the visible sequence of the buttons, the resulting button values will not appear inascending sequence.
You don’t have to implement the capability that the SetValues() function provides using the GroupBoxobject. All the buttons are explicit members of the Form1 class, so you could take the pedestrian approachand access each of them directly to set the value for the Text property. This will guarantee the buttonsequence is correct if you named them in sequence. You need at least two separate functions — one for theLotto entry and one for the Euromillions entry, although the latter might more conveniently be split intotwo functions making three in all. Here’s how the function to set values for the Lotto entry might look:
void SetNewValues(array<int>^ values){Array::Sort(values);lottoValue1->Text = values[0].ToString();lottoValue2->Text = values[1].ToString();lottoValue3->Text = values[2].ToString();lottoValue4->Text = values[3].ToString();lottoValue5->Text = values[4].ToString();lottoValue6->Text = values[5].ToString();
}
This function uses the handle to each button to set its Text property. Functions to set the Text propertyfor the Euromillions entry could be implemented in essentially the same way. You would then need tomodify the playMenuItem_Click() handler function to call these functions to set the values.
You can now recompile Ex22_01 to see if it all works. If you managed to enter all the code without typos,you should be able to generate a Lotto entry like the one shown in Figure 22-15.
Figure 22-15
The numbers on the buttons appear in ascending sequence so they look neat and tidy. If they do not appearin sequence, it may be because you did not add the buttons to the GroupBox control in an orderly manner.
The program also produces an entry for the Euromillions lottery as in Figure 22-16.
1234
Chapter 22: More on Windows Forms Applications
25905c22.qxd:WroxPro 2/21/08 9:25 AM Page 1234

Figure 22-16
Now that the basic functionality is there, it’s time to develop the application further.
Handling Events for the Limits MenuThere are three menu items on the Limits menu, and you’ll need a handler for the Click event for each.Double-click each of the menu items in turn to generate the handler functions; this will also register eachof them to handle the Click event.
The Click event handler for the Reset menu item is going to be the easiest to implement because all ithas to do is set the user limits back to be the same as the limits imposed by the lottery that’s currentlyvisible. The Click event handlers for the other two menu items are going to involve rather more work.You will have to make provision for the limit values to be entered somehow, and the obvious way to dothis is to display a dialog box when the menu item is clicked. Clearly, the next step in developing theapplication is to create a dialog box.
Creating a Dialog BoxThe Toolbox window provides several standard dialog boxes; all of them are quite fancy but none ofthem are suitable in this instance. Because you need something very specific in this program, you mustcreate the dialog box yourself. A dialog box is just a form with its FormBorderStyle property value setto FixedDialog, so you’ll get a lot of help from the Form Designer in creating the dialog box.
Select Project > Add New Item on the main menu, or press Ctrl+Shift+A to display the Add NewItem dialog. Select the UI from the Categories: list in the right pane and the template in the rightpane as Windows Form and enter the name as LottoLimitsDialog. This is the dialog window you’lldisplay when setting the upper or lower limits for the Lotto entry. You’ll create another dialog form forthe Euromillions lottery entry later on. When you click the Add button, a new form is added to the proj-ect and is displayed in the Editor window. The class type for the new dialog box is the name you sup-plied, LottoLimitsDialog.
Press F4 to display the Properties window for the new form. You can change the Text property valueto “Set Limits for Lotto Values”, and this text is displayed in the title bar of dialog window; you
1235
Chapter 22: More on Windows Forms Applications
25905c22.qxd:WroxPro 2/21/08 9:25 AM Page 1235

can adjust the width of the window by dragging the right side until the title bar text is visible. You canalso set the value for the StartPosition property in the Layout group of properties to Center Parentso the dialog window displays at the center of the parent form that displays it — this is the applicationwindow in the example. Because this is going to be a dialog box and not an application window, set theFormBorderStyle property value to FixedDialog. The dialog window should not be minimized ormaximized by the user when it is displayed, so set the MinimizeBox and MaximizeBox properties in theWindow Style group to False to remove the capability. A dialog box should be closed through the but-tons that you’ll provide in the dialog window, so set the ControlBox property value to False to removethe control and system boxes from the title bar.
The next step is to add two buttons toward the bottom of the form; these are going to be the OK andCancel buttons for the dialog box. Set the Text property value for the button to the left to be “OK” andthe (Name) property to be lottoOK. You can also set the value for the DialogResult property in theBehavior group to OK. The values for the same properties for the right button should be “Cancel”,lottoCancel, and Cancel, respectively. The effect of setting the DialogResult property value for thebuttons is that the value of the DialogResult property for the dialog box is set to the value correspon-ding to the value for the DialogResult property for the button that was clicked to close the dialog box.This gives you the possibility of testing programmatically for which button was used to close the dialogand execute different code depending on whether it was the OK button or the Cancel button.
Now that you have added the buttons to the dialog box, you can return to the dialog properties and setthe values for the AcceptButton and CancelButton properties in the Misc property group to lottoOKand lottoCancel, respectively. This has the effect that pressing the Enter key while the dialog box isdisplayed clicked the OK button, and pressing the Esc key clicks the Cancel button.
You have more than one control in the dialog box that you could use to permit a limit value to beentered. You can use a ListBox control to enable the user to select from a list of possible values, so you can try that here. You should add two Label controls to the dialog box form with two ListBoxcontrols alongside, as shown in Figure 22-17.
Figure 22-17
The (Name) property for the list boxes should be lottoLowerList and lottoUpperList for the topand bottom. As you see, I resized the ListBox controls to be the same height as the Label controls and a width sufficient to display a single limit value. I also changed the font Size property to 10 and theScrollAlwaysVisible property to True. Make sure the SelectionMode property value is One forboth list boxes, as you want to allow only one item to be selected from a list box at one time.
The GUI for the dialog box is complete, but to make it do what you want you are back in coding modeagain. You can start with the code that populates the ListBox controls with limit values.
1236
Chapter 22: More on Windows Forms Applications
25905c22.qxd:WroxPro 2/21/08 9:25 AM Page 1236

Adding a List to a ListBoxThe list that a ListBox controls is a set of objects that are stored as handles of type Object^, so any kindof object can be stored in the list. In the example you want to store a set of integer limit values in each listbox, and for the most part you are able to rely on autoboxing and unboxing to convert values of type intto and from objects of type Int32 whenever necessary. The Items property for a ListBox object returnsa reference to a collection of the objects in the list box; this collection has an Add() method that adds anobject that you pass as the argument to the list. A ListBox object has a large number of properties includ-ing the Enabled property that has the value true when the user can interact with the list box and thevalue false when interaction is to be inhibited.
The basic process for loading up the list for a list box is the same for both ListBox controls, so you couldcode a private function member of the LottoLimitsDialog class that is generalized to add a range ofintegers to a list box:
void SetList(ListBox^ listBox, int min, int max, int selected){listBox->BeginUpdate(); // Suppress drawing the listbox
for(int n = min ; n <= max ; n++)listBox->Items->Add(n);
listBox->EndUpdate(); // Resume drawing the list box
listBox->SelectedItem = Int32(selected);}
The arguments to the SetList() function are the list box for which the list is to be added, the minimumand maximum integers in the range to be added, and the integer that is to be selected in the list box. Thefunction adds integers from min to max inclusive to the list box using the Add() function for the collec-tion object that is returned by the Items property for the ListBox object. It also sets the selected valueas the item that is initially selected in the list when the list box is displayed by setting it as the value forthe SelectedItem property for the list box.
When the user selects a limit in the dialog box, you’ll need somewhere to put the value so that it can beaccessed from a function belonging to the Form1 object; the event handler for the menu items have responsi-bility for retrieving the limit value and storing it in the Form1 object. One way to do this is to add a coupleof private members to the LottoLimitsDialog class to store the upper and lower limit values and thenadd public properties to the class to make the values available externally. Adding the following code to theLottoLimitsDialog class definition does that:
private: int lowerLimit; // Lower limit from controlint upperLimit; // upper limit from control
public:property int LowerLimit // Property accessing lower limit{int get(){ return lowerLimit; }
void set(int limit){ lowerLimit = limit;
1237
Chapter 22: More on Windows Forms Applications
25905c22.qxd:WroxPro 2/21/08 9:25 AM Page 1237
lottoLowerList->SelectedItem = Int32(limit);}
}
property int UpperLimit // Property accessing upper limit{int get(){ return upperLimit; }
void set(int limit){ upperLimit = limit;lottoUpperList->SelectedItem = Int32(limit);
}}
You need to be able to update the properties because the Click event handler for the Limits > Resetmenu item changes the limits, and you want the ListBox objects to have whatever is the current upper orlower limit selected. As well as storing the value in the class object, you also update the ListBox objectsto reflect the new limits.
You can now create two public member functions in the LottoLimitsDialog class that sets up the twoListBox controls:
public:void SetLowerLimitsList(int min, int max, int selected){SetList(lottoLowerList, min, max, selected);lowerLimit = selected;
}
void SetUpperLimitsList(int min, int max, int selected){SetList(lottoUpperList, min, max, selected);upperLimit = selected;
}
Each function uses the SetList() function to set the range of values in the corresponding ListBox objectand then sets the selected value in the member for storing the limit.
Handling the Dialog Button EventsAdd an event handler function for the Click event for the OK Button object, so return to the Design tabfor the LottoLimitsDialog form and double-click the OK button to add the skeleton code.
You don’t need to add a handler for the Click event for the Cancel button. The effect of clicking thebutton is to close the dialog box and no further action is required.
You can implement the handler for the Click event for the OK button like this:
System::Void lottoOK_Click(System::Object^ sender, System::EventArgs^ e) {// If there’s a currently selected upper limit item, save it
1238
Chapter 22: More on Windows Forms Applications
25905c22.qxd:WroxPro 2/21/08 9:25 AM Page 1238

if(lottoUpperList->SelectedItem != nullptr)upperLimit = safe_cast<Int32>(lottoUpperList->SelectedItem);
// If there’s a currently selected lower limit item, save itif(lottoLowerList->SelectedItem != nullptr)lowerLimit = safe_cast<Int32>(lottoLowerList->SelectedItem);
}
The function first stores the upper limit value from the lottoUpperList ListBox object in the membervariable you added for that purpose. The SelectedItem property for a ListBox object makes the cur-rently selected item available as a handle of type Object^ and as a precaution the code verifies that thehandle returned is not null. Before storing the selected item you must cast it to its actual type — typeInt32. Auto-unboxing then takes care of converting the object to an integer. The handler next stores thelower limit value from the other ListBox object in the same way. When the handler finishes executing,the dialog box is closed automatically.
Controlling the State of the ListBox ObjectsThe same dialog object is used in the response to the Click events for both the Limits > Upper andLimits > Lower menu items, but you don’t want to allow both list boxes to be changed in either case.For the Upper menu item event you’ll want the selection of a lower limit to be inhibited, and for theLower menu item you’ll want the list box for the upper limit to be inhibited. You could add a couple ofpublic function members to the LottoLimitsDialog class to make this possible. Here’s the function toset the state of the ListBox objects for the Upper menu item:
void SetUpperEnabled(){lottoUpperList->Enabled = true; // Enable upper list boxlottoLowerList->Enabled = false; // Disable lower list box
}
You set the Enabled property for the lottoUpperList object to true to allow the user to interact withit. Setting the Enabled property for lottoLowerList to false makes it read-only.
For the Lower menu item you do the reverse:
void SetLowerEnabled(){lottoUpperList->Enabled = false; // Disable upper list boxlottoLowerList->Enabled = true; // Enable lower list box
}
You have done a lot of work to get the dialog object to behave as you want in the application, but you don’tyet have a dialog object. The application window object takes care of that.
Creating the Dialog ObjectThe Form1 class constructor can create the dialog object. It can also initialize the ListBox objects in thedialog. Add a private member to the Form1 class that stores the handle to the dialog box:
private: LottoLimitsDialog^ lottoLimitsDialog;
1239
Chapter 22: More on Windows Forms Applications
25905c22.qxd:WroxPro 2/21/08 9:25 AM Page 1239

Add the following lines of code to the body of the Form1 constructor:
lottoLimitsDialog = gcnew LottoLimitsDialog;lottoLimitsDialog->SetLowerLimitsList(1, lottoUpperLimit-lottoValuesCount+1,
lottoUserMinimum);lottoLimitsDialog->SetUpperLimitsList(lottoValuesCount, lottoUpperLimit,
lottoUserMaximum);
This code is very straightforward. The first statement creates the dialog object. The next two statementscall the functions that initialize the lists in the ListBox objects. The maximum value in the ListBoxobject that sets the lower limit is calculated so that it permits the required number of values for an entryto be created. If the maximum value for a value is 49 and the number of values in an entry is 6, the maxi-mum for the lower limit must be 44 — if it was any higher you could not create six different values. Thesame reasoning applies to the minimum value for the upper limit; it cannot be less than the number of val-ues in an entry. The selected item for the list boxes are the lottoUserMinimum and lottoUserMaximumvalues.
Because you refer to the LottoLimitsDialog class name in the Form1 class constructor, you’ll need toadd an #include directive for the class definition to Form1.h:
#include “LottoLimitsDialog.h”
Using the Dialog BoxYou’ll put the dialog box into operation in the code for the Click event handlers for the Upper and Lowermenu items in the Limits menu. To display a dialog box as a modal dialog box, you call the ShowDialog()function for the dialog object. Optionally you can pass the handle to the parent form as the argument to theShowDialog() function. You can implement the Click event handler functions like this:
System::Void lowerMenuItem_Click(System::Object^ sender, System::EventArgs^ e) {if(lottoTab->Visible){lottoLimitsDialog->SetLowerEnabled();::DialogResult result = lottoLimitsDialog->ShowDialog(this);
if(result == ::DialogResult::OK){// Update user limits from dialog propertieslottoUserMaximum = lottoLimitsDialog->UpperLimit;lottoUserMinimum = lottoLimitsDialog->LowerLimit;
}}
}
System::Void upperMenuItem_Click(System::Object^ sender, System::EventArgs^ e) {if(lottoTab->Visible){lottoLimitsDialog->SetUpperEnabled();::DialogResult result = lottoLimitsDialog->ShowDialog(this);
1240
Chapter 22: More on Windows Forms Applications
25905c22.qxd:WroxPro 2/21/08 9:25 AM Page 1240

if(result == ::DialogResult::OK){// Update user limits from dialog propertieslottoUserMaximum = lottoLimitsDialog->UpperLimit;lottoUserMinimum = lottoLimitsDialog->LowerLimit;
}}
}
These two functions both work in the same way; they call the function to set the list box states and thendisplay the dialog box as a modal dialog box by calling the ShowDialog() function for the dialog object.If you wanted to display the dialog box as a modeless dialog box, you call the Show() function for thedialog object instead.
When you call the ShowDialog() function, it does not return until the dialog box closes. This meansthat the code to update the limits is not executed until the new limits have been recorded in the dialogobject by the Click event handler for the lottoOK button. When you display a dialog box as modelessby calling the Show() function, the function returns immediately. Thus if you need to be able to accessdata that might have been changed in the dialog box, you need another way to do it. Adding a handlerfunction for the Closing event for the dialog form is one possibility; another would be to deal withtransferring the data in the handler for the button that closes the dialog box.
The ShowDialog() function returns a value of the enumeration type DialogResult and you store this inthe local variable, result. The return value from the ShowDialog() function indicates which button in thedialog was clicked, and if the value is the enumeration constant ::DialogResult::OK, it indicates that theOK button was clicked. Thus the code in each handler function updates only the lottoUserMaximum andLottoUserMinimum fields when the OK button was used to close the dialog.
Note the use of the :: operator in the type specification ::DialogResult and in the expression::DialogResult::OK. The scope resolution operator is necessary preceding the DialogResult nameto distinguish the name of the enumeration at global scope from the property with the same name that is a member of the Form1 class.
Of course, you could access the DialogResult property for the lottoLimitsDialog object directly, soyou could write the if statement as:
if(lottoLimitsDialog->DialogResult == ::DialogResult::OK){
// Update user limits from dialog propertieslottoUserMaximum = lottoLimitsDialog->UpperLimit;lottoUserMinimum = lottoLimitsDialog->LowerLimit;
}
The former version is better because it is obvious that you are checking the value returned by theShowDialog() function.
At the moment, the Click event handler for the OK button does not validate the input values. It is cur-rently quite possible to set the lower and upper limits to values that make it impossible to assign sixunique values for the lottery entry. You can use the DialogResult property for the form to deal withthe problem.
1241
Chapter 22: More on Windows Forms Applications
25905c22.qxd:WroxPro 2/21/08 9:25 AM Page 1241

Validating the InputThe difference between the upper and lower limits that the user chooses must be greater than or equal to5 if there are to be 6 unique values in a Lotto entry. You could modify the Click event handler for the OKbutton in the dialog class to check for this:
System::Void lottoOK_Click(System::Object^ sender, System::EventArgs^ e) {int upper = 0;int lower = 0;// If there’s a currently selected upper limit item, save itif(lottoUpperList->SelectedItem != nullptr)upper = safe_cast<Int32>(lottoUpperList->SelectedItem);
// If there’s a currently selected lower limit item, save itif(lottoLowerList->SelectedItem != nullptr)lower = safe_cast<Int32>(lottoLowerList->SelectedItem);
if(upper - lower < 5){MessageBox::Show(L”Upper limit: “ + upper + L” Lower limit: “ + lower +
L”\nUpper limit must be at least 5 greater that the lower limit.” +L”\nTry Again.”,L”Limits Invalid”, MessageBoxButtons::OK,MessageBoxIcon::Error);
DialogResult = ::DialogResult::None;}else{upperLimit = upper;lowerLimit = lower;
}}
Now the function saves the values selected in the ListBox objects in the local variables lower and upper.If the values differ by less than 5, a message box is displayed and closing of the dialog box is inhibited bysetting the value of the DialogResult property to None. The static Show() function in the MessageBoxclass displays a message box that is customized by the arguments to the function. This version of theShow() function used here accepts four arguments as shown in the following table.
Parameter Type Description
String^ The text to be displayed in the message box.
String^ The text to appear in the title bar of the message box.
MessageBoxButtons An enumeration constant specifying the buttons to appear in the mes-sage box. The MessageBoxButtons enumeration defines the followingvalues:
OK, OKCancel, YesNo, YesNoCancel, RetryCancel,AbortRetryIgnore
1242
Chapter 22: More on Windows Forms Applications
25905c22.qxd:WroxPro 2/21/08 9:26 AM Page 1242
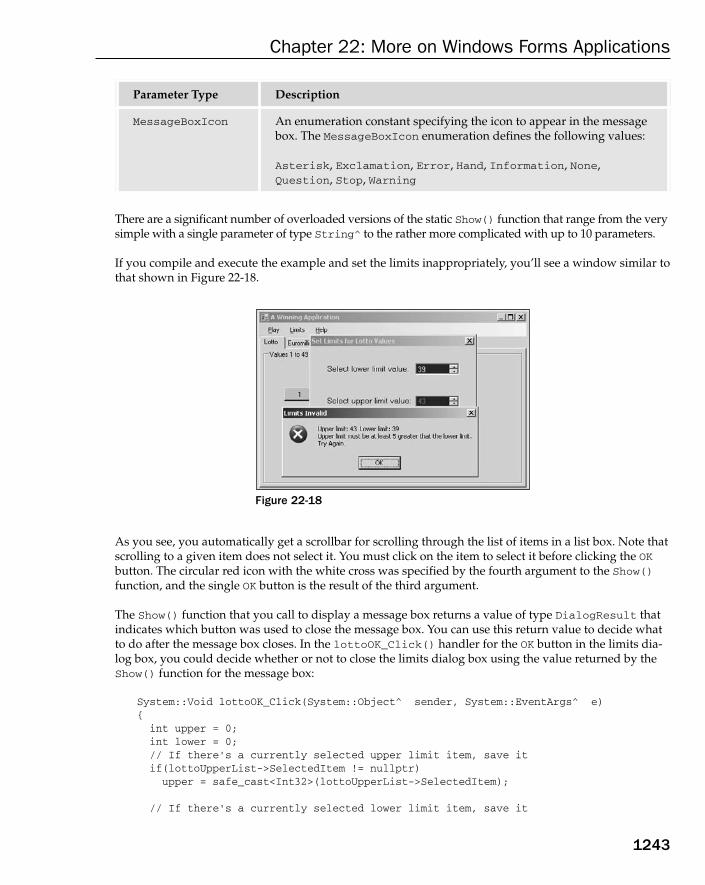
There are a significant number of overloaded versions of the static Show() function that range from the verysimple with a single parameter of type String^ to the rather more complicated with up to 10 parameters.
If you compile and execute the example and set the limits inappropriately, you’ll see a window similar tothat shown in Figure 22-18.
Figure 22-18
As you see, you automatically get a scrollbar for scrolling through the list of items in a list box. Note thatscrolling to a given item does not select it. You must click on the item to select it before clicking the OKbutton. The circular red icon with the white cross was specified by the fourth argument to the Show()function, and the single OK button is the result of the third argument.
The Show() function that you call to display a message box returns a value of type DialogResult thatindicates which button was used to close the message box. You can use this return value to decide whatto do after the message box closes. In the lottoOK_Click() handler for the OK button in the limits dia-log box, you could decide whether or not to close the limits dialog box using the value returned by theShow() function for the message box:
System::Void lottoOK_Click(System::Object^ sender, System::EventArgs^ e) {
int upper = 0;int lower = 0;// If there’s a currently selected upper limit item, save itif(lottoUpperList->SelectedItem != nullptr)
upper = safe_cast<Int32>(lottoUpperList->SelectedItem);
// If there’s a currently selected lower limit item, save it
Parameter Type Description
MessageBoxIcon An enumeration constant specifying the icon to appear in the messagebox. The MessageBoxIcon enumeration defines the following values:
Asterisk, Exclamation, Error, Hand, Information, None,Question, Stop, Warning
1243
Chapter 22: More on Windows Forms Applications
25905c22.qxd:WroxPro 2/21/08 9:26 AM Page 1243

if(lottoLowerList->SelectedItem != nullptr)lower = safe_cast<Int32>(lottoLowerList->SelectedItem);
if(upper - lower < 5){::DialogResult result = MessageBox::Show(L”Upper limit: “ + upper + L” Lower limit: “ + lower +
L”\nUpper limit must be at least 5 greater that the lower limit.” +L”\nTry Again.”,L”Limits Invalid”, MessageBoxButtons::OKCancel,MessageBoxIcon::Error);
if(result == ::DialogResult::OK)DialogResult = ::DialogResult::None;
elseDialogResult = ::DialogResult::Cancel;
}else{
upperLimit = upper;lowerLimit = lower;
}}
Because the third argument to the Show() function is MessageBoxButtons::OKCancel, the messagebox now has two buttons, as shown in Figure 22-19.
Figure 22-19
In the Click event handler for the OK button in the limits dialog box you store the return value from theShow() function in result. The type for result has to be specified using the scope resolution operator.Otherwise, it is interpreted by the compiler as the DialogResult property for the lottoLimitsDialogobject, and the code does not compile. If result contains the value ::DialogResult::OK, you set theDialogResult property for the lottoLimitsDialog object to ::DialogResult::None, which preventsthe dialog box from closing and allows the limit to be changed. Otherwise you set the DialogResultproperty for the dialog to ::Dialog::Cancel, which has the same effect as clicking the Cancel buttonfor the dialog box so it closes.
1244
Chapter 22: More on Windows Forms Applications
25905c22.qxd:WroxPro 2/21/08 9:26 AM Page 1244

Handling the Reset Menu Item EventYou can implement the event handler for the Reset menu item like this:
System::Void resetMenuItem_Click(System::Object^ sender, System::EventArgs^ e) {if(lottoTab->Visible){// Reset user limits for LottolottoUserMaximum = lottoUpperLimit; lottoUserMinimum = lottoLowerLimit; lottoLimitsDialog->UpperLimit = lottoUpperLimit;lottoLimitsDialog->LowerLimit = lottoLowerLimit;
}else if(euroTab->Visible){// Reset user limits for EuromillionseuroUserMaximum = euroUpperLimit; euroUserMinimum = euroLowerLimit; euroStarsUserMaximum = euroStarsUpperLimit; euroStarsUserMinimum = euroStarsLowerLimit;
// Code to update Euromillions limits dialog...}
}
This just resets the limits in the fields in the Form1 object and then updates the properties in the dialogobject accordingly. You still have to add code to this function to deal with resetting the dialog box towhich you have yet added the application that will handle the input for the Euromillions lottery limits.
You can now recompile the program and try resetting the limits for the Lotto entry after you have changedthem. Selecting the Limits > Reset menu item resets both limits to their original values.
Adding the Second DialogThe second dialog box for setting limits for the Euromillions lottery is going to be easy; it’s the sameprocess as for the first dialog box. Create a new form in the project by pressing Ctrl+Shift+A to dis-play the Add New Item dialog box and select the UI category and the Windows Form template; thename should be EuroLimitsDialog. You can set property values for this dialog box in much the sameway as for the previous dialog.
Form Property Value to be Set
FormBorderStyle FixedDialog
ControlBox False
MinimizeBox False
MaximizeBox False
Text Set Euromillions Limits
1245
Chapter 22: More on Windows Forms Applications
25905c22.qxd:WroxPro 2/21/08 9:26 AM Page 1245

You can add OK and Cancel buttons to the dialog form next. Set the Text property values for the buttonsto “OK” and “Cancel” and the (Name) property values to euroOK and euroCancel, respectively. Youshould also set the DialogResult property values to OK and Cancel. With the buttons defined, you canreturn to the properties for the dialog form and set the AcceptButton and CancelButton property val-ues to euroOK and euroCancel, respectively. Set the value of the AcceptButton property for the formto be euroOK.
In the interests of getting experience of a wider range of controls, you’ll forego consistency in the appli-cation, and you won’t use ListBox controls to handle the input as you did in the first dialog box. In thisdialog box you need to provide for the entry of upper and lower limits for the set of five values as wellas the set of two stars. It won’t make for a very elegant implementation, but to maximize the variety ofcontrols you work with you’ll use NumericUpDown controls for the former and ComboBox controls forthe latter. You can add these controls together with associated Label controls to the dialog form witheach group of controls placed within a GroupBox control, as illustrated in Figure 22-20. Obviously you’llneed to add the GroupBox controls first and then place the other controls within them.
Figure 22-20
You can set the value of the Text property for each Label control as shown in Figure 22-20. The font sizefor the labels has been changed to 9 point. To identify the function of the controls within each group box,the value for the Text property for the upper group box has been set to “Set Values Limits” and thatof the lower group box “Set Stars Limits.” You won’t be accessing the GroupBox objects in the code,so the (Name) property values for these are of no importance.
The values for the (Name) properties for the NumericUpDown controls in the upper group box should beset to lowerValuesLimits and upperValuesLimits. You can set the values that these controls displayby setting values for the Maximum and Minimum properties. These values for the lowerValuesLimitscontrol on the left should be 45 and 1 respectively, and the values for the Maximum and Minimum proper-ties for the control to the right should be 49 and 5 respectively. You can set the value of the Value prop-erty for the upperValuesLimit control to 49; this is the value displayed initially in the control. If youalso set the ReadOnly property value for each of the NumericUpDown controls to True, this prevents theentry of a value from the keyboard. You are using the NumericUpDown control very simply here. You can
1246
Chapter 22: More on Windows Forms Applications
25905c22.qxd:WroxPro 2/21/08 9:26 AM Page 1246
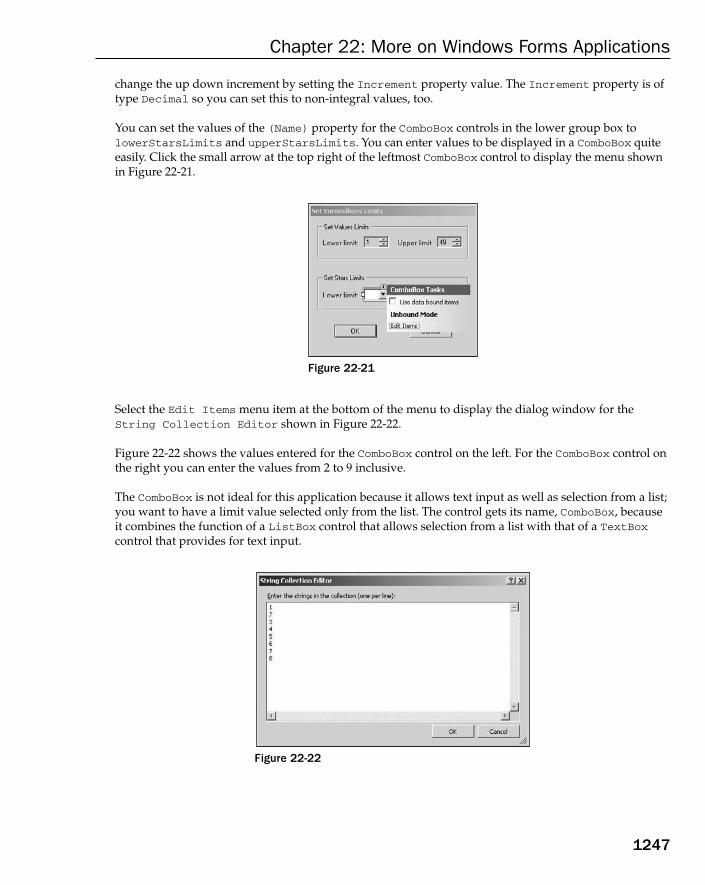
change the up down increment by setting the Increment property value. The Increment property is oftype Decimal so you can set this to non-integral values, too.
You can set the values of the (Name) property for the ComboBox controls in the lower group box tolowerStarsLimits and upperStarsLimits. You can enter values to be displayed in a ComboBox quiteeasily. Click the small arrow at the top right of the leftmost ComboBox control to display the menu shownin Figure 22-21.
Figure 22-21
Select the Edit Items menu item at the bottom of the menu to display the dialog window for theString Collection Editor shown in Figure 22-22.
Figure 22-22 shows the values entered for the ComboBox control on the left. For the ComboBox control onthe right you can enter the values from 2 to 9 inclusive.
The ComboBox is not ideal for this application because it allows text input as well as selection from a list;you want to have a limit value selected only from the list. The control gets its name, ComboBox, becauseit combines the function of a ListBox control that allows selection from a list with that of a TextBoxcontrol that provides for text input.
Figure 22-22
1247
Chapter 22: More on Windows Forms Applications
25905c22.qxd:WroxPro 2/21/08 9:26 AM Page 1247

Getting the Data from the Dialog ControlsYou’ll get the limit values back from the controls in essentially the same way as you did for the dialogbox for Lotto limits. You can add some new data members to the EuroLimitsDialog class to hold theuser limit values first:
private:int lowerValuesLimit;int upperValuesLimit;int lowerStarsLimit;int upperStarsLimit;
To be on the safe side you had better initialize these members in the class constructor:
EuroLimitsDialog(void):lowerValuesLimit(1),upperValuesLimit(50),lowerStarsLimit(1),upperStarsLimit(9)
{InitializeComponent();////TODO: Add the constructor code here//
}
You’ll also need some public properties defined in the dialog class to make the limits accessible from theapplication window object:
public:property int LowerValuesLimit{int get() { return lowerValuesLimit; }
void set(int limit){lowerValuesLimit = limit;lowerValuesLimits->Value = limit; // Set as selected in NumericUpDown
}}property int UpperValuesLimit{int get() { return upperValuesLimit; }
void set(int limit){upperValuesLimit = limit;upperValuesLimits->Value = limit; // Set as selected in NumericUpDown
}}property int LowerStarsLimit{
1248
Chapter 22: More on Windows Forms Applications
25905c22.qxd:WroxPro 2/21/08 9:26 AM Page 1248
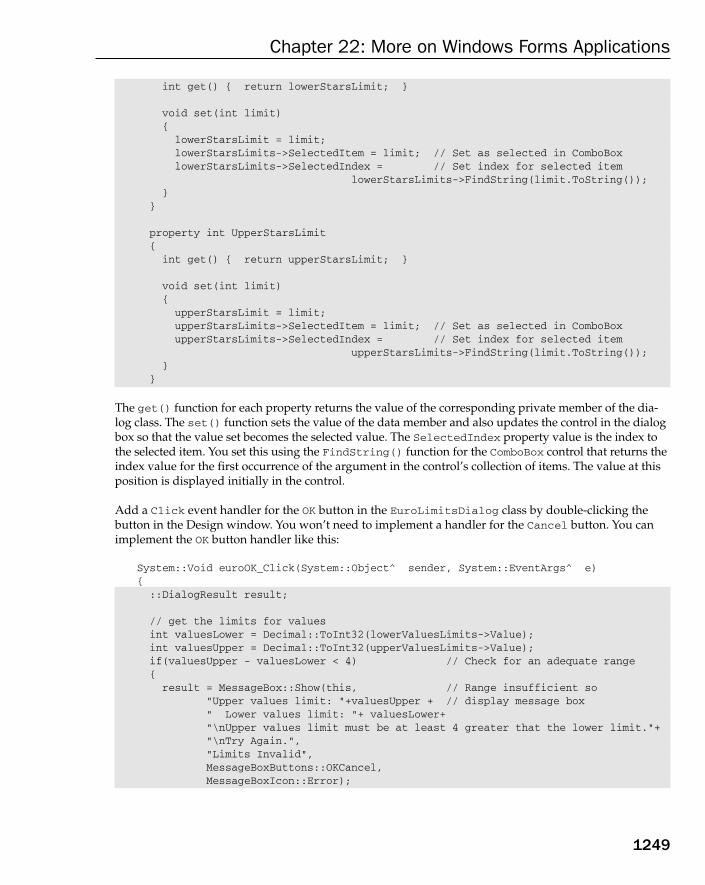
int get() { return lowerStarsLimit; }
void set(int limit){lowerStarsLimit = limit;lowerStarsLimits->SelectedItem = limit; // Set as selected in ComboBox lowerStarsLimits->SelectedIndex = // Set index for selected item
lowerStarsLimits->FindString(limit.ToString());}
}
property int UpperStarsLimit{int get() { return upperStarsLimit; }
void set(int limit){upperStarsLimit = limit;upperStarsLimits->SelectedItem = limit; // Set as selected in ComboBox upperStarsLimits->SelectedIndex = // Set index for selected item
upperStarsLimits->FindString(limit.ToString());}
}
The get() function for each property returns the value of the corresponding private member of the dia-log class. The set() function sets the value of the data member and also updates the control in the dialogbox so that the value set becomes the selected value. The SelectedIndex property value is the index tothe selected item. You set this using the FindString() function for the ComboBox control that returns theindex value for the first occurrence of the argument in the control’s collection of items. The value at thisposition is displayed initially in the control.
Add a Click event handler for the OK button in the EuroLimitsDialog class by double-clicking thebutton in the Design window. You won’t need to implement a handler for the Cancel button. You canimplement the OK button handler like this:
System::Void euroOK_Click(System::Object^ sender, System::EventArgs^ e) {::DialogResult result;
// get the limits for values int valuesLower = Decimal::ToInt32(lowerValuesLimits->Value);int valuesUpper = Decimal::ToInt32(upperValuesLimits->Value);if(valuesUpper - valuesLower < 4) // Check for an adequate range{result = MessageBox::Show(this, // Range insufficient so
“Upper values limit: “+valuesUpper + // display message box“ Lower values limit: “+ valuesLower+“\nUpper values limit must be at least 4 greater that the lower limit.”+“\nTry Again.”,“Limits Invalid”,MessageBoxButtons::OKCancel,MessageBoxIcon::Error);
1249
Chapter 22: More on Windows Forms Applications
25905c22.qxd:WroxPro 2/21/08 9:26 AM Page 1249
if(result == ::DialogResult::OK) // If message box OK clickedDialogResult = ::DialogResult::None; // prevent dialog from closing
else // Messag box Cancel clickedDialogResult = ::DialogResult::Cancel; // so close the dialog
return;}
// Get stars limitsint starsLower = lowerStarsLimits->SelectedItem == nullptr ?
lowerStarsLimit :Int32::Parse(lowerStarsLimits->SelectedItem->ToString());
int starsUpper = upperStarsLimits->SelectedItem == nullptr ?upperStarsLimit :Int32::Parse(upperStarsLimits->SelectedItem->ToString());
if(starsUpper - starsLower < 1) // Check for an adequate range{result = MessageBox::Show(this, // Range insufficient so
“Upper stars limit: “+starsUpper + // so display message box“ Lower stars limit: “+ starsLower+“\nUpper stars limit must be at least 1 greater that the lower limit.”+“\nTry Again.”,“Limits Invalid”,MessageBoxButtons::OKCancel,MessageBoxIcon::Error);
if(result == ::DialogResult::OK) // If message box OK clickedDialogResult = ::DialogResult::None; // prevent dialog from closing
else // Message box Cancel clickedDialogResult = ::DialogResult::Cancel; // so close the dialog
}// Store the new limitslowerValuesLimit = valuesLower;upperValuesLimit = valuesUpper;lowerStarsLimit = starsLower;upperStarsLimit = starsUpper;
}
The Value property for a NumericUpDown control returns a value of type Decimal. To convert this totype Int32 you pass it as the argument to the static ToInt32() function in the Decimal class. The valuethat this function returns is automatically unboxed so that it can be stored in the variable of type int.
The value returned by the SelectedItem property for a ComboBox control is of type Object^, so to beon the safe side you check whether it is null. If it is null, you set the local variable to the current valuerecorded in the dialog object; if it isn’t null, you store the value represented by the SelectedItem prop-erty. You can’t store the value directly, but calling the ToString() function for the object produces astring representation of the object that you are then able to convert to type int using the static Parse()function in the Int32 class.
1250
Chapter 22: More on Windows Forms Applications
25905c22.qxd:WroxPro 2/21/08 9:26 AM Page 1250

You will need a private member of the Form1 class that stores a handle to the new dialog box:
private:EuroLimitsDialog^ euroLimitsDialog; // Dialog to set Euromillions limits
You can add the following statements to the end of the code in the Form1 class constructor to create thedialog object and update the properties for the stars limit values:
euroLimitsDialog = gcnew EuroLimitsDialog;euroLimitsDialog->LowerStarsLimit = euroStarsLowerLimit;euroLimitsDialog->UpperStarsLimit = euroStarsUpperLimit;
By setting the LowerStarsLimit and UpperStarsLimit properties for the dialog object, you ensurethat the ComboBox controls show these values when the dialog box is initially displayed. If there is noselected item set for a ComboBox control, it displays nothing initially.
Don’t forget to add the #include directive for the EuroLimitsDialog class definition to Form1.h:
#include “EuroLimitsDialog.h”
Disabling Input ControlsWhen the Limits > Upper menu item is clicked, you want to prevent the input for a lower limit beingentered, and when the Limits > Lower menu item is selected, you want to prevent input for an upperlimit value. You can add a couple of member functions to the EuroLimitsDialog class to make thispossible:
public:// Disables controls for selecting upper limitsvoid SetLowerEnabled(void){upperValuesLimits->Enabled = false;upperStarsLimits->Enabled = false;lowerValuesLimits->Enabled = true;lowerStarsLimits->Enabled = true;
}
// Disables controls for selecting lower limitsvoid SetUpperEnabled(void){upperValuesLimits->Enabled = true;upperStarsLimits->Enabled = true;lowerValuesLimits->Enabled = false;lowerStarsLimits->Enabled = false;
}
The value of the Enabled property for a control determines whether it is enabled. A true value enablesthe control, and a value of false disables it so the user cannot interact with it. The SetLowerEnabled()function disables the controls used to enter upper limits and enables those for entry of lower limits. TheSetUpperEnabled() function does the reverse.
1251
Chapter 22: More on Windows Forms Applications
25905c22.qxd:WroxPro 2/21/08 9:26 AM Page 1251

Updating the Limits Menu Item HandlersThe last step to complete the support for entering limits for the Euromillions lottery is to update theClick event handlers in the Form1 class for the items in the Limits menu. The handler for the Uppermenu item should be modified as follows:
System::Void upperMenuItem_Click(System::Object^ sender, System::EventArgs^ e) {::DialogResult result;if(lottoTab->Visible){
lottoLimitsDialog->SetUpperEnabled();result = lottoLimitsDialog->ShowDialog(this);if(result == ::DialogResult::OK){
lottoUserMaximum = lottoLimitsDialog->UpperLimit;lottoUserMinimum = lottoLimitsDialog->LowerLimit;
}}else if(euroTab->Visible){euroLimitsDialog->SetUpperEnabled();result = euroLimitsDialog->ShowDialog(this); if(result == ::DialogResult::OK){euroUserMaximum = euroLimitsDialog->UpperValuesLimit;euroUserMinimum = euroLimitsDialog->LowerValuesLimit;euroStarsUserMaximum = euroLimitsDialog->UpperStarsLimit;euroStarsUserMinimum = euroLimitsDialog->LowerStarsLimit;
}}
}
The local variable result is used in both if statements, so it is now declared at the beginning of thefunction. After enabling the controls in the dialog box appropriately by calling the SetUpperEnabled()function for the dialog object, you display the dialog box as modal. If the user closes the dialog box byclicking the OK button, you store the results available through the properties of the dialog object.
The changes to the handler for the Click event for the Lower menu item are very similar:
System::Void lowerMenuItem_Click(System::Object^ sender, System::EventArgs^ e) {::DialogResult result;if(lottoTab->Visible){
lottoLimitsDialog->SetLowerEnabled();result = lottoLimitsDialog->ShowDialog(this);if(result == ::DialogResult::OK){
lottoUserMaximum = lottoLimitsDialog->UpperLimit;lottoUserMinimum = lottoLimitsDialog->LowerLimit;
}}
1252
Chapter 22: More on Windows Forms Applications
25905c22.qxd:WroxPro 2/21/08 9:26 AM Page 1252

else if(euroTab->Visible){euroLimitsDialog->SetLowerEnabled();result = euroLimitsDialog->ShowDialog(this); if(result == ::DialogResult::OK){euroUserMaximum = euroLimitsDialog->UpperValuesLimit;euroUserMinimum = euroLimitsDialog->LowerValuesLimit;euroStarsUserMaximum = euroLimitsDialog->UpperStarsLimit;euroStarsUserMinimum = euroLimitsDialog->LowerStarsLimit;
}}
}
The logic here is the same as in the previous handler function.
Implementing the Help > About Menu Item This is easy now that you know about the MessageBox class. You can just show a message box when theHelp > About menu item is clicked:
System::Void aboutToolStripMenuItem_Click(System::Object^ sender,System::EventArgs^ e)
{MessageBox::Show(L”© Copyright Ivor Horton”, L”About A Winning Application”,
MessageBoxButtons::OK, MessageBoxIcon::Exclamation);}
When the the menu item is clicked, the handler function displays the message box shown in Figure 22-23.
Figure 22-23
Handling a Button ClickClicking a button should change the value on the button to a new random value. Of course, the valuemust be different from values on the other buttons as well as being different from the value for the button
1253
Chapter 22: More on Windows Forms Applications
25905c22.qxd:WroxPro 2/21/08 9:26 AM Page 1253

that was clicked. It would be a good idea to present the whole set in sorted order; this may result in thenew value being on a different button, but that’s likely to be better that not having the values in sequence.
The process for handling a button click is going to be the same for all the buttons, so you’ll be able toeconomize on code by creating a generalized function to do the work. You can define a private functionmember of the Form1 class that generates a new value for a given Button object from an array of buttons:
// Generates a new value for button different from current button valuesvoid SetNewValue(Button^ button, array<Button^>^ buttons,
int lowerLimit, int upperLimit){int index = 0; // Index of button in buttons
// Array to store button valuesarray<int>^ values = gcnew array<int>(buttons->Length);
// Get values from buttons and find index for buttonfor(int i = 0 ; i < values->Length ; i++){values[i] = Int32::Parse(buttons[i]->Text); // Get current button value
// If current handle is same as button, save the index valueif(button == buttons[i]) index = i;
}
int newValue = 0; // Store the new button value// Check if it is different from the other button valuesfor(;;) // Loop until we get a good one{newValue = random->Next(lowerLimit, upperLimit); // Generate a valueif(IsValid(newValue, values, values->Length)) // If it’s OK...break; // ...end the loop
}values[index] = newValue; // Store the new value at index
Array::Sort(values); // Sort the valuefor(int i = 0 ; i < values->Length ; i++) // and set the valuesbuttons[i]->Text = values[i].ToString(); // as text on the buttons
}
The first two function parameters are the button that is to have a new number and the array of buttons inthe group to which the first button belongs. The next two parameters specify the lower and upper limitsfor the values. The current values of the buttons in the array are stored in the values array in the first loop.This loop also finds the index value in the buttons array for the Button^ handle that is the first argu-ment. You need this so you know which element of the values array is to be replaced by a new value.
The new value is created in the indefinite for loop. This is the same mechanism that you used to createthe values for the button in the first instance. After you have a valid new value, you store it in the valuesarray. You then sort the elements in the values array before storing them as the values for the Text prop-erties for the buttons in the buttons array. You’ll be able to use this function for dealing with the Clickevents for all of the buttons.
1254
Chapter 22: More on Windows Forms Applications
25905c22.qxd:WroxPro 2/21/08 9:26 AM Page 1254

If you have not already done so, double-click the first button on the Lotto tab to generate a Click eventhandler function for it. You can edit the name of the handler function by opening the Properties tab for the button, selecting the Events button, and changing the value for the Click event. When you pressEnter, the code is updated with the new name. I changed the value to lottoValue_Click.
You can amend the Click event handler to call the SetNewValue() function you have just added to theForm1 class:
System::Void lottoValue_Click(System::Object^ sender, System::EventArgs^ e) {Button^ button = safe_cast<Button^>(sender);
// Create the array of button handlesarray<Button^>^ buttons = {lottoValue1, lottoValue2, lottoValue3,
lottoValue4, lottoValue5, lottoValue6};
// Replace the value on buttonSetNewValue(button, buttons, lottoUserMinimum, lottoUserMaximum);
}
The availability of the SetNewValue() function makes this handler function very simple. The first state-ment stores the handle to the button that was clicked. The first parameter to the event handler is a handleto the object that originated the event, so all that’s necessary is to cast it to the appropriate type. You thenjust assemble the handles for the buttons in an array and call the new function — job done!
You still have to deal with the Click event for the other buttons on the Lotto tab, but this doesn’t require anymore code. Open the Properties window for the second button and then click the Events button. If youclick the Click event value, you’ll see a list of the existing event handlers. If you select lottoValue_Clickfrom the list, the event handler for the first button will be registered as the event handler for the second but-ton, too.
You can repeat the process for the remaining four buttons on the Lotto tab so that the one event handleris called in response to the Click event for any of the buttons on the Lotto tab.
The Click event handlers for the buttons on the Euromillions tab are going to be very easy. Double-clickthe first of the five buttons in the Values group to create the event handler. Open the Properties windowfor the button and change the value for the Click event to euroValue_Click. You can then modify thecode for the handler like this:
System::Void euroValue_Click(System::Object^ sender, System::EventArgs^ e) {Button^ button = safe_cast<Button^>(sender);array<Button^>^ buttons = {euroValue1, euroValue2, euroValue3,
euroValue4, euroValue5 };SetNewValue(button, buttons, euroUserMinimum, euroUserMaximum);
}
This works exactly the same as the handler for the Lotto buttons. The array contains the handles to the fivebuttons in the values group, and the SetNewValue() function does the rest. If you open the Propertieswindow for each of the remaining four buttons in the group, you can select this function to respond to theClick event for each of them. Be sure you select euroValue_Click and not lottoValue_Click!
1255
Chapter 22: More on Windows Forms Applications
25905c22.qxd:WroxPro 2/21/08 9:26 AM Page 1255

Follow the same procedure for the Stars buttons on the Euromillions tab. You can implement the handler as:
System::Void euroStar_Click(System::Object^ sender, System::EventArgs^ e) {Button^ button = safe_cast<Button^>(sender);array<Button^>^ buttons = { euroStar1, euroStar2 };SetNewValue(button, buttons, euroStarsUserMinimum, euroStarsUserMaximum);
}
Set the handler for the Click event for the second button to be euro_StarClick and you are done. Ifyou recompile the example, you should be able to generate a new value for any button on either tab justby clicking it. The last piece to complete the example is to allow the user to enter a value for a button.
Responding to the Context MenuRight-clicking a button brings up a context menu with a single menu item, Choose. When the user clicksthis item, the program should display a dialog box that allowed a suitable value to be entered. Click thename of the context menu in the Design tab for Form1 and then double-click the menu item to create theClick event handler.
The first problem is to determine which group of buttons was clicked to cause the event. Each group onbuttons is in its own GroupBox control, and the GroupBox class has a Controls property that returns areference to an object of type Control::ControlCollection that represents the collection of controlsin the group box. The Control::ControlCollection class defines the Contains() function that returnstrue if the control that you pass as the argument is within the collection and false otherwise. Thus youhave a way to determine to which group of buttons the button causing the Click event belongs. An outlineimplementation of the event handler looks like this:
System::Void chooseValue_Click(System::Object^ sender, System::EventArgs^ e) {// Get the button that was clicked for the context menu, then...
if(lottoValues->Controls->Contains(theButton)){// the button is from the lotto group...
}else if(euroValues->Controls->Contains(theButton)){// The button is in the Values group...
}else if(euroStars->Controls->Contains(theButton)){// The button is in the Stars group...
}}
That sorts out which group of buttons is involved, at least in principle. But there’s still a bit of a prob-lem — how do you find out which button was right-clicked to open the context menu?
1256
Chapter 22: More on Windows Forms Applications
25905c22.qxd:WroxPro 2/21/08 9:26 AM Page 1256

The chooseValue_Click() handler is called when the Choose menu item is clicked, so the senderparameter for the handler identifies the menu item, not the button. You need a handler that responds tothe original click on the button and you can create this by double-clicking buttonContextMenu in theDesign pane for Form1. You can complete the code for the handler function that is created like this:
System::Void buttonContextMenu_Opening(System::Object^ sender,System::ComponentModel::CancelEventArgs^ e)
{contextButton = safe_cast<Button^>(buttonContextMenu->SourceControl);
}
This casts the sender handle to type Button^ and stores it in the contextButton member of the Form1class. Because in this case the event is for the context menu, the sender parameter identifies the compo-nent that was clicked to display it. Of course, you have yet to add the contextButton variable as a pri-vate member of the Form1 class:
private:Button^ contextButton; // Button that was right-clicked for context menu
All you need to do now is figure out what to do next.
The Logic for Dealing with the Choose Menu ItemThe process for responding to the Choose item being clicked can be the same whichever group of buttonsis involved, and it could work something like the following:
1. Display a dialog box to allow a value to be entered.
2. Check that the value is valid — that is, within range and different from the other buttons.
3. Display a message box if the value is not valid and allow the entry to be retired or the dialogoperation to be cancelled.
4. If the value is valid, update the button that was right-clicked with the new value.
The first step in implementing this process is to create a new dialog form.
Creating the Dialog Form Press Ctrl+Shift+A to display the Add New Item dialog box; then select UI as the category and WindowsForm as the template. Enter the name as UserValueDialog and click the Add button. You can now openthe Properties window for the form by pressing F4 and setting the property values to make it a dialogbox. Set the ControlBox, MinimizeBox, and MaximizeBox property values to False, and set the Textproperty to “User Value Input”. You should also set the FormBorderStyle property value toFixedDialog.
Add OK and Cancel buttons to the dialog form as well as a Label control and a TextBox control, asshown in Figure 22-24.
1257
Chapter 22: More on Windows Forms Applications
25905c22.qxd:WroxPro 2/21/08 9:26 AM Page 1257

Figure 22-24
Set the Text and (Name) property values for the OK button to OK, and the value for the DialogResultproperty should be set to OK. The values for the Text, (Name), and DialogResult properties for the Cancelbutton should be Cancel. Set the value of the (Name) property for the TextBox control to be textBox andthe value for the TextAlign property as Center. The (Name) property for the Label control can belabel, and the Text property can be anything you like because you’ll change this in the code to suitthe circumstances.
You can now display the properties for the dialog form once again and set the values for theAcceptButton and CancelButton properties to OK and Cancel, respectively.
Developing the Dialog ClassThe value entered in the TextBox control must be available to the Form1 object, so add a property to theUserValueDialog class to store it:
public:property int Value;
This is an example of a trivial scalar property so get() and set() functions are supplied by default.
The dialog object needs to know what the limits are for the value because the handler for the OK button in the dialog class is verifying that the value is legal. For the same reason, the dialog object needs to knowwhat the current values on the buttons are to ensure they are not duplicated. You could add three furtherproperty members to the UserValueDialog class to store the data:
public:property int LowerLimit;property int UpperLimit;property array<int>^ Values; // Current button values
You won’t want to leave spurious values lying around in the text box after it has been used, so add thefollowing public function to the UserValueDialog class:
void ClearTextBox() {textBox->Text = “”;
}
1258
Chapter 22: More on Windows Forms Applications
25905c22.qxd:WroxPro 2/21/08 9:26 AM Page 1258
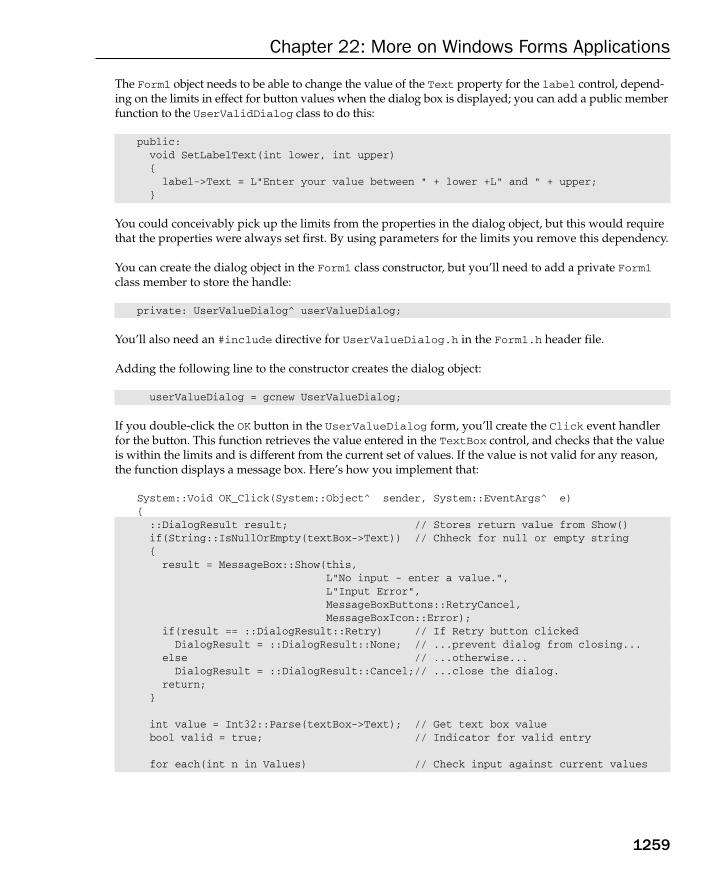
The Form1 object needs to be able to change the value of the Text property for the label control, depend-ing on the limits in effect for button values when the dialog box is displayed; you can add a public memberfunction to the UserValidDialog class to do this:
public:void SetLabelText(int lower, int upper){label->Text = L”Enter your value between “ + lower +L” and “ + upper;
}
You could conceivably pick up the limits from the properties in the dialog object, but this would requirethat the properties were always set first. By using parameters for the limits you remove this dependency.
You can create the dialog object in the Form1 class constructor, but you’ll need to add a private Form1class member to store the handle:
private: UserValueDialog^ userValueDialog;
You’ll also need an #include directive for UserValueDialog.h in the Form1.h header file.
Adding the following line to the constructor creates the dialog object:
userValueDialog = gcnew UserValueDialog;
If you double-click the OK button in the UserValueDialog form, you’ll create the Click event handlerfor the button. This function retrieves the value entered in the TextBox control, and checks that the valueis within the limits and is different from the current set of values. If the value is not valid for any reason,the function displays a message box. Here’s how you implement that:
System::Void OK_Click(System::Object^ sender, System::EventArgs^ e) {::DialogResult result; // Stores return value from Show()if(String::IsNullOrEmpty(textBox->Text)) // Chheck for null or empty string{result = MessageBox::Show(this,
L”No input - enter a value.”,L”Input Error”,MessageBoxButtons::RetryCancel,MessageBoxIcon::Error);
if(result == ::DialogResult::Retry) // If Retry button clicked DialogResult = ::DialogResult::None; // ...prevent dialog from closing...
else // ...otherwise...DialogResult = ::DialogResult::Cancel;// ...close the dialog.
return;}
int value = Int32::Parse(textBox->Text); // Get text box valuebool valid = true; // Indicator for valid entry
for each(int n in Values) // Check input against current values
1259
Chapter 22: More on Windows Forms Applications
25905c22.qxd:WroxPro 2/21/08 9:26 AM Page 1259

if(value == n) // If it’s the same...{valid = false; // ...it is invalid.break; // Exit the loop
}
// Check limits and result of previous validity checkif(!valid || value < LowerLimit || value > UpperLimit){result = MessageBox::Show(this,
L”Input not valid.” +L”Value must be from “ + LowerLimit +L” to “ + UpperLimit +L”\nand must be different from existing values.”,L”Input Error”,MessageBoxButtons::RetryCancel,MessageBoxIcon::Error);
if(result == ::DialogResult::Retry)DialogResult = ::DialogResult::None;
elseDialogResult = ::DialogResult::Cancel;
}elseValue = value; // Store the input in the property
}
A message box is displayed if the Text property for the text box is null or an empty string. The messagebox shows an error message and has Retry and Cancel buttons instead of OK and Cancel for a change.If Retry is clicked, the user wants another go at input so you prevent the dialog box from closing by set-ting its DialogResult property to ::DialogResult::None. The only other possibility is that the userclicked Cancel in the message box, in which case you set the DialogResult property for the dialogobject to ::DialogResult::Cancel, which has the same effect as clicking the Cancel button for thedialog box.
The Text property for the TextBox control returns a handle of type String^. You convert this to an inte-ger by passing the handle to the static Parse() function in the Int32 class. You compare the value fromthe text box with the elements from the values array that represent the current set of button values. Thenew value should be different from all of these, so if you find one that is the same, you set valid to falseand exit the loop.
The condition for the if statement following the for each loop checks the value against the limits andthe current value of valid by ORing the conditions together. If any of the three expressions are false, thecondition is false, and you display a message box. This works in the same way as the previous messagebox and displays an error message and Retry and Cancel buttons. If the value does indeed turn out to bevalid you store it in the Value property for the dialog object ready for retrieval by the event handler in theForm1 object that started the whole process off.
Handling the Click Event for the ChooseMenuYou are now going to complete the skeleton of the chooseValue_Click() handler function using the capa-bilities that you have added to the UserValueDialog class. The handle for the button that was right-clicked
1260
Chapter 22: More on Windows Forms Applications
25905c22.qxd:WroxPro 2/21/08 9:26 AM Page 1260

is already stored in the contextButton member because the buttonContextMenu_Opening() handlerthat you added earlier is executed first.
System::Void chooseValue_Click(System::Object^ sender, System::EventArgs^ e) {array<int>^ values; // Array to store current button valuesarray<Button^>^ theButtons; // Handle to aray of buttons
// Check if the button is in the lottoValues group boxif(lottoValues->Controls->Contains(contextButton)){// the button is from the lotto group...array<Button^>^ buttons = {lottoValue1, lottoValue2, lottoValue3,
lottoValue4, lottoValue5, lottoValue6};theButtons = buttons; // Store array handle at outer scopevalues = GetButtonValues(buttons); // Get array of button values
// Set up the dialog ready to be shownuserValueDialog->Values = values = GetButtonValues(buttons);userValueDialog->LowerLimit = lottoUserMinimum;userValueDialog->UpperLimit = lottoUserMaximum;userValueDialog->SetLabelText(lottoUserMinimum, lottoUserMaximum);userValueDialog->ClearTextBox();
}// Check if the button is in the euroValues group boxelse if(euroValues->Controls->Contains(contextButton)){// The button is in the Values group...array<Button^>^ buttons = {euroValue1, euroValue2, euroValue3,
euroValue4, euroValue5};theButtons = buttons; // Store array handle at outer scopevalues = GetButtonValues(buttons); // Get array of button values
// Set up the dialog ready to be shownuserValueDialog->Values = values;userValueDialog->LowerLimit = euroUserMinimum;userValueDialog->UpperLimit = euroUserMaximum;userValueDialog->SetLabelText(euroUserMinimum, euroUserMaximum);userValueDialog->ClearTextBox();
}// Check if the button is in the euroStars group boxelse if(euroStars->Controls->Contains(contextButton)){// The button is in the Stars group...array<Button^>^ buttons = { euroStar1, euroStar2 };theButtons = buttons; // Store array handle at outer scopevalues = GetButtonValues(buttons); // Get array of button values
// Set up the dialog ready to be shownuserValueDialog->Values = values;userValueDialog->LowerLimit = euroStarsUserMinimum;userValueDialog->UpperLimit = euroStarsUserMaximum;userValueDialog->SetLabelText(euroStarsUserMinimum, euroStarsUserMaximum);
1261
Chapter 22: More on Windows Forms Applications
25905c22.qxd:WroxPro 2/21/08 9:26 AM Page 1261
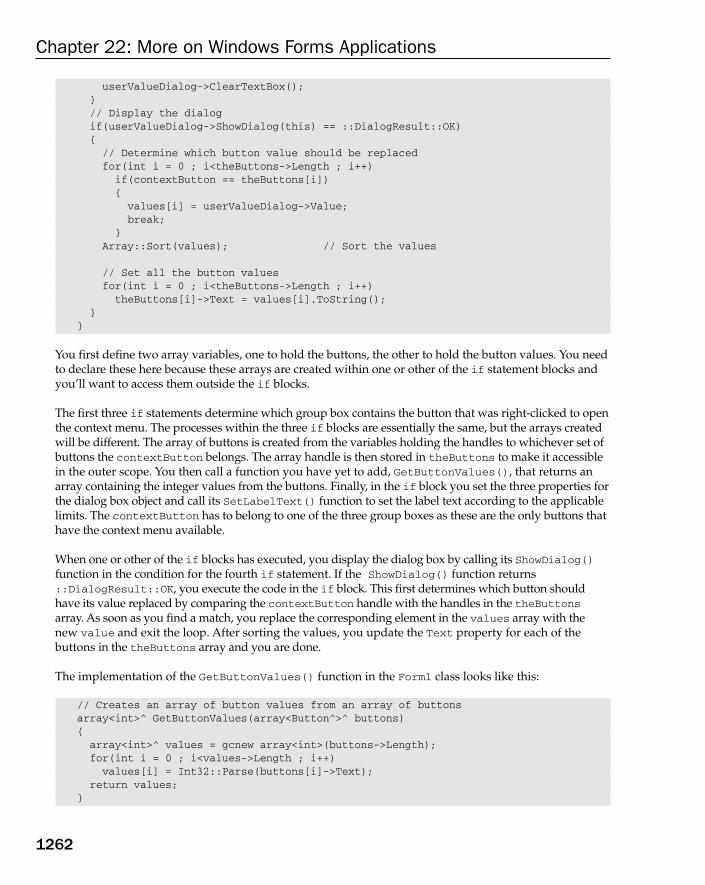
userValueDialog->ClearTextBox();}// Display the dialogif(userValueDialog->ShowDialog(this) == ::DialogResult::OK){// Determine which button value should be replacedfor(int i = 0 ; i<theButtons->Length ; i++)if(contextButton == theButtons[i]){values[i] = userValueDialog->Value;break;
}Array::Sort(values); // Sort the values
// Set all the button valuesfor(int i = 0 ; i<theButtons->Length ; i++)theButtons[i]->Text = values[i].ToString();
}}
You first define two array variables, one to hold the buttons, the other to hold the button values. You needto declare these here because these arrays are created within one or other of the if statement blocks andyou’ll want to access them outside the if blocks.
The first three if statements determine which group box contains the button that was right-clicked to openthe context menu. The processes within the three if blocks are essentially the same, but the arrays createdwill be different. The array of buttons is created from the variables holding the handles to whichever set ofbuttons the contextButton belongs. The array handle is then stored in theButtons to make it accessiblein the outer scope. You then call a function you have yet to add, GetButtonValues(), that returns anarray containing the integer values from the buttons. Finally, in the if block you set the three properties forthe dialog box object and call its SetLabelText() function to set the label text according to the applicablelimits. The contextButton has to belong to one of the three group boxes as these are the only buttons thathave the context menu available.
When one or other of the if blocks has executed, you display the dialog box by calling its ShowDialog()function in the condition for the fourth if statement. If the ShowDialog() function returns::DialogResult::OK, you execute the code in the if block. This first determines which button shouldhave its value replaced by comparing the contextButton handle with the handles in the theButtonsarray. As soon as you find a match, you replace the corresponding element in the values array with the new value and exit the loop. After sorting the values, you update the Text property for each of the buttons in the theButtons array and you are done.
The implementation of the GetButtonValues() function in the Form1 class looks like this:
// Creates an array of button values from an array of buttonsarray<int>^ GetButtonValues(array<Button^>^ buttons){array<int>^ values = gcnew array<int>(buttons->Length);for(int i = 0 ; i<values->Length ; i++)values[i] = Int32::Parse(buttons[i]->Text);
return values;}
1262
Chapter 22: More on Windows Forms Applications
25905c22.qxd:WroxPro 2/21/08 9:26 AM Page 1262

Here you create an array of integer values the same length as the array of button handles that is passedas the argument. You then populate the values array with the int equivalents of the string returned bythe Text properties of the buttons, and return the handle to the values array.
After compiling the project once more, you should have a fully functional application. You can generatelottery entries for a variety of lotteries with the range of values constrained or not. You can also elect togenerate new random individual values in an entry or choose your own. It has always worked but neverwon for me; of course, working is a measure of success.
SummaryIn this chapter, you assembled a Windows Form application that uses the controls that you are most likelyto need in the majority of programs. It should be apparent that Windows Forms programs are gearedexclusively to using the Design capability. All the code for a class goes into the class definition, so with avery complex form the class is many lines of code. With a production application the code consists of anumber of large classes that are rather unstructured, and difficult to modify and maintain at the code level.You should therefore always use the Design capability and the Properties window to expedite changeswherever you can and whenever you need to access the code, use Class View to find your way around.
The key points to keep in mind from this chapter include:
❑ An application window is a form, and a form is defined by a class derived from theSystem::Form class.
❑ A dialog window is a form that has its FormBorderStyle property value set to FixedDialog.
❑ A dialog box can be created as a modal dialog by calling its ShowDialog() function or as amodeless dialog by calling its Show() function.
❑ You can control whether or not a dialog box closes by setting the DialogResult property valuefor the dialog object.
❑ A ComboBox control combines the capabilities of a ListBox and a TextBox and allows selectionof an item from a list or a new item to be entered from the keyboard.
❑ A NumericUpDown control allows the entry of numeric data by stepping through values withina given range with a given step increment.
❑ You can add the definition of a Click event handler for a control by double-clicking the controlin the Form Design tab.
❑ You can specify an existing function to be a handler for a given event for a control through theProperties window. Clicking the Events button in the Properties window displays the list ofevents for a control.
❑ You should only change the names of automatically generated class members through theProperties window — not directly using the Code editor.
1263
Chapter 22: More on Windows Forms Applications
25905c22.qxd:WroxPro 2/21/08 9:26 AM Page 1263
ExercisesYou can download the source code for the examples in the book and the solutions to the following exercisesfrom www.wrox.com.
1. Modify Ex22_01 so that it displays a dialog box that you created as a dialog form when theHelp > About menu item is clicked.
2. Modify Ex22_01 so that the dialog box that displays for the Choose context menu item uses aListBox control instead of the text box and displays the complete set of legal values that can be chosen.
3. Investigate the properties and functions available for the WebBrowser control and modifyEx22_01 to allow a URL to be entered through a TextBox so that the WebBrowser control displays the page at the URL that was entered.
1264
Chapter 22: More on Windows Forms Applications
25905c22.qxd:WroxPro 2/21/08 9:26 AM Page 1264

23Accessing Data Sources
in a Windows FormsApplication
In this chapter, you’ll investigate how you can develop form-based applications that will displaydata from a variety of sources and specifically how you can create form-based programs to accessan existing database. In this chapter, you will learn about:
❑ What kind of classes are involved in encapsulating a data source
❑ How you can use the DataGridView control to display your own data
❑ How you can customize the appearance of a DataGridView control
❑ What the function of the BindingSource component is and how you use it with aDataGridView control
❑ How you use a BindingNavigator control to navigate data from a source managed by a BindingSource control
❑ How you expedite updating of a database using a BindingNavigator control and aBindingSource component
Visual C++ 2008 provides a high degree of automation for creating Forms-based applications thataccess data sources but you will start by ignoring the automation and get a feel for how you canwork with components programmatically. With this approach, you’ll not only get a good insightinto how things work; you’ll also appreciate how much the automation is doing for you.
25905c23.qxd:WroxPro 2/21/08 9:26 AM Page 1265
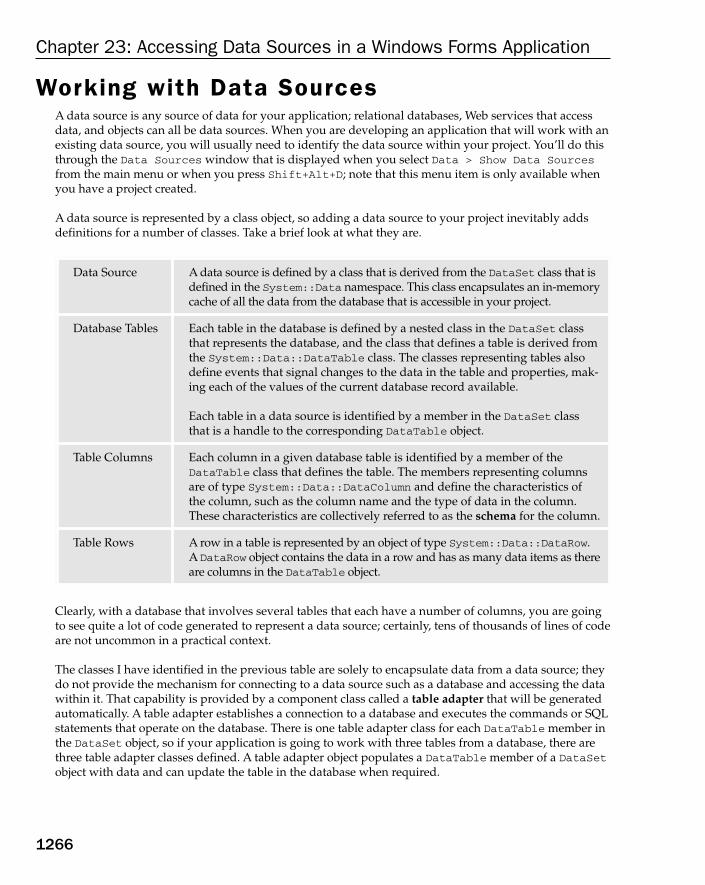
Working with Data SourcesA data source is any source of data for your application; relational databases, Web services that accessdata, and objects can all be data sources. When you are developing an application that will work with anexisting data source, you will usually need to identify the data source within your project. You’ll do thisthrough the Data Sources window that is displayed when you select Data > Show Data Sourcesfrom the main menu or when you press Shift+Alt+D; note that this menu item is only available whenyou have a project created.
A data source is represented by a class object, so adding a data source to your project inevitably addsdefinitions for a number of classes. Take a brief look at what they are.
Clearly, with a database that involves several tables that each have a number of columns, you are goingto see quite a lot of code generated to represent a data source; certainly, tens of thousands of lines of codeare not uncommon in a practical context.
The classes I have identified in the previous table are solely to encapsulate data from a data source; theydo not provide the mechanism for connecting to a data source such as a database and accessing the datawithin it. That capability is provided by a component class called a table adapter that will be generatedautomatically. A table adapter establishes a connection to a database and executes the commands or SQLstatements that operate on the database. There is one table adapter class for each DataTable member inthe DataSet object, so if your application is going to work with three tables from a database, there arethree table adapter classes defined. A table adapter object populates a DataTable member of a DataSetobject with data and can update the table in the database when required.
Data Source A data source is defined by a class that is derived from the DataSet class that isdefined in the System::Data namespace. This class encapsulates an in-memorycache of all the data from the database that is accessible in your project.
Database Tables Each table in the database is defined by a nested class in the DataSet classthat represents the database, and the class that defines a table is derived fromthe System::Data::DataTable class. The classes representing tables alsodefine events that signal changes to the data in the table and properties, mak-ing each of the values of the current database record available.
Each table in a data source is identified by a member in the DataSet classthat is a handle to the corresponding DataTable object.
Table Columns Each column in a given database table is identified by a member of theDataTable class that defines the table. The members representing columnsare of type System::Data::DataColumn and define the characteristics ofthe column, such as the column name and the type of data in the column.These characteristics are collectively referred to as the schema for the column.
Table Rows A row in a table is represented by an object of type System::Data::DataRow.A DataRow object contains the data in a row and has as many data items as thereare columns in the DataTable object.
1266
Chapter 23: Accessing Data Sources in a Windows Forms Application
25905c23.qxd:WroxPro 2/21/08 9:26 AM Page 1266

Accessing and Displaying DataThere are three components defined in the System::Windows::Forms namespace that are designed tobe used together for accessing and displaying data in a Windows Forms application:
The BindingSource component is not a control as it has no graphical representation that a user can interact with, but it’s designed to complement and work with the DataGridView control and theBindingNavigator in database applications. The BindingSource component provides the communica-tions with the data source necessary to execute queries and update commands, the DataGridView controlsprovides the user interface for viewing and entering the data and the BindingNavigator control provides a toolbar that simplifies data navigation. Using the BindingNavigator control is optional. If you prefer,you can change records programmatically yourself.
Although these three components are designed to work as a team, the DataGridView control is a particu-larly useful tool in its own right, as you can use it quite independently from the other two. It provides anastonishing range of capabilities for changing the visual appearance of the grid that displays the data. You’llexplore some of the ways in which you can customize the DataGridView control before going into how youcan use it combined with the BindingSource and BindingNavigator components.
Note that you can also use the SqlConnection, SqlDataAdapter, and DataSet controls foraccessing a data source. If you want to use these controls, then you may need to add them to the ToolBox yourself. You do this by selecting Tools > Choose ToolBox Items from the main menu and checking the controls in the list that you want to have added to the ToolBox.
Using a DataGridView ControlThe DataGridView control enables you to display and modify a rectangular array of data from a widerange of data sources. You can also use the DataGridView control to display almost any kind of datathat originates directly in a program. Under the covers it is a complex control that provides an enormousamount of flexibility, and you can take advantage of its many features through its many properties, func-tions, and events. At the same time, the DataGridView control can be remarkably easy to use. You canignore the complexity of the internals and use it through the Form Design capability that takes care of all
Component Description
DataGridView This control can display virtually any kind of data in a rectangular grid.You can use this control quite independently of the other two components.
BindingSource This component is used to encapsulate data from a data source. The com-ponent can manage accessing and updating the data source, and can beused as the vehicle for displaying data in a DataGridView control.
BindingNavigator This control provides a toolbar containing controls for navigating andmanipulating data from a data source, typically a data source encapsu-lated in a BindingSource control.
1267
Chapter 23: Accessing Data Sources in a Windows Forms Application
25905c23.qxd:WroxPro 2/21/08 9:26 AM Page 1267

the basic detail for you. You’ll see later in this chapter how you can produce a complete working programexample to access the Northwind database with no programming at all on your part; the whole programwill be generated through the Form Design capability and by setting properties for components used inthe project.
The data in a DataGridView control is displayed in a rectangular array of cells that you can envisage asa collection of rows or as a collection of columns. Each column of cells has a header cell at the top thattypically contains text that identifies it, and each row has a row header cell at the beginning, as shown in Figure 23-1.
Figure 23-1
You reference rows and columns of cells through properties of the DataGridView control object. TheRows property returns a value of type DataGridRowCollection that is a collection of all the rows, andyou refer to a particular row using an index, as illustrated in Figure 23-1. Similarly, the Columns prop-erty for the control returns a value of type DataGridViewColumnCollection that you can also index to reference a particular column. Rows and columns are indexed from zero. The Cells property for aDataGridRowCollection object represents a collection containing the cells in the row, and you canindex the Cells property to access a specific cell in a row. Figure 23-1 shows an example of how youreference the fourth cell in the third row.
The number of rows is available as the value of the RowCount property for the control, and theColumnCount property returns the number of columns. Initially, when the control is not bound to a datasource, it will have no columns or rows. You can set the number of columns and or the number of rows bysetting property values for the control, but when you use the control to display data from a data source,this is taken care of automatically.
You can use the DataGridView control in three different modes, as shown in the following table.
unbound mode In unbound mode you transfer the data to the control yourself, typically usingthe Add() function for the Rows property for the control. You would use thismode for displaying relatively small amounts of data.
DataGridView^ gridCntrl = gcnew DataGridView; //Creates the control
These are the row headers
gridCntrl->RowCountis the number of rows
gridCntrl->Rows[2]refers to a single row
Row0Row1Row2Row3
gridCntrl->ColumnCountis the number of columns
gridCntrl->Columns[3]refers to a single column
Column0 Column1 Column2 Column3 Column4
These are thecolumn headers
gridCntrl->Rowsreferences the
collection of rows
gridCntrl->Rows[2]->Cells[3]references the 4th cell
in the 3rd row
gridCntrl->Columnsreferences the
collection of columns
1268
Chapter 23: Accessing Data Sources in a Windows Forms Application
25905c23.qxd:WroxPro 2/21/08 9:27 AM Page 1268
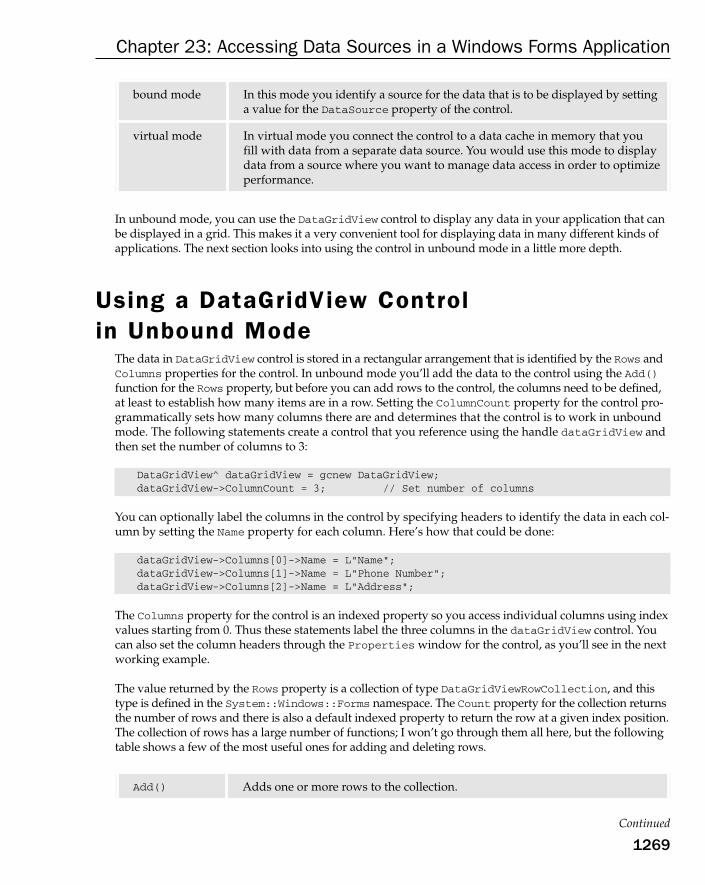
In unbound mode, you can use the DataGridView control to display any data in your application that canbe displayed in a grid. This makes it a very convenient tool for displaying data in many different kinds ofapplications. The next section looks into using the control in unbound mode in a little more depth.
Using a DataGridView Control in Unbound Mode
The data in DataGridView control is stored in a rectangular arrangement that is identified by the Rows andColumns properties for the control. In unbound mode you’ll add the data to the control using the Add()function for the Rows property, but before you can add rows to the control, the columns need to be defined,at least to establish how many items are in a row. Setting the ColumnCount property for the control pro-grammatically sets how many columns there are and determines that the control is to work in unboundmode. The following statements create a control that you reference using the handle dataGridView andthen set the number of columns to 3:
DataGridView^ dataGridView = gcnew DataGridView;dataGridView->ColumnCount = 3; // Set number of columns
You can optionally label the columns in the control by specifying headers to identify the data in each col-umn by setting the Name property for each column. Here’s how that could be done:
dataGridView->Columns[0]->Name = L”Name”;dataGridView->Columns[1]->Name = L”Phone Number”;dataGridView->Columns[2]->Name = L”Address”;
The Columns property for the control is an indexed property so you access individual columns using indexvalues starting from 0. Thus these statements label the three columns in the dataGridView control. Youcan also set the column headers through the Properties window for the control, as you’ll see in the nextworking example.
The value returned by the Rows property is a collection of type DataGridViewRowCollection, and thistype is defined in the System::Windows::Forms namespace. The Count property for the collection returnsthe number of rows and there is also a default indexed property to return the row at a given index position.The collection of rows has a large number of functions; I won’t go through them all here, but the followingtable shows a few of the most useful ones for adding and deleting rows.
Continued
Add() Adds one or more rows to the collection.
bound mode In this mode you identify a source for the data that is to be displayed by settinga value for the DataSource property of the control.
virtual mode In virtual mode you connect the control to a data cache in memory that youfill with data from a separate data source. You would use this mode to displaydata from a source where you want to manage data access in order to optimizeperformance.
1269
Chapter 23: Accessing Data Sources in a Windows Forms Application
25905c23.qxd:WroxPro 2/21/08 9:27 AM Page 1269

The Add() function for the value returned by the Rows property comes in four overloaded versions thatenable you to add a row of data to the control in a variety of ways.
All versions of the Add() function return a value of type int that is the index of the last row that was added to the collection. If the DataSource property for the DataGridView control is not null, or the control has no columns, all versions of the Add() function throw an exception of typeSystem::InvalidOperationException.
You could add rows to the dataGridView control that has three columns with the following statements:
dataGridView->Rows->Add(L”Fred Able”, L”914 696 1200”,L”1235 First Street, AnyTown”);
dataGridView->Rows->Add(L”May East”, L”914 696 1399”,L”1246 First Street, AnyTown”);
Each of these statements adds a new row to the collection and the three arguments to the Add() functioncorrespond to the three columns in the control. The control must have sufficient columns to accommo-date the number of items you add in a row. If you attempt to add more data items to a row than there arecolumns in the control, the excess items are ignored.
You will first try unbound mode in a working example where you set up the DataGridView control bysetting its properties from the Form Design tab.
Add() Adds one new row to the collection.
Add(int rowCount) Adds rowCount new rows to the collection. An exception oftype System::ArgumentOutOfRangeException is thrown ifrowCount is zero or negative.
Add(DataGridViewRow^ row) Adds the row specified by the argument. A DataGridViewRowobject contains the collection of cells in a row as well as theparameters that determine the appearance of the cells in the row.
Add(... Object^ object) Adds a new row and populates the cells in the row with theobjects specified by the arguments.
Insert() Inserts one or more rows in the collection.
Clear() Deletes all rows in the collection.
AddCopy() Adds a copy of the row specified by the argument.
InsertCopy() Inserts a copy of the row specified by the first argument at the position speci-fied by the second argument.
Remove() Removes the row specified by the argument, which is of typeDataGridViewRow^.
RemoveAt() Removes the row specified by the index value you supply as the argument.
1270
Chapter 23: Accessing Data Sources in a Windows Forms Application
25905c23.qxd:WroxPro 2/21/08 9:27 AM Page 1270

Try It Out The DataGridView Control in Unbound ModeThis example displays a list of books where each book is specified by the ISBN, the title, the author, and thepublisher. Create a new Windows Form project with the name Ex23_01. Add a DataGridView control tothe form and click the arrow at the top-right of the control to display the pop-up menu shown in Figure 23-2.
If you click the bottom menu item, Dock in parent container, the control fills the client area of theform. The top menu item is for selecting a data source, but you are not going to specify a data source thistime. If you click the AddColumn menu item, the dialog box shown in Figure 23-3 for entering columnsto the control is displayed.
Figure 23-2
Figure 23-3
The Unbound column radio button is checked because there is no data source identified for the control,which is the way it should be for this example. The Name: entry is the value of the Name property for the
1271
Chapter 23: Accessing Data Sources in a Windows Forms Application
25905c23.qxd:WroxPro 2/21/08 9:27 AM Page 1271

column, and the Header Text: entry is the value of the HeaderText property, which corresponds to thetext that is shown in the control as the column heading. If you extend the list box that is for selecting theType: value, you’ll see you have a range of choices for the type of column. Here you should leave it as thedefault choice — a TextBox column — because you’ll be adding strings as the data to be displayed. Theother column types in the list deal with provide for various controls in the cells representing the data:
To add a column to the control, you enter values for the Name: and Header Text:, select the Type: fromthe list if you want other than the default type, and click the Add button. In this example, you can addcolumns with the names ISBN, Title, Author, and Publisher. The Header Text: entry can be thesame as the name in each case. When you have entered the columns, click the Close button to close thedialog (the Close button is visible after you have added at least one column). All the columns should nowbe displayed in the control, so you can drag the right edge of the form so all four columns are visible.
You can edit the columns at any time by clicking the Edit Columns item in the pop-up menu; it displaysthe dialog box shown in Figure 23-4.
Figure 23-4
DataGridViewButtonColumn This type is used to display a button in each cell in the column.
DataGridViewCheckBoxColumn This type is used when you want to store boolvalues (System::Boolean objects) orSystem::Windows::Forms::CheckState objects as checkboxes in the cells in the column.
DataGridViewComboBoxColumn This type is used when you want to display a drop-downlist in each cell in the column.
DataGridViewImageColumn You select this type when each cell in the column is to display and image in each cell in the column.
DataGridViewLinkColumn You use this type when each cell in the column is to displaya link.
1272
Chapter 23: Accessing Data Sources in a Windows Forms Application
25905c23.qxd:WroxPro 2/21/08 9:27 AM Page 1272

The Edit Columns dialog box enables you to resequence existing columns, to add new columns, or todelete columns; you can also edit any of the properties for a column.
Return to the Design tab and change the Text property for the form to My Book List. If you display thecode for the form, you can modify the constructor to add data to the DataGridView control using theAdd() function for the Rows property, like this:
Form1(void){InitializeComponent();////TODO: Add the constructor code here// Create book data, one book per arrayarray<String^>^ book1 = {L”0-09-174271-4”, L”Wonderful Life”,
L”Stephen Jay Gould”, L”Hutchinson Radius”};array<String^>^ book2 = {L”0-09-977170-5”, L”The Emperor’s New Mind”,
L”Roger Penrose”, L”Vintage”};array<String^>^ book3 = {L”0-14-017996-8”,L”Metamagical Themas”,
L”Douglas R. Hofstadter”, L”Penguin”};array<String^>^ book4 = {L”0-201-36080-2”, L”The Meaning Of It All”,
L”Richard P. Feynman”, L”Addison-Wesley”};array<String^>^ book5 = {L”0-593-03449-X”, L”The Walpole Orange”,
L”Frank Muir”, L”Bantam Press”};array<String^>^ book6 = {L”0-439-99358-X”, L”The Amber Spyglass”,
L”Philip Pullman”, L”Scholastic Children’s Books”};array<String^>^ book7 = {L”0-552-13461-9”, L”Pyramids”,
L”Terry Pratchett”, L”Corgi Books”};array<String^>^ book8 = {L”0-7493-9739-X”, L”Made In America”,
L”Bill Bryson”, L”Minerva”};
// Create Array of booksarray<array<String^>^>^ books ={book1, book2, book3, book4,
book5, book6, book7, book8};
// Add all the books to the controlfor each(array<String^>^ book in books )dataGridView1->Rows->Add(book);
//}
There’s an array of type array<String^> created for each book, and the handle to each array is storedin an array referenced by a variable of type array<array<String^>^>^. Each of the arrays of stringshas four elements that contain data items that correspond to the columns in the DataGridView control,so each array defines a book.
For convenience, you assemble the handles to the arrays of strings into the books array. The type forbooks looks a little messy because of the ^ repetitions, but it is simply a handle to an array of elementswhere each element is of type array<String^>^. The books array enables you to set up all the data inthe control in a single for each loop. The Rows property for the DataGridView object returns a handleof type DataGridViewRowCollection^ that references the collection of rows in the control. Calling theAdd() function for the object returned by the Rows property adds a complete row to the collection. Each
1273
Chapter 23: Accessing Data Sources in a Windows Forms Application
25905c23.qxd:WroxPro 2/21/08 9:27 AM Page 1273

element in the array that is passed as the argument corresponds to a column in the control, and the typeof data element must correspond with the type you selected for the column. Here all the columns havethe same type, so all the cells in a row can be passed in an array. If the columns were of different types,you could specify the item for each column by a separate argument to the Add() function, or you coulduse an array of elements of type Object^.
If you compile and execute the example by pressing Ctrl+F5, you should see the application windowshown in Figure 23-5.
Figure 23-5
If you reduce the size of the application window by dragging the lower-right corner, you get scrollbarsdisplayed automatically to enable you to scroll to see the rest of the control. If you increase the size of the window, eventually the scrollbars disappear.
It would be nice if the columns were wide enough to accommodate the maximum length of text theycontain. Changing the value of the AutoSizeColumnsMode property in the Layout group fixes that.After you have closed the application, open the Properties window for the DataGridView control fromthe Form1[Design] tab in the Editor pane and change the AutoSizeColumnsMode property value toAllCells. If you recompile the program and run it again, you’ll see that the application window isnow as shown in Figure 23-6.
Figure 23-6
1274
Chapter 23: Accessing Data Sources in a Windows Forms Application
25905c23.qxd:WroxPro 2/21/08 9:27 AM Page 1274
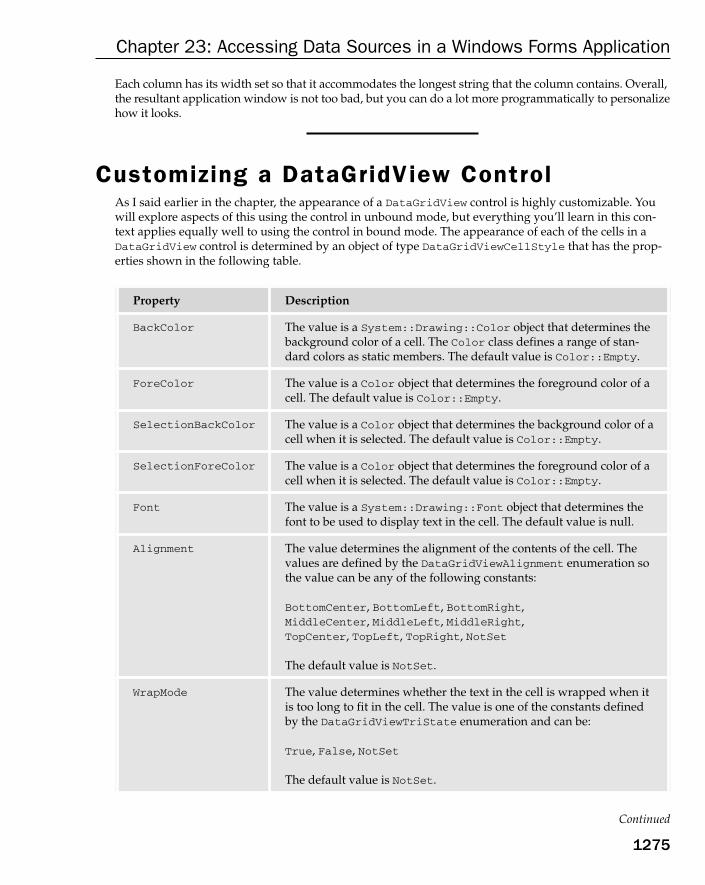
Each column has its width set so that it accommodates the longest string that the column contains. Overall,the resultant application window is not too bad, but you can do a lot more programmatically to personalizehow it looks.
Customizing a DataGridView Control As I said earlier in the chapter, the appearance of a DataGridView control is highly customizable. Youwill explore aspects of this using the control in unbound mode, but everything you’ll learn in this con-text applies equally well to using the control in bound mode. The appearance of each of the cells in aDataGridView control is determined by an object of type DataGridViewCellStyle that has the prop-erties shown in the following table.
Continued
Property Description
BackColor The value is a System::Drawing::Color object that determines thebackground color of a cell. The Color class defines a range of stan-dard colors as static members. The default value is Color::Empty.
ForeColor The value is a Color object that determines the foreground color of acell. The default value is Color::Empty.
SelectionBackColor The value is a Color object that determines the background color of acell when it is selected. The default value is Color::Empty.
SelectionForeColor The value is a Color object that determines the foreground color of acell when it is selected. The default value is Color::Empty.
Font The value is a System::Drawing::Font object that determines thefont to be used to display text in the cell. The default value is null.
Alignment The value determines the alignment of the contents of the cell. Thevalues are defined by the DataGridViewAlignment enumeration sothe value can be any of the following constants:
BottomCenter, BottomLeft, BottomRight,MiddleCenter, MiddleLeft, MiddleRight,TopCenter, TopLeft, TopRight, NotSet
The default value is NotSet.
WrapMode The value determines whether the text in the cell is wrapped when itis too long to fit in the cell. The value is one of the constants definedby the DataGridViewTriState enumeration and can be:
True, False, NotSet
The default value is NotSet.
1275
Chapter 23: Accessing Data Sources in a Windows Forms Application
25905c23.qxd:WroxPro 2/21/08 9:27 AM Page 1275
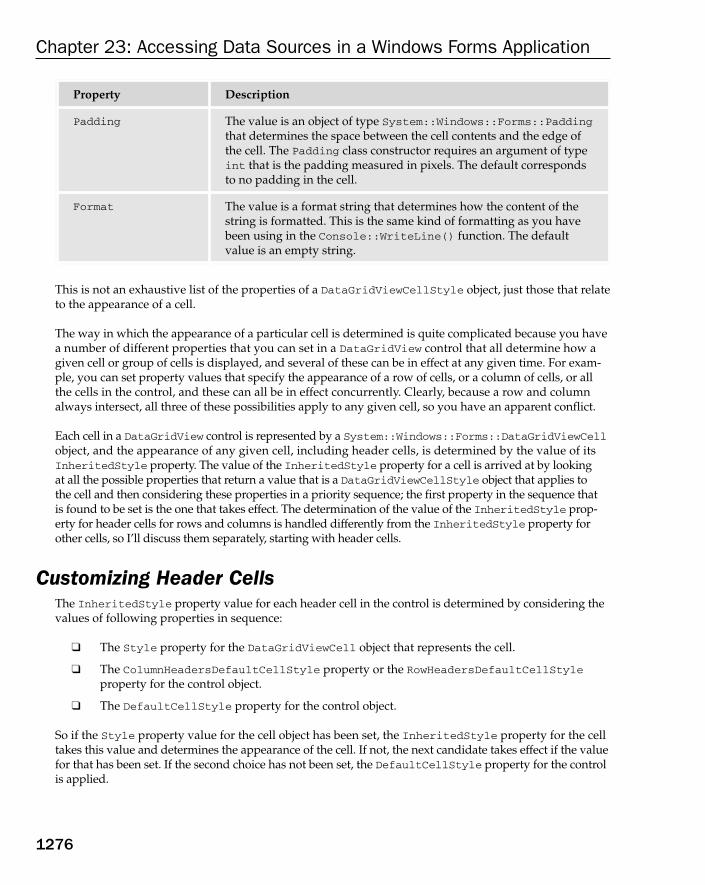
This is not an exhaustive list of the properties of a DataGridViewCellStyle object, just those that relateto the appearance of a cell.
The way in which the appearance of a particular cell is determined is quite complicated because you havea number of different properties that you can set in a DataGridView control that all determine how agiven cell or group of cells is displayed, and several of these can be in effect at any given time. For exam-ple, you can set property values that specify the appearance of a row of cells, or a column of cells, or allthe cells in the control, and these can all be in effect concurrently. Clearly, because a row and columnalways intersect, all three of these possibilities apply to any given cell, so you have an apparent conflict.
Each cell in a DataGridView control is represented by a System::Windows::Forms::DataGridViewCellobject, and the appearance of any given cell, including header cells, is determined by the value of itsInheritedStyle property. The value of the InheritedStyle property for a cell is arrived at by looking at all the possible properties that return a value that is a DataGridViewCellStyle object that applies to the cell and then considering these properties in a priority sequence; the first property in the sequence that is found to be set is the one that takes effect. The determination of the value of the InheritedStyle prop-erty for header cells for rows and columns is handled differently from the InheritedStyle property forother cells, so I’ll discuss them separately, starting with header cells.
Customizing Header CellsThe InheritedStyle property value for each header cell in the control is determined by considering thevalues of following properties in sequence:
❑ The Style property for the DataGridViewCell object that represents the cell.
❑ The ColumnHeadersDefaultCellStyle property or the RowHeadersDefaultCellStyleproperty for the control object.
❑ The DefaultCellStyle property for the control object.
So if the Style property value for the cell object has been set, the InheritedStyle property for the celltakes this value and determines the appearance of the cell. If not, the next candidate takes effect if the valuefor that has been set. If the second choice has not been set, the DefaultCellStyle property for the controlis applied.
Property Description
Padding The value is an object of type System::Windows::Forms::Paddingthat determines the space between the cell contents and the edge ofthe cell. The Padding class constructor requires an argument of typeint that is the padding measured in pixels. The default corresponds to no padding in the cell.
Format The value is a format string that determines how the content of thestring is formatted. This is the same kind of formatting as you havebeen using in the Console::WriteLine() function. The defaultvalue is an empty string.
1276
Chapter 23: Accessing Data Sources in a Windows Forms Application
25905c23.qxd:WroxPro 2/21/08 9:27 AM Page 1276

Don’t forget that the value of the InheritedStyle property is an object of type DataGridViewCellStyle,which itself has properties that determine various aspects of the appearance of the cell. The process of goingthrough the priority sequence applies to each of the properties of the DataGridViewCellStyle object, sooverall there may be contributions from more than one of the properties in the priority sequence.
Customizing Non-Header CellsThe InheritedStyle property value for each non-header cell in the control (the non-header cells beingthe cells containing data) is determined from the following properties in the DataGridView object insequence:
❑ The Style property for the DataGridViewCell object that represents the cell.
❑ The DefaultCellStyle property for the DataGridViewRow object that represents the row containing the cell. You would typically reference the DataGridViewRow object by indexing the Rows property for the control object.
❑ The AlternatingRowsDefaultCellStyle property for the control object; this applies only to cells in rows with odd index numbers.
❑ The RowsDefaultCellStyle property for the control object.
❑ The DefaultCellStyle property for the DataGridViewColumn object that contains the cell.You would typically access a DataGridViewColumn object by indexing the Columns propertyfor the control object.
❑ The DefaultCellStyle property for the control object.
Potentially you could have a different DataGridViewCellStyle object for each cell, but for efficiencyyou need to keep the number of such objects to a minimum.
The next Try It Out explores some of these possibilities in an example where you set up the DataGridViewobject yourself.
Try It Out Setting the Appearance of the ControlCreate a new CLR project using the Windows Forms template with the name Ex23_02. Add aDataGridView control to the form in the Design tab and change its (Name) property to dataGridView.This is the name of the handle in the class that references the control object. You can also change the Textproperty for the form to “My Other Book List”. For the rest of the example, you are going to be work-ing with the code in the constructor.
The data that you display is similar to that in the previous example, but to extend the possibilities a little,you’ll add a date entry at the beginning of each row specifying a book, so the cells in the first column willcontain references to objects of type System::DateTime, and the remaining columns will be strings. TheDateTime class defines an instant in time that you typically specify as a date plus the time of day. In theexample, only the date is of interest, so you’ll use a constructor that accepts only three arguments: theyear, the month, and the day.
1277
Chapter 23: Accessing Data Sources in a Windows Forms Application
25905c23.qxd:WroxPro 2/21/08 9:27 AM Page 1277
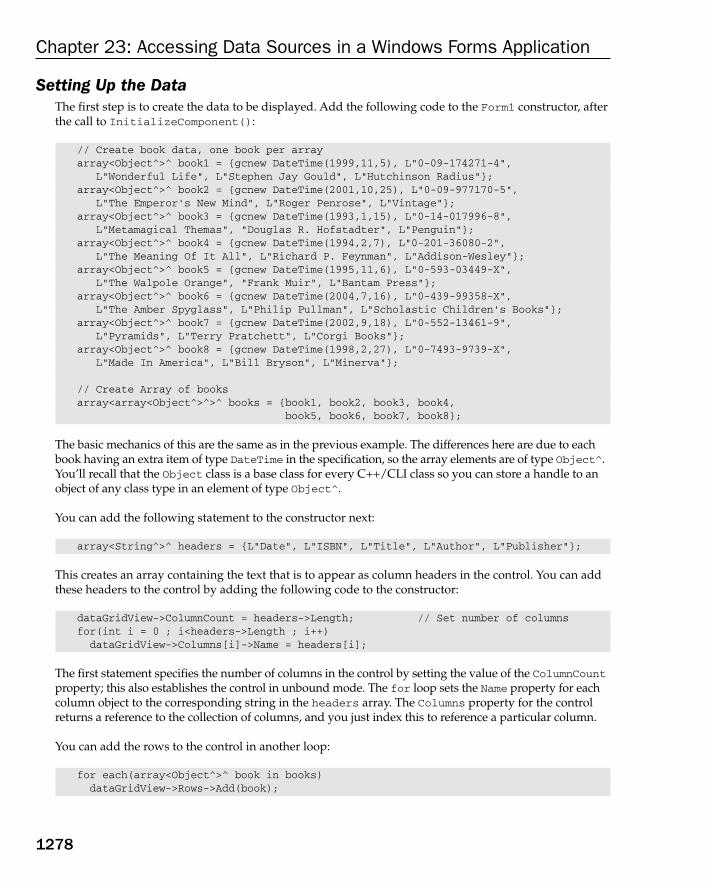
Setting Up the DataThe first step is to create the data to be displayed. Add the following code to the Form1 constructor, afterthe call to InitializeComponent():
// Create book data, one book per arrayarray<Object^>^ book1 = {gcnew DateTime(1999,11,5), L”0-09-174271-4”,
L”Wonderful Life”, L”Stephen Jay Gould”, L”Hutchinson Radius”};array<Object^>^ book2 = {gcnew DateTime(2001,10,25), L”0-09-977170-5”,
L”The Emperor’s New Mind”, L”Roger Penrose”, L”Vintage”};array<Object^>^ book3 = {gcnew DateTime(1993,1,15), L”0-14-017996-8”,
L”Metamagical Themas”, “Douglas R. Hofstadter”, L”Penguin”};array<Object^>^ book4 = {gcnew DateTime(1994,2,7), L”0-201-36080-2”,
L”The Meaning Of It All”, L”Richard P. Feynman”, L”Addison-Wesley”};array<Object^>^ book5 = {gcnew DateTime(1995,11,6), L”0-593-03449-X”,
L”The Walpole Orange”, “Frank Muir”, L”Bantam Press”};array<Object^>^ book6 = {gcnew DateTime(2004,7,16), L”0-439-99358-X”,
L”The Amber Spyglass”, L”Philip Pullman”, L”Scholastic Children’s Books”};array<Object^>^ book7 = {gcnew DateTime(2002,9,18), L”0-552-13461-9”,
L”Pyramids”, L”Terry Pratchett”, L”Corgi Books”};array<Object^>^ book8 = {gcnew DateTime(1998,2,27), L”0-7493-9739-X”,
L”Made In America”, L”Bill Bryson”, L”Minerva”};
// Create Array of booksarray<array<Object^>^>^ books = {book1, book2, book3, book4,
book5, book6, book7, book8};
The basic mechanics of this are the same as in the previous example. The differences here are due to eachbook having an extra item of type DateTime in the specification, so the array elements are of type Object^.You’ll recall that the Object class is a base class for every C++/CLI class so you can store a handle to anobject of any class type in an element of type Object^.
You can add the following statement to the constructor next:
array<String^>^ headers = {L”Date”, L”ISBN”, L”Title”, L”Author”, L”Publisher”};
This creates an array containing the text that is to appear as column headers in the control. You can addthese headers to the control by adding the following code to the constructor:
dataGridView->ColumnCount = headers->Length; // Set number of columnsfor(int i = 0 ; i<headers->Length ; i++)dataGridView->Columns[i]->Name = headers[i];
The first statement specifies the number of columns in the control by setting the value of the ColumnCountproperty; this also establishes the control in unbound mode. The for loop sets the Name property for eachcolumn object to the corresponding string in the headers array. The Columns property for the controlreturns a reference to the collection of columns, and you just index this to reference a particular column.
You can add the rows to the control in another loop:
for each(array<Object^>^ book in books)dataGridView->Rows->Add(book);
1278
Chapter 23: Accessing Data Sources in a Windows Forms Application
25905c23.qxd:WroxPro 2/21/08 9:27 AM Page 1278

The for each loop selects each of the elements from the books array in turn add passes it to the Add()method for the reference returned by the Rows property for the control. Each element in the books arrayis an array of strings, and there are as many strings in the array as there are columns in the control.
The control has now been loaded with the data, so the number of rows and columns is determined andthe contents of the column headers have been specified. You can now set about customizing the appear-ance of the control.
Setting Up the ControlYou want the control to be docked in the client area of the form, and you can do this by setting the valueof the Dock property:
dataGridView->Dock = DockStyle::Fill;
The Dock property must be set to one of the constants defined by the DockStyle enumeration; other possi-ble values are Top, Bottom, Left, Right, or None, and these specify the sides of the control that are docked.
You can also relate the position of the control to the client area of the form by setting the Anchor propertyfor the control.The value of Anchor property specifies the edges of the control that are to be attached to theclient area of the form. The value is a bitwise combination of the constants defined by the AnchorStylesenumeration and can be any or all of Top, Bottom, Left, and Right. For example, to anchor the top andleft sides of the control, you would specify the value as AnchorStyles::Top & AnchorStyles::Left.Setting the Anchor property fixes the position of the control plus its scrollbars within the container at agiven size, so when you resize the application window the control and its scrollbars remain at a fixed size.If you set the Dock property as in the previous statement, resizing the application window exposes more orless of the control and the scrollbars adjust accordingly, so that is much better in this case.
You want the width of the columns to be adjusted to accommodate the data in the cells, and you can putthis into effect by calling the AutoResizeColumns() function:
dataGridView->AutoResizeColumns();
This statement adjusts the width of all columns to accommodate the current contents, and this includesheader cells. Note that this is effective at the time the function is called, so the contents need to be therewhen you call it. If the contents are changed subsequently, the column width is not adjusted. If you wantthe column widths to be adjusted whenever the contents of the cells change, you should also set theAutoSizeColumnsMode property for the control, like this:
dataGridView->AutoSizeColumnsMode = DataGridViewAutoSizeColumnsMode::AllCells;
The value must be one of the constants defined by the DataGridViewAutoSizeColumnsMode enumera-tion, and the other possible values are ColumnHeader, AllCellsExceptHeader, DisplayedCells,DisplayedCellsExceptHeader, Fill, and None. Of course, these are also the property values in thelist for this property that displays on the Properties page for the DataGridView control.
It may be that you want to allow only the columns width for specific columns to be automatically adjustedwhen the contents change; in this case, you set a value for the AutoSizeMode property for the column object.
1279
Chapter 23: Accessing Data Sources in a Windows Forms Application
25905c23.qxd:WroxPro 2/21/08 9:27 AM Page 1279
There are two further overloaded versions of the AutoResizeColumns() function. One accepts an argu-ment of type DataGridViewAutoSizeColumnsMode, and the cells affected are determined by the valueof the argument. The other overload is protected and, therefore, for use in functions in a derived class; itaccepts an additional argument of type bool that indicates whether the cell height is to be considered incalculating a new width.
You can set the default background color of all cells in the control like this:
dataGridView->DefaultCellStyle->BackColor = Color::Pink;
This sets the background color as the standard color Pink that is defined as a static member of the Colorclass. The properties of the DefaultCellStyle property for the control object only determine what appliesto a cell in the absence of any higher priority cell style being in effect.
You could also set the default foreground color for all cells:
dataGridView->DefaultCellStyle->ForeColor = Color::DarkBlue;
To identify when cells have been selected, you can specify selection colors for the foreground and back-ground. Here’s how you could define the background color when a cell is selected:
dataGridView->DefaultCellStyle->SelectionBackColor = Color::Green;
Of course, the point of setting property values programmatically is that it happens at run-time so youcan set values depending on conditions and data values that you find when the application is running.Property values that you set through the Properties pane in the IDE are set once and for all — unlessyou have code that changes them subsequently.
That’s enough for the control for now. You’ll personalize the column headers next.
Setting Up the Column HeadersIf you want to determine the appearance of the column headers yourself, you need to set the value of theEnableHeadersVisualStyles property for the control to false:
dataGridView->EnableHeadersVisualStyles = false;
The controls in a WindowsForms application are usually drawn according to the visual styles theme that is in effect, and this theme determines the appearance of the controls. If you are running the applicationunder Windows XP, the controls are drawn according to the Windows XP theme; if you are using WindowsVista then controls will be drawn in the Vista style. When the EnableHeadersVisualStyles propertyvalue is true, the visual styles for the column headers will be set according to the visual styles theme ineffect for the application, and the styles you set are ignored.
You’ll be setting several properties for the appearance of the headers and an easy way to do this is to createa DataGridViewCellStyle object for which you can set the properties as you want them, and then makethis object the one that determines the styles for the headers. You can create the DataGridViewCellStyleobject like this:
DataGridViewCellStyle^ headerStyle = gcnew DataGridViewCellStyle;
1280
Chapter 23: Accessing Data Sources in a Windows Forms Application
25905c23.qxd:WroxPro 2/21/08 9:27 AM Page 1280

It would be nice to have the header text in a larger font, and you can set the font by setting a value for theFont property:
headerStyle->Font = gcnew System::Drawing::Font(“Times New Roman”, 12,FontStyle::Bold);
The header text is now in 12-point bold characters in the Times New Roman font.
You can also set the background and foreground colors for the header cells:
headerStyle->BackColor = Color::AliceBlue;headerStyle->ForeColor = Color::BurlyWood;
The text is now drawn in the color BurlyWood against an AliceBlue background. If you prefer some-thing different, the Color class offers you a lot of choices, and Intellisense should show the list as youcomplete typing the scope resolution operator.
To set the appearance of the header cells to correspond with the properties that you’ve set for theheaderStyle object, you need to add the following statement:
dataGridView->ColumnHeadersDefaultCellStyle = headerStyle;
This sets the value of the ColumnHeadersDefaultCellStyle property for the control to be theheaderStyle handle. This replaces the existing DataGridViewCellStyle object that was in effectfor the headers.
There is one other thing you should do in relation to the column headers. The larger font requires theheight of the cells to be adjusted to accommodate it. Calling the AutoResizeColumnHeadersHeight()function for the control adjusts the heights of the header cells to accommodate their current contents:
dataGridView->AutoResizeColumnHeadersHeight();
The height of all header cells is adjusted to fit the largest cell contents. If you just want the height of aparticular column header to be adjusted, you can use the overloaded version of the function that acceptsan argument specifying the index of the column to be adjusted.
If you don’t want the row or column headers to be visible you can make them disappear by setting thevalue of the RowHeadersVisible property and/or ColumnHeadersVisible property for the control to false.
Formatting a ColumnThe first column contains handles to a DateTime object. As it is, the application simply calls theToString() function for the objects to get something to display, but you can do better than that. You can set the Format property for the DefaultCellStyle property for the column, and this format specification is then used to display the contents of the cells:
dataGridView->Columns[0]->DefaultCellStyle->Format = L”y”;
1281
Chapter 23: Accessing Data Sources in a Windows Forms Application
25905c23.qxd:WroxPro 2/21/08 9:27 AM Page 1281

This sets the Format property to the string containing the y format specification for a DateTime objectthat presents the object in the short date form as month plus year. There are several other format speci-fiers for DateTime objects that you could use. For example, D displays the day as well as the month andyear, and f and F displays the time as well as the date.
If you have added all that code to the Form1 class constructor, it’s time to don the sunglasses and givethe example a whirl. If you compile and run it, you should see something like the application windowshown in Figure 23-7.
Figure 23-7
I have resized the width of the window in Figure 23-7 to show more of the columns. Unfortunately, in thebook the application window appears in shades of grey but you should see it on your screen in gloriousTechnicolor.
If you click one of the row headers on the left of the control, you should see the row highlighted as shownin Figure 23-8.
Figure 23-8
The background color in the cells in the row is the one you set for the SelectionBackColor propertyof the DefaultCellStyle property for the control. You can also select an individual cell by clicking it,and the background color of the cell changes to green.
1282
Chapter 23: Accessing Data Sources in a Windows Forms Application
25905c23.qxd:WroxPro 2/21/08 9:27 AM Page 1282
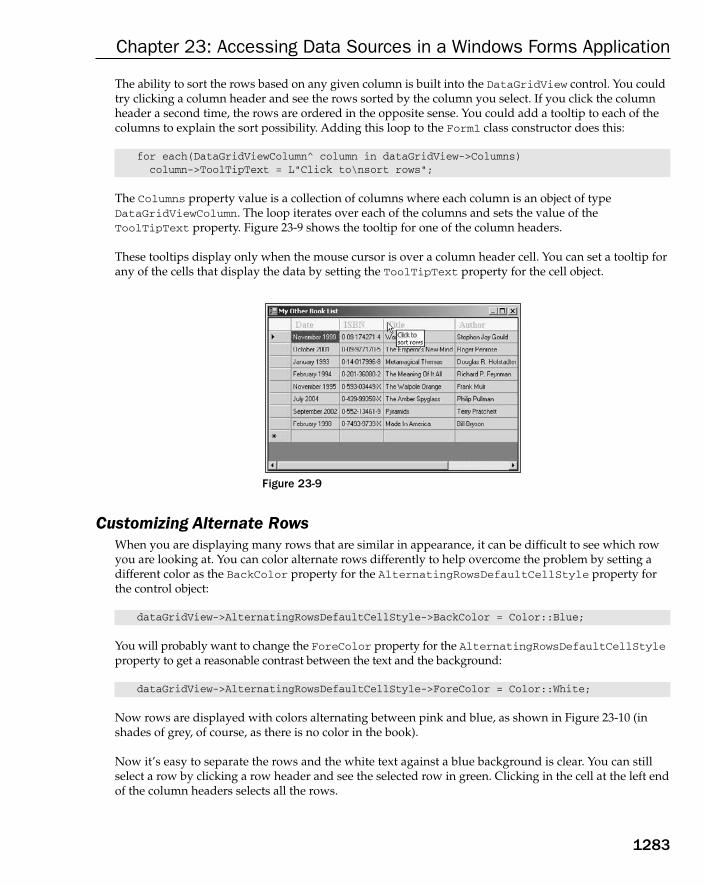
The ability to sort the rows based on any given column is built into the DataGridView control. You couldtry clicking a column header and see the rows sorted by the column you select. If you click the columnheader a second time, the rows are ordered in the opposite sense. You could add a tooltip to each of thecolumns to explain the sort possibility. Adding this loop to the Form1 class constructor does this:
for each(DataGridViewColumn^ column in dataGridView->Columns)column->ToolTipText = L”Click to\nsort rows”;
The Columns property value is a collection of columns where each column is an object of typeDataGridViewColumn. The loop iterates over each of the columns and sets the value of theToolTipText property. Figure 23-9 shows the tooltip for one of the column headers.
These tooltips display only when the mouse cursor is over a column header cell. You can set a tooltip forany of the cells that display the data by setting the ToolTipText property for the cell object.
Figure 23-9
Customizing Alternate RowsWhen you are displaying many rows that are similar in appearance, it can be difficult to see which rowyou are looking at. You can color alternate rows differently to help overcome the problem by setting adifferent color as the BackColor property for the AlternatingRowsDefaultCellStyle property forthe control object:
dataGridView->AlternatingRowsDefaultCellStyle->BackColor = Color::Blue;
You will probably want to change the ForeColor property for the AlternatingRowsDefaultCellStyleproperty to get a reasonable contrast between the text and the background:
dataGridView->AlternatingRowsDefaultCellStyle->ForeColor = Color::White;
Now rows are displayed with colors alternating between pink and blue, as shown in Figure 23-10 (inshades of grey, of course, as there is no color in the book).
Now it’s easy to separate the rows and the white text against a blue background is clear. You can stillselect a row by clicking a row header and see the selected row in green. Clicking in the cell at the left endof the column headers selects all the rows.
1283
Chapter 23: Accessing Data Sources in a Windows Forms Application
25905c23.qxd:WroxPro 2/21/08 9:27 AM Page 1283

Figure 23-10
Dynamically Setting Cell StylesYou have several possibilities for changing the appearance of cells by handling events for theDataGridView control. The CellFormatting event for a DataGridView control fires when the contents of a cell need to be formatted ready to be displayed, so by adding a handler for this event you can adjust the appearance of any cell depending on what the contents are. I want now to explorehow you could extend Ex23_02 to do this.
Suppose, for example, that in Ex23_02 you wanted to set the background color of cells in the Date col-umn to red if the date is before the year 2000. Recall from the discussion of events in Chapter 9 that toregister a handler for an event you add an instance of the delegate to the event. The delegate for theCellFormatting event is of type DataGridViewCellFormattingEventHandler, and it expects two parameters: the first parameter is of type Object^ and identifies the source of the event and thesecond parameter is a handle to an object of type DataGridViewCellFormattingEventArgs.
The second argument passed to a handler for the CellFormatting event provides additional informationabout the event through the properties shown in the following table.
Property Description
Value The value is a handle to the contents of the cell that is being formatted.
DesiredType The value is a handle to an object of type Type that identifies the type ofthe contents off the cell being formatted.
CellStyle Gets or sets the cell style of the cell that is associated with the formattingevent so the value is a handle to an object of typeDataGridViewCellStyle.
ColumnIndex The value is the column index for the cell that is being formatted.
RowIndex The value is the row index for the cell that is being formatted.
FormattingApplied The value, true or false, indicates whether formatting of the cell contents has been applied.
1284
Chapter 23: Accessing Data Sources in a Windows Forms Application
25905c23.qxd:WroxPro 2/21/08 9:27 AM Page 1284
These properties enable you to find out all you need to know about the cell being formatted — the rowand column for the cell, the current style in effect, and the contents of the cell.
The first step in handling the CellFormatting event is to define a handler function for it. The handlercode needs to be as short and efficient as possible because the function is called for every cell in the con-trol whenever the cell needs to be formatted. You could add the following function to the Form1 classthat is a handler function for the CellFormatting event:
private:void OnCellFormatting(Object^ sender, DataGridViewCellFormattingEventArgs^ e){// Check if it’s the date columnif(dataGridView->Columns[e->ColumnIndex]->Name == L”Date”){// If the cell content is not null and the year is less than 2000// Set the background to redif(e->Value != nullptr && safe_cast<DateTime^>(e->Value)->Year < 2000){e->CellStyle->BackColor = Color::Red;e->FormattingApplied = false; // We did not format the data
}}
}
Don’t forget, any code that you add manually to a form class definition must go after the #pragmaendregion directive. You first check whether the current column is the Date column because you areinterested only in modifying cells in that column. For cells in the Date column you check if the cell con-tents actually exist, and if there is a DateTime object present, that the year is less than 2000. In this caseyou set the BackColor property for the object returned by the CellStyle property to Color::Red. Youset the FormattingApplied property to false to indicate that you have not formatted the contents.This is not strictly necessary because the value starts out as false. You would set it to true if you weretaking care of formatting the contents in the handler and this would prevent subsequent formattingusing the value of the Format property.
To register this function as a handler for the CellFormatting event, add the following statement to theend of the Form1 class constructor:
dataGridView->CellFormatting += gcnew DataGridViewCellFormattingEventHandler(this, &Form1::OnCellFormatting);
The first argument to the delegate is the handle to the object containing the handler function and is thecurrent Form1 object. The second argument is the address of the function that is the new handler for theevent. If you recompile the example and execute it once again, you should see that all the cells in theDate column that contain a date prior to the year 2000 have the background color red.
The DataGridView control defines CellMouseEnter and CellMouseLeave events that fire when themouse cursor enters or leaves a cell. You could implement handlers for these events to highlight thecell that the mouse cursor is over by changing its background color. You could set new backgroundand foreground colors in the handler for the CellMouseEnter event and restore the original colors inthe handler for the CellMouseLeave event. There are a few tricky aspects to this, so it’s worth lookinginto specifically.
1285
Chapter 23: Accessing Data Sources in a Windows Forms Application
25905c23.qxd:WroxPro 2/21/08 9:27 AM Page 1285
Try It Out Highlighting the Cell under the Mouse CursorThis will be an extension to Ex23_02 including the latest addition of the CellFormatting event handlerrather than a new example from scratch. You’ll need to store the old background and foreground colorssomewhere, so add the following private data members to the Form1 class:
// Stores for old cell colors in mouse enter event handler// for restoring later in mouse leave event handlerprivate: Color oldCellBackColor; private: Color oldCellForeColor;
You should initialize both of these to Color::Empty in the Form1 class constructor.
The first parameter to the delegate for either the CellMouseEnter or CellMouseLeave events is a handleto the object originating the event, which is the DataGridView control. The second parameter to both dele-gates is a handle to an object of type DataGridViewCellEventsArg that provides additional informationabout the event. This object has RowIndex and ColumnIndex properties, and the values of these propertiesenable you to locate the cell the mouse is entering or leaving; you can use the former to index the Rowsproperty to select the row that contains the cell and the latter to index the Cells property to select the cellitself within the row. There’s one thing to note — the value of the RowIndex property is -1 when the mousecursor is in the column header row and the ColumnIndex property value is -1 when the mouse cursor isover one of the row headers. You’ll need to check for these possibilities because attempting to use a nega-tive index with the Rows property value causes an exception to be thrown, as does indexing the Cellsproperty for a row with a negative value.
You can now define a private handler function in the Form1 class for the CellMouseEnter event like this:
private:void OnCellMouseEnter(Object^ sender, DataGridViewCellEventArgs^ e){if(e->ColumnIndex >= 0 && e->RowIndex >= 0) // Verify indexes non-negative {// Identify the cell we have enteredDataGridViewCell^ cell =
dataGridView->Rows[e->RowIndex]->Cells[e->ColumnIndex];
// Save any old colors that are setoldCellBackColor = cell->Style->BackColor;oldCellForeColor = cell->Style->ForeColor;
// Set highlight colorscell->Style->BackColor = Color::White;cell->Style->ForeColor = Color::Black;
}}
After establishing that both index values are non-negative, you obtain the handle for the cell that themouse cursor entered. You do this by first selecting the row by indexing the value of the Rows propertyfor the control with the RowIndex property value for the parameter e; you then index the Cells prop-erty of the row using the ColumnIndex property of e to select the cell within the row.
1286
Chapter 23: Accessing Data Sources in a Windows Forms Application
25905c23.qxd:WroxPro 2/21/08 9:27 AM Page 1286
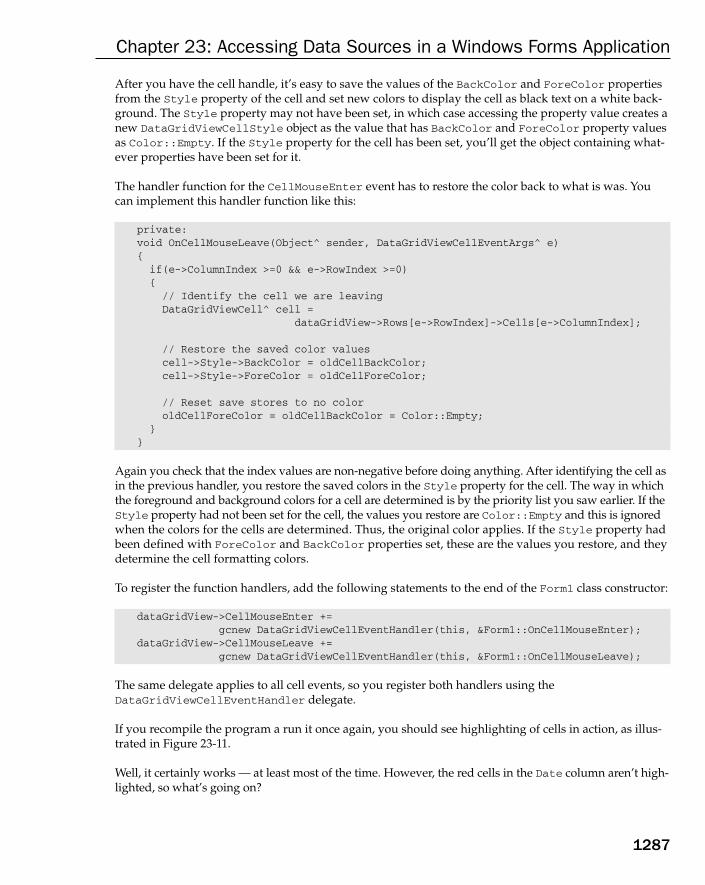
After you have the cell handle, it’s easy to save the values of the BackColor and ForeColor propertiesfrom the Style property of the cell and set new colors to display the cell as black text on a white back-ground. The Style property may not have been set, in which case accessing the property value creates anew DataGridViewCellStyle object as the value that has BackColor and ForeColor property valuesas Color::Empty. If the Style property for the cell has been set, you’ll get the object containing what-ever properties have been set for it.
The handler function for the CellMouseEnter event has to restore the color back to what is was. Youcan implement this handler function like this:
private:void OnCellMouseLeave(Object^ sender, DataGridViewCellEventArgs^ e){if(e->ColumnIndex >=0 && e->RowIndex >=0){// Identify the cell we are leavingDataGridViewCell^ cell =
dataGridView->Rows[e->RowIndex]->Cells[e->ColumnIndex];
// Restore the saved color valuescell->Style->BackColor = oldCellBackColor;cell->Style->ForeColor = oldCellForeColor;
// Reset save stores to no coloroldCellForeColor = oldCellBackColor = Color::Empty;
}}
Again you check that the index values are non-negative before doing anything. After identifying the cell asin the previous handler, you restore the saved colors in the Style property for the cell. The way in whichthe foreground and background colors for a cell are determined is by the priority list you saw earlier. If theStyle property had not been set for the cell, the values you restore are Color::Empty and this is ignoredwhen the colors for the cells are determined. Thus, the original color applies. If the Style property hadbeen defined with ForeColor and BackColor properties set, these are the values you restore, and theydetermine the cell formatting colors.
To register the function handlers, add the following statements to the end of the Form1 class constructor:
dataGridView->CellMouseEnter +=gcnew DataGridViewCellEventHandler(this, &Form1::OnCellMouseEnter);
dataGridView->CellMouseLeave +=gcnew DataGridViewCellEventHandler(this, &Form1::OnCellMouseLeave);
The same delegate applies to all cell events, so you register both handlers using theDataGridViewCellEventHandler delegate.
If you recompile the program a run it once again, you should see highlighting of cells in action, as illus-trated in Figure 23-11.
Well, it certainly works — at least most of the time. However, the red cells in the Date column aren’t high-lighted, so what’s going on?
1287
Chapter 23: Accessing Data Sources in a Windows Forms Application
25905c23.qxd:WroxPro 2/21/08 9:27 AM Page 1287
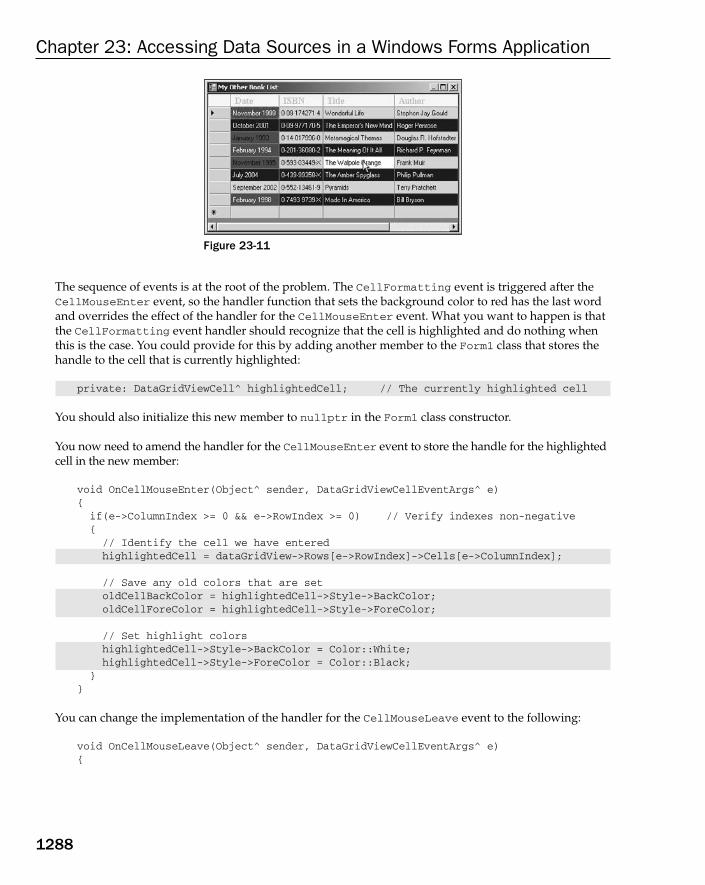
Figure 23-11
The sequence of events is at the root of the problem. The CellFormatting event is triggered after theCellMouseEnter event, so the handler function that sets the background color to red has the last wordand overrides the effect of the handler for the CellMouseEnter event. What you want to happen is thatthe CellFormatting event handler should recognize that the cell is highlighted and do nothing whenthis is the case. You could provide for this by adding another member to the Form1 class that stores thehandle to the cell that is currently highlighted:
private: DataGridViewCell^ highlightedCell; // The currently highlighted cell
You should also initialize this new member to nullptr in the Form1 class constructor.
You now need to amend the handler for the CellMouseEnter event to store the handle for the highlightedcell in the new member:
void OnCellMouseEnter(Object^ sender, DataGridViewCellEventArgs^ e){if(e->ColumnIndex >= 0 && e->RowIndex >= 0) // Verify indexes non-negative {// Identify the cell we have enteredhighlightedCell = dataGridView->Rows[e->RowIndex]->Cells[e->ColumnIndex];
// Save any old colors that are setoldCellBackColor = highlightedCell->Style->BackColor;oldCellForeColor = highlightedCell->Style->ForeColor;
// Set highlight colorshighlightedCell->Style->BackColor = Color::White;highlightedCell->Style->ForeColor = Color::Black;
}}
You can change the implementation of the handler for the CellMouseLeave event to the following:
void OnCellMouseLeave(Object^ sender, DataGridViewCellEventArgs^ e){
1288
Chapter 23: Accessing Data Sources in a Windows Forms Application
25905c23.qxd:WroxPro 2/21/08 9:27 AM Page 1288

if(e->ColumnIndex >=0 && e->RowIndex >=0){
// Restore the saved color valueshighlightedCell->Style->BackColor = oldCellBackColor;highlightedCell->Style->ForeColor = oldCellForeColor;
// Reset save stores to no coloroldCellForeColor = oldCellBackColor = Color::Empty;
highlightedCell = nullptr; // Reset highlighted cell handle}
}
You no longer need to determine the cell handle, as it’s available in the highlightedCell member ofthe Form1 class. You don’t even have to check it, because a CellMouseLeave event must always be pre-ceded by a CellMouseEnter event. You reset the handle of the highlighted cell to null because it’s goodpractice to do so.
You can now amend the handler for the CellFormatting event:
void OnCellFormatting(Object^ sender, DataGridViewCellFormattingEventArgs^ e){// Check whether the cell is highlightedif(dataGridView->Rows[e->RowIndex]->Cells[e->ColumnIndex] == highlightedCell)return;
// Check if it’s the date columnif(dataGridView->Columns[e->ColumnIndex]->Name == L”Date”){
// If the cell content is not null and the year is less than 2000// Set the background to redif(e->Value != nullptr && safe_cast<DateTime^>(e->Value)->Year < 2000){
e->CellStyle->BackColor = Color::Red;e->FormattingApplied = false; // We did not format the data
}}
}
If you rebuild the example, you should now see that any of the cells can be highlighted by moving themouse cursor over them.
You should now have a good idea of how you can implement an event handler for a DataGridView con-trol. There are a multitude of other events, so you have huge scope for doing many more things dynami-cally to customize the control to your application needs.
1289
Chapter 23: Accessing Data Sources in a Windows Forms Application
25905c23.qxd:WroxPro 2/21/08 9:27 AM Page 1289

Using Bound ModeIn bound mode, the source of the data that a DataGridView control displays is specified by the value ofits DataSource property, which in general you can set to be any ref class object of a type that imple-ments any of the interfaces shown in the following table.
You can obviously design your own classes so that they implement one or other of these interfaces, andthen you’ll be able to use them as a data source for a DataGridView control in bound mode. Most of thetime, though, you’ll want to access an existing data source without having to go to the trouble of creatingyour own classes to access the data in which case the BindingSource component is likely to be your firstchoice.
The BindingSource ComponentYou use the BindingSource component as an intermediary between controls on a form and a table in adata source. You have the option of binding the component to a DataGridView control that displays thecontents of the table, or to a set of individual controls where each displays a column from the table. Youcan also add data programmatically to a BindingSource component, in which case it acts as the datasource and behaves essentially as a list.
Interface Description
System::Collections::Ilist A class that implements this interface represents a collectionof objects that can be accessed through a single index. AllC++/CLI one-dimensional arrays implement this interface,so a DataGridView object can use any one-dimensionalarray as the source of the data that is displayed.
The IList interface inherits the members of theICollection and IEnumerable interface classes that are defined in the System::Collections namespace.
System::ComponentModel::IListSource
A class that implements this interface makes the dataavailable as a list that is an IList object. The list can contain objects that also implement the IList interface.
System::ComponentModel::IBindingList
This interface class extends the IList interface class to allowmore complex data binding situations to be accommodated.
System::ComponentModel::IBindingListView
Adds sorting and filtering capabilities to the IBindingListinterface.
The BindingSource class that you’ll meet a little later inthis chapter defines a control that implements this interface.
1290
Chapter 23: Accessing Data Sources in a Windows Forms Application
25905c23.qxd:WroxPro 2/21/08 9:27 AM Page 1290

You’ll first look at how you use a BindingSource component as the data source for a DataGridViewcontrol. There is a high degree of automation possible in creating a program that uses a BindingSourcecomponent, but to get an idea of how the component hooks up with the control, you’ll assemble thecomponents on the form manually in the first instance. To make a BindingSource component the datasource for a DataGridView control, you set the value of the DataSource property for the control to bethe handle that references the BindingSource component.
Note that at the time of writing a bug in Visual Studio 2008 prevents the creation of the next example,Ex23_03; this also affects the succeeding examples, Ex23_04 and Ex23_05. The symptoms of the bug are that the Data Source Configuration Wizard dialog that you use to associate a database with the DataGridView component in the application only displays the icon that you use to choose anobject as the data source, so you have no possibility to choose a database.
The example can be created with Visual Studio 2005 and has been tested in that environment. The restof screenshots shown in this chapter are also from Visual Studio 2005, but the screenshots from VisualStudio 2008 should be virtually identical. Hopefully by the time you are reading this, the bug will befixed and will not be apparent in your version of Visual Studio 2008. If you do experience the bug, it is a good idea to see whether there are any updates for the product by selecting the Check for Updatesmenu item from the Help menu.
Try It Out Using a BindingSource ComponentHere you’ll put together a simple program to view a database table. I’ll describe the process assuming youare using the Northwind database that you used back when you were working with the MFC, but you canuse any database you have available on your system.
Create a new Windows Forms project with the name Ex23_03 and change the Text property for the formto something helpful such as Using a Binding Source Component. Add a DataGridView control tothe client area of the form and change its Name property to dataGridView. You can also set the Dockproperty value for the control to FILL. At the moment, the DataGridView control is unbound, so youneed to add a data source to the project that you can bind to the control, and this process will create theBindingSource component along the way. Click the small arrow at the top right of the control to dis-play its menu, click the arrow for the list box adjacent to the Choose Data Source menu item, and clickthe Add Project Data Source link. This displays the dialog box shown in Figure 23-12.
The same dialog box is displayed if you select the Data > Add New Data Source menu item from themain menu, but this only adds the data source to the project — it does not associate it with a control. Asyou see, you have a choice of two locations for the data source, but here you want to click the Databaseoption. The second option allows you to specify an object that provides the data source defined eitherwithin the project or within some other assembly that you have created.
After selecting the Database option and clicking the Next button, you’ll see the dialog box shown inFigure 23-13.
The existing data connections that you have set up appear in the drop-down list, and you can choose oneof those. You can also click the New Connection button to set up a new connection to a data source. Thisdisplays the Add Connection dialog box shown in Figure 23-14.
1291
Chapter 23: Accessing Data Sources in a Windows Forms Application
25905c23.qxd:WroxPro 2/21/08 9:27 AM Page 1291

Figure 23-12
Figure 23-13
1292
Chapter 23: Accessing Data Sources in a Windows Forms Application
25905c23.qxd:WroxPro 2/21/08 9:27 AM Page 1292

Figure 23-14
Here you can enter the data source specification as a name, or you can enter a connection string for thedata source by clicking the second radio button. After you have entered any necessary login information,you can test that the connection really does work by clicking the Test Connection button. On my system,the ODBC source is preselected, but if you don’t want the default that you see displayed, you can click theChange button to display the Change Data Source dialog box shown in Figure 23-15.
Figure 23-15
The dialog box displays the types of data sources that you have available, and you choose the type of datasource that you want to work with and click the OK button. You’ll then return to the dialog box shown inFigure 23-14 where you can complete the identification and verification of the data source before clicking
1293
Chapter 23: Accessing Data Sources in a Windows Forms Application
25905c23.qxd:WroxPro 2/21/08 9:27 AM Page 1293
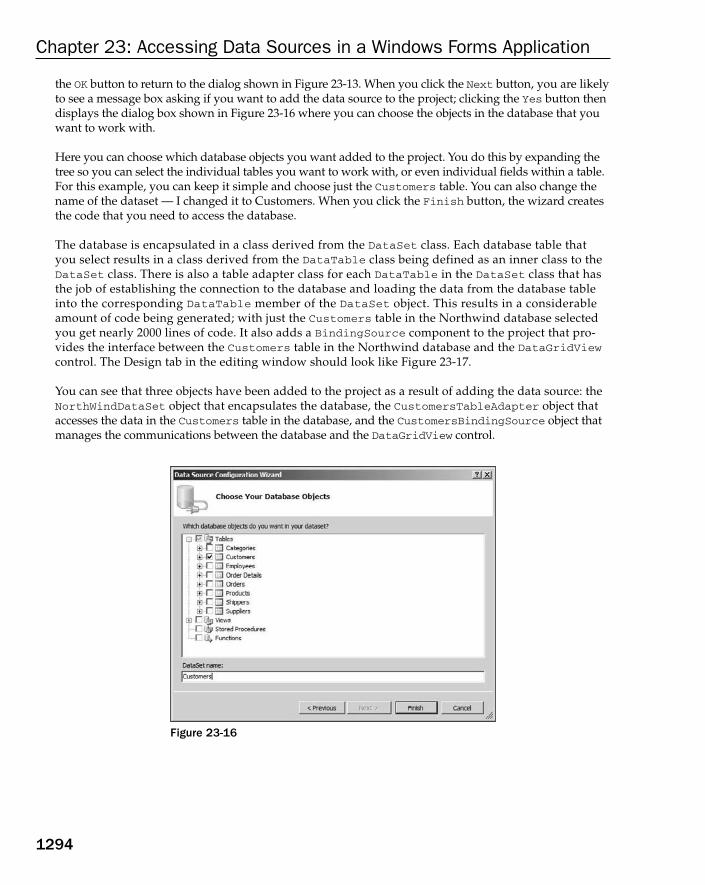
the OK button to return to the dialog shown in Figure 23-13. When you click the Next button, you are likelyto see a message box asking if you want to add the data source to the project; clicking the Yes button thendisplays the dialog box shown in Figure 23-16 where you can choose the objects in the database that youwant to work with.
Here you can choose which database objects you want added to the project. You do this by expanding thetree so you can select the individual tables you want to work with, or even individual fields within a table.For this example, you can keep it simple and choose just the Customers table. You can also change thename of the dataset — I changed it to Customers. When you click the Finish button, the wizard createsthe code that you need to access the database.
The database is encapsulated in a class derived from the DataSet class. Each database table that you select results in a class derived from the DataTable class being defined as an inner class to theDataSet class. There is also a table adapter class for each DataTable in the DataSet class that hasthe job of establishing the connection to the database and loading the data from the database tableinto the corresponding DataTable member of the DataSet object. This results in a considerableamount of code being generated; with just the Customers table in the Northwind database selectedyou get nearly 2000 lines of code. It also adds a BindingSource component to the project that pro-vides the interface between the Customers table in the Northwind database and the DataGridViewcontrol. The Design tab in the editing window should look like Figure 23-17.
You can see that three objects have been added to the project as a result of adding the data source: theNorthWindDataSet object that encapsulates the database, the CustomersTableAdapter object thataccesses the data in the Customers table in the database, and the CustomersBindingSource object thatmanages the communications between the database and the DataGridView control.
Figure 23-16
1294
Chapter 23: Accessing Data Sources in a Windows Forms Application
25905c23.qxd:WroxPro 2/21/08 9:27 AM Page 1294
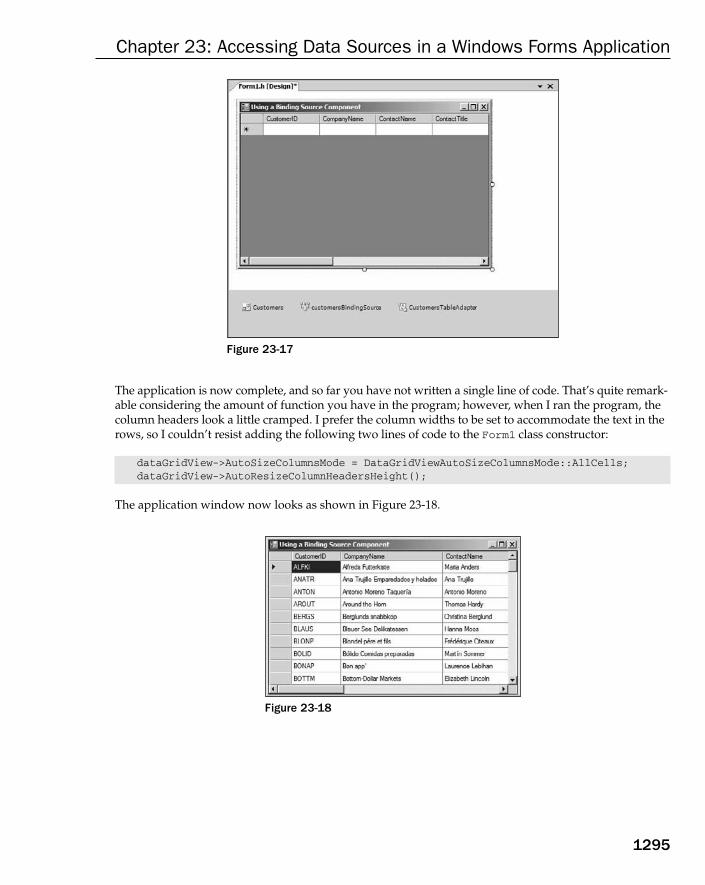
Figure 23-17
The application is now complete, and so far you have not written a single line of code. That’s quite remark-able considering the amount of function you have in the program; however, when I ran the program, thecolumn headers look a little cramped. I prefer the column widths to be set to accommodate the text in therows, so I couldn’t resist adding the following two lines of code to the Form1 class constructor:
dataGridView->AutoSizeColumnsMode = DataGridViewAutoSizeColumnsMode::AllCells;dataGridView->AutoResizeColumnHeadersHeight();
The application window now looks as shown in Figure 23-18.
Figure 23-18
1295
Chapter 23: Accessing Data Sources in a Windows Forms Application
25905c23.qxd:WroxPro 2/21/08 9:27 AM Page 1295

You can use the scrollbars to navigate the data and your mouse wheel should scroll the rows. TheBindingNavigator control could improve things a bit, so next you’ll see how to use that.
Using the BindingNavigator ControlThe BindingNavigator control has been specifically designed to work with a BindingSource compo-nent. To use a BindingNavigator control to navigate the data from a data source could not be simpler;you just add the control to the form and set the value of the BindingSource property for the control to thevariable encapsulating the BindingSource component. The next Try It Out extends Ex23_03 to do that.
Try It Out Using a BindingNavigator ControlClick the BindingNavigator control in the Toolbox window and then click in the client area of the formto add it to the project. If you open the Properties window for the control, you are able to set the valuefor the BindingSource property to customersBindingSource, which is the name of the handle to theBindingSource control that encapsulates the Customers table. That’s it; you’re done. If you recompileand rerun the application, you see that the application window now has a toolbar for navigating the data,as shown in Figure 23-19.
Figure 23-19
You can click the button arrows to progress forward and backward through the data records, and there arealso buttons to go to the first or last records. If you type a record sequence number in the text box on thetoolbar and press Enter, you’ll go directly to that record. The ability to navigate through the records worksin whatever sequence they are in. You could sort the records in country order by clicking the header for theCountry column to sort the records, and you’ll then be able to navigate through them in that sequence. TheBindingNavigator control also provides buttons for adding a new record and deleting a record.
Each of the buttons provided by the BindingNavigator control connects to a member of theBindingSource object being navigated.
1296
Chapter 23: Accessing Data Sources in a Windows Forms Application
25905c23.qxd:WroxPro 2/21/08 9:27 AM Page 1296

Thus clicking a button on the navigator toolbar initiates an action in the BindingSource object that ismanaging the data source, but none of the default operations change the database that the BindingSourcecomponent is managing. To do that you must write some code.
Try It Out Updating a DatabaseYou are going to have to do something extra when the user clicks a button in the BindingNavigatorcontrol to add a new record or to delete a record. The way to do this is to implement a handler functionto deal with a Click event for the buttons.
Toolbar Control Action
Move First Calls the MoveFirst() function for the BindingSource controlobject, which changes the current record for the underlying datasource to be the first record.
Move Previous Calls the MovePrevious() function for the BindingSource con-trol object, which changes the current record for the underlyingdata source to be the previous record if there is one.
Current Position Corresponds to the value of the Current property for theBindingSource object, which is the current record in the underly-ing data source.
Total Number of Items Corresponds to the value of the Count property value for theBindingSource object, which corresponds to the number ofrecords in the underlying data source.
Move Next Calls the MoveNext() function for the BindingSource controlobject, which changes the current record for the underlying datasource to be the next record if there is one.
Move Last Calls the MoveLast() function for the BindingSource controlobject, which changes the current record for the underlying datasource to be the last record.
Add New Calls the AddNew() function for the BindingSource object. Thishas the effect of calling EndEdit() to execute any pending editoperations for the underlying data source and creates a new recordin the list maintained by the BindingSource object. This does notupdate the underlying data source.
Delete Calls the RemoveCurrent() function for the BindingSourceobject to remove the current record from the list. This does notmodify the underlying data source.
1297
Chapter 23: Accessing Data Sources in a Windows Forms Application
25905c23.qxd:WroxPro 2/21/08 9:27 AM Page 1297
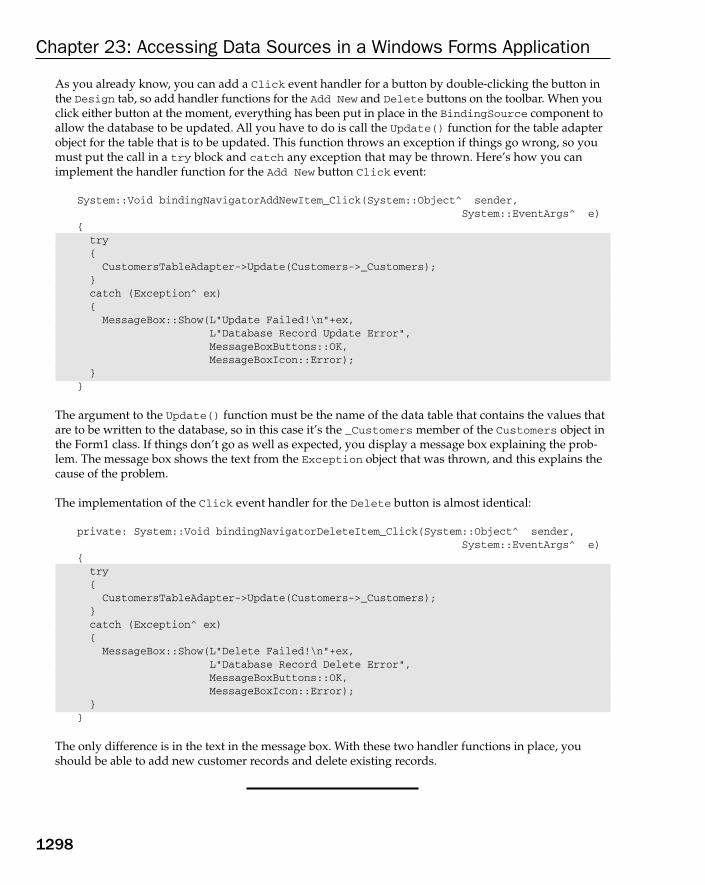
As you already know, you can add a Click event handler for a button by double-clicking the button inthe Design tab, so add handler functions for the Add New and Delete buttons on the toolbar. When youclick either button at the moment, everything has been put in place in the BindingSource component toallow the database to be updated. All you have to do is call the Update() function for the table adapterobject for the table that is to be updated. This function throws an exception if things go wrong, so youmust put the call in a try block and catch any exception that may be thrown. Here’s how you canimplement the handler function for the Add New button Click event:
System::Void bindingNavigatorAddNewItem_Click(System::Object^ sender,System::EventArgs^ e)
{try{CustomersTableAdapter->Update(Customers->_Customers);
}catch (Exception^ ex){MessageBox::Show(L”Update Failed!\n”+ex,
L”Database Record Update Error”,MessageBoxButtons::OK,MessageBoxIcon::Error);
}}
The argument to the Update() function must be the name of the data table that contains the values thatare to be written to the database, so in this case it’s the _Customers member of the Customers object inthe Form1 class. If things don’t go as well as expected, you display a message box explaining the prob-lem. The message box shows the text from the Exception object that was thrown, and this explains thecause of the problem.
The implementation of the Click event handler for the Delete button is almost identical:
private: System::Void bindingNavigatorDeleteItem_Click(System::Object^ sender,System::EventArgs^ e)
{try{CustomersTableAdapter->Update(Customers->_Customers);
}catch (Exception^ ex){MessageBox::Show(L”Delete Failed!\n”+ex,
L”Database Record Delete Error”,MessageBoxButtons::OK,MessageBoxIcon::Error);
}}
The only difference is in the text in the message box. With these two handler functions in place, youshould be able to add new customer records and delete existing records.
1298
Chapter 23: Accessing Data Sources in a Windows Forms Application
25905c23.qxd:WroxPro 2/21/08 9:27 AM Page 1298
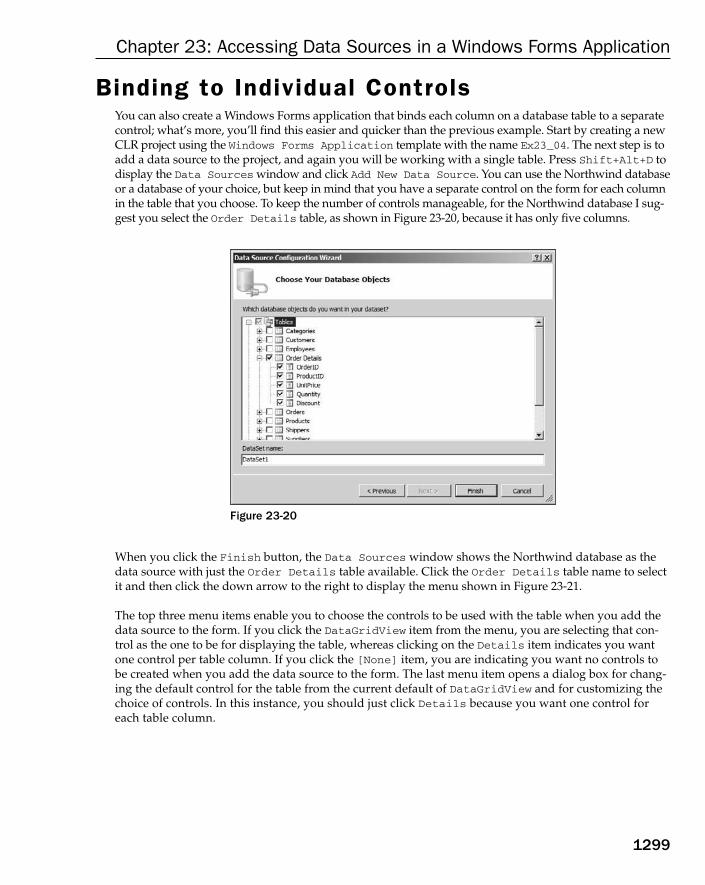
Binding to Individual ControlsYou can also create a Windows Forms application that binds each column on a database table to a separatecontrol; what’s more, you’ll find this easier and quicker than the previous example. Start by creating a newCLR project using the Windows Forms Application template with the name Ex23_04. The next step is toadd a data source to the project, and again you will be working with a single table. Press Shift+Alt+D todisplay the Data Sources window and click Add New Data Source. You can use the Northwind databaseor a database of your choice, but keep in mind that you have a separate control on the form for each columnin the table that you choose. To keep the number of controls manageable, for the Northwind database I sug-gest you select the Order Details table, as shown in Figure 23-20, because it has only five columns.
Figure 23-20
When you click the Finish button, the Data Sources window shows the Northwind database as thedata source with just the Order Details table available. Click the Order Details table name to selectit and then click the down arrow to the right to display the menu shown in Figure 23-21.
The top three menu items enable you to choose the controls to be used with the table when you add thedata source to the form. If you click the DataGridView item from the menu, you are selecting that con-trol as the one to be for displaying the table, whereas clicking on the Details item indicates you wantone control per table column. If you click the [None] item, you are indicating you want no controls tobe created when you add the data source to the form. The last menu item opens a dialog box for chang-ing the default control for the table from the current default of DataGridView and for customizing thechoice of controls. In this instance, you should just click Details because you want one control foreach table column.
1299
Chapter 23: Accessing Data Sources in a Windows Forms Application
25905c23.qxd:WroxPro 2/21/08 9:27 AM Page 1299
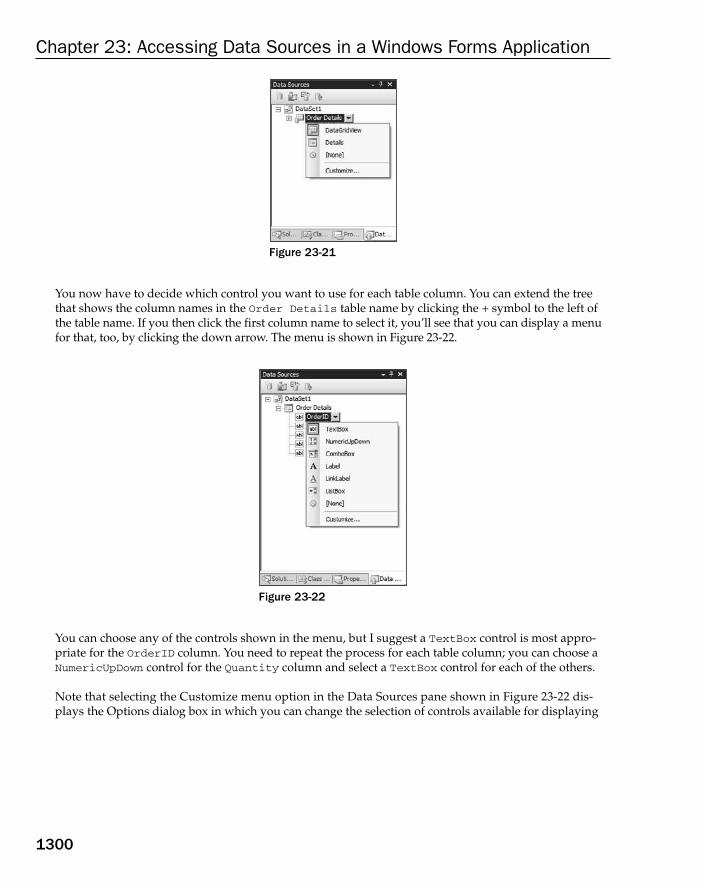
Figure 23-21
You now have to decide which control you want to use for each table column. You can extend the treethat shows the column names in the Order Details table name by clicking the + symbol to the left ofthe table name. If you then click the first column name to select it, you’ll see that you can display a menufor that, too, by clicking the down arrow. The menu is shown in Figure 23-22.
Figure 23-22
You can choose any of the controls shown in the menu, but I suggest a TextBox control is most appro-priate for the OrderID column. You need to repeat the process for each table column; you can choose aNumericUpDown control for the Quantity column and select a TextBox control for each of the others.
Note that selecting the Customize menu option in the Data Sources pane shown in Figure 23-22 dis-plays the Options dialog box in which you can change the selection of controls available for displaying
1300
Chapter 23: Accessing Data Sources in a Windows Forms Application
25905c23.qxd:WroxPro 2/21/08 9:27 AM Page 1300

different types of data. You can also change the control to be selected by default when you drag an itemfrom the Data Sources pane to a form. Figure 23-23 shows the Options dialog box.
Figure 23-23
Figure 23-23 shows the controls associated with displaying a list, and there is a separate list of associatedcontrols for each of the data types you can select. I have checked the ComboBox and ListBox controls inaddition to the DataGridView default, so all three controls are options for displaying a list of data items.You can choose other data types in the drop-down list box at the top of the dialog box for which you wantto modify the choice of controls available.
The final step to create the program is to drag the Order Details table from the Data Sources win-dow to the client area of the form window. The Design tab in the Editor pane will then look similar tothat shown in Figure 23-24.
I have changed the Text property for the form to make the text in the title bar a little more relevant, and Irepositioned the controls slightly so they are better located within the client area. I also rearranged theitems in the grey area at the bottom to make them all visible in the Design pane. You can see that fivecontrols corresponding to the five table columns have been added automatically to the form as well aslabel controls to indicate which is which. There’s a BindingNavigator control at the top of the clientarea for navigating the table data. Below the form you can see that the application has a BindingSourcecomponent that links the database to the controls, and the DataSet and table adapter classes are alsoidentified.
If you press Ctrl+F5 to build and execute the program, you’ll have a complete working program forviewing and editing the Order Details table in the Northwind database. There is a Save button thathas been added to the BindingNavigator toolbar that you click to store any changes you make back inthe database table. Figure 23-25 shows the application window.
1301
Chapter 23: Accessing Data Sources in a Windows Forms Application
25905c23.qxd:WroxPro 2/21/08 9:27 AM Page 1301

Figure 23-24
Figure 23-25
You could create a program that uses the DataGridView control to display a table in essentially the sameway. If you want to try it, just create another project and add the data source as in the previous example.If you then immediately drag the table from the Data Sources window to the form, the application iscomplete. You need only set the Text property for the form for the title bar text and set the value of theDock property for the DataGridView control before compiling and running the program.
Working with Multiple TablesCreating an application that works with multiple tables is almost as easy as the previous example. In thisexample, you’ll use a tab control to allow three different tables in the Northwind to be accessed. Create anew Forms project with the name Ex23_05, and press Shift+Alt+D to open the Data Sources window.Add the Northwind database to the project with the Customers, Products, and Employees tables checked.
1302
Chapter 23: Accessing Data Sources in a Windows Forms Application
25905c23.qxd:WroxPro 2/21/08 9:27 AM Page 1302

Add a TabControl control from the Containers group in the Toolbox window to the form and set theDock property value for the tab control to Fill. If you click the arrow at the top right of the control, you’llbe able to add a third tab page to the control. You can move between the tabs on the TabControl controlusing the Tab key, or by clicking the tab page label twice; take care not to double-click the control or you’llgenerate handler functions for it. Move to the first tab page and set its Text property value to Employees.You can then set the Text property value for the other two tabs to Customers and Products.
You should also add a Panel control to each tab page with its Dock property value set to Fill. This is nec-essary to locate the BindingNavigator and DataGridView controls properly on the tab page. If you addthem directly to the tab, setting the DataGridView Dock property to Fill with the BindingNavigatorcontrol docked to the top of the tab page, the column headers for the DataGridView control are hidden bythe BindingNavigator control. This won’t happen within a Panel container. You might also want tochange the Text property value for the form to something relevant — I made it “Accessing MultipleTables”.
You can now drag the Customer table from the Data Sources window to the panel on the tab pagelabeled Customers. A DataGridView control is added to the panel, and a BindingNavigator controlappears at the top of the form. You’ll want each tab page to have its own BindingNavigator control, sohaving it placed on the form is not convenient. You’ll need to move it to the panel on the tab page. Youcan do this by first setting the Dock property value for the BindingNavigator control to None and thendragging the control on to panel on the Customers tab page.
After you have added the table to the Customers tab page, switch to the next tab before dragging the nexttable on to its panel from the Data Sources window. When you have added the appropriate table to thepanels on the other two tab pages, they each contain a DataGridView control, but no BindingNavigatorcontrol — this was not added because you have one already from adding the Customers table. You couldadd BindingNavigator controls to these tab pages from the Toolbox window, but there’s a shortcut youcan use. Click the BindingNavigator control on the Customers tab page and press Ctrl+C to copy it tothe Clipboard. Switch to one of the other tab pages, select its panel, and press Ctrl+V to copy the controlfrom the Clipboard to the panel on the tab page. Switch to the third tab page, select its panel, and thenpress Ctrl+V once more to add a BindingNavigator control to the panel on that tab page. You can thenset the Dock property value for each of the three BindingNavigator controls to Top and the Dock prop-erty value for each of the DataGridView controls to Fill.
The two BindingNavigator controls that are copies have their BindingSource property values setincorrectly, so select the value field for the property for each of these controls and select the correctBindingSource component from the drop-down list. You should select EmployeesBindingSource forthe control on the Employees tab page, and ProductsBindingSource for the control on the Productstab page.
If you press Ctrl+F5 to build and execute the example, you should see the application window shownin Figure 23-26.
This all works with no coding at all. I think you’ll agree that this is an amazing capability for generatingapplications to access data sources.
1303
Chapter 23: Accessing Data Sources in a Windows Forms Application
25905c23.qxd:WroxPro 2/21/08 9:27 AM Page 1303
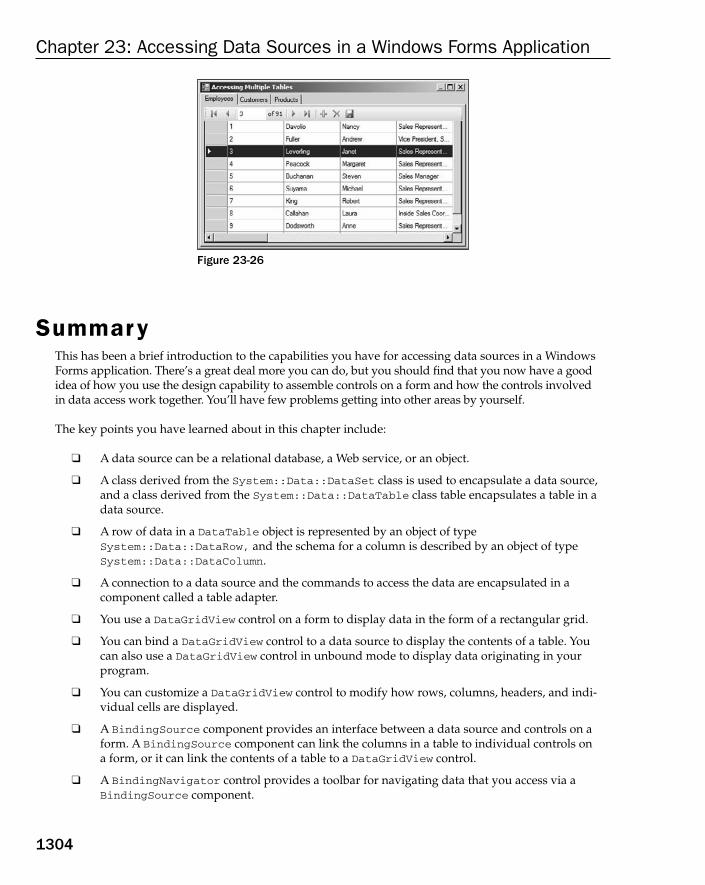
Figure 23-26
SummaryThis has been a brief introduction to the capabilities you have for accessing data sources in a WindowsForms application. There’s a great deal more you can do, but you should find that you now have a goodidea of how you use the design capability to assemble controls on a form and how the controls involved in data access work together. You’ll have few problems getting into other areas by yourself.
The key points you have learned about in this chapter include:
❑ A data source can be a relational database, a Web service, or an object.
❑ A class derived from the System::Data::DataSet class is used to encapsulate a data source,and a class derived from the System::Data::DataTable class table encapsulates a table in adata source.
❑ A row of data in a DataTable object is represented by an object of typeSystem::Data::DataRow, and the schema for a column is described by an object of typeSystem::Data::DataColumn.
❑ A connection to a data source and the commands to access the data are encapsulated in a component called a table adapter.
❑ You use a DataGridView control on a form to display data in the form of a rectangular grid.
❑ You can bind a DataGridView control to a data source to display the contents of a table. Youcan also use a DataGridView control in unbound mode to display data originating in your program.
❑ You can customize a DataGridView control to modify how rows, columns, headers, and indi-vidual cells are displayed.
❑ A BindingSource component provides an interface between a data source and controls on aform. A BindingSource component can link the columns in a table to individual controls on a form, or it can link the contents of a table to a DataGridView control.
❑ A BindingNavigator control provides a toolbar for navigating data that you access via aBindingSource component.
1304
Chapter 23: Accessing Data Sources in a Windows Forms Application
25905c23.qxd:WroxPro 2/21/08 9:27 AM Page 1304
ExercisesYou can download the source code for the examples in the book and the solutions to the following exercisesfrom www.wrox.com.
1. Modify Ex23_04 so that the column headers are displayed in a 12-point italic font.
2. Modify Ex23_05 so the columns are wide enough to accommodate the text in each cell.
3. Modify Ex23_05 so that alternate rows of data on each tab page appear shaded.
4. Create a Windows Forms application that displays the Suppliers table from the Northwinddatabase.
1305
Chapter 23: Accessing Data Sources in a Windows Forms Application
25905c23.qxd:WroxPro 2/21/08 9:27 AM Page 1305

25905c23.qxd:WroxPro 2/21/08 9:27 AM Page 1306
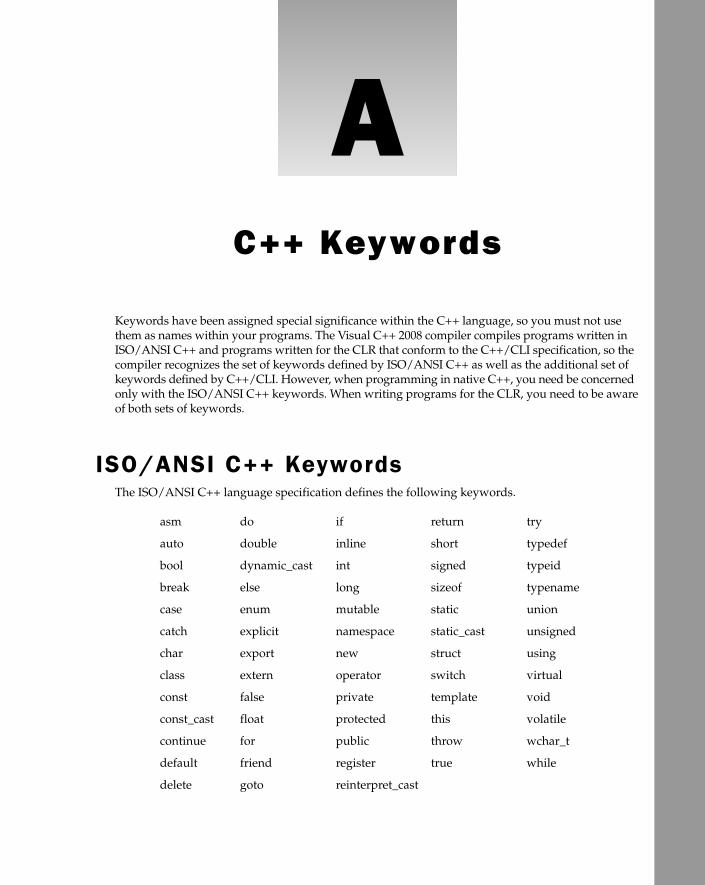
AC++ Keywords
Keywords have been assigned special significance within the C++ language, so you must not usethem as names within your programs. The Visual C++ 2008 compiler compiles programs written inISO/ANSI C++ and programs written for the CLR that conform to the C++/CLI specification, so thecompiler recognizes the set of keywords defined by ISO/ANSI C++ as well as the additional set ofkeywords defined by C++/CLI. However, when programming in native C++, you need be concernedonly with the ISO/ANSI C++ keywords. When writing programs for the CLR, you need to be awareof both sets of keywords.
ISO/ANSI C++ KeywordsThe ISO/ANSI C++ language specification defines the following keywords.
asm do if return try
auto double inline short typedef
bool dynamic_cast int signed typeid
break else long sizeof typename
case enum mutable static union
catch explicit namespace static_cast unsigned
char export new struct using
class extern operator switch virtual
const false private template void
const_cast float protected this volatile
continue for public throw wchar_t
default friend register true while
delete goto reinterpret_cast
25905bapp01.qxd:WroxPro 2/21/08 9:30 AM Page 1307

C++/CLI KeywordsThe C++/CLI language specification defines the following keywords in addition to those defined forISO/ANSI C++.
enum class interface class ref struct
enum struct interface struct value class
for each nullptr value struct
gcnew ref class
Note that the word pairs are keywords, not necessarily the individual words; for example, for eachis a keyword, but each is not.
The C++/CLI language also defines a number of identifiers that are not keywords but have a context-sensitive meaning in some circumstances. These are shown in the following list.
abstract in override
delegate initonly property
event internal sealed
finally literal where
generic
In principle you can still use these identifiers as names in your code because the context determines whenthey have special significance, but I recommend that you treat them as keywords and do not use them forother purposes. In that way you avoid any possibility for confusion on the part of someone else who maybe reading your code.
1308
Appendix A: C++ Keywords
25905bapp01.qxd:WroxPro 2/21/08 9:30 AM Page 1308
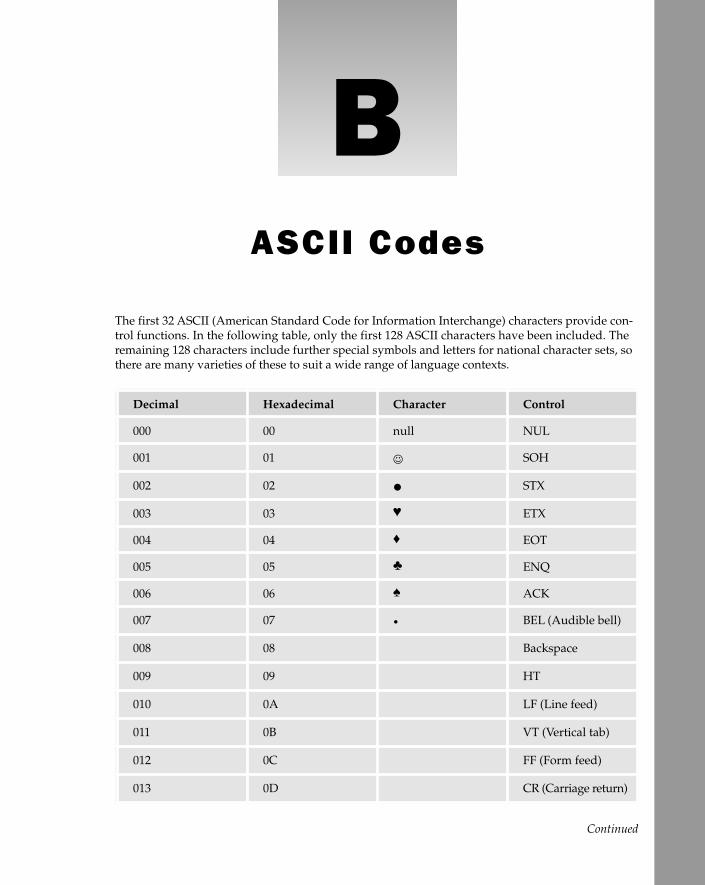
BASCII Codes
The first 32 ASCII (American Standard Code for Information Interchange) characters provide con-trol functions. In the following table, only the first 128 ASCII characters have been included. Theremaining 128 characters include further special symbols and letters for national character sets, sothere are many varieties of these to suit a wide range of language contexts.
Continued
Decimal Hexadecimal Character Control
000 00 null NUL
001 01 ☺ SOH
002 02 � STX
003 03 ♥ ETX
004 04 ♦ EOT
005 05 ♣ ENQ
006 06 ♠ ACK
007 07 � BEL (Audible bell)
008 08 Backspace
009 09 HT
010 0A LF (Line feed)
011 0B VT (Vertical tab)
012 0C FF (Form feed)
013 0D CR (Carriage return)
25905bapp02.qxd:WroxPro 2/21/08 9:31 AM Page 1309

Decimal Hexadecimal Character Control
014 0E SO
015 0F ¤ SI
016 10 DLE
017 11 DC1
018 12 DC2
019 13 DC3
020 14 DC4
021 15 NAK
022 16 SYN
023 17 ETB
024 18 CAN
025 19 EM
026 1A → SUB
027 1B ← ESC (Escape)
028 1C ∟ FS
029 1D GS
030 1E RS
031 1F US
032 20 space
033 21 !
034 22 “
035 23 #
1310
Appendix B: ASCII Codes
25905bapp02.qxd:WroxPro 2/21/08 9:31 AM Page 1310

Continued
Decimal Hexadecimal Character Control
036 24 $
037 25 %
038 26 &
039 27 ‘
040 28 (
041 29 )
042 2A *
043 2B +
044 2C ,
045 2D -
046 2E .
047 2F /
048 30 0
049 31 1
050 32 2
051 33 3
052 34 4
053 35 5
054 36 6
055 37 7
056 38 8
057 39 9
1311
Appendix B: ASCII Codes
25905bapp02.qxd:WroxPro 2/21/08 9:31 AM Page 1311

Decimal Hexadecimal Character Control
058 3A :
059 3B ;
060 3C <
061 3D =
062 3E >
063 3F ?
064 40 @
065 41 A
066 42 B
067 43 C
068 44 D
069 45 E
070 46 F
071 47 G
072 48 H
073 49 I
074 4A J
075 4B K
076 4C L
077 4D M
078 4E N
079 4F O
1312
Appendix B: ASCII Codes
25905bapp02.qxd:WroxPro 2/21/08 9:31 AM Page 1312
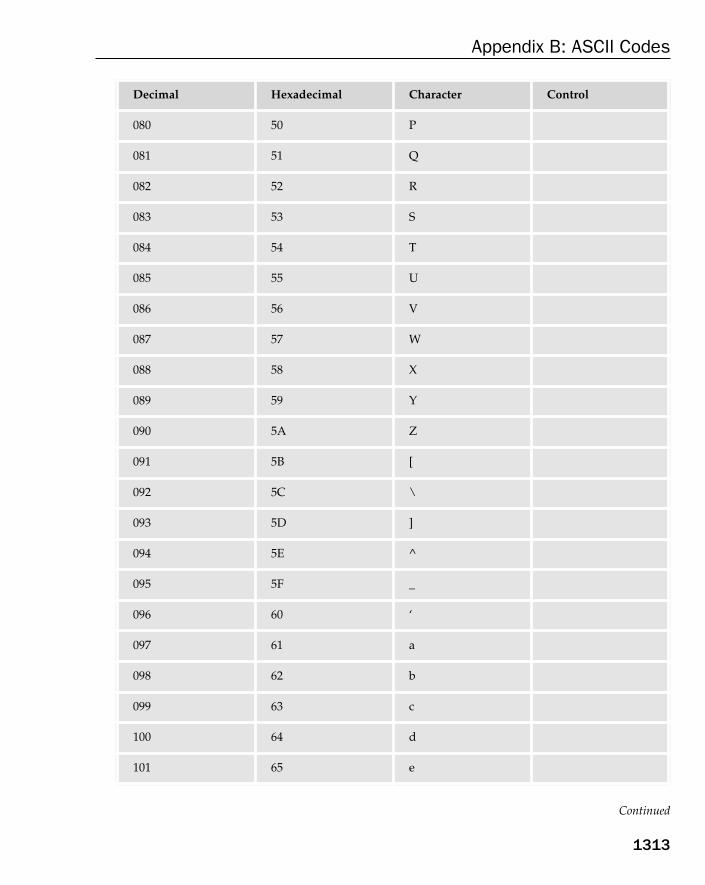
Continued
Decimal Hexadecimal Character Control
080 50 P
081 51 Q
082 52 R
083 53 S
084 54 T
085 55 U
086 56 V
087 57 W
088 58 X
089 59 Y
090 5A Z
091 5B [
092 5C \
093 5D ]
094 5E ^
095 5F _
096 60 ‘
097 61 a
098 62 b
099 63 c
100 64 d
101 65 e
1313
Appendix B: ASCII Codes
25905bapp02.qxd:WroxPro 2/21/08 9:31 AM Page 1313

Decimal Hexadecimal Character Control
102 66 f
103 67 g
104 68 h
105 69 i
106 6A j
107 6B k
108 6C l
109 6D m
110 6E n
111 6F o
112 70 p
113 71 q
114 72 r
115 73 s
116 74 t
117 75 u
118 76 v
119 77 w
120 78 x
121 79 y
122 7A z
123 7B {
1314
Appendix B: ASCII Codes
25905bapp02.qxd:WroxPro 2/21/08 9:31 AM Page 1314
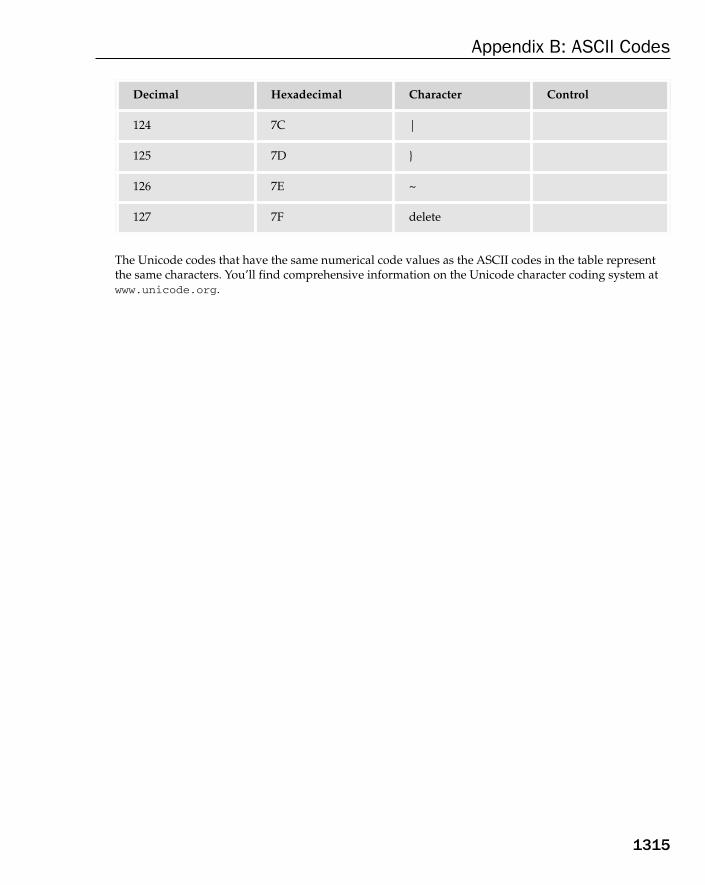
The Unicode codes that have the same numerical code values as the ASCII codes in the table representthe same characters. You’ll find comprehensive information on the Unicode character coding system atwww.unicode.org.
Decimal Hexadecimal Character Control
124 7C |
125 7D }
126 7E ~
127 7F delete
1315
Appendix B: ASCII Codes
25905bapp02.qxd:WroxPro 2/21/08 9:31 AM Page 1315

25905bapp02.qxd:WroxPro 2/21/08 9:31 AM Page 1316

CWindows Message Types
The Windows operating system defines the type of system message that it sends to your applica-tion by a symbolic constant such as WM_PAINT. The symbolic constant is composed of two parts: a prefix, WM in this case, that identifies the type of window that can process the message, and therest, PAINT in this case, that specifies what the window should do when the message is received.The following table shows the message prefixes and the corresponding target window category.
Continued
Message Prefix Target Window Type
ABM Application desktop toolbar control
BM Button control
CB Combo box control
CBEM Extended combo box control
CDM Common dialog box control
DBT Device
DL Drag list box control
DM Default push button control
DTM Date and time picker control
EM Edit control
HDM Header control
HKM Hot key control
25905bapp03.qxd:WroxPro 2/21/08 9:32 AM Page 1317
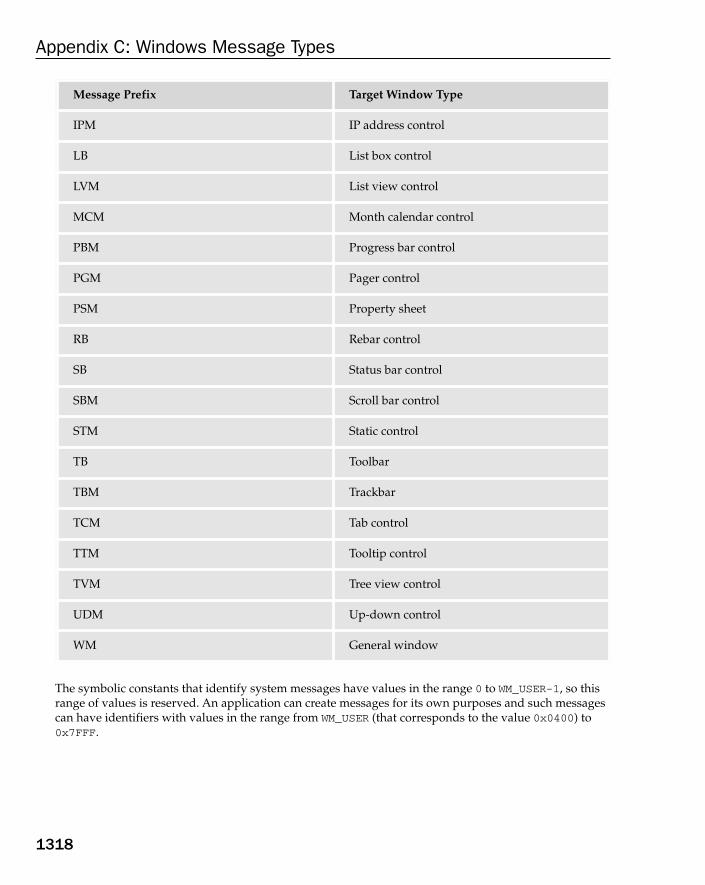
The symbolic constants that identify system messages have values in the range 0 to WM_USER-1, so thisrange of values is reserved. An application can create messages for its own purposes and such messagescan have identifiers with values in the range from WM_USER (that corresponds to the value 0x0400) to0x7FFF.
Message Prefix Target Window Type
IPM IP address control
LB List box control
LVM List view control
MCM Month calendar control
PBM Progress bar control
PGM Pager control
PSM Property sheet
RB Rebar control
SB Status bar control
SBM Scroll bar control
STM Static control
TB Toolbar
TBM Trackbar
TCM Tab control
TTM Tooltip control
TVM Tree view control
UDM Up-down control
WM General window
1318
Appendix C: Windows Message Types
25905bapp03.qxd:WroxPro 2/21/08 9:32 AM Page 1318
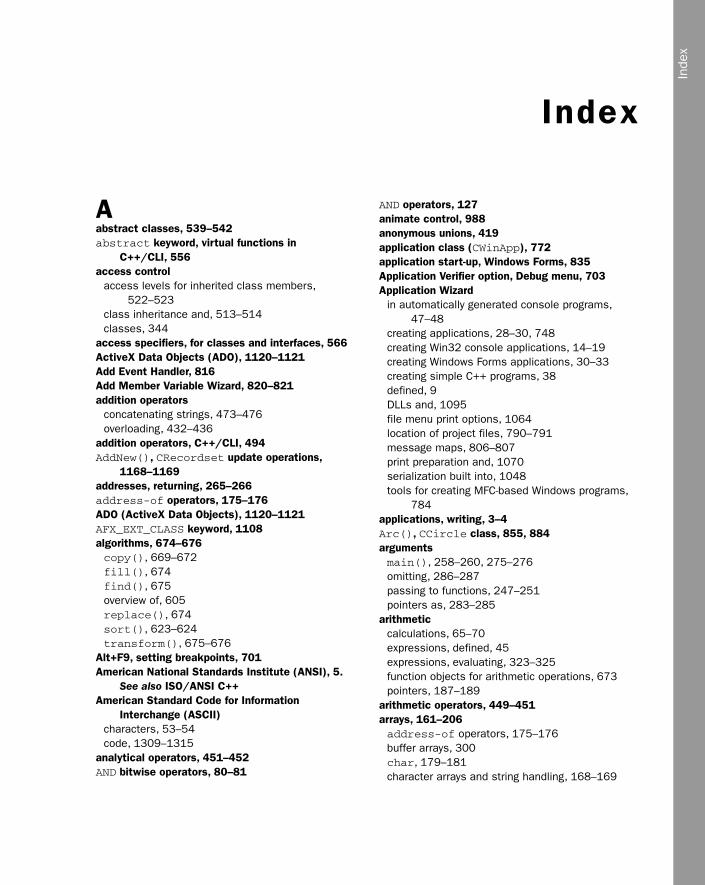
Inde
x
Index
Aabstract classes, 539–542abstract keyword, virtual functions in
C++/CLI, 556access control
access levels for inherited class members,522–523
class inheritance and, 513–514classes, 344
access specifiers, for classes and interfaces, 566ActiveX Data Objects (ADO), 1120–1121Add Event Handler, 816Add Member Variable Wizard, 820–821addition operators
concatenating strings, 473–476overloading, 432–436
addition operators, C++/CLI, 494AddNew(), CRecordset update operations,
1168–1169addresses, returning, 265–266address-of operators, 175–176ADO (ActiveX Data Objects), 1120–1121AFX_EXT_CLASS keyword, 1108algorithms, 674–676copy(), 669–672fill(), 674find(), 675overview of, 605replace(), 674sort(), 623–624transform(), 675–676
Alt+F9, setting breakpoints, 701American National Standards Institute (ANSI), 5.
See also ISO/ANSI C++American Standard Code for Information
Interchange (ASCII)characters, 53–54code, 1309–1315
analytical operators, 451–452AND bitwise operators, 80–81
AND operators, 127animate control, 988anonymous unions, 419application class (CWinApp), 772application start-up, Windows Forms, 835Application Verifier option, Debug menu, 703Application Wizard
in automatically generated console programs,47–48
creating applications, 28–30, 748creating Win32 console applications, 14–19creating Windows Forms applications, 30–33creating simple C++ programs, 38defined, 9DLLs and, 1095file menu print options, 1064location of project files, 790–791message maps, 806–807print preparation and, 1070serialization built into, 1048tools for creating MFC-based Windows programs,
784applications, writing, 3–4Arc(), CCircle class, 855, 884argumentsmain(), 258–260, 275–276omitting, 286–287passing to functions, 247–251pointers as, 283–285
arithmeticcalculations, 65–70expressions, defined, 45expressions, evaluating, 323–325function objects for arithmetic operations, 673pointers, 187–189
arithmetic operators, 449–451arrays, 161–206address-of operators, 175–176buffer arrays, 300char, 179–181character arrays and string handling, 168–169
25905bindex.qxd:WroxPro 2/20/08 5:57 PM Page 1319

arrays (continued)constant pointers and pointers to constants,
185–187counting characters, 191–192declaring, 163–166defined, 162–163delete operators, 195dynamic memory allocation and, 194–199exercises, 238for arrays, 195–196free store, using, 196–198free store vs. heap, 194helper functions, 913indirect data access. See indirect data accessindirection operators, 176initializing, 166–167initializing pointers, 178–179library functions for strings, 200–206multidimensional. See multidimensional arraysmultiple data values of same type, 162–174names as pointers, 189–191new operators, 195null-terminated strings, 200–206of objects, 371–372overview, 161, 911–912passing to functions, 251–253pointer arithmetic and, 187–189of pointers, 181–183, 285pointers, declaring, 175pointers, generally, 174, 187–192pointers, working with, 176–178programming with strings, 170–171references, declaring and initializing, 199–200sizeof operators, 183–185storing multiple strings, 173–174string input, 169–171summary, 236–237
arrays, C++/CLI, 206–238arrays of arrays, 221–223CLR, 209–213comparing strings, 229exercises, 238interior pointers, 233–237joining strings, 224–225modifying strings, 227–229multidimensional, 217–221one-dimensional, searching, 215–217one-dimensional, sorting, 213–214overview, 206–207searching strings, 230–233
sorting associated, 214strings in, 224–227summary, 236–237tracking handles, 207–209tracking references, 233
ASCII (American Standard Code for InformationInterchange)
characters, 53–54codes, 1309–1315
assembliesC++/CLI programming language, 565defined, 25
assertionsC++/CLI debugging, 735–737native C++ debugging, 708–709
assign()deleting elements from a list, 634replacing contents of a vector, 618
assignment operatorsimplementing for C++/CLI reference types, 503overloading, 427–431
assignment statementscalculations, 65casting, 77–78defined, 45
associated arrays, C++/CLI, 214associative containers, 651–665
defined, 606map containers. See map containers, STL/CLRmultimap containers, 664–665multiset containers, 651overview of, 651set containers, 651
associative containers, STL/CLR, 685–692at(), accessing elements in vectors, 615–616Attach to Process option, Debug menu, 704attributes
defined, 6GDI (Graphical Device Interface), 849
Audio Video Interleaved (AVI), 988automatic variables, in storage duration and
scope, 89Automation, MFC extension DLLs, 1100Autos window, debugger, 705–707AVI (Audio Video Interleaved), 988
Bback(), accessing elements in vectors, 616bad pointers, 263–264
1320
arrays (continued)
25905bindex.qxd:WroxPro 2/20/08 5:57 PM Page 1320
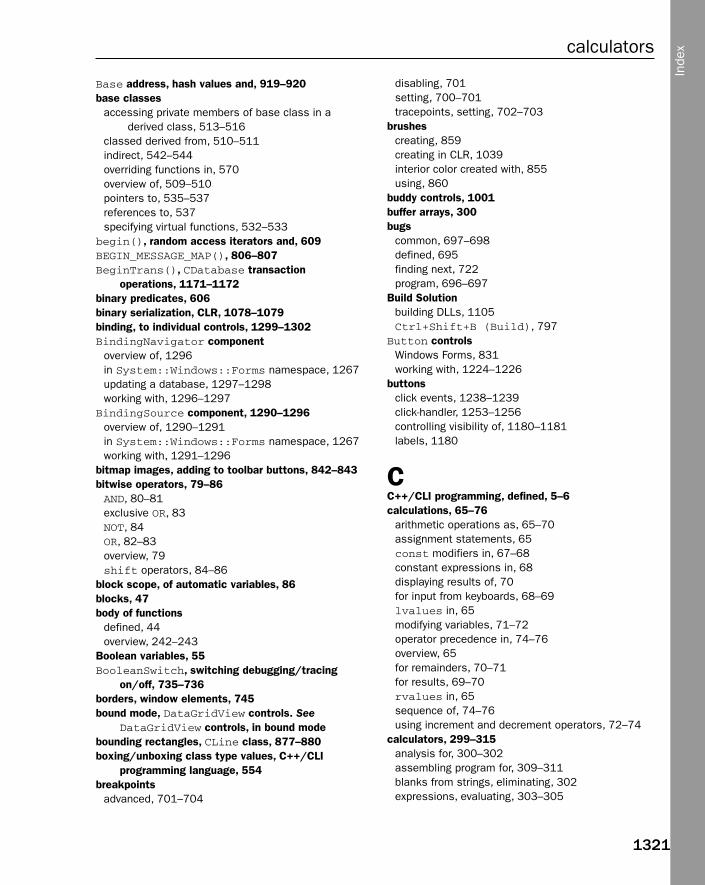
Base address, hash values and, 919–920base classes
accessing private members of base class in aderived class, 513–516
classed derived from, 510–511indirect, 542–544overriding functions in, 570overview of, 509–510pointers to, 535–537references to, 537specifying virtual functions, 532–533
begin(), random access iterators and, 609BEGIN_MESSAGE_MAP(), 806–807BeginTrans(), CDatabase transaction
operations, 1171–1172binary predicates, 606binary serialization, CLR, 1078–1079binding, to individual controls, 1299–1302BindingNavigator component
overview of, 1296in System::Windows::Forms namespace, 1267updating a database, 1297–1298working with, 1296–1297
BindingSource component, 1290–1296overview of, 1290–1291in System::Windows::Forms namespace, 1267working with, 1291–1296
bitmap images, adding to toolbar buttons, 842–843bitwise operators, 79–86AND, 80–81exclusive OR, 83NOT, 84OR, 82–83overview, 79shift operators, 84–86
block scope, of automatic variables, 86blocks, 47body of functions
defined, 44overview, 242–243
Boolean variables, 55BooleanSwitch, switching debugging/tracing
on/off, 735–736borders, window elements, 745bound mode, DataGridView controls. See
DataGridView controls, in bound modebounding rectangles, CLine class, 877–880boxing/unboxing class type values, C++/CLI
programming language, 554breakpoints
advanced, 701–704
disabling, 701setting, 700–701tracepoints, setting, 702–703
brushescreating, 859creating in CLR, 1039interior color created with, 855using, 860
buddy controls, 1001buffer arrays, 300bugs
common, 697–698defined, 695finding next, 722program, 696–697
Build Solutionbuilding DLLs, 1105Ctrl+Shift+B (Build), 797
Button controlsWindows Forms, 831working with, 1224–1226
buttonsclick events, 1238–1239click-handler, 1253–1256controlling visibility of, 1180–1181labels, 1180
CC++/CLI programming, defined, 5–6calculations, 65–76
arithmetic operations as, 65–70assignment statements, 65const modifiers in, 67–68constant expressions in, 68displaying results of, 70for input from keyboards, 68–69lvalues in, 65modifying variables, 71–72operator precedence in, 74–76overview, 65for remainders, 70–71for results, 69–70rvalues in, 65sequence of, 74–76using increment and decrement operators, 72–74
calculators, 299–315analysis for, 300–302assembling program for, 309–311blanks from strings, eliminating, 302expressions, evaluating, 303–305
1321
calculators
Inde
x
25905bindex.qxd:WroxPro 2/20/08 5:57 PM Page 1321
calculators (continued)extending program for, 311–312functions in, 303modified programs for, 314–315numbers analysis, 306–309overview, 299–300substrings, extracting, 312–314value of terms, 305–306
calculators, C++/CLI programming, 322–328arithmetic expressions, 323–325input strings, removing spaces from, 323numbers evaluation, 325–326substrings, extracting, 327–328value of terms, 325
call stack, debugging programs and, 715–716cancel button
controlling visibility, 1180–1181implementing cancel operation, 1185
CancelUpdate(), CRecordset updateoperations, 1168–1169
capacity(), vector containers, 611CArchive class, 1050–1052CArray template class
helper functions, 913overview of, 911–912
case labels, 132case values, 131cases, sharing, 133–134<cassert> header, 708casting, 76–79
assignment statements, 77–78explicit, 78–79old-style, 79operands, rules for, 76–77
catch block, 289–291Category ID field, in relational database application,
1115CBox class, 508–509CBox class
adding data members, 456–457adding function members, 458–462adding global functions, 463–465addition operators, overloading, 432–436analyzing CBox objects, 451–452basic operations, 447combining CBox objects, 449–451comparing CBox objects, 448–449constructor, 457defining, 455–456
implementing, 447–448multifile project, 453–455simple destructor, 410–412using, 465–468
CBox objectsanalyzing, 451–452combining, 449–451comparing, 448–449operator function and, 421
CBrush objectscreating, 859setting color with, 855using, 860
CButton class, 987CCircle class
constructor for, 883–884drawing circles, 884implementing, 883overview, 882
CClientDC class, 852, 888CCmdUI, member functions, 825CCurve class
defining, 925–927drawing, in a window, 884–885exercising, 925–927implementing, 927–928
CCustomerView dialog, 1205–1207CDatabase class, 1128, 1171–1172CDate class, 1207CDC class
circles, 854–856displaying graphics, 852–853drawing modes, 886lines, 853–854overview of, 852
CDialog classadding, 990–992developing, 1258–1260for edit boxes, 1023–1024for list boxes, 1019–1020overview of, 986
CDocument class, 780CElement class. See also elements
adding pen widths to elements, 999–1000
class definitions, 874–875CText derived from, 1026defining element classes, 870–873getting elements to move themselves, 961
1322
calculators (continued)
25905bindex.qxd:WroxPro 2/20/08 5:57 PM Page 1322

serializing element classes, 1048, 1058–1059storing temporary elements, 873–874
cell stylesDataGridView cell style properties, 1275–1276dynamically setting for DataGridView control,
1284–1289headers, customizing, 1276–1277nonheaders, customizing, 1277
CellFormatting events, 1284–1289CFile object, CArchive class and, 1050CFont class, 1030CFrameWnd class, 773char, 179–181char array, 412character
ASCII codes, 1309–1315data types, 53–54
character arrays, string handling an, 168–169child windows, window elements, 745Choose menu item
click event, 1260–1263dealing with, 1257
Circle class, defining circles for CLR drawings,903–904
circlesdefining for CLR drawings, 903–904drawing, 854–856, 884
class constructors, 351–358adding to CBOX class, 351–353C++/CLI programming, 557calling, 516–519CCircle class, 883–884CLine class, 875CRectangle class, 881defaults, 353–355defined, 351–358in derived classes, 516–519initializing, 358modifying, 823parameter values, assigning, 355–356parameter values, supplying, 356–357working with, 351–353
class definitionsCElement class, 874–875message handlers, 807–809serialization in document class and, 1048–1049
class destructorsfor CMessage class, 413–415default destructor, 410–412overview of, 409–410
class hierarchy, multiple levels of, 544class inheritance, 507–599
access control, 513–514access levels, for inherited class members,
522–523accessing private members of base class, 514–516base classes, 509–510constructors, in derived classes, 516–519copy constructors, in derived classes, 524–528defined, 509derived classes, 510–513exercises, 597–599friend classes, 530multiple levels of, 542–544native C++ compared with C++/CLI, 558OOP basic concepts, 507–509overview of, 507protected members, 519–522summary, 596–597virtual functions. See virtual functionsworking with inherited functions, 531–532
class inheritance, C++/CLI, 555–558access specifiers, 566boxing/unboxing class type values, 554class libraries, creating, 566–568class libraries, using, 568–570classes, generic, 585–588classes and assemblies and, 565collection classes, generic, 590–595delegates, calling, 574–576delegates, creating, 571–574delegates, declaring, 571delegates, overview, 571delegates, unbound, 576–579derived reference classes, 558–560destructors and finalizers, in reference classes,
583–585event handling, 581–583events, 571events, creating, 580–581exercises, 597functions, specifying new, 570–571interface classes, defining, 561–562interface classes, generic, 589–590interface classes, implementing, 562–565overview of, 553–554summary, 596–597virtual functions, 555–558visibility specifiers, 565
class interface, 446–447
1323
class interface
Inde
x
25905bindex.qxd:WroxPro 2/20/08 5:57 PM Page 1323

class libraries, C++/CLIcreating, 566–568using, 568–570
class membersaccess levels for inherited, 522–523as friends, 528–529, 530interface classes, 561private, 513protected, 519–522public, 513
class objectspointers to, 535–537storing in vector containers, 618–622
class properties, C++/CLI, 390–403indexed properties, complex, 401–402indexed properties, defining, 397–398indexed properties, working with default, 398–401overview, 390–403reserved property names, 403scalar properties, defining, 390–393scalar properties, working with, 393–397static properties, 402–403trivial scalar properties, 393
class templatesdefining, 438–440member functions, 440–441with multiple parameters, 444–446objects created from, 441–444overview of, 438
Class View, defining CBox class, 455–456Class View tabs, 17Class Wizard, adding dialog class with, 990classes, 343–351
access control, 344adding to MFC extension DLLs, 1103–1104addition operators, overloading, 432–436anonymous unions, 419arrays of objects of, 371–372assignment operators, overloading, 427–431casting between, 550CBox class, adding data members, 456–457CBox class, adding function members, 458–462CBox class, adding global functions, 463–465CBox class, analyzing CBox objects, 451–452CBox class, combining CBox objects, 449–451CBox class, comparing CBox objects, 448–449CBox class, constructor for, 457CBox class, defining, 455–456CBox class, implementing, 447–448CBox class, multifile project with, 453–455CBox class, using, 465–468
class definitions, 793–797class interface, 446–447class templates, 438class templates, defining, 438–440class templates, member functions, 440–441class templates, objects created from, 441–444class templates, with multiple parameters,
444–446CMessage class, 413–415comparison operators, overloading, 424–426const objects of, 368–371constructors, 351constructors, modifying, 823context menus, associating with, 945–946copy constructors, 415–417data members of, 345–347declaring objects of, 344–345default destructor, 410–412defining, 344destructors, 409–410document templates, 783dynamic memory allocation, 412–413exercises, 504–505first, 340–342incomplete definitions, 538increment and decrement operators, overloading,
436–437inline functions, 350–351member function definitions, positioning, 349–350member functions of, 347–349menu messages, 817nested classes, 550–553operations on, 342–343operator overloading, 420–423overview, 340–343overview of, 409pointers to objects of, 376–379private members, 358–366program code, file names, 470–471program code, organizing, 468references to objects of, 376–379serialization, 1054serialization, preparing for, 1080–1081static members, 373–376STL templates, 601strings, accessing/modifying, 476–480strings, comparing, 480–484strings, concatenating, 473–476strings, creating string objects, 471–473strings, overview, 471strings, searching, 484–489
1324
class libraries
25905bindex.qxd:WroxPro 2/20/08 5:57 PM Page 1324
strings, sorting words from text, 489–494summary, 503–504terminology of, 343this pointer, 366–368typeid(), for determining class type, 1063unions, between variables, 417–419unions, in classes and structures, 419viewing, 792–793Windows applications, 783–784
classes, C++/CLI, 494, 565–568access specifiers for, 566–568assignment operators, implementing, 503decrement operators, overloading, 499–500exercises, 504–505reference classes, overloading, 500–502reference types, implementing, 503summary, 503–504value classes, overloading, 494–498visibility specifiers for, 565
ClassView context menu, 785, 792–793ClassWizard, 806clear(), deleting elements from a list, 633CLI (Common Language Infrastructure), 2click events
buttons, 1238–1239, 1253–1256Choose menu item, 1260–1263context menus, 1256–1257input validation, 1242–1244
client areadrawing, 765–766drawing in a window and, 848redrawing, 758, 869–870window elements, 745
client coordinatesdealing with, 940–941overview of, 939pixels for measuring, 1009
CLine classbounding rectangles, 877–880constructor for, 875drawing lines, 875implementing, 875Move(), 961normalized rectangles, 880overview of, 875
CList class, 913–918adding elements to a list, 913–915deleting objects from a list, 917drawing a curve, 924–925helper functions for a list, 917–918iterating through a list, 916
overview of, 913searching a list, 916–917working with, 923
CLR (Common Language Runtime)arrays, 209–213calculator program for, 322–328console applications, 7console projects, 24–26debugging CLR programs, 731defined, 2–3fruity console program, 100–102function arguments, variable numbers of, 275heap, 381–385nested if statements, 153–154standards and, 5–6Windows Forms program executing CLR project,
775–777writing C++ applications and, 3–4
CLR sketch applicationcontext menus, 976–977Element Move operation, 979highlighting elements for selection, 972–976moving elements, 979–981
CMap class, 918–920helper functions, 919–920overview of, 918–919
CMenu class, 950CMessage class
class destructor for, 413–415copy constructors, 415–417
CMultiDocTemplate, 783CMyApp class, Windows application classes,
783–784CMyDoc class, Windows application classes,
783–784CMyView class, Windows application classes,
783–784CMyWnd class, Windows application classes,
783–784CObject class
as base class for element classes, 870functionality of, 1052serialization and, 1049
codeASCII characters, 1309–1315closing dialog boxes, 994–995debugging code, 709–714displaying dialog boxes, 994object code, 9source code, 17–19Unicode characters, 1315
1325
code
Inde
x
25905bindex.qxd:WroxPro 2/20/08 5:57 PM Page 1325
Code Definition windows, 10–11collections, 910CArray template class, 911–912CCurve class, defining, 925–927CCurve class, exercising, 925–927CCurve class, implementing, 927–928CList template class, drawing a curve, 924–925CList template class, overview, 913–918CList template class, using, 923CMap template class, 918–920CTypedPtrList template class, 921–923generic C++/CLI classes, 590–595helper functions, 913overview of, 909typed pointer, 920types of, 910type-safe, 911
collocation, sorting words from text, 489color drawings, 857–860
brushes, creating, 859brushes, using, 860defining color for CLR drawings, 899pens, creating, 857–858pens, using, 858–859
Color menu, adding to menu bar, 815columns, DataGridView
formats, 1281–1283headers, 1280–1281types of, 1272
columns, System::Data::DataColumnnamespace, 1266
COM, 1120–1121combo box controls, 1035–1037comma operators, 73–74command messages
adding data members to class definitions, 820–821creating menu message functions, 817–820message categories and, 809–810MFC handling, 810overview of, 816–817processing, 810–811
command-line argumentsaccessing, 276receiving, 259–260
comments, in programs, 42CommitTrans(), CDatabase transaction
operations, 1171–1172common controlsButton controls, 1224overview of, 988WebBrowser control, 1226
Common Language Infrastructure (CLI), 2Common Language Runtime. See CLR (Common
Language Runtime)Common Type System (CTS), 3comparison operators
comparing CBox objects, 448–449full support for, 424–426pair objects and, 653strings, 480–484testing extended class in program debugging,
720–722using with SQL SELECT statements, 1117
comparisons, function objects for, 672–673comparisons, values. See values, comparingcompilation time, precompiled headers and,
797–798compiler, ISO/ANSI C++, 455compound statements, 47concatenating strings, 473–476conditional operators, 130–131configurations, 20console applications
automatically generated, 47–48files created by building, 19overview of, 6–7
const modifiersin calculations, 67–68using, 257–258
const objects, of classesmember functions and, 369–371overview, 368–369
constant expressions, 68constant pointers, 185–187constructors. See class constructors
defining for CBox class, 457new operator and, 412
container adapters, 603containers. See also associative containers;
sequence containerscontainer adapters, 603double-ended queue containers, 626–629list containers. See list containers, STL/CLRmap containers. See map containers, STL/CLRmultimap containers, 664–665multiset containers, 651overview of, 602–603priority queue containers, 643–648queue containers. See queue containersset containers, 651stack containers, 649–651vector containers. See vector containers
1326
Code Definition windows
25905bindex.qxd:WroxPro 2/20/08 5:57 PM Page 1326
containers, STL/CLRdefining curves, 967–968double-ended queue containers, 680–684list containers, 684–685overview of, 677
context menusadding to Windows Forms applications, 1228associating with a class, 945–946choosing, 946–948creating in CLR, 976–977exercising pop-ups, 949–950highlighting elements for selection, 952–956identifying selected element, 948–949implementing, 943–945menu items, checking, 950–952overview of, 943responding to, 1256–1257
ContextMenuStrip controls, 1228continue statements, 142–143control menu, window elements, 745control notification messages, 809–810control variables, 1004controls
adding to dialog boxes, 988–990adding to dialog resources, 1193–1196ASCII codes for, 1309–1315binding to, 1299–1302common controls, 988DataGridView control, in unbound mode,
1279–1280dialog controls, 1248–1251edit boxes. See edit box controlsedit controls, enabling/disabling, 1178–1180exercises, 1045initializing, 996–997input controls, disabling, 1251linking to recordsets, 1136–1138list boxes. See list box controlsoverview of, 986–987spin button control. See spin button controlstatus bars. See status bar controlssummary, 1044–1045tab sequence, 1004types of, 986–987variables, 1004
controls, CLRcombo boxes, 1035–1037drawing text, 1038exercises, 1045fonts, choosing, 1039–1040fonts, creating, 1039
overview of, 1030–1031summary, 1044–1045text boxes, 1042–1043text elements, creating, 1037, 1043TextElement class, 1041
Controls property, GroupBox controls, 1233cooperative multitasking, Windows programs, 759coordinate system transformations, CLR, 965–967coordinates
comparing logical, client, and screen, 1009logical coordinates and client coordinates,
939–941printing documents and, 1075–1077
copy(), 669copy constructors
default, 364–366implementing, 379–380, 415–417reference class types, 389–390
copy constructors, in derived classes, 524–528fixing, 526–527how it works, 525overview of, 524–526
copying null-terminated strings, 203–204count(), accessing objects in a map, 655counting characters, 191–192CPen objects
creating pens, 857–858overview of, 857using pens, 858–859
CPoint class, 924.cpp file, 806CPrintInfo class, 1066–1068CProductView class, 1132–1133Create(), 992CreateElement(), 889, 1000–1001CreateWindow(), 756CRecordset class
checking legality of update operations, 1169creating recordsets and, 1128database update operations, 1168–1169record locking, 1170sorting, 1138–1139
CRecordView classcreating, 1144–1147initializing, 1149–1150overview of, 1132–1134
CRectangle classconstructor for, 881drawing rectangles, 881–882
_crtDbgFlag, free store debugging, 725–726crtdbg.h, 723
1327
crtdbg.h
Inde
x
25905bindex.qxd:WroxPro 2/20/08 5:57 PM Page 1327
_CrtSetReportFile(), free store debugging,726–727
_CrtSetReportMode(), free store debugging,726–727
CScaleDialog class, 1005, 1018CScrollView class, 1012CSingleDocTemplate class, 783CSketcherDoc class, 820–821CSScrollView class, 935–937CStatic class, 987CStatusBar class, 1014CString class, 1024–1025CstringW class, 1130CText class
constructor for, 1027–1028derived from CElement class, 1026drawing CText object, 1028implementing, 1027moving CText object, 1028
CTextDialog class, 1023Ctrl+Alt+X (Toobox window), 836Ctrl+D (tab sequence), 1004Ctrl+F5 (Execute), 797–798Ctrl+Shift+B (Build), 797Ctrl+Shift+N (New Project), 785, 1100Ctrl+T (test), 990CTS (Common Type System), 3CTypedPtrList class, 921–923
creating sketch document with, 929–931functions, 921–923overview of, 921
current position, graphics displayed relative to, 852Curve class, 967–968curve collections, 884–885
defining, 925–927exercising, 925–927implementing, 927–928
curvesdrawing with CList template class, 924–925STL/CLR containers for defining, 967–968
customer recordsetadding, 1156–1157filtering, 1160–1163
customer resource dialogcreating, 1157–1158linking to order dialog, 1163–1165
customer view class, 1158–1160CView class
scrolling views, 937–939
UpdateAllViews(), 935–937views in frame windows, 781
CWinApp class, 772
Ddata
corruption, common bugs, 697retrieving with SQL, 1116–1117setting up for DataGridView control, 1278–1279
data access, indirect. See indirect data accessdata exchange, spin button control, 1006data members
adding for CBox class, 456–457adding to class definitions, 820–821, 1230–1231CPrintInfo class, 1066–1067defined, 341dialog box support, 995–996initializing new, 821–823nonserializable, 1079
data sources. See database applicationsdata sources, accessing from Windows Forms. See
Windows Forms, data source accessData Sources window, 1266data types, 51–60
Boolean variables, 55character, 53–54class constructors, 351for enumeration constants, 109–110floating-point numbers, 55–56integer variables, 52–53in ISO/ANSI C++, 56–57literals, 57–58multiple data values of same type. See multiple
data values, of same typeoptions for use in loops, 143–145overview, 51–52synonyms for, 58type modifiers, 54–55variables with specific sets of values, 58–60Windows, 748–749
data types, C++/CLI, 97–112enumerations, 107–112fruity CLR console program and, 100–102input from keyboards, 106–107output, formatting, 103–106output to the command line, 102overview, 97–100safe_cast, using, 107value class types, 98
1328
_CrtSetReportFile()
25905bindex.qxd:WroxPro 2/20/08 5:57 PM Page 1328

data types, defining, 331–380arrays of class objects, 371–372classes, operations on, 342–343classes, understanding, 343–351const objects, 368–371exercises, 406–407first class, 340–342indirect member selection operators, 340IntelliSense and, 337–338objects, 340–342overview, 331pointers, to class objects, 376–379pointers, to structs members, 339–340private members, of classes, 358–366references to class objects, 376–379static members, of classes, 373–376structs, accessing members of, 333structs, initializing, 333structs, overview of, 332–333structs, working with, 334–337structures generally, 332–340summary, 405–406terminology in, 343this pointer, 366–368
data types, defining in C++/CLI, 381–407class properties. See class properties, C++/CLIexercises, 406–407initonly fields, 403–404literal fields, 385–386overview, 381reference class types, copy constructors for,
389–390reference class types, defining, 386–387reference class types, working with, 387–389static constructors, 405summary, 405–406ToString() function in classes, 384–385value class types, defining, 381–382value class types, working with, 383–384
database applicationscreating, 1122customer recordset, adding, 1156–1157customer recordset, filtering, 1160–1163customer resource dialog, creating, 1157–1158customer resource dialog, linking to order dialog,
1163–1165customer view class, creating, 1158–1160data transfer between database and recordset,
1131–1132database viewer, exercising, 1165–1166
exercises, 1166exercising example, 1138MFC supported, 1120–1121multiple table views, accessing, 1150–1151ODBC classes, 1121–1122ODBC database, registering, 1122–1124ODBC program, generating, 1124–1125overview of, 1113–1116product orders, viewing, 1151–1155queries, 1129–1131record view class, adding, 1143–1147record view class, initializing, 1149–1150record view class, overview, 1132–1134recordset class, adding, 1141–1143recordsets, creating, 1127–1129recordsets, filtering, 1147–1148recordsets, linking controls to, 1136–1138recordsets, sorting, 1138–1139recordsets, using second recordset object,
1140–1141snapshot vs. dynaset records, 1126summary, 1166view dialog, creating, 1134–1136views, switching, 1151–1155window caption, modifying, 1139–1140
databases, SQL. See SQL (Structured QueryLanguage)
databases, update operationsBindingNavigator component, 1297–1298button labels, changing, 1180cancel button, visibility of, 1180–1181cancel operation, 1185CDatabase transaction operations, 1171–1172checking legality of operations, 1169controlled updating, 1185–1186CRecordset supporting, 1168–1169customizing application for, 1173–1174dialog resources, adding controls, 1193–1196dialog switching, implementing, 1197–1200edit controls, enabling/disabling, 1178–1180example of, 1172–1173exercises, 1215expediting the update, 1183–1184how it works, 1174–1175implementing update mode, 1177–1178managing, 1175–1177order data, storing, 1205–1207order entry process, 1186–1187Order IDs, creating, 1200–1205orders, adding new, 1209–1214
1329
databases
Inde
x
25905bindex.qxd:WroxPro 2/20/08 5:57 PM Page 1329

databases (continued)overview of, 1167–1168products, selecting, 1207–1209record locking and, 1169–1170Record menu, disabling, 1181–1183recordset views, creating, 1188–1193recordsets, creating, 1188resources, creating, 1187–1188summary, 1214tables, adding rows to, 1186–1187transactions, 1170
DataGridView controlsmodes, 1268–1269overview of, 1267–1268in System::Windows::Forms namespace, 1267
DataGridView controls, in bound modebinding to individual controls, 1299–1302BindingNavigator component, 1296–1297BindingSource component, 1290–1296overview of, 1269, 1290tables, working with multiple, 1302–1304updating database, 1297–1298
DataGridView controls, in unbound mode,1269–1275
cell styles, dynamically setting, 1284–1289column formats, 1281–1283column headers, setting up, 1280–1281control, setting up, 1279–1280customizing, 1275–1277data, setting up, 1278–1279overview of, 1268rows, customizing alternate, 1283–1284
DataSet class, in System::Data namespace,1266
dates, setting, 1207DDV (Dialog Data Validation), 1006DDX (Dialog Data Exchange), 1006Debug classes, C++/CLI
overview of, 732working with, 737–741
Debug menu, 703–704_DEBUG preprocessor symbol, 709–710Debug toolbar, 701–703debugger
basic debugging operations, 699–700overview of, 698starting, 700
debugging code, adding, 709–714debugging techniques, 695–731
assertions, 708–709
basic operations, 698–700breakpoints, advanced, 701–704breakpoints, setting, 700–701common bugs, 697–698debugging code, adding, 709–714debugging dynamic memory. See dynamic memory
allocationdebugging programs. See programs, debuggingoverview of, 695–696program bugs, 696–697starting debugging, 703–705summary, 741–742tracepoints, setting, 702–703variable values, changing, 707variable values, inspecting, 705–707
debugging techniques, C++/CLIassertions, 736Debug and Trace, classes, 732Debug and Trace, working with, 737–741output, controlling, 735–736output, generating, 732–733output, indenting, 734output destination, 734overview of, 731–732summary, 741–742trace output in Windows Forms
applications, 741decimals, ASCII codes, 1309–1315decision making, 117–153. See also loops
comparing values, 117–119conditional operators, 130–131continue statements, 142–143data types, options for use in loops, 143–145do-while loops, 148–149exercises, 159–160extended if statements, 122–124floating-point loop counters, 145–146if statements, 119–120indefinite for loops, 140–141logical operators and expressions, 126–129for loop, using, 136–137for loop, variations on, 138multiple counters, using, 139–140nested if statements, 120–122nested if-else statements, 124–126nested loops, 149–152overview, 117repeating blocks of statements generally, 135summary, 159switch statements, 131–134
1330
databases (continued)
25905bindex.qxd:WroxPro 2/20/08 5:57 PM Page 1330
unconditional branching, 134while loops, 146–148
decision making, C++/CLI. See also loops, C++/CLIdecisions making, C++/CLI, 153–160for each loops, 156–159exercises, 159–160nested if statements, 153–154overview, 153summary, 159
declarationsarrays, 163–166defined, 43–44delegates, C++/CLI, 571friend classes, 530namespaces, 94–96object classes, 344–345pointers, 175pointers to functions, 280–283references, 199–200tracking handles, 207–209variables, 50–51, 89
DECLARE_DYNAMIC(), serialization macro, 1052DECLARE_DYNCREATE(), serialization macro,
1049, 1052DECLARE_MESSAGE_MAP(), 806–807DECLARE_SERIAL(), serialization macro,
1052–1053decorated names, DLLs, 1104decrement operators ( — )
overloading, 436–437overloading in C++/CLI, 499–500working with, 72–74
default destructor, 410–412defaults
class constructors, 353–355copy constructors, 364–366indexed properties, 397mapping mode, 850parameter values for constructor arguments,
supplying, 356–537parameter values in classes, assigning, 355–356type modifiers, 54
delegates, C++/CLIcalling, 574–576creating, 571–574declaring, 571event handlers as, 838overview of, 571unbound, 576–579
Delete(), CRecordset update operations,1168–1169
delete operators, 195deque. See double-ended queue containersderived classes
accessing private members of base class in,513–516
constructors in, 516–519copy constructors in, 524–528defined, 509deriving from base class, 510–511pointers to, 535–537specifying new functions, 570–571working with, 511–513
derived classes, C++/CLIoverview of, 553reference classes, 555, 558–560
Design window, 976destructors
calling wrong, 545–548MFC documents, 931virtual, 544
destructors, C++/CLI, 583–585destructors, class
default destructor, 410–412overview of, 409–410
device contextGDI (Graphical Device Interface), 849linking device-independent Windows API output
functions to drivers and devices, 765–766preparing for printing documents, 1072–1073
device coordinates. See client coordinatesDevice Points to Logical Points (DPtoL), 940–941dialog boxes
buttons added to, 1187–1188code for closing, 994–995code for displaying, 994controls added to, 988–990, 1193–1196creating, 988customer resource dialog, 1157–1158data members supporting, 995–996dialog class (CDialog), adding, 990–992dialog class (CDialog), developing, 1258–1260dialog form, creating, 1257–1258displaying, 992–993, 1021elements, creating in view, 1000–1001exercises, 1045for file operations, 1086initializing, 996–997, 1006–1007
1331
dialog boxes
Inde
x
25905bindex.qxd:WroxPro 2/20/08 5:57 PM Page 1331

dialog boxes (continued)linking order dialog to customer resource dialog,
1163–1165modal and modeless, 992overview of, 985–986pen dialog example, 1001pen width dialog, adding to document, 998–999pen width dialog, adding to elements, 999–1000radio buttons, message handling for, 997–998summary, 1044–1045switching between, 1197–1200testing, 988–990view dialog, for database, 1134–1136for viewing records, 1143–1144
dialog boxes, CLRadding, 1031customizing, 1031–1032displaying, 1032–1033, 1043exercises, 1045overview of, 1030–1031pen widths, setting, 1033–1035summary, 1044–1045text dialog, creating, 1042
dialog boxes, Windows Forms applicationadding second, 1245–1248creating, 1235–1236handling button events, 1238–1239using, 1240–1242
dialog class (CDialog)adding, 990–992developing, 1258–1260for edit boxes, 1023–1024for list boxes, 1019–1020
dialog controls, getting data from, 1248–1251Dialog Data Exchange (DDX), 1006Dialog Data Validation (DDV), 1006dialog forms, creating, 1257–1258dialog objects, creating, 1239–1240direct base classes, 509direct member selection operators, 345DispatchMessage(), retrieving Windows
messages, 759–760display content, linking Windows API output
functions to drivers and devices, 765–766.dll file, 1107dllexport attribute, 1108DllImport, 1110–1111DLLMain(), 1098, 1102–1103DLLs (Dynamic Link Libraries), 1093–1112
contents of a DLL file, 1098
DLLMain(), 1102–1103exporting symbols from, 1109–1111exporting variables and functions from, 1108extension DLLs, adding classes to, 1103–1104extension DLLs, applying in Sketcher application,
1106–1107extension DLLs, building, 1105extension DLLs, exporting classes from,
1104–1105extension DLLs, writing/using, 1100–1102files required in order to use, 1107how they work, 1095–1096importing symbols into a program, 1109–1110interface, 1098main(), 1098overview of, 1093–1095runtime dynamic linking, 1097–1098SDI applications and, 787types of, 1098–1099when to use, 1099–1100
dockable toolbars, 12–13docking controls, 1279–1280document, recording document changes, 1055document class, serialization in, 1048–1050document objects, altering, 1055document size
printing documents and, 1068–1069scale factor and, 1009–1010
document storage. See serializationdocument templates
classes, 783overview of, 782–783
document viewslogical coordinates and client coordinates, 939–941MM_LONGENGLISH mapping mode, 941–943scrolling views, 937–939updating multiple views, 935–937
documentation, 13documents, MFC
adding elements, 933–934creating with CTypedPtrList template class,
929–931document destructors, implementing, 931drawing sketch document, 931–933exercising sketch document, 934–935interfaces, 780linking documents and views, 781–782overview of, 780templates, 782–783
documents, printing. See printing documents
1332
dialog boxes (continued)
25905bindex.qxd:WroxPro 2/20/08 5:57 PM Page 1332
document/view concept, in MFC, 780DoDataExchange(), 1006, 1136DoFieldExchange(), 1131DoPreparePrinting(), 1070double-ended queue containers, 626–629double-ended queue containers, STL/CLR, 680–684do-while loops, 148–149DPtoLP() (Device Points to Logical Points),
940–941Draw()CLine class, 877coordinate system transformations and, 966Graphics class in CLR, 899–900highlighting elements for selection, 952–956MFC sketch document, 931–933
drawing, in a window, 847brushes, creating, 859brushes, using, 860CCircle class, constructor for, 883–884CCircle class, drawing circles, 884CCircle class, implementing, 883CCircle class, overview of, 882CCurve class, 884–885CDC class, 852CElement class, 874–875circles, 854–856client area, overview, 848client area, redrawing, 869–870CLine class, bounding rectangles, 877–880CLine class, constructor for, 875CLine class, drawing lines, 875CLine class, implementing, 875CLine class, normalized rectangles, 880color drawings, 857CRectangle class, constructor for, 881CRectangle class, drawing rectangles, 881–882deleting and moving shapes, 943device context, 849displaying graphics, 852–853drawing mode, selecting, 886–887elements, creating, 889–891elements, defining classes for, 870–873elements, storing temporary, 873–874exercises, 907GDI (Graphical Device Interface), 848–849lines, calculating enclosing rectangle for, 880lines, overview, 853–854mapping modes, 849–851mouse, drawing with, 861–862, 867–869mouse, messages from, 864–865
mouse, programming, 863–864mouse message handlers, 865–867, 885mouse messages, capturing, 893–895mouse properties, 865OnDraw() member function, 851–852OnMouseMove() handler, 887–889overview of, 847–848pens, creating, 857–858pens, using, 858–859running the Sketcher example, 892–893summary, 906–907View class, 851WM_LBUTTONUP messages, dealing with, 891–892
drawing, in a window (CLR)circles, defining, 903–904colors, defining, 899element class, defining, 897–898exercises, 907forms, drawing on, 895lines, defining, 898–899lines, drawing, 899–900mouse event handlers, adding, 895–897MouseMove event handler, implementing, 904–905MouseUp event handler, implementing, 905overview of, 895Paint event handler, implementing, 905–906pens, defining, 900–902pens, standard, 902rectangles, defining, 902–903summary, 906–907
drawing mode, selecting, 886–887drawing text, CLR controls and, 1038DrawString(), Graphics class, 1038drivers, ODBC, 1121dynamic memory allocation, 194–199
class destructors and, 409classes, 412–413for arrays, 195–196free store, using, 196–198heap, 194multidimensional arrays, 198–199new and delete operators, 195overview, 194
dynamic_cast operator, 550dynaset records, vs. snapshot, 1126
Eeatspaces()function, 302–303Edit(), CRecordset update operations,
1168–1169
1333
Edit()
Inde
x
25905bindex.qxd:WroxPro 2/20/08 5:57 PM Page 1333

edit box controlscreating, 1022–1023CString class, 1024–1025CText class, 1027–1028dialog class for, 1023–1024overview of, 1021text element, creating, 1028–1029text element, defining, 1026–1027text menu item, adding, 1025–1026
edit controls, enabling/disabling, 1178–1180Editor windows, 10–11Element class, C++/CLI, 897–898Element menu
adding event handlers to, 838adding menu items to, 814–815completing, 815positioning, 813
Element Move operation, implementing in CLR, 979elements, 1000–1001
adding to documents, 933–934adding to list collections, 913–915class definitions, 870–873creating, 889–891deleting, 957–958, 978getting elements to move themselves, 961–963hash values and, 919–920highlighting, 952–956identifying selected, 948–949masked, 964–965moving, 958–959moving in CLR, 979–981serializing element classes, 1058–1059storing temporary, 873–874text element, defining, 1026–1027
Ellipse(), CCircle class, 855, 884empty console projects, 21–23encapsulation, defined, 343end(), random access iterators and, 609END_MESSAGE_MAP(), 806–807enum classes, visibility specifiers, 565enumerations, C++/CLI, 107–112
defining, 58, 108–109as flags, 111–112native, 112operations on constants, 110–111overview, 107–109types for constants, specifying, 109–110values for constants, specifying, 110
erase()deleting elements from a list, 633–634
deleting elements from a map, 655deleting elements from a multimap container, 664deleting elements in a vector, 617
errorsdealing with, 23–24stepping over to errors, 716–720syntactic and semantic, 697
escape sequences, 63–64Event Handler Wizard
adding message handlers to user interface,824–825
creating menu message functions, 817–820for menu messages, 815–816
event handlersimplementing, 839–840for menu messages, 815–816
event handlers, Windows Forms applicationcreating, 1228–1229for Limits menu, 1235, 1252–1253for menu items, 1229–1230for Play menu item, 1231–1235
event-driven programmingdefined, 7–8Windows OSs, 746
events, 7–8events, C++/CLI
creating, 580–581handling, 581–583overview of, 571
exceptionscatching, 290–291defined, 287–288throwing, 289working with, 288–289
exclusive OR operators, 83.exe file extension, 1095executable modules, creating and running in MFC,
797–801Execute (Ctrl+F5), 797–798executing program versions, 20–21explicit boxing, 554explicit casting, 69, 78–79exporting classes, from extension DLLs, 1104–1105expr() function, 303–305extended if statements, 122–124extension DLLs
adding classes, 1103–1104applying in Sketcher application, 1106–1107building, 1105exporting classes, 1104–1105
1334
edit box controls
25905bindex.qxd:WroxPro 2/20/08 5:57 PM Page 1334
types of DLLs, 1099Windows Sockets and, 1099writing/using, 1100–1102
extract()function, 312–314extraction operators (>>), 60, 1051
FF10 (Step Over), stepping over to errors, 716–720fields
defined, 332, 343nonserializable, 1079–1081in relational databases, 1114
file extensions, options for DLLs, 1095file names, program code, 470–471file operations
creating dialogs, 1086implementing for a sketch, 1086–1088open, 1087–1088overview of, 1086print, 1089–1090save, 1086–1087save as, 1088
file scope, 89FileMode enumeration values, 1081–1082files, required in order to use DLLs, 1107fill(), algorithms, 674filters/filtering
customer recordset, 1160–1163defining filter parameters, 1148–1149list containers, 636–639recordsets, 1147–1148
finalizers, C++/CLI reference classes, 583–585find()
algorithms, 675objects in a map, 654–655objects in a multimap container, 654–655strings, searching, 484–489
Find(), searching list collections, 916–917FindIndex(), searching list collections, 917first class, 340flags, enumerations as, 111–112floating toolbars, 12floating-point loop counters, 145–146floating-point numbers, 55–56fonts
choosing, 1039–1040creating, 1039defining, 1030
for each loops, 156–159
for loopsindefinite, 140–141using, 136–137variations on, 138
foreign keys, in relational databases, 1115Form Design capability, 1228Form1 class
adding members, 1230–1231creating dialog objects, 1239–1240
Format property, columns, 1281–1283forms. See also Windows Forms applications
defined, 831drawing in CLR drawings, 895
frame windowsMFC window class, 773views appearing in, 781
free storevs. heap, 194using, 196–198
free store, debug operationschecking, 723–724controlling, 725–726output, 726–727
friend, of a class, 528–529friend classes, 530friend functions
definitions, placing, 364overview, 362–364working with, 362–364
front(), accessing elements in vectors, 616fruity CLR console program, 100–102function adapters, 606function headers, 241–242function members, 343
adding for CBox class, 458–462function objects
for arithmetic operations, 673for comparisons, 672–673overview of, 605–606
functional notation, 51functions
addresses returned by, 265–266arguments, omitting, 286–287arguments, pointers as, 283–285arguments, to main(), 258–260arguments, variable numbers of, 260–262,
274–275arguments passed to, 247–251arrays of pointers to, 285arrays passed to, 251–253
1335
functions
Inde
x
25905bindex.qxd:WroxPro 2/20/08 5:57 PM Page 1335
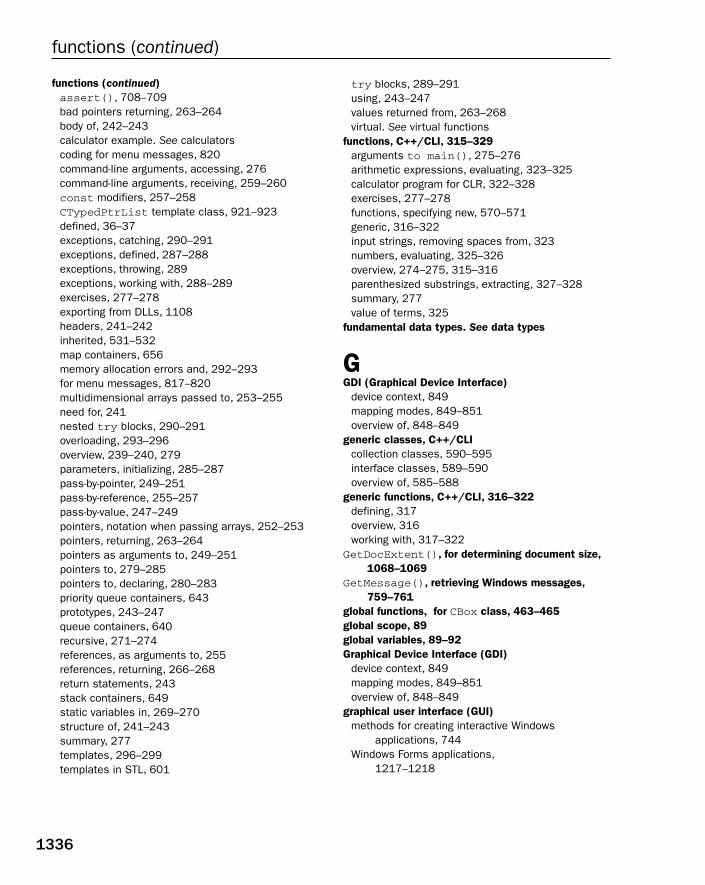
functions (continued)assert(), 708–709bad pointers returning, 263–264body of, 242–243calculator example. See calculatorscoding for menu messages, 820command-line arguments, accessing, 276command-line arguments, receiving, 259–260const modifiers, 257–258CTypedPtrList template class, 921–923defined, 36–37exceptions, catching, 290–291exceptions, defined, 287–288exceptions, throwing, 289exceptions, working with, 288–289exercises, 277–278exporting from DLLs, 1108headers, 241–242inherited, 531–532map containers, 656memory allocation errors and, 292–293for menu messages, 817–820multidimensional arrays passed to, 253–255need for, 241nested try blocks, 290–291overloading, 293–296overview, 239–240, 279parameters, initializing, 285–287pass-by-pointer, 249–251pass-by-reference, 255–257pass-by-value, 247–249pointers, notation when passing arrays, 252–253pointers, returning, 263–264pointers as arguments to, 249–251pointers to, 279–285pointers to, declaring, 280–283priority queue containers, 643prototypes, 243–247queue containers, 640recursive, 271–274references, as arguments to, 255references, returning, 266–268return statements, 243stack containers, 649static variables in, 269–270structure of, 241–243summary, 277templates, 296–299templates in STL, 601
try blocks, 289–291using, 243–247values returned from, 263–268virtual. See virtual functions
functions, C++/CLI, 315–329arguments to main(), 275–276arithmetic expressions, evaluating, 323–325calculator program for CLR, 322–328exercises, 277–278functions, specifying new, 570–571generic, 316–322input strings, removing spaces from, 323numbers, evaluating, 325–326overview, 274–275, 315–316parenthesized substrings, extracting, 327–328summary, 277value of terms, 325
fundamental data types. See data types
GGDI (Graphical Device Interface)
device context, 849mapping modes, 849–851overview of, 848–849
generic classes, C++/CLIcollection classes, 590–595interface classes, 589–590overview of, 585–588
generic functions, C++/CLI, 316–322defining, 317overview, 316working with, 317–322
GetDocExtent(), for determining document size,1068–1069
GetMessage(), retrieving Windows messages,759–761
global functions, for CBox class, 463–465global scope, 89global variables, 89–92Graphical Device Interface (GDI)
device context, 849mapping modes, 849–851overview of, 848–849
graphical user interface (GUI)methods for creating interactive Windows
applications, 744Windows Forms applications,
1217–1218
1336
functions (continued)
25905bindex.qxd:WroxPro 2/20/08 5:57 PM Page 1336

Graphics class coordinate system transformations and, 965–967Draw(), 899DrawString(), 1038
graphics display modes, 852–853group box, pen width options, 989GroupBox controlsControls property, 1233Windows Forms, 831working with, 1222–1224
GUI (graphical user interface)methods for creating interactive Windows
applications, 744Windows Forms applications, 1217–1218
H.h file, DLL file requirements, 1105handles, integer values for identifying objects, 752hash values, map keys and, 919–920header files, 43headers
column headers, for DataGridView control,1280–1281
DataGridView controls, customizing, 1276–1277function headers, 241–242STL container adapters, 603STL containers, 602
heap vs. free store, 194Help>About menu items, Windows Forms
applications, 1253helper functions
array collections, 913list collections, 917–918map collections, 919–920
hexadecimal, ASCII codes, 1309–1315highlighting elements
cell under mouse cursor, 1286–1289for selection, 952–956for selection in CLR, 972–976
Hungarian notationMFC and, 771Windows notation and, 750
IIComparable, interface class, 561IContainer, interface class, 562–565IController, interface class, 562
IDE (Integrated Development Environment)compiler in, 9components of, 9console applications, files created by building, 19debugging and releasing program versions, 20defined, 9–10dockable toolbars, 12–13documentation in, 13editor in, 9error handling, 23–24executing program versions, 20–21libraries in, 10linker in, 9MFC applications, building and executing, 30MFC applications, creating, 27–29options, setting, 26–27projects, creating CLR console, 24–26projects, creating empty console, 21–23projects, creating Win32 console application, 14–19projects, defining, 14projects and solutions, 13–14solutions, building, 19source code, modifying, 17–19summary, 33–34toolbar options, 11–12Windows applications, 27–30Windows Forms applications, 30–33working with, 10–11
identifiers, 49if statements, 119–126
basic, 119–120extended, 122–124nested, 120–122, 153–154nested if-else, 124–126
IMPLEMENT_DYNCREATE() macro, 1049–1050implicit boxing, 554implicit casts, 69#include statements, 43, 309, 512incomplete definitions, classes, 538incorrect results, common bugs, 698increment operators (++), overloading, 436–437indefinite for loops, 140–141Indent(), indenting debug output, 734indexed properties, C++/CLI
complex, 401–402defined, 390defining, 397–398working with default, 398–401
indirect base classes, 509
1337
indirect base classes
Inde
x
25905bindex.qxd:WroxPro 2/20/08 5:57 PM Page 1337

indirect data access, 174–194address-of operators, 175–176array names as pointers, 189–191arrays of pointers, 181–183char, 179–181constant pointers and pointers to constants,
185–187counting characters, 191–192declaring pointers, 175defined, 174indirection operators, 176initializing pointers, 178–179multidimensional arrays, pointer notation with,
193–194multidimensional arrays, using pointers with,
192–193pointer arithmetic, 187–189pointers, defined, 174pointers and arrays, 187–192sizeof operators, 183–185using pointers, 176–178
indirect member access operators, 340indirect member selection operators, 340indirection operators, 176inheritance. See class inheritanceinitial values, for variables, 51initializing
arrays, 166–167defined, 51multidimensional arrays, 172–173parameters, 285–287pointers, 178–179references, 199–200structs, 333
InitInstance(), SDI application, 799–800initonly fields, 403–404input, analyzing, 300–302input, keyboard
C++/CLI, 106–107for calculations, 68–69generally, 60
input controls, disabling, 1251input stream iterators, 665–668input strings, 323input validation, Windows Forms applications,
1242–1244input/output operations, 60–64
escape sequences, 63–64input from keyboards, 60
output, formatting, 61–62output to command lines, 60–61
insert()elements in a list, 630–631elements in a vector, 616–617elements into multimap containers, 664pairs into a map, 653–654string objects, 478–479
inserter iterators, 669–672insertion operators (<<), CArchive class, 1051instances, 340–342
of class templates, 438instantiation, 343
of class templates, 438integer type modifiers, 54–55integer variables, 52–53Integrated Development Environment. See IDE
(Integrated Development Environment)IntelliSense, 337–338interface, DLL, 1098interface class keyword, 561interface classes, C++/CLI, 561–565
defining, 561–562generic, 589–590implementing, 562–565overview of, 561
interface struct keyword, 561interfaces
class interface, 446–447DLLs, 1105document interfaces, MFC, 780GDI (Graphical Device Interface). See GDI (Graphical
Device Interface)GUI (graphical user interface), 744, 1217–1218
interfaces, C++/CLIaccess specifiers for, 566–568visibility specifiers for, 565
interior pointers, 233–237intermediate languages, 2internal, C++/CLI access specifier, 566–568ISO/ANSI C++
compiler, 455fundamental data types, 56–57keywords, 1307–1308learning about, 5standards, 5–6
iteratorsbegin()and end(), 609categories of, 604
1338
indirect data access
25905bindex.qxd:WroxPro 2/20/08 5:57 PM Page 1338
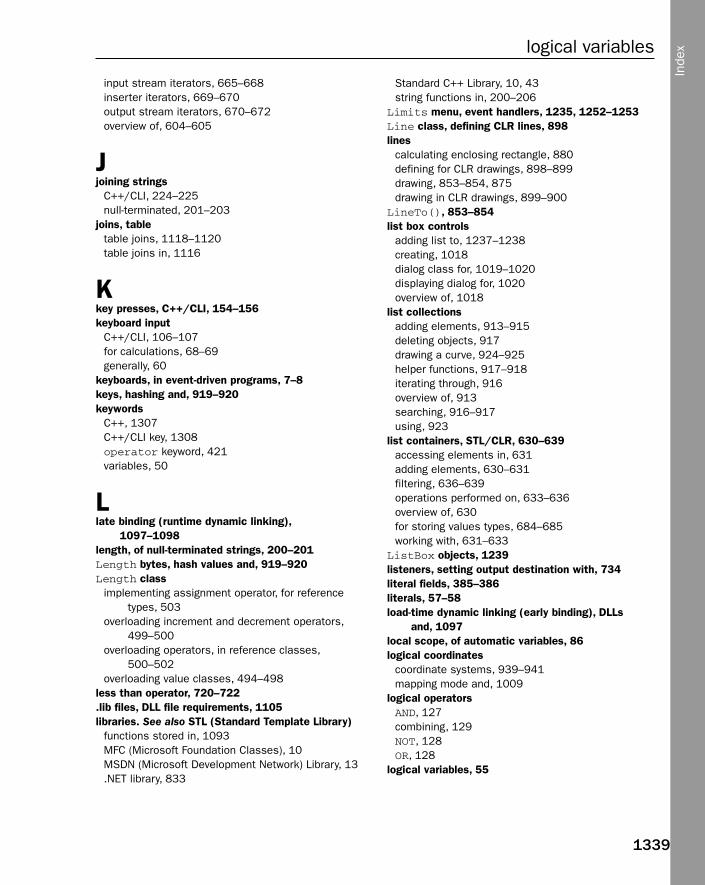
input stream iterators, 665–668inserter iterators, 669–670output stream iterators, 670–672overview of, 604–605
Jjoining strings
C++/CLI, 224–225null-terminated, 201–203
joins, tabletable joins, 1118–1120table joins in, 1116
Kkey presses, C++/CLI, 154–156keyboard input
C++/CLI, 106–107for calculations, 68–69generally, 60
keyboards, in event-driven programs, 7–8keys, hashing and, 919–920keywords
C++, 1307C++/CLI key, 1308operator keyword, 421variables, 50
Llate binding (runtime dynamic linking),
1097–1098length, of null-terminated strings, 200–201Length bytes, hash values and, 919–920Length class
implementing assignment operator, for referencetypes, 503
overloading increment and decrement operators,499–500
overloading operators, in reference classes,500–502
overloading value classes, 494–498less than operator, 720–722.lib files, DLL file requirements, 1105libraries. See also STL (Standard Template Library)
functions stored in, 1093MFC (Microsoft Foundation Classes), 10MSDN (Microsoft Development Network) Library, 13.NET library, 833
Standard C++ Library, 10, 43string functions in, 200–206
Limits menu, event handlers, 1235, 1252–1253Line class, defining CLR lines, 898lines
calculating enclosing rectangle, 880defining for CLR drawings, 898–899drawing, 853–854, 875drawing in CLR drawings, 899–900
LineTo(), 853–854list box controls
adding list to, 1237–1238creating, 1018dialog class for, 1019–1020displaying dialog for, 1020overview of, 1018
list collectionsadding elements, 913–915deleting objects, 917drawing a curve, 924–925helper functions, 917–918iterating through, 916overview of, 913searching, 916–917using, 923
list containers, STL/CLR, 630–639accessing elements in, 631adding elements, 630–631filtering, 636–639operations performed on, 633–636overview of, 630for storing values types, 684–685working with, 631–633
ListBox objects, 1239listeners, setting output destination with, 734literal fields, 385–386literals, 57–58load-time dynamic linking (early binding), DLLs
and, 1097local scope, of automatic variables, 86logical coordinates
coordinate systems, 939–941mapping mode and, 1009
logical operatorsAND, 127combining, 129NOT, 128OR, 128
logical variables, 55
1339
logical variables
Inde
x
25905bindex.qxd:WroxPro 2/20/08 5:57 PM Page 1339

loops, 135–152continue statements, 142–143defined, 135do-while, 148–149for each, 156–159floating-point loop counters, 145–146for, 136–138indefinite for, 140–141key presses and, 154–156multiple counters, using, 139–140nested, 149–152for repeating blocks of statements, 135types in, other, 143–145variations on for, 138while, 146–148
loops, C++/CLI, 153–160for each loops, 156–159exercises, 159–160nested if statements, 153–154overview, 153summary, 159
lvalues, 65
Mmain()function
arguments to, 258–260, 275–276defined, 44for implementing calculators, 310–311
make_pair(), helper function for creating pairobjects, 653
managed C++, 3–4manipulators, 62map collections, 918–920
helper functions, 919–920overview of, 918–919
map containers, STL/CLR, 652–664accessing objects, 654–655functions, 656implementing phone book using map, 686–692operations performed on, 655–656overview of, 652storing objects, 652–654working with, 656–664
mapping modesGDI (Graphical Device Interface), 849–851scalable, 1008–1009scaling and, 1008settings, 1010–1012
masked elements, 964–965
MDI (Multiple Document Interface)command messages, processing, 811creating MDI applications, 801–802overview of, 780
member access operators, 333member functions
class templates, 440–441definitions, 369–371
member selection operators, 333members
of classes, 343defined, 332
memory, debugging dynamicfree store debug operations, checking, 723–724free store debug operations, controlling, 725–726free store debug operations, output, 726–727leak detection, 727–731overview of, 723
memory, sharing between variables, 417memory allocation errors, 292–293memory leaks
causes of, 723detecting, 724, 727–731difficulty in detecting, 723
menu baradding menu items to, 813Color menu added to, 815as window element, 746
menu itemsadding to Element menu, 814–815adding to menu bar, 813adding to spin button control, 1002–1003Choose menu item, 1257in context menus, 950–952event handlers for, 1229–1230Help>About, 1253Limits menu, 1235, 1252–1253Menu Strip container for, 836–837modifying existing, 815Reset, 1245text, adding, 1025–1026
menu items, CLRchecks, 840–842event handlers, 838–839
menu messagesclasses, 817coding functions, 820creating functions, 817–820deleting elements, 957–958event handlers, 816
1340
loops
25905bindex.qxd:WroxPro 2/20/08 5:57 PM Page 1340
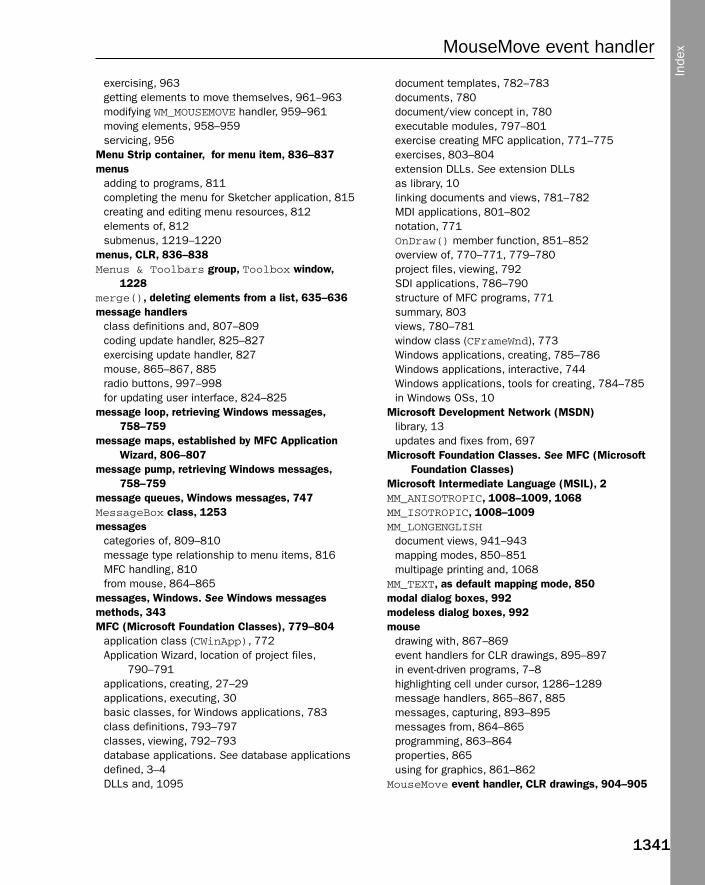
exercising, 963getting elements to move themselves, 961–963modifying WM_MOUSEMOVE handler, 959–961moving elements, 958–959servicing, 956
Menu Strip container, for menu item, 836–837menus
adding to programs, 811completing the menu for Sketcher application, 815creating and editing menu resources, 812elements of, 812submenus, 1219–1220
menus, CLR, 836–838Menus & Toolbars group, Toolbox window,
1228merge(), deleting elements from a list, 635–636message handlers
class definitions and, 807–809coding update handler, 825–827exercising update handler, 827mouse, 865–867, 885radio buttons, 997–998for updating user interface, 824–825
message loop, retrieving Windows messages,758–759
message maps, established by MFC ApplicationWizard, 806–807
message pump, retrieving Windows messages,758–759
message queues, Windows messages, 747MessageBox class, 1253messages
categories of, 809–810message type relationship to menu items, 816MFC handling, 810from mouse, 864–865
messages, Windows. See Windows messagesmethods, 343MFC (Microsoft Foundation Classes), 779–804
application class (CWinApp), 772Application Wizard, location of project files,
790–791applications, creating, 27–29applications, executing, 30basic classes, for Windows applications, 783class definitions, 793–797classes, viewing, 792–793database applications. See database applicationsdefined, 3–4DLLs and, 1095
document templates, 782–783documents, 780document/view concept in, 780executable modules, 797–801exercise creating MFC application, 771–775exercises, 803–804extension DLLs. See extension DLLsas library, 10linking documents and views, 781–782MDI applications, 801–802notation, 771OnDraw() member function, 851–852overview of, 770–771, 779–780project files, viewing, 792SDI applications, 786–790structure of MFC programs, 771summary, 803views, 780–781window class (CFrameWnd), 773Windows applications, creating, 785–786Windows applications, interactive, 744Windows applications, tools for creating, 784–785in Windows OSs, 10
Microsoft Development Network (MSDN)library, 13updates and fixes from, 697
Microsoft Foundation Classes. See MFC (MicrosoftFoundation Classes)
Microsoft Intermediate Language (MSIL), 2MM_ANISOTROPIC, 1008–1009, 1068MM_ISOTROPIC, 1008–1009MM_LONGENGLISH
document views, 941–943mapping modes, 850–851multipage printing and, 1068
MM_TEXT, as default mapping mode, 850modal dialog boxes, 992modeless dialog boxes, 992mouse
drawing with, 867–869event handlers for CLR drawings, 895–897in event-driven programs, 7–8highlighting cell under cursor, 1286–1289message handlers, 865–867, 885messages, capturing, 893–895messages from, 864–865programming, 863–864properties, 865using for graphics, 861–862
MouseMove event handler, CLR drawings, 904–905
1341
MouseMove event handler
Inde
x
25905bindex.qxd:WroxPro 2/20/08 5:57 PM Page 1341

MouseUp event handler, CLR drawings, 905Move(), getting elements to move themselves, 961MoveTo(), displaying graphics and, 853MSDN (Microsoft Development Network)
library, 13updates and fixes from, 697
MSIL (Microsoft Intermediate Language), 2multidimensional arrays
in C++/CLI, 217–221defined, 171–172dynamic allocation of, 198–199initializing, 172–173passing to functions, 253–255pointer notation with, 193–194pointers with, 192–193
multifile project, CBox class, 453–455multimap containers, 664–665multipage printing, 1066–1068multiple counters, 139–140multiple data values, of same type, 162–174
arrays, declaring, 163–166arrays, defined, 162–163arrays, initializing, 166–167character arrays and string handling, 168–169multidimensional arrays, defined, 171–172multidimensional arrays, initializing, 172–173multiple strings, storing, 173–174overview, 162programming with strings, 170–171string input, 169–171
Multiple Document Interface (MDI)command messages, processing, 811creating MDI applications, 801–802overview of, 780
multiple namespaces, 96–97multiple parameters, class templates, 444–446multiple strings, 173–174multiple top-level document architecture, MFC
document interfaces, 780multiset containers, 651multitasking, Windows programs, 759multop number, 301
Nnamed indexed properties, 397names
functions, 241as pointers, 189–191
program files, 470–471variables, 49
namespacesdeclaration and, 43–44declaring, 94–96defined, 25–26multiple, 96–97.NET library, 833overview, 93–94structure of C++ programs, 43–44
native C++ programs, defined, 2–5native enumerations, 112NDEBUG preprocessor symbol, 708nested classes
overview of, 550–552working with, 552–553
nested if statements, 120–122nested if statements, C++/CL, 153–154nested if-else statements, 124–126nested loops, 149–152nested try blocks, 290–291.NET Framework, 2, 1078.NET library namespaces, 833new keyword, 570–571new operators
constructors and, 412dynamic memory allocation and, 195
noarg constructors, 353non-queued messages, Windows programs, 758normalized rectangles, CLine class, 880NOT operators, 84, 128notation
MFC (Microsoft Foundation Classes), 771pointers, 193–194Windows programming, 749–750
null pointer, 705null-terminated strings
comparing, 204copying, 203–204joining, 201–203length of, 200–201searching, 204–206
number() function, calculators, 306–309, 311–312numbers, evaluating, 325–326
Oobject code, 9object files, 9
1342
MouseUp event handler
25905bindex.qxd:WroxPro 2/20/08 5:57 PM Page 1342
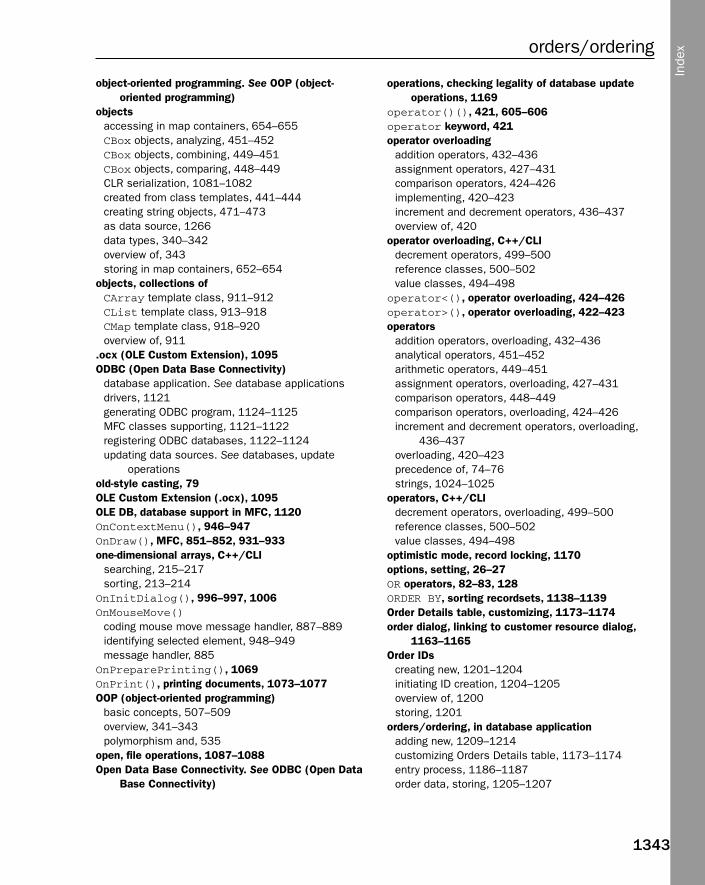
object-oriented programming. See OOP (object-oriented programming)
objectsaccessing in map containers, 654–655CBox objects, analyzing, 451–452CBox objects, combining, 449–451CBox objects, comparing, 448–449CLR serialization, 1081–1082created from class templates, 441–444creating string objects, 471–473as data source, 1266data types, 340–342overview of, 343storing in map containers, 652–654
objects, collections ofCArray template class, 911–912CList template class, 913–918CMap template class, 918–920overview of, 911
.ocx (OLE Custom Extension), 1095ODBC (Open Data Base Connectivity)
database application. See database applicationsdrivers, 1121generating ODBC program, 1124–1125MFC classes supporting, 1121–1122registering ODBC databases, 1122–1124updating data sources. See databases, update
operationsold-style casting, 79OLE Custom Extension (.ocx), 1095OLE DB, database support in MFC, 1120OnContextMenu(), 946–947OnDraw(), MFC, 851–852, 931–933one-dimensional arrays, C++/CLI
searching, 215–217sorting, 213–214
OnInitDialog(), 996–997, 1006OnMouseMove()
coding mouse move message handler, 887–889identifying selected element, 948–949message handler, 885
OnPreparePrinting(), 1069OnPrint(), printing documents, 1073–1077OOP (object-oriented programming)
basic concepts, 507–509overview, 341–343polymorphism and, 535
open, file operations, 1087–1088Open Data Base Connectivity. See ODBC (Open Data
Base Connectivity)
operations, checking legality of database updateoperations, 1169
operator()(), 421, 605–606operator keyword, 421operator overloading
addition operators, 432–436assignment operators, 427–431comparison operators, 424–426implementing, 420–423increment and decrement operators, 436–437overview of, 420
operator overloading, C++/CLIdecrement operators, 499–500reference classes, 500–502value classes, 494–498
operator<(), operator overloading, 424–426operator>(), operator overloading, 422–423operators
addition operators, overloading, 432–436analytical operators, 451–452arithmetic operators, 449–451assignment operators, overloading, 427–431comparison operators, 448–449comparison operators, overloading, 424–426increment and decrement operators, overloading,
436–437overloading, 420–423precedence of, 74–76strings, 1024–1025
operators, C++/CLIdecrement operators, overloading, 499–500reference classes, 500–502value classes, 494–498
optimistic mode, record locking, 1170options, setting, 26–27OR operators, 82–83, 128ORDER BY, sorting recordsets, 1138–1139Order Details table, customizing, 1173–1174order dialog, linking to customer resource dialog,
1163–1165Order IDs
creating new, 1201–1204initiating ID creation, 1204–1205overview of, 1200storing, 1201
orders/ordering, in database applicationadding new, 1209–1214customizing Orders Details table, 1173–1174entry process, 1186–1187order data, storing, 1205–1207
1343
orders/ordering
Inde
x
25905bindex.qxd:WroxPro 2/20/08 5:57 PM Page 1343

orders/ordering (continued)Order IDs, creating, 1200–1205products, selecting for orders, 1207–1209
ordinal values, DLLs, 1104output
to command lines, 60–61, 102conditional operators with, 130–131formatting, 61–62, 103–106free store debug operations, 726–727statements, 45
output, C++/CLI debuggingcontrolling, 735–736destination, 734generating, 732–733indenting, 734
output stream iterators, 670–672overloading functions, 293–296overriding operator precedence, 76
Ppackaging problems, class interfaces and, 446–447page coordinates. See logical coordinatesPaint event handler
CLR drawings, 905–906drawing sketch with, 971–972
panes, status bars, 1013parameters
class templates with multiple parameters, 444–446defined, 240–242initializing, 285–287insert(), 478–479parameter values, for constructor arguments,
356–357parameter values, in classes, 355–356
parameters, SQL filtersdefining, 1148–1149overview of, 1147–1148
parent windows, window elements, 745parenthesized substrings, extracting, 327–328parts, status bars, 1015pass-by-pointer, 249–251pass-by-reference, 255–257pass-by-value, 247–249passing
arguments to functions, 247–251arrays to functions, 251–253multidimensional arrays to functions, 253–255
pdo_it function, 282–283Pen class, 900–902
Pen width dialog boxexercising, 1001pen width, adding to document, 998–999pen width, adding to elements, 999–1000
penscreating, 857–858defining for CLR drawings, 900–902pen width options, 989setting drawing width, 1033–1035standard for CLR drawings, 902using, 858–859
pessimistic mode, record locking, 1170pfun() statement, 280–281Play menu event, 1231–1235playMenuItem_Click(), 1231pointer notation when passing arrays, 252–253pointers
for accessing members of structs, 339–340address-of operators, 175–176as arguments to functions, 249–251arithmetic, 187–189array names as, 189–191and arrays, 187–192arrays of, 181–183causes of bad pointers, 698char, 179–181to class objects, 376–379, 535–537constants and, 185–187counting characters, 191–192declaring, 175declaring to functions, 280–283defined, 174dynamic_cast operator and, 550to functions, 279–285indirect data access and, 174indirect member selection operators, 340indirection operators, 176initializing, 178–179multidimensional arrays and, 192–193notation, when passing arrays, 252–253notation, with multidimensional arrays, 193–194null pointer, 705returning, 263–264sizeof operators, 183–185storing in vector containers, 624–626with structs, 338–340working with, 176–178
polymorphism, virtual functions and, 535pop_back(), deleting elements in a vector, 616
1344
orders/ordering (continued)
25905bindex.qxd:WroxPro 2/20/08 5:57 PM Page 1344
pop-up menuscontext menus, 943exercising, 949–950flags, 946Popup property and, 813
Popup property, 813POSITION values, list collections, 915–916precompiled headers, compilation time and,
797–798predicates
for filtering a list, 636–639overview of, 606
pre-emptive multitasking, Windows programs, 759prefixes
Windows messages, 1317–1318Windows notation, 749–750
preprocessor directives, adding debugging codewith, 709
primary keys, in relational databases, 1114print, file operations, 1089–1090Print(), generating debugging output with, 733print preview, for documents, 1077PrintDocument component, 1089printing documents
cleaning up after, 1072CPrintInfo class, 1066–1068document size and, 1068–1069exercises, 1091–1092logic and functions involved in printing process,
1065–1066multipage, 1066–1068overview of, 1064–1065preparing device context for, 1072–1073preparing for, 1070–1072print preview, 1077process of, 1073–1077storing print data, 1069–1070summary, 1090–1091
printing documents, CLRoverview of, 1089print operation, 1089–1090PrintDocument component, 1089
priority queue containers, 643–648functions, 643overview of, 643–644working with, 644–648
private classes, C++/CL, 565private keyword, class membership and, 513private members, of classes, 358–366
access levels for inherited members, 522–523
accessing, 361accessing private members of base class in a
derived class, 513–516default copy constructors, 364–366friend functions and, 362–364overview, 358–359working with, 359–361
private protected keyword, C++/CLI accessspecifiers, 566–568
Product ID, in relational databases, 1114products
selecting for orders, 1207–1209viewing product orders, 1151–1155
Products tablequerying, 1129in relational databases, 1114
program codefile names, 470–471organizing, 468
programming mouse, 863–864programs
bugs, 696–697comments, 42hangs/crashes, 698named indexed properties, 397statements, 44–46structure. See structuresWindows. See also Windows programming
programs, debuggingcall stack, 715–716finding next bug, 722overview of, 715program versions, 20stepping over to errors, 716–720testing extended class, 720–722
project fileslocation of, 790–791viewing, 792
project folders, 13projectsCtrl+Shift+N (New Project), 785, 1100defining, 14solutions and, 13–14
propertiesC++/CLI class properties. See class properties,
C++/CLIcell styles, 1275–1276columns, 1281–1283controls, 1233defined, 390
1345
properties
Inde
x
25905bindex.qxd:WroxPro 2/20/08 5:57 PM Page 1345
properties (continued)modifying Windows Forms application, 834–835mouse, 865read-only, 390reserved property names, 403toolbar buttons, 829–830write-only, 390
Property Manager tabs, 17protected keyword, class membership and,
519–522protected members
access levels for inherited class members,522–523
creating elements and, 889prototypes, function, 243–247public classes, specifying in C++/CLI, 565public data, accessing, 783public keyword, class membership and, 513public members
access control and, 513access levels for inherited class members,
522–523interface classes, 561
public protected keyword, C++/CLI accessspecifiers, 566–568
pure virtual functionsabstract classes, 539–542overview of, 538–539
push_back()adding elements to lists, 630adding elements to vector containers, 608
push_front(), adding elements to lists, 630
Qqueries, 1129–1131queue containers, 640–648
functions, 640priority queue containers, 643–648working with, 640–643
queued messages, Windows programs, 758
RR2_NOTXORPEN, 887, 1062radio buttons
adding to group box, 989–990initializing, 996–997message handling, 997–998
Raster OPeration (ROP), 886
rbegin(), reverse iterators, 610RDBMS (relational database management systems),
1115read-only properties, 390Record Field Exchange, RFX_(), 1131–1132record locking, 1169–1170Record menu, disabling, 1181–1183record view class
creating, 1144–1147initializing, 1149–1150overview of, 1132–1134
recordschoosing SQL records, 1117in relational databases, 1114sorting SQL records, 1120
recordsetsadding filters to, 1147–1148creating, 1127–1129, 1188customer recordset, adding, 1156–1157customer recordset, filtering, 1160–1163data transfer between database and recordset,
1131–1132linking controls to, 1136–1138recordset class, 1141–1143second recordset object, 1140–1141SELECT statements resulting in, 1116–1117snapshot vs. dynaset records, 1126sorting, 1138–1139views, for database update, 1188–1193
Rectangle(), CRectangle class, 881–882rectangles
calculating enclosing rectangle for lines, 880defining for CLR drawings, 902–903drawing, 881–882RECT structure, 338
recursive function calls, 271–274reference classes, C++/CLI
base class for, 553copy constructors, 389–390defining, 386–387derived classes and, 558–560destructors and finalizers, 583–585implementing assignment operator for, 503overloading, 500–502storing reference class objects, 680–684working with, 387–389
referencesas arguments to functions, 255to base classes, 537to class objects, 376, 379–380
1346
properties (continued)
25905bindex.qxd:WroxPro 2/20/08 5:57 PM Page 1346

declaring and initializing, 199–200defined, 199dynamic_cast operator and, 550returning, 266–268using, 199–200to virtual functions, 537–539
references, C++/CLI, 555RegisterClassEx(), creating program window,
756–757registering window class, 756Regular DLL, dynamically linked to MFC, 1099Regular DLL, statically linked to MFC, 1099relational database management systems (RDBMS),
1115relational databases. See also database
applicationscomponents of, 1114as data source, 1266overview of, 1113RDBMS (relational database management systems),
1115–1116relational operators, 117releases, program versions, 20remainders, 70–71remove(), deleting elements from a list, 634remove_if(), deleting elements from a list, 636rend(), reverse iterators, 610repeating blocks of statements. See loopsreplace()
algorithms, 674string objects, 479–480
reserve(), increasing container capacity, 609reserved property names, 403Reset menu item, 1245resize(), vector containers, 612Resource Editors, tools for creating MFC-based
Windows programs, 785resource files, as window element, 746Resource View
adding Tooltips, 831creating view dialogs, 1134–1136, 1143–1144customer resource dialog, 1157–1158customer resource dialog, linking to order dialog,
1163–1165extending toolbar resources, 827–828IDE windows, 10–11overview of, 17switching from Solution Explorer to, 812
resourcesadding buttons to dialog boxes, 1187–1188adding controls to dialog resources, 1193–1196
creating and editing menu resources, 812extending toolbar resources, 827–828
results, displaying, 69–70return statements, 243return values, 241reverse iterators, 610RFX_() (Record Field Exchange), 1131–1132roll back, of transactions, 1170Rollback(), CDatabase transaction operations,
1171–1172ROP (Raster OPeration), 886rows
adding to tables, 1186–1187customizing, 1283–1284DataGridView functions for, 1269–1270System::Data::DataRows namespace, 1266
rulesfor casting operands, 76–77for returning addresses, 265–266for returning references, 268
Run(), SDI application, 800–801Run to Cursor option, Debug menu, 704runtime dynamic linking (late binding), 1097–1098rvalues, 65
Ssafe_cast, 107save, file operations, 1086–1087save as, file operations, 1088scalable mapping modes, 1008–1009scalar properties, C++/CLI
defining, 390–393trivial, 393working with, 393–397
scale dialogdisplaying for spin button control, 1002removing, 1018scale dialog class, 1004–1005
scale factordocument size settings, 1009–1010mapping mode settings, 1010–1012overview of, 1008scalable mapping modes and, 1008–1009scrolling with scaling, 1012–1013
scale menu item, adding to spin button control,1002–1003
scope resolution operatorsin classes, 349defined, 43storage duration and scope, 91–92
1347
scope resolution operators
Inde
x
25905bindex.qxd:WroxPro 2/20/08 5:57 PM Page 1347

screen coordinates, pixels for measuring, 1009scrolling
scaling and, 1012scroll bar controls, 1012–1013views, 937–939
SDI (Single Document Interface)Build Solution, 797class definitions, 793–797command messages, 810creating SDI applications, 786–790executable modules, 797–801location of project files, 790–791overview of, 780precompiled headers and, 797–798viewing classes, 792–793viewing project files, 792
searchesFind(), searching list collections, 916–917FindIndex(), searching list collections, 917null-terminated strings, 204–206one-dimensional arrays, 215–217strings, 224–225, 230–233, 484–489
SELECT statementsfilters, 1147in relational database, 1116snapshot vs. dynaset records, 1126sorting records, 1120table joins, 1118WHERE clause, 1117
SelectObject(), 858SelectView(), 1151–1152semantic errors, 697Send-To-Back operation, in CLR, 978sequence, of calculations, 74–76sequence containers, 607–651
basic types, 607defined, 606double-ended queue containers, 626–629list containers, 630–639overview of, 607–608queue containers, 640–648stack containers, 649–651vector containers. See vector containers
sequence containers, STL/CLRdouble-ended queue containers for storing reference
class objects, 680–684list containers for storing values types, 684–685overview of, 677vectors for storing handles, 678–680
Serializable attribute, 1083
serializationCArchive class, 1050–1052CObject class, 1052collections and, 910DECLARE_SERIAL() macro, 1052–1053in document class definition, 1048–1049in document class implementation, 1049–1050exercises, 1091–1092exercising, 1061–1062how it works, 1053–1054implementing for a class, 1054–1055overview of, 1047–1048recording document changes, 1055Serialize(), for documents, 1056–1057Serialize(), for elements, 1058–1059Serialize(), for shapes, 1059–1061Serialize(), overview of, 1050summary, 1090–1091
serialization, CLRbinary serialization, 1078–1079fields that are not serializable, 1079–1081file operations, for a sketch, 1086–1088object serialization, 1081–1082overview of, 1078sketch serialization, 1083–1086
Serialize()definition of, 1050document objects and, 1049how it works, 1053–1054implementing for documents, 1056–1057implementing for elements, 1058–1059implementing for shapes, 1059–1061
set containers, 651SetCapture(), capturing mouse messages,
893–895SetCheck(), CCmdUI class, 826SetROP2(), 886SetTextAlign(), 1077SetValues(), 1233–1234shapes
of collections, 910deleting and moving, 943serialization, 1059–1061
shift operators, 84–86Shift+Alt+D (Show Data Sources item), 1266Show(), 1242–1243Show Data Sources item (Shift+Alt+D), 1266ShowDialog(), 1240–1241ShowWindow(), 757–758Single Document Interface. See SDI (Single
Document Interface)
1348
screen coordinates
25905bindex.qxd:WroxPro 2/20/08 5:57 PM Page 1348
size(), vector containers, 611sizeof operators, 183–185Sketcher application
CLR version. See Windows applications, CLR-basedMFC version. See Windows applications, MFC-based
sketchs, CLR serialization, 1083–1086snapshot, vs. dynaset records, 1126SOAP serialization, 1078Socket class, in STL, 601Solution Explorer
IDE windows, 10–11overview of, 16switching to Resource View, 812
solutions, 13–14, 19sort(), 623–624sorting elements, 623–624sorting recordsets, 1138–1139sorting SQL records, 1120sorting vector elements, 623–624sorting words from text, 489–494source code, modifying, 17–19spin button control
creating, 1003–1004defined, 988dialog data exchange and validation, 1006displaying, 1007–1008initializing the dialog, 1006–1007overview of, 1001–1002scale dialog class, 1004–1005scale menu item, 1002–1003tab sequence, 1004toolbar buttons, 1002–1003
splice(), deleting elements from a list, 635SQL (Structured Query Language)
overview of, 1116records, 1117retrieving data with, 1116–1117SELECT statements. See SELECT statementssorting records, 1120table joins, 1118–1120
stack containersfunctions, 649STL (Standard Template Library), 649–651
stacks, in automatic variables, 86–87Standard C++ Library, 10, 43standard libraries, 1093. See also librariesStandard Template Library. See STL (Standard
Template Library)standards, learning, 5–6Start Debugging, Debug menu, 703, 722
stateof free store, 724of ListBox objects, 1239
statement blocks, 47statements, 44–46#include, 43, 309, 512assignment, 45, 65, 77–78extended if statements, 122–124if statements. See if statementsloops. See loopsnested if statements, 120–122nested if statements, C++/CL, 153–154nested if-else statements, 124–126pfun() statement, 280–281SELECT statements. See SELECT statementsthrow statement, 289–291
static constructors, 405static members, of classes, 373–376
data members, 373–374function members, 376instances, counting, 374–375
static properties, 402–403static storage duration, 89–93static variables
in functions, 269–270storage duration and scope, 93
statically linked functions, DLLs compared with,1093–1095
status bar controlsadding to frames, 1014–1015overview of, 1013–1014panes, 1013parts, 1015–1017updating, 1017–1018
std namespace, 601Step Into option, Debug menu, 704Step Over (F10), Debug menu, 704–705, 705,
716–720STL (Standard Template Library), 601–693
algorithms, 605, 674–676associative containers. See associative containerscontainer adapters, 603containers, 602–603double-ended queue containers, 626–629exercises, 693function adapters, 606function objects, 605–606, 672–673input stream iterators, 665–668inserter iterators, 669–670iterators, 604–605
1349
STL (Standard Template Library)
Inde
x
25905bindex.qxd:WroxPro 2/20/08 5:57 PM Page 1349

STL (Standard Template Library) (continued)list containers. See list containers, STL/CLRmap containers. See map containers, STL/CLRmultimap containers, 664–665output stream iterators, 670–672overview of, 601–602queue containers. See queue containerssequence containers. See sequence containersstack containers, 649–651summary, 692–693vector containers. See vector containers
STL/CLR, 676–692associative containers, 685–692containers, 677overview of, 676–677sequence containers. See sequence containers,
STL/CLRstorage
class objects, in vector containers, 618–622handles, in vector containers, 678–680multiple strings, 173–174objects, in map containers, 652–654order data, 1205–1207Order IDs, 1201pointers, in vector containers, 624–626print data, 1069–1070reference class objects, 680–684temporary elements, 873–874values types, in list containers, 684–685
storage, duration and scope, 86–93automatic variables in, 89declarations, positioning variable, 89global variables, 89–92for multiple strings, 173–174overview, 86scope resolution operators, 91–92static variables, 93
strcat(), debugging programs and, 715–716strcpy(), 413strcpy(), compared with strcpy_s(), 714strcpy_s()
compared with strcpy(), 714as derived class, 511
stream input data incorrect, common bugs, 698stream iterators
input, 665–668output, 670–672
strings, 200–206accessing characters in, 156–160accessing/modifying, 476–480comparing, 480–484
comparing null-terminated strings, 204concatenating, 473–476copying null-terminated strings, 203–204creating string objects, 471–473handling, 168–169input, 169–171joining null-terminated strings, 201–203length of null-terminated strings, 200–201overloaded operators, 1024–1025overview, 200, 471programming with, 170–171searching, 484–489searching null-terminated strings, 204–206sorting words from text, 489–494
strings, C++/CLI, 224–233comparing, 229joining, 224–225modifying, 227–229overview, 224searching, 230–233working with, 225–227
strlen(), 413Stroustrup, Bjarne, 342structs, 332–340
accessing members of, 333defining, 332–333indirect member selection operators, 340initializing, 333pointers with, 338–340RECT, 338working with, 334–337
structure, C++/CLI. See functions, C++/CLIStructured Query Language. See SQL (Structured
Query Language)structures, 42–48. See also functions
automatically generated console programs, 47–48comments, 42declarations, 43–44header files, 43main () function, 44MFC programs, 771namespaces, 43–44#include directive, 43overview, 36–42statement blocks, 47statements, 44–46unions in, 419whitespace, 46–47Windows programs as, 750–751
submenus, Windows Forms applications,1219–1220
1350
STL (Standard Template Library) (continued)
25905bindex.qxd:WroxPro 2/20/08 5:57 PM Page 1350

sumarray()function, 284–285swap(), swapping contents of two vectors, 618switch statements, 131–134symbols
exporting from DLLs, 1109–1111importing into a program, 1109–1110
synonyms, for data types, 58syntactic errors, 697System, 833system menu, window elements, 745System::Collections, 833System::Collections::Generic, 590System::ComponentModel, 833System::Data, 833, 1266System::Data::DataColumn, 1266System::Data::DataRows, 1266System::Data::DataTable, 1266System::Diagnostics, 732System::Drawing, 833System::Drawing, 895System::Drawing::Brush, 1039System::Drawing::Color, 839, 899System::Drawing::Font, 1039–1040System::Drawing::FontStyle, 1039System::Drawing::Graphics, 899System::Drawing::Pens, 900–902System::Drawing::Rectangle, 903System::IO::Stream, 1081System::Object, 553, 554, 555System::Runtime::Serialization, 1079System::Runtime::Serialization::Formatte
rs::Binary, 1082, 1086System::Windows::Forms, 833, 1267System::Windows::Forms::Form class, 775
Ttab controls, adding to Windows Forms application,
1220–1222tab sequence controls, 1004TabControl controls
adding, 1220–1221working with multiple tables, 1302–1304
table adapters, 1266table joins
in relational database application, 1116SQL, 1118–1120
table viewsaccessing multiple views, 1150–1151switching, 1151–1154
tablesadding rows, 1186–1187customizing Orders Details table, 1173–1174in relational databases, 1114System::Data::DataTable namespace, 1266working with multiple, 1302–1304
template classes. See also STL (Standard TemplateLibrary)
CArray, 911–912CList, 913–918CMap, 918–919CTypedPtrList, 920–923overview of, 911
template libraries, C++/CLI. See STL/CLRtemplates, function, 296–299term() function, 305–306ternary operators, 130testing, dialog boxes, 988–990text
base and derived classes, 1026constructor for CText class, 1027–1028drawing text, 1028drawing text, in CLR, 1038implementing, 1027moving text objects, 1028, 1062–1064strings sorting words from text, 489–494text dialog, in CLR, 1042text elements, creating, 1028–1029text elements, for CLR controls, 1037text elements, for CLR text boxes, 1043text elements, for edit boxes, 1026–1027
text alignment, printing documents and, 1076text box controls
overview of, 1042–1043Windows Forms and, 831
Text Editorcreating MFC-based Windows programs, 785–786viewing variables in, 707
text elementsfor CLR controls, 1037for CLR text boxes, 1043creating, 1028–1029for edit boxes, 1026–1027
text menu item, adding to edit controls, 1025–1026TextElement class
creating, 1043defining, 1041
this pointer, 366–368throw statement, 289–291title bar icon, window elements, 745
1351
title bar icon
Inde
x
25905bindex.qxd:WroxPro 2/20/08 5:57 PM Page 1351
title bars, window elements, 745to main() function, 258–260, 275–276toolbar buttons
adding, 827–828, 992editing properties, 829–830exercising, 830for spin button control, 1002–1003
toolbarsoptions, 11–12as window element, 746
toolbars, CLR, 842–844Toolbox window
displaying, 1220Menus & Toolbars group, 1228standard dialog boxes, 1235–1236View menu, 836
ToolStrip controls, 842tooltips, 830ToString(), 384–385, 553trace
outputting trace information, 741switching debugging/tracing on/off, 735
Trace classes, C++/CLIoverview of, 732working with, 737–741
tracepoints, 702–703TraceSwitch, 735–736tracking handles, 207–209tracking references, 233transactionsCDatabase class, 1171–1172overview of, 1170
transform(), algorithms, 675–676transformations, coordinate system, 965–967TranslateMessage(), retrieving Windows
messages, 759–760tree controls, 988try blocks, 290–291type modifiers
const, 67–68defined, 54–55
type safe collectionsCArray template class, 911–912CList template class, 913–918CMap template class, 918–920overview of, 910–911
typed pointer collectionsCTypedPtrList template class, 921–923,
929–931overview of, 920
typed pointer list collections, 921–923creating sketch document with, 929–931functions, 921–923overview of, 921
typeid(), determining class type with, 1063types. See data types
Uunary predicates, 606unbound mode, DataGridView controls, see
DataGridView controls, in unbound modeunconditional branching, 134unhandled exceptions, 698Unicode codes, 1315unions
anonymous unions, 419in classes and structures, 419between variables, 417–419
unique(), deleting elements from a list, 634unmanaged C++, 3–5Update(), CRecordset update operations,
1168–1169update handlers
coding command update handler, 825–827exercising, 827updating user interface, 824–825
update messages, 816–817update mode, 1177–1178UPDATE_COMMAND_UI. See update handlersUpdateAllViews(), 935–937updating database operation. See databases, update
operationsuser interfaces. See also interfaces
class interface, 446–447GDI (Graphical Device Interface). See GDI (Graphical
Device Interface)GUI (graphical user interface), 744, 1217–1218message handlers for updating, 824–825
Vvalidation
input validation for Windows Forms, 1242–1244spin button control, 1006
value classesbase class for, 553types of, 98
value classes, C++/CLIdefining, 381–382
1352
title bars
25905bindex.qxd:WroxPro 2/20/08 5:57 PM Page 1352
overloading, 494–498working with, 383–384
value of terms C++/CLI, 325values
enumeration constants, 110ISO/ANSI C++, 56–57returning, 263–268variable, 58–60, 705–707
values, comparing, 117–134conditional operators, 130–131extended if statements, 122–124generally, 117–119if statements, 119–120logical operators and expressions, 126–129nested if statements, 120–122nested if-else statements, 124–126switch statements, 131–134unconditional branching, 134
values types, storing in a list, 684–685variable declarations
defined, 44, 50–51positioning, 89
variable numbers, of argumentsaccepting, 274–275defined, 260–262
variable valueschanging, 707inspecting, 705–707with specific sets of variables, 58–60
variablesassignment statements, 77–78Boolean type, 55casting, 76–79data types and. See data typesdeclaring, 50–51defined, 48–49explicit casts, 78–79exporting from DLLs, 1108floating-point numbers, 55–56initial values for, 51integer type, 52–53keywords, 50modifying, 71–72naming, 49old-style casts and, 79operands, rules for casting, 76–77sharing memory between, 417unions between, 417–419values, 58–60, 705–707
.vbx (Visual Basic Extension), 1095
vector containersaccessing elements in, 615–616capacity and size of, 611–615creating, 608–610inserting/deleting elements, 616–618sorting elements, 623–624storing class objects, 618–622storing pointers, 624–626
vector containers, STL/CLR, 678–680versions, of programs, 20–21View class, 851–852View menu, Toolbox window, 836viewport, coordinates and, 1009views
activation, 1154–1155updating multiple, 935–937
views, databasecreating, 1188–1193customer view class, 1158–1160dialogs for, 1134–1136multiple table views, 1150–1151record view class, adding, 1143–1147record view class, initializing, 1149–1150record view class, overview of, 1132–1134switching, 1151–1155
views, MFClinking documents and views in MFC, 781–782overview of, 780–781
virtual destructorscalling wrong destructor, 545–548how it works, 548–550overview of, 544, 544–545
virtual functionsabstract classes, 539–542exercises, 597–599incomplete class definitions, 538indirect base classes, 542–544overview of, 530–531pointers to class objects, 535–537polymorphism and, 535pure virtual functions, 538–539references with, 537–538summary, 596–597virtual destructors, 544–550what it is, 532–535working with inherited functions, 531–532
virtual functions, C++/CLI, 555virtual keyword, 532virtual machine environments, 2virtual mode, DataGridView controls, 1269
1353
virtual mode
Inde
x
25905bindex.qxd:WroxPro 2/20/08 5:57 PM Page 1353
visibility specifierscancel button and, 1180–1181for classes and interfaces, 565
Visual Basic Extension (.vbx), 1095Visual C++ 2008, overview, 1–34
applications, writing, 3–4attributes, 6CLR and, 2–3CLR console, 24–26console application files, 19console applications, 6–7debugging and releasing program versions, 20dockable toolbars, 12–13documentation, 13empty consoles, 21–23error handling, 23–24executing program versions, 20–21IDE for. See IDE (Integrated Development
Environment)introduction, 1learning about, 4–9MFC-based applications, 27–30.NET framework, 2options, setting, 26–27projects, 13–14solutions, 19source code, 17–19standards, 5–6summary, 33–34toolbar options, 11–12Win32 console applications, 14–19Windows applications, 27–30Windows Forms applications, 30–33Windows programming concepts and, 7–9
Wwatch, setting for variables, 705Watch windows, debugger, 707Web services, as data source, 1266WebBrowser control, 1226–1227WHERE clause, in SELECT statements, 1117while loops, 146–148whitespace, 46–47Win32 API, 1095Win32 console applications, 7, 14–19WINDCLASSEX structure, 753–755window caption, modifying, 1139–1140window class (CFrameWnd), MFC, 773WindowProc()
code for complete function, 767–768
decoding Windows messages, 764–765organization of Windows programs and, 769–770processing Windows messages, 763–764redrawing client area, 758redrawing client area for Windows programs,
765–766structure of Windows programs and, 750WindowProc(), 766
windows, in Windows OSscreating program windows, 756–757elements of, 744–746initializing program windows, 757–758structure for defining program windows, 753–755target windows for Windows messages, 1317–1318terminology regarding, 746
Windows APIcreating simple, 768–769drawing process, 847–848methods for creating interactive Windows
application, 744overview of, 747–748
Windows applicationsbasic classes, 783creating and executing, 27–30MDI (multiple document interface) application,
801–802MFC tools for creating, 784–785MFC-based, 786–790process of creating, 785–786SDI (single document interface) application,
creating, 786–790Windows applications, CLR-based
event handlers, implementing, 839–840menu items, adding event handlers for, 838–839menu items, setting checks, 840–842menus, adding, 836–838summary, 845toolbars, adding, 842–844
Windows applications, MFC-based, 786–790adding menus to, 811command messages, processing, 810–811completing the menu, 815creating, 785–786data members, adding to class definitions,
820–821data members, initializing new, 821–823handling messages, 810handling Windows messages, 805–806interactive, 744MDI applications, 801–802menu items, adding to Element menu, 814–815
1354
visibility specifiers
25905bindex.qxd:WroxPro 2/20/08 5:57 PM Page 1354

menu items, adding to menu bar, 813menu items, modifying existing, 815menu messages, classes for, 817menu messages, coding functions for, 820menu messages, creating functions for, 817–820menu messages, event handlers for, 816menu resources, creating and editing, 812message categories, 809–810message handler definitions, 807–809message handlers, coding update handler, 825–827message handlers, exercising update handler, 827message handlers, for updating user interface,
824–825message maps, 806–807running, 802, 823–824summary, 845toolbar buttons, adding, 827–828toolbar buttons, editing properties of, 829–830toolbar buttons, exercising, 830tools for creating, 784–785tooltips, adding, 830
Windows client area, 765–766. See also client areaWindows Forms Application template, 832Windows Forms applications, 1217–1264Button controls, 1224–1226buttons, click events, 1238–1239buttons, event handlers, 1253–1256Choose menu item, click events, 1260–1263Choose menu item, dealing with, 1257context menus, adding, 1228context menus, responding to, 1256–1257creating, 30–33dialog boxes, adding second, 1245–1248dialog boxes, creating, 1235–1236dialog boxes, getting data from, 1248–1251dialog boxes, using, 1240–1242dialog class, developing, 1258–1260dialog form, creating, 1257–1258dialog objects, creating, 1239–1240event handlers, creating, 1228–1229event handlers, for buttons, 1231–1235event handlers, for Limits menu, 1235,
1252–1253event handlers, for menu items, 1229–1230event handlers, for Play menu event, 1231–1235example, operation of, 1227–1228exercise creating, 775–777exercises, 1264GroupBox controls, using, 1222–1224GUI, creating, 1217–1218Help>About menu items, 1253
input controls, disabling, 1251input validation, 1242–1244ListBox controls, adding list to, 1237–1238ListBox objects, state of, 1239members, adding to Form1 class, 1230–1231methods for creating interactive Windows
application, 744operations in development of, 831–832outputting trace information from, 741overview of, 775, 832–834properties, 834–835Reset menu item, handling, 1245start-up, 835submenus, 1219–1220summary, 1263tab controls, adding, 1220–1222WebBrowser control, using, 1226–1227
Windows Forms, data source access, 1265–1305accessing/displaying data, 1267binding to individual controls, 1299–1302BindingNavigator component, 1296–1297BindingSource component, 1290–1296cell styles, dynamically setting, 1284–1289column formats, 1281–1283column headers, setting up, 1280–1281control, setting up, 1279–1280data, setting up, 1278–1279DataGridView controls, 1267–1269DataGridView controls, customizing, 1275–1277DataGridView controls, in bound mode, 1290DataGridView controls, in unbound mode,
1269–1275overview of, 1265rows, customizing alternate, 1283–1284summary, 1302–1304tables, working with multiple, 1302–1304updating database, 1297–1298working with data sources, 1266
Windows Forms, library for, 10Windows messages
message categories, 809–810MFC handling, 805–806, 810overview of, 747processing functions, 763–765queues, 758–761types of, 1317–1318
Windows programming, 743–778. See alsoWinMain()
concepts, 7–9data types, 748–749DLLs and, 1095
1355
Windows programming
Inde
x
25905bindex.qxd:WroxPro 2/20/08 5:57 PM Page 1355

Windows programming (continued)ending programs, 766–767event-driven programming and, 746message processing functions, 763–765message queues, 758–761messages, 747methods for creating interactive Windows
application, 744MFC for. See MFC (Microsoft Foundation Classes)notation, 749–750organization of Windows programs, 769–770overview of, 743program window, creating, 756–757program window, initializing, 757–758program window, specifying, 753–755structure of a Windows program, 750–751summary, 778Window client area, drawing, 765–766window elements, 744–746WindowProc(), 767–768Windows API, 747–748, 768–769Windows Forms and, 775–777Windows OS and, 746
Windows Sockets, MFC extension DLLs, 1101
WinMain()complete function assembled, 761–763messages, retrieving for program, 758–761organization of Windows programs and, 769–770overview of, 751–753program window, creating, 756–757program window, initializing, 757–758program window, specifying, 753–755structure of Windows programs and, 750
WM_COMMAND, Windows messages, 808WM_LBUTTONDOWN, Windows messages, 865WM_LBUTTONUP, Windows messages, 865, 891–892WM_MOUSEMOVE, Windows messages, 865, 885WM_MOUSEMOVE, Windows messages, 959–961WM_PAINT, Windows messages, 848WM_RBUTTONDOWN, Windows messages, 963WndProc(), handling Windows message, 747Write(), generating debugging output, 732–733WriteLine(), generating debugging output,
732–733write-only properties, 390
XXML serialization, 1078
1356
Windows programming (continued)
25905bindex.qxd:WroxPro 2/20/08 5:57 PM Page 1356

Get more fromWrox.
Available wherever books are sold or visit wrox.com
978-0-470-18757-9 978-0-470-19137-8 978-0-470-19136-1
Gorroffr
teetGmoom
ommorWWr
erreoorxooxrroorroffr moom rWWr .xooxrro
9-75781-074-0-879 9 -879 879 8-73191-074-0- 8731910740 1-63191-074-0-879
obreverehwelbaliavAAv oc.xorwtisivrodloseraskoo mo
25905badvert.qxd:WroxPro 2/20/08 6:02 PM Page 1357

Take your library wherever you go.Now you can access more than 200 complete Wrox booksonline, wherever you happen to be! Every diagram, description,screen capture, and code sample is available with your subscription to the Wrox Reference Library. For answers when and where you need them, go to wrox.books24x7.com andsubscribe today!
Programmer to ProgrammerTM
• ASP.NET • C#/C++ • Database • General • Java• Mac• Microsoft Office
• .NET • Open Source • PHP/MySQL • SQL Server • Visual Basic • Web• XML
Find books on
www.wrox.com
25905badvert.qxd:WroxPro 2/20/08 6:02 PM Page 1358