IT-Pro-Manual.pdf - cloudfront.net
354
-
Upload
khangminh22 -
Category
Documents
-
view
0 -
download
0
Transcript of IT-Pro-Manual.pdf - cloudfront.net


TABLE OF CONTENTS
Introduction
Section 1 Communications Section 2 Network Analysis Section 3 Portable Applications Section 4 Service & Support Section 5 Security Section 6 Reference & Education Section 7 Games Section 8 Minimum Install Section 9 Attack & Recovery

1 © 2007 Institute for Network Professionals ITProUSB - Introduction
IITT PPrrooffeessssiioonnaallss TToooollbbooxx The Ultimate USB
INTRODUCTION
Overview
The reason for this combination training course and pre-installed software on a USB thumb drive was to meet the needs of IT Professionals. The developers are also involved in the IT profession and had a personal need for these tools.
How many times have you been asked to “just take a look” at someone’s misbehaving computer?
Have you ever been on the road without your laptop and needed access to your calendar, address book or email?
Have you ever started the task of preparing a new computer and just didn’t have the bandwidth to download all the ‘minimum installation files’ you normally put onto a computer?
Were you ever in a position of trying to explain the reasons for strong passwords and increased security, but no one seemed to listen?
Well, you are in luck! You have come to the right place to help make your life as an IT Professional much easier—and have a lot of fun while doing it.
Your IT Professionals Toolbox Ultimate USB drive has been specially formulated and rigorously tested in a variety of environments to provide you with the portable tools, software, and data synchronization you need to help simplify and streamline your life.
Unlike our counterparts in days past, who had very large heavy tools to lug around, you can easily carry your ‘Toolbox’ on a lightweight and fast USB thumb drive.
We have attempted to get you a set of tools and software to help you in your various activities as an IT Professional. This is by no means a ‘final’ set. We will be continually improving and adding to this compilation; you should too. Feel free to add your favorite tools and installers—anything to make your like easier.
If you have time, please send us information on your additions and changes. We would love to hear what software you rely on to make your life, as an IT Professional, easier—[email protected].
How to Use This Course/Software/USB Drive
Out on the Internet one can find just about anything, including sets of software bundles loaded with a huge array of useful and useless stuff. One of the problems of having a lot of cool and useful software is sorting through the massive amounts of potential solutions to find the application you really need. Additionally, after you’ve found what you want, how do you go about learning to use it?
2 © 2007 Institute for Network Professionals ITProUSB - Introduction
For this reason we have developed this course, not only as a way for you to obtain some of the very best tools available, but to provide multiple ways of learning how to use them.
For each of the tools, or compilations of tools, we’ve provided you with the following ways to learn:
1. A printed consistent, simple, short description of the product, the ‘Why, When, and Where’ questions on using this tool in helping you in your professional or support role. This also includes where you might head next to continue your learning.
2. A printed set of Lab Exercises designed to teach you the ‘How’ of using the tools, such as: configuration, implementation, and generally walking you through the tool’s feature sets, showing you step by step how to do some simple exercises. We believe in the PhD approach to Lab Exercises—Push Here Dummy—because they can consistently provide real results and give learners the opportunity to bravely “branch out.”
Many of these tools are very complex and have entire books written on the ins and outs of using the sophisticated software. We won’t be going into that level of depth, but we will dig far enough in for you to get your hands dirty.
In addition to this specific training on your Ultimate USB, your student kit includes these additional full training programs:
• Laura Chappell Podbooks (PDFs) from the Protocol Analysis Institute
In these seven (7) books you'll find 1200 pages of detailed training as packet analysis expert Laura Chappell leads you through key aspects and tools for network protocol analysis.
• Introduction to Network Analysis • Advanced Network Analysis • Packet Filtering: Catching the Cool Packets • TCP/IP Analysis and Troubleshooting • White Hat Toolbox - Volume 1 • White Hat Toolbox - Volume 2 • Onsite! Case Studies - Volume 1
• Keith Parsons Course: Introduction to Wireless Networks
This introductory course covers the basics for designing and implementing Wireless Local Area Networks (WLAN). It clears up some of the mistaken notions concerning RF and Wireless LANs; it covers Site Surveys, WLAN troubleshooting and Wireless LAN security. WLAN security is currently a very hot topic so Keith looks at various WLAN security options and their effectiveness.
There are eight modules, totaling 3 hours, 26 minutes.
• Radio Frequency Fundamentals • Decibel Math • Antenna Fundamentals • Wireless LAN Fundamentals • Site Survey • Wireless LAN Troubleshooting • Wireless LAN Security • Wireless Cellular Data

3 © 2007 Institute for Network Professionals ITProUSB - Introduction
Software Licensing
We have worked with a variety of software vendors to pull together this special IT Professionals Toolbox. Many of the software licenses are of the Open Source, Freeware and Shareware variety. But a few of the great tools at your disposal have been purchased and licensed for YOU exclusively.
Please DO NOT share this set of software with others! We have also included a DVD with all the software installation files, a backup copy of the Ultimate USB stick as well as many supporting documents and training. This includes many copyrights—we trust you to NOT break this confidence. If you have friends or co-workers who want to have a similar tool, they will have to purchase one directly.
Thank you for your understanding and cooperation.
Tripping Anti-Virus Alarms
This set of Professional tools includes many examples of software that have been classified as ‘Hacker Tools’ and sometime trip Anti-Virus alarms, depending on the specific A/V on the target machine.
If your specific situation has the Ultimate USB continually tripping the A/V alarms, these are NOT viruses. If it bothers you, just delete the offending files. You always have a backup copy on the student DVD.
The ‘Attack’ Stick
We have also included in your IT Professionals Toolbox a separate USB stick built on the USB Switchblade platform. This tool is designed as a helpful aid in doing Penetration Tests.
What is the difference between doing a Penetration Test and Hacking?
PermissionPermissionPermissionPermission!!!!
With a penetration test you have tacit permission from the computer’s owner to attempt to penetrate the security for testing purposes.
The exact same techniques and software can be used without permission for hacking, however, this is illegal.
You have with this Attack Stick, tools to automatically retrieve personal and potentially harmful information from your target devices.
USE WITH CAUTIONUSE WITH CAUTIONUSE WITH CAUTIONUSE WITH CAUTION!!!!
USE ONLY WITH PERMISSIONUSE ONLY WITH PERMISSIONUSE ONLY WITH PERMISSIONUSE ONLY WITH PERMISSION!!!!
A Day in the Life of an IT Professional
Going to Work
On your way into the office you stop by a coffee shop to have your breakfast and check a couple of things on the Internet. Knowing the Public WiFi is insecure, your surf the net anonymously, knowing your private information (such as sites you have visited, passwords, etc.) are secure.
At the Office
Arriving at the office you are tasked with building a new laptop for the boss, using your Ultimate USB you quickly load all the ‘minimum’ software and prepare the machine in record time.

4 © 2007 Institute for Network Professionals ITProUSB - Introduction
Late that day while giving a presentation to the IT staff you are able to show with the ‘Attack Stick’ certain vulnerabilities on your current laptop image. After demonstrating to the staff, as a group you come up with a new more secure strategy for your office computers.
Impressed with your presentation, your manager asks if you can do a specific penetration test against a new network design in the lab before it rolls out to production. Again, with just your IT Professionals Toolbox Ultimate USB you perform both network and host penetration tests to validate your security design.
At Home
You are asked by your spouse to make sure the kids computer is running as fast as it should (the kids have been complaining the internet is slow…). You just insert your Ultimate USB and run a variety of tests and tools to find if anything is out of place, and fix anything that might need a little ‘tweaking.’ The spouse is happy, the kids are happy, and you can get back to your own activites.
Friends and Family
Like many other weekends and evenings, you’ve been invited over to your ‘Aunt Betty’s’ house to help ‘fix’ her computer. Because you have your IT Professionals Toolbox Ultimate USB with you, you just stop by on the way home, instead of a having to make a special trip home to get your case of DVDs and CDs.
Using the tools in the Service & Support section on your Ultimate USB, you can quickly check Anti-Virus, Spyware, and Registry systems to be sure her computer is ready to go.
Away
While on a business trip you stop by an Internet Café to work through some tasks. In addition to the anonymous surfing and emailing, using your Ultimate USB, you’ll have access to your email, calendar, tasks, and address book, as well as a copy of your ‘My Documents’ folder you’ve previously synced to your Ultimate USB.
—
Later on, you realize how much better your life has been since you learned how to use your IT Professionals Toolbox Ultimate USB!
Section Software List
Note: Final list of software included is subject to change. © 2007 Institute for Network Professionals 1 ITPro Section Software List - 1
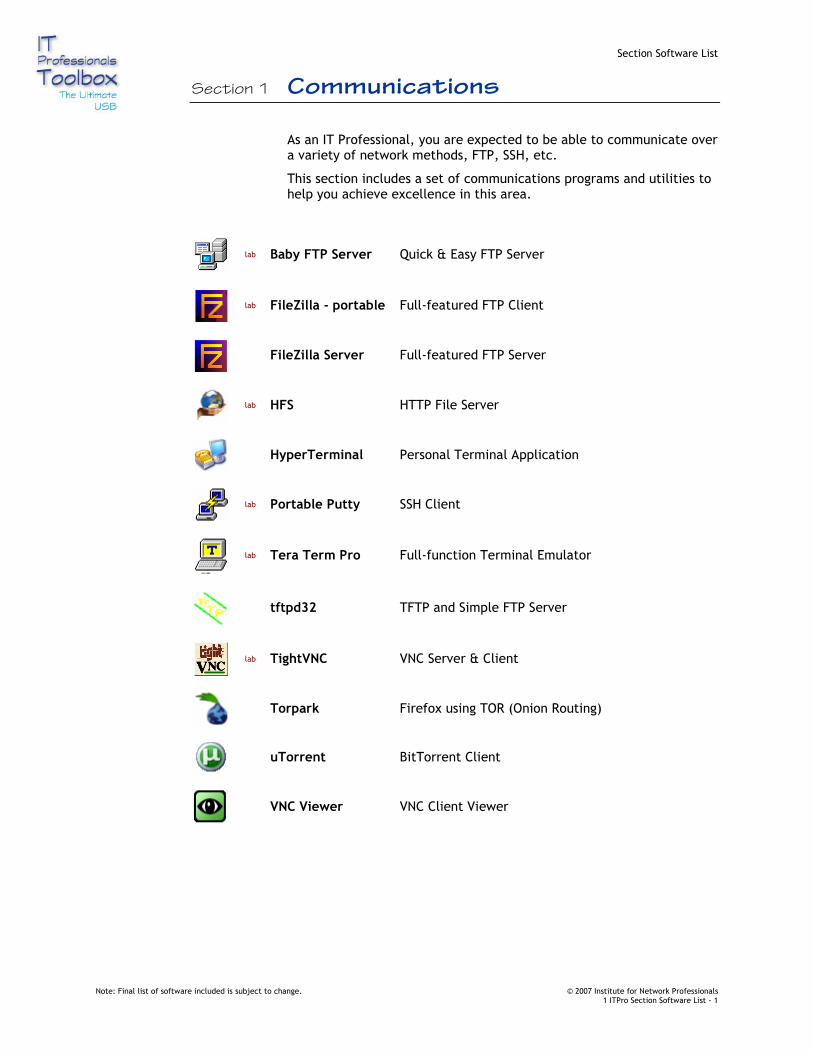
Section 1 Communications
As an IT Professional, you are expected to be able to communicate over a variety of network methods, FTP, SSH, etc.
This section includes a set of communications programs and utilities to help you achieve excellence in this area.
lab Baby FTP Server Quick & Easy FTP Server
lab FileZilla - portable Full-featured FTP Client
FileZilla Server Full-featured FTP Server
lab HFS HTTP File Server
HyperTerminal Personal Terminal Application
lab Portable Putty SSH Client
lab Tera Term Pro Full-function Terminal Emulator
tftpd32 TFTP and Simple FTP Server
lab TightVNC VNC Server & Client
Torpark Firefox using TOR (Onion Routing)
uTorrent BitTorrent Client
VNC Viewer VNC Client Viewer

Section Software List
Note: Final list of software included is subject to change. © 2007 Institute for Network Professionals 1 ITPro Section Software List - 1
Category: COMMUNICATIONS
© 2007 Institute for Network Professionals 1a ITProUSB - 1 - Network Analysis - v1.2 www.inpnet.org • www.HOTLabs.org 1 4/26/2007
Section 1 – COMMUNICATIONS Table of Contents
Baby FTP Server ...........................................................3
FileZilla .....................................................................7
HFS (Http File Server)................................................... 11
HyperTerminal ........................................................... 17
PuTTY ..................................................................... 19
Tera Term Pro ........................................................... 23
Tftpd32 ................................................................... 27
TightVNC Client/Server (VNCViewer)................................. 29
uTorrent .................................................................. 33
VNC Viewer............................................................... 35

Category: COMMUNICATIONS
© 2007 Institute for Network Professionals 1a ITProUSB - 1 - Network Analysis - v1.2 www.inpnet.org • www.HOTLabs.org 2 4/26/2007

Category: COMMUNICATIONS
© 2007 Institute for Network Professionals 1a ITProUSB - 1 - Network Analysis - v1.2 www.inpnet.org • www.HOTLabs.org 3 4/26/2007
Baby FTP Server
Baby FTP Server by Pablo Software Solutions is an anonymous only FTP server that allows for simple setup and simple transfers.
Product Information
Source
Pablo Software Solutions
Open Source
Free
www.pablosoftwaresolutions.com
Where, When, Why
Communication—Light Weight FTP Server
Transferring files is part of an IT Professionals life, whether it’s to get pictures to someone, passing off documents, service packs, drivers, or providing a mirror for an Open Source project. Using the Baby FTP Server, less is often times enough for the job. Point the FTP server to a directory, set permissions, and let people log in!
Usage and Features
• Easy setup, anonymous only, so no user accounts or passwords to worry about
• Allows you to independently toggle uploading, renaming files, deleting files, downloading files, and creating new folders.
Requirements / Dependencies
• 32-bit compatible Windows (95/NT/98/Me/2000/XP/2003/Vista)
• TCP/IP
Where to Go for More Information
• www.pablosoftwaresolutions.com
Category: COMMUNICATIONS
© 2007 Institute for Network Professionals 1a ITProUSB - 1 - Network Analysis - v1.2 www.inpnet.org • www.HOTLabs.org 4 4/26/2007
Lab: Using Baby FTP Server
What you will do in this lab:
• Configure a simple FTP Server
• Browse the FTP server using an FTP Client (FileZillaFileZillaFileZillaFileZilla) • Transfer files back and forth
Lab Part 1
In this lab you will be configuring a very simple FTP server for anonymous access, and using an FTP client to transfer files back and forth.
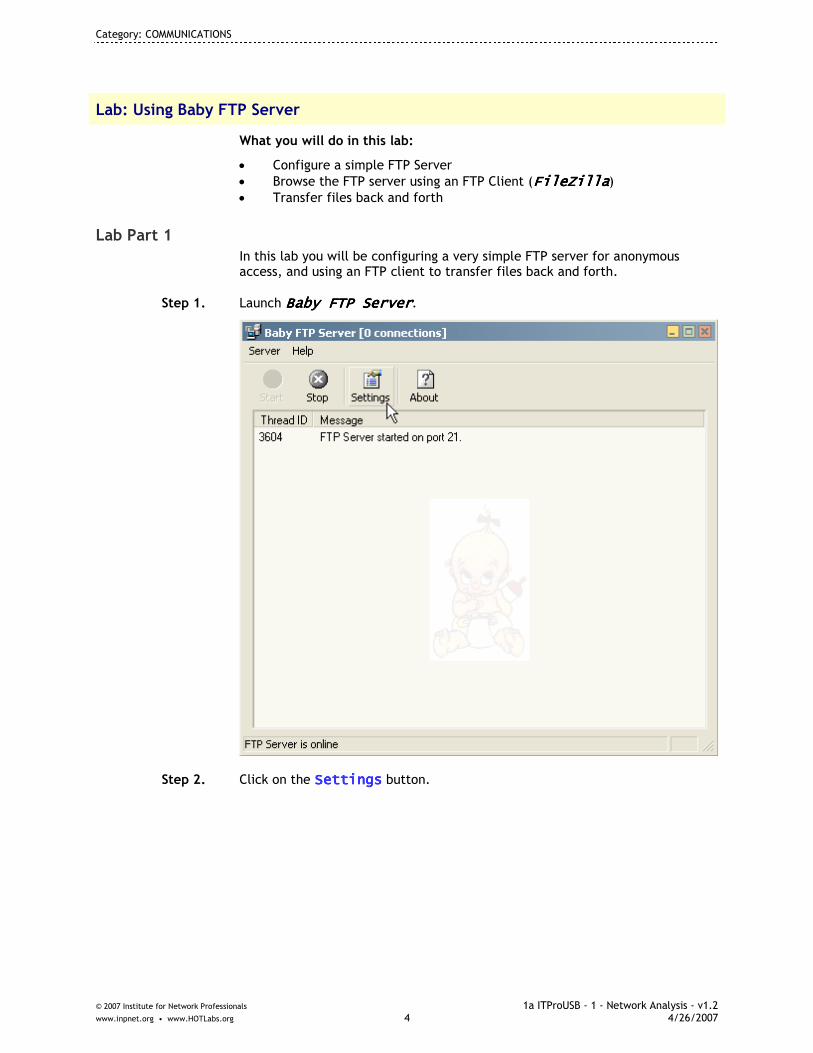
Step 1. Launch Baby FTP SBaby FTP SBaby FTP SBaby FTP Servererverervererver.
Step 2. Click on the SettingsSettingsSettingsSettings button.

Category: COMMUNICATIONS
© 2007 Institute for Network Professionals 1a ITProUSB - 1 - Network Analysis - v1.2 www.inpnet.org • www.HOTLabs.org 5 4/26/2007
Step 3. Choose the existing directory to use for your FTP Server by clicking on the ‘........’ button. Put check marks in all of the ‘Allow’ options. Click on OKOKOKOK to confirm the changes.
NOTE: In this example, the Baby FTP ServeBaby FTP ServeBaby FTP ServeBaby FTP Server r r r folder is being used as the home directory.
Step 4. Now that the server is set up, launch FileZillaFileZillaFileZillaFileZilla.
Step 5. In FileZillFileZillFileZillFileZilla a a a you will want to connect to the Baby FTP ServerBaby FTP ServerBaby FTP ServerBaby FTP Server. If you have a partner for this lab, use their IP address, otherwise connect to your own system using ‘localhostlocalhostlocalhostlocalhost’ as the hostname. Click QuickconnectQuickconnectQuickconnectQuickconnect when the address is in place. Since this is an anonymous FTP, the password doesn’t matter.
Step 6. Create an Upload folder by right clickingright clickingright clickingright clicking on the FTP Server’s pane (left side), and clicking on Create DirectoCreate DirectoCreate DirectoCreate Directoryryryry. In this example the directory is ‘UploadUploadUploadUpload’. Click OKOKOKOK after entering the name.
Now you’ll see the UploadUploadUploadUpload folder in the directory list. Double click on UploadUploadUploadUpload to enter that folder. Find a file on your local system on the left hand side to add to the queue. Add the file to the upload queue by right right right right clickingclickingclickingclicking the file or folder and selecting Add to QueueAdd to QueueAdd to QueueAdd to Queue. Now that there is something in the queue, click on the Process QueueProcess QueueProcess QueueProcess Queue button (Q with a red arrow underneath).

Category: COMMUNICATIONS
© 2007 Institute for Network Professionals 1a ITProUSB - 1 - Network Analysis - v1.2 www.inpnet.org • www.HOTLabs.org 6 4/26/2007
Step 7. Click on the .. folder.. folder.. folder.. folder in the remote site pane. Look for a text file, like readme.txtreadme.txtreadme.txtreadme.txt. Right clickRight clickRight clickRight click on the text file and click on View/EditView/EditView/EditView/Edit. Congratulations, you’ve downloaded a file from the Baby FTP ServerBaby FTP ServerBaby FTP ServerBaby FTP Server.
Step 8. Close the FTP service.
What you learned in this Lab:
In this Lab you learned to use Product to:
1. Configure a simple FTP Server
2. Browse the FTP server using an FTP Client (FileZilla)
3. Transfer files back and forth
Category: COMMUNICATIONS
© 2007 Institute for Network Professionals 1a ITProUSB - 1 - Network Analysis - v1.2 www.inpnet.org • www.HOTLabs.org 7 4/26/2007
FileZilla
FileZilla is an industry leading file transfer application supporting FTP, SFTP over SSH, and supports TLS and SSL with regular FTP transactions for enhanced security. FileZilla allows for site management, credential storage, speed throttling, proxies, and a number of other interesting features.
Hosted by SourceForge, FileZilla has a large userbase and strong cooperative community. Support open source applications and start using FileZilla today.
Product Information
Source
Tim Kosse
Open Source
Free
filezilla.sourceforge.net
Where, When, Why
Communication — FTP Client
Have you ever had a need to send or receive a file? Chances are you probably have access to an FTP server somewhere. This application can allow you, Joe IT, to easily manage your files on an FTP or SFTP (over SSH) server. Allowing drag-n-drop functionality, intelligent queuing, pause and resume, and multiple simultaneous connections, getting or sending your files couldn’t get much easier.
Usage and Features
• Open Source software, which means a lot of people have scrutinized the security of the code
• FTP and SFTP over SSH server support, including other security measures such as GSS, TLS, and SSL
• Simultaneous connections for maximizing bandwidth
• Speed throttling for incoming and outbound connections
• Site management (so you don’t have to always remember your passwords)
• And much more!
Requirements / Dependencies
• Minimal hardware requirements
• Windows NT/2000/XP/2003/Vista (and Windows 95 with Winsock2)
Where to Go for More Information
• http://filezilla.sourceforge.net/documentation/
• http://filezilla.sourceforge.net/forum/
• http://filezilla-project.org/wiki
Category: COMMUNICATIONS
© 2007 Institute for Network Professionals 1a ITProUSB - 1 - Network Analysis - v1.2 www.inpnet.org • www.HOTLabs.org 8 4/26/2007
Lab: Using FileZilla
What you will do in this lab:
• Create a new site profile in your Site Manager
• Connect to an FTP server
• Transfer files from the FTP server to your USB drive
Lab Part 1
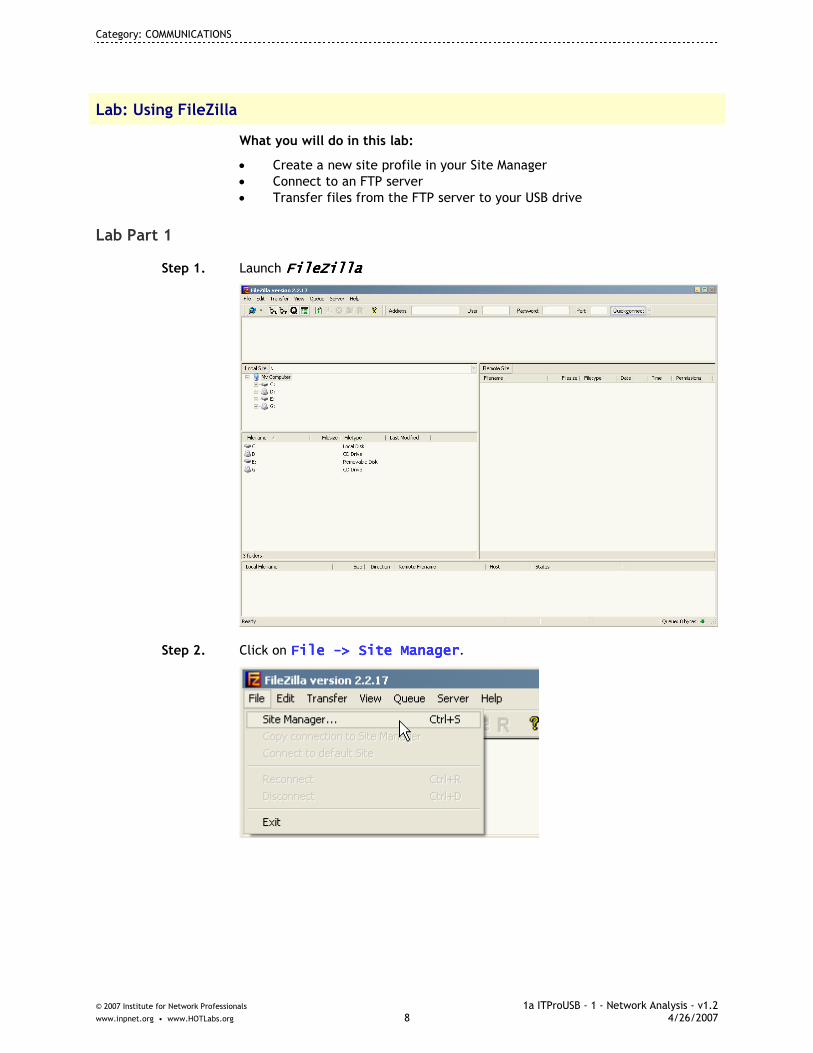
Step 1. Launch FileZillaFileZillaFileZillaFileZilla
Step 2. Click on File File File File ----> Site Manager> Site Manager> Site Manager> Site Manager.

Category: COMMUNICATIONS
© 2007 Institute for Network Professionals 1a ITProUSB - 1 - Network Analysis - v1.2 www.inpnet.org • www.HOTLabs.org 9 4/26/2007
Step 3. Click on New SiteNew SiteNew SiteNew Site.
Step 4. Give the site a name, for example: samsamsamsample ftp serverple ftp serverple ftp serverple ftp server
And fill in the other important information, such as Host, Servicetype, Logontype, User, and Password. In this example we are using the following information:
• Host: hotlabs.orghotlabs.orghotlabs.orghotlabs.org • Port: 21212121 • Servertype: FTPFTPFTPFTP • Logontype: NormalNormalNormalNormal • User: itproitproitproitpro • Password: itproitproitproitpro
Step 5. Click connecconnecconnecconnect t t t to connect to your sample server.

Category: COMMUNICATIONS
© 2007 Institute for Network Professionals 1a ITProUSB - 1 - Network Analysis - v1.2 www.inpnet.org • www.HOTLabs.org 10 4/26/2007
Step 6. Once you’ve connected to your server of choice, transferring files back and forth is as easy as dragging and dropping the files from the source to their destination. You’ll see we’ve provided some PDF files (that are already included on your USB drive) as examples. Feel free to transfer them from the remote server to your local drive.
(Note: writing to the FTP server is disabled)
Step 7. Close the FTP Client software.
What you learned in this Lab:
In this Lab you learned to use FileZilla to:
1. Create FTP sites using the site manager.
2. Connect to a configured FTP server.
3. Transfer files from the FTP server.
Category: COMMUNICATIONS
© 2007 Institute for Network Professionals 1a ITProUSB - 1 - Network Analysis - v1.2 www.inpnet.org • www.HOTLabs.org 11 4/26/2007
HFS (Http File Server)
HFS is an Open Source HTTP based File Server that quickly and easily allows you to receive and share files with others when all they have (or can use) is a web browser. It provides virtual folders, bandwidth control, HTML Template support (so your HFS configuration can suit your taste), logging, access control, and more!
Product Information
Source
Massimo Melina
Open Source
Free
www.rejetto.com/hfs
Where, When, Why
Communication — HTTP File Server
So, you’ve been asked to send someone a file through e-mail, but their spam filters keep deleting your attachment because it’s “potentially harmful”. Alternatively, all you have is an FTP site and your Grandmother, bless her heart, doesn’t know how to use FileZilla. Don’t worry—you have HFS, an easy way to make sure that other person gets or sends what they need to. Fire up HFS, create a new user, a virtual folder, give them your HFS web address, and let the transferring begin!
Usage and Features
• HTTP 1.1 (web) based file transfers
• Account management
• Virtual folders
• Only requires a web browser for downloading and uploading files
Requirements / Dependencies
• Some type of network access (local or internet, based on where the receiver is)
• In the case of a computer behind firewalls or NAT, port forwarding must be enabled for the HFS service (default port 80)
• Windows NT/2000/XP/2003/Vista
Where to Go for More Information
• http://www.rejetto.com/hfs/?f=support
• http://www.rejetto.com/hfs/

Category: COMMUNICATIONS
© 2007 Institute for Network Professionals 1a ITProUSB - 1 - Network Analysis - v1.2 www.inpnet.org • www.HOTLabs.org 12 4/26/2007
Lab: Using HFS
What you will do in this lab:
• Configure HFS to serve a folder over HTTP
• Browse the HFS server using your Web Browser
• Open a file
Lab Part 1
We’ll be starting HFS, creating a user, creating a virtual folder from your USB drive, and browsing the contents.
Step 1. Launch HFSHFSHFSHFS.
Step 2. Click on Menu Menu Menu Menu ----> Add folder from disk> Add folder from disk> Add folder from disk> Add folder from disk.

Category: COMMUNICATIONS
© 2007 Institute for Network Professionals 1a ITProUSB - 1 - Network Analysis - v1.2 www.inpnet.org • www.HOTLabs.org 13 4/26/2007
Step 3. Browse to the USB DriveUSB DriveUSB DriveUSB Drive, and find the Reference and EducationReference and EducationReference and EducationReference and Education folder. Click on the Reference and EducationReference and EducationReference and EducationReference and Education folder, then click OKOKOKOK.
Step 4. You’re given the option to assign this folder a type, either Real foldReal foldReal foldReal foldeeeer r r r or Virtual folderVirtual folderVirtual folderVirtual folder. Choose R R R Real foldeeal foldeeal foldeeal folder r r r for this exercise.
The differences between the two are that a Real folder links to a directory and reflects the current contents while a Virtual folder generates an index of files in that folder at the time of creation and will only change when changes are made through HFS.
Category: COMMUNICATIONS
© 2007 Institute for Network Professionals 1a ITProUSB - 1 - Network Analysis - v1.2 www.inpnet.org • www.HOTLabs.org 14 4/26/2007
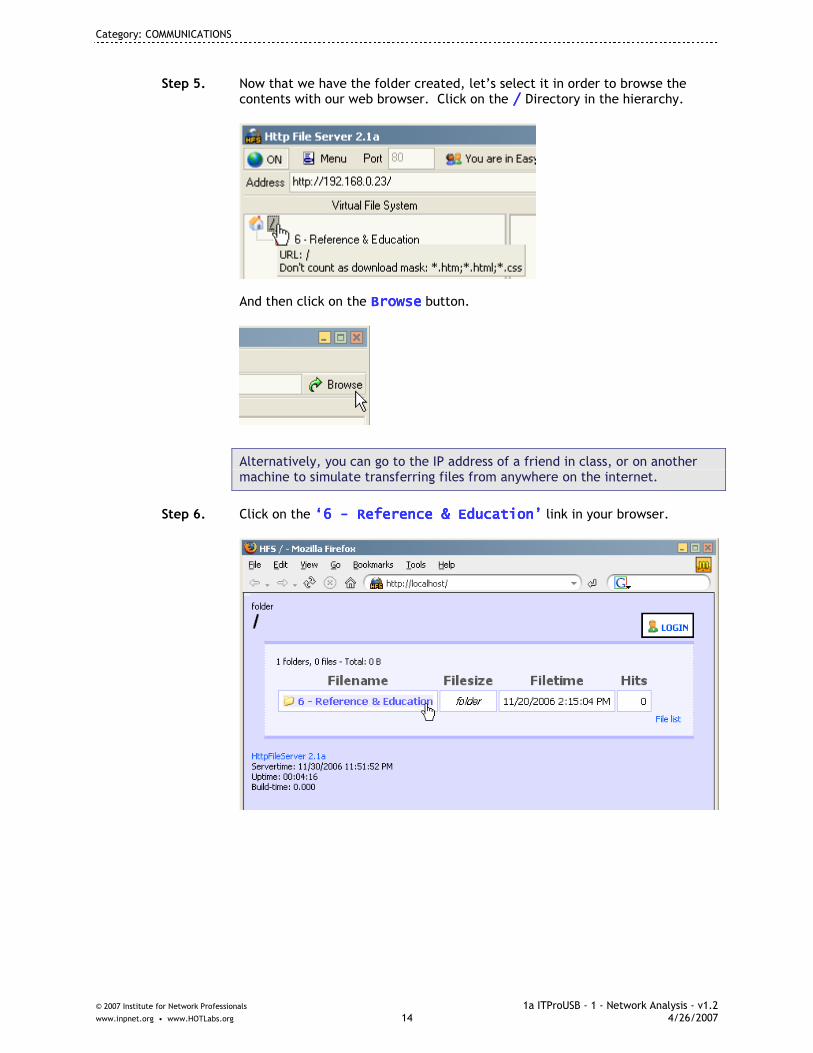
Step 5. Now that we have the folder created, let’s select it in order to browse the contents with our web browser. Click on the //// Directory in the hierarchy.
And then click on the BrowseBrowseBrowseBrowse button.
Alternatively, you can go to the IP address of a friend in class, or on another machine to simulate transferring files from anywhere on the internet.
Step 6. Click on the ‘6 ‘6 ‘6 ‘6 ---- Reference & Education’ Reference & Education’ Reference & Education’ Reference & Education’ link in your browser.

Category: COMMUNICATIONS
© 2007 Institute for Network Professionals 1a ITProUSB - 1 - Network Analysis - v1.2 www.inpnet.org • www.HOTLabs.org 15 4/26/2007
Step 7. Find the ‘Ethernet Reference Chart‘Ethernet Reference Chart‘Ethernet Reference Chart‘Ethernet Reference Chart.jpg’.jpg’.jpg’.jpg’ file and click on itclick on itclick on itclick on it.
Step 8. View the file.
Step 9. Close HFS
What you learned in this Lab:
In this Lab you learned to use HFS to:
1. Configure directories and files serve over HTTP
2. Browse HFS Folders
3. Download files using your Web Browser and HFS

Category: COMMUNICATIONS
© 2007 Institute for Network Professionals 1a ITProUSB - 1 - Network Analysis - v1.2 www.inpnet.org • www.HOTLabs.org 16 4/26/2007

Category: COMMUNICATIONS
© 2007 Institute for Network Professionals 1a ITProUSB - 1 - Network Analysis - v1.2 www.inpnet.org • www.HOTLabs.org 17 4/26/2007
HyperTerminal
HyperTerminal Private Edition is a more powerful version of HyperTerminal, which comes in Windows 95, Windows 98, and NT 4.0.
Product Information
Source
HyperTerminal
Freeware
Hilgrave, Inc.
http://www.uvnc.com
Where, When, Why
Communications
You need to open a terminal emulation session to log into a UNIX or VMS host.
Usage and Features
• Define key macros, save keystrokes, or adapt to host systems that require special keys or command sequences.
• Assign passwords, user ID's and host commands to a single key.
• Select terminal screen size and colors to take advantage of host systems that let you adjust the number or rows and columns displayed.
• Set the program to automatically exit after you log out.
• Use pass-through printing to allow host systems to print directly to the users printer.
• TCP/IP support for accessing telnet sites on the Internet.
• Auto-redial busy telephone numbers.
• Conduct multiple simultaneous telnet sessions.
• Set HTPE as your default telnet client.
• VT-220 terminal emulation
• Corrects the video driver problems introduced by Microsoft Internet Explorer 5.0
• Supports VT320 terminal emulation, which is used by many businesses for access to applications running on UNIX and VMS host computers.
• Enhanced printing control for customers allows users to print through Windows’ print driver or directly to the printer.
Requirements / Dependencies
Supported Operating Systems:
• Windows 95/NT/ME/NT/2000
Where to Go for More Information
• http://www.hilgraeve.com/htpe

Category: COMMUNICATIONS
© 2007 Institute for Network Professionals 1a ITProUSB - 1 - Network Analysis - v1.2 www.inpnet.org • www.HOTLabs.org 18 4/26/2007
Category: COMMUNICATIONS
© 2007 Institute for Network Professionals 1a ITProUSB - 1 - Network Analysis - v1.2 www.inpnet.org • www.HOTLabs.org 19 4/26/2007
PuTTY
PuTTY is a free implementation of Telnet and SSH for Windows 32bit and Unix platforms. It can also be used as an xterm terminal emulator. This is a vital application that can be used for remote administration through a console and for securing inherently insecure applications by tunneling them through SSH.
Product Information
Source
Simon Tatham
Open Source (MIT License)
Free
http://www.chiark.greenend.org.uk/~sgtatham/putty/
Where, When, Why
Communication — SSH/Telnet/rlogin/Raw client and xterm emulator
Oh no! That latest package upgrade has caused a service to stop, and you’re not at the office? Don’t fret, PuTTY can get you to a terminal to restart processes, edit configuration files, or even reboot the server if absolutely necessary. As long as you’re comfortable with a command line, this is heaven—an extremely light weight remote access solution.
Usage and Features
• SSH-1, SSH-2, Telnet, Rlogin, and Raw connection types
• Public Key authentication
• Tunneled connections to help make insecure applications secure; similar to the Chunnel in that cars aren’t submarines
• And much more
Requirements / Dependencies
• Windows NT/95/98/2000/XP/2003/Vista or some Unix type OS
• TCP/IP and some type of network
Where to Go for More Information
• http://www.chiark.greenend.org.uk/~sgtatham/putty/books
• http://en.wikipedia.org/wiki/PuTTY

Category: COMMUNICATIONS
© 2007 Institute for Network Professionals 1a ITProUSB - 1 - Network Analysis - v1.2 www.inpnet.org • www.HOTLabs.org 20 4/26/2007
Lab: Using PuTTY
What you will do in this lab:
• Create a saved session
• Initiate and establish a secure connection with a remote SSH server
• Authenticate your session with keyboard responses
Lab Part 1
In this lab we will connect to an SSH enabled Linux server with an account created for this lab. We do not offer a real shell account because that could get messy. Instead we’ve replaced your shell with a simple BASH script that won’t tempt you to break anything.
“Lead me not into temptation; I can find my own way.”
—Plagiarized enough to be in the public domain?
Step 1. Launch PuTTYPuTTYPuTTYPuTTY.
Step 2. Use these values to connect to our server.
• Host Name: hotlabs.orghotlabs.orghotlabs.orghotlabs.org • Port: 22222222 • Protocol: SSHSSHSSHSSH • Saved Sessions: hotlabs.orghotlabs.orghotlabs.orghotlabs.org

Category: COMMUNICATIONS
© 2007 Institute for Network Professionals 1a ITProUSB - 1 - Network Analysis - v1.2 www.inpnet.org • www.HOTLabs.org 21 4/26/2007
Step 3. Click SaveSaveSaveSave to save this session for future use.
Step 4. Now that the session has been saved, it can be selected at any time to connect to that server. Since the information should still be in your client, click on OpenOpenOpenOpen to initiate a connection with the server.
Step 5. The first time you connect to an unknown server, a warning will be displayed asking you to confirm the RSA2 key fingerprint. The fingerprint for our server is shown in the graphic below. Click on YesYesYesYes to save the host key in your known hosts database, or NoNoNoNo to continue without keeping the key on file.
Note: If you notice that the key fingerprint is different than what is expected, WATCH OUT—the server you are communicating with could be malicious. Verify the new key with the owner of the server in question before accepting. Faking an IP address or host name is easy, but brute-forcing a strong key set—not so much.
Step 6. Once connected, credentials are needed to login to the server. Since we’re not troubling with Public Key based authentication, in this exercise you will need to enter the following information:
• login as: itproitproitproitpro • Password: itproitproitproitpro
Note: As an added security bonus, your password will not echo back to the screen, thereby avoiding giving away the number of characters used.
Category: COMMUNICATIONS
© 2007 Institute for Network Professionals 1a ITProUSB - 1 - Network Analysis - v1.2 www.inpnet.org • www.HOTLabs.org 22 4/26/2007
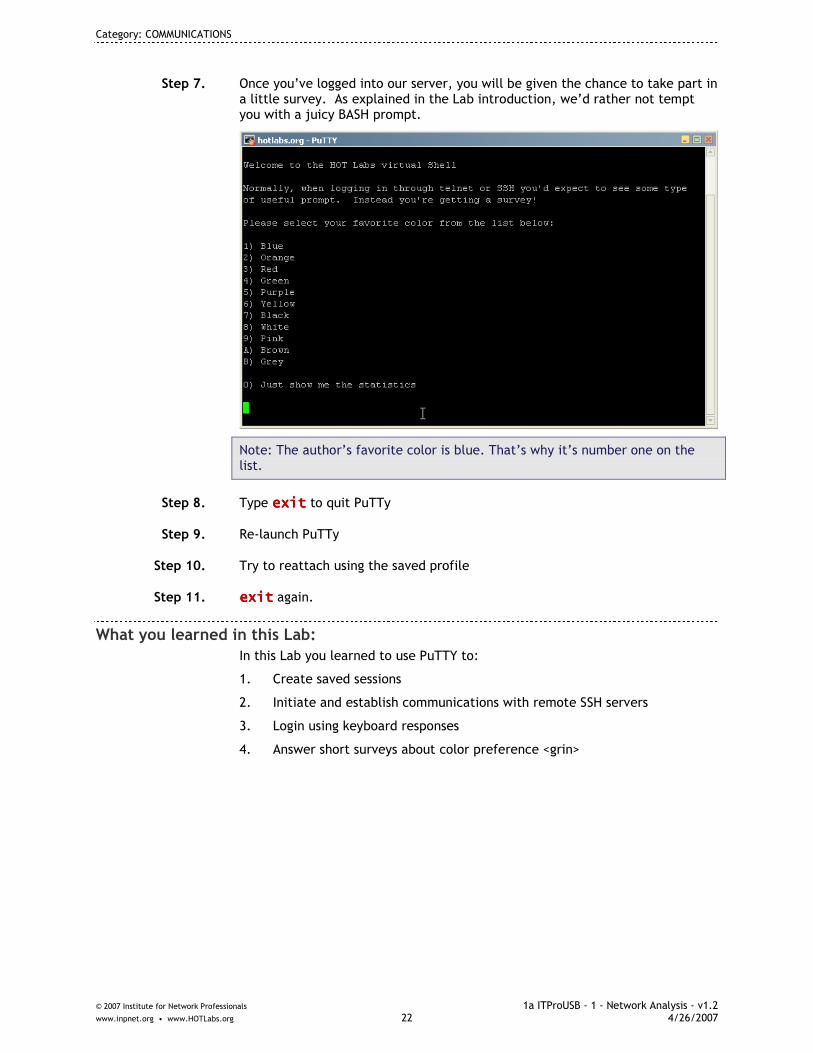
Step 7. Once you’ve logged into our server, you will be given the chance to take part in a little survey. As explained in the Lab introduction, we’d rather not tempt you with a juicy BASH prompt.
Note: The author’s favorite color is blue. That’s why it’s number one on the list.
Step 8. Type exitexitexitexit to quit PuTTy
Step 9. Re-launch PuTTy
Step 10. Try to reattach using the saved profile
Step 11. exitexitexitexit again.
What you learned in this Lab:
In this Lab you learned to use PuTTY to:
1. Create saved sessions
2. Initiate and establish communications with remote SSH servers
3. Login using keyboard responses
4. Answer short surveys about color preference <grin>

Category: COMMUNICATIONS
© 2007 Institute for Network Professionals 1a ITProUSB - 1 - Network Analysis - v1.2 www.inpnet.org • www.HOTLabs.org 23 4/26/2007
Tera Term Pro
Tera Term Pro is an easy to use Telnet and Serial Port communication software package. Supporting the important transfer protocols such as Kermit, XMODEM, and ZMODEM, you’ll be able to transfer new firmware and configuration files back and forth or maybe even dial a BBS (Bulletin Board System).
Product Information
Source
Takashi Teranishi
Open Source
Free
hp.vector.co.jp/authors/VA002416/teraterm.html
Where, When, Why
Communication—Telnet and Serial Port Communication
You know a piece of hardware is expensive when in the most dire of situations you have to get it to boot to it’s boot loader, plug in a serial cable, and reflash its firmware. We all know who makes hardware like that, so there’s no reason to name names. Truth be told, it’s a blessing that we can configure a device like that through a Serial port. It gives us a chance to get out from behind our desk, stop by the vending machine, and reprogram that device at 9600 baud. Tera Term Pro is a no-nonsense, extremely portable solution for just such an occasion.
Usage and Features
• Standard terminal communication
Requirements / Dependencies
• Windows NT/95/98/ME/2000/XP/2003
• Serial port
Where to Go for More Information
• hp.vector.co.jp/authors/VA002416/teraterm.html
Category: COMMUNICATIONS
© 2007 Institute for Network Professionals 1a ITProUSB - 1 - Network Analysis - v1.2 www.inpnet.org • www.HOTLabs.org 24 4/26/2007
Lab: Using Tera Term Pro
What you will do in this lab:
• Set a connection type and serial port
• Change Serial Port options
• Send commands through the serial connection
Lab Part 1
In this lab, we most likely not be doing this exercise live. This application can be used in the manner of the example provided. If you do have a serial device with which you can communicate, feel free to play along.
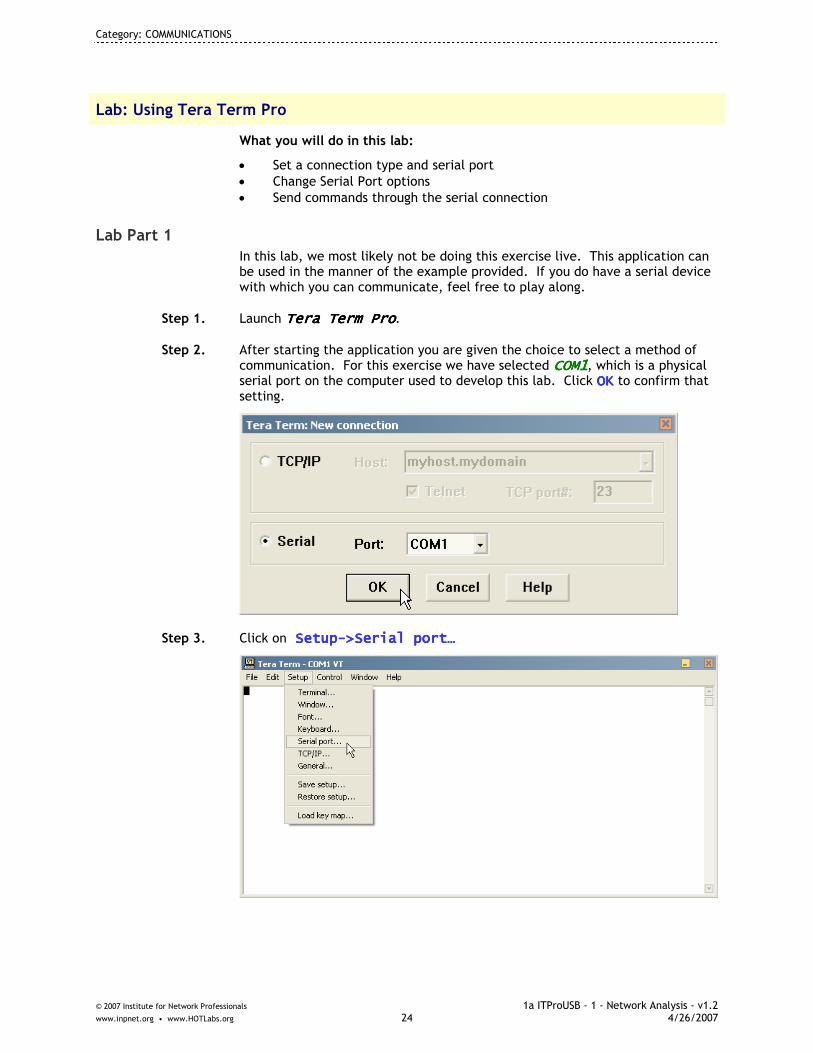
Step 1. Launch Tera Term ProTera Term ProTera Term ProTera Term Pro.
Step 2. After starting the application you are given the choice to select a method of communication. For this exercise we have selected COM1COM1COM1COM1, which is a physical serial port on the computer used to develop this lab. Click OKOKOKOK to confirm that setting.
Step 3. Click on S S S Setupetupetupetup---->Serial port…>Serial port…>Serial port…>Serial port…

Category: COMMUNICATIONS
© 2007 Institute for Network Professionals 1a ITProUSB - 1 - Network Analysis - v1.2 www.inpnet.org • www.HOTLabs.org 25 4/26/2007
Step 4. Verify that the COM Port in use has the correct settings for your device. In the example here, the settings should be as shown in the graphic. Click OKOKOKOK to confirm any changes.
Step 5. As an example: With my attached Cisco 1200 series Access Point, I am required to press EnterEnterEnterEnter before a prompt is displayed. Once displayed, I use the enableenableenableenable command to configure the device. Tera Term is not providing a local echo of your characters as the Cisco hardware takes care of that for us, which prevents the password from being shown to any observer.
Obviously the commands you will need to issue for your hardware will be dependant on the software, but this gives you an idea of how easy it is to use Tera Term for serial communications.
NOTE: When the need arises, to send and receive files through different protocols to your devices, such as firmware upgrades or configuration files, click on FileFileFileFile ���� TransferTransferTransferTransfer ���� [ [ [ [Protocol]Protocol]Protocol]Protocol] ���� [Option] [Option] [Option] [Option].
What you learned in this Lab:
In this Lab you learned to use Tera Term to:
1. Set a connection type and serial port
2. Change Serial Port options
3. Send commands through the serial connection

Category: COMMUNICATIONS
© 2007 Institute for Network Professionals 1a ITProUSB - 1 - Network Analysis - v1.2 www.inpnet.org • www.HOTLabs.org 26 4/26/2007
Category: COMMUNICATIONS
© 2007 Institute for Network Professionals 1a ITProUSB - 1 - Network Analysis - v1.2 www.inpnet.org • www.HOTLabs.org 27 4/26/2007
Tftpd32
A full featured TFTP server, a TFTP client, a BOOTP/DHCP Server, an SNTP server and a SYSLOG server combined into a single program which takes only 120kBytes.
Product Information
Source
Tftpd32
Freeware
Philippe Jounin
http://tftpd32.jounin.net
Where, When, Why
Communications
You need to download from an tftp site.
You need to quickly create a temporary tftp server
You need a portable DHCP server.
Usage and Features
• TFTP server
• TFTP client
• DHCP server
• SNTP
• Syslog server
• The TFTP client and server are fully compatible with TFTP option support (tsize, blocksize and timeout), which allow the maximum performance when transferring the data. Some extended features such as directory facility, security tuning, interface filtering; progress bars and early acknowledgments enhance usefulness and throughput of the TFTP protocol for both client and server. The included DHCP server provides unlimited automatic or static IP address assignment.
Requirements / Dependencies
Supported Operating Systems:
• Windows 95/NT/ME/NT/2000/XP
Where to Go for More Information
• http://tftpd32.jounin.net/

Category: COMMUNICATIONS
© 2007 Institute for Network Professionals 1a ITProUSB - 1 - Network Analysis - v1.2 www.inpnet.org • www.HOTLabs.org 28 4/26/2007
Category: COMMUNICATIONS
© 2007 Institute for Network Professionals 1a ITProUSB - 1 - Network Analysis - v1.2 www.inpnet.org • www.HOTLabs.org 29 4/26/2007
TightVNC Client/Server (VNCViewer)
VNC (Virtual Network Computing) has been the most prolific form of remote graphical administration and Thin Client interface for a long time. Using a standard TCP/IP connection, you can control the keyboard and mouse input of a graphical session, be it XWindows, Apple’s OS X, or Microsoft Windows. This client also supports file transfers between the remote and local host, when connected to a compatible server.
Product Information
Source
Constantin Klapinsky and other TightVNC Developers
Open Source
Free
www.tightvnc.com
Where, When, Why
Communication—VNC (Virtual Network Computing) Client/Server
So, command line administration may not be your thing. Who can blame you with all of the incredible GUI tools available these days. But it’d hard to be everywhere at once, you know? Here’s where VNC comes in handy. You can start your TightVNC Client TightVNC Client TightVNC Client TightVNC Client (VNCViewerVNCViewerVNCViewerVNCViewer), connect remotely to the server or workstation that needs work done, and not have to leave your own home or office. That server in Taipei, fixed… the workstation two floors down, updated. Productivity +1.
Usage and Features
• Remotely connect to another computer over standard TCP/IP
• Can be used in conjunction with an SSH tunnel for increased security
• Supports multiple VNC compression protocols to reduce bandwidth requirements
• Local cursor handling (no more cursor chasing)
• And more
Requirements / Dependencies
• Requires 32 Bit Windows or *nix (Unix, Linux, FreeBSD, etc.)
• No current OSX port, but the viewer can connect to other OSX based VNC Servers
Where to Go for More Information
• www.tightvnc.com

Category: COMMUNICATIONS
© 2007 Institute for Network Professionals 1a ITProUSB - 1 - Network Analysis - v1.2 www.inpnet.org • www.HOTLabs.org 30 4/26/2007
Lab: Using TightVNC Viewer/Server
What you will do in this lab:
• Configure a VNC Server on a Windows host
• Connect to a VNC Server from a Windows host
• Change basic configuration options for the Client and Server
Lab Part 1—VNC Server Configuration
In order to properly experience these labs, the server will need to be configured prior to the client. Watch what the Server partner is doing if you’re going to be the client… this product is easy enough to use that you may not have to do it twice.
Step 1. Launch TightVNC Server (WinVNC)TightVNC Server (WinVNC)TightVNC Server (WinVNC)TightVNC Server (WinVNC).
Step 2. You may not have noticed, but WinVNC WinVNC WinVNC WinVNC has placed an icon in your System Tray. Double click on the WinVNC iWinVNC iWinVNC iWinVNC iconconconcon.
Step 3. Change the Password for incoming VNC Connections to something like ‘passwordpasswordpasswordpassword’, then click OKOKOKOK. Configuring a VNC Server can be as easy as that!

Category: COMMUNICATIONS
© 2007 Institute for Network Professionals 1a ITProUSB - 1 - Network Analysis - v1.2 www.inpnet.org • www.HOTLabs.org 31 4/26/2007
Lab Part 2—VNC Client Configuration
Step 4. Launch TightVNC Client (VNCViewer).TightVNC Client (VNCViewer).TightVNC Client (VNCViewer).TightVNC Client (VNCViewer).
Step 5. Enter the IP AddressIP AddressIP AddressIP Address or Host nameHost nameHost nameHost name in the box for VNC server VNC server VNC server VNC server.
Step 6. You may have specific options to change for the VNC connection relative to your network connection speed and personal preference. Click on the Options buttonOptions buttonOptions buttonOptions button to see what there is to adjust. Click on OKOKOKOK to return to the connection menu when finished.
NOTE: Over a LAN, you may want to either disable JPEG compression or increase the quality since bandwidth won’t be much of an issue. Most of the options here are meant to increase usability in situations where you will not have a fast enough connection for perfect graphics.
Step 7. Click on OKOKOKOK to initiate a VNC connection. Enter the password that was configured in the Server portion of the lab in the Session password field. The example used above was ‘paspaspaspasswordswordswordsword’. Click OKOKOKOK to confirm your password.

Category: COMMUNICATIONS
© 2007 Institute for Network Professionals 1a ITProUSB - 1 - Network Analysis - v1.2 www.inpnet.org • www.HOTLabs.org 32 4/26/2007
Step 8. Now you are presented with the display on the Remote VNC Server. Click around, type on the keyboard, and you’ll find that you have control as if you were sitting at the computer itself. Since you may have the Server computer nearby, watch as the cursor moves with yours. This will give you the opportunity to take care of tasks that require a GUI.
Step 9. And that’s it. You’ve now configured a VNC Server, connected to it with the VNC Client, and you can see that it does allow full control of the mouse and keyboard with a view of the current display.
NOTE: Full Screen graphics (DOS applications, etc.) or graphics that take advantage of hardware acceleration probably won’t work. This is not meant for remote gaming, though Solitaire and Minesweeper probably will work.
Step 10. Disconnect
What you learned in this Lab:
In this Lab you learned to use TightVNC Client/Server to:
1. Configure a VNC Server on a Windows host
2. Connect to a VNC Server from a Windows host
3. Change basic configuration options for the Client and Server
Category: COMMUNICATIONS
© 2007 Institute for Network Professionals 1a ITProUSB - 1 - Network Analysis - v1.2 www.inpnet.org • www.HOTLabs.org 33 4/26/2007
uTorrent
uTorrentuTorrentuTorrentuTorrent is a Bit Torrent client. BitTorrent (often abbreviated to 'BT') is a protocol (a set of rules and description of how to do things) allowing you to download files quickly by allowing people downloading the file to upload (distribute) parts of it at the same time. BitTorrent is often used for distribution of very large files, very popular files and files available for free, as it is a lot cheaper, faster and more efficient to distribute files using BitTorrent than a regular download.
Product Information
Source
uTorrent
Freeware
http://utorrent.com
Where, When, Why
Communications
You need to download the latest episode of 24 you just missed, along with that educational show on VISTA application development. You use your USB stick to start uTorrentuTorrentuTorrentuTorrent to download both simultaneously.
Usage and Features
• Multiple simultaneous downloads
• Configurable bandwidth scheduler
• Global and per-torrent speed limiting
• Quick-resumes interrupted transfers
• RSS Downloader
• Trackerless support (Mainline DHT)
Requirements / Dependencies
Supported Operating Systems:
• Windows 95/NT/ME/NT/2000/XP
Where to Go for More Information
• http://www.utorrent.com/faq.php
• http://www.utorrent.com/guides.php (Has a Beginners’ Guide, Connection Setup Guide, Migrating Files to Bit Torrent)

Category: COMMUNICATIONS
© 2007 Institute for Network Professionals 1a ITProUSB - 1 - Network Analysis - v1.2 www.inpnet.org • www.HOTLabs.org 34 4/26/2007

Category: COMMUNICATIONS
© 2007 Institute for Network Professionals 1a ITProUSB - 1 - Network Analysis - v1.2 www.inpnet.org • www.HOTLabs.org 35 4/26/2007
VNC Viewer
VNC (Virtual Network Computing) provides remote graphical connection and administration using a TCP/IP connection.
Product Information
Source
vncviewer
Freeware
http://www.uvnc.com
Where, When, Why
Communications
You need to support a desktop remotely and require a portable VNC client to control a mouse and keyboard remotely.
Usage and Features
• FileTransfer
• VideoDriver
• optional EncryptionPlugins
• MSLogon
• TextChat
• ViewerToolbar
• JavaViewer with FileTransfer, as well as Autoscaling and ServerSideScaling, Multiple-Monitors-support, Repeater/Proxy-support, AutoReconnection, good performances and tons of other functionalities..
Requirements / Dependencies
Supported Operating Systems:
• Windows 95/NT/ME/NT/2000/XP
Where to Go for More Information
• http://uvnc.com

Category: COMMUNICATIONS
© 2007 Institute for Network Professionals 1a ITProUSB - 1 - Network Analysis - v1.2 www.inpnet.org • www.HOTLabs.org 36 4/26/2007

Section Software List
Note: Final list of software included is subject to change. © 2007 Institute for Network Professionals 2 ITPro Section Software List - 2
Section 2 Network Analysis
We have included a wide variety of tools for Network Analysis, from simple scanners, to an entire Linux system, to packet capture and display tools, to full-functioned network analysis toolsets.
All of these require you to have a fairly robust understanding of the entire TCP/IP stack
lab $$ NetScanTools Pro Full-Featured Network Analysis Toolset
lab $$ The Network Toolkit Set of Windows Tools w/Linux Emulator
lab 3d Traceroute Visual Traceroute & Tools
AdapterWatch NIC Statistics
lab Angry IP Scanner Fast Ping-Sweep
ARP Cache Watch Track changes in ARP Cache
Convert IP Convert IP Addresses
lab CurrPorts Listing of Listening Ports
lab Hover IP Quick, Simple IP Information
lab IPNetInfo Quick IP Information
lab MySpeedPC Track & Document Internet Access Speed
lab NetMeter Track Network Throughput
lab Network Stumbler Wireless AP Scanner
Sam Spade Network Reconnaissance

Section Software List
Note: Final list of software included is subject to change. © 2007 Institute for Network Professionals 2 ITPro Section Software List - 2
lab SoftPerfect Network Scanner Easy Network Scanner
SuperScan4 Network Scanning Tool
lab TCPNetView Quick SMB Network Devices Scanner
lab TCPView Scanner to see Open Ports
lab WhoAmI Current IP Connectivity
Win32WhoIs Easy WhoIs Lookup
lab WinIPS Change IP Network Connections
Wireshark Network Protocol Analysis

Category: NETWORK ANALYSIS
© 2007 Institute for Network Professionals 2a ITProUSB - 2 - Network Analysis - v1.2 www.inpnet.org • www.HOTLabs.org 1 4/26/2007
Section 2 – NETWORK ANALYSIS Table of Contents
NetScanTools Pro ..........................................................3
The Network Toolkit .................................................... 19
3d Traceroute............................................................ 37
Angry IP Scanner......................................................... 43
Convert IP ................................................................ 47
CurrPorts.................................................................. 49
HoverIP.................................................................... 53
IPNetInfo.................................................................. 57
MySpeed PC............................................................... 61
NetMeter.................................................................. 65
Network Stumbler ....................................................... 67
Sam Spade ................................................................ 73
SoftPerfect Network Scanner .......................................... 75
SuperScan4 ............................................................... 81
TCPNetView .............................................................. 83
TCPView .................................................................. 85
WhoAmI ................................................................... 87
WinIPS..................................................................... 91
Wireshark ................................................................. 93

Category: NETWORK ANALYSIS
© 2007 Institute for Network Professionals 2a ITProUSB - 2 - Network Analysis - v1.2 www.inpnet.org • www.HOTLabs.org 2 4/26/2007

Category: NETWORK ANALYSIS
© 2007 Institute for Network Professionals 2a ITProUSB - 2 - Network Analysis - v1.2 www.inpnet.org • www.HOTLabs.org 3 4/26/2007
NetScanTools Pro
NetScanTools Pro NetScanTools Pro NetScanTools Pro NetScanTools Pro is an integrated collection of internet information gathering utilities for 32 bit Windows 2003/XP/2000. Use it to research IP addresses, hostnames, domain names, email addresses, URLs automatically or with manual tools
Product Information
Source Northwest Performance Software, Inc.
Commerical
$349 (USB Edition); $249 (PC Edition); annual maintenance plan $75
www.netscantools.com
When, Where, Why Network Analysis—Network Testing and Analysis Utilities Suite
You are on-site and have been authorized to investigate the possibility of rogue severs present in the organization and to prepare a security report showing all Ip addresses in use, all DHCP servers, validate DNS records in use, and chart open ports in use. You turn to NetScanTools Pro NetScanTools Pro NetScanTools Pro NetScanTools Pro as a complete package of network analysis utilities you carry on your Ultimate USB stick.
Usage and Features Network Information Gathering, Reconnaissance and Discovery Solution Network and internet Security, administration, internet forensics, and law enforcement internet crimes investigation
• NetScanTools Pro is used in network analysis/security and recon/traceback training courses taught by Laura Chappell of the Protocol Analysis Institute.
• Training for ethical “hacking” • Documentation and reporting of the above • DNS Checking and Testing tools including NSLOOKUP with 43 record query
options and DIG. Check zone transfers with List Domain or Dig w/AXFR. DNS Validation (IP to Hostname to IP mapping check) is found in both the NSLOOKUP and HyperTrans tools.
• Find domain name and IPv4 address registrations fast with our advanced whois and rwhois query tool that features automatic whois server selection.
• NetScanner is a ping sweep utility that includes DNS queries, NetBIOS queries for NetBIOS name table and MAC address.
• NetBIOS share detection shows visible and hidden shares and we can do a 'writable' share test find shares subject to attacks by worms and viruses.
• SNMPv1/v2c tools include walk, get, set and several advanced queries such as remote ARP cache, remote listening ports and more.
• IP and MAC address associations found using NetScanner, ARP, SNMP, and NetBIOS can be automatically updated and maintained in the IP/MAC address management database.

Category: NETWORK ANALYSIS
© 2007 Institute for Network Professionals 2a ITProUSB - 2 - Network Analysis - v1.2 www.inpnet.org • www.HOTLabs.org 4 4/26/2007
• The Port Scanner tool uses several different methods to determine if a TCP or UDP port is being used on a machine.
• Traceroute includes the firewall penetrating TCP traceroute. Normal ICMP and UDP traceroute methods are also available.
• DHCP Server Discovery finds rogue or misconfigured DHCP servers. • IP Packet Viewer shows IP prefixed packets going by your wired ethernet
card. This packet capture program has the ability to preserve packet data for future analysis and export packets to other programs.
• Email Address Validation and Open SMTP Relay Checking assist in verifying an email address status and show configuration issues with SMTP servers.
• Numerous useful utilities like Subnet Calculator, TTCP for network speed checking, Ping, and safe URL web page capture with obscured URL decoding.
• Optional Manage Switch Port Mapping tool works with many SNMP enabled managed ethernet network switches.
Requirements / Dependencies
• Minimum Pentium® 90 with Windows. Recommended: at least a 400Mhz machine. 64MB memory is absolute minimum, we recommend 128MB or more.
• Hard disk space: 28 Mbytes of disk space. • NetScanTools Pro 10 may run on Windows Windows NT4 SP6a, ME, and 98;
however, it is optimized for Windows Server 2003, XP SP2 or 2000 (32 bit OS versions only).
• Video display resolution 1024x768 • Wired ethernet connection • In firewalled environments, installation of the WinPcap driver is required
Where to Go for More Information
• http://www.netscantools.com • Help section in Net Scan Tools Pro • Forum available at http://nwpsw.com/forum/

Category: NETWORK ANALYSIS
© 2007 Institute for Network Professionals 2a ITProUSB - 2 - Network Analysis - v1.2 www.inpnet.org • www.HOTLabs.org 5 4/26/2007
NetScanTools Pro Lab
What you will do in this lab:
• Activate NetScanTools Pro with an activation key • Use Automated Wizard for Initial Scan of a Device • Overview of Netscanner using ping to discover other addresses and
devices on your network • Portscan a Target in NetScanTools Pro
• OS Fingerprint a Target
Lab Part 1 — Register and Activate NetScanTools Pro
Step 1. Launch NetScanTools ProNetScanTools ProNetScanTools ProNetScanTools Pro .
Step 2. Accept the license agreement.
Step 3. When NetScanTools Pro opens the first time, it requests an activation code.
IMPORTANT: It is important that you complete this to activation now or later in order to continue using all the features of NetScanTools Pro after the initial 14 non-registered uses, and to receive the full year of updates included with your license.

Category: NETWORK ANALYSIS
© 2007 Institute for Network Professionals 2a ITProUSB - 2 - Network Analysis - v1.2 www.inpnet.org • www.HOTLabs.org 6 4/26/2007
Step 4. Click Step 1: Register OnlineStep 1: Register OnlineStep 1: Register OnlineStep 1: Register Online . The following screen should appear. If not, browse to
http://netscantools.com/nstpro10registration.html
Step 5. Enter the Program Version Number as 10.410.410.410.4.
Step 6. Enter the 22 digit CDKEY 22 digit CDKEY 22 digit CDKEY 22 digit CDKEY found on the yellow laminated IT Professionals Toolbox Software Registrations card that came with your 3 USB drive.
Step 7. Enter First NameFirst NameFirst NameFirst Name, Last NameLast NameLast NameLast Name, and Email AddressEmail AddressEmail AddressEmail Address.
Step 8. In the field Purchased From (optional), enter HOT LabsHOT LabsHOT LabsHOT Labs.
Step 9. After completing the form, clickclickclickclick on Submit Registration Submit Registration Submit Registration Submit Registration InformationInformationInformationInformation.
Step 10. You will be returned to the registration window in this lab step 3 above. Click Register Later/Start ProgramRegister Later/Start ProgramRegister Later/Start ProgramRegister Later/Start Program
to start NetScanTools Pro using one of the initial 14 usages until you receive an email with the actual activation code within one business day.
Step 11. LATER: When you receive the registration code email back from NetScanTools, you will need to copy and paste THE ENTIRE BODY of the email message into text box located under that dialog box’s “Step 4” (see sample box below)

Category: NETWORK ANALYSIS
© 2007 Institute for Network Professionals 2a ITProUSB - 2 - Network Analysis - v1.2 www.inpnet.org • www.HOTLabs.org 7 4/26/2007
Step 12. LATER: Click on Validate and Save Registration InformationValidate and Save Registration InformationValidate and Save Registration InformationValidate and Save Registration Information.
Lab Part 2 — Use Automated Wizard for Initial Scan of a Device In this part of the lab, you learn how to use NetScanTools Pro to perform automated investigation and research on a selected target machine.
Step 13. Net ScanTools Pro starts, initializes and runs .
Step 14. From the menu on the button left select AutomatedAutomatedAutomatedAutomated for a wizard to guide the setup for research on a target machine. Click on Step 1Step 1Step 1Step 1 select the level of “contact” this machine will be allowed to have with the target machine. In this lab, select Intermediate Intermediate Intermediate Intermediate (or Advanced).
Warning: NEVER scan a computer you do not own or have the owner's permission to scan!

Category: NETWORK ANALYSIS
© 2007 Institute for Network Professionals 2a ITProUSB - 2 - Network Analysis - v1.2 www.inpnet.org • www.HOTLabs.org 8 4/26/2007
Step 15. Click on Step 2Step 2Step 2Step 2 give the IP address or domain name of the target machine. In the the drop-down menu for localhostlocalhostlocalhostlocalhost, delete “localhost” and type in laurachapplaurachapplaurachapplaurachappell.netell.netell.netell.net ( Optional: if you do not have internet connecitivity, just change “localhost” to the actual IP address of your own actual IP address of your own actual IP address of your own actual IP address of your own machinemachinemachinemachine in this lab.)
Category: NETWORK ANALYSIS
© 2007 Institute for Network Professionals 2a ITProUSB - 2 - Network Analysis - v1.2 www.inpnet.org • www.HOTLabs.org 9 4/26/2007
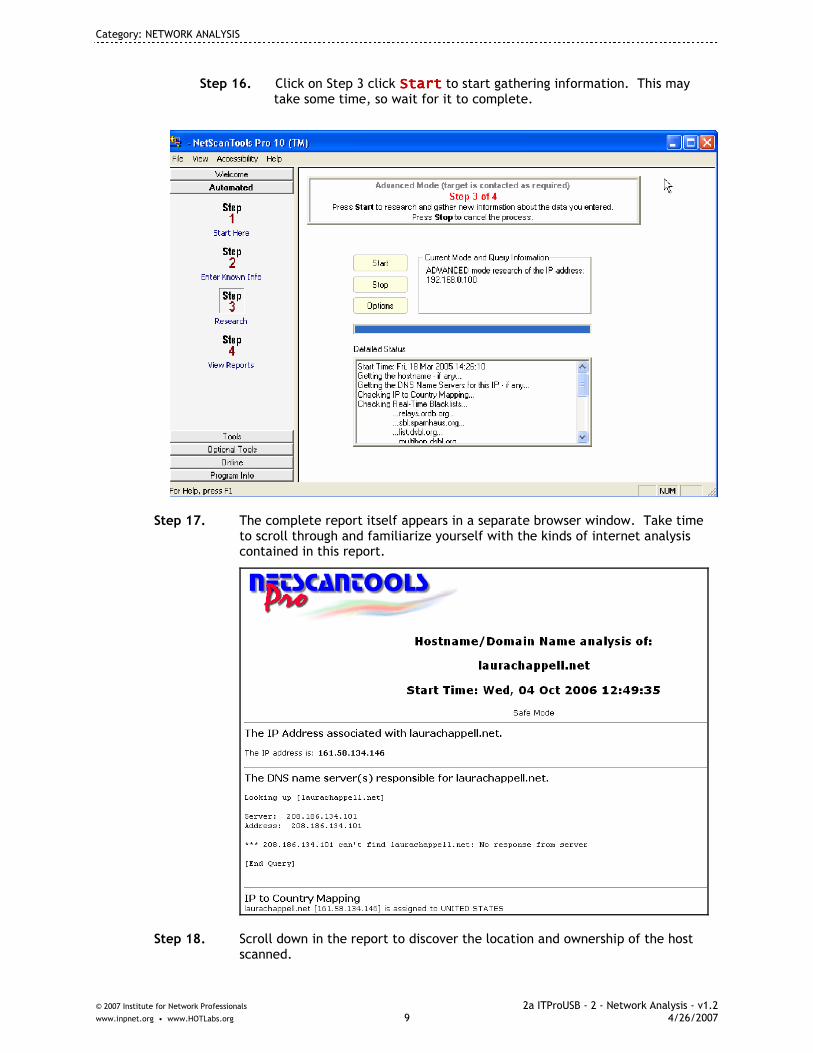
Step 16. Click on Step 3 click StartStartStartStart to start gathering information. This may take some time, so wait for it to complete.
Step 17. The complete report itself appears in a separate browser window. Take time to scroll through and familiarize yourself with the kinds of internet analysis contained in this report.
Step 18. Scroll down in the report to discover the location and ownership of the host scanned.

Category: NETWORK ANALYSIS
© 2007 Institute for Network Professionals 2a ITProUSB - 2 - Network Analysis - v1.2 www.inpnet.org • www.HOTLabs.org 10 4/26/2007
Step 19. Toggle back to the NetScanPro Tools screen, and click on Step 4Step 4Step 4Step 4.
Step 20. Highlight the name of the reportname of the reportname of the reportname of the report and Click on View ReportView ReportView ReportView Report, to return to review the information collected.

Category: NETWORK ANALYSIS
© 2007 Institute for Network Professionals 2a ITProUSB - 2 - Network Analysis - v1.2 www.inpnet.org • www.HOTLabs.org 11 4/26/2007
Lab Part 3 — Overview of Netscanner in NetScanTools Pro In this part of the lab, you will run a simple Ping scan to discover what other machines and addresses are in use of your network. NetScanner is one of the most powerful features of Net Scan Tools Pro as it easily integrated multiple functions into one single window.
Step 21. On the left menu bar, click ToolsToolsToolsTools.
Step 22. Click NetScannerNetScannerNetScannerNetScanner.
Step 23. Insure that the Start IPStart IPStart IPStart IP and End IPEnd IPEnd IPEnd IP fields are populated with the subnet range your machine is on. Also click on Get Subnet MaskGet Subnet MaskGet Subnet MaskGet Subnet Mask.
Step 24. Click Start NetScanStart NetScanStart NetScanStart NetScan.
Step 25. Click on I Accept I Accept I Accept I Accept the Notice to EndNotice to EndNotice to EndNotice to End----UserUserUserUser.

Category: NETWORK ANALYSIS
© 2007 Institute for Network Professionals 2a ITProUSB - 2 - Network Analysis - v1.2 www.inpnet.org • www.HOTLabs.org 12 4/26/2007
Step 26. The scan completes and the report is displayed on the screen.
Step 27. Scroll through the report to notice the hostnames and IP addresses in use. In the right column you will be the subnet address of the network.

Category: NETWORK ANALYSIS
© 2007 Institute for Network Professionals 2a ITProUSB - 2 - Network Analysis - v1.2 www.inpnet.org • www.HOTLabs.org 13 4/26/2007
Step 28. At this point, there is a wealth of analytical information available about each device discovered. Highlight one host name or IPone host name or IPone host name or IPone host name or IP, right clickright clickright clickright click on it, and first view the features options available:
You can:
Display ping time graphs to determine round-trip response times to the host
Connect to the host with FTP, HTTP, or telnet to obtain banner information or check for default password use

Category: NETWORK ANALYSIS
© 2007 Institute for Network Professionals 2a ITProUSB - 2 - Network Analysis - v1.2 www.inpnet.org • www.HOTLabs.org 14 4/26/2007
Traceroute to the host to identify the path to that host
Perform a Whois quiry (port 43) on the host to see who owns the address (or address range)
Export responding targets to the port probe target list and then perform a UDP/TCP port scan on the responding targets to find out what services are running on the target
Export responding targets to the net topography target list, which builds a map of routers and gateways along a path to target hosts
Step 29. You may also double-click on a device in the NetSanner report to display all the gathered information about that device. Here, the report shows the results of pinging the device and running a Whois quiry
Category: NETWORK ANALYSIS
© 2007 Institute for Network Professionals 2a ITProUSB - 2 - Network Analysis - v1.2 www.inpnet.org • www.HOTLabs.org 15 4/26/2007
Lab Part 4 — Portscan a Target in NetScanTools Pro
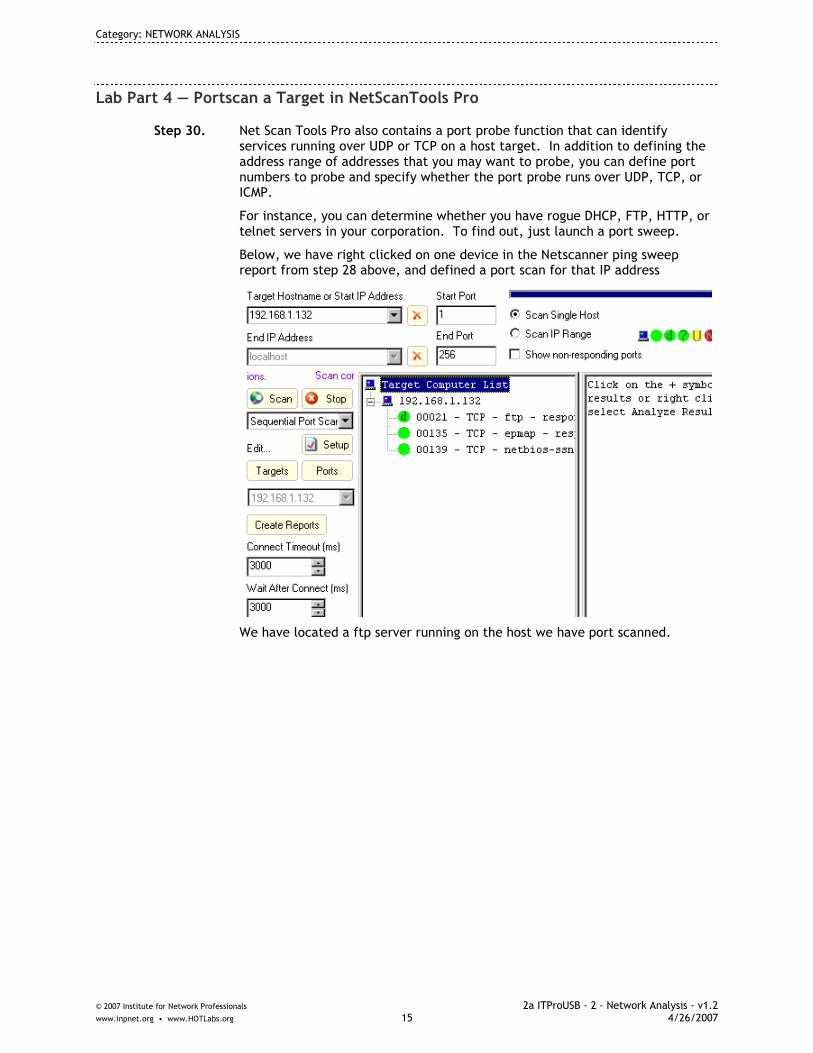
Step 30. Net Scan Tools Pro also contains a port probe function that can identify services running over UDP or TCP on a host target. In addition to defining the address range of addresses that you may want to probe, you can define port numbers to probe and specify whether the port probe runs over UDP, TCP, or ICMP.
For instance, you can determine whether you have rogue DHCP, FTP, HTTP, or telnet servers in your corporation. To find out, just launch a port sweep.
Below, we have right clicked on one device in the Netscanner ping sweep report from step 28 above, and defined a port scan for that IP address
We have located a ftp server running on the host we have port scanned.

Category: NETWORK ANALYSIS
© 2007 Institute for Network Professionals 2a ITProUSB - 2 - Network Analysis - v1.2 www.inpnet.org • www.HOTLabs.org 16 4/26/2007
Lab Part 5 — OS Fingerprint a Target in NetScanTools Pro
Step 31. NetScanPro Tools includes a OS Fingerprint of a target. It sends a series of packets to that target and, based on the replies, determines the type of operating system running on that device. Click on OS FingerprintingOS FingerprintingOS FingerprintingOS Fingerprinting on the ToolsToolsToolsTools menu in Net ScanToNet ScanToNet ScanToNet ScanTools Prools Prools Prools Pro.
Step 32. In the Hostname or IP Address field, enter www.packet-level.com.
Step 33. Click on AnalyzeAnalyzeAnalyzeAnalyze.
Step 34. Click on I AcceptI AcceptI AcceptI Accept for the Notice to End-User.
Step 35. Wait with all threads complete and the report displays.
Step 36. This particular host is not really a normal host but was a device configured to obscure the OS in this scan. Repeat the OS Fingerprint by entering the hostname www.kernel.orgwww.kernel.orgwww.kernel.orgwww.kernel.org.
Category: NETWORK ANALYSIS
© 2007 Institute for Network Professionals 2a ITProUSB - 2 - Network Analysis - v1.2 www.inpnet.org • www.HOTLabs.org 17 4/26/2007
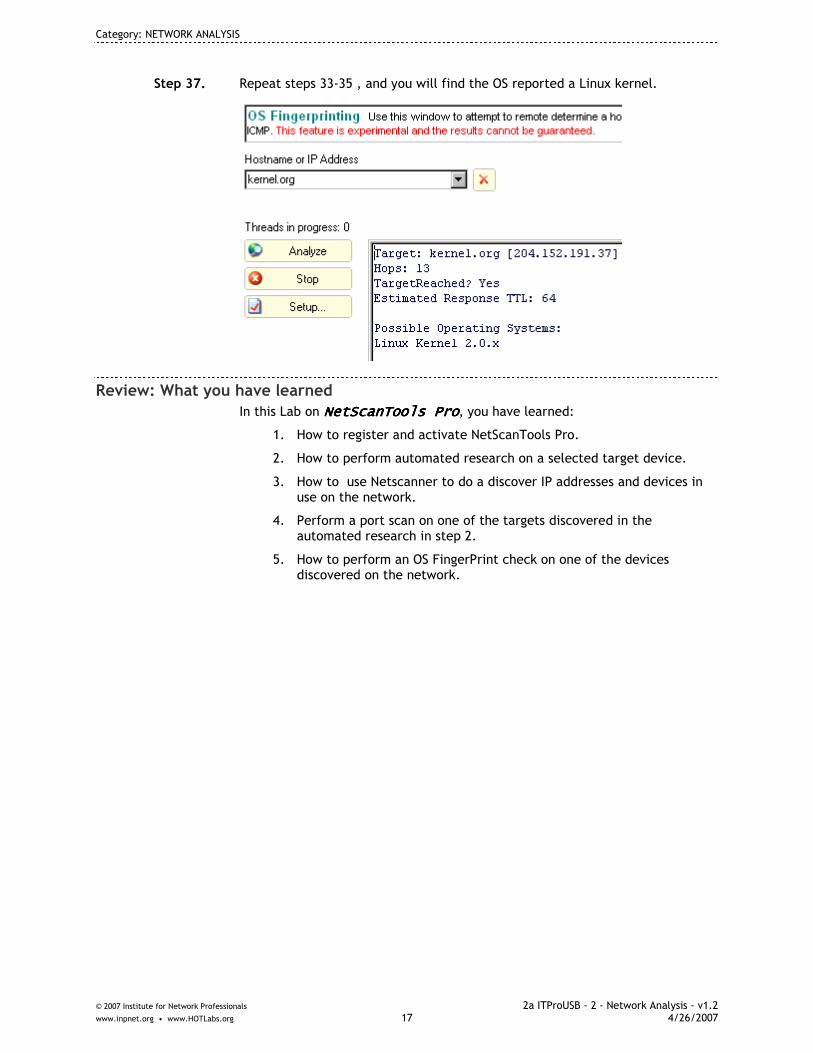
Step 37. Repeat steps 33-35 , and you will find the OS reported a Linux kernel.
Review: What you have learned In this Lab on NetScanTools ProNetScanTools ProNetScanTools ProNetScanTools Pro, you have learned:
1. How to register and activate NetScanTools Pro.
2. How to perform automated research on a selected target device.
3. How to use Netscanner to do a discover IP addresses and devices in use on the network.
4. Perform a port scan on one of the targets discovered in the automated research in step 2.
5. How to perform an OS FingerPrint check on one of the devices discovered on the network.

Category: NETWORK ANALYSIS
© 2007 Institute for Network Professionals 2a ITProUSB - 2 - Network Analysis - v1.2 www.inpnet.org • www.HOTLabs.org 18 4/26/2007
Category: NETWORK ANALYSIS
© 2007 Institute for Network Professionals 2a ITProUSB - 2 - Network Analysis - v1.2 www.inpnet.org • www.HOTLabs.org 19 4/26/2007
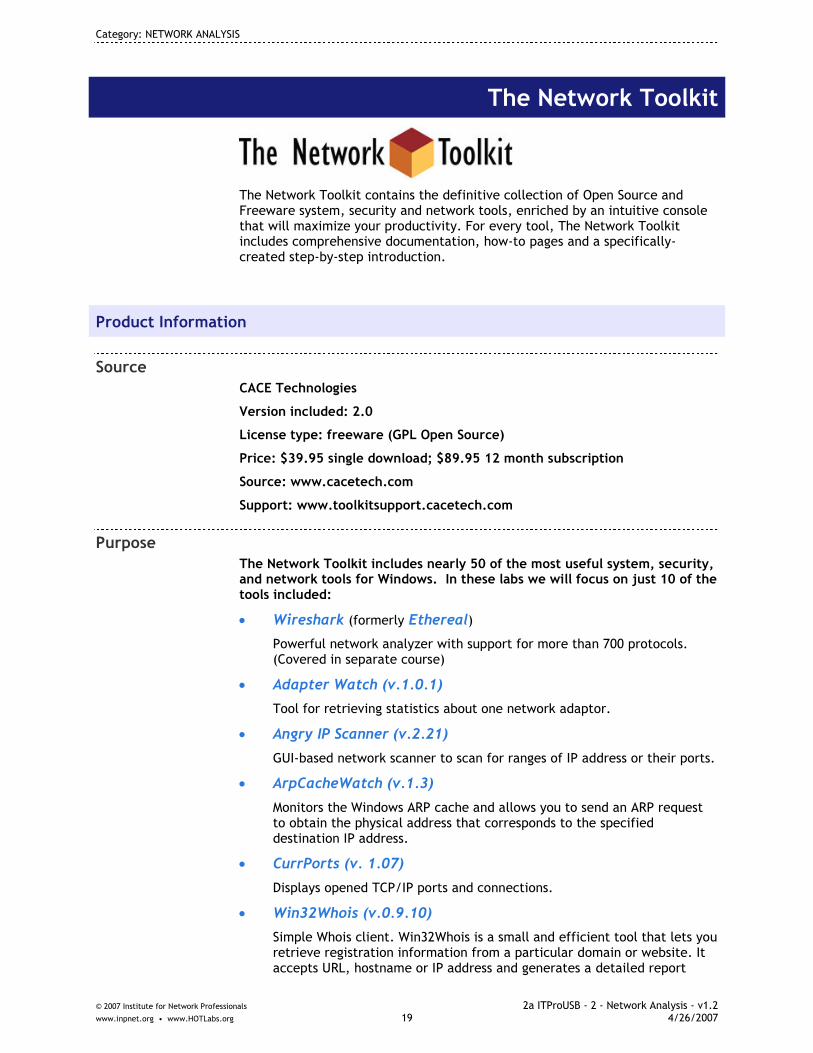
The Network Toolkit
The Network Toolkit contains the definitive collection of Open Source and Freeware system, security and network tools, enriched by an intuitive console that will maximize your productivity. For every tool, The Network Toolkit includes comprehensive documentation, how-to pages and a specifically-created step-by-step introduction.
Product Information
Source CACE Technologies
Version included: 2.0
License type: freeware (GPL Open Source)
Price: $39.95 single download; $89.95 12 month subscription
Source: www.cacetech.com
Support: www.toolkitsupport.cacetech.com
Purpose The Network Toolkit includes nearly 50 of the most useful system, security, and network tools for Windows. In these labs we will focus on just 10 of the tools included:
• Wireshark (formerly Ethereal)
Powerful network analyzer with support for more than 700 protocols. (Covered in separate course)
• Adapter Watch (v.1.0.1)
Tool for retrieving statistics about one network adaptor.
• Angry IP Scanner (v.2.21)
GUI-based network scanner to scan for ranges of IP address or their ports.
• ArpCacheWatch (v.1.3)
Monitors the Windows ARP cache and allows you to send an ARP request to obtain the physical address that corresponds to the specified destination IP address.
• CurrPorts (v. 1.07)
Displays opened TCP/IP ports and connections.
• Win32Whois (v.0.9.10)
Simple Whois client. Win32Whois is a small and efficient tool that lets you retrieve registration information from a particular domain or website. It accepts URL, hostname or IP address and generates a detailed report

Category: NETWORK ANALYSIS
© 2007 Institute for Network Professionals 2a ITProUSB - 2 - Network Analysis - v1.2 www.inpnet.org • www.HOTLabs.org 20 4/26/2007
listing all the available technical and contact information it can find. The generated report can be saved as a file.
• Asterisk Logger (v1.02)
Allows you to reveal passwords behind asterisks.
• AsterWin IE (v. 1.03)
Discovers passwords used in Internet Explorer.
• Protected Storage PassView (v.1.62)
Reveals the content of the “Protected Storage” registry key. This registry contains the passwords stored on a local computer by Internet Explorer, Outlook Express, and MSN Explorer.
• StartupRun (v.1.22)
Displays the list of applications that are loaded automatically each time Windows boots. You are allowed to edit, disable, enable, and delete the selected startup entries.
Usage The Network Toolkit may be used for a wide range of system and networking needs which are conveniently grouped into categories:
• Network Analyzers • Network Monitors • Traffic Generators • Network Scanners • IDS • Network Utilities • Network Clients • Auditing Tools • Password Revealers • System Tools • Supplementary Tools (DOS Command Shell, UNIX shell, WinPCap)
Requirements / Dependencies The Network Toolkit has the following requirements.
• Microsoft Windows NT4, 2000, XP (x86), 2003 (x86). 64-bit compatibility: Although the CD can be browsed correctly, several tools may not work properly on such platforms
• Internet Explorer 6.0 or newer. • Some of the documentation requires Acrobat Reader 6.0 or newer in
order to be displayed.

Category: NETWORK ANALYSIS
© 2007 Institute for Network Professionals 2a ITProUSB - 2 - Network Analysis - v1.2 www.inpnet.org • www.HOTLabs.org 21 4/26/2007
The Network Toolkit Lab
What you will do in this lab:
• Use AdapterWatch to reveal statistics on your network adaptor • Use Angry IP Scanner to find IP addresses and ports in use • Use ArpCacheWatch to monitor the Windows ARP cache • Use CurrPorts to detect open ports • Use Win32Whois to looked information on a domain (internet connection
required) • Use Asterisk Logger to reveal the password behind an asterisk • Use AsterWin IE to discover a password used in Internet Explorer • Use Protected Storage PassView to look for Internet Explorer passwords • Use StartupRun to removed unwanted applications from the startup.
Lab Part 1 — AdapterWatch In this first part of the lab, we will use AdapterWatch to reveal statistics on one of the network adaptors on a Windows machine. AdapterWatch displays several statistics about the network adapters installed on a machine, for example MAC/IP/TCP/ICMP counters, addresses, DNS and WINS servers, MTU value, the current transfer speed, and more.
Step 1. Launce The Network Toolkit from your USB stick.
Step 2. On the left pane, click on the + by Tools � By Category � Network Monitors � then ...
Step 3. ... on the AdapterWatch line, click Run… (at end of line)

Category: NETWORK ANALYSIS
© 2007 Institute for Network Professionals 2a ITProUSB - 2 - Network Analysis - v1.2 www.inpnet.org • www.HOTLabs.org 22 4/26/2007
Step 4. You should now be able to detect your IP, default gateway, DNS servers, and see an incrementing steam of data packets:
Step 5. Click on the TCP/UDP tab notice any significant number of failed connection attempts or number of errors received:
Step 6. Click on the IP Statistics tab. Notice if your nic had any datagram packets that required reassembly and failed?

Category: NETWORK ANALYSIS
© 2007 Institute for Network Professionals 2a ITProUSB - 2 - Network Analysis - v1.2 www.inpnet.org • www.HOTLabs.org 23 4/26/2007
Step 7. Click on the ICMP Statistics tab, and in another windows at a command line ping local host –t. Notice the echo requests sent and received.
Step 8. The General tab provides your hostname of this machine, any domain name if it is a server, and DHCP Scope settings, etc.
Step 9. Select File from the menu, and notice that you may issue and release and renew command for your IP address.
Step 10. Select View � HTML Report - All items, and a new browser window opens with the log of your adaptor statistics you may now save to a file in html format.

Category: NETWORK ANALYSIS
© 2007 Institute for Network Professionals 2a ITProUSB - 2 - Network Analysis - v1.2 www.inpnet.org • www.HOTLabs.org 24 4/26/2007
Step 11. Use File � Close or the exit icon on the toolbar when you are finished.
Category: NETWORK ANALYSIS
© 2007 Institute for Network Professionals 2a ITProUSB - 2 - Network Analysis - v1.2 www.inpnet.org • www.HOTLabs.org 25 4/26/2007
Lab Part 2 — Angry IP Scanner
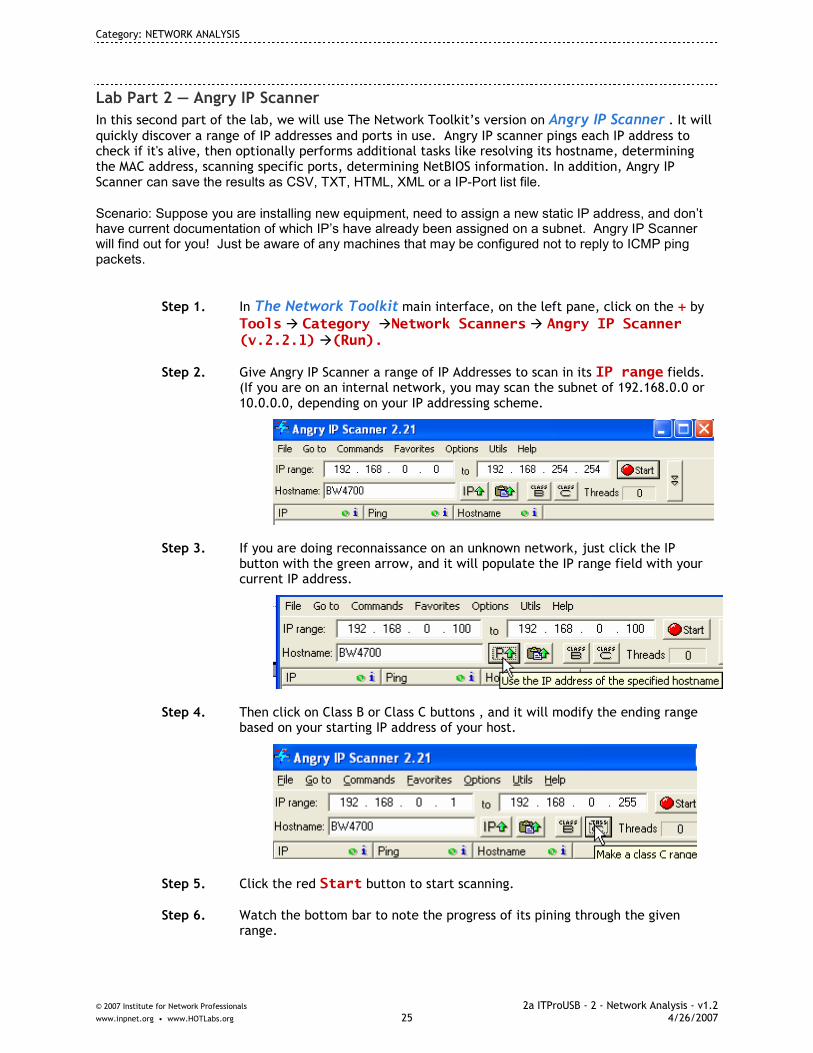
In this second part of the lab, we will use The Network Toolkit’s version on Angry IP Scanner . It will quickly discover a range of IP addresses and ports in use. Angry IP scanner pings each IP address to check if it's alive, then optionally performs additional tasks like resolving its hostname, determining the MAC address, scanning specific ports, determining NetBIOS information. In addition, Angry IP Scanner can save the results as CSV, TXT, HTML, XML or a IP-Port list file.
Scenario: Suppose you are installing new equipment, need to assign a new static IP address, and don’t have current documentation of which IP’s have already been assigned on a subnet. Angry IP Scanner will find out for you! Just be aware of any machines that may be configured not to reply to ICMP ping packets.
Step 1. In The Network Toolkit main interface, on the left pane, click on the + by Tools � Category �Network Scanners � Angry IP Scanner (v.2.2.1) �(Run).
Step 2. Give Angry IP Scanner a range of IP Addresses to scan in its IP range fields. (If you are on an internal network, you may scan the subnet of 192.168.0.0 or 10.0.0.0, depending on your IP addressing scheme.
Step 3. If you are doing reconnaissance on an unknown network, just click the IP button with the green arrow, and it will populate the IP range field with your current IP address.
Step 4. Then click on Class B or Class C buttons , and it will modify the ending range based on your starting IP address of your host.
Step 5. Click the red Start button to start scanning.
Step 6. Watch the bottom bar to note the progress of its pining through the given range.
Category: NETWORK ANALYSIS
© 2007 Institute for Network Professionals 2a ITProUSB - 2 - Network Analysis - v1.2 www.inpnet.org • www.HOTLabs.org 26 4/26/2007
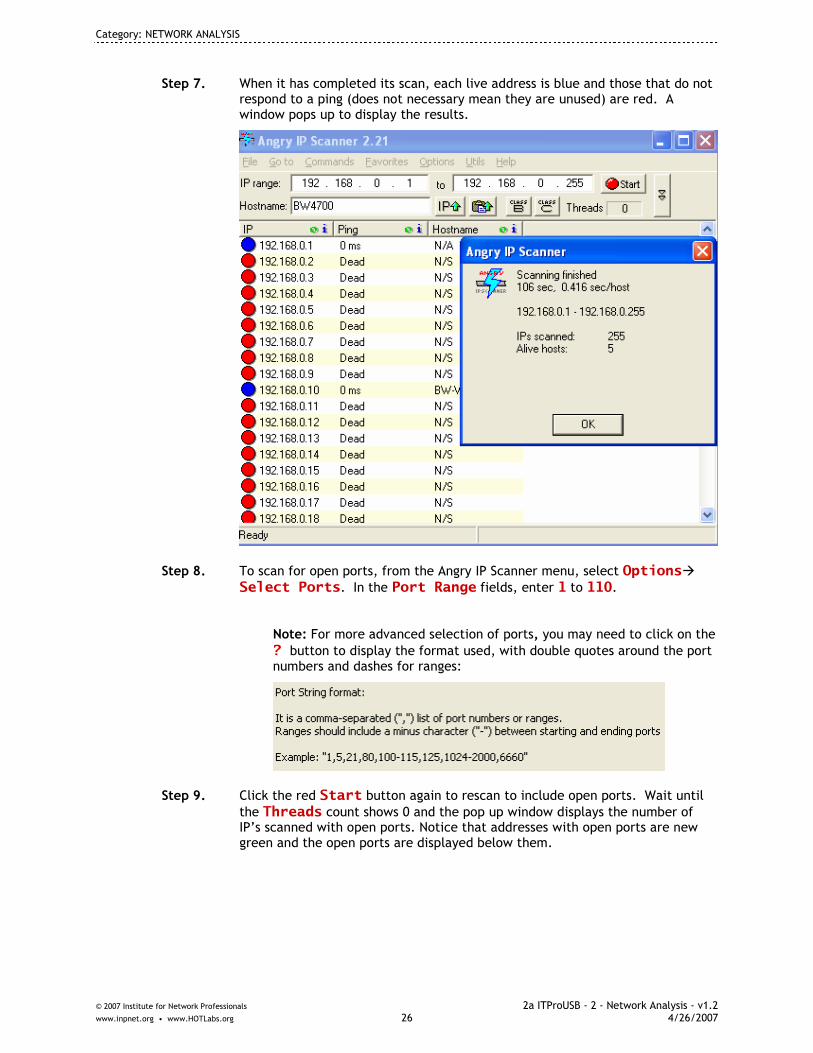
Step 7. When it has completed its scan, each live address is blue and those that do not respond to a ping (does not necessary mean they are unused) are red. A window pops up to display the results.
Step 8. To scan for open ports, from the Angry IP Scanner menu, select Options� Select Ports. In the Port Range fields, enter 1 to 110.
Note: For more advanced selection of ports, you may need to click on the ? button to display the format used, with double quotes around the port numbers and dashes for ranges:
Step 9. Click the red Start button again to rescan to include open ports. Wait until the Threads count shows 0 and the pop up window displays the number of IP’s scanned with open ports. Notice that addresses with open ports are new green and the open ports are displayed below them.
Category: NETWORK ANALYSIS
© 2007 Institute for Network Professionals 2a ITProUSB - 2 - Network Analysis - v1.2 www.inpnet.org • www.HOTLabs.org 27 4/26/2007
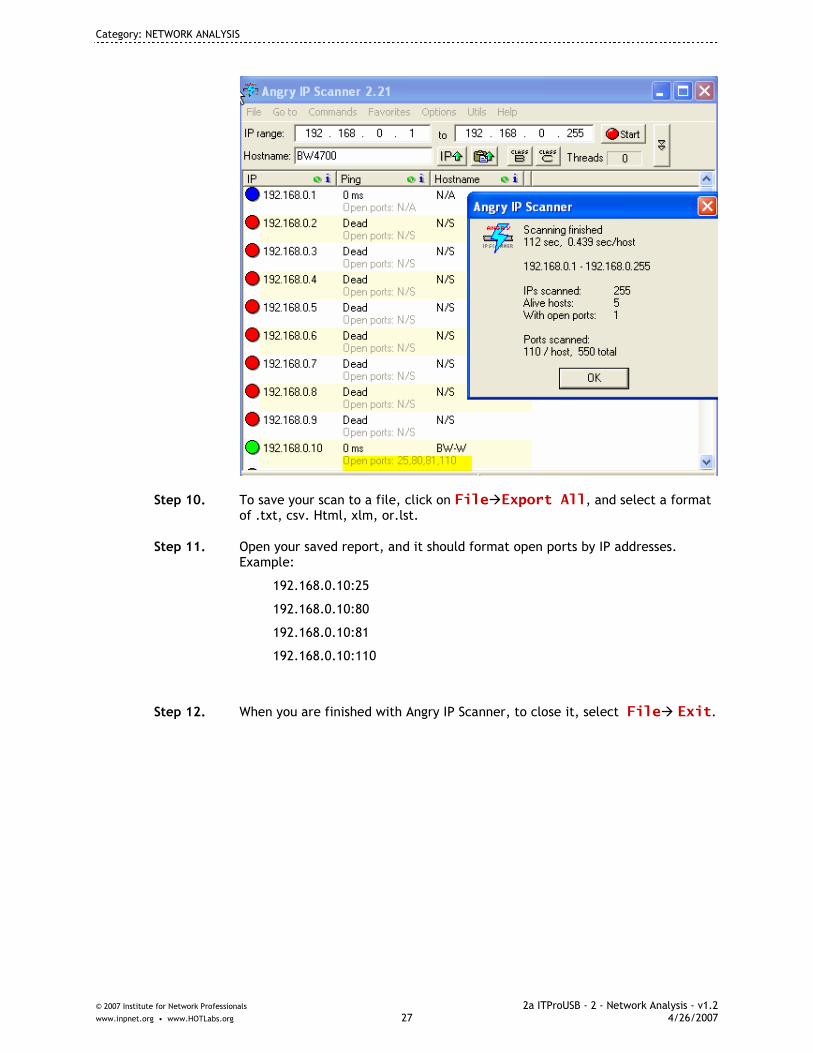
Step 10. To save your scan to a file, click on File�Export All, and select a format of .txt, csv. Html, xlm, or.lst.
Step 11. Open your saved report, and it should format open ports by IP addresses. Example:
192.168.0.10:25
192.168.0.10:80
192.168.0.10:81
192.168.0.10:110
Step 12. When you are finished with Angry IP Scanner, to close it, select File� Exit.

Category: NETWORK ANALYSIS
© 2007 Institute for Network Professionals 2a ITProUSB - 2 - Network Analysis - v1.2 www.inpnet.org • www.HOTLabs.org 28 4/26/2007
Lab Part 3 — ArpCacheWatch ArpCacheWatch monitors the Windows ARP cache and allows you to send an ARP request to obtain the physical address that corresponds to the specified destination IP address. If you want to send an ARP request you can fill the two text boxes on the top: the first is the source and it's initialized to your IP address, the second is the IP address you want to resolve. When you click Send ARP the request will be sent and in the text box below will be displayed the MAC address and the Adapter type of the Ethernet card corresponding to the indicated IP address. Scenario: Suppose you need to isolate the physical location of a nic card at a particular IP address on the network. Use ArpCache to disclose the machine’s MAC address. .
Step 1. In The Network Toolkit main interface, on the left pane, click on the + by Tools � Category �Network Utilities � ArpCacheWatch (v,1.3) �(Run).
Step 2. ArpCacheWatch runs without any user intervention and displays the MAC addresses of the IP addresses it can scan on the network:
Step 3. If you need to locate the MAC address of one specific IP address, enter the IP address in the Destination IP Address field and click Send ARP:
Step 4. The discovered MA address will be displayed in the results screen below.
Step 5. When you are finished with ARPCacheWatch, and since there is no menu for
this utility, close it by clicking on its icon on the top left of its window� Close, or just close it with the Windows red close button
on the top right side.
Lab Part 4 — CurrPorts CurrPorts displays the list of all currently opened TCP/IP and UDP ports on your local computer. For each port in the list, information about the process that opened the port is also displayed, including
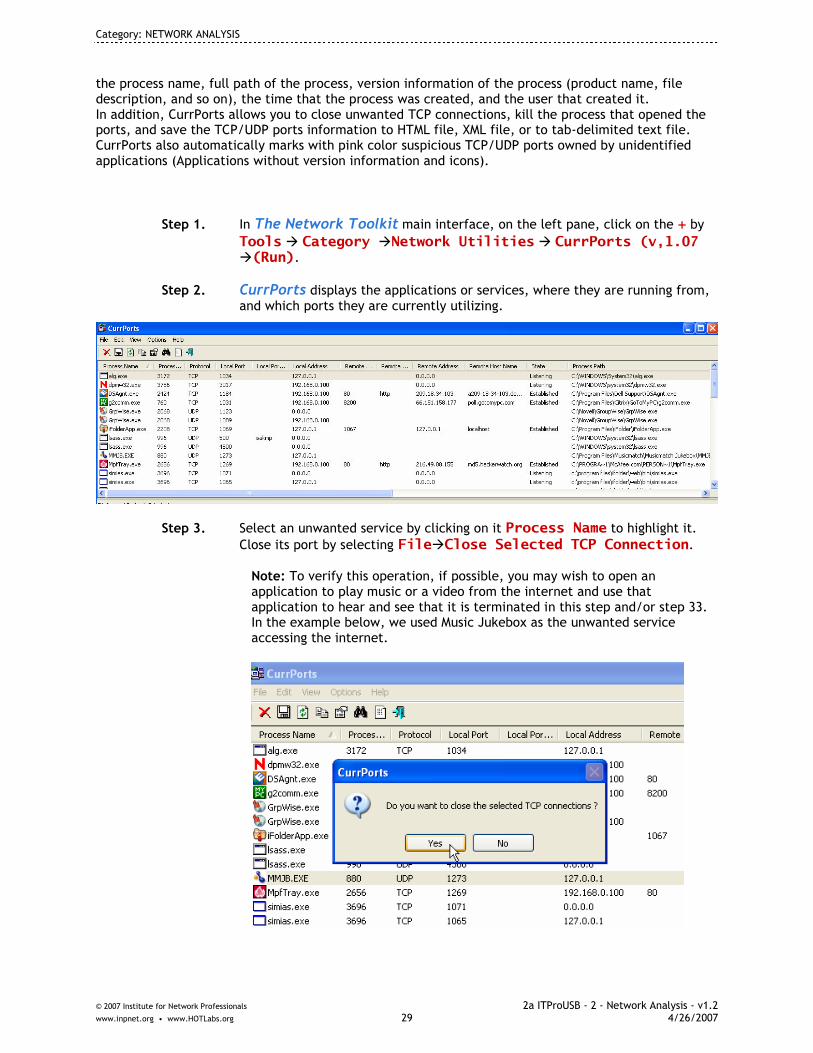
Category: NETWORK ANALYSIS
© 2007 Institute for Network Professionals 2a ITProUSB - 2 - Network Analysis - v1.2 www.inpnet.org • www.HOTLabs.org 29 4/26/2007
the process name, full path of the process, version information of the process (product name, file description, and so on), the time that the process was created, and the user that created it. In addition, CurrPorts allows you to close unwanted TCP connections, kill the process that opened the ports, and save the TCP/UDP ports information to HTML file, XML file, or to tab-delimited text file. CurrPorts also automatically marks with pink color suspicious TCP/UDP ports owned by unidentified applications (Applications without version information and icons).
Step 1. In The Network Toolkit main interface, on the left pane, click on the + by Tools � Category �Network Utilities � CurrPorts (v,1.07 �(Run).
Step 2. CurrPorts displays the applications or services, where they are running from, and which ports they are currently utilizing.
Step 3. Select an unwanted service by clicking on it Process Name to highlight it. Close its port by selecting File�Close Selected TCP Connection.
Note: To verify this operation, if possible, you may wish to open an application to play music or a video from the internet and use that application to hear and see that it is terminated in this step and/or step 33. In the example below, we used Music Jukebox as the unwanted service accessing the internet.

Category: NETWORK ANALYSIS
© 2007 Institute for Network Professionals 2a ITProUSB - 2 - Network Analysis - v1.2 www.inpnet.org • www.HOTLabs.org 30 4/26/2007
Step 4. To kill the process that used that open port, select File�Kill Processes of Selected Ports.
Step 5. When you have finished with CurrPorts, use its exit icon .
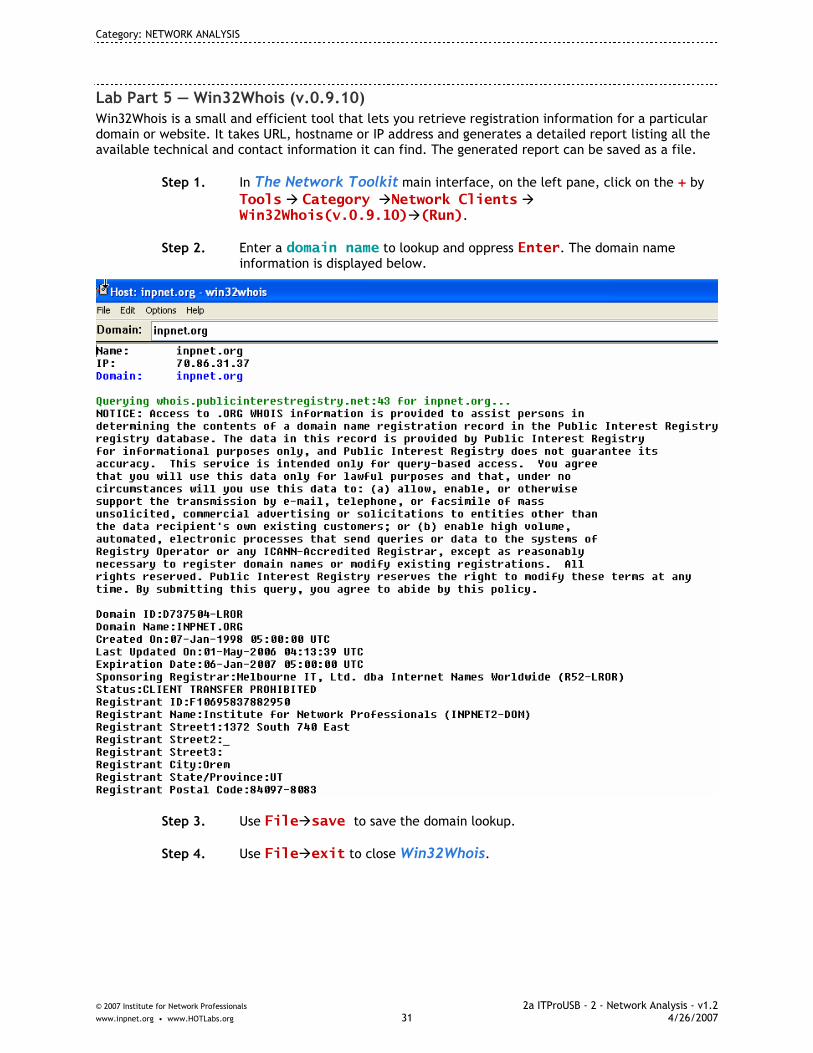
Category: NETWORK ANALYSIS
© 2007 Institute for Network Professionals 2a ITProUSB - 2 - Network Analysis - v1.2 www.inpnet.org • www.HOTLabs.org 31 4/26/2007
Lab Part 5 — Win32Whois (v.0.9.10) Win32Whois is a small and efficient tool that lets you retrieve registration information for a particular domain or website. It takes URL, hostname or IP address and generates a detailed report listing all the available technical and contact information it can find. The generated report can be saved as a file.
Step 1. In The Network Toolkit main interface, on the left pane, click on the + by Tools � Category �Network Clients � Win32Whois(v.0.9.10)�(Run).
Step 2. Enter a domain name to lookup and oppress Enter. The domain name information is displayed below.
Step 3. Use File�save to save the domain lookup.
Step 4. Use File�exit to close Win32Whois.

Category: NETWORK ANALYSIS
© 2007 Institute for Network Professionals 2a ITProUSB - 2 - Network Analysis - v1.2 www.inpnet.org • www.HOTLabs.org 32 4/26/2007
Lab Part 6 — Asterisk Logger (v.1.02) Many applications allow you to type a password. The typed password is normally not shown on the screen, and instead you see a sequence of asterisk characters ('****'). This utility can be used to reveal the passwords stored behind the asterisks in standard password text-boxes.
Step 1. In The Network Toolkit main interface, on the left pane, click on the + by Tools � Category �Password Revealers � Asterisk Logger(v.1.02)�(Run). The main window will appear, with no items in it.
Step 2. Open the window that contains the asterisk text-box you want to reveal. The password will be instantly revealed inside the password box, and in addition, a record containing the password and other information will be added to the main window of Asterisk Logger utility.
Step 3. After you reveal all the passwords you need, you can select the desired passwords in the main window of Asterisk Logger, and save them into a text or HTML file.
Step 4. When you have finished with Asterisk Logger, use File� exit to close it.
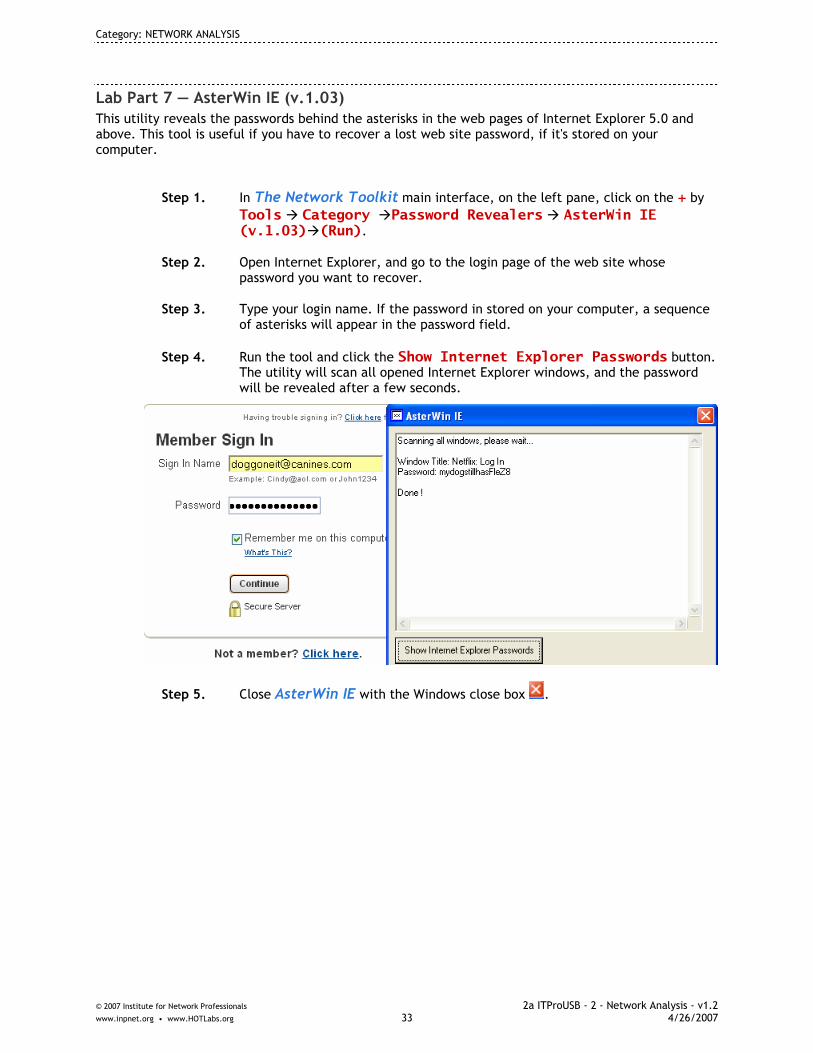
Category: NETWORK ANALYSIS
© 2007 Institute for Network Professionals 2a ITProUSB - 2 - Network Analysis - v1.2 www.inpnet.org • www.HOTLabs.org 33 4/26/2007
Lab Part 7 — AsterWin IE (v.1.03) This utility reveals the passwords behind the asterisks in the web pages of Internet Explorer 5.0 and above. This tool is useful if you have to recover a lost web site password, if it's stored on your computer.
Step 1. In The Network Toolkit main interface, on the left pane, click on the + by Tools � Category �Password Revealers � AsterWin IE (v.1.03)�(Run).
Step 2. Open Internet Explorer, and go to the login page of the web site whose password you want to recover.
Step 3. Type your login name. If the password in stored on your computer, a sequence of asterisks will appear in the password field.
Step 4. Run the tool and click the Show Internet Explorer Passwords button. The utility will scan all opened Internet Explorer windows, and the password will be revealed after a few seconds.
Step 5. Close AsterWin IE with the Windows close box .

Category: NETWORK ANALYSIS
© 2007 Institute for Network Professionals 2a ITProUSB - 2 - Network Analysis - v1.2 www.inpnet.org • www.HOTLabs.org 34 4/26/2007
Lab Part 8 — Protected Storage PassView (v.1.62) Protected Storage PassView is a small utility to reveal the content of the "Protected Storage" registry key. This registry key contains the passwords stored on your computer by Internet Explorer, Outlook Express and MSN Explorer. Protected Storage PassView can only show the passwords of the current logged-on user. It cannot reveal the passwords of other users. The usage is trivial: once executed, Protected Storage PassView displays in its window all the passwords it's able to find, showing the resource name, the password type, the username (if available) and the password. The 'View' menu allows you to filter the main window content by displaying only certain types of passwords
Step 1. In The Network Toolkit main interface, on the left pane, click on the + by Tools � Category �Password Revealers � Protected Storage PassView (v.1.62)�(Run).
Step 2. The screen displays all the values of IE passwords and other entry fields for the current user.
Step 3. You may highlight information to be logged and saved. Click File�Import/Export� Export Selected Items. It offers to save them as Protected Storage Export Files (.prs), or you can save them with a different extension.
Step 4. When you are finished with Protected Storage PassView, use File� exit to close it.
Step 5.

Category: NETWORK ANALYSIS
© 2007 Institute for Network Professionals 2a ITProUSB - 2 - Network Analysis - v1.2 www.inpnet.org • www.HOTLabs.org 35 4/26/2007
Lab Part 9 — StartupRun (v. 1.12) The StartupRun utility displays the list of all applications that are loaded automatically when Windows boots. For each application, additional information is displayed (Product Name, File Version, Description, and Company Name), in order to allow you to easily identify the applications that are loaded at Windows startup. You are allowed to edit, disable, enable and delete the selected startup entries. If StartupRun identifies a spyware or adware program that runs at startup, it automatically paints it in pink color. You can also save the list of startup items into a text or html files Scenario: Sometimes an interval-controlled application that starts automatically may produce an error when running on a schedule that can cause the system to behave erratically. In this scenario, we have identified that an older Quicken or Quickbooks BillMInder agent has been logged in the Windows system logging as causing an error prior to the system rebooting at night. We need to locate where it is being started from and stop it. Also, GoogleTalk always starts but is never intended for use. It too needs to be deleted from the startup.
Step 1. In The Network Toolkit main interface, on the left pane, click on the + by Tools � Category �System Tools � StartupRun (v.1.22)�(Run).
Step 2. The screen displays all applications that are loaded automatically.
Step 3. Highlight an application that should not be running automatically upon startup.
Step 4. Select File�Disable Selected Items.
Step 5. Confirm Yes to disable them.
Step 6. Notice in the Disabled field they now are marked Yes.
Step 7. When you are finished with StartupRun, use File� exit to close it.

Category: NETWORK ANALYSIS
© 2007 Institute for Network Professionals 2a ITProUSB - 2 - Network Analysis - v1.2 www.inpnet.org • www.HOTLabs.org 36 4/26/2007

Category: NETWORK ANALYSIS
© 2007 Institute for Network Professionals 2a ITProUSB - 2 - Network Analysis - v1.2 www.inpnet.org • www.HOTLabs.org 37 4/26/2007
3d Traceroute
3d Traceroute brings a third dimension to running Traceroutes. It still contains the standard traceroute components of delay times and number of hops to your destination, but much more as well.
Product Information
Source Dipl.-Lng. Holger Lembke
Freeware
http://www.d3tr.com/index.html
Where, When, Why Network Analysis—Graphical Network Traceroute showing Time
You are trying to track down the culprit that is causing the ‘Network Is Slow’ complaints from your users. Is the slowdown inside our network, with our ISP, or somewhere on the other end? With 3d Traceroute3d Traceroute3d Traceroute3d Traceroute you have an easy-to-use program that adds a third dimension, time to a standard Traceroute, it allows the user to graphically ‘see’ where the slowdown is occurring.
Usage and Features
• 3d traceroute display: multiple graphics modification options • statistics window: min, max, average, standard deviation and
history window with destination ping time • as list: the usual data view with lots of features • Whois query: everything with only one click • record and playback: record any trace and playback step by step • build in browser: and the browser is already built in. • NSLookup: with UDP and TCP. And zone transfer capability. • Day and Night trace: Admins beloved toy • passive OS fingerprinting • three different Portscanner (knows 3,612 well known ports) • analyze eMail headers: against RBLs • Connection viewer: TCP, IP, UDP etc. statistics • HTTP Spy: query HTTP-headers and webpages • Atomic Clock Sync • TELNET client
Requirements / Dependencies
• Windows 2000 and Windows XP, XP SP1 und XP SP2
Where to Go for More Information
• http://www.d3tr.com/index.html • help files and tutorials, etc.
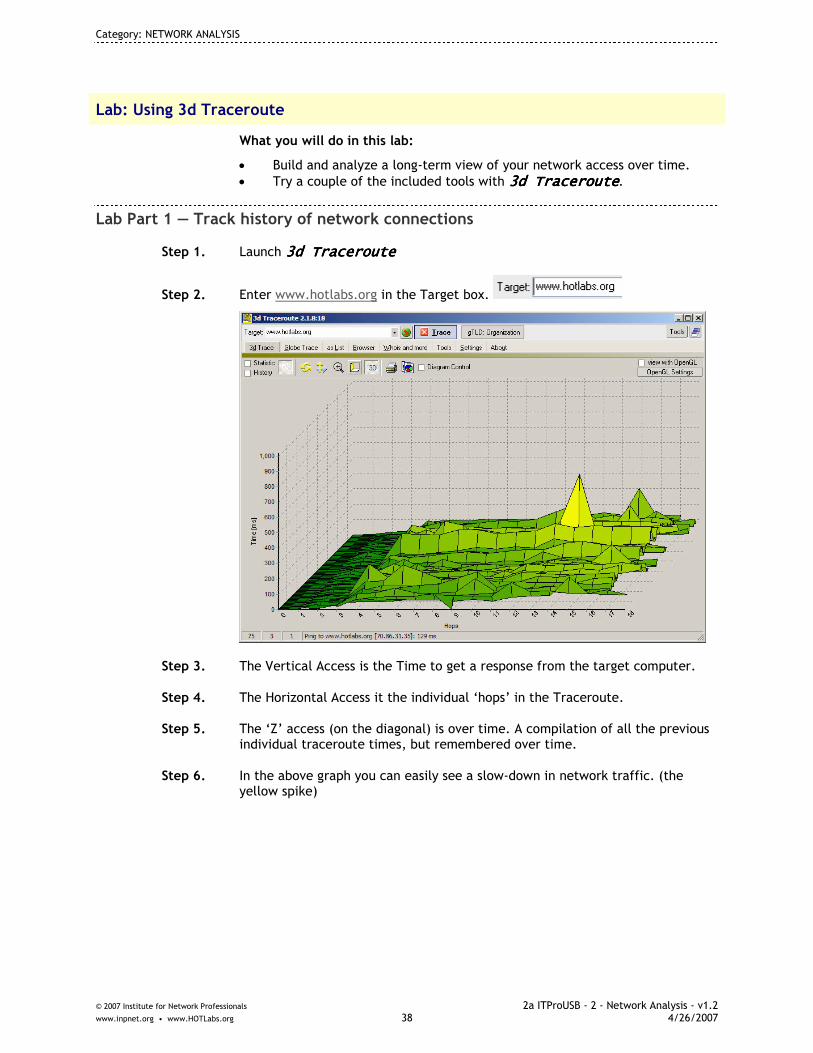
Category: NETWORK ANALYSIS
© 2007 Institute for Network Professionals 2a ITProUSB - 2 - Network Analysis - v1.2 www.inpnet.org • www.HOTLabs.org 38 4/26/2007
Lab: Using 3d Traceroute
What you will do in this lab:
• Build and analyze a long-term view of your network access over time. • Try a couple of the included tools with 3d Traceroute3d Traceroute3d Traceroute3d Traceroute.
Lab Part 1 — Track history of network connections
Step 1. Launch 3d Traceroute3d Traceroute3d Traceroute3d Traceroute
Step 2. Enter www.hotlabs.org in the Target box.
Step 3. The Vertical Access is the Time to get a response from the target computer.
Step 4. The Horizontal Access it the individual ‘hops’ in the Traceroute.
Step 5. The ‘Z’ access (on the diagonal) is over time. A compilation of all the previous individual traceroute times, but remembered over time.
Step 6. In the above graph you can easily see a slow-down in network traffic. (the yellow spike)

Category: NETWORK ANALYSIS
© 2007 Institute for Network Professionals 2a ITProUSB - 2 - Network Analysis - v1.2 www.inpnet.org • www.HOTLabs.org 39 4/26/2007
Below are some ideas on how to set and modify the options of 3d Traceroute.
Step 7. With 3d Traceroute you can view the data with the 3d trace3d trace3d trace3d trace viewer or with a as list viewlist viewlist viewlist view.
Step 8. Click on the ToolsClick on the ToolsClick on the ToolsClick on the Tools tab to view the other included tools built into 3d 3d 3d 3d TracerouteTracerouteTracerouteTraceroute.

Category: NETWORK ANALYSIS
© 2007 Institute for Network Professionals 2a ITProUSB - 2 - Network Analysis - v1.2 www.inpnet.org • www.HOTLabs.org 40 4/26/2007
Step 9. You can now manipulate the data from the various trace routes to give you different ‘views’ of the data with 3d manipulation.

Category: NETWORK ANALYSIS
© 2007 Institute for Network Professionals 2a ITProUSB - 2 - Network Analysis - v1.2 www.inpnet.org • www.HOTLabs.org 41 4/26/2007
Step 10. Please review the 3d trace below. Is the network slowdown on our local network? Where is the network slowdown?
Step 11. Click on the ToolsClick on the ToolsClick on the ToolsClick on the Tools tab to try out a few of the included tools.
What you learned in this Lab: In this Lab you learned to use Product to:
1. How to visually show the network slowdown using 3d Traceroute3d Traceroute3d Traceroute3d Traceroute.
2. Ways to easily manipulate the data into entertaining more informative ways for reporting to management.

Category: NETWORK ANALYSIS
© 2007 Institute for Network Professionals 2a ITProUSB - 2 - Network Analysis - v1.2 www.inpnet.org • www.HOTLabs.org 42 4/26/2007

Category: NETWORK ANALYSIS
© 2007 Institute for Network Professionals 2a ITProUSB - 2 - Network Analysis - v1.2 www.inpnet.org • www.HOTLabs.org 43 4/26/2007
Angry IP Scanner
AngAngAngAngry IP scanner ry IP scanner ry IP scanner ry IP scanner is a very fast IP scanner and port scanner. It can scan IP addresses in any range as well as any their ports. Its binary file size is very small compared to other IP or port scanners. Angry IP scanner simply pings each IP address to check if it's alive, then optionally it is resolving its hostname, determines the MAC address, scans ports, etc. The amount of gathered data about each host can be extended with the available plugins. It also has additional features, like NetBIOS information (computer name, workgroup name, and currently logged in Windows user), favorite IP address ranges, customizable openers, etc.
Product Information
Source Angryziber Software
Freeware – Open Source
http://www.angryziber.com/
Where, When, Why Network Analysis—Quick Network Scanner
Like some other fast network scanners, Angry IP Scanner is a very quick and easy way to find what computers and servers are on a network. Did you ever ‘loose’ a network device and don’t know it’s IP address to control?
Looking to see if anyone on your network still has network shares visible?
Need to get a quick listing of all the IP Address, MAC Addresses and Hostnames on your network?
Well, Angry IP Scanner is just the tool for you!
Usage and Features
• TFast Multi-Threaded ping and port scanner • Resolves Hostnames, MAC Address, Workgroup Name, User Names • Scanned results can be saved to a variety of formats – CSV, TXT, HTML,
XML – easy to edit with other software
Like ALL Network Analysis tools – You must always have permission in order to scan and connect to computers.
Requirements / Dependencies
• TCP/IP Stack
Where to Go for More Information
• Angry IP Scanner Forum - http://sourceforge.net/forum/?group_id=25534

Category: NETWORK ANALYSIS
© 2007 Institute for Network Professionals 2a ITProUSB - 2 - Network Analysis - v1.2 www.inpnet.org • www.HOTLabs.org 44 4/26/2007
Lab: Using Angry IP Scanner
What you will do in this lab:
• Configure Columns and Settings • Run a scan of your network and analyze
Lab Part 1 — Scanning your network
Step 1. Launch Angry IP ScannerAngry IP ScannerAngry IP ScannerAngry IP Scanner.
Step 2. Click Options Options Options Options ���� Set Columns… Set Columns… Set Columns… Set Columns…
Step 3. Choose the following column headings (using the >>>> button to move them to the display side) then click OK OK OK OK
Step 4. Now we are ready to load the local subnet addresses. You can always type in the direct IP Address range, or a quicker way is to use the icons. First click on
the IP AddressIP AddressIP AddressIP Address icon to load your own IP Address, then the Class CClass CClass CClass C
icon to extend the range to your subnet. Then StartStartStartStart.
Step 5. Angry IP ScannerAngry IP ScannerAngry IP ScannerAngry IP Scanner will then proceed to ping and port scan all the range addresses. Watch and see as it loads. Clicking on a column heading after the scan is complete will allow you to sort on that column. Sorting on the Ping column puts the computers in fastest order (it also puts all the live computers on the top and dead IP addresses on the bottom)
Step 6. Did it get your IP Address and MAC Address correct? What about your neighbors? Do any of the enumerated computers have any open shares? How about answering to an FTP or WEB query?

Category: NETWORK ANALYSIS
© 2007 Institute for Network Professionals 2a ITProUSB - 2 - Network Analysis - v1.2 www.inpnet.org • www.HOTLabs.org 45 4/26/2007
Step 7. By Right Clicking Right Clicking Right Clicking Right Clicking on any computer you can now attempt to communicate directly with that computer via standard ports.
What you learned in this Lab: In this Lab you learned to use Angry IP Scanner to:
1. Configure it to scan and display a variety of standard services
2. Scanned an IP Range for live computers and their services
3. Attempted to connect directly to a computer.

Category: NETWORK ANALYSIS
© 2007 Institute for Network Professionals 2a ITProUSB - 2 - Network Analysis - v1.2 www.inpnet.org • www.HOTLabs.org 46 4/26/2007
Category: NETWORK ANALYSIS
© 2007 Institute for Network Professionals 2a ITProUSB - 2 - Network Analysis - v1.2 www.inpnet.org • www.HOTLabs.org 47 4/26/2007
Convert IP
Simple tool to convert from ‘standard’ dotted decimal IP Addresses into Hex and decimal
Product Information
Where, When, Why To help in tracking down spammers who obfuscate their web and IP Addresses.
Usage and Features
• Convert to�from Decimal, Hexadecimal and dotted Decimal formatted IP Address
Requirements / Dependencies
• None
Where to Go for More Information
• None

Category: NETWORK ANALYSIS
© 2007 Institute for Network Professionals 2a ITProUSB - 2 - Network Analysis - v1.2 www.inpnet.org • www.HOTLabs.org 48 4/26/2007
Lab: Using Convert IP
What you will do in this lab:
• Convert to and from Dotted Decimal formatted IP Addresses
Step 1. Launch ConvConvConvConvert IPert IPert IPert IP.
Step 2. Enter a ‘standard’ dotted decimal IP address
Step 3. Click on ‘Convert’
Step 4. Note the other ways to point to an IP Address
Step 5. Open a DOS box and Ping www.hotlabs.org web site. Write down the IP address.
Step 6. Enter this IP address in the converter. Write down the decimal conversion
Step 7. Ping the decimal conversion.
Step 8. Does it work the same as dotted decimal?
Category: NETWORK ANALYSIS
© 2007 Institute for Network Professionals 2a ITProUSB - 2 - Network Analysis - v1.2 www.inpnet.org • www.HOTLabs.org 49 4/26/2007
CurrPorts
CurrPortsCurrPortsCurrPortsCurrPorts displays the list of all currently opened TCP/IP and UDP ports on your local computer. For each port in the list, information about the process that opened the port is also displayed, including the process name, full path of the process, version information of the process (product name, file description, and so on), the time that the process was created, and the user that created it.
In addition, CurrPortsCurrPortsCurrPortsCurrPorts allows you to close unwanted TCP connections, kill the process that opened the ports, and save the TCP/UDP ports information to HTML file , XML file, or to tab-delimited text file. CurrPortsCurrPortsCurrPortsCurrPorts also automatically mark with pink color suspicious TCP/UDP ports owned by unidentified applications
Product Information
Source NirSoft
Freeware
http://www.nirsoft.net/utils/cports.html
Where, When, Why Network Analysis—Scanner for Currently Open local TCP/IP and UDP Ports
Ever wonder what ports are open? You might be surprised to see what your computer is listening to at any one moment. This utility shows detailed listings of both TCP and UDP endpoints on the target system. Not only what might be listening, but also what is currently active!
Usage and Features
• See what ports are listening or active on TCP and UDP • Terminate Connections to open or active ports • CurrPortsCurrPortsCurrPortsCurrPorts is a Windows program that will show you detailed listings of
all TCP and UDP endpoints on your system, including the local and remote addresses and state of TCP connections.
• On Windows NT, 2000 and XP CurrPortsCurrPortsCurrPortsCurrPorts also reports the name of the process that owns the endpoint. CurrPortsCurrPortsCurrPortsCurrPorts provides a more informative and conveniently presented subset of the Netstat program that ships with Windows.
• CurrPortsCurrPortsCurrPortsCurrPorts will resolve URLs to active IP Addresses
Requirements / Dependencies
• Windows NT, Windows 2000, and Windows XP • Windows 98 with limited functionality
Where to Go for More Information
• http://www.nirsoft.net/utils/cports.html
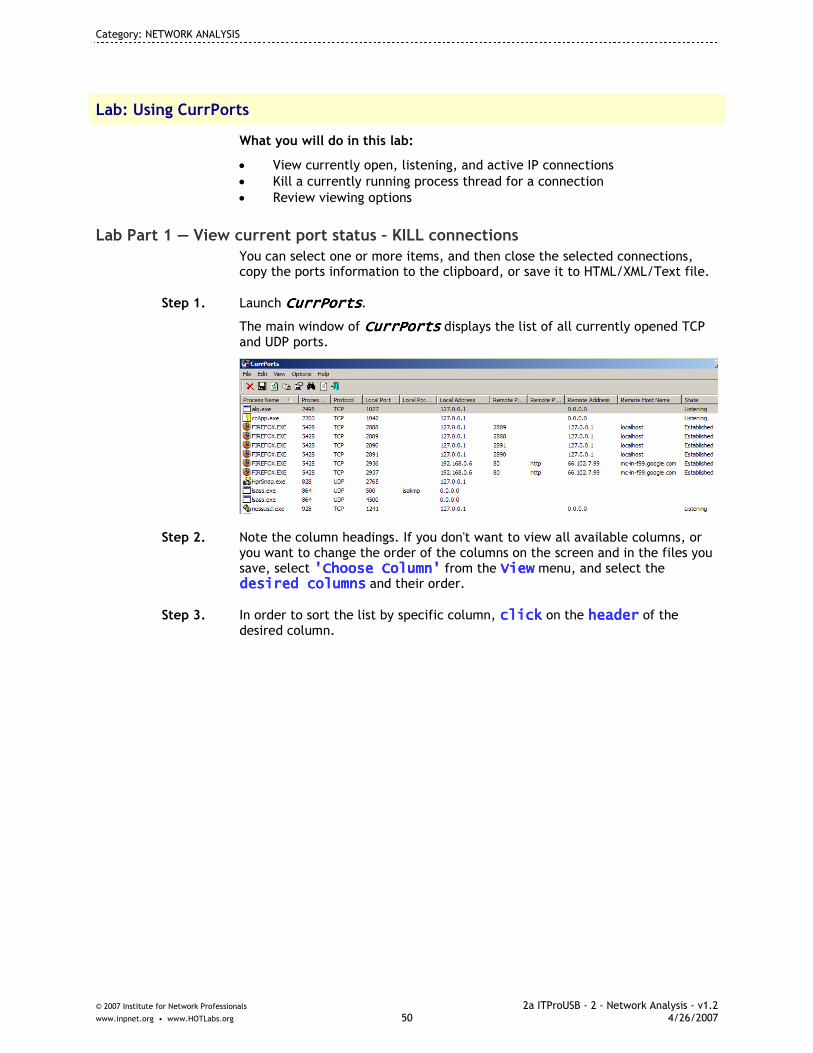
Category: NETWORK ANALYSIS
© 2007 Institute for Network Professionals 2a ITProUSB - 2 - Network Analysis - v1.2 www.inpnet.org • www.HOTLabs.org 50 4/26/2007
Lab: Using CurrPorts
What you will do in this lab:
• View currently open, listening, and active IP connections • Kill a currently running process thread for a connection • Review viewing options
Lab Part 1 — View current port status – KILL connections You can select one or more items, and then close the selected connections, copy the ports information to the clipboard, or save it to HTML/XML/Text file.
Step 1. Launch CurrPortsCurrPortsCurrPortsCurrPorts.
The main window of CurrPortsCurrPortsCurrPortsCurrPorts displays the list of all currently opened TCP and UDP ports.
Step 2. Note the column headings. If you don't want to view all available columns, or you want to change the order of the columns on the screen and in the files you save, select 'Choose Column''Choose Column''Choose Column''Choose Column' from the ViewViewViewView menu, and select the desired columnsdesired columnsdesired columnsdesired columns and their order.
Step 3. In order to sort the list by specific column, clickclickclickclick on the headerheaderheaderheader of the desired column.
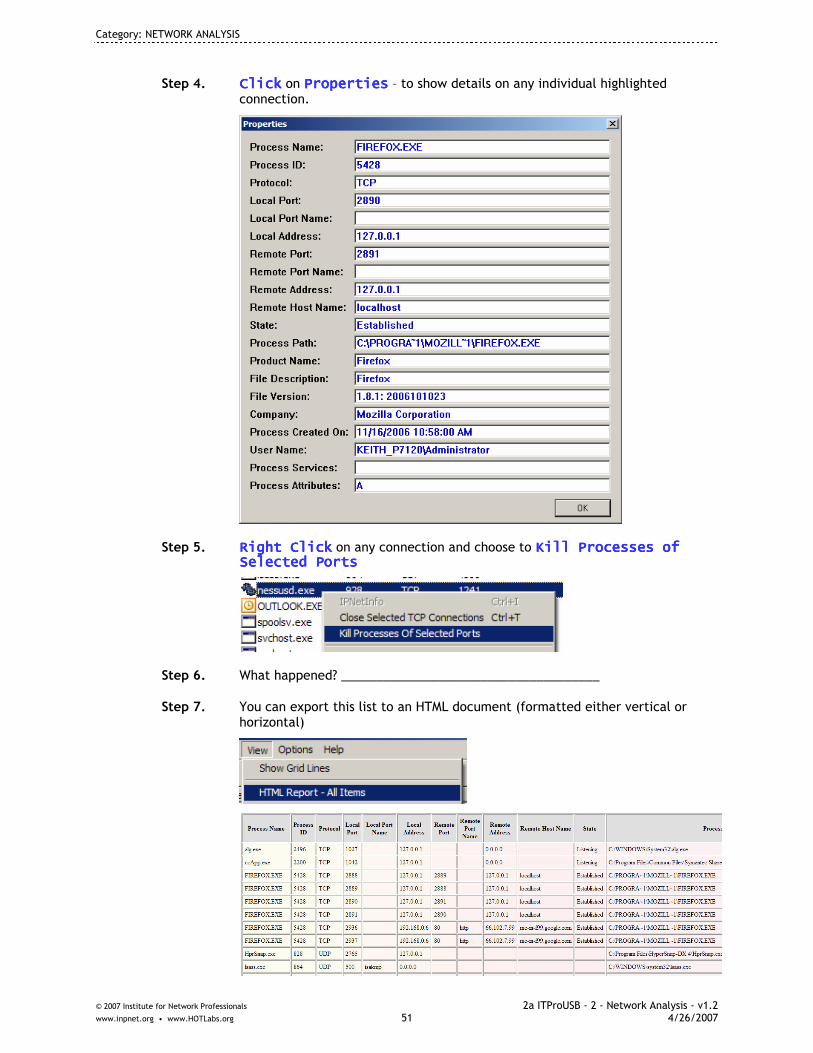
Category: NETWORK ANALYSIS
© 2007 Institute for Network Professionals 2a ITProUSB - 2 - Network Analysis - v1.2 www.inpnet.org • www.HOTLabs.org 51 4/26/2007
Step 4. ClickClickClickClick on PropertiesPropertiesPropertiesProperties – to show details on any individual highlighted connection.
Step 5. Right ClickRight ClickRight ClickRight Click on any connection and choose to Kill Processes of Kill Processes of Kill Processes of Kill Processes of Selected PortsSelected PortsSelected PortsSelected Ports
Step 6. What happened? _____________________________________
Step 7. You can export this list to an HTML document (formatted either vertical or horizontal)

Category: NETWORK ANALYSIS
© 2007 Institute for Network Professionals 2a ITProUSB - 2 - Network Analysis - v1.2 www.inpnet.org • www.HOTLabs.org 52 4/26/2007
Step 8. Now, back in the CurrPorts window, familiarize yourself with the following options which are available under the OptionsOptionsOptionsOptions menu:
Display ListeningDisplay ListeningDisplay ListeningDisplay Listening: If this option is enabled, all listening ports are displayed.
Display EstablishedDisplay EstablishedDisplay EstablishedDisplay Established: If this option is enabled, all established connections are displayed.
Display ClosedDisplay ClosedDisplay ClosedDisplay Closed: If this option is enabled, closed ports (with 'Time Wait', 'Close Wait', or 'Closed' state) are displayed.
Display Items With Unknown StateDisplay Items With Unknown StateDisplay Items With Unknown StateDisplay Items With Unknown State: If this option is enabled, items with unknown state (the state column is empty) are displayed.
Display Items Without Remote AddressDisplay Items Without Remote AddressDisplay Items Without Remote AddressDisplay Items Without Remote Address: If this option is enabled, disconnected ports with no remote address are displayed.
Display TCP PortsDisplay TCP PortsDisplay TCP PortsDisplay TCP Ports: If this option is disabled, TCP ports won't be displayed in the ports list.
Display UDP PortsDisplay UDP PortsDisplay UDP PortsDisplay UDP Ports: If this option is disabled, UDP ports won't be displayed in the ports list.
Mark Ports Of Unidentified ApplicationsMark Ports Of Unidentified ApplicationsMark Ports Of Unidentified ApplicationsMark Ports Of Unidentified Applications: If this option is enabled, all TCP/UDP ports that opened by applications with no version information and with no icons, are automatically marked with pink color. If you have on your system one or more ports marked with pink color, you should deeply check the processes that created these ports. It could be only an innocent application that simply doesn't contain any icons and version information (For example: the executables of MySQL and Oracle servers don't contain any icons or version info, so if you have MySQL/Oracle servers on your system, the ports they open will be marked.), but it can also be a trojan or other unwanted application that infiltrated into your system.
Mark New/Modified PortsMark New/Modified PortsMark New/Modified PortsMark New/Modified Ports: If this option is enabled, each time the ports list is refreshed, all newly added ports and existing ports with changes are marked with green color.
Auto RefreAuto RefreAuto RefreAuto Refreshshshsh: Allows you to automatically refresh the opened ports list each 2, 4, 6, 8, or 10 seconds.
Sort On Auto RefreshSort On Auto RefreshSort On Auto RefreshSort On Auto Refresh: If this option is enabled, the entire ports list is sorted each time that the list is refreshed automatically. Otherwise, new/modified ports are added to the bottom of the list.
What you learned in this Lab: In this Lab you learned to use Product to:
1. How to view details and properties for live IP connections.
2. Kill connections

Category: NETWORK ANALYSIS
© 2007 Institute for Network Professionals 2a ITProUSB - 2 - Network Analysis - v1.2 www.inpnet.org • www.HOTLabs.org 53 4/26/2007
HoverIP
HoverIP is a powerful set of IP utilities, all inside a single utility.
With HoverIP you can display your IP configuration (on all network cards), perform different tasks like NSLOOKUP, PING, TRACEROUTE, SCAN PORTS or network, and manage ROUTES in a very convenient way !
Product Information
Source Hover Corporation
Freeware
http://www.hoverdesk.net/freeware.htm
Why, When & Where Network Analysis—IP Configuration Lookup & Utilities
This is a quick tool to find out information about your TCP/IP client. More than a simple C:\ipconfig /all will give you. Yes, you can always open up a DOS box and run these commands in a CLI, but this is a quick easy way to get the same information, and look at different NICs all at the same time.
This way you don’t have to remember all those command line switches!
Usage and Features
• Quick way to check your IP configuration and access – and be able to switch between various NIC as well as Renew DHCP information
• Complete a DNS lookup using NSLookup of any Domain • Tabular information on station’s routing table setup • Simple Traceroute • Port Scanning of a target or a range
Requirements / Dependencies
• HoverIP will not work with Windows 95

Category: NETWORK ANALYSIS
© 2007 Institute for Network Professionals 2a ITProUSB - 2 - Network Analysis - v1.2 www.inpnet.org • www.HOTLabs.org 54 4/26/2007
Lab: Using HoverIP
What you will do in this lab:
• Find out your current machine’s IP configuration information • Lookup the DNS information on a Web Server • Do a traceroute from your current computer to that Web Server
Lab Part 1 – Find out the IP configuration on Client Computer
Step 1. Launch HoverIPHoverIPHoverIPHoverIP.
Step 2. Hover IP starts and automatically finds out information on your default NIC’s TCP/IP configuration. Including Hostname and Domain. From here you can also do a DHCP Release or Renew.
Step 3. Change the NIC by clicking in the Drop Down Box – note the changes to the information.
Lab Part 2 – Look up DNS information on a Server In this section you’ll be ‘checking out’ the information provided by DNS on a specific web server – www.hotlabs.orgwww.hotlabs.orgwww.hotlabs.orgwww.hotlabs.org.
Step 4. Launch HoverIPHoverIPHoverIPHoverIP.
Step 5. Click on the NSLookup TabClick on the NSLookup TabClick on the NSLookup TabClick on the NSLookup Tab.

Category: NETWORK ANALYSIS
© 2007 Institute for Network Professionals 2a ITProUSB - 2 - Network Analysis - v1.2 www.inpnet.org • www.HOTLabs.org 55 4/26/2007
Step 6. Enter www.hotlabs.orgwww.hotlabs.orgwww.hotlabs.orgwww.hotlabs.org in the Address/Domain to check box. Then Click Click Click Click the Start buttonthe Start buttonthe Start buttonthe Start button.
Step 7. Review the answers from the DNS query –
a. Who is hosting this Web Server? b. What is the IP address of the Web Server?
Lab Part 3 — Traceroute to a Server Just like using the built-in DOS command TRACERT, this command will start a Trace Route series of ICMP broadcasts to help you trace the direction and passage of time for a set of ping packets, the an every increasing TTL to ‘watch’ where the packets go on their way to the server.
Step 8. Launch HoverIPHoverIPHoverIPHoverIP.
Step 9. Click Click Click Click on the TracerouteTracerouteTracerouteTraceroute Tab Tab Tab Tab.
Step 10. Enter www.hotlabs.org in the Host box. Then Click the Start button. Also check the Perform Reverse Lookup check box to see the names of the hosts along the way.

Category: NETWORK ANALYSIS
© 2007 Institute for Network Professionals 2a ITProUSB - 2 - Network Analysis - v1.2 www.inpnet.org • www.HOTLabs.org 56 4/26/2007
Step 11. Review the answers from the Traceroute –
a. How Many hops to the server? b. What is the longest hop time? c. What ISP is the server using? d. What ISP are you using right now?
What you learned in this Lab: In this Lab you learned to use HoverIP to:
1. Get a quick graphical response of NIC card’s TCP/IP and SMB configuration
2. Use a simple DNS tool to query the database on a specific address or domain for DNS information
3. Traceroute back to the same server to track hop-count, and delays incurred in getting data from your computer to the server.

Category: NETWORK ANALYSIS
© 2007 Institute for Network Professionals 2a ITProUSB - 2 - Network Analysis - v1.2 www.inpnet.org • www.HOTLabs.org 57 4/26/2007
IPNetInfo
IPNetInfoIPNetInfoIPNetInfoIPNetInfo is a small utility that allows you to easily find all available information about an IP address: The owner of the IP address, the country/state name, IP addresses range, contact information (address, phone, fax, and email), and more.
This utility can be very useful for finding the origin of unsolicited mail. You can simply copy the message headers from your email software and paste them into IPNetInfoIPNetInfoIPNetInfoIPNetInfo utility. IPNetInfoIPNetInfoIPNetInfoIPNetInfo automatically extracts all IP addresses from the message headers, and displays the information about these IP addresses.
Product Information
Source NirSoft
Freeware
http://www.nirsoft.net/utils/ipnetinfo.html
Where, When, Why Network Analysis—IP Traceback lookup utility
Trying to track down that Spam? Who really is behind that URL you’ve been phised? Where and Who is hosting a companies web site?
Well, ask no more. Just use IPNetInfoIPNetInfoIPNetInfoIPNetInfo to help track down these and other questions about IP addresses.
Usage and Features
• Track down information on IP Addresses, URLs or Mail Headers • Simple Cut and Paste Functionality • Very Detailed Reports – IP, Country, State, Network, Owner, IP Range,
Contacts, Addresses, and More.
Requirements / Dependencies
• Windows operating system: Windows 98/ME/2000/XP/2003. • Internet connection.
Where to Go for More Information
• http://www.nirsoft.net/utils/ipnetinfo.html • How to get full e-mail headers -
http://www.haltabuse.org/help/headers/
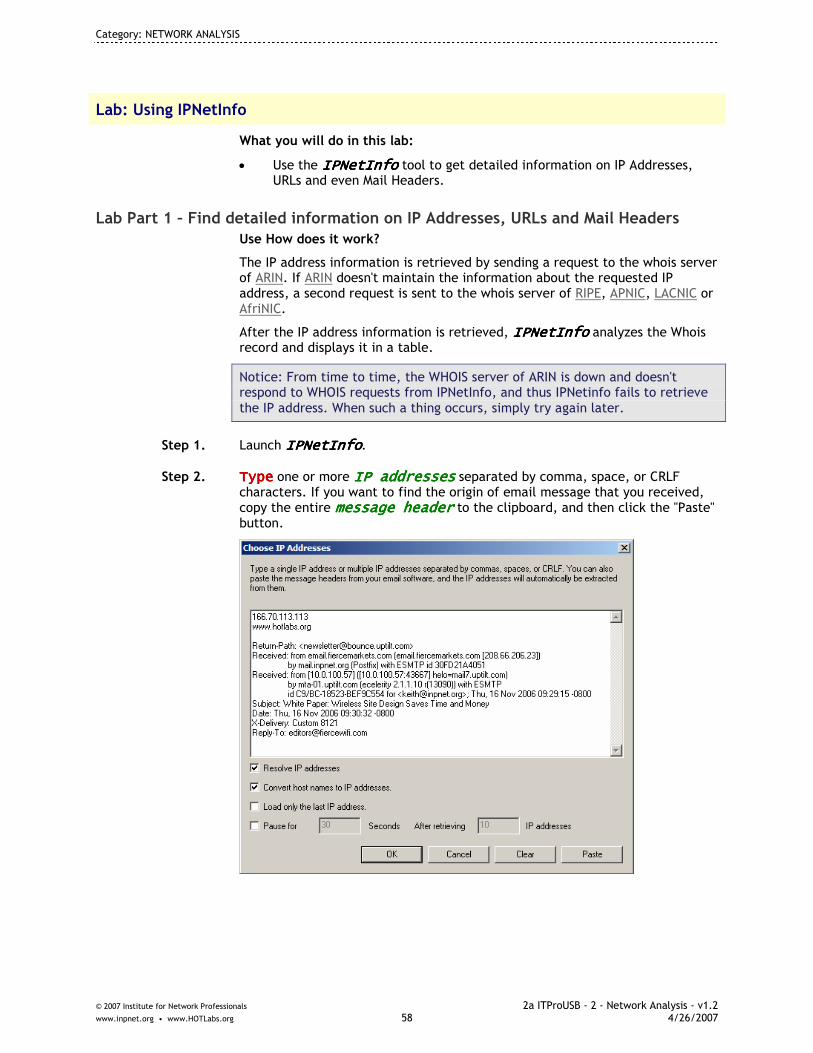
Category: NETWORK ANALYSIS
© 2007 Institute for Network Professionals 2a ITProUSB - 2 - Network Analysis - v1.2 www.inpnet.org • www.HOTLabs.org 58 4/26/2007
Lab: Using IPNetInfo
What you will do in this lab:
• Use the IPNetInfoIPNetInfoIPNetInfoIPNetInfo tool to get detailed information on IP Addresses, URLs and even Mail Headers.
Lab Part 1 – Find detailed information on IP Addresses, URLs and Mail Headers Use How does it work?
The IP address information is retrieved by sending a request to the whois server of ARIN. If ARIN doesn't maintain the information about the requested IP address, a second request is sent to the whois server of RIPE, APNIC, LACNIC or AfriNIC.
After the IP address information is retrieved, IPNetInfoIPNetInfoIPNetInfoIPNetInfo analyzes the Whois record and displays it in a table.
Notice: From time to time, the WHOIS server of ARIN is down and doesn't respond to WHOIS requests from IPNetInfo, and thus IPNetinfo fails to retrieve the IP address. When such a thing occurs, simply try again later.
Step 1. Launch IPNetInfoIPNetInfoIPNetInfoIPNetInfo.
Step 2. TypeTypeTypeType one or more IP addressesIP addressesIP addressesIP addresses separated by comma, space, or CRLF characters. If you want to find the origin of email message that you received, copy the entire message headermessage headermessage headermessage header to the clipboard, and then click the "Paste" button.

Category: NETWORK ANALYSIS
© 2007 Institute for Network Professionals 2a ITProUSB - 2 - Network Analysis - v1.2 www.inpnet.org • www.HOTLabs.org 59 4/26/2007
Step 3. Then click OKclick OKclick OKclick OK
Step 4. Note it has resolved the URLs into IP address, as well as found all the IP addresses from the E-mail Header.
Step 5. ClickClickClickClick on HTML ReportHTML ReportHTML ReportHTML Report
Step 6. Review Resulting Report (You can view the results of this IP information in a horizontal or vertical format)
Step 7. ClickClickClickClick on the PropertiesPropertiesPropertiesProperties button to see all the details on any highlighted IP address on IPNetInfo screen.

Category: NETWORK ANALYSIS
© 2007 Institute for Network Professionals 2a ITProUSB - 2 - Network Analysis - v1.2 www.inpnet.org • www.HOTLabs.org 60 4/26/2007
Note: IPNetInfoIPNetInfoIPNetInfoIPNetInfo always ignores the following special IP address blocks, because they are not used as public Internet addresses:
10.0.0.0 - 10.255.255.255
127.0.0.0 - 127.255.255.255
169.254.0.0 - 169.254.255.255
172.16.0.0 - 172.31.255.255
192.168.0.0 - 192.168.255.255
224.0.0.0 - 239.255.255.255
What you learned in this Lab: In this Lab you learned to use IPNetInfo to:
1. Find detailed information on any IP Address, URL or even Mail Headers.
Category: NETWORK ANALYSIS
© 2007 Institute for Network Professionals 2a ITProUSB - 2 - Network Analysis - v1.2 www.inpnet.org • www.HOTLabs.org 61 4/26/2007
MySpeed PC
MySpeed PMySpeed PMySpeed PMySpeed PC C C C is a speed test program that accurately measures your Internet connection bandwidth, and provides an easy to understand report of your download and upload speeds and connection quality.
Product Information
Source VisualWare
Free for Personal Use
http://www.myspeed.com/pe/index.html
Where, When, Why Network Analysis—Internet Speed/Bandwidth Measurement Utility
You might be helping a friend configure their network connection, or perhaps working at a remote work site, and don’t know the actual ‘pipe’ to the Internet. Or, you might know your Internet connection (DSL, Cable Modem, or T1) but just want to test it to see if you are getting what you paid for. Using this Executable Speed Tester – you can get consistent results from any target network machine.
Usage and Features
• Runs from any personal computer—Run MySpeed PCMySpeed PCMySpeed PCMySpeed PC from your USB and easily test your Internet connection speed to servers in the US and UK.
• Upload and download speed test measurements—Connections often have different upload and download speeds, but most bandwidth tests only measure the download speed, providing only half the picture. MySpeed PC accurately reports both upload and download speeds.
• Reports bandwidth consistency (QOS), Max Pause and Round Trip Time (RTT) —The consistency of download capacity is a critical measure for bandwidth-intensive applications such as VoIP and multimedia. MySpeed MySpeed MySpeed MySpeed PCPCPCPC reports Quality of Service measurements of consistent bandwidth delivery. Max Pause, the longest pause recorded during the data download, and the Round Trip Time are also reported.
• Speed Test Detail Log—View the raw data results for any speed test for a step by step view of each data packet transfer, the elapsed time and number of bytes transferred.
• Accurate—carefully engineered and tested to measure connection speeds
Requirements / Dependencies
• Windows 98, 2000, XP • JVM
Where to Go for More Information
• White Papers on QOS http://www.myspeed.com/support/qos_matters.html
http://www.myspeed.com/support/qos.html

Category: NETWORK ANALYSIS
© 2007 Institute for Network Professionals 2a ITProUSB - 2 - Network Analysis - v1.2 www.inpnet.org • www.HOTLabs.org 62 4/26/2007
• Differences between Bandwidth Testers http://www.myspeed.com/support/benchmarks.html

Category: NETWORK ANALYSIS
© 2007 Institute for Network Professionals 2a ITProUSB - 2 - Network Analysis - v1.2 www.inpnet.org • www.HOTLabs.org 63 4/26/2007
Lab: Using MySpeed PC
What you will do in this lab:
• Test your current network connection speed to the Internet
Lab Part 1 — Testing your network connection speeds Using this tool allows you to test the current network connection speeds over the Internet in a consistent manner. It will work the same from any PC that is connected to the Internet. You can use these results to compare different network configurations and/or different ISPs.
Step 1. Launch MySpeed PCMySpeed PCMySpeed PCMySpeed PC.
Step 2. This starts with a pretty, but non-functioning screen. In order to start the test,
click click click click on the Start Start Start Start button.
Step 3. Watch the screen as it starts the test—it works through the download tests, then on to the upload tests.
Step 4. What is your current Upload speed? __________Download speed? __________ Why are they different? _____________________________________________
Step 5. Read the following Frequently Asked Questions concerning bandwidth speed testing to help in you analyzing your results.
What is the QOS percentage?
MySpeedMySpeedMySpeedMySpeed reports the Quality of Service (QOS) for your Internet connection, which represents the level of consistent download bandwidth (or throughput) provided by your ISP. The higher QOS percentage, the higher the overall quality
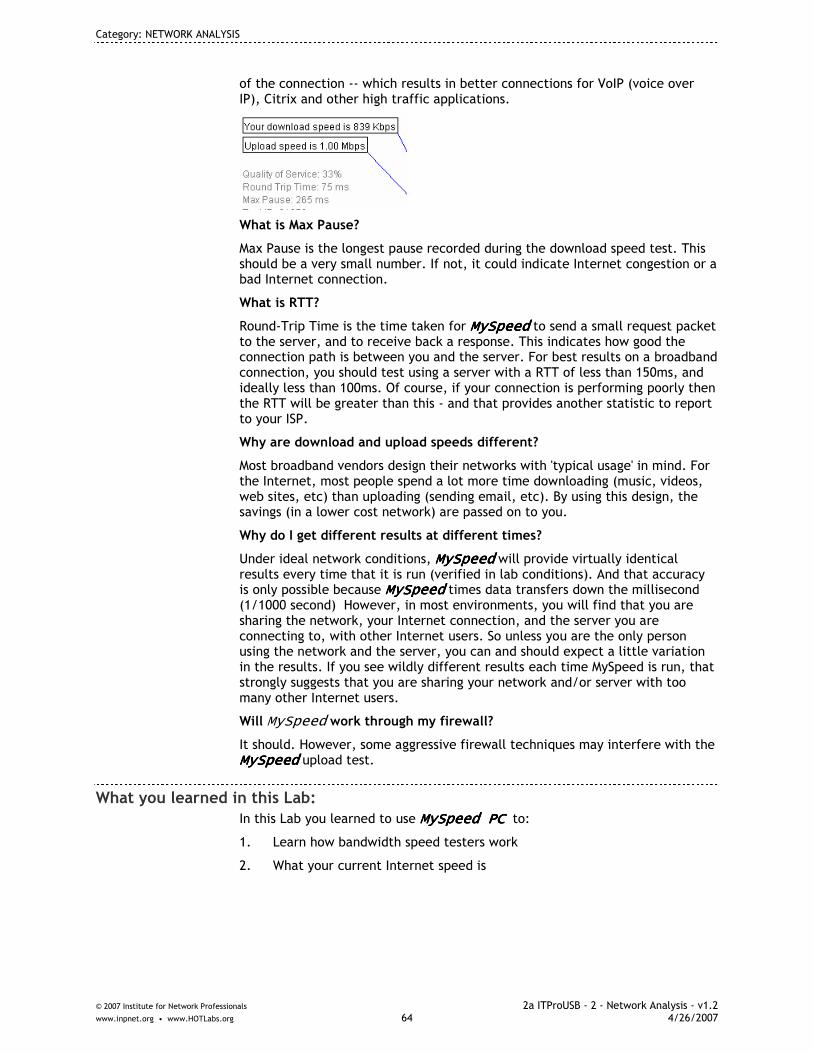
Category: NETWORK ANALYSIS
© 2007 Institute for Network Professionals 2a ITProUSB - 2 - Network Analysis - v1.2 www.inpnet.org • www.HOTLabs.org 64 4/26/2007
of the connection -- which results in better connections for VoIP (voice over IP), Citrix and other high traffic applications.
What is Max Pause?
Max Pause is the longest pause recorded during the download speed test. This should be a very small number. If not, it could indicate Internet congestion or a bad Internet connection.
What is RTT?
Round-Trip Time is the time taken for MySpeedMySpeedMySpeedMySpeed to send a small request packet to the server, and to receive back a response. This indicates how good the connection path is between you and the server. For best results on a broadband connection, you should test using a server with a RTT of less than 150ms, and ideally less than 100ms. Of course, if your connection is performing poorly then the RTT will be greater than this - and that provides another statistic to report to your ISP.
Why are download and upload speeds different?
Most broadband vendors design their networks with 'typical usage' in mind. For the Internet, most people spend a lot more time downloading (music, videos, web sites, etc) than uploading (sending email, etc). By using this design, the savings (in a lower cost network) are passed on to you.
Why do I get different results at different times?
Under ideal network conditions, MySpeedMySpeedMySpeedMySpeed will provide virtually identical results every time that it is run (verified in lab conditions). And that accuracy is only possible because MySpeedMySpeedMySpeedMySpeed times data transfers down the millisecond (1/1000 second) However, in most environments, you will find that you are sharing the network, your Internet connection, and the server you are connecting to, with other Internet users. So unless you are the only person using the network and the server, you can and should expect a little variation in the results. If you see wildly different results each time MySpeed is run, that strongly suggests that you are sharing your network and/or server with too many other Internet users.
Will MySpeed work through my firewall?
It should. However, some aggressive firewall techniques may interfere with the MySpeedMySpeedMySpeedMySpeed upload test.
What you learned in this Lab: In this Lab you learned to use MySpeed PMySpeed PMySpeed PMySpeed PC C C C to:
1. Learn how bandwidth speed testers work
2. What your current Internet speed is

Category: NETWORK ANALYSIS
© 2007 Institute for Network Professionals 2a ITProUSB - 2 - Network Analysis - v1.2 www.inpnet.org • www.HOTLabs.org 65 4/26/2007
NetMeter
NetMeterNetMeterNetMeterNetMeter is a small, customizable network bandwidth monitoring program for Windows 95/98/98SE/ME/NT4/2000/XP
Product Information
Source Freeware
http://readerror.gmxhome.de/
Where, When, Why Network Analysis—Graphical Network Traffic Monitor
Sometimes a great little utility like NetMeterNetMeterNetMeterNetMeter is exactly what an IT Professional needs! Though simple, it can still be very valuable in tracking network access and troubleshooting a variety of networking issues.
Just load up NetMeter and watch the moving graphs to see visually how much traffic is being sent over the Network. If you are expecting something different that what you see… well that’s the value of NetMeterNetMeterNetMeterNetMeter!
You can also use this to compare different network throughput results based on different network configurations, comparing Wireless –vs- Wired connections, etc.
Usage and Features
• Visual view of Network traffic on individual/all network interface cards
Requirements / Dependencies
• Windows 95/98/98SE/ME/NT4/2000/XP
Where to Go for More Information
• http://readerror.gmxhome.de/

Category: NETWORK ANALYSIS
© 2007 Institute for Network Professionals 2a ITProUSB - 2 - Network Analysis - v1.2 www.inpnet.org • www.HOTLabs.org 66 4/26/2007
Lab: Using NetMeter
What you will do in this lab:
• Watch your network traffic in real time
Lab Part 1 — Watching network traffic Using NetMeterNetMeterNetMeterNetMeter is an easy task – just start it and watch!
Of course it has additional capabilities – setting thresholds, having alarms, etc. but for now we’ll just be watching.
Step 1. Launch NetMeterNetMeterNetMeterNetMeter.
Step 2. Note the scale is on the left side of the screen – Also note the small arrow icons in the task bar. If you lose access to the graph window, just click again on this
icon.
Step 3. By Right Clicking on the Taskbar icon you can bring up the options window to set the NetMeterNetMeterNetMeterNetMeter Options, which interface, and how NetNetNetNetMeterMeterMeterMeter will display the network traffic information.
What you learned in this Lab: In this Lab you learned to use Product to:
1. How to quickly see visually network traffic on your target machine.

Category: NETWORK ANALYSIS
© 2007 Institute for Network Professionals 2a ITProUSB - 2 - Network Analysis - v1.2 www.inpnet.org • www.HOTLabs.org 67 4/26/2007
Network Stumbler
Network StumblerNetwork StumblerNetwork StumblerNetwork Stumbler, sometimes called NetStumbler, is a “Swiss Army knife” for WLAN diagnostics, helping to discover, configure, optimize and secure wireless networks.
Product Information
Source NetStumbler.com (Marius Milner)
“Beggarware” (This means that you do not have to pay for a license to use it. However if you use it and like it, please consider making a donation to support future development and other costs incurred as a result of making this software available.)
License is Free, however a $50 donation is strongly suggested for corporate and government users. Donate at http://www.stumbler.net/donate.
www.NetStumbler.com
Where, When, Why Network Analysis – Wireless LAN diagnostics tool
IT professionals can use Network Stumbler Network Stumbler Network Stumbler Network Stumbler to verify that wireless access points (APs) have good area coverage with appropriate signal quality, make sure that a wireless LAN is not exposed to unauthorized users, discover competing APs, document the security in use and to do simple site surveys.
Network StumblerNetwork StumblerNetwork StumblerNetwork Stumbler may also be used for “WarDriving,” and it supports GPS integration.
Usage and Features
• Detect Wireless Local Area Networks (WLANs) using 802.11 a, b and g • Verify that your network is set up the way you intended • Find locations with poor coverage in your WLAN • Detect other networks that may be causing interference on your network • Detect unauthorized "rogue" access points in your workplace • Help aim directional antennas for long-haul WLAN links • Use it recreationally for WarDriving
Requirements / Dependencies
• This version requires a Windows operating system • A Wireless LAN card capable of supporting an NDIS driver
Note: The requirements for NetStumbler are somewhat complex and depend on hardware, firmware versions, driver versions and operating system. The best way to see if it works on your system is to try it. Some configurations have been extensively tested and are known to work. These are detailed at http://www.stumbler.net/compat.

Category: NETWORK ANALYSIS
© 2007 Institute for Network Professionals 2a ITProUSB - 2 - Network Analysis - v1.2 www.inpnet.org • www.HOTLabs.org 68 4/26/2007
Where to Go for More Information
• Downloads - www.netstumbler.com/downloads/ • FAQs - www.netstumbler.com/faqs/ • HotSpots - hotspots.netstumbler.com/ • Dictionary - www.netstumbler.com/faqs/dictionary/ • Forums - www.netstumbler.org/ • help files

Category: NETWORK ANALYSIS
© 2007 Institute for Network Professionals 2a ITProUSB - 2 - Network Analysis - v1.2 www.inpnet.org • www.HOTLabs.org 69 4/26/2007
Lab: Using Network Stumbler
What you will do in this lab…
• Configure Network StumblerNetwork StumblerNetwork StumblerNetwork Stumbler • Use Network StumblerNetwork StumblerNetwork StumblerNetwork Stumbler’s AP scanner • Use Network StumblNetwork StumblNetwork StumblNetwork Stumbler er er er to displays AP’s by channel • Use Network Stumbler Network Stumbler Network Stumbler Network Stumbler to display signal strength of an AP
Configure Network Stumbler Introduction: In this Lab, you will first configure Network Stumbler Network Stumbler Network Stumbler Network Stumbler to use the Windows built-in Wi-Fi card and select the NDIS NDIS NDIS NDIS driver for it. Then you will use it to scan and gain information on the Access Points it detects in and around the classroom.
Assuming you have booted your computer into the Windows OS and assuming that your wireless Ethernet card is active but not connected with an AP or AdHoc network, you have met the prerequisites for starting Network Network Network Network Stumbler.Stumbler.Stumbler.Stumbler.
Step 1. Launch Network StumblerNetwork StumblerNetwork StumblerNetwork Stumbler.
Step 2. When Network Stumbler starts, it typically does not detect any AP’s or activity:
Step 3. This is because you must enable an NDIS driver for your Wi-Fi card. In the Network Stumbler menu, left click on Device, and select the NDIS driver for your wireless card.

Category: NETWORK ANALYSIS
© 2007 Institute for Network Professionals 2a ITProUSB - 2 - Network Analysis - v1.2 www.inpnet.org • www.HOTLabs.org 70 4/26/2007
This example shows the selection of an NDIS 5.1NDIS 5.1NDIS 5.1NDIS 5.1 driver for an internal Intel PRO/Wireless 2915ABG NetworkIntel PRO/Wireless 2915ABG NetworkIntel PRO/Wireless 2915ABG NetworkIntel PRO/Wireless 2915ABG Network card....
IMPORTANT Note: You do NOT and should NOT have your wireless card connected with any particular AP at this point. Network StumblerNetwork StumblerNetwork StumblerNetwork Stumbler uses the Wi-Fi card and its built-in antenna to scan for any and all AP’s
Step 4. Nearby AP traffic should begin to appear in Network Stumbler:
Step 5. Left click no the + sign next to Channels and select a channel that shows an active AP.
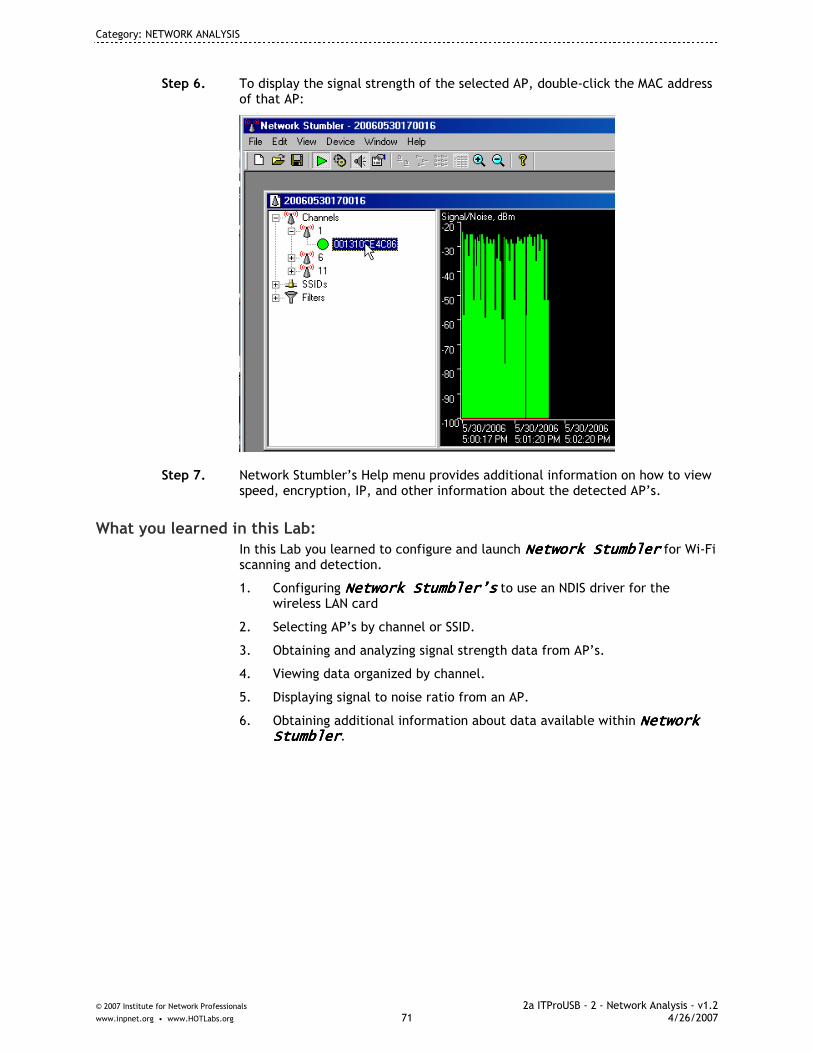
Category: NETWORK ANALYSIS
© 2007 Institute for Network Professionals 2a ITProUSB - 2 - Network Analysis - v1.2 www.inpnet.org • www.HOTLabs.org 71 4/26/2007
Step 6. To display the signal strength of the selected AP, double-click the MAC address of that AP:
Step 7. Network Stumbler’s Help menu provides additional information on how to view speed, encryption, IP, and other information about the detected AP’s.
What you learned in this Lab: In this Lab you learned to configure and launch Network StumblerNetwork StumblerNetwork StumblerNetwork Stumbler for Wi-Fi scanning and detection.
1. Configuring Network Stumbler’sNetwork Stumbler’sNetwork Stumbler’sNetwork Stumbler’s to use an NDIS driver for the wireless LAN card
2. Selecting AP’s by channel or SSID.
3. Obtaining and analyzing signal strength data from AP’s.
4. Viewing data organized by channel.
5. Displaying signal to noise ratio from an AP.
6. Obtaining additional information about data available within Network Network Network Network StumblerStumblerStumblerStumbler.

Category: NETWORK ANALYSIS
© 2007 Institute for Network Professionals 2a ITProUSB - 2 - Network Analysis - v1.2 www.inpnet.org • www.HOTLabs.org 72 4/26/2007

Category: NETWORK ANALYSIS
© 2007 Institute for Network Professionals 2a ITProUSB - 2 - Network Analysis - v1.2 www.inpnet.org • www.HOTLabs.org 73 4/26/2007
Sam Spade
Sam Spade is a network-query tool that can help you locate bulk mailers and maybe even make them answer for their transgressions. Many server-finding tools, such as nslookup, whois, and traceroute, have been previously available, but only from a command line. Sam Spade lets you use these tools from a graphical interface, and information found with one tool can be queried using another. Its SMTP Verify tool helps you check on the validity of an e-mail address, which is good for finding out if mail is being sent from that address or forwarded from another address to cover the spammer's tracks
Product Information
Source Sam Spade
Freeware
Steve Adkins
http://www.samspade.org
Where, When, Why Network Analysis
You need to perform a query to locate a spammer, analyzing email headers and tracking down the sender. You only have your USB stick, and do not want to leave a trace on the machine you will work from.
Usage and Features
• Sends HTTP packets to your ISP's Web server every minute or so, to keep a dial-up link active.
• There is also an included Web browser. • An abuse.net query will identify the e-mail addresses listed at a database
maintained by abuse.net.
Requirements / Dependencies Supported Operating Systems:
• Windows NT, Windows 2000, Windows 9.x, Windows XP.
Where to Go for More Information
• http://samspade.org • Manuals and Tutorials available in Help, Help Topics, Manuals and
Tutorials

Category: NETWORK ANALYSIS
© 2007 Institute for Network Professionals 2a ITProUSB - 2 - Network Analysis - v1.2 www.inpnet.org • www.HOTLabs.org 74 4/26/2007

Category: NETWORK ANALYSIS
© 2007 Institute for Network Professionals 2a ITProUSB - 2 - Network Analysis - v1.2 www.inpnet.org • www.HOTLabs.org 75 4/26/2007
SoftPerfect Network Scanner
SoftPerfect Network ScannerSoftPerfect Network ScannerSoftPerfect Network ScannerSoftPerfect Network Scanner (NetScanNetScanNetScanNetScan) is a multi-threaded IP, SNMP and NetBIOS scanner with a modern interface and several advanced features. It is intended for both system administrators and users who are interested in computer security. The program pings computers, scans for listening TCP ports and shows what types of resources are shared on a network (including system and hidden). In addition, it allows you to mount shared resources as network drives, browse them using Windows Explorer, filter the results list and more.
Product Information
Source SoftPerfect Research
Freeware
http://www.softperfect.com/products/networkscanner/
Where, When, Why Network Analysis—Network Scanner and Penetration Tester
Sometimes you’re on a network, and you don’t know anything about the subnet you are on. Perhaps you’re looking for a ‘missing’ server or printer, or you have an Access Point but don’t know its IP address to control it. Using SoftPerfect Network ScannerSoftPerfect Network ScannerSoftPerfect Network ScannerSoftPerfect Network Scanner (NetScanNetScanNetScanNetScan) you can quickly see the network. You can point it at your local subnet, or an external network – either way you get a great group of information about the computers on that network.
As a penetration testing tool, once the scanning is complete, you can use this tool to attempt to access any network shares, connect to the computer’s Web, FTP or Telnet services.
WARNING: As with all network scanning tools, be sure to GET PERMISSION prior to running!
Usage and Features
• Pings computers. • Detects hardware (MAC) addresses even across routers. • Detects hidden shared resources (normally they are not visible on a
network) and write accessible shares. • Scans for listening TCP ports and SNMP services. • Mounting and exploring of found resources. • Doesn't require administrative privileges.
Requirements / Dependencies
• Supported platforms Windows 95, 98, ME, NT, 2000, XP, 2003
Where to Go for More Information
• Online Manual - http://www.softperfect.com/products/networkscanner/manual/

Category: NETWORK ANALYSIS
© 2007 Institute for Network Professionals 2a ITProUSB - 2 - Network Analysis - v1.2 www.inpnet.org • www.HOTLabs.org 76 4/26/2007
Lab: Using Network Scanner (NetScan)
What you will do in this lab:
• Scan your local internal subnet • Scan your external IP address subnet • Connect to services and shares on scanned computers
Lab Part 1 – Scanning your local subnet
Step 1. Launch NetScanNetScanNetScanNetScan (Network Scanner) (Network Scanner) (Network Scanner) (Network Scanner)
Look at the toolbar with buttons used to access the main program features.
The program controls are as follows:
Save the scan results to a file.
Expand the results tree.
Collapse the results tree.
Search the results tree.
Apply the shares filter. Only the computers with available shared folders will be shown.
Apply the ports filter. Only the computers with an open TCP port will be shown.
Apply the host name filter. Only the computers with a valid host name will be shown.
Apply the SNMP filter. Only the computers with a running SNMP service will be shown.
Program Options.
Auto-detect the network configuration.
Online Help (this web page).

Category: NETWORK ANALYSIS
© 2007 Institute for Network Professionals 2a ITProUSB - 2 - Network Analysis - v1.2 www.inpnet.org • www.HOTLabs.org 77 4/26/2007
Step 2. Press Ctrl+O or the button to access the options.
Step 3. You can choose Options Options Options Options ���� Auto Auto Auto Auto Detect Local IP RangeDetect Local IP RangeDetect Local IP RangeDetect Local IP Range to quickly auto fill the IP range of your local subnet
Step 4. The Auto Detect feature will prompt you to decide which of the IP ranges available through your various NICs you want to scan.
Step 5. ChooseChooseChooseChoose one of the local subnets, then click click click click the Start Scanning Start Scanning Start Scanning Start Scanning button.
Step 6. After allowing the scan to complete, review the information provided. Are there any ‘+’ signs before devices? ________
Step 7. Expand one of these and see what is available. What are these folders? __________________________________________ What is the difference between the normal folders and those with a Red square inside? __________________________________________________

Category: NETWORK ANALYSIS
© 2007 Institute for Network Professionals 2a ITProUSB - 2 - Network Analysis - v1.2 www.inpnet.org • www.HOTLabs.org 78 4/26/2007
Step 8. DoubleDoubleDoubleDouble----ClickClickClickClick on one of the folders.… What happens? ________________
Step 9. Can you use The SoftPerfect Network ScannerSoftPerfect Network ScannerSoftPerfect Network ScannerSoftPerfect Network Scanner to access network shares that are open? ________ Can you access shares that you don’t have rights to? ________
Step 10. To find out what your ‘external’ address is, Click Options Options Options Options ���� Detect Detect Detect Detect External IP AddressExternal IP AddressExternal IP AddressExternal IP Address. Then choose Go Go Go Go. This is the address your computer is using on the Internet, though you might have a non-routable ‘private’ IP address assigned by your local DHCP server and NAT device.
Step 11. What is your External IP Address? ____________________________
Step 12. Clicking on the UseUseUseUse button loads the subnet where your external address resides in the scan range. What would you see if you scanned this range? _______________________ DO you have permission to scan that subnet? _________________________

Category: NETWORK ANALYSIS
© 2007 Institute for Network Professionals 2a ITProUSB - 2 - Network Analysis - v1.2 www.inpnet.org • www.HOTLabs.org 79 4/26/2007
Step 13. If you Right ClickRight ClickRight ClickRight Click on one of the found computers in the scan window you’ll get an option to try and connect via HTTP, FTP or Telnet. Are you able to connect via any of these methods to your personal computer? _______ What about the Default Gateway on your subnet? _______
What you learned in this Lab: In this Lab you learned to use SoftPerfect Network Scanner to:
1. Quickly configure and scan your local subnet to find local computers, shares, MAC address and Host names.
2. Use the tool to connect to shares, FTP, HTTP and Telnet sessions to scanned computers.
3. Find your ‘external’ IP Address
4. Scan the external subnet where your computer lives – if you have permission.

Category: NETWORK ANALYSIS
© 2007 Institute for Network Professionals 2a ITProUSB - 2 - Network Analysis - v1.2 www.inpnet.org • www.HOTLabs.org 80 4/26/2007

Category: NETWORK ANALYSIS
© 2007 Institute for Network Professionals 2a ITProUSB - 2 - Network Analysis - v1.2 www.inpnet.org • www.HOTLabs.org 81 4/26/2007
SuperScan4
SuperScan is a powerful TCP port scanner, pinger, and resolver.
Product Information
Source SuperScan4
Freeware
Foundstone, Inc.
http://www.foundstone.com
Where, When, Why Network Analysis
You need to scan for open ports, only have your USB stick, and do not want to leave trace on the machine you will scan from.
Usage and Features
• Source port scanning • Superior scanning speed • Support for unlimited IP pages • Improved host detection using multiple IP protocols • TCP SYN scanning • UDP scanning (two methods) • IP address import support ranges and CIDR formats • Fast hostname resolving • Massive built-in port list description database
Requirements / Dependencies Supported Operating Systems:
• Windows 2000, XP only • use SuperScan3 for Win 95/98/ME
Where to Go for More Information
• http://foundstone.com • Quick Usage Guide in SuperScan4, Help, About menu

Category: NETWORK ANALYSIS
© 2007 Institute for Network Professionals 2a ITProUSB - 2 - Network Analysis - v1.2 www.inpnet.org • www.HOTLabs.org 82 4/26/2007

Category: NETWORK ANALYSIS
© 2007 Institute for Network Professionals 2a ITProUSB - 2 - Network Analysis - v1.2 www.inpnet.org • www.HOTLabs.org 83 4/26/2007
TCPNetView
TCPNetView was written for determining IP-addresses and MAC-addresses of computers on a Local Area Network (LAN). The program works under Windows 95/98/NT4.0.
Product Information
Source Alexander P. Gorlach
Freeware
http://gorlach.etype.net/netview/index-e.html
Where, When, Why Network Analysis—Quick Scanner for local Network Resources
When you need a quick view of who is on your subnet. Perhaps looking for a ‘missing’ device, or just to see who is joining you on this subnet. TCPNetView is a quick way to see your network.
It will also resolve NetBios Names, MAC addresses and any resource names
Usage and Features
• Enumerator for local subnet • Includes Netbios network resources, host names, IP Address, MAC Address
and any resource comments • Can export this scan to a text file
Requirements / Dependencies
• Any Windows System
Where to Go for More Information
• http://gorlach.etype.net/netview/index-e.html

Category: NETWORK ANALYSIS
© 2007 Institute for Network Professionals 2a ITProUSB - 2 - Network Analysis - v1.2 www.inpnet.org • www.HOTLabs.org 84 4/26/2007
Lab: Using TCPNetView
What you will do in this lab:
• Scan your local subnet
Lab Part 1 — Scan your local subnet
Step 1. Launch TCPNetView.
Step 2. Be patient while the scanning takes place. It may a few minutes.
Step 3. How many other devices can you see on your same subnet? ______________
Did you know all this information about your computer is available to all others on your netowork? ________
Step 4. Type one of the ‘Network Resource’ names into an Explorer window. It may take a little while for the resource to be located.
Hint: Be sure to use the “\\\\\\\\” in front of the resource.
Step 5. What happens? _____________________________________________
Step 6. Export this list to a text file on your C:C:C:C:\\\\ drive by clicking File File File File ���� Sav Sav Sav Save As…e As…e As…e As…
What you learned in this lab:
1. To scan for resources on your subnet
2. To export the scan information to a text file

Category: NETWORK ANALYSIS
© 2007 Institute for Network Professionals 2a ITProUSB - 2 - Network Analysis - v1.2 www.inpnet.org • www.HOTLabs.org 85 4/26/2007
TCPView
TCPView TCPView TCPView TCPView is a Windows program that will show you detailed listings of all TCP and UDP endpoints on your system, including the local and remote addresses and state of TCP connections. On Windows NT, 2000 and XP TCPView also reports the name of the process that owns the endpoint. TCPView provides a more informative and conveniently presented subset of the Netstat program that ships with Windows.
Product Information
Source Sysinternals
www.sysinternals.com
Where, When, Why Network Analysis—Quick Scanner for open TCP and UDP ports
Ever wonder what ports are open? You might be surprised to see what your computer is listening to at any one moment. This utility shows detailed listings of both TCP and UDP endpoints on the target system. Not only what might be listening, but also what is currently active!
Usage and Features
• See what ports are listening or active on TCP and UDP • Terminate Connections to open or active ports
Requirements / Dependencies
• TCPView works on Windows NT/2000/XP and Windows 98/Me. You can use TCPView on Windows 95 if you get the Windows 95 Winsock 2 Update
Information: Based on new licensing agreements from Microsoft after they purchased Systinternals – you might have to personally download your own copy of this file from the link below and place it in your USB Drive in the folder: <usb drive>\\\\2 2 2 2 –––– Network Analysis Network Analysis Network Analysis Network Analysis\\\\TCPViewTCPViewTCPViewTCPView.
Where to Go for More Information
• www.microsoft.com/technet/sysinternals/Networking/TcpView.mspx

Category: NETWORK ANALYSIS
© 2007 Institute for Network Professionals 2a ITProUSB - 2 - Network Analysis - v1.2 www.inpnet.org • www.HOTLabs.org 86 4/26/2007
Lab: Using TCPView
What you will do in this lab:
• View open and active ports • Terminate an active connection
Lab Part 1 — View Open and Active Ports
Step 1. Launch TCPViewTCPViewTCPViewTCPView.
Step 2. Note the ports that are currently active and listening
e. How many sockets are currently being used by your browser? ______ f. Why is the browser NOT using port 80 for HTTP traffic? ___________ g. How many ports are being ‘listened’ to on your machine? _______
Step 3. Start a browser session (or some other network application that you won’t mind killing in a moment). Does it show up in the active processes? ________
Step 4. Then Right Click Right Click Right Click Right Click on that Active ConnectionActive ConnectionActive ConnectionActive Connection and choose End Process…End Process…End Process…End Process… to quit that connection.
Step 5. Return to the application (like your browser) to see what happened when you terminated the connection.
What you learned in this Lab: In this Lab you learned to use TCPView to:
1. View what ports are active or listening.
2. Terminate an active connection.

Category: NETWORK ANALYSIS
© 2007 Institute for Network Professionals 2a ITProUSB - 2 - Network Analysis - v1.2 www.inpnet.org • www.HOTLabs.org 87 4/26/2007
WhoAmI
WhoAmI provides quick verification of Internet Connectivity Diagnostics on your system, such as your operating system version (OS), TCP/IP status, Local IP, External IP, Gateway, DNS and Web Access.
Product Information
Source VisualWare
Freeware
http://whoami.visualware.com/
Where, When, Why Network Analysis—Network Configuration Viewer
Sometimes you just need a quick look at your IP Stack’s configuration. Without having to open a DOS Box and typing ipconfig /allipconfig /allipconfig /allipconfig /all… you can learn what your TCP/IP configuration is using WhoAmIWhoAmIWhoAmIWhoAmI.
In addition, this also shows more information than the simple DOS command.
Usage and Features
• Internal and External IP address configurations • Testing of Live DNS access • Learn what version of Windows and Java is running
Requirements / Dependencies
• JVM
Where to Go for More Information
• http://whoami.visualware.com/
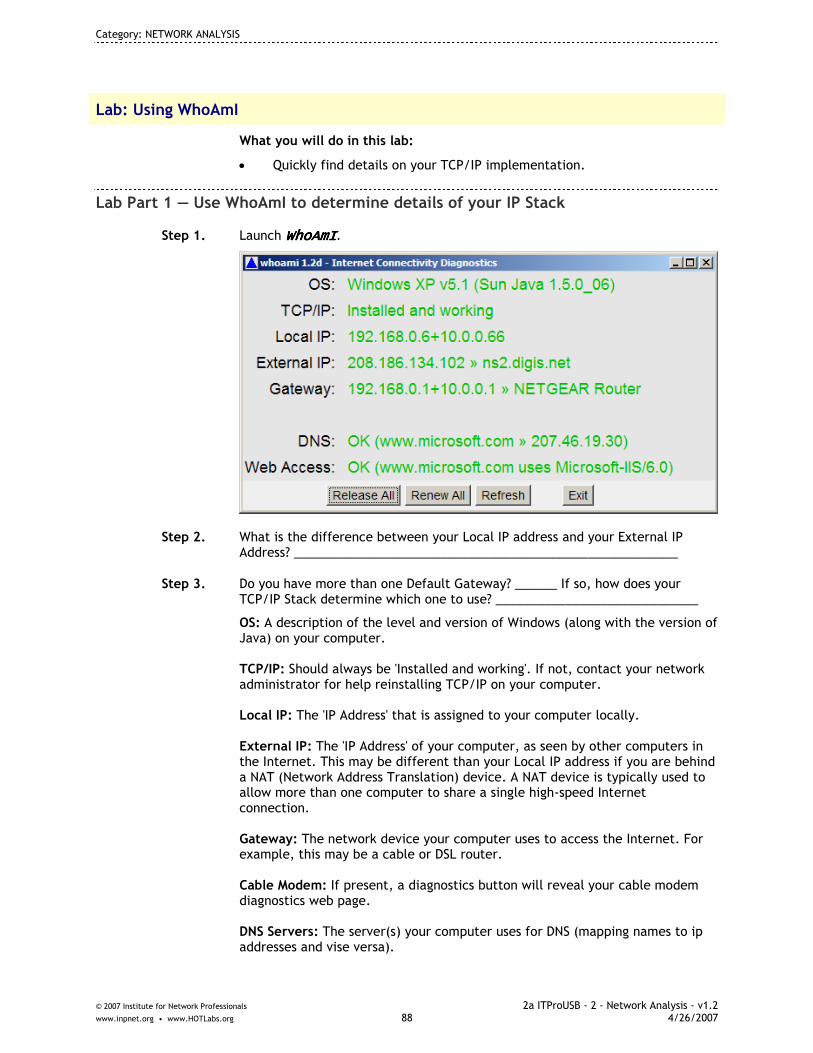
Category: NETWORK ANALYSIS
© 2007 Institute for Network Professionals 2a ITProUSB - 2 - Network Analysis - v1.2 www.inpnet.org • www.HOTLabs.org 88 4/26/2007
Lab: Using WhoAmI
What you will do in this lab:
• Quickly find details on your TCP/IP implementation.
Lab Part 1 — Use WhoAmI to determine details of your IP Stack
Step 1. Launch WhoAmIWhoAmIWhoAmIWhoAmI.
Step 2. What is the difference between your Local IP address and your External IP Address? _______________________________________________________
Step 3. Do you have more than one Default Gateway? ______ If so, how does your TCP/IP Stack determine which one to use? _____________________________
OS: A description of the level and version of Windows (along with the version of Java) on your computer. TCP/IP: Should always be 'Installed and working'. If not, contact your network administrator for help reinstalling TCP/IP on your computer. Local IP: The 'IP Address' that is assigned to your computer locally. External IP: The 'IP Address' of your computer, as seen by other computers in the Internet. This may be different than your Local IP address if you are behind a NAT (Network Address Translation) device. A NAT device is typically used to allow more than one computer to share a single high-speed Internet connection. Gateway: The network device your computer uses to access the Internet. For example, this may be a cable or DSL router. Cable Modem: If present, a diagnostics button will reveal your cable modem diagnostics web page. DNS Servers: The server(s) your computer uses for DNS (mapping names to ip addresses and vise versa).

Category: NETWORK ANALYSIS
© 2007 Institute for Network Professionals 2a ITProUSB - 2 - Network Analysis - v1.2 www.inpnet.org • www.HOTLabs.org 89 4/26/2007
DNS: The results of an actual DNS query, to verify that DNS is working for your computer. Web Access: The results of an actual web page query, to verify that web page access is working for your computer.
What you learned in this Lab: In this Lab you learned to use WhoAmI to:
1. Find your internal and external IP Address, gateways, and DNS

Category: NETWORK ANALYSIS
© 2007 Institute for Network Professionals 2a ITProUSB - 2 - Network Analysis - v1.2 www.inpnet.org • www.HOTLabs.org 90 4/26/2007
Category: NETWORK ANALYSIS
© 2007 Institute for Network Professionals 2a ITProUSB - 2 - Network Analysis - v1.2 www.inpnet.org • www.HOTLabs.org 91 4/26/2007
WinIPS
Winips is a handy utility that lets you quickly and easily change the IP address of any TCP/IP interface on your computer. It is a single < 100k EXE that installs itself on the toolbar when run and lets you choose from a recent IP address or saved ones.
This is a huge timesaver if you configure or debug network equipment all day long! Keep it on your USB memory stick for use on any NT or XP computer. It saves most recent settings with the exe so you can easily move between computers.
Product Information
Source WinIPS
Niceware – do something nice for someone!
www.winips.com
Where, When, Why
Anytime you need to quickly change IP addresses of your computers – changing from static to dynamic and back again. This is much easier than opening Network � Properties � IP…
Usage and Features
The creators of winips spent a week in Bay St Louis helping with the Katrina relief efforts. We were installing wireless internet links, computer kiosks and VOIP phones.
In doing so, we spent a lot of time switching between dynamic IPs and various static ones using the Windows TCP/IP properties box.
Inspired to make this simpler and faster, Matt wrote a tool to make this as convenient as possible. Winips is the result.
Requirements / Dependencies
• Winips currently runs on windows 2000 and XP
Where to Go for More Information
• www.winips.com
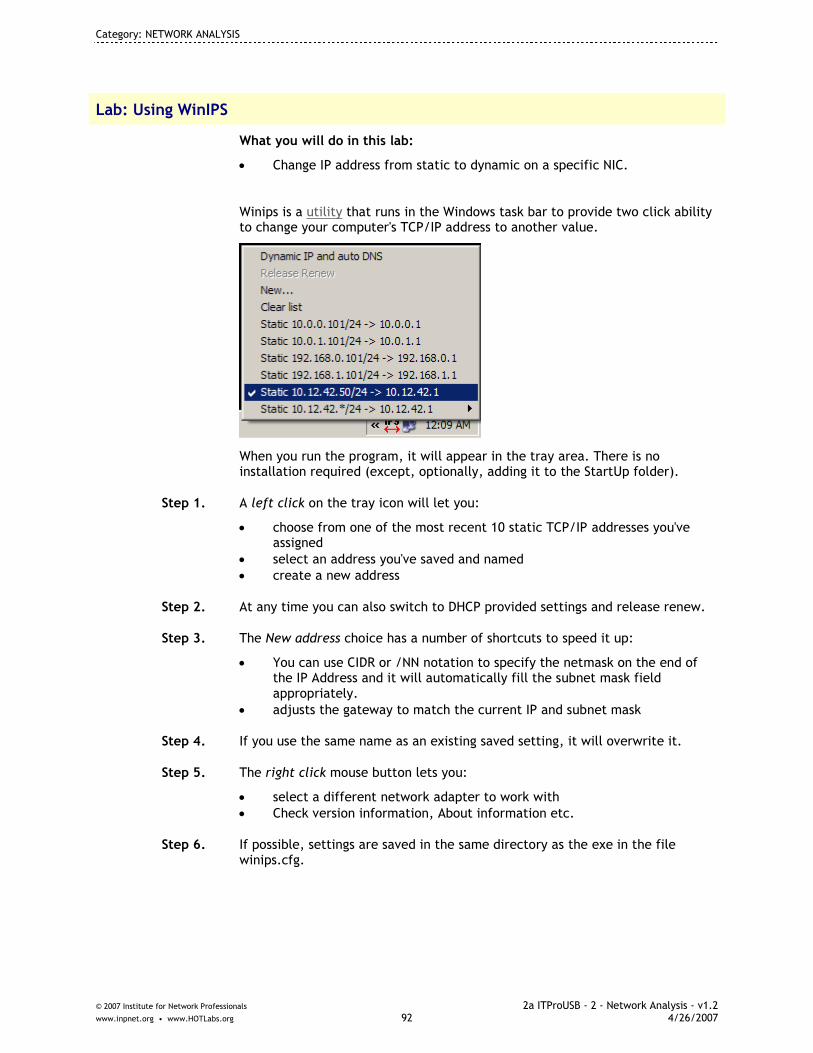
Category: NETWORK ANALYSIS
© 2007 Institute for Network Professionals 2a ITProUSB - 2 - Network Analysis - v1.2 www.inpnet.org • www.HOTLabs.org 92 4/26/2007
Lab: Using WinIPS
What you will do in this lab:
• Change IP address from static to dynamic on a specific NIC.
Winips is a utility that runs in the Windows task bar to provide two click ability to change your computer's TCP/IP address to another value.
When you run the program, it will appear in the tray area. There is no installation required (except, optionally, adding it to the StartUp folder).
Step 1. A left click on the tray icon will let you:
• choose from one of the most recent 10 static TCP/IP addresses you've assigned
• select an address you've saved and named • create a new address
Step 2. At any time you can also switch to DHCP provided settings and release renew.
Step 3. The New address choice has a number of shortcuts to speed it up:
• You can use CIDR or /NN notation to specify the netmask on the end of the IP Address and it will automatically fill the subnet mask field appropriately.
• adjusts the gateway to match the current IP and subnet mask
Step 4. If you use the same name as an existing saved setting, it will overwrite it.
Step 5. The right click mouse button lets you:
• select a different network adapter to work with • Check version information, About information etc.
Step 6. If possible, settings are saved in the same directory as the exe in the file winips.cfg.
Category: NETWORK ANALYSIS
© 2007 Institute for Network Professionals 2a ITProUSB - 2 - Network Analysis - v1.2 www.inpnet.org • www.HOTLabs.org 93 4/26/2007
Wireshark
Wireshark is an open source, full-featured network packet analyzer.
Product Information
Source Wireshark
Open Source GNU
http://www.wireshark.org
Where, When, Why Network Analysis
You need to capture network packets and do not have commercial software available to you. WiresharkWiresharkWiresharkWireshark on your USB stick is ready to do the job.
Usage and Features
• Available for UNIX and Windows. • Capture live packet data from a network interface. • Display packets with very detailed protocol information. • Open and Save packet data captured. • Import and Export packet data from and to a lot of other capture
programs. • Filter packets on many criteria. • Search for packets on many criteria. • Colorize packet display based on filters. • Create various statistics
Requirements / Dependencies Supported Operating Systems:
• Windows 2000, XP Home, XP Pro, XP Tablet PC, XP Media Center, Server 2003 or Vista (XP Pro recommended)
• Wireshark currently runs on most UNIX and Linux platforms
Where to Go for More Information
• Wireshark User’s Guide, available online at: http://www.wireshark.org/docs/wsug_html/
• Man Pages—complete set of Wireshark man pages are available online at: http://www.wireshark.org/docs/man-pages/
• Display Filter Reference—complete list of display filters from version 0.10.0 to present, available online at: http://www.wireshark.org/docs/dfref/
• Release Information for each version of Wireshark available online at: Release Notes — http://www.wireshark.org/docs/relnotes/ Security Advisories — http://www.wireshark.org/security/

Category: NETWORK ANALYSIS
© 2007 Institute for Network Professionals 2a ITProUSB - 2 - Network Analysis - v1.2 www.inpnet.org • www.HOTLabs.org 94 4/26/2007

Section Software List
Note: Final list of software included is subject to change. © 2007 Institute for Network Professionals 3 ITPro Section Software List - 3
Section 3 Portable Applications
You might not always have your laptop, and all the applications contained therein, but with your trusty ‘Ultimate USB’ you can always have usable competent applications with you.
In this section we have included a wide variety of applications an IT Professional might find useful: Open Office, Instant Messaging, Password Tracking, PDF reader, graphics viewer, and even a website editor.
lab $$ DmailerSnyc
Synchronize Outlook (Express) for localized Contacts, Calendar, Tasks and Email on the go
lab $$ Secure II - Lexar Create and use an encrypted USB drive Partition
AbiWord Portable Full-featured Word Processing
Audacity Audio editing suite
Essential PIM Full-featured Personal Information Manager
lab
FastStone Image Viewer
Graphics of all types Viewer
lab Foxit Reader PDF Viewer
lab GAIM Portable Flexible Instant Messaging Client
GIMP Portable Graphics and Photo Editor
lab Miranda Portable Instant Messaging Client
Portable FileZilla
Full-featured FTP Client (see section 1 – Communications)
lab Portable Firefox
Localized (leave no trace) Internet Browser w/Plugins
Portable Nvu Website WYSIWYG Editor
lab
Portable Open Office
Full Featured Office – Including; Word Processing, Spreadsheet, Presentations, Drawing and Database

Section Software List
Note: Final list of software included is subject to change. © 2007 Institute for Network Professionals 3 ITPro Section Software List - 3
Scribus Page Layout Program
VLC Media Player
WordPad Simple Word Processor

Category: PORTABLE APPLICATIONS
© 2007 Institute for Network Professionals 3a ITProUSB - 3 - Portable Applications - v1.2 www.inpnet.org • www.HOTLabs.org 1 4/26/2007
Section 3 – PORTABLE APPLICATIONS Table of Contents
DmailerSync Plus ..........................................................3
Secure II................................................................... 11
AbiWord Portable........................................................ 19
Audacity .................................................................. 21
EssentialPIM .............................................................. 23
FastStone Image Viewer ................................................ 25
FoxIT Reader ............................................................. 31
GAIM Portable............................................................ 35
GIMP Portable............................................................ 39
Miranda IM Portable..................................................... 41
Portable Firefox ......................................................... 47
Portable Nvu ............................................................. 49
Portable Open Office ................................................... 51
Scribus .................................................................... 57
VLC ........................................................................ 59
WordPad .................................................................. 61

Category: PORTABLE APPLICATIONS
© 2007 Institute for Network Professionals 3a ITProUSB - 3 - Portable Applications - v1.2 www.inpnet.org • www.HOTLabs.org 2 4/26/2007

Category: PORTABLE APPLICATIONS
© 2007 Institute for Network Professionals 3a ITProUSB - 3 - Portable Applications - v1.2 www.inpnet.org • www.HOTLabs.org 3 4/26/2007
DmailerSync Plus
DmailerSyncDmailerSyncDmailerSyncDmailerSync™ PlusPlusPlusPlus allows you to SYNCHRONIZE and BACKUP your home or office computer with any Flash Drive device (USB Flash Drive, CompactFlash®, SD™, SmartMedia™, Memory Stick PRO™ etc.), Hard Disk Drive (internal or external) or even with an iPod. It is easy to use and always secure, utilizing AES 128-bit encryption.
Product Information
Source Dmailer
single user
$39.95
http://www.dmailer.com
Where, When, Why Portable Applications - Portable MS Outlook & personal files Synchronization
With DmailerSyncDmailerSyncDmailerSyncDmailerSync™ Plus Plus Plus Plus, you now can couple the popularity of mobile devices with this “advanced synchronization and Outlook® & Outlook Express® data management “software.
You can go "on the road" without having to carry a laptop.
Turn any PC into your own protected workspace with DmaiDmaiDmaiDmailerSynclerSynclerSynclerSync™ Plus Plus Plus Plus software loaded onto your mobile device (USB drive, memory stick, iPod, etc.)!
With DmailerSync and your external device, you can access, edit and restore ALL your personal files (My Documents & IE favorites) and Outlook® data (emails, attachments, folders, calendar, contacts, tasks, notes) from any windows PC, even if Outlook® is not pre-installed on it. You can even SEND and RECEIVE emails securely from your device in a few clicks.
And, when you again have access to your home or office computer, DmailerSync synchronizes all of your changes like you had never been gone.
Usage and Features
• Transport work between office and home systems. • Never leave without your personal files and Outlook/Outlook Express data
in your pocket. • Go "on the road" without having to carry a notebook computer. • Organize and edit documents • Send and receive emails • Add a meeting in your calendar • Change a contact, display your notes • Access your Internet Explorer or Firefox favorites from Internet cafes and
other public access computers. • Backup and Restore all your personal data in one single click.

Category: PORTABLE APPLICATIONS
© 2007 Institute for Network Professionals 3a ITProUSB - 3 - Portable Applications - v1.2 www.inpnet.org • www.HOTLabs.org 4 4/26/2007
Requirements / Dependencies
• Microsoft Windows 2000, XP Home and Professional (not compatible with Mac)
• Microsoft Outlook 2000, 2002, 2003 • Microsoft Outlook Express v5.5 and above • Microsoft Exchange 5.5, 2000, 2003 • USB 1.1 and 2.0 (USB 2.0 port required for Hi-Speed transfer) • Available languages:
English, French, German, Italian, Spanish, Danish, Japanese, Traditional and Simplified Chinese
• U3 smart device ready - see full details at www.U3.com
Where to Go for More Information
• Main website: www.dmailer.com • Support FAQ: www.dmailer.com/site/support/faq_dmailersync.html
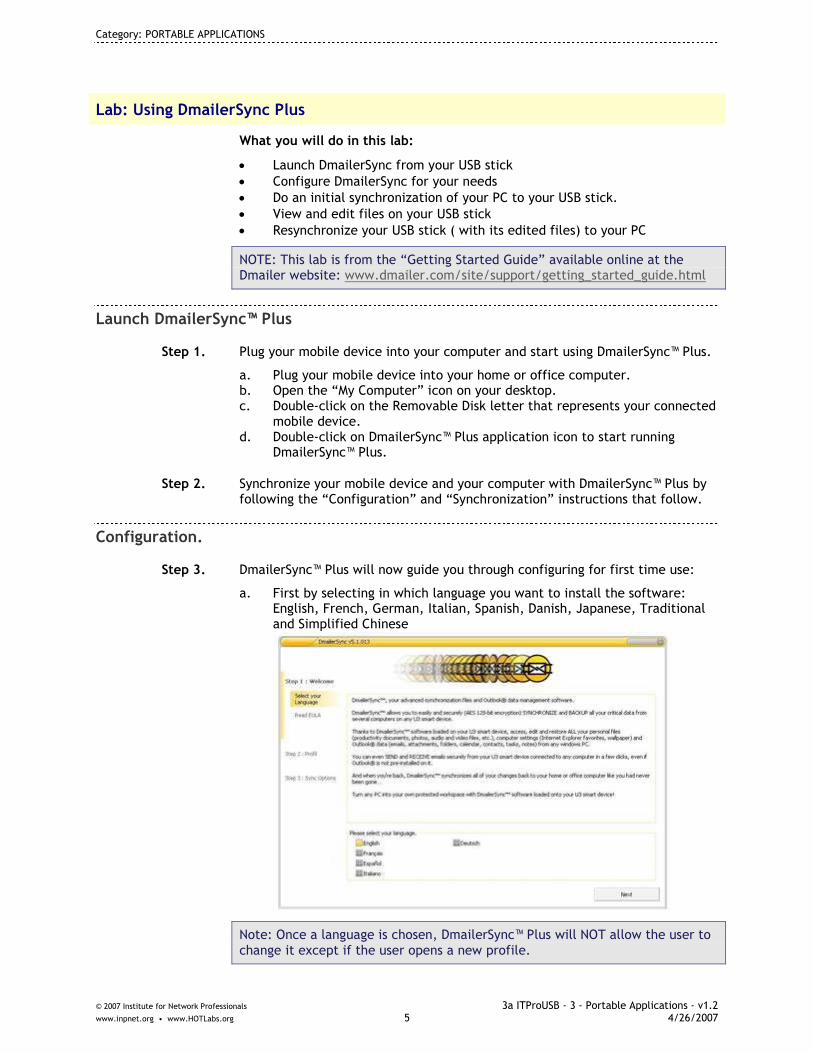
Category: PORTABLE APPLICATIONS
© 2007 Institute for Network Professionals 3a ITProUSB - 3 - Portable Applications - v1.2 www.inpnet.org • www.HOTLabs.org 5 4/26/2007
Lab: Using DmailerSync Plus
What you will do in this lab:
• Launch DmailerSync from your USB stick • Configure DmailerSync for your needs • Do an initial synchronization of your PC to your USB stick. • View and edit files on your USB stick • Resynchronize your USB stick ( with its edited files) to your PC
NOTE: This lab is from the “Getting Started Guide” available online at the Dmailer website: www.dmailer.com/site/support/getting_started_guide.html
Launch DmailerSync™ Plus
Step 1. Plug your mobile device into your computer and start using DmailerSync™ Plus.
a. Plug your mobile device into your home or office computer. b. Open the “My Computer” icon on your desktop. c. Double-click on the Removable Disk letter that represents your connected
mobile device. d. Double-click on DmailerSync™ Plus application icon to start running
DmailerSync™ Plus.
Step 2. Synchronize your mobile device and your computer with DmailerSync™ Plus by following the “Configuration” and “Synchronization” instructions that follow.
Configuration.
Step 3. DmailerSync™ Plus will now guide you through configuring for first time use:
a. First by selecting in which language you want to install the software: English, French, German, Italian, Spanish, Danish, Japanese, Traditional and Simplified Chinese
Note: Once a language is chosen, DmailerSync™ Plus will NOT allow the user to change it except if the user opens a new profile.

Category: PORTABLE APPLICATIONS
© 2007 Institute for Network Professionals 3a ITProUSB - 3 - Portable Applications - v1.2 www.inpnet.org • www.HOTLabs.org 6 4/26/2007
b. Then by asking you to create a new profile with a name and a personal password for data protection.
c. Please remember this password. DmailerSync™ Plus will ask you for it each time you try to open this profile.
d. You have also the option to synchronize multiple computers by creating different profile name (ex: home, business, etc.)
Note: If you have forgotten your personal password, you‘ll have to restart this setup process and synchronize your profile data again.
Synchronization.
Step 4. Specify, in the “Options” panels, which personal files, Outlook® or Outlook Express® data and PC settings you want to synchronize between your computer and your mobile device.
a. Use the “check box” menu on the left of the screen to select options to synchronize emails from one or multiple specific folders.
b. On the bottom right side of those screens, you can always see the available disk space left on your mobile device BEFORE synchronization.
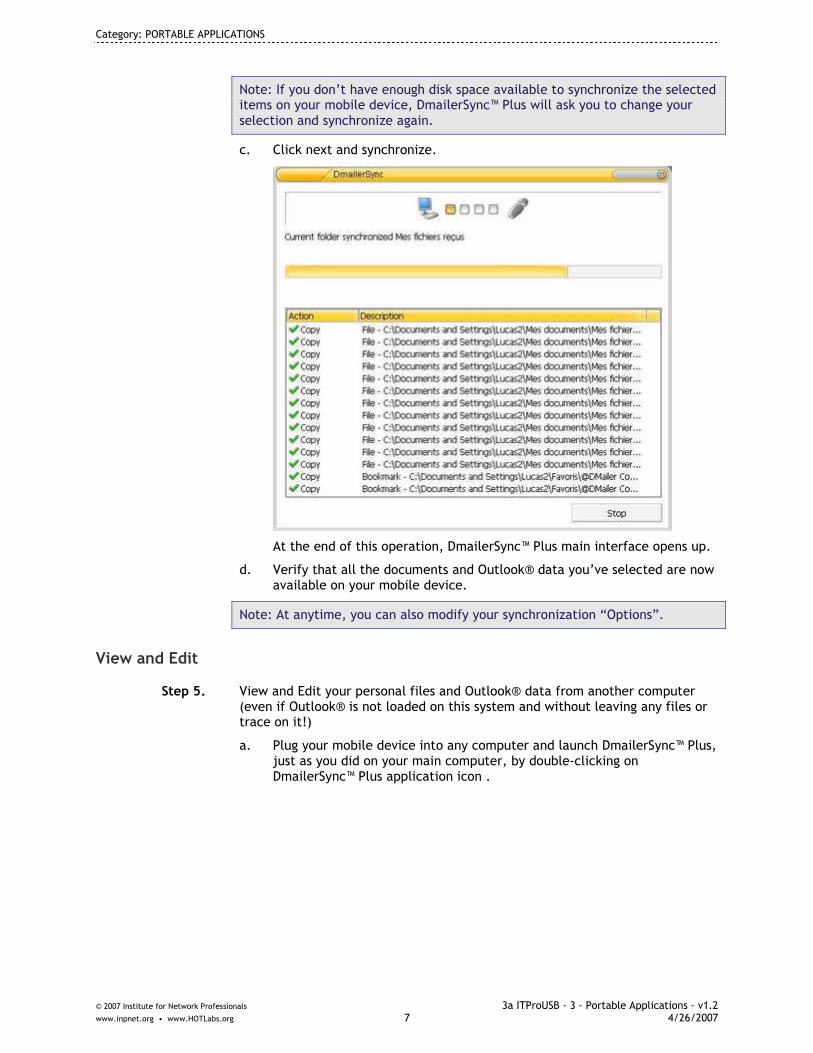
Category: PORTABLE APPLICATIONS
© 2007 Institute for Network Professionals 3a ITProUSB - 3 - Portable Applications - v1.2 www.inpnet.org • www.HOTLabs.org 7 4/26/2007
Note: If you don’t have enough disk space available to synchronize the selected items on your mobile device, DmailerSync™ Plus will ask you to change your selection and synchronize again.
c. Click next and synchronize.
At the end of this operation, DmailerSync™ Plus main interface opens up.
d. Verify that all the documents and Outlook® data you’ve selected are now available on your mobile device.
Note: At anytime, you can also modify your synchronization “Options”.
View and Edit
Step 5. View and Edit your personal files and Outlook® data from another computer (even if Outlook® is not loaded on this system and without leaving any files or trace on it!)
a. Plug your mobile device into any computer and launch DmailerSync™ Plus, just as you did on your main computer, by double-clicking on DmailerSync™ Plus application icon .

Category: PORTABLE APPLICATIONS
© 2007 Institute for Network Professionals 3a ITProUSB - 3 - Portable Applications - v1.2 www.inpnet.org • www.HOTLabs.org 8 4/26/2007
b. Select your profile and enter your password and DmailerSync™ Plus main interface opens up. Our user interface is very intuitive and easy to navigate.
c. Work on your documents and Outlook® or Outlook Express® data as you
normally would (view, edit, erase, save etc.). Access and edit your personal files and Outlook® or Outlook Express® data: send emails with or without attachments, add a meeting in your calendar, change a contact, display your notes and tasks, edit a World or Excel document and even access to your I.E. or Firefox favorites in a cybercafé, on a friend's laptop, or in a colleague's office — personal productivity is a snap with DmailerSync™ Plus.
Note: All the modifications have been stored on your mobile device. Because DmailerSync™ Plus run directly from it, absolutely NO traces or files will be left on this computer.
Resync to your main computer
Step 6. Return your mobile device to your main computer and synchronize your changes thanks to DmailerSync™ Plus
a. Plug again your mobile device into your main computer and launch DmailerSync™ Plus, just as you did already twice by double-clicking on DmailerSync™ Plus application icon
b. Enter your password and DmailerSync™ Plus main interface opens up and automatically determines which files need to be synchronized.
c. When you're ready, click on the “Synchronize” button to synchronize your modified documents and Outlook© and Outlook Express© data (emails, attachments, calendar, contacts, notes, and tasks). Please be patient, this operation can be lengthy. The “progress bar” indicates what’s currently happening and the different stages of this process. All the modification you did in Step 5 (View and Edit) while you were away will now be applied onto your main computer’s Outlook® or Outlook Express® like you had never been gone… You’re done, it’s that simple!

Category: PORTABLE APPLICATIONS
© 2007 Institute for Network Professionals 3a ITProUSB - 3 - Portable Applications - v1.2 www.inpnet.org • www.HOTLabs.org 9 4/26/2007
What you learned in this Lab: In this Lab you learned to use DmailerSync to:
1. Backup and synchronized data from your PC
2. Edit PC data while away from your PC, utilizing DmailerSync on your USB stick.
3. Resynchronize your remotely edited data to your main computer

Category: PORTABLE APPLICATIONS
© 2007 Institute for Network Professionals 3a ITProUSB - 3 - Portable Applications - v1.2 www.inpnet.org • www.HOTLabs.org 10 4/26/2007
Category: PORTABLE APPLICATIONS
© 2007 Institute for Network Professionals 3a ITProUSB - 3 - Portable Applications - v1.2 www.inpnet.org • www.HOTLabs.org 11 4/26/2007
Secure II
Lexar’s Secure II is an integrated software suite that allows you to create encrypted volumes up to 20GB. These volumes can sit on your USB drive or on another computer’s hard drive. You can encrypt individual files, and shred files that you don’t want to be recovered. Not only for the paranoid, Secure II provides on-the-fly 256-bit AES encryption seamlessly for you, the responsible, cautious IT Professional.
Product Information
Source Lexar
Commercial (for use with specific Lexar USB drives)
$0.00, included with the hardware
www.lexar.com
Where, When, Why Portable Applications—File and Drive Encryption and Security
“Hey Honey, have you seen my USB drive?”
Imagine your distress if you hadn’t encrypted your passwords, financial information, and other sensitive information. Fortunately Lexar has included software that will protect your data on your Lightning USB drive. A lost drive may be an inconvenience, but it beats loss AND identity theft any day.
Usage and Features
• On-the-fly 256 bit AES Encryption • Encrypted volumes • Encrypted files • File shredding, recycle bin shredding, and free space shredding
Requirements / Dependencies
• Windows 98SE/2000/XP/2003 • USB 2.0 Host Controller for optimal performance
Where to Go for More Information
• www.lexar.com

Category: PORTABLE APPLICATIONS
© 2007 Institute for Network Professionals 3a ITProUSB - 3 - Portable Applications - v1.2 www.inpnet.org • www.HOTLabs.org 12 4/26/2007
Lab: Using Secure II
What you will do in this lab:
• Learn to use Secure II to create encrypted volumes (Vaults) • Learn to use Secure II to encrypt and decrypt individual files • Learn to use Secure II to shred files, further securing your data from
unauthorized access
Lab Part 1 In this lab we will be exploring the different features of Lexar’s Secure II software, including creating an encrypted volume, encrypting and decrypting individual files, and shredding files.
Step 1. Launch Secure II.
With the first use, you will be shown a list of the ‘salient’* features provided by the software. Click Continue to proceed to the Dashboard.
* Note: Salient is used here as a synonym for awesome.
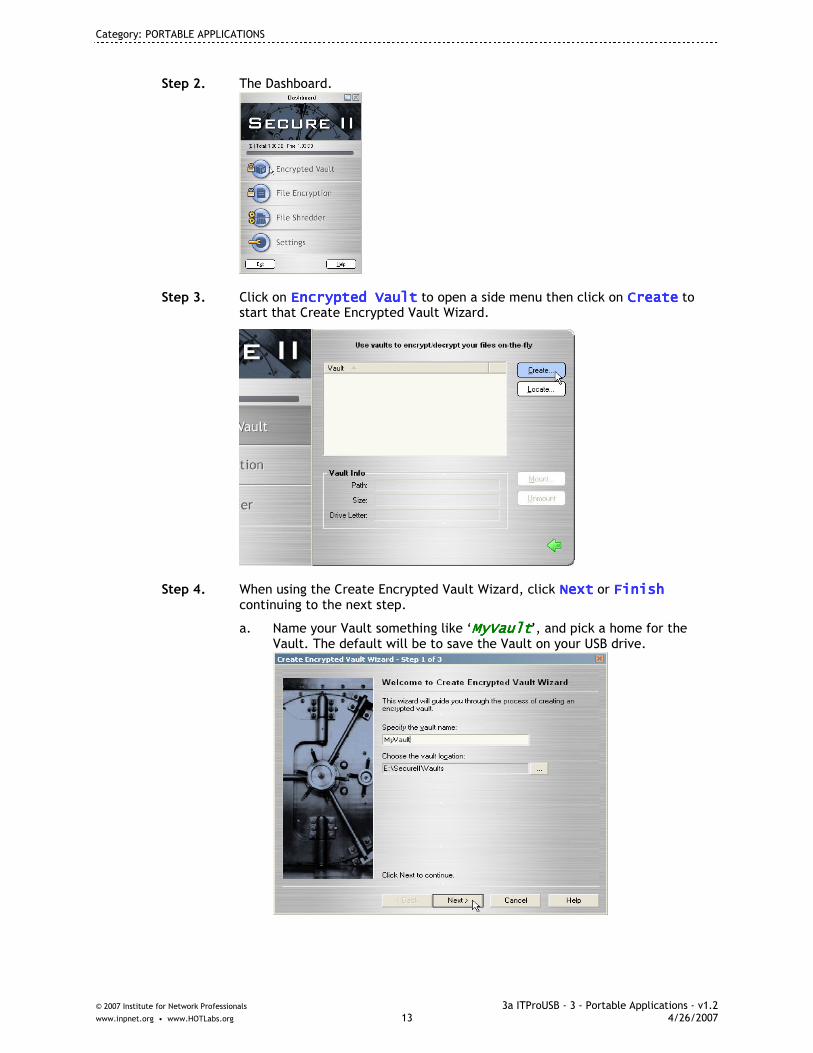
Category: PORTABLE APPLICATIONS
© 2007 Institute for Network Professionals 3a ITProUSB - 3 - Portable Applications - v1.2 www.inpnet.org • www.HOTLabs.org 13 4/26/2007
Step 2. The Dashboard.
Step 3. Click on Encrypted VaultEncrypted VaultEncrypted VaultEncrypted Vault to open a side menu then click on CreateCreateCreateCreate to start that Create Encrypted Vault Wizard.
Step 4. When using the Create Encrypted Vault Wizard, click NextNextNextNext or FinishFinishFinishFinish continuing to the next step.
a. Name your Vault something like ‘MyVaultMyVaultMyVaultMyVault’, and pick a home for the Vault. The default will be to save the Vault on your USB drive.

Category: PORTABLE APPLICATIONS
© 2007 Institute for Network Professionals 3a ITProUSB - 3 - Portable Applications - v1.2 www.inpnet.org • www.HOTLabs.org 14 4/26/2007
b. Allocate space to the volume. In this example 128MB128MB128MB128MB will be allocated to the Vault.
c. Set your password for the Vault. Passwords must be between 8-32
characters. Adding more symbols, numbers, and mixing case will give you a higher score on the Strength Meter. In this example, ‘mypasswordmypasswordmypasswordmypassword’ is used. Please don’t use this password.
Note: Don’t do what the author did the first time. The password hint cannot be the same as the password. It’s against the rules. This works though:

Category: PORTABLE APPLICATIONS
© 2007 Institute for Network Professionals 3a ITProUSB - 3 - Portable Applications - v1.2 www.inpnet.org • www.HOTLabs.org 15 4/26/2007
d. When you’ve clicked finish, Secure II will begin to create your Vault. Once that has completed you will be presented with a blank drive, ready to be filled with secrets.
Creating a new volume… we’re half way there.
It’s empty!
e. Copy files to this Vault.
Step 5. Moving to the next item in the dashboard, we have individual file encryption. Click on File EncryptionFile EncryptionFile EncryptionFile Encryption.
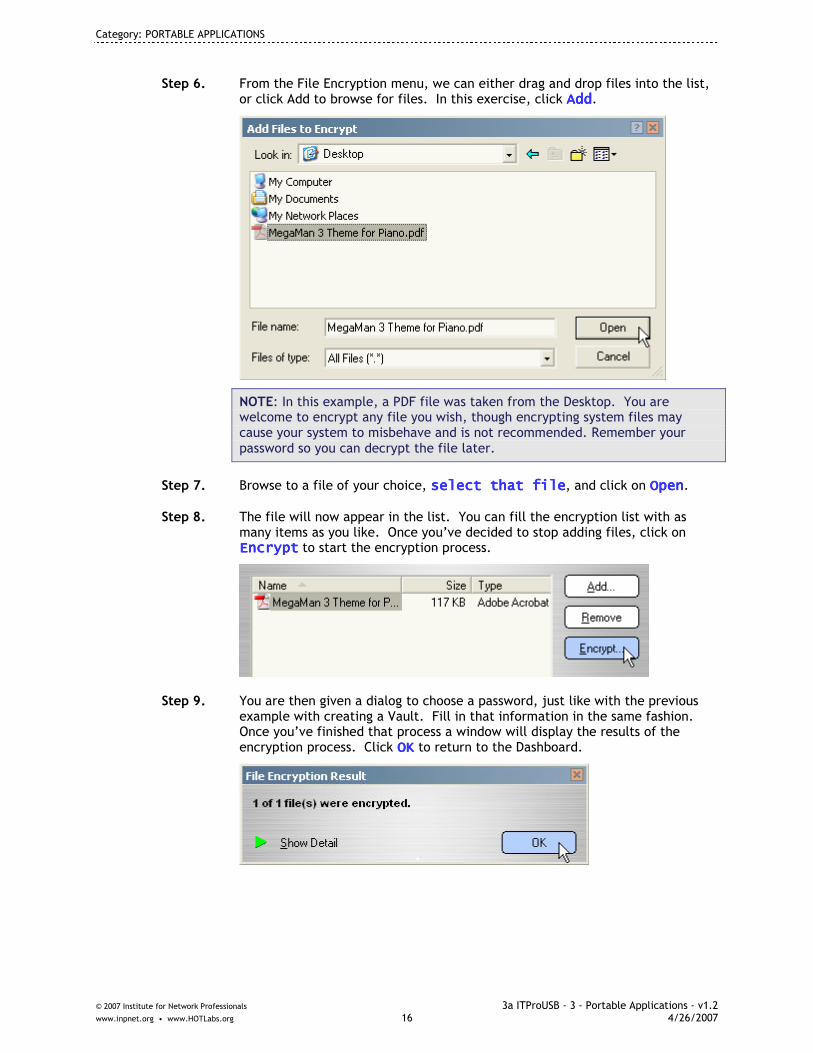
Category: PORTABLE APPLICATIONS
© 2007 Institute for Network Professionals 3a ITProUSB - 3 - Portable Applications - v1.2 www.inpnet.org • www.HOTLabs.org 16 4/26/2007
Step 6. From the File Encryption menu, we can either drag and drop files into the list, or click Add to browse for files. In this exercise, click AddAddAddAdd.
NOTE: In this example, a PDF file was taken from the Desktop. You are welcome to encrypt any file you wish, though encrypting system files may cause your system to misbehave and is not recommended. Remember your password so you can decrypt the file later.
Step 7. Browse to a file of your choice, select that fileselect that fileselect that fileselect that file, and click on OpenOpenOpenOpen.
Step 8. The file will now appear in the list. You can fill the encryption list with as many items as you like. Once you’ve decided to stop adding files, click on EncryptEncryptEncryptEncrypt to start the encryption process.
Step 9. You are then given a dialog to choose a password, just like with the previous example with creating a Vault. Fill in that information in the same fashion. Once you’ve finished that process a window will display the results of the encryption process. Click OKOKOKOK to return to the Dashboard.

Category: PORTABLE APPLICATIONS
© 2007 Institute for Network Professionals 3a ITProUSB - 3 - Portable Applications - v1.2 www.inpnet.org • www.HOTLabs.org 17 4/26/2007
Step 10. You will see that in the example here, the file now shows an icon indicating that it is encrypted.
Step 11. Now to decrypt the encrypted file(s). Click on the Decrypt FilesDecrypt FilesDecrypt FilesDecrypt Files tab. Click AddAddAddAdd, and browse to the file(s) you would like to decrypt. OpenOpenOpenOpen each file to add it to the list, or drag and drop the encrypted files into the list.
Click on DecryptDecryptDecryptDecrypt to start the decryption process. You will be required to re-enter your password. In this example, once again the password is ‘mypasswordmypasswordmypasswordmypassword’. Click on OKOKOKOK once the password has been entered.
Close the Results window once you’ve read the details. Congratulations, your files are no longer encrypted.
Step 12. Let’s shred a file, shall we? Click on File Shredder. Here you will see a similar window to the Encrypt File option. You can select, with the three tabs at the top, to shred filesshred filesshred filesshred files, to shred the contents of the Recyshred the contents of the Recyshred the contents of the Recyshred the contents of the Recycle cle cle cle BinBinBinBin, and to shred free space on the driveshred free space on the driveshred free space on the driveshred free space on the drive. Each of these options does what is expected, which is to overwrite the data contained in those locations and erase records of those files’ existence from the Windows file systems.
Click on AddAddAddAdd, and browse for an unimportant file. If you’re not sure of which file to shred, create a new text document on your desktop for the sole purpose of shredding it.

Category: PORTABLE APPLICATIONS
© 2007 Institute for Network Professionals 3a ITProUSB - 3 - Portable Applications - v1.2 www.inpnet.org • www.HOTLabs.org 18 4/26/2007
Step 13. I couldn’t bring myself to accept the prompt, but you can. Click YesYesYesYes to shred the file.
What you learned in this Lab: In this Lab you learned to use Secure II to:
1. Create encrypted volumes (Vaults)
2. Encrypt and decrypt individual files
3. Shred files, further securing your data from unauthorized access

Category: PORTABLE APPLICATIONS
© 2007 Institute for Network Professionals 3a ITProUSB - 3 - Portable Applications - v1.2 www.inpnet.org • www.HOTLabs.org 19 4/26/2007
AbiWord Portable
AbiWord Portable is a free word processing program similar to Microsoft Word. It is suitable for a variety of word processing activities and has the ability to read and write a number of document types including Microsoft Word, Word Perfect, Open Document (pre-installed), RTF, HTML, Palm and more. It includes grammar and spelling checkers as well as an array of other handy features including mail merge capabilities. It also has a plugin system allowing you to add features with available add-on plugins.
Product Information
Source AbiSource
Free / Open Source (GPL)
Dom Lachowicz
www.abisource.com
Where, When, Why Portable Applications — Full-Featured Word Processor
You need to edit a document for work, but you are away from your personal computer. So you use it on any computer to edit and create the documents you need to finish without leaving any personal information behind.
Usage and Features
• Multi Platform • Interoperability • Advanced Document Layout • Grammar and Spell Checker • Mail Merge Capabilities
Requirements / Dependencies
• Windows 95/98/Me/2000/XP • MAC OS X 10.2 or later • Most Unix and Linux Platforms
Where to Go for More Information
• www.abisource.com

Category: PORTABLE APPLICATIONS
© 2007 Institute for Network Professionals 3a ITProUSB - 3 - Portable Applications - v1.2 www.inpnet.org • www.HOTLabs.org 20 4/26/2007
Category: PORTABLE APPLICATIONS
© 2007 Institute for Network Professionals 3a ITProUSB - 3 - Portable Applications - v1.2 www.inpnet.org • www.HOTLabs.org 21 4/26/2007
Audacity
Audacity is a free, easy-to-use audio editor and recorder for Windows, Mac OS X, GNU/Linux, and other operating systems. Audacity can record live audio through a microphone or mixer, or digitize recordings from cassette tapes, vinyl records, or minidiscs. With some sound cards, it can also capture streaming audio. Import sound files, edit them, and combine them with other files or new recordings. Export your recordings in several common file formats. And much more.
Product Information
Source Audacity
Free (GPL)
http://audacity.sourceforge.net/
Where, When, Why Portable Applications — Audio Editing Suite
You need to edit some audio clips and don’t have access to your preferred audio editing software. Upload your audio files into Audacity Audacity Audacity Audacity and edit. When you are finished you can export them in several different formats.
Usage and Features
• Record live audio • Convert tapes and records into digital recordings or CDs • Edit Ogg Vorbis, MP3, and WAV sound files • Cut, copy, splice, and mix sounds together • Change the speed or pitch of a recording
Requirements / Dependencies
• Windows, Mac OS X, GNU/Linux
Where to Go for More Information
• http://audacity.sourceforge.net/help/

Category: PORTABLE APPLICATIONS
© 2007 Institute for Network Professionals 3a ITProUSB - 3 - Portable Applications - v1.2 www.inpnet.org • www.HOTLabs.org 22 4/26/2007
Category: PORTABLE APPLICATIONS
© 2007 Institute for Network Professionals 3a ITProUSB - 3 - Portable Applications - v1.2 www.inpnet.org • www.HOTLabs.org 23 4/26/2007
EssentialPIM
Automatically import your existing data from Outlook, Outlook Express,
TreePad, Google calendar or pretty much any PIM software that just
isn't doing it for you with EssentialPIM. All your data in one place,
interconnected so you don't have to mess around, and just the data you
need without a lot of clutter. EssentialPIM is powerfully simple.
Product Information
Source EPIM Ltd.
Free (upgrade to Pro Version for $39.95)
www.essentailpim.com
Where, When, Why Portable Applications — Full-Featured Personal Information Manager
You are away from your personal machine and need to look up the contact information on a client. You use EssentialPIM EssentialPIM EssentialPIM EssentialPIM on your USB stick on any computer to quickly locate your contact information that you synched from Outlook without leaving any trace on the machine you use.
Usage and Features
• Every feature you need to organize your life: scheduling, contact info, To Do lists and versatile notes
• Two-way synchronization with MS Outlook • Simple printout of any or all modules and quick export of your data into
the most useful formats • Strong data protection using Advanced Encryption Standard (AES)
algorithm • Multilingual interfaces
Requirements / Dependencies
• 32MB of RAM or more
Where to Go for More Information
• http://www.essentialpim.com/help/

Category: PORTABLE APPLICATIONS
© 2007 Institute for Network Professionals 3a ITProUSB - 3 - Portable Applications - v1.2 www.inpnet.org • www.HOTLabs.org 24 4/26/2007

Category: PORTABLE APPLICATIONS
© 2007 Institute for Network Professionals 3a ITProUSB - 3 - Portable Applications - v1.2 www.inpnet.org • www.HOTLabs.org 25 4/26/2007
FastStone Image Viewer
FastStone Image ViewerFastStone Image ViewerFastStone Image ViewerFastStone Image Viewer is an image browser, viewer, and editor which support all major graphic formats, including BMP, JPEG, JPEG 2000, GIF, PNG, PCX, TIFF, WMF, ICO and TGA. It has a nice array of features such as image viewing, management, comparison, red-eye removal, emailing, resizing, cropping, color adjustments, musical slideshow and much more.
Product Information
Source FastStone Soft
Freeware (non-commercial, not-for-profit, and educational use).
Donations accepted. Commercial use: $34.95 for lifetime license
www.FastStone.org
Where, When, Why Portable Applications—Image Viewer and Editor
Purpose: You are working on a public or friend’s machine and need to view graphics and other image files in various formats. You have just opened an email with an attachment with an extension .png you do not normally use and need to save it as a more common jpg file. You need your portable FastStone Image ViewerFastStone Image ViewerFastStone Image ViewerFastStone Image Viewer on your USB stick! Now that you can view the image, you realize you only need a region of it and must crop the image, but you don’t see the full Adobe Photoshop on this machine. It also would be nice to get the red eye out of Aunt Betty’s eyes in this one image. Now that you’ve edited that image, you see that you have some other images to manage, so to make all the other graphics files more easily viewable, you would like to save them as a slideshow of images and attach your favorite Hip-Hop beat to it!
Usage and Features
• View images in a variety of ways, including full screen, select-zoom and customizable magnifier
• Process images (.e.g., remove red-eye, resize/resample, crop, rotate/flip, color adjust, etc.)
• Convert/rename images in batches • Save images as bmp, jpeg, jpeg2000, gif, png, pcx, tiff, wmf, ico, tga,
pef, raf, mrw, orf, dng • Create dynamic slideshows using up to 150+ transition effects and
background music
Requirements / Dependencies
• All windows platforms • 128MB RAM
Where to Go for More Information
• Download an excellent tutorial at www.faststone.org/download.htm • Use HelpHelpHelpHelp����DocumentationDocumentationDocumentationDocumentation on the menu.

Category: PORTABLE APPLICATIONS
© 2007 Institute for Network Professionals 3a ITProUSB - 3 - Portable Applications - v1.2 www.inpnet.org • www.HOTLabs.org 26 4/26/2007
Lab: Using FastStone Image Viewer
What you will do in this lab:
• Select an image on your machine to view and edit • Zoom in to full screen image • Crop a portion of the image. • Save the cropped portion of the image in a separate file, using lower
compression to save space • Email the edited image to yourself with FastStone Image Viewer.
Lab Part 1 In this lab, you will launch FastStone Image Viewer and edit a random image you find on your system.
Step 1. Launch FastStone Image ViewerFastStone Image ViewerFastStone Image ViewerFastStone Image Viewer.
Step 2. The screen opens with thumbnail views of every image on the default drive.
Step 3. Browse to your USB stick driUSB stick driUSB stick driUSB stick drive letterve letterve letterve letter and highlight /Course /Course /Course /Course Files/Sample Pictures/PFiles/Sample Pictures/PFiles/Sample Pictures/PFiles/Sample Pictures/Plumaria.jpglumaria.jpglumaria.jpglumaria.jpg, then change to full screen
view clicking this icon on the far right of the tool bar (or doubledoubledoubledouble----clickclickclickclick the file ).
Note: Esc returns to the original view.

Category: PORTABLE APPLICATIONS
© 2007 Institute for Network Professionals 3a ITProUSB - 3 - Portable Applications - v1.2 www.inpnet.org • www.HOTLabs.org 27 4/26/2007
Step 4. Move the mouse to hoover over the bottom portion of the full screen so that the bottom tool bar appears.
Step 5. A single left click on the crop tool on the bottom tool bar opens a Crop Board window.
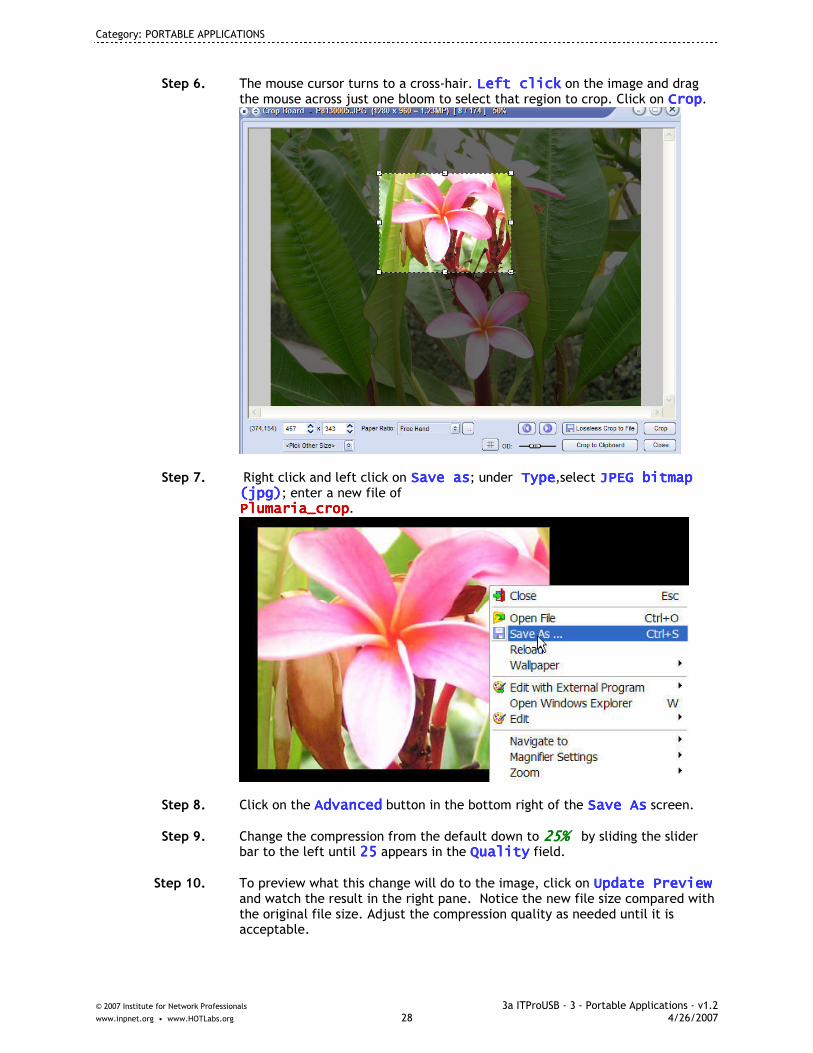
Category: PORTABLE APPLICATIONS
© 2007 Institute for Network Professionals 3a ITProUSB - 3 - Portable Applications - v1.2 www.inpnet.org • www.HOTLabs.org 28 4/26/2007
Step 6. The mouse cursor turns to a cross-hair. LefLefLefLeft clickt clickt clickt click on the image and drag the mouse across just one bloom to select that region to crop. Click on CropCropCropCrop.
Step 7. Right click and left click on Save asSave asSave asSave as; under Type Type Type Type,select JPEG bitmap JPEG bitmap JPEG bitmap JPEG bitmap (jpg)(jpg)(jpg)(jpg); enter a new file of Plumaria_cropPlumaria_cropPlumaria_cropPlumaria_crop.
Step 8. Click on the AdvancedAdvancedAdvancedAdvanced button in the bottom right of the Save AsSave AsSave AsSave As screen.
Step 9. Change the compression from the default down to 25%25%25%25% by sliding the slider bar to the left until 25252525 appears in the QualityQualityQualityQuality field.
Step 10. To preview what this change will do to the image, click on Update PreviewUpdate PreviewUpdate PreviewUpdate Preview and watch the result in the right pane. Notice the new file size compared with the original file size. Adjust the compression quality as needed until it is acceptable.

Category: PORTABLE APPLICATIONS
© 2007 Institute for Network Professionals 3a ITProUSB - 3 - Portable Applications - v1.2 www.inpnet.org • www.HOTLabs.org 29 4/26/2007
Step 11. Click OKOKOKOK and then SaveSaveSaveSave at the Save AsSave AsSave AsSave As screen. You are returned to the cropped image that has been saved.
Step 12. Press EscEscEscEsc to return to the original image. There should now be an additional image on the screen of the cropped imaged with the new filename you just saved.
Step 13. Right clickRight clickRight clickRight click on it (or the original graphic image) and click on the EmailEmailEmailEmail button on the right side.
Step 14. In the right panel, click SenSenSenSend Emaild Emaild Emaild Email.
Step 15. (Conditional) If you are asked to use the default email client, click on YesYesYesYes.
Category: PORTABLE APPLICATIONS
© 2007 Institute for Network Professionals 3a ITProUSB - 3 - Portable Applications - v1.2 www.inpnet.org • www.HOTLabs.org 30 4/26/2007
Step 16. Address the email to yourself, give it a subject, and click SendSendSendSend. (You may do this for practice even if you do not presently have an email account defined or an internet connection. If you receive an error message that the connection to the server failed, just click on CloseCloseCloseClose in that error message window. Then click on CloseCloseCloseClose in the email window.
Step 17. Exit FastStone Image Viewer.
What you learned in this Lab: In this Lab you learned to use FastStone Image Viewer to:
1. Select am image on your machine to view and edit
2. Zoom in to full screen image
3. Crop a portion of the image.
4. Save the cropped portion of the image in a separate file, using lower compression to save space
5. Email the edited image to yourself with FastStone Image Viewer.

Category: PORTABLE APPLICATIONS
© 2007 Institute for Network Professionals 3a ITProUSB - 3 - Portable Applications - v1.2 www.inpnet.org • www.HOTLabs.org 31 4/26/2007
FoxIT Reader
Foxit ReaderFoxit ReaderFoxit ReaderFoxit Reader 2.0 is a free PDF document viewer and printer, with incredible small size (only 1.5 M download size), breezing-fast launch speed and amazingly rich feature set.
Product Information
Source FoxIT Software
Shareware, Pro Pac version available
Free (Pro Pac $39.99)
www.foxitsoftware.com
Where, When, Why Portable Applications—PDF Viewer and Printer
You are helping a friend who does not happen to have Adobe Acrobat loaded, and have on your USB stick a reference document in pdf format you need to leave with her to explain the usage of an application she has asked you about. If only you could open and write to it, you could save much time by highlighting certain sections of it before printing it for her. You open the portable FoxIT Reader from your USB stick to do highlight portions of the pdf file and then print it.
Usage and Features
• View or print PDF document • Fill out PDF forms and save them • View PDF as text • Critical add-ons, such as UI language package, JPEG2000/JBIG decoder,
CJK package, GDI+ for early Windows version, etc • Breezing-fast: When you run Foxit Reader, it launches instantly without
any delay. You are not forced to view an annoying splash window displaying company logo, author names, etc.
• Annotation tool: Have you ever wished to annotate (or comment on) a PDF document when you are reading it? Foxit Reader 2.0 allows you to draw graphics, highlight text, type text and make notes on a PDF document and then print out or save the annotated document.
• Text converter: You may convert the whole PDF document into a simple text file.
• Interactive form filler: Now you don't have to print out PDF forms first and then manually fill out paper forms. Instead, you can use PC to fill out interactive forms directly, and then print them out, save them, email them or export the form data into FDF file for further processing
• High security and privacy: Foxit Reader highly respects the security and privacy of users and will never connect to Internet without users' permission. While other PDF Reader often silently connects to the Internet in the background. Foxit PDF Reader does not contain any spyware or adware.

Category: PORTABLE APPLICATIONS
© 2007 Institute for Network Professionals 3a ITProUSB - 3 - Portable Applications - v1.2 www.inpnet.org • www.HOTLabs.org 32 4/26/2007
Requirements / Dependencies
• Supports Windows 98/Me/2000/XP/2003 • Linux • Mobile devices • U3 devices
Where to Go for More Information
• Technical FAQ at www.foxitsoftware.com/support/techsupport/index.html#faqreader
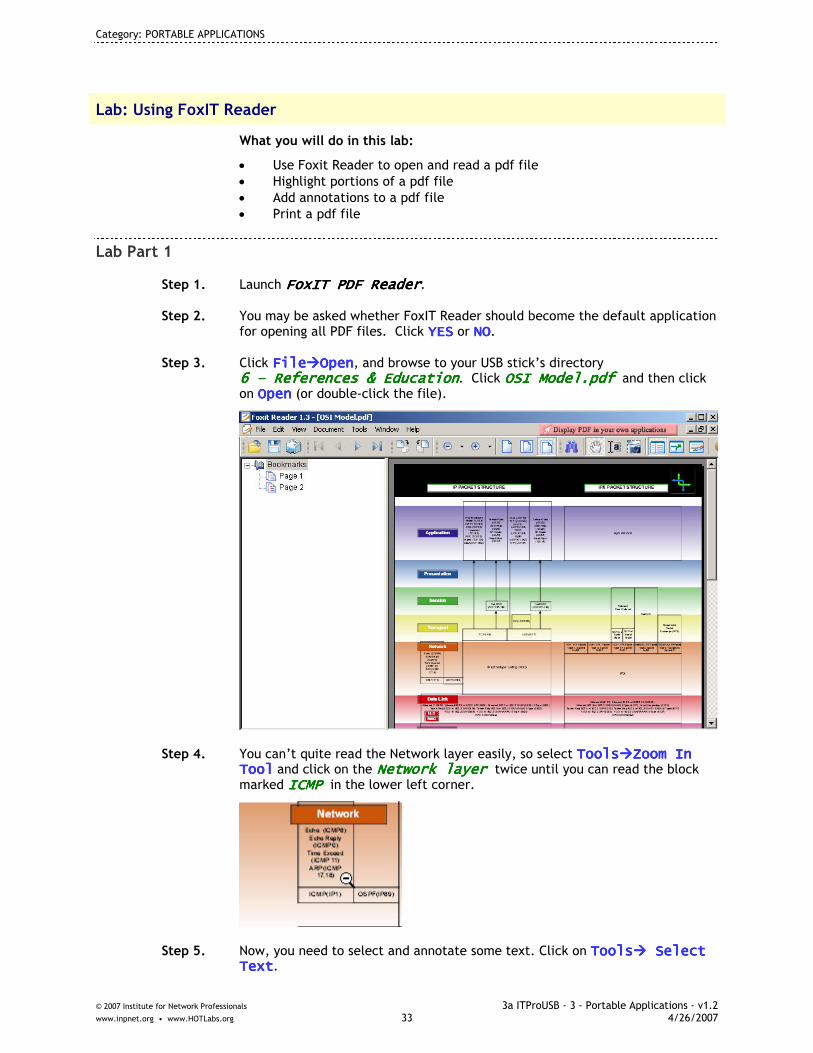
Category: PORTABLE APPLICATIONS
© 2007 Institute for Network Professionals 3a ITProUSB - 3 - Portable Applications - v1.2 www.inpnet.org • www.HOTLabs.org 33 4/26/2007
Lab: Using FoxIT Reader
What you will do in this lab:
• Use Foxit Reader to open and read a pdf file • Highlight portions of a pdf file • Add annotations to a pdf file • Print a pdf file
Lab Part 1
Step 1. Launch FoxIT PDF ReaderFoxIT PDF ReaderFoxIT PDF ReaderFoxIT PDF Reader.
Step 2. You may be asked whether FoxIT Reader should become the default application for opening all PDF files. Click YESYESYESYES or NONONONO.
Step 3. Click FileFileFileFile����OpenOpenOpenOpen, and browse to your USB stick’s directory 6 6 6 6 –––– References & Education References & Education References & Education References & Education. Click OSI Model.pdf OSI Model.pdf OSI Model.pdf OSI Model.pdf and then click on OpenOpenOpenOpen (or double-click the file).
Step 4. You can’t quite read the Network layer easily, so select ToolsToolsToolsTools����Zoom In Zoom In Zoom In Zoom In ToolToolToolTool and click on the Network layeNetwork layeNetwork layeNetwork layer r r r twice until you can read the block marked ICMP ICMP ICMP ICMP in the lower left corner.
Step 5. Now, you need to select and annotate some text. Click on ToolsToolsToolsTools���� Select Select Select Select TextTextTextText.

Category: PORTABLE APPLICATIONS
© 2007 Institute for Network Professionals 3a ITProUSB - 3 - Portable Applications - v1.2 www.inpnet.org • www.HOTLabs.org 34 4/26/2007
Step 6. Click Click Click Click and drag drag drag drag around the ICMP block to highlight it.
Step 7. ClickClickClickClick on Tools Tools Tools Tools ���� Commenting Too Commenting Too Commenting Too Commenting Tools ls ls ls ���� TypewriterTypewriterTypewriterTypewriter to open an annotation text box.
Step 8. Type “Annotated ICMP Annotated ICMP Annotated ICMP Annotated ICMP –––– this is the protocol ping uses. this is the protocol ping uses. this is the protocol ping uses. this is the protocol ping uses.” Drag and stretch the text box as needed.
Step 9. To print (if you have a printer set up), clickclickclickclick on the printer iconprinter iconprinter iconprinter icon on the toolbar (or FileFileFileFile����PrintPrintPrintPrint).
Step 10. Exit FoxITFoxITFoxITFoxIT Reader Reader Reader Reader.
What you learned in this Lab: In this Lab you learned to use Product to:
1. Used Foxit Reader to open and read a pdf file
2. Highlighted portions of a pdf file
3. Added annotations to a pdf file
4. Printed a pdf file
Category: PORTABLE APPLICATIONS
© 2007 Institute for Network Professionals 3a ITProUSB - 3 - Portable Applications - v1.2 www.inpnet.org • www.HOTLabs.org 35 4/26/2007
GAIM Portable
Gaim PortableGaim PortableGaim PortableGaim Portable is a multi-protocol instant messaging client that works with AOL Instant Messenger, ICQ, MSN Messenger, Yahoo! and more. You can log into multiple networks all with the same program. All your IM settings and buddy lists are self-contained, so it leaves no personal information behind on the machine you run it on. You can also easily add the Off-the-record plugin for secure, encrypted messaging
Product Information
Source PortableApps.Com
Open Source (GPL)
http://portableapps.com/apps/internet/gaim_portable
Where, When, Why Portable Applications—Multi-Protocol Chat Utility
You are in the Coffee Shop or at Aunt Betty’s and realize you had agreed to be on a chat session with some colleagues about the new implementation being rolled out next weekend. You need a portable chat application that will let you into whichever chat session you have an account on, be it AIM, ICQ, Yahoo, MSN, or others. You use your USB stick to start GAIM PortableGAIM PortableGAIM PortableGAIM Portable and join in the tech chat session, leaving no trace on the machine you happen to borrow for the occasion.
Usage and Features
• Multiprotocol instant messaging (IM) client • Supports AIM, ICQ, MSN Messenger, Yahoo !, IRC, Jabber, Gadu-Gadu,
SILC, Novell GroupWise Messenger, Lotus Sametime, and Zephyr • File transfer, away messages, Buddy Pounce, typing notification
Requirements / Dependencies Supported Operating Systems:
• Windows 98/Me/2000/XP • Linux • MAC OS • BSD • Qtopia
Where to Go for More Information
• GAIM Portable Support http://portableapps.com/support/gaim_portable#using
• GAIM documentation http://gaim.sourceforge.net/documentation.php • GAIM Portable Support Forum
http://portableapps.com/forums/support/gaim_portable
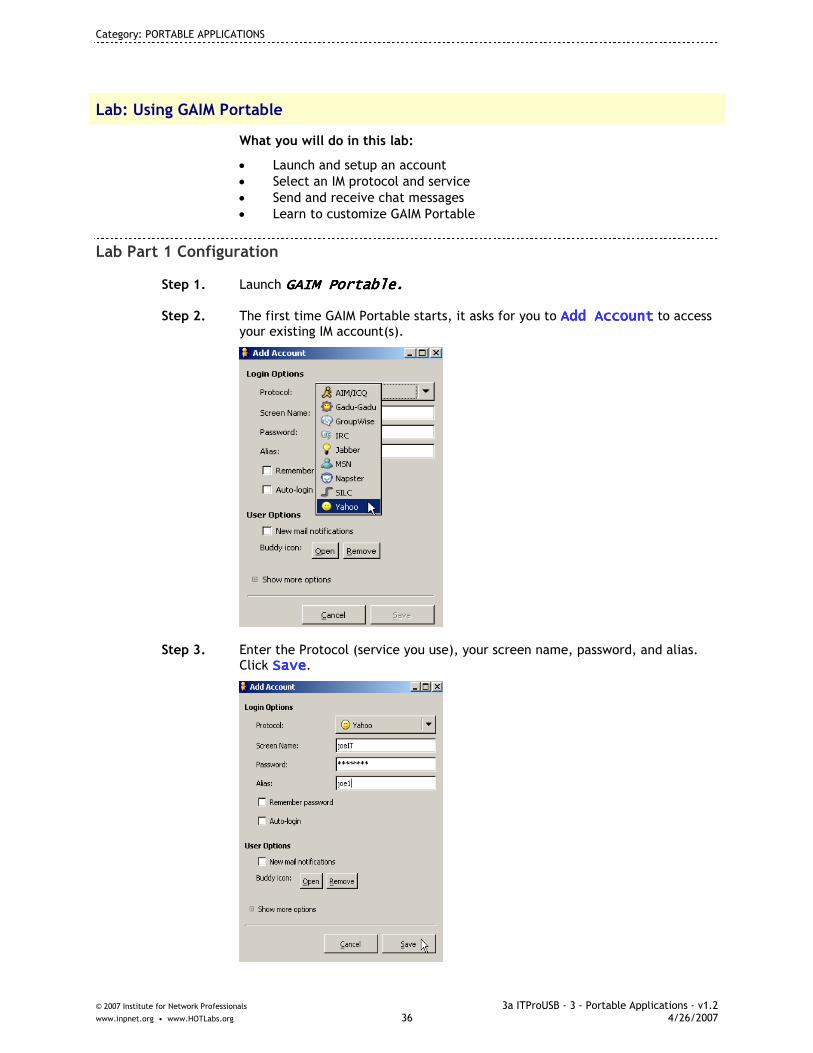
Category: PORTABLE APPLICATIONS
© 2007 Institute for Network Professionals 3a ITProUSB - 3 - Portable Applications - v1.2 www.inpnet.org • www.HOTLabs.org 36 4/26/2007
Lab: Using GAIM Portable
What you will do in this lab:
• Launch and setup an account • Select an IM protocol and service • Send and receive chat messages • Learn to customize GAIM Portable
Lab Part 1 Configuration
Step 1. Launch GAIM Portable.GAIM Portable.GAIM Portable.GAIM Portable.
Step 2. The first time GAIM Portable starts, it asks for you to Add AccountAdd AccountAdd AccountAdd Account to access your existing IM account(s).
Step 3. Enter the Protocol (service you use), your screen name, password, and alias. Click SaveSaveSaveSave.

Category: PORTABLE APPLICATIONS
© 2007 Institute for Network Professionals 3a ITProUSB - 3 - Portable Applications - v1.2 www.inpnet.org • www.HOTLabs.org 37 4/26/2007
Step 4. At this point the GAIM Portable Login window appears. Enter your password and click Sign onSign onSign onSign on.
Of course, you won’t be able to complete these next few steps if you don’t already have some kind of actual IM account
Step 5. From here, you may chat as on any IM client.
Step 6. To customize buddy lists or any number of other options, you may click on PreferencesPreferencesPreferencesPreferences in the GAIM sign on screen (see Step 4 above) or OptionsOptionsOptionsOptions in the chat window.

Category: PORTABLE APPLICATIONS
© 2007 Institute for Network Professionals 3a ITProUSB - 3 - Portable Applications - v1.2 www.inpnet.org • www.HOTLabs.org 38 4/26/2007
Step 7. Exit GAIM PortableGAIM PortableGAIM PortableGAIM Portable when you are finished, and no trace of your session will be left on the host machine. All your options will be stored on your USB stick.
What you learned in this Lab: In this Lab you learned to use Product to:
1. Launched and setup an account
2. Selected an IM protocol and service and logged in
3. Learned where to send and receive chat messages
4. Learned where to customize GAIM Portable

Category: PORTABLE APPLICATIONS
© 2007 Institute for Network Professionals 3a ITProUSB - 3 - Portable Applications - v1.2 www.inpnet.org • www.HOTLabs.org 39 4/26/2007
GIMP Portable
GIMP is an acronym for GNU Image Manipulation Program. It is a freely distributed program for such tasks as photo retouching, image composition and image authoring. It has many capabilities. It can be used as a simple paint program, an expert quality photo retouching program, an online batch processing system, a mass production image renderer, an image format converter, etc. GIMP is expandable and extensible. It is designed to be augmented with plug-ins and extensions to do just about anything. The advanced scripting interface allows everything from the simplest task to the most complex image manipulation procedures to be easily scripted.
Product Information
Source The GIMP Team
Free / Open Source (GPL)
www.gimp.org
Where, When, Why Portable Applications — Graphics and Photo Editor
You are on the go and need to edit some graphics or photos. Upload your image into GIMPGIMPGIMPGIMP, edit, and then export.
Usage and Features
• Full suite of painting tools • Tile based memory management so image size is limited only by disk
space • Full alpha channel support • A Procedural Database for calling internal GIMP functions form external
programs as in Script-fu • Over 100 plug-ins avaiblabe • Load and save animations in a convenient frame-as-layer format • Much, much more!
Requirements / Dependencies
• Windows 98/Me/2000/XP/Vista
Where to Go for More Information
• http://gimp-win.sourceforge.net/

Category: PORTABLE APPLICATIONS
© 2007 Institute for Network Professionals 3a ITProUSB - 3 - Portable Applications - v1.2 www.inpnet.org • www.HOTLabs.org 40 4/26/2007

Category: PORTABLE APPLICATIONS
© 2007 Institute for Network Professionals 3a ITProUSB - 3 - Portable Applications - v1.2 www.inpnet.org • www.HOTLabs.org 41 4/26/2007
Miranda IM Portable
Miranda IM PortableMiranda IM PortableMiranda IM PortableMiranda IM Portable is a multi protocol instant messenger client for Windows. Miranda IM uses very little memory and is extremely fast
Product Information
Source Miranda IM
Open Source (GPL)
www.miranda-im.org
Where, When, Why Portable Applications—Multi-Protocol Chat Utility
You are in the Coffee Shop or at Aunt Betty’s and realize you had agreed to be on a chat session with some colleagues about the new implementation being rolled out next weekend. You need a portable chat application that will let you into whichever chat session you have an account on, be it AIM, ICQ, Yahoo, MSN, or others. You use your USB stick to start Miranda IM Portable Miranda IM Portable Miranda IM Portable Miranda IM Portable and join in the tech chat session, leaving no trace on the machine you happen to borrow for the occasion.
Usage and Features
• Multiprotocol instant messenger. Supports ICQ, AIM, MSN, Jabber, IRC, Gadu Gadu, Tlen, Netsend, and more.
• 350 free plugins available to extend the look, feel, sounds, emoticons, -splash screens, etc.
• See examples of various Miranda skins and customizations on next page
Requirements / Dependencies Supported Operating Systems:
• Windows 95 • Windows 98 • Windows Me • Windows NT 4 • Windows 2000 • Windows XP
Where to Go for More Information
• Beginner’s Guide at http://help.miranda-im.org/Quick_Start • Comprehensive Guide at http://help.miranda-
im.org/Comprehensive_Guide • Forums at http://forums.miranda-im.org/ • Blog at: http://www.miranda-im.org/blog/ • Help from main menu
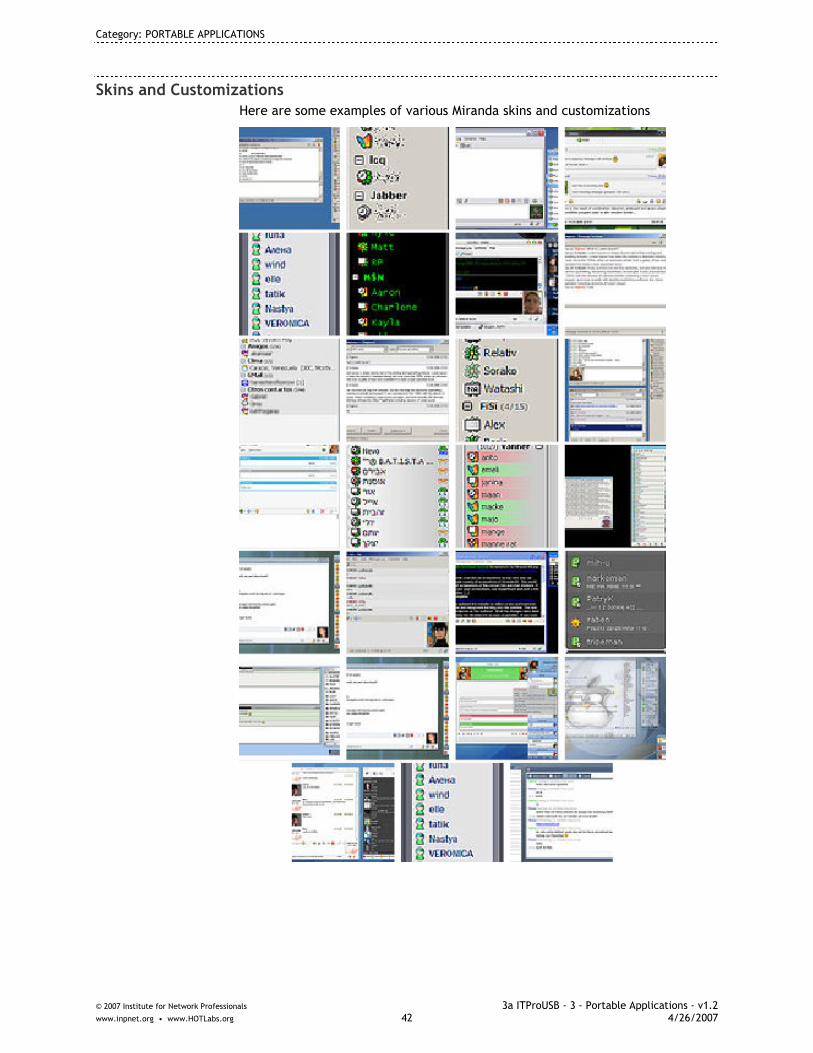
Category: PORTABLE APPLICATIONS
© 2007 Institute for Network Professionals 3a ITProUSB - 3 - Portable Applications - v1.2 www.inpnet.org • www.HOTLabs.org 42 4/26/2007
Skins and Customizations Here are some examples of various Miranda skins and customizations

Category: PORTABLE APPLICATIONS
© 2007 Institute for Network Professionals 3a ITProUSB - 3 - Portable Applications - v1.2 www.inpnet.org • www.HOTLabs.org 43 4/26/2007
Lab: Using Miranda IM Portable
What you will do in this lab:
• Launch and setup a first-time profile • Select an IM protocol and service • Send and receive chat messages • Learn to customize Miranda
Lab Part 1 Configuration
Step 1. Launch Miranda IM PortableMiranda IM PortableMiranda IM PortableMiranda IM Portable.
Step 2. The first time Miranda starts, it asks for a new profile. You may not see this message. If you do, enter your name or the name of the place where you will be using Miranda: work, home, tech support, etc. Leave the profile driver at the Miranda Database default unless you have experience with a different profile database. Click CreateCreateCreateCreate.
Step 3. Once your profile is created, a number of pop-ups will occur depending on which protocol you have selected to use. Enter your screen nscreen nscreen nscreen names/idsames/idsames/idsames/ids and passwordspasswordspasswordspasswords in each box and click SSSSaveaveaveave or OkOkOkOk. If you do not have an account with selected service, you can follow the URLs on each box and register an account. Once all the services are filled out, Miranda will start.
Step 4. If you have an AIM account, enter your SSSScreennamecreennamecreennamecreenname and PPPPassword assword assword assword for AIM and click OkOkOkOk; otherwise, click Cancel.

Category: PORTABLE APPLICATIONS
© 2007 Institute for Network Professionals 3a ITProUSB - 3 - Portable Applications - v1.2 www.inpnet.org • www.HOTLabs.org 44 4/26/2007
Step 5. You will be asked the same information about an existing ICQ account. Fill in the ICQ numberICQ numberICQ numberICQ number and PasswordPasswordPasswordPassword if you have one, or you may click on the link for Create new account if you would like to set one up. Otherwise, click on CancelCancelCancelCancel to continue.
Step 6. If you have an IRC nickname and full name, enter that and click OkOkOkOk; otherwise, click Cancel.
Step 7. A wizard appears to offer to import contacts and message history. Click Next Next Next Next to choose information for importing. Otherwise, click CancelCancelCancelCancel to use Miranda immediately.
Step 8. If you choose to import information, you will be asked about its source. Click NextNextNextNext, or CancelCancelCancelCancel if you decide not to import information.

Category: PORTABLE APPLICATIONS
© 2007 Institute for Network Professionals 3a ITProUSB - 3 - Portable Applications - v1.2 www.inpnet.org • www.HOTLabs.org 45 4/26/2007
Step 9. At this point the Miranda main window appears.
Lab Part 2 Using Miranda to participate in a chat session
Step 10. Click on the Miranda iconMiranda iconMiranda iconMiranda icon to open the main menu, and then select the service you wish to login to and click on OnlineOnlineOnlineOnline for your status.
Step 11. Buddies: If you never used a client before and are connecting to service for the first time, your contact list will be pretty empty. To add buddies, you can right click on the contact list and click on Find/Add ContactsFind/Add ContactsFind/Add ContactsFind/Add Contacts. Alternatively you can add contacts by clicking on the main menu. You can search for buddies this way, but it might be hard to find a new friend to add.

Category: PORTABLE APPLICATIONS
© 2007 Institute for Network Professionals 3a ITProUSB - 3 - Portable Applications - v1.2 www.inpnet.org • www.HOTLabs.org 46 4/26/2007
Step 12. Sending a first message: Once you click on the message option by right clicking on the contact or by double clicking on their name, a message window will appear. In the center of the window you will find a rich text box that displays your conversation, and below that will be a smaller one that allows you to enter text. Simply, click on the smaller text box and begin typing to enter your first message. Press enter when you are done, and the message will be sent.
Step 13. Customizing Miranda: Most of customizing of Miranda is done from the Options
menu. Click on the Miranda icon , OptionsOptionsOptionsOptions. From here you can edit your login to a service or add plugins, change display properties.
Step 14. To get HelpHelpHelpHelp, from the main menu from the Miranda icon , click on HelpHelpHelpHelp���� SuSuSuSupportpportpportpport .
What you learned in this Lab: In this Lab you learned to use Miranda IM to:
1. Launch and setup a first-time profile
2. Select an IM protocol and service
3. Send and receive a chat message
Category: PORTABLE APPLICATIONS
© 2007 Institute for Network Professionals 3a ITProUSB - 3 - Portable Applications - v1.2 www.inpnet.org • www.HOTLabs.org 47 4/26/2007
Portable Firefox
Mozilla Firefox is a fast, full-featured web browser that's easy to use. It has lots of great features including popup-blocking, tabbed-browsing, integrated search, improved privacy features, automatic updating and more.
Plus, thanks to the PortableApps.com launcher bundled in the Mozilla Firefox, Portable Edition, it leaves no personal information behind on the machine you run it on, so you can take your favorite browser along with all your favorite bookmarks and extensions with you wherever you go.
Product Information
Source Mozilla
Free / Open Source
www.mozilla.com
Where, When, Why Portable Applications — Localized (leave no trace) Internet Browser
You need to access the web and don’t want to leave any trace on the machine. You also want access to your browser bookmarks and passwords.
Usage and Features
• Popup-blocking • Tabbed-browsing • Integrated search • Automatic updates • Leaves no personal information behind
Requirements / Dependencies
• Windows 98/Me/2000/XP/Vista, Wine on Linux/UNIX
Where to Go for More Information
• www.mozilla.com/en-US/firefox/ • http://portableapps.com/support/firefox_portable

Category: PORTABLE APPLICATIONS
© 2007 Institute for Network Professionals 3a ITProUSB - 3 - Portable Applications - v1.2 www.inpnet.org • www.HOTLabs.org 48 4/26/2007

Category: PORTABLE APPLICATIONS
© 2007 Institute for Network Professionals 3a ITProUSB - 3 - Portable Applications - v1.2 www.inpnet.org • www.HOTLabs.org 49 4/26/2007
Portable Nvu
Nvu is an easy-to-use web editor similar to Microsoft Frontpage or
Dreamweaver. It is based on the same Gecko engine that powers Firefox and
Thunderbird and features an FTP site manager, color picker, tabbed interface,
CSS editing, standard-compliant markup, fully customizable interface, a built-
in spellchecker and more.
Product Information
Source Nvu
Free / Open Source
Linspire, Inc.
www.nvu.com
Where, When, Why Portable Applications — Website WYSIWYG Editor
You don’t have access to your personal computer and you need to edit your companies’ website, so you run NvuNvuNvuNvu off of your USB stick and use it on any computer, without leaving any personal information behind.
Usage and Features
• WYSIWYG editing of pages, making web creation as easy as typing a letter with your word processor.
• Integrated file management via FTP. Simply login to your web site and navigate through your files, editing web pages on the fly, directly from your site.
• Reliable HTML code creation that will work with all of today's most popular browsers.
• Jump between WYSIWYG Editing Mode and HTML using tabs. • Tabbed editing to make working on multiple pages a snap. • Powerful support for forms, tables, and templates. • The easiest-to-use, most powerful Web Authoring System available for
Desktop Linux, Microsoft Windows and Apple Macintosh users.
Requirements / Dependencies
• Windows 95/98/Me/2000/XP/Vista, Wine on Linux/UNIX
Where to Go for More Information
• http://www.nvu.com • http://portableapps.com/support/nvu_portable

Category: PORTABLE APPLICATIONS
© 2007 Institute for Network Professionals 3a ITProUSB - 3 - Portable Applications - v1.2 www.inpnet.org • www.HOTLabs.org 50 4/26/2007
Category: PORTABLE APPLICATIONS
© 2007 Institute for Network Professionals 3a ITProUSB - 3 - Portable Applications - v1.2 www.inpnet.org • www.HOTLabs.org 51 4/26/2007
Portable Open Office
Open Office Open Office Open Office Open Office is a suite of applications designed to provide the functionality of the Microsoft Office suite – word processing, spreadsheet, presentations, graphics, and database applications.
Product Information
Source Sun Microsystems -- OpenOffice.Org
license type: GPL
price: N/A
www.openoffice.org
Where, When, Why Portable Application—Office Productivity Suite
You are on-site, and the workstation you have been given to work on does not have a word processing, spreadsheet, and presentations suite on it. You need to document the work you have done on the network today, prepare a cost sheet for the new equipment you have recommended, and leave the admin a brief presentation they can show their manager about your proposal. With your Ultimate USB stick and the Open Office Open Office Open Office Open Office suite on it, you are in business. You can even save them documents with a .doc, .xls, and .ppt extensions!
Usage and Features Open Office Open Office Open Office Open Office allows you to:
• Create and edit documents (WriterWriterWriterWriter) • Create and edit spreadsheets, including complex formulas (CalcCalcCalcCalc) • Create and edit databases (BaseBaseBaseBase) • Create and edit graphics (DrawDrawDrawDraw) • Create and edit slideshow presentations (ImpressImpressImpressImpress) • Portable OpenOffice leaves no trace of files on the hard drive; everything
is contained on the USB stick
Requirements / Dependencies OpenOffice can be run under Windows and Linux operating systems. The specific Portable OpenOffice2 included on the Ultimate USB Stick does not even need to be installed. It runs entirely from the USB drive and does not leave any trace on the system running it.

Category: PORTABLE APPLICATIONS
© 2007 Institute for Network Professionals 3a ITProUSB - 3 - Portable Applications - v1.2 www.inpnet.org • www.HOTLabs.org 52 4/26/2007
Lab: Quick Start with OpenOffice
What you will do in this lab:
• Open and edit a short document • Open and prepare a spreadsheet • Open and prepare a slide presentation
Lab Part 1.1—Open and Edit a Document
Step 1. Launch Open OfficeOpen OfficeOpen OfficeOpen Office . (On the USB stick it is on the PstartPstartPstartPstart menu, or under \\\\3333---- PortableApps PortableApps PortableApps PortableApps\\\\PortableOpenOfficePortableOpenOfficePortableOpenOfficePortableOpenOffice.)
Step 2. Select FileFileFileFile ���� NewNewNewNew ���� Text DocumentText DocumentText DocumentText Document.
Step 3. Prepare a template document with the following lines
Name:Name:Name:Name: Date:Date:Date:Date: Project:Project:Project:Project: Description:Description:Description:Description:
Step 4. Click on the Save Save Save Save icon (third from left) or FileFileFileFile ���� SaveSaveSaveSave. Use the filename mydocumentmydocumentmydocumentmydocument and for the location use <USB drive letter>:<USB drive letter>:<USB drive letter>:<USB drive letter>:\\\\3333---- Portable ApplicationsPortable ApplicationsPortable ApplicationsPortable Applications\\\\OpenOfficePortableOpenOfficePortableOpenOfficePortableOpenOfficePortable\\\\DataDataDataData .
Step 5. CloseCloseCloseClose your document.
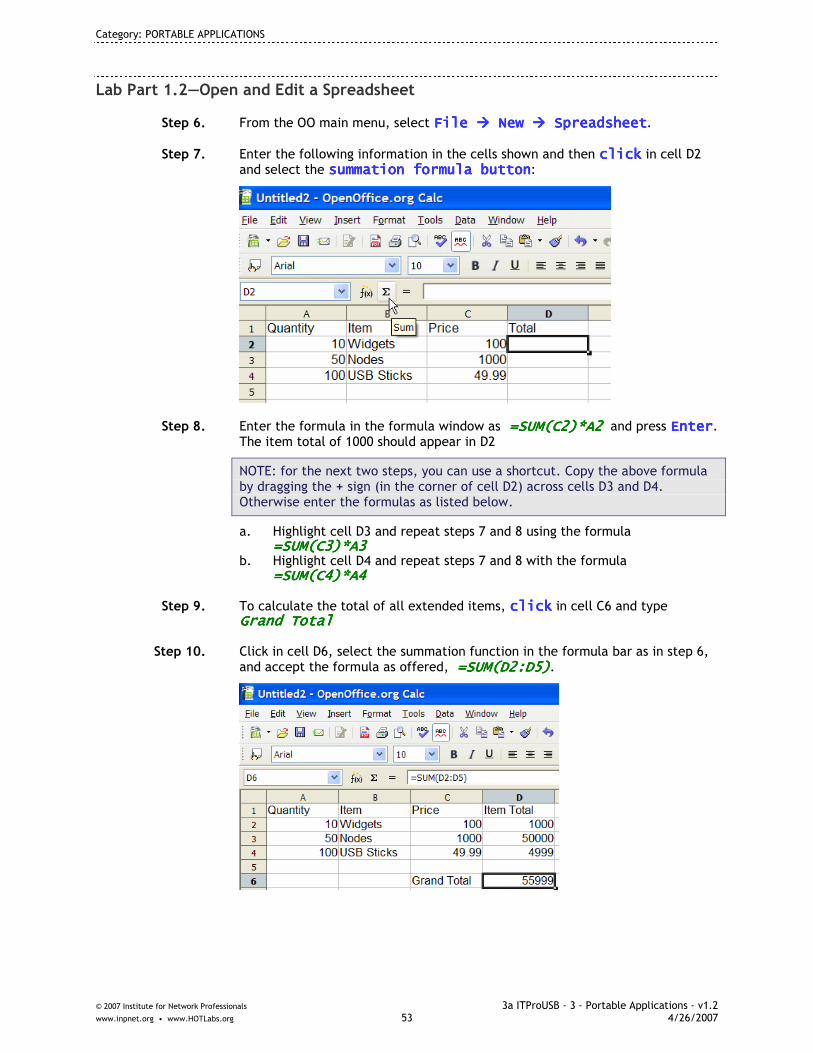
Category: PORTABLE APPLICATIONS
© 2007 Institute for Network Professionals 3a ITProUSB - 3 - Portable Applications - v1.2 www.inpnet.org • www.HOTLabs.org 53 4/26/2007
Lab Part 1.2—Open and Edit a Spreadsheet
Step 6. From the OO main menu, select FileFileFileFile ���� New New New New ���� Spreadsheet Spreadsheet Spreadsheet Spreadsheet.
Step 7. Enter the following information in the cells shown and then clickclickclickclick in cell D2 and select the summation formula buttonsummation formula buttonsummation formula buttonsummation formula button:
Step 8. Enter the formula in the formula window as =SUM(C2)*A2 =SUM(C2)*A2 =SUM(C2)*A2 =SUM(C2)*A2 and press EnterEnterEnterEnter. The item total of 1000 should appear in D2
NOTE: for the next two steps, you can use a shortcut. Copy the above formula by dragging the + sign (in the corner of cell D2) across cells D3 and D4. Otherwise enter the formulas as listed below.
a. Highlight cell D3 and repeat steps 7 and 8 using the formula =SUM(C3)*A3=SUM(C3)*A3=SUM(C3)*A3=SUM(C3)*A3
b. Highlight cell D4 and repeat steps 7 and 8 with the formula =SUM(C4)*A4=SUM(C4)*A4=SUM(C4)*A4=SUM(C4)*A4
Step 9. To calculate the total of all extended items, clickclickclickclick in cell C6 and type Grand TotalGrand TotalGrand TotalGrand Total
Step 10. Click in cell D6, select the summation function in the formula bar as in step 6, and accept the formula as offered, =SUM(D2:D5) =SUM(D2:D5) =SUM(D2:D5) =SUM(D2:D5).

Category: PORTABLE APPLICATIONS
© 2007 Institute for Network Professionals 3a ITProUSB - 3 - Portable Applications - v1.2 www.inpnet.org • www.HOTLabs.org 54 4/26/2007
Step 11. To add some formatting for currency, highlight cells D2 to D6, from the menu select FormatFormatFormatFormat ���� CellsCellsCellsCells ���� CurrencyCurrencyCurrencyCurrency and click OKOKOKOK.
Your completed spreadsheet should display the totals of all items as currency.
Step 12. Click on the SaveSaveSaveSave icon and save as myspreadsheetmyspreadsheetmyspreadsheetmyspreadsheet in /3/3/3/3---- Portable Portable Portable Portable Applications/OpenOfficePortable/DataApplications/OpenOfficePortable/DataApplications/OpenOfficePortable/DataApplications/OpenOfficePortable/Data on the <U<U<U<USB drive SB drive SB drive SB drive letterletterletterletter>>>>.
Step 13. CloseCloseCloseClose your spreadsheet
Lab Part 1.3—Open and Edit a Presentation
Step 14. To prepare a brief presentation, from the OpenOffice CalcOpenOffice CalcOpenOffice CalcOpenOffice Calc menu select FileFileFileFile����NewNewNewNew����PresentationPresentationPresentationPresentation, and then CreateCreateCreateCreate.
Step 15. On the right pane, under LayoutsLayoutsLayoutsLayouts, select the second slide in the left row, which displays “Title, textTitle, textTitle, textTitle, text” when the mouse hovers over it.
Step 16. Click inside the Add TextAdd TextAdd TextAdd Text window and type OpenOpenOpenOpen Office Office Office Office PresentationPresentationPresentationPresentation. Press EnterEnterEnterEnter.
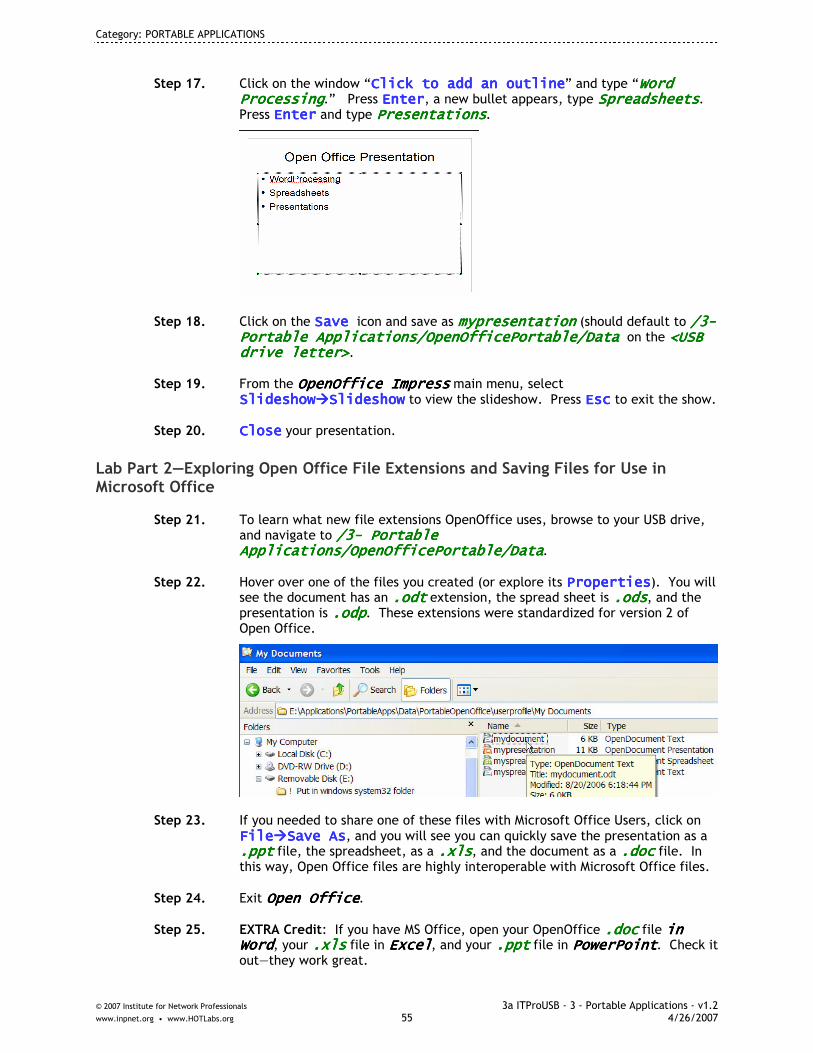
Category: PORTABLE APPLICATIONS
© 2007 Institute for Network Professionals 3a ITProUSB - 3 - Portable Applications - v1.2 www.inpnet.org • www.HOTLabs.org 55 4/26/2007
Step 17. Click on the window “Click to add an outlineClick to add an outlineClick to add an outlineClick to add an outline” and type “Word Word Word Word ProcessingProcessingProcessingProcessing.” Press EnterEnterEnterEnter, a new bullet appears, type SpreadsheetsSpreadsheetsSpreadsheetsSpreadsheets. Press EnterEnterEnterEnter and type PresentationsPresentationsPresentationsPresentations.
Step 18. Click on the Save Save Save Save icon and save as mypresentationmypresentationmypresentationmypresentation (should default to /3/3/3/3---- Portable Applications/OpenOfficePPortable Applications/OpenOfficePPortable Applications/OpenOfficePPortable Applications/OpenOfficePortable/Dataortable/Dataortable/Dataortable/Data on the <U<U<U<USB SB SB SB drive letterdrive letterdrive letterdrive letter>>>>.
Step 19. From the OpenOffice ImpressOpenOffice ImpressOpenOffice ImpressOpenOffice Impress main menu, select SlideshowSlideshowSlideshowSlideshow����SlideshowSlideshowSlideshowSlideshow to view the slideshow. Press EscEscEscEsc to exit the show.
Step 20. CloseCloseCloseClose your presentation.
Lab Part 2—Exploring Open Office File Extensions and Saving Files for Use in Microsoft Office
Step 21. To learn what new file extensions OpenOffice uses, browse to your USB drive, and navigate to /3/3/3/3---- Portable Portable Portable Portable Applications/OpenOfficePortable/DataApplications/OpenOfficePortable/DataApplications/OpenOfficePortable/DataApplications/OpenOfficePortable/Data.
Step 22. Hover over one of the files you created (or explore its PropertiesPropertiesPropertiesProperties). You will see the document has an .odt.odt.odt.odt extension, the spread sheet is .ods.ods.ods.ods, and the presentation is .odp.odp.odp.odp. These extensions were standardized for version 2 of Open Office.
Step 23. If you needed to share one of these files with Microsoft Office Users, click on FileFileFileFile����Save AsSave AsSave AsSave As, and you will see you can quickly save the presentation as a .ppt.ppt.ppt.ppt file, the spreadsheet, as a .xls.xls.xls.xls, and the document as a .doc.doc.doc.doc file. In this way, Open Office files are highly interoperable with Microsoft Office files.
Step 24. Exit Open OfficeOpen OfficeOpen OfficeOpen Office.
Step 25. EXTRA Credit: If you have MS Office, open your OpenOffice .doc.doc.doc.doc file inininin WordWordWordWord, your .xls.xls.xls.xls file in ExcelExcelExcelExcel, and your .ppt.ppt.ppt.ppt file in PowerPointPowerPointPowerPointPowerPoint. Check it out—they work great.
Category: PORTABLE APPLICATIONS
© 2007 Institute for Network Professionals 3a ITProUSB - 3 - Portable Applications - v1.2 www.inpnet.org • www.HOTLabs.org 56 4/26/2007
Lab Part 3—Editing Microsoft Office Documents with Open Office Portable.
To prove the interoperability of OpenOffice with existing WordWordWordWord, ExcelExcelExcelExcel, and PowerPointPowerPointPowerPointPowerPoint files, you can open sample files on your USB stick.
Step 26. Within OpenOffice Portable WriterOpenOffice Portable WriterOpenOffice Portable WriterOpenOffice Portable Writer, click on FileFileFileFile ���� Open Open Open Open. Browse to the <U<U<U<USB drive letterSB drive letterSB drive letterSB drive letter>>>> and the directory \\\\CourseFilesCourseFilesCourseFilesCourseFiles\\\\Microsoft Office SamplesMicrosoft Office SamplesMicrosoft Office SamplesMicrosoft Office Samples.
Step 27. Open the file named Sample Word DocumentSample Word DocumentSample Word DocumentSample Word Document.
Step 28. Repeat FileFileFileFile ���� OpenOpenOpenOpen and select Sample Excel SpreadsheSample Excel SpreadsheSample Excel SpreadsheSample Excel Spreadsheeeeetttt. Notice how it opens OpenOpenOpenOpenOffice CalcOffice CalcOffice CalcOffice Calc, retaining the formulas and calculations
Step 29. From within OpenOpenOpenOpenOffice CalcOffice CalcOffice CalcOffice Calc, use FileFileFileFile ���� OpenOpenOpenOpen and select SampleSampleSampleSample Powerpoint PresentationPowerpoint PresentationPowerpoint PresentationPowerpoint Presentation. Notice it opens in OpenOffice ImpressOpenOffice ImpressOpenOffice ImpressOpenOffice Impress.
Step 30. Select from the menu bar Slide ShowSlide ShowSlide ShowSlide Show ���� Slide ShowSlide ShowSlide ShowSlide Show, and use the space bar or down arrow to move through the slide show. Press EscEscEscEsc to exit the show.
Step 31. Exit OpenOffice Portable using FileFileFileFile ���� Exit Exit Exit Exit within ImpressImpressImpressImpress, and all three applications will close.
Review: What you have learned In this Lab on Open Office, you have learned:
1. How to open a portable copy of Open Office on any system you may access.
2. How to prepare a new document.
3. How to prepare a new spread sheet.
4. How to prepare a new presentation.
5. The new filename extensions Open Office uses: ....odtodtodtodt, ....odsodsodsods, and ....odpodpodpodp.
6. How to share these documents with Microsoft Office users by saving them as .doc.doc.doc.doc, .xls.xls.xls.xls, and .ppt.ppt.ppt.ppt files.
7. How to open and edit existing documents created by Microsoft Word, Excel, and Presentations.

Category: PORTABLE APPLICATIONS
© 2007 Institute for Network Professionals 3a ITProUSB - 3 - Portable Applications - v1.2 www.inpnet.org • www.HOTLabs.org 57 4/26/2007
Scribus
Scribus is an open-source program that brings award-winning professional page layout to Linux/Unix, MacOS X, OS/2 and Windows desktops with a combination of "press-ready" output and new approaches to page layout. Underneath the modern and user friendly interface, Scribus supports professional publishing features, such as CMYK color, separations, ICC color management and versatile PDF creation.
Product Information
Source Scribus
Free / Open Source (GPL)
www.scribus.net
Where, When, Why Portable Applications — Page Layout Program
You are on the go and need to create a quick professional document. Start ScribusScribusScribusScribus and create a professional quality document easily.
Usage and Features
• Professional features (CMYK color, spot color, sperations, ICC color and robust commercial grade PDF)
• Friendly, easy to use, interface
Requirements / Dependencies
• Windows 2000/XP, MacOS X, OS/2, Debian Repository w/Instructions, Source and RPMS.
Where to Go for More Information
• www.scribus.net

Category: PORTABLE APPLICATIONS
© 2007 Institute for Network Professionals 3a ITProUSB - 3 - Portable Applications - v1.2 www.inpnet.org • www.HOTLabs.org 58 4/26/2007

Category: PORTABLE APPLICATIONS
© 2007 Institute for Network Professionals 3a ITProUSB - 3 - Portable Applications - v1.2 www.inpnet.org • www.HOTLabs.org 59 4/26/2007
VLC
VLC media player is a highly portable multimedia player for various audio and video formats (MPEG-1, MPEG-2, MPEG-4, DivX, mp3, ogg, ...) as well as DVDs, VCDs, and various streaming protocols. It can also be used as a server to stream in unicast or multicast in IPv4 or IPv6 on a high-bandwidth network.
Product Information
Source VideoLAN
Free
www.videolan.org
Where, When, Why Portable Applications — Portable Media Player
You don’t have access to your personal computer with your preferred media player. Use VLC VLC VLC VLC to watch and listen to all your favorite video and audio files anywhere, on any machine, without leaving any personal information behind.
Usage and Features
• Free cross-platform media player • Supports a large number of multimedia formats, without the need for
additional codecs • Can be used as a streaming server, with extended features • Full feature list at: http://www.videolan.org/vlc/features.html
Requirements / Dependencies
• Windows 95/98/Me/2000/XP/Vista (Note: Win 95/98/Me are not officially supported)
Where to Go for More Information
• http://www.videolan.org/support/

Category: PORTABLE APPLICATIONS
© 2007 Institute for Network Professionals 3a ITProUSB - 3 - Portable Applications - v1.2 www.inpnet.org • www.HOTLabs.org 60 4/26/2007

Category: PORTABLE APPLICATIONS
© 2007 Institute for Network Professionals 3a ITProUSB - 3 - Portable Applications - v1.2 www.inpnet.org • www.HOTLabs.org 61 4/26/2007
WordPad
WordPad is a simple word processor that is included with almost all versions of Microsoft Windows from Windows 95 upwards. It is more advanced than Notepad, which is rather a basic text editor, but not at all as advanced as Microsoft Word. It originated in Windows 1.0x as Write.
Product Information
Source Microsoft
Free
www.microsoft.com/windows
Where, When, Why Portable Applications — Simple Word Processor
You need a simple quick document. Open up WordPad WordPad WordPad WordPad and create your document, then print or export as needed.
Usage and Features
• Format and print text • Supports Rich Text Format
Requirements / Dependencies
• Windows 95 or later
Where to Go for More Information
• http://www.microsoft.com/resources/documentation/windows/xp/all/proddocs/en-us/app_wordpad.mspx?mfr=true
• Help Files

Category: PORTABLE APPLICATIONS
© 2007 Institute for Network Professionals 3a ITProUSB - 3 - Portable Applications - v1.2 www.inpnet.org • www.HOTLabs.org 62 4/26/2007
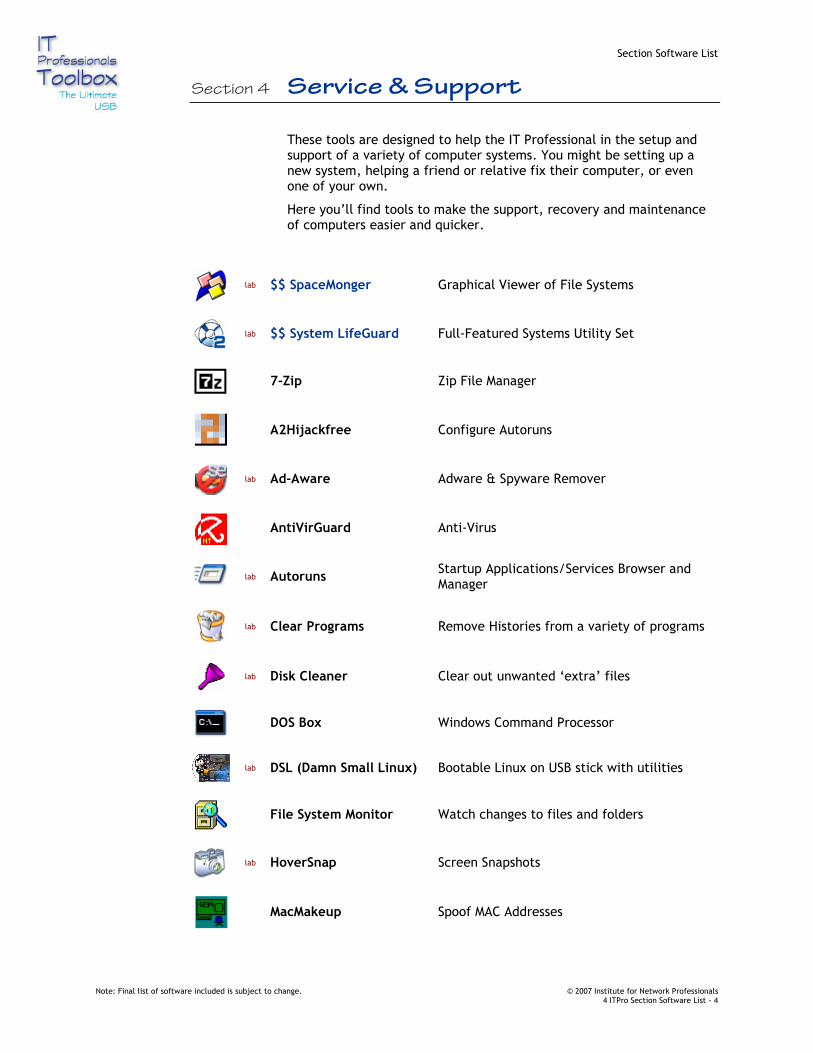
Section Software List
Note: Final list of software included is subject to change. © 2007 Institute for Network Professionals 4 ITPro Section Software List - 4
Section 4 Service & Support
These tools are designed to help the IT Professional in the setup and support of a variety of computer systems. You might be setting up a new system, helping a friend or relative fix their computer, or even one of your own.
Here you’ll find tools to make the support, recovery and maintenance of computers easier and quicker.
lab $$ SpaceMonger Graphical Viewer of File Systems
lab $$ System LifeGuard Full-Featured Systems Utility Set
7-Zip Zip File Manager
A2Hijackfree Configure Autoruns
lab Ad-Aware Adware & Spyware Remover
AntiVirGuard Anti-Virus
lab Autoruns
Startup Applications/Services Browser and Manager
lab Clear Programs Remove Histories from a variety of programs
lab Disk Cleaner Clear out unwanted ‘extra’ files
DOS Box Windows Command Processor
lab DSL (Damn Small Linux) Bootable Linux on USB stick with utilities
File System Monitor Watch changes to files and folders
lab HoverSnap Screen Snapshots
MacMakeup Spoof MAC Addresses

Section Software List
Note: Final list of software included is subject to change. © 2007 Institute for Network Professionals 4 ITPro Section Software List - 4
lab MM CompView What Multi-Media Codecs are installed
Portable ClamWin Anti-Virus
Process Viewer What is using the computers cycles
Registry Monitor Manage and track changes to Registry
Registry Scanner Find settings in the Registry
Remove WGA Help manage Windows Genuine issues
Restoration Return erased items
SpyBot Spyware Remover
StartupRun What programs should run at boot time
Stinger Anti-Virus
System Information Full detailed auditing of system configuration
Timer Simple on-screen timer software
WhoAmI Information on IP Network Connection
WinAudit Audit of installed services & software
WinFingerPrint Versions of Windows
lab ZoomIt Screen Magnifier
Category: SERVICE & SUPPORT
© 2007 Institute for Network Professionals 4a ITProUSB - 4 - Service & Support - v1.2 www.inpnet.org • www.HOTLabs.org 1 4/26/2007
Section 4 – SERVICE & SUPPORT Table of Contents
SpaceMonger ...............................................................3
System LifeGuard 2...................................................... 11
Ad-Aware SE.............................................................. 27
Autoruns .................................................................. 31
ClearProg ................................................................. 35
Disk Cleaner .............................................................. 37
DSL Linux Boot Disk Recovery.......................................... 39
HoverSnap ................................................................ 47
MM CompView............................................................ 51
ZoomIt..................................................................... 53

Category: SERVICE & SUPPORT
© 2007 Institute for Network Professionals 4a ITProUSB - 4 - Service & Support - v1.2 www.inpnet.org • www.HOTLabs.org 2 4/26/2007

Category: SERVICE & SUPPORT
© 2007 Institute for Network Professionals 4a ITProUSB - 4 - Service & Support - v1.2 www.inpnet.org • www.HOTLabs.org 3 4/26/2007
SpaceMonger
SpaceMongerSpaceMongerSpaceMongerSpaceMonger is a tool that can help you quickly and easily manage the thousands of files and folders on your computer. It uses a technique called treemaps to show you the entire contents of your computer all at once. With a few minutes practice, you’ll be navigating your data with ease!
Product Information
Source Sixty-Five Software Inc.
Single User - $19.95
www.sixty-fice.cc
Where, When, Why It's time to face the facts. Your computer's hard drive is a mess, and you have no idea where anything is in it. Heck, you don't even know what's in it. Search tools haven't helped; all they tell you is what you already know: that your data is a mess. What you need is understanding and organization.
Enter SpaceMongerSpaceMongerSpaceMongerSpaceMonger, the best-kept secret of IT professionals the world over. No matter how messy your data, no matter how jam-packed your drive, SpaceMongerSpaceMongerSpaceMongerSpaceMonger can give you that bird's-eye-view you've wished for. With the magic of treemaps, as well as charts and graphs aplenty, you'll never be lost in your data again!
Usage and Features
• This is a bullet list of the different type of • features the product has. The bullets may coincide with the • descriptive element in the section above. • Each bullet could show paired information like… • feature—use
Requirements / Dependencies
• Windows 98 through Server 2003
Where to Go for More Information
• http://www.sixty-five.cc/sm/ • Regular Expressions documentation on the web

Category: SERVICE & SUPPORT
© 2007 Institute for Network Professionals 4a ITProUSB - 4 - Service & Support - v1.2 www.inpnet.org • www.HOTLabs.org 4 4/26/2007
Lab: Using SpaceMonger
What you will do in this lab:
• Get a graphical view of your hard drive • Find and remove ‘excess’ files from your hard drive • View statistics of your filesystem
Lab Part 1
Warning: The use of this tool can be habit-forming.
Step 1. Launch SpaceMongerSpaceMongerSpaceMongerSpaceMonger.
Step 2. Click on the small icon to get to the license box

Category: SERVICE & SUPPORT
© 2007 Institute for Network Professionals 4a ITProUSB - 4 - Service & Support - v1.2 www.inpnet.org • www.HOTLabs.org 5 4/26/2007
Step 3. Enter your license information as outlined on your Yellow Software Registration Card included in your student kit. Note that you can paste the entire license code at once, saving time.
Step 4. First, let’s take a look at SpaceMongerSpaceMongerSpaceMongerSpaceMonger in action. See the list of disks going down the left side of the window? DoubleDoubleDoubleDouble----ClickClickClickClick on the one near the top labeled “C:C:C:C:” and watch as SpaceMongerSpaceMongerSpaceMongerSpaceMonger scans your comptuer’s hard disk.
Step 5. Lots and lots of colored boxes, right? Each box represents a single filefilefilefile or a folderfolderfolderfolder on your computer. Each box is sized in the display relative to the amount of space it takes up on your hard drive. Big boxes represent big files or folders, so they take up lots of space in the display. Little boxes represent smaller files or folders so they take up only a little amount of space. Make sense? Now let’s look at one of those boxes in detail to see what all the numbers and colors mean.
Step 6. Find the red box with “Program Files” printed across the top. We’ll use “Program Files” as our first example because just about everyone has it.
Step 7. Wherever you see a box in the treemaptreemaptreemaptreemap that represents a folderfolderfolderfolder, it will have a little folder icon ( ), a name (Program Files), and if there is enough room, the size of the folder both as bytes (2.4 Gb), and as the number of files and folders contained within it. (29521) – Of course, it will also be sized relative to its contents, so boxes for folders tend to be pretty big because folders tend to contain more data than individual files.
Step 8. Those pretty colors aren’t just for show. SpaceMongerSpaceMongerSpaceMongerSpaceMonger assigns colors to files and folders based on their depthdepthdepthdepth, which is how many folders they are contained within. Red things are at the top, or “rootrootrootroot”, orange things are always within red folders; yellow things are within orange, and so on. You can immediately tell how deeply buried any file or folder is by its color.

Category: SERVICE & SUPPORT
© 2007 Institute for Network Professionals 4a ITProUSB - 4 - Service & Support - v1.2 www.inpnet.org • www.HOTLabs.org 6 4/26/2007
Step 9. You can now start to understand one of the biggest benefits of treemaps: you can see the whole disk hierarchy at once. In fact, every file and folder on your “C:”“C:”“C:”“C:” drive is visible right now. Neat, huh?
Step 10. It’s okay to be able to look at all the files on your disk at once, but what about files that are tool small to see? If you’ve got a 30kb Word document on a 40GB drive, that document only takes up 0.00007% of the display, or only one pixel. Obviously that’s way to small to be useful. Well, there’s a way around that little problem: Zooming and Panning.
Step 11. Look at the left side of SpaceMonger’sSpaceMonger’sSpaceMonger’sSpaceMonger’s main window, right next to the files. You’ll see icons representing the primary tools for manipulating the disk contents. (there are even more tools than these in other places in the program)
Step 12. ClickClickClickClick on the ZoomZoomZoomZoom----InInInIn tool and watch what happens.
Step 13. Just like that, you are ‘closer’ to your data. As you might suspect, the ZoomZoomZoomZoom----
OutOutOutOut tool does just the opposite. Try it now. The ZoomZoomZoomZoom----FullFullFullFull tool takes you back to the top level.
Step 14. When you are ‘zoomed in’, you can also use the scrollbars around the outer border of the display to panpanpanpan around the disk contents.
Step 15. You can also choose the ZoomZoomZoomZoom tool . This tool combined with your mouse gives you even greater control – try using the Right ClickRight ClickRight ClickRight Click, Left ClickLeft ClickLeft ClickLeft Click and Scroll WheelScroll WheelScroll WheelScroll Wheel while hovering over the display.
Step 16. Now try the PanPanPanPan tool . (yes, you could continue to use the scroll bars on the borders)
Step 17. Looking to zoom in on a single folder? Just doubledoubledoubledouble----clickclickclickclick on the folder’s folder’s folder’s folder’s titlebartitlebartitlebartitlebar and it will expand to file the display (or most of it) – If you doubledoubledoubledouble----clickclickclickclick on the title bartitle bartitle bartitle bar, it will zoom back out!
Step 18. While the display is pretty and informative, it wouldn’t be terribly useful if
that is all it could do. The Select Tool looks like a regular mouse arrow. Use this to clickclickclickclick on a folderfolderfolderfolder. Notice how the folder ‘dark-lights’ in black? That indicates the folder is selectedselectedselectedselected. Note the folder information is added to the information box below the display.
Step 19. You can use all the typical selection tools you’re used to when selecting files. ClickingClickingClickingClicking selects a file; shiftshiftshiftshift----clickingclickingclickingclicking lets you select multiple (contiguous) files; and controlcontrolcontrolcontrol----clickingclickingclickingclicking lets you both add and remove files (dis-contiguous) from the selection. Give it a try. Note the file/folder information of your selections building below in the information box.

Category: SERVICE & SUPPORT
© 2007 Institute for Network Professionals 4a ITProUSB - 4 - Service & Support - v1.2 www.inpnet.org • www.HOTLabs.org 7 4/26/2007
Step 20. The Status Bar at the very bottom of the SpaceMongerSpaceMongerSpaceMongerSpaceMonger window show you the folders, bytes, and MB in your current selection.
Step 21. Clean up your drive! Many people use SpaceMongerSpaceMongerSpaceMongerSpaceMonger to help clean their disks. These tools work just as you’d expect.
Step 22. Well, there’s a ton of additional features in SpaceMonger, but by now you’re itching to go and just play around with the utility. So, go ahead and play around… you have my permission!
Step 23. Enjoy!
Ok, a couple more things for you to check out…
Step 24. Find BarFind BarFind BarFind Bar – by the way this also works with all regular expressions – a truly powerful tool!
Step 25. Try some of these helpful ideas for regular expressions:
Regex mode allows the use of full regular-expressions in the Find Bar. Regex Mode is enabled by clicking on the wrench icon above the Find Bar. When enabled, regex mode supports the following operators and operands:
abc A literal "abc" (case-insensitive)
[a-z] A character class: a single character in the given range. Named character classes as found in Perl or PHP are not supported. Negated character classes, such as [^0-9] and [a-z^m-p] are supported.
. Matches any character.
r* Matches zero or more r.
r+ Matches one or more r.
r? Matches zero or one r (an optional r).
r{2,4} Matches two to four r.
r{2,} Matches two or more r.
r{,4} Matches at most four r.
rs Matches an r followed by an s
r|s Matches r or s or both.
^r Matches r, but only at the start of the name.
r$ Matches r, but only at the end of the name.
(r) Parentheses may be used to override precedence.
\ Backslashes can be used to escape operator characters

Category: SERVICE & SUPPORT
© 2007 Institute for Network Professionals 4a ITProUSB - 4 - Service & Support - v1.2 www.inpnet.org • www.HOTLabs.org 8 4/26/2007
Step 26. Statistics Tab – learn all about your disk with easy graphs and pie charts – even the Boss can understand these!
Step 27. Not happy with how SpaceMongerSpaceMongerSpaceMongerSpaceMonger works? Well, click on the SetupSetupSetupSetup button and change it.

Category: SERVICE & SUPPORT
© 2007 Institute for Network Professionals 4a ITProUSB - 4 - Service & Support - v1.2 www.inpnet.org • www.HOTLabs.org 9 4/26/2007
Step 28. Other tools you can run from inside SpaceMongerSpaceMongerSpaceMongerSpaceMonger:
Step 29. Wondering what those little icons do to change the display? Check this out.
These are the five map-layout modes, in order:
Physical map:Physical map:Physical map:Physical map: Each file is sized according to the amount of physical disk space that it takes up; this is equivalent to sizing each file by the number of square millimeters of storage that it occupies.
Logical map:Logical map:Logical map:Logical map: Each file is sized according to the number of bytes that it appears to be to the user and to applications, regardless of how much physical space it actually uses. The logical map's numbers match the numbers you see in directory and folder listings.
Uniform map:Uniform map:Uniform map:Uniform map: In a uniform map, all files are the same size. This is useful for comparing directories and folders by the number of files they contain, rather than by the sizes of those files.
Log map:Log map:Log map:Log map: This is somewhere between the logical map and the uniform map; files are sized by the logarithm of their logical file sizes. This causes large files to be larger than small files, but not much larger, so that directories can be compared by both count of files and by bytes, at a glance.
DirectoryDirectoryDirectoryDirectory----weighted map:weighted map:weighted map:weighted map: This map is heavily oriented toward understanding the structure of your filesystem. Files are relatively insignificant in this layout, and folders (directories) are very, very significant (much larger by comparison). This doesn't tell you much about how big your files are, but it can tell you a lot about how deeply your folders are nested and where.

Category: SERVICE & SUPPORT
© 2007 Institute for Network Professionals 4a ITProUSB - 4 - Service & Support - v1.2 www.inpnet.org • www.HOTLabs.org 10 4/26/2007

Category: SERVICE & SUPPORT
© 2007 Institute for Network Professionals 4a ITProUSB - 4 - Service & Support - v1.2 www.inpnet.org • www.HOTLabs.org 11 4/26/2007
System LifeGuard 2
System LifeGuard System LifeGuard System LifeGuard System LifeGuard 2 2 2 2 is a collection of Windows utilities used to keep a PC running faster and cleaner, all while better protecting valuable data.
Every time you run programs or use the Internet on your computer - unwanted files and procedures are stored on your hard-disc. Just using your computer normally, accumulates old material that begins to slow down the operation of your hardware and software.
System LifeGuard is designed to be used frequently - to protect your computer's data and activity - and to keep your system running as smoothly as the day you took it out of the box.
Product Information
Source NeoByte Solutions
single user license
$29.95 USD
www.neobytesolutions.com/slg/
Where, When, Why Service & Support — System Maintenance Tools Suite
Your mother’s PC is sluggish, so you decide to run a series of system cleanup utilities to get her file system, registry, and disk drive into better running condition. Since these utilities run from your IT Pro USB stick, which you happen to have in your pocket, it’s easy for you to do, even without your personal laptop.
Usage and Features
• PC Cleaner • System tweaker • Scheduler • Disk Defragmenter • Program Uninstaller • Internet privacy • Startup manager and Shutdown Manager • Shred all unnecessary files • Registry Cleaner • System backup & restore with a FTP backup option • Detects duplicates, old and large files
Requirements / Dependencies
• Windows OS
Where to Go for More Information
• www.neobytesolutions.com/slg/ • help files
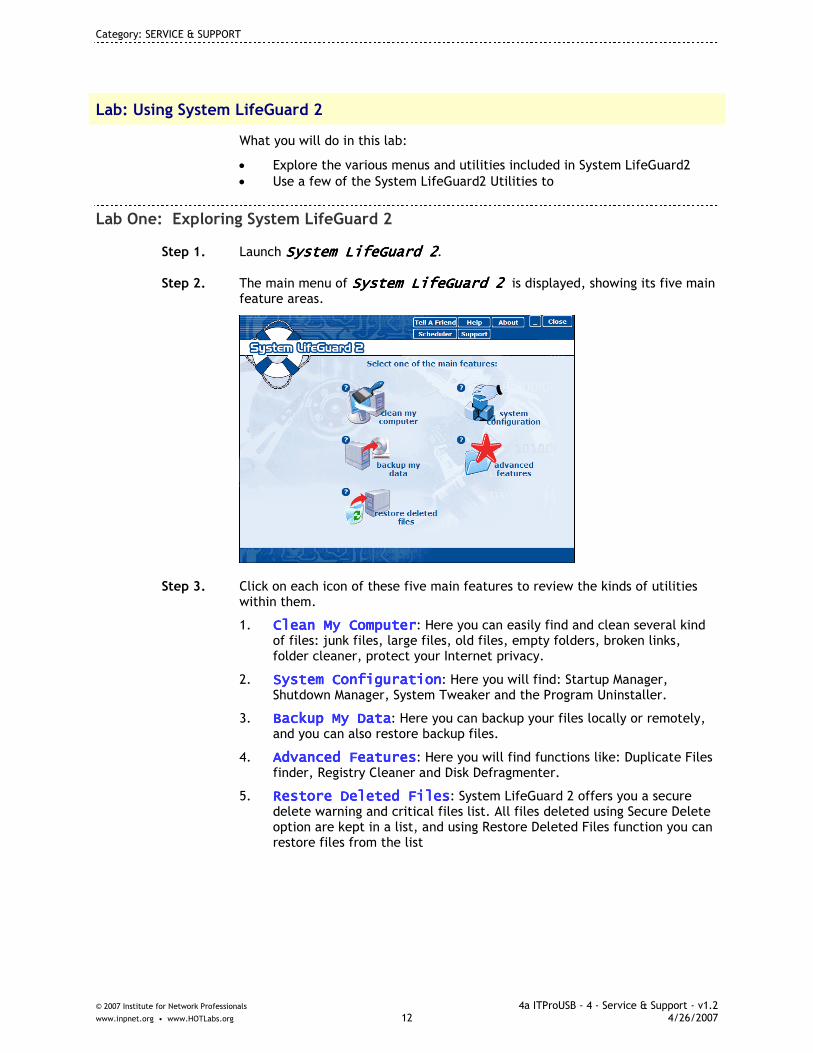
Category: SERVICE & SUPPORT
© 2007 Institute for Network Professionals 4a ITProUSB - 4 - Service & Support - v1.2 www.inpnet.org • www.HOTLabs.org 12 4/26/2007
Lab: Using System LifeGuard 2
What you will do in this lab:
• Explore the various menus and utilities included in System LifeGuard2 • Use a few of the System LifeGuard2 Utilities to
Lab One: Exploring System LifeGuard 2
Step 1. Launch System LifeGuardSystem LifeGuardSystem LifeGuardSystem LifeGuard 2222.
Step 2. The main menu of System LifeGuardSystem LifeGuardSystem LifeGuardSystem LifeGuard 2 2 2 2 is displayed, showing its five main feature areas.
Step 3. Click on each icon of these five main features to review the kinds of utilities within them.
1. Clean My ComputerClean My ComputerClean My ComputerClean My Computer: Here you can easily find and clean several kind of files: junk files, large files, old files, empty folders, broken links, folder cleaner, protect your Internet privacy.
2. System ConfigurationSystem ConfigurationSystem ConfigurationSystem Configuration: Here you will find: Startup Manager, Shutdown Manager, System Tweaker and the Program Uninstaller.
3. Backup My DataBackup My DataBackup My DataBackup My Data: Here you can backup your files locally or remotely, and you can also restore backup files.
4. Advanced FeaturesAdvanced FeaturesAdvanced FeaturesAdvanced Features: Here you will find functions like: Duplicate Files finder, Registry Cleaner and Disk Defragmenter.
5. Restore Deleted FilesRestore Deleted FilesRestore Deleted FilesRestore Deleted Files: System LifeGuard 2 offers you a secure delete warning and critical files list. All files deleted using Secure Delete option are kept in a list, and using Restore Deleted Files function you can restore files from the list
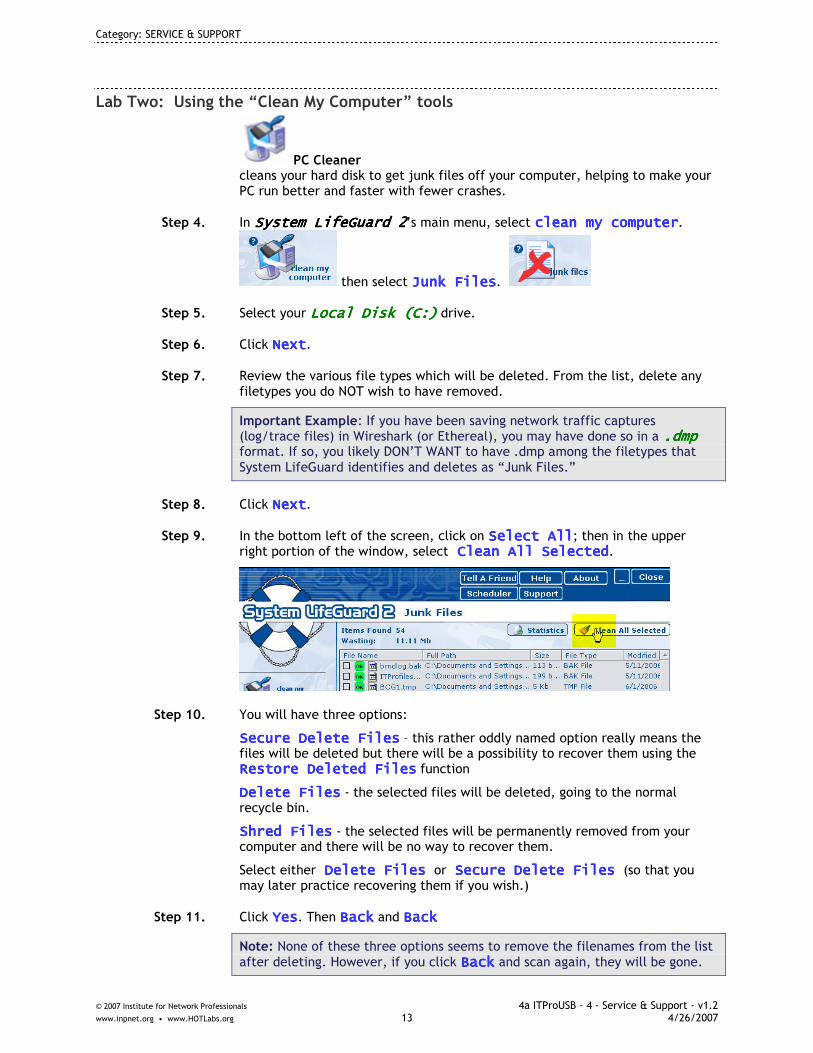
Category: SERVICE & SUPPORT
© 2007 Institute for Network Professionals 4a ITProUSB - 4 - Service & Support - v1.2 www.inpnet.org • www.HOTLabs.org 13 4/26/2007
Lab Two: Using the “Clean My Computer” tools
PC Cleaner cleans your hard disk to get junk files off your computer, helping to make your PC run better and faster with fewer crashes.
Step 4. In System LifeGuard 2System LifeGuard 2System LifeGuard 2System LifeGuard 2’s main menu, select clean my computerclean my computerclean my computerclean my computer.
then select Junk FilesJunk FilesJunk FilesJunk Files.
Step 5. Select your Local Disk (C:)Local Disk (C:)Local Disk (C:)Local Disk (C:) drive.
Step 6. Click NextNextNextNext.
Step 7. Review the various file types which will be deleted. From the list, delete any filetypes you do NOT wish to have removed.
Important Example: If you have been saving network traffic captures (log/trace files) in Wireshark (or Ethereal), you may have done so in a .dmp.dmp.dmp.dmp format. If so, you likely DON’T WANT to have .dmp among the filetypes that System LifeGuard identifies and deletes as “Junk Files.”
Step 8. Click NextNextNextNext.
Step 9. In the bottom left of the screen, click on SelectSelectSelectSelect All All All All; then in the upper right portion of the window, select Clean All Selected Clean All Selected Clean All Selected Clean All Selected.
Step 10. You will have three options:
Secure Delete FilesSecure Delete FilesSecure Delete FilesSecure Delete Files – this rather oddly named option really means the files will be deleted but there will be a possibility to recover them using the Restore Deleted FilesRestore Deleted FilesRestore Deleted FilesRestore Deleted Files function
Delete FilesDelete FilesDelete FilesDelete Files - the selected files will be deleted, going to the normal recycle bin.
Shred FilesShred FilesShred FilesShred Files - the selected files will be permanently removed from your computer and there will be no way to recover them.
Select either Delete Files Delete Files Delete Files Delete Files or Secure Delete Files Secure Delete Files Secure Delete Files Secure Delete Files (so that you may later practice recovering them if you wish.)
Step 11. Click YesYesYesYes. Then BackBackBackBack and BackBackBackBack
Note: None of these three options seems to remove the filenames from the list after deleting. However, if you click BackBackBackBack and scan again, they will be gone.
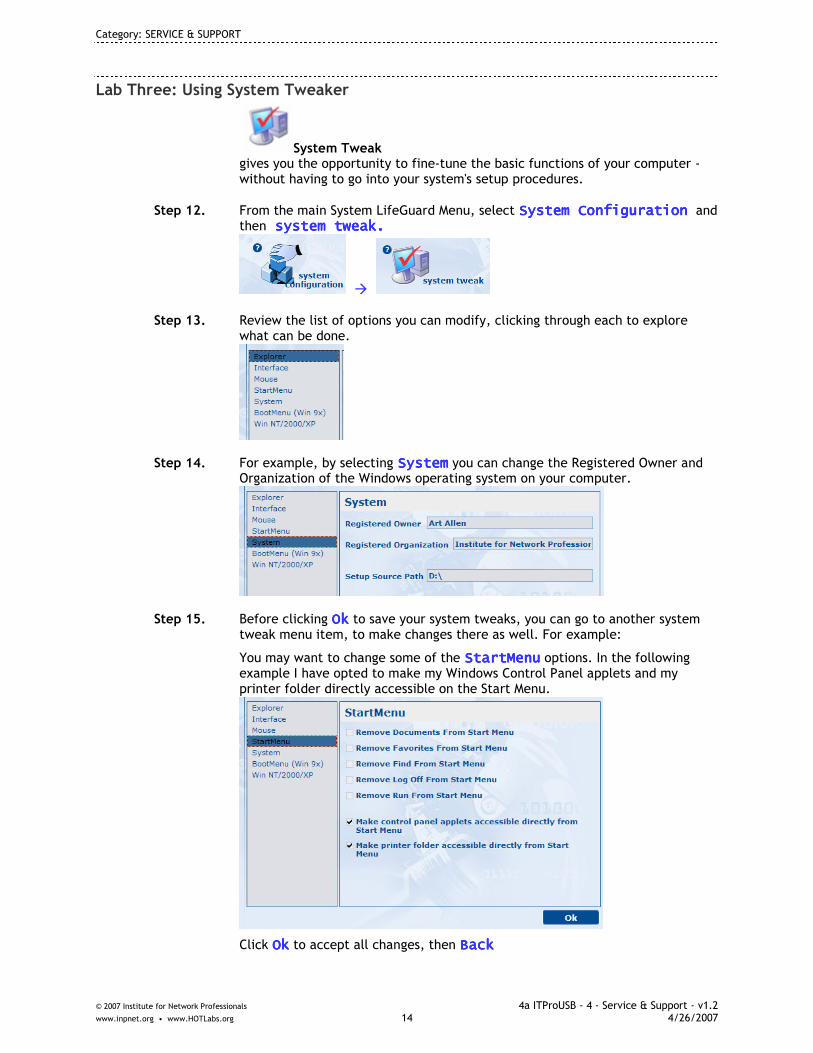
Category: SERVICE & SUPPORT
© 2007 Institute for Network Professionals 4a ITProUSB - 4 - Service & Support - v1.2 www.inpnet.org • www.HOTLabs.org 14 4/26/2007
Lab Three: Using System Tweaker
System Tweak gives you the opportunity to fine-tune the basic functions of your computer - without having to go into your system's setup procedures.
Step 12. From the main System LifeGuard Menu, select System ConfigurationSystem ConfigurationSystem ConfigurationSystem Configuration and then system tweak. system tweak. system tweak. system tweak.
�
Step 13. Review the list of options you can modify, clicking through each to explore what can be done.
Step 14. For example, by selecting SystemSystemSystemSystem you can change the Registered Owner and Organization of the Windows operating system on your computer.
Step 15. Before clicking OkOkOkOk to save your system tweaks, you can go to another system tweak menu item, to make changes there as well. For example:
You may want to change some of the StartMStartMStartMStartMenuenuenuenu options. In the following example I have opted to make my Windows Control Panel applets and my printer folder directly accessible on the Start Menu.
Click OkOkOkOk to accept all changes, then BackBackBackBack

Category: SERVICE & SUPPORT
© 2007 Institute for Network Professionals 4a ITProUSB - 4 - Service & Support - v1.2 www.inpnet.org • www.HOTLabs.org 15 4/26/2007
Lab Four: Using Scheduler
Scheduler can automatically handle your data and file cleanup, and application launching time table!
Note: NO Lab.
Scheduling is NOT a good utility to run from a USB stick
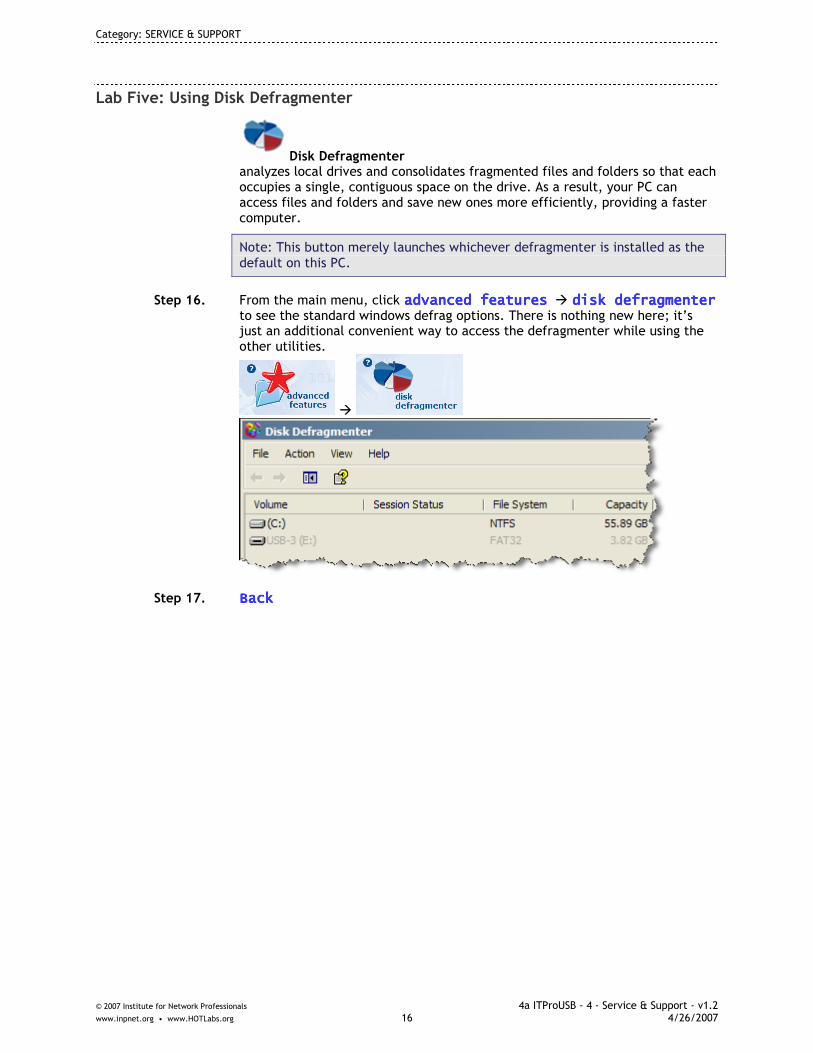
Category: SERVICE & SUPPORT
© 2007 Institute for Network Professionals 4a ITProUSB - 4 - Service & Support - v1.2 www.inpnet.org • www.HOTLabs.org 16 4/26/2007
Lab Five: Using Disk Defragmenter
Disk Defragmenter analyzes local drives and consolidates fragmented files and folders so that each occupies a single, contiguous space on the drive. As a result, your PC can access files and folders and save new ones more efficiently, providing a faster computer.
Note: This button merely launches whichever defragmenter is installed as the default on this PC.
Step 16. From the main menu, click advanced featuresadvanced featuresadvanced featuresadvanced features � disk defragmenterdisk defragmenterdisk defragmenterdisk defragmenter to see the standard windows defrag options. There is nothing new here; it’s just an additional convenient way to access the defragmenter while using the other utilities.
�
Step 17. BackBackBackBack

Category: SERVICE & SUPPORT
© 2007 Institute for Network Professionals 4a ITProUSB - 4 - Service & Support - v1.2 www.inpnet.org • www.HOTLabs.org 17 4/26/2007
Lab Six: Using Program Uninstaller
Program Uninstaller thoroughly uninstalls your unwanted programs! This tool uninstalls your unwanted Windows Programs. Here you will also see programs with invalid entries - so you will be able to remove them.
Step 18. From the main System LifeGuard Menu, select System ConfigurationSystem ConfigurationSystem ConfigurationSystem Configuration and then remove uninstall programs remove uninstall programs remove uninstall programs remove uninstall programs to view this tool.
�
Step 19. BackBackBackBack and BackBackBackBack

Category: SERVICE & SUPPORT
© 2007 Institute for Network Professionals 4a ITProUSB - 4 - Service & Support - v1.2 www.inpnet.org • www.HOTLabs.org 18 4/26/2007
Lab Seven: Using Internet Privacy
Internet privacy Use Internet privacy to clean internet history, cookies and cache (keep your downloads and visited web sites private).
Step 20. From the main menu, select clean my computerclean my computerclean my computerclean my computer � Internet privacyInternet privacyInternet privacyInternet privacy
�
Step 21. From the Internet privacyInternet privacyInternet privacyInternet privacy submenu, select one of the five options, such as clean clean clean clean iiiinternet cachenternet cachenternet cachenternet cache. When the cache cleaning is completed, you will be presented with a confirmation dialog box.
Step 22. Click BackBackBackBack.

Category: SERVICE & SUPPORT
© 2007 Institute for Network Professionals 4a ITProUSB - 4 - Service & Support - v1.2 www.inpnet.org • www.HOTLabs.org 19 4/26/2007
Lab Eight: Using Startup Manager
Startup manager offers you the option to decide what applications to run on your computer at Start Up. This way you can get rid of unwanted application running at startup and making your computer very difficult to work with. In exchange you'll obtain a faster computer.
Step 23. From the main features page, and select system configurationsystem configurationsystem configurationsystem configuration � startup managerstartup managerstartup managerstartup manager.
�
Step 24. Highlight iTunesHelperiTunesHelperiTunesHelperiTunesHelper., (or some otsome otsome otsome other startup application her startup application her startup application her startup application that you don’t want loading every time you boot up).
Step 25. Click DeleteDeleteDeleteDelete and then YesYesYesYes.
Step 26. iTunesHelperiTunesHelperiTunesHelperiTunesHelper (or other application) (or other application) (or other application) (or other application) will no longer startup when you restart this machine.
Step 27. Click BackBackBackBack.

Category: SERVICE & SUPPORT
© 2007 Institute for Network Professionals 4a ITProUSB - 4 - Service & Support - v1.2 www.inpnet.org • www.HOTLabs.org 20 4/26/2007
Lab Nine: Using Shred all Unnecessary Files
Shred all unnecessary files You can permanently remove the files you want without leaving behind any chance of recovering them.
Note: No Lab.
This application works fine. For an even better file shredder, capable of DOD standard, see the Invisible SecretsInvisible SecretsInvisible SecretsInvisible Secrets application, also from NeoByte.

Category: SERVICE & SUPPORT
© 2007 Institute for Network Professionals 4a ITProUSB - 4 - Service & Support - v1.2 www.inpnet.org • www.HOTLabs.org 21 4/26/2007
Lab Ten: Using Registry Cleaner
Registry Cleaner will clear your registry of invalid entries, helping to produce a better working environment for running Windows on your computer. In just seconds, you can have a faster-functioning computer.
Step 28. Return to the main featuresmain featuresmain featuresmain features window.
Step 29. Click on advanced featuresadvanced featuresadvanced featuresadvanced features � registry cleanerregistry cleanerregistry cleanerregistry cleaner.
�
Step 30. Leave the Simple ModeSimple ModeSimple ModeSimple Mode selected.
Step 31. Click NextNextNextNext and wait while the registry is scanned.
Step 32. Check the box for HKEY_CURRENT_USER/Software/Microsoft/Internet HKEY_CURRENT_USER/Software/Microsoft/Internet HKEY_CURRENT_USER/Software/Microsoft/Internet HKEY_CURRENT_USER/Software/Microsoft/Internet EEEExplorer/Mainxplorer/Mainxplorer/Mainxplorer/Main.
Step 33. Click in the upper right Remove SelectedRemove SelectedRemove SelectedRemove Selected, then click YesYesYesYes. Result: the registry key for the blank or empty (null) screen in IE has been removed.
Step 34. Click Back Back Back Back twice.
Category: SERVICE & SUPPORT
© 2007 Institute for Network Professionals 4a ITProUSB - 4 - Service & Support - v1.2 www.inpnet.org • www.HOTLabs.org 22 4/26/2007
Lab Eleven: Using System Backup & Restore with a FTP Backup Option
System backup & restore with a FTP backup option offers a way to keep your vital computer data safe: The Backup Files section provides two options:
• Backup Local (on the same computer, a different location) • Backup Remote (to an FTP server)
Note: No Lab.
Managing, scheduling and running backups from a USB stick is not recommended. Of course, doing an actual simple backup TO a USB stick is fine.

Category: SERVICE & SUPPORT
© 2007 Institute for Network Professionals 4a ITProUSB - 4 - Service & Support - v1.2 www.inpnet.org • www.HOTLabs.org 23 4/26/2007
Lab Twelve: Using Shutdown Manager
Shutdown manager System Lifeguard 2 offers the Shutdown manager so that you can set your computer to shut down periodically.
Note: NO Lab.
Shutdown Manager is NOT a good utility to run from a USB stick

Category: SERVICE & SUPPORT
© 2007 Institute for Network Professionals 4a ITProUSB - 4 - Service & Support - v1.2 www.inpnet.org • www.HOTLabs.org 24 4/26/2007
Lab Thirteen: Using Detect Duplicate Files
Detect duplicate, old and large files System LifeGuard 2 lets you detect all these files and decide what to do with them: delete, backup or organize them to other locations.
Step 35. Select aaaadvanced featuresdvanced featuresdvanced featuresdvanced features � duplicate filesduplicate filesduplicate filesduplicate files
�
Note: If you want to find/delete old filesold filesold filesold files or large fileslarge fileslarge fileslarge files, you must start by selecting clean clean clean clean my computermy computermy computermy computer instead of advanced feaadvanced feaadvanced feaadvanced featuresturesturestures.
Step 36. Next, you should indicate where you want to look for duplicate files. To save time for now, let’s just look in “My Documents.”
To do this, first clickclickclickclick the Add New PathAdd New PathAdd New PathAdd New Path button. In the dialog box that will pop up, browse to “My DocumentsMy DocumentsMy DocumentsMy Documents” and click OOOOkkkk. The newly added path now shows up “checked” in the Duplicate Files search list.
Second, notice that, “Local Disk (C:)Local Disk (C:)Local Disk (C:)Local Disk (C:)” is still checked too. Since we don’t want to search the whole drive, UnUnUnUn----checkcheckcheckcheck it.

Category: SERVICE & SUPPORT
© 2007 Institute for Network Professionals 4a ITProUSB - 4 - Service & Support - v1.2 www.inpnet.org • www.HOTLabs.org 25 4/26/2007
Step 37. Make the appropriate selection on the OptionsOptionsOptionsOptions screen by choosing whether or not you want to find duplicate files by filename onlyfilename onlyfilename onlyfilename only or by filename filename filename filename and sizeand sizeand sizeand size. You can also list commonly duplicated filenames that you don’t want to identify in your search, such as “readme.doc” files, etc.
Step 38. Click NNNNext ext ext ext > > > > and wait while the system scans your target drive(s) and folder(s) for duplicate files. When the scanning ends, a list of the found duplicate files will be prepared.
Step 39. Scroll through the list of duplicate files on the left. When you find one you are interested it, click it to highlight it (as shown with the hwhwhwhw----wired.html wired.html wired.html wired.html file in the illustration). The actual duplicates with then appear in the right-side column. You can look at their Full Path locations, etc., to determine what action you want to take.
Step 40. By checking file(s) in the right column, you can operate on them by choosing from the options at the bottom of the window. Click these options to become familiar with what they can do for you.

Category: SERVICE & SUPPORT
© 2007 Institute for Network Professionals 4a ITProUSB - 4 - Service & Support - v1.2 www.inpnet.org • www.HOTLabs.org 26 4/26/2007
Extra Credit
Step 41. Review the System LifeGuard to report to see all of the maintenance activities you just completed.
What you learned in this Lab: In this Lab you learned to use System LifeGuard 2 System LifeGuard 2 System LifeGuard 2 System LifeGuard 2 to:
1. Tune your computer by ridding it of unneeded files, links, and registry entries.
2. Tweak your windows configuration.
3. Use the scheduler and the startup and shutdown managers to schedule certain applications and and maintenance routines
4. Eliminate Internet history, cookies, temp files, etc.
5. Backup data to a remote FTP server.
6. Identify duplicate files in a target drive or directory.

Category: SERVICE & SUPPORT
© 2007 Institute for Network Professionals 4a ITProUSB - 4 - Service & Support - v1.2 www.inpnet.org • www.HOTLabs.org 27 4/26/2007
Ad-Aware SE
AdAdAdAd----Aware SEAware SEAware SEAware SE is one of the most used anti-spyware tools available today. As we all know, despite what browser companies are trying to tell us, there are clever people discovering how to make our computes do what THEY want it to, not what WE want them to do. Ad-Aware, when run regularly, helps remove potentially unwanted helper applications and tracking cookies that can compromise your security and data.
Product Information
Source Lavasoft
Free for non-commercial use
Free
www.lavasoft.com
Where, When, Why Service & Support—Anti-Spyware, Malware, and Privacy tool
You’re visiting a relative, or a co-worker, or a friend. They ask, ‘Hey, why is my internet so slow?’ The answer to that question seems to always be Spyware. Random advertisements pop up while they use the computer, and Internet Explorer windows have more toolbars than viewable HTML rendering space. What do you do? Run a series of applications designed to remove that garbage from a computer, one of which is AdAdAdAd----Aware SEAware SEAware SEAware SE from Lavasoft.
Usage and Features
• Finds and quarantines potential security risks and problem applications • Multiple scan modes to help find different kinds of Malware • Internet updates keep the known list of offending applications current
Requirements / Dependencies
• Pentium 166 MHz or Higher • IE 5.5 or Higher • Windows 98/98SE/Me/NT4/2000 or XP
Where to Go for More Information
• www.lavasoft.com/products/ad-aware_se_professional.php

Category: SERVICE & SUPPORT
© 2007 Institute for Network Professionals 4a ITProUSB - 4 - Service & Support - v1.2 www.inpnet.org • www.HOTLabs.org 28 4/26/2007
Lab: Using Ad-Aware SE
What you will do in this lab:
• Update definitions for AdAdAdAd----Aware SEAware SEAware SEAware SE • Scan your system using default options • Remove offending items to a Quarantine
Lab Part 1 In this lab we will use Ad-Aware to update its definitions, then scan your computer for any malicious or possibly exploitable conditions.
Step 1. Launch AdAdAdAd----Aware SEAware SEAware SEAware SE.
Each time you start AdAdAdAd----Aware SEAware SEAware SEAware SE you will see the date of the last Definition file loaded. In this example, the latest definition was dated November 14, 2006. It is recommended that you check for updates often.
Step 2. Click on ‘Check for updates now’‘Check for updates now’‘Check for updates now’‘Check for updates now’ to make sure that you have the latest definition set. Click ConnectConnectConnectConnect after you have configured any necessary proxy information.

Category: SERVICE & SUPPORT
© 2007 Institute for Network Professionals 4a ITProUSB - 4 - Service & Support - v1.2 www.inpnet.org • www.HOTLabs.org 29 4/26/2007
Step 3. New definitions have been found. Click OKOKOKOK to download and install those updates. Click FinishFinishFinishFinish after the Webupdate has completed to return to the main AdAdAdAd----Aware SEAware SEAware SEAware SE menu.
Step 4. At the main menu, click on StartStartStartStart or Scan Now to begin a new scan on your system. In preparing the system scan, you have a choice between four scan modes. For this exercise, we’ll use ‘Perform smart system scan’. Select Perform smart system scanPerform smart system scanPerform smart system scanPerform smart system scan, and click NextNextNextNext.
Ad-Aware SE Scans the hard drive and current running processes for recognized files.
The scan has finished and reports that Critical Objects have been found.

Category: SERVICE & SUPPORT
© 2007 Institute for Network Professionals 4a ITProUSB - 4 - Service & Support - v1.2 www.inpnet.org • www.HOTLabs.org 30 4/26/2007
Step 5. To remove these offending objects, click NextNextNextNext to Scan Results page.
Step 6. Right click Right click Right click Right click on an object object object object in the left column, and go to Select All Select All Select All Select All ObjectsObjectsObjectsObjects after you have reviewed that the files shown are to be removed. In this example, two tracking cookies were found that would help websites know where the user had been.
Step 7. Click NextNextNextNext to quarantine those objects. Confirm the dialog box asking to remove those files by clicking OKOKOKOK.
Step 8. You’ve now learned how to remove malicious files from your system. Since they are under quarantine and have not been completely deleted yet, you can use your web browser to see if any of those changes have caused previous wanted functionality to be removed.
If that is the case, you can restore a quarantine into your system to restore what was removed.
What you learned in this Lab: In this Lab you learned to use AdAdAdAd----Ware SEWare SEWare SEWare SE to:
1. Update definitions for AdAdAdAd----Aware SEAware SEAware SEAware SE
2. Scan your system using default options
3. Remove offending items to a Quarantine

Category: SERVICE & SUPPORT
© 2007 Institute for Network Professionals 4a ITProUSB - 4 - Service & Support - v1.2 www.inpnet.org • www.HOTLabs.org 31 4/26/2007
Autoruns
Autoruns Autoruns Autoruns Autoruns is an extremely comprehensive startup item manager. Showing you things you had no idea existed. If there is something starting automatically that you don’t want, this program will give you that ability.
Product Information
Source SysInternals
Freeware
Free
www.sysinternals.com
Where, When, Why Service & Support—Startup Applications/Services Browser and Manager
There are a number of applications that love to run for your entire Windows session. These programs may or may not ask if they can run, but they do it anyway. Some of these applications are ones you care about, others not so much, like that one Adware program that keeps sending you to those casino sites. Here’s your way out. Start up AutorunsAutorunsAutorunsAutoruns and find that program, and take it out.
Usage and Features
• Comprehensive application, DLL, service, driver, and whatever else will auto start with your Windows session manager
• Support to temporarily disable a startup item, or delete it completely • Comparisons between different startup lists • Hide Signed Microsoft Entries, we trust them right?
Requirements / Dependencies
• 32-bit and 64-bit Windows (95,NT,98,98SE,Me,2000,XP,2003,Vista)
Where to Go for More Information
• www.sysinternals.com

Category: SERVICE & SUPPORT
© 2007 Institute for Network Professionals 4a ITProUSB - 4 - Service & Support - v1.2 www.inpnet.org • www.HOTLabs.org 32 4/26/2007
Lab: Using Autoruns
What you will do in this lab:
• Explore the options of AutorunsAutorunsAutorunsAutoruns • Browse startup items • Learn how to make a comparison of previous startup items to current
startup items • Hide signed Microsoft entries • Learn how to disable and delete services
Lab Part 1 In this exercise we will be browsing the items found in AutorunsAutorunsAutorunsAutoruns.
Step 1. Launch AutorunsAutorunsAutorunsAutoruns.
Step 2. The default Tab is shows everything that will start automatically on boot and login. The help file for this program gives descriptions for each of the tabs, that information is provided below for your convenience:
Logon: This entry results in scans of standard autostart locations such as the Startup folder for the current user and all users, the Run Registry keys, and standard application launch locations.
Explorer: Select this entry to see Explorer shell extensions, browser helper objects, explorer toolbars, active setup executions, and shell execute hooks.
Internet Explorer: This entry shows Browser Helper Objects (BHO's), Internet Explorer toolbars and extensions.
Services: All Windows services configured to start automatically when the system boots.
Drivers: This displays all kernel-mode drivers registered on the system except those that are disabled.
Scheduled Tasks: Task scheduler tasks configured to start at boot or logon.

Category: SERVICE & SUPPORT
© 2007 Institute for Network Professionals 4a ITProUSB - 4 - Service & Support - v1.2 www.inpnet.org • www.HOTLabs.org 33 4/26/2007
AppInit DLLs: This has Autoruns shows DLLs registered as application initialization DLLs.
Boot Execute: Native images (as opposed to Windows images) that run early during the boot process.
Image Hijacks: Image file execution options and command prompt autostarts.
Known DLLs: This reports the location of DLLs that Windows loads into applications that reference them.
Winlogon Notifications: Shows DLLs that register for Winlogon notification of logon events.
Winsock Providers: Shows registered Winsock protocols, including Winsock service providers. Malware often installs itself as a Winsock service provider because there are few tools that can remove them. Autoruns can uninstall them, but cannot disable them.
Printer Monitor Drivers: Displays DLLs that load into the print spooling service. Malware has used this support to autostart itself.
Step 3. An excellent feature of AutorunsAutorunsAutorunsAutoruns is the ability to load a previously saved copy of the startup items list to make a comparison, for instance after installing a new application or a nasty Malware infection. New items will show up with a green background. To save a copy of your current Autoruns list, click on FileFileFileFile ���� SaveSaveSaveSave or press Ctrl+SCtrl+SCtrl+SCtrl+S.
Save this listing wherever you like for future use. When you are ready to make a comparison, click on Compare…Compare…Compare…Compare… instead and browse to the old file. New entries since the older version appear in the lists with a green background.
Step 4. Another extremely useful option is to hide signed Microsoft applications because those should be safe for use. Click Options Options Options Options ���� Hide Microsoft Hide Microsoft Hide Microsoft Hide Microsoft EntriesEntriesEntriesEntries. Once that change has been made, refresh by clicking on the Refresh IcoRefresh IcoRefresh IcoRefresh Icon n n n or by pressing F5F5F5F5.
NOTE: We won’t have you delete or disable any services here, but to do so you will take the check mark out of the item’s box to disable the service, and Right Click the item and click Delete to remove it. You can also do a Google search or check the item’s properties with that context menu.

Category: SERVICE & SUPPORT
© 2007 Institute for Network Professionals 4a ITProUSB - 4 - Service & Support - v1.2 www.inpnet.org • www.HOTLabs.org 34 4/26/2007
What you learned in this Lab: In this Lab you learned to use AutorunsAutorunsAutorunsAutoruns to:
1. Browse startup items
2. Make a comparison of previous startup items to current startup items
3. Hide signed Microsoft entries
4. Disable and delete services

Category: SERVICE & SUPPORT
© 2007 Institute for Network Professionals 4a ITProUSB - 4 - Service & Support - v1.2 www.inpnet.org • www.HOTLabs.org 35 4/26/2007
ClearProg
Complete tool to remove surf tracks from any browser – as well as many other programs.
Product Information
Source Sven Hoffmann
Free
www.clearprog.de
Where, When, Why To clear tracks from surfing, downloading, or usage of other programs.
Usage and Features
• Supports Internet Explorer, Opera, Netscape/Mozilla, Windows, MS Office and other programs.
• Also supports a myriad of other programs via PlugIns
Requirements / Dependencies
• None
Where to Go for More Information
• www.clearprog.de

Category: SERVICE & SUPPORT
© 2007 Institute for Network Professionals 4a ITProUSB - 4 - Service & Support - v1.2 www.inpnet.org • www.HOTLabs.org 36 4/26/2007
Lab: Using ClearProg
What you will do in this lab:
• Clear out cookies, temp files, history, and typed URLs from your Browser
Lab Part 1
Step 1. Launch ClearProgClearProgClearProgClearProg.
Step 2. Choose your Browser of choice – and clear you cookies, history, etc.
Step 3. That’s it
Step 4. If you so desire, you can also use this tool in command line mode to process clearing from a batch file. Use the ‘?’ and choose ‘Reference’ for the details.

Category: SERVICE & SUPPORT
© 2007 Institute for Network Professionals 4a ITProUSB - 4 - Service & Support - v1.2 www.inpnet.org • www.HOTLabs.org 37 4/26/2007
Disk Cleaner
Disk Cleaner is a free open source tool to quickly and easily free disk space that is used by temporary files like those in the system temporary folder, the Internet Explorer Cache and Cookies folder, and the Recycle Bin.
Product Information
Source Diskcleaner
Free
www.diskcleaner.nl
Where, When, Why In doing regular maintenance of computers – you know, you’re over at a relatives house and they want you to ‘speed up’ their computer. This is one tool that can quickly remove tons of unwanted old files.
Usage and Features
• Free up disk space in temporary files
Requirements / Dependencies
• None
Where to Go for More Information
• www.diskcleaner.nl

Category: SERVICE & SUPPORT
© 2007 Institute for Network Professionals 4a ITProUSB - 4 - Service & Support - v1.2 www.inpnet.org • www.HOTLabs.org 38 4/26/2007
Lab: Using DiskCleaner
What you will do in this lab:
• Clear Temporary files from your hard drive
Lab Part 1
Step 1. Launch DiskCleanerDiskCleanerDiskCleanerDiskCleaner.
Step 2. Check the items you’d like removed.
Step 3. Click on the CleanCleanCleanClean button.
Step 4. Review results.
Step 5. That’s it.

Category: SERVICE & SUPPORT
© 2007 Institute for Network Professionals 4a ITProUSB - 4 - Service & Support - v1.2 www.inpnet.org • www.HOTLabs.org 39 4/26/2007
DSL Linux Boot Disk Recovery
Damn Small Linux (DSL) is a portable distribution Linux complete with a desktop that allows you to boot Linux from a removable device such as the USB drive.
Product Information
Source Damn Small Linux. org
Free
http://www.damnsmalllinux.org/
Where, When, Why Portable Linux OS.
Can be booted from within a host OS such as Windows.
You need to rescue data from a Windows machine that cannot even boot up. You insert your USB stick with a DSL partition on it, boot to Linux first, mount the Windows partition, and copy off the data you need.
Usage and Features
• Run light enough to power a 486DX with 16MB of Ram • Run fully in RAM with as little as 128MB (you will be amazed at how fast
your computer can be!) • Modularly grow -- DSL is highly extendable without the need to customize
Requirements / Dependencies
• 50MB space • 128MB ram
Where to Go for More Information
• FAQ at http://www.damnsmalllinux.org/wiki/index.php/FAQ • Forums at http://www.damnsmalllinux.org/cgi-bin/forums/ikonboard.cgi

Category: SERVICE & SUPPORT
© 2007 Institute for Network Professionals 4a ITProUSB - 4 - Service & Support - v1.2 www.inpnet.org • www.HOTLabs.org 40 4/26/2007
Lab: Using DSL USB Boot to Recover Data from an Unbootable Windows Drive
What you will do in this lab:
• Boot to DSL Linux portably from your USB stick • Mount a Windows partition inside Linux • Rescue valuable data from the Windows partition to the DSL Linux USB
stick
In this lab, you will simulate working on a Windows drive which is no longer accessible. Using the bootable DSL partition on the USB Attack/Recovery stick, you will first boot to Linux, and then be able to mount the Windows file system. You will navigate to critical files and rescue them by copying them off to the USB stick.
Lab Steps
Step 1. Place your Attack/Recovery stick with the DSL Linux bootable partition in a USB port in a Windows machine.
Step 2. Turn on the power and quickly press the appropriate key to display the boot device menu (often F12F12F12F12).
Step 3. From the boot menu, select the USB storage deviceUSB storage deviceUSB storage deviceUSB storage device and press <Enter><Enter><Enter><Enter>....
Step 4. At this point, you should see the DSL OS begin to boot and load into memory.
Note: You may have a bit of a wait before this screen appears.

Category: SERVICE & SUPPORT
© 2007 Institute for Network Professionals 4a ITProUSB - 4 - Service & Support - v1.2 www.inpnet.org • www.HOTLabs.org 41 4/26/2007
Step 5. Once booted, the DSL desktop should look like this:
To access the Windows partition, DSL provides a mounting tool in the bottom right corner of the screen (see image above).
NOTE: If you have been using a USB mouse, it may not work.
Step 6. Left clickLeft clickLeft clickLeft click on the drive designation in the middle grey bar to toggle between partitions until you see an unmounted partition that may represent your Windows C: drive.
The Linux designation will vary depending on the type of drive and number of partitions on it. hdahdahdahda represents the first IDE drive. hda1hda1hda1hda1 represents the first partition on the first IDE drive. If you have one drive and only 1 partition, hda1hda1hda1hda1 would be a good choice.
NOTE: hdahdahdahda could be replaced by sdasdasdasda depending on your harddrive type.
Step 7. ClickClickClickClick on the unmounted bar to mount that partition. It should now turn green and show “mounted.”
If you are unsure which partition is the Windows partition, mount several of them so you can look at them. This will not harm anything.

Category: SERVICE & SUPPORT
© 2007 Institute for Network Professionals 4a ITProUSB - 4 - Service & Support - v1.2 www.inpnet.org • www.HOTLabs.org 42 4/26/2007
Step 8. To check for files to rescue on the mounted Windows partition, open a terminal window. That is easily done from the top left icon “ATerminalATerminalATerminalATerminal” on the desktop. ClickClickClickClick to open a terminal window.
Step 9. At the terminal prompt, you will need “rootrootrootroot” permissions (similar to the Windows Administrator) to access and copy some of the files you may need to recover. At the prompt, type sudo susudo susudo susudo su, press <Enter><Enter><Enter><Enter>, and you will have switched to those permissions.
(Notice that the prompt symbol changes from a $ for normal users to a # designating the root user.)
Step 10. Next, you need to identify the location of your Windows partition using the Linux command mount mount mount mount which will display all of the currently mounted partitions.
Type mount mount mount mount and press <Enter><Enter><Enter><Enter>.... The display will vary according to the exact partitions mounted but should look something like this:
The last partition mounted is the last one displayed, so the last line should be the Windows partition (unless you manually mounted several partitions). In the example above, the line reads
/dev/hda1 on /mnt/hda1 type ntfs
That means the device and partition hda1hda1hda1hda1 will appear in the Linux filesystem under the directory /mnt/hda1/mnt/hda1/mnt/hda1/mnt/hda1. It confirms it is the Windows partition by listing it as type ntfsntfsntfsntfs.
Note two things that will be important if you are newer to Linux. Forward slashes / are used to separate directories and files. Also, all directory and file names are cAsEsEnSiTiVe. In Step 17 we will be changing to the Documents and Settings directory (c:\Documents and Settings) which appears with two cap letters and must be typed that way.
Step 11. Use the cd cd cd cd command (it is the same in Linux) to change directory to that location. In this case, cd cd cd cd /mnt//mnt//mnt//mnt/hda1hda1hda1hda1 and press <En<En<En<Enter>ter>ter>ter>.... (The directory for your Windows mounted partition may differ.)

Category: SERVICE & SUPPORT
© 2007 Institute for Network Professionals 4a ITProUSB - 4 - Service & Support - v1.2 www.inpnet.org • www.HOTLabs.org 43 4/26/2007
Step 12. Use the lslslsls (list files, like Windows dirdirdirdir) command to list the directories and files in this partition.
Type lslslsls and press <Enter><Enter><Enter><Enter>....
If this is the root of your “C:C:C:C:\\\\” drive in Windows, you should see familiar files listed such as autoexec.batautoexec.batautoexec.batautoexec.bat, io.sysio.sysio.sysio.sys, \\\\windowswindowswindowswindows, Documents and Documents and Documents and Documents and SettingsSettingsSettingsSettings, etc.
Step 13. For practice in rescue, we will copy the entire system registry in the ntuser.dat file off the Windows partition to the USB drive. To do that, we need to know the location of the USB drive as it appears in Linux.
Look at the mountmountmountmount command as in Step 11 again. In the example in that step above, you are looking for one partition that is “type vfat.” Vfat is the format your USB stick should appear as in Linux. In the example in Step 11, that would be the second line:
/dev/hdb1 on /cdrom type vfat (rw)
It lists the USB drive as mounted by the directory name cdromcdromcdromcdrom (even though it is a USB drive), but that doesn’t affect anything. So, in this case, you will be copying files to the destination directory of either /dev/hdb1dev/hdb1dev/hdb1dev/hdb1, or you could use /cdrom/cdrom/cdrom/cdrom.
Step 14. Before we change to the directory in which ntuser.datntuser.datntuser.datntuser.dat is located, prove to yourself you are at the root of the Windows partition by typing pwd pwd pwd pwd (print working directory) and press <Enter><Enter><Enter><Enter>.... It should show your current directory is /mnt/hda1/mnt/hda1/mnt/hda1/mnt/hda1 or whichever designation you are using.
Step 15. The Windows registry is located in /Documents and Settings/<user>/ntuser.dat./Documents and Settings/<user>/ntuser.dat./Documents and Settings/<user>/ntuser.dat./Documents and Settings/<user>/ntuser.dat.
Change to that directory by typing”: cd Documentscd Documentscd Documentscd Documents\\\\ andandandand\\\\ Settings/ Settings/ Settings/ Settings/ and press <Enter>.<Enter>.<Enter>.<Enter>. (the cases, spaces, backward and forward slash are necessary)
SHORTCUT: Linux has a nice “Auto Tab” feature that will eliminate the need to type the entire path. Just begin the first few letters, then press tabtabtabtab.
Step 16. Type ls ls ls ls and press <Enter> <Enter> <Enter> <Enter> to display the user names under that directory.

Category: SERVICE & SUPPORT
© 2007 Institute for Network Professionals 4a ITProUSB - 4 - Service & Support - v1.2 www.inpnet.org • www.HOTLabs.org 44 4/26/2007
Step 17. Select the primary user of the machine and change to their directory by typing cdcdcdcd <user<user<user<username>name>name>name> <Enter><Enter><Enter><Enter>. . . .
In the example images below, the username of the primary user is “studentstudentstudentstudent”.
Should the username happen be more than one word with spaces in it, enclose the entire command in single quotes like this:
cdcdcdcd '/Documents and Settings/Firstname Lastname' '/Documents and Settings/Firstname Lastname' '/Documents and Settings/Firstname Lastname' '/Documents and Settings/Firstname Lastname'
Step 18. Type pwdpwdpwdpwd again and press <Enter><Enter><Enter><Enter> to prove you are in the directory for that user.
Step 19. Prove the ntuser.datntuser.datntuser.datntuser.dat file exists by typing llllssss and pressing <En<En<En<Enterterterter>>>>. Notice Linux sees the filename as all caps, NTUSER.DATNTUSER.DATNTUSER.DATNTUSER.DAT.
Step 20. To copy ntuser.datntuser.datntuser.datntuser.dat off to the root of your USB stick, type:
cp NTUSER.DATcp NTUSER.DATcp NTUSER.DATcp NTUSER.DAT ////dev/hdb1dev/hdb1dev/hdb1dev/hdb1
(or whatever the directory was in Step 15 for the vfat partition of the USB stick) and press <Enter><Enter><Enter><Enter>. Linux just returns a prompt after a successful copy and does NOT display “1 file copied.”
Step 21. To prove that file was copied, list the ntuser.datntuser.datntuser.datntuser.dat file at the root of the USB stick by typing:
ls ls ls ls NTUSER.DAT NTUSER.DAT NTUSER.DAT NTUSER.DAT ////ddddev/hdb1ev/hdb1ev/hdb1ev/hdb1
(or the appropriate directory for vfat partition) and press <<<<EnterEnterEnterEnter>>>>. You should see the file copied there.
Step 22. Optional: You may now navigate through the Windows partition with the cdcdcdcd command and practice copying additional files to the USB drive. Specifically, you may wish to copy off the SAM, system, and software files by changing to their directory in \\\\WindowsWindowsWindowsWindows\\\\system32system32system32system32\\\\configconfigconfigconfig with:
cd cd cd cd /mnt/hda1/Windows/system32/config/mnt/hda1/Windows/system32/config/mnt/hda1/Windows/system32/config/mnt/hda1/Windows/system32/config
and press <Enter><Enter><Enter><Enter>.

Category: SERVICE & SUPPORT
© 2007 Institute for Network Professionals 4a ITProUSB - 4 - Service & Support - v1.2 www.inpnet.org • www.HOTLabs.org 45 4/26/2007
Step 23. Use ls ls ls ls to view the files present in that directory:
Step 24. Copy the files with
cp SAM cp SAM cp SAM cp SAM /dev/hdb1/dev/hdb1/dev/hdb1/dev/hdb1
cp system cp system cp system cp system /dev/hdb1/dev/hdb1/dev/hdb1/dev/hdb1
cp software cp software cp software cp software /dev/hdb1/dev/hdb1/dev/hdb1/dev/hdb1.
IMPORTANT ALTERNATIVE:
Suppose you needed to rescue more files or larger files than would fit on the small USB stick?
1 - Plug in an additional external USB storage device.
2 - Use the mount utility in Step 7 to mount another partition that initially shows ntfs (probably) and unmounted.
3 - At the terminal window in Step 11, look for the directory that is the root of that drive, and when copying files in Step 21, use that directory as the destination instead of the USB stick.
With a large drive, you should be able to rescue much (or all) of the Windows partition.
Extra Credit
Step 25. If you are done early with all of the labs steps above, rightrightrightright----clickclickclickclick on the desktop and experiment with the various Linux utilities available in the drop-down menu.
Step 26. Exit Linux by rightrightrightright----clickingclickingclickingclicking the desktop and selecting shutdownshutdownshutdownshutdown
What you learned in this Lab: In this Lab you learned to use the DSL boot USB stick to:
1. Boot portably to Linux on a Windows machine, even if the Windows partition cannot be booted.
2. Mount the Windows partition in Linux and navigate the Windows file system.
3. Rescue valuable data by copying files off to the USB stick or to an external USB device.

Category: SERVICE & SUPPORT
© 2007 Institute for Network Professionals 4a ITProUSB - 4 - Service & Support - v1.2 www.inpnet.org • www.HOTLabs.org 46 4/26/2007

Category: SERVICE & SUPPORT
© 2007 Institute for Network Professionals 4a ITProUSB - 4 - Service & Support - v1.2 www.inpnet.org • www.HOTLabs.org 47 4/26/2007
HoverSnap
HoverSnap HoverSnap HoverSnap HoverSnap is a free handy snapshot tool with jpg, png, bmp and gif support. HoverSnap can take snapshots of the full screen, active window or a selected area. It can even capture layered windows (alphablended ones under 2K / XP). You can even FTP upload your screenshots!
Product Information
Source HoverDesk
Shareware
$0
www.hoverdesk.net
Where, When, Why Service & Support—Screen Capture Utility
You are on-site to update a number of network services: changing DHCP subnet ranges, changing static IP’s of a web server and reconfiguring it and its DNS records, changing time sync sources on a server, etc. The person responsible for the network cannot shadow you while you do this work, so you offered to document the changes you make.
You would like to capture incremental screen shots of the “before” and “after” of each change both to hand over a complete, annotated set of documentation and as a CYA maneuver in case anyone later claims other services no longer work after the changes you made! You reach for your Ultimate USB stick, launch the portable HoverSnapHoverSnapHoverSnapHoverSnap, and begin “shooting” incremental screen captures of the changes you are making. Later, you call up Open Office, drop the screen captures into a document and annotate them to show the exact changes you made and which files they are in.
Usage and Features
• Set up the capture folder / filename and format • Reduce the capture size. • Auto-generate filename option • Add the time stamp (date/time) to your filename in order to be able to
take several captures without having to change the filename • Reduce the capture size • Optional sound when capture is done.
Requirements / Dependencies
• Win 2000 /XP
Where to Go for More Information
• Limited information at http://www.hoverdesk.net/freeware.htm

Category: SERVICE & SUPPORT
© 2007 Institute for Network Professionals 4a ITProUSB - 4 - Service & Support - v1.2 www.inpnet.org • www.HOTLabs.org 48 4/26/2007
Lab: Using HoverSnap
What you will do in this lab:
• Launch HoverSnap and select snapshot format • Set the fault path and filename to save to • Capture a window • Capture a region in a window • Save a screen capture • Upload a screen capture
Lab Part 1
Step 1. Launch HoverSnapHoverSnapHoverSnapHoverSnap.
Step 2. Click on the Snapshot Format for PortablPortablPortablPortable Network Graphics (.png)e Network Graphics (.png)e Network Graphics (.png)e Network Graphics (.png) because png files are often easier to manipulate in editing.
Step 3. Under File StorageFile StorageFile StorageFile Storage � FolderFolderFolderFolder, click on Browse Browse Browse Browse to select a default path for saving files. Please select a temp directorytemp directorytemp directorytemp directory or other convenient place to save a file. In real life, you may wish to create a \snaps directory on your Ultimate USB stick for this purpose.
Step 4. Enter a filename of hoversnap01hoversnap01hoversnap01hoversnap01.
Step 5. Click to select the box by AutoAutoAutoAuto----generate filename on new capturegenerate filename on new capturegenerate filename on new capturegenerate filename on new capture. (Do not click on Hide or Quit.)

Category: SERVICE & SUPPORT
© 2007 Institute for Network Professionals 4a ITProUSB - 4 - Service & Support - v1.2 www.inpnet.org • www.HOTLabs.org 49 4/26/2007
Step 6. Press ALT+PrintScreenALT+PrintScreenALT+PrintScreenALT+PrintScreen to create an automate capture and filename with a unique time stamp of this screen showing HoverSnap’s configuration.
Step 7. HoverSnap is minimized in your system tray. Left clickLeft clickLeft clickLeft click once on its icon to open and restore its window
Step 8. Press CTRL+PrintScreenCTRL+PrintScreenCTRL+PrintScreenCTRL+PrintScreen. Your cursor changes to a cross-hair. Drag to highlight the area in the HoverSnap window around the fields for Folder and Filename. When you release the left mouse button, that region is captured and saved with the unique filename and timestamp.
Step 9. HoverSnap is minimized in your system tray. Left clickLeft clickLeft clickLeft click once on its icon to open and restore its window.
Step 10. Open a command window: StartStartStartStart����RunRunRunRun�cmdcmdcmdcmd. Type ipconfig /all <Enter>ipconfig /all <Enter>ipconfig /all <Enter>ipconfig /all <Enter>.
Step 11. Scroll if necessary to display one of the active network adaptor’s IP address.
Step 12. Press CTRL+PrintScreenCTRL+PrintScreenCTRL+PrintScreenCTRL+PrintScreen. Your cursor changes to a cross-hair. Drag to highlight the area with the active network card, its IP address, Subnet IP address, Subnet IP address, Subnet IP address, Subnet Mask, Default Gateway, DHCP Server, and DNS ServerMask, Default Gateway, DHCP Server, and DNS ServerMask, Default Gateway, DHCP Server, and DNS ServerMask, Default Gateway, DHCP Server, and DNS Server. When you release the left mouse button, that region is captured and saved with the unique filename and timestamp.
Step 13. To view the results of your three screen captures, launch FastStone FastStone FastStone FastStone ViewerViewerViewerViewer. In the left pane, navigate to the directory in which HoverSnap saved its files.
Your display should look something like that below. From here you could double-click to view each of them full screen, then right click to edit and annotate them before you copy and paste them into the word-processing document where you will write up your documentation of configuring HoverSnap and the existing network card configuration on your machine. Hoover your mouse over any image and notice the complete filename, including the timestamp with HH:MM:SS to keep each snap’s filename unique.

Category: SERVICE & SUPPORT
© 2007 Institute for Network Professionals 4a ITProUSB - 4 - Service & Support - v1.2 www.inpnet.org • www.HOTLabs.org 50 4/26/2007
Step 14. (Optional) Restore the HoverSnap window from your system tray. You may upload your snaps to your FTP server by clicking on FTP Upload !FTP Upload !FTP Upload !FTP Upload !.
Step 15. (Optional) Type in the DNS name or IP addressDNS name or IP addressDNS name or IP addressDNS name or IP address for the server, ftp login namelogin namelogin namelogin name and passwordpasswordpasswordpassword (or leave blank for anonymous FTP), highlight the filenamefilenamefilenamefilename in the window of existing HoverSnaps you want to upload, enter the remote directoryremote directoryremote directoryremote directory, if it is not the default FTP directory, and then click Upload !Upload !Upload !Upload !.
Step 16. Exit HoverSnapHoverSnapHoverSnapHoverSnap by clicking on its CloseCloseCloseClose button.
What you learned in this Lab: In this Lab you learned to use Product to:
1. Launched HoverSnap and select snapshot format.
2. Set the default path and filename to save to
3. Captured a window
4. Captured a region in a window
5. Saved a screen capture
6. Uploaded a screen capture
Category: SERVICE & SUPPORT
© 2007 Institute for Network Professionals 4a ITProUSB - 4 - Service & Support - v1.2 www.inpnet.org • www.HOTLabs.org 51 4/26/2007
MM CompView
The MMCompView utility displays the details of all installed multimedia components (Codec and ActiveX filters) and allows you to disable and enable specific components.
Product Information
Source Nirsoft
Free
www.nirsoft.net
Where, When, Why To check what multi-media codecs you have installed. Tracking down the ‘why’ of multi-media troubleshooting.
Usage and Features
• Display Name – Description – Version – Company – etc
Requirements / Dependencies
• none
Where to Go for More Information
• www.nirsoft.net/utils/mmview.html

Category: SERVICE & SUPPORT
© 2007 Institute for Network Professionals 4a ITProUSB - 4 - Service & Support - v1.2 www.inpnet.org • www.HOTLabs.org 52 4/26/2007
Lab: Using MM CompView
What you will do in this lab:
• Check the multi-media CODECs installed on your system.
Lab Part 1
Step 1. Launch MM CompViewMM CompViewMM CompViewMM CompView
Step 2. Review the Codecs installed on your system.
Step 3. That’s it.

Category: SERVICE & SUPPORT
© 2007 Institute for Network Professionals 4a ITProUSB - 4 - Service & Support - v1.2 www.inpnet.org • www.HOTLabs.org 53 4/26/2007
ZoomIt
ZoomItZoomItZoomItZoomIt is screen zoom and annotation tool for technical presentations that include application demonstrations. ZoomItZoomItZoomItZoomIt runs unobtrusively in the tray and activates with customizable hotkeys to zoom in on an area of the screen, move around while zoomed, and draw on the zoomed image. I wrote ZoomItZoomItZoomItZoomIt to fit my specific needs and use it in all my presentations.
Product Information
Source SysInternals
Free for Personal Use
http://www.microsoft.com/technet/sysinternals/utilities/ZoomIt.mspx
Where, When, Why Service & Support—Screen Zoom Utility
This is a special tool that is great for teachers or presenters who need to Zoom in on a specific portion of the screen. It allows much better views for those following along. In addition it comes with the ability to quickly do a non-destructive drawing on the screen to highlight or note specific items.
For those teaching – it has a great little break timer to countdown the length of classroom breaks.
Usage and Features
• Zoom in on computer screens • Non-destructive Draw on screen • Quick and easy countdown timer for classroom breaks
Requirements / Dependencies
• None
Where to Go for More Information
• http://www.microsoft.com/technet/sysinternals/utilities/ZoomIt.mspx
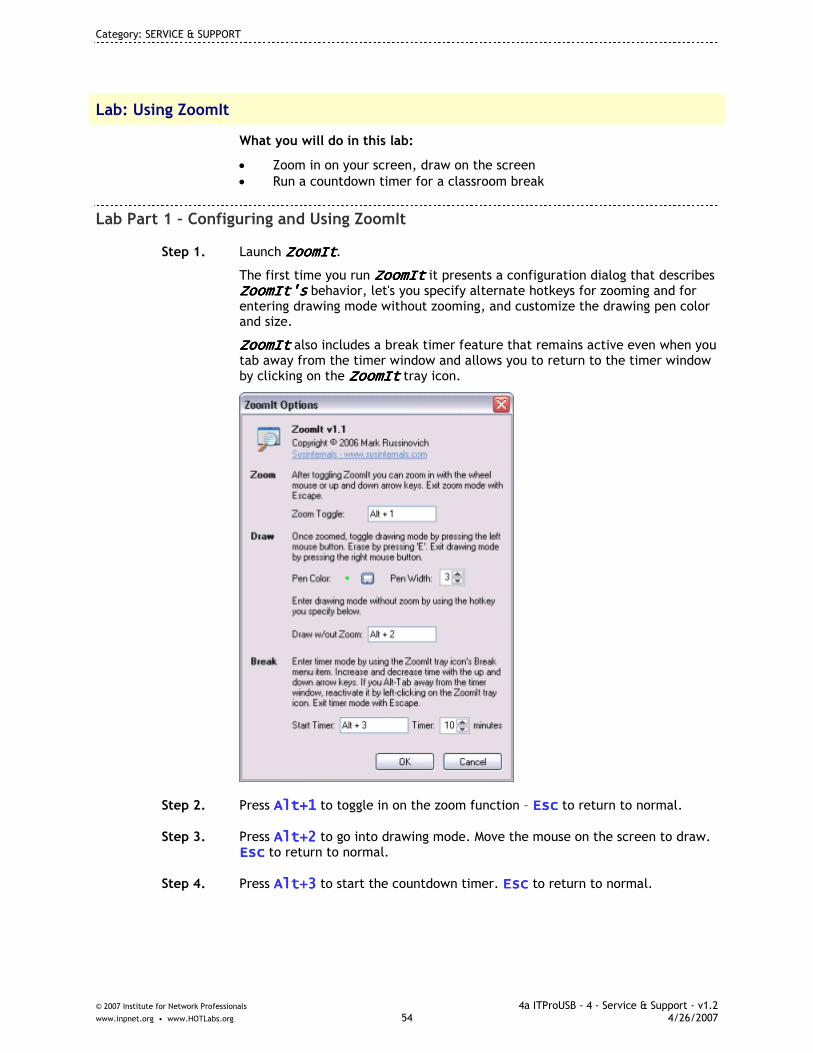
Category: SERVICE & SUPPORT
© 2007 Institute for Network Professionals 4a ITProUSB - 4 - Service & Support - v1.2 www.inpnet.org • www.HOTLabs.org 54 4/26/2007
Lab: Using ZoomIt
What you will do in this lab:
• Zoom in on your screen, draw on the screen • Run a countdown timer for a classroom break
Lab Part 1 – Configuring and Using ZoomIt
Step 1. Launch ZoomItZoomItZoomItZoomIt.
The first time you run ZoomItZoomItZoomItZoomIt it presents a configuration dialog that describes ZoomIt'sZoomIt'sZoomIt'sZoomIt's behavior, let's you specify alternate hotkeys for zooming and for entering drawing mode without zooming, and customize the drawing pen color and size.
ZoomItZoomItZoomItZoomIt also includes a break timer feature that remains active even when you tab away from the timer window and allows you to return to the timer window by clicking on the ZoomItZoomItZoomItZoomIt tray icon.
Step 2. Press Alt+1Alt+1Alt+1Alt+1 to toggle in on the zoom function – EscEscEscEsc to return to normal.
Step 3. Press Alt+2Alt+2Alt+2Alt+2 to go into drawing mode. Move the mouse on the screen to draw. EscEscEscEsc to return to normal.
Step 4. Press Alt+3Alt+3Alt+3Alt+3 to start the countdown timer. EscEscEscEsc to return to normal.
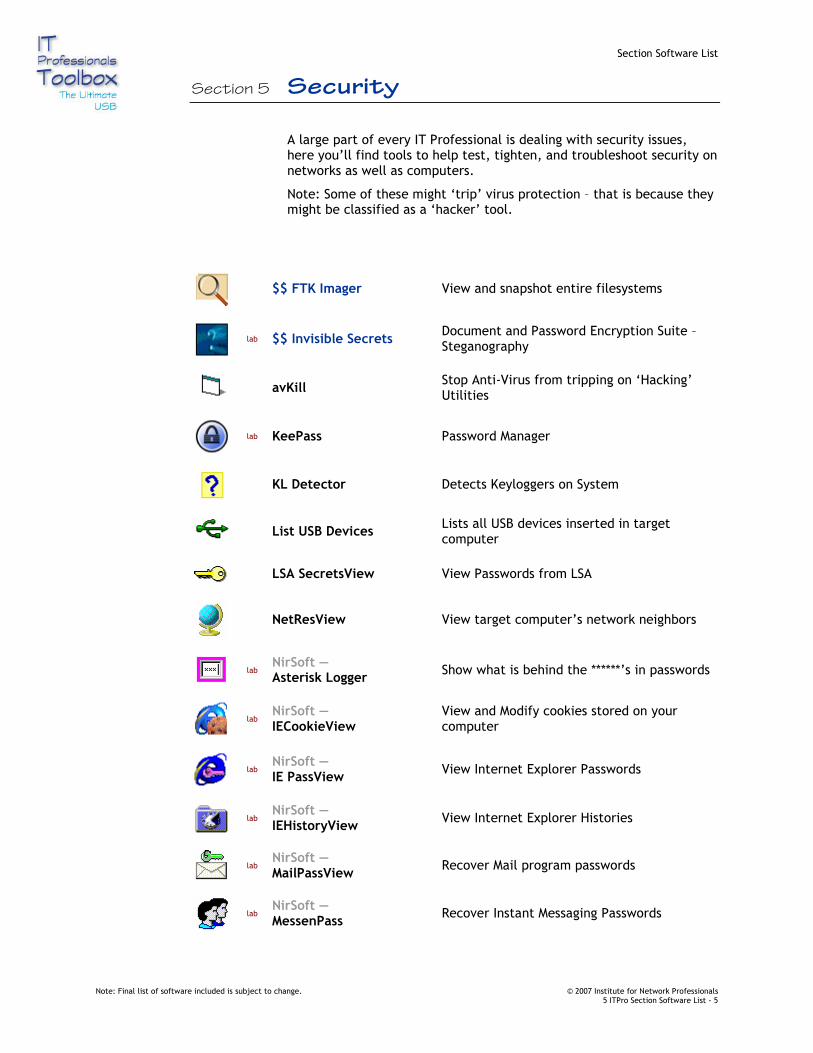
Section Software List
Note: Final list of software included is subject to change. © 2007 Institute for Network Professionals 5 ITPro Section Software List - 5
Section 5 Security
A large part of every IT Professional is dealing with security issues, here you’ll find tools to help test, tighten, and troubleshoot security on networks as well as computers.
Note: Some of these might ‘trip’ virus protection – that is because they might be classified as a ‘hacker’ tool.
$$ FTK Imager View and snapshot entire filesystems
lab $$ Invisible Secrets
Document and Password Encryption Suite – Steganography
avKill Stop Anti-Virus from tripping on ‘Hacking’ Utilities
lab KeePass Password Manager
KL Detector Detects Keyloggers on System
List USB Devices Lists all USB devices inserted in target computer
LSA SecretsView View Passwords from LSA
NetResView View target computer’s network neighbors
lab
NirSoft — Asterisk Logger
Show what is behind the ******’s in passwords
lab
NirSoft — IECookieView
View and Modify cookies stored on your computer
lab
NirSoft — IE PassView
View Internet Explorer Passwords
lab
NirSoft — IEHistoryView
View Internet Explorer Histories
lab
NirSoft — MailPassView
Recover Mail program passwords
lab
NirSoft — MessenPass
Recover Instant Messaging Passwords

Section Software List
Note: Final list of software included is subject to change. © 2007 Institute for Network Professionals 5 ITPro Section Software List - 5
lab
NirSoft — Network Password Recovery
Recover Network Passwords
lab
NirSoft — ProduKey
Recover Microsoft Product Keys
lab
NirSoft — Protected Storage PassView
Recover passwords and information from Protected Storage
lab
NirSoft — SniffPass
View passwords over the network
lab
NirSoft — WinUpdatesList
List all Windows Updates on target computer
lab
NirSoft — WirelessKeyView
View wireless WEP and WPA Keys
Outlook PST Viewer Recovers Outlook PST passwords
Password Revealer See what is behind those ******’s
lab SMAC MAC Address Spoofer
lab Steganos LockNote and fSekrit
Simple Programs for Encrypted Text Files
lab TrueCrypt Encrypt partitions on USB Drive
Category: SECURITY
© 2007 Institute for Network Professionals 5a ITProUSB - 5 - Security - v1.2 www.inpnet.org • www.HOTLabs.org 1 4/26/2007
Section 5 – SECURITY Table of Contents
FTK Imager .................................................................3
Invisible Secrets ...........................................................5
KeePass Password Safe ................................................. 19
NirSoft Password & History Utilities .................................. 27
SMAC....................................................................... 39
Steganos LockNote and fSekrit — Encrypted Notes................. 43
TrueCrypt................................................................. 49

Category: SECURITY
© 2007 Institute for Network Professionals 5a ITProUSB - 5 - Security - v1.2 www.inpnet.org • www.HOTLabs.org 2 4/26/2007

Category: SECURITY
© 2007 Institute for Network Professionals 5a ITProUSB - 5 - Security - v1.2 www.inpnet.org • www.HOTLabs.org 3 4/26/2007
FTK Imager
FTK Imager FTK Imager FTK Imager FTK Imager is a data preview and imaging tool that lets you quickly assess electronic evidence to determine if further analysis with AccessData® Forensic Toolkit® (FTK™) is warranted. FTK Imager is for law enforcement and every IT, IS and Security professional interested in copying data from FAT, NTFS, EXT2 and EXT3 as well as HFS and HPFS file systems.
FTK Imager FTK Imager FTK Imager FTK Imager can also create perfect copies (forensic images) of computer data without making changes to the original evidence. It also allows you to truly multi-task by creating multiple images from a single source and/or multiple images simultaneously. FTK Imager generates DD, SMART and Encase® images and reads several other industry standard formats.
Product Information
Source
AccessData
Single user license (other licensing available)
$89.00 Non-law enforcement (single user) Free of Charge for Law-enforcement
www.accessdata.com
Where, When, Why
Security - Forensic data imaging and preview tool
FTK Imager on a Stick adds portability to FTK Imager: you can take Imager to the problem machine, and pull the registry files back onto the thumb-drive. You can take FTK Imager with you to check machines where they're set up. If you're a business manager, you can use it to periodically check work stations for illicit material.
You can also use the image (you pulled to your thumb-drive) to retrieve lost data without interrupting the work station.
IMPORTANT: If you are creating a criminal case, you should NOT use Imager on a Stick to create an image of the suspect's computer. Imager on a Stick will update the registry to indicate that a thumb-drive had been read, rendering the evidence forensically unsound.
Usage and Features
• Preview files and folders on local hard drives, floppy diskettes, Zip disks, CDs, and DVDs.
• Create forensic images of local hard drives, floppy diskettes, Zip disks, CDs, and DVDs.
• Preview the contents of forensic images stored on the local machine or on a network drive.
• Export files and folders. • Generate hash reports for regular files and disk images
(including files inside disk images) • Acquire locked system files (such as SAM / SYSTEM / NTUSER) • Hash physically or logically for verification (MD5 and SHA1) • Preview media (thumbnail views, keyword searches, properties)

Category: SECURITY
© 2007 Institute for Network Professionals 5a ITProUSB - 5 - Security - v1.2 www.inpnet.org • www.HOTLabs.org 4 4/26/2007
Requirements / Dependencies
• Windows
Where to Go for More Information
• www.accessdata.com • Training: http://www.accessdata.com/training/

Category: SECURITY
© 2007 Institute for Network Professionals 5a ITProUSB - 5 - Security - v1.2 www.inpnet.org • www.HOTLabs.org 5 4/26/2007
Invisible Secrets
Invisible Secrets 4 encrypts your data and files for safe keeping or for secure transfer across the net. It also hides them in places that on the surface appear totally innocent, such as picture or sound files, or web pages—a perfect disguise for sensitive information.
With Invisible Secrets, you may encrypt and hide files directly from Windows Explorer, and then automatically transfer them by e-mail or via the Internet.
Product Information
Source
NeoByte Solutions
License Type: single user; multi-user licensing available
$39.95
www.invisiblesecrets.com
Where, When, Why
Security — Data and Communication privacy suite
As an IT professional, you often need to protect sensitive data stored on your computer. You have many passwords in your mind or spread all over your computer and need a way to organize and protect them. You often need to transfer confidential data in a secure manner. When you delete sensitive data from your PC, you need to make sure it is really gone and can’t be retrieved. For security and penetration testing, you need to use some very powerful (but dangerous) software tools, which you lock so they can’t be used by unauthorized parties. You use Invisible SecretsInvisible SecretsInvisible SecretsInvisible Secrets to do it all.
Usage and Features
• password manager stores passwords securely & creates secure passwords • shredder that destroy files, folders and internet traces beyond recovery, • locker that allows you to password protect certain applications, • utility to create self-decrypting packages and mail them to your friends or
business partners, using strong file encryption algorithms (AES Rijndael) • tool that allows you to transfer a password securely over the internet, • “cryptboard” facilitates using the utilities directly in Windows Explorer • file encryption tool that is shell integrated and offers a useful wizard
Requirements / Dependencies
• Windows operating system
Where to Go for More Information
• www.neobytesolutions.com/invisiblesecrets • Help files

Category: SECURITY
© 2007 Institute for Network Professionals 5a ITProUSB - 5 - Security - v1.2 www.inpnet.org • www.HOTLabs.org 6 4/26/2007
Lab: Using Invisible Secrets
What you will do in this lab:
• Hide a file using steganography • Reveal (unhide) a steganographic secret • Create and secure passwords with the Password Manager. • Create a self-decrypting file • Securely delete (shred) a file from your computer • Create a secure IP to IP transfer with a partner • Lock an application in your Windows Start menu
Lab Part 1: Using Invisible Secrets to Hide a File with Steganography
About this lab: In this lab exercise you will use Invisible Secrets Invisible Secrets Invisible Secrets Invisible Secrets to embed a secret into an image using steganography. In addition, you use encryption and a password to help thwart recovery.
Note: You can find the picture and secrets files on the USB stick in the \\\\CourseFilesCourseFilesCourseFilesCourseFiles\\\\steganographysteganographysteganographysteganography folder.
Step 1. Launch Invisible SecretsInvisible SecretsInvisible SecretsInvisible Secrets.
Step 2. From the main application menu screen, select Hide FilesHide FilesHide FilesHide Files.
Step 3. First you need to select the secret (the file you want to hide in the carrier). Click Add FilesAdd FilesAdd FilesAdd Files and browse to the \\\\CourseFilesCourseFilesCourseFilesCourseFiles\\\\steganographysteganographysteganographysteganography files folder of your USB stick.
Step 4. You are going to hide two secrets inside an image. Select the files CAMNKTUZ.pdfCAMNKTUZ.pdfCAMNKTUZ.pdfCAMNKTUZ.pdf and russia.xlsrussia.xlsrussia.xlsrussia.xls. Click OpenOpenOpenOpen.
Step 5. Now you need to select the carrier. ClickClickClickClick the explore button next to the edit box and browse again to the \\\\CourseFilesCourseFilesCourseFilesCourseFiles\\\\steganographysteganographysteganographysteganography files directory.

Category: SECURITY
© 2007 Institute for Network Professionals 5a ITProUSB - 5 - Security - v1.2 www.inpnet.org • www.HOTLabs.org 7 4/26/2007
Step 6. Select the file rooftop.jpgrooftop.jpgrooftop.jpgrooftop.jpg and click NextNextNextNext.
The carrier.
Step 7. Enter the password “secretsecretsecretsecret” in both password boxes.
Step 8. Select TwofishTwofishTwofishTwofish as the encryption algorithm and click NextNextNextNext.
Step 9. ClickClickClickClick the browsebrowsebrowsebrowse button next to the edit box and browse to your desktop. Enter the filename rooftoprooftoprooftoprooftop----s.jpgs.jpgs.jpgs.jpg. Click SaveSaveSaveSave.
Step 10. Click HideHideHideHide and Invisible SecretsInvisible SecretsInvisible SecretsInvisible Secrets will embed your secrets into the carrier image and create a new stego-file on your desktop. When the encrypt/hide process is completed, click NextNextNextNext.
Step 11. Click FinishFinishFinishFinish.
Note: There are several possible carriers and secrets in the USB stick’s\\\\CourseFilesCourseFilesCourseFilesCourseFiles\\\\steganography steganography steganography steganography directory. The image fountain.jpg fountain.jpg fountain.jpg fountain.jpg contains a secret that you will unhide in the next lab exercise. Other secrets may be hidden in that directory.

Category: SECURITY
© 2007 Institute for Network Professionals 5a ITProUSB - 5 - Security - v1.2 www.inpnet.org • www.HOTLabs.org 8 4/26/2007
Lab Part 2: Using Invisible Secrets to Unhide a Steganographic Secret
About this lab: In this lab exercise you use Invisible SecretsInvisible SecretsInvisible SecretsInvisible Secrets to unhide a secret from a carrier.
Step 12. Launch Invisible SecretsInvisible SecretsInvisible SecretsInvisible Secrets and select Unhide FilesUnhide FilesUnhide FilesUnhide Files.
Step 13. Browse to the \\\\CourseFilesCourseFilesCourseFilesCourseFiles\\\\steganographysteganographysteganographysteganography files directory on the USB stick. Select the pegasus.jpgpegasus.jpgpegasus.jpgpegasus.jpg file and click NextNextNextNext.
The stego-image.
Step 14. Enter “hidehidehidehide” (minus the quotes) as the carrier access/decryption password.
Step 15. Select Blowfish Blowfish Blowfish Blowfish as the decryption algorithm. Click NextNextNextNext.
Step 16. Select your desktop desktop desktop desktop as the destination folder and check off the secret that is listed in the window.
Step 17. Click UnhideUnhideUnhideUnhide. Invisible SecretsInvisible SecretsInvisible SecretsInvisible Secrets will put a copy of the secret on your desktop.
Step 18. Click the Explore Extracted FilesExplore Extracted FilesExplore Extracted FilesExplore Extracted Files button.
Step 19. Double-click on the secret file secret file secret file secret file to open and view the contents.
Step 20. What did you find ________________________________________________
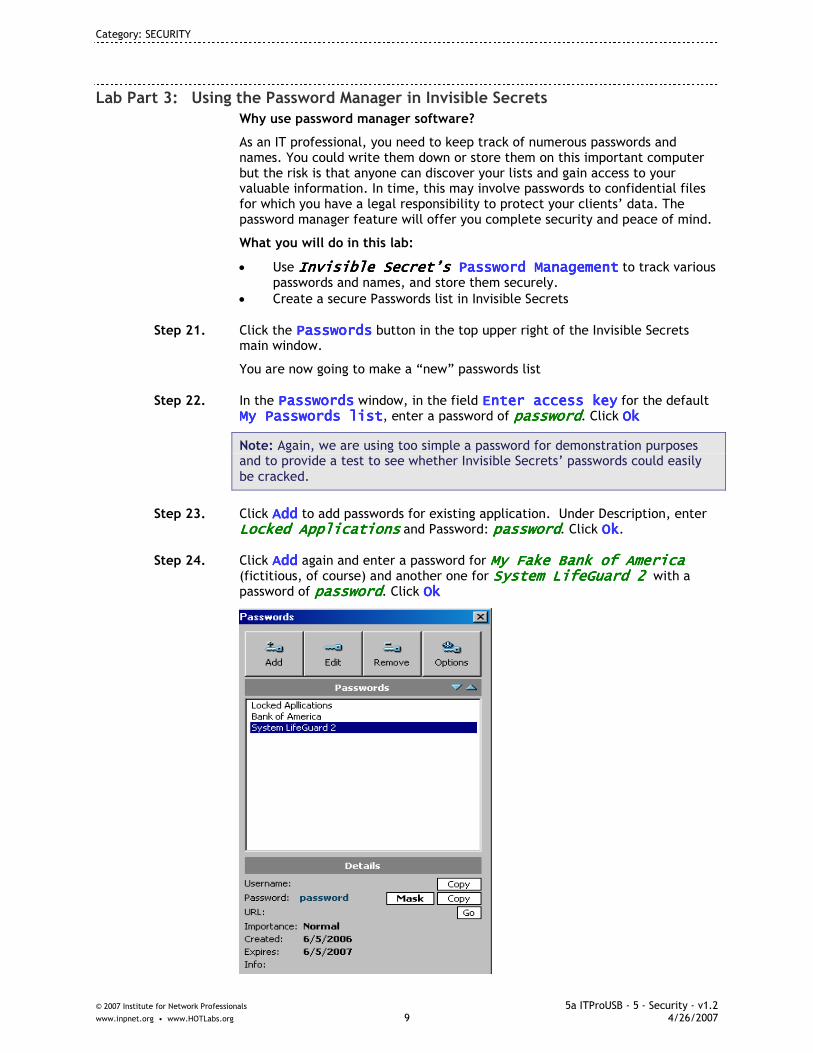
Category: SECURITY
© 2007 Institute for Network Professionals 5a ITProUSB - 5 - Security - v1.2 www.inpnet.org • www.HOTLabs.org 9 4/26/2007
Lab Part 3: Using the Password Manager in Invisible Secrets
Why use password manager software?
As an IT professional, you need to keep track of numerous passwords and names. You could write them down or store them on this important computer but the risk is that anyone can discover your lists and gain access to your valuable information. In time, this may involve passwords to confidential files for which you have a legal responsibility to protect your clients’ data. The password manager feature will offer you complete security and peace of mind.
What you will do in this lab:
• Use Invisible Secret’sInvisible Secret’sInvisible Secret’sInvisible Secret’s Password Management Password Management Password Management Password Management to track various passwords and names, and store them securely.
• Create a secure Passwords list in Invisible Secrets
Step 21. Click the PasswordsPasswordsPasswordsPasswords button in the top upper right of the Invisible Secrets main window.
You are now going to make a “new” passwords list
Step 22. In the PasswordsPasswordsPasswordsPasswords window, in the field Enter access keyEnter access keyEnter access keyEnter access key for the default My Passwords lMy Passwords lMy Passwords lMy Passwords listististist, enter a password of passwordpasswordpasswordpassword. Click OkOkOkOk
Note: Again, we are using too simple a password for demonstration purposes and to provide a test to see whether Invisible Secrets’ passwords could easily be cracked.
Step 23. Click AddAddAddAdd to add passwords for existing application. Under Description, enter Locked ApplicationsLocked ApplicationsLocked ApplicationsLocked Applications and Password: passwordpasswordpasswordpassword. Click OkOkOkOk.
Step 24. Click AddAddAddAdd again and enter a password for My Fake Bank of AmericaMy Fake Bank of AmericaMy Fake Bank of AmericaMy Fake Bank of America (fictitious, of course) and another one for System LifeGuard 2System LifeGuard 2System LifeGuard 2System LifeGuard 2 with a password of passwordpasswordpasswordpassword. Click OkOkOkOk
Category: SECURITY
© 2007 Institute for Network Professionals 5a ITProUSB - 5 - Security - v1.2 www.inpnet.org • www.HOTLabs.org 10 4/26/2007
Note the powerful tools for generating strong passwords, rather thank entering your own. Experiment with those tools if you wish, but for the purposes of this lab, just enter the simple passwords as shown above.
Step 25. To practice using the Password list, click on PasswordsPasswordsPasswordsPasswords again.
Step 26. Enter access key: passwordpasswordpasswordpassword.
Step 27. Click OkOkOkOk.
Step 28. Highlight an entry on the passwords list and click ViewViewViewView to see the visible password.
Step 29. From here, you may also Manage Passwords ListsManage Passwords ListsManage Passwords ListsManage Passwords Lists . This will open a window containing all the lists of passwords you have created so far. Here you have four buttons available:
• New ListNew ListNew ListNew List - create a new list of passwords • DestroyDestroyDestroyDestroy (shred) selected list • EditEditEditEdit selected list of passwords • PropertiesPropertiesPropertiesProperties - edit the properties of the selected list of passwords
(name and access key).

Category: SECURITY
© 2007 Institute for Network Professionals 5a ITProUSB - 5 - Security - v1.2 www.inpnet.org • www.HOTLabs.org 11 4/26/2007
Lab Part 4: Using Invisible Secrets to Create Self-Decrypting Files
About this lab: In this lab exercise you use Invisible Secrets to create a self-decrypting package (SDP). This allows you to securely send a compressed, encrypted file to a recipient who can open the file without any special software – they just need the correct password. [Of course, you need to select a strong password to ensure the security of the package.]
Step 30. Launch Invisible SecretsInvisible SecretsInvisible SecretsInvisible Secrets and select SelfSelfSelfSelf----Decrypting PackagesDecrypting PackagesDecrypting PackagesDecrypting Packages.
You have two tabs available – FilesFilesFilesFiles and Popup MessagePopup MessagePopup MessagePopup Message. Use the FilesFilesFilesFiles area to select the files to be encrypted. Optionally use Popup MessagePopup MessagePopup MessagePopup Message to display a popup after successful decryption with additional file information.
Step 31. Click the Popup MessagePopup MessagePopup MessagePopup Message tab. Enter the following message:
This set of files contains IP address assignments for numerous countries.
Step 32. Click the FilesFilesFilesFiles tab, click the AddAddAddAdd button.
Step 33. Browse to and select the file IPaddressblocks.zipIPaddressblocks.zipIPaddressblocks.zipIPaddressblocks.zip in the \\\\CourseFilesCourseFilesCourseFilesCourseFiles\\\\ipaddressesipaddressesipaddressesipaddresses directory of your USB stick.
Step 34. Click NextNextNextNext and the self-decrypting package options window appears.
Step 35. Enter a password and save the package to the desktop. You can also choose to optionally ZIP the self-extracting package and shred the original files when done (the shredder conforms to the DoD-5220-22-M data destruction standard).
.
Step 36. Click NextNextNextNext. You are prompted when encryption is complete. Click FinishFinishFinishFinish.
Step 37. Test your self-encrypting package.

Category: SECURITY
© 2007 Institute for Network Professionals 5a ITProUSB - 5 - Security - v1.2 www.inpnet.org • www.HOTLabs.org 12 4/26/2007
Lab Part 5: Using Invisible Secrets to Shred Files
About this Lab: Deleting files and folders from Windows Explorer is not secure. This will delete only the file's name so that you will no longer see it in Windows Explorer. Invisible Secrets comes with a file shredder feature. To destroy files and folder beyond recovery you must overwrite the file / folder before erase. Invisible Secrets 4 provides an integrated Shredder (DoD 5220.22-M compliant) for this operation.
You can use the file shredder software to permanently remove files and folders from your computer.
Step 38. To prove the file shredding functionality, we will first use a normal Windows deletion of a sample password list and prove that it may still be recovered. In Invisible Secret’s Invisible Secret’s Invisible Secret’s Invisible Secret’s main window, select PasswordsPasswordsPasswordsPasswords.
Step 39. Enter the access key of password password password password to open the password list.
Step 40. Highlight, one at a time, each of the three sample password entries (for Locked Applications, System LifeGuard2, and your fictitious bank account) and click on Copy to copy the visible password to the clipboard.
Step 41. On your desktop, right clickright clickright clickright click and select NewNewNewNew�OpenOpenOpenOpenDocumentDocumentDocumentDocument to create a new blank file.
This assumes you have OpenOffice installed. Alternatively you could create a new text file or a Word file.
Open that OpenOffice document file and paste in each of the three passwords.
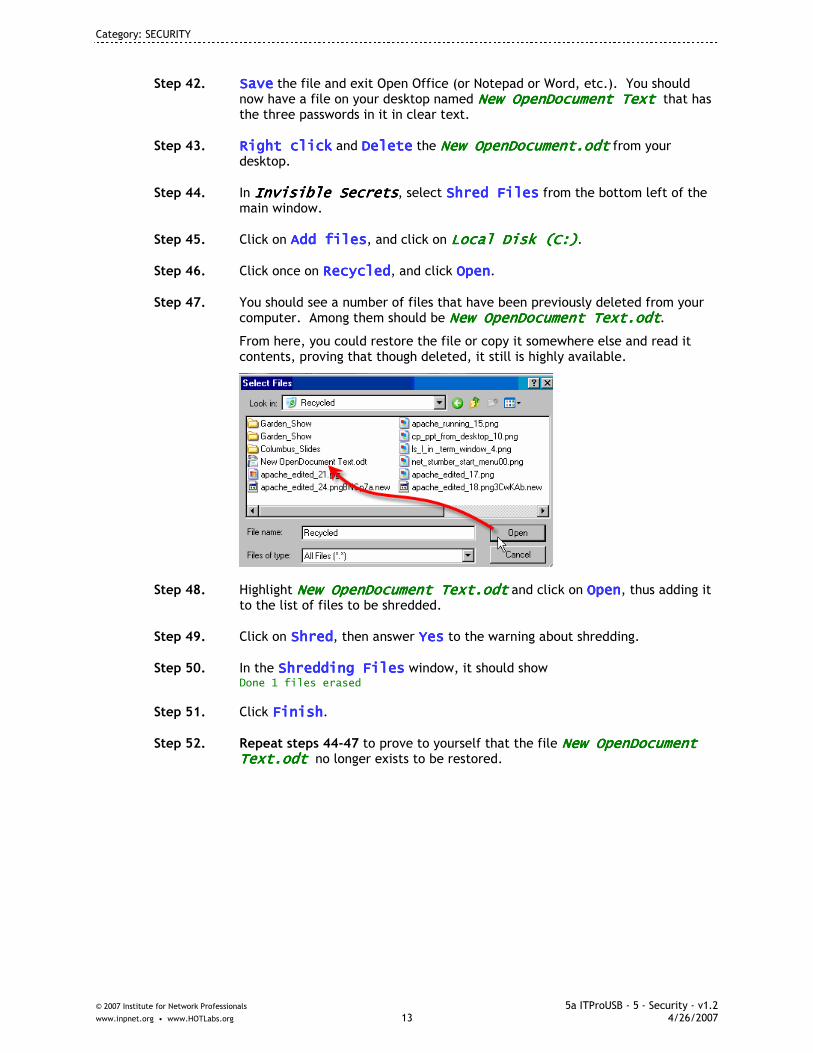
Category: SECURITY
© 2007 Institute for Network Professionals 5a ITProUSB - 5 - Security - v1.2 www.inpnet.org • www.HOTLabs.org 13 4/26/2007
Step 42. SaveSaveSaveSave the file and exit Open Office (or Notepad or Word, etc.). You should now have a file on your desktop named New OpenNew OpenNew OpenNew OpenDocumenDocumenDocumenDocument Text t Text t Text t Text that has the three passwords in it in clear text.
Step 43. Right clickRight clickRight clickRight click and DeleteDeleteDeleteDelete the New OpenNew OpenNew OpenNew OpenDocument.odtDocument.odtDocument.odtDocument.odt from your desktop.
Step 44. In Invisible SecretsInvisible SecretsInvisible SecretsInvisible Secrets, select Shred FilesShred FilesShred FilesShred Files from the bottom left of the main window.
Step 45. Click on Add filesAdd filesAdd filesAdd files, and click on Local Disk (C:)Local Disk (C:)Local Disk (C:)Local Disk (C:).
Step 46. Click once on RecycledRecycledRecycledRecycled, and click OpenOpenOpenOpen.
Step 47. You should see a number of files that have been previously deleted from your computer. Among them should be New OpenDocument Text.odtNew OpenDocument Text.odtNew OpenDocument Text.odtNew OpenDocument Text.odt.
From here, you could restore the file or copy it somewhere else and read it contents, proving that though deleted, it still is highly available.
Step 48. Highlight New OpenDocument Text.odtNew OpenDocument Text.odtNew OpenDocument Text.odtNew OpenDocument Text.odt and click on OpenOpenOpenOpen, thus adding it to the list of files to be shredded.
Step 49. Click on ShredShredShredShred, then answer YesYesYesYes to the warning about shredding.
Step 50. In the Shredding FilesShredding FilesShredding FilesShredding Files window, it should show Done 1 files erased
Step 51. Click FinishFinishFinishFinish.
Step 52. Repeat steps 44-47 to prove to yourself that the file New OpenDocument New OpenDocument New OpenDocument New OpenDocument Text.odt Text.odt Text.odt Text.odt no longer exists to be restored.

Category: SECURITY
© 2007 Institute for Network Professionals 5a ITProUSB - 5 - Security - v1.2 www.inpnet.org • www.HOTLabs.org 14 4/26/2007
Lab Part 6: Using Invisible Secrets for Secure IP-to-IP Password Transfer
About this lab: In this lab exercise you Invisible Secrets to securely transfer a password between two Invisible Secrets systems. In addition, you can save the password in Invisible Secrets Password Manager.
Note: You will work with a partner in this exercise. Decide which one of you will be the sender and which one of you will be the receiver. This exercise presumes that you have network connectivity with your partner.
Step 53. With your partner, note your respective IP addresses.
Target #1 IP Address (Sender): _______________________ Target #2 IP Address (Receiver): _______________________
Step 54. Both partners must launch Invisible SecretsInvisible SecretsInvisible SecretsInvisible Secrets and select IPIPIPIP----totototo----IP IP IP IP Secure Password TransferSecure Password TransferSecure Password TransferSecure Password Transfer.
This process requires port 10000. The Windows Firewall may block Invisible Secrets from accepting any connections. If so, a window will appear prompting you to keep blocking or unblock the application. In order for this lab to work, you must unblock Invisible Secrets. In addition, an IDS application, such as KF Sensor, may be configured to bind to this port. You may need to temporarily shut down any such applications as well.
Step 55. Complete the information for both the sender and receiver.
The receiver simply needs to select Receive Password and click Next.
The Receiver’s configuration.

Category: SECURITY
© 2007 Institute for Network Professionals 5a ITProUSB - 5 - Security - v1.2 www.inpnet.org • www.HOTLabs.org 15 4/26/2007
The sender must select Transmit PasswordTransmit PasswordTransmit PasswordTransmit Password and enter the IP address IP address IP address IP address of the receiver as well as the password password password password before clicking NextNextNextNext.
The Sender’s configuration.
Step 56. The receiver will be notified of a successful transfer. Click ViewViewViewView to see the password that was received.
You can click Copy Copy Copy Copy to copy the password to the buffer or Store Store Store Store to store the password in the Password Manager (you will be prompted to select an access key for Password Manager the first time it is run).

Category: SECURITY
© 2007 Institute for Network Professionals 5a ITProUSB - 5 - Security - v1.2 www.inpnet.org • www.HOTLabs.org 16 4/26/2007
Lab Part 7: Removing Applications/Groups from the Start Menu
About this lab: In this lab exercise you use Invisible SecretsInvisible SecretsInvisible SecretsInvisible Secrets to lock an application so others cannot run it. Invisible Secrets will encrypt the application so it can only be unlocked with the correct password.
The Lock ApplicationsLock ApplicationsLock ApplicationsLock Applications function is intended for use only when the Invisible Secrets Invisible Secrets Invisible Secrets Invisible Secrets program is installed on a computer. It may not function correctly when running from a USB stick.
In this exercise, we are going to lock NoteNoteNoteNotepadpadpadpad. Notepad is listed in the StartStartStartStart � All ProgramsAll ProgramsAll ProgramsAll Programs � Accessories Accessories Accessories Accessories menu.
Step 57. Open Invisible SecretsInvisible SecretsInvisible SecretsInvisible Secrets and select Locked ApplicationsLocked ApplicationsLocked ApplicationsLocked Applications.
Step 58. You must set your password the first time you use the Lock ApplicationLock ApplicationLock ApplicationLock Application feature. Make sure you set a password you will remember after the class! Click OKOKOKOK.
Step 59. Select the LockLockLockLock New New New New Applications Applications Applications Applications button in the main Lock Lock Lock Lock ApplicationsApplicationsApplicationsApplications window. The list of installed applications appears in the Lock Application window. Scroll down and click NotepadNotepadNotepadNotepad.
Step 60. Ensure Remove from Start MenuRemove from Start MenuRemove from Start MenuRemove from Start Menu is selected and click the Lock Lock Lock Lock button. A window appears indicating that the application has been locked and the application is removed from the listing.
(INSERT NEW GRAPHIC HERE)
Category: SECURITY
© 2007 Institute for Network Professionals 5a ITProUSB - 5 - Security - v1.2 www.inpnet.org • www.HOTLabs.org 17 4/26/2007
Step 61. Click OKOKOKOK. The application is now shown in the Lock Applications window. Click FinishFinishFinishFinish.
Step 62. Test your lock by trying to open Notepad in the StartStartStartStart � All ProgramsAll ProgramsAll ProgramsAll Programs � Accessories Accessories Accessories Accessories menu.
Step 63. To run Notepad, double-click on the Notepad icon in the Lock Lock Lock Lock ApplicationsApplicationsApplicationsApplications window in Invisible SecretsInvisible SecretsInvisible SecretsInvisible Secrets.
Note: Unlocking applications is just as simple. Click the application icon in Invisible Secrets and click Unlock Selected.
In this lab, you learned to use Invisible Secrets to:
1. Hide a file using steganography
2. Reveal (unhide) a steganographic secret
3. Create and secure passwords with the Password Manager.
4. Create a self-decrypting file
5. Securely delete (shred) a file from your computer
6. Create a secure IP to IP transfer with a partner
7. Lock an application in your Windows Start menu

Category: SECURITY
© 2007 Institute for Network Professionals 5a ITProUSB - 5 - Security - v1.2 www.inpnet.org • www.HOTLabs.org 18 4/26/2007

Category: SECURITY
© 2007 Institute for Network Professionals 5a ITProUSB - 5 - Security - v1.2 www.inpnet.org • www.HOTLabs.org 19 4/26/2007
KeePass Password Safe
KeePassKeePassKeePassKeePass is a free/open-source password manager (or safe) which helps you to manage your passwords in a secure way. You can put all your passwords in one database, which is locked with one master key or a key-disk. So you only have to remember one single master password or insert the key-disk to unlock the whole database. The databases are encrypted using the best and most secure encryption algorithms currently known (AES and Twofish).
Product Information
Source
Dominik Reichl
Open Source (OSI certified)
$Free
http://keepass.sourceforge.net
Where, When, Why
Security (also Portable Applications)—Password Manager
Today you need to remember many passwords. You need a password for the Windows network logon, your e-mail account, your homepage's ftp password, online passwords (like CodeProject member account), etc. etc. etc. The list is endless. Also, you should use different passwords for each account. Because if you use only one password everywhere and someone gets this password you have a problem... A serious problem. The thief would have access to your e-mail account, homepage, etc. That bad…very bad!.
But who can remember all those passwords? Nobody, but KeePassKeePassKeePassKeePass can. The easy-to-use password manager stores your passwords in a highly encrypted database. This database consists of only one file, so it can be easily transferred from one computer to another.
Usage and Features
• Highly encrypted databases • Support of master passwords and key-disks • Runs on all Windows operating systems and doesn't need to be installed • Export password list to TXT, HTML, XML or CSV files • Import from CSV, CodeWallet(Pro) TXT and Password Safe v2 TXT files • Easy database transfer • Support of password groups • Time fields and entry attachment support • Auto-type, global auto-type hot key combination and drag-n-drop support • Intuitive and secure Windows clipboard handling • Searching and sorting • Multi-language support • Strong random password generator • Low memory requirement • Plugin architecture • Open-Source!

Category: SECURITY
© 2007 Institute for Network Professionals 5a ITProUSB - 5 - Security - v1.2 www.inpnet.org • www.HOTLabs.org 20 4/26/2007
Requirements / Dependencies
• This compiled binary version runs on Windows 95 / 98 / 98SE / ME / NT / 2000 / XP / 2003 / Vista
• KeePassKeePassKeePassKeePass currently is available in over 20 different languages • The application does NOT need to be installed
Where to Go for More Information
• Help (includes a basic tutorial) • Downloads - keepass.sourceforge.net/download.php • Feature List - keepass.sourceforge.net/features.php • Plugins / Extensions - keepass.sourceforge.net/plugins.php • KeePass Forums - keepass.sourceforge.net/forums.php

Category: SECURITY
© 2007 Institute for Network Professionals 5a ITProUSB - 5 - Security - v1.2 www.inpnet.org • www.HOTLabs.org 21 4/26/2007
Lab: Using KeePass
What you will do in this lab:
• Create a password database and master key (password) • Add entries to the password database • Use the entries in the password database • Save the passwords database
Create a password database
Step 1. Launch KeePassKeePassKeePassKeePass.
Step 2. Create a new password database by selecting File File File File ���� New New New New
This will bring up the “Create a new password databaseCreate a new password databaseCreate a new password databaseCreate a new password database” dialog box where you can enter your master password or key. This can be a simple password for tutorial or demo purposes. However, when you use KeePass for actually securing a database of passwords, the master key should be long, strong, and use mixed characters.
As the help files say, “The password database will be encrypted with the password you enter here. The password you enter here will be the only password you'll ever have to remember from now on… Keep in mind that [if] someone gets your database file and guesses the password [master key], he could access all passwords you stored in the database.”
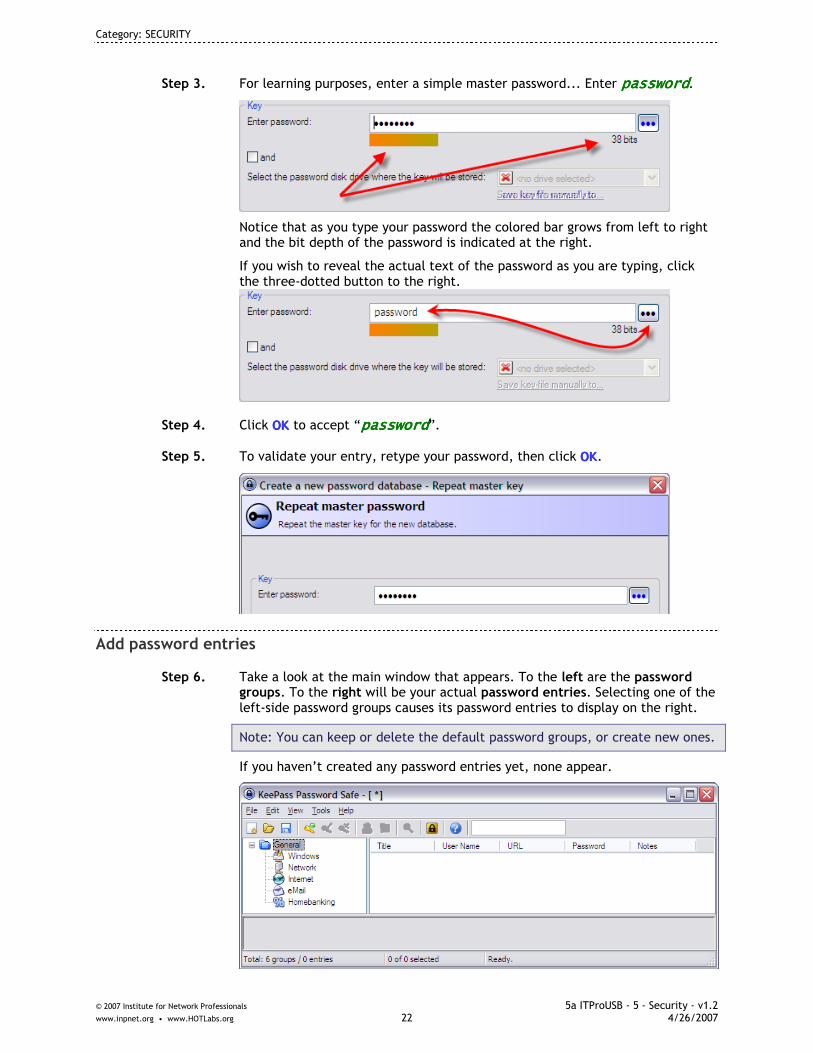
Category: SECURITY
© 2007 Institute for Network Professionals 5a ITProUSB - 5 - Security - v1.2 www.inpnet.org • www.HOTLabs.org 22 4/26/2007
Step 3. For learning purposes, enter a simple master password... Enter passwordpasswordpasswordpassword.
Notice that as you type your password the colored bar grows from left to right and the bit depth of the password is indicated at the right.
If you wish to reveal the actual text of the password as you are typing, click the three-dotted button to the right.
Step 4. Click OKOKOKOK to accept “passwordpasswordpasswordpassword”.
Step 5. To validate your entry, retype your password, then click OKOKOKOK.
Add password entries
Step 6. Take a look at the main window that appears. To the left are the password groups. To the right will be your actual password entries. Selecting one of the left-side password groups causes its password entries to display on the right.
Note: You can keep or delete the default password groups, or create new ones.
If you haven’t created any password entries yet, none appear.

Category: SECURITY
© 2007 Institute for Network Professionals 5a ITProUSB - 5 - Security - v1.2 www.inpnet.org • www.HOTLabs.org 23 4/26/2007
Step 7. Next, let’s have you store two passwords of your own in the KeePass database. Move your mouse into the right-side password entry view area, rightrightrightright----clickclickclickclick and select Add EntryAdd EntryAdd EntryAdd Entry from the popup menu.
The Add Entry window opens where you can add and edit a password entry. In this example, JoeJoeJoeJoe has added an entry for his email account on mail.xyz.commail.xyz.commail.xyz.commail.xyz.com.
Note that KeePass has generated a good quality password for Joe. If he prefers, he could enter his own password.
Step 8. Make two password entries of your own. If some of the fields are not required for your entries, leave them blank.To complete each entry, click OKOKOKOK.
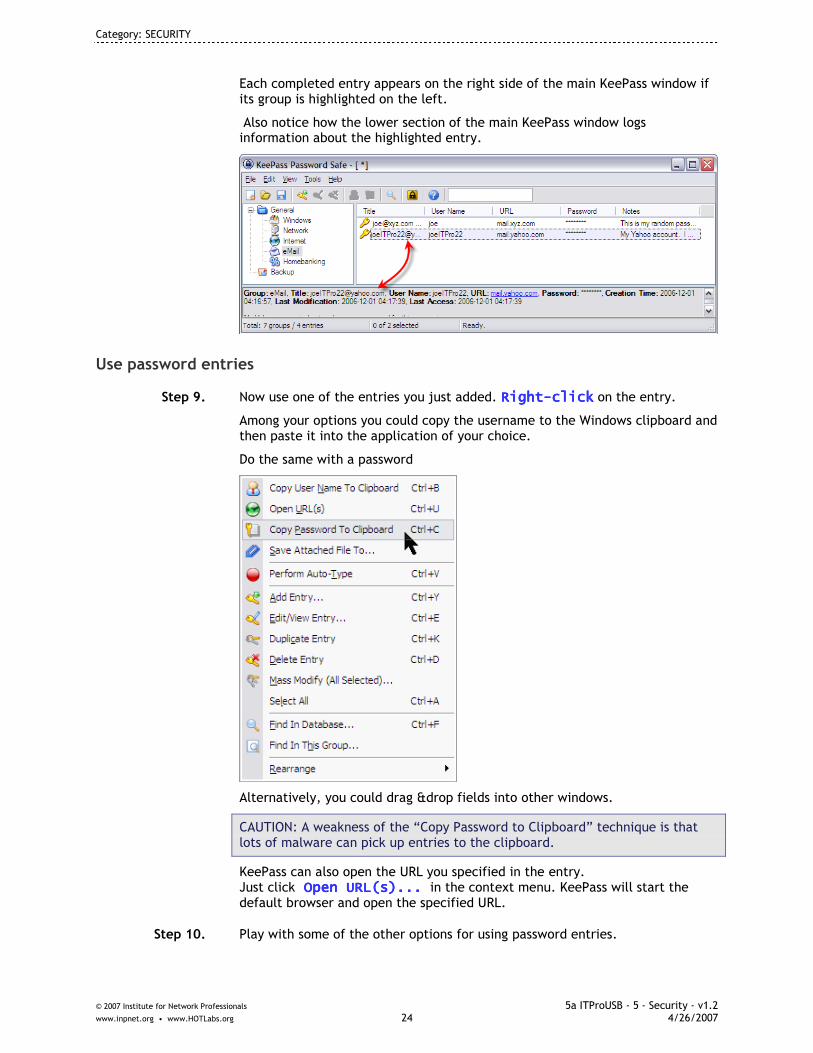
Category: SECURITY
© 2007 Institute for Network Professionals 5a ITProUSB - 5 - Security - v1.2 www.inpnet.org • www.HOTLabs.org 24 4/26/2007
Each completed entry appears on the right side of the main KeePass window if its group is highlighted on the left.
Also notice how the lower section of the main KeePass window logs information about the highlighted entry.
Use password entries
Step 9. Now use one of the entries you just added. RightRightRightRight----clickclickclickclick on the entry.
Among your options you could copy the username to the Windows clipboard and then paste it into the application of your choice.
Do the same with a password
Alternatively, you could drag &drop fields into other windows.
CAUTION: A weakness of the “Copy Password to Clipboard” technique is that lots of malware can pick up entries to the clipboard.
KeePass can also open the URL you specified in the entry. Just click Open URL(s)... Open URL(s)... Open URL(s)... Open URL(s)... in the context menu. KeePass will start the default browser and open the specified URL.
Step 10. Play with some of the other options for using password entries.
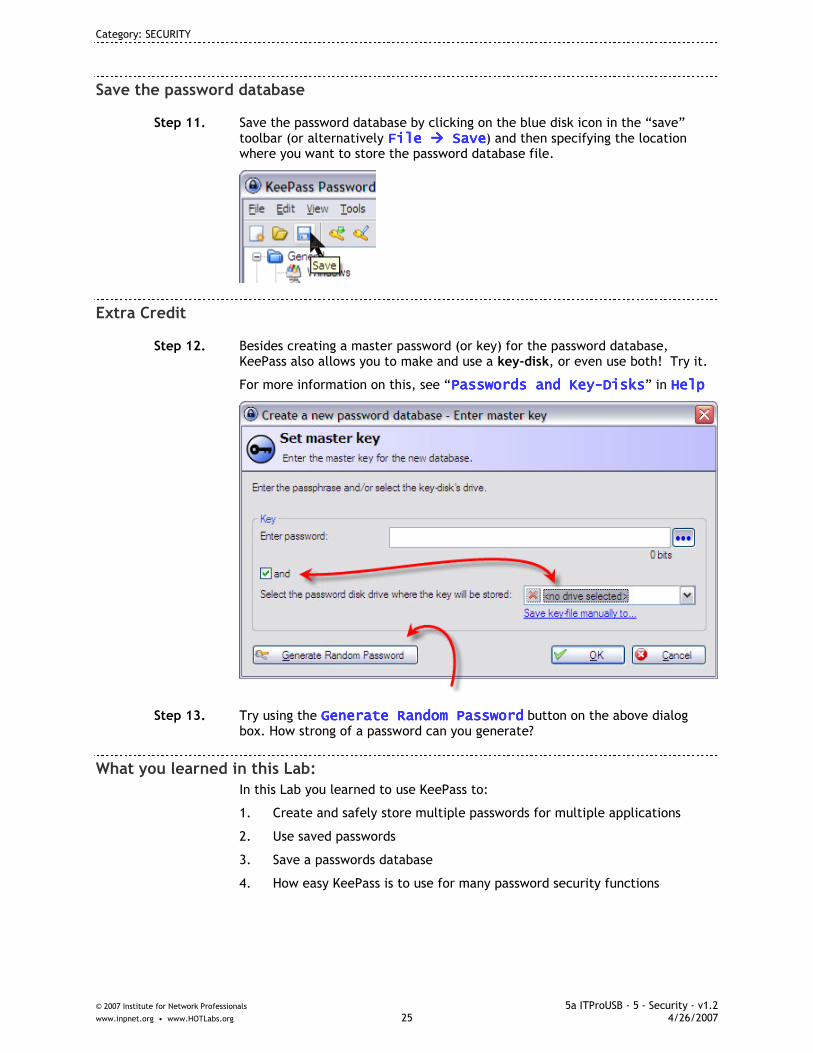
Category: SECURITY
© 2007 Institute for Network Professionals 5a ITProUSB - 5 - Security - v1.2 www.inpnet.org • www.HOTLabs.org 25 4/26/2007
Save the password database
Step 11. Save the password database by clicking on the blue disk icon in the “save” toolbar (or alternatively File File File File ���� Save Save Save Save) and then specifying the location where you want to store the password database file.
Extra Credit
Step 12. Besides creating a master password (or key) for the password database, KeePass also allows you to make and use a key-disk, or even use both! Try it.
For more information on this, see “Passwords and KeyPasswords and KeyPasswords and KeyPasswords and Key----DisksDisksDisksDisks” in HelpHelpHelpHelp
Step 13. Try using the Generate Random PasswordGenerate Random PasswordGenerate Random PasswordGenerate Random Password button on the above dialog box. How strong of a password can you generate?
What you learned in this Lab:
In this Lab you learned to use KeePass to:
1. Create and safely store multiple passwords for multiple applications
2. Use saved passwords
3. Save a passwords database
4. How easy KeePass is to use for many password security functions

Category: SECURITY
© 2007 Institute for Network Professionals 5a ITProUSB - 5 - Security - v1.2 www.inpnet.org • www.HOTLabs.org 26 4/26/2007
Category: SECURITY
© 2007 Institute for Network Professionals 5a ITProUSB - 5 - Security - v1.2 www.inpnet.org • www.HOTLabs.org 27 4/26/2007
NirSoft Password & History Utilities
This group is a series of individual software packages aimed at Password Recovery, History Recovery or Product Key Recovery.
Because of the sensitive nature of the information obtained by these tools – please be careful and always have permission first before deploying these recovery tools.
Product Information
Source
NirSoft
Freeware
www.nirsoft.net
Where, When, Why
Security—Password and History Recovery Utilities (multiple applications)
Have you or any of your friends or family ever forgotten a password? Of course you have had this experience. Well, with these simple tools you can quickly find the passwords and get back to happy computing.
Now, with this great power comes great responsibility as well. You need to use these tools for good and not for evil!
You can recover passwords, history from IE and Cookies as well as recover those pesky Microsoft Product Keys. Use the ProduKey BEFORE you need to reinstall and you can be ready for those Office and XP keys – you’ll be all ready to reinstall after a crash.
WARNING: Always have permission before using any of these recovery utilities
IMPORTANT NOTE: Many of these utilities might trip your Anti-Virus alarms – not as a ‘virus’ per se, but as a ‘hacking tool.’
Some AV products will delete the offending files directly from your USB Stick –- to replace them, copy the original files from the Student DVD to the appropriate location on your Ultimate USB stick \5 – Security\Toolname\Tool
Usage and Features
• MessenPassMessenPassMessenPassMessenPass – Recovery of instant messenger passwords • MailPassViewMailPassViewMailPassViewMailPassView – Recovery of popular e-mail client passwords • ProtectedProtectedProtectedProtected StorageStorageStorageStorage PassViewPassViewPassViewPassView – Recovery of all passwords and
AutoComplete strings from Protected Storage • DialupassDialupassDialupassDialupass – Recovery of VPN and Internet dialup connection passwords • Asterisk LoAsterisk LoAsterisk LoAsterisk Loggerggerggergger – Reveal passwords hidden behind asterisk (******)
characters in password boxes • SniffPassSniffPassSniffPassSniffPass – Listen on the network for POP3, IMAP4, SMTP, FTP and
HTTP passwords • Network Password RecoveryNetwork Password RecoveryNetwork Password RecoveryNetwork Password Recovery – Recover network passwords stored
by Windows XP
Category: SECURITY
© 2007 Institute for Network Professionals 5a ITProUSB - 5 - Security - v1.2 www.inpnet.org • www.HOTLabs.org 28 4/26/2007
• WirelessKeyView WirelessKeyView WirelessKeyView WirelessKeyView – View Wireless LAN WEP and WPA keys • IE PassView IE PassView IE PassView IE PassView – View Internet Explorer passwords • IECookiesViewIECookiesViewIECookiesViewIECookiesView – View and Modify cookies stored on your computer • IEHistoryViewIEHistoryViewIEHistoryViewIEHistoryView – View and Delete URLS you’ve visited in the last few
days • WinUpdatesListWinUpdatesListWinUpdatesListWinUpdatesList – Display all the Windows updates on the target
machine • ProduKeyProduKeyProduKeyProduKey – Recover Microsoft Office/Windows Product CD-Keys
Requirements / Dependencies
• Any Windows operating system
Where to Go for More Information
• www.nirsoft.net

Category: SECURITY
© 2007 Institute for Network Professionals 5a ITProUSB - 5 - Security - v1.2 www.inpnet.org • www.HOTLabs.org 29 4/26/2007
Lab: Using Password & History Recovery Utilities
What you will do in this lab:
• Run through a series of hands-on lab exercises testing a variety of password and history recovery utilities.
• As a penetration test – showing what information is vulnerable
Lab Part 1 - Messenpass
Step 1. Launch MessenPassMessenPassMessenPassMessenPass.
Did it find any of your Instant Messenger accounts and passwords? _______
Step 2. Try exporting an HTML file of the results
Lab Part 2 - MailPassView
Step 3. Launch MailPassViewMailPassViewMailPassViewMailPassView.
Did it find any of your Mail accounts and passwords? ________
Step 4. You can export an HTML file of the results.

Category: SECURITY
© 2007 Institute for Network Professionals 5a ITProUSB - 5 - Security - v1.2 www.inpnet.org • www.HOTLabs.org 30 4/26/2007
Lab Part 3 – Protected Storage Passview
Protected Storage PassViewProtected Storage PassViewProtected Storage PassViewProtected Storage PassView is a small utility to reveal the content of the "Protected Storage" registry key. This registry key contains the passwords stored on your computer by Internet Explorer, Outlook Express and MSN Explorer.
The usage is trivial: once executed, Protected Storage PassViewProtected Storage PassViewProtected Storage PassViewProtected Storage PassView displays in its window all the passwords it's able to find, showing the resource name, the password type, the username (if available) and the password.
The 'View' menu allows you to filter the main window content by displaying only certain types of passwords
Step 5. Launch Protected Storage PassViewProtected Storage PassViewProtected Storage PassViewProtected Storage PassView.
Step 6. Note the wealth of information this quickly provides – web sites, passwords, etc. – These items are clearly and easily available to anyone who has access to your computers!
What was discovered on *your* computer? _____________________________
How does this make you feel about the security of your private information?
____________________________________________________
Step 7. Like the other NirSoft products, this too can export to an HTML file.
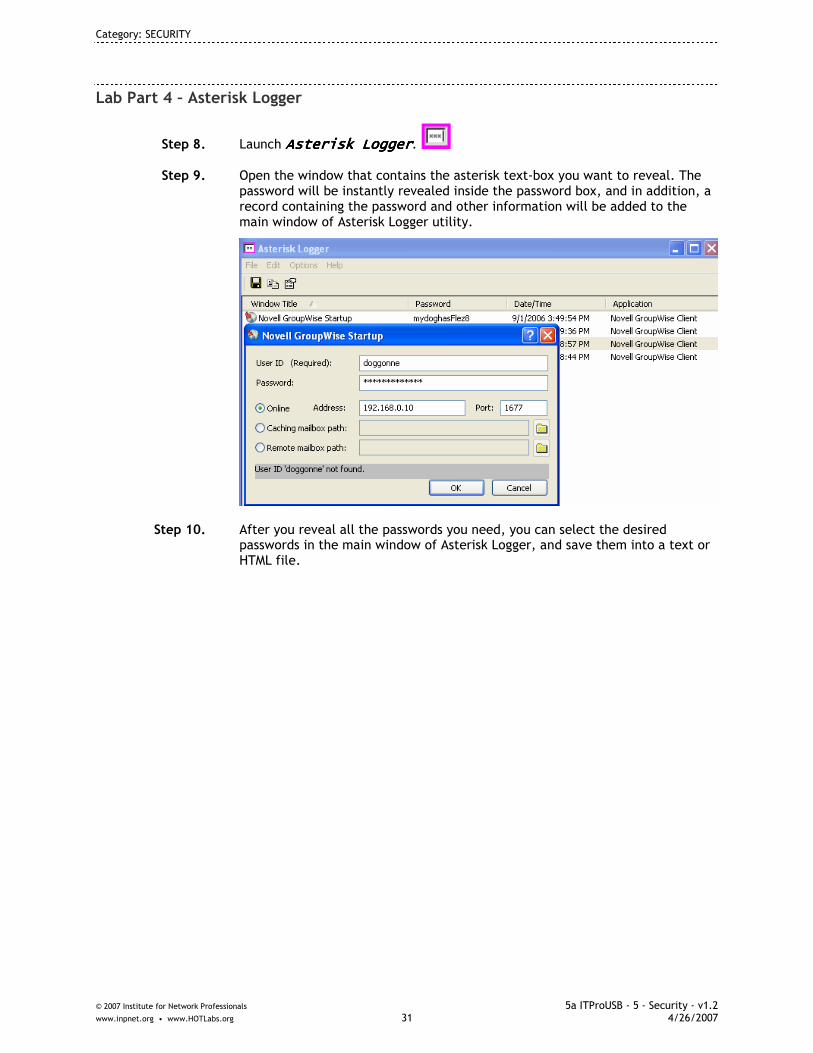
Category: SECURITY
© 2007 Institute for Network Professionals 5a ITProUSB - 5 - Security - v1.2 www.inpnet.org • www.HOTLabs.org 31 4/26/2007
Lab Part 4 – Asterisk Logger
Step 8. Launch Asterisk LoggerAsterisk LoggerAsterisk LoggerAsterisk Logger.
Step 9. Open the window that contains the asterisk text-box you want to reveal. The password will be instantly revealed inside the password box, and in addition, a record containing the password and other information will be added to the main window of Asterisk Logger utility.
Step 10. After you reveal all the passwords you need, you can select the desired passwords in the main window of Asterisk Logger, and save them into a text or HTML file.
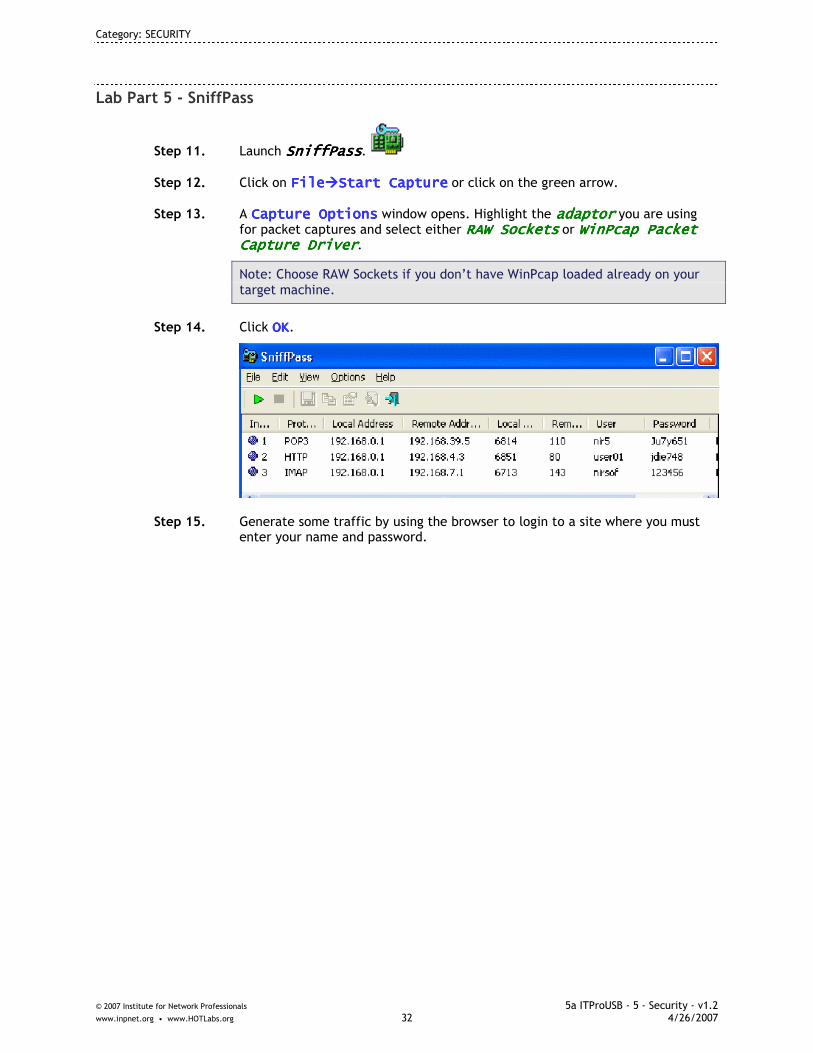
Category: SECURITY
© 2007 Institute for Network Professionals 5a ITProUSB - 5 - Security - v1.2 www.inpnet.org • www.HOTLabs.org 32 4/26/2007
Lab Part 5 - SniffPass
Step 11. Launch SniffPassSniffPassSniffPassSniffPass.
Step 12. Click on FileFileFileFile����Start CaptureStart CaptureStart CaptureStart Capture or click on the green arrow.
Step 13. A Capture OptionsCapture OptionsCapture OptionsCapture Options window opens. Highlight the adaptoradaptoradaptoradaptor you are using for packet captures and select either RAW SocketsRAW SocketsRAW SocketsRAW Sockets or WinPcap Packet WinPcap Packet WinPcap Packet WinPcap Packet Capture DriverCapture DriverCapture DriverCapture Driver.
Note: Choose RAW Sockets if you don’t have WinPcap loaded already on your target machine.
Step 14. Click OKOKOKOK.
Step 15. Generate some traffic by using the browser to login to a site where you must enter your name and password.
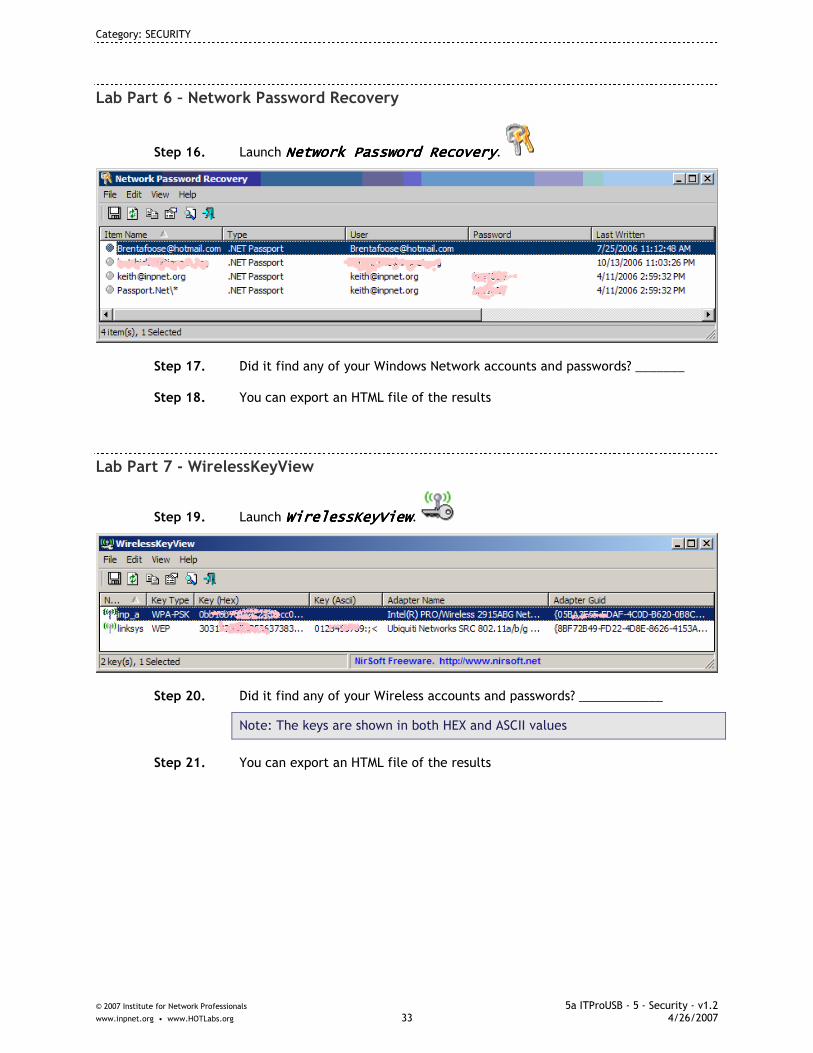
Category: SECURITY
© 2007 Institute for Network Professionals 5a ITProUSB - 5 - Security - v1.2 www.inpnet.org • www.HOTLabs.org 33 4/26/2007
Lab Part 6 – Network Password Recovery
Step 16. Launch Network Password RecoveryNetwork Password RecoveryNetwork Password RecoveryNetwork Password Recovery.
Step 17. Did it find any of your Windows Network accounts and passwords? _______
Step 18. You can export an HTML file of the results
Lab Part 7 - WirelessKeyView
Step 19. Launch WirelessKeyViewWirelessKeyViewWirelessKeyViewWirelessKeyView.
Step 20. Did it find any of your Wireless accounts and passwords? ____________
Note: The keys are shown in both HEX and ASCII values
Step 21. You can export an HTML file of the results

Category: SECURITY
© 2007 Institute for Network Professionals 5a ITProUSB - 5 - Security - v1.2 www.inpnet.org • www.HOTLabs.org 34 4/26/2007
Lab Part 8 – IE PassView
Step 22. Launch IE PassViewIE PassViewIE PassViewIE PassView.
Step 23. Did it find any of your Internet Explorer accounts and passwords?
Step 24. You can export an HTML file of the results

Category: SECURITY
© 2007 Institute for Network Professionals 5a ITProUSB - 5 - Security - v1.2 www.inpnet.org • www.HOTLabs.org 35 4/26/2007
Lab Part 9 – IECookiesView – Internet Explorer Cookies Manager
Step 25. Launch IECookiesViewIECookiesViewIECookiesViewIECookiesView.
L
Step 26. Look through the column headings by scrolling to the right.
Step 27. You can export an HTML file of the results
Lab Part 10 - IEHistoryView
Step 28. Launch IEHistoryViewIEHistoryViewIEHistoryViewIEHistoryView.
Step 29. Did you know your surfing history was this easy to see?
Step 30. Now using the options in Microsoft IE, clear out your history and cache and try running this utility again. Did it clear your data?

Category: SECURITY
© 2007 Institute for Network Professionals 5a ITProUSB - 5 - Security - v1.2 www.inpnet.org • www.HOTLabs.org 36 4/26/2007
Lab Part 11 - WinUpdatesList
Step 31. Launch WinUpdatesListWinUpdatesListWinUpdatesListWinUpdatesList.
Step 32. How many times has the target machine been ‘patched’ or updated by Microsoft for the Windows OS? _______
Step 33. You can export an HTML file of the results
Lab Part 12 - ProduKey
Step 34. Launch ProduKeyProduKeyProduKeyProduKey.
Step 35. Cut and paste these keys into a text file and save as part of your backup. When it’s time to restore, you’ll have your CD-Keys all ready to go.

Category: SECURITY
© 2007 Institute for Network Professionals 5a ITProUSB - 5 - Security - v1.2 www.inpnet.org • www.HOTLabs.org 37 4/26/2007
What you learned in this Lab:
In this Lab you learned to use Password & History Recovery Utilities to:
1. View all the different types of saved passwords and history files that are available to anyone with access to your computer.
2. These tools can all be run remotely if a hacker has control of your computer.
3. As an example in a penetration test, you can show the clients the vulnerabilities of their machines to a anyone with these simple software utilities.
4. Your Anti-Virus software might have caught a few of these tools, but what about those the AV didn’t catch?

Category: SECURITY
© 2007 Institute for Network Professionals 5a ITProUSB - 5 - Security - v1.2 www.inpnet.org • www.HOTLabs.org 38 4/26/2007

Category: SECURITY
© 2007 Institute for Network Professionals 5a ITProUSB - 5 - Security - v1.2 www.inpnet.org • www.HOTLabs.org 39 4/26/2007
SMAC
SMAC (Scriptable Command-Line MAC Address Changer) is a powerful, yet an easy-to-use and intuitive Windows MAC Address Modifying Utility (MAC Address spoofing) which allows users to change MAC address for almost any Network Interface Cards (NIC) on the Windows 2000, XP, 2003, and VISTA Server systems, regardless of whether the manufacturers allow this option or not.
Product Information
Source
KLC Consulting, Inc.
Commercial (single user or site license)
Standard Edition $29.99; Professional Edition $99.99; Site License $2199.00
www.klcconsulting.net/smac
Where, When, Why
Security—MAC Address Spoofing
You have just setup MAC address filtering for one of your company’s wireless Access Points. For testing purposes, you’ve set it to block everything but your own MAC address. You’d like to test it without having to borrow someone else’s computer for a unique MAC address. You take out your USB stick, load SMAC, assign yourself a new software MAC address and attempt to access the internet through the AP, which you now cannot.
Usage and Features
• Randomly generate new MAC address right after changing it • Helps people to protect their privacy by hiding their real MAC Addresses
in the widely available wifi Wireless Network • Helps Network and IT Security professionals to troubleshoot network
problems • Test Intrusion Detection / Prevention Systems (IDS/IPS) • recover (MAC Address based) software licenses
Requirements / Dependencies
• SMAC 2.0 Works on Windows 2000, XP, 2003 • SMAC works on Network Interface Cards (NIC) that are on the Microsoft
Hardware Compatibility List (HCL).
Where to Go for More Information
• User Guide download at http://www.klcconsulting.net/smac/#Download • On line Table of Contents at
http://www.klcconsulting.net/smac/#features

Category: SECURITY
© 2007 Institute for Network Professionals 5a ITProUSB - 5 - Security - v1.2 www.inpnet.org • www.HOTLabs.org 40 4/26/2007
Lab: Using SMAC
What you will do in this lab:
• Check your existing MAC address • Use SMAC to spoof a different MAC address • Prove your machine now has a different MAC address • Restore your physical MAC address
Lab Part 1
Step 1. Check your real MAC address before you begin this lab. Click on StartStartStartStart����RunRunRunRun�cmdcmdcmdcmd�ipconfig /allipconfig /allipconfig /allipconfig /all <Enter>. Write down your MAC address here: _____________________________________________
Step 2. Launch SMACSMACSMACSMAC.
Step 3. Click Accept Accept Accept Accept to accept the License Agreement.
Step 4. The main SMAC menu appears with the listing of Network Adaptors, IP Addresses, and Active MAC addresses.
Step 5. To spoof a new MAC address, click on the Network AdaptoNetwork AdaptoNetwork AdaptoNetwork Adaptor r r r row to highlight the correct nic card to spoof.

Category: SECURITY
© 2007 Institute for Network Professionals 5a ITProUSB - 5 - Security - v1.2 www.inpnet.org • www.HOTLabs.org 41 4/26/2007
Step 6. In the New Spoofed MAC Address, enter a new spoofed MAC address of 0C0C0C0C----0C0C0C0C----0C0C0C0C----0C0C0C0C----0C0C0C0C----01010101 and click Update MACUpdate MACUpdate MACUpdate MAC.
Note: If you are running an eval copy of SMAC, this is the ONLY spoofed address it will apply. Licensed copies accept any address than is in the proper HEX format of 0-9 and A-F.
Step 7. In the lower left of the SMAC window, notice the difference between the new Spoofed MAC AddressSpoofed MAC AddressSpoofed MAC AddressSpoofed MAC Address and the Active MAC Active MAC Active MAC Active MAC AAAAddressddressddressddress.
This is because you will need to reboot for the registry to be read with the spoofed MAC address in it.
Step 8. Exit SMAC and rrrreboot eboot eboot eboot your machine.
Step 9. Re-run Hoover IPHoover IPHoover IPHoover IP or ipconfigipconfigipconfigipconfig to verify the MAC address is now the spoofed 0C-0C-0C-0C-0C-01.
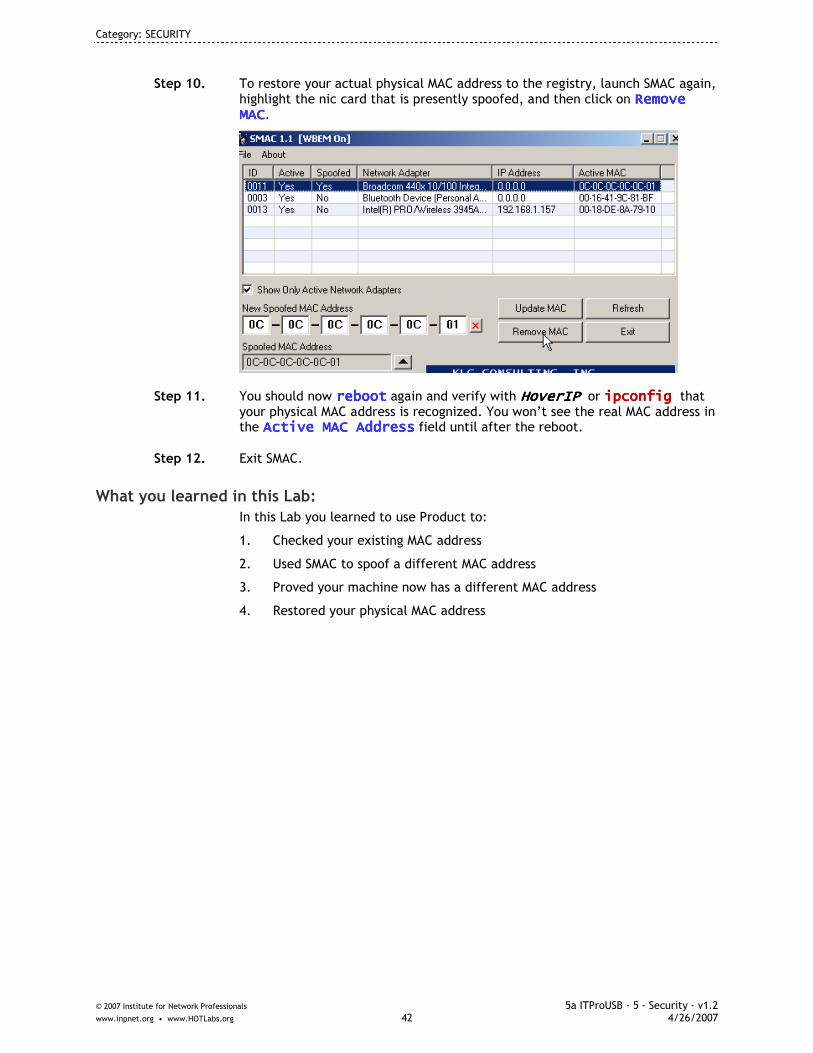
Category: SECURITY
© 2007 Institute for Network Professionals 5a ITProUSB - 5 - Security - v1.2 www.inpnet.org • www.HOTLabs.org 42 4/26/2007
Step 10. To restore your actual physical MAC address to the registry, launch SMAC again, highlight the nic card that is presently spoofed, and then click on Remove Remove Remove Remove MACMACMACMAC.
Step 11. You should now rebootrebootrebootreboot again and verify with HoverIHoverIHoverIHoverIP P P P or ipconfiipconfiipconfiipconfig g g g that your physical MAC address is recognized. You won’t see the real MAC address in the Active MAC AddressActive MAC AddressActive MAC AddressActive MAC Address field until after the reboot.
Step 12. Exit SMAC.
What you learned in this Lab:
In this Lab you learned to use Product to:
1. Checked your existing MAC address
2. Used SMAC to spoof a different MAC address
3. Proved your machine now has a different MAC address
4. Restored your physical MAC address

Category: SECURITY
© 2007 Institute for Network Professionals 5a ITProUSB - 5 - Security - v1.2 www.inpnet.org • www.HOTLabs.org 43 4/26/2007
Steganos LockNote and fSekrit — Encrypted Notes
Steganos LockNoteSteganos LockNoteSteganos LockNoteSteganos LockNote and fSekritfSekritfSekritfSekrit are small applications for keeping encrypted notes.
The real advantage of Steganos Lock Note and fSekrit is that notes are truly self-contained; the editor program and your note are merged together into a tiny self-contained program file, removing the need to install a special application to view your data. This makes them truly portable and ideal for use on a USB drive.
Product Information
Source
Steganos LockNote – Steganos
fSekrit - Donationcoder.com
Steganos Lock Note - GPL
fSekrit –Shareware (donations accepted)
Free
http://locknote.steganos.com/
http://www.donationcoder.com/Software/Other/fSekrit/
Where, When, Why
Security
You are on-site and need to store safely new passcodes you have just entered for your company or customer. You know you should avoid storing any trace of these files on a hard drive. You have checked for any keylogging utilities before you enter them. You open your USB stick and start Steganos LockNote or fSekrit. You encrypt the sensitive information on to your USB stick and offer to transfer the executable encrypted files to your customer’s or manager’s USB stick for safe storage. She asks you if you could help encrypt two documents she has. You just have her drop them into LockNote, save them with passwords, and give her the executable files for her documents also.
Usage and Features
• Hide your serial numbers, passwords, phone numbers and everyday notes in a safe place. Your information will be encrypted using a password and most modern AES 256bit encryption technology
• Your information will be encrypted using very strong encryption (256-bit AES/Rijndael in CBC mode) to ensure that your data is never at risk.
Requirements / Dependencies
• Win 2000 /XP
Where to Go for More Information
• http://locknote.steganos.com/ • http://www.donationcoder.com/Software/Other/fSekrit/

Category: SECURITY
© 2007 Institute for Network Professionals 5a ITProUSB - 5 - Security - v1.2 www.inpnet.org • www.HOTLabs.org 44 4/26/2007
Lab: Using LockNote and fSekrit
What you will do in this lab:
• Launch Steganos LockNote and fSekrit. • Drag and drop existing documents into LockNote and enter an encryption
key • Type sensitive passwords into fSekrit and save them as an executable
with a passphrase for de-encryption.
Steganos LockNote
Step 1. Launch Steganos LockNoteSteganos LockNoteSteganos LockNoteSteganos LockNote.
Step 2. A welcome message with instructions appears.
Step 3. Select another text documenttext documenttext documenttext document. Drag and drop that document into the LockNote window. Click YesYesYesYes to convert this file.
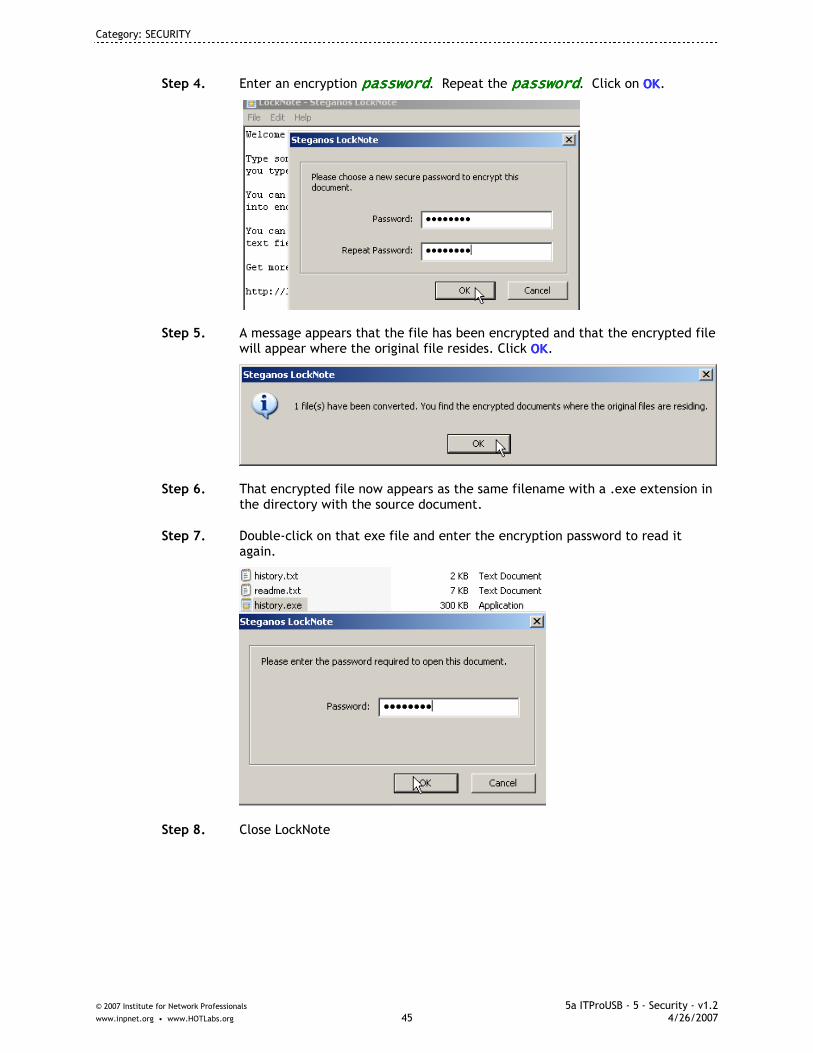
Category: SECURITY
© 2007 Institute for Network Professionals 5a ITProUSB - 5 - Security - v1.2 www.inpnet.org • www.HOTLabs.org 45 4/26/2007
Step 4. Enter an encryption passwordpasswordpasswordpassword. Repeat the passwordpasswordpasswordpassword. Click on OKOKOKOK.
Step 5. A message appears that the file has been encrypted and that the encrypted file will appear where the original file resides. Click OKOKOKOK.
Step 6. That encrypted file now appears as the same filename with a .exe extension in the directory with the source document.
Step 7. Double-click on that exe file and enter the encryption password to read it again.
Step 8. Close LockNote

Category: SECURITY
© 2007 Institute for Network Professionals 5a ITProUSB - 5 - Security - v1.2 www.inpnet.org • www.HOTLabs.org 46 4/26/2007
fSekrit
Step 1. Launch fSekritfSekritfSekritfSekrit.
Step 2. Type in the blank window a set of passwordspasswordspasswordspasswords or other secure information.
Step 3. Click on File�Save. Enter a filename. Notice that .exe extension will be added.
Step 4. Enter a passphrasepassphrasepassphrasepassphrase twice and click OKOKOKOK.
Step 5. Exit fSekrit.
Step 6. Double-click on the executable fSekrit just created in its own the directory (or wherever you placed it).
Step 7. Enter the passphrase and click OKOKOKOK. Your encrypted file appears.
Step 8. Exit fSekrit.

Category: SECURITY
© 2007 Institute for Network Professionals 5a ITProUSB - 5 - Security - v1.2 www.inpnet.org • www.HOTLabs.org 47 4/26/2007
What you learned in these Labs:
In these Labs you learned to use Steganos LockNote and fSekrit to:
1. Safely encrypt files with passwords and important codes in them without leaving a trace on a hard drive.
2. Drag and drop existing documents into an encryption utility to encrypt the entire file.

Category: SECURITY
© 2007 Institute for Network Professionals 5a ITProUSB - 5 - Security - v1.2 www.inpnet.org • www.HOTLabs.org 48 4/26/2007

Category: SECURITY
© 2007 Institute for Network Professionals 5a ITProUSB - 5 - Security - v1.2 www.inpnet.org • www.HOTLabs.org 49 4/26/2007
TrueCrypt
TrueCrypt is an extremely secure virtual encrypted volume application that works in Windows and Linux. The attention to detail allows for as much paranoia or security as one feels is necessary with probably a million different ways to encrypt the information, and a near infinite number of possible keys.
When TrueCrypt is used responsibly and wisely, that data is secure. TrueCrypt provides plausible deniability by allowing nested volumes, steganography, and having no trace of its existence because it was designed to look like random data.
Product Information
Source
TrueCrypt Foundation
Open Source
Free
www.truecrypt.org
Where, When, Why
Security—Encrypted Virtual Volume System
“Where’s the bomb. You’ve read my file, you know what I can do.”
If you don’t want Jack Bauer and Chloe O’Brain to know that you know something, TrueCrypt TrueCrypt TrueCrypt TrueCrypt is for you. Plausible deniability, hidden volumes through steganography, and as many ciphers and encryption algorithms as a cyberspy could ever hope for. Or you may just want to keep your kids from seeing your Christmas shopping list.
Usage and Features
• Creates a virtual encrypted disk within a file and mounts it as a real disk • Encrypts entire hard disk partition or storage device (e.g. USB flash drive) • Encryption is automatic, real-time (on-the-fly) and transparent • Provides two levels of plausible deniability, in case an adversary forces
you to reveal the password: - Hidden volume (steganography – more information may be found here) - TrueCrypt volumes cannot be identified (look like random data)
• Encryption algorithms: AES-256, Blowfish (448-bit key), CAST5, Serpent, Triple DES, and Twofish
• Mode of operation: LRW (CBC supported as legacy).
Requirements / Dependencies
• Windows 2000/XP/2003/Vista
Where to Go for More Information
• www.truecrypt.org/faq.php • www.truecrypt.org/docs/ • www.truecrypt.org/forum.php
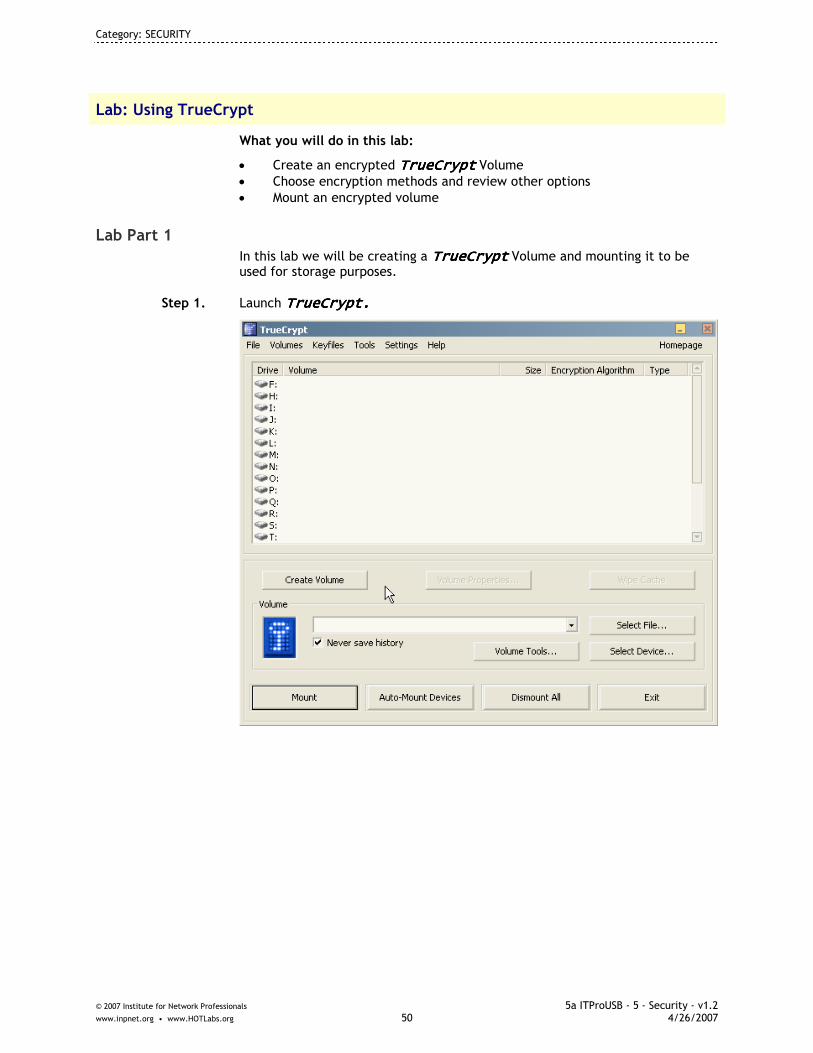
Category: SECURITY
© 2007 Institute for Network Professionals 5a ITProUSB - 5 - Security - v1.2 www.inpnet.org • www.HOTLabs.org 50 4/26/2007
Lab: Using TrueCrypt
What you will do in this lab:
• Create an encrypted TrueCryptTrueCryptTrueCryptTrueCrypt Volume • Choose encryption methods and review other options • Mount an encrypted volume
Lab Part 1
In this lab we will be creating a TrueCryptTrueCryptTrueCryptTrueCrypt Volume and mounting it to be used for storage purposes.
Step 1. Launch TrueCrypt.TrueCrypt.TrueCrypt.TrueCrypt.

Category: SECURITY
© 2007 Institute for Network Professionals 5a ITProUSB - 5 - Security - v1.2 www.inpnet.org • www.HOTLabs.org 51 4/26/2007
Step 2. Click on Create VolumeCreate VolumeCreate VolumeCreate Volume to begin the TrueCryptTrueCryptTrueCryptTrueCrypt Volume Creation Wizard. For this exercise we will be creating a standard TrueCryptTrueCryptTrueCryptTrueCrypt volume. Make sure that ‘Standard TrueCryptTrueCryptTrueCryptTrueCrypt volume’ is selected, then click NextNextNextNext.
Step 3. We will be using a file as the Volume Location. Click ‘Select FileSelect FileSelect FileSelect File’ to continue the wizard.
Step 4. Browse to the root of the USB Drive (in this case E:E:E:E:). This is cool: you’ll be able to have your encrypted volume easily with you.
Step 5. Give the volume a filename. This example uses ‘truecryptvolumetruecryptvolumetruecryptvolumetruecryptvolume’. Click OpenOpenOpenOpen to assign that location to the volume.

Category: SECURITY
© 2007 Institute for Network Professionals 5a ITProUSB - 5 - Security - v1.2 www.inpnet.org • www.HOTLabs.org 52 4/26/2007
Step 6. Having returned to the Volume Location step, click NextNextNextNext after confirming the destination of the new TrueCryptTrueCryptTrueCryptTrueCrypt volume.
Step 7. In the next step, titled Encryption Options, use the default settings, which are AESAESAESAES for the encryption algorithm and RIPEMDRIPEMDRIPEMDRIPEMD----160160160160 for the Hash Algorithm. Click NextNextNextNext to continue to the subsequent step.
NOTE: AES and RIPEMD-160 are the defaults for a very good reason. Both of these options are currently optimal for most situations, balancing security and performance.
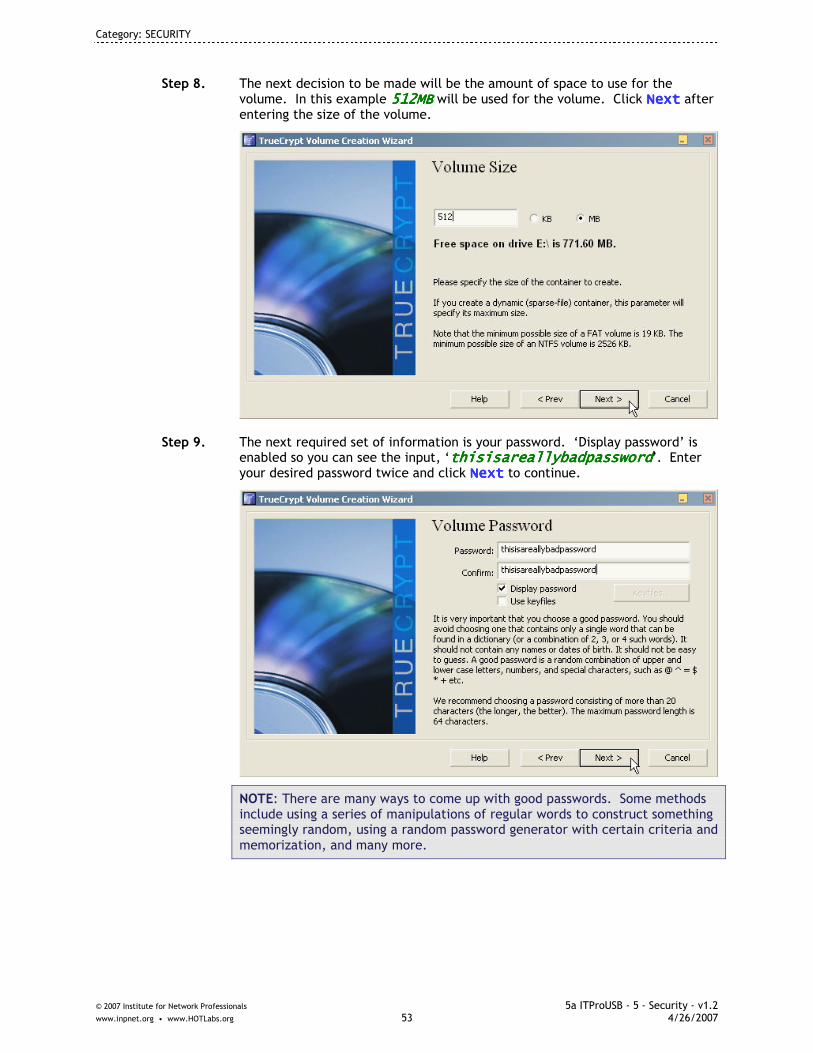
Category: SECURITY
© 2007 Institute for Network Professionals 5a ITProUSB - 5 - Security - v1.2 www.inpnet.org • www.HOTLabs.org 53 4/26/2007
Step 8. The next decision to be made will be the amount of space to use for the volume. In this example 512MB512MB512MB512MB will be used for the volume. Click NextNextNextNext after entering the size of the volume.
Step 9. The next required set of information is your password. ‘Display password’ is enabled so you can see the input, ‘thisisareallybadpasswordthisisareallybadpasswordthisisareallybadpasswordthisisareallybadpassword’. Enter your desired password twice and click NextNextNextNext to continue.
NOTE: There are many ways to come up with good passwords. Some methods include using a series of manipulations of regular words to construct something seemingly random, using a random password generator with certain criteria and memorization, and many more.

Category: SECURITY
© 2007 Institute for Network Professionals 5a ITProUSB - 5 - Security - v1.2 www.inpnet.org • www.HOTLabs.org 54 4/26/2007
Step 10. All supported versions of Windows also support NTFSNTFSNTFSNTFS, so that will probably be the best solution for exclusively Windows volumes. If you intend to use this TrueCryptTrueCryptTrueCryptTrueCrypt volume with a Linux system as well, you may wish to choose FATFATFATFAT.
Select your File System.
Step 11. The final step for volume creation will take a while to gather random data to create a more secure key based on your password.
Move your mouse around to help it find more chaos. Once it’s ready it will format your drive with the desired format using your new encryption key.
Step 12. Click FormatFormatFormatFormat
Step 13. Once the format is complete you will click OKOKOKOK to confirm the Volume Creation Wizard and then click Exit Exit Exit Exit to return to the main menu.
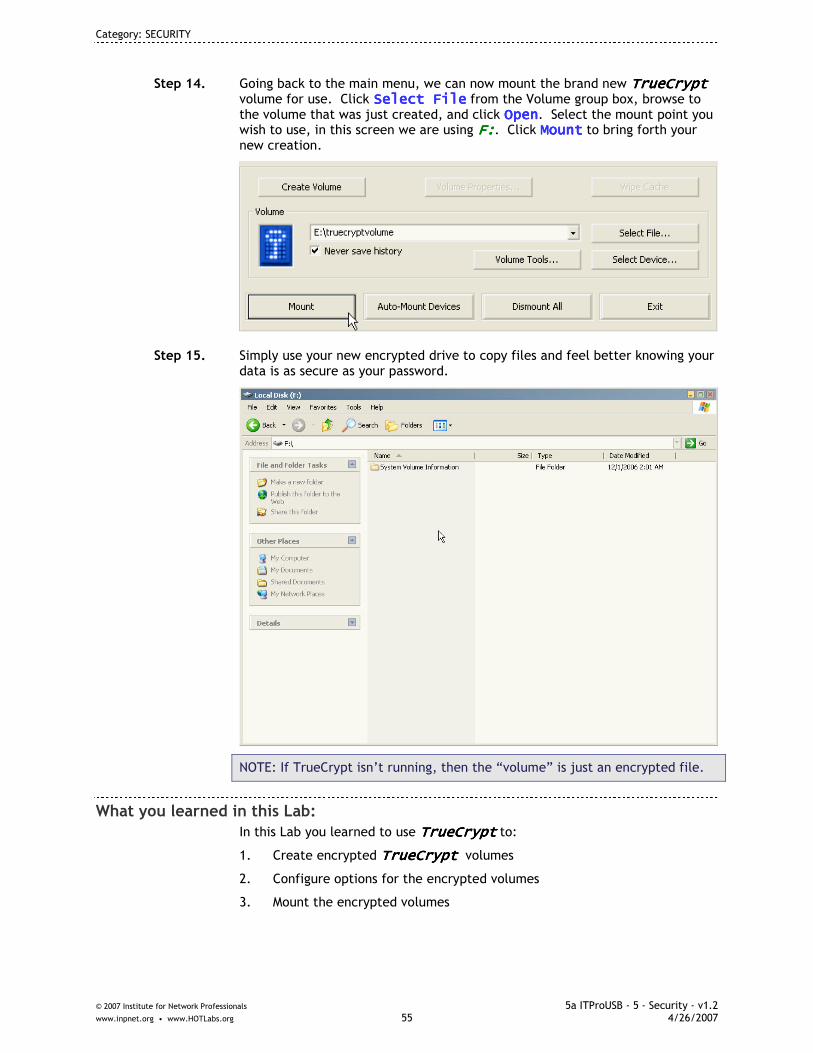
Category: SECURITY
© 2007 Institute for Network Professionals 5a ITProUSB - 5 - Security - v1.2 www.inpnet.org • www.HOTLabs.org 55 4/26/2007
Step 14. Going back to the main menu, we can now mount the brand new TrueCryptTrueCryptTrueCryptTrueCrypt volume for use. Click Select FileSelect FileSelect FileSelect File from the Volume group box, browse to the volume that was just created, and click OpenOpenOpenOpen. Select the mount point you wish to use, in this screen we are using F:F:F:F:. Click MountMountMountMount to bring forth your new creation.
Step 15. Simply use your new encrypted drive to copy files and feel better knowing your data is as secure as your password.
NOTE: If TrueCrypt isn’t running, then the “volume” is just an encrypted file.
What you learned in this Lab:
In this Lab you learned to use TrueCryptTrueCryptTrueCryptTrueCrypt to:
1. Create encrypted TrueCrypt TrueCrypt TrueCrypt TrueCrypt volumes
2. Configure options for the encrypted volumes
3. Mount the encrypted volumes

Category: SECURITY
© 2007 Institute for Network Professionals 5a ITProUSB - 5 - Security - v1.2 www.inpnet.org • www.HOTLabs.org 56 4/26/2007

Section Software List
Note: Final list of software included is subject to change. © 2007 Institute for Network Professionals 6 ITPro Section Software List - 6
Section 6 Reference & Education
An IT Professional needs a variety of reference documents at their disposal. Here is a start and a collection. Please feel free to add documents here to help you in your specific industry.
We have also included a few educational programs and calculators to help you on your career.
Engineering/Scientific Calculator
Complex Math Calculator
Converber
Convert a wide variety of measurements
XCALC Calculator Calculator
Convert Units Converts units of different values
Periodic Table
Online Interactive Periodic Table of the Elements
Solar System Viewer
Interactive Graphic Viewer of Solar System
lab
The Sage – Dictionary & Thesaurus
Dictionary and Thesaurus
Google Cheat Sheets
Keyboard Shortcuts
OSI and TCP/IP Models
Linux Quick Reference
Registry Quick Find
Hexadecimal Conversions

Section Software List
Note: Final list of software included is subject to change. © 2007 Institute for Network Professionals 6 ITPro Section Software List - 6

Category: REFERENCE & EDUCATION
© 2007 Institute for Network Professionals 6a ITProUSB - 6 - Reference & Education - v1.2 www.inpnet.org • www.HOTLabs.org 1 4/26/2007
Section 6 – REFERENCE & EDUCATION Table of Contents
Reference & Education - Miscellaneous ................................3
TheSage’s English Dictionary and Thesaurus ..........................7

Category: REFERENCE & EDUCATION
© 2007 Institute for Network Professionals 6a ITProUSB - 6 - Reference & Education - v1.2 www.inpnet.org • www.HOTLabs.org 2 4/26/2007
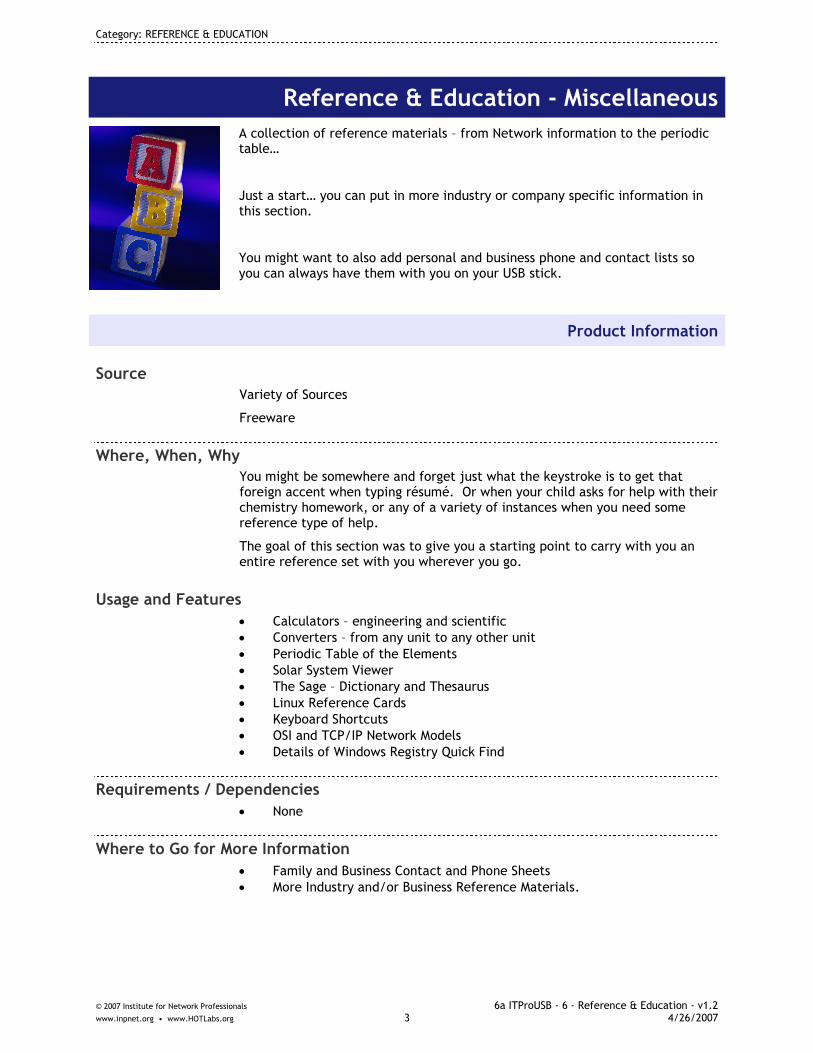
Category: REFERENCE & EDUCATION
© 2007 Institute for Network Professionals 6a ITProUSB - 6 - Reference & Education - v1.2 www.inpnet.org • www.HOTLabs.org 3 4/26/2007
Reference & Education - Miscellaneous
A collection of reference materials – from Network information to the periodic table…
Just a start… you can put in more industry or company specific information in this section.
You might want to also add personal and business phone and contact lists so you can always have them with you on your USB stick.
Product Information
Source
Variety of Sources
Freeware
Where, When, Why
You might be somewhere and forget just what the keystroke is to get that foreign accent when typing résumé. Or when your child asks for help with their chemistry homework, or any of a variety of instances when you need some reference type of help.
The goal of this section was to give you a starting point to carry with you an entire reference set with you wherever you go.
Usage and Features
• Calculators – engineering and scientific • Converters – from any unit to any other unit • Periodic Table of the Elements • Solar System Viewer • The Sage – Dictionary and Thesaurus • Linux Reference Cards • Keyboard Shortcuts • OSI and TCP/IP Network Models • Details of Windows Registry Quick Find
Requirements / Dependencies
• None
Where to Go for More Information
• Family and Business Contact and Phone Sheets • More Industry and/or Business Reference Materials.

Category: REFERENCE & EDUCATION
© 2007 Institute for Network Professionals 6a ITProUSB - 6 - Reference & Education - v1.2 www.inpnet.org • www.HOTLabs.org 4 4/26/2007
Lab: Using Reference
What you will do in this lab:
• Try out some of the initial starting references
Lab – Trying out Reference Materials
Step 1. Start by running PstartPstartPstartPstart to the Reference and Education Section.
Step 2. Try out each of these reference programs:
Engineering/Scientific Calculator
Converber
XCALC Calculator
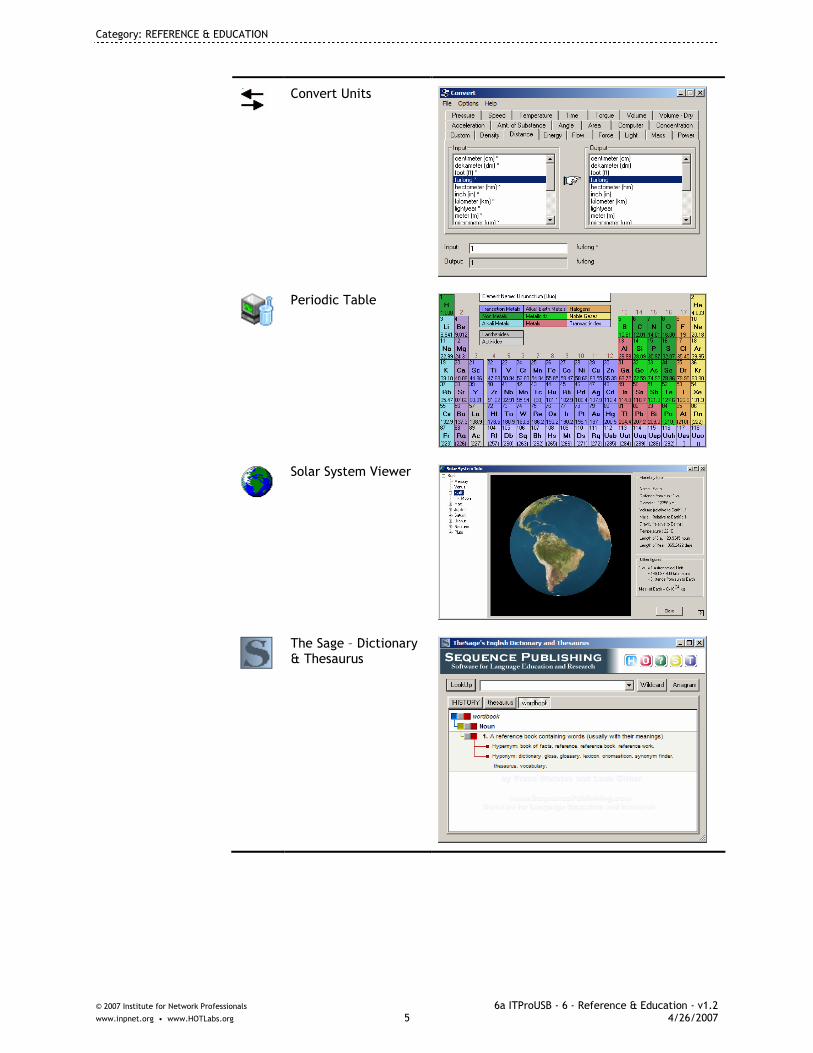
Category: REFERENCE & EDUCATION
© 2007 Institute for Network Professionals 6a ITProUSB - 6 - Reference & Education - v1.2 www.inpnet.org • www.HOTLabs.org 5 4/26/2007
Convert Units
Periodic Table
Solar System Viewer
The Sage – Dictionary & Thesaurus

Category: REFERENCE & EDUCATION
© 2007 Institute for Network Professionals 6a ITProUSB - 6 - Reference & Education - v1.2 www.inpnet.org • www.HOTLabs.org 6 4/26/2007
Step 3. Now navigate to the 6 6 6 6 ---- Reference Reference Reference Reference folder on your Ultimate USB and look at the various PDF and HTML reference documents available for you.
• Google Cheat Sheets • Keyboard Shortcuts • OSI and TCP/IP Models • Linux Quick Reference • Registry Quick Find Document • US Frequencies • Hexadecimal Conversions
Step 4. You can now addaddaddadd any of your own reference items – things you might have on your computer so you can always have this information with you on your USB drive all the time.
Step 5. If you have a publicly available document that should be included in our ‘master’ list, please send an e-mail to [email protected]
Enjoy!

Category: REFERENCE & EDUCATION
© 2007 Institute for Network Professionals 6a ITProUSB - 6 - Reference & Education - v1.2 www.inpnet.org • www.HOTLabs.org 7 4/26/2007
TheSage’s English Dictionary and Thesaurus
TheSage's English Dictionary and Thesaurus is a professional software package that integrates a complete dictionary and multifaceted thesaurus of the English language into a single and powerful language reference system.
TheSage allows you to look up words directly from most applications, offering multiple detailed definitions each coupled with its own thesaurus.
Product Information
Source
Sequence Publishing
Shareware
Free
http://www.sequencepublishing.com/thesage.html
Where, When, Why
Reference
You are on-site and unsure about the meaning of a phrase in a long document you must respond to. You also have to check the spelling of that word and wish you had a simpler term you could use instead.
Usage and Features
• Comprehensive dictionary: over 145,000 references with multiple detailed definitions (over 200,000)
• Complete thesaurus: nearly 1,200,000 relationships between definitions (synonyms, antonyms, hypernyms, hyponyms, meronyms, holonyms,...)
• Example sentences: A large collection that already includes approximately 35,000 examples of usage.
• Wildcard searches • Cross-referencing • Anagram search • Tabbed interface: previous lookups and searches remains readily available • Completely portable: fully functional when run from a USB stick
Requirements / Dependencies
• Windows 95, 98, Me, 2000, and XP • 20MB free space
Where to Go for More Information
• http://www.sequencepublishing.com/thesage.html
• Help from main menu .

Category: REFERENCE & EDUCATION
© 2007 Institute for Network Professionals 6a ITProUSB - 6 - Reference & Education - v1.2 www.inpnet.org • www.HOTLabs.org 8 4/26/2007
Lab: Using TheSage
What you will do in this lab:
• Launch TheSage. • Lookup a word in a current document • Use TheSage to obtain a synonym, antonym, or anagram.
Lab Part 1
Step 1. Launch The SageThe SageThe SageThe Sage.
Step 2. Practice looking up the meaning of an unusual word by typing chatoyantchatoyantchatoyantchatoyant in the LookUp windowLookUp windowLookUp windowLookUp window and then click on the LookUpLookUpLookUpLookUp button.
Step 3. Click on the red boxred boxred boxred box for the thesaurus to list synonyms. Click on the green box for examples of usage.

Category: REFERENCE & EDUCATION
© 2007 Institute for Network Professionals 6a ITProUSB - 6 - Reference & Education - v1.2 www.inpnet.org • www.HOTLabs.org 9 4/26/2007
Step 4. To use the other features such as antonyms and anagrams, type a new term optimisticoptimisticoptimisticoptimistic in the LookUpLookUpLookUpLookUp window and press the EnterEnterEnterEnter key. Then click on the red box to reveal both synonyms and antonyms.
Step 5. The antonym “pessimistic” is displayed.
Step 6. Use the drop-down menu in the LookUp window to return to the word “pessimistic” and then click on the AnagramAnagramAnagramAnagram button.
Step 7. 131 entries are displayed which can be spelled with the letters in “optimistic.”
Step 8. You are unsure whether this non-technical application really correctly understands “mips,” so double-click on “mips” to see the definition provided:
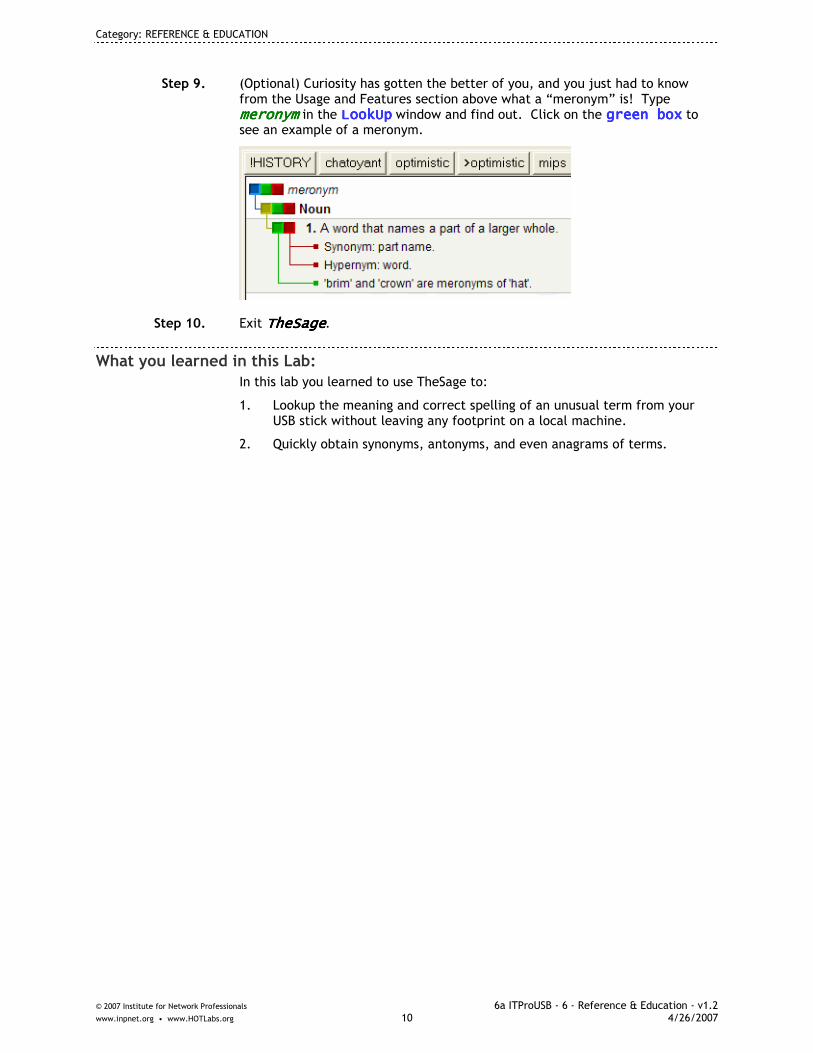
Category: REFERENCE & EDUCATION
© 2007 Institute for Network Professionals 6a ITProUSB - 6 - Reference & Education - v1.2 www.inpnet.org • www.HOTLabs.org 10 4/26/2007
Step 9. (Optional) Curiosity has gotten the better of you, and you just had to know from the Usage and Features section above what a “meronym” is! Type meronymmeronymmeronymmeronym in the LookUpLookUpLookUpLookUp window and find out. Click on the green boxgreen boxgreen boxgreen box to see an example of a meronym.
Step 10. Exit TheSageTheSageTheSageTheSage.
What you learned in this Lab:
In this lab you learned to use TheSage to:
1. Lookup the meaning and correct spelling of an unusual term from your USB stick without leaving any footprint on a local machine.
2. Quickly obtain synonyms, antonyms, and even anagrams of terms.

Section Software List
Note: Final list of software included is subject to change. © 2007 Institute for Network Professionals 7 ITPro Section Software List - 7
Section 7 Games
No computer person is totally complete without a couple of computer games at their fingertips. We’ve included a small subset – but enough to start you wasting time wherever you might be.
Enjoy!
Sudoku Graphical Sudoku Game
Bricks Brickout type Game
Mazes Maze Builder Game
NagaSkaki Chess Full-Featured Chess
Othello Othello Game
Risk Game of Risk
Pawn Chess Simple Chess
Nmania Minesweeper MineSweeper Game
Uno Uno
Titanion Shoot down invaders

Section Software List
Note: Final list of software included is subject to change. © 2007 Institute for Network Professionals 7 ITPro Section Software List - 7

Category: GAMES
© 2007 Institute for Network Professionals 7a ITProUSB - 7 - Games - v1.2 www.inpnet.org • www.HOTLabs.org 1 4/26/2007
Section 7 – GAMES Table of Contents
Games .......................................................................3

Category: GAMES
© 2007 Institute for Network Professionals 7a ITProUSB - 7 - Games - v1.2 www.inpnet.org • www.HOTLabs.org 2 4/26/2007
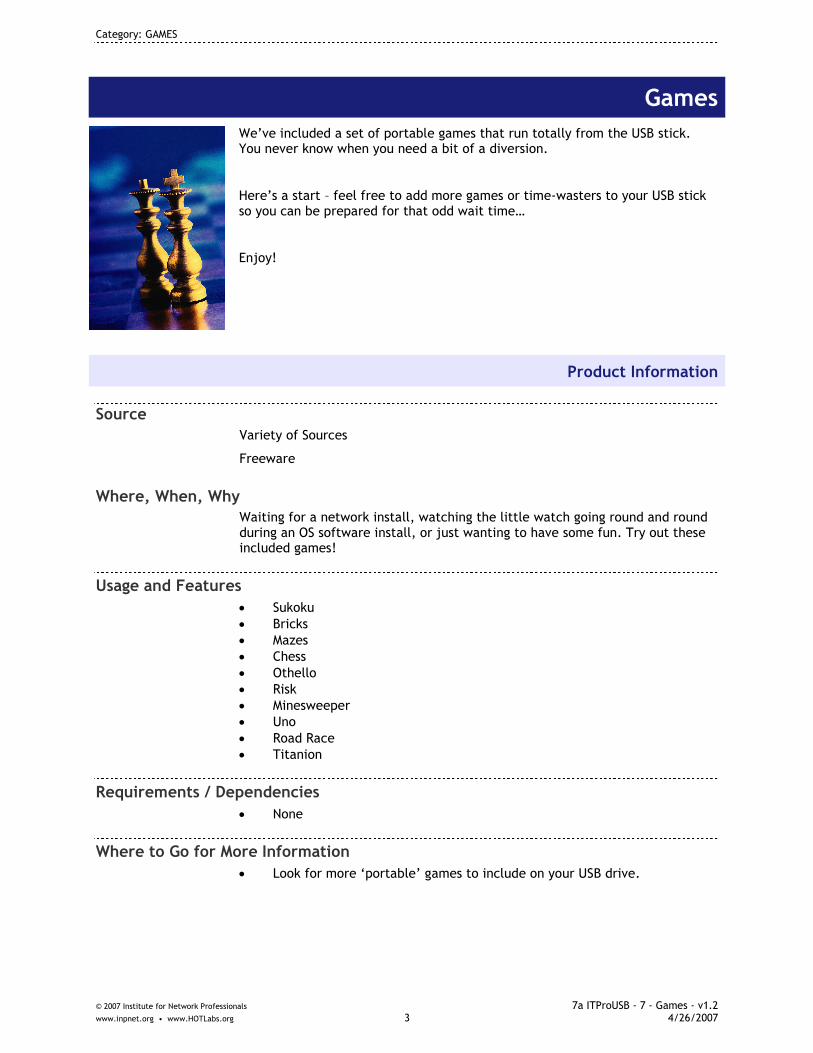
Category: GAMES
© 2007 Institute for Network Professionals 7a ITProUSB - 7 - Games - v1.2 www.inpnet.org • www.HOTLabs.org 3 4/26/2007
Games
We’ve included a set of portable games that run totally from the USB stick. You never know when you need a bit of a diversion.
Here’s a start – feel free to add more games or time-wasters to your USB stick so you can be prepared for that odd wait time…
Enjoy!
Product Information
Source
Variety of Sources
Freeware
Where, When, Why
Waiting for a network install, watching the little watch going round and round during an OS software install, or just wanting to have some fun. Try out these included games!
Usage and Features
• Sukoku
• Bricks
• Mazes
• Chess
• Othello
• Risk
• Minesweeper
• Uno
• Road Race
• Titanion
Requirements / Dependencies
• None
Where to Go for More Information
• Look for more ‘portable’ games to include on your USB drive.
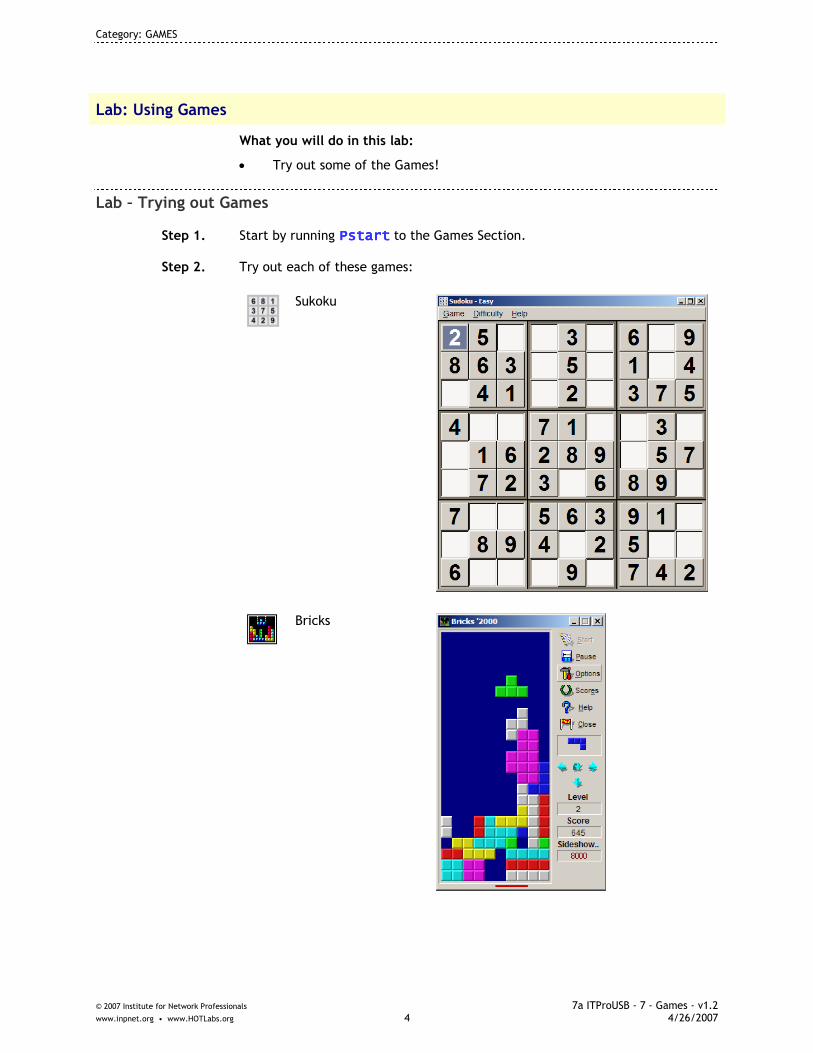
Category: GAMES
© 2007 Institute for Network Professionals 7a ITProUSB - 7 - Games - v1.2 www.inpnet.org • www.HOTLabs.org 4 4/26/2007
Lab: Using Games
What you will do in this lab:
• Try out some of the Games!
Lab – Trying out Games
Step 1. Start by running PstartPstartPstartPstart to the Games Section.
Step 2. Try out each of these games:
Sukoku
Bricks

Category: GAMES
© 2007 Institute for Network Professionals 7a ITProUSB - 7 - Games - v1.2 www.inpnet.org • www.HOTLabs.org 5 4/26/2007
Mazes
NagaSkaki Chess
Othello

Category: GAMES
© 2007 Institute for Network Professionals 7a ITProUSB - 7 - Games - v1.2 www.inpnet.org • www.HOTLabs.org 6 4/26/2007
Risk
Pawn Chess
Nmania Minesweeper
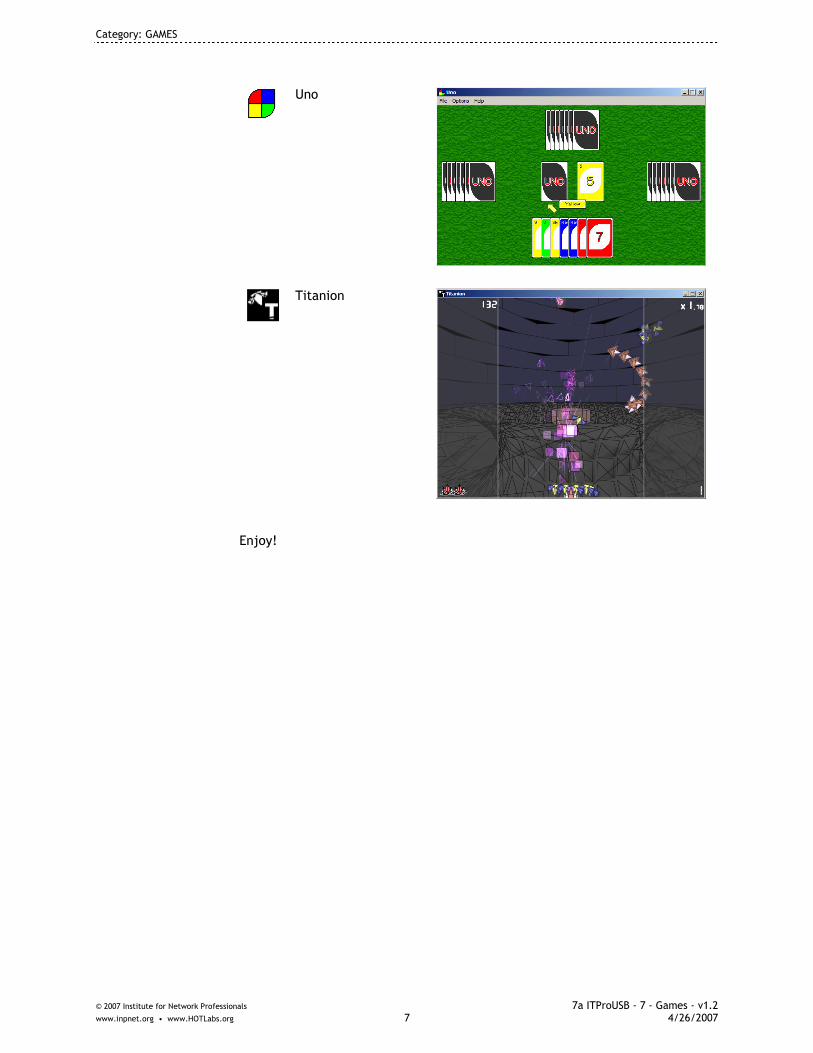
Category: GAMES
© 2007 Institute for Network Professionals 7a ITProUSB - 7 - Games - v1.2 www.inpnet.org • www.HOTLabs.org 7 4/26/2007
Uno
Titanion
Enjoy!

Category: GAMES
© 2007 Institute for Network Professionals 7a ITProUSB - 7 - Games - v1.2 www.inpnet.org • www.HOTLabs.org 8 4/26/2007

Section Software List
Note: Final list of software included is subject to change. © 2007 Institute for Network Professionals 8 ITPro Section Software List - 8
Section 8 Minimum Install
This section of the USB stick is a ‘placeholder’ for you to include the software you normally install during the initial setup of any computer. This might include PDF readers, graphics viewers, standard utilities, things you might want to have on any computer.
Because of licensing issues, you can easily download and store here the installation files for any of your ‘minimum install’ set. (we can’t legally provide these for you… but we left you this space)
ActiveSync www.microsoft.com/windowsmobile/activesync/activesync42.mspx
Media Player www.microsoft.com/windows/windowsmedia/download/AllDownloads.aspx?displang=en&qstechnology
Microsoft Reader www.microsoft.com/reader/downloads/pc.asp
Direct X www.microsoft.com/downloads
XP Power Toys www.microsoft.com/windowsxp/downloads/powertoys/xppowertoys.mspx
Microsoft Messenger http://get.live.com/messenger/overview
RealOnePlayer http://forms.real.com/real/realone/realone.html
iTunes www.apple.com/itunes/download/
Quicktime www.apple.com/itunes/download/
GoogleEarth http://earth.google.com/downloads.html
Firefox www.mozilla.com/en-US/
Skype www.skype.com/download/skype/windows/helloagain.html
OpenOffice http://download.openoffice.org/2.0.2/index.html
VMware Player www.vmware.com/download/player/
Adobe Acrobat Reader
www.adobe.com/downloads/
Adobe Flash Player www.adobe.com/downloads/
SysInternals Suite http://download.sysinternals.com/Files/SysinternalsSuite.zip
MySpeed Personal Edition
www.myspeed.com/pe/index.html

Section Software List
Note: Final list of software included is subject to change. © 2007 Institute for Network Professionals 8 ITPro Section Software List - 8

Category: MINIMUM INSTALL
© 2007 Institute for Network Professionals 8a ITProUSB - 8 - Minimum Install - v1.2 www.inpnet.org • www.HOTLabs.org 1 4/26/2007
Section 8 – MINIMUM INSTALL Table of Contents
Minimum Install Files .....................................................3

Category: MINIMUM INSTALL
© 2007 Institute for Network Professionals 8a ITProUSB - 8 - Minimum Install - v1.2 www.inpnet.org • www.HOTLabs.org 2 4/26/2007

Category: MINIMUM INSTALL
© 2007 Institute for Network Professionals 8a ITProUSB - 8 - Minimum Install - v1.2 www.inpnet.org • www.HOTLabs.org 3 4/26/2007
Minimum Install Files
This section is a place for you to store those installers you want to have for each computer you’re working on, things like Adobe Acrobat Reader, etc.
Product Information
Source
Various
Most are free for download
See below for source links
Where, When, Why
You just opened the box on a new laptop… you want to get it up to just the right installation. There are a series of software applications and utilties you want to have on all of your computers… it’s nice to have those right at your fingertips.
Or, you might be over at “Aunt Betty’s” – and notice her computer is missing some vital tools and utilities. SO you just whip out your Ultimate USB and solve the problem right then and there.
Usage and Features
• These are really up to you to include the files and installers that you normally use.
• We’ve include a subset of a few ‘standards’ to get your started.
• Feel free to add as many as you need for your installations.
Requirements / Dependencies
• Depends on the software you include
Where to Go for More Information
• Manufacturer web sites

Category: MINIMUM INSTALL
© 2007 Institute for Network Professionals 8a ITProUSB - 8 - Minimum Install - v1.2 www.inpnet.org • www.HOTLabs.org 4 4/26/2007
Lab: Using Minimum Install Files
What you will do in this lab:
• Download the files and installers you want to include in this section of your USB drive
Lab Part 1
Step 1. We’ve included a couple of installers on your drive – but you can download more of your own and copy them into this area of your USB Drive. Below are some links to various download sites you might want to look into. Add, to the blanks in the list, those installers that you personally find indispensable.
ActiveSync http://www.microsoft.com/windowsmobile/activesync/activesync42.mspx
Media Player http://www.microsoft.com/windows/windowsmedia/download/AllDownloads.aspx?displang=en&qstechnology=
Microsoft Reader http://www.microsoft.com/reader/downloads/pc.asp
Direct X http://www.microsoft.com/downloads
XP Power Toys http://www.microsoft.com/windowsxp/downloads/powertoys/xppowertoys.mspx
Microsoft Messenger http://get.live.com/messenger/overview
RealOnePlayer http://forms.real.com/real/realone/realone.html
iTunes http://www.apple.com/itunes/download/
Quicktime http://www.apple.com/itunes/download/
GoogleEarth http://earth.google.com/downloads.html
Firefox http://www.mozilla.com/en-US/
Skype http://www.skype.com/download/skype/windows/helloagain.html
OpenOffice http://download.openoffice.org/2.0.2/index.html
VMware Player http://www.vmware.com/download/player/
Adobe Acrobat Reader http://www.adobe.com/downloads/
Adobe Flash Player http://www.adobe.com/downloads/
SysInternals Suite http://download.sysinternals.com/Files/SysinternalsSuite.zip
MySpeed Personal Edition
http://www.myspeed.com/pe/index.html
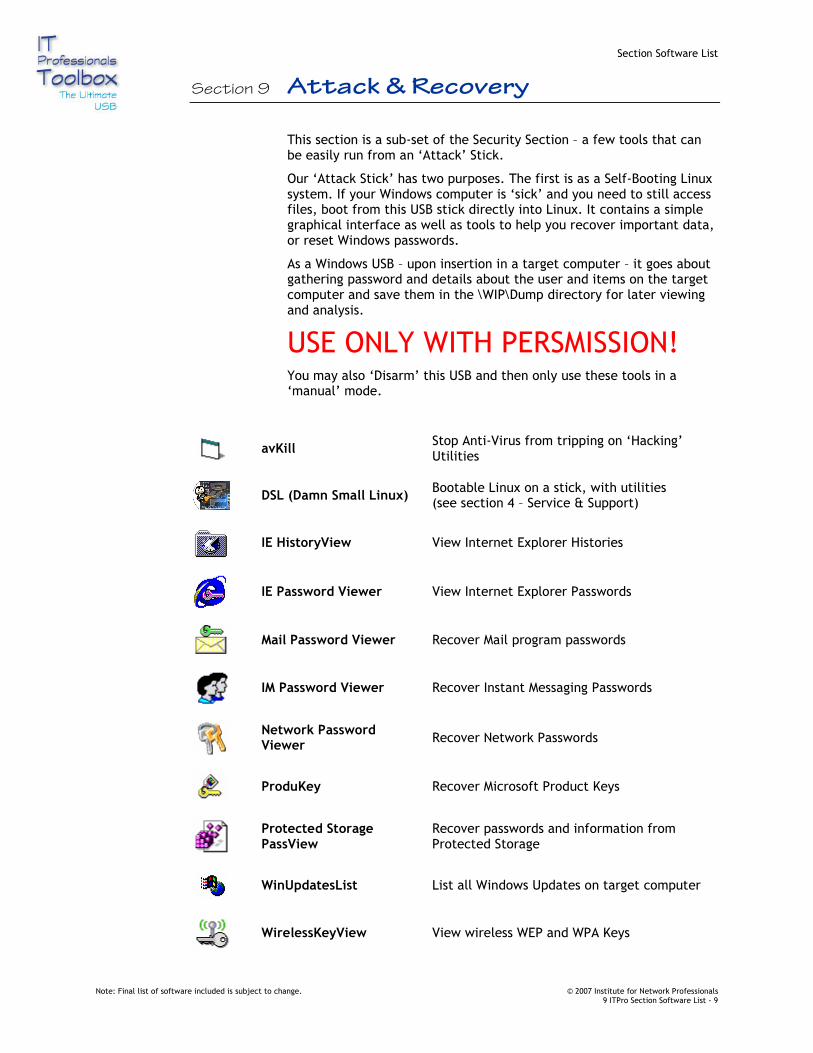
Section Software List
Note: Final list of software included is subject to change. © 2007 Institute for Network Professionals 9 ITPro Section Software List - 9
Section 9 Attack & Recovery
This section is a sub-set of the Security Section – a few tools that can be easily run from an ‘Attack’ Stick.
Our ‘Attack Stick’ has two purposes. The first is as a Self-Booting Linux system. If your Windows computer is ‘sick’ and you need to still access files, boot from this USB stick directly into Linux. It contains a simple graphical interface as well as tools to help you recover important data, or reset Windows passwords.
As a Windows USB – upon insertion in a target computer – it goes about gathering password and details about the user and items on the target computer and save them in the \WIP\Dump directory for later viewing and analysis.
USE ONLY WITH PERSMISSION! You may also ‘Disarm’ this USB and then only use these tools in a ‘manual’ mode.
avKill
Stop Anti-Virus from tripping on ‘Hacking’ Utilities
DSL (Damn Small Linux)
Bootable Linux on a stick, with utilities (see section 4 – Service & Support)
IE HistoryView View Internet Explorer Histories
IE Password Viewer View Internet Explorer Passwords
Mail Password Viewer Recover Mail program passwords
IM Password Viewer Recover Instant Messaging Passwords
Network Password Viewer
Recover Network Passwords
ProduKey Recover Microsoft Product Keys
Protected Storage PassView
Recover passwords and information from Protected Storage
WinUpdatesList List all Windows Updates on target computer
WirelessKeyView View wireless WEP and WPA Keys

Section Software List
Note: Final list of software included is subject to change. © 2007 Institute for Network Professionals 9 ITPro Section Software List - 9
List USB Devices
Lists all USB devices inserted in target computer
Outlook PST Viewer Recovers Outlook PST passwords
LSA SecretsView View Passwords from LSA
NetResView View target computer’s network neighbors

Category: ATTACK & RECOVERY
© 2007 Institute for Network Professionals 9a ITProUSB - 9 - Attack & Recovery - v1.2 www.inpnet.org • www.HOTLabs.org 1 4/26/2007
Section 9 – ATTACK & RECOVERY Table of Contents
Attack and Recovery - USB Switchblade ...............................3

Category: ATTACK & RECOVERY
© 2007 Institute for Network Professionals 9a ITProUSB - 9 - Attack & Recovery - v1.2 www.inpnet.org • www.HOTLabs.org 2 4/26/2007
Category: ATTACK & RECOVERY
© 2007 Institute for Network Professionals 9a ITProUSB - 9 - Attack & Recovery - v1.2 www.inpnet.org • www.HOTLabs.org 3 4/26/2007
Attack and Recovery - USB Switchblade
The goal of the Attack & Recovery tools (based on USB SwitchbladeUSB SwitchbladeUSB SwitchbladeUSB Switchblade) is to silently recover information from a target Windows 2000 or higher computer, including password hashes, LSA secrets, IP information, etc... the original Amish technique of using social engineering to trick a user into running the payload when choosing "Open folder to display files" upon insertion. While the USB Switchblade does require a system running Windows 2000, XP, or 2003 logged in with Administrative privileges and physical access, the beauty lies in the fact that the payload can run silently and without modifying the system or sending network traffic, making it near invisible.
Product Information
Source
Hak.5 Team
Combination of Freeware
Where, When, Why
Ok, now this one is going to be hard to justify the Where, When and Why—Unless you have the correct permissions to do a Penetration Test on the target devices. A single USB stick designed to ‘hack’ into an unsuspecting computer, copy down the SAM files, IE history, Protected Storage, Passwords, etc.
As a penetration testing demonstration, this small USB device excels at ‘scaring’ the target. By showing how easy it is to learn a very large amount of information about the target machine, very quickly, very easily.
For example the USB Switchblade can be used to retrieve information from a target system at a LAN party by lending the key to an unsuspecting individual with the intent to distribute a game patch or the like.
Usage and Features
• Using this tool to stealthily retrieve passwords, Internet browsing history and detailed information from a target machine.
• Shows Product Keys, Passwords from IE, Firefox, Wireless, Windows, Protected storage and more!
DO NOT USE THIS WITHOUT APPROPRIATE PERMISSIONS!
Requirements / Dependencies
• Windows Target Machine with physical access to USB Port
Where to Go for More Information
• http://www.hak5.org/wiki/Switchblade_Packages
• http://www.hak5.org/forums/viewtopic.php?p=31505
• http://www.hak5.org/wiki/index.php?title=USB_Switchblade
Category: ATTACK & RECOVERY
© 2007 Institute for Network Professionals 9a ITProUSB - 9 - Attack & Recovery - v1.2 www.inpnet.org • www.HOTLabs.org 4 4/26/2007
Lab: Using USB Switchblade
What you will do in this lab:
• Use the ‘Attack Stick’ to run USB Switchblade on a target device to retrieve passwords, detailed information, etc.
Lab Part 1 – Penetration Test Demonstration
DO NOT USE THIS WITHOUT APPROPRIATE PERMISSIONS!
Using this tool in a penetration testing mode can be used to ‘scare’ unaware individuals of the items on their computer that ‘share’ their personal information. With only a few seconds, and physical access to a USB port, many pieces of personal information and history can be gathered.
Use with Caution.
Step 1. Insert ‘Attack Stick’ in target computer. If Autorun does not launch – they you will need to Launch USB SwitchBladeUSB SwitchBladeUSB SwitchBladeUSB SwitchBlade. Start the GO.BATGO.BATGO.BATGO.BAT file in the \\\\WIPWIPWIPWIP\\\\CMDCMDCMDCMD\\\\ directory – or at your USB drive prompt, type: \\\\WIPWIPWIPWIP\\\\CMDCMDCMDCMD\\\\go.go.go.go.batbatbatbat.
Step 2. You might have tripped an Anti-Virus alarm by running this Attack. Try turning off Anti-Virus for a period of time.
Step 3. When the attack is complete, remove the USB stick.
Step 4. On a different computer (or the same as the target – it doesn’t matter) retrieve the ‘found’ information by opening the \\\\WIPWIPWIPWIP\\\\DUMPDUMPDUMPDUMP folder and finding a folder with a name of the target computer. Inside you’ll find a set of files containing massive amounts of personal information.
Step 5. Please review each of these files.
Step 6. Did you find passwords? For what programs? Did it find ALL passwords? Why or why not? _________________________________________________
Step 7. There are other sets of tools that can use this same method for good and not for evil! Running scripts to update A/V packages, etc.
IMPORTANT! Please delete the contents of the \\\\winwinwinwin\\\\dumpdumpdumpdump folder before continuing – it contains private information!
What you learned in this Lab:
In this Lab you learned to use USB SwitchbladeUSB SwitchbladeUSB SwitchbladeUSB Switchblade to:
1. Wow! Was it really that easy to find all that personal information
2. How am I going to protect myself and my computer from this type of attack in the future?
3. What else might I do with this type of platform?