Instructions for using AMX Touch Pad in room K227
29
Executive Classroom KT 227 Instruction Manual Using the AMX Touch Screen System
-
Upload
khangminh22 -
Category
Documents
-
view
3 -
download
0
Transcript of Instructions for using AMX Touch Pad in room K227
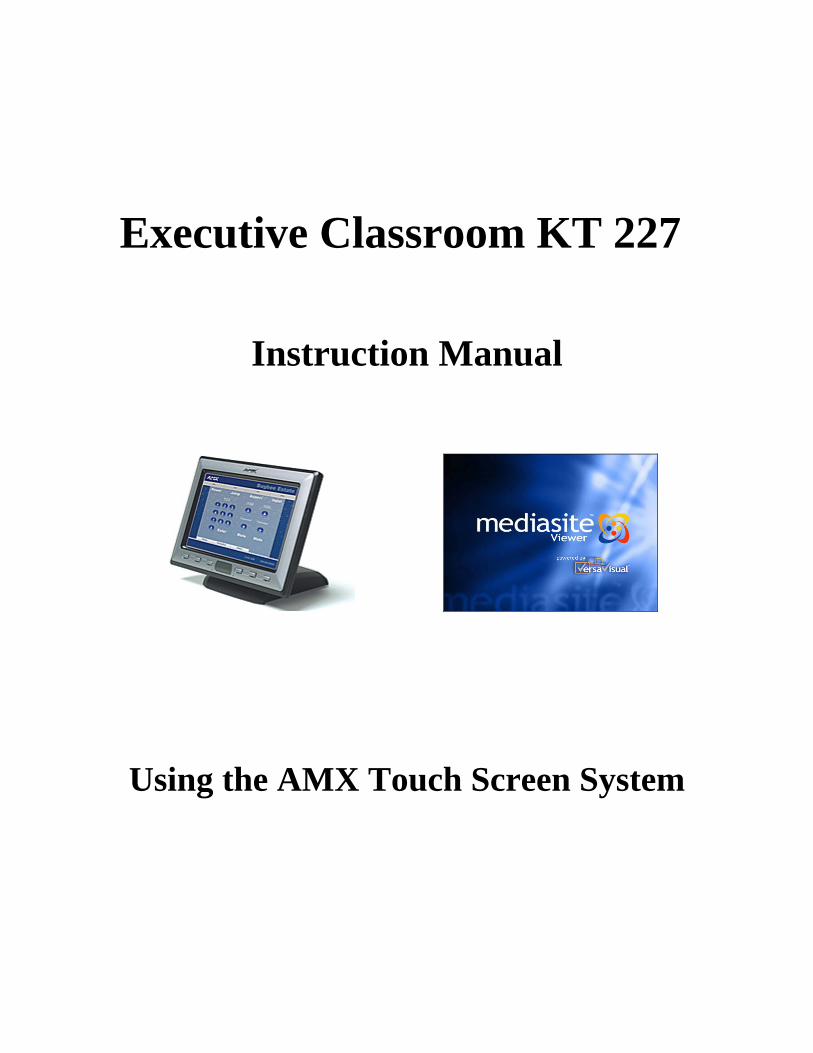
Executive Classroom KT 227
Instruction Manual
Using the AMX Touch Screen System
Instructions for lecturing in Kettler Hall building room 227.
Table of Contents Brief Summary of Startup Instructions 2 Starting the System for LOCAL PRESENTATIONS only 2 Using the AMX Touch Screen to Capture or Record 6 Using the AMX Touch Screen for DISTANCE LEARNING classes 12 Using the DOCUMENT CAMERA 17 Using the HOUSE PC 18 Using the VCR to play a videotape 19 Using the DVD feature 21 Using the Instructor Camera/Student Camera 22 Turning Lights ON or OFF in the Room 25 Projector Screens 26 Scheduling Recording Sessions / Technical Support 28
1
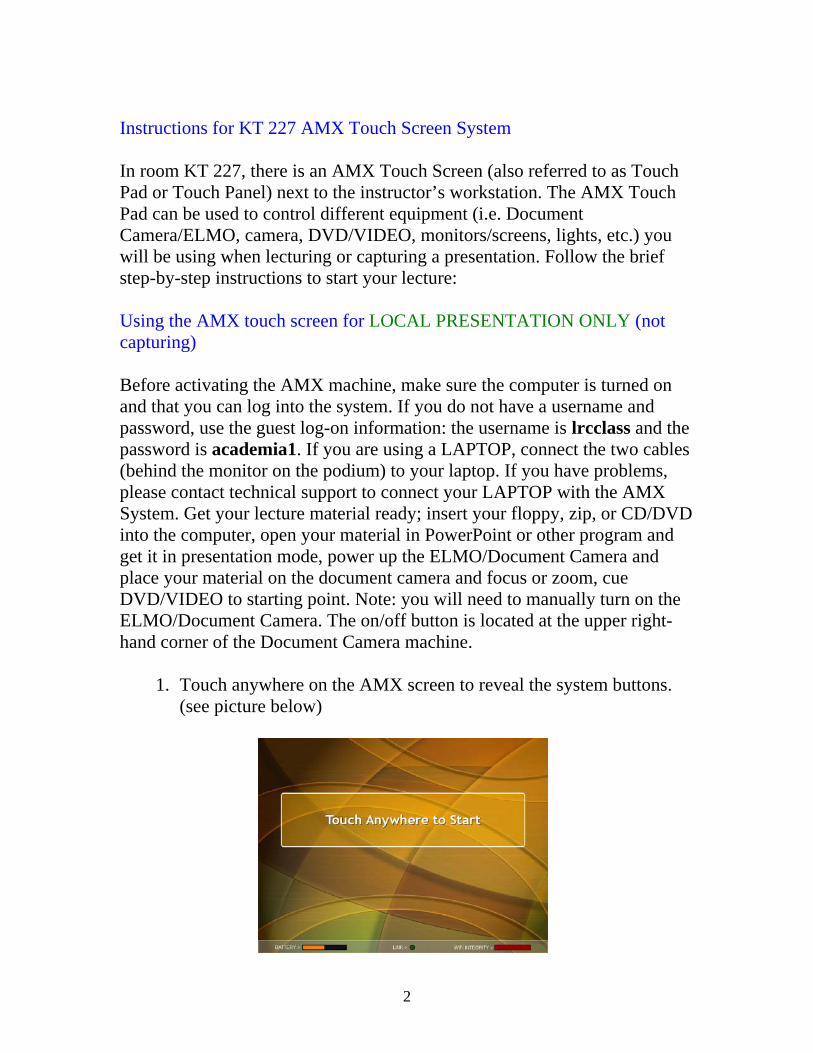
Instructions for KT 227 AMX Touch Screen System In room KT 227, there is an AMX Touch Screen (also referred to as Touch Pad or Touch Panel) next to the instructor’s workstation. The AMX Touch Pad can be used to control different equipment (i.e. Document Camera/ELMO, camera, DVD/VIDEO, monitors/screens, lights, etc.) you will be using when lecturing or capturing a presentation. Follow the brief step-by-step instructions to start your lecture: Using the AMX touch screen for LOCAL PRESENTATION ONLY (not capturing) Before activating the AMX machine, make sure the computer is turned on and that you can log into the system. If you do not have a username and password, use the guest log-on information: the username is lrcclass and the password is academia1. If you are using a LAPTOP, connect the two cables (behind the monitor on the podium) to your laptop. If you have problems, please contact technical support to connect your LAPTOP with the AMX System. Get your lecture material ready; insert your floppy, zip, or CD/DVD into the computer, open your material in PowerPoint or other program and get it in presentation mode, power up the ELMO/Document Camera and place your material on the document camera and focus or zoom, cue DVD/VIDEO to starting point. Note: you will need to manually turn on the ELMO/Document Camera. The on/off button is located at the upper right-hand corner of the Document Camera machine.
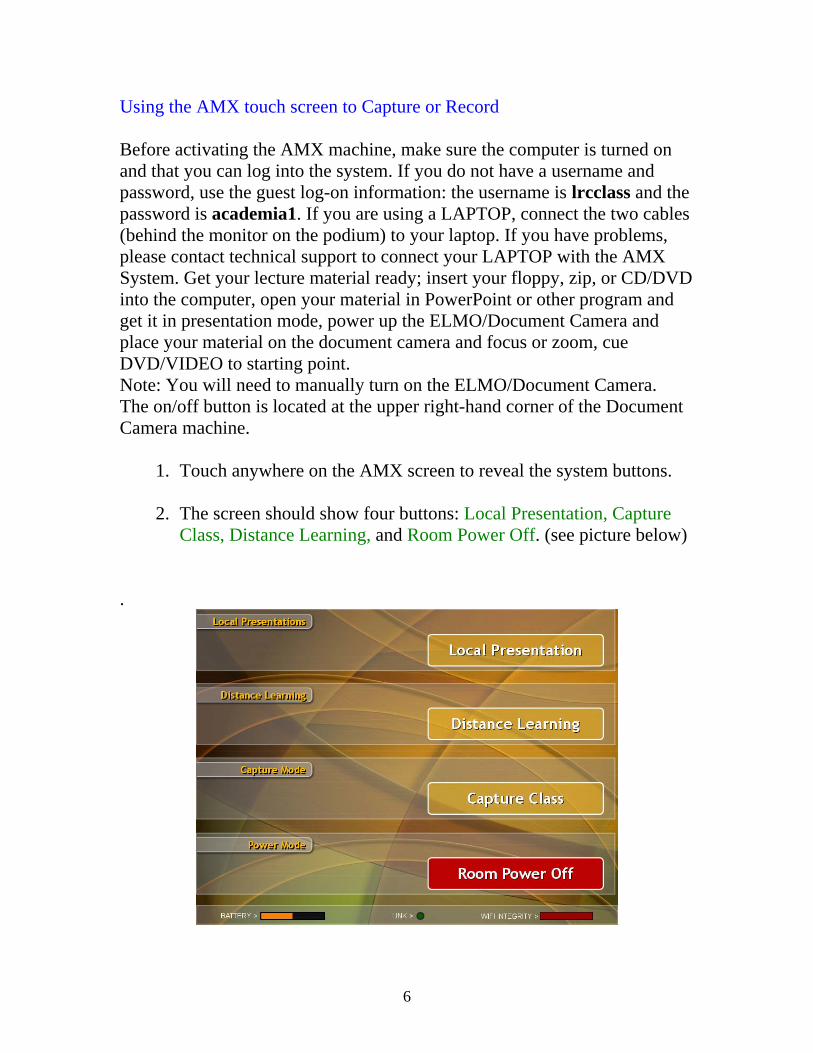
1. Touch anywhere on the AMX screen to reveal the system buttons. (see picture below)
2
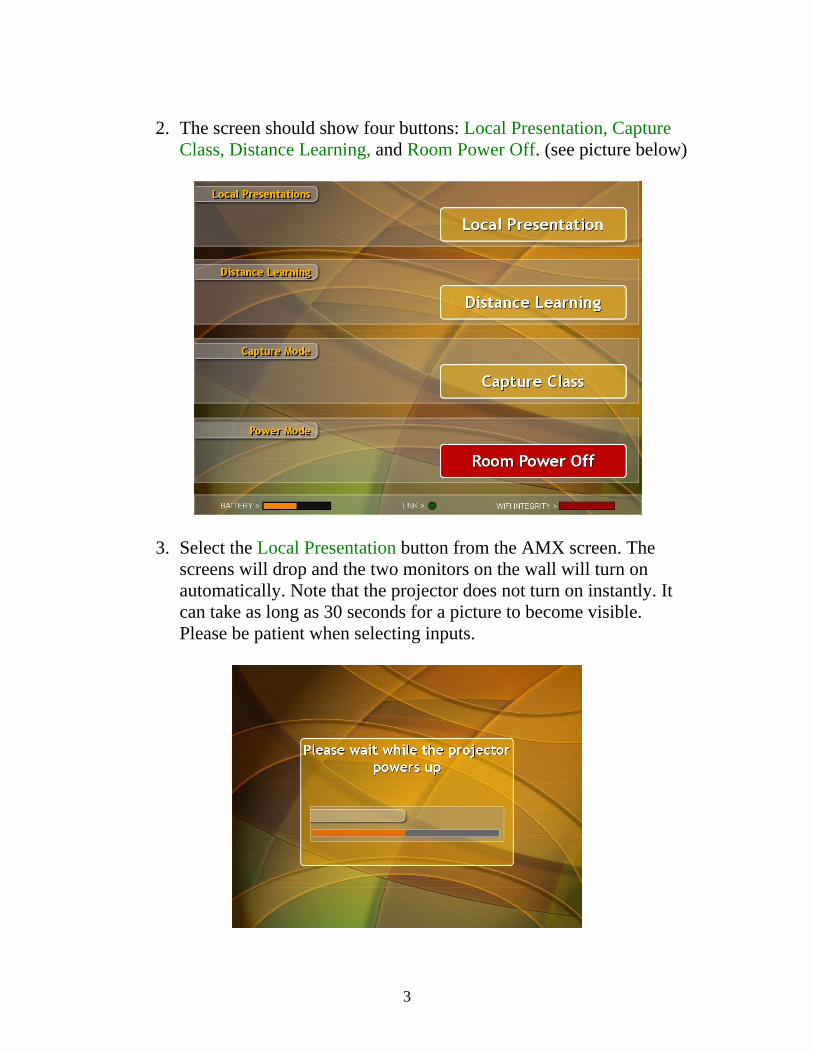
2. The screen should show four buttons: Local Presentation, Capture
Class, Distance Learning, and Room Power Off. (see picture below)
3. Select the Local Presentation button from the AMX screen. The screens will drop and the two monitors on the wall will turn on automatically. Note that the projector does not turn on instantly. It can take as long as 30 seconds for a picture to become visible. Please be patient when selecting inputs.
3

Below is the screen you will see next.
4. The buttons at the top of the AMX screen are: Laptop- House PC- DVD -VCR –Document Camera-Media Site.
5. The monitors and screens will automatically display the same image
as on the House PC computer desktop. If you wish to display an image from different equipment, select the piece of equipment you will be using from the AMX screen.
6. When you are finished with your lecture or presentation, select the
EXIT Mode Menu (left side on the AMX screen)
7. You will be directed to the main menu.
4

8. Press Room Power Off. The monitors will be turned off automatically and the screens will rise.
9. It will take the projector a few seconds to power down. If you see
the following screen, then the system is shutting down successfully.
10. Before you leave the room, remember to log-off the workstation, manually turn off the ELMO/Document Camera, and turn off the lights.
5
Using the AMX touch screen to Capture or Record Before activating the AMX machine, make sure the computer is turned on and that you can log into the system. If you do not have a username and password, use the guest log-on information: the username is lrcclass and the password is academia1. If you are using a LAPTOP, connect the two cables (behind the monitor on the podium) to your laptop. If you have problems, please contact technical support to connect your LAPTOP with the AMX System. Get your lecture material ready; insert your floppy, zip, or CD/DVD into the computer, open your material in PowerPoint or other program and get it in presentation mode, power up the ELMO/Document Camera and place your material on the document camera and focus or zoom, cue DVD/VIDEO to starting point. Note: You will need to manually turn on the ELMO/Document Camera. The on/off button is located at the upper right-hand corner of the Document Camera machine.
1. Touch anywhere on the AMX screen to reveal the system buttons. 2. The screen should show four buttons: Local Presentation, Capture
Class, Distance Learning, and Room Power Off. (see picture below)
.
6
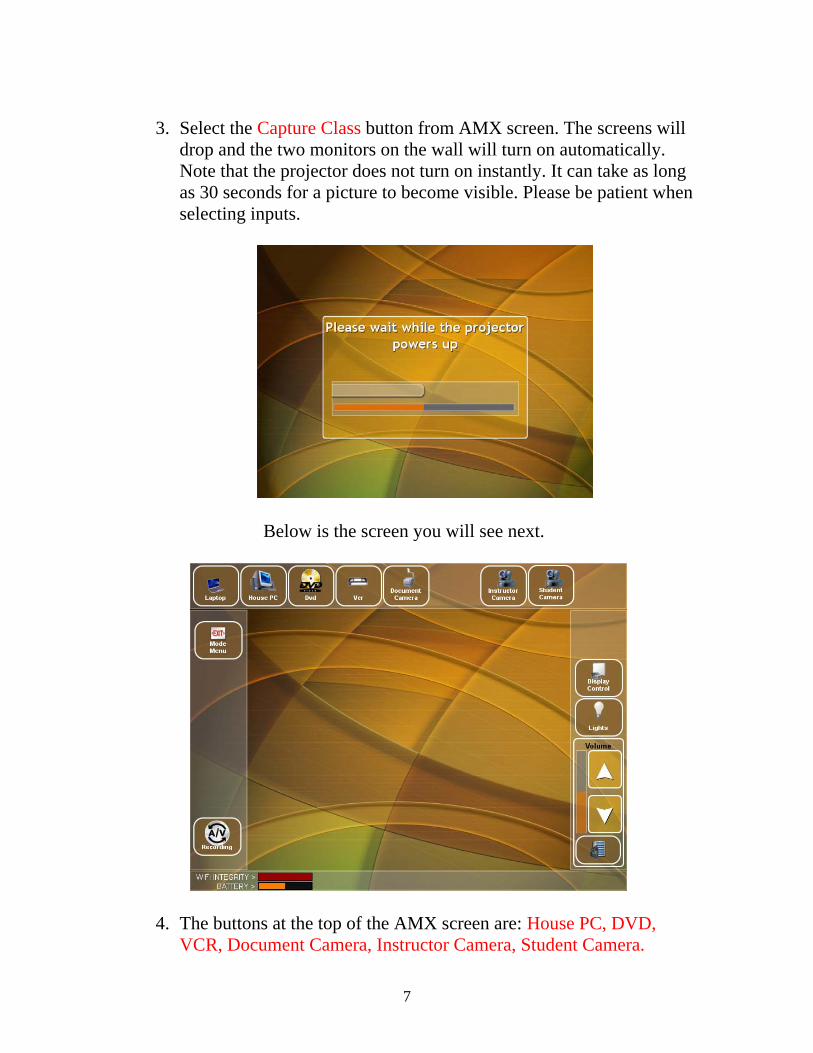
3. Select the Capture Class button from AMX screen. The screens will
drop and the two monitors on the wall will turn on automatically. Note that the projector does not turn on instantly. It can take as long as 30 seconds for a picture to become visible. Please be patient when selecting inputs.
Below is the screen you will see next.
4. The buttons at the top of the AMX screen are: House PC, DVD,
VCR, Document Camera, Instructor Camera, Student Camera.
7
5. The monitor on the right side and the drop-screens will
automatically display the same image as on House PC computer desktop. If you wish to display an image from different equipment, select the piece of equipment you will be using from the AMX screen.
6. The left monitor will automatically display the instructor’s video or
the podium area.
7. Press Instructor Camera from the AMX screen and adjust the view to your preference. (see Instructions for Instructor Camera for more details)
8. If you are using the Document Camera, make sure the image you
want to be displayed is clearly visible on the monitor and the screens. Use ZOOM IN and OUT and FOCUS buttons on the AMX system to get the right image.
9. Turn on the microphone. Perform the battery check (need to see
three green lines glowing). If you need to replace the battery, extra batteries are located in the cabinet on the left side of the podium, directly under the ELMO/Document Camera.
10. Open the equipment cabinet behind the podium. The cabinet blends
in with the walls. To open the cabinet, push the door slightly (you will hear it click) and then pull it open.
11. In the cabinet you will see a monitor. Underneath the monitor is a
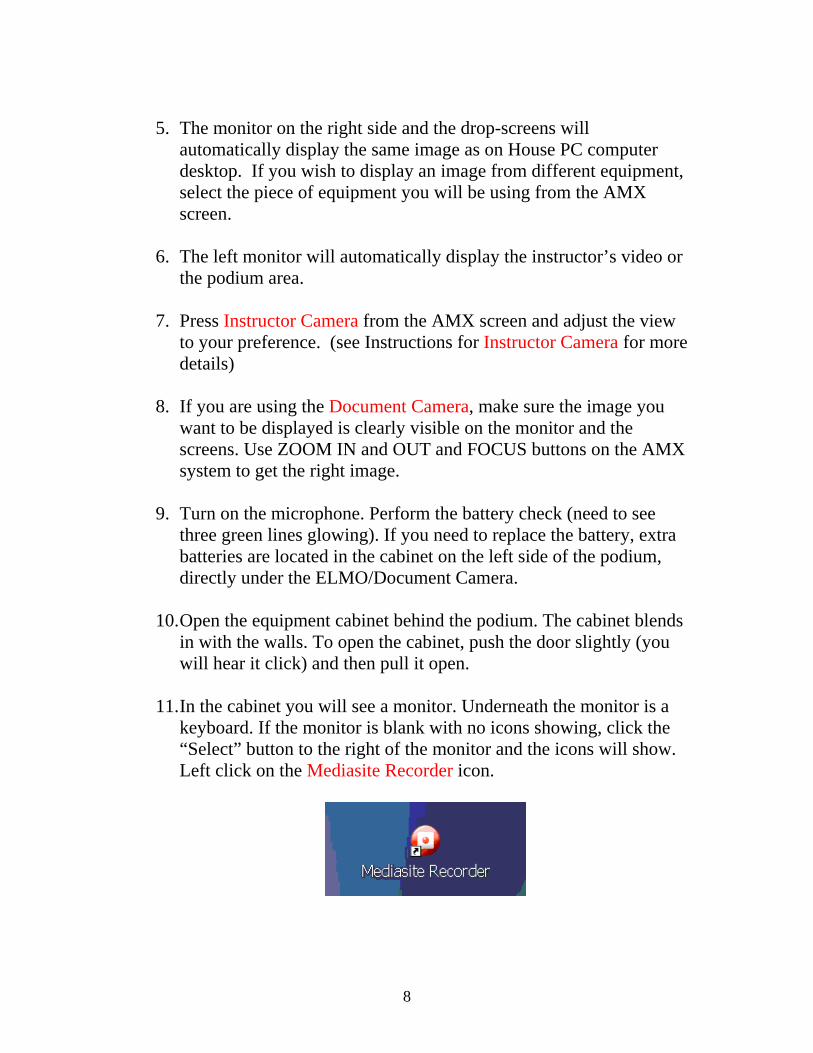
keyboard. If the monitor is blank with no icons showing, click the “Select” button to the right of the monitor and the icons will show. Left click on the Mediasite Recorder icon.
8
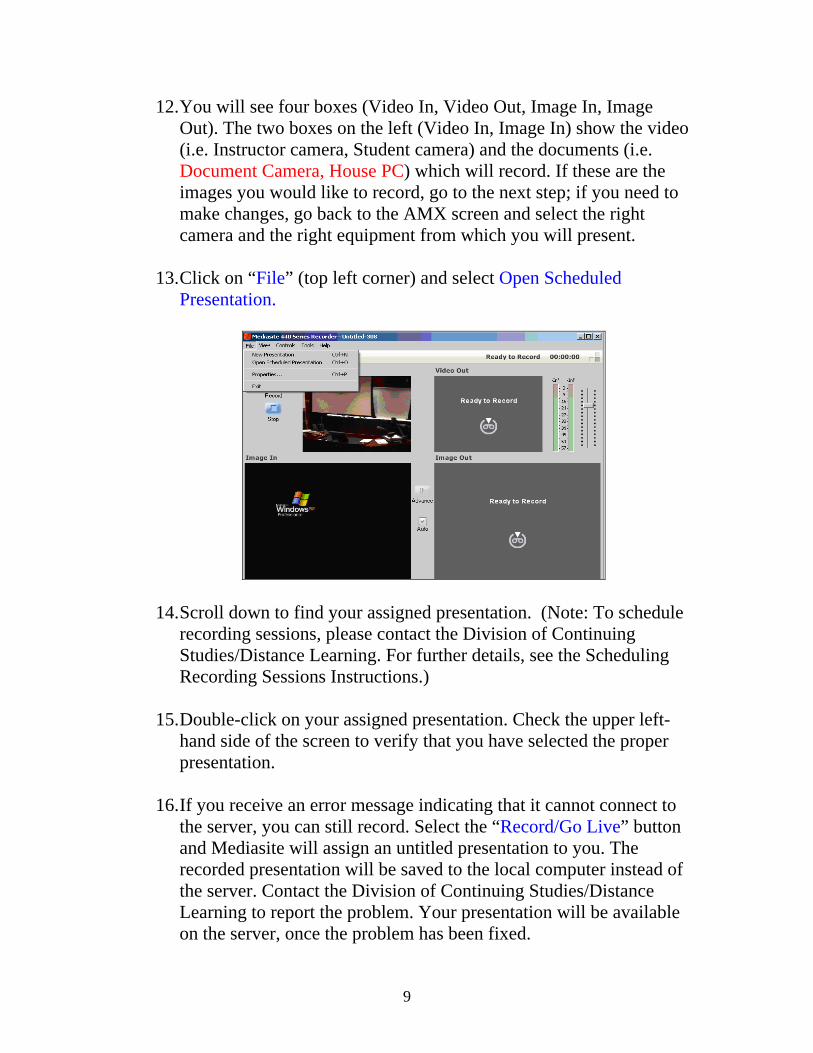
12. You will see four boxes (Video In, Video Out, Image In, Image Out). The two boxes on the left (Video In, Image In) show the video (i.e. Instructor camera, Student camera) and the documents (i.e. Document Camera, House PC) which will record. If these are the images you would like to record, go to the next step; if you need to make changes, go back to the AMX screen and select the right camera and the right equipment from which you will present.
13. Click on “File” (top left corner) and select Open Scheduled
Presentation.
14. Scroll down to find your assigned presentation. (Note: To schedule recording sessions, please contact the Division of Continuing Studies/Distance Learning. For further details, see the Scheduling Recording Sessions Instructions.)
15. Double-click on your assigned presentation. Check the upper left-
hand side of the screen to verify that you have selected the proper presentation.
16. If you receive an error message indicating that it cannot connect to
the server, you can still record. Select the “Record/Go Live” button and Mediasite will assign an untitled presentation to you. The recorded presentation will be saved to the local computer instead of the server. Contact the Division of Continuing Studies/Distance Learning to report the problem. Your presentation will be available on the server, once the problem has been fixed.
9
17. Test the microphone. When you speak, the bars in the upper right
corner of the screen should go up (green colored area). If the movement goes into the red section, adjust the volume control down a little. If you do not see any movements of the volume control bars, the volume will still record.
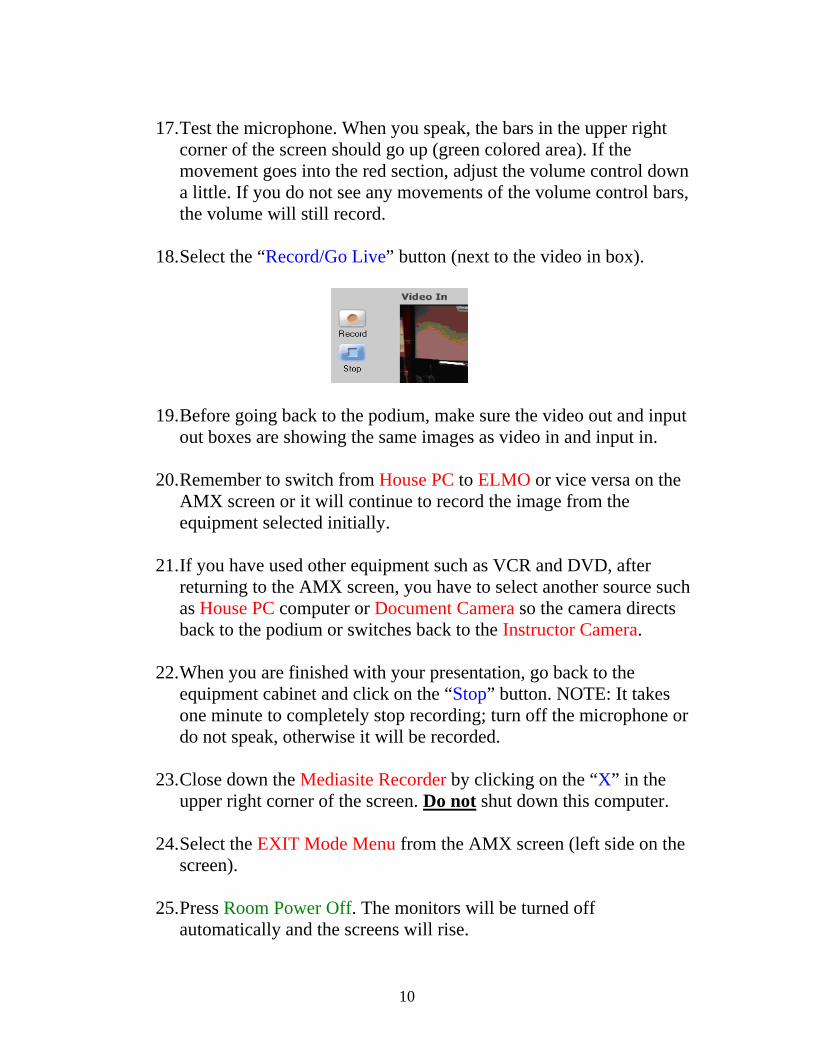
18. Select the “Record/Go Live” button (next to the video in box).
19. Before going back to the podium, make sure the video out and input out boxes are showing the same images as video in and input in.
20. Remember to switch from House PC to ELMO or vice versa on the
AMX screen or it will continue to record the image from the equipment selected initially.
21. If you have used other equipment such as VCR and DVD, after
returning to the AMX screen, you have to select another source such as House PC computer or Document Camera so the camera directs back to the podium or switches back to the Instructor Camera.
22. When you are finished with your presentation, go back to the
equipment cabinet and click on the “Stop” button. NOTE: It takes one minute to completely stop recording; turn off the microphone or do not speak, otherwise it will be recorded.
23. Close down the Mediasite Recorder by clicking on the “X” in the
upper right corner of the screen. Do not shut down this computer.
24. Select the EXIT Mode Menu from the AMX screen (left side on the screen).
25. Press Room Power Off. The monitors will be turned off
automatically and the screens will rise.
10
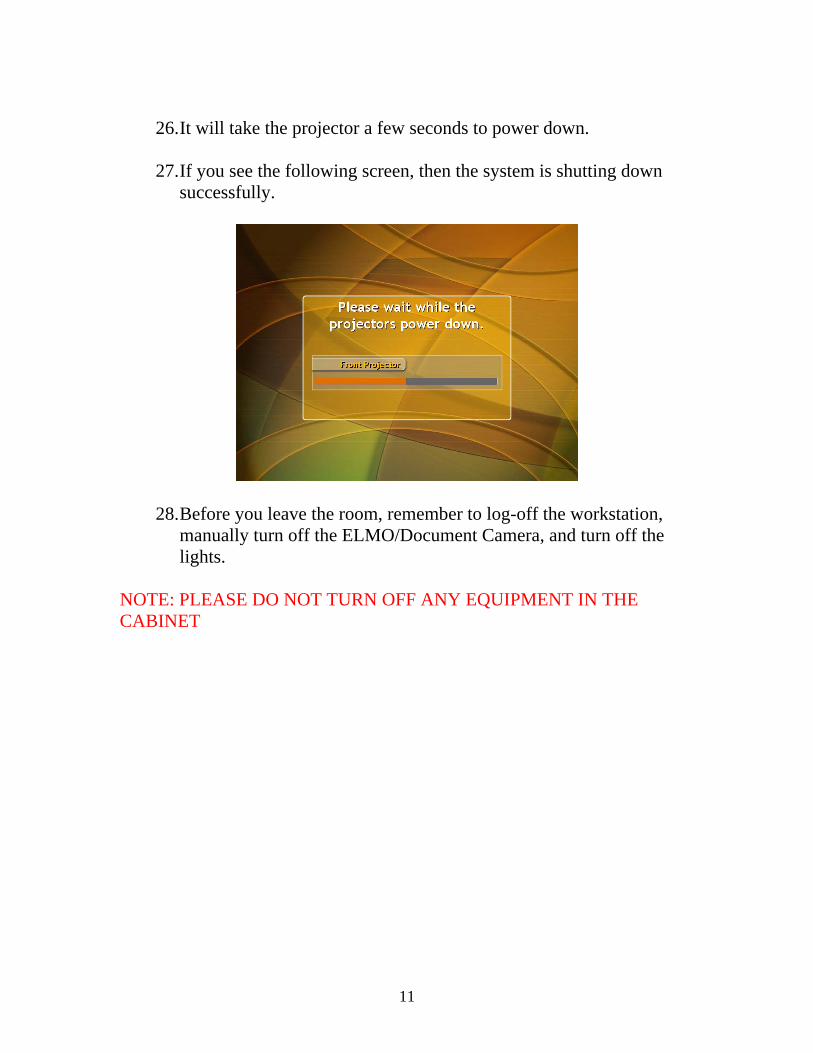
26. It will take the projector a few seconds to power down.
27. If you see the following screen, then the system is shutting down
successfully.
28. Before you leave the room, remember to log-off the workstation, manually turn off the ELMO/Document Camera, and turn off the lights.
NOTE: PLEASE DO NOT TURN OFF ANY EQUIPMENT IN THE CABINET
11
Using the AMX Touch Screen for Distance Learning Classes Before activating the AMX machine, make sure the computer is turned on and that you can log into the system. If you do not have a username and password, use the guest log-on information: the username is lrcclass and the password is academia1. If you are using a LAPTOP, connect the two cables (behind the monitor on the podium) to your laptop. If you have problems, please contact technical support to connect your LAPTOP with the AMX System. Get your lecture material ready; insert your floppy, zip, or CD/DVD into the computer, open your material in PowerPoint or other program and get it in presentation mode, power up the ELMO/Document Camera and place your material on the document camera and focus or zoom, cue DVD/VIDEO to starting point. Note: You will need to manually turn on the ELMO/Document Camera. The on/off button is located in the upper right-hand corner of the Document Camera machine.
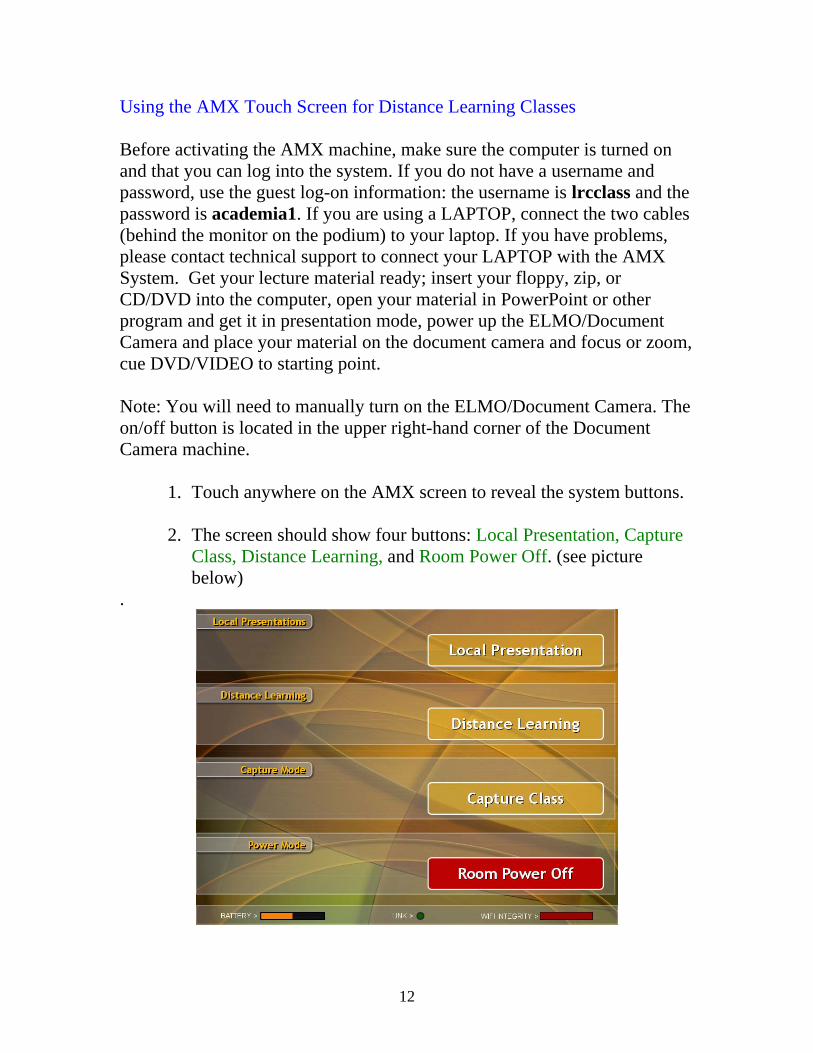
1. Touch anywhere on the AMX screen to reveal the system buttons. 2. The screen should show four buttons: Local Presentation, Capture
Class, Distance Learning, and Room Power Off. (see picture below)
.
12
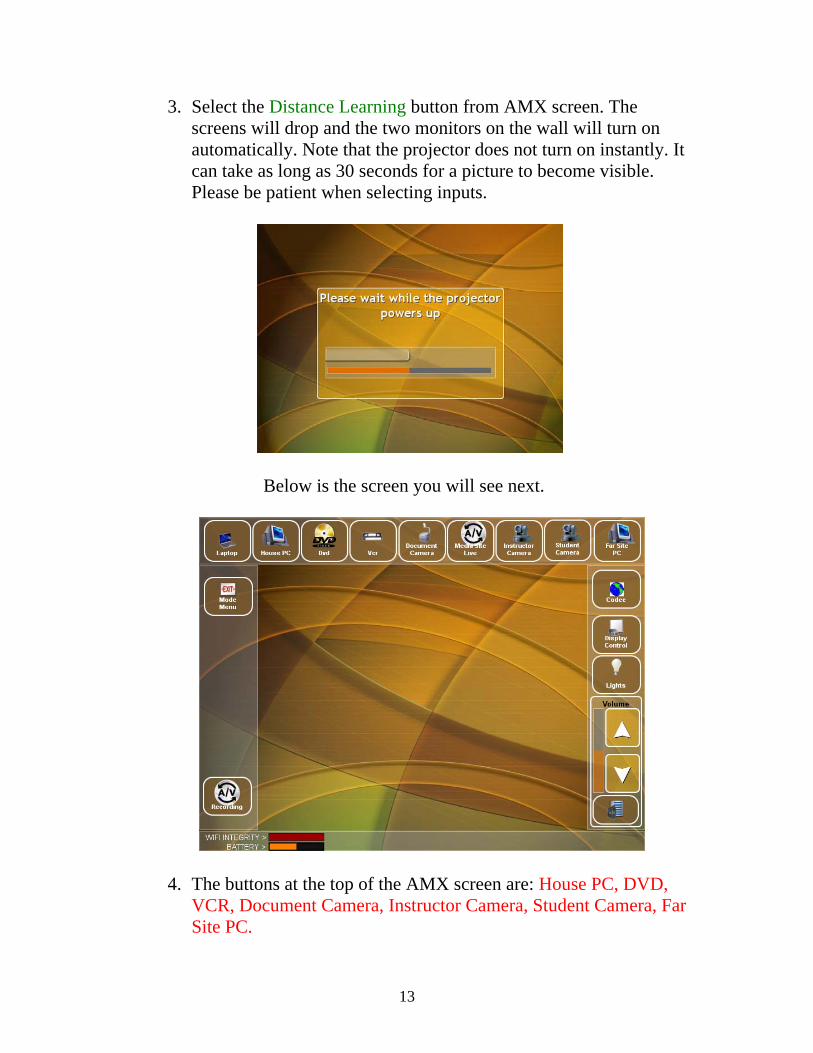
3. Select the Distance Learning button from AMX screen. The screens will drop and the two monitors on the wall will turn on automatically. Note that the projector does not turn on instantly. It can take as long as 30 seconds for a picture to become visible. Please be patient when selecting inputs.
Below is the screen you will see next.
4. The buttons at the top of the AMX screen are: House PC, DVD, VCR, Document Camera, Instructor Camera, Student Camera, Far Site PC.
13
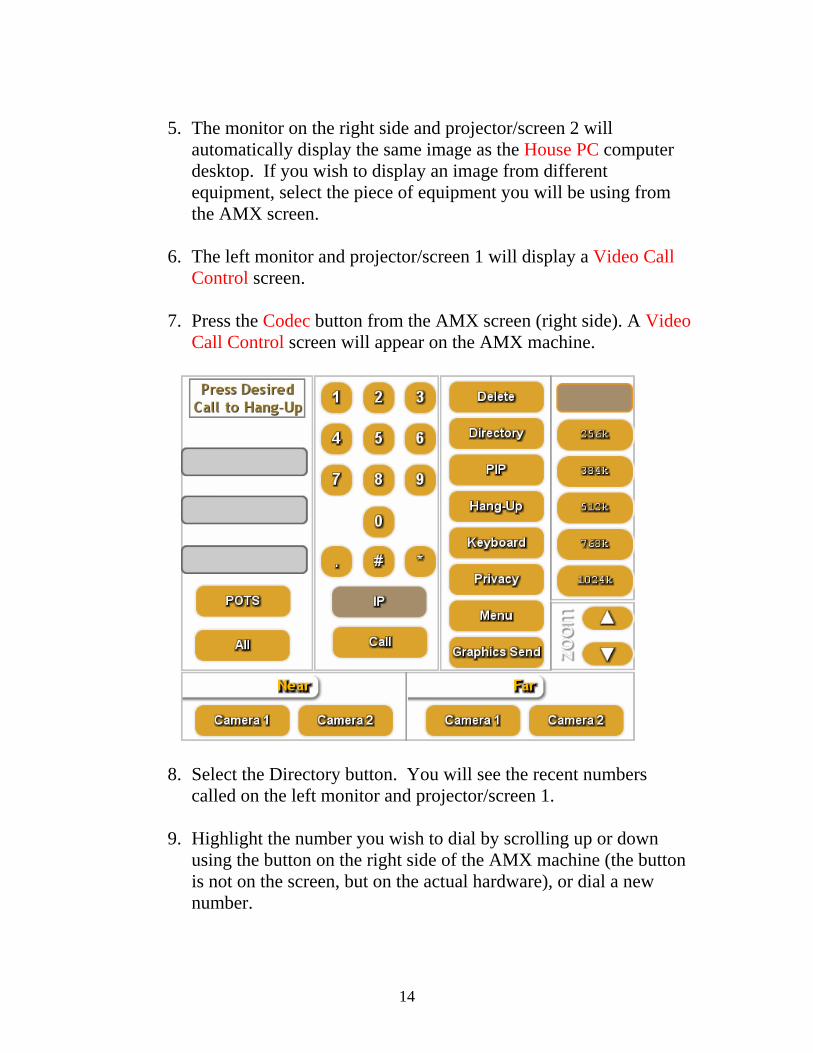
5. The monitor on the right side and projector/screen 2 will
automatically display the same image as the House PC computer desktop. If you wish to display an image from different equipment, select the piece of equipment you will be using from the AMX screen.
6. The left monitor and projector/screen 1 will display a Video Call
Control screen.
7. Press the Codec button from the AMX screen (right side). A Video Call Control screen will appear on the AMX machine.
8. Select the Directory button. You will see the recent numbers
called on the left monitor and projector/screen 1. 9. Highlight the number you wish to dial by scrolling up or down
using the button on the right side of the AMX machine (the button is not on the screen, but on the actual hardware), or dial a new number.
14
10. To place a call to Warsaw, room 109: select FW-wec-109, and for room 107: select FW-wec-107.
11. Once you have found the location you wish to call, or dialed a new number, press Call from the AMX screen and you will be connected.
12. If your call has been connected successfully, projector/screen 1
will show video from the distant location or far site.
13. If you have problems connecting, please contact the Distance Learning Technician or First Tier Support for KT 227. (See page 28 for contact information)
14. Choose the equipment you will be using and the camera view (i.e.
Instructor Camera, Student Camera) to be displayed at the distant location.
15. Turn on the microphone. Perform the battery check (Three green
lines should glow).If you need to replace the battery, extra batteries are located in the cabinet on the left side of the podium, directly under the ELMO/Document Camera.
16. There are several microphones located on the students’ desks.
When students are talking, they need to press and hold the PUSH buttons on the microphones for them to be heard at the far site.
17. When a student presses the PUSH button on the microphones, the
Student Camera will automatically zoom in to the area where the student is sitting. When the student releases from the speaker, the camera should revert back to the Instructor Camera.
18. If view is not switching automatically to Instructor Camera/podium
view, select Instructor Camera from the AMX screen.
19. For instructions on how to use different equipment and cameras, please refer to the equipment section in the user menu.
15
20. If the students on the far site do not see the image from the equipment you are working (i.e. Document Camera, House PC), select Graphics Send ON/OFF button from the AMX screen (left side).
21. When you finish your lecture, to disconnect with the far site, press
Codec from the AMX menu and then select the Hang Up button.
22. Press Exit Mode Menu (left side on AMX screen).
23. Select Room Power Off. The monitor will be turned off automatically and the screens will rise.
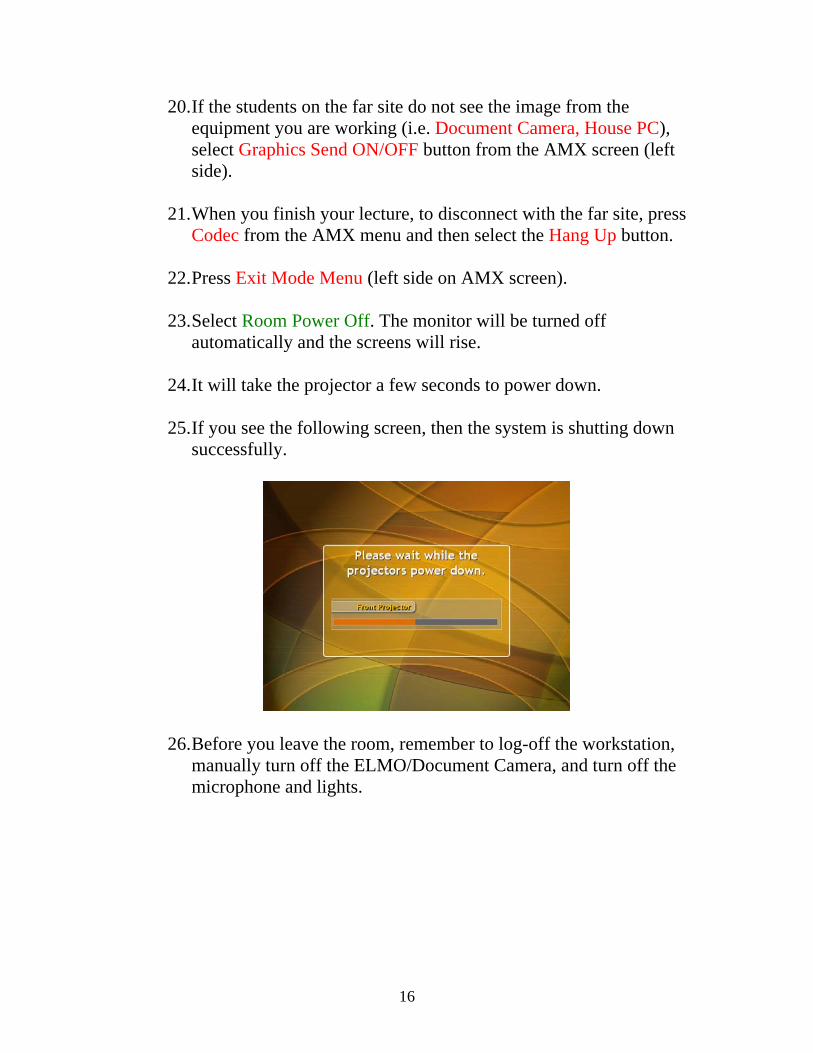
24. It will take the projector a few seconds to power down.
25. If you see the following screen, then the system is shutting down
successfully.
26. Before you leave the room, remember to log-off the workstation, manually turn off the ELMO/Document Camera, and turn off the microphone and lights.
16
Using the Document Camera/ELMO. You can use the document camera for a variety of purposes: display transparencies, display charts/graphs on paper, write formulas, show small items such as coins, etc. Since you cannot write directly on the document camera, supplies (markers, paper, transparencies, etc.) will be provided in the cabinet directly under the ELMO. If you do not find the supplies you need, please contact the First Tier Support for KT 227. (See page 28 for contact information)
1. To switch to the document camera using the AMX screen, press the Document Camera button.
2. The item on the Document Camera will be displayed on the two monitors as well as on the screens.
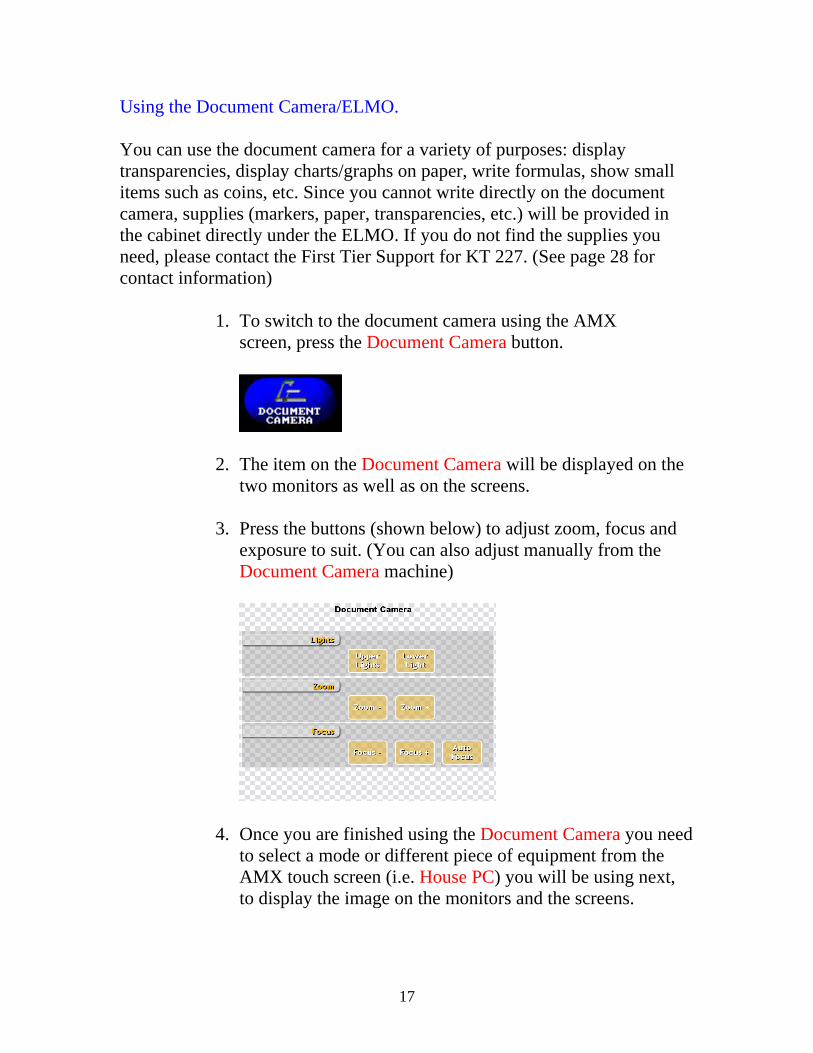
3. Press the buttons (shown below) to adjust zoom, focus and
exposure to suit. (You can also adjust manually from the Document Camera machine)
4. Once you are finished using the Document Camera you need
to select a mode or different piece of equipment from the AMX touch screen (i.e. House PC) you will be using next, to display the image on the monitors and the screens.
17
Using the House PC The House PC computer is a computer set up to display material that you bring on floppy, CD/DVDROM, or zip. You can also pull items from your network drive. The computer sets up individual profiles for each user based on their login information. You can create shortcuts to frequently used programs or files on the desktop and the settings will be saved for you to use each time you log in. You can also use the GUEST account on the computer by entering “lrcclass” as username and “adademia1” for password. If you use the GUEST account, no presets or shortcuts can be saved to the desktop.
1. To control the House PC Computer, touch the AMX screen anywhere to reveal the system buttons
2. Select the presentation choice (i.e. Local Presentation, Capture
Class)
3. Press the House PC button from the list of equipment on top of the screen.
4. Local Presentation: The PC desktop will display on the monitors
and drop-screens.
5. Capture Class: The House PC desktop will be displayed on the screens and the right monitor. The left monitor will show the view of the podium.
6. Distance Learning: The House PC desktop will be displayed on the
Projector screen 2, which is the farthest screen from the printers.
18
Using the VCR to play a videotape. In KT227, there is an equipment cabinet behind the podium, on the right side of the drop-screens. There, you will find several media equipment including a VCR. 1. Insert the videotape into the VCR. 2. Touch the AMX screen anywhere to reveal the system buttons.
3. Select the presentation choice (i.e. Local Presentation, Capture
Class)
4. Press the VCR button, located in the top row of the AMX screen.
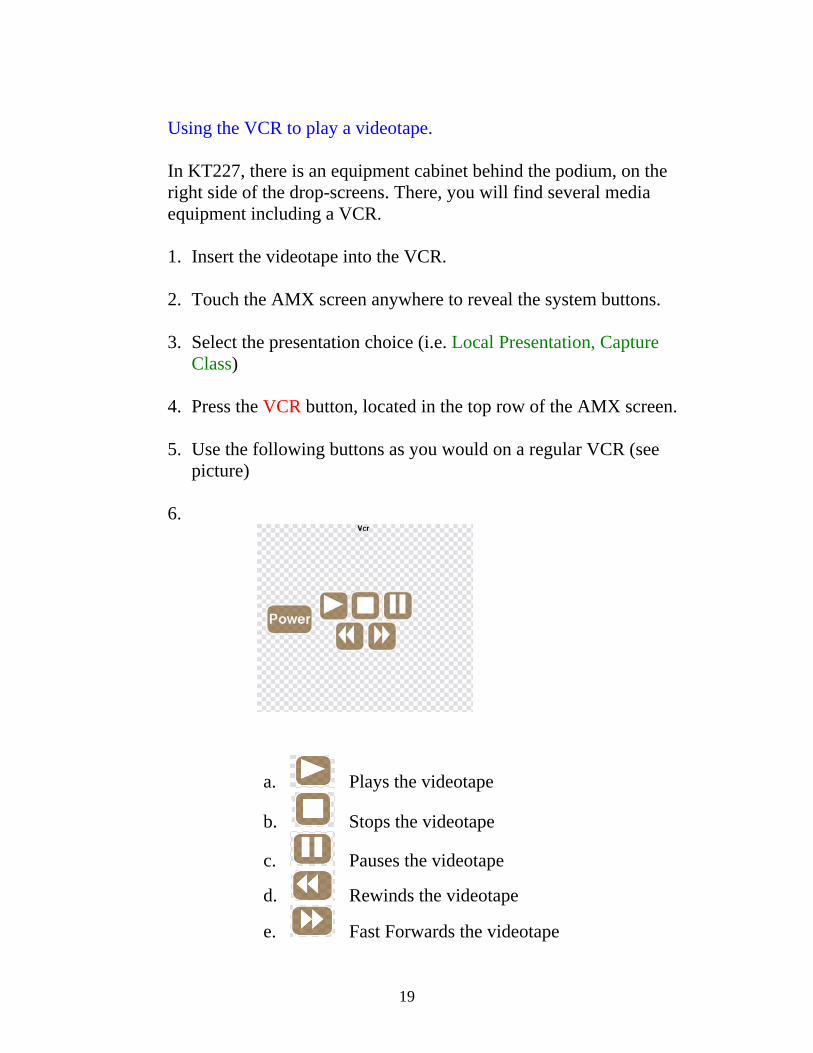
5. Use the following buttons as you would on a regular VCR (see picture)
6.
a. Plays the videotape
b. Stops the videotape
c. Pauses the videotape
d. Rewinds the videotape
e. Fast Forwards the videotape
19
7. When you are finished playing the video, select the equipment you will be using or return to the main menu by selecting EXIT Mode Menu if you are in the Local Presentation Mode.
8. In Capture Class or Distance Learning, after returning to the main
AMX screen, you have to select another source such as House PC computer or Document Camera so the monitors in the room will return to the instructor. Playing a VCR or DVD eliminates the instructor video. You have to return to another source so the video output switches back to the instructor camera.
9. Choose a different presentation style from the menu or to shut off
the system pressroom Room Power Off.
10. Local Presentation: The Video will display on the monitors and drop-screens
11. Capture Class: The Video will be displayed on the screens and the
right monitor. The left monitor will show the view of the podium.
12. Distance Learning: The Video will be displayed on the Projector screen2, which is the farthest screen from the printers.
NOTE: PLEASE DO NOT TURN OFF ANY EQUIPMENT IN THE CABINET
20
Using the DVD feature. The DVD feature is very similar to the VCR.
1. Insert a DVD into the DVD player. The DVD player is located in the equipment cabinet behind the podium. Please use the Panasonic DVD player.
2. Touch the AMX screen anywhere to reveal the system buttons.
3. Select the presentation choice (i.e. Local Presentation, Capture
Class)
4. Press the DVD button located in the top row on the AMX screen.
5. Use the buttons to play, stop, navigate through chapters, etc. like a regular DVD player.
6. When you are finished playing the DVD, select the equipment you
will be using or return to the main menu by selecting EXIT Mode Menu if you are in the Local Presentation Mode.
7. In Capture Class or Distance Learning, after returning to the main
AMX screen, you have to select another source such as House PC computer or Document Camera so the monitors in the room will return to the instructor. Playing a VCR or DVD eliminates the instructor video. You have to return to another source so the video output switches back to the instructor camera.
8. Choose a different presentation style from the menu or to shut off
the system press Room Power Off button.
9. If you have problems using the DVD player, please contact technical support. (See page 28 for contact information)
NOTE: PLEASE DO NOT TURN OFF ANY EQUIPMENT IN THE CABINET
21
Using the Instructor Camera/ Student Camera. When presenting locally, you will not need to use the Instructor Camera or Student Camera. If you would like the instructor’s video or students’ video to be viewed on the monitors and screens, then choose Capture Class mode instead of Local Presentation.
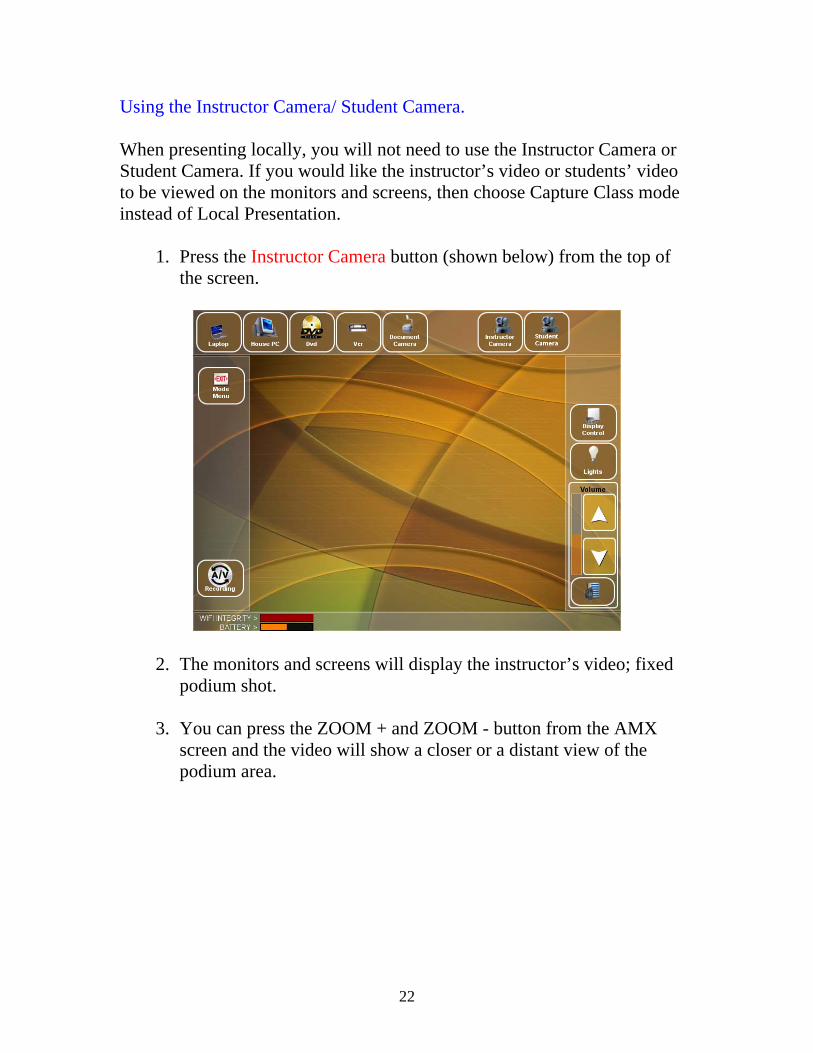
1. Press the Instructor Camera button (shown below) from the top of the screen.
2. The monitors and screens will display the instructor’s video; fixed podium shot.
3. You can press the ZOOM + and ZOOM - button from the AMX
screen and the video will show a closer or a distant view of the podium area.
22
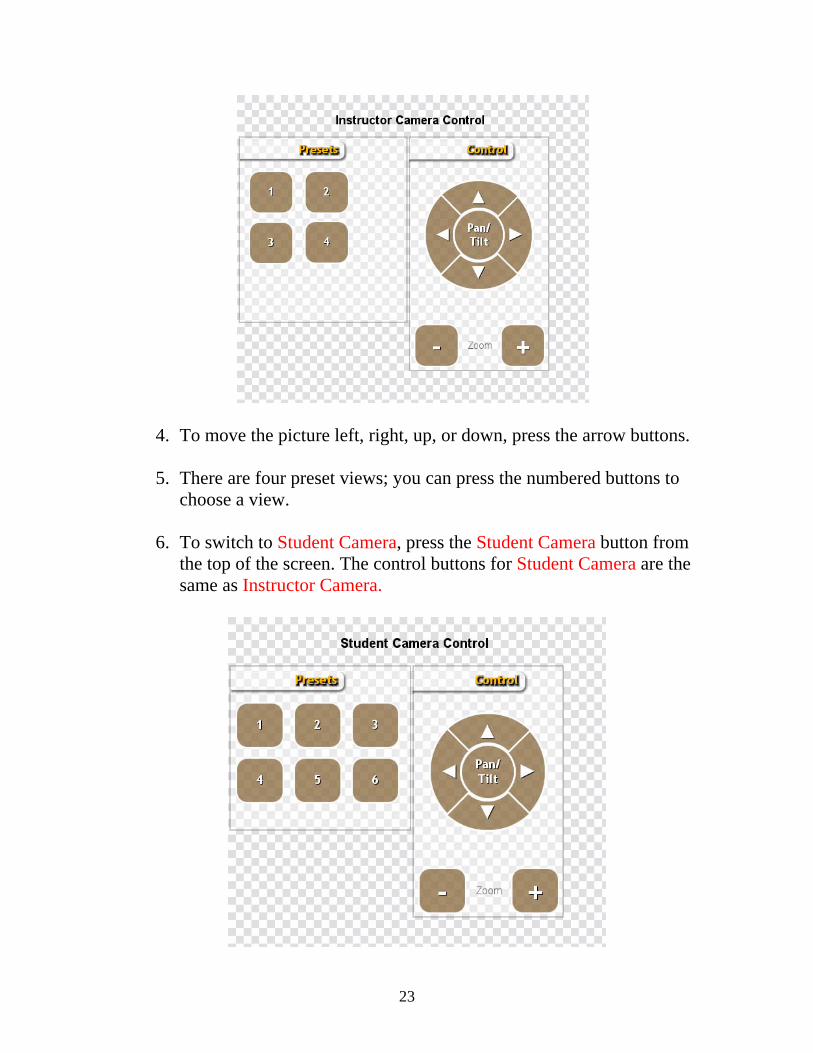
4. To move the picture left, right, up, or down, press the arrow buttons. 5. There are four preset views; you can press the numbered buttons to
choose a view.
6. To switch to Student Camera, press the Student Camera button from the top of the screen. The control buttons for Student Camera are the same as Instructor Camera.
23
7. Distance Learning Mode: More detailed information on how the
Student Camera works in this mode are provided in the Instructions for Distance Learning.
8. To switch to an equipment view, press the button of the equipment
you wish to use, located at the top of the AMX screen.
24
Lights: To turn on the lights in KT 227, push and hold for two to three seconds the second button from the top on the light-switchbox or panel. There is a light-switchbox located next to each entrance door and a main light-switchbox left of the whiteboard. If you need to make different areas of the room darker or brighter, flip up the top cover of the main light-switchbox and push and hold the up or down arrow button in the different zones until you get the desired lighting in each area of the room. The room is divided into six zones. To turn off the lights, press and hold the fifth button from the top or second button from the bottom. You can also turn the lights on or off by using the AMX touch screen.
1. Touch the screen anywhere to reveal the system buttons. 2. Select the mode you wish to use. (Local Presentation, Capture
Class, Distance Learning)
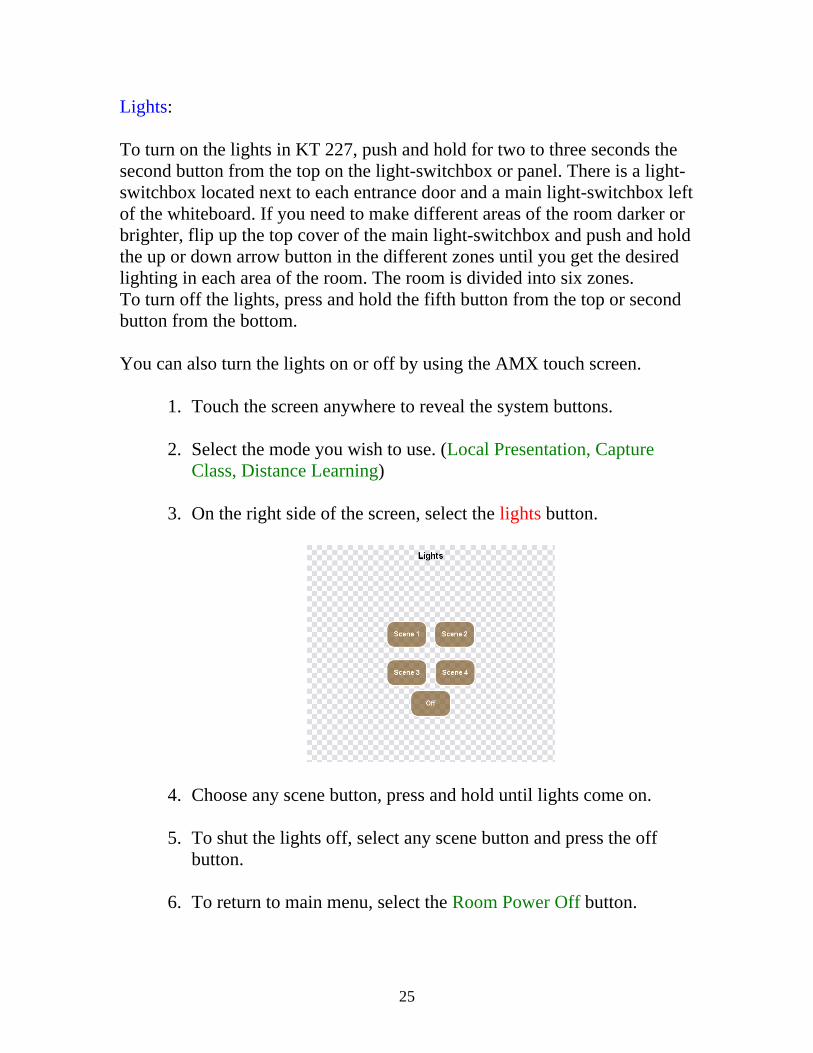
3. On the right side of the screen, select the lights button.
4. Choose any scene button, press and hold until lights come on.
5. To shut the lights off, select any scene button and press the off button.
6. To return to main menu, select the Room Power Off button.
25

Projector Screens The projector will power up and the screens will drop automatically every time the AMX system is in use. If you wish to raise one or both screens, follow these steps:
1. Touch the AMX screen anywhere to reveal the system buttons. 2. Select the presentation mode (i.e. Local Presentation)
3. Press the Display Controls button (left side of the AMX screen)
The image above is similar to the image you will see on the AMX screen. In KT 227, there are only two monitors and two screens.
4. Choose which screen you would like to raise. Projector 1 is the closest screen to the printers; projector 2 is the screen farthest from the printers.
5. If you wish not to use screen 1, press Projector 1 OFF button. 6. Next, select Projector 1 arrow-button UP and the screen will rise.
26
7. You can also manually raise the screen from the Projector Control
boxes located next to Screen 1. The left box is for screen 1 and the right box for screen 2. Push the UP button for the corresponding screen to rise. You will still need to turn off the projector from the AMX Touch Screen.
8. To lower the screen again, press on the corresponding screen ON
button on the Display Controls menu and the arrow-DOWN button to lower the screen.
NOTE: If the projector displays any warning messages (i.e. Please clean the air filter), please contact the Division of Continuing Studies/Distance Learning or the First Tier Support for KT 227. (See page 28 for contact information)
27
Scheduling Recording Sessions Please visit www.ipfw.edu/dlearning/kt227/, select the appropriate link and follow the instructions to schedule recording sessions in room KT 227. If you need assistance, please contact: Deb Hein 260-481-6111 [email protected] Mersiha Alic [email protected] Technical Support For any assistance with equipment or MediaSite in KT 227, please contact the First Tier Support: Mersiha Alic, Distance Learning Graduate Aid: [email protected] 260-481-6111 Saw Kapaw, Distance Learning Technician: [email protected] phone: 260-481-6185 pager: 260-698-9466 The campus switchboard operator can also use a radio to contact Saw. Dial “0” on a campus phone to reach the switchboard. Second Tier Support: IT Services Help Desk: 260-481-6030 Sensory Technologies Help Desk: 1-800-488-4336 Monday - Friday 6:30am - 6:30pm EST
28