Installing Your Basestation
14
Installing Your Basestation ROS + PR2 Training Workshop
-
Upload
khangminh22 -
Category
Documents
-
view
1 -
download
0
Transcript of Installing Your Basestation

Installing Your BasestationROS + PR2 Training Workshop

2ROS + PR2 Training Workshop
Introduction
1.Why do we use a basestation?
● Seamless transition between wired and wireless networking
● Servicing the PR2
● Intermediate storage for HW logs

3ROS + PR2 Training Workshop
Network Requirements
1.Basestation needs “static” IP● Must be visible on wired and wirelessly ● Only necessary on VPN port (default: 1194)
2.Basestation needs an additional 2 Ips● Will be forwarded to robot
3.Robot must be able to acquire DHCP address on both wired and wireless networks

4ROS + PR2 Training Workshop
Basestation Setup: physical

5ROS + PR2 Training Workshop
Basestation Setup: computer
1.Default hostname is “basestation.”To change name you must edit:● /etc/hostname● /etc/hosts● /etc/dhcp3/dhclient.conf (Only if using DHCP)
2.To set static IP, edit:● /etc/network/interfaces● /etc/resolv.conf
3.If you use DHCP:● DHCP server MUST assign consistent IP address via client-id
4.To configure the basestation VPN certificate, run:● sudo /etc/openvpn/gen_server_key

6ROS + PR2 Training Workshop
Configuring the Robot
1.To use the basestation to configure a robot, plug it into the robot service port.

7ROS + PR2 Training Workshop
Configuring Robot Wireless
1.The robot comes equipped with a Linksys WRT610n router running ddwrt
2.To configure it, plug the basestation into the robot service port
3.Use firefox to go to: http://10.68.0.5
4.The router must stay at that address, but other settings can be changed as necessary to connect to your wireless
8ROS + PR2 Training Workshop
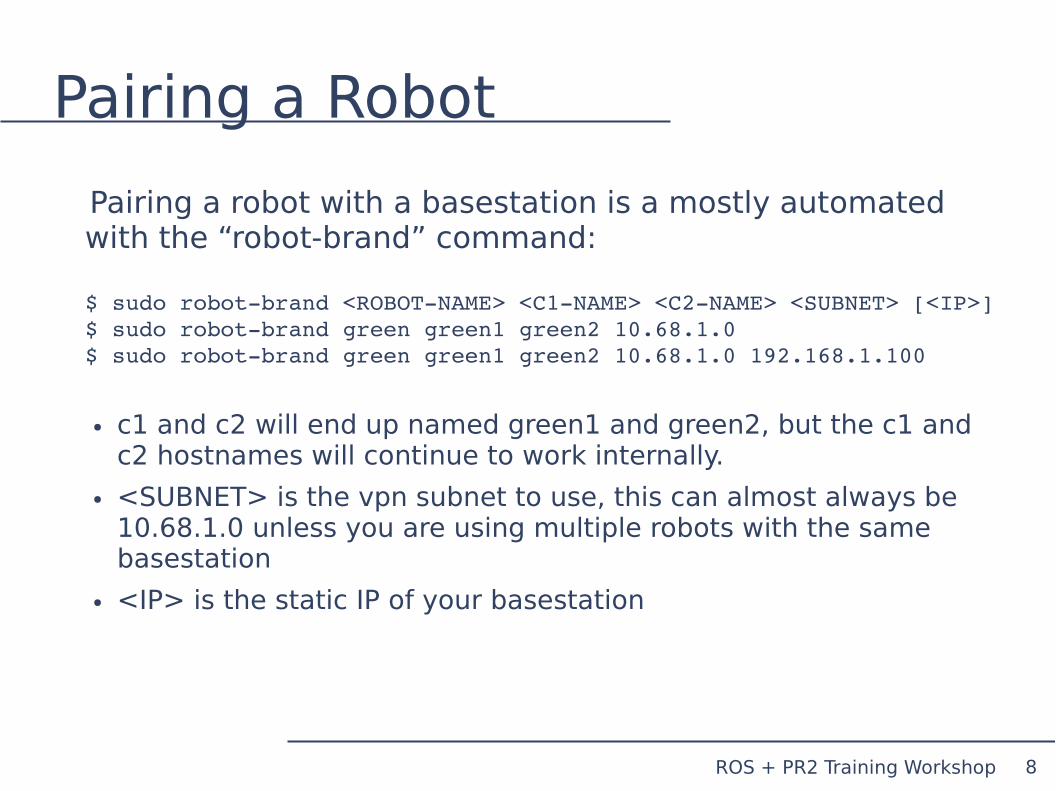
Pairing a Robot
Pairing a robot with a basestation is a mostly automated with the “robot-brand” command:
$ sudo robotbrand <ROBOTNAME> <C1NAME> <C2NAME> <SUBNET> [<IP>]$ sudo robotbrand green green1 green2 10.68.1.0$ sudo robotbrand green green1 green2 10.68.1.0 192.168.1.100
● c1 and c2 will end up named green1 and green2, but the c1 and c2 hostnames will continue to work internally.
● <SUBNET> is the vpn subnet to use, this can almost always be 10.68.1.0 unless you are using multiple robots with the same basestation
● <IP> is the static IP of your basestation

9ROS + PR2 Training Workshop
Pairing a robot: forwarding
1.It is convenient (but not necessary) to set up the basestation to forward a specific IP address to the robot computers.
2.Edit the file: /etc/robot-forward.conf:
<C1NAME> 10.68.1.1 <ROBOTIP1><C2NAME> 10.68.1.2 <ROBOTIP2>
green1 10.68.1.1 192.168.1.101 # Static IP setupgreen2 10.68.1.2 192.168.1.102 # Static IP setup
red1 10.68.1.1 dhcp # dhcp setupred2 10.68.1.2 dhcp # dhcp setup
3. NOTE: if using dhcp, the dhcp-server must respect the client-id field and will use the name of the computer as the client-id.
4.To turn on forwarding run:
$sudo robotforward start

10ROS + PR2 Training Workshop
Generating User VPN Keys
1.If you don't want to forward traffic to the robot, you will need to allow users onto the robot VPN network
2.Run:$sudo /etc/openvpn/gen_user_key <NAME>
3.This will create a file: /etc/openvpn/<NAME>.tgz
4.If a user has openvpn set up on their computer, they should be able to untar this file in their openvpn directory and start openvpn

11ROS + PR2 Training Workshop
Using the KVM
1.Plug the basestation into the robot service port
2.Go to: http://10.68.0.91 (or http://10.68.0.92)
3.Choose “Advance Console” and click Launch
4.Let it run “JavaRSM.jnlp”
5.Click the + and login to:● 10.68.0.91, root, changeme● 10.68.0.92, root, changeme
6.Click on the “Remote KVM Console” Tab
7.Click on one of the servers to connect to

12ROS + PR2 Training Workshop
Bagfile Upload Policy
1. Once per day, a cron-job on the robot will push the contents from the robot: “/hwlog” directory to basestation via rsync
2. The basestation will then attempt to send these log-files back to WG for processing
3. If your robot/basestation does not have network access, you will be responsible for doing this step manually.
● Copy the contents of hwlog and the “sendhwlog” python script to another machine with internet access
● Run sendhwlog:
$sudo sendhwlog path /path/to/bagfiles id <wan0 mac address> wg
$sudo sendhwlog path /mnt/disk/bags id 001517b19217 wg
● Make sure to get the id correct

13ROS + PR2 Training Workshop
Where To Get More Help
1.Everything covered here should be mentioned in the PR2 Manual
2.The PR2-documentation website contains additional FAQ information
3.Mailing list:

Practice