Installing Cisco VIM through Cisco VIM Unified Management
70
Installing Cisco VIM through Cisco VIM Unified Management The VIM UM has an UI admin, who has the privilege to manage the UI offering. The Insight UI admin, has the rights to add the right users as Pod administrators. Post bootstrap, the URL for the UI will be: https://br_api:9000. The following topics helps you to install and configure Cisco Virtual Infrastructure Manager with VIM Insight: • Unified Management Dashboard, on page 1 • Pods, on page 2 • Pod Administrator, on page 4 • Unified Management (UM) Administrator, on page 4 • Registering New Pod to Insight , on page 5 • Configuring OpenStack Installation, on page 6 • Post Installation Features for Active Blueprint, on page 61 Unified Management Dashboard When you login as UM admin, you will be redirected to the UM admin Dashboard. Installing Cisco VIM through Cisco VIM Unified Management 1
-
Upload
khangminh22 -
Category
Documents
-
view
4 -
download
0
Transcript of Installing Cisco VIM through Cisco VIM Unified Management

Installing Cisco VIM through Cisco VIM UnifiedManagement
The VIM UM has an UI admin, who has the privilege to manage the UI offering. The Insight UI admin, hasthe rights to add the right users as Pod administrators. Post bootstrap, the URL for the UI will be:https://br_api:9000.
The following topics helps you to install and configure Cisco Virtual InfrastructureManager with VIM Insight:
• Unified Management Dashboard, on page 1• Pods, on page 2• Pod Administrator, on page 4• Unified Management (UM) Administrator, on page 4• Registering New Pod to Insight , on page 5• Configuring OpenStack Installation, on page 6• Post Installation Features for Active Blueprint, on page 61
Unified Management DashboardWhen you login as UM admin, you will be redirected to the UM admin Dashboard.
Installing Cisco VIM through Cisco VIM Unified Management1

The UM dashboard displays the following information about the pods it is currently managing:
Pod Status
• Active - Number of Pods which has health status OK (Example: Mgmt Node health of the pod is good).
• Inactive - Number of Pods whose health status is not good (Example:. Mgmt Node health of the pod isnot good).
• Total number of Pods - Number of Pods registered in the system.
Pod Users
• Total – Total number of users registered who are associated with at-least one Pod.
• Registered – Number of users who have completed the registration process and are associated with at-leastone Pod.
• Active – Number of Online users who are associated with at-least one Pod.
You can see the list of Pod with its Pod name, description, IP address, location, Pod status along with theTotal users and Active users of each pod. You can search for a Pod using Name, IP and location in the searchoption.
If you click Get health of current nodes icon (spin) it does the health check of the Pod.
PodsPods allows you to check the health status (indicated through green and red dot) of the pod respectively.
To fetch the latest health status, click Refresh which is at the upper right corner.
Installing Cisco VIM through Cisco VIM Unified Management2
Installing Cisco VIM through Cisco VIM Unified ManagementPods

• Green dot – Pod is reachable and health is good.
• Red dot – Pod is not reachable.
Pod UsersThe Pod Users page, gives you the details associated the pod, status (Online or Offline) and their Roles.
UM admin has the right to manage all Pod users in the system. The user with UM admin access can managethe following actions:
• Revoke User’s permission from a specific Pod.
• Delete User from the system.
Revoking UserUM admin revokes the user’s permission from a Pod by clicking (undo) icon. If the user is the only user witha Full-Pod-Access role for that particular Pod, then the revoke operation is not permitted. In this case, anotheruser is granted with a Full-Pod-Access role for that Pod and then proceeds with revoking the old user.
If the user is revoked from the last associated Pod, then the user is deleted from the system.Note
Deleting UsersUM admin can delete any user from the system by clicking X from an Action column. The delete operationis not permitted if the user has Full-Pod-Access. In, such case another user is granted with Full-Pod-Accessrole for that Pod and then proceed with deleting the old user. UM admin must revoke respective permissionfirst and then proceed further.
Installing Cisco VIM through Cisco VIM Unified Management3
Installing Cisco VIM through Cisco VIM Unified ManagementPod Users

Pod AdministratorPod admins are the users who has the permission to register new Pods in the system. UM admin can add anynumber of Pod admins in the system.
Adding Pod Admin
Step 1 Log in as UI Admin and navigate to POD Administrator page.Step 2 Click Add Pod Administrator .Step 3 Enter the Email ID of the user.
• If email is already registered, then Username gets populated automatically.
• If not registered, an email is sent to the user email ID.
Step 4 Navigate to https://br_api :9000.Step 5 Enter the Email ID and the Password of the Pod Admin and click Login as Pod User, it redirects to the landing page.
Now the Pod admin can register a new Pod.
Revoking Pod AdminUM admin can revoke Pod admin’s permission anytime. To revoke Pod admin permission for the user, clickundo icon.
You cannot revoke self permission.Note
Unified Management (UM) AdministratorUM admins have the access to the UM profile. Only a UM admin can add another UM admin in the system.There should be at least one UM admin in the system.
Installing Cisco VIM through Cisco VIM Unified Management4
Installing Cisco VIM through Cisco VIM Unified ManagementPod Administrator

Adding UM AdminTo add a UM admin perform the following steps.
Step 1 Log in as UI Admin and navigate to UM Administrator page.Step 2 Click Add UM Administrator.Step 3 Enter the Email ID of the user.
• If email is already registered then Username gets populated automatically.
• If not registered, an email is sent to the user Email ID.
Step 4 Navigate to https://br_api: 9000.Step 5 Enter the Email ID and the Password of the UMAdmin and click Log in as UM admin it will redirect to UM dashboard.
Revoking UM AdminUM admin can revoke another UM admin’s permission. To revoke UM Admin permission for any user, clickundo icon.
You cannot revoke a self’s permission. You can revoke a user if the user is not associated with any pod. After,revoking the user is deleted from the system.
Note
Registering New Pod to InsightFollowing are the steps that are required for UI Admin to register a Pod Admin:
Before you begin
UI Admin has to register a Pod Admin to allow the user to access a pod.
Installing Cisco VIM through Cisco VIM Unified Management5
Installing Cisco VIM through Cisco VIM Unified ManagementAdding UM Admin

Step 1 Log in as UM Administrator, you will be redirected to UM Admin section.Step 2 Navigate to Pod Administrator and click Add Pod Admin.Step 3 Enter the Email ID and the Password of the Pod Admin and click Login as Pod User, it will redirect to landing page.Step 4 Click Add New Pod to register a Pod. Add New Pod popup window appears on the screen.
Step 5 Enter the Add New Pod field values, and click Browse to browse the Root CA certificate and Upload it.Step 6 Click Register to start the Pod registration process starts.
The newly created Pod appears on the Landing Page.
Configuring OpenStack InstallationBefore you begin
You need to create a Blueprint (B or C Series) to initiate OpenStack Installation through the VIM.
Step 1 In the Navigation pane, choose Pre-Install > Blueprint Setup.Step 2 To create a B Series Blueprint:
1. On the Blueprint Initial Setup page of the Cisco VIM Insight, complete the following fields:
Installing Cisco VIM through Cisco VIM Unified Management6
Installing Cisco VIM through Cisco VIM Unified ManagementConfiguring OpenStack Installation

DescriptionName
Enter blueprint configuration name.Blueprint Name field
Choose one of the following platform types:
• B-Series (By default) choose B series for this section.
• C-Series
Platform Type drop-down list
Choose one of the following tenant network types:
• Linuxbridge/VXLAN
• OVS/VLAN
Tenant Network drop-down list
Choose one of the following pod types:
• Fullon(By Default)
• Micro
• UMHC
UMHC pod type is only supported forOVS/VLAN tenant type.
Note
Pod type micro is supported for OVS/VLAN,ACI/VLAN, VPP/VLAN.
Note
Pod Type drop-down list
Installing Cisco VIM through Cisco VIM Unified Management7
Installing Cisco VIM through Cisco VIM Unified ManagementConfiguring OpenStack Installation

DescriptionName
Choose one of the following Ceph types:
• Dedicated
• Central (By Default) - Not supported in Production
Ceph Mode drop-down list
Swiftstack, LDAP, Syslog Export Settings, Install Mode,TorSwitch Information, TLS, Nfvmon, PodName, VMTP,Nfvbench, Auto Backup, Heat, Keystone v3, Enable EscPriv.
If any one is selected, the corresponding section is visiblein various Blueprint sections.
By default all features are disabled except Auto Backup.
Optional Features and Services Checkbox
Click Browse button to import the existing yaml file.
If you have an existing B Series YAML file you can usethis feature to upload the file.
Insight will automatically fill in the fields and if anymandatory field is missed then it gets highlighted in therespective section.
Import Existing YAML file
2. Click Physical Setup to navigate to theRegistry Setup configuration page. Fill in the following details for RegistrySetup:
DescriptionName
User-Name for Registry (Mandatory).Registry User Name text field
Password for Registry (Mandatory).Registry Password text field
Email ID for Registry (Mandatory).Registry Email text field
Once all mandatory fields are filled the Validation Check Registry Page will show a Green Tick.
3. Click UCSM Common Tab and complete the following fields:
Installing Cisco VIM through Cisco VIM Unified Management8
Installing Cisco VIM through Cisco VIM Unified ManagementConfiguring OpenStack Installation

DescriptionName
By default value is Admin.User name disabled field
Enter Password for UCSM Common (Mandatory).Password text field
Enter IP Address for UCSM Common(Mandatory).UCSM IP text field
Enter the resource prefix(Mandatory).Resource Prefix text field
Choose one of the following types:
• NFVI (Default)
• Media
QOS Policy Type drop-down
Select the Max VF Count.
<1-54> Maximum VF count 54, default is 20.
If VF performance is enabled we recommend you to keepMAX_VF_COUNT to 20 else may fail on some VICslike 1240.
Max VF Count text field
Default is false. Set to true to apply adaptor policy at VFlevel.
Enable VF Performance optional checkbox
Default is false.Enable Prov FI PIN optional checkbox
Installing Cisco VIM through Cisco VIM Unified Management9
Installing Cisco VIM through Cisco VIM Unified ManagementConfiguring OpenStack Installation

DescriptionName
Enables JBOD mode to be set on disks. Applicable onlyif you have RAID controller configured on Storage C240Rack servers.
MRAID-CARD optional checkbox
Visible when Tenant Network type is OVS/VLANEnable UCSM Plugin optional checkbox
Visible only when UCSM Plugin is enabled. If UCSMPlugin is disabled then this option is set to False.
Enable QoS Policy optional checkbox
Visible only when UCSM Plugin is enabled.Enable QOS for Port Profile optional checkbox
Visible when UCSM Plugin is enabled. Enter the valuesfor network and vlans ranges. Grid can handle all CRUDoperations like Add, Delete, Edit and, Multiple Delete.
SRIOV Multi VLAN Trunk optional grid
4. Click Networking to advance to the networking section of the Blueprint:
DescriptionName
Enter the domain name (Mandatory).Domain Name field
If your configuration uses an HTTP proxy server, enterthe IP address of the server.
HTTP Proxy Server field
Installing Cisco VIM through Cisco VIM Unified Management10
Installing Cisco VIM through Cisco VIM Unified ManagementConfiguring OpenStack Installation

DescriptionName
If your configuration uses an HTTPS proxy server, enterthe IP address of the server.
HTTPS Proxy Server field
Specifies the list of IP Address with Mask.IP Tables on Management Pods
Enter a maximum of four and minimum of one IPv4 and/or IPv6 addresses in the table.
NTP Server
Enter a maximum of three and minimum of one IPv4and/or IPv6 addresses.
Domain Name Server
Installing Cisco VIM through Cisco VIM Unified Management11
Installing Cisco VIM through Cisco VIM Unified ManagementConfiguring OpenStack Installation

DescriptionName
Network table
Installing Cisco VIM through Cisco VIM Unified Management12
Installing Cisco VIM through Cisco VIM Unified ManagementConfiguring OpenStack Installation

DescriptionName
Network table is pre-populated with segments. To addNetworks you can either clear all the table using DeleteAll or click Edit icon for each segment and fill in thedetails.
You can add, edit, or delete network information in thetable:
• Click + to enter new entries (networks) to the table.
• Specify the following fields in the Edit Entry toNetworks dialog box.
DescriptionName
Enter the VLAN ID.VLAN field
For Segment - Provider, theVLAN ID value is always"none".
You can select any onesegment from the dropdownlist.
Segment drop-down list
• API
• Management/Provision
• Tenant
• CIMC
• Storage
• External
Installing Cisco VIM through Cisco VIM Unified Management13
Installing Cisco VIM through Cisco VIM Unified ManagementConfiguring OpenStack Installation

DescriptionName
DescriptionName
• Provider (optional)
Some segmentsdo not needsome of thevalues listed inthe precedingpoints.
Note
Enter the IPv4 address forthe subnet.
Subnet field
Enter IPv6 address. Thisfield will be available onlyfor Management provisionand API.
IPv6 Subnet field
Enter the IPv4 address forthe Gateway.
Gateway field
Enter IPv6 gateway. Thisfield will only availableonly for Managementprovision and API network.
IPv6 Gateway field
Enter the pool informationin the required format, forexample: 10.30.1.1 or10.30.1.1 to 10.30.1.12
Pool field
Enter the pool informationin the required format, forexample:10.1.1.5-10.1.1.10,10.2.1.5-10.2.1.10
This field is only availablefor the Mgmt/Provision.
IPv6 Pool field
Click Save.
5. On the Servers and Roles page of the Cisco VIM Suite wizard, you will see a pre-populated table filled with Roles:Control, Compute and Block Storage (Only if CEPH Dedicated is selected in Blueprint Initial Setup.
Installing Cisco VIM through Cisco VIM Unified Management14
Installing Cisco VIM through Cisco VIM Unified ManagementConfiguring OpenStack Installation

DescriptionName
Enter the username of the server.Server User Name field
Default value is false. You can set it as true or false.Disable Hyperthreading
Installing Cisco VIM through Cisco VIM Unified Management15
Installing Cisco VIM through Cisco VIM Unified ManagementConfiguring OpenStack Installation

DescriptionName
Enter the Cobbler details in the following fields:
DescriptionName
The default value is 45 min.
This is an optionalparameter. Timeout isdisplayed in minutes, andits value ranges from 30 to120.
Cobbler Timeout field
Kickstart file for StorageNode.
Block Storage Kickstartfield
Enter the Admin Password.Password should beAlphanumeric. Passwordshould contain minimum 8characters andmaximum of32 characters.
Admin Password Hashfield
Enter the cobbler usernameto access the cobbler server.
Cobbler Username field
Kickstart file for ControlNode.
Control Kickstart field
Kickstart file for ComputeNode.
Compute Kickstart field
Enter the admin usernameof the Cobbler.
CobblerAdminUsernamefield
Cobbler
Installing Cisco VIM through Cisco VIM Unified Management16
Installing Cisco VIM through Cisco VIM Unified ManagementConfiguring OpenStack Installation

DescriptionName
Add Entry to Servers and Roles
Installing Cisco VIM through Cisco VIM Unified Management17
Installing Cisco VIM through Cisco VIM Unified ManagementConfiguring OpenStack Installation

DescriptionName
Click Edit or + to add a new server and role to the table.
Enter a server nameServer Name
Choose Blade or Rack fromthe drop-down list.
Server Type drop-downlist
The Rack ID for the server.Rack ID
Enter a Chassis ID.Chassis ID
Enter a Rack Unit ID.If Rack is chosen, theRackUnit ID field is displayed.
Enter a Blade ID.If Blade is chosen, theBlade ID field is displayed.
If Server type is Blade thenselect Control and
Select the Role from thedrop-down list.
Compute. If server is Rackthen select Block Storage.
It is an optional field but ifprovided for one server then
Management IP
it is mandatory to provide
Installing Cisco VIM through Cisco VIM Unified Management18
Installing Cisco VIM through Cisco VIM Unified ManagementConfiguring OpenStack Installation

DescriptionName
details for other Servers aswell.
Enter theManagement IPv6Address.
Management IPv6
Click Save.
6. Click ToR Switch checkbox in Blueprint Initial Setup to enable the TOR SWITCH configuration page. It is anOptional section in Blueprint Setup but once all the fields are filled it is a part of the Blueprint.
DescriptionName
Enabling this checkbox, changes the configure ToR sectionfrom false to true.
Configure ToR optional checkbox.
Installing Cisco VIM through Cisco VIM Unified Management19
Installing Cisco VIM through Cisco VIM Unified ManagementConfiguring OpenStack Installation

DescriptionName
ToR Switch Information mandatory table.
Installing Cisco VIM through Cisco VIM Unified Management20
Installing Cisco VIM through Cisco VIM Unified ManagementConfiguring OpenStack Installation

DescriptionName
Click (+) to add information for ToR Switch.
DescriptionName
ToR switch hostname.Hostname
ToR switch username.Username
Tor switch password.Password
ToR switch SSH IP Address.SSH IP
ToR switch ssn num.SSN Num
Peer Management IP. You donot define if there is no peer.
VPC Peer Keepalive
Do not define if peer isabsent.
VPC Domain
Installing Cisco VIM through Cisco VIM Unified Management21
Installing Cisco VIM through Cisco VIM Unified ManagementConfiguring OpenStack Installation

DescriptionName
VPC Peer Port Info Interface for vpc peer ports.
Management interface ofmanagement node.
BR Management Port Info
Port channel number formanagement interface ofmanagement node.
BR Management PO Info
ClickSave.
Enter the Port Channel input.Port Channel field.On clicking save button, Add ToR Info Connectedto Fabric field will be visible.
Enter the Port number.Switch Name field.
7. ClickOpenStack Setup tab to advance to the OpenStack Setup Configuration page. On theOpenStack Setup pageof the Cisco VIM Insight wizard, complete the following fields:
DescriptionName
Fill in the following details:
Enter IP address of ExternalVIP.
External VIPAddress field
Enter IPv6 address ofExternal VIP.
External VIPAddress IPv6field
Enter the Router ID for HA.Virtual Router ID field
Enter IPv6 address of InternalIP.
Internal VIP Address IPv6field
Enter IP address of InternalVIP.
Internal VIP Address field
HA Proxy
Installing Cisco VIM through Cisco VIM Unified Management22
Installing Cisco VIM through Cisco VIM Unified ManagementConfiguring OpenStack Installation

DescriptionName
Pre-populated field values. This option would always be true.
adminAdmin Username field
adminAdmin Tenant Name field
Keystone
Installing Cisco VIM through Cisco VIM Unified Management23
Installing Cisco VIM through Cisco VIM Unified ManagementConfiguring OpenStack Installation

DescriptionName
LDAP (Only if Keystonev3 is enabled)
This option is only available with Keystonev3
Note
Installing Cisco VIM through Cisco VIM Unified Management24
Installing Cisco VIM through Cisco VIM Unified ManagementConfiguring OpenStack Installation
DescriptionName
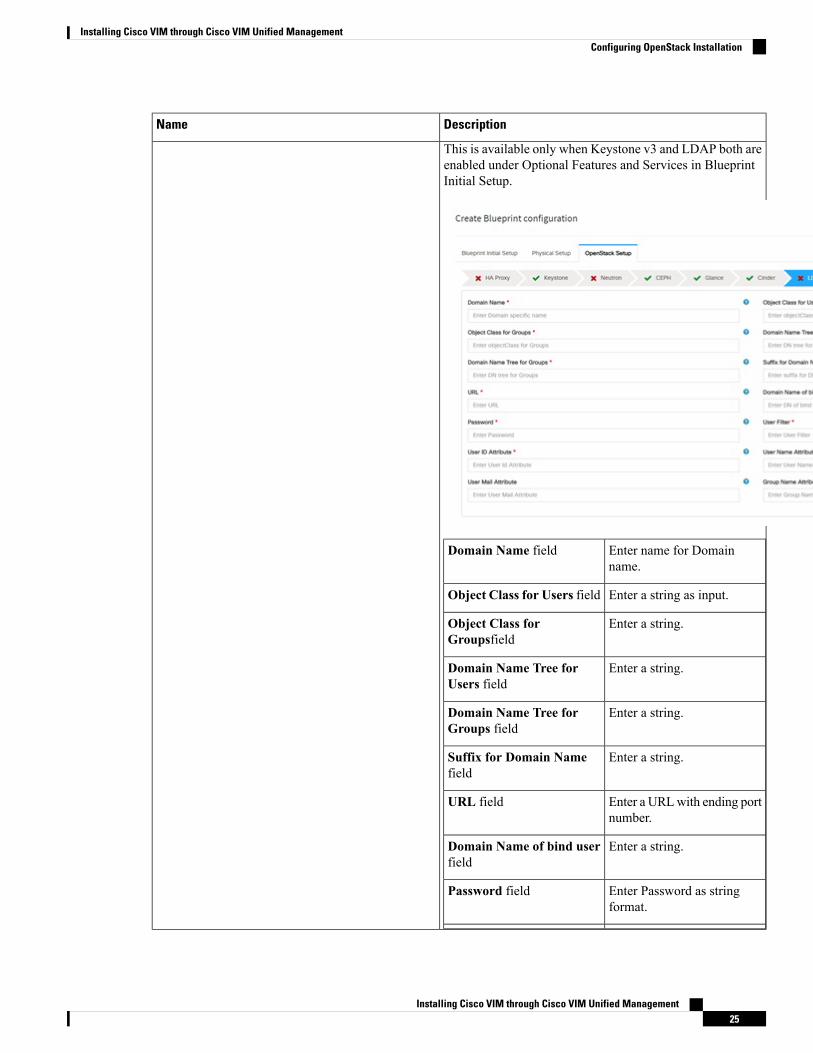
This is available only when Keystone v3 and LDAP both areenabled under Optional Features and Services in BlueprintInitial Setup.
Enter name for Domainname.
Domain Name field
Enter a string as input.Object Class for Users field
Enter a string.Object Class forGroupsfield
Enter a string.Domain Name Tree forUsers field
Enter a string.Domain Name Tree forGroups field
Enter a string.Suffix for Domain Namefield
Enter a URLwith ending portnumber.
URL field
Enter a string.Domain Name of bind userfield
Enter Password as stringformat.
Password field
Installing Cisco VIM through Cisco VIM Unified Management25
Installing Cisco VIM through Cisco VIM Unified ManagementConfiguring OpenStack Installation

DescriptionName
User Filter field Enter filter name as string.
Enter a string.User ID Attribute field
Enter a string.User Name Attribute field
Enter a string.User Mail Attribute field
Enter a string.GroupNameAttribute field
Installing Cisco VIM through Cisco VIM Unified Management26
Installing Cisco VIM through Cisco VIM Unified ManagementConfiguring OpenStack Installation

DescriptionName
Neutron
Installing Cisco VIM through Cisco VIM Unified Management27
Installing Cisco VIM through Cisco VIM Unified ManagementConfiguring OpenStack Installation

DescriptionName
Neutron fields would change on the basis ofTenant NetworkType Selection from Blueprint Initial Setup. Following arethe options available for Neutron for OVS/VLAN:
Auto Filled based on theTenant Network Type
Tenant Network Type field
selected in the BlueprintInitial Setup page.
Auto Filled based on theTenant Network Type
Mechanism Drivers field
selected in Blueprint InitialSetup page.
Auto filled with the Computeyou added in Server andRoles.
NFV Hosts field
If you select All in thissection NFV_HOSTS: ALLwill be added to the Blueprintor you can select oneparticular compute. For Eg:
NFV_HOSTS:compute-server-1,compute-server-2.
List of ranges separated bycomma form start:end.
Tenant VLAN Ranges field
List of ranges separated bycomma form start:end.
Provider VLAN Rangesfield
2M or 1GVM Hugh Page Size(available forNFV_HOSTSoption) field
Installing Cisco VIM through Cisco VIM Unified Management28
Installing Cisco VIM through Cisco VIM Unified ManagementConfiguring OpenStack Installation

DescriptionName
Enable Jumbo Frames field Enable the checkbox
For Tenant Network Type Linux Bridge everything remainsthe same but Tenant VLAN Ranges will be removed.
Installing Cisco VIM through Cisco VIM Unified Management29
Installing Cisco VIM through Cisco VIM Unified ManagementConfiguring OpenStack Installation

DescriptionName
CEPH
Installing Cisco VIM through Cisco VIM Unified Management30
Installing Cisco VIM through Cisco VIM Unified ManagementConfiguring OpenStack Installation

DescriptionName
1. 1. When Object Storage Backend is selected Central inblueprint initial setup.
By default Central.CEPH Mode
Enter Cluster ID.Cluster ID
Enter Monitor Host for CEPHMonitor Host
EnterMonitorMembers for CEPHMonitor Members
Enter Secret UUID for CEPHSecret UUID
Drop down selection. You canchoose CEPH or local.
NOVA Boot from
Enter NOVA RBD Pool (default'sto vms)
NOVARBDPOOL
Optional, needed for Central Cephand when mgmt network is notroutable
CEPH NAT
2. When Object Storage Backend is selected Dedicated inblueprint initial setup.
• CEPH Mode: By default Dedicated.
• NOVABoot: From drop down selection you can chooseCEPH or local.
3. When Object Storage Backend is selected NetApp inblueprint initial setup.
Installing Cisco VIM through Cisco VIM Unified Management31
Installing Cisco VIM through Cisco VIM Unified ManagementConfiguring OpenStack Installation

DescriptionName
1. When Object Storage Backend is selected Central inblueprint initial setup.
GLANCE
By default Populated for CEPH Dedicated with VolumeDriver value as CEPH.
CINDER
Installing Cisco VIM through Cisco VIM Unified Management32
Installing Cisco VIM through Cisco VIM Unified ManagementConfiguring OpenStack Installation

DescriptionName
VMTP
VMTP optional section will only be visible onceVMTP is selected from Blueprint Initial Setup.
Installing Cisco VIM through Cisco VIM Unified Management33
Installing Cisco VIM through Cisco VIM Unified ManagementConfiguring OpenStack Installation

DescriptionName
Check one of the check boxes to specify a VMTP network:
• Provider Network
• External Network
For the Provider Network complete the following:
Enter the name for theexternal network.
Network Name field
Enter the Subnet for ProviderNetwork.
Subnet field
Enter the starting floatingIPv4 address.
Network IP Start field
Enter the ending floatingIPv4 address.
Network IP End field
Enter the IPv4 address for theGateway.
Network Gatewayfield
Enter the DNS server IPv4address.
DNS Server field
Enter the segmentation ID.Segmentation ID field
For External Network fill in the following details:
Installing Cisco VIM through Cisco VIM Unified Management34
Installing Cisco VIM through Cisco VIM Unified ManagementConfiguring OpenStack Installation

DescriptionName
Network Name field Enter the name for theexternal network.
Enter the Subnet for ExternalNetwork.
Subnet field
Enter the starting floatingIPv4 address.
Network IP Start field
Enter the ending floatingIPv4 address.
Network IP End field
Enter the IPv4 address for theGateway.
Network Gateway field
Enter the DNS server IPv4address.
DNS Server field
TLS has two options:
• External LB VIP FQDN - -Text field.
• External LB VIP TLS True/False. By default thisoption is false.
TLS This optional section will only be visible onceTLS is selected from Blueprint Initial Setup Page.
Following are the field descriptions for VIM Admins:
• User Name - Text field.
• Password -Password field. Admin hash password shouldalways start with $6.
Under the OpenStack setup tab,Vim_admins tab willbe visible only when Vim_admins is selected fromthe Optional Features & Services under theBlueprint Initial setup tab
Installing Cisco VIM through Cisco VIM Unified Management35
Installing Cisco VIM through Cisco VIM Unified ManagementConfiguring OpenStack Installation

DescriptionName
Following are the options that needs to be filled forSwiftStack:
IP address of PAC(proxy-account-container)endpoint.
Cluster End Point field
Admin user for swift toauthenticate in keystone.
Admin User field
The service tenantcorresponding to theAccount-Container used bySwiftstack.
Admin Tenant field
Reseller_prefix as configuredfor KeysoneAuth,AuthTokensupport in Swiftstack E.gKEY_
Reseller Prefix field
swiftstack_admin_passwordAdmin Password field
http or httpsProtocol
SwiftStack optional section will be visible onceSwiftStack is selected from Blueprint Initial SetupPage. SwiftStack is only supported with KeyStonev2. If you select Keystonev3, swiftstack will not beavailable for configuration.
8. If Syslog Export or NFVBENCH is selected in Blueprint Initial Setup Page, the Services Setup page will beenabled for the user to view. Following are the options under Services Setup Tab:
Installing Cisco VIM through Cisco VIM Unified Management36
Installing Cisco VIM through Cisco VIM Unified ManagementConfiguring OpenStack Installation

DescriptionName
Following are the options for Syslog Settings:
Enter Syslog IP address.Remote Host
Only UDP is supported.Protocol
Defaults to local5.Facility
Defaults to debug.Severity
Defaults to ELK.Clients
Defaults to 514 but can bemodified by the User.
Port
Syslog Export
Installing Cisco VIM through Cisco VIM Unified Management37
Installing Cisco VIM through Cisco VIM Unified ManagementConfiguring OpenStack Installation

DescriptionName
NFVBENCH enable checkbox which by default is false.
Add ToR information connected to switch:
• Select a TOR Switch and enter the Switch name.
• Enter the port number. For example:eth1/5. VTEP VLANS(mandatory and needed only for VXLAN): Enter 2 differentVLANs for VLAN1 and VLAN2
• NIC Ports: INT1 and INT2 optional input. Enter the 2 portnumbers of the 4-port 10G Intel NIC at the managementnode used for NFVBench.
NFVBENCH
Enable the checkbox to set it as True. By default it is False.ENABLE_ESC_PRIV
Step 3 To create a C Series Blueprint:
1. On the Blueprint Initial Setup page of the Cisco VIM Insight, complete the following fields:
Installing Cisco VIM through Cisco VIM Unified Management38
Installing Cisco VIM through Cisco VIM Unified ManagementConfiguring OpenStack Installation

DescriptionName
Enter the name for the blueprint configuration.Blueprint Name field.
Choose one of the following platform types:
• B-Series (By default)• C-Series ( Select C Series)
Platform Type drop-down list
Choose one of the following tenant network types:
• Linux Bridge/VXLAN
• OVS/VLAN
• VTS/VLAN
• VPP/VLAN
• ACI/VLAN
when VTS/VLAN or ACI/VLAN is selectedthen respective tabs are available on Blueprintsetup.
Note
Tenant Network drop-down list
Installing Cisco VIM through Cisco VIM Unified Management39
Installing Cisco VIM through Cisco VIM Unified ManagementConfiguring OpenStack Installation

DescriptionName
Choose one of the following pod type :
• Fullon(By Default)
• Micro
• UMHC
UMHC pod type is only supported forOVS/VLAN tenant type.
Note
Pod type micro is supported for OVS/VLAN,ACI/VLAN,VPP/VLAN.
Note
Pod Type drop-down list
Choose one of the following Ceph types:
• Dedicated (By Default)• Central. Central is not supported in Production
Ceph Mode drop-down list
Swiftstack, LDAP, Syslog Export Settings, Install Mode,TorSwitch Information, TLS, NFVMON, Pod Name,VMTP, NFVBench, Autbackup, Heat, Keystone v3,Enable Esc Priv.
If any one is selected, the corresponding section is visiblein various Blueprint sections.
By default all features are disabled except Auto Backup.
Optional and Services Features checkbox
If you have an existing C Series YAML file you can usethis feature to upload the file.
Insight will automatically fill in the fields and any missedmandatory field will be highlighted in the respectivesection.
Import Existing YAML file
2. Click Physical Setup to advance to the Registry Setup configuration page. Fill in the following details for RegistrySetup:
DescriptionName
Installing Cisco VIM through Cisco VIM Unified Management40
Installing Cisco VIM through Cisco VIM Unified ManagementConfiguring OpenStack Installation

User-Name for Registry (Mandatory).Registry User Name text field
Password for Registry (Mandatory).Registry Password text field
Email ID for Registry (Mandatory).Registry Email text field
Once all the mandatory fields are filled the Validation Check Registry Page will be changed to a Green Tick.
3. Click CIMC Common Tab and complete the following fields:
DescriptionName
By default value is Admin.User Name disabled field
Enter Password for UCSM Common (Mandatory).Password text field
4. Click Networking to advance to the networking section of the Blueprint.
Installing Cisco VIM through Cisco VIM Unified Management41
Installing Cisco VIM through Cisco VIM Unified ManagementConfiguring OpenStack Installation

DescriptionName
Enter the domain name. (Mandatory)Domain Name field
If your configuration uses an HTTP proxy server, enterthe IP address of the server.
HTTP Proxy Server field
If your configuration uses an HTTPS proxy server, enterthe IP address of the server.
HTTPS Proxy Server field
Specifies the list of IP Address with Mask.IP Tables on Management Pods
Enter a maximum of four and minimum of one IPv4and/or IPv6 addresses in the table.
NTP Servers field
Enter a maximum of three and minimum of one IPv4and/or IPV6 addresses.
Domain Name Servers field
Installing Cisco VIM through Cisco VIM Unified Management42
Installing Cisco VIM through Cisco VIM Unified ManagementConfiguring OpenStack Installation

DescriptionName
Networks table
Installing Cisco VIM through Cisco VIM Unified Management43
Installing Cisco VIM through Cisco VIM Unified ManagementConfiguring OpenStack Installation

DescriptionName
Network table is pre-populated with Segments. To addNetworks you can either clear all the table with Deleteall or click edit icon for each segment and fill in thedetails.
You can add, edit, or delete network information in thetable.
• Click Add (+) to add new entries (networks) to thetable.
• Specify the following fields in the Edit Entry toNetworks dialog:
DescriptionName
Enter the VLAN ID.VLAN field
For Segment - Provider, theVLAN ID value is 'none'.
When you add/edit newsegment then following
Segment drop-down list
segments types areavailable in the form ofdropdown list and you canselect only one.
• API
• Management/provision
• Tenant
• Storage
Installing Cisco VIM through Cisco VIM Unified Management44
Installing Cisco VIM through Cisco VIM Unified ManagementConfiguring OpenStack Installation

DescriptionName
• External
• Provider
• ACIINFRA
Aciinfra segmentis available onlywhenACI/VLANtenant type isselected)Depending uponthe segment someof the entriesbelow are notneeded. Pleaserefer to theexample file inopenstack-configsdir for details.
Note
Enter the IPv4 address forthe subnet.
Subnet field
Enter IPv6 Address. Thisfield will be available onlyfor Management provisionand API
IPv6 Subnet field
Enter the IPv4 address forthe Gateway.
Gateway field
Enter the IPv6 address forthe gateway. This willsupport for API andmanagement provision.
Gateway IPv6 field
Enter the pool informationin the required format, forexample:10.1.1.5-10.1.1.10,10.2.1.5-10.2.1.10
This field is available onlyfor the Mgmt/Provision,Storage, and Tenantsegments.
Pool field
Enter the pool informationin the required format. Forexample:10.1.1.5-10.1.1.10,10.2.1.5-10.2.1.10
IPv6 Pool field
Installing Cisco VIM through Cisco VIM Unified Management45
Installing Cisco VIM through Cisco VIM Unified ManagementConfiguring OpenStack Installation
DescriptionName
Click Save.
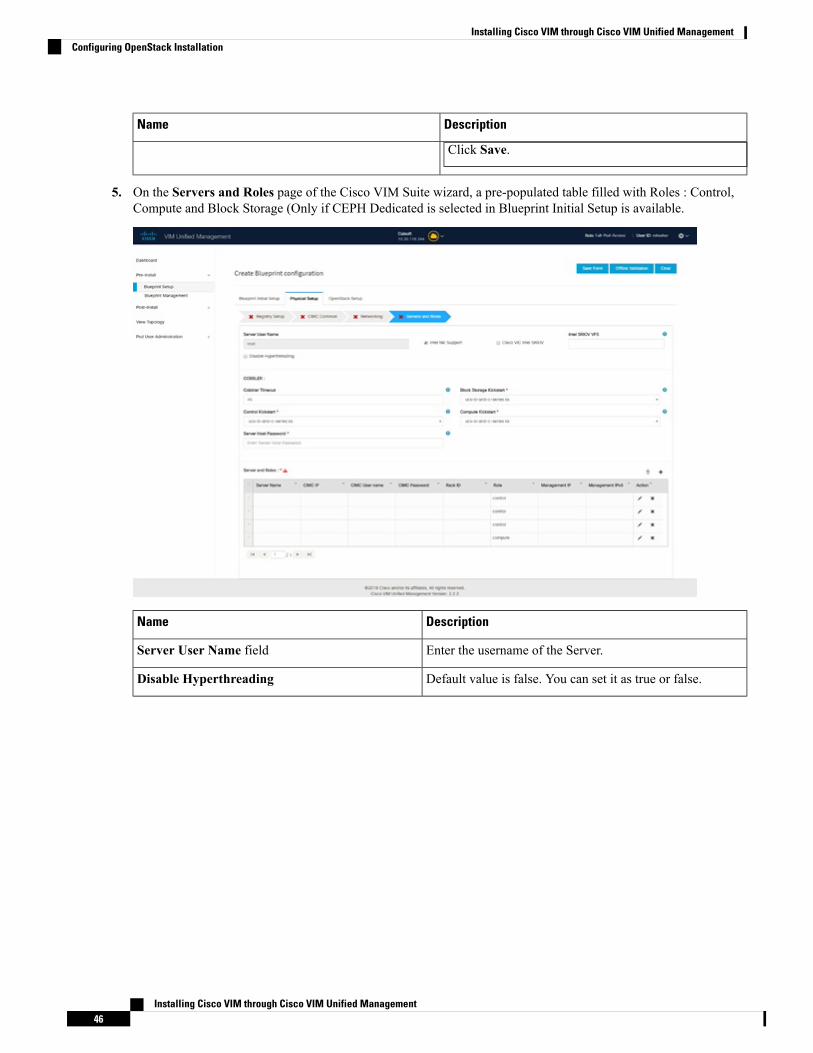
5. On the Servers and Roles page of the Cisco VIM Suite wizard, a pre-populated table filled with Roles : Control,Compute and Block Storage (Only if CEPH Dedicated is selected in Blueprint Initial Setup is available.
DescriptionName
Enter the username of the Server.Server User Name field
Default value is false. You can set it as true or false.Disable Hyperthreading
Installing Cisco VIM through Cisco VIM Unified Management46
Installing Cisco VIM through Cisco VIM Unified ManagementConfiguring OpenStack Installation

DescriptionName
Enter the Cobbler details in the following fields:
DescriptionName
The default value is 45 min.
This is an optional parameter.Timeout is displayed inminutes, and its value rangesfrom 30 to 120.
Cobbler Timeout field
Kickstart file for StorageNode.
Block Storage Kickstartfield
Enter the Admin Password.Password should beAlphanumeric. Passwordshould contain minimum 8characters and maximum of32 characters.
AdminPasswordHash field
Enter the cobbler usernameto access the cobbler server.
Cobbler Username field
Kickstart file for ControlNode.
Control Kickstart field
Kickstart file for ComputeNode.
Compute Kickstart field
Enter the admin username ofthe Cobbler.
Cobbler Admin Usernamefield
Cobbler
Installing Cisco VIM through Cisco VIM Unified Management47
Installing Cisco VIM through Cisco VIM Unified ManagementConfiguring OpenStack Installation
DescriptionName
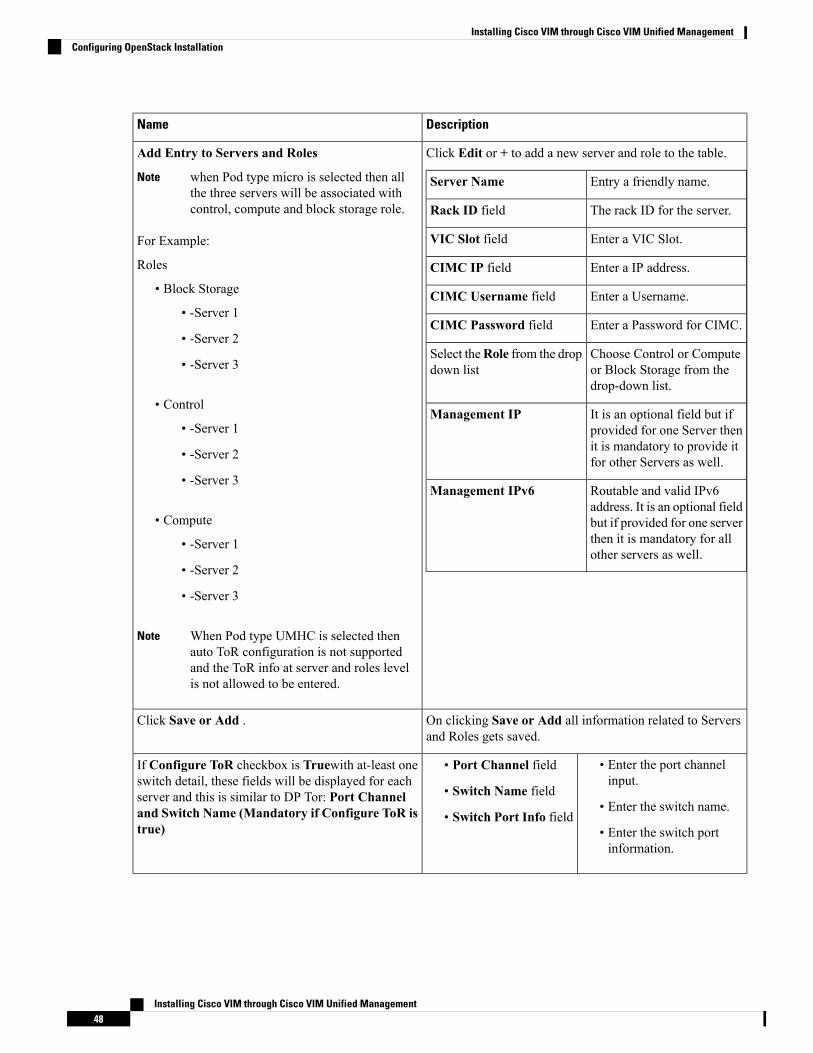
Click Edit or + to add a new server and role to the table.
Entry a friendly name.Server Name
The rack ID for the server.Rack ID field
Enter a VIC Slot.VIC Slot field
Enter a IP address.CIMC IP field
Enter a Username.CIMC Username field
Enter a Password for CIMC.CIMC Password field
Choose Control or Computeor Block Storage from thedrop-down list.
Select theRole from the dropdown list
It is an optional field but ifprovided for one Server thenit is mandatory to provide itfor other Servers as well.
Management IP
Routable and valid IPv6address. It is an optional fieldbut if provided for one serverthen it is mandatory for allother servers as well.
Management IPv6
Add Entry to Servers and Roles
when Pod type micro is selected then allthe three servers will be associated withcontrol, compute and block storage role.
Note
For Example:
Roles
• Block Storage
• -Server 1
• -Server 2
• -Server 3
• Control
• -Server 1
• -Server 2
• -Server 3
• Compute
• -Server 1
• -Server 2
• -Server 3
When Pod type UMHC is selected thenauto ToR configuration is not supportedand the ToR info at server and roles levelis not allowed to be entered.
Note
On clicking Save or Add all information related to Serversand Roles gets saved.
Click Save or Add .
• Enter the port channelinput.
• Enter the switch name.
• Enter the switch portinformation.
• Port Channel field
• Switch Name field
• Switch Port Info field
If Configure ToR checkbox is Truewith at-least oneswitch detail, these fields will be displayed for eachserver and this is similar to DP Tor: Port Channeland Switch Name (Mandatory if Configure ToR istrue)
Installing Cisco VIM through Cisco VIM Unified Management48
Installing Cisco VIM through Cisco VIM Unified ManagementConfiguring OpenStack Installation

DescriptionName
• Enter the port channelinput.
• Enter the switch name.
• Enter the switch portinformation.
• Port Channel field
• Switch Name field
• Switch Port Info field
DP ToR (Only for Control and Compute) : Mandatoryif Intel NIC and Configure TOR is True.
• Enter the switch name.
• Enter the switch portinformation.
• Switch Name field
• Switch Port Info field
SRIOV TOR INFO (Only for Compute Nodes). It ismandatory in server and roles if Intel NIC andConfigure TOR is True. Switch Name (Mandatoryif Configure ToR is true). This field appears onlywhen Intel NIC support is true, as Auto TOR configis not supported in VIC_NIC combo
For SRIOV support for Intel NIC. By Default, SRIOVsupport is disabled. To enable, define a value in the range #* 1-32 when INTEL_NIC_SUPPORT is set True (X710MaxVFs = 32) # * 1-63 when CISCO_VIC_INTEL_SRIOV isset True (X520 Max VFs = 63)
Intel SRIOV VFS (valid for Intel NIC testbeds) andcan be integer.
In some cases the # of Physical SRIOV port needed is 4; tomeet that requirement, define the following: # this is optional,if nothing is defined code will assume it to be 2; the only 2integer values this parameter # takes is 2 or 4 and is truewhen INTEL_NIC_SUPPORT is True andINTEL_SRIOV_VFS is valid
INTEL_SRIOV_PHYS_PORTS (valid for Intel NICtest beds) and can be of value 2 or 4 (default is 2)
If all mandatory fields are filled click Save or Add to addinformation on Servers and Roles.
Click Save or Add .
Default value is false. You can set it as true or false.Disable Hyperthreading
Click Save
Maximum two ToR info needs to be configured for each connection type on each node (control, computeand block_storage node).
Note
If pod type UMHC is selected then CISCO_VIC_INTEL_SRIOV is enabled to be TRUE.Note
For Tenant type ACI/VLAN, port channel for each ToR port will not be available in servers and roles, asAPIC will automatically assign port-channel numbers. Also, for ACI in full on mode you can select IntelNIC Support in the “Servers and Roles” section.
Note
6. Click ToR Switch checkbox in Blueprint Initial Setup to enable the TOR SWITCH configuration page. It is anOptional section in Blueprint Setup but once all the fields are filled in then it will become a part of the Blueprint.
Installing Cisco VIM through Cisco VIM Unified Management49
Installing Cisco VIM through Cisco VIM Unified ManagementConfiguring OpenStack Installation

DescriptionName
Enabling this checkbox, changes the configure ToR section fromfalse to true.
Configure tor is true then ToR switch info maps inservers
Note
Configure ToR optional checkbox.
If UMHC is selected as podtype,configure TOR is not allowed.
Note
Click (+) to add information for ToR Switch.
DescriptionName
ToR switch name.Name
ToR switch username.Username
ToR switch password.Password
ToR switch SSH IP.SSH IP
ToR switch ssn num.SSN Num
Peer Management IP. Youcannot define if there is no peer.
VPC Peer Keepalive
Cannot define if there is nopeer.
VPC Domain
Interface for vpc peer ports.VPC Peer Port Info
VLAN ids for vpc peer ports(optional).
VPC Peer VLAN Info
Management interface of buildnode.
BR Management Port Info
Port channel number formanagement interface of buildnode.
BR Management PO Info
VLAN id for managementinterface of build node (access).
BR Management VLAN info
ToR Switch Information mandatory table ifyou want to enter ToR information.
Click Save.
When tenant type ACI/VLAN is selected, the TOR switch information table differs and is mandatory.Note
DescriptionName
Enabling this checkbox, changes the configure ToR section fromfalse to true.
Configure tor is true then ToR switch info maps inservers
Note
Configure ToR optional checkbox.
If UMHC is selected as podtype,configure TOR is not allowed.
Note
Installing Cisco VIM through Cisco VIM Unified Management50
Installing Cisco VIM through Cisco VIM Unified ManagementConfiguring OpenStack Installation

DescriptionName
Click (+) to add information for ToR Switch.
DescriptionName
ToR switch name.Name
ToR switch username.Username
ToR switch password.Password
ToR switch SSH IP.SSH IP
ToR switch ssn num.SSN Num
Peer Management IP. Youcannot define if there is no peer.
VPC Peer Keepalive
Cannot define if there is nopeer.
VPC Domain
Interface for vpc peer ports.VPC Peer Port Info
VLAN ids for vpc peer ports(optional).
VPC Peer VLAN Info
Management interface of buildnode.
BR Management Port Info
Port channel number formanagement interface of buildnode.
BR Management PO Info
VLAN id for managementinterface of build node (access).
BR Management VLAN info
ToR Switch Information mandatory table ifyou want to enter ToR information.
Click Save.
When the Tenant type ACI/VLAN is selected, the ToR switch information table differs and is mandatory.Note
Installing Cisco VIM through Cisco VIM Unified Management51
Installing Cisco VIM through Cisco VIM Unified ManagementConfiguring OpenStack Installation

DescriptionName
Is not checked, as by default ACI will configure the ToRs
ToR switch name.Host Name
Enter Peer must be existpair.
VPC Peer keep alive
Enter an integer.VPC Domain
Enter BRmanagement portinfo eg. Eth1/19 ,atleast onepair to be exist.
BRmanagement port info
Entered integer must beunique.
Enter Node ID
Configure ToR
If TOR_TYPE is selected as NCS-5500, the TOR switch information table differs and is mandatory.Note
DescriptionName
Enabling this checkbox, changes the configure ToRsection from false to true.
Configure TOR is true then ToR switchinfomaps in servers.
Note
Configure ToR optional checkbox
If NSC-5500 is selected as TOR_TYPE,configure TOR is set as mandatory.
Note
Installing Cisco VIM through Cisco VIM Unified Management52
Installing Cisco VIM through Cisco VIM Unified ManagementConfiguring OpenStack Installation

DescriptionName
Click (+) to add information for Fretta Switch.
DescriptionName
Enter the NCS-5500hostname.
Name
Enter the NCS-5500username.
User Name
Enter the NCS-5500password.
Password
Enter the NCS-5500 ssh IPAddress.
SSH IP
Peer management IP.VPC Peer Link
Port channel number formanagement interface ofbuild node.
BRManagement PO Info
VLAN id for managementinterface of build node(access).
BR Management VLANinfo
Interface for vpc peer ports.VPC Peer Port Info
Address for ISIS exchange.VPC Peer Port Address
ISIS loopack IP Address.ISIS Loopback Interfaceaddress
Enter a String.ISIS net entity title
Integer between 16000 to1048575.
ISIS prefix SID
If you want to enter Fretta details fill in the NCS-5500Information table.
When TOR-TYPE selected as NCS-5500 and 2 NCS-5500 are configured it is mandatory to configureMULTI_SEGMENT_ROUTING_INFO
DescriptionName
Integer between 1 to 65535.BGP AS Number field
A valid string.ISIS Area Tagfield
Loopback Interface name.Loopback Interface namefield
Integer between 1 to 65535.API bundle IDfield
Installing Cisco VIM through Cisco VIM Unified Management53
Installing Cisco VIM through Cisco VIM Unified ManagementConfiguring OpenStack Installation

DescriptionName
String (Optional, only needed when br_api of mgmt nodeis also going through NCS-5500; this item andapi_bundle_id are mutually exclusive).
API bridge domain field
A valid string (user pre-provisions physical, bundleinterface, sub-interface and external BD for externaluplink and provides external BD info setup_data).
EXT bridge domain field
7. Click OpenStack Setup Tab to advance to the OpenStack Setup Configuration page.
8. On the OpenStack Setup Configuration page of the Cisco VIM Insight wizard, complete the following fields:
DescriptionName
Fill in the following details:
Enter IP address of ExternalVIP.
External VIP Address field
Enter IPv6 address of ExternalVIP.
External VIP Address IPv6field
Enter the Router ID for HA.Virtual Router ID field
Enter IPv6 address of InternalIP.
Internal VIP Address IPv6field
Enter IP address of InternalVIP.
Internal VIP Address field
HA Proxy
Mandatory fields are pre-populated.
admin.Admin User Name
admin.Admin Tenant Name
Keystone
Installing Cisco VIM through Cisco VIM Unified Management54
Installing Cisco VIM through Cisco VIM Unified ManagementConfiguring OpenStack Installation

DescriptionName
LDAP enable checkbox which by default is false, if LDAP isenabled on keystone.
Enter name for Domain name.Domain Name field
Enter a string as input.Object Class for Users field
Enter a string.Object Class for Groupsfield
Enter a string.Domain Name Tree for Usersfield
Enter a string.Domain Name Tree forGroups field
Enter a string.Suffix for Domain Name field
Enter a URL with ending portnumber.
URL field
Enter a string.Domain Name of Bind Userfield
Enter Password as stringformat.
Password field
Enter filter name as string.User Filter field
Enter a string.User ID Attribute field
Enter a string.User Name Attribute field
Enter a string.User Mail Attribute field
Enter a string.Group Name Attribute field
LDAP
Installing Cisco VIM through Cisco VIM Unified Management55
Installing Cisco VIM through Cisco VIM Unified ManagementConfiguring OpenStack Installation

DescriptionName
Neutron fields would change on the basis of Tenant NetworkType Selection from Blueprint Initial Setup. Following are theoptions available for Neutron for OVS/VLAN:
Auto Filled based on the TenantNetwork Type selected in theBlueprint Initial Setup page.
Tenant Network Type field
Auto Filled based on the TenantNetwork Type selected inBlueprint Initial Setup page.
Mechanism Drivers field
Auto filled with the Computeyou added in Server and Roles.
If you select All in this sectionNFV_HOSTS: ALL will beadded to the Blueprint or youcan select one particularcompute. For Eg:
NFV_HOSTS:compute-server-1,compute-server-2.
NFV Hosts field
List of ranges separated bycomma form start:end.
Tenant VLAN Ranges field
List of ranges separated bycomma form start:end.
Provider VLANRanges field
2M or 1GVM Hugh Page Size(available for NFV_HOSTSoption) field
Enable the checkboxEnable Jumbo Frames field
For Tenant Network Type Linux Bridge everything remains thesame but Tenant VLAN Ranges will be removed.
Neutron
Ceph has two pre-populated fields:
• CEPHMode : By default Dedicated.
• NOVA Boot: From drop down selection you can chooseCeph or local.
CEPH
By default Populated forCEPHDedicatedwith Store Backendvalue as CEPH.
GLANCE
By default Populated forCEPHDedicatedwithVolume Drivervalue as CEPH.
CINDER
Installing Cisco VIM through Cisco VIM Unified Management56
Installing Cisco VIM through Cisco VIM Unified ManagementConfiguring OpenStack Installation

DescriptionName
Check one of the check boxes to specify a VMTP network:
• Provider Network
• External Network
For the Provider Network complete the following:
Enter the name for the externalnetwork.
Network Name field
Enter the Subnet for ProviderNetwork.
Subnet field
Enter the starting floating IPv4address.
Network IP Start field
Enter the ending floating IPv4address.
Network IP End field
Enter the IPv4 address for theGateway.
Network Gatewayfield
Enter the DNS server IPv4address.
DNS Server field
Enter the segmentation ID.Segmentation ID field
For External Network fill in the following details:
Enter the name for the externalnetwork.
Network Name field
Enter the starting floating IPv4address.
IP Start field
Enter the ending floating IPv4address.
IP End field
Enter the IPv4 address for theGateway.
Gateway field
Enter the DNS server IPv4address.
DNS Server field
Enter the Subnet for ExternalNetwork.
Subnet field
VMTP optional section, this will be visible onlyif VMTP is selected from Blueprint Initial Setup.For VTS tenant type Provider network is onlysupported.
Installing Cisco VIM through Cisco VIM Unified Management57
Installing Cisco VIM through Cisco VIM Unified ManagementConfiguring OpenStack Installation

DescriptionName
TLS has two options:
• External LB VIP FQDN - Text Field.
• External LB VIP TLS - True/False. By default this optionis false.
TLS optional section, this will be visible only ifTLS is selected fromBlueprint Initial Setup Page.
Following are the options that needs to be filled for SwiftStack:
IP address of PAC(proxy-account-container)endpoint.
Cluster End Point
Admin user for swift toauthenticate in keystone.
Admin User
The service tenantcorresponding to theAccount-Container used bySwiftstack.
Admin Tenant
Reseller_prefix as configuredfor Keysone Auth,AuthTokensupport in Swiftstack E.gKEY_
Reseller Prefix
swiftstack_admin_passwordAdmin Password
http or httpsProtocol
SwiftStack optional section will be visible onlyif SwiftStack is selected from Blueprint InitialSetup Page. SwiftStack is only supported withKeyStonev2. If you selectKeystonev3, swiftstackwill not be available to configure.
When the Tenant type ACI/VLAN is selected then ACIINFO tab is available in blueprint setup.Note
Installing Cisco VIM through Cisco VIM Unified Management58
Installing Cisco VIM through Cisco VIM Unified ManagementConfiguring OpenStack Installation

When ACI/VLAN is selected then ToR switch from initial setup is mandatory.
DescriptionName
Enter host input. Example: <ip1|host1>:[port] . maxof 3, min of 1, not 2;
APIC Hosts field
Enter a string format.apic_username field
Enter Password.apic_password filed
Enter input as string. Max length 8.apic_system_id field
Enter string max length 6.apic_resource_prefix field
Allowed only 10.0.0.0/16apic_tep_address_ pool field
Allowed only 225.0.0.0/15multiclass_address_pool field
Enter integer(1- 65535)apic_pod_id field
Enter String, max length 32apic_installer_tenant field
Enter String, max length 32apic_installer_vrf field
Enter String, max length 32api_l3out_network field
Note
DescriptionName
True or false default is false.VTS Day0 (checkbox)
Enter as string does not contain special characters.VTS User name
Enter passwordVTS Password
Enter IP Address format.VTS NCS IP
Enter a stringVTC SSH Username
Enter passwordVTC SHH Password
When Tenant Type is VTS/VLAN then VTS tab is available in blueprint setup.
Note
If vts day0 is enabled then SSH username and SSH password is mandatory.
If SSH_username is input present then SSH password is mandatory vice-versa
Note
9. If Syslog Export or NFVBENCH is selected in Blueprint Initial Setup Page, then Services Setup page will beenabled for user to view. Following are the options under Services Setup Tab:
Installing Cisco VIM through Cisco VIM Unified Management59
Installing Cisco VIM through Cisco VIM Unified ManagementConfiguring OpenStack Installation

DescriptionName
Following are the options for Syslog Settings:
Enter Syslog IP Address.Remote Host
Supports only UDP.Protocol
Defaults to local5.Facility
Defaults to debug.Severity
Defaults to ELK.Clients
Defaults to 514 but can be modified bythe User.
Port
Syslog Export
NFVBENCH enable checkbox by default isfalse.
Add ToR information connect to Switch:
• Select a TOR Switch and enter the Switch name.
• Enter the port number. For Example: eth1/5 . VTEP VLANS (mandatory andneeded only for VTS/VXLAN,): Enter 2 different VLANs for VLAN1 andVLAN2.
• NIC Ports: INT1 and INT2 optional input. Enter the 2 port numbers of the4-port 10G Intel NIC at the management node used for NFVBench.
NFVBENCH
Enable the checkbox to set it as True. By default it is False.ENABLE_ESC_PRIV
Step 4 Click Offlinevalidation, to initiate an offline validation of the Blueprint.Step 5 Blueprint can also be created using an Upload functionality:
• In Blueprint Initial Setup.
• Click Browse in the blueprint initial setup.
• Select the YAML file you want to upload.
• Click Select button.
• Clicking on load button in the Insight UI Application. All the fields present in the YAML file would be uploadedto the respective fields in UI.
• Enter the name of the Blueprint (Make sure you enter unique name while saving Blueprints. There would be no twoBlueprints with same name.)
• Click Offline Validation.
• If all the mandatory fields in the UI are populated, then Offline Validation of the Blueprint will start else a pop upwould be visible which will inform which section of Blueprint Creation has a missing information error.
• On Validation Success of Blueprint Save Blueprint button will be enabled with Cancel button
• A pop up will be generated asking to initiate the deployment with Blueprint Name and the stages you need to run.
Installing Cisco VIM through Cisco VIM Unified Management60
Installing Cisco VIM through Cisco VIM Unified ManagementConfiguring OpenStack Installation

On Validation Failure of Blueprint Cancel button will be enabled.
Once theOfflinevalidation is successful, Save option will be enabled which will redirect you to the BlueprintManagementPage.
The wizard advances to the Blueprint Management page. On the Blueprint Management page you can select the recentlyadded valid Blueprint and click Install button which is disabled by default.
A pop up will be generated asking to initiate the deployment with Blueprint Name and the stages you need to run.
By default all stages are selected but you can also do an incremented install.
In case of Incremented Install you should select stages in the order. For Example: If you select Validation Stage thenthe 2nd stage Management Node Orchestration will be enabled. You cannot skip stages and run a deployment.
Once you click Proceed the Cloud Deployment would be initiated and the progress can be viewed from "Dashboard".
Once the Blueprint is in Active State, the Post-Install features listed in Navigation Bar will changed to Activestage.
Note
Post Installation Features for Active BlueprintThis option is only available to a pod, which is successfully deployed. There are multiple sublinks availableto manage the day-n operation of the pod. However, often Insight cross-launches the relevant services, throughdelegating the actual rendering to the individual services.
Monitoring the PodCiscoVIMuses ELK (elasticsearch, logstash andKibana) tomonitor theOpenStack services, by cross-launchingthe Kibana dashboard.
To cross launch Kibana, complete the following instructions:
Step 1 Login as POD User.Step 2 Naviagte to POD.Step 3 Navigate to Post-installStep 4 ClickMonitoring
The Authentication Required browser pop up is displayed.Step 5 Enter the username as admin.Step 6 Enter the ELK_PASSWORD password obtained from /root/installer-<tagid>/openstack-configs/secrets.yaml in the
management node.Kibana is launched in an I-Frame
Click Click here to view Kibana logs in new tab link to view Kibana Logs in a new tab.Note
Installing Cisco VIM through Cisco VIM Unified Management61
Installing Cisco VIM through Cisco VIM Unified ManagementPost Installation Features for Active Blueprint

Cross Launching HorizonHorizon is the canonical implementation of Openstack's Dashboard, which provides a web-based user interfaceto OpenStack services including Nova, Swift and, Keystone.
Step 1 Log in as POD User.Step 2 Navigate to POD.Step 3 Navigate to Postinstall.Step 4 Click Horizon.Step 5 Click Click here to view Horizon logs in new tab.
You will be redirected to Horizon landing page in a new tab.
NFVI MonitoringNFVI monitoring is a Cross launch browser same as Horizon. NFVI monitoring link is available in the postinstall only if the setupdata has NFVI Monitoring configuration during the cloud deployment which basicallypings the monitoring and checks status of Collector VM1 Info and Collector VM2 Info.
Step 1 Login as POD User.Step 2 Naviagte to POD.Step 3 Navigate to Post-installStep 4 Click Reconfigure.Step 5 Click NFVI MonitoringStep 6 Click the link Click here to view NFVI monitoring..
You will be redirected to NFVI monitoring page
Run VMTPVIM 2.0, provides an integrated data and control plan test tool (called VMTP).VMTP helps you to test thecloud at any given time.
Run VMTP is divided in two sections:
• Results for Auto Run: Auto run shows the results of VMTPwhich was run during the cloud deployment(Blueprint Installation).
• Results for Manual Run: To run VMTP on demand click Run VMTP.
If VMTP stage was skipped or not-run during Blueprint Installation, this sectionof POST Install gets disabled for the user.
Note
Installing Cisco VIM through Cisco VIM Unified Management62
Installing Cisco VIM through Cisco VIM Unified ManagementCross Launching Horizon

Run CloudPulseIn VIM 2.2, we provide an integrated tool, called Cloud Pulse, that periodically checks the cloud servicesendpoint. The results of these tests are reflected under the Cloud Pulse link. You can also run these APIendpoint tests on demand, and fetch the result of these tests by refreshing the table.
Endpoints Tests:
1. cinder_endpoint
2. glace_endpoint
3. keystone_endpoint
4. nova_endpoint
5. neutron_endpoint
6. all_endpoint_tests
Operator Tests:
1. rabbitmq_check
2. galera_check
3. ceph_check
4. node_check
5. docker_check
6. all_operator_tests
Run NFV BenchOne can Run NFV Bench for BandC series Pod, through Cisco VIM Insight. On a pod running with CVIM2.2 and higher releases, click on the NFVBench link on the NAV-Menu.
You can run either fixed rate test or NDR/PDR test. As the settings and results for the test types differ, theoptions to run these tests are presented in two tabs, with its own settings and results .
NDR/PDR Test
Step 1 Login as POD User.Step 2 Naviagte to POD.Step 3 Navigate to Post-installStep 4 Click Run NFV Bench.Step 5 Log-in to CISCO VIM Insight.Step 6 Click on NDR/PDR test and complete the following fields
DescriptionName
Select duration from 10 to 60 sec. Default is 20 secIteration Duration
Installing Cisco VIM through Cisco VIM Unified Management63
Installing Cisco VIM through Cisco VIM Unified ManagementRun CloudPulse

DescriptionName
Select the correct frame size to runFrame Size
Click on Run NDR/PDR test. Once NDR/PDR test isfinished it will display each type of test with its own settingsand results.
Run NDR/PDR test
Fixed Rate Test
Step 1 Log in as POD User.Step 2 Navigate to POD.Step 3 Navigate to Postinstall.Step 4 Click Run NFV Bench.Step 5 Click Fixed rate test and complete the following fields.
DescriptionName
Rate: Select right configuration pps or bps from dropdown-list and enter values:
For pps: minimum: 2500pps; maximum: 14500000pps(=14.5Mpps); default: 1000000pps (=1Mpps)
For bps: minimum: 1400000bps; maximum:10000000000bps (=10Gbps); default: 1000000000 (=1Gbps)
Rate
Select duration from 10-60Sec. Default is 20sec.Iteration Duration
Select the right frame size(64,IMIX,1518) to run.Frame Size
ClickRun FixedRate Test.Once Fixed rate test is finished,it displays each type of test with its own settings and results.
Run Fixed Rate Test
POD ManagementOne of the key aspects of Cisco VIM is that it provides the ability for the admin to perform pod life-cyclemanagement from a hardware and software perspective. Nodes of a given pod corrupts at times and VIMprovides the ability to add, remove or replace nodes, based on the respective roles with some restrictions.Details of pod management will be listed in the admin guide, however as a summary the following operationsare allowed on a running pod:
Step 1 Add or Remove Storage Nodes: You can add one node at a time, given that we run Ceph as a distributed storage offering.
Installing Cisco VIM through Cisco VIM Unified Management64
Installing Cisco VIM through Cisco VIM Unified ManagementFixed Rate Test

Step 2 Add or Remove Computes Nodes: N-computes nodes can be replaced simultaneously; however at any given point, atleast one compute node should be active.
Step 3 Replace Control Nodes: We do not support double fault scenarios, replacement of one controller at a time is supported.
System UpdateAs part of the lifecycle management of the cloud, VIM has the ability to bring in patches (bug fixes relatedto code, security, etc.), thereby providing the additional value of seamless cloud management from softwareperspective. Software update of the cloud is achieved by uploading a valid tar file following initiation of aSystem Update from the Insight as follows:
Step 1 Login as POD User.Step 2 Naviagte to POD.Step 3 Navigate to Post-installStep 4 Click System Update.Step 5 Click Openstack PasswordStep 6 Click Browse button.Step 7 Select the valid tar file.Step 8 Click Open > Upload and Update .
Message stating System Update has been initiated will be displayed. Logs front-ended by hyperlink would be visible inthe section below before Update Logs to help see the progress of the update. During the software update, all other podmanagement activities will be disabled. Post-update, normal cloud management will commence.
Reconfiguring CIMC Password through InsightUpdate the cimc_password in the CIMC-COMMON section, and/or the individual cimc_password for eachserver and then run the update password option.
To update a password, you need to follow the password rules:
• Must contain at least one lower case letter.
• Must contain at least one upper case letter.
• Must contain at least one digit between 0 to 9.
• One of these special characters !$#@%^-_+=*&
• Your password has to be 8 to 14 characters long.
Before you begin
You must have a C-series pod up and running with Cisco VIM to reconfigure CIMC password.
Installing Cisco VIM through Cisco VIM Unified Management65
Installing Cisco VIM through Cisco VIM Unified ManagementSystem Update

Reconfigure CIMC password section would be disabled if the pod is in failed state as indicated by ciscoviminstall-status.
Note
Step 1 Login as POD User.Step 2 Naviagte to POD.Step 3 Navigate to Post-installStep 4 Click Reconfigure.Step 5 Click Openstack Password
DescriptionName
CIMC_COMMON old password field cannot be edited.CIMC_COMMON old Password
Enter newCIMC-COMMON password. Password shouldbe alphanumeric according to the password rule.
CIMC-COMMON new Password
Old CIMC-COMMON password will be updated withnew CIMC-COMMON password.
Click Update Password
Reconfiguring OpenStack PasswordCisco VIM has been designed with security to accommodate users password policy.
There are two options to regenerate the Password:
1. Regenerate all passwords: Check the Regenerate all passwords checkbox and click Set Password.This automatically regenerates all passwords in alphanumeric format.
2. Regenerate single ormore password: If you want to set a specific password for any service like Horizon'sADMIN_USER_PASSWORD you can add it by doing an inline edit. Double click field under Passwordand then enter the password which enables Set Password.
During the reconfiguration of password, all other pod management activities are disabled. Postupdate, normalcloud management commences.
Note
Reconfiguring OpenStack Services, TLS certs and ELK configurationsCisco VIM supports the reconfiguration of OpenStack log level services, TLS certificates, and ELKconfiguration. Listed below are the steps to reconfigure the OpenStack and other services:
Step 1 Login as POD User.
Installing Cisco VIM through Cisco VIM Unified Management66
Installing Cisco VIM through Cisco VIM Unified ManagementReconfiguring OpenStack Password

Step 2 Naviagte to POD.Step 3 Navigate to Post-installStep 4 Click Reconfigure OpenStack Config.Step 5 Click on the specific item to be changed and updated; For TLS certificate it is the path to certificate location.Step 6 Enter Set Config and the process will commence.
During the reconfiguration process, all other pod management activities will be disabled. Post-update, normal cloudmanagement will commence.
Reconfiguring Optional ServicesCisco VIM offers optional services such as heat, migration to Keystone v3, NFVBench, NFVIMON and soon, that can be enabled as post-pod deployment. Optional services can be un-configured as post-deploymentin Cisco VIM feature set. These services can be enabled in one-shot or selectively. Listed below are the stepsto enable optional services:
Step 1 Login as POD User.Step 2 Naviagte to POD.Step 3 Navigate to Post-installStep 4 Click Reconfigure Optional Services.Step 5 Choose the right service and update the fields with the right values.Step 6 Enter Reconfigure to commence the process.
During the reconfiguration process, all other pod management activities will be disabled. Post-update, normal cloudmanagement will commence. Once reconfigure is initiated than optional feature would be updated in active blueprint. Ifreconfigure of Optional Services fail in the time of reconfigure process then it is advised to contact CiscoTAC to resolvethe situation through CLI.
All reconfigure operation feature contains repeated deployment true or false.
• Repeated re-deployment true - Feature can be re-deployed again.
• Repeated re-deployment false- Deployment of feature allowed only once.
Note
Deployment Status :
Repeated re-deployment OptionsOptional Features
TrueAPICINFO
FalseEXTERNAL_LB_VIP_FQDN
FalseEXTERNAL_LB_VIP_TLS
TrueINSTALL_MODE
TrueLDAP
TrueNETWORKING
Installing Cisco VIM through Cisco VIM Unified Management67
Installing Cisco VIM through Cisco VIM Unified ManagementReconfiguring Optional Services

Repeated re-deployment OptionsOptional Features
FalseNFVBENCH
FalseNFVIMON
FalsePODNAME
TruePROVIDER_VLAN_RANGES
TrueSWIFTSTACK
FalseSYSLOG_EXPORT_SETTINGS
TrueTENANT_VLAN_RANGES
FalseTORSWITCHINFO
TrueVIM _ ADMINS
FalseVMTP
FalseVTS_PARAMETERS
`
True
AUTOBACKUP
FalseHeat
FalseKeystone v3
TrueHTTP Proxy Server
TrueHTTPS Proxy Server
Pod User AdministrationCisco VIM Insight offers Users (Pod Admin(s) or Pod Users) to manage Users and roles associated with them.
Managing UsersTo add new User
Step 1 Click Login as POD User.Step 2 Navigate to POD User Administration.Step 3 ClickManage Users.Step 4 Click Add Users to add a new user.Step 5 Complete the following fields in the Add Users page of the Cisco VIM Insight:
Installing Cisco VIM through Cisco VIM Unified Management68
Installing Cisco VIM through Cisco VIM Unified ManagementPod User Administration
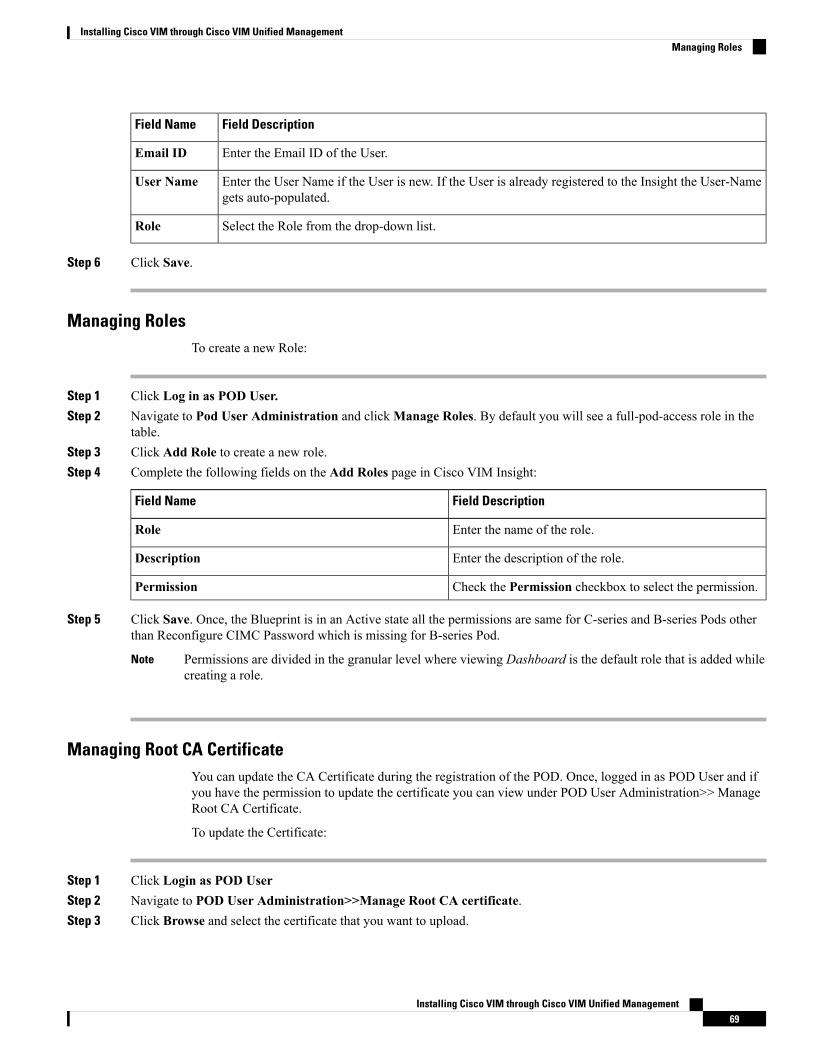
Field DescriptionField Name
Enter the Email ID of the User.Email ID
Enter the User Name if the User is new. If the User is already registered to the Insight the User-Namegets auto-populated.
User Name
Select the Role from the drop-down list.Role
Step 6 Click Save.
Managing RolesTo create a new Role:
Step 1 Click Log in as POD User.Step 2 Navigate to Pod User Administration and clickManage Roles. By default you will see a full-pod-access role in the
table.Step 3 Click Add Role to create a new role.Step 4 Complete the following fields on the Add Roles page in Cisco VIM Insight:
Field DescriptionField Name
Enter the name of the role.Role
Enter the description of the role.Description
Check the Permission checkbox to select the permission.Permission
Step 5 Click Save. Once, the Blueprint is in an Active state all the permissions are same for C-series and B-series Pods otherthan Reconfigure CIMC Password which is missing for B-series Pod.
Permissions are divided in the granular level where viewing Dashboard is the default role that is added whilecreating a role.
Note
Managing Root CA CertificateYou can update the CA Certificate during the registration of the POD. Once, logged in as POD User and ifyou have the permission to update the certificate you can view under POD User Administration>> ManageRoot CA Certificate.
To update the Certificate:
Step 1 Click Login as POD UserStep 2 Navigate to POD User Administration>>Manage Root CA certificate.Step 3 Click Browse and select the certificate that you want to upload.
Installing Cisco VIM through Cisco VIM Unified Management69
Installing Cisco VIM through Cisco VIM Unified ManagementManaging Roles

Step 4 Click Upload.
• If the certificate is Invalid, and does not matches with the certificate on the management node located at(var/www/mercury/mercury-ca.crt) then Insight will revert the certificate which was working previously.
• If the Certificate is valid, Insight will run a management node health check and then update the certificate with thelatest one.
The CA Certificate which is uploaded should be same as the one which is in the management node.Note
Installing Cisco VIM through Cisco VIM Unified Management70
Installing Cisco VIM through Cisco VIM Unified ManagementManaging Root CA Certificate