Installing SmartPlant License Manager on a Stand-alone ...
12
SmartPlant License Manager requires a static IP Address on the license machine. In order for a stand-alone system (such as a laptop) to be used as a SmartPlant License Manager license machine, you need to install and configure the Microsoft Loopback Adapter. The following steps use Microsoft Windows 10 as an example and explain how to configure the Microsoft Loopback Adapter and SmartPlant License Manager on a laptop. Step 1: Installing Microsoft Loopback Adapter (on page 1) Step 2: Configuring Static IP Address for the Microsoft Loopback Adapter (on page 3) Step 3: Configuring Advanced Settings for the Loopback Adapter (on page 4) Step 4: Installing SmartPlant License Manager and Generating a Machine ID (on page 9) Step 5: Adding pdlice.exe to Firewall Exception List (on page 11) Step 6: Selecting a License Machine and Reserving a Seat (on page 11) Step 1: Installing Microsoft Loopback Adapter (Windows 10) 1. Log on to your computer with a local Administrator account. 2. Open Control Panel. 3. In Category view, click Hardware and Sound > Device Manager. or In Large icons or Small icons view, click Device Manager. 4. Select Network adapters. 5. Click Action > Add legacy hardware. 6. In the Add Hardware wizard, click Next. Installing SmartPlant License Manager on a Stand-alone System (Windows 10)
-
Upload
khangminh22 -
Category
Documents
-
view
0 -
download
0
Transcript of Installing SmartPlant License Manager on a Stand-alone ...

SmartPlant License Manager requires a static IP Address on the license machine. In order for a stand-alone system (such as a laptop) to be used as a SmartPlant License Manager license machine, you need to install and configure the Microsoft Loopback Adapter. The following steps use Microsoft Windows 10 as an example and explain how to configure the Microsoft Loopback Adapter and SmartPlant License Manager on a laptop.
Step 1: Installing Microsoft Loopback Adapter (on page 1) Step 2: Configuring Static IP Address for the Microsoft Loopback Adapter (on page 3) Step 3: Configuring Advanced Settings for the Loopback Adapter (on page 4) Step 4: Installing SmartPlant License Manager and Generating a Machine ID (on page 9) Step 5: Adding pdlice.exe to Firewall Exception List (on page 11) Step 6: Selecting a License Machine and Reserving a Seat (on page 11)
Step 1: Installing Microsoft Loopback Adapter (Windows 10)
1. Log on to your computer with a local Administrator account.
2. Open Control Panel.
3. In Category view, click Hardware and Sound > Device Manager.
or
In Large icons or Small icons view, click Device Manager.
4. Select Network adapters.
5. Click Action > Add legacy hardware.
6. In the Add Hardware wizard, click Next.
Installing SmartPlant License Manager on a Stand-alone System (Windows 10)

7. Select Install the hardware that I manually select from a list (Advanced) option, and click Next.
8. Select Network adapters from the Common hardware types list, and click Next.

9. Select Microsoft and Microsoft KM-TEST Loopback Adapter, and then click Next.
10. Click Next on The wizard is ready to install your hardware window.
11. Click Finish when the wizard completes the installation.
For more information, refer to the Microsoft Support web site (https://support.microsoft.com), and search using the phrase "loopback adapter."
It is recommended that you rename this adapter to make it easier to recognize in the future. In the Control Panel, click Network and Internet > Network and Sharing Center > Change adapter settings. Then, right-click the name of the adapter you created and select Rename. Enter a name that is easy for you to recognize, for example, SPLM LoopBack, or a similarly unique name.
Step 2: Configuring Static IP Address for the Microsoft Loopback Adapter (Windows 10)
1. Log on to your computer with a local Administrator account.
2. Open Control Panel.
3. Click Network and Internet > Network and Sharing Center.
4. Click Change adapter settings.
5. Right-click the installed loopback adapter and select Properties.
6. Select Internet Protocol Version 4 (TCP/IPv4).
7. Click Properties. The Internet Protocol Version 4 (TCP/IPv4) Properties dialog box is displayed.
8. Click Use the following IP address.

9. Type in the loopback adapter's IP address (for example, 192.168.0.10) and Subnet mask (for example, 255.255.255.0).
Check with your IT department if you're not sure what to enter on this dialog box.
10. Click OK to dismiss the Internet Protocol Version 4 Properties dialog box.
11. Click OK to dismiss Loopback Adapter Properties.
Step 3: Configuring Advanced Settings for the Loopback Adapter (Windows 10)
The following procedure explains how to move the Microsoft Loopback Adapter to the top of the network connections list so the machine identifier (ID) will gather the information from the Loopback Adapter to generate the code.
In Windows 7, this procedure described how to modify the loopback adapter settings using
the operating system user interface (Advanced Settings > Adapters and Bindings tab). However, in Windows 10, this feature in the operating system has been deprecated. For more information, search on "network binding windows 10" in your preferred web search engine. If you are working with Windows 10, you must follow this new procedure.
The IP addresses and other network values shown in this procedure may vary according to your configuration.
1. Log on to your computer with a local Administrator account.
2. Open a command prompt, and enter ipconfig.

3. Find the Loopback Adapter in the ipconfig window, and note its IPv4 address and subnet mask.
4. In a command prompt, enter route print.
5. Using the IPv4 address and subnet mask for the Loopback Adapter, find the Loopback Adapter in the route print window.

If the Loopback Adapter is listed at the top of the Interface List and its metric value in the IPv4 Route Table is greater than 256 but lower than the other network adapters, licensing will work correctly. Skip the rest of this procedure.
If the Loopback Adapter is NOT at the top of the Interface List and if its metric value in
the IPv4 Route Table is greater than 256 but NOT lower than the other adapters, continue this procedure. You will manually set the interface metric for the loopback adapter and thereby force it to the top of the list.

Here is a case where you would need to continue this procedure.
6. Open Control Panel.
7. Click Network and Internet > Network and Sharing Center.
8. Click Change adapter settings.
9. Right-click each adapter, and select Disable. Do this for ALL adapters.
10. Right-click the Loopback Adapter, and select Properties.
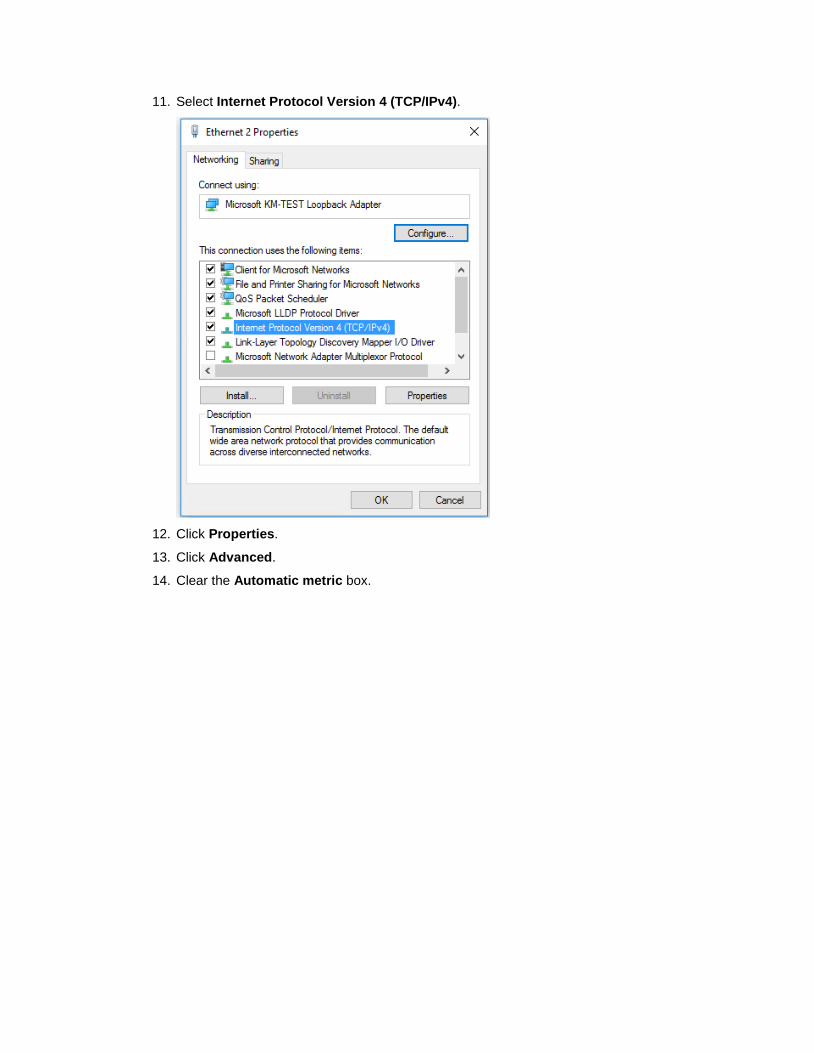
11. Select Internet Protocol Version 4 (TCP/IPv4).
12. Click Properties.
13. Click Advanced.
14. Clear the Automatic metric box.

15. In the Interface metric box, type a value. The metric value in the IPv4 Route Table is this value plus 256. The picture shows a 1 in the Interface metric box as an example.
16. Click OK > OK > Close.
17. Right-click the Loopback Adapter, and select Enable.
18. Enable all the other adapters.
19. For all adapters except the Loopback Adapter, right-click the adapter, select Properties > Internet Protocol Version 4 (TCP/IPv4) > Properties > Advanced, and check the metric setting. It can either be set to Automatic or to a specific Interface metric.
If a specific value is in the Interface metric box, make sure that the value is greater than 1 and does not conflict with any of the other adapters.
20. Open a command prompt, and enter route print. The goal is to verify that the Loopback Adapter is at the top of the Interface List and that its metric value in the IPv4 Route Table is greater than 256 but lower than the other network adapters and does not conflict with any others.
21. Reboot the license machine before generating a machine ID.
Step 4: Installing SmartPlant License Manager and Generating a Machine ID (Windows 10)
The following procedure describes installing the SmartPlant License Manager software and then generating a machine identifier (ID) for a stand-alone system.
1. Log on to your computer with a local Administrator account.

2. Install SmartPlant License Manager from your SmartPlant License Manager installation media.
3. During installation, select the License Machine option.
4. After SmartPlant License Manager is installed, open Device Manager.
5. Click View > Show hidden devices on the menu bar.
6. Expand Network adapters.
7. Right-click and disable all of the network adapters except Microsoft KM-TEST Loopback Adapter in the list.
8. Click Start > All apps > Intergraph SmartPlant License Manager > SmartPlant License Manager > Generate Machine ID.
9. Save your machine ID as a text file on your laptop, for example, c:\MachineID.txt.
10. After your machine ID is created, enable all network adapters in the Device Manager list.
11. Email the machine ID text file to Intergraph ([email protected]) or to your regional office to request a SmartPlant License Manager key.
Do not re-run the Generate Machine ID command after you have sent your machine ID to Intergraph.
12. After you receive a license key from Intergraph, click Start > All apps > Intergraph SmartPlant License Manager > SmartPlant License Manager.
13. Select Install and Remove > Install License Key.
14. Type the license key file name, including the path to the location of the key file. This file was attached to the email message from eLicense (https://ppmapps.intergraph.com/elicensev3) or was downloaded from eLicense when the key was generated.
15. If you receive a Mismatching error from SmartPlant License Manager when starting your software or when testing seat reservation, open a DOS window on your laptop and enter pdlice –c, and then follow all the steps starting at step 4 above.

Step 5: Adding pdlice.exe to Firewall Exception List (Windows 10)
In order for SmartPlant License Manager to work properly, pdlice.exe must be added to the Windows Firewall Exception (Allowed Programs) list. Otherwise, you may not be able to get a license and you may see a [Connecting Socket] Connection Time Out error message in your scavenging log file.
After a new installation or upgrade of SmartPlant License Manager, you must remove pdlice.exe from your Firewall Exception list if it is there from a previous SmartPlant License Manager installation, and re-add it to the list. This will ensure that the correct version of pdlice.exe is selected. Otherwise, you may see a [Connecting Socket] Connection Time Out error message in your scavenging log file.
1. Open Control Panel.
2. Click System and Security > Windows Firewall.
3. Click Allow an app or feature through Windows Firewall.
4. Click Change settings.
5. Click Allow another app.
6. Click Browse to find pdlice.exe (the default location is c:\Win32app\ingr\splm\bin).
7. Select pdlice.exe and then click Open.
8. Click Add.
9. Select SmartPlant License Manager in the Allowed apps and features list.
10. Select the appropriate Private and Public options.
11. Click OK.
Step 6: Selecting a License Machine and Reserving a Seat (Windows 10)
Use the following procedure to select a license machine and then test to be sure a seat can be reserved and released.
If the IP address for the loopback adapter is different after you install a SmartPlant License Manager key, the key will no longer be valid and the Product Tag list in the Test Seat Reservation dialog box will be empty. You will need to generate a new machine identifier (ID) and install a new key.
1. Select Start > All apps > Intergraph SmartPlant License Manager > SmartPlant License Manager.
2. Select Configure and Test, and then click Select.
3. Click Select License Machine for Client, and then click Select.
4. Enter your machine's node name or loopback adapter’s IP address in the License machine field.
5. Click OK.
6. Select Test Seat Reservation, and then click Select.
7. Select your license machine from the License machine drop-down list box.

8. On the Test Seat Reservation dialog box, select either Interactive or Batch as a Mode option.
9. Select your product tag from the Product tag drop-down list box, and then click OK.
10. Make a note of the seat number reserved, and then click Close.
11. Click Test Seat Release, and then click Select.
12. Select your license machine in the License machine name field.
13. In the Seat number field, enter the seat number.
14. Click OK. The software releases your seat successfully.
Now you should be able to start your SmartPlant application.