Installation & User Manual Model: Alchemy FB18 with Remote ...
32
Installation & User Manual Model: Alchemy FB18 with Remote Control Version 001. Oct. 2021
-
Upload
khangminh22 -
Category
Documents
-
view
4 -
download
0
Transcript of Installation & User Manual Model: Alchemy FB18 with Remote ...

Installation & User Manual
Model: Alchemy FB18with Remote Control
Version 001. Oct. 2021

2
Thank you for choosing fully remote control Alchemy Bioethanol fireplace.
Model: Alchemy FB18
Please read this manual carefully for correct installation, use and maintenance of the fireplace and familiarise yourself with the proper use of the product.
Operate the fireplace in accordance with the instructions provided, so you can fully enjoy the product for many years.
The company reserves the right to make any product upgrades or improvement without prior notice.

3
Contents
1. Supplied Parts ........................................................................... 4
2. Safety Information .................................................................... 72.1 Explosion/ Hazard ........................................................ 72.2 Fire Positioning ............................................................. 72.3 Ventilation ..................................................................... 72.4 Fuelling the Fire ............................................................ 82.5 Hot Surface Hazard ................................................... 82.6 Using Accessories ......................................................... 8
3. Installation ................................................................................. 113.1 Burner Clearance .......................................................... 113.2 Installing & removing appliance from recess................. 133.3 Ventilation ..................................................................... 143.4 Levelling the Burner ...................................................... 14
4. Quick Start ................................................................................ 154.1 Operating Remote Control and Turning ON Burner ...... 154.2 Out of Fuel Notification and Refuelling ......................... 17
5. Safety Systems ......................................................................... 185.1 Leak Detection Sensor .................................................. 185.2 Overflow Detection Sensor ........................................... 185.3 Bioethanol Fuelling Detection Switch ........................... 18
6. Servicing ................................................................................... 196.1 Cleaning the Ceramic ................................................... 19
7. Technical Information ................................................................ 19
8. Troubleshooting ......................................................................... 20
AppendixAppendix 1 – Remote Control (Optional Features) ............. 23Appendix 2 – Pump Top Change Over ............................... 27Appendix 3 – Dimensions and Spare Parts ........................ 29

4
1. Supplied and Optional Parts
5. Fuel Filling Funnel
1. Burner
2. Remote Control3. RC Handset 4 x AAA Batteries
4. AC 220V -240V Mains Power Cable

5
6. Log Plate and Logs Effect (Optional)
Complete Log set
Individual Logs
Log Plate showing pin locations.
A
B
C
D
E
F
G
6
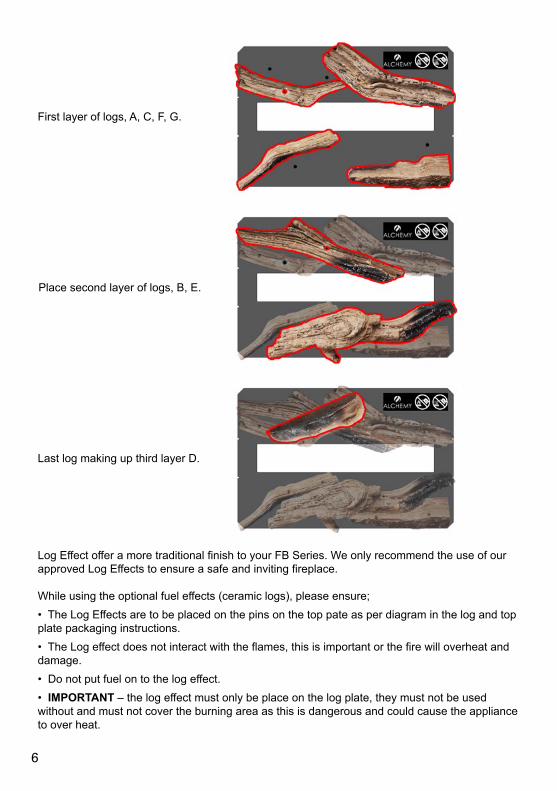
Log Effect offer a more traditional finish to your FB Series. We only recommend the use of our approved Log Effects to ensure a safe and inviting fireplace.
While using the optional fuel effects (ceramic logs), please ensure;• The Log Effects are to be placed on the pins on the top pate as per diagram in the log and top plate packaging instructions.• The Log effect does not interact with the flames, this is important or the fire will overheat and damage.• Do not put fuel on to the log effect.• IMPORTANT – the log effect must only be place on the log plate, they must not be used without and must not cover the burning area as this is dangerous and could cause the appliance to over heat.
First layer of logs, A, C, F, G.
Place second layer of logs, B, E.
Last log making up third layer D.

7
2. Safety Information
Thank you for choosing an Alchemy Bioethanol fireplace, fully remote controlled.Please read this manual carefully for correct Installation, use and maintenance of the fireplace and familiarise yourself with the proper use of the product.Operate the fireplace in accordance with the instructions provided, so you can fully enjoy the product for many years.The company reserves the right to make any product upgrades or improvement without prior notice.
2.1 EXPLOSION/FIRE HAZARDI. Use only approved Bioethanol fuel. Never use gasoline.II. Shut unit off and allow to cool 30 minutes before refuelling. Flame may be difficult to see do not assume unit is off.III. Wipe up spills immediately with a dry cloth followed by a cloth dampened with water. Allow to dry completely before lighting Burner.IV. Do not operate in a room with oxygen tanks in use or if flammable vapours are present.V. Store fuel only in original container. Store away from area where the Fire is located at minimum distance of 200cm. Transport and/or store fuel only in a plastic or metal container that is acceptable for use with the fuel and non red in colour.VI. Never smoke while refuelling or lighting the unit.
2.2 FIRE POSITIONINGI. Keep children and animals away from the fire. Never leave children unsupervised when the fire is operating.II. For decorative purposes only. Not suitable for continuous operation. Do not use the Fire to heat or boil water or as a cooking appliance. Do not put wood, charcoal, paper or other combustible objects in the Fire.III. Do not place fireplace near windows or doors that can create draughts, this may cause irregular operation.
2.3 VENTILATIONIt is recommended that you keep a good ventilation of the area (see page 14), in order to ensure a healthy level of oxygen and prevent the risk of indoor air pollution. Improper ventilation can cause serious injury or death.Bioethanol combustion releases carbon dioxide (CO2) and water (H2O). The combustion requires oxygen, therefore the area where the fireplace is placed, should have adequate ventilation with air bricks/vents or any other means, to allow for fresh air circulation.

8
2.4 FUELLING THE FIREI. This fire uses Bioethanol fuel. Bioethanol is a flammable liquid. Store in original container away from heat and sources of ignition. FOLLOW CONTAINER DIRECTIONS ON USE AND SAFETY OF LIQUID FUEL.II. Bioethanol is classified as a flammable liquid class 1B (for flammability) and class 3 PGII (for transportation) and is regulated by various standards around the world. You must familiarise yourself and comply with these regulations in order to safely and legally store, handle, decant and use this fuel.III. Use only approved Bioethanol fuel that contains 85%-95% Alcohol. Poor quality of fuel may lead to undesirable results: reduction in reliability, incomplete and inefficient combustion, smoke and odours, residues inside the burner.IV. Alchemy Ltd is not liable for any damage caused by using the incorrect type of fuel.
2.5 HOT SURFACE HAZARDI. Due to high surface temperatures, keep children, pets, clothing and furniture away from the fireplace, as the appliance is hot while in operation, contact with the fire may cause skin burns.II. After turning off the Burner the unit will be very hot and will stay hot for up to 30 minutes after use. To avoid injury, do not touch with any parts of your body or with any combustible materials such as matches or flammable liquids.
2.6 USING ACCESSORIESI. Use only authorised accessories supplied by Alchemy Ltd.II. NON-COMBUSTIBLE Pebbles, logs or other refractory decorative fire accessories should not be placed directly over the Burner mouth or interfere with the flame.III. Do not use fittings or spare parts, other than those available from or recommended by Alchemy Ltd
IT IS VERY IMPORTANT THAT THE AIR INLET GRILLES ON THE UNDERSIDE OF THE APPLIANCE ARE NOT OBSTRUCTED.
ALWAYS UNPLUG FROM MAINS SUPPLY BEFORE CLEANING OR UNDERTAKING.
DO NOT POUR OVER LIVE FLAMES DO NOT FILL WHILE HOT

9
INSTALLATION GENERAL INFORMATION
• While installing the device according to the instruction manual local and national guidelines are to be observed. • The device must be placed on a level surface.• Do not obstruct the ventilation slots and/or ventilators. • No items are recommended to be placed on the unit except the log set provided by the manufacturer. • Do not install the device in areas where there are large draughts of air, near fans, vents, etc. • Do not place in areas where there might be a potentially explosive atmosphere of paint vapours, industrial dusts, etc. • No flammable items should be placed in direct contact or within a radius of 1m / 3.28ft of the device. Do not place near curtains, net curtains, etc. • Do not expose the device to external weather conditions. The device is for indoor use only. • Do not place the device in close proximity to sources of humidity. • It is obligatory to have a carbon-dioxide (CO2) or dry chemical extinguisher placed nearby the device. • Installation of the device must allow for easy removal of the device for servicing. • The room in which the device is to be installed must have sufficient ventilation to ensure air exchange in the room at least once per hour. • Do not start the device before a full installation has been completed. • Do not fill the fuel container before placing the device in its final position.• Do not use any other decorative fuel effects other than our recommended goods. Bioethanol is the only fuel.
• Alchemy FB series are designed to work with quality fully approved, Bioethanol Fuel. Poor quality of fuel may lead to undesirable results:
• Reduction in reliability;• Incomplete and inefficient combustion;• Smoke and odours;• Residues inside the burner.
• The Advantages for using Alchemy Bioethanol fuels are:• Bioethanol is produced from renewable crops, which are environmentally friendly.• The use of Bioethanol helps in the reduction of the CO2 emissions, therefore contributing for the reduction of global warming;• Improved performance of your FB Burner and no odour
• Please ensure: • Use only liquid Bioethanol as fuel.• Keep the fuel away from children and animals, as well as from a working fireplace;• Avoid contact with eyes and skin;• Do not drink Bioethanol and keep away from children.• Bioethanol should be stored at a minimum distance of 100cm away from the fireplace;• Use only Bioethanol, that contains 85%-95% Alcohol
We recommend the use of Alchemy Bioethanol fuel to get the best out of your FB Series.
10
USER INSTRUCTIONS
User Cautions:
Your health and safety are paramount; therefore, we have taken all necessary consideration for the design, production, assembly and transport to ensure a pleasing and excellent performance for your Bioethanol fire.
Please follow these instructions for assembly, use and maintenance as follow:
• Do not cover your fireplace burner when running or hot;
• Keep it away from flames, ignition sources, and flammable materials;
• Do not place the fireplace near windows or doors that can create draughts. These draughts may cause irregular operation;
• Keep children, animals and the infirm away from the fireplace.
• In the event of spilled Bioethanol, please absorb it with a dry soft paper or cloth and avoid any naked flame around.
• Please Note: The fireplace gets hot during operation, avoid touching it for 10 minutes after the flame is completely extinguished.
• Do not fill up the Fuel TANK while burner still hot, wait for it to cool down;
• Never pour Bioethanol over live flames;
• After turning off the flames wait at least 3 minutes before attempting to re-ignite;
• In case of uncontrolled flames, please use a fire blanket or extinguisher.
• Do not use water to extinguish the fire;
• After turning off the fire, it will take a few seconds for the flames to completely go out;
• In the event that Bioethanol spelt out while filling up the tank, absorb and dry all parts before ignition attempt;
• If you use “Fuel Effect” parts of any type then, do not place them on the flames
• The elements of construction above the device must be made of non-combustible materials.
• Do not fill appliance prior to installation.

11
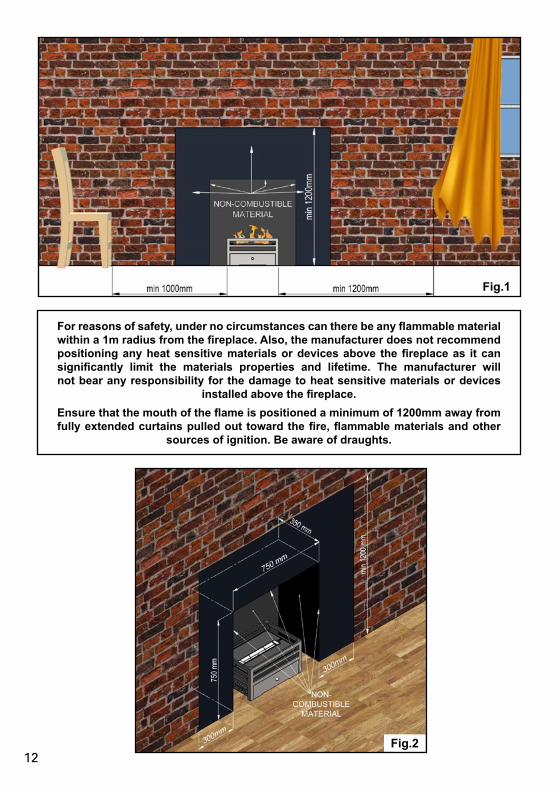
3. InstallationINSTALLATION PARAMETERSThe floor must be level and the Burner positioned on a flat surface; this can be perfected with the adjustable feet. The Burner must only be placed on a non combustible surface and must be installed in accordance with the outlined safety requirements and clearances.
The basket/ burner must be open and have free air on the front and sides in accordance with the minimum opening sizes in fig.1 and fig.2. notably the minimum chamber dimensions are 750mm wide x 750mm high x 350mm deep.Ventilation must be around the burner to alleviate any heat build-up on the appliance and its controls. Excessive heat build-up may cause the appliance to overheat and shut off. Ensure the enclosure around the appliance is made from non-combustible materials. Any stud work introduced must be non-combustible materials. Any voids within the breast are recommended to be ventilated to prevent heat build-up with continuous use. The Hearth must be within 1mm+/- of levelness to ensure even flame spread across the burner.
3.1 BURNER CLEARANCE
3.1.1 COMBUSTIBLE MATERIALS• Do not place any kind of combustible materials near the fireplace, within 1000mm.• Wood or plastic shelves should be at least at a distance of 1000mm from the fireplace.
3.1.2 NON-COmBUsTiBle mATeriAls• Non-Combustibles such as stone, metal or ceramics.• Other non-combustibles such as glass.
imPOrTANT DeFiNiTiON:
Non-Combustible material: A material that does not react to heat. • Any material which when tested to BS 476-11:1982 (2007) does not flame nor cause any rise in temperature on the centre (specimen).• Products classified as non-combustible in tests following the procedures in BS 476-4:1970 (2007).• Any material classified as class A1 in accordance with BS EN 13501-1:2002 Fire classification of construction products and building elements. Classification using data from reaction to fire tests.
PLEASE NOTE THAT TIME RATED PLASTER BOARDS OF ANY TYPE ARE NOT SUITABLE FOr THis CONsTrUCTiON, We reCOmmeND ONlY CAlCiUm siliCATe & VermiCUliTe BASED BOARDS RATED TO A1.
12
For reasons of safety, under no circumstances can there be any flammable material within a 1m radius from the fireplace. Also, the manufacturer does not recommend positioning any heat sensitive materials or devices above the fireplace as it can significantly limit the materials properties and lifetime. The manufacturer will not bear any responsibility for the damage to heat sensitive materials or devices
installed above the fireplace.Ensure that the mouth of the flame is positioned a minimum of 1200mm away from fully extended curtains pulled out toward the fire, flammable materials and other
sources of ignition. Be aware of draughts.
Fig.1
Fig.2

13
3.2 iNsTAlliNg & remOViNg APPliANCe FrOm reCess
To install the appliance into a recess, • Connect the Power cable to the fire on the rear port. DO NOT CONNECT TO MAINS SUPPLY UNTIL AFTER THE APPLIANCE IS SAFELY INSTALLED. • Once inserted, ensure the fire is level. • Proceed with connecting the power lead to the mains supply.
14
3.3 VENTILATIONIt is recommended that you keep a good ventilation of the area in order to ensure a healthy level of oxygen, please see table below:
Alchemy FB18Free air under burner (cm²) Minimum Room Size (m³)
50 25
To calculate the room size, measure the Height, length and width and multiply all measurements. e.g. (L) 6.6m x (W) 3.8m x (H) 2.4m = 60.192m3
Bioethanol combustion releases carbon dioxide (CO2) and water (H2O). The combustion requires oxygen, therefore the area where the fireplace is positioned, should have adequate ventilation with air bricks/vents or any other means, to allow enough fresh air to ensure one room volume change of air per hour.
For new build and renovated properties with a lower air permeability: While in operation this appliance emits heat, water vapour (H2O) and Carbon Dioxide (CO2), therefore it is necessary to provide ventilation to the room of the appliance from an external space as per Document F building regulations.
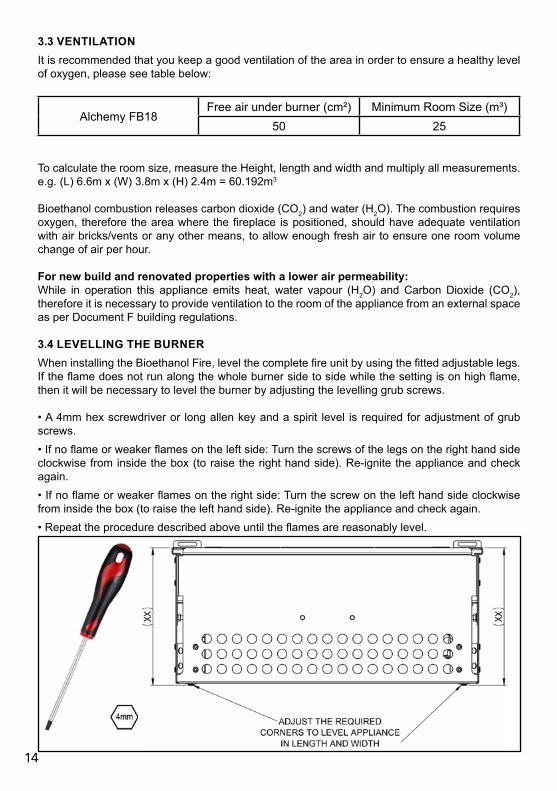
3.4 LEVELLING THE BURNERWhen installing the Bioethanol Fire, level the complete fire unit by using the fitted adjustable legs. If the flame does not run along the whole burner side to side while the setting is on high flame, then it will be necessary to level the burner by adjusting the levelling grub screws.
• A 4mm hex screwdriver or long allen key and a spirit level is required for adjustment of grub screws.• If no flame or weaker flames on the left side: Turn the screws of the legs on the right hand side clockwise from inside the box (to raise the right hand side). Re-ignite the appliance and check again.• If no flame or weaker flames on the right side: Turn the screw on the left hand side clockwise from inside the box (to raise the left hand side). Re-ignite the appliance and check again.• Repeat the procedure described above until the flames are reasonably level.

15
4. Quick start
4.1 OPERATING REMOTE CONTROL AND TURNING ON BURNER
Make sure the remote is loaded with batteries. Normally the handset is already paired from the factory however; if it requires to be done again follow Pairing Device instructions (see page 25).
I. Touch power button to awaken handset.
II. To TURN ON hold power button until red bar fills. The screen will display PRIMING for about 30 seconds, followed by FLAME.
III. When the flame has established the screen will display the level of heating. To INCREASE FLAME touch power button to awaken handset and rotate touch dial clockwise. To DECREASE FLAME touch power button to awaken handset and rotate touch dial anti clockwise. There are 3 levels of flame.
IV. To TURN OFF, touch power button to awaken handset. Hold power button until red bar fills, and handset once again displays STANDBY.

16
Burner is priming when the glow plug is heating up and the fuel starts pumping out, as shown in the image.
Once the glow plug reaches required temperature and reached by the fuel, the flame will ignite.
17
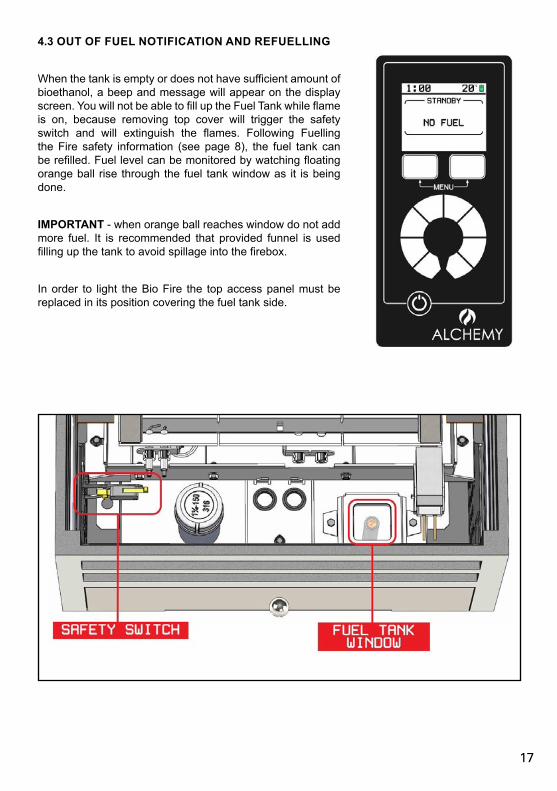
4.3 OUT OF FUEL NOTIFICATION AND REFUELLING
When the tank is empty or does not have sufficient amount of bioethanol, a beep and message will appear on the display screen. You will not be able to fill up the Fuel Tank while flame is on, because removing top cover will trigger the safety switch and will extinguish the flames. Following Fuelling the Fire safety information (see page 8), the fuel tank can be refilled. Fuel level can be monitored by watching floating orange ball rise through the fuel tank window as it is being done.
IMPORTANT - when orange ball reaches window do not add more fuel. It is recommended that provided funnel is used filling up the tank to avoid spillage into the firebox.
In order to light the Bio Fire the top access panel must be replaced in its position covering the fuel tank side.

18
5. Safety SystemsThe Alchemy Bioethanol range incorporates several safety systems to ensure a complete peace of mind.
5.1 LEAK DETECTION SENSORThe Bio Fires have a leak detection sensor located underneath the burner on the lowest part of the sump as per image showing the sensor location. Thus, if there is a leak the fire will turn off itself. A strong beep will sound by the safety system on appliance.
5.2 OVERFLOW DETECTION SENSORThe Bio Fires have a leak detection sensor located underneath the burner on the lowest part of the sump as per image showing the sensor location. Thus, if there is a leak the fire will turn off itself. A strong beep will sound by the safety system on appliance.
5.3 BIOETHANOL FUELLING DETECTION SWITCHYou will not be able to fill up the Fuel Tank while the flame is on due to the safety Micro-switch. Removing top access panel will trigger the switch and extinguish the flames. A message ‘Lid Open’ will appear on your handset. In order to light the Bio Fire you must replace the top access panel in its position covering the fuel tank side.

19
6. servicingTurn the appliance OFF and isolate the mains supply. Ensure the appliance is fully cold before attempting to start servicing the appliance. No liability can be accepted by Alchemy Ltd for injury caused by burning or scolding by a hot appliance.
A suggested procedure for servicing is listed below.A. Lay out dust sheet on flooring, mask off any special fireplace materials.B. Carefully remove the log plate with logs (if purchased with optional Log Plate).C. Use a Vacuum cleaner to clean the top of the burner and metal top plate.D. Remove metal top plate and wipe with a dust cloth.E. Check fuel system inside the firebox for any damage or leaks.F. Replace metal top plate or log plate.G. Check the safe operation of the appliance.
6.1 CLEANING THE CERAMICSRemove the ceramic top plate as detailed above.Gently clean the ceramics in the open air, using a soft brush and a vacuum cleaner. Where necessary replace damaged components only with genuine supplier specified parts. Seal any scrap ceramics in plastic bags and dispose at proper refuse sites. When using a vacuum cleaner, it is recommended that one with a HEPA filtering system is used.Re-fit the Fire bed arrangement and check the safe operation of the appliance.
Note: It is recommended that the pump top is replaced biannually as part of the service (see Appendix 2 on page 27).
7. Technical information
Bioethanol Fire FB18GROSS INPUT on High (Hs) (kW) 3.5Ethanol Consumption on High (L/Hr) 0.4GROSS INPUT on Low (Hs) (kW) 2Ethanol Consumption on Low (L/Hr) 0.19Fuel Tank Volume Capacity (L) 3.2
These values are indicative only and may vary depending on the installation and denatured ethanol used.
20
8. Troubleshooting8.1 There is smoke or a foreign smell coming from the Burner when burninga. There may be waste burning that should not be in the Burner.b. You are using the wrong fuel (it is essential that you ONLY use Bioethanol).c. You have placed something around/above the flame that has not been approved or recommended.d. If the Burner is empty (the flame is dying) or you have just turned the fire OFF, this is normal. Like extinguishing candles.e. The quality of Bioethanol you are using is not good enough.SOLUTIONTurn the Burner OFF and wait until it cools down. Clean/service the Burner and remove objects/waste. Contact your local distributor for fuel brand recommendation.
8.2 When i attempt to light the Burner, it does not starta. You have not put enough fuel in the Burner.b. You have not used the right fuel (it is imperative that you ONLY use Bioethanol).c. The Burner opening is obstructed, there needs to be adequate ventilation for the flame to start.d. The Bioethanol is cold and takes time to ignite.SOLUTIONCheck -Stop Code – in the DEVICE menu on the handset for further guidance. Check fuel level by inspection through the fuel tank window, check type of fuel used. Repeat starting procedure until the Burner warms up and remains ignited.
8.3 i have spilt some fuel, what do i do before lighting?Use the isolation switch to prevent the fire turning ON. Keep people away from the area. Wipe up spilt liquid thoroughly using a dry cloth, wipe again with a cloth dampened with water. Avoid breathing vapours. Ventilate enclosed space by opening windows and doors. If fuel got spilled on hands, wash thoroughly. ONLY ignite when the area is completely dry and you are certain that all spilt fuel has been removed. Please refer to MSDS for Bioethanol.
8.4 The flame is unusually volatile and highThis is likely to be caused by a strong draught blowing on the flame. Locate and remove the source of the draught (it may be that you have a window/door open or fan operating that is directly pushing air towards the fire). If you cannot remove the source of the draught and the flame is too volatile, turn the fire OFF. You will need to rethink the positioning of your unit before operating again or install a fire screen to minimise the draught effect. Contact your distributor.

21
8.5 rC Handset error CodesThe software installed will give an error/ stop coded if the bioethanol fire stopped or did not start from any reason. If the bio-fire stops a code is generated, and can be read on the RC handset.
The code number will help to see at which stage in the ignition process or operating the fault has happened.
The display will show the version number and the stop code as follow:Display “rxxx.Dxxx.sCx”R = receiver software version number.D = Device software version number. SC= stop code in hex format (as shown below).
1 Top plate not aligned – switch activeReason: Top plate not sitting on the fire box properly after being removed or being knocked.Solution: Align top plates, and make sure they are in correct position.
2 No fuel reaching tank sensor (igNiTiON PrOCess)Reason: Not enough fuel in tank.Solution: Put more fuel into the tank.
3 Thermocouple hot – Hot Tray (igNiTiON PrOCess)Reason: Fire has recently been turned off or top plate safety switch activated.Solution: Wait 5 minutes to try turning on flame again
4 Two minutes safety break (igNiTiON PrOCess)Reason: The thermocouple safety sequence (3 – Thermocouple hot) has not completed.Solution: Wait another 2 mins to try turn on flame again.
5 low level sensor not reached, pump timed outReason: The fuel has not reached the low level sensor in the burner during operation due to fuel running out, blockage in the fuel lines or faulty pump.Solution: Check for leaks, around fuel tank. Check fuel, refuel if no fuel. If leak found or still doesn’t turn on after refuelling, call engineer/dealer to check fuel lines and pump.

22
6 High level sensor not reached, pump timed out Reason: The fuel has not reached the high level sensor in the burner during operation due to fuel running out, blockage in the fuel lines or faulty pump.Solution: Check for leaks, around fuel tank. Check fuel, refuel if no fuel. If leak found or still doesn’t turn on after refuelling, call engineer/dealer to check fuel lines and pump.
7 Timed out wait for fuel low level (igNiTiON PrOCess) Reason: The fuel has not reached the low level sensor in the burner during ignition process due to shortage of fuel, blockage in the fuel lines or faulty pump.Solution: Check for leaks, around fuel tank. Check fuel, refuel if no fuel. If leak found or still doesn’t turn on after refuelling, call engineer/dealer to check fuel lines and pump.
8 Timed out wait for fuel high level (igNiTiON PrOCess)Reason: The fuel has not reached the high level sensor in the burner during ignition process due to shortage of fuel, blockage in the fuel lines or faulty pump.Solution: Check for leaks, around fuel tank. Check fuel, refuel if no fuel. If leak found or still doesn’t turn on after refuelling, call engineer/dealer to check fuel lines and pump.
9 Timed out waiting for flame (igNiTiON PrOCess) Reason: Thermocouple did not get hot enough in required period as flame did not reach it during ignition process, due to fuel running out, blockage in fuel lines or faulty pump.Solution: Check for leaks, around fuel tank. Check fuel, refuel if no fuel. If leak found or still doesn’t turn on after refuelling, call engineer/dealer to check fuel lines and pump.
A Timed out wait for high level after flame (igNiTiON PrOCess)Reason: Fuel did not reach high sensor in the burner after flame on during the ignition process, due to fuel running out, blockage in fuel lines or faulty pump.Solution: Check fuel, refuel if no fuel. If still doesn’t turn on after refuelling, call engineer/dealer to check fuel lines and pump.
B Flame out (THermOCOUPle TemP. DrOP)Reason: Strong draught could have put the flame out or the thermocouple could be faulty.Solution: Remove source of draught and try relighting fire (after waiting for the safety sequence to finish). If fire still does not light, contact engineer/ dealer to check thermocouple.
C Dropout from ignition program (igNiTiON PrOCess)Reason: Software issue, program is corrupted.Solution: Contact dealer to get re-programmed.
D stop code received from rF reCeiVerReason: The user has switched off the appliance.Solution: If the user requires for the appliance to be back just normal quick start procedure.
e No fuel reaching tank level sensor (Fire OPerATiNg).Reason: Fuel ran out and there is not enough fuel in the tank to keep burner operating.Solution: Put more fuel into the tank.
23
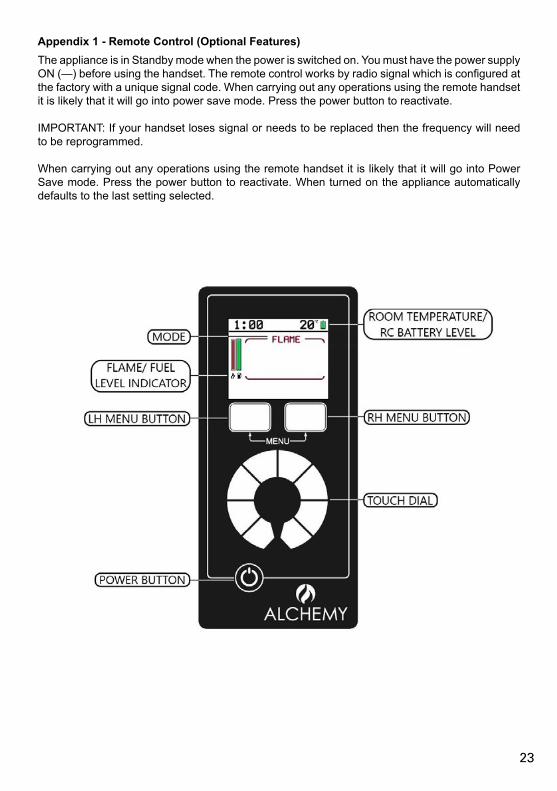
Appendix 1 - remote Control (Optional Features)The appliance is in Standby mode when the power is switched on. You must have the power supply ON (—) before using the handset. The remote control works by radio signal which is configured at the factory with a unique signal code. When carrying out any operations using the remote handset it is likely that it will go into power save mode. Press the power button to reactivate.
IMPORTANT: If your handset loses signal or needs to be replaced then the frequency will need to be reprogrammed.
When carrying out any operations using the remote handset it is likely that it will go into Power Save mode. Press the power button to reactivate. When turned on the appliance automatically defaults to the last setting selected.

24
1. remote Control FunctionsPress both Menu buttons until a menu appears at top of screen. Three screen options will appear. To select options rotate dial until highlighted in RED and press select.
• SET CLOCK• DEVICE• ADVANCED
1.1 SET CLOCK
I. Select CLOCK in the option menu and rotate touch dial until desired time is displayed.II. By pressing select it changes from Hours, Minutes and Days.III. When correct time has been set, press the RH Menu button to save.
1.2 DEVICE

25
1.2.1 DELETING DEVICE
I. Scroll to DEVICE menu and press select. II. This gives details of the appliance and also gives the option to delete the appliance from the remote handset. Press and hold the delete option to remove appliance. III. Once the deletion process completes, the handset will show NO PAIRED DEVICE. By selecting EXIT options to the main screen, the PAIRING selection will appear.
1.2.2 PAIRING DEVICE
To pair a handset (existing or new) to the appliance the current pairing program must be deleted (as shown previously).I. Ensure appliance is switched OFF and isolated from mains power.II. Touch power button on the remote panel.III. Select PAIR option on remote.IV. Switch ON appliance by connecting to main 230V.V. The remote screen will show STANDBY when successful.
NOTe: The handset screen will show seArCHiNg if the appliance is not plugged in and switched ON.
NOTe: The ‘ClONe’ button is not used.

26
1.3.1 SCREEN DIMMER
I. Scroll to ADVANCE menu and press select.II. This function dims the screen of the remote. To switch dimmer on or off press SET option to toggle between ON and OFF.
1.3 ADVANCED

27
Appendix 2 - Pump Top Change Over
To remove the Pump Top, the tabs on the side need to be pushed in as shown on images to release the top from the body. Image above is pump inside the fire enclosure, view from top.
The same step of removing Pump Top, image shows pump without fire enclosure box, front view and a close up of the tab/catch mechanism.
28
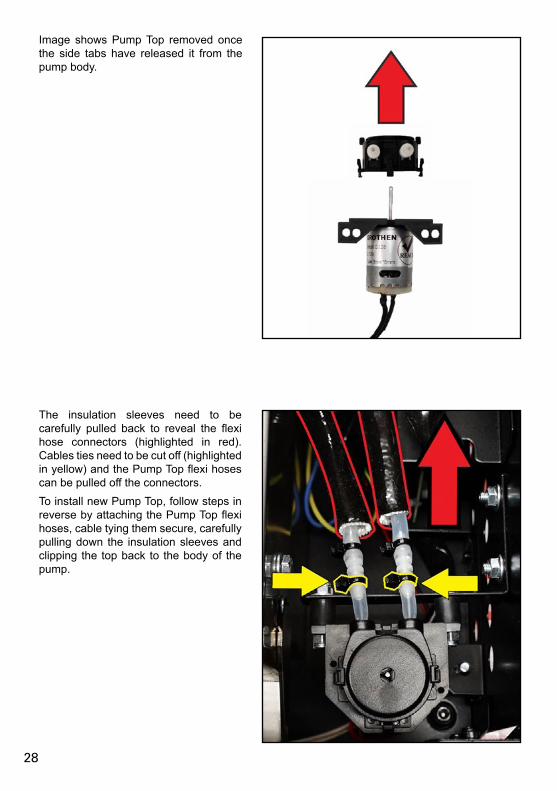
Image shows Pump Top removed once the side tabs have released it from the pump body.
The insulation sleeves need to be carefully pulled back to reveal the flexi hose connectors (highlighted in red). Cables ties need to be cut off (highlighted in yellow) and the Pump Top flexi hoses can be pulled off the connectors. To install new Pump Top, follow steps in reverse by attaching the Pump Top flexi hoses, cable tying them secure, carefully pulling down the insulation sleeves and clipping the top back to the body of the pump.
29
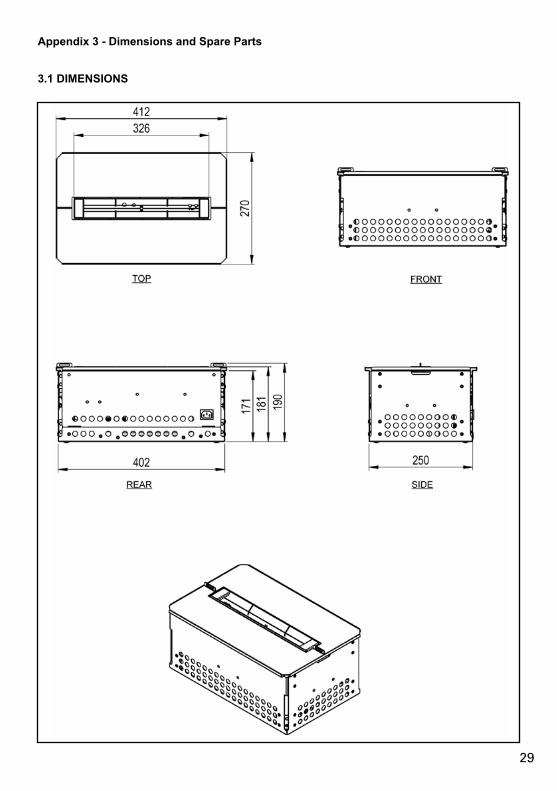
Appendix 3 - Dimensions and spare Parts
3.1 DIMENSIONS
30
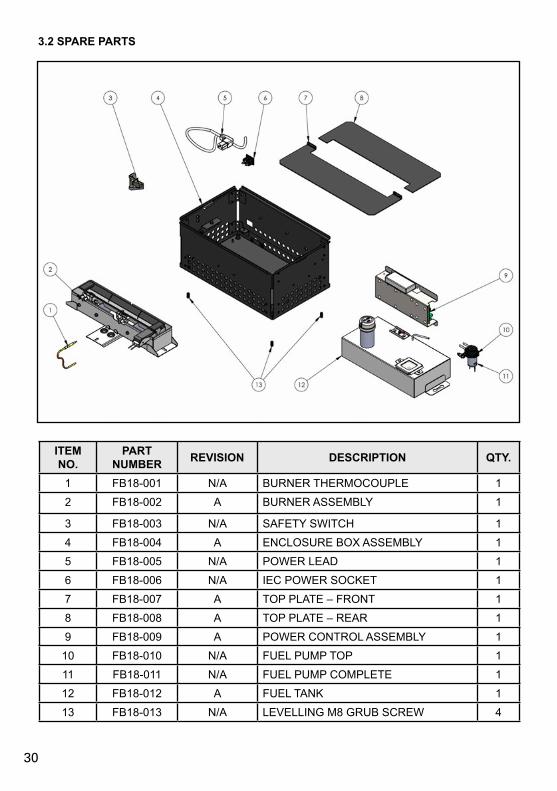
3.2 SPARE PARTS
ITEM NO.
PART NUMBER REVISION DESCRIPTION QTY.
1 FB18-001 N/A BURNER THERMOCOUPLE 12 FB18-002 A BURNER ASSEMBLY 1
3 FB18-003 N/A SAFETY SWITCH 14 FB18-004 A ENCLOSURE BOX ASSEMBLY 15 FB18-005 N/A POWER LEAD 16 FB18-006 N/A IEC POWER SOCKET 17 FB18-007 A TOP PLATE – FRONT 18 FB18-008 A TOP PLATE – REAR 19 FB18-009 A POWER CONTROL ASSEMBLY 1
10 FB18-010 N/A FUEL PUMP TOP 111 FB18-011 N/A FUEL PUMP COMPLETE 112 FB18-012 A FUEL TANK 113 FB18-013 N/A LEVELLING M8 GRUB SCREW 4

31
NOTES
.........................................................................................................................................................
.........................................................................................................................................................
.........................................................................................................................................................
.........................................................................................................................................................
.........................................................................................................................................................
.........................................................................................................................................................
.........................................................................................................................................................
.........................................................................................................................................................
.........................................................................................................................................................
.........................................................................................................................................................
.........................................................................................................................................................
.........................................................................................................................................................
.........................................................................................................................................................
.........................................................................................................................................................
.........................................................................................................................................................
.........................................................................................................................................................
.........................................................................................................................................................
.........................................................................................................................................................
.........................................................................................................................................................
.........................................................................................................................................................
.........................................................................................................................................................
.........................................................................................................................................................
.........................................................................................................................................................