HI931 AUTOMATIC POTENTIOMETRIC TITRATOR - Hanna ...
184
HI931 AUTOMATIC POTENTIOMETRIC TITRATOR
-
Upload
khangminh22 -
Category
Documents
-
view
3 -
download
0
Transcript of HI931 AUTOMATIC POTENTIOMETRIC TITRATOR - Hanna ...

HI931
AUTOMATIC POTENTIOMETRIC TITRATOR

Thank you for choosing a Hanna Instruments product.This manual has been written for HI931 Automatic Potentiometric Titrator with software version 1.03and higher. Please read this instruction manual carefully before using this instrument. This manual will provide you with the necessary information for the correct use of this instrument, as well as a precise idea of its versatility.If you need additional technical information, do not hesitate to e-mail us at [email protected] or view our contact list for a Hanna Instruments representative near you at www.hannainst.com.
DearCustomer,
© 2020 Hanna Instruments
All rights are reserved. Reproduction in whole or in part is prohibited without the written consent of the copyright owner, Hanna Instruments Inc.,
Woonsocket, Rhode Island, 02895, USA.

III
INTRODUCTION
The HI931 is an automatic potentiometric titrator with high accuracy, great flexibility and repeatability.The titrator is designed to perform a variety of potentiometric titrations, allowing the user to obtain both good results and high-speed analysis.The main attributes of the HI931 titrator are:
• Small footprint, requires minimal bench space• Casing made with strong, chemically resistant plastic• Flexible electrode holder supports up to 3 electrodes, 4 dispensing tubes, 1 temperature sensor and removable
stirrer • Electrode holder positions electrodes in the center of beaker, allowing for smaller sample sizes• Support for 100 titration methods• User-customizable reports• Integrated research grade pH/mV/ISE meter• Clearly displayed warning and error messages
This manual provides information regarding installation and functionality of the titrator and refined operation suggestions.Before using the titrator, it is recommended you become familiar with its various features and functionality.
This manual is divided into four parts:
PART 1: QUICK START GUIDEHelps the user quickly setup and operate HI931 Automatic Potentiometric titrator. It covers basic connections, user interface and how to run a titration.
PART 2: INSTRUCTION MANUALProvides a comprehensive description of the operating principles, user interface, general options, methods, titration mode, optimization, maintenance etc.
PART 3: APPLICATIONSContains complete instructions for commonly-used analyses. Additional methods and method packs are available, contact your local Hanna Instruments office for more details.
PART 4: TITRATION THEORYOutlines the principles of operation of the titrator. It covers the chemistry of titrations, titration types and result calculations.

IV
TABLE OF CONTENTS
PART 1: QUICK START GUIDE1. SAFETY MEASURES ......................................................................................................................................................... 1-22. ABBREVIATIONS ............................................................................................................................................................. 1-23. TITRATOR CONNECTIONS ................................................................................................................................................. 1-3
3.1. FRONT VIEW ........................................................................................................................................................ 1-33.2. REAR VIEW .......................................................................................................................................................... 1-4
4. USER INTERFACE ............................................................................................................................................................ 1-44.1. KEYPAD ............................................................................................................................................................... 1-44.2. DISPLAY .............................................................................................................................................................. 1-5
5. LANGUAGE ..................................................................................................................................................................... 1-56. CONTEXTUAL HELP .......................................................................................................................................................... 1-57. METHODS ...................................................................................................................................................................... 1-6
7.1. STANDARD METHODS ........................................................................................................................................... 1-67.2. USER-DEFINED METHODS ..................................................................................................................................... 1-6
8. HOW TO CALIBRATE A pH ELECTRODE ............................................................................................................................... 1-68.1. PREPARATION ...................................................................................................................................................... 1-68.2. CALIBRATION PROCEDURE .................................................................................................................................... 1-6
9. THE FIRST TITRATION ..................................................................................................................................................... 1-79.1. REQUIRED SOLUTIONS ......................................................................................................................................... 1-79.2. PRIMING THE BURETTE ......................................................................................................................................... 1-79.3. METHOD SELECTION ............................................................................................................................................. 1-79.4. SETTING METHOD PARAMETERS ............................................................................................................................ 1-89.5. SETTING UP TITRATION REPORT ............................................................................................................................ 1-89.6. PREPARING THE SAMPLE ...................................................................................................................................... 1-89.7. PERFORMING A TITRATION .................................................................................................................................... 1-99.8. TITRATION SCREEN ............................................................................................................................................... 1-99.9. TITRATION GRAPH ................................................................................................................................................ 1-99.10. TITRATION TERMINATION .................................................................................................................................. 1-109.11. RESULTS ......................................................................................................................................................... 1-109.12. VIEWING THE LAST TITRATION DATA .................................................................................................................. 1-119.13. PRINTING THE TITRATION REPORT ..................................................................................................................... 1-119.14. SAVING DATA TO USB STORAGE DEVICE ............................................................................................................. 1-119.15. TITRATION REPORT ........................................................................................................................................... 1-12
PART 2: INSTRUCTION MANUAL1. SETUP ............................................................................................................................................................................ 2-2
1.1. UNPACKING ......................................................................................................................................................... 2-21.2. SAFETY MEASURES ............................................................................................................................................... 2-31.3. HI931 TITRATOR TECHNICAL SPECIFICATIONS ......................................................................................................... 2-31.4. INSTALLATION ...................................................................................................................................................... 2-5
2. USER INTERFACE .......................................................................................................................................................... 2-132.1. START UP .......................................................................................................................................................... 2-132.2. KEYPAD ............................................................................................................................................................. 2-132.3. DISPLAY ............................................................................................................................................................ 2-152.4. MENU NAVIGATION ............................................................................................................................................ 2-16
3. GENERAL OPTIONS ........................................................................................................................................................ 2-183.1. SAVE TO USB ..................................................................................................................................................... 2-183.2. RESTORE FROM USB .......................................................................................................................................... 2-193.3. ADMINISTRATION ............................................................................................................................................... 2-20
V
3.4. TEMPERATURE ................................................................................................................................................... 2-213.5. DATE & TIME SETTING ........................................................................................................................................ 2-233.6. DISPLAY SETTINGS ............................................................................................................................................. 2-243.7. BEEPER ............................................................................................................................................................. 2-243.8. STIRRER ............................................................................................................................................................ 2-253.9. LANGUAGE ......................................................................................................................................................... 2-253.10. TOTAL VOLUME ALERT ...................................................................................................................................... 2-263.11. TITRANT AGE REMINDER ................................................................................................................................... 2-263.12. USB LINK WITH PC ........................................................................................................................................... 2-273.13. SETUP BALANCE INTERFACE .............................................................................................................................. 2-273.14. PRINTER MODE ................................................................................................................................................ 2-313.15. RESET TO DEFAULT SETTINGS ............................................................................................................................ 2-323.16. OPTIMIZE MEMORY SPACE ................................................................................................................................ 2-323.17. UPDATE SOFTWARE .......................................................................................................................................... 2-33
4. TITRATION METHODS .................................................................................................................................................... 2-344.1. SELECTING METHODS ......................................................................................................................................... 2-344.2. STANDARD METHODS ......................................................................................................................................... 2-344.3. USER-DEFINED METHODS ................................................................................................................................... 2-364.4. VIEWING / MODIFYING METHOD ......................................................................................................................... 2-374.5. METHOD OPTIONS .............................................................................................................................................. 2-384.6. PRINTING .......................................................................................................................................................... 2-61
5. TITRATION MODE .......................................................................................................................................................... 2-625.1. RUNNING A TITRATION ....................................................................................................................................... 2-625.2. STOPPING A TITRATION....................................................................................................................................... 2-63
6. pH MODE ..................................................................................................................................................................... 2-646.1. DISPLAY ............................................................................................................................................................ 2-656.2. pH SETUP .......................................................................................................................................................... 2-656.3. pH CALIBRATION ................................................................................................................................................ 2-726.4. LOGGING ........................................................................................................................................................... 2-74
7. mV MODE .................................................................................................................................................................... 2-757.1. DISPLAY ............................................................................................................................................................ 2-767.2. mV SETUP ......................................................................................................................................................... 2-767.3. RELATIVE mV CALIBRATION ................................................................................................................................. 2-797.4. LOGGING ........................................................................................................................................................... 2-79
8. ISE MODE .................................................................................................................................................................... 2-808.1. DISPLAY ............................................................................................................................................................ 2-808.2. ISE SETUP ......................................................................................................................................................... 2-818.3. ISE CALIBRATION ............................................................................................................................................... 2-908.4. LOGGING ........................................................................................................................................................... 2-91
9. AUXILIARY FUNCTIONS .................................................................................................................................................. 2-929.1. BURETTE ........................................................................................................................................................... 2-929.2. STIRRER ............................................................................................................................................................ 2-959.3. RESULTS ........................................................................................................................................................... 2-95
10. MAINTENANCE & PERIPHERALS.................................................................................................................................... 2-9910.1. BURETTE MAINTENANCE ................................................................................................................................... 2-9910.2. PERIPHERALS ................................................................................................................................................ 2-102
11. ACCESSORIES ........................................................................................................................................................... 2-10511.1. SOLUTIONS ................................................................................................................................................... 2-10511.2. SENSORS ...................................................................................................................................................... 2-10811.3. TITRATOR COMPONENTS ................................................................................................................................. 2-111

VI
PART 3: APPLICATIONSHI0001EN 0.1N SODIUM HYDROXIDE TITRANT CONCENTRATION ............................................................................................. 3-2HI0002EN 0.1N HYDROCHLORIC ACID TITRANT CONCENTRATION ............................................................................................. 3-4HI0003EN 0.1M SODIUM THIOSULFATE TITRANT CONCENTRATION .......................................................................................... 3-6HI0010EN 0.1M FERROUS AMMONIUM SULFATE TITRANT CONCENTRATION ............................................................................. 3-8HI0200EN 0.02M SILVER NITRATE TITRANT CONCENTRATION ................................................................................................ 3-10HI1004EN ALKALINITY OF WATER ........................................................................................................................................ 3-12HI1005EN ACIDITY OF WATER ............................................................................................................................................. 3-14HI1007EN CHLORIDE IN WATER .......................................................................................................................................... 3-16HI1008EN NEUTRALIZATION WITH SULFURIC ACID ............................................................................................................... 3-18HI1009EN NEUTRALIZATION WITH SODIUM HYDROXIDE ....................................................................................................... 3-20HI1011EN TROUBLESHOOTING 1 ........................................................................................................................................ 3-22HI1012EN TROUBLESHOOTING 2 ........................................................................................................................................ 3-24
PART 4: TITRATION THEORY1. TITRATION THEORY ......................................................................................................................................................... 4-2
1.1. INTRODUCTION .................................................................................................................................................... 4-21.2. USES OF TITRATIONS............................................................................................................................................ 4-21.3. ADVANTAGES & DISADVANTAGES ........................................................................................................................... 4-2
2. TYPES OF TITRATIONS ..................................................................................................................................................... 4-32.1. TITRATIONS ACCORDING TO THE MEASUREMENT METHOD ....................................................................................... 4-32.2. TITRATIONS ACCORDING TO THE REACTION TYPE ..................................................................................................... 4-52.3. TITRATIONS ACCORDING TO THE TITRATION SEQUENCE ......................................................................................... 4-10
3. TITRATION PROCEDURE ................................................................................................................................................. 4-113.1. MANUAL TITRATION ............................................................................................................................................ 4-113.2. AUTOMATIC TITRATION ...................................................................................................................................... 4-11
4. TITRATION RESULTS ...................................................................................................................................................... 4-134.1. ACCURACY ......................................................................................................................................................... 4-134.2. REPEATABILITY ................................................................................................................................................... 4-134.3. SOURCES OF ERROR .......................................................................................................................................... 4-13
5. CALCULATIONS ............................................................................................................................................................. 4-155.1. SAMPLE CALCULATION BY MASS .......................................................................................................................... 4-155.2. SAMPLE CALCULATION BY VOLUME ...................................................................................................................... 4-155.3. STANDARDIZE TITRANT BY MASS ......................................................................................................................... 4-155.4. STANDARDIZE TITRANT BY VOLUME ..................................................................................................................... 4-165.5. BLANK TITRATION............................................................................................................................................... 4-165.6. MULTIPLE ENDPOINT TITRATION .......................................................................................................................... 4-16
6. GLOSSARY .................................................................................................................................................................... 4-18

QUICK START GUIDE
1PART 1:
QUICK START GUIDE

QUIC
K ST
ART
GUID
E
1
1-2
1. SAFETY MEASURESThe following safety measures must be followed:1) Never connect or disconnect the pump assembly or other peripheral with the titrator turned on.2) Verify that the burette and the attached tubing are assembled correctly.3) Always check that the titrant bottle and the titration beaker are placed on a flat, stable surface.4) Always wipe up spills and splashes immediately.5) Avoid the following environmental working conditions
• Severe vibrations• Direct sunlight• Atmospheric relative humidity above 95% non-condensing• Environment temperatures below 10°C and above 40°C• Explosion hazards
6) Have the titrator serviced by qualified service personnel only.
2. ABBREVIATIONSABS Acrylonitrile Butadiene StyreneGLP Good Laboratory PracticePEI PolyetherimidePTFE PolytetrafluoroethylenePVDF Polyvinylidene fluorideRPM Revolutions per minuteeq / kg Equivalents per kilogrameq / L Equivalents per literg / 100 mL Grams per 100 millilitersg / L Grams per literμg/ L Micrograms per litermeq / kg Milliequivalents per kilogrammeq / L Milliequivalents per litermg / 100 mL Milligrams per 100 millilitersmg / g Milligrams per grammg / kg Milligrams per kilogrammg / L Milligrams per litermmol / g Millimoles per grammmol / kg Millimoles per kilogrammmol / L Millimoles per literM (mol / L) Molarity (moles per liter)mol / kg Moles per kilogrammol / L Moles per literN (eq / L) Normality (equivalents per liter)ppb (μg / kg) Parts per billion (micrograms per kilogram)ppb (μg / L) Parts per billion (micrograms per liter)ppm (mg / kg) Parts per million (milligrams per kilogram)

QUICK START GUIDE
1
1-3
ppm (mg / L) Parts per million (milligrams per liter)ppt (g / kg) Parts per thousand (grams per kilogram)ppt (g / L) Parts per thousand (grams per liter)% (g / 100 g) Percent by weight (grams per 100 grams)%w / v Percent weight by volume
3. TITRATOR CONNECTIONS
3.1. FRONT VIEW

QUIC
K ST
ART
GUID
E
1
1-4
3.2. REAR VIEW
k
Extension
4. USER INTERFACE
4.1. KEYPAD
The titrator’s keypad has 27 keys grouped in five categories, as follows:
Option keys Enter key
Numerickeys
Functionkeys
Arrowkeys

QUICK START GUIDE
1
1-5
4.2. DISPLAY
The titrator has a 5.7” graphical backlit color display.
The user interface contains several screens. In each screen, many information fields are present at the same time. The information is displayed in an easy-to-read manner.Virtual option keys describe the function performed when the corresponding soft key is pressed.
5. LANGUAGETo change the language, press from the main screen. Highlight Language option. Using the and keys, select the language from the options listed in the Set Language screen and press .Restart the titrator in order to apply the new language setting.
6. CONTEXTUAL HELPInformation about the titrator can be easily accessed by pressing . The contextual help can be accessed at any time and it provides useful information about the current screen.

QUIC
K ST
ART
GUID
E
1
1-6
7. METHODSThe HI931 titrator can store up to 100 methods (standard and user-defined).
7.1. STANDARD METHODS
Each titrator is supplied with a package of standard methods. Standard method packs are developed at Hanna Instruments to meet analysis requirements of specific industries (e.g., water treatment, wine, dairy, etc.).
7.2. USER-DEFINED METHODS
User defined methods allow the user to create and save their own methods. Each new method is based on an existing method which is altered to suit a specific application.
8. HOW TO CALIBRATE A pH ELECTRODETo enter pH calibration mode, press , then , then .
8.1. PREPARATION
Pour small quantities of the buffer solutions into clean beakers. If possible, use plastic beakers to minimize any EMC interferences.For accurate calibration and to minimize cross-contamination, use two beakers for each buffer solution: one for rinsing the electrode and one for calibration. If you are measuring in the acidic range, use pH 7.01 or 6.86 as the first buffer and pH 4.01/3.00 or 1.68 as the second buffer. If you are measuring in the alkaline range, use pH 7.01 or 6.86 as the first buffer and pH 10.01/9.18 or 12.45 as the second buffer.For extended range measurements (acidic and alkaline), perform a five-point calibration by selecting five buffers across the entire pH range.
8.2. CALIBRATION PROCEDURE
During calibration, the user has a choice of 8 standard buffers: (pH 1.68, 3.00, 4.01, 6.86, 7.01, 9.18, 10.01, 12.45) and up to 5 custom buffers.For accurate measurements it is recommended to perform a five-point calibration. However, at least a two-point calibration is suggested. For pH titrations, the selected buffers should bracket your endpoint (e.g. if your endpoint value is at 8.5, use 7.01 or 6.86 and 9.18 or 10.01 for calibration).To begin calibration:1) Press . If the instrument was calibrated before, previous calibration can be cleared by pressing .
Note: It is very important to clear calibration history when a new electrode is used.
2) Immerse the pH electrode and the temperature probe approximately 4 cm (1.5”) into a buffer solution and stir gently.
3) If necessary, select the pH calibration buffer value with or .4) Once the reading has stabilized, press to update the calibration. The calibration buffer will be added to
the Calibrated Buffers section.5) Rinse the pH electrode and the temperature probe, then immerse them into the next buffer solution and follow the
above procedure or press to exit the calibration.
QUICK START GUIDE
1
1-7
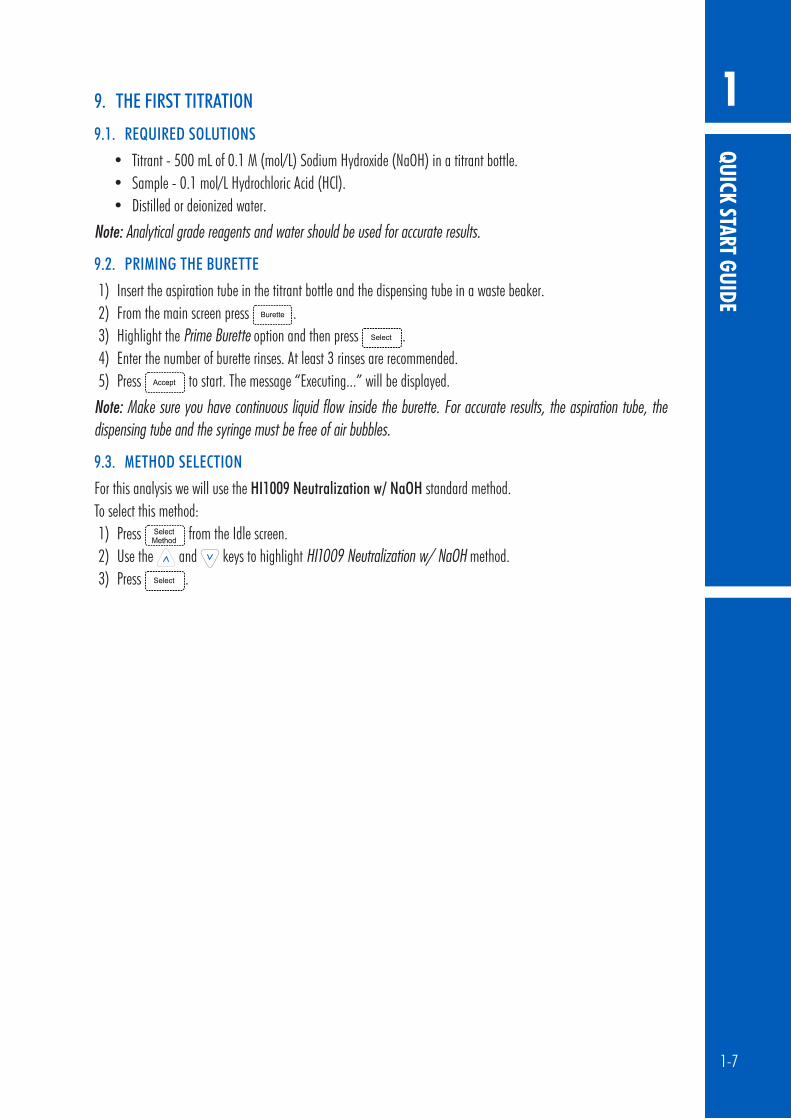
9. THE FIRST TITRATION
9.1. REQUIRED SOLUTIONS
• Titrant - 500 mL of 0.1 M (mol/L) Sodium Hydroxide (NaOH) in a titrant bottle.• Sample - 0.1 mol/L Hydrochloric Acid (HCl).• Distilled or deionized water.
Note: Analytical grade reagents and water should be used for accurate results.
9.2. PRIMING THE BURETTE
1) Insert the aspiration tube in the titrant bottle and the dispensing tube in a waste beaker.2) From the main screen press .3) Highlight the Prime Burette option and then press .4) Enter the number of burette rinses. At least 3 rinses are recommended.5) Press to start. The message “Executing...” will be displayed.
Note: Make sure you have continuous liquid flow inside the burette. For accurate results, the aspiration tube, the dispensing tube and the syringe must be free of air bubbles.
9.3. METHOD SELECTION
For this analysis we will use the HI1009 Neutralization w/ NaOH standard method.To select this method:1) Press from the Idle screen.2) Use the and keys to highlight HI1009 Neutralization w/ NaOH method.3) Press .

QUIC
K ST
ART
GUID
E
1
1-8
9.4. SETTING METHOD PARAMETERS
To display the method parameters, press .The View/Modify Method screen will be displayed.Only certain parameters can be changed.For this titration, the NaOH titrant concentration and the size of the HCl sample need to be entered.1) Highlight Titrant Conc. option, then press . The Titrant Concentration screen will be displayed.2) Enter the correct value, then press .3) Highlight Analyte Size option, then press .4) Enter the volume of the sample (e.g.: 5 mL), then press .5) Press , highlight Save Method option and then press .
9.5. SETTING UP TITRATION REPORT
Users can select the information that is stored for each titration.To obtain proper information at the end of the titration, perform the following operations: 1) From the main screen, press and the Data Parameters screen will be displayed.2) Highlight Setup Titration Report option and press .3) Mark the fields to be included with the * symbol using the and keys, and press to toggle the
selection.4) Press and then press to return to the main screen.
9.6. PREPARING THE SAMPLE
1) Add 50 to 65 mL of distilled / deionized water to the titration beaker.2) Use a pipette or burette to add 5.0 mL of the sample (0.1M Hydrochloric Acid (HCl)) into the same beaker.3) Slide the stirrer assembly up.4) Place the beaker under the stirrer assembly.5) Lower the stirrer assembly until the electrodes are submersed and the stirrer is close to the bottom of the beaker.6) Adjust the level of the sample solution with distilled / deionized water so that the pH electrode bulb is completely
immersed in the sample solution and the reference junction of the electrode is 5-6 mm below the surface.

QUICK START GUIDE
1
1-9
9.7. PERFORMING A TITRATION
From the main screen, press . You will be prompted to enter the analyte size. Enter 5 mL and press . The titrator will start the analysis.At the end of the titration, the message “Titration Completed” will appear on the display with the final concentration of the analyte in the sample and the equivalence endpoint volume.
9.8. TITRATION SCREEN
During a titration, the following screen is displayed:
9.9. TITRATION GRAPH
After a few doses are dispensed, will become active. Press to display the real-time titration graph.The curves displayed are plots of the pH and the 1st derivative versus Titrant Volume. See PART 2: INSTRUCTION MANUAL for more information.The two graphs are scaled to fit in the same screen window. Press to change the y-axis scale to either the pH values or the 1st derivative values.
QUIC
K ST
ART
GUID
E
1
1-10
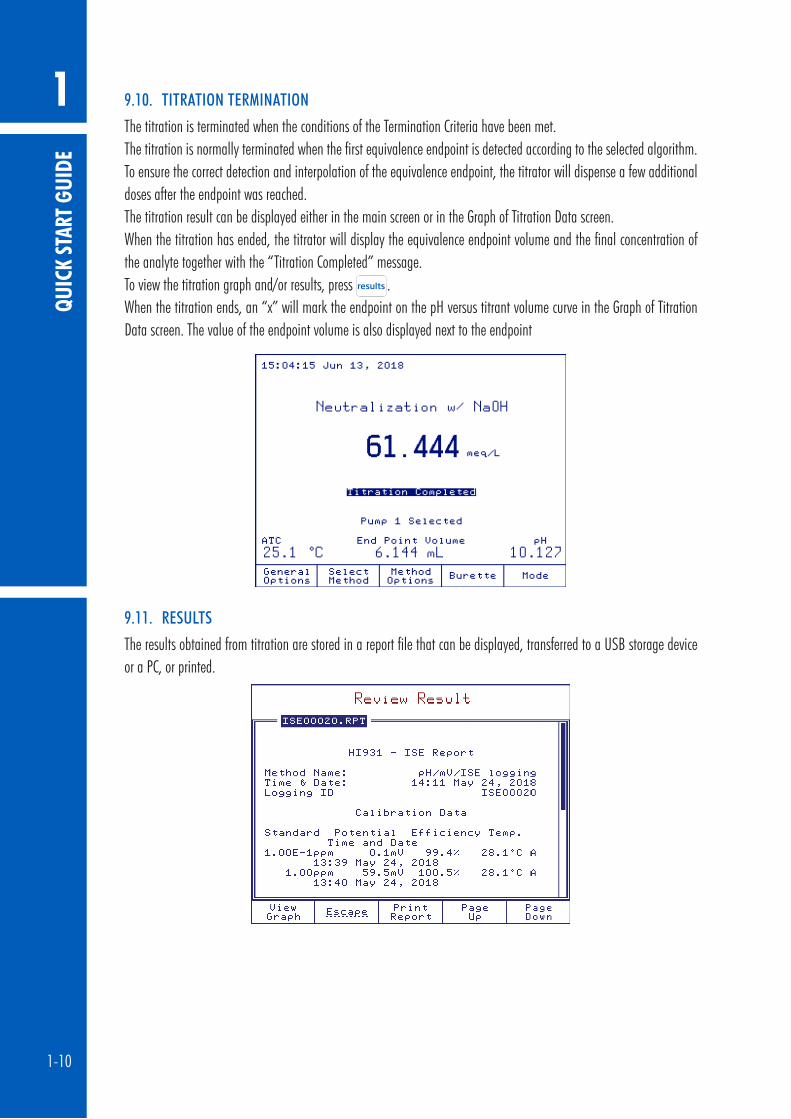
9.10. TITRATION TERMINATION
The titration is terminated when the conditions of the Termination Criteria have been met.The titration is normally terminated when the first equivalence endpoint is detected according to the selected algorithm. To ensure the correct detection and interpolation of the equivalence endpoint, the titrator will dispense a few additional doses after the endpoint was reached.The titration result can be displayed either in the main screen or in the Graph of Titration Data screen.When the titration has ended, the titrator will display the equivalence endpoint volume and the final concentration of the analyte together with the “Titration Completed” message.To view the titration graph and/or results, press .When the titration ends, an “x” will mark the endpoint on the pH versus titrant volume curve in the Graph of Titration Data screen. The value of the endpoint volume is also displayed next to the endpoint
9.11. RESULTS
The results obtained from titration are stored in a report file that can be displayed, transferred to a USB storage device or a PC, or printed.

QUICK START GUIDE
1
1-11
9.12. VIEWING THE LAST TITRATION DATA
To view the last titration report:1) From the main screen, press . The Data Parameters screen will be displayed.2) From the Data Parameters screen highlight Review Last Report option and press . The Review Result
screen will be displayed.3) Use the and keys to display information related to the last titration performed.
9.13. PRINTING THE TITRATION REPORT
Connect a DOS / Windows-compatible parallel printer directly to the DB 25 pin connector located on the back of the titrator.
Note: Prior to connecting the printer, ensure that the titrator and the printer have been turned off.
From the Review Report screen, press . During the information transfer to the printer, the message “Printing” will be displayed on the screen.Press to return to the Data Parameters screen.Press again to return to the main screen.
9.14. SAVING DATA TO USB STORAGE DEVICE
Note: The USB Storage Device has to be formatted FAT or FAT32.
This feature allows saving the results of titrations logging sessions on a USB storage device.1) From the main screen, press , the General Options screen will be displayed.2) Highlight Save Files to USB Storage Device option using the and keys.3) Insert the USB storage device into the USB socket.4) Press , the List of Files on Titrator screen will be displayed.5) Use the and keys to select the report files.
6) Press to transfer all available reports to the USB storage device, or highlight the name of the report file to be transferred and press . Transferring a report file will automatically transfer the corresponding log file and titration graph (*.BMP file if applicable).
7) Press to return to the General Options screen.8) Press again to return to the main screen.

QUIC
K ST
ART
GUID
E
1
1-12
9.15. TITRATION REPORT
While scrolling with the and keys, the fields below can be seen on the titrator display or printed. The same information is available on the saved report file (Ti_00011.rpt in this example, with all report fields selected).
HI931 - Titration Report
Method Name: Neutralization w/ NaOH Time & Date: 15:01 Jun 13, 2018 Report ID: Ti_00011
Calibration Data
Buffer Potential EfficiencyTemp. Time and Date 4.010pH169.3mV98.8%24.0°CA 11:44 Jun 13, 2018 7.010pH-5.8mV98.7%23.9°CA 11:42 Jun 13, 2018 10.010pH-180.7mV98.7%24.0°CA 11:46Jun13,2018
GLP&MeterInformation Sample Name: CompanyName: Operator Name: ElectrodeName: Field 1: Field 2: Field 3: TitratorSoftwareVersion:v1.00 BaseBoardSoftwareVersion:v1.00 Pump1SoftwareVersion:v1.00 Stirrer1SoftwareVersion:v1.00 Titrator Serial Number: TT180525011 AnalogBoard1SerialNumber:AB180525005 Pump1SerialNumber:DP180525004 Stirrer 1 Serial Number: OS180524001 Analog1CalibrationDate:May25,2018
MethodParameters Name: Neutralization w/ NaOH MethodRevision:3.0 StirrerConfiguration: Stirrer: Stirrer 1 StirringSpeed:1400RPM PumpConfiguration: Titrantpump:Pump1 DosingType:Dynamic MinVol:0.050mL MaxVol:0.500mL deltaE:20.000mV EndPointMode:pH1EQpoint,1stDer RecognitionOptions Threshold:50mV/mL Range:NO FilteredDerivatives:NO

QUICK START GUIDE
1
1-13
Pre-TitrationVolume:0.000mL Pre-TitrationStirTime:0sec MeasurementMode:SignalStability deltaE:1.0mV deltat:2sec Minwait:2sec Maxwait:15sec ElectrodeType:pH Blank Option: No Blank Calculations:SampleCalc.byVolume DilutionOption:Disabled TitrantName:0.1NHaOH TitrantConc.:0.1000N(eq/L) AnalyteSize:10.0000mL AnalyteEntry:Fixed MaximumTitrantVolume:20.000mL PotentialRange:-2000.0to2000.0mV Volume/FlowRate:25mL/50.0mL/min SignalAveraging:1Reading SignificantFigures:XXXXX
N(eq/L)-->meq/L
Veq1000meq -*--*------- Leq ------------- mL L --*------ 1000mL
V=volumedispensedinliters. 0.100eq/L->titrantconc. 10.000mL->samplevolume
NrVolume[mL]mVpHGraphicTemp.[°C]Time 00.000274.42.2190.024.9A00:00:00 10.050274.42.2201.025.0A00:00:07 20.100274.42.2200.025.0A00:00:10 30.200274.32.222-0.825.0A00:00:12 40.400274.02.227-1.625.0A00:00:15 50.800273.22.241-2.025.0A00:00:18 61.300271.52.271-3.425.0A00:00:24 71.800269.52.304-3.925.1A00:00:30 82.300267.22.344-4.725.1A00:00:37 92.800264.42.393-5.725.1A00:00:43 103.300260.82.455-7.225.1A00:00:50 113.800256.12.535-9.325.1A00:00:58 124.300250.32.635-11.725.1A00:01:05 134.800241.92.779-16.825.1A00:01:14 145.300228.33.011-27.225.1A00:01:23 155.800193.03.614-70.525.1A00:01:31 166.07721.06.556-620.025.1A00:01:48 176.128-38.27.568-1183.225.1A00:02:03 186.177-123.69.031-1708.025.1A00:02:19 196.227-157.79.616-682.825.1A00:02:28 206.278-174.59.903-335.825.1A00:02:35 216.339-187.810.130-215.925.1A00:02:42

QUIC
K ST
ART
GUID
E
1
1-14
TitrationResults Method Name: Neutralization w/ NaOH Time & Date: 15:01 Jun 13, 2018 AnalyteSize:10.0000mL EndPointVolume:6.144mL pHEquivalencePoint:8.063 Result:61.444meq/L Initial&FinalpH:2.219to10.130 TitrationDuration:2:42[mm:ss] Titration went to Completion
AnalystSignature:____________________

INSTRUCTION MANUAL
2PART 2:
INSTRUCTION MANUAL

INST
RUCT
ION
MAN
UAL
SETU
P
2
2-2
1. SETUP
1.1. UNPACKING
Remove the titrator and accessories from the packaging and examine it carefully. For further assistance, please contact your local Hanna Instruments Office or email us at [email protected] HI931 potentiometric titrator is supplied with:
ITEM QUANTITYTitrator .................................................................................................................................................... 1 pc.Pump assembly ........................................................................................................................................ 1 pc.Burette assembly ...................................................................................................................................... 1 pc.
• Burette with 25 mL syringe• Aspiration tube with fitting and protection tube• Dispensing tube with dispensing tip, protection tube and tube guide• Tube locks• Tool for burette cap removal• Light spectrum protection screen
Electrodes holder and stirrer ...................................................................................................................... 1 pc.• Stirrer holder• Overhead stirrer• Propellers (3 pcs.)• Support rod
Burette blank support ............................................................................................................................... 1 pc.Pump and burette locking screws with plastic head ...................................................................................... 1 pc.Temperature sensor ................................................................................................................................... 1 pc.Shorting cap ............................................................................................................................................ 1 pc.Power adapter .......................................................................................................................................... 1 pc.USB cable ................................................................................................................................................ 1 pc.Instruction manual ................................................................................................................................... 1 pc.USB memory stick .................................................................................................................................... 1 pc.HI900 PC application (installation kit on USB memory stick) ........................................................................ 1 pc.Quality certificate ..................................................................................................................................... 1 pc.If any of the items are missing or damaged, please contact your local Hanna Instruments Office or email us at [email protected] 11.3. TITRATOR COMPONENTS section for component pictures.
Note: Save all packing materials until you are sure that the instrument functions correctly. Any damaged or defective items must be returned in their original packing materials together with the supplied accessories.

INSTRUCTION MANUAL
SETUP
2
2-3
1.2. SAFETY MEASURES
The following safety measures must be followed:1. Never connect or disconnect the pump assembly or other peripheral with the titrator turned on.2. Verify that the burette and the attached tubing are assembled correctly.3. Always check that the titrant bottle and the titration beaker are placed on a flat, stable surface.4. Always wipe up spills and splashes immediately.5. Avoid the following environmental working conditions
• Severe vibrations• Direct sunlight• Atmospheric relative humidity above 95% non-condensing• Environment temperatures below 10°C and above 40°C• Explosion hazards
6. Have the titrator serviced by qualified service personnel only.
1.3. HI931 TITRATOR TECHNICAL SPECIFICATIONS
Analysis Type Standard titration (Standardization, Fixed pH / mV, Equivalence point pH / mV)
Endpoint Mode
Fixed mVFixed pHmV equivalence point (1st or 2nd derivative)pH equivalence point (1st or 2nd derivative)
Burette
Size 5 mL / 10 mL / 25 mL / 50 mLResolution 0.001 mLFlow Rate 0.3 mL to 2 x burette volume per minute
Accuracy
± 0.005 mL (5 mL burette)± 0.010 mL (10 mL burette)± 0.025 mL (25 mL burette)± 0.050 mL (50 mL burette)
StirrerRange 200 to 2500 RPMResolution 100 RPM
mV
Range -2000.0 to 2000.0 mVResolution 0.1 mVAccuracy ± 0.1 mVCalibration single point, offset
pH
Range -2.000 to 20.000 pHResolution 0.1 / 0.01 / 0.001 pHAccuracy ± 0.001 pHCalibration up to five points with standard or custom buffers

INST
RUCT
ION
MAN
UAL
SETU
P
2
2-4
ISE
Range 1x10⁻⁶ to 9.999x10¹⁰
Resolution 1 / 0.1 / 0.01Accuracy ± 0.001 pHCalibration up to five points
TemperatureRange
-5.0 to 105 °C23.0 to 221.0 °F268.2 to 378.2 K
Resolution 0.1 °C / 0.1 °F / 0.1 KAccuracy ± 0.1 °C / ± 0.2 °F / ± 0.1 K
Data StorageMethods up to 100 titration methods (standard and user-defined)Reports up to 100 titration and pH / mV / ISE reports
Connections
Measurement
1 x BNC socket (pH, ORP, ISE half-cell and ISE combination electrodes)1 x 4 mm banana socket (reference electrode)1 x RCA socket (temperature sensor)1 x 6-pin connector (stirrer)
Peripheral
1 x 6-pin mini DIN (external PC keyboard)1 x DB-25 socket (printer)1 x USB standard B (PC connection)1 x DB-9 socket (analytical balance)1 x USB standard A (USB flash drive)
AdditionalSpecifications
Electrode Holder
4 x multi-purpose slots (titrant tubes)3 x 12-mm electrode slots1 x temperature sensor slot1 x overhead stirrer slot
Display 5.7" graphical color display with backlightPower Supply 100 - 240 VAC, 50 / 60 HzPower Draw 0.5 ampsEnclosure Material ABS, PC and SteelKeypad PolyesterDimensions 315 x 205 x 375 mm (12.4 x 8.1 x 14.8 ")Weight approximately 4.3 kg (9.5 lbs.) with 1 pump, stirrer and sensorsOperating Environment
10 to 40 °C (50 to 104 °F); up to 95 % RH
Storage Environment
-20 to 70 °C (-4 to 158 °F); up to 95 % RH

INSTRUCTION MANUAL
SETUP
2
2-5
1.4. INSTALLATION
1.4.1. TITRATOR FRONT VIEW
1.4.2. TITRATOR REAR VIEW
k
Extension

INST
RUCT
ION
MAN
UAL
SETU
P
2
2-6
1.4.3. TITRATOR RIGHT-SIDE VIEW

INSTRUCTION MANUAL
SETUP
2
2-7
1.4.4. TITRATOR ASSEMBLY
Note: Assembly operations must be completed before connecting the titrator to the power supply!
1.4.4.1. Assembling Support RodTo insert support rod into the titrator case:1. Remove protective cap from titrator case2. Insert the support rods into the titrator case 3. Turn the support rod clockwise to secure it in place

INST
RUCT
ION
MAN
UAL
SETU
P
2
2-8
1.4.4.2. Attaching Stirrer & ElectrodeTo attach the stirrer to the titrator, follow these steps:1. Place the electrode holder (B) in the stirrer support housing (A). The stirrer support housing can be inverted if
necessary.2. Slide the electrode holder into the support rod and set the desired height using the holder button.3. Insert electrode (C), temperature sensor (D) and stirrer (E) into the dedicated holes in the electrode holder. Push
them until they are in stable position.
Note: For small sample sizes, use the electrode adapter (F) in the center of the holder.

INSTRUCTION MANUAL
SETUP
2
2-9
1.4.4.3. Connecting the PumpTo connect the pump, follow these steps:1. Retrieve the pump cable from inside the bay. The pump 1 connector is located in the left bay and pump 2 connector
in the right bay.2. Connect the cable to the pump as shown below. The pump connector is located on the bottom of the pump.3. Lower the pump into the titrator, then slide it towards the front of the titrator case until it is firmly latched.4. Secure the pump with the locking screw.
This procedure can be repeated to connect a second pump.
1.4.4.4. Attaching Burette Blank SupportTo attach the support, follow these steps:1. Insert and lower the burette blank support into the titrator’s bay. 2. Slide it towards the front of the titrator case until it is firmly latched.3. Secure the burette blank support with the locking screw.

INST
RUCT
ION
MAN
UAL
SETU
P
2
2-10
1.4.4.5. Attaching the BuretteTo attach the burette to the pump, follow these steps:1. Make sure that the mark from the valve actuating cap and from the burette body are aligned.
2. Slide the burette into the support on the burette pump. Ensure correct coupling between the syringe plunger (A) and the pump piston (B).
INSTRUCTION MANUAL
SETUP
2
2-11
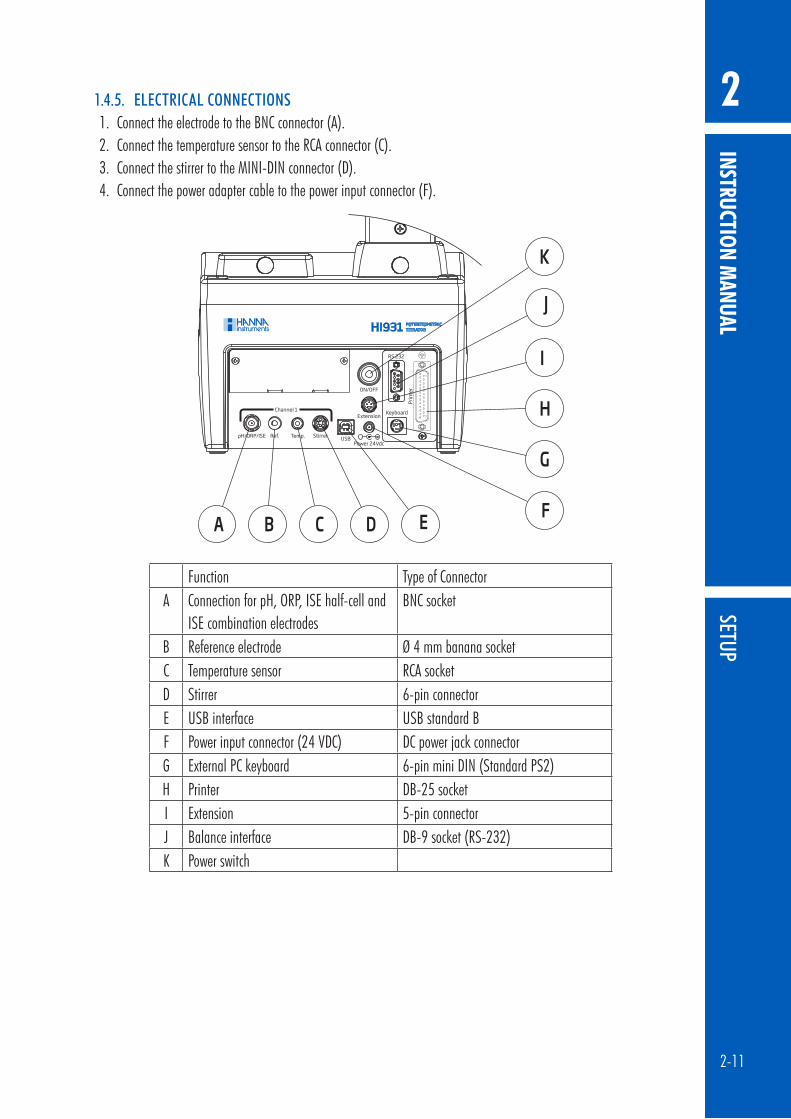
1.4.5. ELECTRICAL CONNECTIONS1. Connect the electrode to the BNC connector (A).2. Connect the temperature sensor to the RCA connector (C).3. Connect the stirrer to the MINI-DIN connector (D).4. Connect the power adapter cable to the power input connector (F).
Function Type of ConnectorA Connection for pH, ORP, ISE half-cell and
ISE combination electrodesBNC socket
B Reference electrode Ø 4 mm banana socketC Temperature sensor RCA socketD Stirrer 6-pin connectorE USB interface USB standard BF Power input connector (24 VDC) DC power jack connectorG External PC keyboard 6-pin mini DIN (Standard PS2)H Printer DB-25 socketI Extension 5-pin connectorJ Balance interface DB-9 socket (RS-232)K Power switch
INST
RUCT
ION
MAN
UAL
USER
INTE
RFAC
E
2
2-12
2. USER INTERFACE
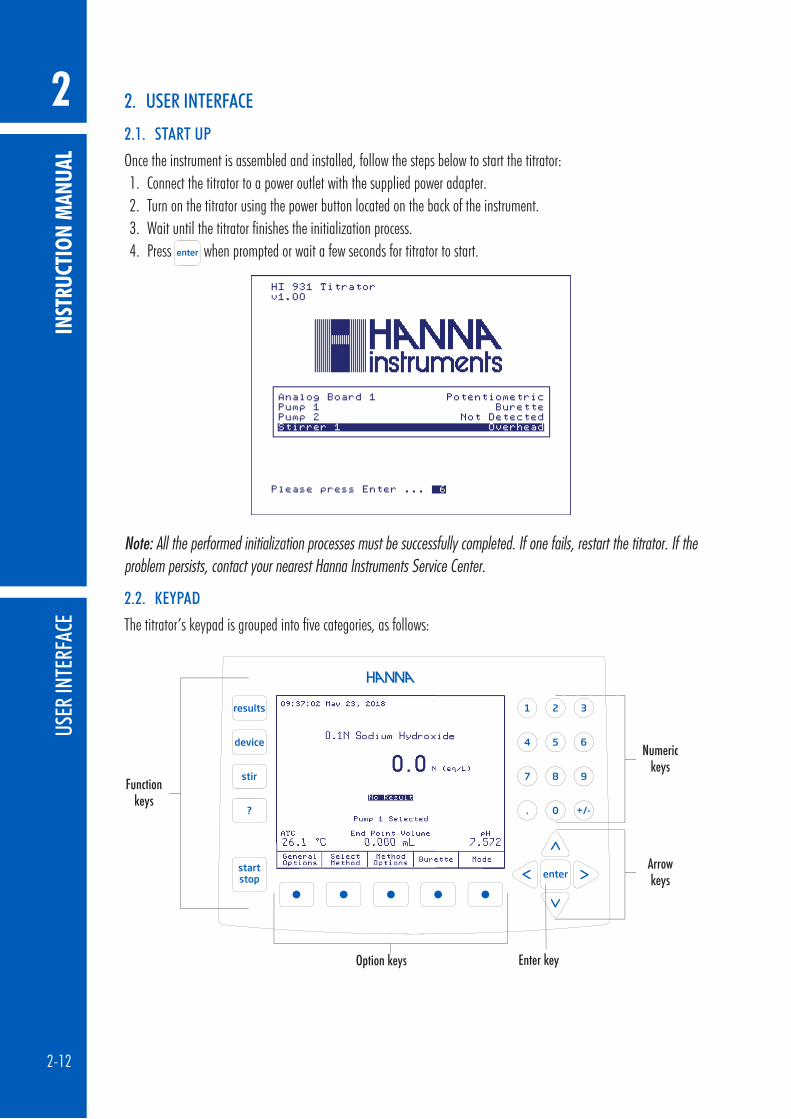
2.1. START UP
Once the instrument is assembled and installed, follow the steps below to start the titrator:1. Connect the titrator to a power outlet with the supplied power adapter.2. Turn on the titrator using the power button located on the back of the instrument.3. Wait until the titrator finishes the initialization process.4. Press when prompted or wait a few seconds for titrator to start.
Note: All the performed initialization processes must be successfully completed. If one fails, restart the titrator. If the problem persists, contact your nearest Hanna Instruments Service Center.
2.2. KEYPAD
The titrator’s keypad is grouped into five categories, as follows:
Option keys Enter key
Numerickeys
Functionkeys
Arrowkeys

INSTRUCTION MANUAL
USER INTERFACE
2
2-13
2.2.1. FUNCTION KEYSIf one of these keys is pressed, the associated function is immediately performed. Some of the keys are active only in specific screens:
Starts or stops a titration process
Turns the selected stirrer on and off
Reserved
Access the data parameters menu (reports, GLP, meter information, report setup)
Displays contextual help
2.2.2. OPTION KEYSThese keys are assigned to the virtual keys on the display. Their functions are listed in the boxes above the buttons and vary depending on the displayed screen. An underlined virtual key can also be activated by pressing .
2.2.3. ARROW KEYSThese keys have the following functions:
• Move the on-screen cursor.• Increase or decrease the stirrer speed and other settings.• Select a character (alphanumeric screen only).• Navigate through menu options.
2.2.4. NUMERIC KEYS to Used for numeric entries. Toggles between positive and negative values. Used for decimal point.
2.2.5. ENTER KEYThis key has the following functions:
• Accepts alphanumeric data entry.• Executes the default (underlined) virtual option key.

INST
RUCT
ION
MAN
UAL
USER
INTE
RFAC
E
2
2-14
2.3. DISPLAY
The titrator has a large color graphical display. The main screen is shown below with short explanations of the screen segments.
2.3.1. THE MAIN SCREEN
The user interface contains several screens. For each titrator function, several screens may be used.Method name Displays the name of the selected method.Time and Date Displays the current date and time.Temperature reading Displays the measured temperature.
ATC Automatic temperature compensationManual Manual temperature compensation
Manual Temperature probe is not connected, manual temperature compensationStirrer information The selected stirrer, actual and set stirrer speed is displayed in RPM. When stirrer is off,
the stirrer information is not displayed.Endpoint volume Displays the volume delivered to reach the titration endpoint. When no titration has been
performed, the displayed volume is “0.000 mL”.Result Displays the titration result.mV or pH reading Displays the current reading. The reading will be in mV or pH.
mV Indicates actual potential reading.rel mV Indicates relative potential reading.pH Indicates actual pH value.
Titration status Displays the status of the selected titration. No Result is displayed when a titration has not been performed.Reminders Indicates when a task needs to be performed and displays errors.Pump 1 selected Displays the active pump.

INSTRUCTION MANUAL
USER INTERFACE
2
2-15
2.4. MENU NAVIGATION
2.4.1. SELECTING AN OPTIONPress the option key below the virtual key. For example, to access the Method Options screen, press the option key below it.
2.4.2. SELECTING A MENU ITEMUse the and arrow keys to move the cursor.When the menu is larger than the display, a scroll bar is active on the right side. The and keys can be used to scroll though the pages.To activate the selected menu item, press or .
2.4.3. ENTERING TEXT Use to erase previous text. Use the arrow keys to highlight the letter then press . Use the same procedure to enter the whole name.
For editing, use the and keys.When editing is complete, press .
The method name will be updated and displayed in the name field of the View / Modify Method screen. When all the desired parameters have been set, press .

INST
RUCT
ION
MAN
UAL
USER
INTE
RFAC
E
2
2-16
2.4.4. SAVING MODIFICATIONSThe Saving Method screen allows the user to save the modifications. To exit without saving, press or highlight Exit Without Saving Method option and then press . To save the modifications, highlight Save Method option and then press .
Note: To access the contextual help menu, press at any time. Help is related to the displayed screen. Press or to return to the previous screen.

INSTRUCTION MANUAL
GENERAL OPTIONS
2
2-17
3. GENERAL OPTIONSThe General Options screen gives access to options that are not directly related to the titration process or pH / mV / ISE measurement. To access this screen, press from the main screen.
3.1. SAVE TO USB
This option allows the user to save files from the titrator to a USB storage device.
Note: The USB Storage Device has to be formatted FAT or FAT32.
On the titrator, the available file types are:Standard method HIXXXXYY.MTD (e.g.: HI0001EN.MTD, HI1004EN.MTD)User-defined method USERXXXX.MTD (e.g.: USER0001.MTD) Report Ti_XXXXX.RPT, mV_XXXXX.RPT, pH_XXXXX.RPT, ISEXXXXX.RPT, mVrXXXXX.RPT (e.g.:
Ti_00001.RPT, mV_00001.RPT, pH_00001.RPT, ISE00001.RPT, mVr00001.RPT)Insert the USB storage device into the USB port on the right side of the titrator.Use the and keys to select the file type. The number of files and the file names will be displayed. Use the and keys to scroll through the list.
INST
RUCT
ION
MAN
UAL
GENE
RAL O
PTIO
NS
2
2-18
The option keys allow the following operations: Returns to the General Options screen. Copies highlighted file from the titrator to USB storage device. Copies all displayed files from the titrator to USB storage device. Deletes the highlighted file. Deletes all displayed files.
Note: The saved files will be stored on the USB key in the HI931 folder, as follows:
Methods USB Drive\HI931\Methods\*.mtdReports USB Drive\HI931\Reports\*.rpt
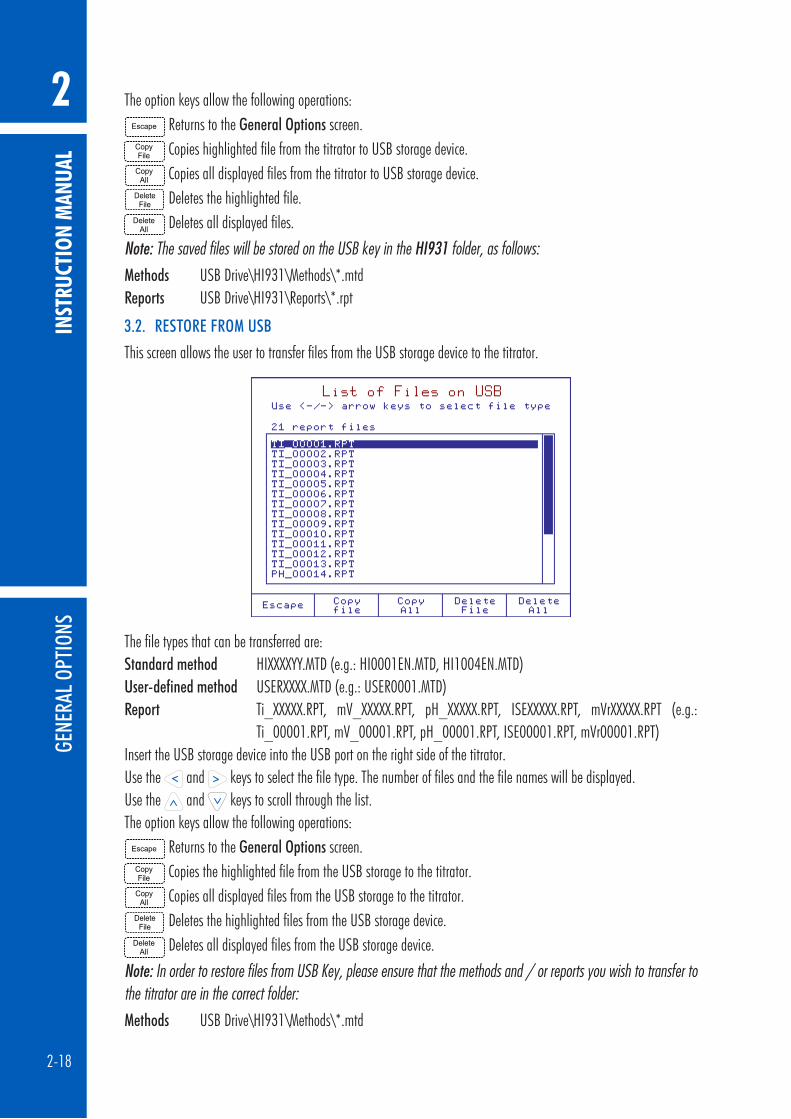
3.2. RESTORE FROM USB
This screen allows the user to transfer files from the USB storage device to the titrator.
The file types that can be transferred are:Standard method HIXXXXYY.MTD (e.g.: HI0001EN.MTD, HI1004EN.MTD)User-defined method USERXXXX.MTD (e.g.: USER0001.MTD) Report Ti_XXXXX.RPT, mV_XXXXX.RPT, pH_XXXXX.RPT, ISEXXXXX.RPT, mVrXXXXX.RPT (e.g.:
Ti_00001.RPT, mV_00001.RPT, pH_00001.RPT, ISE00001.RPT, mVr00001.RPT)Insert the USB storage device into the USB port on the right side of the titrator.Use the and keys to select the file type. The number of files and the file names will be displayed. Use the and keys to scroll through the list.The option keys allow the following operations:
Returns to the General Options screen. Copies the highlighted file from the USB storage to the titrator. Copies all displayed files from the USB storage to the titrator. Deletes the highlighted files from the USB storage device. Deletes all displayed files from the USB storage device.
Note: In order to restore files from USB Key, please ensure that the methods and / or reports you wish to transfer to the titrator are in the correct folder:
Methods USB Drive\HI931\Methods\*.mtd

INSTRUCTION MANUAL
GENERAL OPTIONS
2
2-19
Reports USB Drive\HI931\Reports\*.rpt
3.3. ADMINISTRATION
A 4-digit numeric PIN can be set to prevent unauthorized changes from being made.When the user enters administration mode and a pin has not been set, the user will be prompted to enter a new PIN.
Once a PIN has been set, the titrator can be locked. When a titrator is locked, the users cannot modify methods or delete reports. Basic functions are still available (review reports, save to USB, etc.).
To return to administration mode, the titrator can be unlocked by entering the PIN.

INST
RUCT
ION
MAN
UAL
GENE
RAL O
PTIO
NS
2
2-20
If the PIN is lost or forgotten, press recovery pin and contact technical support to supply the required information.
3.4. TEMPERATURE
The temperature menu allows access to all three menu options related to temperature: source, setting and units.

INSTRUCTION MANUAL
GENERAL OPTIONS
2
2-21
3.4.1. TEMPERATURE SOURCEOption: Automatic Temperature or Manual TemperatureSelect the temperature source used for temperature compensation.When Automatic Temperature is selected, “ATC” is displayed on the main screen and the temperature is read by the temperature probe.When Manual Temperature is selected, “Manual” is displayed on the main screen and a preset temperature value is used for temperature compensation.
Note: The selected temperature source will be indicated in the report files: A for Automatic and M for Manual.
3.4.2. MANUAL TEMPERATURE SETTINGOption: -5.0 to 105.0 °C (23.0 to 221.0 °F, 268.2 to 378.2 K)If the temperature probe is not connected, the user can manually set the temperature used by the titrator for compensation.

INST
RUCT
ION
MAN
UAL
GENE
RAL O
PTIO
NS
2
2-22
3.4.3. TEMPERATURE UNITSOption: °C, °F, KThe temperature ranges are as displayed in the Temperature Units screen.
3.5. DATE & TIME SETTING
This screen allows the user to set the date and time. Use the and keys or the numeric keys to modify the date and time.
Moves move the cursor to the next field. or Changes the time format.

INSTRUCTION MANUAL
GENERAL OPTIONS
2
2-23
3.6. DISPLAY SETTINGS
This screen allows the user to customize the display settings. Increases the backlight time-saver interval. Decreases the backlight time-saver interval.
The backlight intensity can be adjusted using the and keys.There are 8 levels of backlight intensity, ranging from 0 to 7.
The displayed color palette allows for selection of appropriate backlight intensity.The backlight time-saver option protects the display during standby periods, when no keys have been pressed for a set amount of time, the backlight will turn off. If the backlight is off, press any key to reactivate the backlight.The range for backlight time-saver interval is between 1 and 60 minutes. To disable the backlight time-saver, increase the time to the maximum allowed, the Off indication will be displayed.
3.7. BEEPER
Option: On or OffIf enabled (on) an audible alert will sound after a titration is completed, when an invalid key is pressed or when a critical error occurs during titration.

INST
RUCT
ION
MAN
UAL
GENE
RAL O
PTIO
NS
2
2-24
3.8. STIRRER
Option: Enabled or DisabledThe stirrer can be disabled in individual titration method, if necessary.
3.9. LANGUAGE
Using the and keys, select the language from the options listed and press .Restart the titrator in order to apply the new language setting.
INSTRUCTION MANUAL
GENERAL OPTIONS
2
2-25
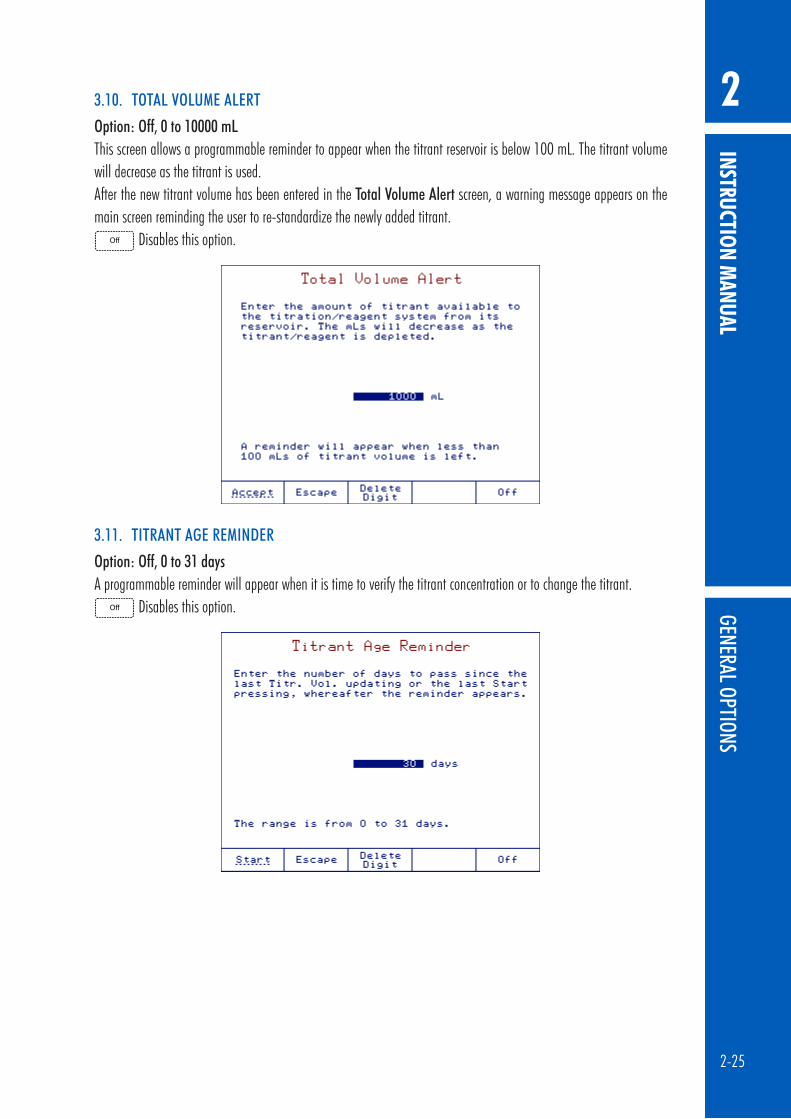
3.10. TOTAL VOLUME ALERT
Option: Off, 0 to 10000 mLThis screen allows a programmable reminder to appear when the titrant reservoir is below 100 mL. The titrant volume will decrease as the titrant is used.After the new titrant volume has been entered in the Total Volume Alert screen, a warning message appears on the main screen reminding the user to re-standardize the newly added titrant.
Disables this option.
3.11. TITRANT AGE REMINDER
Option: Off, 0 to 31 daysA programmable reminder will appear when it is time to verify the titrant concentration or to change the titrant.
Disables this option.

INST
RUCT
ION
MAN
UAL
GENE
RAL O
PTIO
NS
2
2-26
3.12. USB LINK WITH PC
In order to use this feature, the USB cable needs to connect the titrator with the PC. Make sure that HI900 PC application is running on the PC.
“Active / Inactive” message shows the status of the USB link with the PC.“Active” means that the titrator is using the USB communication with the PC and not with another device.“Ready” shows that the titrator is able to communicate with the PC.During transfer of information between the PC and the titrator, press “Transmit” and the status is displayed.
3.13. SETUP BALANCE INTERFACE
This screen allows the user to setup an analytical balance for automatic acquisition of sample mass prior to titration or standardization.
The balance is connected to the titrator via RS 232 interface. Enables the selected balance. Disables the selected balance (automatic weight acquisition will not be available). Returns to the General Options screen. Adds a new balance to the list. Customizes the serial communication parameters. The Balance Configuration screen will open. Deletes the highlighted balance.

INSTRUCTION MANUAL
GENERAL OPTIONS
2
2-27
Note: At least one balance must be in the list.
Be sure that the balance configuration settings match the settings of your balance. It may be necessary to change settings on your balance or titrator. Users should consult their balance instruction manual.Verify connection with the balance is working properly by pressing the key.
3.13.1. BALANCE NAMEOption: Up to 24 charactersAsign a name for your customized balance.

INST
RUCT
ION
MAN
UAL
GENE
RAL O
PTIO
NS
2
2-28
3.13.2. BAUD RATEOption: 4800, 9600, 19200, 38400Set the serial communication baud rate.
3.13.3. DATA BITSOption: 5, 6, 7, 8 bitsSet the number of data bits.

INSTRUCTION MANUAL
GENERAL OPTIONS
2
2-29
3.13.4. PARITYOption: No Parity, Even, OddSet the parity of data packet.
3.13.5. STOP BITOption: 1 bit or 2 bitsSet the number of stop bits.

INST
RUCT
ION
MAN
UAL
GENE
RAL O
PTIO
NS
2
2-30
3.13.6. EDIT REQUEST STOPOption: Up to 10 charactersType the syntax for weight request command.
3.14. PRINTER MODE
Option: Ansi, Ascii, Text
Ansi Use this mode when the printer is set as Ansi. When in this mode, all available accented characters and symbols will be printed.
Ascii Use this mode when the printer is set as Ascii. When in this mode, only some of the available accented characters and symbols will be printed.
Text This mode is recommended when the user doesn’t need to print accented characters.

INSTRUCTION MANUAL
GENERAL OPTIONS
2
2-31
3.15. RESET TO DEFAULT SETTINGS
Note: This will delete all user-defined methods and restore all manufacturer settings such as titrator configuration, standard method parameters, etc.
3.16. OPTIMIZE MEMORY SPACE
This screen allows the user to run a memory defragmentation utility to increase access speed to memory storage. Press and then restart the titrator. Do not disconnect the power suply during this operation.

INST
RUCT
ION
MAN
UAL
GENE
RAL O
PTIO
NS
2
2-32
3.17. UPDATE SOFTWARE
This screen allows the user to update the titrator software from a USB storage device containing a software setup kit.
To update the software:1. Copy the “Setup931” folder to a USB storage device.2. Insert the USB storage device into the USB port.3. Go to General Options, then Update Software. The titrator will display the current and new software versions.4. Press . When prompted, remove the USB storage device and restart the titrator.

INSTRUCTION MANUAL
TITRATION METHODS
2
2-33
4. TITRATION METHODSAll parameters required to complete an analysis are grouped into a method.The titrator is supplied with a pack of standard methods, these methods have been developed by Hanna Instruments and can be used to create user-defined methods. Standard and user-defined methods can be upgraded, saved or deleted by connecting the titrator to a PC using the HI900 PC application or a USB flash drive.
4.1. SELECTING METHODS
To select a method, press from the main screen. A list of available methods will be displayed.
In the Analysis Methods screen, you can view the list of all available methods (standard and user-defined methods).To select a method, highlight the method then press . The name of the selected method will be displayed on the main screen.
4.2. STANDARD METHODS
The standard methods are developed for the most common types of analysis and can be used as templates to create new user-defined methods. Only specific method parameters can be modified by the use. See 4.5. METHOD OPTIONS for more information.

INST
RUCT
ION
MAN
UAL
TITR
ATIO
N ME
THOD
S
2
2-34
4.2.1. UPGRADING STANDARD METHODSTo upgrade the titrator with new standard methods, follow the steps below:From USB storage device:1. Insert the USB storage device into the USB port, located on the right side of the titrator.2. Press from the main screen.3. Using and keys, highlight Restore from USB Storage Device option and choose .4. Using and keys, navigate through file types to find “standard method files”.5. Press the or key to upgrade the titrator with the standard methods.6. Press to return to General Options screen.
From PC:You can upgrade the titrator with standard methods from a PC using the HI900 PC application. See 3.12. USB LINK WITH PC for more information.
4.2.2. DELETING STANDARD METHODSStandard methods can be removed from the titrator by following one of the procedures below.From General Options Screen:1. Using the and keys, highlight Save to USB option and press .2. Using the and keys, navigate through the file types menu to find the list of “standard method files”.3. Press the or keys to remove unnecessary standard methods.4. Press to return to the General Options screen.
From PC:The not required standard methods can be removed from the titrator using the HI900 PC application. See 3.12. USB LINK WITH PC for more information.
4.2.3. RESTORING THE STANDARD METHODS TO THE MANUFACTURER SETTINGSYou can restore the standard methods to the default settings by highlighting a standard method and pressing .

INSTRUCTION MANUAL
TITRATION METHODS
2
2-35
4.3. USER-DEFINED METHODS
User-defined methods are created by users, by modifying a standard method or previously created user-defined method.All method parameters can be modified to suit user-specific requirements.
4.3.1. CREATING USER-DEFINED METHODSTo create a new user-defined method, start from a standard or previously generated user-defined method and follow these steps:1. Press from the main screen.2. Using the and keys, highlight an existing method from the method list.3. Press . A new user-defined method will be generated.4. Press to activate the new method.
Note: The titrator can hold 100 methods (standard and user-defined). When the limit is reached, a warning message is displayed.
4.3.2. DELETING USER-DEFINED METHODS1. To remove a user-defined method, press from the main screen. 2. Highlight the user-defined method that you want to delete and press , a confirmation screen will appear. 3. Press again to confirm, or press to cancel the operation.
INST
RUCT
ION
MAN
UAL
TITR
ATIO
N ME
THOD
S
2
2-36
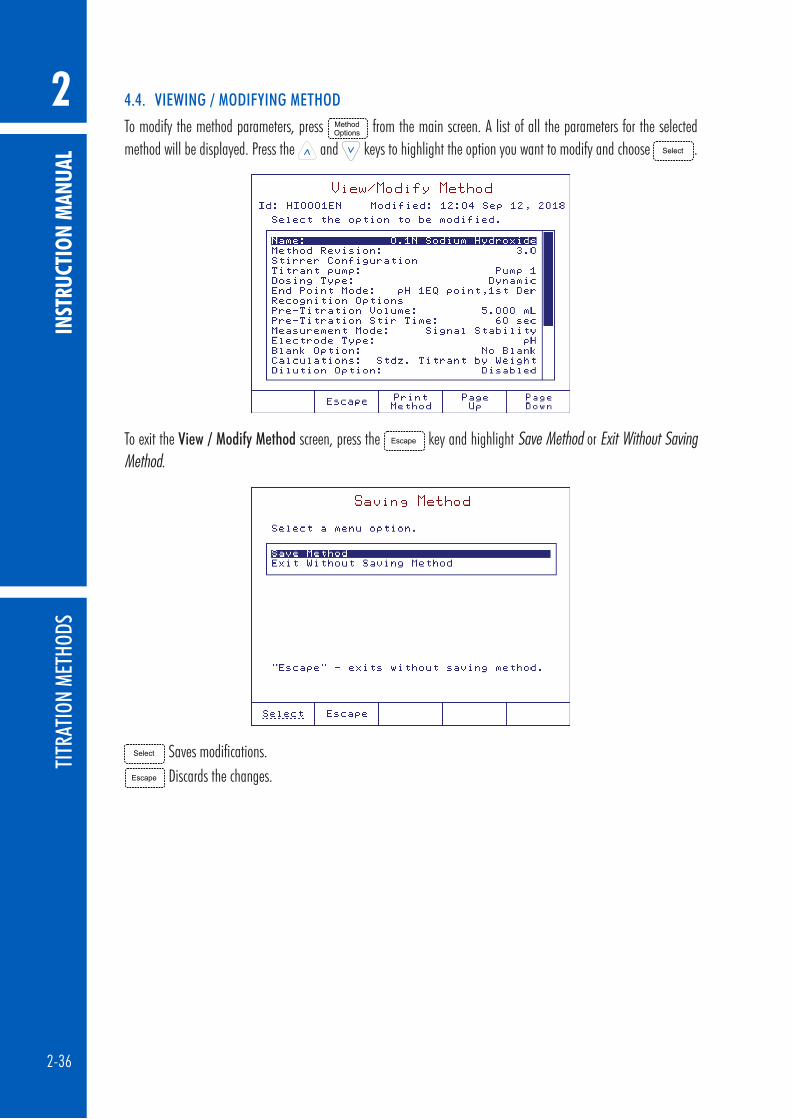
4.4. VIEWING / MODIFYING METHOD
To modify the method parameters, press from the main screen. A list of all the parameters for the selected method will be displayed. Press the and keys to highlight the option you want to modify and choose .
To exit the View / Modify Method screen, press the key and highlight Save Method or Exit Without Saving Method.
Saves modifications. Discards the changes.

INSTRUCTION MANUAL
TITRATION METHODS
2
2-37
4.5. METHOD OPTIONS
Note: Not all method options can be changed for standard methods.
4.5.1. NAMEOption: Up to 24 characters
4.5.2. METHOD REVISIONOption: Up to 3 characters

INST
RUCT
ION
MAN
UAL
TITR
ATIO
N ME
THOD
S
2
2-38
4.5.3. STIRRER CONFIGURATIONUse the arrow keys to select the menu option.
4.5.3.1. StirrerOption: Stirrer 1 or Disabled
4.5.3.2. Stirrer SpeedOption: 200 to 2500 RPM
The stirrer will remain on for as long as the method is active. When the stirrer is running, the speed can be adjusted at any time by using the and keys.

INSTRUCTION MANUAL
TITRATION METHODS
2
2-39
4.5.4. PUMP CONFIGURATIONOption: Pump 1, Pump 2 (if installed)
4.5.5. DOSING TYPEOption: Linear Dosing or Dynamic Dosing
4.5.5.1. Linear DosingLinear dosing dispenses a pre-defined volume of titrant with every addition.
INST
RUCT
ION
MAN
UAL
TITR
ATIO
N ME
THOD
S
2
2-40
Linear dosing is recommended for titrations with a slower reaction rate, difficult nonaqueous titrations, and specific applications.
Note: For steep and normal titration curves, smaller volume increments are recommended, to obtain many points around the equivalence point. For flat titration curves, larger volume increments are recommended for equivalence point detection.
To set the dosing volume, select Linear Dosing and enter the optimum dose.Dosing volume ranges are:5 mL burette 0.001 to 4.750 mL10 mL burette 0.001 to 9.500 mL25 mL burette 0.005 to 23.750 mL50 mL burette 0.005 to 47.500 mL
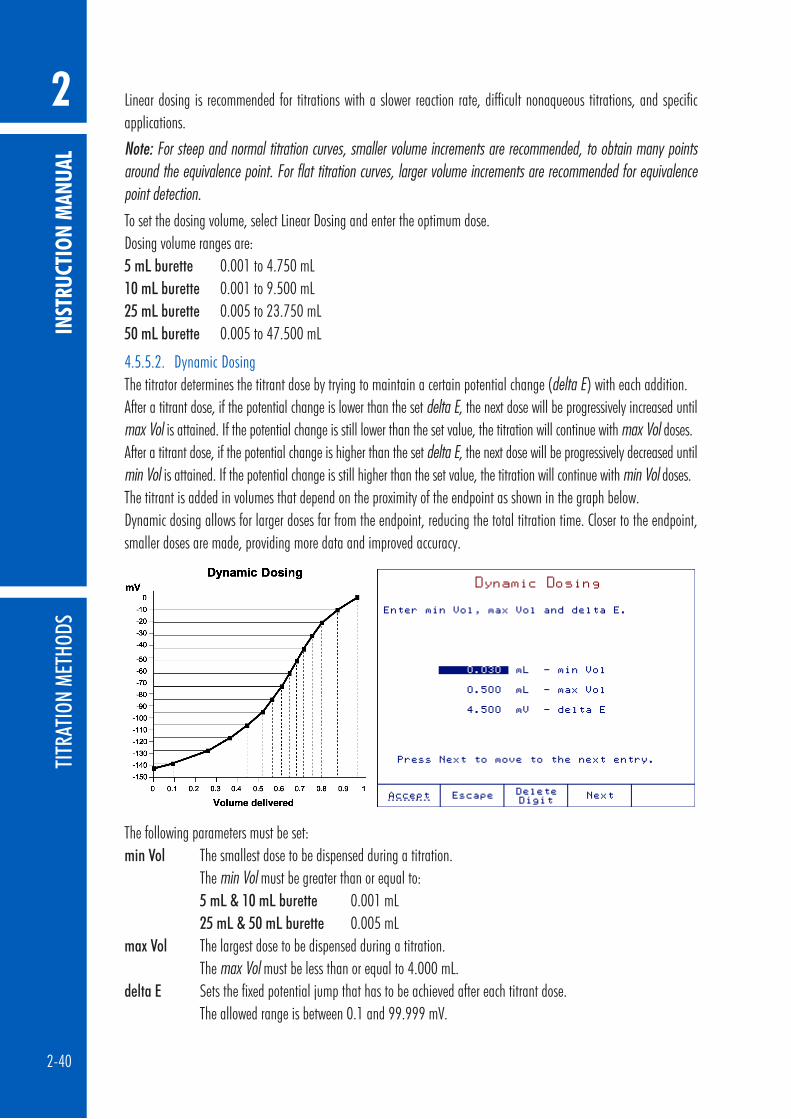
4.5.5.2. Dynamic DosingThe titrator determines the titrant dose by trying to maintain a certain potential change (delta E) with each addition.After a titrant dose, if the potential change is lower than the set delta E, the next dose will be progressively increased until max Vol is attained. If the potential change is still lower than the set value, the titration will continue with max Vol doses.After a titrant dose, if the potential change is higher than the set delta E, the next dose will be progressively decreased until min Vol is attained. If the potential change is still higher than the set value, the titration will continue with min Vol doses.The titrant is added in volumes that depend on the proximity of the endpoint as shown in the graph below.Dynamic dosing allows for larger doses far from the endpoint, reducing the total titration time. Closer to the endpoint, smaller doses are made, providing more data and improved accuracy.
The following parameters must be set:min Vol The smallest dose to be dispensed during a titration. The min Vol must be greater than or equal to: 5 mL & 10 mL burette 0.001 mL 25 mL & 50 mL burette 0.005 mLmax Vol The largest dose to be dispensed during a titration. The max Vol must be less than or equal to 4.000 mL.delta E Sets the fixed potential jump that has to be achieved after each titrant dose. The allowed range is between 0.1 and 99.999 mV.

INSTRUCTION MANUAL
TITRATION METHODS
2
2-41
Recommendations for dosing parameters:For steep and normal titration curves the recommended settings are:delta E 3.5 to 9 mVmin Vol 0.010 to 0.025 mL (25 mL burette)max Vol 0.075 to 0.250 mL (25 mL burette)For flat titration curves the recommended settings are:delta E 10 to 15 mVmin Vol 0.050 to 0.150 mL (25 mL burette)max Vol 0.400 to 0.600 mL (25 mL burette)To achieve the highest levels of accuracy and reproducibility, it is recommended that 20 to 80% of the nominal burette volume used for each titration is consumed. If lower volumes of titrant are required, a smaller burette can be used.
4.5.6. ENDPOINT MODEOption: Equivalence Endpoint (pH or mV) or Fixed Endpoint (pH or mV)
4.5.6.1. Fixed Endpoint (pH or mV)Fixed Endpoint (pH)Option: -2.000 to 20.000 pHThe titration is terminated when the preset pH value has been exceeded. The endpoint volume is a calculated value based on the dispensed volume when pH is under the preset value and the dispensed volume when pH exceeds the preset value.

INST
RUCT
ION
MAN
UAL
TITR
ATIO
N ME
THOD
S
2
2-42
Fixed Endpoint (mV)Option: -2000.0 to 2000.0 mVThe endpoint detection algorithm is the same as for pH, but the threshold value is expressed in mV.
4.5.6.2. Equivalence Endpoint (pH or mV)The titration is terminated when the equivalence point is detected (the point where the added quantity of titrant equals the quantity of analyte present in the sample).

INSTRUCTION MANUAL
TITRATION METHODS
2
2-43
Endpoint DeterminationOption: 1st derivative or 2nd derivative
The equivalence point detection algorithm requires three additional titrant doses to be dispensed after the equivalence point is reached.The reported endpoint volume is a calculated value based on a number of points around the equivalence point.The potentiometric titration curve is the response in mV potential, or pH, between the indication of the electrode versus the volume of titrant added.The inflection point of the titration curve is assumed to be the equivalence point of the chemical reaction.For non-symmetric titration curves, the theoretical error can be reduced by using the dynamic dosing.

INST
RUCT
ION
MAN
UAL
TITR
ATIO
N ME
THOD
S
2
2-44
1st DerivativeWhen 1st derivative is used to recognize the equivalence point, the titration curve inflection point (EQP) is the point where the 1st derivative reaches its maximum value.
The detection algorithm looks for the maximum value of the 1st derivative. The 1st derivative must be greater than the threshold value at the maximum point. See 4.5.7. RECOGNITION OPTIONS (EQUIVALENCE ENDPOINT ONLY) section for more information.
2nd DerivativeWhen 2nd derivative is used to recognize the equivalence point, the titration curve inflection point (EQP) is the point where the second derivative crosses zero.

INSTRUCTION MANUAL
TITRATION METHODS
2
2-45
The detection algorithm looks for the point where the second derivative changes sign.The checked point, or 1st derivative, must be greater than the threshold value. See 4.5.7. RECOGNITION OPTIONS (EQUIVALENCE ENDPOINT ONLY) section for more information.
4.5.7. RECOGNITION OPTIONS (EQUIVALENCE ENDPOINT ONLY)The Recognition Options screen is a set of parameters used to avoid false detection of the equivalence point due to the chemical system (titrant / sample species and concentrations) and / or electrode response.
4.5.7.1. ThresholdOption: 1 to 9999 mV / mLThis parameter must be set by the user according to the analysis.The threshold represents the absolute value of the 1st derivative, expressed in mV / mL, which the detection algorithm does not search for the equivalence point.

INST
RUCT
ION
MAN
UAL
TITR
ATIO
N ME
THOD
S
2
2-46
The recommended value is 40% of the absolute value of the 1st derivative.
Depending on the titration curve profile, the following guide can be used:Flat 1 to 450Normal 50 to 1800Steep 1800 to 9999
4.5.7.2. RangeOption: -2.000 to 20.000 pH or -2000.0 to 2000.0 mVRange is an optional feature for equivalence point recognition.Select Yes in the Range Options screen to enable.The titrator will only look for an equivalence point between the set values.

INSTRUCTION MANUAL
TITRATION METHODS
2
2-47
The Limit 2 value must not be equal to the Limit 1 value.
4.5.7.3. Filtered DerivativesOption: Yes or NoThis option adds a filtering procedure in the 1st and 2nd derivative computation algorithm that reduces the influence of pH or mV noise.Select Yes in the Filtered Derivative Option to enable.

INST
RUCT
ION
MAN
UAL
TITR
ATIO
N ME
THOD
S
2
2-48
Noise can be due to:• Chemical system properties (sample, titrant, solvent), such as slow chemical reactions or unbuffered samples
such as wastewater, tap water, wine• Electrode response• Incorrect method parameters settings such as Signal Stability, Stirring Speed, etc.• Insufficient titrant additions
Note: A shift in the endpoint volume by 1 or 2 doses may be seen due to filtering.
4.5.8. PRE-TITRATION VOLUMEDuring a titration, the equivalence point is reached after many titrant doses. These doses take up extra time while having no relevance for equivalence point detection.Pre-titration volume adds a large initial dose to jump directly to the proximity of the equivalence point.This first dose occurs after the pre-titration stir time is completed.The ranges for pre-titration volumes are shown below:5 mL burette 0.001 to 4.750 mL 10 mL burette 0.001 to 9.500 mL 25 mL burette 0.005 to 23.750 mL 50 mL burette 0.005 to 47.500 mL
To disable a pre-titration volume, enter 0.000 mL.
Note: A pre-titration volume is highly recommended whenever possible. Fewer doses will considerably shorten the overall titration duration.

INSTRUCTION MANUAL
TITRATION METHODS
2
2-49
4.5.9. PRE-TITRATION STIR TIMEOption: 0 to 180 secondsWhen enabled, the sample is mixed for a set period of time before any titrant is added. This allows the sample to becomehomogeneous.
Pre-titration stir time is disabled if 0 seconds is entered.
4.5.10. MEASUREMENT MODEOption: Signal Stability or Timed IncrementDuring titration, the acquisition of the potential (mV) value of the solution can be done by using either Signal Stability or Timed Increment option.

INST
RUCT
ION
MAN
UAL
TITR
ATIO
N ME
THOD
S
2
2-50
4.5.10.1. Signal StabilityWhen Signal Stability is selected, the titrator acquires the potential (mV) only when stable conditions are reached.The principles of signal stability are plotted below:
The signal stability window (condition) represents the time interval (∆t) during which the potential measured in solution (mV) is confined inside the potential interval (∆E).The new signal value is acquired if the stability condition is reached after the minimum (tmin) wait time.If the stability condition is not reached and the maximum (tmax) wait time has elapsed, the potential is acquired.
delta E Maximum change in potential during delta t The range is from 0.1 to 99.9 mV.delta t The time interval during which the potential is measured. The range is from 1 to 10 seconds.t min wait The minimum elapsed time before a stability check. This is also the minimum elapsed time between two doses. The range is from 2 seconds to t max wait time.t max wait The maximum elapsed time between two successive doses. If the t max wait has elapsed, a new dose is
added even if the signal stability condition is not reached.

INSTRUCTION MANUAL
TITRATION METHODS
2
2-51
The range is from t min wait time to 180 seconds.
4.5.10.2. Timed IncrementOption: 2 to 180 secondsWhen Timed Increment is selected, the titrator acquires the potential (mV) at a fixed time interval (no signal stability check).The time period between two acquisitions must be set according to the reaction and the response time of the electrode.

INST
RUCT
ION
MAN
UAL
TITR
ATIO
N ME
THOD
S
2
2-52
4.5.11. ELECTRODE TYPEOption: Up to 20 characters
4.5.12. BLANK OPTION
Option: Disabled, V-Blank, Blank-V
This feature allows the user to select the procedure for the blank calculations (where V is the volume of titrant dispensed during the titration and blank is the volume of titrant consumed by the blank sample).
If one of the options (V-Blank or Blank-V) is selected in the View / Modify Method screen, the blank value will be active on the View / Modify Method screen and the value of the blank can be set (in liters).

INSTRUCTION MANUAL
TITRATION METHODS
2
2-53
4.5.13. CALCULATIONSThe final result is calculated using the endpoint volume (titrant volume at the equivalence point or at the fixed endpoint), and a formula selected by the user.
4.5.13.1. Standard Titration Calculations
4.5.13.1.1. Edit Variable ValuesEdit the variables in a previously selected calculation.For each formula, selected variables can be changed.
4.5.13.1.2. No Formula (mL only)Only the volume of titrant (mL) required to reach the endpoint will be displayed.
4.5.13.1.3. No Formula (L only)Only the volume of titrant (L) required to reach the endpoint is displayed.
4.5.13.1.4. Sample Calculations by WeightTitrant unitsOption: M (mol / L), N (eq / L), g / L, mg / LFinal result unitsOption: ppt (g / kg), ppm (mg / kg), ppb (µg / kg), % (g / 100 g), mg / g, mg / kg, mol / kg, mmol / g, eq / kg, meq / kgThis calculation is used when the concentration of an analyte is determined by the weight of the sample. The results are based on the initial sample weight (in grams).The titrator will calculate the results based on the titrant and sample units selected.A formula example is shown below using M (mol / L) as the titrant unit and ppt (g / kg) as the final result unit:

INST
RUCT
ION
MAN
UAL
TITR
ATIO
N ME
THOD
S
2
2-54
Variables can be set according to the amount of sample and titrant used.
4.5.13.1.5. Sample Calculations by VolumeTitrant UnitsOption: M (mol /L), N (eq / L), g / L, mg / LFinal Result UnitsOption: ppt (g / L), ppm (mg / L), ppb (µg / L), M (mol /L), N (eq / L), mg / L, µg / L, mmol / L, mg / mL, mg / 100 mL, g / 100 mL, eq / L, meq / LThis calculation is used when the concentration of an analyte is determined in terms of the volume of sample. The results are based on the initial sample volume (in milliliters).The titrator will calculate the results based on the selected units.

INSTRUCTION MANUAL
TITRATION METHODS
2
2-55
A formula example is shown below using N (eq / L) as the titrant units and g / L as the final result units.Variables can be set according to the amount of sample and titrant used.
4.5.13.1.6. Standardize Titrant by WeightOption: M (mol /L), N (eq / L), g / L, mg / LThis calculation is used when the concentration of the titrant is determined using a solid standard. Determination of the titrant concentration is based on the primary standard weight (in grams).The calculation is based on the selected titrant unit. If the titrant unit is M (mol / L), the formula used to calculate the result is displayed below.

INST
RUCT
ION
MAN
UAL
TITR
ATIO
N ME
THOD
S
2
2-56
4.5.13.1.7. Standardize Titrant by VolumeOption: M (mol /L), N (eq / L), g / L, mg / LThis calculation is used when the concentration of the titrant is determined using a primary standard solution. Determination of the titrant concentration is based on the primary standard volume (in milliliters).The calculation is based on the selected titrant unit. If the titrant unit is N (eq / L), the formula used to calculate the result is displayed below.
4.5.13.1.8. Generic FormulaFinal results units:Option: ppt (g / kg), ppt (g / L), ppm (mg / kg), ppm (mg / L), ppb (µg / kg), ppb (µg / L), % (g / 100 g), M (mol / L), mg / g, N (eq / L), g / L, mg / kg, mg / L, mol / kg, µg / L, mol / L, mmol / g, eq / kg, mmol / L, meq / kg, mg / mL, mg / 100 mL, g / 100 mL, eq / L, meq / L, no unitUsers can define their own calculation formula based on the final result units in a solid or liquid sample.The titrator will calculate the results based on the selected unit. The formula can be either for titrant standardization or sample analysis.
C the concentration of the titrantF1, F2, F3 general factorS sample size, in grams or millilitersV the volume delivered, in liters, to reach the endpoint

INSTRUCTION MANUAL
TITRATION METHODS
2
2-57
General factorsWeight conversion mol / L, eq / L, g / L, mg / LReaction ratio mol / mol, mol / eq, eq / molUnit conversion L to mL, g to mgWeight conversion kg, g, mg, µg, mole, mmole
4.5.14. DILUTION OPTIONOption: Enabled or DisabledWhen the initial sample is diluted, a titration is made with an aliquot of the diluted sample, dilution calculations can be used.The calculations are based on the original sample weight or volume in order to express the results for the initial sample.
Final Dilution Volume The volume of the sample after dilutionAliquot Volume Volume of sample taken from the dilution for titrationAnalyte size to be diluted The initial sample weight or volume
4.5.15. TITRANT NAMEOption: Up to 15 characters
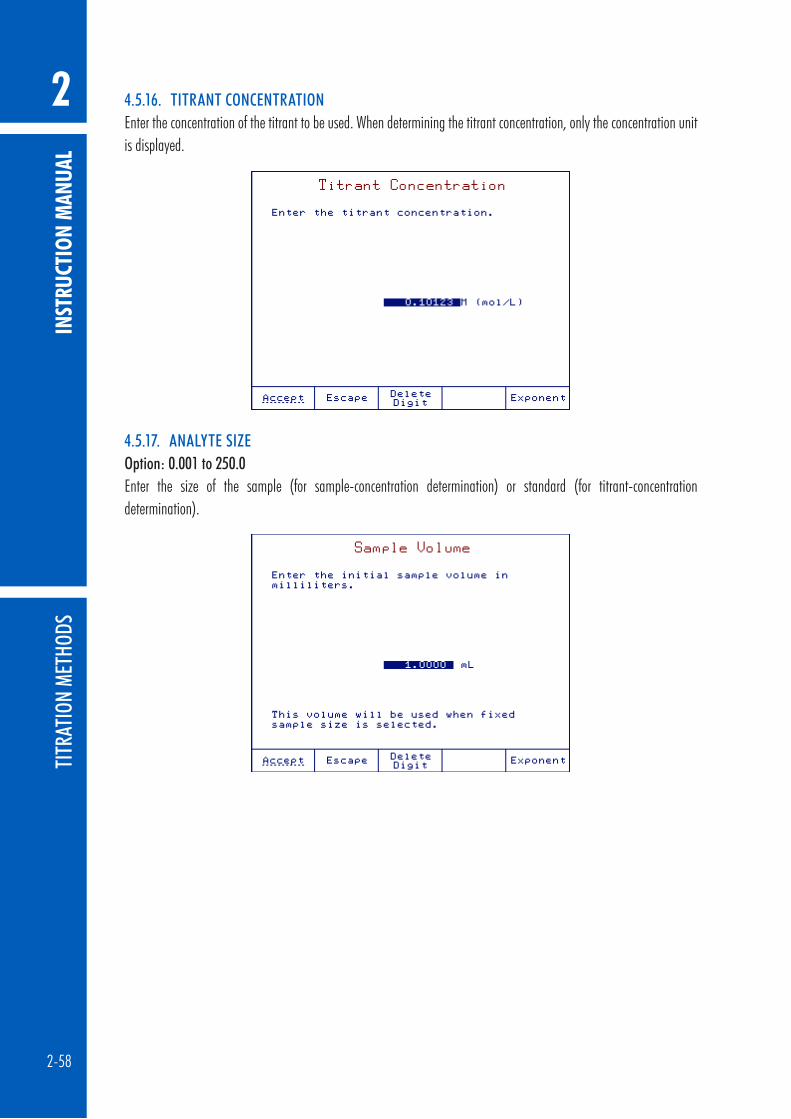
INST
RUCT
ION
MAN
UAL
TITR
ATIO
N ME
THOD
S
2
2-58
4.5.16. TITRANT CONCENTRATIONEnter the concentration of the titrant to be used. When determining the titrant concentration, only the concentration unit is displayed.
4.5.17. ANALYTE SIZEOption: 0.001 to 250.0Enter the size of the sample (for sample-concentration determination) or standard (for titrant-concentration determination).

INSTRUCTION MANUAL
TITRATION METHODS
2
2-59
4.5.18. ANALYTE ENTRYOption: Fixed or Manual
Fixed Weight or Volume For each titration will use a set weight or volume in the calculations.Manual Weight or Volume For each titration the exact weight or volume can be entered at the beginning
of each titration.
4.5.19. MAXIMUM TITRANT VOLUMEOption: 0.100 to 100.000 mLThe maximum titrant volume used in the titration must be set according to the analysis.If the titration endpoint (fixed or equivalence point) is not reached, the titration will be terminated after the maximum titrant volume has been dispensed. The error message “Limits Exceeded” will appear on the display.

INST
RUCT
ION
MAN
UAL
TITR
ATIO
N ME
THOD
S
2
2-60
4.5.20. POTENTIAL RANGEOption: -2000.0 to 2000.0 mVThe input potential range can be set by the user. The titration will be terminated and an error message will appear if the potential is outside these limits.These limits provide protection against a titration that does not generate an endpoint due to potential over-range.
4.5.21. VOLUME / FLOW RATEThe flow rate for the dosing system can be set by the user in an interval of 0.3 to 2 times the burette volume:5 mL burette 0.3 to 10 mL / min10 mL burette 0.3 to 20 mL / min25 mL burette 0.3 to 50 mL / min50 mL burette 0.3 to 100 mL / minThe flow rate is set for all burette operations.
Note: The titrator will automatically detect the burette size and display the correct high limit volume.
4.5.22. SIGNAL AVERAGINGOption: 1, 2, 3, 4 readingsThis option enables filtering on the mV / pH reading.If 1 Reading is selected, the filtering is disabled. The titrator will take the last reading and place it into a “moving window” along with the last 2, 3 or 4 readings (depending on the selected option). The average of those readings is displayed and used for calculations.

INSTRUCTION MANUAL
TITRATION METHODS
2
2-61
Averaging more readings is helpful when a noisy signal is received from the electrode.
4.5.23. SIGNIFICANT FIGURESOption: Two (XX), Three (XXX), Four (XXXX) or Five (XXXXX)This option allows you to set the format for displaying the final titration result.
4.6. PRINTING
To print method parameters, press from the main screen.Press and wait a few seconds until the printer completes the job.If no printer is connected to the dedicated socket, or if the printer is offline, an error message will appear on the display. See 10.2.1. CONNECTING TO A PRINTER section for details on connecting a printer to the titrator.

INST
RUCT
ION
MAN
UAL
TITR
ATIO
N MO
DE
2
2-62
5. TITRATION MODE
5.1. RUNNING A TITRATION
Before beginning a titration, make sure that the following conditions are met:• At least one pump is properly installed.• A burette is inserted in the pump and filled with titrant.• The aspiration tube is inserted in the titrant bottle and primed. The dispensing tube is over the titration beaker.• The standard or sample has been carefully weighed / measured into the beaker.• The electrode(s) and the temperature probe are submersed in the beaker.• The desired method is selected and the parameters are set to the optimal values.
5.1.1. STARTING A TITRATIONTo start a new analysis, press from the main screen.When an analysis begins:
• The stirrer will turn on, if enabled. See 4.5.3. STIRRER CONFIGURATION section for more information.• The pre-titration volume will be dispensed, if enabled. See 4.5.8. PRE-TITRATION VOLUME section for more
information.• After the pre-titration volume is added the pre-titration stir time starts, if enabled. See 4.5.9. PRE-TITRATION
STIR TIME section for more information.• The titrator will start the analysis and continue to deliver titrant until the endpoint is detected or the titration is
terminated.
5.1.2. SUSPENDING A TITRATIONWhile a titration or analysis is in progress, you can temporarily stop it by pressing . This will stop the dosing pump if it is running.To continue the titration or analysis press .
5.1.3. VIEWING THE TITRATION CURVEDuring a titration, the potentiometric curve and the derivative curve (equivalence point only) can be displayed on the Titration Graph screen by pressing .The potentiometric curve and the derivative curve are scaled to fit simultaneously inside the display.When a titration endpoint is successfully detected, the volume is displayed on the graph and marked with an “x”.

INSTRUCTION MANUAL
TITRATION MODE
2
2-63
The contents of the graph as related to an endpoint type are as follows:Equivalence endpoint (pH) The pH readings and the selected derivative vs. volume of titrant are displayed (see Figure 1).Equivalence endpoint (mV) The mV readings and the selected derivative vs. volume of titrant are displayed (see Figure 2).Fixed endpoint (pH) The pH readings vs. volume of titrant are displayed (see Figure 3).Fixed endpoint (mV) The mV readings vs. volume of titrant are displayed (see Figure 4).
Figure 1 Equivalence endpoint (pH) Figure 2 Equivalence endpoint (mV)
Figure 3 Fixed endpoint (pH) Figure 4 Fixed endpoint (mV)
Changes the y-axis from the pH (mV) reading to the derivate value (equivalence point titrations only). Saves the graph as a bitmap (available when titration is complete).
5.2. STOPPING A TITRATION
The titration or analysis is terminated when one of the following conditions is met:Titration completedThis is the only mode with valid final result values. The endpoint or stable reading was successfully detected, the final results will be displayed.Manually terminatedThe current titration or analysis was terminated by the user before the endpoint was detected.Limits exceededThe maximum titrant volume was delivered without reaching the endpoint. An error message is displayed on the screen.Critical errorA critical error occurred and the titration was stopped. These errors are typically related to the dosing system. An error message is displayed on the screen.Potential out of rangeThe measured values from the electrode are outside the potential range. An error message is displayed on the screen.

INST
RUCT
ION
MAN
UAL
pH M
ODE
2
2-64
6. pH MODEBy pressing from the main screen, the titrator can be switched to Titrator, pH, mV or ISE modes.
When one of these keys is pressed, the titrator will enter the selected mode:
Switches to Titrator mode.
Switches to pH mode.
Switches to mV mode.
Switches to ISE mode.

INSTRUCTION MANUAL
pH MODE
2
2-65
6.1. DISPLAY
If one of these keys is pressed, the associated function is immediately performed. Some of the keys are active only in specific screens:
Gives access to options that are not directly related to the measurement process. See 3. GENERAL OPTIONS section for more information.
Stores the current pH reading. See 6.4. LOGGING section for more information.or
Starts the interval log. See 6.4. LOGGING section for more information. Enters the pH calibration screen. See 6.3. pH CALIBRATION section for more information.
Enters the pH setup screen, parameters are associated with pH measurements and calibration. See 6.2. pH SETUP section for more information.
Allows the user to switch between the available measurement modes: Titrator, pH, mV or ISE mode.
6.2. pH SETUP
To access pH Setup, press option key while in pH mode.
Use and keys to highlight the desired option.Press or to access the selected option.

INST
RUCT
ION
MAN
UAL
pH M
ODE
2
2-66
6.2.1. BUFFER ENTRY TYPEOption: Automatic, Semiautomatic, Manual
Automatic The instrument automatically selects the pH calibration point as the closest buffer from the predefined buffer group. See 6.2.4. EDIT BUFFER GROUP section for more information.
Semiautomatic The instrument automatically selects the closest buffer from the available buffers (standard and custom buffers).
Manual The calibration buffer must be manually selected during calibration from the available buffer list (standard and custom buffers).
6.2.2. FIRST-CALIBRATION POINTOption: Point or Offset
Point The slope values adjacent to the calibration points will be reevaluated (normal calibration).Offset The existing slope values will not be changed.

INSTRUCTION MANUAL
pH MODE
2
2-67
6.2.3. EDIT CUSTOM BUFFERSIf you wish to use buffers other than the standard ones, use the Edit Custom Buffers option to set the desired pH value. Up to five pH custom buffers can be set.
Note: Custom buffers are not temperature compensated, enter the value of the buffer at the calibration temperature.
1. Use the and keys to select the desired buffer.2. Press to delete the selected buffer.3. Press to edit the selected buffer.
4. Use the numeric keypad to enter the pH buffer value.5. Press to save the value.6. Press to return to pH Setup menu.

INST
RUCT
ION
MAN
UAL
pH M
ODE
2
2-68
6.2.4. EDIT BUFFER GROUPOption: Up to five buffersSelect up to five buffers from the available buffers (Hanna or custom) to be used for automatic buffer recognition.Within the buffer group, pH values must be at least 1.5 pH apart.If the buffer group already contains five pH buffers, at least one pH buffer has to be removed in order to add another buffer.
Use the arrow keys to select the pH buffer to be included / removed in / from the buffer group. or Adds or removes the selected pH buffer to / from buffer group. Returns to pH Setup menu.
6.2.5. CALIBRATION REMINDEROption: Daily, Periodic, Disabled
Daily The calibration reminder will appear daily at a specified time.Periodic The calibration reminder will appear after the set time since the last calibration has elapsed.Disabled The calibration reminder will not appear.

INSTRUCTION MANUAL
pH MODE
2
2-69
6.2.6. SET REMINDER PERIODOption: Disabled to 31 days, 23 hours and 59 minutesIf Daily or Periodic option was selected for the calibration reminder, the reminder period must also be set. For a daily reminder period, the time of day can be set.For a periodic reminder period, the number of days, hours and minutes can be set.
Moves the cursor to the next field. Saves the changes or to return to the previous screen. Disables the calibration reminder and return to pH setup.
6.2.7. CLEAR CALIBRATIONThis option clears the existing pH calibration for the selected channel. If the calibration is cleared, the factory calibration will be used.
Clears the previous calibration or to return to the previous screen without clearing the calibration.
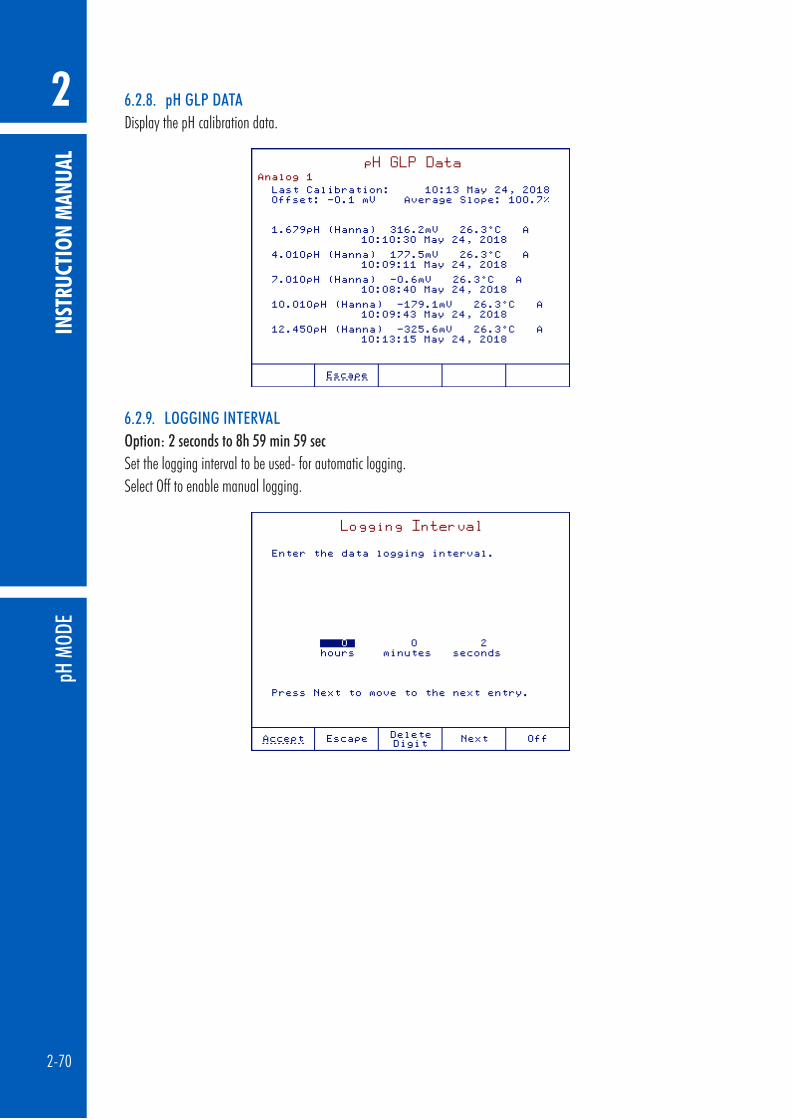
INST
RUCT
ION
MAN
UAL
pH M
ODE
2
2-70
6.2.8. pH GLP DATADisplay the pH calibration data.
6.2.9. LOGGING INTERVALOption: 2 seconds to 8h 59 min 59 secSet the logging interval to be used- for automatic logging.Select Off to enable manual logging.

INSTRUCTION MANUAL
pH MODE
2
2-71
6.2.10. SIGNAL STABILITY CRITERIAOption: Fast, Medium, Accurate
Fast Quicker results, less accuracyMedium Medium speed results, medium accuracyAccurate Slower results, high accuracy
6.2.11. pH RESOLUTIONOption: One (X.X), Two (X.XX), Three (X.XXX) decimal places
6.2.12. STIRRER CONFIGURATIONOption: Disabled or Stirrer 1

INST
RUCT
ION
MAN
UAL
pH M
ODE
2
2-72
6.2.13. STIRRING SPEEDOption: 200 to 2500 RPM
6.3. pH CALIBRATION
Calibrate the instrument often, especially if high accuracy is required.The instrument should be recalibrated:
• Whenever the pH electrode is replaced.• At least once a week.• After testing aggressive chemicals.• When “No pH Calibration” or “pH Calibration Expired” message appears on the display.
PreparationPour small quantities of the buffer solutions into clean beakers. If possible, use plastic beakers to minimize any EMC interferences.For accurate calibration and to minimize cross-contamination, use two beakers for each buffer solution: one for rinsing the electrode and one for calibration. If you are measuring in the acidic range, use pH 7.01 or 6.86 as the first buffer and pH 4.01 / 3.00 or 1.68 as the second buffer. If you are measuring in the alkaline range, use pH 7.01 or 6.86 as the first buffer and pH 10.01 / 9.18 or 12.45 as the second buffer.For extended range measurements (acidic and alkaline), perform a five-point calibration by selecting five buffers across the entire pH range.

INSTRUCTION MANUAL
pH MODE
2
2-73
Calibration procedureDuring calibration, the user has a choice of 8 standard buffers: (pH 1.68, 3.00, 4.01, 6.86, 7.01, 9.18, 10.01, 12.45) and up to 5 custom buffers.For accurate measurements it is recommended to perform a five-point calibration. However, at least a two-point calibration is suggested. For pH titrations, the selected buffers should bracket your endpoint (e.g. if your endpoint value is at 8.5, use 7.01 or 6.86 and 9.18 or 10.01 for calibration).To begin calibration:1. Press . If the instrument was calibrated before, previous calibration can be cleared by pressing .
Note: It is very important to clear calibration history when a new electrode is used.
2. Immerse the pH electrode and the temperature probe approximately 4 cm (1.5”) into a buffer solution and stir gently.
3. If necessary, select the pH calibration buffer value with or .4. Once the reading has stabilized, press to update the calibration. The calibration buffer will be added to
the Calibrated Buffers section.5. Rinse the pH electrode and the temperature probe, then immerse them into the next buffer solution and follow the
above procedure or press to exit the calibration.
Notes:
• The new calibration points will replace old ones if the difference between them is ± 0.2 pH. • Buffers used in previous calibrations will not have a solid background. • If calibrating with a standard buffer in MTC mode, the pH value and temperature can be modified by pressing
. The values can be adjusted using the numeric keys. Press to save the new values.
• In ATC mode, the pH value for custom buffers can be modified by pressing . • If the Automatic Buffer entry type was selected for the calibration procedure, the titrator will automatically
select the buffer closest to the measured pH value from the buffer group.• If the Semiautomatic Buffer entry type was selected, use the or to select the buffer. Only
buffers in the buffer group will be displayed.

INST
RUCT
ION
MAN
UAL
pH M
ODE
2
2-74
Calibration messages:Wrong Buffer. Please check the buffer.The message is displayed when the difference between the pH reading and the value of the selected calibration buffer is significant. Check if you have selected the appropriate calibration buffer.Wrong buffer temperature.The message is displayed if the buffer temperature is out of the defined temperature range.Clean the electrode or check the buffer. Press to update calibration.This message alerts the user that some dirt or deposits could be on the electrode, or the buffer is contaminated.Slope too low. Please check the buffer .This message appears if the current slope is under 80% of the default slope. Recalibrate the instrument using fresh buffers.Slope too high. Press to clear the old calibration.This message appears as a result of an erroneous slope condition.
6.4. LOGGING
Data logging is available in pH mode. It can be logging on demand (Manual Logging) or automatically (Interval Logging) at predefined time intervals.The the logging report can be customized. See 9.3.5. SETTING UP pH / mV / ISE REPORT for more information.
6.4.1. INTERVAL LOGGINGThe logging interval is set in the pH Setup screen.Press to start the log.The logging interval and name of logging file will be displayed on the measure screen.To stop the automatic logging, press Stop.
6.4.2. MANUAL LOGGINGTo manually log pH readings, press from the pH measurement screen.A new record will be added to the report every time is pressed.

INSTRUCTION MANUAL
mV MODE
2
2-75
7. mV MODEBy pressing from the main screen, the titrator can be switched to Titrator, pH, mV or ISE modes.
When one of these keys is pressed, the titrator will enter the selected mode:
Switches to Titrator mode.
Switches to pH mode.
Switches to mV mode.
Switches to ISE mode.

INST
RUCT
ION
MAN
UAL
mV
MODE
2
2-76
7.1. DISPLAY
The mV screen is shown below:
If one of these keys is pressed, the associated function is immediately performed. Some of the keys are active only in specific screens:
Gives access to options that are not directly related to the measurement process. See 3. GENERAL OPTIONS section for more information.
Stores the current pH reading. See 7.4. LOGGING section for more information.or
Starts the interval log. See 7.4. LOGGING section for more information. Enters the pH calibration screen. See 7.3. RELATIVE mV CALIBRATION section for more information. Enters the pH setup screen, parameters are associated with pH measurements and calibration. See 7.2. mV SETUP
section for more information. Allows the user to switch between measurement modes: Titrator, pH, mV or ISE mode.
7.2. mV SETUP

INSTRUCTION MANUAL
mV MODE
2
2-77
7.2.1. CLEAR RELATIVE mV OFFSET Clears the relative mV offset or to return to the previous screen.
7.2.2. LOGGING INTERVALOption: 2 seconds to 8h 59min 59secPress Off to enable manual logging.

INST
RUCT
ION
MAN
UAL
mV
MODE
2
2-78
7.2.3. STABILITY CRITERIAOption: Fast, Medium, Accurate
Fast Quicker results, less accuracyMedium Medium speed results, medium accuracyAccurate Slower results, high accuracy
7.2.4. STIRRER CONFIGURATIONOption: Stirrer 1 or Disabled

INSTRUCTION MANUAL
mV MODE
2
2-79
7.2.5. STIRRING SPEEDOption: 200 to 2500 RPM
7.3. RELATIVE mV CALIBRATION
Accepts the value.
Cancels this operation and return to the previous screen.
Delets the last digit.
7.4. LOGGING
Data logging is available in mV mode. It can be logging on demand (Manual Logging) or automatically (Interval Logging) at predefined time intervals.The the logging report can be customized. See 9.3.5. SETTING UP pH / mV / ISE REPORT section for more information.
7.4.1. INTERVAL LOGGINGThe logging interval is set in the mV Setup screen.Press to start the log.The logging interval and name of logging file will be displayed on the measure screen.To stop the automatic logging, press Stop.
7.4.2. MANUAL LOGGINGTo manually log mV readings, press from the mV measurement screen.A new record will be added to the report every time is pressed.
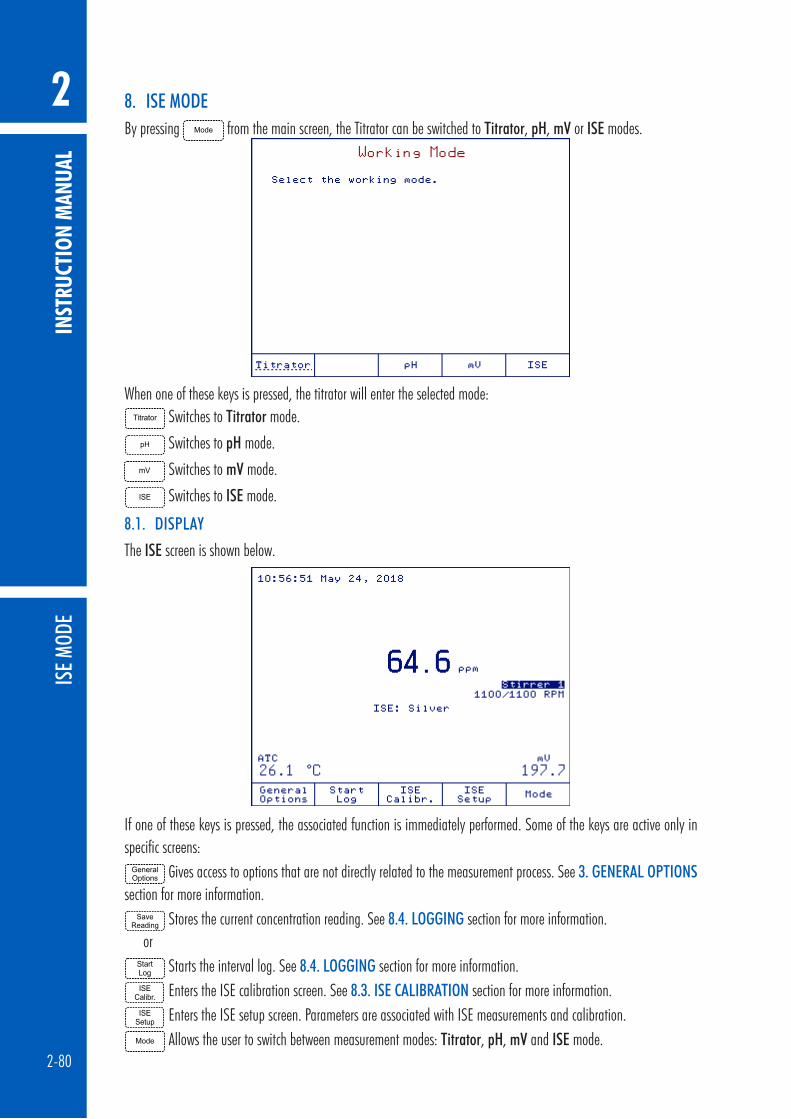
INST
RUCT
ION
MAN
UAL
ISE M
ODE
2
2-80
8. ISE MODEBy pressing from the main screen, the Titrator can be switched to Titrator, pH, mV or ISE modes.
When one of these keys is pressed, the titrator will enter the selected mode: Switches to Titrator mode.
Switches to pH mode.
Switches to mV mode.
Switches to ISE mode.
8.1. DISPLAY
The ISE screen is shown below.
If one of these keys is pressed, the associated function is immediately performed. Some of the keys are active only in specific screens:
Gives access to options that are not directly related to the measurement process. See 3. GENERAL OPTIONS section for more information.
Stores the current concentration reading. See 8.4. LOGGING section for more information.or
Starts the interval log. See 8.4. LOGGING section for more information. Enters the ISE calibration screen. See 8.3. ISE CALIBRATION section for more information. Enters the ISE setup screen. Parameters are associated with ISE measurements and calibration. Allows the user to switch between measurement modes: Titrator, pH, mV and ISE mode.

INSTRUCTION MANUAL
ISE MODE
2
2-81
8.2. ISE SETUP
To access the ISE Setup, press option key in ISE mode.
8.2.1. CALIBRATION GROUPOption: All Standards or Standards Group
All Standards Includes both standard and custom solutions.Standards Group Includes only the standards selected by the user.

INST
RUCT
ION
MAN
UAL
ISE M
ODE
2
2-82
8.2.2. TEMPERATURE COMPENSATIONOption: Enabled or Disabled
Note: When Temperature compensation is enabled, the isopotential point must also be set.
8.2.3. ISOPOTENTIAL POINT (TEMPERATURE COMPENSATION)Option: 1.00 E-2 to 1.00 E+5 ppmThis option allows the user to set an isopotential point for the selected electrode when temperature compensation is enabled. The isopotential point is edited in ppm units only. The isopotential point will vary for different electrodes, if measurements are going to be made at several temperatures, the value should be entered if it is known.

INSTRUCTION MANUAL
ISE MODE
2
2-83
8.2.4. EDITING CUSTOM STANDARDSOption: Up to five
1. Use the and keys to select the standard.2. Press to delete the standard.3. Press to edit the selected custom standard; use the numeric keys to edit the standard.
8.2.5. EDITING STANDARD GROUPOption: Up to 5 standards
Use the arrow keys to select the standard to be included in / removed from the standard group. or Adds or removes the selected standard to / from standard group. Returns to ISE Setup menu.

INST
RUCT
ION
MAN
UAL
ISE M
ODE
2
2-84
8.2.6. CALIBRATION REMINDEROption: Daily, Periodic, Disabled
Daily The calibration reminder will appear daily, at specified time.Periodic The calibration reminder will appear after the set time since the last calibration has elapsed.Disable The calibration reminder will not appear.
8.2.7. SETTING REMINDERIf Daily or Periodic option was selected for the calibration reminder, the reminder period must also be set. For a daily reminder, the time of day can be set.For a periodic reminder period the number of days, hours and minutes can be set.
Moves the cursor to the next field. Saves the changes or to return to the previous screen. Disables the calibration reminder and return to ISE setup menu.

INSTRUCTION MANUAL
ISE MODE
2
2-85
8.2.8. CLEARING CALIBRATIONThis option clears the existing ISE calibration. If the calibration is cleared, a new calibration must be done in order to take measurements.
Clears the previous calibration or to return to the previous screen.
8.2.9. ISE GLP DATADisplays the ISE calibration data

INST
RUCT
ION
MAN
UAL
ISE M
ODE
2
2-86
8.2.10. ELECTRODE TYPEOption: Ammonia, Bromide, Cadmium, Calcium, Carbon Dioxide, Chloride, Cupric, Cyanide, Fluoride, Iodide, Lead, Nitrate, Potassium, Silver, Sodium, Sulfate, Sulfide, five custom electrodes
See the ion constants (name, molar weight, electric charge / slope). Returns to the setup screen.
The Ion Constants for Custom Electrodes can be modified.
8.2.10.1. NameOption: up to 10 characters

INSTRUCTION MANUAL
ISE MODE
2
2-87
8.2.10.2. Molar WeightOption: 0.001 g / mol to 1000.000 g / mol
8.2.10.3. Electric Charge / SlopeOption: 2 / 29.58, 1 / 59.16, -1 / -59.16, -2 / -29.58 or None / -59.16
8.2.11. CONCENTRATION UNITOptions: ppt (g / L), ppm (mg / L), ppb (µg / L), mg / mL, M (mol / L), mmol / L, %w / v ,user defined

INST
RUCT
ION
MAN
UAL
ISE M
ODE
2
2-88
8.2.12. LOGGING INTERVALOption: 2 seconds to 8h 59 min. 59 sec.
8.2.13. STABILITY CRITERIAOption: Fast, Medium, Accurate
Fast Quicker results, less accuracyMedium Medium speed results, medium accuracyAccurate Slower results, high accuracy

INSTRUCTION MANUAL
ISE MODE
2
2-89
8.2.14. ISE SIGNIFICANT DIGITSOption: One (X), Two (XX), Three (XXX).
8.2.15. STIRRER CONFIGURATIONOption: Disabled, Stirrer 1
8.2.16. STIRRING SPEEDOption: 200 to 2500 RPM

INST
RUCT
ION
MAN
UAL
ISE M
ODE
2
2-90
8.3. ISE CALIBRATION
It is recommended to calibrate the instrument frequently if high accuracy is required. The instrument should also be recalibrated whenever the “Calibrate Electrode” message appears on the LCD. Due to electrode conditioning time, the electrode must be immersed for several seconds to stabilize. The user will be guided step by step during calibration with easy-to-follow messages on the display. This will make the calibration a simple and error-free procedure.PreparationPour small quantities of the standard solution into clean beakers. If possible, use plastic beakers to minimize any EMC interferences.For accurate calibration and to minimize cross-contamination, use two beakers for each standard solution: one for rinsing the electrode and one for calibration.
Note: For accurate measurements, add the appropriate ISA (Ionic Strength Adjustment) to the calibration standards.
Calibration procedureBefore calibrating, make sure that the electrode type and concentration unit has been selected in ISE Setup. Up to a five-points calibration is possible using any combination of five standard solutions and five custom solutions.The ISE calibration and measurement can be performed with or without temperature compensation. If the temperature compensation option is enabled, the isopotential point of the electrode must be set in ISE Setup.1. Press from the main screen. If the instrument was calibrated before and the calibration was not cleared,
the old calibration can be cleared by pressing .2. Immerse the ISE and the temperature probe approximately 2 cm into the standard with the lowest concentration.3. Select the standard concentration with or .4. When the reading has stabilized, press to update the calibration. The calibration point value will be added
to the Calibrated Standard list.5. Select and repeat the procedure with all of the available standards.6. Press to exit the calibration.
INSTRUCTION MANUAL
ISE MODE
2
2-91
8.4. LOGGING
Data logging is available in ISE mode. It can be logging on demand (Manual Logging) or automatically (Interval Logging) at predefined time intervals.The the logging report can be customized. See 9.3.5. SETTING UP pH / mV / ISE REPORT section for more information.
8.4.1. INTERVAL LOGGINGThe logging interval is set in the ISE Setup screen.Press to start the log.The logging interval and name of logging file will be displayed on the measure screen.To stop the automatic logging, press Stop.
8.4.2. MANUAL LOGGINGTo manually log pH readings, press from the ISE measurement screen.A new record will be added to the report every time is pressed.

INST
RUCT
ION
MAN
UAL
AUXI
LIAR
Y FUN
CTIO
NS
2
2-92
9. AUXILIARY FUNCTIONS
9.1. BURETTE
To access the Burette screen, press from the main titration screen.Highlight the desired option and then press .
Allows you to select the desired pump for burette operations (it is only active if two pumps are connected).

INSTRUCTION MANUAL
AUXILIARY FUNCTIONS
2
2-93
9.1.1. PRIMING THE BURETTEOption: Up to 5The Prime Burette option is used to fill the burette with titrant before starting a titration. The priming process consists of several cycles of filling and emptying the burette with titrant.Two rinse cycles are shown in the figure below. The dispensing tube is connected on the right side and the aspiration tube on the left side.
Note: Before starting this operation, the aspiration tube must be inserted in the titrant bottle. A waste container should be placed under the dispensing tip to collect the waste solution.
To prime the burette, select Prime Burette, enter the number of rinses and press .We recommend at least three rinses to assure that the air bubbles are completely removed.

INST
RUCT
ION
MAN
UAL
AUXI
LIAR
Y FUN
CTIO
NS
2
2-94
9.1.2. RINSING BURETTE TIPA 2 mL dose of titrant will be dispensed from the burette when this operation is selected, this will eliminate any air in the dispensing tip.
9.1.3. MANUAL DISPENSEManual Dispense option allows a defined titrant volume to be dosed. Select the Manual Dispense option and press
.
Use the numeric keypad to enter the volume to be dispensed.The manual dispense volume must be between the limits shown below:5 mL burette 0.001 to 4.750 mL10 mL burette 0.001 to 9.500 mL25 mL burette 0.005 to 23.750 mL50 mL burette 0.005 to 47.500 mL
9.1.4. PURGING THE BURETTEThis option allows the burette to be emptied before cleaning or storing the burette. The burette is flushed twice.
Note: Before starting this operation, remove the aspiration tube from the titrant bottle.
The figures below show the steps in a purge burette operation.

INSTRUCTION MANUAL
AUXILIARY FUNCTIONS
2
2-95
9.2. STIRRER
The stirrer can be turned on and off by pressing .During the titration process, the stirring speed can be manually adjusted using the and keys.
9.3. RESULTS
From the Data Parameters screen, you can access the following options:
9.3.1. REVIEWING LAST ANALYSIS REPORT
The report contains information based on the selections made in the Setup Titration Report and Setup ISE / pH / mV Report screen.
Review the graph. Print the titration report. Return to the previous screen. Scroll through the pages.

INST
RUCT
ION
MAN
UAL
AUXI
LIAR
Y FUN
CTIO
NS
2
2-96
9.3.2. REVIEWING AVAILABLE REPORTSUp to 100 reports can be saved on the titrator. To view one of the saved reports, highlight a report and then press .
The report contains only the information selected in the Setup Titration Report and Setup pH / mV / ISE Report screens during report configuration.
Review the selected graph. Review the selected report. Print the selected report. Delete the selected report. Return to the previous screen.
9.3.3. GLP DATAOption: Up to 20 characters
Sample Name Allows the sample name to be recorded in each report. The sample name will increase by one, with each new titration or logging report, if the last character is a number.
Company Name Allows the company name to be recorded in each report.Operator Name Allows the operator name to be recorded in each report.Electrode Name Allows the electrode name to be recorded in each report. Fields 1, 2, 3 Allows any additional information to be recorded in each report.The fields must be selected from Setup Titration Report screen in order to be displayed in the titration report. See 9.3.6. SETTING UP TITRATION REPORT section for more information.

INSTRUCTION MANUAL
AUXILIARY FUNCTIONS
2
2-97
9.3.4. METER INFORMATIONDisplays titrator configuration data.
Titrator Serial Number The serial number of the titrator base board.Analog Board 1 Serial Number The serial number of the analog board.Pump 1 (or 2) Serial Number The serial number of the connected pump.Titrator Software Version The current software version installed on the titrator.Base Board Software Version The current software version present on the base board of the
titrator.Pump 1 (or 2) Software Version The current software version for the pump.Analog 1 Calibration Date Manufacturer calibration date of the analog board.
Note: If more than 1 year elapsed from the calibration date of the analog board 1, the message “Analog 1 Calibration Due” will appear on the main screen. The analog board need to be recalibrated.

INST
RUCT
ION
MAN
UAL
AUXI
LIAR
Y FUN
CTIO
NS
2
2-98
9.3.5. SETTING UP pH / mV / ISE REPORTCustomize a unique report to record the pH, mV, and ISE measurements. An asterisk means that it will be included in the report.
Adds the highlighted information to the report. Removes the highlighted information from the report. Returns to the Data Parameter Screen. Report is not updated. Updates the report with the selected items. Report previously saved will not be updated. Scrolls through the options.
9.3.6. SETTING UP TITRATION REPORTCustomize a unique report to record the titration results. An asterisk means that it will be included in the titration report.
Adds the highlighted information to the report. Removes the highlighted information from the report. Returns to the Data Parameter Screen. Report is not updated. Updates the report with the selected items. Report previously saved will not be updated. Scrolls through the options.

INSTRUCTION MANUAL
MAINTENANCE & PERIPHERALS
2
2-99
10. MAINTENANCE & PERIPHERALSThe 25-mL burette included with the titrator exceeds the ISO 8655 standard for accurate delivery of liquids by a motor-driven piston burette.
10.1. BURETTE MAINTENANCE
10.1.1. BURETTE ASSEMBLYThe burette is delivered with a 25-mL syringe inside and with all of the accessories mounted. See 1. SETUP section for more information. The burette assembly consists of a rigid housing which holds the glass syringe, a 3-way valve and titrant tubing.
10.1.2. CHANGING THE BURETTERemove the burette from the pump assembly by sliding it forward and then slide the new burette into place.
10.1.3. DISASSEMBLING THE BURETTEThe aspiration and the dispensing tubes have fittings and tube protectors. The aspiration tube is mounted on the left side and the dispensing tube is mounted on the right side of the burette.To remove the dispensing tube and the aspiration tube follow these steps:1. Remove the blue tube protector (A) by sliding it off the clear titrant tubing.2. Remove the tube lock (B) from the burette holder.3. Turn the fitting (C) counterclockwise to remove it from the burette holder.4. Slide the clear titrant tubing through the fitting.

INST
RUCT
ION
MAN
UAL
MAIN
TENA
NCE &
PER
IPHE
RALS
2
2-100
10.1.4. ASSEMBLING THE BURETTETo attach the dispensing tube and the aspiration tube, follow these steps:1. Insert the flat-shaped end of the titrant tubing into the valve outlet (A) and screw the fitting clockwise to tighten.
The highest of the 9 cuts should be vertical in the final position.2. Bend the tube up into the vertical position to enter the highest cut of the fitting (C).3. Replace the tube lock fitting (D).4. Replace the blue tube protector (E) by sliding it over the clear titrant tubing, the protector will sit in the tube lock
fitting.
10.1.5. CLEANING THE BURETTETo clean the burette, follow these steps:1. If the burette is filled with titrant, remove the aspiration tube from the titrant bottle and purge burette. See
9.1.4. PURGING THE BURETTE section for more information.2. Insert the aspiration tube into cleaning solution, deionized water or titrant solvent.3. Go through two cycles of filling and emptying the burette. See 9.1.4. PURGING THE BURETTE section for more
information.4. During second cycle, remove the aspiration tube from the cleaning solution, deionized water or solvent and allow
the air to replace the liquid in the burette. This will clean the aspiration tube.If this simple cleaning procedure is not adequate, continue with these steps:1. Remove the burette assembly from the pump.2. Remove the dispensing and aspiration tubes. Clean them separately or insert new ones.3. Remove the protective cap from the bottom of the burette assembly by using the burette removal tool.4. Remove the syringe from the burette assembly by unscrewing it with your fingers.5. Extract the piston from the syringe.6. Clean both the piston and the syringe with appropriate cleaning solution. Rinse with deionized water.7. Remove the excess liquid.
Warning: Avoid contacting the titrant with bare hands. Avoid spilling titrant. Clean the external side of the syringe and piston to remove aggressive chemicals. Do not touch the white PTFE part of the piston or internal walls of the burette with bare hands or greasy materials.

INSTRUCTION MANUAL
MAINTENANCE & PERIPHERALS
2
2-101
8. Reinsert the piston into the syringe.9. Reinsert the syringe by screwing it in the valve with your fingers.
10. Reinsert the protective cap to the bottom of the burette assembly. Carefully position the cap into the burette.11. Slide the burette into the burette stand. Notice the position of the piston shaft to the pump couple.12. Priming the burette three times with new titrant is recommended.
10.1.6. BURETTE PREPARATION (TITRANT FILLING)Before starting a titration, the burette must be properly filled with titrant in order to obtain an accurate and repeatable result. To fill the burette, follow the next steps and recommendations:1. If necessary, clean the burette and make sure it is empty.2. From the main screen press .3. Highlight Prime Burette option and press .4. Enter the number of times the burette needs to be rinsed (minimum three rinses are recommend allowing air
bubbles to be evacuated).5. Press .
To avoid the presence of the air bubbles inside the burette, make sure to have a continuous liquid flow inside the burette. A little air just above the liquid level at the first filling is normal. The next filling will evacuate all of the air; no air will be left in the valve.Sometimes during this process, slight finger tapping on the tubes helps remove any residual air bubbles.If air bubbles are still present:1. Remove the aspiration tube from the titrant bottle.2. Repeat burette preparation procedure.3. If this is not successful, clean the burette again.

INST
RUCT
ION
MAN
UAL
MAIN
TENA
NCE &
PER
IPHE
RALS
2
2-102
10.2. PERIPHERALS
Warning! Connection or disconnection of POWER, PUMP ASSEMBLY, PRINTER or RS232 INTERFACE must only be done when titrator and external devices are turned off.
10.2.1. CONNECTING TO A PRINTERA variety of parallel printers can be connected to the parallel port of the titrator using a DB25 cable.
Warning: The titrator and the external printer must be both turned off before they are connected.
10.2.2. CONNECTING AN EXTERNAL PC KEYBOARDThis connection allows the use of an external PS/2 PC Keyboard in addition to the titrator’s keypad.

INSTRUCTION MANUAL
MAINTENANCE & PERIPHERALS
2
2-103
The correspondence between the titrator’s keypad and the United States 101-type external keyboard is detailed below:External PC Keyboard (United States 101) Titrator KeypadFunction key F-1
Function key F-2
Function key F-3
Function key F-4
Function key F-5 Option key 1 (from left to right)Function key F-6 Option key 2 (from left to right)Function key F-7 Option key 3 (from left to right)Function key F-8 Option key 4 (from left to right)Function key F-9 Option key 5 (from left to right)Function key F-10
Arrow key: Up
Arrow key: Down
Arrow key: Left
Arrow key: Right
Page Up
Page Down
Numeric keys: 0 to 9 to Enter
Alphanumeric keys Allow alphanumeric entries

INST
RUCT
ION
MAN
UAL
MAIN
TENA
NCE &
PER
IPHE
RALS
2
2-104
10.2.3. CONNECTING TO A COMPUTERThe titrator can be connected to a computer using a USB cable. HI900 PC application needs to be installed on the PC.
To connect the PC to the titrator follow the steps below: 1. Connect the cable to the USB port on the rear panel of the titrator.2. Connect the cable to the USB port on the PC.
The HI900 PC application allows the transfer of methods and reports between the titrator and PC. See 3.12. USB LINK WITH PC section for more information.

INSTRUCTION MANUAL
ACCESSORIES
2
2-105
11. ACCESSORIES
11.1. SOLUTIONS
11.1.1. pH CALIBRATION BUFFERSHI7001M pH 1.68 buffer solution, 230 mLHI7001L pH 1.68 buffer solution, 500 mLHI7004M pH 4.01 buffer solution, 230 mLHI7004L pH 4.01 buffer solution, 500 mLHI7006M pH 6.86 buffer solution, 230 mLHI7006L pH 6.86 buffer solution, 500 mLHI7007M pH 7.01 buffer solution, 230 mLHI7007L pH 7.01 buffer solution, 500 mLHI7009M pH 9.18 buffer solution, 230 mLHI7009L pH 9.18 buffer solution, 500 mLHI7010M pH 10.01 buffer solution, 230 mLHI7010L pH 10.01 buffer solution, 500 mL
11.1.2. pH CALIBRATION BUFFERS IN FDA APPROVED BOTTLEHI8004L pH 4.01 buffer solution, 500 mLHI8006L pH 6.86 buffer solution, 500 mLHI8007L pH 7.01 buffer solution, 500 mLHI8009L pH 9.18 buffer solution, 500 mLHI8010L pH 10.01 buffer solution, 500 mL
11.1.3. pH TECHNICAL CALIBRATION BUFFERSHI5016 pH 1.68 buffer solution, 500 mLHI5003 pH 3.00 buffer solution, 500 mLHI5004 pH 4.01 buffer solution, 500 mLHI5068 pH 6.86 buffer solution, 500 mLHI5007 pH 7.01 buffer solution, 500 mLHI5091 pH 9.18 buffer solution, 500 mLHI5010 pH 10.01 buffer solution, 500 mLHI5124 pH 12.45 buffer solution, 500 mL
11.1.4. pH MILLESIMAL CALIBRATION BUFFERSHI6016 pH 1.679 buffer solution, 500 mLHI6016-01 pH 1.679 buffer solution, 1 LHI6003 pH 3.000 buffer solution, 500 mLHI6003-01 pH 3.000 buffer solution, 1 LHI6004 pH 4.010 buffer solution, 500 mLHI6004-01 pH 4.010 buffer solution, 1 LHI6068 pH 6.862 buffer solution, 500 mLHI6068-01 pH 6.862 buffer solution, 1 LHI6007 pH 7.010 buffer solution, 500 mL

INST
RUCT
ION
MAN
UAL
ACCE
SSOR
IES
2
2-106
HI6007-01 pH 7.010 buffer solution, 1 LHI6091 pH 9.177 buffer solution, 500 mLHI6091-01 pH 9.177 buffer solution, 1 LHI6010 pH 10.010 buffer solution, 500 mLHI6010-01 pH 10.010 buffer solution, 1 LHI6124 pH 12.450 buffer solution, 500 mLHI6124-01 pH 12.450 buffer solution, 1 L
11.1.5. ELECTRODE CLEANING SOLUTIONSHI7061M General purpose cleaning solution, 230 mLHI7061L General purpose cleaning solution, 500 mLHI7073M Protein cleaning solution, 230 mLHI7073L Protein cleaning solution, 500 mLHI7074M Inorganic cleaning solution, 230 mLHI7074L Inorganic cleaning solution, 500 mLHI7077M Oil & fat cleaning solution, 230 mLHI7077L Oil & fat cleaning solution, 500 mL
11.1.6. ELECTRODE CLEANING SOLUTIONS IN FDA APPROVED BOTTLEHI8061M General purpose solution, 230 mLHI8061L General purpose solution, 500 mLHI8073M Protein cleaning solution, 230 mLHI8073L Protein cleaning solution, 500 mLHI8077M Oil & fat cleaning solution, 230 mLHI8077L Oil & fat cleaning solution, 500 mL
11.1.7. ELECTRODE STORAGE SOLUTIONSHI70300M Storage solution, 230 mLHI70300L Storage solution, 500 mL
11.1.8. ELECTRODE STORAGE SOLUTIONS IN FDA APPROVED BOTTLEHI80300M Storage solution, 230 mLHI80300L Storage solution, 500 mL
11.1.9. ELECTRODE REFILL ELECTROLYTE SOLUTIONSHI7071 3.5 M KCl with AgCl Reference Electrolyte Solution, 30 mLHI7072 1 M Potassium Nitrate Electrode Fill SolutionHI7075 1.7 M Potassium Nitrate, 0.7 M Potassium Chloride Electrode Fill SolutionHI7076 1 M Sodium Chloride Electrode Fill SolutionHI7078 0.5 M Ammonium Sulfate Electrode Fill SolutionHI7082 3.5 M KCl Reference Electrolyte Solution, 30 mL
11.1.10. ELECTRODE REFILL ELECTROLYTE SOLUTIONS IN FDA APPROVED BOTTLEHI8071 3.5 M KCl with AgCl Reference Electrolyte Solution, 30 mLHI8072 1 M Potassium Nitrate Electrode Fill SolutionHI8082 3.5 M KCl Reference Electrolyte Solution, 30 mL
INSTRUCTION MANUAL
ACCESSORIES
2
2-107
11.1.11. ORP PRETREATMENT SOLUTIONSHI7091M Reducing pretreatment solution, 230 mLHI7091L Reducing pretreatment solution, 500 mLHI7092M Oxidizing pretreatment solution, 230 mLHI7092L Oxidizing pretreatment solution, 500 mL
11.1.12. TITRATION REAGENTSHI70429 0.05 M Silver nitrate titration reagent, 1 LHI70433 0.01 N Stabilized iodine titration reagent, 1 LHI70439 0.1 M Sodium thiosulfate titration reagent, 1 LHI70440 0.02 N Stabilized iodine titration reagent, 1 LHI70441 0.04 N Stabilized iodine titration reagent, 1 LHI70448 0.02 M Silver nitrate titration reagent, 1 LHI70449 0.02 M EDTA titration reagent, 1 LHI70455 0.01 N Sodium hydroxide titration reagent, 1 LHI70456 0.1 N Sodium hydroxide titration reagent, 1 LHI70457 1 N Sodium hydroxide titration reagent, 1 LHI70458 0.01 M Sulfuric acid titration reagent, 1 LHI70459 0.05 M Sulfuric acid titration reagent, 1 LHI70462 0.01 N Hydrochloric acid titration reagent, 1 LHI70463 0.1 N Hydrochloric acid titration reagent, 1 LHI70464 1 N Hydrochloric acid titration reagent, 1 L
11.1.13. ION-SELECTIVE ELECTRODE CALIBRATION STANDARDSHI4001-01 0.1 M Ammonia standardHI4001-02 100 ppm Ammonia standard (as N)HI4001-03 1000 ppm Ammonia standard (as N)HI4002-01 0.1 M Bromide standardHI4003-01 0.1 M Cadmium standardHI4004-01 0.1 M Calcium standardHI4005-01 0.1 M Carbon dioxide standardHI4005-03 1000 ppm Carbon dioxide standard (as CaCO3)HI4007-01 0.1 M Chloride standardHI4007-02 100 ppm Chloride standardHI4007-03 1000 ppm Chloride standardHI4008-01 0.1 M Cupric standardHI4010-01 0.1 M Fluoride standardHI4010-02 100 ppm Fluoride standardHI4010-03 1000 ppm Fluoride standardHI4011-01 0.1 M Iodide standardHI4012-01 0.1 M Lead standardHI4012-21 0.1 M Sulfate standardHI4013-01 0.1 M Nitrate standard

INST
RUCT
ION
MAN
UAL
ACCE
SSOR
IES
2
2-108
HI4013-02 100 ppm Nitrate standardHI4013-03 1000 ppm Nitrate standardHI4014-01 0.1 M Potassium standardHI4015-01 0.1 M Silver standard
11.2. SENSORS
11.2.1. pH ELECTRODESHI1043BGlass-body, double junction, refillable, combination pH electrodeUse: strong acid and base, paint and solventsHI1053BGlass-body, triple ceramic, conic shape, refillable, combination pH electrodeUse: emulsions, fats and creams, soil and semi-solids samplesHI1083BGlass-body, micro, Viscolene, nonrefillable, combination pH electrodeUse: biotechnology and micro titrationHI1131BGlass-body, double junction, refillable, combination pH electrodeUse: general purposeHI1330BGlass-body, semimicro, single junction, refillable, combination pH electrodeUse: laboratory, vials, and test tubesHI1331BGlass-body, semimicro, single junction, refillable, combination pH electrodeUse: flasksHI1230BPlastic-body (PEI), double junction, gel-filled, combination pH electrodeUse: general purposeHI2031BGlass-body, conical tip, refillable, combination pH electrodeUse: dairy and semi-solid productsHI1332BPlastic-body (PEI), double junction, refillable, combination pH electrodeUse: chemicals, field applications and quality control testingFC100BPlastic-body (PVDF), double junction, refillable, combination pH electrodeUse: cheeseFC200BPlastic-body (PVDF), single junction, conical tip, non-refillable Viscolene electrolyte, combination pH electrodeUse: milk, yogurt, dairy products, and semi-solid foodsFC210BGlass-body, double junction, conical tip, non-refillable Viscolene electrolyte, combination pH electrode

INSTRUCTION MANUAL
ACCESSORIES
2
2-109
Use: milk, yogurt, and creamFC220BGlass-body, single junction, refillable, combination pH electrodeUse: milk, yogurt, cream, sauce, and fruit juicesFC911BPlastic-body (PVDF), double junction, refillable, combination pH electrodeUse: sauce, juices, dairy products and other liquid or slurry forms of foodHI1413BGlass-body, single junction, flat tip, non-refillable Viscolene electrolyte, combination pH electrodeUse: surfaces, skin, leather, paper, and emulsions
11.2.2. ORP ELECTRODESHI3131BGlass-body, refillable, combination platinum ORP electrodeUse: laboratories and general purposeHI3230BPlastic-body (PEI), gel-filled, combination platinum ORP electrodeUse: municipal water and quality controlHI4430BPlastic-body (PEI), gel-filled, combination gold ORP electrodeUse: oxidants and ozone
11.2.3. HALF-CELL ELECTRODESHI2110B Glass-body, single half-cell pH electrodeUse: general purposeHI5311Glass-body, silver / silver chloride (Ag / AgCl) reference half-cell electrode, double junction, refillable with 4mm banana plug with 1m (3.3’) cableUse: general purpose with wide temperature rangeHI5315Plastic-body (PEI), double junction, silver / silver chloride (Ag / AgCl) reference half-cell electrode, refillable with 4mm plug with 1 m (3.3’) cable.Use: Ion-Selective ElectrodesHI5412Glass-body, single Calomel reference half-cell electrode, refillable with 4mm plug with 1m (3.3’) cableUse: general purpose with constant temperature range
11.2.4. ION-SELECTIVE ELECTRODESHI4101 Ammonia ion selective electrodeHI4002 / HI4102 Bromide ion selective electrodeHI4003 / HI4103 Cadmium ion selective electrodeHI4004 / HI4104 Chloride ion selective electrodeHI4105 Carbon dioxide ion selective electrode

INST
RUCT
ION
MAN
UAL
ACCE
SSOR
IES
2
2-110
HI4007 / HI4107 Chloride ion selective electrodeHI4008 / HI4108 Cupric ion selective electrodeHI4009 / HI4109 Cyanide ion selective electrodeHI4010 / HI4110 Fluoride ion selective electrodeHI4011 / HI4111 Iodide ion selective electrodeHI4012 / HI4112 Lead ion selective electrodeHI4013 / HI4113 Nitrate ion selective electrodeHI4014 / HI4114 Potassium ion selective electrodeHI4015 / HI4115 Silver / Sulfide ion selective electrodeFC300B Sodium electrode
11.2.5. TEMPERATURE SENSORHI7662-TWTemperature probe with 1 m (3.3’) paneled cable

INSTRUCTION MANUAL
ACCESSORIES
2
2-111
11.3. TITRATOR COMPONENTS
Pump assemblyHI930100
50 mL SyringeHI900250
3 Way valveHI900260
Aspiration tube with fitting and protection tubeHI900270
Tool for burette cap removalHI900942
Dispensing tube with dispensing tip, fitting, protection tube and tube guideHI930280
Burette with:5 mL syringe - HI93010510 mL syringe - HI93011025 mL syringe - HI93012550 mL syringe - HI930150
Overhead stirrer &3 propellersHI930301
5 mL SyringeHI900205
Replacement propellers (3 pcs.)HI930302
10 mL SyringeHI900210
High chemical resistance propellers (3 pcs.)HI930303
25 mL SyringeHI900225
Stirrer supportHI930320

INST
RUCT
ION
MAN
UAL
ACCE
SSOR
IES
2
2-112
Overhead electrode holderHI930310
Shorting capHI900945
Temperature probeHI7662-TW
Power adapter (usa plug)HI900946
USB CableHI920013
Power adapter (european plug)HI900947
USB Storage deviceHI930900U
Blank burette supportHI930190
Instruction manual binderHI930800
Blank supportHI930191
Electrode adapter for overhead stirrer holderHI930311
Titrant bottle holderHI930315
Titrant bottle cap assemblyHI930330

APPLICATIONS
3PART 3:
APPLICATIONS

APPL
ICAT
IONS
HI00
01EN
3
3-2
HI0001EN 0.1N SODIUM HYDROXIDE TITRANT CONCENTRATION
DESCRIPTIONMethod for the standardization (titer determination) of 0.1N Sodium Hydroxide (NaOH) titrant solution against Potassium Hydrogen Phthalate (KHP). The results are expressed in N (eq/L).REFERENCEAOAC Official Methods of Analysis, Official Method 936.16ELECTRODE• HI1131B Combination pH Electrode• HI7662-T Temperature Probe
REAGENTS• HI70456 0.1N Sodium Hydroxide (1 L)• HI70401 Potassium Hydrogen Phthalate (20 g)• HI70436 Deionized Water (1 gal)
ACCESSORIES• HI70300L Storage Solution (500 mL)• HI7071 Electrode Fill Solution (30 mL x 4)• HI7004L pH 4.01 Buffer Solution (500 mL)• HI7007L pH 7.01 Buffer Solution (500 mL)• HI7010L pH 10.01 Buffer Solution (500 mL)• HI740036P 100 mL Plastic Beaker (10 pcs)• Analytical Balance with 0.0001 g resolution
DEVICE PREPARATION• Connect the pH electrode and temperature probe to
the titrator.• Install a 25 mL burette filled with 0.1N sodium
hydroxide (HI70456) on pump one and verify that no air bubbles are present in the burette or tubing. If necessary prime the burette until all the air has been removed completely.
• Press from the main screen. Use the arrow keys to highlight HI0001EN 0.1N Sodium Hydroxide and press .
ELECTRODE PREPARATION• Press from the main screen, if necessary
select the analog board and press .• Calibrate the electrode using pH 4.01, 7.01 and
10.01 buffers. Refer to the instruction manual for calibration procedure.
SAMPLE PREPARATION• Crush approximately 3 grams of potassium hydrogen
phthalate (HI70401) and dry it for 2 hours at 120°C. Cool to room temperature in a desiccator.
• Place a clean 100 mL plastic beaker on the analytical balance.
• Zero the balance.• Carefully weigh approximately 0.20 grams of dried
potassium hydrogen phthalate into the beaker. Ensure that all of the potassium hydrogen phthalate is on the bottom of the beaker.
• Record the exact weight of the sample once the balance has stabilized with an accuracy of 0.0001 grams.
• Remove the beaker from the balance and add deionized water to the 50 mL mark on the beaker.
ANALYSIS• Place the beaker under the stirrer assembly and
lower it to immerse the pH electrode, temperature probe and stirrer. Ensure that the reference junction of the pH electrode is 5 to 6 mm below the surface. If necessary add extra deionized water.
Note: The dispensing tip should be slightly submerged in the sample.• Press . You will be prompted to enter the weight
of the analyte (weight of potassium hydrogen phthalate). Use the numeric keypad to enter the exact weight and press to start the analysis.
Note: Ensure that the potassium hydrogen phthalate dissolves completely during the pre-titration stir time. Erroneous results may occur if the sample does not dissolve completely prior to titration. If necessary the pre-titration stir time can be increased. • At the end of the titration, after detection of the
equivalence point, “Titration Completed” will appear with the result. The result is expressed in N (eq/L) of sodium hydroxide.
• Remove the pH electrode, temperature probe and stirrer from the sample and rinse them thoroughly with deionized water.
• Record the result.

APPLICATIONSHI0001EN
3
3-3
Note: For improved accuracy, repeat this procedure a minimum of three times and calculate the average value.For methods utilizing 0.1N sodium hydroxide titrant solution, follow the steps below to enter the titer/standardized value.• Select the method utilizing 0.1N sodium hydroxide.• Press from the main screen.
• Using the arrow keys, highlight Titrant Conc. and press .
• Use the numeric keypad to enter the standardized (titer) value of the titrant then press .
• Press to exit the View/Modify Method screen. Use the arrow keys to highlight Save Method and press .
METHOD PARAMETERS
Name: 0.1N Sodium HydroxideMethod Revision: 3.0Stirrer Configuration:
Stirrer: Stirrer 1Stirring Speed: 1400 RPM
Pump Configuration:Titrant Pump: Pump 1
Dosing Type: DynamicMin Vol: 0.030 mLMax Vol: 0.500 mLdelta E: 4.500 mV
End Point Mode: pH 1EQ point, 1st DerRecognition Options:
Threshold: 500 mV/mLRange: NOFiltered Derivatives: NO
Pre-Titration Volume: 5.000 mLPre-Titration Stir Time: 60 secMeasurement Mode: Signal Stability
delta E: 0.3 mVdelta t: 2 secMin wait: 3 secMax wait: 30 sec
Electrode Type: pHBlank Option: No BlankCalculations: Stdz. Titrant by WeightDilution Option: DisabledTitrant Name: 0.1N NaOHAnalyte Size: 0.20000 gAnalyte Entry: ManualMaximum Titrant Volume: 15.000 mLPotential Range: -2000.0 to 2000.0 mVVolume/Flow Rate: 25 mL/50.0 mL/minSignal Averaging: 1 ReadingSignificant Figures: XXXXX
CALCULATIONS
Calculations: Stdz. Titrant by WeightTitrant units: N (eq/L)Titrant volume dosed: V (L)Standard weight: 0.200 gmw of standard: 204.23 g/molTitrant/Standard: 1.000 eq/mol
RESULTS
Titration ReportMethod Name: 0.1N Sodium HydroxideTime & Date: 17:03 Jun 07, 2018Report ID: Ti_00053
Titration ResultsMethod Name: 0.1N Sodium HydroxideTime & Date: 17:03 Jun 07, 2018Analyte Size: 0.20920 gEnd Point Volume: 10.215 mLpH Equivalence Point: 8.394Result: 0.10027 N(eq/L)Initial & Final pH: 4.173 to 9.570Titration Duration: 6:25 [mm:ss]Titration went to Completion
Analyst Signature:____________________
APPL
ICAT
IONS
HI00
02EN
3
3-4
HI0002EN 0.1N HYDROCHLORIC ACID TITRANT CONCENTRATION
DESCRIPTIONMethod for the standardization (titer determination) of 0.1N Hydrochloric Acid (HCl) titrant solution against Sodium Hydroxide (NaOH). The results are expressed in N (eq/L).REFERENCEAOAC Official Methods of Analysis, Official Method 936.15ELECTRODE• HI1131B Combination pH Electrode• HI7662-T Temperature Probe
REAGENTS• HI70463 0.1N Hydrochloric Acid (1 L)• HI70456 0.1N Sodium Hydroxide (1 L)• HI70436 Deionized Water (1 gal)
ACCESSORIES• HI70300L Storage Solution (500 mL)• HI7071 Electrode Fill Solution (30 mL x 4)• HI7004L pH 4.01 Buffer Solution (500 mL)• HI7007L pH 7.01 Buffer Solution (500 mL)• HI7010L pH 10.01 Buffer Solution (500 mL)• HI740036P 100 mL Plastic Beaker (10 pcs)• 10 mL Class A Volumetric Pipette
DEVICE PREPARATION• Connect the pH electrode and temperature probe to
the titrator.• Install a 25 mL burette filled with 0.1N hydrochloric
acid (HI70453) on pump one and verify that no air bubbles are present in the burette or tubing. If necessary prime the burette until all the air has been removed completely.
• Press from the main screen. Use the arrow keys to highlight HI0002EN 0.1N Hydrochloric Acid and press .
ELECTRODE PREPARATION• Press from the main screen, if necessary
select the analog board and press .• Calibrate the electrode using pH 4.01, 7.01 and
10.01 buffers. Refer to the instruction manual for calibration procedure.
SAMPLE PREPARATION• Use a Class A volumetric pipette to transfer exactly
10.00 mL of 0.1N sodium hydroxide (HI70456) to a clean 100 mL beaker
• Add deionized water to the 50 mL mark on the beaker.
ANALYSIS• Place the beaker under the stirrer assembly and
lower it to immerse the pH electrode, temperature probe and stirrer. Ensure that the reference junction of the pH electrode is 5 to 6 mm below the surface. If necessary add extra deionized water.
Note: The dispensing tip should be slightly submerged in the sample.• Press . The titrator start the analysis.• At the end of the titration, after detection of the
equivalence point, “Titration Completed” will appear with the result. The result is expressed in N (eq/L) of hydrochloric acid.
• Remove the pH electrode, temperature probe and stirrer from the sample and rinse them thoroughly with deionized water.
• Record the result.Note: For improved accuracy, repeat this procedure a minimum of three times and calculate the average value.For methods utilizing 0.1N hydrochloric acid titrant solution, follow the steps below to enter the titer/standardized value.• Select the method utilizing 0.1N hydrochloric acid.• Press from the main screen.• Using the arrow keys, highlight Titrant Conc. and
press .• Use the numeric keypad to enter the standardized
(titer) value of the titrant then press .• Press to exit the View/Modify Method
screen. Use the arrow keys to highlight Save Method and press .

APPLICATIONSHI0002EN
3
3-5
METHOD PARAMETERS
Name: 0.1N Hydrochloric AcidMethod Revision: 3.0Stirrer Configuration:
Stirrer: Stirrer 1Stirring Speed: 1400 RPM
Pump Configuration:Titrant Pump: Pump 1
Dosing Type: DynamicMin Vol: 0.030 mLMax Vol: 0.500 mLdelta E: 6.000 mV
End Point Mode: pH 1EQ point, 1st DerRecognition Options:
Threshold: 500 mV/mLRange: NOFiltered Derivatives: NO
Pre-Titration Volume: 5.000 mLPre-Titration Stir Time: 0 secMeasurement Mode: Signal Stability
delta E: 1.0 mVdelta t: 2 secMin wait: 3 secMax wait: 15 sec
Electrode Type: pHBlank Option: No BlankCalculations: Stdz. Titrant by VolumeDilution Option: DisabledTitrant Name: 0.1N HClAnalyte Size: 10.0000 mLAnalyte Entry: FixedMaximum Titrant Volume: 15.000 mLPotential Range: -2000.0 to 2000.0 mVVolume/Flow Rate: 25 mL/50.0 mL/minSignal Averaging: 1 ReadingSignificant Figures: XXXXX
CALCULATIONS
Calculations: Stdz. Titrant by VolumeTitrant units: N (eq/L)Titrant volume dosed: V (L)Standard volume: 10.000 mLStandard conc.: 0.100 eq/L
RESULTS
Titration ReportMethod Name: 0.1N Hydrochloric AcidTime & Date: 14:55 July 30, 2018Report ID: Ti_00002
Titration ResultsMethod Name: 0.1N Hydrochloric AcidTime & Date: 14:55 July 30, 2018Analyte Size: 10.000 mLEnd Point Volume: 9.979 mLpH Equivalence Point: 5.059Result: 0.10020 N(eq/L)Initial & Final pH: 12.135 to 4.989Titration Duration: 2:45 [mm:ss]Titration went to Completion
Analyst Signature:____________________
APPL
ICAT
IONS
HI00
03EN
3
3-6
HI0003EN 0.1M SODIUM THIOSULFATE TITRANT CONCENTRATION
DESCRIPTIONMethod for the standardization (titer determination) of 0.1M Sodium Thiosulfate (Na2S2O3) titrant solution against Potassium Iodate (KIO3). The results are expressed in M (mol/L).REFERENCEStandard Methods for the Examination of Water and Wastewater 19th Edition, Method 4500-Cl BELECTRODE• HI3131B Combination ORP Electrode
REAGENTS• HI70439 0.1M Sodium Thiosulfate (1 L)• HI70407 Potassium Iodate (20 g)• HI70425 16% Sulfuric Acid (500 mL)• HI70468 Potassium Iodide (35 g)• HI70436 Deionized Water (1 gal)
ACCESSORIES• HI70300L Storage Solution (500 mL)• HI7071 Electrode Fill Solution (30 mL x 4)• HI740036P 100 mL Plastic Beakers (10 pcs)• Analytical Balance 0.0001 g • 100 mL Class A Volumetric Flask• 10 mL Class A Volumetric Pipette
DEVICE PREPARATION• Connect the ORP electrode to the titrator.• Install a 25 mL burette filled with 0.1M sodium
thiosulfate (HI70439) on pump one and verify that no air bubbles are present in the burette or tubing. If necessary prime the burette until all the air has been removed completely.
• Press from the main screen. Use the arrow keys to highlight HI0003EN 0.1M Sodium Thiosulfate and press .
ELECTRODE PREPARATION• Prepare the ORP electrode according to the procedure
in the manual.SAMPLE PREPARATION• Crush approximately 2 grams of potassium iodate
(HI70407) and dry it for 2 hours at 120°C. Cool to room temperature in a desiccator.
• Carefully weigh approximately 0.35 grams of dried potassium iodate.
• Record the exact weight of the sample once the balance has stabilized with an accuracy of 0.0001 grams.
• Carefully transfer the salt to a 100 mL Class A volumetric flask. Add approximately 80 mL of deionized water, and mix to dissolve. Once the salt is completely dissolved bring the flask to volume with deionized water, mix well.
• Use a Class A volumetric pipette to transfer exactly 10.00 mL of the solution to a clean 100 mL plastic beaker.
• Add deionized water to the 50 mL mark on the beaker.• Add 5.00 mL of 16% sulfuric acid (HI70425) and 1.5
grams of potassium iodide (HI70468) to the beaker.ANALYSIS• Place the beaker under the stirrer assembly and lower
it to immerse the ORP electrode and stirrer. Ensure that the reference junction of the ORP electrode is 5 to 6 mm below the surface. If necessary add extra deionized water.
Note: The dispensing tip should be slightly submerged in the sample.• Press . You will be prompted to enter the weight
of the analyte (weight of potassium iodate). Use the numeric keypad to enter the exact weight and press
to start the analysis.• At the end of the titration, after detection of the
equivalence point, “Titration Completed” will appear with the result. The result is expressed in M (mol/L) of sodium thiosulfate.
• Remove the ORP electrode and stirrer from the sample and rinse them thoroughly with deionized water.
• Record the result.Note: For improved accuracy, repeat this procedure a minimum of three times and calculate the average value.
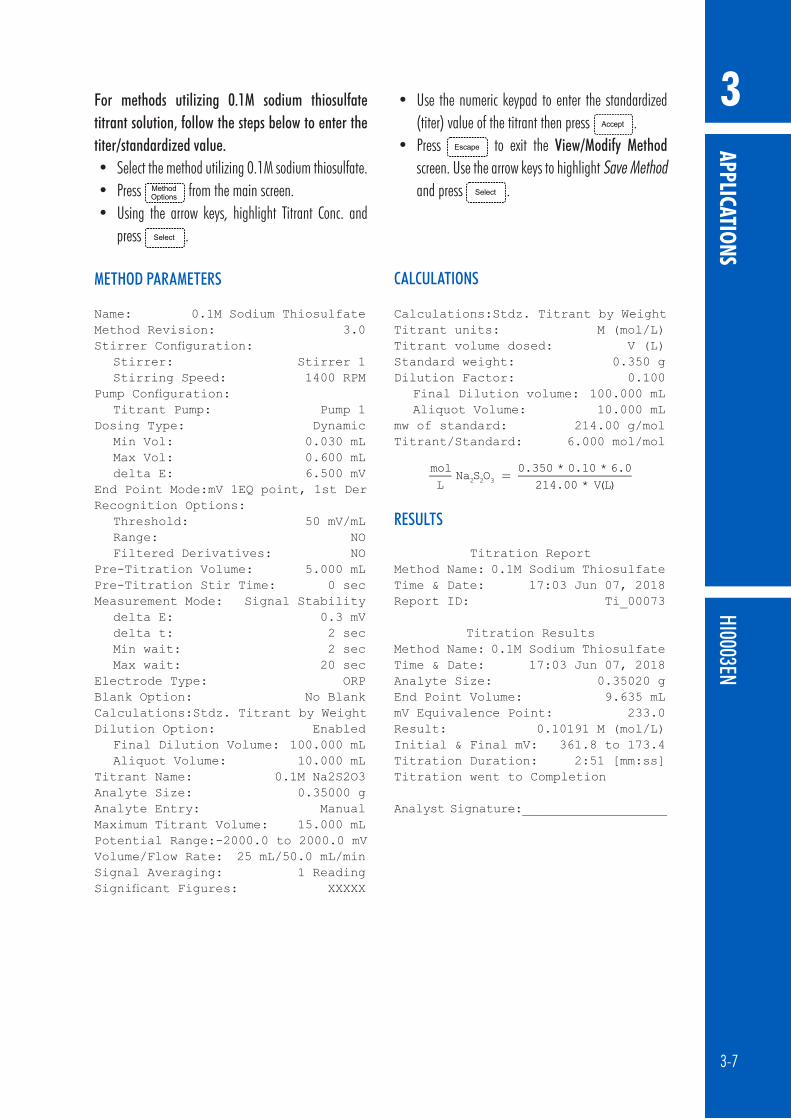
APPLICATIONSHI0003EN
3
3-7
For methods utilizing 0.1M sodium thiosulfate titrant solution, follow the steps below to enter the titer/standardized value.• Select the method utilizing 0.1M sodium thiosulfate.• Press from the main screen.• Using the arrow keys, highlight Titrant Conc. and
press .
• Use the numeric keypad to enter the standardized (titer) value of the titrant then press .
• Press to exit the View/Modify Method screen. Use the arrow keys to highlight Save Method and press .
METHOD PARAMETERS
Name: 0.1M Sodium ThiosulfateMethod Revision: 3.0Stirrer Configuration:
Stirrer: Stirrer 1Stirring Speed: 1400 RPM
Pump Configuration:Titrant Pump: Pump 1
Dosing Type: DynamicMin Vol: 0.030 mLMax Vol: 0.600 mLdelta E: 6.500 mV
End Point Mode: mV 1EQ point, 1st DerRecognition Options:
Threshold: 50 mV/mLRange: NOFiltered Derivatives: NO
Pre-Titration Volume: 5.000 mLPre-Titration Stir Time: 0 secMeasurement Mode: Signal Stability
delta E: 0.3 mVdelta t: 2 secMin wait: 2 secMax wait: 20 sec
Electrode Type: ORPBlank Option: No BlankCalculations: Stdz. Titrant by WeightDilution Option: Enabled
Final Dilution Volume: 100.000 mLAliquot Volume: 10.000 mL
Titrant Name: 0.1M Na2S2O3Analyte Size: 0.35000 gAnalyte Entry: ManualMaximum Titrant Volume: 15.000 mLPotential Range: -2000.0 to 2000.0 mVVolume/Flow Rate: 25 mL/50.0 mL/minSignal Averaging: 1 ReadingSignificant Figures: XXXXX
CALCULATIONS
Calculations: Stdz. Titrant by WeightTitrant units: M (mol/L)Titrant volume dosed: V (L)Standard weight: 0.350 gDilution Factor: 0.100
Final Dilution volume: 100.000 mLAliquot Volume: 10.000 mL
mw of standard: 214.00 g/molTitrant/Standard: 6.000 mol/mol
RESULTS
Titration ReportMethod Name: 0.1M Sodium ThiosulfateTime & Date: 17:03 Jun 07, 2018Report ID: Ti_00073
Titration ResultsMethod Name: 0.1M Sodium ThiosulfateTime & Date: 17:03 Jun 07, 2018Analyte Size: 0.35020 gEnd Point Volume: 9.635 mLmV Equivalence Point: 233.0Result: 0.10191 M (mol/L)Initial & Final mV: 361.8 to 173.4Titration Duration: 2:51 [mm:ss]Titration went to Completion
Analyst Signature:____________________

APPL
ICAT
IONS
HI00
10EN
3
3-8
HI0010EN 0.1M FERROUS AMMONIUM SULFATE TITRANT CONCENTRATION
DESCRIPTIONMethod for the standardization (titer determination) of 0.1M Ferrous Ammonium Sulfate (FAS) titrant solution against Potassium Dichromate (K2Cr2O7). The results are expressed in M (mol/L).REFERENCEStandard Methods for the Examination of Water and Wastewater 21st Edition, Method 5220BELECTRODE• HI3131B Combination ORP Electrode
REAGENTS• HI70444 25% Sulfuric Acid• HI70436 Deionized Water (1 gal)• Ferrous Ammonium Sulfate (ACS Grade)• Potassium Dichromate (ACS Grade)
ACCESSORIES• HI70300L Storage Solution (500 mL)• HI7071 Electrode Fill Solution (30 mL x 4)• HI740036P 100 mL Plastic Beakers (10 pcs)• Analytical Balance with 0.0001 g resolution• 100 mL Class A Volumetric Flask• 500 mL Class A Volumetric Flask• 10 mL Class A Volumetric Pipette
TITRANT PREPARATION• Carefully weigh 19.607 grams of ferrous ammonium
sulfate.• Carefully transfer the salt to a 500 mL Class A
volumetric flask. Add approximately 300 mL of deionized water, and mix to dissolve.
• Add 40.00 mL of 25% sulfuric acid (HI70444) to the flask. Invert the solution to mix.
• Allow the flask to return to room temperature.• Bring the flask to volume with deionized water, mix well.
DEVICE PREPARATION• Connect the ORP electrode to the titrator.• Install a 25 mL burette filled with 0.1M ferrous
ammonium sulfate on pump one and verify that no air bubbles are present in the burette or tubing. If necessary prime the burette until all the air has been removed completely.
• Press from the main screen. Use the arrow keys to highlight HI0010EN 0.1M FAS and press
.ELECTRODE PREPARATION• Prepare the ORP electrode according to the procedure
in the manual.SAMPLE PREPARATION• Carefully weigh approximately 0.49 grams of dried
potassium dichromate.• Record the exact weight of the sample once the balance
has stabilized with an accuracy of 0.0001 grams. • Carefully transfer the salt to a 100 mL Class A
volumetric flask. Add approximately 80 mL of deionized water, and mix to dissolve. Once the salt is completely dissolved bring the flask to volume with deionized water, mix well.
• Use a Class A volumetric pipette to transfer exactly 10.00 mL of the solution to a clean 100 mL plastic beaker.
• Add 25.00 mL of 25% sulfuric acid (HI70444) to the beaker.
• Add deionized water to the 50 mL mark on the beaker.ANALYSIS• Place the beaker under the stirrer assembly and
lower it to immerse the electrode and stirrer. Ensure that the reference junction of the ORP electrode is 5 to 6 mm below the surface. If necessary add extra deionized water.
Note: The dispensing tip should be slightly submerged in the sample.• Press . You will be prompted to enter the weight
of the analyte (weight of potassium dichromate). Use the numeric keypad to enter the exact weight and press to start the analysis.
• At the end of the titration, after detection of the equivalence point, “Titration Completed” will appear with the result. The result is expressed in M (mol/L) of ferrous ammonium sulfate.
• Remove the ORP electrode and stirrer from the sample and rinse them thoroughly with deionized water.

APPLICATIONSHI0010EN
3
3-9
• Record the result.Note: For improved accuracy, repeat this procedure a minimum of three times and calculate the average value.For methods utilizing 0.1M ferrous ammonium sulfate titrant solution, follow the steps below to enter the titer/standardized value.• Select the method utilizing 0.1M ferrous ammonium
sulfate.
• Press from the main screen.• Using the arrow keys, highlight Titrant Conc. and
press .• Use the numeric keypad to enter the standardized
(titer) value of the titrant then press .• Press to exit the View/Modify Method
screen. Use the arrow keys to highlight Save Method and press .
METHOD PARAMETERS
Name: 0.1M FASMethod Revision: 3.0Stirrer Configuration:
Stirrer: Stirrer 1Stirring Speed: 1400 RPM
Pump Configuration:Titrant Pump: Pump 1
Dosing Type: DynamicMin Vol: 0.030 mLMax Vol: 0.500 mLdelta E: 4.500 mV
End Point Mode: mV 1EQ point, 1st DerRecognition Options:
Threshold: 35 mV/mLRange: NOFiltered Derivatives: NO
Pre-Titration Volume: 5.000 mLPre-Titration Stir Time: 0 secMeasurement Mode: Signal Stability
delta E: 0.5 mVdelta t: 3 secMin wait: 2 secMax wait: 20 sec
Electrode Type: ORPBlank Option: No BlankCalculations: Stdz. Titrant by WeightDilution Option: Enabled
Final Dilution Volume: 100.000 mLAliquot Volume: 10.000 mL
Titrant Name: 0.1M FASAnalyte Size: 0.49000 gAnalyte Entry: ManualMaximum Titrant Volume: 15.000 mLPotential Range: -2000.0 to 2000.0 mVVolume/Flow Rate: 25 mL/50.0 mL/minSignal Averaging: 1 ReadingSignificant Figures: XXXXX
CALCULATIONS
Calculations: Stdz. Titrant by WeightTitrant units: M (mol/L)Titrant volume dosed: V (L)Standard weight: 0.490 gDilution Factor: 0.100
Final Dilution volume: 100.000 mLAliquot Volume: 10.000 mL
mw of standard: 294.18 g/molTitrant/Standard: 6.000 mol/mol
RESULTS
Titration ReportMethod Name: 0.1M FASTime & Date: 15:59 August 1, 2018Report ID: Ti_00015
Titration ResultsMethod Name: 0.1M FASTime & Date: 15:59 August 1, 2018Analyte Size: 0.491 gEnd Point Volume: 9.879 mLmV Equivalence Point: 667.4Result: 0.10137 M (mol/L)Initial & Final mV: 791.3 to 598.0Titration Duration: 3:05 [mm:ss]Titration went to Completion
Analyst Signature:____________________

APPL
ICAT
IONS
HI02
00EN
3
3-10
HI0200EN 0.02M SILVER NITRATE TITRANT CONCENTRATION
DESCRIPTIONMethod for the standardization (titer determination) of 0.02M Silver Nitrate (AgNO3) titrant solution against Sodium Chloride (NaCl). The results are expressed in M (mol/L).REFERENCEAOAC Official Methods of Analysis, Official Method 941.18ELECTRODE• HI4115 Silver/Sulfide Combination ISE
REAGENTS• HI70448 0.02M Silver Nitrate (1 L)• HI70406 Sodium Chloride (20 g)• HI70427 1.5M Nitric Acid Solution (500 mL)• HI70436 Deionized Water (1 gal)
ACCESSORIES• HI7072 Electrode Fill Solution (4 x 30 mL)• Analytical Balance with 0.0001 g resolution• 150 mL Glass Beaker• 100 mL Class A Volumetric Flask• 5 mL Class A Volumetric Pipette
DEVICE PREPARATION• Connect the Silver/Sulfide electrode to the titrator. • Install a 25 mL burette filled with 0.02M silver
nitrate (HI70448) on pump one and verify that no air bubbles are present in the burette or tubing. If necessary prime the burette until all the air has been removed completely.
• Press from the main screen. Use the arrow keys to highlight HI0200EN 0.02M Silver Nitrate and press .
ELECTRODE PREPARATION• Prepare the Silver/Sulfide electrode according to the
procedure in the manual.SAMPLE PREPARATION• Crush approximately 2 grams of sodium chloride
(HI70406) and dry it for 2 hours at 140°C. Cool to room temperature in a desiccator.
• Weigh 0.20 g of dried sodium chloride with an accuracy of 0.0001 g. Transfer the salt to a 100 mL volumetric flask. Add approximately 80 mL of distilled water and mix. Dissolve completely before bringing to volume.
• Use a Class A volumetric pipette to transfer exactly 5.00 mL of prepared standard solution to a 150 mL glass beaker and add distilled water to the 100 mL mark on the beaker.
• Add 10.00 mL of 1.5M nitric acid (HI70427) to the beaker.
ANALYSIS• Place the beaker under the stirrer assembly and lower
it to immerse the Silver/Sulfide electrode and stirrer. Ensure that the reference junction of the electrode is 5 to 6 mm below the surface. If necessary add extra deionized water.
Note: The dispensing tip should be slightly submerged in the sample.• Press . You will be prompted to enter the weight
of the analyte (weight of sodium chloride). Use the numeric keypad to enter the exact weight and press
to start the analysis.• At the end of the titration, after detection of the
equivalence point, “Titration Completed” will appear with the result. The result is expressed in M (mol/L) of silver nitrate.
• Remove the electrode and stirrer from the sample and rinse them thoroughly with deionized water.
• Record the result.Note: For improved accuracy, repeat this procedure a minimum of three times and calculate the average value.For methods utilizing 0.02M silver nitrate titrant solution, follow the steps below to enter the titer/standardized value.• Select the method utilizing 0.02M silver nitrate.• Press from the main screen.• Using the arrow keys, highlight Titrant Conc. and
press .• Use the numeric keypad to enter the standardized
(titer) value of the titrant then press .• Press to exit the View/Modify Method
screen. Use the arrow keys to highlight Save Method and press .

APPLICATIONSHI0200EN
3
3-11
METHOD PARAMETERS
Name: 0.02M Silver NitrateMethod Revision: 3.0Stirrer Configuration:
Stirrer: Stirrer 1Stirring Speed: 1400 RPM
Pump Configuration:Titrant Pump: Pump 1
Dosing Type: DynamicMin Vol: 0.030 mLMax Vol: 0.500 mLdelta E: 8.000 mV
End Point Mode: mV 1EQ point, 1st DerRecognition Options:
Threshold: 100 mV/mLRange: NOFiltered Derivatives: YES
Pre-Titration Volume: 6.000 mLPre-Titration Stir Time: 0 secMeasurement Mode: Signal Stability
delta E: 1.0 mVdelta t: 2 secMin wait: 2 secMax wait: 20 sec
Electrode Type: Silver/SulfideBlank Option: No BlankCalculations: Stdz. Titrant by WeightDilution Option: Enabled
Final Dilution Volume: 100.000 mLAliquot Volume: 5.000 mL
Titrant Name: 0.02M AgNO3Analyte Size: 0.20000 gAnalyte Entry: ManualMaximum Titrant Volume: 15.000 mLPotential Range: -2000.0 to 2000.0 mVVolume/Flow Rate: 25 mL/50.0 mL/minSignal Averaging: 1 ReadingSignificant Figures: XXXXX
CALCULATIONS
Calculations: Stdz. Titrant by WeightTitrant units: M (mol/L)Titrant volume dosed: V (L)Standard weight: 0.200 gDilution Factor: 0.05
Final Dilution volume: 100.000 mLAliquot Volume: 5.000 mL
mw of standard: 58.440 g/molTitrant/Standard: 1.000 mol/mol
RESULTS
Titration ReportMethod Name: 0.02M Silver NitrateTime & Date: 15:52 August 1, 2018Report ID: Ti_00037
Titration ResultsMethod Name: 0.02M Silver NitrateTime & Date: 15:52 August 1, 2018Analyte Size: 0.1923 gEnd Point Volume: 9.065 mLmV Equivalence Point: 273.1Result: 0.01815 M (mol/L)Initial & Final mV: 146.9 to 291.0Titration Duration: 2:21 [mm:ss]Titration went to Completion
Analyst Signature:____________________
APPL
ICAT
IONS
HI10
04EN
3
3-12
HI1004EN ALKALINITY OF WATER0 to 2500 mg/L CaCO3, pH 4.5 Endpoint
DESCRIPTIONMethod for the determination of total (methyl red) alkalinity in water by titration of a sample to pH 4.5. The results are expressed in mg/L (ppm) as calcium carbonate. For the determination of phenolphthalein alkalinity, set the endpoint to pH 8.3.REFERENCEStandard Methods for the Examination of Water and Wastewater 21st edition, Method 2320BELECTRODE• HI1131B Combination pH Electrode• HI7662-T Temperature Probe
REAGENTS• HI70463 0.1N Hydrochloric Acid (1 L)• HI70436 Deionized Water (1 gal)
ACCESSORIES• HI70300L Storage Solution (500 mL)• HI7082 Electrode Fill Solution (4 x 30 mL)• HI7004L pH 4.01 Buffer Solution (500 mL)• HI7007L pH 7.01 Buffer Solution (500 mL)• HI7010L pH 10.01 Buffer Solution (500 mL)• HI740036P 100 mL Plastic Beaker (10 pcs)• 50 mL Class A Volumetric Pipette
DEVICE PREPARATION• Connect the pH electrode and temperature probe to
the titrator.• Install a 25 mL burette filled with 0.1N hydrochloric
acid (HI70463) on pump one and verify that no air bubbles are present in the burette or tubing. If necessary prime the burette until all the air has been removed completely.
• For the determination of the exact concentration of the 0.1N hydrochloric acid, follow HI0002EN 0.1N Hydrochloric Acid Titrant Concentration.
• Press from the main screen. Use the arrow keys to highlight HI1004EN Alkalinity of Water and press .
ELECTRODE PREPARATION• Press from the main screen, if necessary
select the analog board and press .• Calibrate the electrode using pH 4.01, 7.01 and
10.01 buffers. Refer to the instruction manual for calibration procedure.
SAMPLE PREPARATION• Use a Class A volumetric pipette to transfer exactly
50.00 mL of sample to a clean 100 mL plastic beaker.
ANALYSIS• Place the beaker under the stirrer assembly and
lower it to immerse the pH electrode, temperature sensor and stirrer. Ensure that the reference junction of the pH electrode is 5 to 6 mm below the surface. If necessary add extra deionized water.
Note: The dispensing tip should be slightly submerged in the sample.• Press . The titrator will start the analysis.• At the end of the titration, when pH 4.50 is reached,
“Titration Completed” will appear with the result. The result is expressed in mg/L as calcium carbonate.
• Remove the electrode and stirrer from the sample and rinse them thoroughly with deionized water.
• Record the result.

APPLICATIONSHI1004EN
3
3-13
METHOD PARAMETERS
Name: Alkalinity of WaterMethod Revision: 3.0Stirrer Configuration:
Stirrer: Stirrer 1Stirring Speed: 1400 RPM
Pump Configuration:Titrant Pump: Pump 1
Dosing Type: DynamicMin Vol: 0.050 mLMax Vol: 0.500 mLdelta E: 5.000 mV
End Point Mode: Fixed 4.500 pHPre-Titration Volume: 0.000 mLPre-Titration Stir Time: 0 secMeasurement Mode: Signal Stability
delta E: 1.0 mVdelta t: 2 secMin wait: 2 secMax wait: 20 sec
Electrode Type: pHBlank Option: No BlankCalculations: Sample Calc. by VolumeDilution Option: DisabledTitrant Name: 0.1N HClTitrant Conc.: 0.1000 N(eq/L)Analyte Size: 50.000 mLAnalyte Entry: FixedMaximum Titrant Volume: 25.000 mLPotential Range: -2000.0 to 2000.0 mVVolume/Flow Rate: 25 mL/50.0 mL/minSignal Averaging: 1 ReadingSignificant Figures: XXXXX
CALCULATIONS
Calculations: Sample Calc. by VolumeTitrant units: N (eq/L)Titrant volume dosed: V (L)Final result units: mg/LTitrant Conc.: 0.1000 N(eq/L)Sample/Titrant: 0.500 mol/eqmw of standard: 100.09 g/molSample Volume: 50.000 mL
RESULTS
Titration ReportMethod Name: Alkalinity of WaterTime & Date: 14:36 August 1, 2018Report ID: Ti_00036
Titration ResultsMethod Name: Alkalinity of WaterTime & Date: 14:36 August 1, 2018Analyte Size: 50.000 mLEnd Point Volume: 9.336 mLpH Fixed End Point: 4.500Result: 934.44 mg/LInitial & Final pH: 10.232 to 4.419Titration Duration: 3:23 [mm:ss]Titration went to Completion
Analyst Signature:____________________

APPL
ICAT
IONS
HI10
05EN
3
3-14
HI1005EN ACIDITY OF WATER0 to 2500 mg/L, pH 8.3 Endpoint
DESCRIPTIONMethod for the determination of total (phenolphthalein) acidity in water by titration of a sample to pH 8.3. The results are expressed in mg/L (ppm) as calcium carbonate. For the determination of methyl orange acidity, set the endpoint to pH 3.7.REFERENCEStandard Methods for the Examination of Water and Wastewater 21st edition, Method 2310BELECTRODE• HI1131B Combination pH Electrode• HI7662-T Temperature Probe
REAGENTS• HI70456 0.1N Sodium Hydroxide (1 L)• HI70436 Deionized Water (1 gal)
ACCESSORIES• HI70300L Storage Solution (500 mL)• HI7082 Electrode Fill Solution (4 x 30 mL)• HI7004L pH 4.01 Buffer Solution (500 mL)• HI7007L pH 7.01 Buffer Solution (500 mL)• HI7010L pH 10.01 Buffer Solution (500 mL)• HI740036P 100 mL Plastic Beaker (10 pcs)• 50 mL Class A Volumetric Pipette
DEVICE PREPARATION• Connect the pH electrode and temperature probe to
the titrator.• Install a 25 mL burette filled with 0.1N sodium
hydroxide (HI70456) on pump one and verify that no air bubbles are present in the burette or tubing. If necessary prime the burette until all the air has been removed completely.
• For the determination of the exact concentration of the 0.1N sodium hydroxide, follow HI0001EN 0.1N Sodium Hydroxide Titrant Concentration.
• Press from the main screen. Use the arrow keys to highlight HI1005EN Acidity in Water and press .
ELECTRODE PREPARATION• Press from the main screen, if necessary
select the analog board and press .• Calibrate the electrode using pH 4.01, 7.01 and
10.01 buffers. Refer to the instruction manual for calibration procedure.
SAMPLE PREPARATION• Use a Class A volumetric pipette to transfer exactly
50.00 mL of sample to a clean 100 mL plastic beaker.
ANALYSIS• Place the beaker under the stirrer assembly and
lower it to immerse the pH electrode, temperature sensor and stirrer. Ensure that the reference junction of the pH electrode is 5 to 6 mm below the surface. If necessary add extra deionized water.
Note: The dispensing tip should be slightly submerged in the sample.• Press , the titrator will start the analysis.• At the end of the titration, when pH 8.30 is reached,
“Titration Completed” will appear with the result. The result is expressed in mg/L as calcium carbonate.
• Remove the pH electrode, temperature probe and stirrer from the sample and rinse them thoroughly with deionized water.
• Record the result.

APPLICATIONSHI1005EN
3
3-15
METHOD PARAMETERS
Name: Acidity of WaterMethod Revision: 3.0Stirrer Configuration:
Stirrer: Stirrer 1Stirring Speed: 1400 RPM
Pump Configuration:Titrant Pump: Pump 1
Dosing Type: DynamicMin Vol: 0.050 mLMax Vol: 0.500 mLdelta E: 5.000 mV
End Point Mode: Fixed 8.300 pHPre-Titration Volume: 0.000 mLPre-Titration Stir Time: 0 secMeasurement Mode: Signal Stability
delta E: 1.0 mVdelta t: 2 secMin wait: 2 secMax wait: 20 sec
Electrode Type: pHBlank Option: No BlankCalculations: Sample Calc. by VolumeDilution Option: DisabledTitrant Name: 0.1N NaOHTitrant Conc.: 0.1000 N(eq/L)Analyte Size: 50.000 mLAnalyte Entry: FixedMaximum Titrant Volume: 25.000 mLPotential Range: -2000.0 to 2000.0 mVVolume/Flow Rate: 25 mL/50.0 mL/minSignal Averaging: 1 ReadingSignificant Figures: XXXXX
CALCULATIONS
Calculations: Sample Calc. by VolumeTitrant units: N (eq/L)Titrant volume dosed: V (L)Final result units: (mg/L)Titrant Conc.: 0.1000 N(eq/L)Sample/Titrant: 0.500 mol/eqmw of standard: 100.09 g/molSample Volume: 50.000 mL
RESULTS
Titration ReportMethod Name: Acidity of WaterTime & Date: 14:54 August 1, 2018Report ID: Ti_00023
Titration ResultsMethod Name: Acidity of WaterTime & Date: 14:54 August 1, 2018Analyte Size: 50.000 mLEnd Point Volume: 5.879 mLpH Fixed End Point: 8.300Result: 588.43 (mg/L)Initial & Final pH: 2.465 to 8.398Titration Duration: 3:42 [mm:ss]Titration went to Completion
Analyst Signature:____________________

APPL
ICAT
IONS
HI10
07EN
3
3-16
HI1007EN CHLORIDE IN WATER0 to 150 ppm (mg/L)
DESCRIPTIONMethod for the determination of chloride in water. The results are expressed as ppm (mg/L) as Chloride. REFERENCEStandard Methods for the Examination of Water and Wastewater 21st edition, Method 4500-ClELECTRODE• HI4115 Silver/Sulfide Combination ISE
REAGENTS• HI70448 0.02M Silver Nitrate (1 L)• HI70427 1.5M Nitric Acid Solution (500 mL)• HI70436 Deionized Water (1 gal)
ACCESSORIES• HI7072 Electrode Fill Solution (4 x 30 mL)• 150 mL Glass Beaker• 100 mL Class A Volumetric Pipette• 10 mL Class A Volumetric Pipette
DEVICE PREPARATION• Connect the Silver/Sulfide electrode to the titrator. • Install a 25 mL burette filled with 0.02M silver
nitrate (HI70448) on pump one and verify that no air bubbles are present in the burette or tubing. If necessary prime the burette until all the air has been removed completely.
• For the determination of the exact concentration of the 0.02M Silver Nitrate, follow HI0200EN 0.02M Silver Nitrate Titrant Concentration.
• Press from the main screen. Use the arrow keys to highlight HI1007EN Chloride in Water and press .
ELECTRODE PREPARATION• Prepare the Silver/Sulfide electrode according to the
procedure in the manual.SAMPLE PREPARATION• Use a class A volumetric pipette to transfer exactly
100.00 mL of sample to a clean 150 mL beaker.• Add 10.00 mL of 1.5M nitric acid (HI70427) to the
beaker.
ANALYSIS• Place the beaker under the stirrer assembly and
lower it to immerse the electrode and stirrer. Ensure that the reference junction of the electrode is 5 to 6 mm below the surface. If necessary add extra deionized water.
Note: The dispensing tip should be slightly submerged in the sample.• Press , the titrator will start the analysis.• At the end of the titration, after detection of the
equivalence point, “Titration Completed” will appear with the result. The result is expressed in ppm (mg/L) of chloride.
• Remove the electrode and stirrer from the sample and rinse them thoroughly with deionized water.
• Record the result.
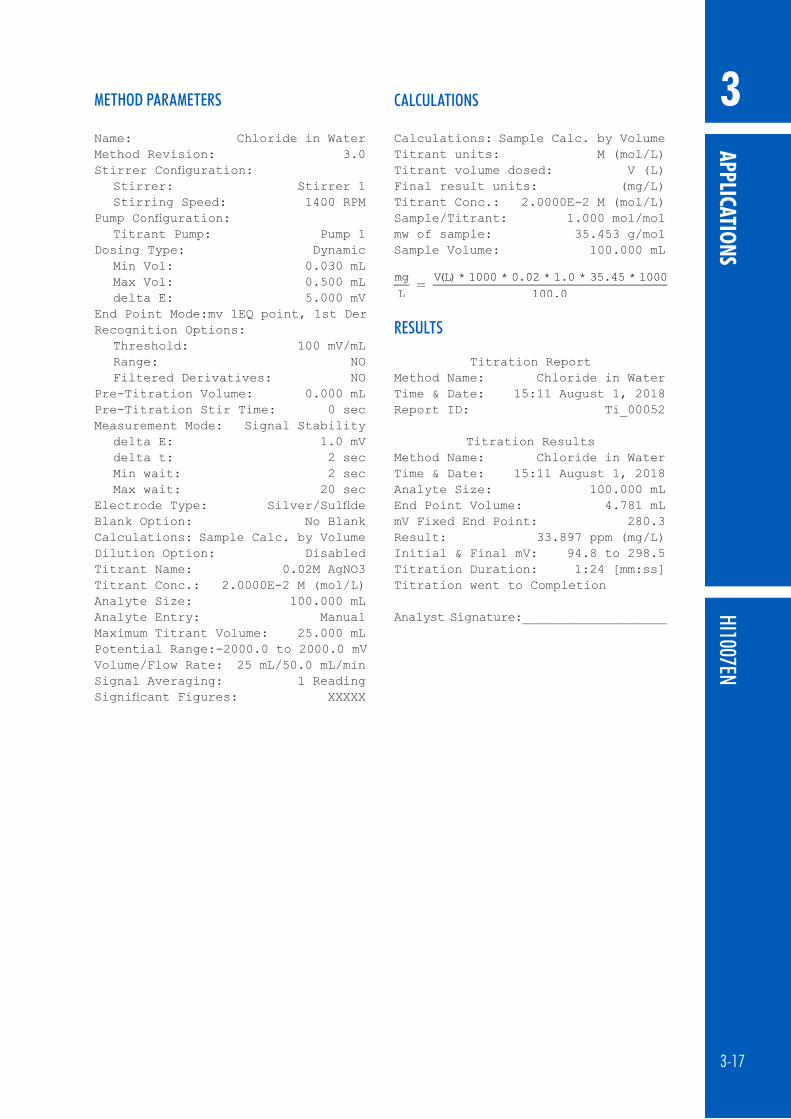
APPLICATIONSHI1007EN
3
3-17
METHOD PARAMETERS
Name: Chloride in WaterMethod Revision: 3.0Stirrer Configuration:
Stirrer: Stirrer 1Stirring Speed: 1400 RPM
Pump Configuration:Titrant Pump: Pump 1
Dosing Type: DynamicMin Vol: 0.030 mLMax Vol: 0.500 mLdelta E: 5.000 mV
End Point Mode: mv 1EQ point, 1st DerRecognition Options:
Threshold: 100 mV/mLRange: NOFiltered Derivatives: NO
Pre-Titration Volume: 0.000 mLPre-Titration Stir Time: 0 secMeasurement Mode: Signal Stability
delta E: 1.0 mVdelta t: 2 secMin wait: 2 secMax wait: 20 sec
Electrode Type: Silver/SulfideBlank Option: No BlankCalculations: Sample Calc. by VolumeDilution Option: DisabledTitrant Name: 0.02M AgNO3Titrant Conc.: 2.0000E-2 M (mol/L)Analyte Size: 100.000 mLAnalyte Entry: ManualMaximum Titrant Volume: 25.000 mLPotential Range: -2000.0 to 2000.0 mVVolume/Flow Rate: 25 mL/50.0 mL/minSignal Averaging: 1 ReadingSignificant Figures: XXXXX
CALCULATIONS
Calculations: Sample Calc. by VolumeTitrant units: M (mol/L)Titrant volume dosed: V (L)Final result units: (mg/L)Titrant Conc.: 2.0000E-2 M (mol/L)Sample/Titrant: 1.000 mol/molmw of sample: 35.453 g/molSample Volume: 100.000 mL
RESULTS
Titration ReportMethod Name: Chloride in WaterTime & Date: 15:11 August 1, 2018Report ID: Ti_00052
Titration ResultsMethod Name: Chloride in WaterTime & Date: 15:11 August 1, 2018Analyte Size: 100.000 mLEnd Point Volume: 4.781 mLmV Fixed End Point: 280.3Result: 33.897 ppm (mg/L)Initial & Final mV: 94.8 to 298.5Titration Duration: 1:24 [mm:ss]Titration went to Completion
Analyst Signature:____________________

APPL
ICAT
IONS
HI10
08EN
3
3-18
HI1008EN NEUTRALIZATION WITH SULFURIC ACID0 to 200 meq/L
DESCRIPTIONMethod for the determination of strong or weak base concentration by titration of a sample to the equivalence point with sulfuric acid. The results are expressed as meq/L. ELECTRODE• HI1131B Combination pH Electrode• HI7662-T Temperature Probe
REAGENTS• HI70459 0.05M Sulfuric Acid (1 L)• HI70436 Deionized Water (1 gal)
ACCESSORIES• HI70300L Storage Solution (500 mL)• HI7082 Electrode Fill Solution (4 x 30 mL)• HI7004L pH 4.01 Buffer Solution• HI7007L pH 7.01 Buffer Solution• HI7010L pH 10.01 Buffer Solution• HI740036P 100 mL Plastic Beaker (10 pcs)• 10 mL Class A Volumetric Pipette
DEVICE PREPARATION• Connect the pH electrode and temperature probe to
the titrator.• Install a 25 mL burette filled with 0.05M sulfuric
acid (HI70459) on pump one and verify that no air bubbles are present in the burette or tubing. If necessary prime the burette until all the air has been removed completely.
• For the determination of the exact concentration of the 0.05M sulfuric acid, follow HI0103EN 0.05M Sulfuric Acid Titrant Concentration.
• Press from the main screen. Use the arrow keys to highlight HI1008EN Neutralization w/H2SO4 and press .
ELECTRODE PREPARATION• Press from the main screen, if necessary
select the analog board and press .• Calibrate the electrode using pH 4.01, 7.01 and
10.01 buffers. Refer to the instruction manual for calibration procedure.
SAMPLE PREPARATION• Use a class A volumetric pipette to transfer exactly
10.00 mL of sample to a clean 100 mL plastic beaker.
• Add deionized water to the 50 mL mark on the beaker.
ANALYSIS• Place the beaker under the stirrer assembly and
lower it to immerse the pH electrode, temperature probe and stirrer. Ensure that the reference junction of the pH electrode is 5 to 6 mm below the surface.
Note: The dispensing tip should be slightly submerged in the sample.• Press , the titrator will start the analysis.• At the end of the titration, after detection of the
equivalence point, “Titration Completed” will appear with the result. The result is expressed in meq/L.
• Remove the pH electrode and stirrer from the sample and rinse them thoroughly with deionized water.
• Record the result.

APPLICATIONSHI1008EN
3
3-19
METHOD PARAMETERS
Name: Neutralization w/ H2S04Method Revision: 3.0Stirrer Configuration:
Stirrer: Stirrer 1Stirring Speed: 1400 RPM
Pump Configuration:Titrant Pump: Pump 1
Dosing Type: DynamicMin Vol: 0.050 mLMax Vol: 0.500 mLdelta E: 20.000 mV
End Point Mode: pH 1EQ point, 1st DerRecognition Options:
Threshold: 50 mV/mLRange: NOFiltered Derivatives: NO
Pre-Titration Volume: 0.000 mLPre-Titration Stir Time: 0 secMeasurement Mode: Signal Stability
delta E: 1.0 mVdelta t: 2 secMin wait: 2 secMax wait: 15 sec
Electrode Type: pHBlank Option: No BlankCalculations: Sample Calc. by VolumeDilution Option: DisabledTitrant Name: 0.05M H2S04Titrant Conc.: 5.0000E-2 M (mol/L)Analyte Size: 10.000 mLAnalyte Entry: FixedMaximum Titrant Volume: 20.000 mLPotential Range: -2000.0 to 2000.0 mVVolume/Flow Rate: 25 mL/50.0 mL/minSignal Averaging: 1 ReadingSignificant Figures: XXXXX
CALCULATIONS
Calculations: Sample Calc. by VolumeTitrant units: M (mol/L)Titrant volume dosed: V (L)Final result units: meq/LTitrant Conc.: 5.0000E-2 M (mol/L)Sample/Titrant: 2.000 eq/molSample Volume: 10.000 mL
RESULTS
Titration ReportMethod Name: Neutralization w/ H2SO4Time & Date: 09:46 August 1, 2018Report ID: Ti_00027
Titration ResultsMethod Name: Neutralization w/ H2SO4Time & Date: 09:46 August 1, 2018Analyte Size: 10.000 mLEnd Point Volume: 9.562 mLmV Equivalence Point: 7.966Result: 95.620 meq/LInitial & Final pH: 11.655 to 6.248Titration Duration: 1:24 [mm:ss]Titration went to Completion
Analyst Signature:____________________

APPL
ICAT
IONS
HI10
09EN
3
3-20
HI1009EN NEUTRALIZATION WITH SODIUM HYDROXIDE0 to 200 meq/L
DESCRIPTIONMethod for the determination of strong or weak acid concentration by titration of a sample to the equivalence point with sodium hydroxide. The results are expressed as meq/L. ELECTRODE• HI1131B Combination pH Electrode• HI7662-T Temperature Probe
REAGENTS• HI70456 0.1N Sodium Hydroxide (1 L)• HI70436 Deionized Water (1 gal)
ACCESSORIES• HI70300L Storage Solution (500 mL)• HI7082 Electrode Fill Solution (4 x 30 mL)• HI7004L pH 4.01 Buffer Solution• HI7007L pH 7.01 Buffer Solution• HI7010L pH 10.01 Buffer Solution• HI740036P 100 mL Plastic Beaker (10 pcs)• 10 mL Class A Volumetric Pipette
DEVICE PREPARATION• Connect the pH electrode and temperature probe to
the titrator.• Install a 25 mL burette filled with 0.1N sodium
hydroxide (HI70456) on pump one and verify that no air bubbles are present in the burette or tubing. If necessary prime the burette until all the air has been removed completely.
• For the determination of the exact concentration of the 0.1N sodium hydroxide, follow HI0001EN 0.1N Sodium Hydroxide Titrant Concentration
• Press from the main screen. Use the arrow keys to highlight HI1009EN Neutralization w/NaOH and press .
ELECTRODE PREPARATION• Press from the main screen, if necessary
select the analog board and press .• Calibrate the electrode using pH 4.01, 7.01 and
10.01 buffers. Refer to the instruction manual for calibration procedure.
SAMPLE PREPARATION• Use a class A volumetric pipette to transfer exactly
10.00 mL of sample to a clean 100 mL plastic beaker.
• Add deionized water to the 50 mL mark on the beaker.
ANALYSIS• Place the beaker under the stirrer assembly and
lower it to immerse the pH electrode, temperature probe and stirrer. Ensure that the reference junction of the pH electrode is 5 to 6 mm below the surface.
Note: The dispensing tip should be slightly submerged in the sample.• Press , the titrator will start the analysis.• At the end of the titration, after detection of the
equivalence point, “Titration Completed” will appear with the result. The result is expressed in meq/L.
• Remove the pH electrode and stirrer from the sample and rinse them thoroughly with deionized water.
• Record the result.
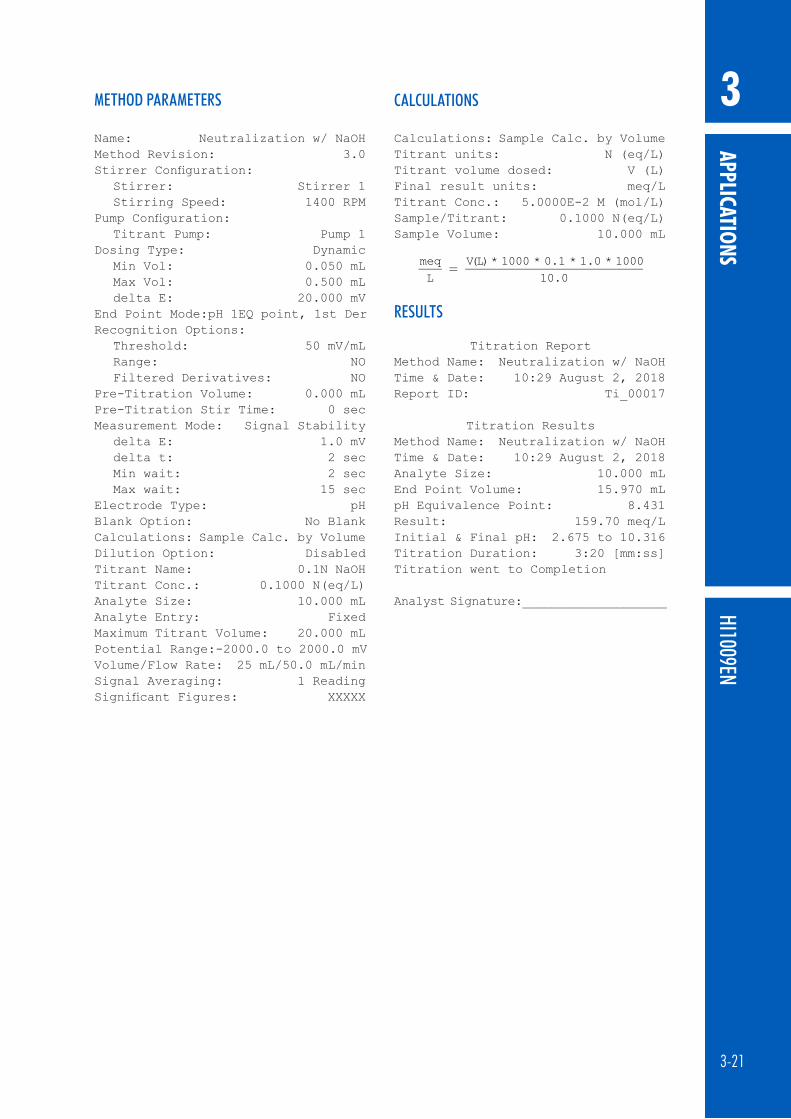
APPLICATIONSHI1009EN
3
3-21
METHOD PARAMETERS
Name: Neutralization w/ NaOHMethod Revision: 3.0Stirrer Configuration:
Stirrer: Stirrer 1Stirring Speed: 1400 RPM
Pump Configuration:Titrant Pump: Pump 1
Dosing Type: DynamicMin Vol: 0.050 mLMax Vol: 0.500 mLdelta E: 20.000 mV
End Point Mode: pH 1EQ point, 1st DerRecognition Options:
Threshold: 50 mV/mLRange: NOFiltered Derivatives: NO
Pre-Titration Volume: 0.000 mLPre-Titration Stir Time: 0 secMeasurement Mode: Signal Stability
delta E: 1.0 mVdelta t: 2 secMin wait: 2 secMax wait: 15 sec
Electrode Type: pHBlank Option: No BlankCalculations: Sample Calc. by VolumeDilution Option: DisabledTitrant Name: 0.1N NaOHTitrant Conc.: 0.1000 N(eq/L)Analyte Size: 10.000 mLAnalyte Entry: FixedMaximum Titrant Volume: 20.000 mLPotential Range: -2000.0 to 2000.0 mVVolume/Flow Rate: 25 mL/50.0 mL/minSignal Averaging: 1 ReadingSignificant Figures: XXXXX
CALCULATIONS
Calculations: Sample Calc. by VolumeTitrant units: N (eq/L)Titrant volume dosed: V (L)Final result units: meq/LTitrant Conc.: 5.0000E-2 M (mol/L)Sample/Titrant: 0.1000 N(eq/L)Sample Volume: 10.000 mL
RESULTS
Titration ReportMethod Name: Neutralization w/ NaOHTime & Date: 10:29 August 2, 2018Report ID: Ti_00017
Titration ResultsMethod Name: Neutralization w/ NaOHTime & Date: 10:29 August 2, 2018Analyte Size: 10.000 mLEnd Point Volume: 15.970 mLpH Equivalence Point: 8.431Result: 159.70 meq/LInitial & Final pH: 2.675 to 10.316Titration Duration: 3:20 [mm:ss]Titration went to Completion
Analyst Signature:____________________

APPL
ICAT
IONS
HI10
11EN
3
3-22
HI1011EN TROUBLESHOOTING 1
DESCRIPTIONMethod for verifying the dosing and potentiometric signal accuracy of the titrator. This method should be used to troubleshoot a titrator equipped with a 25 mL burette. The titrator dispenses a 20.00 mL pre-titration volume, waits 20 seconds and dispenses an additional 20.00 mL dose, bringing the total volume to 40.00 mL. This procedure can also be used to check the stability of the mV and temperature channels.The dosing accuracy of the 25 mL burette is ± 0.025 mL (± 0.1% of the full volume).If the results are not correct, check all fittings for leakage, and burette and tubing for air bubbles. Repeat the measurement.REFERENCEISO/TC 48/SC1N 380E and 383E: “Piston and/or Plunger Operated Volumetric Apparatus”ACCESSORIES• HI762000C 0°C Temperature Key• HI762070C 70°C Temperature Key• HI70436 Deionized Water (1 gal)• HI7662-T Temperature Probe• Shorting Cap• Narrow Neck Beaker• Analytical Balance with 0.0001g resolution
DEVICE PREPARATION• Connect the shorting cap to the BNC socket on
Analog Board 1• Install a 25 mL burette filled with room temperature
deionized water (HI70436) on pump one and verify that no air bubbles are present in the burette or tubing. If necessary prime the burette until all the air has been removed completely.
• Press from the main screen. Use the arrow keys to highlight HI1011EN Troubleshooting 1 and press .
LARGE DOSE DISPENSING PROCEDURE• Add a small amount of deionized water to a narrow
neck beaker.
• Place the narrow neck beaker on an analytical balance and zero the balance.
• Place the dosing tip through the neck of the beaker. Take care not to immerse it in the liquid during dispensing and not to touch the beaker walls.
• Press .• Write down the exact weight displaced on the
balance after each dose.• This procedure can be repeated on pump 2.
Other burette sizes can be checked using the following settings, see instruction manual for accuracy:
Burette Volume
Pre-titration Volume
Max. Titrant Volume
5 mL 4.000 mL 8.000 mL10 mL 8.000 mL 16.000 mL
METHOD PARAMETERSName: Troubleshooting 1Method Revision: 3.0Stirrer Configuration:
Stirrer: Stirrer 1Stirring Speed: 0 RPM
Pump Configuration:Titrant Pump: Pump 1
Dosing Type: Linear – 20.000 mLEnd Point Mode: Fixed 10.0 mVPre-Titration Volume: 20.000 mLPre-Titration Stir Time: 0 secMeasurement Mode: Timed Increment
Time interval: 20 secElectrode Type: Shorting CapBlank Option: No BlankCalculations: No Formula (mL only)Titrant Name: DI WaterMaximum Titrant Volume: 40.000 mLPotential Range: -2000.0 to 2000.0 mVVolume/Flow Rate: 25 mL/50.0 mL/minSignal Averaging: 1 ReadingSignificant Figures: XXXXX

APPLICATIONSHI1011EN
3
3-23
CALCULATIONS
V Volume of measure mass of water (mL)m Measure mass of water (g)ρL Density of dispensed water (g/mL)ρair Density of ambient air (g/mL)ρstd Density of calibration standard weight (g/mL)
ALTERNATIVE CALCULATIONS
If the actual values of the above parameters are not accessible the following equation can be used:
V=M*FV Volume of measured mass of water (mL)F Transformation factor
The values from the table have been calculated by correcting the air and water density with temperature, assuming the density of dry air ρair = 0.0012 g/mL and density of calibration steel standard weigh ρSTD = 8 g/mL.
Temperature ( °C) Factor17.0 1.00229018.0 1.00246719.0 1.00265420.0 1.00285321.0 1.00306122.0 1.00328223.0 1.00351224.0 1.00375225.0 1.00400226.0 1.00426127.0 1.00453128.0 1.00480929.0 1.00509730.0 1.005395
TEMPERATURE CHANNEL FAST CHECK PROCEDURE
• Connect the shorting cap to the BNC socket on Analog Board 1.
• Connect the HI762000C 0°C temperature key to the RCA socket (temperature sensor input) on Analog Board 1.
• On the main screen select , if necessary select the analog board and press .
• The titrator should display ATC 0.0 ± 0.4°C with no fluctuations or drift.
• Connect the HI762070C 70°C temperature key to the RCA socket (temperature sensor input) on Analog Board 1.
• The titrator should display ATC 70.0 ± 0.4°C with no fluctuations or drift.
• This procedure can be repeated on analog board 2.
TEMPERATURE & mV CHANNEL LOGGING PROCEDURE
• Connect the shorting cap to the BNC socket on Analog Board 1.
• Connect the HI762000C 0°C temperature key to the RCA socket (temperature sensor input) on Analog Board 1.
• On the main screen select , if necessary select the analog board and press .
• Press and use the arrow keys to highlight Logging Interval. Set the logging interval to 15 seconds and press . Press to return to the main screen.
• Press the key and use the arrow keys to highlight Setup pH/mV/ISE Report, press .
• Select Potential and Temperature and Units. All other fields should be unselected.
• Press to return to the Data Parameters screen.
• Press to return to the main screen. • Once on the main screen press to start the
automatic log.• Let the log run for about 10 minutes. Press
to stop the automatic log.• Press , use the arrow keys to highlight Review
Last Analysis Report, and press .• The mV column should display 0.0 ± 0.1 mV and the
temperature column should display 0.0°C ± 0.4°C.• This procedure can be repeated using the HI762070C
70°C temperature key and on analog board 2.

APPL
ICAT
IONS
HI10
12EN
3
3-24
HI1012EN TROUBLESHOOTING 2
DESCRIPTIONMethod for verifying the dosing of the titrator. This method should be used to troubleshoot a titrator equipped with a 25 mL burette. The titrator dispenses a 10.00 mL pre-titration volume, waits 20 seconds and dispenses an additional 0.5 mL dose twenty times, waiting 20 seconds between each dose, bringing the total volume to 20 mL. This procedure can also be used to check the stirrer functionality.The dosing accuracy of the 25 mL burette is ± 0.025 mL (± 0.1% of the full volume).If the results are not correct, check all fittings for leakage, and burette and tubing for air bubbles. Repeat the measurement.REFERENCEISO/TC 48/SC1N 380E and 383E: “Piston and/or Plunger Operated Volumetric Apparatus”ACCESSORIES• HI762000C 0°C Temperature Key• HI70436 Deionized Water (1 gal)• HI7662-T Temperature Probe• Shorting Cap• Narrow Neck Beaker• Analytical Balance with 0.0001g resolution
DEVICE PREPARATION• Connect the shorting cap to the BNC socket on
Analog Board 1• Install a 25 mL burette filled with room temperature
deionized water (HI70436) on pump one and verify that no air bubbles are present in the burette or tubing. If necessary prime the burette until all the air has been removed completely.
• Press from the main screen. Use the arrow keys to highlight HI1012EN Troubleshooting 2 and press .
SMALL DOSE DISPENSING PROCEDURE• Add a small amount of deionized water to a narrow
neck beaker. By doing this the air space in the beaker will be vapor-saturated minimizing evaporation.
• Place the narrow neck beaker on an analytical balance and zero the balance.
• Place the dosing tip through the neck of the beaker. Take care not to immerse it in the liquid during dispensing and not to touch the beaker walls.
• Press .• Write down the exact weight displaced on the
balance after each dose.• This procedure can be repeated on pump 2.
Other burette sizes can be checked using the following settings, see instruction manual for accuracy:
Burette Volume
Pre-titration Volume
Max. Titrant Volume
5 mL 4.000 mL 8.000 mL10 mL 8.000 mL 16.000 mL

APPLICATIONSHI1012EN
3
3-25
METHOD PARAMETERSName: Troubleshooting 2Method Revision: 3.0Stirrer Configuration:
Stirrer: Stirrer 1Stirring Speed: 0 RPM
Pump Configuration:Titrant Pump: Pump 1
Dosing Type: Linear – 0.500 mLEnd Point Mode: Fixed 10.0 mVPre-Titration Volume: 10.000 mLPre-Titration Stir Time: 0 secMeasurement Mode: Timed Increment
Time interval: 10 secElectrode Type: Shorting CapBlank Option: No BlankCalculations: No Formula (mL only)Titrant Name: DI WaterMaximum Titrant Volume: 20.000 mLPotential Range: -2000.0 to 2000.0 mVVolume/Flow Rate: 25 mL/50.0 mL/minSignal Averaging: 1 ReadingSignificant Figures: XXXXX
CALCULATIONS
V Volume of measure mass of water (mL)m Measure mass of water (g)ρL Density of dispensed water (g/mL)ρair Density of ambient air (g/mL)ρstd Density of calibration standard weight (g/mL)
ALTERNATIVE CALCULATIONS
If the actual values of the above parameters are not accessible the following equation can be used:
V=M*FV Volume of measured mass of water (mL)F Transformation factor
The values from the table have been calculated by correcting the air and water density with temperature, assuming the density of dry air ρair = 0.0012 g/mL and density of calibration steel standard weigh ρSTD = 8 g/mL.
Temperature ( °C) Factor17.0 1.00229018.0 1.00246719.0 1.00265420.0 1.00285321.0 1.00306122.0 1.00328223.0 1.00351224.0 1.00375225.0 1.00400226.0 1.00426127.0 1.00453128.0 1.00480929.0 1.00509730.0 1.005395
STIRRING SPEED FAST CHECK PROCEDURE
• On the main screen select , if necessary select the analog board and press .
• Press and use the arrow keys to highlight Stirrer Configuration. Use the arrow keys to highlight Stirrer 1. Press .
• Use the arrow keys to highlight Strring Speed. Use the numeric keypad to enter 200 rpms then press
.• Press to exit the mV Setup screen.• From the main screen, press , use the up arrow
key to increase the stir speed slowly to 2500 rpms.• Check that the propeller continues to increase speed,
following the commands.• This procedure can be repeated on stirrer 2.

APPL
ICAT
IONS
3
3-26

TITRATION THEORY
4PART 4:
TITRATION THEORY

TITR
ATIO
N TH
EORY
4
4-2
1. TITRATION THEORY
1.1. INTRODUCTIONA titration is a quantitative, volumetric procedure used in analytical chemistry to determine the concentration of an analyte (the species being measured) in solution. The concentration of the analyte is determined by slowly adding a titrant to the solution. As the titrant is added, a chemical reaction occurs between the titrant and the analyte.Titration reactions are relatively fast, simple reactions that can be expressed using a chemical equation. The titration reaction continues as the titrant is added until all of the analyte is consumed and the analyte reacts completely and quantitatively with the titrant.The point at which all of the analyte has been reacted is called the equivalence point, also known as the theoretical or stoichiometric endpoint. This point is accompanied by an abrupt physical change in the solution, which sharply defines the endpoint of the reaction. The physical change associated with the titration endpoint can be produced by the titrant, or an indicator, and can be detected visually or by physical measurements.Titrations cannot be used to determine the quantity of all analytes. The chemical reaction between the titrant and analyte must fulfill four requirements:
• Must be fast and occur within approximately one second after the titrant is added• Must go to completion• Must have well-known stoichiometry (reaction ratios)• A convenient endpoint or inflection point
Titrations provide many advantages over alternative methods; they are highly precise, quickly performed and require relatively simple apparatus and instrumentation.
1.2. USES OF TITRATIONS
• Acid content of plant effluents, food (e.g.: cheese and wine), plating and etching baths, petroleum products, drugs• Base content of fertilizer (containing ammonia), bleach, minerals• Hardness in water• Metal content of alloys, minerals, ores, clays, waters, plating baths, paints, paper, plant materials, biological
fluids, petroleum products• Moisture content in foodstuffs, petrochemicals, plastics, pharmaceutical products• Redox reagent concentrations such as available chlorine in potable water, peroxide, traces of oxidants and
reductants in food, reductants in high temperature or high pressure boiler water, vitamin analysis
1.3. ADVANTAGES & DISADVANTAGES
Advantages of titrations as an analytical technique:• More precise results than many instrumental methods, such as measurement by electrode, the accuracy of the
measurement is up to 0.1%• Simple methods, reasonable capital costs and easy training• Suitability to measure major components of a mixture or product• Automation can reduce time and labor spent on each analysis
Disadvantages of titrations as an analytical technique:• The time it takes to prepare standards and titrants• Good technique is required to achieve precise results (training and practice required)• Not suitable for determining trace or minor components of a mixture or product• Limited dynamic range, it may require additional sample preparation (dilution) and repeat analyses

TITRATION THEORY
4
4-3
2. TYPES OF TITRATIONS
2.1. TITRATIONS ACCORDING TO THE MEASUREMENT METHOD
2.1.1. AMPEROMETRIC TITRATIONSAn amperometric titration is performed by placing two electrodes (typically a metal ion-selective electrode and a reference electrode) into the sample solution and keeping the potential of the metal electrode at a selected voltage. The current that flows, due to the oxidation or reduction of a reactant or product, is plotted vs. volume of titrant to provide the titration curve and locate the equivalence point. Changes in the current are due to changes in the concentration of a particular species (being oxidized or reduced at the electrode). Generally, the reaction between the analyte and titrant forms a new species. Depending on the titration, the reactants are electroactive and the products are not or vice-versa. Amperometric titration curves look like two straight lines intersecting at the equivalence point, this is due to the change in the electroactivity of the solution. Figure 1A, Amperometric titrations, shows an active analyte and non-reactive titrant. Figure 1B and 1D, Amperometric titrations, shows a nonreactive analyte and a reactive titrant. Figure 1C, Amperometric titrations, shows a reactive analyte and titrant.Many metal ions can be amperometrically titrated using a precipitation, complexation or redox reaction. Some metal ions and species that can be determined in this manner include silver, barium, halides, potassium, magnesium, palladium, molybdate, sulfate, tungstate, zinc, bismuth, cadmium, fluoride, indium, thallium, iodine and gold.
Figure 1: Amperometric titrations
2.1.2. POTENTIOMETRIC TITRATIONSPotentiometric titrations are done by measuring the voltage across the solution using an electrode system. An electrode system consists of an indicator electrode and a reference electrode. As titrant is added, the variations in the potential of the indicator electrode, with respect to the reference electrode, are monitored to show the progress of the titration.Potentiometry is the measurement of a potential under conditions of zero current flow. The measured potential can then be used to determine the analytical quantity of interest, generally a component concentration of the analyte solution. The potential that develops in the electrochemical cell is the result of the free energy change that would occur if the chemical phenomena were to proceed until the equilibrium condition has been satisfied.
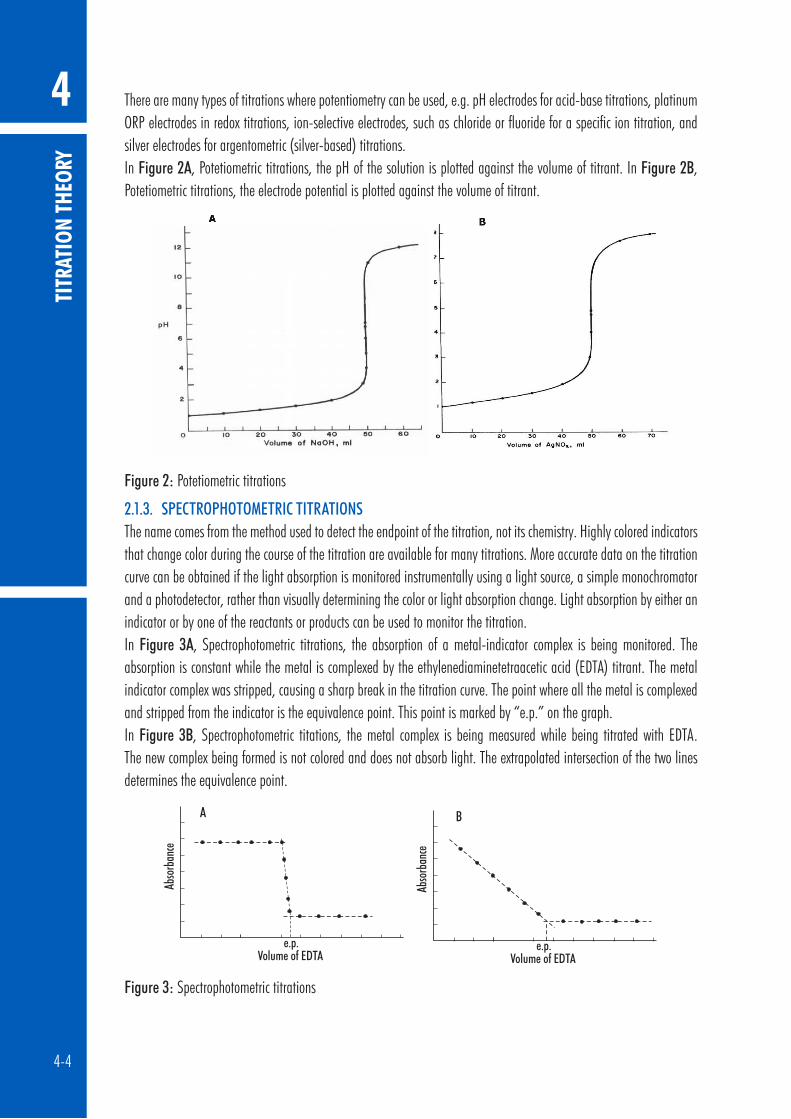
TITR
ATIO
N TH
EORY
4
4-4
There are many types of titrations where potentiometry can be used, e.g. pH electrodes for acid-base titrations, platinum ORP electrodes in redox titrations, ion-selective electrodes, such as chloride or fluoride for a specific ion titration, and silver electrodes for argentometric (silver-based) titrations.In Figure 2A, Potetiometric titrations, the pH of the solution is plotted against the volume of titrant. In Figure 2B, Potetiometric titrations, the electrode potential is plotted against the volume of titrant.
Figure 2: Potetiometric titrations
2.1.3. SPECTROPHOTOMETRIC TITRATIONSThe name comes from the method used to detect the endpoint of the titration, not its chemistry. Highly colored indicators that change color during the course of the titration are available for many titrations. More accurate data on the titration curve can be obtained if the light absorption is monitored instrumentally using a light source, a simple monochromator and a photodetector, rather than visually determining the color or light absorption change. Light absorption by either an indicator or by one of the reactants or products can be used to monitor the titration. In Figure 3A, Spectrophotometric titrations, the absorption of a metal-indicator complex is being monitored. The absorption is constant while the metal is complexed by the ethylenediaminetetraacetic acid (EDTA) titrant. The metal indicator complex was stripped, causing a sharp break in the titration curve. The point where all the metal is complexed and stripped from the indicator is the equivalence point. This point is marked by “e.p.” on the graph. In Figure 3B, Spectrophotometric titations, the metal complex is being measured while being titrated with EDTA. The new complex being formed is not colored and does not absorb light. The extrapolated intersection of the two lines determines the equivalence point.
Figure 3: Spectrophotometric titrations

TITRATION THEORY
4
4-5
2.2. TITRATIONS ACCORDING TO THE REACTION TYPE
2.2.1. ACID-BASE TITRATIONSAcid-base titrations are the most common type of titrations. They are based upon a reaction between an acid and a base, a stoichiometric neutralization or the exchange of protons. Virtually all acid-base titrations are carried out using a strong acid or a strong base as the titrant. The endpoint of a titration carried out with a weak acid or a weak base would be difficult to detect due to a small change in pH at the equivalence point.Chemical indicators can be used to determine the endpoint. The indicator will change color to signify that the end of the titration has been reached. The color of the indicator is dependent upon the concentration of ions in the solution. An acid-base indicator is composed of a conjugate weak acid-weak base pair, where the two forms exhibit different colors depending on the pH of the solution. For an indicator, the acid ionization constant (Ka) is usually written as:
HIn is the acid form of the indicator and In– is the base form. At the center of the change region, the ratio of [In–] to [HIn] is one, [H3O
+]=Ka and pH=pKa. The color change region is usually ±1 pH unit around this point. Table 1, Aqueous acid-base chemical indicators, contains a list of aqueous acid-base chemical indicators, the pH range, the pKa and the expected color (acid and base form). It is generally recommended to select a chemical indicator that has a pKa as close to the endpoint of the titration as possible.When chemical indicators are not suitable, a potentiometric pH titration can also be used. The pH of the solution is plotted versus the volume of titrant added.
Table 1: Aqueous acid-base chemical indicators
pH Range Indicator pKa Acid Form Base Form
0.0 - 1.6 Methyl Violet Yellow Blue
1.2 - 2.8 Thymol Blue 1.65 Red Yellow
3.2 - 4.4 Methyl Orange 3.46 Red Yellow
3.8 - 5.4 Bromocresol Green 4.90 Yellow Blue
4.8 - 6.0 Methyl Red 5.00 Red Yellow
5.2 - 6.8 Chlorophenol Blue 6.25 Yellow Red
6.0 -7.6 Bromothymol Blue 7.30 Yellow Blue
6.6 - 8.0 Phenol Red 8.00 Yellow Red
7.4 -9.0 Metacresol Purple 8.30 Yellow Purple
8.0 - 9.6 Thymol Blue 9.20 Yellow Blue
8.2 - 10.0 Phenolphthalein 9.50 Clear Pink
9.4 -10.6 Thymolphthalein Clear Blue
10.1 - 12.0 Alizarin Yellow R Yellow Red
11.4 - 12.6 Indigo Carmine Blue Yellow

TITR
ATIO
N TH
EORY
4
4-6
Figure 4, Acid-base titration, shows a traditional strong acid-strong base titration curve, the volume of sodium hydroxide (NaOH) added to the solution is plotted against the pH of the solution. Note the abrupt change in the pH at the equivalence point.
Figure 4: Acid-base titration
2.2.2. ARGENTOMETRIC TITRATIONSArgentometric titrations use silver (nitrate) as the titrant and are generally precipitation titrations, as many silver salts are insoluble. These titrations are commonly used to titrate and determine the concentration of bromide, chloride, cyanide, iodide and sulfide.Argentometric titrations can be done with Mohr’s indicator. After all of the chloride has reacted, a red silver chromate precipitate is formed or the titration can be easily followed with a silver ISE (or chloride ISE for chloride titrations) and a reference electrode.Figure 5, Argentometric titration, shows the titration of a sodium chloride solution with silver nitrate (AgNO3). The volume of AgNO3 is plotted against the potentiometric signal from a chloride ISE.
Figure 5: Argentometric titration
2.2.3. COMPLEXOMETRIC TITRATIONSA complex is a species where a central metal ion is covalently bonded to one or more electron donating groups called ligands. In a complexometric titration, metal ions are titrated using a titrant that binds strongly to it. Often these titrants contain EDTA

TITRATION THEORY
4
4-7
or CDTA, polydentate ligands that form very stable coordination compounds with metal ions. The complexation reaction must be fast in order to be useful for direct titration. Some metal ions react too slowly with EDTA for a direct titration.An indicator electrode that responds to the metal ion can be used to monitor the titration progress. The titration curve will appear similar to a potentiometric titration. Complexation indicators change color at the endpoint as all metal ions are “consumed” or complexed by the titrant.Figure 6, Complexometric titration, shows a typically complexometric titration curve when using an indicator electrode that responds to the metal ion.
Figure 6: Complexometric titration
2.2.4. ION-SELECTIVE TITRATIONSThe most popular ion-selective titration is an acid-base titration. The hydrogen ion concentration is specifically measured and monitored during the titration process to locate the equivalence point. Using an ion-selective electrode (ISE) as the indicator electrode, the potentiometric signal (in mV) is used to directly follow a specific ion’s concentration (or activity).Examples of ISE titrations include titrating fluoride with an aluminum titrant using a fluoride ISE, chloride with silver nitrate using a chloride ISE, sodium with a sodium ISE, etc. The equivalence point can be determined by plotting the mV value vs. the amount of titrant added.
2.2.5. NON-AQUEOUS SOLVENT ACID-BASE TITRATIONSNon-aqueous solvents must be used to titrate very weak acids and bases due to the inherent leveling effect water has on all acids and bases dissolved in it. A wide variety of weak acids and bases can be titrated using non-aqueous solvents. Mixtures of acids or bases can often be individually analyzed in a single sequential titration.

TITR
ATIO
N TH
EORY
4
4-8
2.2.5.1. TITRATION OF ACIDSWeak acids with pKa’s up to about 11 can be titrated in non-aqueous solvents. These include carboxylic acids, enols, phenols, imides, sulfonic acids and inorganic acids. Water or lower alcohols are suitable for titrating medium to strong acids (pKa less than 5). Titrating a weaker acid with a strong base titrant requires a solvent less acidic than water or ethanol/methanol. Solvents such as acetone, acetonitrile, t-butyl alcohol, dimethylformamide, isopropanol and pyridine have been found to work well for acid-base titrations of strong, medium and weak acids/bases. Titrants include alcoholic potassium hydroxide and various sodium or potassium alkoxides in a 10:1 mixture of benzene/methanol. The best titrants are quaternary ammonium hydroxides (such as tetrabutylammonium hydroxide) due to good solubility of tetraalkylammonium salts of the titrated acids and the clean potentiometric titration curve obtained. Figure 7, Non-aqueous titration, shows an example of titration with tributylmethylammonium hydroxide titrant.
Figure 7: Non-aqueous titration
2.2.5.2. TITRATION OF BASESWeak bases with pKb’s up to about 11, which do not ionize with water, can be titrated in non-aqueous solvents. These bases include aliphatic and aromatic amines, basic nitrogen heterocycles, alkali metal and amine salts of acids, and many other organic basic compounds. Titrating a weak base with a strong acid titrant requires a basic solvent that is as weak as possible. Water and alcohols allow the titration of medium strength bases, such as aliphatic amines (pKb = 4 to 5), but not the titration of weaker bases such as pyridine (pKb = 8.8). Glacial acetic acid works well for weak bases and has been used extensively. Less basic solvents such as acetone, acetonitrile and nitromethane extend the range of titrable compounds.The endpoint for non-aqueous titrations are usually determined potentiometrically using a pH glass electrode, a modified calomel or double junction reference electrode with a low-flow rate reference junction. Good potentiometric titration curves are obtained in most solvents, except those with very low dielectric constants such as benzene or chloroform, when high electrical resistance of the solvent causes unstable potentials.
2.2.6. PRECIPITATION TITRATIONSPrecipitation titrations allow for faster analysis when compared to gravimetric analysis, where a precipitate is formed, filtered, dried and weighed to analyze a compound. Typically silver halides, silver thiocyanate and a few mercury, lead, and zinc salts are titrated using this method. The chemical reactions must form an insoluble salt and precipitate out quickly in order to be analyzed by this method. When the reaction is not quick, a back titration can be used. A measured excess of the precipitating reagent (titrant) is added to force the reaction to occur, and then unreacted titrant is titrated with a standard solution of another reagent.

TITRATION THEORY
4
4-9
2.2.7. REDOX TITRATIONSThere are a number of oxidation-reduction reactions that can be used to determine unknown concentration by titration. If the reaction goes to completion, is fast and has an analytical signal available to follow it, a titration can be performed. The term “fast” means that each addition of titrant is reacted completely and the sensing electrode is able to detect the change in solution in less than one second. Figure 8, Redox titration, shows an example of a redox titration using Cerium (IV) as a titrant.Redox titrations are potentiometric titrations where the mV signal from a combination ORP (redox) electrode (usually with a platinum indicator electrode) is used to follow the reaction of oxidant/reductant. The electrode potential is determined by the Nernst equation and is controlled by the oxidant reductant ratio.
Figure 8: Redox titrationVisual indicators, such as Ferroin, are also available. The oxidized and reduced form of the indicator will have different colors and can be used to determine the endpoint.Various reductants can be determined by titrants with oxidants such as potassium permanganate, potassium chromate or iodine. Commonly used reductants that are used as titrants include sodium thiosulfate and ferrous ammonium sulfate.As with acid-base titrations, the potential changes dramatically at the equivalence point.
2.2.8. KARL FISCHER TITRATIONSThis method is based on a well-defined chemical reaction between water and the Karl Fischer reagent. The chemistry provides excellent specificity for water determination. The method can be used to determine free and bound water in a sample matrix. The Karl Fischer method is widely considered to produce the most rapid, accurate and reproducible results and has the largest detectable concentration range spanning 1 ppm to 100%. The determination of water content is one of the most commonly practiced methods in laboratories around the world. Knowledge of water content is critical to understanding chemical and physical properties of materials and ascertaining product quality. Water content determination is conducted on many sample types including pharmaceuticals and cosmetics, foods and natural products, organic and inorganic compounds, chemicals, solvents and gases, petroleum and plastic products as well as paints and adhesives. The KF method is verifiable and can be fully documented. As a result, Karl Fischer titration is the standard method for analysis of water in a multitude of samples as specified by numerous organizations including the Association of Official Analytical Chemists, the United States and European Pharmacopoeia, ASTM, American Petroleum Institute, British Standards and DIN.

TITR
ATIO
N TH
EORY
4
4-10
2.3. TITRATIONS ACCORDING TO THE TITRATION SEQUENCE
2.3.1. BACK TITRATIONSBack titrations are generally used when a reaction is too slow to be directly accomplished during a “direct” titration, where the reaction goes to completion within a few seconds. In a back titration, a large excess of a reagent is added to the sample solution, helping a slow reaction to go to completion. The unreacted, excess reagent is then titrated. The difference in the total volume of the first reagent added and amount determined from the second titration is the quantity of reagent required to complete the first reaction.
2.3.2. MULTIPLE ENDPOINT TITRATIONSUnder certain conditions, some titrations can exhibit more than one equivalence point and be titratable to the individual endpoints to determine the concentration of each individual component. Examples of these types of titrations include acid-base (different strengths acids or bases are in a mixture), redox (each species has a different reduction potential), complexometric (different species are separately titratable), and acid-base, using polyprotic acids (the pKa of the different protons varies enough to separate them).In Figure 9A, Multiple endpoint titrations, a titration of a polyprotic acid is shown, the different acid strengths of the first and second proton can be determined. Figure 9B, Multiple endpoint titrations, shows a titration with two different metal redox species, the different redox potentials allow the species to be separated. In Figure 9C, Multiple endpoint titrations, the solution being titrated contains a mixture of strong, weak, and very weak acids, the different pKa’s allow the species to be separated.
A
CB
Figure 9: Multiple endpoint titrations

TITRATION THEORY
4
4-11
3. TITRATION PROCEDURE
3.1. MANUAL TITRATION
Apparatus required for manual titration include:• Volumetric burette, for precisely controlled delivery of titrant to the reaction vessel• Erlenmeyer, or similar flask, that facilitates constant mixing or swirling required to ensure solution homogeneity• Volumetric pipettes for the precise addition of samples and indicator solutions• Titrant solutions of known concentration• A visual or instrumental indicator for detecting the completion of the reaction
A typical manual titration consists of the following steps:1) A volumetric pipette is used to add a known volume of sample to the flask.2) An indicator solution or instrument probe is added to the flask.3) A burette is used to measure the addition of titrant to the flask and dispense titrant in a controlled manner.4) Titrant is added via the burette until the method indication signals the reaction endpoint.5) Analyte concentration is calculated based on the concentration and volume of titrant required to reach the
endpoint.
Wrap fingers around tap, keeping pressure on to stop tap coming out
Swirl flask constantly
3.2. AUTOMATIC TITRATION
Automatic titrators are high-precision analytical instruments that deliver the titrant, monitor the physical change associated with the titration reaction, automatically stop at the endpoint and calculates the concentration of the analyte. Automatic titrators are best for repetitive titrations and high-accuracy analyses.An automatic titrator must have an accurate liquid dispensing system. In high-accuracy systems like the HI900-series titrators, the liquid dispensing system consists of three main components: motor-driven syringe burette capable of accurately and precisely dispensing very small volumes of titrant, valve system capable of switching between titrant intake and outlet and a dispensing tip. These three main subsystem components must be as accurate as possible, with very low gear backlash in the burette pump, minimal piston seal flexing, precision ground inner diameter of the glass syringe, a low dead-volume valve, minimal evaporation/permeation, and chemically resistant tubing.

TITR
ATIO
N TH
EORY
4
4-12
Apparatus required for automatic titration include:• An automatic titrator, equipped with a burette• A beaker• An electronic stirring system, either a propeller stirrer or a magnetic stir bar and stir plate• Volumetric pipettes for the precise addition of samples• Standard titrant solutions of known concentration• An electrode system that can be used to determine the endpoint of the titration
A typical automatic titration consists of the following steps:1) Set up the automatic titrator according to the manufacturer’s instructions.2) Use a volumetric pipette to add a known volume of sample to the beaker.3) Submerge the propeller stirrer or add the stir bar to the beaker and turn on.4) Start the titration. 5) The titrator will automatically stop at the endpoint and determine the concentration of the analyte.

TITRATION THEORY
4
4-13
4. TITRATION RESULTS
4.1. ACCURACY
The factors most critical to achieving accurate results with the HI900 titration systems are the concentration of the sample, size of the sample and having an optimized set of method parameters.4.2. REPEATABILITY
Repeatability or the agreement between replicate determinations, is expressed quantitatively as the relative standard deviation (RSD).
4.3. SOURCES OF ERROR
One of the advantages of volumetric analysis is excellent accuracy and precision. The sources of error can be grouped into sampling, titrant and standards, chemical reactions, endpoint determination and calculations.
4.3.1. SAMPLING ERRORS• Selection of a non-homogeneous or non-representative sample• Sample changed or was contaminated during collection, storage or transfers• Poor technique when transferring sample to beaker or flask• Errors in the balance (calibrate and check balance regularly)
4.3.2. PREPARATION ERRORSIncorrect preparation due to:
• Poor technique in weighing the salt or when transferring to volumetric glassware• Low-purity salts or water used to make titrant and standard• Dirty or wet glassware• Improper storage of titrant or standard which allows water gain, evaporation or deterioration• Failure to standardize frequently, to adjust for change in titrant• Failure to flush titrator tubing with a volume of titrant before standardizing• Volume errors from pipettes and volumetric flasks (grade A glassware is required)• Balance errors when weighing out salts (calibrate and check balance regularly)
4.3.3. DISPENSING ERRORSIncorrect dispensing due to:
• Dead valve volume and leaking valve• Inaccuracy in motor drive and gear lash or backlash• Poor burette or piston seal• Non-uniform diameter of burette glass cylinder• Chemical incompatibility with tubing or bubble generation• Density or temperature changes in titrant• Inadequate volume to cover electrode
TITR
ATIO
N TH
EORY
4
4-14
4.3.4. CHEMICAL REACTION ERRORS• Inappropriate solvent or sample, resulting in side reactions• Poor mixing in the titration vessel• Reaction between titrant and sample is not rapid• Reaction does not go to completion• Reaction has side reactions
4.3.5. ENDPOINT DETERMINATION ERRORSMost manual titrations use a visual indicator to indicate when the endpoint is reached and the titration should be stopped. Automatic titrators use instrumental methods to determine the end of a titration and the equivalence point. There are two predominant methods used to determine the equivalence point, first derivative and second derivative.The first derivative is often used to determine the inflection point. The inflection point of the titration curve (mV vs. volume) is normally assumed to be the equivalence point. The maximum value of the first derivative (∆mV vs. ∆V) corresponds to the theoretical equivalence point. During a titration it is rare to have a data point exactly at the first derivative maximum, the maximum value is determined by interpolating the first derivative data points.The second derivative (∆mV2 vs. ∆V2 ) can also be used to determine the equivalence point, and can offer advantages over the first derivative method. Second derivatives have increased sensitivity to smaller inflection points and easier numerical evaluation of the actual equivalence point. The value where the second derivative is equal to zero is the equivalence point. The second derivative requires fewer points located near the equivalence point, where data is often not obtained or not as reliable.Errors in determining the endpoint can result from:
• Incorrect signals from the sensor• Sensor drift• Sensor or instrument has slow response (it is recommended to keep the sensors in good condition)• Inappropriate setting on the titrator

TITRATION THEORY
4
4-15
5. CALCULATIONSThe main variables used in calculating a result from a titration are the sample volume, the concentration of the titrant, and the volume of titrant required to reach the equivalence point. At the equivalence point, an equal number of equivalents of the analyte and titrant has been added.
5.1. SAMPLE CALCULATION BY MASS
Csample Sample Concentration (g/100g)Vtitrant Volume of TitrantCtitrant Titrant Concentration (eq/L)Ratio Equivalence Ratio of analyte / titrant (mol analyte / eq titrant)FWanalyte Formula Weight of the Analyte (g/mol)msample Mass of Sample (g)
5.2. SAMPLE CALCULATION BY VOLUME
Csample Sample Concentration (g/100mL)Vtitrant Volume of TitrantCtitrant Titrant Concentration (eq/L)Ratio Equivalence Ratio of analyte / titrant (mol analyte / eq titrant)FWanalyte Formula Weight of the Analyte (g/mol)Vsample Volume of Sample (mL)
5.3. STANDARDIZE TITRANT BY MASS
Titrant standardization is the second most important calculation in titrations. A primary standard is titrated in order to determine the concentration of the titrant. This is essentially a typical titration calculated in “reverse”, where the concentration of the solution is known and the titrant is unknown.
Ctitrant Titrant Concentration (N)mstandard Mass of Standard (g)Ratio Equivalence Ratio of titrant / standard (eq titrant / mol standard)FWstandard Formula Weight of the Standard (g/mol)Vtitrant Volume of Titrant (L)

TITR
ATIO
N TH
EORY
4
4-16
5.4. STANDARDIZE TITRANT BY VOLUME
Titrant standardization is the second most important calculation in titrations. A primary standard is titrated in order to determine the concentration of the titrant. This is essentially a typical titration calculated in “reverse”, where the concentration of the solution is known and the titrant is unknown.
Ctitrant Titrant Concentration (N)Vstandard Volume of Standard (mL)Cstandard Concentration of Standard (eq/L)Vtitrant Volume of Titrant (L)
5.5. BLANK TITRATION
In a blank titration a pre-titration is performed, often times on the solvent to be used for the sample titration, and the titrant volume required to reach the endpoint is noted. This blank value nullifies error due to titrant required to react with the components of the titration solution matrix. The basic titration equation can be used for a blank titration, with the single modification that the volume of titrant used in the blank titration should be subtracted from the regular titration titrant volume.
Csample Sample Concentration (g/100 g)Ctitrant Titrant Concentration (eq/L)Vsample Volume of Titrant required for the sample (L)Vblank Volume of Titrant required for the blank (L)Ratio Equivalence ratio of analyte / titrant (mol analyte / eq titrant)FWanalyte Formula Weight of the Analyte (g/mol)msample Mass of Sample (g)
5.6. MULTIPLE ENDPOINT TITRATION
Some titrations have two or more endpoints, each corresponding to the equivalence point for a specific reaction. Multiple endpoint titrations are similar to a blank titration in that the volume of titrant required to reach the first endpoint is subtracted from the titrant volume used to reach the next sequential endpoint.

TITRATION THEORY
4
4-17
Csample1 Sample 1 Concentration (g/100g)Csample2 Sample 2 Concentration (g/100g)Csample3 Sample 3 Concentration (g/100g)Vtitrant 1 Volume of titrant required to reach the first endpoint (L)Vtitrant 2 Volume of titrant required to reach the second endpoint (L)Vtitrant 3 Volume of titrant required to reach the third endpoint (L)Ctitrant Concentration of Titrant (N)Ratio Equivalence Ratio of analyte / titrant (mol analyte / eq titrant)FWanalyte 1 Formula Weight of the analyte 1 (g/mol)FWanalyte 2 Formula Weight of the analyte 2 (g/mol)FWanalyte 3 Formula Weight of the analyte 3 (g/mol)msample Mass of Sample (g)
5.6.1. BACK TITRATIONThe equation used in back titration calculations is also similar to the equation for a blank titration. Instead of subtracting the initial amount of titrant needed to react with the blank, the amount of second titrant needed to react with the excess titrant added in the first titration is subtracted from the amount of the first titrant added. The difference between the two amounts is the amount of titrant necessary to reach the first equivalence point.
Csample Sample Concentration (g/100mL)Ctitrant 1 Concentration of Titrant 1 (N)Vtitrant 1 Volume of Titrant 1 (L)Ctitrant 2 Concentration of Titrant 2 (N)Vtitrant 2 Volume of Titrant 2 (L)Ratio Equivalence Ratio of analyte / titrant (mol analyte / eq titrant)FWanalyte Formula Weight of the analyte (g/mol)Vsample Volume of Sample (mL)

TITR
ATIO
N TH
EORY
4
4-18
6. GLOSSARY
AcidA chemical species that can donate one or more protons (hydrogen ions).
Acid-Base TitrationStoichiometric neutralization titrations, based upon the reaction that occurs between an acid and a base.
ActivityA physical property corresponding to the concentration of all ions in a solution. Electrodes respond to activity.
Amperometric TitrationTitrations where the current flow between two electrodes (often a metal electrode and a reference electrode) are used to monitor the titration progress.
AnalyteThe chemical species being measured in a titration.
Argentometric TitrationTitrations that use silver (nitrate) as the titrant. These titrations are typically precipitation titrations.
Automatic TitratorAn instrument designed to automatically carry out a titration. It will add the appropriate amount of titrant, determine the endpoint and calculate the results.
Back TitrationA type of titration where an excess amount of titrant is added to a sample, forcing a sluggish reaction to go to completion. The excess reagent is then “back” titrated with a second titrant.
BaseA chemical species that can accept one or more protons (hydrogen ions).
Biamperometric IndicationUses a dual platinum pin electrode to measure the current flow through a titration solution.
Bivoltametric IndicationUses a dual platinum pin electrode to measure the voltage required to maintain a constant current flow through a titration solution while constant voltage is applied across the platinum elements of the electrode.
BuretteA graduated cylindrical piece of laboratory glassware that is used to dispense precise amounts of solution.
Complex IonA species where a central metal ion is covalently bonded to one or more electron donating groups called ligands.
Complexometric TitrationsMetal ions are titrated using a titrant that binds strongly to it. The titrants often contain Ethylenediaminetetraacetic Acid (EDTA) or Cyclohexylenedinitrilotetraacetic Acid (CDTA).
EndpointThe point were a titration is stopped because a physical change in the solution has indicated a completed titration. Titration endpoints typically coincide with the equivalence point. A fixed value endpoint (pH or mV) can be used as well. The titration will stop at the desired point regardless if the titration is complete.
TITRATION THEORY
4
4-19
Equivalence PointThe point where the quantity of titrant is stoichiometrically equal to the quantity of analyte.
FormalThe theoretical number of equivalents per liter of the solution. It is used in solutions where the exact concentration of a species may be affected by the other ions present, therefore the stated concentration may not be exactly correct.
Gravimetric AnalysisA quantitative determination of an analyte based on the mass of the solid.
Indicator Electrode An electrode that responds to the species of interest. The electrode potential is proportional to the concentration or activity of that ion in the solution being measured.
IndicatorsChemical indicators are typically organic dyes that change form under different physical conditions, causing a color change that can be seen by an analyst. Typically used in manual titrations, chemical indicators have been replaced with electrometric indicators, which are used with automatic titrators.
Inflection PointThe point on a titration curve were the second derivative curve changes signs.
Ion-Selective Electrode (ISE)An electrode that responds to a specific ion. The electrode potential is proportional to the concentration or activity of that ion in the solution being measured.
Karl Fischer TitrationA titration that uses a chemical reaction that is specific for determining water.
Manual TitrationA titration that is carried out by hand. The analyst must add the appropriate amount of titrant, determine the endpoint and calculate the results.
MolarThe concentration of a solute in a solution.
Mole (mol)A quantity of a chemical species. The molecular weight of a substance in grams is equal to the mass of one mole of the substance. One mole is equal to 6.022 x 10²³ atoms or molecules.
MonochromatorA device that allows only a narrow range of wavelengths to pass though it by separating the light into different wavelengths.
Multiple Endpoint TitrationA titration that reacts multiple species in solution, sequentially, using the same titrant. The concentration of each analyte can be determined from their respective endpoints.
Nernst EquationThe fundamental equation relating cell voltage to the concentration of a solution.
NeutralizationA chemical reaction where an acid and a base react to form a neutral salt and water.

TITR
ATIO
N TH
EORY
4
4-20
Non-aqueousA solution that does not contain water.
Non-aqueous TitrationA titration that is preformed in non-aqueous solutions, typically used to titrate very weak acids and bases to eliminate the leveling effect water has on all acids and bases dissolved in it.
NormalThe concentration of a solution which accounts for any stoichiometric difference between the various species in a solution.
Oxidation / Reduction Potential (ORP)The measurement describing whether a species wants to donate or accept electrons from other species in a redox reaction. If a solutions reduction potential is higher than the species it is reacting with, it will typically gain electrons or be reduced. If the potential is lower than the species it is reacting with, it will typically lose electrons or be oxidized.
OxidantThe species that is accepting electrons in a redox reaction.
PipetteScientific apparatus that is used to deliver precise volumes of liquids.
Polyprotic AcidAcids that are capable of donating more than one proton per acid molecule.
Potentiometric TitrationA titration in which the endpoint is determined by monitoring the voltage of the solution using an electrode.
Precipitation TitrationA titration in which the analyte reacts with the titrant to form an insoluble compound. The endpoint is typically detected with an ISE sensitive to either the analyte or titrant.
ReagentThe chemical added in a titration that causes the given reaction to occur.
Reduction-Oxidation Reaction (redox)A chemical reaction in which the atoms involved in the reaction have their oxidation numbers changed. Reduction is the gain of electrons, which decreases the oxidation number. Oxidation is the loss of electrons, which increases the oxidation number.
ReductantsThe electron donor in a redox reaction.
Reference ElectrodeAn electrode that supplies a constant electrode potential. It is used in combination with an “indicator” electrode, allowing for the “indicator” electrode potential to be measured.
Relative Standard Deviation (RSD)A measure of the amount of relative variation in a set of data. It is calculated by dividing the standard deviation by the mean: RSD = (Standard Deviation of X) * 100 / (Mean of X)
RepeatabilityThe variation in sample measurements taken by a single person or instrument under the same conditions.

TITRATION THEORY
4
4-21
Spectrophotometric TitrationA titration in which the endpoint is marked by a change in color and/or color intensity.
StoichiometryThe quantitative relationship of the reactants and products in a chemical reaction.
TitrantThe chemical added in a titration that causes the given reaction to occur.
TitrationA quantitative, volumetric procedure used in analytical chemistry to determine the concentration of an analyte in solution. The concentration of the analyte is determined by slowly adding a titrant to the solution. As the titrant is added, a chemical reaction between the titrant and the analyte occurs.
Titration CurveA graph containing the physical data obtained for a titration. The data plotted is often an independent variable (volume of titrant) vs. a dependent variable (pH of the solution). From the titration curve, the equivalence point or endpoint can be determined.


HI931 05/20
The HI931 is warranted for two years against defects in workmanship and materials when used for its intended purpose and maintained according to instructions. Damage due to accidents, misuse, tampering or lack of prescribed maintenance is not covered.If service is required, contact your local Hanna Instruments Office. If under warranty, report the model number, date of purchase, serial number and the nature of the problem. If the repair is not covered by the warranty, you will be notified of the charges incurred. If the instrument is to be returned to Hanna Instruments, first obtain a Returned Goods Authorization (RGA) number from the Technical Service department and then send it with shipping costs prepaid. When shipping any instrument, make sure it is properly packed for complete protection.
Warranty
Recommendations for Users
Before using this product, make sure it is entirely suitable for your specific application and for the environment in which it is used. Any variation introduced by the user to the supplied equipment may degrade the meters’ performance. For yours and the meter’s safety do not use or store the meter in hazardous environments.
Certification All Hanna Instruments conform to the CE European Directives.
Disposal of Electrical & Electronic Equipment. The product should not be treated as household waste. Instead hand it over to the appropriate collection point for the recycling of electrical and electronic equipment which will conserve natural resources.Ensuring proper product and battery disposal prevents potential negative consequences for the environment and human health. For more information, contact your city, your local household waste disposal service, the place of purchase or go to www.hannainst.com.

Hanna Instruments reserves the right to modify the design, construction or appearance of its products without advance notice.

w
World HeadquartersHanna Instruments Inc.Highland Industrial Park584 Park East DriveWoonsocket, RI 02895 USA www.hannainst.com
MAN931 Printed in ROMANIA