Halloween Designs - Bead Spider
11
1 1. Cut and condition (optional) a piece of thread to the length suggested for your desired pattern and place a needle on one end. 2. Thread on the first two beads in the row marked by the RED ARROW of your beaded pattern, leaving a tail equal to the length seggested for your desired pattern. Thread through both beads again so that the two beads are firmly side by side. 3. Continue using ladder stitch to add the remaining beads of your first row, as per the pattern. 4. Working in the direction marked by the GREEN ARROW of your beaded pattern, use brick stitch to create your beadwork as per the pattern. Try to keep a firm tension throughout. 5. With the first side of your pattern completed, remove the needle from your working thread and attach it to your tail thread. Working in the direction marked by the BLUE ARROW of your beaded pattern, use brick stitch to create the remainder of the pattern. Again, try to keep a firm tension throughout. 6. Glue on or attach any findings you wish to use to complete your pattern. Finish your project by weaving your working thread and tail thread back into your work, tying occasional knots to secure it, and trim off any excess. A free video demonstrating the techniques in these patterns is available at www.beadspider.co.uk/video-tutorials KEY: Ideal Starting Position Direction of work for weaving thread Direction of work for tail thread This pattern pack includes 26 fun Haloween themed patterns of varying degrees of difficulty. Brick stitch patterns are suitable for use with seed beads or delica beads of any size. For best results be sure to use beads that are all from the one manufacturer and of the same size and type. The colours presented this pattern pack are merely a suggestion, you can certainly alter them to your liking for a different look. For best results though, be sure to swap all the beads of one colour with the colour of your choice. If using this design as a pendant, earring or to hang, the easiest way to achieve this is with a small loop of beads extending from the top of the pattern, else with a single line of beads, again, extending from the same spot. “Caught the Bug Project” Halloween Designs Brick Stitch Pattern Pack
-
Upload
khangminh22 -
Category
Documents
-
view
5 -
download
0
Transcript of Halloween Designs - Bead Spider

1
1. Cut and condition (optional) a piece of thread to the length suggested for your desired pattern and place a
needle on one end.
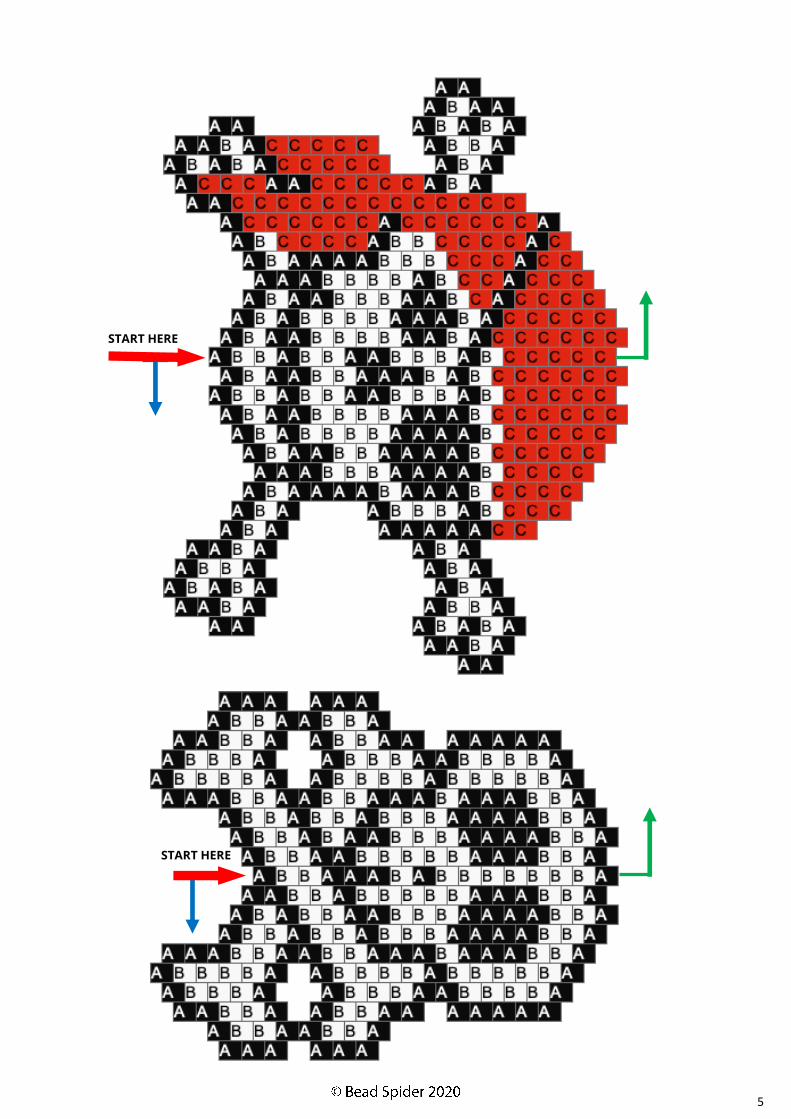
2. Thread on the first two beads in the row marked by the RED ARROW of your beaded pattern, leaving a tail
equal to the length seggested for your desired pattern. Thread through both beads again so that the two
beads are firmly side by side.
3. Continue using ladder stitch to add the remaining beads of your first row, as per the pattern.
4. Working in the direction marked by the GREEN ARROW of your beaded pattern, use brick stitch to create your beadwork as per the pattern. Try to keep a firm tension throughout.
5. With the first side of your pattern completed, remove the needle from your working thread and attach it to your tail thread. Working in the direction marked by the BLUE ARROW of your beaded pattern, use brick stitch to create the remainder of the pattern. Again, try to keep a firm tension throughout.
6. Glue on or attach any findings you wish to use to complete your pattern. Finish your project by weaving your working thread and tail thread back into your work, tying occasional knots to secure it, and trim off any excess.
A free video demonstrating the techniques in these patterns is available at www.beadspider.co.uk/video-tutorials
KEY:
Ideal Starting Position Direction of work for weaving thread
Direction of work for tail thread
This pattern pack includes 26 fun Haloween themed patterns of varying degrees of difficulty.
Brick stitch patterns are suitable for use with seed beads or delica beads of any size. For best results be sure to use
beads that are all from the one manufacturer and of the same size and type.
The colours presented this pattern pack are merely a suggestion, you can certainly alter them to your liking for a different look. For best results though, be sure to swap all the beads of one colour with the colour of your choice.
If using this design as a pendant, earring or to hang, the easiest way to achieve this is with a small loop of beads extending from the top of the pattern, else with a single line of beads, again, extending from the same spot.
“Caught the Bug Project”
Halloween Designs
Brick Stitch Pattern Pack

2
START HERE
START HERE
START HERE
START HERE

3
START HERE
START HERE
4
START HERE
START HERE
5
START HERE
START HERE

6
START HERE
START HERE

7
START HERE
START HERE
START HERE

8
START HERE
START HERE
START HERE
START HERE

9
START HERE
START HERE
START HERE

10
START HERE
START HERE
Making the Tassel
The size, shape and pattern of your tassel is entirely up to your own personal preference and is quite fun to
experiment with. In this example, each tassel increases in size by 2 beads but is only a design suggestion.
1. To make the smallest of your tassels, pick up a total of 10 delica beads. Diagram 1
2. Passing around the last seed bead, pass back up through all the beads added in the previous row.
Continue up through the seed bead in the bottom row of your bodice section. At this point, pull the thread
tight enough that there are no gaps but still loose enough that your tassel drapes nicely. Take the thread
across and down the second delica bead, ready to create the next tassel. Diagram 2
3. Continue making each tassel two seed beads longer than the previous one until you finish the central
tassel. From this point create the rest of the tassels to mirror the first half. Diagram 3
1 3 2

11
ST
AR
T H
ER
E
ST
AR
T H
ER
E
Adding Limbs
The length of the limbs of the skeleton and monster is entirely up to your own personal preference and is
quite fun to experiment with. Use our examples below as a guide to the length of each limb.
1. To make one arm of the skeleton bring your thread out from the bead indicated with the purple arrow.
Pick up a total of 15 delica beads.
2. Missing the last three seed beads, pass back up through the remaining beads added in step one. This will
form a three bead picot at the end of the arm.
3. Take the needle back through the seed bead where you started from in the body. At this point, pull the
thread tight enough that there are no gaps but still loose enough that your limb drapes nicely.
4. Weave the thread across the body to make the other arm in the same way.
5. Referring to steps 1-4
Make the Skeleton legs using 19 beads each.
Make the monster arms using four green beads and three red beads for the picot each
Make the monster legs using four green beads and four red beads for the square picot each.