Guide to Install Polaris Offline Client on Your PC - Main Staff
32
Updated on December 12, 2014 Page 1 of 32 Polaris Offline Guide The Polaris Offline Guide for 4.1R2.1139 is also posted on http://staff.mainlib.org/files/ils-support/polaris-resources/polaris-offline-guide.pdf This document consists of five sections: A. Uninstall Old Version Polaris Offline Client B. Install Polaris Offline Client 4.1R2.1139 a) Install Offline Client from main-utilities website b) Install Offline Client from a CD C. Download the PolPatron.mdb and PolSystem.mdb files D. Working Offline E. Upload Offline Transaction Files ** PLEASE NOTE: Log in as Administrator to install / uninstall Polaris offline client. Per Polaris contract, the offline client can be installed only on one circulation PC. Polaris Offline Client 4.1R2.1139 will not work with old version mdb files. You will have to download 4.1R2.1139 mdb files to work with 4.1R2.1139 offline client.
-
Upload
khangminh22 -
Category
Documents
-
view
7 -
download
0
Transcript of Guide to Install Polaris Offline Client on Your PC - Main Staff

Updated on December 12, 2014 Page 1 of 32
Polaris Offline Guide
The Polaris Offline Guide for 4.1R2.1139 is also posted on http://staff.mainlib.org/files/ils-support/polaris-resources/polaris-offline-guide.pdf This document consists of five sections:
A. Uninstall Old Version Polaris Offline Client B. Install Polaris Offline Client 4.1R2.1139
a) Install Offline Client from main-utilities website b) Install Offline Client from a CD
C. Download the PolPatron.mdb and PolSystem.mdb files D. Working Offline E. Upload Offline Transaction Files
** PLEASE NOTE:
Log in as Administrator to install / uninstall Polaris offline client.
Per Polaris contract, the offline client can be installed only on one circulation PC.
Polaris Offline Client 4.1R2.1139 will not work with old version mdb files. You will have to download 4.1R2.1139 mdb files to work with 4.1R2.1139 offline client.

Polaris Offline Guide
Page 2 of 32
A. Uninstall Old Version Polaris Offline Client If you don’t have Polaris Offline Client installed on a PC, you may skip to Section B “Install Polaris Offline Client 4.1R2.1139”. Before installing the new offline client, uninstall the old version first. The instructions of uninstalling offline client for Windows XP PCs and Windows 7 PCs are as follows: For Windows XP PCs:
1. Click the “start” button, then select the “Control Panel”. The “Control Panel” window appears.
Figure 1
2. Double click the “Add or Remove Programs”. The “Add or Remove Programs” window appears. See Figure 2
Polaris Offline Guide
Page 3 of 32
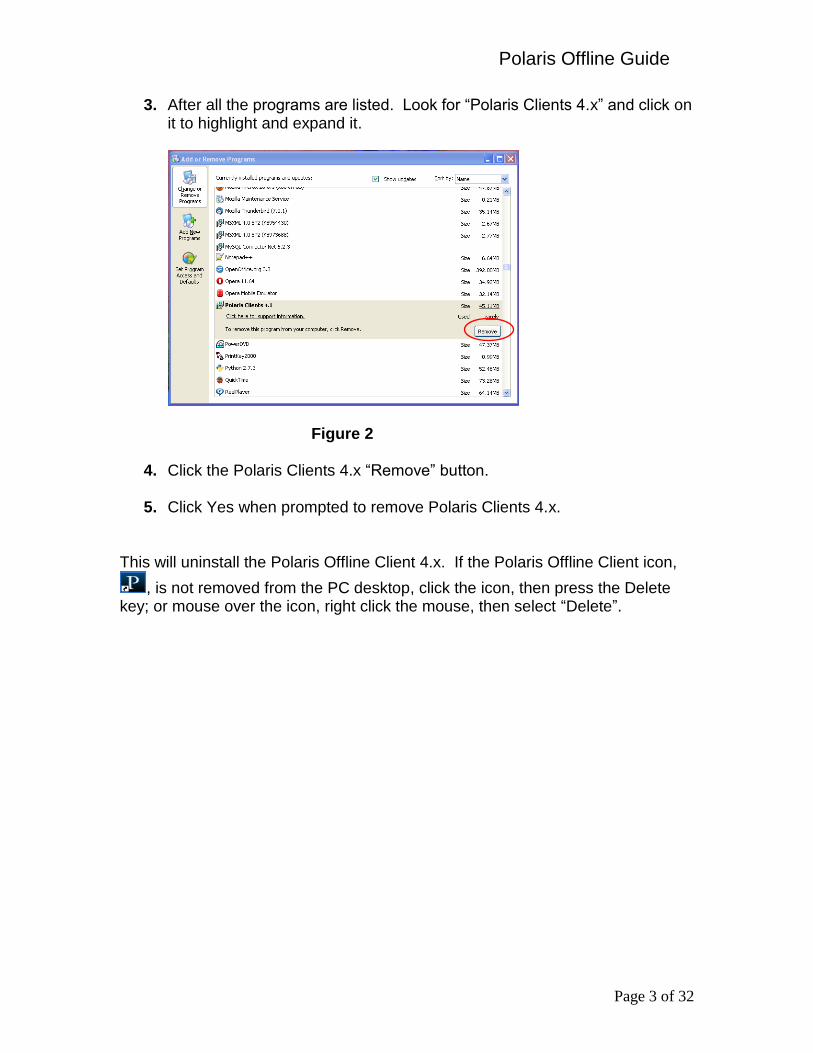
3. After all the programs are listed. Look for “Polaris Clients 4.x” and click on it to highlight and expand it.
Figure 2
4. Click the Polaris Clients 4.x “Remove” button.
5. Click Yes when prompted to remove Polaris Clients 4.x. This will uninstall the Polaris Offline Client 4.x. If the Polaris Offline Client icon,
, is not removed from the PC desktop, click the icon, then press the Delete key; or mouse over the icon, right click the mouse, then select “Delete”.

Polaris Offline Guide
Page 4 of 32
For Windows 7 PCs:
1. Click the “Start” button down in the left corner of the PC screen, then select “Control Panel”. The “Control Panel -> All Control Panel Items” window appears.
2. Double click the “Programs and Features”.
Figure 3

Polaris Offline Guide
Page 5 of 32
3. The “Programs and Features” window appears.
Figure 4
4. Look for “Polaris Clients 4.x”. Select the program by clicking the program.
5. Click “Uninstall”. This will uninstall the Polaris Offline Client 4.x. If the Polaris Offline Client icon,
, is not removed from the PC desktop, click the icon, then press the Delete key; or mouse over the icon, right click the mouse, then select “Delete”.

Polaris Offline Guide
Page 6 of 32
B. Install Polaris Offline Client 4.1R2.1139
a) Install Offline Client from the main-utilities Website
1. To download and install Polaris 4.1R2.1139 offline client, go to
http://main-utilities.polarislibrary.com/
NOTE: Polaris changed the flow. You will be prompted to log in at this point. Use the username and password on page 23 of this document.
2. Click the “Polaris 4.1R2.1139 Client” link.
Figure 5

Polaris Offline Guide
Page 7 of 32
Note: The following screenshots were captured from Internet Explorer 8 on a Windows XP. If you use Windows 7 or different IE version or other browsers, the images might be different, but the procedures are similar.
3. The “File Download – Security Warning” pop-up appears
Figure 6
4. Click Run
Note: If it takes too long (more than 20 minutes) to download the offline
client the first time, cancel the process, and download again.
Usually, it is pretty fast the second or third time. You can do other
work on the PC while waiting for the download.
5. The “Internet Explorer – Security Warning” pop-up appears
Figure 7
6. Click Run

Polaris Offline Guide
Page 8 of 32
7. The “WinRAR self-extracting archive” window appears
Figure 8
8. Click Install
9. Depending on what files the PC already has, the “Confirm file replace”
pop-up window might appear.
Figure 9
10. Click “Yes to All” button

Polaris Offline Guide
Page 9 of 32
11. If you get the Error (rarely). Please download again. Go to step 2.
Figure 10
12. The “Polaris Client Installer Pre-Requisites” window appears. The
prerequisites listed in the window may differ for each PC due to operating
system variations and software already installed. If you had installed
Polaris Offline Client before, it only lists the offline client.
Figure 11
13. Skip to step 5 in Section b) to install the offline client.
Polaris Offline Guide
Page 10 of 32
b) Install Offline Client from a CD
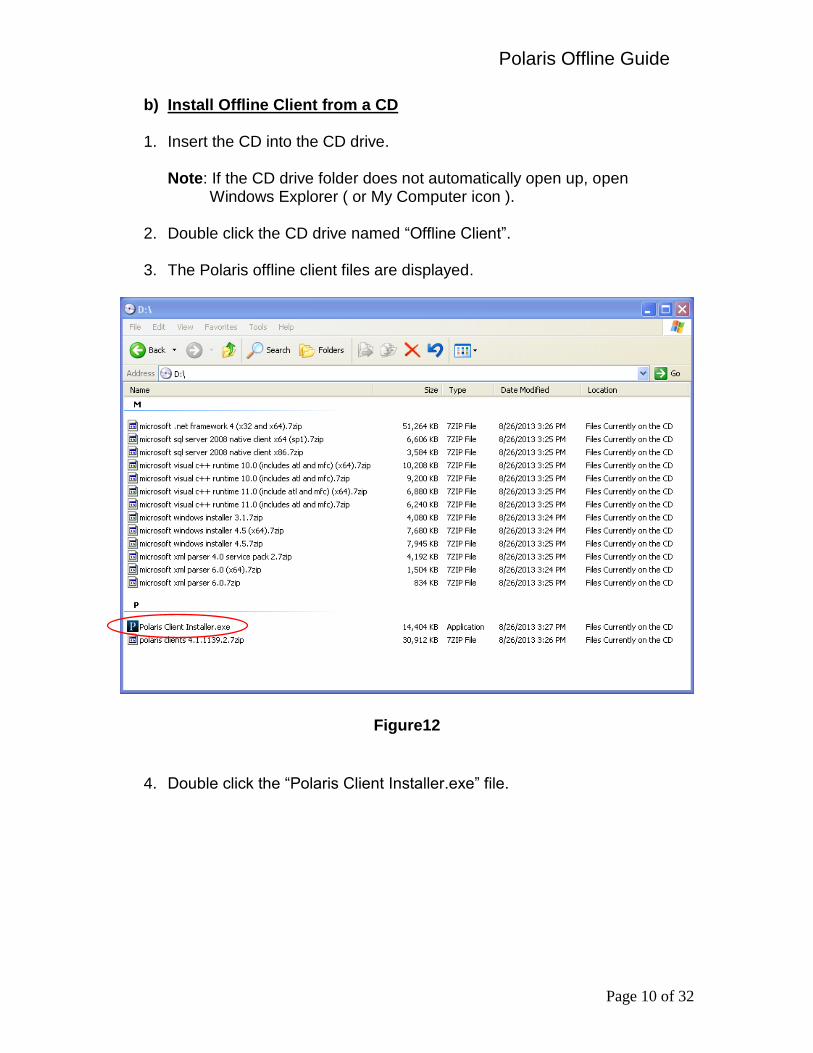
1. Insert the CD into the CD drive.
Note: If the CD drive folder does not automatically open up, open Windows Explorer ( or My Computer icon ).
2. Double click the CD drive named “Offline Client”.
3. The Polaris offline client files are displayed.
Figure12
4. Double click the “Polaris Client Installer.exe” file.

Polaris Offline Guide
Page 11 of 32
Polaris offline client opens to the “Polaris Client Installer Pre-Requisites” window. The prerequisites listed in the window may differ for each PC due to operating system variations and software already installed. If you had installed Polaris Offline Client before, it only lists the offline client.
Figure13
5. Check the checkbox “If an answer file is provided, Install the Polaris Client silently.”
6. Click “Next”. It will take a few minutes to download the pre-requisites.
Check this box
Polaris Offline Guide
Page 12 of 32
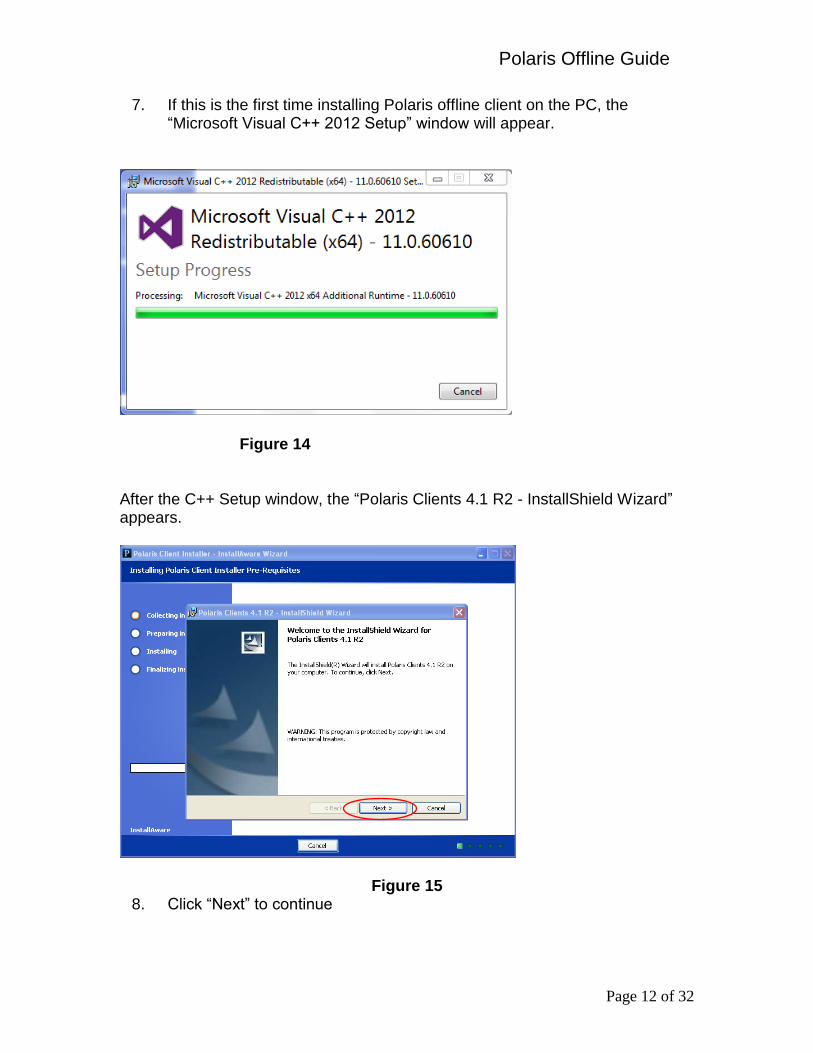
7. If this is the first time installing Polaris offline client on the PC, the “Microsoft Visual C++ 2012 Setup” window will appear.
Figure 14 After the C++ Setup window, the “Polaris Clients 4.1 R2 - InstallShield Wizard” appears.
Figure 15 8. Click “Next” to continue

Polaris Offline Guide
Page 13 of 32
The “License Agreement” dialog box appears.
Figure 16
9. Check “I accept the terms in the license agreement”. 10. Click “Next”.
Check here to
accept the agreement
Polaris Offline Guide
Page 14 of 32
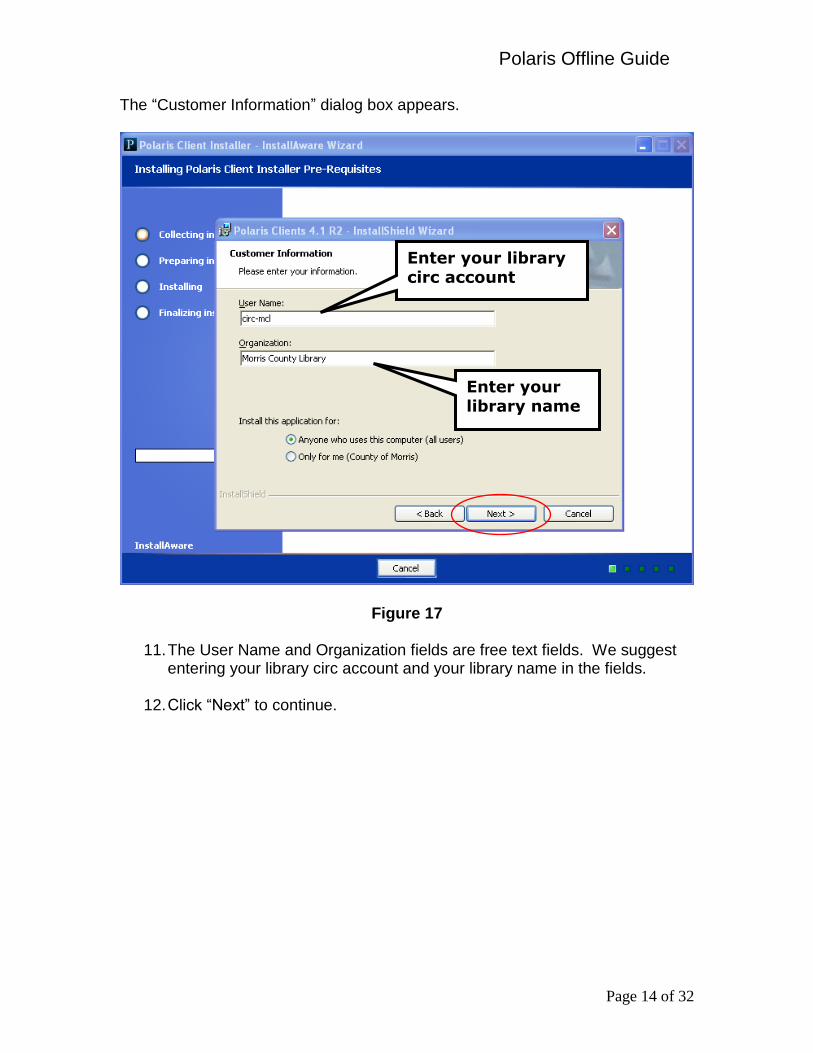
The “Customer Information” dialog box appears.
Figure 17
11. The User Name and Organization fields are free text fields. We suggest entering your library circ account and your library name in the fields.
12. Click “Next” to continue.
Enter your library circ account
Enter your library name

Polaris Offline Guide
Page 15 of 32
The “Custom Setup” dialog box appears.
Figure 18
13. Do not change the settings. Click “Next” to continue.

Polaris Offline Guide
Page 16 of 32
The “Offline Transaction Folder” dialog box appears
Figure 19
14. Accept the default folder, click “Next” to continue.

Polaris Offline Guide
Page 17 of 32
The “Server Information” dialog box appears.
Figure 20
15. Enter “MAINPRO” in the Application Server Name field. Click “Next” to continue.
Polaris Offline Guide
Page 18 of 32
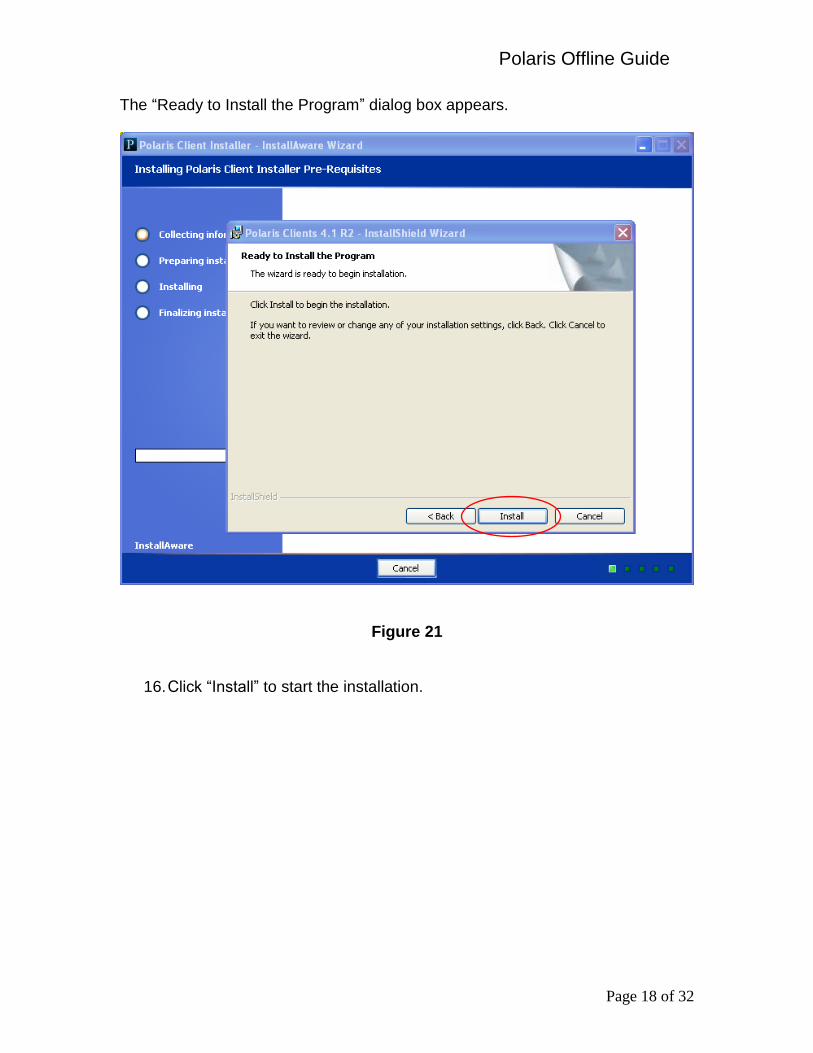
The “Ready to Install the Program” dialog box appears.
Figure 21
16. Click “Install” to start the installation.

Polaris Offline Guide
Page 19 of 32
When the installation process is finished, the “InstallShield Wizard Completed” dialog box appears.
Figure 22
17. Click “Finish” to close the InstallShield Wizard.
18. The Polaris offline staff client shortcut icon , Polaris ILS 4.1R2, is displayed on the desktop.
19. To avoid the confusion with Polaris Remote Desktop icon, you might want
to rename the “Polaris ILS 4.1R2” to “Polaris Offline 4.1R2.1139”.
20. Now you have finished installing Polaris offline client on your PC.

Polaris Offline Guide
Page 20 of 32
C. Download the PolSystem.mdb and PolPatron.mdb files
Polaris offline transactions use these two files to check system and patron information. Polaris recommends that libraries download these two files daily in order to have up to date system and patron information when offline transaction is performed. If the PC that you are installing the offline client on is Windows XP, you may skip the following section and go to the “To download the mdb files” section. **For Windows 7 PCs, the folder that the files are downloaded to is hidden. You need to do this one time process to make the folder unhidden. The process is 1. Open the Windows Explore. If the Menu bar ( File Edit … ) is not
visible, press the “Alt” key to bring up the Menu bar. 2. Go to Tools -> Folder Options … 3. Click the “View” tab. 4. In the “Hidden files and folders” section, click the “Show hidden files
and folders” radio button. 5. Click “Apply” button. 6. While you are in the Windows Explore, click C drive. 7. Find “ProgramData” folder. 8. Right click “ProgramData” and go to “Properties” on the bottom of the
list. 9. In the “General” tab, uncheck the Attributes: “Hidden” checkbox at the
bottom of the window.
10. Click “Apply”.

Polaris Offline Guide
Page 21 of 32
11. The “Confirm Attribute Changes” dialog box appears.
Figure 23
12. Check “Apply changes to this folder only”.
13. Click “OK”.
Check this

Polaris Offline Guide
Page 22 of 32
To download the mdb files:
1. Open Internet Explorer browser. 2. Go to http://main-utilities.polarislibrary.com .
Figure 24
3. In the Polaris Offline Files section, you need to download the Patron
offline files and System offline files. 4. First click Patron offline files. 5. You will be prompted to log in.

Polaris Offline Guide
Page 23 of 32
Figure 25
Enter
User name: MAINOffline
Password: D0wnl0@d1989 (the 0s are zeroes, ‘l’ is a lower case ‘L’) (It is easier to copy and paste the password.)
6. After log in, you will be prompted to save the PolPatron.mdb file.
( On Windows 7, the “Save” button is at the bottom of the screen. Click the down arrow next to the “Save” button and select “Save As” )

Polaris Offline Guide
Page 24 of 32
Figure 26 7. Click “Save”. 8. Traverse to the following path to save the file :
C:\ProgramData\Polaris\4.1R2\Offline
9. Click Save.
10. It will take a while to download the Patron file.
Note: If it takes too long (more than 15 minutes) to download the files the first time, abort the process, download again. Usually, it goes pretty fast the second or third time.
11. After you save the PolPatron.mdb file, click the link for the System offline
files.
12. Save the PolSystem.mdb file in the same folder as the PolPatron.mdb file.
13. Now, you have the up-to-date System and Patron files on the PC.

Polaris Offline Guide
Page 25 of 32
D. Working Offline
To work offline, make sure you have Polaris offline client installed on the PC and both PolSystem.mdb and PolPatron.mdb files are in the local C:\ProgramData\Polaris\4.1R2\Offline folder. Log in to Windows as staff to work offline. The followings are the steps to work offline in Polaris:
1. Double-click the Polaris offline client shortcut icon that was installed on the PC desktop.
2. The Polaris Offline shortcut bar and the “Polaris Log On” dialog box appear.
Figure 27
Figure 28 3. Check “Work off-line”. The Password field will be grayed out.
4. Enter your library’s circ username, e.g. circ-mcl
5. Click OK.
6. Please perform only check-out operation in offline mode.
Check “Work off-line”

Polaris Offline Guide
Page 26 of 32
7. On the Polaris Shortcut Bar, Select Circulation -> Check-out or press F3 for check-out function.
8. The Offline Check Out window appears.
9. Go to the Tools->Options …, check the “Check out receipt” option and
select the appropriate Printer and Driver names for the receipt printer.
10. The offline check-out receipt contains only item barcode and due date. The offline receipt is not configurable.
11. Set the Loan Period for the item due date. The default loan period is two
weeks. The loan period for different material types can be set using the “Special…” button.
12. You will have to scan or enter patron’s barcode to bring up patron
information. There is no patron name search in offline.
13. Press Enter key to bring up patron information. Tab key will not bring up patron information.
14. Please note that in offline mode, the Polaris client is limited in what patron
information it can access to. Blocks do not appear for patron fines in offline mode, library-assigned blocks on the patron's account will generate a pop-up alert message.

Polaris Offline Guide
Page 27 of 32
15. Do the normal checkout.
Figure 29
16. Polaris recommends that you log off and log back in to the offline client
every 2 to 3 hours to avoid corrupting offline transaction files. 17. Exit and close the Polaris Shortcut Bar window when done.

Polaris Offline Guide
Page 28 of 32
E. Upload Offline Transaction Files
1. When Polaris server is available, log on to Polaris staff client on the
Terminal Server to upload the transaction files. 2. Click Circulation -> Bookmobile
Figure 30 The BookMobile workform opens.
3. Click “Find File”
Figure 31

Polaris Offline Guide
Page 29 of 32
It opens a Windows Explorer.
Figure 32
4. Navigate to the folder on the local workstation to
“C:\ProgramData\Polaris\4.1R2\OfflineTransaction” folder. 5. Select the files to open by clicking the file names. Make sure that the
timestamps of the files are the ones to be opened.
6. Click “Open”.
Local workstation C
drive

Polaris Offline Guide
Page 30 of 32
The files will be listed in the “Transaction files to be uploaded” section of the Bookmobile workform.
Figure 33
7. All files must be uploaded in date and time order. 8. If you have only one file to upload, select the file and click the “Upload
File” button. If you have multiple transaction files to upload, the files are listed in order, from oldest (earliest) to newest (most recent). You can hold down the control key and click all the transaction files. When all the files are highlighted, click the “Upload File” button.
Polaris Offline Guide
Page 31 of 32
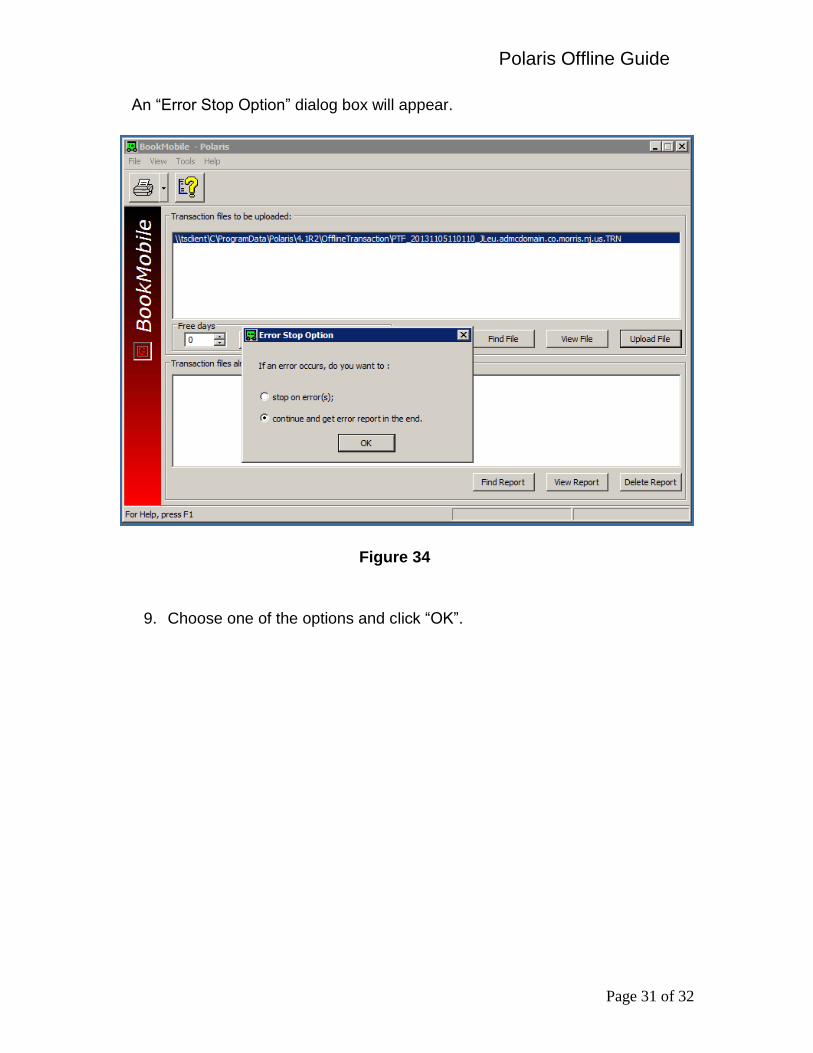
An “Error Stop Option” dialog box will appear.
Figure 34
9. Choose one of the options and click “OK”.

Polaris Offline Guide
Page 32 of 32
The transaction log files are created in the “Transaction files already uploaded” section of the window.
Figure 35
10. You may select a report to view by highlighting the desired log file and clicking the “View Report” button.
11. This finishes uploading offline transaction files.
12. Exit BookMobile window.