gtk3.pdf - RIP Tutorial
34
gtk3 #gtk3
-
Upload
khangminh22 -
Category
Documents
-
view
0 -
download
0
Transcript of gtk3.pdf - RIP Tutorial

gtk3
#gtk3

Table of Contents
About 1
Chapter 1: Getting started with gtk3 2
Remarks 2
Versions 2
Examples 2
Installation or Setup 3
Python 3
C++ 3
[C++] "Hello World" in gtkmm 4
[C] "Hello World" in Gtk+ 5
starter kit 6
Chapter 2: GTK+ 3 with Vala 8
Examples 8
Hello world 8
The code 8
Compilation and Running on Linux 8
Chapter 3: gtk+3 linux c 9
Introduction 9
Examples 9
css in action 9
glarea sample 11
Chapter 4: GTK+3 with Python 16
Examples 16
A simple GTK window 16
Simple binding to a widget's key-press-event 16
Embed a Video in a Gtk window in Python3 18
Chapter 5: Gtk3 with Ruby 20
Examples 20
Get up and running 20
Chapter 6: Installation of GTK+3 On Windows (using GNOME GIT Repository)( C Language-
Assum 21
Examples 21
Downloading GTK+3 (also suitable for other versions) and Setting Up 21
Chapter 7: Using Glade with Builder API 25
Examples 25
[C++] using Gtk::Builder in gtkmm 25
Overview 25
Workflow 25
Example 25
Using Gio::Resource 29
Credits 31

About
You can share this PDF with anyone you feel could benefit from it, downloaded the latest version from: gtk3
It is an unofficial and free gtk3 ebook created for educational purposes. All the content is extracted from Stack Overflow Documentation, which is written by many hardworking individuals at Stack Overflow. It is neither affiliated with Stack Overflow nor official gtk3.
The content is released under Creative Commons BY-SA, and the list of contributors to each chapter are provided in the credits section at the end of this book. Images may be copyright of their respective owners unless otherwise specified. All trademarks and registered trademarks are the property of their respective company owners.
Use the content presented in this book at your own risk; it is not guaranteed to be correct nor accurate, please send your feedback and corrections to [email protected]
https://riptutorial.com/ 1

Chapter 1: Getting started with gtk3
Remarks
GTK+ 3 also known as Gtk3 is a multi-platform GUI toolkit, it is written in C but has bindings for a lot of languages including C++, Python, Vala and Ruby. (For the full list see the Gtk website).
Gtk+ is part of the GNU Project and falls under the GNU LGPL licences meaning it is allowed to be used by all developers, including those developing proprietary software, without any license fees or royalties.
Credits: loosely based on http://www.gtk.org/
Versions
Version Release date
3.20 2016-03-01
3.18 2015-09-01
3.16 2015-03-01
3.14 2014-09-01
3.12 2014-03-01
3.10 2013-09-01
3.8 2013-03-01
3.6 2012-09-01
3.4 2012-04-01
3.2 2011-10-01
3.0 2010-02-01
Sources:
https://wiki.gnome.org/Projects/GTK%2B/OldRoadmap••
Examples
https://riptutorial.com/ 2
Installation or Setup
Python
Windows
The easiest way to install GTK3 for Python is by using PyGObject for Windows. It offers an installer that installs most things you need to develop GTK appilcations.
The number of options the PyGObject installer offers can be daunting, but for most GTK projects the only option you have to select is GTK+ 3.xx.
C++
The C++ binding for Gtk+ is known as gtkmm.
Windows
On Microsoft Windows gtkmm can be installed through MSYS2 environment. Once MSYS2 environment is set up by installing the installer and updating the package list, install gtkmm with
pacman -S mingw-w64-x86_64-gtkmm3 #64 bit pacman -S mingw-w64-i686-gtkmm3 #32 bit
Install pkg-config for easily obtaining compiler and linker flags and GNU autotools build integration
pacman -S pkg-config
Now gtkmm application can be compiled, linked and run from within MSYS2 environment.
# enable C++ 14 support if needed # -mwindows flag is to suppress the background command-prompt window # for GUI applications g++ -mwindows -std=c++14 -o app.exe app.cpp `pkg-config --cflags --libs gtkmm-3.0` ./app.exe
But the executable won't run outside the MSYS2 shell because of missing standard environment variables for .dll lookup. The following .dlls need to be copied from <MSYS2 INSTALLATION DIRECTORY>\mingw64\lib\(for 64-bit installation) into the application directory (where the .exe is located) manually. The version numbers may change according to the installation.
libatk-1.0-0.dll libatkmm-1.6-1.dll libbz2-1.dll libcairo-2.dll libcairo-gobject-2.dll libcairomm-1.0-1.dll libepoxy-0.dll libexpat-1.dll
https://riptutorial.com/ 3

libffi-6.dll libfontconfig-1.dll libfreetype-6.dll libgcc_s_seh-1.dll libgdk_pixbuf-2.0-0.dll libgdk-3-0.dll libgdkmm-3.0-1.dll libgio-2.0-0.dll libgiomm-2.4-1.dll libglib-2.0-0.dll libglibmm-2.4-1.dll libgmodule-2.0-0.dll libgobject-2.0-0.dll libgtk-3-0.dll libgtkmm-3.0-1.dll libharfbuzz-0.dll libiconv-2.dll libintl-8.dll libpango-1.0-0.dll libpangocairo-1.0-0.dll libpangoft2-1.0-0.dll libpangomm-1.4-1.dll libpangowin32-1.0-0.dll libpixman-1-0.dll libpng16-16.dll libsigc-2.0-0.dll libstdc++-6.dll libwinpthread-1.dll zlib1.dll
After this step the program should run. But it won't find standard icon sets for Gtk+, i.e. the Adwaita icon theme, so icons may not load. The icons and a few other files need to be copied into application directory so that the application can load them.
From <MSYS2 INSTALL DIRECTORY>
mingw64 | +-- lib | +-- gdk-pixbuf-2.0 share | +-- icons | +-- Adwaita | +-- hicolor (fallback icon theme for Gtk+)
To application directory, with same directory structure.
[C++] "Hello World" in gtkmm
#include <gtkmm/application.h> #include <gtkmm/applicationwindow.h> #include <gtkmm/button.h>
https://riptutorial.com/ 4

// main window of the application class HelloWorldWindow : public Gtk::ApplicationWindow { // a simple push button Gtk::Button btn; public: HelloWorldWindow() : btn("Click me!") {// initialize button with a text label // when user presses the button "clicked" signal is emitted // connect an event handler for the signal with connect() // which accepts lambda expression, among other things btn.signal_clicked().connect( [this]() { btn.set_label("Hello World"); }); // add the push button to the window add(btn); // make the window visible show_all(); } }; int main(int argc, char *argv[]) { // This creates an Gtk+ application with an unique application ID auto app = Gtk::Application::create(argc, argv, "org.gtkmm.example.HelloApp"); HelloWorldWindow hw; // this starts the application with our window // close the window to terminate the application return app->run(hw); }
[C] "Hello World" in Gtk+
#include <gtk/gtk.h> // callback function which is called when button is clicked static void on_button_clicked(GtkButton *btn, gpointer data) { // change button label when it's clicked gtk_button_set_label(btn, "Hello World"); } // callback function which is called when application is first started static void on_app_activate(GApplication *app, gpointer data) { // create a new application window for the application // GtkApplication is sub-class of GApplication // downcast GApplication* to GtkApplication* with GTK_APPLICATION() macro GtkWidget *window = gtk_application_window_new(GTK_APPLICATION(app)); // a simple push button GtkWidget *btn = gtk_button_new_with_label("Click Me!"); // connect the event-handler for "clicked" signal of button g_signal_connect(btn, "clicked", G_CALLBACK(on_button_clicked), NULL); // add the button to the window gtk_container_add(GTK_CONTAINER(window), btn); // display the window gtk_widget_show_all(GTK_WIDGET(window)); } int main(int argc, char *argv[]) { // create new GtkApplication with an unique application ID GtkApplication *app = gtk_application_new(
https://riptutorial.com/ 5

"org.gtkmm.example.HelloApp", G_APPLICATION_FLAGS_NONE ); // connect the event-handler for "activate" signal of GApplication // G_CALLBACK() macro is used to cast the callback function pointer // to generic void pointer g_signal_connect(app, "activate", G_CALLBACK(on_app_activate), NULL); // start the application, terminate by closing the window // GtkApplication* is upcast to GApplication* with G_APPLICATION() macro int status = g_application_run(G_APPLICATION(app), argc, argv); // deallocate the application object g_object_unref(app); return status; }
starter kit
#include <gtk/gtk.h> static void destroy(GtkWidget *widget, gpointer data) { gtk_main_quit(); } int main(int argc, char *argv[]) { gtk_init(&argc, &argv); GtkWidget *window = gtk_window_new(GTK_WINDOW_TOPLEVEL); gtk_window_set_title(GTK_WINDOW(window), "Window"); g_signal_connect(window, "destroy", G_CALLBACK(destroy), NULL); GtkWidget *k; k= gtk_fixed_new(); gtk_container_add(GTK_CONTAINER(window), k); GtkWidget* la,*r; la = gtk_button_new_with_label (",mkl"); gtk_fixed_put (GTK_FIXED (k), la,50,237); gtk_widget_set_size_request(la, 98, 90); // gtk_container_set_border_width(GTK_CONTAINER (la) , 5); r = gtk_button_new_with_label (",kii"); gtk_fixed_put (GTK_FIXED (k), r,150,237); gtk_widget_set_size_request(r, 98, 90); gtk_widget_set_size_request(GTK_WIDGET(window),300,349); gtk_widget_show_all(GTK_WIDGET(window)); gtk_main(); return 0; }
compile:
c++ starterkit.c `pkg-config --libs --cflags gtk+-3.0` -o p
and
https://riptutorial.com/ 6
./p
Read Getting started with gtk3 online: https://riptutorial.com/gtk3/topic/4255/getting-started-with-gtk3
https://riptutorial.com/ 7
Chapter 2: GTK+ 3 with Vala
Examples
Hello world
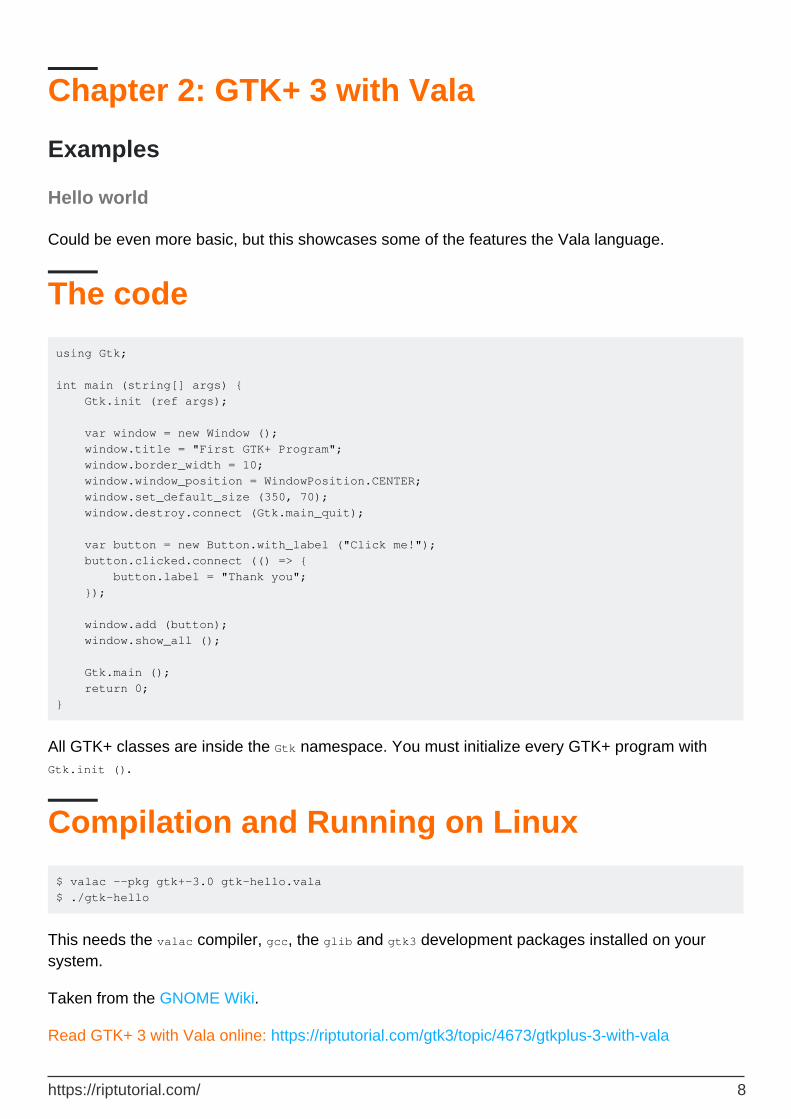
Could be even more basic, but this showcases some of the features the Vala language.
The code
using Gtk; int main (string[] args) { Gtk.init (ref args); var window = new Window (); window.title = "First GTK+ Program"; window.border_width = 10; window.window_position = WindowPosition.CENTER; window.set_default_size (350, 70); window.destroy.connect (Gtk.main_quit); var button = new Button.with_label ("Click me!"); button.clicked.connect (() => { button.label = "Thank you"; }); window.add (button); window.show_all (); Gtk.main (); return 0; }
All GTK+ classes are inside the Gtk namespace. You must initialize every GTK+ program with Gtk.init ().
Compilation and Running on Linux
$ valac --pkg gtk+-3.0 gtk-hello.vala $ ./gtk-hello
This needs the valac compiler, gcc, the glib and gtk3 development packages installed on your system.
Taken from the GNOME Wiki.
Read GTK+ 3 with Vala online: https://riptutorial.com/gtk3/topic/4673/gtkplus-3-with-vala
https://riptutorial.com/ 8
Chapter 3: gtk+3 linux c
Introduction
code samples and some other stuff
Examples
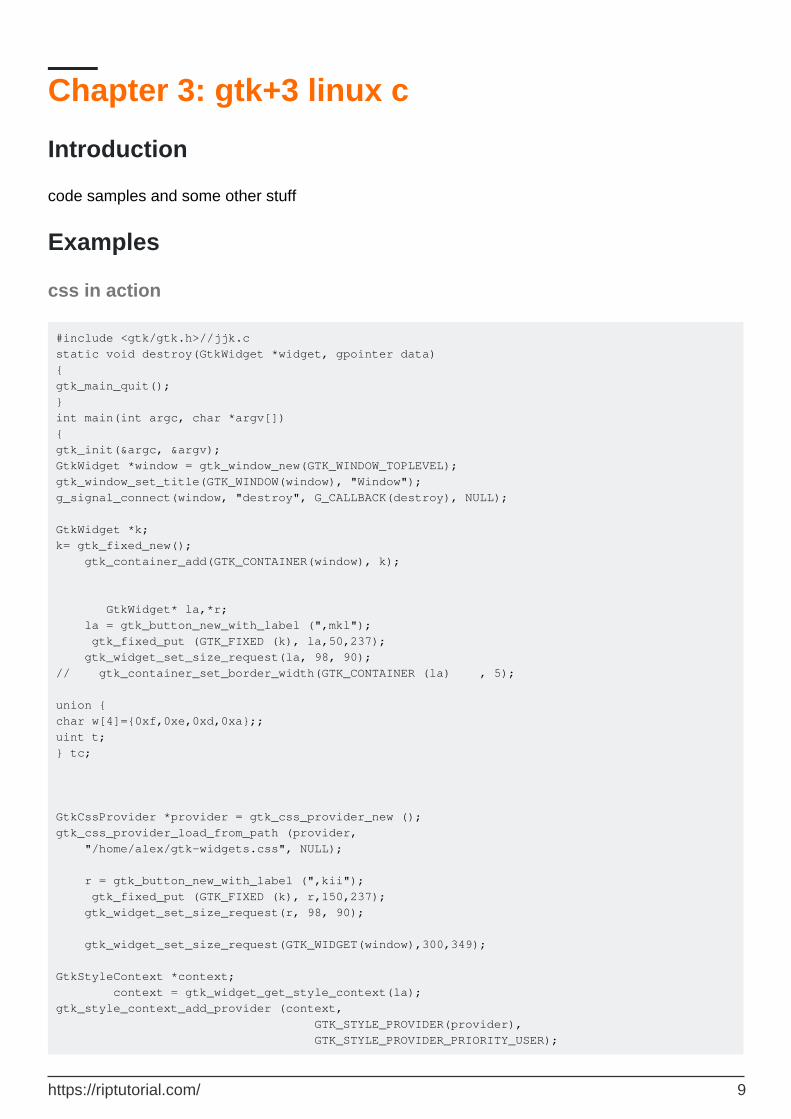
css in action
#include <gtk/gtk.h>//jjk.c static void destroy(GtkWidget *widget, gpointer data) { gtk_main_quit(); } int main(int argc, char *argv[]) { gtk_init(&argc, &argv); GtkWidget *window = gtk_window_new(GTK_WINDOW_TOPLEVEL); gtk_window_set_title(GTK_WINDOW(window), "Window"); g_signal_connect(window, "destroy", G_CALLBACK(destroy), NULL); GtkWidget *k; k= gtk_fixed_new(); gtk_container_add(GTK_CONTAINER(window), k); GtkWidget* la,*r; la = gtk_button_new_with_label (",mkl"); gtk_fixed_put (GTK_FIXED (k), la,50,237); gtk_widget_set_size_request(la, 98, 90); // gtk_container_set_border_width(GTK_CONTAINER (la) , 5); union { char w[4]={0xf,0xe,0xd,0xa};; uint t; } tc; GtkCssProvider *provider = gtk_css_provider_new (); gtk_css_provider_load_from_path (provider, "/home/alex/gtk-widgets.css", NULL); r = gtk_button_new_with_label (",kii"); gtk_fixed_put (GTK_FIXED (k), r,150,237); gtk_widget_set_size_request(r, 98, 90); gtk_widget_set_size_request(GTK_WIDGET(window),300,349); GtkStyleContext *context; context = gtk_widget_get_style_context(la); gtk_style_context_add_provider (context, GTK_STYLE_PROVIDER(provider), GTK_STYLE_PROVIDER_PRIORITY_USER);
https://riptutorial.com/ 9
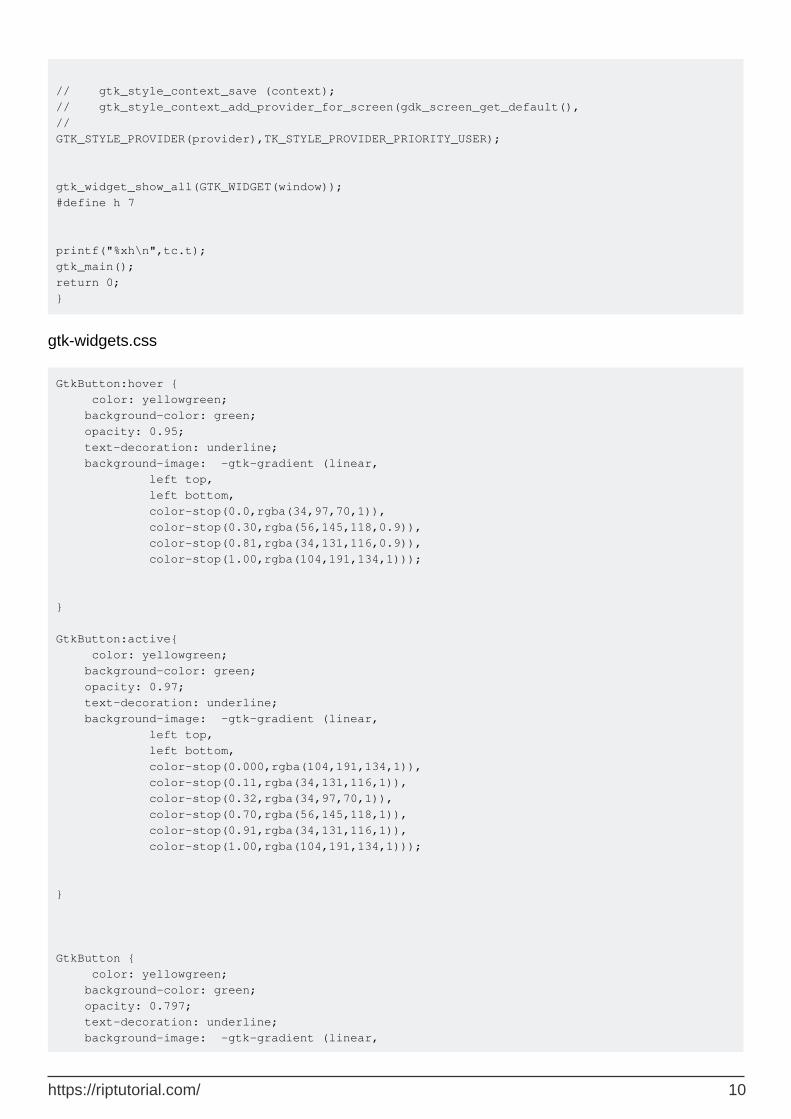
// gtk_style_context_save (context); // gtk_style_context_add_provider_for_screen(gdk_screen_get_default(), // GTK_STYLE_PROVIDER(provider),TK_STYLE_PROVIDER_PRIORITY_USER); gtk_widget_show_all(GTK_WIDGET(window)); #define h 7 printf("%xh\n",tc.t); gtk_main(); return 0; }
gtk-widgets.css
GtkButton:hover { color: yellowgreen; background-color: green; opacity: 0.95; text-decoration: underline; background-image: -gtk-gradient (linear, left top, left bottom, color-stop(0.0,rgba(34,97,70,1)), color-stop(0.30,rgba(56,145,118,0.9)), color-stop(0.81,rgba(34,131,116,0.9)), color-stop(1.00,rgba(104,191,134,1))); } GtkButton:active{ color: yellowgreen; background-color: green; opacity: 0.97; text-decoration: underline; background-image: -gtk-gradient (linear, left top, left bottom, color-stop(0.000,rgba(104,191,134,1)), color-stop(0.11,rgba(34,131,116,1)), color-stop(0.32,rgba(34,97,70,1)), color-stop(0.70,rgba(56,145,118,1)), color-stop(0.91,rgba(34,131,116,1)), color-stop(1.00,rgba(104,191,134,1))); } GtkButton { color: yellowgreen; background-color: green; opacity: 0.797; text-decoration: underline; background-image: -gtk-gradient (linear,
https://riptutorial.com/ 10

left top, left bottom, color-stop(0.0,rgba(34,97,70,1)), color-stop(0.50,rgba(56,145,118,1)), color-stop(0.51,rgba(34,131,116,1)), color-stop(1.00,rgba(104,191,134,1))); } c++ jjk.c --target=arm-linux-gnu `pkg-config --libs --cflags gtk+-3.0` -o op
glarea sample
Shaders 3.3 + extension.seen at radeon hd5500
#version 330
triangles deployed so that normal to point out of a cube.trace each triangle 3points order.
//#include <stdio.h> //#include <string.h> //#include <iostream> //#include <glib.h> #include <gdk/gdkx.h> #include <epoxy/glx.h> #include <epoxy/gl.h> #include <gtk/gtk.h> #include <glm/glm.hpp> #include <glm/gtc/matrix_transform.hpp> #include <glm/gtc/type_ptr.hpp> const GLchar *vert_src ="\n" \ "#version 330 \n" \ " #extension GL_ARB_explicit_uniform_location : enable \n" \ " \n" \ " out vec4 knn; \n" \ " layout(location = 0) in vec4 in_position; \n" \ " layout(location =10)uniform mat4 projection; \n" \ " out vec4 P; \n" \ "void main() \n" \ "{ \n" \ " gl_Position = projection*in_position; \n" \ "knn=in_position ; \n" \ " \n" \ "// gl_Position = in_position; \n" \
https://riptutorial.com/ 11

"} \n" ; const GLchar *frag_src ="\n" \ "#version 330 \n" \ " vec4 b; \n" \ " in vec4 knn; \n" \ "void main (void) \n" \ "{ \n" \ " if(gl_FrontFacing){ \n" \ " b= vec4(gl_FragCoord.x/10.0,gl_FragCoord.y/357.0,gl_FragCoord.z* 0.5,1.0); \n" \ " gl_FragColor = vec4(0.021,-.1777*(knn.y+2)+0.1+1.21557*knn.x+knn.z ,1.215*knn.z+0.583*knn.y +.0357*knn.x+3*b.y, 1.0); \n" \ " } \n" \ "else discard; \n" \ " \n" \ " \n" \ "} \n"; GLfloat t[16]={ 1,0,0,0, 0,1,0,0, 0,0,1,0, 0,0,0,1}; glm::mat4 yt,b; GLuint gl_vao, gl_buffer, gl_program; static gboolean realise(GtkGLArea *area, GdkGLContext *context) { gtk_gl_area_make_current(GTK_GL_AREA(area)); if (gtk_gl_area_get_error (GTK_GL_AREA(area)) != NULL) { printf("failed to initialiize buffers\n"); return false; } GLfloat verts[] = { +0.7,+0.7,+0.7, -0.7,0.7, 0.7, -0.7,+0.7, -0.7, 0.7,+0.7, -0.7, +0.7,+0.7,+0.7, -0.7,+0.7, -0.7, -0.7,-0.7, +0.7, +0.7,+0.7,+0.7, -0.7,0.7, 0.7, +0.7,+0.7,+0.7, -0.7,-0.7, +0.7, 0.7,-0.7, 0.7, +0.7,-0.7,-0.7,
https://riptutorial.com/ 12

-0.7,-0.7,-0.7, 0.7,+0.7, -0.7, -0.7,+0.7, -0.7, 0.7,+0.7, -0.7, -0.7,-0.7, -0.7, -0.7,-0.7, +0.7, -0.7,-0.7, -0.7, 0.7,-0.7, 0.7, +0.7,-0.7, -0.7, 0.7,-0.7, 0.7, -0.7,-0.7, -0.7, 0.7,+0.7, -0.7, +0.7,+0.7,+0.7, +0.7,-0.7, -0.7, 0.7,-0.7, -0.7, +0.7,+0.7,+0.7, 0.7,-0.7, 0.7, -0.7,-0.7, -0.7, -0.7,0.7, 0.7, -0.7,+0.7, -0.7, -0.7,-0.7, +0.7, -0.7,0.7, 0.7, -0.7,-0.7, -0.7 }; b=glm::lookAt(glm::vec3(1.75,-2.38,1.4444), glm::vec3( 0., 0., 0.),glm::vec3( 0.,0.2,-00.)); yt=glm::perspective(45., 1., 1.2, 300.); b=yt*b*glm::mat4(1.); //b=glm::lookAt(glm::vec3(0., 0.,-1.),glm::vec3( 0., 0., 0.),glm::vec3( 0.,025.,-1.)); //yt=yt*b; GLuint frag_shader, vert_shader; frag_shader = glCreateShader(GL_FRAGMENT_SHADER); vert_shader = glCreateShader(GL_VERTEX_SHADER); glShaderSource(frag_shader, 1, &frag_src, NULL); glShaderSource(vert_shader, 1, &vert_src, NULL);
https://riptutorial.com/ 13

glCompileShader(frag_shader); glCompileShader(vert_shader); gl_program = glCreateProgram(); glAttachShader(gl_program, frag_shader); glAttachShader(gl_program, vert_shader); glLinkProgram(gl_program); // glUniformMatrix4fv(1, 1, 0, glm::value_ptr(b)); glGenVertexArrays(1, &gl_vao); glBindVertexArray(gl_vao); glGenBuffers(1, &gl_buffer); glBindBuffer(GL_ARRAY_BUFFER, gl_buffer); glBufferData(GL_ARRAY_BUFFER, sizeof(verts), verts, GL_STATIC_DRAW); glEnableVertexAttribArray(0); glVertexAttribPointer(0, 3, GL_FLOAT, GL_FALSE, 0, (void*)0); glBindVertexArray(0); return TRUE; } static gboolean render(GtkGLArea *area, GdkGLContext *context) { glEnable(GL_DEPTH_TEST); glEnable(GL_BLEND); glClear(GL_COLOR_BUFFER_BIT | GL_DEPTH_BUFFER_BIT); glClearColor(0.0, 0.0, 0.0, 1.0); glUseProgram(gl_program); glUniformMatrix4fv(10, 1, 0, &b[0][0]); glBindVertexArray(gl_vao); glDrawArrays(GL_TRIANGLES,0,36 ); glBindVertexArray (0); glUseProgram (0); glFlush(); return TRUE; }
https://riptutorial.com/ 14

int main(int argc, char** argv) { gtk_init(&argc, &argv); GtkWidget *window = gtk_window_new(GTK_WINDOW_TOPLEVEL), *gl_area = gtk_gl_area_new(); g_signal_connect(window, "delete-event", G_CALLBACK(gtk_main_quit), NULL); g_signal_connect(gl_area, "realize", G_CALLBACK(realise), NULL); g_signal_connect(gl_area, "render", G_CALLBACK(render), NULL); gtk_container_add(GTK_CONTAINER(window), gl_area); gtk_widget_show_all(window); gtk_main(); return 0; }
Read gtk+3 linux c online: https://riptutorial.com/gtk3/topic/8246/gtkplus3-linux-c
https://riptutorial.com/ 15

Chapter 4: GTK+3 with Python
Examples
A simple GTK window
Simply presenting a window is easy with GTK and Python. The example below is based off the Python GTK3 Tutorial, which you should read if you are a beginner in GUI programming or GTK.
import gi gi.require_version('Gtk', '3.0') from gi.repository import Gtk # Set up the Gtk window win = Gtk.Window() # Tell Gtk what to do when the window is closed (in this case quit the main loop) win.connect("delete-event", Gtk.main_quit) # Create a label saying Hello World! label = Gtk.Label(label="Hello World!") # Add the label to the window win.add(label) # Tell Gtk to show all widgets inside the window win.show_all() # Start the Gtk main loop, which returns when Gtk.main_quit is called Gtk.main()
Which will (on Windows 10) result in:
Simple binding to a widget's key-press-event
The simplest way to get an event handler called on a key press is to connect the handler to the key-press-event signal. In this example, we register for the event for the whole window, but you can also register for individual widgets too.
The most important part is the connection of the handler to the event:
self.connect("key-press-event",self.on_key_press_event)
In the event handler, the widget and the key-press event are passed in as parameters. Key-press modifiers such as the Ctrl key are available in event.state and the pressed key is event.keyval.
https://riptutorial.com/ 16
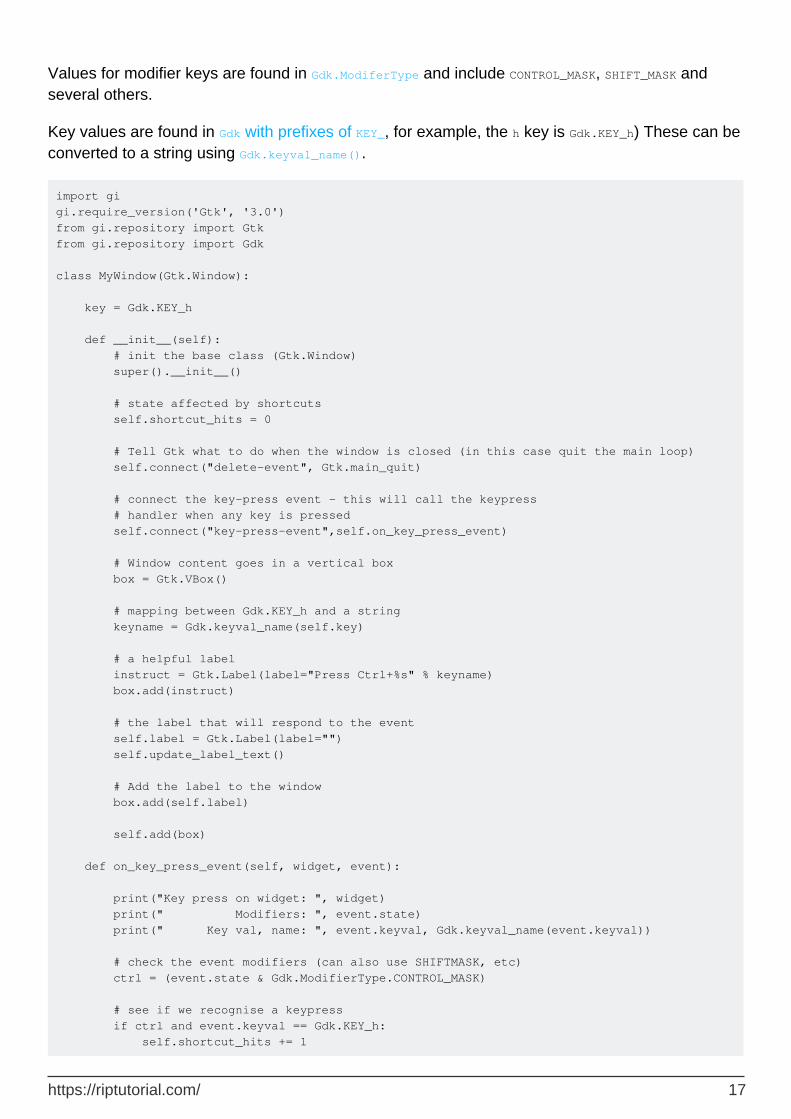
Values for modifier keys are found in Gdk.ModiferType and include CONTROL_MASK, SHIFT_MASK and several others.
Key values are found in Gdk with prefixes of KEY_, for example, the h key is Gdk.KEY_h) These can be converted to a string using Gdk.keyval_name().
import gi gi.require_version('Gtk', '3.0') from gi.repository import Gtk from gi.repository import Gdk class MyWindow(Gtk.Window): key = Gdk.KEY_h def __init__(self): # init the base class (Gtk.Window) super().__init__() # state affected by shortcuts self.shortcut_hits = 0 # Tell Gtk what to do when the window is closed (in this case quit the main loop) self.connect("delete-event", Gtk.main_quit) # connect the key-press event - this will call the keypress # handler when any key is pressed self.connect("key-press-event",self.on_key_press_event) # Window content goes in a vertical box box = Gtk.VBox() # mapping between Gdk.KEY_h and a string keyname = Gdk.keyval_name(self.key) # a helpful label instruct = Gtk.Label(label="Press Ctrl+%s" % keyname) box.add(instruct) # the label that will respond to the event self.label = Gtk.Label(label="") self.update_label_text() # Add the label to the window box.add(self.label) self.add(box) def on_key_press_event(self, widget, event): print("Key press on widget: ", widget) print(" Modifiers: ", event.state) print(" Key val, name: ", event.keyval, Gdk.keyval_name(event.keyval)) # check the event modifiers (can also use SHIFTMASK, etc) ctrl = (event.state & Gdk.ModifierType.CONTROL_MASK) # see if we recognise a keypress if ctrl and event.keyval == Gdk.KEY_h: self.shortcut_hits += 1
https://riptutorial.com/ 17

self.update_label_text() def update_label_text(self): # Update the label based on the state of the hit variable self.label.set_text("Shortcut pressed %d times" % self.shortcut_hits) if __name__ == "__main__": win = MyWindow() win.show_all() # Start the Gtk main loop Gtk.main()
More advanced behaviour for application-wide shortcuts can be achieved with an accelerator group (Gtk.AccelGroup), but often a quick key-press handler is all you need to capture the keyboard events you want for a specific widget.
Embed a Video in a Gtk window in Python3
Below is an example of Gstreamer pipeline embedded in a simple gtk window. When run, a small window should appear like this:
import gi gi.require_version('Gtk', '3.0') gi.require_version('Gst', '1.0') from gi.repository import Gtk, Gst Gst.init(None) Gst.init_check(None) class GstWidget(Gtk.Box): def __init__(self, pipeline): super().__init__() # Only setup the widget after the window is shown. self.connect('realize', self._on_realize) # Parse a gstreamer pipeline and create it. self._bin = Gst.parse_bin_from_description(pipeline, True) def _on_realize(self, widget): pipeline = Gst.Pipeline()
https://riptutorial.com/ 18
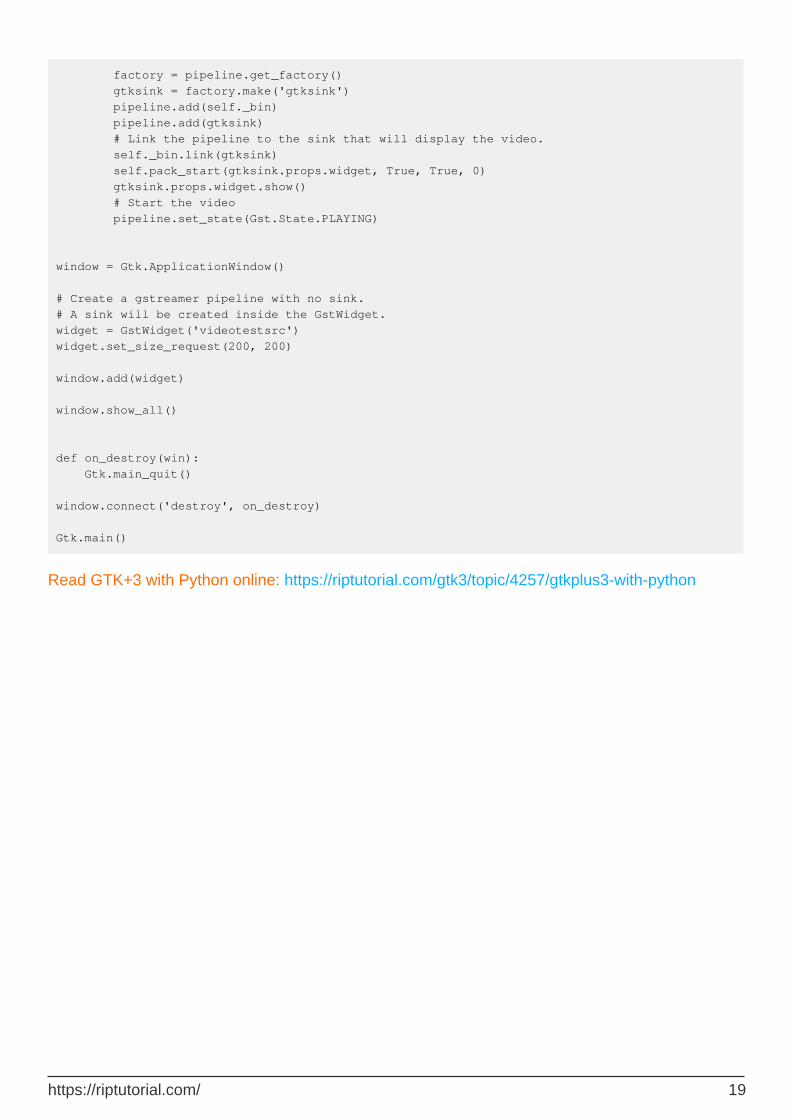
factory = pipeline.get_factory() gtksink = factory.make('gtksink') pipeline.add(self._bin) pipeline.add(gtksink) # Link the pipeline to the sink that will display the video. self._bin.link(gtksink) self.pack_start(gtksink.props.widget, True, True, 0) gtksink.props.widget.show() # Start the video pipeline.set_state(Gst.State.PLAYING) window = Gtk.ApplicationWindow() # Create a gstreamer pipeline with no sink. # A sink will be created inside the GstWidget. widget = GstWidget('videotestsrc') widget.set_size_request(200, 200) window.add(widget) window.show_all() def on_destroy(win): Gtk.main_quit() window.connect('destroy', on_destroy) Gtk.main()
Read GTK+3 with Python online: https://riptutorial.com/gtk3/topic/4257/gtkplus3-with-python
https://riptutorial.com/ 19

Chapter 5: Gtk3 with Ruby
Examples
Get up and running
# Like any other ruby code, require gtk3 after installing from "gem install gtk3" require 'gtk3' # Like in Rails, you import working functions from a higher class, in this case the GTK Window class RubyApp < Gtk::Window # Calling the original method from GTK Window and redefining the defaults def initialize super # Printing window title set_title "Center" # Invoking built-in GTK connection and calling destroy to replicate the quit action signal_connect "destroy" do Gtk.main_quit end # Sets the window size 500px wide by 400px tall set_default_size 500, 400 # Where the window should be displayed on the screen set_window_position Gtk::Window::Position::CENTER # After initialization, show everything show end end # Call the class, just like any other ruby program window = RubyApp.new # GTK method. Runs until destroy is called Gtk.main
Save this file as new.rb and run from terminal ruby new.rb
Read Gtk3 with Ruby online: https://riptutorial.com/gtk3/topic/5501/gtk3-with-ruby
https://riptutorial.com/ 20

Chapter 6: Installation of GTK+3 On Windows (using GNOME GIT Repository)( C Language-Assuming GCC is Installed)
Examples
Downloading GTK+3 (also suitable for other versions) and Setting Up
Downloading the Bundle:
The easiest way to download the required GTK Bundle is to search and download it using this link: https://git.gnome.org/browse/gtk+ (GNOME GIT Repository)
GNOME GIT Repository provides the bundles for different versions and you can easily find the desired version by scrolling through the list. These are uploaded by other users or authors and you will often find new bundles coming up.
Alternatives:
The other option or the alternate method to acquire the bundle is to use MSYS2. This method is a bit complicated and is not well explained or documented. The best way is to directly download the
https://riptutorial.com/ 21

bundle from an external file hosting website.
MSYS2 Method-
http://www.gtk.org/download/windows.php (Official Website Resource on acquiring the Bundle)
1.
https://msys2.github.io/ (download MSYS2)2.
Note : Rest Of This Documentation Is Based On The Assumption That The GTK Bundle Is Downloaded From The GNOME GIT Repository. Not Tested With MSYS2 Method. Since The Bundle Remains Universal, The Method Used Shouldn't Be An Issue. Based On Ease, The Highly Recommended Way To Obtain The Bundle is T0 Use GNOME GIT Repository.
Extracting and Storing the Bundle in a Desired Location (Explained using the C: Drive).
Create a Folder Named gtk in the C: Drive. You could choose other names for the folder but this name helps us to identify the content pretty easily and remembering the name becomes easier. Let us term the Gtk folder location as %GD% for ease and in this case it is C:\gtk (could be different in your case).
1.
Setting the Path for Gtk binary in Windows Environment Variables.This is important in order to access and obtain the required Gtk libraries while using Cmd to Compile and run the Programs. To set up the Path Environment Variable:
2.
Windows XP : right-click on "My Computer" -> "Properties".•Windows Vista/7/8/10 : right-click on "Computer" -> "Properties" -> "Advanced system settings". Click on "Advanced tab" -> "Environment variables".
•
Add new Gtk bin file Path (%GD%\bin) to the Path variable (Under System Variables or add a variable named Path to the User Variables Section and add the value in it) available in the dialogue box which opens. You should also add a new variable named PKG_CONFIG_PATH and give it the following value-
•
https://riptutorial.com/ 22

C:\gtk\lib\pkgconfig (since my gtk folder is located in C: drive).
Variable Name Value
Path %GD%\bin
PKG_CONFIG_PATH %GD%\lib\pkgconfig
%GD% is the location of the Gtk Folder
Now we are done with Extracting and setting up the Environment Variables. You will find that I have added the value to the Path variable in System variables sections as well as User Variables section. Adding to any one of these sections is more than enough.
3.Testing the set-up (You must have GCC installed on your system already-MinGW preferable (http://www.mingw.org/): Run the following commands on the cmd:
pango-querymodules:%GTKDIR%\etc\pango\pango.modules
https://riptutorial.com/ 23

gdk-pixbuf-query-loaders:%GTKDIR%\lib\gdk-pixbuf-2.0\2.10.0\loaders.cache
gtk-query-immodules-3.0: %GTKDIR%\lib\gtk-3.0\3.0.0\immodules.cache
In the console, verify that "pkg-config" prints out something reasonable by typing : pkg-config --cflags --libs gtk+-3.0 It should print out something similar to what is shown in the following image.
•
That's It. You have Downloaded and Set UP GTK On Your Windows System.
Read Installation of GTK+3 On Windows (using GNOME GIT Repository)( C Language-Assuming GCC is Installed) online: https://riptutorial.com/gtk3/topic/5602/installation-of-gtkplus3-on-windows--using-gnome-git-repository---c-language-assuming-gcc-is-installed-
https://riptutorial.com/ 24

Chapter 7: Using Glade with Builder API
Examples
[C++] using Gtk::Builder in gtkmm
Overview
Gtk+ supports a workflow where the task of user interface design and the task of programming are decoupled. Although the user interface elements such as buttons, menus, layout etc. can be directly added from code, this approach not only clutters the code, but also makes changing the UI for anyone but the programmer hard. Besides, some interface elements are used only to hold the layout structure and not need to participate in logic, adding them from code only makes it longer. Instead Glade can be used to generate UI description as XML and Gtk+ Builder API can be used to load the UI and operate on it.
Workflow
Design UI elements in Glade using drag and drop. Glade generates XML file which contains UI descriptions. This can also be done manually by writing proper XML syntax and saving it with a .glade extension.
1.
Load UI from the file directly with
auto ui = Gtk::Builder::create_from_file("ui.glade");
2.
Access individual UI elements
// when element doesn't need to be added to another UI element auto ui_elem = Glib::RefPtr<Gtk::Button>::cast_dynamic( ui->get_object("button_UI_id") ); // when element needs to be added to another widget Gtk::Button *btn = nullptr; ui->get_widget<Gtk::Button>("button_UI_id", btn);
3.
Example
https://riptutorial.com/ 25

simple.glade
<?xml version="1.0" encoding="UTF-8"?> <!-- Generated with glade 3.20.0 --> <interface> <requires lib="gtk+" version="3.20"/> <object class="GtkBox" id="cont"> <property name="width_request">200</property> <property name="height_request">200</property> <property name="visible">True</property> <property name="can_focus">False</property> <property name="orientation">vertical</property>
https://riptutorial.com/ 27
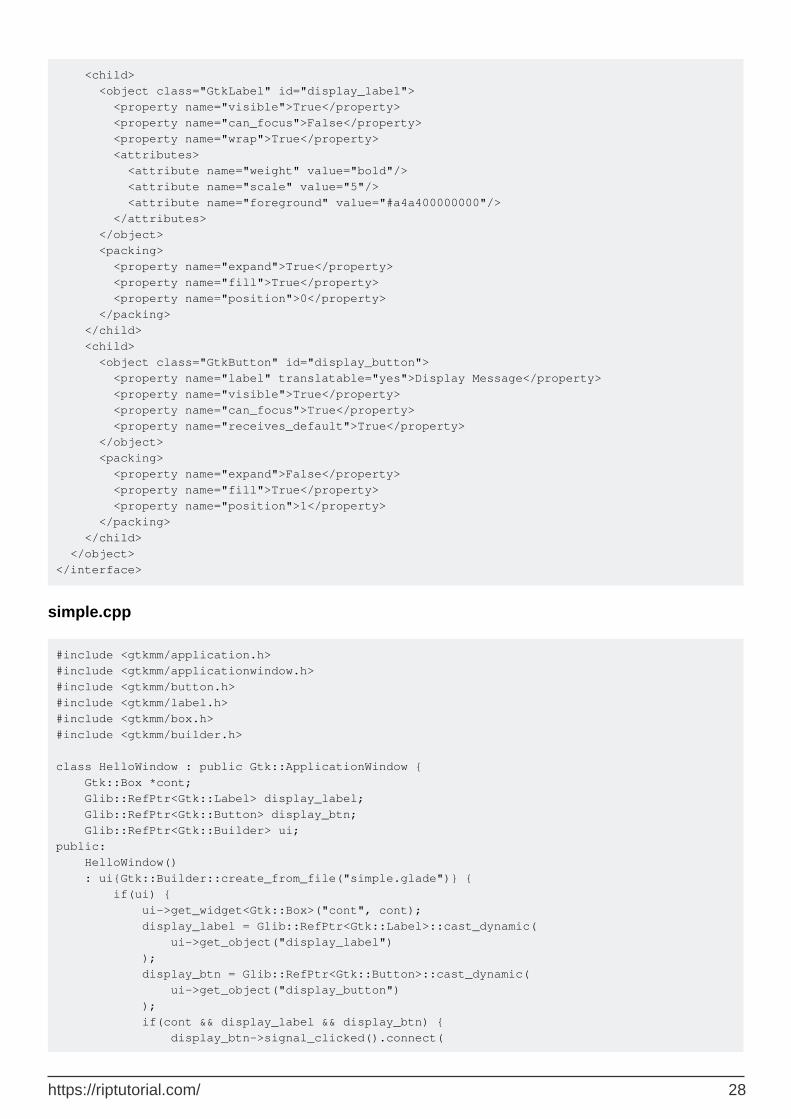
<child> <object class="GtkLabel" id="display_label"> <property name="visible">True</property> <property name="can_focus">False</property> <property name="wrap">True</property> <attributes> <attribute name="weight" value="bold"/> <attribute name="scale" value="5"/> <attribute name="foreground" value="#a4a400000000"/> </attributes> </object> <packing> <property name="expand">True</property> <property name="fill">True</property> <property name="position">0</property> </packing> </child> <child> <object class="GtkButton" id="display_button"> <property name="label" translatable="yes">Display Message</property> <property name="visible">True</property> <property name="can_focus">True</property> <property name="receives_default">True</property> </object> <packing> <property name="expand">False</property> <property name="fill">True</property> <property name="position">1</property> </packing> </child> </object> </interface>
simple.cpp
#include <gtkmm/application.h> #include <gtkmm/applicationwindow.h> #include <gtkmm/button.h> #include <gtkmm/label.h> #include <gtkmm/box.h> #include <gtkmm/builder.h> class HelloWindow : public Gtk::ApplicationWindow { Gtk::Box *cont; Glib::RefPtr<Gtk::Label> display_label; Glib::RefPtr<Gtk::Button> display_btn; Glib::RefPtr<Gtk::Builder> ui; public: HelloWindow() : ui{Gtk::Builder::create_from_file("simple.glade")} { if(ui) { ui->get_widget<Gtk::Box>("cont", cont); display_label = Glib::RefPtr<Gtk::Label>::cast_dynamic( ui->get_object("display_label") ); display_btn = Glib::RefPtr<Gtk::Button>::cast_dynamic( ui->get_object("display_button") ); if(cont && display_label && display_btn) { display_btn->signal_clicked().connect(
https://riptutorial.com/ 28
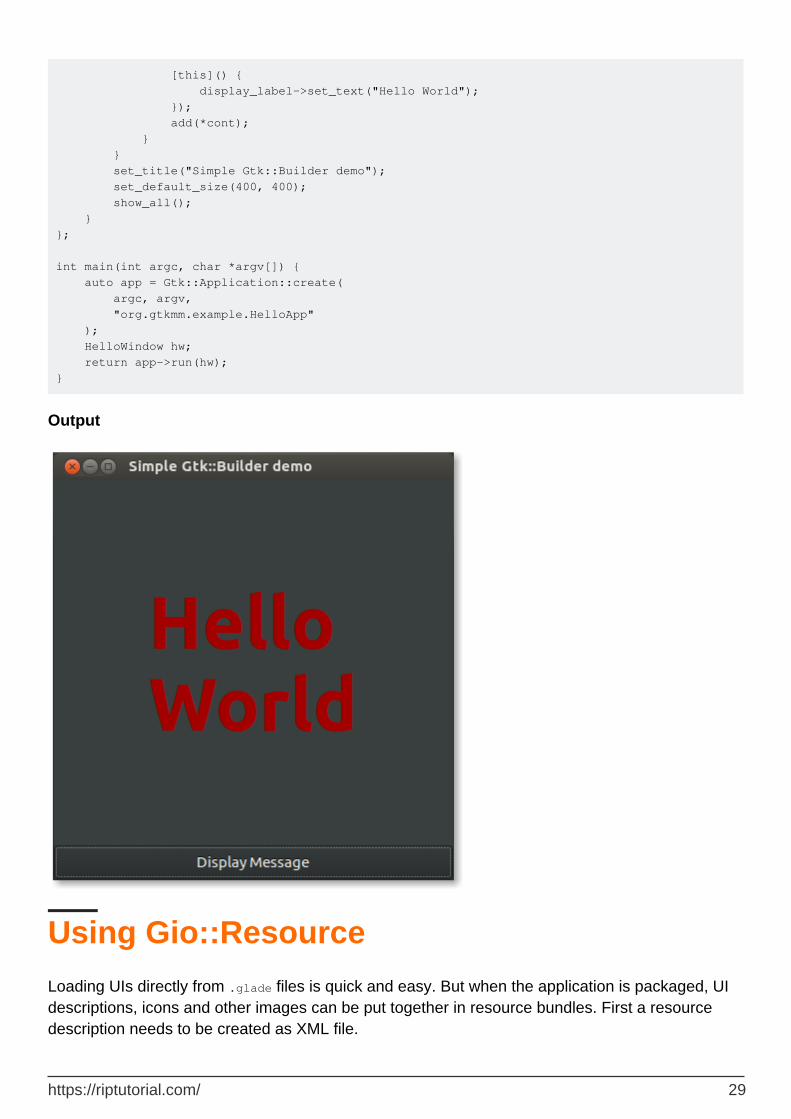
[this]() { display_label->set_text("Hello World"); }); add(*cont); } } set_title("Simple Gtk::Builder demo"); set_default_size(400, 400); show_all(); } }; int main(int argc, char *argv[]) { auto app = Gtk::Application::create( argc, argv, "org.gtkmm.example.HelloApp" ); HelloWindow hw; return app->run(hw); }
Output
Using Gio::Resource
Loading UIs directly from .glade files is quick and easy. But when the application is packaged, UI descriptions, icons and other images can be put together in resource bundles. First a resource description needs to be created as XML file.
https://riptutorial.com/ 29

resources.xml
<gresources> <gresource prefix="/unique/prefix/"> <file>icon.png</file> <!-- text files such as XML can be compressed to save memory --> <file compressed="true">ui.glade</file> </gresource> </gresources>
Then either create a separate .gresource file or a .c file containing resources as string data to be linked as a part of the application.
# generates separate resource file glib-compile-resources --target=ui.gresource resources.xml # generates .c file glib-compile-resources --generate-source resources.xml
Then from application code load the resource bundle
// from separate file auto resource_bundle = Gio::Resource::create_from_file("ui.gresource"); // from stream of bytes in .c file auto resource_bundle = Glib:wrap(draw_resource_get_resource()); resource_bundle.register_global();
From resource bundle load UI elements
auto ui = Gtk::Builder::create_from_resource("/unique/prefix/ui.glade");
Read Using Glade with Builder API online: https://riptutorial.com/gtk3/topic/5579/using-glade-with-builder-api
https://riptutorial.com/ 30

Credits
S. No
Chapters Contributors
1Getting started with gtk3
B8vrede, Community, Samik, Алексей Неудачин
2 GTK+ 3 with Vala meskobalazs
3 gtk+3 linux c Martijn Pieters, Алексей Неудачин
4 GTK+3 with Python12345ieee, Aaron Schif, B8vrede, Inductiveload, joaquinlpereyra, RamenChef
5 Gtk3 with Ruby arjun
6
Installation of GTK+3 On Windows (using GNOME GIT Repository)( C Language-Assuming GCC is Installed)
Mathews Mathai
7Using Glade with Builder API
Samik
https://riptutorial.com/ 31