gfi helpdesk admin guide
377
GFI HELPDESK ADMIN GUIDE
-
Upload
khangminh22 -
Category
Documents
-
view
3 -
download
0
Transcript of gfi helpdesk admin guide

GFI HELPDESK ADMIN GUIDE
The information and content in this document is provided for informational purposes only and is provided "as is" withno warranties of any kind, either express or implied, including without limitation any warranties of merchantability,fitness for a particular purpose, and non-infringement. GFI Software disclaims and in no event shall be liable for anylosses or damages of any kind, including any consequential or incidental damages in connection with the furnishing,performance or use of this document. The information is obtained from publicly available sources. Though reasonableeffort has been made to ensure the accuracy of the data provided, GFI makes no warranty, promise or guarantee aboutthe completeness, accuracy, recency or adequacy of information contained in this document and is not responsible formisprints, out-of-date information, or errors. GFI reserves the right to revise or update its products, software ordocumentation without notice. You must take full responsibility for your use and application of any GFI product or service.No part of this documentation may be reproduced in any form by any means without prior written authorization of GFISoftware.
If you believe there are any factual errors in this document, please contact us and we will review your concerns as soon aspractical.
GFI and GFI HelpDesk are trademarks or registered trademarks of GFI Software or its affiliates in the US and othercountries. Any other trademarks contained herein are the property of their respective owners.
GFI HelpDesk is copyright of GFI. - 1999-2021 GFI. All rights reserved.
Document Version: 4.93.x
Last updated (month/day/year): 08/09/2021
Contents
1 Introduction 6
2 Deploying 72.1 Installation 7
2.1.1 System requirements for GFI HelpDesk 82.1.2 Pre-installation server configuration 82.1.3 Installing GFI HelpDesk 102.1.4 Downloading the license file for GFI HelpDesk 142.1.5 Manually Scheduling a Server Task/Cron Job for GFI HelpDesk Download 162.1.6 Disabling SELinux 17
2.2 Upgrade 172.2.1 Upgrading your GFI HelpDesk 172.2.2 Migrating GFI HelpDesk from one server to another 25
2.3 License 262.3.1 Open source software in GFI HelpDesk 26
2.4 Downgrading from Fusion to Case 282.5 GeoIP 29
3 Using GFI HelpDesk 323.1 Quick start guide 32
3.1.1 Understanding user types and interfaces 333.1.2 Setting Up Your Team in GFI HelpDesk 353.1.3 Guide to automation with GFI HelpDesk 353.1.4 Guide to setting up archiver custom app in GFI HelpDesk 373.1.5 Guide to managing support tickets 423.1.6 Building your knowledge base 443.1.7 Helping your customers submit tickets 45
3.2 Support tickets 513.2.1 Establishing service level agreements (SLAs) and escalations 513.2.2 Advance support tickets 55
3.3 User accounts 863.3.1 Editing or Deleting Notes for an Organization 873.3.2 Error: "Staff count exceeded" 883.3.3 Importing Users from Other CRM or Mailing List 883.3.4 Merging user accounts 893.3.5 Editing or deleting notes for a user account 893.3.6 Changing the staff or admin password through the helpdesk 903.3.7 Adding customers to an organization automatically 913.3.8 Creating staff accounts and assigning them to teams 91
3.4 Reports KQL 923.4.1 Introduction to building and running reports 923.4.2 Report types in GFI HelpDesk 933.4.3 Introduction to Kayako Query Language (KQL) 983.4.4 Advanced reporting using KQL 105
4 Configuration 1144.1 Users 116
4.1.1 Creating staff accounts and assigning them to teams 1164.1.2 Editing or Deleting Notes for an Organization 1174.1.3 Error: "Staff count exceeded" 117
4.1.4 Importing Users from Other CRM or Mailing List 1184.1.5 Merging user accounts 1194.1.6 Editing or deleting notes for a user account 1194.1.7 Changing the staff or admin password through the helpdesk 120
4.2 Organizing your support requests into departments 1214.2.1 Understanding how departments work 1214.2.2 Creating and managing departments 122
4.3 Custom fields 1244.3.1 Understanding how custom fields work 1244.3.2 Inserting a new custom group and field 125
4.4 Email configuration 1274.4.1 Setting up email notifications for your staff 1284.4.2 Introduction to email queues 1314.4.3 Advanced email configurations 132
4.5 Custom templates 1494.5.1 Managing your template modifications 1494.5.2 Understanding how custom templates work 1534.5.3 Best practices for editing GFI HelpDesk templates 1564.5.4 Customizing notification email templates 1594.5.5 Reviewing template editing history and comparing versions 1634.5.6 Customizing support center look 165
4.6 Advanced configuration 1654.6.1 Purging attachments - Overview 1664.6.2 Accessing GFI HelpDesk diagnostic tools 1694.6.3 Changing the product base URL in GFI HelpDesk 1714.6.4 Adding or updating SSL certificates for your domain 1724.6.5 Rebuilding helpdesk cache manually 1734.6.6 Removing-Ticket-URL-from-the-Auto-Response-Emails 1734.6.7 Hiding the Ticket Owner on the Helpdesk Portal 1744.6.8 Creating knowledge bases for multiple brands 1754.6.9 Using template groups to create a branded support experience 1794.6.10 Removing the login form from your support site 1814.6.11 Adding quicklinks to your support site with widgets 1844.6.12 Integrating GFI HelpDesk with Identity Providers 1854.6.13 Setting up automatic approval of support center comments 1864.6.14 Preventing spam for helpcenter comments using CAPTCHA and Akismet 1874.6.15 Enabling LoginShare for user accounts 1884.6.16 Enabling additional language packs 1904.6.17 Setting up SEO-friendly URLs 1914.6.18 Disabling staff LoginShare from database 1934.6.19 Changing or modifying the registration policy consent text 1934.6.20 Disabling 'Automatically set ticket owner to active staff user' option 1954.6.21 Sending emails in bulk 1964.6.22 Preventing spam tickets in GFI HelpDesk 1964.6.23 Enabling LoginShare for staff user accounts 1974.6.24 Understanding sections in language packs 1984.6.25 Configuring remote authentication using LoginShare 1994.6.26 Moderating comments on knowledge base articles 2004.6.27 Configuring time zones in GFI HelpDesk 2014.6.28 Running multiple support sites from one GFI HelpDesk instance 2014.6.29 Sharing secure access to your GFI HelpDesk 202
4.7 Developer resource 204
4.7.1 GFI HelpDesk REST API - Overview 2044.7.2 Generating API signature using PHP 2104.7.3 Exporting knowledge base articles to GFI HelpDesk 2124.7.4 Enabling GFI HelpDesk's REST API 2134.7.5 Code snippets for generating an API signature 2144.7.6 GFI HelpDesk hooks 2184.7.7 Understanding the GFI HelpDesk Rest API and its methods 2304.7.8 Setting staff permissions to moderate comments on knowledge base articles 2314.7.9 List of GFI HelpDesk APIs 2324.7.10 API Test Controller 291
4.8 Live chat and calls 2914.8.1 Live Chat in GFI HelpDesk 2924.8.2 Status of chats 2934.8.3 Changing the default department in live chat window 2934.8.4 Advanced live chats 295
5 Troubleshooting 3125.1 Unable to start XAMPP services on mac machine 3125.2 Error: 'Privacy Policy Required' when submitting tickets 3145.3 Handling PHP deprecated function errors while on GFI HelpDesk 3145.4 Uncaught exception received when searching 3155.5 Troubleshooting the message: "Your connection to this site is not secure" 3165.6 Fixing common GFI HelpDesk errors 3175.7 Error when installing GFI HelpDesk on a different drive 3215.8 Knowledgebase articles not displaying correctly after an upgrade 3245.9 Resolving memory exhaustion errors 3255.10 Resetting the administrator password without the helpdesk access 3265.11 Frequently asked questions 327
5.11.1 Installation issues 3275.11.2 Common issues 3315.11.3 Other issues 371
6 Glossary 374
GFI HelpDesk 1 Introduction | 6
1 IntroductionGFI HelpDesk is an enterprise-grade on-premise service desk software built on the powerful Kayako helpdesk software.GFI HelpDesk can be hosted in the customer’s own infrastructure, on-premise, or in any public cloud infrastructure thatsupports MySQL/MariaDB and PHP 7+.
GFI HelpDesk was built to enable flexibility and increase productivity. Various tools and workflows are available toautomate follow-ups and reminders for support agents. Agents can collaborate on tickets using notes and have allcustomer’s information that is required to resolve a ticket at their fingertips. Predefined responses can speed-up replytimes to increase agents’ productivity.
GFI HelpDesk is easy to install on a variety of platforms and systems. It can also be branded to the requirements based onthe desired look and feel as well as very easy to use by support agents with little training required.
GFI HelpDesk also lets you keep customers informed with news, knowledge-based articles as well as instinct answers toqueries enabling fewer support tickets for easy and known answers.
GFI HelpDesk provides a powerful query engine KQL that can be used to access data and measure customer satisfaction,track team performance, and use all the data to understand your customer support experience. Various pre-built reportsare available to measure the progress with one click. Additional reports can be built using KQL.
GFI HelpDesk 2 Deploying | 7
2 DeployingThe following topics provide information on how to successfully deploy a fully functional instance of GFI HelpDesk andhow to upgrade existing installations.
Topics in this section:
2.1 Installation 7
2.1.1 System requirements for GFI HelpDesk 8
2.1.2 Pre-installation server configuration 8
2.1.3 Installing GFI HelpDesk 10
2.1.4 Downloading the license file for GFI HelpDesk 14
2.1.5 Manually Scheduling a Server Task/Cron Job for GFI HelpDesk Download 16
2.1.6 Disabling SELinux 17
2.2 Upgrade 17
2.2.1 Upgrading your GFI HelpDesk 17
2.2.2 Migrating GFI HelpDesk from one server to another 25
2.3 License 26
2.3.1 Open source software in GFI HelpDesk 26
2.4 Downgrading from Fusion to Case 28
2.5 GeoIP 29
2.1 InstallationGet help with installing, running, and upgrading GFI HelpDesk on your own server.
Topics in this section:
2.1.1 System requirements for GFI HelpDesk 8
2.1.2 Pre-installation server configuration 8
2.1.3 Installing GFI HelpDesk 10
2.1.4 Downloading the license file for GFI HelpDesk 14
2.1.5 Manually Scheduling a Server Task/Cron Job for GFI HelpDesk Download 16
2.1.6 Disabling SELinux 17
GFI HelpDesk 2 Deploying | 8
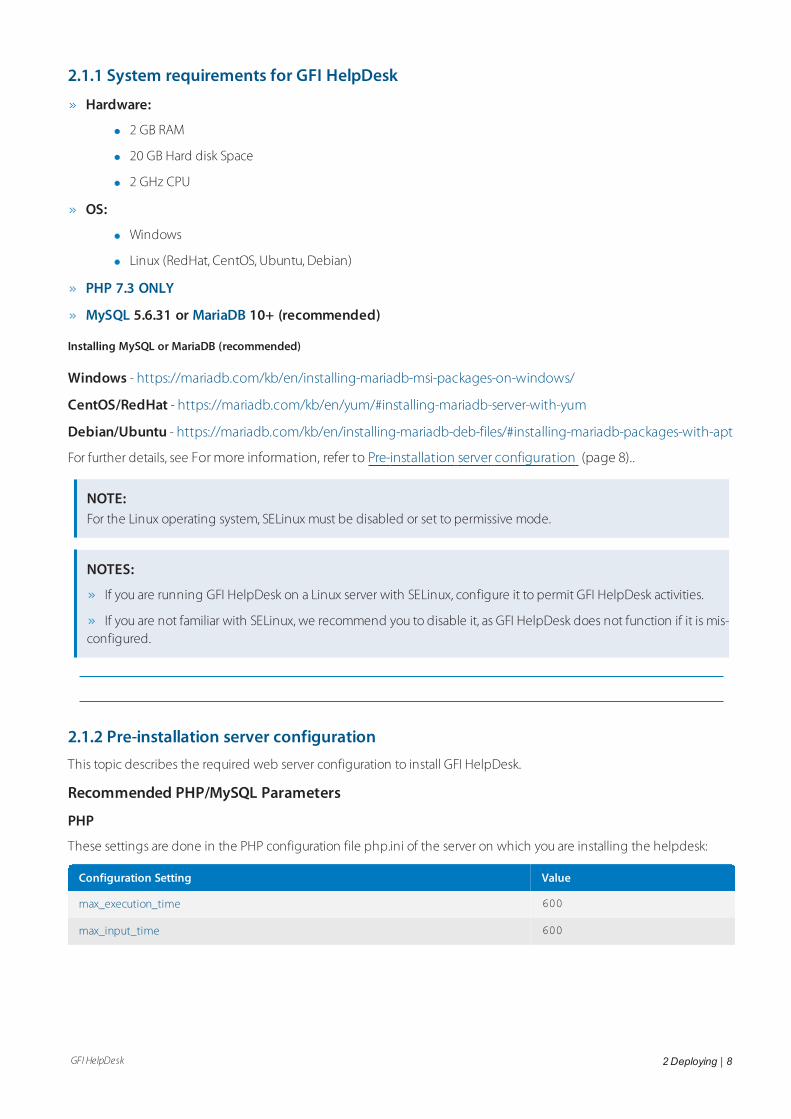
2.1.1 System requirements for GFI HelpDesk
Hardware:
2 GB RAM
20 GB Hard disk Space
2 GHz CPU
OS:
Windows
Linux (RedHat, CentOS, Ubuntu, Debian)
PHP 7.3 ONLY
MySQL 5.6.31 or MariaDB 10+ (recommended)
Installing MySQL or MariaDB (recommended)
Windows - https://mariadb.com/kb/en/installing-mariadb-msi-packages-on-windows/
CentOS/RedHat - https://mariadb.com/kb/en/yum/#installing-mariadb-server-with-yum
Debian/Ubuntu - https://mariadb.com/kb/en/installing-mariadb-deb-files/#installing-mariadb-packages-with-apt
For further details, see For more information, refer to Pre-installation server configuration (page 8)..
NOTE:For the Linux operating system, SELinux must be disabled or set to permissive mode.
NOTES:
If you are running GFI HelpDesk on a Linux server with SELinux, configure it to permit GFI HelpDesk activities.
If you are not familiar with SELinux, we recommend you to disable it, as GFI HelpDesk does not function if it is mis-configured.
2.1.2 Pre-installation server configurationThis topic describes the required web server configuration to install GFI HelpDesk.
Recommended PHP/MySQL Parameters
PHP
These settings are done in the PHP configuration file php.ini of the server on which you are installing the helpdesk:
Configuration Setting Value
max_execution_time 600
max_input_time 600
GFI HelpDesk 2 Deploying | 9
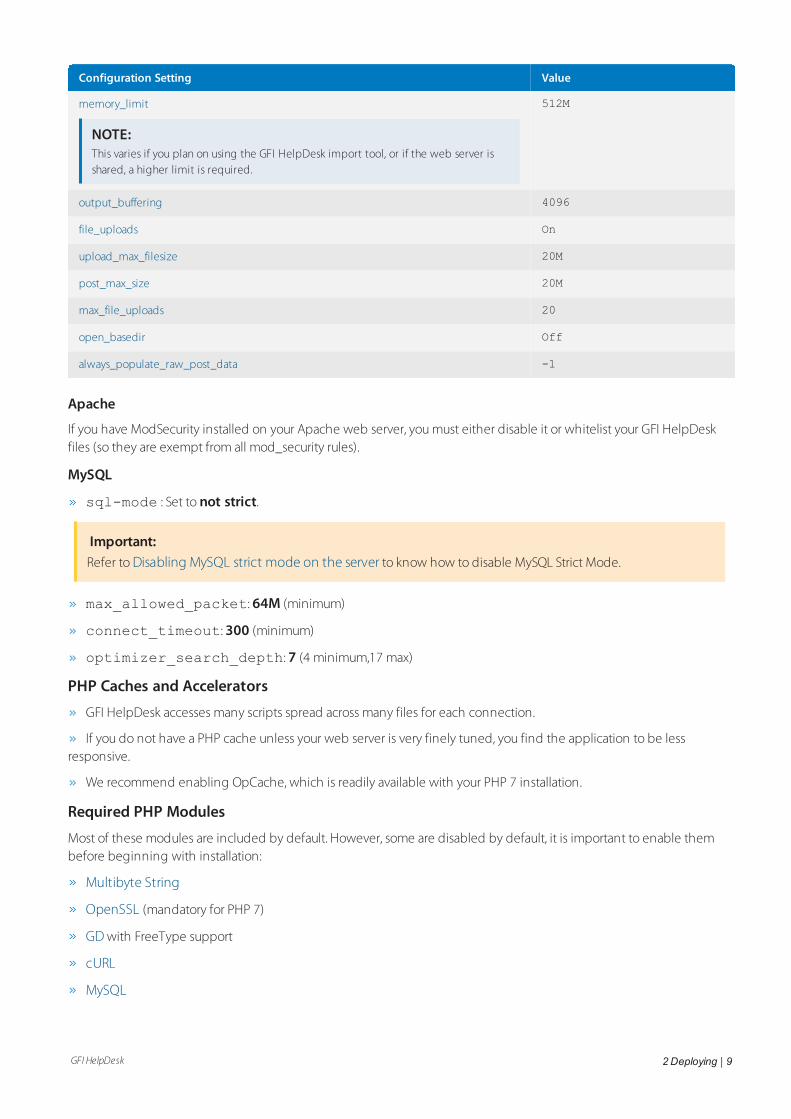
Configuration Setting Value
memory_limit
NOTE:This varies if you plan on using the GFI HelpDesk import tool, or if the web server isshared, a higher limit is required.
512M
output_buffering 4096
file_uploads On
upload_max_filesize 20M
post_max_size 20M
max_file_uploads 20
open_basedir Off
always_populate_raw_post_data -1
Apache
If you have ModSecurity installed on your Apache web server, you must either disable it or whitelist your GFI HelpDeskfiles (so they are exempt from all mod_security rules).
MySQL
sql-mode : Set to not strict.
Important:Refer to Disabling MySQL strict mode on the server to know how to disable MySQL Strict Mode.
max_allowed_packet: 64M (minimum)
connect_timeout: 300 (minimum)
optimizer_search_depth: 7 (4 minimum,17 max)
PHP Caches and Accelerators
GFI HelpDesk accesses many scripts spread across many files for each connection.
If you do not have a PHP cache unless your web server is very finely tuned, you find the application to be lessresponsive.
We recommend enabling OpCache, which is readily available with your PHP 7 installation.
Required PHP Modules
Most of these modules are included by default. However, some are disabled by default, it is important to enable thembefore beginning with installation:
Multibyte String
OpenSSL (mandatory for PHP 7)
GD with FreeType support
cURL
MySQL
GFI HelpDesk 2 Deploying | 10
MySQLi
Mysqlnd (required for PHP 5.x only)
PDO
PDO_MYSQL
SimpleXML
Filter
JSON
IMAP
Sockets
XML Parser
DOM
intl
Fileinfo
2.1.3 Installing GFI HelpDeskIn this topic, you get a walk through the steps necessary for installing GFI HelpDesk on your own server.
View our how to install video here.
Important:Before installing GFI HelpDesk on your server, you'll need to check to make sure your server environment meets allof the requirements.
Downloading, unpacking, and uploading the product files
The first part of the installation process is to download the product files, extract them on your local machine, and uploadthem from there to your server:
1. Download GFI HelpDesk from the following location depending on the required edition:
Case http://cdndl.gfi.com/gfihelpdesk/gfihelpdesk_case.tar.gz
Fusion http://cdndl.gfi.com/gfihelpdesk/gfihelpdesk_fusion.tar.gz
2. Click the link to the product and save the file to your machine.
3. Extract the package locally.
4. The extracted folder contains a sub-folder named 'upload', which contains all the files required to install your help-desk.
5. In the root directory of your web server, create a new folder for your GFI HelpDesk installation to live in and name it,for example, 'support'.
6. Using either the command line or an FTP client of your choice, upload all of the files from the 'upload' folder into yournewly created 'support' folder.

GFI HelpDesk 2 Deploying | 11
NOTE:If you are using an FTP client, make sure it is uploaded using binary mode.
Now that the product files are up on your web server, it's time to do some setup on the backend.
Creating a MySQL/MariaDB database
Your next step is to create a new MySQL/MariaDB database on your server that GFI HelpDesk can use.
NOTE:You need root-level permissions to set up a new database on your server.
Using command line
If you are using the command line, you can use the following commands to create the database and user credentials youneed.
CREATE DATABASE gfihelpdesk;
USE gfihelpdesk;
ALTER DATABASE gfihelpdesk DEFAULT CHARACTER SET utf8 COLLATE utf8_unicode_ci;
GRANT ALL PRIVILEGES ON gfihelpdesk.* TO 'gfihelpdesk_user'@'localhost' IDENTIFIED by 'password_of_your_choice';
Important:Enter an actual password in place of 'password_of_your_choice' in the above command.
Using phpMyAdmin or other graphical server configuration tool
If you are using phpMyAdmin or another graphical server configuration tool, you have to use their create databasefunction to do the following:
1. Create a new database called gfihelpdesk, set to use utf8_unicode_ci for its table collation.
2. Add a new user to the database called gfihelpdesk with a password of your choice.
3. Specify localhost when prompted for a hostname
4. Grant all privileges to that user.
With your database ready and waiting, there are a few last configuration steps you have to take.
Database configuration and license
Before you begin the GFI HelpDesk installation, the database configuration and the license file should be correctly setup.
Rename 'config.php.new'
To avoid accidental overwriting of config.php which is located in __swift/config/ and contains importantdata, the default name for the file is config.php.new. Rename it toconfig.php before continuing.
Edit 'config.php'
The 'config.php' file must be manually edited for configuration of the helpdesk's database connection.
The following variables in this file need to be edited:
GFI HelpDesk 2 Deploying | 12
$_DB["hostname"] – Unless you have supplied a different hostname when creating your database, this variableshould be set tolocalhost.
$_DB["username"] – Unless you have supplied a different user name when creating your database, this variableshould be set togfihelpdesk_user.
$_DB["password"] – The variable should be set to the password that you supplied when setting up yourdatabase user.
$_DB["name"] - Unless you have supplied a different user name when creating your database, this variable shouldbe set togfihelpdesk_fusion-.
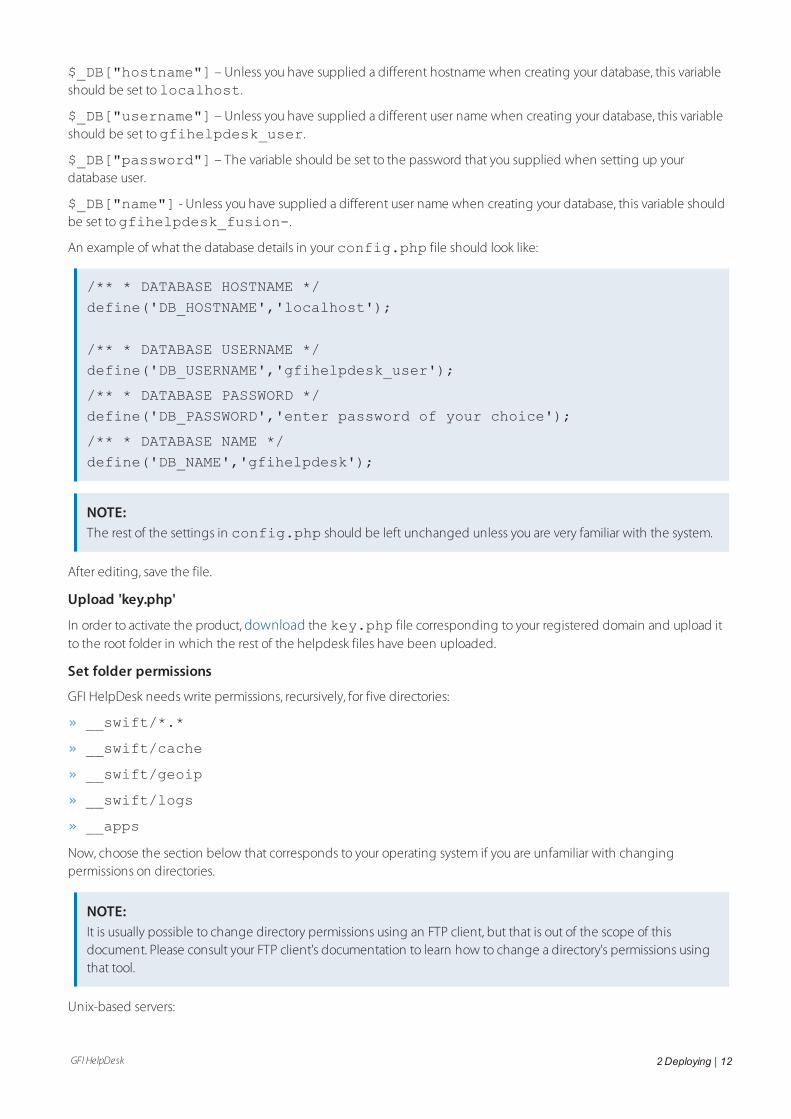
An example of what the database details in your config.php file should look like:
/** * DATABASE HOSTNAME */define('DB_HOSTNAME','localhost');
/** * DATABASE USERNAME */define('DB_USERNAME','gfihelpdesk_user');
/** * DATABASE PASSWORD */define('DB_PASSWORD','enter password of your choice');
/** * DATABASE NAME */define('DB_NAME','gfihelpdesk');
NOTE:The rest of the settings in config.php should be left unchanged unless you are very familiar with the system.
After editing, save the file.
Upload 'key.php'
In order to activate the product, download the key.php file corresponding to your registered domain and upload itto the root folder in which the rest of the helpdesk files have been uploaded.
Set folder permissions
GFI HelpDesk needs write permissions, recursively, for five directories:
__swift/*.*
__swift/cache
__swift/geoip
__swift/logs
__apps
Now, choose the section below that corresponds to your operating system if you are unfamiliar with changingpermissions on directories.
NOTE:It is usually possible to change directory permissions using an FTP client, but that is out of the scope of thisdocument. Please consult your FTP client's documentation to learn how to change a directory's permissions usingthat tool.
Unix-based servers:
GFI HelpDesk 2 Deploying | 13
On a Unix-based system, the chmod command to set permissions to '777' on the above mentioned directories:
From within the __swift directory:
chmod-Rf 777 files cache geoip logs library
From within your GFI HelpDesk root directory (for example, 'support'):
chmod-Rf 777 __apps
Windows-based servers:
Make below two adjustments if GFI HelpDesk is run on a Windows-based server:
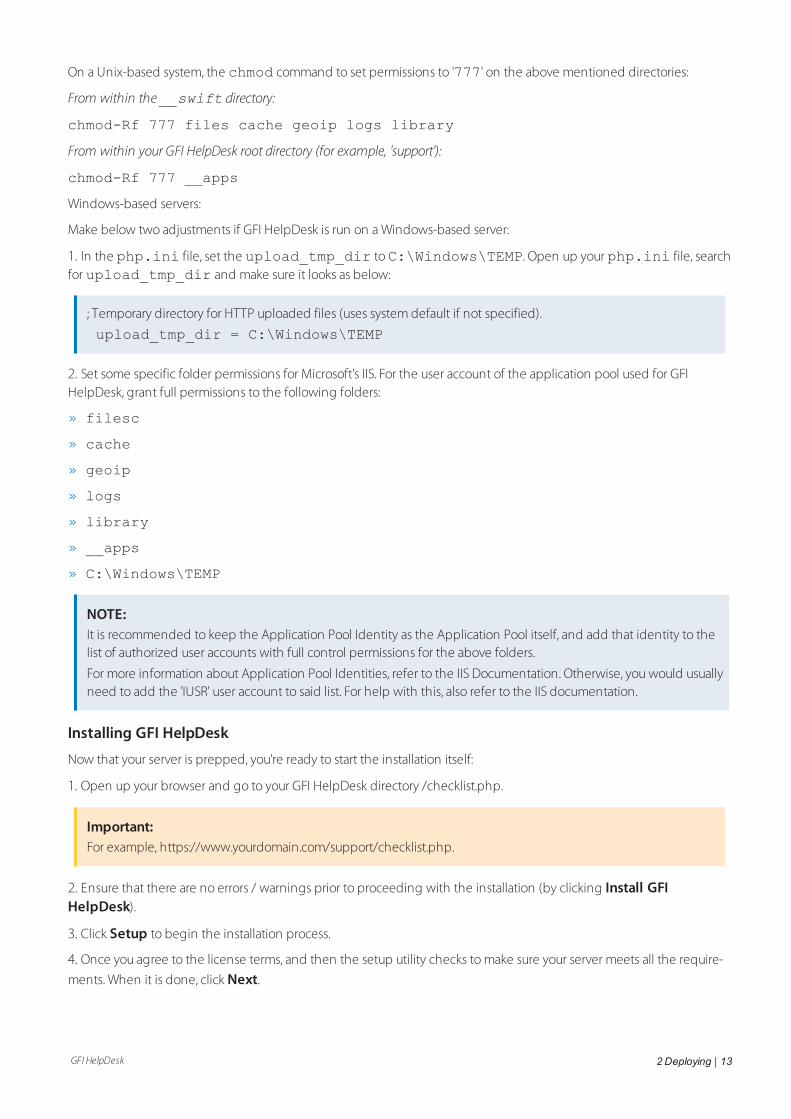
1. In the php.ini file, set the upload_tmp_dir toC:\Windows\TEMP. Open up your php.ini file, searchfor upload_tmp_dir and make sure it looks as below:
; Temporary directory for HTTP uploaded files (uses system default if not specified).
upload_tmp_dir = C:\Windows\TEMP
2. Set some specific folder permissions for Microsoft's IIS. For the user account of the application pool used for GFIHelpDesk, grant full permissions to the following folders:
filesc
cache
geoip
logs
library
__apps
C:\Windows\TEMP
NOTE:It is recommended to keep the Application Pool Identity as the Application Pool itself, and add that identity to thelist of authorized user accounts with full control permissions for the above folders.
For more information about Application Pool Identities, refer to the IIS Documentation. Otherwise, you would usuallyneed to add the 'IUSR' user account to said list. For help with this, also refer to the IIS documentation.
Installing GFI HelpDesk
Now that your server is prepped, you're ready to start the installation itself:
1. Open up your browser and go to your GFI HelpDesk directory /checklist.php.
Important:For example, https://www.yourdomain.com/support/checklist.php.
2. Ensure that there are no errors / warnings prior to proceeding with the installation (by clicking Install GFIHelpDesk).
3. Click Setup to begin the installation process.
4. Once you agree to the license terms, and then the setup utility checks to make sure your server meets all the require-
ments. When it is done, click Next.
GFI HelpDesk 2 Deploying | 14
5. The next step is to create credentials for the default administrator account and supply some important details for thehelpdesk. The Product URL should the publicly accessible URL of your helpdesk. For example - https://y-ourdomain.com/support/.
6. Once the details are filled, click Start Setup to begin the automated setup procedure.
NOTE:The automated portion of the setup script may take quite some time. Do not interrupt it for any reason else theinstallation can be corrupted and you have to start over again.
Once setup has completed, a success screen is displayed, and you only have one more step before you are ready to startusing GFI HelpDesk!
IMPORTANT: Removing the /setup directory
Once the setup process has completed successfully, remove the setup directory from your server, as a security measure.You may receive warnings if you do not delete it.
This completes installing GFI HelpDesk!
2.1.4 Downloading the license file for GFI HelpDesk
key.php is the license file for GFI HelpDesk.
If you are on a GFI HelpDesk , you may have to download and install the license (key.php) file corresponding to yourregistered domain from https://accounts.gfi.com/ and upload it to the root folder in which the rest of the helpdeskfiles have been uploaded.
This topic provides information on downloading the key.php file for the GFI HelpDesk account.
If you are on the GFI HelpDesk Download version and have renewed your subscription, or have made changes to youraccount such as an increase/decrease of seat count and domain change, you must update your existing key.php file witha new one.
You can download the key.php file by selecting the product GFI HelpDesk from https://accounts.gfi.com/ and then
clicking License file section under Overview tab.
NOTE:Every time you replace the key.php file, rebuild the cache to bring those changes into effect using the followinglink:
https://[yourhelpdesk URL]/staff/index.php?/Core/Default/RebuildCache
Steps to download the key.php file:
1. Go to https://accounts.gfi.com/ and select product as GFI HelpDesk.
2. Go to Overview >License and download the license.
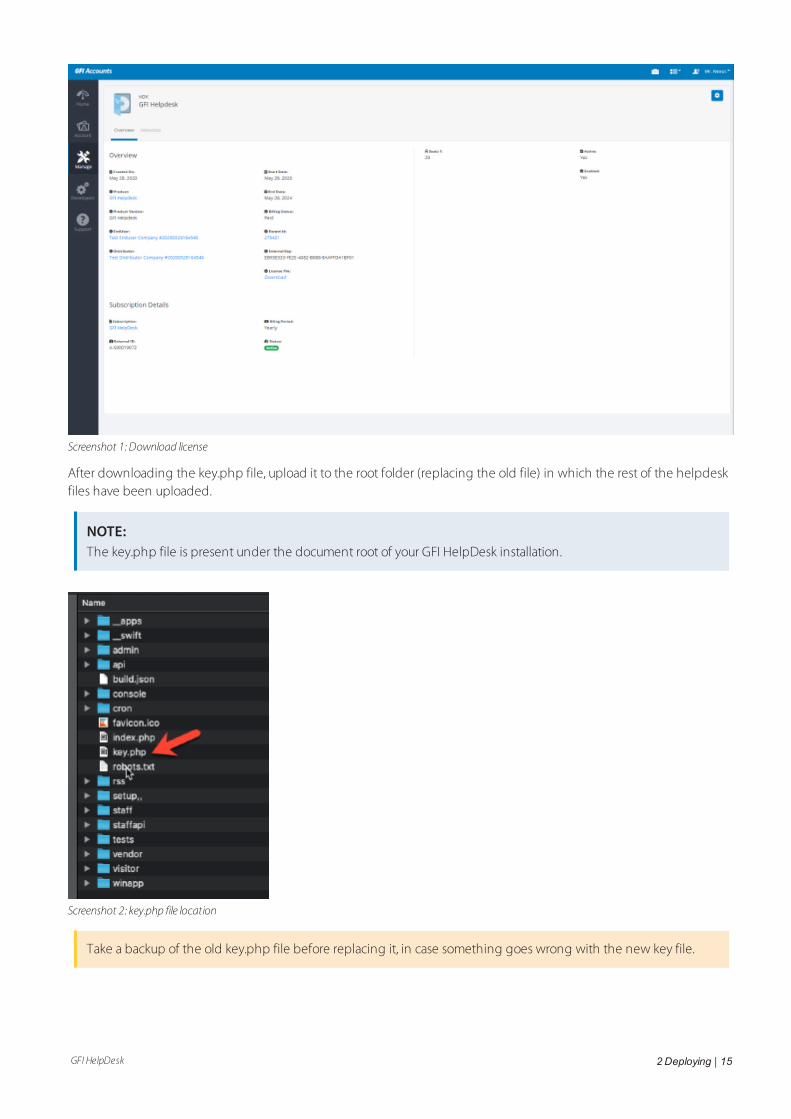
GFI HelpDesk 2 Deploying | 15
Screenshot 1: Download license
After downloading the key.php file, upload it to the root folder (replacing the old file) in which the rest of the helpdeskfiles have been uploaded.
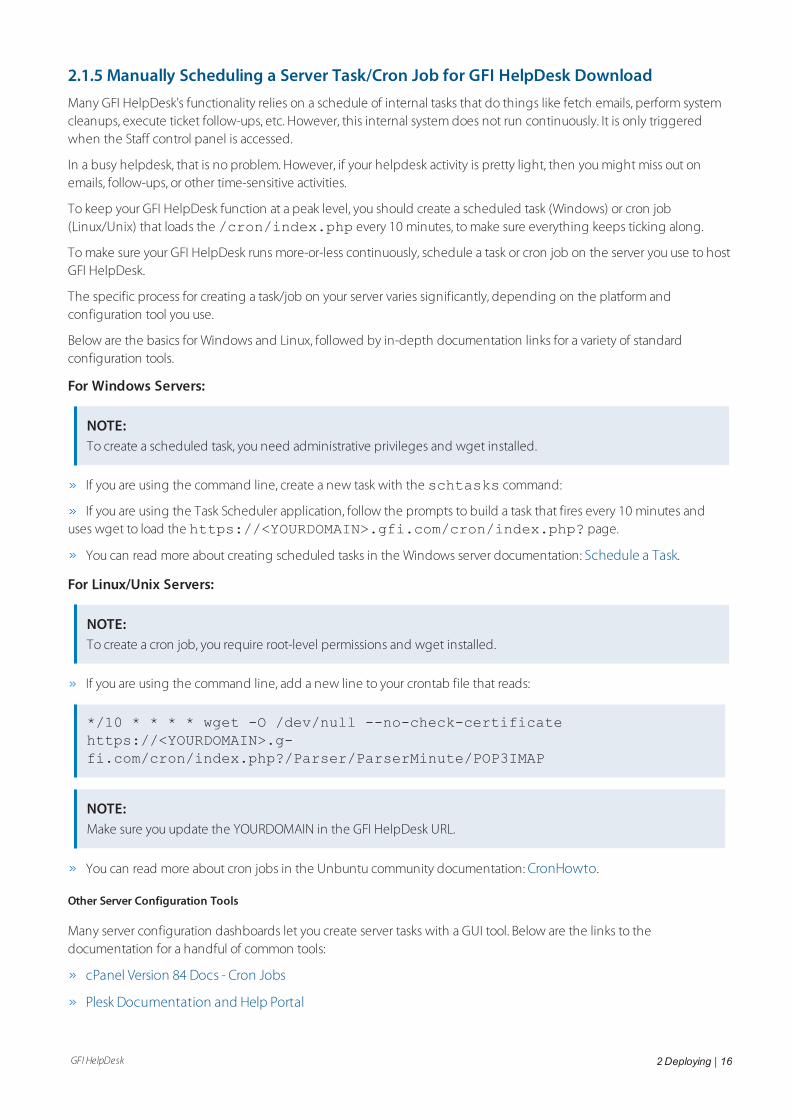
NOTE:The key.php file is present under the document root of your GFI HelpDesk installation.
Screenshot 2: key.php file location
Take a backup of the old key.php file before replacing it, in case something goes wrong with the new key file.
GFI HelpDesk 2 Deploying | 16
2.1.5 Manually Scheduling a Server Task/Cron Job for GFI HelpDesk DownloadMany GFI HelpDesk's functionality relies on a schedule of internal tasks that do things like fetch emails, perform systemcleanups, execute ticket follow-ups, etc. However, this internal system does not run continuously. It is only triggeredwhen the Staff control panel is accessed.
In a busy helpdesk, that is no problem. However, if your helpdesk activity is pretty light, then you might miss out onemails, follow-ups, or other time-sensitive activities.
To keep your GFI HelpDesk function at a peak level, you should create a scheduled task (Windows) or cron job(Linux/Unix) that loads the /cron/index.php every 10 minutes, to make sure everything keeps ticking along.
To make sure your GFI HelpDesk runs more-or-less continuously, schedule a task or cron job on the server you use to hostGFI HelpDesk.
The specific process for creating a task/job on your server varies significantly, depending on the platform andconfiguration tool you use.
Below are the basics for Windows and Linux, followed by in-depth documentation links for a variety of standardconfiguration tools.
For Windows Servers:
NOTE:To create a scheduled task, you need administrative privileges and wget installed.
If you are using the command line, create a new task with the schtasks command:
If you are using the Task Scheduler application, follow the prompts to build a task that fires every 10 minutes anduses wget to load the https://<YOURDOMAIN>.gfi.com/cron/index.php? page.
You can read more about creating scheduled tasks in the Windows server documentation: Schedule a Task.
For Linux/Unix Servers:
NOTE:To create a cron job, you require root-level permissions and wget installed.
If you are using the command line, add a new line to your crontab file that reads:
*/10 * * * * wget -O /dev/null --no-check-certificatehttps://<YOURDOMAIN>.g-fi.com/cron/index.php?/Parser/ParserMinute/POP3IMAP
NOTE:Make sure you update the YOURDOMAIN in the GFI HelpDesk URL.
You can read more about cron jobs in the Unbuntu community documentation: CronHowto.
Other Server Configuration Tools
Many server configuration dashboards let you create server tasks with a GUI tool. Below are the links to thedocumentation for a handful of common tools:
cPanel Version 84 Docs - Cron Jobs
Plesk Documentation and Help Portal

GFI HelpDesk 2 Deploying | 17
2.1.6 Disabling SELinux
SELinux (Security-Enhanced Linux ) is an advanced security mechanism built into modern Linux distributives. Whenenabled, it can prevent GFI HelpDesk setup scripts from installing the Help Desk, can block errors from appearing on abrowser and can cause other issues, including different permissions errors and warnings like:
PHP Warning: fopen(./__swift/logs/log.error_xxx.txt): failed to open stream:
Permission denied in /var/www/html/GFI HelpDesk/__swift/library/Log/class.SWIFT_Log.php on line 409
or
PHP Fatal error: Uncaught SWIFT_Exception: Invalid data provided in
/var/www/html/GFI HelpDesk/__swift/library/Log/class.SWIFT_Log.php:539
Implement the steps below to find the current status of SELinux and disable it, if needed:
1. To get the current state of SELinux run the following command in the command line on the server:
getenforce
If you see Enforcing or Permissive, it means SELinux is up and running. The permissive mode does not blockanything. However, it logs all security policy violations. In case there are no plans to have SELinux enabled on the serverthere is no need to keep it in the Permissive mode.
2. To disable SELinux edit the file /etc/selinux/config:
Find the line starting with SELINUX= and set the value to disabled so it should look like:
SELINUX=disabled
3. Save the file and reboot the server to apply the changes.
Confirmation
Executing getenforce command in the command line returns disabled as the output.
2.2 UpgradeIt is recommended that you run the latest GFI HelpDesk Download release. Before upgrading your GFI HelpDesk , makesure your server environment is up-to-date and create a back-up copy of your database.
For further details, see Server-configuration-requirements.htm.
2.2.1 Upgrading your GFI HelpDesk 17
2.2.2 Migrating GFI HelpDesk from one server to another 25
2.2.1 Upgrading your GFI HelpDeskFollow the instructions in this topic carefully as a failure in doing so may result in errors after the upgrade such as"Uncaught exception" or "AutoExecute Query."
GFI HelpDesk 2 Deploying | 18
This topic goes through the procedure for upgrading your GFI HelpDesk to the latest version which is free if you have anactive account.
In this topic 'downgrading' (that is, switching from Fusion to Case or Engage) is also covered, as the processes are almostidentical.
Note:Though the process is referred to as 'upgrading' throughout this topic, it applies to both upgrades and downgrades.
A clean install is always recommended which means you need to delete your old directory before copying the newfiles in.
Upgrading GFI HelpDesk
This section describes how to upgrade a GFI HelpDesk installation to the latest version while retaining all settings.
This upgrade process takes several hours, depending on the size of your database, during which your support Centercannot be accessed by your customers.
Important notes when upgrading
Check that your license is current, which should include both your product license and your support subscription. Tocheck the status of your license and subscription login to https://accounts.gfi.com then navigate to GFI HelpDesk andcheck your expiry date.
Make sure you have admin privileges for not only your GFI HelpDesk instance but also the server you use to host it.
Ensure that your server environment is up-to-date with GFI HelpDesk's requirements.
Create a folder on your computer to save a copy of your data (for example,gfihelpdesk_backup). You canname this folder to whatever you like, but it is referred to as gfihelpdesk_backup throughout these docs.
Upgrade procedure
For complete upgrade procedure, see Upgrade steps.
Steps to upgrade
The upgrade process consists of the following steps:
Step 1: Disabling Your Helpdesk
Take GFI HelpDesk Offline
To prevent new data from being generated while you are upgrading, disable your helpdesk. You can create a temporarypage to inform visitors.
To set up your placeholder page:
1. Create a simple .html page called index.html with a message explaining that your support site is temporarilyunavailable.
2. Save your customized index.html file, and any image files it uses on your local machine.
3. Log onto your server and navigate to your GFI HelpDesk root directory.
GFI HelpDesk 2 Deploying | 19
4. Upload your index.html file + images.
5. In the same folder, find the index.php file, which is your current support site homepage.
6. Rename index.php toindex_down.php. This ensures that no one can access your helpdesk while you areupdating.
7. Open up a browser window and navigate to your support site. The new index.html page is now seen.
Renaming the cron Folder
It is also recommend to rename your cron folder temporarily so that if you have a manual cron job set up, it does not pingyour helpdesk during the upgrade.
To change the name of your cron folder:
1. Navigate to your GFI HelpDesk root directory, and find a folder called cron.
2. Rename this folder to cron_disabled. This prevents any manual cron jobs you have set up from firing while you runyour backups.
Disable Your Email Queues
Disable your email queues, so you do not miss any incoming requests while GFI HelpDesk is offline.
1. Log into the GFI HelpDesk admin control panel.
2. On the menu sidebar, click Email Parser followed by Email Queues.
For queues using POP3 or IMAP:
a. Click the email address on the list.
b. Under 'Email Queue Settings', next to Email Queue is Enabled select 'No'.
c. Click Update.
d. Any emails sent to these email addresses now simply accumulates in the email inboxes while GFI HelpDesk is offline.
For email queues using the Pipe method:
a. Log into the mail server for the address being used to forward emails and disable mail forwarding while GFI HelpDeskis offline.
b. You can then follow the instructions above to disable the queue within GFI HelpDesk.
Step 2: Make a Complete Backup of Your GFI HelpDesk Files
Back up your templates
Next, yCreate a backup of any templates you've modified in GFI HelpDesk so you can import them into your updatedhelpdesk.
To back up your templates:
1. Go back to the GFI HelpDesk administrative control panel.
2. On the menu sidebar, go to Templates > Import/Export.
3. Next to Export Type, make sure Export all templates is selected.
4. Click Export XML and save your backup to your ‘[GFI HelpDesk_backup]’ folder.
Back up any language support files that is modified.
GFI HelpDesk 2 Deploying | 20
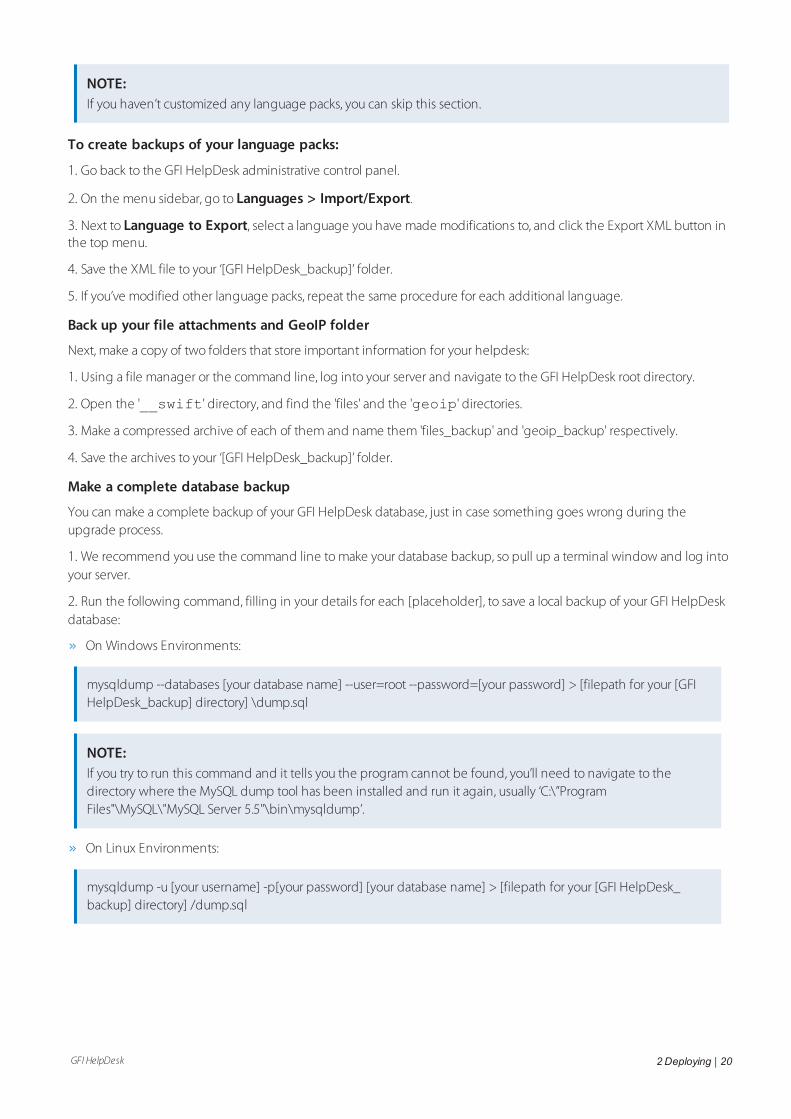
NOTE:If you haven’t customized any language packs, you can skip this section.
To create backups of your language packs:
1. Go back to the GFI HelpDesk administrative control panel.
2. On the menu sidebar, go to Languages > Import/Export.
3. Next to Language to Export, select a language you have made modifications to, and click the Export XML button inthe top menu.
4. Save the XML file to your ‘[GFI HelpDesk_backup]’ folder.
5. If you’ve modified other language packs, repeat the same procedure for each additional language.
Back up your file attachments and GeoIP folder
Next, make a copy of two folders that store important information for your helpdesk:
1. Using a file manager or the command line, log into your server and navigate to the GFI HelpDesk root directory.
2. Open the '__swift' directory, and find the 'files' and the 'geoip' directories.
3. Make a compressed archive of each of them and name them 'files_backup' and 'geoip_backup' respectively.
4. Save the archives to your ‘[GFI HelpDesk_backup]’ folder.
Make a complete database backup
You can make a complete backup of your GFI HelpDesk database, just in case something goes wrong during theupgrade process.
1. We recommend you use the command line to make your database backup, so pull up a terminal window and log intoyour server.
2. Run the following command, filling in your details for each [placeholder], to save a local backup of your GFI HelpDeskdatabase:
On Windows Environments:
mysqldump --databases [your database name] --user=root --password=[your password] > [filepath for your [GFIHelpDesk_backup] directory] \dump.sql
NOTE:If you try to run this command and it tells you the program cannot be found, you’ll need to navigate to thedirectory where the MySQL dump tool has been installed and run it again, usually ‘C:\”ProgramFiles"\MySQL\"MySQL Server 5.5"\bin\mysqldump’.
On Linux Environments:
mysqldump -u [your username] -p[your password] [your database name] > [filepath for your [GFI HelpDesk_backup] directory] /dump.sql
GFI HelpDesk 2 Deploying | 21
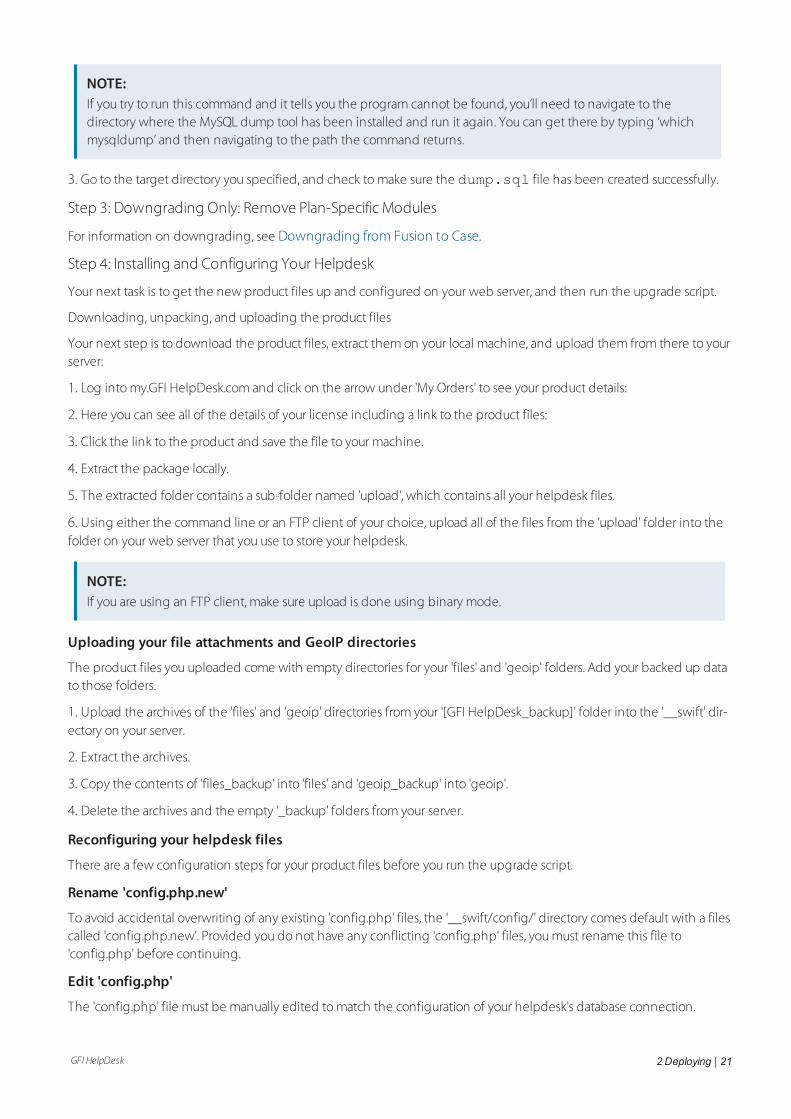
NOTE:If you try to run this command and it tells you the program cannot be found, you’ll need to navigate to thedirectory where the MySQL dump tool has been installed and run it again. You can get there by typing ‘whichmysqldump’ and then navigating to the path the command returns.
3. Go to the target directory you specified, and check to make sure the dump.sql file has been created successfully.
Step 3: Downgrading Only: Remove Plan-Specific Modules
For information on downgrading, see Downgrading from Fusion to Case.
Step 4: Installing and Configuring Your Helpdesk
Your next task is to get the new product files up and configured on your web server, and then run the upgrade script.
Downloading, unpacking, and uploading the product files
Your next step is to download the product files, extract them on your local machine, and upload them from there to yourserver:
1. Log into my.GFI HelpDesk.com and click on the arrow under 'My Orders' to see your product details:
2. Here you can see all of the details of your license including a link to the product files:
3. Click the link to the product and save the file to your machine.
4. Extract the package locally.
5. The extracted folder contains a sub-folder named 'upload', which contains all your helpdesk files.
6. Using either the command line or an FTP client of your choice, upload all of the files from the 'upload' folder into thefolder on your web server that you use to store your helpdesk.
NOTE:If you are using an FTP client, make sure upload is done using binary mode.
Uploading your file attachments and GeoIP directories
The product files you uploaded come with empty directories for your 'files' and 'geoip' folders. Add your backed up datato those folders.
1. Upload the archives of the 'files' and 'geoip' directories from your '[GFI HelpDesk_backup]' folder into the '__swift' dir-ectory on your server.
2. Extract the archives.
3. Copy the contents of 'files_backup' into 'files' and 'geoip_backup' into 'geoip'.
4. Delete the archives and the empty '_backup' folders from your server.
Reconfiguring your helpdesk files
There are a few configuration steps for your product files before you run the upgrade script.
Rename 'config.php.new'
To avoid accidental overwriting of any existing 'config.php' files, the '__swift/config/' directory comes default with a filescalled 'config.php.new'. Provided you do not have any conflicting 'config.php' files, you must rename this file to'config.php' before continuing.
Edit 'config.php'
The 'config.php' file must be manually edited to match the configuration of your helpdesk's database connection.
GFI HelpDesk 2 Deploying | 22
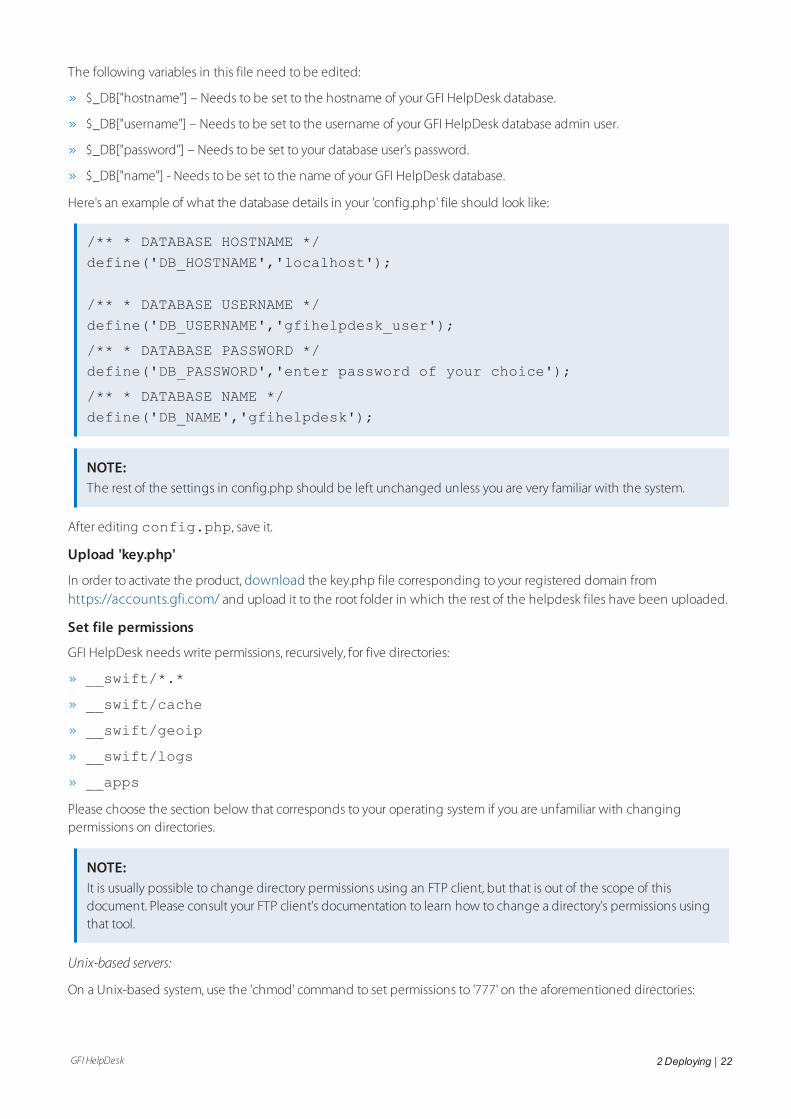
The following variables in this file need to be edited:
$_DB["hostname"] – Needs to be set to the hostname of your GFI HelpDesk database.
$_DB["username"] – Needs to be set to the username of your GFI HelpDesk database admin user.
$_DB["password"] – Needs to be set to your database user's password.
$_DB["name"] - Needs to be set to the name of your GFI HelpDesk database.
Here's an example of what the database details in your 'config.php' file should look like:
/** * DATABASE HOSTNAME */define('DB_HOSTNAME','localhost');
/** * DATABASE USERNAME */define('DB_USERNAME','gfihelpdesk_user');
/** * DATABASE PASSWORD */define('DB_PASSWORD','enter password of your choice');
/** * DATABASE NAME */define('DB_NAME','gfihelpdesk');
NOTE:The rest of the settings in config.php should be left unchanged unless you are very familiar with the system.
After editing config.php, save it.
Upload 'key.php'
In order to activate the product, download the key.php file corresponding to your registered domain fromhttps://accounts.gfi.com/ and upload it to the root folder in which the rest of the helpdesk files have been uploaded.
Set file permissions
GFI HelpDesk needs write permissions, recursively, for five directories:
__swift/*.*
__swift/cache
__swift/geoip
__swift/logs
__apps
Please choose the section below that corresponds to your operating system if you are unfamiliar with changingpermissions on directories.
NOTE:It is usually possible to change directory permissions using an FTP client, but that is out of the scope of thisdocument. Please consult your FTP client's documentation to learn how to change a directory's permissions usingthat tool.
Unix-based servers:
On a Unix-based system, use the 'chmod' command to set permissions to '777' on the aforementioned directories:
GFI HelpDesk 2 Deploying | 23
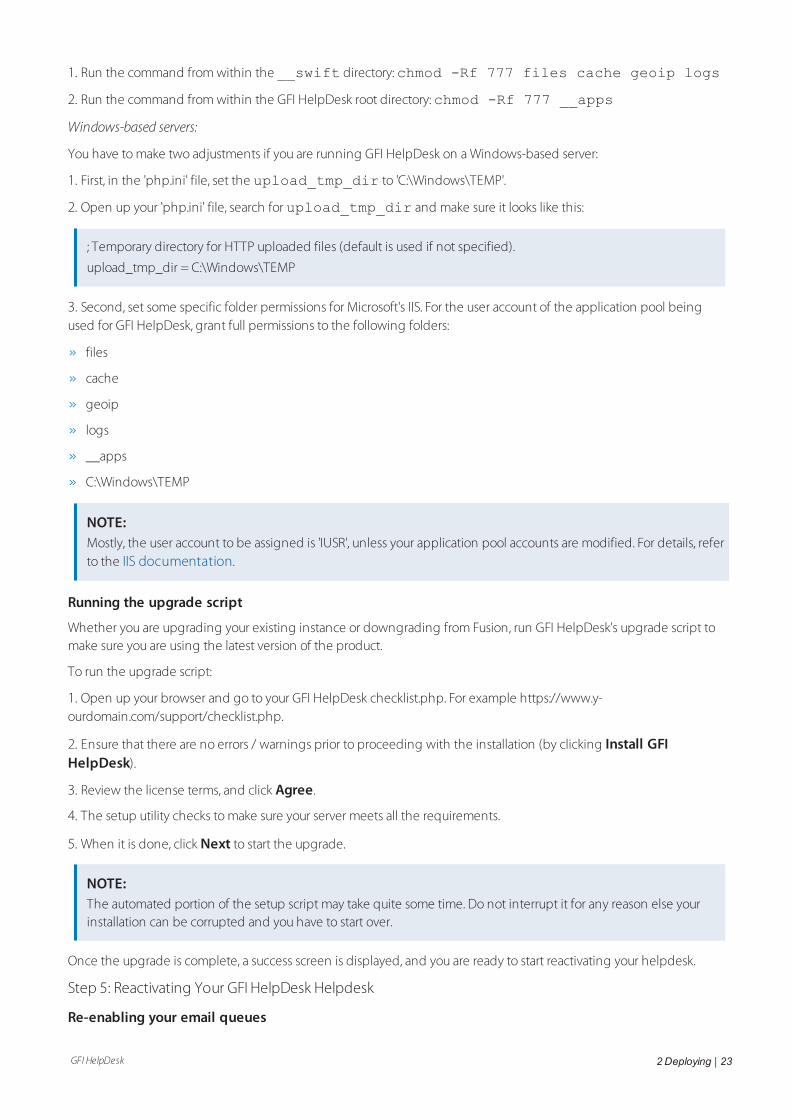
1. Run the command from within the __swift directory:chmod -Rf 777 files cache geoip logs
2. Run the command from within the GFI HelpDesk root directory:chmod -Rf 777 __apps
Windows-based servers:
You have to make two adjustments if you are running GFI HelpDesk on a Windows-based server:
1. First, in the 'php.ini' file, set the upload_tmp_dir to 'C:\Windows\TEMP'.
2. Open up your 'php.ini' file, search for upload_tmp_dir and make sure it looks like this:
; Temporary directory for HTTP uploaded files (default is used if not specified).
upload_tmp_dir = C:\Windows\TEMP
3. Second, set some specific folder permissions for Microsoft's IIS. For the user account of the application pool beingused for GFI HelpDesk, grant full permissions to the following folders:
files
cache
geoip
logs
__apps
C:\Windows\TEMP
NOTE:Mostly, the user account to be assigned is 'IUSR', unless your application pool accounts are modified. For details, referto the IIS documentation.
Running the upgrade script
Whether you are upgrading your existing instance or downgrading from Fusion, run GFI HelpDesk's upgrade script tomake sure you are using the latest version of the product.
To run the upgrade script:
1. Open up your browser and go to your GFI HelpDesk checklist.php. For example https://www.y-ourdomain.com/support/checklist.php.
2. Ensure that there are no errors / warnings prior to proceeding with the installation (by clicking Install GFIHelpDesk).
3. Review the license terms, and click Agree.
4. The setup utility checks to make sure your server meets all the requirements.
5. When it is done, click Next to start the upgrade.
NOTE:The automated portion of the setup script may take quite some time. Do not interrupt it for any reason else yourinstallation can be corrupted and you have to start over.
Once the upgrade is complete, a success screen is displayed, and you are ready to start reactivating your helpdesk.
Step 5: Reactivating Your GFI HelpDesk Helpdesk
Re-enabling your email queues
GFI HelpDesk 2 Deploying | 24
The first thing to do, once the upgrade process is complete, is to capture any emails that came in while your helpdeskwas unavailable. From there, you can re-enable all your queues so everything starts flowing again.
To re-enable your email queues:
1. Collect any emails from while you were away. Log in to the Admin Control Panel.
2. On the menu sidebar, click Email Parser followed by Email Queues.
3. Make a list of the queues you have set up to use the Pipe method.
NOTE:You are going to use POP3 to go collect any missed emails, but then you can set your queues back to using the Pipemethod if you prefer.
4. For all of your queues, regardless of mailbox type:
a. Click the email address on the list.
b. Next to Mailbox Type select POP3.
c. Next to Email Queue is Enabled select Yes.
d. Click the Update button.
e. Repeat the steps above for all of your queues.
5. Next, we’re going to schedule a custom task to force GFI HelpDesk to fetch your emails:
a. Over on the menu sidebar, click Scheduled Tasks followed by Manage.
b. Scroll down and find Fetch emails (POP3/IMAP) on the list and click the checkbox.
c. At the top of the page, click the Execute button to run the task.
6. Now that you have pulled in any messages you missed, you can reset your Pipe queues:
a. Log into the mail server of the address you are using to forward emails and re-enable mail forwarding to your supportaddress.
b. Come back to the admin control panel and select the address from the list.
c. Next to Mailbox Type select Pipe.
d. Click the Update button.
e. Repeat the steps above for any other Pipe queues.
Restoring your templates
Your next step is to restore any templates that you'd modified prior to the update.
NOTE:If you did not modify or back up any of your templates, skip this section.
Restoring your template modifications from your backups takes a few steps. Follow the instructions in the article:Managing Your Template Modifications to reimplement your template modifications.
Importing your language packs
If you created backups for your modified language packs, they’re next on the import list.
GFI HelpDesk 2 Deploying | 25
NOTE:If you did not modify or back up any of your language packs, skip this section.
To import your customized language packs:
1. Still in the admin control panel, from the menu sidebar, click Languages followed by Import/Export.
2. Select Import at the top of the page.
3. Next to Template Group XML File, click the Choose File button.
4. Navigate to your [GFI HelpDesk_backup] folder, select the language backup you created, and click the Open button.
5. Click the Import button at the top of the page to finish the import.
6. If you’ve modified other language packs, repeat the same procedure for each additional language.
Remove your placeholder page and 'cron_disabled' directory
Now that everything's up and running again in the background, it's time to take down the placeholder page you put upto divert people away from your Support Center. You can also remove the 'cron_disabled' folder, as a new 'cron' folder iscreated when uploading the product files.
To take down the placeholder page:
1. Go to your GFI HelpDesk root directory.
2. Delete the 'index.html' page you put up at the beginning of this process.
3. Rename 'index_down.php' back to 'index.php'.
4. Delete the 'cron_disabled' folder.
5. Visit your support URL – you should see your GFI HelpDesk Support Center.
Last step! Rebuild support desk cache
Rebuild your cache to make sure your desk is not hanging onto any outdated data that could interfere with things. Thereare two steps for this:
1. On your web server, go to the __swift/cache/ directory and delete everything.
NOTE:These are temp files and are replaced as soon as you complete step 2, below.
2. In the GFI HelpDesk admin control panel, click Diagnostics and then Rebuild Cache in the sidebar.
2.2.2 Migrating GFI HelpDesk from one server to anotherThis topic provides the steps on how to migrate your GFI HelpDesk from one server to another.
To migrate your GFI HelpDesk helpdesk to another server, follow the steps below:
1. As a precaution, take a backup of your database, templates, languages and code modifications (if any). For more inform-ation on helpdesk backups, refer to the topic Upgrading (or Downgrading) Your GFI HelpDesk.
2. Check if all the prerequisites are installed on the server on which you are about to migrate the helpdesk. For moreinformation on server prerequisites, refer to the topic Server Configuration Requirements.
3. Move all the product files from the old server to the document root of the new server.
GFI HelpDesk 2 Deploying | 26
4. Assign full permissions (Read, Write, and Execute) to "cache", "geoip", "logs" " and "files" directories, which are availableunder the __swift folder, along with the __apps directory.
5. Create a new database and import the database dump taken in Step 1 from the old server to this new database.
6. Enter the new database details (Hostname, Database_name, Database_username, and password) in the con-fig/config.php file.
7. If the domain remains the same after migration, you may skip Steps 7 and 8, otherwise, you need to change theproduct URL in the database by using the following query from the MySQL CLI (Command Line Interface):
mysql> update swsettings set data = 'http://newproductURL/' where vkey = 'general_producturl';
8. After carrying out the above-mentioned steps, you need to contact support to change the registered domain name,since you need to replace the previous key with the new license key corresponding to the new domain.
9. Once you replace the old key with the new one, rebuild the help desk cache from the web browser using the URL inthe following format:http://<new-productURL>/staff/index.php?/Core/Default/RebuildCache.
2.3 LicenseGFI HelpDesk is available in yearly subscriptions from GFI Software or one of the certified GFI Partners. It is licensed byUser and a single live accessible installation of the Software is permitted and optionally an additional 1 (one) privateinstallation is available for use only by Customer for internal testing purposes.
Each live installation of the Software can be accessed through the licensed domain names associated with the license.
License files are available for download from the GFI Accounts portal at https://accounts.gfi.com and the latest fileshould be used at all times. In order to increase the number of users this can be done at renewal or another other timeby reaching out to GFI Software or the GFI Partner.
To change your domain names reach out to the GFI Customer Care team on [email protected].
Include the following information on your email:
On which license this is linked to your account on accounts.gfi.com
The final list of the domains that should be in the license
In case of adjustments to a trial license, you can simply request a new trial license from https://www.gfi.com/helpdesk.
Learn more about downloading and upgrading licenses.
2.3.1 Open source software in GFI HelpDesk 26
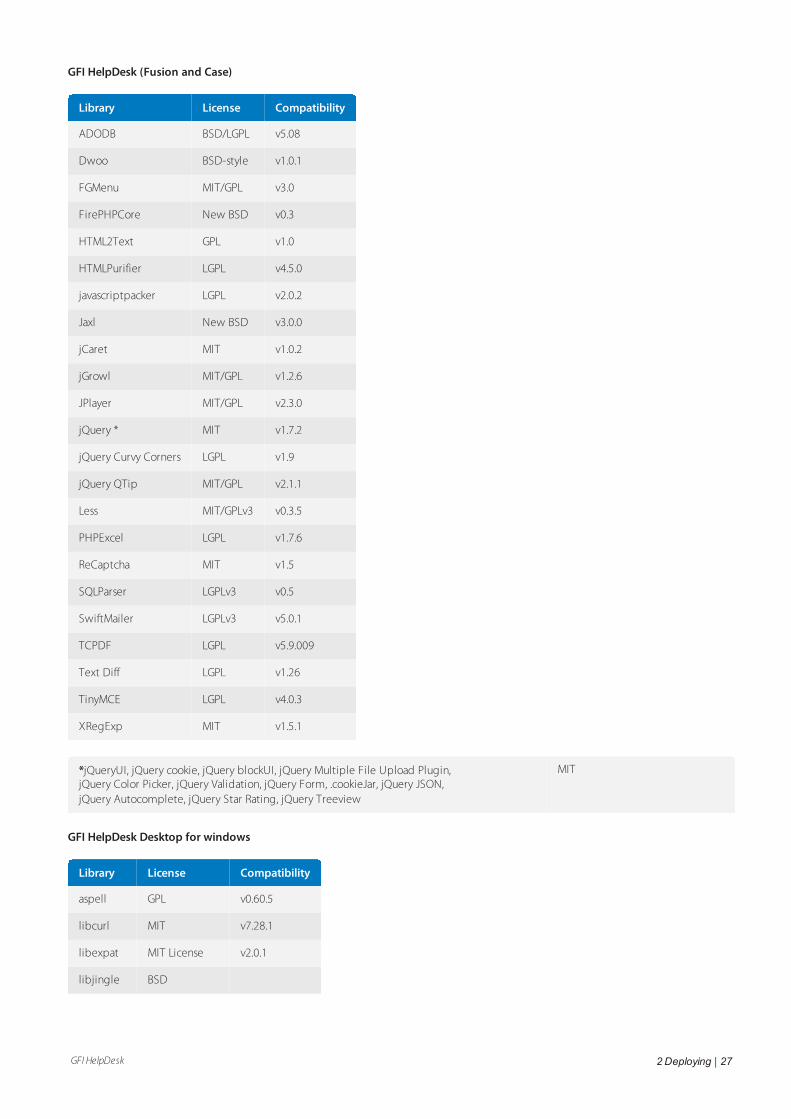
2.3.1 Open source software in GFI HelpDeskThis document lists the open source components of GFI HelpDesk. It is to the best of our knowledge and theinformation available at the time is complete with respect to the latest versions of our software.
However, we make no guarantees as to the completeness or accuracy of the list.
GFI HelpDesk 2 Deploying | 27
GFI HelpDesk (Fusion and Case)
Library License Compatibility
ADODB BSD/LGPL v5.08
Dwoo BSD-style v1.0.1
FGMenu MIT/GPL v3.0
FirePHPCore New BSD v0.3
HTML2Text GPL v1.0
HTMLPurifier LGPL v4.5.0
javascriptpacker LGPL v2.0.2
Jaxl New BSD v3.0.0
jCaret MIT v1.0.2
jGrowl MIT/GPL v1.2.6
JPlayer MIT/GPL v2.3.0
jQuery * MIT v1.7.2
jQuery Curvy Corners LGPL v1.9
jQuery QTip MIT/GPL v2.1.1
Less MIT/GPLv3 v0.3.5
PHPExcel LGPL v1.7.6
ReCaptcha MIT v1.5
SQLParser LGPLv3 v0.5
SwiftMailer LGPLv3 v5.0.1
TCPDF LGPL v5.9.009
Text Diff LGPL v1.26
TinyMCE LGPL v4.0.3
XRegExp MIT v1.5.1
*jQueryUI, jQuery cookie, jQuery blockUI, jQuery Multiple File Upload Plugin,jQuery Color Picker, jQuery Validation, jQuery Form, .cookieJar, jQuery JSON,jQuery Autocomplete, jQuery Star Rating, jQuery Treeview
MIT
GFI HelpDesk Desktop for windows
Library License Compatibility
aspell GPL v0.60.5
libcurl MIT v7.28.1
libexpat MIT License v2.0.1
libjingle BSD
GFI HelpDesk 2 Deploying | 28
Library License Compatibility
pjsip GPL v1.14
SQLite Public Domain v3.6.10
TightVNC GPL
OpenSSL BSD v1.0.1c
zlib BSD v1.2.6
2.4 Downgrading from Fusion to CaseTo downgrade from Fusion edition to Case edition, obtain your new updated license key file key.php by followingthe instructions in the topic Downloading the license file for GFI HelpDesk.
Then follow the operation below to remove unlicensed modules, without having to do a full reinstallation again.
If you are switching from GFI HelpDesk Fusion to GFI HelpDesk Case, follow these instructions to disable/remove the livechat elements from your helpdesk.
Fusion-to-Case: Disable the "Live Chat" icon
Disable the "Live Chat" icon featured on the Client Support Center so that it no longer appears for the clients to click. To
do that, log in to the Admin Control Panel of the helpdesk and navigate to Settings >> Live Chat >> ClientSupport Interface Settings and set the option Display Live Support Status Icon to No.
Fusion-to-Case: Uninstall "Live Chat" and OnSite modules
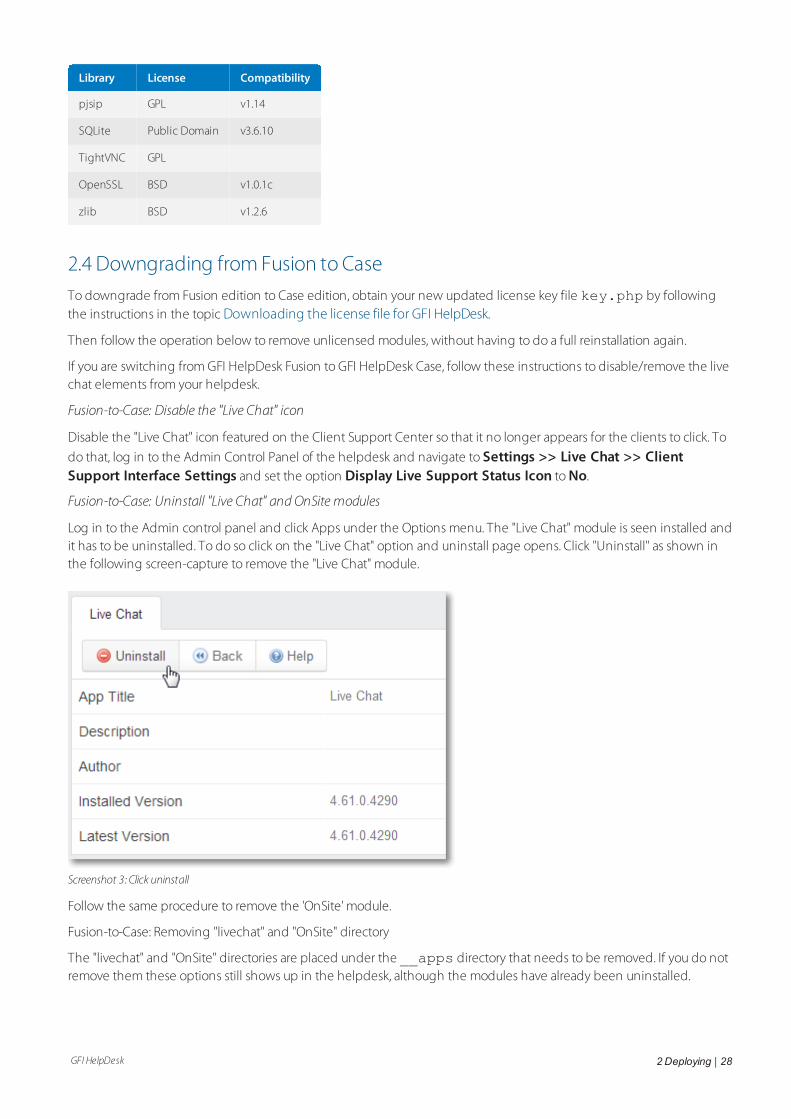
Log in to the Admin control panel and click Apps under the Options menu. The "Live Chat" module is seen installed andit has to be uninstalled. To do so click on the "Live Chat" option and uninstall page opens. Click "Uninstall" as shown inthe following screen-capture to remove the "Live Chat" module.
Screenshot 3: Click uninstall
Follow the same procedure to remove the 'OnSite' module.
Fusion-to-Case: Removing "livechat" and "OnSite" directory
The "livechat" and "OnSite" directories are placed under the __apps directory that needs to be removed. If you do notremove them these options still shows up in the helpdesk, although the modules have already been uninstalled.
GFI HelpDesk 2 Deploying | 29
2.5 GeoIPGFI HelpDesk has built-in functionality to identify the location of visitors to your helpdesk from their IP Address.
Presently, GFI is offering lite database versions for both City (Locations) and City (Blocks).
To enable this functionality, install the GeoIP files and index them in the database.
The GeoIP files are available to download from https://cdndl.gfi.com/gfihelpdesk/geoiplite.zip.
Installing GeoIP files
To Install the GeoIP files, do the following:
1. Download the GeoIP files package.
2. Upload the contents of the package to/__swift/geoip/.
3. From GFI HelpDesk Admin Console go to GeoIP. (Your admin domain looks like:http://<YOUR HelpDeskDOMAIN>/admin/).
Indexing the installed GeoIP files
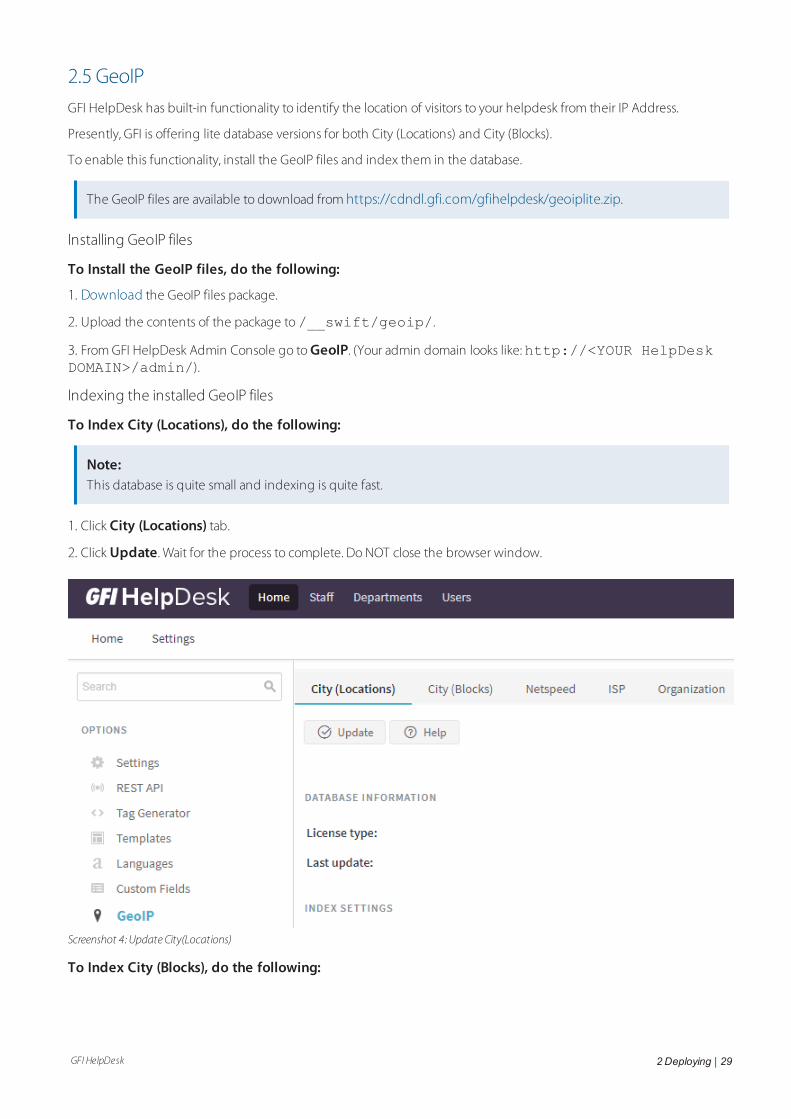
To Index City (Locations), do the following:
Note:This database is quite small and indexing is quite fast.
1. Click City (Locations) tab.
2. Click Update. Wait for the process to complete. Do NOT close the browser window.
Screenshot 4: Update City(Locations)
To Index City (Blocks), do the following:
GFI HelpDesk 2 Deploying | 30
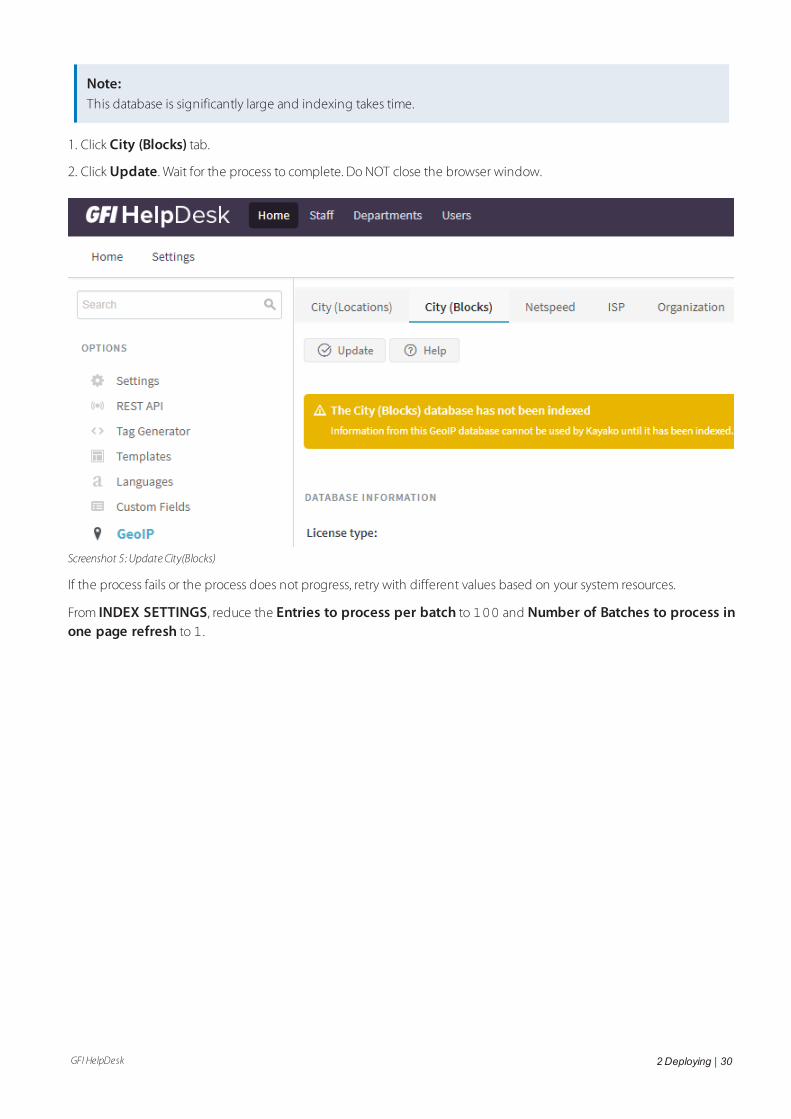
Note:This database is significantly large and indexing takes time.
1. Click City (Blocks) tab.
2. Click Update. Wait for the process to complete. Do NOT close the browser window.
Screenshot 5: Update City(Blocks)
If the process fails or the process does not progress, retry with different values based on your system resources.
From INDEX SETTINGS, reduce the Entries to process per batch to100 and Number of Batches to process inone page refresh to1.
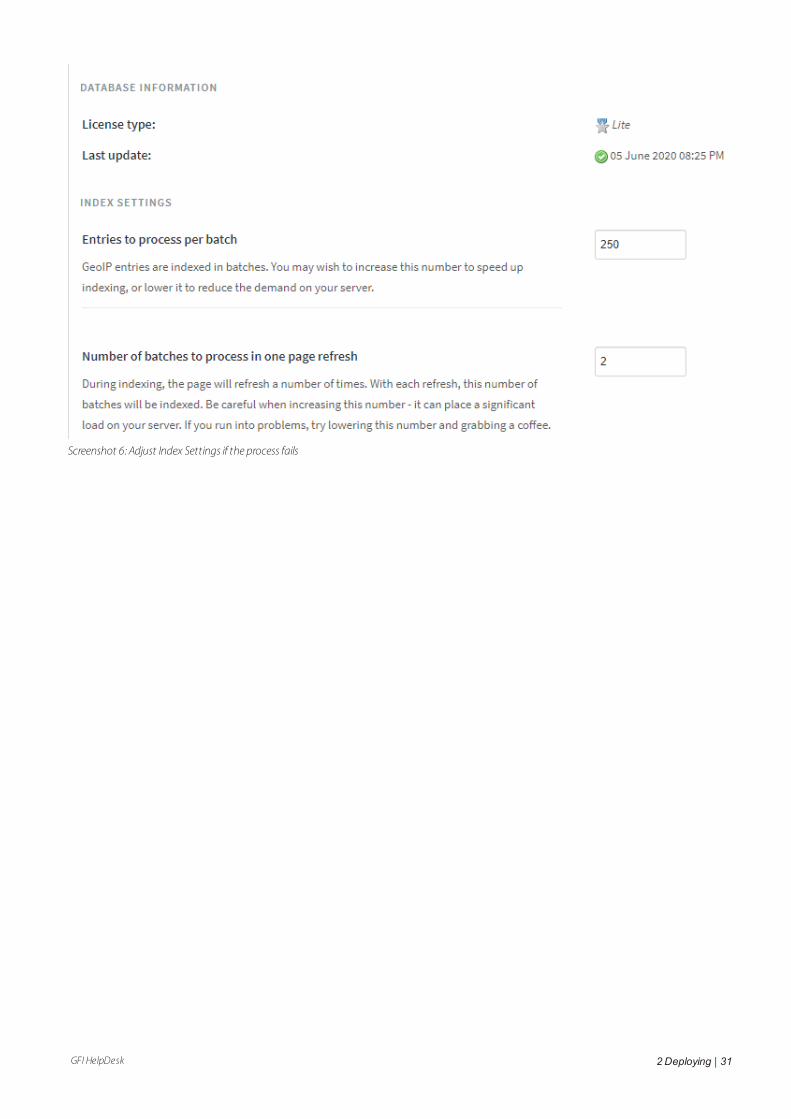
GFI HelpDesk 2 Deploying | 31
Screenshot 6: Adjust Index Settings if the process fails
GFI HelpDesk 3 UsingGFI HelpDesk | 32
3 Using GFI HelpDeskGFI HelpDesk helps you set up a cutting edge customer support system. There are tools and workflows available toautomate follow-ups and reminders for support agents.
Topics in this section:
3.1 Quick start guide 32
3.1.1 Understanding user types and interfaces 33
3.1.2 Setting Up Your Team in GFI HelpDesk 35
3.1.3 Guide to automation with GFI HelpDesk 35
3.1.4 Guide to setting up archiver custom app in GFI HelpDesk 37
3.1.5 Guide to managing support tickets 42
3.1.6 Building your knowledge base 44
3.1.7 Helping your customers submit tickets 45
3.2 Support tickets 51
3.2.1 Establishing service level agreements (SLAs) and escalations 51
3.2.2 Advance support tickets 55
3.3 User accounts 86
3.3.1 Editing or Deleting Notes for an Organization 87
3.3.2 Error: "Staff count exceeded" 88
3.3.3 Importing Users from Other CRM or Mailing List 88
3.3.4 Merging user accounts 89
3.3.5 Editing or deleting notes for a user account 89
3.3.6 Changing the staff or admin password through the helpdesk 90
3.3.7 Adding customers to an organization automatically 91
3.3.8 Creating staff accounts and assigning them to teams 91
3.4 Reports KQL 92
3.4.1 Introduction to building and running reports 92
3.4.2 Report types in GFI HelpDesk 93
3.4.3 Introduction to Kayako Query Language (KQL) 98
3.4.4 Advanced reporting using KQL 105
3.1 Quick start guideGet to know GFI HelpDesk with guides to the interface, key features, and common workflows.
GFI HelpDesk 3 UsingGFI HelpDesk | 33
3.1.1 Understanding user types and interfaces 33
3.1.2 Setting Up Your Team in GFI HelpDesk 35
3.1.3 Guide to automation with GFI HelpDesk 35
3.1.4 Guide to setting up archiver custom app in GFI HelpDesk 37
3.1.5 Guide to managing support tickets 42
3.1.6 Building your knowledge base 44
3.1.7 Helping your customers submit tickets 45
3.1.1 Understanding user types and interfacesYou are on your way to delivering amazing support to every one of your customers. This guide is designed to help youget familiar with the basics and hit the ground running.
By the end of this section, you will know how GFI HelpDesk is organized, where to find each tool and section, and whatto do there.
Meet user types:
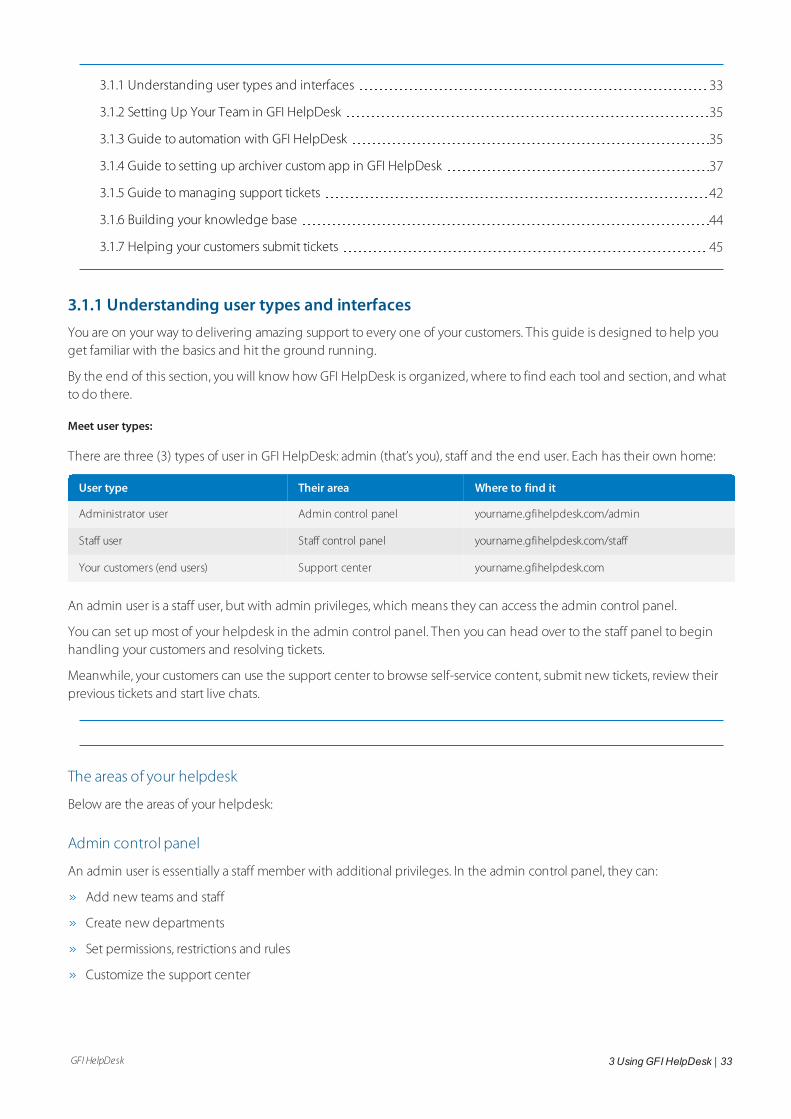
There are three (3) types of user in GFI HelpDesk: admin (that’s you), staff and the end user. Each has their own home:
User type Their area Where to find it
Administrator user Admin control panel yourname.gfihelpdesk.com/admin
Staff user Staff control panel yourname.gfihelpdesk.com/staff
Your customers (end users) Support center yourname.gfihelpdesk.com
An admin user is a staff user, but with admin privileges, which means they can access the admin control panel.
You can set up most of your helpdesk in the admin control panel. Then you can head over to the staff panel to beginhandling your customers and resolving tickets.
Meanwhile, your customers can use the support center to browse self-service content, submit new tickets, review theirprevious tickets and start live chats.
The areas of your helpdesk
Below are the areas of your helpdesk:
Admin control panel
An admin user is essentially a staff member with additional privileges. In the admin control panel, they can:
Add new teams and staff
Create new departments
Set permissions, restrictions and rules
Customize the support center
GFI HelpDesk 3 UsingGFI HelpDesk | 34
Add custom statuses, priorities and types
Manage rules, workflow, and automation
Staff control panel
Anyone in your team who needs to talk with customers and manage the helpdesk needs a staff user account. Not all staffmembers are created equally, though. As an admin, you can set rights and restrictions for other staff members.
In the staff control panel, your team can:
Correspond with your customers
Create tickets (send emails to customers)
Manage and resolve tickets
Manage customer accounts and organization profiles
Publish self-service content to the support center
Review live chat transcripts and call recordings
Run reports
Support center
The support center is the customer-facing touchpoint of your helpdesk. In the support center, your customers can:
Submit new tickets
Track and update their existing tickets
Start live chats
Get answers from your self-service content
Using the support center is optional: you do not have to force your customers through it. Customers can reach you via thehelpdesk through email, live chat widgets, and phone without needing to use the support center.
Some GFI HelpDesk customers prefer to make the helpdesk transparent to the customer, others prefer to use the supportcenter and provide a go-to support portal for their customers.
The apps
Kayako Desktop
Kayako Desktop is a Windows application which your team uses to connect to the helpdesk and use GFI HelpDesk's real-time support features: visitor monitoring, live chat, and voice.
Download Kayako Desktop
Getting help and support
From the team: You can get in touch with our team at any time: please contact support. We are available all dayduring the week and offer limited support over the weekend.
Community forums: Posting on the community forums (forums.gfi.com) is a great way to talk to and learn fromhundreds of other customer service pros and helpdesk admins. Official support (that is, responses from the GFI HelpDeskteam) is not guaranteed here. If you want support directly from the GFI HelpDesk team, please contact us directly.
GFI HelpDesk 3 UsingGFI HelpDesk | 35
3.1.2 Setting Up Your Team in GFI HelpDeskTo really get a feel for GFI HelpDesk at work, we suggest inviting your team members to join. You can then go throughyour customer service process together as a team. Try to involve at least one person from each team at your company, soeach of them can bring a different perspective to the table when you set up your workflows.
In this topic, you can learn how to set up your team in GFI HelpDesk.
Each staff user belongs to a team, that is why you need to create your teams first - and then add staff users to them.
Create a new team
To create a new team, do the following:
1. Go to the Admin Control Panel, click on Staff and then Insert Team.
2. At this point, you can assign the new team to Departments, which gives members of this team access to the ticketsand live chats in those departments.
3. In the next tab, you can set individual permissions for members of this team.
Note:Access control in GFI HelpDesk is very powerful: you can control who can see, create, edit and delete most things inGFI HelpDesk.
We recommend leaving the defaults at this stage until you get familiar with GFI HelpDesk.
Add staff users
To add a new staff user, do the following:
1. In the Admin Control Panel, click Staff and then Insert Staff.
2. Fill in the essentials under the General tab.
Remember your staff teams: if you enabled Administrator team for one of them, any staff users you add to thatteam is able to access the admin control panel.
3. Under the Assigned Departments tab, you can either have this staff user inherit the department permissions fromtheir team, or you can override them for this individual.
Note:We recommend sticking to the defaults while getting started.
3.1.3 Guide to automation with GFI HelpDeskAutomated ticket rules are designed to minimize repetitive clicking and to keep you from typing out the same oldmessages over and over. In fact, when you implement rules, they do much of the admin work for you, freeing you up tofocus on your customers.
We use email rules to help a ticket make its way to the right place from the moment it arrives in the e-mail queue.
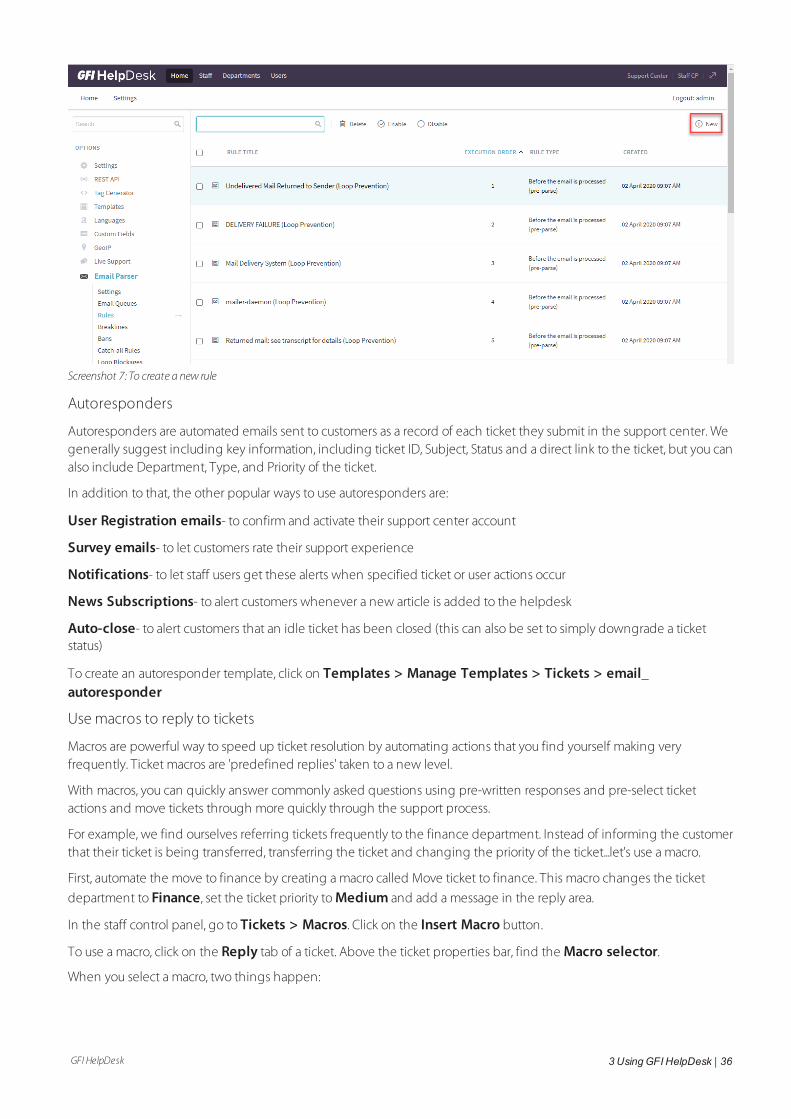
To create a new email rule, click on Rules under Mail Parser on the Options menu. It looks like this:
GFI HelpDesk 3 UsingGFI HelpDesk | 36
Screenshot 7: To create a new rule
Autoresponders
Autoresponders are automated emails sent to customers as a record of each ticket they submit in the support center. Wegenerally suggest including key information, including ticket ID, Subject, Status and a direct link to the ticket, but you canalso include Department, Type, and Priority of the ticket.
In addition to that, the other popular ways to use autoresponders are:
User Registration emails- to confirm and activate their support center account
Survey emails- to let customers rate their support experience
Notifications- to let staff users get these alerts when specified ticket or user actions occur
News Subscriptions- to alert customers whenever a new article is added to the helpdesk
Auto-close- to alert customers that an idle ticket has been closed (this can also be set to simply downgrade a ticketstatus)
To create an autoresponder template, click on Templates > Manage Templates > Tickets > email_autoresponder
Use macros to reply to tickets
Macros are powerful way to speed up ticket resolution by automating actions that you find yourself making veryfrequently. Ticket macros are 'predefined replies' taken to a new level.
With macros, you can quickly answer commonly asked questions using pre-written responses and pre-select ticketactions and move tickets through more quickly through the support process.
For example, we find ourselves referring tickets frequently to the finance department. Instead of informing the customerthat their ticket is being transferred, transferring the ticket and changing the priority of the ticket...let's use a macro.
First, automate the move to finance by creating a macro called Move ticket to finance. This macro changes the ticket
department to Finance, set the ticket priority to Medium and add a message in the reply area.
In the staff control panel, go to Tickets > Macros. Click on the Insert Macro button.
To use a macro, click on the Reply tab of a ticket. Above the ticket properties bar, find the Macro selector.
When you select a macro, two things happen:
GFI HelpDesk 3 UsingGFI HelpDesk | 37
The ticket reply area fills up the content you specified when creating the macro
The ticket properties bar is pre-selected with any ticket properties you specified when creating the macro
None of these things are saved or sent automatically. All the macro is doing here is filling in and selecting fields, so make
sure to hit the Send button to save the ticket's property changes.
You can use this process to apply more than one macro (to combine a bunch of pre-written replies, for example).
Canned responses
A canned response is very much like a predefined reply, except we use them in live chats (via GFI HelpDesk Desktop)instead of email.
This comes in handy, because text messages, images, URLs or code, can all be used as canned responses.
To create a canned response, first add a category or two by clicking Insert Category under the categories tab. Thengo ahead and click Insert Response under the same tab.
Visitor rules
Visitor rules are designed to automate the ID, group and mine information from visitors to your website. With thisinformation, you can automatically offer a chat with visitors, who have browsed certain pages or have spent significanttime on your site.
Rules take the repetitive work out of your hands, while still helping you help your most promising leads while you'refresh in their minds.
These are the two major ways you can target a visitor with visitor rules:
When a visitor first enters your website- rules are checked once when the visitor opens up the site.
Each page a visitor opens- rules are checked on every page load during a visitor’s session.
To set up a visitor rule, find its section under the live support tab in the admin control panel.
Auto-close a ticket
We can automatically close unresolved tickets that haven't been touched or updated a specified period of time.
From this page, you can create, delete, enable or disable auto close rules.
Bonus: mail parser rules
Helpdesk parser rules can also determine department changes, which tickets are marked as spam, ticket priority, ticketstatus and so on. For this reason, this is a powerful automation tool.
For more information on mail parser rules, see Mail parser rule essentials for setting up email rules.
3.1.4 Guide to setting up archiver custom app in GFI HelpDeskThe Archiver custom app allows you to delete/export old data in GFI HelpDesk. It gives an extension to the Maintenancemenu in the admin panel.
The additional menu items provides an option to purge/export the old data for a specific user or a complete database.The custom app deletes records permanently, so it is highly recommended to keep database backups.
You must have an on-premise installation of GFI HelpDesk with the full access of source code. The code files of thiscustom app is placed under the installation folder of GFI HelpDesk and further, it needs to be installed as a plug-in underthe Apps section in the admin panel.
In this topic, you can go through the steps necessary for installing Archiver custom app under the GFI HelpDeskinstallation, on your own server.
GFI HelpDesk 3 UsingGFI HelpDesk | 38
Downloading, unpacking, and uploading the product files
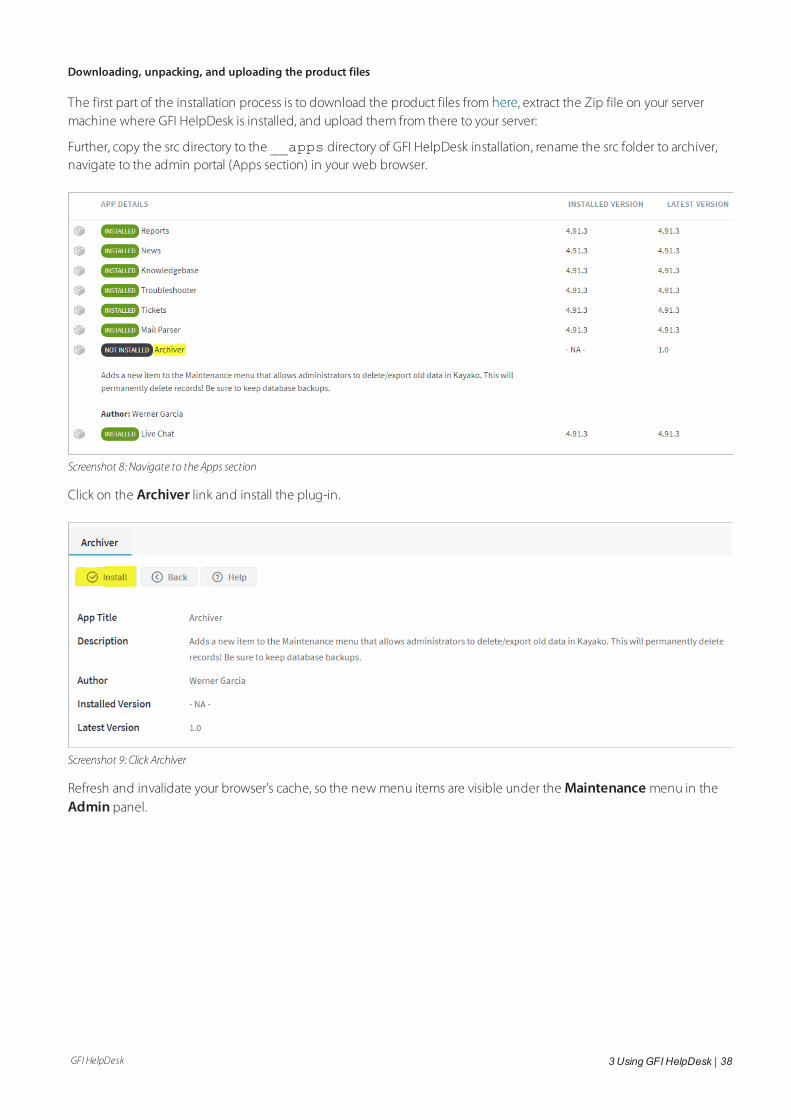
The first part of the installation process is to download the product files from here, extract the Zip file on your servermachine where GFI HelpDesk is installed, and upload them from there to your server:
Further, copy the src directory to the __apps directory of GFI HelpDesk installation, rename the src folder to archiver,navigate to the admin portal (Apps section) in your web browser.
Screenshot 8: Navigate to the Apps section
Click on the Archiver link and install the plug-in.
Screenshot 9: Click Archiver
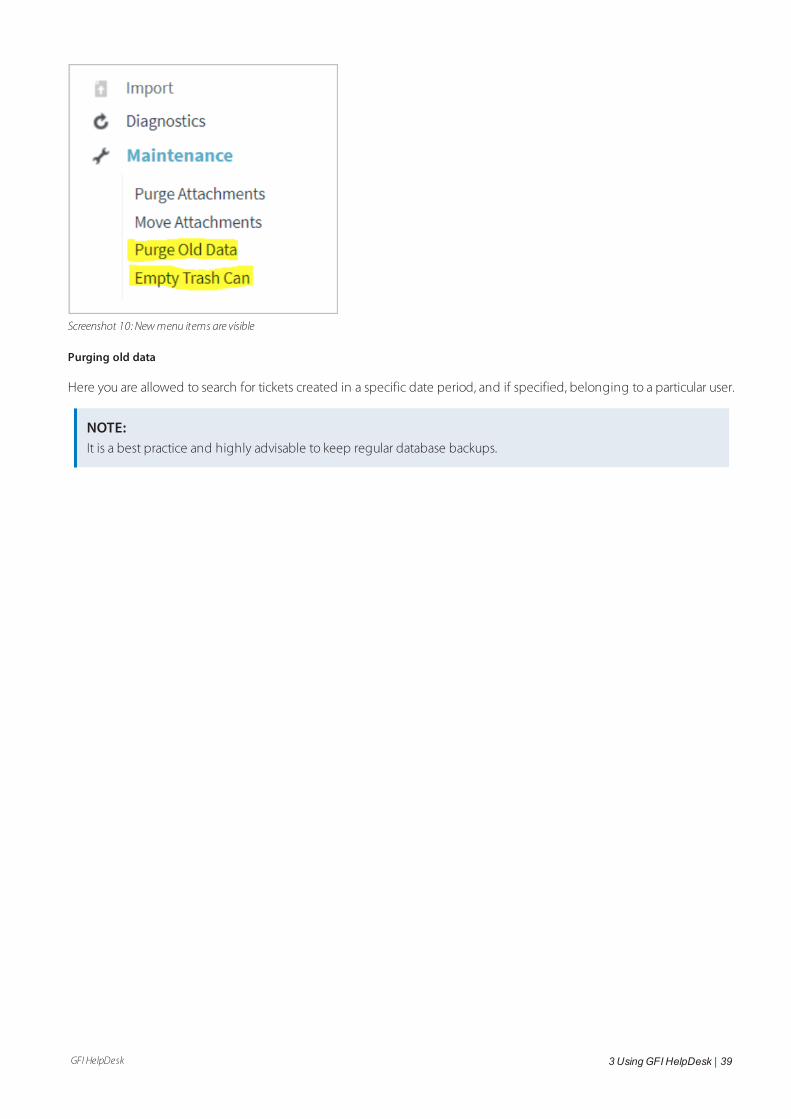
Refresh and invalidate your browser's cache, so the new menu items are visible under the Maintenance menu in theAdmin panel.
GFI HelpDesk 3 UsingGFI HelpDesk | 39
Screenshot 10: Newmenu items are visible
Purging old data
Here you are allowed to search for tickets created in a specific date period, and if specified, belonging to a particular user.
NOTE:It is a best practice and highly advisable to keep regular database backups.
GFI HelpDesk 3 UsingGFI HelpDesk | 40
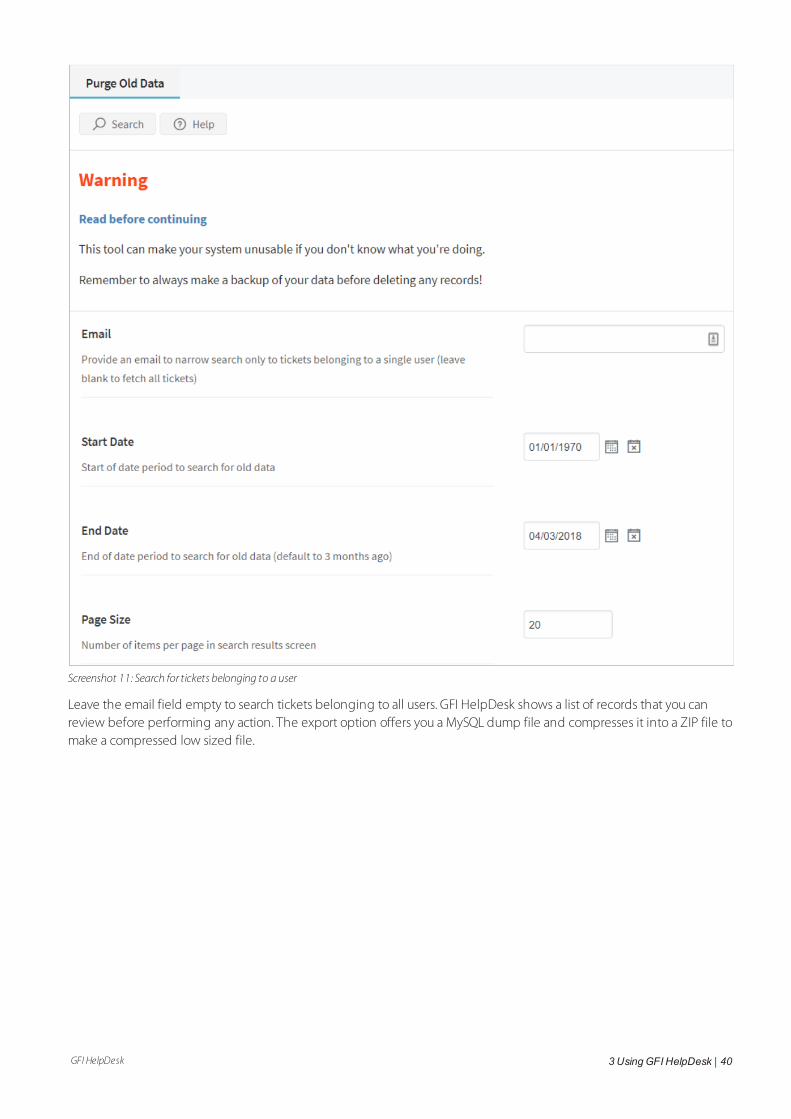
Screenshot 11: Search for tickets belonging to a user
Leave the email field empty to search tickets belonging to all users. GFI HelpDesk shows a list of records that you canreview before performing any action. The export option offers you a MySQL dump file and compresses it into a ZIP file tomake a compressed low sized file.
GFI HelpDesk 3 UsingGFI HelpDesk | 41
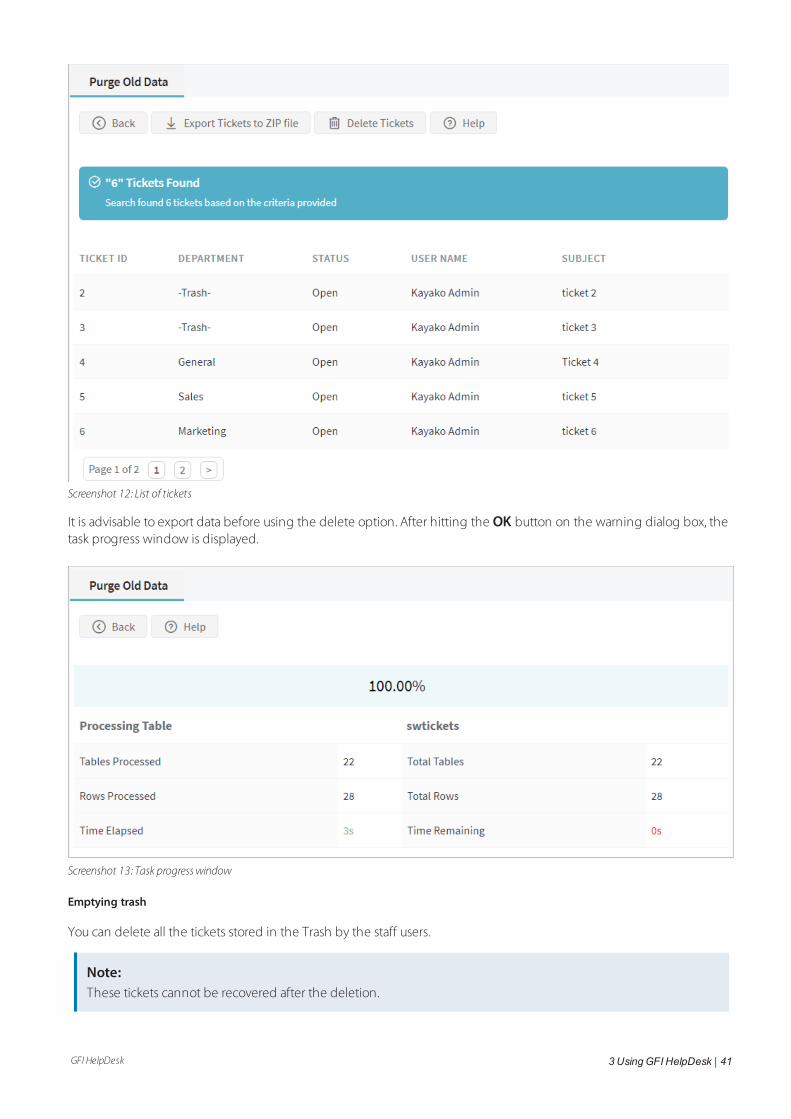
Screenshot 12: List of tickets
It is advisable to export data before using the delete option. After hitting the OK button on the warning dialog box, thetask progress window is displayed.
Screenshot 13: Task progresswindow
Emptying trash
You can delete all the tickets stored in the Trash by the staff users.
Note:These tickets cannot be recovered after the deletion.
GFI HelpDesk 3 UsingGFI HelpDesk | 42
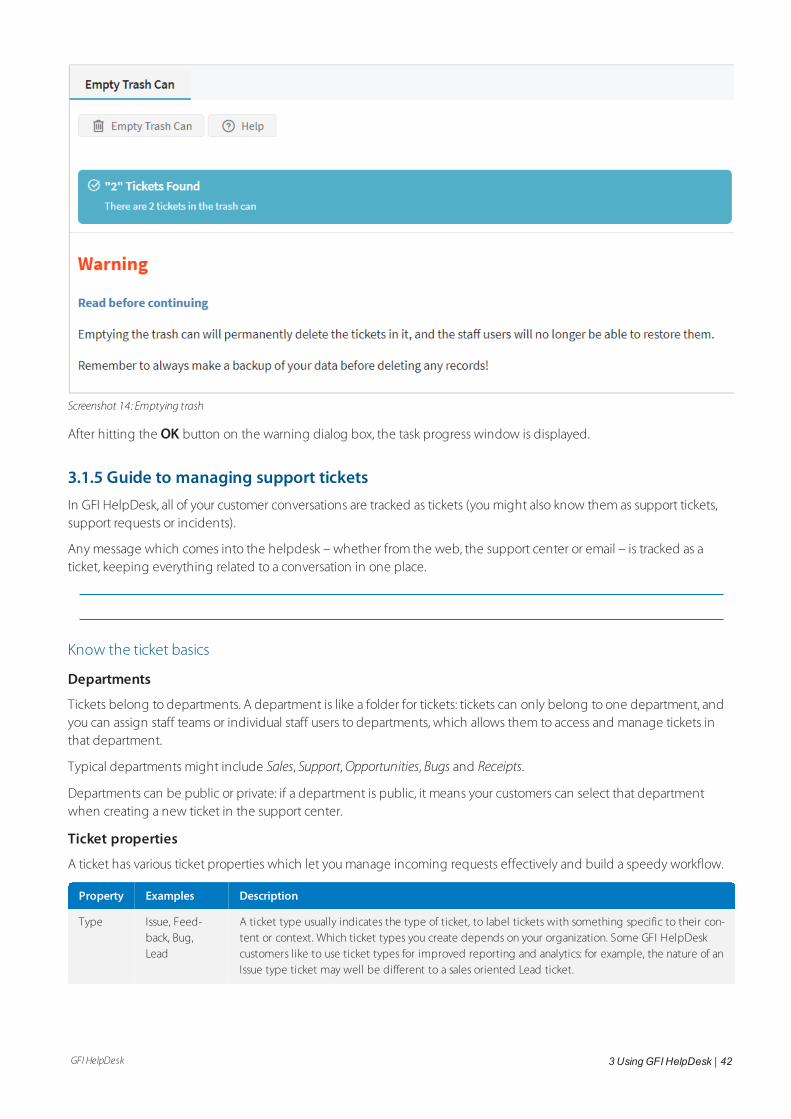
Screenshot 14: Emptying trash
After hitting the OK button on the warning dialog box, the task progress window is displayed.
3.1.5 Guide to managing support ticketsIn GFI HelpDesk, all of your customer conversations are tracked as tickets (you might also know them as support tickets,support requests or incidents).
Any message which comes into the helpdesk – whether from the web, the support center or email – is tracked as aticket, keeping everything related to a conversation in one place.
Know the ticket basics
Departments
Tickets belong to departments. A department is like a folder for tickets: tickets can only belong to one department, andyou can assign staff teams or individual staff users to departments, which allows them to access and manage tickets inthat department.
Typical departments might include Sales, Support, Opportunities, Bugs and Receipts.
Departments can be public or private: if a department is public, it means your customers can select that departmentwhen creating a new ticket in the support center.
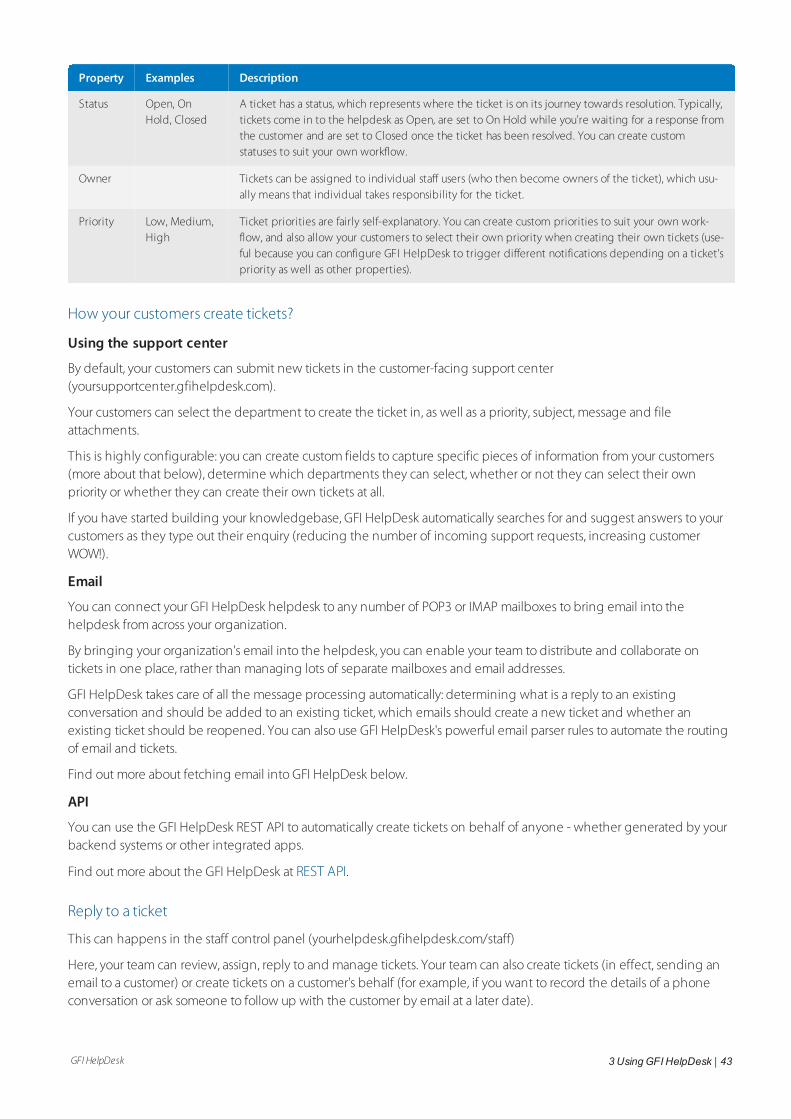
Ticket properties
A ticket has various ticket properties which let you manage incoming requests effectively and build a speedy workflow.
Property Examples Description
Type Issue, Feed-back, Bug,Lead
A ticket type usually indicates the type of ticket, to label tickets with something specific to their con-tent or context. Which ticket types you create depends on your organization. Some GFI HelpDeskcustomers like to use ticket types for improved reporting and analytics: for example, the nature of anIssue type ticket may well be different to a sales oriented Lead ticket.
GFI HelpDesk 3 UsingGFI HelpDesk | 43
Property Examples Description
Status Open, OnHold, Closed
A ticket has a status, which represents where the ticket is on its journey towards resolution. Typically,tickets come in to the helpdesk as Open, are set to On Hold while you're waiting for a response fromthe customer and are set to Closed once the ticket has been resolved. You can create customstatuses to suit your own workflow.
Owner Tickets can be assigned to individual staff users (who then become owners of the ticket), which usu-ally means that individual takes responsibility for the ticket.
Priority Low, Medium,High
Ticket priorities are fairly self-explanatory. You can create custom priorities to suit your own work-flow, and also allow your customers to select their own priority when creating their own tickets (use-ful because you can configure GFI HelpDesk to trigger different notifications depending on a ticket'spriority as well as other properties).
How your customers create tickets?
Using the support center
By default, your customers can submit new tickets in the customer-facing support center(yoursupportcenter.gfihelpdesk.com).
Your customers can select the department to create the ticket in, as well as a priority, subject, message and fileattachments.
This is highly configurable: you can create custom fields to capture specific pieces of information from your customers(more about that below), determine which departments they can select, whether or not they can select their ownpriority or whether they can create their own tickets at all.
If you have started building your knowledgebase, GFI HelpDesk automatically searches for and suggest answers to yourcustomers as they type out their enquiry (reducing the number of incoming support requests, increasing customerWOW!).
You can connect your GFI HelpDesk helpdesk to any number of POP3 or IMAP mailboxes to bring email into thehelpdesk from across your organization.
By bringing your organization's email into the helpdesk, you can enable your team to distribute and collaborate ontickets in one place, rather than managing lots of separate mailboxes and email addresses.
GFI HelpDesk takes care of all the message processing automatically: determining what is a reply to an existingconversation and should be added to an existing ticket, which emails should create a new ticket and whether anexisting ticket should be reopened. You can also use GFI HelpDesk's powerful email parser rules to automate the routingof email and tickets.
Find out more about fetching email into GFI HelpDesk below.
API
You can use the GFI HelpDesk REST API to automatically create tickets on behalf of anyone - whether generated by yourbackend systems or other integrated apps.
Find out more about the GFI HelpDesk at REST API.
Reply to a ticket
This can happens in the staff control panel (yourhelpdesk.gfihelpdesk.com/staff)
Here, your team can review, assign, reply to and manage tickets. Your team can also create tickets (in effect, sending anemail to a customer) or create tickets on a customer's behalf (for example, if you want to record the details of a phoneconversation or ask someone to follow up with the customer by email at a later date).
GFI HelpDesk 3 UsingGFI HelpDesk | 44
On the left hand side, you can see the department tree. This lists all of departments you have been assigned to. Clickon status under each department to view the tickets in that department and set to a particular status.
Above the department tree, there are a shortcut filters.
My Tickets shows you all of the tickets which are open and are assigned to you.
Inbox shows tickets which are open.
Unassigned shows tickets which are open and not yet assigned to anyone.
Open a ticket and click on the Reply tab to start composing a reply. At the same time, you can change the ticket'sproperties (like the status and priority) which is saved once you send the reply.
Fetch email into GFI HelpDesk
You can connect GFI HelpDesk to any number of POP3 and IMAP mailboxes using Email Queues, which are responsiblefor:
connecting to the mailboxes
fetching email
processing the email into tickets
Find Email Parser in the admin control panel (yourhelpdesk.gfihelpdesk.com/admin) and then click on Email Queues.Click on New, and then follow the steps to connect your mailbox.
For more information, see Introduction to email queues.
Custom fields
GFI HelpDesk's powerful custom fields builder helps you customize various forms across the helpdesk - including thenew ticket form - allowing you to make sure the right information is collected from customers to equip your team toanswer customer enquiries quickly.
To create a custom field, find Custom Fields in the admin control panel. First, create a custom field Group to organize yourcustom fields. In this example, we have group called Product information and various fields to collect information about acustomer's product.
For more information, see Introduction to email queues.
Bonus: Turbo charge your tickets
GFI HelpDesk is ready to go out of the box. While we've quickly gone through the basics, there is a lot more GFI HelpDeskcan do to turbo charge your support and enable your team to improve customer satisfaction.
If you're ready to dive in, we suggest starting here:
Configuring SLA plans to set reply and ticket resolution deadlines
Ticket macros to speed up ticket responses
Customizing ticket views and filters in the staff control panel
3.1.6 Building your knowledge baseThe Knowledge Base is a library designed to help your customers answer their own questions with standard information,how-to's, and instructions.
Your self-service resources is so helpful that your agents can help customers with more inquiries that need their personalattention.
Some of our most successful customers have grown theirs into extensive libraries by adding just one to two articles at atime.
GFI HelpDesk 3 UsingGFI HelpDesk | 45
Create categories
The knowledge base is organized entirely by category for easy viewing. You can start an article with inbuild Rootcategory or create a new category by clicking Insert Category.
Once you have established this, you can go on to do the following from this page:
Insert a sub-category
Insert a new article in a category
Filter articles within a category
Publish an article
To create a new article:
1. Click Knowledgebase on the navigation bar.
2. Choose New Article.
Notes:
When you are drafting an article, remember to hit Update early and often to save your work.
You can place this article in multiple categories, which comes in handy when you are creating multiple guideswith overlapping information.
Moderate comments
Customers can rate and comment on knowledge base articles, which you can moderate in the admin + staff controlpanels.
If you encourage your customers to do this (and you should), it becomes a valuable source of direct feedback forimproving or retooling your articles.
By default, the comments are not published to your knowledge base until a staff user approves.
Finally, there are three things you can do with a comment: approve, reject, or mark as spam.
Publish news or announcements
Use the News section to publish news and announcements for your customers to see when they log into the helpdesk.
Every time you publish a new announcement, you can have an automated email sent to every customer who subscribesto this feature.
3.1.7 Helping your customers submit ticketsThis topic provides a starting point for helping your users submit their first tickets through your support site. The sectionsbelow covers the basic steps your users needs to follow to get started. Since every GFI HelpDesk-powered support site isdifferent, the steps and screenshots below may vary from what your users experiences.
This guide is designed as a starting point, which you can modify to suit the particulars of your support site.
Note:Everything below is directed at the end users of your support site. Feel free to copy this article and edit it to fit yourneeds.
To make it easier to reach out to our support team, we have put together this guide to help you get started. Below are theinstructions for creating an account, as well as submitting and tracking your support requests.
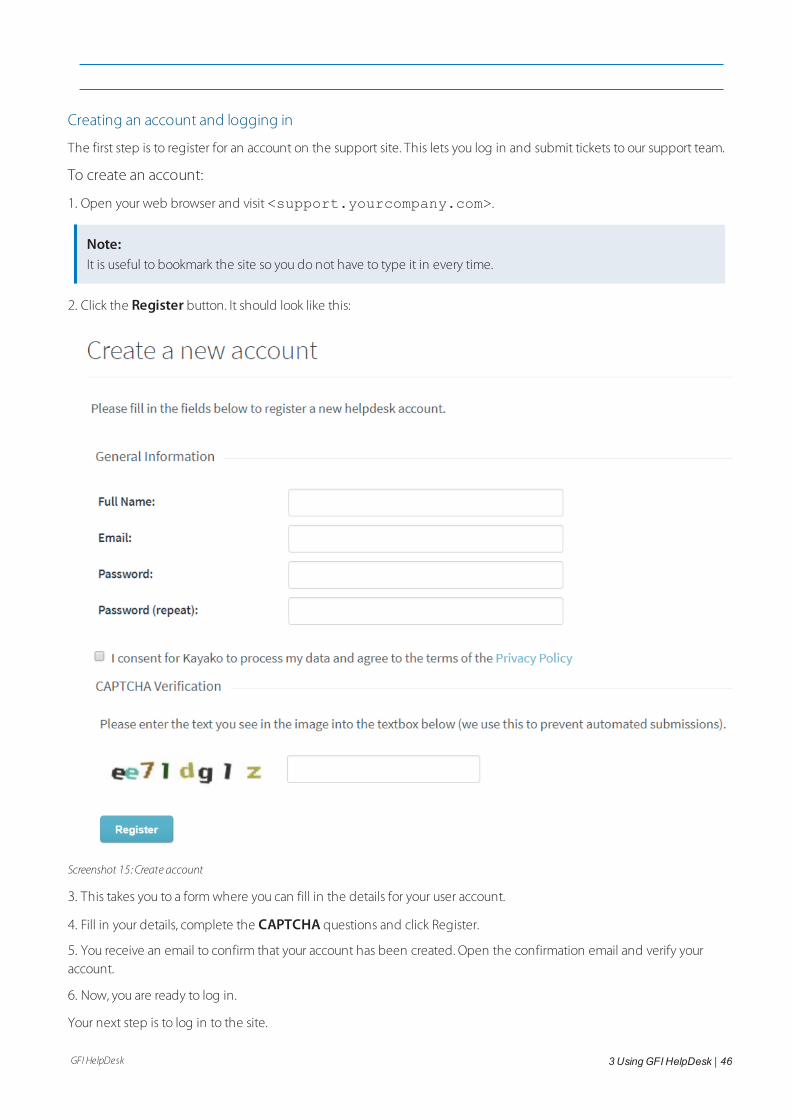
GFI HelpDesk 3 UsingGFI HelpDesk | 46
Creating an account and logging in
The first step is to register for an account on the support site. This lets you log in and submit tickets to our support team.
To create an account:
1. Open your web browser and visit <support.yourcompany.com>.
Note:It is useful to bookmark the site so you do not have to type it in every time.
2. Click the Register button. It should look like this:
Screenshot 15: Create account
3. This takes you to a form where you can fill in the details for your user account.
4. Fill in your details, complete the CAPTCHA questions and click Register.
5. You receive an email to confirm that your account has been created. Open the confirmation email and verify youraccount.
6. Now, you are ready to log in.
Your next step is to log in to the site.

GFI HelpDesk 3 UsingGFI HelpDesk | 47
To log in to the support site
1. Switch back to the support site in your browser.
2. Go to the login form.
3. Enter the email address and password you used when registering on the site.
Note:You are taken to a page where you can fill in details for your account profile.
4. Add any details you like, and click the Update button to save your changes.
Now you are ready to get in touch with our support team.
Submitting your first ticket
Requests to our support team are handled in the form of support tickets. This section walks you through the process ofsubmitting a support ticket.
To create your first ticket:
1. Go to the front page of the support site and make sure you are logged in.
2. Click the Submit a Ticket button.
Note:You can also click the Submit a Ticket link on the top navigation menu.
3. From here, you may fill in the details for your support request. We will go through each one step-by-step.
a. First, select a department to submit your ticket to. This tells our support team what your request is related to.
b. Click the Next button.
c. On this screen, describe the problem you are having. From the Priority pull-down, choose the option that bestdescribes the problem you are facing. This is how we try to think about each priority level:
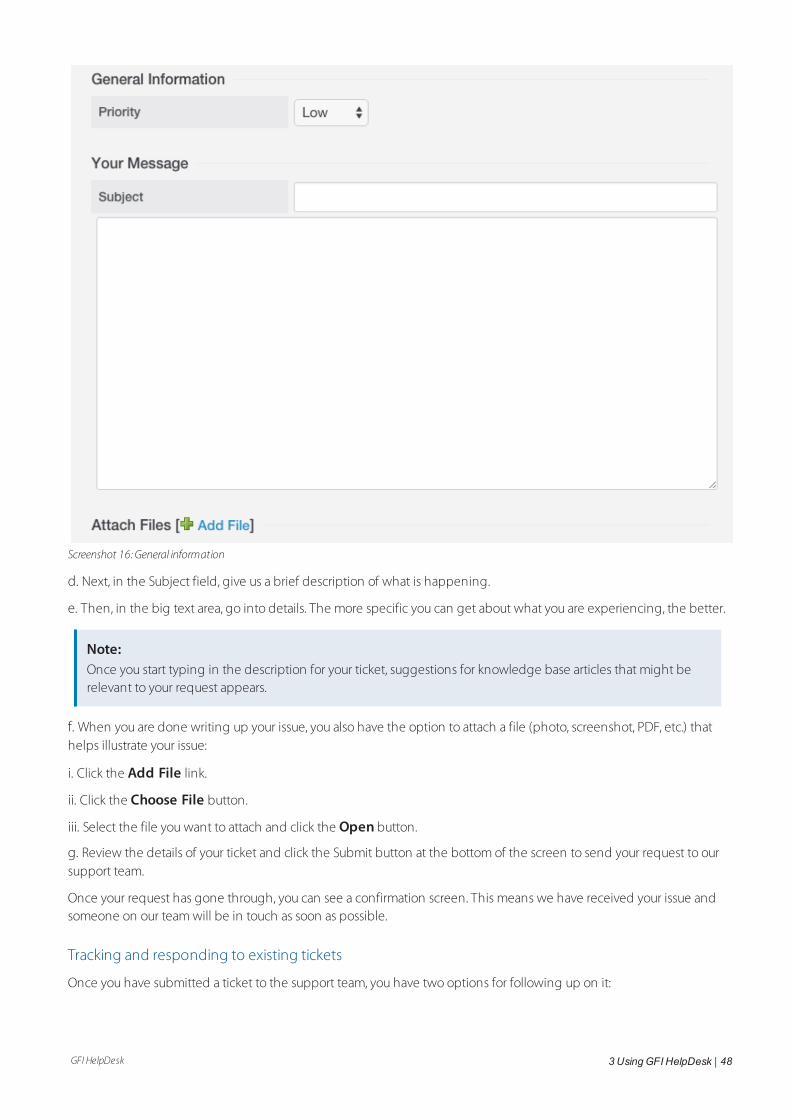
GFI HelpDesk 3 UsingGFI HelpDesk | 48
Screenshot 16: General information
d. Next, in the Subject field, give us a brief description of what is happening.
e. Then, in the big text area, go into details. The more specific you can get about what you are experiencing, the better.
Note:Once you start typing in the description for your ticket, suggestions for knowledge base articles that might berelevant to your request appears.
f. When you are done writing up your issue, you also have the option to attach a file (photo, screenshot, PDF, etc.) thathelps illustrate your issue:
i. Click the Add File link.
ii. Click the Choose File button.
iii. Select the file you want to attach and click the Open button.
g. Review the details of your ticket and click the Submit button at the bottom of the screen to send your request to oursupport team.
Once your request has gone through, you can see a confirmation screen. This means we have received your issue andsomeone on our team will be in touch as soon as possible.
Tracking and responding to existing tickets
Once you have submitted a ticket to the support team, you have two options for following up on it:
GFI HelpDesk 3 UsingGFI HelpDesk | 49
Option 1: Email
In addition to receiving a confirmation email when we receive your request, you also get an email when we reply. Youcan simply reply to that email (without changing the subject line) and our support team receives your responses.
Option 2: Support site
Alternatively, you can view and respond to any tickets you have open directly from the support site interface. Below, youcan find instructions for using the support site to track your tickets.
To access your existing tickets from the Support Site:
1. Head to the front page and make sure you are logged in.
2. Click the My Tickets button.
Note:You can also click the My Tickets link on the top navigation menu.
3. A page with a table that lists all of your tickets opens. The table provides some basic information about the status ofeach ticket, but clicking on the ticket's subject gives you a much closer look.
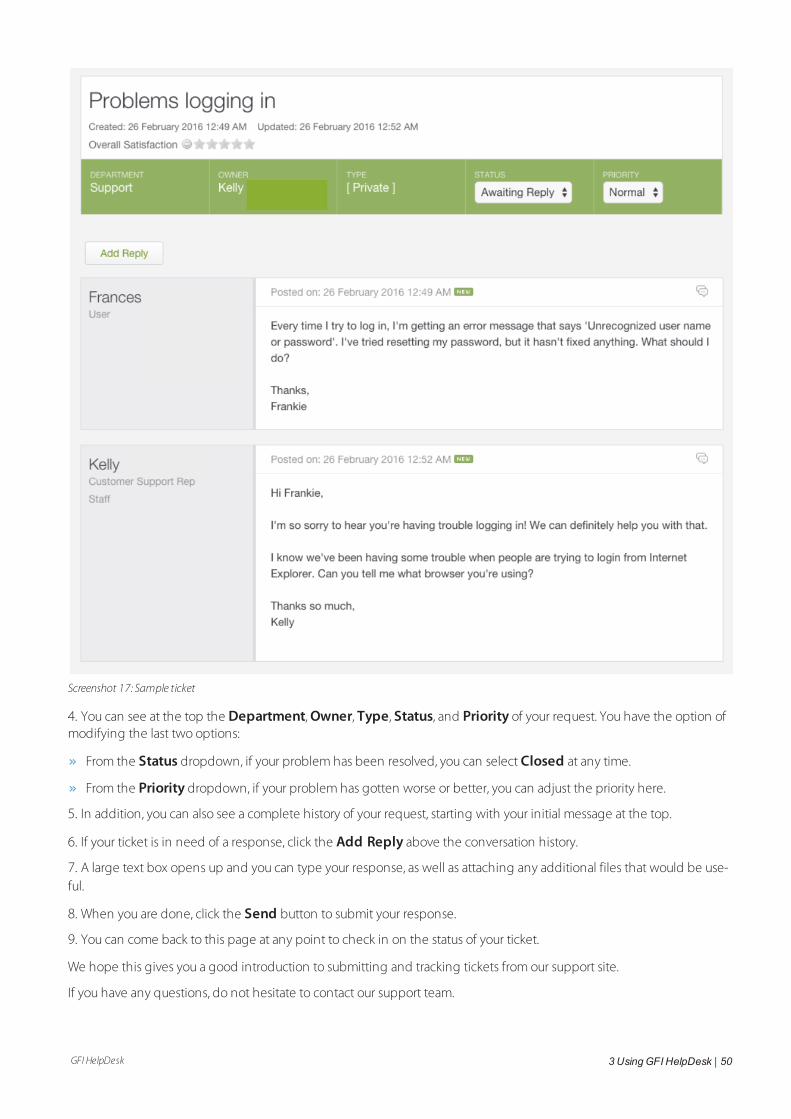
GFI HelpDesk 3 UsingGFI HelpDesk | 50
Screenshot 17: Sample ticket
4. You can see at the top the Department, Owner, Type, Status, and Priority of your request. You have the option ofmodifying the last two options:
From the Status dropdown, if your problem has been resolved, you can select Closed at any time.
From the Priority dropdown, if your problem has gotten worse or better, you can adjust the priority here.
5. In addition, you can also see a complete history of your request, starting with your initial message at the top.
6. If your ticket is in need of a response, click the Add Reply above the conversation history.
7. A large text box opens up and you can type your response, as well as attaching any additional files that would be use-ful.
8. When you are done, click the Send button to submit your response.
9. You can come back to this page at any point to check in on the status of your ticket.
We hope this gives you a good introduction to submitting and tracking tickets from our support site.
If you have any questions, do not hesitate to contact our support team.
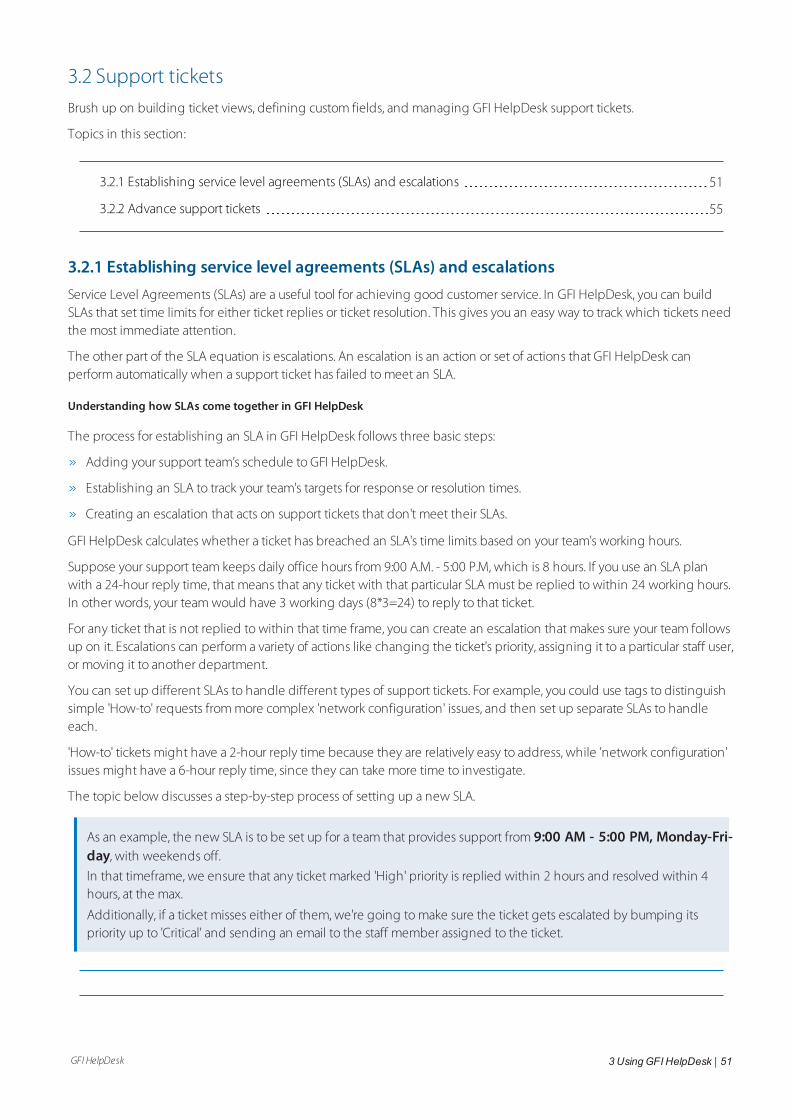
GFI HelpDesk 3 UsingGFI HelpDesk | 51
3.2 Support ticketsBrush up on building ticket views, defining custom fields, and managing GFI HelpDesk support tickets.
Topics in this section:
3.2.1 Establishing service level agreements (SLAs) and escalations 51
3.2.2 Advance support tickets 55
3.2.1 Establishing service level agreements (SLAs) and escalationsService Level Agreements (SLAs) are a useful tool for achieving good customer service. In GFI HelpDesk, you can buildSLAs that set time limits for either ticket replies or ticket resolution. This gives you an easy way to track which tickets needthe most immediate attention.
The other part of the SLA equation is escalations. An escalation is an action or set of actions that GFI HelpDesk canperform automatically when a support ticket has failed to meet an SLA.
Understanding how SLAs come together in GFI HelpDesk
The process for establishing an SLA in GFI HelpDesk follows three basic steps:
Adding your support team’s schedule to GFI HelpDesk.
Establishing an SLA to track your team's targets for response or resolution times.
Creating an escalation that acts on support tickets that don't meet their SLAs.
GFI HelpDesk calculates whether a ticket has breached an SLA's time limits based on your team's working hours.
Suppose your support team keeps daily office hours from 9:00 A.M. - 5:00 P.M, which is 8 hours. If you use an SLA planwith a 24-hour reply time, that means that any ticket with that particular SLA must be replied to within 24 working hours.In other words, your team would have 3 working days (8*3=24) to reply to that ticket.
For any ticket that is not replied to within that time frame, you can create an escalation that makes sure your team followsup on it. Escalations can perform a variety of actions like changing the ticket's priority, assigning it to a particular staff user,or moving it to another department.
You can set up different SLAs to handle different types of support tickets. For example, you could use tags to distinguishsimple 'How-to' requests from more complex 'network configuration' issues, and then set up separate SLAs to handleeach.
'How-to' tickets might have a 2-hour reply time because they are relatively easy to address, while 'network configuration'issues might have a 6-hour reply time, since they can take more time to investigate.
The topic below discusses a step-by-step process of setting up a new SLA.
As an example, the new SLA is to be set up for a team that provides support from 9:00 AM - 5:00 PM, Monday-Fri-day, with weekends off.
In that timeframe, we ensure that any ticket marked 'High' priority is replied within 2 hours and resolved within 4hours, at the max.
Additionally, if a ticket misses either of them, we're going to make sure the ticket gets escalated by bumping itspriority up to 'Critical' and sending an email to the staff member assigned to the ticket.
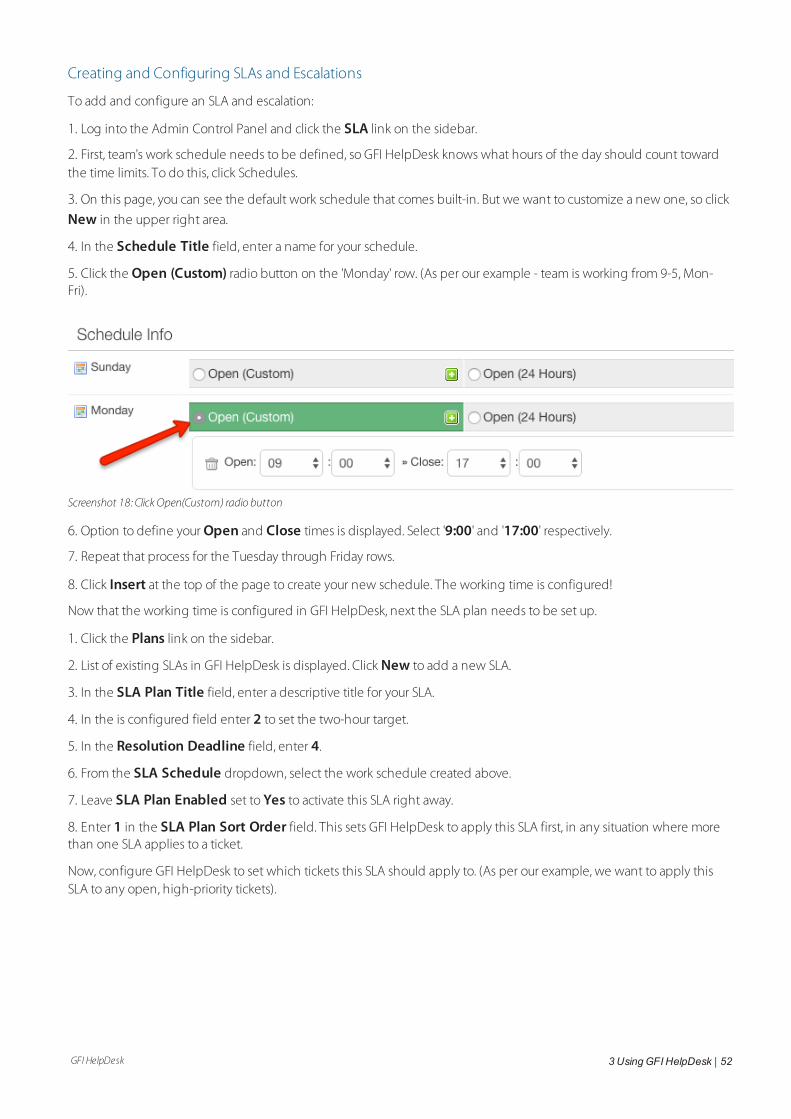
GFI HelpDesk 3 UsingGFI HelpDesk | 52
Creating and Configuring SLAs and Escalations
To add and configure an SLA and escalation:
1. Log into the Admin Control Panel and click the SLA link on the sidebar.
2. First, team's work schedule needs to be defined, so GFI HelpDesk knows what hours of the day should count towardthe time limits. To do this, click Schedules.
3. On this page, you can see the default work schedule that comes built-in. But we want to customize a new one, so click
New in the upper right area.
4. In the Schedule Title field, enter a name for your schedule.
5. Click the Open (Custom) radio button on the 'Monday' row. (As per our example - team is working from 9-5, Mon-Fri).
Screenshot 18: Click Open(Custom) radio button
6. Option to define your Open and Close times is displayed. Select '9:00' and '17:00' respectively.
7. Repeat that process for the Tuesday through Friday rows.
8. Click Insert at the top of the page to create your new schedule. The working time is configured!
Now that the working time is configured in GFI HelpDesk, next the SLA plan needs to be set up.
1. Click the Plans link on the sidebar.
2. List of existing SLAs in GFI HelpDesk is displayed. Click New to add a new SLA.
3. In the SLA Plan Title field, enter a descriptive title for your SLA.
4. In the is configured field enter 2 to set the two-hour target.
5. In the Resolution Deadline field, enter 4.
6. From the SLA Schedule dropdown, select the work schedule created above.
7. Leave SLA Plan Enabled set to Yes to activate this SLA right away.
8. Enter 1 in the SLA Plan Sort Order field. This sets GFI HelpDesk to apply this SLA first, in any situation where morethan one SLA applies to a ticket.
Now, configure GFI HelpDesk to set which tickets this SLA should apply to. (As per our example, we want to apply thisSLA to any open, high-priority tickets).
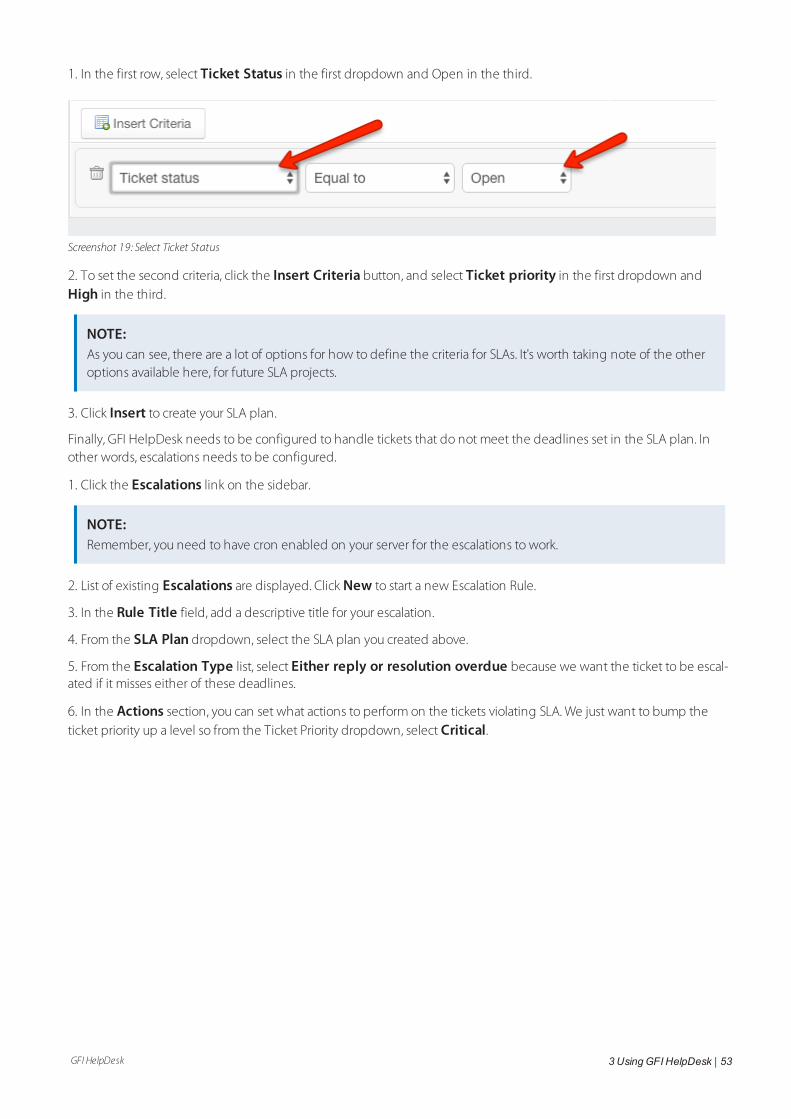
GFI HelpDesk 3 UsingGFI HelpDesk | 53
1. In the first row, select Ticket Status in the first dropdown and Open in the third.
Screenshot 19: Select Ticket Status
2. To set the second criteria, click the Insert Criteria button, and select Ticket priority in the first dropdown andHigh in the third.
NOTE:As you can see, there are a lot of options for how to define the criteria for SLAs. It's worth taking note of the otheroptions available here, for future SLA projects.
3. Click Insert to create your SLA plan.
Finally, GFI HelpDesk needs to be configured to handle tickets that do not meet the deadlines set in the SLA plan. Inother words, escalations needs to be configured.
1. Click the Escalations link on the sidebar.
NOTE:Remember, you need to have cron enabled on your server for the escalations to work.
2. List of existing Escalations are displayed. Click New to start a new Escalation Rule.
3. In the Rule Title field, add a descriptive title for your escalation.
4. From the SLA Plan dropdown, select the SLA plan you created above.
5. From the Escalation Type list, select Either reply or resolution overdue because we want the ticket to be escal-ated if it misses either of these deadlines.
6. In the Actions section, you can set what actions to perform on the tickets violating SLA. We just want to bump theticket priority up a level so from the Ticket Priority dropdown, select Critical.
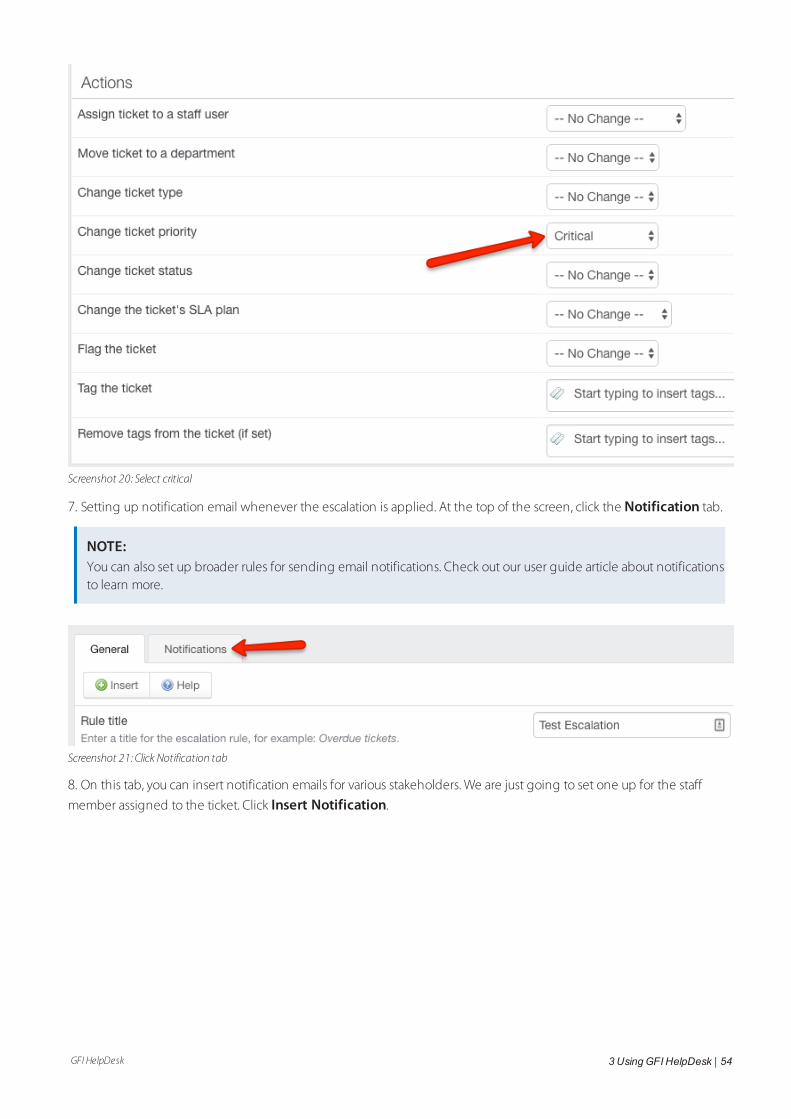
GFI HelpDesk 3 UsingGFI HelpDesk | 54
Screenshot 20: Select critical
7. Setting up notification email whenever the escalation is applied. At the top of the screen, click the Notification tab.
NOTE:You can also set up broader rules for sending email notifications. Check out our user guide article about notificationsto learn more.
Screenshot 21: Click Notification tab
8. On this tab, you can insert notification emails for various stakeholders. We are just going to set one up for the staff
member assigned to the ticket. Click Insert Notification.
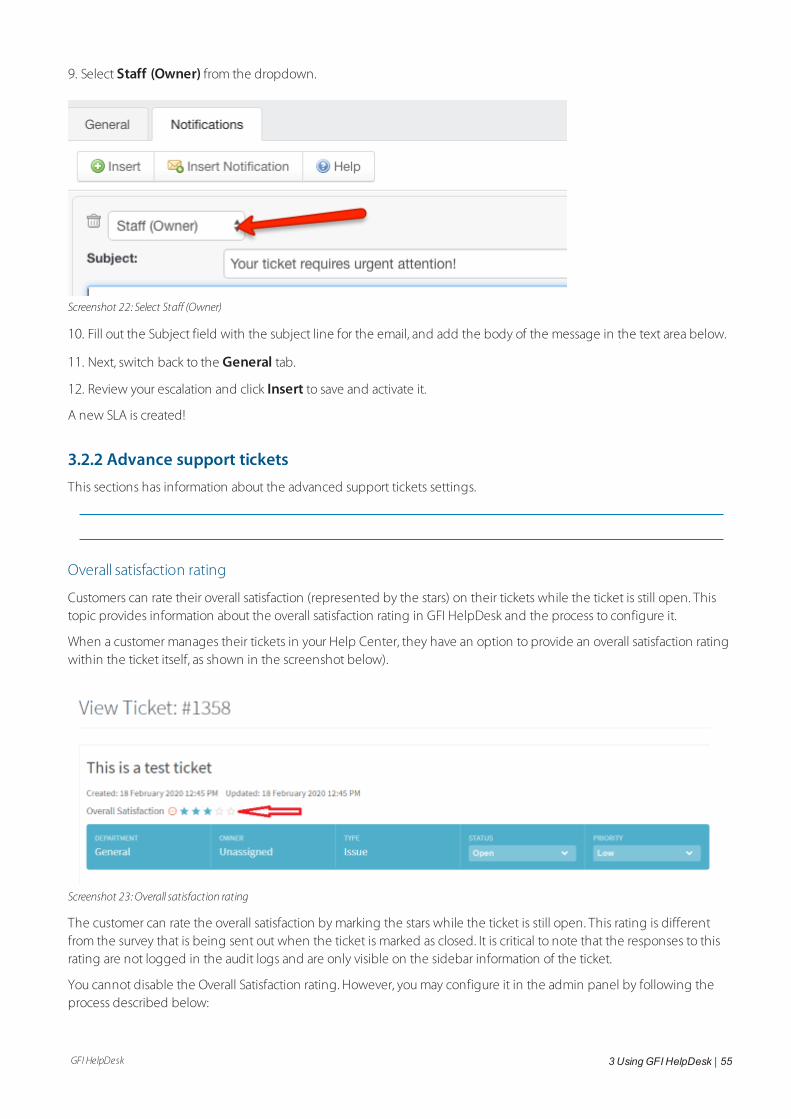
GFI HelpDesk 3 UsingGFI HelpDesk | 55
9. Select Staff (Owner) from the dropdown.
Screenshot 22: Select Staff (Owner)
10. Fill out the Subject field with the subject line for the email, and add the body of the message in the text area below.
11. Next, switch back to the General tab.
12. Review your escalation and click Insert to save and activate it.
A new SLA is created!
3.2.2 Advance support ticketsThis sections has information about the advanced support tickets settings.
Overall satisfaction rating
Customers can rate their overall satisfaction (represented by the stars) on their tickets while the ticket is still open. Thistopic provides information about the overall satisfaction rating in GFI HelpDesk and the process to configure it.
When a customer manages their tickets in your Help Center, they have an option to provide an overall satisfaction ratingwithin the ticket itself, as shown in the screenshot below).
Screenshot 23: Overall satisfaction rating
The customer can rate the overall satisfaction by marking the stars while the ticket is still open. This rating is differentfrom the survey that is being sent out when the ticket is marked as closed. It is critical to note that the responses to thisrating are not logged in the audit logs and are only visible on the sidebar information of the ticket.
You cannot disable the Overall Satisfaction rating. However, you may configure it in the admin panel by following theprocess described below:
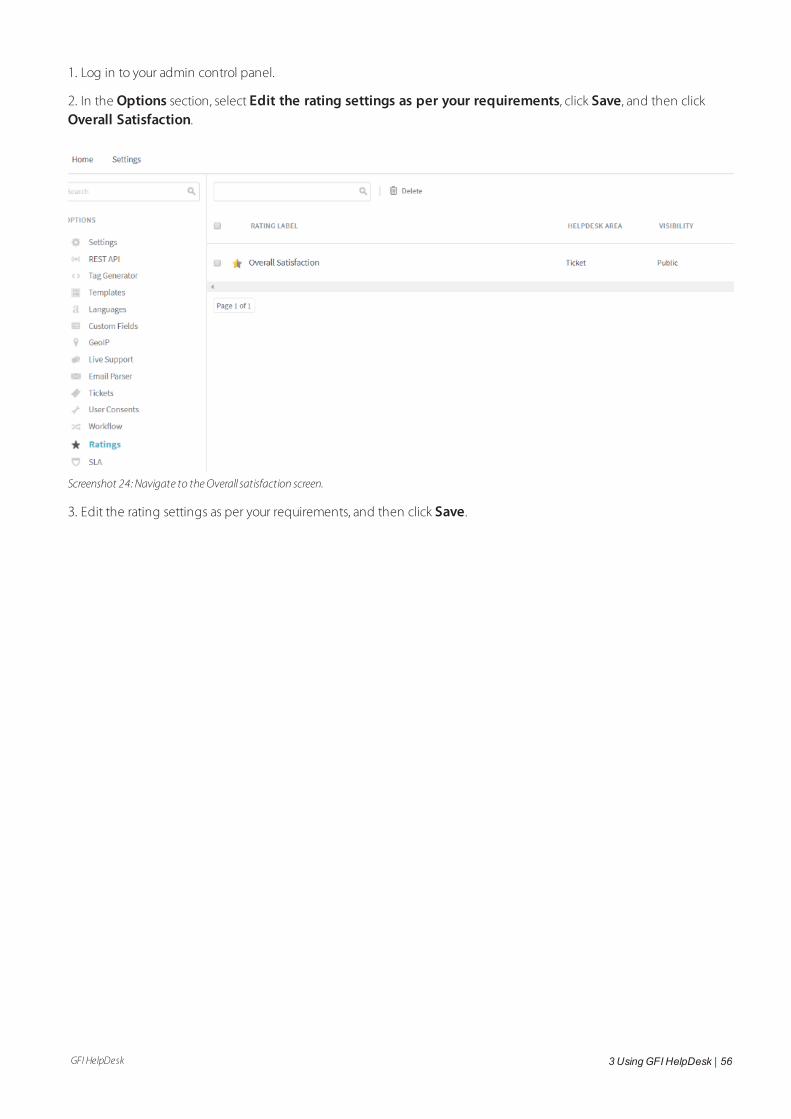
GFI HelpDesk 3 UsingGFI HelpDesk | 56
1. Log in to your admin control panel.
2. In the Options section, select Edit the rating settings as per your requirements, click Save, and then clickOverall Satisfaction.
Screenshot 24: Navigate to theOverall satisfaction screen.
3. Edit the rating settings as per your requirements, and then click Save.
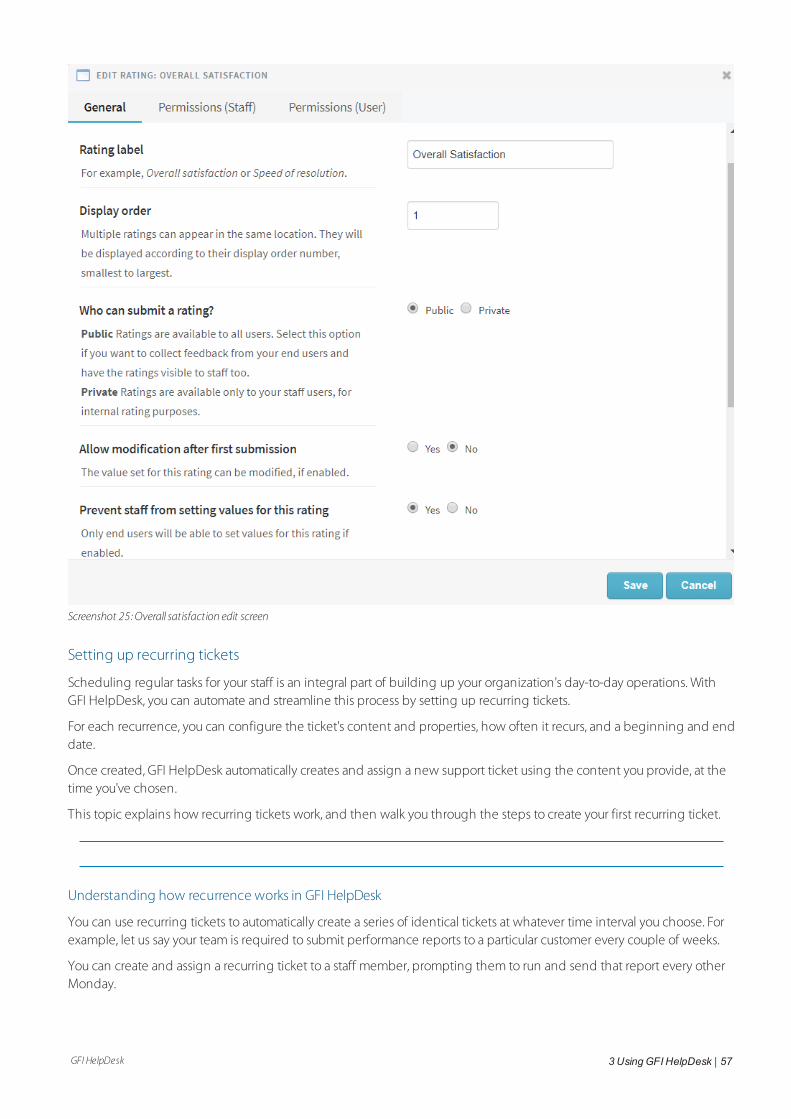
GFI HelpDesk 3 UsingGFI HelpDesk | 57
Screenshot 25: Overall satisfaction edit screen
Setting up recurring tickets
Scheduling regular tasks for your staff is an integral part of building up your organization's day-to-day operations. WithGFI HelpDesk, you can automate and streamline this process by setting up recurring tickets.
For each recurrence, you can configure the ticket's content and properties, how often it recurs, and a beginning and enddate.
Once created, GFI HelpDesk automatically creates and assign a new support ticket using the content you provide, at thetime you've chosen.
This topic explains how recurring tickets work, and then walk you through the steps to create your first recurring ticket.
Understanding how recurrence works in GFI HelpDesk
You can use recurring tickets to automatically create a series of identical tickets at whatever time interval you choose. Forexample, let us say your team is required to submit performance reports to a particular customer every couple of weeks.
You can create and assign a recurring ticket to a staff member, prompting them to run and send that report every otherMonday.
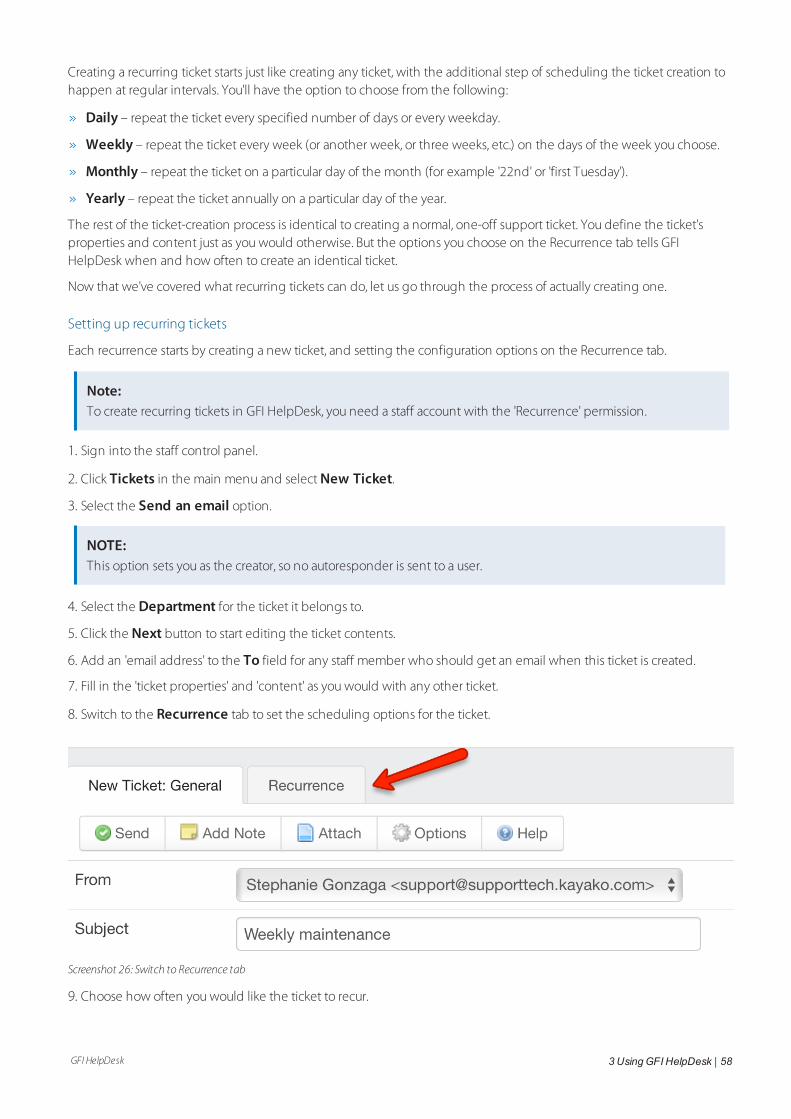
GFI HelpDesk 3 UsingGFI HelpDesk | 58
Creating a recurring ticket starts just like creating any ticket, with the additional step of scheduling the ticket creation tohappen at regular intervals. You'll have the option to choose from the following:
Daily – repeat the ticket every specified number of days or every weekday.
Weekly – repeat the ticket every week (or another week, or three weeks, etc.) on the days of the week you choose.
Monthly – repeat the ticket on a particular day of the month (for example '22nd' or 'first Tuesday').
Yearly – repeat the ticket annually on a particular day of the year.
The rest of the ticket-creation process is identical to creating a normal, one-off support ticket. You define the ticket'sproperties and content just as you would otherwise. But the options you choose on the Recurrence tab tells GFIHelpDesk when and how often to create an identical ticket.
Now that we've covered what recurring tickets can do, let us go through the process of actually creating one.
Setting up recurring tickets
Each recurrence starts by creating a new ticket, and setting the configuration options on the Recurrence tab.
Note:To create recurring tickets in GFI HelpDesk, you need a staff account with the 'Recurrence' permission.
1. Sign into the staff control panel.
2. Click Tickets in the main menu and select New Ticket.
3. Select the Send an email option.
NOTE:This option sets you as the creator, so no autoresponder is sent to a user.
4. Select the Department for the ticket it belongs to.
5. Click the Next button to start editing the ticket contents.
6. Add an 'email address' to the To field for any staff member who should get an email when this ticket is created.
7. Fill in the 'ticket properties' and 'content' as you would with any other ticket.
8. Switch to the Recurrence tab to set the scheduling options for the ticket.
Screenshot 26: Switch to Recurrence tab
9. Choose how often you would like the ticket to recur.
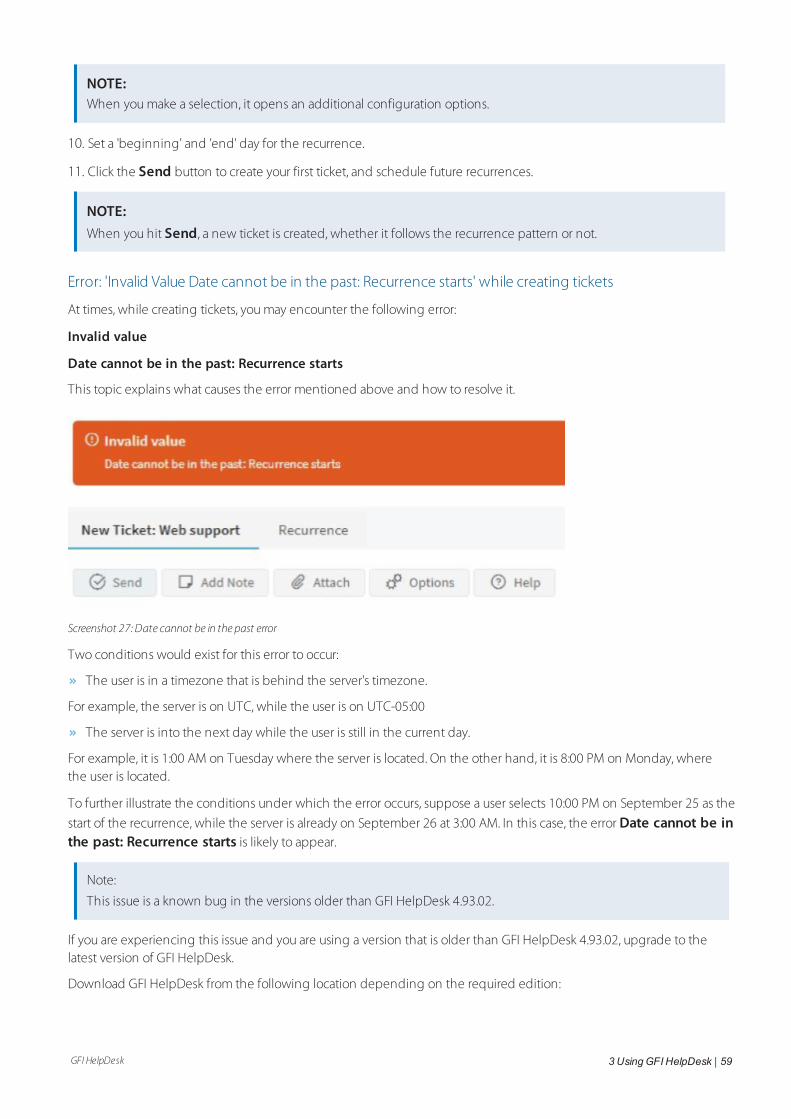
GFI HelpDesk 3 UsingGFI HelpDesk | 59
NOTE:When you make a selection, it opens an additional configuration options.
10. Set a 'beginning' and 'end' day for the recurrence.
11. Click the Send button to create your first ticket, and schedule future recurrences.
NOTE:When you hit Send, a new ticket is created, whether it follows the recurrence pattern or not.
Error: 'Invalid Value Date cannot be in the past: Recurrence starts' while creating tickets
At times, while creating tickets, you may encounter the following error:
Invalid value
Date cannot be in the past: Recurrence starts
This topic explains what causes the error mentioned above and how to resolve it.
Screenshot 27: Date cannot be in the past error
Two conditions would exist for this error to occur:
The user is in a timezone that is behind the server's timezone.
For example, the server is on UTC, while the user is on UTC-05:00
The server is into the next day while the user is still in the current day.
For example, it is 1:00 AM on Tuesday where the server is located. On the other hand, it is 8:00 PM on Monday, wherethe user is located.
To further illustrate the conditions under which the error occurs, suppose a user selects 10:00 PM on September 25 as the
start of the recurrence, while the server is already on September 26 at 3:00 AM. In this case, the error Date cannot be inthe past: Recurrence starts is likely to appear.
Note:
This issue is a known bug in the versions older than GFI HelpDesk 4.93.02.
If you are experiencing this issue and you are using a version that is older than GFI HelpDesk 4.93.02, upgrade to thelatest version of GFI HelpDesk.
Download GFI HelpDesk from the following location depending on the required edition:
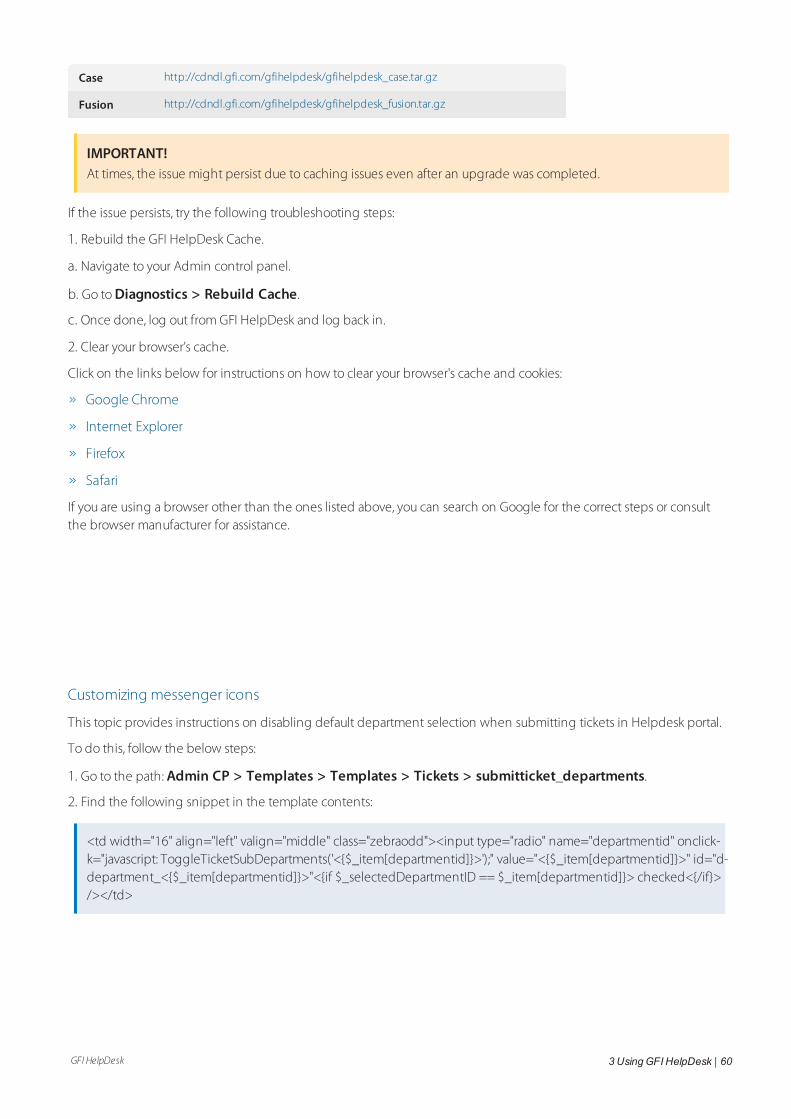
GFI HelpDesk 3 UsingGFI HelpDesk | 60
Case http://cdndl.gfi.com/gfihelpdesk/gfihelpdesk_case.tar.gz
Fusion http://cdndl.gfi.com/gfihelpdesk/gfihelpdesk_fusion.tar.gz
IMPORTANT!At times, the issue might persist due to caching issues even after an upgrade was completed.
If the issue persists, try the following troubleshooting steps:
1. Rebuild the GFI HelpDesk Cache.
a. Navigate to your Admin control panel.
b. Go to Diagnostics > Rebuild Cache.
c. Once done, log out from GFI HelpDesk and log back in.
2. Clear your browser's cache.
Click on the links below for instructions on how to clear your browser's cache and cookies:
Google Chrome
Internet Explorer
Firefox
Safari
If you are using a browser other than the ones listed above, you can search on Google for the correct steps or consultthe browser manufacturer for assistance.
Customizing messenger icons
This topic provides instructions on disabling default department selection when submitting tickets in Helpdesk portal.
To do this, follow the below steps:
1. Go to the path: Admin CP > Templates > Templates > Tickets > submitticket_departments.
2. Find the following snippet in the template contents:
<td width="16" align="left" valign="middle" class="zebraodd"><input type="radio" name="departmentid" onclick-k="javascript: ToggleTicketSubDepartments('<{$_item[departmentid]}>');" value="<{$_item[departmentid]}>" id="d-department_<{$_item[departmentid]}>"<{if $_selectedDepartmentID == $_item[departmentid]}> checked<{/if}>/></td>
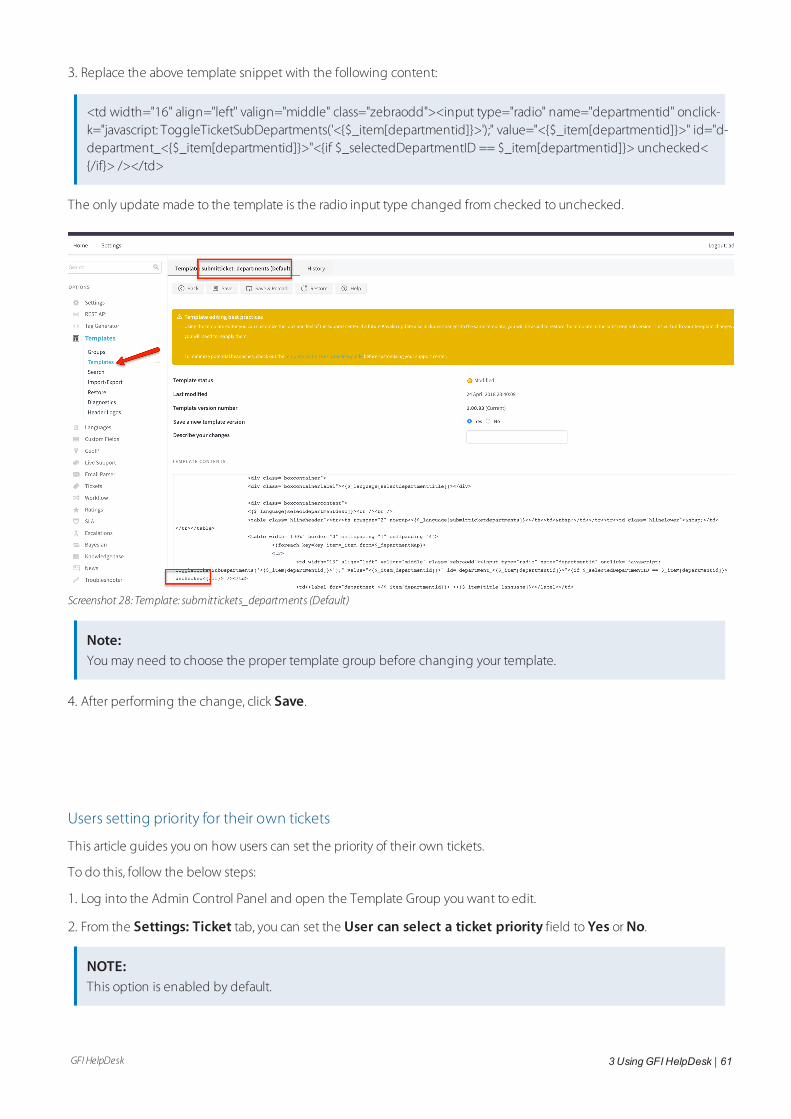
GFI HelpDesk 3 UsingGFI HelpDesk | 61
3. Replace the above template snippet with the following content:
<td width="16" align="left" valign="middle" class="zebraodd"><input type="radio" name="departmentid" onclick-k="javascript: ToggleTicketSubDepartments('<{$_item[departmentid]}>');" value="<{$_item[departmentid]}>" id="d-department_<{$_item[departmentid]}>"<{if $_selectedDepartmentID == $_item[departmentid]}> unchecked<{/if}> /></td>
The only update made to the template is the radio input type changed from checked to unchecked.
Screenshot 28: Template: submittickets_departments (Default)
Note:You may need to choose the proper template group before changing your template.
4. After performing the change, click Save.
Users setting priority for their own tickets
This article guides you on how users can set the priority of their own tickets.
To do this, follow the below steps:
1. Log into the Admin Control Panel and open the Template Group you want to edit.
2. From the Settings: Ticket tab, you can set the User can select a ticket priority field to Yes or No.
NOTE:This option is enabled by default.
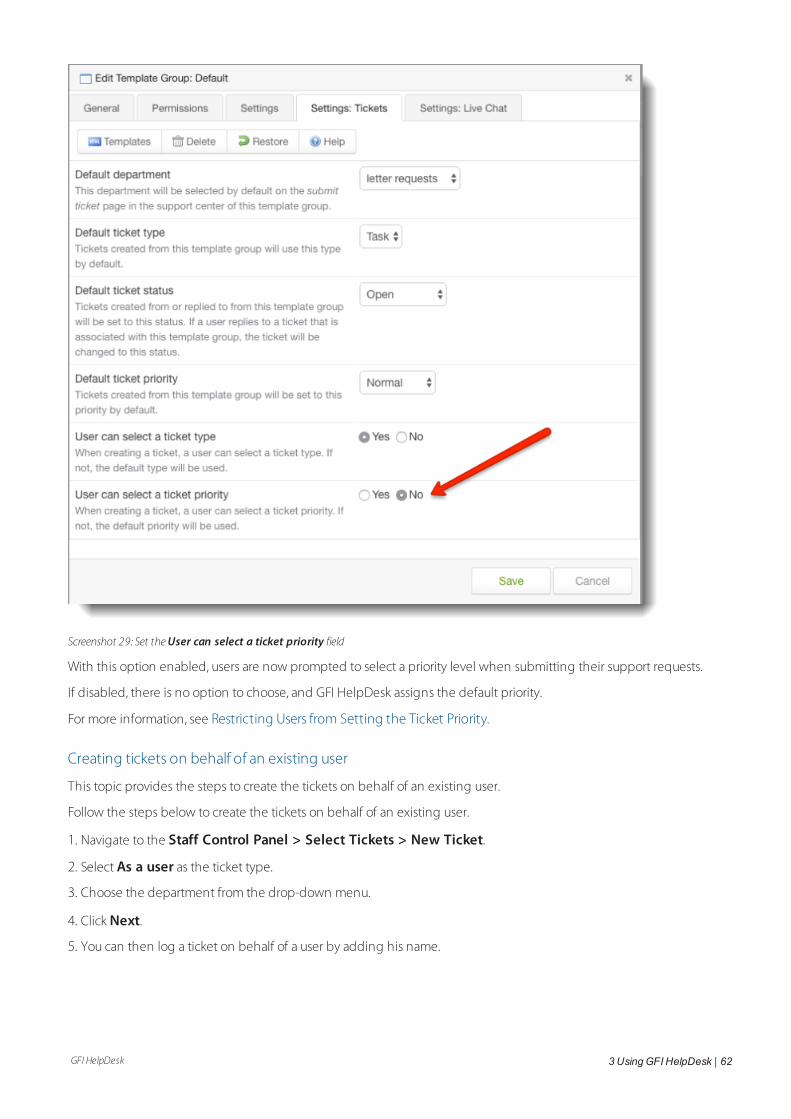
GFI HelpDesk 3 UsingGFI HelpDesk | 62
Screenshot 29: Set theUser can select a ticket priority field
With this option enabled, users are now prompted to select a priority level when submitting their support requests.
If disabled, there is no option to choose, and GFI HelpDesk assigns the default priority.
For more information, see Restricting Users from Setting the Ticket Priority.
Creating tickets on behalf of an existing user
This topic provides the steps to create the tickets on behalf of an existing user.
Follow the steps below to create the tickets on behalf of an existing user.
1. Navigate to the Staff Control Panel > Select Tickets > New Ticket.
2. Select As a user as the ticket type.
3. Choose the department from the drop-down menu.
4. Click Next.
5. You can then log a ticket on behalf of a user by adding his name.
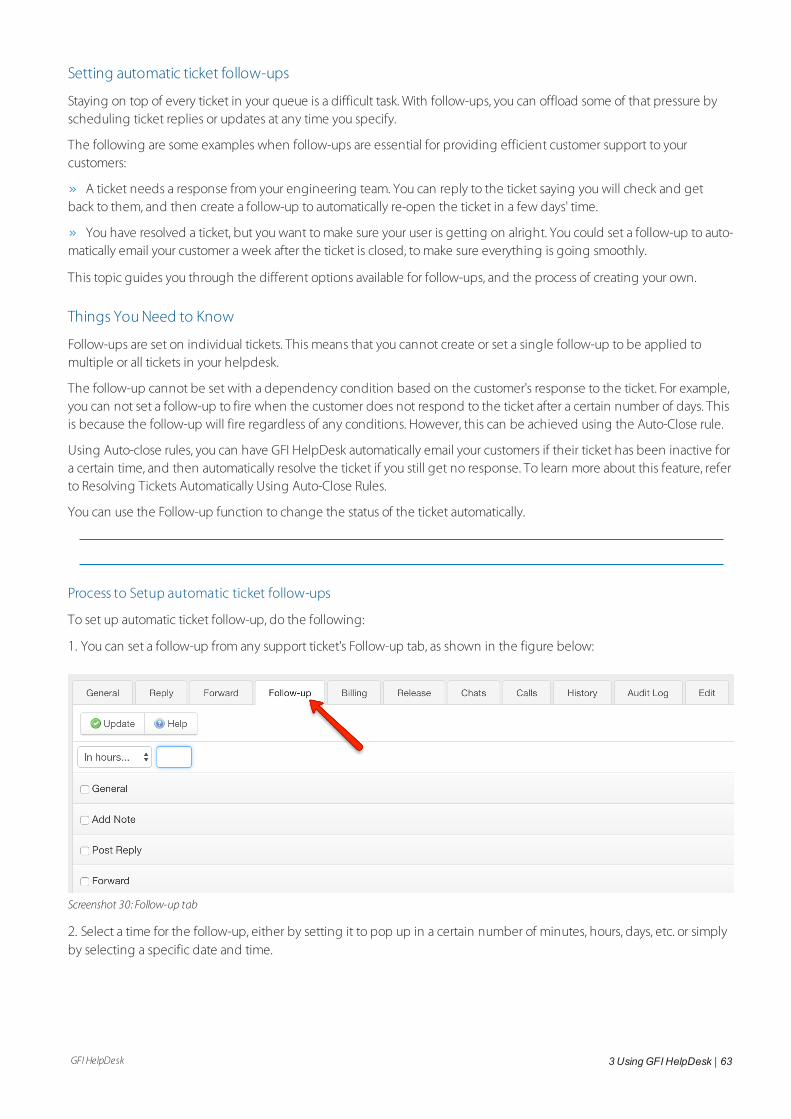
GFI HelpDesk 3 UsingGFI HelpDesk | 63
Setting automatic ticket follow-ups
Staying on top of every ticket in your queue is a difficult task. With follow-ups, you can offload some of that pressure byscheduling ticket replies or updates at any time you specify.
The following are some examples when follow-ups are essential for providing efficient customer support to yourcustomers:
A ticket needs a response from your engineering team. You can reply to the ticket saying you will check and getback to them, and then create a follow-up to automatically re-open the ticket in a few days' time.
You have resolved a ticket, but you want to make sure your user is getting on alright. You could set a follow-up to auto-matically email your customer a week after the ticket is closed, to make sure everything is going smoothly.
This topic guides you through the different options available for follow-ups, and the process of creating your own.
Things You Need to Know
Follow-ups are set on individual tickets. This means that you cannot create or set a single follow-up to be applied tomultiple or all tickets in your helpdesk.
The follow-up cannot be set with a dependency condition based on the customer's response to the ticket. For example,you can not set a follow-up to fire when the customer does not respond to the ticket after a certain number of days. Thisis because the follow-up will fire regardless of any conditions. However, this can be achieved using the Auto-Close rule.
Using Auto-close rules, you can have GFI HelpDesk automatically email your customers if their ticket has been inactive fora certain time, and then automatically resolve the ticket if you still get no response. To learn more about this feature, referto Resolving Tickets Automatically Using Auto-Close Rules.
You can use the Follow-up function to change the status of the ticket automatically.
Process to Setup automatic ticket follow-ups
To set up automatic ticket follow-up, do the following:
1. You can set a follow-up from any support ticket's Follow-up tab, as shown in the figure below:
Screenshot 30: Follow-up tab
2. Select a time for the follow-up, either by setting it to pop up in a certain number of minutes, hours, days, etc. or simplyby selecting a specific date and time.
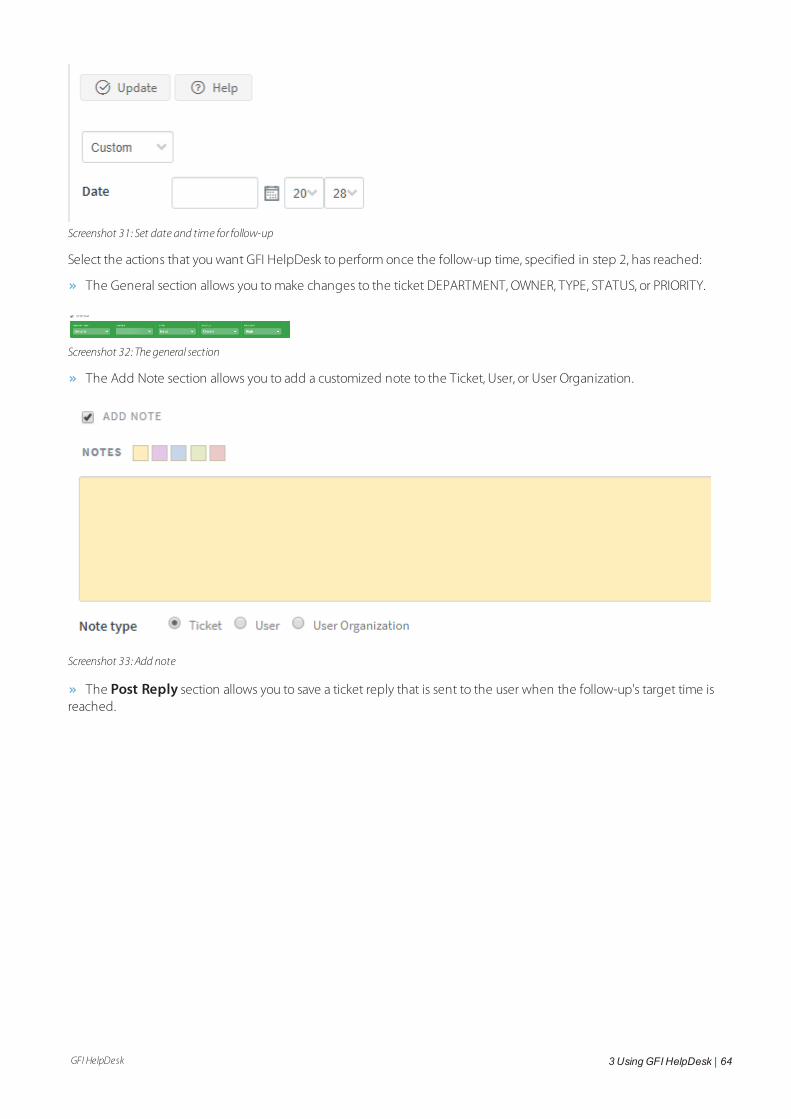
GFI HelpDesk 3 UsingGFI HelpDesk | 64
Screenshot 31: Set date and time for follow-up
Select the actions that you want GFI HelpDesk to perform once the follow-up time, specified in step 2, has reached:
The General section allows you to make changes to the ticket DEPARTMENT, OWNER, TYPE, STATUS, or PRIORITY.
Screenshot 32: The general section
The Add Note section allows you to add a customized note to the Ticket, User, or User Organization.
Screenshot 33: Add note
The Post Reply section allows you to save a ticket reply that is sent to the user when the follow-up's target time isreached.
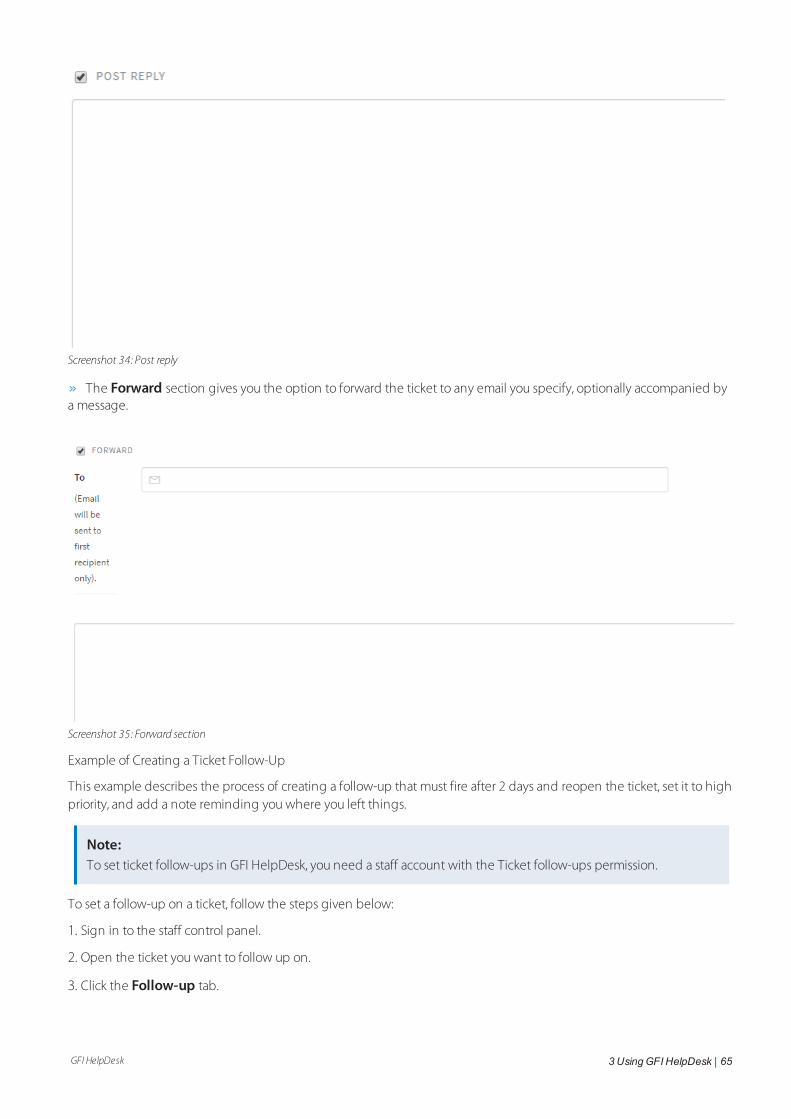
GFI HelpDesk 3 UsingGFI HelpDesk | 65
Screenshot 34: Post reply
The Forward section gives you the option to forward the ticket to any email you specify, optionally accompanied bya message.
Screenshot 35: Forward section
Example of Creating a Ticket Follow-Up
This example describes the process of creating a follow-up that must fire after 2 days and reopen the ticket, set it to highpriority, and add a note reminding you where you left things.
Note:To set ticket follow-ups in GFI HelpDesk, you need a staff account with the Ticket follow-ups permission.
To set a follow-up on a ticket, follow the steps given below:
1. Sign in to the staff control panel.
2. Open the ticket you want to follow up on.
3. Click the Follow-up tab.
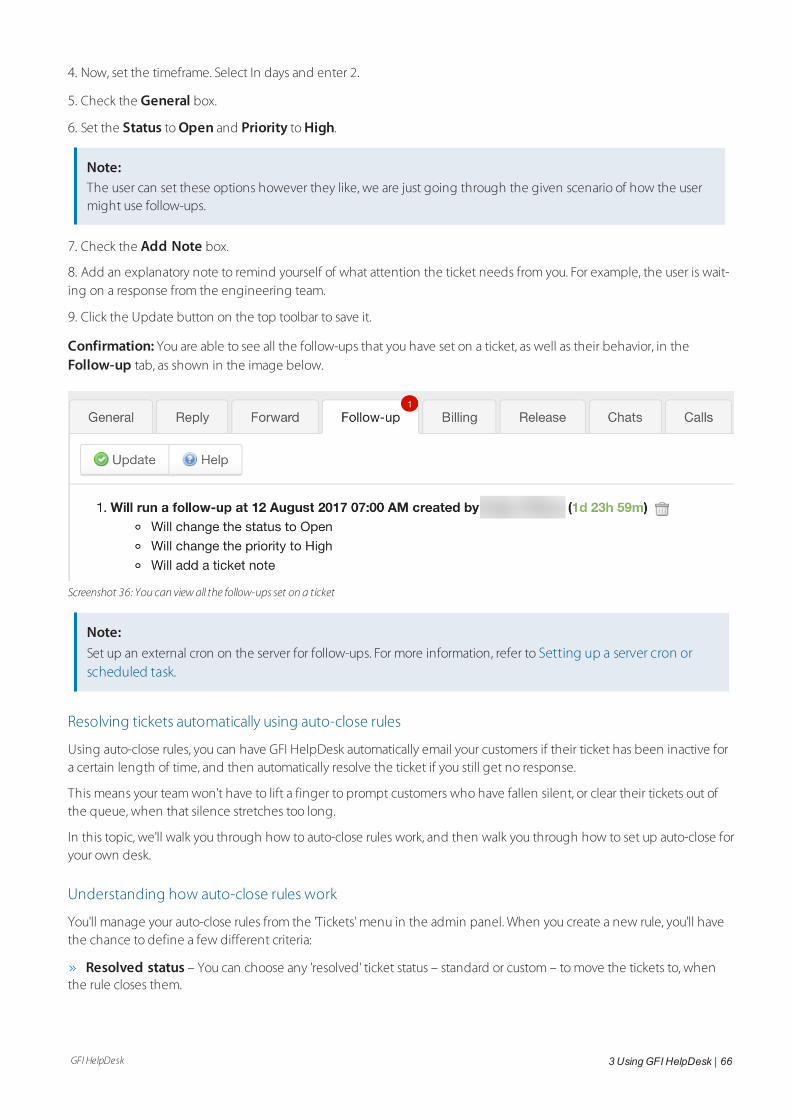
GFI HelpDesk 3 UsingGFI HelpDesk | 66
4. Now, set the timeframe. Select In days and enter 2.
5. Check the General box.
6. Set the Status to Open and Priority to High.
Note:The user can set these options however they like, we are just going through the given scenario of how the usermight use follow-ups.
7. Check the Add Note box.
8. Add an explanatory note to remind yourself of what attention the ticket needs from you. For example, the user is wait-ing on a response from the engineering team.
9. Click the Update button on the top toolbar to save it.
Confirmation: You are able to see all the follow-ups that you have set on a ticket, as well as their behavior, in theFollow-up tab, as shown in the image below.
Screenshot 36: You can viewall the follow-ups set on a ticket
Note:Set up an external cron on the server for follow-ups. For more information, refer to Setting up a server cron orscheduled task.
Resolving tickets automatically using auto-close rules
Using auto-close rules, you can have GFI HelpDesk automatically email your customers if their ticket has been inactive fora certain length of time, and then automatically resolve the ticket if you still get no response.
This means your team won't have to lift a finger to prompt customers who have fallen silent, or clear their tickets out ofthe queue, when that silence stretches too long.
In this topic, we'll walk you through how to auto-close rules work, and then walk you through how to set up auto-close foryour own desk.
Understanding how auto-close rules work
You'll manage your auto-close rules from the 'Tickets' menu in the admin panel. When you create a new rule, you'll havethe chance to define a few different criteria:
Resolved status – You can choose any 'resolved' ticket status – standard or custom – to move the tickets to, whenthe rule closes them.

GFI HelpDesk 3 UsingGFI HelpDesk | 67
Inactivity threshold – This is the first of two-time limits you'll set. If no update is made to a ticket in the number ofhours you define here, GFI HelpDesk automatically marks the ticket as inactive.
Closure threshold – Once a ticket has been marked inactive, GFI HelpDesk then starts counting toward the closurethreshold. When the ticket has stayed inactive for the number of hours you define here, the rule sets the ticket to theresolved status you've chosen.
Notifications – You'll have the option to send customers an automatic email when either the inactivity or closurethreshold has been met. You can also customize those messages by modifying the phrases for the auto-close noti-fications.
Ticket criteria – You can also limit the scope of the auto-close rule according to tickets' attributes as well, like depart-ment, type, status, etc.
Overall, by defining a set of auto-close rules, you can tell GFI HelpDesk to send reminders about and set timers for anysubset of your tickets, so your team doesn't have to chase down disengaged customers manually.
Creating a new auto-close rule
You may want to have a plan for which tickets you want to target with your rule, as well as the thresholds you want to setfor inactivity and closure. Once you've got those in hand, you're ready to dive into the instructions.
NOTE:To manage auto-close rules in GFI HelpDesk, you need an administrator account with the 'Ticket auto-close rules'permission.
To add a new auto-close rule:
1. Sign into your admin control panel.
2. Under the Tickets section, click the Auto-close link.
3. Here you can see any rules your team has already configured and the default 'Close tickets after five days if we won't
hear back from the customer' rule. Click the New button in the upper-right.
4. In the Rule title text box, enter a title for this auto-close rule.
5. From the Change status to drop-down, select either a default or custom 'resolved' status that you want the rule tomove tickets into when it's closed.
NOTE:To check whether the status is resolved or unresolved, go to Tickets > Statuses in the admin control panel andclick a status to review its details.
6. In the Inactivity threshold box, specify the number hours after which GFI HelpDesk should mark the ticket as inact-ive.
7. In the Closure threshold box, specify the number of hours after which the ticket should go to the resolved status.
NOTE:These thresholds are calculated using calendar hours, not business hours.
GFI HelpDesk 3 UsingGFI HelpDesk | 68
8. If you want to send an email to the customer when their ticket hits the inactivity threshold, set the Send inactivitynotification email option to Yes.
9. If you want to send an email to tell the customer when their ticket is closed, set the Send final ticket closed noti-fication email option to Yes.
10. You can also tell GFI HelpDesk not to send a survey invitation for automatically closed tickets, by setting the Sup-press customer survey email option to Yes.
11. Set the Rule is enabled to Yes to enable the rule when you save it.
NOTE:You can always come back and change this later.
12. The Execution order field gives you the chance to tell GFI HelpDesk which order to execute your auto-close rules,in case you have more than one enabled. The smaller the number you select here, the higher priority it takes.
13. Finally, in the last step, you can specify any criteria by which you want to limit the scope of your new rule. GFIHelpDesk automatically closes only tickets that match the criteria specified here.
NOTE:If you use Ticket status as a criterion, you need to select 'unresolved' statuses.
14. When you're done defining your criteria, click the Insert button in the top toolbar to save your new rule.
Note:If you are using the self-hosted version of GFI HelpDesk, set up an external cron on the server for auto-close. Formore information, see setting up a server cron or scheduled task.
Standardizing support procedures with workflows
Many support teams spend a lot of time handling common administrative support requests like equipment purchases ortravel budget approvals. These requests go through a predefined set of steps that do not change from one request tothe next.
Using GFI HelpDesk workflow feature, you can capture and streamline these procedures, saving your team valuable timeand dramatically reducing the occurrence of human error.
Workflows are built to capture each step in a procedure so it can be followed exactly the same way every time, at thepush of a button. Whether your process has two steps or a dozen, you can use workflows to keep your team and yourtickets on track.
In this topic, you can see how you might use GFI HelpDesk workflows, and then walk you through how to create thatexample, step-by-step.
Understanding how to use workflows
Let's have a look at a specific example of how a team might use workflows so that we can understand how all the piecescome together. We go with purchasing a piece of new equipment since it is a common use case for workflows.
When a new request comes in where someone wants to purchase a new piece of equipment, what steps does it needto go through?
The request goes through two steps:
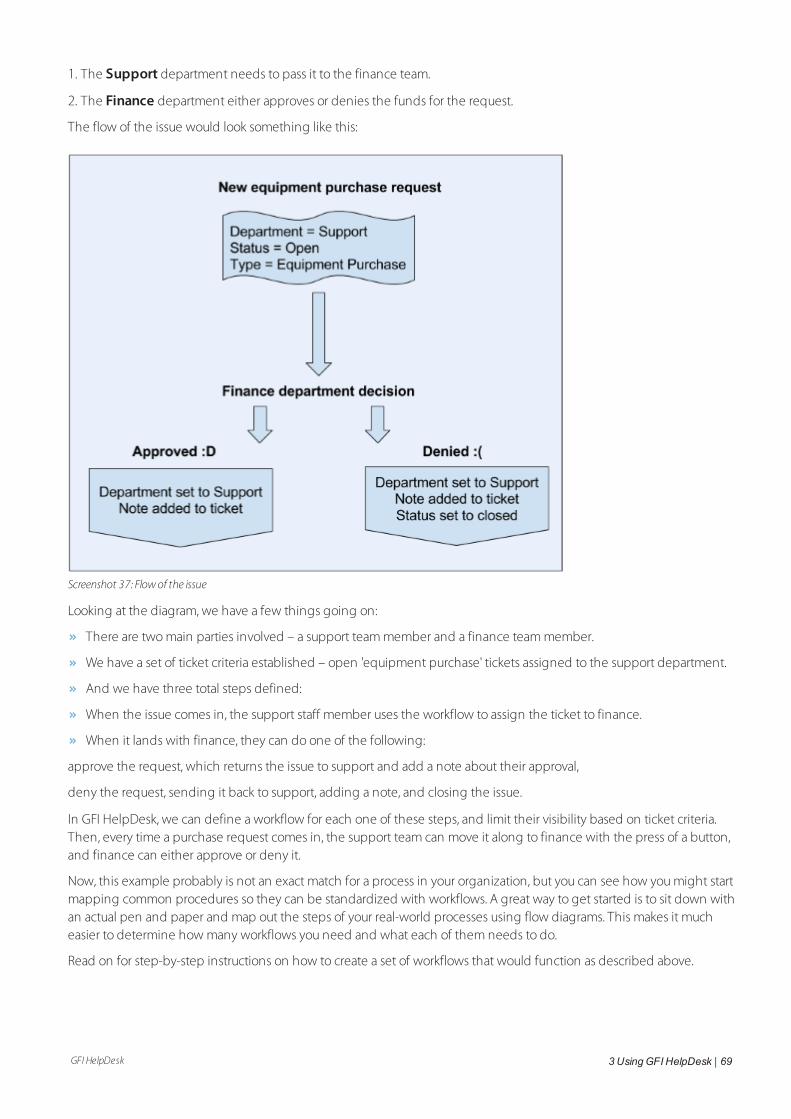
GFI HelpDesk 3 UsingGFI HelpDesk | 69
1. The Support department needs to pass it to the finance team.
2. The Finance department either approves or denies the funds for the request.
The flow of the issue would look something like this:
Screenshot 37: Flowof the issue
Looking at the diagram, we have a few things going on:
There are two main parties involved – a support team member and a finance team member.
We have a set of ticket criteria established – open 'equipment purchase' tickets assigned to the support department.
And we have three total steps defined:
When the issue comes in, the support staff member uses the workflow to assign the ticket to finance.
When it lands with finance, they can do one of the following:
approve the request, which returns the issue to support and add a note about their approval,
deny the request, sending it back to support, adding a note, and closing the issue.
In GFI HelpDesk, we can define a workflow for each one of these steps, and limit their visibility based on ticket criteria.Then, every time a purchase request comes in, the support team can move it along to finance with the press of a button,and finance can either approve or deny it.
Now, this example probably is not an exact match for a process in your organization, but you can see how you might startmapping common procedures so they can be standardized with workflows. A great way to get started is to sit down withan actual pen and paper and map out the steps of your real-world processes using flow diagrams. This makes it mucheasier to determine how many workflows you need and what each of them needs to do.
Read on for step-by-step instructions on how to create a set of workflows that would function as described above.
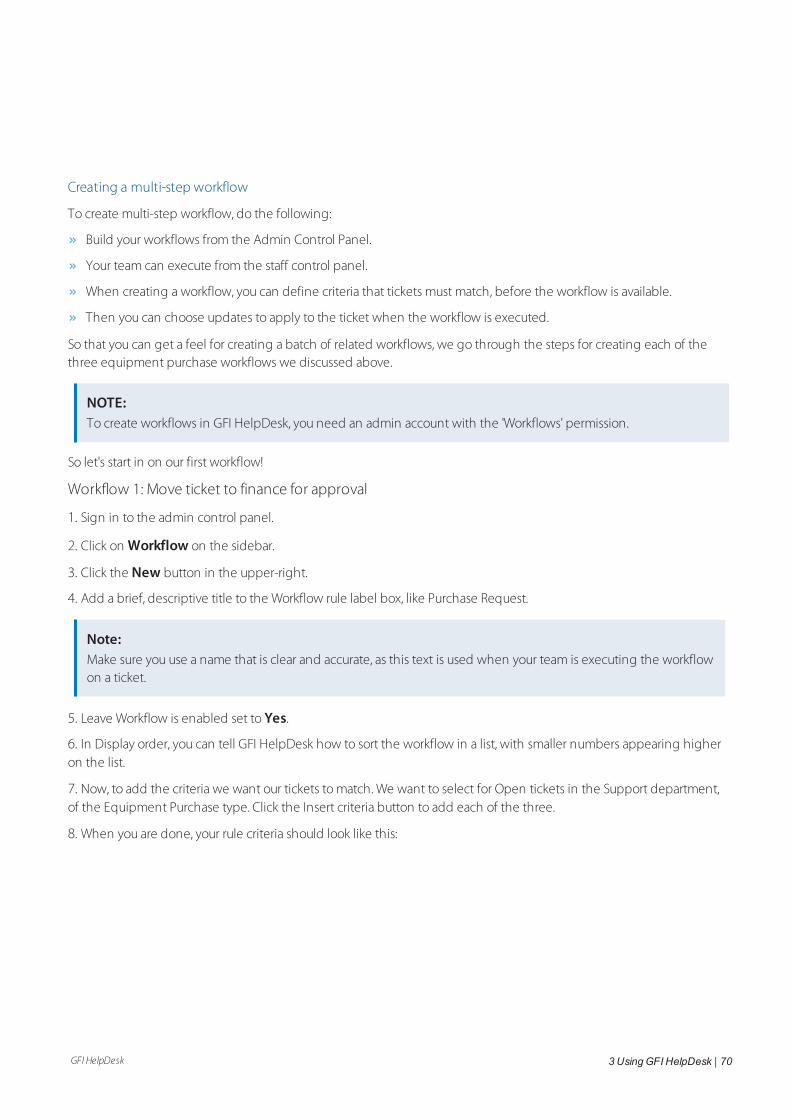
GFI HelpDesk 3 UsingGFI HelpDesk | 70
Creating a multi-step workflow
To create multi-step workflow, do the following:
Build your workflows from the Admin Control Panel.
Your team can execute from the staff control panel.
When creating a workflow, you can define criteria that tickets must match, before the workflow is available.
Then you can choose updates to apply to the ticket when the workflow is executed.
So that you can get a feel for creating a batch of related workflows, we go through the steps for creating each of thethree equipment purchase workflows we discussed above.
NOTE:To create workflows in GFI HelpDesk, you need an admin account with the 'Workflows' permission.
So let's start in on our first workflow!
Workflow 1: Move ticket to finance for approval
1. Sign in to the admin control panel.
2. Click on Workflow on the sidebar.
3. Click the New button in the upper-right.
4. Add a brief, descriptive title to the Workflow rule label box, like Purchase Request.
Note:Make sure you use a name that is clear and accurate, as this text is used when your team is executing the workflowon a ticket.
5. Leave Workflow is enabled set to Yes.
6. In Display order, you can tell GFI HelpDesk how to sort the workflow in a list, with smaller numbers appearing higheron the list.
7. Now, to add the criteria we want our tickets to match. We want to select for Open tickets in the Support department,of the Equipment Purchase type. Click the Insert criteria button to add each of the three.
8. When you are done, your rule criteria should look like this:
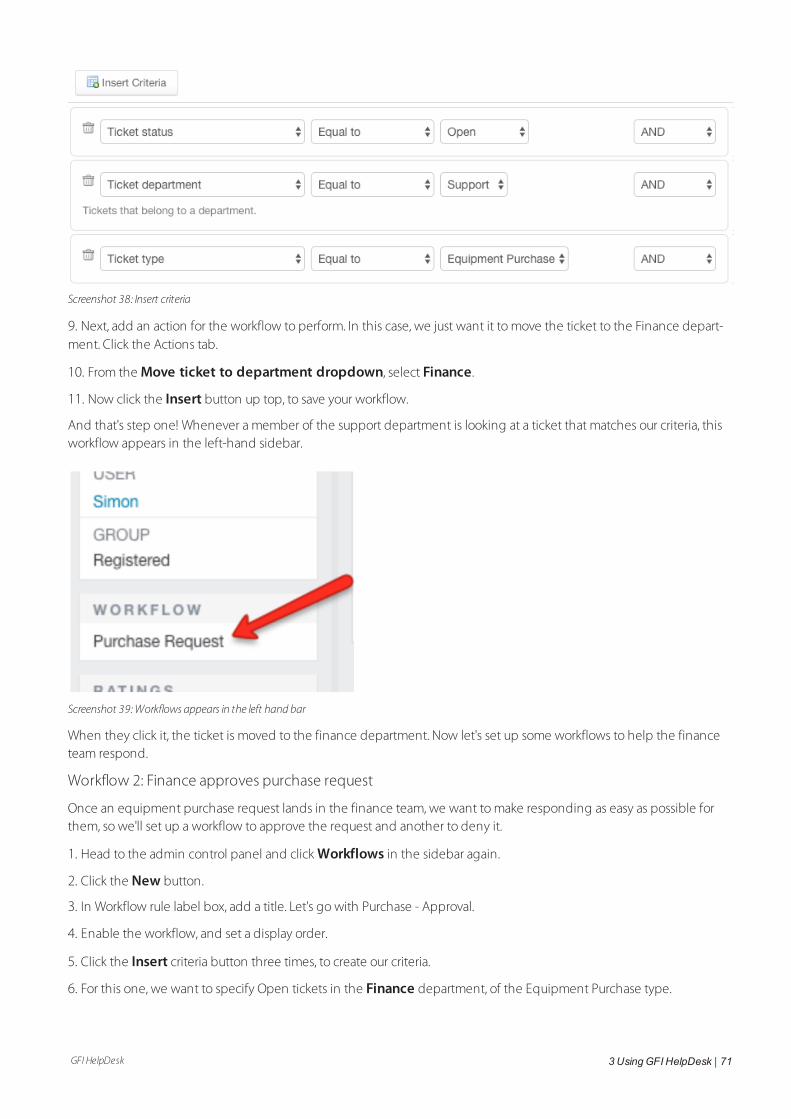
GFI HelpDesk 3 UsingGFI HelpDesk | 71
Screenshot 38: Insert criteria
9. Next, add an action for the workflow to perform. In this case, we just want it to move the ticket to the Finance depart-ment. Click the Actions tab.
10. From the Move ticket to department dropdown, select Finance.
11. Now click the Insert button up top, to save your workflow.
And that's step one! Whenever a member of the support department is looking at a ticket that matches our criteria, thisworkflow appears in the left-hand sidebar.
Screenshot 39:Workflows appears in the left hand bar
When they click it, the ticket is moved to the finance department. Now let's set up some workflows to help the financeteam respond.
Workflow 2: Finance approves purchase request
Once an equipment purchase request lands in the finance team, we want to make responding as easy as possible forthem, so we'll set up a workflow to approve the request and another to deny it.
1. Head to the admin control panel and click Workflows in the sidebar again.
2. Click the New button.
3. In Workflow rule label box, add a title. Let's go with Purchase - Approval.
4. Enable the workflow, and set a display order.
5. Click the Insert criteria button three times, to create our criteria.
6. For this one, we want to specify Open tickets in the Finance department, of the Equipment Purchase type.
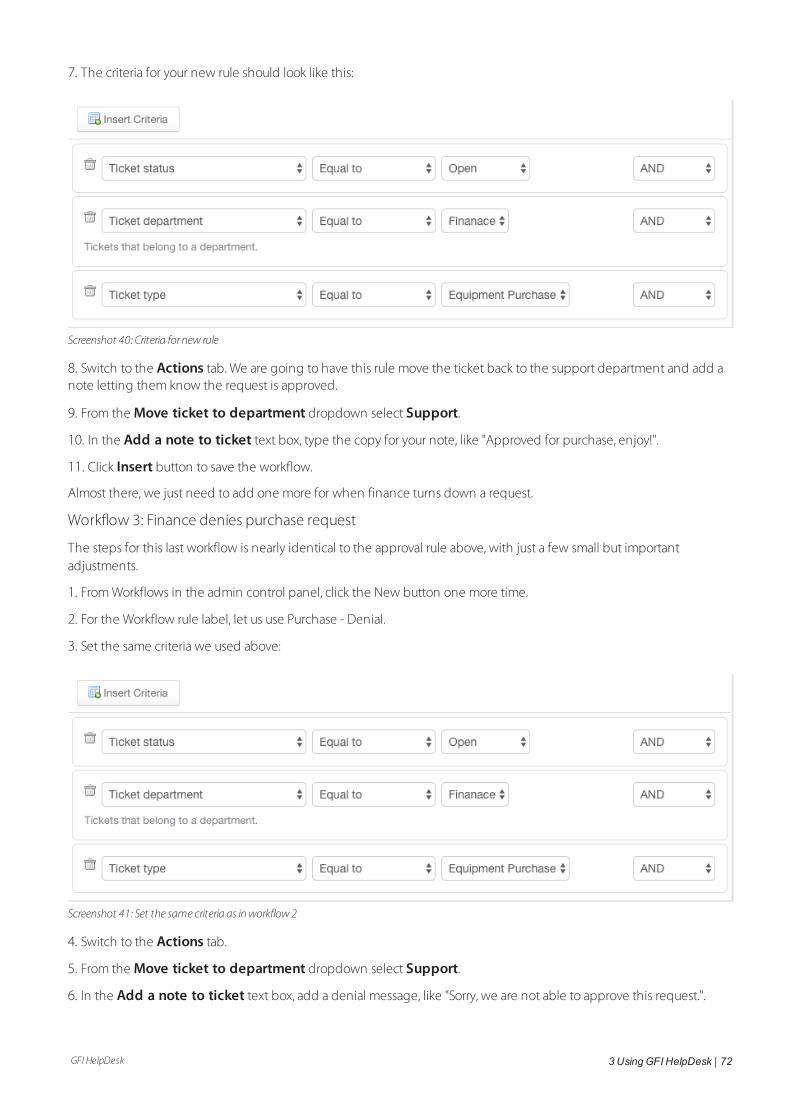
GFI HelpDesk 3 UsingGFI HelpDesk | 72
7. The criteria for your new rule should look like this:
Screenshot 40: Criteria for new rule
8. Switch to the Actions tab. We are going to have this rule move the ticket back to the support department and add anote letting them know the request is approved.
9. From the Move ticket to department dropdown select Support.
10. In the Add a note to ticket text box, type the copy for your note, like "Approved for purchase, enjoy!".
11. Click Insert button to save the workflow.
Almost there, we just need to add one more for when finance turns down a request.
Workflow 3: Finance denies purchase request
The steps for this last workflow is nearly identical to the approval rule above, with just a few small but importantadjustments.
1. From Workflows in the admin control panel, click the New button one more time.
2. For the Workflow rule label, let us use Purchase - Denial.
3. Set the same criteria we used above:
Screenshot 41: Set the same criteria as inworkflow2
4. Switch to the Actions tab.
5. From the Move ticket to department dropdown select Support.
6. In the Add a note to ticket text box, add a denial message, like "Sorry, we are not able to approve this request.".
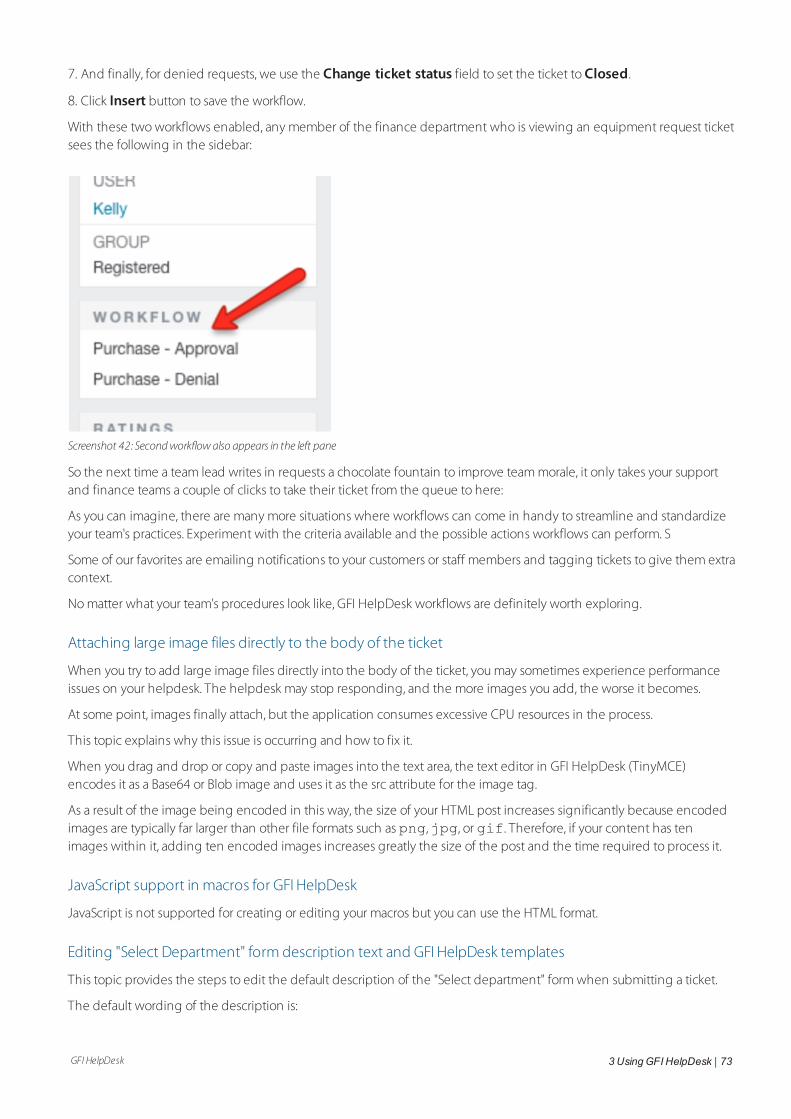
GFI HelpDesk 3 UsingGFI HelpDesk | 73
7. And finally, for denied requests, we use the Change ticket status field to set the ticket to Closed.
8. Click Insert button to save the workflow.
With these two workflows enabled, any member of the finance department who is viewing an equipment request ticketsees the following in the sidebar:
Screenshot 42: Secondworkflowalso appears in the left pane
So the next time a team lead writes in requests a chocolate fountain to improve team morale, it only takes your supportand finance teams a couple of clicks to take their ticket from the queue to here:
As you can imagine, there are many more situations where workflows can come in handy to streamline and standardizeyour team's practices. Experiment with the criteria available and the possible actions workflows can perform. S
Some of our favorites are emailing notifications to your customers or staff members and tagging tickets to give them extracontext.
No matter what your team's procedures look like, GFI HelpDesk workflows are definitely worth exploring.
Attaching large image files directly to the body of the ticket
When you try to add large image files directly into the body of the ticket, you may sometimes experience performanceissues on your helpdesk. The helpdesk may stop responding, and the more images you add, the worse it becomes.
At some point, images finally attach, but the application consumes excessive CPU resources in the process.
This topic explains why this issue is occurring and how to fix it.
When you drag and drop or copy and paste images into the text area, the text editor in GFI HelpDesk (TinyMCE)encodes it as a Base64 or Blob image and uses it as the src attribute for the image tag.
As a result of the image being encoded in this way, the size of your HTML post increases significantly because encodedimages are typically far larger than other file formats such as png,jpg, or gif. Therefore, if your content has tenimages within it, adding ten encoded images increases greatly the size of the post and the time required to process it.
JavaScript support in macros for GFI HelpDesk
JavaScript is not supported for creating or editing your macros but you can use the HTML format.
Editing "Select Department" form description text and GFI HelpDesk templates
This topic provides the steps to edit the default description of the "Select department" form when submitting a ticket.
The default wording of the description is:
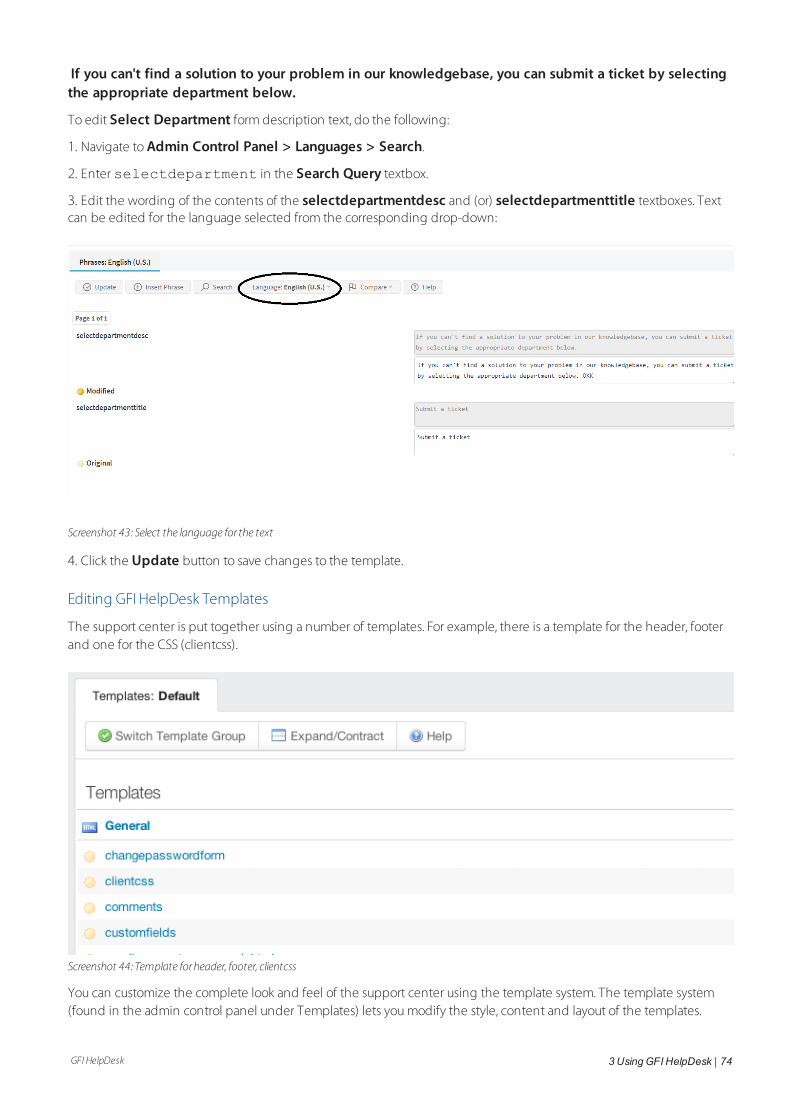
GFI HelpDesk 3 UsingGFI HelpDesk | 74
If you can't find a solution to your problem in our knowledgebase, you can submit a ticket by selectingthe appropriate department below.
To edit Select Department form description text, do the following:
1. Navigate to Admin Control Panel > Languages > Search.
2. Enter selectdepartment in the Search Query textbox.
3. Edit the wording of the contents of the selectdepartmentdesc and (or) selectdepartmenttitle textboxes. Textcan be edited for the language selected from the corresponding drop-down:
Screenshot 43: Select the language for the text
4. Click the Update button to save changes to the template.
Editing GFI HelpDesk Templates
The support center is put together using a number of templates. For example, there is a template for the header, footerand one for the CSS (clientcss).
Screenshot 44: Template forheader, footer, clientcss
You can customize the complete look and feel of the support center using the template system. The template system(found in the admin control panel under Templates) lets you modify the style, content and layout of the templates.
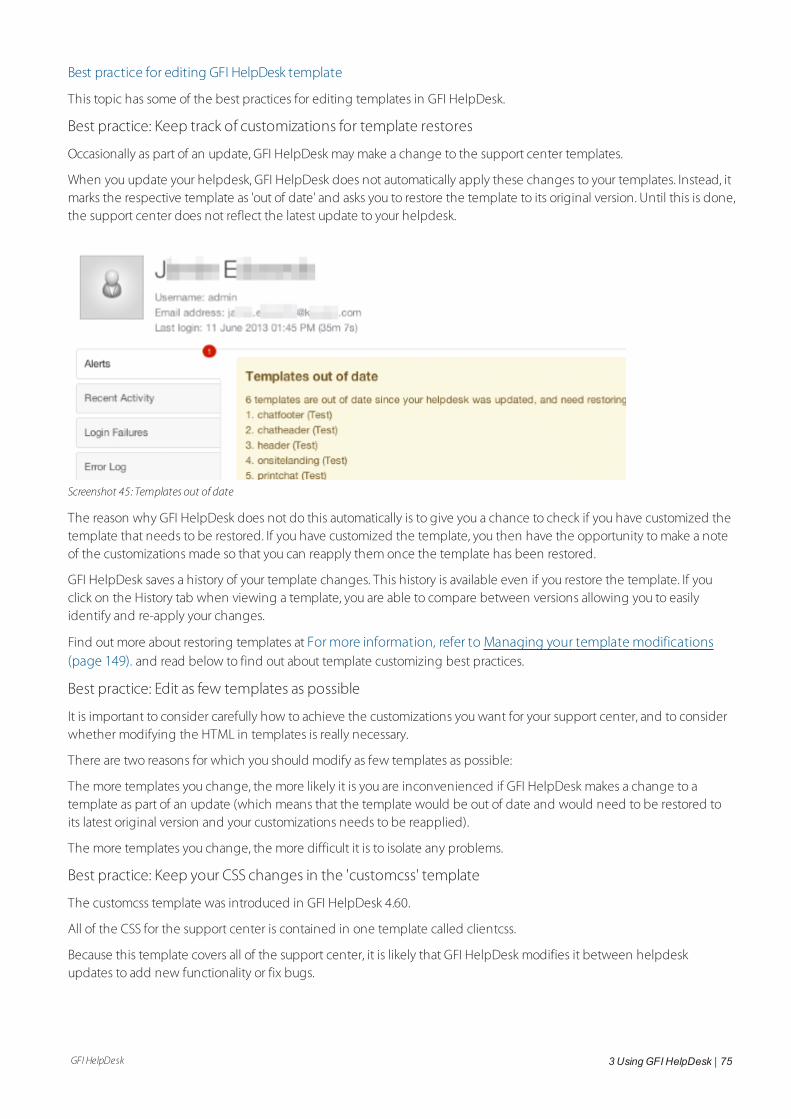
GFI HelpDesk 3 UsingGFI HelpDesk | 75
Best practice for editing GFI HelpDesk template
This topic has some of the best practices for editing templates in GFI HelpDesk.
Best practice: Keep track of customizations for template restores
Occasionally as part of an update, GFI HelpDesk may make a change to the support center templates.
When you update your helpdesk, GFI HelpDesk does not automatically apply these changes to your templates. Instead, itmarks the respective template as 'out of date' and asks you to restore the template to its original version. Until this is done,the support center does not reflect the latest update to your helpdesk.
Screenshot 45: Templates out of date
The reason why GFI HelpDesk does not do this automatically is to give you a chance to check if you have customized thetemplate that needs to be restored. If you have customized the template, you then have the opportunity to make a noteof the customizations made so that you can reapply them once the template has been restored.
GFI HelpDesk saves a history of your template changes. This history is available even if you restore the template. If youclick on the History tab when viewing a template, you are able to compare between versions allowing you to easilyidentify and re-apply your changes.
Find out more about restoring templates at For more information, refer to Managing your template modifications(page 149). and read below to find out about template customizing best practices.
Best practice: Edit as few templates as possible
It is important to consider carefully how to achieve the customizations you want for your support center, and to considerwhether modifying the HTML in templates is really necessary.
There are two reasons for which you should modify as few templates as possible:
The more templates you change, the more likely it is you are inconvenienced if GFI HelpDesk makes a change to atemplate as part of an update (which means that the template would be out of date and would need to be restored toits latest original version and your customizations needs to be reapplied).
The more templates you change, the more difficult it is to isolate any problems.
Best practice: Keep your CSS changes in the 'customcss' template
The customcss template was introduced in GFI HelpDesk 4.60.
All of the CSS for the support center is contained in one template called clientcss.
Because this template covers all of the support center, it is likely that GFI HelpDesk modifies it between helpdeskupdates to add new functionality or fix bugs.
GFI HelpDesk 3 UsingGFI HelpDesk | 76
Therefore, we suggest that any CSS changes you wish to make should be made in the customcss template. We never
make changes to this template; it is empty and intended solely for your own custom CSS. It is loaded after clientcss,meaning anything in customcss overrides clientcss.
For example, by default, clientcss includes a statement to style the title of knowledgebase articles:
.kbtitle
{ font-size: 30px;
font-weight: 200;
}
If you wish to increase the font size, rather than modifying this statement in clientcss, you should override thestatement using the customcss template by adding:
.kbtitle {
font-size: 40px;
}
Because customcss is loaded after clientcss, the element kbtitle ends up with a font-size of 40px and a font-weight of200.
Try to use CSS rather than editing the HTML
For example, let us say you wanted to hide the author avatar shown on knowledgebase articles. In the templateknowledgebasearticle you finds the following HTML:
<divclass="kbavatar"><imgsrc="/Base/StaffProfile/DisplayAvatar/"align="absmiddle"border="0"/></div>
Rather than modifying the template directly by deleting this HTML, you could create a new CSS statement in thecustomcss template to hide it:
.kbavatar {
display: none;
}
Handling SMTP SSL errors
While working with an external SMTP server, may receive some SSL errors related to the connection with the server, suchas:
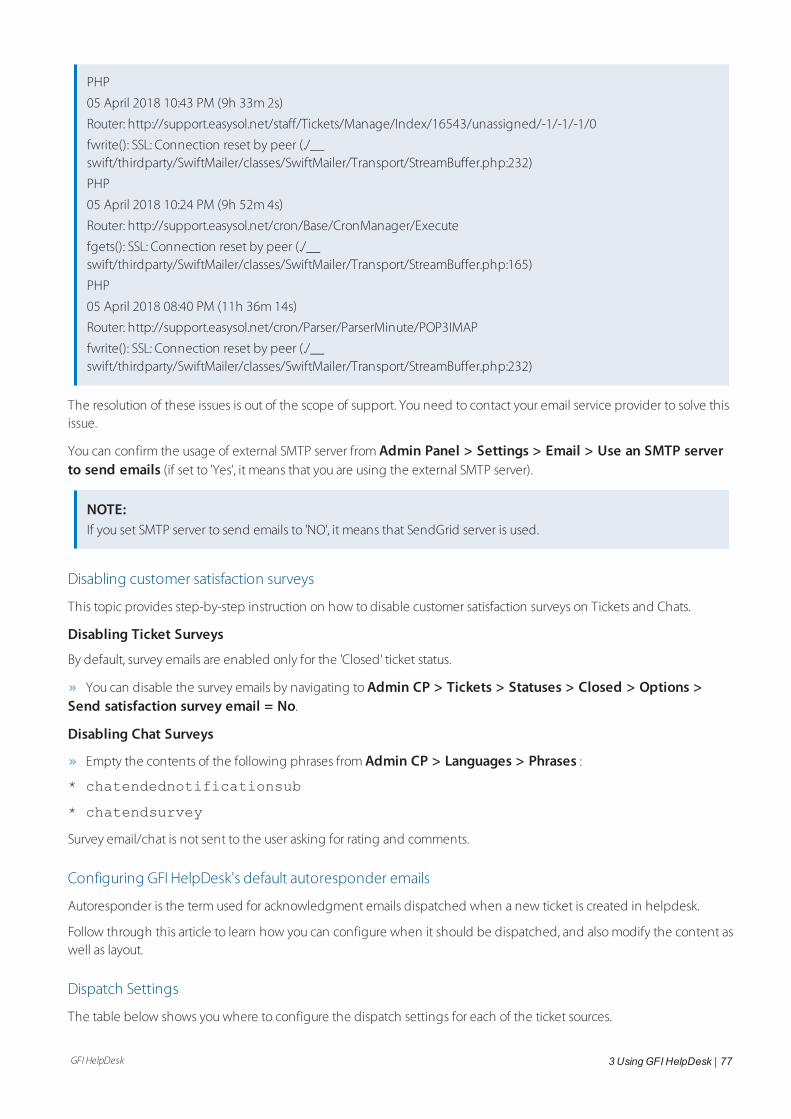
GFI HelpDesk 3 UsingGFI HelpDesk | 77
PHP
05 April 2018 10:43 PM (9h 33m 2s)
Router: http://support.easysol.net/staff/Tickets/Manage/Index/16543/unassigned/-1/-1/-1/0
fwrite(): SSL: Connection reset by peer (./__swift/thirdparty/SwiftMailer/classes/SwiftMailer/Transport/StreamBuffer.php:232)
PHP
05 April 2018 10:24 PM (9h 52m 4s)
Router: http://support.easysol.net/cron/Base/CronManager/Execute
fgets(): SSL: Connection reset by peer (./__swift/thirdparty/SwiftMailer/classes/SwiftMailer/Transport/StreamBuffer.php:165)
PHP
05 April 2018 08:40 PM (11h 36m 14s)
Router: http://support.easysol.net/cron/Parser/ParserMinute/POP3IMAP
fwrite(): SSL: Connection reset by peer (./__swift/thirdparty/SwiftMailer/classes/SwiftMailer/Transport/StreamBuffer.php:232)
The resolution of these issues is out of the scope of support. You need to contact your email service provider to solve thisissue.
You can confirm the usage of external SMTP server from Admin Panel > Settings > Email > Use an SMTP serverto send emails (if set to 'Yes', it means that you are using the external SMTP server).
NOTE:If you set SMTP server to send emails to 'NO', it means that SendGrid server is used.
Disabling customer satisfaction surveys
This topic provides step-by-step instruction on how to disable customer satisfaction surveys on Tickets and Chats.
Disabling Ticket Surveys
By default, survey emails are enabled only for the 'Closed' ticket status.
You can disable the survey emails by navigating to Admin CP > Tickets > Statuses > Closed > Options >Send satisfaction survey email = No.
Disabling Chat Surveys
Empty the contents of the following phrases from Admin CP > Languages > Phrases :
* chatendednotificationsub
* chatendsurvey
Survey email/chat is not sent to the user asking for rating and comments.
Configuring GFI HelpDesk's default autoresponder emails
Autoresponder is the term used for acknowledgment emails dispatched when a new ticket is created in helpdesk.
Follow through this article to learn how you can configure when it should be dispatched, and also modify the content aswell as layout.
Dispatch Settings
The table below shows you where to configure the dispatch settings for each of the ticket sources.
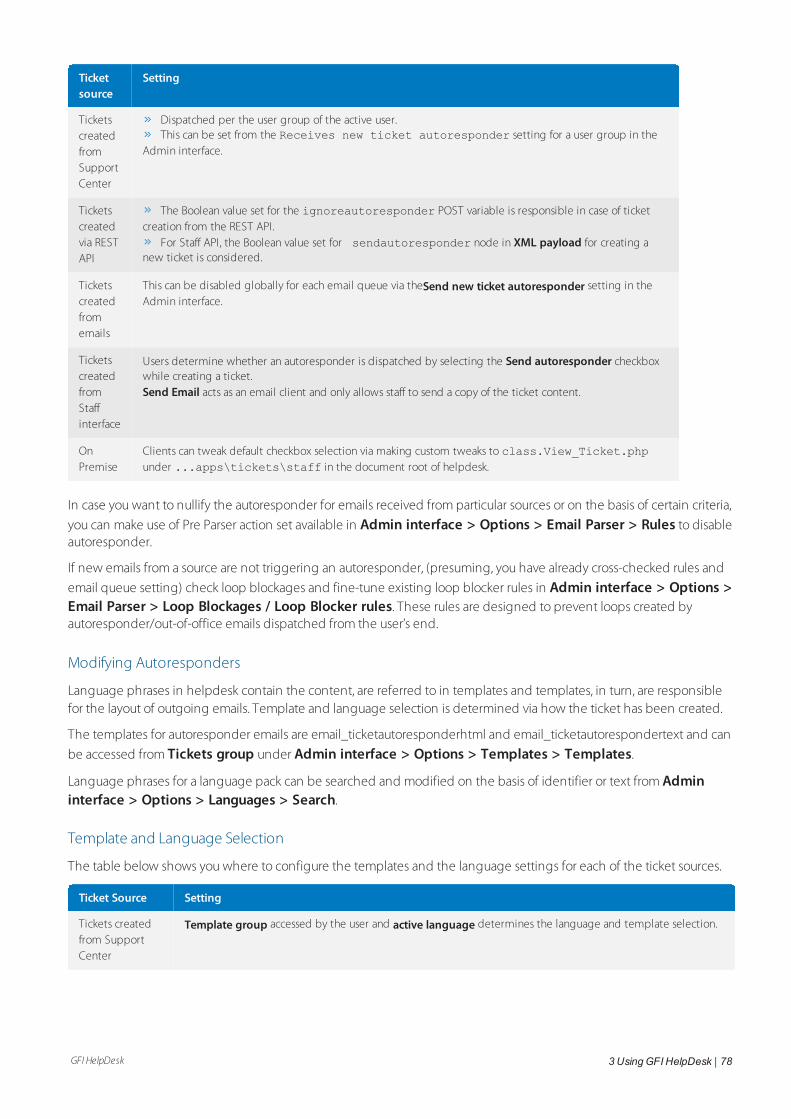
GFI HelpDesk 3 UsingGFI HelpDesk | 78
Ticketsource
Setting
TicketscreatedfromSupportCenter
Dispatched per the user group of the active user.This can be set from the Receives new ticket autoresponder setting for a user group in the
Admin interface.
Ticketscreatedvia RESTAPI
The Boolean value set for the ignoreautoresponder POST variable is responsible in case of ticketcreation from the REST API.
For Staff API, the Boolean value set for sendautoresponder node in XML payload for creating anew ticket is considered.
Ticketscreatedfromemails
This can be disabled globally for each email queue via theSend new ticket autoresponder setting in theAdmin interface.
TicketscreatedfromStaffinterface
Users determine whether an autoresponder is dispatched by selecting the Send autoresponder checkboxwhile creating a ticket.Send Email acts as an email client and only allows staff to send a copy of the ticket content.
OnPremise
Clients can tweak default checkbox selection via making custom tweaks to class.View_Ticket.phpunder ...apps\tickets\staff in the document root of helpdesk.
In case you want to nullify the autoresponder for emails received from particular sources or on the basis of certain criteria,
you can make use of Pre Parser action set available in Admin interface > Options > Email Parser > Rules to disableautoresponder.
If new emails from a source are not triggering an autoresponder, (presuming, you have already cross-checked rules and
email queue setting) check loop blockages and fine-tune existing loop blocker rules in Admin interface > Options >Email Parser > Loop Blockages / Loop Blocker rules. These rules are designed to prevent loops created byautoresponder/out-of-office emails dispatched from the user’s end.
Modifying Autoresponders
Language phrases in helpdesk contain the content, are referred to in templates and templates, in turn, are responsiblefor the layout of outgoing emails. Template and language selection is determined via how the ticket has been created.
The templates for autoresponder emails are email_ticketautoresponderhtml and email_ticketautorespondertext and can
be accessed from Tickets group under Admin interface > Options > Templates > Templates.
Language phrases for a language pack can be searched and modified on the basis of identifier or text from Admininterface > Options > Languages > Search.
Template and Language Selection
The table below shows you where to configure the templates and the language settings for each of the ticket sources.
Ticket Source Setting
Tickets createdfrom SupportCenter
Template group accessed by the user and active language determines the language and template selection.
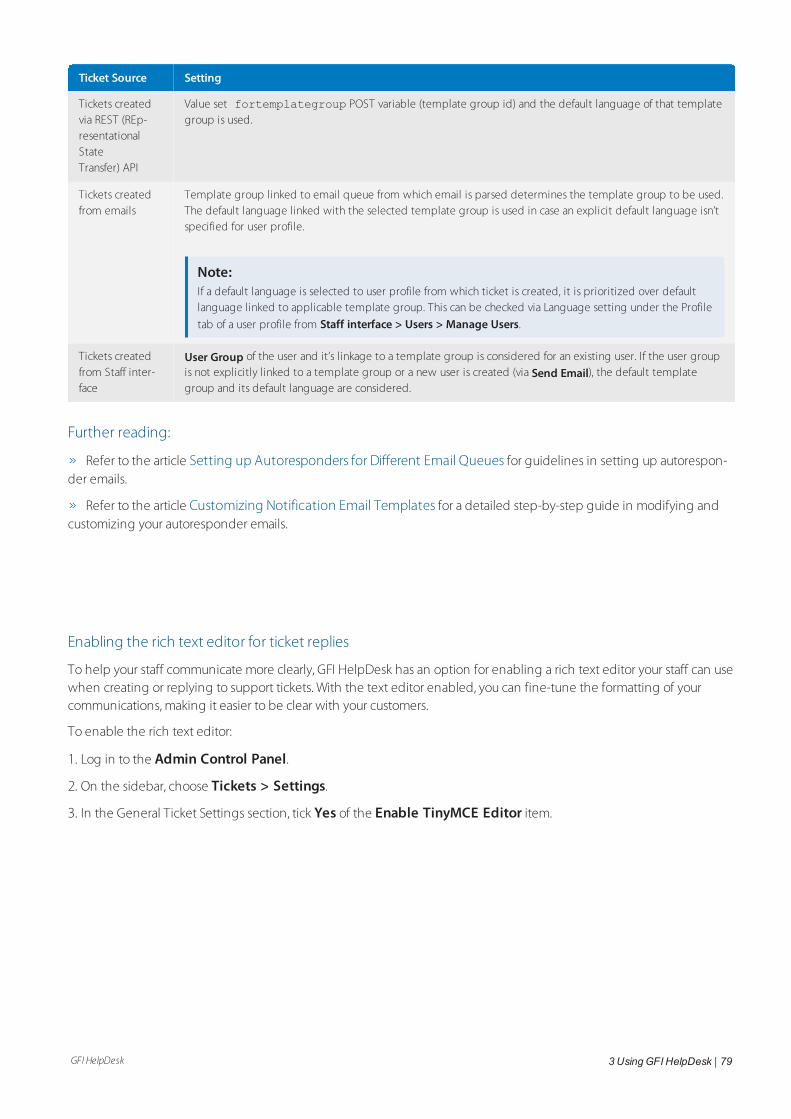
GFI HelpDesk 3 UsingGFI HelpDesk | 79
Ticket Source Setting
Tickets createdvia REST (REp-resentationalStateTransfer) API
Value set fortemplategroup POST variable (template group id) and the default language of that templategroup is used.
Tickets createdfrom emails
Template group linked to email queue from which email is parsed determines the template group to be used.The default language linked with the selected template group is used in case an explicit default language isn’tspecified for user profile.
Note:If a default language is selected to user profile from which ticket is created, it is prioritized over defaultlanguage linked to applicable template group. This can be checked via Language setting under the Profile
tab of a user profile from Staff interface > Users > Manage Users.
Tickets createdfrom Staff inter-face
User Group of the user and it’s linkage to a template group is considered for an existing user. If the user groupis not explicitly linked to a template group or a new user is created (via Send Email), the default templategroup and its default language are considered.
Further reading:
Refer to the article Setting up Autoresponders for Different Email Queues for guidelines in setting up autorespon-der emails.
Refer to the article Customizing Notification Email Templates for a detailed step-by-step guide in modifying andcustomizing your autoresponder emails.
Enabling the rich text editor for ticket replies
To help your staff communicate more clearly, GFI HelpDesk has an option for enabling a rich text editor your staff can usewhen creating or replying to support tickets. With the text editor enabled, you can fine-tune the formatting of yourcommunications, making it easier to be clear with your customers.
To enable the rich text editor:
1. Log in to the Admin Control Panel.
2. On the sidebar, choose Tickets > Settings.
3. In the General Ticket Settings section, tick Yes of the Enable TinyMCE Editor item.

GFI HelpDesk 3 UsingGFI HelpDesk | 80
Screenshot 46: General ticket settings
4. Click the Update button on the toolbar to save your changes.
Note:TinyMCE is the name of the rich text editor that Kayako uses. You can learn more about it at TinyMCE homepage.
Using tags to organize your helpdesk
Keeping your helpdesk organized can be a daunting task. One of the ways GFI HelpDesk can lessen that burden is withtags.
Using keywords to tag related content means you can filter your views to quickly find the information you need. Use tagsto filter your tickets and live chats by topic, group users or organizations by industry, or set up any other kind ofcategorization that your team might need.
Once you create a tag, GFI HelpDesk displays it in a tag cloud in the sidebar, so you can filter your lists with a single click.
In this topic, we'll explain how tags work in GFI HelpDesk, where you can use them, and how to start tagging things.
Understanding how tags work
Tags are a quick and powerful way to keep your helpdesk organized and easy-to-navigate. By tagging content withdescriptive keywords or phrases, you can make it much easier for your team to find the information they're looking for –fast.
You can use tags on the following types of GFI HelpDesk content:
Support tickets
Live chat conversations
Offline messages and surveys
User accounts
Organization profiles
For each type of content, you'll see a field that looks like this:
Screenshot 47: Type here to insert tag
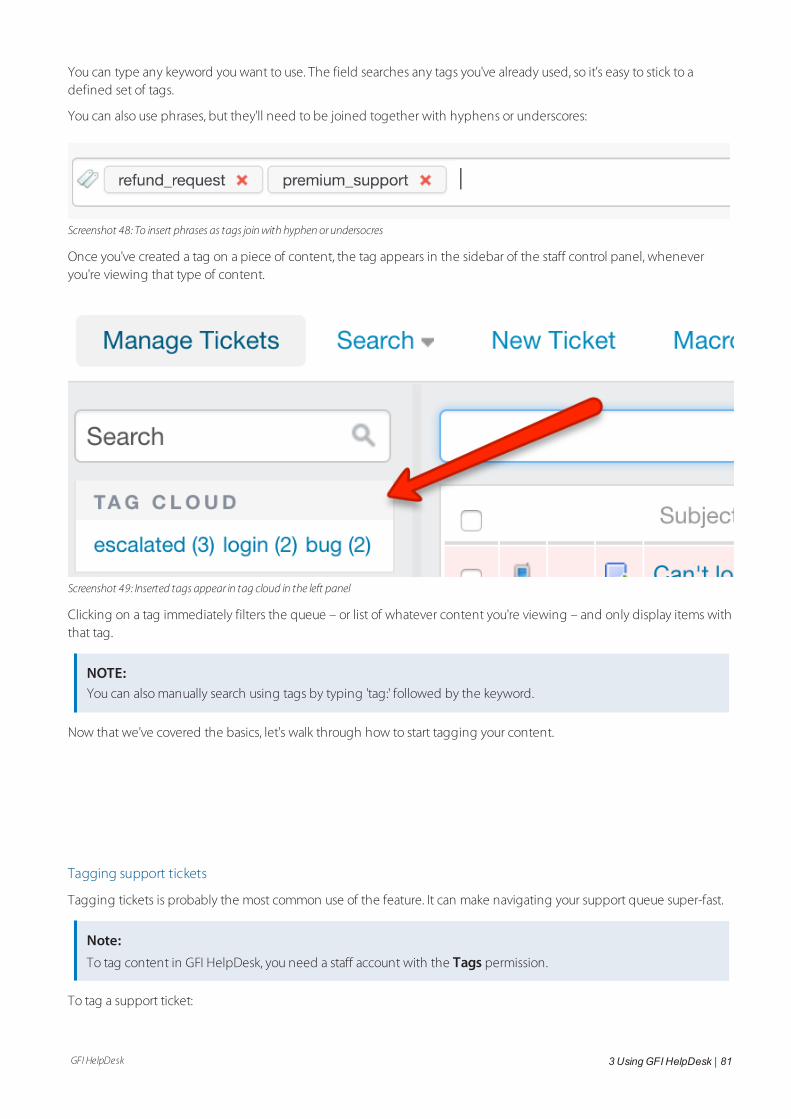
GFI HelpDesk 3 UsingGFI HelpDesk | 81
You can type any keyword you want to use. The field searches any tags you've already used, so it's easy to stick to adefined set of tags.
You can also use phrases, but they'll need to be joined together with hyphens or underscores:
Screenshot 48: To insert phrases as tags joinwith hyphen orundersocres
Once you've created a tag on a piece of content, the tag appears in the sidebar of the staff control panel, wheneveryou're viewing that type of content.
Screenshot 49: Inserted tags appear in tag cloud in the left panel
Clicking on a tag immediately filters the queue – or list of whatever content you're viewing – and only display items withthat tag.
NOTE:You can also manually search using tags by typing 'tag:' followed by the keyword.
Now that we've covered the basics, let's walk through how to start tagging your content.
Tagging support tickets
Tagging tickets is probably the most common use of the feature. It can make navigating your support queue super-fast.
Note:To tag content in GFI HelpDesk, you need a staff account with the Tags permission.
To tag a support ticket:
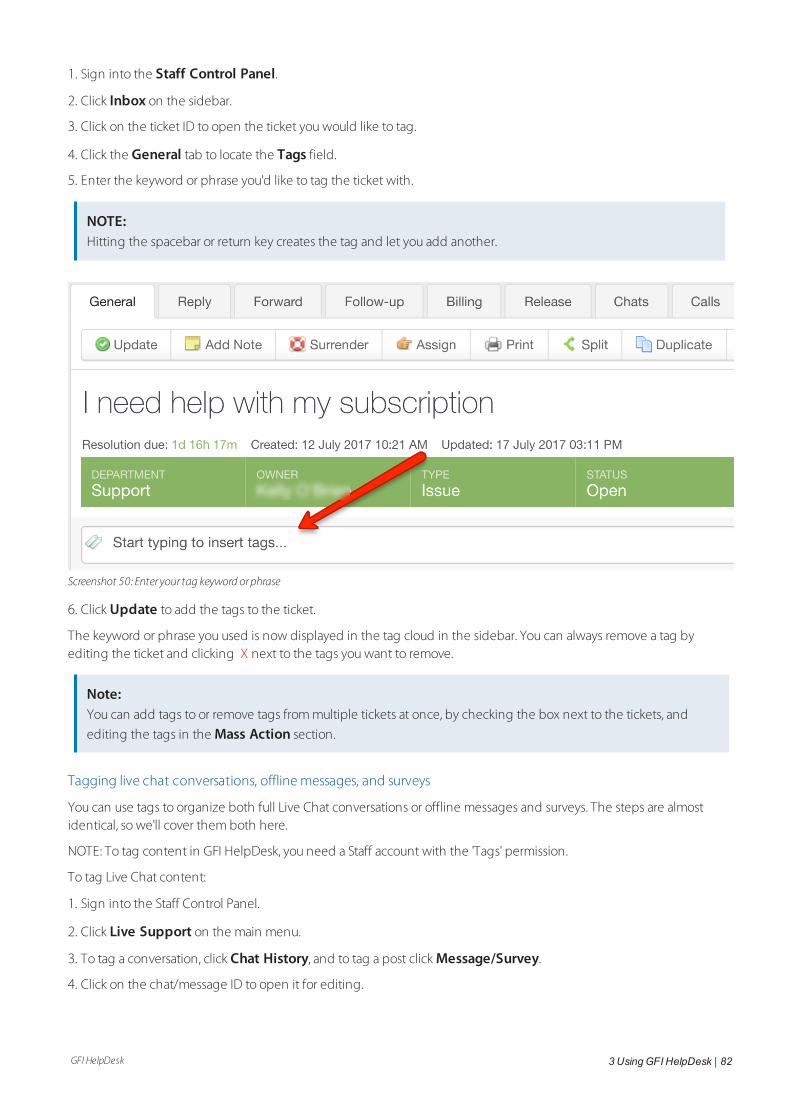
GFI HelpDesk 3 UsingGFI HelpDesk | 82
1. Sign into the Staff Control Panel.
2. Click Inbox on the sidebar.
3. Click on the ticket ID to open the ticket you would like to tag.
4. Click the General tab to locate the Tags field.
5. Enter the keyword or phrase you'd like to tag the ticket with.
NOTE:Hitting the spacebar or return key creates the tag and let you add another.
Screenshot 50: Enter your tag keyword orphrase
6. Click Update to add the tags to the ticket.
The keyword or phrase you used is now displayed in the tag cloud in the sidebar. You can always remove a tag byediting the ticket and clicking X next to the tags you want to remove.
Note:You can add tags to or remove tags from multiple tickets at once, by checking the box next to the tickets, and
editing the tags in the Mass Action section.
Tagging live chat conversations, offline messages, and surveys
You can use tags to organize both full Live Chat conversations or offline messages and surveys. The steps are almostidentical, so we'll cover them both here.
NOTE: To tag content in GFI HelpDesk, you need a Staff account with the 'Tags' permission.
To tag Live Chat content:
1. Sign into the Staff Control Panel.
2. Click Live Support on the main menu.
3. To tag a conversation, click Chat History, and to tag a post click Message/Survey.
4. Click on the chat/message ID to open it for editing.

GFI HelpDesk 3 UsingGFI HelpDesk | 83
5. Below the properties section is the Tags field.
Screenshot 51: Tag field
6. Enter the keyword or phrase you would like to use.
Note:Hitting the spacebar or return key creates the tag and let you add another.
7. Click Update to add the tags.
The keyword or phrase you used is now displayed in the tag cloud in the sidebar. You can always remove a tag byediting the chat or message and clicking the X next to the tag(s) you want to remove.
Tagging users and organizations
You can categorize both users and organizations using tags. The steps are almost identical, so we'll cover them bothhere.
To tag a user or organization:
1. Sign into the Staff Control Panel.
2. Click Users on the main menu.
3. To tag a user conversation, click Manage Users, or to tag an organization, click Manage Organizations.
4. Click on the user or organization to open it for editing.
5. Below the user or organization details is the Tags field.
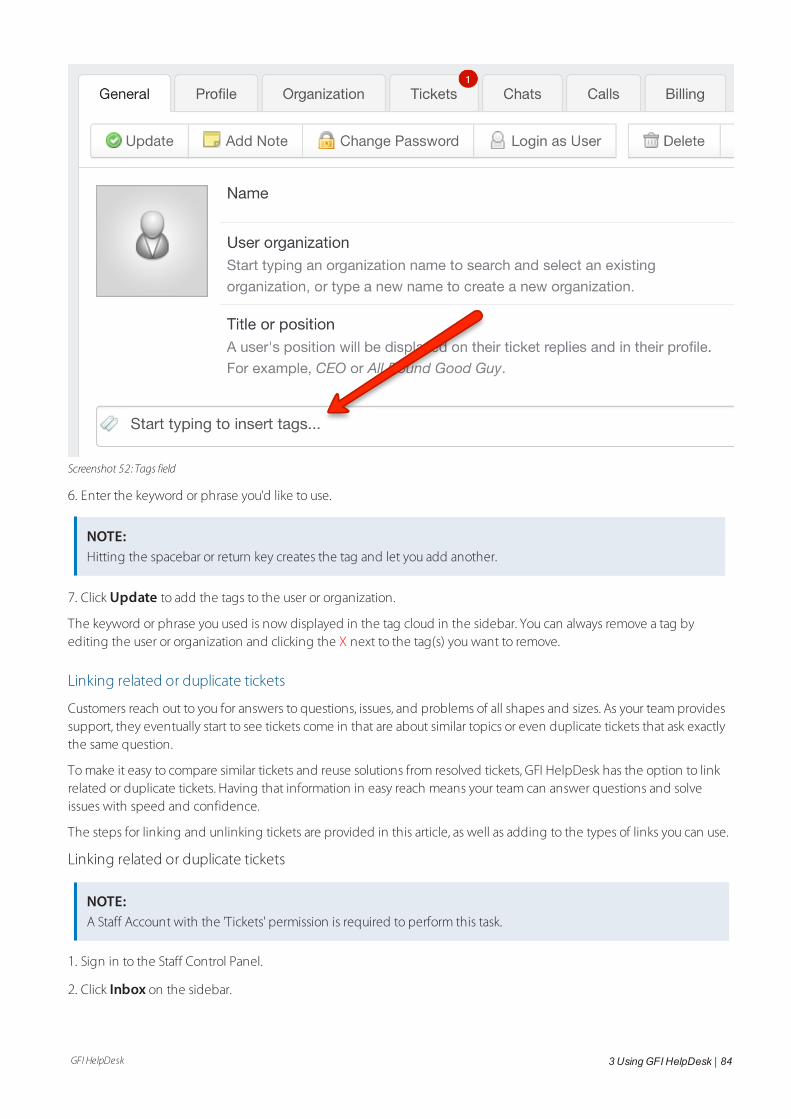
GFI HelpDesk 3 UsingGFI HelpDesk | 84
Screenshot 52: Tags field
6. Enter the keyword or phrase you'd like to use.
NOTE:Hitting the spacebar or return key creates the tag and let you add another.
7. Click Update to add the tags to the user or organization.
The keyword or phrase you used is now displayed in the tag cloud in the sidebar. You can always remove a tag byediting the user or organization and clicking the X next to the tag(s) you want to remove.
Linking related or duplicate tickets
Customers reach out to you for answers to questions, issues, and problems of all shapes and sizes. As your team providessupport, they eventually start to see tickets come in that are about similar topics or even duplicate tickets that ask exactlythe same question.
To make it easy to compare similar tickets and reuse solutions from resolved tickets, GFI HelpDesk has the option to linkrelated or duplicate tickets. Having that information in easy reach means your team can answer questions and solveissues with speed and confidence.
The steps for linking and unlinking tickets are provided in this article, as well as adding to the types of links you can use.
Linking related or duplicate tickets
NOTE:A Staff Account with the 'Tickets' permission is required to perform this task.
1. Sign in to the Staff Control Panel.
2. Click Inbox on the sidebar.
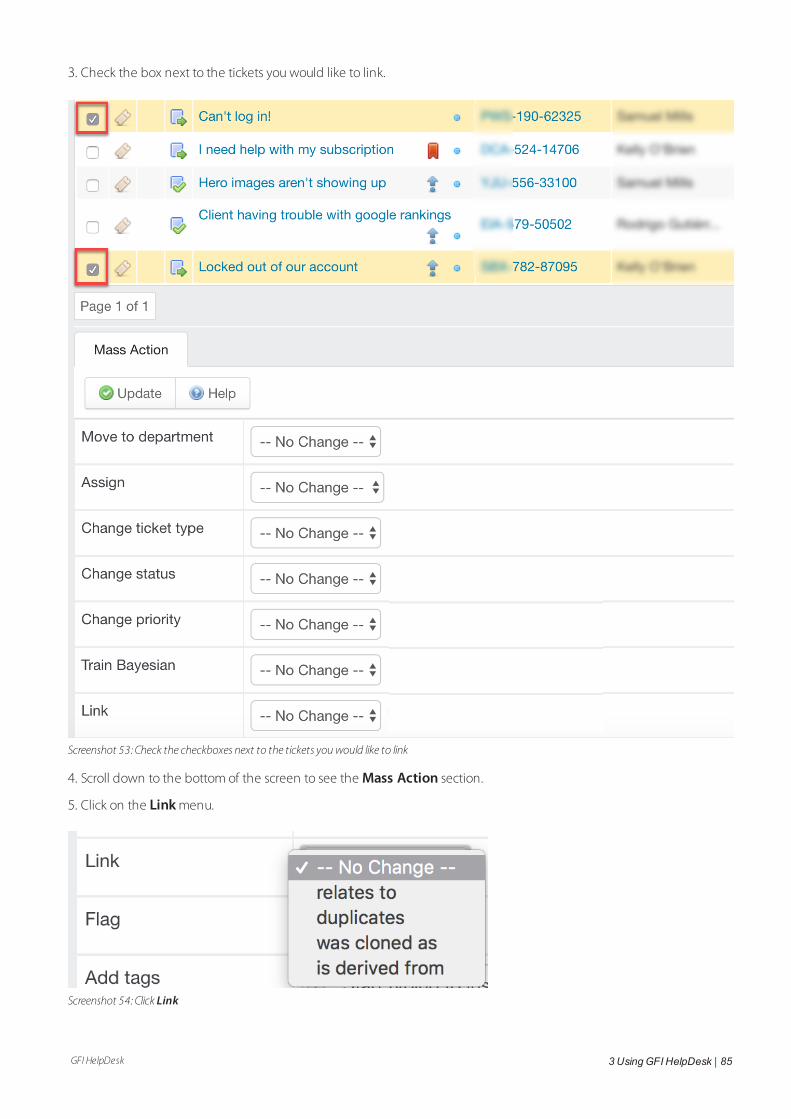
GFI HelpDesk 3 UsingGFI HelpDesk | 85
3. Check the box next to the tickets you would like to link.
Screenshot 53: Check the checkboxes next to the tickets youwould like to link
4. Scroll down to the bottom of the screen to see the Mass Action section.
5. Click on the Link menu.
Screenshot 54: Click Link
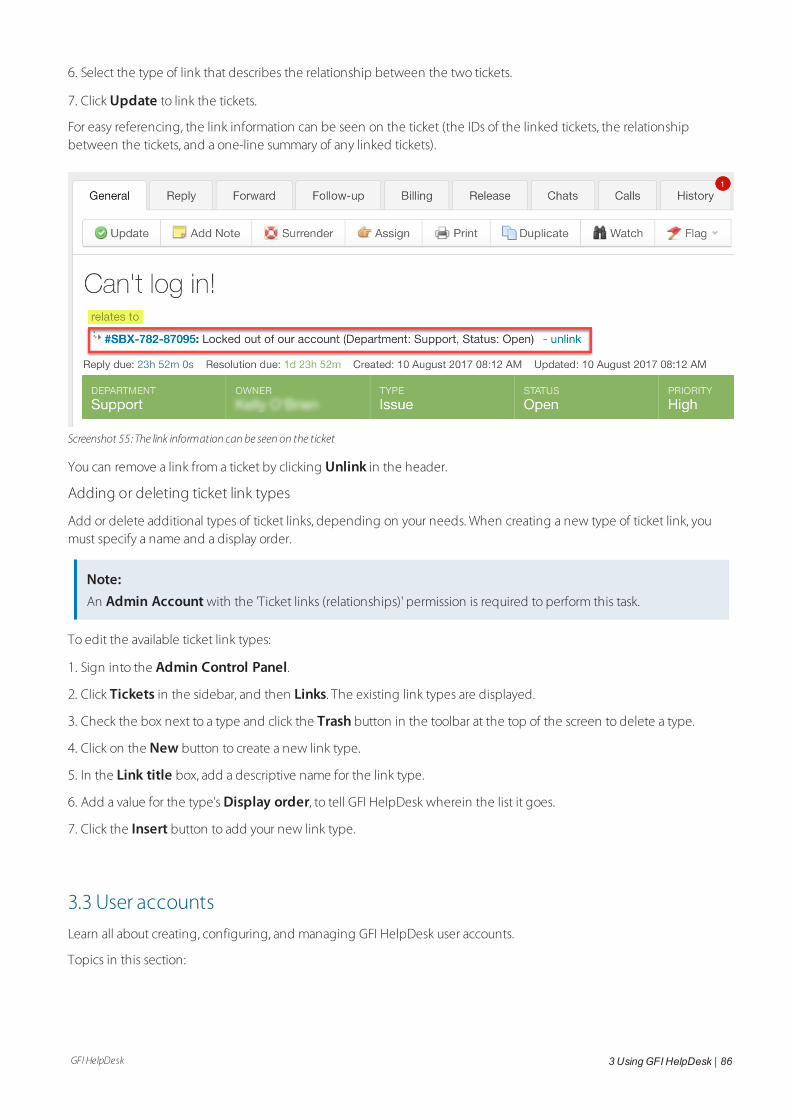
GFI HelpDesk 3 UsingGFI HelpDesk | 86
6. Select the type of link that describes the relationship between the two tickets.
7. Click Update to link the tickets.
For easy referencing, the link information can be seen on the ticket (the IDs of the linked tickets, the relationshipbetween the tickets, and a one-line summary of any linked tickets).
Screenshot 55: The link information can be seen on the ticket
You can remove a link from a ticket by clicking Unlink in the header.
Adding or deleting ticket link types
Add or delete additional types of ticket links, depending on your needs. When creating a new type of ticket link, youmust specify a name and a display order.
Note:An Admin Account with the 'Ticket links (relationships)' permission is required to perform this task.
To edit the available ticket link types:
1. Sign into the Admin Control Panel.
2. Click Tickets in the sidebar, and then Links. The existing link types are displayed.
3. Check the box next to a type and click the Trash button in the toolbar at the top of the screen to delete a type.
4. Click on the New button to create a new link type.
5. In the Link title box, add a descriptive name for the link type.
6. Add a value for the type's Display order, to tell GFI HelpDesk wherein the list it goes.
7. Click the Insert button to add your new link type.
3.3 User accountsLearn all about creating, configuring, and managing GFI HelpDesk user accounts.
Topics in this section:
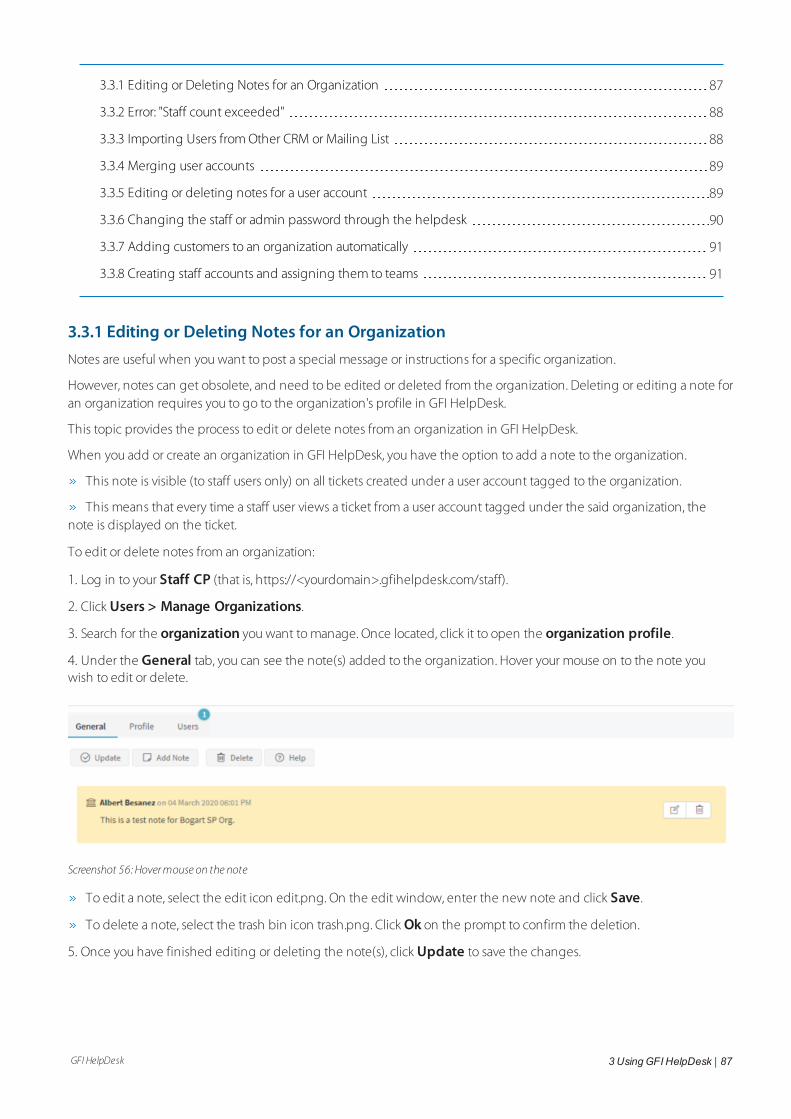
GFI HelpDesk 3 UsingGFI HelpDesk | 87
3.3.1 Editing or Deleting Notes for an Organization 87
3.3.2 Error: "Staff count exceeded" 88
3.3.3 Importing Users from Other CRM or Mailing List 88
3.3.4 Merging user accounts 89
3.3.5 Editing or deleting notes for a user account 89
3.3.6 Changing the staff or admin password through the helpdesk 90
3.3.7 Adding customers to an organization automatically 91
3.3.8 Creating staff accounts and assigning them to teams 91
3.3.1 Editing or Deleting Notes for an OrganizationNotes are useful when you want to post a special message or instructions for a specific organization.
However, notes can get obsolete, and need to be edited or deleted from the organization. Deleting or editing a note foran organization requires you to go to the organization's profile in GFI HelpDesk.
This topic provides the process to edit or delete notes from an organization in GFI HelpDesk.
When you add or create an organization in GFI HelpDesk, you have the option to add a note to the organization.
This note is visible (to staff users only) on all tickets created under a user account tagged to the organization.
This means that every time a staff user views a ticket from a user account tagged under the said organization, thenote is displayed on the ticket.
To edit or delete notes from an organization:
1. Log in to your Staff CP (that is, https://<yourdomain>.gfihelpdesk.com/staff).
2. Click Users > Manage Organizations.
3. Search for the organization you want to manage. Once located, click it to open the organization profile.
4. Under the General tab, you can see the note(s) added to the organization. Hover your mouse on to the note youwish to edit or delete.
Screenshot 56: Hovermouse on the note
To edit a note, select the edit icon edit.png. On the edit window, enter the new note and click Save.
To delete a note, select the trash bin icon trash.png. Click Ok on the prompt to confirm the deletion.
5. Once you have finished editing or deleting the note(s), click Update to save the changes.
GFI HelpDesk 3 UsingGFI HelpDesk | 88
Screenshot 57: Click update
3.3.2 Error: "Staff count exceeded"The number of staff members that you can add to GFI HelpDesk depends on the seats you have purchased. If your staffcount exceeds the number of purchased seats, your helpdesk becomes inaccessible and you may receive the followingmessage:
Staff count exceeded. (3 > 2). Please contact GFI HelpDesk Support forfurther assistance.
This topic provides instructions to resolve this issue.
Execute the below queries to disable extra staff members from the database:
UPDATE swstaff
SET isenabled = 0
WHERE fullname = [Full name of any of your staff members in your helpdesk];
DELETE
FROM swregistry
WHERE vkey='staffcache';
Note:Disabled staff accounts do not count in the total seat allocation.
3.3.3 Importing Users from Other CRM or Mailing ListMany organizations maintain their clients' or end users' database, and they expect to use the same database in their GFIHelpDesk Helpdesk for the sake of user database integrity. Hence, the option to import the users' database from adifferent CRM or mailing list is introduced in GFI HelpDesk to facilitate this.
This topic guides you on how to import users from other CRM or mailing list.
Getting CSV file ready
To import user's database in GFI HelpDesk, the database backup should be in CSV file format.
The format for the CSV file should be as follows:
EmailAddress | FirstName | LastName | Organization | Phone Number | Salutation | Designation | Email Domain Filter |Address | City | State | Postal code | Country | Phone | Fax | Website
For example:
GFI HelpDesk 3 UsingGFI HelpDesk | 89
[email protected], Jack, Russel, GFI HelpDesk, 9876942040, Mr, Manager, [email protected], Sco 123 G.T Road,Jalandhar, Punjab, 144001, India, 01812934839, 01813231432, www.organization.com
NOTE:The first three fields are mandatory. The columns must be comma separated as shown in the above example. Theycannot be separated by semi-colon.
Importing users
Once your CSV file is ready, you can import the users in your GFI HelpDesk from: Staff control panel > Users >Import Users.
Choose the CSV file where you want to import the users.
When your import is done, you can check to confirm that the users have been created successfully by going to Staff CP
and navigating to Users > Manage Users and Manage Organizations.
3.3.4 Merging user accountsYour customers can submit requests using different email addresses. It's possible that duplicate end-user accounts mightbe created.
While merging several user accounts, one user account should be marked as the primary user account. The primary useraccount acts as a base of the merged user by retaining all the basic details such as name, phone number, address andcompany details.
Merging moves all the tickets and contact information from the secondary contact(s) into the primary contact. Thesecondary contact(s) is deleted after merging and cannot be restored.
Below are the steps to merge contacts:
1. Login to your GFI HelpDesk Staff Control Panel.
2. Click on Users in the top menu bar and then click on the Manage Users option in the sub menu bar.
3. Select the user accounts you are looking to merge.
4. In the Mass Action section, click on the Merge tab.
5. Select the Primary User in the drop down list and click on the Merge button on the top.
6. Your users contacts is now merged.
3.3.5 Editing or deleting notes for a user accountWhen you add or create a user account in GFI HelpDesk, you have the option to add a note to the user account. This noteis visible in all the tickets created under that user account to the staff users only.
This means that every time a staff user is viewing a ticket from the said user account, the note is displayed on the ticket.
Notes are useful when you want to post a special message or instructions for a specific user. However, notes can getobsolete, and you may wonder how to edit or delete a note.
Deleting or editing a note for a user account requires you to go to the user's profile in GFI HelpDesk.
This topic provides instructions on how to edit or delete notes for a user account in GFI HelpDesk.
Below are the steps to edit or delete notes for a user account:
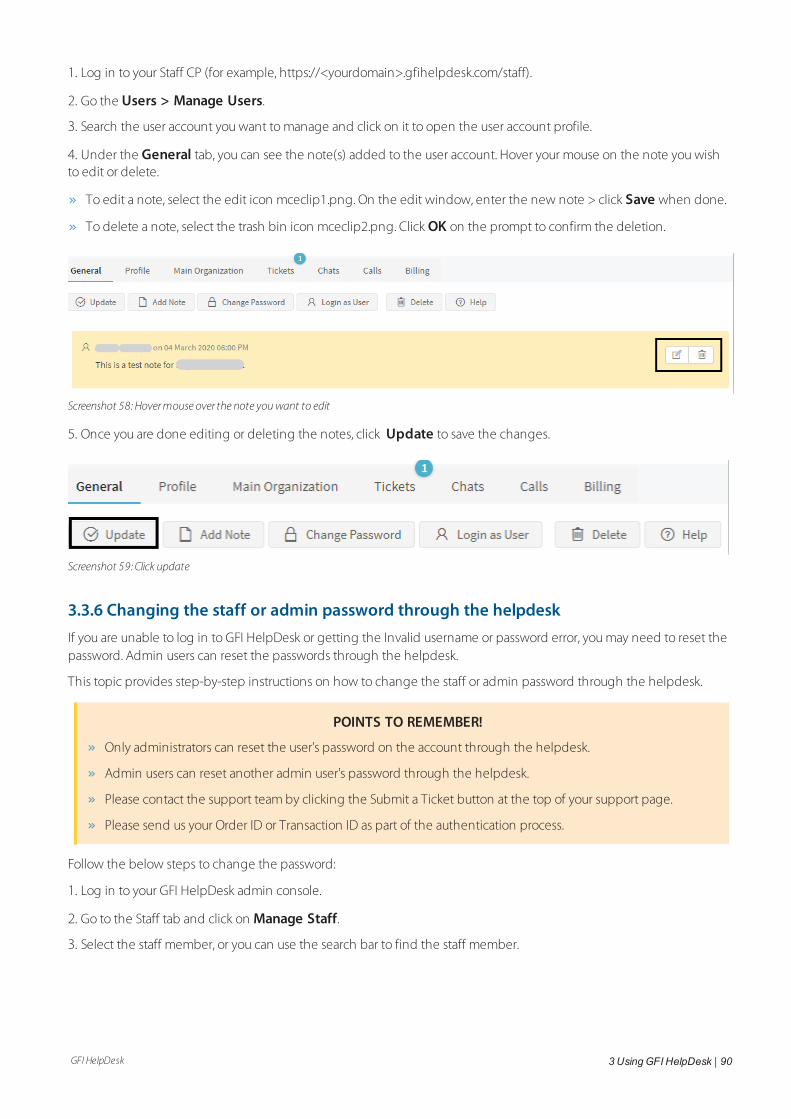
GFI HelpDesk 3 UsingGFI HelpDesk | 90
1. Log in to your Staff CP (for example, https://<yourdomain>.gfihelpdesk.com/staff).
2. Go the Users > Manage Users.
3. Search the user account you want to manage and click on it to open the user account profile.
4. Under the General tab, you can see the note(s) added to the user account. Hover your mouse on the note you wishto edit or delete.
To edit a note, select the edit icon mceclip1.png. On the edit window, enter the new note > click Save when done.
To delete a note, select the trash bin icon mceclip2.png. Click OK on the prompt to confirm the deletion.
Screenshot 58: Hovermouse over the note youwant to edit
5. Once you are done editing or deleting the notes, click Update to save the changes.
Screenshot 59: Click update
3.3.6 Changing the staff or admin password through the helpdeskIf you are unable to log in to GFI HelpDesk or getting the Invalid username or password error, you may need to reset thepassword. Admin users can reset the passwords through the helpdesk.
This topic provides step-by-step instructions on how to change the staff or admin password through the helpdesk.
POINTS TO REMEMBER!
Only administrators can reset the user's password on the account through the helpdesk.
Admin users can reset another admin user's password through the helpdesk.
Please contact the support team by clicking the Submit a Ticket button at the top of your support page.
Please send us your Order ID or Transaction ID as part of the authentication process.
Follow the below steps to change the password:
1. Log in to your GFI HelpDesk admin console.
2. Go to the Staff tab and click on Manage Staff.
3. Select the staff member, or you can use the search bar to find the staff member.
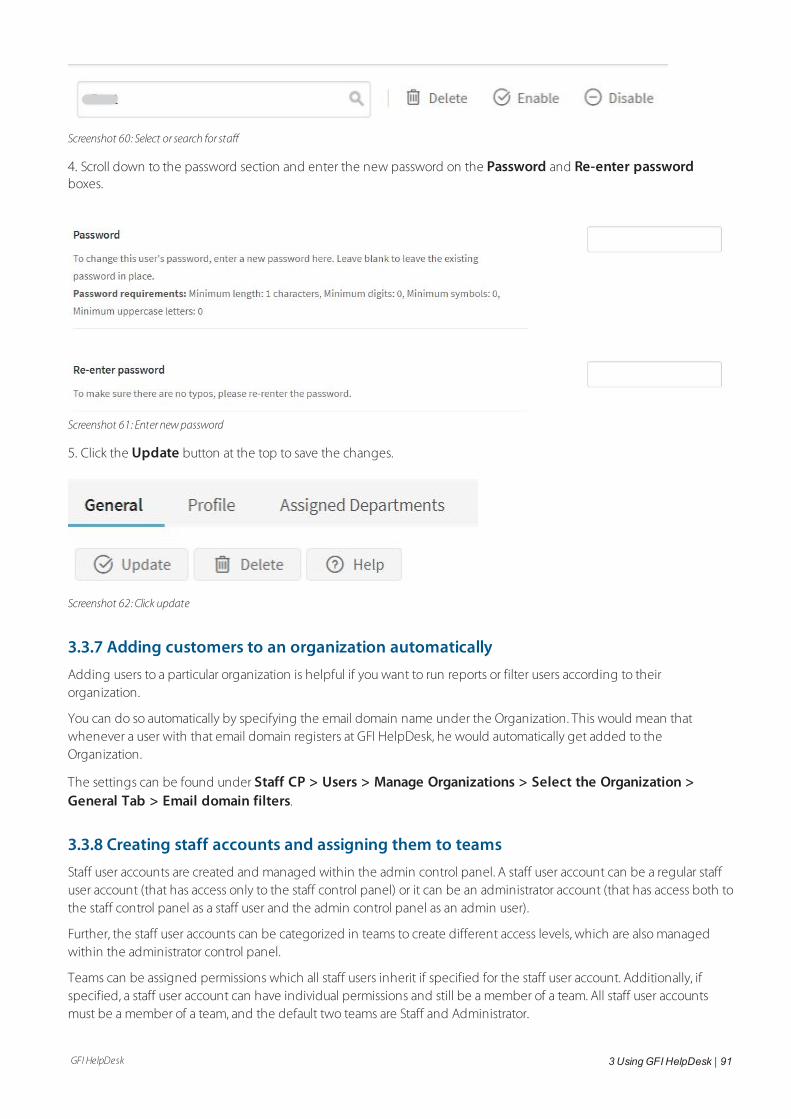
GFI HelpDesk 3 UsingGFI HelpDesk | 91
Screenshot 60: Select or search for staff
4. Scroll down to the password section and enter the new password on the Password and Re-enter passwordboxes.
Screenshot 61: Enter newpassword
5. Click the Update button at the top to save the changes.
Screenshot 62: Click update
3.3.7 Adding customers to an organization automaticallyAdding users to a particular organization is helpful if you want to run reports or filter users according to theirorganization.
You can do so automatically by specifying the email domain name under the Organization. This would mean thatwhenever a user with that email domain registers at GFI HelpDesk, he would automatically get added to theOrganization.
The settings can be found under Staff CP > Users > Manage Organizations > Select the Organization >General Tab > Email domain filters.
3.3.8 Creating staff accounts and assigning them to teamsStaff user accounts are created and managed within the admin control panel. A staff user account can be a regular staffuser account (that has access only to the staff control panel) or it can be an administrator account (that has access both tothe staff control panel as a staff user and the admin control panel as an admin user).
Further, the staff user accounts can be categorized in teams to create different access levels, which are also managedwithin the administrator control panel.
Teams can be assigned permissions which all staff users inherit if specified for the staff user account. Additionally, ifspecified, a staff user account can have individual permissions and still be a member of a team. All staff user accountsmust be a member of a team, and the default two teams are Staff and Administrator.

GFI HelpDesk 3 UsingGFI HelpDesk | 92
A staff user becomes an administrator user when added to the administrator team. You may specify the permissions in
Admin CP by navigating to Staff > Manage Teams.
There are different permissions provided which can be assigned to the staff according to the team type.
For staff team, there are 49 different permissions that are specified regarding the action that are performed in Staff CP.
For the administrator team, there are 66 different permissions that are specified regarding the actions that are performedin Admin CP.
3.4 Reports KQLGet detailed reports of the happenings in your helpdesk with GFI HelpDesk reporting.
Topics in this section:
3.4.1 Introduction to building and running reports 92
3.4.2 Report types in GFI HelpDesk 93
3.4.3 Introduction to Kayako Query Language (KQL) 98
3.4.4 Advanced reporting using KQL 105
3.4.1 Introduction to building and running reportsReports in GFI HelpDesk lets you access the huge amount of data in your helpdesk and turn that data into usefulinformation.
This topic introduces you to how building and running reports are processed.
Accessing and Running Reports
1. Login to the Staff Control Panel.
2. Go to Reports on the top navigation bar. From here you can access all of your Helpdesk Reports, which can besearched, filtered by category or filter out the reports you have created.
3. Click on a report title to edit, run, export or schedule the report.
4. Click Run Report to process the report. The results of the report (if there are any) are rendered in a table.
5. Click Schedule to let you specify how often the report should be sent to your email. The schedule (if successfully cre-ated) becomes available for editing or removal under the Schedules tab.
Creating Reports
Although your GFI HelpDesk Helpdesk comes with a long list useful reports out-of-the-box, unlike other helpdeskreporting systems, GFI HelpDesk allows you to tweak and create your own, almost without limitation.
Kayako Query Language (KQL)
The syntax used to define a report. KQL is used to specify the data you want to include in your reports and how the datashould be displayed. It is flexible and powerful, but still easy to grasp.
See Report Types for information on the types of report you can generate, and the KQL needed to process it.
Report Writer
To get started, simply place your cursor inside of the text editor and start with the first suggestion. You can use yourmouse or arrow keys to make a selection. It's as easy as that!
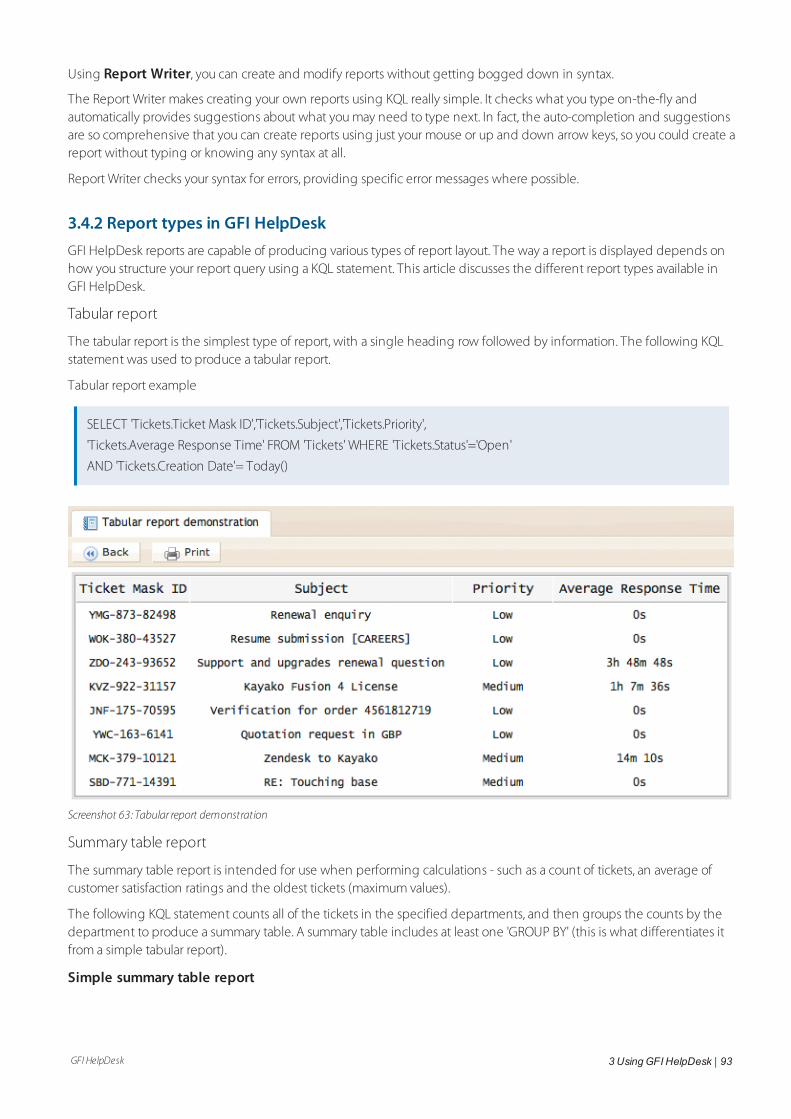
GFI HelpDesk 3 UsingGFI HelpDesk | 93
Using Report Writer, you can create and modify reports without getting bogged down in syntax.
The Report Writer makes creating your own reports using KQL really simple. It checks what you type on-the-fly andautomatically provides suggestions about what you may need to type next. In fact, the auto-completion and suggestionsare so comprehensive that you can create reports using just your mouse or up and down arrow keys, so you could create areport without typing or knowing any syntax at all.
Report Writer checks your syntax for errors, providing specific error messages where possible.
3.4.2 Report types in GFI HelpDeskGFI HelpDesk reports are capable of producing various types of report layout. The way a report is displayed depends onhow you structure your report query using a KQL statement. This article discusses the different report types available inGFI HelpDesk.
Tabular report
The tabular report is the simplest type of report, with a single heading row followed by information. The following KQLstatement was used to produce a tabular report.
Tabular report example
SELECT 'Tickets.Ticket Mask ID','Tickets.Subject','Tickets.Priority',
'Tickets.Average Response Time' FROM 'Tickets' WHERE 'Tickets.Status'='Open'
AND 'Tickets.Creation Date'= Today()
Screenshot 63: Tabular report demonstration
Summary table report
The summary table report is intended for use when performing calculations - such as a count of tickets, an average ofcustomer satisfaction ratings and the oldest tickets (maximum values).
The following KQL statement counts all of the tickets in the specified departments, and then groups the counts by thedepartment to produce a summary table. A summary table includes at least one 'GROUP BY' (this is what differentiates itfrom a simple tabular report).
Simple summary table report
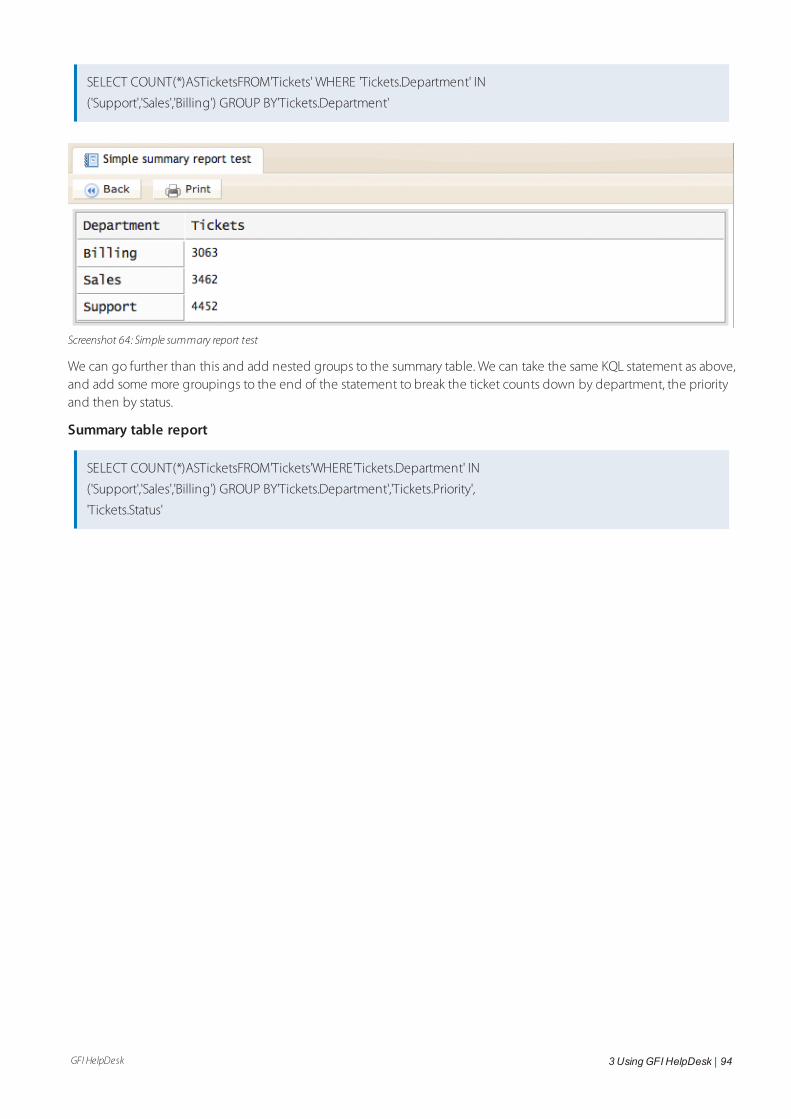
GFI HelpDesk 3 UsingGFI HelpDesk | 94
SELECT COUNT(*)ASTicketsFROM'Tickets' WHERE 'Tickets.Department' IN
('Support','Sales','Billing') GROUP BY'Tickets.Department'
Screenshot 64: Simple summary report test
We can go further than this and add nested groups to the summary table. We can take the same KQL statement as above,and add some more groupings to the end of the statement to break the ticket counts down by department, the priorityand then by status.
Summary table report
SELECT COUNT(*)ASTicketsFROM'Tickets'WHERE'Tickets.Department' IN
('Support','Sales','Billing') GROUP BY'Tickets.Department','Tickets.Priority',
'Tickets.Status'
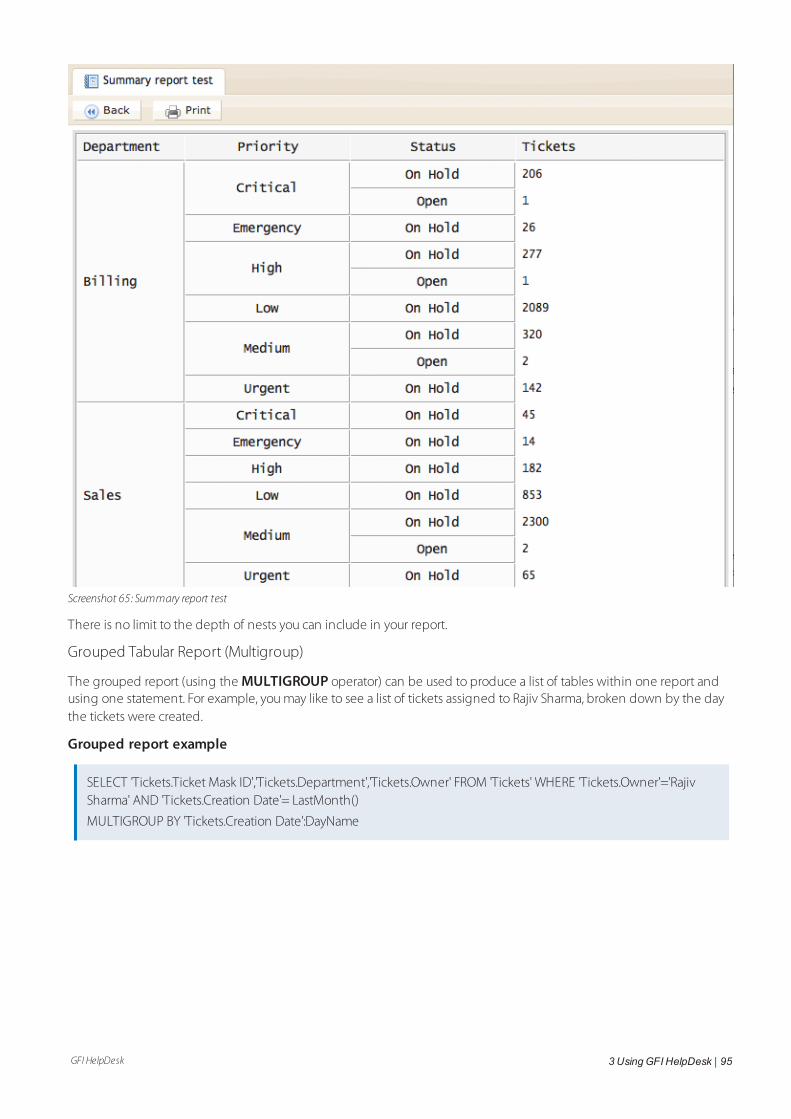
GFI HelpDesk 3 UsingGFI HelpDesk | 95
Screenshot 65: Summary report test
There is no limit to the depth of nests you can include in your report.
Grouped Tabular Report (Multigroup)
The grouped report (using the MULTIGROUP operator) can be used to produce a list of tables within one report andusing one statement. For example, you may like to see a list of tickets assigned to Rajiv Sharma, broken down by the daythe tickets were created.
Grouped report example
SELECT 'Tickets.Ticket Mask ID','Tickets.Department','Tickets.Owner' FROM 'Tickets' WHERE 'Tickets.Owner'='RajivSharma' AND 'Tickets.Creation Date'= LastMonth()
MULTIGROUP BY 'Tickets.Creation Date':DayName
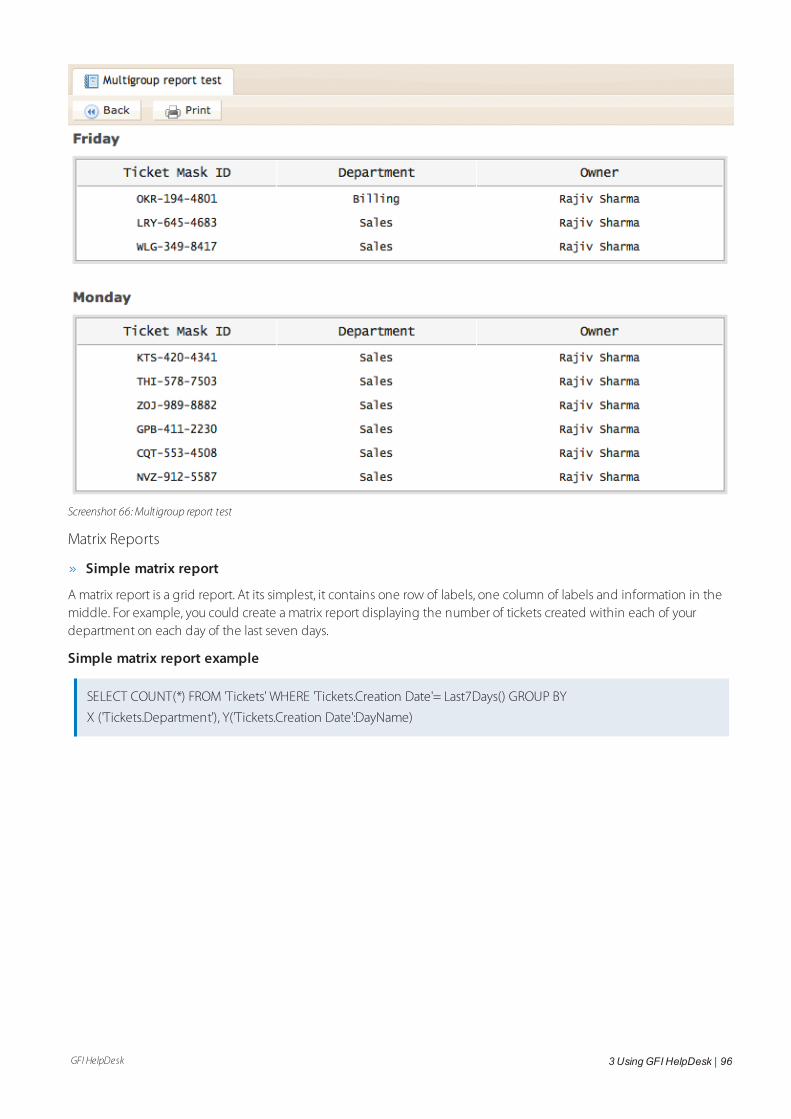
GFI HelpDesk 3 UsingGFI HelpDesk | 96
Screenshot 66:Multigroup report test
Matrix Reports
Simple matrix report
A matrix report is a grid report. At its simplest, it contains one row of labels, one column of labels and information in themiddle. For example, you could create a matrix report displaying the number of tickets created within each of yourdepartment on each day of the last seven days.
Simple matrix report example
SELECT COUNT(*) FROM 'Tickets' WHERE 'Tickets.Creation Date'= Last7Days() GROUP BY
X ('Tickets.Department'), Y('Tickets.Creation Date':DayName)
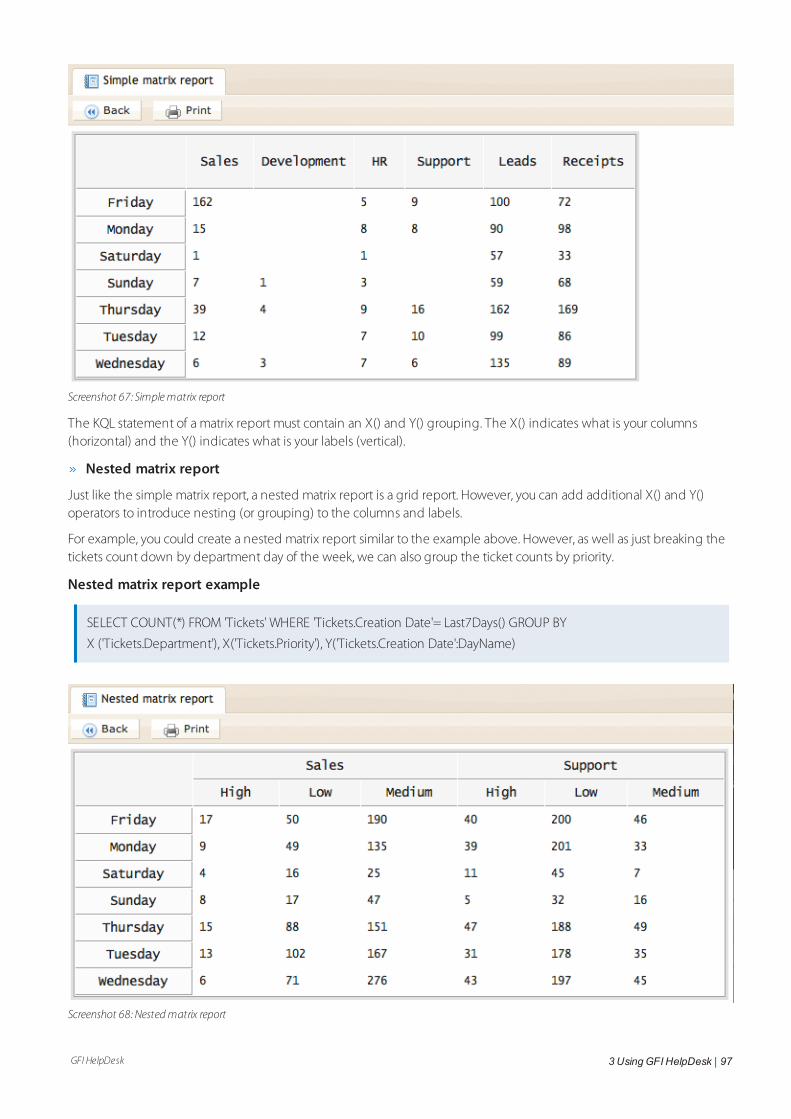
GFI HelpDesk 3 UsingGFI HelpDesk | 97
Screenshot 67: Simplematrix report
The KQL statement of a matrix report must contain an X() and Y() grouping. The X() indicates what is your columns(horizontal) and the Y() indicates what is your labels (vertical).
Nested matrix report
Just like the simple matrix report, a nested matrix report is a grid report. However, you can add additional X() and Y()operators to introduce nesting (or grouping) to the columns and labels.
For example, you could create a nested matrix report similar to the example above. However, as well as just breaking thetickets count down by department day of the week, we can also group the ticket counts by priority.
Nested matrix report example
SELECT COUNT(*) FROM 'Tickets' WHERE 'Tickets.Creation Date'= Last7Days() GROUP BY
X ('Tickets.Department'), X('Tickets.Priority'), Y('Tickets.Creation Date':DayName)
Screenshot 68: Nestedmatrix report
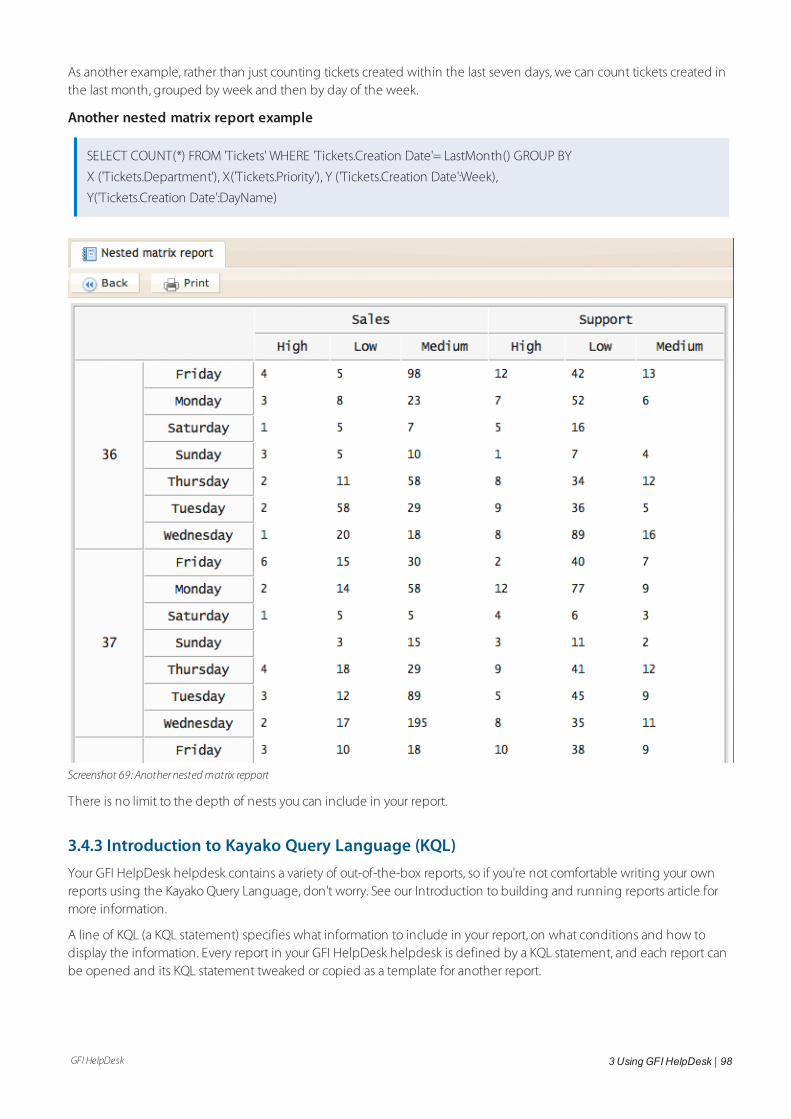
GFI HelpDesk 3 UsingGFI HelpDesk | 98
As another example, rather than just counting tickets created within the last seven days, we can count tickets created inthe last month, grouped by week and then by day of the week.
Another nested matrix report example
SELECT COUNT(*) FROM 'Tickets' WHERE 'Tickets.Creation Date'= LastMonth() GROUP BY
X ('Tickets.Department'), X('Tickets.Priority'), Y ('Tickets.Creation Date':Week),
Y('Tickets.Creation Date':DayName)
Screenshot 69: Anothernestedmatrix repport
There is no limit to the depth of nests you can include in your report.
3.4.3 Introduction to Kayako Query Language (KQL)Your GFI HelpDesk helpdesk contains a variety of out-of-the-box reports, so if you're not comfortable writing your ownreports using the Kayako Query Language, don't worry. See our Introduction to building and running reports article formore information.
A line of KQL (a KQL statement) specifies what information to include in your report, on what conditions and how todisplay the information. Every report in your GFI HelpDesk helpdesk is defined by a KQL statement, and each report canbe opened and its KQL statement tweaked or copied as a template for another report.
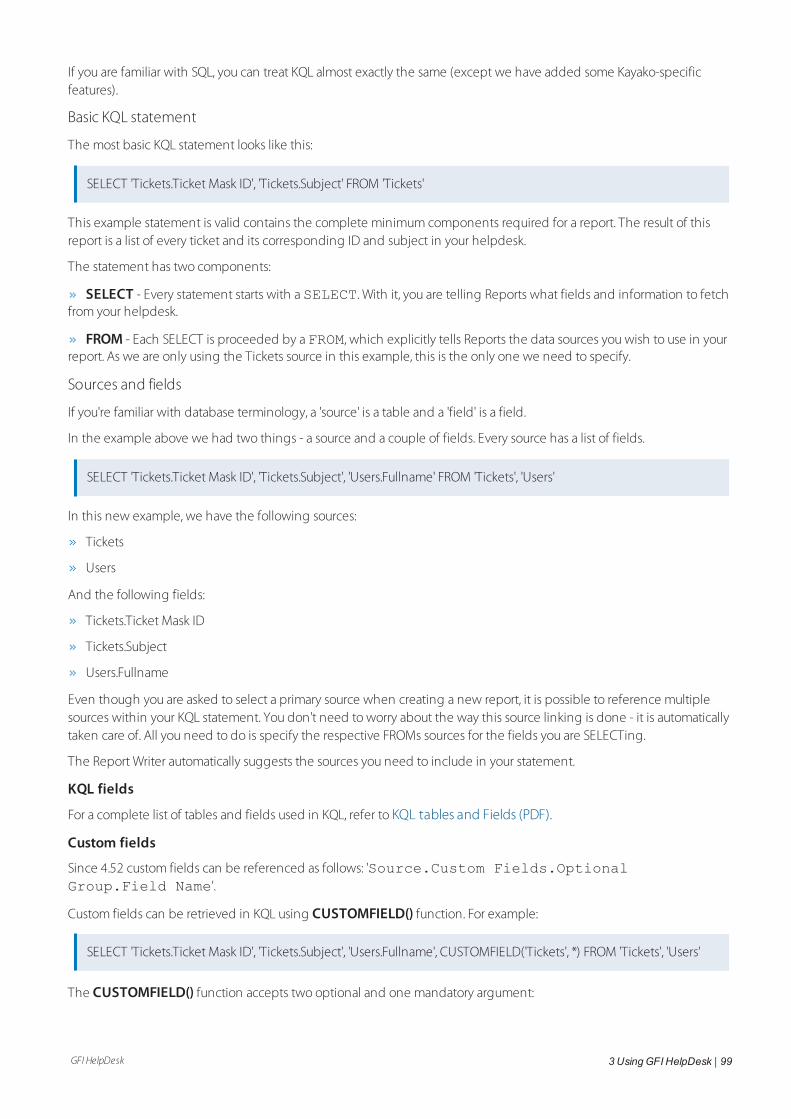
GFI HelpDesk 3 UsingGFI HelpDesk | 99
If you are familiar with SQL, you can treat KQL almost exactly the same (except we have added some Kayako-specificfeatures).
Basic KQL statement
The most basic KQL statement looks like this:
SELECT 'Tickets.Ticket Mask ID', 'Tickets.Subject' FROM 'Tickets'
This example statement is valid contains the complete minimum components required for a report. The result of thisreport is a list of every ticket and its corresponding ID and subject in your helpdesk.
The statement has two components:
SELECT - Every statement starts with a SELECT. With it, you are telling Reports what fields and information to fetchfrom your helpdesk.
FROM - Each SELECT is proceeded by a FROM, which explicitly tells Reports the data sources you wish to use in yourreport. As we are only using the Tickets source in this example, this is the only one we need to specify.
Sources and fields
If you're familiar with database terminology, a 'source' is a table and a 'field' is a field.
In the example above we had two things - a source and a couple of fields. Every source has a list of fields.
SELECT 'Tickets.Ticket Mask ID', 'Tickets.Subject', 'Users.Fullname' FROM 'Tickets', 'Users'
In this new example, we have the following sources:
Tickets
Users
And the following fields:
Tickets.Ticket Mask ID
Tickets.Subject
Users.Fullname
Even though you are asked to select a primary source when creating a new report, it is possible to reference multiplesources within your KQL statement. You don't need to worry about the way this source linking is done - it is automaticallytaken care of. All you need to do is specify the respective FROMs sources for the fields you are SELECTing.
The Report Writer automatically suggests the sources you need to include in your statement.
KQL fields
For a complete list of tables and fields used in KQL, refer to KQL tables and Fields (PDF).
Custom fields
Since 4.52 custom fields can be referenced as follows: 'Source.Custom Fields.OptionalGroup.Field Name'.
Custom fields can be retrieved in KQL using CUSTOMFIELD() function. For example:
SELECT 'Tickets.Ticket Mask ID', 'Tickets.Subject', 'Users.Fullname', CUSTOMFIELD('Tickets', *) FROM 'Tickets', 'Users'
The CUSTOMFIELD() function accepts two optional and one mandatory argument:
GFI HelpDesk 3 UsingGFI HelpDesk | 100
Source (optional)
Custom field group title (optional)
Custom field title, custom field name or *
Thus the above KQL produces a list of all custom fields under the Tickets source. If source is omitted the primary source isused. If custom field group title is omitted a custom field is searched in all groups of source.
The third argument can be custom field title (for example, 'Role'), custom field name (for example, '6nvjvi53lbh2') or *(all custom fields).
It is safe to use CUSTOMFIELD(Source, *) if there are no custom fields associated with source.
Currently, custom fields are available for the following sources:
Users
User Organizations
Chats
Tickets
Ticket Billing
See also the KQL Condition and Operator Reference.
Conditionally selecting information (WHERE)
The example KQL statement used above:
SELECT 'Tickets.Ticket Mask ID', 'Tickets.Subject', 'Users.Fullname' FROM 'Tickets', 'Users'
Would produce a report that listed every single ticket in the helpdesk, including the ticket ID, subject and user's name.We can refine this report to include tickets that match some specific criteria.
For example, the following KQL statement includes a WHERE and some conditions. It only includes tickets that belong tothe Sales department and are set to the status Open:
SELECT 'Tickets.Ticket Mask ID', 'Tickets.Subject', 'Users.Fullname' FROM 'Tickets', 'Users' WHERE 'Tickets.Department'='Sales' AND 'Tickets.Status'= 'Open'
Multiple conditions
The AND operator in the example above indicates that tickets must match both conditions. We could also use the ORoperator to indicate optional conditions. The example below produces a report listing tickets set to the status Open thatbelong to either the Support department or the Sales department:
SELECT 'Tickets.Ticket Mask ID', 'Tickets.Subject', 'Users.Fullname' FROM 'Tickets', 'Users' WHERE ('Tickets.Department'='Sales' OR 'Tickets.Department'= 'Support') AND 'Tickets.Status'= 'Open'
Because we grouped the department condition in brackets, it gets treated as one condition. This KQL statement containsthe following conditions:
('Tickets.Department' = 'Sales' OR 'Tickets.Department' = 'Support')
AND
'Tickets.Status' = 'Open'
A ticket is included in our report only if both of these conditions are met. For example:
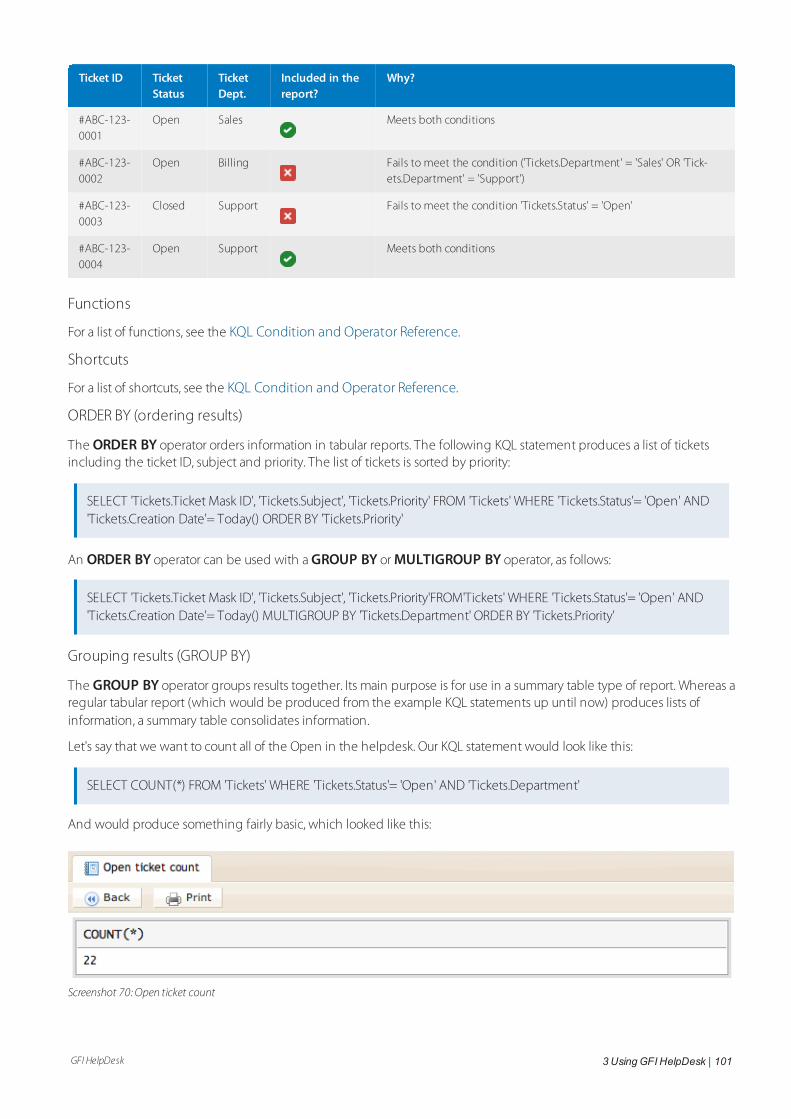
GFI HelpDesk 3 UsingGFI HelpDesk | 101
Ticket ID TicketStatus
TicketDept.
Included in thereport?
Why?
#ABC-123-0001
Open Sales Meets both conditions
#ABC-123-0002
Open Billing Fails to meet the condition ('Tickets.Department' = 'Sales' OR 'Tick-ets.Department' = 'Support')
#ABC-123-0003
Closed Support Fails to meet the condition 'Tickets.Status' = 'Open'
#ABC-123-0004
Open Support Meets both conditions
Functions
For a list of functions, see the KQL Condition and Operator Reference.
Shortcuts
For a list of shortcuts, see the KQL Condition and Operator Reference.
ORDER BY (ordering results)
The ORDER BY operator orders information in tabular reports. The following KQL statement produces a list of ticketsincluding the ticket ID, subject and priority. The list of tickets is sorted by priority:
SELECT 'Tickets.Ticket Mask ID', 'Tickets.Subject', 'Tickets.Priority' FROM 'Tickets' WHERE 'Tickets.Status'= 'Open' AND'Tickets.Creation Date'= Today() ORDER BY 'Tickets.Priority'
An ORDER BY operator can be used with a GROUP BY or MULTIGROUP BY operator, as follows:
SELECT 'Tickets.Ticket Mask ID', 'Tickets.Subject', 'Tickets.Priority'FROM'Tickets' WHERE 'Tickets.Status'= 'Open' AND'Tickets.Creation Date'= Today() MULTIGROUP BY 'Tickets.Department' ORDER BY 'Tickets.Priority'
Grouping results (GROUP BY)
The GROUP BY operator groups results together. Its main purpose is for use in a summary table type of report. Whereas aregular tabular report (which would be produced from the example KQL statements up until now) produces lists ofinformation, a summary table consolidates information.
Let's say that we want to count all of the Open in the helpdesk. Our KQL statement would look like this:
SELECT COUNT(*) FROM 'Tickets' WHERE 'Tickets.Status'= 'Open' AND 'Tickets.Department'
And would produce something fairly basic, which looked like this:
Screenshot 70: Open ticket count
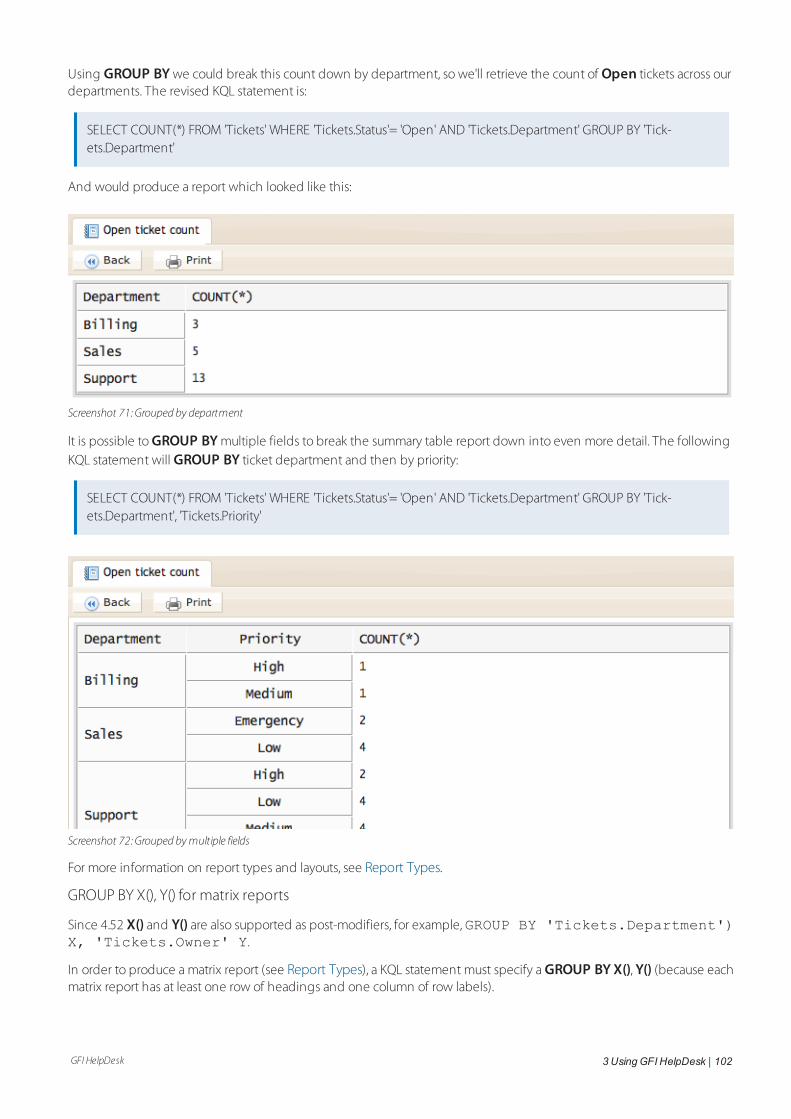
GFI HelpDesk 3 UsingGFI HelpDesk | 102
Using GROUP BY we could break this count down by department, so we'll retrieve the count of Open tickets across ourdepartments. The revised KQL statement is:
SELECT COUNT(*) FROM 'Tickets' WHERE 'Tickets.Status'= 'Open' AND 'Tickets.Department' GROUP BY 'Tick-ets.Department'
And would produce a report which looked like this:
Screenshot 71: Grouped by department
It is possible to GROUP BY multiple fields to break the summary table report down into even more detail. The followingKQL statement will GROUP BY ticket department and then by priority:
SELECT COUNT(*) FROM 'Tickets' WHERE 'Tickets.Status'= 'Open' AND 'Tickets.Department' GROUP BY 'Tick-ets.Department', 'Tickets.Priority'
Screenshot 72: Grouped bymultiple fields
For more information on report types and layouts, see Report Types.
GROUP BY X(), Y() for matrix reports
Since 4.52 X() and Y() are also supported as post-modifiers, for example,GROUP BY 'Tickets.Department')X, 'Tickets.Owner' Y.
In order to produce a matrix report (see Report Types), a KQL statement must specify a GROUP BYX(), Y() (because eachmatrix report has at least one row of headings and one column of row labels).
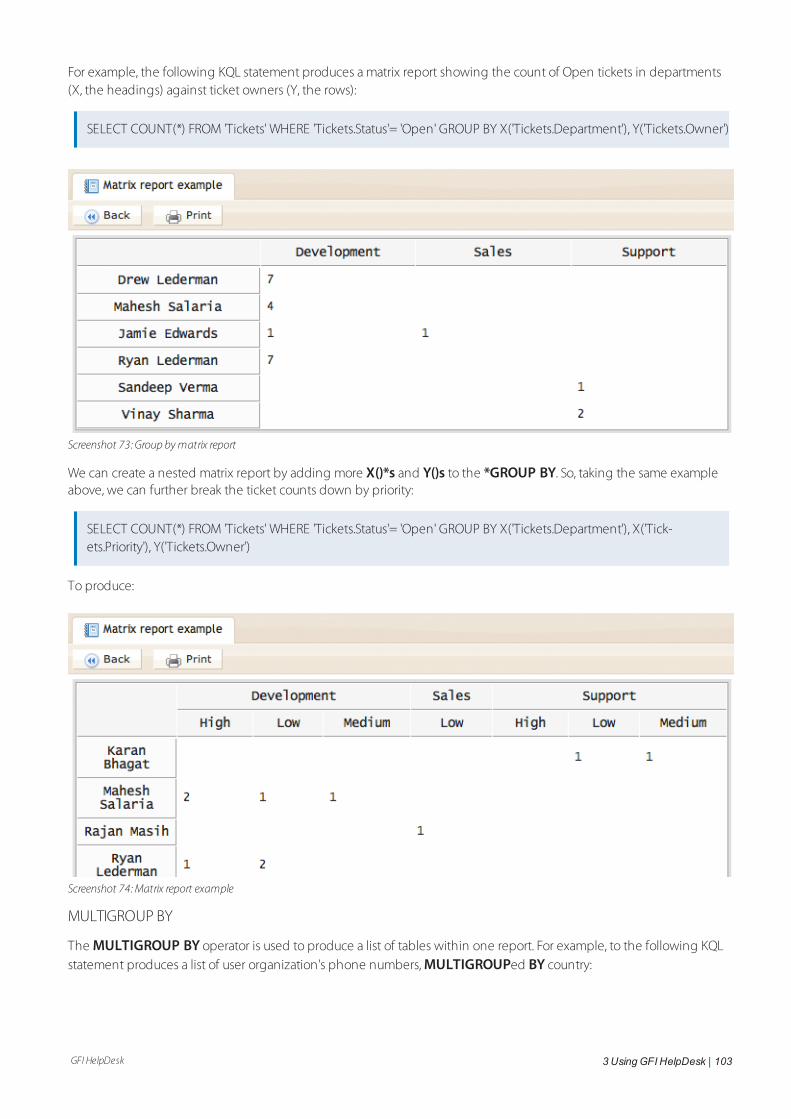
GFI HelpDesk 3 UsingGFI HelpDesk | 103
For example, the following KQL statement produces a matrix report showing the count of Open tickets in departments(X, the headings) against ticket owners (Y, the rows):
SELECT COUNT(*) FROM 'Tickets' WHERE 'Tickets.Status'= 'Open' GROUP BY X('Tickets.Department'), Y('Tickets.Owner')
Screenshot 73: Group bymatrix report
We can create a nested matrix report by adding more X()*s and Y()s to the *GROUP BY. So, taking the same exampleabove, we can further break the ticket counts down by priority:
SELECT COUNT(*) FROM 'Tickets' WHERE 'Tickets.Status'= 'Open' GROUP BY X('Tickets.Department'), X('Tick-ets.Priority'), Y('Tickets.Owner')
To produce:
Screenshot 74:Matrix report example
MULTIGROUP BY
The MULTIGROUP BY operator is used to produce a list of tables within one report. For example, to the following KQLstatement produces a list of user organization's phone numbers, MULTIGROUPed BY country:
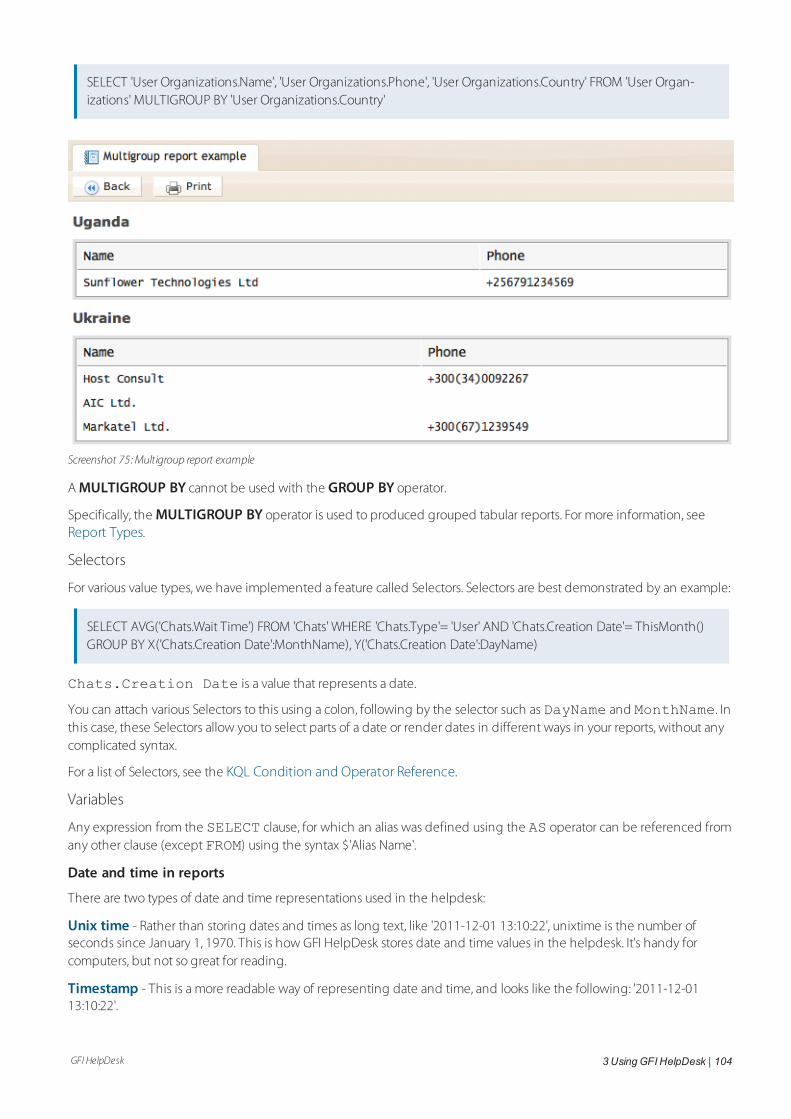
GFI HelpDesk 3 UsingGFI HelpDesk | 104
SELECT 'User Organizations.Name', 'User Organizations.Phone', 'User Organizations.Country' FROM 'User Organ-izations' MULTIGROUP BY 'User Organizations.Country'
Screenshot 75:Multigroup report example
A MULTIGROUP BY cannot be used with the GROUP BY operator.
Specifically, the MULTIGROUP BY operator is used to produced grouped tabular reports. For more information, seeReport Types.
Selectors
For various value types, we have implemented a feature called Selectors. Selectors are best demonstrated by an example:
SELECT AVG('Chats.Wait Time') FROM 'Chats' WHERE 'Chats.Type'= 'User' AND 'Chats.Creation Date'= ThisMonth()GROUP BY X('Chats.Creation Date':MonthName), Y('Chats.Creation Date':DayName)
Chats.Creation Date is a value that represents a date.
You can attach various Selectors to this using a colon, following by the selector such as DayName and MonthName. Inthis case, these Selectors allow you to select parts of a date or render dates in different ways in your reports, without anycomplicated syntax.
For a list of Selectors, see the KQL Condition and Operator Reference.
Variables
Any expression from the SELECT clause, for which an alias was defined using the AS operator can be referenced fromany other clause (except FROM) using the syntax $'Alias Name'.
Date and time in reports
There are two types of date and time representations used in the helpdesk:
Unix time - Rather than storing dates and times as long text, like '2011-12-01 13:10:22', unixtime is the number ofseconds since January 1, 1970. This is how GFI HelpDesk stores date and time values in the helpdesk. It's handy forcomputers, but not so great for reading.
Timestamp - This is a more readable way of representing date and time, and looks like the following: '2011-12-0113:10:22'.
GFI HelpDesk 3 UsingGFI HelpDesk | 105
When a date and time value is selected in a report, all of the calculation is done when the time value is unixtime. Whenyour report is run and the results are displayed, the unixtime is converted to a timestamp.
3.4.4 Advanced reporting using KQLThis sections has information about the advanced reporting using KQL.
Optimizing KQL reports
Optimization is challenging, no matter what you are doing, and unfortunately, reporting in GFI HelpDesk is no exception.
How to make the process of writing, rendering, and processing reports most effective?
Today, these questions concern a majority of the users working with reports in GFI HelpDesk.
Optimizing KQL (Kayako Query Language) reports is a set of actions aimed at improving the speed of report renderingand reducing memory usage. To optimize your report performance, you need to know the right tools, and how to focuson the target result set which you want to see.
Understanding how reports work?
With the KQL reports, it is essential to know that it fetches data directly from the database; thus, it uses MySQL and serverresources to fetch any results. So, the only way to make a query run faster is to reduce the number of calculations that thesoftware (and, therefore, resources) must perform.
The optimization here lies in two directions: increasing the speed of report rendering and reducing memory usage.
Optimizing KQL reports
To increase the speed of rendering reports, it is necessary to request only needed data from large databases. That is, if forthe report, you need results only from a given time range, then there is no need to fetch all the data available in thedatabase. Otherwise, a huge amount of resources is spent on it to get all the data, not to mention the time spent. So, youneed some understanding of how MySQL makes calculations.
The following section describes the basic statements that must be checked before moving on to query plans:
SELECT *
Using the SELECT * statement is only recommended when you want to use all of the data returned by thisstatement. For example, if you are using a KQL query like:
SELECT * FROM 'Tickets'
This not only fetches all the fields from the Tickets table but also put additional load on the MySQL server and add to thetime required to complete this query. Instead, you should only call the required fields, as shown in the followingexample.
SELECT 'Tickets.Ticket ID', 'Tickets.Subject', 'Tickets.Department' FROM 'Tickets'
WHERE
It is always logical to use a WHERE construction in KQL. In case you do not need all the fields and records from a table,
GFI HelpDesk 3 UsingGFI HelpDesk | 106
etc., but only the ones corresponding to specific conditions. This applies a positive effect on performance. So, it is alwayssuggested to add your conditions under the WHERE clause of the report like this:
SELECT 'Tickets.Ticket ID' FROM 'Tickets' WHERE 'Tickets.Department' = 'General'
In this sample query, you are telling GFI HelpDesk to fetch results only from a specific department. Thus, the system onlylooks at the results under that department instead of the entire database.
To find more useful conditions and operators, see KQL Condition & Operator Reference.
MKTIME
When filtering the report's data and minimizing the data set that needs to be queried, the time ranges play animportant role. For example, if you are running reports for data older than a month, you can use the MKTIME function tolimit the scope of your report. The following report helps you limit the time range for your report and reduce its loadtime:
SELECT 'Tickets.Ticket ID' FROM 'Tickets' WHERE 'Tickets.Department' = 'General' AND 'Tickets.Creation Date'<=MKTIME('0','0','0','20','9','2017') AND 'Tickets.Creation Date'<= MKTIME('0','0','0','3','31','2017')
This function becomes highly useful when you are running reports for large data sets. For example, you want to query allthe data since 2010; you can use the MKTIME function to break into 6 reports and reduce the time taken to run thisreport. The MKTIME function accepts a date in the following syntax:
MKTIME('hour','minute','second','month','day','year','is_dst');
NOTE:The parameters of the MKTIME() function should be added in single quotes in GFI HelpDesk 4.93.01 and above.For further information, refer toMKTIME.
LIMIT
Again, this is one more useful function to set limits to the scope of your report and avoid processing too many records.
For example, you are fetching results from a very high-volume system where thousands of records are created every day.And even after using all the conditions and filters, the report is taking too long to run; you can use the LIMIT function tobreak the results into parts, as shown in the example below.
SELECT 'Tickets.Ticket ID' FROM 'Tickets' WHERE 'Tickets.Department' = 'General' AND 'Tickets.Creation Date'= Today()LIMIT 100 OFFSET 0
This report gives you only the first 100 rows from the total results. To continue fetching the remaining records, you canincrement the offset like this:
SELECT 'Tickets.Ticket ID' FROM 'Tickets' WHERE 'Tickets.Department' = 'General' AND 'Tickets.Creation Date'= Today()LIMIT 100 OFFSET 100
KQL matrix reports are broken after an upgrade
If you upgraded your GFI HelpDesk to version 4.93.01 and try to run a matrix report, you may notice issues such as:
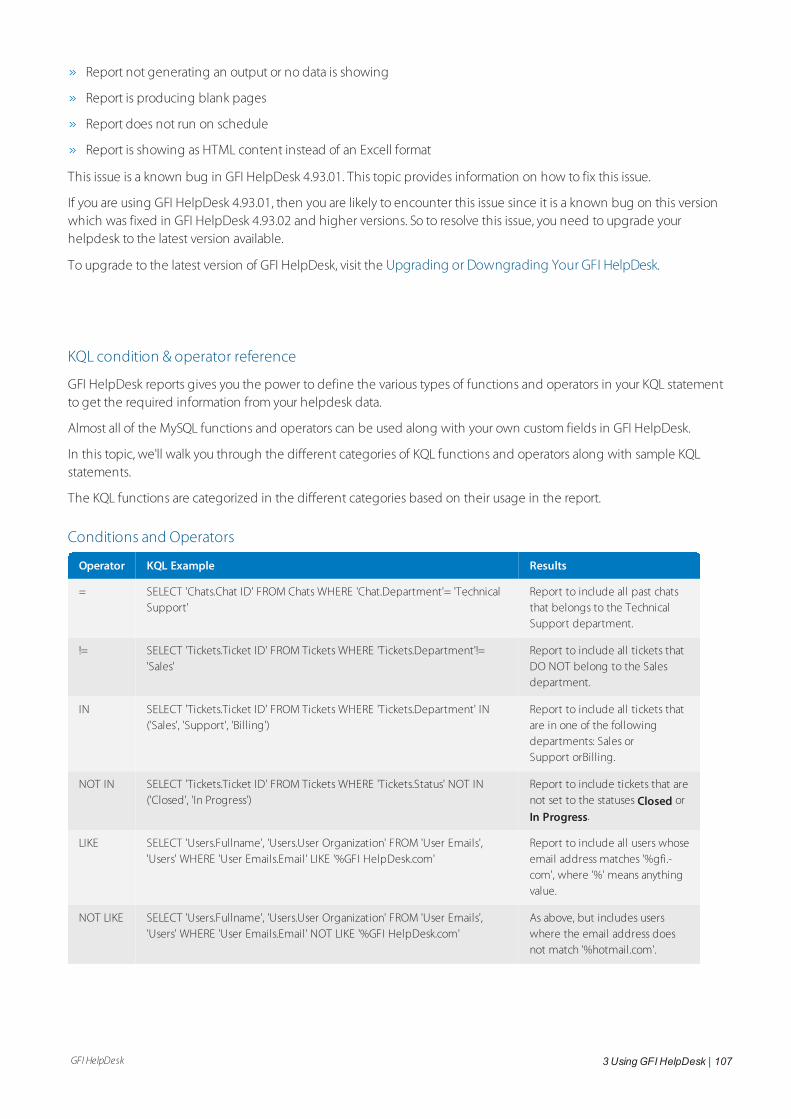
GFI HelpDesk 3 UsingGFI HelpDesk | 107
Report not generating an output or no data is showing
Report is producing blank pages
Report does not run on schedule
Report is showing as HTML content instead of an Excell format
This issue is a known bug in GFI HelpDesk 4.93.01. This topic provides information on how to fix this issue.
If you are using GFI HelpDesk 4.93.01, then you are likely to encounter this issue since it is a known bug on this versionwhich was fixed in GFI HelpDesk 4.93.02 and higher versions. So to resolve this issue, you need to upgrade yourhelpdesk to the latest version available.
To upgrade to the latest version of GFI HelpDesk, visit the Upgrading or Downgrading Your GFI HelpDesk.
KQL condition & operator reference
GFI HelpDesk reports gives you the power to define the various types of functions and operators in your KQL statementto get the required information from your helpdesk data.
Almost all of the MySQL functions and operators can be used along with your own custom fields in GFI HelpDesk.
In this topic, we'll walk you through the different categories of KQL functions and operators along with sample KQLstatements.
The KQL functions are categorized in the different categories based on their usage in the report.
Conditions and Operators
Operator KQL Example Results
= SELECT 'Chats.Chat ID' FROM Chats WHERE 'Chat.Department'= 'TechnicalSupport'
Report to include all past chatsthat belongs to the TechnicalSupport department.
!= SELECT 'Tickets.Ticket ID' FROM Tickets WHERE 'Tickets.Department'!='Sales'
Report to include all tickets thatDO NOT belong to the Salesdepartment.
IN SELECT 'Tickets.Ticket ID' FROM Tickets WHERE 'Tickets.Department' IN('Sales', 'Support', 'Billing')
Report to include all tickets thatare in one of the followingdepartments: Sales orSupport orBilling.
NOT IN SELECT 'Tickets.Ticket ID' FROM Tickets WHERE 'Tickets.Status' NOT IN('Closed', 'In Progress')
Report to include tickets that arenot set to the statuses Closed or
In Progress.
LIKE SELECT 'Users.Fullname', 'Users.User Organization' FROM 'User Emails','Users' WHERE 'User Emails.Email' LIKE '%GFI HelpDesk.com'
Report to include all users whoseemail address matches '%gfi.-com', where '%' means anythingvalue.
NOT LIKE SELECT 'Users.Fullname', 'Users.User Organization' FROM 'User Emails','Users' WHERE 'User Emails.Email' NOT LIKE '%GFI HelpDesk.com'
As above, but includes userswhere the email address doesnot match '%hotmail.com'.
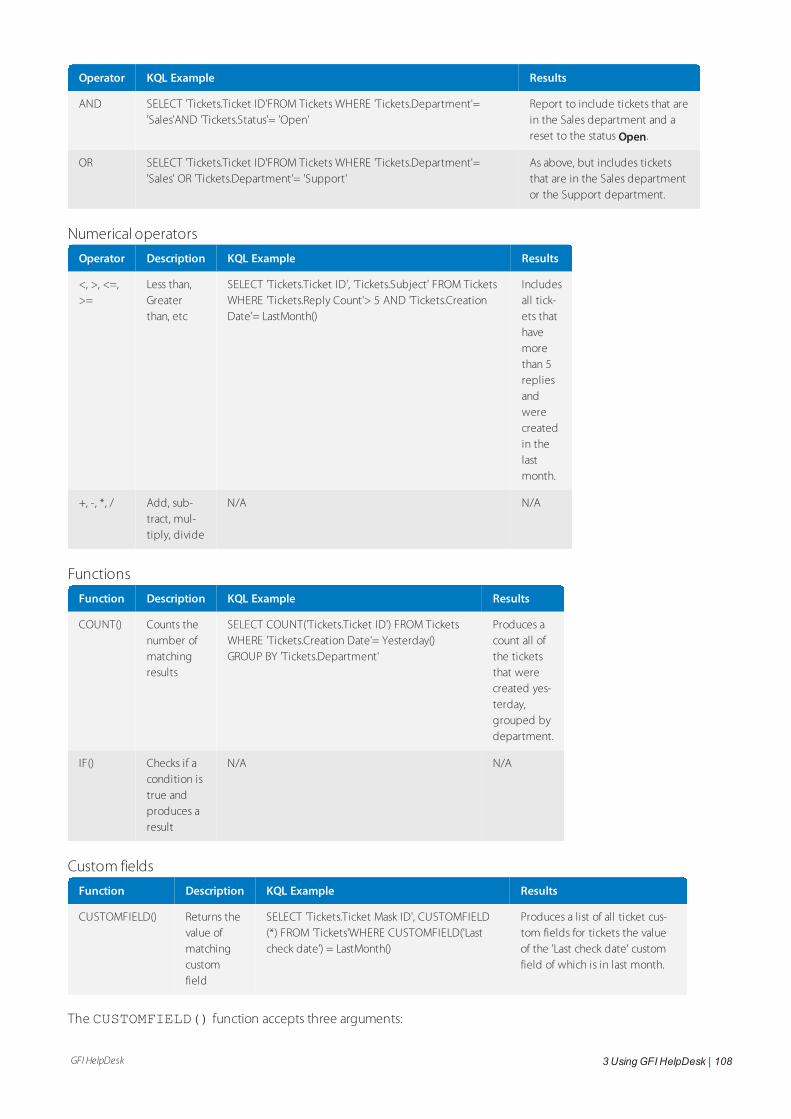
GFI HelpDesk 3 UsingGFI HelpDesk | 108
Operator KQL Example Results
AND SELECT 'Tickets.Ticket ID'FROM Tickets WHERE 'Tickets.Department'='Sales'AND 'Tickets.Status'= 'Open'
Report to include tickets that arein the Sales department and areset to the status Open.
OR SELECT 'Tickets.Ticket ID'FROM Tickets WHERE 'Tickets.Department'='Sales' OR 'Tickets.Department'= 'Support'
As above, but includes ticketsthat are in the Sales departmentor the Support department.
Numerical operators
Operator Description KQL Example Results
<, >, <=,>=
Less than,Greaterthan, etc
SELECT 'Tickets.Ticket ID', 'Tickets.Subject' FROM TicketsWHERE 'Tickets.Reply Count'> 5 AND 'Tickets.CreationDate'= LastMonth()
Includesall tick-ets thathavemorethan 5repliesandwerecreatedin thelastmonth.
+, -, *, / Add, sub-tract, mul-tiply, divide
N/A N/A
Functions
Function Description KQL Example Results
COUNT() Counts thenumber ofmatchingresults
SELECT COUNT('Tickets.Ticket ID') FROM TicketsWHERE 'Tickets.Creation Date'= Yesterday()GROUP BY 'Tickets.Department'
Produces acount all ofthe ticketsthat werecreated yes-terday,grouped bydepartment.
IF() Checks if acondition istrue andproduces aresult
N/A N/A
Custom fields
Function Description KQL Example Results
CUSTOMFIELD() Returns thevalue ofmatchingcustomfield
SELECT 'Tickets.Ticket Mask ID', CUSTOMFIELD(*) FROM 'Tickets'WHERE CUSTOMFIELD('Lastcheck date') = LastMonth()
Produces a list of all ticket cus-tom fields for tickets the valueof the 'Last check date' customfield of which is in last month.
The CUSTOMFIELD() function accepts three arguments:
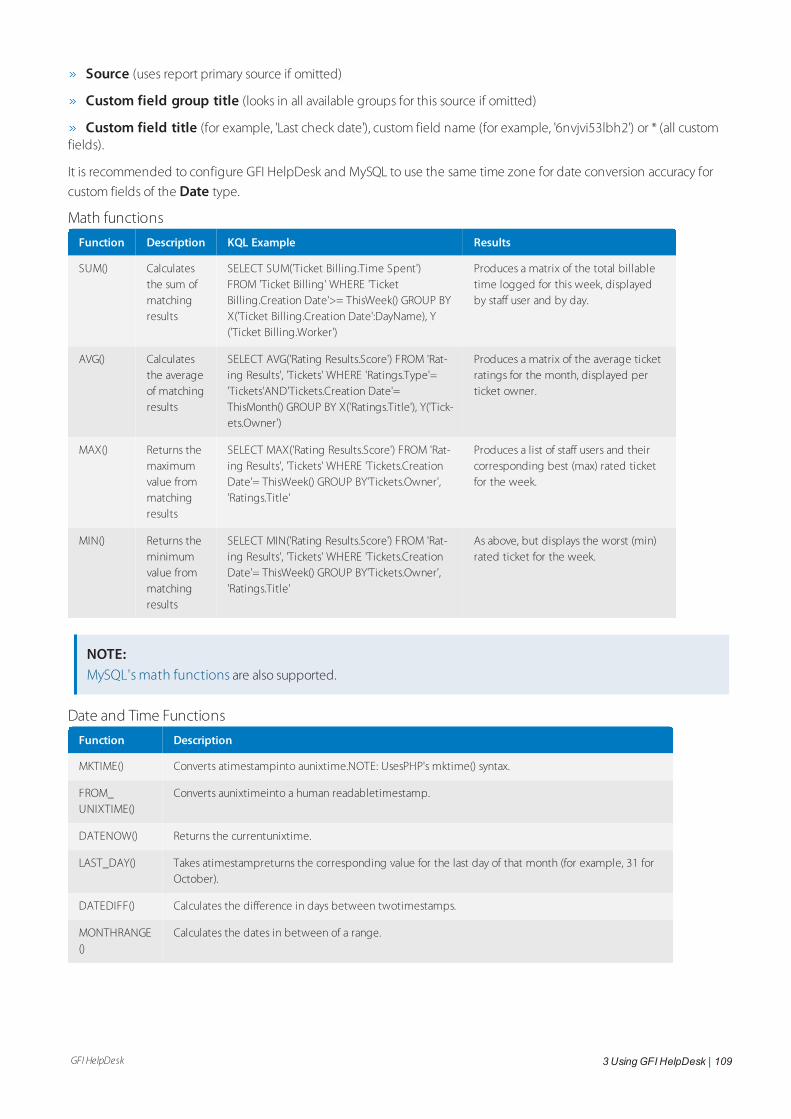
GFI HelpDesk 3 UsingGFI HelpDesk | 109
Source (uses report primary source if omitted)
Custom field group title (looks in all available groups for this source if omitted)
Custom field title (for example, 'Last check date'), custom field name (for example, '6nvjvi53lbh2') or * (all customfields).
It is recommended to configure GFI HelpDesk and MySQL to use the same time zone for date conversion accuracy for
custom fields of the Date type.
Math functions
Function Description KQL Example Results
SUM() Calculatesthe sum ofmatchingresults
SELECT SUM('Ticket Billing.Time Spent')FROM 'Ticket Billing' WHERE 'TicketBilling.Creation Date'>= ThisWeek() GROUP BYX('Ticket Billing.Creation Date':DayName), Y('Ticket Billing.Worker')
Produces a matrix of the total billabletime logged for this week, displayedby staff user and by day.
AVG() Calculatesthe averageof matchingresults
SELECT AVG('Rating Results.Score') FROM 'Rat-ing Results', 'Tickets' WHERE 'Ratings.Type'='Tickets'AND'Tickets.Creation Date'=ThisMonth() GROUP BY X('Ratings.Title'), Y('Tick-ets.Owner')
Produces a matrix of the average ticketratings for the month, displayed perticket owner.
MAX() Returns themaximumvalue frommatchingresults
SELECT MAX('Rating Results.Score') FROM 'Rat-ing Results', 'Tickets' WHERE 'Tickets.CreationDate'= ThisWeek() GROUP BY'Tickets.Owner','Ratings.Title'
Produces a list of staff users and theircorresponding best (max) rated ticketfor the week.
MIN() Returns theminimumvalue frommatchingresults
SELECT MIN('Rating Results.Score') FROM 'Rat-ing Results', 'Tickets' WHERE 'Tickets.CreationDate'= ThisWeek() GROUP BY'Tickets.Owner','Ratings.Title'
As above, but displays the worst (min)rated ticket for the week.
NOTE:MySQL's math functions are also supported.
Date and Time Functions
Function Description
MKTIME() Converts atimestampinto aunixtime.NOTE: UsesPHP's mktime() syntax.
FROM_UNIXTIME()
Converts aunixtimeinto a human readabletimestamp.
DATENOW() Returns the currentunixtime.
LAST_DAY() Takes atimestampreturns the corresponding value for the last day of that month (for example, 31 forOctober).
DATEDIFF() Calculates the difference in days between twotimestamps.
MONTHRANGE()
Calculates the dates in between of a range.
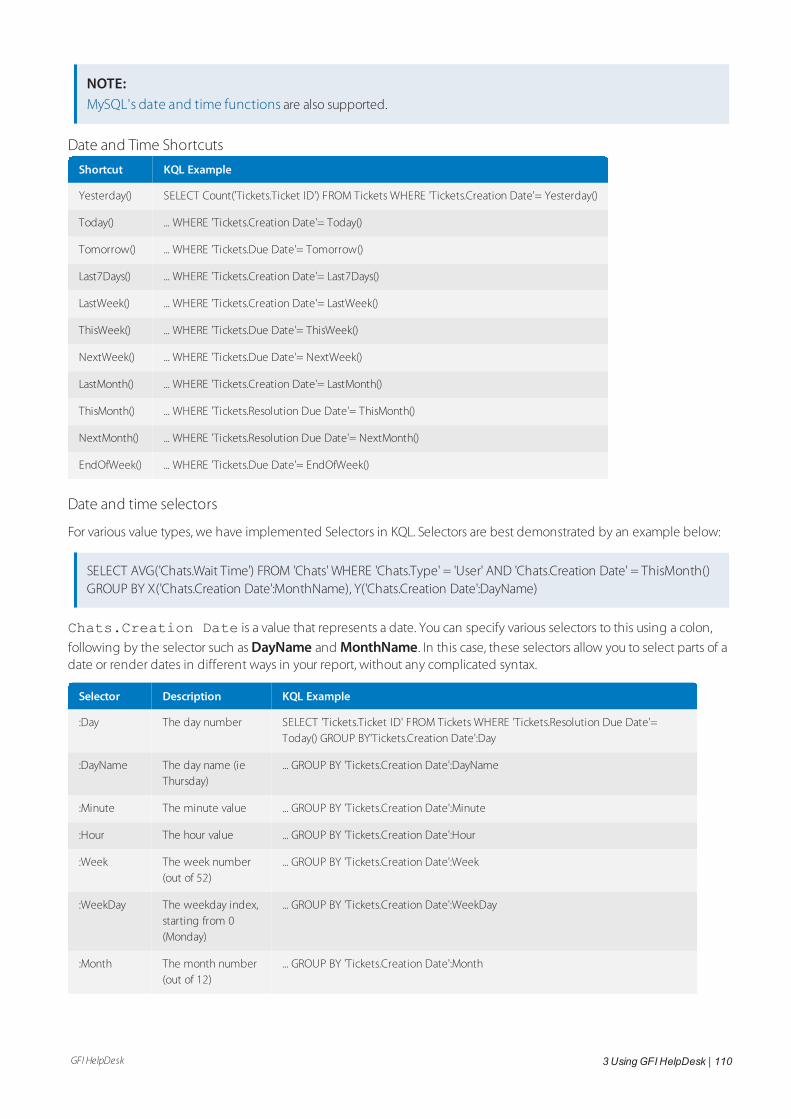
GFI HelpDesk 3 UsingGFI HelpDesk | 110
NOTE:MySQL's date and time functions are also supported.
Date and Time Shortcuts
Shortcut KQL Example
Yesterday() SELECT Count('Tickets.Ticket ID') FROM Tickets WHERE 'Tickets.Creation Date'= Yesterday()
Today() ... WHERE 'Tickets.Creation Date'= Today()
Tomorrow() ... WHERE 'Tickets.Due Date'= Tomorrow()
Last7Days() ... WHERE 'Tickets.Creation Date'= Last7Days()
LastWeek() ... WHERE 'Tickets.Creation Date'= LastWeek()
ThisWeek() ... WHERE 'Tickets.Due Date'= ThisWeek()
NextWeek() ... WHERE 'Tickets.Due Date'= NextWeek()
LastMonth() ... WHERE 'Tickets.Creation Date'= LastMonth()
ThisMonth() ... WHERE 'Tickets.Resolution Due Date'= ThisMonth()
NextMonth() ... WHERE 'Tickets.Resolution Due Date'= NextMonth()
EndOfWeek() ... WHERE 'Tickets.Due Date'= EndOfWeek()
Date and time selectors
For various value types, we have implemented Selectors in KQL. Selectors are best demonstrated by an example below:
SELECT AVG('Chats.Wait Time') FROM 'Chats' WHERE 'Chats.Type' = 'User' AND 'Chats.Creation Date' = ThisMonth()GROUP BY X('Chats.Creation Date':MonthName), Y('Chats.Creation Date':DayName)
Chats.Creation Date is a value that represents a date. You can specify various selectors to this using a colon,
following by the selector such as DayName and MonthName. In this case, these selectors allow you to select parts of adate or render dates in different ways in your report, without any complicated syntax.
Selector Description KQL Example
:Day The day number SELECT 'Tickets.Ticket ID' FROM Tickets WHERE 'Tickets.Resolution Due Date'=Today() GROUP BY'Tickets.Creation Date':Day
:DayName The day name (ieThursday)
... GROUP BY 'Tickets.Creation Date':DayName
:Minute The minute value ... GROUP BY 'Tickets.Creation Date':Minute
:Hour The hour value ... GROUP BY 'Tickets.Creation Date':Hour
:Week The week number(out of 52)
... GROUP BY 'Tickets.Creation Date':Week
:WeekDay The weekday index,starting from 0(Monday)
... GROUP BY 'Tickets.Creation Date':WeekDay
:Month The month number(out of 12)
... GROUP BY 'Tickets.Creation Date':Month
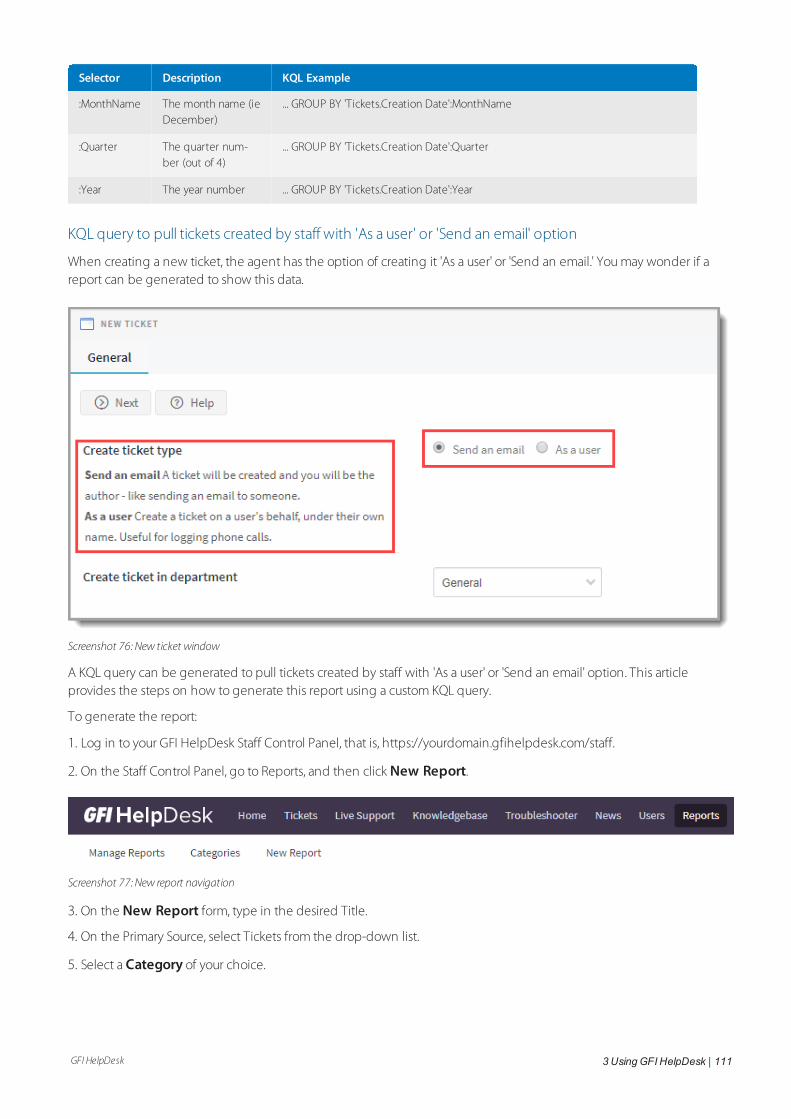
GFI HelpDesk 3 UsingGFI HelpDesk | 111
Selector Description KQL Example
:MonthName The month name (ieDecember)
... GROUP BY 'Tickets.Creation Date':MonthName
:Quarter The quarter num-ber (out of 4)
... GROUP BY 'Tickets.Creation Date':Quarter
:Year The year number ... GROUP BY 'Tickets.Creation Date':Year
KQL query to pull tickets created by staff with 'As a user' or 'Send an email' option
When creating a new ticket, the agent has the option of creating it 'As a user' or 'Send an email.' You may wonder if areport can be generated to show this data.
Screenshot 76: New ticket window
A KQL query can be generated to pull tickets created by staff with 'As a user' or 'Send an email' option. This articleprovides the steps on how to generate this report using a custom KQL query.
To generate the report:
1. Log in to your GFI HelpDesk Staff Control Panel, that is, https://yourdomain.gfihelpdesk.com/staff.
2. On the Staff Control Panel, go to Reports, and then click New Report.
Screenshot 77: New report navigation
3. On the New Report form, type in the desired Title.
4. On the Primary Source, select Tickets from the drop-down list.
5. Select a Category of your choice.
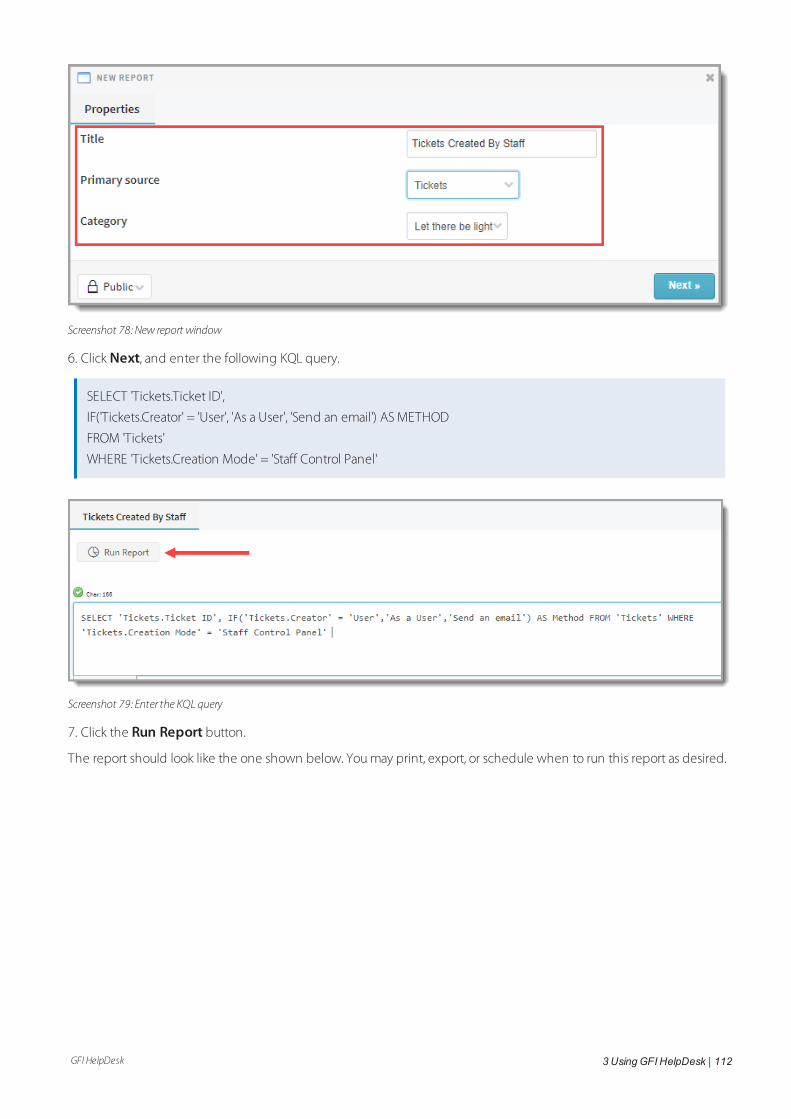
GFI HelpDesk 3 UsingGFI HelpDesk | 112
Screenshot 78: New report window
6. Click Next, and enter the following KQL query.
SELECT 'Tickets.Ticket ID',
IF('Tickets.Creator' = 'User', 'As a User', 'Send an email') AS METHOD
FROM 'Tickets'
WHERE 'Tickets.Creation Mode' = 'Staff Control Panel'
Screenshot 79: Enter the KQL query
7. Click the Run Report button.
The report should look like the one shown below. You may print, export, or schedule when to run this report as desired.
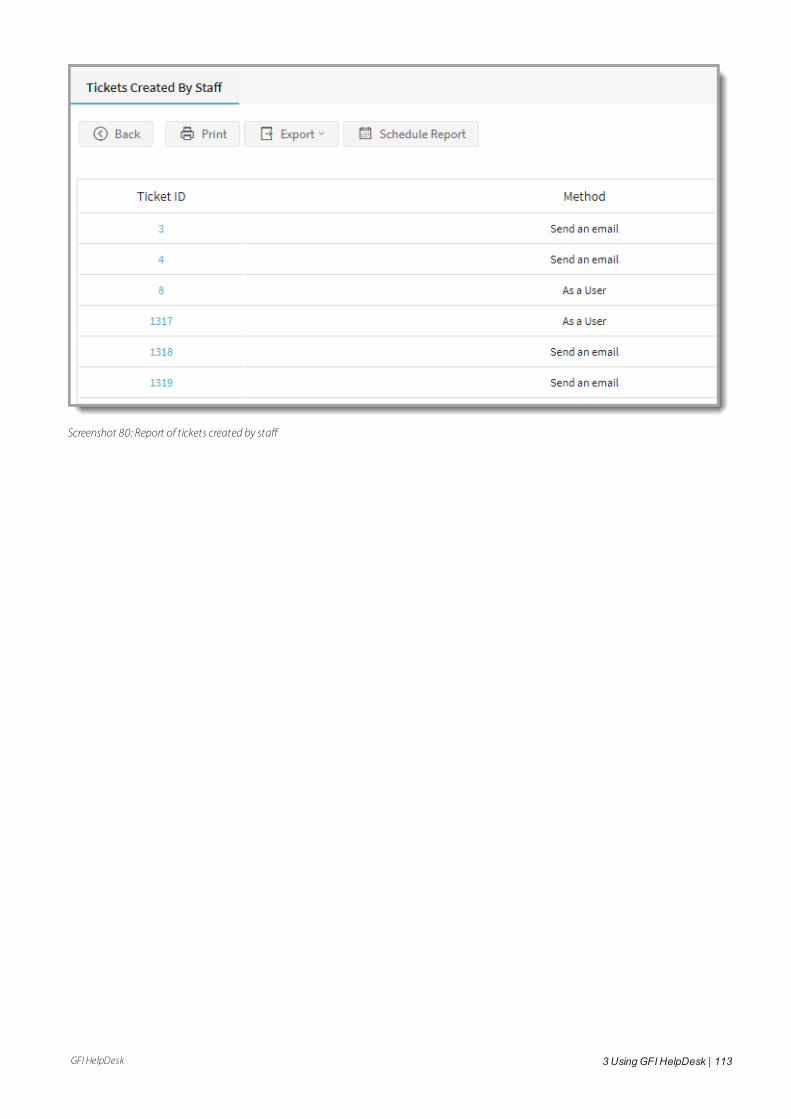
GFI HelpDesk 3 UsingGFI HelpDesk | 113
Screenshot 80: Report of tickets created by staff
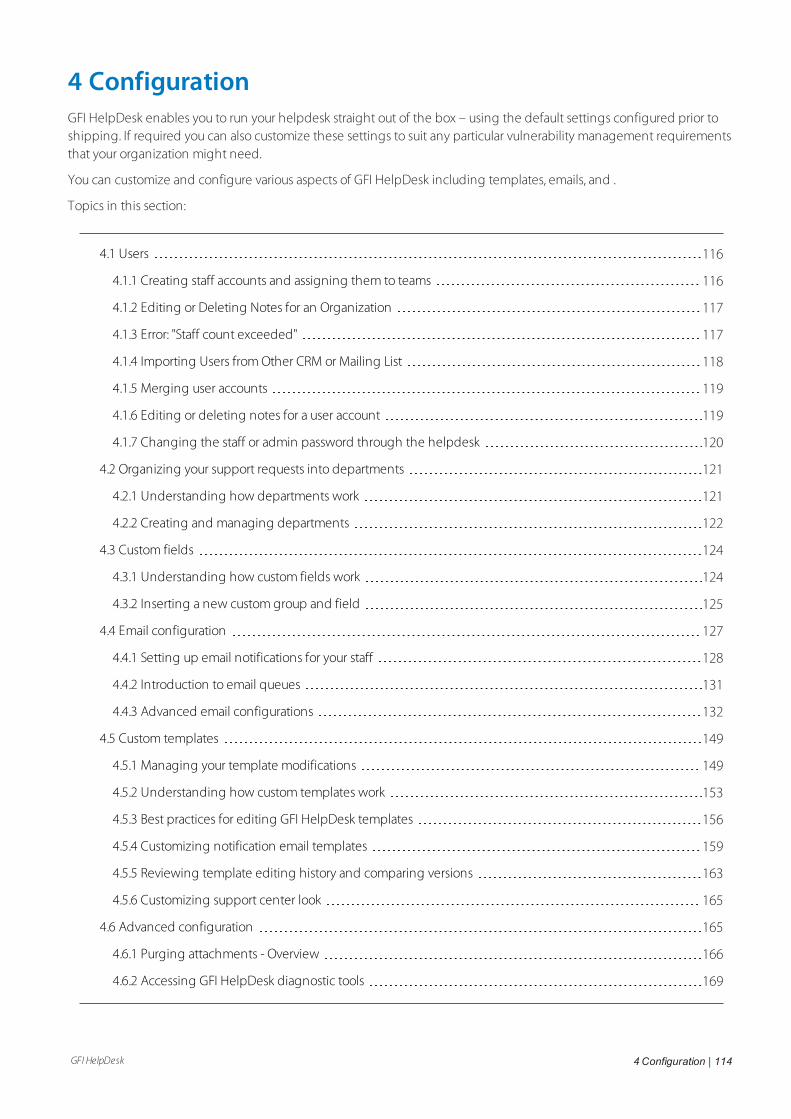
GFI HelpDesk 4 Configuration | 114
4 ConfigurationGFI HelpDesk enables you to run your helpdesk straight out of the box – using the default settings configured prior toshipping. If required you can also customize these settings to suit any particular vulnerability management requirementsthat your organization might need.
You can customize and configure various aspects of GFI HelpDesk including templates, emails, and .
Topics in this section:
4.1 Users 116
4.1.1 Creating staff accounts and assigning them to teams 116
4.1.2 Editing or Deleting Notes for an Organization 117
4.1.3 Error: "Staff count exceeded" 117
4.1.4 Importing Users from Other CRM or Mailing List 118
4.1.5 Merging user accounts 119
4.1.6 Editing or deleting notes for a user account 119
4.1.7 Changing the staff or admin password through the helpdesk 120
4.2 Organizing your support requests into departments 121
4.2.1 Understanding how departments work 121
4.2.2 Creating and managing departments 122
4.3 Custom fields 124
4.3.1 Understanding how custom fields work 124
4.3.2 Inserting a new custom group and field 125
4.4 Email configuration 127
4.4.1 Setting up email notifications for your staff 128
4.4.2 Introduction to email queues 131
4.4.3 Advanced email configurations 132
4.5 Custom templates 149
4.5.1 Managing your template modifications 149
4.5.2 Understanding how custom templates work 153
4.5.3 Best practices for editing GFI HelpDesk templates 156
4.5.4 Customizing notification email templates 159
4.5.5 Reviewing template editing history and comparing versions 163
4.5.6 Customizing support center look 165
4.6 Advanced configuration 165
4.6.1 Purging attachments - Overview 166
4.6.2 Accessing GFI HelpDesk diagnostic tools 169
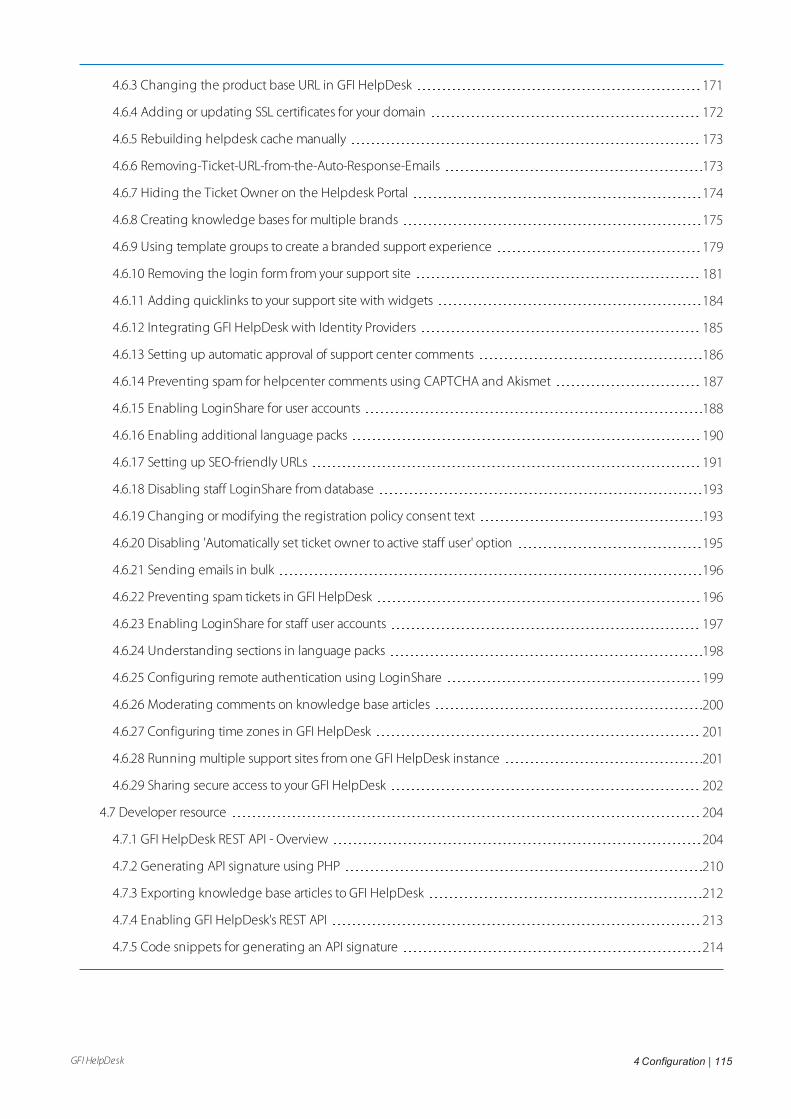
GFI HelpDesk 4 Configuration | 115
4.6.3 Changing the product base URL in GFI HelpDesk 171
4.6.4 Adding or updating SSL certificates for your domain 172
4.6.5 Rebuilding helpdesk cache manually 173
4.6.6 Removing-Ticket-URL-from-the-Auto-Response-Emails 173
4.6.7 Hiding the Ticket Owner on the Helpdesk Portal 174
4.6.8 Creating knowledge bases for multiple brands 175
4.6.9 Using template groups to create a branded support experience 179
4.6.10 Removing the login form from your support site 181
4.6.11 Adding quicklinks to your support site with widgets 184
4.6.12 Integrating GFI HelpDesk with Identity Providers 185
4.6.13 Setting up automatic approval of support center comments 186
4.6.14 Preventing spam for helpcenter comments using CAPTCHA and Akismet 187
4.6.15 Enabling LoginShare for user accounts 188
4.6.16 Enabling additional language packs 190
4.6.17 Setting up SEO-friendly URLs 191
4.6.18 Disabling staff LoginShare from database 193
4.6.19 Changing or modifying the registration policy consent text 193
4.6.20 Disabling 'Automatically set ticket owner to active staff user' option 195
4.6.21 Sending emails in bulk 196
4.6.22 Preventing spam tickets in GFI HelpDesk 196
4.6.23 Enabling LoginShare for staff user accounts 197
4.6.24 Understanding sections in language packs 198
4.6.25 Configuring remote authentication using LoginShare 199
4.6.26 Moderating comments on knowledge base articles 200
4.6.27 Configuring time zones in GFI HelpDesk 201
4.6.28 Running multiple support sites from one GFI HelpDesk instance 201
4.6.29 Sharing secure access to your GFI HelpDesk 202
4.7 Developer resource 204
4.7.1 GFI HelpDesk REST API - Overview 204
4.7.2 Generating API signature using PHP 210
4.7.3 Exporting knowledge base articles to GFI HelpDesk 212
4.7.4 Enabling GFI HelpDesk's REST API 213
4.7.5 Code snippets for generating an API signature 214
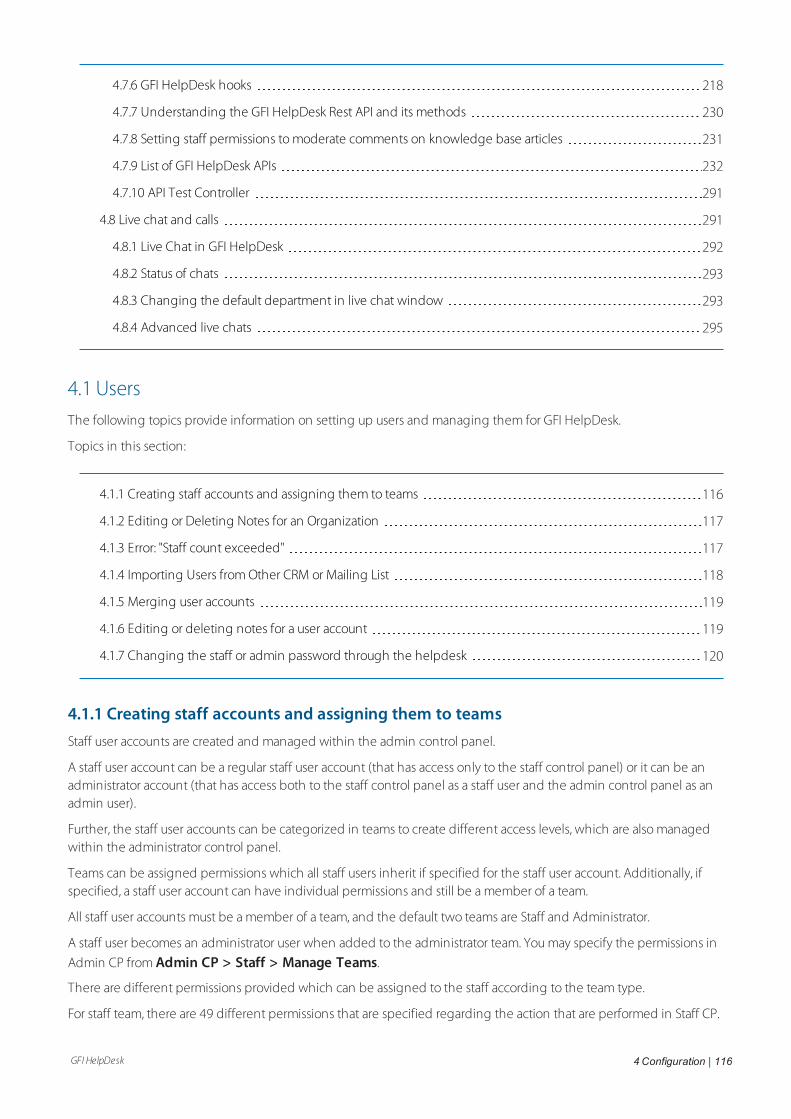
GFI HelpDesk 4 Configuration | 116
4.7.6 GFI HelpDesk hooks 218
4.7.7 Understanding the GFI HelpDesk Rest API and its methods 230
4.7.8 Setting staff permissions to moderate comments on knowledge base articles 231
4.7.9 List of GFI HelpDesk APIs 232
4.7.10 API Test Controller 291
4.8 Live chat and calls 291
4.8.1 Live Chat in GFI HelpDesk 292
4.8.2 Status of chats 293
4.8.3 Changing the default department in live chat window 293
4.8.4 Advanced live chats 295
4.1 UsersThe following topics provide information on setting up users and managing them for GFI HelpDesk.
Topics in this section:
4.1.1 Creating staff accounts and assigning them to teams 116
4.1.2 Editing or Deleting Notes for an Organization 117
4.1.3 Error: "Staff count exceeded" 117
4.1.4 Importing Users from Other CRM or Mailing List 118
4.1.5 Merging user accounts 119
4.1.6 Editing or deleting notes for a user account 119
4.1.7 Changing the staff or admin password through the helpdesk 120
4.1.1 Creating staff accounts and assigning them to teamsStaff user accounts are created and managed within the admin control panel.
A staff user account can be a regular staff user account (that has access only to the staff control panel) or it can be anadministrator account (that has access both to the staff control panel as a staff user and the admin control panel as anadmin user).
Further, the staff user accounts can be categorized in teams to create different access levels, which are also managedwithin the administrator control panel.
Teams can be assigned permissions which all staff users inherit if specified for the staff user account. Additionally, ifspecified, a staff user account can have individual permissions and still be a member of a team.
All staff user accounts must be a member of a team, and the default two teams are Staff and Administrator.
A staff user becomes an administrator user when added to the administrator team. You may specify the permissions in
Admin CP from Admin CP > Staff > Manage Teams.
There are different permissions provided which can be assigned to the staff according to the team type.
For staff team, there are 49 different permissions that are specified regarding the action that are performed in Staff CP.
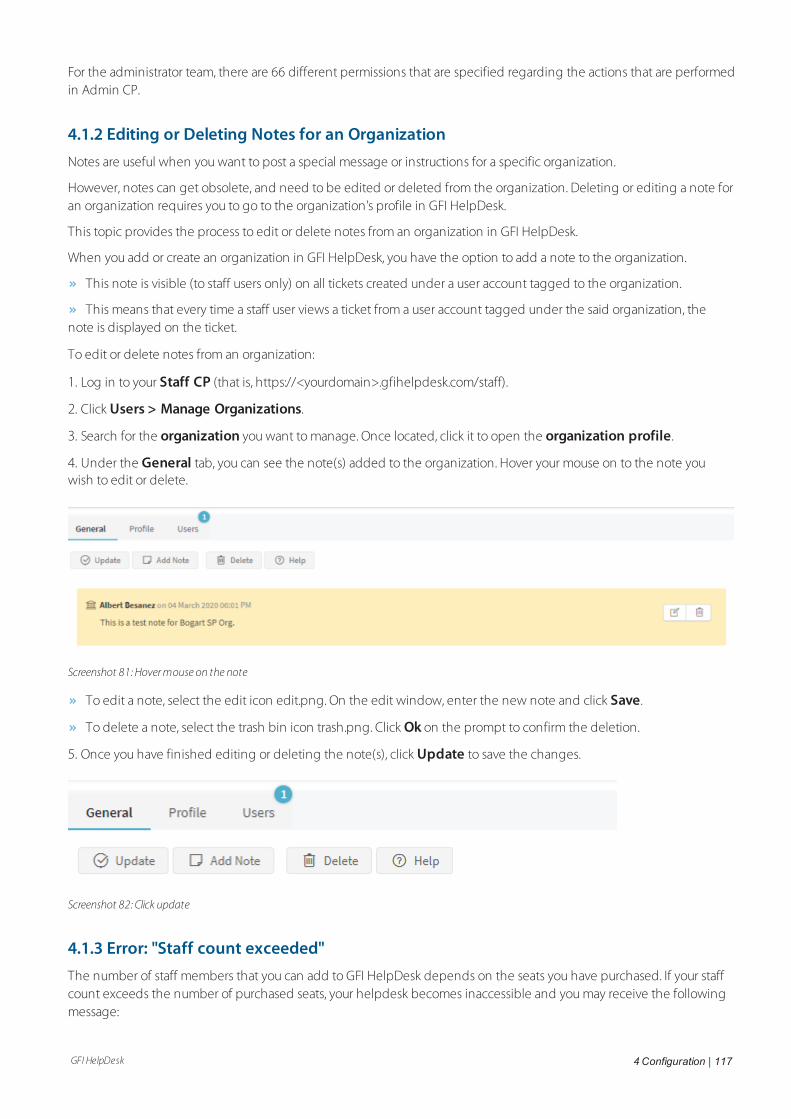
GFI HelpDesk 4 Configuration | 117
For the administrator team, there are 66 different permissions that are specified regarding the actions that are performedin Admin CP.
4.1.2 Editing or Deleting Notes for an OrganizationNotes are useful when you want to post a special message or instructions for a specific organization.
However, notes can get obsolete, and need to be edited or deleted from the organization. Deleting or editing a note foran organization requires you to go to the organization's profile in GFI HelpDesk.
This topic provides the process to edit or delete notes from an organization in GFI HelpDesk.
When you add or create an organization in GFI HelpDesk, you have the option to add a note to the organization.
This note is visible (to staff users only) on all tickets created under a user account tagged to the organization.
This means that every time a staff user views a ticket from a user account tagged under the said organization, thenote is displayed on the ticket.
To edit or delete notes from an organization:
1. Log in to your Staff CP (that is, https://<yourdomain>.gfihelpdesk.com/staff).
2. Click Users > Manage Organizations.
3. Search for the organization you want to manage. Once located, click it to open the organization profile.
4. Under the General tab, you can see the note(s) added to the organization. Hover your mouse on to the note youwish to edit or delete.
Screenshot 81: Hovermouse on the note
To edit a note, select the edit icon edit.png. On the edit window, enter the new note and click Save.
To delete a note, select the trash bin icon trash.png. Click Ok on the prompt to confirm the deletion.
5. Once you have finished editing or deleting the note(s), click Update to save the changes.
Screenshot 82: Click update
4.1.3 Error: "Staff count exceeded"The number of staff members that you can add to GFI HelpDesk depends on the seats you have purchased. If your staffcount exceeds the number of purchased seats, your helpdesk becomes inaccessible and you may receive the followingmessage:
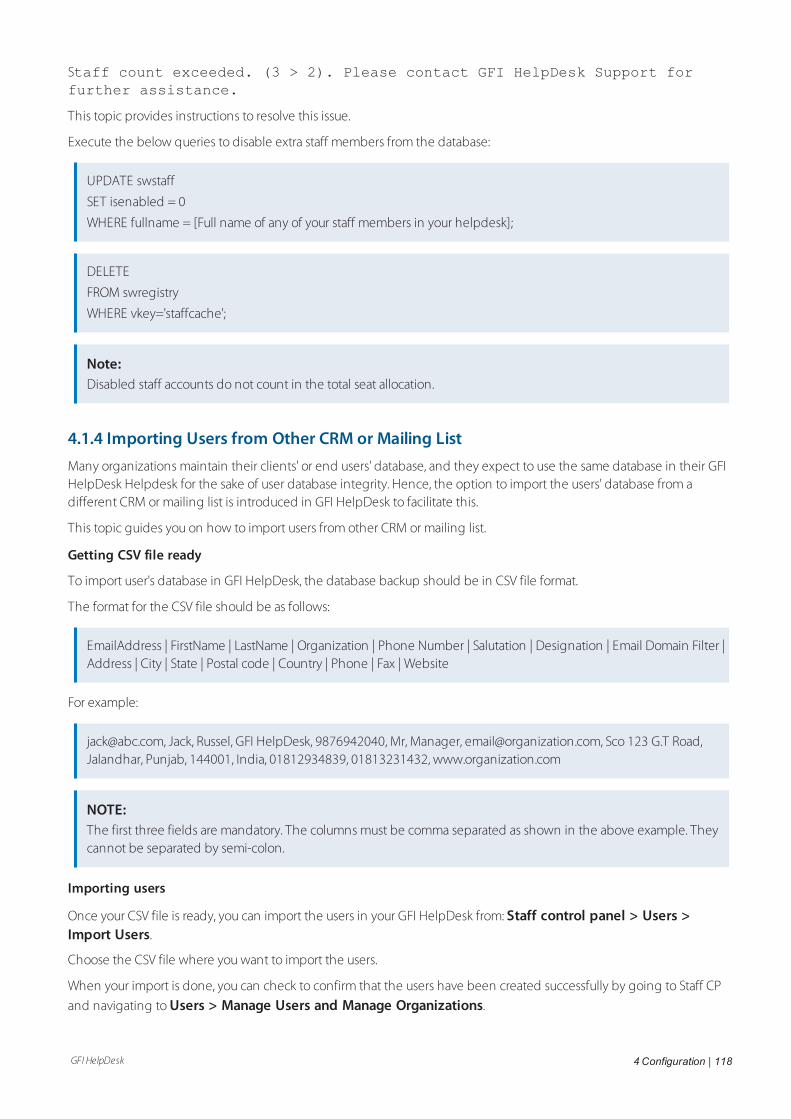
GFI HelpDesk 4 Configuration | 118
Staff count exceeded. (3 > 2). Please contact GFI HelpDesk Support forfurther assistance.
This topic provides instructions to resolve this issue.
Execute the below queries to disable extra staff members from the database:
UPDATE swstaff
SET isenabled = 0
WHERE fullname = [Full name of any of your staff members in your helpdesk];
DELETE
FROM swregistry
WHERE vkey='staffcache';
Note:Disabled staff accounts do not count in the total seat allocation.
4.1.4 Importing Users from Other CRM or Mailing ListMany organizations maintain their clients' or end users' database, and they expect to use the same database in their GFIHelpDesk Helpdesk for the sake of user database integrity. Hence, the option to import the users' database from adifferent CRM or mailing list is introduced in GFI HelpDesk to facilitate this.
This topic guides you on how to import users from other CRM or mailing list.
Getting CSV file ready
To import user's database in GFI HelpDesk, the database backup should be in CSV file format.
The format for the CSV file should be as follows:
EmailAddress | FirstName | LastName | Organization | Phone Number | Salutation | Designation | Email Domain Filter |Address | City | State | Postal code | Country | Phone | Fax | Website
For example:
[email protected], Jack, Russel, GFI HelpDesk, 9876942040, Mr, Manager, [email protected], Sco 123 G.T Road,Jalandhar, Punjab, 144001, India, 01812934839, 01813231432, www.organization.com
NOTE:The first three fields are mandatory. The columns must be comma separated as shown in the above example. Theycannot be separated by semi-colon.
Importing users
Once your CSV file is ready, you can import the users in your GFI HelpDesk from: Staff control panel > Users >Import Users.
Choose the CSV file where you want to import the users.
When your import is done, you can check to confirm that the users have been created successfully by going to Staff CP
and navigating to Users > Manage Users and Manage Organizations.
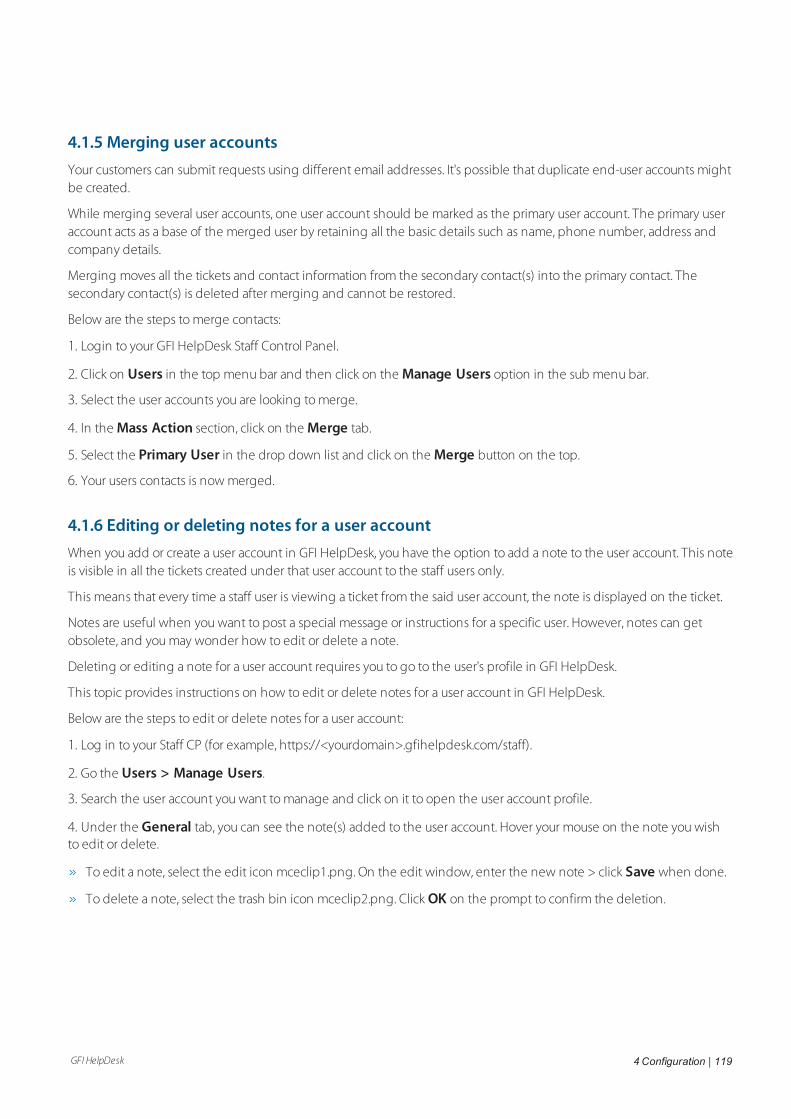
GFI HelpDesk 4 Configuration | 119
4.1.5 Merging user accountsYour customers can submit requests using different email addresses. It's possible that duplicate end-user accounts mightbe created.
While merging several user accounts, one user account should be marked as the primary user account. The primary useraccount acts as a base of the merged user by retaining all the basic details such as name, phone number, address andcompany details.
Merging moves all the tickets and contact information from the secondary contact(s) into the primary contact. Thesecondary contact(s) is deleted after merging and cannot be restored.
Below are the steps to merge contacts:
1. Login to your GFI HelpDesk Staff Control Panel.
2. Click on Users in the top menu bar and then click on the Manage Users option in the sub menu bar.
3. Select the user accounts you are looking to merge.
4. In the Mass Action section, click on the Merge tab.
5. Select the Primary User in the drop down list and click on the Merge button on the top.
6. Your users contacts is now merged.
4.1.6 Editing or deleting notes for a user accountWhen you add or create a user account in GFI HelpDesk, you have the option to add a note to the user account. This noteis visible in all the tickets created under that user account to the staff users only.
This means that every time a staff user is viewing a ticket from the said user account, the note is displayed on the ticket.
Notes are useful when you want to post a special message or instructions for a specific user. However, notes can getobsolete, and you may wonder how to edit or delete a note.
Deleting or editing a note for a user account requires you to go to the user's profile in GFI HelpDesk.
This topic provides instructions on how to edit or delete notes for a user account in GFI HelpDesk.
Below are the steps to edit or delete notes for a user account:
1. Log in to your Staff CP (for example, https://<yourdomain>.gfihelpdesk.com/staff).
2. Go the Users > Manage Users.
3. Search the user account you want to manage and click on it to open the user account profile.
4. Under the General tab, you can see the note(s) added to the user account. Hover your mouse on the note you wishto edit or delete.
To edit a note, select the edit icon mceclip1.png. On the edit window, enter the new note > click Save when done.
To delete a note, select the trash bin icon mceclip2.png. Click OK on the prompt to confirm the deletion.
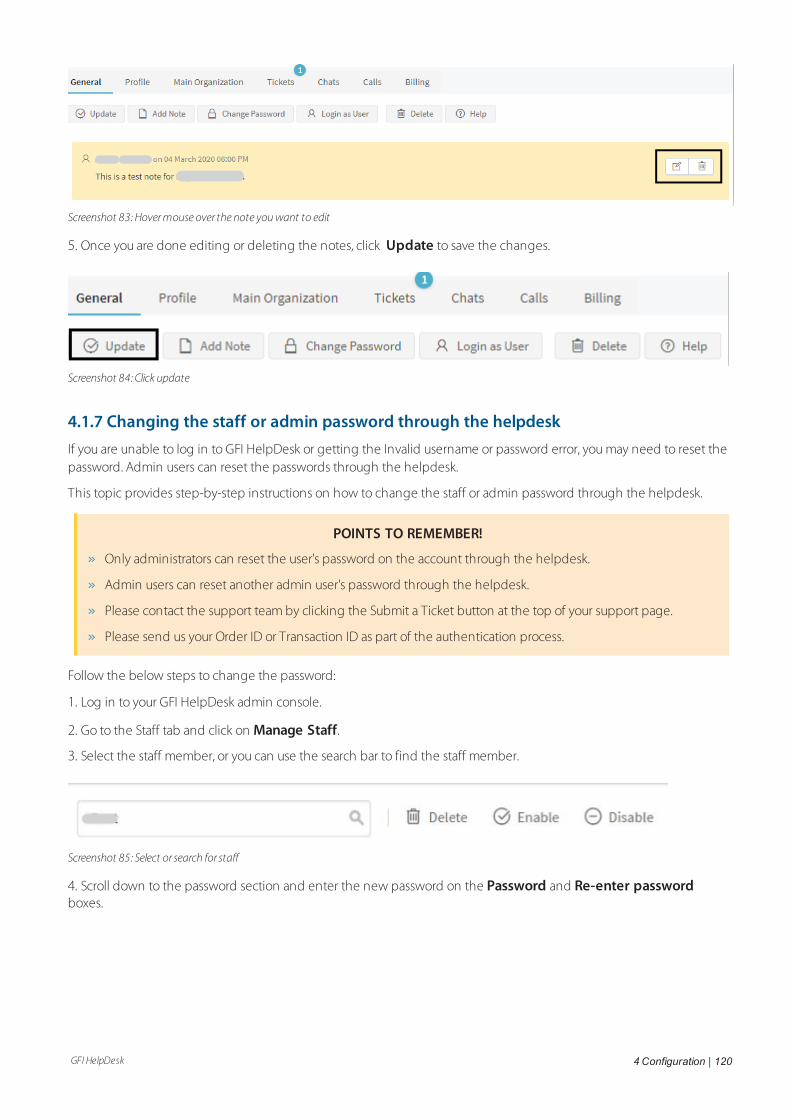
GFI HelpDesk 4 Configuration | 120
Screenshot 83: Hovermouse over the note youwant to edit
5. Once you are done editing or deleting the notes, click Update to save the changes.
Screenshot 84: Click update
4.1.7 Changing the staff or admin password through the helpdeskIf you are unable to log in to GFI HelpDesk or getting the Invalid username or password error, you may need to reset thepassword. Admin users can reset the passwords through the helpdesk.
This topic provides step-by-step instructions on how to change the staff or admin password through the helpdesk.
POINTS TO REMEMBER!
Only administrators can reset the user's password on the account through the helpdesk.
Admin users can reset another admin user's password through the helpdesk.
Please contact the support team by clicking the Submit a Ticket button at the top of your support page.
Please send us your Order ID or Transaction ID as part of the authentication process.
Follow the below steps to change the password:
1. Log in to your GFI HelpDesk admin console.
2. Go to the Staff tab and click on Manage Staff.
3. Select the staff member, or you can use the search bar to find the staff member.
Screenshot 85: Select or search for staff
4. Scroll down to the password section and enter the new password on the Password and Re-enter passwordboxes.
GFI HelpDesk 4 Configuration | 121
Screenshot 86: Enter newpassword
5. Click the Update button at the top to save the changes.
Screenshot 87: Click update
4.2 Organizing your support requests into departmentsLearn about organizing your support requests into departments in this topic.
For most companies, the responsibility of handling support requests is divided among several different teams.
In GFI HelpDesk, you can distribute the support requests using departments. Splitting your tickets between multipledepartments means each request is getting in front of the people best qualified to resolve it.
For each department, you can assign teams or staff members, set its visibility, and choose whether it handles chats ortickets.
You can move tickets between departments either manually or using workflows, and you also have the option to set upnotifications for your teams, when a new ticket gets moved into one of their departments.
In this section, it is described how GFI HelpDesk departments work, and then walk step-by-step through creating andediting departments.
Topics in this section:
4.2.1 Understanding how departments work 121
4.2.2 Creating and managing departments 122
4.2.1 Understanding how departments workThink of GFI HelpDesk departments as buckets, which you can use to store different types of support requests. For eachdepartment-bucket you assign teams and/or individual staff members to it, so they can look after the requests that landin there.
As you set up new departments, they show up in the sidebar of the staff control panel – broken down by ticket priority –so you can quickly switch between buckets.
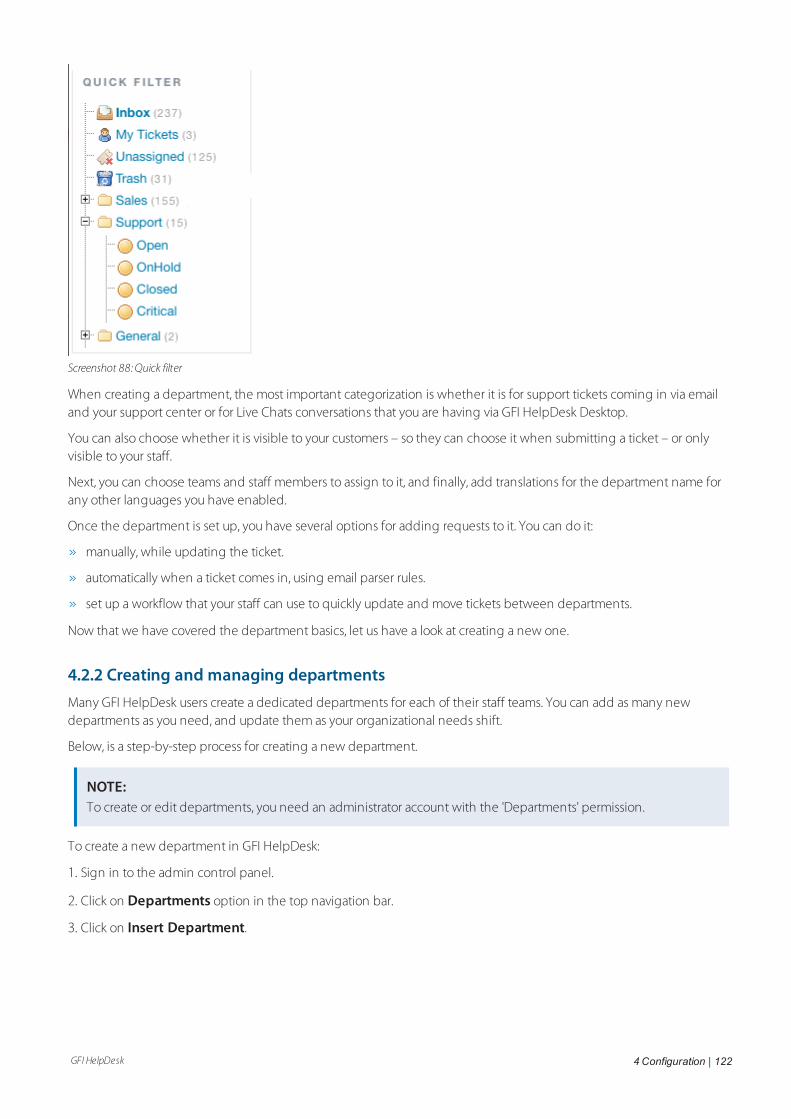
GFI HelpDesk 4 Configuration | 122
Screenshot 88: Quick filter
When creating a department, the most important categorization is whether it is for support tickets coming in via emailand your support center or for Live Chats conversations that you are having via GFI HelpDesk Desktop.
You can also choose whether it is visible to your customers – so they can choose it when submitting a ticket – or onlyvisible to your staff.
Next, you can choose teams and staff members to assign to it, and finally, add translations for the department name forany other languages you have enabled.
Once the department is set up, you have several options for adding requests to it. You can do it:
manually, while updating the ticket.
automatically when a ticket comes in, using email parser rules.
set up a workflow that your staff can use to quickly update and move tickets between departments.
Now that we have covered the department basics, let us have a look at creating a new one.
4.2.2 Creating and managing departmentsMany GFI HelpDesk users create a dedicated departments for each of their staff teams. You can add as many newdepartments as you need, and update them as your organizational needs shift.
Below, is a step-by-step process for creating a new department.
NOTE:To create or edit departments, you need an administrator account with the 'Departments' permission.
To create a new department in GFI HelpDesk:
1. Sign in to the admin control panel.
2. Click on Departments option in the top navigation bar.
3. Click on Insert Department.
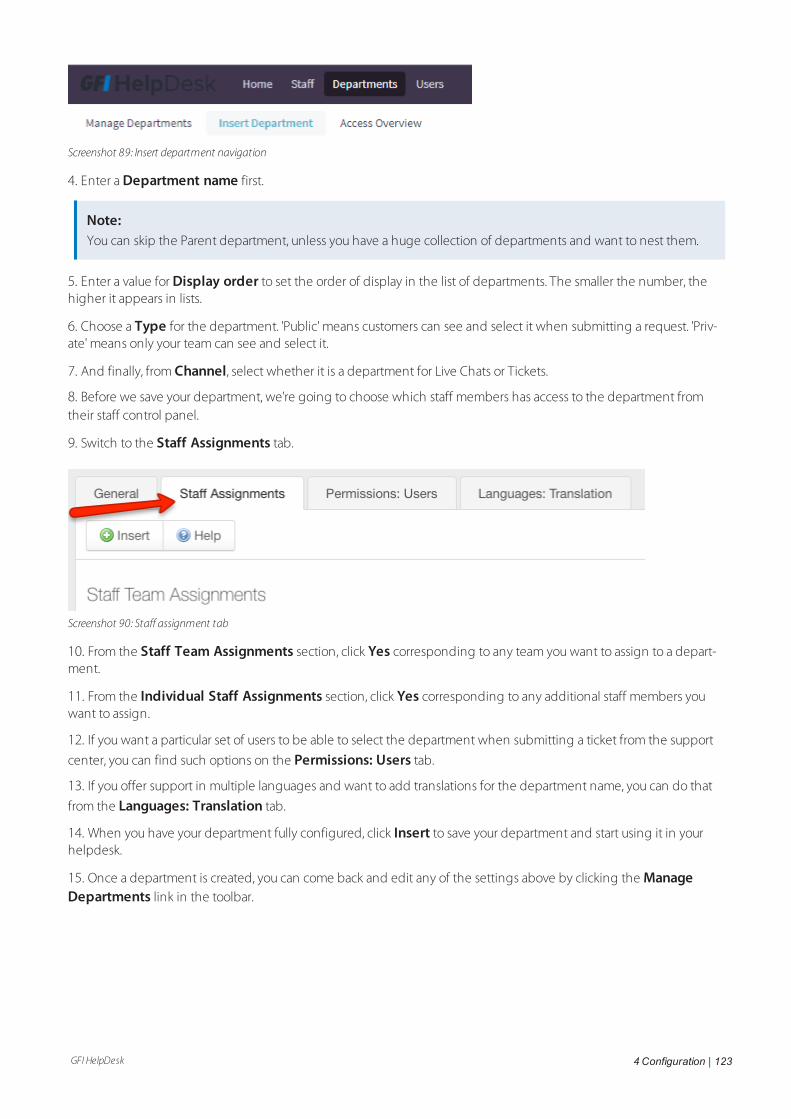
GFI HelpDesk 4 Configuration | 123
Screenshot 89: Insert department navigation
4. Enter a Department name first.
Note:You can skip the Parent department, unless you have a huge collection of departments and want to nest them.
5. Enter a value for Display order to set the order of display in the list of departments. The smaller the number, thehigher it appears in lists.
6. Choose a Type for the department. 'Public' means customers can see and select it when submitting a request. 'Priv-ate' means only your team can see and select it.
7. And finally, from Channel, select whether it is a department for Live Chats or Tickets.
8. Before we save your department, we're going to choose which staff members has access to the department fromtheir staff control panel.
9. Switch to the Staff Assignments tab.
Screenshot 90: Staff assignment tab
10. From the Staff Team Assignments section, click Yes corresponding to any team you want to assign to a depart-ment.
11. From the Individual Staff Assignments section, click Yes corresponding to any additional staff members youwant to assign.
12. If you want a particular set of users to be able to select the department when submitting a ticket from the support
center, you can find such options on the Permissions: Users tab.
13. If you offer support in multiple languages and want to add translations for the department name, you can do that
from the Languages: Translation tab.
14. When you have your department fully configured, click Insert to save your department and start using it in yourhelpdesk.
15. Once a department is created, you can come back and edit any of the settings above by clicking the ManageDepartments link in the toolbar.
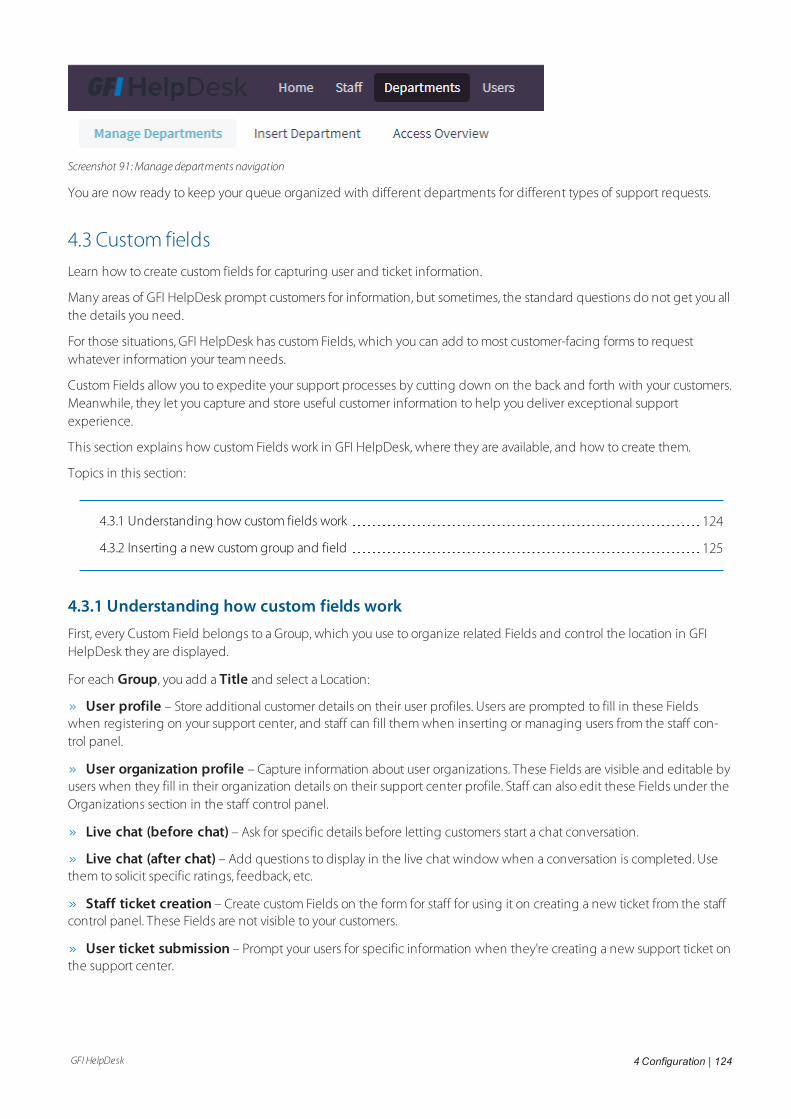
GFI HelpDesk 4 Configuration | 124
Screenshot 91:Manage departments navigation
You are now ready to keep your queue organized with different departments for different types of support requests.
4.3 Custom fieldsLearn how to create custom fields for capturing user and ticket information.
Many areas of GFI HelpDesk prompt customers for information, but sometimes, the standard questions do not get you allthe details you need.
For those situations, GFI HelpDesk has custom Fields, which you can add to most customer-facing forms to requestwhatever information your team needs.
Custom Fields allow you to expedite your support processes by cutting down on the back and forth with your customers.Meanwhile, they let you capture and store useful customer information to help you deliver exceptional supportexperience.
This section explains how custom Fields work in GFI HelpDesk, where they are available, and how to create them.
Topics in this section:
4.3.1 Understanding how custom fields work 124
4.3.2 Inserting a new custom group and field 125
4.3.1 Understanding how custom fields workFirst, every Custom Field belongs to a Group, which you use to organize related Fields and control the location in GFIHelpDesk they are displayed.
For each Group, you add a Title and select a Location:
User profile – Store additional customer details on their user profiles. Users are prompted to fill in these Fieldswhen registering on your support center, and staff can fill them when inserting or managing users from the staff con-trol panel.
User organization profile – Capture information about user organizations. These Fields are visible and editable byusers when they fill in their organization details on their support center profile. Staff can also edit these Fields under theOrganizations section in the staff control panel.
Live chat (before chat) – Ask for specific details before letting customers start a chat conversation.
Live chat (after chat) – Add questions to display in the live chat window when a conversation is completed. Usethem to solicit specific ratings, feedback, etc.
Staff ticket creation – Create custom Fields on the form for staff for using it on creating a new ticket from the staffcontrol panel. These Fields are not visible to your customers.
User ticket submission – Prompt your users for specific information when they're creating a new support ticket onthe support center.

GFI HelpDesk 4 Configuration | 125
Staff and end user ticket creation – Select this location to create a Group of Fields that appears to both your staffand your end users, when they're creating new support tickets.
Ticket time tracking / billing entry – Track detailed billing information by adding custom Fields to the Billingticket tab in the staff control panel.
NOTE:Once a custom Field Group is created; you cannot change its location.
When you have created a field Group or two, you can start to add the Fields themselves. GFI HelpDesk supports a varietyof different field types:
Text – Small, single-line text box that allows users to enter a short string of text.
Text area – Larger text area, spanning multiple-lines, that allows users to enter larger blocks of text.
Password – Text box that masks any values entered, for security.
Checkbox (multiple choices) – List of options with checkboxes next to them. Users can select multiple options.
Radio Buttons (single choice) – List of options with radio button selectors. Users can select one option.
Drop-down select (single choice) – List of options in a dropdown menu. Users can select one option.
Multi-selection menu (multiple choices) – List of options in a menu. Users can select multiple options.
Linked select (multiple choices) – Drill down menu that takes users through nested options, where they canmake multiple selections.
Date – Pop-up calendar that users can select a date from.
File – Field where users can upload individual files.
Custom – Blank field container that allows you to supply your own HTML for a form field.
After you have selected a Field type, you can define the field's options and also configure its behavior in the followingways:
You can control whether it's editable by users or just by staff.
You can make it required.
You can restrict the values it accepts by matching them to a regular expression.
4.3.2 Inserting a new custom group and fieldYou can use custom Fields to serve a lot of different purposes. Consider a common example – adding Fields to the ticketsubmission form to capture the user's product type and serial number.
You need an administrator account with the Custom field Groups and Custom Fields permissions to execute thefollowing instructions:
1. Log in to the admin control panel and click Custom Fields > Groups in the sidebar.
2. Click the New button.
3. Add a Title for your new Group, such as Product Details.
4. From the Custom field Group location dropdown, select Staff and end user ticket creation.
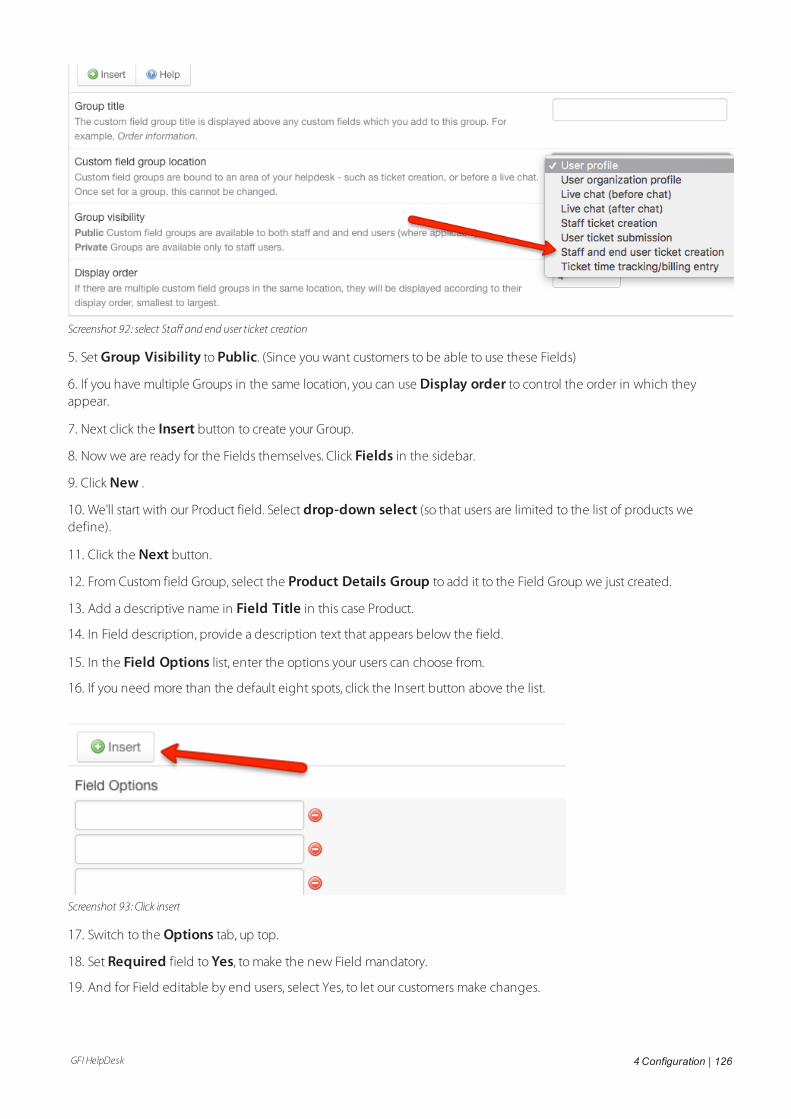
GFI HelpDesk 4 Configuration | 126
Screenshot 92: select Staff and end user ticket creation
5. Set Group Visibility to Public. (Since you want customers to be able to use these Fields)
6. If you have multiple Groups in the same location, you can use Display order to control the order in which theyappear.
7. Next click the Insert button to create your Group.
8. Now we are ready for the Fields themselves. Click Fields in the sidebar.
9. Click New .
10. We'll start with our Product field. Select drop-down select (so that users are limited to the list of products wedefine).
11. Click the Next button.
12. From Custom field Group, select the Product Details Group to add it to the Field Group we just created.
13. Add a descriptive name in Field Title in this case Product.
14. In Field description, provide a description text that appears below the field.
15. In the Field Options list, enter the options your users can choose from.
16. If you need more than the default eight spots, click the Insert button above the list.
Screenshot 93: Click insert
17. Switch to the Options tab, up top.
18. Set Required field to Yes, to make the new Field mandatory.
19. And for Field editable by end users, select Yes, to let our customers make changes.
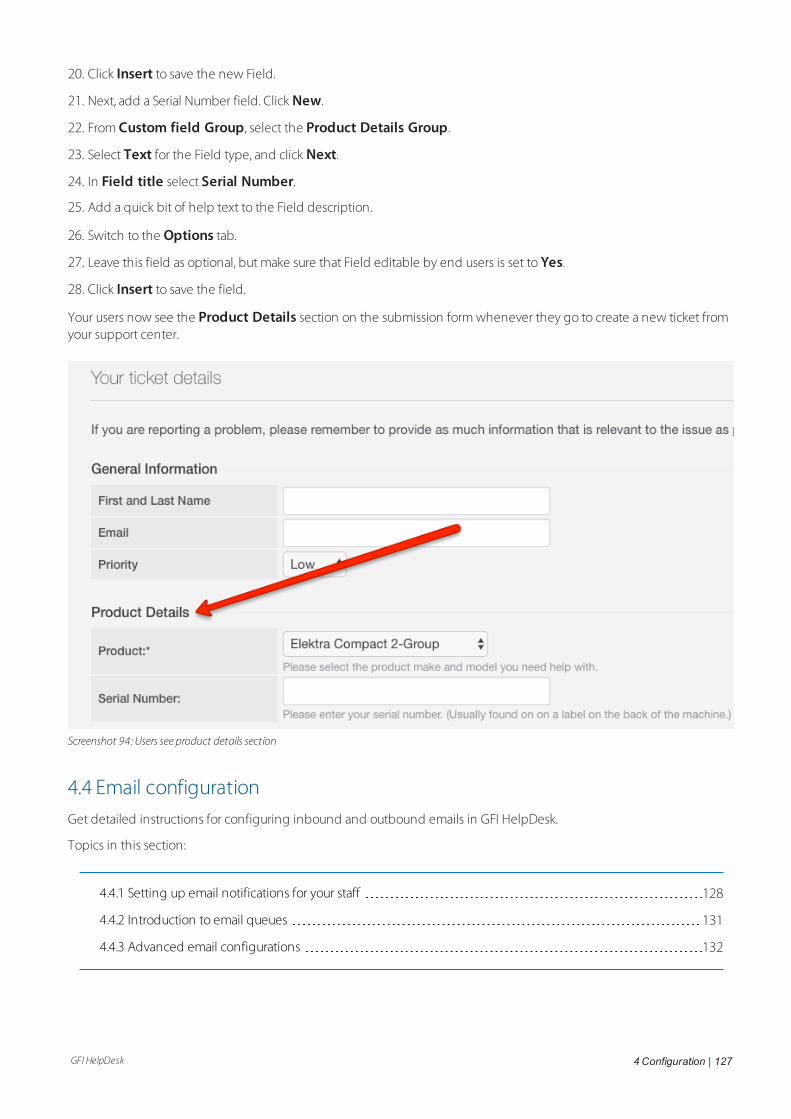
GFI HelpDesk 4 Configuration | 127
20. Click Insert to save the new Field.
21. Next, add a Serial Number field. Click New.
22. From Custom field Group, select the Product Details Group.
23. Select Text for the Field type, and click Next.
24. In Field title select Serial Number.
25. Add a quick bit of help text to the Field description.
26. Switch to the Options tab.
27. Leave this field as optional, but make sure that Field editable by end users is set to Yes.
28. Click Insert to save the field.
Your users now see the Product Details section on the submission form whenever they go to create a new ticket fromyour support center.
Screenshot 94: Users see product details section
4.4 Email configurationGet detailed instructions for configuring inbound and outbound emails in GFI HelpDesk.
Topics in this section:
4.4.1 Setting up email notifications for your staff 128
4.4.2 Introduction to email queues 131
4.4.3 Advanced email configurations 132
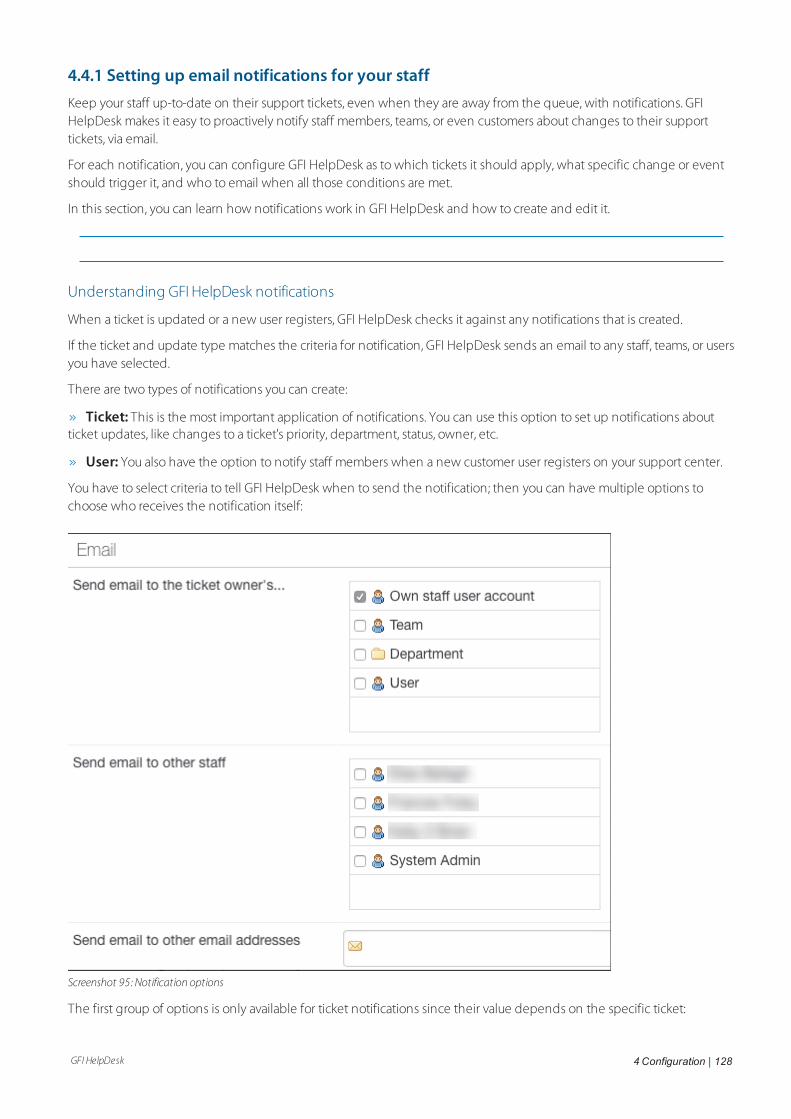
GFI HelpDesk 4 Configuration | 128
4.4.1 Setting up email notifications for your staffKeep your staff up-to-date on their support tickets, even when they are away from the queue, with notifications. GFIHelpDesk makes it easy to proactively notify staff members, teams, or even customers about changes to their supporttickets, via email.
For each notification, you can configure GFI HelpDesk as to which tickets it should apply, what specific change or eventshould trigger it, and who to email when all those conditions are met.
In this section, you can learn how notifications work in GFI HelpDesk and how to create and edit it.
Understanding GFI HelpDesk notifications
When a ticket is updated or a new user registers, GFI HelpDesk checks it against any notifications that is created.
If the ticket and update type matches the criteria for notification, GFI HelpDesk sends an email to any staff, teams, or usersyou have selected.
There are two types of notifications you can create:
Ticket: This is the most important application of notifications. You can use this option to set up notifications aboutticket updates, like changes to a ticket's priority, department, status, owner, etc.
User: You also have the option to notify staff members when a new customer user registers on your support center.
You have to select criteria to tell GFI HelpDesk when to send the notification; then you can have multiple options tochoose who receives the notification itself:
Screenshot 95: Notification options
The first group of options is only available for ticket notifications since their value depends on the specific ticket:
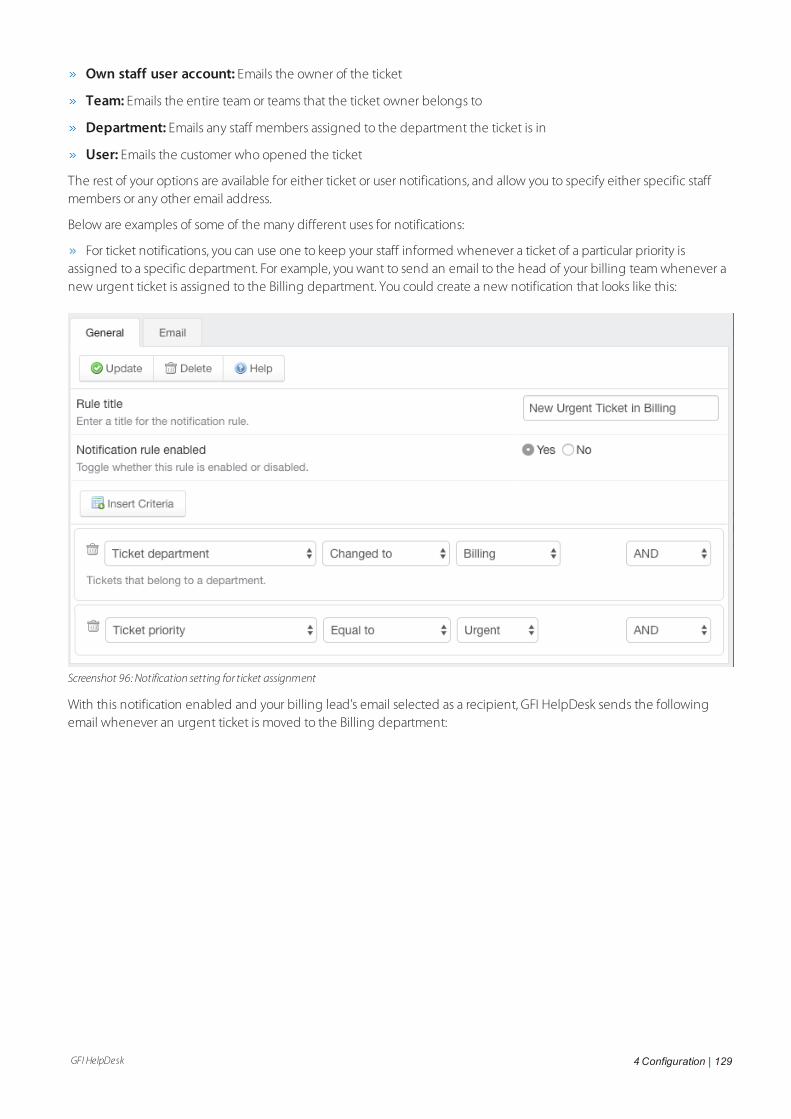
GFI HelpDesk 4 Configuration | 129
Own staff user account: Emails the owner of the ticket
Team: Emails the entire team or teams that the ticket owner belongs to
Department: Emails any staff members assigned to the department the ticket is in
User: Emails the customer who opened the ticket
The rest of your options are available for either ticket or user notifications, and allow you to specify either specific staffmembers or any other email address.
Below are examples of some of the many different uses for notifications:
For ticket notifications, you can use one to keep your staff informed whenever a ticket of a particular priority isassigned to a specific department. For example, you want to send an email to the head of your billing team whenever anew urgent ticket is assigned to the Billing department. You could create a new notification that looks like this:
Screenshot 96: Notification setting for ticket assignment
With this notification enabled and your billing lead's email selected as a recipient, GFI HelpDesk sends the followingemail whenever an urgent ticket is moved to the Billing department:
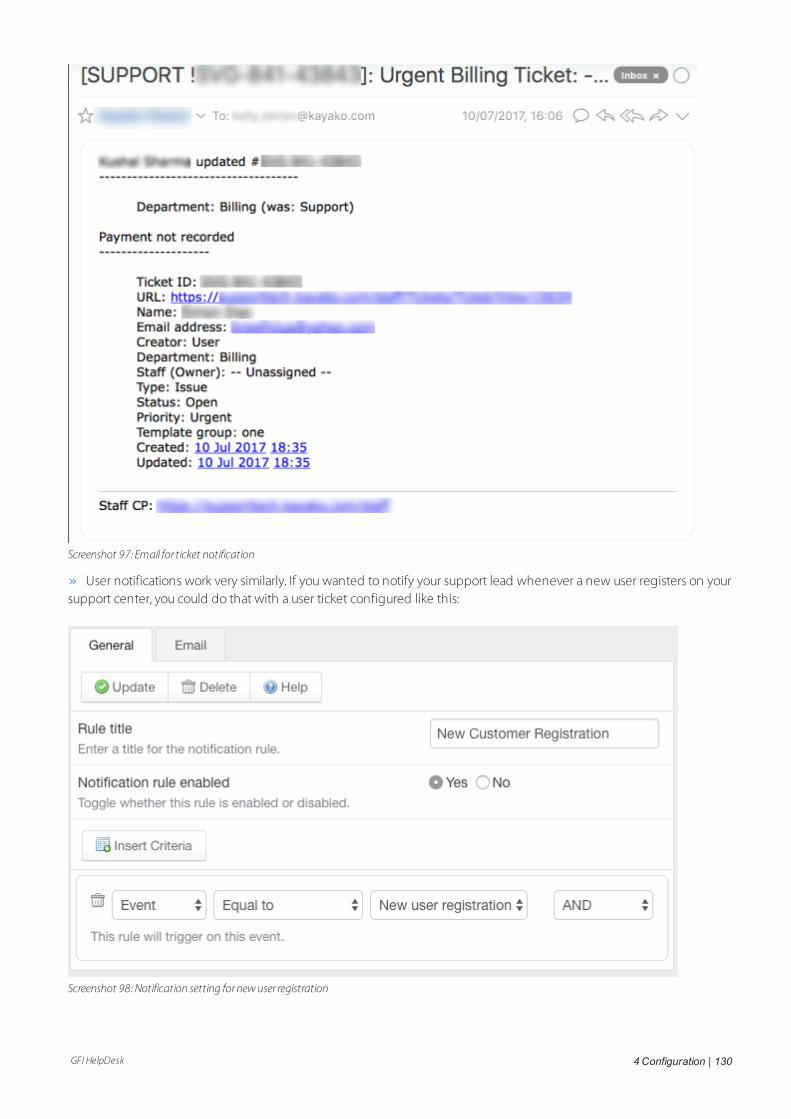
GFI HelpDesk 4 Configuration | 130
Screenshot 97: Email for ticket notification
User notifications work very similarly. If you wanted to notify your support lead whenever a new user registers on yoursupport center, you could do that with a user ticket configured like this:
Screenshot 98: Notification setting fornewuser registration
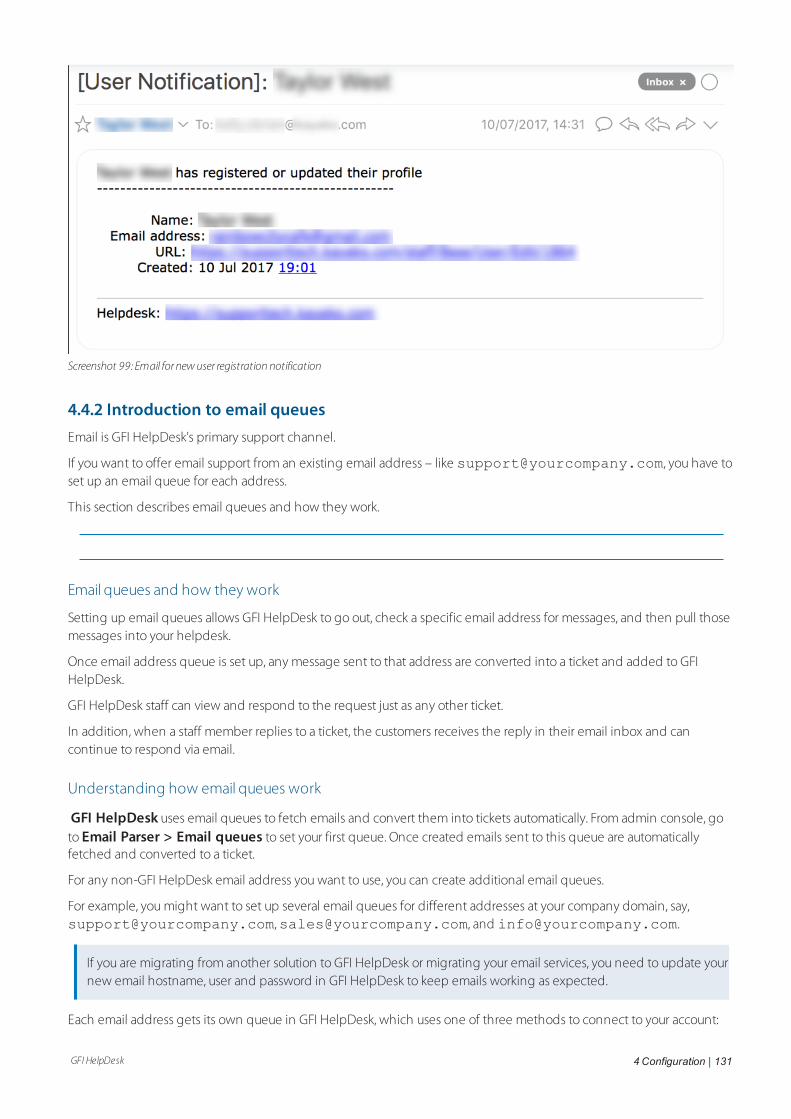
GFI HelpDesk 4 Configuration | 131
Screenshot 99: Email for newuser registration notification
4.4.2 Introduction to email queuesEmail is GFI HelpDesk's primary support channel.
If you want to offer email support from an existing email address – like [email protected], you have toset up an email queue for each address.
This section describes email queues and how they work.
Email queues and how they work
Setting up email queues allows GFI HelpDesk to go out, check a specific email address for messages, and then pull thosemessages into your helpdesk.
Once email address queue is set up, any message sent to that address are converted into a ticket and added to GFIHelpDesk.
GFI HelpDesk staff can view and respond to the request just as any other ticket.
In addition, when a staff member replies to a ticket, the customers receives the reply in their email inbox and cancontinue to respond via email.
Understanding how email queues work
GFI HelpDesk uses email queues to fetch emails and convert them into tickets automatically. From admin console, goto Email Parser > Email queues to set your first queue. Once created emails sent to this queue are automaticallyfetched and converted to a ticket.
For any non-GFI HelpDesk email address you want to use, you can create additional email queues.
For example, you might want to set up several email queues for different addresses at your company domain, say,[email protected],[email protected], and [email protected].
If you are migrating from another solution to GFI HelpDesk or migrating your email services, you need to update yournew email hostname, user and password in GFI HelpDesk to keep emails working as expected.
Each email address gets its own queue in GFI HelpDesk, which uses one of three methods to connect to your account:
GFI HelpDesk 4 Configuration | 132
POP3 – If your email server supports POP3 access, you use this method by filling in your server credentials so GFIHelpDesk can check your mail server.
Note:A server job is required for POP3 email fetching, and this needs to be set up as a cron job in Linux or tasks inwindows. See Manually Scheduling a Server Task/Cron Job for GFIHelpdesk Download.
IMAP – If your email server supports IMAP access, you can use this method by filling in your server credentials.
Note:A server job is required for IMAP email fetching, and this needs to be set up as a cron job in Linux or tasks inwindows. For more information, see Manually scheduling a server task/cron Job for GFIHelpdesk
Once a queue is added for an address, GFI HelpDesk can be configured to handle tickets that are created from thatqueue. For example, you could configure your email queue for [email protected] to automatically assign itstickets to the Sales department and set their priority to High.
4.4.3 Advanced email configurationsThis sections has information about the advanced email configurations and settings.
Error "From Email is Empty #0..." when parsing emails
Sometimes, when a user tries to send an email with multiline headers or a From address that contains special characters,they see the error in the email parser log that says From Email is Empty #0. This article provides informationon how to fix this issue.
This issue is a known bug that was caused by the code that handles multiple recipients or missing quotes thatwere not present. The parser was detecting the data on the From field as invalid.
If you are still using GFI HelpDesk 4.93.0, then you are likely to encounter this issue since it is a known bug on thisversion which was fixed in GFI HelpDesk 4.93.02 and higher versions. So to resolve this issue, you need to upgrade yourhelpdesk to the latest version available.
To upgrade to the latest version of GFI HelpDesk, please visit the Upgrading or Downgrading Your GFI HelpDesk.
Preventing spam in Russian language
Spam, junk, or unsolicited bulk emails can come from different sources with messages that are mostly commercial.
They are not only annoying, but they can also be dangerous as they may include phishing links or attachmentscontaining malware. At times, you may receive spam emails in the Russian language.
This topic provides instructions to block spam emails that contain messages in Russian.
To add a rule to ignore every email that contains Russian characters in the subject line or body, please follow the stepsbelow:
1. Log in to your GFI HelpDesk instance and go to the admin area.
2. Under Email Parser, click Rules.
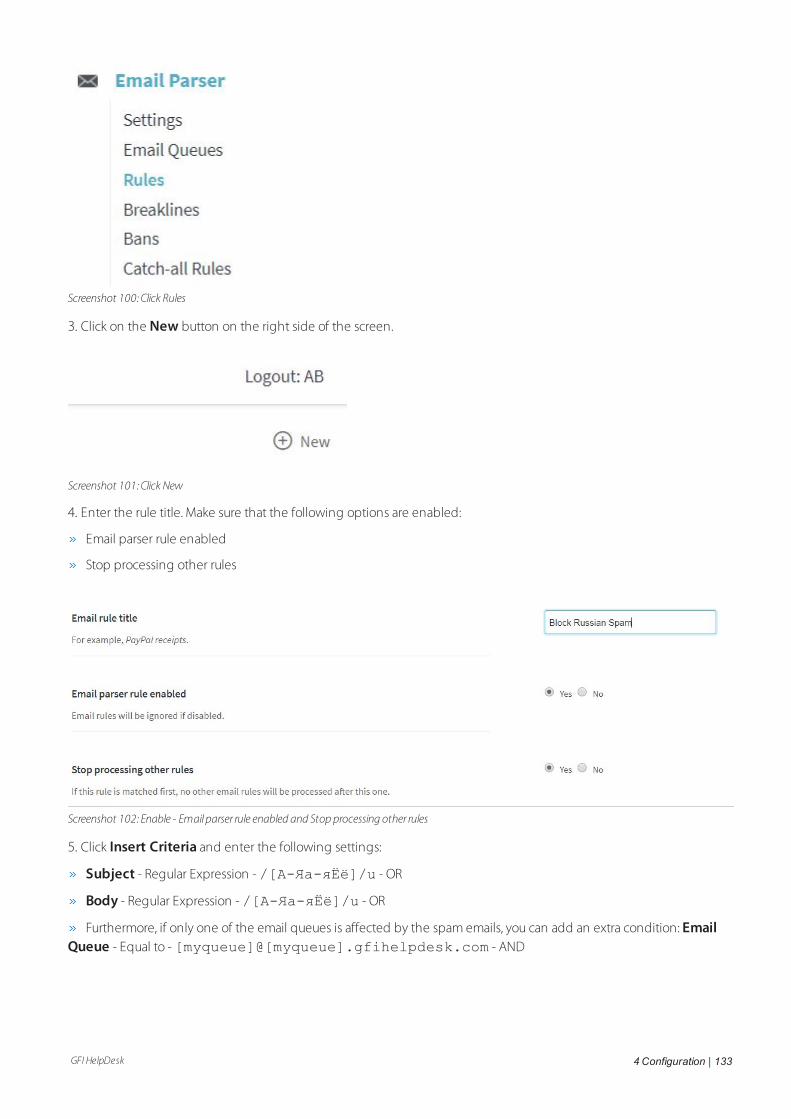
GFI HelpDesk 4 Configuration | 133
Screenshot 100: Click Rules
3. Click on the New button on the right side of the screen.
Screenshot 101: Click New
4. Enter the rule title. Make sure that the following options are enabled:
Email parser rule enabled
Stop processing other rules
Screenshot 102: Enable - Email parser rule enabled and Stop processing other rules
5. Click Insert Criteria and enter the following settings:
Subject - Regular Expression - /[А-Яа-яЁё]/u - OR
Body - Regular Expression - /[А-Яа-яЁё]/u - OR
Furthermore, if only one of the email queues is affected by the spam emails, you can add an extra condition: EmailQueue - Equal to - [myqueue]@[myqueue].gfihelpdesk.com - AND
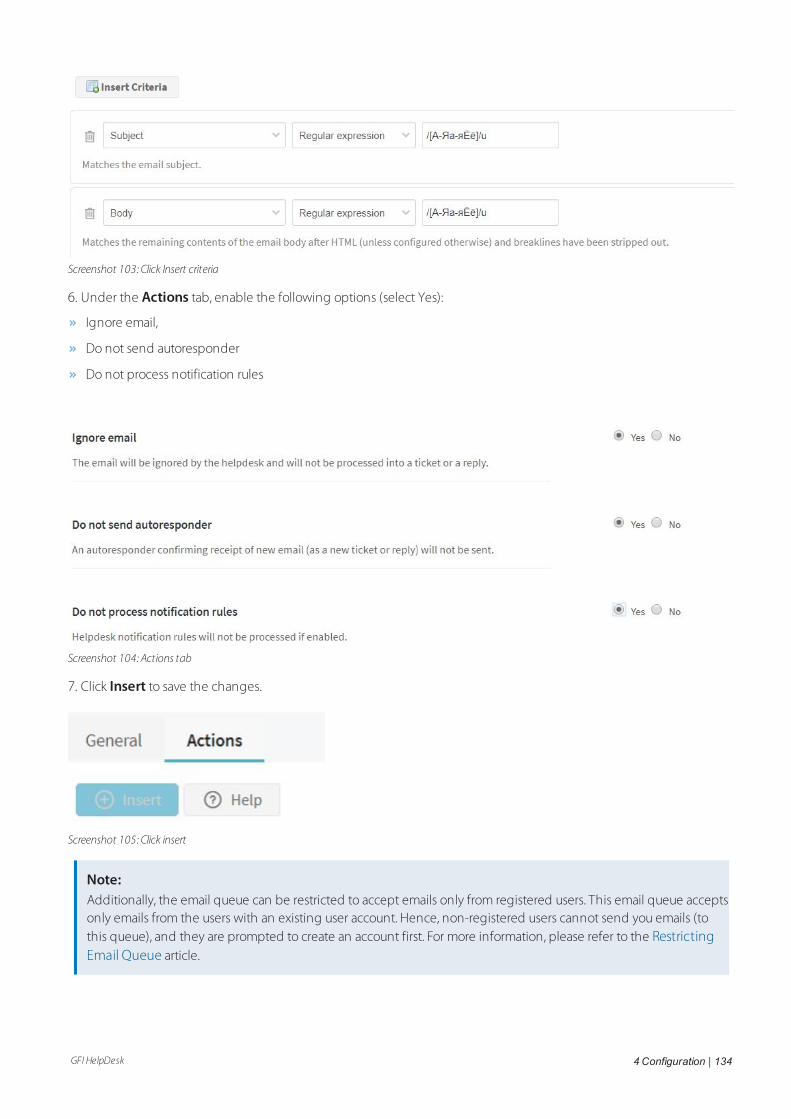
GFI HelpDesk 4 Configuration | 134
Screenshot 103: Click Insert criteria
6. Under the Actions tab, enable the following options (select Yes):
Ignore email,
Do not send autoresponder
Do not process notification rules
Screenshot 104: Actions tab
7. Click Insert to save the changes.
Screenshot 105: Click insert
Note:Additionally, the email queue can be restricted to accept emails only from registered users. This email queue acceptsonly emails from the users with an existing user account. Hence, non-registered users cannot send you emails (tothis queue), and they are prompted to create an account first. For more information, please refer to the RestrictingEmail Queue article.
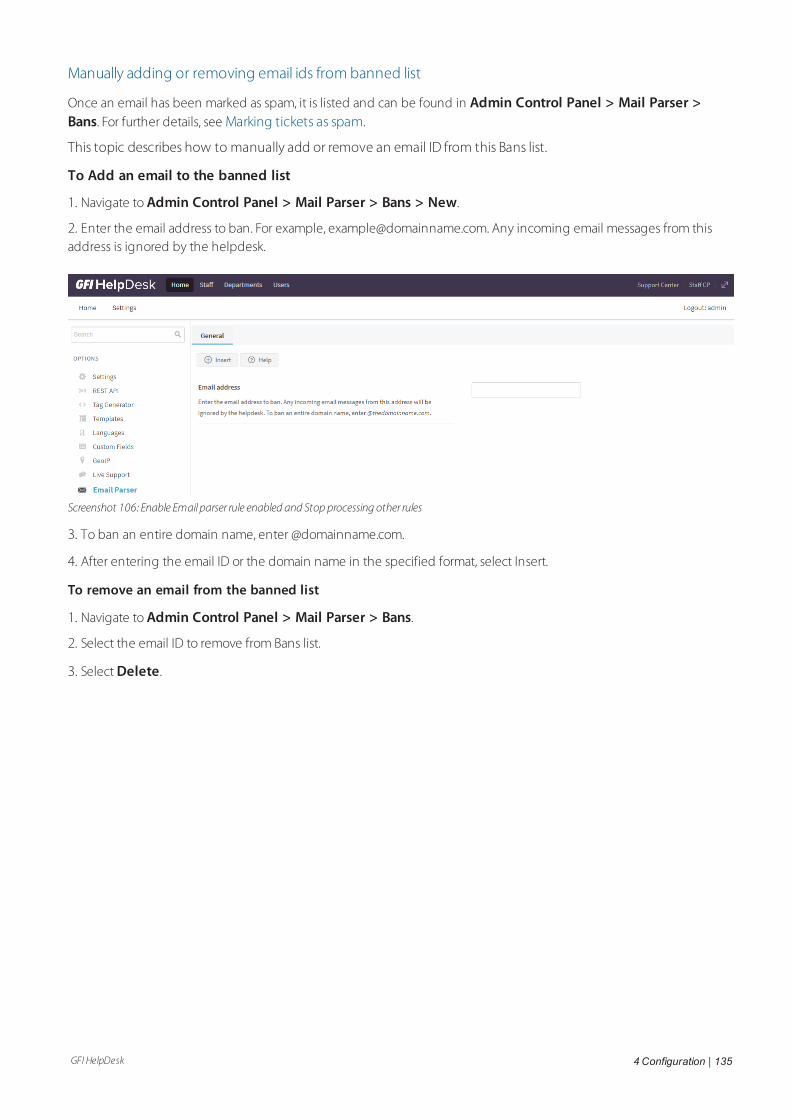
GFI HelpDesk 4 Configuration | 135
Manually adding or removing email ids from banned list
Once an email has been marked as spam, it is listed and can be found in Admin Control Panel > Mail Parser >Bans. For further details, see Marking tickets as spam.
This topic describes how to manually add or remove an email ID from this Bans list.
To Add an email to the banned list
1. Navigate to Admin Control Panel > Mail Parser > Bans > New.
2. Enter the email address to ban. For example, [email protected]. Any incoming email messages from thisaddress is ignored by the helpdesk.
Screenshot 106: Enable Email parser rule enabled and Stop processing other rules
3. To ban an entire domain name, enter @domainname.com.
4. After entering the email ID or the domain name in the specified format, select Insert.
To remove an email from the banned list
1. Navigate to Admin Control Panel > Mail Parser > Bans.
2. Select the email ID to remove from Bans list.
3. Select Delete.
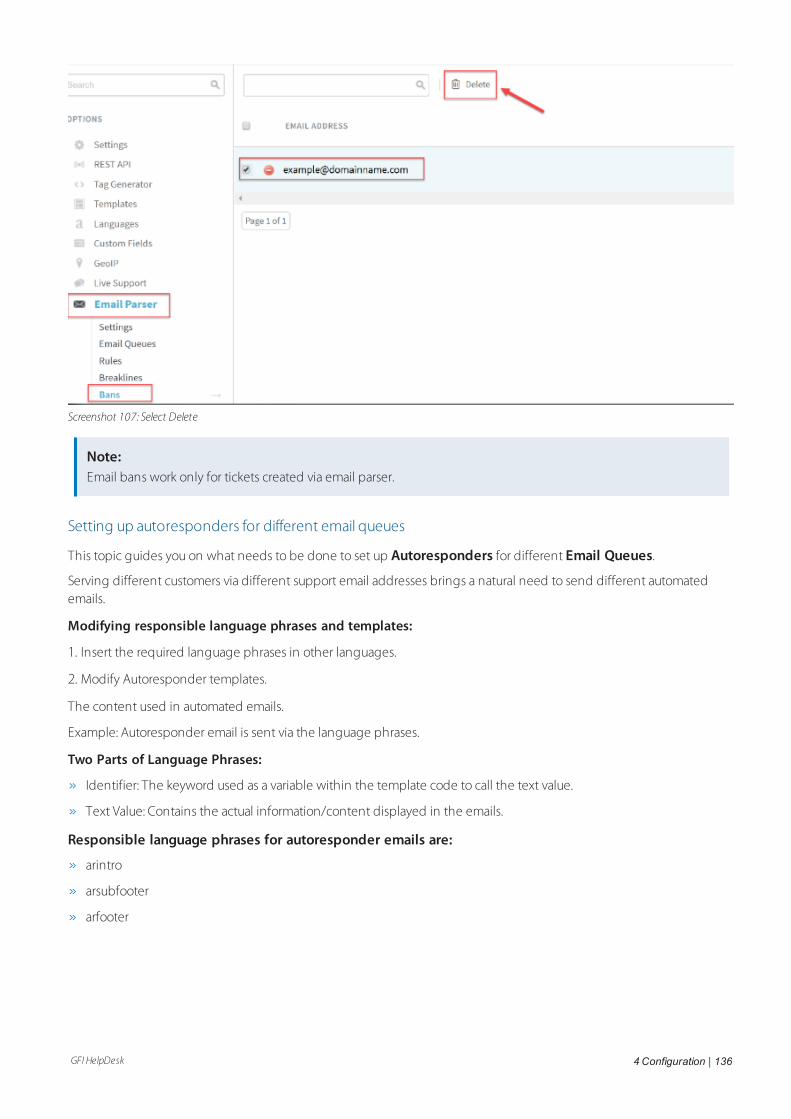
GFI HelpDesk 4 Configuration | 136
Screenshot 107: Select Delete
Note:Email bans work only for tickets created via email parser.
Setting up autoresponders for different email queues
This topic guides you on what needs to be done to set up Autoresponders for different Email Queues.
Serving different customers via different support email addresses brings a natural need to send different automatedemails.
Modifying responsible language phrases and templates:
1. Insert the required language phrases in other languages.
2. Modify Autoresponder templates.
The content used in automated emails.
Example: Autoresponder email is sent via the language phrases.
Two Parts of Language Phrases:
Identifier: The keyword used as a variable within the template code to call the text value.
Text Value: Contains the actual information/content displayed in the emails.
Responsible language phrases for autoresponder emails are:
arintro
arsubfooter
arfooter
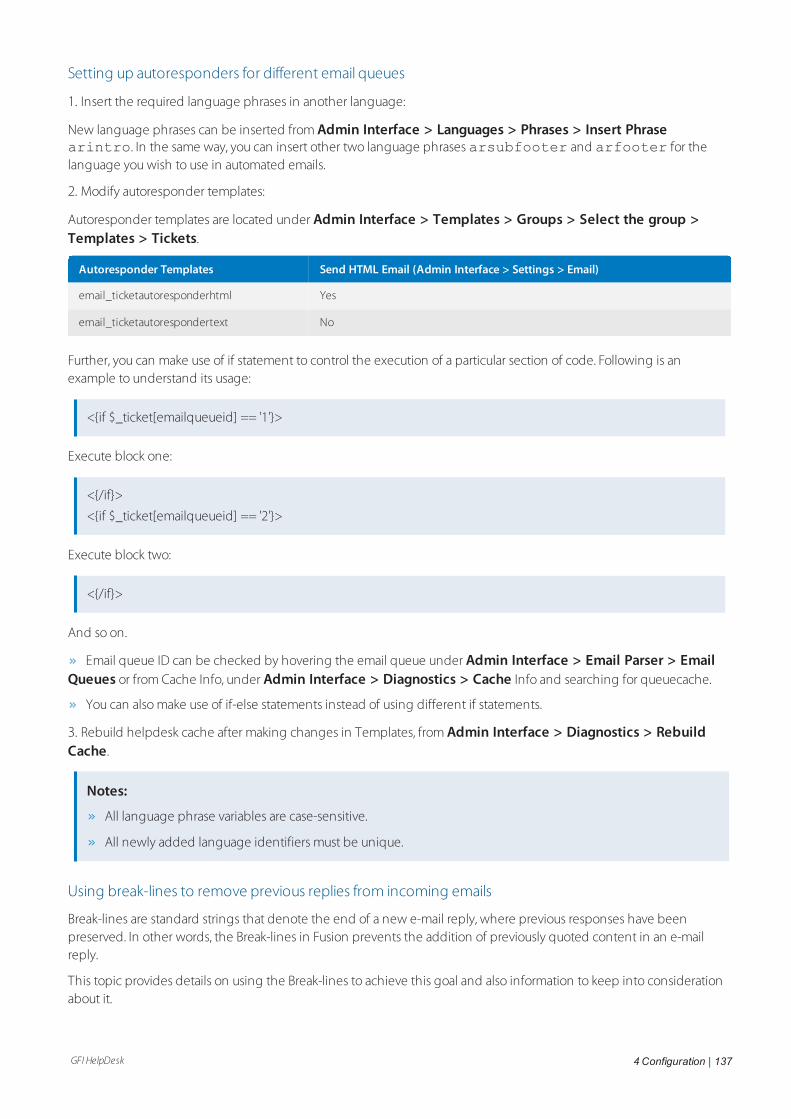
GFI HelpDesk 4 Configuration | 137
Setting up autoresponders for different email queues
1. Insert the required language phrases in another language:
New language phrases can be inserted from Admin Interface > Languages > Phrases > Insert Phrasearintro. In the same way, you can insert other two language phrases arsubfooter and arfooter for thelanguage you wish to use in automated emails.
2. Modify autoresponder templates:
Autoresponder templates are located under Admin Interface > Templates > Groups > Select the group >Templates > Tickets.
Autoresponder Templates Send HTML Email (Admin Interface > Settings > Email)
email_ticketautoresponderhtml Yes
email_ticketautorespondertext No
Further, you can make use of if statement to control the execution of a particular section of code. Following is anexample to understand its usage:
<{if $_ticket[emailqueueid] == '1'}>
Execute block one:
<{/if}>
<{if $_ticket[emailqueueid] == '2'}>
Execute block two:
<{/if}>
And so on.
Email queue ID can be checked by hovering the email queue under Admin Interface > Email Parser > EmailQueues or from Cache Info, under Admin Interface > Diagnostics > Cache Info and searching for queuecache.
You can also make use of if-else statements instead of using different if statements.
3. Rebuild helpdesk cache after making changes in Templates, from Admin Interface > Diagnostics > RebuildCache.
Notes:
All language phrase variables are case-sensitive.
All newly added language identifiers must be unique.
Using break-lines to remove previous replies from incoming emails
Break-lines are standard strings that denote the end of a new e-mail reply, where previous responses have beenpreserved. In other words, the Break-lines in Fusion prevents the addition of previously quoted content in an e-mailreply.
This topic provides details on using the Break-lines to achieve this goal and also information to keep into considerationabout it.
GFI HelpDesk 4 Configuration | 138
The helpdesk strips the entire text that follows the Break-line. The parser strips off the content to ensure the threadedticket view within the client support interface and staff control panel is clean when viewing a ticket.
An example of Break-lines:
=========================
Original reply by client via E-mail :
Reply Content
—---Original Message-----
Quoted Message
Result (after ticket is parsed in the help desk):
Reply Content
=========================
Break-lines can be added from Admin CP > Mail parser > Breaklines > New. Break-lines can be added as plain textor using regular expression and specifying them as Regex.
Additionally, if you want that inserted Break-line should append in all the ticket replies automatically, then Break-line can
be added at the above of the below mentioned templates from Admin CP > Templates > Templates > Tickets :
email_ticketstaffreplyhtml
email_ticketstaffreplytext
Note:Break-lines only work on tickets created via e-mail / Mail Parser and do not work on tickets that are created via theclient support center.
These do not apply to new tickets. Means, if a client creates a new ticket via e-mail, which contains a text matchingto a Break-line, it does not strip the text off from this first post.
The Break-lines text is only matched to *replies* to the existing tickets, which are being sent via e-mail.
Also, in case you would like GFI HelpDesk to not include the ticket reply summary in staff replies, you can tell it to stop
doing exactly that by going to Admin CP > Options > Tickets > Settings.
Using SPF to avoid emails from being marked as spam
SPF (Sender Policy Framework) is an anti-spam technique used by some modern email services to ensure the emailthey are receiving is really coming from your email server.
An entry is placed on your domains DNS (Domain Name Service) records. This record holds the IP address of theemail servers which are authorized to send a legitimate email for your domain. When an email server receives an email, itlooks up the IP listed on this record, and then compare that IP to the IP of the connecting server. If they are different, itknows the connection is not authorized and terminates the connection. If they match, it receives the email.
This topic describes the process to set up SPF for GFI HelpDesk.
Add a new TXT record to your email domains DNS record, the record you need to add depends on your mail servers IPaddress:
For example, If your email domain is MyEmailDomain.com, and your mail servers IP address was 100.200.100.200 thenthe SPF record you would need to add to your domains DNS would be:
GFI HelpDesk 4 Configuration | 139
MyEmailDomain.com. IN TXT "v=spf1 mx ip4:100.200.100.200 ~all"
If your GFI HelpDesk server routes email directly, then you would need you to add both the IP of your mail server andyour GFI HelpDesk server, for example:
MyEmailDomain.com. IN TXT "v=spf1 mx ip4:100.200.100.200 ip4:100.200.100.100 ~all"
If you are unsure of which record to add, please contact our support who can advise you on which record you haveto add. Adding incorrect records results in emails your sending out, not arriving at the recipient's end.
Disabling automated emails
Sending automated emails can make a support persons’ life easy as they do not need to look and acknowledge newrequests while sitting on their desks, or keep a constant track of time so that an important follow-up with a client is notmissed. However, automated emails do not fit in all business requirements, and you may need to stop all or some ofthem.
This topic provides the different types of automated emails that GFI HelpDesk sends and, along with it, the options tostop them.
Below is a list of automated emails in GFI HelpDesk and where to disable them:
Registration email
Every new user registered in helpdesk receives a welcome email. It can be disabled by turning off the Send registration
confirmation email option available under Users > Settings in Admin Interface.
Autoresponder email
It is dispatched to the ticket creator confirming the receipt of a new ticket in helpdesk as an acknowledgment. It can bedisabled from:
Tickets created via Support Center:
Go to Admin Interface > Users > Manage User Groups > Permissions > Receives new ticketAutoresponder.
Tickets created via Email Queues:
Go to Admin Interface > Email Parser > Email Queues > Ticket Options > Send new ticketAutoresponder.
Ticket survey email
Ticket survey is enabled for Closed status in a standard installation, that is, the user receives the survey emailautomatically when you change the ticket status to closed. Disable the Send satisfaction survey email option to stop the
survey emails from being sent for Closed status from Admin Interface > Settings > Tickets > Statuses.
Auto-close notification emails
If you have an active auto-close rule in your helpdesk, your users receive "ticket inactivity and closure" notification emails
respective to the rule criteria. These notification emails can be stopped from being sent by navigating to AdminInterface > Tickets > Auto Close.
Staff notifications
Your staff may receive notification emails on user account registration/updating or different ticket events. You may check
and disable notification rules from Staff Interface under Home > Notifications.
GFI HelpDesk 4 Configuration | 140
Setting up signatures for outgoing emails
Signatures in the outgoing emails are pulled from the Staff Profile and the Email Queues. However, signatures set up inthe Staff Profile are always displayed above the Email Queue signatures in the outgoing emails.
This article provides instructions to set up the Staff Profile and Email Queue signatures.
Setting up a staff profile signature
1. Navigate to the Staff Control Panel by clicking Home > My Preferences > Profile tab.
2. Enter the signature you’d like to use.
3. Click Update to save.
Setting up an email queue signature
1. Navigate to the Admin Control Panel by clicking Home > Email Parser > Email Queues > Select the emailqueue > Settings tab.
2. Enter the signature you’d like to use.
3. Click Update.
Optimizing the configuration of the email queues
Once you have set up at least one email queue in GFI HelpDesk, it is worth taking a look at some of your system-widesettings, to make sure your queues are operating at optimum efficiency.
In this topic, you can look at some of the settings that you should be aware of to keep things running smoothly.
Optimizing your email settings
Within the admin control panel, you can find a handful of system-wide settings under Email Parser and then Settings onthe sidebar.
On the page that opens up, you can see a long list of email configuration options. We would not go over all of them inthis article since they apply to a variety of different email-related processes. Instead, we focus on the settings that aremost critical for safeguarding the performance of your email queues.
Maximum number of emails to download in a batch
Right up top, under the POP3/IMAP Email Download Settings heading, this setting controls the maximum number ofemails fetched into GFI HelpDesk any time it checks an email queue. By default its set to '20', which is fine if yourhelpdesk has a small number of queues and doesn't routinely fetch large email attachments.
If, however, you find yourself with a large number of queues and regular email attachments exceeding 8 MB, werecommend changing this setting to '10' or lower.
NOTE:If you do not adjust this setting to accommodate a large number of queues or large attachments, it can significantlyimpact the performance of your helpdesk.
Email size limit
Next, on the list, this setting lets you restrict the size of each email coming into GFI HelpDesk. Any incoming email thatexceeds this size limit is not fetched from your email server. These limits include the email's content and attachments.
The default is 2048 KB, and the only max is that it cannot exceed the php_memory_limit value set in your php.inifile. That being said, we do not recommend setting a high limit here. The larger the attachments you receive, thehigher the risk that your helpdesk's performance suffers.
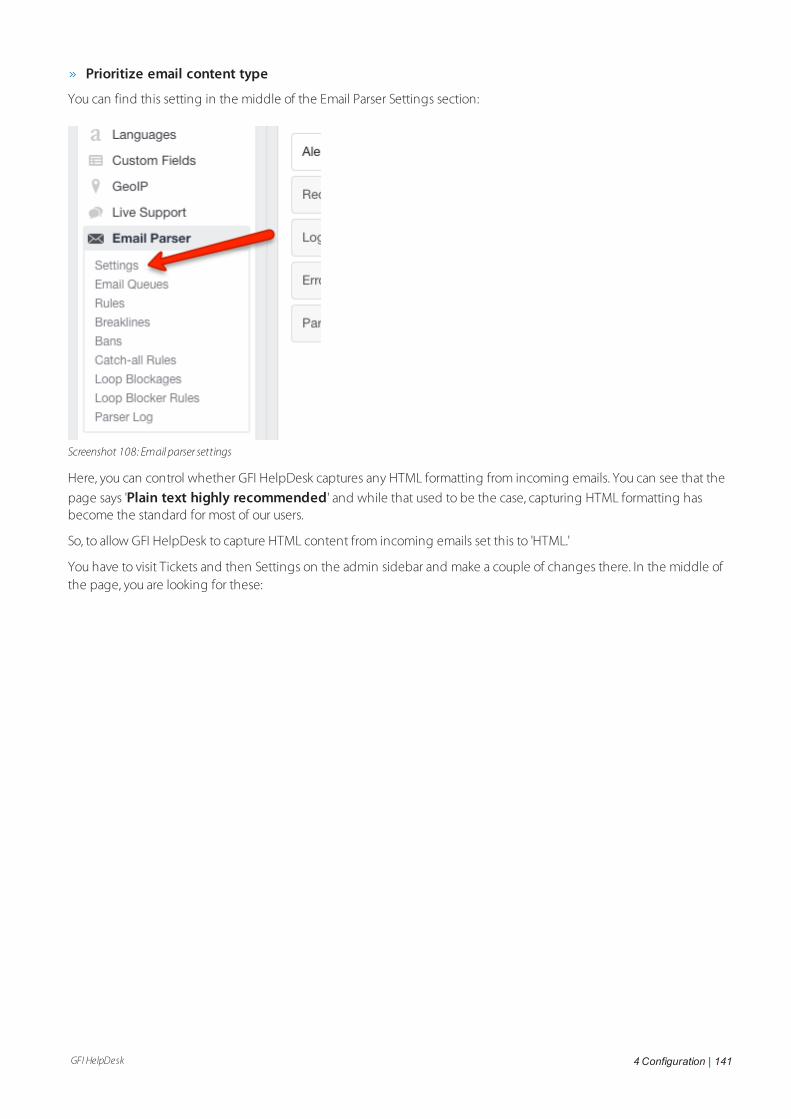
GFI HelpDesk 4 Configuration | 141
Prioritize email content type
You can find this setting in the middle of the Email Parser Settings section:
Screenshot 108: Email parser settings
Here, you can control whether GFI HelpDesk captures any HTML formatting from incoming emails. You can see that the
page says 'Plain text highly recommended' and while that used to be the case, capturing HTML formatting hasbecome the standard for most of our users.
So, to allow GFI HelpDesk to capture HTML content from incoming emails set this to 'HTML.'
You have to visit Tickets and then Settings on the admin sidebar and make a couple of changes there. In the middle ofthe page, you are looking for these:
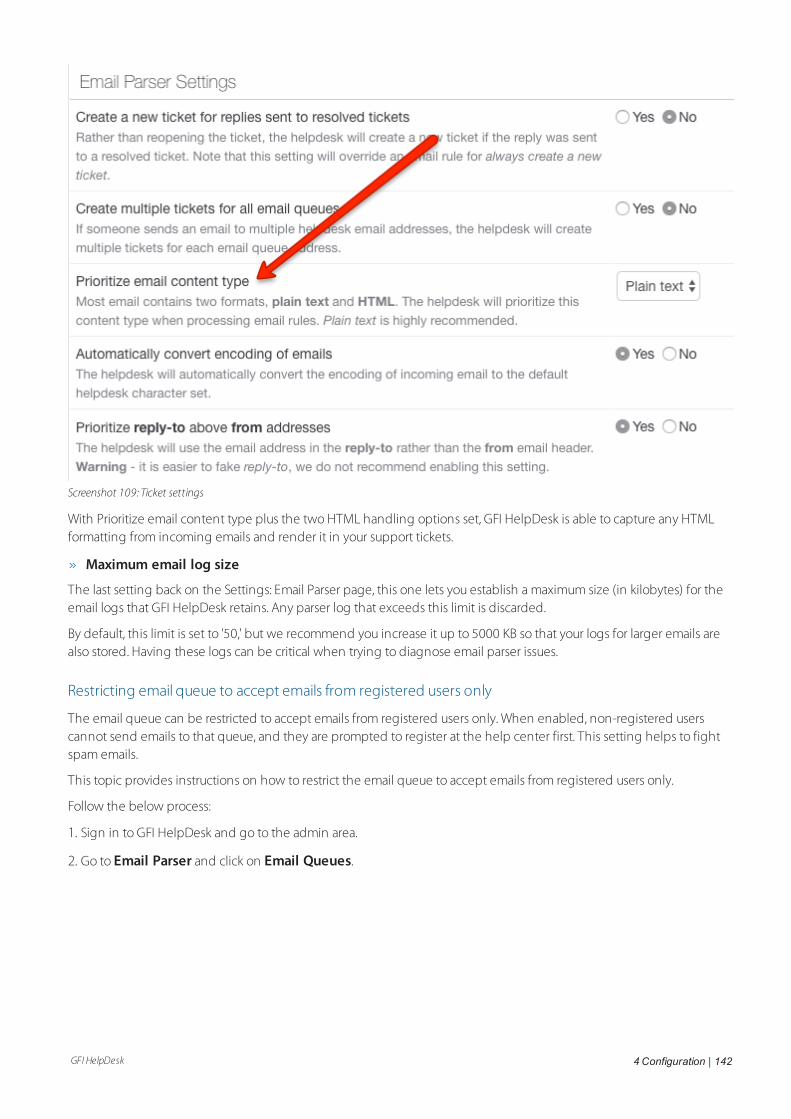
GFI HelpDesk 4 Configuration | 142
Screenshot 109: Ticket settings
With Prioritize email content type plus the two HTML handling options set, GFI HelpDesk is able to capture any HTMLformatting from incoming emails and render it in your support tickets.
Maximum email log size
The last setting back on the Settings: Email Parser page, this one lets you establish a maximum size (in kilobytes) for theemail logs that GFI HelpDesk retains. Any parser log that exceeds this limit is discarded.
By default, this limit is set to '50,' but we recommend you increase it up to 5000 KB so that your logs for larger emails arealso stored. Having these logs can be critical when trying to diagnose email parser issues.
Restricting email queue to accept emails from registered users only
The email queue can be restricted to accept emails from registered users only. When enabled, non-registered userscannot send emails to that queue, and they are prompted to register at the help center first. This setting helps to fightspam emails.
This topic provides instructions on how to restrict the email queue to accept emails from registered users only.
Follow the below process:
1. Sign in to GFI HelpDesk and go to the admin area.
2. Go to Email Parser and click on Email Queues.

GFI HelpDesk 4 Configuration | 143
Screenshot 110: Click EmailQueues
3. Click on the email queue address you want to configure, example: [email protected]
4. Click the Ticket Options tab.
Screenshot 111: Click Ticket Options tab
5. In the Registration required section, select Yes.
Screenshot 112: Select Yes
6. Click Update to save the changes.
Screenshot 113: Click Update
Preventing incoming emails with no subject from creating a ticket
If you have incoming emails with no subject and you would like to ignore them to prevent to generate a spam ticket, youcan create an email rule to discard them.
In this topic, you can learn the steps on how to set up a rule to accomplish this.
When GFI HelpDesk parses an email with an empty subject, it adds "(no subject)" to the ticket subject. We can create arule to prevent this email from creating a ticket.
To create the rule:
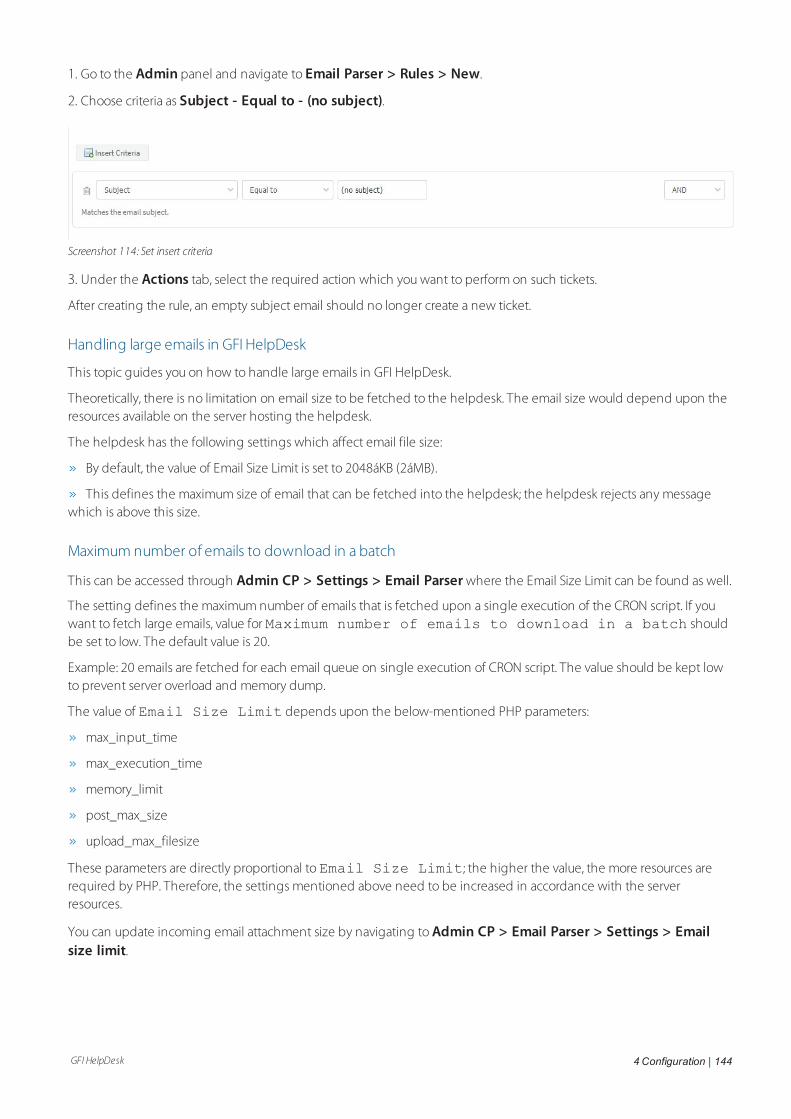
GFI HelpDesk 4 Configuration | 144
1. Go to the Admin panel and navigate to Email Parser > Rules > New.
2. Choose criteria as Subject - Equal to - (no subject).
Screenshot 114: Set insert criteria
3. Under the Actions tab, select the required action which you want to perform on such tickets.
After creating the rule, an empty subject email should no longer create a new ticket.
Handling large emails in GFI HelpDesk
This topic guides you on how to handle large emails in GFI HelpDesk.
Theoretically, there is no limitation on email size to be fetched to the helpdesk. The email size would depend upon theresources available on the server hosting the helpdesk.
The helpdesk has the following settings which affect email file size:
By default, the value of Email Size Limit is set to 2048áKB (2áMB).
This defines the maximum size of email that can be fetched into the helpdesk; the helpdesk rejects any messagewhich is above this size.
Maximum number of emails to download in a batch
This can be accessed through Admin CP > Settings > Email Parser where the Email Size Limit can be found as well.
The setting defines the maximum number of emails that is fetched upon a single execution of the CRON script. If youwant to fetch large emails, value for Maximum number of emails to download in a batch shouldbe set to low. The default value is 20.
Example: 20 emails are fetched for each email queue on single execution of CRON script. The value should be kept lowto prevent server overload and memory dump.
The value of Email Size Limit depends upon the below-mentioned PHP parameters:
max_input_time
max_execution_time
memory_limit
post_max_size
upload_max_filesize
These parameters are directly proportional toEmail Size Limit; the higher the value, the more resources arerequired by PHP. Therefore, the settings mentioned above need to be increased in accordance with the serverresources.
You can update incoming email attachment size by navigating to Admin CP > Email Parser > Settings > Emailsize limit.
GFI HelpDesk 4 Configuration | 145
Preventing spam emails using Bayesian Filtering
Bayesian is the process of using a naive Bayes classifier to help train or untrain the helpdesk and identify e-mails ondifferent parameters.
This topic shows how to prevent spam emails using Bayesian Filtering.
Follow the below steps:
1. Manage Bayesian from Admin CP > Bayesian.
2. Train or untrain the helpdesk to update or increase the value of the probability of incoming content respective to thecategories.
The helpdesk can be trained on Bayesian using three different ways:
Workflows.
Mass Action of tickets.
From Admin CP > Bayesian >Diagnostics.
Multiple decisions can be taken on the basis of Bayesian probability values by:
Forwarding of incoming emails to a specific email address by creating the Pre Parser rules.
Routing the tickets to the specific department by creating the Post Parser rule.
Creating different Workflows to perform specific actions.
Creating SLA plans to meet specific requirements.
Spam filtering.
Mail parser rule essentials for setting up email rules
A volley of emails comes in every few minutes and you are left wondering how to filter, categorize, sort and even ignorethose unwarranted spam or bounce back emails.
Each mailbox has a unique set of ticket properties linked to incoming emails but when that becomes limiting tocategorizing your emails, parser rules kick in.
This topic provides information on the mail parser rule essentials when setting up email rules.
NOTE:If you are migrating from another solution to GFI HelpDesk and you already had Email Rules set before, set them upin GFI HelpDesk to keep emails working as expected.
To set up email rules go to Admin CP > Email Parser > Rules.
Mail Parser Rules work on eligible emails. This means that any email which doesn’t follow RFC guidelines is in the BansList or cannot be parsed due to message size restrictions or any other technicality is not matched against these rules.
Message Size Limit
Helpdesk message size limit (in kilobytes) is specified from the Email Size Limit setting under the Admin Control
Panel: Email Parser > Settings.
The maximum allowed limit for On Demand Helpdesk is 10240 KB, that is 10 MB.
GFI HelpDesk 4 Configuration | 146
GFI HelpDesk customers can configure PHP parameters (in conjunction with required limit and actual server hardware) tosupport large size attachments parsing from server side. If the server cannot support it, the Helpdesk cannot parse theemail.
Rule criteria and action set can be segregated neatly into two sets
Pre Parse criteria set:
Consider actual mail properties on the basis of raw mail headers, such as Sender email address and Destination emailaddress amongst others.
Pre Parse criteria can be used to set any action set: Pre Parse or Post Parse.
Post Parse criteria set:
Recognized by Post Parse postfix in criteria selector.
Cater to actual ticket properties set for the ticket which is created or to which the email is appended post parsing.
Post Parse criteria only work for Post Parse action set.
You can make use of Post Parse action set to assign emails matching certain criteria to particular staff members.
Parser Rules are checked against an incoming eligible email in ascending order of the value for ExecutionOrder.
Once a rule matches, parser checks if Stop Processing Rules setting is disabled before proceeding to check the mailagainst other rules.
Refer to this operator usage table in case you are specifying multiple criteria:
Criteria 1 Criteria 2 Criteria 3 Means
AND/OR NA NA Criteria 1 should be true.
AND AND OR All criteria must match
AND OR OR Criteria 1 must hold and either of Criteria 2 or Criteria 3 be true
OR OR OR Any criteria must hold.
Remove specific attachment types or big attachments while parsing emails
1. Enable the Use file attachment type whitelist setting from Admin Control Panel under Ticketsand Settings in the sidebar.
2. Make the required changes from Tickets and File Types.
Editing automated email message text
All automated emails in helpdesk can be personalized according to the needs of an organization.
With the availability of different language phrases it becomes handy to modify the content of automated emails such asautoresponder, registration email, survey email.
This topic details the use of available language phrases to customize the various types of Automated Email text.
Modifying language phrases
Language phrases of a particular language can be modified as follows:
1. Navigate to admin Interface > Languages > Search.
2. Enter the text (of an automated email) that you want to search, or its identifier.
GFI HelpDesk 4 Configuration | 147
3. Select the type, language within which you want to search the query, and click Search.
4. On search, you get a page with two Text Areas:
The Upper Text Areas shows the original content of the searched language phrase which cannot be edited.
The Lower Text Area also shows the same content (if it is not modified before).
5. Enter or update the content in the Lower Text Area and click Update.
The language phrases associated with various types of automated email messages which could be customized are listedbelow.
Registration email
The users receive a registration email with their profile details (including their password), once they register. There aretwo different registration emails:
One that is dispatched when a user registers from Client Interface manually.
Other when a client is registered automatically when they submit a ticket for the very first time.
The two different language phrases are listed below:
registersuccessemail - This is used when a user registers from Client Interface.
registerwelcomeemail - This is used when a user is registered automatically in help desk when they sub-mit a ticket for the first time.
Autoresponder email
It is dispatched as an acknowledgment to the ticket creator confirming the receipt of the ticket in the help desk.Autoresponder email phrases include:
arintro
arsubfooter
arfooter
Survey email
The Survey email is sent to the user asking for their rating and feedback when their ticket is moved to Closed status(provided Send satisfaction survey email option is enabled, under Admin Interface > Tickets > Statuses >Closed > Options).
Languages phrases used in Survey email are:
surveyintro
surveydescription1
surveydescription2
surveydescription3
surveycta
surveysubfooter
surveyfooter
Auto close email
Auto Close mechanism is used to update the customers informing them that you are waiting for their response on therespective ticket, and further, to mark the ticket as resolved after defined hours.
GFI HelpDesk 4 Configuration | 148
If you have an active Auto Close rule in your help desk, your users receive ticket inactivity (Auto Close pending) andclosure (Auto Close final) notification emails respective to rule criteria.
Auto close pending
Language phrases include:
acpendingintro
acpendingsubfooter
Auto close final
The final language phrases include:
acfinalintro
acfinalsubfooter
Registration required email
It is sent if you have enabled Registration Required option under Email Queue settings for an email queue (AdminInterface > Email Parser > Email Queues > select the email queue > Ticket Options). Language phrasesused in this email are:
regemailrejectintro
regemailrejectsub
regemailrejectfooter
For information about modifying the variables included in automated emails, see customizing notification emailtemplates.
Changing outgoing email addresses for automated emails
You may have one, two or multiple email addresses (queues) through which your customers contact you. The emailchannel probably handles the majority of helpdesk communication. To correspond to customer queries, you also have adefault return email address, and staff email addresses that are used in the outgoing emails.
This topic describes which email address is used/linked with which outgoing email and how you should configure it sothat every single user reply reaches your helpdesk.
The following table details the outgoing email addresses linked with various actions and where to change these addressfrom the Admin Interface:
Type Of Email Outgoing Email Address used in Automated Emails
User Registration Default Return Email Address mentioned atAdmin Interface > Settings > General
User Notifications Default Return Email Address mentioned at Admin Interface > Settings > General
News subscription Default Return Email Address mentioned at Admin Interface > Settings > General
Mail Parser ruleaction
Email Queue Address mentioned at Admin Interface > Email Parser > Email Queue
Autoresponder Email queue Address mentioned at Admin Interface > Email Parser > Email Queue
Auto Close Email queue Address mentioned at Admin Interface > Email Parser > Email Queue
Ticket Notifications If the ticket department is linked to an email queue, then email queue address is used otherwise the
Default Return Email address is used.
GFI HelpDesk 4 Configuration | 149
Type Of Email Outgoing Email Address used in Automated Emails
Survey If the ticket department is linked to an email queue, then email queue address is used otherwise the“Default Return Email address is used.
Staff replies If the ticket department is linked to an email queue, then email queue address is used, or the QueueOverrides specified in the email queue settings otherwise the Default Return Email address is used. Staffcan also select their email address in the From drop-down list.
Note:If you want to disable any of the automated emails. For more information about , see Disabling automated emails.
4.5 Custom templatesMaster GFI HelpDesk's custom templates, so you can fine tune your customers' support experience.
Topics in this section:
4.5.1 Managing your template modifications 149
4.5.2 Understanding how custom templates work 153
4.5.3 Best practices for editing GFI HelpDesk templates 156
4.5.4 Customizing notification email templates 159
4.5.5 Reviewing template editing history and comparing versions 163
4.5.6 Customizing support center look 165
4.5.1 Managing your template modificationsCustomizing your GFI HelpDesk templates gives your team control over the appearance – and in some cases, thefunctionality of your emails and support center.
Any time you update, upgrade or reinstall your help desk, you have to back up and re-implement any templatemodifications you have made.
This section provides an overview of the template backup and restoration process and explains how to restore yourtemplate modifications after an update.
NOTE:The process of restoring your templates is the same, whether you are updating, upgrading, downgrading, installing,migrating, etc.
Below are the steps for template modification:
Step 1: Understanding how to maintain your template modifications
The safest way to do this is to follow these steps:
1. Before starting the update process, export a backup copy of any modified templates.
2. Run through the update, which includes a fresh copy of all of GFI HelpDesk's templates – but it does not overwriteany of your changes.
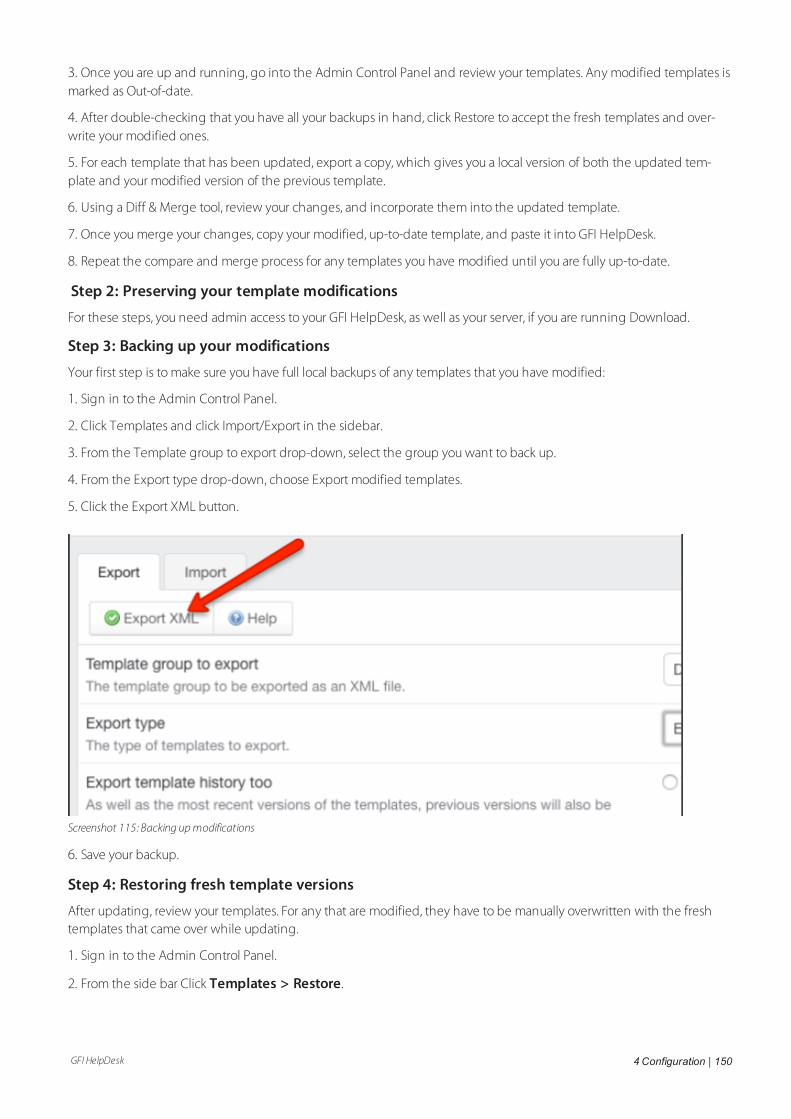
GFI HelpDesk 4 Configuration | 150
3. Once you are up and running, go into the Admin Control Panel and review your templates. Any modified templates ismarked as Out-of-date.
4. After double-checking that you have all your backups in hand, click Restore to accept the fresh templates and over-write your modified ones.
5. For each template that has been updated, export a copy, which gives you a local version of both the updated tem-plate and your modified version of the previous template.
6. Using a Diff & Merge tool, review your changes, and incorporate them into the updated template.
7. Once you merge your changes, copy your modified, up-to-date template, and paste it into GFI HelpDesk.
8. Repeat the compare and merge process for any templates you have modified until you are fully up-to-date.
Step 2: Preserving your template modifications
For these steps, you need admin access to your GFI HelpDesk, as well as your server, if you are running Download.
Step 3: Backing up your modifications
Your first step is to make sure you have full local backups of any templates that you have modified:
1. Sign in to the Admin Control Panel.
2. Click Templates and click Import/Export in the sidebar.
3. From the Template group to export drop-down, select the group you want to back up.
4. From the Export type drop-down, choose Export modified templates.
5. Click the Export XML button.
Screenshot 115: Backing upmodifications
6. Save your backup.
Step 4: Restoring fresh template versions
After updating, review your templates. For any that are modified, they have to be manually overwritten with the freshtemplates that came over while updating.
1. Sign in to the Admin Control Panel.
2. From the side bar Click Templates > Restore.
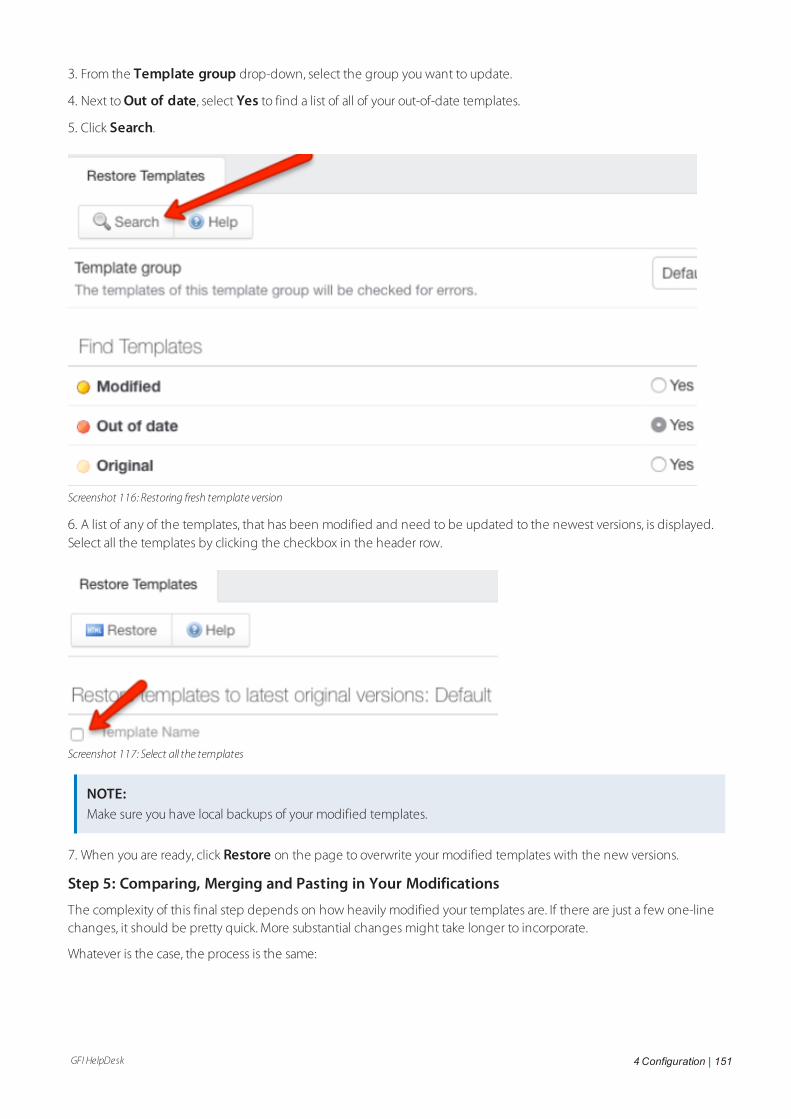
GFI HelpDesk 4 Configuration | 151
3. From the Template group drop-down, select the group you want to update.
4. Next to Out of date, select Yes to find a list of all of your out-of-date templates.
5. Click Search.
Screenshot 116: Restoring fresh template version
6. A list of any of the templates, that has been modified and need to be updated to the newest versions, is displayed.Select all the templates by clicking the checkbox in the header row.
Screenshot 117: Select all the templates
NOTE:Make sure you have local backups of your modified templates.
7. When you are ready, click Restore on the page to overwrite your modified templates with the new versions.
Step 5: Comparing, Merging and Pasting in Your Modifications
The complexity of this final step depends on how heavily modified your templates are. If there are just a few one-linechanges, it should be pretty quick. More substantial changes might take longer to incorporate.
Whatever is the case, the process is the same:
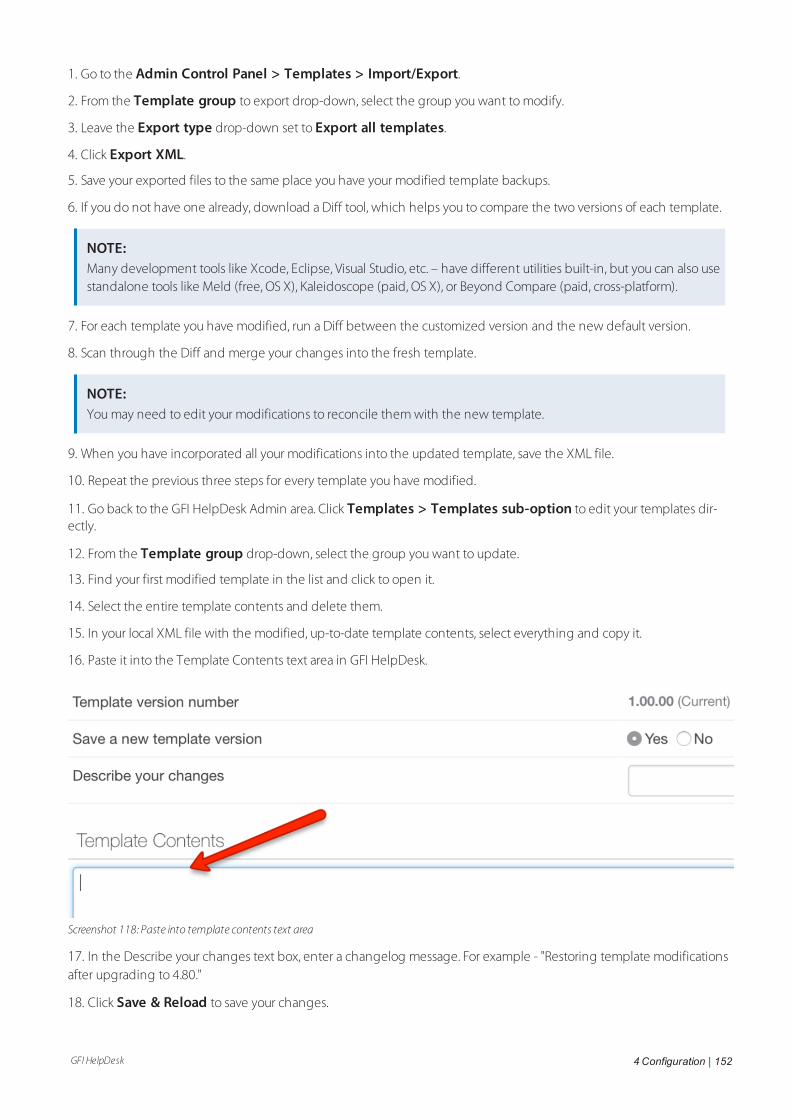
GFI HelpDesk 4 Configuration | 152
1. Go to the Admin Control Panel > Templates > Import/Export.
2. From the Template group to export drop-down, select the group you want to modify.
3. Leave the Export type drop-down set to Export all templates.
4. Click Export XML.
5. Save your exported files to the same place you have your modified template backups.
6. If you do not have one already, download a Diff tool, which helps you to compare the two versions of each template.
NOTE:Many development tools like Xcode, Eclipse, Visual Studio, etc. – have different utilities built-in, but you can also usestandalone tools like Meld (free, OS X), Kaleidoscope (paid, OS X), or Beyond Compare (paid, cross-platform).
7. For each template you have modified, run a Diff between the customized version and the new default version.
8. Scan through the Diff and merge your changes into the fresh template.
NOTE:You may need to edit your modifications to reconcile them with the new template.
9. When you have incorporated all your modifications into the updated template, save the XML file.
10. Repeat the previous three steps for every template you have modified.
11. Go back to the GFI HelpDesk Admin area. Click Templates > Templates sub-option to edit your templates dir-ectly.
12. From the Template group drop-down, select the group you want to update.
13. Find your first modified template in the list and click to open it.
14. Select the entire template contents and delete them.
15. In your local XML file with the modified, up-to-date template contents, select everything and copy it.
16. Paste it into the Template Contents text area in GFI HelpDesk.
Screenshot 118: Paste into template contents text area
17. In the Describe your changes text box, enter a changelog message. For example - "Restoring template modificationsafter upgrading to 4.80."
18. Click Save & Reload to save your changes.
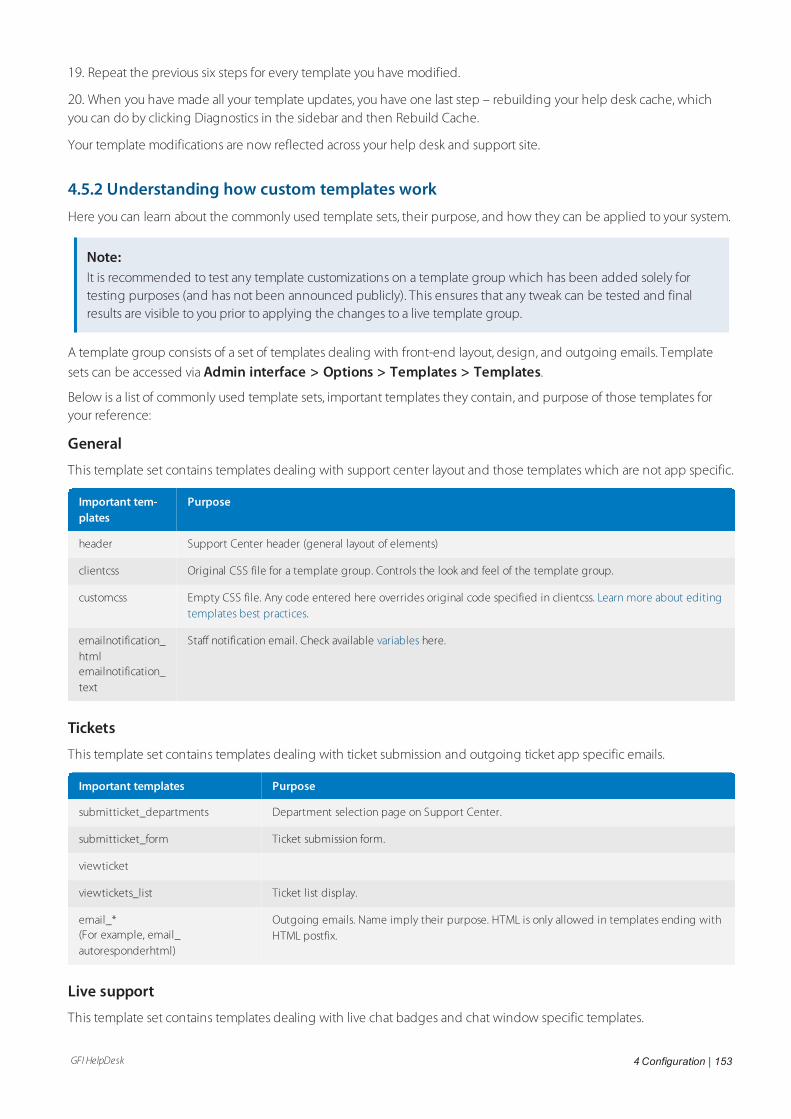
GFI HelpDesk 4 Configuration | 153
19. Repeat the previous six steps for every template you have modified.
20. When you have made all your template updates, you have one last step – rebuilding your help desk cache, whichyou can do by clicking Diagnostics in the sidebar and then Rebuild Cache.
Your template modifications are now reflected across your help desk and support site.
4.5.2 Understanding how custom templates workHere you can learn about the commonly used template sets, their purpose, and how they can be applied to your system.
Note:It is recommended to test any template customizations on a template group which has been added solely fortesting purposes (and has not been announced publicly). This ensures that any tweak can be tested and finalresults are visible to you prior to applying the changes to a live template group.
A template group consists of a set of templates dealing with front-end layout, design, and outgoing emails. Template
sets can be accessed via Admin interface > Options > Templates > Templates.
Below is a list of commonly used template sets, important templates they contain, and purpose of those templates foryour reference:
General
This template set contains templates dealing with support center layout and those templates which are not app specific.
Important tem-plates
Purpose
header Support Center header (general layout of elements)
clientcss Original CSS file for a template group. Controls the look and feel of the template group.
customcss Empty CSS file. Any code entered here overrides original code specified in clientcss. Learn more about editingtemplates best practices.
emailnotification_htmlemailnotification_text
Staff notification email. Check available variables here.
Tickets
This template set contains templates dealing with ticket submission and outgoing ticket app specific emails.
Important templates Purpose
submitticket_departments Department selection page on Support Center.
submitticket_form Ticket submission form.
viewticket
viewtickets_list Ticket list display.
email_*(For example, email_autoresponderhtml)
Outgoing emails. Name imply their purpose. HTML is only allowed in templates ending withHTML postfix.
Live support
This template set contains templates dealing with live chat badges and chat window specific templates.
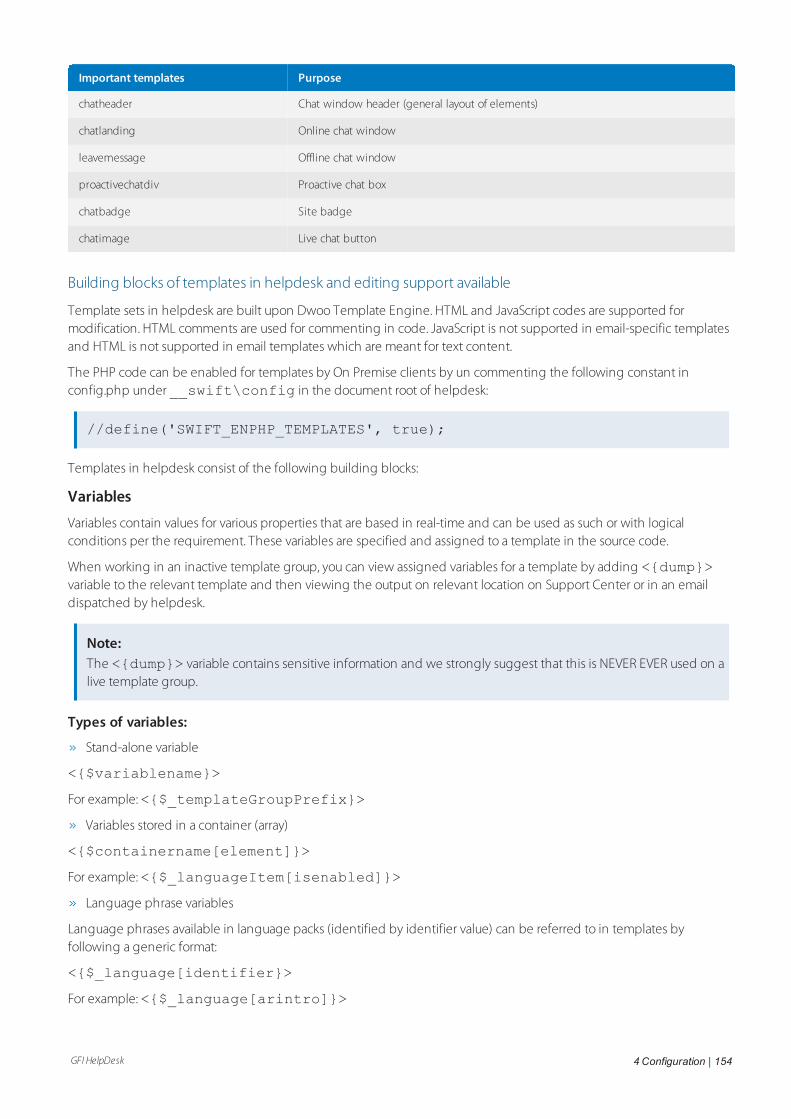
GFI HelpDesk 4 Configuration | 154
Important templates Purpose
chatheader Chat window header (general layout of elements)
chatlanding Online chat window
leavemessage Offline chat window
proactivechatdiv Proactive chat box
chatbadge Site badge
chatimage Live chat button
Building blocks of templates in helpdesk and editing support available
Template sets in helpdesk are built upon Dwoo Template Engine. HTML and JavaScript codes are supported formodification. HTML comments are used for commenting in code. JavaScript is not supported in email-specific templatesand HTML is not supported in email templates which are meant for text content.
The PHP code can be enabled for templates by On Premise clients by un commenting the following constant inconfig.php under __swift\config in the document root of helpdesk:
//define('SWIFT_ENPHP_TEMPLATES', true);
Templates in helpdesk consist of the following building blocks:
Variables
Variables contain values for various properties that are based in real-time and can be used as such or with logicalconditions per the requirement. These variables are specified and assigned to a template in the source code.
When working in an inactive template group, you can view assigned variables for a template by adding <{dump}>variable to the relevant template and then viewing the output on relevant location on Support Center or in an emaildispatched by helpdesk.
Note:The <{dump}> variable contains sensitive information and we strongly suggest that this is NEVER EVER used on alive template group.
Types of variables:
Stand-alone variable
<{$variablename}>
For example:<{$_templateGroupPrefix}>
Variables stored in a container (array)
<{$containername[element]}>
For example:<{$_languageItem[isenabled]}>
Language phrase variables
Language phrases available in language packs (identified by identifier value) can be referred to in templates byfollowing a generic format:
<{$_language[identifier}>
For example:<{$_language[arintro]}>
GFI HelpDesk 4 Configuration | 155
Language phrases can be added to an existing language pack via Insert Phrase button from Admin > Options >Languages > Phrases.
We recommend inserting a new phrase with a unique identifier to all language packs in your helpdesk to ensure thatlanguage selection does not affect language phrase from getting called or does not result in an undefined index error.
Note:All variables (including language phrase variables) are case-sensitive.
Logical conditions
You can make use of if-else statements making use of variables matching using logical operators to control the display ofparticular sections of code.
Generic format for if-else:
<{if $variable operator ‘value1’}>
//Code block to be executed
<{elseif $variable operator ‘value2’}>
//Code block to be executed
<{/if}>
An example:
_activeLanguageID variable contains language ID selected for Support Center. This piece of code, forexample, can be placed in the header template.
<{if $_activeLanguageID == '1'}>
You are currently browsing in ‘English (U.S.)’
<{elseif $_activeLanguageID == '2'}>
You are currently browsing in ‘Deutshe (de)’
<{else}>
You are browsing but not in ‘English (U.S.)’ or ‘Deutsch (de)’ language
<{/if}>
Blocks and functions
On Premise clients can check compiled Dwoo-specific functions from under __swift\thirdparty\dwoo\plugins\builtin in the document root.
Dwoo provides documentation for blocks and functions.
An example
You can display Reply due counter to a client (making use of date_format function), by adding this piece of code to
the viewticket template under Ticket group:
<{$_ticket[duetime]|date_format: "%A, %B %d, %Y %R %Z"}>
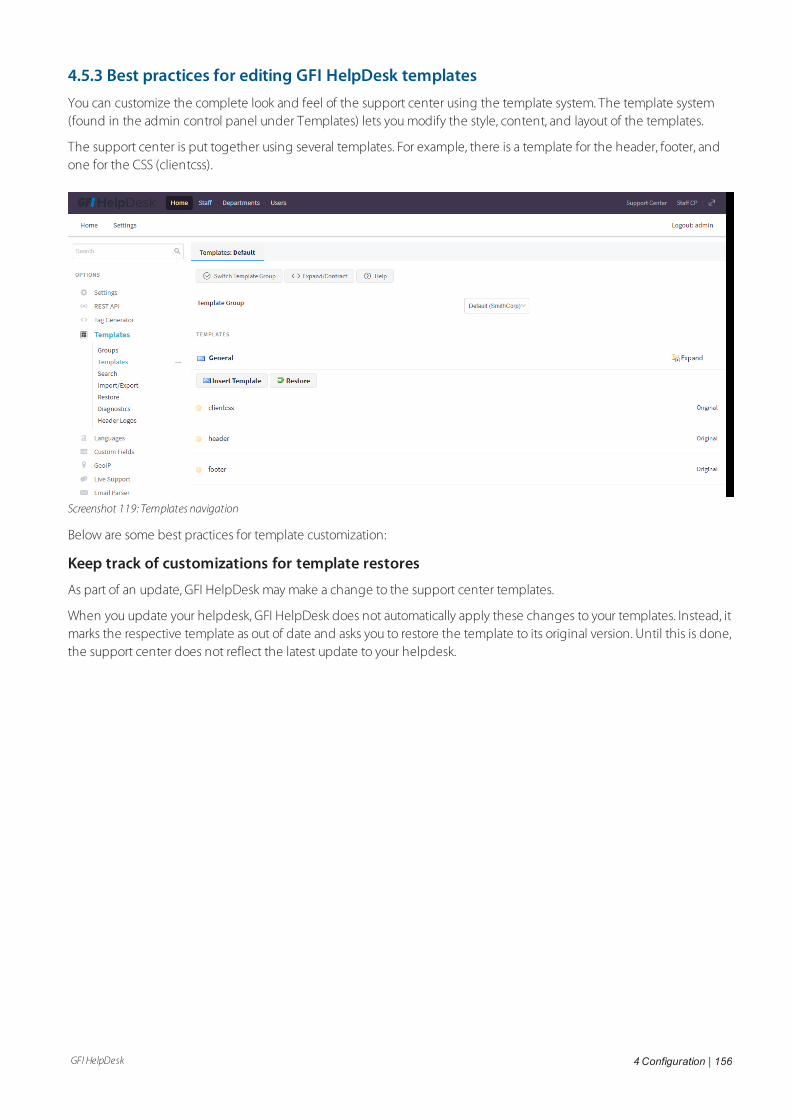
GFI HelpDesk 4 Configuration | 156
4.5.3 Best practices for editing GFI HelpDesk templatesYou can customize the complete look and feel of the support center using the template system. The template system(found in the admin control panel under Templates) lets you modify the style, content, and layout of the templates.
The support center is put together using several templates. For example, there is a template for the header, footer, andone for the CSS (clientcss).
Screenshot 119: Templates navigation
Below are some best practices for template customization:
Keep track of customizations for template restores
As part of an update, GFI HelpDesk may make a change to the support center templates.
When you update your helpdesk, GFI HelpDesk does not automatically apply these changes to your templates. Instead, itmarks the respective template as out of date and asks you to restore the template to its original version. Until this is done,the support center does not reflect the latest update to your helpdesk.
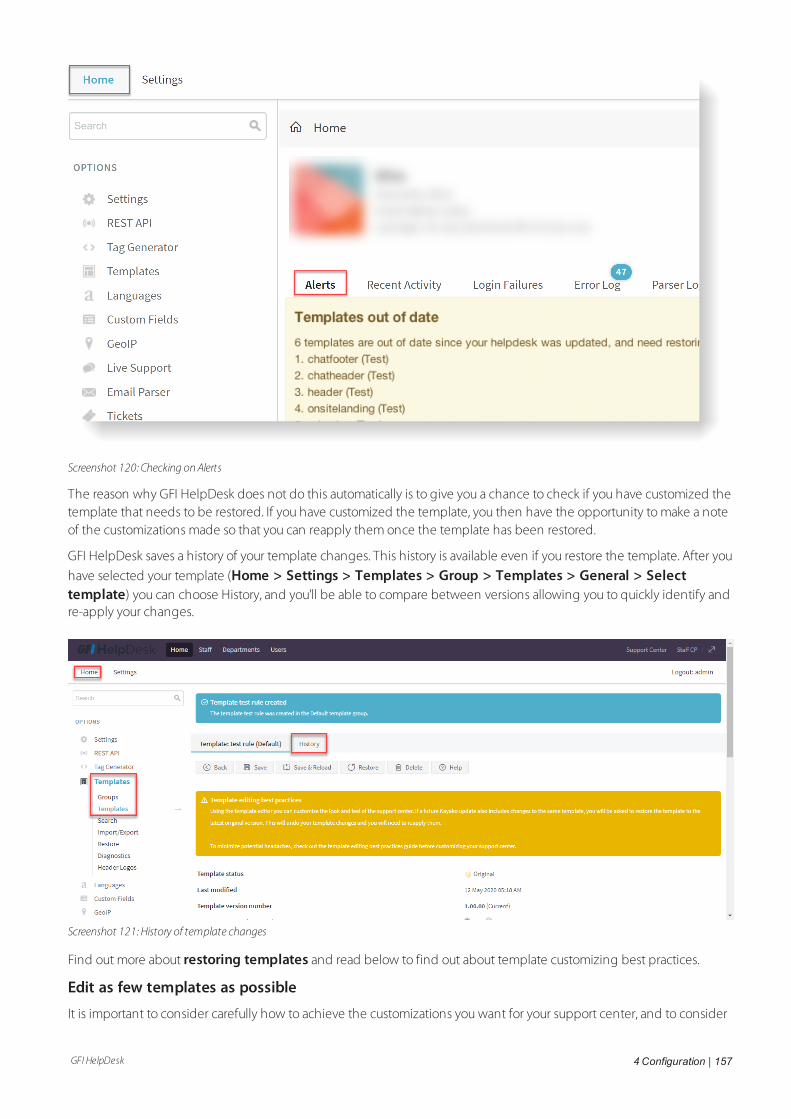
GFI HelpDesk 4 Configuration | 157
Screenshot 120: Checking onAlerts
The reason why GFI HelpDesk does not do this automatically is to give you a chance to check if you have customized thetemplate that needs to be restored. If you have customized the template, you then have the opportunity to make a noteof the customizations made so that you can reapply them once the template has been restored.
GFI HelpDesk saves a history of your template changes. This history is available even if you restore the template. After you
have selected your template (Home > Settings > Templates > Group > Templates > General > Selecttemplate) you can choose History, and you'll be able to compare between versions allowing you to quickly identify andre-apply your changes.
Screenshot 121: History of template changes
Find out more about restoring templates and read below to find out about template customizing best practices.
Edit as few templates as possible
It is important to consider carefully how to achieve the customizations you want for your support center, and to consider
GFI HelpDesk 4 Configuration | 158
whether modifying the HTML in templates is necessary.
There are two reasons you'll want to modify as few templates as possible:
The more templates you change, the more inconvenience you can face if GFI HelpDesk makes a change to a tem-plate as part of an update (which means that the template would be out of date and would need to be restored to itslatest original version and your customizations needs to be reapplied).
The more templates you change, the more difficult it is to isolate any problems.
Keep your CSS Changes in the 'customcss' template
All of the CSS for the support center is contained in one template called clientcss.
Because this template covers all of the support centers, GFI HelpDesk may modify it between helpdesk updates to addnew functionality or fix bugs.
Therefore, we suggest that any CSS changes you wish to make should be made in the customcss template. We'll nevermake changes to this template; it is empty and intended solely for your custom CSS. It is loaded after clientcss, meaninganything in customcss overrides clientcss.
For example, by default clientcss includes a statement to style the title of knowledgebase articles:
kbtitle {
font-size: 30px;
font-weight: 200;
}
If you wish to increase the font size, rather than modifying this statement in clientcss, you should override the statementusing the customcss template by adding:
.kbtitle {
font-size: 40px;}
Because customcss is loaded after clientcss, the element kbtitle ends up with a font-size of 40px and a font-weight of 200.
Try to use CSS rather than editing the hTML
For example, you want to hide the author avatar shown on knowledge base articles. In the template knowledge basearticle you find the following HTML:
<div-class-="kbavatar"><imgsrc="/Base/StaffProfile/DisplayAvatar/"align="absmiddle"border="0"/></div>
Rather than modifying the template directly by deleting this HTML, you could create a new CSS statement in thecustomcss template to hide it:
.kbavatar {
display: none;
}
GFI HelpDesk 4 Configuration | 159
4.5.4 Customizing notification email templatesCustomizing the templates that govern your notification emails allows you to personalize the content that appears ineach email.
This can be very useful when choosing which content is most relevant to your staff versus your customers.
This section gives you a quick overview of notification email templates and how the customization process works. It alsodescribes the steps to personalize your own email notification templates.
Email template variables
Most outgoing emails from GFI HelpDesk are rendered through their respective email templates.
Generally, these templates include language phrases, plain text, HTML/CSS, logical statements, and template variables.This means that you have a lot of options for controlling how the notifications appears to you and your customers.
Variables can be used in email templates to fill in specific content elements related to either a user or a ticket.
For example, if you want each notification email to start with Dear [Customer's Name], you can use a variable inthe email template to supply the Customer Name for each recipient.
The notification email templates being discussed here are:
staff notification template
user notification template
Additionally, each template has two versions:
HTML version
plain text version
You can set your preference for which format to use in the admin control panel, and then modify the matchingtemplate.
Note:Each of these starts out with just a single variable, called either $_notificationContentsHTML or $_notificationContentsText, depending on the template.
These variables contain the default contents of your notification emails. If you ever want to restore the default contentsfor your emails, you can just delete your changes and replace them the default variable.
Modifying notification email templates
You can customize your notification template by following these steps:
1. Log in to the GFI HelpDesk admin control panel.
2. Click on Templates in the left navigation bar.
3. Under that, click Groups and select the required template group.
4. In the Edit Template Group window that opens, click the Templates button.
5. Click General to expand the category.
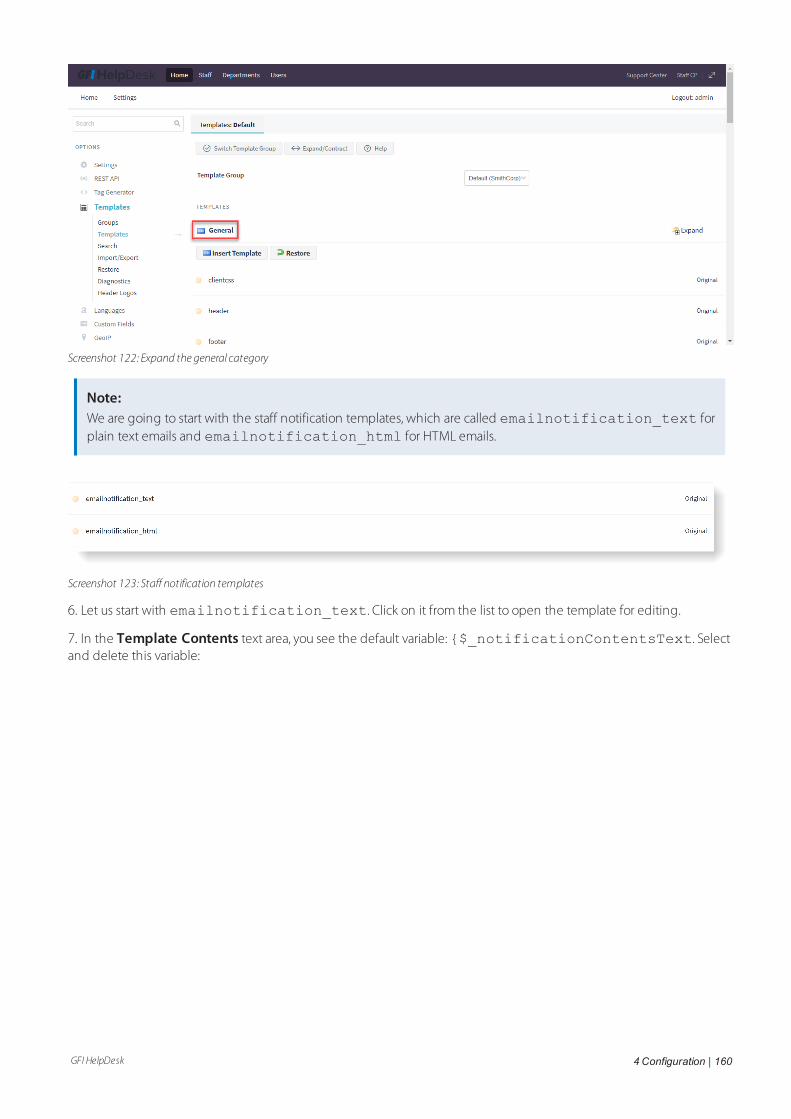
GFI HelpDesk 4 Configuration | 160
Screenshot 122: Expand the general category
Note:We are going to start with the staff notification templates, which are called emailnotification_text forplain text emails and emailnotification_html for HTML emails.
Screenshot 123: Staff notification templates
6. Let us start with emailnotification_text. Click on it from the list to open the template for editing.
7. In the Template Contents text area, you see the default variable:{$_notificationContentsText. Selectand delete this variable:

GFI HelpDesk 4 Configuration | 161
Screenshot 124: Delete variable
8. Now, to add your preferred content to the template, you can add any combination of the following variables:
Simply copy them and paste them into the Template Contents window in the order in which they should appear.
Variable Function
<{$_ticketNotification[subject]}> Ticket subject
<{$_ticketNotification[ticketid]}> Ticket ID/mask
<{$_ticketNotification[ticketlink]}> Ticket hyperlink
<{$_ticketNotification[fullname]}> Customer's full name
<{$_ticketNotification[email]}> Customer's email address
<{$_ticketNotification[phoneno]}> Customer's phone number
<{$_ticketNotification[creator]}> Creator (that is, user/staff)
<{$_ticketNotification[department]}> Ticket department
<{$_ticketNotification[owner]}> Ticket owner's full name
<{$_ticketNotification[type]}> Ticket type
<{$_ticketNotification[status]}> Ticket status
<{$_ticketNotification[priority]}> Ticket priority
<{$_ticketNotification[slaplantitle]}> SLA plan on ticket
<{$_ticketNotification[templategrouptitle]}> Template group used
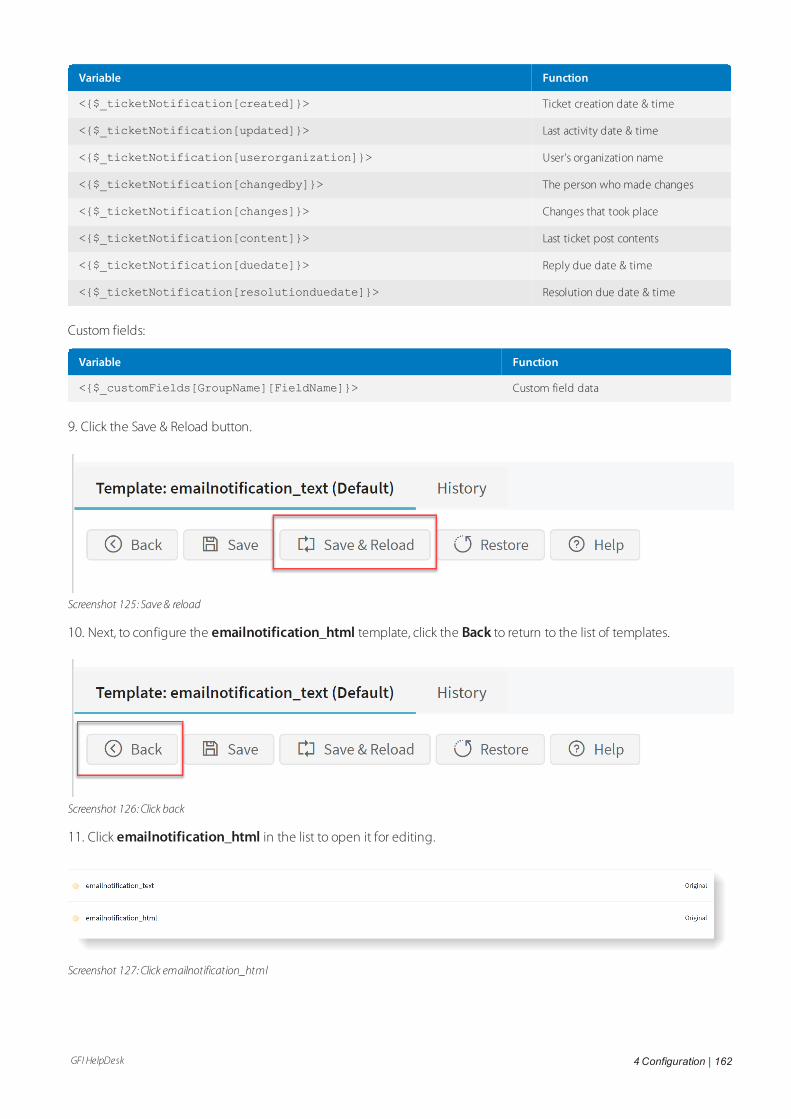
GFI HelpDesk 4 Configuration | 162
Variable Function
<{$_ticketNotification[created]}> Ticket creation date & time
<{$_ticketNotification[updated]}> Last activity date & time
<{$_ticketNotification[userorganization]}> User's organization name
<{$_ticketNotification[changedby]}> The person who made changes
<{$_ticketNotification[changes]}> Changes that took place
<{$_ticketNotification[content]}> Last ticket post contents
<{$_ticketNotification[duedate]}> Reply due date & time
<{$_ticketNotification[resolutionduedate]}> Resolution due date & time
Custom fields:
Variable Function
<{$_customFields[GroupName][FieldName]}> Custom field data
9. Click the Save & Reload button.
Screenshot 125: Save & reload
10. Next, to configure the emailnotification_html template, click the Back to return to the list of templates.
Screenshot 126: Click back
11. Click emailnotification_html in the list to open it for editing.
Screenshot 127: Click emailnotification_html
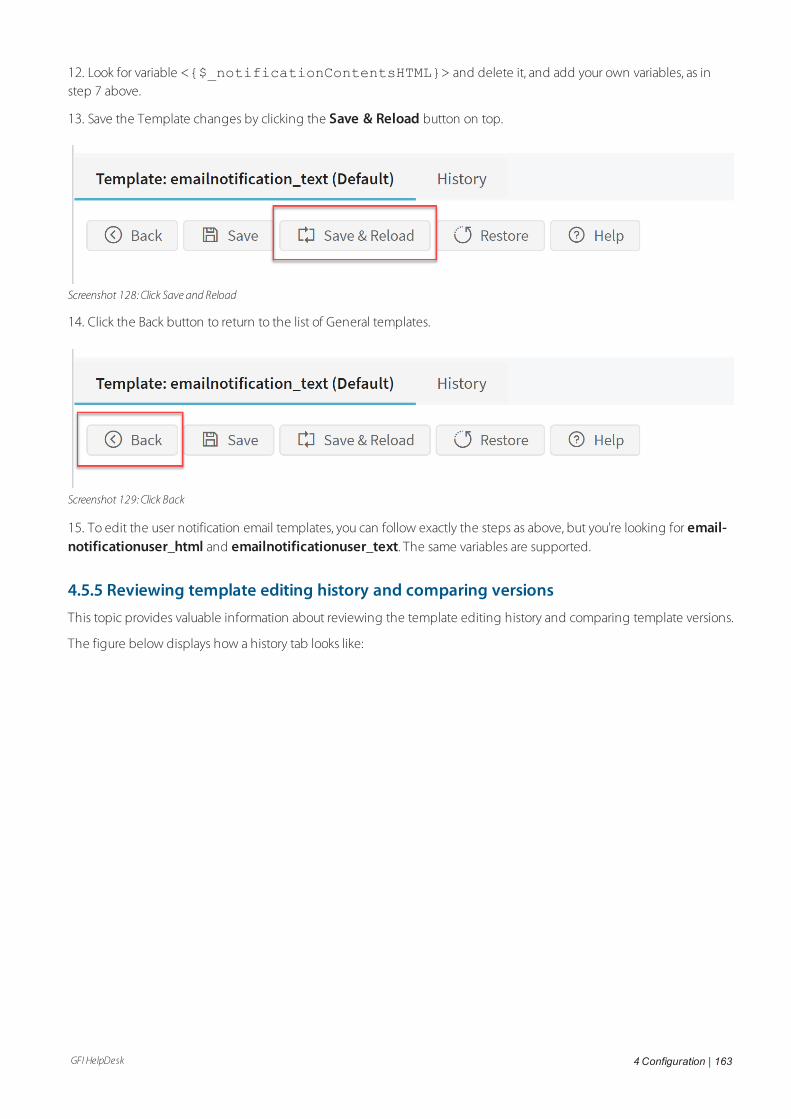
GFI HelpDesk 4 Configuration | 163
12. Look for variable <{$_notificationContentsHTML}> and delete it, and add your own variables, as instep 7 above.
13. Save the Template changes by clicking the Save & Reload button on top.
Screenshot 128: Click Save and Reload
14. Click the Back button to return to the list of General templates.
Screenshot 129: Click Back
15. To edit the user notification email templates, you can follow exactly the steps as above, but you're looking for email-notificationuser_html and emailnotificationuser_text. The same variables are supported.
4.5.5 Reviewing template editing history and comparing versionsThis topic provides valuable information about reviewing the template editing history and comparing template versions.
The figure below displays how a history tab looks like:
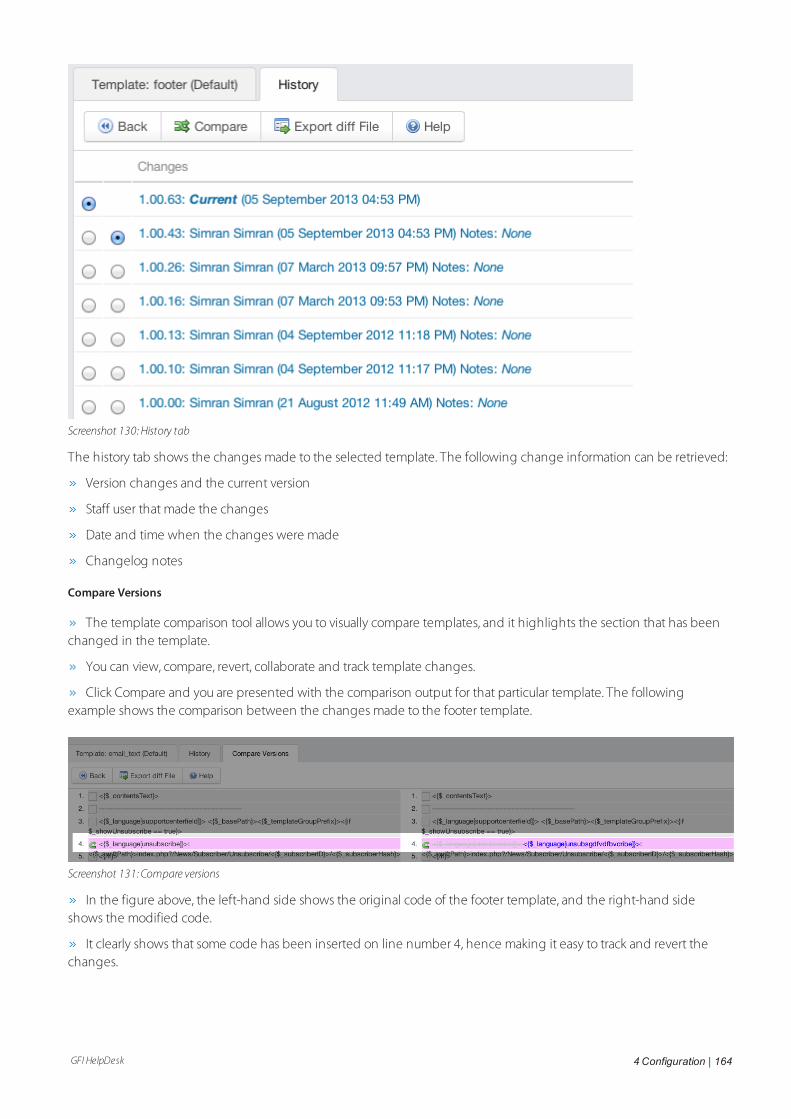
GFI HelpDesk 4 Configuration | 164
Screenshot 130: History tab
The history tab shows the changes made to the selected template. The following change information can be retrieved:
Version changes and the current version
Staff user that made the changes
Date and time when the changes were made
Changelog notes
Compare Versions
The template comparison tool allows you to visually compare templates, and it highlights the section that has beenchanged in the template.
You can view, compare, revert, collaborate and track template changes.
Click Compare and you are presented with the comparison output for that particular template. The followingexample shows the comparison between the changes made to the footer template.
Screenshot 131: Compare versions
In the figure above, the left-hand side shows the original code of the footer template, and the right-hand sideshows the modified code.
It clearly shows that some code has been inserted on line number 4, hence making it easy to track and revert thechanges.

GFI HelpDesk 4 Configuration | 165
Export diff File
The export diff tool exports the template code, as a patch file, that has been included or excluded from the original.
A + shows the lines or white spaces added and a - shows the lines that were present in the original but has beenexcluded during modification.
The figure below shows an example template code in an exported file.
Screenshot 132: Export diff file
4.5.6 Customizing support center lookThis topic provides instruction on how to customize the look of your support center.
To change the look and feel of the client support center, modify the required templates from the admin control panel:
Login to Admin Control Panel and go to Templates > Groups > Templates. The associated templates are cli-entcss and header.
Templates can be modified to hide the Search bar or Loginbox or Subscribe option.
The widgets can be hidden from Admin Control Panel > Widgets.
Client support center and Control panel logos can be changed from:
Admin control panel > Templates > Header Logos.
The logos must fit inside 150px (width) by 24px (height).
4.6 Advanced configurationTurn here for advice on GFI HelpDesk's APIs, integrations, and mobile apps.
Topics in this section:
4.6.1 Purging attachments - Overview 166
4.6.2 Accessing GFI HelpDesk diagnostic tools 169
4.6.3 Changing the product base URL in GFI HelpDesk 171
4.6.4 Adding or updating SSL certificates for your domain 172
4.6.5 Rebuilding helpdesk cache manually 173
GFI HelpDesk 4 Configuration | 166
4.6.6 Removing-Ticket-URL-from-the-Auto-Response-Emails 173
4.6.7 Hiding the Ticket Owner on the Helpdesk Portal 174
4.6.8 Creating knowledge bases for multiple brands 175
4.6.9 Using template groups to create a branded support experience 179
4.6.10 Removing the login form from your support site 181
4.6.11 Adding quicklinks to your support site with widgets 184
4.6.12 Integrating GFI HelpDesk with Identity Providers 185
4.6.13 Setting up automatic approval of support center comments 186
4.6.14 Preventing spam for helpcenter comments using CAPTCHA and Akismet 187
4.6.15 Enabling LoginShare for user accounts 188
4.6.16 Enabling additional language packs 190
4.6.17 Setting up SEO-friendly URLs 191
4.6.18 Disabling staff LoginShare from database 193
4.6.19 Changing or modifying the registration policy consent text 193
4.6.20 Disabling 'Automatically set ticket owner to active staff user' option 195
4.6.21 Sending emails in bulk 196
4.6.22 Preventing spam tickets in GFI HelpDesk 196
4.6.23 Enabling LoginShare for staff user accounts 197
4.6.24 Understanding sections in language packs 198
4.6.25 Configuring remote authentication using LoginShare 199
4.6.26 Moderating comments on knowledge base articles 200
4.6.27 Configuring time zones in GFI HelpDesk 201
4.6.28 Running multiple support sites from one GFI HelpDesk instance 201
4.6.29 Sharing secure access to your GFI HelpDesk 202
4.6.1 Purging attachments - OverviewThis section describes the process to purge attachments.
The Maintenance area of the admin control panel allows you to do the following:
Purge Attachments
The attachments are stored in the database or the Files directory depending upon the setting. Such setting is done in
Admin CP > Settings > Server setting and performance > Storage location for file attachments. To savethe database space or file space, older/unwanted attachments can be purged.
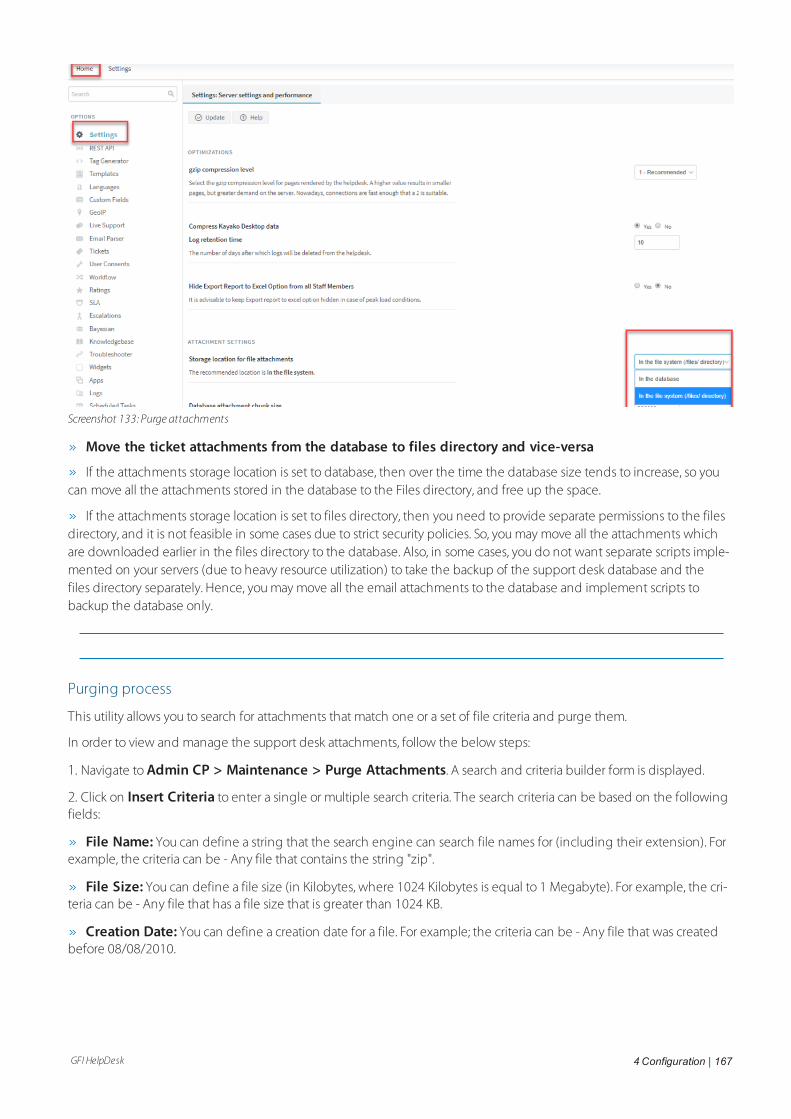
GFI HelpDesk 4 Configuration | 167
Screenshot 133: Purge attachments
Move the ticket attachments from the database to files directory and vice-versa
If the attachments storage location is set to database, then over the time the database size tends to increase, so youcan move all the attachments stored in the database to the Files directory, and free up the space.
If the attachments storage location is set to files directory, then you need to provide separate permissions to the filesdirectory, and it is not feasible in some cases due to strict security policies. So, you may move all the attachments whichare downloaded earlier in the files directory to the database. Also, in some cases, you do not want separate scripts imple-mented on your servers (due to heavy resource utilization) to take the backup of the support desk database and thefiles directory separately. Hence, you may move all the email attachments to the database and implement scripts tobackup the database only.
Purging process
This utility allows you to search for attachments that match one or a set of file criteria and purge them.
In order to view and manage the support desk attachments, follow the below steps:
1. Navigate to Admin CP > Maintenance > Purge Attachments. A search and criteria builder form is displayed.
2. Click on Insert Criteria to enter a single or multiple search criteria. The search criteria can be based on the followingfields:
File Name: You can define a string that the search engine can search file names for (including their extension). Forexample, the criteria can be - Any file that contains the string "zip".
File Size: You can define a file size (in Kilobytes, where 1024 Kilobytes is equal to 1 Megabyte). For example, the cri-teria can be - Any file that has a file size that is greater than 1024 KB.
Creation Date: You can define a creation date for a file. For example; the criteria can be - Any file that was createdbefore 08/08/2010.
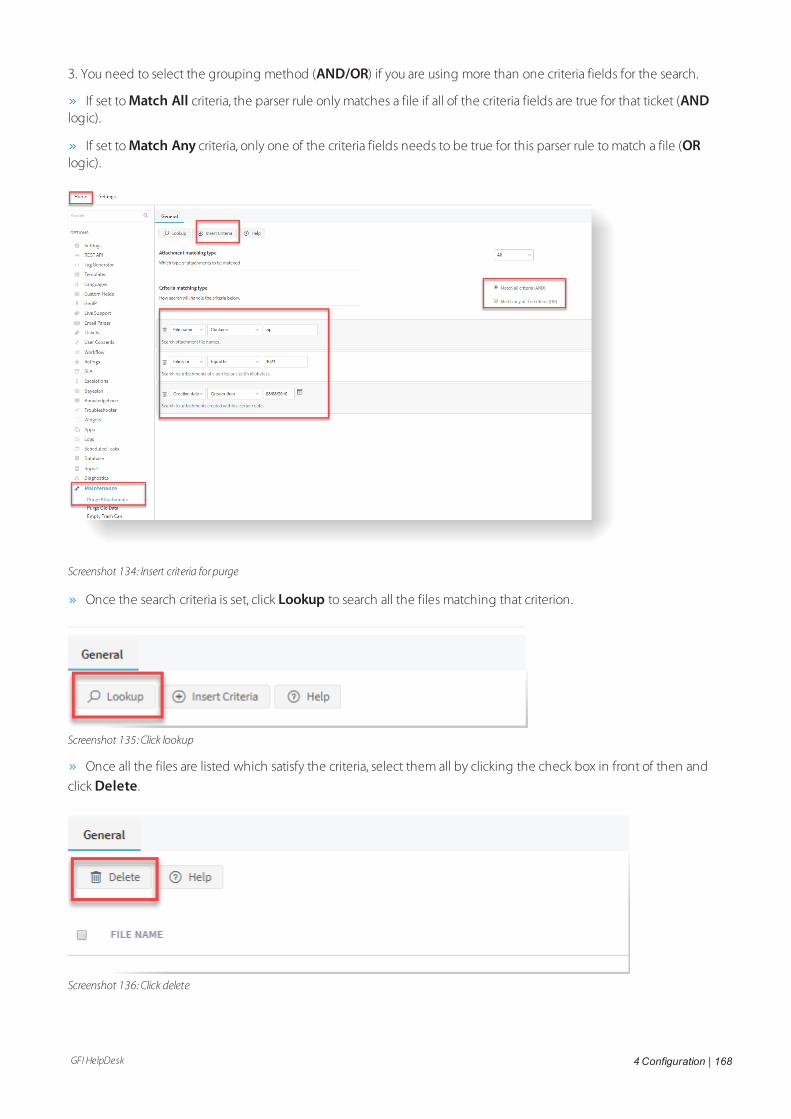
GFI HelpDesk 4 Configuration | 168
3. You need to select the grouping method (AND/OR) if you are using more than one criteria fields for the search.
If set to Match All criteria, the parser rule only matches a file if all of the criteria fields are true for that ticket (ANDlogic).
If set to Match Any criteria, only one of the criteria fields needs to be true for this parser rule to match a file (ORlogic).
Screenshot 134: Insert criteria for purge
Once the search criteria is set, click Lookup to search all the files matching that criterion.
Screenshot 135: Click lookup
Once all the files are listed which satisfy the criteria, select them all by clicking the check box in front of then and
click Delete.
Screenshot 136: Click delete
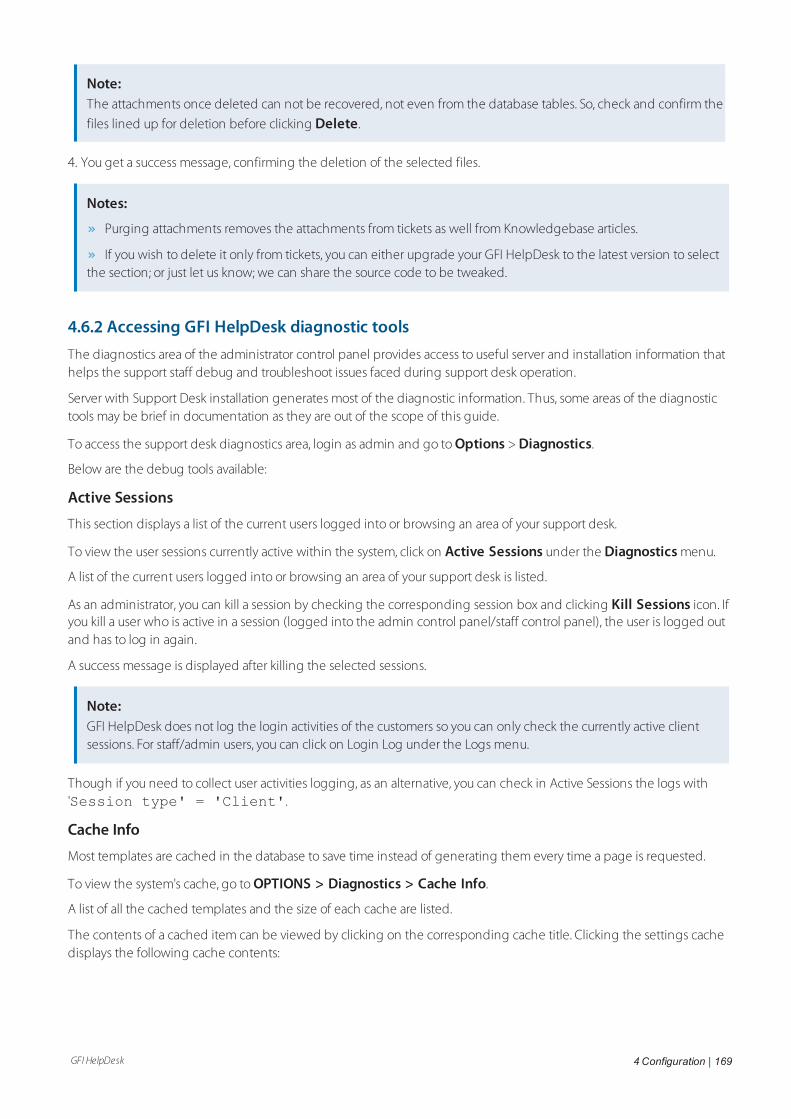
GFI HelpDesk 4 Configuration | 169
Note:The attachments once deleted can not be recovered, not even from the database tables. So, check and confirm the
files lined up for deletion before clicking Delete.
4. You get a success message, confirming the deletion of the selected files.
Notes:
Purging attachments removes the attachments from tickets as well from Knowledgebase articles.
If you wish to delete it only from tickets, you can either upgrade your GFI HelpDesk to the latest version to selectthe section; or just let us know; we can share the source code to be tweaked.
4.6.2 Accessing GFI HelpDesk diagnostic toolsThe diagnostics area of the administrator control panel provides access to useful server and installation information thathelps the support staff debug and troubleshoot issues faced during support desk operation.
Server with Support Desk installation generates most of the diagnostic information. Thus, some areas of the diagnostictools may be brief in documentation as they are out of the scope of this guide.
To access the support desk diagnostics area, login as admin and go to Options > Diagnostics.
Below are the debug tools available:
Active Sessions
This section displays a list of the current users logged into or browsing an area of your support desk.
To view the user sessions currently active within the system, click on Active Sessions under the Diagnostics menu.
A list of the current users logged into or browsing an area of your support desk is listed.
As an administrator, you can kill a session by checking the corresponding session box and clicking Kill Sessions icon. Ifyou kill a user who is active in a session (logged into the admin control panel/staff control panel), the user is logged outand has to log in again.
A success message is displayed after killing the selected sessions.
Note:GFI HelpDesk does not log the login activities of the customers so you can only check the currently active clientsessions. For staff/admin users, you can click on Login Log under the Logs menu.
Though if you need to collect user activities logging, as an alternative, you can check in Active Sessions the logs with'Session type' = 'Client'.
Cache Info
Most templates are cached in the database to save time instead of generating them every time a page is requested.
To view the system's cache, go to OPTIONS > Diagnostics > Cache Info.
A list of all the cached templates and the size of each cache are listed.
The contents of a cached item can be viewed by clicking on the corresponding cache title. Clicking the settings cachedisplays the following cache contents:
GFI HelpDesk 4 Configuration | 170
Screenshot 137: Cache content
Rebuild Cache
The rebuild cache option is provided to recreate the cached contents in the __swift/cache/ directory, as well asall the cached data like settings, staff groups, language phrase, etc. stored in the database.
To view and rebuild the support desk cache, go to OPTIONS > Diagnostics > Rebuild Cache.
Clicking on the Rebuild cache option clears the support desk cache, and you get a success messages under the resultcolumn.
At times, the admin control panel may freeze due to excessive or outdated data stored in the cache. In this case, youneed to delete all the files from the __swift/cache/ directory and rebuild your cache.
PHP Info
PHPinfo is a function that returns information in HTML form about the PHP environment on your server. PHP's phpinfo()executes when viewing the PHP info.
To view the system's PHP info, go to OPTIONS > Diagnostics > PHP Info.
It displays a page which contains all the information related to the PHP environment set on the server containing thesupport desk.
PHPinfo is one of the essential troubleshooting functions concerning PHP. The main objective of the phpinfo() functionis to diagnose PHP problems that are possibly related to its configuration.
Report Issue
This section is provided to report a bug in the software.
GFI HelpDesk 4 Configuration | 171
Submitting a bug under the report bug section sends all the relevant information about the server, along with yourcomments, to the GFI HelpDesk support staff so that support can diagnose the information and confirm the bug.
To access and report a bug, go to OPTIONS > Diagnostics > Report Issue.
It displays the page where you can fill in the bug-related information.
After filling in the required information related to the bug, click Send to dispatch the email.
License Info
This section provides vital information about your product license.
To view your GFI HelpDesk Fusion, Case or Engage license information, click on License Info under the Diagnosticsmenu.
Your product's license information is displayed.
This section shows the following information about your product licensing:
Expiration Date The exact date when the license for this product expires
Registered Name The email address used to register the product with GFI HelpDesk
Organization The organization name associated with this product license
Number of staff usersallowed
The number of seats for which this license is valid
Unique ID The unique identifier associated with your product license
Product The product tier you have purchased, that is, GFI HelpDesk Fusion, Engage, or Case.
Licensed Domains This is a list of your registered domain(s)/sub-domain(s)/IP(s). The domains/sub-domains/IPs mentionedhere are valid for the product installation.
4.6.3 Changing the product base URL in GFI HelpDeskAs a GFI HelpDesk customer, you have the option to change your GFI HelpDesk base URL.
For example - you can change frombrewfictus.gfihelpdesk.com tosupport.brewfictus.com.
This topic provides instructions on how to change the GFI HelpDesk base URL.
Keep in mind that your GFI HelpDesk OnDemand instance is protected by a “wildcard” SSL certificate. This certificatecovers our domain (www.gfi.com) and any sub-domains we have (www.[yourdomain].gfi.com).
However, you need to purchase an SSL certificate for your GFI HelpDesk Download domain and any custom domainsincluding OnDemand custom domain or URL.
To learn more, read Adding or Updating SSL Certificates For Your Domain.
GFI HelpDesk
If you need to update the product URL of your GFI HelpDesk (on-premise installation), there are two ways to do it.
NOTE:The code assumes GFI HelpDesk is installed at a location /var/www/swift and MY-NEW-DOMAIN is thenew URL.
GFI HelpDesk 4 Configuration | 172
A. Using an SQL query
1. Get database details from config.php.
head -n50 /var/www/swift/__swift/config/config.php
2. Check the product URL in database.
select data from swsettings where vkey='general_producturl';
3. Update product URL in database.
update swsettings set data = 'https://MY-NEW-DOMAIN/' where vkey = 'gen-eral_producturl';
4. Rebuild Cache of Help desk by following the instructions here, Rebuilding Helpdesk Cache Manually.
Note:Cache files are written every time someone access a GFI HelpDeskinstallation.
When you delete the cache through the steps above, some files may be left behind, which may cause issues in theUI.
If you start to experience issues after performing this procedure, it may be helpful to go directly to the __swift/cache directory and delete everything there.
B. From the Console
Execute the following commands from the command line (be careful with the %2F strings surrounding MY-NEW-DOMAIN):
1. cd /var/www/swift
2. php console/index.php /Base/LegacyInstance/ChangeProductURL"http%3A%2F%2FMY-NEW-DOMAIN%2F"
4.6.4 Adding or updating SSL certificates for your domainThis section provides information about SSL certificates and the steps in adding or updating an SSL certificate for yourdomain.
To ensure that website visitors' information is always safe, an SSL certificate needs to be installed for the domain.
Secure Sockets Layer (SSL) technology protects the online transactions and helps increase trust in your Web site in thefollowing three essential ways:
An SSL Certificate enables encryption of sensitive information during online transactions.
Each SSL Certificate is a unique credential identifying the certificate owner.
A Certificate Authority authenticates the identity of the certificate owner before it is issued.
Web servers and Web browsers rely on the Secure Sockets Layer (SSL) protocol to create a uniquely encrypted channelfor private communications over the public Internet. Each SSL Certificate consists of a public key and a private key.
The public key is used to encrypt information and the private key is used to decrypt it. When a Web browser points to asecured domain, a level of encryption is established based on the type of SSL Certificate.
GFI HelpDesk 4 Configuration | 173
That said, we know you have spent valuable time and resources building up your brand, and we also know that a largepart of that is your online presence — including your website domain. That is why we have added the capability forOnDemand customers to use SSL certificates for their support domains.
Adding or updating your SSL for your GFI HelpDesk instance
If you are using GFI HelpDesk , once your DNS changes have taken effect and our team has added your SSL certificate,you have to update the base URL for your support site:
Note:To install your certificate, you can follow the general guidelines or request help from your certificate issuer to getinstalled in Apache Server.
1. Log into your Admin CP and keep the tab open to keep the session active.
2. Go to your MySQL database.
3. Run the following query (replace the URL accordingly):
UPDATE swsettingsSET data = 'https://[newURL].com' WHERE vkey = 'general_producturl'
4. Rebuild your GFI HelpDesk cache by opening the following link in a browser (replace the URL accordingly):
https://[newURL].com/admin/index.php?/Base/Diagnostics/RebuildCache
5. Open to your new base URL. The portal should be functioning correctly with the updated URL.
4.6.5 Rebuilding helpdesk cache manuallyFollow the instructions below to rebuild the help desk cache manually:
1. Copy the URL http://yourdomain.com/helpdesk-installation-dir-ectory/staff/index.php?/Core/Default/RebuildCache to a browser.
2. Replace yourdomain.com with your actual domain name.
3. Replace helpdesk-installation-directory with the actual help desk installation directory on yourservers.
4. Press Enter.
4.6.6 Removing-Ticket-URL-from-the-Auto-Response-EmailsThe auto-response emails have a link to the ticket in the following format:
You can check the status of or reply to this ticket online at:
http://<SupportDomain>/index.php?/Tickets/Ticket/View/PAE-785-70892
The topic details the process to remove the ticket URL from the auto-response emails.
in order to remove the link from the autoresponder email, follow the steps below:
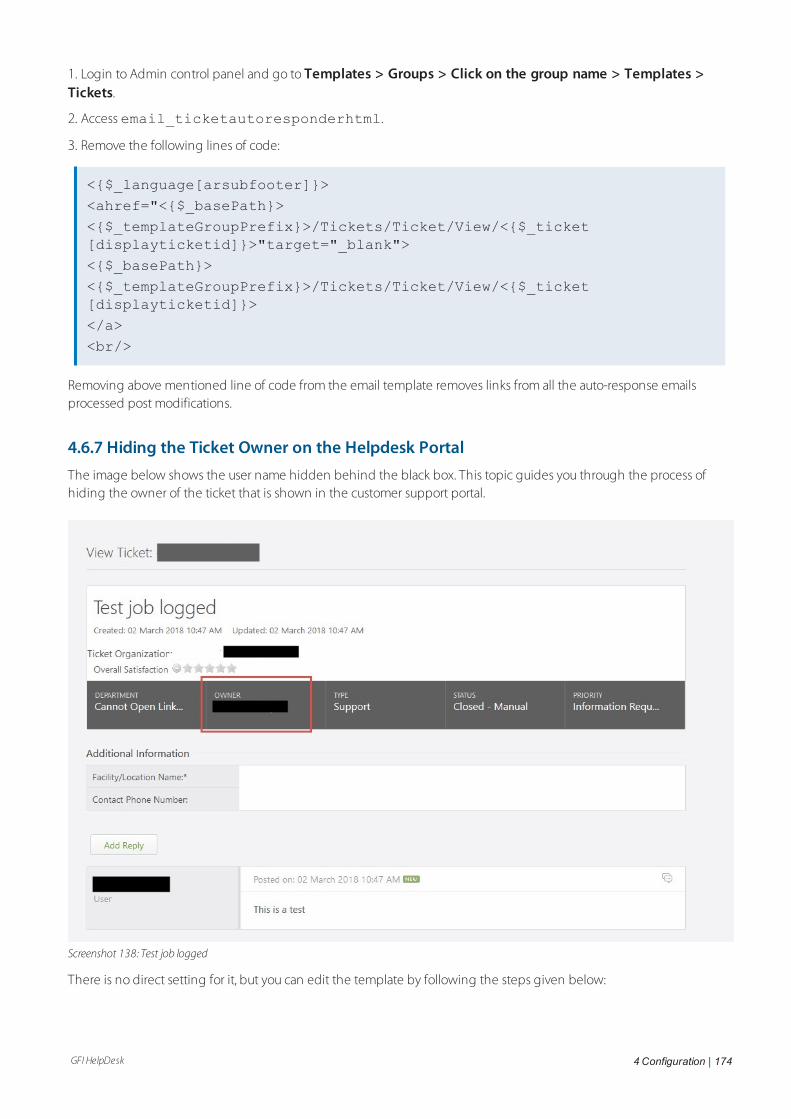
GFI HelpDesk 4 Configuration | 174
1. Login to Admin control panel and go to Templates > Groups > Click on the group name > Templates >Tickets.
2. Access email_ticketautoresponderhtml.
3. Remove the following lines of code:
<{$_language[arsubfooter]}>
<ahref="<{$_basePath}>
<{$_templateGroupPrefix}>/Tickets/Ticket/View/<{$_ticket[displayticketid]}>"target="_blank">
<{$_basePath}>
<{$_templateGroupPrefix}>/Tickets/Ticket/View/<{$_ticket[displayticketid]}>
</a>
<br/>
Removing above mentioned line of code from the email template removes links from all the auto-response emailsprocessed post modifications.
4.6.7 Hiding the Ticket Owner on the Helpdesk PortalThe image below shows the user name hidden behind the black box. This topic guides you through the process ofhiding the owner of the ticket that is shown in the customer support portal.
Screenshot 138: Test job logged
There is no direct setting for it, but you can edit the template by following the steps given below:
GFI HelpDesk 4 Configuration | 175
1. Login to Admin Control Panel and go to Templates > Templates.
2. In the Tickets section, find the viewticket template.
3. Find the following code in the template's contents:
<div class="ticketgeneralpropertiesobject"><div class-s="ticketgeneralpropertiestitle"><{$_language[vtowner]}></div><divclass="ticketgeneralpropertiescontent"><{$_ticketContainer[own-er]}></div></div>
4. Replace it with the below code:
<div class="ticketgeneralpropertiesobject"><div class-s="ticketgeneralpropertiestitle"><{$_language[vtowner]}></div><divclass="ticketgeneralpropertiescontent">(private)</div></div>
4.6.8 Creating knowledge bases for multiple brandsSupport queries can be solved before they even reach you with a well-structured self-service portal.
The most effective self-service portals are those that deliver a seamless customer experience, and a lot of that comesdown to consistent branding between your product and your support.
With GFI HelpDesk, you can create multiple knowledge bases, each branded for a specific product line or a subset ofcustomers.
Here you can know how GFI HelpDesk handles multi-brand knowledge bases and then walk you through the steps tocreating your own.
Understanding how GFI HelpDesk handles multi-brand knowledge bases
GFI HelpDesk is designed to support multiple brand-specific front-ends all from one common back-end managementinterface.
To make sure that your branded content appears in the right place, to the right audience, with the right formatting,there are several elements that need to be in place:
creating new user groups for each brand you want to use. GFI HelpDesk uses these to control the visibility of the dif-ferent categories and articles.
assigning user accounts to different user groups.
control the look of the branded support sites, you'll define a template group for each brand, and link those templatesto the corresponding user groups.
building categories for each brand and link them to a particular user group so that any articles in those categoriesonly appear on that brand's knowledge base.
updating your support site links in order to route traffic to the knowledge base for a brand.
Once each of those elements is in place, your team can write and publish self-service articles and easily restrict them to aparticular branded knowledge base. Read on for detailed instructions for how to set up a multi-brand knowledge tosupport three example brands.
GFI HelpDesk 4 Configuration | 176
Building a multi-brand knowledge base
To create a multi-brand knowledge base, do the following:
1. Log into the admin control panel.
2. Click the Users link on the top toolbar, and then the Insert User Group link that appears below.
3. Now, we are going set up a 'Guest' user group and a 'Registered' user group for each of three brands. So we'll need sixuser groups, all together:
'Guest - Brand A'
'Registered - Brand A'
'Guest - Brand B'
'Registered - Brand B'
'Guest - Brand C'
'Registered - Brand C'
4. In the Group Name field, enter the name for the first group, 'Guest - Brand A'.
5. In the Group Type field, select Guest.
6. Click Insert to save your new group.
7. You end up back on the Manage User Groups page. Click the Insert User Group link to create your next group.
8. This time, the Group Name should be 'Registered - Brand A'.
9. For Group Type, select 'Registered'.
10. Click the Insert button to save.
11. Repeat the steps above to create the remaining four user groups—a 'Guest' and 'Registered' group each for Brands'B' and 'C'.
NOTE:For the 'Guest' user groups, GFI HelpDesk determines which template to use for guest traffic, based on the URL theyuse to get to your help desk. More on that below.
12. Next, we need to populate each user group with the user accounts that belong to them.
13. Click the Staff CP link in the upper right to switch to the staff control panel.
14. Click the Users link on the toolbar.
15. On the Manage Users page, find the customer accounts for 'Brand A' and check the box to the left.
16. At the bottom of the screen, under the Mass Action heading, select 'Registered - Brand A' from the User Groupdropdown.
17. Repeat the last two steps to add any customer accounts for 'Brand B' and 'Brand C' to the appropriate 'Registered'user group.
18. Next, comes the templates, which control how the content in each brand appears on the support site. Because tem-plate customization is one of GFI HelpDesk's most powerful features, refer customizing the templates involved in brand-ing a support center. Follow the steps from it to create three new Template Groups:
Next, we need to populate each user group with the user accounts that belong to them.
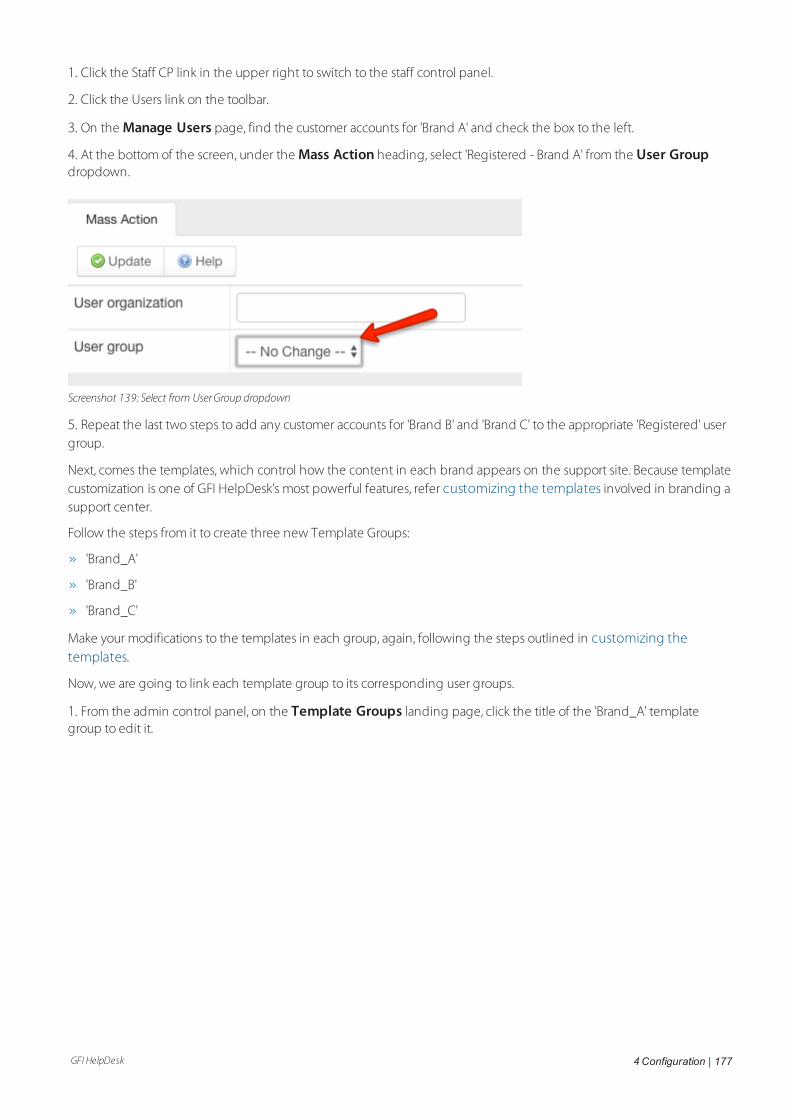
GFI HelpDesk 4 Configuration | 177
1. Click the Staff CP link in the upper right to switch to the staff control panel.
2. Click the Users link on the toolbar.
3. On the Manage Users page, find the customer accounts for 'Brand A' and check the box to the left.
4. At the bottom of the screen, under the Mass Action heading, select 'Registered - Brand A' from the User Groupdropdown.
Screenshot 139: Select from UserGroup dropdown
5. Repeat the last two steps to add any customer accounts for 'Brand B' and 'Brand C' to the appropriate 'Registered' usergroup.
Next, comes the templates, which control how the content in each brand appears on the support site. Because templatecustomization is one of GFI HelpDesk's most powerful features, refer customizing the templates involved in branding asupport center.
Follow the steps from it to create three new Template Groups:
'Brand_A'
'Brand_B'
'Brand_C'
Make your modifications to the templates in each group, again, following the steps outlined in customizing thetemplates.
Now, we are going to link each template group to its corresponding user groups.
1. From the admin control panel, on the Template Groups landing page, click the title of the 'Brand_A' templategroup to edit it.
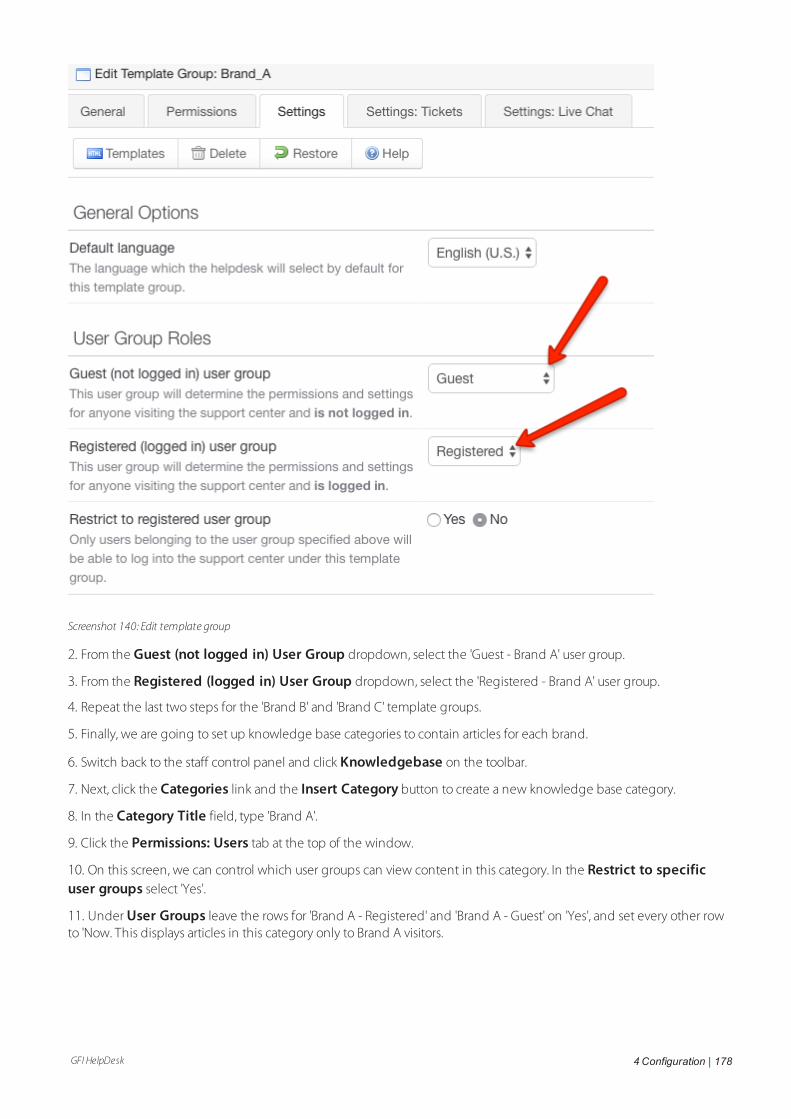
GFI HelpDesk 4 Configuration | 178
Screenshot 140: Edit template group
2. From the Guest (not logged in) User Group dropdown, select the 'Guest - Brand A' user group.
3. From the Registered (logged in) User Group dropdown, select the 'Registered - Brand A' user group.
4. Repeat the last two steps for the 'Brand B' and 'Brand C' template groups.
5. Finally, we are going to set up knowledge base categories to contain articles for each brand.
6. Switch back to the staff control panel and click Knowledgebase on the toolbar.
7. Next, click the Categories link and the Insert Category button to create a new knowledge base category.
8. In the Category Title field, type 'Brand A'.
9. Click the Permissions: Users tab at the top of the window.
10. On this screen, we can control which user groups can view content in this category. In the Restrict to specificuser groups select 'Yes'.
11. Under User Groups leave the rows for 'Brand A - Registered' and 'Brand A - Guest' on 'Yes', and set every other rowto 'Now. This displays articles in this category only to Brand A visitors.
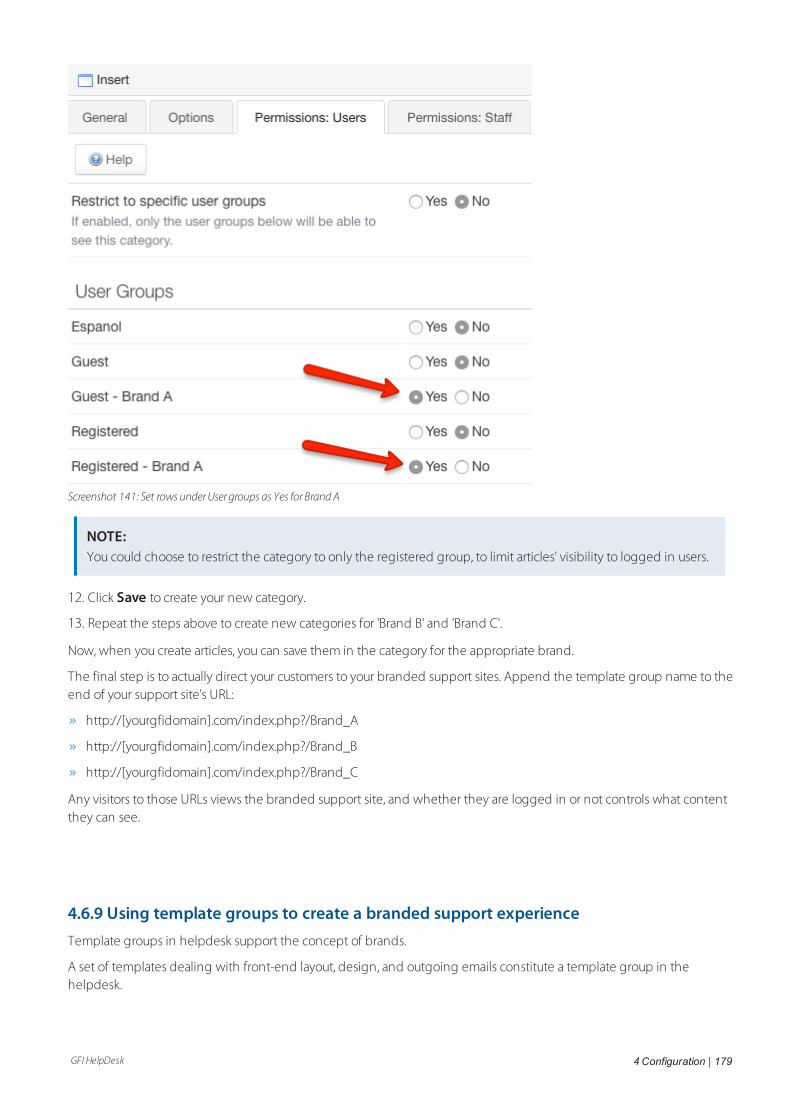
GFI HelpDesk 4 Configuration | 179
Screenshot 141: Set rows underUser groups as Yes for Brand A
NOTE:You could choose to restrict the category to only the registered group, to limit articles' visibility to logged in users.
12. Click Save to create your new category.
13. Repeat the steps above to create new categories for 'Brand B' and 'Brand C'.
Now, when you create articles, you can save them in the category for the appropriate brand.
The final step is to actually direct your customers to your branded support sites. Append the template group name to theend of your support site's URL:
http://[yourgfidomain].com/index.php?/Brand_A
http://[yourgfidomain].com/index.php?/Brand_B
http://[yourgfidomain].com/index.php?/Brand_C
Any visitors to those URLs views the branded support site, and whether they are logged in or not controls what contentthey can see.
4.6.9 Using template groups to create a branded support experienceTemplate groups in helpdesk support the concept of brands.
A set of templates dealing with front-end layout, design, and outgoing emails constitute a template group in thehelpdesk.
GFI HelpDesk 4 Configuration | 180
Each template group is linked to a particular set of a user group (for which it is intended), carries its own brand name, hasa linked default language and set of default ticket properties linked to it.
In essence, each group acts as a unique front-end with a customizable set of templates which can be modified to let youreflect a brand to your users and personalize the experience on the basis of the brand.
Understanding user groups
Helpdesk allows core segregation of your user base on the basis of the user group to which a user profile is linked.
Permission set in terms of content visibility (except for ticket sharing) is done on the basis of the user group to which auser profile is linked.
User groups are of two types – ‘Registered’ and ‘Guest’. ‘Guest’ type user groups allow you to segregate content visibilityfor visitors, that is, users who haven’t logged in. ‘Registered’ type controls visibility for logged in user. Each templategroup is linked to one of each.
You can add and manage user groups in helpdesk from Admin interface > Users.
How helpdesk handles registration and authentication?
Registration from support center results in user profile being linked to ‘Registered’ type user group linked to thetemplate group which has been accessed. A ticket submitted or a chat initiated from an unknown email address resultsin a user profile being created in a similar manner.
A new live chat tag is generated for a template group and an email queue is linked to one. This means that no matterwhat the source might be, an unknown email address is registered once a request is submitted.
A user placing authentication from a template group is re-directed to another template group if user group (or the user)doesn’t match user group linked to template group, and user group of that user is linked to another template group inthe helpdesk.
Note:Local user authentication is not attempted from a template group if login share authentication is enabled for it.
Configuring template groups
To configure template groups login to Admin interface.
Go to Options > Templates > Groups.
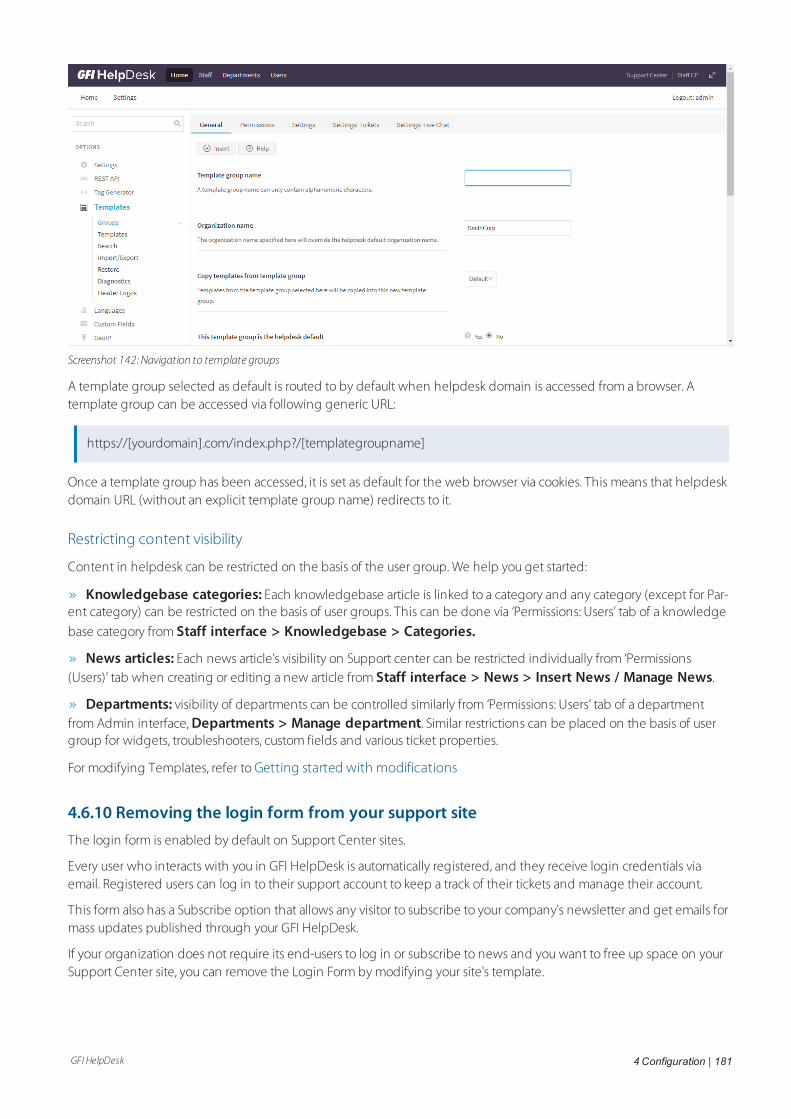
GFI HelpDesk 4 Configuration | 181
Screenshot 142: Navigation to template groups
A template group selected as default is routed to by default when helpdesk domain is accessed from a browser. Atemplate group can be accessed via following generic URL:
https://[yourdomain].com/index.php?/[templategroupname]
Once a template group has been accessed, it is set as default for the web browser via cookies. This means that helpdeskdomain URL (without an explicit template group name) redirects to it.
Restricting content visibility
Content in helpdesk can be restricted on the basis of the user group. We help you get started:
Knowledgebase categories: Each knowledgebase article is linked to a category and any category (except for Par-ent category) can be restricted on the basis of user groups. This can be done via ‘Permissions: Users’ tab of a knowledge
base category from Staff interface > Knowledgebase > Categories.
News articles: Each news article’s visibility on Support center can be restricted individually from ‘Permissions(Users)’ tab when creating or editing a new article from Staff interface > News > Insert News / Manage News.
Departments: visibility of departments can be controlled similarly from ‘Permissions: Users’ tab of a departmentfrom Admin interface, Departments > Manage department. Similar restrictions can be placed on the basis of usergroup for widgets, troubleshooters, custom fields and various ticket properties.
For modifying Templates, refer to Getting started with modifications
4.6.10 Removing the login form from your support siteThe login form is enabled by default on Support Center sites.
Every user who interacts with you in GFI HelpDesk is automatically registered, and they receive login credentials viaemail. Registered users can log in to their support account to keep a track of their tickets and manage their account.
This form also has a Subscribe option that allows any visitor to subscribe to your company's newsletter and get emails formass updates published through your GFI HelpDesk.
If your organization does not require its end-users to log in or subscribe to news and you want to free up space on yourSupport Center site, you can remove the Login Form by modifying your site's template.
GFI HelpDesk 4 Configuration | 182
Note:Removing the Login Form means clients cannot log in and access their tickets, update their profile or subscribe tonews updates.
Below are the steps for removing the login form from support site:
1. Log in to the GFI HelpDesk Admin Panel.
2. Click on Templates on the navigation bar.
3. Click Groups and then select the template group for your site from the list.
4. Click on General to expand the category.
5. Click on header to open the header template, which contains the code responsible for rendering the Login Form.
6. Select the code below, and delete it from the header template:
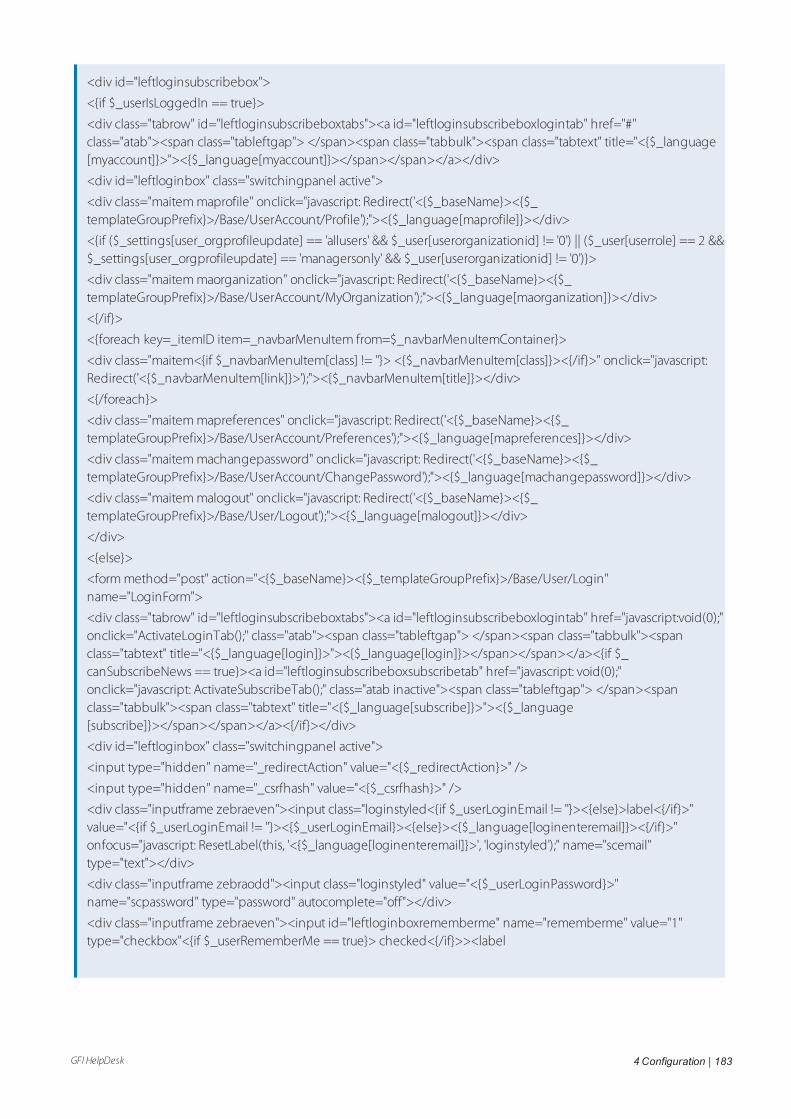
GFI HelpDesk 4 Configuration | 183
<div id="leftloginsubscribebox">
<{if $_userIsLoggedIn == true}>
<div class="tabrow" id="leftloginsubscribeboxtabs"><a id="leftloginsubscribeboxlogintab" href="#"class="atab"><span class="tableftgap"> </span><span class="tabbulk"><span class="tabtext" title="<{$_language[myaccount]}>"><{$_language[myaccount]}></span></span></a></div>
<div id="leftloginbox" class="switchingpanel active">
<div class="maitem maprofile" onclick="javascript: Redirect('<{$_baseName}><{$_templateGroupPrefix}>/Base/UserAccount/Profile');"><{$_language[maprofile]}></div>
<{if ($_settings[user_orgprofileupdate] == 'allusers' && $_user[userorganizationid] != '0') || ($_user[userrole] == 2 &&$_settings[user_orgprofileupdate] == 'managersonly' && $_user[userorganizationid] != '0')}>
<div class="maitem maorganization" onclick="javascript: Redirect('<{$_baseName}><{$_templateGroupPrefix}>/Base/UserAccount/MyOrganization');"><{$_language[maorganization]}></div>
<{/if}>
<{foreach key=_itemID item=_navbarMenuItem from=$_navbarMenuItemContainer}>
<div class="maitem<{if $_navbarMenuItem[class] != ''}> <{$_navbarMenuItem[class]}><{/if}>" onclick="javascript:Redirect('<{$_navbarMenuItem[link]}>');"><{$_navbarMenuItem[title]}></div>
<{/foreach}>
<div class="maitem mapreferences" onclick="javascript: Redirect('<{$_baseName}><{$_templateGroupPrefix}>/Base/UserAccount/Preferences');"><{$_language[mapreferences]}></div>
<div class="maitem machangepassword" onclick="javascript: Redirect('<{$_baseName}><{$_templateGroupPrefix}>/Base/UserAccount/ChangePassword');"><{$_language[machangepassword]}></div>
<div class="maitem malogout" onclick="javascript: Redirect('<{$_baseName}><{$_templateGroupPrefix}>/Base/User/Logout');"><{$_language[malogout]}></div>
</div>
<{else}>
<form method="post" action="<{$_baseName}><{$_templateGroupPrefix}>/Base/User/Login"name="LoginForm">
<div class="tabrow" id="leftloginsubscribeboxtabs"><a id="leftloginsubscribeboxlogintab" href="javascript:void(0);"onclick="ActivateLoginTab();" class="atab"><span class="tableftgap"> </span><span class="tabbulk"><spanclass="tabtext" title="<{$_language[login]}>"><{$_language[login]}></span></span></a><{if $_canSubscribeNews == true}><a id="leftloginsubscribeboxsubscribetab" href="javascript: void(0);"onclick="javascript: ActivateSubscribeTab();" class="atab inactive"><span class="tableftgap"> </span><spanclass="tabbulk"><span class="tabtext" title="<{$_language[subscribe]}>"><{$_language[subscribe]}></span></span></a><{/if}></div>
<div id="leftloginbox" class="switchingpanel active">
<input type="hidden" name="_redirectAction" value="<{$_redirectAction}>" />
<input type="hidden" name="_csrfhash" value="<{$_csrfhash}>" />
<div class="inputframe zebraeven"><input class="loginstyled<{if $_userLoginEmail != ''}><{else}>label<{/if}>"value="<{if $_userLoginEmail != ''}><{$_userLoginEmail}><{else}><{$_language[loginenteremail]}><{/if}>"onfocus="javascript: ResetLabel(this, '<{$_language[loginenteremail]}>', 'loginstyled');" name="scemail"type="text"></div>
<div class="inputframe zebraodd"><input class="loginstyled" value="<{$_userLoginPassword}>"name="scpassword" type="password" autocomplete="off"></div>
<div class="inputframe zebraeven"><input id="leftloginboxrememberme" name="rememberme" value="1"type="checkbox"<{if $_userRememberMe == true}> checked<{/if}>><label
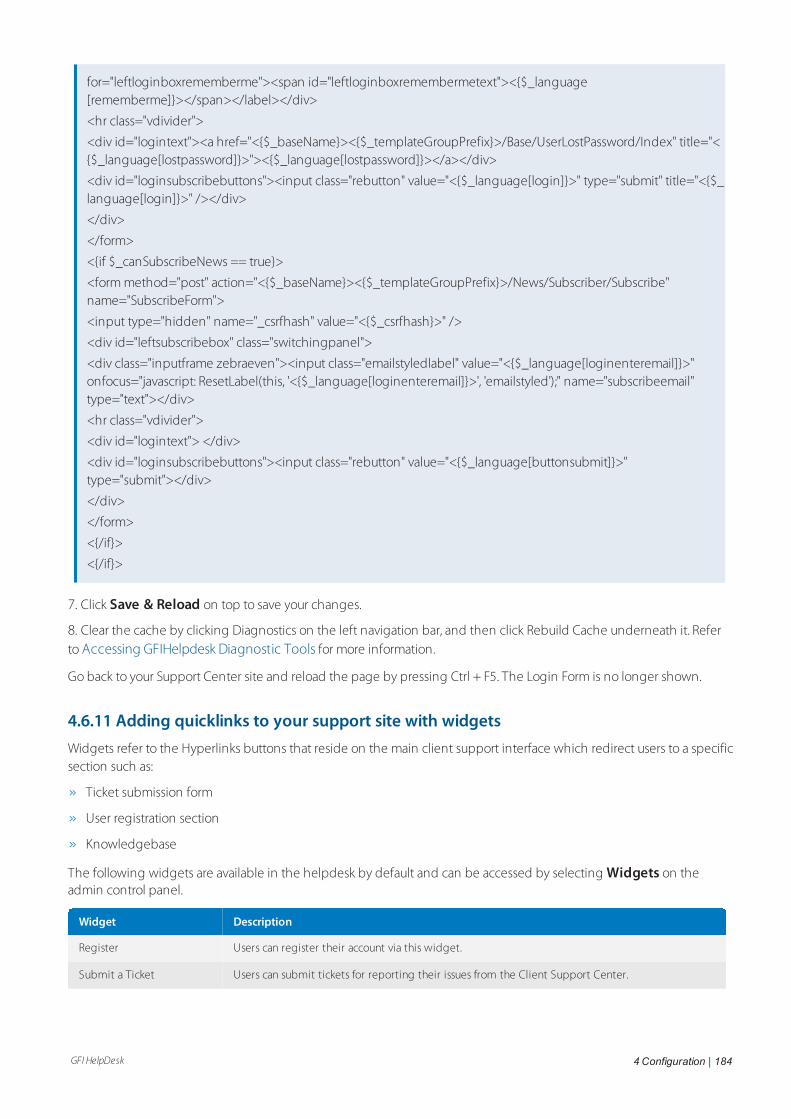
GFI HelpDesk 4 Configuration | 184
for="leftloginboxrememberme"><span id="leftloginboxremembermetext"><{$_language[rememberme]}></span></label></div>
<hr class="vdivider">
<div id="logintext"><a href="<{$_baseName}><{$_templateGroupPrefix}>/Base/UserLostPassword/Index" title="<{$_language[lostpassword]}>"><{$_language[lostpassword]}></a></div>
<div id="loginsubscribebuttons"><input class="rebutton" value="<{$_language[login]}>" type="submit" title="<{$_language[login]}>" /></div>
</div>
</form>
<{if $_canSubscribeNews == true}>
<form method="post" action="<{$_baseName}><{$_templateGroupPrefix}>/News/Subscriber/Subscribe"name="SubscribeForm">
<input type="hidden" name="_csrfhash" value="<{$_csrfhash}>" />
<div id="leftsubscribebox" class="switchingpanel">
<div class="inputframe zebraeven"><input class="emailstyledlabel" value="<{$_language[loginenteremail]}>"onfocus="javascript: ResetLabel(this, '<{$_language[loginenteremail]}>', 'emailstyled');" name="subscribeemail"type="text"></div>
<hr class="vdivider">
<div id="logintext"> </div>
<div id="loginsubscribebuttons"><input class="rebutton" value="<{$_language[buttonsubmit]}>"type="submit"></div>
</div>
</form>
<{/if}>
<{/if}>
7. Click Save & Reload on top to save your changes.
8. Clear the cache by clicking Diagnostics on the left navigation bar, and then click Rebuild Cache underneath it. Referto Accessing GFIHelpdesk Diagnostic Tools for more information.
Go back to your Support Center site and reload the page by pressing Ctrl + F5. The Login Form is no longer shown.
4.6.11 Adding quicklinks to your support site with widgetsWidgets refer to the Hyperlinks buttons that reside on the main client support interface which redirect users to a specificsection such as:
Ticket submission form
User registration section
Knowledgebase
The following widgets are available in the helpdesk by default and can be accessed by selecting Widgets on theadmin control panel.
Widget Description
Register Users can register their account via this widget.
Submit a Ticket Users can submit tickets for reporting their issues from the Client Support Center.

GFI HelpDesk 4 Configuration | 185
Widget Description
Knowledgebase The knowledgebase is a database of categorized articles that act as an information repository (muchlike a frequently asked question database) for the clients.
News A collection of latest updates about an organization, new products launched or new features addedin the existing product are visible to the clients in the News section.
Troubleshooter Troubleshooter wizard guides the clients through a series of sequential instructions which enableself-diagnosis and resolution of the issue they are facing. The clients are offered step-by-step prob-lem solving using a story-board of questions and answers helping the user resolve their issue.
View Tickets This widget is only visible to a logged-in user to check their current tickets statuses.
Renaming the Widgets Title
The widget's title can be renamed by following the below steps:
1. Log in to the Admin Control Panel.
2. Click Widgets.
3. Select the Widget and click the Widget label to edit.
4.6.12 Integrating GFI HelpDesk with Identity ProvidersAn identity provider (IdP) is a system entity that creates, maintains, and manages identity information and offers userauthentication as a service. There are two types of identity providers: Security Assertion Markup Language (SAML) andOpen Connect OD (OpenID). GFI HelpDesk supports SAML.
This topic provides information on how you can integrate GFI HelpDesk with identity providers.
Security Assertion Markup Language (SAML) is an XML-based open-standard data format for exchangingauthentication and authorization data between parties, in particular, between an identity provider and a service provider.
The SAML specification defines three roles:
the principal (typically a user)
the identity provider (IdP)
the service provider (SP)
In the use case addressed by SAML, the principal requests a service from the service provider. The service providerrequests and obtains an identity assertion from the identity provider. On the basis of this assertion, the service providercan make an access control decision - in other words, it can decide whether to perform some service for the connectedprincipal.
There is a GFI HelpDesk module for SAML's Single Sign-On integration for GFI HelpDesk version 4.50 and higher. Usingsingle sign-on (SSO) module permits a single action of user authentication and authorization to access all computers andsystems where he has access permission, without the need to enter multiple passwords.
To download the GFI HelpDesk module for SAML Single Sign-On integration, please visit GFI HelpDesk Forge.
Features
Users can log in with Facebook credentials.
Users can log in with Twitter credentials.
Can easily integrate with your IdP so that users in your organization can log in with there IdP credentials
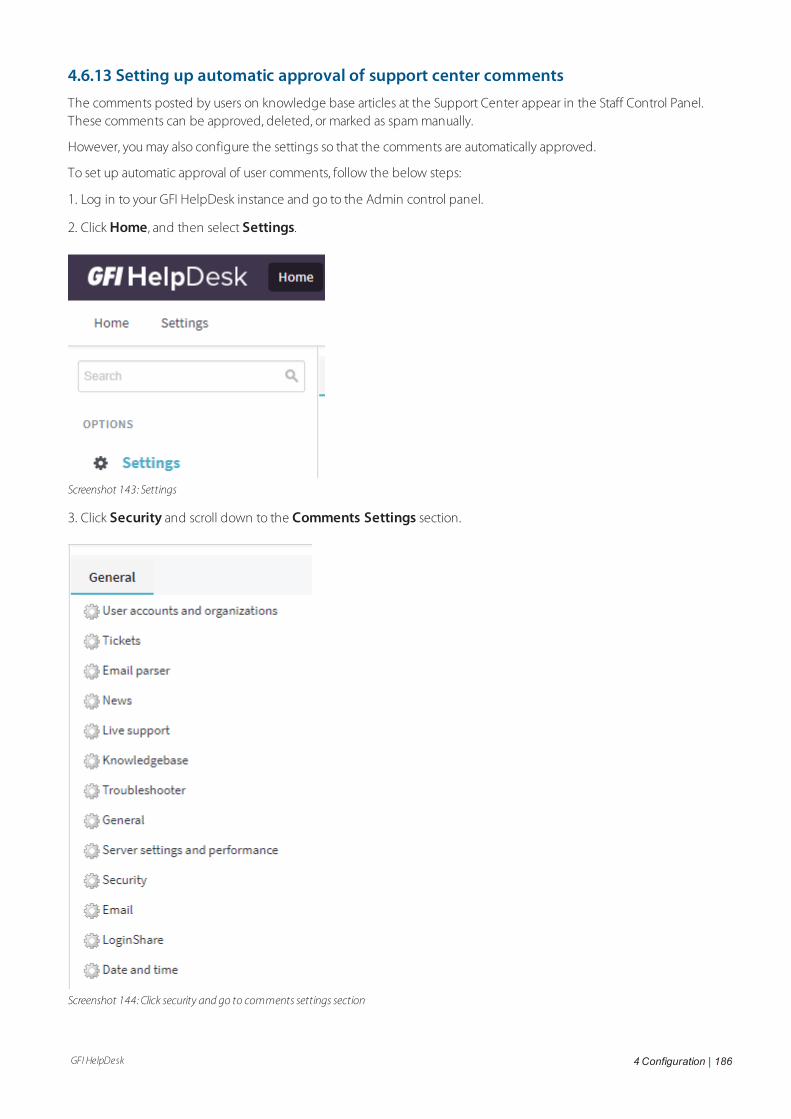
GFI HelpDesk 4 Configuration | 186
4.6.13 Setting up automatic approval of support center commentsThe comments posted by users on knowledge base articles at the Support Center appear in the Staff Control Panel.These comments can be approved, deleted, or marked as spam manually.
However, you may also configure the settings so that the comments are automatically approved.
To set up automatic approval of user comments, follow the below steps:
1. Log in to your GFI HelpDesk instance and go to the Admin control panel.
2. Click Home, and then select Settings.
Screenshot 143: Settings
3. Click Security and scroll down to the Comments Settings section.
Screenshot 144: Click security and go to comments settings section
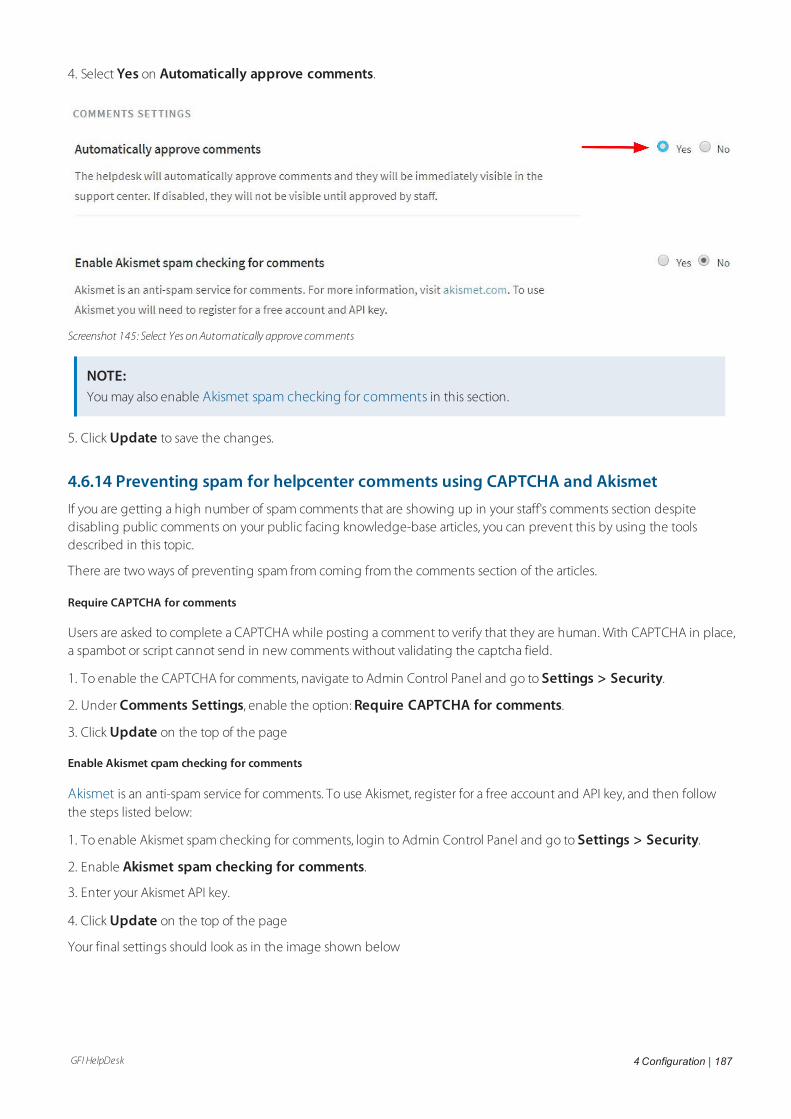
GFI HelpDesk 4 Configuration | 187
4. Select Yes on Automatically approve comments.
Screenshot 145: Select Yes onAutomatically approve comments
NOTE:You may also enable Akismet spam checking for comments in this section.
5. Click Update to save the changes.
4.6.14 Preventing spam for helpcenter comments using CAPTCHA and AkismetIf you are getting a high number of spam comments that are showing up in your staff's comments section despitedisabling public comments on your public facing knowledge-base articles, you can prevent this by using the toolsdescribed in this topic.
There are two ways of preventing spam from coming from the comments section of the articles.
Require CAPTCHA for comments
Users are asked to complete a CAPTCHA while posting a comment to verify that they are human. With CAPTCHA in place,a spambot or script cannot send in new comments without validating the captcha field.
1. To enable the CAPTCHA for comments, navigate to Admin Control Panel and go to Settings > Security.
2. Under Comments Settings, enable the option: Require CAPTCHA for comments.
3. Click Update on the top of the page
Enable Akismet cpam checking for comments
Akismet is an anti-spam service for comments. To use Akismet, register for a free account and API key, and then followthe steps listed below:
1. To enable Akismet spam checking for comments, login to Admin Control Panel and go to Settings > Security.
2. Enable Akismet spam checking for comments.
3. Enter your Akismet API key.
4. Click Update on the top of the page
Your final settings should look as in the image shown below
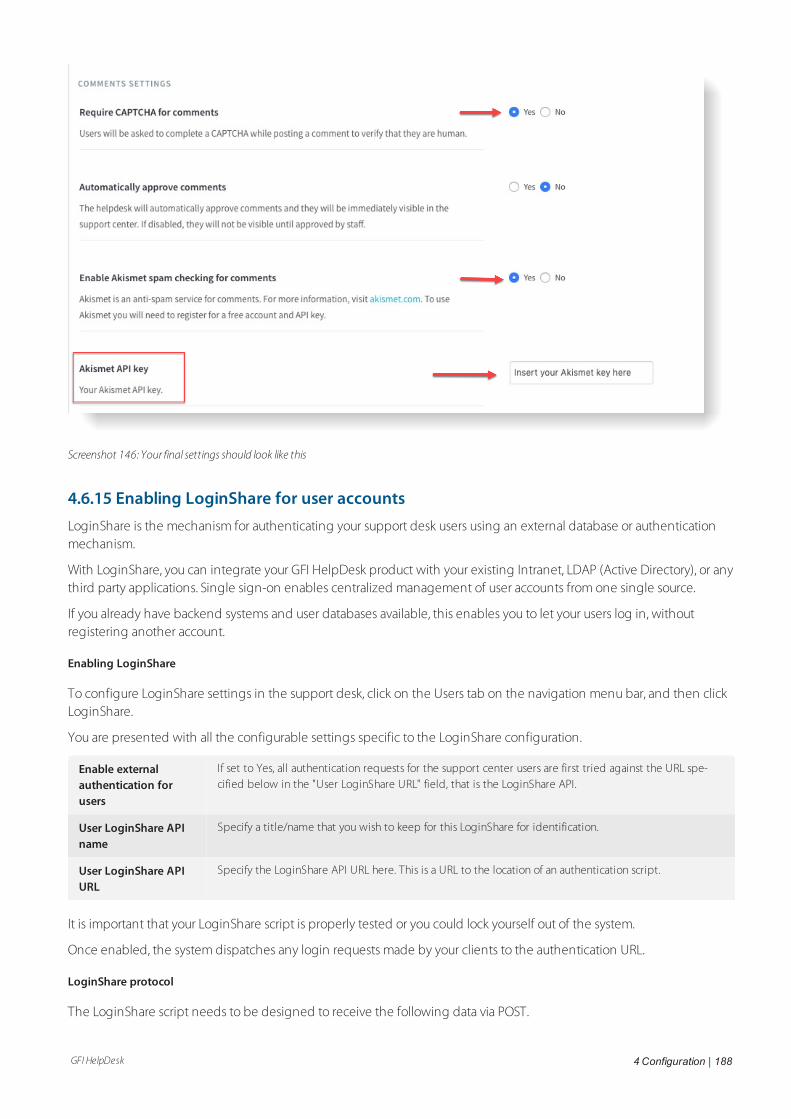
GFI HelpDesk 4 Configuration | 188
Screenshot 146: Your final settings should look like this
4.6.15 Enabling LoginShare for user accountsLoginShare is the mechanism for authenticating your support desk users using an external database or authenticationmechanism.
With LoginShare, you can integrate your GFI HelpDesk product with your existing Intranet, LDAP (Active Directory), or anythird party applications. Single sign-on enables centralized management of user accounts from one single source.
If you already have backend systems and user databases available, this enables you to let your users log in, withoutregistering another account.
Enabling LoginShare
To configure LoginShare settings in the support desk, click on the Users tab on the navigation menu bar, and then clickLoginShare.
You are presented with all the configurable settings specific to the LoginShare configuration.
Enable externalauthentication forusers
If set to Yes, all authentication requests for the support center users are first tried against the URL spe-cified below in the "User LoginShare URL" field, that is the LoginShare API.
User LoginShare APIname
Specify a title/name that you wish to keep for this LoginShare for identification.
User LoginShare APIURL
Specify the LoginShare API URL here. This is a URL to the location of an authentication script.
It is important that your LoginShare script is properly tested or you could lock yourself out of the system.
Once enabled, the system dispatches any login requests made by your clients to the authentication URL.
LoginShare protocol
The LoginShare script needs to be designed to receive the following data via POST.
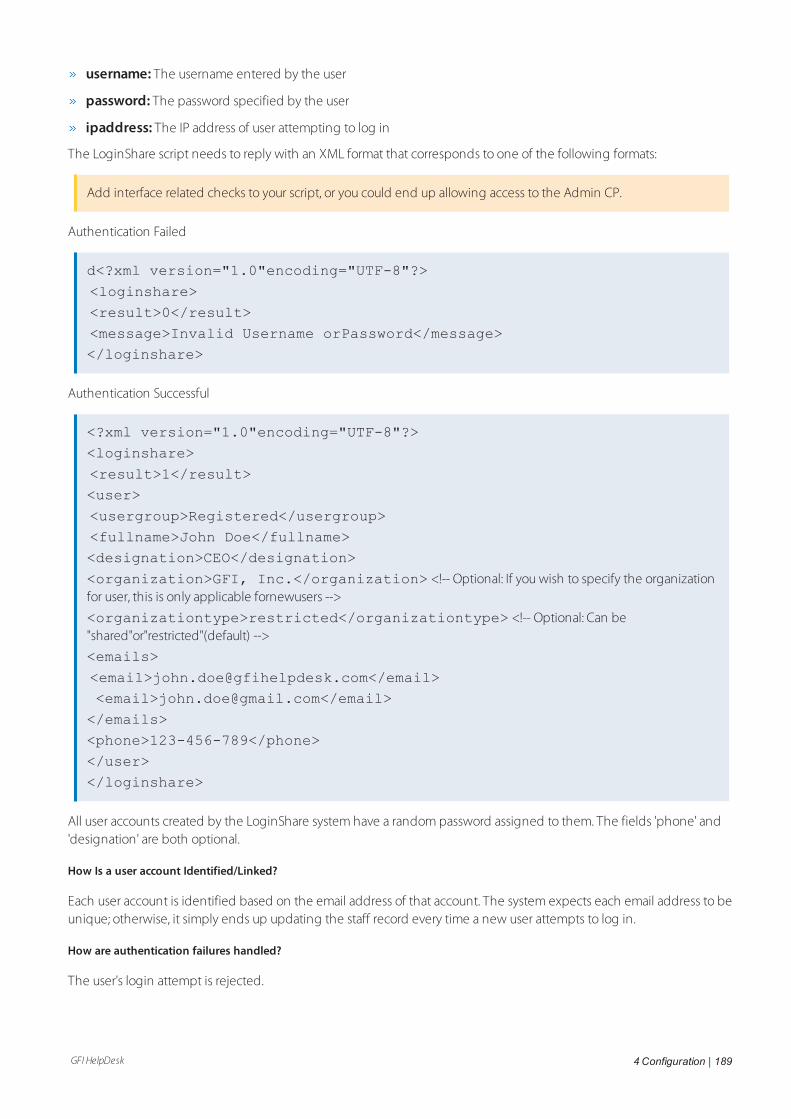
GFI HelpDesk 4 Configuration | 189
username: The username entered by the user
password: The password specified by the user
ipaddress: The IP address of user attempting to log in
The LoginShare script needs to reply with an XML format that corresponds to one of the following formats:
Add interface related checks to your script, or you could end up allowing access to the Admin CP.
Authentication Failed
d<?xml version="1.0"encoding="UTF-8"?>
<loginshare>
<result>0</result>
<message>Invalid Username orPassword</message></loginshare>
Authentication Successful
<?xml version="1.0"encoding="UTF-8"?>
<loginshare>
<result>1</result><user>
<usergroup>Registered</usergroup>
<fullname>John Doe</fullname><designation>CEO</designation>
<organization>GFI, Inc.</organization> <!-- Optional: If you wish to specify the organizationfor user, this is only applicable fornewusers -->
<organizationtype>restricted</organizationtype> <!-- Optional: Can be"shared"or"restricted"(default) -->
<emails>
<email>[email protected]</email><email>[email protected]</email>
</emails>
<phone>123-456-789</phone>
</user>
</loginshare>
All user accounts created by the LoginShare system have a random password assigned to them. The fields 'phone' and'designation' are both optional.
How Is a user account Identified/Linked?
Each user account is identified based on the email address of that account. The system expects each email address to beunique; otherwise, it simply ends up updating the staff record every time a new user attempts to log in.
How are authentication failures handled?
The user's login attempt is rejected.
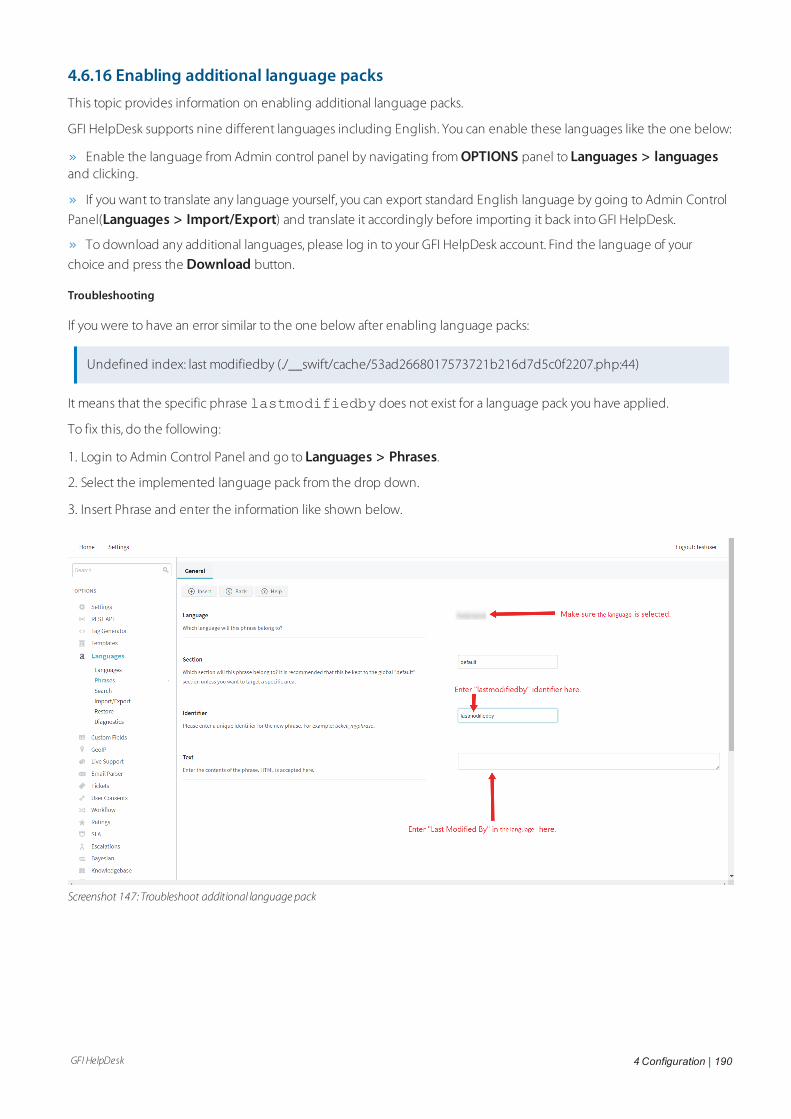
GFI HelpDesk 4 Configuration | 190
4.6.16 Enabling additional language packsThis topic provides information on enabling additional language packs.
GFI HelpDesk supports nine different languages including English. You can enable these languages like the one below:
Enable the language from Admin control panel by navigating from OPTIONS panel to Languages > languagesand clicking.
If you want to translate any language yourself, you can export standard English language by going to Admin Control
Panel(Languages > Import/Export) and translate it accordingly before importing it back into GFI HelpDesk.
To download any additional languages, please log in to your GFI HelpDesk account. Find the language of your
choice and press the Download button.
Troubleshooting
If you were to have an error similar to the one below after enabling language packs:
Undefined index: last modifiedby (./__swift/cache/53ad2668017573721b216d7d5c0f2207.php:44)
It means that the specific phrase lastmodifiedby does not exist for a language pack you have applied.
To fix this, do the following:
1. Login to Admin Control Panel and go to Languages > Phrases.
2. Select the implemented language pack from the drop down.
3. Insert Phrase and enter the information like shown below.
Screenshot 147: Troubleshoot additional language pack

GFI HelpDesk 4 Configuration | 191
FAQs
1. What is language-en-gb.xml file used for?
This is a language file for English (U.K.). You can import it in your GFI HelpDesk from Admin CP > Languages >Import/Export.
2. What is geoiplite.tar.gz file used for?
This is GeoIP database which is used for visitor information in GFI HelpDesk Desktop application.
To Configure GeoIP , please follow the below-mentioned steps:
a. Extract the archive and you get the folder "geoiplite.tar.gz".
b. Copy all the contents of the folder "geoiplite.tar.gz" to the product file "../__swift/geoip".
c. Access admin control panel, go to GeoIP, and update the GeoIP database .
Please note, after copying Geo lite files in your geoip folder, do remember to configure the GeoIP by going to Admin CP> GeoIP. Here you need to click "UPDATE" respectively in all following four menu tabs:
a. City ( Locations )
b. City ( Blocks )
c. ISP
d. Organization
It takes some time to index the geo lite files in the database when you click on update.
4.6.17 Setting up SEO-friendly URLsThis topic describes the process to set up SEO-friendly URLs.
By default, URLs to locations in your Support Center look like this:
https://my.domainname.com/index.php?/Knowledgebase/List
This URL includes index.php?, which is necessary for the helpdesk to know where to send the request but is notvery attractive to your end-users and it is generally better to have 'clean URLs' listed in search engines.
It is possible to achieve this using functionality called rewrite rules, which are provided by and configured on your webserver (rather than GFI HelpDesk).
To set up SEO-friendly URLs, do the following:
1. Edit your helpdesk __swift/config/config.php file
a. Locate the following code in your helpdesk config file, located in ./__swift/config/config.php:
define('SWIFT_BASENAME', 'index.php?');
b. Remove 'index.php?' as value for 'SWIFT_BASENAME', and save the changes
define('SWIFT_BASENAME', '');
2. Configure a rewrite rule in your web server
If you use Apache:
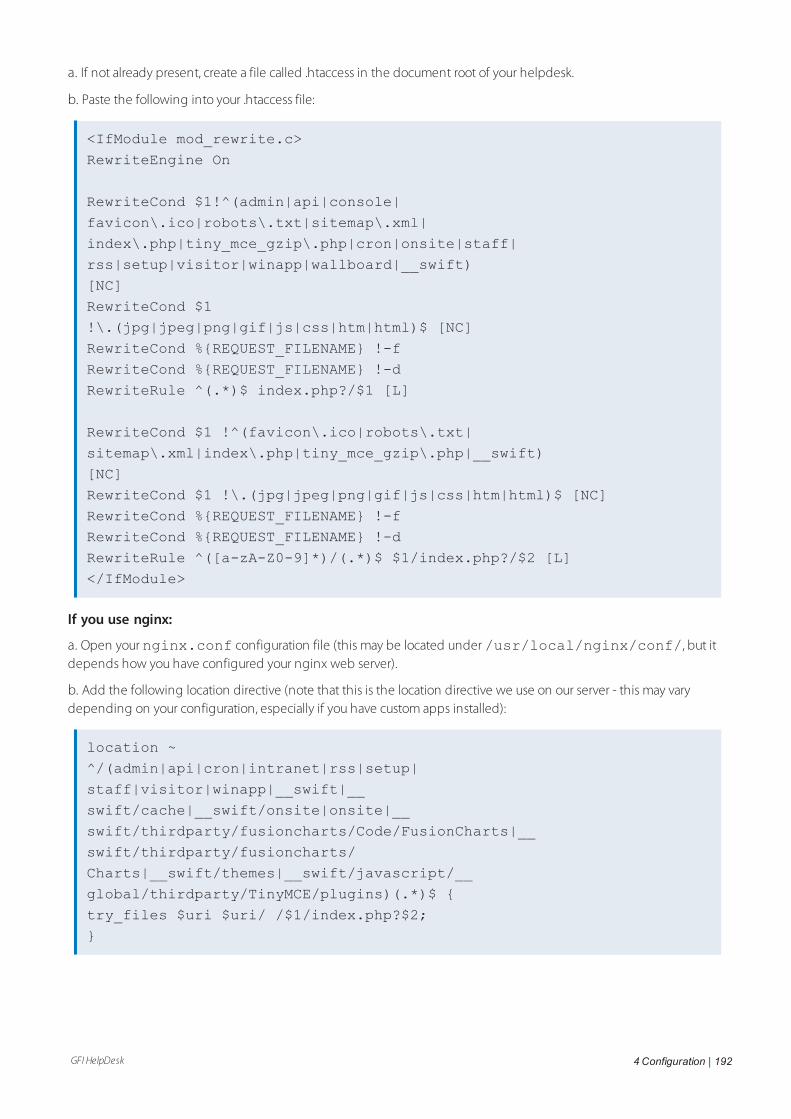
GFI HelpDesk 4 Configuration | 192
a. If not already present, create a file called .htaccess in the document root of your helpdesk.
b. Paste the following into your .htaccess file:
<IfModule mod_rewrite.c>
RewriteEngine On
RewriteCond $1!^(admin|api|console|
favicon\.ico|robots\.txt|sitemap\.xml|
index\.php|tiny_mce_gzip\.php|cron|onsite|staff|
rss|setup|visitor|winapp|wallboard|__swift)
[NC]
RewriteCond $1
!\.(jpg|jpeg|png|gif|js|css|htm|html)$ [NC]
RewriteCond %{REQUEST_FILENAME} !-f
RewriteCond %{REQUEST_FILENAME} !-d
RewriteRule ^(.*)$ index.php?/$1 [L]
RewriteCond $1 !^(favicon\.ico|robots\.txt|
sitemap\.xml|index\.php|tiny_mce_gzip\.php|__swift)
[NC]
RewriteCond $1 !\.(jpg|jpeg|png|gif|js|css|htm|html)$ [NC]
RewriteCond %{REQUEST_FILENAME} !-f
RewriteCond %{REQUEST_FILENAME} !-d
RewriteRule ^([a-zA-Z0-9]*)/(.*)$ $1/index.php?/$2 [L]
</IfModule>
If you use nginx:
a. Open your nginx.conf configuration file (this may be located under /usr/local/nginx/conf/, but itdepends how you have configured your nginx web server).
b. Add the following location directive (note that this is the location directive we use on our server - this may varydepending on your configuration, especially if you have custom apps installed):
location ~
^/(admin|api|cron|intranet|rss|setup|
staff|visitor|winapp|__swift|__
swift/cache|__swift/onsite|onsite|__
swift/thirdparty/fusioncharts/Code/FusionCharts|__
swift/thirdparty/fusioncharts/
Charts|__swift/themes|__swift/javascript/__
global/thirdparty/TinyMCE/plugins)(.*)$ {
try_files $uri $uri/ /$1/index.php?$2;
}
GFI HelpDesk 4 Configuration | 193
NOTE:This is an example of working web server rules/settings that can be used in an ideal server setup to switch to SEOfriendly URLs.
If the same rules are not working in your server environment, please contact your web server admin to edit the rulesaccordingly as we do not provide web server specific support.
4.6.18 Disabling staff LoginShare from databaseThis topic provides instruction on how to disable staff LoginShare from the database.
If you have enabled LoginShare for staff and due to any reason, you are unable to log in at Admin CP because ofLoginShare, you can disable staff LoginShare from the database.
1. To achieve this, you would need to make changes in ‘swsettings’ table and set the value of "loginshare_staffenable"field as 0.
MySQL query:
UPDATE `swsettings` SET DATA = 0 WHERE vkey =
'loginshare_staffenable';
2. Once done, rebuild the help desk cache, using the URL: http://y-ourdomain.com/staff/index.php?/Core/Default/RebuildCache
4.6.19 Changing or modifying the registration policy consent textWhen a user registers or subscribes to get access to your Help Center, they are asked to agree with GFI HelpDesk's PrivacyPolicy Statement by checking the box of the consent policy statement.
The default statement is, "I consent for GFI HelpDesk to process my data and agree to the terms of the Privacy Policy."This statement can be customized for your organization.
This topic provides the steps on how to alter the text on the Privacy Policy Statement.
To modify the registration policy consent text:
1. Log in to GFI HelpDesk Admin CP and go to Languages > Search.
2. In the Search field, enter regpolicytext.
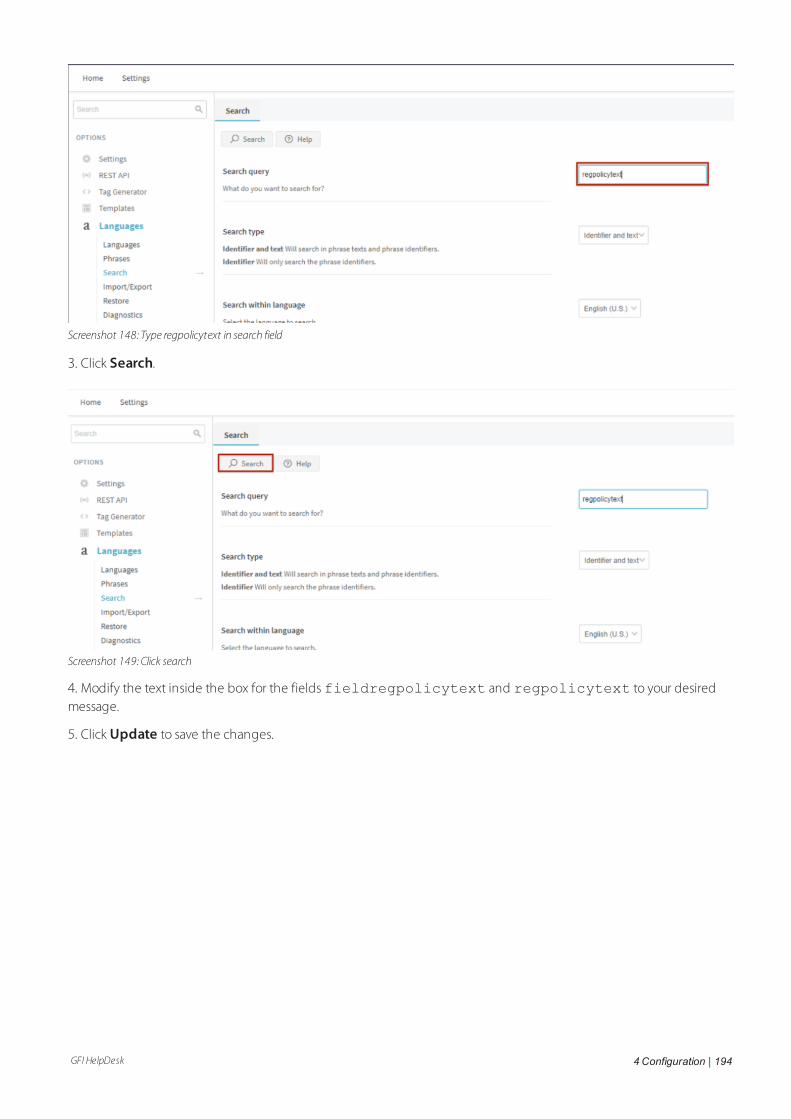
GFI HelpDesk 4 Configuration | 194
Screenshot 148: Type regpolicytext in search field
3. Click Search.
Screenshot 149: Click search
4. Modify the text inside the box for the fields fieldregpolicytext and regpolicytext to your desiredmessage.
5. Click Update to save the changes.
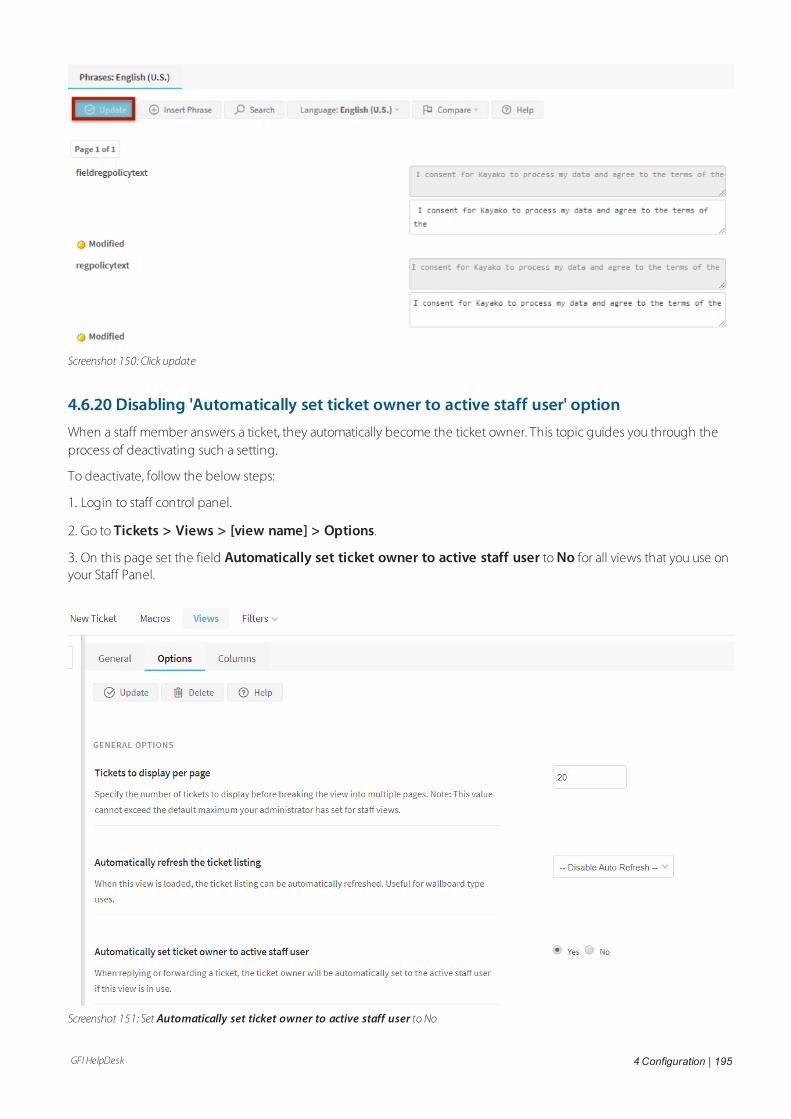
GFI HelpDesk 4 Configuration | 195
Screenshot 150: Click update
4.6.20 Disabling 'Automatically set ticket owner to active staff user' optionWhen a staff member answers a ticket, they automatically become the ticket owner. This topic guides you through theprocess of deactivating such a setting.
To deactivate, follow the below steps:
1. Login to staff control panel.
2. Go to Tickets > Views > [view name] > Options.
3. On this page set the field Automatically set ticket owner to active staff user to No for all views that you use onyour Staff Panel.
Screenshot 151: Set Automatically set ticket owner to active staff user to No
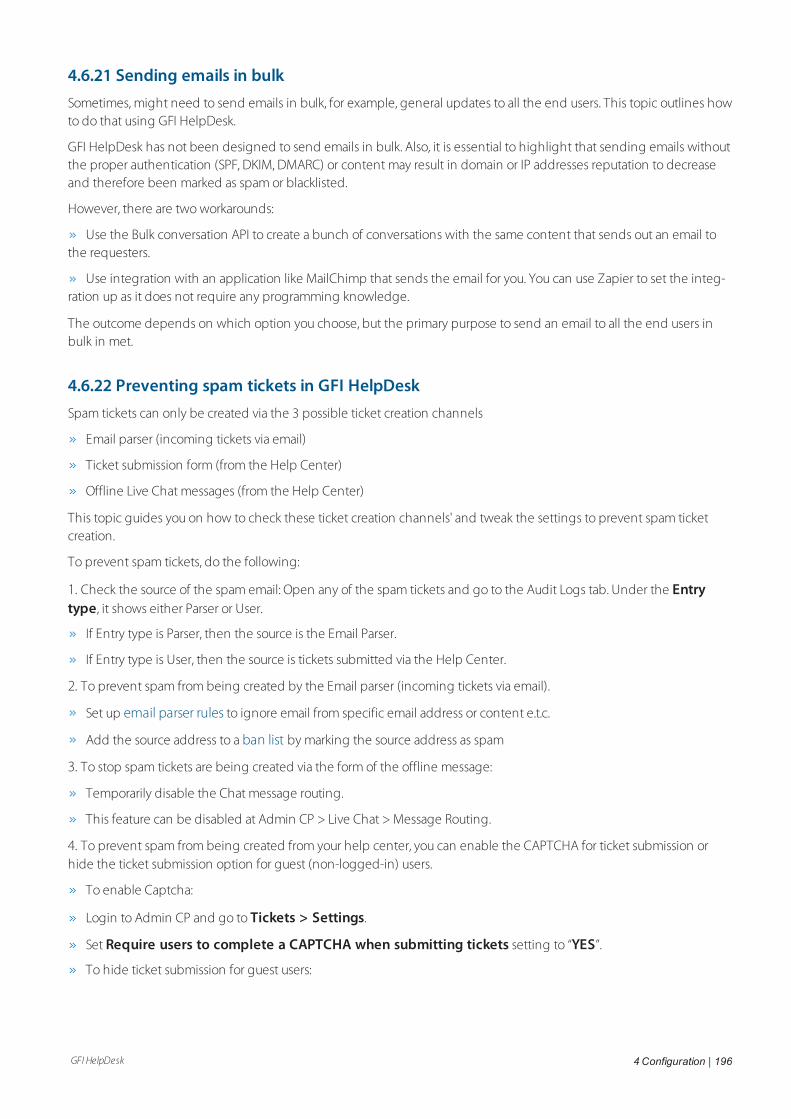
GFI HelpDesk 4 Configuration | 196
4.6.21 Sending emails in bulkSometimes, might need to send emails in bulk, for example, general updates to all the end users. This topic outlines howto do that using GFI HelpDesk.
GFI HelpDesk has not been designed to send emails in bulk. Also, it is essential to highlight that sending emails withoutthe proper authentication (SPF, DKIM, DMARC) or content may result in domain or IP addresses reputation to decreaseand therefore been marked as spam or blacklisted.
However, there are two workarounds:
Use the Bulk conversation API to create a bunch of conversations with the same content that sends out an email tothe requesters.
Use integration with an application like MailChimp that sends the email for you. You can use Zapier to set the integ-ration up as it does not require any programming knowledge.
The outcome depends on which option you choose, but the primary purpose to send an email to all the end users inbulk in met.
4.6.22 Preventing spam tickets in GFI HelpDeskSpam tickets can only be created via the 3 possible ticket creation channels
Email parser (incoming tickets via email)
Ticket submission form (from the Help Center)
Offline Live Chat messages (from the Help Center)
This topic guides you on how to check these ticket creation channels' and tweak the settings to prevent spam ticketcreation.
To prevent spam tickets, do the following:
1. Check the source of the spam email: Open any of the spam tickets and go to the Audit Logs tab. Under the Entrytype, it shows either Parser or User.
If Entry type is Parser, then the source is the Email Parser.
If Entry type is User, then the source is tickets submitted via the Help Center.
2. To prevent spam from being created by the Email parser (incoming tickets via email).
Set up email parser rules to ignore email from specific email address or content e.t.c.
Add the source address to a ban list by marking the source address as spam
3. To stop spam tickets are being created via the form of the offline message:
Temporarily disable the Chat message routing.
This feature can be disabled at Admin CP > Live Chat > Message Routing.
4. To prevent spam from being created from your help center, you can enable the CAPTCHA for ticket submission orhide the ticket submission option for guest (non-logged-in) users.
To enable Captcha:
Login to Admin CP and go to Tickets > Settings.
Set Require users to complete a CAPTCHA when submitting tickets setting to “YES”.
To hide ticket submission for guest users:
GFI HelpDesk 4 Configuration | 197
Login to Admin CP and go to Widgets > Submit a Ticket > Options tab.
Set Widget visibility to “Logged in users only”
4.6.23 Enabling LoginShare for staff user accountsLoginShare is the mechanism for authenticating your support desk users using an external database or authenticationmechanism.
With LoginShare you can integrate your GFI HelpDesk product with your existing Intranet, LDAP (Active Directory) or anythird party applications. Single sign-on enables centralized management of staff and user accounts from one singlesource.
If you already have backend systems and user databases available, this enables you to let your users log in, withoutregistering another account.
Enabling LoginShare:
1. To configure LoginShare settings in the support desk, click on the Staff tab on the navigation menu bar, and thenclick LoginShare.
2. You are presented with all the configurable settings specific to the LoginShare configuration.
Enable externalauthentication forstaff
If this setting is set to Yes, all authentication requests for the staff is first tried against the URL specifiedbelow in the "Staff LoginShare URL" field, that is the LoginShare API.
Staff LoginShare APIname
Specify a name that you wish to keep for this LoginShare
Staff LoginShare APIURL
Specify the LoginShare API URL here. This is a URL to the location of an authentication script.
3. Click Update to upload and save the settings you have made. Once enabled, the system dispatches each login byyour staff to the authentication URL. It is important that your LoginShare script is properly tested or you could lock your-self out of the system.
LoginShare protocol:
The LoginShare script needs to be designed to receive the following data via POST
username: The username entered by the staff
password: The password specified by the staff
ipaddress: The IP address of staff attempting to login
interface: The interface from which staff is attempting to log-in. For example: staff, admin, winapp, mobile
The LoginShare script needs to reply back with an XML format that corresponds to one of the following formats:
It is important to add interface related checks to your script or you could end up allowing access to the Admin CP.
Authentication failed
<?xml version="1.0" encoding="UTF-8"?>
<loginshare>
<result>0</result>
<message>Invalid Username or Password</message>
</loginshare>
GFI HelpDesk 4 Configuration | 198
Authentication successful
All staff user accounts created by the LoginShare system have a random password assigned to them.
<?xml version="1.0" encoding="UTF-8"?>
<loginshare>
<result>1</result>
<staff>
<firstname>John</firstname>
<lastname>Doe</lastname>
<designation>CEO</designation>
<email>[email protected]</email>
<mobilenumber>123-456-789</mobilenumber>
<signature>John Doe([email protected])</signature>
<team>Staff</team>
</staff>
</loginshare>
How are staff identified?
Each staff account is identified based on the username of that account. The system expects each username of staff to beunique, otherwise, it simply ends up updating the staff record every time a new staff user attempts to log in.
How is authentication failure handled?
Staff control panel
The staff is denied access to the staff control panel.
Administrator control panel
The system attempts to authenticate the staff against the user account information in GFI HelpDesk's defaultauthentication system(stored in your helpdesk's database). This is to prevent any lockouts in case your LoginShare scriptfails or becomes unreachable.
All staff accounts created in GFI HelpDesk's default authentication system as a result of LoginShare authentication hassecure random passwords assigned to them.
This means that only the staff created prior to the implementation of LoginShare are able to log in using this fallbackmethod.
4.6.24 Understanding sections in language packsThis article provides information on the different sections of the Language Packs that you can use in GFI HelpDesk.
The language packs for GFI HelpDesk Fusion are separated into distinct sections. Each section contains a collection ofphrases that are common to a particular area of the product. When adding your own language phrase entries, you maywant to be sure that you add it under the correct section.
Here is an alphabetical list of the sections available and a short description of which part of the product they are relatedto:
Section Name Description
Default The "global" section. Use this if there is no specific section you would like to target.
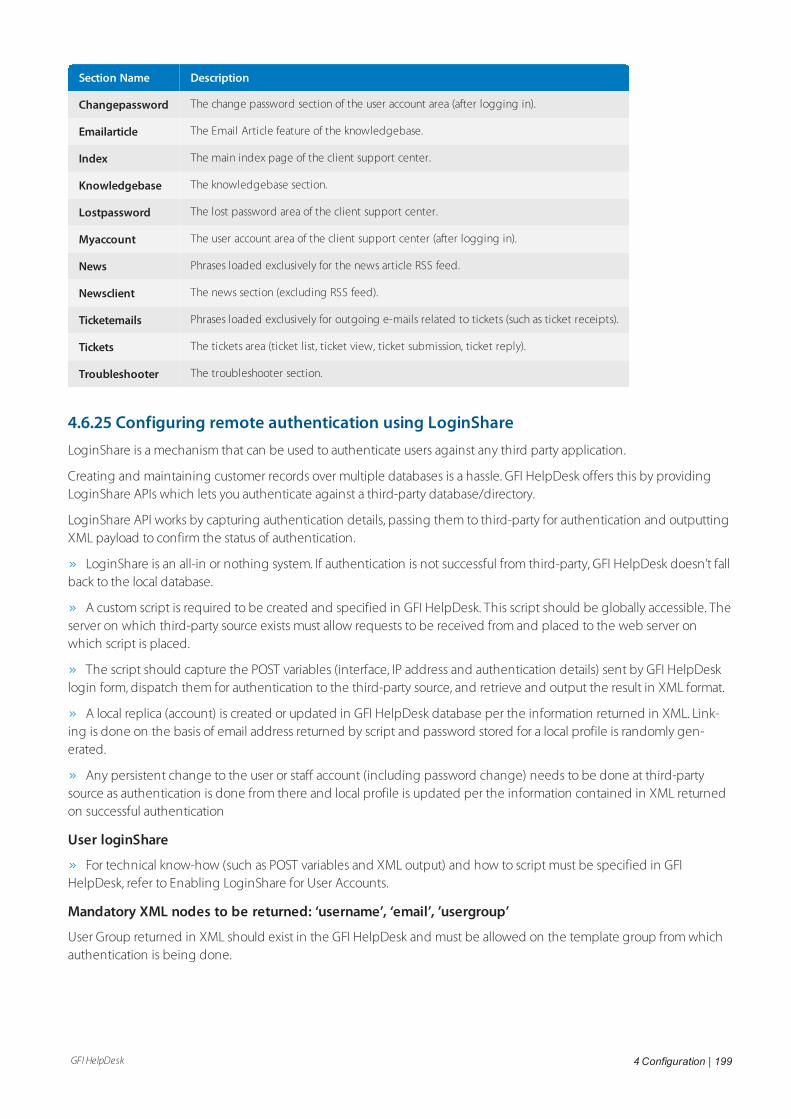
GFI HelpDesk 4 Configuration | 199
Section Name Description
Changepassword The change password section of the user account area (after logging in).
Emailarticle The Email Article feature of the knowledgebase.
Index The main index page of the client support center.
Knowledgebase The knowledgebase section.
Lostpassword The lost password area of the client support center.
Myaccount The user account area of the client support center (after logging in).
News Phrases loaded exclusively for the news article RSS feed.
Newsclient The news section (excluding RSS feed).
Ticketemails Phrases loaded exclusively for outgoing e-mails related to tickets (such as ticket receipts).
Tickets The tickets area (ticket list, ticket view, ticket submission, ticket reply).
Troubleshooter The troubleshooter section.
4.6.25 Configuring remote authentication using LoginShareLoginShare is a mechanism that can be used to authenticate users against any third party application.
Creating and maintaining customer records over multiple databases is a hassle. GFI HelpDesk offers this by providingLoginShare APIs which lets you authenticate against a third-party database/directory.
LoginShare API works by capturing authentication details, passing them to third-party for authentication and outputtingXML payload to confirm the status of authentication.
LoginShare is an all-in or nothing system. If authentication is not successful from third-party, GFI HelpDesk doesn’t fallback to the local database.
A custom script is required to be created and specified in GFI HelpDesk. This script should be globally accessible. Theserver on which third-party source exists must allow requests to be received from and placed to the web server onwhich script is placed.
The script should capture the POST variables (interface, IP address and authentication details) sent by GFI HelpDesklogin form, dispatch them for authentication to the third-party source, and retrieve and output the result in XML format.
A local replica (account) is created or updated in GFI HelpDesk database per the information returned in XML. Link-ing is done on the basis of email address returned by script and password stored for a local profile is randomly gen-erated.
Any persistent change to the user or staff account (including password change) needs to be done at third-partysource as authentication is done from there and local profile is updated per the information contained in XML returnedon successful authentication
User loginShare
For technical know-how (such as POST variables and XML output) and how to script must be specified in GFIHelpDesk, refer to Enabling LoginShare for User Accounts.
Mandatory XML nodes to be returned: ‘username’, ‘email’, ’usergroup’
User Group returned in XML should exist in the GFI HelpDesk and must be allowed on the template group from whichauthentication is being done.
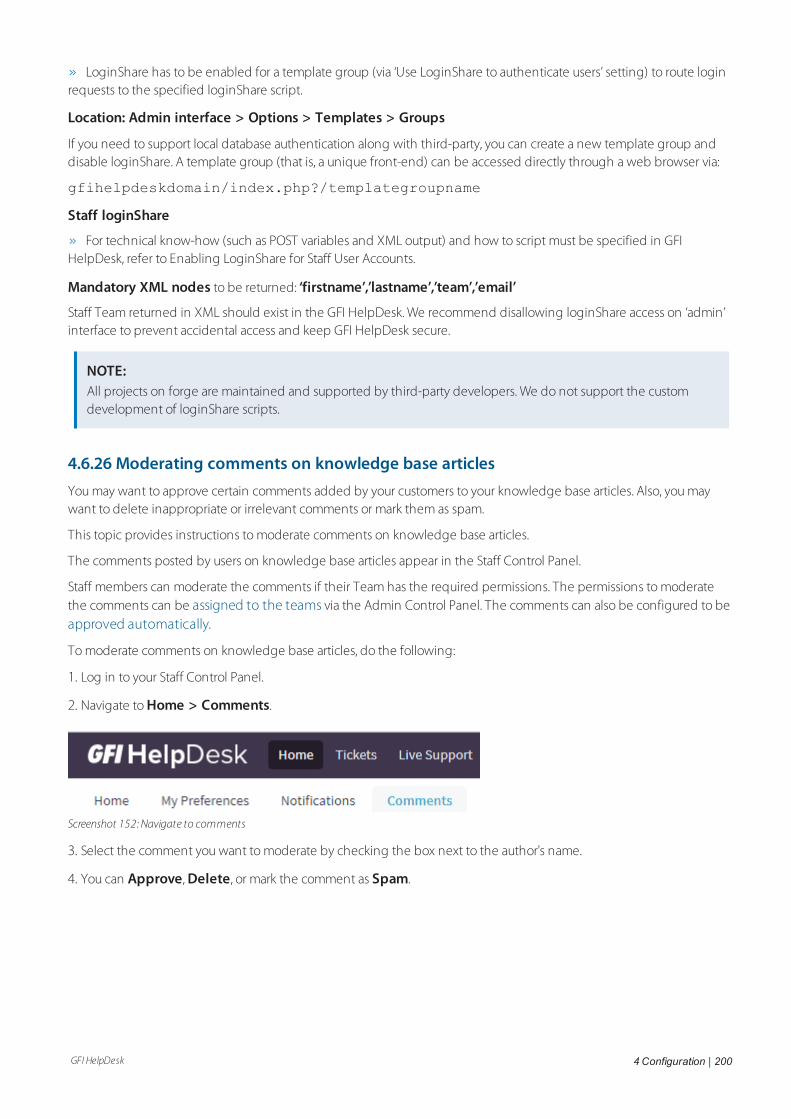
GFI HelpDesk 4 Configuration | 200
LoginShare has to be enabled for a template group (via ‘Use LoginShare to authenticate users’ setting) to route loginrequests to the specified loginShare script.
Location: Admin interface > Options > Templates > Groups
If you need to support local database authentication along with third-party, you can create a new template group anddisable loginShare. A template group (that is, a unique front-end) can be accessed directly through a web browser via:
gfihelpdeskdomain/index.php?/templategroupname
Staff loginShare
For technical know-how (such as POST variables and XML output) and how to script must be specified in GFIHelpDesk, refer to Enabling LoginShare for Staff User Accounts.
Mandatory XML nodes to be returned: ‘firstname’,’lastname’,’team’,’email’
Staff Team returned in XML should exist in the GFI HelpDesk. We recommend disallowing loginShare access on ‘admin’interface to prevent accidental access and keep GFI HelpDesk secure.
NOTE:All projects on forge are maintained and supported by third-party developers. We do not support the customdevelopment of loginShare scripts.
4.6.26 Moderating comments on knowledge base articlesYou may want to approve certain comments added by your customers to your knowledge base articles. Also, you maywant to delete inappropriate or irrelevant comments or mark them as spam.
This topic provides instructions to moderate comments on knowledge base articles.
The comments posted by users on knowledge base articles appear in the Staff Control Panel.
Staff members can moderate the comments if their Team has the required permissions. The permissions to moderatethe comments can be assigned to the teams via the Admin Control Panel. The comments can also be configured to beapproved automatically.
To moderate comments on knowledge base articles, do the following:
1. Log in to your Staff Control Panel.
2. Navigate to Home > Comments.
Screenshot 152: Navigate to comments
3. Select the comment you want to moderate by checking the box next to the author's name.
4. You can Approve, Delete, or mark the comment as Spam.
GFI HelpDesk 4 Configuration | 201
Screenshot 153: Approve, Delete, spam
4.6.27 Configuring time zones in GFI HelpDeskHelp desk allows the administrator to set up different time zones according to the requirements, to specify correct Dateand Time within different processes.
An administrator can set the date and time format and values by following the below steps:
1. Login to Admin CP and go to Settings > Date and Time.
2. “Enable Automatic Daylight Savings” can be enabled/disabled according to the time. The same time is reflec-ted in the tickets, chats, and reports, etc.
Additionally, staff members can select their time zone depending on their requirements by logging to Staff CP andnavigating to Preferences > Time Zone.
4.6.28 Running multiple support sites from one GFI HelpDesk instanceThis article is useful in case you are looking to provide support to your clients using different user interfaces, but want tohave a single installation and Admin/Staff CP (Control Panel) for your staff.
For example, you wish that your clients can submit tickets or initiate the chat accessing different URLs :
http://products.com/
http://productA.com/
http://productB.com/
Your staff have to assist using one backend, that is, Admin/Staff CP by accessing Products Admin(http://products.com/admin) and Products Staff (http://products.com/staff).
This can be achieved with the help of multi-domain concept. In this case:
The domain which is used as a product URL in the help desk is called the primary domain (http://products.com/).
Any other domain which is used to access the help desk using a different template group is called secondarydomain (http://productA.com/ or http://productB.com/).
With the download subscription model, you can use unlimited domains for one license. Also, setting up multi-domain is not possible on SaaS.
The installation of the primary domain is a normal procedure. For the secondary domain, you need to perform thefollowing steps:
1. Place the product files in the document root of the website to be used as a secondary domain.
2. Rename __/swift/config/config.php.new to__/swift/config/config.php and add thedatabase access details of the database being used at the primary domain in it. It means that the database which is usedat the primary domain must be accessible through MySQL-CLI from the server, which is used for secondary installation.
3. Place the license key in the document root of the secondary domain. You do not require the license key for the sec-ondary domain.
GFI HelpDesk 4 Configuration | 202
4. Create the template groups in the primary domain, which is to be linked with the secondary domain.
5. Make the changes in the config.php file (on the secondary domains), by specifying the template group name.
/**
* SWIFT TEMPLATE GROUP
* Can be used for multi-point installations. Use this to specify a custom
template group to load for this installation.
*/
//define('SWIFT_TEMPLATE_GROUP', 'default');
In the above example, the default is the template group name of primary installation.
4.6.29 Sharing secure access to your GFI HelpDeskYour GFI HelpDesk helpdesk is the central hub for all of your customer support operations. Any issue or bug that canimpact your support center needs to be resolved quickly. Although we do our best to provide solutions to commonproblems in our self-service content and through conversations with our support team, there are times when morehands-on assistance is necessary.
For those situations, our support team may ask you to share direct access to your helpdesk and/or web server to enable usto diagnose and resolve the problem you are running into.
In this section, you can go through our policy on sharing access, and detail the steps necessary for sharing that access inthe most secure manner possible.
Understanding when and how to share access to your helpdesk
Please remember:
Any type of system access is sensitive and should only be done when absolutely necessary.
We only request access to your systems when we have exhausted all other options, such as when we aretroubleshooting high/critical issues that cannot be addressed through our self-service content or regular support.
With this in mind, the GFI HelpDesk support agent handling your case explains three important things to you in fulldetail before performing any type of troubleshooting:
The error or potential errors causing the issue
Which system they require access to and why
How the issue is addressed
Note:If your company network policy restricts you from providing access to your systems, let us know and we can discussalternatives, like shared and/or supervised remote access.
Sharing secure access to your systems
If you need to share secure access to your GFI HelpDesk, FTP/SSH account, or database, we recommend you follow thesteps below before handing over your login credentials to the GFI HelpDesk support team.
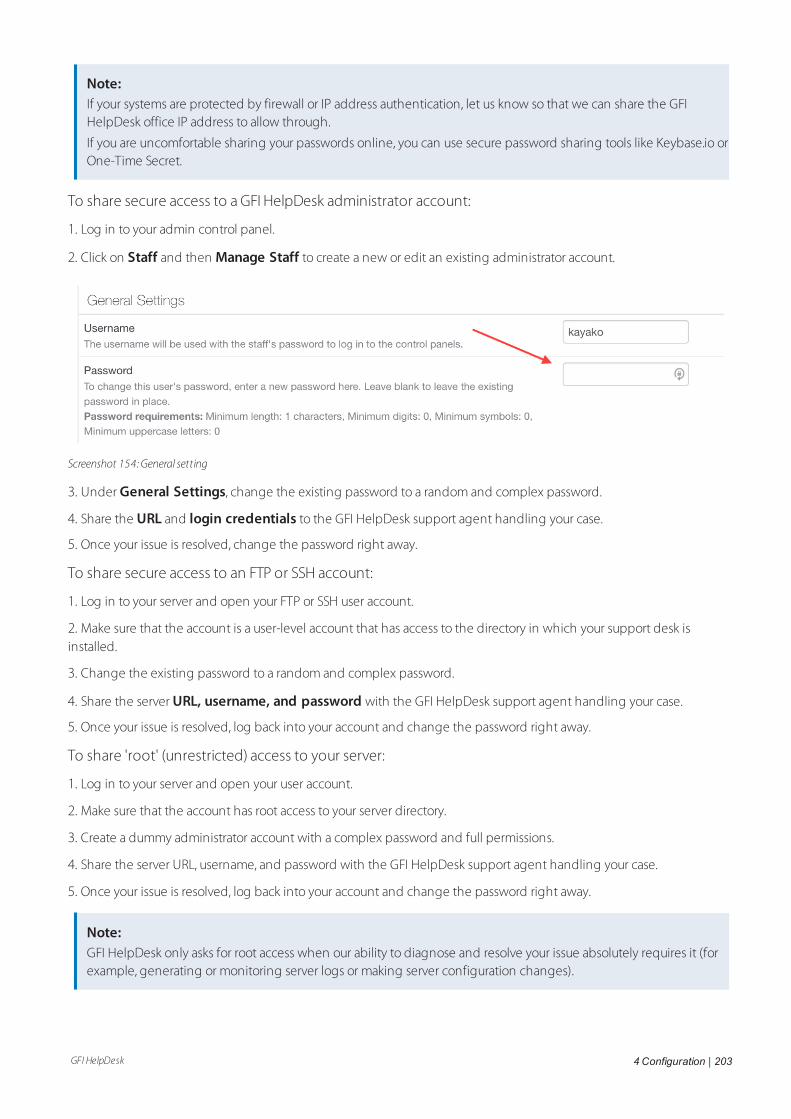
GFI HelpDesk 4 Configuration | 203
Note:If your systems are protected by firewall or IP address authentication, let us know so that we can share the GFIHelpDesk office IP address to allow through.
If you are uncomfortable sharing your passwords online, you can use secure password sharing tools like Keybase.io orOne-Time Secret.
To share secure access to a GFI HelpDesk administrator account:
1. Log in to your admin control panel.
2. Click on Staff and then Manage Staff to create a new or edit an existing administrator account.
Screenshot 154: General setting
3. Under General Settings, change the existing password to a random and complex password.
4. Share the URL and login credentials to the GFI HelpDesk support agent handling your case.
5. Once your issue is resolved, change the password right away.
To share secure access to an FTP or SSH account:
1. Log in to your server and open your FTP or SSH user account.
2. Make sure that the account is a user-level account that has access to the directory in which your support desk isinstalled.
3. Change the existing password to a random and complex password.
4. Share the server URL, username, and password with the GFI HelpDesk support agent handling your case.
5. Once your issue is resolved, log back into your account and change the password right away.
To share 'root' (unrestricted) access to your server:
1. Log in to your server and open your user account.
2. Make sure that the account has root access to your server directory.
3. Create a dummy administrator account with a complex password and full permissions.
4. Share the server URL, username, and password with the GFI HelpDesk support agent handling your case.
5. Once your issue is resolved, log back into your account and change the password right away.
Note:GFI HelpDesk only asks for root access when our ability to diagnose and resolve your issue absolutely requires it (forexample, generating or monitoring server logs or making server configuration changes).
GFI HelpDesk 4 Configuration | 204
To share access to POP3 or IMAP email accounts, databases, and other systems:
1. Log in to your user account.
2. Create a dummy administrator account or change the password of an existing account. Make sure the password is ran-dom and complex.
3. Share the username and password with the GFI HelpDesk support agent handling your case.
4. Once your issue is resolved, log back into your account and change the password right away.
Taking extra steps to secure your accounts protects you from unwanted access or changes to your systems. If you areunsure about providing root access to your server or creating new administrator accounts, you can also consult yoursystem admin or IT department for advice and alternatives.
4.7 Developer resourceGet detailed instructions for configuring inbound and outbound emails in GFI HelpDesk.
Topics in this section:
4.7.1 GFI HelpDesk REST API - Overview 204
4.7.2 Generating API signature using PHP 210
4.7.3 Exporting knowledge base articles to GFI HelpDesk 212
4.7.4 Enabling GFI HelpDesk's REST API 213
4.7.5 Code snippets for generating an API signature 214
4.7.6 GFI HelpDesk hooks 218
4.7.7 Understanding the GFI HelpDesk Rest API and its methods 230
4.7.8 Setting staff permissions to moderate comments on knowledge base articles 231
4.7.9 List of GFI HelpDesk APIs 232
4.7.10 API Test Controller 291
4.7.1 GFI HelpDesk REST API - OverviewThe GFI HelpDesk REST API lets you quickly develop applications to connect and integrate into your GFI HelpDesk.
Whether building a custom plugin, connecting GFI HelpDesk to another app or pulling data from GFI HelpDesk into yourother internal systems, the API lets you retrieve, add and modify data in your helpdesk.
Almost every object in GFI HelpDesk (whether it is a ticket, user, staff, etc) can be manipulated using the API.
REST basics
A request to the GFI HelpDesk REST API request is simply an HTTP request with the URL set to the path of the helpdeskapp (such as Base), controller (like User) and parameters containing the payload of the request.
The GFI HelpDesk API is a "RESTful web API" (read more about the format on Wikipedia). The API uses plain XML forreceiving and dispatching data.
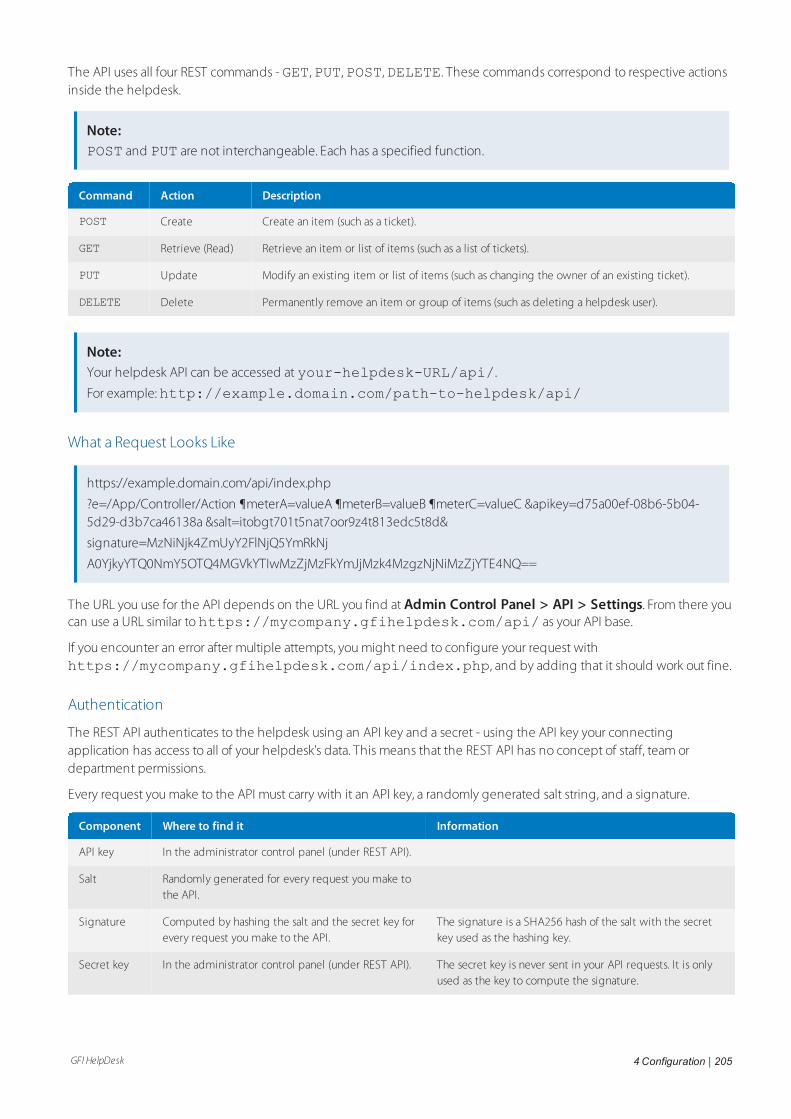
GFI HelpDesk 4 Configuration | 205
The API uses all four REST commands - GET,PUT,POST,DELETE. These commands correspond to respective actionsinside the helpdesk.
Note:POST and PUT are not interchangeable. Each has a specified function.
Command Action Description
POST Create Create an item (such as a ticket).
GET Retrieve (Read) Retrieve an item or list of items (such as a list of tickets).
PUT Update Modify an existing item or list of items (such as changing the owner of an existing ticket).
DELETE Delete Permanently remove an item or group of items (such as deleting a helpdesk user).
Note:Your helpdesk API can be accessed at your-helpdesk-URL/api/.
For example:http://example.domain.com/path-to-helpdesk/api/
What a Request Looks Like
https://example.domain.com/api/index.php
?e=/App/Controller/Action ¶meterA=valueA ¶meterB=valueB ¶meterC=valueC &apikey=d75a00ef-08b6-5b04-5d29-d3b7ca46138a &salt=itobgt701t5nat7oor9z4t813edc5t8d&
signature=MzNiNjk4ZmUyY2FlNjQ5YmRkNj
A0YjkyYTQ0NmY5OTQ4MGVkYTIwMzZjMzFkYmJjMzk4MzgzNjNiMzZjYTE4NQ==
The URL you use for the API depends on the URL you find at Admin Control Panel > API > Settings. From there youcan use a URL similar tohttps://mycompany.gfihelpdesk.com/api/ as your API base.
If you encounter an error after multiple attempts, you might need to configure your request withhttps://mycompany.gfihelpdesk.com/api/index.php, and by adding that it should work out fine.
Authentication
The REST API authenticates to the helpdesk using an API key and a secret - using the API key your connectingapplication has access to all of your helpdesk's data. This means that the REST API has no concept of staff, team ordepartment permissions.
Every request you make to the API must carry with it an API key, a randomly generated salt string, and a signature.
Component Where to find it Information
API key In the administrator control panel (under REST API).
Salt Randomly generated for every request you make tothe API.
Signature Computed by hashing the salt and the secret key forevery request you make to the API.
The signature is a SHA256 hash of the salt with the secretkey used as the hashing key.
Secret key In the administrator control panel (under REST API). The secret key is never sent in your API requests. It is onlyused as the key to compute the signature.

GFI HelpDesk 4 Configuration | 206
Generating the Signature
To generate a request signature:
1. Generate a random string to create a salt (in PHP, you would use mt_rand() to do this)
2. Generate the signature by hashing the salt using SHA256 with the secret key as the key (in PHP, you would usehash_hmac() to do this)
3. base64 encode the signature (in PHP, you would use base64_encode() to do this)
4. URL encode the output (in PHP, you would use urlencode() to do this)
It is recommended that the value of salt be randomized for every request to ensure secure authentication.
Testing the API
We recommend using cURL. ReqBin is an easy to use online cURL client. Your helpdesk comes with an API TestController, which you can use to quickly test your REST API implementation.
Advanced
Request URL Type
Standard:http://example.domain.com/api/index.php?/App/Controller/Action¶meter=1&...
With an ?e= parameter:http://example.domain.com/api/index.php?e=/App/Controller/Action¶meter=1&...
Some customers on certain types of web server run into problems using one, but not the other (often relating to rewriterules or security packages).
Arrays
To post an array using the query string, you should list each item in the array like this:
?usergroupid[]=2&usergroupid[]=3&usergroupid[]=X
The above example essentially passes an array to your helpdesk containing ("2", "3", "X") for the parameterusergroupid.
Response
The server's response to a REST API request is always an HTTP response with a status code representing the result of therequest.
Some responses contains a payload in the body and others don't.
Response code Description
200 OK The request was processed successfully.
400 BadRequest
The request cannot be fulfilled due to bad syntax.
401 Unau-thorized
Similar to 403 Forbidden, but specifically for use when authentication is possible but has failed or not yet beenprovided.
GFI HelpDesk 4 Configuration | 207
Response code Description
403 For-bidden
The request was a legal request, but the server is refusing to respond to it.
404 NotFound
The requested resource could not be found but may be available again in the future.
405 NotAllowed
A request was made of a resource using a request method not supported by that resource; for example, usingGET on a form which requires data to be presented via POST, or using PUT on a read-only resource.
List of GFI HelpDesk APIs
This section provides the current list of REST APIs that GFI HelpDesk provides.
Below is the list of GFI HelpDesk APIs.
Note:Red=Required.
Blue = Either of the value
REST - UserSearch
This topic provides details about the REST - UserSearch API call that GFI HelpDesk uses, including its field types,Arguments, and sample responses.
POST /Base/UserSearch
Run a search on Users. You can search users from email, full name, phone, organization name, and user group.
Post Variables
Name Description
query The Search Query
Response
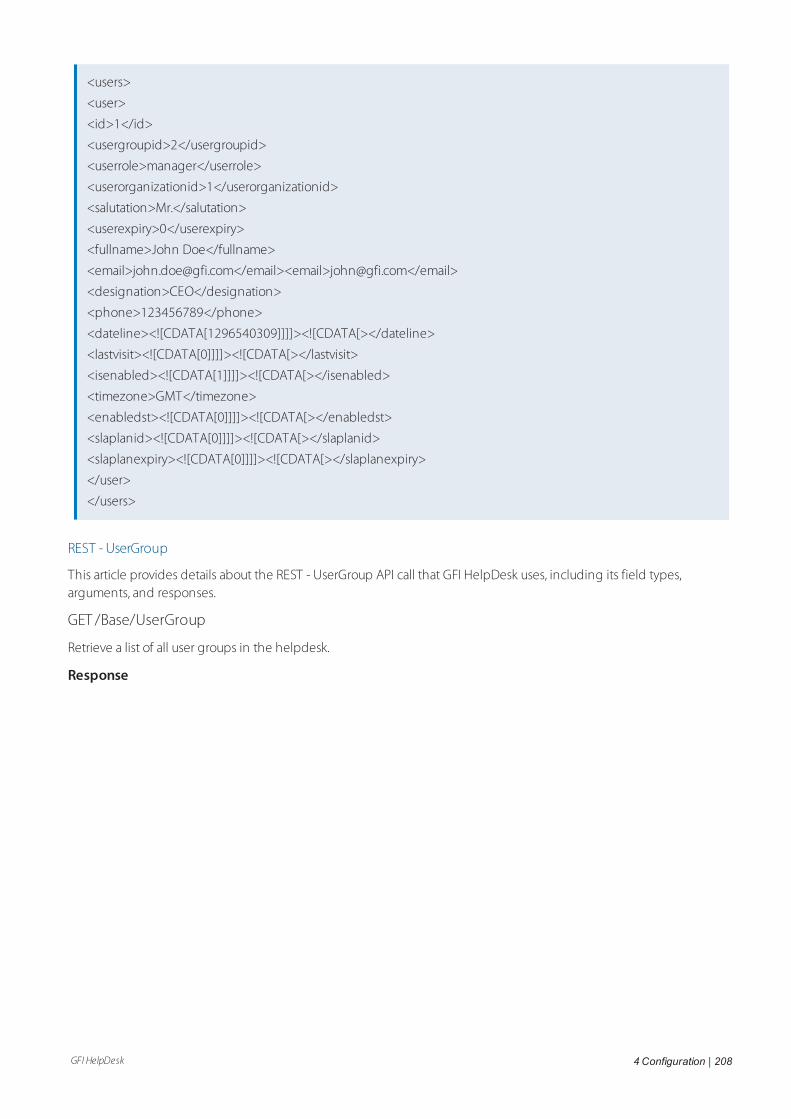
GFI HelpDesk 4 Configuration | 208
<users>
<user>
<id>1</id>
<usergroupid>2</usergroupid>
<userrole>manager</userrole>
<userorganizationid>1</userorganizationid>
<salutation>Mr.</salutation>
<userexpiry>0</userexpiry>
<fullname>John Doe</fullname>
<email>[email protected]</email><email>[email protected]</email>
<designation>CEO</designation>
<phone>123456789</phone>
<dateline><![CDATA[1296540309]]]]><![CDATA[></dateline>
<lastvisit><![CDATA[0]]]]><![CDATA[></lastvisit>
<isenabled><![CDATA[1]]]]><![CDATA[></isenabled>
<timezone>GMT</timezone>
<enabledst><![CDATA[0]]]]><![CDATA[></enabledst>
<slaplanid><![CDATA[0]]]]><![CDATA[></slaplanid>
<slaplanexpiry><![CDATA[0]]]]><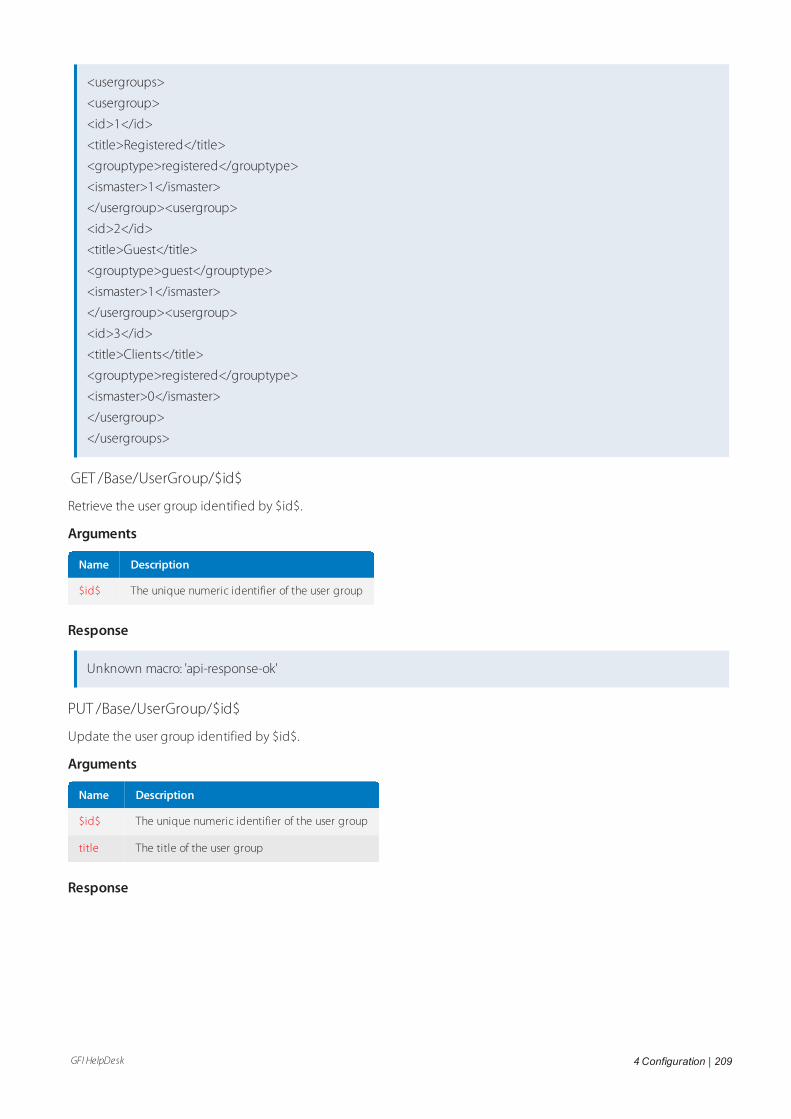
GFI HelpDesk 4 Configuration | 209
<usergroups>
<usergroup>
<id>1</id>
<title>Registered</title>
<grouptype>registered</grouptype>
<ismaster>1</ismaster>
</usergroup><usergroup>
<id>2</id>
<title>Guest</title>
<grouptype>guest</grouptype>
<ismaster>1</ismaster>
</usergroup><usergroup>
<id>3</id>
<title>Clients</title>
<grouptype>registered</grouptype>
<ismaster>0</ismaster>
</usergroup>
</usergroups>
GET /Base/UserGroup/$id$
Retrieve the user group identified by $id$.
Arguments
Name Description
$id$ The unique numeric identifier of the user group
Response
Unknown macro: 'api-response-ok'
PUT /Base/UserGroup/$id$
Update the user group identified by $id$.
Arguments
Name Description
$id$ The unique numeric identifier of the user group
title The title of the user group
Response
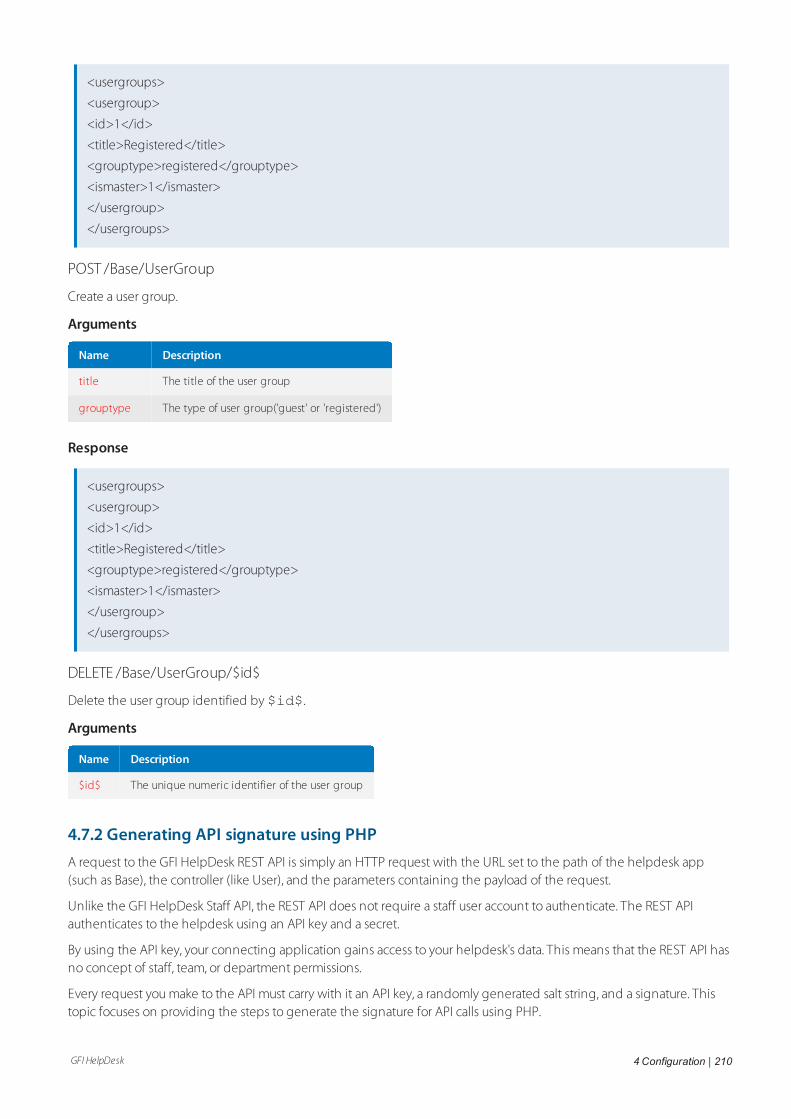
GFI HelpDesk 4 Configuration | 210
<usergroups>
<usergroup>
<id>1</id>
<title>Registered</title>
<grouptype>registered</grouptype>
<ismaster>1</ismaster>
</usergroup>
</usergroups>
POST /Base/UserGroup
Create a user group.
Arguments
Name Description
title The title of the user group
grouptype The type of user group('guest' or 'registered')
Response
<usergroups>
<usergroup>
<id>1</id>
<title>Registered</title>
<grouptype>registered</grouptype>
<ismaster>1</ismaster>
</usergroup>
</usergroups>
DELETE /Base/UserGroup/$id$
Delete the user group identified by $id$.
Arguments
Name Description
$id$ The unique numeric identifier of the user group
4.7.2 Generating API signature using PHPA request to the GFI HelpDesk REST API is simply an HTTP request with the URL set to the path of the helpdesk app(such as Base), the controller (like User), and the parameters containing the payload of the request.
Unlike the GFI HelpDesk Staff API, the REST API does not require a staff user account to authenticate. The REST APIauthenticates to the helpdesk using an API key and a secret.
By using the API key, your connecting application gains access to your helpdesk's data. This means that the REST API hasno concept of staff, team, or department permissions.
Every request you make to the API must carry with it an API key, a randomly generated salt string, and a signature. Thistopic focuses on providing the steps to generate the signature for API calls using PHP.
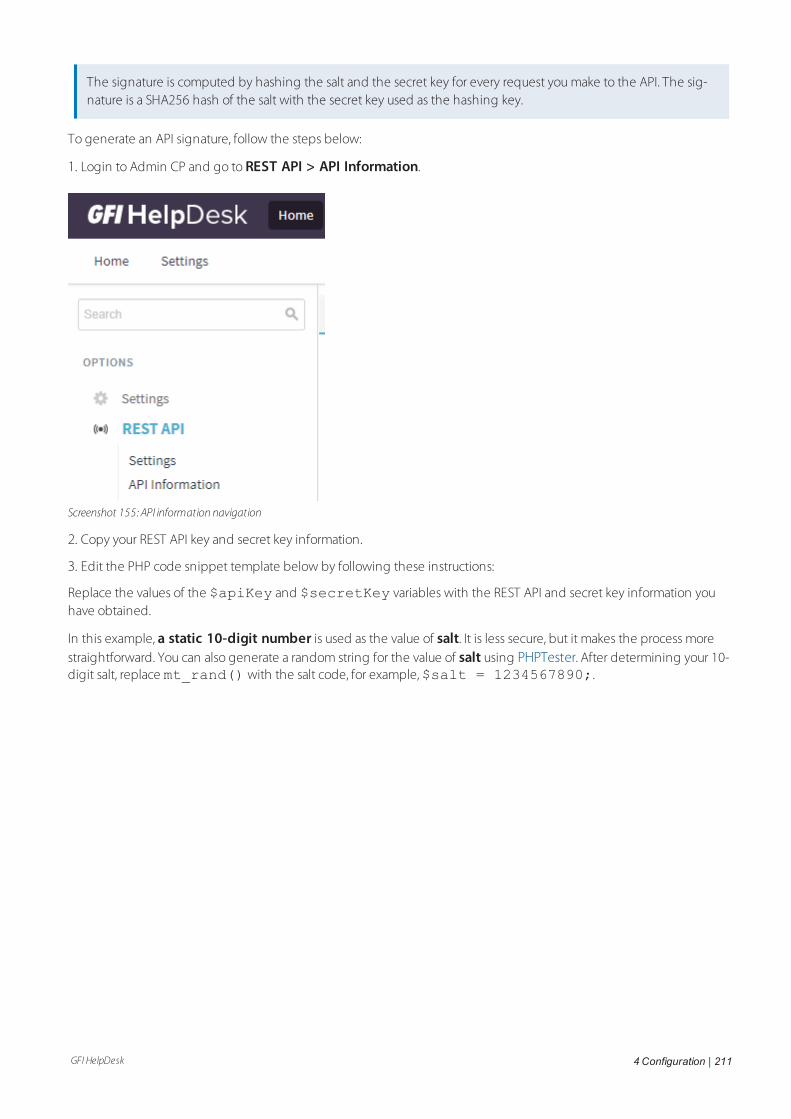
GFI HelpDesk 4 Configuration | 211
The signature is computed by hashing the salt and the secret key for every request you make to the API. The sig-nature is a SHA256 hash of the salt with the secret key used as the hashing key.
To generate an API signature, follow the steps below:
1. Login to Admin CP and go to REST API > API Information.
Screenshot 155: API information navigation
2. Copy your REST API key and secret key information.
3. Edit the PHP code snippet template below by following these instructions:
Replace the values of the $apiKey and $secretKey variables with the REST API and secret key information youhave obtained.
In this example, a static 10-digit number is used as the value of salt. It is less secure, but it makes the process morestraightforward. You can also generate a random string for the value of salt using PHPTester. After determining your 10-digit salt, replace mt_rand() with the salt code, for example,$salt = 1234567890;.
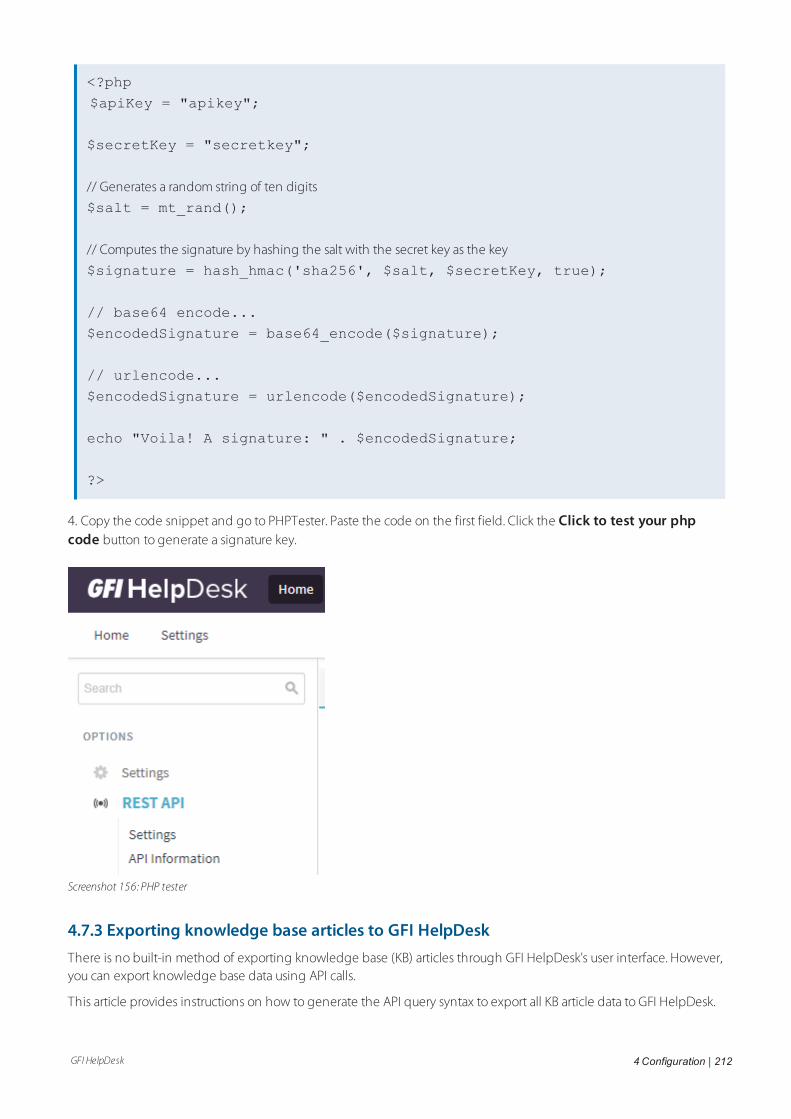
GFI HelpDesk 4 Configuration | 212
<?php
$apiKey = "apikey";
$secretKey = "secretkey";
// Generates a random string of ten digits
$salt = mt_rand();
// Computes the signature by hashing the salt with the secret key as the key
$signature = hash_hmac('sha256', $salt, $secretKey, true);
// base64 encode...
$encodedSignature = base64_encode($signature);
// urlencode...
$encodedSignature = urlencode($encodedSignature);
echo "Voila! A signature: " . $encodedSignature;
?>
4. Copy the code snippet and go to PHPTester. Paste the code on the first field. Click the Click to test your phpcode button to generate a signature key.
Screenshot 156: PHP tester
4.7.3 Exporting knowledge base articles to GFI HelpDeskThere is no built-in method of exporting knowledge base (KB) articles through GFI HelpDesk's user interface. However,you can export knowledge base data using API calls.
This article provides instructions on how to generate the API query syntax to export all KB article data to GFI HelpDesk.
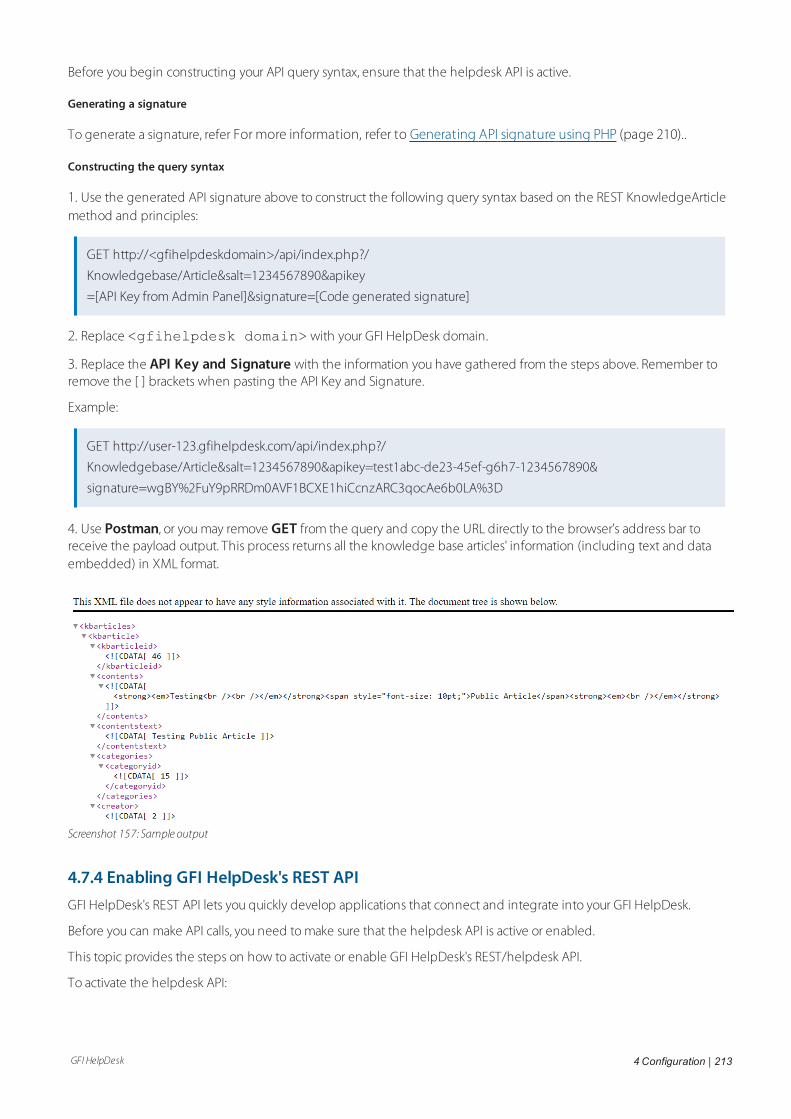
GFI HelpDesk 4 Configuration | 213
Before you begin constructing your API query syntax, ensure that the helpdesk API is active.
Generating a signature
To generate a signature, refer For more information, refer to Generating API signature using PHP (page 210)..
Constructing the query syntax
1. Use the generated API signature above to construct the following query syntax based on the REST KnowledgeArticlemethod and principles:
GET http://<gfihelpdeskdomain>/api/index.php?/
Knowledgebase/Article&salt=1234567890&apikey
=[API Key from Admin Panel]&signature=[Code generated signature]
2. Replace <gfihelpdesk domain> with your GFI HelpDesk domain.
3. Replace the API Key and Signature with the information you have gathered from the steps above. Remember toremove the [ ] brackets when pasting the API Key and Signature.
Example:
GET http://user-123.gfihelpdesk.com/api/index.php?/
Knowledgebase/Article&salt=1234567890&apikey=test1abc-de23-45ef-g6h7-1234567890&
signature=wgBY%2FuY9pRRDm0AVF1BCXE1hiCcnzARC3qocAe6b0LA%3D
4. Use Postman, or you may remove GET from the query and copy the URL directly to the browser's address bar toreceive the payload output. This process returns all the knowledge base articles' information (including text and dataembedded) in XML format.
Screenshot 157: Sample output
4.7.4 Enabling GFI HelpDesk's REST APIGFI HelpDesk's REST API lets you quickly develop applications that connect and integrate into your GFI HelpDesk.
Before you can make API calls, you need to make sure that the helpdesk API is active or enabled.
This topic provides the steps on how to activate or enable GFI HelpDesk's REST/helpdesk API.
To activate the helpdesk API:
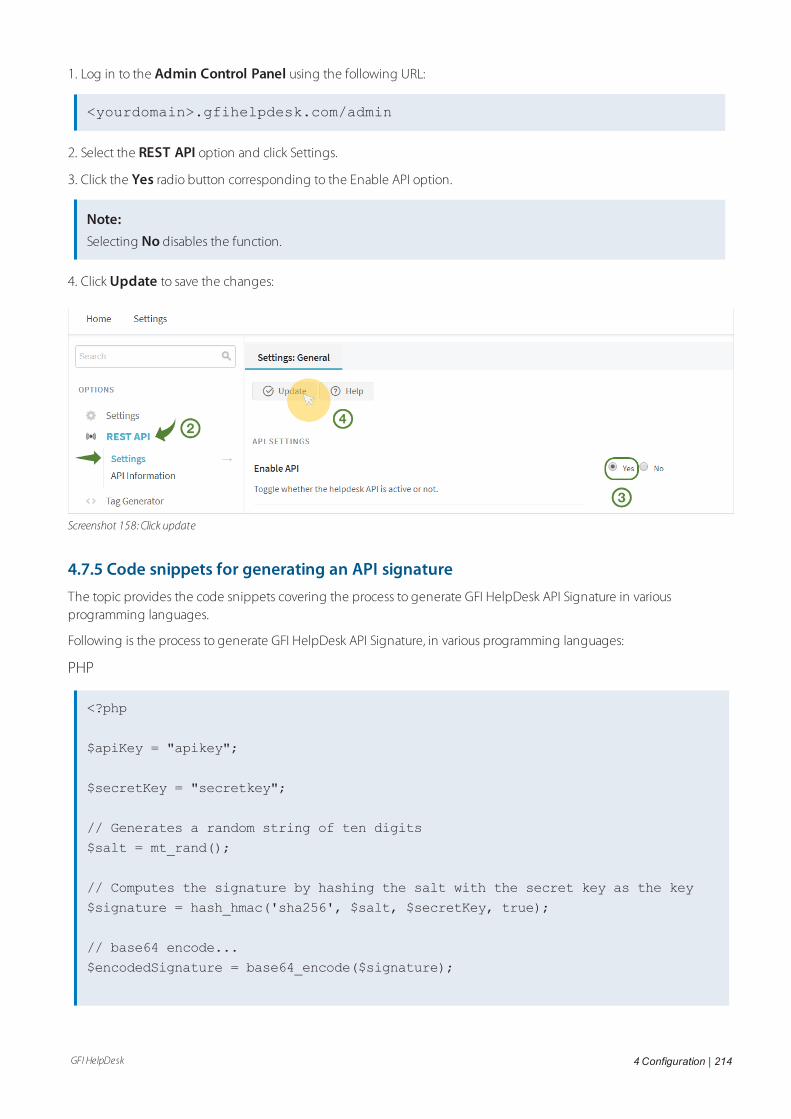
GFI HelpDesk 4 Configuration | 214
1. Log in to the Admin Control Panel using the following URL:
<yourdomain>.gfihelpdesk.com/admin
2. Select the REST API option and click Settings.
3. Click the Yes radio button corresponding to the Enable API option.
Note:Selecting No disables the function.
4. Click Update to save the changes:
Screenshot 158: Click update
4.7.5 Code snippets for generating an API signatureThe topic provides the code snippets covering the process to generate GFI HelpDesk API Signature in variousprogramming languages.
Following is the process to generate GFI HelpDesk API Signature, in various programming languages:
PHP
<?php
$apiKey = "apikey";
$secretKey = "secretkey";
// Generates a random string of ten digits
$salt = mt_rand();
// Computes the signature by hashing the salt with the secret key as the key
$signature = hash_hmac('sha256', $salt, $secretKey, true);
// base64 encode...
$encodedSignature = base64_encode($signature);
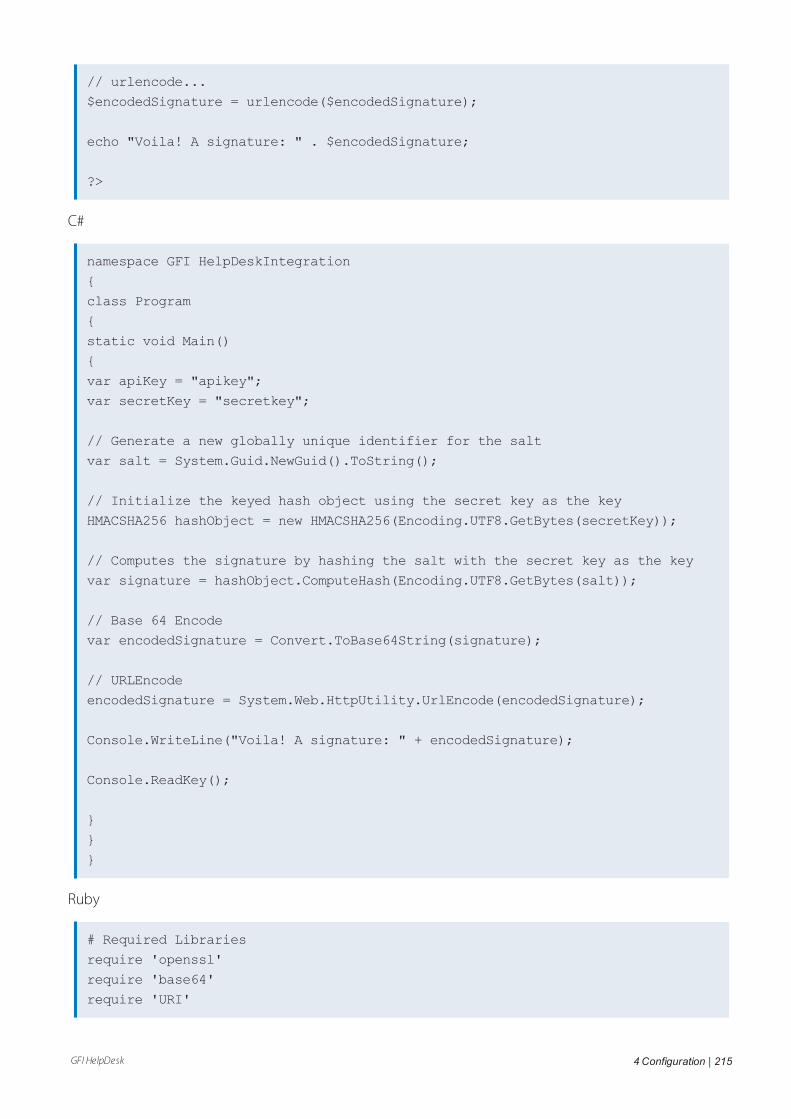
GFI HelpDesk 4 Configuration | 215
// urlencode...
$encodedSignature = urlencode($encodedSignature);
echo "Voila! A signature: " . $encodedSignature;
?>
C#
namespace GFI HelpDeskIntegration
{
class Program
{
static void Main()
{
var apiKey = "apikey";
var secretKey = "secretkey";
// Generate a new globally unique identifier for the salt
var salt = System.Guid.NewGuid().ToString();
// Initialize the keyed hash object using the secret key as the key
HMACSHA256 hashObject = new HMACSHA256(Encoding.UTF8.GetBytes(secretKey));
// Computes the signature by hashing the salt with the secret key as the key
var signature = hashObject.ComputeHash(Encoding.UTF8.GetBytes(salt));
// Base 64 Encode
var encodedSignature = Convert.ToBase64String(signature);
// URLEncode
encodedSignature = System.Web.HttpUtility.UrlEncode(encodedSignature);
Console.WriteLine("Voila! A signature: " + encodedSignature);
Console.ReadKey();
}
}
}
Ruby
# Required Libraries
require 'openssl'
require 'base64'
require 'URI'
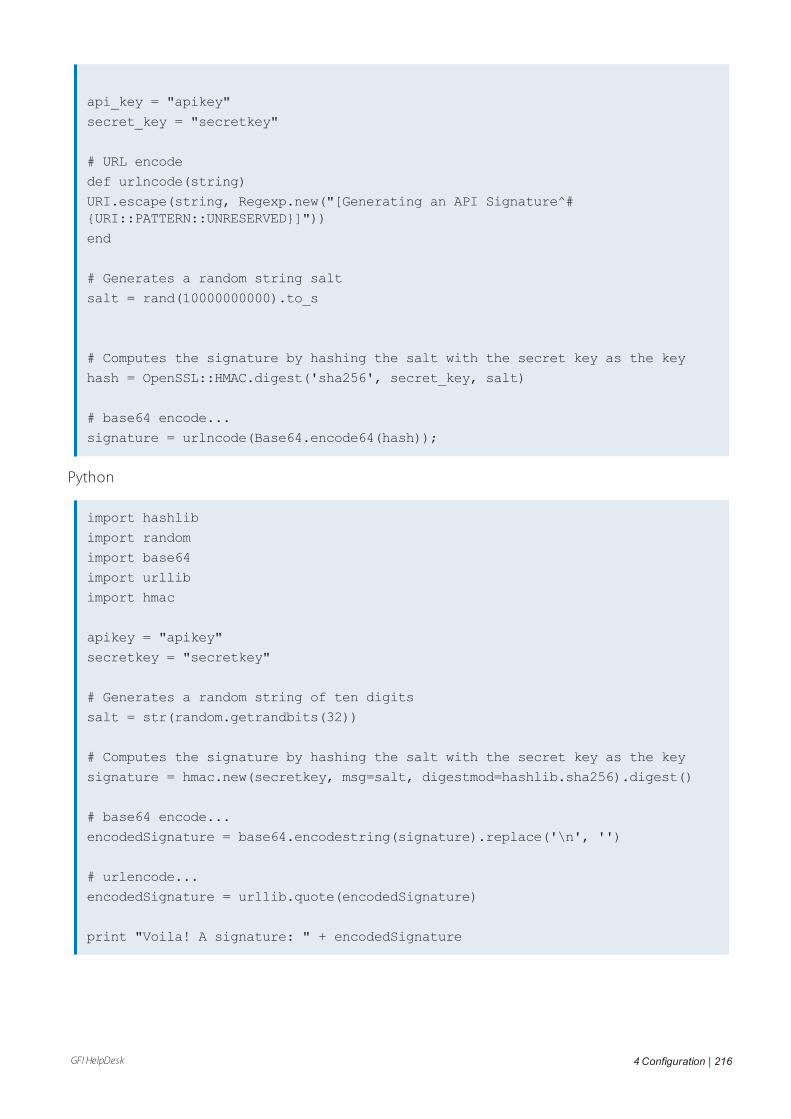
GFI HelpDesk 4 Configuration | 216
api_key = "apikey"
secret_key = "secretkey"
# URL encode
def urlncode(string)
URI.escape(string, Regexp.new("[Generating an API Signature^#{URI::PATTERN::UNRESERVED}]"))
end
# Generates a random string salt
salt = rand(10000000000).to_s
# Computes the signature by hashing the salt with the secret key as the key
hash = OpenSSL::HMAC.digest('sha256', secret_key, salt)
# base64 encode...
signature = urlncode(Base64.encode64(hash));
Python
import hashlib
import random
import base64
import urllib
import hmac
apikey = "apikey"
secretkey = "secretkey"
# Generates a random string of ten digits
salt = str(random.getrandbits(32))
# Computes the signature by hashing the salt with the secret key as the key
signature = hmac.new(secretkey, msg=salt, digestmod=hashlib.sha256).digest()
# base64 encode...
encodedSignature = base64.encodestring(signature).replace('\n', '')
# urlencode...
encodedSignature = urllib.quote(encodedSignature)
print "Voila! A signature: " + encodedSignature
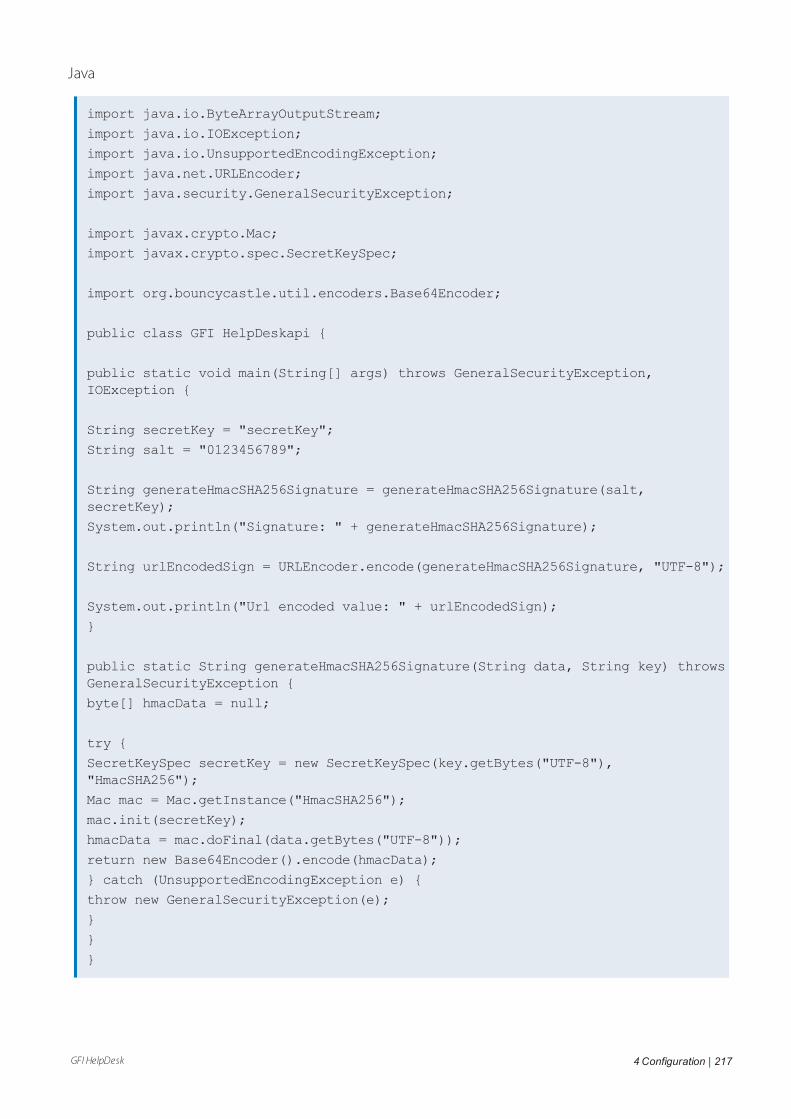
GFI HelpDesk 4 Configuration | 217
Java
import java.io.ByteArrayOutputStream;
import java.io.IOException;
import java.io.UnsupportedEncodingException;
import java.net.URLEncoder;
import java.security.GeneralSecurityException;
import javax.crypto.Mac;
import javax.crypto.spec.SecretKeySpec;
import org.bouncycastle.util.encoders.Base64Encoder;
public class GFI HelpDeskapi {
public static void main(String[] args) throws GeneralSecurityException,IOException {
String secretKey = "secretKey";
String salt = "0123456789";
String generateHmacSHA256Signature = generateHmacSHA256Signature(salt,secretKey);
System.out.println("Signature: " + generateHmacSHA256Signature);
String urlEncodedSign = URLEncoder.encode(generateHmacSHA256Signature, "UTF-8");
System.out.println("Url encoded value: " + urlEncodedSign);
}
public static String generateHmacSHA256Signature(String data, String key) throwsGeneralSecurityException {
byte[] hmacData = null;
try {
SecretKeySpec secretKey = new SecretKeySpec(key.getBytes("UTF-8"),"HmacSHA256");
Mac mac = Mac.getInstance("HmacSHA256");
mac.init(secretKey);
hmacData = mac.doFinal(data.getBytes("UTF-8"));
return new Base64Encoder().encode(hmacData);
} catch (UnsupportedEncodingException e) {
throw new GeneralSecurityException(e);
}
}
}
GFI HelpDesk 4 Configuration | 218
4.7.6 GFI HelpDesk hooksHooks are placed inside a code file that allows functions in other code files to be run by having them hook into thecurrent code.
Exposing a hook
It is best to expose a hook when you want a section in your custom code to be available to be hooked into by other codefiles. This exposed section allows code to be run within your custom code file.
An exposed hook can be called from within the same app or from other custom apps; This makes hooks very versatile inhow they are accessed within the GFI HelpDesk suite.
When to use a hook
To determine if a hook should be used depends on the goal that needs to be achieved. If the functionality that isrequired to be added needs to manipulate or show data in an app that is not updated by you then utilizing a hook isrecommended. This method preferred to manually modify this code because when an update to the app is released,the custom changed to it does not have to be re-added manually.
When a situation as described above is encountered, then that is when using an available hook is recommended.
How to use a hook
Once it has been determined that a hook is what is needed or needs to be utilized, the following steps outline how togo about doing so.
Creating a hook
To create a hook in code that allows others to run custom code within the generated file, one must add a simple line ofcode. This line of code allows another developer to create a hook file that is executed automatically.
The line of code is laid out as follows:
($_hookCode = SWIFT_Hook::Execute('HOOK_NAME')) ? eval($_hookCode) :false;
The only stipulation about hooks is that the name must be unique for the app that it is for. Once the hook code has beenadded to the code file the hook is ready to be used.
Using a Hook
A hook is used by creating a hook file in the app where the desired hook to use is located. This file contains the codethat is to be run.
Creating the file
The hook file is created within the app where the hook to be used is found. All hook files are contained into a directorycalled hooks.
The hook file itself follows a specific naming convention, HOOK_NAME.hook where HOOK_NAME is the same as theHOOK_NAME in creating hook code above.
This is an example of how the hook directory and files are set up.\__apps/appname/hooks/HOOK_NAME.hook
Coding the file
The code inside the hook file is PHP calls that are not contained within a class or function. The code inside this fileshould be kept as minimal as possible by keeping all complicated calls within functions that are called from inside thehook file.
The code within this file is executed within the class and function that the hook resides in. As a result, the code hasaccess to all the same functions and variables within that function.
GFI HelpDesk 4 Configuration | 219
This is an example of how the code within a hook file is laid out.
<?php echo "You are running code inside a hook file!"; ?>
From inside this hook file libraries can be loaded and more complicated functions can be called to manipulate data ordisplay more information to the user of the web portal.
Upgrading
When the app, where these created hook files resides, is updated the upgrade never overwrites or removes the hooksdirectory. This means all of the customizations that have been added is retained between updates and upgrades anddoes not require additional altering of code each update.
Examples
A step by step guide illustrating the functionality of Hooks organization_tickets hook.pdf is attached along with the filesrequired to use the sample Hook, as organizationtickets.rar, described in the documentation.
Directory of hooks
Hooks are placed inside a code file that allows functions in other code files to be run by having them hook into thecurrent code. The framework ships with the hooks listed below.
For instructions on using hooks refer to GFI HelpDesk hooks.
REST API
Hooks for the REST API:
restauthentication
Description: This hook is executed after successful authentication in the REST API interface.
Location:__swift/library/Controllers/class.Controller_api.php
Admin control panel
Hooks for the admin control panel:
admin_dashboard_init
Description: Is executed before any tabs are rendered in the admin dashboard.
Location:__swift/apps/base/admin/class.Controller_dashboard.php
admin_dashboard_end
Description: Is executed after all tabs are rendered in the admin dashboard.
Location:__swift/apps/base/admin/class.Controller_dashboard.php
admin_dashboard_output_start
Description: Is executed before the tab output 'div' containers are rendered in the admin dashboard.
Location:__swift/apps/base/admin/class.Controller_dashboard.php
admin_dashboard_output_end
Description: Is executed after the tab output 'div' containers are rendered in the admin dashboard.
GFI HelpDesk 4 Configuration | 220
Location:__swift/apps/base/admin/class.Controller_dashboard.php
admin_staff_tabs
Description: Is executed after the tabs are rendered in the 'Staff' section of admin control panel.
Location:__swift/apps/base/admin/class.View_Staff.php
admin_staff_runchecks
Description: Is executed after all the checks have been carried out whilst inserting/updating a Staff in admin controlpanel.
Location:__swift/apps/base/admin/class.Controller_Staff.php
admin_staff_insert
Description: Is executed after a Staff is inserted.
Location:__swift/apps/base/admin/class.Controller_Staff.php
admin_staff_update
Description: Is executed after a Staff is updated.
Location:__swift/apps/base/admin/class.Controller_Staff.php
admin_staff_disable
Description: Is executed when a Staff is disabled.
Location:__swift/apps/base/admin/class.Controller_Staff.php
admin_staff_enable
Description: Is executed when a Staff is enabled.
Location:__swift/apps/base/admin/class.Controller_Staff.php
admin_staff_delete
Description: Is executed when a Staff is deleted.
Location:__swift/apps/base/admin/class.Controller_Staff.php
admin_staffteam_tabs
Description: Is executed after the tabs are rendered in the 'Team' section of admin control panel.
Location:__swift/apps/base/admin/class.View_StaffGroup.php
admin_staffteam_runchecks
Description: Is executed after all the checks have been carried out whilst inserting/updating a Team in admin controlpanel.
Location:__swift/apps/base/admin/class.Controller_StaffGroup.php
admin_staffteam_insert
Description: Is executed after a Team is inserted.
Location:__swift/apps/base/admin/class.Controller_StaffGroup.php
admin_staffteam_update
Description: Is executed after a Team is updated.
Location:__swift/apps/base/admin/class.Controller_StaffGroup.php
GFI HelpDesk 4 Configuration | 221
admin_staffteam_delete
Description: Is executed when a Team is deleted.
Location: __swift/apps/base/admin/class.Controller_StaffGroup.php
admin_department_tabs
Description: Is executed after the tabs are rendered in the 'Department' section of admin control panel.
Location:__swift/apps/base/admin/class.View_Department.php
admin_department_runchecks
Description: Is executed after all the checks have been carried out whilst inserting/updating a Department in admincontrol panel.
Location:__swift/apps/base/admin/class.Controller_Department.php
admin_department_insert
Description: Is executed after a Department is inserted.
Location:__swift/apps/base/admin/class.Controller_Department.php
admin_department_update
Description: Is executed after a Department is updated.
Location:__swift/apps/base/admin/class.Controller_Department.php
admin_department_delete
Description: Is executed when a Department is deleted.
Location:__swift/apps/base/admin/class.Controller_Department.php
admin_usergroup_tabs
Description: Is executed after the tabs are rendered in the 'User Group' section of admin control panel.
Location:__swift/apps/base/admin/class.View_UserGroup.php
admin_usergroup_runchecks
Description: Is executed after all the checks have been carried out whilst inserting/updating a User Group in admincontrol panel
Location:__swift/apps/base/admin/class.Controller_UserGroup.php
admin_usergroup_insert
Description: Is executed after a User Group is inserted.
Location:__swift/apps/base/admin/class.Controller_UserGroup.php
admin_usergroup_update
Description: Is executed after a User Group is updated.
Location:__swift/apps/base/admin/class.Controller_UserGroup.php
admin_usergroup_delete
Description: Is executed when a User Group is deleted.
Location:__swift/apps/base/admin/class.Controller_UserGroup.php
GFI HelpDesk 4 Configuration | 222
Staff control panel
Hooks for the staff control panel:
staff_dashboard_init
Description: Is executed before any tabs are rendered in the staff dashboard.
Location:__swift/apps/base/staff/class.Controller_Home.php
staff_dashboard_end
Description: Is executed after all tabs are rendered in the staff dashboard.
Location:__swift/apps/base/staff/class.Controller_Home.php
staff_dashboard_counter_end
Description: Is executed after the counters are processed in the staff dashboard.
Location:__swift/apps/base/staff/class.Controller_Home.php
staff_user_tabs
Description: Is executed after the tabs are rendered in the 'User' section of staff control panel.
Location:__swift/apps/base/staff/class.View_User.php
staff_user_infobox
Description: Is executed in the User Information box after all the data is rendered.
Location:__swift/apps/base/staff/class.View_User.php
staff_user_tree
Description: Is executed in the User Tree right after the 'User Groups' nodes.
Location:_swift/apps/base/library/User/class.SWIFT_UserRenderManager.php
staff_user_runchecks
Description: Is executed after all the checks have been carried out whilst inserting/updating a User.
Location:__swift/apps/base/staff/class.Controller_User.php
staff_user_insert
Description: Is executed after a User is inserted.
Location:__swift/apps/base/staff/class.Controller_User.php
staff_user_update
Description: Is executed after a User is updated.
Location:__swift/apps/base/staff/class.Controller_User.php
staff_user_disable
Description: Is executed when a User is disabled.
Location:__swift/apps/base/staff/class.Controller_User.php
staff_user_enable
Description: Is executed when a User is enabled.
Location:__swift/apps/base/staff/class.Controller_User.php
GFI HelpDesk 4 Configuration | 223
staff_user_delete
Description: Is executed when a User is deleted.
Location:__swift/apps/base/staff/class.Controller_User.php
staff_userorganization_tabs
Description: Is executed after the tabs are rendered in the 'User Organization' section of staff control panel.
Location:__swift/apps/base/staff/class.View_UserOrganization.php
staff_userorganization_runchecks
Description: Is executed after all the checks have been carried out whilst inserting/updating a User Organization.
Location:__swift/apps/base/staff/class.Controller_UserOrganization.php
staff_userorganization_insert
Description: Is executed after a User Organization is inserted.
Location:__swift/apps/base/staff/class.Controller_UserOrganization.php
staff_userorganization_update
Description: Is executed after a User Organization is updated.
Location:__swift/apps/base/staff/class.Controller_UserOrganization.php
staff_userorganization_delete
Description: Is executed when a User Organization is deleted.
Location:__swift/apps/base/staff/class.Controller_UserOrganization.php
staff_tickets_viewtickettab
Description: Is executed after all tabs are rendered in the View Ticket controller. This hook can be used to add customtabs when viewing a ticket.
Location:__apps/tickets/staff/class.View_Ticket.php
staff_newticket_tabs
Description: Is executed after all the tabs for New Ticket section are rendered.
Location:__apps/tickets/staff/class.View_Ticket.php
staff_newticket_create
Description: Is executed when the New Ticket data is submitted.
Location:__apps/tickets/staff/class.Controller_Ticket.php
staff_ticket_edittab
Description: Is executed in the Edit tab after the fields are rendered.
Location:__apps/tickets/staff/class.View_Ticket.php
staff_ticket_edit
Description: Is executed when the Edit tab data is submitted.
Location:__apps/tickets/staff/class.Controller_Ticket.php
staff_ticket_generaltab
Description: Is executed in the General tab after the fields are rendered.
GFI HelpDesk 4 Configuration | 224
Location:__apps/tickets/staff/class.View_Ticket.php
staff_ticket_general
Description: Is executed when the General tab data is submitted.
Location:__apps/tickets/staff/class.Controller_Ticket.php
staff_ticket_generaltoolbar
Description: Is executed in the General tab toolbar after all the buttons are rendered.
Location:__apps/tickets/staff/class.View_Ticket.php
staff_ticket_replytabtoolbar
Description: Is executed in the Reply tab toolbar after all the buttons are rendered.
Location:__apps/tickets/staff/class.View_Ticket.php
staff_ticket_dispatchtab
Description: Is executed in the Dispatch tab (New Ticket/Reply/Forward) after all the data is rendered.
Location:__apps/tickets/staff/class.View_Ticket.php
staff_ticket_workflow
Description: Is executed in the Reply tab after the workflow options are rendered.
Location:__apps/tickets/staff/class.View_Ticket.php
staff_ticket_reply
Description: Is executed when the Reply tab data is submitted.
Location:__apps/tickets/staff/class.Controller_Ticket.php
staff_ticket_billingtab
Description: Is executed in the Billing tab after all the data is rendered.
Location:__apps/tickets/staff/class.View_Ticket.php
staff_ticket_billing
Description: Is executed when the Billing tab data is submitted.
Location:__apps/tickets/staff/class.Controller_Ticket.php
staff_ticket_forwardtab
Description: Is executed in the Forward tab after all the data is rendered.
Location:__apps/tickets/staff/class.View_Ticket.php
staff_ticket_forward
Description: Is executed when the Forward tab data is submitted.
Location:__apps/tickets/staff/class.Controller_Ticket.php
staff_ticket_followuptab
Description: Is executed in the Follow-Up tab after all the data is rendered.
Location:__apps/tickets/staff/class.View_Ticket.php
GFI HelpDesk 4 Configuration | 225
staff_ticket_followup
Description: Is executed when the Follow-Up tab data is submitted.
Location:__apps/tickets/staff/class.Controller_Ticket.php
staff_ticket_releasetab
Description: Is executed in the Release tab after all the data is rendered.
Location:__apps/tickets/staff/class.View_Ticket.php
staff_ticket_release
Description: Is executed when the Release tab data is submitted.
Location:__apps/tickets/staff/class.Controller_Ticket.php
staff_ticket_infobox
Description: Is executed in the Information box after all the data is rendered.
Location:__apps/tickets/staff/class.View_Ticket.php
staff_ticket_tree
Description: Is executed in the Ticket tree right after the 'Trash' node.
Location:__apps/tickets/library/View/class.SWIFT_TicketViewRenderer.php
staff_call_delete
Description: Is executed when a Call is deleted.
Location:__apps/livechat/staff/class.Controller_Call.php
staff_call_toolbar
Description: Is executed in the Call tab toolbar after all the buttons are rendered.
Location:__apps/livechat/staff/class.View_Call.php
staff_call_tabs
Description: Is executed after all the tabs are rendered in the Call section.
Location:__apps/livechat/staff/class.View_Call.php
staff_call_tree
Description: Is executed in the Calls tree before all the primary nodes.
Location:__apps/livechat/staff/class.View_Call.php
staff_chat_delete
Description: Is executed when a Chat is deleted.
Location:__apps/livechat/staff/class.Controller_ChatHistory.php
staff_chat_submit
Description: Is executed when a Chat is updated.
Location:__apps/livechat/staff/class.Controller_ChatHistory.php
staff_chat_toolbar
Description: Is executed when a Chat toolbar is rendered.
GFI HelpDesk 4 Configuration | 226
Location:__apps/livechat/staff/class.View_ChatHistory.php
staff_chat_tabs
Description: Is executed when all the Chat tabs are rendered.
Location:__apps/livechat/staff/class.View_ChatHistory.php
staff_chat_generaltab
Description: Is executed when all the properties in the General tab under Chat section are rendered.
Location:__apps/livechat/staff/class.View_ChatHistory.php
staff_message_delete
Description: Is executed when an offline message is deleted.
Location:__apps/livechat/staff/class.Controller_Message.php
staff_message_viewsubmit
Description: Is executed when a message is updated.
Location:__apps/livechat/staff/class.Controller_Message.php
staff_message_reply
Description: Is executed when a reply to a message is submitted.
Location:__apps/livechat/staff/class.Controller_Message.php
staff_message_toolbar
Description: Is executed when all the toolbar buttons are rendered in the General tab of Messages.
Location:__apps/livechat/staff/class.View_Message.php
staff_message_generaltab
Description: Is executed after the primary properties are rendered in the General tab of Messages.
Location:__apps/livechat/staff/class.View_Message.php
staff_message_tabs
Description: Is executed after all the tabs are rendered in the Messages section.
Location:__apps/livechat/staff/class.View_Message.php
staff_preferences_submit
Description: Is executed when the staff preferences are updated.
Location:__swift/apps/base/staff/class.Controller_Preferences.php
staff_preferences_runchecks
Description: Is executed when the checks are run for the submitted data in staff preferences.
Location:__swift/apps/base/staff/class.Controller_Preferences.php
staff_preferences_toolbar
Description: Is executed when all the toolbar buttons are rendered in the General tab of Staff Preferences.
Location:__swift/apps/base/staff/class.View_Preferences.php
GFI HelpDesk 4 Configuration | 227
staff_preferences_generaltab
Description: Is executed after the primary properties are rendered in the General tab of Staff Preferences.
Location:__swift/apps/base/staff/class.View_Preferences.php
staff_preferences_tabs
Description: Is executed after all the tabs are rendered in the Staff Preferences section.
Location:__swift/apps/base/staff/class.View_Preferences.php
Client support center
Hooks for the client support center:
client_init
Description: Is executed after the preliminary initialization of client support center interface but before any output issent to the user.
Location:swift/library/Controllers/class.Controller_client.php
client_userlogin
Description: Is executed after the user successfully logs in to the client support center.
Location:__swift/apps/base/client/class.Controller_User.php
client_user_register
Description: Is executed when the registration form is rendered for the user.
Location:__swift/apps/base/client/class.Controller_UserRegistration.php
client_user_registerchecks
Description: Is executed when the registration form is submitted and checks are carried out.
Location:__swift/apps/base/client/class.Controller_UserRegistration.php
client_user_registersubmit
Description: Is executed when the registration form is submitted and the user is registered.
Location:__swift/apps/base/client/class.Controller_UserRegistration.php
client_user_profile
Description: Is executed when the profile form is rendered.
Location:__swift/apps/base/client/class.Controller_UserAccount.php
client_user_profilechecks
Description: Is executed when the profile form is submitted and the checks are carried out.
Location:__swift/apps/base/client/class.Controller_UserAccount.php
client_user_profilesubmit
Description: Is executed when the profile form is submitted and the update is carried out.
Location:__swift/apps/base/client/class.Controller_UserAccount.php
Visitor (user chat interface)
Hooks for the user chat interface:
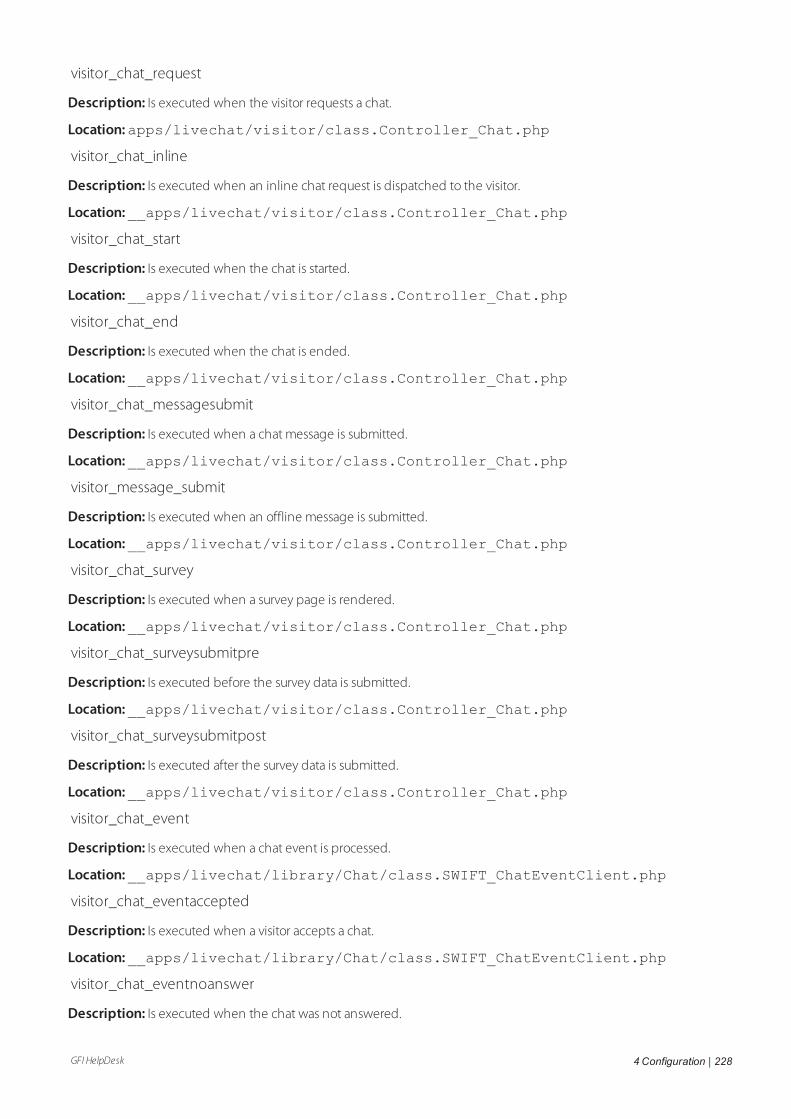
GFI HelpDesk 4 Configuration | 228
visitor_chat_request
Description: Is executed when the visitor requests a chat.
Location:apps/livechat/visitor/class.Controller_Chat.php
visitor_chat_inline
Description: Is executed when an inline chat request is dispatched to the visitor.
Location:__apps/livechat/visitor/class.Controller_Chat.php
visitor_chat_start
Description: Is executed when the chat is started.
Location:__apps/livechat/visitor/class.Controller_Chat.php
visitor_chat_end
Description: Is executed when the chat is ended.
Location:__apps/livechat/visitor/class.Controller_Chat.php
visitor_chat_messagesubmit
Description: Is executed when a chat message is submitted.
Location:__apps/livechat/visitor/class.Controller_Chat.php
visitor_message_submit
Description: Is executed when an offline message is submitted.
Location:__apps/livechat/visitor/class.Controller_Chat.php
visitor_chat_survey
Description: Is executed when a survey page is rendered.
Location:__apps/livechat/visitor/class.Controller_Chat.php
visitor_chat_surveysubmitpre
Description: Is executed before the survey data is submitted.
Location:__apps/livechat/visitor/class.Controller_Chat.php
visitor_chat_surveysubmitpost
Description: Is executed after the survey data is submitted.
Location:__apps/livechat/visitor/class.Controller_Chat.php
visitor_chat_event
Description: Is executed when a chat event is processed.
Location:__apps/livechat/library/Chat/class.SWIFT_ChatEventClient.php
visitor_chat_eventaccepted
Description: Is executed when a visitor accepts a chat.
Location:__apps/livechat/library/Chat/class.SWIFT_ChatEventClient.php
visitor_chat_eventnoanswer
Description: Is executed when the chat was not answered.
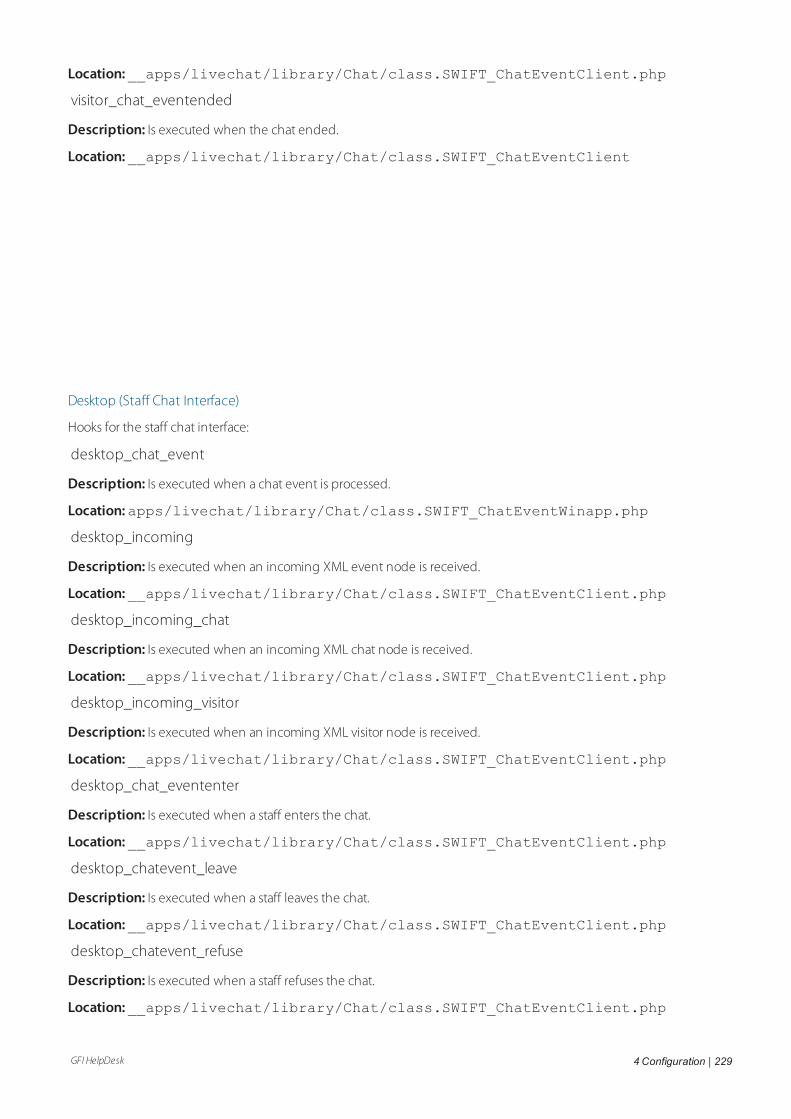
GFI HelpDesk 4 Configuration | 229
Location:__apps/livechat/library/Chat/class.SWIFT_ChatEventClient.php
visitor_chat_eventended
Description: Is executed when the chat ended.
Location:__apps/livechat/library/Chat/class.SWIFT_ChatEventClient
Desktop (Staff Chat Interface)
Hooks for the staff chat interface:
desktop_chat_event
Description: Is executed when a chat event is processed.
Location:apps/livechat/library/Chat/class.SWIFT_ChatEventWinapp.php
desktop_incoming
Description: Is executed when an incoming XML event node is received.
Location:__apps/livechat/library/Chat/class.SWIFT_ChatEventClient.php
desktop_incoming_chat
Description: Is executed when an incoming XML chat node is received.
Location:__apps/livechat/library/Chat/class.SWIFT_ChatEventClient.php
desktop_incoming_visitor
Description: Is executed when an incoming XML visitor node is received.
Location:__apps/livechat/library/Chat/class.SWIFT_ChatEventClient.php
desktop_chat_evententer
Description: Is executed when a staff enters the chat.
Location:__apps/livechat/library/Chat/class.SWIFT_ChatEventClient.php
desktop_chatevent_leave
Description: Is executed when a staff leaves the chat.
Location:__apps/livechat/library/Chat/class.SWIFT_ChatEventClient.php
desktop_chatevent_refuse
Description: Is executed when a staff refuses the chat.
Location:__apps/livechat/library/Chat/class.SWIFT_ChatEventClient.php

GFI HelpDesk 4 Configuration | 230
4.7.7 Understanding the GFI HelpDesk Rest API and its methodsThis topic provides information on understanding the GFI HelpDesk Representational State Transfer ApplicationProgramming Interface (REST API) and its methods.
With version 4, we have implemented the mechanism 'REST API'.
REST is an architecture style for designing networked applications. The idea is that, rather than using complexmechanisms such as Common Object Request Broker Architecture (CORBA), Remote Procedure Call (RPC), or SimpleObject Access Protocol (SOAP) to connect between machines, simple HTTP is used to make calls between machines.
An API is a software-to-software interface, not a user interface, using which applications talk to each other without anyuser knowledge or intervention.
The REST API allows to develop applications or to connect and integrate other applications into the helpdesk. Whetherwe are building a custom plugin, connecting GFI HelpDesk to another app or pulling data from helpdesk into your otherinternal systems, the API lets us retrieve, add and modify data in the helpdesk. Almost every object in GFI HelpDesk (aticket, a user, a staff, etc.) can be manipulated using the API.
In our software, the REST API request is simply an HTTP request with the URL set to the path of the helpdesk module(such as Base), controller (like User) and parameters containing the payload of the request (that is, API key, salt, andsignature). The GFI HelpDesk API is a 'RESTful web API'. The API uses plain XML for receiving and dispatching data.
REST API allows the following actions to perform in helpdesk:
GET
PUT
POST
DELETE
The API uses all four REST commands (GET, PUT, POST, DELETE). These commands correspond to respective actionsinside the helpdesk. Using REST API in helpdesk, the above-mentioned actions can be performed on the followingsections:
Tickets
TicketAttachment
TicketCount
TicketCustomField
TicketNote
TicketPost
TicketPriority
Department
Staff
TicketSearch
TicketStatus
TicketTimeTrack
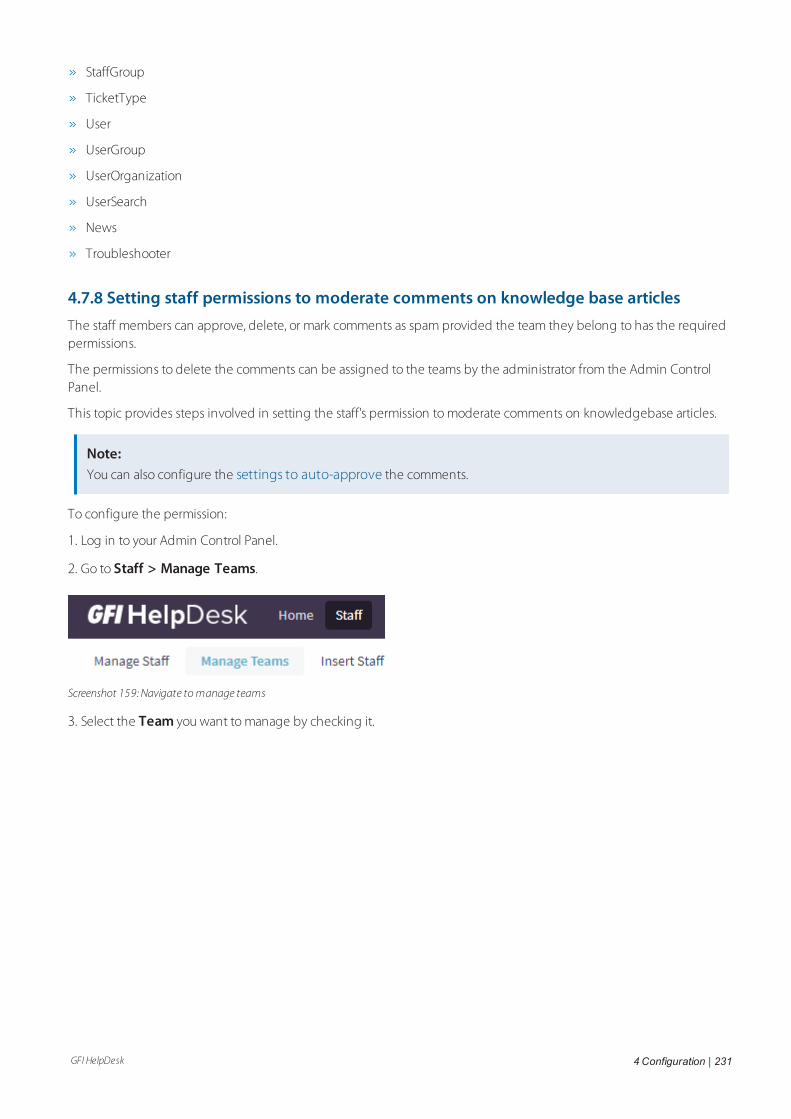
GFI HelpDesk 4 Configuration | 231
StaffGroup
TicketType
User
UserGroup
UserOrganization
UserSearch
News
Troubleshooter
4.7.8 Setting staff permissions to moderate comments on knowledge base articlesThe staff members can approve, delete, or mark comments as spam provided the team they belong to has the requiredpermissions.
The permissions to delete the comments can be assigned to the teams by the administrator from the Admin ControlPanel.
This topic provides steps involved in setting the staff's permission to moderate comments on knowledgebase articles.
Note:You can also configure the settings to auto-approve the comments.
To configure the permission:
1. Log in to your Admin Control Panel.
2. Go to Staff > Manage Teams.
Screenshot 159: Navigate tomanage teams
3. Select the Team you want to manage by checking it.
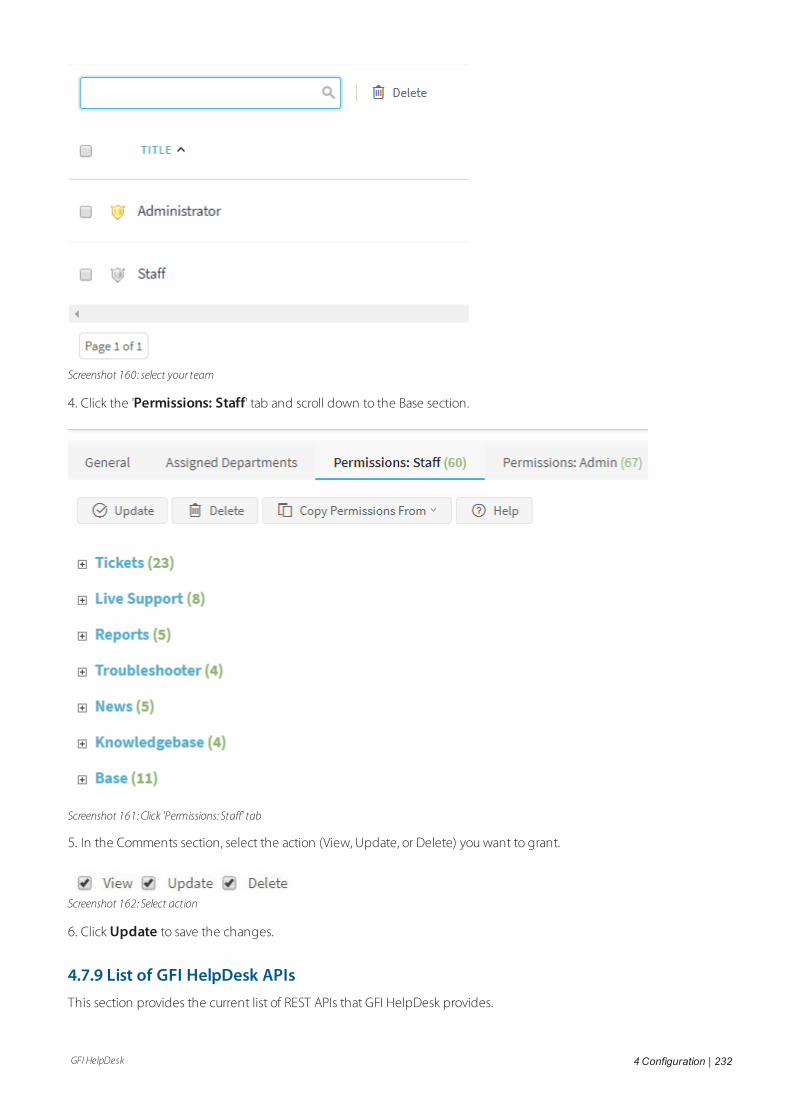
GFI HelpDesk 4 Configuration | 232
Screenshot 160: select your team
4. Click the 'Permissions: Staff' tab and scroll down to the Base section.
Screenshot 161: Click 'Permissions: Staff' tab
5. In the Comments section, select the action (View, Update, or Delete) you want to grant.
Screenshot 162: Select action
6. Click Update to save the changes.
4.7.9 List of GFI HelpDesk APIsThis section provides the current list of REST APIs that GFI HelpDesk provides.
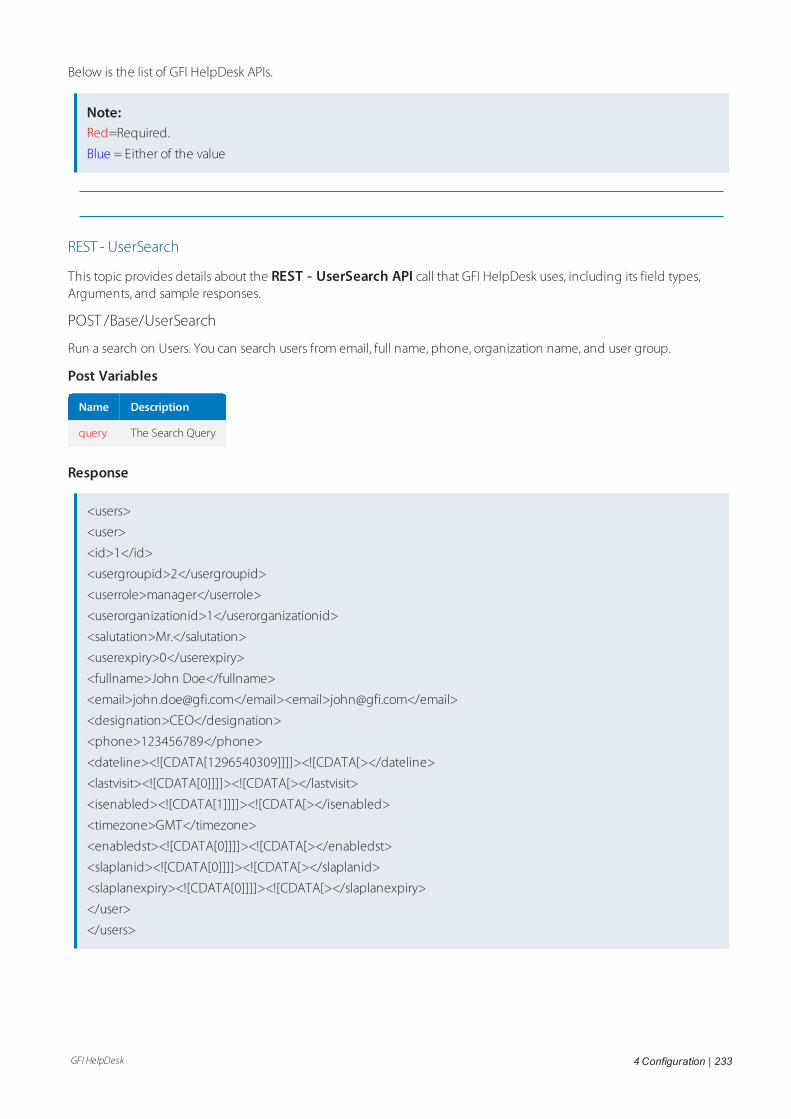
GFI HelpDesk 4 Configuration | 233
Below is the list of GFI HelpDesk APIs.
Note:Red=Required.
Blue = Either of the value
REST - UserSearch
This topic provides details about the REST - UserSearch API call that GFI HelpDesk uses, including its field types,Arguments, and sample responses.
POST /Base/UserSearch
Run a search on Users. You can search users from email, full name, phone, organization name, and user group.
Post Variables
Name Description
query The Search Query
Response
<users>
<user>
<id>1</id>
<usergroupid>2</usergroupid>
<userrole>manager</userrole>
<userorganizationid>1</userorganizationid>
<salutation>Mr.</salutation>
<userexpiry>0</userexpiry>
<fullname>John Doe</fullname>
<email>[email protected]</email><email>[email protected]</email>
<designation>CEO</designation>
<phone>123456789</phone>
<dateline><![CDATA[1296540309]]]]><![CDATA[></dateline>
<lastvisit><![CDATA[0]]]]><![CDATA[></lastvisit>
<isenabled><![CDATA[1]]]]><![CDATA[></isenabled>
<timezone>GMT</timezone>
<enabledst><![CDATA[0]]]]><![CDATA[></enabledst>
<slaplanid><![CDATA[0]]]]><![CDATA[></slaplanid>
<slaplanexpiry><![CDATA[0]]]]><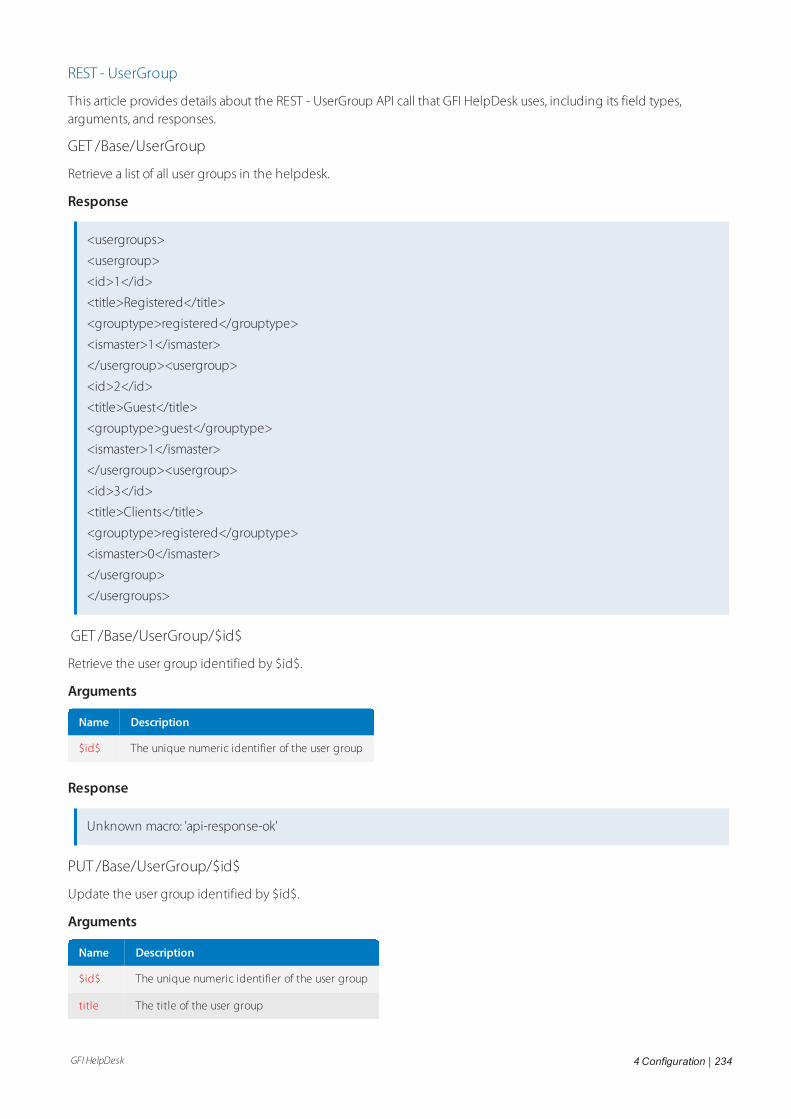
GFI HelpDesk 4 Configuration | 234
REST - UserGroup
This article provides details about the REST - UserGroup API call that GFI HelpDesk uses, including its field types,arguments, and responses.
GET /Base/UserGroup
Retrieve a list of all user groups in the helpdesk.
Response
<usergroups>
<usergroup>
<id>1</id>
<title>Registered</title>
<grouptype>registered</grouptype>
<ismaster>1</ismaster>
</usergroup><usergroup>
<id>2</id>
<title>Guest</title>
<grouptype>guest</grouptype>
<ismaster>1</ismaster>
</usergroup><usergroup>
<id>3</id>
<title>Clients</title>
<grouptype>registered</grouptype>
<ismaster>0</ismaster>
</usergroup>
</usergroups>
GET /Base/UserGroup/$id$
Retrieve the user group identified by $id$.
Arguments
Name Description
$id$ The unique numeric identifier of the user group
Response
Unknown macro: 'api-response-ok'
PUT /Base/UserGroup/$id$
Update the user group identified by $id$.
Arguments
Name Description
$id$ The unique numeric identifier of the user group
title The title of the user group
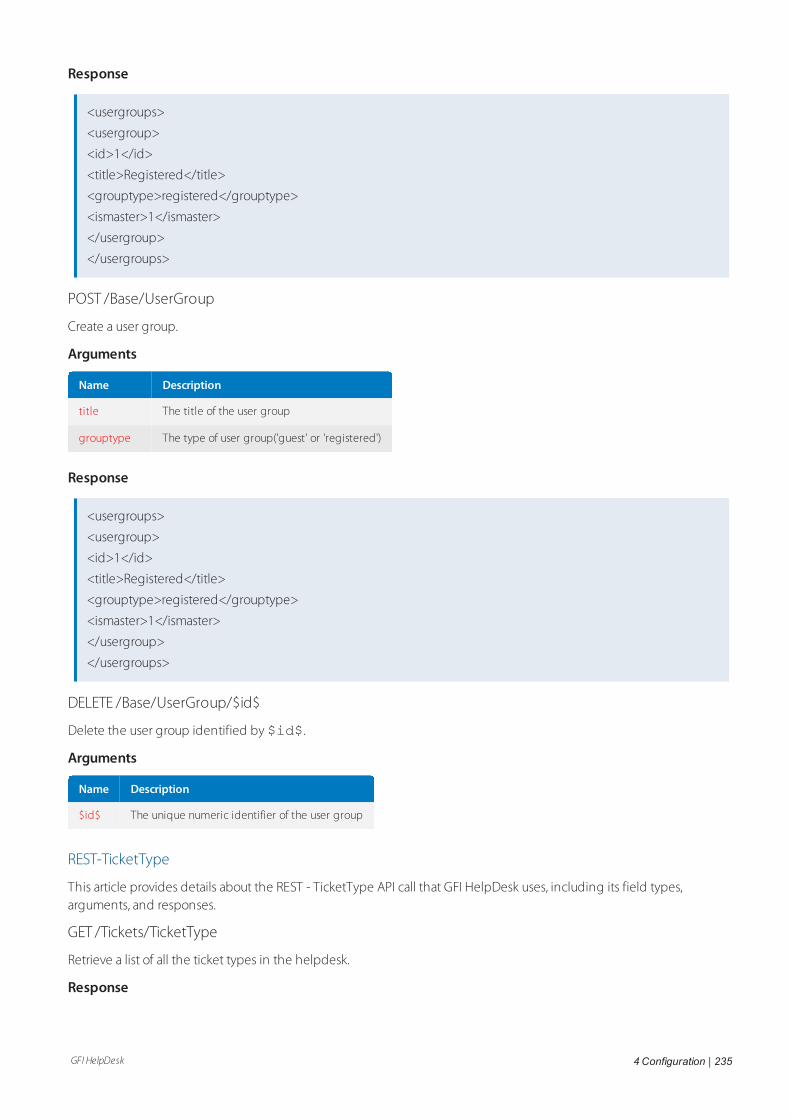
GFI HelpDesk 4 Configuration | 235
Response
<usergroups>
<usergroup>
<id>1</id>
<title>Registered</title>
<grouptype>registered</grouptype>
<ismaster>1</ismaster>
</usergroup>
</usergroups>
POST /Base/UserGroup
Create a user group.
Arguments
Name Description
title The title of the user group
grouptype The type of user group('guest' or 'registered')
Response
<usergroups>
<usergroup>
<id>1</id>
<title>Registered</title>
<grouptype>registered</grouptype>
<ismaster>1</ismaster>
</usergroup>
</usergroups>
DELETE /Base/UserGroup/$id$
Delete the user group identified by $id$.
Arguments
Name Description
$id$ The unique numeric identifier of the user group
REST-TicketType
This article provides details about the REST - TicketType API call that GFI HelpDesk uses, including its field types,arguments, and responses.
GET /Tickets/TicketType
Retrieve a list of all the ticket types in the helpdesk.
Response
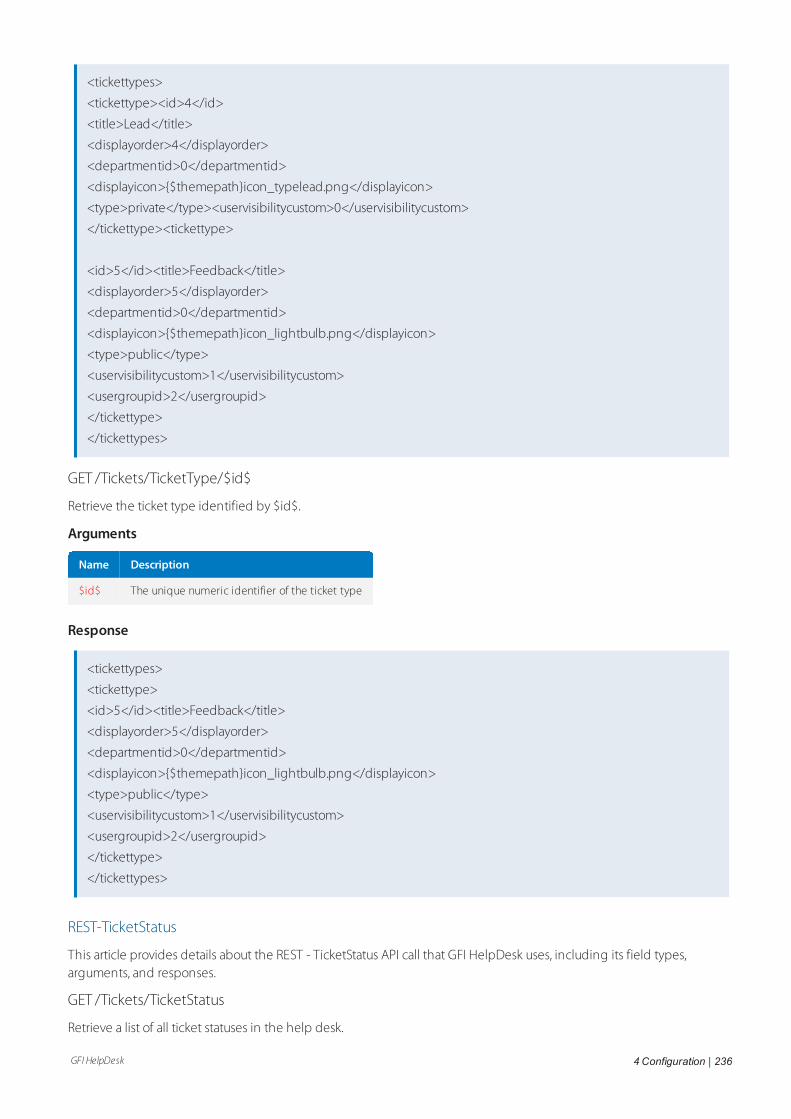
GFI HelpDesk 4 Configuration | 236
<tickettypes>
<tickettype><id>4</id>
<title>Lead</title>
<displayorder>4</displayorder>
<departmentid>0</departmentid>
<displayicon>{$themepath}icon_typelead.png</displayicon>
<type>private</type><uservisibilitycustom>0</uservisibilitycustom>
</tickettype><tickettype>
<id>5</id><title>Feedback</title>
<displayorder>5</displayorder>
<departmentid>0</departmentid>
<displayicon>{$themepath}icon_lightbulb.png</displayicon>
<type>public</type>
<uservisibilitycustom>1</uservisibilitycustom>
<usergroupid>2</usergroupid>
</tickettype>
</tickettypes>
GET /Tickets/TicketType/$id$
Retrieve the ticket type identified by $id$.
Arguments
Name Description
$id$ The unique numeric identifier of the ticket type
Response
<tickettypes>
<tickettype>
<id>5</id><title>Feedback</title>
<displayorder>5</displayorder>
<departmentid>0</departmentid>
<displayicon>{$themepath}icon_lightbulb.png</displayicon>
<type>public</type>
<uservisibilitycustom>1</uservisibilitycustom>
<usergroupid>2</usergroupid>
</tickettype>
</tickettypes>
REST-TicketStatus
This article provides details about the REST - TicketStatus API call that GFI HelpDesk uses, including its field types,arguments, and responses.
GET /Tickets/TicketStatus
Retrieve a list of all ticket statuses in the help desk.
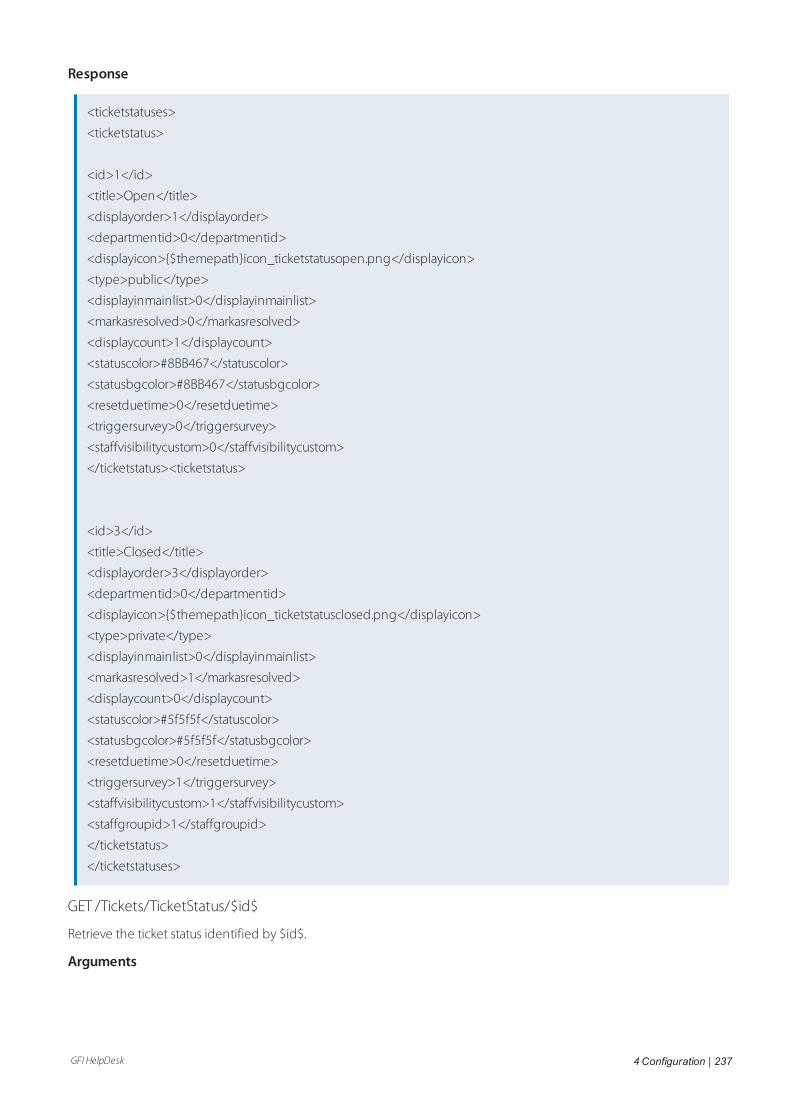
GFI HelpDesk 4 Configuration | 237
Response
<ticketstatuses>
<ticketstatus>
<id>1</id>
<title>Open</title>
<displayorder>1</displayorder>
<departmentid>0</departmentid>
<displayicon>{$themepath}icon_ticketstatusopen.png</displayicon>
<type>public</type>
<displayinmainlist>0</displayinmainlist>
<markasresolved>0</markasresolved>
<displaycount>1</displaycount>
<statuscolor>#8BB467</statuscolor>
<statusbgcolor>#8BB467</statusbgcolor>
<resetduetime>0</resetduetime>
<triggersurvey>0</triggersurvey>
<staffvisibilitycustom>0</staffvisibilitycustom>
</ticketstatus><ticketstatus>
<id>3</id>
<title>Closed</title>
<displayorder>3</displayorder>
<departmentid>0</departmentid>
<displayicon>{$themepath}icon_ticketstatusclosed.png</displayicon>
<type>private</type>
<displayinmainlist>0</displayinmainlist>
<markasresolved>1</markasresolved>
<displaycount>0</displaycount>
<statuscolor>#5f5f5f</statuscolor>
<statusbgcolor>#5f5f5f</statusbgcolor>
<resetduetime>0</resetduetime>
<triggersurvey>1</triggersurvey>
<staffvisibilitycustom>1</staffvisibilitycustom>
<staffgroupid>1</staffgroupid>
</ticketstatus>
</ticketstatuses>
GET /Tickets/TicketStatus/$id$
Retrieve the ticket status identified by $id$.
Arguments
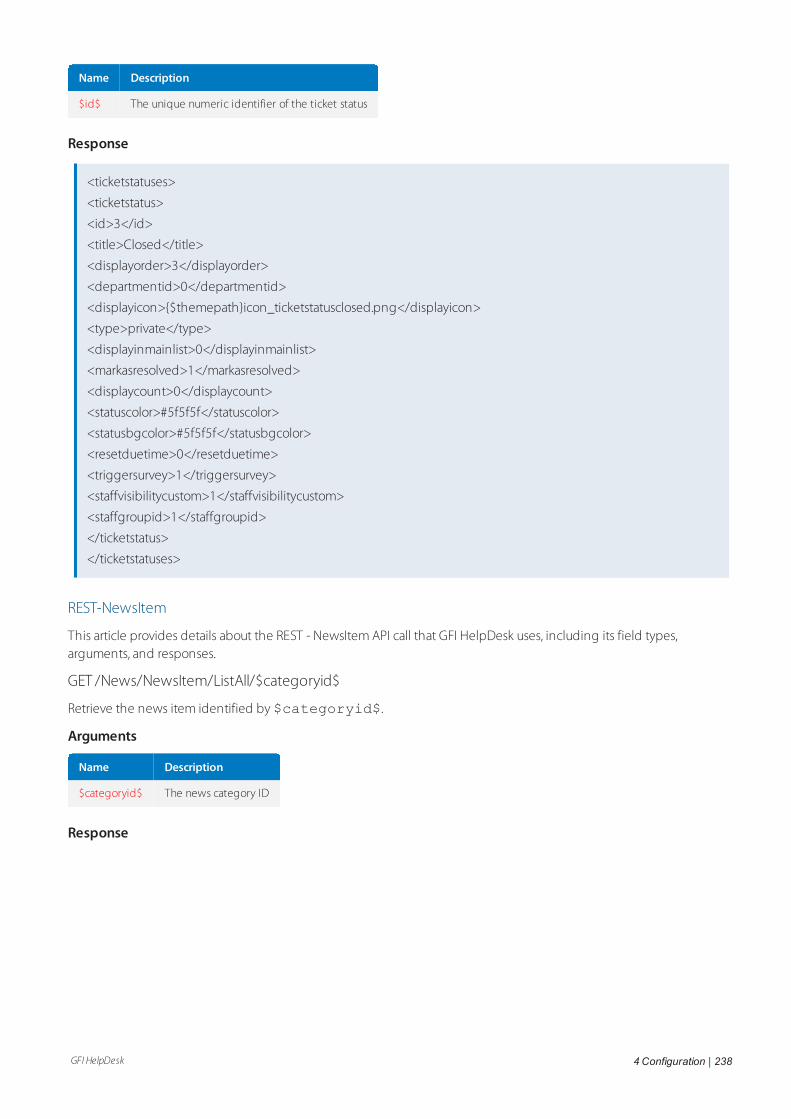
GFI HelpDesk 4 Configuration | 238
Name Description
$id$ The unique numeric identifier of the ticket status
Response
<ticketstatuses>
<ticketstatus>
<id>3</id>
<title>Closed</title>
<displayorder>3</displayorder>
<departmentid>0</departmentid>
<displayicon>{$themepath}icon_ticketstatusclosed.png</displayicon>
<type>private</type>
<displayinmainlist>0</displayinmainlist>
<markasresolved>1</markasresolved>
<displaycount>0</displaycount>
<statuscolor>#5f5f5f</statuscolor>
<statusbgcolor>#5f5f5f</statusbgcolor>
<resetduetime>0</resetduetime>
<triggersurvey>1</triggersurvey>
<staffvisibilitycustom>1</staffvisibilitycustom>
<staffgroupid>1</staffgroupid>
</ticketstatus>
</ticketstatuses>
REST-NewsItem
This article provides details about the REST - NewsItem API call that GFI HelpDesk uses, including its field types,arguments, and responses.
GET /News/NewsItem/ListAll/$categoryid$
Retrieve the news item identified by $categoryid$.
Arguments
Name Description
$categoryid$ The news category ID
Response
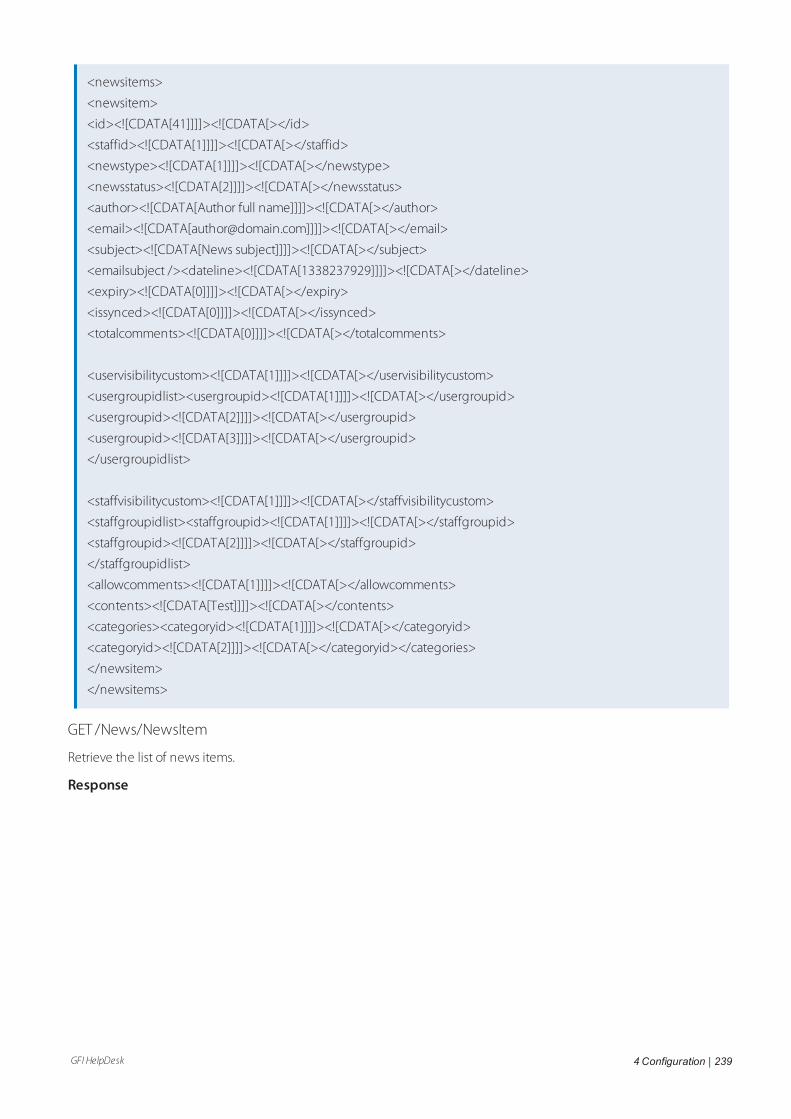
GFI HelpDesk 4 Configuration | 239
<newsitems>
<newsitem>
<id><![CDATA[41]]]]><![CDATA[></id>
<staffid><![CDATA[1]]]]><![CDATA[></staffid>
<newstype><![CDATA[1]]]]><![CDATA[></newstype>
<newsstatus><![CDATA[2]]]]><![CDATA[></newsstatus>
<author><![CDATA[Author full name]]]]><![CDATA[></author>
<email><![CDATA[[email protected]]]]]><![CDATA[></email>
<subject><![CDATA[News subject]]]]><![CDATA[></subject>
<emailsubject /><dateline><![CDATA[1338237929]]]]><![CDATA[></dateline>
<expiry><![CDATA[0]]]]><![CDATA[></expiry>
<issynced><![CDATA[0]]]]><![CDATA[></issynced>
<totalcomments><![CDATA[0]]]]><![CDATA[></totalcomments>
<uservisibilitycustom><![CDATA[1]]]]><![CDATA[></uservisibilitycustom>
<usergroupidlist><usergroupid><![CDATA[1]]]]><![CDATA[></usergroupid>
<usergroupid><![CDATA[2]]]]><![CDATA[></usergroupid>
<usergroupid><![CDATA[3]]]]><![CDATA[></usergroupid>
</usergroupidlist>
<staffvisibilitycustom><![CDATA[1]]]]><![CDATA[></staffvisibilitycustom>
<staffgroupidlist><staffgroupid><![CDATA[1]]]]><![CDATA[></staffgroupid>
<staffgroupid><![CDATA[2]]]]><![CDATA[></staffgroupid>
</staffgroupidlist>
<allowcomments><![CDATA[1]]]]><![CDATA[></allowcomments>
<contents><![CDATA[Test]]]]><![CDATA[></contents>
<categories><categoryid><![CDATA[1]]]]><![CDATA[></categoryid>
<categoryid><![CDATA[2]]]]><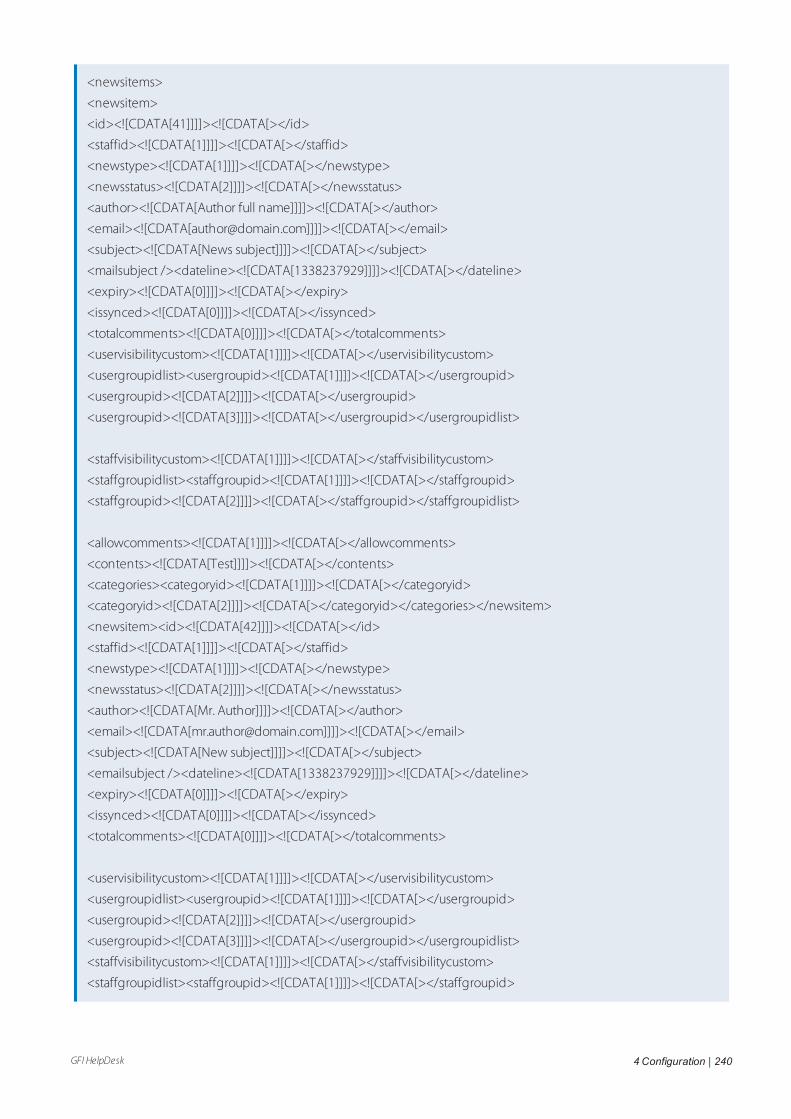
GFI HelpDesk 4 Configuration | 240
<newsitems>
<newsitem>
<id><![CDATA[41]]]]><![CDATA[></id>
<staffid><![CDATA[1]]]]><![CDATA[></staffid>
<newstype><![CDATA[1]]]]><![CDATA[></newstype>
<newsstatus><![CDATA[2]]]]><![CDATA[></newsstatus>
<author><![CDATA[Author full name]]]]><![CDATA[></author>
<email><![CDATA[[email protected]]]]]><![CDATA[></email>
<subject><![CDATA[News subject]]]]><![CDATA[></subject>
<mailsubject /><dateline><![CDATA[1338237929]]]]><![CDATA[></dateline>
<expiry><![CDATA[0]]]]><![CDATA[></expiry>
<issynced><![CDATA[0]]]]><![CDATA[></issynced>
<totalcomments><![CDATA[0]]]]><![CDATA[></totalcomments>
<uservisibilitycustom><![CDATA[1]]]]><![CDATA[></uservisibilitycustom>
<usergroupidlist><usergroupid><![CDATA[1]]]]><![CDATA[></usergroupid>
<usergroupid><![CDATA[2]]]]><![CDATA[></usergroupid>
<usergroupid><![CDATA[3]]]]><![CDATA[></usergroupid></usergroupidlist>
<staffvisibilitycustom><![CDATA[1]]]]><![CDATA[></staffvisibilitycustom>
<staffgroupidlist><staffgroupid><![CDATA[1]]]]><![CDATA[></staffgroupid>
<staffgroupid><![CDATA[2]]]]><![CDATA[></staffgroupid></staffgroupidlist>
<allowcomments><![CDATA[1]]]]><![CDATA[></allowcomments>
<contents><![CDATA[Test]]]]><![CDATA[></contents>
<categories><categoryid><![CDATA[1]]]]><![CDATA[></categoryid>
<categoryid><![CDATA[2]]]]><![CDATA[></categoryid></categories></newsitem>
<newsitem><id><![CDATA[42]]]]><![CDATA[></id>
<staffid><![CDATA[1]]]]><![CDATA[></staffid>
<newstype><![CDATA[1]]]]><![CDATA[></newstype>
<newsstatus><![CDATA[2]]]]><![CDATA[></newsstatus>
<author><![CDATA[Mr. Author]]]]><![CDATA[></author>
<email><![CDATA[[email protected]]]]]><![CDATA[></email>
<subject><![CDATA[New subject]]]]><![CDATA[></subject>
<emailsubject /><dateline><![CDATA[1338237929]]]]><![CDATA[></dateline>
<expiry><![CDATA[0]]]]><![CDATA[></expiry>
<issynced><![CDATA[0]]]]><![CDATA[></issynced>
<totalcomments><![CDATA[0]]]]><![CDATA[></totalcomments>
<uservisibilitycustom><![CDATA[1]]]]><![CDATA[></uservisibilitycustom>
<usergroupidlist><usergroupid><![CDATA[1]]]]><![CDATA[></usergroupid>
<usergroupid><![CDATA[2]]]]><![CDATA[></usergroupid>
<usergroupid><![CDATA[3]]]]><![CDATA[></usergroupid></usergroupidlist>
<staffvisibilitycustom><![CDATA[1]]]]><![CDATA[></staffvisibilitycustom>
<staffgroupidlist><staffgroupid><![CDATA[1]]]]><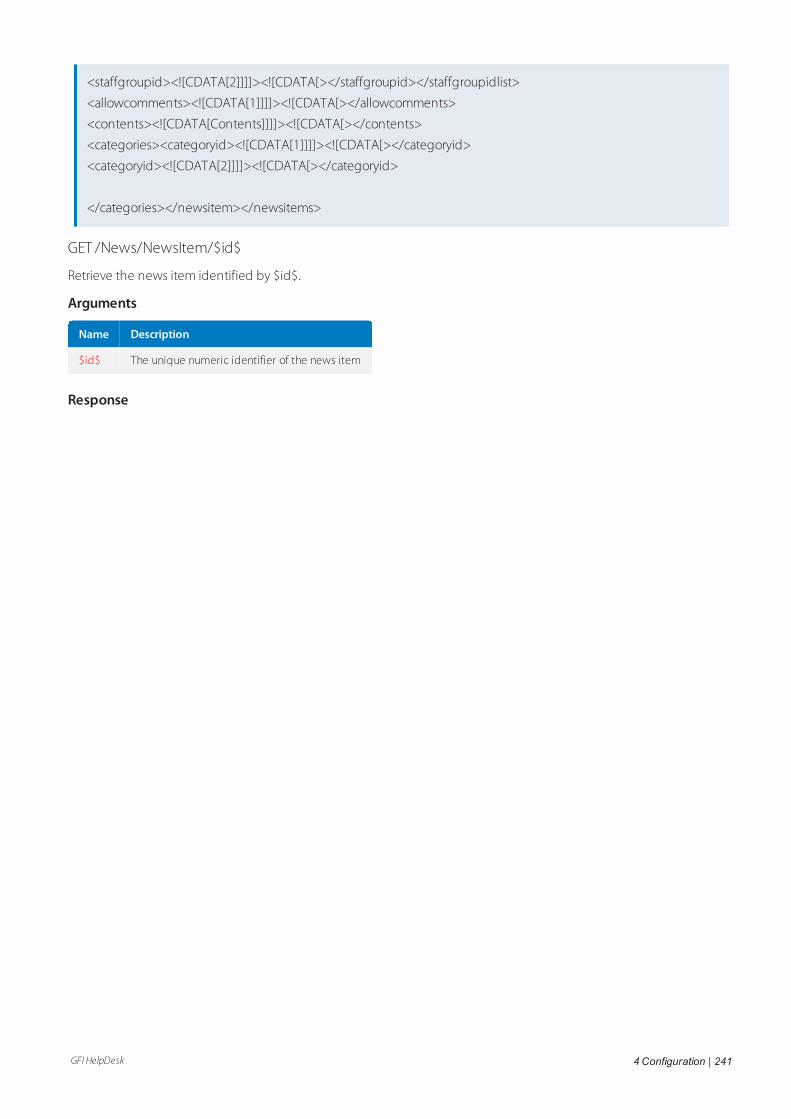
GFI HelpDesk 4 Configuration | 241
<staffgroupid><![CDATA[2]]]]><![CDATA[></staffgroupid></staffgroupidlist>
<allowcomments><![CDATA[1]]]]><![CDATA[></allowcomments>
<contents><![CDATA[Contents]]]]><![CDATA[></contents>
<categories><categoryid><![CDATA[1]]]]><![CDATA[></categoryid>
<categoryid><![CDATA[2]]]]><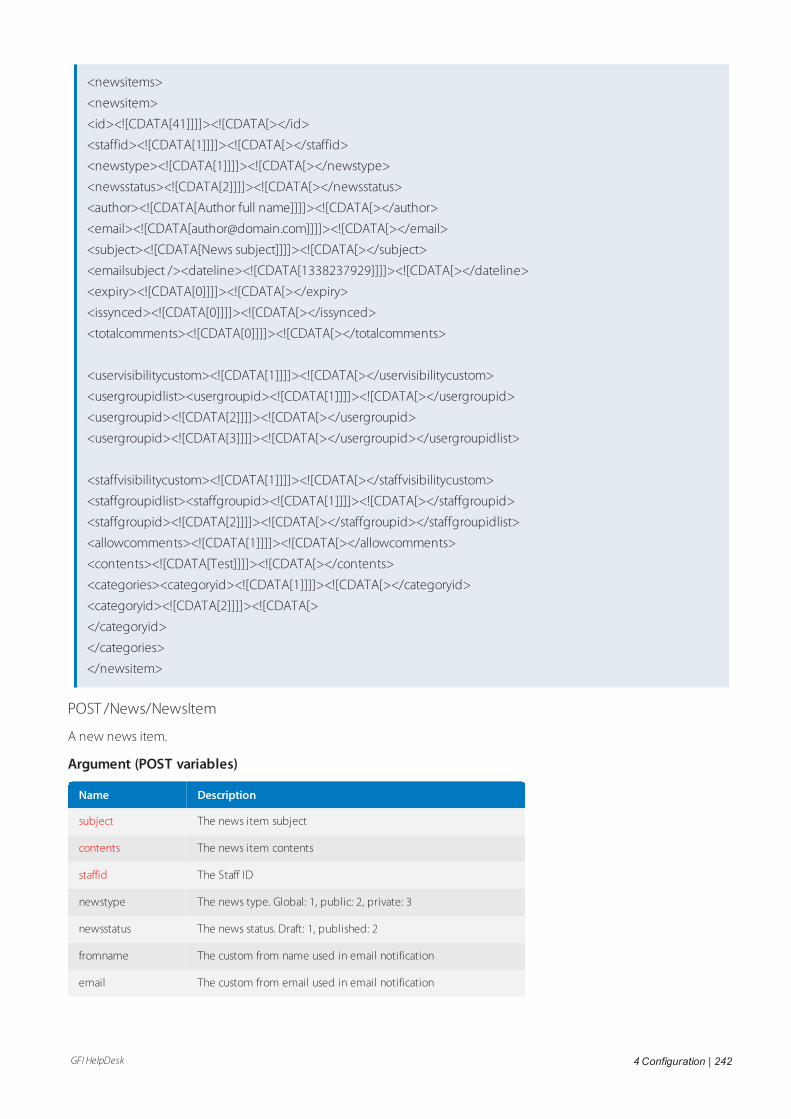
GFI HelpDesk 4 Configuration | 242
<newsitems>
<newsitem>
<id><![CDATA[41]]]]><![CDATA[></id>
<staffid><![CDATA[1]]]]><![CDATA[></staffid>
<newstype><![CDATA[1]]]]><![CDATA[></newstype>
<newsstatus><![CDATA[2]]]]><![CDATA[></newsstatus>
<author><![CDATA[Author full name]]]]><![CDATA[></author>
<email><![CDATA[[email protected]]]]]><![CDATA[></email>
<subject><![CDATA[News subject]]]]><![CDATA[></subject>
<emailsubject /><dateline><![CDATA[1338237929]]]]><![CDATA[></dateline>
<expiry><![CDATA[0]]]]><![CDATA[></expiry>
<issynced><![CDATA[0]]]]><![CDATA[></issynced>
<totalcomments><![CDATA[0]]]]><![CDATA[></totalcomments>
<uservisibilitycustom><![CDATA[1]]]]><![CDATA[></uservisibilitycustom>
<usergroupidlist><usergroupid><![CDATA[1]]]]><![CDATA[></usergroupid>
<usergroupid><![CDATA[2]]]]><![CDATA[></usergroupid>
<usergroupid><![CDATA[3]]]]><![CDATA[></usergroupid></usergroupidlist>
<staffvisibilitycustom><![CDATA[1]]]]><![CDATA[></staffvisibilitycustom>
<staffgroupidlist><staffgroupid><![CDATA[1]]]]><![CDATA[></staffgroupid>
<staffgroupid><![CDATA[2]]]]><![CDATA[></staffgroupid></staffgroupidlist>
<allowcomments><![CDATA[1]]]]><![CDATA[></allowcomments>
<contents><![CDATA[Test]]]]><![CDATA[></contents>
<categories><categoryid><![CDATA[1]]]]><![CDATA[></categoryid>
<categoryid><![CDATA[2]]]]><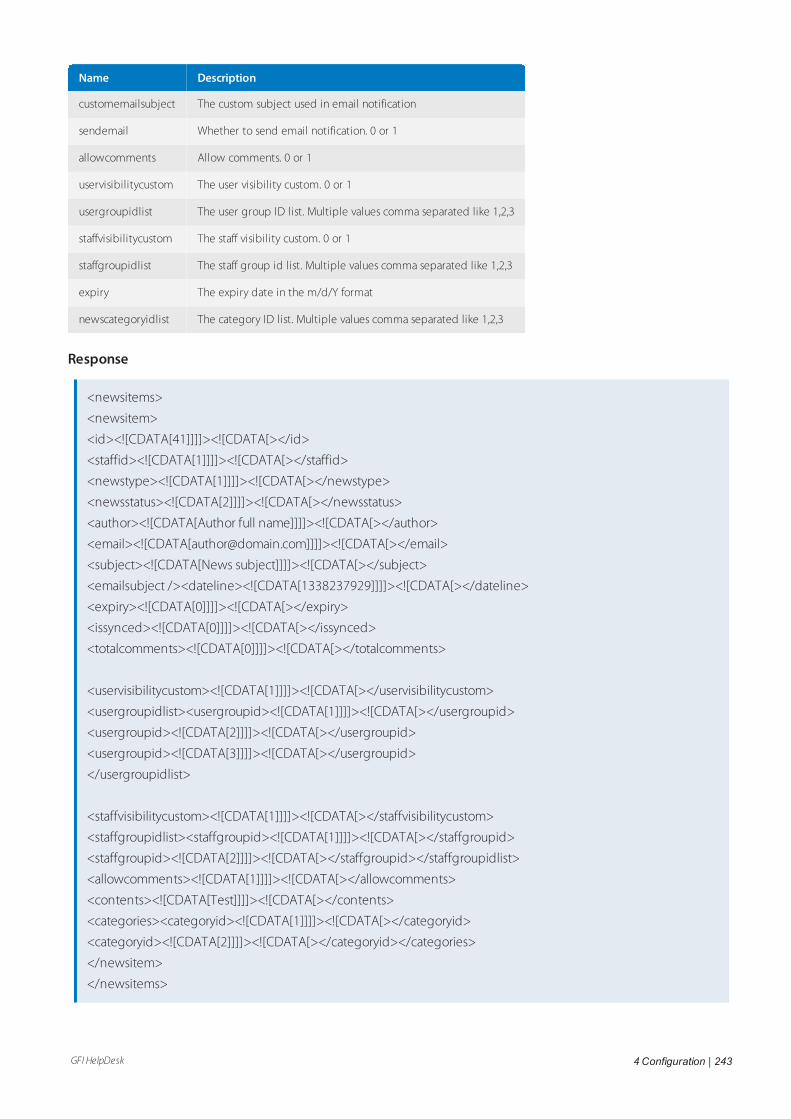
GFI HelpDesk 4 Configuration | 243
Name Description
customemailsubject The custom subject used in email notification
sendemail Whether to send email notification. 0 or 1
allowcomments Allow comments. 0 or 1
uservisibilitycustom The user visibility custom. 0 or 1
usergroupidlist The user group ID list. Multiple values comma separated like 1,2,3
staffvisibilitycustom The staff visibility custom. 0 or 1
staffgroupidlist The staff group id list. Multiple values comma separated like 1,2,3
expiry The expiry date in the m/d/Y format
newscategoryidlist The category ID list. Multiple values comma separated like 1,2,3
Response
<newsitems>
<newsitem>
<id><![CDATA[41]]]]><![CDATA[></id>
<staffid><![CDATA[1]]]]><![CDATA[></staffid>
<newstype><![CDATA[1]]]]><![CDATA[></newstype>
<newsstatus><![CDATA[2]]]]><![CDATA[></newsstatus>
<author><![CDATA[Author full name]]]]><![CDATA[></author>
<email><![CDATA[[email protected]]]]]><![CDATA[></email>
<subject><![CDATA[News subject]]]]><![CDATA[></subject>
<emailsubject /><dateline><![CDATA[1338237929]]]]><![CDATA[></dateline>
<expiry><![CDATA[0]]]]><![CDATA[></expiry>
<issynced><![CDATA[0]]]]><![CDATA[></issynced>
<totalcomments><![CDATA[0]]]]><![CDATA[></totalcomments>
<uservisibilitycustom><![CDATA[1]]]]><![CDATA[></uservisibilitycustom>
<usergroupidlist><usergroupid><![CDATA[1]]]]><![CDATA[></usergroupid>
<usergroupid><![CDATA[2]]]]><![CDATA[></usergroupid>
<usergroupid><![CDATA[3]]]]><![CDATA[></usergroupid>
</usergroupidlist>
<staffvisibilitycustom><![CDATA[1]]]]><![CDATA[></staffvisibilitycustom>
<staffgroupidlist><staffgroupid><![CDATA[1]]]]><![CDATA[></staffgroupid>
<staffgroupid><![CDATA[2]]]]><![CDATA[></staffgroupid></staffgroupidlist>
<allowcomments><![CDATA[1]]]]><![CDATA[></allowcomments>
<contents><![CDATA[Test]]]]><![CDATA[></contents>
<categories><categoryid><![CDATA[1]]]]><![CDATA[></categoryid>
<categoryid><![CDATA[2]]]]><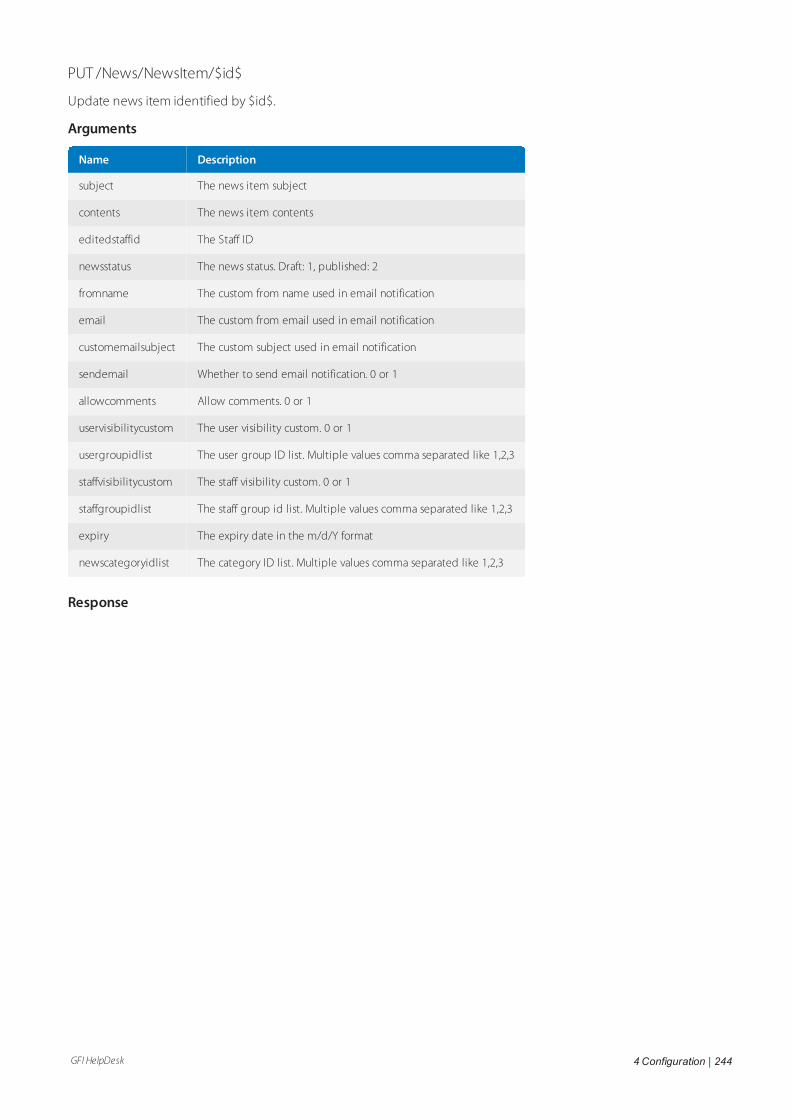
GFI HelpDesk 4 Configuration | 244
PUT /News/NewsItem/$id$
Update news item identified by $id$.
Arguments
Name Description
subject The news item subject
contents The news item contents
editedstaffid The Staff ID
newsstatus The news status. Draft: 1, published: 2
fromname The custom from name used in email notification
email The custom from email used in email notification
customemailsubject The custom subject used in email notification
sendemail Whether to send email notification. 0 or 1
allowcomments Allow comments. 0 or 1
uservisibilitycustom The user visibility custom. 0 or 1
usergroupidlist The user group ID list. Multiple values comma separated like 1,2,3
staffvisibilitycustom The staff visibility custom. 0 or 1
staffgroupidlist The staff group id list. Multiple values comma separated like 1,2,3
expiry The expiry date in the m/d/Y format
newscategoryidlist The category ID list. Multiple values comma separated like 1,2,3
Response
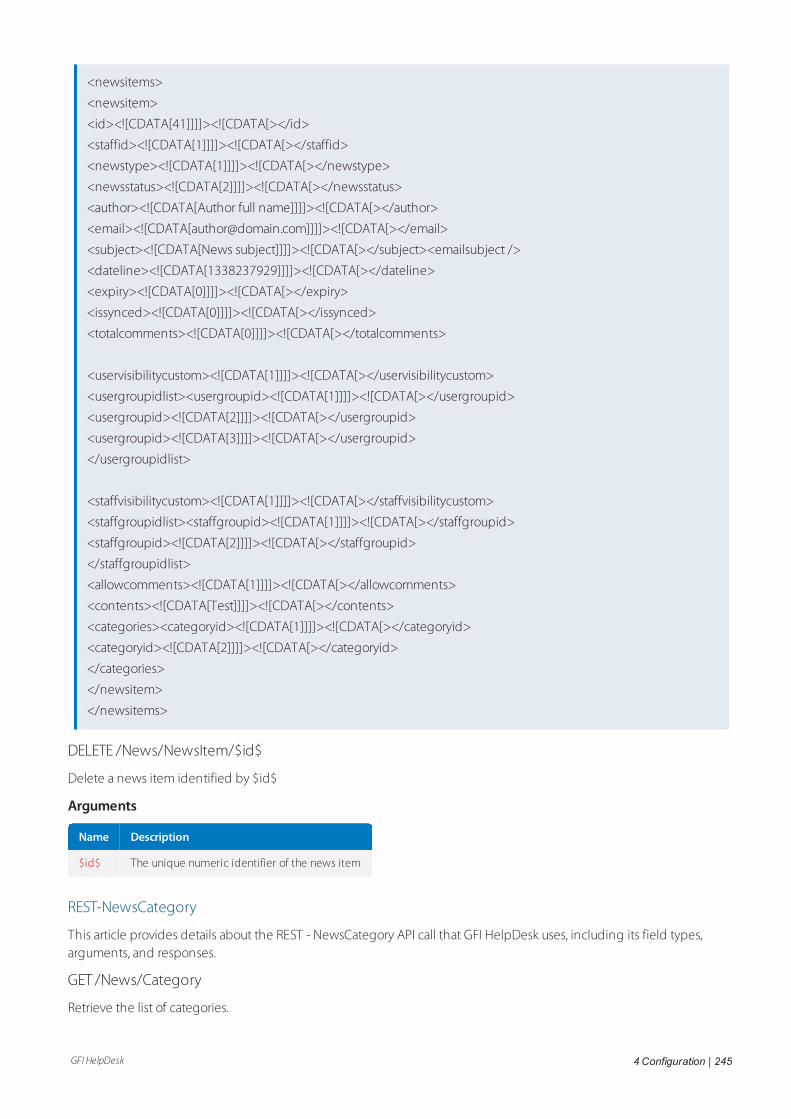
GFI HelpDesk 4 Configuration | 245
<newsitems>
<newsitem>
<id><![CDATA[41]]]]><![CDATA[></id>
<staffid><![CDATA[1]]]]><![CDATA[></staffid>
<newstype><![CDATA[1]]]]><![CDATA[></newstype>
<newsstatus><![CDATA[2]]]]><![CDATA[></newsstatus>
<author><![CDATA[Author full name]]]]><![CDATA[></author>
<email><![CDATA[[email protected]]]]]><![CDATA[></email>
<subject><![CDATA[News subject]]]]><![CDATA[></subject><emailsubject />
<dateline><![CDATA[1338237929]]]]><![CDATA[></dateline>
<expiry><![CDATA[0]]]]><![CDATA[></expiry>
<issynced><![CDATA[0]]]]><![CDATA[></issynced>
<totalcomments><![CDATA[0]]]]><![CDATA[></totalcomments>
<uservisibilitycustom><![CDATA[1]]]]><![CDATA[></uservisibilitycustom>
<usergroupidlist><usergroupid><![CDATA[1]]]]><![CDATA[></usergroupid>
<usergroupid><![CDATA[2]]]]><![CDATA[></usergroupid>
<usergroupid><![CDATA[3]]]]><![CDATA[></usergroupid>
</usergroupidlist>
<staffvisibilitycustom><![CDATA[1]]]]><![CDATA[></staffvisibilitycustom>
<staffgroupidlist><staffgroupid><![CDATA[1]]]]><![CDATA[></staffgroupid>
<staffgroupid><![CDATA[2]]]]><![CDATA[></staffgroupid>
</staffgroupidlist>
<allowcomments><![CDATA[1]]]]><![CDATA[></allowcomments>
<contents><![CDATA[Test]]]]><![CDATA[></contents>
<categories><categoryid><![CDATA[1]]]]><![CDATA[></categoryid>
<categoryid><![CDATA[2]]]]><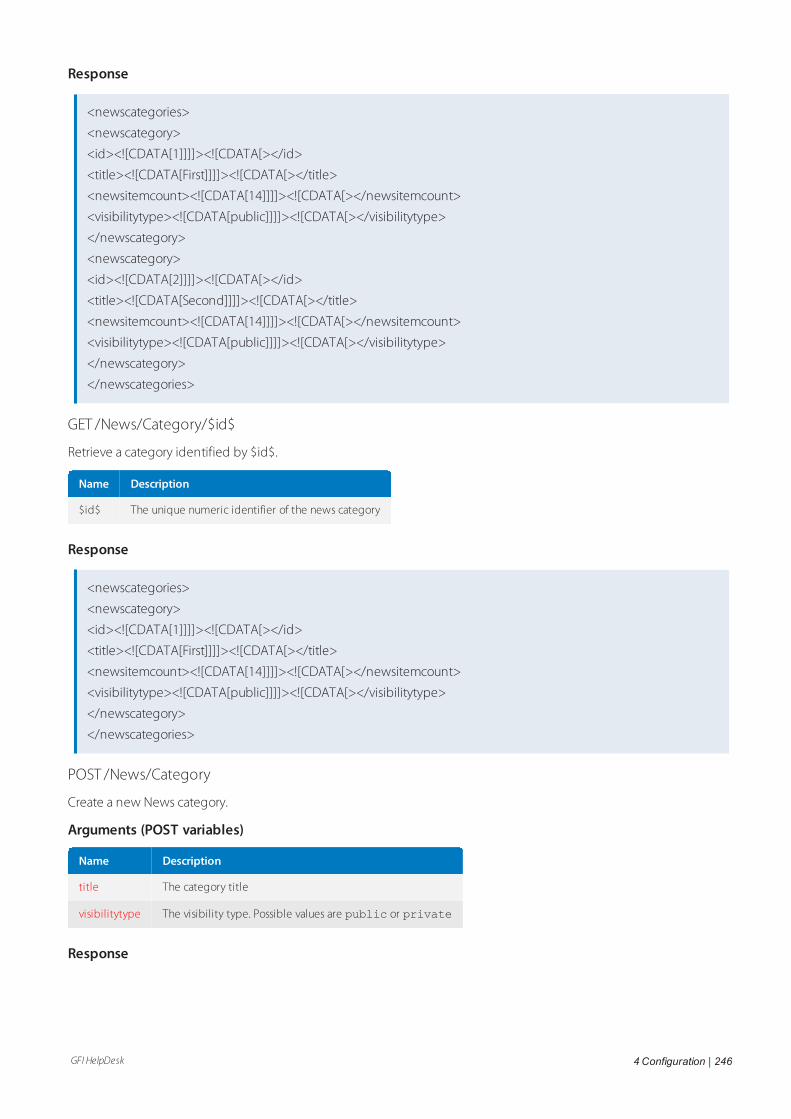
GFI HelpDesk 4 Configuration | 246
Response
<newscategories>
<newscategory>
<id><![CDATA[1]]]]><![CDATA[></id>
<title><![CDATA[First]]]]><![CDATA[></title>
<newsitemcount><![CDATA[14]]]]><![CDATA[></newsitemcount>
<visibilitytype><![CDATA[public]]]]><![CDATA[></visibilitytype>
</newscategory>
<newscategory>
<id><![CDATA[2]]]]><![CDATA[></id>
<title><![CDATA[Second]]]]><![CDATA[></title>
<newsitemcount><![CDATA[14]]]]><![CDATA[></newsitemcount>
<visibilitytype><![CDATA[public]]]]><![CDATA[></visibilitytype>
</newscategory>
</newscategories>
GET /News/Category/$id$
Retrieve a category identified by $id$.
Name Description
$id$ The unique numeric identifier of the news category
Response
<newscategories>
<newscategory>
<id><![CDATA[1]]]]><![CDATA[></id>
<title><![CDATA[First]]]]><![CDATA[></title>
<newsitemcount><![CDATA[14]]]]><![CDATA[></newsitemcount>
<visibilitytype><![CDATA[public]]]]><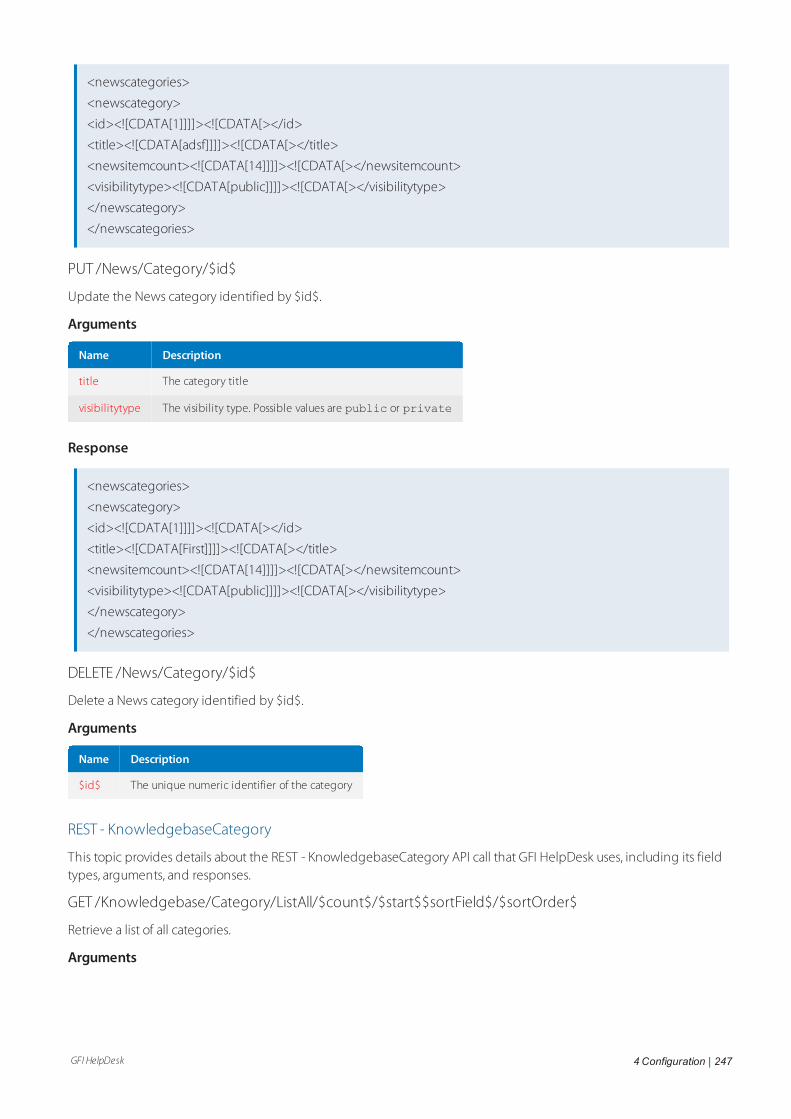
GFI HelpDesk 4 Configuration | 247
<newscategories>
<newscategory>
<id><![CDATA[1]]]]><![CDATA[></id>
<title><![CDATA[adsf]]]]><![CDATA[></title>
<newsitemcount><![CDATA[14]]]]><![CDATA[></newsitemcount>
<visibilitytype><![CDATA[public]]]]><![CDATA[></visibilitytype>
</newscategory>
</newscategories>
PUT /News/Category/$id$
Update the News category identified by $id$.
Arguments
Name Description
title The category title
visibilitytype The visibility type. Possible values are public or private
Response
<newscategories>
<newscategory>
<id><![CDATA[1]]]]><![CDATA[></id>
<title><![CDATA[First]]]]><![CDATA[></title>
<newsitemcount><![CDATA[14]]]]><![CDATA[></newsitemcount>
<visibilitytype><![CDATA[public]]]]><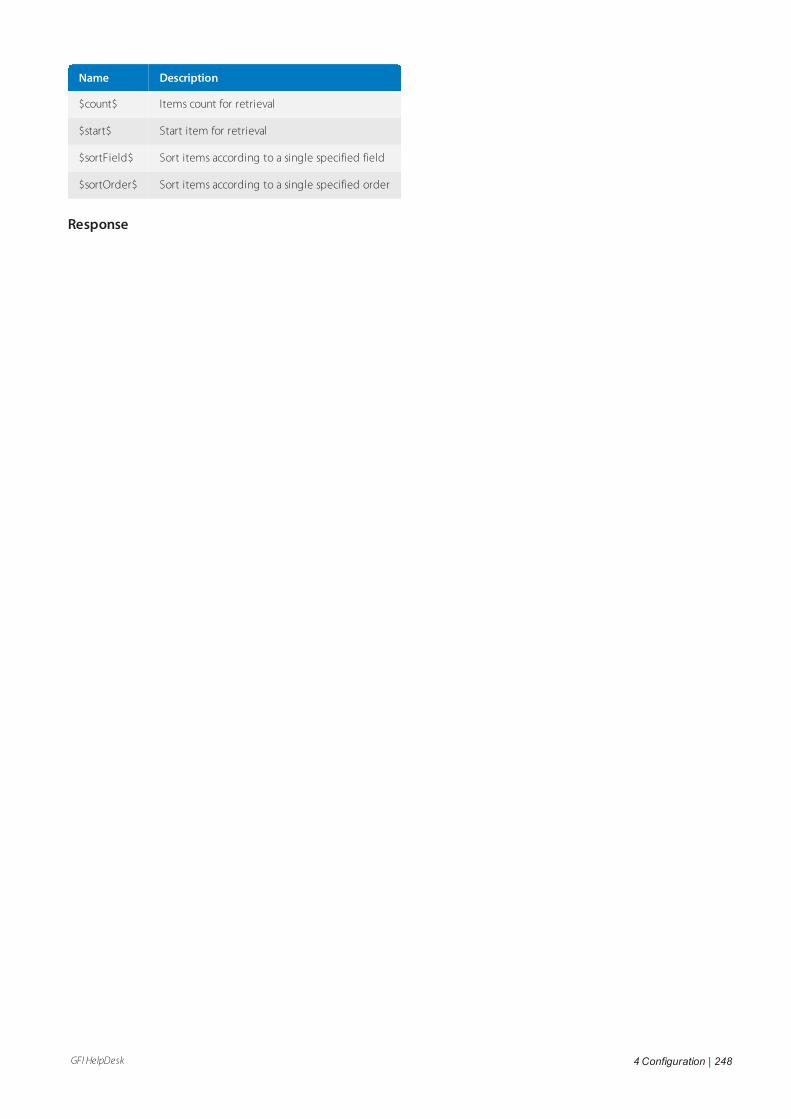
GFI HelpDesk 4 Configuration | 248
Name Description
$count$ Items count for retrieval
$start$ Start item for retrieval
$sortField$ Sort items according to a single specified field
$sortOrder$ Sort items according to a single specified order
Response

GFI HelpDesk 4 Configuration | 249
<kbcategories>
<kbcategory>
<id><![CDATA[70]]]]><![CDATA[></id>
<parentkbcategoryid><![CDATA[0]]]]><![CDATA[></parentkbcategoryid>
<staffid><![CDATA[1]]]]><![CDATA[></staffid>
<title><![CDATA[category title]]]]><![CDATA[></title>
<totalarticles><![CDATA[1]]]]><![CDATA[></totalarticles>
<categorytype><![CDATA[4]]]]><![CDATA[></categorytype>
<displayorder><![CDATA[6]]]]><![CDATA[></displayorder>
<allowcomments><![CDATA[1]]]]><![CDATA[></allowcomments>
<uservisibilitycustom><![CDATA[0]]]]><![CDATA[></uservisibilitycustom>
<usergroupidlist>
<usergroupid><![CDATA[1]]]]><![CDATA[></usergroupid>
</usergroupidlist>
<staffvisibilitycustom><![CDATA[0]]]]><![CDATA[></staffvisibilitycustom>
<staffgroupidlist>
<staffgroupid><![CDATA[1]]]]><![CDATA[></staffgroupid>
</staffgroupidlist>
<allowrating><![CDATA[1]]]]><![CDATA[></allowrating>
<ispublished><![CDATA[1]]]]><![CDATA[></ispublished>
</kbcategory>
<kbcategory>
<id><![CDATA[79]]]]><![CDATA[></id>
<parentkbcategoryid><![CDATA[0]]]]><![CDATA[></parentkbcategoryid>
<staffid><![CDATA[1]]]]><![CDATA[></staffid>
<title><![CDATA[The next one]]]]><![CDATA[></title>
<totalarticles><![CDATA[6]]]]><![CDATA[></totalarticles>
<categorytype><![CDATA[4]]]]><![CDATA[></categorytype>
<displayorder><![CDATA[7]]]]><![CDATA[></displayorder>
<allowcomments><![CDATA[1]]]]><![CDATA[></allowcomments>
<uservisibilitycustom><![CDATA[0]]]]><![CDATA[></uservisibilitycustom>
<usergroupidlist>
<usergroupid><![CDATA[1]]]]><![CDATA[></usergroupid>
</usergroupidlist>
<staffvisibilitycustom><![CDATA[0]]]]><![CDATA[></staffvisibilitycustom>
<staffgroupidlist>
<staffgroupid><![CDATA[1]]]]><![CDATA[></staffgroupid>
</staffgroupidlist>
<allowrating><![CDATA[1]]]]><![CDATA[></allowrating>
<ispublished><![CDATA[1]]]]><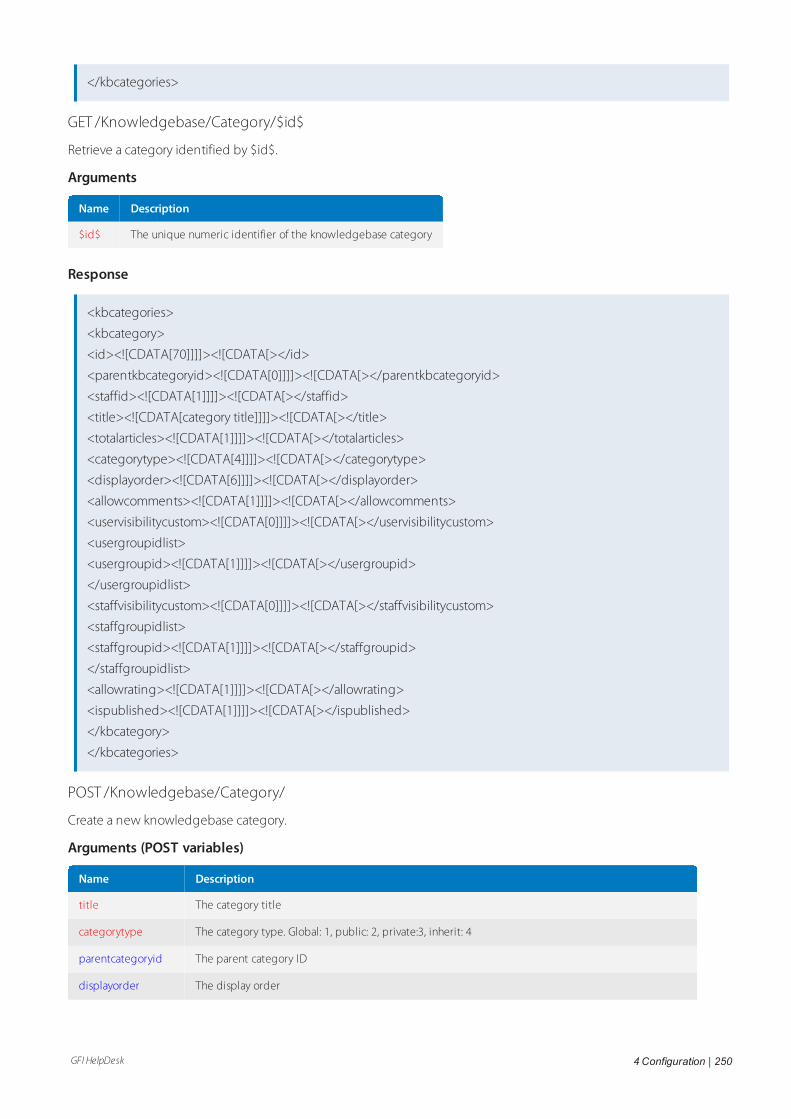
GFI HelpDesk 4 Configuration | 250
</kbcategories>
GET /Knowledgebase/Category/$id$
Retrieve a category identified by $id$.
Arguments
Name Description
$id$ The unique numeric identifier of the knowledgebase category
Response
<kbcategories>
<kbcategory>
<id><![CDATA[70]]]]><![CDATA[></id>
<parentkbcategoryid><![CDATA[0]]]]><![CDATA[></parentkbcategoryid>
<staffid><![CDATA[1]]]]><![CDATA[></staffid>
<title><![CDATA[category title]]]]><![CDATA[></title>
<totalarticles><![CDATA[1]]]]><![CDATA[></totalarticles>
<categorytype><![CDATA[4]]]]><![CDATA[></categorytype>
<displayorder><![CDATA[6]]]]><![CDATA[></displayorder>
<allowcomments><![CDATA[1]]]]><![CDATA[></allowcomments>
<uservisibilitycustom><![CDATA[0]]]]><![CDATA[></uservisibilitycustom>
<usergroupidlist>
<usergroupid><![CDATA[1]]]]><![CDATA[></usergroupid>
</usergroupidlist>
<staffvisibilitycustom><![CDATA[0]]]]><![CDATA[></staffvisibilitycustom>
<staffgroupidlist>
<staffgroupid><![CDATA[1]]]]><![CDATA[></staffgroupid>
</staffgroupidlist>
<allowrating><![CDATA[1]]]]><![CDATA[></allowrating>
<ispublished><![CDATA[1]]]]><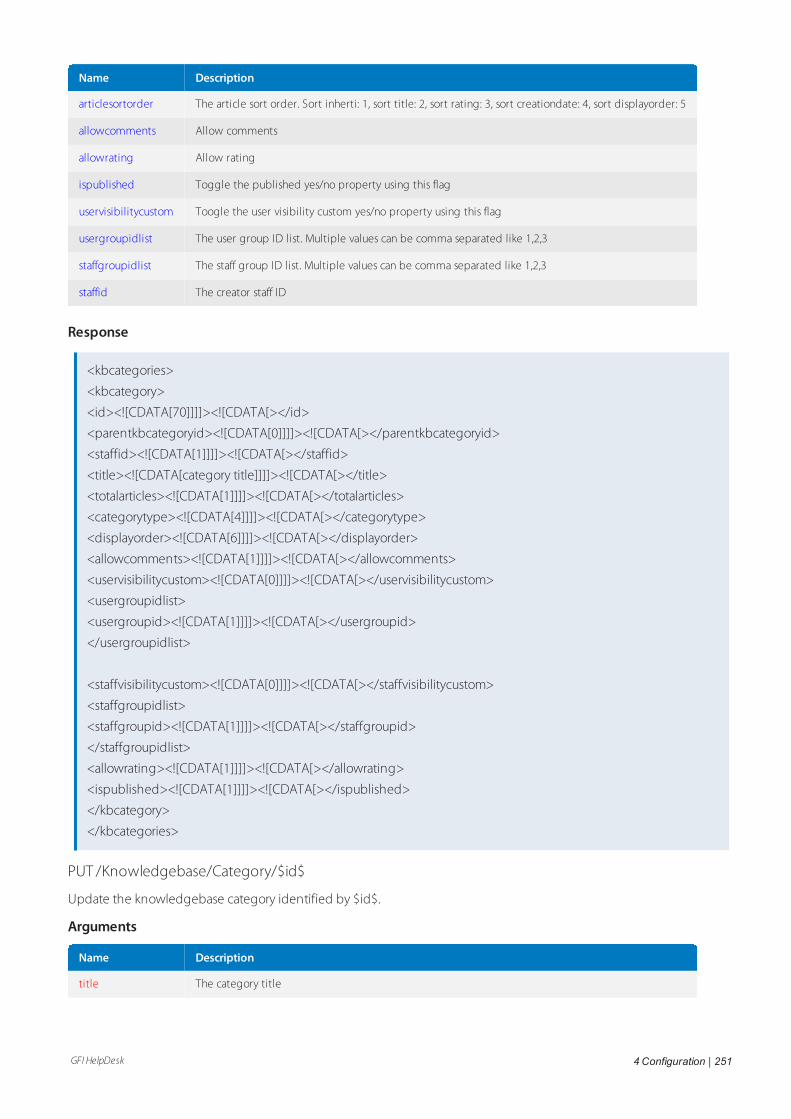
GFI HelpDesk 4 Configuration | 251
Name Description
articlesortorder The article sort order. Sort inherti: 1, sort title: 2, sort rating: 3, sort creationdate: 4, sort displayorder: 5
allowcomments Allow comments
allowrating Allow rating
ispublished Toggle the published yes/no property using this flag
uservisibilitycustom Toogle the user visibility custom yes/no property using this flag
usergroupidlist The user group ID list. Multiple values can be comma separated like 1,2,3
staffgroupidlist The staff group ID list. Multiple values can be comma separated like 1,2,3
staffid The creator staff ID
Response
<kbcategories>
<kbcategory>
<id><![CDATA[70]]]]><![CDATA[></id>
<parentkbcategoryid><![CDATA[0]]]]><![CDATA[></parentkbcategoryid>
<staffid><![CDATA[1]]]]><![CDATA[></staffid>
<title><![CDATA[category title]]]]><![CDATA[></title>
<totalarticles><![CDATA[1]]]]><![CDATA[></totalarticles>
<categorytype><![CDATA[4]]]]><![CDATA[></categorytype>
<displayorder><![CDATA[6]]]]><![CDATA[></displayorder>
<allowcomments><![CDATA[1]]]]><![CDATA[></allowcomments>
<uservisibilitycustom><![CDATA[0]]]]><![CDATA[></uservisibilitycustom>
<usergroupidlist>
<usergroupid><![CDATA[1]]]]><![CDATA[></usergroupid>
</usergroupidlist>
<staffvisibilitycustom><![CDATA[0]]]]><![CDATA[></staffvisibilitycustom>
<staffgroupidlist>
<staffgroupid><![CDATA[1]]]]><![CDATA[></staffgroupid>
</staffgroupidlist>
<allowrating><![CDATA[1]]]]><![CDATA[></allowrating>
<ispublished><![CDATA[1]]]]><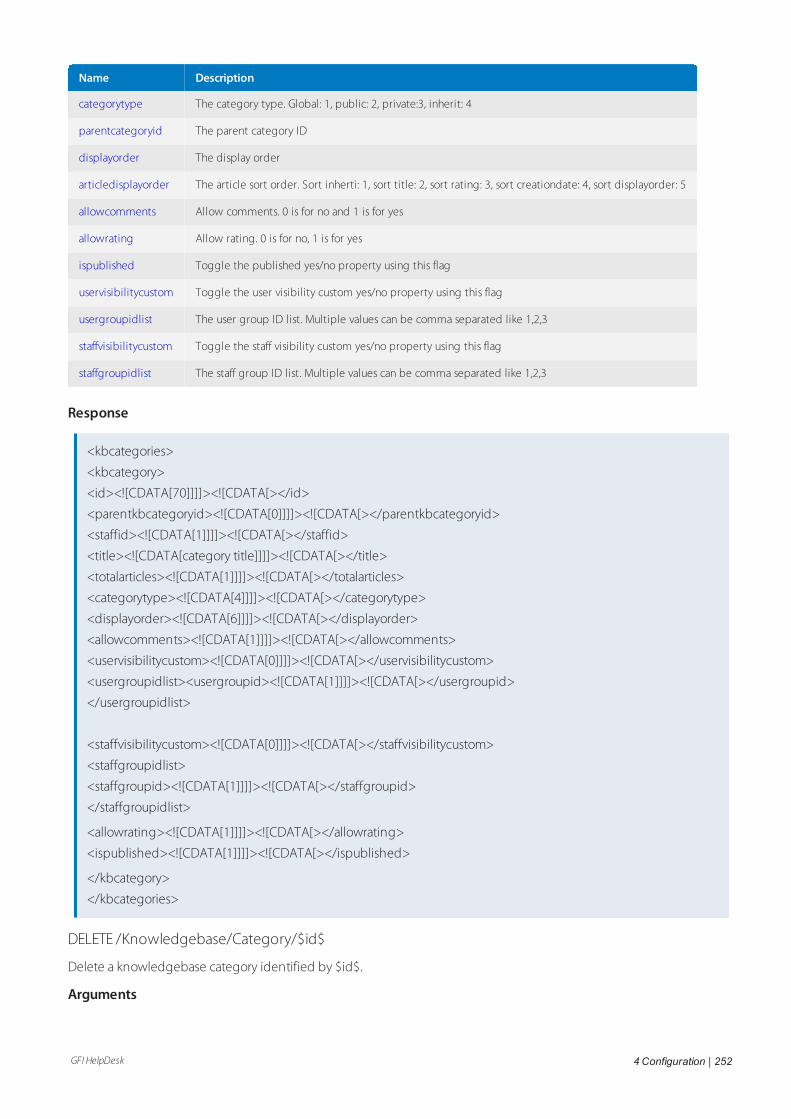
GFI HelpDesk 4 Configuration | 252
Name Description
categorytype The category type. Global: 1, public: 2, private:3, inherit: 4
parentcategoryid The parent category ID
displayorder The display order
articledisplayorder The article sort order. Sort inherti: 1, sort title: 2, sort rating: 3, sort creationdate: 4, sort displayorder: 5
allowcomments Allow comments. 0 is for no and 1 is for yes
allowrating Allow rating. 0 is for no, 1 is for yes
ispublished Toggle the published yes/no property using this flag
uservisibilitycustom Toggle the user visibility custom yes/no property using this flag
usergroupidlist The user group ID list. Multiple values can be comma separated like 1,2,3
staffvisibilitycustom Toggle the staff visibility custom yes/no property using this flag
staffgroupidlist The staff group ID list. Multiple values can be comma separated like 1,2,3
Response
<kbcategories>
<kbcategory>
<id><![CDATA[70]]]]><![CDATA[></id>
<parentkbcategoryid><![CDATA[0]]]]><![CDATA[></parentkbcategoryid>
<staffid><![CDATA[1]]]]><![CDATA[></staffid>
<title><![CDATA[category title]]]]><![CDATA[></title>
<totalarticles><![CDATA[1]]]]><![CDATA[></totalarticles>
<categorytype><![CDATA[4]]]]><![CDATA[></categorytype>
<displayorder><![CDATA[6]]]]><![CDATA[></displayorder>
<allowcomments><![CDATA[1]]]]><![CDATA[></allowcomments>
<uservisibilitycustom><![CDATA[0]]]]><![CDATA[></uservisibilitycustom>
<usergroupidlist><usergroupid><![CDATA[1]]]]><![CDATA[></usergroupid>
</usergroupidlist>
<staffvisibilitycustom><![CDATA[0]]]]><![CDATA[></staffvisibilitycustom>
<staffgroupidlist>
<staffgroupid><![CDATA[1]]]]><![CDATA[></staffgroupid>
</staffgroupidlist>
<allowrating><![CDATA[1]]]]><![CDATA[></allowrating>
<ispublished><![CDATA[1]]]]><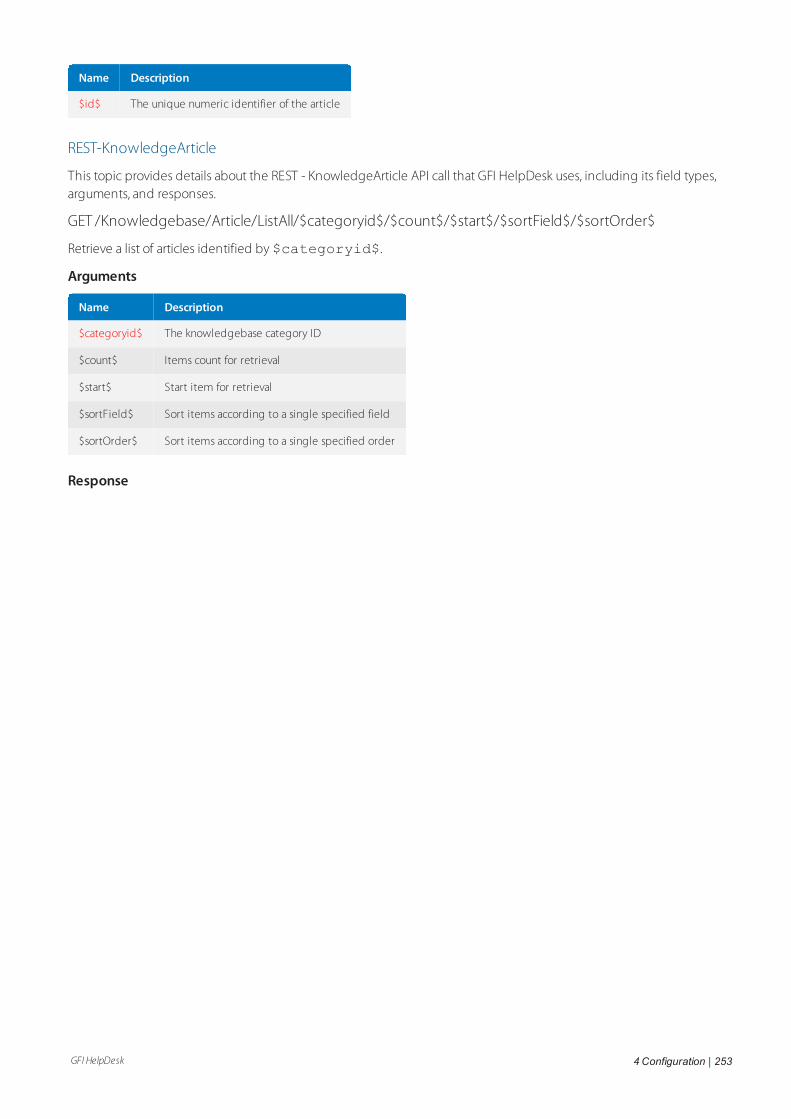
GFI HelpDesk 4 Configuration | 253
Name Description
$id$ The unique numeric identifier of the article
REST-KnowledgeArticle
This topic provides details about the REST - KnowledgeArticle API call that GFI HelpDesk uses, including its field types,arguments, and responses.
GET /Knowledgebase/Article/ListAll/$categoryid$/$count$/$start$/$sortField$/$sortOrder$
Retrieve a list of articles identified by $categoryid$.
Arguments
Name Description
$categoryid$ The knowledgebase category ID
$count$ Items count for retrieval
$start$ Start item for retrieval
$sortField$ Sort items according to a single specified field
$sortOrder$ Sort items according to a single specified order
Response

GFI HelpDesk 4 Configuration | 254
<kbarticles>
<kbarticle>
<kbarticleid><![CDATA[1]]]]><![CDATA[></kbarticleid>
<contents><![CDATA[Contents]]]]>
<![CDATA[></contents><contentstext>
<![CDATA[Contents]]]]><![CDATA[>
</contentstext><categories><categoryid>
<![CDATA[0]]]]><![CDATA[></categoryid>
</categories>
<creator><![CDATA[2]]]]><![CDATA[></creator>
<creatorid><![CDATA[1]]]]><![CDATA[></creatorid>
<author><![CDATA[Simaranjit Singh]]]]><![CDATA[></author>
<email><![CDATA[[email protected]]]]]><![CDATA[></email>
<subject><![CDATA[Subject]]]]><![CDATA[></subject>
<isedited><![CDATA[1]]]]><![CDATA[></isedited>
<editeddateline><![CDATA[1336757517]]]]><![CDATA[></editeddateline>
<editedstaffid><![CDATA[1]]]]><![CDATA[></editedstaffid>
<views><![CDATA[24]]]]><![CDATA[></views>
<isfeatured><![CDATA[0]]]]><![CDATA[></isfeatured>
<allowcomments><![CDATA[1]]]]><![CDATA[></allowcomments>
<totalcomments><![CDATA[0]]]]><![CDATA[></totalcomments>
<hasattachments><![CDATA[1]]]]><![CDATA[></hasattachments>
<attachments>
<attachment>
<id><![CDATA[4]]]]><![CDATA[></id>
<filename><![CDATA[photo.jpg]]]]><![CDATA[></filename>
<filesize><![CDATA[88.42 KB]]]]><![CDATA[></filesize>
<link><![CDATA[http://localhost/fusiongit/trunk/api/index.php?/Knowledgebase/Article/GetAttachment/1/20]]]]><![CDATA[></link>
</attachment>
<attachment>
<id><![CDATA[5]]]]><![CDATA[></id>
<filename><![CDATA[cap_ture1.png]]]]><![CDATA[></filename>
<filesize><![CDATA[8.99 KB]]]]><![CDATA[></filesize>
<link><![CDATA[http://localhost/fusiongit/trunk/api/index.php?/Knowledgebase/Article/GetAttachment/1/20]]]]><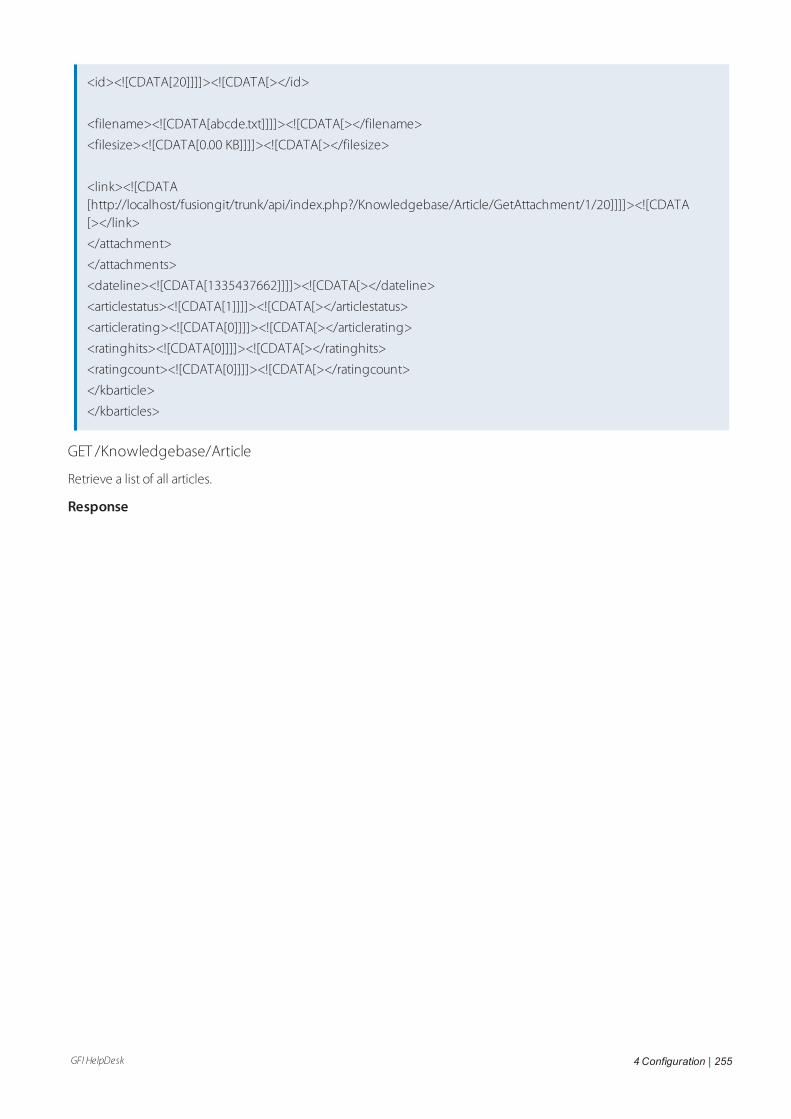
GFI HelpDesk 4 Configuration | 255
<id><![CDATA[20]]]]><![CDATA[></id>
<filename><![CDATA[abcde.txt]]]]><![CDATA[></filename>
<filesize><![CDATA[0.00 KB]]]]><![CDATA[></filesize>
<link><![CDATA[http://localhost/fusiongit/trunk/api/index.php?/Knowledgebase/Article/GetAttachment/1/20]]]]><![CDATA[></link>
</attachment>
</attachments>
<dateline><![CDATA[1335437662]]]]><![CDATA[></dateline>
<articlestatus><![CDATA[1]]]]><![CDATA[></articlestatus>
<articlerating><![CDATA[0]]]]><![CDATA[></articlerating>
<ratinghits><![CDATA[0]]]]><![CDATA[></ratinghits>
<ratingcount><![CDATA[0]]]]><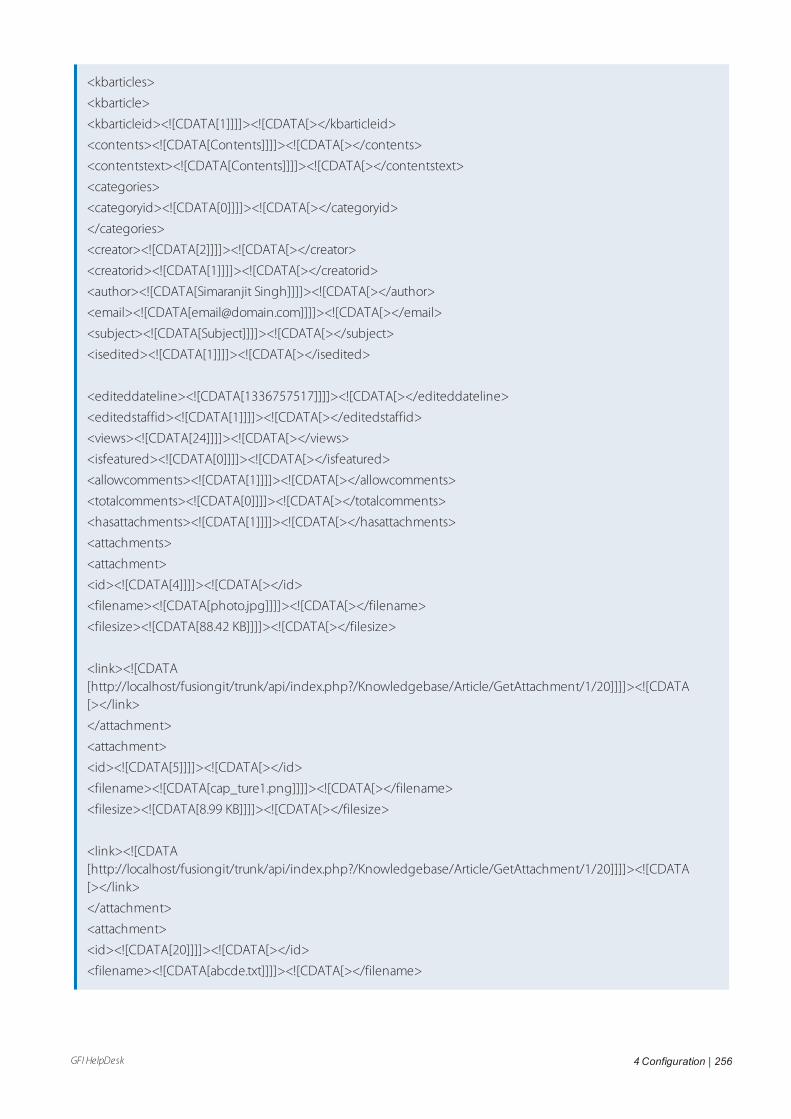
GFI HelpDesk 4 Configuration | 256
<kbarticles>
<kbarticle>
<kbarticleid><![CDATA[1]]]]><![CDATA[></kbarticleid>
<contents><![CDATA[Contents]]]]><![CDATA[></contents>
<contentstext><![CDATA[Contents]]]]><![CDATA[></contentstext>
<categories>
<categoryid><![CDATA[0]]]]><![CDATA[></categoryid>
</categories>
<creator><![CDATA[2]]]]><![CDATA[></creator>
<creatorid><![CDATA[1]]]]><![CDATA[></creatorid>
<author><![CDATA[Simaranjit Singh]]]]><![CDATA[></author>
<email><![CDATA[[email protected]]]]]><![CDATA[></email>
<subject><![CDATA[Subject]]]]><![CDATA[></subject>
<isedited><![CDATA[1]]]]><![CDATA[></isedited>
<editeddateline><![CDATA[1336757517]]]]><![CDATA[></editeddateline>
<editedstaffid><![CDATA[1]]]]><![CDATA[></editedstaffid>
<views><![CDATA[24]]]]><![CDATA[></views>
<isfeatured><![CDATA[0]]]]><![CDATA[></isfeatured>
<allowcomments><![CDATA[1]]]]><![CDATA[></allowcomments>
<totalcomments><![CDATA[0]]]]><![CDATA[></totalcomments>
<hasattachments><![CDATA[1]]]]><![CDATA[></hasattachments>
<attachments>
<attachment>
<id><![CDATA[4]]]]><![CDATA[></id>
<filename><![CDATA[photo.jpg]]]]><![CDATA[></filename>
<filesize><![CDATA[88.42 KB]]]]><![CDATA[></filesize>
<link><![CDATA[http://localhost/fusiongit/trunk/api/index.php?/Knowledgebase/Article/GetAttachment/1/20]]]]><![CDATA[></link>
</attachment>
<attachment>
<id><![CDATA[5]]]]><![CDATA[></id>
<filename><![CDATA[cap_ture1.png]]]]><![CDATA[></filename>
<filesize><![CDATA[8.99 KB]]]]><![CDATA[></filesize>
<link><![CDATA[http://localhost/fusiongit/trunk/api/index.php?/Knowledgebase/Article/GetAttachment/1/20]]]]><![CDATA[></link>
</attachment>
<attachment>
<id><![CDATA[20]]]]><![CDATA[></id>
<filename><![CDATA[abcde.txt]]]]><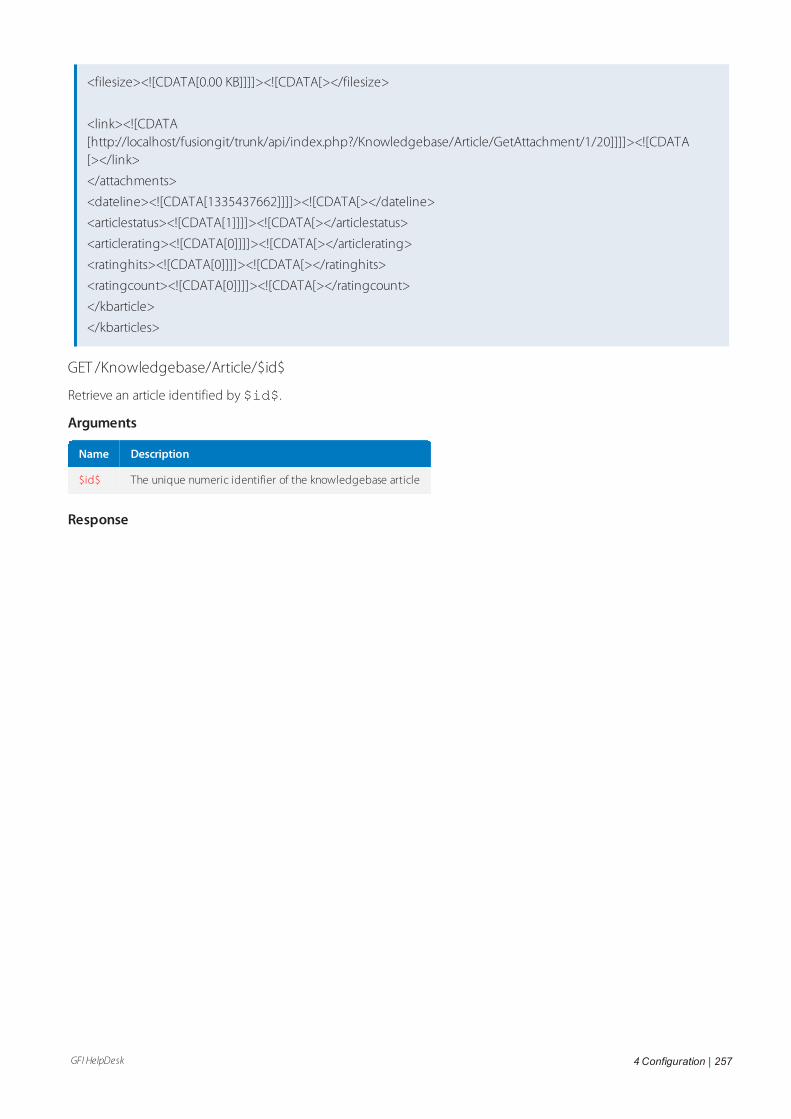
GFI HelpDesk 4 Configuration | 257
<filesize><![CDATA[0.00 KB]]]]><![CDATA[></filesize>
<link><![CDATA[http://localhost/fusiongit/trunk/api/index.php?/Knowledgebase/Article/GetAttachment/1/20]]]]><![CDATA[></link>
</attachments>
<dateline><![CDATA[1335437662]]]]><![CDATA[></dateline>
<articlestatus><![CDATA[1]]]]><![CDATA[></articlestatus>
<articlerating><![CDATA[0]]]]><![CDATA[></articlerating>
<ratinghits><![CDATA[0]]]]><![CDATA[></ratinghits>
<ratingcount><![CDATA[0]]]]><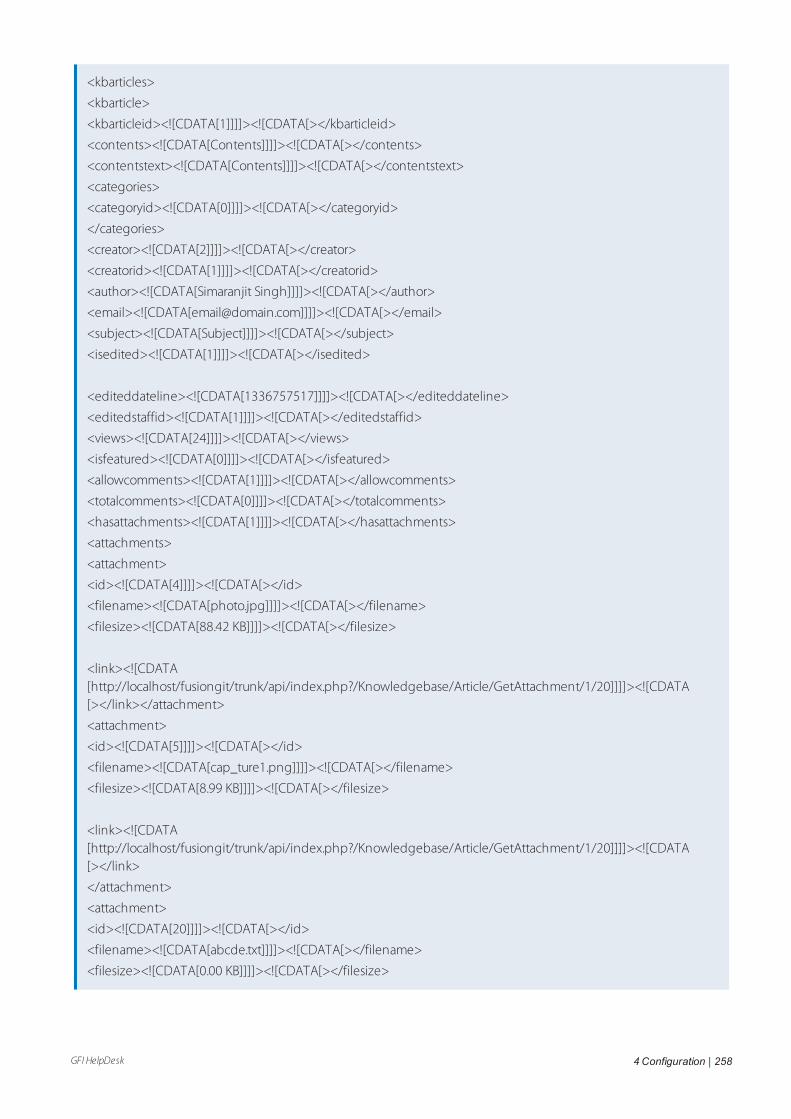
GFI HelpDesk 4 Configuration | 258
<kbarticles>
<kbarticle>
<kbarticleid><![CDATA[1]]]]><![CDATA[></kbarticleid>
<contents><![CDATA[Contents]]]]><![CDATA[></contents>
<contentstext><![CDATA[Contents]]]]><![CDATA[></contentstext>
<categories>
<categoryid><![CDATA[0]]]]><![CDATA[></categoryid>
</categories>
<creator><![CDATA[2]]]]><![CDATA[></creator>
<creatorid><![CDATA[1]]]]><![CDATA[></creatorid>
<author><![CDATA[Simaranjit Singh]]]]><![CDATA[></author>
<email><![CDATA[[email protected]]]]]><![CDATA[></email>
<subject><![CDATA[Subject]]]]><![CDATA[></subject>
<isedited><![CDATA[1]]]]><![CDATA[></isedited>
<editeddateline><![CDATA[1336757517]]]]><![CDATA[></editeddateline>
<editedstaffid><![CDATA[1]]]]><![CDATA[></editedstaffid>
<views><![CDATA[24]]]]><![CDATA[></views>
<isfeatured><![CDATA[0]]]]><![CDATA[></isfeatured>
<allowcomments><![CDATA[1]]]]><![CDATA[></allowcomments>
<totalcomments><![CDATA[0]]]]><![CDATA[></totalcomments>
<hasattachments><![CDATA[1]]]]><![CDATA[></hasattachments>
<attachments>
<attachment>
<id><![CDATA[4]]]]><![CDATA[></id>
<filename><![CDATA[photo.jpg]]]]><![CDATA[></filename>
<filesize><![CDATA[88.42 KB]]]]><![CDATA[></filesize>
<link><![CDATA[http://localhost/fusiongit/trunk/api/index.php?/Knowledgebase/Article/GetAttachment/1/20]]]]><![CDATA[></link></attachment>
<attachment>
<id><![CDATA[5]]]]><![CDATA[></id>
<filename><![CDATA[cap_ture1.png]]]]><![CDATA[></filename>
<filesize><![CDATA[8.99 KB]]]]><![CDATA[></filesize>
<link><![CDATA[http://localhost/fusiongit/trunk/api/index.php?/Knowledgebase/Article/GetAttachment/1/20]]]]><![CDATA[></link>
</attachment>
<attachment>
<id><![CDATA[20]]]]><![CDATA[></id>
<filename><![CDATA[abcde.txt]]]]><![CDATA[></filename>
<filesize><![CDATA[0.00 KB]]]]><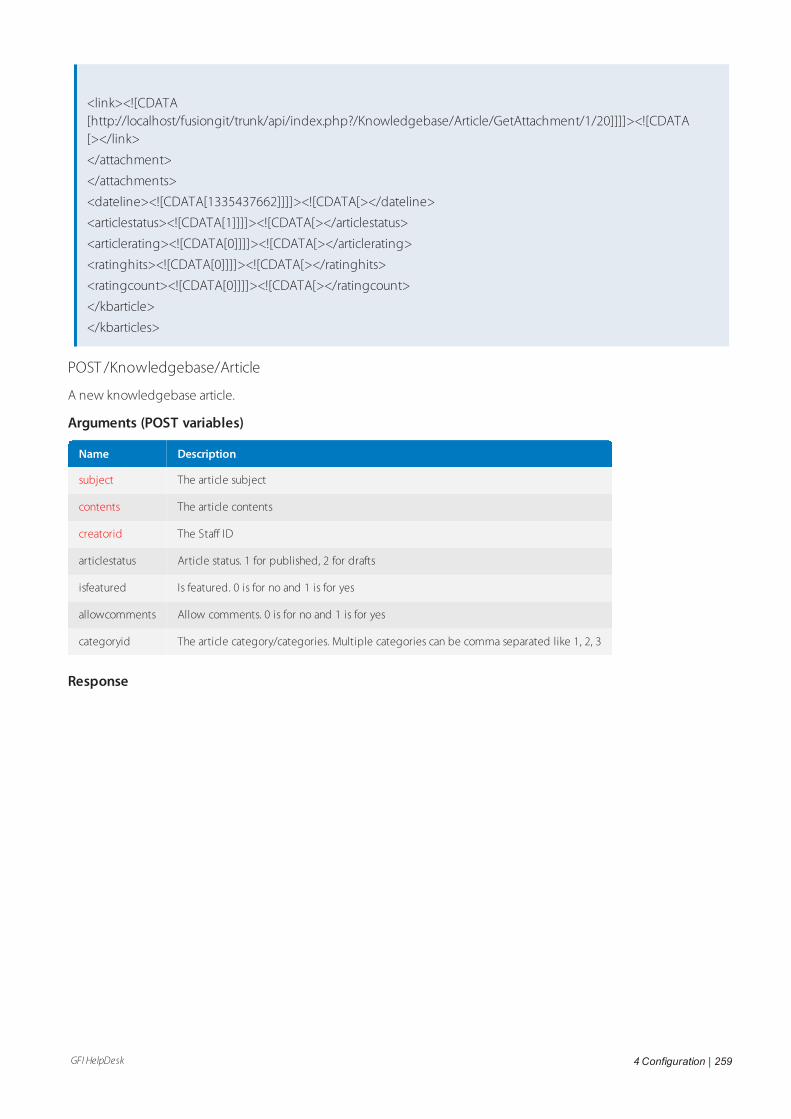
GFI HelpDesk 4 Configuration | 259
<link><![CDATA[http://localhost/fusiongit/trunk/api/index.php?/Knowledgebase/Article/GetAttachment/1/20]]]]><![CDATA[></link>
</attachment>
</attachments>
<dateline><![CDATA[1335437662]]]]><![CDATA[></dateline>
<articlestatus><![CDATA[1]]]]><![CDATA[></articlestatus>
<articlerating><![CDATA[0]]]]><![CDATA[></articlerating>
<ratinghits><![CDATA[0]]]]><![CDATA[></ratinghits>
<ratingcount><![CDATA[0]]]]><
GFI HelpDesk 4 Configuration | 260
<kbarticles>
<kbarticle>
<kbarticleid><![CDATA[1]]]]><![CDATA[></kbarticleid>
<contents><![CDATA[Contents]]]]><![CDATA[></contents>
<contentstext><![CDATA[Contents]]]]><![CDATA[></contentstext>
<categories>
<categoryid><![CDATA[0]]]]><![CDATA[></categoryid>
</categories>
<creator><![CDATA[2]]]]><![CDATA[></creator>
<creatorid><![CDATA[1]]]]><![CDATA[></creatorid>
<author><![CDATA[Simaranjit Singh]]]]><![CDATA[></author>
<email><![CDATA[[email protected]]]]]><![CDATA[></email>
<subject><![CDATA[Subject]]]]><![CDATA[></subject>
<isedited><![CDATA[1]]]]><![CDATA[></isedited>
<editeddateline><![CDATA[1336757517]]]]><![CDATA[></editeddateline>
<editedstaffid><![CDATA[1]]]]><![CDATA[></editedstaffid>
<views><![CDATA[24]]]]><![CDATA[></views>
<isfeatured><![CDATA[0]]]]><![CDATA[></isfeatured>
<allowcomments><![CDATA[1]]]]><![CDATA[></allowcomments>
<totalcomments><![CDATA[0]]]]><![CDATA[></totalcomments>
<hasattachments><![CDATA[1]]]]><![CDATA[></hasattachments>
<attachments>
<attachment>
<id><![CDATA[4]]]]><![CDATA[></id>
<filename><![CDATA[photo.jpg]]]]><![CDATA[></filename>
<filesize><![CDATA[88.42 KB]]]]><![CDATA[></filesize>
<link><![CDATA[http://localhost/fusiongit/trunk/api/index.php?/Knowledgebase/Article/GetAttachment/1/20]]]]><![CDATA[></link>
</attachment>
<attachment>
<id><![CDATA[5]]]]><![CDATA[></id>
<filename><![CDATA[cap_ture1.png]]]]><![CDATA[></filename>
<filesize><![CDATA[8.99 KB]]]]><![CDATA[></filesize>
<link><![CDATA[http://localhost/fusiongit/trunk/api/index.php?/Knowledgebase/Article/GetAttachment/1/20]]]]><![CDATA[></link>
</attachment>
<attachment>
<id><![CDATA[20]]]]><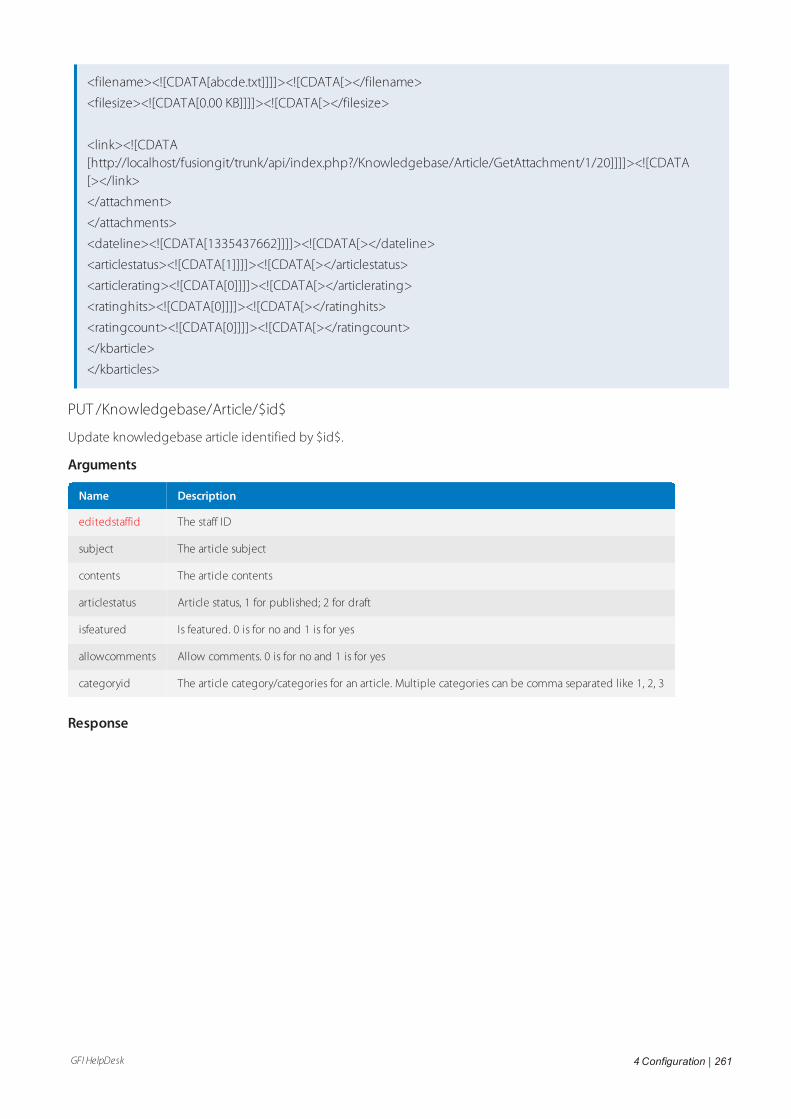
GFI HelpDesk 4 Configuration | 261
<filename><![CDATA[abcde.txt]]]]><![CDATA[></filename>
<filesize><![CDATA[0.00 KB]]]]><![CDATA[></filesize>
<link><![CDATA[http://localhost/fusiongit/trunk/api/index.php?/Knowledgebase/Article/GetAttachment/1/20]]]]><![CDATA[></link>
</attachment>
</attachments>
<dateline><![CDATA[1335437662]]]]><![CDATA[></dateline>
<articlestatus><![CDATA[1]]]]><![CDATA[></articlestatus>
<articlerating><![CDATA[0]]]]><![CDATA[></articlerating>
<ratinghits><![CDATA[0]]]]><![CDATA[></ratinghits>
<ratingcount><![CDATA[0]]]]><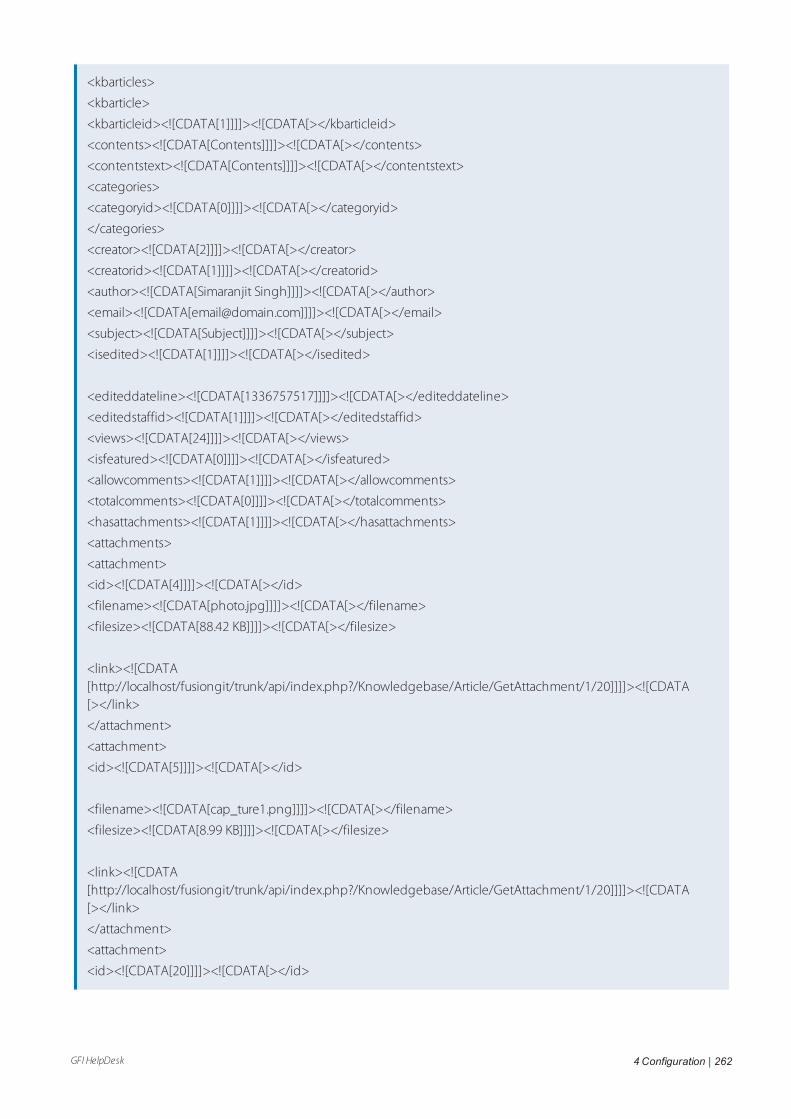
GFI HelpDesk 4 Configuration | 262
<kbarticles>
<kbarticle>
<kbarticleid><![CDATA[1]]]]><![CDATA[></kbarticleid>
<contents><![CDATA[Contents]]]]><![CDATA[></contents>
<contentstext><![CDATA[Contents]]]]><![CDATA[></contentstext>
<categories>
<categoryid><![CDATA[0]]]]><![CDATA[></categoryid>
</categories>
<creator><![CDATA[2]]]]><![CDATA[></creator>
<creatorid><![CDATA[1]]]]><![CDATA[></creatorid>
<author><![CDATA[Simaranjit Singh]]]]><![CDATA[></author>
<email><![CDATA[[email protected]]]]]><![CDATA[></email>
<subject><![CDATA[Subject]]]]><![CDATA[></subject>
<isedited><![CDATA[1]]]]><![CDATA[></isedited>
<editeddateline><![CDATA[1336757517]]]]><![CDATA[></editeddateline>
<editedstaffid><![CDATA[1]]]]><![CDATA[></editedstaffid>
<views><![CDATA[24]]]]><![CDATA[></views>
<isfeatured><![CDATA[0]]]]><![CDATA[></isfeatured>
<allowcomments><![CDATA[1]]]]><![CDATA[></allowcomments>
<totalcomments><![CDATA[0]]]]><![CDATA[></totalcomments>
<hasattachments><![CDATA[1]]]]><![CDATA[></hasattachments>
<attachments>
<attachment>
<id><![CDATA[4]]]]><![CDATA[></id>
<filename><![CDATA[photo.jpg]]]]><![CDATA[></filename>
<filesize><![CDATA[88.42 KB]]]]><![CDATA[></filesize>
<link><![CDATA[http://localhost/fusiongit/trunk/api/index.php?/Knowledgebase/Article/GetAttachment/1/20]]]]><![CDATA[></link>
</attachment>
<attachment>
<id><![CDATA[5]]]]><![CDATA[></id>
<filename><![CDATA[cap_ture1.png]]]]><![CDATA[></filename>
<filesize><![CDATA[8.99 KB]]]]><![CDATA[></filesize>
<link><![CDATA[http://localhost/fusiongit/trunk/api/index.php?/Knowledgebase/Article/GetAttachment/1/20]]]]><![CDATA[></link>
</attachment>
<attachment>
<id><![CDATA[20]]]]><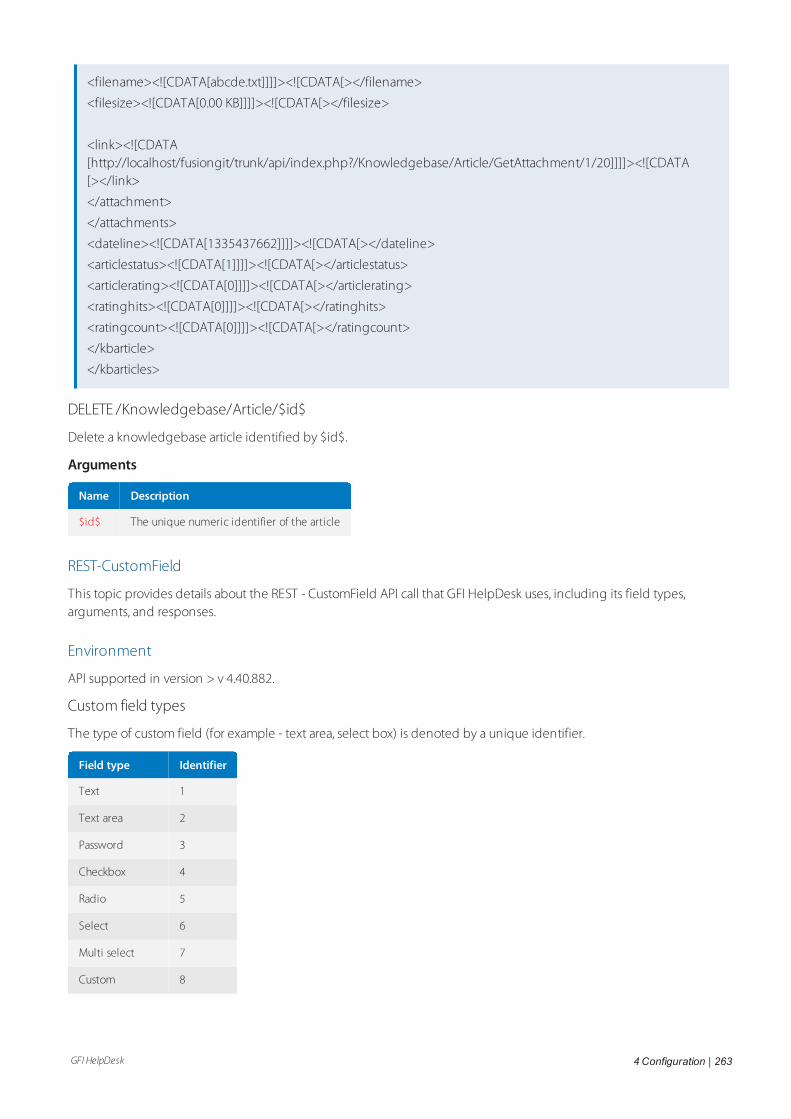
GFI HelpDesk 4 Configuration | 263
<filename><![CDATA[abcde.txt]]]]><![CDATA[></filename>
<filesize><![CDATA[0.00 KB]]]]><![CDATA[></filesize>
<link><![CDATA[http://localhost/fusiongit/trunk/api/index.php?/Knowledgebase/Article/GetAttachment/1/20]]]]><![CDATA[></link>
</attachment>
</attachments>
<dateline><![CDATA[1335437662]]]]><![CDATA[></dateline>
<articlestatus><![CDATA[1]]]]><![CDATA[></articlestatus>
<articlerating><![CDATA[0]]]]><![CDATA[></articlerating>
<ratinghits><![CDATA[0]]]]><![CDATA[></ratinghits>
<ratingcount><![CDATA[0]]]]><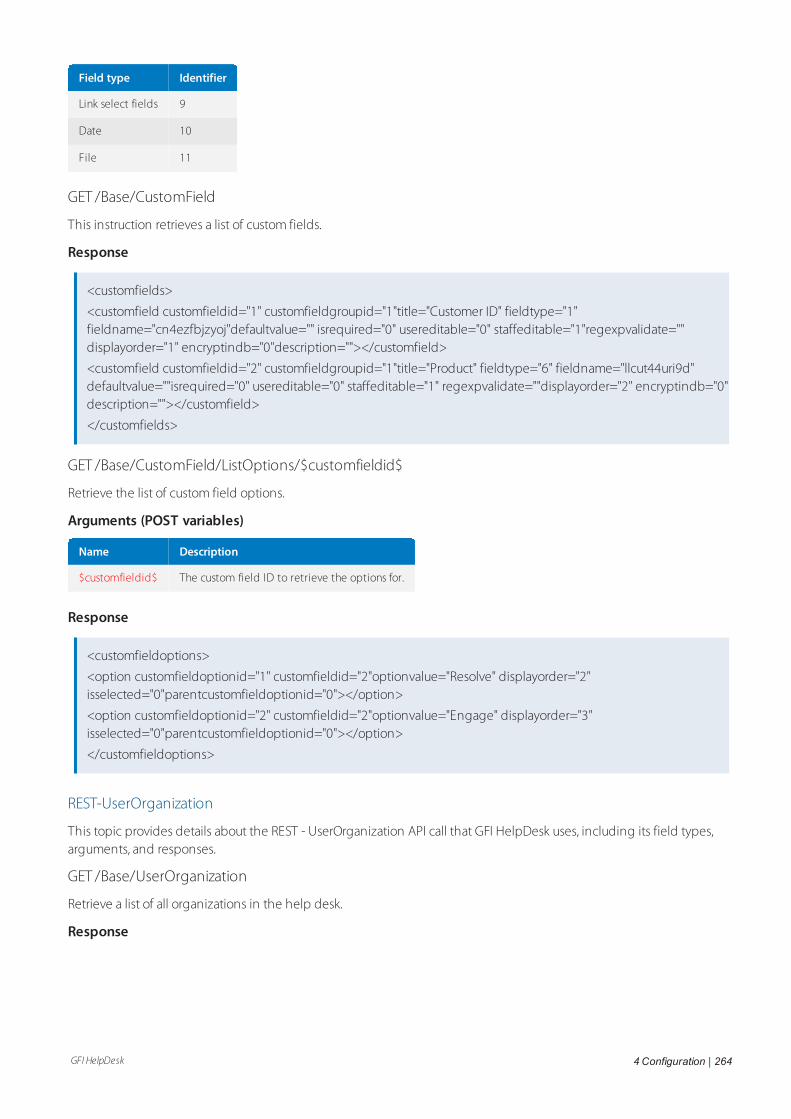
GFI HelpDesk 4 Configuration | 264
Field type Identifier
Link select fields 9
Date 10
File 11
GET /Base/CustomField
This instruction retrieves a list of custom fields.
Response
<customfields>
<customfield customfieldid="1" customfieldgroupid="1"title="Customer ID" fieldtype="1"fieldname="cn4ezfbjzyoj"defaultvalue="" isrequired="0" usereditable="0" staffeditable="1"regexpvalidate=""displayorder="1" encryptindb="0"description=""></customfield>
<customfield customfieldid="2" customfieldgroupid="1"title="Product" fieldtype="6" fieldname="llcut44uri9d"defaultvalue=""isrequired="0" usereditable="0" staffeditable="1" regexpvalidate=""displayorder="2" encryptindb="0"description=""></customfield>
</customfields>
GET /Base/CustomField/ListOptions/$customfieldid$
Retrieve the list of custom field options.
Arguments (POST variables)
Name Description
$customfieldid$ The custom field ID to retrieve the options for.
Response
<customfieldoptions>
<option customfieldoptionid="1" customfieldid="2"optionvalue="Resolve" displayorder="2"isselected="0"parentcustomfieldoptionid="0"></option>
<option customfieldoptionid="2" customfieldid="2"optionvalue="Engage" displayorder="3"isselected="0"parentcustomfieldoptionid="0"></option>
</customfieldoptions>
REST-UserOrganization
This topic provides details about the REST - UserOrganization API call that GFI HelpDesk uses, including its field types,arguments, and responses.
GET /Base/UserOrganization
Retrieve a list of all organizations in the help desk.
Response
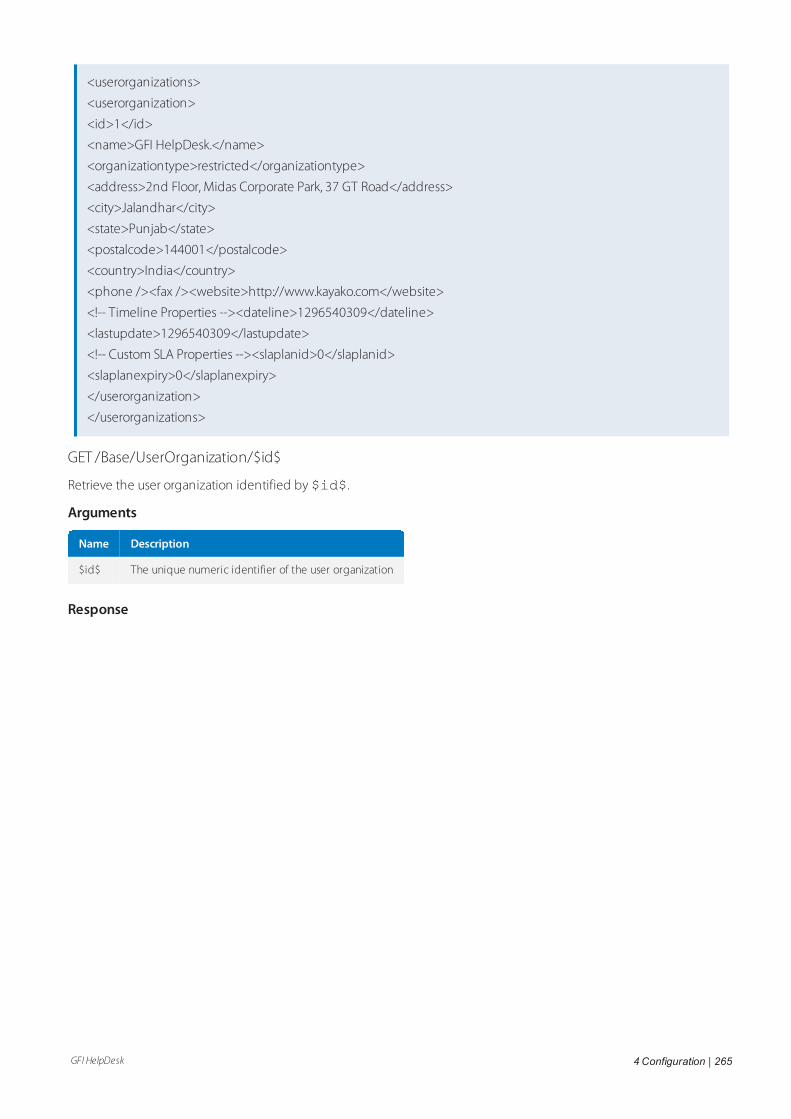
GFI HelpDesk 4 Configuration | 265
<userorganizations>
<userorganization>
<id>1</id>
<name>GFI HelpDesk.</name>
<organizationtype>restricted</organizationtype>
<address>2nd Floor, Midas Corporate Park, 37 GT Road</address>
<city>Jalandhar</city>
<state>Punjab</state>
<postalcode>144001</postalcode>
<country>India</country>
<phone /><fax /><website>http://www.kayako.com</website>
<!-- Timeline Properties --><dateline>1296540309</dateline>
<lastupdate>1296540309</lastupdate>
<!-- Custom SLA Properties --><slaplanid>0</slaplanid>
<slaplanexpiry>0</slaplanexpiry>
</userorganization>
</userorganizations>
GET /Base/UserOrganization/$id$
Retrieve the user organization identified by $id$.
Arguments
Name Description
$id$ The unique numeric identifier of the user organization
Response
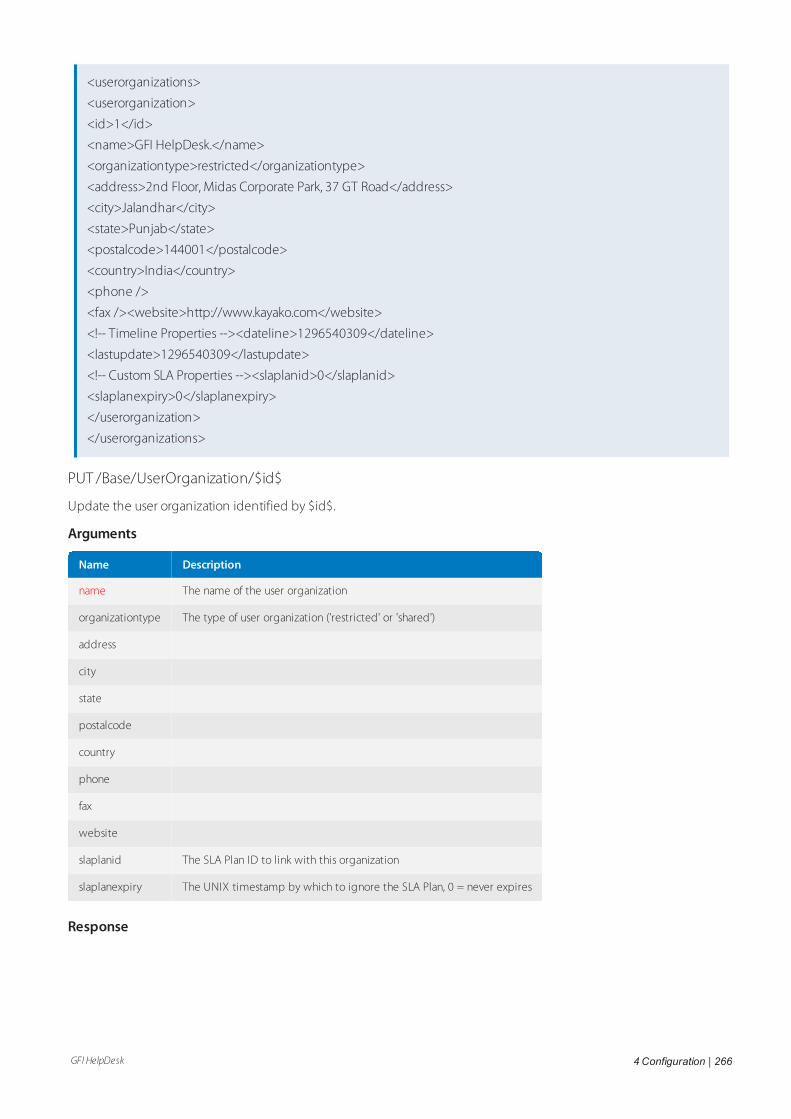
GFI HelpDesk 4 Configuration | 266
<userorganizations>
<userorganization>
<id>1</id>
<name>GFI HelpDesk.</name>
<organizationtype>restricted</organizationtype>
<address>2nd Floor, Midas Corporate Park, 37 GT Road</address>
<city>Jalandhar</city>
<state>Punjab</state>
<postalcode>144001</postalcode>
<country>India</country>
<phone />
<fax /><website>http://www.kayako.com</website>
<!-- Timeline Properties --><dateline>1296540309</dateline>
<lastupdate>1296540309</lastupdate>
<!-- Custom SLA Properties --><slaplanid>0</slaplanid>
<slaplanexpiry>0</slaplanexpiry>
</userorganization>
</userorganizations>
PUT /Base/UserOrganization/$id$
Update the user organization identified by $id$.
Arguments
Name Description
name The name of the user organization
organizationtype The type of user organization ('restricted' or 'shared')
address
city
state
postalcode
country
phone
fax
website
slaplanid The SLA Plan ID to link with this organization
slaplanexpiry The UNIX timestamp by which to ignore the SLA Plan, 0 = never expires
Response

GFI HelpDesk 4 Configuration | 267
<userorganizations>
<userorganization>
<id>1</id>
<name>GFI HelpDesk.</name>
<organizationtype>restricted</organizationtype>
<address>2nd Floor, Midas Corporate Park, 37 GT Road</address>
<city>Jalandhar</city>
<state>Punjab</state>
<postalcode>144001</postalcode>
<country>India</country>
<phone /><fax /> <website>http://www.kayako.com</website>
<!-- Timeline Properties --><dateline>1296540309</dateline>
<lastupdate>1296540309</lastupdate>
<!-- Custom SLA Properties -->
<slaplanid>0</slaplanid>
<slaplanexpiry>0</slaplanexpiry>
</userorganization>
</userorganizations>
POST /Base/UserOrganization
Create a new user organization record.
Arguments
Name Description
name The name of the user organization.
organizationtype The type of user organization('restricted'or'shared')
address
city
state
postalcode
country
phone
fax
website
slaplanid The SLA Plan ID to link with this organization
slaplanexpiry The UNIX timestamp by which to ignore the SLA Plan, 0 = never expires
Response
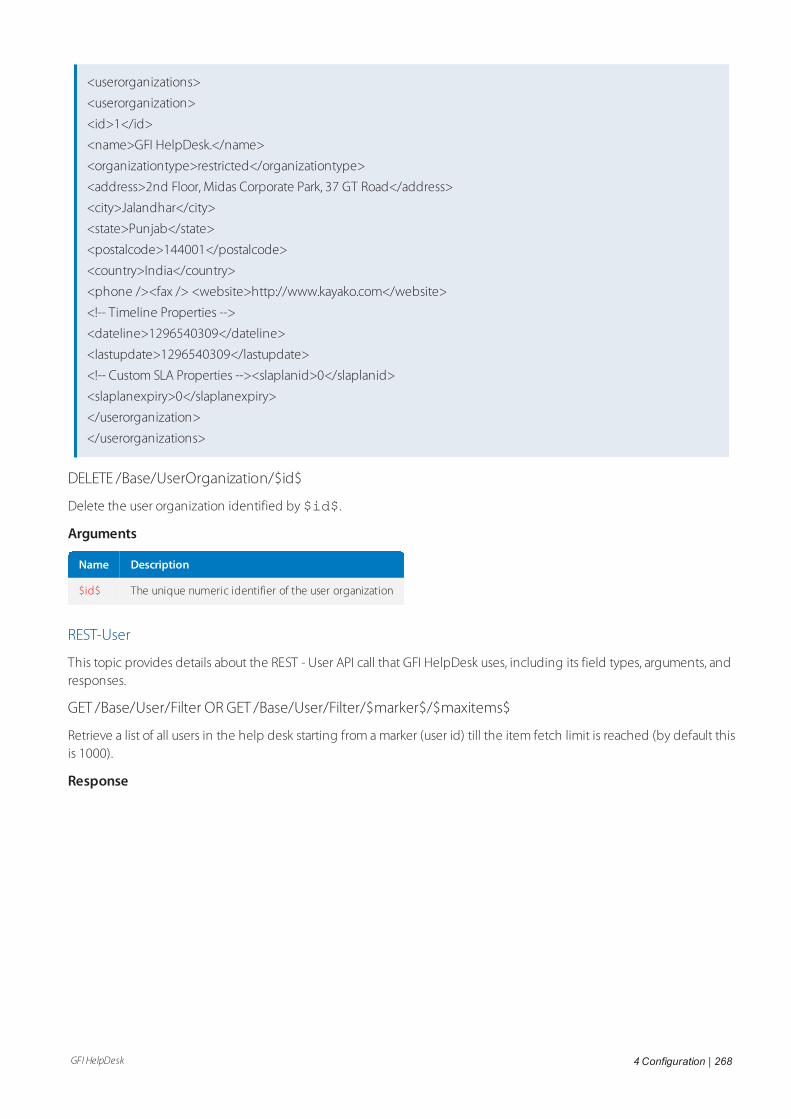
GFI HelpDesk 4 Configuration | 268
<userorganizations>
<userorganization>
<id>1</id>
<name>GFI HelpDesk.</name>
<organizationtype>restricted</organizationtype>
<address>2nd Floor, Midas Corporate Park, 37 GT Road</address>
<city>Jalandhar</city>
<state>Punjab</state>
<postalcode>144001</postalcode>
<country>India</country>
<phone /><fax /> <website>http://www.kayako.com</website>
<!-- Timeline Properties -->
<dateline>1296540309</dateline>
<lastupdate>1296540309</lastupdate>
<!-- Custom SLA Properties --><slaplanid>0</slaplanid>
<slaplanexpiry>0</slaplanexpiry>
</userorganization>
</userorganizations>
DELETE /Base/UserOrganization/$id$
Delete the user organization identified by $id$.
Arguments
Name Description
$id$ The unique numeric identifier of the user organization
REST-User
This topic provides details about the REST - User API call that GFI HelpDesk uses, including its field types, arguments, andresponses.
GET /Base/User/Filter OR GET /Base/User/Filter/$marker$/$maxitems$
Retrieve a list of all users in the help desk starting from a marker (user id) till the item fetch limit is reached (by default thisis 1000).
Response
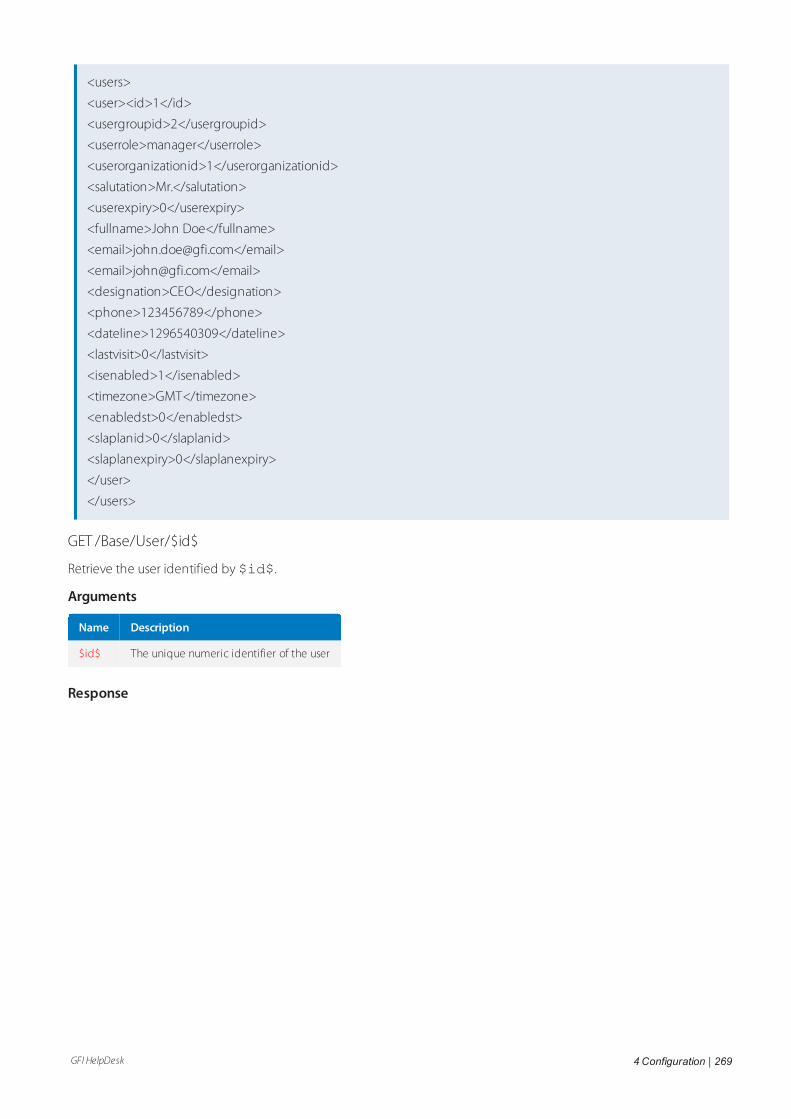
GFI HelpDesk 4 Configuration | 269
<users>
<user><id>1</id>
<usergroupid>2</usergroupid>
<userrole>manager</userrole>
<userorganizationid>1</userorganizationid>
<salutation>Mr.</salutation>
<userexpiry>0</userexpiry>
<fullname>John Doe</fullname>
<email>[email protected]</email>
<email>[email protected]</email>
<designation>CEO</designation>
<phone>123456789</phone>
<dateline>1296540309</dateline>
<lastvisit>0</lastvisit>
<isenabled>1</isenabled>
<timezone>GMT</timezone>
<enabledst>0</enabledst>
<slaplanid>0</slaplanid>
<slaplanexpiry>0</slaplanexpiry>
</user>
</users>
GET /Base/User/$id$
Retrieve the user identified by $id$.
Arguments
Name Description
$id$ The unique numeric identifier of the user
Response
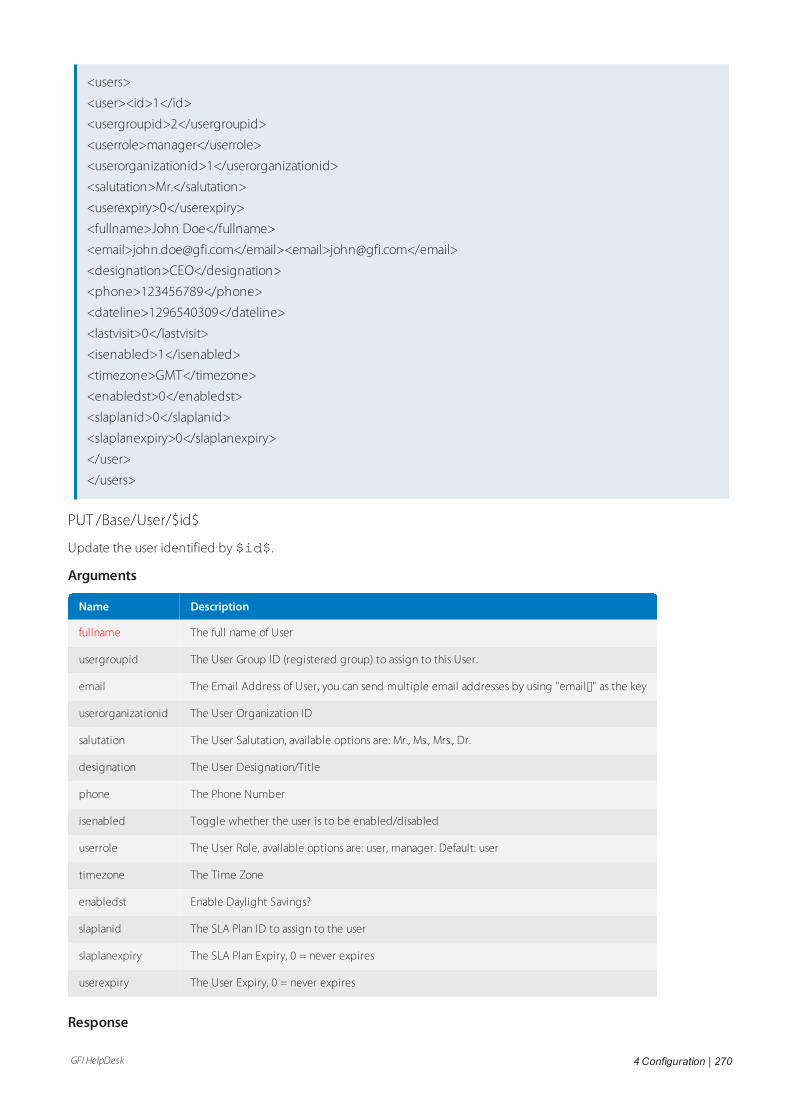
GFI HelpDesk 4 Configuration | 270
<users>
<user><id>1</id>
<usergroupid>2</usergroupid>
<userrole>manager</userrole>
<userorganizationid>1</userorganizationid>
<salutation>Mr.</salutation>
<userexpiry>0</userexpiry>
<fullname>John Doe</fullname>
<email>[email protected]</email><email>[email protected]</email>
<designation>CEO</designation>
<phone>123456789</phone>
<dateline>1296540309</dateline>
<lastvisit>0</lastvisit>
<isenabled>1</isenabled>
<timezone>GMT</timezone>
<enabledst>0</enabledst>
<slaplanid>0</slaplanid>
<slaplanexpiry>0</slaplanexpiry>
</user>
</users>
PUT /Base/User/$id$
Update the user identified by $id$.
Arguments
Name Description
fullname The full name of User
usergroupid The User Group ID (registered group) to assign to this User.
email The Email Address of User, you can send multiple email addresses by using "email[]" as the key
userorganizationid The User Organization ID
salutation The User Salutation, available options are: Mr., Ms., Mrs., Dr.
designation The User Designation/Title
phone The Phone Number
isenabled Toggle whether the user is to be enabled/disabled
userrole The User Role, available options are: user, manager. Default: user
timezone The Time Zone
enabledst Enable Daylight Savings?
slaplanid The SLA Plan ID to assign to the user
slaplanexpiry The SLA Plan Expiry, 0 = never expires
userexpiry The User Expiry, 0 = never expires
Response
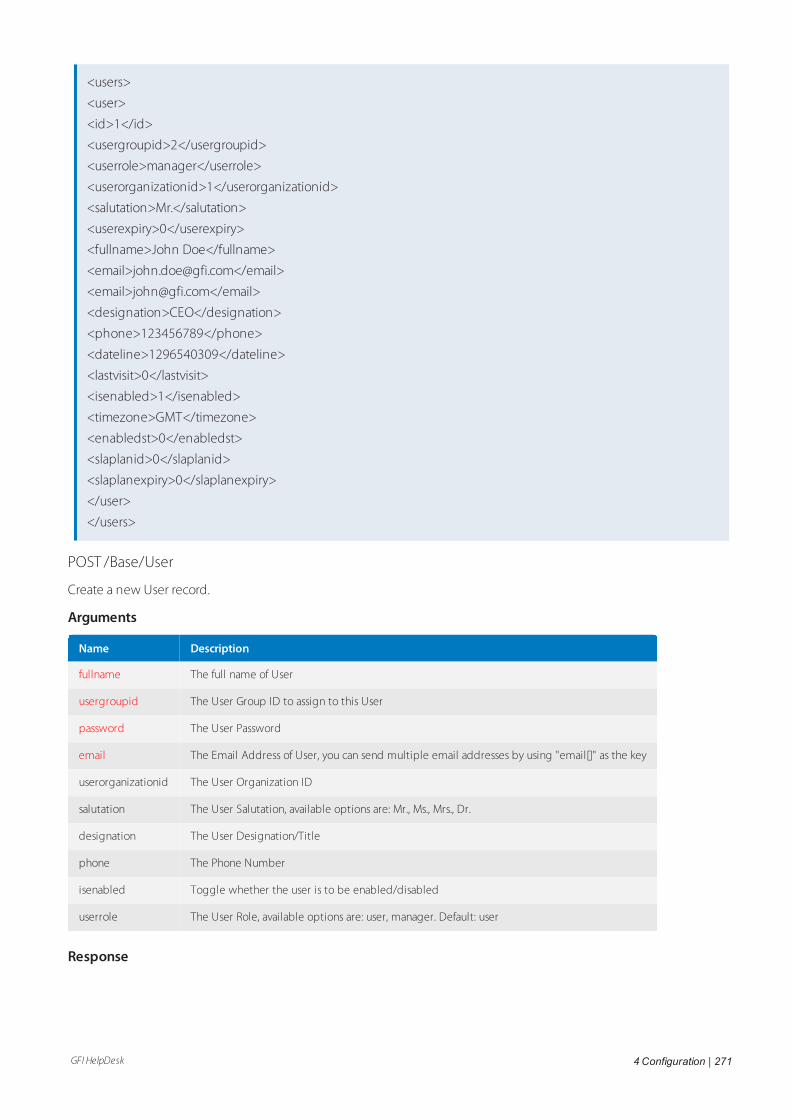
GFI HelpDesk 4 Configuration | 271
<users>
<user>
<id>1</id>
<usergroupid>2</usergroupid>
<userrole>manager</userrole>
<userorganizationid>1</userorganizationid>
<salutation>Mr.</salutation>
<userexpiry>0</userexpiry>
<fullname>John Doe</fullname>
<email>[email protected]</email>
<email>[email protected]</email>
<designation>CEO</designation>
<phone>123456789</phone>
<dateline>1296540309</dateline>
<lastvisit>0</lastvisit>
<isenabled>1</isenabled>
<timezone>GMT</timezone>
<enabledst>0</enabledst>
<slaplanid>0</slaplanid>
<slaplanexpiry>0</slaplanexpiry>
</user>
</users>
POST /Base/User
Create a new User record.
Arguments
Name Description
fullname The full name of User
usergroupid The User Group ID to assign to this User
password The User Password
email The Email Address of User, you can send multiple email addresses by using "email[]" as the key
userorganizationid The User Organization ID
salutation The User Salutation, available options are: Mr., Ms., Mrs., Dr.
designation The User Designation/Title
phone The Phone Number
isenabled Toggle whether the user is to be enabled/disabled
userrole The User Role, available options are: user, manager. Default: user
Response
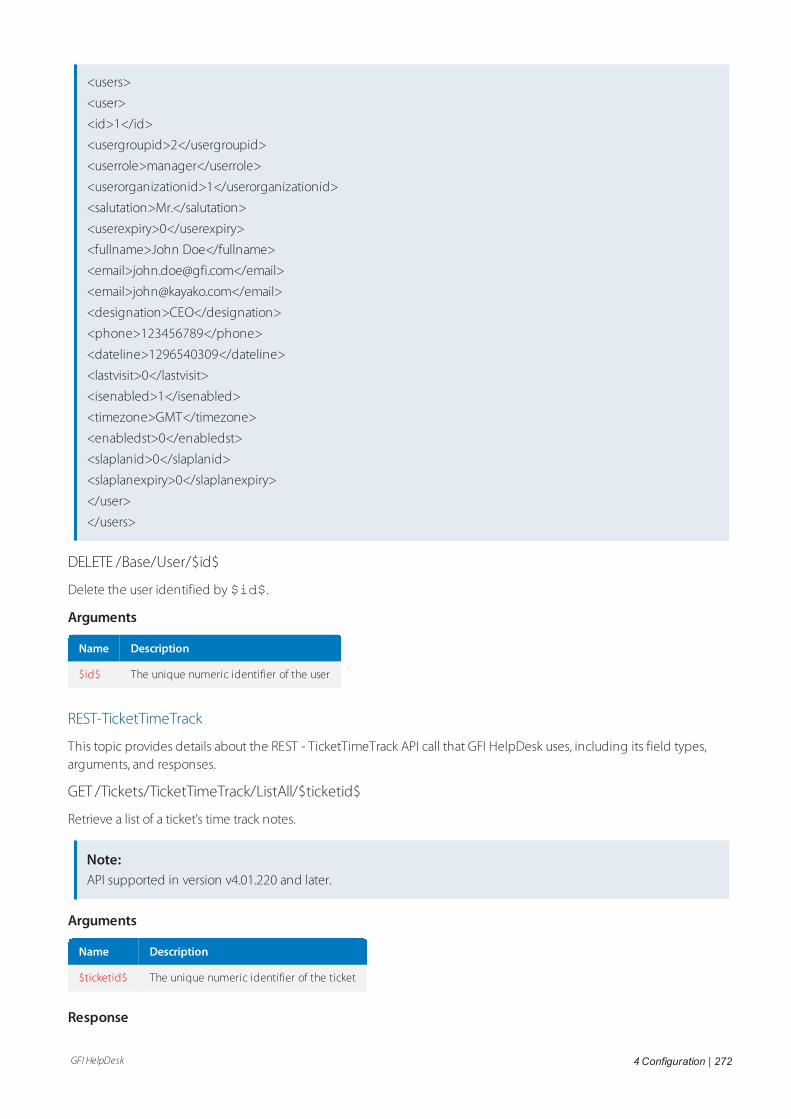
GFI HelpDesk 4 Configuration | 272
<users>
<user>
<id>1</id>
<usergroupid>2</usergroupid>
<userrole>manager</userrole>
<userorganizationid>1</userorganizationid>
<salutation>Mr.</salutation>
<userexpiry>0</userexpiry>
<fullname>John Doe</fullname>
<email>[email protected]</email>
<email>[email protected]</email>
<designation>CEO</designation>
<phone>123456789</phone>
<dateline>1296540309</dateline>
<lastvisit>0</lastvisit>
<isenabled>1</isenabled>
<timezone>GMT</timezone>
<enabledst>0</enabledst>
<slaplanid>0</slaplanid>
<slaplanexpiry>0</slaplanexpiry>
</user>
</users>
DELETE /Base/User/$id$
Delete the user identified by $id$.
Arguments
Name Description
$id$ The unique numeric identifier of the user
REST-TicketTimeTrack
This topic provides details about the REST - TicketTimeTrack API call that GFI HelpDesk uses, including its field types,arguments, and responses.
GET /Tickets/TicketTimeTrack/ListAll/$ticketid$
Retrieve a list of a ticket's time track notes.
Note:API supported in version v4.01.220 and later.
Arguments
Name Description
$ticketid$ The unique numeric identifier of the ticket
Response
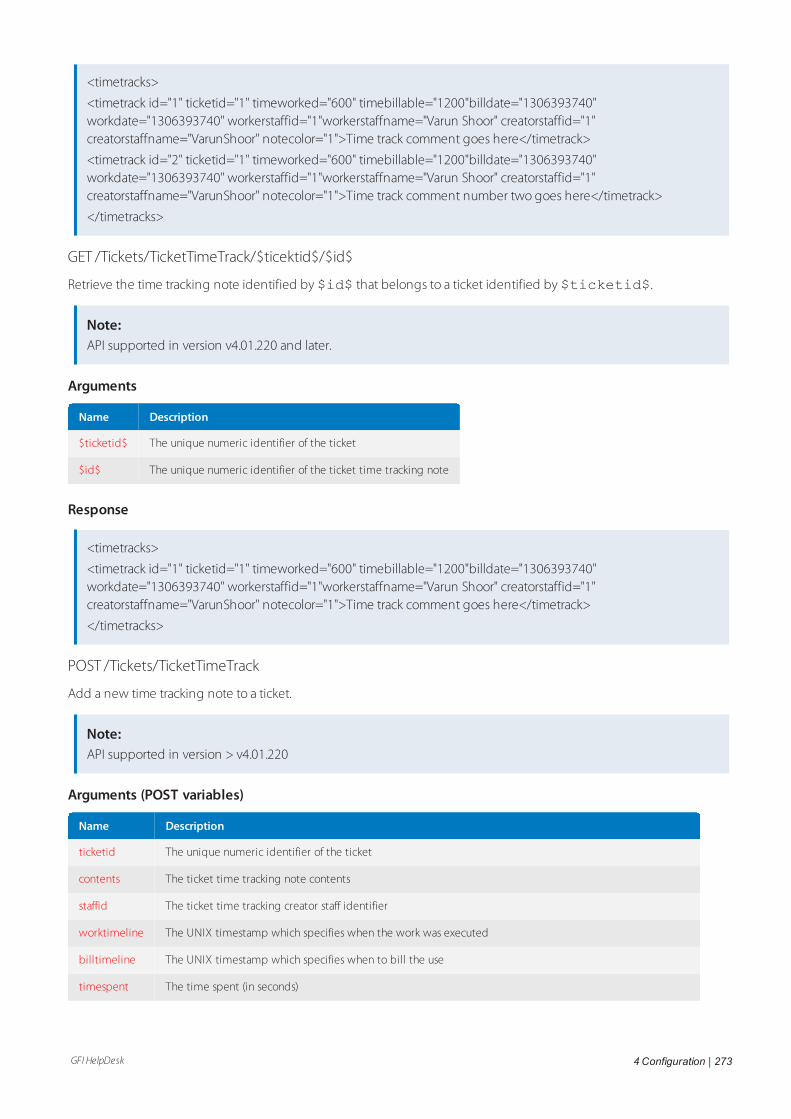
GFI HelpDesk 4 Configuration | 273
<timetracks>
<timetrack id="1" ticketid="1" timeworked="600" timebillable="1200"billdate="1306393740"workdate="1306393740" workerstaffid="1"workerstaffname="Varun Shoor" creatorstaffid="1"creatorstaffname="VarunShoor" notecolor="1">Time track comment goes here</timetrack>
<timetrack id="2" ticketid="1" timeworked="600" timebillable="1200"billdate="1306393740"workdate="1306393740" workerstaffid="1"workerstaffname="Varun Shoor" creatorstaffid="1"creatorstaffname="VarunShoor" notecolor="1">Time track comment number two goes here</timetrack>
</timetracks>
GET /Tickets/TicketTimeTrack/$ticektid$/$id$
Retrieve the time tracking note identified by $id$ that belongs to a ticket identified by $ticketid$.
Note:API supported in version v4.01.220 and later.
Arguments
Name Description
$ticketid$ The unique numeric identifier of the ticket
$id$ The unique numeric identifier of the ticket time tracking note
Response
<timetracks>
<timetrack id="1" ticketid="1" timeworked="600" timebillable="1200"billdate="1306393740"workdate="1306393740" workerstaffid="1"workerstaffname="Varun Shoor" creatorstaffid="1"creatorstaffname="VarunShoor" notecolor="1">Time track comment goes here</timetrack>
</timetracks>
POST /Tickets/TicketTimeTrack
Add a new time tracking note to a ticket.
Note:API supported in version > v4.01.220
Arguments (POST variables)
Name Description
ticketid The unique numeric identifier of the ticket
contents The ticket time tracking note contents
staffid The ticket time tracking creator staff identifier
worktimeline The UNIX timestamp which specifies when the work was executed
billtimeline The UNIX timestamp which specifies when to bill the use
timespent The time spent (in seconds)
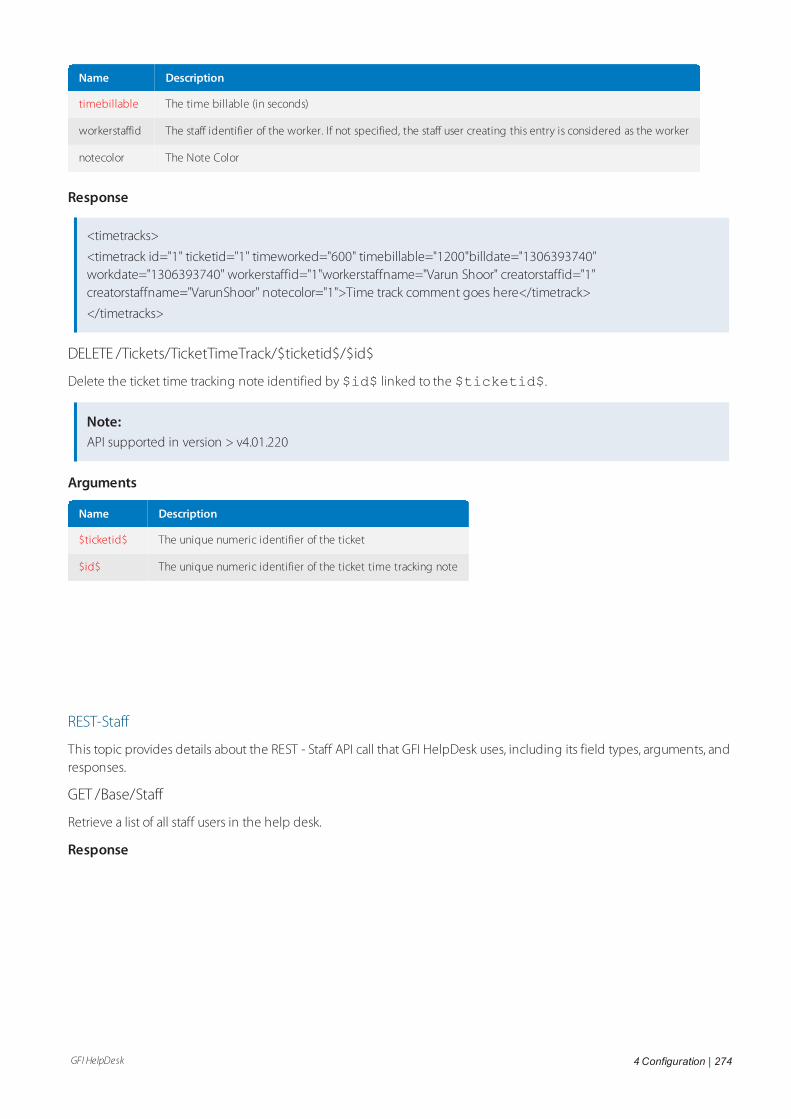
GFI HelpDesk 4 Configuration | 274
Name Description
timebillable The time billable (in seconds)
workerstaffid The staff identifier of the worker. If not specified, the staff user creating this entry is considered as the worker
notecolor The Note Color
Response
<timetracks>
<timetrack id="1" ticketid="1" timeworked="600" timebillable="1200"billdate="1306393740"workdate="1306393740" workerstaffid="1"workerstaffname="Varun Shoor" creatorstaffid="1"creatorstaffname="VarunShoor" notecolor="1">Time track comment goes here</timetrack>
</timetracks>
DELETE /Tickets/TicketTimeTrack/$ticketid$/$id$
Delete the ticket time tracking note identified by $id$ linked to the $ticketid$.
Note:API supported in version > v4.01.220
Arguments
Name Description
$ticketid$ The unique numeric identifier of the ticket
$id$ The unique numeric identifier of the ticket time tracking note
REST-Staff
This topic provides details about the REST - Staff API call that GFI HelpDesk uses, including its field types, arguments, andresponses.
GET /Base/Staff
Retrieve a list of all staff users in the help desk.
Response
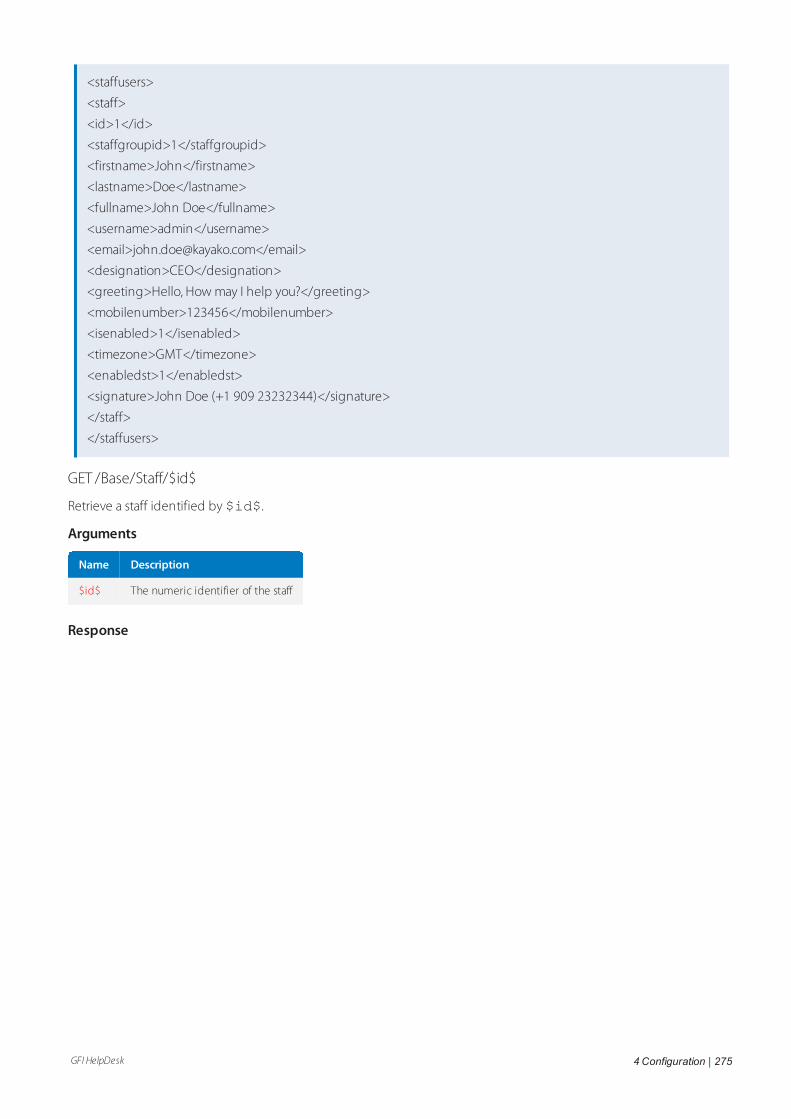
GFI HelpDesk 4 Configuration | 275
<staffusers>
<staff>
<id>1</id>
<staffgroupid>1</staffgroupid>
<firstname>John</firstname>
<lastname>Doe</lastname>
<fullname>John Doe</fullname>
<username>admin</username>
<email>[email protected]</email>
<designation>CEO</designation>
<greeting>Hello, How may I help you?</greeting>
<mobilenumber>123456</mobilenumber>
<isenabled>1</isenabled>
<timezone>GMT</timezone>
<enabledst>1</enabledst>
<signature>John Doe (+1 909 23232344)</signature>
</staff>
</staffusers>
GET /Base/Staff/$id$
Retrieve a staff identified by $id$.
Arguments
Name Description
$id$ The numeric identifier of the staff
Response
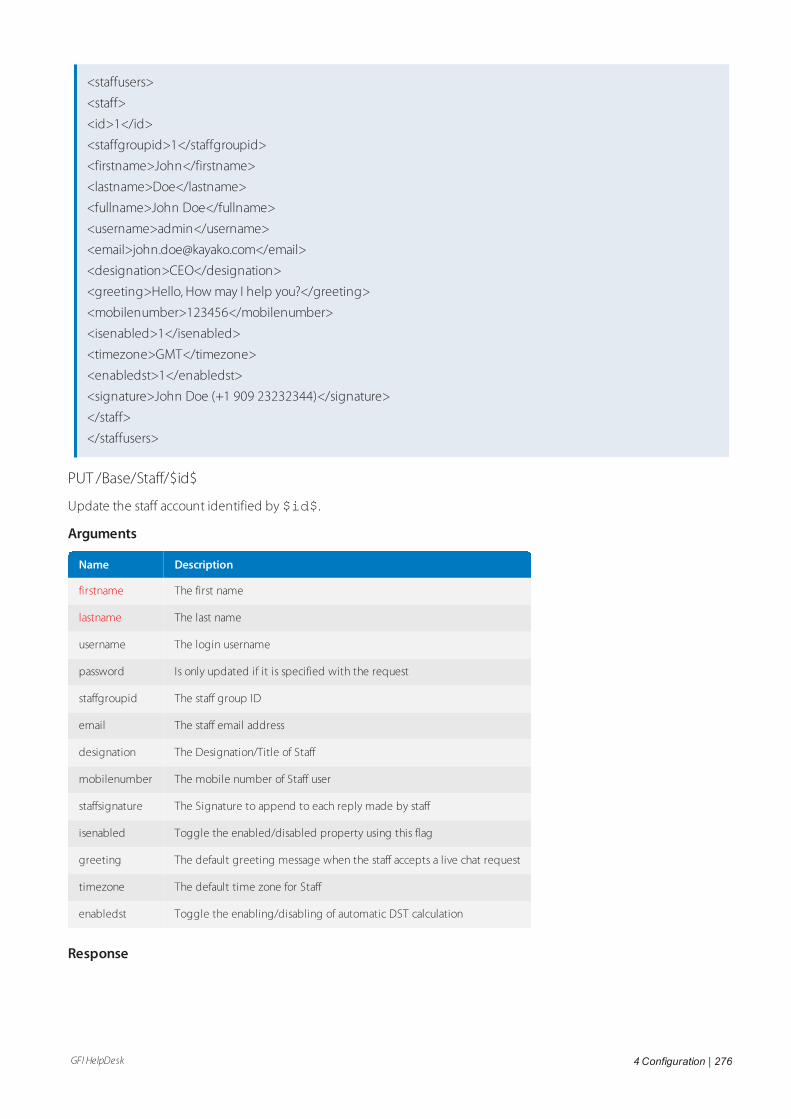
GFI HelpDesk 4 Configuration | 276
<staffusers>
<staff>
<id>1</id>
<staffgroupid>1</staffgroupid>
<firstname>John</firstname>
<lastname>Doe</lastname>
<fullname>John Doe</fullname>
<username>admin</username>
<email>[email protected]</email>
<designation>CEO</designation>
<greeting>Hello, How may I help you?</greeting>
<mobilenumber>123456</mobilenumber>
<isenabled>1</isenabled>
<timezone>GMT</timezone>
<enabledst>1</enabledst>
<signature>John Doe (+1 909 23232344)</signature>
</staff>
</staffusers>
PUT /Base/Staff/$id$
Update the staff account identified by $id$.
Arguments
Name Description
firstname The first name
lastname The last name
username The login username
password Is only updated if it is specified with the request
staffgroupid The staff group ID
email The staff email address
designation The Designation/Title of Staff
mobilenumber The mobile number of Staff user
staffsignature The Signature to append to each reply made by staff
isenabled Toggle the enabled/disabled property using this flag
greeting The default greeting message when the staff accepts a live chat request
timezone The default time zone for Staff
enabledst Toggle the enabling/disabling of automatic DST calculation
Response
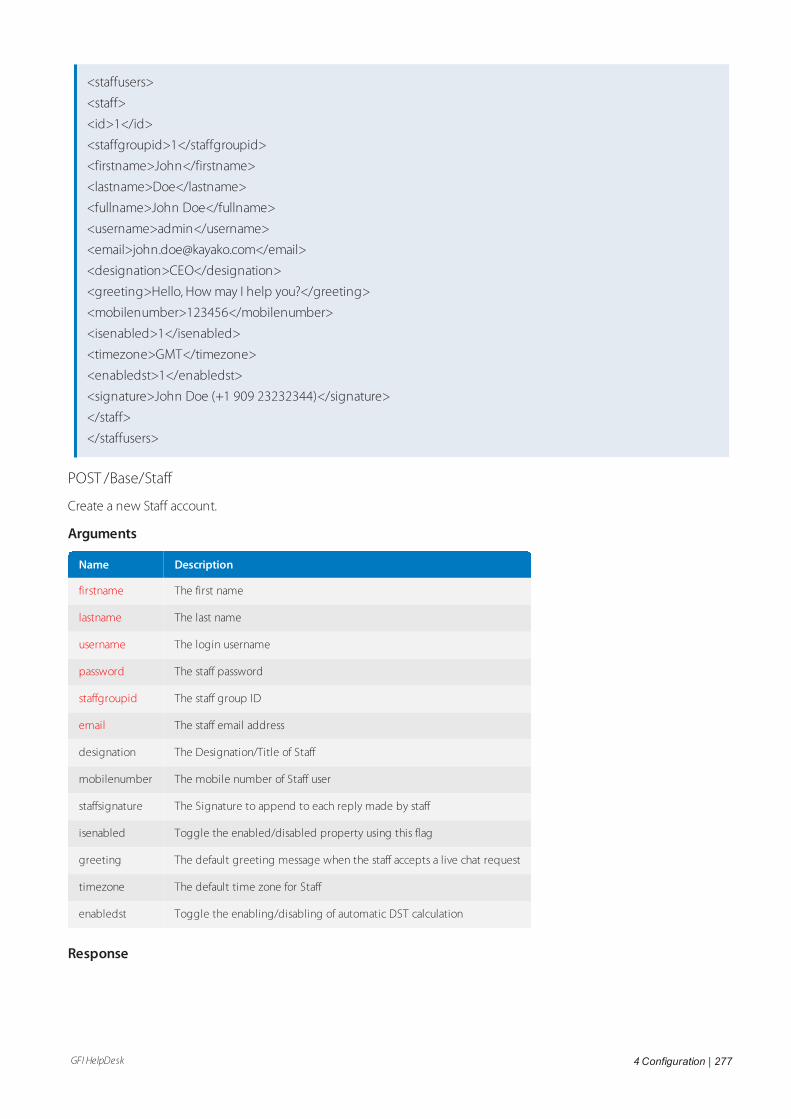
GFI HelpDesk 4 Configuration | 277
<staffusers>
<staff>
<id>1</id>
<staffgroupid>1</staffgroupid>
<firstname>John</firstname>
<lastname>Doe</lastname>
<fullname>John Doe</fullname>
<username>admin</username>
<email>[email protected]</email>
<designation>CEO</designation>
<greeting>Hello, How may I help you?</greeting>
<mobilenumber>123456</mobilenumber>
<isenabled>1</isenabled>
<timezone>GMT</timezone>
<enabledst>1</enabledst>
<signature>John Doe (+1 909 23232344)</signature>
</staff>
</staffusers>
POST /Base/Staff
Create a new Staff account.
Arguments
Name Description
firstname The first name
lastname The last name
username The login username
password The staff password
staffgroupid The staff group ID
email The staff email address
designation The Designation/Title of Staff
mobilenumber The mobile number of Staff user
staffsignature The Signature to append to each reply made by staff
isenabled Toggle the enabled/disabled property using this flag
greeting The default greeting message when the staff accepts a live chat request
timezone The default time zone for Staff
enabledst Toggle the enabling/disabling of automatic DST calculation
Response
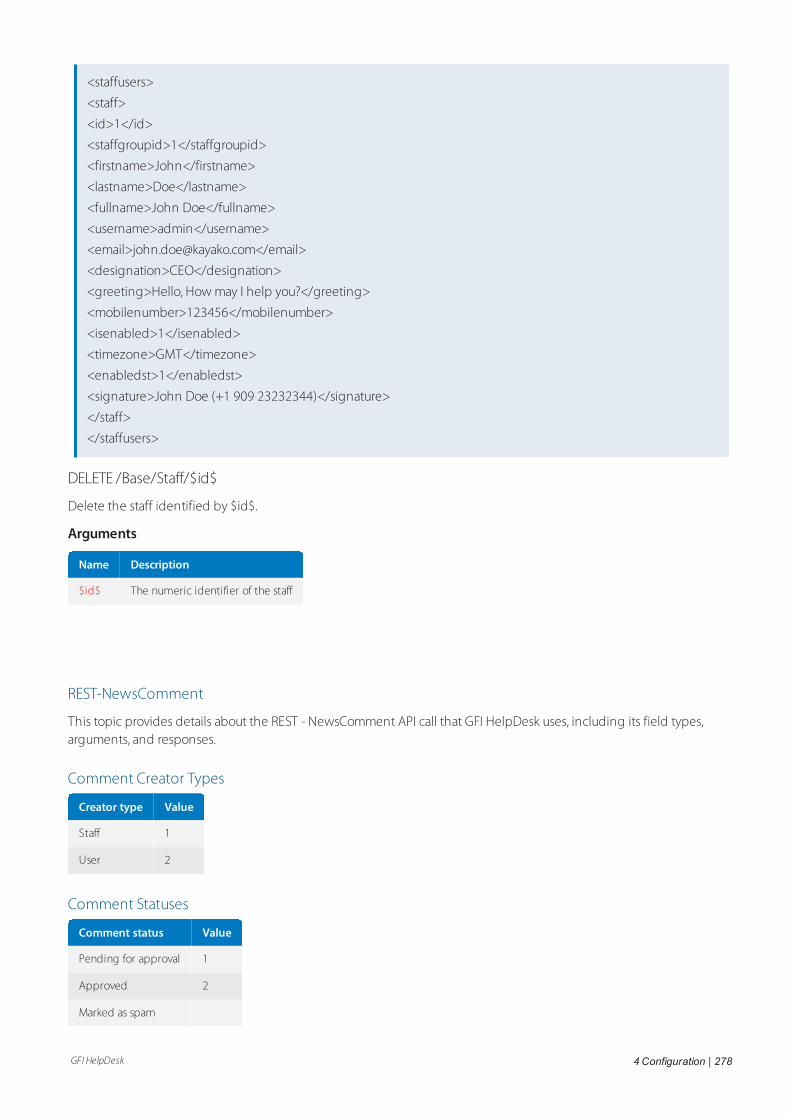
GFI HelpDesk 4 Configuration | 278
<staffusers>
<staff>
<id>1</id>
<staffgroupid>1</staffgroupid>
<firstname>John</firstname>
<lastname>Doe</lastname>
<fullname>John Doe</fullname>
<username>admin</username>
<email>[email protected]</email>
<designation>CEO</designation>
<greeting>Hello, How may I help you?</greeting>
<mobilenumber>123456</mobilenumber>
<isenabled>1</isenabled>
<timezone>GMT</timezone>
<enabledst>1</enabledst>
<signature>John Doe (+1 909 23232344)</signature>
</staff>
</staffusers>
DELETE /Base/Staff/$id$
Delete the staff identified by $id$.
Arguments
Name Description
$id$ The numeric identifier of the staff
REST-NewsComment
This topic provides details about the REST - NewsComment API call that GFI HelpDesk uses, including its field types,arguments, and responses.
Comment Creator Types
Creator type Value
Staff 1
User 2
Comment Statuses
Comment status Value
Pending for approval 1
Approved 2
Marked as spam
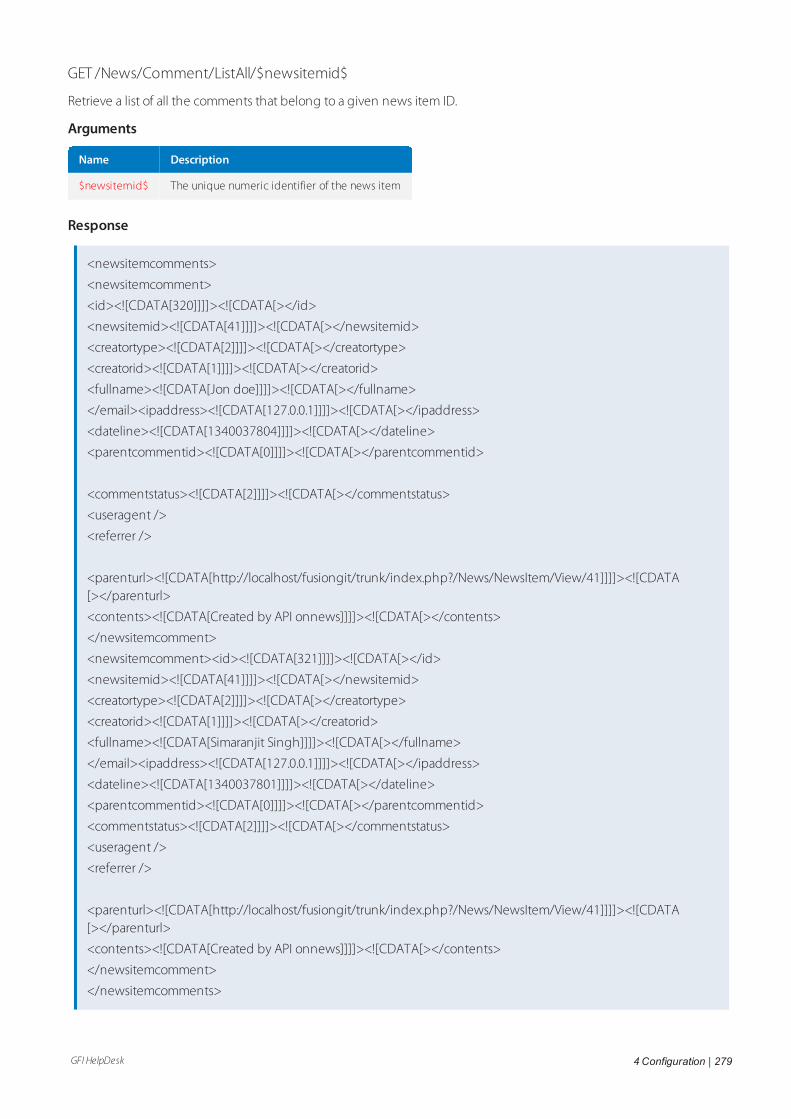
GFI HelpDesk 4 Configuration | 279
GET /News/Comment/ListAll/$newsitemid$
Retrieve a list of all the comments that belong to a given news item ID.
Arguments
Name Description
$newsitemid$ The unique numeric identifier of the news item
Response
<newsitemcomments>
<newsitemcomment>
<id><![CDATA[320]]]]><![CDATA[></id>
<newsitemid><![CDATA[41]]]]><![CDATA[></newsitemid>
<creatortype><![CDATA[2]]]]><![CDATA[></creatortype>
<creatorid><![CDATA[1]]]]><![CDATA[></creatorid>
<fullname><![CDATA[Jon doe]]]]><![CDATA[></fullname>
</email><ipaddress><![CDATA[127.0.0.1]]]]><![CDATA[></ipaddress>
<dateline><![CDATA[1340037804]]]]><![CDATA[></dateline>
<parentcommentid><![CDATA[0]]]]><![CDATA[></parentcommentid>
<commentstatus><![CDATA[2]]]]><![CDATA[></commentstatus>
<useragent />
<referrer />
<parenturl><![CDATA[http://localhost/fusiongit/trunk/index.php?/News/NewsItem/View/41]]]]><![CDATA[></parenturl>
<contents><![CDATA[Created by API onnews]]]]><![CDATA[></contents>
</newsitemcomment>
<newsitemcomment><id><![CDATA[321]]]]><![CDATA[></id>
<newsitemid><![CDATA[41]]]]><![CDATA[></newsitemid>
<creatortype><![CDATA[2]]]]><![CDATA[></creatortype>
<creatorid><![CDATA[1]]]]><![CDATA[></creatorid>
<fullname><![CDATA[Simaranjit Singh]]]]><![CDATA[></fullname>
</email><ipaddress><![CDATA[127.0.0.1]]]]><![CDATA[></ipaddress>
<dateline><![CDATA[1340037801]]]]><![CDATA[></dateline>
<parentcommentid><![CDATA[0]]]]><![CDATA[></parentcommentid>
<commentstatus><![CDATA[2]]]]><![CDATA[></commentstatus>
<useragent />
<referrer />
<parenturl><![CDATA[http://localhost/fusiongit/trunk/index.php?/News/NewsItem/View/41]]]]><![CDATA[></parenturl>
<contents><![CDATA[Created by API onnews]]]]><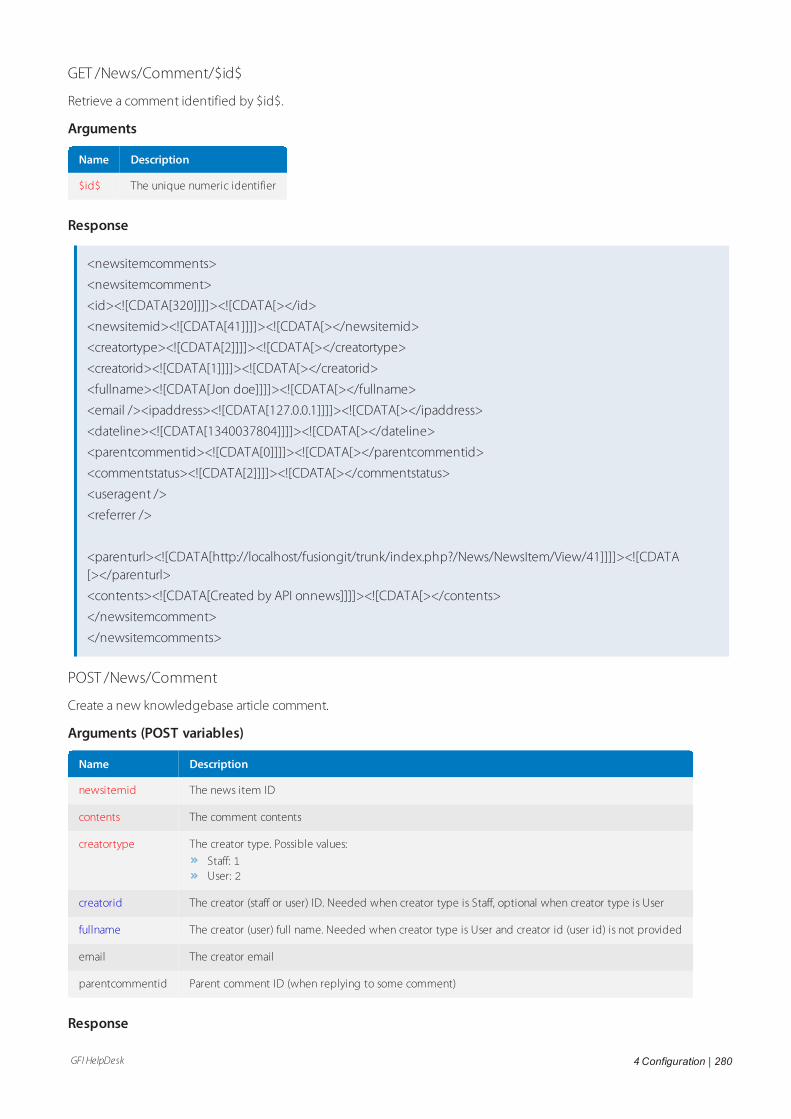
GFI HelpDesk 4 Configuration | 280
GET /News/Comment/$id$
Retrieve a comment identified by $id$.
Arguments
Name Description
$id$ The unique numeric identifier
Response
<newsitemcomments>
<newsitemcomment>
<id><![CDATA[320]]]]><![CDATA[></id>
<newsitemid><![CDATA[41]]]]><![CDATA[></newsitemid>
<creatortype><![CDATA[2]]]]><![CDATA[></creatortype>
<creatorid><![CDATA[1]]]]><![CDATA[></creatorid>
<fullname><![CDATA[Jon doe]]]]><![CDATA[></fullname>
<email /><ipaddress><![CDATA[127.0.0.1]]]]><![CDATA[></ipaddress>
<dateline><![CDATA[1340037804]]]]><![CDATA[></dateline>
<parentcommentid><![CDATA[0]]]]><![CDATA[></parentcommentid>
<commentstatus><![CDATA[2]]]]><![CDATA[></commentstatus>
<useragent />
<referrer />
<parenturl><![CDATA[http://localhost/fusiongit/trunk/index.php?/News/NewsItem/View/41]]]]><![CDATA[></parenturl>
<contents><![CDATA[Created by API onnews]]]]><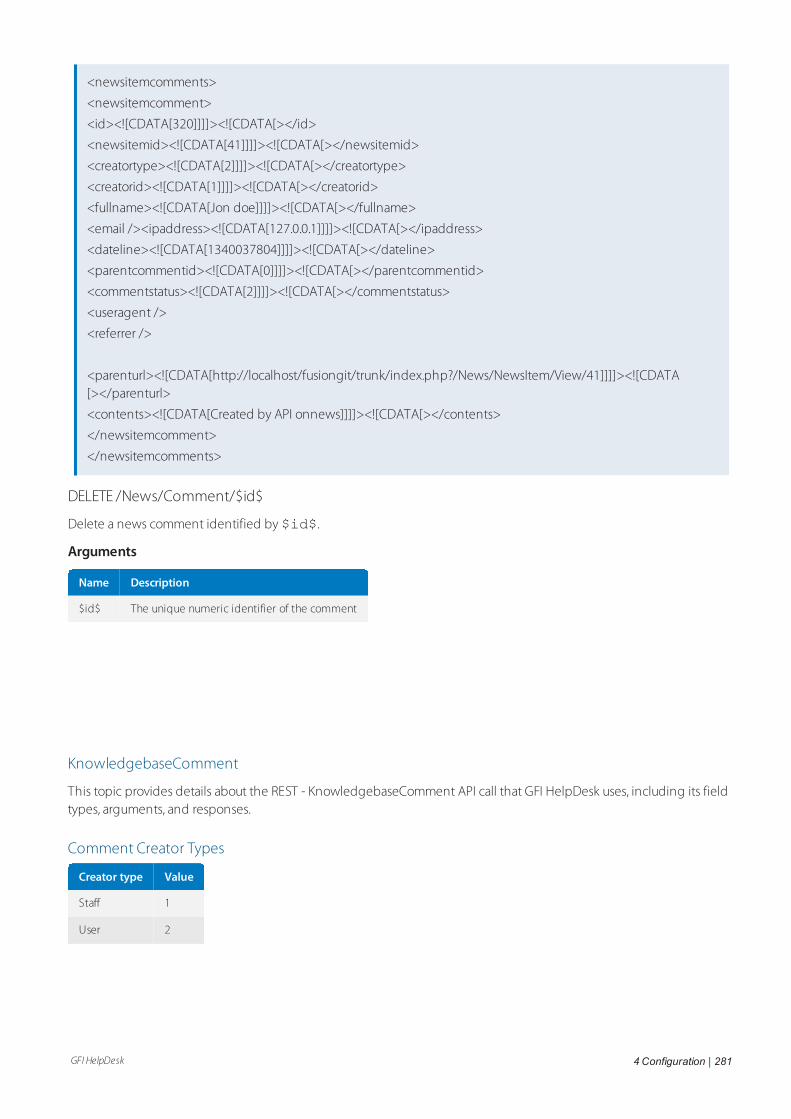
GFI HelpDesk 4 Configuration | 281
<newsitemcomments>
<newsitemcomment>
<id><![CDATA[320]]]]><![CDATA[></id>
<newsitemid><![CDATA[41]]]]><![CDATA[></newsitemid>
<creatortype><![CDATA[2]]]]><![CDATA[></creatortype>
<creatorid><![CDATA[1]]]]><![CDATA[></creatorid>
<fullname><![CDATA[Jon doe]]]]><![CDATA[></fullname>
<email /><ipaddress><![CDATA[127.0.0.1]]]]><![CDATA[></ipaddress>
<dateline><![CDATA[1340037804]]]]><![CDATA[></dateline>
<parentcommentid><![CDATA[0]]]]><![CDATA[></parentcommentid>
<commentstatus><![CDATA[2]]]]><![CDATA[></commentstatus>
<useragent />
<referrer />
<parenturl><![CDATA[http://localhost/fusiongit/trunk/index.php?/News/NewsItem/View/41]]]]><![CDATA[></parenturl>
<contents><![CDATA[Created by API onnews]]]]><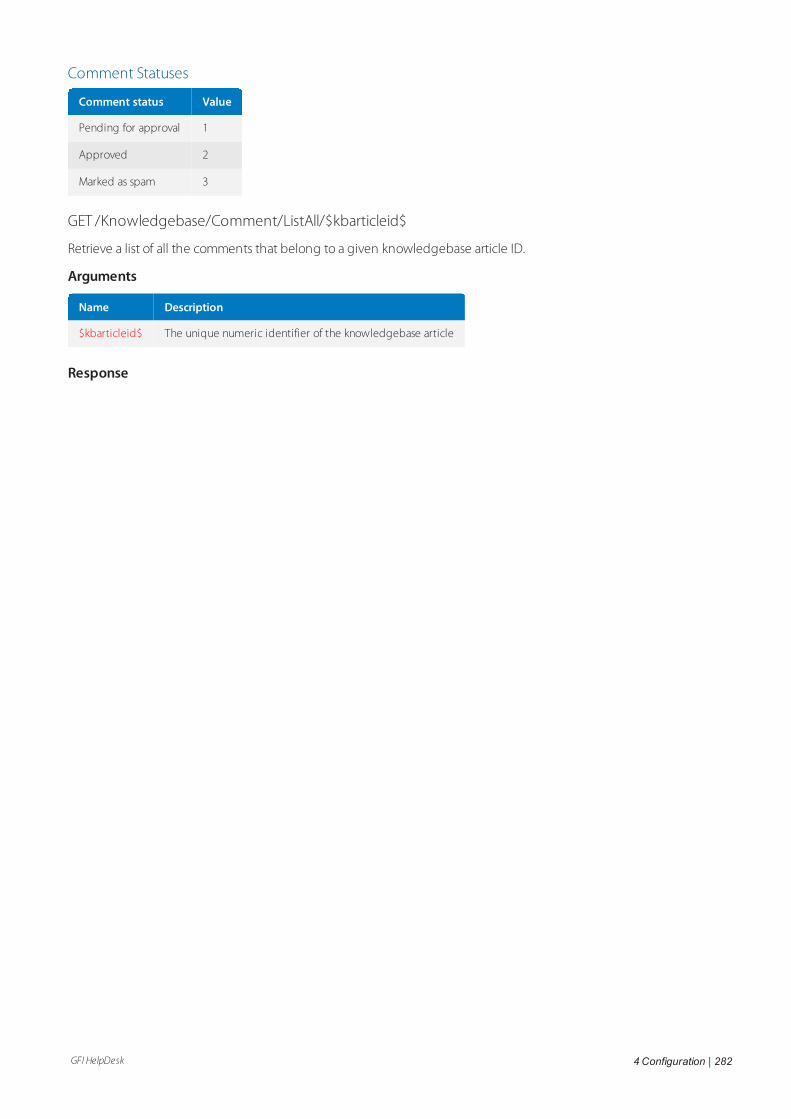
GFI HelpDesk 4 Configuration | 282
Comment Statuses
Comment status Value
Pending for approval 1
Approved 2
Marked as spam 3
GET /Knowledgebase/Comment/ListAll/$kbarticleid$
Retrieve a list of all the comments that belong to a given knowledgebase article ID.
Arguments
Name Description
$kbarticleid$ The unique numeric identifier of the knowledgebase article
Response
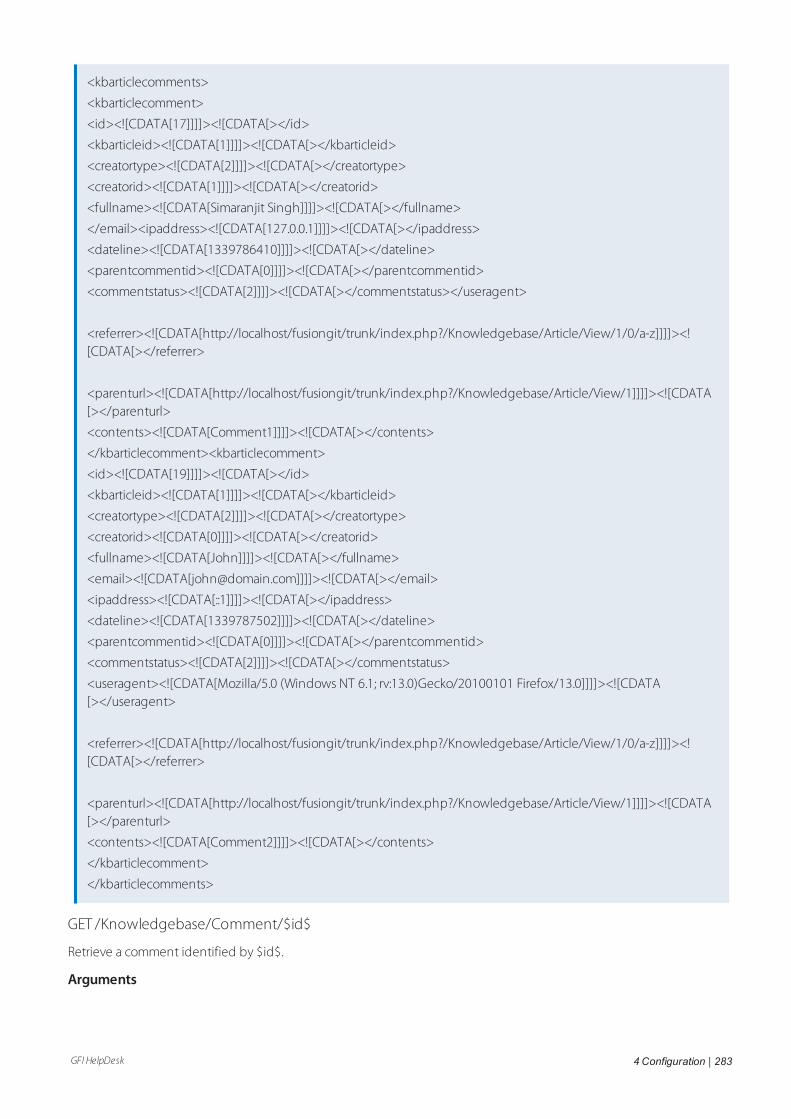
GFI HelpDesk 4 Configuration | 283
<kbarticlecomments>
<kbarticlecomment>
<id><![CDATA[17]]]]><![CDATA[></id>
<kbarticleid><![CDATA[1]]]]><![CDATA[></kbarticleid>
<creatortype><![CDATA[2]]]]><![CDATA[></creatortype>
<creatorid><![CDATA[1]]]]><![CDATA[></creatorid>
<fullname><![CDATA[Simaranjit Singh]]]]><![CDATA[></fullname>
</email><ipaddress><![CDATA[127.0.0.1]]]]><![CDATA[></ipaddress>
<dateline><![CDATA[1339786410]]]]><![CDATA[></dateline>
<parentcommentid><![CDATA[0]]]]><![CDATA[></parentcommentid>
<commentstatus><![CDATA[2]]]]><![CDATA[></commentstatus></useragent>
<referrer><![CDATA[http://localhost/fusiongit/trunk/index.php?/Knowledgebase/Article/View/1/0/a-z]]]]><![CDATA[></referrer>
<parenturl><![CDATA[http://localhost/fusiongit/trunk/index.php?/Knowledgebase/Article/View/1]]]]><![CDATA[></parenturl>
<contents><![CDATA[Comment1]]]]><![CDATA[></contents>
</kbarticlecomment><kbarticlecomment>
<id><![CDATA[19]]]]><![CDATA[></id>
<kbarticleid><![CDATA[1]]]]><![CDATA[></kbarticleid>
<creatortype><![CDATA[2]]]]><![CDATA[></creatortype>
<creatorid><![CDATA[0]]]]><![CDATA[></creatorid>
<fullname><![CDATA[John]]]]><![CDATA[></fullname>
<email><![CDATA[[email protected]]]]]><![CDATA[></email>
<ipaddress><![CDATA[::1]]]]><![CDATA[></ipaddress>
<dateline><![CDATA[1339787502]]]]><![CDATA[></dateline>
<parentcommentid><![CDATA[0]]]]><![CDATA[></parentcommentid>
<commentstatus><![CDATA[2]]]]><![CDATA[></commentstatus>
<useragent><![CDATA[Mozilla/5.0 (Windows NT 6.1; rv:13.0)Gecko/20100101 Firefox/13.0]]]]><![CDATA[></useragent>
<referrer><![CDATA[http://localhost/fusiongit/trunk/index.php?/Knowledgebase/Article/View/1/0/a-z]]]]><![CDATA[></referrer>
<parenturl><![CDATA[http://localhost/fusiongit/trunk/index.php?/Knowledgebase/Article/View/1]]]]><![CDATA[></parenturl>
<contents><![CDATA[Comment2]]]]><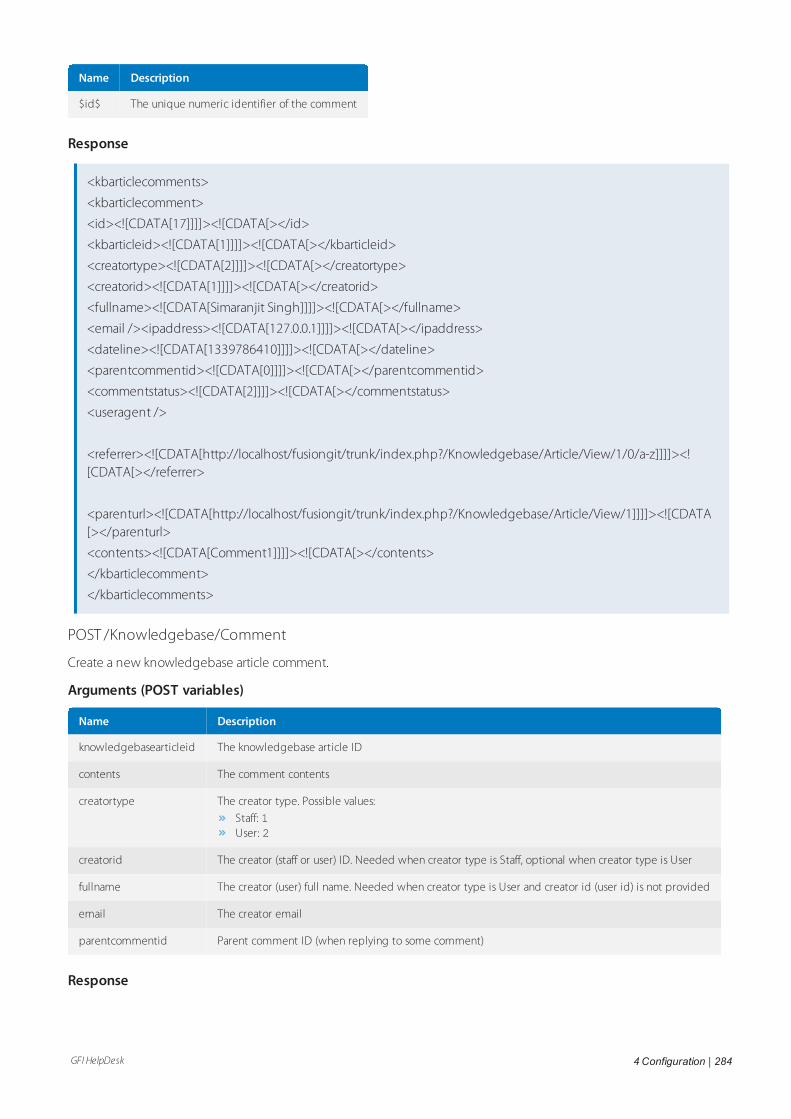
GFI HelpDesk 4 Configuration | 284
Name Description
$id$ The unique numeric identifier of the comment
Response
<kbarticlecomments>
<kbarticlecomment>
<id><![CDATA[17]]]]><![CDATA[></id>
<kbarticleid><![CDATA[1]]]]><![CDATA[></kbarticleid>
<creatortype><![CDATA[2]]]]><![CDATA[></creatortype>
<creatorid><![CDATA[1]]]]><![CDATA[></creatorid>
<fullname><![CDATA[Simaranjit Singh]]]]><![CDATA[></fullname>
<email /><ipaddress><![CDATA[127.0.0.1]]]]><![CDATA[></ipaddress>
<dateline><![CDATA[1339786410]]]]><![CDATA[></dateline>
<parentcommentid><![CDATA[0]]]]><![CDATA[></parentcommentid>
<commentstatus><![CDATA[2]]]]><![CDATA[></commentstatus>
<useragent />
<referrer><![CDATA[http://localhost/fusiongit/trunk/index.php?/Knowledgebase/Article/View/1/0/a-z]]]]><![CDATA[></referrer>
<parenturl><![CDATA[http://localhost/fusiongit/trunk/index.php?/Knowledgebase/Article/View/1]]]]><![CDATA[></parenturl>
<contents><![CDATA[Comment1]]]]><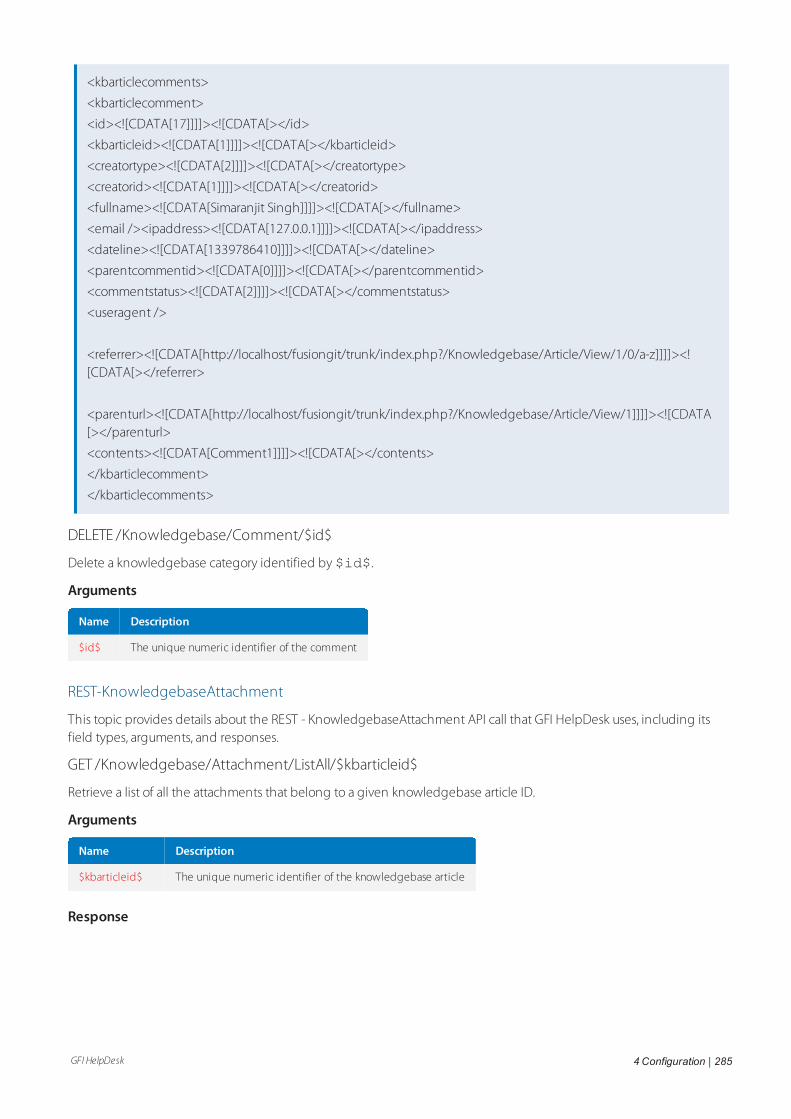
GFI HelpDesk 4 Configuration | 285
<kbarticlecomments>
<kbarticlecomment>
<id><![CDATA[17]]]]><![CDATA[></id>
<kbarticleid><![CDATA[1]]]]><![CDATA[></kbarticleid>
<creatortype><![CDATA[2]]]]><![CDATA[></creatortype>
<creatorid><![CDATA[1]]]]><![CDATA[></creatorid>
<fullname><![CDATA[Simaranjit Singh]]]]><![CDATA[></fullname>
<email /><ipaddress><![CDATA[127.0.0.1]]]]><![CDATA[></ipaddress>
<dateline><![CDATA[1339786410]]]]><![CDATA[></dateline>
<parentcommentid><![CDATA[0]]]]><![CDATA[></parentcommentid>
<commentstatus><![CDATA[2]]]]><![CDATA[></commentstatus>
<useragent />
<referrer><![CDATA[http://localhost/fusiongit/trunk/index.php?/Knowledgebase/Article/View/1/0/a-z]]]]><![CDATA[></referrer>
<parenturl><![CDATA[http://localhost/fusiongit/trunk/index.php?/Knowledgebase/Article/View/1]]]]><![CDATA[></parenturl>
<contents><![CDATA[Comment1]]]]><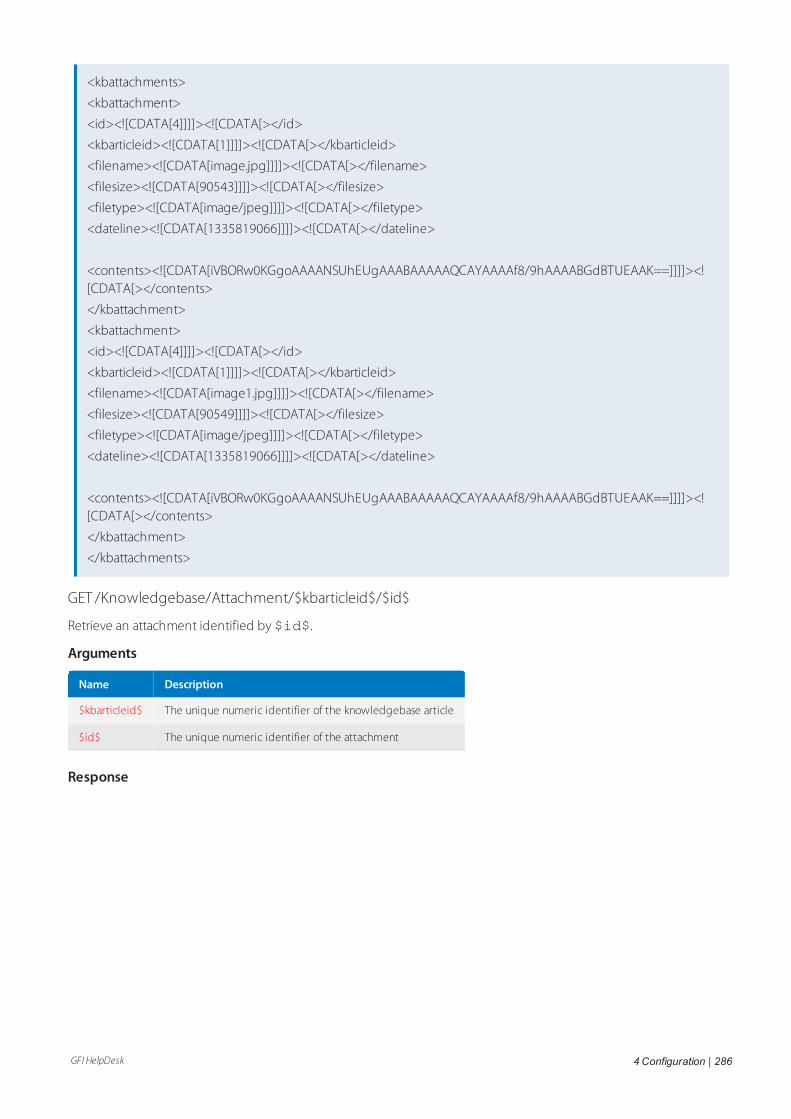
GFI HelpDesk 4 Configuration | 286
<kbattachments>
<kbattachment>
<id><![CDATA[4]]]]><![CDATA[></id>
<kbarticleid><![CDATA[1]]]]><![CDATA[></kbarticleid>
<filename><![CDATA[image.jpg]]]]><![CDATA[></filename>
<filesize><![CDATA[90543]]]]><![CDATA[></filesize>
<filetype><![CDATA[image/jpeg]]]]><![CDATA[></filetype>
<dateline><![CDATA[1335819066]]]]><![CDATA[></dateline>
<contents><![CDATA[iVBORw0KGgoAAAANSUhEUgAAABAAAAAQCAYAAAAf8/9hAAAABGdBTUEAAK==]]]]><![CDATA[></contents>
</kbattachment>
<kbattachment>
<id><![CDATA[4]]]]><![CDATA[></id>
<kbarticleid><![CDATA[1]]]]><![CDATA[></kbarticleid>
<filename><![CDATA[image1.jpg]]]]><![CDATA[></filename>
<filesize><![CDATA[90549]]]]><![CDATA[></filesize>
<filetype><![CDATA[image/jpeg]]]]><![CDATA[></filetype>
<dateline><![CDATA[1335819066]]]]><![CDATA[></dateline>
<contents><![CDATA[iVBORw0KGgoAAAANSUhEUgAAABAAAAAQCAYAAAAf8/9hAAAABGdBTUEAAK==]]]]><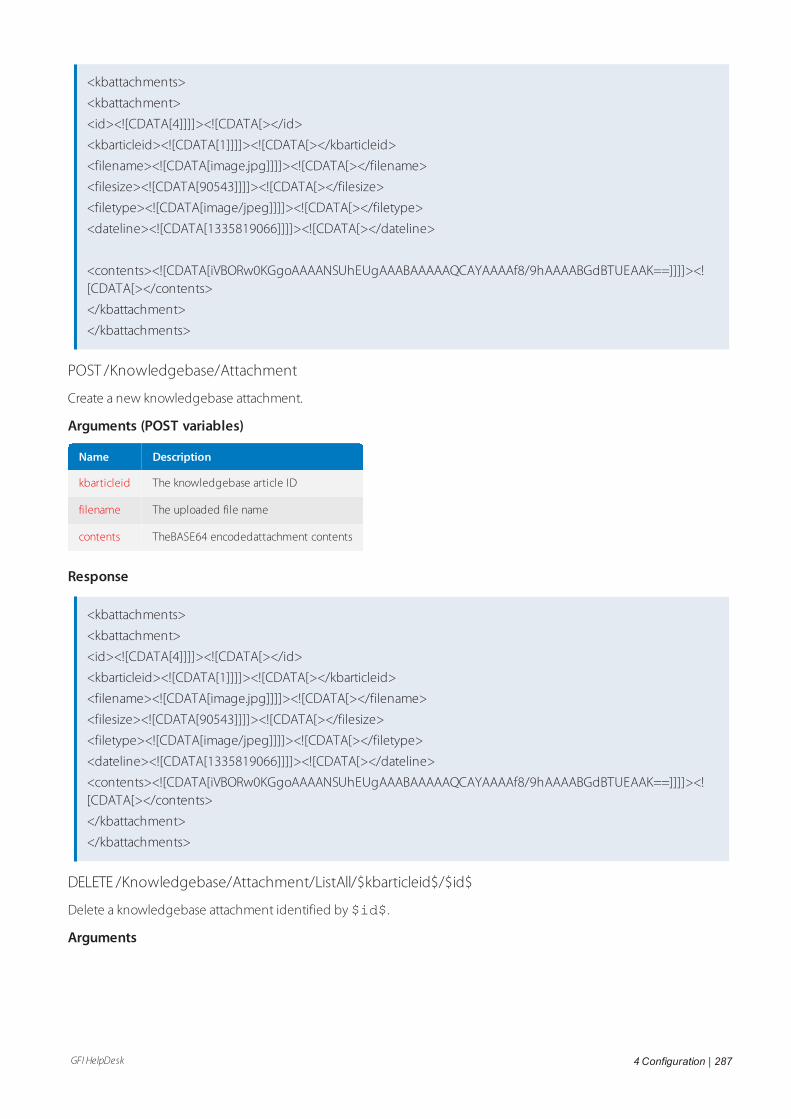
GFI HelpDesk 4 Configuration | 287
<kbattachments>
<kbattachment>
<id><![CDATA[4]]]]><![CDATA[></id>
<kbarticleid><![CDATA[1]]]]><![CDATA[></kbarticleid>
<filename><![CDATA[image.jpg]]]]><![CDATA[></filename>
<filesize><![CDATA[90543]]]]><![CDATA[></filesize>
<filetype><![CDATA[image/jpeg]]]]><![CDATA[></filetype>
<dateline><![CDATA[1335819066]]]]><![CDATA[></dateline>
<contents><![CDATA[iVBORw0KGgoAAAANSUhEUgAAABAAAAAQCAYAAAAf8/9hAAAABGdBTUEAAK==]]]]><![CDATA[></contents>
</kbattachment>
</kbattachments>
POST /Knowledgebase/Attachment
Create a new knowledgebase attachment.
Arguments (POST variables)
Name Description
kbarticleid The knowledgebase article ID
filename The uploaded file name
contents TheBASE64 encodedattachment contents
Response
<kbattachments>
<kbattachment>
<id><![CDATA[4]]]]><![CDATA[></id>
<kbarticleid><![CDATA[1]]]]><![CDATA[></kbarticleid>
<filename><![CDATA[image.jpg]]]]><![CDATA[></filename>
<filesize><![CDATA[90543]]]]><![CDATA[></filesize>
<filetype><![CDATA[image/jpeg]]]]><![CDATA[></filetype>
<dateline><![CDATA[1335819066]]]]><![CDATA[></dateline>
<contents><![CDATA[iVBORw0KGgoAAAANSUhEUgAAABAAAAAQCAYAAAAf8/9hAAAABGdBTUEAAK==]]]]><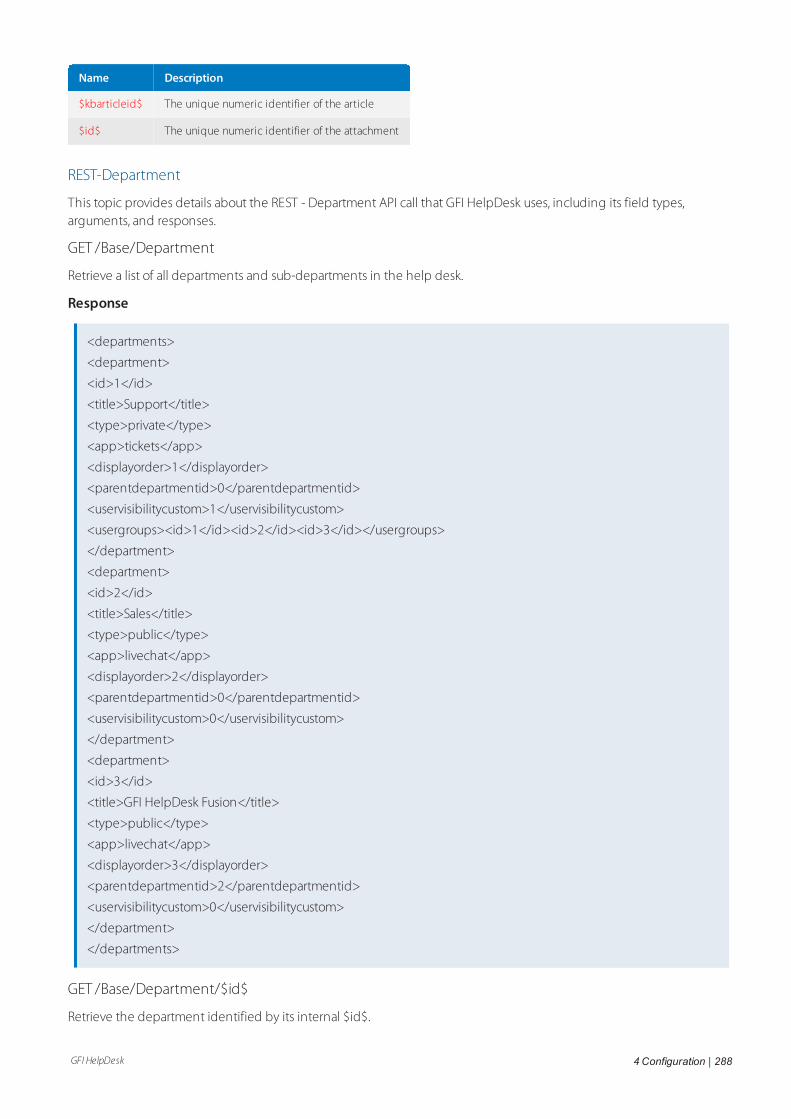
GFI HelpDesk 4 Configuration | 288
Name Description
$kbarticleid$ The unique numeric identifier of the article
$id$ The unique numeric identifier of the attachment
REST-Department
This topic provides details about the REST - Department API call that GFI HelpDesk uses, including its field types,arguments, and responses.
GET /Base/Department
Retrieve a list of all departments and sub-departments in the help desk.
Response
<departments>
<department>
<id>1</id>
<title>Support</title>
<type>private</type>
<app>tickets</app>
<displayorder>1</displayorder>
<parentdepartmentid>0</parentdepartmentid>
<uservisibilitycustom>1</uservisibilitycustom>
<usergroups><id>1</id><id>2</id><id>3</id></usergroups>
</department>
<department>
<id>2</id>
<title>Sales</title>
<type>public</type>
<app>livechat</app>
<displayorder>2</displayorder>
<parentdepartmentid>0</parentdepartmentid>
<uservisibilitycustom>0</uservisibilitycustom>
</department>
<department>
<id>3</id>
<title>GFI HelpDesk Fusion</title>
<type>public</type>
<app>livechat</app>
<displayorder>3</displayorder>
<parentdepartmentid>2</parentdepartmentid>
<uservisibilitycustom>0</uservisibilitycustom>
</department>
</departments>
GET /Base/Department/$id$
Retrieve the department identified by its internal $id$.
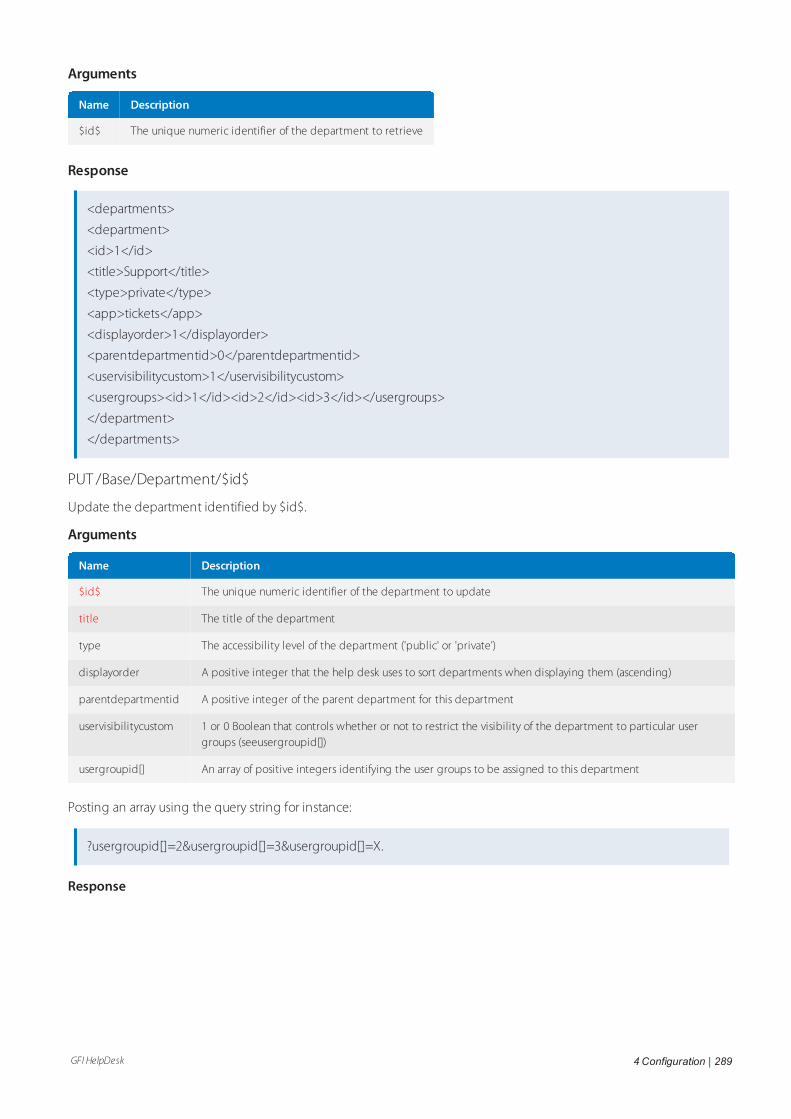
GFI HelpDesk 4 Configuration | 289
Arguments
Name Description
$id$ The unique numeric identifier of the department to retrieve
Response
<departments>
<department>
<id>1</id>
<title>Support</title>
<type>private</type>
<app>tickets</app>
<displayorder>1</displayorder>
<parentdepartmentid>0</parentdepartmentid>
<uservisibilitycustom>1</uservisibilitycustom>
<usergroups><id>1</id><id>2</id><id>3</id></usergroups>
</department>
</departments>
PUT /Base/Department/$id$
Update the department identified by $id$.
Arguments
Name Description
$id$ The unique numeric identifier of the department to update
title The title of the department
type The accessibility level of the department ('public' or 'private')
displayorder A positive integer that the help desk uses to sort departments when displaying them (ascending)
parentdepartmentid A positive integer of the parent department for this department
uservisibilitycustom 1 or 0 Boolean that controls whether or not to restrict the visibility of the department to particular usergroups (seeusergroupid[])
usergroupid[] An array of positive integers identifying the user groups to be assigned to this department
Posting an array using the query string for instance:
?usergroupid[]=2&usergroupid[]=3&usergroupid[]=X.
Response
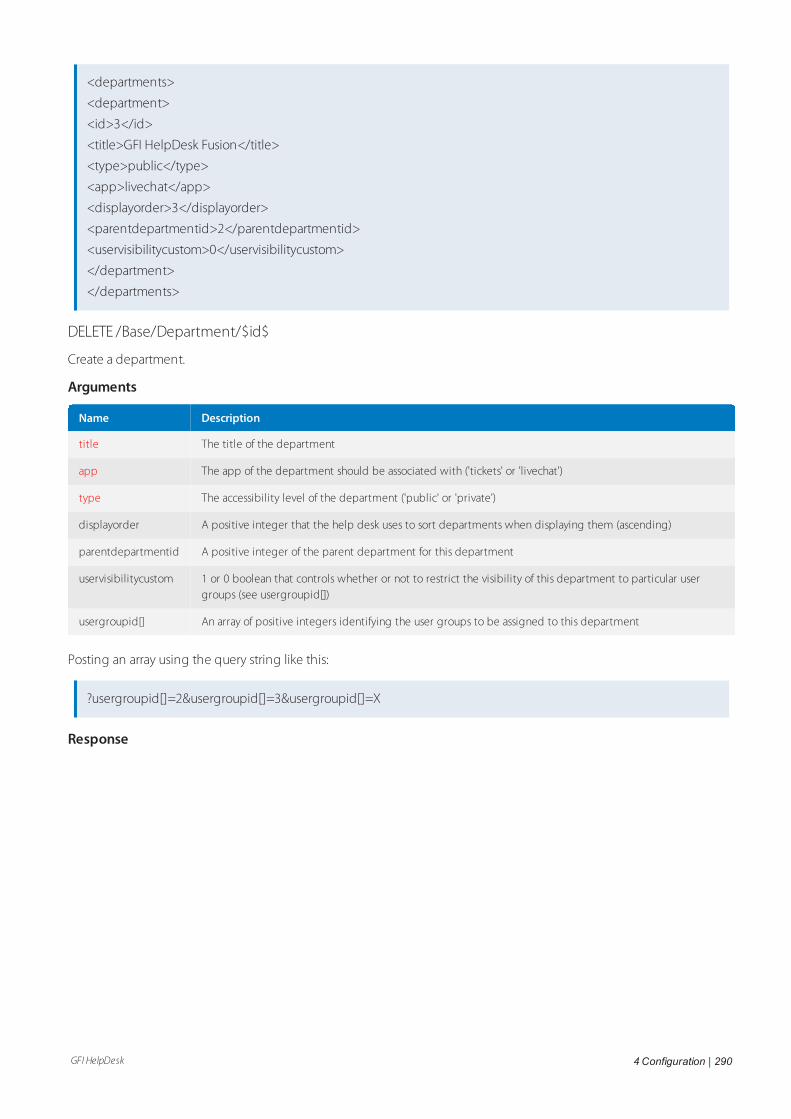
GFI HelpDesk 4 Configuration | 290
<departments>
<department>
<id>3</id>
<title>GFI HelpDesk Fusion</title>
<type>public</type>
<app>livechat</app>
<displayorder>3</displayorder>
<parentdepartmentid>2</parentdepartmentid>
<uservisibilitycustom>0</uservisibilitycustom>
</department>
</departments>
DELETE /Base/Department/$id$
Create a department.
Arguments
Name Description
title The title of the department
app The app of the department should be associated with ('tickets' or 'livechat')
type The accessibility level of the department ('public' or 'private')
displayorder A positive integer that the help desk uses to sort departments when displaying them (ascending)
parentdepartmentid A positive integer of the parent department for this department
uservisibilitycustom 1 or 0 boolean that controls whether or not to restrict the visibility of this department to particular usergroups (see usergroupid[])
usergroupid[] An array of positive integers identifying the user groups to be assigned to this department
Posting an array using the query string like this:
?usergroupid[]=2&usergroupid[]=3&usergroupid[]=X
Response
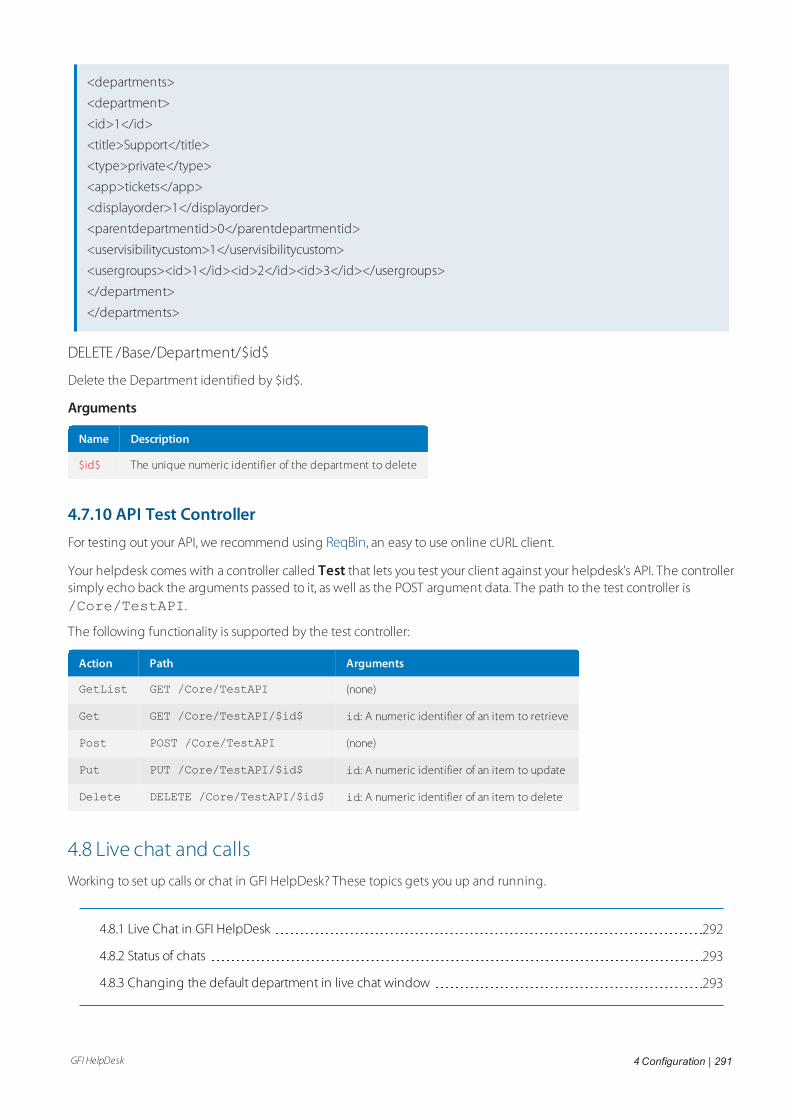
GFI HelpDesk 4 Configuration | 291
<departments>
<department>
<id>1</id>
<title>Support</title>
<type>private</type>
<app>tickets</app>
<displayorder>1</displayorder>
<parentdepartmentid>0</parentdepartmentid>
<uservisibilitycustom>1</uservisibilitycustom>
<usergroups><id>1</id><id>2</id><id>3</id></usergroups>
</department>
</departments>
DELETE /Base/Department/$id$
Delete the Department identified by $id$.
Arguments
Name Description
$id$ The unique numeric identifier of the department to delete
4.7.10 API Test Controller
For testing out your API, we recommend using ReqBin, an easy to use online cURL client.
Your helpdesk comes with a controller called Test that lets you test your client against your helpdesk's API. The controllersimply echo back the arguments passed to it, as well as the POST argument data. The path to the test controller is/Core/TestAPI.
The following functionality is supported by the test controller:
Action Path Arguments
GetList GET /Core/TestAPI (none)
Get GET /Core/TestAPI/$id$ id: A numeric identifier of an item to retrieve
Post POST /Core/TestAPI (none)
Put PUT /Core/TestAPI/$id$ id: A numeric identifier of an item to update
Delete DELETE /Core/TestAPI/$id$ id: A numeric identifier of an item to delete
4.8 Live chat and callsWorking to set up calls or chat in GFI HelpDesk? These topics gets you up and running.
4.8.1 Live Chat in GFI HelpDesk 292
4.8.2 Status of chats 293
4.8.3 Changing the default department in live chat window 293
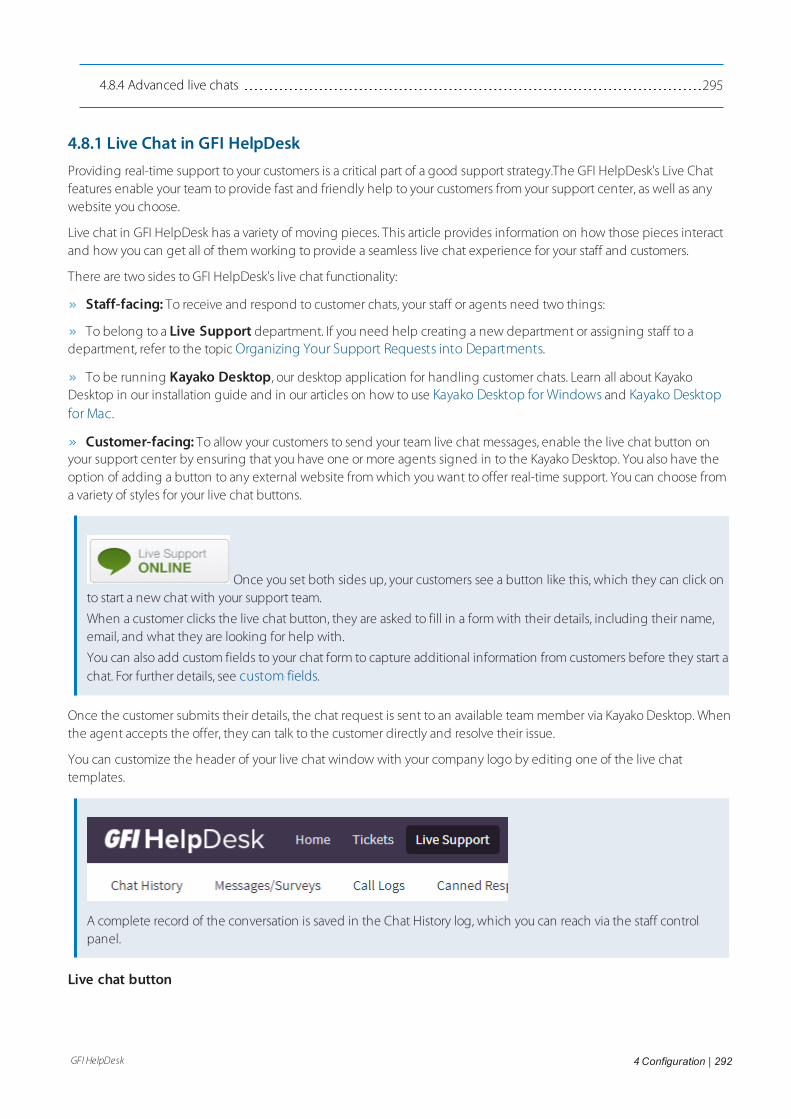
GFI HelpDesk 4 Configuration | 292
4.8.4 Advanced live chats 295
4.8.1 Live Chat in GFI HelpDeskProviding real-time support to your customers is a critical part of a good support strategy.The GFI HelpDesk's Live Chatfeatures enable your team to provide fast and friendly help to your customers from your support center, as well as anywebsite you choose.
Live chat in GFI HelpDesk has a variety of moving pieces. This article provides information on how those pieces interactand how you can get all of them working to provide a seamless live chat experience for your staff and customers.
There are two sides to GFI HelpDesk's live chat functionality:
Staff-facing: To receive and respond to customer chats, your staff or agents need two things:
To belong to a Live Support department. If you need help creating a new department or assigning staff to adepartment, refer to the topic Organizing Your Support Requests into Departments.
To be running Kayako Desktop, our desktop application for handling customer chats. Learn all about KayakoDesktop in our installation guide and in our articles on how to use Kayako Desktop for Windows and Kayako Desktopfor Mac.
Customer-facing: To allow your customers to send your team live chat messages, enable the live chat button onyour support center by ensuring that you have one or more agents signed in to the Kayako Desktop. You also have theoption of adding a button to any external website from which you want to offer real-time support. You can choose froma variety of styles for your live chat buttons.
Once you set both sides up, your customers see a button like this, which they can click onto start a new chat with your support team.
When a customer clicks the live chat button, they are asked to fill in a form with their details, including their name,email, and what they are looking for help with.
You can also add custom fields to your chat form to capture additional information from customers before they start achat. For further details, see custom fields.
Once the customer submits their details, the chat request is sent to an available team member via Kayako Desktop. Whenthe agent accepts the offer, they can talk to the customer directly and resolve their issue.
You can customize the header of your live chat window with your company logo by editing one of the live chattemplates.
A complete record of the conversation is saved in the Chat History log, which you can reach via the staff controlpanel.
Live chat button
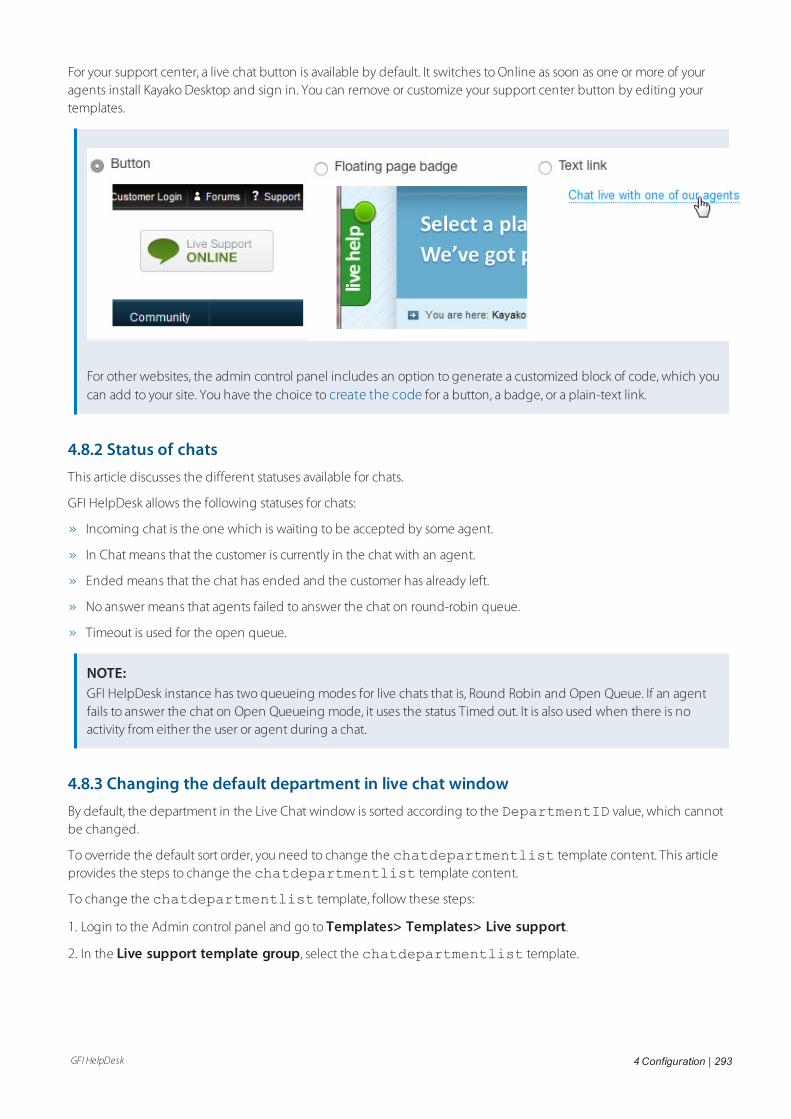
GFI HelpDesk 4 Configuration | 293
For your support center, a live chat button is available by default. It switches to Online as soon as one or more of youragents install Kayako Desktop and sign in. You can remove or customize your support center button by editing yourtemplates.
For other websites, the admin control panel includes an option to generate a customized block of code, which youcan add to your site. You have the choice to create the code for a button, a badge, or a plain-text link.
4.8.2 Status of chatsThis article discusses the different statuses available for chats.
GFI HelpDesk allows the following statuses for chats:
Incoming chat is the one which is waiting to be accepted by some agent.
In Chat means that the customer is currently in the chat with an agent.
Ended means that the chat has ended and the customer has already left.
No answer means that agents failed to answer the chat on round-robin queue.
Timeout is used for the open queue.
NOTE:GFI HelpDesk instance has two queueing modes for live chats that is, Round Robin and Open Queue. If an agentfails to answer the chat on Open Queueing mode, it uses the status Timed out. It is also used when there is noactivity from either the user or agent during a chat.
4.8.3 Changing the default department in live chat windowBy default, the department in the Live Chat window is sorted according to the DepartmentID value, which cannotbe changed.
To override the default sort order, you need to change the chatdepartmentlist template content. This articleprovides the steps to change the chatdepartmentlist template content.
To change the chatdepartmentlist template, follow these steps:
1. Login to the Admin control panel and go to Templates> Templates> Live support.
2. In the Live support template group, select the chatdepartmentlist template.
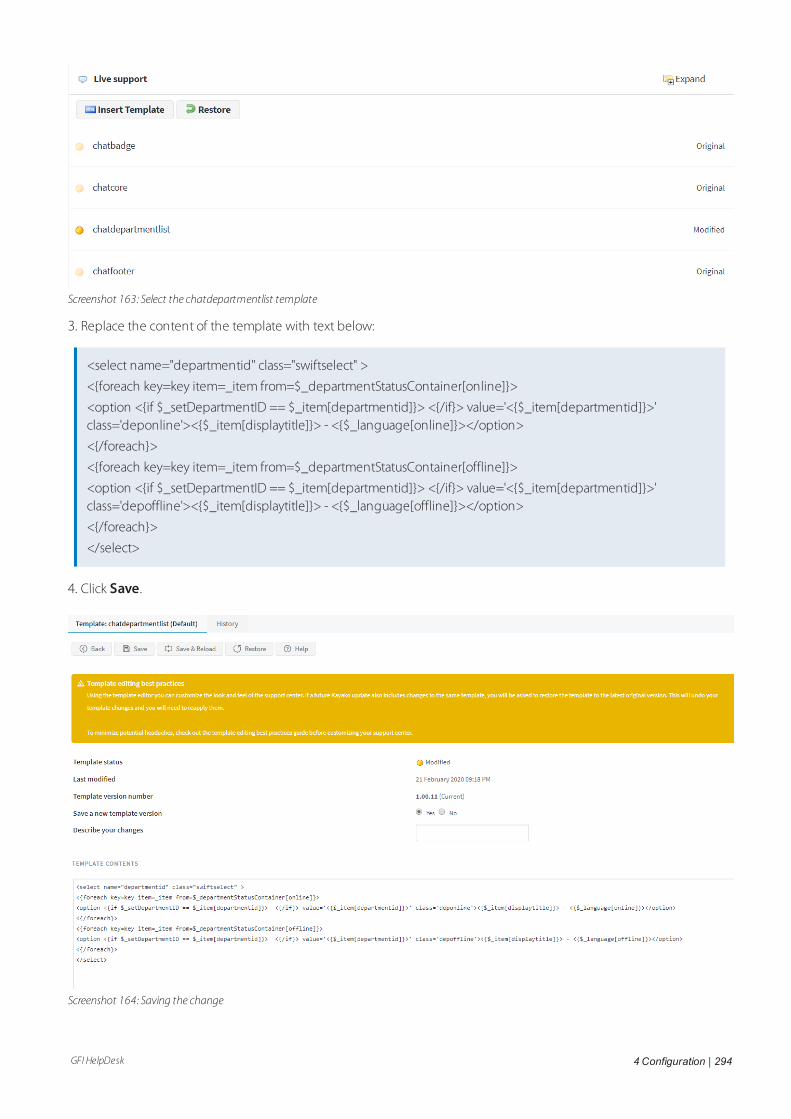
GFI HelpDesk 4 Configuration | 294
Screenshot 163: Select the chatdepartmentlist template
3. Replace the content of the template with text below:
<select name="departmentid" class="swiftselect" >
<{foreach key=key item=_item from=$_departmentStatusContainer[online]}>
<option <{if $_setDepartmentID == $_item[departmentid]}> <{/if}> value='<{$_item[departmentid]}>'class='deponline'><{$_item[displaytitle]}> - <{$_language[online]}></option>
<{/foreach}>
<{foreach key=key item=_item from=$_departmentStatusContainer[offline]}>
<option <{if $_setDepartmentID == $_item[departmentid]}> <{/if}> value='<{$_item[departmentid]}>'class='depoffline'><{$_item[displaytitle]}> - <{$_language[offline]}></option>
<{/foreach}>
</select>
4. Click Save.
Screenshot 164: Saving the change
GFI HelpDesk 4 Configuration | 295
4.8.4 Advanced live chatsThis sections has information about the advanced settings and configurations in livechats.
Generating and adding a live chat button to website
You can add GFI HelpDesk live chat to any and as many of your company's websites as you like. The admin control panelallows you to customize and generate a block of code that you can then drop into your website's source code.
The topic details the process to generate and add a live chat button to a website.
Prerequisites
Administrator Account
Use the live support tag generator permission
Procedure
To generate and add a Live Chat button, follow the steps listed below:
1. Sign in to the admin control panel.
2. Click Tag Generator in the sidebar.
3. Leave the Live Support Channel dropdown set to 'Chat.'
4. From the Tag Type section, choose the style of live chat button you want to generate – button, badge, or a plain-textlink.
Note:The last tag type is for tracking visitors.
5. Click the Next button up top.
6. In the Routing Options section, you can choose particular departments or skills to route chats to, when they come inthrough this button.
7. Under General Options, you can enable SSL, choose which template group your live chat button belongs to, or turnthe chat form on or off.
8. At the bottom of the form, you can use the Insert Variable and Insert Staff Alert buttons to pass information toGFI HelpDesk Desktop, when a staff member accepts a chat.
9. Before you generate your code block, switch to the Customize tab.
10. Here, you can customize the appearance of your button or badge.
11. When you've finished, click the Generate Tag button.
12. The next page displays the code block for your customized live chat button, as well as a preview of what the buttonor badge looks like
13. Select the entire code block and copy it.
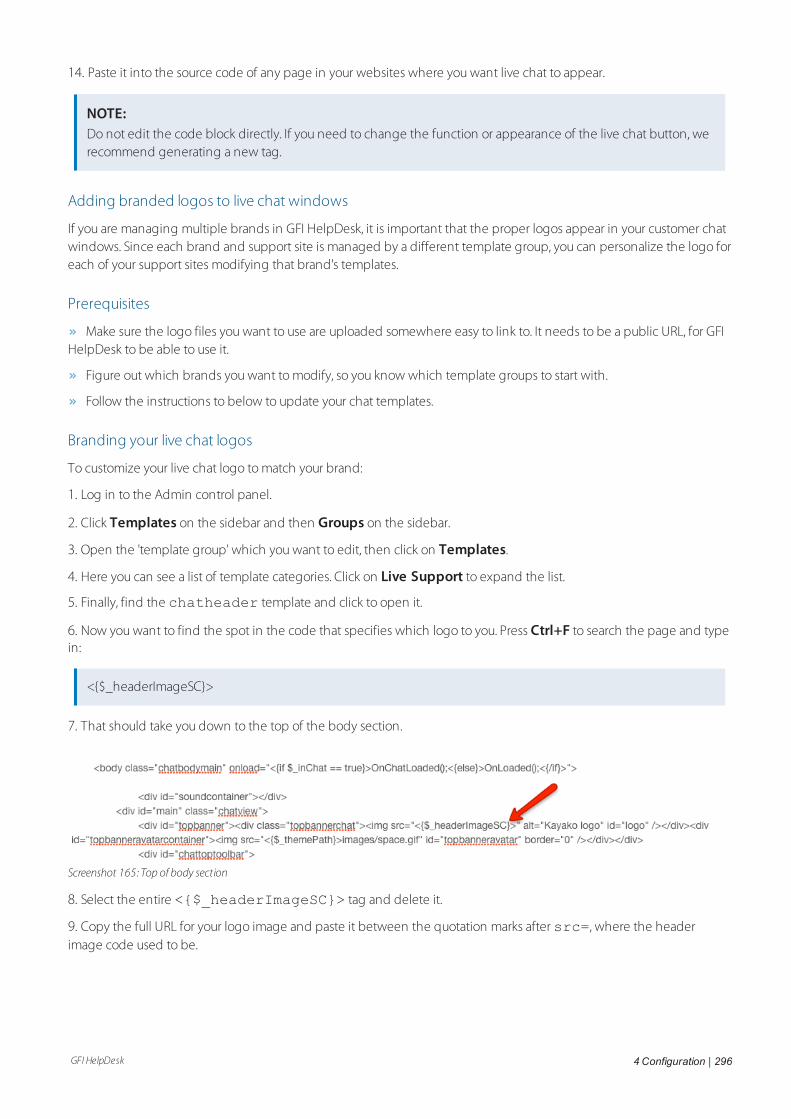
GFI HelpDesk 4 Configuration | 296
14. Paste it into the source code of any page in your websites where you want live chat to appear.
NOTE:Do not edit the code block directly. If you need to change the function or appearance of the live chat button, werecommend generating a new tag.
Adding branded logos to live chat windows
If you are managing multiple brands in GFI HelpDesk, it is important that the proper logos appear in your customer chatwindows. Since each brand and support site is managed by a different template group, you can personalize the logo foreach of your support sites modifying that brand's templates.
Prerequisites
Make sure the logo files you want to use are uploaded somewhere easy to link to. It needs to be a public URL, for GFIHelpDesk to be able to use it.
Figure out which brands you want to modify, so you know which template groups to start with.
Follow the instructions to below to update your chat templates.
Branding your live chat logos
To customize your live chat logo to match your brand:
1. Log in to the Admin control panel.
2. Click Templates on the sidebar and then Groups on the sidebar.
3. Open the 'template group' which you want to edit, then click on Templates.
4. Here you can see a list of template categories. Click on Live Support to expand the list.
5. Finally, find the chatheader template and click to open it.
6. Now you want to find the spot in the code that specifies which logo to you. Press Ctrl+F to search the page and typein:
<{$_headerImageSC}>
7. That should take you down to the top of the body section.
Screenshot 165: Top of body section
8. Select the entire <{$_headerImageSC}> tag and delete it.
9. Copy the full URL for your logo image and paste it between the quotation marks after src=, where the headerimage code used to be.
GFI HelpDesk 4 Configuration | 297
NOTE:Remember that the icon image, sized no larger 150px by 40px, needs to be hosted at a publicly available URL.
10. When you have made your changes, that line of code should look something like this:
<div id="topbanner"><div class="topbannerchat"> <img src-c="https://support.yourcompany.com/brandedlogo.png" alt="GFIHelpdesk <{$_productTitle}> Logo" id="logo" />
11. After making the change, click the Save button.
12. Repeat the steps above for the 'template groups' of any additional brands you support.
13. Finally, go ahead and refresh one of your branded support sites, open up a chat, and you should see your updatedlogo.
Adding a Click-to-Call button to your site
Click-to-Call is a form of Web-based communication in which a person clicks a button, image or text to request animmediate connection with another person in real-time by phone call.
The feature of Click to Call is provided in the GFI HelpDesk Desktop application, using which incoming and outgoingcalls can be made.
For using Click to Call, code can be generated from Admin CP > Tag Generator > Click to Call and can be placed atany page(s) of a website.
When the customers click on the icon, a window opens , where they need to mention their calling number. Afterclicking on "Call Me" automatically a call, and a chat request would be routed to the available phone operator in GFIHelpDesk Desktop application.
Make sure that your staff configure GFI HelpDesk Desktop application with your VoIP details, which can be done from:
GFI HelpDesk Desktop > File > Settings > Phone:
VoIP server domain is required
Outbound Proxy is required by some services
VoIP server name (Host name or IP address) with username and password of the account
For more information on setting up the VoIP, see Enabling VoIP/Phone support in Kayako Desktop.
Note:Click to Call feature is not available with GFI HelpDesk Case. It is only available with GFI HelpDesk Fusion and GFIHelpDesk Engage.
Handling chats with Kayako Desktop for Mac
Kayako Desktop provides you with a platform to interact with your site visitors and manage your support chatseffectively. By connecting Kayako Desktop to your GFI HelpDesk domain, you can manage live chat requests that come inthrough the chat widget on your support site.
Kayako Desktop provides your support team an all-in-one tool for offering real-time support, including live chat,simultaneous conversations, visitor monitoring, support for multiple GFI HelpDesk instances, and much more.
Kayako Desktop comes in two flavors: one for Windows, one for Mac OS X. This topic is about Kayako Desktop for Mac(KDFM).
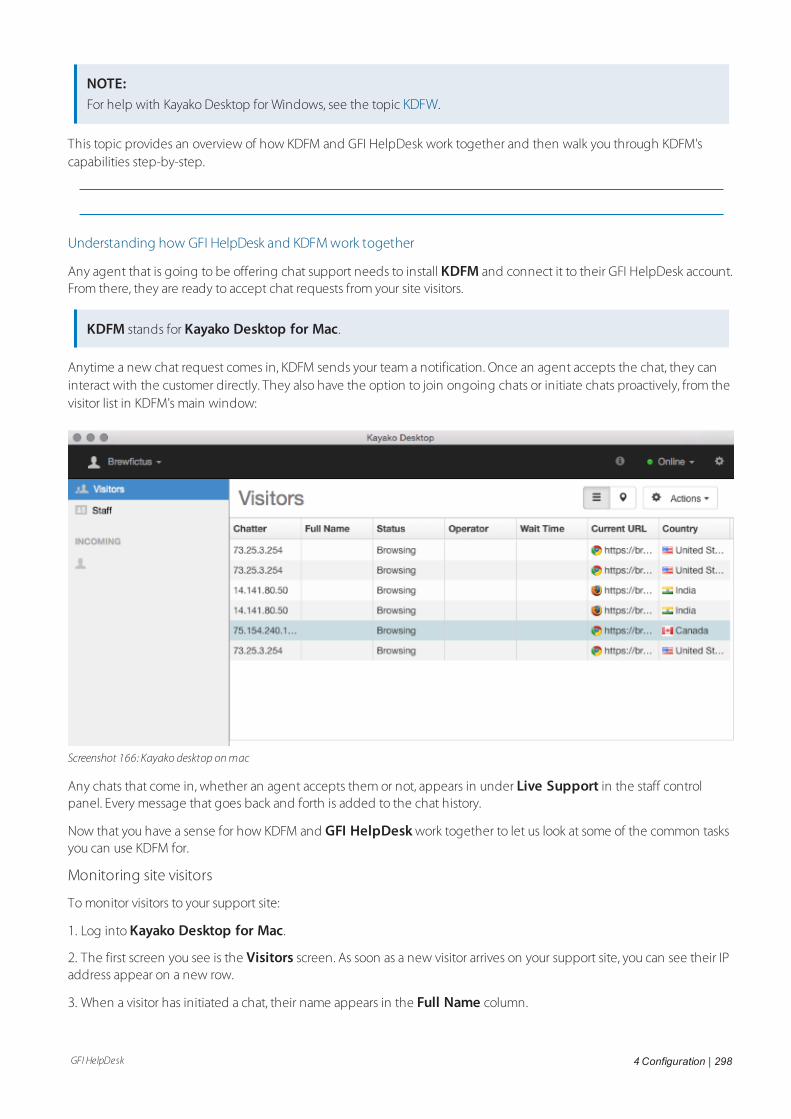
GFI HelpDesk 4 Configuration | 298
NOTE:For help with Kayako Desktop for Windows, see the topic KDFW.
This topic provides an overview of how KDFM and GFI HelpDesk work together and then walk you through KDFM'scapabilities step-by-step.
Understanding how GFI HelpDesk and KDFM work together
Any agent that is going to be offering chat support needs to install KDFM and connect it to their GFI HelpDesk account.From there, they are ready to accept chat requests from your site visitors.
KDFM stands for Kayako Desktop for Mac.
Anytime a new chat request comes in, KDFM sends your team a notification. Once an agent accepts the chat, they caninteract with the customer directly. They also have the option to join ongoing chats or initiate chats proactively, from thevisitor list in KDFM's main window:
Screenshot 166: Kayako desktop onmac
Any chats that come in, whether an agent accepts them or not, appears in under Live Support in the staff controlpanel. Every message that goes back and forth is added to the chat history.
Now that you have a sense for how KDFM and GFI HelpDesk work together to let us look at some of the common tasksyou can use KDFM for.
Monitoring site visitors
To monitor visitors to your support site:
1. Log into Kayako Desktop for Mac.
2. The first screen you see is the Visitors screen. As soon as a new visitor arrives on your support site, you can see their IPaddress appear on a new row.
3. When a visitor has initiated a chat, their name appears in the Full Name column.
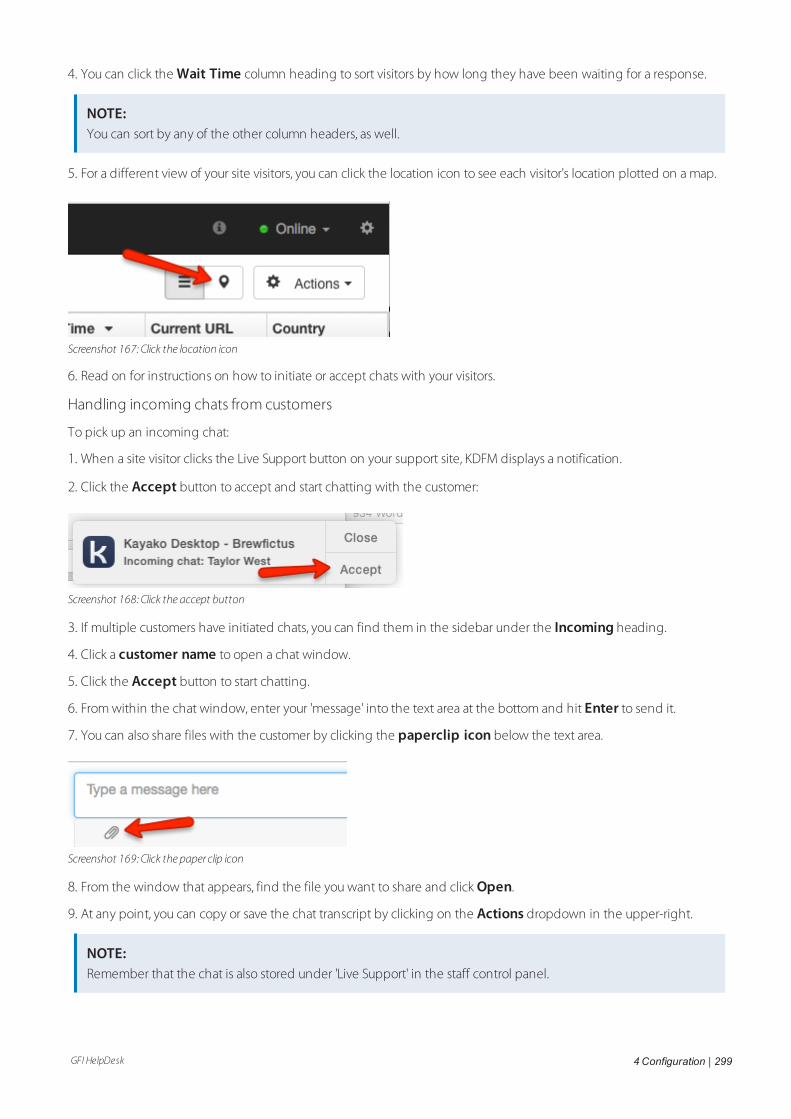
GFI HelpDesk 4 Configuration | 299
4. You can click the Wait Time column heading to sort visitors by how long they have been waiting for a response.
NOTE:You can sort by any of the other column headers, as well.
5. For a different view of your site visitors, you can click the location icon to see each visitor's location plotted on a map.
Screenshot 167: Click the location icon
6. Read on for instructions on how to initiate or accept chats with your visitors.
Handling incoming chats from customers
To pick up an incoming chat:
1. When a site visitor clicks the Live Support button on your support site, KDFM displays a notification.
2. Click the Accept button to accept and start chatting with the customer:
Screenshot 168: Click the accept button
3. If multiple customers have initiated chats, you can find them in the sidebar under the Incoming heading.
4. Click a customer name to open a chat window.
5. Click the Accept button to start chatting.
6. From within the chat window, enter your 'message' into the text area at the bottom and hit Enter to send it.
7. You can also share files with the customer by clicking the paperclip icon below the text area.
Screenshot 169: Click the paper clip icon
8. From the window that appears, find the file you want to share and click Open.
9. At any point, you can copy or save the chat transcript by clicking on the Actions dropdown in the upper-right.
NOTE:Remember that the chat is also stored under 'Live Support' in the staff control panel.
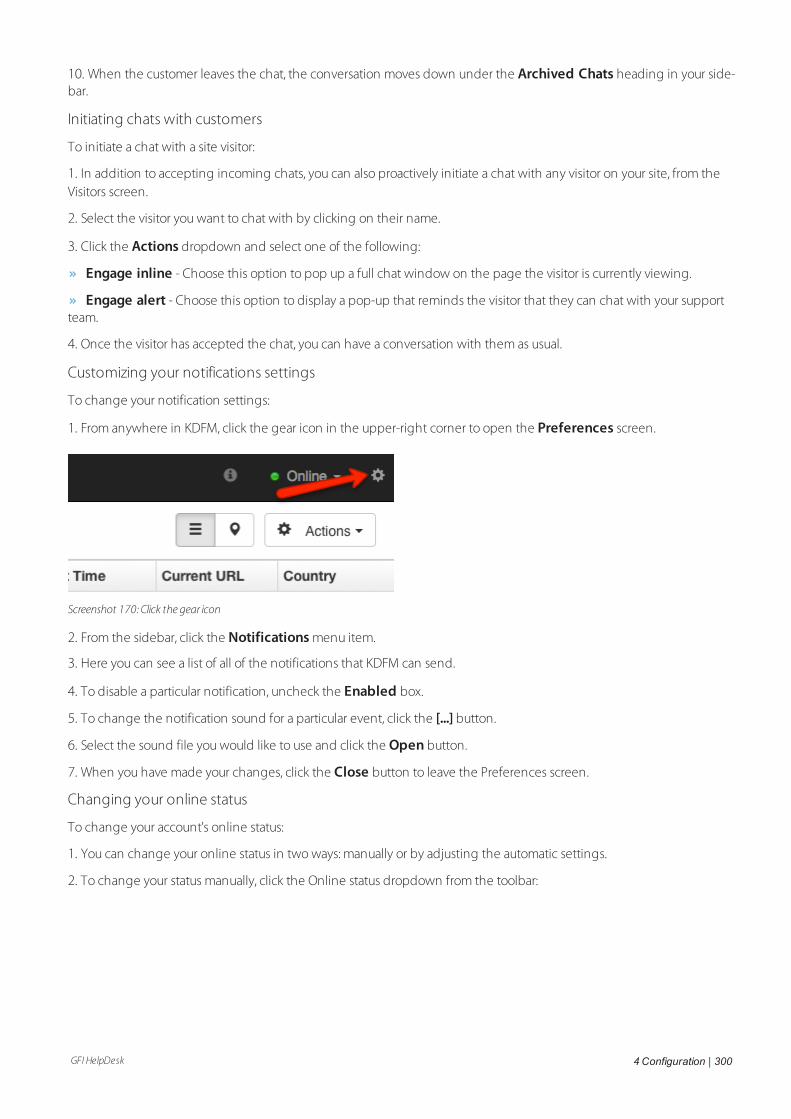
GFI HelpDesk 4 Configuration | 300
10. When the customer leaves the chat, the conversation moves down under the Archived Chats heading in your side-bar.
Initiating chats with customers
To initiate a chat with a site visitor:
1. In addition to accepting incoming chats, you can also proactively initiate a chat with any visitor on your site, from theVisitors screen.
2. Select the visitor you want to chat with by clicking on their name.
3. Click the Actions dropdown and select one of the following:
Engage inline - Choose this option to pop up a full chat window on the page the visitor is currently viewing.
Engage alert - Choose this option to display a pop-up that reminds the visitor that they can chat with your supportteam.
4. Once the visitor has accepted the chat, you can have a conversation with them as usual.
Customizing your notifications settings
To change your notification settings:
1. From anywhere in KDFM, click the gear icon in the upper-right corner to open the Preferences screen.
Screenshot 170: Click the gear icon
2. From the sidebar, click the Notifications menu item.
3. Here you can see a list of all of the notifications that KDFM can send.
4. To disable a particular notification, uncheck the Enabled box.
5. To change the notification sound for a particular event, click the [...] button.
6. Select the sound file you would like to use and click the Open button.
7. When you have made your changes, click the Close button to leave the Preferences screen.
Changing your online status
To change your account's online status:
1. You can change your online status in two ways: manually or by adjusting the automatic settings.
2. To change your status manually, click the Online status dropdown from the toolbar:
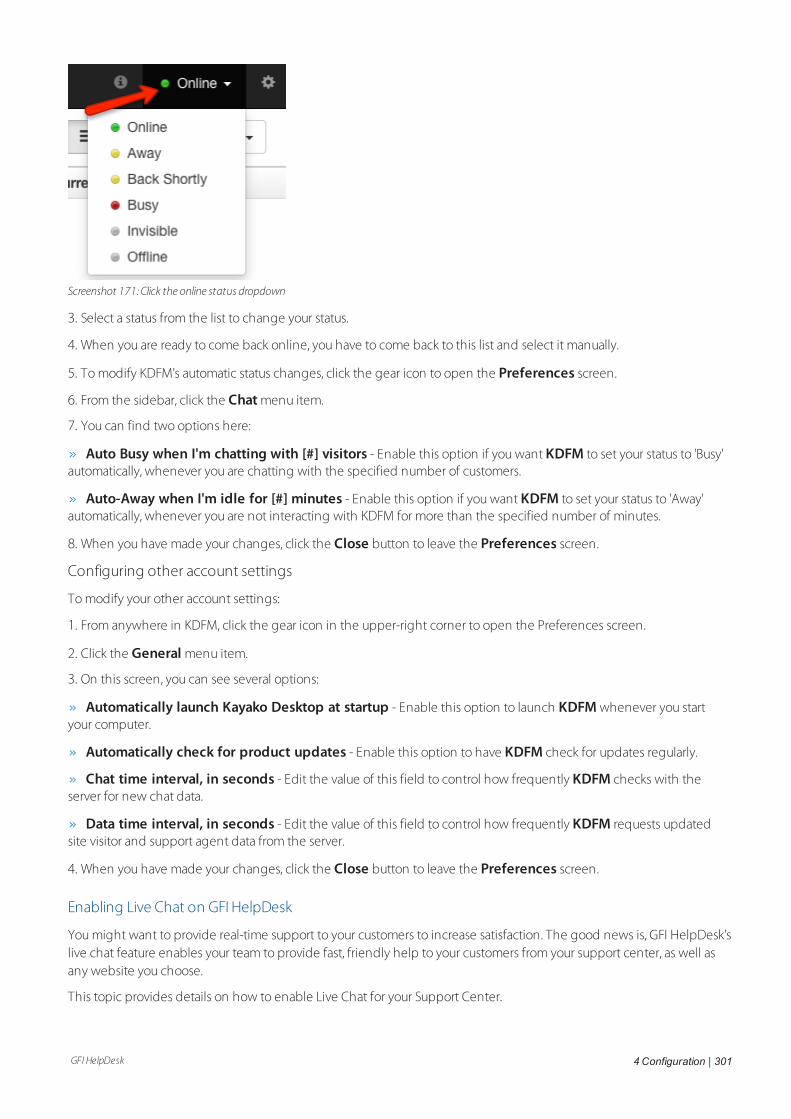
GFI HelpDesk 4 Configuration | 301
Screenshot 171: Click the online status dropdown
3. Select a status from the list to change your status.
4. When you are ready to come back online, you have to come back to this list and select it manually.
5. To modify KDFM's automatic status changes, click the gear icon to open the Preferences screen.
6. From the sidebar, click the Chat menu item.
7. You can find two options here:
Auto Busy when I'm chatting with [#] visitors - Enable this option if you want KDFM to set your status to 'Busy'automatically, whenever you are chatting with the specified number of customers.
Auto-Away when I'm idle for [#] minutes - Enable this option if you want KDFM to set your status to 'Away'automatically, whenever you are not interacting with KDFM for more than the specified number of minutes.
8. When you have made your changes, click the Close button to leave the Preferences screen.
Configuring other account settings
To modify your other account settings:
1. From anywhere in KDFM, click the gear icon in the upper-right corner to open the Preferences screen.
2. Click the General menu item.
3. On this screen, you can see several options:
Automatically launch Kayako Desktop at startup - Enable this option to launch KDFM whenever you startyour computer.
Automatically check for product updates - Enable this option to have KDFM check for updates regularly.
Chat time interval, in seconds - Edit the value of this field to control how frequently KDFM checks with theserver for new chat data.
Data time interval, in seconds - Edit the value of this field to control how frequently KDFM requests updatedsite visitor and support agent data from the server.
4. When you have made your changes, click the Close button to leave the Preferences screen.
Enabling Live Chat on GFI HelpDesk
You might want to provide real-time support to your customers to increase satisfaction. The good news is, GFI HelpDesk'slive chat feature enables your team to provide fast, friendly help to your customers from your support center, as well asany website you choose.
This topic provides details on how to enable Live Chat for your Support Center.
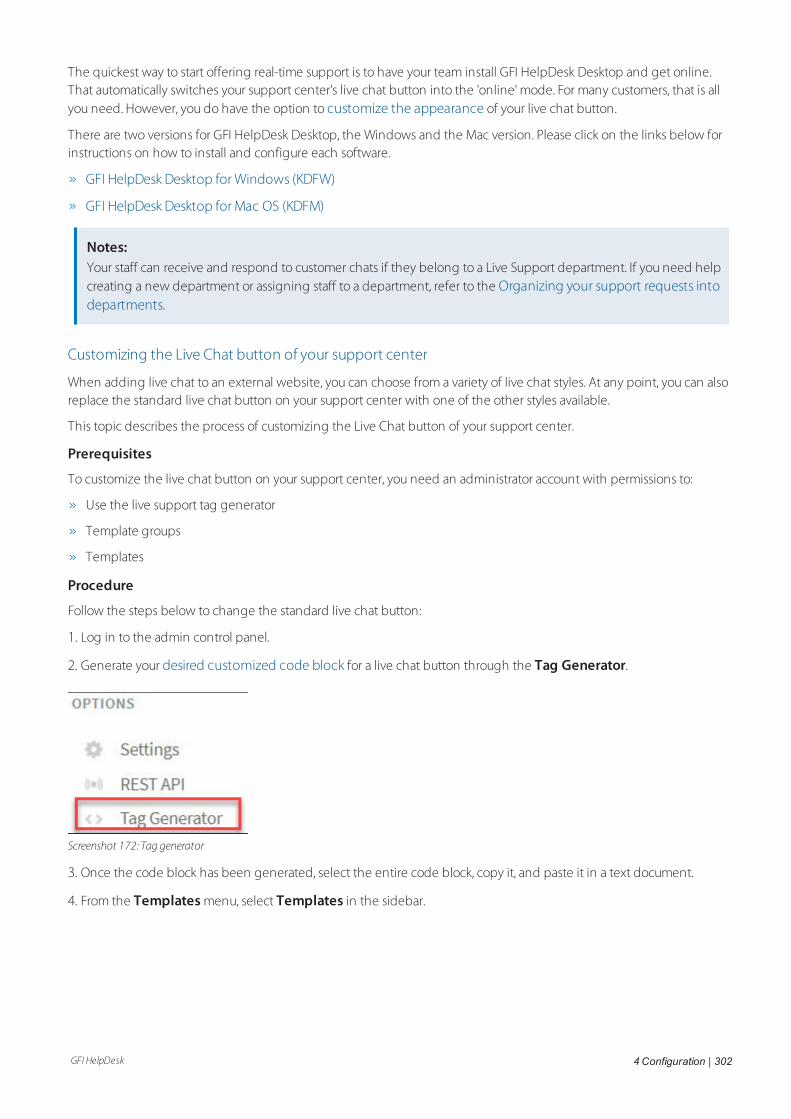
GFI HelpDesk 4 Configuration | 302
The quickest way to start offering real-time support is to have your team install GFI HelpDesk Desktop and get online.That automatically switches your support center's live chat button into the 'online' mode. For many customers, that is allyou need. However, you do have the option to customize the appearance of your live chat button.
There are two versions for GFI HelpDesk Desktop, the Windows and the Mac version. Please click on the links below forinstructions on how to install and configure each software.
GFI HelpDesk Desktop for Windows (KDFW)
GFI HelpDesk Desktop for Mac OS (KDFM)
Notes:Your staff can receive and respond to customer chats if they belong to a Live Support department. If you need helpcreating a new department or assigning staff to a department, refer to the Organizing your support requests intodepartments.
Customizing the Live Chat button of your support center
When adding live chat to an external website, you can choose from a variety of live chat styles. At any point, you can alsoreplace the standard live chat button on your support center with one of the other styles available.
This topic describes the process of customizing the Live Chat button of your support center.
Prerequisites
To customize the live chat button on your support center, you need an administrator account with permissions to:
Use the live support tag generator
Template groups
Templates
Procedure
Follow the steps below to change the standard live chat button:
1. Log in to the admin control panel.
2. Generate your desired customized code block for a live chat button through the Tag Generator.
Screenshot 172: Tag generator
3. Once the code block has been generated, select the entire code block, copy it, and paste it in a text document.
4. From the Templates menu, select Templates in the sidebar.
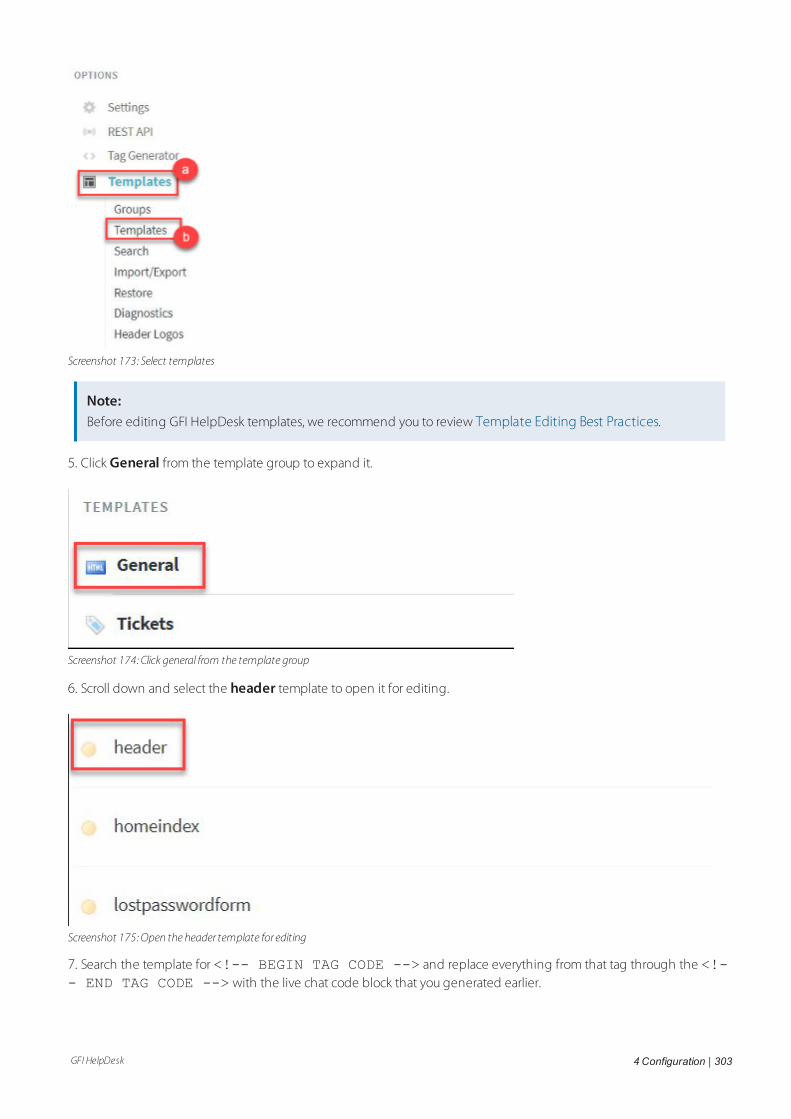
GFI HelpDesk 4 Configuration | 303
Screenshot 173: Select templates
Note:Before editing GFI HelpDesk templates, we recommend you to review Template Editing Best Practices.
5. Click General from the template group to expand it.
Screenshot 174: Click general from the template group
6. Scroll down and select the header template to open it for editing.
Screenshot 175: Open the header template for editing
7. Search the template for <!-- BEGIN TAG CODE --> and replace everything from that tag through the <!-- END TAG CODE --> with the live chat code block that you generated earlier.

GFI HelpDesk 4 Configuration | 304
8. Click Save to update the template.
Screenshot 176: Click Save
Adding Live chat on WordPress GFI HelpDesk integration
This topic guides you on how to add Live Chat in the WordPress GFI HelpDesk page.
Prerequisites
An active GFI HelpDesk subscription
Admin access to the Wordpress site
The GFI HelpDesk WordPress app available on the Github page
Procedure
To offer Live Chat support from your WordPress site, you need to create a Live Chat tag to include on the page:
1. Log in as an admin to your WordPress site.
2. Go to the GFI HelpDesk Admin Control Panel and click Tag Generator on the menu sidebar.
3. Select the type of Live Chat tag you want, and follow the prompts for creating it.
4. Once you’ve generated the Live Chat tag, switch back to the WordPress Admin > Kayako > Live Chat Tag.
5. In the text box, labeled Paste the tag generated by GFI HelpDesk Fusion here:, paste the code for the LiveChat tag you created with GFI HelpDesk.
6. Before saving, copy the shorthand code below and add it in your WordPress Theme. This code should be present inyour theme to display the chat icon.
<?php if(function_exists('the_kayako_liveChatTag')) the_kayako_liveChatTag(); ?>
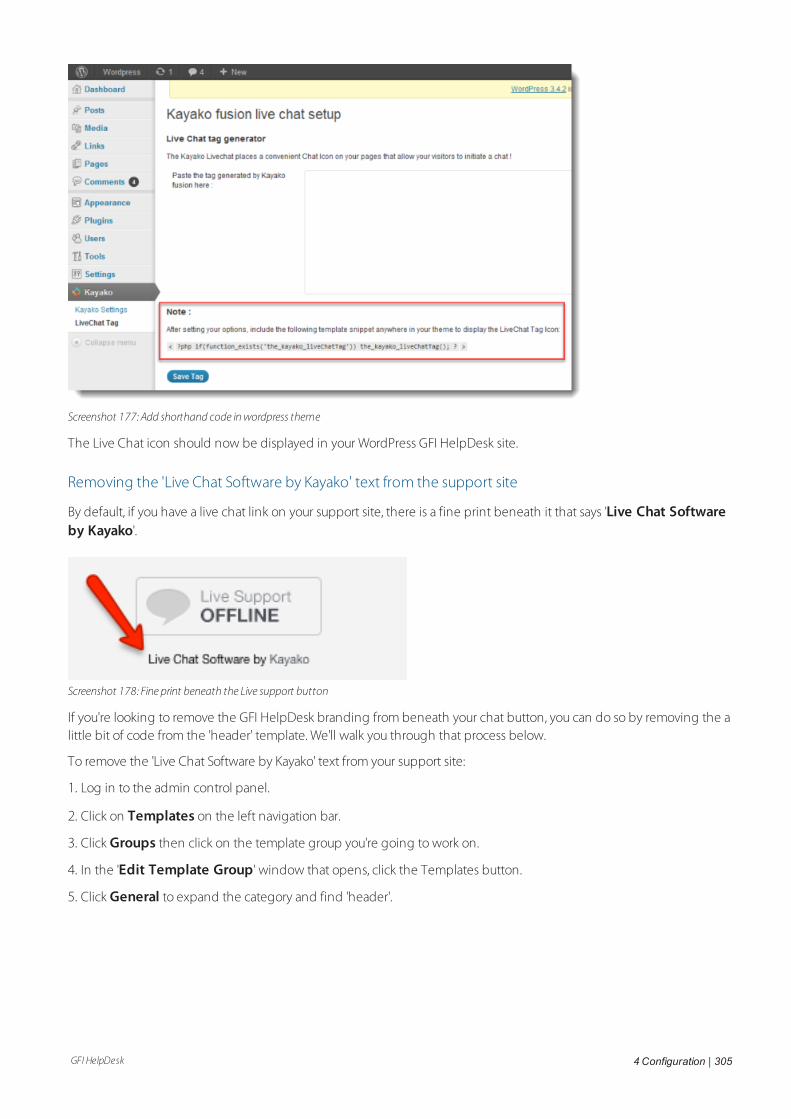
GFI HelpDesk 4 Configuration | 305
Screenshot 177: Add shorthand code inwordpress theme
The Live Chat icon should now be displayed in your WordPress GFI HelpDesk site.
Removing the 'Live Chat Software by Kayako' text from the support site
By default, if you have a live chat link on your support site, there is a fine print beneath it that says 'Live Chat Softwareby Kayako'.
Screenshot 178: Fine print beneath the Live support button
If you're looking to remove the GFI HelpDesk branding from beneath your chat button, you can do so by removing the alittle bit of code from the 'header' template. We'll walk you through that process below.
To remove the 'Live Chat Software by Kayako' text from your support site:
1. Log in to the admin control panel.
2. Click on Templates on the left navigation bar.
3. Click Groups then click on the template group you're going to work on.
4. In the 'Edit Template Group' window that opens, click the Templates button.
5. Click General to expand the category and find 'header'.
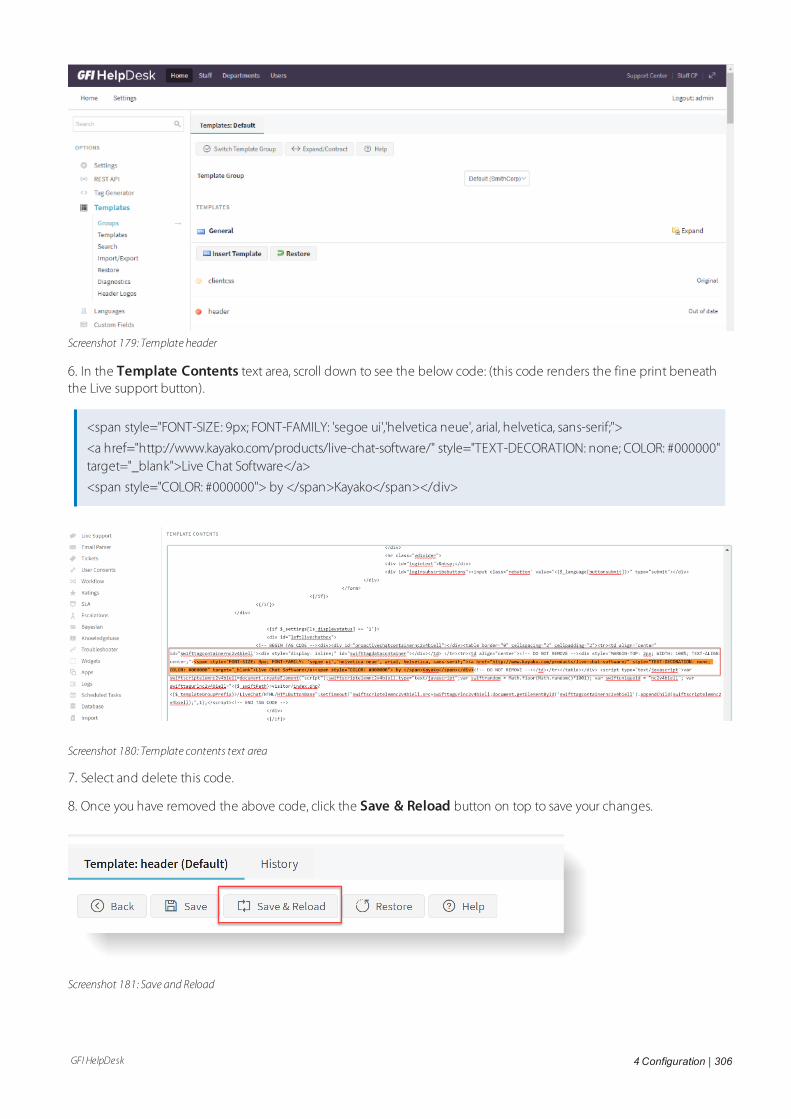
GFI HelpDesk 4 Configuration | 306
Screenshot 179: Template header
6. In the Template Contents text area, scroll down to see the below code: (this code renders the fine print beneaththe Live support button).
<span style="FONT-SIZE: 9px; FONT-FAMILY: 'segoe ui','helvetica neue', arial, helvetica, sans-serif;">
<a href="http://www.kayako.com/products/live-chat-software/" style="TEXT-DECORATION: none; COLOR: #000000"target="_blank">Live Chat Software</a>
<span style="COLOR: #000000"> by </span>Kayako</span></div>
Screenshot 180: Template contents text area
7. Select and delete this code.
8. Once you have removed the above code, click the Save & Reload button on top to save your changes.
Screenshot 181: Save and Reload
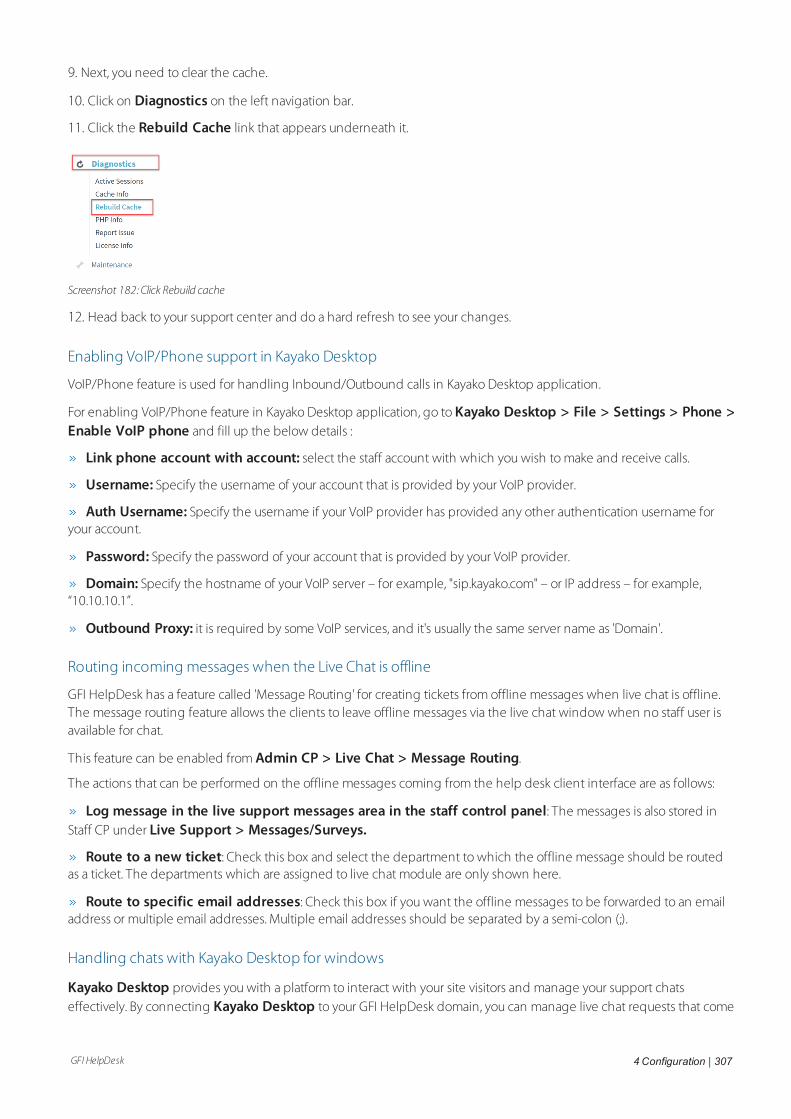
GFI HelpDesk 4 Configuration | 307
9. Next, you need to clear the cache.
10. Click on Diagnostics on the left navigation bar.
11. Click the Rebuild Cache link that appears underneath it.
Screenshot 182: Click Rebuild cache
12. Head back to your support center and do a hard refresh to see your changes.
Enabling VoIP/Phone support in Kayako Desktop
VoIP/Phone feature is used for handling Inbound/Outbound calls in Kayako Desktop application.
For enabling VoIP/Phone feature in Kayako Desktop application, go to Kayako Desktop > File > Settings > Phone >Enable VoIP phone and fill up the below details :
Link phone account with account: select the staff account with which you wish to make and receive calls.
Username: Specify the username of your account that is provided by your VoIP provider.
Auth Username: Specify the username if your VoIP provider has provided any other authentication username foryour account.
Password: Specify the password of your account that is provided by your VoIP provider.
Domain: Specify the hostname of your VoIP server – for example, "sip.kayako.com" – or IP address – for example,“10.10.10.1”.
Outbound Proxy: it is required by some VoIP services, and it's usually the same server name as 'Domain'.
Routing incoming messages when the Live Chat is offline
GFI HelpDesk has a feature called 'Message Routing' for creating tickets from offline messages when live chat is offline.The message routing feature allows the clients to leave offline messages via the live chat window when no staff user isavailable for chat.
This feature can be enabled from Admin CP > Live Chat > Message Routing.
The actions that can be performed on the offline messages coming from the help desk client interface are as follows:
Log message in the live support messages area in the staff control panel: The messages is also stored inStaff CP under Live Support > Messages/Surveys.
Route to a new ticket: Check this box and select the department to which the offline message should be routedas a ticket. The departments which are assigned to live chat module are only shown here.
Route to specific email addresses: Check this box if you want the offline messages to be forwarded to an emailaddress or multiple email addresses. Multiple email addresses should be separated by a semi-colon (;).
Handling chats with Kayako Desktop for windows
Kayako Desktop provides you with a platform to interact with your site visitors and manage your support chatseffectively. By connecting Kayako Desktop to your GFI HelpDesk domain, you can manage live chat requests that come
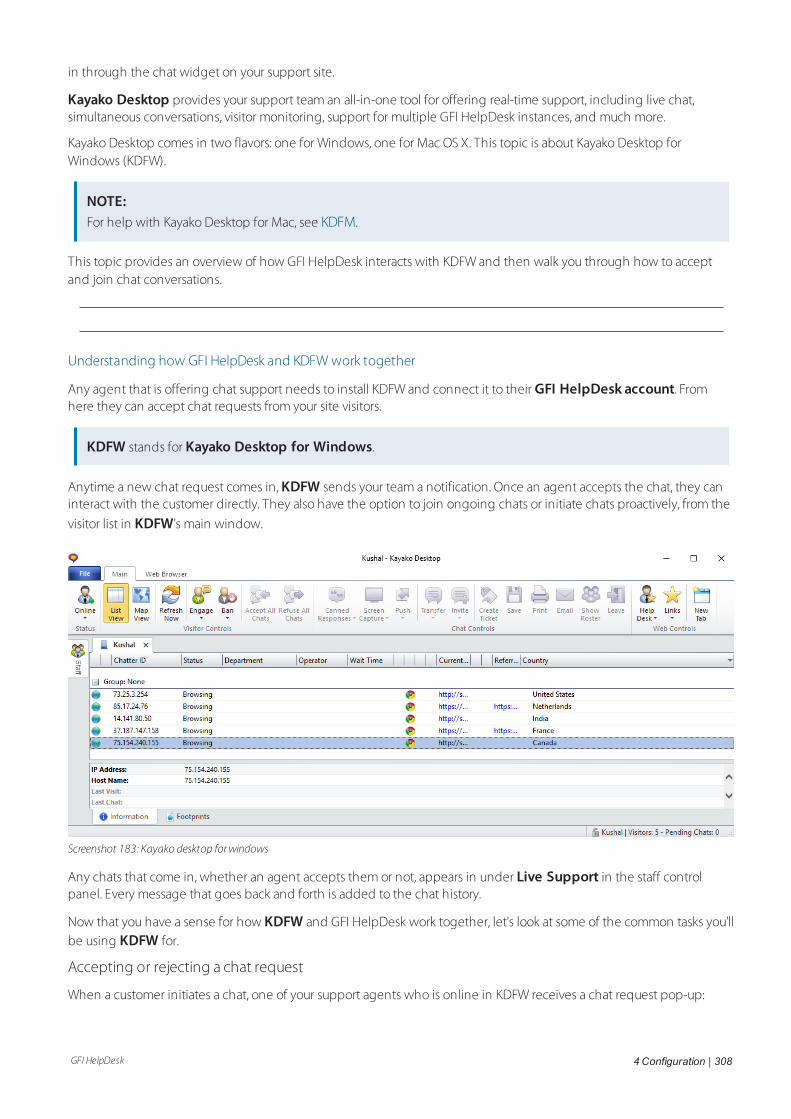
GFI HelpDesk 4 Configuration | 308
in through the chat widget on your support site.
Kayako Desktop provides your support team an all-in-one tool for offering real-time support, including live chat,simultaneous conversations, visitor monitoring, support for multiple GFI HelpDesk instances, and much more.
Kayako Desktop comes in two flavors: one for Windows, one for Mac OS X. This topic is about Kayako Desktop forWindows (KDFW).
NOTE:For help with Kayako Desktop for Mac, see KDFM.
This topic provides an overview of how GFI HelpDesk interacts with KDFW and then walk you through how to acceptand join chat conversations.
Understanding how GFI HelpDesk and KDFW work together
Any agent that is offering chat support needs to install KDFW and connect it to their GFI HelpDesk account. Fromhere they can accept chat requests from your site visitors.
KDFW stands for Kayako Desktop for Windows.
Anytime a new chat request comes in, KDFW sends your team a notification. Once an agent accepts the chat, they caninteract with the customer directly. They also have the option to join ongoing chats or initiate chats proactively, from the
visitor list in KDFW's main window.
Screenshot 183: Kayako desktop forwindows
Any chats that come in, whether an agent accepts them or not, appears in under Live Support in the staff controlpanel. Every message that goes back and forth is added to the chat history.
Now that you have a sense for how KDFW and GFI HelpDesk work together, let's look at some of the common tasks you'llbe using KDFW for.
Accepting or rejecting a chat request
When a customer initiates a chat, one of your support agents who is online in KDFW receives a chat request pop-up:

GFI HelpDesk 4 Configuration | 309
Screenshot 184: Chat initiate alert
You can see the customer name (Adam) and chat subject in the pop-up.
If you click Accept, you start a conversation with the customer. If you click Decline, chat request is routed to next availableagent.
Joining an ongoing chat
In addition to accepting new chat requests, you can also join ongoing chats from the main KDFW tab.
To join an ongoing chat:
1. Log into Kayako Desktop for Windows.
2. The first screen you see is the Visitors screen. Find the chat you want to join and right-click.
3. Hover over the Join option.
Screenshot 185: Hover over join option
4. From here, you have two options:
Join chat — Click this option to join the chat and be visible to both the other agent and the customer.
Join chat as observer — Click this option to join the chat as an observer, you cannot participate in the con-versation and the only staff members are aware of your presence.
Sending files from a chat window
If you are in a chat with the customer and want to share a file on the fly, you do not require any channel-switching. TheKDFW lets you send many different types of media. When you share a file with your customer, it appears in their chatwindow, where they download it. Any files you send over KDFW are secured by the same measures that protect the restof your GFI HelpDesk account.
Below are the different types of files you can send:
Sending an image
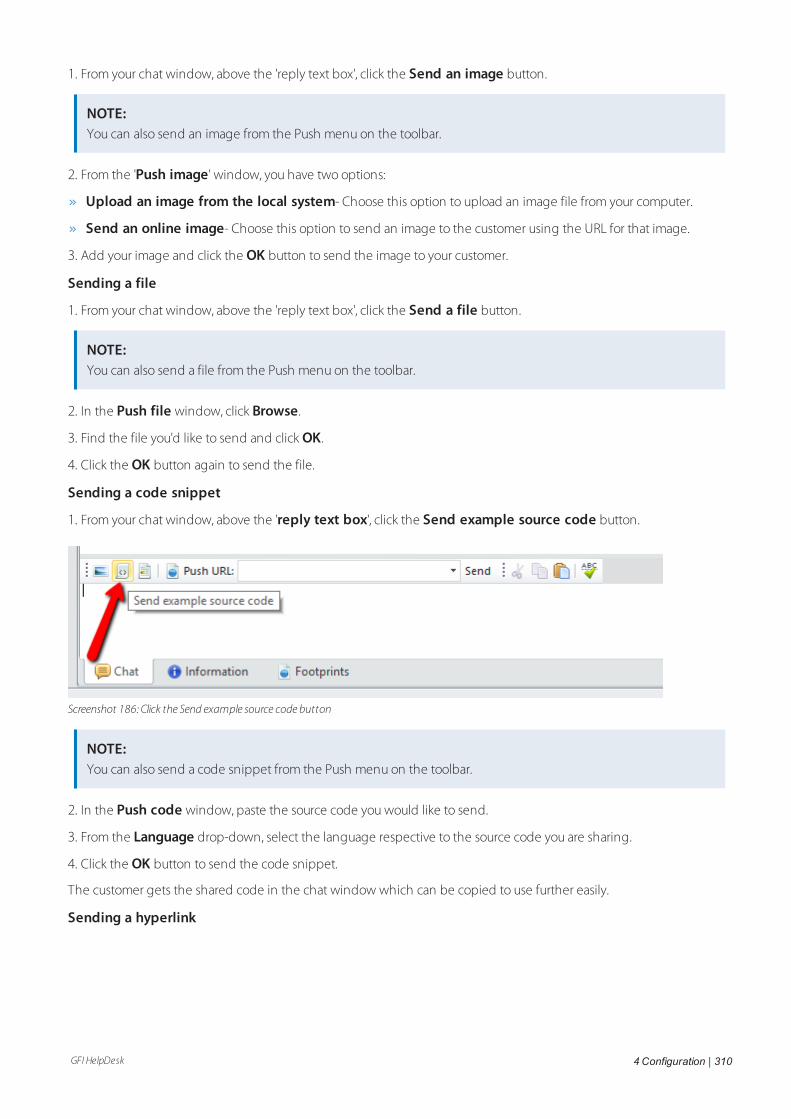
GFI HelpDesk 4 Configuration | 310
1. From your chat window, above the 'reply text box', click the Send an image button.
NOTE:You can also send an image from the Push menu on the toolbar.
2. From the 'Push image' window, you have two options:
Upload an image from the local system- Choose this option to upload an image file from your computer.
Send an online image- Choose this option to send an image to the customer using the URL for that image.
3. Add your image and click the OK button to send the image to your customer.
Sending a file
1. From your chat window, above the 'reply text box', click the Send a file button.
NOTE:You can also send a file from the Push menu on the toolbar.
2. In the Push file window, click Browse.
3. Find the file you'd like to send and click OK.
4. Click the OK button again to send the file.
Sending a code snippet
1. From your chat window, above the 'reply text box', click the Send example source code button.
Screenshot 186: Click the Send example source code button
NOTE:You can also send a code snippet from the Push menu on the toolbar.
2. In the Push code window, paste the source code you would like to send.
3. From the Language drop-down, select the language respective to the source code you are sharing.
4. Click the OK button to send the code snippet.
The customer gets the shared code in the chat window which can be copied to use further easily.
Sending a hyperlink
GFI HelpDesk 4 Configuration | 311
1. From your chat window, above the 'reply text box', you can see a Push URL text box.
NOTE:You can also send a hyperlink from the Push menu on the toolbar.
2. Type or paste the URL you want to link your customer to.
3. Click the Send button to the right to send across a clickable hyperlink.

GFI HelpDesk 5 Troubleshooting | 312
5 TroubleshootingThis topic explains how to resolve issues encountered while using GFI HelpDesk. These issues can be resolved using thecontents of this guide. If any issues remain unresolved after reviewing the manual, check if your problem is listed below.
Topics in this section:
5.1 Unable to start XAMPP services on mac machine 312
5.2 Error: 'Privacy Policy Required' when submitting tickets 314
5.3 Handling PHP deprecated function errors while on GFI HelpDesk 314
5.4 Uncaught exception received when searching 315
5.5 Troubleshooting the message: "Your connection to this site is not secure" 316
5.6 Fixing common GFI HelpDesk errors 317
5.7 Error when installing GFI HelpDesk on a different drive 321
5.8 Knowledgebase articles not displaying correctly after an upgrade 324
5.9 Resolving memory exhaustion errors 325
5.10 Resetting the administrator password without the helpdesk access 326
5.11 Frequently asked questions 327
5.11.1 Installation issues 327
5.11.2 Common issues 331
5.11.3 Other issues 371
5.1 Unable to start XAMPP services on mac machineThis topic describes the procedure to fix the issues if XAMPP is unable to start properly in macOS and you get a blankpage when trying to setup GFI HelpDesk.
All Services in XAMPP won’t start after you successfully install GFI HelpDesk and restart the machine.
You managed to install XAMPP, had it working, successfully install GFI HelpDesk. The next time you switch on your MAC
after shutdown or restart, all services in XAMPP does not start, even after pressing the Start or Start All button.

GFI HelpDesk 5 Troubleshooting | 313
Screenshot 187:Manage servers
Below are the steps to satrt XAMPP services on mac:
1. Check PHP Error log, there is a Fatal Error related to Safe Mode.
Screenshot 188: php error log
2. Checked PHP.ini and search for any entry related to Safe Mode.
3. Disable the safe_mode by putting a semicolon in front of the text and save the file.
Screenshot 189: Disable safemode
4. Go to XAMPP again and try to restart the services again.
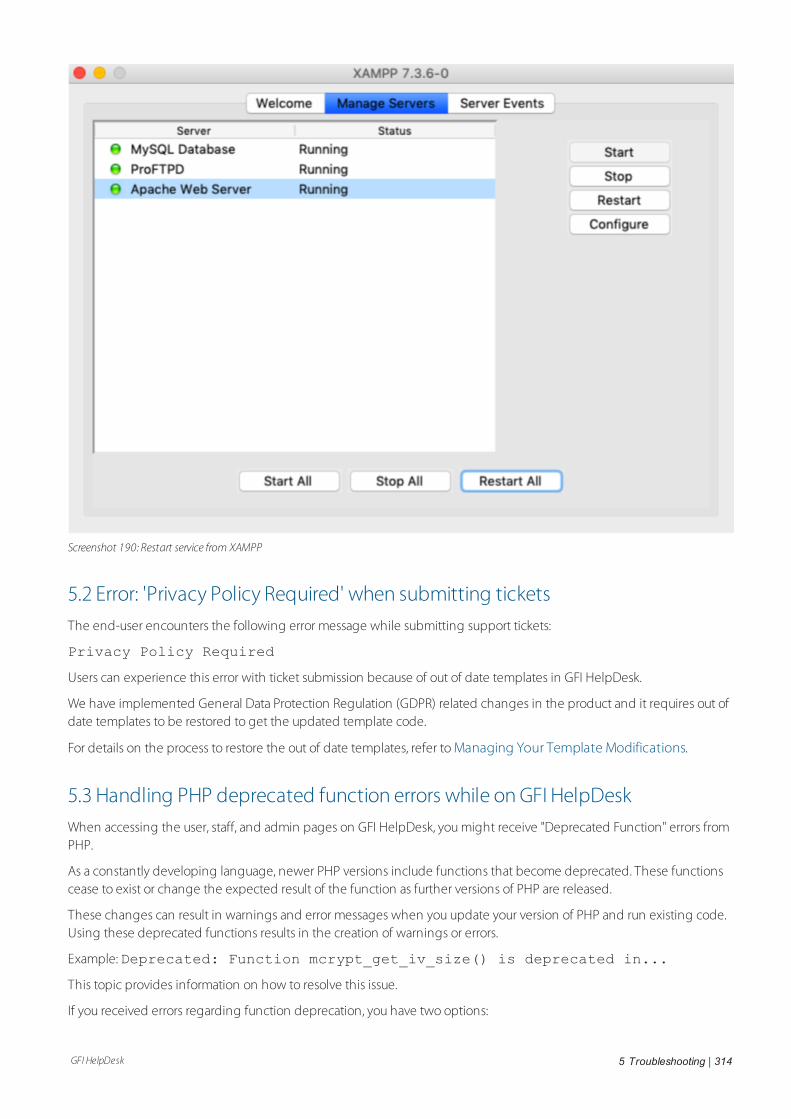
GFI HelpDesk 5 Troubleshooting | 314
Screenshot 190: Restart service from XAMPP
5.2 Error: 'Privacy Policy Required' when submitting ticketsThe end-user encounters the following error message while submitting support tickets:
Privacy Policy Required
Users can experience this error with ticket submission because of out of date templates in GFI HelpDesk.
We have implemented General Data Protection Regulation (GDPR) related changes in the product and it requires out ofdate templates to be restored to get the updated template code.
For details on the process to restore the out of date templates, refer to Managing Your Template Modifications.
5.3 Handling PHP deprecated function errors while on GFI HelpDeskWhen accessing the user, staff, and admin pages on GFI HelpDesk, you might receive "Deprecated Function" errors fromPHP.
As a constantly developing language, newer PHP versions include functions that become deprecated. These functionscease to exist or change the expected result of the function as further versions of PHP are released.
These changes can result in warnings and error messages when you update your version of PHP and run existing code.Using these deprecated functions results in the creation of warnings or errors.
Example:Deprecated: Function mcrypt_get_iv_size() is deprecated in...
This topic provides information on how to resolve this issue.
If you received errors regarding function deprecation, you have two options:

GFI HelpDesk 5 Troubleshooting | 315
Suppress the warnings by adding the following line to the php.ini file:
error_reporting = E_ALL & ~E_NOTICE & ~E_DEPRECATED
Upgrade your PHP to a higher version. For information about PHP releases, please visit the Unsupported HistoricalReleases website.
For more information about how to edit the php.ini file, refer to the article How Can I Edit the PHP.Ini File?
5.4 Uncaught exception received when searchingWhen performing search in GFI HelpDesk, the following exception can be received sometimes:
Uncaught Exception AutoExecute Query: AutoExecute Query:
INSERT swsearchstores
(array
(
'sessionid' => 'gM7CPU9K09lWAIB1ydsF1d2d25e4faeaffe89849e1912350626bd7a1a147RKFwmO8TT6Dtt',
'storetype' => 5, 'dateline' => 1557820459, 'lastupdate' => 1557820459, 'staffid' => '112', 'userid' => false,
)
)
in ./__swift/library/Database/class.SWIFT_Database.php:603
This is because MySQL Strict Mode is enabled by default and should be disabled to use GFI HelpDesk.
The recommended resolution for this is to Disable MySQL Strict Mode at the server level.
Alternatively, you can disable MySQL Strict Mode at the session level.
Note:
This configuration ensures that every time GFI HelpDesk wants to connect to the MySQL Database, Strict Mode isdisabled at the session level.
The user must have the necessary permissions on the database to disable Strict Mode.
Follow the below steps to disable MySQL Strict Mode at the session level:
1. Launch a text editor.
2. Open the file: __swift/library/Database/class.SWIFT_Database.php
3. Find the method __construct()
4. At the end of that method, just before the line:return parent::__construct(), add the following lineof code:
$this->Execute("SET SESSION sql_mode=''");
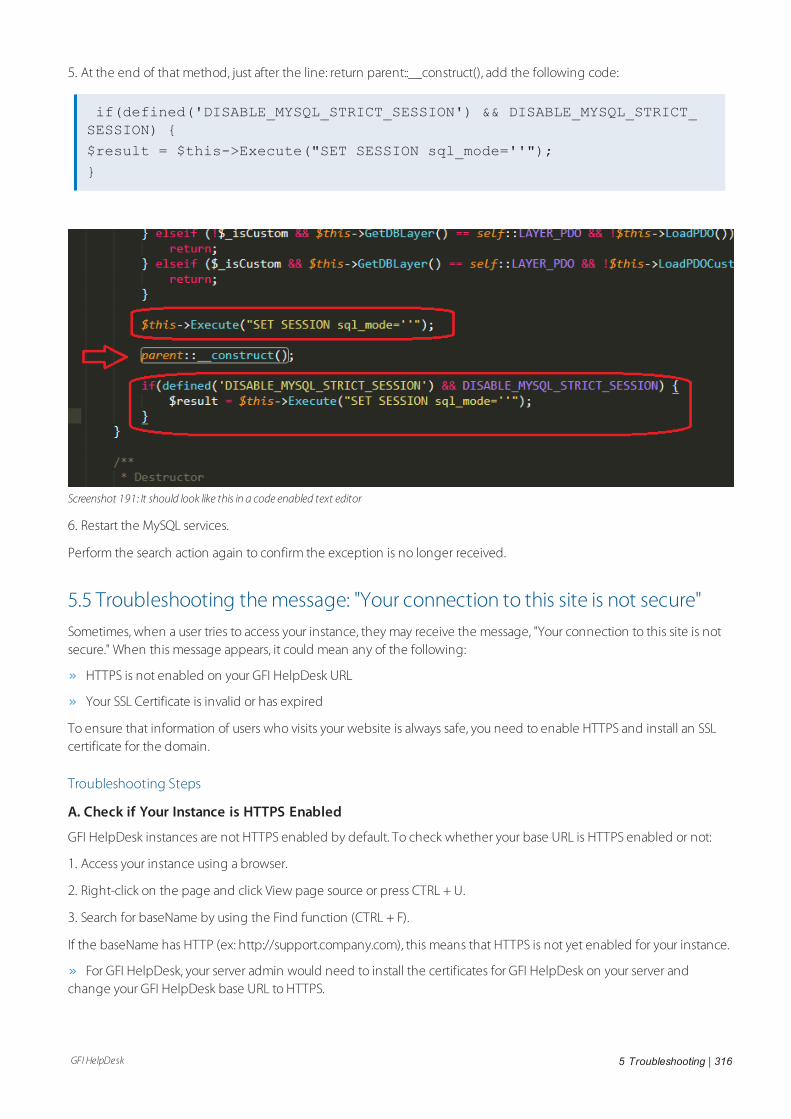
GFI HelpDesk 5 Troubleshooting | 316
5. At the end of that method, just after the line: return parent::__construct(), add the following code:
if(defined('DISABLE_MYSQL_STRICT_SESSION') && DISABLE_MYSQL_STRICT_SESSION) {
$result = $this->Execute("SET SESSION sql_mode=''");
}
Screenshot 191: It should look like this in a code enabled text editor
6. Restart the MySQL services.
Perform the search action again to confirm the exception is no longer received.
5.5 Troubleshooting the message: "Your connection to this site is not secure"Sometimes, when a user tries to access your instance, they may receive the message, "Your connection to this site is notsecure." When this message appears, it could mean any of the following:
HTTPS is not enabled on your GFI HelpDesk URL
Your SSL Certificate is invalid or has expired
To ensure that information of users who visits your website is always safe, you need to enable HTTPS and install an SSLcertificate for the domain.
Troubleshooting Steps
A. Check if Your Instance is HTTPS Enabled
GFI HelpDesk instances are not HTTPS enabled by default. To check whether your base URL is HTTPS enabled or not:
1. Access your instance using a browser.
2. Right-click on the page and click View page source or press CTRL + U.
3. Search for baseName by using the Find function (CTRL + F).
If the baseName has HTTP (ex: http://support.company.com), this means that HTTPS is not yet enabled for your instance.
For GFI HelpDesk, your server admin would need to install the certificates for GFI HelpDesk on your server andchange your GFI HelpDesk base URL to HTTPS.
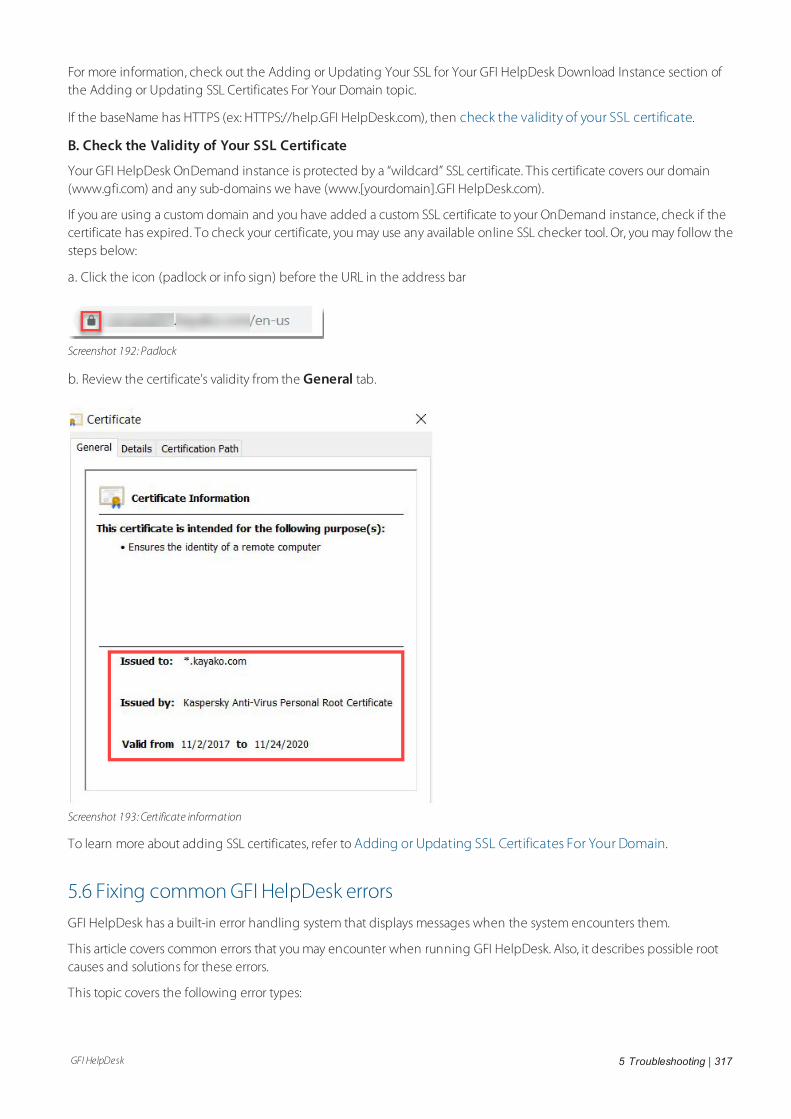
GFI HelpDesk 5 Troubleshooting | 317
For more information, check out the Adding or Updating Your SSL for Your GFI HelpDesk Download Instance section ofthe Adding or Updating SSL Certificates For Your Domain topic.
If the baseName has HTTPS (ex: HTTPS://help.GFI HelpDesk.com), then check the validity of your SSL certificate.
B. Check the Validity of Your SSL Certificate
Your GFI HelpDesk OnDemand instance is protected by a “wildcard” SSL certificate. This certificate covers our domain(www.gfi.com) and any sub-domains we have (www.[yourdomain].GFI HelpDesk.com).
If you are using a custom domain and you have added a custom SSL certificate to your OnDemand instance, check if thecertificate has expired. To check your certificate, you may use any available online SSL checker tool. Or, you may follow thesteps below:
a. Click the icon (padlock or info sign) before the URL in the address bar
Screenshot 192: Padlock
b. Review the certificate's validity from the General tab.
Screenshot 193: Certificate information
To learn more about adding SSL certificates, refer to Adding or Updating SSL Certificates For Your Domain.
5.6 Fixing common GFI HelpDesk errorsGFI HelpDesk has a built-in error handling system that displays messages when the system encounters them.
This article covers common errors that you may encounter when running GFI HelpDesk. Also, it describes possible rootcauses and solutions for these errors.
This topic covers the following error types:
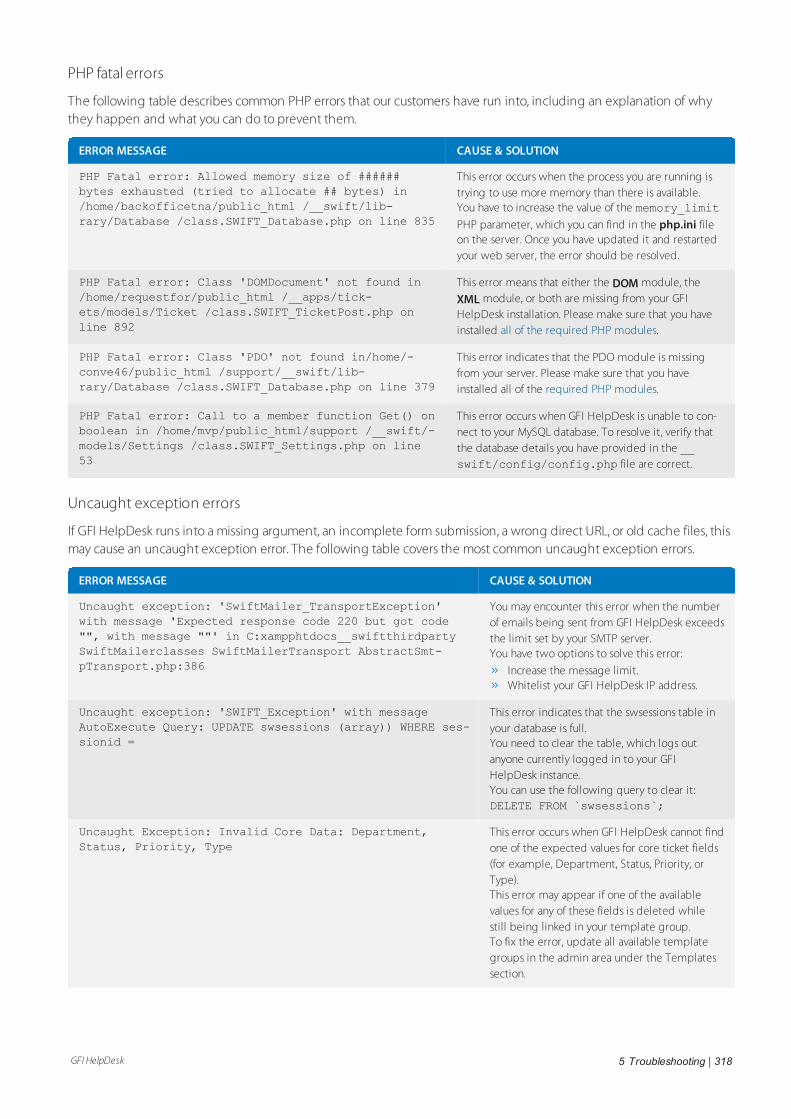
GFI HelpDesk 5 Troubleshooting | 318
PHP fatal errors
The following table describes common PHP errors that our customers have run into, including an explanation of whythey happen and what you can do to prevent them.
ERROR MESSAGE CAUSE & SOLUTION
PHP Fatal error: Allowed memory size of ######bytes exhausted (tried to allocate ## bytes) in/home/backofficetna/public_html /__swift/lib-rary/Database /class.SWIFT_Database.php on line 835
This error occurs when the process you are running istrying to use more memory than there is available.You have to increase the value of the memory_limitPHP parameter, which you can find in the php.ini fileon the server. Once you have updated it and restartedyour web server, the error should be resolved.
PHP Fatal error: Class 'DOMDocument' not found in/home/requestfor/public_html /__apps/tick-ets/models/Ticket /class.SWIFT_TicketPost.php online 892
This error means that either the DOM module, the
XML module, or both are missing from your GFIHelpDesk installation. Please make sure that you haveinstalled all of the required PHP modules.
PHP Fatal error: Class 'PDO' not found in/home/-conve46/public_html /support/__swift/lib-rary/Database /class.SWIFT_Database.php on line 379
This error indicates that the PDO module is missingfrom your server. Please make sure that you haveinstalled all of the required PHP modules.
PHP Fatal error: Call to a member function Get() onboolean in /home/mvp/public_html/support /__swift/-models/Settings /class.SWIFT_Settings.php on line53
This error occurs when GFI HelpDesk is unable to con-nect to your MySQL database. To resolve it, verify thatthe database details you have provided in the __swift/config/config.php file are correct.
Uncaught exception errors
If GFI HelpDesk runs into a missing argument, an incomplete form submission, a wrong direct URL, or old cache files, thismay cause an uncaught exception error. The following table covers the most common uncaught exception errors.
ERROR MESSAGE CAUSE & SOLUTION
Uncaught exception: 'SwiftMailer_TransportException'with message 'Expected response code 220 but got code"", with message ""' in C:xampphtdocs__swiftthirdpartySwiftMailerclasses SwiftMailerTransport AbstractSmt-pTransport.php:386
You may encounter this error when the numberof emails being sent from GFI HelpDesk exceedsthe limit set by your SMTP server.You have two options to solve this error:
Increase the message limit.Whitelist your GFI HelpDesk IP address.
Uncaught exception: 'SWIFT_Exception' with messageAutoExecute Query: UPDATE swsessions (array)) WHERE ses-sionid =
This error indicates that the swsessions table inyour database is full.You need to clear the table, which logs outanyone currently logged in to your GFIHelpDesk instance.You can use the following query to clear it:DELETE FROM `swsessions`;
Uncaught Exception: Invalid Core Data: Department,Status, Priority, Type
This error occurs when GFI HelpDesk cannot findone of the expected values for core ticket fields(for example, Department, Status, Priority, orType).This error may appear if one of the availablevalues for any of these fields is deleted whilestill being linked in your template group.To fix the error, update all available templategroups in the admin area under the Templatessection.
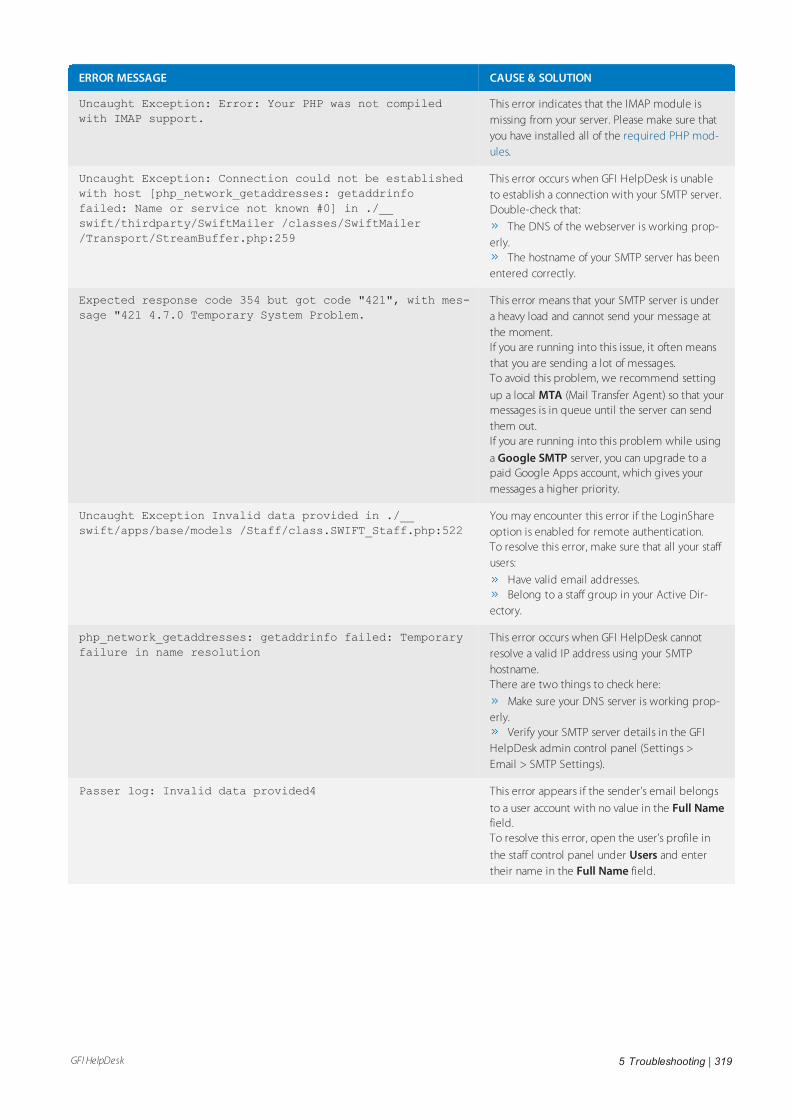
GFI HelpDesk 5 Troubleshooting | 319
ERROR MESSAGE CAUSE & SOLUTION
Uncaught Exception: Error: Your PHP was not compiledwith IMAP support.
This error indicates that the IMAP module ismissing from your server. Please make sure thatyou have installed all of the required PHP mod-ules.
Uncaught Exception: Connection could not be establishedwith host [php_network_getaddresses: getaddrinfofailed: Name or service not known #0] in ./__swift/thirdparty/SwiftMailer /classes/SwiftMailer/Transport/StreamBuffer.php:259
This error occurs when GFI HelpDesk is unableto establish a connection with your SMTP server.Double-check that:
The DNS of the webserver is working prop-erly.
The hostname of your SMTP server has beenentered correctly.
Expected response code 354 but got code "421", with mes-sage "421 4.7.0 Temporary System Problem.
This error means that your SMTP server is undera heavy load and cannot send your message atthe moment.If you are running into this issue, it often meansthat you are sending a lot of messages.To avoid this problem, we recommend setting
up a local MTA (Mail Transfer Agent) so that yourmessages is in queue until the server can sendthem out.If you are running into this problem while using
a Google SMTP server, you can upgrade to apaid Google Apps account, which gives yourmessages a higher priority.
Uncaught Exception Invalid data provided in ./__swift/apps/base/models /Staff/class.SWIFT_Staff.php:522
You may encounter this error if the LoginShareoption is enabled for remote authentication.To resolve this error, make sure that all your staffusers:
Have valid email addresses.Belong to a staff group in your Active Dir-
ectory.
php_network_getaddresses: getaddrinfo failed: Temporaryfailure in name resolution
This error occurs when GFI HelpDesk cannotresolve a valid IP address using your SMTPhostname.There are two things to check here:
Make sure your DNS server is working prop-erly.
Verify your SMTP server details in the GFIHelpDesk admin control panel (Settings >Email > SMTP Settings).
Passer log: Invalid data provided4 This error appears if the sender's email belongs
to a user account with no value in the Full Namefield.To resolve this error, open the user's profile in
the staff control panel under Users and entertheir name in the Full Name field.

GFI HelpDesk 5 Troubleshooting | 320
ERROR MESSAGE CAUSE & SOLUTION
Undefined index: csrfhash error on updating things You may encounter this error if your GFIHelpDesk has a particularly large list ofdepartments, user groups, or teams. Sinceloading the full list can consume a lot of systemresources, the process may time out.To resolve this error, do the following:
1. In your PHP configuration file, find the para-meter called max_input_vars.2. Change its value to 5000 and save the file.3. Restart the web service.
UNSERIALIZE FAILED: a:1:{s:15:\ "templategroupid\";s:1:\"1\";}
This error occurs when the magic_quotes_gpc parameter is enabled.You need to disable it to resolve this error.Open your PHP configuration file and set
magic_quotes_gpc to Off.
Undefined index: dateline (./__apps/tickets/staff/class.View_Ticket.php:3318)
You may encounter this error if you have MySQLstrict mode enabled on your server. Hence, youneed to disable the MySQL strict mode.
Notice Undefined index: _ticketContent (./__swift/cache/ 5923709124d225fdff b71bd2a3798fdc.php:68)
If you have any outdated or incorrect templates,they may cause this error. To resolve this error,restore your templates to their default versions.
Other common errors
The errors that are described in the following table can be caused by hardware problems, conflicts with the serverenvironment, outdated releases, etc.
ERROR MESSAGE CAUSE & SOLUTION
Failed to place call. Reason: Unknown error 420006. This error occurs when GFI HelpDesk Desktop cannotfind a sound card on your computer.We recommend checking that the drivers for yoursound card are installed properly and making sure itis up and running.
Reason: Failed: Bad MD5 sum You have this error if your server is trying to serve upGFI HelpDesk via its CDN (Content DeliveryNetwork).Since there are elements of GFI HelpDesk that doesnot function properly if cached (, live chat), it causesthis error.The solution here is to configure your CDN so that itnever caches GFI HelpDesk.
ERROR: Product file version (4.xx.x) does not matchwith the database version (). Please run the upgradescript to ensure that the product is up to date.
This error indicates that your product files are out ofsync with the version of GFI HelpDesk in your data-base. To fix it, upgrade to the latest version of GFIHelpDesk.

GFI HelpDesk 5 Troubleshooting | 321
ERROR MESSAGE CAUSE & SOLUTION
Blank page with HTTP Error 500 Internal server error This error means that PHP has crashed so quickly andthoroughly that it did not even have time to displayan error message.This error may be caused by:
A database connection issue.The wrong file access permissions configured for
an important folder.
You need to log in to your server and have a look atyour error logs to find the reason for this error.
Error: AutoExecute Query: AutoExecute Query: INSERTswusers (array ( 'usergroupid' => '2', 'salutation'=> 0, 'userrole' => 1, 'userorganizationid' => 0,...
You may encounter this error if you have MySQL strictmode enabled on your server. Hence, you need to dis-able the MySQL strict mode.
5.7 Error when installing GFI HelpDesk on a different driveYou may want to install GFI HelpDesk to a different drive on your server. However, when running the application, it mayattempt to look for the application files in the C:\ drive (default installation location). Changing GFI HelpDesk's installationlocation causes a caching issue.
Once a cache is built, GFI HelpDesk continues to use it for web requests and other tasks. If the cache has the wrong URLor path, it logs errors in GFI HelpDesk when trying to access the cached file. To avoid the caching issue, always clear thecache directory.
When a caching issue occurs, an error message similar to the one below may be encountered:
Warning!
require_once
(C:\WebSites\gfihelpdesk\Support\__swift\apps\base\library\UserInterface
/class.SWIFT_UserInterfaceToolbar.php):
failed to open stream: No such file or directory...
This topic provides more information on how to resolve the caching issue.
To ensure that your helpdesk's database does not have any outdated data that could interfere with your runningapplications, rebuild your cache. Follow the steps below to resolve the caching issue:
1. On your web server, go to the __swift/cache/ directory and select all the files so you can delete every file inthe folder (as in the GIF animation below).
NOTE:These are temporary files and are replaced as soon as you complete step 2.
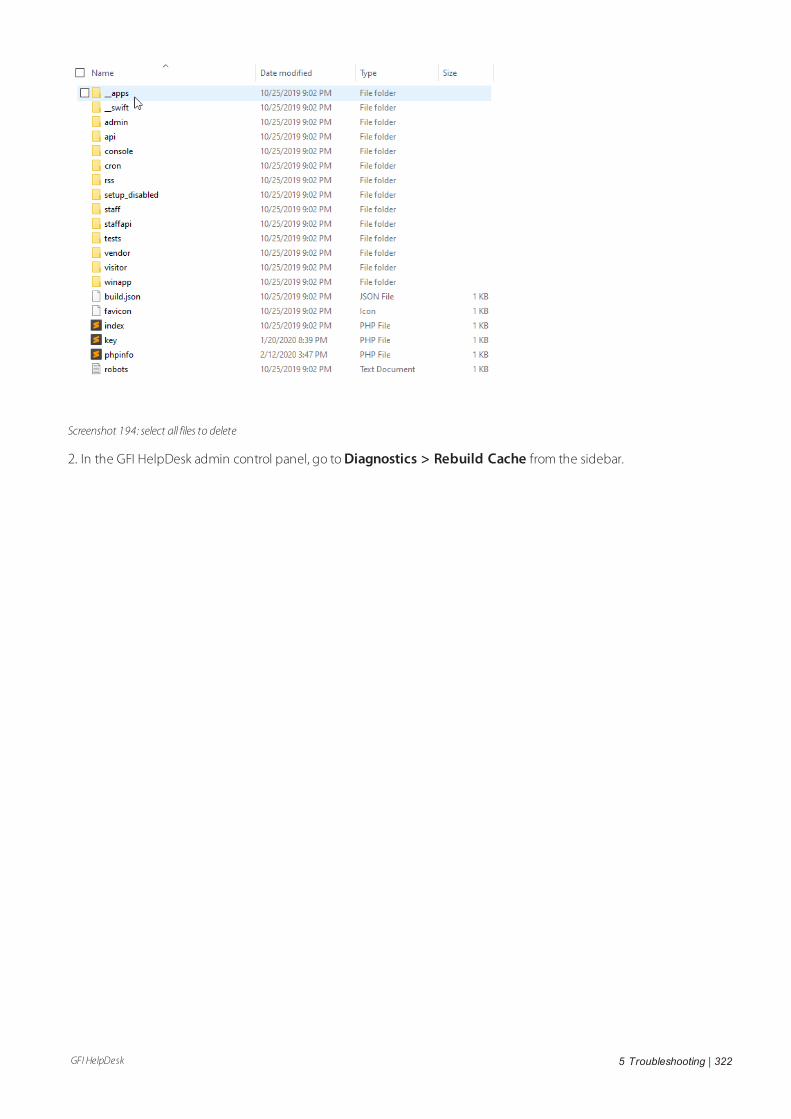
GFI HelpDesk 5 Troubleshooting | 322
Screenshot 194: select all files to delete
2. In the GFI HelpDesk admin control panel, go to Diagnostics > Rebuild Cache from the sidebar.
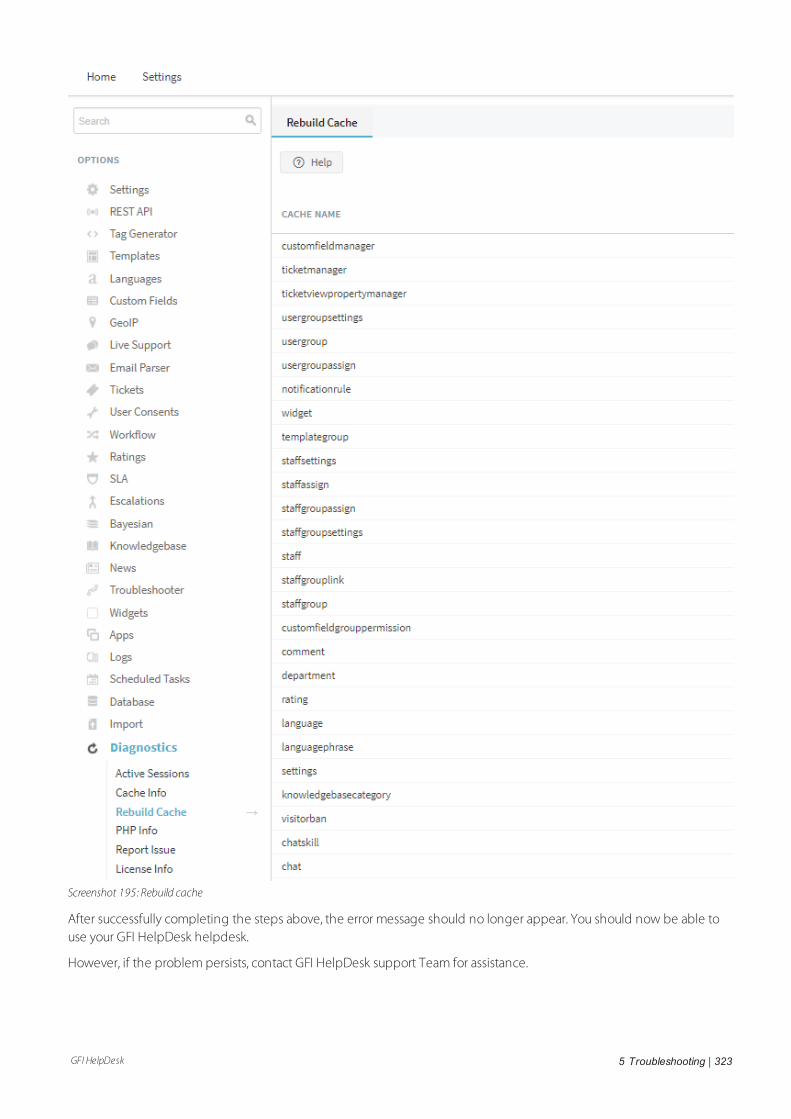
GFI HelpDesk 5 Troubleshooting | 323
Screenshot 195: Rebuild cache
After successfully completing the steps above, the error message should no longer appear. You should now be able touse your GFI HelpDesk helpdesk.
However, if the problem persists, contact GFI HelpDesk support Team for assistance.
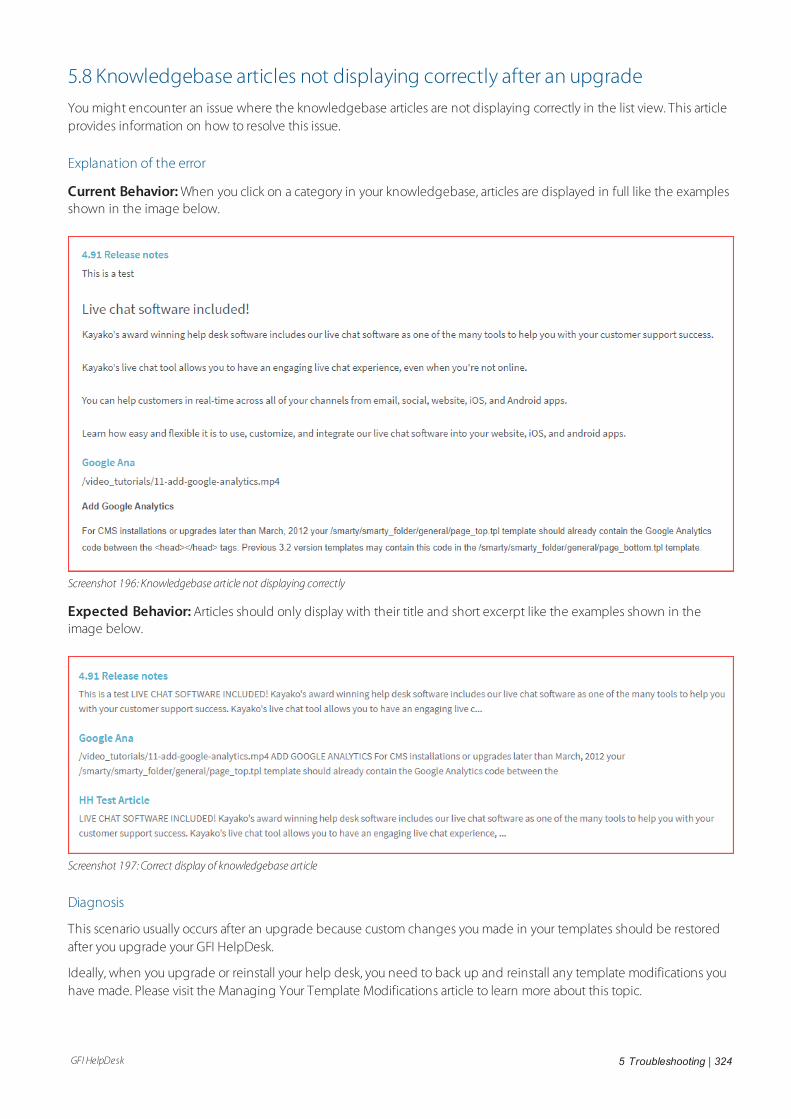
GFI HelpDesk 5 Troubleshooting | 324
5.8 Knowledgebase articles not displaying correctly after an upgradeYou might encounter an issue where the knowledgebase articles are not displaying correctly in the list view. This articleprovides information on how to resolve this issue.
Explanation of the error
Current Behavior: When you click on a category in your knowledgebase, articles are displayed in full like the examplesshown in the image below.
Screenshot 196: Knowledgebase article not displaying correctly
Expected Behavior: Articles should only display with their title and short excerpt like the examples shown in theimage below.
Screenshot 197: Correct display of knowledgebase article
Diagnosis
This scenario usually occurs after an upgrade because custom changes you made in your templates should be restoredafter you upgrade your GFI HelpDesk.
Ideally, when you upgrade or reinstall your help desk, you need to back up and reinstall any template modifications youhave made. Please visit the Managing Your Template Modifications article to learn more about this topic.
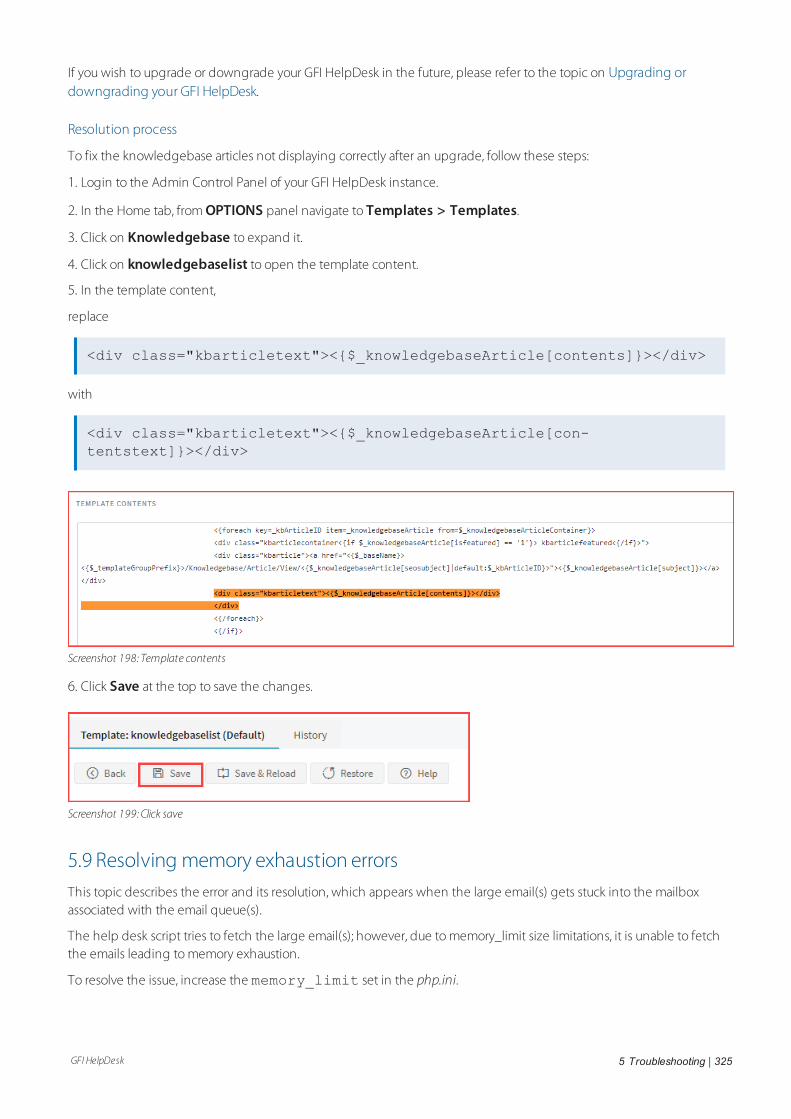
GFI HelpDesk 5 Troubleshooting | 325
If you wish to upgrade or downgrade your GFI HelpDesk in the future, please refer to the topic on Upgrading ordowngrading your GFI HelpDesk.
Resolution process
To fix the knowledgebase articles not displaying correctly after an upgrade, follow these steps:
1. Login to the Admin Control Panel of your GFI HelpDesk instance.
2. In the Home tab, from OPTIONS panel navigate to Templates > Templates.
3. Click on Knowledgebase to expand it.
4. Click on knowledgebaselist to open the template content.
5. In the template content,
replace
<div class="kbarticletext"><{$_knowledgebaseArticle[contents]}></div>
with
<div class="kbarticletext"><{$_knowledgebaseArticle[con-tentstext]}></div>
Screenshot 198: Template contents
6. Click Save at the top to save the changes.
Screenshot 199: Click save
5.9 Resolving memory exhaustion errorsThis topic describes the error and its resolution, which appears when the large email(s) gets stuck into the mailboxassociated with the email queue(s).
The help desk script tries to fetch the large email(s); however, due to memory_limit size limitations, it is unable to fetchthe emails leading to memory exhaustion.
To resolve the issue, increase the memory_limit set in the php.ini.
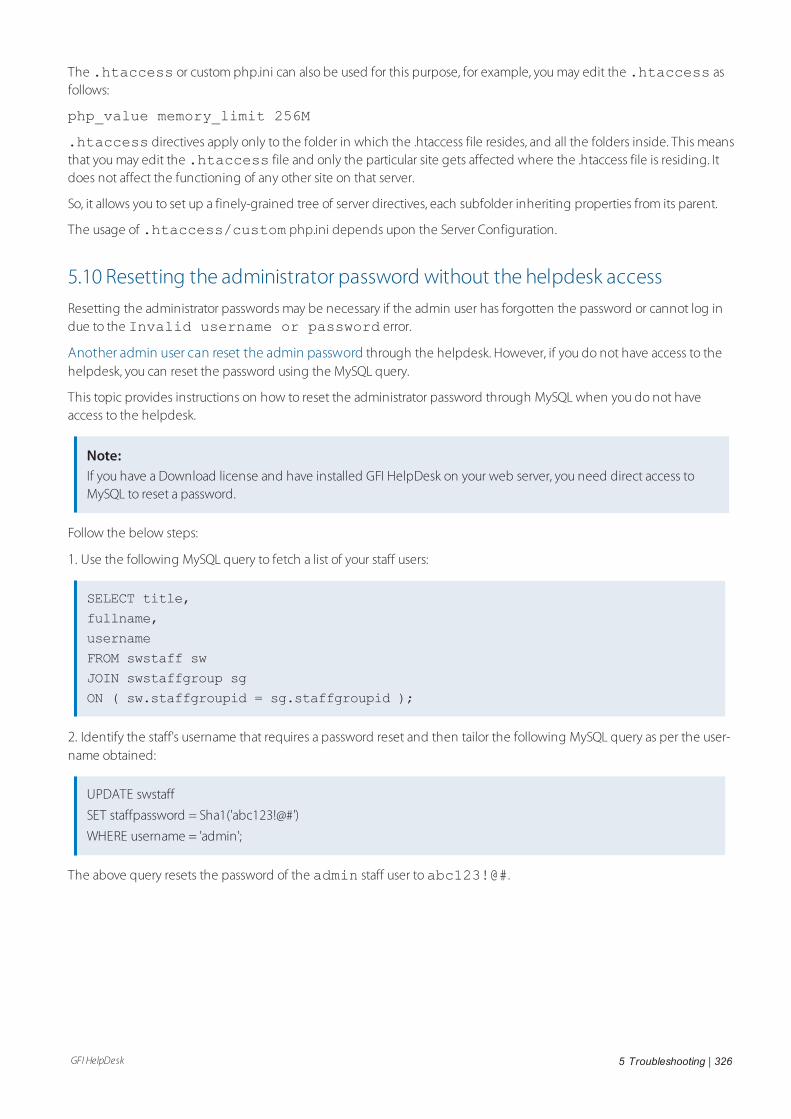
GFI HelpDesk 5 Troubleshooting | 326
The .htaccess or custom php.ini can also be used for this purpose, for example, you may edit the .htaccess asfollows:
php_value memory_limit 256M
.htaccess directives apply only to the folder in which the .htaccess file resides, and all the folders inside. This meansthat you may edit the .htaccess file and only the particular site gets affected where the .htaccess file is residing. Itdoes not affect the functioning of any other site on that server.
So, it allows you to set up a finely-grained tree of server directives, each subfolder inheriting properties from its parent.
The usage of .htaccess/custom php.ini depends upon the Server Configuration.
5.10 Resetting the administrator password without the helpdesk accessResetting the administrator passwords may be necessary if the admin user has forgotten the password or cannot log indue to the Invalid username or password error.
Another admin user can reset the admin password through the helpdesk. However, if you do not have access to thehelpdesk, you can reset the password using the MySQL query.
This topic provides instructions on how to reset the administrator password through MySQL when you do not haveaccess to the helpdesk.
Note:If you have a Download license and have installed GFI HelpDesk on your web server, you need direct access toMySQL to reset a password.
Follow the below steps:
1. Use the following MySQL query to fetch a list of your staff users:
SELECT title,
fullname,
username
FROM swstaff sw
JOIN swstaffgroup sg
ON ( sw.staffgroupid = sg.staffgroupid );
2. Identify the staff's username that requires a password reset and then tailor the following MySQL query as per the user-name obtained:
UPDATE swstaff
SET staffpassword = Sha1('abc123!@#')
WHERE username = 'admin';
The above query resets the password of the admin staff user toabc123!@#.
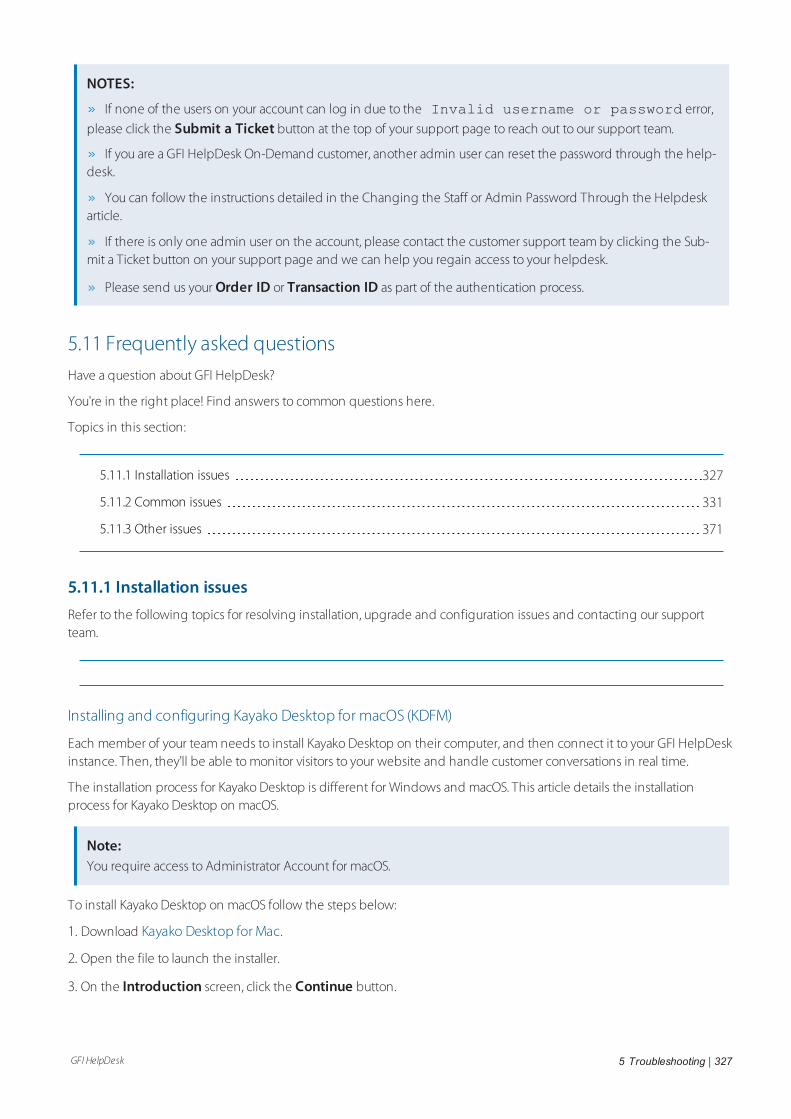
GFI HelpDesk 5 Troubleshooting | 327
NOTES:
If none of the users on your account can log in due to the Invalid username or password error,
please click the Submit a Ticket button at the top of your support page to reach out to our support team.
If you are a GFI HelpDesk On-Demand customer, another admin user can reset the password through the help-desk.
You can follow the instructions detailed in the Changing the Staff or Admin Password Through the Helpdeskarticle.
If there is only one admin user on the account, please contact the customer support team by clicking the Sub-mit a Ticket button on your support page and we can help you regain access to your helpdesk.
Please send us your Order ID or Transaction ID as part of the authentication process.
5.11 Frequently asked questionsHave a question about GFI HelpDesk?
You're in the right place! Find answers to common questions here.
Topics in this section:
5.11.1 Installation issues 327
5.11.2 Common issues 331
5.11.3 Other issues 371
5.11.1 Installation issuesRefer to the following topics for resolving installation, upgrade and configuration issues and contacting our supportteam.
Installing and configuring Kayako Desktop for macOS (KDFM)
Each member of your team needs to install Kayako Desktop on their computer, and then connect it to your GFI HelpDeskinstance. Then, they'll be able to monitor visitors to your website and handle customer conversations in real time.
The installation process for Kayako Desktop is different for Windows and macOS. This article details the installationprocess for Kayako Desktop on macOS.
Note:You require access to Administrator Account for macOS.
To install Kayako Desktop on macOS follow the steps below:
1. Download Kayako Desktop for Mac.
2. Open the file to launch the installer.
3. On the Introduction screen, click the Continue button.
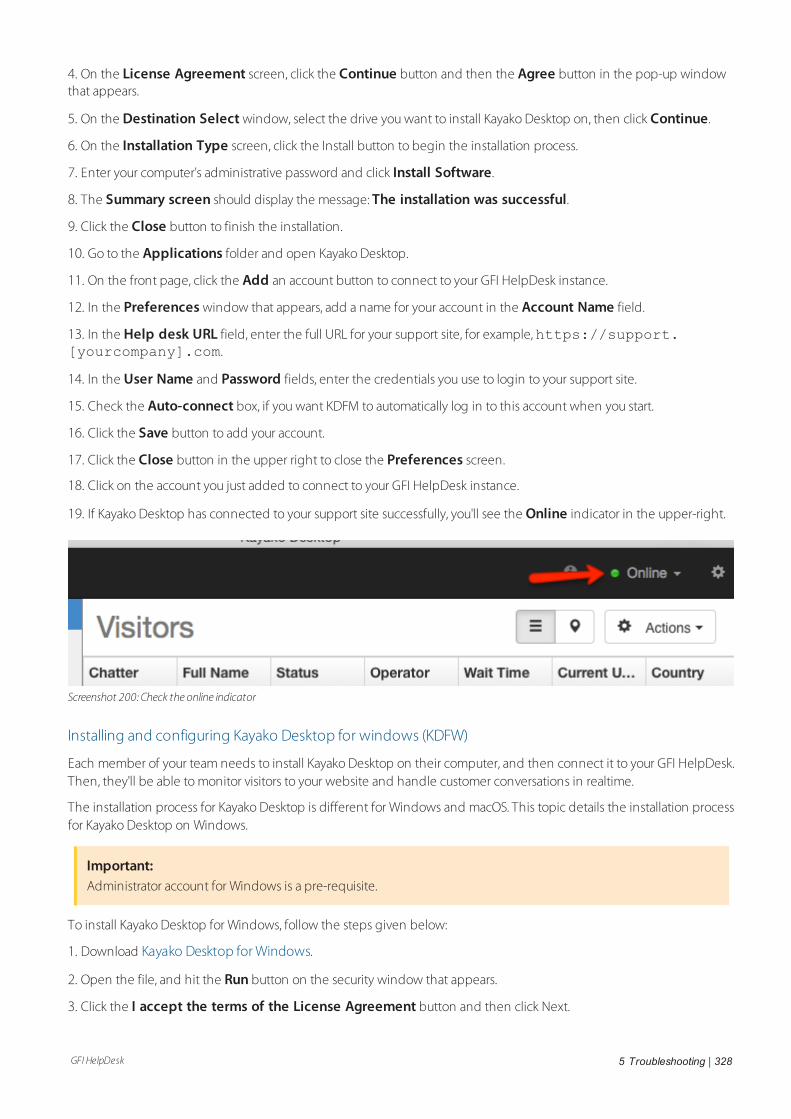
GFI HelpDesk 5 Troubleshooting | 328
4. On the License Agreement screen, click the Continue button and then the Agree button in the pop-up windowthat appears.
5. On the Destination Select window, select the drive you want to install Kayako Desktop on, then click Continue.
6. On the Installation Type screen, click the Install button to begin the installation process.
7. Enter your computer's administrative password and click Install Software.
8. The Summary screen should display the message: The installation was successful.
9. Click the Close button to finish the installation.
10. Go to the Applications folder and open Kayako Desktop.
11. On the front page, click the Add an account button to connect to your GFI HelpDesk instance.
12. In the Preferences window that appears, add a name for your account in the Account Name field.
13. In the Help desk URL field, enter the full URL for your support site, for example,https://support.[yourcompany].com.
14. In the User Name and Password fields, enter the credentials you use to login to your support site.
15. Check the Auto-connect box, if you want KDFM to automatically log in to this account when you start.
16. Click the Save button to add your account.
17. Click the Close button in the upper right to close the Preferences screen.
18. Click on the account you just added to connect to your GFI HelpDesk instance.
19. If Kayako Desktop has connected to your support site successfully, you'll see the Online indicator in the upper-right.
Screenshot 200: Check the online indicator
Installing and configuring Kayako Desktop for windows (KDFW)
Each member of your team needs to install Kayako Desktop on their computer, and then connect it to your GFI HelpDesk.Then, they'll be able to monitor visitors to your website and handle customer conversations in realtime.
The installation process for Kayako Desktop is different for Windows and macOS. This topic details the installation processfor Kayako Desktop on Windows.
Important:Administrator account for Windows is a pre-requisite.
To install Kayako Desktop for Windows, follow the steps given below:
1. Download Kayako Desktop for Windows.
2. Open the file, and hit the Run button on the security window that appears.
3. Click the I accept the terms of the License Agreement button and then click Next.
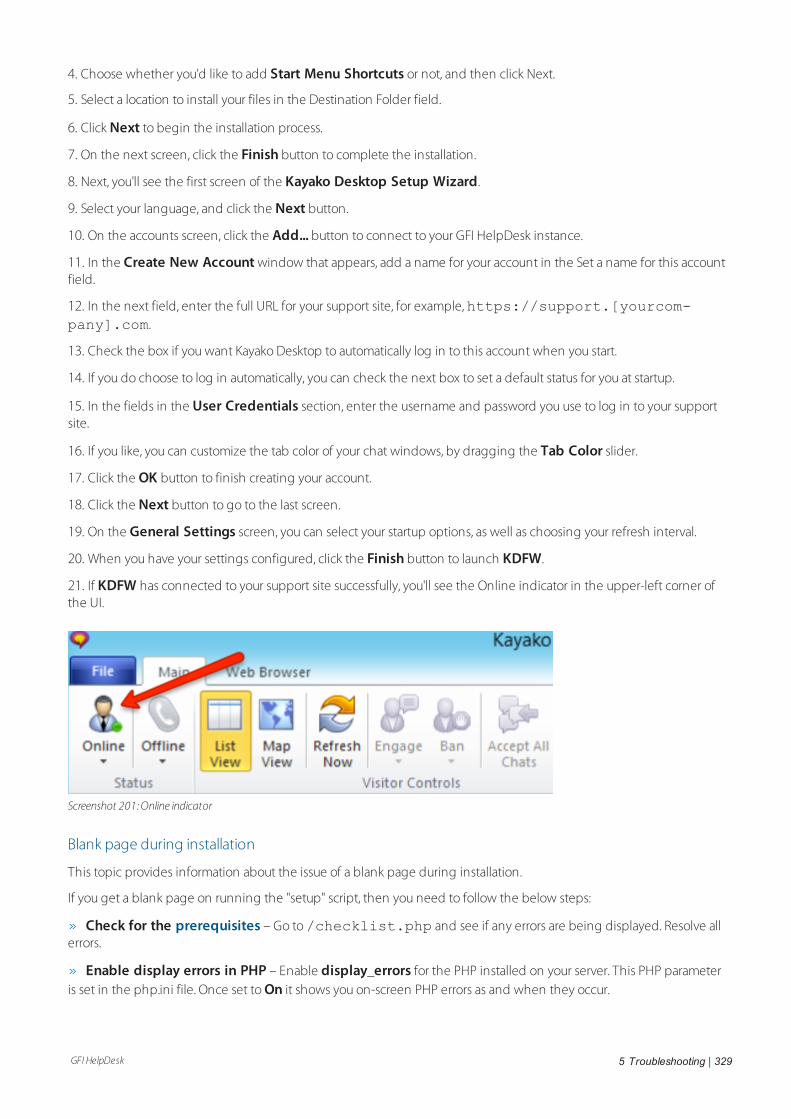
GFI HelpDesk 5 Troubleshooting | 329
4. Choose whether you'd like to add Start Menu Shortcuts or not, and then click Next.
5. Select a location to install your files in the Destination Folder field.
6. Click Next to begin the installation process.
7. On the next screen, click the Finish button to complete the installation.
8. Next, you'll see the first screen of the Kayako Desktop Setup Wizard.
9. Select your language, and click the Next button.
10. On the accounts screen, click the Add... button to connect to your GFI HelpDesk instance.
11. In the Create New Account window that appears, add a name for your account in the Set a name for this accountfield.
12. In the next field, enter the full URL for your support site, for example,https://support.[yourcom-pany].com.
13. Check the box if you want Kayako Desktop to automatically log in to this account when you start.
14. If you do choose to log in automatically, you can check the next box to set a default status for you at startup.
15. In the fields in the User Credentials section, enter the username and password you use to log in to your supportsite.
16. If you like, you can customize the tab color of your chat windows, by dragging the Tab Color slider.
17. Click the OK button to finish creating your account.
18. Click the Next button to go to the last screen.
19. On the General Settings screen, you can select your startup options, as well as choosing your refresh interval.
20. When you have your settings configured, click the Finish button to launch KDFW.
21. If KDFW has connected to your support site successfully, you'll see the Online indicator in the upper-left corner ofthe UI.
Screenshot 201: Online indicator
Blank page during installation
This topic provides information about the issue of a blank page during installation.
If you get a blank page on running the "setup" script, then you need to follow the below steps:
Check for the prerequisites – Go to/checklist.php and see if any errors are being displayed. Resolve allerrors.
Enable display errors in PHP – Enable display_errors for the PHP installed on your server. This PHP parameteris set in the php.ini file. Once set to On it shows you on-screen PHP errors as and when they occur.
GFI HelpDesk 5 Troubleshooting | 330
Downloading the files needed for upgrading GFI HelpDesk
This topic provides the step-by-step process to download the files needed for upgrading GFI HelpDesk.
If you are on a 'Download' subscription, you can download the latest GFI HelpDesk release files for upgrading your GFIHelpDesk instance.
Download GFI HelpDesk from the following location depending on the required edition:
Case http://cdndl.gfi.com/gfihelpdesk/gfihelpdesk_case.tar.gz
Fusion http://cdndl.gfi.com/gfihelpdesk/gfihelpdesk_fusion.tar.gz
Error: 'Failed opening required __swift/config/config.php'
This topic provides information about the error which occurs during installation. The following error is displayed:
Failed opening required __swift\config\config.php
If you get this error when running the installation, it is most likely that you have not renamed config.php.new toconfig.php in the following folder:__swift\config.
The configuration file is named config.php.new by default to prevent overwriting during upgrades.
Error: 'Access denied for user 'user'@'localhost''
This article provides information about the access denied error while connecting to the MySQL server. The followingerror is received:
Access denied for user 'user'@'localhost'
The MySQL user credentials which are specified in __swift/config/config.php are being rejected by yourMySQL server.
For information on creating a new MySQL user, see Creating and Selecting a Database.
Running phpinfo on GFI HelpDesk server
Sometimes, when troubleshooting GFI HelpDesk download issues, the customer may be asked for details about the PHPenvironment on their server. The phpinfo function can be used to return the information about the server's PHPconfiguration in an HTML format.
This article provides instructions for running the phpinfo command.
Follow the instructions provided below:
1. Create a new text file on your computer, and add the code:<?php phpinfo (); ?>
2. Save the file as phpinfo.php.
3. Upload phpinfo.php to the web content folder of your domain using the FTP.
4. Run phpinfo by navigating toyourdomain.com/phpinfo.php in your browser. Replace your-domain.com with your actual domain name.
For more information, see phpinfo - Documentation.
Error: 'The 'X' Module is not configured to load with PHP' during system requirements check
This topic provides information about the error in loading the module during the system requirement check. Thefollowing error is received:
The 'X' Module is not configured to load with PHP
GFI HelpDesk 5 Troubleshooting | 331
Your server is missing some prerequisites that are needed for GFI HelpDesk to run. Refer to the up to date list of serverrequirements.
Disabling MySQL strict mode on the server
MySQL Strict Mode controls how invalid or missing values in data changing queries are handled. This includesINSERT,UPDATE and CREATE TABLE statements. With MySQL Strict Mode enabled, which is the default state,invalid or missing data may cause warnings or errors when attempting to process the query.
When Strict Mode is disabled, the same query would have its invalid or missing values adjusted and would produce asimple warning. This may seem like the preferred result; however, with Strict Mode disabled, specific actions may causeunexpected results. For instance, when the value being inserted exceeds the maximum character limit, it is truncated tofit the limit.
For GFI HelpDesk to run on your server, you need to disable Strict Mode in your MySQL database.
This topic provides the instructions to make changes to the configuration to disable the Strict Mode.
To disable the Strict Mode, do the following:
1. Open the my.ini or my.cnf file for editing (the file you have depends on whether you are running Windows orLinux).
2. Find the following line:
sql_mode = "STRICT_TRANS_TABLES,NO_AUTO_CREATE_USER,NO_ENGINE_SUBSTITUTION"
3. Replace it with the line below:
If the line is not found, insert the line under the [mysqld] section (if there is no[mysqld] section, create it).
Create mysqlId in the following way:
sql_mode= ""
4. Restart the MySQL service for the change to take effect.
If restarting is not a feasible option at the moment, you may log into the database server and execute the belowcommand for the changes to take effect immediately. However, the change is discarded the next time the MySQLservice restarts unless the above process is performed.
set global sql_mode='';
Error: 'Can't connect to MySQL server on '127.0.0.1' (10061)'
This topic provides information about the error in connecting MySQL server.
If you get an error Can't connect to MySQL server, then the MySQL service is probably not running on your server, oryou have provided the wrong MySQL server hostname in GFI HelpDesk's configuration file __swift/config/config.php.
5.11.2 Common issuesRefer to the following topics for resolving common issues and contacting our support team.

GFI HelpDesk 5 Troubleshooting | 332
Disabling the autoresponder email for unregistered users
An autoresponder is sent either when a user sends an email or submits a ticket to the Support Center. Both these formatsof ticket submission have unique autoresponders associated with them that can be suppressed.
If you want to stop the autoresponder email from being sent to unregistered users, you can configure the guest usergroup's permission settings.
If you want to stop receiving emailed tickets from unregistered users, configure the email queues.
This topic outlines the steps to turn off the autoresponder so you can stop receiving emailed tickets from unregisteredusers. Steps for configuring your email queue is also provided.
Disable the autoresponder email for tickets created the support center
To turn off the autoresponder for the Support Center tickets created by unregistered users, follow the steps below:
1. From the Admin Control Panel, navigate to Users > Manage User Groups > Select the Guest Group > Per-missions tab > Tickets.
2. Change the Receives new ticket autoresponder to No.
3. Click Update to save your changes.
Screenshot 202: Disable the autoresponder
Stop Receiving Emailed Tickets from Unregistered Users
To stop receiving tickets from unregistered users, follow the steps given below:
1. From the Admin Control Panel, go to Email Parser > Email Queues > select the Email Queue > TicketOptions tab.
2. Change Registration required to Yes.
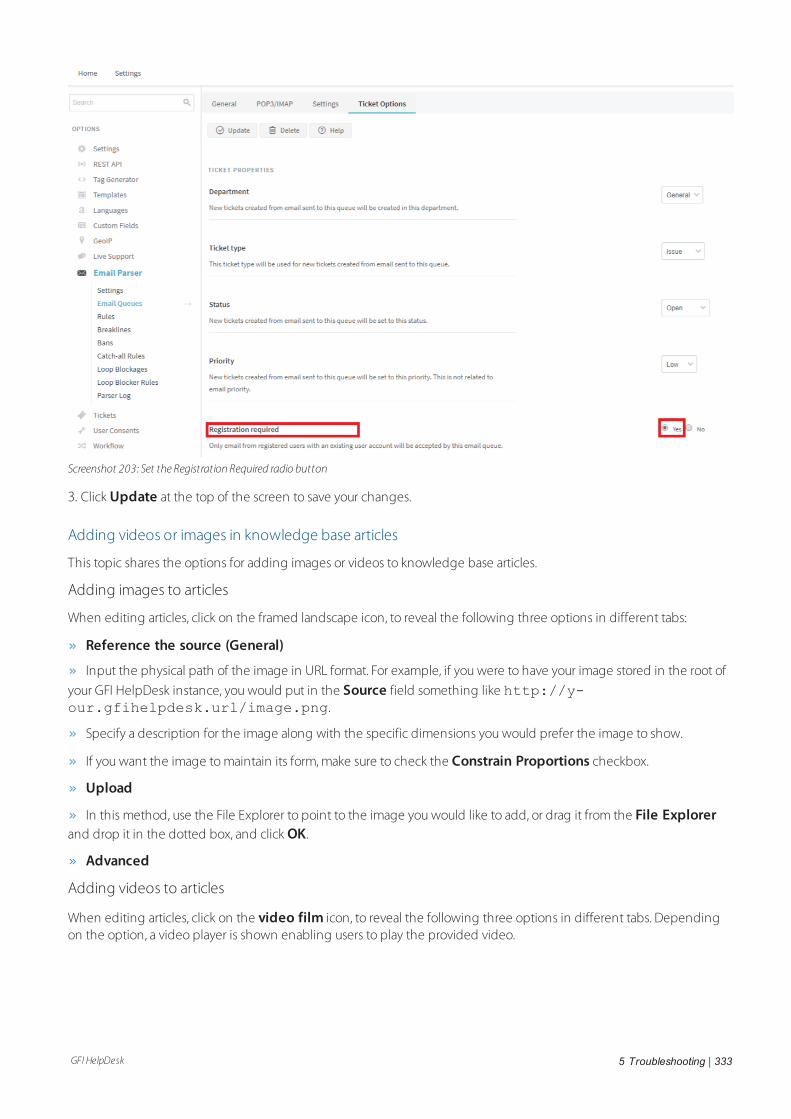
GFI HelpDesk 5 Troubleshooting | 333
Screenshot 203: Set the Registration Required radio button
3. Click Update at the top of the screen to save your changes.
Adding videos or images in knowledge base articles
This topic shares the options for adding images or videos to knowledge base articles.
Adding images to articles
When editing articles, click on the framed landscape icon, to reveal the following three options in different tabs:
Reference the source (General)
Input the physical path of the image in URL format. For example, if you were to have your image stored in the root of
your GFI HelpDesk instance, you would put in the Source field something like http://y-our.gfihelpdesk.url/image.png.
Specify a description for the image along with the specific dimensions you would prefer the image to show.
If you want the image to maintain its form, make sure to check the Constrain Proportions checkbox.
Upload
In this method, use the File Explorer to point to the image you would like to add, or drag it from the File Explorerand drop it in the dotted box, and click OK.
Advanced
Adding videos to articles
When editing articles, click on the video film icon, to reveal the following three options in different tabs. Dependingon the option, a video player is shown enabling users to play the provided video.
GFI HelpDesk 5 Troubleshooting | 334
Reference the source (General)
Input the physical path of the video in URL format. For example, if you were to have your video stored in the root ofyour GFI HelpDesk instance, you would put in the Source field something like http://your.GFIHelpDesk.url/video.mp4.
Specify a description for the video along with the specific dimensions you would prefer the image to show.
If you want the video to be shown in the standard 16:9 aspect ratio, make sure to check the Constrain Proportionscheckbox.
Embed
In this method, it is required that the video you want to show is hosted on a video playing platform that enables
code embedding.
Obtain the code from that platform, copy it and paste it in the text box below the message: Paste your embedcode.
Advanced
Adding multimedia with HTML
You can also insert multimedia via HTML coding by clicking either on Tools or on View and then Source code, but beaware that only HTML code is supported, which excludes other types of coding (for example, scripts, JavaScript, lightbox).
Restricting visibility for your help center content
The core purpose of the Help Center is to house your customer-facing support docs. But many teams have more complexrequirements for their self-service content.
By using GFI HelpDesk's visibility restrictions (referred within the Staff CP as Scope), you can host not only content that'srestricted to certain customers but also content that's only visible to your own support agents.
This topic provides valuable information about how visibility works on the Help Center.
Understanding Help Center Content Visibility
All restrictions to your Help Center content are controlled at the category level. You can choose from the following basictiers of access:
Global: This tier is for both your end users and your staff.
Public: This option is used to restrict the category to only your end users of your Help Center. You can also be morespecific as to which types of users can have access to your Help Center by enabling or disabling visibility to explicit usergroups.
Private: This option can be used to create an internal Help Center accessible to any logged-in agent. You can alsoget more specific, by restricting categories to agents in particular teams.
Inherit: This option is only available when you specify a category within another one and after you have saved thesechanges; just like the name says, it makes the child category inherit the access specified on the parent's category.
Note:If a child category has defined their scope as Public, but its parent category has its scope set as Private, the childcategory is not accessible to end users.
LoginShare Error: Invalid Data Provided: 2
The following error message appears in the support center login page:
GFI HelpDesk 5 Troubleshooting | 335
Invalid data provided: 2
This suggests that you have enabled the LoginShare for users and something is wrong either with the user account inthe third-party database or the LoginShare script.
To resolve this error, do the following:
1. Check if the issue is with the specific user account or if no user is able to log in the help center.
2. Verify the LoginShare settings in your GFI HelpDesk under Admin CP > Users > LoginShare.
3. Set all the required fields in the LoginShare settings properly.
Moving data from another helpdesk system to GFI HelpDesk
GFI HelpDesk has no built in migration from other 3rd party helpdesk systems. For such migrations we suggest tocoordinate with any thrid party that can offer such a service.
An example third party migration service is *https://help-desk-migration.com/*
GFI HelpDesk is built on Kayako Classic so use that as destination helpdesk for quoting or reference.
Sharing a ticket submission link of a specific department to customers
This topic provides information on the URL used by the customer to submit a ticket under one specific department.
If you wish that your clients should be able to submit tickets directly to a specific department without having the optionto choose any department, the following 'direct URL' can be used for ticket submission under one specific department:
http://yourdomain.com/index.php?/Tickets/Submit/RenderForm/<departmentID>
You can check the <departmentID> by hovering over the department name which reflects the details at thebottom left corner of the screen.
Knowledge base search not returning relevant results
This topic provides the process to be followed for the knowledgebase search to return the relevant results.
Knowledgebase search is used by the clients to search and find their own answers to simple queries. Please perform thefollowing steps:
1. Re-index the knowledgebase articles from Admin CP > Knowledgebase > Maintenance.
2. Rebuild help desk cache from Admin CP > Diagnostics > Rebuild Cache.
Also, make sure that the words used for search are not the "stopwords", as specified in MySQL. The list of the words canbe found at Full-Text Stopwords.
Error: Uncaught Exception: Invalid data provided22 (0)
The following error may occur when you try to access your help desk:
Uncaught Exception: Invalid data provided22 (0) in /path/to/document/root/__swift/library/TemplateEngine/class.SWIFT_TemplateEngine.php:976
GFI HelpDesk 5 Troubleshooting | 336
This error is received because your helpdesk is not installed.
To resolve this error:
Execute the setup script using the URL http://[yourdomain].com/setup/ to install the help desk.
Search functionality for users in the help center
The Search functionality works differently depending on whether your end users are logged in or not on your HelpCenter.
This topic provides you with valuable information about the behavior of search functionality for both kinds of end users.
If a user is logged in and performs a search, the list of results first prioritizes any tickets that contain words that match thesearch criteria and then shows the list of articles that match the criteria.
If a user that is not logged in performs a search, the list of results only show the list of articles that match the criteria andno tickets.
Note:
In order to change the order of results for logged in users, a change in the source code must be done.
There is currently no configuration option/setting to disable searching within tickets for logged in users.
Changing the name of a widget
The Widget section is provided under the Options menu of the Admin control panel. By clicking on the Widget, you cansee all the current widgets inserted in the support desk, along with their display order. By default, there are six widgetsthat come with a newly installed version 4 Support Desk, namely:
Register
My Tickets
Submit a Ticket
Knowledgebase
News
Troubleshooter
This topic provides instructions to change the name of a Widget.
Follow the instructions provided below to change the name of the Widget called Knowledgebase:
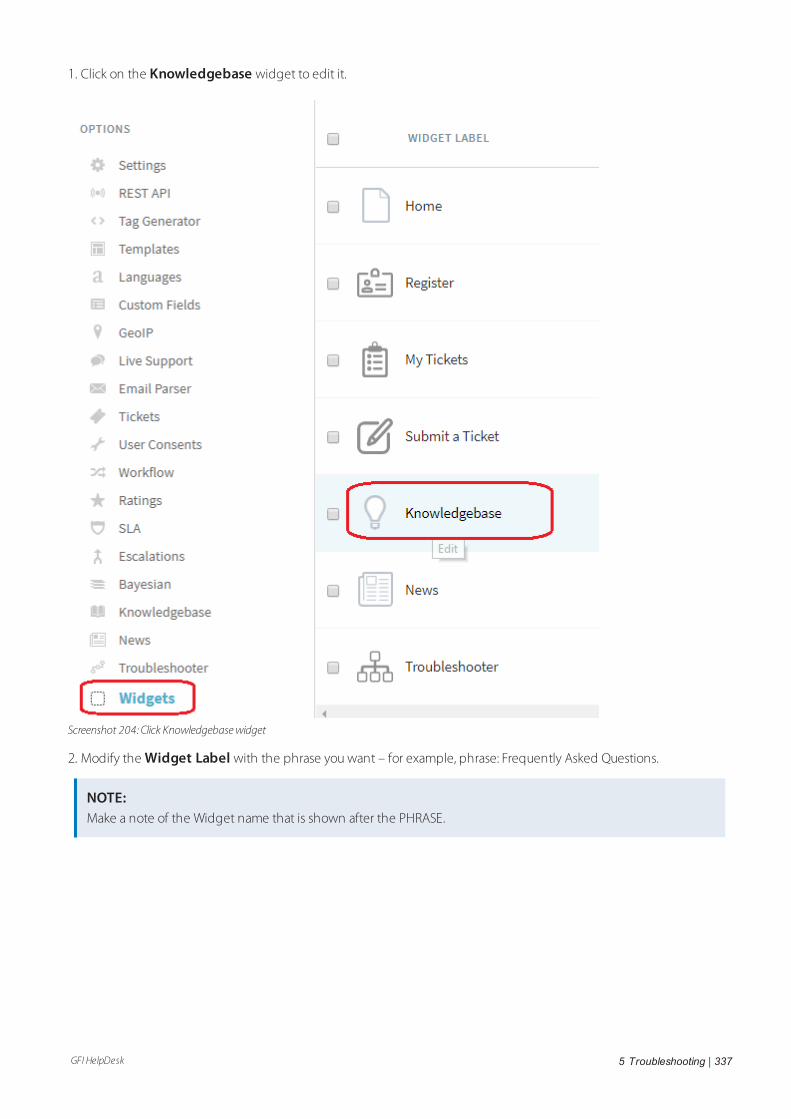
GFI HelpDesk 5 Troubleshooting | 337
1. Click on the Knowledgebase widget to edit it.
Screenshot 204: Click Knowledgebasewidget
2. Modify the Widget Label with the phrase you want – for example, phrase: Frequently Asked Questions.
NOTE:Make a note of the Widget name that is shown after the PHRASE.
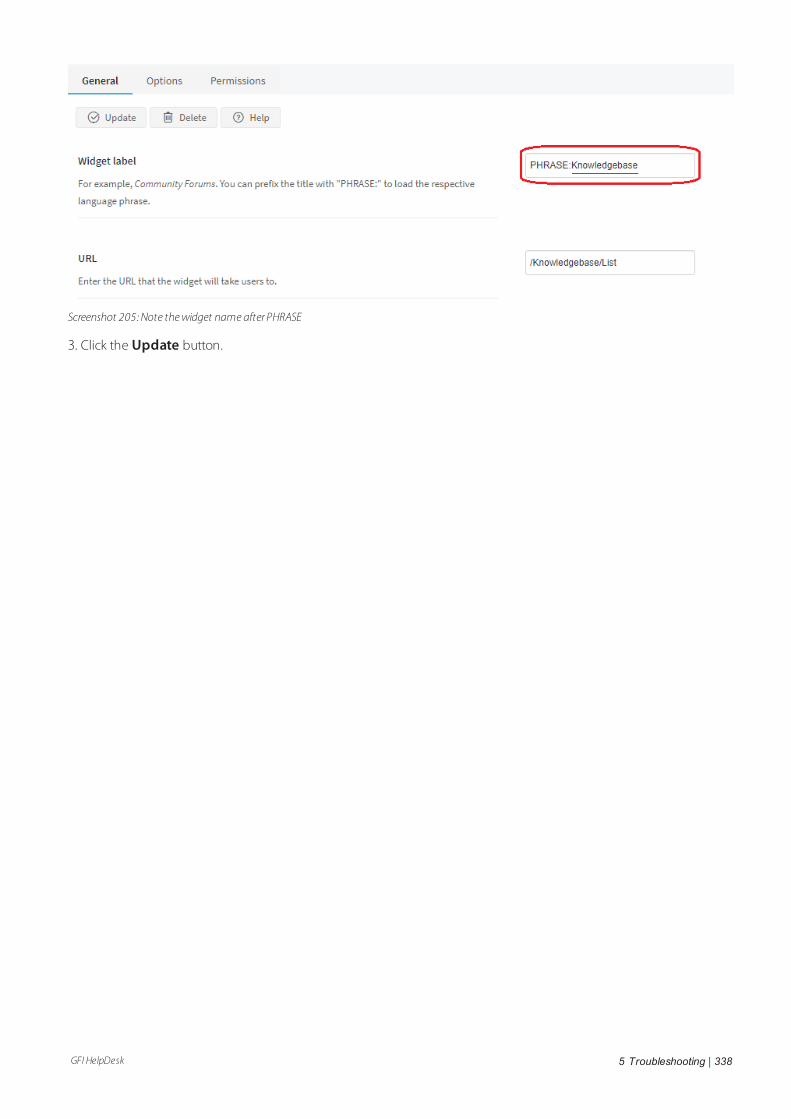
GFI HelpDesk 5 Troubleshooting | 338
Screenshot 205: Note thewidget name after PHRASE
3. Click the Update button.
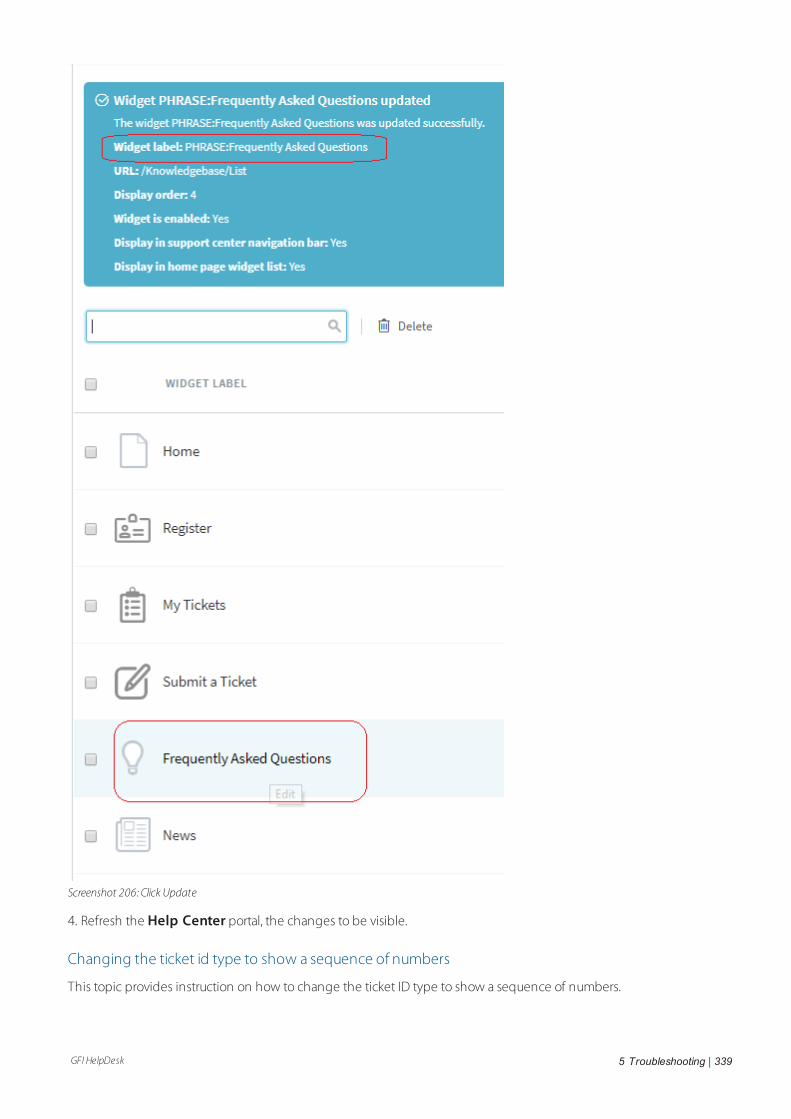
GFI HelpDesk 5 Troubleshooting | 339
Screenshot 206: Click Update
4. Refresh the Help Center portal, the changes to be visible.
Changing the ticket id type to show a sequence of numbers
This topic provides instruction on how to change the ticket ID type to show a sequence of numbers.
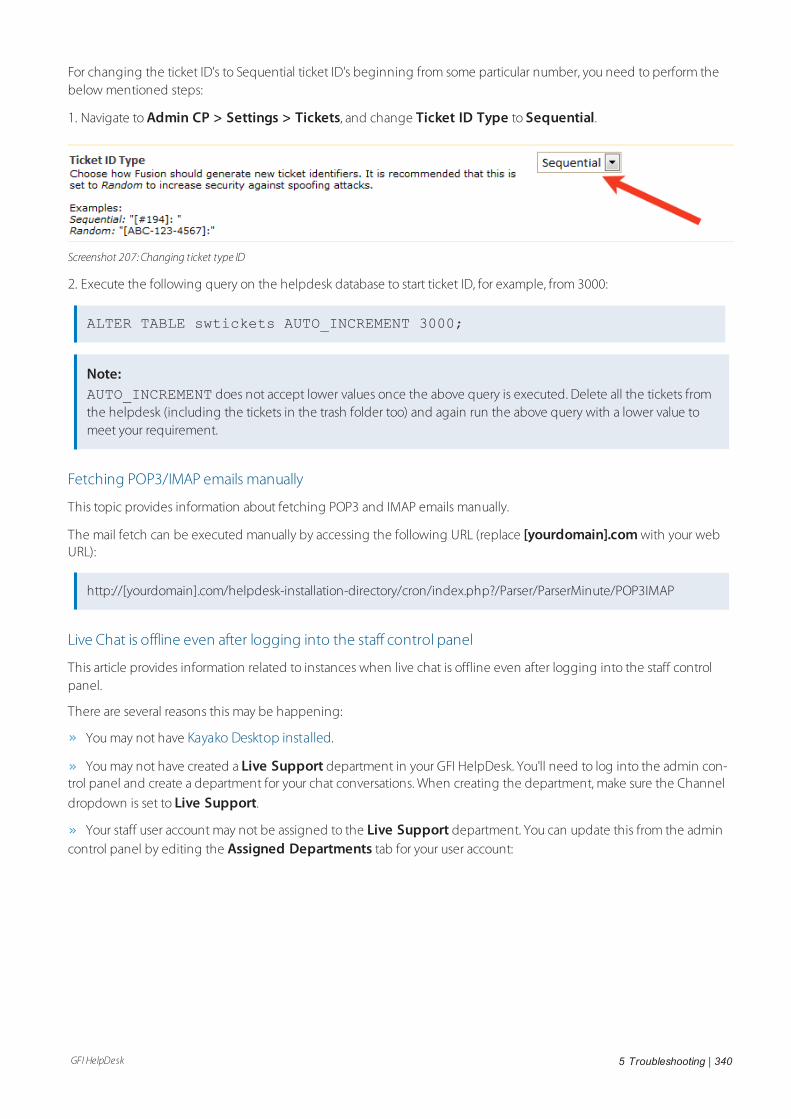
GFI HelpDesk 5 Troubleshooting | 340
For changing the ticket ID's to Sequential ticket ID's beginning from some particular number, you need to perform thebelow mentioned steps:
1. Navigate to Admin CP > Settings > Tickets, and change Ticket ID Type to Sequential.
Screenshot 207: Changing ticket type ID
2. Execute the following query on the helpdesk database to start ticket ID, for example, from 3000:
ALTER TABLE swtickets AUTO_INCREMENT 3000;
Note:AUTO_INCREMENT does not accept lower values once the above query is executed. Delete all the tickets fromthe helpdesk (including the tickets in the trash folder too) and again run the above query with a lower value tomeet your requirement.
Fetching POP3/IMAP emails manually
This topic provides information about fetching POP3 and IMAP emails manually.
The mail fetch can be executed manually by accessing the following URL (replace [yourdomain].com with your webURL):
http://[yourdomain].com/helpdesk-installation-directory/cron/index.php?/Parser/ParserMinute/POP3IMAP
Live Chat is offline even after logging into the staff control panel
This article provides information related to instances when live chat is offline even after logging into the staff controlpanel.
There are several reasons this may be happening:
You may not have Kayako Desktop installed.
You may not have created a Live Support department in your GFI HelpDesk. You'll need to log into the admin con-trol panel and create a department for your chat conversations. When creating the department, make sure the Channel
dropdown is set to Live Support.
Your staff user account may not be assigned to the Live Support department. You can update this from the admincontrol panel by editing the Assigned Departments tab for your user account:
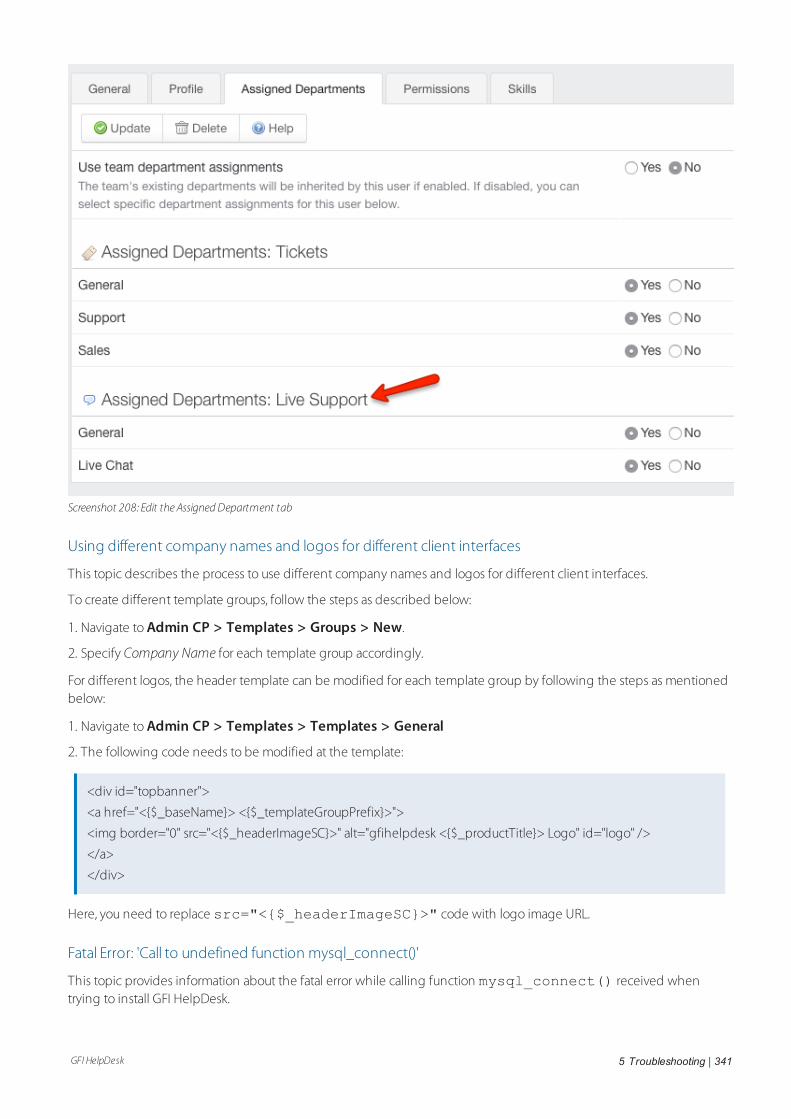
GFI HelpDesk 5 Troubleshooting | 341
Screenshot 208: Edit the AssignedDepartment tab
Using different company names and logos for different client interfaces
This topic describes the process to use different company names and logos for different client interfaces.
To create different template groups, follow the steps as described below:
1. Navigate to Admin CP > Templates > Groups > New.
2. Specify Company Name for each template group accordingly.
For different logos, the header template can be modified for each template group by following the steps as mentionedbelow:
1. Navigate to Admin CP > Templates > Templates > General
2. The following code needs to be modified at the template:
<div id="topbanner">
<a href="<{$_baseName}> <{$_templateGroupPrefix}>">
<img border="0" src="<{$_headerImageSC}>" alt="gfihelpdesk <{$_productTitle}> Logo" id="logo" />
</a>
</div>
Here, you need to replace src="<{$_headerImageSC}>" code with logo image URL.
Fatal Error: 'Call to undefined function mysql_connect()'
This topic provides information about the fatal error while calling function mysql_connect() received whentrying to install GFI HelpDesk.
GFI HelpDesk 5 Troubleshooting | 342
If you get an error like Fatal error: Call to undefined function mysql_connect() when trying to install GFIHelpDesk, it probably means that MySQL support has not been enabled for PHP on your server (that is, the PHP modulephp-mysql has not been installed).
You can confirm whether or not the MySQL module is present by accessing a phpinfo() page for the server. TheMySQL module (if installed) appears in the phpinfo().
Codecs supported with VoIP feature in Kayako Desktop
While using VoIP application to call someone, the analog audio signal generated by the microphone cannot be sentover the internet directly and needs to be digitized and compressed before it can be sent over the internet.
The mathematical models enable the coding and compression of such analog audio signal which is referred to as"Codecs". Originally, the term CODEC referred to a COder/DECoder: a device that converts between analog and digital.Now, the term seems to relate more to COmpression/DECompression.
One of the important features of a codec is its bitrate, which refers to the number of bits that are required to betransmitted per second. The higher the bitrate the higher is the bandwidth requirement, so the purpose of the variouscodecs is to strike a balance between efficiency and quality.
The list of codecs that are supported with VoIP feature in Kayako Desktop application is the following:
G.711 family codec (PCMA, PCMU), Speex/8000 (narrowband), Speex/16000 (wideband), and Speex/32000 (ultra-wideband) with fix bit rate and adjustable quality/complexity settings. Fixed mode implementation is used for targetswhich lack floating point unit.
iLBC in 20 or 30 ms mode, with encoder mode, is adjusted based on remote's SDP (decoder mode is adjustable dur-ing initialization only).
GSM, G.722, G.722.1, and G.722.1C licensed from Polycom. More codecs provided by Intel IPP: G.723.1, G.726, G.728,G.729A, AMR, and AMR-WB. The codecs provided by Nokia APS/VAS on Nokia handsets: AMR, G.729, iLBC, andPCMU/PCMA, L16 family of codecs, mono or stereo.
Troubleshooting session expired errors
Sometimes you may run into repeated session expirations if your computer's internet connection assigns Dynamic ratherthan Static IP addresses. To keep your sessions from expiring every time your IP changes, you can tell GFI HelpDesk not tovalidate your session using your IP address.
The method for this fix depends on what version of GFI HelpDesk you're using. This article provides the GFI HelpDeskversion-specific methods for applying this fix.
Follow the instructions provided below depending on the version of GFI HelpDesk installed in your infrastructure:
1. Log in to the admin control panel.
2. Click the Settings link and then the Security link.
3. Find the setting Validate sessions by checking IP address and select No.

GFI HelpDesk 5 Troubleshooting | 343
Screenshot 209: select No for Validate sessions by checking IP address
4. Click Update to save your changes.
For GFI HelpDesk older than 4.66
1. Log into your server and find ../swift/config/config.php.
2. Open the file for editing.
3. Search for the following: define('SESSION_IPCHECK', false);
4. Replace false' with true, so it reads:define('SESSION_IPCHECK', true)
5. Save your changes and make sure they're pushed live.
Fetching POP3/IMAP emails from GFI HelpDesk
This topic provides information about fetching the POP3/IMAP emails from GFI HelpDesk.
The scheduled task (Admin CP > Scheduled Task > POP3/IMAP fetching) setup in the helpdesk is called pseudocron. Pseudo cron mechanism has been provided as a fallback mechanism for the clients who are yet to configure cronjobs on their servers.
It is not fully reliable since it works only if an active staff is logged in the Staff CP. The reliable way to go about this wouldbe to get a cron job (a scheduled task in Windows environment) configured for the same purpose through either theweb control panel or shell access.
Users not displaying in Kayako Desktop
The users are not displayed in the Kayako Desktop. This issue occurs when the database tables linked with visitors/usershave reached their maximum size.
To fix this, you need to clear a couple of database tables using the following MySQL queries to clear them:
GFI HelpDesk 5 Troubleshooting | 344
DELETE FROM swsessions;
DELETE FROM swvisitorfootprints;
DELETE FROM swvisitorpulls;
Note:Always take the database backup before making any changes to it.
The users are successfully displayed in the Kayako Desktop.
Identifying who deleted a ticket
This topic explains if it is possible to know who deleted a ticket.
A ticket may get deleted accidentally by a Staff member. Once a ticket is deleted from the helpdesk, it is also removed
from the database. You can always check the name of the staff member who deleted a ticket from the Activity Log.
Activity Log logs every activity performed in the admin control panel and the staff control panel.
For example, the log contains information about inserting new staff user, editing new email queue, and deleting tickets.
These logs give an insight into the activities in the helpdesk and can be found at Admin CP > Logs > Activity log.
Preventing users from changing the properties of their tickets
This topic provides instruction on how to prevent users from changing the ticket properties from Client Support Center.
Users can be restricted for changing the ticket properties from Client Support Center.
To restrict the User permissions:
1. Navigate to Admin CP > Users > Manage User Groups.
2. select a user group then set click Permissions tab. Set Can Change Ticket Properties to No.
Disabling search bar on client support center
The "Search" feature can be disabled from the Client Support Center by removing the Search box from the templatecode.
The "Search box" can be removed by modifying the 'header' template from Admin CP > Templates > Templates >General.
The following code needs to be removed from the 'header' template :
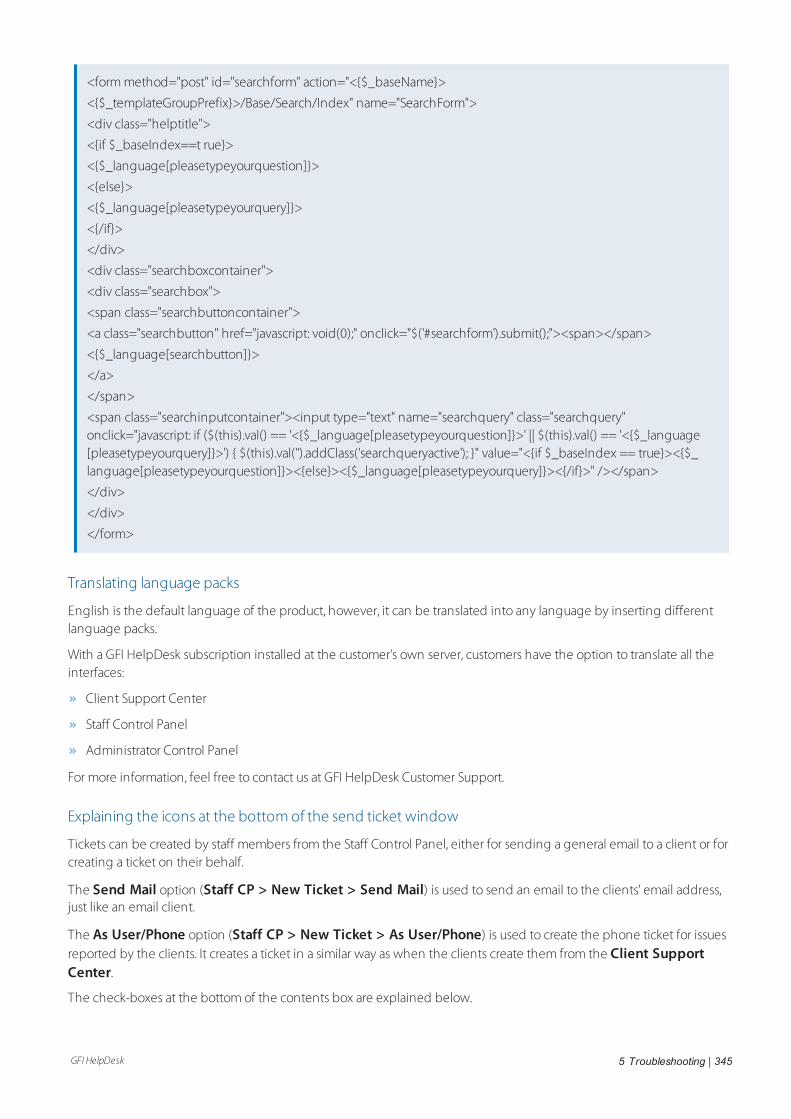
GFI HelpDesk 5 Troubleshooting | 345
<form method="post" id="searchform" action="<{$_baseName}>
<{$_templateGroupPrefix}>/Base/Search/Index" name="SearchForm">
<div class="helptitle">
<{if $_baseIndex==t rue}>
<{$_language[pleasetypeyourquestion]}>
<{else}>
<{$_language[pleasetypeyourquery]}>
<{/if}>
</div>
<div class="searchboxcontainer">
<div class="searchbox">
<span class="searchbuttoncontainer">
<a class="searchbutton" href="javascript: void(0);" onclick="$('#searchform').submit();"><span></span>
<{$_language[searchbutton]}>
</a>
</span>
<span class="searchinputcontainer"><input type="text" name="searchquery" class="searchquery"onclick="javascript: if ($(this).val() == '<{$_language[pleasetypeyourquestion]}>' || $(this).val() == '<{$_language[pleasetypeyourquery]}>') { $(this).val('').addClass('searchqueryactive'); }" value="<{if $_baseIndex == true}><{$_language[pleasetypeyourquestion]}><{else}><{$_language[pleasetypeyourquery]}><{/if}>" /></span>
</div>
</div>
</form>
Translating language packs
English is the default language of the product, however, it can be translated into any language by inserting differentlanguage packs.
With a GFI HelpDesk subscription installed at the customer's own server, customers have the option to translate all theinterfaces:
Client Support Center
Staff Control Panel
Administrator Control Panel
For more information, feel free to contact us at GFI HelpDesk Customer Support.
Explaining the icons at the bottom of the send ticket window
Tickets can be created by staff members from the Staff Control Panel, either for sending a general email to a client or forcreating a ticket on their behalf.
The Send Mail option (Staff CP > New Ticket > Send Mail) is used to send an email to the clients' email address,just like an email client.
The As User/Phone option (Staff CP > New Ticket > As User/Phone) is used to create the phone ticket for issuesreported by the clients. It creates a ticket in a similar way as when the clients create them from the Client SupportCenter.
The check-boxes at the bottom of the contents box are explained below.

GFI HelpDesk 5 Troubleshooting | 346
Option Description
Send Mail Ensures that an email is sent with the contents of the ticket to the email address of the client.
Macro Add the reply to the Macros while replying.
Knowledgebase Add the reply as a knowledgebase article.
Watch Enable alerts of this particular ticket for client and staff replies.
Worked Enter the time worked for a ticket post.
Billable Enter the Billable time of a ticket post.
Attaching files to macro-generated replies
This topic explains how to attach files to macro-generated replies.
Macros can be used to generate predefined replies from Staff CP > Tickets > Macros > Insert Replies. But it is notpossible to attach files in macros.
However, this can be achieved by creating a private knowledge base article which is accessible to staff members only.Follow the steps given below:
1. For private knowledge base articles, the "Private" category can be inserted from Staff CP > Knowledgebase >Categories.
2. Further, an article can be inserted from Staff CP > Knowledgebase > New Article, and the files can be attachedto the knowledge base article.
3. These knowledge base articles can be used in ticket replies by selecting the article from the knowledgebase drop-
down under Quick Insert.
4. Once the article is selected, the file is automatically attached to the ticket reply.
Replying to multiple tickets simultaneously
Mass Reply is used for sending the same resolution/reply/email to multiple users.
This feature is commonly used to send an email to multiple customers to inform them of scheduled maintenance and/orpossible downtime.
To reply to multiple tickets simultaneously, do the following:
1. Go to Staff Control Panel > Tickets > Manage Tickets.
2. Select the required tickets and click Mass Reply.
3. A text box is displayed in which you can type your response.
Removing staff names from ticket replies
In order to have your email replies come from a single, general support persona, rather than using individual staffmembers' names, you must configure email queues and the queue override feature.
To remove staff name from ticket replies, do the following:
1. Insert an email queue (Admin CP > Mail Parser > Email Queues > New) and link it with a department.
2. Enable the Queue Override.
3. Go to Admin CP > Mail Parser > Email Queues.
4. Select the Email Queue.
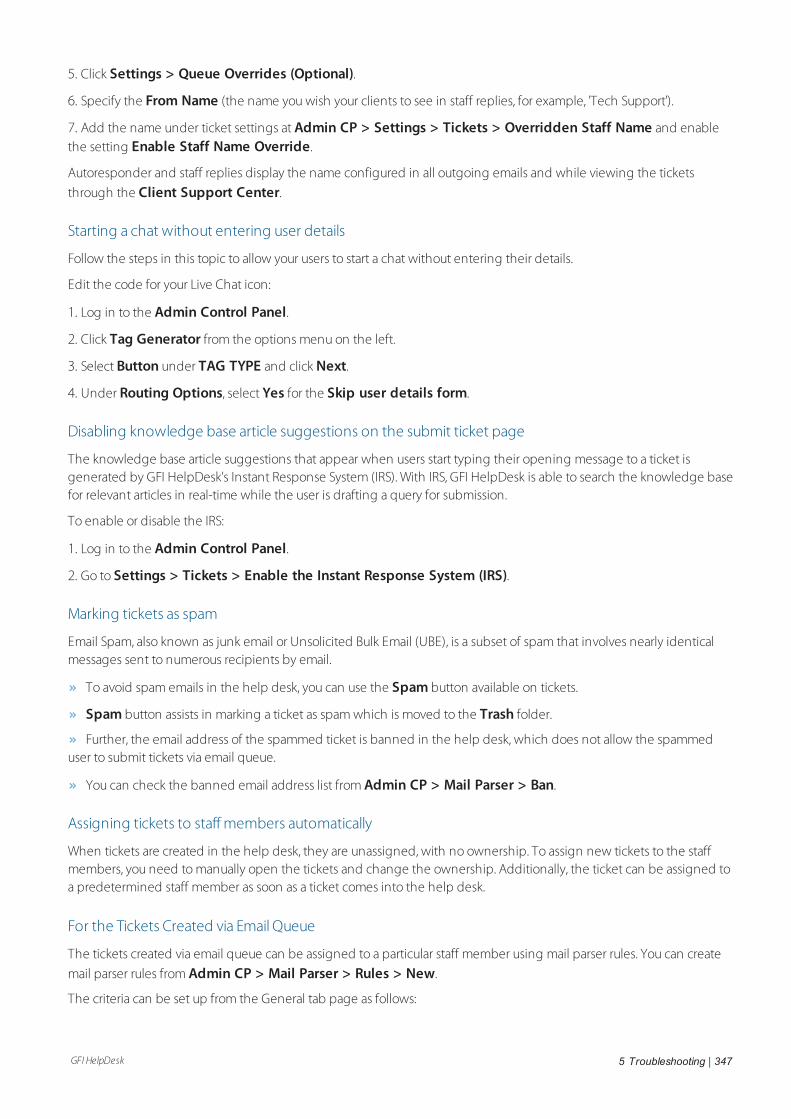
GFI HelpDesk 5 Troubleshooting | 347
5. Click Settings > Queue Overrides (Optional).
6. Specify the From Name (the name you wish your clients to see in staff replies, for example, 'Tech Support').
7. Add the name under ticket settings at Admin CP > Settings > Tickets > Overridden Staff Name and enablethe setting Enable Staff Name Override.
Autoresponder and staff replies display the name configured in all outgoing emails and while viewing the tickets
through the Client Support Center.
Starting a chat without entering user details
Follow the steps in this topic to allow your users to start a chat without entering their details.
Edit the code for your Live Chat icon:
1. Log in to the Admin Control Panel.
2. Click Tag Generator from the options menu on the left.
3. Select Button under TAG TYPE and click Next.
4. Under Routing Options, select Yes for the Skip user details form.
Disabling knowledge base article suggestions on the submit ticket page
The knowledge base article suggestions that appear when users start typing their opening message to a ticket isgenerated by GFI HelpDesk's Instant Response System (IRS). With IRS, GFI HelpDesk is able to search the knowledge basefor relevant articles in real-time while the user is drafting a query for submission.
To enable or disable the IRS:
1. Log in to the Admin Control Panel.
2. Go to Settings > Tickets > Enable the Instant Response System (IRS).
Marking tickets as spam
Email Spam, also known as junk email or Unsolicited Bulk Email (UBE), is a subset of spam that involves nearly identicalmessages sent to numerous recipients by email.
To avoid spam emails in the help desk, you can use the Spam button available on tickets.
Spam button assists in marking a ticket as spam which is moved to the Trash folder.
Further, the email address of the spammed ticket is banned in the help desk, which does not allow the spammeduser to submit tickets via email queue.
You can check the banned email address list from Admin CP > Mail Parser > Ban.
Assigning tickets to staff members automatically
When tickets are created in the help desk, they are unassigned, with no ownership. To assign new tickets to the staffmembers, you need to manually open the tickets and change the ownership. Additionally, the ticket can be assigned toa predetermined staff member as soon as a ticket comes into the help desk.
For the Tickets Created via Email Queue
The tickets created via email queue can be assigned to a particular staff member using mail parser rules. You can create
mail parser rules from Admin CP > Mail Parser > Rules > New.
The criteria can be set up from the General tab page as follows:
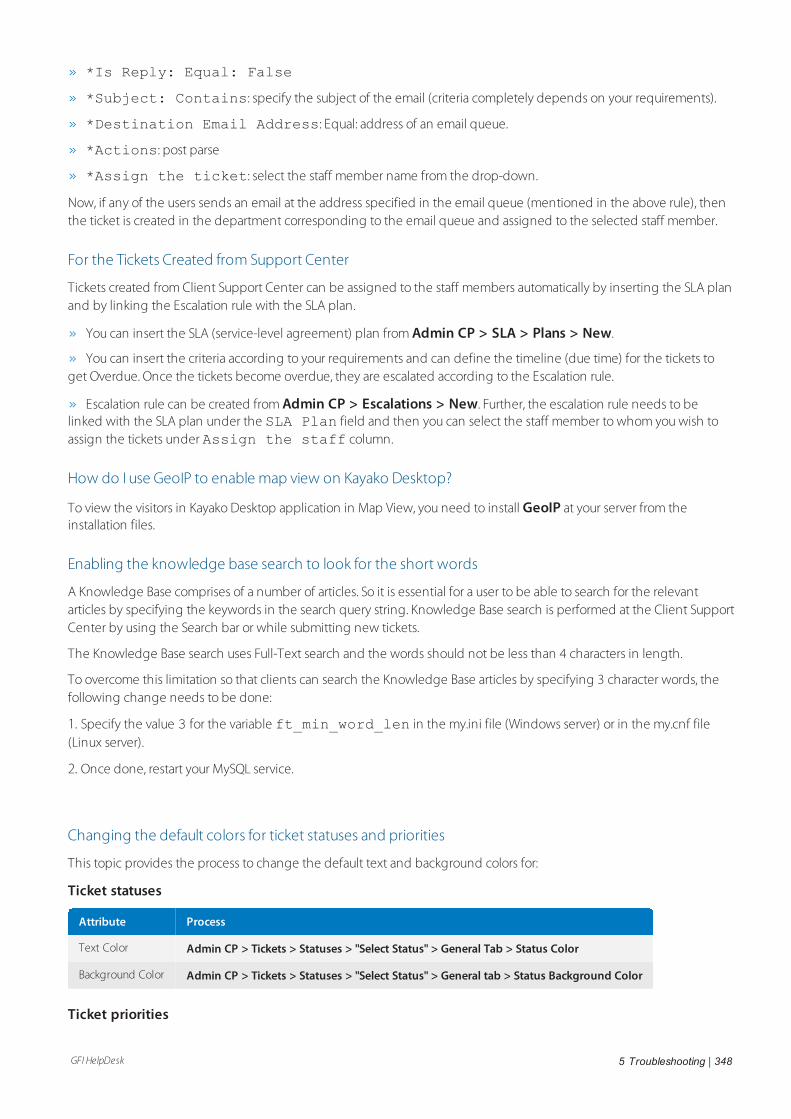
GFI HelpDesk 5 Troubleshooting | 348
*Is Reply: Equal: False
*Subject: Contains: specify the subject of the email (criteria completely depends on your requirements).
*Destination Email Address: Equal: address of an email queue.
*Actions: post parse
*Assign the ticket: select the staff member name from the drop-down.
Now, if any of the users sends an email at the address specified in the email queue (mentioned in the above rule), thenthe ticket is created in the department corresponding to the email queue and assigned to the selected staff member.
For the Tickets Created from Support Center
Tickets created from Client Support Center can be assigned to the staff members automatically by inserting the SLA planand by linking the Escalation rule with the SLA plan.
You can insert the SLA (service-level agreement) plan from Admin CP > SLA > Plans > New.
You can insert the criteria according to your requirements and can define the timeline (due time) for the tickets toget Overdue. Once the tickets become overdue, they are escalated according to the Escalation rule.
Escalation rule can be created from Admin CP > Escalations > New. Further, the escalation rule needs to belinked with the SLA plan under the SLA Plan field and then you can select the staff member to whom you wish toassign the tickets under Assign the staff column.
How do I use GeoIP to enable map view on Kayako Desktop?
To view the visitors in Kayako Desktop application in Map View, you need to install GeoIP at your server from theinstallation files.
Enabling the knowledge base search to look for the short words
A Knowledge Base comprises of a number of articles. So it is essential for a user to be able to search for the relevantarticles by specifying the keywords in the search query string. Knowledge Base search is performed at the Client SupportCenter by using the Search bar or while submitting new tickets.
The Knowledge Base search uses Full-Text search and the words should not be less than 4 characters in length.
To overcome this limitation so that clients can search the Knowledge Base articles by specifying 3 character words, thefollowing change needs to be done:
1. Specify the value 3 for the variable ft_min_word_len in the my.ini file (Windows server) or in the my.cnf file(Linux server).
2. Once done, restart your MySQL service.
Changing the default colors for ticket statuses and priorities
This topic provides the process to change the default text and background colors for:
Ticket statuses
Attribute Process
Text Color Admin CP > Tickets > Statuses > "Select Status" > General Tab > Status Color
Background Color Admin CP > Tickets > Statuses > "Select Status" > General tab > Status Background Color
Ticket priorities
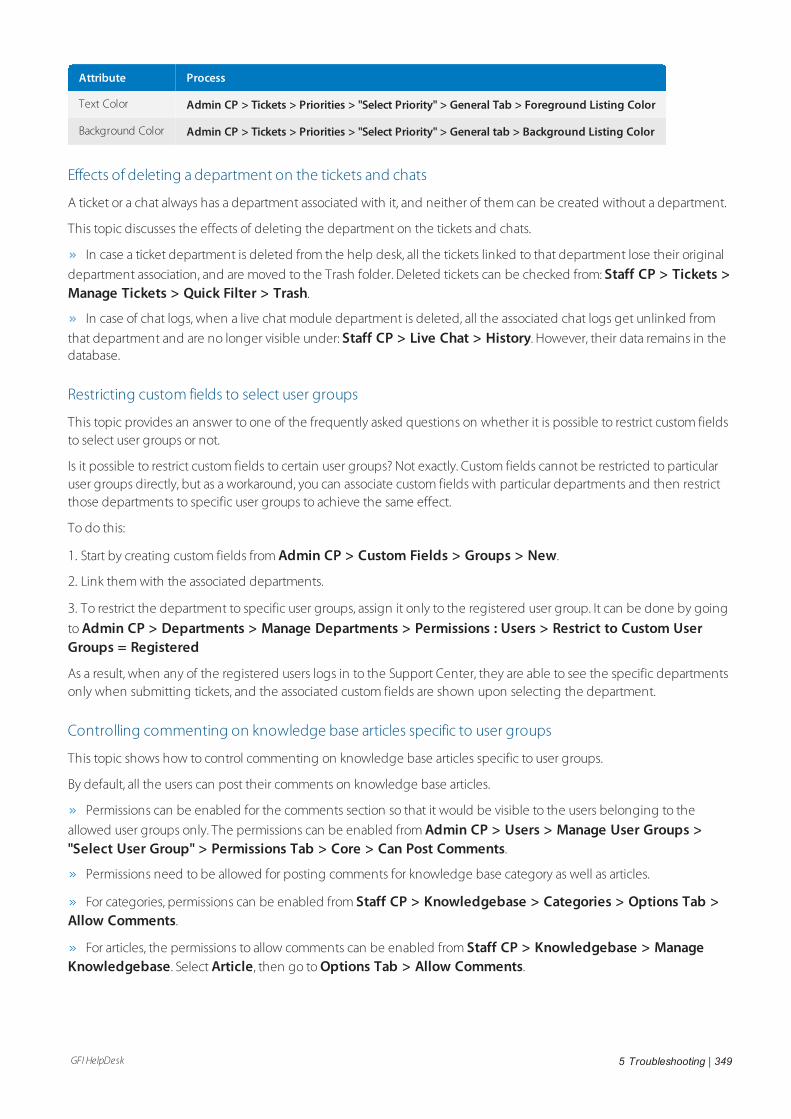
GFI HelpDesk 5 Troubleshooting | 349
Attribute Process
Text Color Admin CP > Tickets > Priorities > "Select Priority" > General Tab > Foreground Listing Color
Background Color Admin CP > Tickets > Priorities > "Select Priority" > General tab > Background Listing Color
Effects of deleting a department on the tickets and chats
A ticket or a chat always has a department associated with it, and neither of them can be created without a department.
This topic discusses the effects of deleting the department on the tickets and chats.
In case a ticket department is deleted from the help desk, all the tickets linked to that department lose their original
department association, and are moved to the Trash folder. Deleted tickets can be checked from: Staff CP > Tickets >Manage Tickets > Quick Filter > Trash.
In case of chat logs, when a live chat module department is deleted, all the associated chat logs get unlinked from
that department and are no longer visible under: Staff CP > Live Chat > History. However, their data remains in thedatabase.
Restricting custom fields to select user groups
This topic provides an answer to one of the frequently asked questions on whether it is possible to restrict custom fieldsto select user groups or not.
Is it possible to restrict custom fields to certain user groups? Not exactly. Custom fields cannot be restricted to particularuser groups directly, but as a workaround, you can associate custom fields with particular departments and then restrictthose departments to specific user groups to achieve the same effect.
To do this:
1. Start by creating custom fields from Admin CP > Custom Fields > Groups > New.
2. Link them with the associated departments.
3. To restrict the department to specific user groups, assign it only to the registered user group. It can be done by going
to Admin CP > Departments > Manage Departments > Permissions : Users > Restrict to Custom UserGroups = Registered
As a result, when any of the registered users logs in to the Support Center, they are able to see the specific departmentsonly when submitting tickets, and the associated custom fields are shown upon selecting the department.
Controlling commenting on knowledge base articles specific to user groups
This topic shows how to control commenting on knowledge base articles specific to user groups.
By default, all the users can post their comments on knowledge base articles.
Permissions can be enabled for the comments section so that it would be visible to the users belonging to the
allowed user groups only. The permissions can be enabled from Admin CP > Users > Manage User Groups >"Select User Group" > Permissions Tab > Core > Can Post Comments.
Permissions need to be allowed for posting comments for knowledge base category as well as articles.
For categories, permissions can be enabled from Staff CP > Knowledgebase > Categories > Options Tab >Allow Comments.
For articles, the permissions to allow comments can be enabled from Staff CP > Knowledgebase > ManageKnowledgebase. Select Article, then go to Options Tab > Allow Comments.
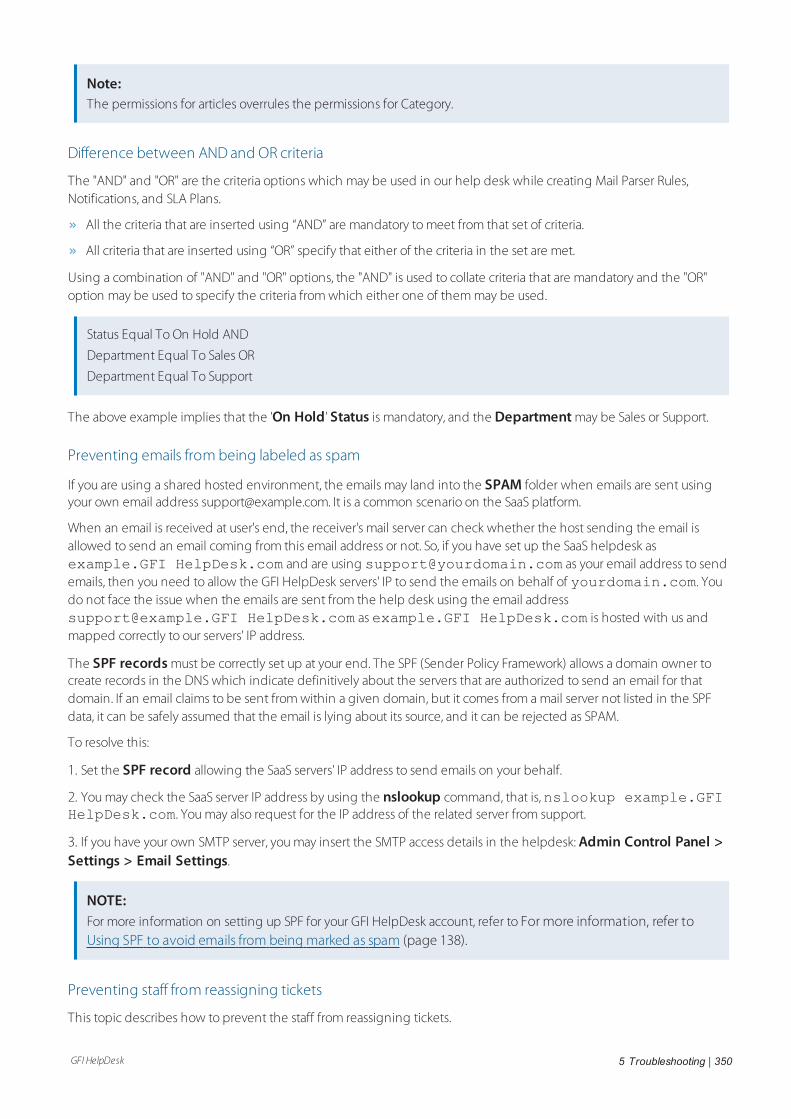
GFI HelpDesk 5 Troubleshooting | 350
Note:The permissions for articles overrules the permissions for Category.
Difference between AND and OR criteria
The "AND" and "OR" are the criteria options which may be used in our help desk while creating Mail Parser Rules,Notifications, and SLA Plans.
All the criteria that are inserted using “AND” are mandatory to meet from that set of criteria.
All criteria that are inserted using “OR” specify that either of the criteria in the set are met.
Using a combination of "AND" and "OR" options, the "AND" is used to collate criteria that are mandatory and the "OR"option may be used to specify the criteria from which either one of them may be used.
Status Equal To On Hold AND
Department Equal To Sales OR
Department Equal To Support
The above example implies that the 'On Hold' Status is mandatory, and the Department may be Sales or Support.
Preventing emails from being labeled as spam
If you are using a shared hosted environment, the emails may land into the SPAM folder when emails are sent usingyour own email address [email protected]. It is a common scenario on the SaaS platform.
When an email is received at user's end, the receiver's mail server can check whether the host sending the email isallowed to send an email coming from this email address or not. So, if you have set up the SaaS helpdesk asexample.GFI HelpDesk.com and are using [email protected] as your email address to sendemails, then you need to allow the GFI HelpDesk servers' IP to send the emails on behalf of yourdomain.com. Youdo not face the issue when the emails are sent from the help desk using the email [email protected] HelpDesk.com as example.GFI HelpDesk.com is hosted with us andmapped correctly to our servers' IP address.
The SPF records must be correctly set up at your end. The SPF (Sender Policy Framework) allows a domain owner tocreate records in the DNS which indicate definitively about the servers that are authorized to send an email for thatdomain. If an email claims to be sent from within a given domain, but it comes from a mail server not listed in the SPFdata, it can be safely assumed that the email is lying about its source, and it can be rejected as SPAM.
To resolve this:
1. Set the SPF record allowing the SaaS servers' IP address to send emails on your behalf.
2. You may check the SaaS server IP address by using the nslookup command, that is,nslookup example.GFIHelpDesk.com. You may also request for the IP address of the related server from support.
3. If you have your own SMTP server, you may insert the SMTP access details in the helpdesk: Admin Control Panel >Settings > Email Settings.
NOTE:For more information on setting up SPF for your GFI HelpDesk account, refer to For more information, refer toUsing SPF to avoid emails from being marked as spam (page 138).
Preventing staff from reassigning tickets
This topic describes how to prevent the staff from reassigning tickets.
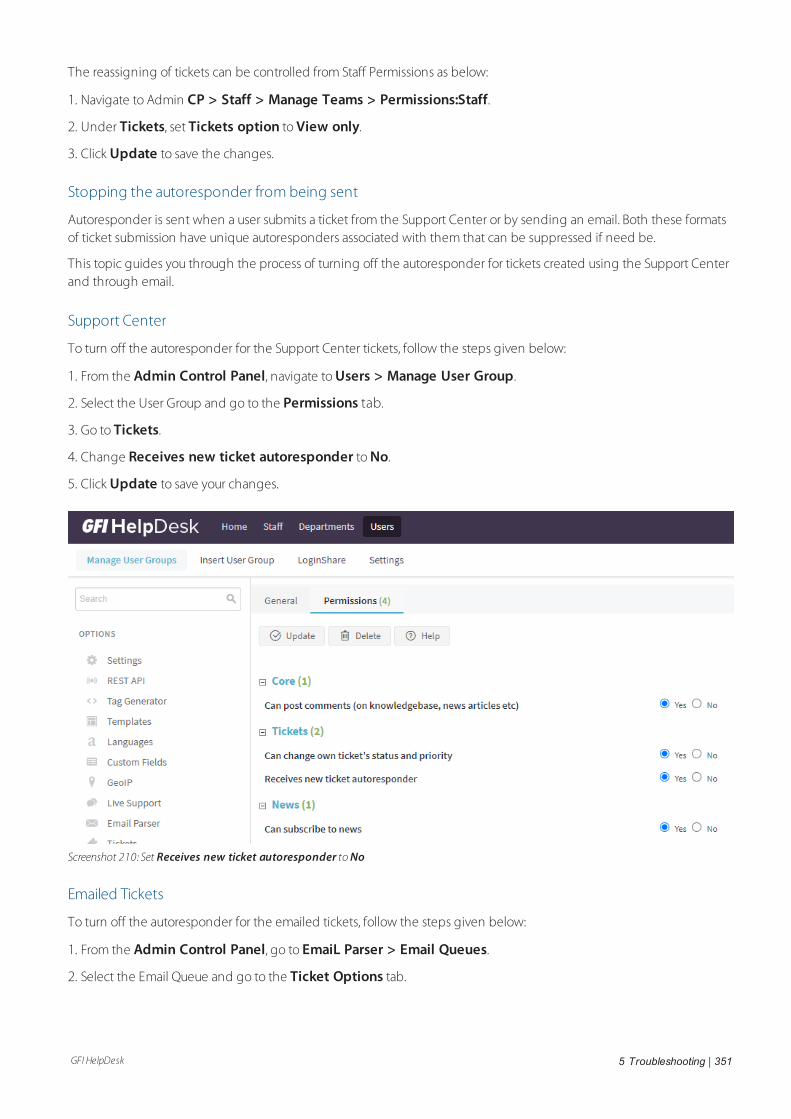
GFI HelpDesk 5 Troubleshooting | 351
The reassigning of tickets can be controlled from Staff Permissions as below:
1. Navigate to Admin CP > Staff > Manage Teams > Permissions:Staff.
2. Under Tickets, set Tickets option to View only.
3. Click Update to save the changes.
Stopping the autoresponder from being sent
Autoresponder is sent when a user submits a ticket from the Support Center or by sending an email. Both these formatsof ticket submission have unique autoresponders associated with them that can be suppressed if need be.
This topic guides you through the process of turning off the autoresponder for tickets created using the Support Centerand through email.
Support Center
To turn off the autoresponder for the Support Center tickets, follow the steps given below:
1. From the Admin Control Panel, navigate to Users > Manage User Group.
2. Select the User Group and go to the Permissions tab.
3. Go to Tickets.
4. Change Receives new ticket autoresponder to No.
5. Click Update to save your changes.
Screenshot 210: Set Receives new ticket autoresponder toNo
Emailed Tickets
To turn off the autoresponder for the emailed tickets, follow the steps given below:
1. From the Admin Control Panel, go to EmaiL Parser > Email Queues.
2. Select the Email Queue and go to the Ticket Options tab.
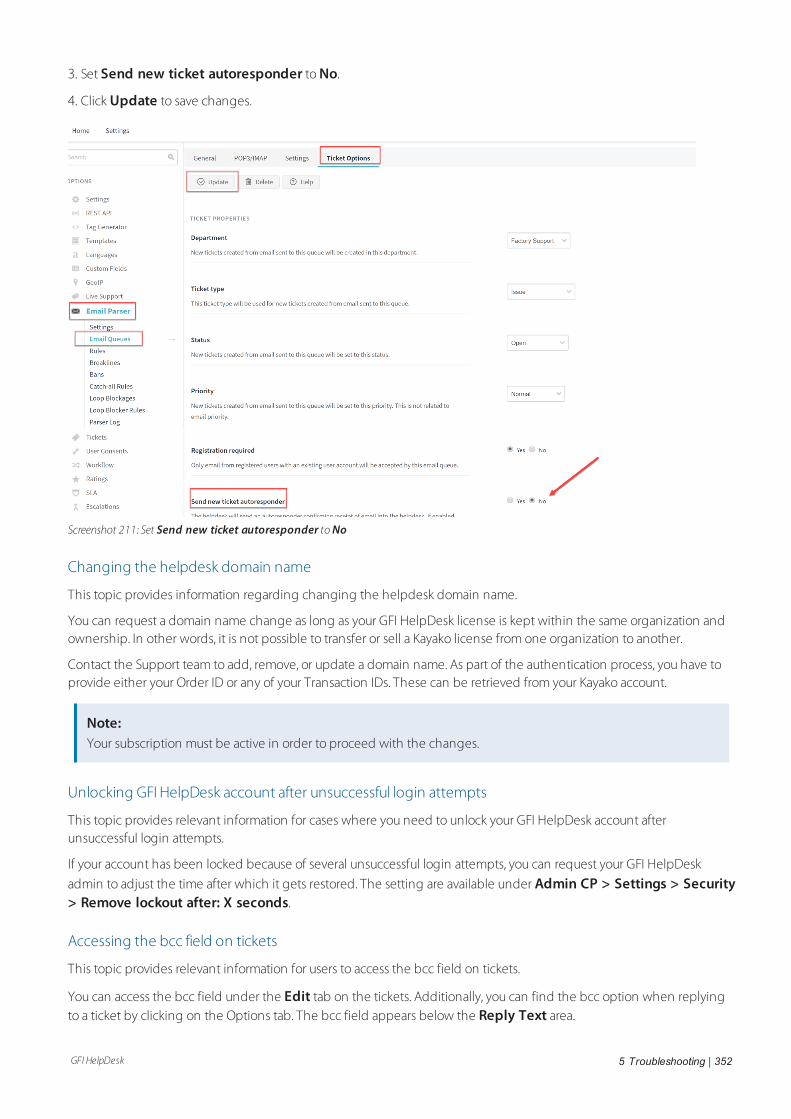
GFI HelpDesk 5 Troubleshooting | 352
3. Set Send new ticket autoresponder to No.
4. Click Update to save changes.
Screenshot 211: Set Send new ticket autoresponder toNo
Changing the helpdesk domain name
This topic provides information regarding changing the helpdesk domain name.
You can request a domain name change as long as your GFI HelpDesk license is kept within the same organization andownership. In other words, it is not possible to transfer or sell a Kayako license from one organization to another.
Contact the Support team to add, remove, or update a domain name. As part of the authentication process, you have toprovide either your Order ID or any of your Transaction IDs. These can be retrieved from your Kayako account.
Note:Your subscription must be active in order to proceed with the changes.
Unlocking GFI HelpDesk account after unsuccessful login attempts
This topic provides relevant information for cases where you need to unlock your GFI HelpDesk account afterunsuccessful login attempts.
If your account has been locked because of several unsuccessful login attempts, you can request your GFI HelpDesk
admin to adjust the time after which it gets restored. The setting are available under Admin CP > Settings > Security> Remove lockout after: X seconds.
Accessing the bcc field on tickets
This topic provides relevant information for users to access the bcc field on tickets.
You can access the bcc field under the Edit tab on the tickets. Additionally, you can find the bcc option when replyingto a ticket by clicking on the Options tab. The bcc field appears below the Reply Text area.
GFI HelpDesk 5 Troubleshooting | 353
Creating canned responses
This topic provides useful information on creating canned responses.
Canned responses can come in handy when the same text has to be used many times. You can create cannedresponses for both tickets and live chat:
For tickets, refer to Reusing Common Replies and Updates Using Macros.
For live chat, refer to Canned Responses in Kayako Desktop.
Use of breaklines
This article provides useful information about the use of breaklines.
Breaklines are used to truncate text in incoming emails. This is useful when emails from the users contain somerepeated contents in the form of ticket history.
You can edit breaklines from Admin CP > Email Parser > Breaklines.
In addition, you need to insert breaklines at the top of your templates. The templates concerned are:
email_ticketstaffreplyhtml
email_ticketstaffreplytext
Note:If you have multiple template groups, you need to insert breaklines for each one of them.
For detailed instructions on using breaklines, refer to Using Break-Lines to Remove Previous Replies from IncomingEmails.
Adding staff members
This topic provides valuable information about adding staff members.
You can add staff members by navigating to Admin Control Panel > Staff > Manage Staff > Insert Staff.
You should be able to assign Team, Department/s and other permissions to a staff member when creating the account.
For further details on how to assign different departments and permissions to staff members, refer to Creating staffaccounts and assigning them to teams.
Customizing the ticket submission form
This topic guides you through the process of customizing the ticket submission form.
Use Custom Fields to customize the Ticket Submission form.
Custom Fields are linked with Custom Groups, which decide the location (User ticket submission form, Staff ticketsubmission form, etc. ) of the Custom Fields.
To do so, follow the steps below:
1. You can add a Custom Group by navigating to Admin Control Panel (CP) > Custom Fields > Groups > New:Location.
2. Now add Custom Fields by navigating to Admin CP > Custom Fields > Fields > New > Select the CustomField Group to associate with.
3. You can also select the type of custom fields that you want to use, such as Text, Radio, etc.
For more details on Custom Fields, refer to Creating custom fields for capturing user and ticket information.

GFI HelpDesk 5 Troubleshooting | 354
Cron's running frequency
This topic provides relevant information that relates to how often the cron runs.
In GFI HelpDesk, the cron runs every ten (10) minutes; this provides enough time for tasks to be completed regardless ofthe task for example, fetching emails into GFI HelpDesk, running reports, etc.
Ticket search not working in the staff control panel
Ticket search does not retrieve relevant tickets when using Advanced, Quick Search or Filters.
This topic provides a resolution to this issue.
Ticket search is used by the staff to search and find the tickets related to any subject, content or belonging to a particularuser. To fix this, please perform the following steps:
1. Re-index the tickets search from Admin CP > Tickets > Maintenance > Rebuild Search Index > Rebuild.
2. Re-index the ticket properties form Admin CP > Tickets > Maintenance > Rebuil Properties > Rebuild.
3. Rebuild helpdesk cache from Admin CP > Diagnostics > Rebuild Cache.
Note:CP stands for Control Panel.
Appending email replies to existing tickets
This topic provides relevant information that explains how email replies are appended to existing tickets.
Email replies are appended to existing tickets if they pass a series of checks. The checks are performed in the followingorder:
1. GFI HelpDesk checks for the ticket ID in subject with the correct format, that is, [#Ticket ID:]. If found, the reply getsappended to the existing ticket.
2. GFI HelpDesk searches for the ticket ID in the body of the reply.
Note:This check is only performed if you enabled the Search for ticket ID in email body option.
3. Finally, GFI HelpDesk looks for a colon symbol (':') with the existing ticket subject from the same user. If it finds a match,then the reply is appended.
For any discrepancies when replies are added to existing tickets, you can look for the attributes above in the parser logsfor those tickets.
Seeing survey responses from users
This topic indicates where you can see survey responses from users.
Customer's surveys for both Live Chats and Tickets can be viewed in the Staff CP. You can also run reports on them.
Settings for Chat Surveys: These settings can be found under Staff CP > Live Support >Messages/Surveys. Keep in mind that a star symbol represents surveys.
Settings for Ticket Surveys: You can find the survey comments on the ticket itself, as a private post. It is high-lighted to differentiate it from an original post.

GFI HelpDesk 5 Troubleshooting | 355
Report to see all Ticket Survey responses: You can create a report with the following KQL code to see allTicket Survey responses:
SELECT 'Tickets.Ticket ID', 'Ticket Posts. Contents' FROM 'Ticket Posts' WHERE 'Ticket Posts.Is Survey Comment' = '1'
If you were to look for Ticket Survey scores, we have some example reports defined in our KQL Condition & Oper-ator Reference.
Changing the 'To' Email ID when replying to a ticket
This topic provides relevant information to be used when changing the 'To' email ID when replying to a ticket.
When replying to a ticket, you need to go to the Edit tab, where you can change the 'To' email ID as required. Oncedone, you can return to the Reply tab to finish and send your message.
Preventing staff from trashing tickets
This topic guides you through the process of preventing the staff from trashing tickets.
You can prevent this by restricting Staff Team permissions.
To do so, follow the steps given below:
1. From the Admin Control Panel, navigate to Manage Teams > Team > Permissions:Staff.
2. Under Tickets set Send tickets to trash to No.
3. Click Update to save changes.
Size limit for an email attachment
This topic provides information about the size limitation of an email attachment.
You and your users can enjoy attachments of up to 10 MB. If you are on the latest release, your users would be notifiedautomatically when their attachment exceeds the allowed limit. They can then send them by breaking into smallerattachments.
Allowing users to edit the ticket type and priority fields when submitting tickets
This topic details the settings required for allowing users to edit the Ticket Type and Priority fields when submitting aticket.
In order to allow end users to select Ticket Type and Ticket Priority when submitting a ticket, they have to be madePublic. You can make them Public from the following settings:
For Ticket types, navigate to Admin CP > Tickets > Types > Select the Type > General tab > Visibility:Public.
For Ticket Priorities, navigate to Admin CP > Tickets > Priorities > Select the Priority > General tab-> Pri-ority type: Public.
Setting up department permissions based on user groups
If you want to restrict department visibility to a particular set of users, you can do so by using permissions for thatdepartment. This article describes the process to set up department permissions based on user groups.
To set up the Department, follow the steps below:
GFI HelpDesk 5 Troubleshooting | 356
1. Navigate to Admin CP > Departments > Manage Departments.
2. Select the required department.
3. From the Permission: Users tab, select the User Groups who should be able to view this Department.
4. Select Update.
Error 'csrfhash'
This topic describes the reasons why the csrfhash error appears in GFI HelpDesk.
CSRF code is added to add a security layer to GFI HelpDesk.
There are two main reasons why you could get a csrfhash error in GFI HelpDesk:
You are likely to get this error if you are being redirected to GFI HelpDesk login from some other website.
The error may also happen if your templates are way out of date.
Error launching GFI HelpDesk: 'Get() on a non-object'
The following error appears when connecting to GFI HelpDesk:
Get() on a non-object.
In this topic, we'll help you diagnose what exactly is disrupting your connection so you can go about resolving it.
We're going to go through several steps to troubleshoot the issue:
We'll check to make sure that all of the required PHP plugins are in place.
We'll take a look at your config.php file to make sure everything is in order.
We'll double-check that your database credentials are still valid.
And if we still haven't found the problem, we'll show you how to edit a settings file in order to make it divulge thespecific problem that it's encountering.
Root cause
This error appears to Download customers when GFI HelpDesk is unable to establish a connection with your database.The trouble is, there are multiple factors involved in establishing that connection, any of which could be the culprit.
Resolution
Check your PHP plugins
GFI HelpDesk officially supports MySQL for its database system and relies on PHP to initiate all connections to MySQL. PHPoffers several MySQL extensions for accessing a MySQL database. GFI HelpDesk uses the following extensions:
MySQL – required for all versions of PHP
MySQLi – required for PHP 5.5.x or later
MySQLnd – required for PHP 5.5.x or later
To check which extensions you have installed, consult your PHPInfo page or ask your server administrator to check it foryou.
NOTE:You can double-check the rest of GFI HelpDesk's server requirements.
Review your 'config.php' file
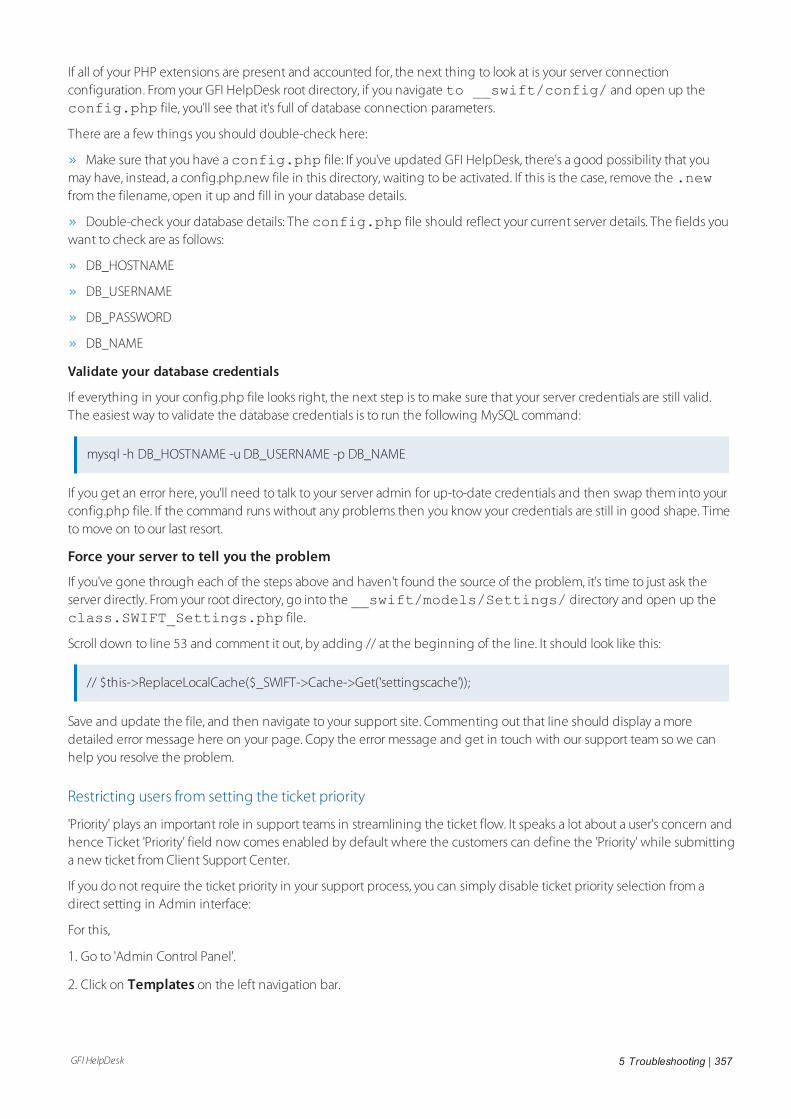
GFI HelpDesk 5 Troubleshooting | 357
If all of your PHP extensions are present and accounted for, the next thing to look at is your server connectionconfiguration. From your GFI HelpDesk root directory, if you navigate to __swift/config/ and open up theconfig.php file, you'll see that it's full of database connection parameters.
There are a few things you should double-check here:
Make sure that you have a config.php file: If you've updated GFI HelpDesk, there's a good possibility that youmay have, instead, a config.php.new file in this directory, waiting to be activated. If this is the case, remove the .newfrom the filename, open it up and fill in your database details.
Double-check your database details: The config.php file should reflect your current server details. The fields youwant to check are as follows:
DB_HOSTNAME
DB_USERNAME
DB_PASSWORD
DB_NAME
Validate your database credentials
If everything in your config.php file looks right, the next step is to make sure that your server credentials are still valid.The easiest way to validate the database credentials is to run the following MySQL command:
mysql -h DB_HOSTNAME -u DB_USERNAME -p DB_NAME
If you get an error here, you'll need to talk to your server admin for up-to-date credentials and then swap them into yourconfig.php file. If the command runs without any problems then you know your credentials are still in good shape. Timeto move on to our last resort.
Force your server to tell you the problem
If you've gone through each of the steps above and haven't found the source of the problem, it's time to just ask theserver directly. From your root directory, go into the __swift/models/Settings/ directory and open up theclass.SWIFT_Settings.php file.
Scroll down to line 53 and comment it out, by adding // at the beginning of the line. It should look like this:
// $this->ReplaceLocalCache($_SWIFT->Cache->Get('settingscache'));
Save and update the file, and then navigate to your support site. Commenting out that line should display a moredetailed error message here on your page. Copy the error message and get in touch with our support team so we canhelp you resolve the problem.
Restricting users from setting the ticket priority
'Priority' plays an important role in support teams in streamlining the ticket flow. It speaks a lot about a user's concern andhence Ticket 'Priority' field now comes enabled by default where the customers can define the 'Priority' while submittinga new ticket from Client Support Center.
If you do not require the ticket priority in your support process, you can simply disable ticket priority selection from adirect setting in Admin interface:
For this,
1. Go to 'Admin Control Panel'.
2. Click on Templates on the left navigation bar.
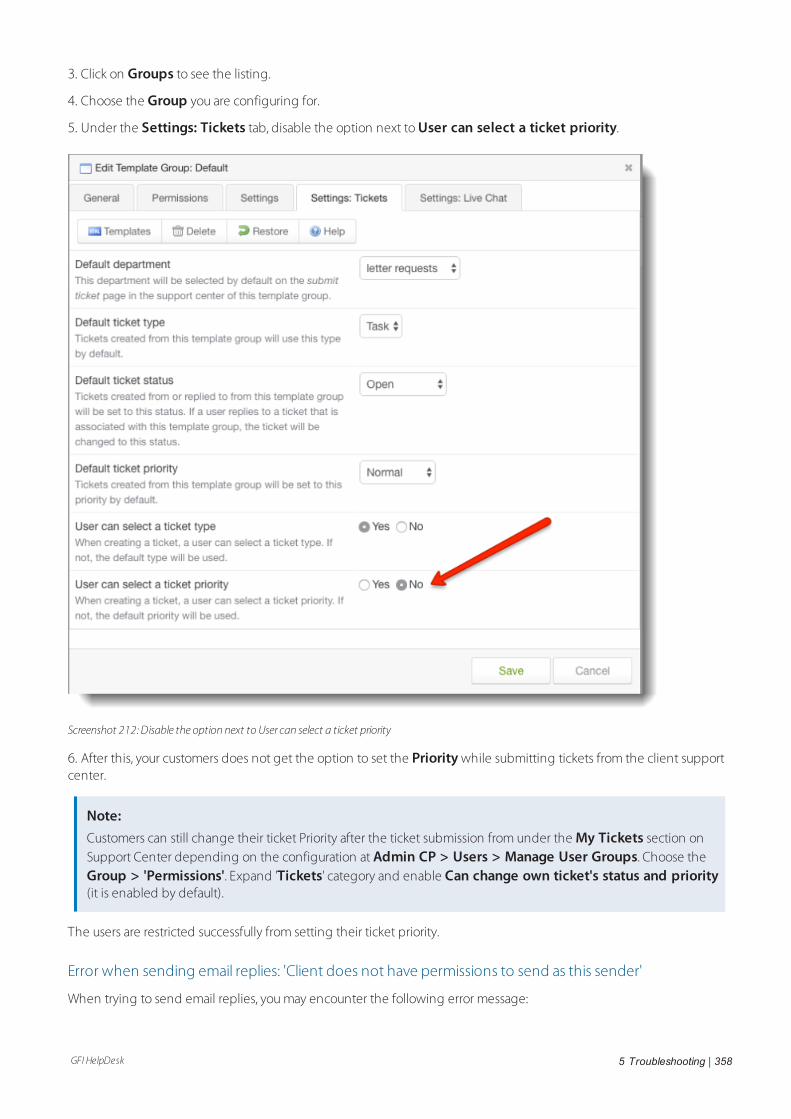
GFI HelpDesk 5 Troubleshooting | 358
3. Click on Groups to see the listing.
4. Choose the Group you are configuring for.
5. Under the Settings: Tickets tab, disable the option next to User can select a ticket priority.
Screenshot 212: Disable the option next to User can select a ticket priority
6. After this, your customers does not get the option to set the Priority while submitting tickets from the client supportcenter.
Note:Customers can still change their ticket Priority after the ticket submission from under the My Tickets section onSupport Center depending on the configuration at Admin CP > Users > Manage User Groups. Choose theGroup > 'Permissions'. Expand 'Tickets' category and enable Can change own ticket's status and priority(it is enabled by default).
The users are restricted successfully from setting their ticket priority.
Error when sending email replies: 'Client does not have permissions to send as this sender'
When trying to send email replies, you may encounter the following error message:

GFI HelpDesk 5 Troubleshooting | 359
550 5.7.1 Client does not have permissions to send as this sender.
In this topic, we'll explain the root cause of this error and show you how to quickly fix it.
Unlike a regular mailbox where you use your own username and password to authenticate to the account, outboundemails from GFI HelpDesk either:
Use the details from an email queue you've defined in Admin Control Panel > Email Parser > Email Queues –for example,support@[yourcompany].com or
Use the global SMTP details, specified at Admin Control Panel > Settings > Email.
NOTE:For more details on the types of email addresses used by GFI HelpDesk, see For more information, refer toChanging outgoing email addresses for automated emails (page 148).
By default, the email queue address is used as the From address of the sender. And since the email queue is using itsown credentials, the mail server authenticates those details without a problem.
The error occurs when you try to select a different sender. For example, it commonly occurs when a staff user selects theirown email address in the 'From' dropdown while updating a ticket. This results in an error because the outboundmailbox does not permit users to send on its behalf. It is commonly associated with Exchange/Office365 accounts whichtend to restrict "send as" access by default.
For instance, when a staff user, Joe, replies to a support email, by default it is sent using the 'From' address of the emailqueue, which, in this case, is support@[yourcompany].com. However, if Joe were to select his own email address, joe@[yourcompany].com, in the 'From' dropdown, it creates a conflict and subsequently lead to the error since you areauthenticating using the support@[yourcompany].com credentials but using joe@[yourcompany].com to send the email.
Resolution
To resolve the error, you need to configure Send as permissions on your mail server so that staff email accounts cansend email using your outbound mailbox account.
The instructions for doing this for some of the more common email servers/providers are listed below:
Office365
Microsoft Exchange
Google Apps
Using custom field data when customizing email templates
In GFI HelpDesk, it is possible to use custom fields data when customizing email templates. To do so, just like any othertype of field, you can use data from custom fields when editing the templates for autoresponders and notification emails.This article provides the details to do so.
To specify a custom field as a variable in a template, you'll use the following tag:<{$_customFields[GroupName][FieldName]}>
You can then replace GroupName and FieldName with the actual group and field names for your custom field.
GFI HelpDesk then adds that field's data to the email copy.
NOTE:Only ticket custom fields can be used in the notifications email templates.
GFI HelpDesk 5 Troubleshooting | 360
Valid examples for the GroupName and FieldName
GroupName – Testing group
FieldName – Testing,Testing text,Text-area, Select_value,Testing-123
Valid template changes are:
<{$_customFields[Testing_roup][Testing]}><br />
<{$_customFields[Testing_group][Testing_text]}><br />
<{$_customFields[Testing_group][Text_area]}><br />
<{$_customFields[Testing_group][Select_value]}><br />
<{$_customFields[Testing_group][Testing_123]}><br />
For more information, see:
Creating custom fields
Customizing notification emails
Configuring autoresponder emails
CC recipients allowed on an email in GFI HelpDesk
The topic details the process to configure maximum no of copy recipients to allow in an email from GFI HelpDesk.
The number of email recipients to be captured on a ticket depends upon the Maximum number of recipients inincoming email setting.
This setting is available under Admin area > Settings > Tickets > Maximum number of recipients in incomingemail.
This is the maximum number of recipients that GFI HelpDesk accepts while processing email.
Setting a default status for replying to tickets
This topic guides you through the process of setting a default status for replying to tickets.
Process
When a staff member replies to a support ticket, GFI HelpDesk can update its status, to keep it moving through thecustomer defined ticket workflow.
GFI HelpDesk allows its customers to set a default reply status based on what ticket view the staff member is workingfrom when they reply.
To select or change the default reply status for a view, follow the steps given below:
Select Tickets > Views on the staff control panel toolbar.
Open up a view, and switch to the Options tab. You'll be able to change the default reply status there as shown in thefigure below:
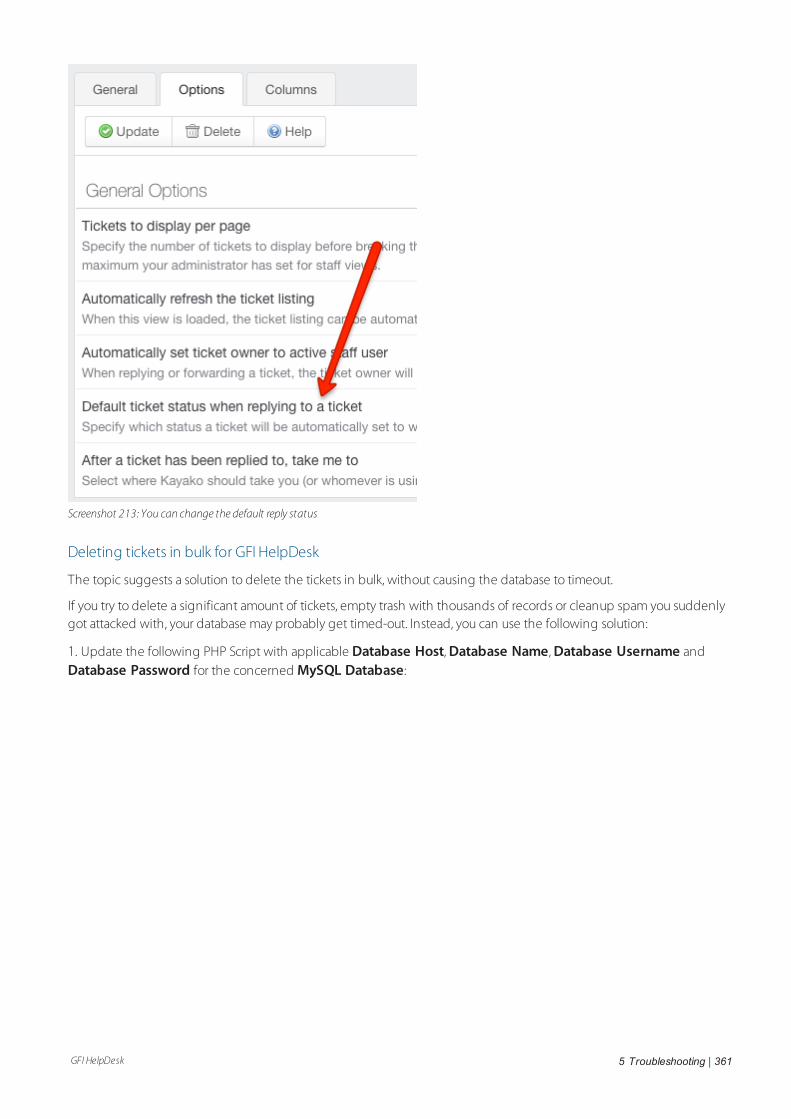
GFI HelpDesk 5 Troubleshooting | 361
Screenshot 213: You can change the default reply status
Deleting tickets in bulk for GFI HelpDesk
The topic suggests a solution to delete the tickets in bulk, without causing the database to timeout.
If you try to delete a significant amount of tickets, empty trash with thousands of records or cleanup spam you suddenlygot attacked with, your database may probably get timed-out. Instead, you can use the following solution:
1. Update the following PHP Script with applicable Database Host, Database Name, Database Username andDatabase Password for the concerned MySQL Database:
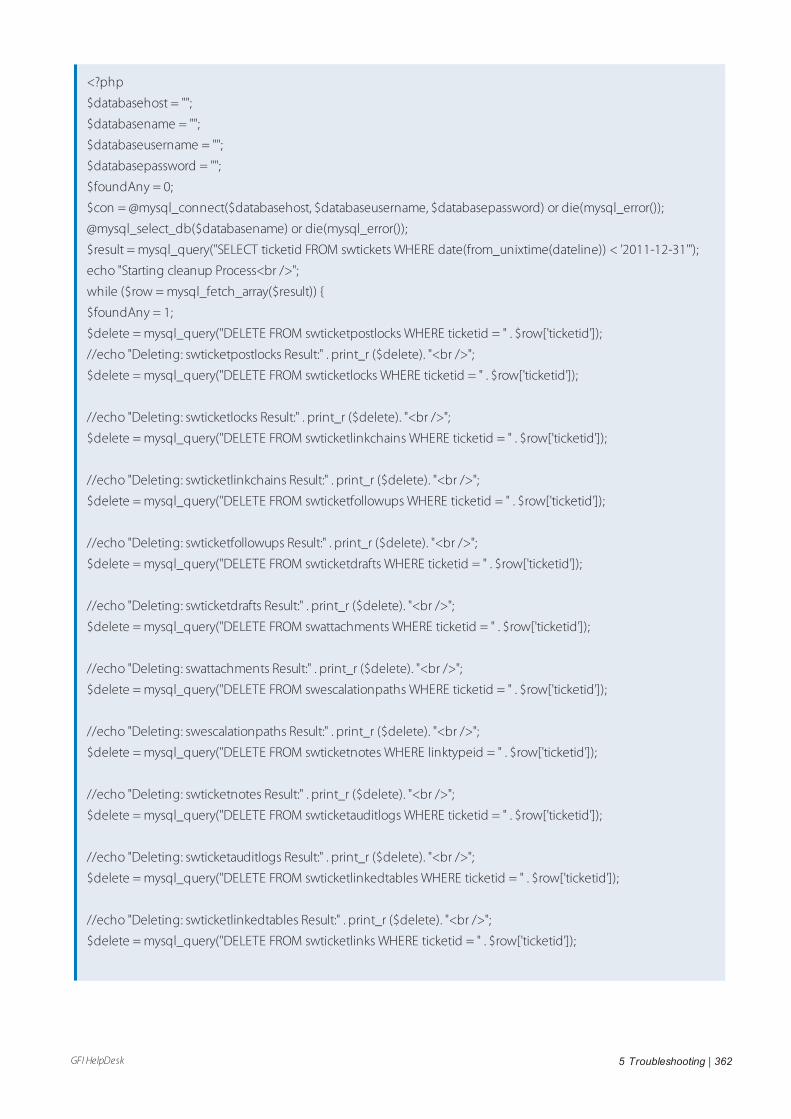
GFI HelpDesk 5 Troubleshooting | 362
<?php
$databasehost = "";
$databasename = "";
$databaseusername = "";
$databasepassword = "";
$foundAny = 0;
$con = @mysql_connect($databasehost, $databaseusername, $databasepassword) or die(mysql_error());
@mysql_select_db($databasename) or die(mysql_error());
$result = mysql_query("SELECT ticketid FROM swtickets WHERE date(from_unixtime(dateline)) < '2011-12-31'");
echo "Starting cleanup Process<br />";
while ($row = mysql_fetch_array($result)) {
$foundAny = 1;
$delete = mysql_query("DELETE FROM swticketpostlocks WHERE ticketid = " . $row['ticketid']);
//echo "Deleting: swticketpostlocks Result:" . print_r ($delete). "<br />";
$delete = mysql_query("DELETE FROM swticketlocks WHERE ticketid = " . $row['ticketid']);
//echo "Deleting: swticketlocks Result:" . print_r ($delete). "<br />";
$delete = mysql_query("DELETE FROM swticketlinkchains WHERE ticketid = " . $row['ticketid']);
//echo "Deleting: swticketlinkchains Result:" . print_r ($delete). "<br />";
$delete = mysql_query("DELETE FROM swticketfollowups WHERE ticketid = " . $row['ticketid']);
//echo "Deleting: swticketfollowups Result:" . print_r ($delete). "<br />";
$delete = mysql_query("DELETE FROM swticketdrafts WHERE ticketid = " . $row['ticketid']);
//echo "Deleting: swticketdrafts Result:" . print_r ($delete). "<br />";
$delete = mysql_query("DELETE FROM swattachments WHERE ticketid = " . $row['ticketid']);
//echo "Deleting: swattachments Result:" . print_r ($delete). "<br />";
$delete = mysql_query("DELETE FROM swescalationpaths WHERE ticketid = " . $row['ticketid']);
//echo "Deleting: swescalationpaths Result:" . print_r ($delete). "<br />";
$delete = mysql_query("DELETE FROM swticketnotes WHERE linktypeid = " . $row['ticketid']);
//echo "Deleting: swticketnotes Result:" . print_r ($delete). "<br />";
$delete = mysql_query("DELETE FROM swticketauditlogs WHERE ticketid = " . $row['ticketid']);
//echo "Deleting: swticketauditlogs Result:" . print_r ($delete). "<br />";
$delete = mysql_query("DELETE FROM swticketlinkedtables WHERE ticketid = " . $row['ticketid']);
//echo "Deleting: swticketlinkedtables Result:" . print_r ($delete). "<br />";
$delete = mysql_query("DELETE FROM swticketlinks WHERE ticketid = " . $row['ticketid']);

GFI HelpDesk 5 Troubleshooting | 363
//echo "Deleting: swticketlinks Result:" . print_r ($delete). "<br />";
$delete = mysql_query("DELETE FROM swticketmergelog WHERE ticketid = " . $row['ticketid']);
//echo "Deleting: swticketmergelog Result:" . print_r ($delete). "<br />";
$delete = mysql_query("DELETE FROM swticketmessageids WHERE ticketid = " . $row['ticketid']);
//echo "Deleting: swticketmessageids Result:" . print_r ($delete). "<br />";
$delete = mysql_query("DELETE FROM swticketnotes WHERE linktypeid = " . $row['ticketid']);
//echo "Deleting: swticketnotes Result:" . print_r ($delete). "<br />";
$delete = mysql_query("DELETE FROM swticketposts WHERE ticketid = " . $row['ticketid']);
//echo "Deleting: swticketposts Result:" . print_r ($delete). "<br />";
$delete = mysql_query("DELETE FROM swticketrecipients WHERE ticketid = " . $row['ticketid']);
//echo "Deleting: swticketrecipients Result:" . print_r ($delete). "<br />";
$delete = mysql_query("DELETE FROM swticketwatchers WHERE ticketid = " . $row['ticketid']);
//echo "Deleting: swticketwatchers Result:" . print_r ($delete). "<br />";
$delete = mysql_query("DELETE FROM swcustomfieldvalues WHERE typeid = " . $row['ticketid']);
//echo "Deleting: swcustomfieldvalues Result:" . print_r ($delete). "<br />";
$result2 = mysql_query("SELECT tickettimetrackid FROM swtickettimetracks WHERE ticketid = " . $row['ticketid']);
while ($row2 = mysql_fetch_array($result2)) {
$delete = mysql_query("DELETE FROM swtickettimetracknotes WHERE tickettimetrackid = " . $row2['tickettimetrackid']);
//echo "Deleting: swtickettimetracknotes Result:" . print_r ($delete). "<br />";
}
$delete = mysql_query("DELETE FROM swtickettimetracks WHERE ticketid = " . $row['ticketid']);
//echo "Deleting: swtickettimetracks Result:" . print_r ($delete). "<br />";
$delete = mysql_query("DELETE FROM swtickets WHERE ticketid = " . $row['ticketid']);
echo "Deleting: swtickets -" . $row['ticketid'] . " Result:" . print_r($delete) . "<br />";
}
@mysql_close($con);
if ($foundAny == 0) {
echo "No tickets where found within that date range";
}
else {
echo "Ticket Cleanup Complete.";
}
?>
GFI HelpDesk 5 Troubleshooting | 364
2. Backup your database. Make sure you have a valid and latest backup of the database before implementing the solu-tion.
3. Execute the script.
You can edit the following line to match your needs (it currently removes tickets that were created before a certain date):
$result = mysql_query("SELECT ticketid FROM swtickets WHERE date(from_unixtime(dateline)) < '2011-12-31'");
For example, if you need to delete all tickets from one user:
$result = mysql_query("SELECT ticketid FROM swtickets WHERE userid='ID OF YOUR USER'");
If you need to remove all tickets from trash:
$result = mysql_query("SELECT ticketid FROM swtickets WHERE departmentid=0");
Maintaining the status when users are replying to tickets
The default functionality is for the Status to be set to Open whenever the customer replies via email.
This topic explains how to update the status change when users are replying to tickets.
1. Go to your Admin Panel > Tickets > Settings.
2. Modify the Set tickets to this status on user reply option. (The default value for this setting is Open.)
3. Change it to -- Do Not Change -- so that the status persists on every ticket even for email responses.
Using placeholders
From version 4.75 and later we have added placeholder support for staff replies in our HTML editor. This can also be usedwithin macros to make your predefined responses much more personalized.
Within the reply/forward area, you can use the below placeholders. When the reply is sent, the placeholder is replacedwith the information it represents.
Note:Placeholders can also be used within the quick insert options, such as macros.
Customers Fullname : {{fullname}}
Customers Forename : {{forename}}
Customers Surname : {{surname}}
Customers Title : {{title}}
Customers Salutation : {{salutation}}
Customers Organization : {{organization}}
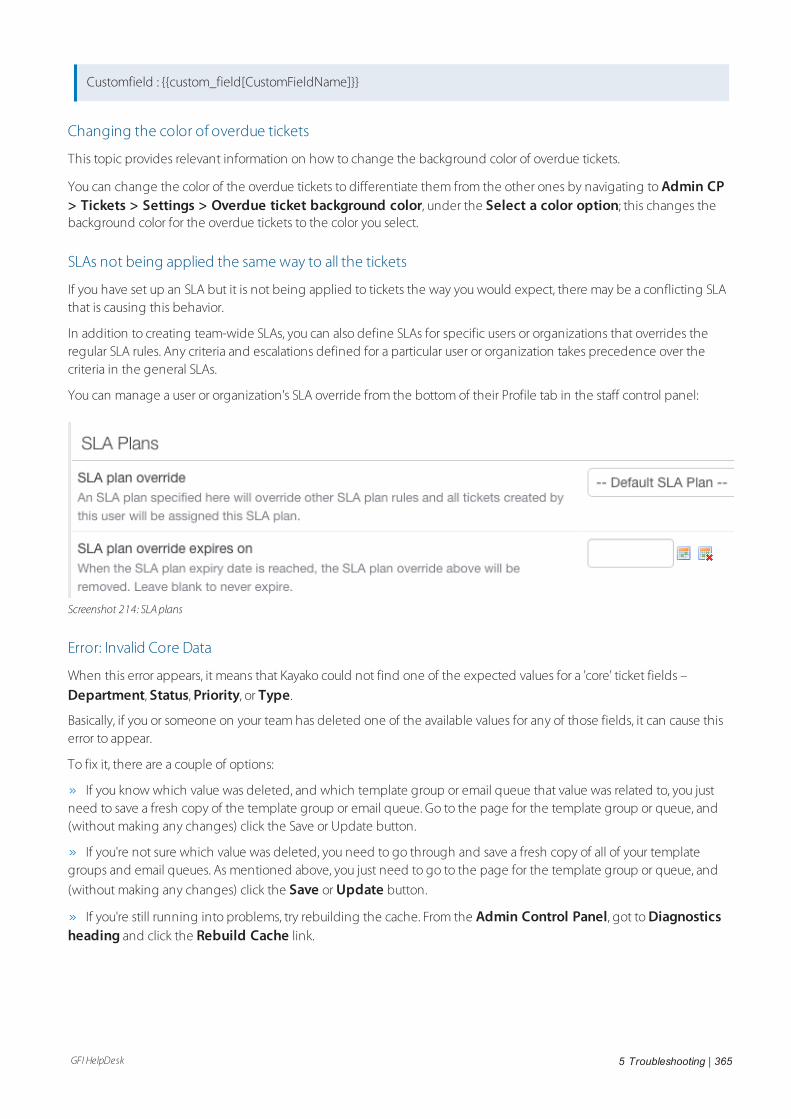
GFI HelpDesk 5 Troubleshooting | 365
Customfield : {{custom_field[CustomFieldName]}}
Changing the color of overdue tickets
This topic provides relevant information on how to change the background color of overdue tickets.
You can change the color of the overdue tickets to differentiate them from the other ones by navigating to Admin CP> Tickets > Settings > Overdue ticket background color, under the Select a color option; this changes thebackground color for the overdue tickets to the color you select.
SLAs not being applied the same way to all the tickets
If you have set up an SLA but it is not being applied to tickets the way you would expect, there may be a conflicting SLAthat is causing this behavior.
In addition to creating team-wide SLAs, you can also define SLAs for specific users or organizations that overrides theregular SLA rules. Any criteria and escalations defined for a particular user or organization takes precedence over thecriteria in the general SLAs.
You can manage a user or organization's SLA override from the bottom of their Profile tab in the staff control panel:
Screenshot 214: SLAplans
Error: Invalid Core Data
When this error appears, it means that Kayako could not find one of the expected values for a 'core' ticket fields –
Department, Status, Priority, or Type.
Basically, if you or someone on your team has deleted one of the available values for any of those fields, it can cause thiserror to appear.
To fix it, there are a couple of options:
If you know which value was deleted, and which template group or email queue that value was related to, you justneed to save a fresh copy of the template group or email queue. Go to the page for the template group or queue, and(without making any changes) click the Save or Update button.
If you're not sure which value was deleted, you need to go through and save a fresh copy of all of your templategroups and email queues. As mentioned above, you just need to go to the page for the template group or queue, and
(without making any changes) click the Save or Update button.
If you're still running into problems, try rebuilding the cache. From the Admin Control Panel, got to Diagnosticsheading and click the Rebuild Cache link.

GFI HelpDesk 5 Troubleshooting | 366
Screenshot 215: Rebuild cache
Editing the list of 'From' email addresses that appears when replying to a customer
When you are communicating with your customers, the email address your messages are coming from can play animportant role. For example, you may want to use different email addresses for different groups of customers, dependingon the type of request they submit or which support site they submitted through.
When creating or replying to a ticket from the staff control panel, you see multiple email addresses in the Fromdropdown, as shown below:
Screenshot 216:Multiple email addresses displayed
This list only has three email addresses to choose from. Your GFI HelpDesk may have more. Regardless of how manythere are, though, the email addresses always appears in the same order:
Email queue addresses come first. The addresses for any email queues you have set up that apply to this ticketappears first in the dropdown list.
The second to last email is always your default support address. You can change this address from the 'admin controlpanel' by clicking Settings and the General in the 'menu' sidebar.
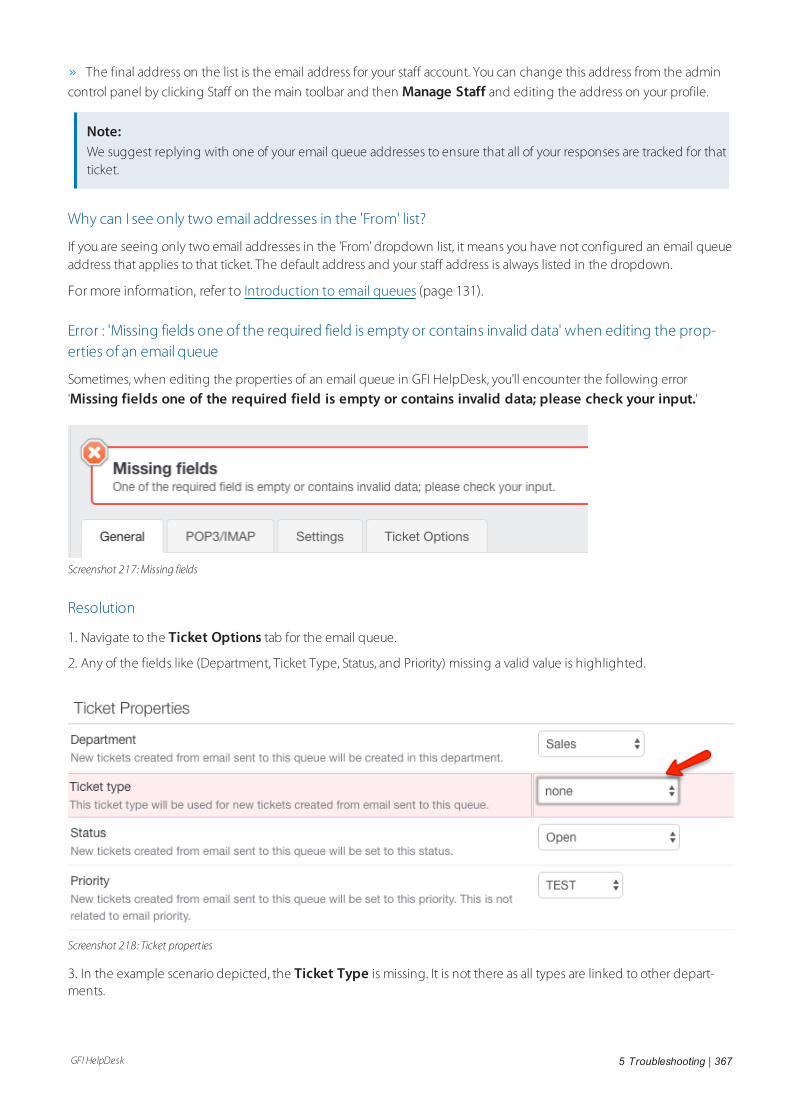
GFI HelpDesk 5 Troubleshooting | 367
The final address on the list is the email address for your staff account. You can change this address from the admin
control panel by clicking Staff on the main toolbar and then Manage Staff and editing the address on your profile.
Note:We suggest replying with one of your email queue addresses to ensure that all of your responses are tracked for thatticket.
Why can I see only two email addresses in the 'From' list?
If you are seeing only two email addresses in the 'From' dropdown list, it means you have not configured an email queueaddress that applies to that ticket. The default address and your staff address is always listed in the dropdown.
For more information, refer to Introduction to email queues (page 131).
Error : 'Missing fields one of the required field is empty or contains invalid data' when editing the prop-erties of an email queue
Sometimes, when editing the properties of an email queue in GFI HelpDesk, you'll encounter the following error
'Missing fields one of the required field is empty or contains invalid data; please check your input.'
Screenshot 217:Missing fields
Resolution
1. Navigate to the Ticket Options tab for the email queue.
2. Any of the fields like (Department, Ticket Type, Status, and Priority) missing a valid value is highlighted.
Screenshot 218: Ticket properties
3. In the example scenario depicted, the Ticket Type is missing. It is not there as all types are linked to other depart-ments.
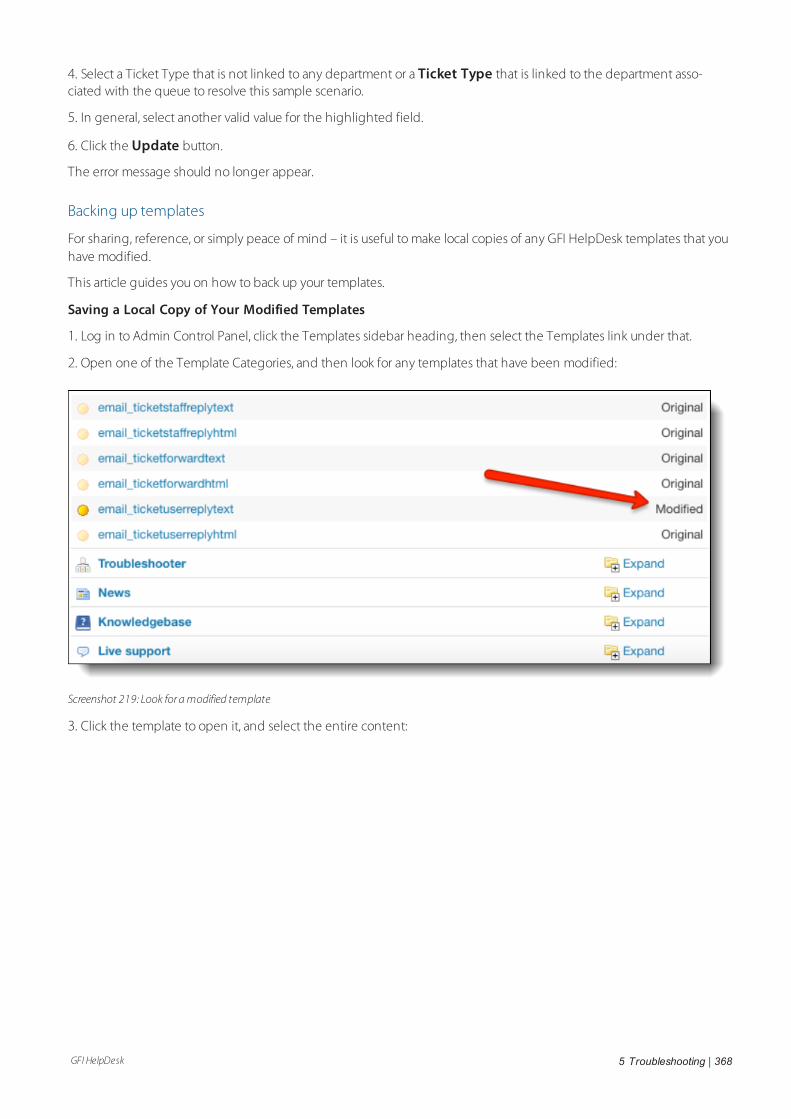
GFI HelpDesk 5 Troubleshooting | 368
4. Select a Ticket Type that is not linked to any department or a Ticket Type that is linked to the department asso-ciated with the queue to resolve this sample scenario.
5. In general, select another valid value for the highlighted field.
6. Click the Update button.
The error message should no longer appear.
Backing up templates
For sharing, reference, or simply peace of mind – it is useful to make local copies of any GFI HelpDesk templates that youhave modified.
This article guides you on how to back up your templates.
Saving a Local Copy of Your Modified Templates
1. Log in to Admin Control Panel, click the Templates sidebar heading, then select the Templates link under that.
2. Open one of the Template Categories, and then look for any templates that have been modified:
Screenshot 219: Look for amodified template
3. Click the template to open it, and select the entire content:
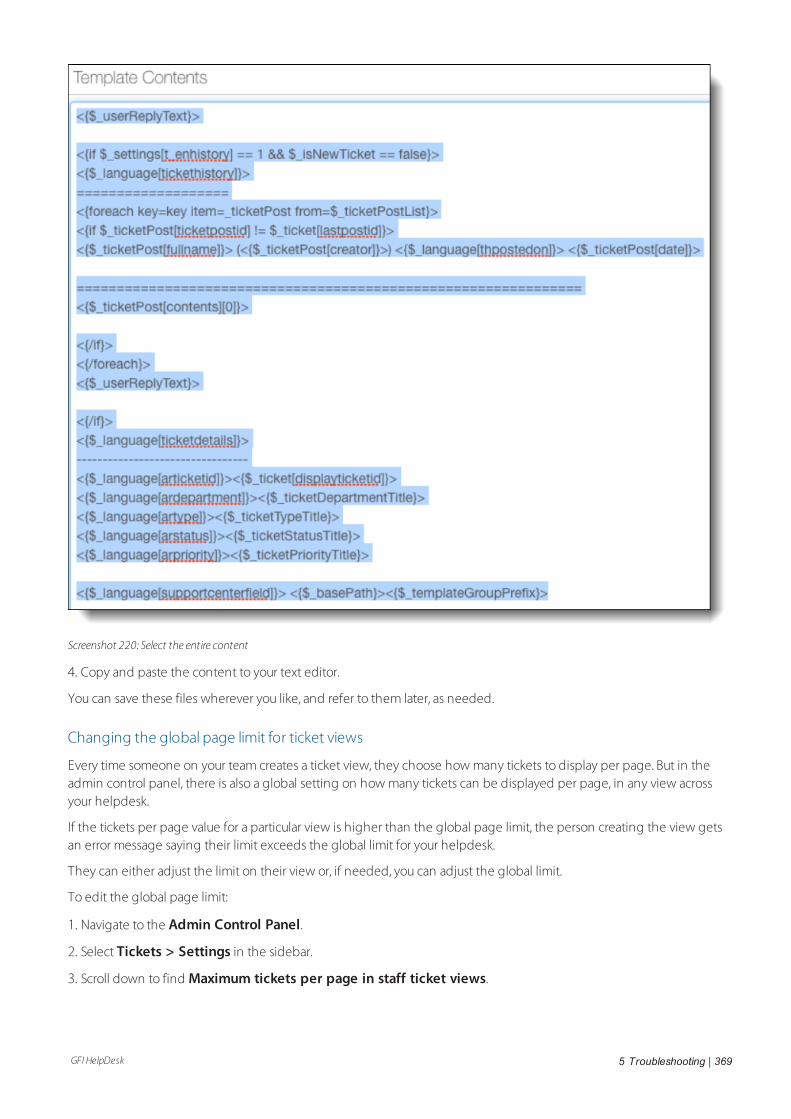
GFI HelpDesk 5 Troubleshooting | 369
Screenshot 220: Select the entire content
4. Copy and paste the content to your text editor.
You can save these files wherever you like, and refer to them later, as needed.
Changing the global page limit for ticket views
Every time someone on your team creates a ticket view, they choose how many tickets to display per page. But in theadmin control panel, there is also a global setting on how many tickets can be displayed per page, in any view acrossyour helpdesk.
If the tickets per page value for a particular view is higher than the global page limit, the person creating the view getsan error message saying their limit exceeds the global limit for your helpdesk.
They can either adjust the limit on their view or, if needed, you can adjust the global limit.
To edit the global page limit:
1. Navigate to the Admin Control Panel.
2. Select Tickets > Settings in the sidebar.
3. Scroll down to find Maximum tickets per page in staff ticket views.
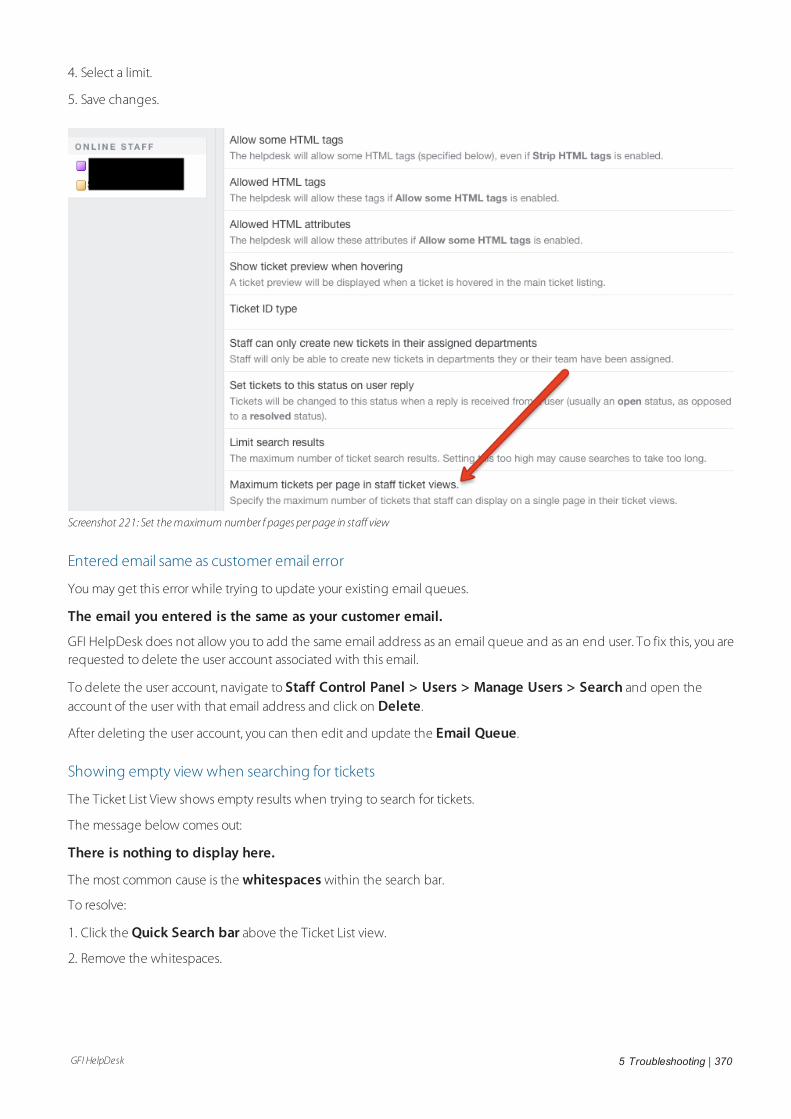
GFI HelpDesk 5 Troubleshooting | 370
4. Select a limit.
5. Save changes.
Screenshot 221: Set themaximum number f pages perpage in staff view
Entered email same as customer email error
You may get this error while trying to update your existing email queues.
The email you entered is the same as your customer email.
GFI HelpDesk does not allow you to add the same email address as an email queue and as an end user. To fix this, you arerequested to delete the user account associated with this email.
To delete the user account, navigate to Staff Control Panel > Users > Manage Users > Search and open theaccount of the user with that email address and click on Delete.
After deleting the user account, you can then edit and update the Email Queue.
Showing empty view when searching for tickets
The Ticket List View shows empty results when trying to search for tickets.
The message below comes out:
There is nothing to display here.
The most common cause is the whitespaces within the search bar.
To resolve:
1. Click the Quick Search bar above the Ticket List view.
2. Remove the whitespaces.
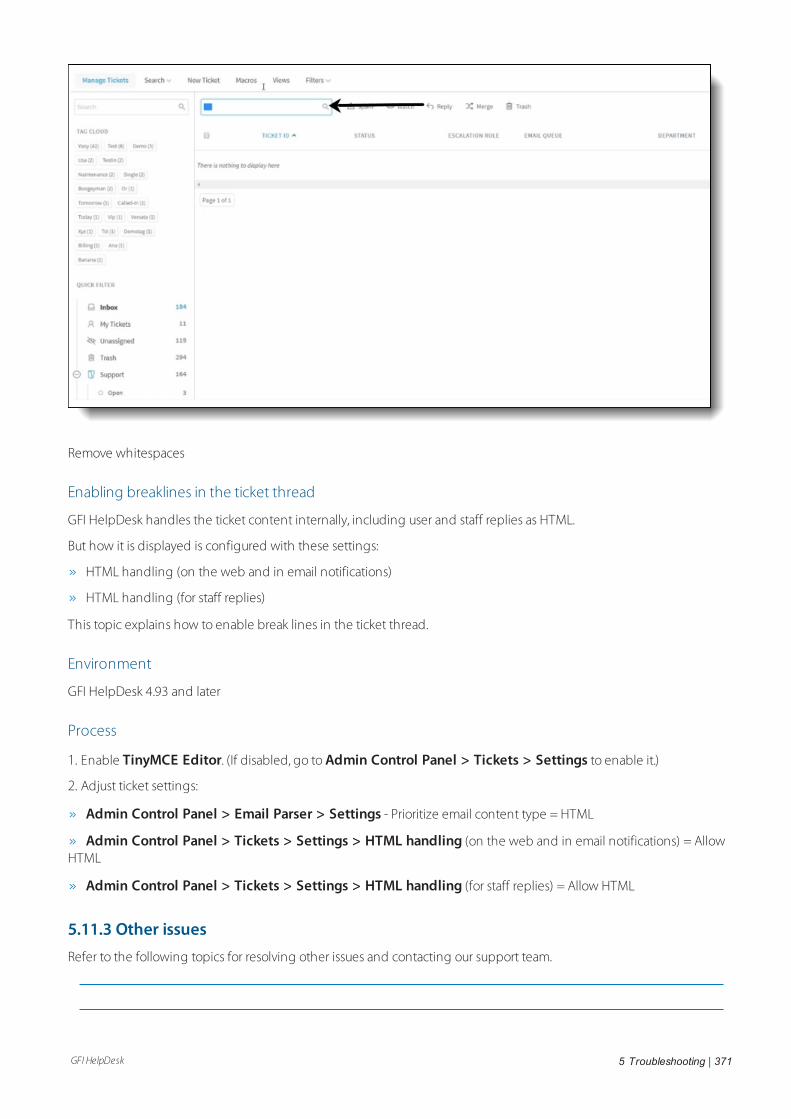
GFI HelpDesk 5 Troubleshooting | 371
Remove whitespaces
Enabling breaklines in the ticket thread
GFI HelpDesk handles the ticket content internally, including user and staff replies as HTML.
But how it is displayed is configured with these settings:
HTML handling (on the web and in email notifications)
HTML handling (for staff replies)
This topic explains how to enable break lines in the ticket thread.
Environment
GFI HelpDesk 4.93 and later
Process
1. Enable TinyMCE Editor. (If disabled, go to Admin Control Panel > Tickets > Settings to enable it.)
2. Adjust ticket settings:
Admin Control Panel > Email Parser > Settings - Prioritize email content type = HTML
Admin Control Panel > Tickets > Settings > HTML handling (on the web and in email notifications) = AllowHTML
Admin Control Panel > Tickets > Settings > HTML handling (for staff replies) = Allow HTML
5.11.3 Other issuesRefer to the following topics for resolving other issues and contacting our support team.
GFI HelpDesk 5 Troubleshooting | 372
Publishing news from other sites to own support site
This topic guides you on how to fetch and publish news from other sites to your own support site.
1. Go to Admin CP > News > Settings > Synchronization Settings.
2. Insert the RSS link location under Global News RSS URL setting.
The RSS feed from the mentioned link is synchronized when News Synchronization cron runs at yourhelpdesk.
By default,News Synchronization cron runs after every 30 minutes. This can be administered through
Admin CP > Scheduled Tasks > Manage.
User subscription to news articles
This topic presents valuable information regarding subscription to news articles.
The users can subscribe to any news articles you publish by inserting their email addresses after clicking on Sub-scribe option available next to login box.
For unsubscribing from a specific section, for example, News section, the user can click on the unsubscribe link thatthey receive in the email when they confirm their subscription.
In case the end users have lost that email, then they need to contact GFI HelpDesk to unsubscribe from News.
Is Kayako Desktop available for non-Windows devices (for example, Mac)?
Yes!
Kayako Desktop for Mac is a native OS X application for managing live chats with your customers. For instructionsdownloading and installing, please refer to the Handling Chats with Kayako Desktop for Mac.
Changing the GFI HelpDesk admin email address
This topic provides the step-by-step process to change the Kayako admin email address.
You can change the GFI HelpDesk admin email address by performing the following:
1. Choose Admin CP > Staff > Manage Staff.
2. Select the staff member.
3. In the General tab, change the email address.
4. Click Update.
You can request another admin user to change this for you if you are not able to log in. If you are the only admin andcannot remember your password, please refer to the FAQ on changing your password.
Resetting the support center password
This topic explains how to reset the Support Center password.
You can reset your Support Center password using the Lost Password option under the Login field on the Homepage. You receive the password by email.
Maximum number of registered users allowed on a support site
This topic explains the maximum limit on the number of registered users on a support site.
You can support as many end users from the Support Center. There is no restriction on this count.
GFI HelpDesk 5 Troubleshooting | 373
Disabling the user registration form on support site
This topic addresses the possibility of disabling the User Registration form on a Support Site.
In GFI HelpDesk, you can disable the User Registration form on a Support Site. You can stop people from registering at
the Support Center by deactivating the Register Widget by navigating to Admin CP > Widgets > RegisterWidget, and selecting No for the Is Enabled option.
Note:Users are automatically registered when they log their first ticket or initiate their first chat from your Support Center.
GFI HelpDesk 6Glossary | 374
6 Glossary
A
Active directoryA directory service for Windows domain networks.
G
GreylistingGreylisting is an antispam method that temporarily rejects messages from unknown senders.
H
HTTPHypertext Transfer Protocol - A protocol for exchange of hypertext documents in HTML.
HTTPSSecure version of secured by SSL.
I
IMInstant Messaging - A real-time online chat.
IMAPInternet Message Access Protocol - One of the two most commonly used Internet standard protocols fore-mail retrieval, the other being POP3.
Instant MessagingInstant messaging is a real-time online chat.
Internet Service ProviderAn organization that can provide Internet service.
IP addressAn identifier assigned to devices connected to a TCP/IP network.
ISPInternet Service Provider - an organization that can provide Internet service.
K
KerberosAn authentication protocol for client/server applications.
GFI HelpDesk 6Glossary | 375
M
MX recordMail Exchanger record is a record in DNS that specifies which server is handles email messages.
N
NNTPNetwork News Transfer Protocol - A transfer protocol for discussion groups over the Internet.
NTLMNT LAN Manager - Security protocols that provide authentication for Windows networks.
O
Open directoryA directory service for Apple based networks.
P
PCI DSSPayment Card Industry Data Security Standard - A set of security standards for organizations to securelyprocess and store data of credit cards.
POP3Post Office Protocol 3 - A protocol used by local email clients to retrieve emails from mailboxes over aTCP/IP connection.
Public folderA common folder that allows users to share information.
R
regular expressionEnables to define a sequence of characters that specify a search pattern.
root certificateA certificate issued by a trusted certificate authority (CA). In the SSL, anyone can generate a signing keyand sign a new certificate.
S
S/MIMESecure/Multipurpose Internet Mail Extensions - Email protocol based on SMTP used to digitally sign andencrypt messages.
GFI HelpDesk 6Glossary | 376
SMTPSimple Mail Transport Protocol - An internet standard used for email transmission across IP networks.
SNMPSimple Network Management Protocol - A protocol for gathering and organizing information aboutdevices in IP networks, and changing devices behavior.
SPFSender Policy Framework is an open source equivalent to Caller ID.
SRV recordService record is a record in DNS that specifies the location of server for individual services.
SSHSecure Socket Shell - A network protocol that provides administrators with a secure way to access aremote machines.
SSLSecure Sockets Layer - A protocol that ensures integral and secure communication between networks.
SSL certificateSSL certificates are used to authenticate an identity on a server.
T
TCPTransmission Control Protocol - ensures packet transmission.
TLSTransport Layer Security - A follower of the SSL protocol and ensures secure communication betweennetworks.
U
UNC pathA standard that specifies the location path of a network resource.
URLUniform Resource Locator is the address of a web page on the world wide web.
W
WebDAVWeb Distributed Authoring and Versioning is a framework that enables users to work with documents ona server.

GFI HelpDesk 6Glossary | 377
X
XMPPExtensible Messaging and Presence Protocol is a protocol used for real-time communication (chat).