FortiConverter Admin Guide - Amazon AWS
198
FortiConverter - Admin Guide Version 6.0.1
-
Upload
khangminh22 -
Category
Documents
-
view
1 -
download
0
Transcript of FortiConverter Admin Guide - Amazon AWS

FortiConverter - Admin GuideVersion 6.0.1

FORTINET DOCUMENT LIBRARYhttps://docs.fortinet.com
FORTINET VIDEO GUIDEhttps://video.fortinet.com
FORTINET BLOGhttps://blog.fortinet.com
CUSTOMER SERVICE & SUPPORThttps://support.fortinet.com
FORTINET TRAINING & CERTIFICATION PROGRAMhttps://www.fortinet.com/support-and-training/training.html
NSE INSTITUTEhttps://training.fortinet.com
FORTIGUARD CENTERhttps://fortiguard.com/
END USER LICENSE AGREEMENThttps://www.fortinet.com/doc/legal/EULA.pdf
FEEDBACKEmail: [email protected]
July 1, 2020FortiConverter 6.0.1 Admin Guide00-400-000000-20181031

TABLE OF CONTENTS
About FortiConverter 7Supported vendors & configuration objects 7General limitations 13Licensing 13
What's new 15Installation 16System requirements 19Activating the license 20Enabling remote connections 22Run FortiConverter on differentWindows users 22
FortiGate Configuration Migration 23Fortinet OfflineModeConversionWizard 23
Caveats 23Fortinet Start Options 24Config Information 25Fortinet interfacemapping 25Fortinet Conversion Result 26
Fortinet DeviceModeConversionWizard 27Caveats 27Fortinet Start options 28Config information 29Fortinet interfacemapping 30Fortinet conversion result 31FortiGate Configuration Import and Backup 31Reasons that may cause import failure 40
Fortinet Bulk Conversion 41The Start Page 42The InterfaceMapping page 43The Bulk Conversion Summary page 45
FortiGate Configuration Obfuscator Tool 473rd Part Security Vendors Conversion 50Alcatel-Lucent Conversion 50
Alcatel-Lucent differences 50Saving the Alcatel-Lucent source configuration file 53Alcatel-Lucent conversion wizard 56
Bluecoat Conversion 60Bluecoat Network Differences 60Saving the Bluecoat source configuration files 60Bluecoat conversion wizard 61Bluecoat start options 61Bluecoat conversion result 61
Check Point Conversions 62Check Point differences 62
FortiConverter 6.0.1 Admin Guide 3Fortinet Technologies Inc.

Saving the Check Point source configuration file 63Check Point conversion wizard 66Check Point NATmerge examples 73
Cisco Conversions 80Cisco differences 80Saving the Cisco source configuration file 81Cisco conversion wizard 81
Forcepoint Stonesoft Conversion 99Forcepoint StoneSoft differences 99Conversion support 99Saving the Forcepoint Stonesoft source configuration files 99Forcepoint Stonesoft ConversionWizard 100Forcepoint Stonesoft Start options 100Source Preview 101VDOMMapping Section 102Forcepoint Stonesoft Interfacemapping 103Forcepoint Stonesoft Route Information 103Forcepoint Stonesoft Conversion result 104
Huawei USGFirewall Conversion 104Conversion support 104Saving the Huawei source configuration files 104Huawei conversion wizard 105Huawei Start options 105VPN Instance 108Huawei Interfacemapping 108Huawei Route Information 109Huawei Conversion result 109
Juniper Conversions 110Juniper ScreenOS or JunosOS differences 110Saving the Juniper source configuration file 111Juniper conversion wizard 112
McAfee Sidewinder Conversion 117Saving theMcAfee source configuration file 117McAfee conversion wizard 118
Palo Alto NetworksConversion 121Saving the PAN source configuration files 121Palo Alto conversion wizard 123
SonicWall Conversion 127SonicWall differences 127
Service book configuration 128Saving the SonicWall source configuration file 129SonicWall conversion wizard 129
SophosConversion 133SophosNetworks differences 133Saving the Sophos source configuration files 133Sophos conversion wizard 134
Tipping Point Conversion 137Tipping Point differences 137
FortiConverter 6.0.1 Admin Guide 4Fortinet Technologies Inc.

Saving the Tipping Point source configuration file 137Tipping Point conversion wizard 138
Vyatta NetworksConversion 141Vyatta Networks (VyOS) differences 141Saving the Vyatta source configuration files 142Vyatta conversion wizard 143
WatchGaurd Conversion 146Conversion support 146Saving theWatchGuard source configuration files 146WatchGuard conversion wizard 146WatchGuard Start options 147Source Preview 147WatchGuard Interfacemapping 148WatchGuard Route Information 149WatchGuard Conversion result 149
IBM IPAM IPS Signature Conversion 149IBMSecurity Event example 149Supported Keywords 150Unsupported Keywords 150Supported Protocol Types 151Rule Overview 153IBMConversion Result 153
Snort IPS Signature Conversion 154Snort conversion wizard 154
Conversion General 160Compare TwoConversions 160Bulk Conversion 161
Prepare source file 161Start Bulk Conversion 162Input interfacemapping 162View conversion results 162
Adjusting table sizes 163Viewingmaximum table sizes for your target device 163
NATmerge options 163Create new conversion folder 164Error Messages 165
3rd Party Vendor Conversion Tuning 169Introduction 169View Conversion Summary 169Manage your firewall objects 170Copy an object to another VDOM 172Copy an object's CLI configuration 172Output an unreferenced object 173Rename an object 174Merge duplicate objects 175Interface pair view split for policies 177
FortiConverter 6.0.1 Admin Guide 5Fortinet Technologies Inc.

Import Configuration 180Connecting FortiGate devices 180Import config to FortiGate via RESTful APIs 181
Start Installation 181View Import Result 183Import Individual objects 184
Import config to FortiGate by upload CLI scripts file 185Import config to FortiManager by upload CLI scripts file 187
Working with object output in indexed files 194Troubleshooting 195Licensing Issues 195Accessing conversion logs 195
Conversion Logs 195Troubleshooting application crashes 197
FortiConverter 6.0.1 Admin Guide 6Fortinet Technologies Inc.

About FortiConverter
About FortiConverter
This content explains how to install and use FortiConverter.
FortiConverter helps you migrate your network to Fortinet network security solutions, significantly reducingworkload and minimizing errors. FortiConverter translates configuration files from other vendors’ firewallproducts into a valid FortiGate or FortiManager configuration file. Because the output uses command linesyntax, it can either be uploaded as a configuration file or piped to the CLI.
For additional assistance, contact [email protected].
Supported vendors & configuration objects
FortiConverter can translate configurations from the following vendors and models.
l In some cases, FortiConverter can't translate some parts of the configuration because of dependencies orunsupported syntax and you must manually convert them.
l If the number of objects exceeds the maximum valid length for FortiGate or FortiManager, FortiConvertertrims them.
l FortiConverter comes with two different applications, each capable of a different set of conversions. TheConverter Application column shows which FortiConverter application to use for each conversion.
Unless noted as an exception below, conversions only support IPv4 unicast policy.
Vendor Models Versions Convertible Objects
Alcatel-Lucent
Brick ALSMS v9.x l Interface (physical,logical, loopback,PPPoE)
l Addresses & AddressBooks
l Partitionsl Services & Service
Booksl Static Routesl Zone rule set
Bluecoat SGOS 6.5.106.7.4
l Addresses & AddressGroups
l Proxy Address (group)l Servicel Proxy Policy
CheckPoint SmartCenter NGFP1 (4.0) to NGXR80
l Interfacel Addresses & Address
Groupsl Local Users & Groups
FortiConverter 6.0.1 Admin Guide 7Fortinet Technologies Inc.

About FortiConverter
Vendor Models Versions Convertible Objects
l NATl Negate Celll Policies
(rulebases.fws/*.csv)l RADIUS, TACACS+,
LDAPl Rules
(rulebases.fws/*.csv)l Schedulesl Services & Service
Groupsl Static Routesl VPN communities
(IPSec site-to-site)
Provider-1 NGXR65 to R80
Cisco ASA 7.x/8.x/9.x l ACLsl Addresses & Address
Groupsl DHCPServersl DNSServersl Interfacel IP Poolsl Local Users & Groupsl NAT (Central NAT)l RADIUS, TACACS+,
LDAPl Services & Service
Groupsl Static Routesl VPN
FWSM 3.x/4.x
IOS 10.x to 12.x
15.x
PIX 5.x/6.x/7.x/8.x
Firepower 6.x
IOS XR 4.x/5.x/6.x l Addresses & AddressGroups & FQDNs
l Interfacel IPPoolsl Policiesl Services & Service
Groupsl Static Routes
Nexus 5.2/6.x/7.x
FortiConverter 6.0.1 Admin Guide 8Fortinet Technologies Inc.

About FortiConverter
Vendor Models Versions Convertible Objects
FortiGate FortiOS FOS5.2 and above FortiGate configuration canbe converted based on theversion of the targetFortiGate device (Wesuggest to migrate toFortiOS 6.0 and above).However, note thatl Older features might
be deprecated andmay not be fullyconverted over.
l The review isnecessary. Afterimporting theconvertedconfiguration, any CLIcommands that havenot successfullyimported can bereviewed on the page.
l For more details,please see "FortiGateconfigurationmigration" and"Reviewing errors afterFortiGate import"sections in adminguide.
Huawei USG Series l Interfacel Zonel Addresses & Address
Groupsl Services & Service
Groupsl Policyl Routel Zonel IPSec Policy (VPN)l Security Contextl Nat Policy (SNAT)l Nat Server (VIP)
IBM PAM IPS Sensor
Juniper SSG/ISG ScreenOS 4.x, 5.x, 6.x l Addresses & AddressGroups & FQDNs
FortiConverter 6.0.1 Admin Guide 9Fortinet Technologies Inc.

About FortiConverter
Vendor Models Versions Convertible Objects
l DHCPServers &Clients & RelaysInterfaces
l Static Routesl Services & Service
Groupsl Policiesl VIPs/MIPsl NATl IP Poolsl VPNl Local Users & Groupsl RADIUS & LDAPl Zones
SRX JunosOS 10.x to 18.x l Addresses & AddressGroups & FQDNs
l DHCPServers & Client& Relay
l Interfacesl IP Poolsl Local Users & Groupsl NATl Policiesl RADIUS & LDAPl Services & Service
Groupsl Static Routesl VIPs/MIPsl VPN (IPSec site-to-
site)l Zonesl Routing-instances
(virtual-router)
MX Juno OS 10.x to 12.x l Addresses & AddressGroups & FQDNs
l Interfacesl IP Poolsl Policiesl Services & Service
Groupsl Static Routes
McAfee Sidewinder 7.x, 8.x l Addresses & AddressGroups & FQDNs
FortiConverter 6.0.1 Admin Guide 10Fortinet Technologies Inc.

About FortiConverter
Vendor Models Versions Convertible Objects
l Interfacesl IP Poolsl Policiesl Services & Service
Groupsl Static Routes
Forcepoint Stonesoft 5.7 l Addresses & AddressGroups
l Interfacesl Policies/ Sub-policyl Aliasl Services & Service
Groupsl Static Routesl NAT
Palo AltoNetworks
PAN OS PAN-OS 1.x to 8.x l Addresses & AddressGroups & FQDNs
l Interfacesl Local Users & Groupsl NATl Policiesl Schedulesl Static Routesl Services & Service
Groupsl Zonesl VPNl Panorama
Snort IPS rules
SonicWall TZ SeriesNSA Series
SonicOS 4.x, 5.x, 6.x l Addresses & AddressGroups & FQDNs
l DHCPServers &Clients & Relays
l Interfacesl Local Users & Groupsl NATl Policiesl Schedulesl Services & Service
Groupsl Static Routesl Zonesl VPN (IPSEC site to
FortiConverter 6.0.1 Admin Guide 11Fortinet Technologies Inc.

About FortiConverter
Vendor Models Versions Convertible Objects
site)l SSLVPN
Sophos XG Series SFOS 17.0 l Interfacel Zonel Addresses & Address
Groupsl Service & Service
Groupsl Users & User Groupsl Policy
Cyberoam Cyberoam OS 10.6
TippingPoint
IPS 4.5 l Addresses & AddressGroups
l Policiesl Services & Service
Groups
Vytta VyOS 5.2 to 6.7 l Interfacel Zonel Addresses & Address
Groupsl Services & Service
Groupsl Policyl Route
WatchGuard FireboxSeries XTMSeries
Fireware 11.3 to 12.1 l Interfacesl Addresses & Address
Groupsl Services & Service
Groupsl Policiesl Static Routesl IPSec VPNl NAT
Exception
l Check Point to FGT conversion can support IPv4 multicast policy.l Check Point, Cisco, and Juniper (Junos only) to FGT conversion can support IPv6 unicast policy.l Juniper (Junos only) can support converting the consolidated policy to FortiOS v6.2 configuration.
FortiConverter 6.0.1 Admin Guide 12Fortinet Technologies Inc.

About FortiConverter
General limitations
FortiConverter is a migration tool, not a migration service. It’s designed to be used as part of a properly plannedmigration process.
Supported FortiOS conversions
FortiConverter supports conversions from other vendors to FortiOS 6.0, 6.2 and 6.4 only.
Creating final configurations
While FortiConverter significantly shortens the conversion process, a final, useable configuration requires youto review and audit the FortiConverter output conversion. The FortiConverter tuning capability can help with thereview and audit process.
While you can use the FortiConverter tuning capability to review and fix errors in the conversion, it isn'tdesigned to perform significant reconfiguration.
Incomplete routing information
In some cases, not all routing information that FortiConverter requires to make a decision about a policyinterface is available. In these cases, it uses the any interface.
Double NAT
For Check Point conversions, the FortiConverter conversion engine uses a manual rule to convertconfigurations that apply source NAT and destination NAT to the same policy (called double NAT).
For all other conversions, FortiConverter NAT merge doesn't support double NAT. Instead, FortiConverterapplies source NAT in the conversion and you complete the configuration by using the tuning page to manuallyapply destination NAT.
IPsec support
FortiConverter converts IPsec configurations to route-based or policy-based IPsec depending on which one thesource configuration is closest to. Users can enable Route-based IPSec for Cisco ASA, PIX,FWSM, Juniper andCheck Point conversions.
Licensing
The trial version of FortiConverter, allows you to complete a conversion and view the results in the Tuningpage. CLI output is disabled, but is available in the fully-licensed version.
FortiConverter 6.0.1 Admin Guide 13Fortinet Technologies Inc.

About FortiConverter
When you purchase a license, FortiConverter is unlocked and full functionality is enabled for all supportedvendors. Your paid license entitles you to any new versions of FortiConverter that Fortinet releases until thelicense expires, as well as direct engineering support.
FortiConverter requires an Internet connection to verify its license. You can use the software for up to 30 dayswithout validating the license online.
For more information, see Activating the license on page 20.
FortiConverter 6.0.1 Admin Guide 14Fortinet Technologies Inc.

What's new
What's new
This release contains the following new features and enhancements:
l Migration to FortiOS 6.4 is supported.l Add support of IBM PAM IPS Sensor conversion.l Add back the offline mode to FortiGate migration.l Improve the Fortinet import wizards, including user interface, new tags filter, and new function to export
the encrypted origin password.l Add the obfuscation tool page to obfuscate FortiGate configuration settings.l Add support forWatchGuard IPsec VPN and NAT conversion.l New feature to split the interface pair view on the tuning page.l Add ability to run the conversion of different windows users on the same host.l Cisco Firepower conversion is now supported. The firewall objects and NAT are converted like Cisco
ASAwhile the converter will deal with the different syntax in Policies between ASA and Firepower.
FortiConverter 6.0.1 Admin Guide 15Fortinet Technologies Inc.

Installation
Installation
Download the FortiConverter installer from the Fortinet Technical Support website:https://support.fortinet.com
To install the FortiConverter application
1. Double-click the FortiConverter installer (.py.exe).2. ClickNext.3. Read the license agreement, select I accept the terms of the License Agreement, then clickNext.To
install the program in a location other than the default, clickBrowse and navigate to the directory youwant.
4. Click Install. If you would like to delete all previous conversions and logs before installation starts, checkthe Clear all history conversions checkbox, otherwise leave it as unchecked.
5. Click Finish to complete and exit the FortiConverter installer.
To completely remove FortiConverter application and data
Uninstalling FortiConverter application from Windows only removes the application itself, it does not removethe conversion data or database. If you re-install the application later, the data can still be accessed.
To remove all conversion data
1. Stop the FortiConverter application.2. Restart your local PostgreSQL database service.
a. Open your Services desktop application.b. Right-click the service name postgres-django, and select Restart.
FortiConverter 6.0.1 Admin Guide 16Fortinet Technologies Inc.

Installation
3. Install the latest version of pgAdmin 4, which can be downloaded at https://www.pgadmin.org/.4. Using pgAdmin 4, create a server record.
l Go toObject > Create > Server.5. Set both the username and password to "postgres".
FortiConverter 6.0.1 Admin Guide 17Fortinet Technologies Inc.

Installation
6. Open the newly created service record, right-click the database "djangodb", and select Delete/Drop.7. ClickOK.8. If you receive the error message: "there is 1 other session xxx", terminate all other existing external
connections, except for the connection from pgAdmin 4.a. Make sure FortiConverter has been stopped.b. Click the "djangodb" database.c. Go to Tools > Query Tool, then enter the following PSQL script.
SELECTpg_terminate_backend(pid)
FROMpg_stat_activity
WHERE--don't kill my own connection!pid <> pg_backend_pid()-- don't kill the connections to other databasesAND datname = 'djangodb';
d. ClickExecute.
FortiConverter 6.0.1 Admin Guide 18Fortinet Technologies Inc.

Installation
9. Restart the pgAdmin 4 tool, and drop "djangodb" again, if available.10. Re-create a database with the name "djangodb" by going toObject > Create > Database . 11. ClickSave.
12. Delete all existing conversion folders to avoid a name conflict.Conversions are, by default, stored atC:\Users\<UserName>\AppData\Roaming\Fortinet\FortiConverter\conversions.
13. Uninstall the program.14. Delete all remaining files and folders in the FortiConverter folder, located at C:\Program
Files\Fortinet\FortiConverter.
System requirements
FortiConverter requires one of the following operating systems (64-bit):
FortiConverter 6.0.1 Admin Guide 19Fortinet Technologies Inc.

Installation
l Microsoft Windows 10l Microsoft Windows 8l Microsoft Windows 7l Microsoft Windows Server 2019l Microsoft Windows Server 2016l Microsoft Windows Server 2012
Also, FortiConverter requires .NET Framework 4.0 or above. If it isn't already installed on your computer, theFortiConverter installer prompts you to download and install it.
A web browser is required.
An Internet connection is required to periodically verify the software license.
For any questions not covered in this content, contact FortiConverter customer support at [email protected].
Activating the license
By default, FortiConverter is installed with a limited trial license. If you have purchased a full license, downloadit to unlock the complete feature set.
To purchase a license, use your usual Fortinet sales channel. For other licensing issues, see Licensing for moreinformation.
If you have already activated a license for the legacy FortiConverter application onyour device, the new application automatically uses that license when it’s installed.
To activate the license
1. Double-click the FortiConverter shortcut.2. Click License.3. Copy the Hardware ID value to the clipboard.4. Ensure you have purchased a license, then sign in to the Fortinet Technical Support web site:
https://support.fortinet.com/Registration uses a simple, four-step wizard that is commonly used for many Fortinet products.
5. On the first page of the wizard, enter the registration code you received when you purchased yourFortiConverter product.
FortiConverter 6.0.1 Admin Guide 20Fortinet Technologies Inc.

Installation
6. Enter the Hardware ID you copied earlier, an optional description, and choose your Fortinet partner fromthe list.
7. After you agree to the license terms, the final page of the wizard allows you to download the license file(.lic file).
8. In FortiConverter, from the License tab, click the icon next to License File, then navigate and select the.lic file.
9. ClickActivate.FortiConverter validates the license file and changes yourActivation Status from Trial to Activate. Yourlicense is valid for all FortiConverter software updates released until the date specified by License ExpiryDate.After the license is activated, the expiry information is under the License tab.
FortiConverter 6.0.1 Admin Guide 21Fortinet Technologies Inc.

Installation
Enabling remote connections
FortiConverter is designed as a web application. The application (FortiConverter.py) should be run withAdministrator privileges because it reads and writes data from/to high privilege directories. For securityconcerns, the default configuration only allows connections from users on the localhost.
To enable remote access to the web application
1. Run notepad as an administrator and open the start.bat file located in the directory C:\ProgramFiles\Fortinet\FortiConverter\.
2. Append string 0.0.0.0:<port_num> after the keyword runserver. The port number used by defaultis 8000.For example:
call "%install_dir%\Python36\python.exe" manage.py runserver 0.0.0.0:8000--insecure
3. Run notepad.exe as an administrator and open C:\ProgramFiles\Fortinet\FortiConverter\converter\backend\mysite\mysite\settings.py
4. Add the wildcard IP address '*' (match ANY) into allowed ALLOWED_HOSTS.For example:
ALLOWED_HOSTS = ['localhost','127.0.0.1','*',
]
Run FortiConverter on different Windows users
In FortiConverter v6.0.1, you are able to run the FortiConverter as different Windows users of the same host.
Each user has an individual conversion list.
As long as a user with administrator privileges on the host installs the FortiConverter tool, all users including thestandard users can run FortiConverter.
FortiConverter 6.0.1 Admin Guide 22Fortinet Technologies Inc.

FortiGate Configuration Migration
FortiGate Configuration Migration
In the latest FortiConverter v6.0.1, we add back the legacy Fortinet offline conversion. Now, the Fortinetconversion has two modes, Device andOfflinemode.
For the device modewhich first introduced in v5.6.3, adopts REST-API to install the converted configurationonto the device directly. It’s also the preferred method to perform Fortinet configuration migration.
The old version offline mode, you have to provide two input configurations, the source, and the default targetdevice configuration. After running the conversion and proceed to the summary page, you can download theconverted configuration and upload it to the device manually.
Fortinet Offline Mode Conversion Wizard
1. Start the FortiConverter. When the start-up is complete, a browser window automatically opens tohttp://127.0.0.1:8000.
2. At the top-right corner of the window, clickNew Conversion.3. Enter the name for the conversion configuration.4. Select Fortinet block from the below and also chooseOfflinemode.5. ClickOK.
The page turns to the Start page.
Caveats
Configurations that may block device-accessing can be removed by FortiConverter, you might need toconfigure these settings manually after the configuration restoration. The settings you should check on are:
l The administrator passwordl The IP of interface "mgmt"l The "accprofile" setting of administratorsl The "trusthost" setting of administrators
FortiConverter 6.0.1 Admin Guide 23Fortinet Technologies Inc.

FortiGate Configuration Migration
For FortiGate conversion, the default admin account settings may be overwritten after the configurationrestoration. For example, if the old FortiGate set the default admin access to disabled, you should temporarilyenable this admin access before the restoration.
config system globalset admin-maintainer enable
end
The conversion output consists of two main parts:
1. The first part is the default configuration of the target device.2. The second part starts with the commented out line "#migrated config starts", and follows with the
migrated source configuration.
If you want to modify the output config manually, we suggest you modify only the second part because thedefinition from the first part will be overwritten by the following definition.
Importing output configuration into FortiGate
Please follow the steps in this video:https://youtu.be/UBjSE-Kb9EM?t=2220
Fortinet Start Options
Setting Description
Profile
Description Enter a description of the conversion.
Input
Source Configuration Select the input configuration file or a device.
Target Device DefaultConfiguration
FortiConverter needs the default configuration of the target device toextract interface or other information of the target device. The defaultconfiguration should contain the same VDOM as those in the sourceconfig.So if the source device contains multiple VDOMs, users should also createVDOMs with the same name on the target device before back up thedefault configuration.
FortiConverter 6.0.1 Admin Guide 24Fortinet Technologies Inc.

FortiGate Configuration Migration
Config Information
Setting Description
Information ofConfigurations
The device model name and the firmware build information of the sourceand target devices are shown in this table.Configuration file names are shown in the table as a link. Click the link tosee the content. The file won’t show if it’s too large.
Detect Messages Some warning or error message detected in the parser would be shown inthis table. If an error message occurs, users would be blocked to processthe conversion further.Users should fix the problem manually and restart a new conversion.
Source ConfigurationPreview
The number of each type of objects are shown in the preview table.
Fortinet interface mapping
You can manually map the interface.
l To select the appropriate FortiGate interface, click the value in the FortiGate Interface column, and thenselect a value or enter a custom interface name.
l To edit other values, double-click the proper column. Use the toolbar icon on the right to show and hidecolumns. You can also use the Tuning page to create mappings after the conversion is complete.
l To import a set of interface mappings from a file, click Import.l To download the current set of interface mappings, clickExport.
FortiConverter 6.0.1 Admin Guide 25Fortinet Technologies Inc.

FortiGate Configuration Migration
l To delete an interface, select the entry and clickDelete Selected. This is useful if your target FortiGatehas fewer interfaces than the source configuration
Setting Description
VDOM Shows the virtual domains used in the conversion.("root" by default)
Source Interface Shows each interface name on the source FortiGate device.
FortiGate Interface Shows the corresponding FortiGate interface. Click to assign a port for eachinterface.
Members Shows any members, if they are set.
IP-Netmask Shows the IP address and netmask of the connection.
Type Shows the type of interface.
Access Shows which protocols has permission to access each interface.
Import Click to load a set of interface mappings from a text file.
Export Saves the current set of interface mappings to a text file.
Delete Selected Click to delete the selected mapping item.
Fortinet Conversion Result
Setting Description
Conversion Summary Provides basic information about the conversion.
Device Summary Provides statistics about the detected objects.
To download your finished conversion, clickDownload Configurations, located in the top-right corner. Yourdownload conversion is a configuration file.
The conversion output consists of two main parts:
1. The first part is the default configuration of the target device.2. The second part starts with the commented out line "#migrated config starts", and follows with the
migrated source configuration.
If you want to modify the output config manually, we suggest you to modify only the second part because thedefinition from the first part will be overwritten by the following definition.
FortiConverter 6.0.1 Admin Guide 26Fortinet Technologies Inc.

FortiGate Configuration Migration
Fortinet Device Mode Conversion Wizard
To start a new conversion
1. Start the FortiConverter. When the start-up is complete, a browser window automatically opens tohttp://127.0.0.1:8000.
2. At the Devices page, clickNew device to create a connection to the target device.3. At the top-right corner of the window, clickNew Conversion.4. Enter the name for the conversion configuration.5. Select Fortinet block from the below and also choose Devicemode.6. ClickOK.
The page turns to the Start page.
Caveats
FortiGate Device mode migration requires connection through a FortiGate device to perform the REST-APIinstall. Users can import the converted configuration directly to the target device from the import wizard page.
The configuration that may block the connection to the device can be replaced or removed by FortiConverterand marked with warning label on the import wizard. You need to configure these settings after theconfiguration import.
Below are some settings you may want to check.
l config system globaln set admin-sportn set admin-portn set admin-server-certn set admin-maintainer
l config system settingsn set manageip
l config system adminl config system replacemsg *l The config of the connection interface between FortiConverter and device.
FortiConverter 6.0.1 Admin Guide 27Fortinet Technologies Inc.

FortiGate Configuration Migration
Below are some settings that FortiConverter doesn’t import.
l All certificate relatedl All encrypted password would be overridden to "12345678"l config user fortitoken
There are known issues in the RESTAPI of the FortiGate side. It may cause the import configuration to beincomplete but still shows that the import was successful, especially the profile configurations.
For example:
l config webfilter profile.l config voip profilel config firewall profile-protocol-options
One suggestion is to review them byCLI Comparison and manually upload to thedevice.
The migration is consisted of two main parts.
1. The first part is the configuration conversion from lower version to higher version base on the inputconfiguration and the target device version.
2. The second part is to import the converted configuration to import to the target device.
After the import, review, and manually adjust, the restorable configuration which can be established by"Backup config". It downloads the configuration from the device and can restore it to another device.
Fortinet Start options
This table lists the start settings.
Setting Description
Profile
Description Enter a description of the conversion
FortiConverter 6.0.1 Admin Guide 28Fortinet Technologies Inc.

FortiGate Configuration Migration
Input
SourceConfiguration
Select the input configuration file or a device.
Target Device (Thedevice needs to beadded in advance)
FortiConverter needs to extract interface or other information of the target devicefor conversion and import. If the source configuration has VDOM enabled,FortiConverter will enable the VDOM on the target device as well.
Bulk Conversion If there are many devices to be converted where all of them are the same modeland sharing the same interface in conversion, then the bulk conversion can convertall of them at once.Switch to the bulk conversion mode, add each input configuration, and select atarget device to perform the bulk conversion.
Config information
This page shows the information inside the configuration.
Setting Description
Information of Configurations The configuration/device model name and firmwareinformation of the source and target devices are shown in thistable.Click the link of the configuration name to see the content.
Import options l Select VDOM to import: When multi-VDOM is enabled,you can choose to select All VDOMs or a single VDOMto convert.
l Import to root: If a single VDOM is selected, you canchoose to convert to root.
Target Device Switch Interface If the virtual switch interface is detected, FortiConverter canhelp to detach the interface before the interface mappingpage.Please note, in FortiConverter, this is an irreversibleoperation, if you want to add the detached interface back, youhave to go to the device to configure manually.
FortiConverter 6.0.1 Admin Guide 29Fortinet Technologies Inc.

FortiGate Configuration Migration
Detect Messages Some warning or error messages detected in the parser wouldbe shown in this table. If an error message occurs, userswould be blocked from processing the conversion further.Users should fix the problem manually and restart a newconversion.
Source Configuration Preview The number of type of objects are shown in the preview table.
Fortinet interface mapping
You can manually map the interface.
l To select the appropriate FortiGate interface, click the value in the FortiGate Interface column, and thenselect a value or enter a custom interface name.
l To edit other values, double-click the proper column. Use the toolbar icon on the right to show and hidecolumns. You can also use the Tuning page to create mappings after the conversion is complete.
l To import a set of interface mappings from a file, click Import.l To download the current set of interface mappings, clickExport.l To delete an interface, select the entry and clickDelete Selected. This is useful if your target FortiGate
has fewer interfaces than the source configuration
Setting Description
VDOM Shows the virtual domains used in the conversion.("root" by default)
Source Interface Shows each interface name on the source FortiGate device.
FortiGate Interface Shows the corresponding FortiGate interface. Click to assign a port for eachinterface.
Members Shows any members, if they are set.
IP-Netmask Shows the IP address and netmask of the connection.
Type Shows the type of interface.
Access Shows which protocols has permission to access each interface.
Import Click to load a set of interface mappings from a text file.
Export Saves the current set of interface mappings to a text file.
Delete Selected Click to delete the selected mapping item.
FortiConverter 6.0.1 Admin Guide 30Fortinet Technologies Inc.

FortiGate Configuration Migration
Interface mapping notes
1. FortiConverter locks the target device interface which is connected to ensure the communication betweenthe FortiConverter tool and the device to not get disconnected. The connected device interface ishighlighted.
2. Users should not map other interfaces to the connected interface.
Fortinet conversion result
When the conversion is completed, it will turn into Fortinet import wizard page.
FortiGate Configuration Import and Backup
l Import configuration to the FortiGate on page 32
l Backup configuration from FortiGate on page 39
FortiConverter 6.0.1 Admin Guide 31Fortinet Technologies Inc.

FortiGate Configuration Migration
Import configuration to the FortiGate
1. Click the Import Config button from top-right corner to start the import process.
2. During the import process, there is an progress bar and import status for each cli category.
FortiConverter 6.0.1 Admin Guide 32Fortinet Technologies Inc.

FortiGate Configuration Migration
3. After imported, please review the import status for every cli category which can be labeled by either one ofthese tags: Success,Warning, Error, Ignored, Not installed, and Altered.
FortiConverter 6.0.1 Admin Guide 33Fortinet Technologies Inc.

FortiGate Configuration Migration
4. For cli objects labeled as "Error", please manually update the CLI commands and then perform selectiveimport by clicking the Import Partial button.
FortiConverter 6.0.1 Admin Guide 34Fortinet Technologies Inc.

FortiGate Configuration Migration
5. To review or edit the CLI configuration, please use the CLI Viewer to see the difference between sourceand target FGT configurations.
6. Use the Difference tab from CLI Viewer to see the differences between source and target configurations.
FortiConverter 6.0.1 Admin Guide 35Fortinet Technologies Inc.

FortiGate Configuration Migration
7. Use the CLI Tries tab from CLI Viewer to edit the configurations and then re-import to FortiGate. Usethe drop down list to switch among VDOMs, double click to edit CLI commands, use "+" or "-" to add ordelete new lines.
8. Use the CLI Notepad tab from CLI Viewer to edit the configurations in text editor mode and then re-import to FortiGate.
FortiConverter 6.0.1 Admin Guide 36Fortinet Technologies Inc.

FortiGate Configuration Migration
9. Use the label "Altered" to filter out all the CLI objects which had been manually updated after the import.
10. The "Reviewed" icon represents the CLI object’s review status, simply click the icon to reflect the reviewstatus.
11. For objects labeled with "Warning" or "Ignored", the tool provides a short mouse over message to indicatethe reason of the failure.
FortiConverter 6.0.1 Admin Guide 37Fortinet Technologies Inc.

FortiGate Configuration Migration
12. The following table explains the supported functions from the config import page.
Tags
Success The CLI successfully installed on the device.
Warning There are some commands to be removed or modified in the CLI by thetool not disconnected yet from the device. You can review the item tooltipby moving mouse cursor over the item.
Error The CLI failed to import the device. You may want to edit the CLI ormanually input to the device.
Ignored The CLI is not supported to import by RESTAPI feature.
Not installed The CLI is not installed on the device.
Altered The CLI has been altered by the user.
Functionality
Export CLI command Export the CLI commands according to the configuration filtered in search.
Generate import logs Download the logs of import.
Export encrypted passwordCLI
Export the CLIs with the original encrypted password string, such as users,VPN, Wifi. It could be uploaded to the device directly.
Push Import the configuration individually.
CLI Viewer Compare the configuration to the target device or edit CLI and push it.
Sync the device Sync the configuration on the target device.
Usability
Partial select Select items and import partially.
Search by config category Filter configuration by category.
Collapse down/up Collapse or expand the category.
Review check Mark the configuration whether it has been reviewed or not.
FortiConverter 6.0.1 Admin Guide 38Fortinet Technologies Inc.

FortiGate Configuration Migration
Backup configuration from FortiGate
After the import, review and manually adjust, you can choose to get a restorable configuration from the targetdevice and restore it to others.
1. Click the Backup Config in the top-right corner of the import wizard.
2. Get the restorable configuration.3. Adjust interface settings if needed. (This is to avoid device conflict in the networks.)4. Open the Restore system Configuration and upload the configuration.5. ClickOK.
FortiConverter 6.0.1 Admin Guide 39Fortinet Technologies Inc.
FortiGate Configuration Migration
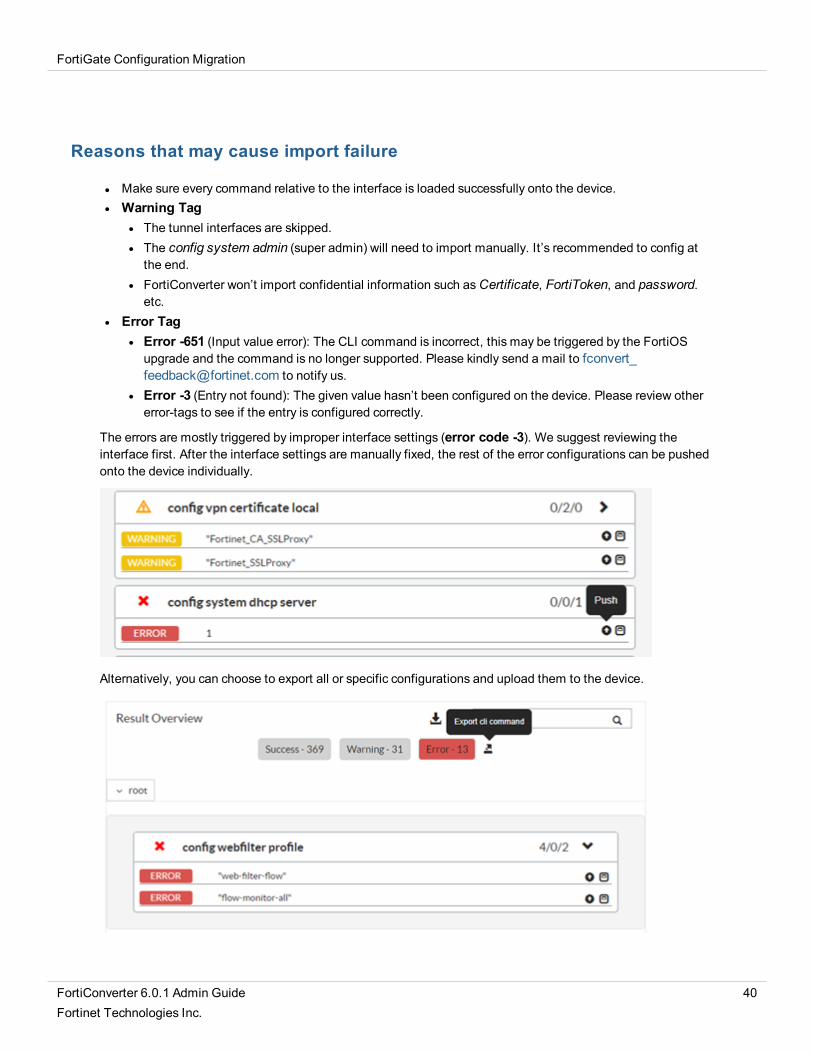
Reasons that may cause import failure
l Make sure every command relative to the interface is loaded successfully onto the device.l Warning Tag
l The tunnel interfaces are skipped.l The config system admin (super admin) will need to import manually. It’s recommended to config at
the end.l FortiConverter won’t import confidential information such asCertificate, FortiToken, and password.
etc.l Error Tag
l Error -651 (Input value error): The CLI command is incorrect, this may be triggered by the FortiOSupgrade and the command is no longer supported. Please kindly send a mail to [email protected] to notify us.
l Error -3 (Entry not found): The given value hasn’t been configured on the device. Please review othererror-tags to see if the entry is configured correctly.
The errors are mostly triggered by improper interface settings (error code -3). We suggest reviewing theinterface first. After the interface settings are manually fixed, the rest of the error configurations can be pushedonto the device individually.
Alternatively, you can choose to export all or specific configurations and upload them to the device.
FortiConverter 6.0.1 Admin Guide 40Fortinet Technologies Inc.
FortiGate Configuration Migration
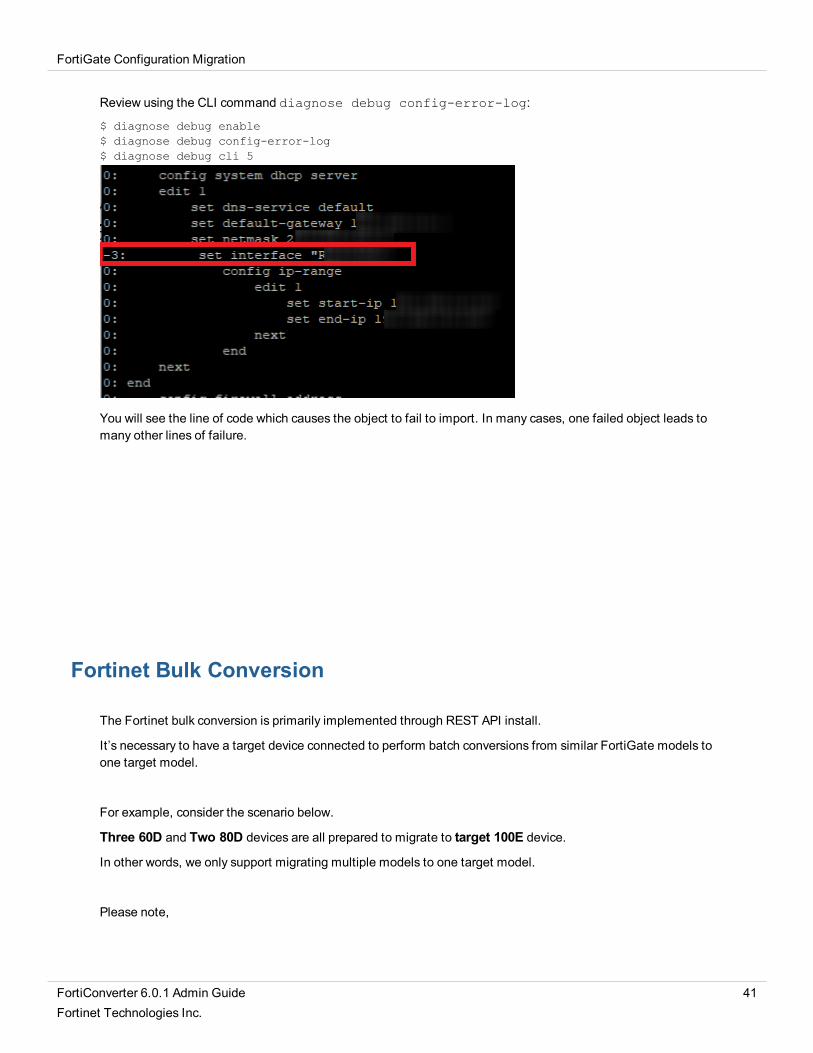
Review using the CLI command diagnose debug config-error-log:
$ diagnose debug enable$ diagnose debug config-error-log$ diagnose debug cli 5
You will see the line of code which causes the object to fail to import. In many cases, one failed object leads tomany other lines of failure.
Fortinet Bulk Conversion
The Fortinet bulk conversion is primarily implemented through REST API install.
It’s necessary to have a target device connected to perform batch conversions from similar FortiGate models toone target model.
For example, consider the scenario below.
Three 60D and Two 80D devices are all prepared to migrate to target 100E device.
In other words, we only support migrating multiple models to one target model.
Please note,
FortiConverter 6.0.1 Admin Guide 41Fortinet Technologies Inc.

FortiGate Configuration Migration
1. Before starting, users have to prepare a clean target device for processing the bulk conversion withREST API install, FortiConverter will establish the restorable configurations for each migration.
2. Fortinet bulk conversion is only supported in Device mode.
The Start Page
1. ClickBulk Conversion to enable Bulk conversion.2. Input a source config or device under Source Configuration and select one target device under Target
Device.3. Click the "+" button to load the sub-conversion.
4. After adding a sub-conversion, the target device column will be locked.Now you can input additional sub-conversions following step 2-3.
FortiConverter 6.0.1 Admin Guide 42Fortinet Technologies Inc.
FortiGate Configuration Migration
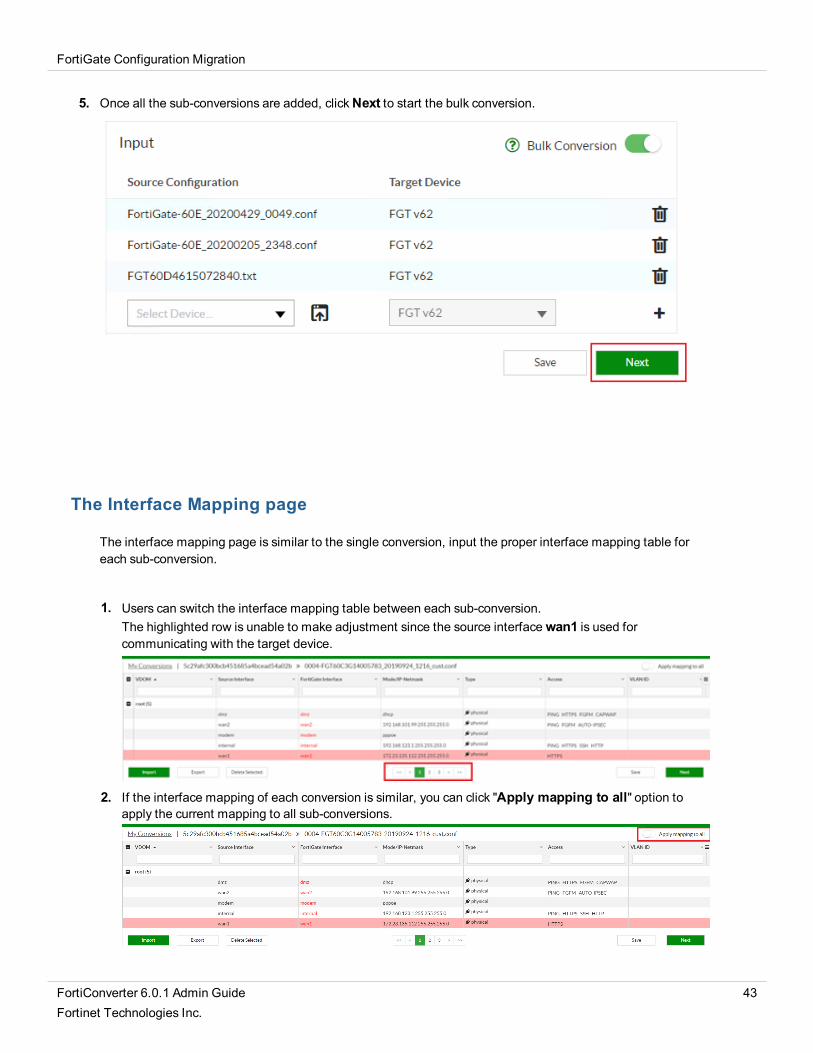
5. Once all the sub-conversions are added, clickNext to start the bulk conversion.
The Interface Mapping page
The interface mapping page is similar to the single conversion, input the proper interface mapping table foreach sub-conversion.
1. Users can switch the interface mapping table between each sub-conversion.The highlighted row is unable to make adjustment since the source interfacewan1 is used forcommunicating with the target device.
2. If the interface mapping of each conversion is similar, you can click "Apply mapping to all" option toapply the current mapping to all sub-conversions.
FortiConverter 6.0.1 Admin Guide 43Fortinet Technologies Inc.

FortiGate Configuration Migration
3. Make sure each interface table maps correctly.4. ClickNext to perform bulk conversion.
Convert, Import and restore phase
At this stage, FortiConverter converts the configuration, imports into the target device, stores them, andrestores the target device to the original state before proceeding to the next sub-conversion.
All steps will be performed automatically. Please make sure the device is connected as usual, and wait until allsteps are completed.
1. FortiConverter is installing the configurations onto the target device.
2.3. The target device is restored to the default state before processing the next import.
4.5. The next sub-conversion continues the process until all the tasks are finished.
Please note that the device performs restore and restart the device between each sub-conversion, and each takes 1-2 minutes.
FortiConverter 6.0.1 Admin Guide 44Fortinet Technologies Inc.

FortiGate Configuration Migration
The Bulk Conversion Summary page
Review the status of the conversion and download all restorable configurations.
1. Click the download button to obtain the restorable configuration for that conversion.
2. Enter the import wizard of the sub-conversion by clicking the edit icon.3. At this page, users can review the status of the import. It’s the import status of the configuration you got
from step1.Please note that you should not try to import any configuration or edit the page before restoringconfiguration onto the device.
FortiConverter 6.0.1 Admin Guide 45Fortinet Technologies Inc.

FortiGate Configuration Migration
4. Load the restorable configuration you got from step1 onto the device if it needs to be fixed.
5. Manually fix the issues if needed.
FortiConverter 6.0.1 Admin Guide 46Fortinet Technologies Inc.

FortiGate Configuration Obfuscator Tool
FortiGate Configuration Obfuscator Tool
This feature can be used to obfuscate IP addresses, object's names, and confidential information for the casewhen the configurations cannot be sent without scrubbing.
1. On the left-sidebar, select Obfuscator to enter the page.
2. 2. Select the types you want to obfuscate. Note that if the object name is unselected, the second row willbe disabled.
3. 3. Upload the FortiGate configuration and clickObfuscate Config.
4. Options description
FortiConverter 6.0.1 Admin Guide 47Fortinet Technologies Inc.

FortiGate Configuration Obfuscator Tool
Type
IPv4 Global find IPv4 addresses include the unicast, multicast, private network,and address range pattern and substitute.
IPv6 Global find IPv6 addresses and substitute.
FQDN Global find FQDN andWildcard-FQDN address and substitute.
MAC Address Global findMAC addresses and substitute.
Password,Pre-Shared key
Global find ENC *** pattern and substitute with the string "012345678".
SSID Global find ssid name and substitute.
Comment Global find set comment|comments and remove the line.
Object Name Global find object names according to the selected object name categories.
Object Name
Interface Find object names under the config system interface and substitute withINTERFACE_INDEX. It won't change the default FortiGate interfacename like "wan1", "port2", "dmz," etc.
Zone Find object names under the config system zone and substitute withZONE_ INDEX.
Address Find object names under the config firewall address and substitute withADDR_ INDEX.It won't change the name like "all", "any", etc.
Address Group Find object names under the config firewall addrgrp and substitute withADDRGrp_ INDEX.
IPPool Find object names under the config firewall ippool and substitute withIPPool_ INDEX.
VIP Find object names under the config firewall vip and substitute with VIP_INDEX.
VIP Group Find object names under the config firewall vipgrp and substitute withVIPGrp_ INDEX.
Service Find object names under the config firewall service custom andsubstitute with SERV_ INDEX.It won't change the name like "all", "any", etc.
Service Group Find object names under the config firewall service group and substitutewith SERVGrp_ INDEX.
VPN Find object names under
FortiConverter 6.0.1 Admin Guide 48Fortinet Technologies Inc.

FortiGate Configuration Obfuscator Tool
Object Name
config vpn ipsec phase1, config vpn ipsec phase2 config vpn ipsecphase1-interface, config vpn ipsec phase2-interface and substitutewith VPN_ INDEX or VPN_INTF_ INDEX.
Policy Find "set name" under the config firewall policy and substitute withPOLICY_ INDEX.
*Note that the text substitution follows the order below.
IP Address > SSID > (substitute object name with the following order) > VPN > Interface > Zone > address andgroup > ippool > vip > vip and group > service and group
According to the substitution order above, if the object name contains an address string (commonly used inIPPool and VIP), it won’t be replaced with the name IPPool_INDEX or VIP_INDEX because the IP address hashigher order.
For example, in the case below, the output replaces the IP string in the object name instead of using IPPool_INDEXwhile other objects such as VIP remains the same.
config firewall ippooledit "ippool-10.161.192.11"
set endip 10.161.192.11set startip 10.161.192.11set type overload
nextend
(After run the obfuscator)
config firewall ippooledit "ippool-10.90.31.207"
set endip 10.90.31.207set startip 10.90.31.207set type overload
nextend
FortiConverter 6.0.1 Admin Guide 49Fortinet Technologies Inc.

3rd Part Security Vendors Conversion
3rd Part Security Vendors Conversion
Alcatel-Lucent Conversion
Alcatel-Lucent differences
Conversion support
FortiConverter supports the conversion of the following Alcatel-Lucent Brick features:
l Interfacesl Host Groupsl Service Groupsl Zone Brick Rulesets
Fortinet plans to support the following Lucent features in a future FortiConverter release:
l NATl Schedulel VPNl Hosts Behind Zone
Address and address group configuration
l Lucent host addresses are mapped to FortiGate addresses.l Lucent host groups are mapped to FortiGate address groups.l Virtual Brick Addresses (VBA) aren't supported.
Interface configuration
l FortiConverter assigns default VLAN configuration directly to physical interfaces.l FortiConverter considers all VLANs named "*" or "Port Default" to be the default VLAN configuration.l Domain Addresses aren't supported.
Service and Service Group configuration
l Lucent Service Groups are mapped to FortiGate Service Groups.l Lucent service "*" maps to FortiGate service "any".
FortiConverter 6.0.1 Admin Guide 50Fortinet Technologies Inc.

3rd Part Security Vendors Conversion
Policy configuration
Lucent Brick Zone Rulesets operate at the zone level, which has no direct equivalent in FortiGate. Zonerulesets need to be translated into equivalent FortiGate policies.
FortiConverter translates Lucent Brick rules by separating traffic into two categories: inter-partition and intra-partition.
l Inter-partition traffic behaves like inter-VDOM traffic, and is simple to convert to FortiGate policies.l Intra-partition traffic is more complicated to convert because multiple zone rules can be applied.
FortiConverter handles the inter-partition traffic by creating a general policy for each rule.
FortiConverter handles the intra-partition traffic by looking for all matches between two zone rulesets.FortiConverter looks at 3 fields: source, destination, and service. All 3 fields must overlap for the rules tomatch. FortiConverter creates a policy for each match using the intersection of each field.
The action of the rules determines the action of the converted policy, as shown in the following table:
Rule 1 Rule 2 Policy
Pass Pass Accept
Pass Drop Deny
Drop Pass Deny
Drop Drop Deny
FortiConverter 6.0.1 Admin Guide 51Fortinet Technologies Inc.

3rd Part Security Vendors Conversion
Inter-partition Deny policies have higher priority than intra-partition policies, while inter-partition Accept policieshave lower priority than intra-partition policies.
Lucent default ruleset "firewall" is currently unsupported.
VDOM configuration
l Lucent partitions map to FortiGate VDOMs.l VDOM names are limited to 11 characters. FortiConverter truncates longer names to 11 characters.l Lucent partition "*Default" maps to the FortiGate root VDOM.
Example conversion
The following block diagram and tables illustrates a Lucent configuration with 2 partitions and 3 zones.
Zone eth0 Ruleset
Rule Num Direction Source Destination Service Action
1000 Out 192.168.1.15 172.30.10.1/24 * Drop
1001 Both 192.168.1.0/24 172.30.10.1/24 * Pass
Zone eth1 Ruleset
Rule Num Direction Source Destination Service Action
1000 In * 172.30.10.5 - 172.30.10.20 TCP Pass
1001 Both 192.168.1.132 172.30.10.9 * Pass
Zone eth2 Ruleset
FortiConverter 6.0.1 Admin Guide 52Fortinet Technologies Inc.

3rd Part Security Vendors Conversion
Rule Num Direction Source Destination Service Action
1000 Both * 10.10.15.0/24 HTTP Pass
This Lucent configuration creates the following FortiGate configuration. Inter-partition rules are in bold.
VDOM lab-hosts Policies
PolicyNum
SrcInterface
DstInterface
Source Destination Service Action
10000 eth0 any 192.168.1.15 172.30.10.1/24 * Deny
10001 eth0 eth1 192.168.1.0/24 172.30.10.5 -172.30.10.20
TCP Accept
10002 eth0 eth1 192.168.1.132 172.30.10.9 * Accept
10003 eth0 any 192.168.1.0/24 172.30.10.1/24 * Accept
10004 any eth0 192.168.1.0/24 172.30.10.1/24 * Accept
10005 eth1 eth0 192.168.1.132 172.30.10.9 * Accept
10006 eth1 any 192.168.1.132 172.30.10.9 * Accept
10007 any eth1 192.168.1.132 172.30.10.9 * Accept
VDOM office-hosts Policies
PolicyNum
SrcInterface
DstInterface
Source Destination Service Action
10000 any eth2 any 10.10.15.0/24 HTTP Accept
10001 eth2 any 10.10.15.0/24 any TCP Accept
Saving the Alcatel-Lucent source configuration file
Overview
This document provides a step-by-step guide for extracting your Lucent Brick configuration. Fortinet provides aPerl script, extractConfig.pl that will read the Brick configuration and extract it into a data format that theFortiConverter can use. FortiConverter can then convert the Brick configuration into its FortiGate equivalent.
FortiConverter 6.0.1 Admin Guide 53Fortinet Technologies Inc.

3rd Part Security Vendors Conversion
Prerequisites
Perl 5 needs to be installed on the machine for the script to run.
ActivePerl 5.16.3was used for this example.
The machine also needs to have the Alcatel-Lucent CLI administration tools installed.
Example Procedure
1. In this example, the target configuration is in the "lab" group, as shown in the SMSGUI tool screenshotbelow. FortiConverter needs configuration information from the Brick Devices, the Brick Zone Rulesets,the Host Groups, and the Service Groups.
2. Open a command terminal.
FortiConverter 6.0.1 Admin Guide 54Fortinet Technologies Inc.

3rd Part Security Vendors Conversion
3. Log on to an SMS administrator account that has access to the target group.In the command line, type: lsmslogon <admin> <outputDirectory>.In this example, the admin account is "dunxingzhang". The output directory isC:\users\dunxingzhang\.
4. Run the Perl script in the command line by typing: perl extractConfig.pl <systemGroup> allIn this example, the target group is "lab", and the script has been copied to the admin’s home directory,C:\Documents and Settings\dunxingzhang.
The script will show its progress as it extracts each object and ruleset
FortiConverter 6.0.1 Admin Guide 55Fortinet Technologies Inc.

3rd Part Security Vendors Conversion
5. When it is completed, the output will be saved in the output directory designated in step 3. A directory iscreated for each category, and each object in a category is saved to its own text file.
Congratulations!You have successfully extracted your Lucent Brick configuration.
6. Compress all the directories as a zip file.
Alcatel-Lucent conversion wizard
The administrator password is not set on the new configuration.For third-party conversions, the trusted host settings are converted. Check the trustedhost settings to ensure they allow management access from the relevant networkinterfaces.
FortiConverter 6.0.1 Admin Guide 56Fortinet Technologies Inc.
3rd Part Security Vendors Conversion
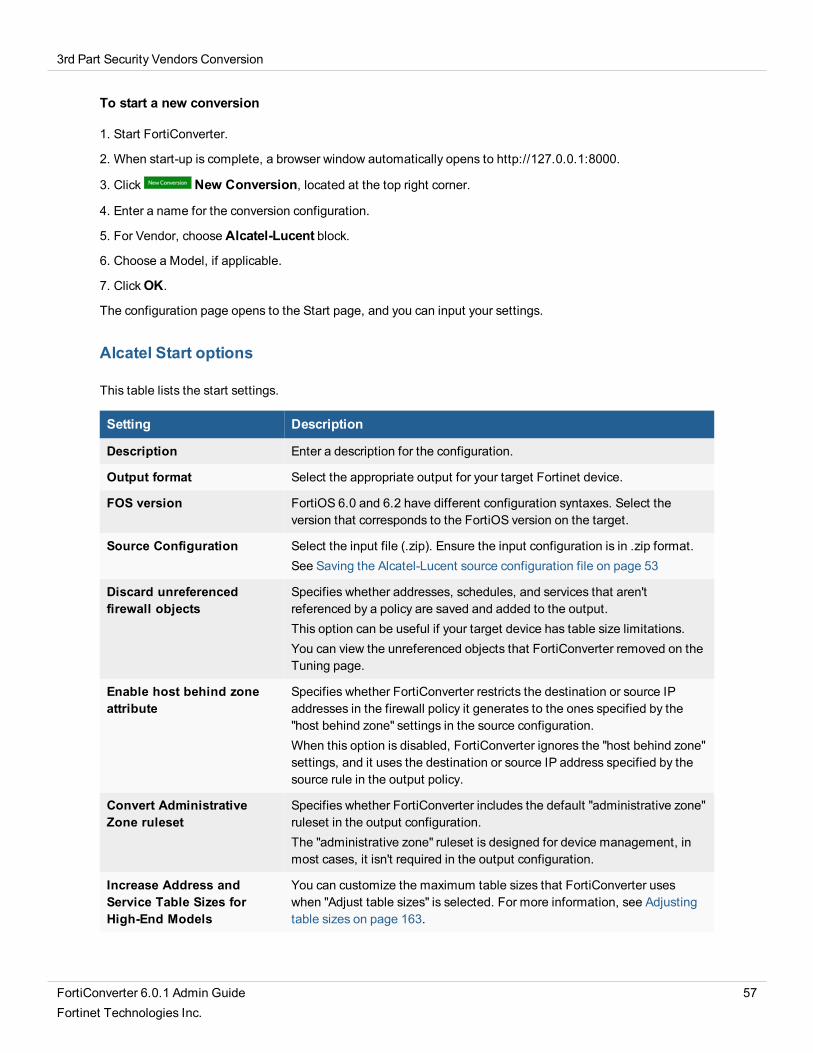
To start a new conversion
1. Start FortiConverter.
2. When start-up is complete, a browser window automatically opens to http://127.0.0.1:8000.
3. Click New Conversion, located at the top right corner.
4. Enter a name for the conversion configuration.
5. For Vendor, choose Alcatel-Lucent block.
6. Choose a Model, if applicable.
7. ClickOK.
The configuration page opens to the Start page, and you can input your settings.
Alcatel Start options
This table lists the start settings.
Setting Description
Description Enter a description for the configuration.
Output format Select the appropriate output for your target Fortinet device.
FOS version FortiOS 6.0 and 6.2 have different configuration syntaxes. Select theversion that corresponds to the FortiOS version on the target.
Source Configuration Select the input file (.zip). Ensure the input configuration is in .zip format.See Saving the Alcatel-Lucent source configuration file on page 53
Discard unreferencedfirewall objects
Specifies whether addresses, schedules, and services that aren'treferenced by a policy are saved and added to the output.This option can be useful if your target device has table size limitations.You can view the unreferenced objects that FortiConverter removed on theTuning page.
Enable host behind zoneattribute
Specifies whether FortiConverter restricts the destination or source IPaddresses in the firewall policy it generates to the ones specified by the"host behind zone" settings in the source configuration.When this option is disabled, FortiConverter ignores the "host behind zone"settings, and it uses the destination or source IP address specified by thesource rule in the output policy.
Convert AdministrativeZone ruleset
Specifies whether FortiConverter includes the default "administrative zone"ruleset in the output configuration.The "administrative zone" ruleset is designed for device management, inmost cases, it isn't required in the output configuration.
Increase Address andService Table Sizes forHigh-End Models
You can customize the maximum table sizes that FortiConverter useswhen "Adjust table sizes" is selected. For more information, see Adjustingtable sizes on page 163.
FortiConverter 6.0.1 Admin Guide 57Fortinet Technologies Inc.

3rd Part Security Vendors Conversion
Setting Description
Enable intra-partition zonerule set merge
Specifies whether FortiConverter creates FortiGate policies for trafficwithin a partition that the source configuration applies the multiple zonerulesets to.For more information on how FortiConverter converts intra-partition zonerulesets to a FortiGate policy, see Alcatel-Lucent Conversion on page 50.
Include input configurationlines for each output policy
Specifies whether FortiConverter includes the input configuration linesused for each FortiGate policy in the FortiGate configuration as a policycomment.
Address comment Specifies whether FortiConverter copies the address comment from sourceconfiguration to the converted FortiGate address.
Interface comment Specifies whether FortiConverter copies the interface comment from thesource configuration to the mapped FortiGate interface.
Service comment Specifies whether FortiConverter copies the service comment from thesource configuration to converted FortiGate service.
Device selection
Setting Description
Select the firewall toconvert
Select a specific firewall to include in the conversion.
Source ConfigurationPreview
The numbers of each type of firewall object are shown in the preview table.Click the object number to see detailed information on each object. In eachtype of object, click the button Export CSV to export the current objectinfo as CSV file.
Partition & Zone rule selection
Setting Description
Select all partitions Select to select all partitions or clear it to de-select all partitions
Partition selection Select the partition to include the partition to the conversion. Includethe individual zone rules within a partition.
Zone rule selection Select or de-select the zone rule to include in the conversion.
Lucent Interface Mapping
You can manually map the interface.
l To select the appropriate FortiGate interface, click the value in the FortiGate Interface column, and thenselect a value or enter a custom interface name.
FortiConverter 6.0.1 Admin Guide 58Fortinet Technologies Inc.

3rd Part Security Vendors Conversion
l To edit other values, double-click the proper column. Use the toolbar icon on the right to show and hidecolumns. You can also use the Tuning page to create mappings after the conversion is complete.
l To import a set of interface mappings from a file, click Import.l To download the current set of interface mappings, clickExport.l To delete an interface, select the entry and clickDelete Selected. It is useful if your target FortiGate has
fewer interfaces than the source configuration.
For the VLAN and Loopback interface, FortiConverter automatically applies the interface name.
It doesn’t show on the page, if required, you can utilize the tuning page to modify the logical interface andzones. See .
Setting Description
VDOM Show the virtual domains used in the conversion.
Source Interface Show each interface on the Lucent firewall.
FortiGate Interface Show the corresponding FortiGate interface. Click to assign a FortiGateport for each interface.
Members Show any members if they are set.
Mode/IP-Netmask Show the interface mode or the IP address and netmask of the connection.
Type Show the type of interface.
Access Show which protocols have permission to access each interface.
Lucent Route Information
FortiConverter creates static routes in the output using the static routes it detects in the source configurationand any routing information you provide.
Double-click an item to edit it.
Setting Description
New Route Click to add a route.
Edit Click to edit the selected route.
Delete Click to delete the selected route.
Alcatel-Lucent Conversion result
Tab Description
Conversion Summary It provides statistics about the conversion.
FortiConverter 6.0.1 Admin Guide 59Fortinet Technologies Inc.

3rd Part Security Vendors Conversion
Tab Description
VDOM Information It shows how VDMSwere mapped from the source device to the newdevice.
Interface Mapping It shows how interfaces were mapped for each VDOM from the sourcedevice.
Device Summary It provides statistics about the detected objects.
FortiConverter includes error and warning messages into the conversion when an erroroccurs.Review the config-all.txt file after each conversion for errors. These errors andwarning messages might cause the import process to fail, if not corrected. See formore details.
Bluecoat Conversion
Bluecoat Network Differences
Conversion support
FortiConverter supports the following features:
l Address (group)l Proxy Address(group)l Servicel Proxy Policy
Saving the Bluecoat source configuration files
Before starting the conversion wizard, save a copy of your Bluecoat configuration file to the computer whereFortiConverter is installed.
To save the source configuration files
1. In the web UI, go to Backup & Firmware.2. Click Import Export.3. Select Export full configurations in blockExport.4. ClickExport and save the configuration file, which should be XML-formatted.
FortiConverter 6.0.1 Admin Guide 60Fortinet Technologies Inc.

3rd Part Security Vendors Conversion
Bluecoat conversion wizard
To start a new conversion
1. Start FortiConverter.
2. When start-up is complete, a browser window automatically opens to http://127.0.0.1:8000.
3. Click New Conversion, located at the top right corner.
4. Enter a name for the conversion configuration.
5. For Vendor, choose Bluecoat from the drop-down list.
6. Choose a Model, if applicable.
7. ClickOK.
The configuration page opens to the Start page, and you can input your settings.
Bluecoat start options
This table lists the start settings.
Setting Description
Profile
Description Enter a description of the configuration.
OutputOptions
OutputFormat
Select the appropriate output for your target Fortinet device.
FOS Version FortiOS 6.0 and 6.2 have different configuration syntaxes. Select the version thatcorresponds to the FortiOS version on the target.
Input
SourceConfiguration
Select the input file.
Bluecoat conversion result
Tab Description
Conversion Summary Provides statistics about the conversion.
Device Summary Provides statistics about the detected objects.
FortiConverter 6.0.1 Admin Guide 61Fortinet Technologies Inc.

3rd Part Security Vendors Conversion
FortiConverter includes error and warning messages into the conversion when an erroroccurs.Review the config-all.txt file after each conversion for errors. These errors andwarning messages might cause the import process to fail, if not corrected. See formore details.
Check Point Conversions
Check Point differences
General
l The FortiGate set allowaccess command for interfaces doesn’t exist on Check Point. BecauseFortiGate requires this setting, FortiConverter enables all services for interfaces by default.
l The interface Lead to Internet is a default static route on FortiGate.l FortiConverter supports Traditional Mode and Simplified Mode IPSec.
Schedule configuration
FortiConverter converts "Day in month" time schedules to FortiGate one-time schedules. It converts "Day inweek" and "None" schedules to recurring schedules.
You assign a year range for the "Day in month" schedule. If the specified day doesn't exist for a certain month,FortiConverter doesn't generate the one-time schedule for that month.
NAT and policy configuration
FortiConverter supports the conversion of the following NAT types:
l Hide NATl Static NATl Manual NAT
FortiConverter doesn't convert NAT global properties.
FortiConverter 6.0.1 Admin Guide 62Fortinet Technologies Inc.

3rd Part Security Vendors Conversion
VPN configuration
Check Point doesn't configure VPN within a firewall rule. When FortiConverter converts the configuration toFortiGate, it generates several VPN policies from non-"Lead to Internet" interfaces to the "Lead to Internet"(default route) interface.
After FortiConverter converts the VPN configuration, the VPN policy destination interface refers to the "Lead toInternet" interface.If you changed the default route egress interface, you may need to update the VPN/Policyconfiguration manually.
FortiConverter can support VPN IPSec policies configured in both Traditional Mode and Simplified Mode.However, FortiConverter can only convert one mode at a time. If encrypted rules are detected, FortiConverterdefaults to Traditional Mode conversion.
To convert Traditional Mode policies to Simplified Mode policies, use the Check Point Security Policy ConverterWizard. This can be found by clicking Policy > Convert to > Simplified VPN from the Check PointSmartDashboard.
FortiConverter can detect and convert meshed and star VPN topologies in Simplified form.
Service objects
Unlike FortiGate service objects, Check Point service objects have a protocol type attribute. FortiGate uses asession helper object to provide the same functionality as the service objects with a protocol type attribute.
Saving the Check Point source configuration file
Before starting the conversion wizard, save a copy of your Check Point configuration file to the computer whereFortiConverter is installed.
To acquire the configuration, please download the following files from the management system, ensure theconfiguration is in a text format. FortiConverter can't take binary files.
For SmartCenter with Check Point version before R80.10
l Object definitions – "objects_5_0.C" (Check Point NG/NGX) or "objects.C" (Check Point 4.x) contains thefirewall's object definitions.
l Policy rulebases – "*.w" or "rulebases_5_0.fws". The file name is "<package name>.W" (default"Standard.W") or "rulebases_5_0.fws".
l Route information (optional) – Helps FortiConverter to correctly interpret the network topology beingconverted. To get this data, enter the route print command (for example, "netstat -nr") on the firewall node
FortiConverter 6.0.1 Admin Guide 63Fortinet Technologies Inc.

3rd Part Security Vendors Conversion
and then copy and paste the output into a plain text file. Codes in the output indicate if the route is adirectly connected interface, a host route, a network route, and so on. The output varies by the platform.
l User and user groups file (optional) – "fwauth.NDB"
File paths of the input files.
File File name Path
Objectdefinitions
objects_5_0.C (Checkpoint NG/NGX)objects.C (Checkpoint 4.x_)
$FWDIR/conf
Policy andRuledefinitions
rulebase_5_0.fws<package name>.W
$FWDIR/conf
User andUser Groupfile
fwauth.NDB $FWDIR/conf/—or—$FWDIR/database/
Routeinformation
NA Save output ofroute printcommand fromfirewall
Uploader Icons used in conversions before R80.10:
FortiConverter 6.0.1 Admin Guide 64Fortinet Technologies Inc.

3rd Part Security Vendors Conversion
For SmartCenter with Check Point version after R80.10
l Policy and rule definitions – "*.csv". The Policy and NAT CSV files can be exported from theSmartConsole.
l Object definitions/ Route information/ User and user groups file – use the same file(s) asmentioned above for conversions before R80.10.
Uploader Icons used in conversions after R80.10:
For Provider-1
l MDS definitions – "mdss.C" This file contains the MDS hierarchy.l MDS object definitions – "objects_5_0.C" This file contains the definition of domains in each MDS.l Global object definitions – "objects_5_0.C" This file contains the definition of objects used in global
policies.l Global policy rule bases – "rulebases_5_0.fws" This file contains the definition of global policies.l Global policy assignments – "customers.C"l CMA domain files – Every CMA needs a set of "objects_5_0.C", "rulebases_5_0.fws" and "fwauth.NDB"
(optional) files as the input.
File paths for the input files.
File File name Path
MDS definitions mdss.C $MDSDIR/conf/mdsdb
MDS object definitions objects_5_0.C $MDSDIR/conf/mdsdb
FortiConverter 6.0.1 Admin Guide 65Fortinet Technologies Inc.

3rd Part Security Vendors Conversion
File File name Path
Global object definitions objects_5_0.C $MDSDIR/conf/
Global policy rule bases rulebases_5_0.fws $MDSDIR/conf/
Global policy assignments customers.C $MDSDIR/conf/mdsdb
CMA object definitions objects_5_0.C Path format: "/opt/<mdsname>/customers/<Domainmgmt. servername>/<CMA>/<fwname>/conf"e.g. "opt\CPmds-R76\customers\domain-1_Management_Server\CPsuite-R76\fw1\conf"
CMA policy rulebases rulebases_5_0.fws
CMA policy rulebases rulebases_5_0.fws
Check Point conversion wizard
The pages that the Check Point conversion wizard shows depend on whether your source configuration isSmartCenter or Provider-1.
Because Provider-1 uses global and device-level virtual domains that are similar to FortiManager ADOMs, youconvert Provider-1 configurations to policy packages and objects for your source firewalls in the FortiManagerPolicy & Objects database. You can only select FortiManager as the output format on the Start options page.
The administrator password is not set on the new configuration.For third-party conversions, the trusted host settings are converted. Check the trustedhost settings to ensure they allow management access from the relevant networkinterfaces.
To start a new conversion
1. Start FortiConverter.
2. When start-up is complete, a browser window automatically opens to http://127.0.0.1:8000.
3. Click New Conversion, located at the top right corner.
4. Enter a name for the conversion configuration.
5. For Vendor, choose Check Point block.
6. Choose a Model, if applicable.
7. ClickOK.
The configuration page opens to the Start page, and you can input your settings.
FortiConverter 6.0.1 Admin Guide 66Fortinet Technologies Inc.

3rd Part Security Vendors Conversion
Check Point Start options
This table lists the start settings.
Setting Description
Profile
Description Enter a description of the configuration.
Output Options
Output Format Select the appropriate output for your targetFortinet device.
FOS Version FortiOS 6.0 and 6.2 have differentconfiguration syntaxes. Select the version thatcorresponds to the FortiOS version on thetarget.
SmartCenter Input
Object Definition File(objects_5_0.C)
Select the object definition file. This file shouldinclude the definition of firewalls, interfacesand firewall objects.
Policy Information File(Standard.W or rulebases_5_0.fws)
Select the policy information file. This fileshould include the information of policies andmanual NAT rules in each policy package.
[Optional] User & User Group File(fwauth.NDB) Select the user and user group file.
Provider-1 Input
MDS Definition File (mdss.c) Select the MDS definition file. This file shouldinclude the MDS hierarchy.
MDS Object File (objects_5_0.c) Select the MDS object definition file.
Global Policy Object File (objects_5_0.c) Select the global object definition file. This fileshould include the definition of global objects.
Global Policy Rulebase File (rulebases_5_0.fws) Select the global policy information file. Thisfile should include the information of policiesand manual NAT rules in each global policypackage.
Global Policy Assignment(customer.C) Select the global policy assignment file.
Target device (Optional)
Target device Select the model of the target device, or selecta device connected to FortiConverter.
Conversion Options
Discard unreferenced firewall objects This option can be useful if your target devicehas table size limitations.
FortiConverter 6.0.1 Admin Guide 67Fortinet Technologies Inc.

3rd Part Security Vendors Conversion
You can view the unreferenced objects thatFortiConverter removed on the Tuning page.
Automatically generate policy interfaces Specifies whether FortiConverter generatespolicy interfaces using a Check Point route file.(For example, a file you obtained using thenetstat -nr command.) You select the route fileon the Policy package page. Check Pointpolicies define rules for network-to-networkcommunication. When you migrate a CheckPoint configuration to FortiGate, which usespolicies that define rules for interface-to-interface communication, you can use theCheck Point router information to determinewhich interface a policy uses. If you disablethis option, or router information isn’tavailable, FortiConverter uses the "any"interface. This option is disabled in Provider-1conversion, because interfaces and routesaren't converted in Provider-1 conversion.
Increase Address and Service Table Sizes for High-End Models
You can customize the maximum table sizesthat FortiConverter uses when Adjust tablesizes is selected. For more information, seeAdjusting table sizes on page 163.
Route-based IPSec Specifies whether Route-based IPSec is usedfor this conversion.
Number of year-long schedules from day in monthschedules
Specifies how many years of one-timeschedules to generate. The wizard convertsCheck Point "day in month" schedules intoequivalent one-time FortiGate schedules.
Comment Options
Interface Comment Specifies whether FortiConverter copies theinterface comment from the sourceconfiguration to the mapped FortiGateinterface.
Address Comment Specifies whether FortiConverter copies theaddress comment from source configuration tothe converted FortiGate address.
Service Comment Specifies whether FortiConverter copies theservice comment from the sourceconfiguration to converted FortiGate service.
Policy comment - Add policy package name and rulenumber
Include policy package name, policy numberand NAT rule number in the comment ofoutput policy.
FortiConverter 6.0.1 Admin Guide 68Fortinet Technologies Inc.

3rd Part Security Vendors Conversion
Policy comment - Preserve the original comment Include the original comment in source file inthe comment of the output policy.
Generate global objects in a separate file FortiConverter can distinguish global objects inthe configuration and output the convertedglobal objects into a separated file.
Remove self-traffic addresses and polices Self-traffic polices should be configured inCheck Point, but they are not necessary inFortiOS. FortiConverter comments out theself-traffics policies or remove self-trafficaddresses from policies when this option isenabled.
NAT Merge Options
Ignore firewall policies with all or any addresseswhen processing NAT rules
Specifies whether FortiConverter ignoresfirewall policies with an "all" or "any" addresswhen it merges a NAT rule and a firewall policyto create a FortiGate NAT policy.FortiConverter creates new policies in theoutput configuration based on where NATrules to firewall policies intersect. Becausefirewall policies that use "all" or "any" as theaddress create many intersections, Fortinetrecommends that you ignore them.
Enable Central NAT merge Specifies whether FortiConverter convertsNATs to FortiGate central NATs instead ofpolicy-based NATs.
Enable identity match of NAT policy Specifies whether FortiConverter converts orignores any identity NAT rules in the sourceconfiguration. The "range" and "network"address objects in a Check point configurationcan include hide NAT and static NAT. CheckPoint performs NAT only when a host in the IPrange of the address object communicateswith a host outside that range. To disable NATfor traffic with both source and destinationinside the address range, Check Pointgenerates an automatic rule called an "identityNAT rule". By default, FortiConverter excludesthis type of rule from the conversion because itperforms no NAT after it is converted andgenerates redundant policies. You can enablethis option to generate policies based on theidentity NAT rules.
NAT Merge Depth
FortiConverter 6.0.1 Admin Guide 69Fortinet Technologies Inc.

3rd Part Security Vendors Conversion
Hide NATStatic NATRule NAT
Specifies which types of NAT FortiConvertermerges with the output firewall policies, orwhether FortiConverter performs NAT mergebased on object names or values.l Off – FortiConverter converts firewall
policies only and doesn't perform NATmerge for this type of NAT. This is usefulfor performing a quick, initial conversionto discover any conversion issues.
l Object Names – FortiConverter performsNAT merge based on matching addressnames in firewall policies and NAT rules.
l Object Values – FortiConverter performsNAT merge based on matching addressvalues in firewall policies and NAT rules. Itgenerates the most accurate matching ofNAT rules and policies, but in most cases,it also generates more NAT policies.
Because it can take FortiConverter severalhours to complete a conversion that include alarge number of NAT rules, Fortinetrecommends that you turn off or limit NATmerge for your initial conversion. Then, resolveany issues with the conversion before you runit again with NAT merge enabled. For moreinformation, including example matches, seeNAT merge options on page 163.
MDS selection (Provider-1 only)
Setting Description
Select the MDS to convert Choose the domain to convert.
Global policy collection (Provider-1)
Setting Description
Standard_Global_Policy Specifies whether FortiConverterconverts the StandardGlobal Policy. You can select both Standard GlobalPolicy and Simple Global Policy.
Simple_Global_Policy Specifies whether FortiConverter converts the SimpleGlobal Policy.
FortiConverter 6.0.1 Admin Guide 70Fortinet Technologies Inc.

3rd Part Security Vendors Conversion
Check Point Source Configuration (Provider-1)
A Provider-1 configuration contains multiple domains. Input the object definition, policy package information,and user file in this page.
Ensure the configuration is in a text format. FortiConverter can't use binary files.
See Saving the Check Point source configuration file on page 63
Setting Description
Browse Click to navigate to the domain source configuration file. See Saving theCheck Point source configuration file on page 63.
Firewall selection (SmartCenter only)
Setting Description
(firewall item) Select one or more firewalls to convert from the domainsource configuration.
Information of Configurations Source configuration file names are shown in the table.Click the file name to see the content. But if the file sizeis too large, the file can't be shown.
Source Configuration Preview The numbers of each kind of firewall objects are shownin the table above. By clicking the object number, thedetailed information of each object is listed in the tablebelow. In each type of object, click the button ExportCSV to export the current object info as CSV file.
Policy collection
Setting Description
(policy collection item) Select the policy collections to convert.
(Route file name field) If you selected Auto generate policy interfaces on the Startoptions page, enter the path and file name of a file thatcontains route information, or clickBrowse to select it. Forexample, the file can contain routing tables you obtained usingthe netstat -nr command.
Policy packages viewer Select the policy package name and the detail of each policy inthe package listed in the table.
Check Point Interface mapping - SmartCenter only
You can manually map the interface.
FortiConverter 6.0.1 Admin Guide 71Fortinet Technologies Inc.

3rd Part Security Vendors Conversion
l To select the appropriate FortiGate interface, click the value in the FortiGate Interface column, and thenselect a value or enter a custom interface name.
l To edit other values, double-click the proper column. Use the toolbar icon on the right to show and hidecolumns. You can also use the Tuning page to create mappings after the conversion is complete.
l To import a set of interface mappings from a file, click Import.l To download the current set of interface mappings, clickExport.l To delete an interface, select the entry and clickDelete Selected. This is useful if your target FortiGate
has fewer interfaces than the source configuration.
Setting Description
VDOM Shows the virtual domains used in the conversion.
Source Interface Shows each interface on the Cisco firewall.
FortiGateInterface
Shows the corresponding FortiGate interface. Click to assign a FortiGate port for eachinterface.
Members Shows any members, if they are set.
IP-Netmask Shows the IP address and netmask of the connection.
Type Shows the type of interface.
Access Shows which protocols has permission to access each interface.
Import Click to load a set of interface mappings from a text file.
Export Saves the current set of interface mappings to a text file.
Delete Selected Click to delete the selected mapping item.
Check Point Route information - SmartCenter only
FortiConverter creates static routes in the output using the static routes it detects in the source configurationand any routing information you provide.
Double-click an item to edit it.
Setting Description
New Route Click to add a route.
Delete Selected Click to delete the selected route.
Check Point Conversion result
Tab Description
Conversion Summary Provides informations about the conversion.
VDOM Mapping Shows how VDOMs were mapped from the source device to the new device.
FortiConverter 6.0.1 Admin Guide 72Fortinet Technologies Inc.

3rd Part Security Vendors Conversion
Interface Mapping Shows how interfaces were mapped for each VDOM from the source device.
Device Summary Provides statistics about the objects detected.
For more information, see View Conversion Summary on page 169
FortiConverter includes error and warning messages into the conversion when an erroroccurs.Review the config-all.txt file after each conversion for errors. These errors andwarning messages might cause the import process to fail, if not corrected. See formore details.
Check Point NAT merge examples
For more information on how handles NAT merges, see NAT merge options on page 163.
Host address hides behind gatewayThe source configuration hides the host address object Host_172.21.84.202_Hide_Gateway behind thegateway.
It also has a firewall rule that matches the object to source addresses.
FortiConverter generates the following policy, for which NAT is enabled (set nat enable). However,because it doesn't specify an IP pool, the source address uses the interface IP address to perform NAT:
edit 10002set srcintf "port2"set dstintf "port1"set srcaddr "Host_172.21.84.202_Hide_Gateway"set dstaddr "Host_Destination"set service "http" "https"set schedule "always"set logtraffic allset status enableset action acceptset comments "Example of address
hides behind gateway."set global-label "FW1"set nat enable
next
When a policy has NAT enabled, it attempts to match a source address to a VIP object. If it finds a match, itperforms static NAT using the VIP object. If it doesn't find a match, it uses the interface IP address. (See thenext section for an example with a VIP object.)
Address with static NAT matches policy source addressThe source configuration static NAT settings translate the IP address of the host address object Host_172.21.84.203_Static to 210.61.82.160.
FortiConverter 6.0.1 Admin Guide 73Fortinet Technologies Inc.

3rd Part Security Vendors Conversion
It also has a firewall rule that matches the object to source addresses.
FortiConverter generates the following VIP object and policy:
edit "vip-Host_172.21.84.203_Static"set extip 210.61.82.160set mappedip 172.21.84.203set extintf port1set nat-source-vip enable
next
edit 10003set srcintf "port2"set dstintf "port1"set srcaddr "Host_172.21.84.203_Static"set dstaddr "Host_Destination"set service "http" "https"set schedule "always"set logtraffic allset status enableset action acceptset comments "Example of address with static NAT in source address."set global-label "FW1"set nat enable
next
When a policy has NAT enabled, it attempts to match a source address to a VIP object. If it finds a match, itperforms static NAT using the VIP object. If it doesn't find a match, it uses the interface IP address. (See Hostaddress hides behind gateway for an example without a VIP object.)
Address with static NAT matches policy destination addressLike the example where static NAT matches the policy destination address, the source configuration staticNAT settings translate the IP address of the host address object Host_172.21.84.203_Static to210.61.82.160.
It also has a firewall rule that matches the object to destinations.
FortiConverter generates the following VIP object and policy. The policy replaces the destination address withthe VIP object:
FortiConverter 6.0.1 Admin Guide 74Fortinet Technologies Inc.

3rd Part Security Vendors Conversion
edit "vip-Host_172.21.84.203_Static"set extip 210.61.82.160set mappedip 172.21.84.203set extintf port1set nat-source-vip enable
next
edit 10004set srcintf "port1"set dstintf "port2"set srcaddr "Host_Source"set dstaddr "vip-Host_172.21.84.203_Static"set service "http" "https"set schedule "always"set logtraffic allset status enableset action acceptset comments "Example of address with static NAT in destination address."set global-label "FW1"
next
In this case, the destination address is used directly.
Manual NAT rule matches policy source address with one-to-one mappingA source configuration has a manual NAT rule that translates a source address:
It also has the following firewall rule:
This configuration is a one-to-one mapping because both the original address and translated address are hostaddresses.
FortiConverter generates the following IP address pool and policy. NAT is enabled for the policy and it uses thepool to perform NAT:
edit "ippool-210.61.82.160"set endip 210.61.82.160set startip 210.61.82.160set type overload
next
edit 10005set srcintf "port2"set dstintf "port1"set srcaddr "Host_172.21.84.204"set dstaddr "Host_Destination"set service "http" "https"
FortiConverter 6.0.1 Admin Guide 75Fortinet Technologies Inc.

3rd Part Security Vendors Conversion
set schedule "always"set logtraffic allset status enableset action acceptset comments "Example of one to one source NAT rule ."set global-label "FW1"set nat enableset poolname "ippool-210.61.82.160"
next
Manual NAT rule matches policy destination addressA source configuration has a manual NAT rule that translates a destination address:
It also has the following firewall rule:
FortiConverter generates the following VIP object and policy:
edit "vip-Host_210.61.82.160"set extip 210.61.82.160set mappedip 172.21.84.204set extintf anyset nat-source-vip enable
next
edit 10007set srcintf "port1"set dstintf "port2"set srcaddr "Host_Source"set dstaddr "Host_172.21.84.204"set service "http" "https"set schedule "always"set logtraffic allset status enableset action acceptset comments "Example of one to one destination NAT rule ."set global-label "FW1"
next
The translated address is used as the destination address because it is in internal network.
NAT rule and policy addresses don't match: Destination address of the policycontains the NAT objectA source configuration has a host address object Host_172.21.84.203_Static that Static NAT translates to210.61.82.160.
It also has the following firewall rule:
FortiConverter 6.0.1 Admin Guide 76Fortinet Technologies Inc.

3rd Part Security Vendors Conversion
AddressGroup_Destination is a group that contains the members Host_172.21.84.203_Static,Host_Member3, and Host_Member4.
FortiConverter generates the following VIP object and NAT policy:
edit "vip-Host_172.21.84.203_Static"set extip 210.61.82.160set mappedip 172.21.84.203set extintf port1set nat-source-vip enable
next
edit 110009set srcintf "port1"set dstintf "port2"set srcaddr "Host_Source"set dstaddr "vip-Host_172.21.84.203_Static"set service "http" "https"set schedule "always"set logtraffic allset status enableset action acceptset global-label "FW1"
next
edit 10009set srcintf "port1"set dstintf "port2"set srcaddr "Host_Source"set dstaddr "AddressGroup_Destination"set service "http" "https"set schedule "always"set logtraffic allset status enableset action acceptset comments "Example of name overlap in destination address."set global-label "FW1"
next
FortiConverter converts policy 10009 directly from the original firewall rule. Policy 11009 is a copy of policy10009 with the destination address field changed to vip-Host_172.21.84.203_Static to reflect thestatic NAT object conversion.
Unused VIP objects generate policyIn some cases, the final policy in an output configuration is one that FortiConverter generates from VIP objectsthat aren't used as a destination address in at least one policy. For example:
edit 001set srcintf "port1"set dstintf "any"set srcaddr "all"
FortiConverter 6.0.1 Admin Guide 77Fortinet Technologies Inc.

3rd Part Security Vendors Conversion
set dstaddr "vip-Host_172.21.84.24" " vip-Host_172.21.84.25" " vip-Host_172.21.84.26"set service "ALL"set schedule "always"set logtraffic allset status enableset action denyset comments "This policy is auto-generated by FortiConverter to activate static-NAT
VIPs that aren't referenced in other policies."next
This type of policy enables the source static NAT mapping by capturing all the VIP objects that other policiesdon't reference.
In some conversions, FortiConverter generates more than one of this kind of policy – one for each externalinterface that is referenced by an unreferenced VIP object.
Check Point NAT merge examples with central NAT
From FOS v6.0.0 release, the central NAT feature was enhanced. You don’t need to add a "set nat enable"clause into each firewall policy command view. This makes the central NAT module run as a separatedfunctional part.
Host address hides behind IPThe source configuration hides the host address object Host_172.21.84.201_Hide_IP behind the IPaddress 210.61.82.139.
It also has a firewall rule that matches the object to source addresses.
FortiConverter captures the hide NAT IP address 210.61.82.139 in an IP pool:
edit "ippool-210.61.82.139"set endip 210.61.82.139set startip 210.61.82.139set type overload
next
FortiConverter also creates a central NAT object that uses the IP pool:
edit 3set srcintf "port2" (generated from route information)set dstintf "port1" (generated from route information)set orig-addr "Host_172.21.84.201_Hide_IP"set dst-addr "all"set nat-ippool "ippool-210.61.82.139"
next
FortiConverter 6.0.1 Admin Guide 78Fortinet Technologies Inc.

3rd Part Security Vendors Conversion
FortiConverter converts the Check Point firewall rule into the following policy:
edit 10001set srcintf "port2" (generated from route information)set dstintf "port1" (generated from route information)set srcaddr "Host_172.21.84.201_Hide_IP"set dstaddr "Host_Destination"set service "http" "https"set schedule "always"set logtraffic allset status enableset action acceptset comments "Example of address hides behind IP."set global-label "FW1"
next
Manual NAT rule matches policy source address with many-to-one mappingA source configuration has a manual NAT rule that translates a source address:
Net_172.21.84.0 is a network object with the IP address 172.21.84.0/24.
The configuration also has the following firewall rule, which matches the object to source addresses:
FortiConverter converts many-to-one rules to an IP pool.
For this configuration, FortiConverter generates the following IP pool, central NAT object, and policy:
edit "ippool-210.61.82.130"set endip 210.61.82.130set startip 210.61.82.130set type overload
next
edit 2set srcintf "port2"set dstintf "port1"set orig-addr "Net_172.21.84.0"set dst-addr "Host_Destination"set nat-ippool "ippool-210.61.82.130"
next
edit 10006set srcintf "port2"set dstintf "port1"set srcaddr "Net_172.21.84.0"set dstaddr "Host_Destination"set service "http" "https"set schedule "always"set logtraffic allset status enableset action acceptset comments "Example of one to many source NAT."set global-label "FW1"
FortiConverter 6.0.1 Admin Guide 79Fortinet Technologies Inc.

3rd Part Security Vendors Conversion
next
Cisco Conversions
Cisco differences
General
l FortiGate’s set allowaccess command for interfaces doesn't exist on Cisco firewalls. BecauseFortiGate requires this setting, FortiConverter enables all services for interfaces by default.
l The postfix "_conflict" used for services prevents a service and a service group from having the samename. It is recommended that you rename these objects.
l On Cisco IPSec VPNs, Phase 1 (ISAKMP) supports more than two types of authentication methods.FortiGate supports only two types: pre-share and rsa-sig. Therefore, you must assign methods foreach VPN connection. The wizard converts Cisco EZVPN configuration to FortiGate VPN policies with thesrcintf "<tunnel-interface-name>" (i.e. phase1-interface object name) and dstintf "any".
l FortiConverter doesn't support the following Cisco configuration elements:l Wild card netmasks for access-list and object- group objects
NAT support
Software Supported NAT types
PIXFWSMASA (8.2 and earlier)
Dynamic NAT (NAT exemption, policy dynamic NAT, regular)Static NAT (Static NAT, Static PAT, Identity Static NAT)
ASA (8.3 and later) Object NAT (Dynamic, Static)Twice NAT
IOS Dynamic NATStatic NAT
Firepower Object NAT(Dynamic, Static)Twice NAT
FortiConverter doesn't support the following NAT features:
l Double NAT, Identity NAT, and NAT Exemption
To reduce the number of NAT polices a conversion generates, FortiConverter doesn't convert Static NAT rulesin which the source and mapped IPs are the same.
FortiConverter 6.0.1 Admin Guide 80Fortinet Technologies Inc.

3rd Part Security Vendors Conversion
Saving the Cisco source configuration file
Before starting the conversion wizard:Cisco, save a copy of your configuration file to the computer whereFortiConverter is installed.
To get the configuration, you can use the CLI commands:
terminal length 0show running-config
Copy and paste the outputs into a plain text file.
Cisco conversion wizard
The administrator password is not set on the new configuration.For third-party conversions, the trusted host settings are converted. Check the trustedhost settings to ensure they allow management access from the relevant networkinterfaces.
To start a new conversion
1. Start FortiConverter.
2. When start-up is complete, a browser window automatically opens to http://127.0.0.1:8000.
3. Click New Conversion, located at the top right corner.
4. Enter a name for the conversion configuration.
5. For Vendor, choose Cisco block.
6. Choose a Model, if applicable.
7. ClickOK.
The configuration page opens to the Start page, and you can input your settings.
Cisco Start options
This table lists the start settings.
Setting Description
Profile
Description Enter a description of the configuration.
Output Options
Output Format Select the appropriate output format for your FortiGatedevice.
FortiConverter 6.0.1 Admin Guide 81Fortinet Technologies Inc.

3rd Part Security Vendors Conversion
FOS Version FortiOS 6.0 and 6.2 have different configurationsyntaxes.Select the version that corresponds to the FortiOSversion on the target.
Input
Security Context Conversion Enable this option to convert configurations with multiplesecurity contexts.
Source Configuration Select the input file or files. This option only appears ifSecurity Context Conversion is disabled.
System Configuration Select the system configuration file. This file should includeinterfaces and config file names for each security context.This option only appears if Security Context Conversion isenabled.
Bulk Conversion If there are many devices to be converted where all of themare the same model, sharing the same interface mappingrelationship in conversion, then bulk conversion can convertall of them at once. Collect all the configuration files to beconverted, compress them into a ZIP file and use the ZIP fileas the input.
Context Configuration(.zip) Select the .zip file containing all the config files. The file namefor each context should match the name given in the systemconfiguration file. This option only appears if Security ContextConversion is enabled. Please see example below in Inputand naming for context configuration file on page 84.
Route File (Optional) Select a route file that FortiConverter uses to determine theinterfaces used in output policies, in addition to routes itdetects in the source configuration. Because Cisco devicesapply access-lists to source interfaces, FortiConverter candetermine the source interfaces for output policies, but notthe destination interfaces. When you specify a route file,FortiConverter uses the information in the file to determinethe destination interface.
Target device(Optional)
Target device Select the model of the target device, or select a deviceconnected to FortiConverter.
Conversion Options
Discard unreferenced firewall objects Specifies whether addresses, schedules, and services thataren't referenced by a policy are saved and added to theoutput. This option can be useful if your target device hastable size limitations. You can view the unreferenced objectsthat FortiConverter removed on the Tuning page.
Increase Address and Service TableSizes for High-End Models
You can customize the maximum table sizes thatFortiConverter uses when Increase Address and Service
FortiConverter 6.0.1 Admin Guide 82Fortinet Technologies Inc.

3rd Part Security Vendors Conversion
Table Sizes for High-End Models is selected. For moreinformation, see Adjusting table sizes on page 163
Automatically generate policyinterfaces
Specifies whether FortiConverter automatically generatespolicy interfaces.
Route-based IPSec Specifies whether Route-based IPSec is used for thisconversion.
Suppress auto grouped items fromCisco ASDM/CSM
When an ACL contains multiple objects in its source address,destination address or service field, Cisco ASDM and CSMmay automatically group them in to a group object becauseCisco ASA only allows single object in each field. This optionexpands the grouped objects after conversion.
Combine expanded multi-objectpolicies
When an ACL contains multiple objects in its source address,destination address or service field, Cisco CSM may expandthe ACL into equivalent multiple ACLs because Cisco ASAonly allows single object in each field. This option combinesthose ACLs into the original one automatically.
Combine policies generated by NATmerge
FortiConverter may generate multiple NAT policies aftermerging NAT rules into ACLs. This option combines andsimplifies the output policies.
Split Address group From VPN Phase2selector
If the remote side of VPN is not a FortiGate but a device ofother vendor, setting an address group in the VPN phase2quick selector does not work. When this option is enabled, aVPN phase2 object with an address group in the selectorwould be split into multiple objects with subnet or a range inselector.
Comment Options
Include input configuration lines foreach output policy
Specifies whether FortiConverter includes the inputconfiguration lines used for each FortiGate policyin theFortiGate configuration as a policy comment.
Address comment Specifies whether FortiConverter copies the addresscomment from the source configuration to the convertedFortiGate address.
Interface comment Specifies whether FortiConverter copies the interfacecomment from the source configuration to the convertedFortiGate address.
Service comment Specifies whether FortiConverter copies the service commentfrom the source configuration to the converted FortiGateaddress.
NAT Merge Options
FortiConverter 6.0.1 Admin Guide 83Fortinet Technologies Inc.

3rd Part Security Vendors Conversion
Ignore firewall policies with all or anyaddresses when processing NAT rules
Specifies whether FortiConverter ignores firewall policies withan "all" or "any" address when it merges a NAT rule and afirewall policy to create a FortiGate NAT policy.FortiConverter creates new policies in the outputconfiguration based on where NAT rules to firewall policiesintersect. Because firewall policies that use "all" or "any" asthe address create many intersections, Fortinet recommendsthat you ignore them.
Enable central NAT merge Specifies whether FortiConverter converts NATs toFortiConverter central NATs instead of policy-based NATs.
Convert Static NATs into VIP/CentralNAT pairs
When this option is enabled (in central NAT mode only), astatic NAT rule would be converted into a central SNAT ruleand an unidirectional VIP object. Otherwise it would beconverted into a bidirectional VIP object
NAT Merge Depth
Mode Specify the source version number. This option is availableonly whenModel isASA.
NAT exemption Specifies which types of NAT FortiConverter merges with theoutput firewall policies, or whether FortiConverter performsNAT merge based on object names or values.l Object Name Match – FortiConverter performs
NAT merge based on matching address names in firewallpolicies and NAT rules.
l Object Content Overlap – FortiConverter performsNAT merge based on matching address values in firewallpolicies and NAT rules. It generates the most accuratematching of NAT rules and policies, but in most cases, italso generates more NAT policies.
Because it can take FortiConverter several hours to completea conversion that include a large number of NAT rules,Fortinet recommends that you turn off or limit NAT merge foryour initial conversion. Then, resolve any issues with theconversion before you run it again with NAT merge enabled.For more information, including sample matches, see NATmerge options on page 163.
Dynamic NAT
Static NAT
Dynamic ACL NAT
Static ACL NAT
Object Dynamic NAT
Object Static NAT
Twice Dynamic NAT
Twice Static NAT
Static ACL NAT
Input and naming for context configuration file
Here is an example on inputting context configuration file and naming convention, please note that the filename should match the root:
FortiConverter 6.0.1 Admin Guide 84Fortinet Technologies Inc.

3rd Part Security Vendors Conversion
Suppose the root config (Security Context.txt) contains the following context information:
Then ExampleConfigs.zip should contain config files named "admin.cfg", "test_second.cfg", "third.cfg".
(i.e. the file names should match the filename following the slash in config-url )
Context selection
This page shows the source configuration before conversion.
By default, all virtual contexts are mapped to VDOMs with the same name.
Click an option under Source Configuration Preview to view it. Use the search bars to filter the search.
Setting Description
[trash] Click to delete the selected mapping item.
Removed vdom Select a removed VDOM and clickAdd to add it back intoVDOM list.
Information of Configurations Source configuration file names are shown in the table as alink. Click the link to see the content. The file won’t show if it’s
FortiConverter 6.0.1 Admin Guide 85Fortinet Technologies Inc.

3rd Part Security Vendors Conversion
too large.
Target Device Switch Interface -Interface/Port
If there are virtual switches in the selected target device,FortiConverter will list the member ports of the virtualswitches. If an interface in the list is going to be used in theconfiguration, it should first be detached from the virtualswitch. Click "X" on the interface to detach it. Please note thata detached interface cannot be re-added later byFortiConverter.
Source Configuration Preview The numbers of each type of firewall object are shown in thepreview table. Click the object number to see detailedinformation on each object. In each type of object, click thebutton Export CSV to export the current object info as CSVfile.
Cisco Interface mapping
You can manually map the interface.
l To select the appropriate FortiGate interface, click the value in the FortiGate Interface column, and thenselect a value or enter a custom interface name.
l To edit other values, double-click the proper column. Use the toolbar icon on the right to show and hidecolumns. You can also use the Tuning page to create mappings after the conversion is complete.
l To import a set of interface mappings from a file, click Import.l To download the current set of interface mappings, clickExport.l To delete an interface, select the entry and clickDelete Selected. This is useful if your target FortiGate
has fewer interfaces than the source configuration.
Setting Description
VDOM Shows the virtual domains used in the conversion.
Source Interface Shows each interface on the Cisco firewall.
FortiGateInterface
Shows the corresponding FortiGate interface. Click to assign a FortiGate port for eachinterface.
Members Shows any members, if they are set.
IP-Netmask Shows the IP address and netmask of the connection.
Type Shows the type of interface.
Access Shows which protocols has permission to access each interface.
Import Click to load a set of interface mappings from a text file.
Export Saves the current set of interface mappings to a text file.
Delete Selected Click to delete the selected mapping item.
FortiConverter 6.0.1 Admin Guide 86Fortinet Technologies Inc.

3rd Part Security Vendors Conversion
Cisco Routing Information
FortiConverter creates static routes in the output using the static routes it detects in the source configurationand any routing information you provide.
Double-click an item to edit it.
Setting Description
New Route Click to add a route.
Delete Selected Click to delete the selected route.
Cisco Conversion result
Some columns can be selected, sorted, and filtered.
Tab Description
Conversion Summary Shows information about the conversion.
VDOM Mapping Shows how VDOMs were mapped from the source device to the new device.
Interface Mapping Shows how interfaces were mapped for each VDOM from the source device.
Device Summary Shows statistics about the objects detected.
For more details on how to fine-tune your conversion, see .
To download your finished conversion, clickDownload Configurations, located in the top-right corner. Yourdownloaded conversion is a .zip file.
FortiConverter includes error and warning messages into the conversion when an erroroccurs.Review the config-all.txt file after each conversion for errors. These errors andwarning messages might cause the import process to fail, if not corrected. See formore details.
Cisco PIX and ASA NAT merge examples
For more information about how FortiConverter handles NAT merges, see NAT merge options on page 163
For ASA, these examples are valid only for source configurationscreated using software versions 8.2.x and earlier.
Identity NATDynamic NAT with ID 0 is the identity NAT and specifies that the address doesn't need to be translated. For
FortiConverter 6.0.1 Admin Guide 87Fortinet Technologies Inc.

3rd Part Security Vendors Conversion
example:
nat (inside) 0 172.17.3.68 255.255.255.255
Currently, because FortiConverter doesn't merge this kind of NAT, it ignores the settings when it converts theconfiguration.
Static identity NATIn the following settings, in the two static NAT settings, the real address and the mapped address are thesame.
static (inside,outside) 200.251.129.33 200.251.129.33 netmask 255.255.255.255
static (inside,outside) 172.17.3.69 access-list inside_nat0_static
access-list inside_nat0_static extended permit ip host 172.17.3.69 object-group Group0
FortiConverter doesn't support this kind of static NAT and it ignores the settings when it converts theconfiguration.
Dynamic NAT with NAT IPA source configuration has the following dynamic NAT settings:
global (outside) 1 172.31.242.69 netmask 255.255.255.255
nat (inside) 1 172.17.3.120 255.255.255.255
It also has the following firewall rule:
access-list acl_inside extended permit tcp host 172.17.3.120 object-groupGroup_Destination eq http
access-group acl_inside in interface inside
FortiConverter generates the following IP pool and NAT policy from the source configuration:
edit "ippool-172.31.242.69"set endip 172.31.242.69set startip 172.31.242.69set type one-to-one
next
edit 10001set srcintf "port1" (corresponds to the interface "inside")set dstintf "port2" (corresponds to the interface "outside")set srcaddr "h_172.17.3.120"set dstaddr "Group_Destination"set service "HTTP"set schedule "always"set logtraffic disableset status enableset action acceptset nat enableset ippool enableset poolname "ippool-172.31.242.69"
next
FortiConverter 6.0.1 Admin Guide 88Fortinet Technologies Inc.
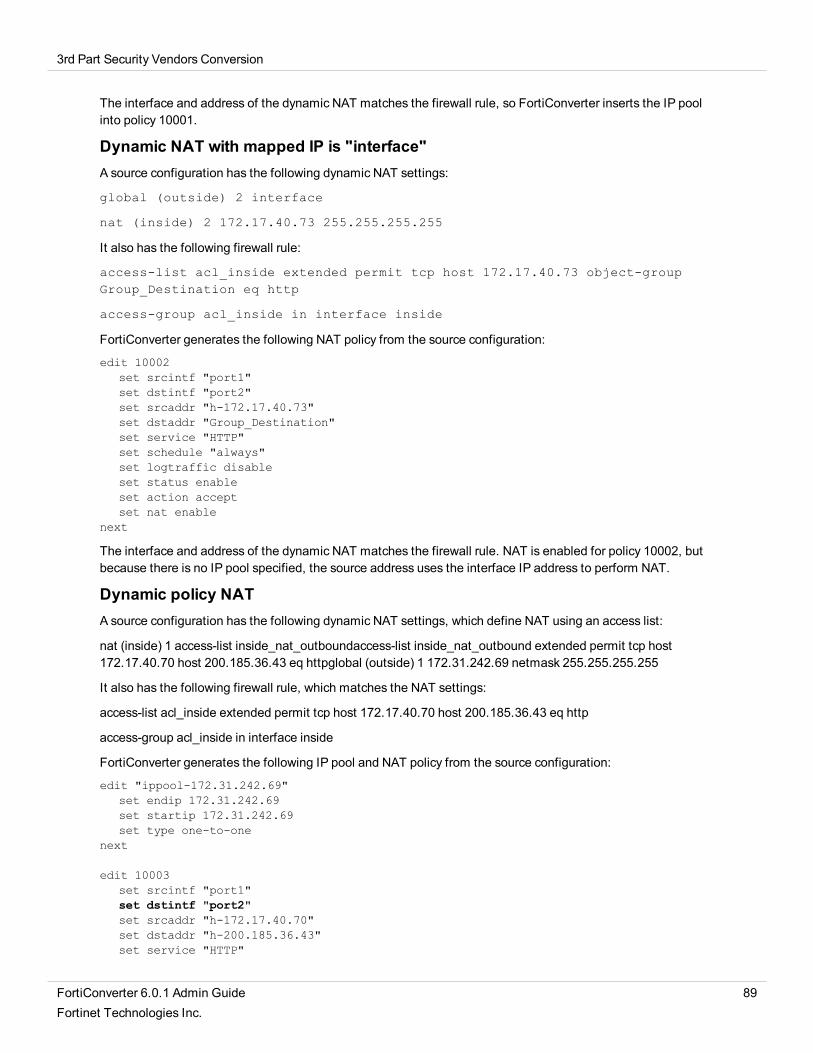
3rd Part Security Vendors Conversion
The interface and address of the dynamic NAT matches the firewall rule, so FortiConverter inserts the IP poolinto policy 10001.
Dynamic NAT with mapped IP is "interface"A source configuration has the following dynamic NAT settings:
global (outside) 2 interface
nat (inside) 2 172.17.40.73 255.255.255.255
It also has the following firewall rule:
access-list acl_inside extended permit tcp host 172.17.40.73 object-groupGroup_Destination eq http
access-group acl_inside in interface inside
FortiConverter generates the following NAT policy from the source configuration:
edit 10002set srcintf "port1"set dstintf "port2"set srcaddr "h-172.17.40.73"set dstaddr "Group_Destination"set service "HTTP"set schedule "always"set logtraffic disableset status enableset action acceptset nat enable
next
The interface and address of the dynamic NAT matches the firewall rule. NAT is enabled for policy 10002, butbecause there is no IP pool specified, the source address uses the interface IP address to perform NAT.
Dynamic policy NATA source configuration has the following dynamic NAT settings, which define NAT using an access list:
nat (inside) 1 access-list inside_nat_outboundaccess-list inside_nat_outbound extended permit tcp host172.17.40.70 host 200.185.36.43 eq httpglobal (outside) 1 172.31.242.69 netmask 255.255.255.255
It also has the following firewall rule, which matches the NAT settings:
access-list acl_inside extended permit tcp host 172.17.40.70 host 200.185.36.43 eq http
access-group acl_inside in interface inside
FortiConverter generates the following IP pool and NAT policy from the source configuration:
edit "ippool-172.31.242.69"set endip 172.31.242.69set startip 172.31.242.69set type one-to-one
next
edit 10003set srcintf "port1"set dstintf "port2"set srcaddr "h-172.17.40.70"set dstaddr "h-200.185.36.43"set service "HTTP"
FortiConverter 6.0.1 Admin Guide 89Fortinet Technologies Inc.

3rd Part Security Vendors Conversion
set schedule "always"set logtraffic disableset status enableset action acceptset nat enableset ippool enableset poolname "ippool-172.31.242.69"
next
The converted configuration is similar to when the source configuration specifies dynamic NAT with a NAT IPaddress.
FortiConverter converts the IP pool based on the dynamic NAT.
Static NAT matches policy source addressA source configuration has the following static NAT settings:
static (inside,outside) 200.251.129.95 172.17.60.85 netmask 255.255.255.255
It also has the following firewall rule:
access-list acl_inside extended permit ip host 172.17.60.85 object-groupGroup_Destination
access-group acl_inside in interface inside
FortiConverter converts the static NAT rule to a VIP object and generates a NAT policy:
edit "vip-200.251.129.95"set extip 200.251.129.95set mappedip 172.17.60.85set extintf port2set nat-source-vip enable
next
edit 10004set srcintf "port1"set dstintf "port2"set srcaddr "h-172.17.60.85"set dstaddr "Group_Destination"set service "ALL"set schedule "always"set logtraffic disableset status enableset action acceptset nat enable
next
The NAT-enabled policy tries to match the source address to a VIP object. If it finds a match, it performs staticNAT as the VIP object specifies. Otherwise, it uses the interface IP for NAT.
Static NAT matches policy destination addressA source configuration has the following static NAT settings (which are the same as the example that matchesby source address):
static (inside,outside) 200.251.129.95 172.17.60.85 netmask 255.255.255.255
It also has the following firewall rule:
access-list acl_outside extended permit ip any host 200.251.129.95
FortiConverter 6.0.1 Admin Guide 90Fortinet Technologies Inc.

3rd Part Security Vendors Conversion
access-group acl_outside in interface outside
FortiConverter creates the same VIP object it does for the source address example, and the following NATpolicy, which uses the VIP object as a destination address:
edit "vip-200.251.129.95"set extip 200.251.129.95set mappedip 172.17.60.85set extintf port2set nat-source-vip enablenext
edit 10005set srcintf "port2"set dstintf "port1"set srcaddr "all"set dstaddr "vip-200.251.129.95"set service "ALL"set schedule "always"set logtraffic disableset status enableset action acceptnext
Static NAT that uses access list matches policy source addressA source configuration has the following settings, which define static NAT using an access list:
static (inside,outside) 172.31.242.69 access-list inside_nat_static
access-list inside_nat_static extended permit ip host 10.100.128.97 object-group Group_Destination
It also has the following firewall rule:
access-list acl_inside extended permit ip host 10.100.128.97 object-groupGroup_Destination
access-group acl_inside in interface inside
FortiConverter converts the static NAT settings to the following VIP object and policies:
edit "vip-172.31.242.69_ip"set extip 172.31.242.69set mappedip 10.100.128.97set extintf port2set nat-source-vip enable
next
edit 10006set srcintf "port1"set dstintf "port2"set srcaddr "h-10.100.128.97"set dstaddr "Group_Destination"set service "ALL"set schedule "always"set logtraffic disableset status enableset action acceptset nat enable
next
FortiConverter 6.0.1 Admin Guide 91Fortinet Technologies Inc.

3rd Part Security Vendors Conversion
The NAT-enabled policy tries to match the source address to a VIP object. If it finds a match, it performs staticNAT as the VIP object specifies. Otherwise, it uses the interface IP for NAT.
Static NAT specified by access list matches policy source addressThe following source configuration settings define static NAT using an access list (they are the same as theexample where static policy NAT matches the policy source address):
static (inside,outside) 172.31.242.69 access-list inside_nat_static
access-list inside_nat_static extended permit ip host 10.100.128.97 object-group Group_Destination
It also has the following firewall rule, which matches the NAT in source address:
access-list acl_outside extended permit ip object-group Group_Destination host 172.31.242.69
access-group acl_outside in interface outside
FortiConverter creates the same VIP object it does for the source address example, and the following NATpolicy, which uses the VIP object as a destination address:
edit "vip-172.31.242.69_ip"set extip 172.31.242.69set mappedip 10.100.128.97set extintf port2set nat-source-vip enable
next
edit 110007set srcintf "por2"set dstintf "port1"set srcaddr "Group_Destination"set dstaddr "vip-172.31.242.69_ip"set service "ALL"set schedule "always"set logtraffic disableset status enableset action acceptnext edit 10007set srcintf "port2"set dstintf "any"set srcaddr "Group_Destination"set dstaddr "h-172.31.242.69"set service "ALL"set schedule "always"set logtraffic disableset status enableset action accept
next
NAT rule and policy addresses don't match exactly
When a NAT rule address doesn't match a policy address exactly, FortiConverter calculates where theaddresses intersect (overlap) and uses the result as the address for the NAT policy it generates.
NAT rule address contains policy addressFor example, a source configuration includes the following dynamic NAT configuration:
FortiConverter 6.0.1 Admin Guide 92Fortinet Technologies Inc.

3rd Part Security Vendors Conversion
global (outside) 1 193.205.32.10 netmask 255.255.255.255
nat (inside) 1 10.1.2.0 255.255.255.0
It also contains the following firewall rule:
access-list acl_inside extended permit tcp host 10.1.2.1 host 193.205.23.66 eq smtp
access-group acl_inside in interface inside
The NAT rule address 10.1.2.0 255.255.255.0 contains the firewall rule source address 10.1.2.1.
FortiConverter converts the source NAT and firewall rules to the following IP pool and policies:
edit "ippool-193.205.32.0-193.205.32.255"set endip 193.205.32.10set startip 193.205.32.10set type one-to-one
next
edit 10001set srcintf "port1"set dstintf "port2"set srcaddr "h-10.1.2.1"set dstaddr "h-193.205.23.66"set service "SMTP"set schedule "always"set logtraffic disableset status enableset action acceptset nat enableset ippool enableset poolname "ippool-193.205.32.10"
next
The source address of rule 10001 is the intersection of the NAT rule and original rule, which is "h-10.1.2.1".
Policy address contains the NAT rule addressA source configuration includes the following NAT settings (which are the same as the example where the NATrule address contains the policy address):
global (outside) 1 193.205.32.10 netmask 255.255.255.255
nat (inside) 1 10.1.2.0 255.255.255.0
It also contains the following firewall rule:
access-list acl_inside extended permit tcp 10.1.0.0 255.255.0.0 host193.205.23.66 eq smtp
access-group acl_inside in interface inside
The firewall rule source address 10.1.0.0 255.255.0.0 contains the NAT rule address 10.1.2.0255.255.255.0.
FortiConverter converts the source NAT and firewall rules to the following IP pool and policies:
edit "ippool-193.205.32.0-193.205.32.255"set endip 193.205.32.10
FortiConverter 6.0.1 Admin Guide 93Fortinet Technologies Inc.

3rd Part Security Vendors Conversion
set startip 193.205.32.10set type one-to-one
next
edit 110002set srcintf "port1"set dstintf "port2"set srcaddr "n-10.1.2.0_24"set dstaddr "h-193.205.23.66"set service "SMTP"set schedule "always"set logtraffic disableset status enableset action acceptset nat enableset ippool enableset poolname "ippool-193.205.32.10"next
edit 10002set srcintf "port1"set dstintf "any"set srcaddr "n-10.1.2.0_16"set dstaddr "h-193.205.23.66"set service "SMTP"set schedule "always"set logtraffic disableset status enableset action accept
next
The policy 00110002 source address "n-10.1.2.0_24" is the intersection of NAT rule and firewall rule 10002.
NAT rule matches address "all" in policyA source configuration includes the following NAT settings (which are the same as the example where the NATrule address contains the policy address):
global (outside) 1 193.205.32.10 netmask 255.255.255.255
nat (inside) 1 10.1.2.0 255.255.255.0
It also contains the following firewall rule:
access-list acl_inside extended permit tcp any host 193.205.23.66 eq smtp
access-group acl_inside in interface inside
The source address field is "any", which contains the NAT rule.
FortiConverter converts the source NAT and firewall rules to the following IP pool and policies:
edit 110003set srcintf "port1"set dstintf "port2"set srcaddr "n-10.1.2.0_24"set dstaddr "h-193.205.23.66"set service "SMTP"set schedule "always"
FortiConverter 6.0.1 Admin Guide 94Fortinet Technologies Inc.

3rd Part Security Vendors Conversion
set logtraffic disableset status enableset action acceptset nat enableset ippool enableset poolname "ippool-193.205.32.10"
next
edit 10003set srcintf "port1"set dstintf "any"set srcaddr "all"set dstaddr "h-193.205.23.66"set service "SMTP"set schedule "always"set logtraffic disableset status enableset action accept
next
The policy 110003 source address "n-10.1.2.0_24" is the intersection of NAT and firewall rules.
Static NAT overlaps policy destination addressA source configuration has the following settings, which define static NAT using an access list:
static (inside,outside) 172.31.242.69 access-list inside_nat_static
access-list inside_nat_static extended permit ip host 10.100.128.97 object-group Group_Destination
It also includes the following firewall rule:
access-list acl_outside extended permit ip object-group Group_Destination 172.31.242.0 255.255.255.0
access-group outside in interface outside
The firewall rule destination address 172.31.242.0 255.255.255.0 contains the static NAT mapped IP172.31.242.69.
FortiConverter generates the following VIP object and policies that use the object as a destination:
edit "vip-172.31.242.69_ip"set extip 172.31.242.69set mappedip 10.100.128.97set extintf port2set nat-source-vip enable
next
edit 110004set srcintf "port2"set dstintf "port1"set srcaddr "Group_Destination"set dstaddr "vip-172.31.242.69_ip"set service "ALL"set schedule "always"set logtraffic disableset status enableset action accept
next
edit 10004
FortiConverter 6.0.1 Admin Guide 95Fortinet Technologies Inc.

3rd Part Security Vendors Conversion
set srcintf "port2"set dstintf "any"set srcaddr "Group_Destination"set dstaddr "n-172.31.242.0_24"set service "ALL"set schedule "always"set logtraffic disableset status enableset action accept
next
Static NAT overlaps address group objectA source configuration has the following settings, which define a static NAT using an access list:
static (inside,outside) 172.31.242.69 access-list inside_nat_static
access-list inside_nat_static extended permit ip host 10.100.128.97 object-group Group_Destination
The access list destination address Group_Destination contains two members:
object-group network Group_Destinationnetwork-object 10.255.253.0 255.255.255.0network-object 10.255.254.0 255.255.255.0
The source configuration also has a firewall rule that matches the static NAT rule and its destination is amember of the group Group_Destination.
access-list acl_inside extended permit ip host 10.100.128.97 10.255.253.0 255.255.255.0access-group acl_inside in interface inside
FortiConverter generates the following NAT policy, which has the destination address 10.255.253.0255.255.255.0.
edit 10009set srcintf "port1"set dstintf "port2"set srcaddr "h-10.100.128.97"set dstaddr "n-10.255.253.0_24"set service "ALL"set schedule "always"set logtraffic disableset status enableset action acceptset nat enable
next
NAT exemption
NAT exemption is a dynamic policy NAT with ID 0. In most cases, you use NAT exemption to do one of thefollowing:
l Exempt from NAT an address that is located in a NAT rule address range.l In environments that use NAT control to block traffic to which no NAT rule applies, to permit this type of
traffic.Exempt an address from a NAT ruleA source configuration has the following NAT exemption configuration:
FortiConverter 6.0.1 Admin Guide 96Fortinet Technologies Inc.

3rd Part Security Vendors Conversion
nat (inside) 0 access-list inside_nat_exemption
access-list inside_nat_exemption extended permit ip host 172.13.100.88object-group Group_Destination
It also has the following dynamic NAT rule:
nat (inside) 4 172.13.100.0 255.255.255.0global (outside) 4 172.80.80.8 netmask 255.255.255.255
Both the NAT exemption and the dynamic NAT rule match the following firewall rule:
access-list acl_inside extended permit ip 172.13.100.0 255.255.255.0 object-group Group_Destination
access-group acl_inside in interface inside
FortiConverter generates the following policies:
edit 110001set srcintf "port1"set dstintf "port2"set srcaddr "h-172.13.100.88"set dstaddr "Group_Destination"set service "ALL"set schedule "always"set logtraffic disableset status enableset action accept
next
edit 10001set srcintf "port1"set dstintf "port2"set srcaddr "n-172.13.100.0_24"set dstaddr "Group_Destination"set service "ALL"set schedule "always"set logtraffic disableset status enableset action acceptset nat enableset ippool enableset poolname "ippool-172.80.80.8"
next
The NAT exemption configuration generates policy 110001 with no NAT behavior. The dynamic NATconfiguration generates policy 10001, which references an IP pool. Because 00110001 comes first in theconfiguration, it applies to address "h-172.13.100.88" before the policy used for address "n-172.13.100.0_24"(which applies dynamic NAT) is applied.
Allowing traffic without NAT when PIX enables NAT controlWhen NAT control is enabled in PIX, traffic from an interface with high-level security to an interface with low-level security isn't allowed if no NAT rule is configured. To allow traffic that doesn't require NAT, a NATexemption is required.
The following NAT configuration is a source configuration, which includes NAT control and a NAT exemption:
nat-control
FortiConverter 6.0.1 Admin Guide 97Fortinet Technologies Inc.

3rd Part Security Vendors Conversion
nat (inside) 0 access-list inside_nat_exemption
access-list inside_nat_exemption extended permit ip host 172.14.100.88object-group Group_Destination
It also has the following firewall rule:
access-list acl_inside extended permit ip 172.14.100.0 255.255.255.0 object-group Group_Destination
access-group acl_inside in interface inside
The interface security level has the following configuration:
nameif ethernet0 outside security0nameif ethernet1 inside security100
FortiConverter generates the following policies:
edit 110002set srcintf "port1"set dstintf "port2"set srcaddr "h-172.14.100.88"set dstaddr "Group_Destination"set service "ALL"set schedule "always"set logtraffic disableset status enableset action accept
next
edit 10002set srcintf "port1"set dstintf "port2"set srcaddr "n-172.14.100.0_24"set dstaddr "Group_Destination"set service "ALL"set schedule "always"set logtraffic disableset status disableset action acceptset comments "This policy is disabled as not allowed by NAT-Control."
next
The source interface of the firewall rule is "inside"(port1), which has security level 100. The destination interfaceof this firewall rule is calculated to be "outside"(port2), which has security level 0. Since "inside" has a highersecurity level than "outside", traffic from "n-172.14.100.0_24" to "Group_Destination" isn't allowed if NAT isn'tconfigured (even if the firewall rule allows it). Only traffic from "h-172.14.100.88" to "Group_Destination" isallowed because a NAT exemption is configured for it. Since other traffic isn't allowed, FortiConverter disablespolicy 10002, and adds a comment to show the reason.
Unused VIP objects generate policy
In some cases, the final policy in an output configuration is one that FortiConverter generates from VIP objectsthat aren't used as a destination address in at least one policy. For example:
edit 001
FortiConverter 6.0.1 Admin Guide 98Fortinet Technologies Inc.

3rd Part Security Vendors Conversion
set srcintf "port1"set dstintf "any"set srcaddr "all"set dstaddr "vip- 172.21.84.24" " vip- 172.21.84.25" " vip- 172.21.84.26"set service "ALL"set schedule "always"set logtraffic allset status enableset action denyset comments "This policy is auto-generated by FortiConverter to activate static-NAT
VIPs that aren't referenced in other policies."next
This type of policy enables the source static NAT mapping by capturing all VIP objects that other policies don'treference.
In some conversions, FortiConverter generates more than one of this kind of policy – one for each externalinterface that is referenced by an unreferenced VIP object.
Forcepoint Stonesoft Conversion
Forcepoint StoneSoft differences
VPNs
StoneSoft VPNs aren’t converted.
Conversion support
FortiConverter supports the following features:
l Interfacel Address (group)l Service (group)l Policy / Sub-Policyl NATl Route
Saving the Forcepoint Stonesoft source configuration files
Before starting the conversion wizard, save a copy of your Forcepoint Stonesoft configuration file (XML format)to the computer where FortiConverter is installed.
FortiConverter 6.0.1 Admin Guide 99Fortinet Technologies Inc.

3rd Part Security Vendors Conversion
Forcepoint Stonesoft Conversion Wizard
The administrator password is not set on the new configuration.For third-party conversions, the trusted host settings are converted. Check the trustedhost settings to ensure they allow management access from the relevant networkinterfaces.
To start a new conversion
1. Start FortiConverter.
2. When start-up is complete, a browser window automatically opens to http://127.0.0.1:8000.
3. Click New Conversion, located at the top right corner.
4. Enter a name for the conversion configuration.
5. For Vendor, choose Forcepoint block.
6. Choose a Model, if applicable.
7. ClickOK.
The configuration page opens to the Start page, and you can input your settings.
Forcepoint Stonesoft Start options
The following table lists the start settings.
Setting Description
Profile
Description Enter a description of the configuration.
Output Options
Output Format Select the appropriate output for your target Fortinetdevice.
FOS Version FortiOS 6.0 and 6.2 have different configuration syntaxes.Select the version that corresponds to the FortiOS versionon the target.
Input
Source Configuration Select the input file.
Bulk Conversion If there are many devices to be converted where all ofthem are the same model, sharing the same interfacemapping relationship in conversion, then bulk conversioncan convert all of them at once. Collect all theconfiguration files to be converted, compress them into aZIP file and use the ZIP file as the input.
FortiConverter 6.0.1 Admin Guide 100Fortinet Technologies Inc.

3rd Part Security Vendors Conversion
Target device (Optional)
Target device Select the model of the target device, or select a deviceconnected to FortiConverter.
Conversion Options
Discard unreferenced firewall objects Specifies whether addresses and services that aren'treferenced by a policy are saved and added to the output.This option can be useful if your target device has tablesize limitations. You can view the unreferenced objectsthat FortiConverter removed on the Tuning page.
Increase Address and Service Table Sizesfor High-End Models
You can customize the maximum table sizes thatFortiConverter uses when Adjust table sizes is selected.For more information, see Adjusting table sizes on page163.
Nat Merge Options
Ignore firewall policies with all or anyaddresses when processing NAT rules
Specifies whether FortiConverter ignores firewall policieswith an "all" or "any" address when it merges a NAT ruleand a firewall policy to create a FortiGate NAT policy.FortiConverter creates new policies in the outputconfiguration based on where NAT rules to firewall policiesintersect. Because firewall policies that use "all" or "any" asthe address create many intersections, Fortinetrecommends that you ignore them.
Enable central NAT merge Specifies whether FortiConverter converts NATs toFortiGate central NATs instead of policy-based NATs. It isrecommended to enable this option.
Source Preview
This page shows the information inside the configuration.
Setting Description
Information of Configurations Source configuration file names are shown in the table as alink. Click the link to see the content. The file won’t show ifit’s too large.
Target Device Switch Interface -Interface/Port
If there are virtual switches in the selected target device,FortiConverter will list the member ports of the virtualswitches. If an interface in the list is going to be used in theconfiguration, it should first be detached from the virtualswitch. Click "X" on the interface to detach it. Please notethat a detached interface cannot be re-added later byFortiConverter.
Source Configuration Preview The numbers of each type of firewall object are shown in the
FortiConverter 6.0.1 Admin Guide 101Fortinet Technologies Inc.

3rd Part Security Vendors Conversion
preview table. Click the object number to see detailedinformation on each object. In each type of object, click thebutton Export CSV to export the current object info as CSVfile.
VDOM Mapping Section
Because a single Stonesoft config could contain multiple configurations for multiple devices, an explicit info ofmapping from firewall names (e.g. <fw_cluster> or <fw_single> or <virtual_fw>) to policy package names (<fw_policy>) is required. Otherwise, policy packages that are missing mapping information will fail to apply.
There are two ways to specify the mapping:
1. 1. Before the conversion, for each firewall-policy pair, manually modify the config by adding <granted_policy_ref> tag with the following format to the end of the config.
2. If <granted_policy_ref> tags are not found while parsing, it is possible to select them from the dropdownlist in VDOM mapping page. (For <master_engine> tag, just choose "Master Engine" from the dropdownlist.)
FortiConverter 6.0.1 Admin Guide 102Fortinet Technologies Inc.

3rd Part Security Vendors Conversion
Forcepoint Stonesoft Interface mapping
You can manually map the interface.
To select the appropriate FortiGate interface, click the value in the FortiGate Interface column, and then selecta value or enter a custom interface name.
To edit other values, double-click the proper column. Use the toolbar icon on the right to show and hidecolumns. You can also use the Tuning page to create mappings after the conversion is complete.
To import a set of interface mappings from a file, click Import.
To download the current set of interface mappings, clickExport.
To delete an interface, select the entry and clickDelete Selected. This is useful if your target FortiGate hasfewer interfaces than the source configuration.
Setting Description
VDOM Shows the virtual domains used in the conversion.
Source Interface Shows each interface name on the Stonesoft firewall.
FortiGate Interface Shows the corresponding FortiGate interface. Click to assign a
FortiGate port for each interface.
Members Shows any members, if they are set.
IP-Netmask Shows the IP address and netmask of the connection.
Type Shows the type of interface.
Access Shows which protocols has permission to access each interface.
Import Click to load a set of interface mappings from a text file.
Export Saves the current set of interface mappings to a text file.
Delete Selected Click to delete the selected mapping item.
Forcepoint Stonesoft Route Information
FortiConverter creates static routes in the output using the static routes it detects from the source configurationas well as routing information you provided.
Double-click an item to edit it.
Setting Description
New Route Click to add a route.
Delete Click to delete the selected route.
FortiConverter 6.0.1 Admin Guide 103Fortinet Technologies Inc.

3rd Part Security Vendors Conversion
Forcepoint Stonesoft Conversion result
Tab Description
Conversion Summary Provides statistics about the conversion.
Interface Mapping Shows how interfaces were mapped for each VDOM from the sourcedevice.
Device Summary Provides statistics about the detected objects.
FortiConverter includes error and warning messages into the conversion when an erroroccurs.Review the config-all.txt file after each conversion for errors. These errors andwarning messages might cause the import process to fail, if not corrected. See formore details.
Huawei USG Firewall Conversion
Conversion support
FortiConverter supports the following features:
l Interfacel Zonel Address (group)l Service (group)l Policyl Routel Zonel IPSec Policy (VPN)l Security Contextl Nat Policy (Converted to Fortigate SNAT)l Nat Server (Converted to Fortigate VIP)
Saving the Huawei source configuration files
Before starting the conversion wizard, save a copy of your Huawei configuration file to the computer whereFortiConverter is installed.
FortiConverter 6.0.1 Admin Guide 104Fortinet Technologies Inc.

3rd Part Security Vendors Conversion
Exporting config through web operation
1. Choose System >Configuration File Management.2. ClickExport in Current Configuration.3. ClickSave and select a path on the terminal to save the configuration file.
Huawei conversion wizard
To start a new conversion
1. Start FortiConverter.
2. When start-up is complete, a browser window automatically opens to http://127.0.0.1:8000.
3. Click New Conversion, located at the top right corner.
4. Enter a name for the conversion configuration.
5. For Vendor, choose Huawei block.
6. Choose a Model, if applicable.
7. ClickOK.
The configuration page opens to the Start page, and you can input your settings.
Huawei Start options
This table lists the start settings.
Setting Description
Profile
Description Enter a description of the configuration.
Output Options
Output Format Select the appropriate output for your target Fortinetdevice.
FOS Version FortiOS 6.0 and 6.2 have different configurationsyntax. Select the version that corresponds to theFortiOS version for the target.
Input
Source Configuration Select the input file.
Virtual System Conversion Enable this option to convert configurations withmultiple virtual systems.
FortiConverter 6.0.1 Admin Guide 105Fortinet Technologies Inc.

3rd Part Security Vendors Conversion
Setting Description
Root Configuration Select the system configuration file. This file shouldinclude interfaces and config file names for eachsecurity context. This option only appears if VirtualSystem Conversion is enabled.
Vsys Configuration (.zip) Select the .zip file containing all the config files. Thefile name for each context should match the namegiven in the root configuration file. This option onlyappears if Virtual System Conversion is enabled.Please see example in Input and naming for vsys file onpage 107.
Bulk conversion If there are many devices to be converted where all ofthem are the same model, sharing the same interfacemapping relationship in conversion, then bulkconversion can convert all of them at once. Collect allthe configuration files to be converted, compress theminto a ZIP file and use the ZIP file as the input.
Target device (Optional)
Target device Select the model of the target device, or select a deviceconnected to FortiConverter.
Conversion Options
Discard unreferenced firewall objects Specifies whether addresses and services that aren'treferenced by a policy are saved and added to theoutput. This option can be useful if your target devicehas table size limitations. You can view theunreferenced objects that FortiConverter removed onthe Tuning page.
Increase Address and Service Table Sizes forHigh-End Models
You can customize the maximum table sizes thatFortiConverter uses when "Adjust table sizes" isselected. For more information, see Adjusting tablesizes on page 163.
Comment Options
Include input configuration lines for eachoutput policy
Specifies whether FortiConverter includes the inputconfiguration lines used for each FortiGate policy in theFortiGate configuration as a policy comment.
Address Comment Specifies whether FortiConverter copies the addresscomment from source configuration to the convertedFortiGate address.
Service Comment Specifies whether FortiConverter copies the servicecomment from the source configuration to theconverted FortiGate service.
FortiConverter 6.0.1 Admin Guide 106Fortinet Technologies Inc.

3rd Part Security Vendors Conversion
Setting Description
Nat Merge Options
Enable central NAT merge Specifies whether FortiConverter converts NATs toFortiGate central NATs instead of policy-based NATs.It is recommended to enable this option with FOS 6.0or later.
Input and naming for vsys file
Here is an example on inputting vsys file and naming convention, please note that the file name should matchthe root:
Suppose the root config (test-FW-01) contains the following vsys information:
Then test-FW-01.zip should contain config files "test-FW-01-first", "test-FW-01-test_sec","test-FW-01-something".
i.e. vsys filename = root file name and vsys name joined by dash.
The files should not have a filename extension (for example .txt), otherwise thefilename-vsys matching would fail.
FortiConverter 6.0.1 Admin Guide 107Fortinet Technologies Inc.

3rd Part Security Vendors Conversion
VPN Instance
Map the VPN instances in the source configuration to VDOMs in the output configuration.
By default, all VPN instances are mapped to VDOMs with the same name. You can modify this defaultmapping as required by renaming VDOMs and removing VPN instances from the conversion.
Setting Description
[trash] Click to delete the selected mapping item.
Removed vdom Select a removed VDOM and clickAdd to add it back intoVDOM list.
Information of Configurations Source configuration file names are shown in the table as alink. Click the link to see the content. The file won’t show if it’stoo large.
Target Device Switch Interface -Interface/Port
If there are virtual switches in the selected target device,FortiConverter will list the member ports of the virtualswitches. If an interface in the list is going to be used in theconfiguration, it should first be detached from the virtualswitch. Click "X" on the interface to detach it. Please note thata detached interface cannot be re-added later byFortiConverter.
Source Configuration Preview The numbers of each type of firewall object are shown in thepreview table. Click the object number to see detailedinformation on each object. In each type of object, click thebutton Export CSV to export the current object info as CSVfile.
Huawei Interface mapping
You can manually map the interface.
To select the appropriate FortiGate interface, click the value in the FortiGate Interface column, and then selecta value or enter a custom interface name.
To edit other values, double-click the proper column. Use the toolbar icon on the right to show and hidecolumns. You can also use the Tuning page to create mappings after the conversion is complete.
To import a set of interface mappings from a file, click Import.
To download the current set of interface mappings, clickExport.
FortiConverter 6.0.1 Admin Guide 108Fortinet Technologies Inc.

3rd Part Security Vendors Conversion
To delete an interface, select the entry and clickDelete Selected. This is useful if your target FortiGate hasfewer interfaces than the source configuration.
Setting Description
VDOM Shows the virtual domains used in the conversion.
Source Interface Shows each interface name on the Huawei firewall.
FortiGate Interface Shows the corresponding FortiGate interface. Click to assign aFortiGate port for each interface.
Members Shows any members, if they are set.
IP-Netmask Shows the IP address and netmask of the connection.
Type Shows the type of interface.
Access Shows which protocols have permission to access each interface.
Import Click to load a set of interface mappings from a text file.
Export Saves the current set of interface mappings to a text file.
Delete Selected Click to delete the selected mapping item.
Huawei Route Information
FortiConverter creates static routes in the output using the static routes it detects in the source configurationand any routing information you provide.
Double-click an item to edit it.
Setting Description
New Route Click to add a route.
Delete Click to delete the selected route.
Huawei Conversion result
Tab Description
Conversion Summary Provides statistics about the conversion.
Interface Mapping Shows how interfaces were mapped for each VDOM from the source device.
Device Summary Provides statistics about the detected objects.
FortiConverter includes error and warning messages into the conversion when an erroroccurs.Review the config-all.txt file after each conversion for errors. These errors andwarning messages might cause the import process to fail, if not corrected. See formore details.
FortiConverter 6.0.1 Admin Guide 109Fortinet Technologies Inc.

3rd Part Security Vendors Conversion
Juniper Conversions
Juniper ScreenOS or Junos OS differences
VLAN logical interfaces
FortiConverter recognizes interface names starting with "vlan" as logical interfaces.
Service objects
Junos OS service objects support MS-RPS and SUN-RPC, where program-numbers (SUN) and UUID (MS) areused instead of ports.
FortiOS supports this configuration using Application Control with an application override.
Example of Junos service object conversion
config application listedit "MS-ActiveDirectory"
config entriesedit 1
set application 152305667config parametersedit 1
set value "45f52c28-7f9f-101a-b52b-08002b2efabe"nextedit 2
set value "811109bf-a4e1-11d1-ab54-00a0c91e9b45"nextendset action pass
nextend
nextend
edit 10012set srcintf "trust"set dstintf "mgn"set srcaddr "MEI-Novi-172.24.81.0-24" "MEI-Novi-172.24.80.0-24" "MEI-Novi-
172.24.252.112-28"set dstaddr "MEI-WAN"set service "MS-ActiveDirectory"set schedule "always"set logtraffic allset status enableset action acceptset comments "95"set application-list "MS-ActiveDirectory"
FortiConverter 6.0.1 Admin Guide 110Fortinet Technologies Inc.

3rd Part Security Vendors Conversion
next
NAT support
For SRX Series gateways, supports the FortiConverter conversion of the following NAT types:
l Destination NATl Source NATl Static NAT
In ScreenOS, source NAT is implicitly enabled when: the destination zone is in the untrust-vr, the source zoneis trust zone and the destination zone is untrust zone, and both belong to the trust-vr.
Saving the Juniper source configuration file
Before starting the conversion wizard, save a copy of your Juniper configuration file to the computer whereFortiConverter is installed.
To get the configuration, for both ScreenOS and Junos, in the web UI, go to Configuration> Update> ConfigFile.
Alternatively, for ScreenOS only, you can use the get conf CLI command and paste the output into a plaintext file.
For Junos, FortiConverter requires the structural configuration file as a valid input. For example:
show configuration## Last commit: 2013-06-05 11:28:53 CST by masterversion 10.2S7;groups {
node0 {system {
host-name SRX3400-Active;backup-router 172.16.1.254 destination 0.0.0.0/0;
}interfaces {
fxp0 {unit 0 {
family inet {address 172.16.1.1/24;
}}
}}
}........................
FortiConverter 6.0.1 Admin Guide 111Fortinet Technologies Inc.

3rd Part Security Vendors Conversion
Juniper conversion wizard
The administrator password is not set on the new configuration.For third-party conversions, the trusted host settings are converted. Check the trustedhost settings to ensure they allow management access from the relevant networkinterfaces.
To start a new conversion
1. Start FortiConverter.
2. When start-up is complete, a browser window automatically opens to http://127.0.0.1:8000.
3. Click New Conversion, located at the top right corner.
4. Enter a name for the conversion configuration.
5. For Vendor, choose Juniper block.
6. Choose a Model, if applicable.
7. ClickOK.
The configuration page opens to the Start page, and you can input your settings.
Juniper Start options
This table lists the start settings.
Setting Description
Profile
Description Enter a description of the configuration.
Output Options
Output Format Select the appropriate output for your target Fortinetdevice.
FOS Version FortiOS5.6 and 6.0 have different configuration syntaxes.Select the version that corresponds to the FortiOS versionon the target.
Input
Source Configuration Select the input file or files.
Bulk Conversion If there are many devices to be converted where all of themare the same model, sharing the same interface mappingrelationship in conversion, then bulk conversion canconvert all of them at once. Collect all the configurationfiles to be converted, compress them into a ZIP file anduse the ZIP file as the input.
FortiConverter 6.0.1 Admin Guide 112Fortinet Technologies Inc.

3rd Part Security Vendors Conversion
Conversion Options
Discard unreferenced firewall objects Specifies whether addresses, schedules, and services thataren't referenced by a policy are saved and added to theoutput. This option can be useful if your target device hastable size limitations. You can view the unreferencedobjects that FortiConverter removed on the Tuning page.
Increase Address and Service Table Sizesfor High-End Models
You can customize the maximum table sizes thatFortiConverter uses when Adjust table sizes is selected.For more information, see Adjusting table sizes on page163
Route-based IPSec Specifies whether Route-based IPSec is used for thisconversion.
Convert virtual router into FOS virtualdomain
FortiOS doesn’t have a corresponding feature to the virtualrouter in Juniper SRX, but it is an approach to convert avirtual router into an independent VDOM in FortiOS. Whenthis option is enabled, each virtual router would beconverted into a VDOM.
Enable consolidated policy mode Enable consolidated mode in FortiOS and convert securityrules into consolidated policies which are able to referenceboth IPv4 and IPv6 addresses in a single policy.
Use Zone name instead of number todistinguish duplicate address names(SRX only)
Juniper SRXmay have multiple address objects with thesame name but tied to different zones. When this option isenabled, duplicate address name will be converted toorigname_zonename. When disabled, they will beconverted to origname_1, origname_2… etc.
Target device (Optional)
Target device Select the model of the target device, or select a deviceconnected to FortiConverter.
Comment Options
Include input configuration lines for eachoutput policy
Specifies whether FortiConverter includes the inputconfiguration lines used for each FortiGate policy in theFortiGate configuration as a policy comment.
Interface Comment Specifies whether FortiConverter copies the interfacecomment from the source configuration to the mappedFortiGate interface.
Address Comment Specifies whether FortiConverter copies the addresscomment from source configuration to the convertedFortiGate address.
Service Comment Specifies whether FortiConverter copies the servicecomment from the source configuration to convertedFortiGate service.
FortiConverter 6.0.1 Admin Guide 113Fortinet Technologies Inc.

3rd Part Security Vendors Conversion
Rule comment Specifies whether FortiConverter copies the security rulecomment from the source configuration to convertedFortiGate service.
Rule comment (SSG and MX) Specifies whether FortiConverter copies the security rulecomment from the source configuration to convertedFortiGate policies.
Rule annotated comment (SRX only) Specifies whether FortiConverter copies the annotatedlines in rules from the source configuration to convertedFortiGate policies.
NAT Merge Options
Ignore firewall policies with all or anyaddresses when processing NAT rules(SRX only)
Specifies whether FortiConverter ignores firewall policieswith an "all" or "any" address when it merges a NAT ruleand a firewall policy to create a FortiGate NAT policy.FortiConverter creates new policies in the outputconfiguration based on where NAT rules to firewall policiesintersect. Because firewall policies that use "all" or "any" asthe address create many intersections, Fortinetrecommends that you ignore them.
Enable Central NAT merge Specifies whether FortiConverter converts NATs toFortiGate central NATs instead of policy-based NATs.
NAT Merge Depth (SRX only)
Source NAT Specifies which types of NAT FortiConverter merges withthe output firewall policies, or whether FortiConverterperforms NAT merge based on object names or values.l Off – FortiConverter converts firewall policies only and
doesn't perform NAT merge for this type of NAT. Thisis useful for performing a quick, initial conversion todiscover any conversion issues.
l Object Names – FortiConverter performs NAT mergebased on matching address names in firewall policiesand NAT rules.
l Object Values – FortiConverter performs NAT mergebased on matching address values in firewall policiesand NAT rules. It generates the most accuratematching of NAT rules and policies, but in most cases,it also generates more NAT policies.
Because it can take FortiConverter several hours tocomplete a conversion that include a large number of NATrules, Fortinet recommends that you turn off or limit NATmerge for your initial conversion. Then, resolve any issueswith the conversion before you run it again with NAT mergeenabled. For more information, including examplematches, see NAT merge options on page 163.
Static NAT
Destination NAT
FortiConverter 6.0.1 Admin Guide 114Fortinet Technologies Inc.

3rd Part Security Vendors Conversion
LSYS (Junos OS) or VSYS (ScreenOS) selection
Map the logical or virtual systems in the source configuration to VDOMs in the output configuration.
By default, all logical or virtual systems are mapped to VDOMs with the same name. You can modify thisdefault mapping as required by renaming VDOMs and removing logical or virtual systems from the conversion.
Setting Description
[trash] Click to delete the selected mapping item.
Removed vdom Select a removed VDOM and clickAdd to add it back intoVDOM list.
Information of Configurations Source configuration file names are shown in the table as alink. Click the link to see the content. The file won’t show if it’stoo large.
Target Device Switch Interface -Interface/Port
If there are virtual switches in the selected target device,FortiConverter will list the member ports of the virtualswitches. If an interface in the list is going to be used in theconfiguration, it should first be detached from the virtualswitch. Click "X" on the interface to detach it. Please note thata detached interface cannot be re-added later byFortiConverter.
Source Configuration Preview The numbers of each type of firewall object are shown in thepreview table. Click the object number to see detailedinformation on each object. In each type of object, click thebutton Export CSV to export the current object info as CSVfile.
Juniper Interface mapping
You can manually map the interface.
l To select the appropriate FortiGate interface, click the value in the FortiGate Interface column, and thenselect a value or enter a custom interface name.
l To edit other values, double-click the proper column. Use the toolbar icon on the right to show and hidecolumns. You can also use the Tuning page to create mappings after the conversion is complete.
l To import a set of interface mappings from a file, click Import.l To download the current set of interface mappings, clickExport.l To delete an interface, select the entry and clickDelete Selected. This is useful if your target FortiGate
has fewer interfaces than the source configuration.
FortiConverter 6.0.1 Admin Guide 115Fortinet Technologies Inc.

3rd Part Security Vendors Conversion
Setting Description
VDOM Shows the virtual domains used in the conversion.
Source Interface Shows each interface on the Cisco firewall.
FortiGateInterface
Shows the corresponding FortiGate interface. Click to assign a FortiGate port for eachinterface.
Members Shows any members, if they are set.
IP-Netmask Shows the IP address and netmask of the connection.
Type Shows the type of interface.
Access Shows which protocols has permission to access each interface.
Import Click to load a set of interface mappings from a text file.
Export Saves the current set of interface mappings to a text file.
Delete Selected Click to delete the selected mapping item.
Juniper Route Information
FortiConverter creates static routes in the output using the static routes it detects in the source configurationand any routing information you provide.
Double-click an item to edit it.
Setting Description
New Route Click to add a route.
Delete Click to delete the selected route.
Juniper Conversion result
Tab Description
Conversion Summary Provides statistics about the conversion.
VDOM Mapping Shows how VDMSwere mapped from the source device to the new device.
Interface Mapping Shows how interfaces were mapped for each VDOM from the source device.
Device Summary Provides statistics about the detected objects.
FortiConverter includes error and warning messages into the conversion when an erroroccurs.Review the config-all.txt file after each conversion for errors. These errors andwarning messages might cause the import process to fail, if not corrected. See formore details.
FortiConverter 6.0.1 Admin Guide 116Fortinet Technologies Inc.

3rd Part Security Vendors Conversion
McAfee Sidewinder Conversion
This section covers conversions forMcAfee Sidewinder (McAfee Firewall Enterprise). For ForcepointStonesoft conversion, please see Forcepoint Stonesoft Conversion on page 99.
Saving the McAfee source configuration file
Before starting the conversion wizard:McAfee, save a copy of your configuration file to the computer whereFortiConverter is installed.
The following is forMcAfee Firewall Enterprise 8. The config is binary therefore the output of the followingcommands must be saved to a text file for FortiConverter.
l Interface and Zone (cf interface|zone|zonegroup query)l Address object and address group object (cf domain|ipaddr|iprange|subnet|netgroup
query)l Service object and service group object (cf application|appgroup query)l Admin users and firewall users & user groups (cf adminuser query, cf udb query, cf
usergroup query)l Static routes (cf route query)l Firewall Policy (cf policy query)
Syntax difference on Sidewinder's CLI between v7 and v8
McAfee Firewall Enterprise v7 McAfee Firewall Enterprise v8
cf interface query cf interface query
cf burb query cf zone query
cf burbgroup query cf zonegroup query
cf domain query cf domain query
cf ipaddr query cf ipaddr query
cf iprange query cf iprange query
cf subnet query cf subnet query
cf netgroup query cf netgroup query
cf service query cf application query
cf servicegroup query cf appgroup query
cf adminuser query cf adminuser query
cf udb query cf udb query
FortiConverter 6.0.1 Admin Guide 117Fortinet Technologies Inc.

3rd Part Security Vendors Conversion
cf usergroup query cf usergroup query
cf static query cf route query
cf policy query cf policy query
McAfee conversion wizard
The administrator password is not set on the new configuration.For third-party conversions, the trusted host settings are converted. Check the trustedhost settings to ensure they allow management access from the relevant networkinterfaces.
To start a new conversion
1. Start FortiConverter. When start-up is complete, a browser window automatically opens tohttp://127.0.0.1:8000.
2. ClickNew Conversion, located at the top right corner.3. Enter a name for the conversion configuration.4. For Vendor, chooseMcAfee from the drop-down list.5. For Model, choose Sidewinder v7 or Sidewinder v8.6. ClickOK.
The configuration page opens to the Start page, and you can input your settings
McAfee Start options
This table lists the start settings.
Setting Description
Profile
Description Enter a description of the configuration.
Output Options
Output Format Select the appropriate output for your target Fortinet device.
FOS Version FortiOS 6.0 and 6.2 have different configuration syntaxes. Select theversion that corresponds to the FortiOS version on the target.
Input
Source Configuration Select the input file.
FortiConverter 6.0.1 Admin Guide 118Fortinet Technologies Inc.

3rd Part Security Vendors Conversion
Setting Description
Bulk conversion If there are many devices to be converted where all of them are the samemodel, sharing the same interface mapping relationship in conversion,then bulk conversion can convert all of them at once. Collect all theconfiguration files to be converted, compress them into a ZIP file and usethe ZIP file as the input.
Conversion Options
Discard unreferencedfirewall objects
Specifies whether addresses and services that aren't referencedby a policy are saved and added to the output. This option can be useful ifyour target device has table size limitations. You can view the unreferencedobjects that FortiConverter removed on the Tuning page.
Increase Address andService Table Sizes forHigh-End Models
You can customize the maximum table sizes that FortiConverter useswhen Adjust table sizes is selected. For more information, see Adjustingtable sizes on page 163.
Source Preview
This page shows the information inside the configuration.
Setting Description
Information ofConfigurations
Source configuration file names are shown in the table as a link. Click thelink to see the content. The file won’t show if it’s too large.
Source ConfigurationPreview
The numbers of each type of firewall object are shown in the preview table.Click the object number to see detailed information on each object. In eachtype of object, click the download icon to export the current object info asCSV file.
McAfee Interface mapping
You can manually map the interface.
To select the appropriate FortiGate interface, click the value in the FortiGate Interface column, and then selecta value or enter a custom interface name.
To edit other values, double-click the proper column. Use the toolbar icon on the right to show and hidecolumns. You can also use the Tuning page to create mappings after the conversion is complete.
To import a set of interface mappings from a file, click Import.
To download the current set of interface mappings, clickExport.
To delete an interface, select the entry and clickDelete Selected. This is useful if your target FortiGate hasfewer interfaces than the source configuration.
FortiConverter 6.0.1 Admin Guide 119Fortinet Technologies Inc.

3rd Part Security Vendors Conversion
Setting Description
VDOM Shows the virtual domains used in the conversion.
Source Interface Shows each interface name on the Sidewinder firewall.
FortiGate Interface Shows the corresponding FortiGate interface. Click to assign aFortiGate port for each interface.
Members Shows any members, if they are set.
IP-Netmask Shows the IP address and netmask of the connection.
Type Shows the type of interface.
Access Shows which protocols has permission to access each interface.
Import Click to load a set of interface mappings from a text file.
Export Saves the current set of interface mappings to a text file.
Delete Selected Click to delete the selected mapping item.
McAfee Route Information
FortiConverter creates static routes in the output using the static routes it detects in the source configurationand any routing information you provide.
Double-click an item to edit it.
Setting Description
New Route Click to add a route.
Delete Click to delete the selected route.
McAfee Conversion result
Tab Description
Conversion Summary Provides statistics about the conversion.
Interface Mapping Shows how interfaces were mapped for each VDOM from thesource device.
Device Summary Provides statistics about the detected objects.
FortiConverter includes error and warning messages into the conversion when an erroroccurs.Review the config-all.txt file after each conversion for errors. These errors andwarning messages might cause the import process to fail, if not corrected. See formore details.
FortiConverter 6.0.1 Admin Guide 120Fortinet Technologies Inc.

3rd Part Security Vendors Conversion
Palo Alto Networks Conversion
Conversion support
FortiConverter supports the following features
l Interfacel Zonel Address(group) (Including IPV6)l Service(group)l Policyl NAT (Rule NAT only)l VPNl Routel Schedulel User
Saving the PAN source configuration files
Before starting the conversion wizard:Palo Alto, save a copy of your configuration file to the computer whereFortiConverter is installed.
In the web UI, go to Device > Setup > Operations, then clickExport named configuration snapshot.
If the configuration is managed using Panorama shared policy configuration, you should disable sharedconfiguration before exporting.
To disable Panorama shared configuration
1. Log in to the device you want to remove from Panorama.2. Go to Device > Setup > Management > Panorama Settings and clickDisable Panorama Policy
and Object orDisable Device and Network Template.
FortiConverter 6.0.1 Admin Guide 121Fortinet Technologies Inc.

3rd Part Security Vendors Conversion
3. Do one of the following to import the configuration from Panorama into the firewall local configuration:l If you clicked Disable Panorama Policy and Object, in the edit dialog box, select Import
Panorama Policy and Objects before disabling and then clickOK.
l If you clicked Disable Device and Network Template, select Import Device and NetworkTemplate before disabling and then clickOK.
4. Log in to the device that was removed from Panorama and go to Device > Setup > Operations > Save> Save named configuration snapshot.
5. Enter a name that helps to identify the configuration. In this example, it is pan2fg.
FortiConverter 6.0.1 Admin Guide 122Fortinet Technologies Inc.

3rd Part Security Vendors Conversion
6. Go to Device > Setup > Operations > Export > Export the named configuration snapshot.
7. ClickOK.
Select the exported file on the Source Configuration page of the Palo Alto conversion wizard.
Palo Alto conversion wizard
The administrator password is not set on the new configuration.For third-party conversions, the trusted host settings are converted. Check the trustedhost settings to ensure they allow management access from the relevant networkinterfaces.
FortiConverter 6.0.1 Admin Guide 123Fortinet Technologies Inc.

3rd Part Security Vendors Conversion
To start a new conversion
1. Start FortiConverter.
2. When start-up is complete, a browser window automatically opens to http://127.0.0.1:8000.
3. Click New Conversion, located at the top right corner.
4. Enter a name for the conversion configuration.
5. For Vendor, choose PaloAlto block.
6. Choose a Model, if applicable.
7. ClickOK.
The configuration page opens to the Start page, and you can input your settings.
Palo Alto Start options
This table lists the start settings.
Setting Description
Profile
Description Enter a description of the configuration.
Output Options
Output Format Select the appropriate output for your target Fortinetdevice.
FOS Version FortiOS 6.0 and 6.2 have different configurationsyntaxes. Select the version that corresponds to theFortiOS version on the target.
Input
Source Configuration Select the input file.
Bulk Conversion If there are many devices to be converted where all ofthem are the same model, sharing the same interfacemapping relationship in conversion, then bulk conversioncan convert all of them at once. Collect all theconfiguration files to be converted, compress them intoa ZIP file and use the ZIP file as the input.
Target device (Optional)
Target device Select the model of the target device, or select a deviceconnected to FortiConverter.
Conversion Options
Discard unreferenced firewall objects Specifies whether addresses and services that aren't
FortiConverter 6.0.1 Admin Guide 124Fortinet Technologies Inc.

3rd Part Security Vendors Conversion
referenced by a policy are saved and added to theoutput. This option can be useful if your target devicehas table size limitations. You can view theunreferenced objects that FortiConverter removed onthe Tuning page.
Increase Address and Service Table Sizesfor High-End Models
You can customize the maximum table sizes thatFortiConverter uses when Adjust table sizes is selected.For more information, see Adjusting table sizes on page163.
Comment Options
Include input configuration lines for eachoutput policy
Specifies whether FortiConverter includes the inputconfiguration lines used for each FortiGate policy in theFortiGate configuration as a policy comment.
Interface Comment Specifies whether FortiConverter copies the interfacecomment from the source configuration to the mappedFortiGate interface.
Address Comment Specifies whether FortiConverter copies the addresscomment from source configuration to the convertedFortiGate address.
Service Comment Specifies whether FortiConverter copies the servicecomment from the source configuration to convertedFortiGate service.
Nat Merge Options
Ignore firewall policies with all or anyaddresses when processing NAT rules
Specifies whether FortiConverter ignores firewallpolicies with an "all" or "any" address when it merges aNAT rule and a firewall policy to create a FortiGate NATpolicy. FortiConverter creates new policies in the outputconfiguration based on where NAT rules to firewallpolicies intersect. Because firewall policies that use "all"or "any" as the address create many intersections,Fortinet recommends that you ignore them.
Enable central NAT merge Specifies whether FortiConverter converts NATs toFortiGate central NATs instead of policy-based NATs. Itis recommended to enable this option with FOS 6.0.
PAN Source Configuration
Source Preview
Setting Description
Information of Configurations Source configuration file names are shown inthe table as a link. Click the link to see thecontent. The file won’t show if it’s too large.
FortiConverter 6.0.1 Admin Guide 125Fortinet Technologies Inc.

3rd Part Security Vendors Conversion
Target Device Switch Interface - Interface/Port If there are virtual switches in the selectedtarget device, FortiConverter will list themember ports of the virtual switches. If aninterface in the list is going to be used in theconfiguration, it should first be detached fromthe virtual switch. Click "X" on the interface todetach it. Please note that a detached interfacecannot be re-added later by FortiConverter.
Source Configuration Preview The numbers of each type of firewall object areshown in the preview table. Click the objectnumber to see detailed information on eachobject. In each type of object, click the buttonExport CSV to export the current object infoas CSV file.
Palo Alto Interface mapping
You can manually map the interface.
l To select the appropriate FortiGate interface, click the value in the FortiGate Interface column, and thenselect a value or enter a custom interface name.
l To edit other values, double-click the proper column. Use the toolbar icon on the right to show and hidecolumns. You can also use the Tuning page to create mappings after the conversion is complete.
l To import a set of interface mappings from a file, click Import.l To download the current set of interface mappings, clickExport.l To delete an interface, select the entry and clickDelete Selected. This is useful if your target FortiGate
has fewer interfaces than the source configuration.
Setting Description
VDOM Shows the virtual domains used in the conversion.("root" by default)
Source Interface Shows each interface name on the PaloAlto firewall.
FortiGateInterface
Shows the corresponding FortiGate interface. Click to assign a FortiGate port for eachinterface.
Members Shows any members, if they are set.
IP-Netmask Shows the IP address and netmask of the connection.
Type Shows the type of interface.
Access Shows which protocols has permission to access each interface.
Import Click to load a set of interface mappings from a text file.
Export Saves the current set of interface mappings to a text file.
Delete Selected Click to delete the selected mapping item.
FortiConverter 6.0.1 Admin Guide 126Fortinet Technologies Inc.

3rd Part Security Vendors Conversion
Palo Alto Route Information
FortiConverter creates static routes in the output using the static routes it detects in the source configurationand any routing information you provide.
Double-click an item to edit it.
Setting Description
New Route Click to add a route.
Delete Click to delete the selected route.
Palo Alto Conversion result
Tab Description
Conversion Summary Provides statistics about the conversion.
Interface Mapping Shows how interfaces were mapped for each VDOM from the source device.
Device Summary Provides statistics about the detected objects.
FortiConverter includes error and warning messages into the conversion when an erroroccurs.Review the config-all.txt file after each conversion for errors. These errors andwarning messages might cause the import process to fail, if not corrected. See formore details.
SonicWall Conversion
SonicWall differences
Special characters
FortiGate reserves '#' (hash sign), '(', and ')' (open and close curved brackets) as special characters. You can'tuse them in the configuration unless an escape sequence precedes them. FortiConverter replaces thesecharacters with the characters: '*' (star), '[' and ']' (open and close square brackets).
Examples:
l The address book "SNWL #1" becomes "SNWL *1".l The service book "Citrix TCP (Session Reliability)" becomes "Citrix TCP [Session Reliability]".
FortiConverter 6.0.1 Admin Guide 127Fortinet Technologies Inc.

3rd Part Security Vendors Conversion
Address book configuration
l On FortiGate address objects don't support MAC addresses. Therefore, the wizard doesn't migrateSonicWall MAC addresses.
l FortiConverter generates two extra address book entries: "Any" and "_Address_Null".l "Any" is added because it is a default address book in SonicWall.l FortiConverter generates "_Address_Null" because FortiGate address groups don't allow a group without
any members. Only empty address groups can refer to "_Address_Null".
Service book configuration
FortiConverter doesn't migrate SonicWall service objects that are predefined on FortiGate. For example, HTTPport 80 and HTTPS port 443.
Schedule configuration
l A SonicWall schedule group can contain only one "one-time" schedule and multiple "recur" schedules. The"one-time" schedule is an implicit object that you can embed in the schedule group. Because FortiGatedefines each schedule group explicitly, FortiConverter automatically generates "one-time" schedules forthe SonicWall implicit schedules.
l FortiGate time schedule configuration doesn't support "24:00" (equal to the next day’s 00:00). It uses"00:00" instead. When FortiConverter converts a SonicWall "recur" time schedule such as "M 00:00 to24:00", it sets the end time to "00:00".
Local User and User Group
l Because FortiConverter can't parse the local user’s password string, it sets all passwords to "123456".l Unlike FortiConverter, SonicWall allows you to nest user groups.
For example, in SonicWall, usergroup1 can be a member of usergroup1. FortiConverter removes any nestedconfigurations.
Route configuration
l FortiConverter doesn't convert automatically generated routes like connected route and host route.
FortiConverter 6.0.1 Admin Guide 128Fortinet Technologies Inc.

3rd Part Security Vendors Conversion
Saving the SonicWall source configuration file
Before starting the conversion wizard:SonicWall, save a copy of your configuration file to the computer whereFortiConverter is installed.
In the web UI, go to System > Settings > Export Settings to export the settings file.
SonicWall conversion wizard
The administrator password is not set on the new configuration.For third-party conversions, the trusted host settings are converted. Check the trustedhost settings to ensure they allow management access from the relevant networkinterfaces.
To start a new conversion
1. Start FortiConverter.
2. When start-up is complete, a browser window automatically opens to http://127.0.0.1:8000.
3. Click New Conversion, located at the top right corner.
4. Enter a name for the conversion configuration.
5. For Vendor, choose SonicWall block.
6. Choose a Model, if applicable.
7. ClickOK.
The configuration page opens to the Start page, and you can input your settings.
SonicWall Start options
This table lists the start settings.
Setting Description
Profile
Description Enter a description of the configuration.
Output Options
Output Format Select the appropriate output for your target Fortinet device.
FOS Version FortiOS 6.0 and 6.2 have different configuration syntaxes.Select the version that corresponds to the FortiOS version onthe target.
Input
Source Configuration Select the input file.
FortiConverter 6.0.1 Admin Guide 129Fortinet Technologies Inc.

3rd Part Security Vendors Conversion
Bulk Conversion If there are many devices to be converted where all of themare the same model, sharing the same interface mappingrelationship in conversion, then bulk conversion can convertall of them at once. Collect all the configuration files to beconverted, compress them into a ZIP file and use the ZIP fileas the input.
Target device (Optional)
Target device Select the model of the target device, or select a deviceconnected to FortiConverter.
Conversion Options
Discard unreferenced firewall objects Specifies whether addresses, schedules, and services thataren't referenced by a policy are saved and added to theoutput.This option can be useful if your target device has table sizelimitations. You can view the unreferenced objects thatFortiConverter removed on the Tuning page.
Increase Address and Service TableSizes for High-End Models
You can customize the maximum table sizes thatFortiConverter uses when Adjust table sizes is selected. Formore information, see Adjusting table sizes on page 163.
Expand zones into lists of interfaces When this option is enabled, FortiConverter discards all zoneobjects in SonicWALL and directly use interfaces as thesource and destination interface of firewall policies.
Comment Options
Include input configuration lines foreach output policy
Specifics whether FortiConverter uses SW_RULE_ID aspolicy comment for each FortiGate policy or the originalcomment from rules in SonicWall configuration.
NAT Merge Options
Ignore firewall policies with all or anyaddresses
Specifies whether FortiConverter ignores firewall policieswith an "all" or "any" address when it merges a NAT rule and afirewall policy to create a FortiGate NAT policy.FortiConverter creates new policies in the outputconfiguration based on where NAT rules to firewall policiesintersect. Because firewall policies that use "all" or "any" asthe address create many intersections, Fortinet recommendsthat you ignore them.
Enable Central NAT merge Specifies whether FortiConverter converts NATs to FortiGatecentral NATs instead of policy-based NATs
Nat Merge Depth
Identical NATSource NATDestination NAT
Specifies which types of NAT FortiConverter merges with theoutput firewall policies, or whether FortiConverter performsNAT merge based on object names or values.
FortiConverter 6.0.1 Admin Guide 130Fortinet Technologies Inc.

3rd Part Security Vendors Conversion
Double NAT l Off -FortiConverter converts firewall policies only anddoesn't perform NAT merge for this type of NAT. This isuseful for performing a quick, initial conversion todiscover any conversion issues.
l Object Names–FortiConverter performs NAT mergebased on matching address names in firewall policiesand NAT rules.
l Object Values–FortiConverter performs NAT mergebased on matching address values in firewall policiesand NAT rules. It generates the most accurate matchingof NAT rules and policies, but in most cases, it alsogenerates more NAT policies.
SonicWall Source Configuration
Source Preview
Setting Description
Information of Configurations Source configuration file names are shown in thetable.
Target Device Switch Interface - Interface/Port If there are virtual switches in the selected targetdevice, FortiConverter will list the member ports of thevirtual switches. If an interface in the list is going to beused in the configuration, it should first be detachedfrom the virtual switch. Click "X" on the interface todetach it. Please note that a detached interfacecannot be re-added later by FortiConverter.
Source Configuration Preview The number of each type of firewall object are shownin the preview table. Click the object number to seedetailed information about each object. In each typeof object, click the button Export CSV to export thecurrent object info as CSV file.
SonicWall Interface mapping
You can manually map the interface.
l To select the appropriate FortiGate interface, click the value in the FortiGate Interface column, and thenselect a value or enter a custom interface name.
l To edit other values, double-click the proper column. Use the toolbar icon on the right to show and hidecolumns. You can also use the Tuning page to create mappings after the conversion is complete.
l To import a set of interface mappings from a file, click Import.l To download the current set of interface mappings, clickExport.
FortiConverter 6.0.1 Admin Guide 131Fortinet Technologies Inc.

3rd Part Security Vendors Conversion
l To delete an interface, select the entry and clickDelete Selected. This is useful if your target FortiGatehas fewer interfaces than the source configuration.
Setting Description
VDOM Shows the virtual domains used in the conversion.
Source Interface Shows each interface on the SonicWall firewall.
FortiGateInterface
Shows the corresponding FortiGate interface. Click to assign a FortiGate port for eachinterface.
Members Shows any members, if they are set.
IP-Netmask Shows the IP address and netmask of the connection.
Type Shows the type of interface.
Access Shows which protocols has permission to access each interface.
Import Click to load a set of interface mappings from a text file.
Export Saves the current set of interface mappings to a text file.
Delete Selected Click to delete the selected mapping item.
SonicWall Route Information
FortiConverter creates static routes in the output using the static routes it detects in the source configurationand any routing information you provide.
Double-click an item to edit it.
Setting Description
New Route Click to add a route.
Delete Click to delete the selected route.
SonicWall Conversion result
Tab Description
Conversion Summary Provides statistics about the conversion.
VDOM Mapping Shows how VDMSwere mapped from the source device to the new device.
Interface Mapping Shows how interfaces were mapped for each VDOM from the source device.
Device Summary Provides statistics about the detected objects.
FortiConverter 6.0.1 Admin Guide 132Fortinet Technologies Inc.
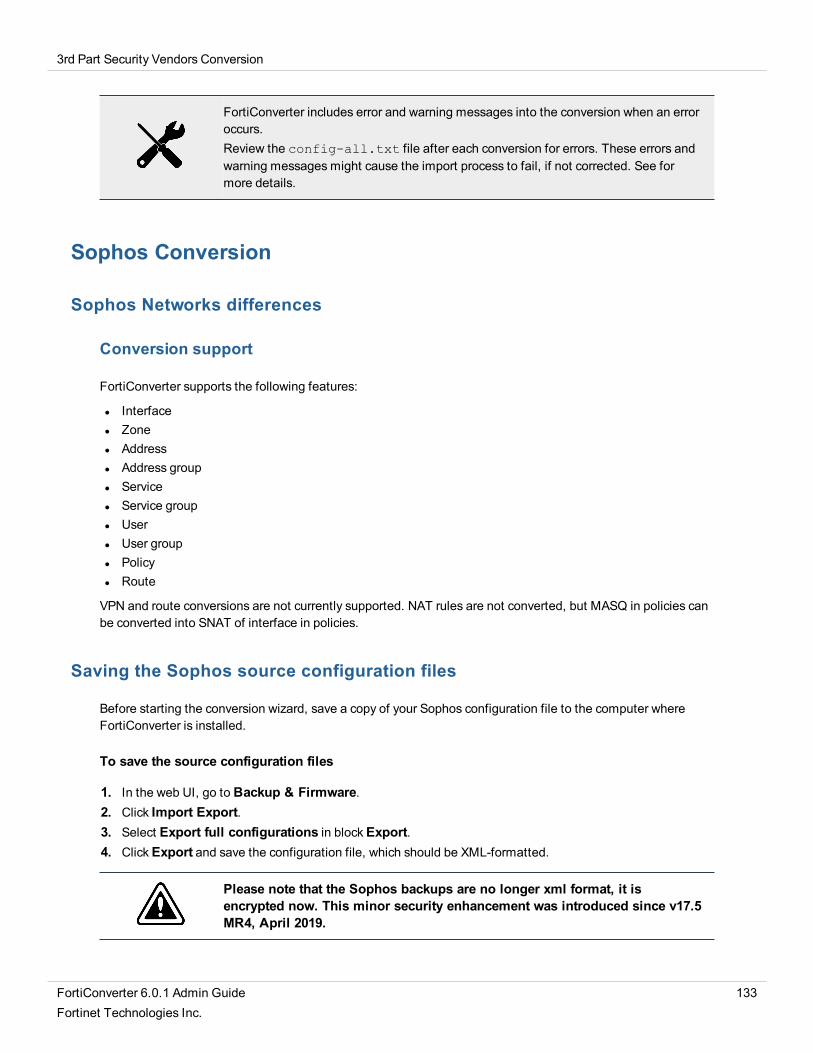
3rd Part Security Vendors Conversion
FortiConverter includes error and warning messages into the conversion when an erroroccurs.Review the config-all.txt file after each conversion for errors. These errors andwarning messages might cause the import process to fail, if not corrected. See formore details.
Sophos Conversion
Sophos Networks differences
Conversion support
FortiConverter supports the following features:
l Interfacel Zonel Addressl Address groupl Servicel Service groupl Userl User groupl Policyl Route
VPN and route conversions are not currently supported. NAT rules are not converted, but MASQ in policies canbe converted into SNAT of interface in policies.
Saving the Sophos source configuration files
Before starting the conversion wizard, save a copy of your Sophos configuration file to the computer whereFortiConverter is installed.
To save the source configuration files
1. In the web UI, go to Backup & Firmware.2. Click Import Export.3. Select Export full configurations in blockExport.4. ClickExport and save the configuration file, which should be XML-formatted.
Please note that the Sophos backups are no longer xml format, it isencrypted now. This minor security enhancement was introduced since v17.5MR4, April 2019.
FortiConverter 6.0.1 Admin Guide 133Fortinet Technologies Inc.

3rd Part Security Vendors Conversion
Sophos conversion wizard
To start a new conversion
1. Start FortiConverter.
2. When start-up is complete, a browser window automatically opens to http://127.0.0.1:8000.
3. Click New Conversion, located at the top right corner.
4. Enter a name for the conversion configuration.
5. For Vendor, choose Sophos block.
6. Choose a Model, if applicable.
7. ClickOK.
The configuration page opens to the Start page, and you can input your settings.
Sophos start options
This table lists the start settings.
Setting Description
Profile
Description Enter a description of the configuration.
Output Options
Output Format Select the appropriate output for your target Fortinet device.
FOS Version FortiOS 6.0 and 6.2 have different configuration syntaxes.Select the version that corresponds to the FortiOS version onthe target.
Input
Source Configuration Select the input file.
Bulk Conversion If there are many devices to be converted where all of themare the same model, sharing the same interface mappingrelationship in conversion, then bulk conversion can convertall of them at once. Collect all the configuration files to beconverted, compress them into a ZIP file and use the ZIP fileas the input.
Target device (Optional)
Target device Select the model of the target device, or select a deviceconnected to FortiConverter.
Conversion Options
Discard unreferenced firewall objects Specifies whether addresses and services that aren'treferenced by a policy are saved and added to the output.
FortiConverter 6.0.1 Admin Guide 134Fortinet Technologies Inc.

3rd Part Security Vendors Conversion
This option can be useful if your target device has table sizelimitations. You can view the unreferenced objects thatFortiConverter removed on the Tuning page.
Increase Address and Service TableSizes for High-End Models
You can customize the maximum table sizes thatFortiConverter uses when Adjust table sizes is selected. Formore information, see Adjusting table sizes on page 163.
Comment Options
Service Group Comment Specifies whether FortiConverter copies the service groupcomment from the source configuration to the FortiGateservice group.
Source preview
This table shows the information inside the configuration.
Setting Description
Information of Configurations Source configuration file names are shown in the table as alink. Click the link to see the content. The file won’t show ifit’s too large.
Target Device Switch Interface -Interface/Port
If there are virtual switches in the selected target device,FortiConverter will list the member ports of the virtualswitches. If an interface in the list is going to be used in theconfiguration, it should first be detached from the virtualswitch. Click "X" on the interface to detach it. Please notethat a detached interface cannot be re-added later byFortiConverter.
Source Configuration Preview The number of each type of firewall object are shown in thepreview table. Click the object number to see detailedinformation about each object. In each type of object, clickthe button Export CSV to export the current object info asCSV file.
Sophos Interface mapping
You can manually map the interface.
l To select the appropriate FortiGate interface, click the value in the FortiGate Interface column, and thenselect a value or enter a custom interface name.
l To edit other values, double-click the proper column. Use the toolbar icon on the right to show and hidecolumns. You can also use the Tuning page to create mappings after the conversion is complete.
l To import a set of interface mappings from a file, click Import.l To download the current set of interface mappings, clickExport.
FortiConverter 6.0.1 Admin Guide 135Fortinet Technologies Inc.

3rd Part Security Vendors Conversion
l To delete an interface, select the entry and clickDelete Selected. This is useful if your target FortiGatehas fewer interfaces than the source configuration.
Setting Description
VDOM Shows the virtual domains used in the conversion. ("root" by default)
Source Interface Shows each interface on the Sophos firewall.
FortiGateInterface
Shows the corresponding FortiGate interface. Click to assign a FortiGate port for eachinterface.
Members Shows any members, if they are set.
IP-Netmask Shows the IP address and netmask of the connection.
Type Shows the type of interface.
Access Shows which protocols has permission to access each interface.
Import Click to load a set of interface mappings from a text file.
Export Saves the current set of interface mappings to a text file.
Delete Selected Click to delete the selected mapping item.
Sophos Route Information
FortiConverter creates static routes in the output using the static routes it detects in the source configurationand any routing information you provide.
Double-click an item to edit it.
Setting Description
New Route Click to add a route.
Delete Click to delete the selected route.
Sophos conversion result
Tab Description
Conversion Summary Provides statistics about the conversion.
Interface Mapping Shows how interfaces are mapped for each VDOM from the source device.
Device Summary Provides statistics about the detected objects.
FortiConverter includes error and warning messages into the conversion when an erroroccurs.Review the config-all.txt file after each conversion for errors. These errors andwarning messages might cause the import process to fail, if not corrected. See formore details.
FortiConverter 6.0.1 Admin Guide 136Fortinet Technologies Inc.

3rd Part Security Vendors Conversion
Tipping Point Conversion
Tipping Point differences
Interface and schedule conversion
Source interfaces and destination interfaces are set to "any" after conversion.
Schedules are set to "always" in all policies after conversion.
Action Set
If "Block" or "Drop" appears in an action set, the FortiGate policy strAction is set to "deny". Otherwise,the policy is set to "accept".
If "rsyslog" is found in an action set, the FortiGate policy strLogTraffic is set to "enable". Otherwise,it is disabled.
Ignored fields
The following fields are parsed but ignored:
l Zonel Usersl Appsl Securityl Reputationl Install On
Saving the Tipping Point source configuration file
Before starting the conversion wizard:Tipping Point, save a copy of your configuration file to the computerwhere FortiConverter is installed.
Please copy and paste all the text format definitions into a one plain text file.
Make sure the file contents are arranged by the order of "Addresses and Address groups", "Services andService groups" and "Policies".
You can use text editor such as Notepad or Notepad++, and only use plain text file as input file forFortiConverter Tool.
If you encounter problems with your TippingPoint configuration file, sendit to FortiConverter support at [email protected]. TheFortiConverter team will help improve your conversion for you.
FortiConverter 6.0.1 Admin Guide 137Fortinet Technologies Inc.

3rd Part Security Vendors Conversion
Part 1: download Addresses and Address groups
1. Click the Admin tab, located at the top.2. ClickNamed resources.3. Click the address or address group.4. Press Ctrl + A to select all.5. Copy and paste the selected address or address group to a plain text editor like Notepad, Notepad++, etc.6. Repeat for all other addresses or address groups.
Part 2: download Service and Service groups
1. Click the Profile tab, located at the top.2. ClickExpand profiles.3. Click on Shared settings.4. Click on the service or service group.5. Press Ctrl + A to select all.6. Copy and paste the selected service or service group to the same text file from Part 1.7. Repeat for all other services and service groups.
Part 3: download Policies
1. Click the Profile tab, located at the top.2. Click Firewall profiles.3. Select a policy from the list.4. Click on an item.5. Press Ctrl + A to select all.6. Copy and paste the policy to the same text file from Part 1 and 2.7. Repeat for all other policies.
Tipping Point conversion wizard
Tipping Point Start options
This table lists the start settings.
Setting Description
Profile
Description Enter a description of the configuration.
Output Options
Output Format Select the appropriate output for your target Fortinet device.
FOS Version (the same as before)
FortiConverter 6.0.1 Admin Guide 138Fortinet Technologies Inc.

3rd Part Security Vendors Conversion
Setting Description
Input
Source Configuration Select the input file
Bulk Conversion If there are many devices to be converted where all of them are the samemodel, sharing the same interface mapping relationship in conversion,then bulk conversion can convert all of them at once. Collect all theconfiguration files to be converted, compress them into a ZIP file and usethe ZIP file as the input.
Target device (Optional)
Target device Select the model of the target device, or select a device connected toFortiConverter.
Conversion Options
Discard unreferencedfirewall objects
Specifies whether addresses, schedules, and services that are notreferenced by a policy are saved and added to the output. This option canbe useful if your target device has table size limitations. You can view theunreferenced objects that FortiConverter removed in the Tuning page.
Increase Address andService Table Sizes forHigh-End Models
You can customize the maximum table sizes thatFortiConverter uses when Adjust table sizes is selected. For moreinformation, see Adjusting table sizes on page 163
Comment Options
Include input configurationlines for each output policy
Specifies whether FortiConverter includes the input configuration linesused for each FortiGate policy in the FortiGate configuration as a policycomment.
VSYS selection
Map the virtual systems in the source configuration to VDOMs in the output configuration.
You can select multiple items from the list:
l To select multiple items, use Ctrl + click.l To select contiguous items, use Shift + click.
Setting Description
Enable VDOM Select to enable VDOMs (add config global and config vdomsyntax) to the output config.
Add Click to add a mapping item after you have deleted one.
Delete Click to delete a mapping item.
FortiConverter 6.0.1 Admin Guide 139Fortinet Technologies Inc.

3rd Part Security Vendors Conversion
Tipping Point Source preview
This table shows the information inside the configuration.
Setting Description
Information of Configurations Source configuration file names are shown in the table as alink. Click the link to see the content. The file won’t show ifit’s too large.
Target Device Switch Interface -Interface/Port
If there are virtual switches in the selected target device,FortiConverter will list the member ports of the virtualswitches. If an interface in the list is going to be used in theconfiguration, it should first be detached from the virtualswitch. Click "X" on the interface to detach it. Please notethat a detached interface cannot be re-added later byFortiConverter.
Source Configuration Preview The number of each type of firewall object are shown in thepreview table. Click the object number to see detailedinformation about each object. In each type of object, clickthe button Export CSV to export the current object info asCSV file.
Tipping Point Interface mapping
You can manually map the interface.
l To select the appropriate FortiGate interface, click the value in the FortiGate Interface column, and thenselect a value or enter a custom interface name.
l To edit other values, double-click the proper column. Use the toolbar icon on the right to show and hidecolumns. You can also use the Tuning page to create mappings after the conversion is complete.
l To import a set of interface mappings from a file, click Import.l To download the current set of interface mappings, clickExport.l To delete an interface, select the entry and clickDelete Selected. This is useful if your target FortiGate
has fewer interfaces than the source configuration.
Setting Description
VDOM Shows the virtual domains used in the conversion. ("root" by default)
Source Interface Shows each interface on the Tipping Point firewall.
FortiGateInterface
Shows the corresponding FortiGate interface. Click to assign a FortiGate port for eachinterface.
Members Shows any members, if they are set.
IP-Netmask Shows the IP address and netmask of the connection.
FortiConverter 6.0.1 Admin Guide 140Fortinet Technologies Inc.

3rd Part Security Vendors Conversion
Type Shows the type of interface.
Access Shows which protocols has permission to access each interface.
Import Click to load a set of interface mappings from a text file.
Export Saves the current set of interface mappings to a text file.
Delete Selected Click to delete the selected mapping item.
Tipping Point Route Information
FortiConverter creates static routes in the output using the static routes it detects in the source configurationand any routing information you provide.
Double-click an item to edit it.
Setting Description
New Route Click to add a route.
Delete Click to delete the selected route.
Tipping Point Conversion result
Tab Description
Conversion Summary Provides statistics about the conversion.
Interface Mapping Shows how interfaces are mapped for each VDOM from the source device.
Device Summary Provides statistics about the detected objects.
FortiConverter includes error and warning messages into the conversion when an erroroccurs.Review the config-all.txt file after each conversion for errors. These errors andwarning messages might cause the import process to fail, if not corrected. See formore details.
Vyatta Networks Conversion
Vyatta Networks (VyOS) differences
Conversion support
FortiConverter supports the following features:
FortiConverter 6.0.1 Admin Guide 141Fortinet Technologies Inc.

3rd Part Security Vendors Conversion
l Interfacel Zonel Address groupl Service groupl Policyl Route
NAT and VPN conversions are not currently supported.
Configuration notes
Vyatta does not provide outgoing interface in static route configuration. FortiConverter uses the next-hopaddress and the network of each interface to determine the outgoing interface. However, since VPNconversions are not supported, and tunnel interfaces are not converted, routes to tunnel interfaces cannot becalculated. The interface fields of those kind of routes are empty in the output field and require you to fill themmanually before the config is imported.
Saving the Vyatta source configuration files
Before starting the conversion wizard, save a copy of your Vyatta configuration file to the computer whereFortiConverter is installed.
1. Use an SSH terminal and connect to the device.2. Input command "set terminal length 0".3. Input "show configuration all" and save the output configuration.
Please note that FortiConverter requires the structural configuration file as a valid input. For example:
firewall {all-ping enablebroadcast-ping disableconfig-trap disablegroup {address-group ADDR_GRP1 {
address 10.58.14.15address 10.58.14.16address 10.58.14.17
}address-group ADDR_GRP2 {
address 10.58.186.41address 10.58.186.52
}........................
FortiConverter 6.0.1 Admin Guide 142Fortinet Technologies Inc.

3rd Part Security Vendors Conversion
Vyatta conversion wizard
To start a new conversion
1. Start FortiConverter.
2. When start-up is complete, a browser window automatically opens to http://127.0.0.1:8000.
3. Click New Conversion, located at the top right corner.
4. Enter a name for the conversion configuration.
5. For Vendor, choose Vyatta block.
6. Choose a Model, if applicable.
7. ClickOK.
The configuration page opens to the Start page, and you can input your settings.
Vyatta Start options
This table lists the start settings.
Setting Description
Profile
Description Enter a description of the configuration.
Output Options
Output Format Select the appropriate output for your target Fortinet device.
FOS Version FortiOS 6.0 and 6.2 have different configuration syntaxes.Select the version that corresponds to the FortiOS version onthe target.
Input
Source Configuration Select the input file.
Bulk Conversion If there are many devices to be converted where all of themare the same model, sharing the same interface mappingrelationship in conversion, then bulk conversion can convertall of them at once. Collect all the configuration files to beconverted, compress them into a ZIP file and use the ZIP fileas the input.
Target device (Optional)
Target device Select the model of the target device, or select a deviceconnected to FortiConverter.
Conversion Options
Discard unreferenced firewall objects Specifies whether addresses and services that aren'treferenced by a policy are saved and added to the output.
FortiConverter 6.0.1 Admin Guide 143Fortinet Technologies Inc.

3rd Part Security Vendors Conversion
This option can be useful if your target device has table sizelimitations. You can view the unreferenced objects thatFortiConverter removed on the Tuning page.
Increase Address and Service TableSizes for High-End Models
You can customize the maximum table sizes thatFortiConverter uses when Adjust table sizes is selected. Formore information, see Adjusting table sizes on page 163.
Comment Options
Include input configuration lines foreach output policy
Specifies whether FortiConverter includes the inputconfiguration lines used for each FortiGate policy in theFortiGate configuration as a policy comment.
Interface Comment Specifies whether FortiConverter copies the interfacecomment from the source configuration to the mappedFortiGate interface.
Address Comment Specifies whether FortiConverter copies the addresscomment from source configuration to the convertedFortiGate address.
Service Comment Specifies whether FortiConverter copies the servicecomment from the source configuration to convertedFortiGate service.
Source preview
This table shows the information inside the configuration.
Setting Description
Information of Configurations Source configuration file names are shown in the table aslinks. Click the link to see file contents. Files that are too largeare not shown.
Target Device Switch Interface -Interface/Port
If there are virtual switches in the selected target device,FortiConverter will list the member ports of the virtualswitches. If an interface in the list is going to be used in theconfiguration, it should first be detached from the virtualswitch. Click "X" on the interface to detach it. Please note thata detached interface cannot be re-added later byFortiConverter.
Source Configuration Preview The number of each type of firewall object are shown in thepreview table. Click the object number to see detailedinformation about each object. In each type of object, click thebutton Export CSV to export the current object info as CSVfile.
FortiConverter 6.0.1 Admin Guide 144Fortinet Technologies Inc.

3rd Part Security Vendors Conversion
Vyatta interface mapping
You can manually map the interface.
l To select the appropriate FortiGate interface, click the value in the FortiGate Interface column, and thenselect a value or enter a custom interface name.
l To edit other values, double-click the proper column. Use the toolbar icon on the right to show and hidecolumns. You can also use the Tuning page to create mappings after the conversion is complete.
l To import a set of interface mappings from a file, click Import.l To download the current set of interface mappings, clickExport.l To delete an interface, select the entry and clickDelete Selected. This is useful if your target FortiGate
has fewer interfaces than the source configuration.
Setting Description
VDOM Shows the virtual domains used in the conversion.("root" by default)
Source Interface Shows each interface name on the Vyatta firewall.
FortiGateInterface
Shows the corresponding FortiGate interface. Click to assign a FortiGate port for eachinterface.
Members Shows any members, if they are set.
IP-Netmask Shows the IP address and netmask of the connection.
Type Shows the type of interface.
Access Shows which protocols has permission to access each interface.
Import Click to load a set of interface mappings from a text file.
Export Saves the current set of interface mappings to a text file.
Delete Selected Click to delete the selected mapping item.
Vyatta route information
FortiConverter creates static routes in the output by using the static routes it detects in the sourceconfiguration, and any routing information you provide.
Double-click item to edit it.
Setting Description
New Route Click to add a route.
Delete Click to delete the selected route.
Vyatta conversion result
FortiConverter 6.0.1 Admin Guide 145Fortinet Technologies Inc.

3rd Part Security Vendors Conversion
Tab Description
Conversion Summary Provides statistics about the conversion.
Interface Mapping Shows how interfaces were mapped for each VDOM from the source device.
Device Summary Provides statistics about the detected objects.
WatchGaurd Conversion
Conversion support
FortiConverter supports the following features:
l Interfacel Address (group)l Service (group)l Policyl Route
Saving the WatchGuard source configuration files
Before starting the conversion wizard, save a copy of your WatchGuard configuration file (in XML format) to thecomputer where FortiConverter is installed.
You can use Policy Manager to download your configuration file.
1. Select File > Save > As File.2. Type the name of the file.3. ClickSave.
WatchGuard conversion wizard
To start a new conversion
1. Start FortiConverter.
2. When start-up is complete, a browser window automatically opens to http://127.0.0.1:8000.
3. Click New Conversion, located at the top right corner.
4. Enter a name for the conversion configuration.
5. For Vendor, chooseWatchGuard block.
6. Choose a Model, if applicable.
7. ClickOK.
FortiConverter 6.0.1 Admin Guide 146Fortinet Technologies Inc.

3rd Part Security Vendors Conversion
The configuration page opens to the Start page, and you can input your settings.
WatchGuard Start options
This table lists the start settings.
Setting Description
Profile
Description Enter a description of the configuration.
Output Options
Output Format Select the appropriate output for your target Fortinet device.
FOS Version FortiOS 6.0 and 6.2 have different configuration syntaxes.Select the version that corresponds to the FortiOS version onthe target.
Input
Source Configuration Select the input file.
Bulk Conversion If there are many devices to be converted where all of themare the same model, sharing the same interface mappingrelationship in conversion, then bulk conversion can convertall of them at once. Collect all the configuration files to beconverted, compress them into a ZIP file and use the ZIP fileas the input.
Target device (Optional)
Target device Select the model of the target device, or select a deviceconnected to FortiConverter.
Conversion Options
Discard unreferenced firewall objects Specifies whether addresses and services that aren'treferencedby a policy are saved and added to the output. This optioncan be useful if your target device has table size limitations.You can view the unreferenced objects that FortiConverterremoved on the Tuning page.
Increase Address and Service TableSizes for High-End Models
You can customize the maximum table sizes thatFortiConverter uses when Adjust table sizes is selected. Formore information, see Adjusting table sizes on page 163.
Source Preview
This page shows the information inside the configuration.
FortiConverter 6.0.1 Admin Guide 147Fortinet Technologies Inc.

3rd Part Security Vendors Conversion
Setting Description
Information of Configurations Source configuration file names are shown in the table as a link.Click the link to see the content. The file won’t show if it’s toolarge.
Target Device Switch Interface -Interface/Port
If there are virtual switches in the selected target device,FortiConverter will list the member ports of the virtual switches.If an interface in the list is going to be used in the configuration,it should first be detached from the virtual switch. Click "X" onthe interface to detach it. Please note that a detached interfacecannot be re-added later by FortiConverter.
Source ConfigurationPreview
The numbers of each type of firewall object are shown in thepreview table. Click the object number to see detailedinformation on each object. In each type of object, click thebutton Export CSV to export the current object info as CSV file.
WatchGuard Interface mapping
You can manually map the interface.
To select the appropriate FortiGate interface, click the value in the FortiGate Interface column, and then selecta value or enter a custom interface name.
To edit other values, double-click the proper column. Use the toolbar icon on the right to show and hidecolumns. You can also use the Tuning page to create mappings after the conversion is complete.
To import a set of interface mappings from a file, click Import.
To download the current set of interface mappings, clickExport.
To delete an interface, select the entry and clickDelete Selected. This is useful if your target FortiGate hasfewer interfaces than the source configuration.
Setting Description
VDOM Shows the virtual domains used in the conversion.
Source Interface Shows each interface name on the WatchGuard firewall.
FortiGate Interface Shows the corresponding FortiGate interface. Click to assign aFortiGate port for each interface.
Members Shows any members, if they are set.
IP-Netmask Shows the IP address and netmask of the connection.
Type Shows the type of interface.
Access Shows which protocols has permission to access each interface.
Import Click to load a set of interface mappings from a text file.
FortiConverter 6.0.1 Admin Guide 148Fortinet Technologies Inc.

3rd Part Security Vendors Conversion
Export Saves the current set of interface mappings to a text file.
Delete Selected Click to delete the selected mapping item.
WatchGuard Route Information
FortiConverter creates static routes in the output using the static routes it detects in the source configurationand any routing information you provide.
Double-click an item to edit it.
Setting Description
New Route Click to add a route.
Delete Click to delete the selected route.
WatchGuard Conversion result
Tag Description
Conversion Summary Provides statistics about the conversion.
Interface Mapping Shows how interfaces were mapped for each VDOM from the sourcedevice.
Device Summary Provides statistics about the detected objects.
FortiConverter includes error and warning messages into the conversion when an erroroccurs.Review the config-all.txt file after each conversion for errors. These errors andwarning messages might cause the import process to fail, if not corrected. See formore details.
IBM IPAM IPS Signature Conversion
IBM Security Event example
<securityEventsListsecurityEventID='xxxxxxxx-XXXX-XXXX-XXXX-XXXXXXXXXXXX' issueID='XXXXXXX'
Enabled='false' virtualSensor='Extranet' isAttack='Attack' checkName='HTTP_Htaccess' risk='medium' protocol='url' ignore='false' display='WithoutRaw'block='true' xpu='0.0' eventThrottling='0' checkDate='2/2005'defaultQuarantine='Block' logEvidence='None' isUserOverride='true'noDelete='false' ><responses />
</securityEventsList>
FortiConverter 6.0.1 Admin Guide 149Fortinet Technologies Inc.

3rd Part Security Vendors Conversion
Supported Keywords
IBM Keyword Corresponding Fortigate Field
Enabled set status
risk set severity
block set action
logEvidence set log-packet
display set log
protocol set protocol
Unsupported Keywords
The following keywords are not supported in IBM conversion.
Unsupported Keywords
virtualSensor
checkName
ignore
xpu
eventThrottling
FortiConverter 6.0.1 Admin Guide 150Fortinet Technologies Inc.
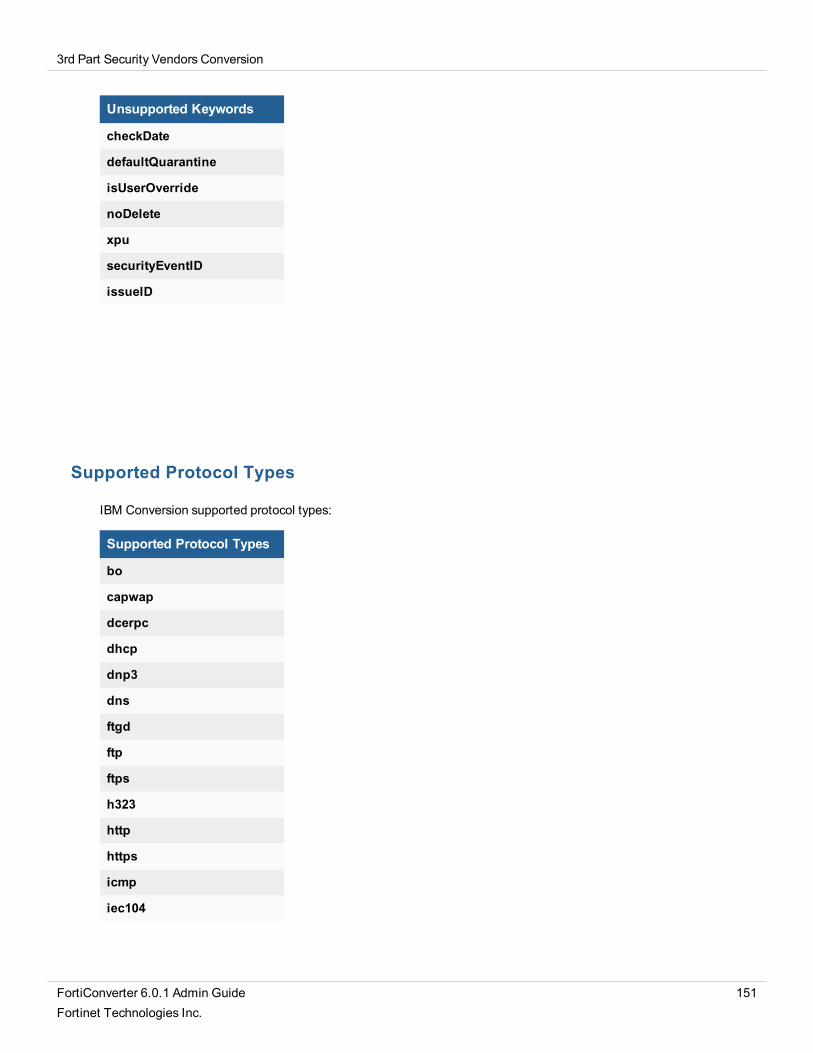
3rd Part Security Vendors Conversion
Unsupported Keywords
checkDate
defaultQuarantine
isUserOverride
noDelete
xpu
securityEventID
issueID
Supported Protocol Types
IBM Conversion supported protocol types:
Supported Protocol Types
bo
capwap
dcerpc
dhcp
dnp3
dns
ftgd
ftp
ftps
h323
http
https
icmp
iec104
FortiConverter 6.0.1 Admin Guide 151Fortinet Technologies Inc.

3rd Part Security Vendors Conversion
Supported Protocol Types
im
imap
imaps
ldap
misc
modbus
mssql
nbss
nntp
other
p2p
pop3
pop3s
radius
rawtcp
rdt
rpc
rtcp
rtp
rtsp
sccp
sip
smtp
smtps
snmp
ssh
ssl
tcp
telnet
tfn
udp
FortiConverter 6.0.1 Admin Guide 152Fortinet Technologies Inc.

3rd Part Security Vendors Conversion
Rule Overview
This page shows the information inside the configuration.
Click the "Export CSV" button to export the current object info as CSV file.
IBM Conversion Result
Page Tab Description
IBM IPS Sensor Shows the parsed IBM IPS sensors, separated into two tables based onwhether the protocol is supported by Fortigate.
Fortigate IPS Sensor Shows only the supported FGT IPS sensors and the conversion results.
FortiConverter 6.0.1 Admin Guide 153Fortinet Technologies Inc.

3rd Part Security Vendors Conversion
Snort IPS Signature Conversion
Snort conversion wizard
Basic outline of a snort rule
[action][protocol][sourceIP][sourceport] -> [destIP][destport] ( [Rule options] )| ---------------- Rule Header ------------------------------- |- Rule Options - |
SNORT rule example
alert tcp $EXTERNAL_NET $FILE_DATA_PORTS -> $HOME_NET any (msg:"FILE-FLASHAdobe Flash Player ActionScript virtual machine opcode verifying codeexecution attempt"; flow:to_client,established; flowbits:isset,file.swf;file_data; content:"|01 09 0A 2E D0 30 D0 5D 04 4A 04 00 68 01 D0 92 90 4E|";fast_pattern:only; metadata:policy balanced-ips drop, policy connectivity-ipsdrop, policy security-ips drop, service ftp; reference:cve,2012-5271;reference:url,adobe.com/support/security/bulletins/apsb12-22.html;classtype:attempted-user; sid:24874; rev:3;)
FGT custom IPS signature
config ips customedit "S24874R3"
set signature "F-SBID(--name \"S24874R3\"; --protocol tcp; --service FTP; --flowfrom_server; --tag test,file.swf; --pattern \"|01 09 0A 2E D0 30 D0 5D 04 4A04 00 68 01 D0 92 90 4E|\";)"
set action blockset status enableset log enableset comment ''
nextend
Warning: The character "?" is a special character in the interactive console onFortiGate, so if it’s in the pcre of a signature, it won’t be saved. The workaround is toupload the IPS signature through the web GUI.
"action" field
Supported keyword
alert
Unsupported keyword
log
"protocol" field
Supported keyword
FortiConverter 6.0.1 Admin Guide 154Fortinet Technologies Inc.

3rd Part Security Vendors Conversion
tcp/udp/ip/icmp/HTTP/FTP/POP3/SMTP/TELNET/SSH/IMAP/SNMP/RADIUSHTTP/FTP/POP3/SMTP/TELNET/SSH/IMAP ->; tcpSNMP/RADIUS ->; udp
"sourceIP", "sourceport", "destIP" and "destport" fields
Supported keyword
Either "any" or "$xxxx" variable
"Rule options" field
Supported keywords
Option Test input Test output
byte_test byte_test:1,!&,0xF8,2; --byte_test 1,~,0xF8,2;
byte_jump byte_jump:4,-10,relative,little; --byte_jump 4,-10,little,relative;
threshold threshold:type limit, track by_src, count 1,seconds 60;
--track SRC_IP; --rate 1,60;
nocase nocase; --no_case;
isdataat isdataat:50,relative; --data_at 50,relative;
http_raw_uri http_raw_uri; --context uri;
http_raw_cookie
http_raw_cookie; --context header;
http_raw_header
http_raw_header; --context header;
http_stat_code
http_stat_code; --context banner;
http_stat_msg http_stat_msg; --context banner;
sip_header sip_header; --context header;
sip_body sip_body; --context body;
id id:123456; --ip_id 123456;
dsize dsize:<400; --data_size <400;
ipopts ipopts:lsrr; --ip_option lsrr;
flags flags:SF,CE; --tcp_flags SF,CE;
seq seq:0; --seq 0;
ack ack:0; --ack 0;
window window:55808; --window_size 55808;
itype itype:>30; --icmp_type >30;
FortiConverter 6.0.1 Admin Guide 155Fortinet Technologies Inc.

3rd Part Security Vendors Conversion
icode icode:>30; --icmp_code >30;
icmp_id icmp_id:0; --icmp_id 0;
icmp_seq icmp_seq:0; --icmp_seq 0;
rpc rpc:100000, *, 3; --rpc_num 100000, *, 3;
sameip sameip; --same_ip;
ttl ttl:<3; --ip_ttl <3;
tos tos:!4; --ip_tos !4;
content content:"OK LOGIN"; --pattern \"OK LOGIN\";
flowbits flowbits:set,logged_in; flowbits:noalert; --tag set,logged_in; --tag quiet;
flow flow:to_server,established; --flow from_client;
pcre pcre:"/^User-Agent\x3A[^\r\n]*malware/miH"; --pcre \"/^User-Agent\x3A[^\r\n]*malware/mi\";
uricontent uricontent:"testurl"; --pattern "testurl"; --context uri;
ip_proto ip_proto:igmp; --protocol igmp;
depth depth:8; --within 8,packet;
offset offset:4; --distance 4,packet;
within within:10; --within 10;
distance distance:4; --distance 4;
http_client_body
http_client_body; --context body;
http_cookie http_cookie; --context header;
http_method http_method; --context uri;
urilen urilen:5; --data_size 5,uri;
metadata metadata:impact_flag red, service dns; --service DNS;
sid sid:19644; --name \"S19644R4\";
rev rev:4; --name \"S19644R4\";
byte_extract byte_extract:1, 0, str_offset; --extract 1,0,$0;
rawbytes rawbytes; --context packet_origin;
msg msg:"Bad Stuff detected within field"; et comment "Bad Stuff detected withinfield"
file_data file_data; --context file;
pkt_data pkt_data; --context packet;
detection_filter
detection_filter:track by_src, count 30, seconds60;
--rate 30,60; --track SRC_IP;
FortiConverter 6.0.1 Admin Guide 156Fortinet Technologies Inc.

3rd Part Security Vendors Conversion
Unsupported keywords:
Option Test input
replace
stream_reassemble
stream_size
cvs
ftpbounce
asn1
fragbits
fragoffset
base64_decode
base64_data
sip_method
sip_stat_code
gtp_type
gtp_info
gtp_version
ssl_state
reference
classtype
priority
gid
fast_pattern
logto
session
resp
react
tag
activites
activites_by
http_encode
count
FortiConverter 6.0.1 Admin Guide 157Fortinet Technologies Inc.
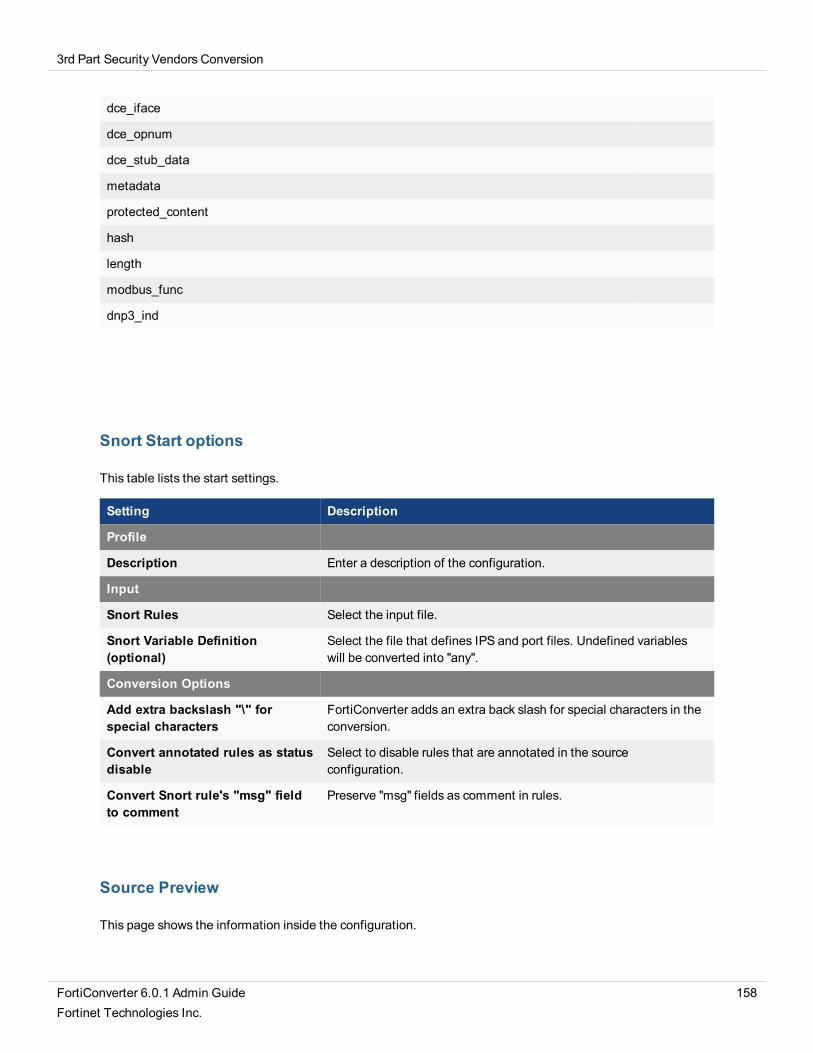
3rd Part Security Vendors Conversion
dce_iface
dce_opnum
dce_stub_data
metadata
protected_content
hash
length
modbus_func
dnp3_ind
Snort Start options
This table lists the start settings.
Setting Description
Profile
Description Enter a description of the configuration.
Input
Snort Rules Select the input file.
Snort Variable Definition(optional)
Select the file that defines IPS and port files. Undefined variableswill be converted into "any".
Conversion Options
Add extra backslash "\" forspecial characters
FortiConverter adds an extra back slash for special characters in theconversion.
Convert annotated rules as statusdisable
Select to disable rules that are annotated in the sourceconfiguration.
Convert Snort rule's "msg" fieldto comment
Preserve "msg" fields as comment in rules.
Source Preview
This page shows the information inside the configuration.
FortiConverter 6.0.1 Admin Guide 158Fortinet Technologies Inc.

3rd Part Security Vendors Conversion
Setting Description
IP Variables The definitions of IP variables parsed from the variable definition file.
Port Variables The definitions of port variables parsed from the variable definition file.
Snort IPS Signature IPS signatures parsed from the input Snort rule files.
Snort Conversion result
Tab Description
Snort IPS Signature Shows variable definitions and Snort IPS signature contents.
FortiGate IPS Signature Shows converted FortiGate IPS signatures.
FortiConverter 6.0.1 Admin Guide 159Fortinet Technologies Inc.

Conversion General
Conversion General
Compare Two Conversions
This feature can be used to compare two similar conversions from the same vendor/model and show thedifferences between them.
To use the feature:
1. Select exactly two conversions to be compared and press the Diff Conversions button.
2. By default, the converter assumes the older conversion is the base conversion and the newer one is theupdated conversion. This means that objects that only exists in the updated conversion will be displayedasAdded and the objects that only exists in the older conversion will be displayed asDeleted. Clicking on
the button allows the base/updated conversion to be swapped.
3. PressConfirm to start the calculation of differences between the two conversions.
FortiConverter 6.0.1 Admin Guide 160Fortinet Technologies Inc.

Conversion General
4. The diff result would then be generated. A firewall object being marked asChangedmeans the objecthave the same name in both conversions, but its actual content differs. However, for Policy, Central NATand static routes, Changedmeans they have the same relative order to other unchanged (Policy/CentralNAT/static routes), with their actual content differs.
5. You may select the object(s) you want to generate CLI with the Checkbox on the left. After that, pressGenerate Config Button to download the desired CLI as .zip file. If no specific object is selected, allobjects' CLI will be generated.
Bulk Conversion
The bulk conversion feature can convert more than one configurations in a single conversion. If there are manydevices to be converted where all of them are the same model, and share the same interface mappingrelationship in conversion, then bulk conversion can convert all of them at once.
Bulk conversion is supported in conversions forCisco, Juniper, Palo Alto, SonicWall, McAfee, Sophos,Vyatta,WatchGuard and FortiGate.
Prepare source file
Collect all the configuration files to be converted, and compress them into a ZIP file.
Note: All the configuration files should have the same physical interfaces, and share the same interfacemapping relationship.
FortiConverter 6.0.1 Admin Guide 161Fortinet Technologies Inc.

Conversion General
FortiGate: For FortiGatemigration, all the input configuration files should be migrated to the same model. Sothe default configuration of the model should be input in "Target Device Default Configuration", and all thesource configurations should apply to the same target configuration.
Start Bulk Conversion
Click the option Bulk Conversion in the start page would enable bulk conversion.
Input the prepared ZIP file and clickNext.
Input interface mapping
FortiConverter arbitrarily select one of the configuration files and extract physical interface name lists from it.The list is expected to be common to all the configuration files. Input interface mapping relationships and clickNext.
VDOM mapping, route and IPSec VPN pages are skipped in the bulk conversion mode.
View conversion results
FortiConverter would convert all the configuration files one by one, using the same interface mappingrelationship input previously. When all the conversions are completed, the summary page of the bulkconversion would be shown:
All the single conversions would be listed in the right hand side. For those conversions completed successfully,you can double click a conversion to open the tuning page or click the download icon to download the output
FortiConverter 6.0.1 Admin Guide 162Fortinet Technologies Inc.

Conversion General
FGT configuration. For failed conversions, you can click the question mark to see the error log. To download allthe output FGT configurations of all the conversions at once, clickDownload All at the upper-right corner.
Adjusting table sizes
The conversion wizard Start options page allows you to specify whether FortiConverter allows larger table sizesand group membership than default in the output configuration.
This is useful when, for example, the source configuration has a large address group and the targetconfiguration can accommodate the larger group. Otherwise, FortiConverter converts the large address groupinto two or more smaller address groups for a single policy.
For example, FortiConverter uses the following default maximum table sizes by default:
l Address groups – 2500l Addresses per group – 300l Custom service objects – 1024
When this option is selected, FortiConverter uses the following maximum table sizes:
l Address groups – 20000l Addresses per group – 1500l Custom service objects – 4096
Viewing maximum table sizes for your target device
On your target system, enter the following command:
print tablesize
The maximum table sizes are displayed in a response similar to the following output:
firewall addrgrp: 0 20000 20000firewall addrgrp: member: 1500 0 0firewall service custom: 0 4096 0
NAT merge options
For Check Point and Cisco PIX conversions, you can select which types of NAT configuration FortiConverteruses to generate output firewall policies, or whether FortiConverter derives its NAT-based policies based onobject names or object values.
Because it can take FortiConverter several hours to complete a conversion that includes a large number of NATrules, Fortinet recommends that you turn off NAT merge for all types of NAT for your initial conversion. Then,after you resolve any issues with the conversion, run it again at a convenient time with NAT merge enabled.
FortiConverter 6.0.1 Admin Guide 163Fortinet Technologies Inc.

Conversion General
NAT merge depth
The FortiConverter NAT merge feature compares the firewall policy source and destination address withaddresses in NAT rules. When these addresses overlap, FortiConverter uses the NAT rules to generateadditional policies in the output configuration.
If a policy has an address with a large range, it can overlap with many NAT rules, which generates many NAT
policies. Because output that includes a large number of NAT policies can be hard to review, FortiConverterprovides NAT merge depth options that can reduce the number of NAT policies.
The merge depth policies control both the type of NAT to merge and the scope of the merge:
l When you select Off for a type of NAT, FortiConverter doesn't perform NAT merge using NAT rules of thattype. If it’s turned off for all types, the output conversion contains the converted source configurationpolicies only.
l When you select Object Names, FortiConverter generates policies based on NAT rules only where theaddress name the rules use is found in a policy. For Cisco PIX, this option can also match NAT rules andpolicies if they contain addresses that match exactly. For example, a source configuration NAT ruledynamically translates the object "address1"(IP 10.10.10.10) to "200.200.200.200". The sourceconfiguration also has three polices:l policy1: source address is "address1"l policy2: source address is "10.10.10.0-10.10.10.255"l policy3: source address is "all"Only policy1 matches the NAT rule, because it shares the address object name, and policy2 and policy3don't matchbecause they don't reference the name "address1".Cisco PIX allows you to use an IP address to configure a NAT rule instead of a name. For example, theNAT rule 10.10.10.10 to 200.200.200.200. WhenObject Names is selected, this NAT rule matches apolicy with source address 10.10.10.10, even though it doesn't refer to a object name because they havethe exactly the same IP range. This is a useful option if you make use of supernet addresses that wouldmatch many address objects.
l When you select Object Values, FortiConverter generates policies based on NAT rules that have addressvalues that fall anywhere in the range specified by a policy (overlap).For the example above, whenObject Values is selected, the NAT rule that translates the object"address1"(IP 10.10.10.10) to "200.200.200.200" matches both policy2 and policy3.Object Values generates the most accurate matching of NAT rules and policies, but in most cases, it alsogenerates more NAT policies.
Create new conversion folder
The FortiConverter application allows you to create separate folders for your conversions.
To add a folder
1. Click the New Folder option from the menu on the left.2. Enter a name for your new folder and pressOK.
FortiConverter 6.0.1 Admin Guide 164Fortinet Technologies Inc.

Conversion General
Your new folder appears in the left menu.
To move conversions to a folder
1. Select a conversion.2. Click the Change Folder button, located at the bottom.3. Select a folder for your conversion and pressOK.
Error Messages
If an error occurs, FortiConverter inserts error messages and warnings into the conversion output file config-all.txt.
These warnings aren't inserted in any configuration branch files.
Review the config-all.txt file after each conversion forerrors. These errors and warning messages might cause the importprocess to fail, if not corrected.
Undefined objects
# Error: Undefined interface/address/service/ippool object <NAME>;
This error occurs when an object used in the policy isn't previously defined. Make sure the object name iscorrect.
Interface
# Warning: Please input vlan interface
This warning means the physical interface of a vlan interface isn't specified.
Zone
# Warning: Interface exists in other Zone.
This warning means an interface belongs to two zones simultaneously. An interface should not belong to morethan one zone at a time.
FortiConverter 6.0.1 Admin Guide 165Fortinet Technologies Inc.

Conversion General
Service
# Error: The number of service custom is <NUMBER>, exceed <NUMBER>limitation.
The number of services exceeds the maximum number supported by the selected FortiGate model.
Service group
# Error: Unconverted members in service group <NAME>
This error occurs when objects in the mentioned service group aren't converted and the service group becomesempty.
User
# Warning: can't support radius server group
This warning means the source configuration contains a radius server group. FortiGate doesn't support radiusserver groups. This warning only appears in Check Point conversions.
# Warning: can't find out radius server
This warning means the radius server of the user isn't defined in the source configuration. This warning onlyappears in Check Point conversions.
# Warning: Please reset the shared secret key.
This warning means the password in the source configuration is encrypted. Reset the shared secret key.
VIP
# Warning: Public IP confliction for below objects.
This warning appears when different VIP objects have the same public IP. Different VIP objects should nothave the same public IP in FortiOS. To fix this issue, add port forwarding or source filter information to theconflicted VIP object.
VPN phase1
# Warning: <NAME> exceed 35 characters"
This warning means the Phase1 name exceeds 35 characters. Manually fix the name.
# Warning: remote-gw should be IP address, object <NAME> was not defined
FortiConverter 6.0.1 Admin Guide 166Fortinet Technologies Inc.

Conversion General
This error occurs when the source configuration provides an address name for the remote-gw field. The remote-gw field should be an IP address.
# Warning: Please reset the pre-shared key.
All pre-shared keys are set to "123456" in the converted VPN object, if the password in source config isencrypted. Users should reset the pre-shared keys.
VPN phase2
# Warning: <NAME> exceed 35 characters
This warning appears when a Phase2 name exceed 35 characters. To fix this issue, fix the name manually.
Policy
# set utm-status enable# set application-list NAME1 NAME2# Application-list support only one item, please recheck config file.
This error means there are multiple items in the application list. There should be only one item in theapplication list. If there are multiple items given in the source configuration, reset the items.
# Warning: Removed self traffic object <NAME> from address list# Warning: Comment out self traffic policy - object name <NAME>
Check Point policies may contain "self traffic" policies, but those policies aren't needed in FortiOS.
# Warning: Comment out default drop all policy
There may be a "drop all" policy in the end of the policy list for some vendors. But FortiOS has its own "drop all"policy by default, so the one in source configuration should be commented out.
Route static
# Warning: Please input field <device>
FortiOS requires the "device" (interface) route field.
Snmp sysinfo
# Warning: Community <NAME> has <NUMBER> hosts, beyond the limitation <NUMBER>.
The number of hosts in a community exceeds the maximum number supported by the FortiGate selectedmodel.
FortiConverter 6.0.1 Admin Guide 167Fortinet Technologies Inc.

Conversion General
Other warnings
Name length
# Warning: truncate <OBJECT> name <NAME> to <NUMBER> characters
# Warning: Trim <NAME> to <NUMBER> characters
When FortiConverter detects an object name that is longer than the limit given in FortiOS, FortiConverterrenames the object.
Route BGP
# Warning: Please reset the password.
This warning appears when the password of route BGP neighbors in the source configuration is encrypted.Reset the password of the route BGP neighbors.
Route OSPF
# Warning: Please reset the md5 key.
This warning appears when the md5 key of the OSPF interface in the source configuration is encrypted.Reset the md5 key.
FortiConverter 6.0.1 Admin Guide 168Fortinet Technologies Inc.

3rd Party Vendor Conversion Tuning
3rd Party Vendor Conversion Tuning
Introduction
Although FortiConverter automatically converts as much of the source configuration as possible, in somecases, your input is required to complete the conversion. The Tuning page automatically opens when theconversion is complete. (Currently this feature is available only in the conversion of 3rd partyvendors.)
From the Tuning page, you can:
l View Conversion Summary on page 169
l Manage your firewall objects on page 170
l Copy an object to another VDOM on page 172
l Copy an object's CLI configuration on page 172
l Output an unreferenced object on page 173
l Rename an object on page 174
View Conversion Summary
The Conversion Summary page displays a summary of the conversion, including VDOM mapping and Interfacemapping, as well as a device summary.
l To fine-tune the conversion, click FortiGate Configuration from the menu on the left, then select anoption.
l To download the final, converted configuration files, clickDownload Configurations, located on theright.
l To download any configurations, from the home page, clickDownload.
FortiConverter 6.0.1 Admin Guide 169Fortinet Technologies Inc.

3rd Party Vendor Conversion Tuning
Manage your firewall objects
The Tuning page has several features enabling you to view, add, edit, and delete your various firewall objects.
To review the converted objects
1. In the upper-left corner, click FortiGate Configuration.
A list of object categories loads in the menu bar, and a table of interface is displayed.2. Select the object category you want to review.
A table containing information about that object category loads.
In the address, address group, service, and service group tables, some object rows are highlighted inyellow. Highlighted rows indicate objects that were automatically created by the FortiConverter tool during
FortiConverter 6.0.1 Admin Guide 170Fortinet Technologies Inc.
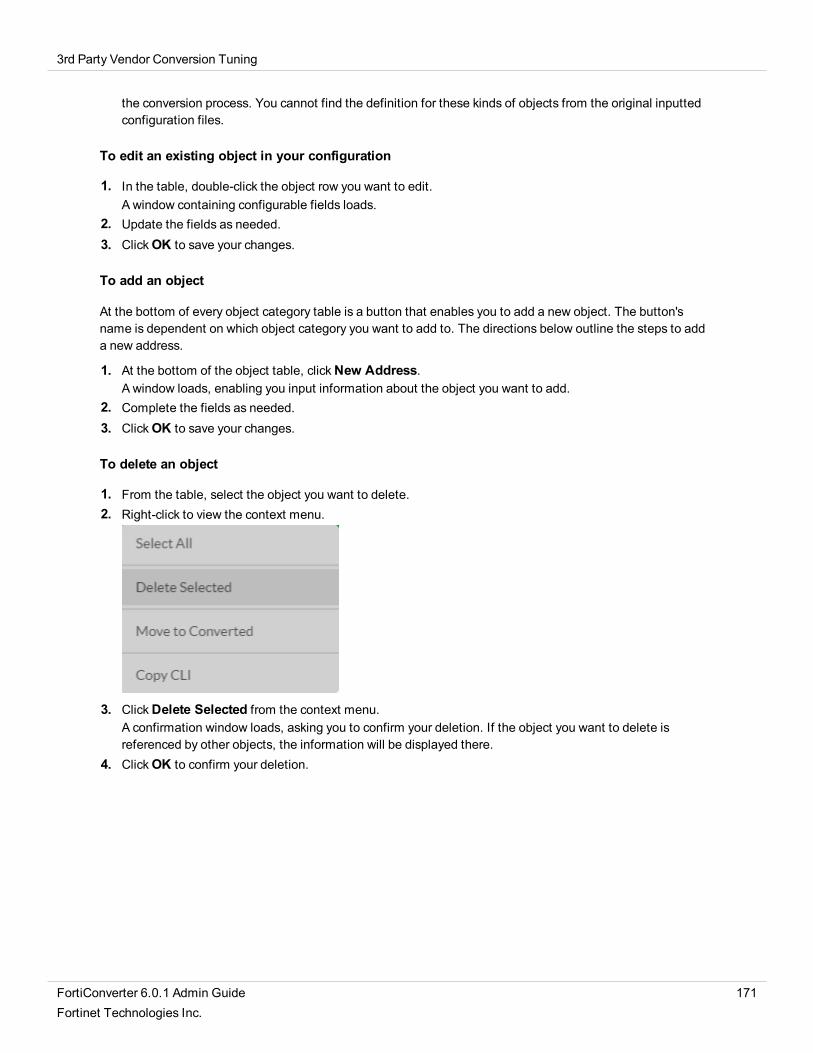
3rd Party Vendor Conversion Tuning
the conversion process. You cannot find the definition for these kinds of objects from the original inputtedconfiguration files.
To edit an existing object in your configuration
1. In the table, double-click the object row you want to edit.A window containing configurable fields loads.
2. Update the fields as needed.3. ClickOK to save your changes.
To add an object
At the bottom of every object category table is a button that enables you to add a new object. The button'sname is dependent on which object category you want to add to. The directions below outline the steps to adda new address.
1. At the bottom of the object table, clickNew Address.A window loads, enabling you input information about the object you want to add.
2. Complete the fields as needed.3. ClickOK to save your changes.
To delete an object
1. From the table, select the object you want to delete.2. Right-click to view the context menu.
3. ClickDelete Selected from the context menu.A confirmation window loads, asking you to confirm your deletion. If the object you want to delete isreferenced by other objects, the information will be displayed there.
4. ClickOK to confirm your deletion.
FortiConverter 6.0.1 Admin Guide 171Fortinet Technologies Inc.

3rd Party Vendor Conversion Tuning
Copy an object to another VDOM
To copy objects to another VDOM
1. In the VDOM information section, toggle the Enable VDOM wrapper switch.
Note: In order to enable the VDOM wrapper, the output requires at least two VDOMs. If the originalconfiguration only has one VDOM, you can manually add a new VDOM.
2. From the table of objects, select the object(s) you want to copy to another VDOM.3. Right-click to view the context menu.
4. Expand the Copy to VDOM sub-menu.Your accessible VDOMs are listed in the sub-menu.
5. Select the VDOM you want to copy to.Your selected object(s) will be included in the selected VDOM output.
Copy an object's CLI configuration
To copy the CLI configuration of an object
1. From the list of objects, select the object that you want to copy the CLI from.2. Right-click to view the context menu.
FortiConverter 6.0.1 Admin Guide 172Fortinet Technologies Inc.

3rd Party Vendor Conversion Tuning
3. ClickCopy CLI.4. From the prompted window, clickSave to save the configuration as a text file, or clickCopy to copy the
configuration to the clipboard.
Output an unreferenced object
You can output unreferenced objects from the address, address group, service, and service group categories.To do so, you must move unreferenced objects from the unreferenced table to the converted objects table.
If you enable the "Discard unreferenced objects" option in the start page, FortiConverter scans each object andchecks whether it is referenced by policies, central NAT rules or other objects.
To output an unreferenced object
1. Select the object category you want to include in your output.Note: You can only output unreferenced objects from the address, address group, service, and servicegroup categories.
2. In the Table Type field, select "unreferenced".
l converted - Objects are referenced and can be generated to the outputs.l unreferenced - Objects are not referenced and generally cannot be generated to the outputs.l unconverted - Objects cannot be converted by FortiConverter tool. They are not supported by
FortiOS, or by FortiConverter.3. Select the object(s) you want to output.
You can select the entire table by right-clicking and selecting Select All from the context menu.4. Right-click to view the context menu.
FortiConverter 6.0.1 Admin Guide 173Fortinet Technologies Inc.

3rd Party Vendor Conversion Tuning
5. Select Move to Converted.FortiConverter moves the selected objects to the converted category.
6. In the upper-right of the page, clickDownload Configuration.The configuration of the objects are included in the output.
Rename an object
FortiOS sets different maximum characters length for object names. Object names that exceed the characterlimit are known as overlengthed, and must be renamed before they can be uploaded to a FortiGate device. Thetuning summary table displays overlengthed objects numbers in red.
There are two ways see which objects are marked as overlengthed. You can:
FortiConverter 6.0.1 Admin Guide 174Fortinet Technologies Inc.

3rd Party Vendor Conversion Tuning
1. Click the red number from Overlengthed column, or2. Go to the table of the object, and click the button Name Overlength.
Overlengthed object names are identified with a red background color.
Once you located the overlengthed objects, there are two ways to rename the object: (1) manually, and (2)automatically.
To manually rename an object
1. Double-click the object row.2. In the prompt window, shorten the object name.3. ClickOK.
To automatically rename an object
1. Select the object row.2. Right-click to view the context menu.3. Click Trim Object Name.
FortiConverter automatically deletes the last few characters from the tail-end of the object name so it fallsunder the character limit.
Merge duplicate objects
This feature helps you to find out duplicate addresses, services, groups which have the same content, andmerge them into a single object.
To merge duplicate objects:
1. Click Find Duplicate in the tuning page. This feature is available for addresses, address groups, servicesand service groups.
2. Duplicate objects would be shown in the pop-out window.
FortiConverter 6.0.1 Admin Guide 175Fortinet Technologies Inc.

3rd Party Vendor Conversion Tuning
3. To merge a group of duplicate objects, clickMerge in the table.4. The detail of the duplicate objects would be shown in another pop-out window. All the objects (policies,
groups, NAT rules) that references the duplicate objects in all VDOMs would be listed.
FortiConverter 6.0.1 Admin Guide 176Fortinet Technologies Inc.

3rd Party Vendor Conversion Tuning
5. There is a droplist in the bottom of the window. Users can either select one of the name of the duplicateobjects, or type a new name in the box.
6. ClickMerge, and all the duplicate objects would be unified into the specified name.7. After the merging is complete, the detail window would be closed and back to the duplicate table window.
The record of this merging would be created and all the merging records would be shown in the merginghistory at the bottom.
Interface pair view split for policies
There are 2 modes to show policies in FortiOS: "Interface Pair View" and "By Sequence".
"Interface Pair View" categorizes policies by their source and destination interfaces, so it is more straightforward to manage.
However, "Interface Pair View" can only be used when all the policies contain only one interface in both sourceand destination interface fields. If there are multiple interfaces in a converted policy, "Interface Pair View Split"can split the policy into equivalent policies with single interface.
FortiConverter 6.0.1 Admin Guide 177Fortinet Technologies Inc.

3rd Party Vendor Conversion Tuning
Please follow the steps below to split the policies:
1. Go to the tuning page of policies.2. Click Interface Pair View Check to list all the policies which have multiple source or destination
interfaces. (Optional)3. Select the policies you want to split and right click.4. Click Interface Pair View Split.
5. The selected policies will be split.
FortiConverter 6.0.1 Admin Guide 178Fortinet Technologies Inc.

3rd Party Vendor Conversion Tuning
FortiConverter 6.0.1 Admin Guide 179Fortinet Technologies Inc.

Import Configuration
Import Configuration
Connecting FortiGate devices
Before REST API imports, FortiConverter needs to connect to FortiGate devices first. The connected devicescan be used as the source devices of FortiGate migration or the target devices of REST API imports. Pleasefollow the steps below to connect your devices to FortiConverter.
Please note that the devices with FortiOS v5.2 or older are not valid devices for REST API feature because lessREST API are supported in those FortiOS versions.
1. Go to the FortiConverter dashboard and click the tab Device in the left side.
2. Click button New Device at the top-right corner.3. Input the network address and login information. If the HTTPS port of the device is changed by the
command config system global -> "set admin-sport, please specify field HTTPS port.
FortiConverter 6.0.1 Admin Guide 180Fortinet Technologies Inc.

Import Configuration
4. Click Test Connection to see if the device can be connected and logged in successfully. ClickOK to savethe device information.
Import config to FortiGate via RESTful APIs
FortiConverter can use REST API provided by FortiOS to import the converted objects from 3rd party vendorsinto your FortiGate.
Start Installation
1. In the tuning page of the conversion, click Install Config at the top-right corner. This button would existonly when there is at least one connectable device saved in FortiConverter.
2. Select the device to be imported and clickConnect.3. ClickOne-Click Install to start importing.
FortiConverter 6.0.1 Admin Guide 181Fortinet Technologies Inc.

Import Configuration
Multiple VDOM: If there are multiple VDOMs in the converted configuration, users can select the VDOMto be imported. When selecting to import "All VDOMs", all VDOMs would be created in the connecteddevice, and all objects would be imported.Single VDOM: When users select a single VDOM, an option "Import To Root" would show up. When thisoption is enabled, the objects in the VDOM would be imported to the root VDOM of the connected device.Otherwise, the VDOM would be created.Root VDOM: If the converted result has only the root VDOM, the options above would not show up.Special Case: In Snort conversion, FortiConverter would detect the VDOM in the connected deviceautomatically, and users can select the IPS custom rules are imported to which VDOM.
4. View the installation logs and wait for the importing to be completed.5. To interrupt the installation, clickStop Importing to stop the installation.
FortiConverter 6.0.1 Admin Guide 182Fortinet Technologies Inc.

Import Configuration
6. Download Logs can be clicked to download the log file of importing. The CLI of failed objects would beprinted in the file, and user can copy and paste the CLI into the terminal of the device to see what erroroccurs.
View Import Result
When the REST API import is finished, the statistic of imported objects would be shown in the table ofconversion summary page.
FortiConverter 6.0.1 Admin Guide 183Fortinet Technologies Inc.

Import Configuration
By clicking the number in the Import Failed column, the failed objects would be listed in a table. In the table ofeach kind of object, the import result would be shown in the right column.
Import Individual objects
Users can also import objects individually in the object pages.
1. Select objects to be imported into the FortiGate.2. Right click and select REST API Import.
It should be reminded that the prerequisite objects should be imported at first.
For example, before importing an address group, all the address objects inside the address group should beimported.
FortiConverter 6.0.1 Admin Guide 184Fortinet Technologies Inc.

Import Configuration
Import config to FortiGate by upload CLI scripts file
This section is only valid in 3rd party vendor to FortiGate conversion.
Conversion to FortiGate outputWhen you convert a source configuration to a FortiGate configuration, the resulting conversion files are placedinto the directory FGT/ folder. File config-all.txt contains all converted CLI configuration, and all kindsof objects are also output into divided files such as config-system-interface.txt and config-firewall-address.txt.
Preparing the output configuration file for importBefore you import the output configuration, search the file for any comments that indicate issues thatFortiConverter detected during the conversion (such as missing objects or conflicting object values) and fixthem. To locate these comments, search for lines that start with # (number/hash symbol). You can'tsuccessfully import the configuration if you don't fix these issues.
Importing the configuration file sectionsTo import the sections of the output configuration file(s),
For FortiOS 6.2.2 and earlier versions,
Please go to the left navigation panel, and select System > Advanced.
Select Upload and Run a New Script to locate the script file then click apply.
For FortiOS 6.2.3 and thereafter,
Please go to the admin dropdown menu in the top right corner.
Then select Configuration > Scripts > Run Script to upload and run the CLI scripts file.
Fortinet also recommends you not to import the file config-all.txt directly, but import each dividedconfiguration such as config-system-interface.txt and config-firewall-address.txtseparately instead. This makes troubleshooting easier if an error occurs.
Because you can't successfully import a section of configuration that references an object that doesn't alreadyexist in the configuration, ensure that you import the configuration sections in their original order. For example,you typically import polices last because they reference interfaces, addresses, users, services, IPsec phase1s,security policies, and so on. If these objects are missing, FortiGate doesn't accept the policy.
CLI debuggingTo make troubleshooting easier when there are import errors, before you import sections, enable CLIdebugging.
By default, CLI debugging is level 3. This is the level to use under normal conditions.
You can use this command to view the current debug level:
# diagnose debug info
A response similar to the following appears:
debug output: disable
FortiConverter 6.0.1 Admin Guide 185Fortinet Technologies Inc.

Import Configuration
console timestamp: disableconsole no user log message: disableCLI debug level: 3
For the configuration importing process, the appropriate debug level is 8. Use this command to change thedebug level:
diag debug enablediag debug CLI 8
When the import process is complete, use this command to return the debug level to the default (3):
diag debug reset
Importing processImport the sections of the conversion output systematically. For each section you import, check for importfailures in the web UI Script Execution History. Use CLI debugging to diagnose and fix any errors. When theimport is successful, continue with to next section of the configuration.
Example import error and troubleshootingThe following simple configuration generates an error because Test3 isn't defined:
config firewall addressedit "Test1"
set subnet 1.1.1.1 255.255.255.255nextedit "Test2"
set subnet 1.1.1.2 255.255.255.255next
endconfig firewall addrgrp
edit "Test-Addresses"set member "Test1" "Test2" "Test3"
nextend
When you save this configuration as a file and import it, the Failure status indicator shows:
The following CLI output captures detailed information about the error:
0: config firewall address0: edit "Test1"0: set subnet 1.1.1.1 255.255.255.2550: next0: edit "Test2"0: set subnet 1.1.1.2 255.255.255.255
FortiConverter 6.0.1 Admin Guide 186Fortinet Technologies Inc.

Import Configuration
0: next0: end0: config firewall addrgrp0: edit "Test-Addresses"-3: set member "Test1" "Test2" "Test3"1: next0: endwrite config file success, prepare to save in flash
The error code -3 indicates that FortiGate did not find the object and the return code 1 indicates that an erroroccurred.
Notice that FortiGate creates the address objects Test1 and Test2. The failure status only relates to theaddress group.
When you fix the script by adding the missing Test3 object and import it again, the Success status indicatorshows.
When the configuration is fixed, all return codes in the CLI debugging are 0, indicating no errors.
0: config firewall address0: edit "Test1"0: set subnet 1.1.1.1 255.255.255.2550: next0: edit "Test2"0: set subnet 1.1.1.2 255.255.255.2550: next0: edit "Test3"0: set subnet 1.1.1.3 255.255.255.2550: next0: end0: config firewall addrgrp0: edit "Test-Addresses"0: set member "Test1" "Test2" "Test3"0: next0: endwrite config file success, prepare to save in flash
Import config to FortiManager by upload CLI scripts file
The example in the procedures uses FortiManager 5.2 and global policies and objects. The procedures aresimilar for environments that don't use the global feature.
To configure FortiManagerOn FortiManager, enable the ADOM feature and create an ADOM for each source domain that you want tomigrate.Ensure that all the ADOMs (including the global ADOM) use the same version of FortiOS.
FortiConverter 6.0.1 Admin Guide 187Fortinet Technologies Inc.

Import Configuration
The output folderThe output folder provides both a global folder and a folder for each source domain. Both folders contain thesubfolder FMGR\.
Object configuration is located in the FMGR\FWObject\ folder, which contains the following files:
l Several text and HTML files that are used for reporting. They aren't used to import the configuration.l The text file config-all , which contains all the CLI commands for the object configuration.l Text files that duplicate sections of the config-all file: address, address groups, services,
scheduled, and so on. When there are many objects (for example, most environments have manyfirewall address objects), these sections are divided into multiple, indexed files. To make the importprocess simpler, Fortinet recommends that you import configurations using the files for individual sections.
Policy scripts are located in policy package folders in \FMGR\Policy as one or more firewall policy files(config-firewall-policy-1, config-firewall-policy-2, and so on).These files are the samecontent as the conversion output file config-all in smaller, indexed files that are easier to import.
Running scriptsWith the exception of config-system-session-helper, you run all scripts using the Policy Package,ADOM Database script target.
You run the config-system-session-helper script on the device database to set device-level settings.
If the global folder contains a config-system-session-helper script, review its contents. In mostcases, it isn't required because the global policies and objects configuration doesn't contain devices. You canadd any configuration in this script to session helper scripts for each domain that uses the global objects.However, in most cases, the domain-level script also contains these settings.
To import policies and objectsYou import your global object and policies first because the ADOM configuration can depend on them. Importobjects before policies because polices depend on objects.
1. In the FortiManager system settings, to enable scripts, go to System Settings > Admin > AdminSettings. UnderDisplay Options on GUI, select Show Script.
2. To display the scripts in the Global Objects menu, on the Policy & Objects tab, go to Tools > DisplayOptions > All On.
3. Go to Global Objects > Advanced > Script.
FortiConverter 6.0.1 Admin Guide 188Fortinet Technologies Inc.

Import Configuration
The list of global scripts is displayed.4. Click Import, enter a name for the script you are importing, and then clickBrowse to navigate to and
select a script from the Global\FMGR\FWObject folder.For more information on the output folders and files, see The output folder on page 188.
5. For the script target, select Policy Package, ADOM Database, and then select OK.6. When the import is complete, review any error messages that FortiConverter inserted as comments and
make any required corrections. For more information, see To troubleshoot script import and executionerrors on page 192.
7. To run the script, right-click it, and then select Run. Because global objects are applied to all ADOMs bydefault, forRun script on policy package, you can use the default policy package.If the script executionfails, troubleshoot the process and make any required changes. For more information, see To troubleshootscript import and execution errors on page 192.
8. Repeat the script import and run process for all the scripts in the Global\FMGR\FWObject folder.
9. When you have imported all the objects, use the same procedures to import and run the policy scriptsusing the firewall policy configuration files located in the Global\FMGR\Policy folder, which contains afolder for each policy package. don't import the config-all file.
FortiConverter 6.0.1 Admin Guide 189Fortinet Technologies Inc.

Import Configuration
After the scripts have run successfully, review the policies.
10. When the policy package is correct, assign it to your ADOM. By default, FortiManager assigns the selectedpolicy package to all policy packages in the ADOM.
11. To complete the ADOM assignment, on the Assignment tab, clickAssign.
12. When the process of assigning the polices and objects is complete, on the Policies & Objects tab, selectthe ADOM to review the policies.
FortiConverter 6.0.1 Admin Guide 190Fortinet Technologies Inc.

Import Configuration
13. To import the domain-level polices and objects into your ADOM, on the Device Manager tab, select theADOM, and then go to Scripts > Script.
14. Repeat the procedure for importing the object and policy scripts with the contents of the <domain_name>\FMGR\FWObject and <domain_name>\FMGR\Policy folders. Import the objects first, butdon't import the config-system-session-helpers script. For the script target, select PolicyPackage, ADOM Database.Ensure you check for error messages that FortiConverter inserted as comments and make any requiredcorrections. For more information, see To troubleshoot script import and execution errors on page 192.
15. Run each imported object script. ForRun script on, select Policy Package, ADOM Database. Correctany errors that prevent the script from executing. For more information, see To troubleshoot script importand execution errors on page 192.If there are many address objects, you import several scripts because the address file is indexed to keepthe files at a manageable size.
16. Before you run the policy scripts, create new policy packages that correspond to each policy package folderin <domain_name>\FMGR\Policy. On the Policy & Objects tab, right-click on the default policypackage and choose Policy Package Create New.Clear the Clone Policy Package option.
Because global polices and objects were assigned to all policy packages in this ADOM, they areautomatically part of each new policy package. The next import task adds the domain-level policies.
17. On the Device Manager tab, run each imported policy script. ForRun script on, select Policy Package,ADOM Database. When you are prompted for a policy package, select the name of the appropriatepackage, which you created earlier.
FortiConverter 6.0.1 Admin Guide 191Fortinet Technologies Inc.

Import Configuration
Correct any errors that prevent the script from executing. For more information, see To troubleshoot scriptimport and execution errors on page 192.
To troubleshoot script import and execution errorsFortiConverter inserts any error messages in output scripts as comments.
In some cases, the script can't run unless you edit it to correct the errors. Double-click the name of the script inthe list of scripts to edit it.
In the following example, the address objects that generate the errors are assigned using the global objectsand can be ignored.
If an error occurs during script execution, go to System Settings > Task Monitor to view the error messageand identify the error. Look for "Failed to commit to DB" in the task information.
FortiConverter 6.0.1 Admin Guide 192Fortinet Technologies Inc.

Import Configuration
Unlike a FortiGate import, which creates an object up to the point of failure, FortiManager creates no objects orpolicies if the script execution fails.
If you identify the cause, correct it in your script.
For example, the following error was generated by a firewall policy that contained both IPv4 and IPv6 objects,which FortiOS doesn't support and FortiConverter did not correct.
Another example of a script execution error generates the following message:
To resolve the error, determine which object precedes the error, locate it in the script, and correct anyconfiguration errors. In this example, the configuration doesn't specify the subnet. If an object you don't want touse generates the error, you can delete it from the script or use # (hash) at the start of the appropriate lines toconvert them to comments. Then, try to run the script again. Repeat the troubleshooting process until the scriptexecution is successful.
FortiConverter 6.0.1 Admin Guide 193Fortinet Technologies Inc.

Import Configuration
If there is no obvious error in the output, try dividing the script into two smaller scripts. If only one script runssuccessfully, you have narrowed the focus of your troubleshooting to the content of the failed script. To divide ascript, right-click it and select Clone. Using the policy numbers to determine and keep track of which policiesyou delete, edit the files so that they each contain a different section of the script. Then, run both scripts.
Dividing scripts into two or more smaller scripts is also useful if you suspect the length of a script is causing theexecution to fail. Scripts that are too long fail without generating an error message.
In some cases, if a script fails, Fortinet recommends that you create a new script instead of editing or deletingit, because sometimes files can remain after you delete it. If you preserve the failed script, you can review itand the error it generates later. In the following example, the following config user server objects tookseveral attempts to run successfully.
Working with object output in indexed files
In some cases, output files are split into smaller, indexed files to make it easier to import them.
If a configuration contains nested groups, script execution can fail because groups defined in one file aredependent on groups defined in another file.
If a script fails because of a missing dependency, remove the object that causes the failure. When you havefinished importing the scripts for the object type, delete the script you edited and import it again. Then, run thescript without editing it. Because the dependency is now included in the imported configuration, the uneditedscript can execute successfully.
FortiConverter 6.0.1 Admin Guide 194Fortinet Technologies Inc.

Troubleshooting
Troubleshooting
For any questions not covered in this content, contact FortiConverter customer support at [email protected].
Licensing Issues
FortiConverter is a single-user application. Using more than one user account may invalidate the Hardware ID.If multiple users require the application, Fortinet recommends that you install it using a single, shared account,on a remotely accessible host.
l A hardware layer change generates a new hardware identifier. For a physical host, this could occur wheninstalling the application on a new laptop, or installing a memory extension or a new network card. For avirtual host, such as VMware, the hardware identified may change because of an update in thevirtualization software, or because of a change to the virtual hardware configuration for that virtual host.
l Windows updates might affect the hardware ID, particularly .Net framework updates.l If your license does change, contact customer services, [email protected], include your serial number,
previous hardware identifier, and new hardware identifier. Customer services can update your FortiCarerecords and you can then download the replacement license from the support portal.
Accessing conversion logs
In most cases, when FortiConverter has an internal problem, the application displays a message in the web UIand adds an error message to a log file.
The logs capture all the conversion steps, including initialization, parsing (two logs), conversion, and reporting.
If the log indicates that FortiConverter encountered an internal error, or for help resolving other errors, contactthe FortiConverter team at [email protected].
Conversion Logs
Log location
The log of FortiConverter is stored at the following location ("AppData" is a hidden folder):
C:\Users\<Windows user name>\AppData\Roaming\Fortinet\FortiConverter
Log file "syslog.txt" is the log file of the application.
FortiConverter 6.0.1 Admin Guide 195Fortinet Technologies Inc.

Troubleshooting
Normal log records
[2019-10-23 13:39:00,665] [ INFO] --- --Start new conversion "TEST"---
[2019-10-23 13:39:00,666] [ INFO] --- Vendor: SonicWALL Model:
[2019-10-23 13:39:00,666] [ INFO] --- ---Starting Parse process---
[2019-10-23 13:39:00,815] [ INFO] --- Parsing input configurations
[2019-10-23 13:39:01,294] [ INFO] --- ---Parse completed---
[2019-10-23 13:39:01,298] [ INFO] --- ---Save conversion completed---
[2019-10-23 13:39:11,630] [ INFO] --- ---Starting convert process---
[2019-10-23 13:39:11,631] [ INFO] --- Converting source configuration
[2019-10-23 13:39:11,634] [ INFO] --- Converting domain root
[2019-10-23 13:39:12,247] [ INFO] --- Start tuning job...
[2019-10-23 13:39:12,509] [ INFO] --- Start nat tuning job...
[2019-10-23 13:39:12,518] [ INFO] --- Start nat merge...
[2019-10-23 13:39:12,519] [ INFO] --- Start nat merge parallelizer
[2019-10-23 13:39:19,897] [ INFO] --- Nat tuning for policy package: root
[2019-10-23 13:39:21,338] [ INFO] --- Merging policies with NAT rules...
[2019-10-23 13:39:24,544] [ INFO] --- Process id 18252 nat merge and optimize all done
[2019-10-23 13:39:24,721] [ INFO] --- Process id 13956 nat merge and optimize all done
[2019-10-23 13:39:24,820] [ INFO] --- Process id 8044 nat merge and optimize all done
[2019-10-23 13:39:28,597] [ INFO] --- Clean up objects by policy reference...
[2019-10-23 13:39:30,498] [ INFO] --- Saving NAT merged policy...
[2019-10-23 13:39:32,782] [ INFO] --- ---Conversion complete---
[2019-10-23 13:39:33,797] [ INFO] --- ---Getting tuning data---
[2019-10-23 13:40:11,105] [ INFO] --- Report: FGT
Log with error
[2019-10-23 13:37:29,963] [ INFO] --- --Start new conversion "TEST"---
[2019-10-23 13:37:29,964] [ INFO] --- Vendor: SonicWALL Model:
[2019-10-23 13:37:29,964] [ INFO] --- ---Starting Parse process---
[2019-10-23 13:37:30,045] [ INFO] --- Parsing input configurations
[2019-10-23 13:37:30,393] [ INFO] --- Parser failed.
[2019-10-23 13:37:30,398] [ ERROR] --- Parse failed.
Traceback (most recent call last):
FortiConverter 6.0.1 Admin Guide 196Fortinet Technologies Inc.

Troubleshooting
File "C:\Users\<Windows usename>\Documents\FortiConverter\NewApplication\Django\backend\mysite\applications\converter\models\convert_job.py", line 112, in do_convert_for_first_phase raise Exception(engine_invoker.get_err_message(result))
Exception: Input Parameter Error
[2019-10-23 13:37:30,407] [ ERROR] --- Parse request failed.
[2019-10-23 13:37:30,408] [ INFO] --- ---Parse completed---
[2019-10-23 13:37:30,411] [ INFO] --- ---Save conversion completed---
Troubleshooting application crashes
In many cases, disabling NAT merge options can resolve an application crash that occurs during a conversion.
For example, for a Cisco PIX conversion, on the wizard Start Option page, clickMore, and then for each type ofNAT, select Off.
See the FortiConverter logs for detailed information about the cause of a crash. See Accessing conversion logson page 195.
FortiConverter 6.0.1 Admin Guide 197Fortinet Technologies Inc.

Copyright© 2020 Fortinet, Inc. All rights reserved. Fortinet®, FortiGate®, FortiCare® and FortiGuard®, and certain other marks are registered trademarks of Fortinet, Inc., inthe U.S. and other jurisdictions, and other Fortinet names herein may also be registered and/or common law trademarks of Fortinet. All other product or company names may betrademarks of their respective owners. Performance and other metrics contained herein were attained in internal lab tests under ideal conditions, and actual performance andother results may vary. Network variables, different network environments and other conditions may affect performance results. Nothing herein represents any bindingcommitment by Fortinet, and Fortinet disclaims all warranties, whether express or implied, except to the extent Fortinet enters a binding written contract, signed by Fortinet’sGeneral Counsel, with a purchaser that expressly warrants that the identified product will perform according to certain expressly-identified performancemetrics and, in suchevent, only the specific performancemetrics expressly identified in such binding written contract shall be binding on Fortinet. For absolute clarity, any such warranty will belimited to performance in the same ideal conditions as in Fortinet’s internal lab tests. In no event does Fortinet make any commitment related to future deliverables, features ordevelopment, and circumstances may change such that any forward-looking statements herein are not accurate. Fortinet disclaims in full any covenants, representations, andguarantees pursuant hereto, whether express or implied. Fortinet reserves the right to change, modify, transfer, or otherwise revise this publication without notice, and themostcurrent version of the publication shall be applicable.