Geometry of light and shadows
164
Geometry of light and shadows
-
Upload
khangminh22 -
Category
Documents
-
view
1 -
download
0
Transcript of Geometry of light and shadows

Geometry of light
and shadows


Geometry of Light
and Shadows
Astronomy for everyday life
NASE
Network for Astronomy Education in School Working Group of the Commission on Education and
Development of the IAU
Editors: Rosa M. Ros and Mary Kay Hemenway

First edition: January 2015
©: NASE 2015-01-31
©:Text by: Francis Berthomieu, Beatriz
García, Mary Kay Hemenway, Ricardo
Moreno, Jay M. Pasachoff,, Rosa M. Ros,
Magda Stavinschi, 2014
Editor: Rosa M. Ros and Mary Kay Hemenway
Graphic Design: Silvina Pérez
Printed in UE
ISBN: 978-84-15771-47-0
Printed by:
Albedo Fulldome, S.L

Index
Introduction
3
History of Astronomy
5
Solar System
22
Local Horizon and Sundials
43
Stellar, solar and lunar demonstrators
60
Earth-moon-sun system: Phases and eclipses
85
Young Astronomer Briefcase
99
Planets and Exoplanets
117
Preparing for Observing
139


NASE publications Geometry of Light and Shadows
3
Introduction
Teaching is not to just transferring knowledge, it is creating the possibility of producing it, Paulo Freire
The Network for Astronomy School Education, NASE, has as its main objective the development of quality training courses in all countries to strengthen astronomy at different levels of education. It proposes to incorporate issues related to the discipline in different curriculum areas to introduce young people in science through the approach of the study of the Universe. The presence of astronomy in schools is essential and goes hand in hand with teacher training. In the NASE proposed activities the active participation, observation, and making models to better understand the scientific contents are promoted on three fundamental premises: the workshops should be at zero cost, the activities can be completed in time for a class and a special laboratory at the institution is not needed. Since all schools have a schoolyard, it is proposed to use this court as "astronomy lab" to make observations and transform the students into the major players in the task of learning. The basis of Astronomy is the scientific study of light, either from the radiation coming from celestial objects (produced or reflected by them) or from the physical study of it. The applications of electromagnetic energy in technology have meant a fundamental change in the lives of human beings. A remarkable series of milestones in the history of the science of light allows us to ensure that their study intersects with science and technology. In 1815, in France Fresnel exhibited the theory of wave nature of light; in 1865, in England Maxwell described the electromagnetic theory of light, the precursor of relativity; in 1915, in Germany Einstein developed general relativity which confirmed the central role of light in space and time, and in 1965, in the United States Penzias and Wilson discovered the cosmic microwave background, fossil remnant of the creation of universe. Moreover, 2015 will mark 1000 years since the great works of Ibn al-Haytham on optics, published during the Islamic Golden Age. That light, electromagnetic energy in general, is a necessary condition for life, has marked the evolution on our planet. It has modified our lives and constitutes a powerful tool that we need to know to use it properly. NASE provides two monographic texts Geometry of Light and Shadows and Cosmic Lights, to show how “light” can be used in teaching concepts in different areas of the natural sciences, from mathematics to biology and to create awareness of the great achievements and discoveries of mankind related to light, as well as the need for responsible use of this energy on Earth. Although the texts can be used independently, covering both will include more aspects of astronomy and astrophysics found in the education programs around the Globe. To learn more about the courses developed in different countries, activities and new courses that have arisen after the initial course, we invite the reader to go to the NASE website (http://www.naseprogram.org). The program is not limited to provide initial training, but tends to form working groups with local teachers, who continue to support themselves and include new teachers as they create new materials and new activities which are made available to the international network on

NASE publications Geometry of Light and Shadows
4
the Internet. The supplementary material of NASE offers a universe of possibilities to the instructor who has followed the basic courses, allowing them to expand the knowledge and select new activities to develop at their own courses and institutions. The primary objective of NASE is to provide Astronomy activities to all to understand and enjoy the process of assimilation of new knowledge. Finally, we thank all the authors for their help in preparation of materials. Also we emphasize the great support received for translations and assistance for the two versions of this book (Spanish/ English): Ligia Arias, Barbara Castanheira, Lara Eakins, Jaime Fabregat, Keely Finkelstein, Irina Marinova Nestor Marinozzi, Mentuch Erin Cooper, Isa Oliveira, Cristina Padilla, Silvina Pérez, Claudia Romagnolli, Colette Salyk, Viviana Sebben, Oriol Serrano, Ruben Trillo and Sarah Tuttle.

NASE publications Geometry of Light and Shadows
5
History of Astronomy
Jay Pasachoff, Magda Stavinschi, Mary Kay Hemenway
International Astronomical Union, Williams College (Massachusetts, USA),
Astronomical Institute of the Romanian Academy (Bucarest, Romania), University of Texas (Austin, USA)
Summary
This short survey of the History of Astronomy provides a brief overview of the ubiquitous
nature of astronomy at its origins, followed by a summary of the key events in the
development of astronomy in Western Europe to the time of Isaac Newton.
Goals
Give a schematic overview of the history of astronomy in different areas throughout
the world, in order to show that astronomy has always been of interest to all the
people.
List the main figures in the history of astronomy who contributed to major changes in
approaching this discipline up to Newton: Tycho Brahe, Copernicus, Kepler and
Galileo.
Conference time constraints prevent us from developing the history of astronomy in
the present day, but more details can be found in other chapters of this book
Pre-History
With dark skies, ancient peoples could see the stars rise in the eastern part of the sky, move
upward, and set in the west. In one direction, the stars moved in tiny circles. Today, for those
in the northern hemisphere, when we look north, we see a star at that position – the North
Star, or Polaris. It isn't a very bright star: 48 stars in the sky are brighter than it, but it happens
to be in an interesting place. In ancient times, other stars were aligned with Earth's North
Pole, or sometimes, there were no stars in the vicinity of the pole.
Since people viewed the sky so often, they noticed that a few of the brighter objects didn't rise
and set exactly with the stars. Of course, the Moon was by far the brightest object in the night
sky. It rose almost an hour later each night, and appeared against a different background of
stars. Its shape also changed in cycles (what we now call phases).
But some of these lights in the sky moved differently from the others. These came to be called
wanderers or planets by the Greeks. Virtually every civilization on Earth noticed, and named,
these objects.
Some ancient people built monuments such as standing circles, like Stonehenge in England,

NASE publications Geometry of Light and Shadows
6
or tombs such as the ones in Menorca in Spain that aligned with the Southern Cross in 1000
BC. The Babylonians were great recorders of astronomical phenomena, but the Greeks built
on that knowledge to try to "explain" the sky.
The Greeks
Most ancient Greeks, including Aristotle (384 BCE – 322 BCE), thought that Earth was in the
center of the universe, and it was made of four elements: Earth, Air, Fire, and Water. Beyond
the Earth was a fifth element, the aether (or quintessence), that made up the points of light in
the sky.
How did these wanderers move among the stars? Mostly, they went in the same direction that
the stars went: rising in the east and moving toward the west. But sometimes, they seemed to
pause and go backwards with respect to the stars. This backward motion is called "retrograde"
motion, to tell it apart from the forward motion, called "prograde."
The Greek astronomer Claudius Ptolemy (c. CE 90 – c. CE 168) worked in Alexandria in
North Africa in the second century CE. Ptolemy wanted to be able to predict the positions of
planets and came up with a mathematical solution. Following Aristotle, he placed the Earth at
the center of the universe. The Moon and the planets go around it in nested circles that got
bigger with distance from Earth. What if the planets really move on small circles whose
centers are on the big circles? Then, on some of the motion on the small circles, they'd be
moving faster backwards than the centers of these circles move forward. For those of us on
Earth, we'd see the planets move backwards.
Those small circles are called "epicycles," and the big circles are called "deferents." Ptolemy's
idea of circles moving on circles held sway over western science for over a thousand years.
Going from observation to theory using mathematics was a unique and important step in the
development of western science.
Although they didn't have the same names for the objects they observed, virtually every
culture on Earth watched the skies. They used the information to set up calendars and predict
the seasonal cycles for planting, harvesting, or hunting as well as religious ceremonies. Like
the Greeks, some of them developed very sophisticated mathematics to predict the motions of
the planets or eclipses, but this does not mean that they attempted what we would call a
scientific theory. Here are some examples:
Africa
The standing stones at Nabta in the Nubian Desert pre-date Stonehenge by 1000 years.
Egyptians used astronomy to align their pyramids as well as extend their religious beliefs to
include star lore. Petroglyphs at Namoratunga (Kenya) share aspects of modern cattle brands.
Star lore comes from all areas of Africa, from the Dogon region of Mali, to West Africa, to
Ethiopia, to South Africa.

NASE publications Geometry of Light and Shadows
7
Islamic Astronomy
Many astronomical developments were made in the Islamic world, particularly during the
Islamic Golden Age (8th
-15th
centuries), and mostly written in the Arabic language. It was
developed most in the Middle East, Central Asia, Al-Andalus, North Africa, and later in the
Far East and India. A significant number of stars in the sky, such as Aldebaran and Altair, and
astronomical terms such as alidade, azimuth, almucantar, are still referred to by their Arabic
names. Arabs invented Arabic numbers, including the use of zero. They were interested in
finding positions and time of day (since it was useful for prayer services). They made many
discoveries in optics as well. Many works in Greek were preserved for posterity through their
translations to Arabic.
The first systematic observations in Islam are reported to have taken place under the
patronage of Al-Maâmun (786-833 CE). Here, and in many other private observatories from
Damascus to Baghdad, meridian degrees were measured, solar parameters were established,
and detailed observations of the Sun, Moon, and planets were undertaken.
Instruments used by the Islamic astronomy were: celestial globes and armillary spheres,
astrolabes, sundials and quadrants.
Fig. 1: Arabic astrolabe
The Americas
North America Native peoples of North America also named their constellations and told sky stories which
were passed down through oral tradition. Some artifacts, such as stone wheels or building

NASE publications Geometry of Light and Shadows
8
alignments, remain as evidence of their use of astronomy in every-day life.
Mayan Astronomy The Maya were a Mesoamerican civilization, noted for the only known fully developed
written language of the pre-Columbian Americas, as well as for its art, architecture,
mathematical and astronomical systems. Initially established during the Pre-Classic period (c.
2000 BCE to 250 CE), Mayan cities reached their highest state of development during the
Classic period (c. 250 CE to 900 CE), and continued throughout the Post-Classic period until
the arrival of the Spanish. The Mayan peoples never disappeared, neither at the time of the
Classic period decline nor with the arrival of the Spanish conquistadors and the subsequent
Spanish colonization of the Americas.
Mayan astronomy is one of the most known ancient astronomies in the world, especially due
to its famous calendar, wrongly interpreted now as predicting the end of the world. Maya
appear to be the only pre-telescopic civilization to demonstrate knowledge of the Orion
Nebula as being fuzzy, i.e. not a stellar pinpoint.
The Maya were very interested in zenithal passages, the time when the Sun passes directly
overhead. The latitudes of most of their cities being below the Tropic of Cancer, these
zenithal passages would occur twice a year equidistant from the solstice. To represent this
position of the Sun overhead, the Maya had a god named Diving God.
Fig. 2: Chichén Itzá(Mexico) is an important archaeological remains of the Maya astronomy.
Venus was the most important astronomical object to the Maya, even more important to them
than the Sun. The Mayan calendar is a system of calendars and almanacs used in the Mayan
civilization of pre-Columbian Mesoamerica, and in some modern Maya communities in
highland Guatemala and Oaxaca, Mexico.
Although the Mesoamerican calendar did not originate with the Mayan, their subsequent
extensions and refinements of it were the most sophisticated. Along with those of the Aztecs,

NASE publications Geometry of Light and Shadows
9
the Mayan calendars are the best documented and most completely understood.
Aztec Astronomy
They were certain ethnic groups of central Mexico, particularly those groups who spoke the
Nahuatl language and who dominated large parts of Mesoamerica in the 14th, 15th and 16th
centuries, a period referred to as the late post-classic period in Mesoamerican chronology.
Aztec culture and history is primarily known through archeological evidence found in
excavations such as that of the renowned Templo Mayor in Mexico City and many others,
from indigenous bark paper codices, from eyewitness accounts by Spanish conquistadors or
16th
and 17th
century descriptions of Aztec culture and history written by Spanish clergymen
and literate Aztecs in the Spanish or Nahuatl language.
The Aztec Calendar, or Sun Stone, is the earliest monolith that remains of the pre-Hispanic
culture in Central and South America. It is believed that it was carved around the year 1479.
This is a circular monolith with four concentric circles. In the center appears the face of
Tonatiuh (Sun God), decorated with jade and holding a knife in his mouth. The four suns or
earlier "worlds" are represented by square-shaped figures flanking the Fifth Sun, in the center.
The outer circle consists of 20 areas that represent the days of each of the 18 months that
comprised the Aztec calendar. To complete the 365-day solar year, the Aztecs incorporated 5
sacrificial, or Nemontemi, days.
Like almost all ancient peoples, the Aztecs grouped into associations the apparent bright stars
(constellations): Mamalhuaztli (Orion's Belt), Tianquiztli (the Pleiades), Citlaltlachtli
(Gemini), Citlalcolotl (Scorpio) and Xonecuilli (The Little Dipper, or Southern Cross for
others, etc.). Comets were called "the stars that smoke. "
The great periods of time in the Aztec cosmology are defined by the eras of different suns,
each of whose end was determined by major disasters such as destruction by jaguars,
hurricanes, fire, flood or earthquakes.
Inca Astronomy
Inca civilization is a civilization pre-Columbian Andean Group. It starts at the beginning of
the 13th
century in the basin of Cuzco in Peru and the current then grows along the Pacific
Ocean and the Andes, covering the western part of South America. At its peak, it extends
from Colombia to Argentina and Chile, across Ecuador, Peru and Bolivia.
The Incas considered their King, the Sapa Inca, to be the "child of the Sun". Its members
identified various dark areas or dark nebulae in the Milky Way as animals, and associated
their appearance with the seasonal rains. Its members identified various dark areas or dark
nebulae in the Milky Way as animals, and associated their appearance with the seasonal rains
The Incas used a solar calendar for agriculture and a lunar calendar for the religious holidays.
According to chronicles of the Spanish conquistadors, on the outskirts of Cuzco in present

NASE publications Geometry of Light and Shadows
10
day Peru there was a big public schedule that consisted of 12 columns each 5 meters high that
could be seen from afar. With it, people could set the date. They celebrated two major parties,
the Inti Raymi and Capac Raymi, the summer and winter solstice respectively.
They had their own constellations: the Yutu (Partridge) was the dark zone in the Milky Way
that we call the Coal Sack. They called the Pleiades cluster Qollqa. With the stars of the Lyra
constellation they did a drawing of one of the most known animals to them, and named it
Little Silver Llama or colored Llama, whose brightest star (Vega) was Urkuchillay, although
according to others, that was the name of the whole constellation. Moreover there were the
Machacuay (snake), the Hamp'atu (toad), the Atoq (Fox), the Kuntur, etc.
Major cities were drawn following celestial alignments and using the cardinal points.
On the outskirts of Cuzco there was an important temple dedicated to the Sun (Inti), from
which came out some lines in radial shape that divided the valley in 328 Temples. That
number is still a mystery, but one possible explanation relates it to the astronomy: it coincides
with the days that contain twelve lunar months. And the 37 days that are missing until the 365
days of the solar year coincides with the days that the Pleiades cluster is not observable from
Cuzco.
India
The earliest textual mention that is given in the religious literature of India (2nd millennium
BCE) became an established tradition by the 1st millennium BCE, when different ancillary
branches of learning began to take shape.
During the following centuries a number of Indian astronomers studied various aspects of
astronomical sciences, and global discourse with other cultures followed. Gnomons and
armillary spheres were common instruments.
The Hindu calendar used in ancient times has undergone many changes in the process of
regionalization, and today there are several regional Indian calendars, as well as an Indian
national calendar. In the Hindu calendar, the day starts with local sunrise. It is allotted five
"properties," called angas.
The ecliptic is divided into 27 nakshatras, which are variously called lunar houses or
asterisms. These reflect the moon's cycle against the fixed stars, 27 days and 72 hours, the
fractional part being compensated by an intercalary 28th nakshatra. Nakshatra computation
appears to have been well known at the time of the Rig Veda (2nd to1st millennium BCE).
China
The Chinese were considered as the most persistent and accurate observers of celestial
phenomena anywhere in the world before the Arabs. Detailed records of astronomical
observations began during the Warring Sates period (4th century BCE) and flourished from
the Han period onwards.

NASE publications Geometry of Light and Shadows
11
Some elements of Indian astronomy reached China with the expansion of Buddhism during
the Later Han dynasty (25-220 CE), but the most detailed incorporation of Indian
astronomical thought occurred during the Tang Dynasty (618-907).
Astronomy was revitalized under the stimulus of Western cosmology and technology after the
Jesuits established their missions. The telescope was introduced in the 17th century.
Equipment and innovation used by Chinese astronomy: armillary sphere, celestial globe, the
water-powered armillary sphere and the celestial globe tower.
Chinese astronomy was focused more on the observations than on theory. According to
writings of the Jesuits, who visited Beijing in the 17th century, the Chinese had data from the
year 4,000 BCE, including the explosion of supernovae, eclipses and the appearance of
comets.
In the year 2300 BCE, they developed the first known solar calendar, and in 2100 BCE
recorded a solar eclipse. In 1200 BCE they described sunspots, calling them "specks dark" in
the Sun. In 532 BCE, they left evidence of the emergence of a supernova star in the Aquila
constellation, and in the 240 and 164 BCE passages of Halley comet. In 100 BCE Chinese
invented the compass with which they marked the direction north.
And in more recent times, they determined the precession of the equinoxes as one degree
every 50 years, recorded more supernovae and found that the tail of comets always points in
the opposite direction to the Sun's position
In the year 1006 CE they noted the appearance of a supernova so bright that could be seen
during the day. It is the brightest supernova that has been reported. And in 1054, they
observed a supernova, the remnants of which would later be called the Crab Nebula.
Their celestial sphere differed from the Western one. The celestial equator was divided into
28 parts, called "houses", and there were a total of 284 constellations with names such as
Dipper, Three Steps, Supreme Palace, Tripod, Spear or Harpoon. Chinese New Year starts on
the day of the first new moon after the sun enters the constellation Aquarius.
The polymath Chinese scientist Shen Kuo (1031-1095 CE) was not only the first in history to
describe the magnetic-needle compass, but also made a more accurate measurement of the
distance between the Pole Star and true North that could be used for navigation. Shen Kuo
and Wei Pu also established a project of nightly astronomical observation over a period of
five successive years, an intensive work that would even rival the later work of Tycho Brahe
in Europe. They also charted the exact coordinates of the planets on a star map for this project
and created theories of planetary motion, including retrograde motion.
Western Europe
Following the fall of Rome, the knowledge complied by the Greeks was barely transmitted
through the work of monks who often copied manuscripts that held no meaning for them.

NASE publications Geometry of Light and Shadows
12
Eventually, with the rise of Cathedral schools and the first universities, scholars started to
tackle the puzzles that science offers. Through trade (and pillaging), new manuscripts from
the East came through the Crusades, and contact with Islamic scholars (especially in Spain)
allowed translations to Latin to be made. Some scholars attempted to pull the information into
an order that would fit it into their Christian viewpoint.
Mathematical genius: Nicholas Copernicus of Poland
In the early 1500s, Nicholas Copernicus (1473 ‒ 1543) concluded that Universe would be
simpler if the Sun, rather than the Earth, were at its center. Then the retrograde motion of the
planets would occur even if all the planets merely orbited the Sun in circles. The backward
motion would be an optical illusion that resulted when we passed another planet. Similarly, if
you look at the car to your right while you are both stopped at a traffic light, if you start
moving first, you might briefly think that the other car is moving backwards.
Fig. 3: Copernicus's diagram first showing the Sun at the center of what we therefore now call the Solar System.
This diagram is from the first edition of De Revolutionibus Orbium Celestium (On the Revolutions of the
Celestial Orbs), published in 1543.
Copernicus shared his ideas with mathematicians, but did not publish them until a young
scientist, Georg Rheticus, convinced him and arranged for the publication in another town. A
printed copy of De Revolutionibus Orbium Celestium arrived just as Copernicus was dying in
1543. He may have never seen the unsigned preface written by the publisher that suggested
that the book was a mathematical way to calculate positions, not the actual truth. Following
Aristotle, Copernicus used circles and added some epicycles. His book followed the structure
of Ptolemy's book, but his devotion to mathematical simplicity was influenced by Pythagorus.

NASE publications Geometry of Light and Shadows
13
Copernicus's book contains (figure 3) perhaps the most famous diagram in the history of
science. It shows the Sun at the center of a series of circles. Copernicus calculated the speeds
at which the planets went around the Sun, since he knew which went fastest in the sky. Thus
he got the planets in the correct order: Mercury, Venus, Earth, Mars, Jupiter, Saturn, and he
got the relative distances of the planets correct also. But, his calculations really didn't predict
the positions of the planets much better than Ptolemy's method did.
In England, Leonard Digges wrote a book, in English, about the Earth and the Universe. In
1576, his son Thomas wrote an appendix in which he described Copernicus's new ideas. In
the appendix, an English-language version of Copernicus's diagram appeared for the first time
(figure 4). Digges also showed the stars at many different distances from the solar system, not
just in one celestial sphere.
Fig 4. The first Copernican diagram in English, from Thomas Digges's appendix to A prognostication
everlasting, a book by his father first published in 1556. It contained only a Ptolemaic diagram. Thomas
Digges's appendix first appeared in 1576; this diagram is from the 1596 printing.
Observational genius: Tycho Brahe of Denmark
The Danish aristocrat Tycho Brahe (1546 – 1601) took over an island off the coast of
Copenhagen, and received rent from the people there. On this island, Hven, he used his
wealth to build a great observatory with larger and better instruments. Though these were pre-
telescopic instruments, they were notable for allowing more precise measurements of the
positions of the stars and planets than had previously been possible.
Tycho ran his home as a forerunner of today's university, with visiting scientists coming to
work with him. He made better and better observing devices to measure the positions of stars
and planets, and kept accurate records.

NASE publications Geometry of Light and Shadows
14
But in his scientific zeal, he neglected some of his duties to his monarch, and when a new
king and queen came in, he was forced out. He chose to move to Prague, on the continent of
Europe, taking even his printing presses and pages that had already been printed, his records,
and his moveable tools.
Tycho succeeded in improving the accuracy of scientific observations. His accurate
observations of a comet at various distances showed him that the spheres did not have to be
nested with the Earth at the center. So, he made his own model of the universe -a hybrid
between Ptolemy's and Copernicus': the Sun and the Moon revolve around the Earth, while
the other planets revolve around the Sun. Tycho still had circles, but unlike Aristotle, he
allowed the circles to cross each other.
We value Tycho mainly for the trove of high-quality observations of the positions among the
stars of the planet Mars. To join him in Prague, Tycho invited a young mathematician,
Johannes Kepler. It is through Kepler that Tycho's fame largely remains.
Using Mathematics: Johannes Kepler of Germany
As a teacher in Graz, Austria, young Johannes Kepler (1571 – 1630) remembered his
childhood interest in astronomy, fostered by a comet and the lunar eclipse that he had seen.
He realized that there are five solid forms made of equally-shaped sides, and that if these
solids were nested and separated by spheres, they could correspond to the six known planets.
His book on the subject, Mysterium Cosmographicum (Mystery of the Cosmos), published in
1596, contained one of the most beautiful diagrams in the history of science (figure 5). In it,
he nested an octahedron, icosahedron, dodecahedron, tetrahedron, and cube, with eight,
twelve, twenty, four, and six sides, respectively, to show the spacing of the then-known
planets. The diagram, though very beautiful, is completely wrong
Fig. 5: Kepler's foldout diagram from his Mysterium Cosmographicum (Mystery of the Cosmos), published in
1596. His thinking of the geometric arrangement of the solar system was superseded in the following decade by

NASE publications Geometry of Light and Shadows
15
his arrangements of the planets according to the first two of his three laws of planetary motion.
But Kepler's mathematical skill earned him an interview with Tycho. In 1600, he became one
of several assistants to Tycho, and he made calculations using the data that Tycho had
amassed. Then Tycho went to a formal dinner and drank liberally. As the story goes,
etiquette prevented him from leaving the table, and he wound up with a burst bladder. His
quick and painful death was carefully followed in a diary, and is well documented.
But Kepler didn't get the data right away. For one thing, the data was one of the few valuable
things that Tycho's children could inherit, since Tycho had married a commoner and was not
allowed to bequeath real property. But Kepler did eventually get access to Tycho's data for
Mars, and he tried to make it fit his calculations. To make his precise calculations, Kepler
even worked out his own table of logarithms.
The data Kepler had from Tycho was of the position of the Mars in the sky, against a
background of stars. He tried to calculate what its real motion around the Sun must be. For a
long while, he tried to fit a circle or an egg-shaped orbit, but he just couldn't match the
observations accurately enough. Eventually, he tried a geometrical figure called an ellipse, a
sort of squashed circle. It fit! The discovery is one of the greatest in the history of
astronomy, and though Kepler first applied it to Mars and other planets in our solar system,
we now apply it even to the hundreds of planets we have discovered around other stars.
Kepler's book of 1609, Astronomia Nova (The New Astronomy), contained the first two of his
three laws of motion:
Kepler's first law: The planets orbit the Sun in ellipses, with the Sun at one focus.
Kepler's second law: A line joining a planet and the Sun sweeps out equal areas in equal
times.
An ellipse is a closed curve that has two key points in it; they are known as the foci. To draw
your own ellipse, put two dots on a piece of paper; each is a focus. Then take a piece of string
longer than the distance between the foci. Tape them down on the foci. Next, put a pencil in
the string, pulling it taut, and gently move it from side to side. The curve you generate will be
one side of an ellipse; it is obvious how to move the pencil to draw the other side. This
experiment with the string shows one of the key points defining an ellipse: the sum of the
distances from a point on the ellipse to each focus remains constant. A circle is a special kind
of ellipse where the two dots are on top of each other.
Kepler kept searching for harmonies in the motions of the planets. He associated the speeds of
the planets with musical notes, the higher notes corresponding to the faster-moving planets,
namely, Mercury and Venus. In 1619, he published his major work Harmonices Mundi (The
Harmony of the Worlds). In it (figure 6), he included not only musical staffs with notes but
also what we call his third law of planetary motion:
Kepler's Third Law of Planetary Motion: The square of the period of a planet's orbit around
the sun is proportional to the cube of the size of its orbit.

NASE publications Geometry of Light and Shadows
16
Astronomers tend to measure distances between planets in terms of the Astronomical Units,
which corresponds to the average distance between the Earth and the Sun, or 150 million
kilometers.
Fig.6: From Kepler's Harmonices Mundi (The Harmony of the World), published in 1619.
Mercury 0.387 AU 0.240 year
Venus 0.723 AU 0.615 year
Earth 1 AU 1 year
Mars 1.523 AU 1.881 years
Jupiter 5.203 AU 11.857 years
Saturn 9.537 AU 29.424 years Table 1: Distances from the Sun and periods of the planets in Kepler's time.
Try squaring the first column and cubing the second column. You will see that they are pretty
equal. Any differences come from the approximation, not from the real world, though with
more decimal places the influences of the other planets could be detected.
Discoveries with the Telescope: Galileo Galilei of Italy
The year 2009 was the International Year of Astronomy, declared first by the International
Astronomical Union, then by UNESCO, and finally by the General Assembly of the United
Nations. Why? It commemorated the use of the telescope on the heavens by Galileo 400 years
previously, in 1609.
Galileo (1564 - 1642) was a professor at Padua, part of the Republic of Venice. He heard of a
Dutch invention that could make distant objects seem closer. Though he hadn't seen one, he
figured out what lenses it must have contained and he put one together. He showed his device
to the nobles of Venice as a military and commercial venture, allowing them to see ships
farther out to sea than ever before. His invention was a great success.

NASE publications Geometry of Light and Shadows
17
Fig. 7a: One of Galileo's two surviving telescopes came to the Franklin Institute in Philadelphia in 2009, on its
first visit to the United States. Note that the outer part of the lens is covered with a cardboard ring. By hiding the
outer part of the lens, which was the least accurate part, Galileo improved the quality of his images. (Photo: Jay
M. Pasachoff). Fig. 7b: A page from Galileo's Sidereus Nuncius (The Starry Messenger), published in 1610,
showing an engraving of the Moon. The book was written in Latin, the language of European scholars. It
included extensive coverage of the relative motion of the four major moons of Jupiter.
Then he had the idea of turning the telescope upward. Though the telescope was hard to use,
had a very narrow field of view, and was hard to point, he succeeded in seeing part of the
Moon and realizing that there was a lot of structure on it. Because of his training in drawing
in Renaissance Italy, he realized that the structure represented light and shadow, and that he
was seeing mountains and craters. From the length of the shadows and how they changed with
changing illumination from the Sun, he could even figure out how high they were. A few
months earlier, the Englishmen Thomas Harriot had pointed a similar telescope at the Moon,
but he had drawn only some hazy scribbles and sketches. But Harriot wasn't interested in
publication or glory, and his work did not become known until after his death.
One lens Galileo used for his discoveries remains, cracked, in the Museum of the History of
Science in Florence, Italy, and two full telescopes he made survive, also there (figure 7a).
Galileo started writing up his discoveries in late 1609. He found not only mountains and
craters on the moon but also that the Milky Way was made out of many stars, as were certain
asterisms. Then, in January 1610, he found four "stars" near Jupiter that moved with it and
that changed position from night to night. That marked the discovery of the major moons of
Jupiter, which we now call the Galilean satellites. He wrote up his discoveries in a slim book
called Sidereus Nuncius (The Starry Messenger), which he published in 1610 (figure 7b).
Since Aristotle and Ptolemy, it had been thought that the Earth was the only center of
revolution. And Aristotle had been thought to be infallible. So the discovery of Jupiter's
satellites by showing that Aristotle could have been wrong was a tremendous blow to the
geocentric notion, and therefore a strong point in favor of Copernicus' heliocentric theory.

NASE publications Geometry of Light and Shadows
18
Galileo tried to name the moons after Cosmo de' Medici, his patron, to curry favor. But those
names didn't stick. Within a few years, Simon Marius proposed the names we now use.
(Marius may even have seen the moons slightly before Galileo, but he published much later.)
From left to right, they are Io, Europa, Ganymede, and Callisto (figure 9). Even in a small,
amateur telescope, you can see them on a clear night, and notice that over hours they change
positions. They orbit Jupiter in periods of about two to sixteen days.
Even in the biggest and best ground-based telescopes, astronomers could not get a clear view
of structure on the surfaces of the Galilean satellites. Only when the NASA satellites Pioneer
10 and 11, and then Voyager 1 and 2, flew close to the Jupiter system did we see enough
detail on the satellites to be able to characterize them and their surfaces. From ground-based
and space-based observations, astronomers are still discovering moons of Jupiter, though the
newly discovered ones are much smaller and fainter than the Galilean satellites.
Galileo used his discoveries to get a better job with a higher salary, in Florence.
Unfortunately, Florence was closer to the Papal authority in Rome, serving as bankers to the
Pope, and was less liberal than the Venetian Republic. He continued to write on a variety of
science topics, such as sunspots, comets, floating bodies. Each one seemed to pinpoint an
argument against some aspect of Aristotle's studies. He discovered that Venus had phases -
which showed that Venus orbited the Sun. This did not prove that Earth orbited the Sun, since
Tycho's hybrid cosmology would explain these phases. But, Galileo saw it as support of
Copernicus.
Fig. 8: In 2009, to commemorate the 400th anniversary of Galileo's first use of the telescope on the heavens, a
plaque was put on a column at the top of the Campanile, a 15th-century tower (re-erected in the early 20th
century after it collapsed in 1902) in Venice. The commemoration here is of Galileo's demonstrating his
telescope to the nobles of Venice by observing ships relatively far out at sea; it was before he turned his
telescope upward. The writing on the plaque can be translated approximately as "Galileo Galilei, with his
spyglass, on August 21, 2009, enlarged the horizons of man, 400 years ago."(Photo: Jay M. Pasachoff)
In 1616, he was told by Church officials in Rome not to teach Copernicanism, that the Sun
rather than the Earth was at the center of the Universe. He managed to keep quiet for a long
time, but in 1632 he published his Dialogo (Dialogue on Two Chief World Systems) that had
three men discussing the heliocentric and geocentric systems. He had official permission to
publish the book, but the book did make apparent his preference for the Copernican
heliocentric system. He was tried for his disobedience and sentenced to house arrest, where
he remained for the rest of his life.

NASE publications Geometry of Light and Shadows
19
Fig. 9: Galileo himself would have been amazed to see what his namesake spacecraft and its predecessors
showed from the "Medician satellites" that he discovered in 1609. Here they show in images at their true
relative scale. From left to right, we see Io, newly resurfaced with two dozen continually erupting volcanoes.
Second is Europa, a prime suspect for finding extraterrestrial life because of the ocean that is under the smooth
ice layer that we see. Third is Ganymede, the largest moon in the solar system, showing especially a
fascinatingly grooved part of its surface. And at right is Callisto, farther out than the others and covered with
hard ice that retains the scarring from overlapping meteorite strikes that occurred over billions of years.
(Photo:NASA, Galileo Mission, PIA01400)
The New Physics: Isaac Newton of England Many believe that the three top physicists of all time are: Isaac Newton, James Clerk
Maxwell, and Albert Einstein. A summary: Newton discovered the law of gravity, Clerk
Maxwell unified electricity and magnetism, and Einstein discovered special and general
relativity.
In a mostly true story, young Isaac Newton (1642 – 1727) was sent home from Cambridge
University to Woolsthorpe, near Lincoln, in England, when the English universities were
closed because of plaque. While there, he saw an apple fall off an apple tree, and he realized
that the same force that controlled the apple's fall was, no doubt, the same force that
controlled the motion of the Moon.
Eventually, Newton was back at Trinity College, Cambridge, on the faculty. In the meantime,
a group of scientists in London got together in a coffeehouse to form a society (now the Royal
Society), and young Edmond Halley was sent to Cambridge to confirm a story that a brilliant
mathematician, Isaac Newton, could help them with an important scientific question. The trip
from London to Cambridge by stagecoach was a lot longer and more difficult than the hour's
train trip is nowadays.
Halley asked Newton if there were a force that fell off with the square of the distance, what
shape would an orbit have? And Newton replied that it would be an ellipse. Excited, Halley
asked if he had proved it, and Newton said it was on some papers he had. He said he couldn't
find them, though perhaps he was merely waiting time to judge whether he really wanted to
turn over his analysis. Anyway, Newton was moved to write out some of his mathematical
conclusions. They led, within a few years, to his most famous book, the Philosophiæ
Naturalis Principia Mathematica (the Mathematical Principles of Natural Philosophy), where
what they then called Philosophy includes what we now call Science.

NASE publications Geometry of Light and Shadows
20
Newton's Principia came out in 1687, in Latin. Newton was still a college teacher then; it was
long before he was knighted for his later work for England's mint. Halley had to pay for the
printing of Newton's book, and he championed it, even writing a preface.
The Principia famously included Newton's law that showed how gravity diminishes by the
square of the distance, and his proof of Kepler's laws of planetary orbits. The book also
includes Newton's laws of motion, neatly shown as "laws," in Latin, whereas Kepler's laws
are buried in his text. Newton's laws of motions are:
Newton's first law of motion: A body in motion tends to remain in motion, and a body at rest
tends to remain at rest.
Newton's second law of motion (modern version): force = mass times acceleration
Newton's third law of motion: For every action, there is an equal and opposite reaction.
Newton laid the foundation though mathematical physics that led to the science of our modern
day.
Astronomy Research Continues
Just as the ancient peoples were curious about the sky and wanted to find our place in the
universe, astronomers of the present day have built on the discoveries of the past with the
same motivation. Theoretical and observational discoveries moved our understanding of our
place in the universe from Ptolemy's geocentric vision, to Copernicus's heliocentric
hypothesis, to the discovery that the solar system was not in the center of our galaxy, to our
understanding of galaxies distributed across the universe.
Contemporary astronomy grapples with the programs of finding the nature of dark matter and
dark energy. Einstein's theory of relativity indicates that not only is our galaxy not in the
center of the universe, but that the "center" is rather meaningless. More recent discoveries of
hundreds of exoplanets orbiting other stars have shown how unusual our solar system may be.
New theories of planet formation parallel new observations of unexpected planetary systems.
The path of discovery lays before astronomers of the modern age just as it did for those from
thousands or hundreds of years ago.
Bibliography
Hoskin, M. (editor), Cambridge Illustrated History of Astronomy, Cambridge
University Press, 1997.
Pasachoff, J and Filippenko A, The Cosmos: Astronomy in the New Mellennium, 4th
ed., Cambridge University Press 2012.
Internet Sources
http://www.solarcorona.com
http://www.astrosociety.org/education/resources/multiprint.html
http://www2.astronomicalheritage.net

NASE publications Geometry of Light and Shadows
21
Solar System
Magda Stavinschi International Astronomical Union, Astronomical Institute of the Romanian
Academy (Bucarest, Romania)
Summary
Undoubtedly, in a universe where we talk about stellar and solar systems, planets and
exoplanets, the oldest and the best-known system is the solar one. Who does not know what
the Sun is, what planets are, comets, asteroids? But is this really true? If we want to know
about these types of objects from a scientific point of view, we have to know the rules that
define this system.
Which bodies fall into these catagories (according to the resolution of the International
Astronomical Union of 24 August 2006)?
- planets
- natural satellites of the planets
- dwarf planets
- other smaller bodies: asteroids, meteorites, comets, dust, Kuiper belt objects, etc.
By extension, any other star surrounded by bodies according to the same laws is called
a stellar system.
What is the place of the Solar system in the universe? These are only some of the
questions we will try to answer now.
Goals
Determine the place of the Sun in the universe.
Determine which objects form the solar system
Find out details of the various bodies in the solar system, in particular of the most
prominent among them
Solar System
What is a system? A system is, by definition, an ensemble of elements (principles, rules,
forces, etc.), mutually interacting in keeping with a number of principles or rules.
What is a Solar System? To define it we shall indicate the elements of the ensemble:
the Sun and all the bodies surrounding it and connected to it through the gravitational force.
What is the place of the Solar System in the universe? The Solar System is
situated in one of the exterior arms of our Galaxy, also called the Milky Way. This arm is
called the Orion Arm. It is located in a region of relatively small density.
The Sun, together with the entire Solar system, is orbiting around the center of our Galaxy,
located at a distance of 25,000 – 28,000 light years (approximately half of the galaxy radius),

NASE publications Geometry of Light and Shadows
22
with an orbital period of approximately 225-250 million years (the galactic year of the Solar
system). The travel distance along this circular orbit is approximately 220 km/s, while the
direction is oriented towards the present position of the star Vega.
Our Galaxy consists of approximately 200 billion stars, together with their planets, and over
1000 nebulae. The mass of the entire Milky Way is approx. 750-1000 billion times bigger
than that of the Sun, and the diameter is approx. 100,000 light years.
Close to the Solar System is the system Alpha Centauri (the brightest star in the constellation
Centaurus). This system is actually made up of three stars, two stars that are a binary system
(Alpha Centauri A and B), that are similar to the Sun, and a third star, Alpha Centauri C,
which is probably orbiting the other two stars. Alpha Centauri C is a red dwarf with a smaller
luminosity than the sun, and at a distance of 0.2 light-years from the other two stars. Alpha
Centauri C is the closest star to the Sun, at a distance of 4.24 light-years that is why it is also
called “Proxima Centauri”.
Our galaxy is part of a group of galaxies called the Local Group, made up of two large spiral
galaxies and at about 50 other ones.
Our Galaxy has the shape of a huge spiral. The arms of this spiral contain, among other
things, interstellar matter, nebulae, and young clusters of stars, which are born out of this
matter. The center of the galaxy is made up of older stars, which are often found in clusters
that are spherical in shape, known as globular clusters. Our galaxy numbers approximately
200 such groups, from among which only 150 are well known. Our Solar system is situated
20 light years above the symmetry equatorial plane and 28,000 light years away from the
galactic center.
The galaxy center is located in the direction of the Sagittarius Constellation, 25,000 – 28,000
light years away from the Sun.
Sun The age of the Sun is approx. 4.6 billion years. At present the Sun has completed about half of
its main evolutionary cycle. During the main stage of its evolution the Sun’s hydrogen core
turns into helium through nuclear fusion. Every second in the Sun’s nucleus, over four million
tons of matter are converted into energy, thus generating neutrinos and solar radiation.
The Sun’s life cycle
In about 5 billion years the Sun will turn into a red giant, and then into a white dwarf, a period
when it will give birth to a planetary nebula. Finally, it will exhaust its hydrogen, which will
lead to radical changes, the total destruction of the Earth included. The solar activity, more
specifically its magnetic activity, produces a number of phenomenon including solar spots on
its surface, solar flares and solar wind variations, which carry matter into the entire Solar
system and even beyond.
The Sun’s composition is made up of mostly hydrogen and helium. Hydrogen accounts for
approx. 74%, and helium accounts for approximately 25% of the Sun, while the rest is made
up of heavier elements, such as oxygen, and carbon.

NASE publications Geometry of Light and Shadows
23
Fig. 1: The Sun
The formation and the evolution of the Solar System
The birth and the evolution of the solar system have generated many fanciful theories in the
past. Even in the beginning of the scientific era, the source of the Sun’s energy and how the
Solar System formed was still a mystery. However new advances in the space era, the
discovery of other worlds similar to our Solar system, as well as advances in nuclear physics,
have all helped us to better understand the fundamental processes that take place inside a star,
and how stars form.
The modern accepted explanation for how the Sun and Solar System formed (as well as other
stars) was first proposed back in 1755 by Emmanuel Kant and also separately by Pierre-
Simon Laplace. According to this theory stars form in large dense clouds of molecular
hydrogen gas. These clouds are gravitationally unstable and collapse into smaller denser
clumps; in the case of the Sun this is called the “solar nebula”, these initial dense clumps then
collapse even more to form stars and a disk of material around them that may eventually
become planets. The solar nebula may have originally been the size of 100 AU and had a
mass 2-3 times bigger than that of the Sun. Meanwhile as the nebula was collapsing more and
more, the conservation of angular momentum made the nebula spin faster as it collapsed, and
caused the center of the nebula to become increasingly warmer. This took place about 4.6
billion years ago. It is generally considered that the solar system looks entirely different today
than it originally did when it was first forming.
But let’s take a better look at the Solar System, as it is today.
Planets
We shall use the definition given by the International Astronomical Union at its 26th General
Meeting, which took place in Prague, in 2006.
In the Solar System a planet is a celestial body that:
1. is in orbit around the Sun,
2. has sufficient mass to assume hydrostatic equilibrium (a nearly round shape), and
3. has "cleared the neighborhood" around its orbit.

NASE publications Geometry of Light and Shadows
24
A non-satellite body fulfilling only the first two of these criteria is classified as a "dwarf
planet". According to the IAU, "planets and dwarf planets are two distinct classes of objects".
A non-satellite body fulfilling only the first criterion is termed a "small solar system body"
(SSSB).
Initial drafts planned to include dwarf planets as a subcategory of planets, but because this
could potentially have led to the addition of several dozens of planets into the Solar system,
this draft was eventually dropped. In 2006, it would only have led to the addition of three
(Ceres, Eris and Makemake) and the reclassification of one (Pluto). Now, we recognize has
five dwarf planets: Ceres, Pluto, Makemake, Haumea and Eris.
According to the definition, there are currently eight planets and five dwarf planets known in
the Solar system. The definition distinguishes planets from smaller bodies and is not useful
outside the Solar system, where smaller bodies cannot be found yet. Extrasolar planets, or
exoplanets, are covered separately under a complementary 2003 draft guideline for the
definition of planets, which distinguishes them from dwarf stars, which are larger.
Let us present them one by one:
MERCURY
Mercury is the closest planet to the Sun and the smallest planet in the Solar system. It is a
terrestrial1 planet in the inner solar system. It gets its name from the Roman god Mercury.
It has no natural satellite. It is one of the five planets that can be seen from the Earth with the
naked eye. It was first observed with the telescope only in the 17th century. More recently it
was surveyed by two space probes: Mariner 10 (three times in 1974-1975) and Messenger
(two times in 2008).
Although it can be seen with the naked eye, it is not easily observable, precisely because it is
the closest planet to the Sun. Its location on the sky is very close to the Sun and it can only be
well observed around the elongations, a little before sunrise and a little after sunset. However,
space missions have given us sufficient information, proving surprisingly that Mercury is very
similar to the Moon.
It is worth mentioning several characteristics of the planet: it is the smallest one in the Solar
system and the closest one to the Sun. It has the most eccentric orbit (e = 0.2056) and also the
most inclined one against the ecliptic (i = 7°005). Its synodic period is of 115.88 days, which
means that three times a year it is situated in a position of maximum elongation west of the
Sun (it is also called “ the morning star” and when it is three times in maximum elongation
position east of the Sun it is called “the evening star”. In either of these cases, the elongation
does not exceed 28°.
It has a radius of 2440 km, making it the smallest planet of the Solar system, smaller even
than two of Jupiter’s Galilean satellites: Ganymede and Callisto. A density of 5.427 g/cm3
makes it the densest planet after the Earth (5.5 g/ cm3). Iron might be the main heavy element
(70% Iron and 30% rocky matter), which contributes to Mercury’s extremely high density. It
is generally asserted that Mercury has no atmosphere, which is not quite correct as its
atmosphere is extremely rarified.
1 A terrestrial planet is a planet that is primarily composed of silicate rocks. Within the Solar system, the
terrestrial (or telluric) planets are the inner planets closest to the Sun.

NASE publications Geometry of Light and Shadows
25
Mercury is the only planet (besides the Earth) with a significant magnetic field, which,
although it is of the order of 1/100 of that of the terrestrial magnetic field, it is sufficient
enough to create a magnetosphere which extends up to 1.5 planetary radii, compared to 11.5
radii in the case of the Earth. Finally, there is another analogy with the Earth: the magnetic
field is created by a dynamo effect and the magnetic is also dipolar like Earth’s, with a
magnetic axis inclined at 11° to the rotation axis.
On Mercury the temperatures vary enormously. When the planet passes through the
perihelion, the temperature can reach 427° C on the equator at noon, namely enough to bring
about the fusion of a metal to zinc. However, immediately after night fall, the temperature can
drop down to 183°C, which makes the diurnal variation rise to 610 C!. No other planet
undergoes such a difference, which is due either to the intense solar radiation during the day,
the absence of a dense atmosphere, and the duration of the Mercurian day (the interval
between dawn and dusk is almost three terrestrial months), long enough time to stock heat (or,
similarly, cold during an equally long night).
Orbital characteristics, Epoch J2000
Aphelion 69,816,900 km, 0.466697 AU
Perihelion 46,001,200 km, 0.307499 AU
Semi-major axis 57,909,100 km, 0.387098 AU
Eccentricity 0.205630
Orbital period 87.969 days, (0.240 85 years), 0.5 Mercury solar day
Synodic Period 115.88 days
Average orbital speed 47.87 km/s
Mean anomaly 174.796°
Inclination 7.005° to Ecliptic
Longitude of ascending node 48.331°
Argument of perihelion 29.124°
Satellite None
Physical Characteristics
Mean radius 2,439.7 ± 1.0 km; 0.3829 Earths
Flattening 0
Surface area 7.48 × 10⁷ km2; 0.147 Earths
Volume 6.083 × 10¹⁰ km3; 0.056 Earths
Mass 3.3022 × 10²³ kg; 0.055 Earths
Mean density 5.427 g/cm3
Equatorial surface gravity 3.7 m/s²; 0.38 g
Escape velocity 4.25 km/s
Sidereal rotation period 58.646 day; 1407.5 h
Albedo 0.119 (bond); 0.106 (geom.)
Surface temperature
0°N, 0°W
85°N, 0°W
Min mean max
100 K 340 K 700 K
80 K 200 K 380 K
Apparent magnitude −2.3 to 5.7
Angular momentum 4.5" – 13"
Atmosphere
Surface pressure trace
Composition: 42% Molecular oxygen, 29.0% sodium, 22.0% hydrogen, 6.0% helium, 0.5%
potassium. Trace amounts of argon, nitrogen, carbon dioxide, water vapor, xenon, krypton,
and neon.
We have to say a few things about the planetary surface.

NASE publications Geometry of Light and Shadows
26
Mercury’s craters are very similar to the lunar ones in morphology, shape and structure. The
most remarkable one is the Caloris basin, the impact that created this basin was so powerful
that it also created lave eruptions and left a large concentric ring (over 2 km tall) surrounding
the crater.
The impacts that generate basins are the most cataclysmic events that can affect the surface of
a planet. They can cause the change of the entire planetary crust, and even internal disorders.
This is what happened when the Caloris crater with a diameter of 1550 km was formed.
The advance of Mercury’s perihelion
The advance of Mercury’s perihelion has been confirmed. Like any other planet, Mercury’s
perihelion is not fixed but has a regular motion around the Sun. For a long time it was
considered that this motion is 43 arcseconds per century, which is faster by comparison with
the forecasts of classical “Newtonian” celestial mechanics. This advance of the perihelion was
predicted by Einstein’s general theory of relativity, the cause being the space curvature due to
the solar mass. This agreement between the observed advance of the perihelion and the one
predicted by the general relativity was the proof in favor of the latter hypothesis’s validity.
VENUS
Venus is one of the eight planets of the Solar system and one of the four terrestrial planets in
the inner system, the second distant from the Sun. It bears the name of the Roman goddess of
love and beauty.
Its closeness to the Sun, structure and atmosphere density make Venus one of the warmest
bodies in the solar system. It has a very weak magnetic field and no natural satellite. It is one
of the only planets with a retrograde revolution motion and the only one with a rotation period
greater than the revolution period.
It is the brightest body in the sky after the Sun and the Moon.
It is the second planet distant from the Sun (situated between Mercury and the Earth), at
approximately 108.2 million km from the Sun. Venus’ trajectory around the Sun is almost a
circle: its orbit has an eccentricity of 0.0068, namely the smallest one in the Solar system.
A Venusian year is somewhat shorter than a Venusian sidereal day, in a ratio of 0.924.
Its dimension and geological structure are similar to those of the Earth. The atmosphere is
extremely dense. The mixture of CO2 and dense sulfur dioxide clouds create the strongest
greenhouse effect in the Solar system, with temperatures of approx. 460°C. Venus’ surface
temperature is higher than Mercury’s, although Venus is situated almost twice as far from the
Sun than Mercury and receives only approx. 25% of solar radiance that Mercury does. The
planet’s surface has an almost uniform relief. Its magnetic field is very weak, but it drags a
plasma tail 45 million km long, observed for the first time by SOHO in 1997.
Remarkable among Venus’ characteristics is its retrograde rotation; it rotates around its axis
very slowly, counterclockwise, while the planets of the Solar system do this often clockwise
(there is another exception: Uranus). Its rotation period has been known since 1962. This
rotation – slow and retrograde – produces solar days that are much shorter than the sidereal

NASE publications Geometry of Light and Shadows
27
day, sidereal days are longer on the planets with clockwise rotation2. Consequently, there are
less than 2 complete solar days throughout a Venusian year.
Fig. 3: Venus
The causes of Venus’ retrograde rotation have not been determined yet. The most probable
explanation would be a giant collision with another large body during the formation of the
planets in the solar system. It might also be possible that the Venusian atmosphere influenced
the planet’s rotation due to its great density.
Venus – the Earth’s twin sister. The analogy. They were born at the same time from the same gas and dust cloud, 4.6 billion years
ago.
both are planets in the inner solar system
their surfaces have a varied ground: mountains, fields, valleys, high plateaus,
volcanoes, impact craters, etc
both have a relatively small number of craters, a sign of a relatively young surface and
of a dense atmosphere
they have close chemical compositions
Properties Venus Earth Ratio Venus/Earth
Mass 4.8685×1024 kg 5.9736×1024 kg 0.815
Equatorial Radius 6,051 km 6,378 km 0.948
Mean density 5.204 g/cm3 5.515 g/cm3 0.952
Semi-major axis 108,208,930 km 149,597,887 km 0.723
Average orbital speed 35.02 km/s 29.783 km/s 1.175
Equatorial surface gravity 8.87 m/s2 9,780327 m/s2 0.906
Venus’ transit Venus’ transit takes place when the planet passes between the Earth and the Sun, when
Venus’ shadow crosses the solar disk. Due to the inclination of Venus’ orbit compared to the
2 The solar day is the (average) interval between two suceeding passages of the Sun at the meridian. For instance,
the Earth has a solar ( average) day of 24 h and a sidereal day of 23 h 56 min 4,09 s. On Venus the solar day has
116.75 terrestrail days (116 days 18 hours), while the sidereal day has 243.018 terrestrial days.

NASE publications Geometry of Light and Shadows
28
Earth’s, this phenomenon is very rare on human time scales. It takes place twice in 8 years,
this double transit being separated from the following one by more than a century (105.5 or
121.5 years) The last transits took place on 8 June 2004 and 6 June 2012, and the following won’t be until
11 December 2117.
Atmosphere
Surface pressure 93 bar (9.3 MPa)
Composition: ~96.5% Carbon dioxide, ~3.5% Nitrogen, 0.015% Sulfur dioxide, 0.007%
Argon, 0.002% Water vapor, 0.001 7% Carbon monoxide, 0.001 2% Helium, 0.000 7% Neon.
EARTH The Earth is the third planet from the Sun in the Solar system, and the fifth in size. It belongs
to the inner planets of the solar system. It is the largest terrestrial planet in the Solar system,
and the only one in the Universe known to accommodate life. The Earth formed approx. 4.57
billion years ago. Its only natural satellite, the Moon, began to orbit it shortly after that, 4.533
billion years ago. By comparison, the age of the Universe is approximately 13.7 billion years.
70.8 % of the Earth’s surface is covered with water, the rest of 29.2% being solid and „dry”.
The zone covered with water is divided into oceans, and the land is subdivided into
continents.
Orbital characteristics, Epoch J2000
Aphelion 108,942,109 km, 0.728231 AU
Perihelion 107,476,259 km, 0.718432 AU
Semi-major axis 108,208,930 km, 0.723332 AU
Eccentricity 0.0068
Orbital period 224.700 day, 0.615197 yr, 1.92 Venus solar day
Synodic Period 583.92 days
Average orbital speed 35.02 km/s
Inclination 3.394 71° to Ecliptic, 3.86° to Sun’s equator
Longitude of ascending node 76.670 69°
Argument of perihelion 54.852 29°
Satellite None
Physical characteristics
Mean radius 6,051.8 ± 1.0 km, 0.949 9 Earths
Flattening 0
Surface area 4.60 × 10⁸ km², 0.902 Earths
Volume 9.38 × 10¹¹ km³, 0.857 Earths
Mass 4.8685 × 1024 kg, 0.815 Earths
Mean density 5.204 g/cm³
Equatorial surface gravity 8.87 m/s2, 0.904 g
Escape velocity 10.46 km/s
Sidereal rotation period -243.018 5 day
Albedo 0.65 (geometric) or 0.75 (bond)
Surface temperature (mean) 461.85 °C
Apparent magnitude up to -4.6 (crescent), -3.8 (full)
Angular momentum 9.7" – 66.0"

NASE publications Geometry of Light and Shadows
29
Fig. 4: Earth
Between the Earth and the rest of the Universe there is a permanent interaction. For example,
the Moon is the cause of the tides on the Earth. The Moon also continuously influences the
speed of Earth’s rotational motion. All bodies that orbit around the Earth are attracted to the
Earth; this attraction force is called gravity, and the acceleration with which these bodies fall
into the gravitational field is called gravitational acceleration (noted with "g" = 9.81 m/s2).
It is believed that creation of the Earth’s oceans was caused by a “shower” of comets in the
Earth’s early formation period. Later impacts with asteroids added to the modification of the
Orbital characteristics, Epoch J2000
Aphelion 152,097,701 km; 1.0167103335 AU
Perihelion 147,098,074 km; 0.9832898912 AU
Semi-major axis 149,597,887.5 km; 1.0000001124 AU
Eccentricity 0.016710219
Orbital period 365.256366 days; 1.0000175 years
Average orbital speed 29.783 km/s; 107,218 km/h
Inclination 1.57869
Longitude of ascending node 348.73936°
Argument of perihelion 114.20783°
Satellite 1 (the Moon)
Physical characteristics
Mean radius 6,371.0 km
Equatorial radius 6,378.1 km
Polar radius 6,356.8 k
Flattening 0.003352
Surface area 510,072,000 km²
Volume 1.0832073 × 10¹² km3
Mass 5.9736 × 1024 kg
Mean density 5.515 g/cm3
Equatorial surface gravity 9.780327 m/s²[9]; 0.99732 g
Escape velocity 11.186 km/s
Sidereal rotation period 0.99726968 d; 23h 56m 4.100s
Albedo 0.367
Surface temperature (mean) min mean max
−89 °C 14 °C 57.7 °C

NASE publications Geometry of Light and Shadows
30
environment decisively. Changes in Earth’s orbit around the Sun may be one cause of ice ages
on the Earth, which took place throughout history.
Atmosphere
Surface pressure 101.3 kPa (MSL)
Composition: 78.08% nitrogen (N2), 20.95% oxygen (O2), 0.93% argon, 0.038% carbon
dioxide; about 1% water vapor (varies with climate).
MARS Mars is the fourth distant planet from the Sun in the Solar system and the second smallest in
size after Mercury. It belongs to the group of terrestrial planets. It bears the name of the
Roman god of war, Mars, due to its reddish color.
Several space missions have been studying it starting from 1960 to find out as much as
possible about its geography, atmosphere, as well as other details. Mars can be observed with
the naked eye. It is not as bright as Venus and only seldom brighter than Jupiter. It overpasses
the latter one during its most favorable configurations (oppositions).
Among all the bodies in the Solar system, the red planet has attracted the most science fiction
stories. The main reason for this is often due to its famous channels, called this for the first
time in 1858 by Giovanni Schiaparelli and considered to be the result of human constructions.
Mars’ red color is due to iron oxide III (also called hematite), to be found in the minerals on
its surface.Mars has a very strong relief; it has the highest mountain in the solar system (the
volcano Olympus Mons), with a height of approx. 25 km, as well as the greatest canyon
(Valles Marineris) with of an average depth of 6 km. The center of Mars is made up of an iron
nucleus with a diameter of approx. 1700 km, covered with an olivine mantel and a basalt crust
with an average width of 50 km.
Mars is surrounded by a thin atmosphere, consisting mainly of carbon dioxide. It used to have
an active hydrosphere, and there was water on Mars once. It has two natural satellites, Phobos
and Deimos, which are likely asteroids captured by the planet.
Mars’ diameter is half the size of the Earth and its surface area is equal to that of the area of
the continents on Earth. Mars has a mass that is about one-tenth that of Earth. Its density is the
smallest among those of the terrestrial planets, which makes its gravity only somewhat
smaller than of Mercury, although its mass is twice as large.
The inclination of Mars’ axis is close to that of the Earth, which is why there are seasons on
Mars just like on Earth. The dimensions of the polar caps vary greatly during the seasons
through the exchange of carbon dioxide and water with the atmosphere.
Another common point, the Martian day is only 39 minutes longer than the terrestrial one. By
contrast, due to its relative distance from the Sun, the Martian year is longer than an Earth
year, more than 322 days longer than the terrestrial year.
Mars is the closest exterior planet to the Earth. This distance is smaller when Mars is in
opposition, namely when it is situated opposite the Sun, as seen from the Earth. Depending on
ellipticity and orbital inclination, the exact moment of closest approach to Earth may vary
with a couple of days.

NASE publications Geometry of Light and Shadows
31
Fig. 5: Mars
On 27 August 2003 Mars was only 55,758 million km away from Earth, namely only 0.3727
AU away, the smallest distance registered in the past 59,618 years. An event such as this often
results in all kinds of fantasies, for instance that Mars could be seen as big as the full Moon.
However, with an apparent diameter of 25.13 arcseconds, Mars could only be seen with the
naked eye as a dot, while the Moon extends over an apparent diameter of approx. 30
arcminutes. The following similar close distance between Mars and Earth will not happen
again until 28 August 2287, when the distance between the two planets will be of 55,688
million km.
Orbital characterisitics, Epoch J2000
Aphelion 249,209,300 km; 1.665861 AU
Perihelion 206,669,000 km; 1.381497 AU
Semi-major axis 227,939,100 km; 1.523679 AU
Eccentricity 0.093315
Orbital period 686.971 day; 1.8808 Julian years
Synodic period 779.96 day; 2.135 Julian years
Average orbital speed 24.077 km/s
Inclination 1.850° to ecliptic; 5.65° to Sun's equator
Longitude of ascending node 49.562°
Argument of perihelion 286.537°
Satellite 2
Physical characteristics
Equatorial radius 3,396.2 ± 0.1 km; 0.533 Earths
Polar radius 3,376.2 ± 0.1 km; 0.531 Earths
Flattening 0.00589 ± 0.00015
Surface area 144,798,500 km²; 0.284 Earths
Volume 1.6318 × 10¹¹ km³; 0.151 Earths
Mass 6.4185 × 10²³ kg; 0.107 Earths
Mean density 3.934 g/cm³
Equatorial surface gravity 3.69 m/s²; 0.376 g
Escape velocity 5.027 km/s
Sidereal rotation period 1.025957 day
Albedo 0.15 (geometric) or 0.25 (bond)
Surface temperature min mean max
−87 °C −46 °C −5 °C
Apparent magnitude +1.8 to −2.91
Angular diameter 3.5—25.1"

NASE publications Geometry of Light and Shadows
32
Atmosphere:
Surface pressure 0.6–1.0 kPa)
Composition 95.72% Carbon dioxide; 2.7% Nitrogen; 1.6% Argon; 0.2% Oxygen; 0.07%
Carbon monoxide; 0.03% Water vapor; 0.01% Nitric oxide; 2.5 ppm Neon; 300 ppb Krypton;
130 ppb Formaldehyde; 80 ppb Xenon; 30 ppb Ozone;10 ppb Methane.
JUPITER Jupiter is the fifth distant planet from the Sun and the biggest of all the planets in our solar
system. Its diameter is 11 times bigger than that of the Earth, its mass is 318 times greater
than Earth, and its volume 1300 times larger than those of our planet.
orbit: 778,547,200 km from the Sun
diameter: 142,984 km (equatorial)
mass: 1.8986x1027
kg
Jupiter is the fourth brightest object in the sky (after the Sun, Moon, Venus and sometimes
Mars). It has been known from prehistoric times. The discovery of its four great satellites, Io,
Europe, Ganymede and Callisto (known as Galilean satellites) by Galileo Galilei and Simon
Marius in 1610 was the first discovery of an apparent motion center not centered on Earth. It
was a major point in favor of the heliocentric theory of planetary motion of Nicolaus
Copernicus. Galileo’s endorsement of the Copernican motion theory brought him trouble with
the Inquisition. Before the Voyager missions, only 16 of its satellites were known, it is now
known to have over 60 satellites.
Fig. 6: Jupiter
Composition: Jupiter probably has a core of solid material that amounts up to 10 - 15 Earth
masses. Above this core, is a deep layer of liquid metallic hydrogen. Due to the temperature
and pressure inside Jupiter, its hydrogen is a liquid and not a gas. It is an electric conductor
and the source of Jupiter’s magnetic field. This layer probably contains some helium and
some traces of “drifts of ice”. The surface layer is mainly made up of molecular hydrogen and
helium, liquid inside and gaseous outside. The atmosphere we see is only the superior part of

NASE publications Geometry of Light and Shadows
33
this deep stratum. Water, carbon dioxide, methane, as well as other simple molecules are also
present in small quantities.
Atmosphere: Jupiter consists of approx. 86% hydrogen and 14% helium (according to the
number of atoms, approx. 75/25% by mass) with traces of methane, water, ammonia and
“stone”. This is very close to the original composition of the Solar Nebula, from which the
entire solar system formed. Saturn has a similar composition, while Uranus and Neptune have
less hydrogen and helium.
The Great Red Spot (GRS) was observed for the first time by the telescopes on Earth, more
than 300 years ago. It is an oval of approximately 12000 by 25000 km, large enough to
encompass two or three Earths. It is a region of high pressure, whose superior clouds are
much higher and colder than the surrounding zones. Similar structures have been observed on
Saturn and Neptune. The way in which such structures exist for such a long time has not been
fully understood yet.
Jupiter and the other gaseous planets have winds of great speed in large bands at different
latitudes. The winds blow in opposite directions in two adjoining bands. The small
temperature or chemical composition differences are responsible for the different coloring of
the bands, an aspect that dominates the image of the planet. Jupiter’s atmosphere is very
turbulent. This proves that the winds are driven, to a great extent, by the internal heat of the
planet and not by coming from the Sun, as is the case with the Earth.
The Magnetosphere Jupiter has a huge magnetic field, 14 times stronger than that of Earth’s
magnetic field. Its magnetosphere extends over 650 million km (beyond Saturn’s orbit).
Jupiter’s satellites are included in its magnetosphere, which partially explains the activity on
Io. A possible problem for future space voyages, as well as a great problem for the designers
of the probes Voyager and Galileo, is that the medium in the neighborhood of Jupiter has
large quantities of particles caught by Jupiter’s magnetic field. This “radiation” is similar, but
much more intense than that observed in the Van Allen belts of the Earth. It would be lethal
for any unprotected human being.
The Galileo probe discovered a new intense radiation between Jupiter’s rings and the upper
layer of the atmosphere. This new radiation belt has an intensity approx. 10 times higher than
that of the Van Allen belts on Earth. Surprisingly, this new belt contains helium ions of high
energy, of unknown origins.
The planet’s rings Jupiter has rings just like Saturn, but much paler and smaller. Unlike
those of Saturn, Jupiter’s rings are dark. They are likely made up of small grains of rocky
material. Unlike Saturn’s rings, Jupiter’s ring seem unlikely to contain ice. The particles from
Jupiter’s rings likely do not remain there for long (because of the atmospheric and magnetic
attraction). The Galileo probe found clear evidence that indicates that the rings are
continuously supplied by the dust formed by the impacts of micrometeorites with the inner
four moons.

NASE publications Geometry of Light and Shadows
34
Orbital characteristics, Epoch J2000
Aphelion 816,520,800 km (5.458104 AU)
Perihelion 740,573,600 km (4.950429 AU)
Semi-major axis 778,547,200 km (5.204267 AU)
Eccentricity 0.048775
Orbital period 4,331.572 days; 11.85920 years; 10,475.8 Jupiter solar days
Synodic period 398.88 days
Average orbital speed 13.07 km/s
Mean anomaly 18.818°
Inclination 1.305° to ecliptic; 6.09° to Sun's equator
Longitude of ascending node 100.492°
Argument of perihelion 275.066°
Satellite 67
Physical characteristics
Equatorial radius 71,492 ± 4 km; 11.209 Earths
Polar radius 66,854 ± 10 km; 10.517 Earths
Flattening 0.06487 ± 0.00015
Surface area 6.21796×10¹⁰ km²; 121.9 Earths
Volume 1.43128×10¹⁵ km³; 1321.3 Earths
Mass 1.8986×1027 kg; 317.8 Earths; 1/1047 Sun
Mean density 1.326 g/cm³
Equatorial surface gravity 24.79 m/s²; 2.528 g
Escape velocity 59.5 km/s
Sidereal rotation period 9.925 h
Albedo 0.343 (bond); 0.52 (geom.)
Apparent magnitude -1.6 to -2.94
Angular diameter 29.8" — 50.1"
Atmosphere
Surface pressure 20–200 kPa[12] (cloud layer)
Scale height 27 km
Composition: 89.8±2.0% Hydrogen (H2), 10.2±2.0% Helium, ~0.3% Methane, ~0.026%
Ammonia, ~0.003% Hydrogen deuteride (HD), 0.0006% Ethane, 0.0004% water. Ices:
Ammonia, water, ammonium hydrosulfide(NH4SH).
SATURN Saturn is the sixth distant planet from the Sun in the Solar system. It is a gas giant planet, the
second in mass and volume after Jupiter. It has a diameter approx. nine times greater than that
of the Earth and is made up of mostly hydrogen. It bears the name of the Roman god Saturn
Mass and dimensions Saturn has the form of a flattened spheroid: it is flattened at the poles
and swollen at the equator. Its equatorial and polar diameters differ approx. by 10%, as a
result of its rapid rotation around its axis and of an extremely fluid internal composition. The
other gas giant planets in the solar system (Jupiter, Uranus, Neptune) are also flattened, but
less so.
Saturn is the second most massive planet in the Solar system, 3.3 times smaller than Jupiter,
but 5.5 times bigger than Neptune and 6.5 times bigger than Uranus. It is 95 times more
massive than the Earth. Its diameter is almost 9 times larger than the Earth’s. Saturn is the
only planet in the Solar system whose average density is smaller than that of water: 0.69

NASE publications Geometry of Light and Shadows
35
g/cm3. Although Saturn’s core is denser than water, its average density is smaller than that of
water because of its large hydrogen gaseous atmosphere.
Fig. 7: Saturn
Atmosphere: Just like Jupiter, Saturn’s atmosphere is organized in parallel bands, however
these are less visible than Jupiter’s and are wider near the equator. Saturn’s cloud systems (as
well as the long lasting storms) were first observed by the Voyager missions. The cloud
observed in 1990 is an example of a great white spot, an ephemeral Saturnian phenomenon
that takes place every 30 years. If periodicity remains the same, the next storm will probably
take place in 2020. In 2006 NASA observed a storm of hurricane dimensions, stationed at the
Southern pole of Saturn that had a well-defined eye. It is the only eye observed on another
planet other than Earth. Saturn’s atmosphere undergoes a differential rotation.
Saturn’s rings are one of the most beautiful phenomena in the solar system, making up its
defining characteristic. Unlike the other gas giant planets with rings, they are extremely bright
(albedo between 0.2 and 0.6) and can also be seen with a pair of binoculars. They are
dominated by permanent activity: collisions, matter accumulations, etc.
Saturn has a great number of satellites. It is difficult to say how many there are, as any piece
of ice in the rings can be considered a satellite. In 2009 62 satellites were identified. 53 were
confirmed and were given names. Most of them are small: 31 have diameters fewer than 10
km, while 13 are smaller than 50 km. Only seven are big enough to take on a spheroidal shape
under the influence of their own gravity. Titan is the largest one, bigger than Mercury and
Pluto, and the only satellite in the solar system with a dense atmosphere.
Atmosphere:
Scale height: 59.5 km
Composition: ~96% Hydrogen (H2), ~3% Helium, ~0.4% Methane, ~0.01% Ammonia,
~0.01% Hydrogen deuteride (HD), 0.000 7% Ethane, Ices: Ammonia, water, ammonium
hydrosulfide ((NH4SH)

NASE publications Geometry of Light and Shadows
36
Orbital characteristics, Epoch J2000
Aphelion 1,513,325,783 km; 10.115958 AU
Perihelion 1,353,572,956 km; 9.048076 AU
Semi-major axis 1,433,449,370 km; 9.582017 AU
Eccentricity 0.055723
Orbital period 10,759.22 days; 29.4571 years
Synodic period 378.09 days
Average orbital speed 9.69 km/s
Mean anomaly 320.346 750°
Inclination 2.485 240° to ecliptic; 5.51° to Sun’s equator
Longitude of ascending node 113.642 811°
Argument of perihelion 336.013 862°
Satellite ~ 200 observed (61 with secure orbits)
Physical characteristics
Equatorial radius 60,268 ± 4 km; 9.4492 Earths
Polar radius 54,364 ± 10 km; 8.5521 Earths
Flattening 0.09796 ± 0.000 18
Surface area 4.27 × 10¹⁰ km²; 83.703 Earths
Volume 8.2713 × 10¹⁴ km³; 763.59 Earths
Mass 5.6846 × 1026 kg; 95.152 Earths
Mean density 0.687 g/cm³; (less than water)
Equatorial surface gravity 10.44 m/s²; 1.065 g
Escape velocity 35.5 km/s
Sidereal rotation period 10.57 hours; (10 hr 34 min)
Equatorial rotation velocity 9.87 km/s; 35 500 km/h
Axial tilt 26.73°
Albedo 0.342 (bond); 0.47 (geom.)
Apparent magnitude +1.2 to -0.24
Angular diameter 14.5" — 20.1" (excludes rings)
URANUS Uranus is a gas giant planet. It is the seventh distant planet from the Sun in the solar system,
the third in size and the fourth in mass. It bears the name of Chronos’ father (Saturn) and of
Zeus’ grandfather (Jupiter). It is the first planet discovered in the modern epoch. Although it
can be seen with the naked eye like the other 5 classical planets, because of its low luminosity
it was not easily identified as being a planet. William Herschel announced its discovery on 13
March 1781, thus enlarging the frontiers of the Solar system for the first time in the modern
epoch. Uranus is the first planet discovered by means of the telescope.
Uranus and Neptune have internal and atmospheric compositions different from those of the
other great gaseous planets, Jupiter and Saturn. That is why astronomers sometimes place
them in a different category, that of the frozen giants or sub-giants.
Uranus’ atmosphere, although made up mainly of hydrogen and helium, also contains large
quantities of water ice, ammonia and methane, as well as the usual traces of hydrocarbons.
Uranus has the coldest atmosphere in the solar system, which reaches a minimum of – 224 oC.
It has a complex structure of clouds: the clouds in the lower layers might be made up of water,
those in the upper layers of methane.
Like the other gas giant planets, Uranus has a system of rings, a magnetosphere and numerous
natural satellites. The Uranian system is unique in the Solar system because its rotation axis is
tilted sideways and is almost into the plane of its revolution about the Sun. Its northern and

NASE publications Geometry of Light and Shadows
37
southern poles therefore lie where the other planets have their equator. In 1986, Voyager 2
took images of Uranus that show a planet almost featureless in visible light, without cloud
bands or storms as on the other gaseous planets. However, recent observations have shown
signs of seasonal change and an increase of the meteorological activity, in a period when
Uranus approached its equinox of December 2007. The wind on Uranus can attain speeds of
250 m/s on its surface.
Orbit and rotation Uranus’ revolution period around the Sun is 84 terrestrial years. Its
average distance from the Sun is of approx. 3 billion km. The solar flux intensity on Uranus is
of approx. 1/400 of that received on Earth.
The rotation period of Uranus’ interior is 17 hours and 14 minutes. In the upper atmosphere
violent winds take place in the rotation direction, as is the case with all the giant gaseous
planets. Consequently, around 60º latitude , visible parts of the atmosphere travel faster and
make a complete rotation in less than 14 hours.
Fig. 8 Uranus
Uranus is a giant planet, like Jupiter, Saturn and Neptune. Even if we know very few things
about its internal composition, we do know that it is certainly different from that of Jupiter or
Saturn. Models of the internal structure of Uranus show that it should have a solid nucleus of
iron silicates, with a diameter of approx. 7500 km, surrounded by a mantle made up of water
ice mixed with helium, methane and ammonia that is 10,000 km wide, followed by a
superficial atmosphere of hydrogen and liquid helium, of approx. 7600 km. Unlike Jupiter and
Saturn, Uranus is not massive enough to preserve hydrogen in a metallic state around its
nucleus.
The bluish-green color is due to the presence of methane in the atmosphere, which absorbs
especially in the red and the infrared.

NASE publications Geometry of Light and Shadows
38
Uranus has at least 13 main rings.
Unlike any other planet in the solar system, Uranus is very inclined against its axis, as the
latter one is almost parallel to its orbital plane. We might say that it rolls on its orbit and
exposes to the Sun its north pole and its southern pole successively.
One consequence of this orientation is that the polar regions receive more energy from the
Sun than the equatorial ones. Nevertheless, Uranus remains warmer at the equator than at the
poles, a mechanism still unexplained. Any theory for the formation of Uranus that also
accounts for its inclination, usually incorporates the idea of a cataclysmic collision with
another body before its present formation.
Uranus has at least 27 natural satellites. The first two were discovered by William Herschel
on 13 March 1787 and were called Titania and Oberon.
Orbital characteristics, Epoch J2000
Aphelion 3,004,419,704 km, 20.083305 AU
Perihelion 2,748,938,461 km, 18.375518 AU
Semi-major axis 2,876,679,082 km, 19.229411 AU
Eccentricity 0.044405
Orbital period 30,799.095 days, 84.3233 years
Synodic period 369.66 day
Average orbital speed 6.81 km/s
Mean anomaly 142.955 717°
Inclination 0.772 556° to ecliptic, 6.48° to Sun's equator
Longitude of ascending node 73.989 821°
Argument of perihelion 96.541 318°
Satellite 27
Physical characteristics
Equatorial radius 25,559 ± 4 km, 4.007 Earths
Polar radius 24,973 ± 20 km, 3.929 Earths
Flattening 0.0229 ± 0.0008
Surface area 8.1156 × 10⁹ km², 15.91 Earths
Volume 6.833 × 10¹³ km³, 63.086 Earths
Mass (8.6810 ± 0.0013) × 1025 kg, 14.536 Earths
Mean density 1.27 g/cm³
Equatorial surface gravity 8.69 m/s², 0.886 g
Escape velocity 21.3 km/s
Sidereal rotation period −0.718 33 day, 7 h 14 min 24
Equatorial rotation velocity 2.59 km/s, 9,320 km/h
Axial tilt 97.77°
Albedo 0.300 (bond), 0.51 (geom.)
Apparent magnitude 5.9 to 5.32
Angular diameter 3.3"–4.1"
Atmosphere
Composition (below 1.3 bar): 83 ± 3% Hydrogen (H2), 15 ± 3% Helium, 2.3% Methane,
0.009% (0.007–0.015%) Hydrogen deuteride (HD). Ices: Ammonia, water, ammonium
hydrosulfide (NH4SH), methane (CH4).
NEPTUNE Neptune is the eighth and the farthest planet from the Sun in the Solar system. It is also the
last gaseous giant planet. It was discovered by the German astronomer Johann Gottfried Galle
on 23 September 1847, following the predictions of Urban Le Verrier who, like the English

NASE publications Geometry of Light and Shadows
39
astronomer John Couch Adams, had found through matematical calculations the region in the
sky where it could likely be found.
It bears the name of the Roman god of the seas, Neptune. Neptune is not visible with the
naked eye and does not appear as a bluish-green disk through the telescope. It was visited
only once by a space probe, Voyager 2, who passed by it on 25 August 1989. Its largest
satellite is Triton.
Its internal composition is similar to that of Uranus. It is believed that it has a solid nucleus
made of silicates and iron, almost as big as the mass of the Earth. Its nucleus, just like
Uranus’, is supposedly covered with a rather uniform composition (rocks in fusion, ice, 15%
hydrogen and a few helium); it does not have any structure in “layers” like Jupiter and Saturn.
Fig. 10: Neptune
Its bluish color comes mainly from methane, which absorbs light in the wavelengths of red. It
seems that another composition give Neptune its bluish color, but that has not been defined
yet.
Like the other giant gaseous planets, it has an aeolian system made up of very rapid winds in
bands parallel to the equator, of immense storms and vortexes. The fastest winds on Neptune
blew at speeds over 2,000 km/h. During the survey of Voyager 2, the most interesting
formation discovered was the “Dark Great Spot”, which was about the size of the “Red Great
Spot” on Jupiter. This spot was not observed about 5 years later when the Hubble Space
Telescope took observations of Uranus. The winds on Uranus might have speeds as high as
300 m/s (1080 km/h) or even up to 2500 km/h. This spot might be a dark giant hurricane that
supposedly travels at 1000 km/h.
Neptune has fewer visible planetary rings. They are dark and their origin is yet unknown.
Neptune has at least 14 natural satellites, among them the largest is Triton, discovered by
William Lassell only 17 days after the discovery of Neptune.

NASE publications Geometry of Light and Shadows
40
Orbital characteristics, Epoch J2000
Aphelion 4,553,946,490 km, 30.44125206 AU
Perihelion 4,452,940,833 km, 29.76607095 AU
Semi-major axis 4,503,443,661 km, 30.10366151 AU
Eccentricity 0.011214269
Orbital period 60,190 days, 164.79 years
Synodic period 367.49 day
Average orbital speed 5.43 km/
Mean anomaly 267.767281°
Inclination 1.767975° to ecliptic, 6.43° to Sun’s equator
Longitude of ascending node 131.794310°
Argument of perihelion 265.646853°
Satellite 14
Physical characteristics
Equatorial radius 24,764 ± 15 km, 3.883 Earths
Polar radius 24,341 ± 30 km, 3.829 Earths
Flattening 0.0171 ± 0.0013
Surface area 7.6408 × 10⁹ km², 14.98 Earths
Volume 6.254 × 10¹³ km³, 57.74 Earths
Mass 1.0243×1026 kg, 17.147 Earths
Mean density 1.638 g/cm³
Equatorial surface gravity 11.15 m/s², 1.14 g
Escape velocity 23.5 km/s
Sidereal rotation period 0.6713 day, 16 h 6 min 36 s
Equatorial rotation velocity 2.68 km/s, 9,660 km/h
Axial tilt 28.32°
Albedo 0.290 (bond), 0.41 (geom.)[7]
Apparent magnitude 8.0 to 7.78
Angular diameter 2.2″–2.4
Atmosphere:
Composition: 80±3.2% Hydrogen (H2), 19±3.2% Helium, 1.5±0.5% Methane, ~0.019%
Hydrogen deuteride (HD), ~0.00015 Ethane. Ices: Ammonia, water, (NH4SH), Methane
Other Bodies in the Solar System
The interplanetary environment Besides light, the Sun radiates a continuous flux of charged particles (plasma) called solar
wind. This flux dissipates at a speed of 1.5 millions km/h, thus creating the heliosphere, a thin
atmosphere which surrounds the Solar system out to a distance of approx. 100 AU (marking
the heliopause). The matter that makes up the heliosphere is called interplanetary medium.
The solar cycle of 11 years, as well as the frequent solar flares and coronal mass ejections,
disturb the heliosphere and create a space climate. The rotation of the solar magnetic field acts
upon the interplanetary medium, creating the stratum of heliospheric current, which is the
greatest structure of the Solar system.
The terrestrial magnetic field protects the atmosphere from the solar wind. The interaction
between the solar wind and the terrestrial magnetic field brings about the polar aurora.

NASE publications Geometry of Light and Shadows
41
The heliosphere ensures a partial protection of the Solar system from cosmic rays, that is
higher on the planets with a magnetic field.
The interplanetary medium accommodates at least two regions of cosmic dust under the form
of a disk. The first one, the cloud of zodiacal dust, is in the internal Solar system and produces
the zodiacal light. It probably formed through a collision inside the asteroid belt caused by the
interactions with the planets. The second one extends between 10 and 40 AU and was
probably created during similar collisions in the Kuiper belt.
THE BELT OF ASTEROIDS Asteroids are mainly small bodies in the solar system made up of rocks and non-volatile
metallic minerals. The asteroid belt occupies an orbit located between Mars and Jupiter, at a
distance of 2.3 up to 3.3 AU from the Sun. The asteroid belt formed from the primordial solar
nebula as a group of planetesimals, the smaller precursors of planets. These planetesimals
were too strongly perturbed by Jupiter’s gravity to form a planet.
Asteroids range between several hundred kilometers down to microscopic dust. All, except
the greatest one, Ceres, are considered small bodies. A few of the other large asteroids such as
Vesta and Hygeia are also still considered small bodies, they could be classified as dwarf
planets at some point, if in the future it can be determined that they have reached hydrostatic
equilibrium.
The asteroid belt contains thousands, even millions of bodies with a diameter of over one
kilometer. Nevertheless, the total mass of the belt is only 4% of the Moon’s mass.
Ceres (2.77 AU) is the largest body in the asteroid belt and the only dwarf planet (classified
thus in 2006). With a diameter of almost 1000 km, and enough mass that it is in hydrostatic
equilibrium and has a spherical shape.
COMETS Comets are small bodies in the Solar system, with diameters on the order of kilometers,
comets are generally made up of volatile ices. They have very eccentric orbits, with the
perihelion sometimes situated in the inner Solar system, while the aphelion is beyond Pluto.
When a comet enters the inner Solar system, its close approach to the Sun leads to the
sublimation and ionization of its surface, creating a tail: a long trail made up of gas and dust.
Fig. 11: Comet

NASE publications Geometry of Light and Shadows
42
Short period comets (e.g. Halley Comet) complete their orbits in less than 200 years and seem
to originate in the Kuiper belt. Long period comets (e.g. Hale-Bopp comet) have a periodicity
of several thousands years and seem to originate in Oort’s cloud. Finally, there are some
comets that have a hyperbolic trajectory, suggesting they may eventually escape the Solar
system. Old comets have lost the greatest part of their volatile components and today are often
considered asteroids.t
Centauri, situated between 9 and 30 AU, are icy bodies analogous to the comets, that orbit
between Jupiter and Neptune. The greatest centaur known, Chariklo, has a diameter ranging
between 200 and 250 km. The first centaur discovered, Chiron, was considered in the
beginning to be a comet because it developed a cometary tail. Some astronomers classify
centaurs as bodies of Kuiper belt.
The Kuiper belt is a great ring made up of debris belonging to a large debris ring, similar to
the asteroid belt, but made up mainly of ice. The first part of the Kuiper belt extends between
30 and 50 AU from the Sun and stops at “Kuiper’s cliff ”, from there begins the second part
of the belt out to 100 AU. This region is believed to be the source of short period comets.
It is mainly made up of small bodies, as well as of some rather big ones, like Quaoar, Varuna
or Orcus, which might be classified as dwarf planets.
The Kuiper belt can be divided largely into “classical” objects and objects in resonance with
Neptune. An example to this effect would be the plutinos that complete two orbits for every
three that Neptune has completed.
PLUTO and CHARON Pluto (39 AU on average), a dwarf planet, is the largest known body of the Kuiper belt.
Discovered in 1930, it was considered a planet and re-classified in August 2006. Pluto has an
eccentric orbit inclined by 17º to its ecliptic plane. Pluto’s orbital distance extends up to 29.7
AU at the perihelion and 49.5 AU at the aphelion.
Pluto’s largest satellite, Charon, is massive enough so that the two orbit around each other,
around a common center of mass that is situated above the surface of each of the bodies. Four
other small satellites, (Nix, Styx, Kerberos and Hydra), orbit the Pluto. Pluto is in an orbital
resonance of 3:2 with Neptune (the planet orbits the Sun twice, for every three times Neptune
orbits the Sun). The other bodies of the Kuiper belt that participate in this resonance with
Neptune are called plutinos (namely small Plutos).
Bibliography
Collin, S, Stavinschi, M., Leçons d’astronomie, Ed. Ars Docendi, 2003.
Kovalevsky, J, Modern Astrometry, Springer Verlag, 2002.
Nato A., Advances in Solar Research at eclipses, from ground and from space, eds.
J.P. Zahn, M. Stavinschi, Series C: Mathematical and Physical Sciences, vol. 558,
Kluwer Publishing House, 2000.
Nato A, Theoretical and Observational Problems Relat-ed to Solar Eclipses, eds. Z.
Mouradian, M. Stavinschi, Kluwer, 1997.

NASE publications Geometry of Light and Shadows
43
Local Horizon and Sundials
Rosa M. Ros International Astronomical Union, Technical University of Catalonia (Barcelona,
Spain)
Summary
The study of the horizon is crucial to facilitate the students' first observations in an
educational center. A simple model that has to be made in each center allows us to study and
comprehend the first astronomical rudiments easier. The model is also presented as a simple
model of an equatorial clock and from it, we can make other models (horizontal and vertical).
Goals - Understand the diurnal and annual movement of the Sun.
- Understand the celestial vault movement.
- Understand the construction of an elemental Sun watch.
The Earth rotates and revolves
As it is well known, Earth rotates around its axis, which results in day and night. The rotation
axis is what ancient astronomers called the axis of the Earth as it seemed that the sky moved
around this axis (the daytime sky and the night sky). But Earth revolves in an ellipse, with the
Sun in one of its focus. As first approximation, we can suppose that it is a circular motion (as
the ellipse’s eccentricity is almost zero, i.e. the orbit is almost a circle).
Fig. 1: Scheme of Earth’s revolution. The angle between the terrestrial equator and the ecliptic plane is 23.5º.
The angle between the rotational terrestrial axis and the axis perpendicular to the ecliptic plane is also 23,5º.

NASE publications Geometry of Light and Shadows
44
Earth needs a year to make a full orbit around the Sun, but it does so in a plane, the ecliptic
plane, which is not perpendicular to the rotational terrestrial axis; it is inclined. Specifically,
the angle between the rotational terrestrial axis and the axis perpendicular to the ecliptic is
23.5º. Similarly, the angle between the terrestrial equator plane and the ecliptic plane is 23.5º
(figure 1). This inclination causes the seasons. To visualize this phenomenon we are going to
build a little model (figure 2).
We illustrate this effect with four spheres and a light bulb, representing the Sun, to be placed
in the center. It is good to draw the terrestrial surface to distinguish the equator and the poles.
Then, we give some values of distances relative to the sphere’s size that represents the Earth
models. In our case, we use 8 cm diameter models. We will get a little square tablecloth or
paper that is about 25 cm across the diagonal. We situate the four spheres in a cross shape
(each one in front of the other, figure 2) elevated using 4 sticks of 3, 15, 25 and 15 cm of
height respectively. The values are calculated so that the inclination of the plane of the
equator with respect the ecliptic plane is about 23º.
Fig. 2a, 2b and 2c: Distribution of the four spheres representing Earth and the light bulb representing the Sun, in
the middle It is necessary to distribute the relative positions so that the angle of the line from the center of the
Sun to the center of the Earth is 23º with respect the ground that represents the equatorial plane.
We will situate the model in a dark room and turn on the light bulb (it could be a candle, but
always be aware that the relative heights are important). It is obvious that the sphere at
position A receives more light in the northern hemisphere than the one at the position C
(figure 3), while the illuminated area of the southern hemisphere is greater in C than in A. At
positions B and D, both hemispheres are equally illuminated; these correspond to spring and
autumnal equinoxes. At the times when there is more illuminated area we say that it is
summer and when there is less, it is winter. We deduce that when the Earth is at position A, it
is summer in the northern hemisphere and winter in the southern hemisphere.

NASE publications Geometry of Light and Shadows
45
When the Earth is at position C, it is winter in the northern hemisphere and summer in the
southern hemisphere.
Fig. 3: Model of the revolution motion that explains seasons. When the Earth is at position A it is summer in the
northern hemisphere and winter in the southern hemisphere. When the Earth is at position C it is winter in the
northern hemisphere and summer in the southern hemisphere. And when the Earth is at positions B and D
hemispheres are equally illuminated and equinoxes take place. Then, daytime and nighttime are equal.
This model offers many opportunities for study because if we imagine that a person lives in
one of the hemispheres, we will see that he/she sees the Sun in different heights depending on
the season. We imagine, for example, that we have a person in the northern hemisphere when
we are at position A, this person sees the Sun above the equatorial plane 23.5º (figure 4a).
However, if he/she is in the northern hemisphere but in the position C, he/she sees the Sun
below the equator at -23.5º (figure 4b). When he/she is at positions B and D, he/she sees it
exactly on the equator, i.e. 0º above the equator. It is not easy to imagine how this model
would work, so we are going to build a more realistic model, where the observer is tied to
Earth and has no option to see the scheme from the exterior of the terrestrial orbit. We will
build a model relative to the local horizon of the observer, AN OBSERVATIONAL MODEL.

NASE publications Geometry of Light and Shadows
46
Fig. 4a: At the position A it is summer in the northern hemisphere and the Sun is 23.5º above equator. However,
in the southern hemisphere it is winter, Fig. 4b: At the position C it is winter in the northern hemisphere and the
Sun is 23.5 below the equator. However, in the southern hemisphere it is summer
Observation Teachers from different science fields (mechanics, electricity, chemistry, biology, etc.) tend to
say that it is not possible to work correctly in a secondary science center without a laboratory.
In this sense, astronomy teachers tend to be happy because they always have an astronomical
laboratory. All institutes and schools have a place where students play: the outdoor
playground or yard. But these are not only playtime places, they are also astronomical
laboratories: a place where it is possible to carry out practical astronomical activities. If we
have a laboratory in every school or institute, it seems opportune to use it!
Fig. 5: Classical representation of the celestial sphere.

NASE publications Geometry of Light and Shadows
47
A problem that appears when a student uses the school-yard to do practical astronomical
activities is the lack of connection with the teacher's explanations of the celestial sphere inside
the classroom and outside.
When the teacher talks about meridians and parallels or position coordinates on the
blackboard, in texts, or in models, he/she presents figures like figure 5. This is not very
difficult and students tend to understand it without a problem. Figures that students have
before their eyes are analogues to the ones that they have used when were studying geography
(figure 6).
Problems begin when we are viewing the sky and there is no line. It is impossible to see the
rotation axis, and it is not really easy to find references in the sky. Now the principal problem
is that a student is inside the celestial sphere while in classroom, but we have presented all the
information viewing the sky from the exterior of the celestial sphere. Then, it is not simple to
understand the new situation of being inside the sphere (figure 7).
Obviously, after this experience we could think how to change our presentation in the
classroom. It is possible to do the presentation from the internal point of view of the sphere.
This way is much more similar to the real situation of the observer, but it is not interesting to
offer only this presentation. Students have to be able to read any astronomy book and
understand the correspondent abstraction of the celestial sphere observation from the exterior,
a normal situation in the scientific literature. In these circumstances, it is possible to think
about making a model for the students that allows the comparison of both points of view and
that also “makes the sky lines visible” and provides a better comprehension of the horizon.
Fig. 6: Celestial sphere from the exterior. Fig. 7: Celestial sphere from the interior.
Local model of the horizon
We begin by taking a photograph of the horizon. It is very easy to take some photographs of
the horizon with a camera and a tripod from any place of the school yard – if local buildings
allow us to do it – or from any balcony with a clearer view of the horizon. (We will mark the
tripod position with paint or chalk on the ground). It is very important to select a good place,
because the idea is to situate the model there during every observation. When taking the
photo, it is necessary that it has a common area with the next one, and then we can join all the
photographs in order to get the horizon as a chain of photographs continuously.

NASE publications Geometry of Light and Shadows
48
Fig. 8: The local horizon. Fig. 9: Model showing the horizon and polar axis.
When we have all the photos, we can connect them. Place one copy next to another in a
continuous way, and then make a cylinder that will be fixed in a wood square base in the same
place that we took the photos (figure 9). It is very important to situate all photos according to
the real horizon.
Later, we introduce the terrestrial rotation axis. Taking the latitudinal value of the place, we
can introduce a wire with the corresponding inclination (latitude) on the model (figure 9).
With this value, it is possible to fix the rotational axis of the model. As the model is oriented
according to the local horizon, the elongation of the wire is used to see the real axis, to locate
the South Pole, and also to imagine the position of the cardinal point south (figure 10).
Obviously, to introduce the cardinal point north and the North Pole results easily. Later, we
can draw the North-South straight line in the model and also in the court or balcony ground
where we took the pictures (using the normal process to determinate the north-south straight
line). This is very important because every time we use this model, we will have to orient it,
and it is very useful to have this real north-south straight line to facilitate the work. (We can
verify this direction with a compass).
Fig. 10: Model with horizon ring and polar axis. Fig. 11: Model with the local meridian.

NASE publications Geometry of Light and Shadows
49
The next step consists of locating the meridian of the place. The local meridian is very easy to
define, but it is not a simple concept to assimilate for the students (maybe because everyone
has his own meridian). We can fix a wire that passes for the cardinal points north and south
and the rotation axis of Earth (figure 11). This wire is the meridian visualization of the
location of the model, but allows us to imagine the local meridian line in the sky. Now it is
very easy to imagine because it begins in the same places that student sees in the model. The
local meridian begins in the same building as it does in the photo but on the real horizon.
When the meridian passes above his head, it will end in the same building that we see, thanks
to the wire in the horizon of the photos.
The process to introduce the equator is more complicated. One possibility consists of the east-
west line. This solution is very simple, but it does not reach anything from the pedagogic
point of view. For educational purposes, it is more convenient to use photography again. We
can situate the camera on the tripod again in the same position that it was in when we took the
first photos of the horizon. (This is why we painted the corresponding marks on the ground,
so we could situate the tripod in the same place again).
With the camera on the tripod, we take a photo of the sunrise and the sunset on the first day of
spring and autumn. In this case, we will have two photos of the precise position of east and
west cardinal points respectively, with respect to the horizon in the photos and obviously
above the real horizon.
We simulate the equator with a wire perpendicular to the terrestrial rotation axis; it is fastened
at the east and west cardinal points (in the horizontal plane that is perpendicular to the north-
south line). However, it is not easy to fix this wire to the wire that symbolizes the rotation
axis because it is inclined, and obviously it is inclined to the equator also. This leaves the
question as to what inclination to use.
We will take four or five pictures of the sunrise on the first day of spring or summer.
Photographing the sun is dangerous when it is quite high in the sky, but it is safe during
sunrise or sunset when the Earth's atmosphere acts like a filter. We will use all the
photographs and use the appropriate software on put them together (using some reference to
the horizon), and we can distinguish the inclination of the sun itself on the horizon. This
picture will serve to introduce the proper slope on the wire representing the equator in the
model (figure 13).
Using the two photographs of the cardinal points East and West, it is possible to know the
inclination of the traces of the stars in equator, and therefore it is possible to locate the wire
that symbolizes equator smoothly. We now know the fixed points and also the inclination, so
the wire can be fastened on the frame and also hold the local meridian (figure 13).
If we consider the Sun as a normal star (the Sun is the most important star for us because it is
the nearest, but its behavior is not very different from other stars), we can obtain the inclined
motion of stars when they rise or set with respect to the horizon. To do this we only have to
take two pictures of this instant near the cardinal point east and west (figure 14).

NASE publications Geometry of Light and Shadows
50
Fig. 12: Sunset point the day of the spring or autumn equinox.
It may be impossible to take the pictures mentioned in the previous paragraph from the city
where the school is built. We have to go to the countryside, in a place that is not affected by
light pollution, and take pictures with a single-lens reflex camera on a tripod with a cable
release. About 10 minutes of exposure is enough. It is very important to place the camera
parallel to horizon (we can use a level to do this operation).
Fig. 13: Trace of the sunrise. Fig. 14: Traces of the stars in the east.
Take this opportunity to get a small portfolio of photographs. For example, you can take one
of the pole area giving a 15 minute exposure, another one of the area above it along the local
meridian, another one following the same meridian and so forth, until you get to the picture
that is on the horizon. The idea is to photograph all the local meridian from north to south,
passing over our heads. Obviously, the local meridian of the place where we have decided to
take pictures is not the same as that of the school, but students can easily understand this
small difference.

NASE publications Geometry of Light and Shadows
51
When we have all the pictures, we can build a meridian strip with them all. With this strip,
students can better understand the movement of the celestial sphere around Earth's axis of
rotation. Interestingly, with the same exposure time, the trajectories drawn by stars change
their length. It is at a minimum around the pole and maximum at the equator. It also changes
shape. At the equator, the trajectory draws a straight line. In the area near the pole, lines are
concave curves above the equator and are convex below. If we make paper copies of the
pictures large enough, we can put the strip over the head of the students, allowing them to
visualize and understand the movement better.
Using the two photographs of east and west cardinal points, it is possible to know the
inclination of the traces of stars at the equator, and therefore it is possible to locate the wire
that symbolizes the equator without problems. We know the points where we have to fix it
and also the inclination, so the wire can be attached to the wood and to the local meridian
(figure 8).
It is clearly possible to introduce the strip of pictures of the local meridian on the model. It is
sufficient to make some copies and make a hole in them at the point that indicates the pole, in
order to introduce the axis of rotation. Note that the wire of the equator corresponds to the
straight-line traces that are on the tape (figure 15).
Fig. 15: The local meridian pictures.
With this model, we can offer the students the two possibilities of viewing the celestial sphere
from the inside and from the outside.

NASE publications Geometry of Light and Shadows
52
If we again take two pictures of the first day of winter and summer when the Sun rises and
sets, students will be able to see that the locations are very different in their city. The
difference between them is amazing. You can also set the parallels of Cancer and Capricorn
with the pictures that give the slope of the equator, since the parallels follow this same
inclination. With a simple conveyor, it is possible to verify that the internal angle between the
Tropic of Cancer and the equator is about 23º, and this is also the angle formed between the
equator and the Tropic of Capricorn (figures 16 and 17).
Fig. 16: Sun trajectories the first day of each season. Sunset and sunrise points do not coincide except two days:
Equinox days. Fig. 17: The angle between two trajectories of the first day of two consecutive seasons is 23.5º
For training students, it is interesting for them to see that sunrises and sunsets do not always
coincide with the east and west, respectively. There are many books that mention that the Sun
rises in the east and sets in the west. Students can see that this is true only twice a year, and it
is not true on the remaining days (figures 16 and 17).
Thus, students see in a practical and simultaneous way the sphere from the inside (the real
sphere) and from the outside (the model). With such model, students can understand their
environment better, and questions about it can be resolved easily. They can also display the
area that corresponds the motion of the sun (between the parallels of the model) and imagine
it above the sky and real horizon of the city. The orientation becomes piece of cake.
Sundials There are other possible applications of the model. This model is no more than a large
sundial. It is great for explaining the construction of a clock in a simple and didactic way,
considering only the horizon and the motion of the Sun. Firstly; it is very easy to see that the
Earth's axis of rotation becomes the stylus of the clock.
If we introduce a plane in the direction of the equatorial plane and move a flashlight on the
Tropic of Cancer, we can see the shadow of the stylus (the wire that represents the Earth's
rotation axis) crossing the plane of the equatorial quadrant. On the other hand, when we move
the flashlight on the Tropic of Capricorn, the shadow appears in the area below the plane, and
it is clear that when the flashlight is placed on the equator, no shadow occurs. Thus, it is easy

NASE publications Geometry of Light and Shadows
53
to verify that the equatorial clock works in summer and spring, showing hours on the clock's
plane, in winter and autumn showing hours below it, and that two days per year, on the two
equinoxes days, it does not work.
Considering the equatorial plane, the horizontal and vertical (oriented east-west), we can see
that the flashlight indicates the same hours in the three quadrants (figure 18). In addition, we
can see when the morning and afternoon hours are for the same stylus (the Earth's rotation
axis). Obviously, it's the same time in the three clocks. It is easily verified in which area we
have to draw the morning and afternoon hours for each clock. (All teachers have at some
point received badly drawn hours on a sundial, but using this model this no longer happens).
Fig. 18: The model is a huge sundial. We can consider three types.
Moving the flashlight along the Tropics of Capricorn and Cancer makes it easy to see that the
path of light emitted from the flashlight produces a different conic section on the plane. In the
first case (the first day of summer), the conic is almost a circle, and the enclosed area is
clearly smaller than in the second case. When followed by the other parallel (first day of
winter), the section is elliptical, and the enclosed area is much greater. Then the students can
understand that radiation is more concentrated in the first situation, i.e., the surface
temperature is higher in summer, and it is also evident in the model that the number of hours
of solar insolation is greater. The natural consequence is that it is warmer in summer than in
winter (figure 19).

NASE publications Geometry of Light and Shadows
54
Fig. 19: The clocks and seasons.
We will take this opportunity to mention some elements that must be known to construct a
sundial.
The equatorial clock is very easy to create. Just put the stylus in the direction of Earth's
rotation axis, i.e., in the north-south direction (a compass can help us do so), and with a height
above the plane of the horizon equal to the latitude of the site (figure 20 and 21). The stylus of
any clock always will be placed in the same way.
Fig. 20: Equatorial clock in used in northern hemisphere Fig. 21: Equatorial clock used in southern hemisphere
The equatorial clock hour lines are drawn at 15 degrees (figure 22a and 22b), since the Sun
gives a 360 degree turn in 24 hours. If we divide 360 by 24, we get 15 degrees each hour.

NASE publications Geometry of Light and Shadows
55
Fig. 22a and 22b: Patten for the equatorial clock.

NASE publications Geometry of Light and Shadows
56
The hour lines of a horizontally or vertically oriented clock are obtained by projecting the
equatorial lines and simply considering the latitude of the place (figures 23a, 23b, 23c y 23d).
Fig. 23a, 23b, 23c y 23d: Some images of the clocks.

NASE publications Geometry of Light and Shadows
57
Solar time and clock time of wristwatches
Sundials give solar time, which is not the same as that on the watches that we all use on our
wrists. We must consider several adjustments:
Longitude adjustment
Earth is divided into 24 time zones from the prime meridian or Greenwich meridian. To make
the longitude adjustment it is necessary to know the local longitude and the longitude of the
"standard" meridian in your area. A “+” sign is added to the east and signed “-” to the west.
We must express the lengths in hours, minutes and seconds (1 degree = 4 minutes).
Summer/winter adjustment
Almost all countries have a summer ("daylight savings") and winter times. An hour is usually
added in the summer. The time change in summer/winter is a decision of the country's
government.
Time equation adjustment
Earth revolves around the Sun according to Kepler's law of areas for an eclipse, i.e., it is not a
constant motion, which creates a serious problem for mechanical watches. Mechanical clocks
define the average time as the average over a full year of time. The Equation of Time is the
difference between "Real Solar Time" and "Average Time". This equation is tabulated on
Table 1. days Gen Feb Mar Apr May Jun Jul Aug Sep Oct Nov Dec
1 +3.4 +13.6 +12.5 +4.1 -2.9 -2.4 +3.6 +6.3 +0.2 -10.1 -16.4 -11.2
6 +5.7 +5.1 +11.2 +2.6 -3.4 -1.6 +4.5 +5.9 -1.5 -11.7 -16.4 -9.2
11 +7.8 +7.3 +10.2 +1.2 -3.7 -0.6 +5.3 +5.2 -3.2 -13.1 -16.0 -7.0
16 +9.7 +9.2 +8.9 -0.1 -3.8 +0.4 +5.9 +4.3 -4.9 -14.3 -15.3 -4.6
21 +11.2 +13.8 +7.4 -1.2 -3.6 +1.5 +6.3 +3.2 -6.7 -15.3 -14.3 -2.2
26 +12.5 +13.1 +5.9 -2.2 -3.2 +2.6 +6.4 +1.9 -8.5 -15.9 -12.9 +0.3
31 +13.4 +4.4 -2.5 +6.3 +0.5 -16.3 +2.8
Table 1: Time equation
Solar time + Total adjustment = Wristwatch clock time
Example 1: Barcelona (Spain) on May 24th
. Adjustment Comment Result
1. Longitude Barcelona is in the same “standard” zone as Greenwich. -8.7 m
2. DST May has DST +1h + 60 m
3. Time equation Read the table for the date May 24 -3.6 m
Total +47.7 m
For example, at 12:00 solar time, our wristwatch says:
(Solar time) 12h + 47.7 m = 12h 47.7 m (Wristwatch time)

NASE publications Geometry of Light and Shadows
58
Example 2: Tulsa, Oklahoma (United States) November 16th
. Adjustment Comment Result
1. Longitude The “standard” meridian of Tulsa is at 90º W. +24 m
2. DST November has none
3. Time equation We read the table for the date November 16 -15.3 m
Total + 8.7 m
For example, at 12:00 solar time, our wristwatch says:
(Solar time) 12h + 8.7 m = 12h 8.7 m (Wristband clock time)
Orientation
Another difficulty for students is orientation. In a general astronomy course, we have to
introduce a sense of direction. It is possible that our students will never study astronomy
again. For students in the northern hemisphere, the minimum outcome to be expected from a
course of astronomy is that students are able to recognize where the North is, know that the
trajectory of the Sun is above the southern horizon, know that the planets move across the
horizon, and in particular learn to locate the various geographical features of their city. For
example, over the horizon of Barcelona (figures 24a and 24b) students can consider various
options regarding the position of the Sun, Moon, and certain constellations on the horizon.
The two mountains that we see are approximately in opposite positions, but that does not
mean anything for the students, and they usually have troubles distinguishing that certain
drawings are possible while others are not. They know the theory, but the practice is not
enough if they do not understand the different possibilities.
Using the model designed to resolve the drawbacks mentioned in the previous section was
very effective in clarifying many issues related to orientation on the local horizon in a way
that was not initially planned.
Fig. 24a: North-East horizon of Barcelona. Fig. 24b: South-West horizon of Barcelona.
It is worth mentioning that this model is useful in explaining the local position of the celestial
sphere during the day and night. It really helps to better understanding the movement of the

NASE publications Geometry of Light and Shadows
59
Sun (and other members of the Solar System moving in the near area). Using the proposed
model, students understand that a bright star in the Polaris area can never be a planet.
Fig. 25a: The model with primary school students, Fig. 25b: The large-scale model in the Science Park of
Granada.
It is a good investment to make a large-scale model. In this case, students and even adults can
get into it and check the Sun's position compared to the equator and the parallels that
correspond to the first day of summer and winter solstice (figure 25a). Some science museums
have built this type of model (figure 25b).
After using the model, students can discern things that they previously would not have. For
example, now it is very clear that the Sun does not rise and set perpendicular to the horizon
except at the equator.
Bibliography
Ros, R.M., De l'intérieur et de l'extérieur, Les Cahiers Clairaut, 95, p.1-5, Orsay,
2001.
Ros, R.M., Laboratorio de Astronomía, Tribuna de Astronomía, 154, p.18-29, 1998.
Ros, R.M., Sunrise and sunset positions change every day, Proceedings of 6th EAAE
International Summer School, 177, 188, Barcelona, 2002.
Ros, R.M., Capell, A., Colom, J., El planisferio y 40 actividades más, Antares,
Barcelona, 2005.
Ros, R.M., Lanciano, N., El horizonte en la Astronomía, Astronomía Astrofotografía y
Astronáutica, 76, p.12-20,1995.

NASE publications Geometry of Light and Shadows
60
Stellar, solar, and lunar demonstrators
Rosa M. Ros, Francis Berthomieu International Astronomical Union, Technical University of Catalonia (Barcelona,
Spain), CLEA (Nice, France)
Summary This worksheet presents a simple method to explain how the apparent motions of stars, the
Sun, and the Moon are observed from different places on Earth. The procedure consists of
building simple models that allows us to demonstrate how these movements are observed
from different latitudes.
Goals
- Understand the apparent motions of stars as seen from different latitudes.
- Understand the apparent motions of the Sun as seen from different latitudes.
- Understand the Moon’s movement and shapes as seen from different latitudes.
The idea behind the demonstrator
It is not simple to explain how the apparent motions of the Sun, the Moon, or stars are
observed from the Earth. Students know that the Sun rises and sets every day, but they are
surprised to learn that the Sun rises and sets at a different point every day or that solar
trajectories can vary according to the local latitude. The demonstrators simplify and explain
the phenomenon of the midnight sun and the solar zenith passage. In particular, the
demonstrators can be very useful for understanding the movement of translation and justify
some latitude differences.
It is easy to remember the shape and appearance of each constellation by learning the
mythological stories and memorizing the geometric rules for finding the constellation in the
sky. However, this only works at a fixed location on Earth. Because of the motion of the
Celestial Sphere, an observer that lives at the North Pole can see all the stars in the Northern
Hemisphere and one who lives at the South Pole can see all the stars in the Southern
Hemisphere. But what do observers see that live at different latitudes?

NASE publications Geometry of Light and Shadows
61
The stellar demonstrator: why are there invisible
stars?
Everything gets complicated when the observer lives in a zone that is not one of the two
poles. In fact, this is true for most observers. In this case, stars fall into three different
categories depending on their observed motions (for each latitude): circumpolar stars, stars
that rise and set, and invisible stars (figure 1). We all have experienced the surprise of
discovering that one can see some stars of the Southern Hemisphere while living in the
Northern Hemisphere. Of course it is similar to the surprise that it is felt when the
phenomenon of the midnight sun is discovered.
Fig 1: Three different types of stars (as seen from a specific latitude): circumpolar, stars that rise and set, and
invisible stars.
Depending on their age, most students can understand fairly easily why some stars appear
circumpolar from the city where they live. However, it is much more difficult for them to
imagine which ones would appear circumpolar as seen from other places in the world. If we
ask whether one specific star (e.g., Sirius) appears to rise and set as seen from Buenos Aires,
it is difficult for students to figure out the answer. Therefore, we will use the stellar
demonstrator to study the observed motions of different stars depending on the latitude of the
place of observation.

NASE publications Geometry of Light and Shadows
62
The main goal of the demonstrator
The main objective is to discover which constellations are circumpolar, which rise and set,
and which are invisible at specific latitudes. If we observe the stars from latitude of around
45º N, it is clear that we can see quite a lot of stars visible from the Southern Hemisphere that
rise and set every night (figure 1).
In our case, the demonstrator should include constellations with varying declinations (right
ascensions are not as important at this stage). It is a very good idea to use constellations that
are familiar to the students. These can have varying right ascensions so they are visible during
different months of the year (figure 2).
Fig 2: Using the demonstrator: this is an example of a demonstrator for the Northern Hemisphere using
constellations from Table 1.
When selecting the constellation to be drawn, only the bright stars should be used so that its
shape is easily identified. It is preferable not to use constellations that are on the same
meridian, but rather to focus on choosing ones that would be well known to the students
(Table 1). If you are interested in making a model for each season, you can make four
different demonstrators, one for each season for your hemisphere. You should use
constellations that have different declinations, but that have right ascension between 21h and
3h for the autumn (spring), between 3h and 9h for the winter (summer), between 9h and 14h
for spring (autumn), and between 14h and 21h for the summer (winter) in the Northern
(Southern) hemisphere for the evening sky.

NASE publications Geometry of Light and Shadows
63
Constellation Maximum
declination
Minimum
declination
Ursa Minor +90º +70º
Ursa Major +60º +50º
Cygnus +50º +30º
Leo +30º +10º
Orion and Sirius +10º -10º
Scorpius -20º -50º
South Cross -50º -70º
Table 1: Constellations appearing in the demonstrator shown in figure 1.
If we decide to select constellations for only one season, it may be difficult to select a
constellation between, for example, 90ºN and 60ºN, another between 60ºN and 40ºN, another
between 40ºN and 20ºN, and another between 20ºN and 20ºS, and so on, without overlapping
and reaching 90ºS. If we also want to select constellations that are well known to students,
with a small number of bright stars that are big enough to cover the entire meridian, it may be
difficult to achieve our objective. Because big, well-known, bright constellations do not cover
the whole sky throughout the year, it may be easier to make only one demonstrator for the
entire year.
There is also another argument for making a unique demonstrator. Any dispute regarding the
seasons take place only at certain latitudes of both hemispheres.
Making the demonstrator
To obtain a sturdy demonstrator (figure 3), it is a good idea to glue together the two pieces of
cardboard before cutting (figures 4 and 5). It is also a good idea to construct another one,
twice as big, for use by the teacher.
Fig. 3: Making the stellar demonstrator.
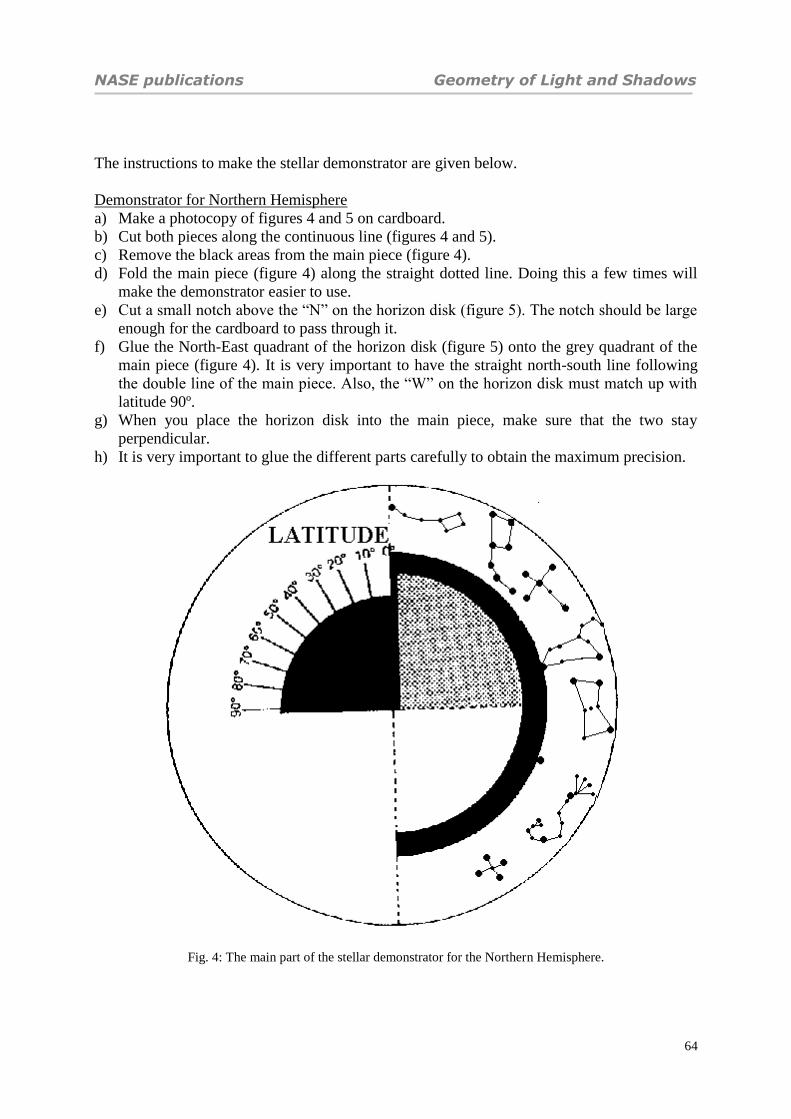
NASE publications Geometry of Light and Shadows
64
The instructions to make the stellar demonstrator are given below.
Demonstrator for Northern Hemisphere
a) Make a photocopy of figures 4 and 5 on cardboard.
b) Cut both pieces along the continuous line (figures 4 and 5).
c) Remove the black areas from the main piece (figure 4).
d) Fold the main piece (figure 4) along the straight dotted line. Doing this a few times will
make the demonstrator easier to use.
e) Cut a small notch above the “N” on the horizon disk (figure 5). The notch should be large
enough for the cardboard to pass through it.
f) Glue the North-East quadrant of the horizon disk (figure 5) onto the grey quadrant of the
main piece (figure 4). It is very important to have the straight north-south line following
the double line of the main piece. Also, the “W” on the horizon disk must match up with
latitude 90º.
g) When you place the horizon disk into the main piece, make sure that the two stay
perpendicular.
h) It is very important to glue the different parts carefully to obtain the maximum precision.
Fig. 4: The main part of the stellar demonstrator for the Northern Hemisphere.

NASE publications Geometry of Light and Shadows
65
Fig. 5: The horizon disc.
Fig. 6: The main part of the stellar demonstrator for the Southern Hemisphere.

NASE publications Geometry of Light and Shadows
66
Demonstrator for Southern Hemisphere
a) Make a photocopy of figures 5 and 6 on cardboard.
b) Cut both pieces along the continuous line (figures 5 and 6).
c) Remove the black areas from the main piece (figure 6).
d) Fold the main piece (figure 6) along the straight dotted line. Doing this a few times
will make the demonstrator easier to use.
e) Cut a small notch on the “S” of the horizon disk (figure 5). It should be large enough
for the cardboard to pass through it.
f) Glue the South-West quadrant of the horizon disk (figure 5) onto the grey quadrant of
the main piece (figure 6). It is very important to have the straight north-south line
following the double line of the main piece. Also the “E” on the horizon disk must
match up with latitude 90º.
g) When you place the horizon disk into the main piece, make sure that the two stay
perpendicular.
h) It is very important to glue the different parts carefully to obtain the maximum
precision.
Choose which stellar demonstrator you want to make depending on where you live. You can
also make a demonstrator by selecting your own constellations following different criteria.
For instance, you can include constellations visible only for one season, constellations visible
only for one month, etc. For this, you must consider only constellations with right ascensions
between two specific values. Then draw the constellations with their declination values on
figure 7. Notice that each sector corresponds to 10º.
Demonstrator applications
To begin using the demonstrator you have to select the latitude of your place of observation.
We can travel over the Earth’s surface on an imaginary trip using the demonstrator.
Use your left hand to hold the main piece of the demonstrator (figure 4 or 6) by the blank area
(below the latitude quadrant). Select the latitude and move the horizon disk until it shows the
latitude chosen. With your right hand, move the disk with the constellations from right to left
several times.
You can observe which constellations are always on the horizon (circumpolar), which
constellations rise and set, and which of them are always below the horizon (invisible).

NASE publications Geometry of Light and Shadows
67
Fig. 7: The main part of the stellar demonstrator for the Northern or Southern Hemispheres.
Star path inclination relative to the horizon
With the demonstrator, it is very easy to observe how the angle of the star path relative to the
horizon changes depending on the latitude (figures 8 and 9).
If the observer lives on the equator (latitude 0º) this angle is 90º. On the other hand, if the
observer is living at the North or South Pole, (latitude 90º N or 90º S) the star path is parallel
to the horizon. In general, if the observer lives in a city at latitude L, the star path inclination
on the horizon is 90º minus L every day.
We can verify this by looking at figures 8 and 9. The photo in figure 9 was taken in Lapland
(Finland) and the one in figure 8 in Montseny (near Barcelona, Spain). Lapland is at a higher
latitude than Barcelona so the star path inclination is smaller.

NASE publications Geometry of Light and Shadows
68
Fig. 8a and 8b: Stars rising in Montseny (near Barcelona, Spain). The angle of the star path relative to the
horizon is 90º minus the latitude (Photo: Rosa M. Ros).
Fig. 9a and 9b: Stars setting in Enontekiö in Lapland (Finland). The angle of the star path relative to the horizon
is 90º minus the latitude. Note that the star paths are shorter than in the previous photo because the aurora
borealis forces a smaller exposure time (Photo: Irma Hannula).
Using the demonstrator in this way, the students can complete the different activities below.
1) If we choose the latitude to be 90ºN, the observer is at the North Pole. We can see that all
the constellations in the Northern Hemisphere are circumpolar. All the ones in the
Southern Hemisphere are invisible and there are no constellations which rise and set.
2) If the latitude is 0º, the observer is on the equator, and we can see that all the
constellations rise and set (perpendicular to the horizon). None are circumpolar or
invisible.
3) If the latitude is 20º (N or S), there are less circumpolar constellations than if the latitude
is 40º (N or S, respectively). But there are a lot more stars that rise and set if the latitude is
20º instead of 40º.
4) If the latitude is 60º (N or S), there are a lot of circumpolar and invisible constellations,
but the number of constellations that rise and set is reduced compared to latitude 40º (N or
S respectively).

NASE publications Geometry of Light and Shadows
69
The solar demonstrator: why the Sun does not
rise at the same point every day
It is simple to explain the observed movements of the sun from the Earth. Students know that
the sun rises and sets daily, but feel surprised when they discover that it rises and sets at
different locations each day. It is also interesting to consider the various solar trajectories
according to the local latitude. And it can be difficult trying to explain the phenomenon of the
midnight sun or the solar zenith passage. Especially the simulator can be very useful for
understanding the movement of translation and justify some latitude differences.
Fig. 10: Three different solar paths (1
st day of spring or autumn, 1
st day of summer, and 1
st day of winter).
Making the demonstrator
To make the solar demonstrator, we have to consider the solar declination, which changes
daily. Then we have to include the capability of changing the Sun’s position according to the
seasons. For the first day of spring and autumn, its declination is 0º and the Sun is moving
along the equator. On the first day of summer (winter in the Southern Hemispheres), the
Sun’s declination is +23.5 º and on the first day of winter (summer in the Southern
Hemisphere) it is -23.5º (figure 10). We must be able to change these values in the model if
we want to study the Sun’s trajectory.
To obtain a sturdy demonstrator (figures 11a y 11b), it is a good idea to glue two pieces of
cardboard together before cutting them. Also you can make one of the demonstrators twice as
large, for use by the teacher.

NASE publications Geometry of Light and Shadows
70
Fig. 11a and 11b: Preparing the solar demonstrator for the Northern Hemisphere at latitude +40º.
The build instructions listed below.
Demonstrator for Northern Hemisphere
a) Make a photocopy of figures 12 and 13 on cardboard.
b) Cut both pieces along the continuous line (figures 12 and 13).
c) Remove the black areas from the main piece (figure 13).
d) Fold the main piece (figure 13) along the straight dotted line. Doing this a few times will
make the demonstrator easier to use.
e) Cut a small notch above the “N” on the horizon disk (figure 13). The notch should be
large enough for the cardboard to pass through it.
f) Glue the North-East quadrant of the horizon disk (figure 13) onto the grey quadrant of the
main piece (figure 12). It is very important to have the straight north-south line following
the double line of the main piece. Also, the “W” on the horizon disk must match up with
latitude 90º.
g) When you place the horizon disk into the main piece, make sure that the two stay
perpendicular.
h) It is very important to glue the different parts carefully to obtain the maximum precision.
i) In order to put the Sun in the demonstrator, paint a circle in red on a piece of paper. Cut it
out and put it between two strips of sticky tape. Place this transparent strip of tape with the
red circle over the declination area in figure 12. The idea is that it should be easy to move
this strip up and down in order to situate the red point on the month of choice.

NASE publications Geometry of Light and Shadows
71
Fig. 12: The main part of the solar demonstrator for the Northern Hemisphere.
Fig. 13: The horizon disk.
To build the solar demonstrator in the Southern Hemisphere you can follow similar steps, but
replace figure 12 with figure 14.

NASE publications Geometry of Light and Shadows
72
Fig. 14: The main part of the solar demonstrator for the Southern Hemisphere.
Demonstrator for Southern Hemisphere
a) Make a photocopy of figures 13 and 14 on cardboard.
b) Cut both pieces along the continuous line (figures 13 and 14).
c) Remove the black areas from the main piece (figure 14).
d) Fold the main piece (figure 14) along the straight dotted line. Doing this a few times will
make the demonstrator easier to use.
e) Cut a small notch above the “S” on the horizon disk (figure 13). The notch should be large
enough for the cardboard to pass through it.
f) Glue the South-West quadrant of the horizon disk (figure 13) onto the grey quadrant of the
main piece (figure 14). It is very important to have the straight north-south line following
the double line of the main piece. Also, the “E” on the horizon disk must match up with
latitude 90º.
g) When you place the horizon disk into the main piece, make sure that the two stay
perpendicular.
h) It is very important to glue the different parts carefully to obtain the maximum precision.
i) In order to put the Sun in the demonstrator, paint a circle in red on a piece of paper. Cut it
out and put it between two strips of sticky tape. Place this transparent strip of tape with the
red circle over the declination area in figure 14. The idea is that it should be easy to move
this strip up and down in order to situate the red point on the month of choice.

NASE publications Geometry of Light and Shadows
73
j) Using the solar demonstrator
To use the demonstrator you have to select your latitude. Again, we can travel over the
Earth’s surface on an imaginary trip using the demonstrator.
We will consider three areas:
1. Places in an intermediate area in the Northern or Southern Hemispheres
2. Places in polar areas
3. Places in equatorial areas
1. - Places in intermediate areas in the Northern or Southern Hemispheres: SEASONS
Angle of the Sun’s path relative to the horizon
Using the demonstrator it is very easy to observe that the angle of the Sun’s path relative to
the horizon depends on the latitude. If the observer lives on the equator (latitude 0º) this angle
is 90º. If the observer lives at the North or South Pole (latitude 90º N or 90º S), the Sun’s path
is parallel to the horizon. In general, if the observer lives in a city at latitude L, the inclination
of the Sun’s path relative to the horizon is 90 minus L every day. We can verify this by
looking at figures 15 and 16. The picture in figure 15 was taken in Lapland (Finland), and the
one in figure 16 in Gandia (Spain). Lapland is at higher latitude than Gandia, so the
inclination of the Sun’s path is smaller.
Fig. 15a y 15b: Sun rising in Enontekiö in Lapland (Finland). The angle of the Sun’s path relative to the horizon
is the co-latitude (90º minus the latitude) (Photo: Sakari Ekko).
Fig. 16a y 16b: Sun rising in Gandia (Spain). The angle of the Sun’s path relative to the horizon is 90 minus the
latitude (Photo: Rosa M. Ros).

NASE publications Geometry of Light and Shadows
74
The height of the Sun’s path depending on the season
1a) the Northern Hemisphere
Using the demonstrator for your city (select the latitude of your city), it is easy to verify that
the altitude (height) of the Sun above the horizon changes according to the season. For
instance, on the first day of spring the declination of the Sun is 0º. We can put the Sun on
March 21st. Then we can move the Sun exactly along the equator from the East towards the
West. We can see that the Sun’s path is at a certain height over the horizon.
At the same latitude we repeat the experiment for different days. When we move the Sun
along the equator on the 1st day of summer, the 21
st of June, (solar declination +23º.5), we
observe that the Sun’s path is higher than on the 1st day of spring. Finally, we repeat the
experiment for the 1st day of winter, the 21
st of December (solar declination -23º.5). We can
see that in this case the Sun’s path is lower. On the 1st day of autumn the declination is 0º and
the Sun’s path follows the equator in a similar way as it did on the 1st day of spring.
Fig. 17a y 17b: The Sun’s path in summer and winter in Norway. It is clear that the Sun is much higher in
summer than in winter. This is why there are many more hours of sunlight during summer.
1b) the Southern Hemisphere
Using the demonstrator for your city (select the latitude of your city), it is easy to verify that
the altitude of the Sun above the horizon changes according to the season. For instance, on the
first day of spring the declination of the Sun is 0º. We can put the Sun on September 23rd
.
Then we can move the Sun along the equator from the East towards the West. We can see that
the Sun’s path is at a certain height over the horizon.
At the same latitude we can repeat the experiment for different days. On the 1st day of
summer, the 21st of December (solar declination -23º.5), when we move the Sun along the
equator, we observe that the Sun’s path is higher than on the 1st day of spring.
Finally, we can repeat the experiment at the same latitude for the 1st day of winter, the 21
st of
June (solar declination +23º.5). We can see that in this case the Sun’s path is lower. On the 1st

NASE publications Geometry of Light and Shadows
75
day of autumn the declination is 0º and the Sun’s path follows the equator in a similar way as
on the 1st day of spring.
Of course if we change the latitude, the height of the Sun’s path changes, but even then the
highest path is still always on the 1st day of summer and the lowest on the 1
st day of winter.
Remarks:
In the summer, when the Sun is higher, the Sun’s light hits the Earth at an angle that is more
perpendicular to the horizon. Because of this, the radiation is concentrated in a smaller area
and the weather is hotter. Also in summertime, the number of hours of sunlight is larger than
in winter. This also increases temperatures during the summer.
The Sun rises and sets in a different place every day
In the preceding experiments, if we had focused our attention on where the Sun rises and sets,
we would have observed that it is not the same place every day. In particular, the distance on
the horizon between the sunrise (or sunset) on the 1st day of two consecutive seasons increases
with the increasing latitude (figure 18a y 18b).
Fig. 18a y 18b: Sunsets in Riga (Latvia) and Barcelona (Spain) the first day of each season (left/winter,
center/spring or autumn, right/summer). The central sunsets in both photos are on the same line. It is easy to
observe that the summer and winter sunsets in Riga (higher latitude) are much more separated than in Barcelona
(Photos: Ilgonis Vilks, Latvia and Rosa M. Ros, Spain).
… Fig. 19a: Sunrises on the first day of 1
st day of spring or autumn, Fig. 19b: Sunrises on the first day 1
st day of
summer, Fig. 19c: Sunrises on the first day of 1st day of winter

NASE publications Geometry of Light and Shadows
76
This is very simple to simulate using the demonstrator. Just mark the position of the
Sun in each season for two different latitudes, for instance 60º and 40º (figure 19a, 19b y 19c).
The illustrations in figures 18 and 19 are for the Northern Hemisphere, but the same concepts
hold for the Southern Hemisphere (figure 20a y 20b). The only difference is the timing of the
seasons.
Fig. 20a and 20b: Sunsets in La Paz (Bolivia) and Esquel (Argentina) the first day of each season (left/summer,
centre/spring and autumn, right/winter). The central sunsets in both photos are on the same line, it is easy to
observe that the summer and winter sunsets in Esquel (higher latitude) are much more separate than in La Paz
(Photos: Juan Carlos Martínez, Colombia and Nestor Camino, Argentina).
Remarks:
The Sun does not rise exactly in the East and does not set exactly in the West. Although this is
a generally accepted idea, it is not really true. It only occurs on two days every year: the 1st
day of spring and the 1st day of autumn at all latitudes.
Another interesting fact is that the Sun crosses the meridian (the imaginary line that goes from
the North Pole to the zenith to the South Pole) at midday at all latitudes (in solar time). This
can be used for orientation.
2. - Polar regions: MIDNIGHT SUN
Polar summer and polar winter
If we introduce the polar latitude in the demonstrator (90º N or 90º S depending on the pole
under consideration) there are three possibilities. If the Sun declination is 0º, the Sun is
moving along the horizon, which is also the equator.
If the declination coincides with the 1st day of summer, the Sun moves parallel to the horizon.
In fact the Sun always moves parallel to the horizon from the second day of spring until the
last day of summer. That means half a year of sunlight.
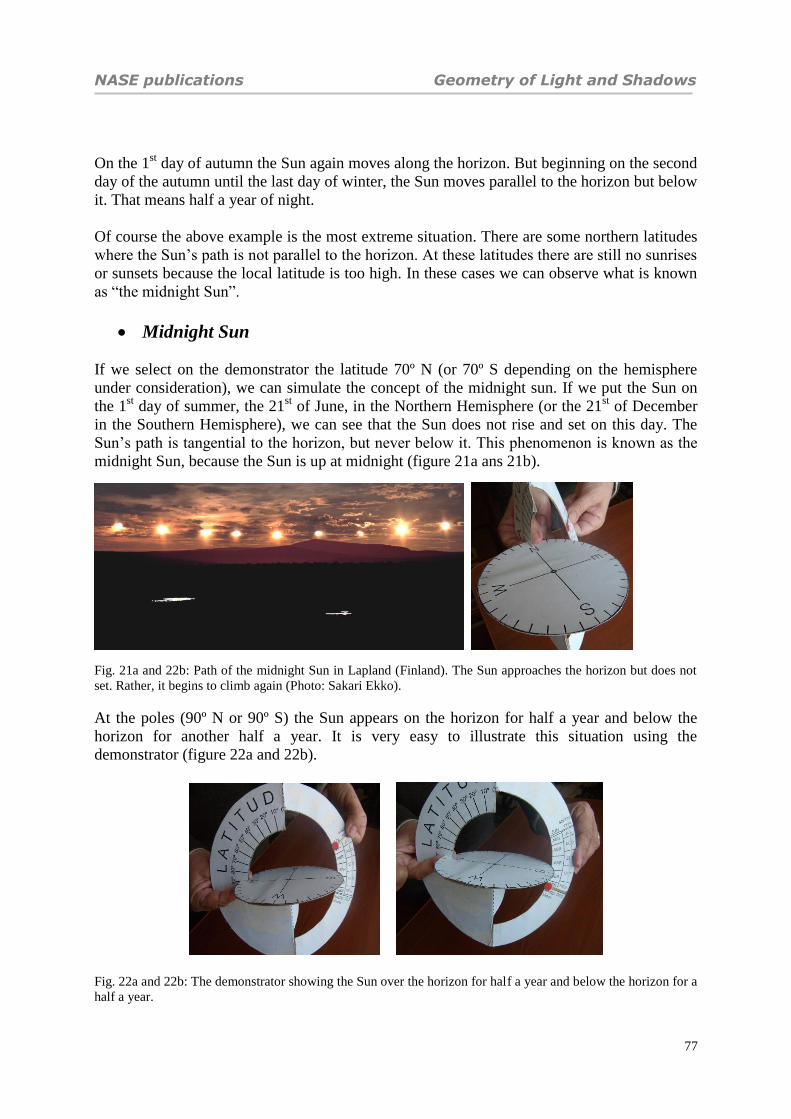
NASE publications Geometry of Light and Shadows
77
On the 1st day of autumn the Sun again moves along the horizon. But beginning on the second
day of the autumn until the last day of winter, the Sun moves parallel to the horizon but below
it. That means half a year of night.
Of course the above example is the most extreme situation. There are some northern latitudes
where the Sun’s path is not parallel to the horizon. At these latitudes there are still no sunrises
or sunsets because the local latitude is too high. In these cases we can observe what is known
as “the midnight Sun”.
Midnight Sun
If we select on the demonstrator the latitude 70º N (or 70º S depending on the hemisphere
under consideration), we can simulate the concept of the midnight sun. If we put the Sun on
the 1st day of summer, the 21
st of June, in the Northern Hemisphere (or the 21
st of December
in the Southern Hemisphere), we can see that the Sun does not rise and set on this day. The
Sun’s path is tangential to the horizon, but never below it. This phenomenon is known as the
midnight Sun, because the Sun is up at midnight (figure 21a ans 21b).
Fig. 21a and 22b: Path of the midnight Sun in Lapland (Finland). The Sun approaches the horizon but does not
set. Rather, it begins to climb again (Photo: Sakari Ekko).
At the poles (90º N or 90º S) the Sun appears on the horizon for half a year and below the
horizon for another half a year. It is very easy to illustrate this situation using the
demonstrator (figure 22a and 22b).
Fig. 22a and 22b: The demonstrator showing the Sun over the horizon for half a year and below the horizon for a
half a year.

NASE publications Geometry of Light and Shadows
78
3. - Equatorial areas: THE SUN AT THE ZENITH
The Sun at the zenith
In equatorial areas, the four seasons are not very distinct. The Sun’s path is practically
perpendicular to the horizon and the solar height is practically the same during the whole
year. The length of the days is also very similar (figures 23a, 23b and 23c).
Fig. 23a, 23b and 23c: The Sun rises on the first day of each season: left - 1
st day of summer, center - 1
st day of
spring or autumn, and right - 1st day of winter (in the Northern Hemisphere). On the equator the Sun’s path is
perpendicular to the horizon. The Sun rises at almost the same point every season. The angular distances
between sunrises are only 23.5º (the ecliptic obliquity). In more extreme latitudes the Sun’s path is more inclined
and the distances between the three sunrise points increase (figures 17 and 19).
Moreover, in tropical countries there are some special days: the days when the Sun passes at
the zenith. On these days, sunlight hits the Earth’s surface at the equator perpendicularly.
Because of this, the temperature is hotter and people’s shadows disappear under their shoes
(figure 24a). In some ancient cultures these days were considered to be very special because
the phenomenon was very easy to observe. This is still the case now. In fact, there are two
days per year when the Sun is at the zenith for those living between the Tropic of Cancer and
the Tropic of Capricorn. We can illustrate this phenomenon using the demonstrator. It is also
possible to approximately calculate the dates, which depend on the latitude (figure 24b).
Fig. 24a: Small shadow (the Sun is almost at the zenith in a place near the equator). Fig. 24b: Simulating the Sun
at the Zenith in Honduras (latitude 15º N).

NASE publications Geometry of Light and Shadows
79
For example (figure 24b), if we select a latitude of 15º N, using the demonstrator we can
calculate approximately on what days the Sun is at the zenith at midday. It is only necessary
to hold a stick perpendicular to the horizon disc and we see that these days are at the end of
April and in the middle of August.
XXL demonstrators
Naturally, the demonstrator can be made with other materials, for instance wood (figure 25a).
In this case a light source can be introduced to show the Sun’s position. With a camera, using
a long exposure time, it is possible to visualize the Sun’s path (figure 25b).
Fig. 25a: XXL wooden demonstrator. Fig. 25b: Stellar wooden demonstrator. Fig. 25c: With a camera it is
possible to photograph the solar path using a large exposure time. (Photos: Sakari Ekko).
Lunar demonstrator: why the Moon smiles in
some places?
When teaching students about the Moon, we would like them to understand why the moon has
phases. Also, students should understand how and why eclipses happen. Moon phases are
very spectacular and it is easy to explain them by means of a ball and a light source.
Models such as those in figure 26 provide an image of the crescent Moon and sequential
changes. There is a rule of thumb that says the crescent Moon is a "C" and waning as a "D".
This is true for the inhabitants of the Southern Hemisphere, but it is useless in the northern
hemisphere where they say that Luna is a "liar”.
Our model will simulate the Moon’s phases (figure 26), and will show why the moon looks
like a “C” or a “D” depending on the phase. Many times, the Moon is observed at the horizon
as shown in figure 27. However, depending on the country, it is possible to observe the Moon
as an inclined “C”, an inclined “D” (figure 28a) or in other cases as a “U” (called a “smiling
Moon”; figure 28b). How can we explain this? We will use the lunar demonstrator to
understand the varying appearance of the Moon’s quarter at different latitudes.

NASE publications Geometry of Light and Shadows
80
Fig. 26: Moon phases.
Fig. 27: Moon phases observed at the horizon.
If we study the movements of the Moon, we must also consider its position relative to the Sun
(which is the cause of its phases) and its declination (since it also changes every day, and
more rapidly than the Sun.) We must therefore build a demonstrator that gives students the
ability to easily change the position of the moon relative to the Sun and at a declination that
varies considerably over a month. Indeed, as seen from Earth against the background stars, the
Moon describes a trajectory in a month rather close to that of the Sun in one year, in line with
the "ecliptic" (but titled about 5 ° due to the inclination of its orbit).
The Moon is in the direction of the Sun when there is a “New Moon”. When there is a “Full
Moon”, it is at a point opposite of the ecliptic, and its declination is opposite to that of the Sun
(within 5 degrees north or south). For example, at the June solstice, the “Full Moon” is at the
position where the Sun is during the December solstice; its declination is negative (between -
18 º and -29 º). The diurnal motion of the full moon in June is similar to that of the Sun in
December.
If we consider the crescent-shaped "D" in the northern hemisphere (and "C" in the Southern),
we know that the Moon is 90° relative to the Sun. However, it is “far” from the sun on the
ecliptic path (about three months’ difference). In June, the crescent moon will have a
declination close to the declination of the Sun in September (0°). In the month of September,
it will have a declination close to that of the Sun in December (-23.5 °), etc...
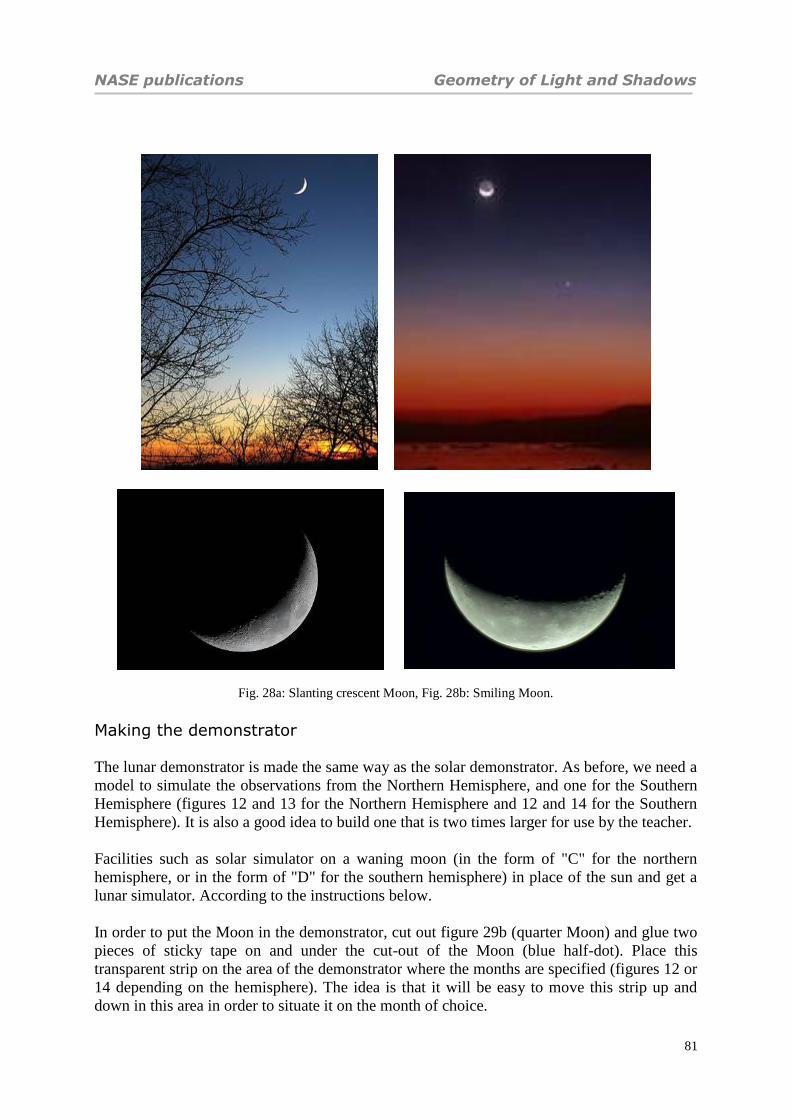
NASE publications Geometry of Light and Shadows
81
Fig. 28a: Slanting crescent Moon, Fig. 28b: Smiling Moon.
Making the demonstrator
The lunar demonstrator is made the same way as the solar demonstrator. As before, we need a
model to simulate the observations from the Northern Hemisphere, and one for the Southern
Hemisphere (figures 12 and 13 for the Northern Hemisphere and 12 and 14 for the Southern
Hemisphere). It is also a good idea to build one that is two times larger for use by the teacher.
Facilities such as solar simulator on a waning moon (in the form of "C" for the northern
hemisphere, or in the form of "D" for the southern hemisphere) in place of the sun and get a
lunar simulator. According to the instructions below.
In order to put the Moon in the demonstrator, cut out figure 29b (quarter Moon) and glue two
pieces of sticky tape on and under the cut-out of the Moon (blue half-dot). Place this
transparent strip on the area of the demonstrator where the months are specified (figures 12 or
14 depending on the hemisphere). The idea is that it will be easy to move this strip up and
down in this area in order to situate it on the month of choice.

NASE publications Geometry of Light and Shadows
82
Fig. 29a: Using the demonstrator, Fig.29b: the Moon in the transparent strip Moon quarter.
Uses of the lunar demonstrator
To use the demonstrator you have to select latitude. We will travel over the Earth’s surface on
an imaginary trip using the demonstrator.
Using your left hand, hold the main piece of the demonstrator (figure 30) by the blank area
(below the latitude quadrant). Select the latitude and move the horizon disc until it shows the
chosen latitude. Choose the day for which you want to simulate the movement of a waning
moon. Add three months to that value and put the moon in the fourth phase (figure 29b). The
month that the moon is facing is where the sun will be in three months. Use your right hand to
move the disk that holds the moon from east to west.
With the simulator for the Northern Hemisphere, you can see that the appearance of the fourth
quarter of the moon changes with the latitude and time of year. From the doll’s perspective,
the waning fourth quarter moon can appear as a “C” or a “U” on the horizon.
If we select latitude around 70º N or 70º S we can see the quarter Moon as a “C” moving
from East to West. The time of year does not matter. For all seasons the Moon looks like a
“C” (figure 30a).
If the latitude is 20º N or 20º S, the observer is close to the tropics, and we can see the
quarter Moon smiling like a “U”. The Moon moves following a line more perpendicular to
the horizon than in the previous example (figure 30b). The “U” shape does not change
with the month. It looks like this all year round.

NASE publications Geometry of Light and Shadows
83
If the latitude is 90º N or 90º S, the observer is at the Poles, and depending on the day
considered:
-We can see the quarter Moon as a “C” moving on a path parallel to the horizon.
-We can’t see it, because its trajectory is below the horizon.
If the latitude is 0º, the observer is on the equator, and we can see the quarter Moon
smiling as a “U”. The Moon rises and sets perpendicularly to the horizon. It will hide (at
midday) in “U” shape, and will return like this: “∩”
Fig. 30a: Demonstrator for latitude 70º N, Fig. 30b: latitude 20º S.
For other observers who live at intermediate latitudes, the quarter Moon rises and sets more or
less at an angle, and has an intermediate shape between a “C” and a “U”.
The above comments apply similarly for the moon in a "D" shape. Again, we have to
remember to correct the day (in this case we will have to take off three months) when we put
in the position of the Sun.
• If we introduce a -70 ° latitude (or 70 ° south) we can see the waning moon as a "D" that
moves from east to west. This does not depend on the time of year. In all seasons the Moon
appears as a "D" (figure 30a).
• If the latitude is -20 ° (figure 30b) the observer is in the tropics and sees the Moon smiling
like a "U", possibly slightly tilted. The Moon moves in a trajectory perpendicular to the
horizon unlike in the previous example (figure 30b). The shape of "U" does not change
depending on the month.
• If the latitude is - 90 °, the observer is at the South Pole and, according to the date, will be
able to:
-View the Moon as a "D" that moves in a path parallel to horizon.
- Not see the Moon, because its path is below the horizon.

NASE publications Geometry of Light and Shadows
84
• At latitude 0°, as in the simulator of the Northern Hemisphere, the observer is at the Equator,
and we can see the smile of the moon as a "U". The moon rises perpendicular to the horizon
and it will hide (around noon) in a "U" and reappear as '∩'.
For other observers who live in middle latitudes, the phase of the Moon rises and sets in an
intermediate position between a "D" and a "U", and is more or less inclined to match the
latitude of observation.
These comments can be applied in a similar way to when the Moon appears as a "C", again
subtracting three months from the Sun's position.
“Acknowledgement: The authors wish to thank Joseph Snider for his solar device produced in
1992 which inspired her to produce other demonstrators.”
Bibliography
Ros, R.M., De l'intérieur et de l'extérieur, Les Cahiers Clairaut, 95, 1, 5. Orsay,
France, 2001.
Ros, R.M., Sunrise and sunset positions change every day, Proceedings of 6th EAAE
International Summer School, 177, 188, Barcelona, 2002.
Ros, R.M., Two steps in the stars' movements: a demonstrator and a local model of
the celestial sphere, Proceedings of 5th EAAE International Summer School, 181,
198, Barcelona, 2001.
Snider, J.L., The Universe at Your Fingertips, Frankoi, A. Ed., Astronomical Society
of the Pacific, San Francisco, 1995.
Warland, W., Solving Problems with Solar Motion Demonstrator, Proceedings of 4th
EAAE International Summer School, 117, 130, Barcelona, 2000.

NASE publications Geometry of Light and Shadows
85
Earth-moon-sun system: Phases and eclipses
Rosa M. Ros International Astronomical Union, Technical University of Catalonia (Barcelona,
Spain)
Summary
The following work deals with moon phases, solar eclipses, and lunar eclipses. These eclipses
are also used to find distances and diameters in the Earth-Moon-Sun system.
Finally, a simple activity enables one to measure longitudes and heights along the moon’s
surface. The origin of tides is also explained.
Goals
- To understand why the moon has phases.
- To understand the cause of lunar eclipses.
- To understand why solar eclipses occur.
- To determine distances and diameters of the Earth-Moon-Sun system.
- To understand the origin of the tides.
Relative positions
The term “eclipse” is used for very different phenomena, but in all cases an eclipse takes
place when one object crosses in front of another object; for this unit, the relative positions of
the Earth and the Moon (opaque objects) cause the interruption of sunlight.
A solar eclipse happens when the Sun is covered by the Moon when it is located between the
Sun and our planet. This kind of eclipse always takes place during new Moon (figure 1).
Lunar eclipses take place when the Moon crosses the shadow of the Earth. That is when the
Moon is on the opposite side of the Sun, so lunar eclipses always occur at full moon phase
(figure 1).
The Earth and the Moon move along elliptical orbits that are not in the same plane. The orbit
of the Moon has an inclination of 5 degrees with respect to the ecliptic (plane of Earth's orbit
around the sun). Both planes intersect on a line called the Line of Nodes. The eclipses take
place when the Moon is near the Line of Nodes. If both planes coincided, the eclipses would
be much more frequent than the zero to three times per year.
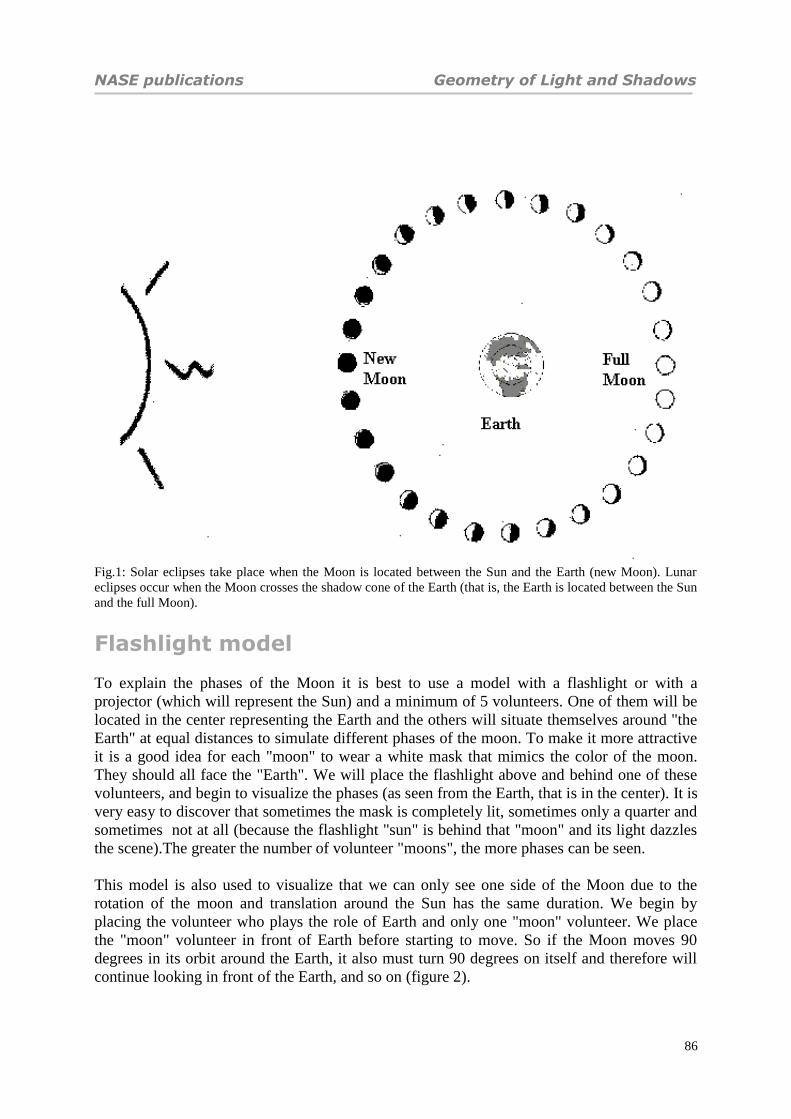
NASE publications Geometry of Light and Shadows
86
Fig.1: Solar eclipses take place when the Moon is located between the Sun and the Earth (new Moon). Lunar
eclipses occur when the Moon crosses the shadow cone of the Earth (that is, the Earth is located between the Sun
and the full Moon).
Flashlight model
To explain the phases of the Moon it is best to use a model with a flashlight or with a
projector (which will represent the Sun) and a minimum of 5 volunteers. One of them will be
located in the center representing the Earth and the others will situate themselves around "the
Earth" at equal distances to simulate different phases of the moon. To make it more attractive
it is a good idea for each "moon" to wear a white mask that mimics the color of the moon.
They should all face the "Earth". We will place the flashlight above and behind one of these
volunteers, and begin to visualize the phases (as seen from the Earth, that is in the center). It is
very easy to discover that sometimes the mask is completely lit, sometimes only a quarter and
sometimes not at all (because the flashlight "sun" is behind that "moon" and its light dazzles
the scene).The greater the number of volunteer "moons", the more phases can be seen.
This model is also used to visualize that we can only see one side of the Moon due to the
rotation of the moon and translation around the Sun has the same duration. We begin by
placing the volunteer who plays the role of Earth and only one "moon" volunteer. We place
the "moon" volunteer in front of Earth before starting to move. So if the Moon moves 90
degrees in its orbit around the Earth, it also must turn 90 degrees on itself and therefore will
continue looking in front of the Earth, and so on (figure 2).

NASE publications Geometry of Light and Shadows
87
Fig. 2: Earth-Moon model with volunteers (to explain the phases and the visible face of the Moon).
Earth-Moon Model
It is not so easy to clearly understand the geometry underlying the phases of the moon, and
solar and lunar eclipses. For that reason, a simple model is proposed in order to facilitate the
understanding of all of these processes.
Insert two nails (about 3 or 4 cm) into a 125 cm. piece of wood. The nails should be separated
by 120 cm. Two balls whose diameters are 4 and 1 cm should be placed on them (figure 3).
Fig. 3: Earth and Moon model.
It is important to maintain these relative sizes as they represent a scale model of the Earth-
Moon system.
Earth diameter 12800 km. 4 cm.
Moon diameter 3500 km. 1 cm.
Earth-Moon distance 384000 km. 120 cm.
Sun diameter 1400000 km. 440 cm. = 4.4 m.
Earth-Sun distance 150000000 km. 4700 cm. = 0.47 Km.
Table 1: Distances and diameters of the Earth-Moon-Sun system.

NASE publications Geometry of Light and Shadows
88
Reproduction of Moon phases:
In a sunny place, when the Moon is visible during the day, point the model towards the Moon
guiding the small ball towards it (figure 4). The observer should stay behind the ball
representing the Earth. The ball that represents the Moon will seem to be as big as the real
Moon and the phase is also the same. By changing the orientation of the model the different
phases of the Moon can be reproduced as the illumination received from the Sun varies. The
Moon-ball has to be moved in order to achieve all of the phases.
Fig.4: Using the model in the patio of the school.
It is better to do this activity outdoors, but, if it’s cloudy, it can also be done indoors with the
aid of a projector as a light source.
Reproduction of Lunar eclipses
The model is held so that the small ball of the Earth is facing the Sun (it is better to use a
projector to or a flashlight avoid looking at the Sun) and the shadow of the Earth covers the
Moon (figure 5a and 5b) as it is larger than the Moon. This is an easy way of reproducing a
lunar eclipse.
Fig.5a and 5b: Lunar eclipse simulation.

NASE publications Geometry of Light and Shadows
89
Fig. 6: Photographic composition of a lunar eclipse. Our satellite crosses the shadow cone produced by the
Earth.
Reproducing the eclipses of the Sun
The model is placed so that the ball of the Moon faces the Sun (it is better to use the projector
or the flashlight) and the shadow of the Moon has to be projected on the small Earth ball. By
doing this, a solar eclipse will be reproduced and a small spot will appear over a region of the
Earth (figure 7a and 7b).
Fig. 7a and 7b Solar eclipse simulation
It is not easy to produce this situation because the inclination of the model has to be finely
adjusted (that is the reason why there are fewer solar than lunar eclipses).

NASE publications Geometry of Light and Shadows
90
Fig.8: Detail of the previous figure 5a.
Fig. 9: Photograph taken from the ISS of the solar eclipse in 1999 over a region of the Earth’s surface.
Observations
A lunar eclipse can only take place when it is full Moon and a solar eclipse when it
is new Moon.
A solar eclipse can only be seen on a small region of the Earth’s surface.
It is rare that the Earth and the Moon are aligned precisely enough to produce an
eclipse, and so it does not occur every new or full Moon.

NASE publications Geometry of Light and Shadows
91
Model Sun-Moon In order to visualize the Sun-Earth-Moon system with special emphasis on distances, we will
consider a new model taking into account the terrestrial point of view of the Sun and the
Moon. In this case we will invite the students to draw and paint a big Sun of 220 cm diameter
(more than 2 meters diameter) on a sheet and we will show them that they can cover this with
a small Moon of 0.6 cm diameter (less than 1 cm diameter).
It is helpful to substitute the Moon ball for a hole in a wooden board in order to be sure about
the position of the Moon and the observer.
In this model, the Sun will be fixed 235 meters away from the Moon and the observer will be
at 60 cm from the Moon. The students feel very surprised that they can cover the big Sun with
this small Moon. This relationship of 400 times the sizes and distances is not easy to imagine
so it is good to show them with an example in order to understand the scale of distances and
the real sizes in the universe.
All these exercises and activities help them (and maybe us) to understand the spatial
relationships between celestial bodies during a solar eclipse. This method is much better than
reading a series of numbers in a book.
Earth Diameter 12 800 km 2.1 cm
Moon Diameter 3 500 km 0.6 cm
Distance Earth-Moon 384 000 km 60 cm
Sun Diameter 1400 000 km 220 cm
Distance Earth-Sun 150 000 000 km 235 m
Table 2: Distances and diameters of system Earth-Moon-Sun
Fig. 10: Sun model, Fig. 11: Observing the Sun through the Moon’s hole.

NASE publications Geometry of Light and Shadows
92
Measuring the Sun’s diameter
We can measure the Sun’s diameter in different ways. Here we present a simple method using
a pinhole camera. We can do it with a shoebox or a cardboard tube that serves as a central
axis for aluminum foil or plastic wrap.
1. We covered one end with semi-transparent vellum graph paper and the other end with a
strong piece of paper or aluminum foil, where we will make a hole with a thin pin (figures
12 and 13).
2. We must point the end with the small hole towards the Sun and look towards the other end
which is covered by the graph paper. We measure the diameter, d, of the image of the Sun
on this graph paper.
Fig. 12 and 13: Model of the pinhole camera.
To calculate the diameter of the Sun, just consider figure 14, where we show two similar
triangles.
Sun Box or tube
Hole
Fig. 14: Underlying geometry of calculation.
Here we can establish the relationship:
l
d
L
D
D d
L l
Observer

NASE publications Geometry of Light and Shadows
93
And can solve for the diameter of the Sun, D:
l
LdD
Knowing the distance from the Sun to the Earth L = 150,000,000 km the tube’s length l and
the diameter d of the Sun’s image over the screen of the graph semi-transparent paper, we can
calculate the diameter D of the Sun. (The answer should be about 1,392,000 km.).
We can repeat the exercise with the Full Moon knowing that it is 400,000 km away from the
Earth.
Sizes and Distances in the Earth-moon-sun
system
Aristarchus (310 to 230 BC) deduced the proportion between the distances and radii of the
Earth-Moon-Sun system. He calculated the radius of the Sun and Moon, the distance from the
Earth to the Sun and the distance from the Earth to the Moon in relation to the radius of the
Earth. Some years afterwards, Eratosthenes (280-192 BC) determined the radius of our planet
and it was possible to calculate all the distances and radii of the Earth-Moon-Sun system.
The proposal of this activity is to repeat both experiments as a student activity. The idea is to
repeat the mathematical process and, as closely as possible, the observations designed by
Aristarchus and Eratosthenes.
Aristarchus’s experiment
Relationship between the Earth-Moon and Earth-Sun distances
Aristarchus determined that the angle between the Moon-Sun line and the Earth-Sun line
when the moon is in quarter phase is =87 º (figure 15).
Fig. 15: Relative position of the Moon in quarter phase.
Nowadays we know that he was slightly wrong, possibly because it was very difficult to
determine the precise timing of the quarter moon. In fact this angle is = 89 º 51 ', but the

NASE publications Geometry of Light and Shadows
94
process used by Aristarchus is perfectly correct. In figure 15, if we use the definition of
secant, we can deduce that
cos = ES/EM
where ES is the distance from the Earth to the Sun, and EM is the distance from the Earth to
the moon. Then approximately,
ES = 400 EM
(although Aristarchus deduced ES = 19 EM).
Relationship between the radius of the Moon and the Sun
The relationship between the diameter of the Moon and the Sun should be similar to the
formula previously obtained, because from the Earth we observe both diameters as 0.5 º. So
both ratios verify
RS = 400 RM
Relationship between the distance from the Earth to the Moon and the lunar radius or between the distance from the Earth to the Sun and the solar radius
Since the observed diameter of the Moon is 0.5 degrees, the circular path (360°) of the Moon
around the Earth would be 720 times the diameter. The length of this path is 2 times the
Earth-Moon distance, i.e. 2 RM 720 = 2 EM. Solving, we find
EM = (720 RM)/
Using similar reasoning, we find
ES = (720 RS)/
This relationship is between the distances to the Earth, the lunar radius, the solar radius and
the terrestrial radius.
During a lunar eclipse, Aristarchus observed that the time required for the moon to cross the
Earth's shadow cone was twice the time required for the moon's surface to be covered (figure
16). Therefore, he concluded that the shadow of the Earth's diameter was twice the diameter
of the moon, that is, the ratio of both diameters or radius was 2:1. Today, it is known that this
value is 2.6:1.
Fig. 16: Shadow cone and relative positions of the Earth-Moon-Sun system.

NASE publications Geometry of Light and Shadows
95
Then, (figure 16) we deduce the following relationship:
x /(2.6 RM) = (x+EM) / RE = (x+EM+ES) / RS
where x is an extra variable. Introducing into this expresion the relationships ES = 400 EM
and RS = 400 RM, we can delete x and after simplifying we obtain,
RM = (401/1440) RE
This allows us to express all the sizes mentioned previously as a function of the Earth’s
radius, so
RS= (2005 /18) RE, ES = (80200 / RE, EM = (401 /(2 RE
where we only have to substitute the radius of our planet to obtain all the distances and radii
of the Earth-Moon-Sun system.
Measurements with students
It's a good idea to repeat the measurements made by Aristarchus with students. In particular,
we first have to calculate the angle between the Sun and the quarter moon. To make this
measurement it is only necessary to have a theodolite and know the exact timing of the
quarter moon.
So we will try to verify if this angle measures = 87º or = 89º 51’ (although this precision is
very difficult to obtain).
Secondly, during a lunar eclipse, using a stopwatch, it is possible to calculate the relationship
between the following times: "the first and last contact of the Moon with the Earth's shadow
cone", i.e., measure the diameter of the Earth’s shadow cone (figure 17a) and "the time
necessary to cover the lunar surface," that is a measure of the diameter of the moon (figure
20b). Finally, it is possible to verify if the ratio between both is 2:1 or is 2.6:1.
Fig. 17a: Measuring the cone of shadow. Fig.17b: Measuring the diameter of the moon.
The most important objective of this activity is not the result obtained for each radius or
distance. The most important thing is to point out to students that if they use their knowledge
and intelligence, they can get interesting results with few resources. In this case, the ingenuity
of Aristarchus was very important to get some idea about the size of the Earth-Moon-Sun
system.

NASE publications Geometry of Light and Shadows
96
It is also a good idea to measure with the students the radius of the Earth following the
process used by Eratosthenes. Although the experiment of Eratosthenes is well known, we
present here a short version of it in order to complete the previous experience.
Eratosthenes’ experiment, again
Consider two stakes placed perpendicular to the ground, in two cities on the Earth’s surface
on the same meridian. The stakes should be pointing toward the center of the Earth. It is
usually better to use a plumb where we mark a point of the wire to measure lengths. We
should measure the length of the plumb from the ground to the mark, and the length of its
shadow from the base of the plumb to the shadow of the mark.
Fig. 18: Placement of plumbs and angles in the Eratosthenes experiment.
We assume that the solar rays are parallel. The solar rays produce two shadows, one for each
plumb. We measure the lengths of the plumb and its shadow and using the tangent definition,
we obtain the angles and (figure 18). The central angle can be calculated imposing that
the sum of the three angles of the triangle is equal to radians. Then and
simplifying
where and have been obtained by the plumb and its shadow.
Finally establishing a proportionality between the angle , the length of its arc d (determined
by the distance above the meridian between the two cities), and 2 radians of the meridian
circle and its length 2RE, we find:
/d = 360/(2RE)
Then we deduce that:
RE= d/
where has been obtained by the observation and d is the distance in km between both cities.
We can find d from a good map.
It should also be mentioned that the purpose of this activity is not the accuracy of the results.
Instead, we want students to discover that thinking and using all of the possibilities you can
imagine can produce surprising results.

NASE publications Geometry of Light and Shadows
97
Tides
Tides are the rise and fall of sea level caused by the combined effects of Earth's rotation and
gravitational forces exerted by the Moon and the Sun. The shape of the sea bottom and shore
in the coastal zone also influence the tides, but to a lesser extent. Tides are produced with a
period of approximately 12 ½ hours.
The tides are mainly due to the attraction between the Moon and Earth. High tides occur on
the sides of the Earth facing the moon and opposite the moon (figure 19). Low tides occur in
the intermediate points.
Fig. 19: Tide’s effect. Fig. 20: Effect on water of the differential relative acceleration of the Earth in different
areas of the ocean.
Tidal phenomena were already known in antiquity, but their explanation was only possible
after the discover of Newton’s law of the Universal Gravitation (1687).
The moon exerts a gravitational force on Earth. When there is a gravitational force, there is a
gravitational acceleration according to Newton's second law (F = m a). Thus, the acceleration
caused by the moon on Earth is given by
Where Lm is the moon mass and d is the distance from the moon to a point on the Earth.
The solid part of Earth is a rigid body and, therefore, we can consider all the acceleration on
this solid part applied to the center of the Earth. However, water is liquid and undergoes a
distinct acceleration that depends on the distance to the moon. So the acceleration of the side
closest to the moon is greater than the far side. Consequently, the ocean's surface will
generate an ellipsoid (figure 20).
That ellipsoid is always extended towards the Moon (figure 19) and the Earth will turn below.
Thus every point on Earth will have a high tide followed by low tide twice per day. Indeed the
period between tides is a little over 12 hours and the reason is that the moon rotates around
the Earth with a synodic period of about 29.5 days. This means that it runs 360º in 29.5 days,
so the moon will move in the sky nearly 12.2 º every day or 6.6 º every 12 hours. Since each
hour the Earth itself rotates about 15 °, 6.6 ° is equivalent to about 24 minutes, so each tidal

NASE publications Geometry of Light and Shadows
98
cycle is 12 hours and 24 minutes. As the time interval between high tide and low tide is about
half this, the time it take for high tides to become low tides, and vice versa, will be about 6
hours 12 min.
Fig. 21: Spring tides and neap tides.
Due to its proximity, the Moon has the strongest infuence on the tides. But the Sun also has
influence on the tides. When the Moon and Sun are in conjunction (New Moon) or opposition
(Full Moon) spring tides occur. When the Moon and the Sun exercise prependicular
gravitational attraction (First Quarter and Last Quarter), the Earth experiences neap tides
(figure 24).
Bibliography
Alonso, M., Finn,E. Física – um curso universitário. Volume I. Ed. Edgard
Blucher, 1972
Broman, L., Estalella, R., Ros, R.M., Experimentos de Astronomía. 27 pasos hacia
el Universo, Editorial Alambra, Madrid, 1988.
Broman, L., Estalella, R., Ros, R.M., Experimentos de Astronomía, Editorial
Alambra, Mexico, 1997.
Fucili, L., García, B., Casali, G., “A scale model to study solar eclipses”,
Proceedings of 3rd EAAE Summer School, 107, 109, Barcelona, 1999
Reddy, M. P. M., Affholder, M. Descriptive physical oceanography: State of the
Art. Taylor and Francis. 249, 2001.
Ros, R.M., Lunar eclipses: Viewing and Calculating Activities, Proceedings of 9th
EAAE International Summer School, 135, 149, Barcelona, 2005.
Ros, R.M., Viñuales, E., Aristarchos’ Proportions, Proceedings of 3rd
EAAE
International Summer School, 55, 64, Barcelona, 1999.
Ros, R.M., Viñuales, E., El mundo a través de los astrónomos alejandrinos,
Astronomía, Astrofotografía y Astronáutica, 63, 21. Lérida, 1993.

NASE publications Geometry of Light and Shadows
99
Young Astronomer Briefcase
Rosa M. Ros International Astronomical Union, Technical University of Catalonia (Barcelona,
Spain)
Summary
To further observation it is necessary that students have a set of simple tools. It is proposed
that they construct some of them and then use them in observing the sky from the school
itself.
Students should understand in a basic way how various instruments have been introduced
over the centuries, how they have developed, and have become necessary. It is an important
part of astronomy, noting the great ability to build them and the skill to use them to do
readings of the observations. These requirements are not easy to develop with students and for
that reason here we propose very simple instruments.
Goals
- Understand the importance of making careful observations.
- Understand the use of various instruments thanks to the fact that students do the construction
by themselves.
The Observations We can acquire some practice in the measurement of time and positions of celestial bodies
with prepared artifacts "ad hoc". Here we give some information to gather a collection of
tools for observation in a suitcase. The suitcase and contents are generally made of cardboard
using glue, scissors, etc.. The topic may offer the possibility to investigate many other ancient
and modern instruments.
The artistic and imaginative ability of students will allow very personal suitcases.
This activity can be easily modified and adapted to the students depending on their age, with
more or less sophisticated tools.
In particular, this suitcase contains:
A ruler for measuring angles
A simplified quadrant
A horizontal goniometer
A planisphere

NASE publications Geometry of Light and Shadows
100
A map of the Moon
An equatorial clock
A spectroscope
We propose a suitcase with very simple tools. The small suitcase can be easily taken to school
or during free time, ready for use. It is important this is not too large or fragile (especially if it
is to be used by very young students). We emphasize that exactness in the measurements is
not the end of this activity.
Contents We obviously can only simulate this on a schoolyard in the summer. The idea is to get
practice with the tools that we will do here now.
First, we need a cardboard box like the ones you receive by mail with a book inside (this will
be the suitcase). It is necessary only to place a handle on the narrow side and that the wide
side could be opened. Inside the box, we will post the following instruments:
A "ruler to measure angles" that can be used to give us the angular distance between
two stars of that constellation. It is very easy to use if we don’t want to introduce the
coordinates.
A simplified quadrant can be used to obtain the height of the stars. When students
see an object through the viewfinder the string indicates the angular position related to
its horizon.
A simple horizontal goniometer can be used to determine the azimuth of the stars.
Obviously you need to use a compass to orient the instrument in the North-South
direction.
A planisphere with the constellations photocopied very clearly onto a disc of white
paper and a cardboard pocket with the "hole" of the latitude to put the disk of the sky
inside. Turning the disc we find the date and time of observation to recognize the
major constellations at the latitude of the "hole" that we use.
A spectroscope to separate light into the seven colors that compose it.
A map of the Moon with the names of seas and some craters that are easily
recognizable through binoculars.
A flashlight (red light) to illuminate the maps before looking at the real sky. Bright
white light will make it difficult for the students' eyes to adjust to the darkness. If
students bring a flashlight in their suitcase, you need to put a red filter on the front. A
group of students with white flashlights can produce a lot of light pollution making the
obsevations more difficult.
A compass for aligning the different instruments.
And of course all the accessories that needs every student: notebook, pen, a watch and,
if it is possible, a camera
Following the instructions and drawings we can get our tools in a very simple way and use
them outdoors. During the day we'll measure, for example, with the quadrant the position

NASE publications Geometry of Light and Shadows
101
(angular height) of a tree, a hill, and so on. At night, we can measure the position of two
different stars or the Moon in order to understand the periodic cycle of its phases. We
encourage students to take data.
For the first nighttime observations it is better to use simple maps prepared in advance to
become familiar with the most important constellations. Of course the astronomical maps are
very accurate but the experience of teachers suggests that sometimes, without assistance, they
are initially confusing.
A ruler to measure angles
Considering a simple proportion we can build a basic instrument for measuring angles in any
situation. Our main aim is to answer the following question: "What is the distance (radius R)
that I need in order to obtain a device that 1º is equivalent to 1 cm?".
Fig. 1: The radius R in order to obtain an instrument where 1º is equivalent to 1 cm.
In figure 1 we consider the relationship between the circumference of length 2 R in
centimeters to 360 degrees, with 1 cm to 1º:
2R cm 1 cm
---------- = -----------
360º 1º
So,
R = 180 / 57 cm
To build the instrument: We take a ruler, where we fix a string of 57 cm of length. It is very
important that the string doesn’t stretch.
How we use it:
We watched with the end of the string almost touching our eye "on the cheek, under
the eye"
We can measure using the rule and the equivalence is 1cm = 1 degree if the string is
extended (figure 2)

NASE publications Geometry of Light and Shadows
102
Fig. 2: Using the instrument (a ruler and a piece of string 57 cm long), we can measure angles with the
equivalence “1cm = 1º”.
Proposed exercises:
What is the angular distance between two stars of the same constellation? Use the "ruler
to measure angles" to compute the distance (in degrees) between Merak and Dubne of Ursa
Major.
A simplified quadrant: quadrant "gun"
A very simplified version of the quadrant can be very useful for measuring angles. Here we
present the "gun" version that is user friendly which encourages their use by students.
To build it: You need a rectangular piece of cardboard (about 12x20cm). We cut out a
rectangular area as in figure 3 in order to hold the instrument. We place two round hooks on
the side (figure 3).
In a paper quadrant (figure 4) with the stick angles shown (figure 3) so that one of the hooks
is on the position 0° (figure 3). Tie a string on the top and at the other end attach a small
weight.
Fig. 3: Quadrant “Gun”.

NASE publications Geometry of Light and Shadows
103
Fig. 4: Graduation of 90 ° to stick on the quadrant.
How to use it?:
When viewing the object through the two hooks the string indicates the angular
position 0 ° refers to the horizon (figure 5b).
A straw passing through the hooks is an excellent viewer that will allow us to measure
the height of the Sun by projecting the image onto a piece of white cardboard.
CAUTION: DO NOT EVER LOOK DIRECTLY AT THE SUN!!!
Fig. 5a and 5b: Using a “gun” style quadrant.

NASE publications Geometry of Light and Shadows
104
Exercises proposed:
What is the latitude of the school?
We will use the quadrant to measure the height of Polaris. The latitude of a place is equal to
the height of the Pole at that place (figure 6).
You can also use the quadrant to compute (in math class) the height of the school or another
nearby building.
Fig. 6: The latitude of the place is equal to the height of the pole.
Horizontal Goniometer
A simplified version of horizontal goniometer can be used to know the second coordinate
needed to determine the position of a celestial body.
To build the tool: Cut a cardboard rectangle about 12x20cm (figure 7a). We stick a
semicircle of paper (figure 8) with the angles indicated so that the diameter of the semicircle
is parallel to the longest side of the rectangle. Using 3 "needles" we can mark two directions
in the goniometer (figure 7b).

NASE publications Geometry of Light and Shadows
105
Fig. 7a and 7b: Using the horizontal goniometer.
Fig. 8: Graduation of 180º to stick on the horizontal goniometer.
How is it used:
If we want to measure the azimuth of a star we align the starting line of the semicircle
in the North-South direction.
The azimuth is the angle between the North-South line and the line through the center
of the circle and the direction of the body.
Proposed exercises:
What is the position of the moon tonight?
Use the quadrant and the horizontal goniometer to calculate the height and azimuth of the
moon. To study the motion of the moon at night, you can determine the two coordinates three
times every hour. This way you can compare the motion of the moon with the stars in the sky.

NASE publications Geometry of Light and Shadows
106
The planisphere
We use star maps -which depend on the latitude- to recognize the constellations. We build one
of them but we recommend extending it with a photocopier.
To build the planisphere: We will use a photocopy of the constellations of the sky in a
"white" disc and will place into a holder depending on your latitude close to the equator.
Northern Hemisphere
For places in the northern hemisphere with latitudes between 0 and 20 degrees you should
prepare two planispheres, one for each horizon. To build the northern horizon we cut the
window of figure 9a by the continuous line corresponding latitude and fold it on the dotted
line to form a pocket. We will place the star map of figure 10a inside. Now we have the
planisphere of the northern horizon. We proceed analogously to build the planisphere of the
southern horizon. Cutting and bending, as before, the window of figure 9b in placing inside
the star map in figure 10a. We will use both planispheres as we are looking towards the
horizon north or south.
When we wish to observe in the northern hemisphere with latitudes between 30 and 70
degrees it is enough to cut the window in figure 9e by the solid line and fold the dotted line to
get a pocket where it will place the circle of stars that we cut above (figure 10a).
Southern Hemisphere
For places in the southern hemisphere with latitudes between 0 and 20 degrees we should
prepare two planispheres, one for each horizon. At first we build the northern horizon. We cut
the window of figure 9c by the continuous line corresponding latitude and fold it by the dotted
line to form a pocket. We will place the star map of figure 10b inside. With this operation we
have the planisphere of the northern horizon. We proceed analogously to build the planisphere
of the southern horizon. Cutting and bending, as before, the window of figure 9d in placing
inside the star map in figure 10b. We will use both planispheres as we are looking towards the
horizon north or south.
When we wish to see in the southern hemisphere with latitudes between 30 and 70 degrees it
is enough to cut the window in Figure 9f by the solid line and fold the dotted line to get a
pocket where it will place the circle of stars that we cut above (figure 10b).
How to use:
Place the date of the day when we will look in line with the observation time by
rotating the circle of stars and use the world map looking at the sky in the direction
indicated. The part of the sky that is visible in the sky is shown.
Note: A planisphere is used as an umbrella. It is a map of the sky and you place it
above your head to recognize constellations.

NASE publications Geometry of Light and Shadows
107
Fig. 9a: Pocket for the northern horizon in northern hemisphere (latitude 0, 10 and 20 North).
Fig. 9b: Pocket for the southern horizon in northern hemisphere (latitude 0, 10 and 20 North).

NASE publications Geometry of Light and Shadows
108
Fig. 9c: Pocket for the northern horizon in southern hemisphere (latitude 0, 10 and 20 South).
Fig. 9d: Pocket for the southern horizon in southern hemisphere (latitude 0, 10 and 20 South).

NASE publications Geometry of Light and Shadows
109
Fig. 9e: Pocket for both horizons in northern hemisphere. Latitudes 30, 40, 50, 60 and 70 North.

NASE publications Geometry of Light and Shadows
110
Fig. 9f: Pocket for both horizons in southern hemisphere. Latitudes 30, 40, 50, 60 and 70 South.

NASE publications Geometry of Light and Shadows
111
Fig. 10a: The disk or stellar map that is placed inside the pocket. Northern Hemisphere.

NASE publications Geometry of Light and Shadows
112
Fig. 10b: The disk or stellar map that is placed inside the pocket. Southern Hemisphere.

NASE publications Geometry of Light and Shadows
113
Proposed exercises:
Which sky can we see tonight?
Using the planisphere you've made for the latitude of your school, turn the stellar disc until
today's date coincides with the time you plan to go out and observe.
Note that the planisphere is a "stellar map" and you have to lift it over your head "as an
umbrella” (it is not a map of your city!).
Spectroscopy
By passing the light of the sun through this sensitive instrument, the student will be able to
visualize the spectral decomposition of the light. This is a simple way for the students to
observe the stellar spectrum with an instrument constructed with their own hands.
How to make the spectroscope: Paint the interior of a large matchbox (of the size typically
used in a kitchen). Make a longitudinal cut (figure 11b) through which the observer can view
the spectrum. Cut a damaged (or otherwise unusable) CD into 8 equal parts, and place one of
the pieces inside the box, on the bottom, with the recordable surface facing up. Close the box,
leaving only a small section open, opposite from where you constructed the viewing slit.
How to use it:
Orient the matchbox so that the sunlight falls through the open section, and observe
through the viewing slit (figure 11a)
Inside the matchbox, you will see the sunlight split into the colors of its spectrum.
Fig. 11a and 11b: How to use the spectroscope.
Proposed exercises:
Compare the solar spectrum with a fluorescent or other lamps that are in school. You
will be able to observe variations that appear in the spectrum depending on the type of lamp
that you're viewing.

NASE publications Geometry of Light and Shadows
114
Map of the Moon
It's good to include in your briefcase a simplified version of a lunar map that includes the
name of the seas and some of the craters that can be seen with binoculars or with small
telescopes.
To build it: You need a square piece of cardboard (about 20x20 cm) (figures 12 or 13).
How to use it?:
Be aware that the orientation will change depending on if you are using the naked eye,
if you are using binoculars or a telescope (inverted image), and whether you are
watching from the Northern or Southern Hemisphere. It is easiest to begin by
identifying the seas, verify that the position is correct and then continue to identify
other lunar features.
Proposed exercise:
Which is the Tycho crater? Look at the moon when it is more than half illuminated and
identify in the central zone a crater with a large system of rays (lines that leaves the crater
and head in all directions across the surface of the satellite).
Fig. 12: Schematic map of the Moon.

NASE publications Geometry of Light and Shadows
115
Fig. 13: Simplified map of the Moon.
Organizing your Briefcase
Place a paper bag with a sheet on the upper side of the box open to store the planisphere, the
map of the Moon, the sundial, etc.
In the deep part of the box place the instruments so that they can not move, using clips, pins,
and small belts. The screw of the quadrant should be set around the center because the
suitcase contains delicate instruments and can be balanced when handle it. A group of
students proposed putting a list on the outside of the bag indicating its contents, so we would
be sure to have gathered everything at the end of the activity. In addition, of course, labeled
with your name and any decorations you can think of, in order to customize the suitcase.
NASE publications Geometry of Light and Shadows
116
Conclusions
Observing how the sky moves during the night, the day and throughout the year is a must for
young astronomers. With these kind of projects, students will be able:
To gain confidence with the measures;
To take responsibility for their own instruments;
To develop their creativity and manual ability;
To understand the importance of systematic collection of data;
To facilitate the understanding of more sophisticated instruments;
To recognize the importance of observation with the naked eye, then and now.
Bibliography
Palici di Suni, C., First Aid Kit. What is necessary for a good astronomer to do an
Observation in any moment?, Proceedings of 9th
EAAE International Summer School,
99, 116, Barcelona, 2005.
Palici di Suni, C., Ros, R.M., Viñuales, E., Dahringer, F., Equipo de Astronomía para
jóvenes astrónomos, Proceedings of 10th
EAAE International Summer School, Vol. 2,
54, 68, Barcelona, 2006.
Ros, R.M., Capell, A., Colom, J., El planisferio y 40 actividades más, Antares,
Barcelona, 2005.
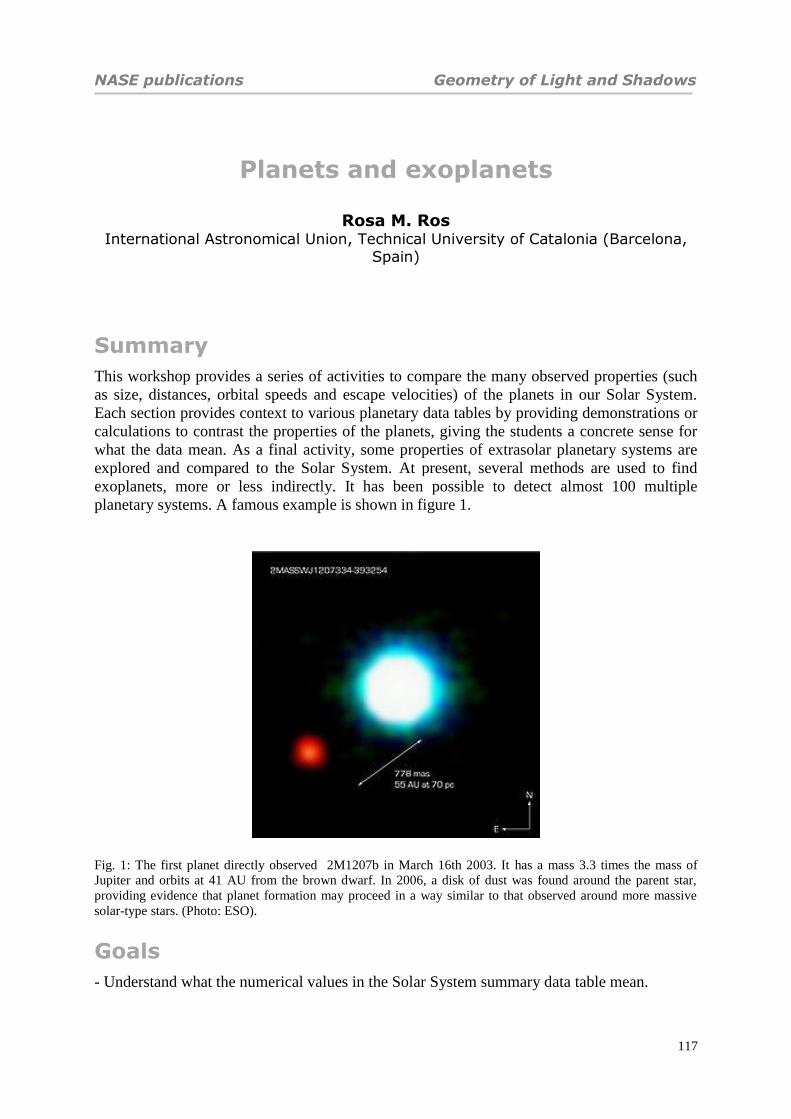
NASE publications Geometry of Light and Shadows
117
Planets and exoplanets
Rosa M. Ros International Astronomical Union, Technical University of Catalonia (Barcelona,
Spain)
Summary
This workshop provides a series of activities to compare the many observed properties (such
as size, distances, orbital speeds and escape velocities) of the planets in our Solar System.
Each section provides context to various planetary data tables by providing demonstrations or
calculations to contrast the properties of the planets, giving the students a concrete sense for
what the data mean. As a final activity, some properties of extrasolar planetary systems are
explored and compared to the Solar System. At present, several methods are used to find
exoplanets, more or less indirectly. It has been possible to detect almost 100 multiple
planetary systems. A famous example is shown in figure 1.
Fig. 1: The first planet directly observed 2M1207b in March 16th 2003. It has a mass 3.3 times the mass of
Jupiter and orbits at 41 AU from the brown dwarf. In 2006, a disk of dust was found around the parent star,
providing evidence that planet formation may proceed in a way similar to that observed around more massive
solar-type stars. (Photo: ESO).
Goals
- Understand what the numerical values in the Solar System summary data table mean.

NASE publications Geometry of Light and Shadows
118
- Deduce the orbital radii and orbital periods of the Galilean satellites of Jupiter using a set of
photographic observations.
- Calculate Jupiter’s mass using Kepler’s third law.
- Understand the main characteristics of extrasolar planetary systems by comparing their
properties to the orbital system of Jupiter and its Galilean satellites.
Solar System and date tables
By creating scale models of the Solar System, the students will compare the different
planetary parameters. To perform these activities, we will use the data in Table 1.
Planets Diameter (km) Distance to Sun (km)
Sun 1 392 000
Mercury 4 878 57.9 106
Venus 12 180 108.3 106
Earth 12 756 149.7 106
Mars 6 760 228.1 106
Jupiter 142 800 778.7 106
Saturn 120 000 1 430.1 106
Uranus 50 000 2 876.5 106
Neptune 49 000 4 506.6 106
Table 1: Data of the Solar System bodies
In all cases, the main goal of the model is to make the data understandable. Millions of
kilometers are not distances that are easily grasped. However, if translated to scaled distances
and sizes, the students usually find them easier to comprehend.
Model of the Solar System
Models of diameters
Using a large piece (or multiple pieces if necessary) of yellow paper cut a circle representing
the Sun. The Sun is scaled to be 139 cm in diameter such that 1 cm is 10 000 km. Cut the
different planets out of plain cardboard or construction paper and draw their morphological
characteristics. By placing the planets near the solar disk, students can grasp the different
planetary scales.
With a scale of 1 cm per 10 000 km, use the following planetary diameters:
Sun 139 cm, Mercury 0.5 cm, Venus 1.2 cm, Earth 1.3 cm, Mars 0.7 cm, Jupiter 14.3 cm,
Saturn 12.0 cm, Uranus 5.0 cm and Neptune 4.9 cm.
Suggestion: It is also possible to complete the previous model by painting the planets on a
shirt, keeping the scale of the planets but only painting a fraction of the Sun.

NASE publications Geometry of Light and Shadows
119
Fig. 2a and 2b: Examples of shirts providing Solar and planetary diameter scale comparisons.
Model of distances
By comparing the distances between the planets and the Sun we can produce another model
that is easy to set up in any school hallway. First, simply cut strips of cardboard 10cm wide,
linking them up to obtain a long strip of several meters (figure 3). Then, place the cutouts of
the planets on it at their correct distances. Remind the students that the distance between the
planets are not to scale with diameters. At the suggested scale, the planets would be one
thousand times smaller as here we are using 1 cm per 10 000 000 km, while in the first
activity above we used 1 cm per 10 000 km. If using a scale of 1cm per 10 million km the
scaled distances are: Mercury 6cm, Venus 11cm, the Earth 15cm, Mars 23cm, Jupiter 78cm,
Saturn 143cm, Uranus 288cm and Neptune 450cm.
Fig. 3: Model of distances.
Suggestion: A fun variation of this model is to use a toilet paper roll each sheet for scale. For
example, you can take as scale a portion of paper for every 20 million km.
Model of diameters and distances
The next challenge is to combine the two above activities and make a model representing the

NASE publications Geometry of Light and Shadows
120
bodies to scale, as well as the corresponding distances between them. It is not actually that
easy to define a scale that allows us to represent the planets with objects that are not too small
and still have distances that are not overly large, in which case the sizes and distances are not
easily assimilated, and the model is not very useful for students. As a suggestion, it may be a
good idea to use the schoolyard to make the model and use balls for the planets as balls of
varying diameters are available as appropriate.
Fig. 4: The Sun and the planets of the model of diameters and distances.
As an example, we provide a possible solution. At one end of the schoolyard we put a
basketball about 25 cm in diameter that represents the Sun. Mercury will be the head of a
needle (1 mm in diameter) located 10 m from the Sun. The head of a slightly larger needle (2
mm in diameter) will represent Venus at 19 m from the Sun, while Earth will be the head of
another needle similar to the previous one (2 mm) at 27 m from the Sun. Mars is a slightly
smaller needle head (1mm), located 41 m from the Sun. Usually, the schoolyard ends here, if
not sooner. We will have to put the following planets in other places outside the schoolyard,
but at landmarks near the school, so that the students are familiar with the distances. A ping-
pong ball (2.5 cm diameter) corresponds to Jupiter at 140 m from the Sun. Another ping-pong
ball (2 cm in diameter) will be Saturn at 250 m from the Sun, a glass marble (1 cm in diameter
) will represent Uranus at 500 m from the Sun, and a final marble (1 cm), located at 800 m,
will represent Neptune.
It should be emphasized that this planetary system does not fit into any school. However, if
we had reduced the distances, the planets would be smaller than the head of a needle and
would be almost impossible to visualize. As a final task, you can calculate what scale has
been used to develop this model.
Model on a city map
The idea is simple - using a map of the city to locate the positions of the different planets,
assuming the Sun is located at the entrance to the school. As an example, we present the map
of Barcelona with different objects (specifically fruits and vegetables) that would be located

NASE publications Geometry of Light and Shadows
121
on the different streets, so you can better imagine their size. As an exercise, we suggest that
you do the same activity with your own city.
Fig. 5: Map of the “Ensanche de Barcelona” with some planets.
Using the map shown here, Mercury would be a grain of caviar, Venus and the Earth a couple
of peas, Mars a peppercorn, Jupiter an orange, Saturn a tangerine and Uranus and Neptune a
pair of walnuts. For the Sun, since there is no vegetable large enough, students should
imagine a sphere roughly the size of a dishwasher. The instructor can do the same activity
using their own city.
Fig. 6a and 6b: Snapshots of the city of Metz.

NASE publications Geometry of Light and Shadows
122
In the city of Metz (France) there is a solar system spread out on its streets and squares, with
corresponding planets accompanied by information panels for those walking by.
Models of light distances
In astronomy it is common to use the light year as a unit of measurement, which can often be
confused as a measurement of time. This concept can be illustrated using a model of the Solar
System. Since the speed of light is c = 300,000 km/s., the distance that corresponds to 1
second is 300,000 km. For example, to travel from the Moon to the Earth, which are separated
by a distance of 384,000 km, it takes light 384,000/300,000 = 1.3 seconds.
Fig. 7: Another example
Using these units, we will instruct the students to calculate the time required for sunlight to
reach each of the planets of the Solar System. (For the instructor, here are the times required:
the time it takes sunlight to reach Mercury is 3.3 minutes, to Venus it takes 6.0 minutes, to
Earth 8.3 minutes, to Mars 12.7 minutes, to Jupiter 43.2 minutes, to Saturn 1.32 hours, to
Uranus 2.66 hours and to Neptune, 4.16 hours.
You may want to ask the students to imagine what a video conference between the Sun and
any of the planets would be like.
Model of the apparent size of the solar disk from each planet
From a planet, for example the Earth, the Sun subtends an angle (figure 8). For very small
values of , we take tan (in radians)
Fig. 8: From the Earth, the Sun subtends an angle .
Knowing that the solar diameter is 1.4x10
6 km, ie a radius of 0.7x10
6 km, and that the Earth-
Sun Earth

NASE publications Geometry of Light and Shadows
123
Sun distance is 150x106
km, we deduce:
radianstg 0045,010150
10·7,06
6
And in degrees:
º255,01800045,0
That is, from the Earth, the Sun has a size of 2 x 0.255 0.51°, i.e., about half a degree.
Repeating the same process for each planet, we get the results in the following table 2 and we
can represent their relative sizes (figure 9).
Planets tan (º) (º) aprox.
Mercury 0.024 1.383 1.4
Venus 0.0129 0.743 0.7
Mars 0.006 0.352 0.4
Jupiter 0.0018 0.1031 0.1
Saturn 0.000979 0.057 0.06
Uranus 0.00048 0.02786 0.03
Neptune 0.0003 0.0178 0.02
Table 2: Results for the different planets.
Fig. 9: The Sun seen from each planet: Mercury, Venus, The Earth, Mars, Jupiter, Saturn, Uranus and Neptune.
Model of densities
The objective of this model is to look for samples of materials that are easily manipulated and
have a density similar to each of the solar system bodies, in order to be able to "feel it in our
hands."

NASE publications Geometry of Light and Shadows
124
Density (g/cm3)
Sun 1.41
Mercury 5.41
Venus 5.25
Earth 5.52
Moon 3.33
Mars 3.9
Jupiter 1.33
Saturn 0.71
Uranus 1.3
Neptune 1.7
Table 3: Densities of the bodies in the Solar System
Fig. 10: Model of densities
From Table 3 of planetary densities, simply compare with the densities of various minerals (in
every school there is usually a collection of materials) or with samples of other materials that
are easy to find such as glass, ceramics, wood, plastics, etc.. The following Table 4 presents
some examples of materials and their densities.
Minerals Density Other materials Density
Plaster 2.3 Glycerin 1.3
Orthoclase 2.6 Cork 0.24
Sulfur 1.1-2.2 Aluminium 2.7
Alite 2 Iron 7.86
quartz 2.65 Cement 2.7 – 3.1
Borax 1.7 Glass 2.4 – 2.8
Blende 4 Tin 7.3
Pyrite 5.2 Clay 1.8 – 2.5
Erythrocytes 5.4 Bakelite 1.25
Calcite 2.7 Oak 0.90
Galena 7.5 Pinewood 0.55
Table 4: Examples of densities of some materials

NASE publications Geometry of Light and Shadows
125
When using materials not included in Table 4, it is very easy to calculate its density. Simply
take a portion of this material, weigh it to find its mass, m, and put it in a container of water to
measure its volume, V. The density d of the material will be,
d m
V
Students should notice that Saturn would "float" in water, because its density is less than 1.
Flattening model of planets
To visualize the deformation (flattening) of gas planets due to the centrifugal force generated
by their rotation, we will build a simple model.
As we can see in figure 9, with a stick and some cardboard strips, we can build this simple
model that reproduces the flattening of Solar System planets due to rotation.
1. Cut some cardboard strips 35 per 1 cm in size.
2. Attach both ends of the strips of cardboard to a 50 cm-long cylindrical stick. Attach the
top ends to the stick so that they cannot move, but allow the bottom ends to move freely
along the stick.
Fig. 11: Model to simulate flattening due to rotation
3. Make the stick turn by placing it between two hands, then rotating it quickly in one
direction and then the other. You will see how the centrifugal force deforms the cardboard
bands (figure 11) in the same way it acts on the planets.
Model about planetary orbital speeds It is well known that not all planets orbit the sun with the same speed (table 5).

NASE publications Geometry of Light and Shadows
126
Planet Orbital average speed (km/s) Distance from the
Sun (km)
Mercury 47.87 57.9 106
Venus 35.02 108.3 106
Earth 29.50 149.7 106
Mars 24.13 228.1 106
Jupiter 13.07 778.7 106
Saturn 9.67 1 430.1 106
Uranus 6.84 2 876.5 106
Neptune 5.48 4 506.6 106
Table 5: Orbital data of the Solar System bodies
The fastest is Mercury, the closest, and the slowest is Neptune, the farthest. Romans had
already noticed that Mercury was the fastest of all and so it was identified as the messenger of
the gods and represented with winged feet. Even if observing with the naked eye, it is possible
to tell that Jupiter and Saturn move much more slowly across the zodiacal constellations than
do Venus and Mars, for example.
From Kepler's third law P2/a
3 = K, it is deduced that the orbital speed decreases when the
distance increases.
Fig. 12a, 12b and 12c: Simulating the circular movement of planets.
To view this relationship, there is also a simple way to experience this relationship. We begin
by tying a heavy object, such as a nut, onto a piece of string. Holding the string from the end
opposite the heavy object, we spin the object in a circular motion above our heads. We can
then see that if we release string as we spin it (making the string longer), the object will lose
speed. Conversely, if we take in string (making it shorter), it will gain speed. In fact, this (e.g.
Kepler’s third law) is a consequence of the conservation of angular momentum.
We can then develop a solar system model with nuts and bits of string proportional in length
to the radii of the planetary orbits (assuming, again, that they all travel in circular orbits).
However, instead of cutting a separate piece for each planet, cut all pieces to a length of about
20 cm. Then, using the appropriate scaling, measure the correct distance from the heavy

NASE publications Geometry of Light and Shadows
127
object and make a knot at this point. Then, the string can be held at the location of the knot
while spinning the heavy object.
To use the model we must hold one of the strings at the location of the knot and turn it over
our heads in a plane parallel to the ground with the minimum speed possible speed that will
keep it in orbit. We will see that this velocity is greater in cases where the radius is smaller.
Model of surface gravities
The formula for gravitational force,
F GMm
d2, allows us to calculate the surface gravity that
acts on the surface of any planet. Considering a unit mass (m = 1) on the planet’s surface (d =
R), we obtain
g GM
R2. If we then substitute M = 4/3 R
3 for the planet mass, we find:
g = 4/3 G R
where G = 6.67 x10⁻¹¹
is the universal gravitational constant, is the density and R is the
radius of the planet. Substituting these last two for the values listed in Table 1, we can
calculate the value of the surface gravity, g, for all planets.
Planet R ecuatorial Radius (km) g surface gravity Density
Mercury 2439 0.378 5.4
Venus 6052 0.894 5.3
Earth 6378 1.000 5.5
Mars 3397 0.379 3.9
Jupiter 71492 2.540 1.3
Saturn 60268 1.070 0.7
Uranus 25559 0.800 1.2
Neptune 25269 1.200 1.7
Table 6: Surface gravity and densities of the Solar System bodies
Let’s see a couple of examples:
gmercury = 4/3 G 5.4 2439 = 3.7,
gvenus = 4/3 G 5.3 6052 = 8.9.
Similarly, we can calculate g for the rest of the planets. (Results are Mars: 3.7, Jupiter: 24.9,
Saturn: 10.5, Uranus: 7.8 and Neptune: 11.8)
Model of bathroom scales
In this case, the goal of the model is to develop a set of 9 bathroom scales (8 planets and the
Moon) so that students can simulate weighing themselves on each of the planets and the
moon.

NASE publications Geometry of Light and Shadows
128
Since the process is the same for each planet, we will only describe one of them. The idea,
essentially, is to open up a bathroom scale and replace the disk labeled with weights with
another with weights calibrated for a particular planet.
1. First, we open the scale. In most scales, there are two springs that secure the base.
Remember that we have to put it back together again (figures 13a y 13b).
2. Once open, the weight disk should be removed, either to be replaced, or drawn over
with the appropriate planetary weights.
3. In the following table we have surface gravities of the moon and various planets of the
Solar System. In one column, they are listed in absolute values (m·s-2
), and in the
other in relative values with respect to terrestrial gravity. These values are the ones we
will use to convert units of “terrestrial” weight to proportional units of weight on other
planets.
4. Finally, we close the scale again, and can now see what we would weigh on one of the
planets
Gravity (m·s
-2) Gravity (T=1)
Moon 1.62 0.16
Mercury 3.70 0.37
Venus 8.87 0.86
Earth 9.80 1.00
Mars 3.71 0.38
Jupiter 23.12 2.36
Saturn 8.96 0.91
Uranus 8.69 0.88
Neptune 11.00 1.12
Table 7: Surface gravities for each Solar System body.
Fig.13a and 13b: Bathroom scale with the replaced disk.

NASE publications Geometry of Light and Shadows
129
Fig. 14: Solar System model with bathroom scales.
Models of craters
Most craters in the solar system are not volcanic but are the result falling meteoroids onto the
surfaces of planets and satellites.
1. First, cover the floor with old newspapers, so that it doesn’t get dirty.
2. Put a 2-3 cm layer of flour in a tray, distributing it with a strainer/sifter so that the
surface is very smooth.
3. Put a layer of a few millimeters of cocoa powder above the flour with the help of a
strainer/sifter (figure 15a).
4. From a height of about 2 meters, drop a projectile: a tablespoon of cocoa powder. The
fall leaves marks similar to those of impact craters (figure 15b).
5. You may want to experiment with varying the height, type, shape, mass, etc. of the
projectiles. In some cases, you can get even get a crater with a central peak.
Fig. 15a: Simulating craters. Fig. 15b: Resulting craters.

NASE publications Geometry of Light and Shadows
130
Model of escape velocities
If the launch speed of a rocket is not very large, the gravitational force of the planet itself
makes the rocket fall back on its surface. If the launch speed is large enough, the rocket
escapes from the planet's gravitational field. Let's calculate the speed above which a rocket
can escape, i.e., the minimum launch speed or escape velocity.
Considering the formulas of uniformly accelerated motion,
e = ½ at2 + v0 t
v = at + v0,
if we replace the acceleration by g and we consider the initial velocity v0 to be zero, we find
that on the planet's surface, R = ½ gt2 and, moreover, v = gt. After removing the time
variable, we find,
gRv 2 ,
where we can replace the values g and R by the values that are listed in the next table to
calculate the escape velocity for each planet.
Planet
R equatorial
radius
(km)
g reduced
surface
gravity
Mercury 2439 0.378
Venus 6052 0.894
Earth 6378 1.000
Mars 3397 0.379
Jupiter 71492 2.540
Saturn 60268 1.070
Uranus 25559 0.800
Neptune 25269 1.200
Table 8: Radius and surface gravities of Solar System bodies.
As an example, we calculate the escape velocities of some planets. For example:
For the Earth, vearth = gR2 (2 9.81 6378)1/2
=11.2 km/s.
For the smallest planet, Mercury, vmercury = (2 9.81 0.378 2439)1/2
= 4.2 km/s.
And for the greatest planet, Jupiter, vjupiter = (2 9.81 2.540 2439)1/2
= 60.9 km/s.
It is clear that it is easier to launch a rocket from Mercury than from the Earth, but it is most
difficult to launch a rocket on Jupiter, where the escape velocity is about 60 km / s.
(To be able to compare the results, the accepted escape velocity for each body in the Solar
System are the following: Mercury 4.3 km/s, Venus 10.3 km/s, Earth 11.2 km/s, Mars 5.0

NASE publications Geometry of Light and Shadows
131
km/s, Jupiter 59.5 km/s, Saturn 35.6 km/s, Uranus 21.2 km/s, Neptune 23.6 km/s. As we can
see, our simple calculations give us acceptable results.)
Model of a rocket with an effervescent tablet
As an example of a rocket that can be launched safely in the classroom, we propose the
following rocket, which uses an aspirin or effervescent tablet as a propellant. We begin by
cutting out the rocket model on the solid lines, and pasting on the dotted lines like in the
photo.
We will use a plastic capsule, such as a film canister, making sure that the capsule can fit
inside the cylinder of the rocket. Then, we put the three triangles as supports on the body of
the rocket and finally, add the cone on the top of the cylinder (figures 16a, 16b, 16c, 16d, 17,
18, 19a, 19b, 19c)
Fig. 16a, 16b, 16c and 16d: The process in four pictures.
After constructing the rocket, we have to carry out the launch. For this, we will put water into
the plastic capsule, up to about 1/3 of its height (about 1 cm). Add 1/4 of an effervescent
aspirin tablet (or other effervescent tablet). Put the tape and the rocket above the capsule.
After about 1 minute, the rocket takes off. Obviously we can repeat as many times as we
would like (at least 3/4 of the aspirin tablet remains, so enjoy launching rockets!).

NASE publications Geometry of Light and Shadows
132
Fig. 19a: Body of the rocket. Paste the fins in the dotted zone.

NASE publications Geometry of Light and Shadows
133
Fig. 17: Some rockets. Fig. 18: Simplified scheme Fig. 19b: Model for the three fins.
Fig. 19c: Top cone of the rocket.
Models of exoplanetary systems The Jet Propulsion Laboratory (NASA; http://planetquest.jpl.nasa.gov/) keeps a catalog of
planetary objects discovered outside our own Solar System. There are more than 1800
confirmed planets.They are called exoplanets (short for extrasolar planets; most are similar in
mass to or more massive than Jupiter, which is the largest planet in our Solar System. This is
why we often compare the masses of extrasolar planets with the mass of Jupiter (1,9 x1027
kg). Only a few of the exoplanets are similar in mass to the Earth, but this is likely due to an
observational bias since the latest detection techniques are better at detecting massive objects.
In this section, we consider some examples of extrasolar planetary systems that have more
than three known planets.
The nomenclature of exoplanets is simple. A letter is placed after the name of the star,

NASE publications Geometry of Light and Shadows
134
beginning with "b" for the first planet found in the system (eg, 51 Pegasi b). The next planet
detected in the system is labeled with the following letter of the alphabet such as, c, d, e, f, etc
(51 Pegasi c, d 51 Pegasi 51 Pegasi 51 Pegasi e or f).
Table 9:Extrasolar systems with multiple planets (three or more). Data from the Extrasolar Planets Catalog2
(except the last column). * The radial velocity method only gives the minimum mass of the planet. ** The
diameter shown in the last column of Table 1 has been calculated assuming that the density of the planet is equal
to the density of Jupiter (1330 kg / m3) for gaseous planets. For planets considered to be terrestrial, the diameter
was calculated using the density of the Earth (5520 kg / m3).
Some exoplanets are very close to the central star, for example Gliese 876 with closer orbits
that Mercury is from the sun. Others have more distant planets (HD 8799 has a planetary
system with three planets about as far as Neptune is from the sun.) One possible way to
display these data is to build scale models of the chosen planetary system. This allows us to
easily compare them with each other and with our Solar System.
Planet name Average
Distance, AU
Orbital
Period, years
Mass,
Jupiter masses
Diameter,
km
Mercury 0.3871 0.2409 0.0002 4879
Venus 0.7233 0.6152 0.0026 12,104
Earth 1.0000 1.0000 0.0032 12,756
Mars 1.5237 1.8809 0.0003 6,794
Jupiter 5.2026 11.8631 1 142,984
Saturn 9.5549 29.4714 0.2994 120,536
Uranus 19.2185 84.04 0.0456 51,118
Neptune 30.1104 164.80 0.0541 49,528
Table 10: Solar System planets.
Today we know that there are exoplanets around different types of stars. In 1992, radio
astronomers announced the discovery of planets around the pulsar PSR 1257 +12. In 1995,
the first detection of an exoplanet around a G-type star, 51 Pegasi, was announced, and since
then exoplanets have been detected in orbit around: a red dwarf star (Gliese 876 in 1998), a
Planet name Average
Distane.,
Au
Orbital
period, days Minimum
mass*,
Jupiter masses
Discovery
Date
year
Diameter**,
km
Ups And b 0,059 4,617 0,69 1996 ~Jupiter 124 000
Ups And c 0,83 241,52 1,98 1999 ~Jupiter 176 000
Ups And d 2,51 1274,6 3,95 1999 ~Jupiter 221 000
Gl 581 e 0,03 3,149 0,006 2009 Terrestrial 16000
Gl 581 b 0,04 5,368 0,049 2005 Terrestrial 32 000
Gl 581 c 0,07 12,929 0,016 2007 Terrestrial 22 000
Gl 581g(not
confirmed) 0,14 36,562 0.009 2005 Terrestrial 18 000
Gl 581 d 0,22 68,8 0,024 2010 Terrestrial 25000
Gl 581 f(not
confirmed)
0,76 433 0,021 2010 Terrestrial 24000

NASE publications Geometry of Light and Shadows
135
giant star (Iota Draconis in 2001) , a brown dwarf star (2M1207 in 2004), a K-type star
(HD40307 in 2008) and an A–type star (Fomalhaut in 2008), among others.
Fig. 20: Planet Fomalhaut b located in a debris disk, in an image of Fomalhaut taken by the Hubble Space
Telescope (Photo:NASA).
Determination of the diameter of exoplanets
First, we will calculate the diameter of a couple of exoplanets included in Table 9.
We can achieve this goal by assuming that we know the density of the exoplanet. For our
study, we consider that gaseous planets have the density of Jupiter and that terrestrial
exoplanets have the same density as the planet Earth. By definition, the density of a body of
mass m is given by : ρ = m/ V
The mass, m, of the exoplanet appears in table 8, and the volume V can be obtained
considering the planet to be a sphere: V = 4 π R3/3
If we substitute this formula in the previous one, we can obtain the radius of the exoplanet:
3
4
3
mR
We suggest that the reader calculate the diameter of Gliese 581d (terrestrial exoplanet)
assuming its density is = 5520 kg/m3 (the density of the Earth). Then repeat the calculation
for a non-terrestrial exoplanet such as the the first multiple planetary system that was
discovered around a main sequence star, Upsilon Andromedae. This system consists of three
planets, all of them similar to Jupiter: Ups planets b, c and d. Calculate their diameters
assuming = 1330 kg/m3 (the density of Jupiter) and compare the results with those in Table
9.

NASE publications Geometry of Light and Shadows
136
Using these results and the average distance taken from Table 9, we can produce a model in
the next section.
Determination of the central star mass
Using the values of table 9 and Kepler’s third law, we can determine the mass of the central
star M. Kepler’s third law states that for a planet with period P and anorbit of radius a, , a3/P
2
is a constant. We can show that this constant is the mass of the central star, expressed in solar
masses. If we consider the motion of exoplanets around the star in a circular orbit of radius a,
we can write
m v2/a = G M m / a
2
For circular motion, the speed v is v2 = G M /a. The period, P, for circular motion, is P= 2
a/v. Then, when we introduce the value of v, we deduce:
P2
=4 π2 a
3/ (G M)
And, for each exoplanet, using Kepler’s third law,
a3/ P
2 = (G M)/ (4 π
2)
Writing the previous relation for the Earth’s motion around the Sun, using P=1 year and a=1
AU, we deduce the following equation:
1 = (G MS)/(4 π2)
Dividing the last two equalities, and taking the sun's mass as unity, we obtain:
a3/ P
2 = M
where a is the radius of the orbit (in AU), P is the period of revolution (in years). This relation
allows us to determine the mass of the central star in units of solar masses.
Expressing the same relationship in diferent units, we can write:
M = 0,0395 10-18
a3/ P
2
where a is the radius of the orbit of the exoplanet (in km), P is the period of revolution of the
exoplanet a (in days) and M is the mass of the central star (in solar masses). For example,
calculate the mass of the stars Ups And and Gl 581 in solar masses (the result should be equal
to 1.03 and 0.03 solar masses, respectively).
Scale model of an exoplanetary system
First we choose the model scale. For distances, the appropriate scale is: 1 AU = 1 m. In this
case all exoplanets can fit inside a typical classroom, as well as the first five planets in our
Solar System. If the activity is carried out outside (e.g. in the school yard), we can build a
complete model. A different scale needs to be used for the size of the planet, for example:

NASE publications Geometry of Light and Shadows
137
10,000 km = 0.5 cm. In this case, the largest planet, Jupiter, is 7 cm in diameter and the
smallest (Mercury) will be 0.2 cm in size. Now we can build the Solar System, the Upsilon
Andromedae and Gliese 581 systems using the average distance values included in Tables 9
and 10, and the previously-calculated diameters.
In the past few years we have learned that the planetary systems configurations are diverse.
Some of the exoplanets orbit around their stars much closer than any planet in our own Solar
System orbits around the sun. Other exoplanets are closer to their parent star than Mercury is
from the Sun. This means they are very hot. Another difference is that many large planets are
close to their stars.
The inner part of the Solar System is populated by the small, rocky planets and the first of the
gas giant planets, Jupiter, is at 5.2 AU from the Sun. These differences are believed to be
mainly due to an observational bias. The radial velocity method for example is more sensitive
when the planets are in smaller orbits and are more massive. But we may assume that most
exoplanets have much larger orbits. It seems plausible that in most exoplanetary systems,
there are one or two giant planets with orbits similar in size to those of Jupiter and Saturn.
We now consider the habitability of exoplanets. The habitable zone is the region around a star
where aplanet with sufficient atmospheric pressure can maintain liquid water on its surface.
This is a conservative definition and it is restricted to life as we know it on Earth. Some
planetary scientists have suggested to include equivalent zones around stars where other
solvent compounds such as ammonia and methane could exist in stable liquid forms.
Rough calculations indicate that the solar system’s habitable zone, where liquid water can
exist (i.e. where the temperature ranges from 0 º to 100º C), ranges from 0.56 to 1.04 AU. The
inner edge of this zone lies between the orbits of Mercury and Venus and the outer edge is
just outside the orbit of Earth. Only two planets in the Solar System (Venus and Earth) are
inside the habitable zone (the blue area in figure 21). As we know, only the Earth is inhabited,
since Venus is too hot (but only because of a strong greenhouse effect on the planet).
It appears that Gliese 581d is an example of a terrestrial exoplanet within the habitable zone
of its parent star, and it may be a potential candidate for extraterrestrial life. Gliese 581 c, on
the other hand, might be within the habitable zone of its host star. Its orbit lasts 13 days and it
is situated 14 times closer to its star than the Earth lies from the Sun. Nevertheless, the
smaller size of the star makes this distance favorable for the planet to harbor liquid water and
to offer the possibility of life. Its radius is 1.5 times that of the Earth and this indicates that it
is a rocky body. Its temperature ranges from 0º C to 40º C, which makes possible the
existence of abundant liquid water. The problem is that it always presents the same face to the
star. This evidence could suggest that the planet could be rocky like Earth or that it could be
covered with oceans. Although, in contrast, some studies indicate that this planet is suffering
from a significant greenhouse effect, like Venus. Gliese 581 e is one of the smallest
exoplanets ever discovered to date. Its mass is 1.7 the mass of the Earth, which makes it the
smallest planet discovered and the closest in size to the planet Earth, although it has an orbit
very close to its parent star at 0.03 AU. This fact makes it difficult to hold an atmosphere and
puts it out of the habitable zone as the proximity of its parent star means that the temperatures

NASE publications Geometry of Light and Shadows
138
are above 100 º C. At these temperatures, water is not in the liquid phase and life as we know
it is not possible.
Gliese 581 g is the first exoplanet to be found within the habitable zone, with enough gravity
to hold an atmosphere (3 to 4 times the mass of Earth) and the right temperature to shelter
liquid water (-31º C to -12º C ).
Fig. 21: The habitable zone. Comparison between the Solar System and the system of exoplanets in Gliese 581.
The blue region indicates the zone where life as we konw it could exist.
There are still many unanswered questions about the properties of exoplanets and there is
much more to learn about their properties and characteristics.
Bibliography
Berthomieu, F., Ros, R.M., Viñuales, E., Satellites of Jupiter observed by Galileo and
Roemer in the 17th
century, Proceedings of 10th EAAE International Summer School,
Barcelona, 2006.
Gaitsch, R., Searching for Extrasolar Planets, Proceedings of 10th
EAAE International
Summer School, Barcelona 2006.
Ros, R.M., A simple rocket model, Proceedings of 8th EAAE International Summer
School, 249, 250, Barcelona, 2004.
Ros, R.M., Measuring the Moon’s Mountains, Proceedings of 7th EAAE International
Summer School, 137, 156, Barcelona, 2003.
Ros, R.M., Capell, A., Colom, J., Sistema Solar Actividades para el Aula, Antares,
Barcelona, 2005.
Ros, R.M., Viñuales, E., Determination of Jupiter's Mass, Proceedings of 1st EAAE
International Summer School, 223, 233, Barcelona, 1997.
Ros, R.M., Viñuales, E., Saurina, C., Astronomía: Fotografía y Telescopio, Mira
Editores, Zaragoza, 1993.
Vilks I., Models of extra-solar planetary systems, Proceedings of 10th
EAAE
International Summer School, Barcelona 2006.

NASE publications Geometry of Light and Shadows
139
Preparing for Observing
Francis Berthomieu, Ricardo Moreno, Beatriz García, Rosa M. Ros International Astronomical Union, CLEA (Niza, France), Retamar School (Madrid,
Spain), National Technological University (Mendoza, Argentina), Technical University of Catalonia (Barcelona, Spain)
Summary
A star party can be a way to learn and have fun, especially if you do it with a friend or with a
group of friends. You have to prepare for it, especially if you plan to use some instruments.
But don't neglect the simple joy of watching the sky with the unaided eye or binoculars.
Goals
Explain how to choose the correct place, time, and date, what equipment you will take
and how to plan the event.
Learn to use the program Stellarium.
Recognize the Light Pollution problem.
Choosing the place and date
Atmospheric light greatly affects our perception of the sky. In cities you can only see the sun,
the moon, a few planets, and a few bright stars and satellites. It is far better to observe from a
dark location, although you might have to give up the advantage of being able to do it at
school or from home.
If you want to see more stars and nebulae, you must go to a site away from roads and towns,
because cities send up a halo of light that prevents proper vision. This phenomenon is known
as "light pollution". Also avoid the vicinity of isolated lamps or lights. Stay away from roads
where cars can dazzle us with their headlights; look for a clear area where large trees don't
interfere with your view of the sky.
In choosing a date, of course, you want clear weather without clouds. It's even better when
the temperatures are comfortable (we recommend checking the weather by Internet). The
phase of the Moon is very important. The worst days are when the moon is full, since it will
produce a lot of ambient light and we will see only the brightest stars. When is waning, the
moon will rise later, we will not see it unless we stay watching until dawn, but dark skies are
assured in the early evening. Perhaps the most interesting are the days when the moon is just
under first quarter, since the early hours of the night we can see the craters of the moon, and
as the moon sets under the horizon, a few hours later, dark sky for our observing session.
If we have a telescope we should go to chosen location before sunset while we have enough
natural light to set up the equipment before darkness.

NASE publications Geometry of Light and Shadows
140
Equipment needed
Planning the observations. We need to remember that the sky changes as the observer's
latitude. You can get the program Stellarium (www.stellarium.org, See the Annex to this unit
for a quick guide), look in astronomy magazines, or examine books. On the web there are
many places to obtain sky charts, for example www.heavens-above.com/skychart or in
www.skyandtelescope.com. To obtain any of these sky maps you must indicate the location,
(usually latitude and longitude), date, and time of day.
Fig. 1: Example of plane of the sky (SkyChart). This is for a mid-latitude north, at the middle of July at 22 h,
Fig. 2: Example of the plane of the sky (SkyChart). This is for a mid-latitude southern, at the middle of July at
22h.
Red flashlight. In the darkness, our eyes slowly open to let in more light, which ensures us to
"see" at night; this ability is called "night vision". Night vision is related to one of the two
types of photo sensitive cells in the retina: the rods. In the retina there are two types of cells:
the cones, sensitive to color and that are activated in bright light, and rods, which are only
active at low light levels. If suddenly the area where we are looking become illuminated, the
pupil is closed immediately and the rods are disabled. If entering the dark again, the pupil will
take a short time to open fully again, but the rods will take at least 10 minutes to allow night
vision back. The rods are less sensitive to red light, so using a red light fools the eye into
acting as if it was much darker. They will retain night vision better. To create a red flashlight
we use a normal flashlight and we add a simple filter using a piece of transparent red paper.
Food. We have to consider the real time of the activity will be several hours, counting travel,
material preparation, observation, collection and the return journey. The activity will be more
pleasant if we share some food and drink (hot or cold depending on the seasonal temperature).
Green laser pointer. It is useful to point out constellations, stars, etc. Be very careful with
this type of pointer. Never point towards the eyes of the participants in the observation or to

NASE publications Geometry of Light and Shadows
141
anyone, it can damage them. Never point at airplanes. This tool only can be manipulated by
adults.
Clothes. Even in summer, in the evening, the temperature always goes down, the wind often
blows, and we must keep in mind that we need to be there for a few hours and the weather
could change. Plan for it to be much cooler than the daytime temperature.
Binoculars, telescopes, camera (see below) these materials change depending the
observations that we plan.
If there are clouds. A cloudy sky can upset the whole plan. However we have provided an
alternative plan: telling stories about mythology of constellations or talk about any
astronomical topic. If we have Internet, we can enjoy the popular Google-Earth, but watching
the sky (Google Sky) or Mars, or any other simulation program of the sky, or can see a video
about something astronomical in YouTube.
Unaided eye
It is essential to know the sky with the naked eye. That means knowing the names of the
major constellations and the bright stars, you only need a chart of the sky, and if it is possible,
a green laser pointer. They are also very useful applications for the iPhone/iPad or Android
that can line up with the constellations and planets help you orient to the rest of the sky, using
the phone GPS. The phone is not affected by clouds so can serve as an alternative if the sky is
covered.
The stars that you see depend on where we are: near the North Pole would see only 50% of
the stars across the sky, those in the northern celestial hemisphere. Near the equator will see
all of the sky eventually, but which ones on a single night depends on the time of the year.
Near the South Pole, we see only half again, in this case the ones which are in the southern
hemisphere.
The constellations and stars that we recommend knowing are:
NORTHERN HEMISPHERE
Constellations: Ursa Major, Ursa Minor, Cassiopeia are usually circumpolar, so always
visible. In summer also see Cygnus, Lyra, Hercules, Bootes, Corona Borealis, Leo, Sagittarius
and Scorpio. The ones you see in winter are: Orion, Canis Major, Taurus, Auriga,
Andromeda, Pegasus, Gemini, and the cluster, the Pleiades.
Stars: Polaris (near the North Celestial Pole), Sirius, Aldebaran, Betelgeuse, Rigel, Arcturus,
Antares, etc..
SOUTHERN HEMISPHERE
Constellations: Southern Cross, Sagittarius, Scorpio, Leo, Carina, Puppis and Vela (the three
constellations formed the ancient constellation of Argo, the ship of the Argonauts). It is also
possible to see Orion and Canis Major from this hemisphere.

NASE publications Geometry of Light and Shadows
142
Star: Antares, Aldebaran, Sirius, Betelgeuse. In the southern hemisphere there is no star that
marks the location of the South Celestial Pole.
The constellations that are in the region called the "Zodiac", can be seen from most of the
northern and southern hemispheres although they change orientation on the celestial sphere.
It is interesting to follow the changing phases of the moon every day, and its changing
position against the background of stars. This last can be done also with the planets, noting its
slow movement on other planets near or on the stars. This is especially noticeable in the faster
moving like Venus or Mercury, when you see at sunset. These planets also may be visible at
sunrise and then you can continue recognizing them in the sky beyond the night of
observation.
For a couple of hours after sunset, you can see shooting stars (meteors) at any time, with a
frequency of about 5 to 10 per hour. At certain times of the year there are "falling stars",
which are many more. For example around January 3 are the Quadrantids, with about 120 per
hour, on August 12 Perseids, with 100 / h, on 18 November is the peak of the Leonids, with
about 20 / h, and between 12 and 14 December are the Geminids, with 120 / h. The Perseids
are not visible from the southern hemisphere.
There are many satellites orbiting the Earth and when they are illuminated by the sun can be
seen from Earth, slowly across the sky. As the altitude is usually not much, you just see them
just before sunrise or just after sunset, for example, the ISS is very bright and takes about 2-3
minutes to cover the visible sky. The times of these and many other satellites can be predicted
over a given geographical location with a week in advance (see www.heavens-above.com).
Fig. 3: Path of the ISS
Fig. 4: Expansion and diameter of the objective
Observations with binoculars
A useful and easily available astronomical instrument is binoculars. Although its ability to
magnify is usually small, they collect much more light than our pupil, and help us see objects
that at first glance are very faint such as star clusters, nebulae, and double stars. Also

NASE publications Geometry of Light and Shadows
143
binoculars have the advantage of increasing the color differences of stars, especially if slightly
out of focus.
They usually bear inscriptions such as 8x30 or 10x50. The first figure gives the magnification
and the second the diameter of the front lens in mm. One highly recommended size for this
activity is the 7x50. At higher magnifications, the image moves a lot, because it is difficult to
keep steady, and larger apertures increase the price enough.
Interesting objects to see with binoculars are the Andromeda Galaxy (M31), the Hercules
Cluster (M13), the double cluster in Perseus, the Praesepe (M44), the Orion Nebula (M42),
the entire area of Sagittarius (nebulae such as the Lagoon M8, Trifid M20, Omega M17,
several globular clusters M22, M55, etc..) and in general the Milky Way, seen with many
more stars than the naked eye. In the southern hemisphere Omega Centauri and 47 Tucanae
are spectacular globular clusters.
Observational telescope
Most people know that the mission of a telescope is to enlarge distant objects, but fewer
people know that has another mission as important as this: to capture more light than the
human eye. This will allow one to see faint objects that would remain faint even if we
increased the magnification.
A telescope has two main parts: the objective and the eyepiece. The objective is a large
diameter lens that bends light (refracting telescopes) or a mirror that reflects light (reflecting
telescopes). Most objective mirrors are parabolic in shape. The eyepiece is a small lens
where, as its name suggests, we place the eye to see. It is usually removable, so that different
sizes of eyepiece allow more or less magnification.
The larger the objective is, more light gets collected, and we can see fainter objects. High
quality lenses are more expensive than mirrors of the same diameter, so larger telescope are
more frequent reflecting telescopes. The most common type is the Newtonian, consisting of a
concave mirror at the bottom of the tube, which returns the rays of the top of the tube, where
there is a small secondary mirror at an angle of 45º, which deflects the rays to a point outside
the tube, where the eyepiece is placed. The secondary mirror blocks some of the incoming
light, but is not significant. Another design is the Cassegrain type, which sends the secondary
light toward a central hole of the primary mirror. The eyepiece is placed behind that central
hole. Finally, there are catadioptics, typically like a Cassegrai but adding a thin lens at the
entrance of the tube, there by greatly reduce the length of the tube and make it more light
weight and portable.
The magnification of a telescope is given by the ratio of the focal length of objective (either
lens or mirror) and focal length of the eyepiece. For example, if we have a telescope with a
lens focal length of 1,000 mm and we put an eyepiece of focal length 10 mm, we obtain a
magnification of 100. If we want to double the magnification, we will need either a longer
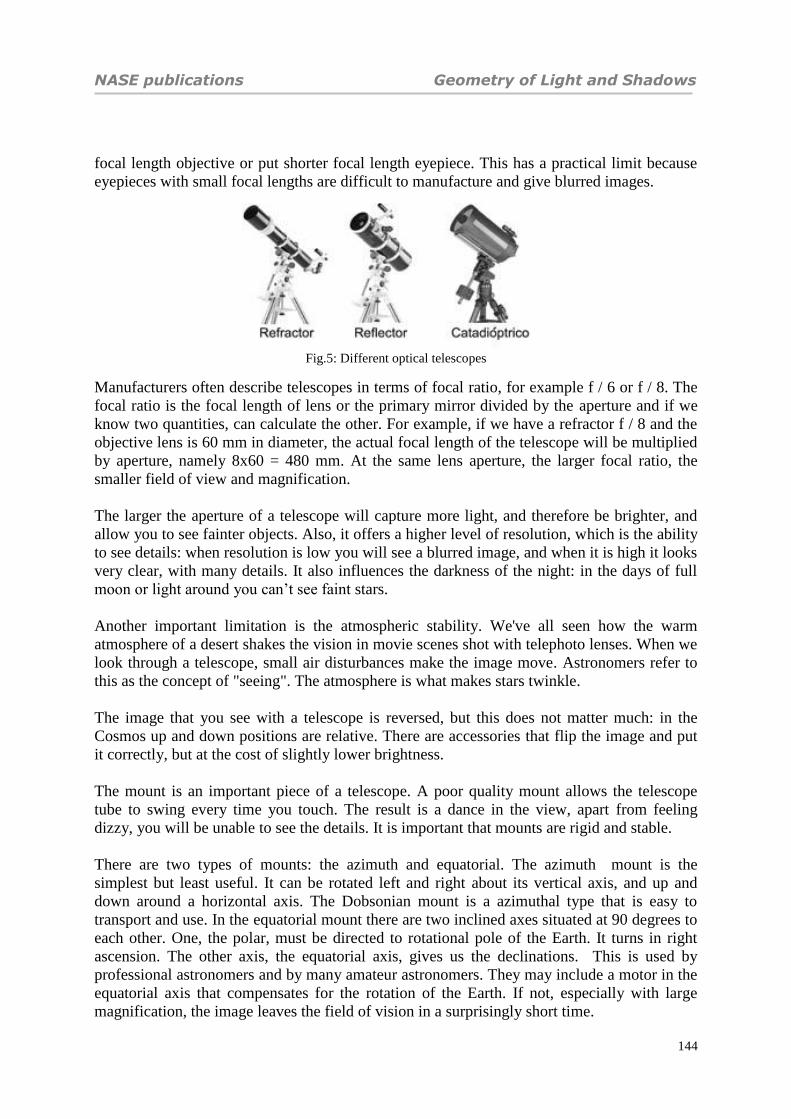
NASE publications Geometry of Light and Shadows
144
focal length objective or put shorter focal length eyepiece. This has a practical limit because
eyepieces with small focal lengths are difficult to manufacture and give blurred images.
Fig.5: Different optical telescopes
Manufacturers often describe telescopes in terms of focal ratio, for example f / 6 or f / 8. The
focal ratio is the focal length of lens or the primary mirror divided by the aperture and if we
know two quantities, can calculate the other. For example, if we have a refractor f / 8 and the
objective lens is 60 mm in diameter, the actual focal length of the telescope will be multiplied
by aperture, namely 8x60 = 480 mm. At the same lens aperture, the larger focal ratio, the
smaller field of view and magnification.
The larger the aperture of a telescope will capture more light, and therefore be brighter, and
allow you to see fainter objects. Also, it offers a higher level of resolution, which is the ability
to see details: when resolution is low you will see a blurred image, and when it is high it looks
very clear, with many details. It also influences the darkness of the night: in the days of full
moon or light around you can’t see faint stars.
Another important limitation is the atmospheric stability. We've all seen how the warm
atmosphere of a desert shakes the vision in movie scenes shot with telephoto lenses. When we
look through a telescope, small air disturbances make the image move. Astronomers refer to
this as the concept of "seeing". The atmosphere is what makes stars twinkle.
The image that you see with a telescope is reversed, but this does not matter much: in the
Cosmos up and down positions are relative. There are accessories that flip the image and put
it correctly, but at the cost of slightly lower brightness.
The mount is an important piece of a telescope. A poor quality mount allows the telescope
tube to swing every time you touch. The result is a dance in the view, apart from feeling
dizzy, you will be unable to see the details. It is important that mounts are rigid and stable.
There are two types of mounts: the azimuth and equatorial. The azimuth mount is the
simplest but least useful. It can be rotated left and right about its vertical axis, and up and
down around a horizontal axis. The Dobsonian mount is a azimuthal type that is easy to
transport and use. In the equatorial mount there are two inclined axes situated at 90 degrees to
each other. One, the polar, must be directed to rotational pole of the Earth. It turns in right
ascension. The other axis, the equatorial axis, gives us the declinations. This is used by
professional astronomers and by many amateur astronomers. They may include a motor in the
equatorial axis that compensates for the rotation of the Earth. If not, especially with large
magnification, the image leaves the field of vision in a surprisingly short time.

NASE publications Geometry of Light and Shadows
145
Azimuth mount Equatorial mount Dobsonian mount
Fig. 6: Different mounts support telescopes
If you have an equatorial mount, you should orient it so that the polar axis is aligned with the
North Pole (or South) of the sky. That takes time, but is necessary for the equatorial tracking
motor, that serves to look at the object, does not move over time, something essential in
photography. If we have no motor, exact alignment is less important, but will serve to keep
the object in the field of view by moving a single wheel.
Finally, computerized telescopes, with a database of positions of celestial objects and two
motors. Once you are set up correctly, these are easier to use. However, you must align it
with three known stars in order to set it up, and beginners often are confused by this step.
The sky’s movements
Basically the sky's movements that we observe respond to relative motions of rotation and
translation of the Earth. This situation makes that us perceive the sky as a set with two basic
movements: daily and yearly.
The diurnal movement is very important, that is very fast and hardly allows us to perceive the
annual movement that is much slower. The Earth rotates around 360º in 24 hours; this is 15º
every hour. This movement is very noticeable although not we are making not careful
observations. The translational motion is 360º every 365 days, which means about one degree
every day (just under one degree per day). If we imagine that there were no rotation, we could
see in the night sky from one day to the next, the same star at the same time in the same place
but run only one degree (i.e. the thickness of a index finger at the extended arm) compared to
the previous day. This observation can only be done if we take as a reference one antenna or a
post that allows us to relate the observation of a date on the next day. This movement is
almost negligible if we do not have a reference and therefore not visible to the naked eye, but
what we notice is that the sky of one day of the year is completely different after three months
or six months. After three months the translation corresponds to 90º, or about 1/4 the sky and
in half a year is ½ sky that is the other side of heaven, diametrically opposed. This movement
has been masked night after night because the rotation, but even then we all know that
watching naked eye after three months the constellations of the night sky are very different.

NASE publications Geometry of Light and Shadows
146
Activity 1: Celestial Dome Umbrella
A simple umbrella can allow us to visualize the movements of the sky explained previously.
The umbrella used routinely placed over our heads a dome where we can draw the desired
constellations. We will use a black gentleman umbrella and on it will draw with white paint.
In this model we will not draw all the constellations, but only we will draw some
constellations and only the more important stars in its. We do not search for beautiful result;
we want a working model with which we can think.
Each umbrella will serve to display for one of the two hemispheres. The intersection point
between the umbrella's cane and the umbrella's fabric is the pole of the hemisphere
considered. The area of the edge of the fabric umbrella (where the ends of the rods are
protected with a piece of plastic), tacos rods, corresponds approximately to the celestial
Ecuador.
Then, the best is to prepare two umbrellas one for each hemisphere.
In the northern hemisphere will draw:
• In the vicinity of the North Pole (close to the cane of the umbrella) the Big Dipper,
Cassiopeia and the polar star which is precisely where the umbrella’s cane passes
through the fabric
• In the area of the outer edge of the umbrella will draw four constellations, one for each
season, the most common and easily recognized:
Spring: Leo
Summer: Cygnus
Autumn: Pegasus
Winter: Orion:
Definitely it is possible to choose any other, but must be distributed in an equidistant way,
each one located about 90 ° from the previous one.
In the southern hemisphere represent:
• In the environment of the South Pole (close umbrella’s cane) the Southern Cross and
the southern celestial pole is located exactly umbrella’s cane passes through the fabric
• In the area of the outer edge of the umbrella we will draw four constellations, one for
each season, the best known:
Spring: Acuarius
Summer: Orion
Autumn: Leo
Winter: Scorpio:
The idea is to choose great constellations and usually above the horizon. This depends a bit of
the place of observation, but this proposal can be adapted to each case.
If the city where we are is located is in the equatorial zone between 20º north latitude and 20º
south latitude, it is necessary to draw the two umbrellas. If we are located in the northern

NASE publications Geometry of Light and Shadows
147
hemisphere, at latitude ranges between 30º and 90º we will draw only the umbrella for this
hemisphere and the same thing happens if we are in the southern hemisphere.
Fig.7: Projecting the stars of the northern hemisphere on a screen to draw the desired constellations. We
recommend preparing the model over a black umbrella; although to photography have used one of another color
in order to explain the process.
To draw constellations with white paint is very convenient to use Stellarium or a similar
software and project the light with a multimedia projector on the umbrella's fabric putting the
polo exactly at the point of intersection of the umbrella's cane with the fabric. We will project
the corresponding hemisphere (figure 7). Once completed each umbrella we can use it with
students placing it above their heads (figure 8).
Fig. 8: Using the northern hemisphere’s umbrella with students
We will put the umbrella’s cane inclined in the direction of the pole corresponding
hemisphere (like the rotation axe of the Earth). Imagine the floor of the room up to our neck,

NASE publications Geometry of Light and Shadows
148
this would be the horizon, so that part of the fabric of the umbrella would be below this
horizon. Then we distinguish two parts in this imaginary horizon. The part that is near the
pole where the sky observed throughout the year is always more or less the same (when
looking at the area of intersection stick umbrella fabric). The Ecuador’s area that remains
higher above the horizon is the most interesting part because the constellations change
throughout the year (figure 9).
Fig. 9: Umbrella's cane inclined in the direction of the pole according to the latitude. We imagine the plane of the
horizon that covers part of the umbrella.
We have to insist that the model explains the translational motion. We imagine that there is no
rotation, something equivalent to observe every day more or less at the same time. We also
noticed that in this simplified model, we visualize the movement of the sky 90º to 90º
discretely, ie every 3 months. As the sky movement is continuous and every day, when it is
mentioned that a particular constellation is visible during a season, we must understand that is
about the constellation that we see in the center of the horizon in the middle months of the
season.
HOW TO USE
We like to use the umbrella to understand the translational motion.
Northern Hemisphere
To fix ideas, suppose that we are in a place of latitude 40 ° North. We put the umbrella of the
northern hemisphere with cane North Pole (40º inclined above ground) above our heads.
In the northern hemisphere the polar star is practically located at the North Pole. It is easy to
recognize the constellation of the Ursa Major or Cassiopeia. From the Ursa Major or Big
Dipper prolong 4 times the distance between the two farthest stars of the tail of the

NASE publications Geometry of Light and Shadows
149
constellation and locates the polar star. Using Cassiopeia, the polar is in the intersection of the
two bisectors of each V of the double W representing Cassiopeia.
Northern Horizon
We look to the polar star area. If we introduce a slight rotation we observe the constellations
of Ursa Major and Cassiopeia rotate around the North Pole throughout the year (figure 10).
Fig. 10: Relative positions of the Ursa Major around the North Pole throughout the year
We begin by placing the Ursa Major on the top and Cassiopeia down (which happens in
spring), we turn the handle of the umbrella 90º in order to have the Ursa Major in the left and
Cassiopeia in the right (then we have the situation of summer). Again we rotate the handle
90° in the same direction, then the Ursa Major is down and Cassiopeia is up (this is the
position corresponding to autumn) and finally we rotate 90º leaving the Ursa Major on the
right and Cassiopeia left (this is in winter). If we rotate again 90º we reproduce the initial
situation and begin the four seasons of a new year (figure 10)
As described at the whole process, it is understood that this area of the sky, which is called the
northern horizon, this is the area of the horizon corresponding to the North, the constellations
that we see throughout the year are always the same and there is more variation
Southern Horizon
We consider now the equatorial area, the area of the tips of the rods now. The constellations
in this area of the southern horizon vary by season. The central spring constellation is Leo,
and then we place the umbrella with Leo in the highest part of the horizon. Then we rotate ¼
turn umbrella, or 90º and we have over the southern horizon, the central constellation of
summer: the swan is with Lira and Aquila summer triangle. With another ¼ turn we are in
autumn and the central constellation will be the great quadrilateral of Pegasus. And we turn

NASE publications Geometry of Light and Shadows
150
another 90º we are in winter, and dominates the horizon sky the constellation Orion with his
hounds dominates the horizon sky.
Southern Hemisphere
Consider, for example, latitude of 40º South. We put the umbrella of the southern hemisphere
with cane headed south pole (inclined at about 40º from the floor) over our heads.
In the southern hemisphere there is no polar star that allows visualizing the position of the
South Pole. The Southern Cross constellation is used to mark the position of the southern
celestial pole; this should be extended to the major axis of the cross towards the foot of the
cross 4.5 times. This constellation makes one revolution around the pole in 24 hours. The
position changes throughout the year for the same time, as shown in figure 10. We assume
that is the same time to obviate the rotation of Earth and observe only the sky rotation due to
the translation.
Southern Horizon
Look to the area of the intersection between umbrella's cane and umbrella's fabric, where is
the South Pole. We rotate slowly the handle and note that the constellation of the Southern
Cross rotates around the South Pole throughout the year. We begin by placing the Southern
Cross above (what happens in winter), we rotate the handle of the umbrella 90º until to have
the Southern Cross on the right (the position on spring). We rotate again 90º in the same
direction, then the Southern Cross is down (this is the position corresponding to the summer)
and, finally rotate 90º leaving the Southern Cross on the left of the South pole (as it is in
autumn). If we rotate again 90º we reproduce the initial situation and begin the four seasons of
a year (figure 11).
Fig. 11: Relative positions of the Southern Cross around the South Pole during the year

NASE publications Geometry of Light and Shadows
151
After the described process it is understood that in that area of the sky, called the northern
horizon (the area of the horizon corresponding to the North cardinal point), the constellations
that we see throughout the year are always the same and there is more variation.
Northern Horizon
We look at the fabric of the umbrella in the equatorial zone, i.e., the northern horizon. This
area is where the constellations vary more. Those which are visible in summer, are not visible
in winter. Zeus, King of the gods in Greek mythology, put the giant Orion in the sky after his
death from the bite of a scorpion. And also, Zeus put this constellation in the sky, but
diametrically opposed, so he could not attack Orion again.
The central constellation during spring is Acuarius. We rotate the umbrella 90º, ie after three
months and we have Orion with his hounds on the northern horizon which is the central
constellation of summer. With another ¼ turn we are in autumn and the central constellation
is Leo. If we rotate the umbrella 90º is winter, and we have the beautiful Scorpios
constellation on the horizon sky
Conclusions for both hemispheres
Following the scheme presented earlier in both hemispheres for two horizons we can
understand the variations in the night sky due to translational motion.
If we want to include the rotation movement in the activity, we have to consider that in
addition to the annual motion described a daily movement due to the Earth's rotation makes.
In a day both the Ursa Major and the Southern Cross give a complete turn to their respective
poles.
To examine just the translation movement is why we have simplified the activity imagining
that we always carry out observation at the same time, so it is as the rotation were deleted.
Dark skies and light pollution
To observe the stars, we must have a dark sky. But this is only possible if we turn away from
the cities. Humans have forgotten about the starry sky because we can not see it. This problem
occurs because most of public lighting produces huge amounts of wasted energy lighting up
the sky, which is unnecessary. Light pollution is one form of environmental pollution less
known than most others. It affects the visibility of the night sky, but also alters the balance of
the ecosystem and affects human health, since it breaches the biological clocks that are
coordinated with periods of light and darkness. To be alert on this subject, learn to recognize
the problem, warn others of the consequences, and find solutions.
There are three types of light pollution:
a) The glow is a phenomenon that occurs, in general, by the public lighting outside. It is
evident when we have the opportunity to travel at night and approach a city. We see
that a light wraps around the city. The light produced by the light glow is wasted, it is

NASE publications Geometry of Light and Shadows
152
spent on lighting up the sky, which is not needed and, therefore, not only affects out
seeing the stars but spends energy unnecessarily. This type of contamination is
reduced by choosing careful light fixtures and bulbs.
b) The intrusion: the external light is projected in all directions and some of them
entered, even unwittingly, to our homes. If the light is projected into the rooms, we
will have to block the windows with curtains or shades at night.
c) The glare: This type of pollution is linked to the lights of cars and even outdoor
lighting in cities and homes. It is evident in places with slopes, as the glare occurs
when someone finds an unexpected lamp or a reflector. In the past, traffic lights based
on LED can also produce this king of light pollution.
It is possible from various programs on the Internet to compile a series of practical activities
for working on this issue, we propose only one that is interactive and easy to perform in any
setting.
Activity 2: Light pollution
The objectives of this workshop are to show the polluting effect of unshielded lighting,
recognizing the beneficial effect from the astronomical point of view, the choice of a baffle
designed to control light pollution and highlight the possibility of improving the view of the
stars, while we illuminate those places where we desire more light.
To carry out this experience obtain one cardboard box of certain dimensions that will allow
the student to look inward. To draw the constellation that you select (in this example is that of
Orion) and mark the stars as points first; later the holes will be made taking into account the
diameter of each, depending on stellar magnitude (figures 12a and 12b). The constellation as
drawn on the outside of the box should be the mirror image of the constellation, so that it will
be seen as it appears in the sky when you look inside the box.
Fig 12a and Fig 12b: Cardboard Box, design of the constellation Orion on one side

NASE publications Geometry of Light and Shadows
153
The box must be painted black on the inside so that if one looks directly inside , the
constellation have the appearance of what is shown in figure 12a and 12b. The "stars", or
points that represent them, will be illuminated by the input of the external light inside the box.
Fig. 13: View of Orion from inside the box. Each hole represents a star
Prepare two tennis table balls, making a hole that would allow it to fit over a flashlight. One
of the balls is left as it is, and the other is painted with synthetic enamel of any color in the
upper hemisphere, representing thus a so-called "shield" that prevents that light from
projecting up (figures 14a and 14b).
Fig. 14a: Tennis table ball unshielded, Fig. 14b: Tennis table ball with a hemisphere painted.

NASE publications Geometry of Light and Shadows
154
To perform the experiment you need to use flashlights in which you can remove the protective
top and leave the light bulb as shown in figures 15a and 15b. The tennis table ball is inserted
into the flashlight.
Fig. 15a: We removed the protector of the flashlight, Fig. 15b: Flashlight with the tennis table ball simulating the
street lamp
Fig. 16a: Lamp without shielded, Fig. 16b: Shielded Lamp
The experiment was performed in two stages: First with just the box. At this time, turn off the
lights during the experiment. Both models are tested with the same flashlight to avoid
variations in the intensity of light. Project the light both unshielded (figure 16a) and shielded
(figure 16b) projecting the light onto a smooth nearby surface, for example a wall or piece of
cardboard.
Second, see what happens inside the box. The situation shown in figures 17a and 17b, for
cases with and without shield respectively. You can use a digital camera to take photos of
what happens inside the box if it is not possible that participants can look inside. External
lights in the room where the experiment takes place should be on.

NASE publications Geometry of Light and Shadows
155
You will notice what is happening very clearly. In the first situation, in the case of outdoor
lighting, we see the situation with the baffle controls light pollution: the emission into the sky
is greatly reduced.
In the second situation, when using both types of flashlight inside the box, we are simulating
the situation of a night with unshielded lamp that sends extra lighting in the sky, called the
glow, which obscures the view of the stars. In the case of digital camera, using automatic
exposure, you can not even focus properly at the stars. By contrast, the flashlight adapted to
control light pollution, it is clear that this device allows the sky to be much darker and the
camera is able to clearly record the constellation of Orion.
Fig. 17a: Appearance of the night sky with lanterns without shielded. Fig. 17b: Appearance of the night sky with
lights shielded
Bibliography
Berthier, D., Descubrir el cielo, Larousse, Barcelona, 2007.
Bourte, P. y Lacroux, J., Observar el cielo a simple vista o con prismáticos, Larousse,
Barcelona, 2010.
García, B., Ladrones de Estrellas, Ed. Kaicron, ColecciónAstronomía, BsAs, 2010.
Reynolds, M., Observación astronómica con prismáticos, Ed. Tutor, Madrid 2006.
Roth, G.D. Guía de las estrellas y de los Planetas. Omega. Barcelona 1989.

Nase Publications Geometry of Light and Shadows
APPENDIX: How to Use Stellarium 0.10.6.1
To fix or not the toolbar (to
bring the cursor to the lower left
corner)
Location. You can enter by
cities, by coordinates or by
clicking on a map
Date and time that is displayed
the sky Setting the view of the sky. In
turn has four menus, which are
explained below
Number of stars, planets ...and
to display or not the atmosphere Coordinate lines show in the
sky, constellations ...
Type of projection of the sky.
We recommend Stereo graphic
or Orthographic
Show the landscape, soil, fog.
Names and figures of the
constellations and stars in each
culture. The best known are the
Western.
Look for an object (i.e. Saturn,
M13, NGC 4123, Altair)
Setting the language and
information of the objects
shown on screen
Help (shortcut keys, etc.).
Normal rate of time
Speed up time. Can be given
several times
Speed downtime.
Back to the current time
Lines of constellations
Names of constellations
Figures constellations
Grid equatorial
Grid azimuth + horizon
Ground/Horizon
Show cardinal Points
Atmosphere
Nebulae and names
Names of the planets
Equatorial mount / azimuth
Center on selected object
Night mode Full screen/ window Ocular (like looking to the
selected object through a
telescope)
Show satellites in orbit Getting around the view ,,,
ZOOM + Repág
ZOOM Avpág
Define selected planet as the
planet from which to see. To
return to Earth, look for Earth,
and then click Ctrl G
(command) to select the planet
Earth from which it looks.
CTRL G
Leave / omit trace the path of
the planets May+T
Screen capture CTRL S
ó PrintScreen
Exit(complete with Stellarium) ó
CTRLQ