CSU GE-Breadth Certification Courses List (All CSU GE-Breadth ...
Upload
khangminh22Category
view
0download
0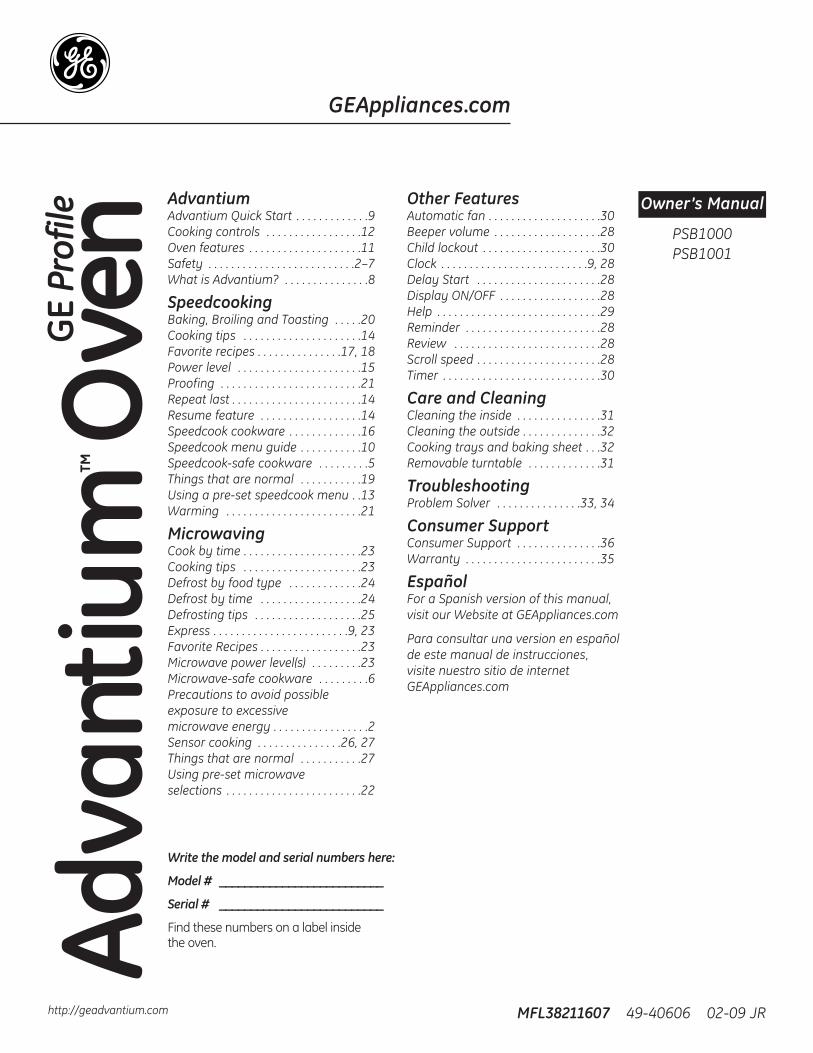
Adva
ntiu
m™
Ove
n
MFL38211607 49-40606 02-09 JR
PSB1000PSB1001
Owner’s Manual
GEAppliances.com
http://geadvantium.com
AdvantiumAdvantium Quick Start . . . . . . . . . . . . .9Cooking controls . . . . . . . . . . . . . . . . .12Oven features . . . . . . . . . . . . . . . . . . . .11Safety . . . . . . . . . . . . . . . . . . . . . . . . . .2–7What is Advantium? . . . . . . . . . . . . . . .8
SpeedcookingBaking, Broiling and Toasting . . . . .20Cooking tips . . . . . . . . . . . . . . . . . . . . .14Favorite recipes . . . . . . . . . . . . . . .17, 18Power level . . . . . . . . . . . . . . . . . . . . . .15Proofing . . . . . . . . . . . . . . . . . . . . . . . . .21Repeat last . . . . . . . . . . . . . . . . . . . . . . .14Resume feature . . . . . . . . . . . . . . . . . .14Speedcook cookware . . . . . . . . . . . . .16Speedcook menu guide . . . . . . . . . . .10Speedcook-safe cookware . . . . . . . . .5Things that are normal . . . . . . . . . . .19Using a pre-set speedcook menu . .13Warming . . . . . . . . . . . . . . . . . . . . . . . .21
MicrowavingCook by time . . . . . . . . . . . . . . . . . . . . .23Cooking tips . . . . . . . . . . . . . . . . . . . . .23Defrost by food type . . . . . . . . . . . . .24Defrost by time . . . . . . . . . . . . . . . . . .24Defrosting tips . . . . . . . . . . . . . . . . . . .25Express . . . . . . . . . . . . . . . . . . . . . . . .9, 23Favorite Recipes . . . . . . . . . . . . . . . . . .23Microwave power level(s) . . . . . . . . .23Microwave-safe cookware . . . . . . . . .6Precautions to avoid possible exposure to excessive microwave energy . . . . . . . . . . . . . . . . .2Sensor cooking . . . . . . . . . . . . . . .26, 27Things that are normal . . . . . . . . . . .27Using pre-set microwave selections . . . . . . . . . . . . . . . . . . . . . . . .22
Other FeaturesAutomatic fan . . . . . . . . . . . . . . . . . . . .30Beeper volume . . . . . . . . . . . . . . . . . . .28Child lockout . . . . . . . . . . . . . . . . . . . . .30Clock . . . . . . . . . . . . . . . . . . . . . . . . . .9, 28Delay Start . . . . . . . . . . . . . . . . . . . . . .28Display ON/OFF . . . . . . . . . . . . . . . . . .28Help . . . . . . . . . . . . . . . . . . . . . . . . . . . . .29Reminder . . . . . . . . . . . . . . . . . . . . . . . .28Review . . . . . . . . . . . . . . . . . . . . . . . . . .28Scroll speed . . . . . . . . . . . . . . . . . . . . . .28Timer . . . . . . . . . . . . . . . . . . . . . . . . . . . .30
Care and CleaningCleaning the inside . . . . . . . . . . . . . . .31Cleaning the outside . . . . . . . . . . . . . .32Cooking trays and baking sheet . . .32Removable turntable . . . . . . . . . . . . .31
TroubleshootingProblem Solver . . . . . . . . . . . . . . .33, 34
Consumer SupportConsumer Support . . . . . . . . . . . . . . .36Warranty . . . . . . . . . . . . . . . . . . . . . . . .35
EspañolFor a Spanish version of this manual,visit our Website at GEAppliances.com
Para consultar una version en españolde este manual de instrucciones, visite nuestro sitio de internetGEAppliances.com
GE
Prof
ile
Write the model and serial numbers here:
Model # __________________________
Serial # __________________________
Find these numbers on a label inside the oven.

2
PRECAUTIONS TO AVOID POSSIBLE EXPOSURE TO EXCESSIVE MICROWAVE ENERGY
(a) Do Not Attempt to operate this oven withthe door open since open-door operationcan result in harmful exposure to microwaveenergy. It is important not to defeat ortamper with the safety interlocks.
(b) Do Not Place any object between the ovenfront face and the door or allow soil orcleaner residue to accumulate on sealingsurfaces.
(c) Do Not Operate the oven if it is damaged. It is particularly important that the ovendoor close properly and that there is nodamage to the:
(1) door (bent),
(2) hinges and latches (broken or loosened),
(3) door seals and sealing surfaces.
(d) The Oven Should Not be adjusted orrepaired by anyone except properlyqualified service personnel.
Advantium Oven
IMPORTANT SAFETY INSTRUCTIONS
SAVE THESE INSTRUCTIONS

� Read all instructions before using this appliance. When using electricalappliances, basic safety precautionsshould be followed, including thefollowing:
� Read and follow the specific precautions inthe PRECAUTIONS TO AVOID POSSIBLEEXPOSURE TO EXCESSIVE MICROWAVEENERGY section on page 2.
� Be sure your appliance is properly installedand grounded by a qualified technician inaccordance with the provided installationinstructions.
� Install or locate this appliance only in accordance with the provided installationinstructions.
� Some products such as whole eggs andsealed containers—for example, closedjars—are able to explode and should not beheated in this oven. Such use of the ovencould result in injury.
� Do not mount this appliance over a sink.
� This oven is not approved or tested formarine use.
� This oven is UL listed for standard wallinstallation.
� Do not operate this appliance if it has been damaged or dropped.
� As with any appliance, close supervision is necessary when used by children.
� Use this appliance only for its intended useas described in this manual.
� Do not use corrosive chemicals or vapors in this appliance.
� This oven is specifically designed to heat,dry or cook food, and is not intended forlaboratory or industrial use.
� Do not store anything directly on top of the microwave oven surface when the microwave oven is in operation.
� This appliance must only be serviced by qualified service personnel. Contactnearest authorized service facility forexamination, repair or adjustment.
� Do not cover or block any openings on the appliance.
� Do not store this appliance outdoors. Do not use this product near water—for example, in a wet basement, near aswimming pool, near a sink or in similarlocations.
� See door surface cleaning instructions inthe Care and Cleaning of the Oven section of this manual.
� To reduce the risk of fire in the oven cavity:
— Do not overcook food. Carefully attendappliance when paper, plastic or othercombustible materials are placed inside theoven while microwave cooking.
— Remove wire twist-ties and metal handlesfrom paper or plastic containers beforeplacing them in the oven.
— Do not use the oven for storage purposes. Do not leave paper products, cooking utensilsor food in the oven when not in use.
— If materials inside the oven ignite, keep the oven door closed, turn the oven off andshut off power at the fuse or circuit breakerpanel. If the door is opened, the fire mayspread.
— Do not use the Sensor Features twice in succession on the same food portion. If food is undercooked after the firstcountdown, use COOK BY TIME foradditional cooking time.
3
WARNING!
SAFETY PRECAUTIONS
To reduce the risk of burns, electric shock, fire, injury to persons,or exposure to excessive microwave energy:
Advantium Oven
IMPORTANT SAFETY INSTRUCTIONS
SAVE THESE INSTRUCTIONS

4
WARNING!
� Do not operate the oven without the turntable in place. The turntablemust be unrestricted so it can turn.
� During and after use, do not touch, or let clothing or other flammablematerials contact any interior area of the oven; allow sufficient time forcooling first.
� Keep the oven free from grease buildup.
� Cook meat and poultry thoroughly—meat to at least an INTERNALtemperature of 160°F, and poultry to at least an INTERNAL temperature of180°F. Cooking to these temperaturesusually protects against foodborneillness.
� Potentially hot surfaces include the oven door, floor, walls, oven rack andturntable.
SAFETY PRECAUTIONS
Arcing is the microwave term for sparks in the oven. Arcing is caused by:
� Metal or foil touching the side of the oven.
� Foil not molded to food (upturned edgesact like antennas).
� Use foil only as recommended in this manual.
� Metal cookware used during eitherspeedcook or microwave cooking (exceptfor the pans provided with the oven).
� Metal, such as twist-ties, poultry pins, or gold-rimmed dishes, in the oven.
� Recycled paper towels containing smallmetal pieces being used in the oven.
ARCING Arcing can occur during both speedcooking and microwave cooking. If you see arcing,press the CLEAR/OFF pad and correct the problem.
Advantium Oven
IMPORTANT SAFETY INSTRUCTIONS
� When microwaving, place all foods andcontainers on the clear glass tray.
� Do not pop popcorn in your oven unless ina special microwave popcorn accessory orunless you use popcorn labeled for use inmicrowave ovens.
� Do not boil eggs in this oven. Pressure willbuild up inside egg yolk and will cause it to burst, possibly resulting in injury.
� Do not operate the oven without foodinside. This may cause damage to theoven. It increases the heat around themagnetron and can shorten the life of the oven.
� Foods with unbroken outer “skin” such as potatoes, hot dogs, sausages, tomatoes,apples, chicken livers and other giblets, andegg yolks should be pierced to allow steamto escape during cooking.
� SUPERHEATED WATERLiquids, such as water, coffee or tea, areable to be overheated beyond the boilingpoint without appearing to be boiling. Visiblebubbling or boiling when the container isremoved from the microwave oven is notalways present. THIS COULD RESULT INVERY HOT LIQUIDS SUDDENLY BOILINGOVER WHEN THE CONTAINER IS DISTURBEDOR A SPOON OR OTHER UTENSIL ISINSERTED INTO THE LIQUID.
To reduce the risk of injury to persons:
— Do not overheat the liquid.
— Stir the liquid both before and halfwaythrough heating it.
— Do not use straight-sided containers withnarrow necks.
— After heating, allow the container to standin the microwave oven for a short timebefore removing the container.
— Use extreme care when inserting a spoonor other utensil into the container.
FOODS
SAVE THESE INSTRUCTIONS

5
WARNING!� The oven and door will get very hot
when speedcooking.
� Cookware will become hot because ofheat transferred from the heated food.Oven mitts will be needed to handle the cookware.
� Do not use coverings, containers orcooking/roasting bags made of foil,plastic, wax or paper whenspeedcooking.
� Do not cover the turntable, wire ovenrack, trays or any part of the oven withmetal foil. This will cause arcing in theoven.
� Use the non-stick metal tray in the sameway you would use a shallow baking panor baking tray.
� Place food directly on the trays whencooking unless prompted by the oven to do otherwise.
� Any oven-safe dish can be used in your oven. Recipes in the AdvantiumCookbook were tested in Pyrex® glasscookware and Corningware® ceramiccasseroles. Cook times and results may vary when using other types ofoven-safe dishes. Place them directly on the trays.
� Do not use the oven to dry newspapers.
� Use of the clear glass tray whenspeedcooking will result in inferiorcooking performance.
Speedcookoven-safecookware
The turntable must always bein place when using the oven.
Put food directly on the non-stick metal tray to
speedcook.
Advantium Oven
IMPORTANT SAFETY INSTRUCTIONS
� The oven and door will get very hotwhen baking, broiling, warming,proofing or toasting.
� Cookware will become hot. Oven mittswill be needed to handle the cookware.
� Do not use coverings, containers orcooking/roasting bags made of foil,plastic, wax or paper whenspeedcooking.
� Do not cover the turntable, wire ovenrack, trays or any part of the oven withmetal foil. This will cause arcing in theoven.
� Use the non-stick metal tray in the sameway you would use a shallow baking panor baking tray.
� Use the aluminum baking sheet on thewire oven rack, and place them on thenon-stick metal tray when baking on twolevels, broiling or toasting foods.
� Place food directly on the trays whencooking unless prompted by the oven to do otherwise.
� Any oven-safe dish can be used in your oven. Recipes in the AdvantiumCookbook were tested in Pyrex® glasscookware and Corningware® ceramiccasseroles. Cook times and results may vary when using other types ofoven-safe dishes. Place them directly on the trays.
� Do not use the oven to dry newspapers.
� Use of the clear glass tray when baking, broiling, warming, proofing ortoasting will result in inferior cookingperformance.
Oven-safecookwareforBaking,Broiling,Warming,Proofing &Toasting
The turntable must always bein place when using the oven.
Put food directly on the non-stick metal trayto bake on one level. Put food directly on the aluminum baking
sheet on the wire oven rack, and place themon the non-stick metal tray, when baking on
two levels, broiling or toasting foods.
SAVE THESE INSTRUCTIONS

6
WARNING!
� Place food or microwavable containerdirectly on the clear glass tray to cookyour food.
� Use of the non-stick metal tray duringmicrowave cooking will result in inferiorcooking performance.
� If you are not sure if a dish ismicrowave-safe,use this test: Placein the oven boththe dish you aretesting and a glassmeasuring cup filled with 1 cup ofwater—set the measuring cup either in or next to the dish. Microwave 30-45seconds at high. If the dish heats, itshould not be used for microwaving.
If the dish remains cool and only thewater in the cup heats, then the dish is microwave-safe.
� Cookware may become hot because of heat transferred from the heated food.Oven mitts may be needed to handle thecookware.
� Do not use recycled paper products.Recycled paper towels, napkins andwaxed paper may contain metal fleckswhich could cause arcing or ignite.Paper products containing nylon ornylon filaments should be avoided,as they may also ignite.
� Use foil only as directed in this manual.When using foil in the oven, keep the foilat least 1″ away from the sides of theoven.
� Do not use the oven to dry newspapers.
� If you use a meat thermometer whilecooking, make sure it is safe for use in microwave ovens.
� Some styrofoam trays (like those thatmeat is packaged on) have a thin strip of metal embedded in the bottom. Whenmicrowaved, the metal can burn the floorof the oven or ignite a paper towel.
� Paper towels, waxed paper and plasticwrap can be used to cover dishes inorder to retain moisture and preventspattering. Be sure to vent plastic wrapso steam can escape.
� Not all plastic wrap is suitable for use in microwave ovens. Check the packagefor proper use.
� “Boilable” cooking pouches and tightlyclosed plastic bags should be slit , piercedor vented as directed by package. If theyare not, plastic could burst during orimmediately after cooking, possiblyresulting in injury. Also, plastic storagecontainers should be at least partiallyuncovered because they form a tightseal. When cooking with containerstightly covered with plastic wrap, removecovering carefully and direct steamaway from hands and face.
� Plastic cookware—Plastic cookwaredesigned for microwave cooking is veryuseful, but should be used carefully. Even microwave-safe plastic may not be as tolerant of overcooking conditions as are glass or ceramic materials andmay soften or char if subjected to shortperiods of overcooking. In longerexposures to overcooking, the food and cookware could ignite.
Follow these guidelines:
1. Use microwave-safe plastics only and use them in strict compliance with the cookware manufacturer’srecommendations.
2. Do not microwave empty containers.
3. Do not permit children to use plasticcookware without complete supervision.
Microwave-safecookware
The turntable must always bein place when using the oven.
The clear glass tray shouldalways be in place when
microwaving.
Make sure to use suitable cookware during microwave cooking. Most glass casseroles,cooking dishes, measuring cups, custard cups, pottery or china dinnerware which does nothave metallic trim or glaze with a metallic sheen can be used. Some cookware is labeled“suitable for microwaving.”
Advantium Oven
IMPORTANT SAFETY INSTRUCTIONS
How to test for a microwave-safe dish.
SAVE THESE INSTRUCTIONS
7
WARNING!
� Don’t defrost frozen beverages innarrow-necked bottles (especiallycarbonated beverages). Even if thecontainer is open, pressure can build up.This can cause the container to burst,possibly resulting in injury.
� Foods cooked in liquids (such as pasta) may tend to boil more rapidlythan foods containing less moisture.Should this occur, refer to the Care and Cleaning of the oven section forinstructions on how to clean the inside of the oven.
� Hot foods and steam can cause burns. Be careful when opening anycontainers of hot food, including popcornbags, cooking pouches and boxes. Toprevent possible injury, direct steamaway from hands and face.
� Do not overcook potatoes. They coulddehydrate and catch fire, causingdamage to your oven.
� Avoid heating baby food in glass jars,even with the lid off. Make sure all infantfood is thoroughly cooked. Stir food todistribute the heat evenly. Be careful toprevent scalding when warming formula.The container may feel cooler than theformula really is. Always test the formulabefore feeding the baby.
� Do not attempt to deep fry in the oven.
SAFETY PRECAUTIONS
SAVE THESE INSTRUCTIONS
Advantium Oven
IMPORTANT SAFETY INSTRUCTIONS
Most pacemakers are shielded frominterference from electronic products,including microwaves. However, patientswith pacemakers may wish to consult theirphysicians if they have concerns.
NOTICE–PACEMAKERS
What is Advantium?
Advantium Oven
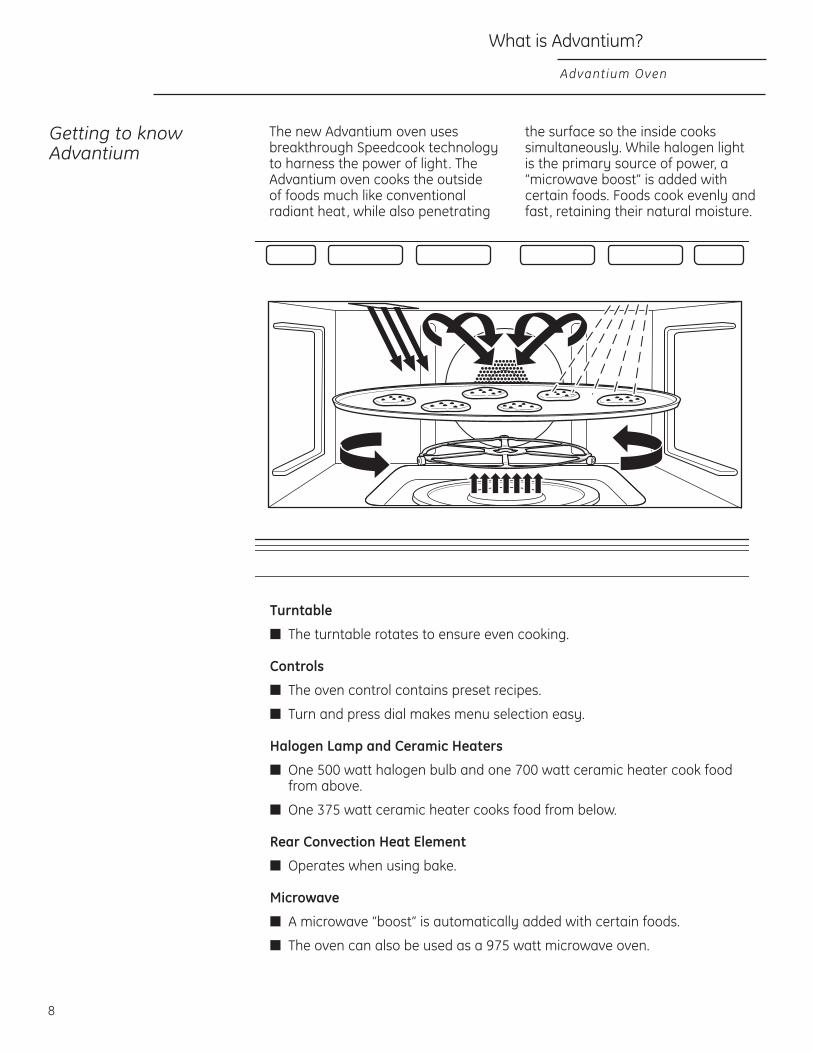
The new Advantium oven usesbreakthrough Speedcook technologyto harness the power of light. TheAdvantium oven cooks the outside of foods much like conventionalradiant heat, while also penetrating
the surface so the inside cookssimultaneously. While halogen light is the primary source of power, a“microwave boost” is added withcertain foods. Foods cook evenly andfast, retaining their natural moisture.
Getting to knowAdvantium
8
Turntable
� The turntable rotates to ensure even cooking.
Controls
� The oven control contains preset recipes.
� Turn and press dial makes menu selection easy.
Halogen Lamp and Ceramic Heaters
� One 500 watt halogen bulb and one 700 watt ceramic heater cook food from above.
� One 375 watt ceramic heater cooks food from below.
Rear Convection Heat Element
� Operates when using bake.
Microwave
� A microwave “boost” is automatically added with certain foods.
� The oven can also be used as a 975 watt microwave oven.

9
Advantium Quick Start
Advantium Oven
Set the clock
When you first plug in the oven or after apower outage:
1. Turn the selector dial to set the hour. Press the dial to enter.
2. Turn the dial to set the minute. Press the dial to enter.
3. Turn the dial to select AM or PM. Press the dial to enter.
To change the time:
1. Press the OPTIONS pad.
2. Turn the dial to SET CLOCK. Press the dial to enter and follow the display directions to set.
Beginspeedcooking
Step 1:Press the SPEEDCOOK pad.
Step 2:Turn the dial to FOOD MENU. Press the dial to enter.
Step 3:Turn the dial to select the type of foodcategory you want. Press the dial to enter it .
Step 4:Turn the dial to select the specific food.Press the dial to enter it .
Step 5:Turn the dial to select the amount, size,and/or doneness (if required, the oven willprompt you). Press the dial after eachselection.
Step 6:Once the display shows ADJUST TIME ORSTART, either press the dial or start pad tostart cooking.
� Press CLEAR/OFF at any time to stop cooking.
Microwavingwith Express
Press EXPRESS repeatedly for 30-secondincrements of microwave cooking time.
The oven starts immediately.
The turntable must always bein place when using the oven.
Put food directly on the non-stick metal tray
to speedcook.
The turntable must always bein place when using the oven.
The clear glass tray shouldalways be in place when
microwaving.
10
Speedcook Menu Guide
Advantium Oven
Displayprompts
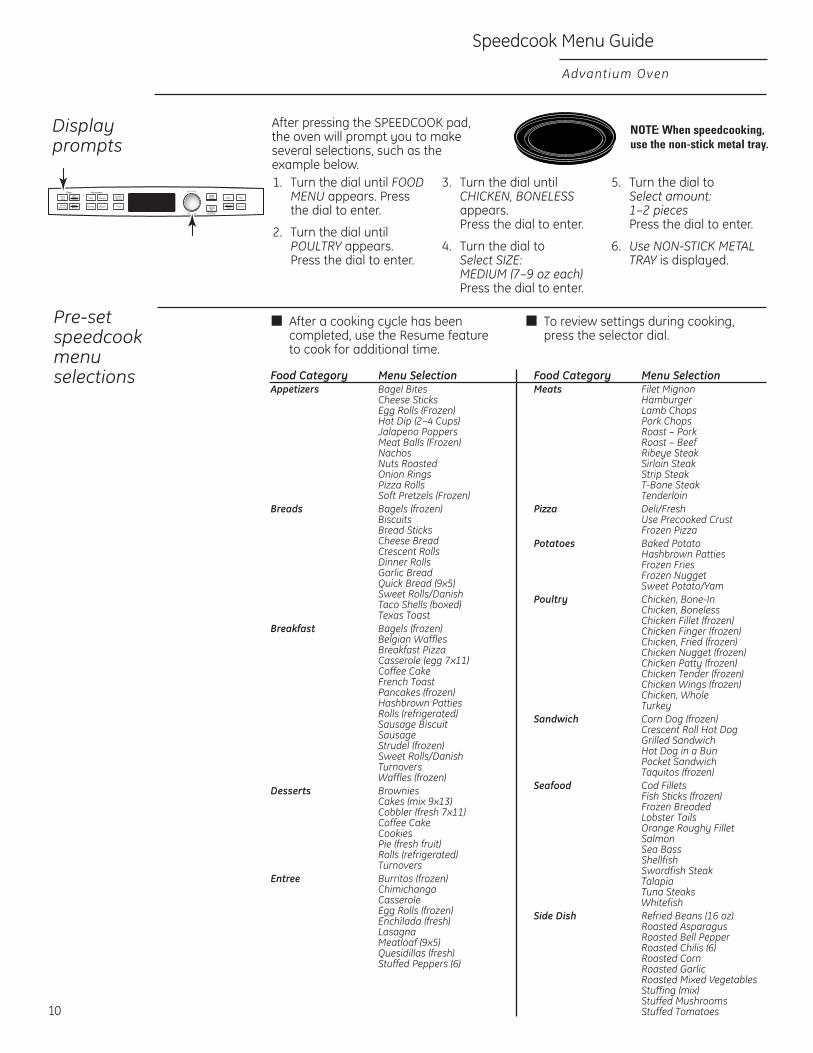
1. Turn the dial until FOODMENU appears. Pressthe dial to enter.
2. Turn the dial untilPOULTRY appears.Press the dial to enter.
3. Turn the dial untilCHICKEN, BONELESS appears.Press the dial to enter.
4. Turn the dial toSelect SIZE:MEDIUM (7–9 oz each)Press the dial to enter.
5. Turn the dial toSelect amount:1–2 piecesPress the dial to enter.
6. Use NON-STICK METALTRAY is displayed.
NOTE: When speedcooking,use the non-stick metal tray.
After pressing the SPEEDCOOK pad,the oven will prompt you to makeseveral selections, such as theexample below.
Food Category Menu SelectionAppetizers Bagel Bites
Cheese SticksEgg Rolls (Frozen)Hot Dip (2–4 Cups)Jalapeno PoppersMeat Balls (Frozen)NachosNuts RoastedOnion RingsPizza RollsSoft Pretzels (Frozen)
Breads Bagels (frozen)BiscuitsBread SticksCheese BreadCrescent RollsDinner RollsGarlic BreadQuick Bread (9x5)Sweet Rolls/DanishTaco Shells (boxed)Texas Toast
Breakfast Bagels (frozen)Belgian WafflesBreakfast PizzaCasserole (egg 7x11)Coffee CakeFrench ToastPancakes (frozen)Hashbrown PattiesRolls (refrigerated)Sausage BiscuitSausageStrudel (frozen)Sweet Rolls/DanishTurnoversWaffles (frozen)
Desserts BrowniesCakes (mix 9x13)Cobbler (fresh 7x11)Coffee CakeCookiesPie (fresh fruit)Rolls (refrigerated)Turnovers
Entree Burritos (frozen)ChimichangaCasseroleEgg Rolls (frozen)Enchilada (fresh)LasagnaMeatloaf (9x5)Quesidillas (fresh)Stuffed Peppers (6)
Food Category Menu SelectionMeats Filet Mignon
HamburgerLamb ChopsPork ChopsRoast – PorkRoast – BeefRibeye SteakSirloin SteakStrip SteakT-Bone SteakTenderloin
Pizza Deli/FreshUse Precooked CrustFrozen Pizza
Potatoes Baked PotatoHashbrown PattiesFrozen FriesFrozen NuggetSweet Potato/Yam
Poultry Chicken, Bone-InChicken, BonelessChicken Fillet (frozen)Chicken Finger (frozen)Chicken, Fried (frozen)Chicken Nugget (frozen)Chicken Patty (frozen)Chicken Tender (frozen)Chicken Wings (frozen)Chicken, WholeTurkey
Sandwich Corn Dog (frozen)Crescent Roll Hot DogGrilled SandwichHot Dog in a BunPocket SandwichTaquitos (frozen)
Seafood Cod FilletsFish Sticks (frozen)Frozen BreadedLobster TailsOrange Roughy FilletSalmonSea BassShellfishSwordfish SteakTalapiaTuna SteaksWhitefish
Side Dish Refried Beans (16 oz)Roasted AsparagusRoasted Bell PepperRoasted Chilis (6)Roasted CornRoasted GarlicRoasted Mixed VegetablesStuffing (mix)Stuffed MushroomsStuffed Tomatoes
Pre-setspeedcookmenuselections
� After a cooking cycle has been completed, use the Resume feature to cook for additional time.
� To review settings during cooking, press the selector dial.

11
Oven Features
Advantium Oven
Ovenfeatures
Throughout this manual, features and appearance may vary from your model.
TurntableThe turntable must always be in place,on the oven floor, for all cooking. Besure the turntable is seated securelyover the spindle in the center of theoven.
Non-stick Metal TrayPut food directly on the non-stick metaltray and place on the turntable whenusing the speedcook and bakefeatures.
Wire Oven Rack and AluminumBaking SheetPut food directly on the aluminumbaking sheet on the wire oven rack,and place them on the non-stick metaltray, when baking on two levels,broiling or toasting foods.
Clear Glass TrayPlace on the turntable when using the microwave features. Place food or microwave-safe cookware directlyon the tray.
Upper Halogen Lamp/Ceramic HeaterOperates when using speedcook or broil.
WindowAllows cooking to be viewed while keeping microwaves confined in the oven.
Door HandlePull to open the door. The door must be securely latched for the oven tooperate.
Door Latches
Lower Ceramic HeaterOperates when using speedcook.
Control PanelThe pads used to operate the oven are located on the control panel.
Rear Convection Heat ElementOperates when using bake.
NOTE: Handle appearance may differ on some models.
Advantium Oven
Cookingcontrols
Oven Features
12
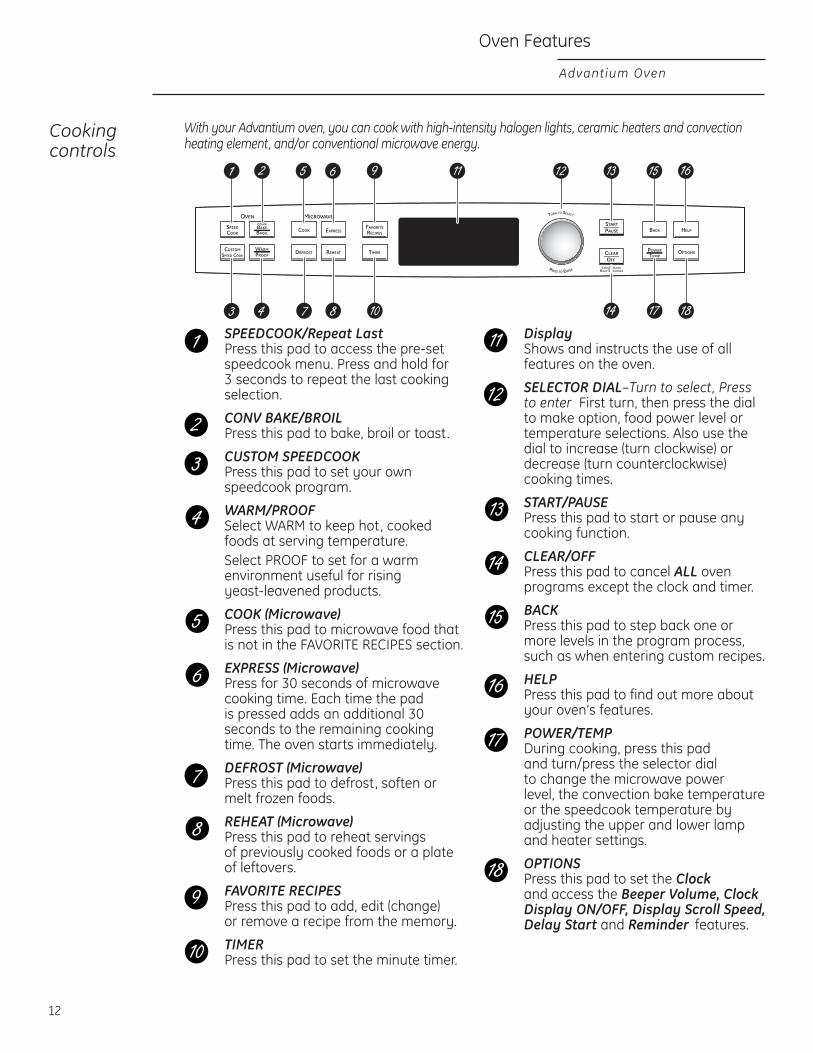
With your Advantium oven, you can cook with high-intensity halogen lights, ceramic heaters and convectionheating element, and/or conventional microwave energy.
SPEEDCOOK/Repeat LastPress this pad to access the pre-setspeedcook menu. Press and hold for 3 seconds to repeat the last cookingselection.
CONV BAKE/BROILPress this pad to bake, broil or toast.
CUSTOM SPEEDCOOKPress this pad to set your own speedcook program.
WARM/PROOFSelect WARM to keep hot, cookedfoods at serving temperature.Select PROOF to set for a warmenvironment useful for rising yeast-leavened products.
COOK (Microwave)Press this pad to microwave food thatis not in the FAVORITE RECIPES section.
EXPRESS (Microwave)Press for 30 seconds of microwavecooking time. Each time the pad is pressed adds an additional 30seconds to the remaining cookingtime. The oven starts immediately.
DEFROST (Microwave)Press this pad to defrost, soften ormelt frozen foods.
REHEAT (Microwave)Press this pad to reheat servings of previously cooked foods or a plateof leftovers.
FAVORITE RECIPESPress this pad to add, edit (change) or remove a recipe from the memory.
TIMERPress this pad to set the minute timer.
DisplayShows and instructs the use of allfeatures on the oven.
SELECTOR DIAL–Turn to select, Pressto enter First turn, then press the dialto make option, food power level ortemperature selections. Also use thedial to increase (turn clockwise) ordecrease (turn counterclockwise)cooking times.
START/PAUSEPress this pad to start or pause anycooking function.
CLEAR/OFFPress this pad to cancel ALL ovenprograms except the clock and timer.
BACKPress this pad to step back one or more levels in the program process, such as when entering custom recipes.
HELPPress this pad to find out more aboutyour oven’s features.
POWER/TEMPDuring cooking, press this pad and turn/press the selector dial to change the microwave power level, the convection bake temperatureor the speedcook temperature byadjusting the upper and lower lampand heater settings.
OPTIONSPress this pad to set the Clockand access the Beeper Volume, ClockDisplay ON/OFF, Display Scroll Speed,Delay Start and Reminder features.
Advantium Oven
Speedcooking
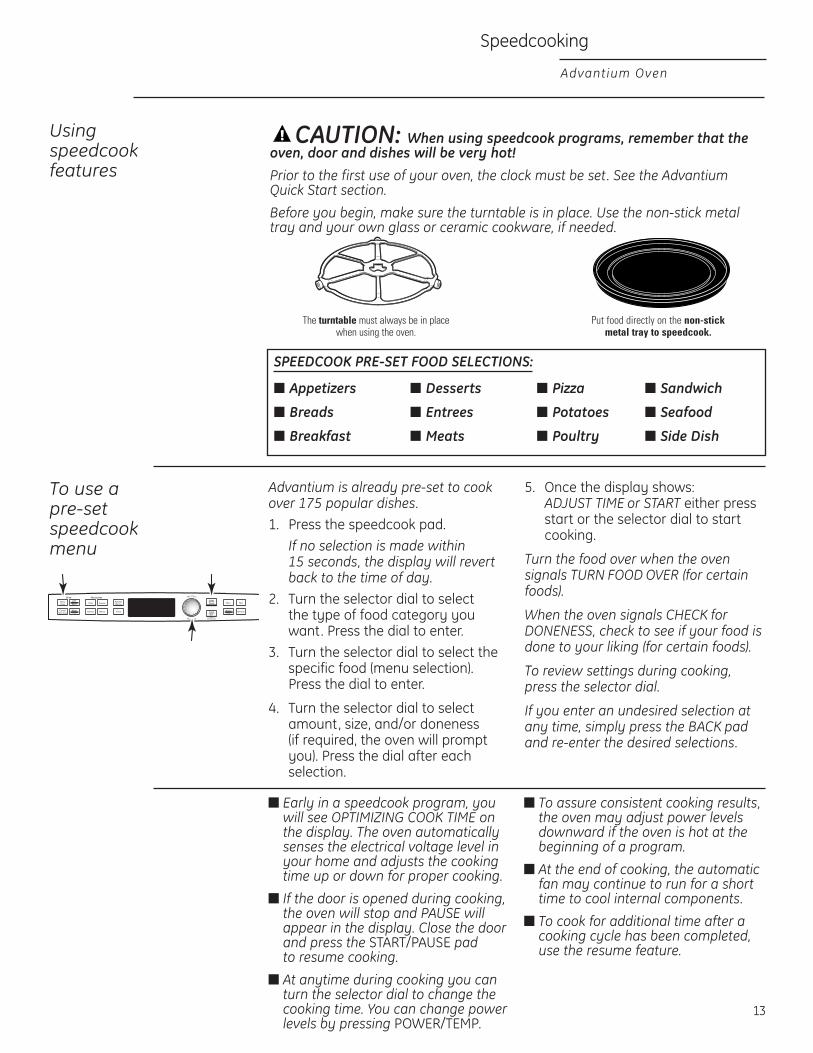
Advantium is already pre-set to cookover 175 popular dishes.1. Press the speedcook pad.
If no selection is made within 15 seconds, the display will revertback to the time of day.
2. Turn the selector dial to select the type of food category youwant. Press the dial to enter.
3. Turn the selector dial to select thespecific food (menu selection).Press the dial to enter.
4. Turn the selector dial to selectamount, size, and/or doneness (if required, the oven will promptyou). Press the dial after eachselection.
5. Once the display shows: ADJUST TIME or START either pressstart or the selector dial to startcooking.
Turn the food over when the ovensignals TURN FOOD OVER (for certainfoods).
When the oven signals CHECK forDONENESS, check to see if your food isdone to your liking (for certain foods).
To review settings during cooking, press the selector dial.
If you enter an undesired selection at any time, simply press the BACK padand re-enter the desired selections.
Usingspeedcookfeatures
CAUTION: When using speedcook programs, remember that theoven, door and dishes will be very hot!Prior to the first use of your oven, the clock must be set. See the AdvantiumQuick Start section.
Before you begin, make sure the turntable is in place. Use the non-stick metaltray and your own glass or ceramic cookware, if needed.
The turntable must always be in placewhen using the oven.
Put food directly on the non-stickmetal tray to speedcook.
SPEEDCOOK PRE-SET FOOD SELECTIONS:
� Appetizers � Desserts � Pizza � Sandwich
� Breads � Entrees � Potatoes � Seafood
� Breakfast � Meats � Poultry � Side Dish
To use apre-setspeedcookmenu
� Early in a speedcook program, youwill see OPTIMIZING COOK TIME onthe display. The oven automaticallysenses the electrical voltage level inyour home and adjusts the cookingtime up or down for proper cooking.
� If the door is opened during cooking,the oven will stop and PAUSE willappear in the display. Close the doorand press the START/PAUSE pad to resume cooking.
� At anytime during cooking you canturn the selector dial to change thecooking time. You can change powerlevels by pressing POWER/TEMP.
� To assure consistent cooking results, the oven may adjust power levelsdownward if the oven is hot at thebeginning of a program.
� At the end of cooking, the automaticfan may continue to run for a shorttime to cool internal components.
� To cook for additional time after acooking cycle has been completed, use the resume feature.
13
Speedcooking
Advantium Oven
14
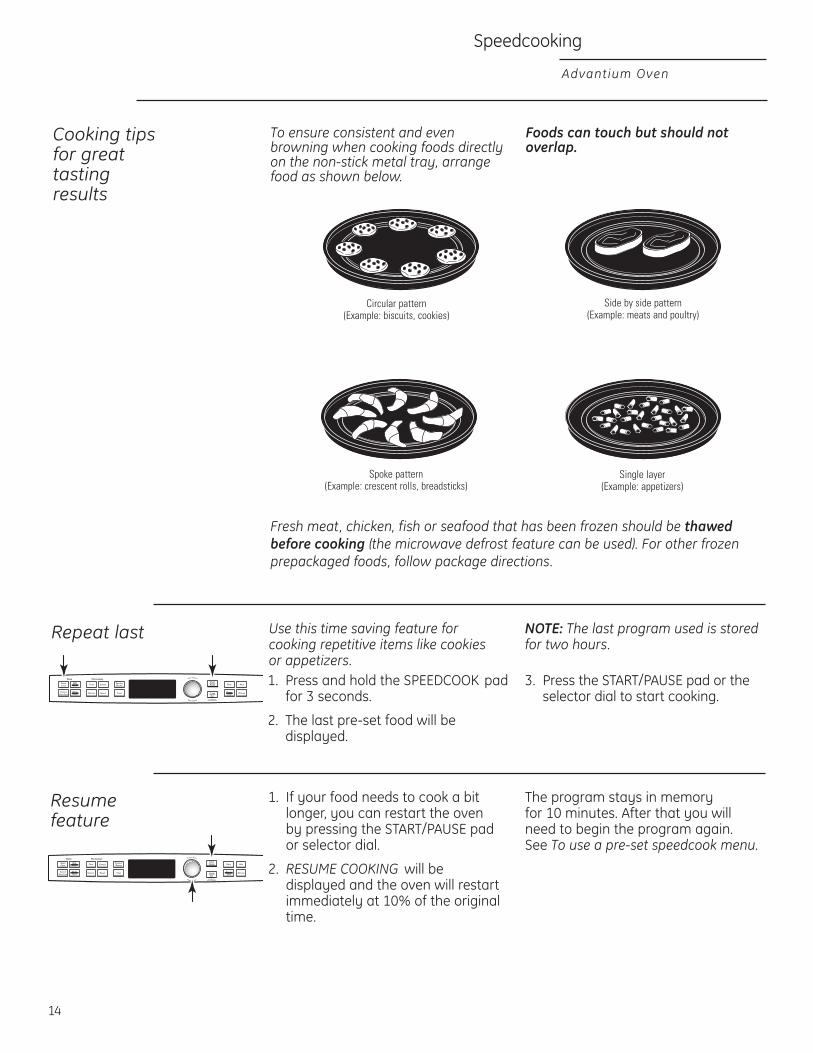
Cooking tipsfor greattastingresults
To ensure consistent and even browning when cooking foods directlyon the non-stick metal tray, arrangefood as shown below.
Foods can touch but should notoverlap.
Circular pattern(Example: biscuits, cookies)
Spoke pattern(Example: crescent rolls, breadsticks)
Single layer(Example: appetizers)
Side by side pattern(Example: meats and poultry)
Repeat last
1. Press and hold the SPEEDCOOK padfor 3 seconds.
2. The last pre-set food will bedisplayed.
3. Press the START/PAUSE pad or theselector dial to start cooking.
Use this time saving feature forcooking repetitive items like cookies or appetizers.
NOTE: The last program used is storedfor two hours.
Resumefeature
1. If your food needs to cook a bitlonger, you can restart the oven by pressing the START/PAUSE pador selector dial.
2. RESUME COOKING will be displayed and the oven will restartimmediately at 10% of the originaltime.
The program stays in memory for 10 minutes. After that you will need to begin the program again. See To use a pre-set speedcook menu.
Fresh meat, chicken, fish or seafood that has been frozen should be thawedbefore cooking (the microwave defrost feature can be used). For other frozenprepackaged foods, follow package directions.
15
Speedcooking
Advantium Oven
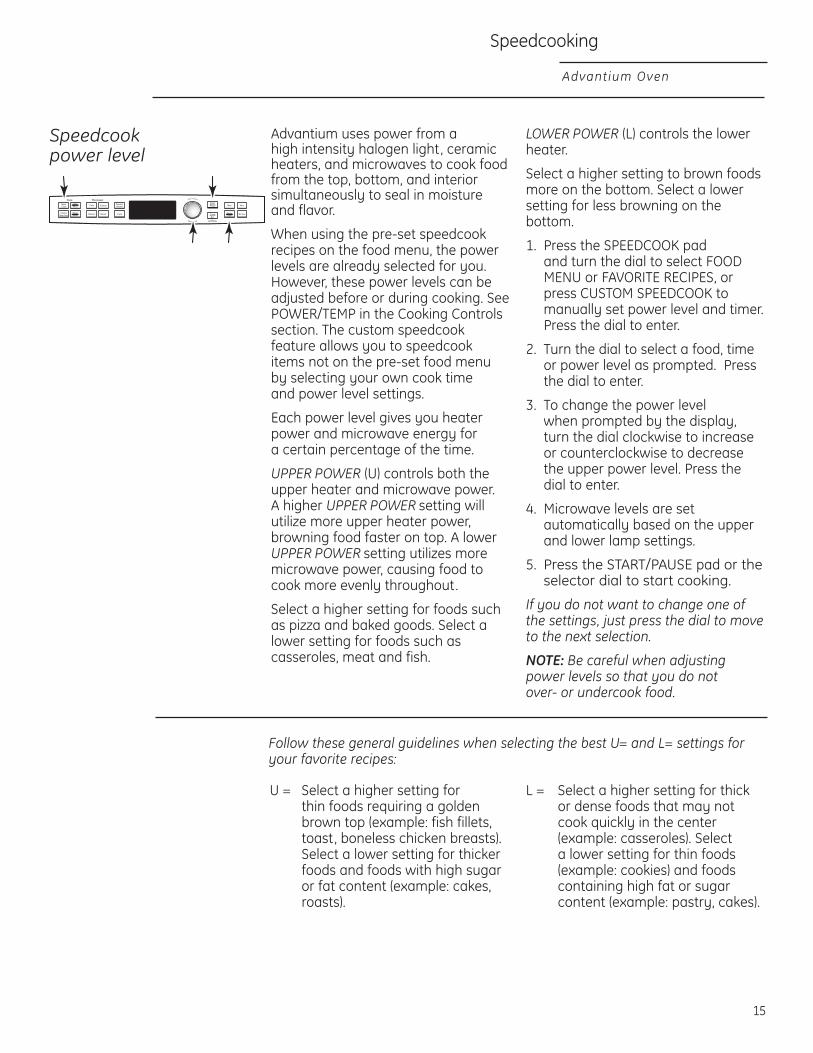
Speedcookpower level
Advantium uses power from a high intensity halogen light, ceramicheaters, and microwaves to cook foodfrom the top, bottom, and interiorsimultaneously to seal in moistureand flavor.
When using the pre-set speedcookrecipes on the food menu, the powerlevels are already selected for you.However, these power levels can beadjusted before or during cooking. SeePOWER/TEMP in the Cooking Controlssection. The custom speedcookfeature allows you to speedcookitems not on the pre-set food menuby selecting your own cook time and power level settings.
Each power level gives you heaterpower and microwave energy for a certain percentage of the time.
UPPER POWER (U) controls both theupper heater and microwave power. A higher UPPER POWER setting willutilize more upper heater power,browning food faster on top. A lowerUPPER POWER setting utilizes moremicrowave power, causing food tocook more evenly throughout.
Select a higher setting for foods suchas pizza and baked goods. Select alower setting for foods such ascasseroles, meat and fish.
LOWER POWER (L) controls the lowerheater.
Select a higher setting to brown foodsmore on the bottom. Select a lowersetting for less browning on thebottom.
1. Press the SPEEDCOOK padand turn the dial to select FOODMENU or FAVORITE RECIPES, orpress CUSTOM SPEEDCOOK tomanually set power level and timer.Press the dial to enter.
2. Turn the dial to select a food, timeor power level as prompted. Pressthe dial to enter.
3. To change the power level when prompted by the display,turn the dial clockwise to increaseor counterclockwise to decreasethe upper power level. Press thedial to enter.
4. Microwave levels are setautomatically based on the upperand lower lamp settings.
5. Press the START/PAUSE pad or theselector dial to start cooking.
If you do not want to change one ofthe settings, just press the dial to moveto the next selection.
NOTE: Be careful when adjustingpower levels so that you do not over- or undercook food.
U = Select a higher setting for thin foods requiring a goldenbrown top (example: fish fillets,toast, boneless chicken breasts).Select a lower setting for thickerfoods and foods with high sugaror fat content (example: cakes,roasts).
L = Select a higher setting for thickor dense foods that may notcook quickly in the center(example: casseroles). Select a lower setting for thin foods(example: cookies) and foodscontaining high fat or sugarcontent (example: pastry, cakes).
Follow these general guidelines when selecting the best U= and L= settings foryour favorite recipes:

Speedcooking
Advantium Oven
16
Customspeedcook
Advantium gives you the flexibility to cook your favorite dishes.
If you want to cook a food item that is not among the pre-set selections,use custom speedcook.
1. Press the CUSTOM SPEEDCOOKpad.
If no entries are made within 15 seconds, the display will revert back to the time of day.
2. Turn the selector dial to select the cooking time. Press the dial to enter.
The display will prompt you to select the power level(s).
3. Turn the dial clockwise to increaseor counterclockwise to decreasethe upper power level. Press thedial to enter.
4. Turn the dial to change the lowerpower level. Press the dial to enter.
5. Press the START/PAUSE pad orpress the selector dial to startcooking.
For power level and cooking timesuggestions, use your cooking guide or cook book.
Speedcookcookware
� Follow cookware suggestions onthe oven display or in the Cookbookor Cooking guide.
� Cookware will become hot becauseof heat transferred from the heatedfood. Oven mitts will be needed to handle the cookware.
� Place food directly on the non-stickmetal tray when cooking, unlessprompted by the oven to dootherwise.
� Use the non-stick metal tray in thesame way you would use a shallowbaking pan or baking tray.
� In addition to the cookwareprovided, you can use non-metalcasserole dishes, pie plates andother heat-safe cookware. Placethem directly on the turntable.
� Be sure to select a size that will rotate easily.
� Place the non-stick metal tray on the turntable. Place glass orceramic cookware on the tray.
� Do not use cookware or coveringsmade of paper, plastic, or foil whencooking during a speedcook cycle.

17
Speedcooking
Advantium Oven
Favoriterecipe—to enter and save
Add and save up to 30 of your ownSpeedcook or microwave recipes, orpre-set Speedcook menu recipes asa favorite recipe. Once it’s done, youcan quickly recall your favorite sothat your food cooks just the wayyou want it every time!
1. Press the FAVORITE RECIPES or the SPEEDCOOK pad.
2. Turn the dial until FAVORITERECIPES appears. Press the dial to enter. (Skip this step if theFAVORITE RECIPES pad waspressed in step 1.)
3. Turn the dial until ADD RECIPEappears. Press the dial to enter.
4. Turn the dial to COPY SPEEDRECIPE or to ADD NEW RECIPE. Press the dial to enter.
If COPY SPEED RECIPE wasselected, turn dial to food type(s) and press the FAVORITERECIPES pad to enter and save the recipe.
If ADD NEW RECIPE was selected,turn the dial to select SPEEDCOOKor MICROWAVE recipe. Press thedial to enter and continue withthese steps.
5. SELECT COOK TIME appears. Turnthe dial to select the cooking time.Press the dial to enter.
The display will prompt you to selectthe power level(s).
6. Turn the dial clockwise to increaseor counterclockwise to decreasethe power level(s). Press the dial to enter.
For power level and cooking timesuggestions, use your cooking guide or cook book.
7. SPELL THE FOOD NAME appears.Turn the dial to the first letter ofyour food description and press thedial to enter. Continue this processto spell the rest of the food name.Press the START/PAUSE pad to savethe recipe and its name.
To find and use stored favoriterecipes:
1. Press the FAVORITE RECIPES or the SPEEDCOOK pad.
2. Turn the dial until FAVORITERECIPES appears. Press the dial to enter.
3. Turn dial to USE FAVORITE RECIPEand press to enter.
4. The recipe names you entered willappear.
5. Turn dial until the recipe you wantis displayed and press the dial toenter.
6. Press the START/PAUSE pad orpress the selector dial to startcooking.
Favoriterecipe—to find and use

Speedcooking
Advantium Oven
Favoriterecipe—to adjust or change
To adjust or change stored customspeedcook recipes:
1. Press the FAVORITE RECIPES or the SPEEDCOOK pad.
2. Turn the dial until FAVORITERECIPES appears. Press the dial to enter.
3. Turn the dial until EDIT RECIPEappears. Press the dial to enter.
4. Turn the dial to the recipe youwant to change. Press the dial to enter. Current settings appear.
5. Press the dial to edit.
6. The display will prompt you toselect the power level(s) and editthe name. Turn the dial and pressto enter the appropriate settings.
For power level and cooking timesuggestions, use your cooking guide or cook book.
To delete stored custom speedcookrecipes:
1. Press the FAVORITE RECIPES or the SPEEDCOOK pad.
2. Turn the dial until FAVORITERECIPES appears. Press the dial to enter.
3. Turn the dial until DELETE RECIPEappears and press the dial toenter.
4. Turn dial to the recipe you want todelete and press the dial to enter.
Favoriterecipe—to delete
18

Speedcooking
Advantium Oven
Things thatare normal
Cooking Times� When speedcooking preprogrammed foods,
you may see OPTIMIZING COOK TIME in thedisplay several seconds after you pressSTART/PAUSE. The oven automaticallysenses the electrical voltage level in yourhome and adjusts the cooking time up or down for proper cooking.
Fan/Vent� The fan will be on during cooking. At
the end of cooking, the automatic fan maycontinue to run for a short time, and thedisplay will read Oven is Cooling. The fanwill automatically shut off when the internalparts of the oven have cooled.
� The oven vent will emit warm air while the oven is on.
Lights� When the oven is on, light may be visible
around the door or outer case.
� The halogen lights will dim and cycle on and off during a speedcook cycle,sometimes even at full power levels. This is normal. The oven senses the heat level and adjusts automatically.
Oven Heat� No preheating time is required during
Speedcook cycles. The oven begins cookingimmediately.
� The door and inside of the oven will be veryhot. Use caution when opening the doorand removing food.
� Do not use cookware or coverings made of paper, plastic, or foil when cookingduring a speedcook cycle.
� When cooking for an extended period of time, the oven may automatically reduce the power levels to maintain the appropriate level of oven heat.
Sounds� Clicks and a fan blowing are normal sounds
during cooking. The relay board is turningcomponents on and off.
19

20
Baking, Broiling and Toasting
Advantium Oven
1. Press the CONV BAKE/BROIL pad.2. Press the dial to select BAKE.3. Turn the dial to set the oven temperature
and press to enter.To bypass preheating:1. When the prompt shows PREHEAT THE
OVEN? turn the dial to NO. Press the dialor press START/PAUSE to begin cooking.
2. Place the food in the oven, turn the dial to set the cook time and press to enter.The oven starts cooking immediately.When cooking is complete, the oven will signal and turn off.
To preheat:1. When the prompt shows PREHEAT THE
OVEN? turn the dial to YES. Press the dialor press START/PAUSE to begin cooking.The oven starts preheating immediately.Do not place the food in the oven. (You willbe prompted to enter the cook time, afterthe oven is preheated.)
2. When the oven is finished preheating, it will signal. If you do not open the doorwithin 1 hour, the oven will turn offautomatically. Open the oven door and,using caution, place the food in the oven.
3. Close the oven door. Turn the dial to setthe cook time and press to enter and startcooking. When cooking is complete, theoven will signal and turn off.
You may change the oven temperature duringpreheating by pressing the POWER/TEMP pad and turning the dial to select the newtemperature.If the oven door is opened during cooking, PAUSE will appear in the display. Close the door and press START/PAUSE.Cook times are shown in minutes and can be a maximum of 179 minutes. Time can bechanged during cooking by turning the dial.
1. Press the CONV BAKE/BROIL pad.2. Turn the dial to BROIL or TOAST and press
to enter. To bypass preheating:1. When the prompt shows PREHEAT THE
OVEN? turn the dial to NO. Press the dialor press START/PAUSE to begin cooking.
2. Place the food in the oven, turn the dial to set the cook time and press to enter.Press the dial to start cooking. Whencooking is complete, the oven will signaland turn off.
To preheat:1. When the prompt shows PREHEAT THE
OVEN? turn the dial to YES. Press the dialor press START/PAUSE to begin cooking.
The oven starts preheating immediately.Do not place the food in the oven. (You willbe prompted to enter the cook time, afterthe oven is preheated.)
2. When the oven is finished preheating, it will signal. If you do not open the doorwithin 1 hour, the oven will turn offautomatically. Open the oven door and,using caution, place the food in the oven.
3. Close the oven door. Turn the dial to setthe cook time and press to enter and startcooking. When cooking is complete, the oven will signal and turn off.
If the oven door is opened during cooking,PAUSE will appear in the display. Close the doorand press START/PAUSE.
How toBake
How toBroil orToast
Baking,BroilingandToasting
Baking allows you to cook foods the same way as a conventional oven, using a heating element to raisethe temperature of the air inside the oven. Any oventemperature from 250°F to 450°F may be set.Broiling allows you to broil foods in the same way as a conventional oven.Toasting allows you to toast foods the same way as a conventional oven.A fan gently circulates heated air throughout the oven,over and around the food. Because the heated air iskept constantly moving, not permitting a layer ofcooler air to develop around the food, some foods cook slightly faster than in regular oven cooking.
Before you begin, make sure the turntable is in place.Use the non-stick metal tray at all times when baking.
CAUTION! When baking, remember thatthe oven, door and dishes will be very hot!
The turntable must always be in place when
using the oven.
Put food or oven-safe cookwaredirectly on the non-stick
metal tray to bake.
Put food directly on the aluminum baking sheet onthe wire oven rack, and place them on the non-stick
metal tray, when broiling or toasting foods.
For two-level baking, place food in a metal bakingdish or directly on the non-stick metal tray. Placethe aluminum baking sheet or your baking dish
with food on top of the wire rack. Stand the rackwith food on the metal tray.
21
Warming and Proofing
Advantium Oven
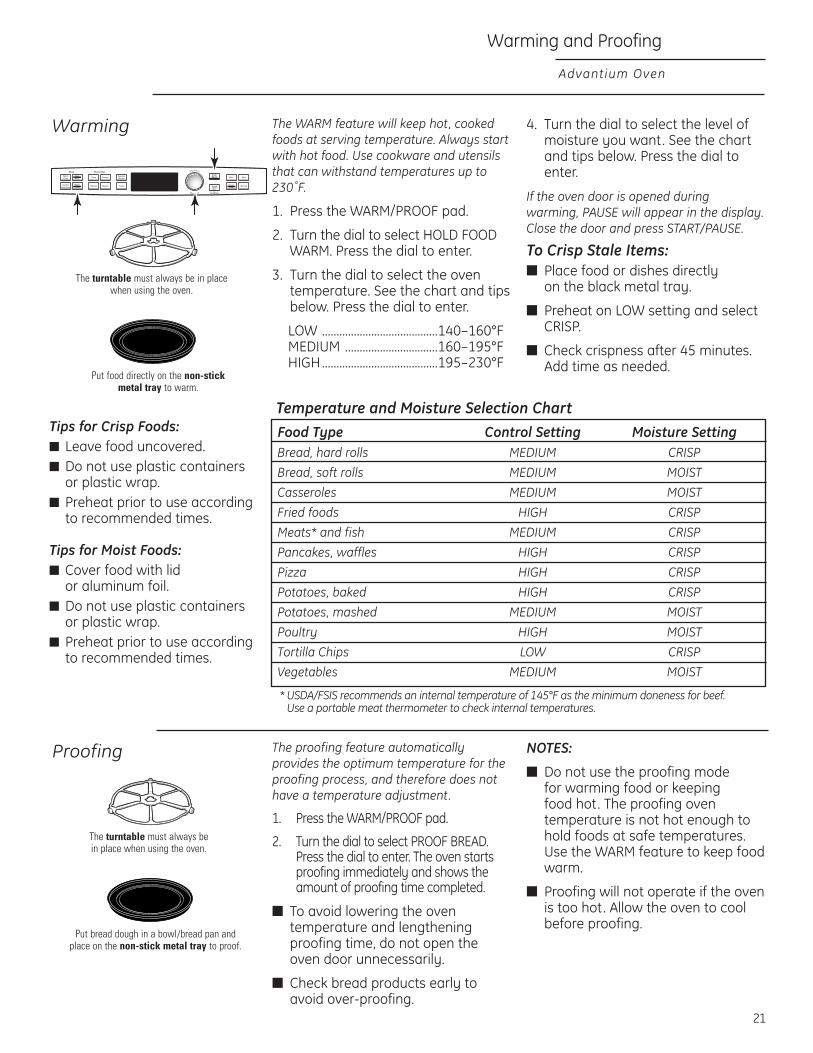
Tips for Crisp Foods:� Leave food uncovered. � Do not use plastic containers
or plastic wrap.� Preheat prior to use according
to recommended times.
Tips for Moist Foods:� Cover food with lid
or aluminum foil.� Do not use plastic containers
or plastic wrap.� Preheat prior to use according
to recommended times.
Food Type Control Setting Moisture SettingBread, hard rolls MEDIUM CRISP
Bread, soft rolls MEDIUM MOIST
Casseroles MEDIUM MOIST
Fried foods HIGH CRISP
Meats* and fish MEDIUM CRISP
Pancakes, waffles HIGH CRISP
Pizza HIGH CRISP
Potatoes, baked HIGH CRISP
Potatoes, mashed MEDIUM MOIST
Poultry HIGH MOIST
Tortilla Chips LOW CRISP
Vegetables MEDIUM MOIST
* USDA/FSIS recommends an internal temperature of 145°F as the minimum doneness for beef. Use a portable meat thermometer to check internal temperatures.
Temperature and Moisture Selection Chart
Warming The WARM feature will keep hot, cookedfoods at serving temperature. Always startwith hot food. Use cookware and utensilsthat can withstand temperatures up to230˚F.
1. Press the WARM/PROOF pad.
2. Turn the dial to select HOLD FOODWARM. Press the dial to enter.
3. Turn the dial to select the oventemperature. See the chart and tipsbelow. Press the dial to enter.
LOW ........................................140–160°FMEDIUM ................................160–195°FHIGH........................................195–230°F
4. Turn the dial to select the level ofmoisture you want. See the chartand tips below. Press the dial toenter.
If the oven door is opened duringwarming, PAUSE will appear in the display.Close the door and press START/PAUSE.
To Crisp Stale Items:� Place food or dishes directly
on the black metal tray.
� Preheat on LOW setting and selectCRISP.
� Check crispness after 45 minutes.Add time as needed.
The proofing feature automaticallyprovides the optimum temperature for theproofing process, and therefore does nothave a temperature adjustment.
1. Press the WARM/PROOF pad.
2. Turn the dial to select PROOF BREAD.Press the dial to enter. The oven startsproofing immediately and shows theamount of proofing time completed.
� To avoid lowering the oventemperature and lengtheningproofing time, do not open theoven door unnecessarily.
� Check bread products early toavoid over-proofing.
NOTES:
� Do not use the proofing mode for warming food or keeping food hot. The proofing oventemperature is not hot enough tohold foods at safe temperatures.Use the WARM feature to keep foodwarm.
� Proofing will not operate if the ovenis too hot. Allow the oven to coolbefore proofing.
Proofing
The turntable must always be in placewhen using the oven.
Put food directly on the non-stick metal tray to warm.
The turntable must always be in place when using the oven.
Put bread dough in a bowl/bread pan andplace on the non-stick metal tray to proof.
Microwaving
Advantium Oven
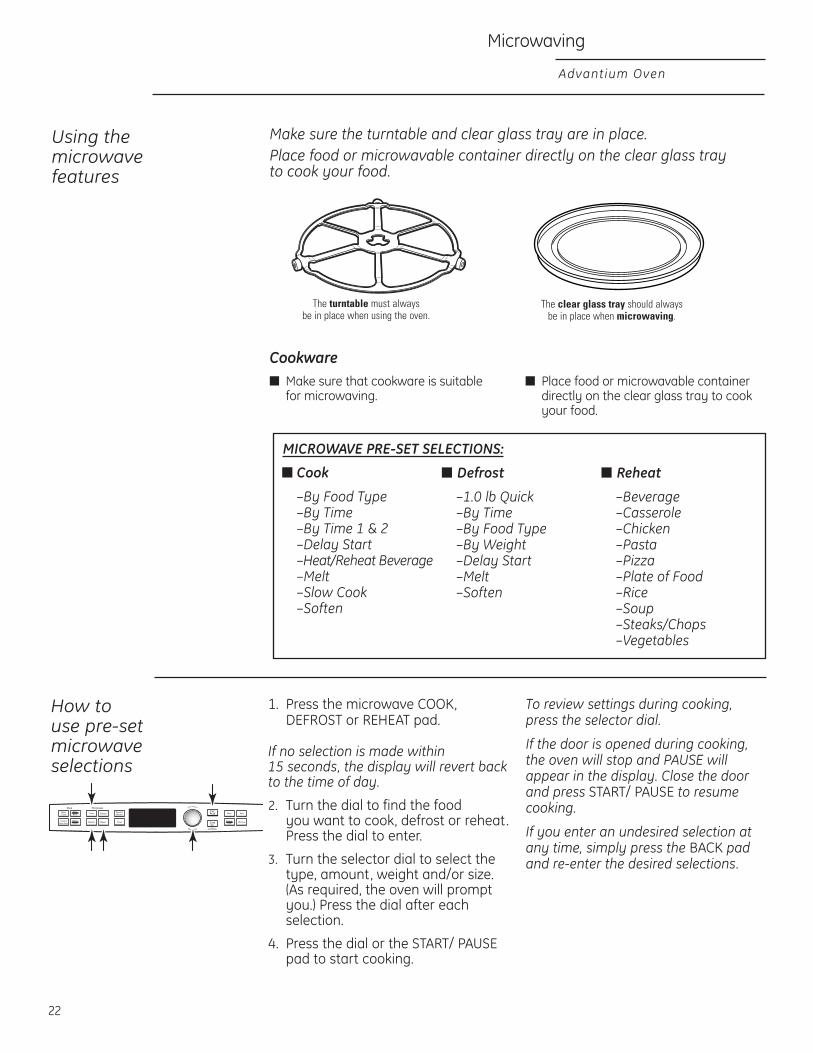
Using themicrowavefeatures
Make sure the turntable and clear glass tray are in place.Place food or microwavable container directly on the clear glass tray to cook your food.
� Cook
–By Food Type–By Time–By Time 1 & 2–Delay Start–Heat/Reheat Beverage–Melt–Slow Cook–Soften
� Defrost
–1.0 lb Quick–By Time–By Food Type–By Weight–Delay Start–Melt–Soften
� Reheat
–Beverage–Casserole–Chicken–Pasta–Pizza–Plate of Food–Rice–Soup–Steaks/Chops–Vegetables
MICROWAVE PRE-SET SELECTIONS:
The turntable must always be in place when using the oven.
The clear glass tray should always be in place when microwaving.
How to use pre-setmicrowaveselections
1. Press the microwave COOK,DEFROST or REHEAT pad.
If no selection is made within 15 seconds, the display will revert backto the time of day.
2. Turn the dial to find the food you want to cook, defrost or reheat.Press the dial to enter.
3. Turn the selector dial to select thetype, amount, weight and/or size. (As required, the oven will promptyou.) Press the dial after eachselection.
4. Press the dial or the START/ PAUSEpad to start cooking.
To review settings during cooking,press the selector dial.
If the door is opened during cooking,the oven will stop and PAUSE willappear in the display. Close the doorand press START/ PAUSE to resumecooking.
If you enter an undesired selection at any time, simply press the BACK padand re-enter the desired selections.
22
Cookware� Make sure that cookware is suitable
for microwaving. � Place food or microwavable container
directly on the clear glass tray to cookyour food.

Microwaving
Advantium Oven
Cook By Timeand Cook ByTime 1 & 2
Use COOK BY TIME and COOK BY TIME1 & 2 to microwave food that is not inthe recipe section and at the time(s)you set.
� The power level is automatically setat high, but you can change it formore flexibility.
1. Press the COOK pad.
2. Turn the dial to select COOK BYTIME or COOK BY TIME 1 & 2and press the dial to enter.
3. Turn the dial to set the cook time and press the dial to enter.
If you selected COOK BY TIME 1 & 2,turn the dial to set the second cooktime and press the dial to enter.
NOTE: To change the power level if you don’t want full power, press thePOWER/TEMP pad after entering thetime(s). Turn the dial to select and pressthe dial to enter.
4. Press the dial or the START/ PAUSEpad to start cooking.
You may open the door during COOKBY TIME and COOK BY TIME 1 & 2 tocheck the food. Close the door andpress START/PAUSE to resume cooking.
Press EXPRESS repeatedly for 30 second increments of microwavecooking time. Oven startsimmediately.
Express
Microwavepower level(s)
1. First, follow directions for COOK BYTIME, COOK BY TIME 1 & 2,DEFROST BY TIME or EXPRESS.
2. Press the POWER/TEMP pad.
3. Turn the dial clockwise to increaseand counterclockwise to decreasethe power level. Press the dial to enter.
4. Press the dial or the START/ PAUSEpad to start cooking.
� You can change the power levelbefore or during a cooking program.
Here are some examples of uses forvarious power levels:
High 10: Fish, bacon, vegetables,boiling liquids.
Med-High 7: Gentle cooking of meatand poultry; baking casseroles andreheating.
Medium 5: Slow cooking andtenderizing for stews and less tender cuts of meat.
Low 2 or 3: Defrosting; simmering;delicate sauces.
Warm 1: Keeping food warm;softening butter.
� When cooking bacon, layer strips on a plate. Cover each layer with a paper towel.
� When cooking vegetables, use a microwave-safe casserole or bowl. Cover with a microwave-safe lid or vented plastic wrap.
� For frozen vegetables, follow the package instructions for addingwater.
� For fresh vegetables, add 2 tablespoons of water for each serving.
Cookingtips
23
See the Favorite recipe sections in theSpeedcook section of this book forinstructions on how to save, use,change or delete a favorite recipe.
Favoriterecipes

Microwaving
Advantium Oven
Defrost byfood type
Auto Defrost automatically sets thedefrosting times and power levels to give even defrosting results formeats, poultry and fish weighing up to 6 pounds.
1. Remove food from the packageand place it on a microwave-safedish.
2. Press the DEFROST pad.
3. Turn the dial to DEFROST BY FOODTYPE. Press the dial to enter.
4. Turn the dial to select food type.Press the dial to enter.
5. Turn the dial to the food weight,using the Conversion Guide atright. For example, dial 1.2 for 1.2 pounds (1 pound, 3 oz.). Press the dial to enter.
6. Press the dial or START/PAUSE padto start defrosting.
7. Turn the food over when the ovensignals TURN FOOD OVER.
� Remove defrosted meat or shieldwarm areas with small pieces of foilfor even defrosting.
� After defrosting, most meats need to stand 5 minutes to completedefrosting. Large roasts shouldstand for about 30 minutes.
Conversion Guide
If the weight of food is stated inpounds and ounces, the ounces mustbe converted to tenths (.1) of a pound.
Weight of Food Enter Food Weightin Ounces (tenths of a pound)
1–2 .13 .2
4–5 .36–7 .4
8 .59–10 .6
11 .712–13 .814–15 .9
Use Time Defrost to defrost for a selected length of time.
1. Press the DEFROST pad.
2. Turn the selector dial to DEFROSTBY TIME. Press the dial to enter.
3. Turn the dial to select the time youwant. Press the dial to enter.
4. Press the dial or START/PAUSE padto start defrosting.
5. Turn the food over when the ovensignals TURN FOOD OVER.
Power level is automatically set at 3, but can be changed. To change thepower levels, see the Microwave PowerLevel(s) section. You can defrost smallitems quickly by raising the powerlevel after entering the time. Powerlevel 7 cuts the total defrosting time in about half; power level 10 cuts the total time to about 1/3. Whendefrosting at high power levels, foodwill need more frequent attention than usual.
Defrost bytime
24
Microwaving
Advantium Oven
Defrostingtips
Use DEFROST BY FOOD TYPE for meat,poultry and fish. Use DEFROST BY TIMEfor most other frozen foods.
� Foods frozen in paper or plastic canbe time defrosted in the package,but foods should be taken out of the package when using DEFROSTBY FOOD TYPE. Closed packagesshould be slit , pierced or ventedafter food has partially defrosted.Plastic storage containers should be partially uncovered.
� Family-size, prepackaged frozendinners can be defrosted andmicrowaved. If the food is in a foil container, transfer it to a microwave-safe dish.
� Foods that spoil easily should notbe allowed to sit out for more thanone hour after defrosting. Roomtemperature promotes the growthof harmful bacteria.
� For more even defrosting of larger foods, such as roasts, useDEFROST BY TIME. Be sure largemeats are completely defrostedbefore cooking.
� When defrosted, food should be cool but softened in all areas. If still slightly icy, return to themicrowave very briefly, or let it stand a few minutes.
25
The sensor feature detects theincreasing humidity released duringcooking. The oven automatically adjuststhe cooking time to various types andamounts of food.
Do not use the Sensor Features twice insuccession on the same food portion—it may result in severely overcooked orburnt food. If food is undercooked after the first countdown, use COOK BY TIMEfor additional cooking time.
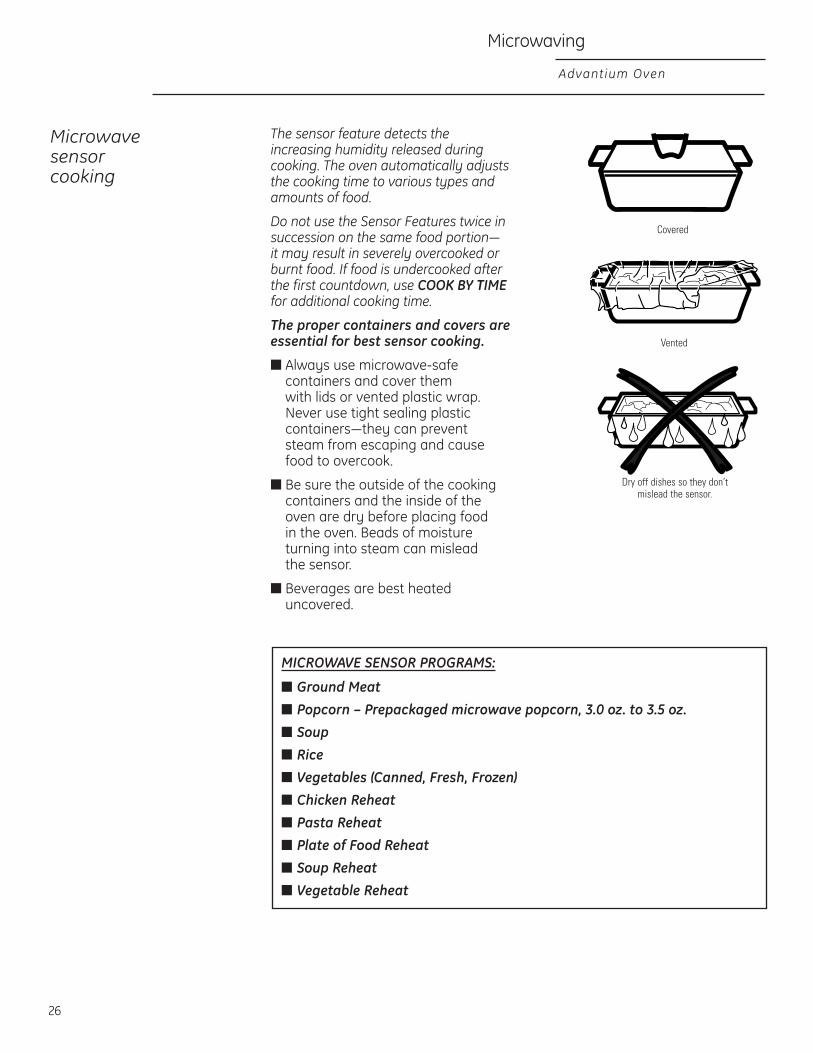
The proper containers and covers areessential for best sensor cooking.
� Always use microwave-safecontainers and cover them with lids or vented plastic wrap.Never use tight sealing plasticcontainers—they can prevent steam from escaping and causefood to overcook.
� Be sure the outside of the cookingcontainers and the inside of theoven are dry before placing food in the oven. Beads of moistureturning into steam can mislead the sensor.
� Beverages are best heateduncovered.
Microwaving
Advantium Oven
Microwavesensorcooking
26
Covered
Vented
Dry off dishes so they don’t mislead the sensor.
MICROWAVE SENSOR PROGRAMS:
� Ground Meat� Popcorn – Prepackaged microwave popcorn, 3.0 oz. to 3.5 oz.� Soup� Rice� Vegetables (Canned, Fresh, Frozen)� Chicken Reheat� Pasta Reheat� Plate of Food Reheat� Soup Reheat� Vegetable Reheat

Microwaving
Advantium Oven
To use allsensorprograms
27
Advantium’s microwave mode features sensor cooking. The ovenautomatically senses when food isdone and shuts itself off—eliminatingthe need to program cook times andpower levels.
1. Press the COOK pad and turn the dial to COOK BY FOOD TYPE.Press the dial to enter. Or press the REHEAT pad.
2. Turn the dial to select the food youwant. Press the dial to enter.
3. Press the dial or press the START/PAUSE pad to start cooking.
Do not open the oven door until time is counting down in the display. If the door is opened, close it andpress START/PAUSE immediately. If the food is not done enough, useCOOK BY TIME in the microwaveselector to cook for more time.
NOTE: Do not use the Sensor Featurestwice in succession on the same foodportion—it may result in severelyovercooked or burnt food.
� If you have been speedcooking and the oven is already hot, it mayindicate that it is too hot for sensorcooking. Of course, you can alwayscontinue with COOK BY TIME orSPEEDCOOK.
NOTE: If the oven is too hot then it willautomatically change to time cooking.
� To shorten or lengthen the cooktime, wait until the time countdownshows in the display. Then turn thedial to add or subtract time.
� If you open the door while SENSORCooking, SENSOR ERROR willappear. Close the door, pressSTART/PAUSE to begin again.
Notes about the Reheat program:
Reheated foods may have widevariations in temperature. Some areasmay be extremely hot.
It is best to use COOK BY TIME and notREHEAT for these foods:
� Bread products
� Food that must be reheateduncovered.
� Foods that need to be stirred or turned.
� Foods calling for a dry look or crispsurface after reheating.
Things thatare normal
Interference� TV/radio interference might be noticed
while using the microwave. Similar to the interference caused by other smallappliances, it does not indicate a problemwith the microwave. Move the radio or TV asfar away from the microwave as possible, orcheck the position of the TV/radio antenna.
Lights� The oven cavity light will come on
during a microwave cooking cycle.
Oven Heat� Cookware may become hot because of heat
transferred from the heated food. Oven mittsmay be needed to handle the cookware.
� Steam or vapor may escape from around the door.

Other Advantium Features
Advantium Oven
“COOK TIMECOMPLETED”
To remind you that you have food in the oven, the oven will displayCOOK TIME COMPLETED and beeponce a minute until you either open the oven door or press theCLEAR/OFF pad.
Featuresunder theOPTIONSpad
Clock: The clock must be set before you can use your oven for the first time(see Quick Start for instructions).
1. To change the clock time, press the OPTIONS pad and turn the dialto CLOCK. Press the dial to enter.
2. Turn the dial to set hours. Press the dial to enter.
3. Turn the dial to set minutes. Press the dial to enter.
4. Turn the dial to select AM or PM.Press the dial to enter.
Clock Display ON/OFF: Use this feature to turn your clockdisplay on or off. Press the OPTIONSpad, turn the dial to select CLOCKDISPLAY ON/OFF. Turn the dial toselect ON or OFF. Press the dial toenter.
Delay Start:Delay Start allows you to set the oven to delay cooking up to 24 hours.Press the OPTIONS pad, turn the dialto select DELAY START and press the dial to enter. Follow the displaydirections to set the Delay Start timeand feature you wish to delay.
Beeper Volume: Use this feature to adjust the volumeof the beeper. You can even turn it off.Press the OPTIONS pad, turn the dialto select BEEPER VOLUME, press thedial to enter, and follow the displaydirections.
Scroll Speed: Is the message scroll too slow or toofast? Change it! Press the OPTIONSpad, turn the dial to select DISPLAYSCROLL SPEED, press the dial to enter,and follow the display directions.
Reminder: Use this feature to set an alarm beepto sound at a specific the time of day.Press the OPTIONS pad, turn the dialto SET/CLEAR REMINDER and press thedial to enter. Turn the dial to select thehour and press to enter. Turn the dialto select the minute and press toenter. Turn the dial to select AM or PMand press to enter.
To review the setting, turn the dial to SET/CLEAR REMINDER and press thedial to enter. Turn the dial to REVIEWand press to enter.
To cancel the setting, turn the dial to SET/CLEAR REMINDER and press the dial to enter. Turn the dial toCLEAR and press to enter.
Use this feature to review the currentcooking selections you have set.
Press the selector dial duringspeedcooking or microwave cooking.
Review
28

Other Advantium Features
Advantium Oven
Help Use this feature to find out more aboutyour oven and its features.
1. Press the HELP pad.
2. Turn the dial to select the featurename. Press the dial to enter.
The display will show a description for the program you have chosen.
Adding Time
Back
Bake
Beverage Heat
Broil
Child Lockout
Clear/Off
Cook
Cook by Time
Cook by Food Type
Custom Speed Cook
Defrost
Defrost by Food Type
Defrost by Time
Defrost by Weight
Delay Start
Express Cook
Favorite Recipes
Help
Hold Food Warm
Options
Power/Temp
Proof Bread
Reheat
Repeat Last
Resume
Review
Sensor Cooking
Set Beeper Volume
Set Clock
Set Display On/Off
Set Display Speed
Set/Clear Reminder
Slow Cook
Soften/Melt
Speed Cook
Start/Pause
Time Cook 1 & 2
Timer On/Off
Toast
Warm/Proof
Features found in the HELP function.
29

Other Advantium Features
Advantium Oven
Use this feature anytime you need a general purpose timer. It can even be used while cooking in the oven.
1. Press the TIMER pad.
2. Turn the dial to select the hours.Press the dial to enter.
3. Turn the dial to select the minutes.Press the dial to enter.
To cancel, press TIMER.
Timer
An automatic fan protects the ovenfrom too much heat inside the ovencavity.
It automatically turns on at low speed if it senses too much heat.
The fan will automatically turn offwhen the internal parts are cool. Itmay stay on for 30 minutes or moreafter the oven control is turned off.
Automaticfan
30
You may lock the control panel to prevent the oven from beingaccidentally started or used bychildren.
Press and hold CLEAR/OFF for 5 seconds to lock and unlock.
When the control panel is locked,Control is LOCKED will be displayedbriefly anytime a pad or dial ispressed.
Child lock-out

The area underneath the turntableshould be cleaned frequently to avoidodors and smoking during a cookingcycle.
The turntable can be broken ifdropped. Wash carefully in warm,sudsy water. Dry completely andreplace.
To replace the turntable, place itscenter over the spindle in the center ofthe oven and turn it until it seats intoplace. (Make sure the smooth side ofthe turntable is facing up and that itscenter seats securely on the spindle.)
Care and Cleaning
Advantium Oven
Helpfulhints
Clean the inside of the oven often forproper heating performance.
Some spatters can be removed with a paper towel, others may require a warm soapy cloth. Remove greasyspatters with a sudsy cloth, then rinse with a damp cloth.
Do not use abrasive cleaners or sharputensils on oven walls.
Never use a commercial ovencleaner on any part of your oven.
Do not clean the inside of the ovenwith metal scouring pads. Pieces canbreak off the pad, causing electricalshock.
An occasional thorough wiping with a solution of baking soda and waterkeeps the inside fresh.
Be certain the oven control is turned off before cleaning any part of this oven.
Walls, Floor, Inside Window, Metal and Plastic Parts on the Door
Do not use the oven without the turntable in place.
How toclean theinside
Removableturntable
Turntable
31

We recommend against using cleaners with ammonia or alcohol, as they can damage the appearanceof the oven. If you choose to use acommon household cleaner, firstapply the cleaner directly to a cleancloth, then wipe the soiled area.
Case
Clean the outside with a sudsy cloth.Rinse and then dry. Wipe the windowclean with a damp cloth.
Glass Control Panel and Door (on some models)
Wipe with a clean damp sponge. Dry thoroughly. Do not use cleaningsprays, large amounts of soap andwater, abrasives or sharp objects on the panel—they can damage it.
Door Seal
It’s important to keep the area clean where the door seals against the oven. Use only mild, non-abrasivedetergents applied with a cleansponge or soft cloth. Rinse well.
Care and Cleaning
Advantium Oven
Put food directly on the aluminumbaking sheet on the wire oven rack, andplace them on the non-stick metal tray,when baking on two levels, broiling or
toasting foods.
Clear glass tray for microwaving Non-stick metal tray for speedcooking
Cooking traysand bakingsheet
To prevent breakage, allow the trays tocool completely before cleaning. Washcarefully in warm, sudsy water or inthe dishwasher.
Do not use metal scouring pads or abrasives, as they may damage the finish. A soap-filled scouring pad may be used to clean the trays.
How to cleanthe outside
32
To clean the stainless steel surface,use warm sudsy water or a stainlesssteel cleaner or polish. Always wipe the surface in the direction of thegrain. Follow the cleaner instructionsfor cleaning the stainless steel surface.
To inquire about purchasing stainlesssteel appliance cleaner or polish, or to find the location of a dealernearest you, please call our toll-freenumber, 800.626.2002 or visitGEAppliances.com.
Stainlesssteel (on somemodels)

33
Troubleshooting
Advantium Oven
Questions?Use thisproblemsolver
Problem Possible Causes What To Do/Explanation
LIGHTS
Light during a This is normal. • This is normal. The oven senses thespeedcook cycle Power level has been heat level and adjusts automatically.dims and cycles on automatically reduced and off, even at full because the oven is hot.power levels
Light visible around This is normal. • When the oven is on, light may the door and outer be visible around the door and case while outer case.speedcooking
FAN
Fan continues to run The oven is cooling. • The fan will automatically shut offafter cooking stops when the internal parts of the oven
have cooled.
Oven vent emits warm This is normal.air while oven is on
Fan comes on This is normal.automatically when using the microwave
COOKING
The oven makes Clicks and fans blowing • These sounds are normal.unusual sounds are normal. The relay while cooking board is turning the
components on and off.
Smoke comes out Food is high in fat • Smoke is normal when cooking of the oven when content. Aerosol spray high-fat foods. I open the door used on the pans.
Food is not fully Programmed times • Increase or decrease time for cooked or browned may not match the size doneness or adjust the upper or at the end of a or amount of food you lower lamps for browning and cooking program are cooking. doneness.
SENSOR ERROR Food amount or type • Press the CLEAR/OFF pad. Set the displayed along with placed in the oven does oven program to match the food an oven signal not match the program or liquid to be cooked or heated.
that was set.
Steam was not sensed by • Vent plastic wrap, use a looser lid the oven because plastic or uncover liquids when cooking wrap was not vented, a lid or heating.too tight was on the dish or a liquid was covered.

Questions?Use thisproblemsolver
Advantium Oven
Problem Possible Causes What To Do/Explanation
DISPLAY
The display is blank The clock display has • Check the OPTIONS menu for clock been turned off. display settings. Turn the display on.
“Control is LOCKED” The control has • Press and hold CLEAR/OFF for appears in display been locked. 5 seconds to unlock the control.
Control display is Clock is not set. • Set the clock.lighted yet oven
Door not securely closed. • Open the door and close securely.will not startSTART/PAUSE pad • Press START/PAUSE.not pressed after enteringcooking selection.
Another selection already • Press CLEAR/OFF.entered in oven andCLEAR/OFF pad notpressed to cancel it .
Size, quantity, or cooking • Make sure you have entered cooking time not entered after time after selecting.final selection.
CLEAR/OFF was pressed • Reset cooking program and press accidentally. START/PAUSE.
OTHER PROBLEMS
The door and inside The heat lamps • This is normal.of the oven feels hot produce intense heat • Use oven mitts to remove food when
in a small space. when ready.
Oven will not start A fuse in your home • Replace fuse or reset circuit breaker.may be blown or thecircuit breaker tripped.
Troubleshooting
34

35
Advantium Oven Warranty
Advantium Oven
For The Period Of: GE Will Replace:
One Year Any part of the oven which fails due to a defect in materials or From the date of the workmanship. During this limited one-year warranty, GE will also original purchase provide, free of charge, all labor and related service costs to replace
the defective part.
Five Years The magnetron tube, if the magnetron tube fails due to a defect in From the date of the materials or workmanship. During this five-year limited warranty, original purchase you will be responsible for any labor or in-home service costs.
All warranty service provided by our Factory ServiceCenters, or an authorized Customer Care® technician. Toschedule service, contact us online at GEAppliances.com,or call 800.GE.CARES (800.432.2737). Please have serial and model numbers availa ble when calling for service.
� Service trips to your home to teach youhow to use the product.
� Improper installation, delivery ormaintenance.
� Product not accessible to provide requiredservice.
� Failure of the product or damage to the product if it is abused, misused (forexample, cavity arcing from wire rack ormetal/foil), or used for other than theintended purpose or used commercially.
� Replacement of house fuses or resetting of circuit breakers.
� Replacement of the cooktop light bulbs.
� Damage to the product caused by accident,fire, floods or acts of God.
� Incidental or consequential damage causedby possible defects with this appliance.
� Damage caused after delivery.
What GE Will Not Cover:
This warranty is extended to the original purchaser and any succeeding owner for productspurchased for home use within the USA. If the product is located in an area where service bya GE Authorized Servicer is not available, you may be responsible for a trip charge or you maybe required to bring the product to an Authorized GE Service Location for service. In Alaska,the warranty excludes the service calls to your home.
Some states do not allow the exclusion or limitation of incidental or consequential damages.This warranty gives you specific legal rights, and you may also have other rights which varyfrom state to state. To know what your legal rights are, consult your local or state consumeraffairs office or your state’s Attorney General.
Warrantor: General Electric Company. Louisville, KY 40225
Staple your receipt here. Proof of the original
purchase date is needed to obtain service under
the warranty.
EXCLUSION OF IMPLIED WARRANTIES—Your sole and exclusive remedy is product repair as provided in this Limited Warranty. Any implied warranties, including theimplied warranties of merchantability or fitness for a particular purpose, are limitedto one year or the shortest period allowed by law.

Printed in Korea
Consumer Support
GE Appliances Website GEAppliances.comHave a question or need assistance with your appliance? Try the GE Appliances Website 24 hours a day, any day of the year! For greater convenience and faster service, you can now download Owner’s Manuals,order parts or even schedule service on-line.
Schedule Service GEAppliances.comExpert GE repair service is only one step away from your door. Get on-line and schedule your service at your convenience any day of the year! Or call 800.GE.CARES (800.432.2737) during normal business hours.
Real Life Design Studio GEAppliances.comGE supports the Universal Design concept—products, services, and environments that can be used by people of all ages, sizes, and capabilities. We recognize the need to design for a wide range of physical andmental abilities and impairments. For details of GE’s Universal Design applications, including kitchen design ideas for people with disabilities, check out our Website today. For the hearing impaired, please call800.TDD.GEAC (800.833.4322).
Extended Warranties GEAppliances.comPurchase a GE extended warranty and learn about special discounts that are available while your warrantyis still in effect. You can purchase it on-line anytime or call 800.626.2224 during normal business hours. GE Consumer Home Services will still be there after your warranty expires.
Parts and Accessories GEAppliances.comIndividuals qualified to service their own appliances can have parts or accessories sent directly to their homes(VISA, MasterCard, and Discover cards are accepted). Order on-line today, 24 hours every day, or by phone at 800.626.2002 during normal business hours.
Instructions contained in this manual cover procedures to be performed by any user. Other servicinggenerally should be referred to qualified service personnel. Caution must be exercised, since improperservicing may cause unsafe operation.
Contact Us GEAppliances.comIf you are not satisfied with the service you receive from GE, contact us on our Website with all the details,including your phone number, or write to: General Manager, Customer Relations
GE Appliances, Appliance ParkLouisville, KY 40225
Register Your Appliance GEAppliances.comRegister your new appliance on-line—at your convenience! Timely product registration will allow for enhancedcommunication and prompt service under the terms of your warranty, should the need arise. You may also mailin the preprinted registration card included in the packing material.

Horn
o Ad
vant
ium
™
MFL38211607 49-40606 02-09 JR
PSB1000PSB1001
Manual delusuario
GEAppliances.com
http://geadvantium.com
AdvantiumControles de cocción . . . . . . . . . . . . .12Funciones del horno . . . . . . . . . . . . . .11Inicio rápida Advantium . . . . . . . . . . . .9¿Qué es Advantium? . . . . . . . . . . . . . .8Seguridad . . . . . . . . . . . . . . . . . . . . . .2–7
Cocción rápida(Speedcooking)Activación de alimentos . . . . . . . . . .21Calentamiento . . . . . . . . . . . . . . . . . . .21Cómo hornear, asar y tostar . . . .19, 20Cómo utilizar el menú de cocciónrápida preestablecido . . . . . . . . . . . .13Consejos de cocción . . . . . . . . . . . . . .14Continuar función . . . . . . . . . . . . . . . .14Cosas que son normales . . . . . . . . . .19Guía de menú de cocción rápida . . . .10Nivel de potencia . . . . . . . . . . . . . . . . .15Recetas favoritas . . . . . . . . . . . . .17, 18Recipientes de cocina rápida seguros . . .5Recipientes para cocción rápida . . . .16Repetir último . . . . . . . . . . . . . . . . . . . .14
MicroondasCocción por sensor . . . . . . . . . . .26, 27Cocción por tiempo . . . . . . . . . . . . . . .23Cómo utilizar las selecciones de microondas preprogramadas . . . .22Consejos de cocina . . . . . . . . . . . . . . .23Consejos para descongelar . . . . . . .25Cosas que son normales . . . . . . . . . .27Descongelación por tiempo . . . . . . .24Descongelación por tipo de alimento . . . . . . . . . . . . . . . . . . . . . .24Nivel(es) de potencia del horno microondas . . . . . . . . . . . .23Precauciones para evitar la posible exposición a energía de microondas excesiva . . . . . . . . . . .2Rápido . . . . . . . . . . . . . . . . . . . . . . . .9, 23Recetas favoritas . . . . . . . . . . . . . . . . .23Recipientes de cocina seguros diseñados para microondas . . . . . . . .6
Otras funcionesAyuda . . . . . . . . . . . . . . . . . . . . . . . . . . .29Cronómetro . . . . . . . . . . . . . . . . . . . . . .30ENCENDIDO/APAGADO La pantalla del reloj . . . . . . . . . . . . . .28Inicio demorado . . . . . . . . . . . . . . . . . .28Recordatorio . . . . . . . . . . . . . . . . . . . . .28Reloj . . . . . . . . . . . . . . . . . . . . . . . . . .9, 28Revisión . . . . . . . . . . . . . . . . . . . . . . . . .28Seguro contra niños . . . . . . . . . . . . . .30Velocidad del avance del texto . . . .28Ventilador automático . . . . . . . . . . . .30Volumen del indicador sonoro . . . .28
Mantenimiento y limpiezaBandejas para cocinar y lámina de hornear . . . . . . . . . . . . . .32Base giratoria desmontable . . . . . . .31Limpieza del exterior . . . . . . . . . . . . .32Limpieza del interior . . . . . . . . . . . . . .31
Resolución de problemasSolucionador de problemas . . .33, 34
Soporte al consumidorGarantía . . . . . . . . . . . . . . . . . . . . . . . . .35Soporte al consumidor . . . . . . . . . . .36
GE
Prof
ile
Anote aquí los números de modelo y de serie:Modelo número ____________________
Número de serie __________________
Los encontrará en una etiqueta dentro del horno.
2
PRECAUCIONES PARA EVITAR LA POSIBLE EXPOSICIÓN A ENERGÍA
DE MICROONDAS EXCESIVA(a) No intente hacer funcionar el horno con
la compuerta abierta ya que ésto puedeprovocar exposición peligrosa a la energíade microondas. Es importante no forzar ni dañar los seguros.
(b) No coloque ningún objeto entre la partefrontal del horno y la compuerta, ni permitaque se acumulen residuos de productolimpiador o detergente, suciedad o polvo en las superficies de sellado.
(c) No haga funcionar el horno si se encuentradañado. Es particularmente importantecerrar bien la compuerta del horno y que no haya daños en:
(1) la compuerta (doblada o curvada),
(2) las bisagras y pestillos (rotos o flojos),
(3) sellos de la compuerta y superficies de sellado.
(d) El horno no debe ser ajustado o reparadopor ninguna persona, excepto por personalde mantenimiento calificado.
Horno Advantium
INSTRUCCIONES DE SEGURIDAD IMPORTANTES
GUARDE ESTAS INSTRUCCIONES

■ Lea todas las instrucciones antes de utilizareste aparato. Cuando utilice aparatoseléctricos, se deben seguir las precaucionesde seguridad básicas, entre las que se incluyen las siguientes:
■ Lea y siga las precauciones específicasdescritas en la sección PRECAUCIONES PARA EVITAR LA POSIBLE EXPOSICIÓN A ENERGÍA DE MICROONDAS EXCESIVAde la página 2.
■ Asegúrese que su aparato esté instalado y puesto a tierra apropiadamente por un técnico cualificado de acuerdo a lasinstrucciones de instalación suministradas.
■ Instale o ubique este aparato únicamente de acuerdo a las instrucciones de instalaciónsuministradas.
■ Algunos productos tales como huevos enterosy contenedores sellados (por ejemplo, frascossellados) son propensos a explotar y no debencalentarse en este horno. Tal uso del hornopuede resultar en lesiones personales.
■ No monte este aparato sobre el fregadero.
■ Este horno no ha sido aprobado ni probadopara utilización marina.
■ Este horno está listado por UL para a instalación de pared estándar.
■ No haga funcionar este aparato si ha sidodañado o dejado caer.
■ Como con cualquier aparato, cuando seautilizado por niños es necesaria una estrechavigilancia.
■ Utilice este aparato solamente para el finprevisto, como se describe en este manual.
■ No utilice químicos ni vapores corrosivos en este aparato.
■ Este horno está específicamente diseñado paracalentar, secar o cocinar alimentos y bebidas y no está diseñado para usarse en un laboratorio ni para uso industrial.
■ No almacene ningún elemento directamentesobre la superficie del horno de microondascuando éste se encuentre en funcionamiento.
■ Sólo personal cualificado debe reparar esteaparato. Póngase en contacto con el centro de mantenimiento autorizado más cercano encaso de necesitar revisión, reparación o ajuste.
■ No cubra ni bloquee ninguna apertura de esteaparato.
■ No almacene este aparato al aire libre. No utilice este producto cerca del agua; por ejemplo, en un sótano húmedo, cerca de una piscina, cerca de un lavabo o lugaressimilares.
■ Consulte las instrucciones de limpieza de la superficie de la puerta en la sección deMantenimiento y limpieza del horno de estemanual.
■ Para reducir el riesgo de incendio dentro del horno:
— No cocine excesivamente los alimentos. Vigile cuidadosamente el aparato cuandose coloque papel, plástico u otros materialescombustibles dentro del microondas mientrasse cocina.
— Quite las tiritas de seguridad (twist-ties) y asas metálicas de los recipientes de papel o plástico antes de colocarlos dentro delmicroondas.
— No utilice el horno para propósitos dealmacenamiento. No deje productos de papel,utensilios de cocina ni comestibles dentro delhorno cuando no se utilicen.
— Si los materiales que se encuentran dentro delhorno prenden fuego, mantenga la compuertadel microondas cerrada, apague el horno ycorte el suministro eléctrico a nivel del fusible o del panel de interruptores de su hogar. Puedepropagar el fuego si abre la compuerta delmicroondas.
— No utilice las funciones del sensor dos veces sucesivamente en la misma porción de alimento. Si el alimento no se cocinacompletamente después del primer conteoregresivo, utilice la función COOK BY TIME(COCINAR POR TIEMPO) para permitir tiempo de cocción adicional.
3
¡ADVERTENCIA!
PRECAUCIONES DE SEGURIDAD
Para reducir el riesgo de quemaduras, descargas eléctricas,incendio, lesiones o exposición a energía de microondasexcesiva:
Horno Advantium
INSTRUCCIONES DE SEGURIDAD IMPORTANTES
GUARDE ESTAS INSTRUCCIONES
4
¡ADVERTENCIA!
■ No haga funcionar el horno sin tener colocadaen su lugar la base giratoria. La base giratoriadebe estar libre de bloqueos para poder girar.
■ Durante y después de utilizarlo, no toque ni permita que la ropa u otros materialesinflamables entren en contacto con ningún áreainterior del horno; primero deje que se enfríe.
■ Mantenga el horno libre de acumulación de grasa.
■ Cocine a fondo la carne de res o ave la carne deres a por los menos una temperatura INTERNAde 160° F y carne de ave a por lo menos unatemperatura INTERNA de 180° F. Cocinar a estastemperaturas generalmente protege contraenfermedades causadas por los alimentos.
■ Entre las superficies potencialmente calientes se incluye la compuerta, base, paredes, parrilla y base giratoria del horno.
PRECAUCIONES DE SEGURIDAD
El arqueo voltaico es el término técnico que define las chispas en el horno. El arqueo voltaico es causado por:
■ Metal o lámina de metal en contacto con el costado del horno.
■ Lámina de metal moldeada al alimento (los bordes doblados hacia arriba actúan comoantenas).
■ Utilice la lámina de metal según las recomendaciones de este manual.
■ Utensilios de cocina de metal utilizados durantela cocción rápida o de microondas (excepto ollassuministradas con el horno).
■ Metal, tal como tiritas metálicas de seguridad,sujetadores para carne de ave o platos conborde de oro en el horno.
■ Toallas de papel reciclado que contenganpedazos de metal pequeños que se utilizan en el horno.
ARQUEOVOLTAICO
El arqueo voltaico puede ocurrir tanto durante la cocción rápida (speedcooking) y de microondas. Si notaque ocurre arqueo voltaico, apriete el botón táctil CLEAR/OFF (BORRAR/APAGAR) y corrija el problema.
Horno Advantium
INSTRUCCIONES DE SEGURIDAD IMPORTANTES
■ Cuando utilice el microondas, coloque todos los alimentos y contenedores en la bandeja de vidrio transparente.
■ No cocine palomitas de maíz en el horno amenos que se coloquen en un accesorio depalomitas de maíz para microondas especial o a menos que utilice palomitas de maíz aptaspara hornos de microondas.
■ No hierva huevos en este horno. Se acumularápresión dentro de la yema del huevo y causaráque explote, posiblemente causando lesiones.
■ No ponga a funcionar el horno sin alimentos enel interior. Esto podría dañar el horno. Aumentael calor alrededor del magnetrón y puedeacortar la vida útil del microondas.
■ Alimentos con la cáscara no cortada, como papas, salchichas, embutidos, tomates, manzanas, hígado de pollo y otrasmenudencias y yemas de huevo debenperforarse para permitir que el vapor escape durante la cocción.
■ AGUA SOBRECALENTADALíquidos, tales como agua, café o té, son capaces de sobrecalentarse más allá del puntode ebullición sin parecer que estén hirviendo. No siempre hay burbujeo o hervor visible cuandose saca el recipiente del horno microondas. ESTOPUEDE RESULTAR EN LA EBULLICIÓN REPENTINADE LÍQUIDOS MUY CALIENTES CUANDO SE MUEVE EL RECIPIENTE O SE INSERTA UNA CUCHARA U OTRO UTENSILIO DENTRO DEL LÍQUIDO.
Para reducir el riesgo de lesión física:— No sobrecaliente el líquido.— Revuelva el líquido antes y a la mitad del tiempo
de calentamiento.— No utilice recipientes con costados rectos
y cuellos angostos.— Después de calentar el recipiente, déjelo
en el horno microondas por un período corto de tiempo antes de sacarlo.
— Tenga extrema precaución cuando introduzcauna cuchara u otro utensilio en el recipiente.
ALIMENTOS
GUARDE ESTAS INSTRUCCIONES

5
¡ADVERTENCIA!■ El horno y la compuerta se tornarán muy
calientes cuando se utiliza la función decocción rápida.
■ Los utensilios de cocina se tornarán muycalientes debido a la transferencia de calorproveniente de los alimentos calentados. Se requerirán guantes de cocina protectorespara manipular los recipientes de cocina.
■ No utilice tapas, recipientes o bolsas decocción/asado fabricadas de láminas de metal,plástico, cera o papel cuando cocine con la función de cocción rápida.
■ No cubra la base giratoria, parrilla de alambre,bandejas ni ninguna pieza del horno con láminade metal. Esto provocará arqueo voltaico en el horno.
■ Utilice la bandeja de metal antiadherente e la misma forma que utilizaría una bandeja o charola para hornear plana.
■ Coloque los alimentos directamente en lasbandejas cuando cocine, a menos que el hornole indique otra cosa.
■ Puede utilizar en el horno cualquier platodiseñado para microondas. Las recetas del Librode cocina Advantium se probaron en recipientesde cocina de vidrio Pyrex® y cacerolas decerámica Corningware®. Los tiempos yresultados de cocción pueden variar cuando se utilizan otros tipos de recipientes diseñadospara hornos microondas. Colóquelosdirectamente en las bandejas.
■ No utilice el horno microondas para secarperiódicos.
■ Utilizar la bandeja de vidrio transparentemientras utiliza la función de cocción rápidapuede producir resultados insatisfactorios.
Utensiliospara cocciónrápidaseguros paramicroondas
La base giratoria siempre debe estar colocadaen su lugar cuando se utiliza el horno.
Coloque la comida directamente en la bandejaantiadherente de metal para realizar
la cocción rápida.
Horno Advantium
INSTRUCCIONES DE SEGURIDAD IMPORTANTES
■ El horno y la compuerta se tornarán muycalientes cuando se hornea, asa, calienta, activa o tuesta algo.
■ Los recipientes de cocina se tornarán muycalientes. Se requerirán guantes de cocinaprotectores para manipular los recipientes de cocina.
■ No utilice tapas, recipientes ni bolsas decocción/asado fabricadas de láminas de metal,plástico, cera o papel cuando cocine con lafunción de cocción rápida.
■ No cubra la base giratoria, parrilla de alambre,bandejas ni ninguna pieza del horno conláminas de metal. Esto causará arqueo voltaico en el horno.
■ Utilice la bandeja metálica antiadherente de la misma forma que utilizaría una bandeja o charola para hornear plana.
■ Utilice la lámina de hornear de aluminio en la parrilla de alambre del horno y colóquelaen la bandeja metálica antiadherente cuandohornee en dos niveles, ase o tueste alimentos.
■ Coloque los alimentos directamente en las bandejas cuando cocine, a menos que el horno le indique hacer otra cosa.
■ Puede utilizar en el horno cualquier platodiseñado para microondas. Las recetas del Librode cocina Advantium se probaron en recipientesde cocina de vidrio Pyrex® y cacerolas decerámica Corningware®. Los tiempos yresultados de cocción pueden variar cuando se utilizan otros tipos de recipientes diseñadospara hornos microondas. Colóquelosdirectamente en las bandejas.
■ No utilice el horno para secar periódicos.
■ Utilizar la bandeja de vidrio transparente cuandohornea, asa, calienta, activa o tuesta puedeproducir resultados insatisfactorios.
Recipientesde cocinasegurosdiseñadosparahornear,asar,calentar,activar ytostar
La base giratoria siempre debe estarcolocada en su lugar cuando se utiliza el horno.
Coloque los alimentos directamenteen la bandeja antiadherente demetal para hornear a un solo nivel. Coloque los alimentos directamente en la hoja para hornear de aluminio
en la parrilla de alambre del horno y colóquelos en la bandeja metálicaantiadherente cuando hornee a dos niveles, ase o tueste alimentos.
GUARDE ESTAS INSTRUCCIONES

6
¡ADVERTENCIA!
■ Coloque los alimentos o recipiente paramicroondas directamente en la bandeja devidrio transparente para cocinar sus alimentos.
■ La utilización de la bandeja metálicaantiadherente durante la cocción en microondaspuede producir resultados insatisfactorios.
■ Si no está seguro de quesu recipiente de cocinasea adecuado paramicroondas, realice la siguiente prueba:coloque en el horno el plato que deseeprobar y una taza demedida de vidrio llena con 1 taza de aguacoloque la taza junto o sobre el plato. Prenda el microondas durante 30–45 segundos a altapotencia. Si el plato se calienta, no debeutilizarse en el microondas.
Si el plato permanece frío y sólo se calienta elagua de la taza, entonces el plato es adecuadopara microondas.
■ Los utensilios de cocina pueden tornarse muy calientes debido a la transferencia de calor proveniente de los alimentos calentados.Podrían requerirse guantes de cocina paramanipular los recipientes de cocina.
■ No utilice productos de papel reciclado. Las toallas, servilletas y papel enceradofabricados de material reciclado puedencontener partículas metálicas que puedencausar arqueo voltaico o prender fuego. Se deben evitar los productos de papel que contienen nylon o filamentos de nylon, ya que también pueden incendiarse.
■ Utilice las láminas metálicas únicamente como se indica en este manual. Cuando utilice la lámina de metal en el horno, mantenga lalámina por lo menos 1″ alejada de los costadosdel horno.
■ No utilice el horno para secar periódicos.
■ Si utiliza un termómetro de carne mientrascocina, asegúrese que sea seguro para utilizarseen hornos microondas.
■ Algunas bandejas de espuma (como aquellas en las que se empaca la carne) tienen una tiritade metal delgada empotrada en la parte inferior.Cuando se cocinan con microondas, el metalpuede quemar el fondo del horno o hacer quearda una toalla de papel.
■ Se puede utilizar toallas de papel, papelencerado y las envolturas plásticas para cubrirlos platos con el propósito de mantener lahumedad y prevenir los salpicones. Asegúresede ventilar cortando la envoltura plástica paraque pueda escapar el vapor.
■ No todas las cubiertas plásticas son adecuadaspara hornos microondas. Lea en la caja lasinstrucciones correspondientes.
■ Se deben cortar, perforar o ventilar como se indica en la caja las bolsas de cocina“hervibles” y bolsas plásticas cerradasherméticamente. De lo contrario, el plásticopuede reventarse durante o inmediatamentedespués de la cocción, resultando en unaposible lesión. También, los recipientes dealmacenamiento plásticos deben al menos estarparcialmente descubiertos debido a que formanun sello muy ajustado. Al cocinar con recipientescubiertos con envoltura plástica de manera muyajustada, quite cuidadosamente la cubierta ydirija el vapor fuera y alejado de manos y rostro.
■ Recipientes de cocina plásticos—Los recipientesde cocina diseñados para microondas son muyútiles, pero deben utilizarse con cuidado. Inclusoel plástico diseñado para microondas podría notolerar condiciones de sobre cocción, así comolos materiales de vidrio o cerámica y podríansuavizarse o carbonizarse si se exponen a períodos cortos de sobre cocción. En exposiciones más prolongadas a lasobrecocción, los alimentos y los recipientes de cocina podrían coger fuego.
Siga las siguientes pautas:
1. Utilice plásticos seguros para microondasúnicamente y utilícelos estrictamente según las especificaciones del fabricante.
2. No cocine en el microondas recipientes vacíos.
3. No permita que los niños utilicen recipientes de plástico sin vigilarlos bien.
Recipientesde cocinasegurosdiseñadosparamicroondas
La base giratoria siempre debe estarcolocada en su lugar cuando se utiliza
el horno.
La bandeja de cristaltransparente siempre deberá
estar en su lugar cuando se cocina con microondas.
Asegúrese de utilizar recipientes de cocina adecuados durante la cocción a microondas. Se pueden utilizar la mayoría de las cacerolas, platos para cocinar, tazas de medir, tazasnormales, cerámica o loza que no tengan bordes metálicos o vidriados con un recubrimientometálico. Algunos recipientes de cocina se encuentran marcados como adecuados paramicroondas.
Horno Advantium
INSTRUCCIONES DE SEGURIDAD IMPORTANTES
Cómo probar si un envase esseguro para usarse en un horno
de microondas
GUARDE ESTAS INSTRUCCIONES

7
¡ADVERTENCIA!
■ No descongele bebidas en botellas con cuellos angostos (especialmentebebidas gaseosas/carbonatadas). Inclusosi el recipiente se encuentra abierto, se puede acumular presión. Esto puedeocasionar que el recipiente explote,dando posiblemente como resultandouna lesión.
■ Los alimentos cocinados en líquidos(tales como la pasta) pueden tener latendencia de hervir más rápidamenteque los alimentos que contienen menoshumedad. En caso de que ocurra esto,consulte la sección de Mantenimiento ylimpieza del horno para las instruccionesde cómo limpiar el interior del horno.
■ Los alimentos calientes y el vaporpueden provocar quemaduras. Tengacuidado al abrir cualquier tipo derecipiente que contenga alimentoscalientes, incluyendo bolsas depalomitas de maíz, bolsas y cajas de cocina. Para prevenir la posibilidad de lesiones, dirija el vapor en direccióncontraria a las manos y el rostro.
■ No cocine las papas excesivamente.Pueden deshidratarse y provocar fuego,causando daños al horno.
■ Evite calentar los alimentos para bebé en frascos de vidrio, incluso sin la tapa.Asegúrese de cocinar bien toda lacomida del bebé. Remueva los alimentospara distribuir el calor uniformemente.Tenga cuidado de evitar lasescaldaduras al calentar la fórmula. El recipiente puede sentirse más frío delo que la fórmula realmente está. Revisesiempre la fórmula antes de alimentar al bebé.
■ Nunca intente freír en abundante aceiteen el microondas.
PRECAUCIONES DE SEGURIDAD
GUARDE ESTAS INSTRUCCIONES
Horno Advantium
INSTRUCCIONES DE SEGURIDAD IMPORTANTES
La mayoría de los marcapasos se encuentran protegidos contra lainterferencia de productos electrónicos,incluyendo los microondas. Sin embargo,los pacientes que tengan marcapasosdeberían consultar a sus médicos si tienen alguna duda.
AVISO—MARCAPASOS
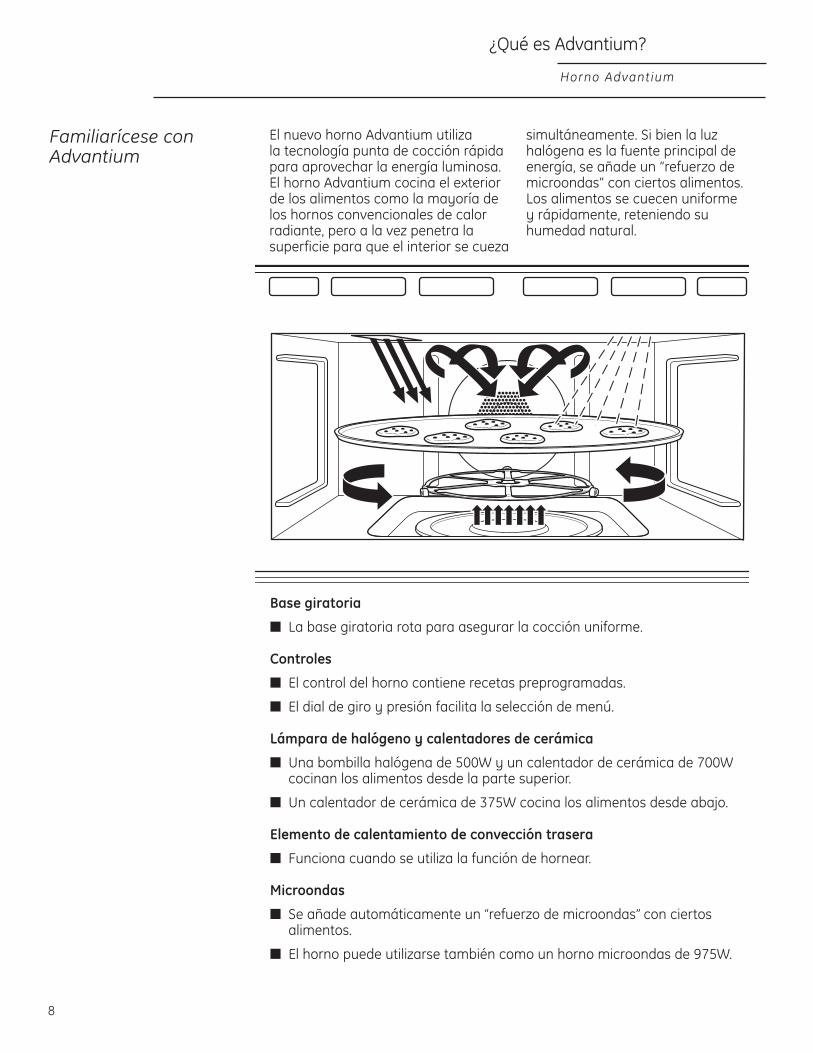
¿Qué es Advantium?
Horno Advantium
El nuevo horno Advantium utiliza la tecnología punta de cocción rápidapara aprovechar la energía luminosa.El horno Advantium cocina el exteriorde los alimentos como la mayoría delos hornos convencionales de calorradiante, pero a la vez penetra lasuperficie para que el interior se cueza
simultáneamente. Si bien la luzhalógena es la fuente principal deenergía, se añade un “refuerzo demicroondas” con ciertos alimentos.Los alimentos se cuecen uniforme y rápidamente, reteniendo suhumedad natural.
Familiarícese conAdvantium
8
Base giratoria
■ La base giratoria rota para asegurar la cocción uniforme.
Controles
■ El control del horno contiene recetas preprogramadas.
■ El dial de giro y presión facilita la selección de menú.
Lámpara de halógeno y calentadores de cerámica
■ Una bombilla halógena de 500W y un calentador de cerámica de 700Wcocinan los alimentos desde la parte superior.
■ Un calentador de cerámica de 375W cocina los alimentos desde abajo.
Elemento de calentamiento de convección trasera
■ Funciona cuando se utiliza la función de hornear.
Microondas
■ Se añade automáticamente un “refuerzo de microondas” con ciertosalimentos.
■ El horno puede utilizarse también como un horno microondas de 975W.

Inicio rápido Advantium
Horno Advantium
Poner elreloj
Cuando conecte por primera vez el hornodespués de una interrupción eléctrica:
1. Gire el dial seleccionador para ponerla hora. Apriete el dial para ingresar.
2. Gire el dial seleccionador para ajustarlos minutos. Apriete el dial paraingresar.
3. Gire el dial para seleccionar AM o PM.Apriete el dial para ingresar.
Para cambiar la hora:
1. Apriete el botón OPTIONS.
2. Gire el dial seleccionador para poner el reloj (SET CLOCK). Apriete el dial e ingrese y siga las instrucciones de la pantalla para ajustar.
Para iniciar lacocción rápida
Paso 1:Apriete el botón SPEEDCOOK (Cocción rápida).
Paso 2:Gire el dial a FOOD MENU (Menú dealimentos). Apriete el dial para ingresar.
Paso 3:Gire el dial para seleccionar el tipo de categoría de alimentos que desee.Apriete el dial para ingresar.
Paso 4:Gire el dial para seleccionar el alimentoespecífico. Apriete el dial para ingresar.
Paso 5:Gire el dial para seleccionar la cantidad,tamaño y/o estado de cocción (si senecesita, el horno le preguntará). Aprieteel dial después de cada selección.
Paso 6:Una vez que la pantalla indique ADJUSTTIME OR START (AJUSTE EL TIEMPO OINICIE), apriete el dial o el botón start(inicio) para comenzar a cocinar.
■ Presionar CLEAR/OFF(BORRAR/APAGAR) en cualquiermomento para detener la cocción.
Uso del microondas con la función EXPRESS(RÁPIDA)
Apriete EXPRESS repetidamente paraincrementos de 30 segundos de tiempo de cocción con microondas.
El horno empezará a funcionarinmediatamente.
La base giratoria siempre debeestar colocada en su lugar cuando
se utiliza el horno.
Coloque la comidadirectamente en la bandeja
antiadherente de metal pararealizar la cocción rápida.
La base giratoria siempre debeestar colocada en su lugarcuando se utiliza el horno.
La bandeja de cristaltransparente siempre deberá
estar en su lugar cuando se cocina con microondas.
9
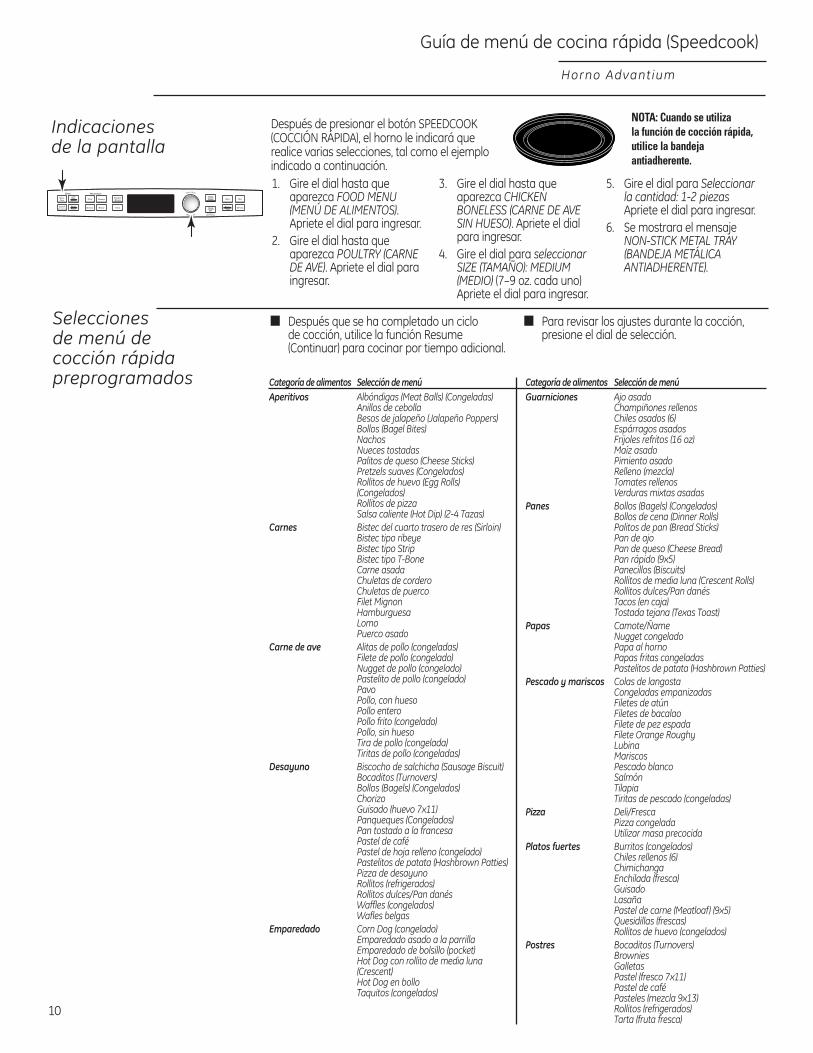
10
Guía de menú de cocina rápida (Speedcook)
Horno Advantium
Indicaciones de la pantalla
1. Gire el dial hasta queaparezca FOOD MENU(MENÚ DE ALIMENTOS).Apriete el dial para ingresar.
2. Gire el dial hasta queaparezca POULTRY (CARNEDE AVE). Apriete el dial para ingresar.
3. Gire el dial hasta queaparezca CHICKENBONELESS (CARNE DE AVESIN HUESO). Apriete el dialpara ingresar.
4. Gire el dial para seleccionarSIZE (TAMAÑO): MEDIUM(MEDIO) (7–9 oz. cada uno)Apriete el dial para ingresar.
5. Gire el dial para Seleccionarla cantidad: 1-2 piezasApriete el dial para ingresar.
6. Se mostrara el mensajeNON-STICK METAL TRAY(BANDEJA METÁLICAANTIADHERENTE).
NOTA: Cuando se utiliza la función de cocción rápida,utilice la bandejaantiadherente.
Después de presionar el botón SPEEDCOOK(COCCIÓN RÁPIDA), el horno le indicará querealice varias selecciones, tal como el ejemploindicado a continuación.
Categoría de alimentos Selección de menúAperitivos Albóndigas (Meat Balls) (Congeladas)
Anillos de cebollaBesos de jalapeño (Jalapeño Poppers)Bollos (Bagel Bites)NachosNueces tostadas Palitos de queso (Cheese Sticks) Pretzels suaves (Congelados)Rollitos de huevo (Egg Rolls) (Congelados) Rollitos de pizzaSalsa caliente (Hot Dip) (2-4 Tazas)
Carnes Bistec del cuarto trasero de res (Sirloin)Bistec tipo ribeyeBistec tipo Strip Bistec tipo T-Bone Carne asadaChuletas de cordero Chuletas de puerco Filet MignonHamburguesa LomoPuerco asado
Carne de ave Alitas de pollo (congeladas) Filete de pollo (congelado) Nugget de pollo (congelado) Pastelito de pollo (congelado) PavoPollo, con huesoPollo entero Pollo frito (congelado) Pollo, sin huesoTira de pollo (congelada) Tiritas de pollo (congeladas)
Desayuno Biscocho de salchicha (Sausage Biscuit) Bocaditos (Turnovers)Bollos (Bagels) (Congelados)ChorizoGuisado (huevo 7x11)Panqueques (Congelados) Pan tostado a la francesaPastel de caféPastel de hoja relleno (congelado) Pastelitos de patata (Hashbrown Patties) Pizza de desayunoRollitos (refrigerados)Rollitos dulces/Pan danésWaffles (congelados)Wafles belgas
Emparedado Corn Dog (congelado) Emparedado asado a la parrilla Emparedado de bolsillo (pocket) Hot Dog con rollito de media luna (Crescent) Hot Dog en bollo Taquitos (congelados)
Categoría de alimentos Selección de menúGuarniciones Ajo asado
Champiñones rellenosChiles asados (6)Espárragos asadosFrijoles refritos (16 oz)Maíz asadoPimiento asadoRelleno (mezcla)Tomates rellenosVerduras mixtas asadas
Panes Bollos (Bagels) (Congelados) Bollos de cena (Dinner Rolls)Palitos de pan (Bread Sticks)Pan de ajoPan de queso (Cheese Bread) Pan rápido (9x5)Panecillos (Biscuits)Rollitos de media luna (Crescent Rolls) Rollitos dulces/Pan danésTacos (en caja)Tostada tejana (Texas Toast)
Papas Camote/ÑameNugget congeladoPapa al hornoPapas fritas congeladas Pastelitos de patata (Hashbrown Patties)
Pescado y mariscos Colas de langosta Congeladas empanizadas Filetes de atúnFiletes de bacalao Filete de pez espadaFilete Orange Roughy Lubina MariscosPescado blancoSalmónTilapiaTiritas de pescado (congeladas)
Pizza Deli/Fresca Pizza congeladaUtilizar masa precocida
Platos fuertes Burritos (congelados) Chiles rellenos (6)ChimichangaEnchilada (fresca) GuisadoLasañaPastel de carne (Meatloaf) (9x5)Quesidillas (frescas)Rollitos de huevo (congelados)
Postres Bocaditos (Turnovers)BrowniesGalletas Pastel (fresco 7x11)Pastel de café Pasteles (mezcla 9x13)Rollitos (refrigerados)Tarta (fruta fresca)
Selecciones de menú decocción rápidapreprogramados
■ Después que se ha completado un ciclo de cocción, utilice la función Resume(Continuar) para cocinar por tiempo adicional.
■ Para revisar los ajustes durante la cocción,presione el dial de selección.
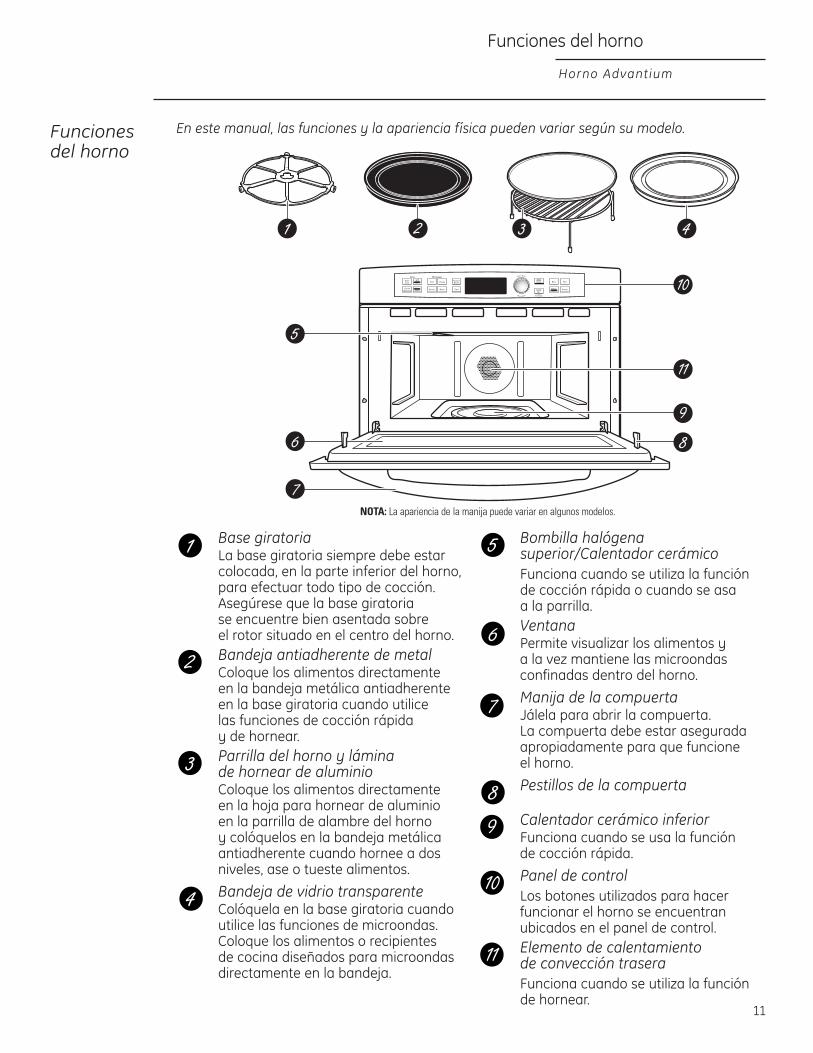
Funciones del horno
Horno Advantium
Funcionesdel horno
En este manual, las funciones y la apariencia física pueden variar según su modelo.
Base giratoriaLa base giratoria siempre debe estarcolocada, en la parte inferior del horno,para efectuar todo tipo de cocción.Asegúrese que la base giratoria se encuentre bien asentada sobre el rotor situado en el centro del horno.Bandeja antiadherente de metalColoque los alimentos directamente en la bandeja metálica antiadherenteen la base giratoria cuando utilice las funciones de cocción rápida y de hornear.Parrilla del horno y lámina de hornear de aluminioColoque los alimentos directamente en la hoja para hornear de aluminio en la parrilla de alambre del horno y colóquelos en la bandeja metálicaantiadherente cuando hornee a dosniveles, ase o tueste alimentos.
Bandeja de vidrio transparenteColóquela en la base giratoria cuandoutilice las funciones de microondas.Coloque los alimentos o recipientes de cocina diseñados para microondasdirectamente en la bandeja.
Bombilla halógenasuperior/Calentador cerámicoFunciona cuando se utiliza la funciónde cocción rápida o cuando se asa a la parrilla.VentanaPermite visualizar los alimentos y a la vez mantiene las microondasconfinadas dentro del horno.
Manija de la compuertaJálela para abrir la compuerta. La compuerta debe estar aseguradaapropiadamente para que funcione el horno.
Pestillos de la compuerta
Calentador cerámico inferiorFunciona cuando se usa la función de cocción rápida.
Panel de controlLos botones utilizados para hacerfuncionar el horno se encuentranubicados en el panel de control.Elemento de calentamiento de convección traseraFunciona cuando se utiliza la funciónde hornear.
11
NOTA: La apariencia de la manija puede variar en algunos modelos.

12
Horno Advantium
Controles de cocción
Funciones del horno
Con su horno Advantium, puede cocinar con luces halógenas de alta intensidad, calentadores de cerámica y elemento de calentamiento de convección y/o energía de microondas convencional.
SPEEDCOOK/Repeat Last (COCCIÓN RÁPIDA/Repetir última)Apriete este botón para acceder al menú de cocción rápida preprogramado. Apriételo y manténgalo presionado por el plazo de 3 segundos para repetir la última selección de cocción.CONV BAKE/BROIL (HORNEAR PORCONV/ASAR) Apriete este botón para hornear, asar o tostar.CUSTOM SPEEDCOOK (COCCIÓN RÁPIDA PERSONALIZADA) Apriete este botón para programar su propioprograma de cocción rápida.WARM/PROOF (CALENTAR/ACTIVAR) Seleccione WARM (CALIENTE) para mantener los alimentos cocinados calientes a temperatura de servir.Seleccione PROOF (ACTIVAR) para programarun entorno caliente útil para que se inflen los productos de levadura.COOK (COCINAR) (Microondas) Apriete este botón para cocinar conmicroondas alimentos que no se encuentranen la sección de FAVORITE RECIPES (RECETAS FAVORITAS).EXPRESS (FUNCIÓN RÁPIDA) (Microondas) Apriete durante 30 segundos de tiempo de cocción de microondas. Cada vez que se aprieta el botón se añaden 30 segundosadicionales al tiempo de cocción restante. El horno empieza a funcionarinmediatamente.DEFROST (DESCONGELAR) (Microondas) Apriete este botón para descongelar, suavizar o derretir alimentos congelados.REHEAT (RECALENTAR) (Microondas)Apriete este botón para recalentar porcionesde alimentos cocinados previamente o un plato de restos.FAVORITE RECIPES (RECETAS FAVORITAS) Apriete este botón para añadir, cambiar o borrar una receta de la memoria.TIMER (CRONÓMETRO) Apriete este botón para programar el cronómetro de minutos.
PantallaMuestra e instruye sobre la utilización de todas las funciones del horno.DIAL DE SELECCIÓN: Gírelo para seleccionar,Apriételo para ingresar Primero gire, luegoapriete el dial para seleccionar la opción, el nivel de potencia del alimento o latemperatura. También utilice el dial paraaumentar (gire hacia el sentido de lasmanecillas del reloj) o disminuir (gire hacia el sentido opuesto de las manecillas del reloj)los tiempos de cocción.START/PAUSE (INICIAR/PAUSAR) Apriete este botón para iniciar o pausarcualquier función de cocción.CLEAR/OFF (BORRAR/APAGAR) Apriete este botón para cancelar TODOSlos programas del horno excepto el reloj y cronómetro.BACK (REGRESAR)Apriete este botón para regresar uno o más niveles en el proceso de programación tal como cuando se ingresan recetaspersonalizadas.HELP (AYUDA) Apriete este botón para conocer más detallessobre las funciones de su horno.POWER/TEMP (POTENCIA/TEMPERATURA)Durante la cocción, apriete este botón ygire/apriete el dial selector para cambiar el nivel de potencia del microondas, la temperatura de hornear de convección o la temperatura de cocción rápida,ajustando la intensidad de las lámparassuperior e inferior y del calentador.OPTIONS (OPCIONES)Apriete este botón para programar el Relojy acceder a las funciones Volumen de laalarma sonora (indicador sonoro), Pantalladel reloj ON/OFF (ENCENDIDA/APAGADA),Velocidad de la búsqueda (scroll) de lapantalla, Inicio demorado y Recordatorio.

Horno Advantium
Cocción rápida
Advantium se encuentra preprogramado paracocinar más de 175 platos populares.1. Apriete el botón Speedcook (Cocción
rápida). Si no se realiza una selección dentro del plazo de 15 segundos, la pantallaregresará a la hora del día.
2. Gire el dial para seleccionar el tipo de categoría de alimentos que desee.Apriete el dial para ingresar.
3. Gire el dial para seleccionar alimentosespecíficos (selección del menú). Aprieteel dial para ingresar.
4. Gire el dial para seleccionar la cantidad,tamaño y/o estado de cocción (si senecesita, el horno le preguntará). Aprieteel dial después de cada selección.
5. Una vez que la pantalla muestre: ADJUSTTIME (AJUSTAR HORA) o START (INICIAR)apriete iniciar o el dial selector paraempezar a cocinar.
Gire los alimentos cuando el horno le indiqueTURN FOOD OVER (DÉ VUELTA A LOSALIMENTOS) (para ciertos alimentos).Cuando el horno indica CHECK for DONENESS(REVISAR NIVEL DE COCCIÓN), revise para versi sus alimentos se encuentran listos del modoque prefiere (para ciertos alimentos).Para revisar los ajustes durante la cocción,apriete el dial selector.Si ingresa una selección incorrecta encualquier momento, simplemente apriete el botón BACK (REGRESAR) y reingrese las selecciones deseadas.
Cómo utilizarlas funcionesde cocciónrápida
PRECAUCIÓN: cuando utilice los programas de cocción rápida, recuerde que el horno, compuerta y los platos se ¡encontrarán muy calientes!Antes de utilizar su horno por primera vez, se debe programar el reloj. Consulte la sección de Inicio rápido de Advantium.Antes de empezar, asegúrese que se encuentre colocada la base giratoria. Si es necesario, utilice la bandeja de metal antiadherente y sus propios recipientes de cocina de cerámica o vidrio.
La base giratoria siempre debe estar colocada en su lugar cuando se utiliza el horno.
Coloque la comida directamente en la bandeja antiadherente de metal
para realizar la cocción rápida.
SELECCIONES DE PRE-SET FOOD SELECTIONS (SELECCIONES DE ALIMENTOSPREPROGRAMADOS) DE COCCIÓN RÁPIDA:■ Aperitivos ■ Desayuno ■ Guarniciones ■ Pescados y mariscos■ Aves ■ Emparedado ■ Panes ■ Pizza■ Carnes ■ Entrantes ■ Papas ■ Postres
Cómo utilizarel menú decocción rápidapreestablecido
■ Al iniciarse un programa de cocción rápida, la pantalla mostrará OPTIMIZING COOKTIME (OPTIMIZANDO TIEMPO DE COCCIÓN).El horno detecta automáticamente el nivelde voltaje eléctrico en su hogar y aumentay disminuye el tiempo de cocción para lacocción adecuada.
■ Si se abre la compuerta durante la cocción, el horno se detendrá automáticamente y se mostrará PAUSE (PAUSA) en la pantalla.Cierre la compuerta y apriete el botónSTART/PAUSE (INICIAR/PAUSAR) paracontinuar cocinando.
■ En cualquier momento durante la cocciónpuede girar el dial selector para cambiar el tiempo de cocción. Usted puede cambiar
los niveles de potencia apretando el botónPOWER/TEMP (POTENCIA/TEMPERATURA).
■ Para asegurar resultados de cocciónconstantes, el horno puede ajustar los niveles de potencia a menor nivel si el horno se encuentra caliente al inicio de un programa.
■ Al final de la cocción, el ventiladorautomático puede continuar funcionandopor un período corto de tiempo para enfriarlos componentes internos.
■ Para cocinar durante un tiempo adicionaldespués de que se ha completado el ciclode cocción, utilice la función Resume(continuar).
13

Cocción rápida (Speedcooking)
Horno Advantium
14
Consejos de cocción para obtenerresultados de saborfantásticos
Para asegurar un dorado uniforme yconstante cuando cocine los alimentosdirectamente en la bandeja de metalantiadherente, coloque los alimentos como se indica a continuación.
Los alimentos pueden estar juntospero no se deben montar unos sobreotros.
Patrón circular(Ejemplo: biscochos, galletas)
Patrón radial(Ejemplo: rollitos de media luna [crescent])
Capa sencilla(Ejemplo: aperitivos)
Patrón de lado a lado(Ejemplo: carnes y aves)
Repeat last (Repetir último)
1. Apretar y mantener apretado el botón SPEEDCOOK (COCCIÓNRÁPIDA) durante 3 segundos.
2. Se mostrará el último alimentopreprogramado.
3. Apriete el botón START/PAUSE(INICIAR/PAUSAR) o el dial selectorpara iniciar la cocción.
Utilice esta función de ahorro de tiempo para cocinar alimentosrepetitivos como galletas o entradas.
NOTA: El último programa utilizado se almacena durante dos horas.
Continuarfunción
1. Si sus alimentos necesitancocinarse por un poco más de tiempo, puede reiniciar el horno apretando el botónSTART/PAUSE (INICIAR/PAUSAR) o el dial selector.
2. El mensaje RESUME COOKING(CONTINUAR COCINANDO)se mostrará y el horno reiniciaráinmediatamente al 10% del tiempooriginal.
El programa se mantiene en la memoria durante 10 minutos.Después de ello necesitará iniciar el programa nuevamente. Consulte el menú de Cómo utilizar el menú de cocción rápida preprogramado.
Se deben descongelar antes de cocinar la carne fresca, pollo, pescado o mariscos que han sido congelados (se puede utilizar la función dedescongelación de microondas). Para otros alimentos preempacadoscongelados, siga las instrucciones de la caja.

Cocción rápida (Speedcooking)
Horno Advantium
Nivel de potenciade la función deCocción rápida
Advantium utiliza el poder de una luzhalógena de alta intensidad, calentadoresde cerámica y microondas para cocinar la parte superior, inferior e interior de los alimentos simultáneamente para sellarla humedad y el sabor.Cuando utiliza las recetas de cocciónrápida preprogramadas en el menú dealimentos, los niveles de potencia ya hansido seleccionados para usted.Sin embargo, estos niveles de potenciapueden ajustarse antes o durante la cocción. Ver POWER/TEMP(POTENCIA/TEMPERATURA) en la sección de Controles de cocción. La función de cocción rápida personalizada le permite cocinar rápidamente alimentosque no se encuentran en el menúpreprogramado de alimentos,seleccionando su propio tiempo de cocción y nivel de potencia.Cada nivel de potencia le brinda potenciade calentamiento y energía de microondasdurante cierto porcentaje de tiempo.La función UPPER POWER (U) [POTENCIASUPERIOR (U)] controla el calentadorsuperior y la potencia de microondas. Un ajuste más alto de UPPER POWER(POTENCIA SUPERIOR) utilizará máspotencia de calentamiento superior,dorando más la comida en la partesuperior. Un ajuste más bajo de UPPERPOWER (POTENCIA SUPERIOR) utilizará máspotencia de microondas, permitiendo quelos alimentos se cocinen más uniforme y completamente.Seleccione un ajuste más alto paraalimentos tales como pizza y alimentoshorneados. Seleccione un ajuste más bajopara alimentos tales como guisados, carnede res y pescado.
LOWER POWER (L) [POTENCIA INFERIOR (L)]controla el calentador inferior.Seleccione un ajuste más alto para dorar alimentos más en el lado inferior.Seleccione un ajuste más bajo para dorarmenos la parte inferior.1. Apriete el botón de SPEEDCOOK
(COCCIÓN RÁPIDA) y gire el dial paraseleccionar el FOOD MENU (MENÚ DECOMIDA) o FAVORITE RECIPES (RECETASFAVORITAS) o apriete el botón CUSTOMSPEEDCOOK (COCCIÓN RÁPIDAPERSONALIZADA) para ajustar el nivel de potencia y el cronómetromanualmente. Apriete el dial paraingresar.
2. Gire el dial para seleccionar un alimento, hora o nivel de potenciacomo se le indica. Apriete el dial para ingresar.
3. Para cambiar el nivel de potenciacuando la pantalla lo indica, gire el dialen sentido de las manecillas del relojpara aumentar o en sentido opuesto de las manecillas del reloj paradisminuir el nivel de potencia superior.Apriete el dial para ingresar.
4. Los niveles de Microondas seprograman automáticamente en basea los ajustes de las lámparas superiorese inferiores.
5. Apriete el botón START/PAUSE(INICIAR/PAUSAR) o el dial selector para iniciar la cocción.
Si no desea cambiar uno de los ajustes,simplemente apriete el dial para pasar a la siguiente selección.NOTA: Tenga cuidado al ajustar los niveles de potencia de modo que no cocine demasiado o muy poco los alimentos.
15
U = Seleccione un ajuste más alto para alimentos delgados querequieren de una cubierta dorada(por ejemplo: filetes de pescado, pan tostado, pechuga de pollodeshuesada). Seleccione un ajustemás bajo para alimentos o comidasmás gruesas con un contenido de grasa o azúcar más alto (por ejemplo: pasteles, asados).
L = Seleccione un ajuste más alto paralos alimentos gruesos o densos quequizás no se cocinen rápidamente en el centro (por ejemplo: guisados).Seleccione un ajuste más bajo paraalimentos delgados (por ejemplo:galletas) y comidas con contenido de grasa o azúcar alto (por ejemplo:bollos, pasteles).
Siga las siguientes pautas cuando selecciona los mejores ajustes U (superior) = y L (inferior) = para sus recetas favoritas:

Cocción rápida (Speedcooking)
Horno Advantium
Cocción rápidapersonalizada
Advantium le brinda la flexibilidad de cocinar sus platillos favoritos.
Si desea cocinar un alimento que no se encuentra listado en las selecciones preprogramadas,utilice la función de cocción rápidapersonalizada.
1. Apriete el botón CUSTOMSPEEDCOOK (Cocción rápidapersonalizada).
Si no se realiza una selección dentro del plazo de 15 segundos, la pantallaregresará a la hora del día.
2. Gire el dial seleccionador paraseleccionar el tiempo de cocción.Apriete el dial para ingresar.
La pantalla le pedirá que seleccioneel nivel de potencia.
3. Gire el dial en sentido de las manecillas del reloj paraincrementar o en sentido contrarioa las manecillas del reloj paradisminuir el nivel de potenciasuperior. Apriete el dial paraingresar.
4. Gire el dial para cambiar el nivel de potencia inferior. Apriete el dialpara ingresar.
5. Apriete el botón START/PAUSE(INICIAR/PAUSAR) o el dial selectorpara iniciar la cocción.
Para obtener sugerencias sobre el nively tiempo de cocción, utilice su guía olibro de cocina.
Recipientesparacocciónrápida
■ Siga las sugerencias indicadas en la pantalla del horno o en elLibro de cocina o Guía de cocina.
■ Los recipientes de cocina se tornarán muy calientes debido a la transferencia de calorproveniente de los alimentoscalentados. Se requerirán guantesde cocina protectores paramanipular los recipientes de cocina.
■ Coloque los alimentos directamente en la bandeja demetal antiadherente cuando cocine,a menos que el horno le indiquerealizar otra cosa.
■ Utilice la bandeja de metalantiadherente de la misma maneraque utilizaría una charola o bandejade hornear plana.
■ Además de los recipientesfacilitados, puede utilizar platos no metálicos para guisados, platospara tartas y otros recipientesresistentes y seguros contra el calor.Colóquelos directamente en la basegiratoria.
■ Asegúrese de seleccionar un tamaño que rote fácilmente.
■ Coloque la bandeja de metalantiadherente en la base giratoria.Coloque los recipientes de vidrio o cerámica en la bandeja.
■ No utilice los recipientes de cocina o cubiertas (tapas) hechas de papel,plástico o láminas de aluminiocuando cocine utilizando un ciclo de cocción rápida.
16

Cocción rápida (Speedcooking)
Horno Advantium
Escoja Favorite recipe(Receta favorita) paraingresar y almacenar
Agregue y almacene hasta 30 de suspropias recetas de microondas o de cocción rápida como sus recetasfavoritas. ¡Una vez que lo hayahecho, podrá acceder a su recetafavorita rápidamente de modo quesus comidas se cocinen justo de lamanera que le gusta todo el tiempo!
1. Apriete el botón FAVORITE RECIPES(RECETAS FAVORITAS) o SPEEDCOOK(COCCIÓN RÁPIDA).
2. Gire el dial hasta que aparezcaFAVORITE RECIPES (RECETASFAVORITAS). Apriete el dial paraingresar (Omita este paso si seapretó el botón FAVORITE RECIPES(RECETAS FAVORITAS) en el paso 1).
3. Gire el dial hasta que aparezcaADD RECIPE (AÑADIR RECETA).Apriete el dial para ingresar.
4. Gire el dial hasta ver COPY SPEED RECIPE (COPIAR LA RECETADE COCCIÓN RÁPIDA) o para ADDNEW RECIPE (AÑADIR UNA RECETANUEVA). Apriete el dial paraingresar.
Si se seleccionó COPY SPEEDRECIPE (COPIAR LA RECETA DECOCCIÓN RÁPIDA), gire el dial paraseleccionar el tipo de alimento yapriete el botón FAVORITE RECIPES(RECETAS FAVORITAS) para ingresary almacenar la receta.
Si se seleccionó ADD NEW RECIPE(AÑADIR RECETA NUEVA), gire el dialpara seleccionar SPEEDCOOK
(COCCIÓN RÁPIDA) o recetaMICROWAVE (DE MICROONDAS).Apriete el dial para ingresar y continúe con estos pasos.
5. Aparecerá SELECT COOK TIME(SELECCIONAR EL TIEMPO DECOCCIÓN). Gire el dial paraseleccionar el tiempo de cocción.Apriete el dial para ingresar.
La pantalla le pedirá que seleccione el nivel de potencia.
6. Gire el dial en sentido de las manecillas del reloj paraincrementar o en sentido contrarioa las manecillas del reloj paradisminuir el nivel de potencia.Apriete el dial para ingresar.
Para obtener sugerencias sobre el nivel y tiempo de cocción, utilice su guía o libro de cocina.
7. Aparecerá SPELL THE FOOD NAME(DELETREAR EL NOMBRE DE LACOMIDA). Gire el dial para ingresarla primera letra de su descripciónde comida y apriete el dial paraingresar. Continúe este procesopara deletrear el resto del nombrede la comida. Apriete el botónSTART/PAUSE (INICIAR/PAUSAR)para almacenar la receta y sunombre.
Para encontrar y utilizar las recetasfavoritas almacenadas:
1. Apriete el botón FAVORITE RECIPES(RECETAS FAVORITAS) o SPEEDCOOK(COCCIÓN RÁPIDA).
2. Gire el dial hasta que aparezcaFAVORITE RECIPES (RECETASFAVORITAS). Apriete el dial para ingresar.
3. Gire el dial hasta ver USE FAVORITERECIPE (UTILIZAR LA RECETAFAVORITA) y apriete para ingresar.
4. Aparecerán los nombres de las recetas que ingresó.
5. Gire el dial hasta que se muestre la receta que desea y apriete el dial para ingresar.
6. Apriete el botón START/PAUSE(INICIAR/PAUSAR) o el dial selectorpara iniciar la cocción.
Escoja Favoriterecipe (Recetafavorita) paraencontrar y utilizar
17

Cocción rápida (Speedcooking)
Horno Advantium
Escoja Favoriterecipe (Recetafavorita) paraajustar o cambiar
Para ajustar o cambiar las recetasde cocción rápida personalizadasalmacenadas:
1. Apriete el botón FAVORITE RECIPES (RECETAS FAVORITAS) oSPEEDCOOK (COCCIÓN RÁPIDA).
2. Gire el dial hasta que aparezcaFAVORITE RECIPES (RECETASFAVORITAS). Apriete el dial paraingresar.
3. Gire el dial hasta que aparezcaEDIT RECIPE (EDITAR RECETA).Apriete el dial para ingresar.
4. Gire el dial para escoger la receta que desea cambiar.Apriete el dial para ingresar.Aparecerán los ajustes actuales.
5. Apriete el dial para ingresar.
6. La pantalla le pedirá queseleccione el nivel de potencia y edite el nombre. Gire el dial yapriételo para ingresar los ajustescorrespondientes.
Para obtener sugerencias sobre elnivel y tiempo de cocción, utilice suguía o libro de cocina.
Para borrar las recetas de cocciónrápida personalizadas almacenadas:
1. Apriete el botón FAVORITE RECIPES (RECETAS FAVORITAS) oSPEEDCOOK (COCCIÓN RÁPIDA).
2. Gire el dial hasta que aparezcaFAVORITE RECIPES (RECETASFAVORITAS). Apriete el dial paraingresar.
3. Gire el dial hasta que aparezcaDELETE RECIPE (BORRAR RECETA)y apriete el dial para ingresar.
4. Gire el dial para escoger la recetaque desea y apriete el dial paraingresar.
Escoja Favoriterecipe (Recetafavorita) paraborarlas
18

Cocción rápida (Speedcooking)/Cómo hornear, asar y tostar
Horno Advantium
Cosas que son normales
Tiempos de cocción■ Cuando cocine con la función de cocción
rápida las comidas preprogramadas, puedeque vea el mensaje OPTIMIZING COOK TIME(OPTIMIZACIÓN DEL TIEMPO DE COCCIÓN)en la pantalla durante algunos segundosdespués de apretar START/PAUSE(INICIAR/PAUSAR). El horno detectaautomáticamente el nivel de voltajeeléctrico en su hogar y ajusta el tiempo decocción, aumentándolo o disminuyéndolopara cocinar adecuadamente.
Ventilador/Ventilación■ El ventilador estará encendido durante
la cocción. Al final de la cocción, elventilador automático puede continuarfuncionando por un período corto de tiempo y se indicará en la pantalla el mensaje Oven is Cooling (Hornoenfriándose). El ventilador se apagaráautomáticamente cuando se hayanenfriado las piezas internas del horno.
■ La rejilla de ventilación del horno emitirá aire caliente mientras el horno se encuentra encendido.
Luces■ Cuando el horno está encendido,
se podrá ver la luz alrededor de lacompuerta o de la cubierta externa.
■ Las luces halógenas se opacarán y ciclaránencendiéndose y apagándose durante un ciclo de cocción rápida, algunas vecesincluso a niveles de potencia más altos.Esto es normal. El horno percibe el nivel de calor y se ajusta automáticamente.
Calor del horno■ No se necesita tiempo de precalentamiento
durante los ciclos de Cocción rápida. Elhorno comienza a cocinar inmediatamente.
■ La compuerta y el interior de la compuertadel horno se encuentran muy calientes.Tenga cuidado al abrir la compuerta ysacar la comida del interior.
■ No utilice recipientes de cocina ni cubiertas(tapas) hechas de papel, plástico o láminasde aluminio cuando cocina utilizando unciclo de cocción rápida.
■ Cuando cocina por un período prolongadode tiempo, el horno puede reducir losniveles de potencia automáticamente para mantener el nivel apropiado de calor.
Sonidos■ Los chasquidos y el sonido de ventilador
funcionando son sonidos normales durantela cocción. El tablero de relé y suscomponentes se apagan y se encienden.
Cómohornear,asar ytostar
La función de hornear le permite cocinar los alimentos de la misma forma que un hornoconvencional, utilizando un elemento decalentamiento para incrementar latemperatura del aire dentro del horno. Se puede ajustar cualquier temperatura de horno de 250 a 450° F.La función Broiling (asar) le permite asaralimentos de la misma manera que un hornoconvencional.La función Toasting (tostar) le permite tostaralimentos de la misma manera que un hornoconvencional.Un ventilador circula aire caliente suavementedentro del horno, sobre y alrededor de losalimentos. Debido a que el aire caliente se mantiene en constante movimiento, no permitiendo que se desarrolle una capa de aire más frío alrededor de los alimentos,algunos alimentos se cocinarán levementemás rápido que la cocción realizada en hornoregular.
Antes de empezar, asegúrese de que se encuentra colocada la base giratoria. Utilice la bandeja de metal antiadherente en todo momento cuando hornee.
¡PRECAUCIÓN! ¡Cuandohornee, recuerde que el horno, compuerta y los platos estarán muy calientes!
La base giratoria siempre debeestar colocada en su lugarcuando se utiliza el horno.
Coloque los recipientes adecuados para hornear directamente
en la bandeja antiadherente de metal para hornear.
19

20
Cómo hornear, asar y tostar
Horno Advantium
1. Apriete el botón CONV BAKE/BROIL(HORNEAR POR CONV/ASAR).
2. Apriete el dial para seleccionar BAKE(HORNEAR).
3. Gire el dial para ajustar la temperaturadel horno y apriételo para ingresarla.
Para omitir el proceso de precalentamiento:1. Cuando aparezca el mensaje
PREHEAT THE OVEN? (¿PRECALENTAREL HORNO?) gire el dial a NO. Apriete el dial o apriete START/PAUSE(INICIAR/PAUSAR) para iniciar la cocción.
2. Coloque los alimentos en el horno, gire el dial para ajustar el tiempo de cocción y apriételo para ingresar. El horno comienza a cocinarinmediatamente. Cuando se hacompletado la cocción, el hornoindicará una señal y se apagará.
Para precalentar:1. Cuando aparezca el mensaje
PREHEAT THE OVEN? (¿PRECALENTAREL HORNO?) gire el dial a YES. Apriete el dial o apriete START/PAUSE(INICIAR/PAUSAR) para iniciar la cocción.El horno empieza a funcionarinmediatamente. No coloquealimentos en el horno (Se le indicará
que ingrese el tiempo de cocción,después que se haya precalentado el horno).
2. Cuando el horno termine elprecalentamiento, emitirá una señal. Si no abre la puerta en el plazode una hora, el horno se apagaráautomáticamente. Abra la compuertadel horno y, con cuidado, coloque losalimentos dentro del horno.
3 Cierre la compuerta del horno. Gire el dial para ajustar el tiempo de cocción y apriételo para comenzara cocinar. Cuando se ha completado la cocción, el horno indicará una señaly se apagará.
Puede cambiar la temperatura del horno durante el precalentamientoapretando el botón POWER/TEMP(POTENCIA/TEMPERATURA) y girando el dial para seleccionar la nuevatemperatura.Si la compuerta del horno se encuentraabierta durante la cocción, aparecerá PAUSE (PAUSA) en la pantalla. Cierre la compuerta y apriete START/PAUSE(INICIAR/PAUSAR).Los tiempos de cocción se muestran en minutos y pueden ser de 179 minutoscomo máximo. Se puede cambiar eltiempo durante la cocción dando vuelta al dial.
1. Apriete el botón CONV BAKE/BROIL(HORNEAR POR CONV/ASAR).
2. Gire el dial a BROIL (ASAR) o TOAST(TOSTAR) y apriételo para ingresar.
Para omitir el proceso de precalentamiento:1. Cuando aparezca el mensaje
PREHEAT THE OVEN? (¿PRECALENTAREL HORNO?) gire el dial a NO. Apriete el dial o apriete START/PAUSE(INICIAR/PAUSAR) para iniciar la cocción.
2. Coloque los alimentos en el horno, gire el dial para ajustar el tiempo de cocción y apriételo para ingresar.Apriete el dial para empezar la cocción.Cuando se ha completado la cocción,el horno indicará una señal y seapagará.
Para precalentar:1. Cuando aparezca el mensaje
PREHEAT THE OVEN? (¿PRECALENTAREL HORNO?) gire el dial a YES. Apriete el dial o apriete START/PAUSE(INICIAR/PAUSAR) para iniciar
la cocción. El horno empieza afuncionar inmediatamente. No coloquealimentos en el horno (Se le indicaráque ingrese el tiempo de cocción,después que se haya precalentado el horno).
2. Cuando el horno termine elprecalentamiento, emitirá una señal. Si no abre la compuerta en el plazo de una hora, el horno se apagaráautomáticamente. Abra la compuertadel horno y, con cuidado, coloque los alimentos dentro del horno.
3. Cierre la compuerta del horno. Gire eldial para ajustar el tiempo de cocción y apriételo para ingresarlo y empezara cocinar. Cuando se ha completado la cocción, el horno indicará una señaly se apagará.
Si se abre la compuerta del horno durantela cocción, aparecerá PAUSE (PAUSA) en la pantalla. Cierre la compuerta y aprieteSTART/PAUSE (INICIAR/PAUSAR).
Cómohornear
Cómo asaro tostar
Coloque los alimentos directamente en la hoja para hornear de aluminio
en la parrilla de alambre del horno y colóquelos en la bandeja metálica antiadherente cuando hornee
a dos niveles, ase o tueste alimentos.
Para hornear a dos niveles, coloque los alimentosen un plato de hornear metálico o directamente en la bandeja metálica antiadherente. Coloque
la lámina de hornear de aluminio o su plato de hornear con alimentos sobre la parte superiorde la parrilla de alambre. Coloque la parrilla con
alimentos en la bandeja de metal.
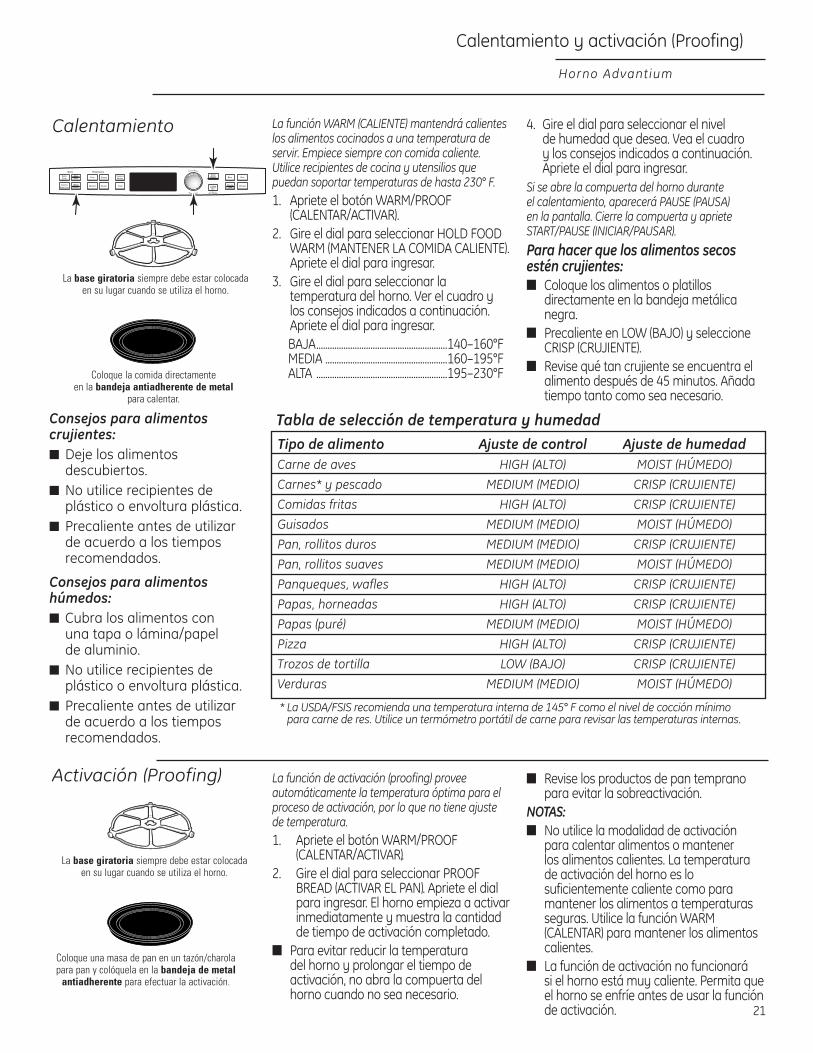
Calentamiento y activación (Proofing)
Horno Advantium
Consejos para alimentoscrujientes:■ Deje los alimentos
descubiertos.■ No utilice recipientes de
plástico o envoltura plástica.■ Precaliente antes de utilizar
de acuerdo a los tiemposrecomendados.
Consejos para alimentoshúmedos:■ Cubra los alimentos con
una tapa o lámina/papel de aluminio.
■ No utilice recipientes deplástico o envoltura plástica.
■ Precaliente antes de utilizar de acuerdo a los tiemposrecomendados.
Tipo de alimento Ajuste de control Ajuste de humedadCarne de aves HIGH (ALTO) MOIST (HÚMEDO)
Carnes* y pescado MEDIUM (MEDIO) CRISP (CRUJIENTE)
Comidas fritas HIGH (ALTO) CRISP (CRUJIENTE)
Guisados MEDIUM (MEDIO) MOIST (HÚMEDO)
Pan, rollitos duros MEDIUM (MEDIO) CRISP (CRUJIENTE)
Pan, rollitos suaves MEDIUM (MEDIO) MOIST (HÚMEDO)
Panqueques, wafles HIGH (ALTO) CRISP (CRUJIENTE)
Papas, horneadas HIGH (ALTO) CRISP (CRUJIENTE)
Papas (puré) MEDIUM (MEDIO) MOIST (HÚMEDO)
Pizza HIGH (ALTO) CRISP (CRUJIENTE)
Trozos de tortilla LOW (BAJO) CRISP (CRUJIENTE)
Verduras MEDIUM (MEDIO) MOIST (HÚMEDO)
* La USDA/FSIS recomienda una temperatura interna de 145° F como el nivel de cocción mínimo para carne de res. Utilice un termómetro portátil de carne para revisar las temperaturas internas.
Tabla de selección de temperatura y humedad
Calentamiento La función WARM (CALIENTE) mantendrá calienteslos alimentos cocinados a una temperatura deservir. Empiece siempre con comida caliente.Utilice recipientes de cocina y utensilios quepuedan soportar temperaturas de hasta 230° F.1. Apriete el botón WARM/PROOF
(CALENTAR/ACTIVAR).2. Gire el dial para seleccionar HOLD FOOD
WARM (MANTENER LA COMIDA CALIENTE).Apriete el dial para ingresar.
3. Gire el dial para seleccionar latemperatura del horno. Ver el cuadro ylos consejos indicados a continuación.Apriete el dial para ingresar.BAJA..........................................................140–160°FMEDIA ......................................................160–195°FALTA ..........................................................195–230°F
4. Gire el dial para seleccionar el nivel de humedad que desea. Vea el cuadro y los consejos indicados a continuación.Apriete el dial para ingresar.
Si se abre la compuerta del horno durante el calentamiento, aparecerá PAUSE (PAUSA) en la pantalla. Cierre la compuerta y aprieteSTART/PAUSE (INICIAR/PAUSAR).
Para hacer que los alimentos secosestén crujientes:■ Coloque los alimentos o platillos
directamente en la bandeja metálicanegra.
■ Precaliente en LOW (BAJO) y seleccioneCRISP (CRUJIENTE).
■ Revise qué tan crujiente se encuentra elalimento después de 45 minutos. Añadatiempo tanto como sea necesario.
La función de activación (proofing) proveeautomáticamente la temperatura óptima para elproceso de activación, por lo que no tiene ajustede temperatura.1. Apriete el botón WARM/PROOF
(CALENTAR/ACTIVAR).2. Gire el dial para seleccionar PROOF
BREAD (ACTIVAR EL PAN). Apriete el dialpara ingresar. El horno empieza a activarinmediatamente y muestra la cantidadde tiempo de activación completado.
■ Para evitar reducir la temperatura del horno y prolongar el tiempo deactivación, no abra la compuerta delhorno cuando no sea necesario.
■ Revise los productos de pan tempranopara evitar la sobreactivación.
NOTAS:■ No utilice la modalidad de activación
para calentar alimentos o mantener los alimentos calientes. La temperaturade activación del horno es losuficientemente caliente como paramantener los alimentos a temperaturasseguras. Utilice la función WARM(CALENTAR) para mantener los alimentoscalientes.
■ La función de activación no funcionará si el horno está muy caliente. Permita queel horno se enfríe antes de usar la funciónde activación.
Activación (Proofing)
La base giratoria siempre debe estar colocada en su lugar cuando se utiliza el horno.
Coloque la comida directamente en la bandeja antiadherente de metal
para calentar.
La base giratoria siempre debe estar colocada en su lugar cuando se utiliza el horno.
Coloque una masa de pan en un tazón/charolapara pan y colóquela en la bandeja de metal
antiadherente para efectuar la activación.
21

Cocción por microondas
Horno Advantium
Cómoutilizar lasfunciones demicroondas
Asegúrese de que la base giratoria y la bandeja de vidrio transparente se encuentran colocadas.Coloque los alimentos o recipiente para microondas directamente en la bandeja de vidrio transparente para cocinar sus alimentos.
■ Cocinar
–Calentar/Recalentar bebidas
–Cocción lenta –Derretir –Inicio demorado –Por tiempo–Por tiempo 1 y 2 –Por tipo de alimento–Suavizar
■ Descongelar
–1,0 lb. Rápido–Derretir–Inicio demorado–Por peso –Por tiempo –Por tipo de alimento –Suavizar
■ Recalentar
–Arroz–Bebidas–Bistecs/Chuletas–Guisado –Pasta–Pizza–Plato de comida–Pollo–Sopa –Verduras
SELECCIONES MICROWAVE PRE-SET (PREPROGRAMACIONESDE MICROONDAS):
La base giratoria siempre debe estar colocada en su lugar cuando se utiliza el horno.
La bandeja de cristal transparente siempredeberá estar en su lugar cuando se cocina
con microondas.
Cómo utilizar lasselecciones demicroondaspreprogramadas
1. Apretar el botón COOK (COCINAR),DEFROST (DESCONGELAR) o REHEAT(RECALENTAR) del microondas.
Si no se realiza una selección dentro del plazo de 15 segundos, la pantallaregresará a la hora del día.
2. Gire el dial para encontrar los alimentos que desea cocinar,descongelar o recalentar. Apriete el dial para ingresar.
3. Gire el dial para seleccionar el tipo, cantidad, peso y/o tamaño(El horno le consultará, en lamedida que sea necesario). Aprieteel dial después de cada selección.
4. Apriete el dial o aprieteSTART/PAUSE (INICIAR/PAUSAR) para iniciar la cocción.
Para revisar los ajustes durante la cocción, apriete el dial selector.
Si se abre la compuerta durante la cocción, el horno se detendrá y semostrará PAUSE (PAUSA) en la pantalla.Cierre la compuerta y apriete el botónSTART/PAUSE (INICIAR/PAUSAR) para continuar cocinando.
Si ingresa una selección no deseada en cualquier momento, simplementeapriete el botón BACK (REGRESAR) yreingrese las selecciones deseadas.
22
Recipientes de cocina■ Asegúrese que sus recipientes de cocina
sean adecuados para utilizarlos en un horno microondas.
■ Coloque los alimentos o recipiente paramicroondas directamente en la bandejade vidrio transparente para cocinar susalimentos.

Cocción por microondas
Horno Advantium
Cook By Time(Cocinar portiempo) y CookBy Time 1 & 2(Cocinar portiempo 1 y 2)
Utilice las funciones de COOK BY TIME(COCINAR POR TIEMPO) y COOK BY TIME 1 & 2para cocinar por microondas los alimentosque no se encuentran en la sección de recetasy en el tiempo que programó.■ El nivel de potencia se encuentra ajustado
automáticamente en High (Alto), peropuede cambiarlo para dar mayorflexibilidad.
1. Apriete el botón COOK (COCINAR).2. Gire el dial para seleccionar COOK BY
TIME (COCINAR POR TIEMPO) o COOK BYTIME 1 & 2 (COCINAR POR TIEMPO 1 & 2) y apriete el dial para ingresar.
3. Gire el dial para ajustar el tiempo decocción y apriete el dial para ingresar.
Si seleccionó COOK BY TIME 1 & 2 (COCINARPOR TIEMPO 1 & 2), gire el dial para ajustar el tiempo de cocción Nº 2 y apriete el dialpara ingresar.NOTA: Para cambiar el nivel de potencia si no desea potencia máxima, apriete el botónPOWER/TEMP (POTENCIA/TEMPERATURA)después de ingresar el tiempo. Gire el dialpara seleccionar y apriete el dial paraingresar.4. Apriete el dial o apriete START/PAUSE
(INICIAR/PAUSAR) para iniciar la cocción.Durante las funciones de COOK BY TIME(COCINAR POR TIEMPO) o COOK BY TIME 1 & 2(COCINAR POR TIEMPO 1 & 2) puede abrir lacompuerta para revisar la comida. Cierre lacompuerta y apriete el botón START/PAUSE(INICIAR/PAUSAR) para continuar cocinando.
Apriete EXPRESS (RÁPIDO) repetidamente por incrementos de 30 segundos de tiempode cocción con microondas. El hornoempieza a funcionar inmediatamente.
Express (Rápido)
Nivel(es) de potencia del hornomicroondas
1. Primero, siga las instrucciones de COOKBY TIME (COCINAR POR TIEMPO), COOK BYTIME 1 & 2 (COCINAR POR TIEMPO 1 & 2),DEFROST BY TIME (DESCONGELAR PORTIEMPO) o EXPRESS (RÁPIDO).
2. Apriete el botón POWER/TEMP(POTENCIA/TEMPERATURA).
3. Gire el dial en sentido de las manecillas del reloj para incrementar o en sentidocontrario a las manecillas del reloj paradisminuir el nivel de potencia. Apriete el dial para ingresar.
4. Apriete el dial o apriete START/PAUSE(INICIAR/PAUSAR) para iniciar la cocción.
■ Puede cambiar el nivel de potencia antes o durante un programa de cocción.
Aquí se presentan algunos ejemplos deutilizaciones para varios niveles de potencia:High (Alto) 10: Pescado, tocino, verduras,líquidos hirvientes.Med (Medio) - High (Alto) 7: Cocciónmoderada de carne de res y pollo; hornearguisados y recalentamiento.Med (Medio) 5: Cocción lenta yablandamiento para guisados y cortes de carne de res menos suaves.Low (Bajo) 2 o 3: Descongelación; hervir a fuego lento; salsas delicadas.Warm (Caliente) 1: Mantener comidascalientes; suavizar mantequilla.
■ Cuando cocine tocino, coloque las tiras enun plato. Cubra cada capa con una toallade papel.
■ Cuando cocine verduras, utilice una cacerola o tazón adecuados paramicroondas. Cúbralas con una tapaadecuada para microondas o envoltura de plástico ventilada.
■ Para verduras congelados, siga lasinstrucciones de la caja para añadir agua.
■ Para verduras frescas, añada 2cucharadas de agua para cada porción.
Consejosde cocina
23
Consultar las secciones de Recetas favoritasen la sección de Cocción rápida de este libropara obtener instrucciones de cómo
almacenar, utilizar, cambiar o borrar una receta favorita.
Recetasfavoritas

Cocción por microondas
Horno Advantium
Descongelaciónpor tipo dealimento
La función Auto Defrost(Descongelación automática) ajustalos tiempos de descongelación y losniveles de potencia para ofrecerresultados de descongelaciónuniformes para carnes de res, pollo y pescado de hasta 6 libras de peso.
1. Saque los alimentos de la caja ycolóquelos en un plato adecuadopara microondas.
2. Apriete el botón DEFROST(DESCONGELAR).
3. Gire el dial para seleccionarDEFROST BY FOOD TYPE(DESCONGELAR POR TIPO DECOMIDA). Apriete el dial paraingresar.
4. Gire el dial para seleccionar el tipode comida. Apriete el dial paraingresar.
5. Gire el dial para seleccionar el pesode los alimentos, utilizando la Guíade conversión de la derecha. Porejemplo, seleccione 1.2 para 1.2libras (1 libra, 3 onzas) Apriete eldial para ingresar.
6. Apriete el dial o el botónSTART/PAUSE (INICIAR/PAUSAR)para comenzar a descongelar.
7. Gire los alimentos cuando el hornole indique TURN FOOD OVER (DARVUELTA A LOS ALIMENTOS).
■ Saque la carne descongelada o cubra las áreas calientes conpedazos pequeños de lámina de aluminio para lograr unadescongelación uniforme.
■ Después de descongelar, la mayoríade las carnes necesitan dejarse enreposo durante 5 minutos paracompletar la descongelación.Asados de mayor tamaño debenpermanecer en reposo por cerca de 30 minutos.
Guía de conversión
Si se indica el peso de los alimentos en libras y onzas, se deben convertirlas onzas a décimos (.1) de libra.
Ingresar el peso Peso del alimento del alimento
en onzas (décimos de libra)1–2 .1
3 .24–5 .36–7 .4
8 .59–10 .6
11 .712–13 .814–15 .9
Utilizar la función Time Defrost(Descongelar por tiempo) para unperíodo seleccionado de tiempo.
1. Apriete el botón DEFROST(DESCONGELAR).
2. Gire el dial para seleccionarDEFROST BY TIME (DESCONGELARPOR TIEMPO). Apriete el dial paraingresar.
3. Gire el dial para seleccionar el tiempo que desea. Apriete el dial para ingresar.
4. Apriete el dial o el botónSTART/PAUSE (INICIAR/PAUSAR)para comenzar a descongelar.
5. Gire los alimentos cuando el hornole indique TURN FOOD OVER (DARVUELTA A LOS ALIMENTOS).
El nivel de potencia se ajustaautomáticamente a 3, pero puedecambiarse. Para cambiar los niveles de potencia, consulte la sección Nivel de potencia del microondas. Puededescongelar alimentos pequeñosaumentando el nivel de potenciadespués de ingresar el tiempo. El nivelde potencia 7 corta el tiempo dedescongelación total a cerca de lamitad; el nivel de potencia 10 corta eltiempo total de descongelación a cercade un tercio. Cuando descongela aniveles de potencia más altos, losalimentos necesitarán atención másfrecuente de la normal.
Descongelaciónpor tiempo
24
Cocción por microondas
Horno Advantium
Consejosparadescongelar
Utilice la función DEFROST BY FOODTYPE (DESCONGELACIÓN POR TIPO DE COMIDA) para carne de res, pollo y pescado. Utilice la función DEFROSTBY TIME (DESCONGELACIÓN PORTIEMPO) para la mayoría de los demásalimentos congelados.
■ Se pueden descongelar alimentoscongelados en papel o plástico en el paquete cuando se utiliza la función DEFROST BY FOOD TYPE(DESCONGELAR POR TIPO DECOMIDA). Se deben cortar, perforaro ventilar los paquetes cerradosdespués de que se hayandescongelado los alimentosparcialmente. Se deben descubrirparcialmente los recipientes dealmacenamiento plásticos.
■ Se pueden descongelar y cocinarcon microondas las meriendaspreempacadas, de tamaño familiar,congeladas. Si el alimento seencuentra en un recipiente delámina de aluminio, transfiéralo a un plato adecuado paramicroondas.
■ Los alimentos que se echan aperder fácilmente no se debendejar fuera del refrigerador durante más de una hora despuésdescongelarse. La temperaturaambiente promueve el crecimientode bacterias nocivas.
■ Para una descongelación másuniforme de alimentos másgrandes, tales como asados, utilicela función DEFROST BY TIME(DESCONGELACIÓN POR TIEMPO).Asegúrese que las carnes seencuentran completamentedescongeladas antes de cocinarlas.
■ Cuando los alimentos seencuentran descongelados, deben encontrarse fríos perosuaves en todas las áreas. Si aúnse encuentran restos de hielo,vuélvalos a colocar en elmicroondas pero por un períodomuy corto de tiempo o déjelosreposar durante un par de minutos.
25

La función de sensor detecta elaumento de humedad liberada durantela cocción. El horno ajusta el tiempo de cocción automáticamente a losdiferentes tipos y cantidades de comida.
No utilice las funciones de sensor dos veces en sucesión en la misma porciónde comida ya que puede tener comoresultado comida severamentesobrecocinada o quemada. Si elalimento no se cocina completamentedespués del primer conteo regresivo,utilice la función de COOK BY TIME(COCINAR POR TIEMPO) para permitirtiempo de cocción adicional.
Los recipientes y tapas o cubiertasapropiadas son esenciales paraobtener los mejores resultados con la cocción por sensor.
■ Utilice siempre recipientesadecuados para microondas ycúbralos con tapas o envolturaplástica ventilada. Nunca utilicerecipientes de plástico con selladoajustado ya que pueden prevenirque el vapor escape ocasionandoque se sobrecocinen los alimentos.
■ Asegúrese de que el exterior de losrecipientes de cocina y el interiordel horno se encuentren secosantes de colocar los alimentos en elhorno. Las gotas de humedad quese convierten en vapor pueden darlecturas incorrectas al sensor.
■ Las bebidas se calientan mejordescubiertas.
Cocción por microondas
Horno Advantium
Cocción demicroondaspor sensor
26
Cubiertas
Ventiladas
Seque los platos de modo que no den lecturas incorrectas al sensor.
PROGRAMAS DE SENSOR PARA COCCIÓN POR MICROONDAS:
■ Carne molida■ Palomitas de maíz – Palomitas de maíz para microondas
preempacadas, de 3,0 onzas. a 3,5 onzas.■ Sopa■ Arroz■ Verduras (enlatadas, frescas, congeladas)■ Recalentamiento de pollo■ Recalentamiento de pasta■ Plato de recalentamiento de comida■ Recalentamiento de sopa

Cocción por microondas
Horno Advantium
Para utilizartodos losprogramasde sensor
La modalidad de microondas Avantium tienela función de cocción por sensor. El hornodetecta automáticamente cuándo estáncocinados los alimentos y se apaga solo,eliminando la necesidad de programartiempos de cocción y niveles de potencia.
1. Apriete el botón COOK (COCINAR) y gire el dial a COOK BY FOOD TYPE(COCCIÓN POR TIPO DE ALIMENTO).Apriete el dial para ingresar. O apriete el botón REHEAT (RECALENTAR).
2. Gire el dial para seleccionar los alimentosque desea. Apriete el dial para ingresar.
3. Apriete el dial o apriete START/PAUSE(INICIAR/PAUSAR) para iniciar la cocción.
No abra la compuerta del horno hasta que el tiempo se encuentre en conteo regresivoen la pantalla. Si la compuerta se encuentra abierta, ciérrela y apriete START/PAUSE(INICIAR/PAUSAR) inmediatamente. Si los alimentos aún no se encuentran losuficientemente cocinados, utilice la funciónCOOK BY TIME (COCCIÓN POR TIEMPO) en elselector de microondas para cocinar por mástiempo.
NOTA: No utilice las funciones de sensor dosveces en sucesión en la misma porción decomida ya que puede dar como resultadocomida severamente sobrecocinada oquemada.
■ Si ha estado utilizando la función decocción rápida y el horno se encuentracaliente, esto puede ser una indicación deque está demasiado caliente como paracocinar por sensor. Por supuesto, siemprepuede proceder a cocinar con la funciónCOOK BY TIME (COCCIÓN POR TIEMPO) o COCCIÓN RÁPIDA.
NOTA: Si el horno se encuentra demasiadocaliente, cambiará automáticamente acocción por tiempo.
■ Para disminuir o aumentar el tiempo de cocción, espere hasta que se muestreel conteo de tiempo regresivo en lapantalla. Luego gire el dial para añadir o restar tiempo.
■ Si abre la compuerta mientras se encuentra utilizando la función SENSOR Cooking (Cocción por SENSOR),aparecerá el mensaje SENSOR ERROR(ERROR DE SENSOR). Cierre la compuertay apriete el botón START/PAUSE(INICIAR/PAUSAR) para comenzarnuevamente.
Notas sobre el programa deRecalentamiento:
Los alimentos recalentados podrían teneramplias variaciones de temperatura. Algunasáreas se pueden encontrar extremadamentecalientes.
Es mejor utilizar la función COOK BY TIME(COCCIÓN POR TIEMPO) y no RECALENTARestos alimentos:
■ Productos de pan
■ Los alimentos que deben recalentarsecubiertos.
■ Los alimentos que necesitan revolverse o voltearse.
■ Los alimentos que necesitan tener un aspecto seco o superficie crujientedespués del recalentamiento.
Cosas que sonnormales
Interferencia■ Quizás note la interferencia de TV/radio mientras
utiliza el microondas. Al igual que la interferenciacausada por otros aparatos pequeños, no indicaque haya un problema con el microondas. Mueva la radio o TV a un lugar lo más alejado posible delmicroondas o compruebe la posición de la antenade radio o TV.
Luces■ La luz del interior del horno se encenderá durante
un ciclo de cocción por microondas.
Calor del horno■ Los recipientes de cocina pueden tornarse
muy calientes debido a la transferencia de calorproveniente de los alimentos calentados. Se requerirán guantes de cocina para manipular los recipientes de cocina.
■ Podría escapar vapor del rededor de la compuerta.
27

Otras funciones Advantium
Horno Advantium
“COOK TIMECOMPLETED”(TIEMPO DECOCCIÓNCOMPLETO)
Para recordarle que tiene comida en el horno, el horno indicará el mensajeCOOK TIME COMPLETED (TIEMPO DECOCCIÓN COMPLETO) y pitará una vez por minuto hasta que abra la compuerta del horno o apriete el botón CLEAR/OFF(BORRAR/APAGAR).
Funciones bajo el botónOPTIONS(OPCIONES)
Reloj:se debe programar el reloj antes que puedautilizar el horno por primera vez (consulteQuick Start/Inicio rápido para obtenerinstrucciones).
1. Para cambiar el tiempo del reloj, apriete el botón OPTIONS (OPCIONES) y gire el diala CLOCK (RELOJ). Apriete el dial paraingresar.
2. Gire el dial para ajustar las horas. Apriete el dial para ingresar.
3. Gire el dial para ajustar los minutos.Apriete el dial para ingresar.
4. Gire el dial para seleccionar AM o PM.Apriete el dial para ingresar.
Clock Display ON/OFF (ENCENDER/APAGARla pantalla del reloj):Utilice esta función para encender o apagarla pantalla del reloj. Apriete el botón OPTIONS(OPCIONES), gire el dial para seleccionarCLOCK DISPLAY ON/OFF (ENCENDER/APAGARLA PANTALLA DEL RELOJ). Gire el dial paraseleccionar ON (ENCENDIDO) u OFF(APAGADO). Apriete el dial para ingresar.
Delay Start (Inicio demorado):La función Delay Start (Inicio demorado) le permite programar el horno para que iniciela cocción más tarde hasta un tiempomáximo de 24 horas. Apriete el botónOPTIONS (OPCIONES), gire el dial paraseleccionar DELAY START (INICIO DEMORADO)y apriete el dial para ingresar. Siga lasinstrucciones de la pantalla para ajustar el tiempo de Delay Start (Inicio demorado) y la función que desea demorar.
Beeper Volume (Volumen del indicadorsonoro):Utilice esta función para ajustar el volumendel indicador sonoro. Incluso lo puede
apagar. Apriete el botón OPTIONS(OPCIONES), gire el dial para seleccionarBEEPER VOLUME (VOLÚMEN DEL INDICADORSONORO), apriete el dial para ingresar y sigalas instrucciones de la pantalla.
Scroll Speed (Velocidad del avance del texto):¿Es el avance del mensaje muy lento o muy rápido? ¡Cámbielo! Apriete el botónOPTIONS (OPCIONES), gire el dial paraseleccionar DISPLAY SCROLL SPEED(VELOCIDAD DEL AVANCE DEL TEXTO DE LA PANTALLA), apriete el dial para ingresary siga las instrucciones de la pantalla.
Recordatorio:Utilice esta función para programar quesuene un pitido de alarma a una horaespecífica del día. Apriete el botón OPTIONS(OPCIONES), gire el dial para seleccionarSET/CLEAR REMINDER (AJUSTAR/BORRARRECORDATORIO) y apriete el dial paraingresar. Gire el dial para seleccionar la horay apriételo para ingresarla. Gire el dial paraseleccionar el minuto y apriételo paraingresarlo. Gire el dial para seleccionar AM o PM y apriételo para ingresarlo.
Para revisar el ajuste, gire el dial y seleccioneSET/CLEAR REMINDER (AJUSTAR/BORRARRECORDATORIO) y apriete el dial paraingresar. Gire el dial y seleccione REVIEW(REVISAR) y apriételo para ingresar.
Para cancelar el ajuste, gire el dial y seleccione SET/CLEAR REMINDER(AJUSTAR/BORRAR RECORDATORIO) y aprieteel dial para ingresar. Gire el dial y seleccioneCLEAR (BORRAR) y apriete para ingresar.
Utilice esta función para revisar lasselecciones de cocción actuales que haseleccionado.
Apriete el dial selector durante la función decocción rápida o la función de cocción pormicroondas.
Revisión
28

Otras funciones Advantium
Horno Advantium
Ayuda Utilice esta función para saber mássobre su horno y sus funciones.
1. Apriete el botón HELP (AYUDA).
2. Gire el dial para seleccionar el nombre de la función. Apriete el dial para ingresar.
La pantalla mostrará una descripcióndel programa que ha seleccionado.
Adding time (Añadir tiempo)
Back (Regresar)
Bake (Hornear)
Beverage Heat(Calentamiento de bebidas)
Broil (Asar)
Seguro contra niños
Clear/Off (Borrar/Apagar)
Cook (Cocinar)
Cook by time (Cocción por tiempo)
Cook by Food Type(Cocinar por tipo de alimento)
Custom Speed Cook(Cocción rápidapersonalizada)
Defrost (Descongelar)
Defrost by Food Type(Descongelación por tipode alimento)
Defrost by Time(Descongelación portiempo)
Defrost by Weight(Descongelación porpeso)
Delay Start (Inicio demorado)
Express Cook (Cocción Express)
Favorite Recipes (Recetas favoritas)
Help (Ayuda)
Hold Food Warm(Mantener caliente la comida)
Options (Opciones)
Power/Temp(Potencia/Temperatura)
Proof Bread (Activar pan)
Reheat (Recalentar)
Repeat last (Repetir último)
Resume (Reanudar)
Review (Revisar)
Sensor Cooking (Cocción por sensor)
Set Beeper Volume(Ajustar el volumen delindicador sonoro)
Set Clock (Poner el reloj)
Set Display On/Off(Ajustar pantallaEncendida/Apagada)
Set Display Speed(Ajustar velocidad depantalla)
Set/Clear Reminder (Ajustar/borrarrecordatorio)
Slow Cook (Cocciónlenta)
Soften/Melt(Suavizar/Derretir)
Speed Cook (Cocción rápida)
Start/Pause(Iniciar/Pausar)
Time Cook 1 & 2 (Tiempode cocción 1 y 2)
Timer On/Off(CronómetroEncendido/Apagado)
Toast (Tostar)
Warm/Proof(Calentar/Activar)
Funciones que se encuentran en la función HELP (AYUDA).
29
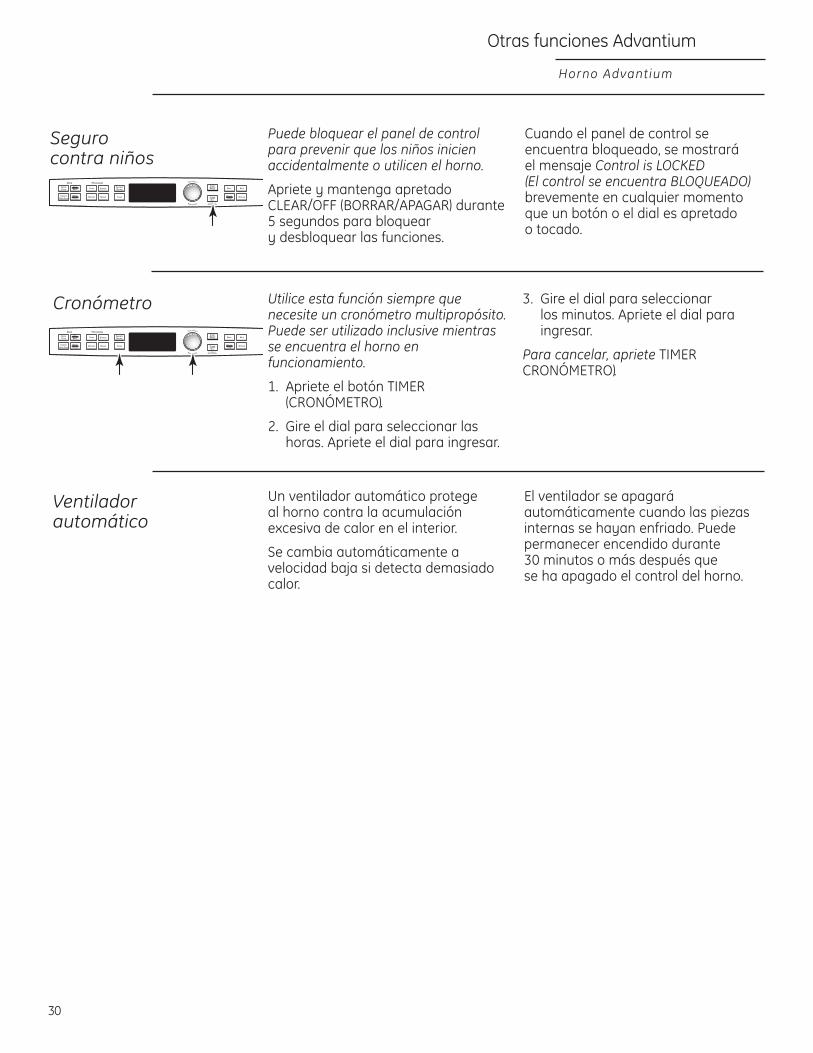
Otras funciones Advantium
Horno Advantium
Utilice esta función siempre quenecesite un cronómetro multipropósito.Puede ser utilizado inclusive mientrasse encuentra el horno enfuncionamiento.
1. Apriete el botón TIMER(CRONÓMETRO).
2. Gire el dial para seleccionar lashoras. Apriete el dial para ingresar.
3. Gire el dial para seleccionar los minutos. Apriete el dial paraingresar.
Para cancelar, apriete TIMERCRONÓMETRO).
Cronómetro
Un ventilador automático protege al horno contra la acumulaciónexcesiva de calor en el interior.
Se cambia automáticamente avelocidad baja si detecta demasiadocalor.
El ventilador se apagaráautomáticamente cuando las piezasinternas se hayan enfriado. Puedepermanecer encendido durante 30 minutos o más después que se ha apagado el control del horno.
Ventiladorautomático
30
Puede bloquear el panel de control para prevenir que los niños inicienaccidentalmente o utilicen el horno.
Apriete y mantenga apretadoCLEAR/OFF (BORRAR/APAGAR) durante5 segundos para bloquear y desbloquear las funciones.
Cuando el panel de control seencuentra bloqueado, se mostrará el mensaje Control is LOCKED (El control se encuentra BLOQUEADO)brevemente en cualquier momentoque un botón o el dial es apretado o tocado.
Seguro contra niños

Se debe limpiar con frecuencia el área localizada debajo de la basegiratoria para evitar olores y humodurante un ciclo de cocción.
Si se deja caer, la base giratoria se puede romper. Lávela cuidadosamente en agua tibiajabonosa. Séquela completamente yvuelva a colocarla.
Para colocar la base giratoria, coloquesu centro sobre el rotor ubicado en elcentro del horno y gírela hasta que seasiente en su lugar (Asegúrese de quela superficie lisa de la base giratoria seencuentre colocada hacia arriba yque el centro se encuentre asentadode manera segura en el rotor).
Mantenimiento y limpieza
Horno Advantium
Consejosútiles
Limpie el interior del horno confrecuencia para que caliente bien.
Se pueden remover algunas partículascon una toalla de papel; otras puedenrequerir un trapo caliente con unasolución jabonosa. Elimine laspartículas de grasa con un trapohumedecido con agua jabonosa,luego enjuague con un trapo húmedo.
No utilice limpiadores abrasivos o utensilios puntiagudos en lasparedes del horno.
Nunca utilice un limpiador de hornocomercial en ninguna pieza delhorno.
No limpie el interior del horno con esponjillas metálicas para fregar.Pueden desprenderse piezas de laesponjilla metálica, ocasionando unadescarga eléctrica.
Una limpieza minuciosa ocasional conun trapo empapado de bicarbonatosódico y agua mantendrá el interiorfresco.
Asegúrese que se encuentreapagado el control del horno antesde limpiar cualquier pieza del horno.
Paredes, piso, ventanilla interna, piezas de metal y plástico en la compuerta
No haga funcionar el horno sin tener colocada en su lugar la base giratoria.
Cómolimpiar el interior
Basegiratoriadesmontable
Base giratoria
31

No recomendamos utilizar limpiadorescompuestos por amoníaco o alcohol, ya quepueden dañar la apariencia del horno. Sidesea utilizar un limpiador casero común,primero aplique el limpiador directamentesobre un trapo limpio y luego limpie el áreasucia.
Cubierta
Limpie el exterior con un trapo y aguajabonosa. Enjuáguela y séquela. Limpie la ventana con un trapo húmedo.
Panel de control de vidrio y compuerta (en algunos modelos)
Límpielos con una esponja húmeda limpia.Séquelos bien. No utilice limpiadores enaerosol, grandes cantidades de agua y jabónu objetos puntiagudos en el panel, ya que lo pueden dañar.
Sello de la compuerta
Es importante mantener el área limpia en el lugar donde la compuerta se sella contra el horno. Utilice únicamente detergentes de acción mediana, no abrasivos aplicadoscon una esponja o trapo húmedo. Enjuáguela bien.
Mantenimiento y limpieza
Horno Advantium
Coloque los alimentos directamente en la hojapara hornear de aluminio en la parrilla de
alambre del horno y colóquelos en la bandejametálica antiadherente cuando hornee a dos
niveles, ase o tueste alimentos.
Bandeja de vidrio transparente para la función de microondas
Bandeja antiadherente de metal para cocción rápida
Bandejas para cocinar y lámina de hornear
Para evitar que se rompan las bandejas, deje que se enfríen completamente antes de limpiarlas. Lave las bandejas en aguajabonosa tibia o en la máquina lavaplatos.
No utilice esponjillas metálicas para fregar olimpiadores abrasivos, ya que pueden dañarel acabado. Se puede utilizar una esponjillacubierta de jabón para limpiar las bandejas.
Cómo limpiarel exterior
32
Para limpiar la superficie de aceroinoxidable, utilice agua jabonosa templadao un limpiador o pulimento para aceroinoxidable. Limpie siempre la superficie enla dirección del grano. Siga lasinstrucciones del producto limpiador paralimpiar la superficie de acero inoxidable.
Para consultas relacionadas con la adquisición de un limpiador o pulimentopara electrodomésticos de aceroinoxidable o para conocer la ubicación del distribuidor más cercano, llame anuestro número gratuito, 800.626.2002 o visite GEAppliances.com.
Aceroinoxidable(en algunosmodelos)

Resolución de problemas
Horno Advantium
¿Tienepreguntas?Utilice estesolucionadorde problemas
Problema Causas posibles Qué hacer/Explicación
LUCES
La luz durante un Esto es normal. • Esto es normal. El horno detecta el nivel ciclo de cocción rápida El nivel de potencia ha sido de calor y se ajusta automáticamente.se atenúa y se cicla se reduce automáticamente incluso a máximos debido a que el horno niveles de potencia se encuentra caliente.
Luz visible alrededor Esto es normal. • Cuando el horno se encuentra la compuerta y encendido la luz sea visible alrededor cubierta externa de la compuerta y cubierta externa.mientras cocción rápida
VENTILADOR
El ventilador El horno se está enfriando. • El ventilador se apagará automáticamente continúa funcionando cuando las piezas internas del horno después de terminar se hayan enfriado.de cocinar
El ventilador del horno Esto es normal.irradia aire caliente mientras el horno se encuentra encendido
El ventilador se enciende Esto es normal.automáticamente cuandoutilizando el microondas
COCCIÓN
El horno hace Chasquidos y ventiladores • Estos sonidos son normales.sonidos inusuales soplando son normales.mientras se cocina El tablero de relés está
encendiendo y apagando los componentes.
Se expulsa humo Los alimentos tienen • El humo es normal cuando se cocina alimentos del horno cuando alto contenido de grasa. con alto contenido de grasa.abro la compuerta Pulverizador en aerosol
utilizado en las bandejas.
La comida no está Los tiempos programados • Aumente o disminuya el tiempo para nivel completamente podrían no corresponder de cocción o ajuste las luces superiores o cocinada o dorada al tamaño o cantidad de inferiores para asar y para el nivel de cocción.al finalizar un comida que está cocinando.programa de cocción
SENSOR ERROR Cantidad o tipo de comida • Apriete el botón CLEAR/OFF (BORRAR/APAGAR).(ERROR DE SENSOR) colocado en el horno Ajuste el programa del horno corresponda mostrado junto con no corresponde con la con la comida o líquido a ser cocinado una señal del horno programación que fue o calentado.
elegido.
Vapor no detectado • Ventile la envoltura de plástico, utilice una tapa por el horno porque más floja o destape los líquidos cuando la envoltura plástico no los cocine o caliente.se ventiló, una tapa muy ajustada estaba sobre el plato o se cubrió un líquido.
33
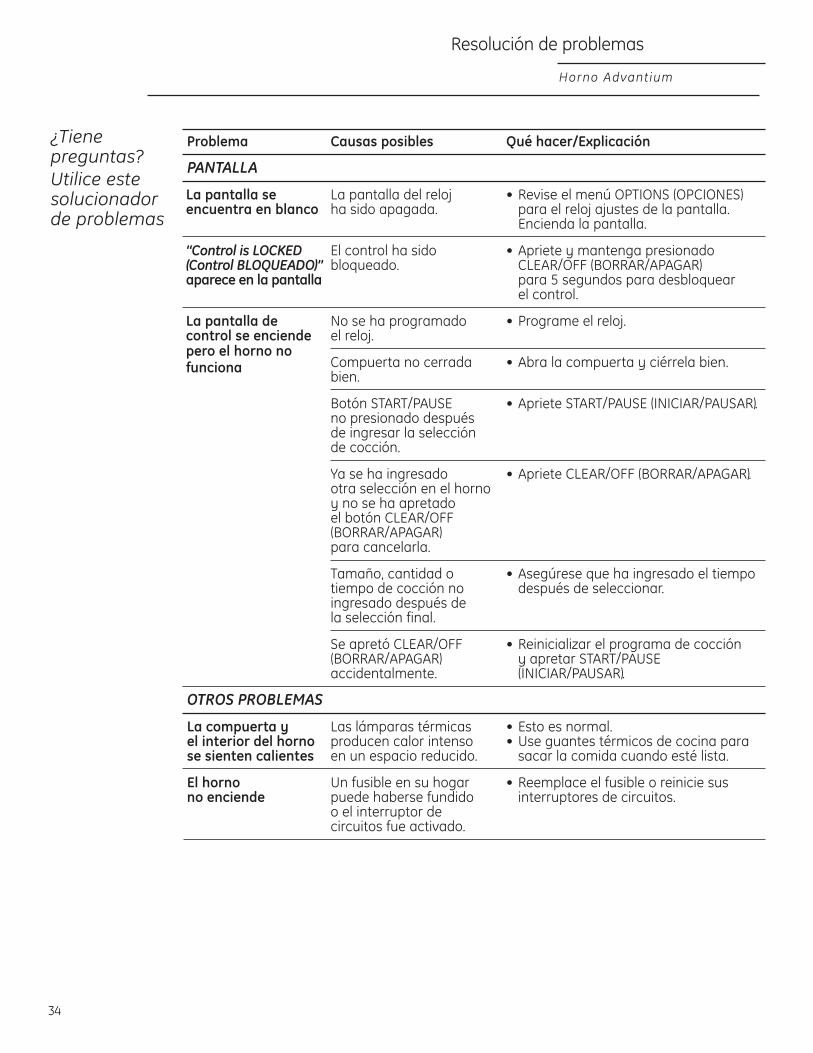
¿Tienepreguntas?Utilice estesolucionadorde problemas
Horno Advantium
Problema Causas posibles Qué hacer/Explicación
PANTALLA
La pantalla se La pantalla del reloj • Revise el menú OPTIONS (OPCIONES) encuentra en blanco ha sido apagada. para el reloj ajustes de la pantalla.
Encienda la pantalla.
“Control is LOCKED El control ha sido • Apriete y mantenga presionado(Control BLOQUEADO)” bloqueado. CLEAR/OFF (BORRAR/APAGAR) aparece en la pantalla para 5 segundos para desbloquear
el control.
La pantalla de No se ha programado • Programe el reloj.control se enciende el reloj.pero el horno no
Compuerta no cerrada • Abra la compuerta y ciérrela bien.funcionabien.
Botón START/PAUSE • Apriete START/PAUSE (INICIAR/PAUSAR).no presionado después de ingresar la selección de cocción.
Ya se ha ingresado • Apriete CLEAR/OFF (BORRAR/APAGAR).otra selección en el horno y no se ha apretado el botón CLEAR/OFF (BORRAR/APAGAR)para cancelarla.
Tamaño, cantidad o • Asegúrese que ha ingresado el tiempo tiempo de cocción no después de seleccionar.ingresado después de la selección final.
Se apretó CLEAR/OFF • Reinicializar el programa de cocción (BORRAR/APAGAR) y apretar START/PAUSE accidentalmente. (INICIAR/PAUSAR).
OTROS PROBLEMAS
La compuerta y Las lámparas térmicas • Esto es normal.el interior del horno producen calor intenso • Use guantes térmicos de cocina para se sienten calientes en un espacio reducido. sacar la comida cuando esté lista.
El horno Un fusible en su hogar • Reemplace el fusible o reinicie sus no enciende puede haberse fundido interruptores de circuitos.
o el interruptor de circuitos fue activado.
Resolución de problemas
34
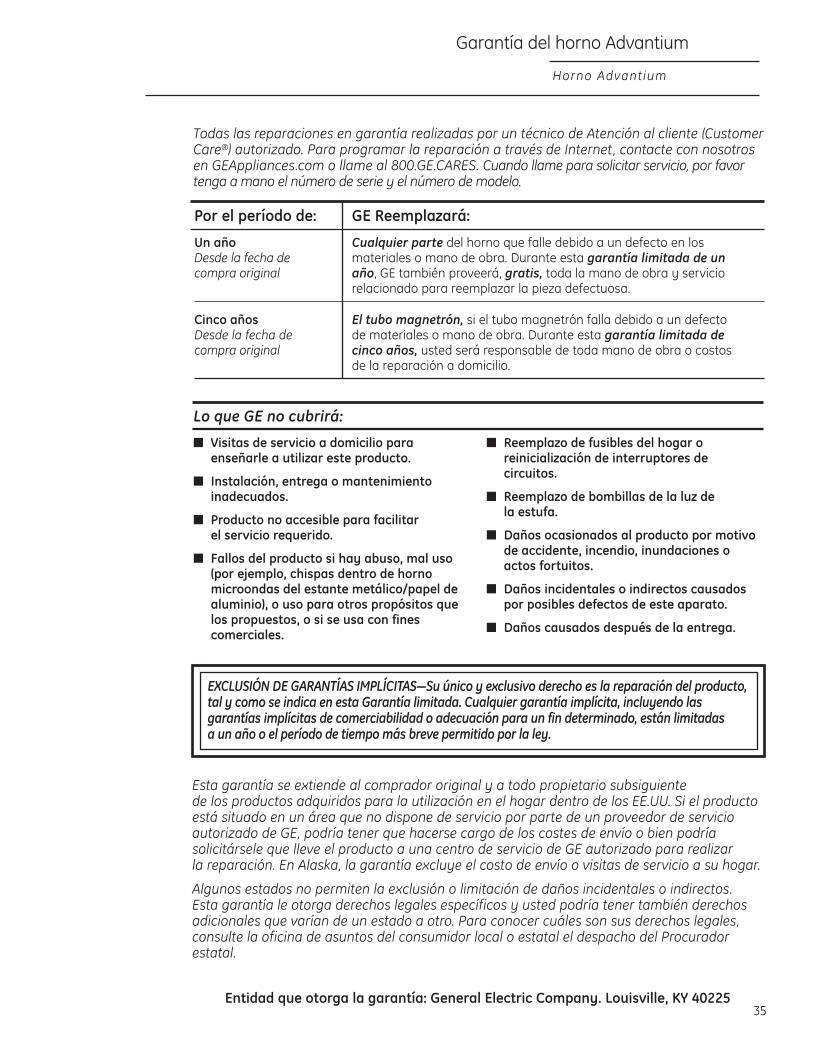
Por el período de: GE Reemplazará:
Un año Cualquier parte del horno que falle debido a un defecto en los Desde la fecha de materiales o mano de obra. Durante esta garantía limitada de un compra original año, GE también proveerá, gratis, toda la mano de obra y servicio
relacionado para reemplazar la pieza defectuosa.
Cinco años El tubo magnetrón, si el tubo magnetrón falla debido a un defecto Desde la fecha de de materiales o mano de obra. Durante esta garantía limitada de compra original cinco años, usted será responsable de toda mano de obra o costos
de la reparación a domicilio.
Garantía del horno Advantium
Horno Advantium
Todas las reparaciones en garantía realizadas por un técnico de Atención al cliente (CustomerCare®) autorizado. Para programar la reparación a través de Internet, contacte con nosotros en GEAppliances.com o llame al 800.GE.CARES. Cuando llame para solicitar servicio, por favor tenga a mano el número de serie y el número de modelo.
■ Visitas de servicio a domicilio paraenseñarle a utilizar este producto.
■ Instalación, entrega o mantenimientoinadecuados.
■ Producto no accesible para facilitar el servicio requerido.
■ Fallos del producto si hay abuso, mal uso(por ejemplo, chispas dentro de hornomicroondas del estante metálico/papel dealuminio), o uso para otros propósitos quelos propuestos, o si se usa con finescomerciales.
■ Reemplazo de fusibles del hogar oreinicialización de interruptores decircuitos.
■ Reemplazo de bombillas de la luz de la estufa.
■ Daños ocasionados al producto por motivode accidente, incendio, inundaciones oactos fortuitos.
■ Daños incidentales o indirectos causadospor posibles defectos de este aparato.
■ Daños causados después de la entrega.
Lo que GE no cubrirá:
Esta garantía se extiende al comprador original y a todo propietario subsiguiente de los productos adquiridos para la utilización en el hogar dentro de los EE.UU. Si el productoestá situado en un área que no dispone de servicio por parte de un proveedor de servicioautorizado de GE, podría tener que hacerse cargo de los costes de envío o bien podríasolicitársele que lleve el producto a una centro de servicio de GE autorizado para realizar la reparación. En Alaska, la garantía excluye el costo de envío o visitas de servicio a su hogar.
Algunos estados no permiten la exclusión o limitación de daños incidentales o indirectos. Esta garantía le otorga derechos legales específicos y usted podría tener también derechosadicionales que varían de un estado a otro. Para conocer cuáles son sus derechos legales,consulte la oficina de asuntos del consumidor local o estatal el despacho del Procuradorestatal.
Entidad que otorga la garantía: General Electric Company. Louisville, KY 4022535
EXCLUSIÓN DE GARANTÍAS IMPLÍCITAS—Su único y exclusivo derecho es la reparación del producto,tal y como se indica en esta Garantía limitada. Cualquier garantía implícita, incluyendo lasgarantías implícitas de comerciabilidad o adecuación para un fin determinado, están limitadas a un año o el período de tiempo más breve permitido por la ley.

Soporte al consumidor
Sitio en la Internet de GE Appliances GEAppliances.com¿Tiene alguna pregunta o necesita ayuda con su aparato? ¡Visite el sitio Web de GE Appliances las 24 horas del día, todos los días del año! Para mayor comodidad y reparaciones más rápidas, ahora puede descargarmanuales del usuario, ordenar piezas o incluso programar su reparación a través de Internet.
Programe la reparación GEAppliances.comEl servicio de reparación experto de GE se encuentra a tan solo un paso de su puerta. ¡Entre en línea y programe su reparación cuando mejor le convenga, todos los días del año! O llame al 800.GE.CARES(800.432.2737) durante horas hábiles normales.
Real Life Design Studio (Estudio de diseño de la vida real) GEAppliances.comGE apoya el concepto de diseño universal: productos, servicios y entornos que pueden ser utilizados porpersonas de todas las edades, tamaños y capacidades. Reconocemos la necesidad de diseñar teniendo enmente una amplia gama de capacidades y discapacidades físicas y mentales. Para obtener más detalles sobre las aplicaciones de diseño universal de GE, incluyendo ideas de diseño de cocina para personas con discapacidades, visite nuestro sitio en la Internet hoy mismo. Para personas con discapacidades auditivas llame, al 800.TDD.GEAC (800.833.4322).
Garantías extendidas GEAppliances.comAdquiera un garantía extendida GE y entérese de descuentos especiales que se encuentran disponiblesmientras su garantía aún se encuentra vigente. Puede adquirirla en línea en cualquier momento o llamando al800.626.2224 durante horas hábiles normales. GE Consumer Home Services aún se encontrará vigente despuésque expire su garantía.
Piezas y accesorios GEAppliances.comLas personas cualificados para reparar sus propios aparatos pueden pedir el envío directo a su hogar de piezasy accesorios (se aceptan las tarjetas VISA, MasterCard y Discover). Ordene en línea hoy mismo, las 24 horas del día, todos los días o por teléfono al 800.626.2002 durante horas hábiles normales.
Las instrucciones incluidas en este manual cubren procedimientos que pueden ser realizados por cualquierusuario. En general otro tipo de reparaciones debe ser realizado por personal de reparaciones cualificado. Se debe tener cuidado, debido que el mantenimiento inadecuado puede causar el funcionamiento inseguro.
Contáctenos GEAppliances.comSi no está satisfecho con el servicio que le ha sido proporcionado por parte de GE, contácte con nosotros en nuestro sitio de Internet, describiéndonos todos los detalles, incluyendo su número de teléfono o escríbanos a:
General Manager, Customer RelationsGE Appliances, Appliance ParkLouisville, KY 40225
Registre su aparato GEAppliances.com¡Registre su nuevo aparato en línea cuando mejor le convenga! El registro oportuno del producto permitirá una comunicación mejorada y rápida reparación bajo los términos de su garantía, en caso de surgir la necesidad. También puede enviar por correo la tarjeta de registro preimpresa incluida en el material de embalaje.
Impreso en Corea
Copyright © 2022 FDOKUMEN