FortiOS New Features Guide - AWS
580
FortiOS - New Features Guide Version 6.2
-
Upload
khangminh22 -
Category
Documents
-
view
2 -
download
0
Transcript of FortiOS New Features Guide - AWS

FortiOS - New Features GuideVersion 6.2

FORTINET DOCUMENT LIBRARYhttps://docs.fortinet.com
FORTINET VIDEO GUIDEhttps://video.fortinet.com
FORTINET BLOGhttps://blog.fortinet.com
CUSTOMER SERVICE & SUPPORThttps://support.fortinet.com
FORTINET TRAINING & CERTIFICATION PROGRAMhttps://www.fortinet.com/training-certification
NSE INSTITUTEhttps://training.fortinet.com
FORTIGUARD CENTERhttps://www.fortiguard.com
END USER LICENSE AGREEMENThttps://www.fortinet.com/doc/legal/EULA.pdf
FEEDBACKEmail: [email protected]
October 26, 2020FortiOS 6.2 New Features Guide01-620-538749-20201026

TABLE OF CONTENTS
Change Log 10Expanding Fabric Family 13Telemetry Integration - New FTNT Products 13Telemetry Integration - AWS Cloud Segments 17SAML SSO for Fabric Devices 18Split-Task VDOM Support 19Dynamic Policy - Fabric Devices 24Fabric Member Synchronization 26
Simplify FortiAnalyzer Pairing 27FortiSandbox 28FortiClient EMS 31
Security Rating 32Security Rating - Extend Checks to FortiAnalyzer 32Security Rating – Historical Rating Dashboard Widget 34Comprehensive Report Extensions 35
Endpoint 38Dynamic Policy – FortiClient EMS (Connector) 38Captive Portal for Compliance Failure 41FortiToken Cloud 44EMS fabric connector GUI support 6.2.1 44FortiToken Cloud multi-factor authentication in the GUI 6.2.1 48
Wireless 51WiFi Location Map 51Monitor and Suppress Phishing SSID 55WiFi QoS Enhancement 57Airtime Fairness 59Extended Details on AP Drill Down 62Troubleshooting – Extended Logging 65Override WiFi Certificates (from GUI) 75Wireless MAC Filter Updates 76Change SSID to VDOMObject 78Direct SNMPMonitoring 80Supporting WPA3 on FAP 6.2.1 82
Switching 84FortiLink Setup 84Voice VLAN Auto-Assignment 85Dynamic VLAN 'Name' Assignment from RADIUS Attribute 87Netflow / IPFIX Support 88QoS Assignment and Rate Limiting for Quarantined VLANs 89Persistent MAC Learning (Sticky MAC) 90Split Port Mode for QSFP ports 91Virtual Switch Extensions 92MSTI Support 95FortiLink Auto Network Configuration Policy 95FortiLink MCLAG configuration in GUI 97
FortiOS 6.2 New Features Guide 3Fortinet Inc.

FortiLink Network Sniffer Extension 98Leverage SAML to switch between Security Fabric FortiGates 6.2.1 100
Leverage LLDP to Simplify Security Fabric Negotiation 107Configuring single-sign-on in the Security Fabric 6.2.2 110
Configuring the root FortiGate 110Configuring a downstream FortiGate as an SP 111Verifying the single-sign-on configuration 112
FSSO dynamic address subtype 6.2.2 113VMware NSX-T managed by FortiManager 6.2.2 117
Diagnose commands 121Fabric Connectors 122Multiple Concurrent SDN/Cloud Connectors 122Filter Lookup Improvement for SDN Connectors 124Obtain full user information through the MS Exchange connector 127Cloud Connector - AliCloud 129Cloud Connector - AWS - IAM Support 132SDN Connector - VMware ESXi 135Kubernetes (K8s) 138
Private Cloud K8s Connector 138AWS Kubernetes (EKS) Connector 141Azure Kubernetes (AKS) Connector 143GCP Kubernetes (GKE) Connector 146Oracle Kubernetes (OKE) Connector 148
SDN Connector - Azure Stack 151SDN Connector - OpenStack Domain Filter 154Endpoint Connector - Cisco pxGrid 156External Block List (Threat Feed) – Policy 160External Block List (Threat Feed) - File Hashes 161
Update to AntiVirus Profile 164Update to utm-virus category logs 166
External Block List (Threat Feed) - Authentication 167Connector GUI Organization 167Use active directory objects directly in policy 6.2.1 168Endpoint connector - FortiNAC 6.2.1 171
Configuring the FortiNAC 171Configuring the FortiGate 173
LDAP connector to get more user information from user login IDs 6.2.1 177OCI SDN connector 6.2.1 178ClearPass endpoint connector via FortiManager 6.2.2 181
Configure the FortiManager 181Add CPPM FSSO user groups to a local user group 182Use the local FSSO user group in a firewall policy 183Verification 184
ClearPass integration for dynamic address objects 6.2.2 186Create a REST API administrator 186Create dynamic IP addresses with the clearpass subtype 187
FortiOS 6.2 New Features Guide 4Fortinet Inc.

Create firewall policies 188Verification 189
Symantec endpoint connector 6.2.2 190Support for wildcard SDN connectors in filter configurations 6.2.3 198FortiClient EMS Cloud support 6.2.3 200
SD-WAN 203Overlay Controller VPN (OCVPN) 203
Hub-and-Spoke Support 203ADVPN Support 209Multiple VPN Support 209OCVPN free license updates 6.2.1 209
SD-WAN Bandwidth Monitoring Service 211Rule Definition Improvements 214
Load Balancing Per-Rule 214Interface Cost 215DSCPMatching (Shaping) 218Traffic Shaping Schedules 222Application Groups in Policies 223Internet Service Groups in Policies 226IPv6 Support (UI) 229Enable dynamic connector address used in policies 6.2.1 232Traffic shaping profile additional priorities 6.2.1 233Ingress traffic shaping 6.2.1 235
Forward Error Correction 236Represent Multiple IPsec Tunnels as a Single Interface 237Dual VPN Tunnel Wizard 239BGP Additional Path Support 241SLA Logging 244Internet Service Customization 246SLA Monitoring via REST API 247SD-WAN support for ADVPN 6.2.1 249Factory default health checks 6.2.1 253BGP route-map and selective rules 6.2.1 256
Examples 257Per-link controls for policy and SLA checks 6.2.1 259
Example 260Weighted random early detection support 6.2.1 261
Multi-Cloud 268AWS Extensions 268
Cross AZ High Availability support 268Autoscale with Transit GW support 6.2.1 271FortiCare-generated license adoption for AWS PAYG variant 6.2.2 274
Azure extensions 275SR-IOV support 6.2.1 275Support HA between AZs 6.2.1 277Azure SDN connector support for non-VM resources 6.2.3 279
FortiOS 6.2 New Features Guide 5Fortinet Inc.

Google Cloud Platform (GCP) Extensions 280HA Between Zones 280Auto Scaling 283
Oracle Cloud Extensions 288IAM Authentication 288Paravirtualized Mode Support 290Native Mode Support for OCI 292High Availability between Availability Domains 297
AliCloud Extensions 298Auto Scaling 298Active-Passive HA support between Availability Zones 6.2.1 302Active-Passive HA support on AliCloud 6.2.1 306
Support up to 18 Interfaces 310OpenStack— Network Service Header (NSH) Chaining Support 312Physical Function (PF) SR-IOV Driver Support 313FortiMeter Extensions 314
FortiMeter - Microsoft Hyper-V Instances 314FortiMeter - Fallback to Public FortiGuard 315
CPU only licensing for private clouds 6.2.2 316SDN connector for NSX-T manager 6.2.2 318
Automation and Dev-Ops 322Trigger - FortiAnalyzer Event Handler 322Trigger - FortiCloud-based IOC 325Action - NSX Quarantine 326Action - CLI Script 330Action - Azure Function 332Action - Google Cloud Function 334Action - AliCloud Function 336Action - Webhook Extensions 338
Advanced Threats 341Flow-based Inspection 341
Web Filtering 341Inspection Mode Per Policy 343Statistics 347Protocol Port Enforcement 349
IP Reputation Filtering 351URL Certificate Blacklist 352Global IP Address Information Database 356Antivirus Performance Improvements 358
CIFS Support 358IPv6 365
Combined IPv4 and IPv6 Policy 365FortiGuard DNS Filter 367
File Filtering for Web and Email Filter Profiles 368Move Botnet C&C into IPS Profile 373
Botnet IPs and Botnet Domains moved to Intrusion Prevention section 374
FortiOS 6.2 New Features Guide 6Fortinet Inc.

Botnet C&C Domain Blocking 375Botnet C&C URL Blocking 375Botnet C&C Signature Blocking 376
NGFW policy mode 6.2.1 376NGFW policy mode application default service 6.2.1 379
Example 379Adding CPU affinity for URL filters 6.2.1 381SSL offload/sandwich mode 6.2.1 382
IOT & OT 384MAC Address-Based Policies 384Device Summary and Filtering 386Manage device objects 6.2.1 387
SOC Adoption 390Topology View—Consolidated Risk 390FortiView— Subnet Filters 393FortiView Dashboards andWidgets 394FortiView Object Names 399FortiView Top Sources Usability 403FortiManager Cloud Service 404FortiAnalyzer Cloud Service 407Extend log timestamp to nanoseconds 6.2.1 411
Compliance 414FortiSandbox Cloud Region Selection 414
FortiCloud Log and Sandbox licenses shown in FortiOS 414FortiSandbox Cloud region selection 416
FortiGate-VM Unique Certificate 417Run a File System Check Automatically 419Password change prompt on first login 6.2.1 420
UX / Usability 422SAML SSO 422Logging - Session versus Attack Direction 427Internet Service Improvement 429Application Control Profile GUI Improvements 430Authentication Policy Extensions 434Workspace Mode 435Extend Policy/Route Check to Policy Routing 437Address Group - Exclusions 440Automatic Address Creation for Attached Networks 441Centralized Web Filtering Statistics 444Traffic Shaping GUI Update 445Unified Login for FortiCare and FortiGate Cloud 449Split-Task VDOMMode 453System Events default dashboard 6.2.2 454Advanced policy options in the GUI 6.2.2 455
FortiOS 6.2 New Features Guide 7Fortinet Inc.

Support for wildcard FQDN addresses in firewall policy 6.2.2 456Traffic class ID configuration updates 6.2.2 459Security Fabric topology improvements 6.2.2 461
SD-WAN visibility 461Fabric device filtering 463
Adding IPsec aggregate members in the GUI 6.2.3 463Other 467Extend Interface Failure Detection to Aggregate Interfaces 467Source & Destination UUID Logging 468DNS - Multiple Domain List 469DNS - Latency Info 471DNS - Add DNS Translation to DNS Profile 474Multiple FortiAnalyzer (or Syslog) Per VDOM 475Web Proxy 476
Transparent Web Proxy Forwarding 476Multiple Dynamic Header Count 477Restricted SaaS Access (0365, G-Suite, Dropbox) 480Syntax update for Microsoft compatibility 6.2.1 482Support FortiSandbox Cloud 6.2.1 484
Protocols 486TLS 1.3 Support 487SMBv2 Support (SSL VPN) 488PTPv2 489Telnet Disabled Option 490SHA-1 Authentication Support (for NTPv4) 492DNS over TLS 493LLDP Reception 494Direct IP Support for LTE/4G 496OSPFv3 neighbor authentication 6.2.1 499LACP support on entry-level E-series devices 6.2.1 501TLS 1.3 proxy support 6.2.1 502GTPv2 in policy 6.2.1 503FortiGate Cloud / FDN communication through an explicit proxy 6.2.1 504Transceiver information on FortiOS GUI 6.2.1 506LACP support on entry-level devices 6.2.2 508Ignore AUTH TLS command for DLP 6.2.2 509LACP support on entry-level devices 6.2.4 510
Recognize AnyCast Address in Geo-IP Blocking 511GTP in Asymmetric Routing 511Firewall - Allow to Customize Default Service 513Firewall - Anti-Replay Option Per-Policy 513NTLM Extensions 514Option to Disable Stateful SCTP Inspection 517HA Failover Condition - SSD Failure 518Option to Fragment IP Packets Before IPSec Encapsulation 519DHCP Relay Agent Information Option 519
FortiOS 6.2 New Features Guide 8Fortinet Inc.

VLAN Inside VXLAN 521Controlling return path with auxiliary session 523
Scenarios 523Effect on NPU offloading sessions 524Verification 525
Disable all cloud communication 526Custom SIP RTP Port Range Support 528Custom Service Max Value Increase 529FortiCarrier License Activation 529GUI Alert on Login to VMX Security Nodes 530Event Log Subtype for FortiExtender 531Decouple FortiSandbox Cloud from FortiCloud 533FortiGate Cloud 535SNMPOID for Log Failed to Send 536FortiGuard Distribution of Updated Apple Certificates (for token push notifications) 539Active Directory Recursive Search Option 540Web proxy global settings 541Device detection label changes 6.2.1 541Device detection changes when upgrading to 6.2 6.2.1 545Flow versus proxy policy improvement 6.2.1 545Virtual switch support for FortiGate 300E series 6.2.2 546IPsec VPN wizard hub-and-spoke ADVPN support 6.2.2 548FortiGuard communication over port 443 with HTTPS 6.2.2 552IPv6 FortiGuard connections 6.2.2 553SSH file scan 6.2.2 553FortiGuard third Party SSL validation and Anycast support 6.2.2 557
Connection to FortiGuard 558Override FortiGuard servers 559
FortiClient EMS Cloud support 6.2.2 559Remove FortiGate Cloud standalone reference 6.2.3 560Dynamic address support for SSL VPN policies 6.2.3 562
Configure the FortiAuthenticator 564Fortinet Single Sign-On Collector Agent 565Configure the FortiGate 566Confirmation 571
GUI support for FortiAP U431F and U433F 6.2.3 573Support for wtp profiles 6.2.4 574Retrieve client OS information from FortiAP 6.2.4 577
GUI 577CLI 578
FortinetOne renamed FortiCloud 6.2.5 579
FortiOS 6.2 New Features Guide 9Fortinet Inc.

Change Log
Change Log
Date Change Description
2020-10-26 Added Controlling return path with auxiliary session on page 523
2020-08-20 Initial release of 6.2.5.
2020-06-19 Added LACP support on entry-level devices 6.2.4 on page 510.
2020-05-12 Initial release of 6.2.4.
2020-02-04 Updated ClearPass endpoint connector via FortiManager 6.2.2 on page 181.
2020-02-19 Added GUI support for FortiAP U431F and U433F 6.2.3 on page 573.
2020-01-21 Added Virtual switch support for FortiGate 300E series 6.2.2 on page 546.
2019-12-19 Initial release of 6.2.3.
2019-11-04 Added FortiGuard third Party SSL validation and Anycast support 6.2.2 on page 557.
2019-11-06 Added Configuring single-sign-on in the Security Fabric 6.2.2 on page 110.
2019-11-12 Added IPv6 FortiGuard connections 6.2.2 on page 553.
2019-11-19 Updated FortiCare-generated license adoption for AWS PAYG variant 6.2.2 on page274.
2019-11-20 Added Flow versus proxy policy improvement 6.2.1 on page 545.
2019-11-20 Added Obtain full user information through the MS Exchange connector on page 127.
2019-11-29 Added FortiClient EMS Cloud support 6.2.2 on page 559.
2019-10-09 Initial release of 6.2.2.
2019-10-25 Added IPsec VPN wizard hub-and-spoke ADVPN support 6.2.2 on page 548.Added CPU only licensing for private clouds 6.2.2 on page 316.Added VMware NSX-T managed by FortiManager 6.2.2 on page 117.
2019-09-03 Added Device detection changes when upgrading to 6.2 6.2.1 on page 545.
2019-08-19 Added SR-IOV support 6.2.1 on page 275.
2019-08-20 AddedWeb proxy global settings on page 541.
2019-08-21 Added Device detection label changes 6.2.1 on page 541.
2019-07-17 Initial release of 6.2.1.
2020-09-02 Updated FortiToken Cloud multi-factor authentication in the GUI 6.2.1 on page 48.
2019-07-23 Added Ingress traffic shaping 6.2.1 on page 235.
2019-06-10 Added FortiAnalyzer Cloud Service on page 407.
2019-05-07 Added FortiManager Cloud Service on page 404.
FortiOS 6.2 New Features Guide 10Fortinet Inc.

Change Log
Date Change Description
2019-04-02 Added FortiClient EMS on page 31.
2019-04-08 Added URL Certificate Blacklist and Decouple FortiSandbox Cloud from FortiCloud.
2019-04-09 Added Event Log Subtype for FortiExtender on page 531.
2019-04-10 Added Captive Portal for Compliance Failure on page 41.Added Centralized Web Filtering Statistics on page 444.Added Airtime Fairness on page 59.Added Extended Details on AP Drill Down on page 62.
2019-04-11 Added SMBv2 Support (SSL VPN) on page 488.Added Split-Task VDOMMode on page 453.
2019-04-12 Added FortiGate Cloud on page 535.Added Unified Login for FortiCare and FortiGate Cloud on page 449.Added FortiView Dashboards andWidgets on page 394.Added SNMPOID for Log Failed to Send on page 536.
2019-04-15 Added Trigger - FortiCloud-based IOC on page 325.Added Endpoint Connector - Cisco pxGrid on page 156.
2019-04-17 Added HA Failover Condition - SSD Failure on page 518.Added Endpoint Connector - Cisco pxGrid on page 156.
2019-04-18 Added FortiGuard Distribution of Updated Apple Certificates (for token pushnotifications) on page 539.Added Global IP Address Information Database on page 356.Added Action - Azure Function on page 332.
2019-04-22 Added Interface Cost on page 215.Added SLA Monitoring via REST API on page 247.Added Direct SNMPMonitoring on page 80.Added Direct IP Support for LTE/4G on page 496.Added Automatic Address Creation for Attached Networks on page 441.Added Device Summary and Filtering on page 386.Added Internet Service Improvement on page 429.Added External Block List (Threat Feed) – Policy on page 160.Added FortiView Object Names on page 399.Added FortiView Top Sources Usability on page 403.Added Comprehensive Report Extensions on page 35.
2019-04-23 Added LLDP Reception on page 494.Added Active Directory Recursive Search Option on page 540.Added Connector GUI Organization on page 167.Added CIFS Support on page 358.
2019-04-29 Added Telemetry Integration - AWS Cloud Segments on page 17.
FortiOS 6.2 New Features Guide 11Fortinet Inc.

Change Log
Date Change Description
Added SAML SSO on page 422.Added SAML SSO for Fabric Devices on page 18.
2019-03-28 Initial release of FortiOS 6.2.0.
FortiOS 6.2 New Features Guide 12Fortinet Inc.

Expanding Fabric Family
This section lists the new features added to FortiOS for the expanding fabric family.
Telemetry Integration - New FTNT Products
With this version, you can add other Fortinet products to the Security Fabric. The following products are supported:
l FortiMaill FortiWebl FortiADCl FortiDDOSl FortiWLC
In FortiGate, you can show device details and widgets in the following pages:
l Security Fabric Settingsl Security Fabric Physical Topologyl Security Fabric Logical Topologyl Dashboard widgets
Sample configuration
To configure Security Fabric devices in the GUI:
1. In Security Fabric > Settings, configure Fabric Devices so that they appear in the Topology field.
FortiOS 6.2 New Features Guide 13Fortinet Inc.

Expanding Fabric Family
2. In the FortiGate Telemetry section, the Topology field shows the devices.
To configure Security Fabric devices in the CLI:
config system csf...
config fabric-deviceedit "FortiADC-1"
set device-ip 172.18.64.36set access-token xxxxxx
nextedit "FML-1"
set device-ip 172.18.64.48set access-token xxxxxx
nextedit "FWB-1"
set device-ip 172.18.64.49set access-token xxxxxx
nextend
end
FortiOS 6.2 New Features Guide 14Fortinet Inc.

Expanding Fabric Family
To configure the Security Fabric Physical Topology in the GUI:
1. Go to Security Fabric > Physical Topology to configure the physical topology.
To configure the Security Fabric Logical Topology in the GUI:
1. Go to Security Fabric > Logical Topology to configure the logical topology.
FortiOS 6.2 New Features Guide 15Fortinet Inc.

Expanding Fabric Family
To view Security Fabric devices in the Dashboard:
1. Go to Dashboard > Main. The Security Fabric widget includes the Security Fabric devices.
To add Security Fabric devices in the Dashboard:
1. When you add a widget, you can add Security Fabric devices.
FortiOS 6.2 New Features Guide 16Fortinet Inc.

Expanding Fabric Family
Telemetry Integration - AWS Cloud Segments
This feature adds cloud segments to the Security Fabric topology view, including:
l Instance Detailsl Instance IDl Known CVEs
The AWS instance can be seeing in the Physical Topology at Security Fabric > Physical Topology.
The instance is connected through the Cloud, and shows the Instance ID.
Downstream clients also show an Instance ID, and CVEs that are discovered from AWS inspector are shown.
FortiOS 6.2 New Features Guide 17Fortinet Inc.

Expanding Fabric Family
AWS is shown in the Logical Topology at Security Fabric > Logical Topology.
The subnet ID is shown beside the port, and the client devices are grouped accordingly.
The CVE and instance ID are also shown.
SAML SSO for Fabric Devices
FortiOS 6.2 New Features Guide 18Fortinet Inc.

Expanding Fabric Family
When Security Fabric is enabled, the root FortiGate will be configured as the Identify Provider (IdP) by default. Whenadded to the Security Fabric, downstream FortiGates will automatically be configured as Service Providers (SP) andprovided all the links required for SAML communication. Administrators must still be authorized on each device, but login credentials are shared between devices. Once authorized, an administrator can move between fabric devices withoutlogging in again.
Optionally, the downstream FortiGate can also be manually configured as an SP and then linked to the root FortiGate.See SAML SSO on page 422 for instructions.
The authentication service is provided by the root FortiGate using local system admin accounts for authentication. Any ofthe administrator account types can be used for SAML log in. After successful authentication, the administrator logs in tothe first downstream FortiGate SP (see SAML SSO on page 422), and can then connect to other downstream FortiGatesthat have the SSO account properly configured, without needing to provide credentials again.
Split-Task VDOM Support
This feature adds support for Security Fabric in split-task VDOMmode.
Security Fabric topology
Security Fabric setting
FortiGate Telemetry can now be enabled in split-task VDOMmode. FortiGate telemetry settings are available on theSecurity Fabric > Settings page.
FortiOS 6.2 New Features Guide 19Fortinet Inc.

Expanding Fabric Family
Telemetry settings are shown in both global and VDOM contexts, but in VDOM contexts only the Topology andFortiTelemetry enabled interfaces fields are shown.
If the upstream FortiGate has split-task VDOMmode enabled, it can allow downstream FortiGates to join the SecurityFabric in the root and FG-traffic VDOMs. If the downstream FortiGate has split-task VDOM mode enabled, it can onlyconnect to the upstream FortiGate via the downstream FortiGate interface in the root VDOM.
FortiOS 6.2 New Features Guide 20Fortinet Inc.

Expanding Fabric Family
Physical topology
The global Physical Topology page shows the root FortiGate and all downstream FortiGates that are in the sameSecurity Fabric.
The root or FG-traffic VDOMs' Physical Topology page shows the root FortiGate and only the downstream FortiGatesthat connect to the current VDOM on the root FortiGate.
FortiOS 6.2 New Features Guide 21Fortinet Inc.

Expanding Fabric Family
Logical topology
FortiGate interfaces are grouped by VDOMs. The global Logical Topology page shows the root FortiGate and alldownstream FortiGates that are in the same Security Fabric, including interfaces' connection information.
The root or FG-traffic VDOMs' Logical Topology page shows the root FortiGate and only the downstream FortiGates thatconnect to the current VDOM on the root FortiGate, including interfaces' connection information.
FortiOS 6.2 New Features Guide 22Fortinet Inc.

Expanding Fabric Family
Dashboard Security Fabric widget
The global Dashboard page shows the root FortiGate and all downstream FortiGates in the Security Fabric widget.
The root or FG-traffic VDOMs' Dashboard page shows the root FortiGate and only the downstream FortiGates thatconnect to the current VDOM on the root FortiGate in the Security Fabric widget.
FortiOS 6.2 New Features Guide 23Fortinet Inc.

Expanding Fabric Family
Dynamic Policy - Fabric Devices
A new dynamic address group is added in 6.2, which represents the configured IP addresses of all Fortinet devicesconnected to the Security Fabric. In this first phase, it includes FortiManager, FortiAnalyzer, FortiClient EMS, FortiMail,FortiAP(s), and FortiSwitch(es). Like other dynamic address groups for fabric connectors, this can be used in IPv4policies and objects.
Firewall address now includes a new default address object called FABRIC_DEVICE, and you can apply the addressobject to the following types of policies:
l IPv4 firewall policy (including virtual wire pairs)l IPv4 shaping policyl IPv4 ACL policyl Policy64 and Policy46 (IPv4 only)l Consolidated policy (IPv4 only)
You cannot apply the FABRIC_DEVICE object to the following types of policies:
FortiOS 6.2 New Features Guide 24Fortinet Inc.

Expanding Fabric Family
l All IPv6 policiesl IPv4 explicit proxy policy
You also cannot use the FABRIC_DEVICE object with the following settings:
l Custom/extension internet-servicel Exclusion of addrgrp
Initially the FABRIC_DEVICE object, does not have an address value. The address value is populated dynamically asthings change. As a result, you cannot edit the FABRIC_DEVICE object, add any addresses to the object, or remove anyaddresses from the object.
The address values of the FABRIC_DEVICE object are populated based on:
l FortiAnalyzer IP (from the Fabric Settings pane)l FortiManager IP (from the Fabric Settings pane)l FortiMail IP (from the Fabric Settings pane)l FortiClient EMS IP (from the Fabric Settings pane)l FortiAP IPs (from the FortiAP Setup pane or DHCP)l FortiSwitch IPs (from the FortiSwitch Setup page or DHCP)
Example of the FABRIC_DEVICE object applied in an IPv4 policy:
Example of the FABRIC_DEVICE object in the Edit Address pane. The pane includes only a Return button because theobject is read-only:
Example of the FABRIC_DEVICE object applied in an IPv4 policy:
FGT-300D_A (root) # show fu firewall address FABRIC_DEVICEconfig firewall address
edit "FABRIC_DEVICE"set type ipmaskset comment "IPv4 addresses of Fabric Devices."set visibility enableset associated-interface ''
FortiOS 6.2 New Features Guide 25Fortinet Inc.

Expanding Fabric Family
set color 0set allow-routing disableset subnet 0.0.0.0 0.0.0.0
nextendFGT-300D_A (root) #FGT-300D_A (root) # show firewall policyconfig firewall policy
edit 1set uuid cbe9e74c-37c6-51e9-9cf1-9510b503f2bfset srcintf "port2"set dstintf "port1"set srcaddr "all"set dstaddr "FABRIC_DEVICE"set action acceptset schedule "always"set service "ALL"set utm-status enableset fsso disableset nat enable
nextendFGT-300D_A (root) #
Example of the diagnose command, which is used to list what IP addresses are included in FABRIC_DEVICE. For now,this is only method to list content in the FABRIC_DEVICE object:
FGT-300D_A (root) # diagnose firewall iprope list 100004policy index=1 uuid_idx=25 action=acceptflag (8050108): redir nat master use_src pol_statsflag2 (4000): resolve_ssoflag3 (20):schedule(always)cos_fwd=255 cos_rev=255group=00100004 av=00004e20 au=00000000 split=00000000host=0 chk_client_info=0x0 app_list=0 ips_view=0misc=0 dd_type=0 dd_mode=0zone(1): 10 -> zone(1): 9source(1): 0.0.0.0-255.255.255.255, uuid_idx=3,dest(5): 172.18.64.48-172.18.64.48, uuid_idx=1, 172.18.60.25-172.18.60.25, uuid_idx=1,
172.18.52.154-172.18.52.154, uuid_idx=1, 172.18.28.31-172.18.28.31, uuid_idx=1,172.18.62.6-172.18.62.6, uuid_idx=1,
service(1):[0:0x0:0/(0,65535)->(0,65535)] helper:auto
FGT-300D_A (root) #
Fabric Member Synchronization
This section lists new fabric member synchronization features added to FortiOS for the expanding fabric family.
FortiOS 6.2 New Features Guide 26Fortinet Inc.

Expanding Fabric Family
Simplify FortiAnalyzer Pairing
This version simplifies the pairing of FortiAnalyzer and FortiGate by using certificate verification to allow the FortiGateadmin to preauthorize access.
When configuring FortiAnalyzer in the root FortiGate, FortiGate has an option to allow FortiAnalyzer to access theFortiGate REST API. FortiGate verifies the FortiAnalyzer by retrieving the FortiAnalyzer serial number and checking itagainst the FortiAnalyzer certificate. After verification, the FortiAnalyzer serial number is stored in the FortiGateconfiguration.
Then on the FortiAnalyzer side, the admin authorizes FortiGates in the same Security Fabric. After authorization, theFortiGates can form a Security Fabric in the FortiAnalyzer side without entering the admin credentials of the rootFortiGate.
Sample configuration
To configure FortiAnalyzer in the root FortiGate GUI:
1. Go to Security Fabric > Settings.2. Enable FortiGate Telemetry and configure settings.
To configure FortiAnalyzer in the root FortiGate CLI:
config log fortianalyzer settingset status enableset server "10.6.30.250"set certificate-verification enableset serial "FL-4HET318900407"set access-config enableset upload-option realtimeset reliable enable
end
FortiOS 6.2 New Features Guide 27Fortinet Inc.

Expanding Fabric Family
To authorize FortiGates in the same Security Fabric using the FortiAnalyzer GUI:
1. In FortiAnalyzer, go to Device Manager and select the FortiGates to be authorized.
2. After a moment, the FortiGates can form a Security Fabric in the FortiAnalyzer without entering the admincredentials of the root FortiGate.
3. Go to the FortiGate to see the FortiAnalyzer logging information.
FortiSandbox
FortiSandbox connection information is defined on the Security Fabric Settings page, and is now synchronized betweenall fabric members.
FortiOS 6.2 New Features Guide 28Fortinet Inc.

Expanding Fabric Family
To configure a FortiSandbox appliance or FortiSandbox Cloud through the root FortiGate:
1. Navigate to Security Fabric > Settings.2. Sandbox inspection displays as enabled and shows FortiSandbox settings for the FortiSandbox Appliance or
FortiSandbox Cloud.l FortiSandbox Appliance:
l FortiSandbox Cloud:
FortiOS 6.2 New Features Guide 29Fortinet Inc.
Expanding Fabric Family
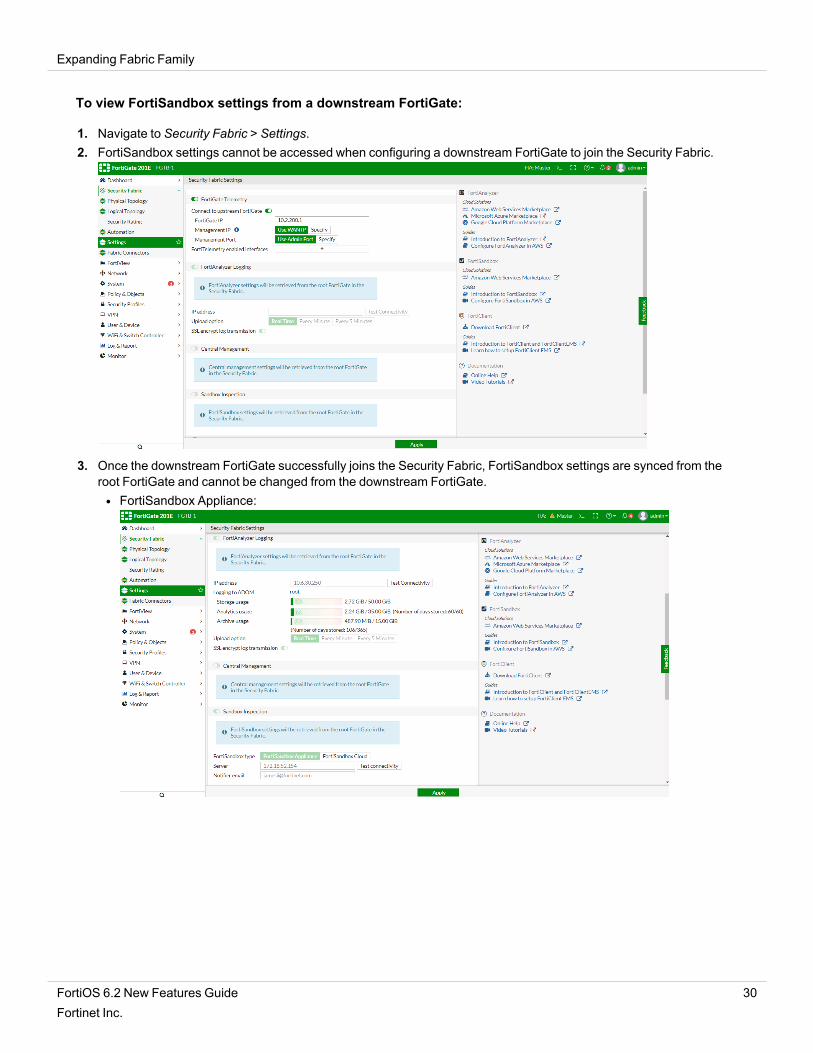
To view FortiSandbox settings from a downstream FortiGate:
1. Navigate to Security Fabric > Settings.2. FortiSandbox settings cannot be accessed when configuring a downstream FortiGate to join the Security Fabric.
3. Once the downstream FortiGate successfully joins the Security Fabric, FortiSandbox settings are synced from theroot FortiGate and cannot be changed from the downstream FortiGate.l FortiSandbox Appliance:
FortiOS 6.2 New Features Guide 30Fortinet Inc.

Expanding Fabric Family
l FortiSandbox Cloud:
FortiClient EMS
This feature simplifies enabling and configuring FortiClient EMS servers in the Security Fabric. Up to three EMS serverscan be added on the global Security Fabric Settings page using the servers' IP addresses, and all EMS settings aresynchronized between all fabric members.
To configure FortiClient EMS servers in the GUI:
1. On the FortiGate, go to Security Fabric > Settings.2. Enable FortiClient Endpoint Management System (EMS).3. Click the plus bar to add an EMS server.4. Enter a name for the server, it's IP/Domain Name, Serial Number, Admin User, and Password (if required) in the
requisite fields.
FortiOS 6.2 New Features Guide 31Fortinet Inc.

Expanding Fabric Family
5. Add up to two more servers as needed.
6. Click Apply.
To configure FortiClient EMS servers using the CLI:
config endpoint-control fctemsedit "ems_133"
set server "172.16.200.133"set serial-number "FCTEMS1234567890"set https-port 10443set admin-username "admin"
nextedit "ems_134"
set server "172.16.200.134"set serial-number "FCTEMS1234567891"set https-port 10443set admin-username "admin"
nextedit "ems_135"
set server "172.16.200.135"set serial-number "FCTEMS1234567892"set https-port 10443set admin-username "admin"
nextend
Security Rating
Security Rating - Extend Checks to FortiAnalyzer
In 6.2, the Security Rating feature can verify FortiAnalyzer configurations and report the results for Compatible Firmwareand Admin Idle Timeout.
FortiOS 6.2 New Features Guide 32Fortinet Inc.

Expanding Fabric Family
To view FortiAnalyzer information and tests in Security Rating:
1. Navigate to Security Fabric > Security Rating.2. The Security Rating results page displays the FortiAnalyzer icon in the topology field, and FortiAnalyzer information
is available through the tooltip.
3. The Compatible Firmware and Admin Idle Timeout tests for FortiAnalyzer are now available:l Compatible Firmware:
FortiOS 6.2 New Features Guide 33Fortinet Inc.

Expanding Fabric Family
l Admin Idle Timeout:
Security Rating – Historical Rating Dashboard Widget
A new System Dashboard widget is added in FortiGate which retrieves and displays the historical security rating trendsfor the Security Fabric.
This version adds a historical security rating score chart to the existing Security Rating Dashboard widget that shows thesecurity rating results over time.
The Security Rating Dashboard widget has two new views:
l A view to show the historical security rating scores over time, along with the industry average for comparison.l A view to show historical security rating scores percentile over time.
The following are available in both views:
l You can select All Industries orMy Industry.l You can select All Regions orMy Region.l You can select Account Registered Region and Industry.l The widget displays only one result per day from FortiAnalyzer.
Sample Security Rating widget showing historical score
The blue line represents the FortiGate Security Rating score.
The red line represents the Region & Industry Average score.
FortiOS 6.2 New Features Guide 34Fortinet Inc.
Expanding Fabric Family
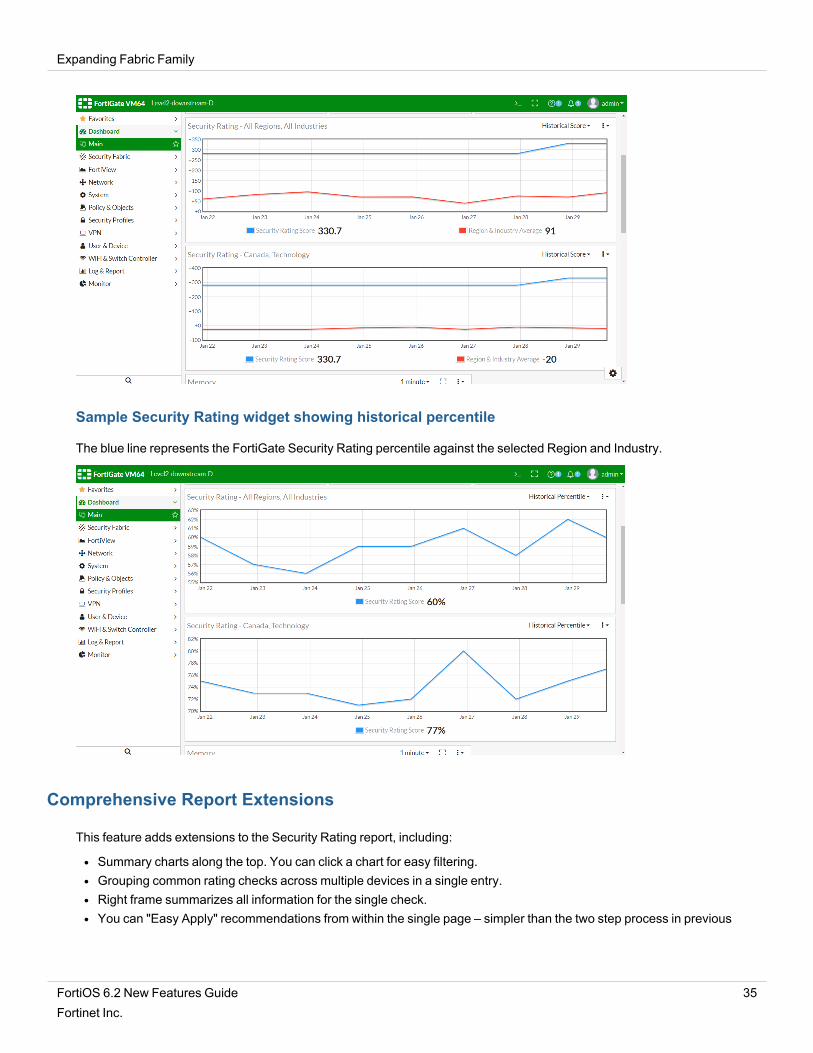
Sample Security Rating widget showing historical percentile
The blue line represents the FortiGate Security Rating percentile against the selected Region and Industry.
Comprehensive Report Extensions
This feature adds extensions to the Security Rating report, including:
l Summary charts along the top. You can click a chart for easy filtering.l Grouping common rating checks across multiple devices in a single entry.l Right frame summarizes all information for the single check.l You can "Easy Apply" recommendations from within the single page – simpler than the two step process in previous
FortiOS 6.2 New Features Guide 35Fortinet Inc.

Expanding Fabric Family
versions.l Choose to show full results or subsets such as failed only, etc.
Sample configuration
The default view for the Security Rating Report.
Security Rating Report with a specific test selected.
Additional details on each compliance test.
FortiOS 6.2 New Features Guide 36Fortinet Inc.

Expanding Fabric Family
You can select Easy Apply for individual recommendations.
Security Rating Report Summary.
Security Rating Report with full results including passed and failed tests.
FortiOS 6.2 New Features Guide 37Fortinet Inc.

Expanding Fabric Family
Endpoint
This section lists new endpoint features added to FortiOS for the expanding Fabric family:
Dynamic Policy – FortiClient EMS (Connector)
This feature introduces a dynamic policy connector for FortiClient EMS. This allows objects to be defined on theFortiGate which map to tags/groups on EMS. EMS dynamically updates these endpoint groups when host compliance orother events happen. This causes FortiOS to dynamically adjust the security policy based on those group definitions.
EMS can define compliance verification rules based on criteria such as certificates, the logged in domain, files present,OS versions, running processes, and registry keys. When a FortiClient endpoint registers to EMS, EMS dynamicallygroups the endpoint based on the compliance verification rules. FortiOS can receive the dynamic endpoint groups fromEMS via the FSSO protocol, using the new "fortiems" FSSO agent type which supports SSL and imports trustedcertificates.
After FortiOS pulls the tags from EMS via the FSSO protocol, you can create user groups based on the tags, then applydynamic firewall policies to the user groups. When host compliance or other events happen, EMS sends updates toFortiOS to update the dynamic policies.
The following instructions assume that EMS is installed, configured, and has endpoints connected. For information onconfiguring EMS, see the FortiClient EMS Administration Guide.
This feature is only available when using FortiOS with EMS 6.2.0 or later.
To add a compliance verification rule in EMS:
This example creates a compliance verification rule that applies to endpoints that have Windows 10 installed.
1. In EMS, go to Compliance Verification > Compliance Verification Rules, and click Add.2. In the Name field, enter the desired rule name. Note that EMS uses the tag name to dynamically group endpoints,
not the rule name configured in this field.3. Toggle Status on or off to enable or disable the rule.
FortiOS 6.2 New Features Guide 38Fortinet Inc.

Expanding Fabric Family
4. For Type, selectWindows,Mac, or Linux. This affects what rule types are available. In this example,Windows isselected.
5. From the Rule dropdown list, select the rule type and configure the related options. Ensure you click the + buttonafter entering each criterion.
Rule type Description
Certificate In the Subject and Issuer fields, enter the certificate subject and issuer. Youcan enter multiple certificates using the + button. You can also use the NOToption to indicate that the rule requires that a certain certificate is not presentfor the endpoint.The endpoint must satisfy all conditions to satisfy this rule. For example, if therule is configured to require certificate A, certificate B, and NOT certificate C,then the endpoint must have both certificates A and B and not certificate C.
Logged in Domain In the Domain field, enter the domain name. You can enter multiple domainnames using the + button. If the rule is configured for multiple domains, theendpoint is considered as satisfying the rule if it belongs to one of theconfigured domains. This option is not available for Linux endpoints.
File In the File field, enter the file path. You can enter multiple files using the +button. You can also use the NOT option to indicate that the rule requires thata certain file is not present on the endpoint.The endpoint must satisfy all conditions to satisfy this rule. For example, if therule is configured to require file A, file B, and NOT file C, then the endpointmust have both files A and B and not file C.
OS Version From theOS Version field, select the OS version. You can enter multipleOS versions using the + button. If the rule is configured for multipleOS versions, the endpoint is considered as satisfying the rule if it has one ofthe configured OS versions installed.
Running Process In the Running Process field, enter the process name. You can enter multipleprocesses using the + button. You can also use the NOT option to indicate thatthe rule requires that a certain process is not running on the endpoint.The endpoint must satisfy all conditions to satisfy this rule. For example, if therule is configured to require process A, process B, and NOT process C, thenthe endpoint must have both processes A and B running and process C notrunning.
Registry Key In the Registry Key field, enter the registry key value. You can enter valuesusing the + button. You can also use the NOT option to indicate that the rulerequires that a certain registry key is not present on the endpoint.The endpoint must satisfy all conditions to satisfy this rule. For example, if therule is configured to require registry key A, registry key B, and NOT registrykey C, then the endpoint must have both registry keys A and B and not registrykey C.This option is only available for Windows endpoints.
In this example,OS Version is selected from the Rule dropdown list, andWindows 10 is then selected from theOSVersion dropdown list.
6. Under Assign to, select All.
FortiOS 6.2 New Features Guide 39Fortinet Inc.

Expanding Fabric Family
7. In the Tag endpoint as dropdown list, select an existing tag or enter a new tag. In this example, a new tag, WIN10_EMS134, is created. EMS uses this tag to dynamically group together endpoints that satisfy the rule, as well as anyother rules that are configured to use this tag.
8. Click Save.
9. Go to Compliance Verification > Host Tag Monitor. All endpoints that have Windows 10 installed are shown groupedby the WIN10_EMS134 tag.
To configure the fortiems FSSO agent:
In the FortiOS CLI, run the following commands. In this example, the FSSO agent name is ems_02, and the EMS serveris located at 172.16.200.134.
config user fssoedit "ems_02"
set server "172.16.200.134"set password 123456set type fortiemsset ssl enableset ssl-trusted-cert "Fortinet_CA"
nextend
To configure EMS FSSO groups:
In the FortiOS CLI, run the following commands. In this example, the FSSO groups for two FSSO agents, ems_02 andems_03, are being configured. TheWIN10_EMS134 dynamic endpoint group is added to the ems_02 FSSO group, andthe MAC_TEAMVIEWER_EMS135 dynamic endpoint group is added to the ems_03 FSSO group.
config user adgrpedit "TAG_WIN10_EMS134"
set server-name "ems_02"nextedit "TAG_MAC_TEAMVIEWER_EMS135"
set server-name "ems_03"next
end
FortiOS 6.2 New Features Guide 40Fortinet Inc.

Expanding Fabric Family
To configure a user group based on EMS tags:
1. In FortiOS, go to User & Device > User Groups. Click Create New.2. In the Name field, enter the desired name.3. For Type, select Fortinet Single Sign-On (FSSO).4. In theMembers field, click +. The Select Entries pane appears. You can identify the dynamic endpoint groups pulled
from EMS because the names begin with TAG_, followed by the tag name from EMS.
5. Select the desired dynamic endpoint groups. Endpoints that currently belong to this dynamic endpoint group inEMS will be members of this FortiOS user group.
6. ClickOK.
To create a dynamic firewall policy for the user group:
You can now create a dynamic firewall policy for the user group. In this example, an IPv4 policy is created for the usergroup.
1. In FortiOS, go to Policy & Objects > IPv4 Policy. Click Create New.2. In the Source field, click +. The Select Entries pane appears. On the User tab, select the user group configured
above.3. Configure other options as desired. ClickOK.4. Go to Policy & Objects > IPv4 Policy to ensure the policy was created and applied to the desired user group. FortiOS
will update this policy when it receives updates from EMS.
Captive Portal for Compliance Failure
FortiOS 6.2 replaces the endpoint compliance profile with the EMS connector. FortiGate supports a customizablecaptive portal to direct users to install or enable the required software.
FortiOS supports per-policy custom disclaimers. For example, you may want to configure three firewall policies, each ofwhich matches traffic from endpoints with different FortiClient statuses:
FortiOS 6.2 New Features Guide 41Fortinet Inc.

Expanding Fabric Family
Endpoint status FortiOS behavior
Endpoint does not haveFortiClient installed.
Traffic matches a firewall policy that displays an in-browser warning to installFortiClient from the provided link.
Endpoint has FortiClientinstalled, registered to EMS, andconnected to the FortiGate.
Traffic matches a dynamic firewall policy which allows the endpoint to reach itsdestination via this policy.
Endpoint is deregistered fromEMS and disconnected from theFortiGate.
Traffic matches another dynamic firewall policy that displays warning to registerFortiClient to EMS.
To configure this feature in the GUI:
1. In the FortiOS CLI, run the following commands to enable per-policy disclaimer messages:config user setting
set auth-cert "Fortinet_Factory"set per-policy-disclaimer enable
end
2. Go to Policy & Objects > IPv4 Policy and select the desired policy for when the endpoint does not have FortiClientinstalled.
3. Under Disclaimer Options, enable Display Disclaimer.4. Enable Customize Messages.5. Click Edit Disclaimer Message.6. FortiOS displays the default disclaimer message. Edit the disclaimer to warn users to install FortiClient and provide
the FortiClient download link. Click Save.
7. Repeat steps 2-6 for each desired policy, creating custom disclaimers as desired.
To configure this feature in the CLI:
config user setting
FortiOS 6.2 New Features Guide 42Fortinet Inc.

Expanding Fabric Family
set auth-cert "Fortinet_Factory"set per-policy-disclaimer enable
endconfig firewall policy
edit 1set name "111"set uuid c3ad8da0-bd7c-51e8-c0da-fe9053bf35aeset srcintf "port12"set dstintf "port11"set srcaddr "all"set dstaddr "pc155_address"set action acceptset schedule "always"set service "ALL"set wsso disableset groups "ems_03_group"set disclaimer enableset replacemsg-override-group "test"set nat enable
nextedit 4
set name "44"set uuid 686ea2ca-348d-51e9-9dca-b2b4b4aabbe2set srcintf "port12"set dstintf "port11"set srcaddr "all"set dstaddr "pc5-address"set action acceptset schedule "always"set service "ALL"set wsso disableset groups "ems_03_group"set disclaimer enableset replacemsg-override-group "test2"set nat enable
nextedit 6
set name "66"set uuid f1034e52-36d5-51e9-fbae-da21922ccd10set srcintf "port12"set dstintf "port11"set srcaddr "all"set dstaddr "all"set status disableset schedule "always"set service "ALL"set logtraffic allset fsso disableset block-notification enableset replacemsg-override-group "endpoint-override"
nextend
FortiOS 6.2 New Features Guide 43Fortinet Inc.

Expanding Fabric Family
FortiToken Cloud
This feature adds centralized token authentication in the cloud, as opposed to built into FortiGate or FortiAuthenticator,simplifying FortiToken management and provisioning.
To configure the centralized token authentication in the cloud on the FortiGate:
1. Enable the FortiToken cloud service feature:
config system globalset fortitoken-cloud-service enable
end
2. Assign the FortiCloud token to local users or administrators using the fortitoken-cloud option:
config user localedit "test-cl3"
set type passwordset two-factor fortitoken-cloudset email-to ............
nextend
The following commands can be used to manage FortiCloud users:
Command Description
diagnose ftk-cloud show users Show all current users on the FortiCloud server.
diagnose ftk-cloud delete user<username>
Delete the specified user from FortiCloud.
diagnose ftk-cloud sync Update the information on the FortiCloud server after changing an email addressor phone number on the FortiGate.
diagnose ftk-cloud server<server_ip>
Change the current FortiCloud server. All FortiCloud related operations on theFortiGate will be synchronized with the new server.
EMS fabric connector GUI support - 6.2.1
FortiOS 6.2.0 supports FortiClient EMS fabric connectors based on FSSO, but you can only use the CLI forconfiguration. FortiOS 6.2.1 adds GUI support for configuration of FortiClient EMS fabric connectors.
This topic describes how to create an EMS fabric connector and a user group for the EMS fabric connector.
To create an EMS fabric connector using the GUI:
1. Go to Security Fabric > Fabric Connectors, and click Create New.In the SSO/Identity section, the FortiClient EMS option is displayed.
FortiOS 6.2 New Features Guide 44Fortinet Inc.

Expanding Fabric Family
2. Select FortiClient EMS, complete the options, and clickOK.
The configured fabric connector is displayed:
FortiOS 6.2 New Features Guide 45Fortinet Inc.

Expanding Fabric Family
To create a user group for the EMS fabric connector using the GUI:
1. Go to User & Device > User Definition, and click Create New.The User/Groups Creation Wizard is displayed.
2. Click FortiClient EMS User, and click Next.The Remote Groups tab is displayed.
FortiOS 6.2 New Features Guide 46Fortinet Inc.

Expanding Fabric Family
3. In the Fabric Device list, select the EMS fabric connector that you created, select tags, and then click Next.
Tags are created in EMS, and FortiOS pulls the tags from EMS.
The Local Group tab is displayed.
FortiOS 6.2 New Features Guide 47Fortinet Inc.

Expanding Fabric Family
4. Beside Add to FSSO Group, click Create New, type a name for the group, and click Submit.
The configured group is displayed:
FortiToken Cloud multi-factor authentication in the GUI - 6.2.1
With this feature, you can now assign FortiToken Cloud multi-factor authentication (MFA) in the GUI.
In the previous version of FortiOS, this was only possible in the CLI.
The GUI now supports provisioning FortiToken Cloud for Fortigate administrators and local firewall users. There is a newFortiToken Cloud icon in the System > AdministratorsGUI. You can assign FortiToken Cloud MFA to multiple users atthe same time.
FortiOS 6.2 New Features Guide 48Fortinet Inc.

Expanding Fabric Family
You must enable this feature first in the CLI:config system global
set fortitoken-cloud-service enable...
end
You may need to log out and log back in for the change to take effect.
To assign FortiToken Cloud MFA to an administrator:
1. Go to System > Administrators. The list of administrators appears.2. Double-click on an administrator to edit the configuration (in this example, ftm-cloud).3. Click the toggle to enable Two-factor Authentication. There are two authentication types available: FortiToken
(mobile) and FortiToken Cloud.4. Select FortiToken Cloud as the Authentication Type.5. ClickOK.
In the administrators list under the Two-factor Authentication column, you can see the FortiToken Cloud icon for the
FortiOS 6.2 New Features Guide 49Fortinet Inc.

Expanding Fabric Family
administrator ftm-cloud.
To assign FortiToken Cloud MFA to multiple users:
1. Go to User & Device > User Definition. The list of users appears.
Users must have valid email addresses in their configuration.
2. Select all the users.3. Right-click on the selected users (in this example, test4 and test6).4. From the dropdown, select Assign Cloud Token.
A prompt appears to confirm the cloud token assignment.
FortiOS 6.2 New Features Guide 50Fortinet Inc.

Expanding Fabric Family
5. ClickOK.
In the users list under the Two-factor Authentication column, you can see the FortiToken Cloud icon for the userstest4 and test6.
Wireless
This section lists new wireless features added to FortiOS for the expanding fabric family.
WiFi Location Map
This feature allows you to upload custommaps or floor plans and then place FortiAP units on the map.Wifi Maps showreal-time status and alerts for the FortiAP units on the map. This features gives you an intuitive view of the location andstatus of each FortiAP unit on the map.
FortiOS 6.2 New Features Guide 51Fortinet Inc.

Expanding Fabric Family
To set up WiFi Maps:
1. Obtain a floor plan or map of where FortiAP units are located.2. Go toWiFi & Switch Controller > WiFi Maps and click Add Map.
3. Click Upload and specify a map in PNG, JPEG, or GIF format to be uploaded.a. Enter theMap name, for example, Level-2.b. If you want, enable Image grayscale to change a color map to grayscale.c. Set Image opacity to specify map transparency.
4. ClickOK.After setting up aWiFi map, you can place FortiAP units on the map.
FortiOS 6.2 New Features Guide 52Fortinet Inc.

Expanding Fabric Family
5. At the top left, click the lock icon to modify the map; and then click the Unplaced AP(s) icon to display the list ofunplaced APs.
6. Drag and drop each FortiAP unit onto its location on the map.
7. When all FortiAP units have been placed on the map, click the lock icon.
TheWiFi map shows where each FortiAP unit is located.
FortiOS 6.2 New Features Guide 53Fortinet Inc.

Expanding Fabric Family
To view a FortiAP unit's operating data, hover over that FortiAP icon.
To view a FortiAP unit's detailed operating data, click that FortiAP icon.
FortiOS 6.2 New Features Guide 54Fortinet Inc.

Expanding Fabric Family
InWifi Maps, you can select to show the 2.4 GHz or 5 GHz band or both. You can also show numerical operatinginformation such as client count, channel, radio TX power, and channel utilization.
You must use the GUI to uploadWiFi maps.
To configure WiFi map settings using CLI commands, see the following examples:
config wireless-controller regionedit "Level-2"
set grayscale enableset opacity 40
nextend
config wireless-controller wtpedit "FP423E3X16000320"
set region "Level-2"set region-x "0.660498"set region-y "0.442825"
nextend
Monitor and Suppress Phishing SSID
In addition to rogue AP detection, wireless administrators should also be concerned about phishing SSIDs, which aredefined as either:
l An SSID defined on FortiGate that is broadcast from an uncontrolled APl A pre-defined pattern for an offending SSID patternFor example, you could define any SSID that contains your company name to be a phishing SSID.
This new feature enables FortiAP to monitor and report these SSIDs in logs and to optionally suppress them.
FortiOS 6.2 New Features Guide 55Fortinet Inc.

Expanding Fabric Family
You can only configure this feature by using the CLI:
config wireless-controller settingset phishing-ssid-detect enable|disableset fake-ssid-action log|suppressconfig offending-ssid
edit 1set ssid-pattern "OFFENDING*"set action log|suppress
nextend
end
The set phishing-ssid-detect enable|disable option enables or disables the phishing SSID detectionfeature. The default setting is enable.
The set fake-ssid-action log|suppress option defines what action FortiGate takes after detecting a fakeSSID. The default setting is log, and can be set to either one or both.
The set ssid-pattern OFFENDING* option defines what criteria which will be used to match an offending SSID. Inthis case, it means all SSID names with leading string OFFENDING, which is not case-sensitive.
The set action log|suppress defines what action FortiGate takes after detecting the corresponding offendingSSID pattern entry. The default setting is log and can be set to either one or both.
Log examples
WiFi event log sample for fake SSID detection
Following is a sample of the log that is generated when a fake SSID is first detected:
1: date=2019-03-01 time=14:53:23 logid="0104043567" type="event" subtype="wireless"level="warning" vd="root" eventtime=1551480803 logdesc="Fake AP detected"ssid="CORP_WIFI_ACCESS" bssid="08:5b:0e:18:1b:d0" aptype=0 rate=130radioband="802.11n-5G" channel=149 action="fake-ap-detected" manuf="Fortinet, Inc."security="WPA2 Personal" encryption="AES" signal=-41 noise=-95 live=173397 age=0onwire="no" detectionmethod="N/A" stamac="N/A" apscan="N/A"sndetected="FP321C3X15001615" radioiddetected=1 stacount=0snclosest="FP321C3X15001615" radioidclosest=1 apstatus=0 msg="Detected Fake AP CORP_WIFI_ACCESS 08:5b:0e:18:1b:d0 chan 149 live 173397 age 0"
Following is a sample of the log that is periodically generated when a fake SSID is continuously detected:
1: date=2019-03-01 time=14:58:53 logid="0104043568" type="event" subtype="wireless"level="warning" vd="root" eventtime=1551481133 logdesc="Fake AP on air" ssid="CORP_WIFI_ACCESS" bssid="08:5b:0e:18:1b:d0" aptype=0 rate=130 radioband="802.11n-5G"channel=149 action="fake-ap-on-air" manuf="Fortinet, Inc." security="WPA2 Personal"encryption="AES" signal=-41 noise=-95 live=173728 age=330 onwire="no"detectionmethod="N/A" stamac="N/A" apscan="N/A" sndetected="N/A" radioiddetected=0stacount=0 snclosest="FP321C3X15001615" radioidclosest=1 apstatus=0 msg="Fake AP On-air CORP_WIFI_ACCESS 08:5b:0e:18:1b:d0 chan 149 live 173728 age 330"
WiFi event log sample for fake SSID suppression
Following is a sample of the log that is generated when a fake SSID is suppressed:
1: date=2019-03-01 time=14:53:23 logid="0104043569" type="event" subtype="wireless"level="warning" vd="root" eventtime=1551480803 logdesc="Rogue AP suppressed"ssid="CORP_WIFI_ACCESS" bssid="08:5b:0e:18:1b:d0" aptype=0 rate=130radioband="802.11n-5G" channel=149 action="rogue-ap-suppressed" manuf="Fortinet,
FortiOS 6.2 New Features Guide 56Fortinet Inc.

Expanding Fabric Family
Inc." security="WPA2 Personal" encryption="AES" signal=-41 noise=-95 live=173397age=0 onwire="no" detectionmethod="N/A" stamac="N/A" apscan="N/A" sndetected="N/A"radioiddetected=0 stacount=0 snclosest="FP321C3X15001615" radioidclosest=1apstatus=0 msg="AP CORP_WIFI_ACCESS 08:5b:0e:18:1b:d0 chan 149 live 173397 age 0"
WiFi event log sample for offending SSID detection
Following a sample of the log that is generated when an offending SSID is first detected:
1: date=2019-03-01 time=14:53:33 logid="0104043619" type="event" subtype="wireless"level="warning" vd="root" eventtime=1551480811 logdesc="Offending AP detected"ssid="OFFENDING_SSID" bssid="1a:5b:0e:b5:f3:bf" aptype=0 rate=130radioband="802.11n-5G" channel=153 action="offending-ap-detected" manuf="Fortinet,Inc." security="WPA2 Personal" encryption="AES" signal=-41 noise=-95 live=173406age=8 onwire="no" detectionmethod="N/A" stamac="N/A" apscan="N/A"sndetected="FP321C3X15001615" radioiddetected=1 stacount=0snclosest="FP321C3X15001615" radioidclosest=1 apstatus=0 msg="Detected Offending APOFFENDING_SSID 1a:5b:0e:b5:f3:bf chan 153 live 173406 age 8"
Following is a sample of a log that is periodically generated when an offending SSID is continuously detected:
1: date=2019-03-01 time=14:55:54 logid="0104043620" type="event" subtype="wireless"level="warning" vd="root" eventtime=1551480952 logdesc="Offending AP on air"ssid="OFFENDING_SSID_TEST" bssid="9a:5b:0e:18:1b:d0" aptype=0 rate=130radioband="802.11n-5G" channel=149 action="offending-ap-on-air" manuf="N/A"security="WPA2 Personal" encryption="AES" signal=-41 noise=-95 live=173548 age=150onwire="no" detectionmethod="N/A" stamac="N/A" apscan="N/A" sndetected="N/A"radioiddetected=0 stacount=0 snclosest="FP321C3X15001615" radioidclosest=1apstatus=0 msg="Offending AP On-air OFFENDING_SSID_TEST 9a:5b:0e:18:1b:d0 chan 149live 173548 age 150"
WiFi event log sample for offending SSID suppression
Following is a sample of the log that is generated when an offending SSID is suppressed:
1: date=2019-03-01 time=14:53:33 logid="0104043569" type="event" subtype="wireless"level="warning" vd="root" eventtime=1551480811 logdesc="Rogue AP suppressed"ssid="OFFENDING_SSID" bssid="1a:5b:0e:b5:f3:bf" aptype=0 rate=130radioband="802.11n-5G" channel=153 action="rogue-ap-suppressed" manuf="Fortinet,Inc." security="WPA2 Personal" encryption="AES" signal=-41 noise=-95 live=173406age=8 onwire="no" detectionmethod="N/A" stamac="N/A" apscan="N/A" sndetected="N/A"radioiddetected=0 stacount=0 snclosest="FP321C3X15001615" radioidclosest=1apstatus=0 msg="AP OFFENDING_SSID 1a:5b:0e:b5:f3:bf chan 153 live 173406 age 8"
WiFi QoS Enhancement
This feature enables FortiGate to preserve the WiFi Multi-Media (WMM) QoS marking of packets by translating them toDifferentiated Services Code Point (DSCP) values when forwarding upstream.
The following QoS profile commands are added to the CLI:
wmm-dscp-marking Enable/disable WMMDifferentiated Services Code Point (DSCP) marking (default =disable).
wmm-vo-dscp DSCPmarking for voice access (default = 48).
wmm-vi-dscp DSCPmarking for video access (default = 32).
FortiOS 6.2 New Features Guide 57Fortinet Inc.

Expanding Fabric Family
wmm-be-dscp DSCPmarking for best effort access (default = 0).
wmm-bk-dscp DSCPmarking for background access (default = 8).
This feature requires a FortiAP-S or FortiAP-W2 device.
To configure WMM QoS marking of packets:
1. Create a QoS profile with wmm-dscp-marking enabled, and modify the wmm-dscp settings:
config wireless-controller qos-profileedit qos-wifi
set wmm-dscp-marking enableset wmm-vo-dscp 44set wmm-vi-dscp 24set wmm-be-dscp 12set wmm-bk-dscp 6
end
2. Select the QoS profile on a VAP interface:
config wireless-controller vapedit "stability3"
set qos-profile "qos-wifi"next
end
3. Verify that the wmm-dscp-marking values are pushed on FortiAP:
cw_diag -c k-qos wlan00WLAN Kernel QoS Settings......WLAN wlan00 :
wmm : 1wmm uapsd : 1call admission control : 0call capacity : 0bandwidth admission control : 0bandwidth capacity : 0dscp mapping : 0dscp marking : 1
vo dscp : 44vi dscp : 24
FortiOS 6.2 New Features Guide 58Fortinet Inc.

Expanding Fabric Family
be dscp : 12bk dscp : 6
4. Verify that, when sending traffic from a client with a WMM setting of VO, the FortiGate receives the packets with aDSCP TID value or 44:
5. Verify that, when sending traffic from a client with a WMM setting of VI, the FortiGate receives the packets with aDSCP TID value or 24:
6. Verify that, when sending traffic from a client with a WMM setting of BE, the FortiGate receives the packets with aDSCP TID value or 12:
7. Verify that, when sending traffic from a client with a WMM setting of BK, the FortiGate receives the packets with aDSCP TID value or 6:
Airtime Fairness
WiFi has a natural tendency for clients farther away or clients at lower data rates to monopolize the airtime and dragdown the overall performance. Airtime fairness helps to improve the overall network performance in these conditions.
Airtime fairness has these characteristics:
l Only applies to downlink traffic.l Can be set on both 2.4 GHz and 5 GHz radio bands.l Can be set per-SSID. Each VAP is granted airtime according to the percentage assigned to the VAP.l Can apply to all kinds of VAP (Bridge, Tunnel, or Mesh) and all kinds of authentication (Open, PSK, or Enterprise).l Only applies to data and is not for control or management.
Airtime fairness is balanced from TX side from AP to client since that's the only direction under the control of AP.
FortiOS 6.2 New Features Guide 59Fortinet Inc.

Expanding Fabric Family
Sample topology and usage
For example, there are two Bridge mode SSIDs with a wireless client and an airtime fairness weight of 80% and 20%.Using WaveDynamix to simulate the same traffic from Ethernet to the wireless client, the traffic for each SSID matchesthe airtime fairness weight assigned to them.
Airtime fairness is not related to SSID type or authentication type. In this example, it uses Bridge mode SSID and OpenAuthentication.
You must use the CLI to use this feature.
To set the airtime fairness weight in SSID:
The default atf-weight is 20 so there is no need to set this option for atf_br2.
config wireless-controller vapedit "atf_br1"
set atf-weight 80set ssid "atf_br1"set security openset local-bridging enableset schedule "always"
nextend
config wireless-controller vapedit "atf_br2"
set ssid "atf_br2"set security openset local-bridging enableset schedule "always"
nextend
To enable airtime fairness in radio:
This example uses one FAP-S423E unit and only enable airtime fairness on the 5 GHz radio band.
config wireless-controller wtp-profileedit "S423E_atf"
config platformset type S423E
endconfig radio-1
set mode disabledendconfig radio-2
set band 802.11acset airtime-fairness enable
FortiOS 6.2 New Features Guide 60Fortinet Inc.

Expanding Fabric Family
set vap-all disableset vaps "atf_br1" "atf_br2"set channel "149"
endset ext-info-enable enable
nextend
config wireless-controller wtpedit "PS423E3X16000029"
set admin enableset wtp-profile "S423E_atf"config radio-2end
nextend
To verify the airtime fairness weight from FAP:
PS423E3X16000029 # cw_diag -c atfAirtime Fairness Info: interface ssid configured-atf applied-atf
Radio 0 ATF disabledRadio 1 ATF enabledwlan10 atf_ssid1 80 80wlan11 atf_ssid2 20 20
PS423E3X16000029 # wlanconfig wlan10 showatfinfoSHOW RADIO ATF TABLE
WLAN:SSID/Client(MAC Address) Air time(%) Config ATF(%%) Assoc wlan10:atf_ssid1 80.0 80.0 wlan11:atf_ssid2 20.0 20.0 ------:Unallocated Airtime 0.0
Verify the airtime fairness weight from real traffic
Using WaveDynamix to create two same clients connected with two SSIDs, downlink traffic is passed from Ethernet tothe wireless client with the same bit rate.
This example shows tx_bytes from atf_br1 is almost four times higher than atf_br2.
To view traffic statistics from SSID1:
PS423E3X16000029 # cw_diag -d vap 90:6C:AC:8A:66:10VAP extension info
Radio 1 VAP 0:tx_packets : 60543tx_bytes : 70608777tx_data_packets : 60543tx_data_bytes : 70608777tx_datapyld_bytes : 68308143tx_ucast_data_packets : 57462tx_mbcast_data_packets : 3081tx_discard : 94193
FortiOS 6.2 New Features Guide 61Fortinet Inc.

Expanding Fabric Family
To view traffic statistics from SSID2:
PS423E3X16000029 # cw_diag -d vap 90:6C:AC:8A:66:11VAP extension info
Radio 1 VAP 1:tx_packets : 18839tx_bytes : 19731946tx_data_packets : 18839tx_data_bytes : 19731946tx_datapyld_bytes : 19016064tx_ucast_data_packets : 15760tx_mbcast_data_packets : 3079tx_discard : 84924
Extended Details on AP Drill Down
This feature provides extended details of an AP. On theManaged FortiAPs page, you can drill down to view all availabledetails of a FortiAP, including:
l AP system information.l Dynamic health and performance information.l Dynamic radio and client details.l Relevant links such as location of the AP in the location map.
Sample topology
FortiOS 6.2 New Features Guide 62Fortinet Inc.

Expanding Fabric Family
Sample configuration
InWiFi & Switch Controller > Managed FortiAPs, right-click a FortiAP and select Drill Down to Details.
The details pane includes the following information:
l The top left shows a summary of configuration and connection status for the AP. The Actions button provides someactions to the AP such as Authorize/Deauthorize, Upgrade, Restart, and LED Blink. The Edit button opens theManaged FortiAP page.
l The top right shows theGeneral Health assessment of the AP and the health assessment based on radio band.l The Locate button appears if the FortiAP is on aWiFi Map.l The bottom section includes tabs to show the Radios summary, Clients list, and a filtered Logs view of all logs of theFortiAP.
FortiOS 6.2 New Features Guide 63Fortinet Inc.

Expanding Fabric Family
If a FortiAP is on aWiFi Map, click the Locate button and that FortiAP is highlighted with a flashing yellow circle on theWiFi Map.
Click Edit to open theManaged FortiAP page to show the FortiAP's operation information and a summary of its healthstatus. Click View More Details to open the details pane.
FortiOS 6.2 New Features Guide 64Fortinet Inc.

Expanding Fabric Family
On the WiFi Map, click a FortiAP icon to open its details pane.
Troubleshooting – Extended Logging
This version adds new logging information in four key areas to aid in wireless troubleshooting: Association,Authentication, DHCP, and DNS.
In previous versions, there were not enough detailed wireless event logs to show client connection procession, and ITadministrators sometimes had difficulty troubleshooting wireless connection problems by checking logs. In this version,the FortiAP can send more detailed events of client connections (such as probe, associate, authentication, 4-wayhandshake, DHCP), and FortiGate can create associated logs of these event.
FortiOS 6.2 New Features Guide 65Fortinet Inc.

Expanding Fabric Family
New probe, authentication, and associate logs when wireless clients try to connect a broadcasted SSIDwith any security-mode
Probe request and response logs
Action Description Message Detail
probe-req Probe requestfrom wirelessstation
AP received proberequest frame fromclientf0:98:9d:76:64:c4
date=2019-01-30 time=14:09:52 logid="0104043681"type="event" subtype="wireless" level="notice" vd="vdom1"eventtime=1548886190 logdesc="Probe request from wirelessstation" sn="PS221E3X16000022" ap="PS221E3X16000022"vap="stability3" ssid="Guest-11" radioid=1stamac="f0:98:9d:76:64:c4" channel=6 security="WPA2Personal" encryption="AES" action="probe-req"reason="Reserved 0" msg="AP received probe request framefrom client f0:98:9d:76:64:c4" remotewtptime="49.326391"
probe-resp
Proberesponse towireless station
AP sent proberesponse frame toclientf0:98:9d:76:64:c4
date=2019-01-30 time=14:09:52 logid="0104043682"type="event" subtype="wireless" level="notice" vd="vdom1"eventtime=1548886190 logdesc="Probe response to wirelessstation" sn="PS221E3X16000022" ap="PS221E3X16000022"vap="stability3" ssid="Guest-11" radioid=1stamac="f0:98:9d:76:64:c4" channel=6 security="WPA2Personal" encryption="AES" action="probe-resp"reason="Reserved 0" msg="AP sent probe response frame toclient f0:98:9d:76:64:c4" remotewtptime="49.326459"
Authentication request and response logs
Action Description Message Detail
auth-req Authenticationrequest fromwireless station
AP receivedauthenticationrequest frame fromclientf0:98:9d:76:64:c4
date=2019-01-30 time=14:09:48 logid="0104043675"type="event" subtype="wireless" level="notice" vd="vdom1"eventtime=1548886188 logdesc="Authentication request fromwireless station" sn="PS221E3X16000022"ap="PS221E3X16000022" vap="stability3" ssid="Guest-11"radioid=1 stamac="f0:98:9d:76:64:c4" channel=6security="WPA2 Personal" encryption="AES" action="auth-req" reason="Reserved 0" msg="AP received authenticationrequest frame from client f0:98:9d:76:64:c4"remotewtptime="44.902962"
FortiOS 6.2 New Features Guide 66Fortinet Inc.

Expanding Fabric Family
Action Description Message Detail
auth-resp Authenticationresponse towireless station
AP sentauthenticationresponse frame toclientf0:98:9d:76:64:c4
date=2019-01-30 time=14:09:48 logid="0104043676"type="event" subtype="wireless" level="notice" vd="vdom1"eventtime=1548886188 logdesc="Authentication response towireless station" sn="PS221E3X16000022"ap="PS221E3X16000022" vap="stability3" ssid="Guest-11"radioid=1 stamac="f0:98:9d:76:64:c4" channel=6security="WPA2 Personal" encryption="AES" action="auth-resp" reason="Reserved 0" msg="AP sent authenticationresponse frame to client f0:98:9d:76:64:c4"remotewtptime="44.903038"
Associate request and response logs
Action Description Message Detail
assoc-req Associationrequest fromwireless station
AP receivedassociation requestframe from clientf0:98:9d:76:64:c4
date=2019-01-30 time=14:09:48 logid="0104043677"type="event" subtype="wireless" level="notice" vd="vdom1"eventtime=1548886188 logdesc="Association request fromwireless station" sn="PS221E3X16000022"ap="PS221E3X16000022" vap="stability3" ssid="Guest-11"radioid=1 stamac="f0:98:9d:76:64:c4" channel=6security="WPA2 Personal" encryption="AES" action="assoc-req" reason="Reserved 0" msg="AP received associationrequest frame from client f0:98:9d:76:64:c4"remotewtptime="44.915155"
assoc-resp
Associationresponse towireless station
AP sent associationresponse frame toclientf0:98:9d:76:64:c4
date=2019-01-30 time=14:09:48 logid="0104043679"type="event" subtype="wireless" level="notice" vd="vdom1"eventtime=1548886188 logdesc="Association response towireless station" sn="PS221E3X16000022"ap="PS221E3X16000022" vap="stability3" ssid="Guest-11"radioid=1 stamac="f0:98:9d:76:64:c4" channel=6security="WPA2 Personal" encryption="AES" action="assoc-resp" reason="Reserved 0" msg="AP sent associationresponse frame to client f0:98:9d:76:64:c4"remotewtptime="44.916829"
FortiOS 6.2 New Features Guide 67Fortinet Inc.

Expanding Fabric Family
New WPA 4-Way handshake logs when wireless clients try to connect WPA2-Personal/WPA2-EnterpriseSSID
Complete WPA 4-Way handshake logs
Action Description Message Detail
WPA-1/4-key-msg
AP sent 1/4message of 4way handshaketo wirelessclient
AP sent 1/4message of 4-wayhandshake to clientf0:98:9d:76:64:c4
date=2019-01-30 time=14:09:48 logid="0104043650"type="event" subtype="wireless" level="notice" vd="vdom1"eventtime=1548886188 logdesc="AP sent 1/4 message of 4way handshake to wireless client" sn="PS221E3X16000022"ap="PS221E3X16000022" vap="stability3" ssid="Guest-11"radioid=1 stamac="f0:98:9d:76:64:c4" channel=6security="WPA2 Personal" encryption="AES" action="WPA-1/4-key-msg" reason="Reserved 0" msg="AP sent 1/4 messageof 4-way handshake to client f0:98:9d:76:64:c4"remotewtptime="44.920791"
WPA-2/4-key-msg
Wireless clientsent 2/4message of 4way handshake
AP received 2/4message of 4-wayhandshake fromclientf0:98:9d:76:64:c4
date=2019-01-30 time=14:09:48 logid="0104043651"type="event" subtype="wireless" level="notice" vd="vdom1"eventtime=1548886188 logdesc="Wireless client sent 2/4message of 4 way handshake" sn="PS221E3X16000022"ap="PS221E3X16000022" vap="stability3" ssid="Guest-11"radioid=1 stamac="f0:98:9d:76:64:c4" channel=6security="WPA2 Personal" encryption="AES" action="WPA-2/4-key-msg" reason="Reserved 0" msg="AP received 2/4message of 4-way handshake from client f0:98:9d:76:64:c4"remotewtptime="44.926647"
WPA-3/4-key-msg
AP sent 3/4message of 4way handshaketo wirelessclient
AP sent 3/4message of 4-wayhandshake to clientf0:98:9d:76:64:c4
date=2019-01-30 time=14:09:48 logid="0104043652"type="event" subtype="wireless" level="notice" vd="vdom1"eventtime=1548886188 logdesc="AP sent 3/4 message of 4way handshake to wireless client" sn="PS221E3X16000022"ap="PS221E3X16000022" vap="stability3" ssid="Guest-11"radioid=1 stamac="f0:98:9d:76:64:c4" channel=6security="WPA2 Personal" encryption="AES" action="WPA-3/4-key-msg" reason="Reserved 0" msg="AP sent 3/4 messageof 4-way handshake to client f0:98:9d:76:64:c4"remotewtptime="44.928406"
WPA-4/4-key-msg
Wireless clientsent 4/4message of 4way handshake
AP received 4/4message of 4-wayhandshake fromclientf0:98:9d:76:64:c4
date=2019-01-30 time=14:09:48 logid="0104043653"type="event" subtype="wireless" level="notice" vd="vdom1"eventtime=1548886188 logdesc="Wireless client sent 4/4message of 4 way handshake" sn="PS221E3X16000022"ap="PS221E3X16000022" vap="stability3" ssid="Guest-11"radioid=1 stamac="f0:98:9d:76:64:c4" channel=6security="WPA2 Personal" encryption="AES" action="WPA-4/4-key-msg" reason="Reserved 0" msg="AP received 4/4message of 4-way handshake from client f0:98:9d:76:64:c4"remotewtptime="44.933383"
FortiOS 6.2 New Features Guide 68Fortinet Inc.

Expanding Fabric Family
Invalid 2/4 handshake logs with wrong PSK input
Action Description Message Detail
WPA-invalid-2/4-key-msg
Wireless client4 wayhandshakefailed withinvalid 2/4message
Probably wrongpassword entered,invalid MIC in 2/4message of 4-wayhandshake fromclientf0:98:9d:76:64:c4
date=2019-01-31 time=16:41:02 logid="0104043648"type="event" subtype="wireless" level="warning" vd="vdom1"eventtime=1548981661 logdesc="Wireless client 4 wayhandshake failed with invalid 2/4 message"sn="PS421E3X15000017" ap="PS421E3X15000017"vap="stability3" ssid="Guest-11" radioid=1stamac="f0:98:9d:76:64:c4" channel=11 security="WPA2Personal" encryption="AES" action="WPA-invalid-2/4-key-msg"reason="Reserved 0" msg="Probably wrong password entered,invalid MIC in 2/4 message of 4-way handshake from clientf0:98:9d:76:64:c4" remotewtptime="0.0"
New RADIUS authentication logs when clients connect WPA2-Enterprise with User-group or Radius-authSSID
RADIUS authenticate success log when client pass authentication
Action Description Message Detail
RADIUS-auth-success
Wireless clientRADIUSauthenticationsuccess
Wireless clientRADIUSauthenticationsuccess
date=2019-01-30 time=14:36:09 logid="0104043630"type="event" subtype="wireless" level="notice" vd="vdom1"eventtime=1548887768 logdesc="Wireless client RADIUSauthentication success" sn="PS221E3X16000022"ap="PS221E3X16000022" vap="stability4" ssid="Guest-21"radioid=1 stamac="f0:98:9d:76:64:c4" channel=6security="WPA2 Enterprise" encryption="AES"action="RADIUS-auth-success" reason="Reserved 0"msg="Client f0:98:9d:76:64:c4 RADIUS authentication success"remotewtptime="0.0"
RADIUS authenticate failure log when client fails to pass authentication
Action Description Message Detail
RADIUS-auth-failure
Wireless clientRADIUSauthenticationfailure
Clientf0:98:9d:76:64:c4RADIUSauthenticationfailure
date=2019-01-30 time=14:35:51 logid="0104043629"type="event" subtype="wireless" level="warning"vd="vdom1" eventtime=1548887750 logdesc="Wirelessclient RADIUS authentication failure"sn="PS221E3X16000022" ap="PS221E3X16000022"vap="stability4" ssid="Guest-21" radioid=1stamac="f0:98:9d:76:64:c4" channel=6 security="WPA2Enterprise" encryption="AES" action="RADIUS-auth-failure"reason="Reserved 0" msg="Client f0:98:9d:76:64:c4RADIUS authentication failure" remotewtptime="0.0"
FortiOS 6.2 New Features Guide 69Fortinet Inc.

Expanding Fabric Family
New RADIUS MAC authentication logs when clients try to connect a SSID with radius-mac-auth enabled
RADIUS MAC authenticate success log when client passes RADIUS MAC authentication
Action Description Message Detail
RADIUS-MAC-auth-success
Wireless clientRADIUS MACauthenticationsuccess
Clientb4:ae:2b:cb:d1:72RADIUS MACauthenticationsuccess
date=2019-01-30 time=15:54:40 logid="0104043633"type="event" subtype="wireless" level="notice" vd="vdom1"eventtime=1548892477 logdesc="Wireless client RADIUSMAC authentication success" sn="PS221E3X16000022"ap="PS221E3X16000022" vap="stability3" ssid="Guest-11"radioid=1 stamac="b4:ae:2b:cb:d1:72" channel=6security="WPA2 Personal" encryption="AES"action="RADIUS-MAC-auth-success" reason="Reserved 0"msg="Client b4:ae:2b:cb:d1:72 RADIUS MACauthentication success" remotewtptime="0.0"
RADIUS MAC authenticate failure log when client fails to pass RADIUS MAC authentication
Action Description Message Detail
RADIUS-MAC-auth-success
Wireless clientRADIUS MACauthenticationsuccess
Client1c:87:2c:b6:a8:49RADIUS MACauthenticationfailure
date=2019-01-30 time=15:47:42 logid="0104043632"type="event" subtype="wireless" level="warning"vd="vdom1" eventtime=1548892061 logdesc="Wirelessclient RADIUS MAC authentication failure"sn="FP320C3X17001909" ap="320C-TEST"vap="stability3" ssid="Guest-11" radioid=2stamac="1c:87:2c:b6:a8:49" channel=40 security="WPA2Personal" encryption="AES" action="RADIUS-MAC-auth-failure" reason="Reserved 0" msg="Client1c:87:2c:b6:a8:49 RADIUS MAC authentication failure"remotewtptime="0.0"
New DHCP logs when clients try to acquire IP after connected
Complete DHCP Discover/Offer/Request/ACK logs
Action Description Message Detail
DHCP-DISCOVER
Wirelessstation sentDHCPDISCOVER
DHCP DISCOVERfrom clientf0:98:9d:76:64:c4
date=2019-01-30 time=14:09:48 logid="0104043663"type="event" subtype="wireless" level="notice"vd="vdom1" eventtime=1548886188 logdesc="Wirelessstation sent DHCP DISCOVER" sn="PS221E3X16000022"ap="PS221E3X16000022" vap="stability3" ssid="Guest-11" stamac="f0:98:9d:76:64:c4" security="WPA2 Personal"encryption="AES" action="DHCP-DISCOVER"reason="N/A" msg="DHCP DISCOVER from clientf0:98:9d:76:64:c4" remotewtptime="45.123652"
FortiOS 6.2 New Features Guide 70Fortinet Inc.

Expanding Fabric Family
Action Description Message Detail
DHCP-OFFER
DHCP serversent DHCPOFFER
DHCP OFFER of IP11.10.80.2 fromserver 11.10.80.1for clientf0:98:9d:76:64:c4
date=2019-01-30 time=14:09:49 logid="0104043664"type="event" subtype="wireless" level="notice"vd="vdom1" eventtime=1548886189 logdesc="DHCPserver sent DHCP OFFER" sn="PS221E3X16000022"ap="PS221E3X16000022" vap="stability3" ssid="Guest-11" stamac="f0:98:9d:76:64:c4" security="WPA2 Personal"encryption="AES" action="DHCP-OFFER" reason="N/A"msg="DHCP OFFER of IP 11.10.80.2 from server11.10.80.1 for client f0:98:9d:76:64:c4"remotewtptime="46.156969"
DHCP-REQUEST
Wirelessstation sentDHCPREQUEST
DHCP REQUESTfor IP 11.10.80.2offered by server11.10.80.1 fromclientf0:98:9d:76:64:c4
date=2019-01-30 time=14:09:50 logid="0104043666"type="event" subtype="wireless" level="notice"vd="vdom1" eventtime=1548886190 logdesc="Wirelessstation sent DHCP REQUEST" sn="PS221E3X16000022"ap="PS221E3X16000022" vap="stability3" ssid="Guest-11" stamac="f0:98:9d:76:64:c4" security="WPA2 Personal"encryption="AES" action="DHCP-REQUEST"reason="N/A" msg="DHCP REQUEST for IP 11.10.80.2offered by server 11.10.80.1 from client f0:98:9d:76:64:c4"remotewtptime="47.243792"
DHCP-ACK DHCP serversent DHCPACK
DHCP ACK for IP11.10.80.2 fromserver 11.10.80.1for clientf0:98:9d:76:64:c4
date=2019-01-30 time=14:09:50 logid="0104043667"type="event" subtype="wireless" level="notice"vd="vdom1" eventtime=1548886190 logdesc="DHCPserver sent DHCP ACK" sn="PS221E3X16000022"ap="PS221E3X16000022" vap="stability3" ssid="Guest-11" stamac="f0:98:9d:76:64:c4" security="WPA2 Personal"encryption="AES" action="DHCP-ACK" reason="N/A"msg="DHCP ACK for IP 11.10.80.2 from server 11.10.80.1for client f0:98:9d:76:64:c4" remotewtptime="47.246381"
Error logs when DHCP failure happens
Action Description Message Detail
DHCP-NAK DHCP serversent DHCPNAK
IP address notassigned, DHCPNAK from server11.10.80.1 for clientb4:ae:2b:cb:d1:72
date=2019-01-30 time=15:22:08 logid="0104043661"type="event" subtype="wireless" level="warning"vd="vdom1" eventtime=1548890528 logdesc="DHCP serversent DHCP NAK" sn="PS221E3X16000022"ap="PS221E3X16000022" vap="stability3" ssid="Guest-11"stamac="b4:ae:2b:cb:d1:72" security="WPA2 Personal"encryption="AES" action="DHCP-NAK" reason="requestedaddress not available" msg="IP address not assigned,DHCP NAK from server 11.10.80.1 for clientb4:ae:2b:cb:d1:72" remotewtptime="289.83561"
FortiOS 6.2 New Features Guide 71Fortinet Inc.

Expanding Fabric Family
Action Description Message Detail
DHCP-no-response
Wirelessstation DHCPprocess failedwith no serverresponse
DHCP server notresponding for clientb4:ae:2b:cb:d1:72
date=2019-02-01 time=10:39:07 logid="0104043658"type="event" subtype="wireless" level="warning"vd="vdom1" eventtime=1549046347 logdesc="Wirelessstation DHCP process failed with no server response"sn="PS421E3X15000017" ap="PS421E3X15000017"vap="stability3" ssid="Guest-11"stamac="b4:ae:2b:cb:d1:72" security="WPA2 Personal"encryption="AES" action="DHCP-no-response"reason="N/A" msg="DHCP server not responding for clientb4:ae:2b:cb:d1:72" remotewtptime="457.629929"
DHCP-no-ACK
No DHCP ACKfrom server
No DHCP ACK forIP 11.10.80.3requested by clientb4:ae:2b:cb:d1:72
date=2019-02-01 time=10:38:56 logid="0104043660"type="event" subtype="wireless" level="warning"vd="vdom1" eventtime=1549046336 logdesc="No DHCPACK from server" sn="PS421E3X15000017"ap="PS421E3X15000017" vap="stability3" ssid="Guest-11"stamac="b4:ae:2b:cb:d1:72" security="WPA2 Personal"encryption="AES" action="DHCP-no-ACK" reason="N/A"msg="No DHCP ACK for IP 11.10.80.3 requested by clientb4:ae:2b:cb:d1:72" remotewtptime="448.236740"
DHCP-self-assigned-IP
Wirelessstation is usingself-assignedIP
Detected selfassigned IP169.254.210.208 ofclientb4:ae:2b:cb:d1:72
date=2019-02-01 time=10:38:51 logid="0104043670"type="event" subtype="wireless" level="warning"vd="vdom1" eventtime=1549046330 logdesc="Wirelessstation is using self-assigned IP" sn="PS421E3X15000017"ap="PS421E3X15000017" vap="stability3" ssid="Guest-11"stamac="b4:ae:2b:cb:d1:72" security="WPA2 Personal"encryption="AES" action="DHCP-self-assigned-IP"reason="N/A" msg="Detected self assigned IP169.254.210.208 of client b4:ae:2b:cb:d1:72"remotewtptime="441.742363"
New GTK-Rekey logs when clients perform gtk-rekey
Action Description Message Detail
WPA-group-1/2-key-msg
AP sent 1/2message ofgroup keyhandshake towireless client
AP sent 1/2message of groupkey handshake toclientf0:98:9d:76:64:c4
date=2019-01-30 time=15:12:01 logid="0104043654"type="event" subtype="wireless" level="notice" vd="vdom1"eventtime=1548889920 logdesc="AP sent 1/2 message ofgroup key handshake to wireless client"sn="PS221E3X16000022" ap="PS221E3X16000022"vap="stability4" ssid="Guest-21" radioid=1stamac="f0:98:9d:76:64:c4" channel=6 security="WPA2Enterprise" encryption="AES" action="WPA-group-1/2-key-msg" reason="Reserved 0" msg="AP sent 1/2 message ofgroup key handshake to client f0:98:9d:76:64:c4"remotewtptime="3778.128070"
FortiOS 6.2 New Features Guide 72Fortinet Inc.

Expanding Fabric Family
Action Description Message Detail
WPA-group-2/2-key-msg
Wireless clientsent 2/2message ofgroup keyhandshake
AP received 2/2message of groupkey handshakefrom clientf0:98:9d:76:64:c4
date=2019-01-30 time=15:12:01 logid="0104043655"type="event" subtype="wireless" level="notice" vd="vdom1"eventtime=1548889920 logdesc="Wireless client sent 2/2message of group key handshake" sn="PS221E3X16000022"ap="PS221E3X16000022" vap="stability4" ssid="Guest-21"radioid=1 stamac="f0:98:9d:76:64:c4" channel=6security="WPA2 Enterprise" encryption="AES" action="WPA-group-2/2-key-msg" reason="Reserved 0" msg="AP received2/2 message of group key handshake from clientf0:98:9d:76:64:c4" remotewtptime="3778.228253"
New Fast-BSS-Transition (FT) logs when 802.11r clients roam between 2 FAPs
FT logs when clients succeed to roaming
Action Description Message Detail
FT-action-req
Wireless clientsent FT actionrequest
AP received FTaction requestframe from clientf0:98:9d:76:64:c4
date=2019-01-31 time=15:13:23 logid="0104043642"type="event" subtype="wireless" level="notice" vd="vdom1"eventtime=1548976403 logdesc="Wireless client sent FTaction request" sn="PS221E3X16000022"ap="PS221E3X16000022" vap="stability3" ssid="Guest-11"radioid=1 stamac="f0:98:9d:76:64:c4" channel=1security="WPA2 Personal" encryption="AES" action="FT-action-req" reason="Reserved 0" msg="AP received FT actionrequest frame from client f0:98:9d:76:64:c4"remotewtptime="146.847041"
FT-action-resp
FT actionresponse wassent to wirelessclient
AP sent FT actionresponse frame toclientf0:98:9d:76:64:c4
date=2019-01-31 time=15:13:23 logid="0104043643"type="event" subtype="wireless" level="notice" vd="vdom1"eventtime=1548976403 logdesc="FT action response wassent to wireless client" sn="PS221E3X16000022"ap="PS221E3X16000022" vap="stability3" ssid="Guest-11"radioid=1 stamac="f0:98:9d:76:64:c4" channel=1security="WPA2 Personal" encryption="AES" action="FT-action-resp" reason="Reserved 0" msg="AP sent FT actionresponse frame to client f0:98:9d:76:64:c4"remotewtptime="146.849137"
FortiOS 6.2 New Features Guide 73Fortinet Inc.

Expanding Fabric Family
Action Description Message Detail
FT-reassoc-req
Wireless clientsent FT re-associationrequest
AP received FT re-association requestframe from clientf0:98:9d:76:64:c4
date=2019-01-31 time=15:13:23 logid="0104043646"type="event" subtype="wireless" level="notice" vd="vdom1"eventtime=1548976403 logdesc="Wireless client sent FTreassociation request" sn="PS221E3X16000022"ap="PS221E3X16000022" vap="stability3" ssid="Guest-11"radioid=2 stamac="f0:98:9d:76:64:c4" channel=40security="WPA2 Personal" encryption="AES" action="FT-reassoc-req" reason="Reserved 0" msg="AP received FTreassociation request frame from client f0:98:9d:76:64:c4"remotewtptime="146.899110"
FT-reassoc-resp
FT re-associationresponse wassent to wirelessclient
AP sent FT re-associationresponse frame toclientf0:98:9d:76:64:c4
date=2019-01-31 time=15:13:23 logid="0104043647"type="event" subtype="wireless" level="notice" vd="vdom1"eventtime=1548976403 logdesc="FT reassociation responsewas sent to wireless client" sn="PS221E3X16000022"ap="PS221E3X16000022" vap="stability3" ssid="Guest-11"radioid=2 stamac="f0:98:9d:76:64:c4" channel=40security="WPA2 Personal" encryption="AES" action="FT-reassoc-resp" reason="Reserved 0" msg="AP sent FTreassociation response frame to client f0:98:9d:76:64:c4"remotewtptime="146.904372"
FT-auth-req
Wireless clientsent FT authrequest
AP received FTauthenticationrequest frame fromclientf0:98:9d:76:64:c4
date=2019-01-31 time=16:49:18 logid="0104043644"type="event" subtype="wireless" level="notice" vd="vdom1"eventtime=1548982158 logdesc="Wireless client sent FT authrequest" sn="PS421E3X15000017"ap="PS421E3X15000017" vap="stability3" ssid="Guest-11"radioid=2 stamac="f0:98:9d:76:64:c4" channel=100security="WPA2 Personal" encryption="AES" action="FT-auth-req" reason="Reserved 0" msg="AP received FTauthentication request frame from client f0:98:9d:76:64:c4"remotewtptime="1805.311496"
FT-auth-resp
FT authresponse wassent to wirelessclient
AP sent FTauthenticationresponse frame toclientf0:98:9d:76:64:c4
date=2019-01-31 time=16:49:18 logid="0104043645"type="event" subtype="wireless" level="notice" vd="vdom1"eventtime=1548982158 logdesc="FT auth response was sentto wireless client" sn="PS421E3X15000017"ap="PS421E3X15000017" vap="stability3" ssid="Guest-11"radioid=2 stamac="f0:98:9d:76:64:c4" channel=100security="WPA2 Personal" encryption="AES" action="FT-auth-resp" reason="Reserved 0" msg="AP sent FTauthentication response frame to client f0:98:9d:76:64:c4"remotewtptime="1805.312777"
FortiOS 6.2 New Features Guide 74Fortinet Inc.

Expanding Fabric Family
Error logs when FT failure
Action Description Message Detail
FT-invalid-action-req
Wireless clientsent invalid FTaction request
Receive invalid FTrequest actionframe from clientf0:98:9d:76:64:c4
date=2019-01-31 time=16:49:17 logid="0104043639"type="event" subtype="wireless" level="warning" vd="vdom1"eventtime=1548982157 logdesc="Wireless client sent invalidFT action request" sn="PS421E3X15000017"ap="PS421E3X15000017" vap="stability3" ssid="Guest-11"radioid=2 stamac="f0:98:9d:76:64:c4" channel=100security="WPA2 Personal" encryption="AES" action="FT-invalid-action-req" reason="Reserved 0" msg="Receive invalidFT request action frame from client f0:98:9d:76:64:c4"remotewtptime="0.0"
FT-invalid-auth-req
Wireless clientsent invalid FTauth request
Receive invalid FTauthenticationrequest frame fromclientf0:98:9d:76:64:c4
date=2019-01-31 time=16:49:18 logid="0104043640"type="event" subtype="wireless" level="warning" vd="vdom1"eventtime=1548982157 logdesc="Wireless client sent invalidFT auth request" sn="PS421E3X15000017"ap="PS421E3X15000017" vap="stability3" ssid="Guest-11"radioid=2 stamac="f0:98:9d:76:64:c4" channel=100security="WPA2 Personal" encryption="AES" action="FT-invalid-auth-req" reason="Reserved 0" msg="Receive invalidFT authentication request frame from client f0:98:9d:76:64:c4"remotewtptime="0.0"
New DNS error logs in DNS service failure
Action Description Message Detail
DNS-no-domain
Wirelessstation DNSprocess faileddue to non-existing domain
DNS lookup ofuop.umeng.comfrom client3c:2e:ff:83:91:33failed with \"non-existing domain\"
date=2019-02-01 time=09:42:03 logid="0104043673"type="event" subtype="wireless" level="warning" vd="vdom1"eventtime=1549042922 logdesc="Wireless station DNS processfailed due to non-existing domain" sn="PS421E3X15000017"ap="PS421E3X15000017" vap="stability3" ssid="Guest-11"stamac="3c:2e:ff:83:91:33" security="WPA2 Personal"encryption="AES" action="DNS-no-domain" reason="Server100.100.16.172 replied \"non-existing domain\"" msg="DNSlookup of uop.umeng.com from client 3c:2e:ff:83:91:33 failedwith \"non-existing domain\"" remotewtptime="1130.445518"
Override WiFi Certificates (from GUI)
FortiOS 6.2 New Features Guide 75Fortinet Inc.

Expanding Fabric Family
This feature enables selecting an uploadedWiFi certificate andWiFi CA certificate in the GUI, and not just the CLI.
To select a WiFi and WiFi CA certificate:
1. Go to System > Settings.2. Select the WiFi certificate from theWiFi certificate dropdown menu.
3. Select the WiFi CA certificate from the WiFi CA certificate dropdown menu.
Wireless MAC Filter Updates
This feature changes the MAC filter function on SSIDs so that it is only based on the MAC address of clients. Previously,the MAC filter worked with device-detection and clients could be filtered by MAC address or device type.
FortiOS 6.2 New Features Guide 76Fortinet Inc.

Expanding Fabric Family
The filter configuration in the CLI is moved from user device and user device-access-list to wireless-controller address and wireless-controller addrgrp respectively.
The new MAC filter function is independent from the security mode of the SSID. To enable it on an SSID, the wirelesscontroller address and address group must be configured.
To block a specific client from connecting to an SSID using a MAC filter:
1. Create a wireless controller address with the client's MAC address, and set the policy to deny:
config wireless-controller addressedit "client_1"
set mac b4:ae:2b:cb:d1:72set policy deny
nextend
2. Create a wireless controller address group using the above address and setting the default policy to allow:
config wireless-controller addrgrpedit mac_grp
set addresses "client_1"set default-policy allow
nextend
3. On the VAP, select the above address group:
config wireless-controller vapedit wifi-vap
set ssid "Fortinet-psk"set security wpa2-only-personalset passphrase fortinetset address-group "mac_grp"
nextend
The client's MAC address (b4:ae:2b:cb:d1:72 in this example) will be denied a connection to the SSID (Fortinet-psk), but other clients (such as e0:33:8e:e9:65:01) will be allowed to connect.
To allow a specific client to connect to an SSID using a MAC filter:
1. Create a wireless controller address with the client's MAC address, and set the policy to allow:
config wireless-controller addressedit "client_1"
set mac b4:ae:2b:cb:d1:72set policy allow
FortiOS 6.2 New Features Guide 77Fortinet Inc.

Expanding Fabric Family
nextend
2. Create a wireless controller address group using the above address and setting the default policy to deny:
config wireless-controller addrgrpedit mac_grp
set addresses "client_1"set default-policy deny
nextend
3. On the VAP, select the above address group:
config wireless-controller vapedit wifi-vap
set ssid "Fortinet-psk"set security wpa2-only-personalset passphrase fortinetset address-group "mac_grp"
nextend
The client's MAC address (b4:ae:2b:cb:d1:73 in this example) will be allowed to connect to the SSID (Fortinet-psk),but other clients (such as e0:33:8e:e9:65:01) will be denied a connection.
Change SSID to VDOM Object
This feature changes the wireless-controller VAP (for SSID configuration) from a global object to a VDOM object,simplifying tracking the object reference count. It also removes the vdom setting from VAP configuration. Whenmulti-vdom is enabled on a FortiGate, the wireless-controller VAP can be added, edited, or deleted only inside of aVDOM.
To create a VAP entry:
1. When vdom-mode is no-vdom:# config wireless-controller vap(vap) # edit newnew entry 'new' added(new) # set ssid new(new) # set passphrase 12345678(new) # set vdom
command parse error before 'vdom'(new) # end# show wireless-controller vap new
config wireless-controller vapedit "new"
set ssid "new"set passphrase ENC
qmVlo9Zn3C4aVZMIw9LrHhXX+wDNn2BMT9hP3vmZGQFZZz+gQ6Lb1jS9UkAkbQabWkGq8uDZDfqwtWV8lZdMDOFyDC0Kgh/yCuCkM5xM1bm9gvnGC9+84VY2mvkV4pUeiugJ/8o1m++buXmP9CdUmLz7eY/VZwYlKnSyFvk7DphbfZJapCOXtgN2zseNoITPQUTKLA==
nextend
FortiOS 6.2 New Features Guide 78Fortinet Inc.

Expanding Fabric Family
2. When vdom-mode is multi-vdom:l A VAP cannot be created in global:
# config global(global) # config wireless-controller vap
command parse error before 'vap'Command fail. Return code 1
(global) #
l A VAP can only be created in a VDOM:# config vdom(vdom) # edit vdom2
current vf=vdom2:1(vdom2) # config wireless-controller vap(vap) # edit new
new entry 'new' added(new) # set ssid new(new) # set passphrase 12345678(new) # set vdom
command parse error before 'vdom'(new) # end(vdom2) # sh wireless-controller vap new
config wireless-controller vapedit "new"
set ssid "new"set passphrase ENC
IidSvoD1C6feNonhsYfUTnOtO89UE/S/wWmOxRHLCud+eR0LD8xuYzWzsRg9/c299Vd2UA809NSUfyRBRD/pFFd/QS6ArQPs4sLVtPiftE63uI53d9azeQv6e5tkQjg4Z7Ztlv2hE47nKkdVXeWZE3mpfRhSxvDUKVzwpR1b8pdwbzDGFlPs+JcoNso6ZeRCuMg54g==
nextend
(vdom2) #
3. When vdom-mode is multi-vdom, references to user-group and radius can be checked correctly when they areused by a VAP interface:l A VAP interface with security-mode set to WPA2-Enterprise and RADIUS authentication:
(vdom2) # show wireless-controller vap newconfig wireless-controller vap
edit "new"set ssid "new"set security wpa2-only-enterpriseset auth radiusset radius-server "peap"
nextend(vdom2) # diagnose sys cmdb refcnt show user.radius.name peapentry used by table wireless-controller.vap:name 'new'
l A VAP interface with security-mode set to WPA2-Enterprise and User-group authentication:(vdom2) # show wireless-controller vap new
config wireless-controller vapedit "new"
set ssid "new"set security wpa2-only-enterpriseset auth usergroupset usergroup "group-radius"
nextend(vdom2) # diagnose sys cmdb refcnt show user.group.name group-radius
FortiOS 6.2 New Features Guide 79Fortinet Inc.

Expanding Fabric Family
entry used by child table usergroup:name 'group-radius' of table wireless-controller.vap:name 'new'
Direct SNMP Monitoring
This feature enables SNMP directly on FortiAP by implementing a SNMPD daemon/subagent on the FortiAP side.
To configure SNMP operation settings per VDOM:
config wireless-controller snmpset engine-id "fap-fortinet"set contact-info "[email protected]"set trap-high-cpu-threshold 80set trap-high-mem-threshold 80config community
edit 1set name "fap-comm-1"set status enableset query-v1-status enableset query-v2c-status enableset trap-v1-status enableset trap-v2c-status enable
nextendconfig user
edit "fap"set status enableset queries enableset trap-status enableset security-level no-auth-no-priv
nextend
end
To allow SNMP access in FortiAP profiles or per FortiAP device:
config wireless-controller wtp-profileedit FAP423E-default
append allowaccess snmpnext
end
To disallow SNMP access in FortiAP profiles or per FortiAP device:
config wireless-controller wtp-profileedit FAP423E-default
unselect allowaccess snmpnext
end
FortiOS 6.2 New Features Guide 80Fortinet Inc.

Expanding Fabric Family
FortiAP SNMP implementation
FortiAP-S and FortiAP-W2 6.2 and later support SNMP query and trap messages according to the wireless controllerSNMP settings pushed from the FortiGate device.
The below example shows an Ubuntu-OS querying a FortiAP 222E unit with the snmpwalk command. The SNMP agentsoftware has the FORTINET-FORTIAP-MIB already imported.
tester@ControlPC:~$ snmpwalk -v 2c -c QAMikeAn 172.18.56.32 .1.3.6.1.4.1.12356.120.1FORTINET-FORTIAP-MIB::fapVersion.0 = STRING: FP222E-v6.2-build0231FORTINET-FORTIAP-MIB::fapSerialNum.0 = STRING: FP222E3X17000073FORTINET-FORTIAP-MIB::fapHostName.0 = STRING: FortiAP-222EFORTINET-FORTIAP-MIB::fapRegionCode.0 = STRING: AFORTINET-FORTIAP-MIB::fapBaseMacAddr.0 = STRING: 70:4c:a5:5d:ea:d0FORTINET-FORTIAP-MIB::fapBiosVer.0 = STRING: 04000002FORTINET-FORTIAP-MIB::fapBiosDataVer.0 = INTEGER: 3FORTINET-FORTIAP-MIB::fapSysPartNum.0 = STRING: 20844-04
Five kinds of trap messages can be sent by the FortiAP-S and FortiAP-W2 devices:
l fapDevUp: Indicates that the specified AP device is up.l CpuOverloadfap: Indicates that the CPU usage of the specified AP has exceeded the configured threshold.l MemOverload: Indicates that the memory usage of the specified AP has exceeded the configured threshold.l fapDevDown: Indicates that the specified AP device is down.l fapfapAcConnected: Indicates that the specified AP device has connected to the specified AC.
The following screenshot shows an SNMP trap receiver (SnmpB) that has received one fapDevUp trap message from aFortiAP unit (serial number: FP222E3X17000000).
FortiOS 6.2 New Features Guide 81Fortinet Inc.

Expanding Fabric Family
Supporting WPA3 on FAP - 6.2.1
This feature is implemented on FortiOS 6.2.0 b0816 and FAP-S/W2 6.2.0 b0218. The GUI configuration is implementedin FortiOS 6.2.1 b0885.
In October 2017, Mathy Vanhoef published a document exposing a flaw in WPA2 networks known as Key ReinstallationAttack (KRACK). To avoid the attack, the Wi-Fi Alliance announced in January that WPA2 enhancements and a newWPA3 standard is coming in 2018.
TheWi-Fi Alliance defined three areas for improvement:
l Enhanced Open: TheWi-Fi Alliance proposes using Opportunistic Wireless Encryption (OWE) (RFC 8110) toimprove security in these such networks.
l WPA3 Personal: WPA3-Personal uses Simultaneous Authentication of Equals (SAE).l WPA3 Enterprise: WPA3-Enterprise contains a new 192-bit security level.
All three areas incorporate Protected Management Frames (PMF) as a prerequisite to protect management frameintegrity.
To configure WPA3 in the GUI:
1. Go toWiFi & Switch Controller > SSID.2. Click Create New > SSID.3. In theWiFi Settings section Security Mode dropdown list, select a WPS3 option.
4. ClickOK.
Use a client with WPA3 to verify the connection.
To configure WPA3 in the CLI:
1. WPA3 OWE.a. WPA3 OWE only. Clients which support WPA3 can connect with this SSID.
config wireless-controller vapedit "80e_owe"set ssid "80e_owe"set security owe
FortiOS 6.2 New Features Guide 82Fortinet Inc.

Expanding Fabric Family
set pmf enableset schedule "always"next
end
b. WPA3 OWE TRANSITION. Clients connect with normal OPEN or OWE depending on its capability. Clientswhich support WPA3 connect with OWS standard. Clients which cannot support WPA3 connect with OpenSSID.
config wireless-controller vapedit "80e_open"set ssid "80e_open"set security openset owe-transition enableset owe-transition-ssid "wpa3_open"set schedule "always"next
edit "wpa3_owe_tr"set ssid "wpa3_open"set broadcast-ssid disableset security oweset pmf enableset owe-transition enableset owe-transition-ssid "80e_open"set schedule "always"next
end
2. WPA3 SAE.a. WPA3 SAE. Clients which support WPA3 can connect with this SSID.
config wireless-controller vapedit "80e_sae"set ssid "80e_sae"set security wpa3-saeset pmf enableset schedule "always"set sae-password 12345678next
end
b. WPA3 SAE TRANSITION. There are two passwords in the SSID. If passphrase is used, the client connectswith WPA2 PSK. If sae-password is used, the client connects with WPA3 SAE.
config wireless-controller vapedit "80e_sae-tr"set ssid "80e_sae-transition"set security wpa3-sae-transitionset pmf optionalset passphrase 11111111set schedule "always"set sae-password 22222222next
end
3. WPA3 Enterprise. Using this option, you can select the auth type to use either RADIUS authentication or local userauthentication.
FortiOS 6.2 New Features Guide 83Fortinet Inc.

Expanding Fabric Family
config wireless-controller vapedit "80e_wpa3"set ssid "80e_wpa3"set security wpa3-enterpriseset pmf enableset auth radiusset radius-server "wifi-radius"set schedule "always"next
edit "80e_wpa3_user"set ssid "80e_wpa3_user"set security wpa3-enterpriseset pmf enableset auth usergroupset usergroup "usergroup"set schedule "always"next
end
Use a client with WPA3 to verify the connection.
Switching
This section lists new switching features added to FortiOS for the expanding fabric family.
FortiLink Setup
UseWiFI & Switch Controller > FortiLink Interface to create or edit FortiLink interfaces. The available options depend onthe capability of the FortiGate model.
By automatically creating FortiLink interfaces as a logical aggregate or hard/soft switch, you can modify the FortiLinkinterfaces. If the physical port in use changes, you don't need to migrate existing policies.
FortiOS 6.2 New Features Guide 84Fortinet Inc.

Expanding Fabric Family
To configure FortiLink interfaces:
1. Go toWiFi & Switch Controller > FortiLink Interface.
2. Configure the interface settings and click Apply.
Voice VLAN Auto-Assignment
You can leverage LLDP-MED to assign voice traffic to the desired voice VLAN. After detection and setup, the IP phoneon the network is segmented to its own VLAN for policy, prioritization, and reporting. The LLDP reception capabilities inFortiOS have been extended to support LLDP-MED assignment for voice, voice signaling, guest, guest voice signaling,softphone, video conferencing, streaming video, and video signaling.
You can configure this feature using the FortiOS CLI. Configuration consists of the following steps:
1. Setting up the VLAN for the voice device2. Setting up the DHCP server for the voice VLAN3. Setting up the LLDP network policy4. Enabling LLDP on the physical interface that the VLAN belongs to5. Applying the LLDP network policy on the physical interface6. Confirming that the VLAN was assigned
To set up the VLAN for the voice device:
config system interfaceedit "vlan_100"
set vdom "root"set ip 192.168.1.99 255.255.255.0set alias "voice_vlan"set device-identification enable
FortiOS 6.2 New Features Guide 85Fortinet Inc.

Expanding Fabric Family
set role lanset snmp-index 25set interface "port10"set vlanid 100
nextend
To set up the DHCP server for the voice VLAN:
config system dhcp serveredit 1
set dns-service defaultset default-gateway 192.168.1.99set netmask 255.255.255.0set interface "vlan_100"config ip-range
edit 1set start-ip 192.168.1.110set end-ip 192.168.1.210
nextend
nextend
To set up the LLDP network policy:
config system lldp network-policyedit "1"
config voiceset status enableset tag dot1qset vlan 100
endnext
end
To enable LLDP on the physical interface that the VLAN belongs to:
config system interfaceedit "port10"
set vdom "root"set type physicalset lldp-reception enableset lldp-transmission enableset snmp-index 14
nextend
To apply the LLDP network policy on the physical interface:
config system interfaceedit "port10"
set lldp-network-policy "1"next
end
FortiOS 6.2 New Features Guide 86Fortinet Inc.

Expanding Fabric Family
To confirm that the VLAN was assigned:
To confirm that the VLAN was assigned as expected, connect an IP phone to the network. Check the IP address on thephone. The IP address should belong to the voice VLAN.
You can also sniff on the FortiGate incoming interface to see if traffic from the IP phone has the desired VLAN tag.
In the example commands above, the voice VLAN was configured as VLAN 100. Therefore, voice traffic from the IPphone should be in VLAN 100.
Dynamic VLAN 'Name' Assignment from RADIUS Attribute
Starting in 6.2, when FortiSwitch receives a VLAN assignment from RADIUS, it determines if the data is an integer orstring representation. If the representation is an integer, FortiSwitch assigns the VLAN. If the representation is a string,the 802.1x agent will search each VLAN's description field for all VLANs (names defined by FortiOS VLAN description). Iffound, the 802.1x agent will make the assignment.
Example
On the FortiGate, all VLANs are specified as a system interface. Each system interface has a well-defined and uniquename. When running FortiLink, the switch has no knowledge of the name association. The switch communicates directlywith the RADIUS server and needs to know the mapping to make the proper selection.
As a result, this information must be provided to the switch. In order to make the feature generic and applicable to theswitch in standalone mode as well, the system interface description field is leveraged. The switch-controllersynchronizes this field to the switch for information purposes, and the description-to-description synchronization hasbeen removed. All descriptions on the FortiGate remain on the FortiGate. The switch-controller synchronizes theFortiGate system interface name to the switch VLAN description.
When FortiSwitch receives a VLAN assignment from RADIUS, it determines if the data is an integer or stringrepresentation. If the representation is an integer, FortiSwitch assigns the VLAN. If the representation is a string, the802.1x agent will search each VLAN's description field for all VLANs (names defined by FortiOS VLAN description). Iffound, the 802.1x agent will make the assignment.
To configure dynamic VLAN name assignment:
1. Configure a RADIUS server:l Set Tunnel-Type to "VLAN".l Set Tunnel-Medium-Type to "IEEE-802".l Set Tunnel-Private-Group-Id to "my.vlan.10". In this option, you designate the VLAN name instead of VLAN ID.
2. Configure FortiGate:edit "my.vlan.10"
set vdom "root"set ip 1.1.1.254 255.255.255.0set allowaccess pingset interface "my.fortlink"set vlanid 10
nextend
3. Configure FortiSwitch:# show switch vlan config switch vlan
FortiOS 6.2 New Features Guide 87Fortinet Inc.

Expanding Fabric Family
edit 10set description "my.vlan.10" --------> VLAN name will be stored into the
"description", which is not new CLI but just new API mapping to be implementedin backend.
nextend
Netflow / IPFIX Support
Support for Netflow (v1, v5, v9) and IPFIX (IP Flow Information Export) is added to FortiSwitch 6.2, and the resulting datawill be available to FortiAnalyzer (and FortiView) for new traffic statistics and topology views. Traffic sampling data canbe used to show which users or devices behind switches are generating the highest traffic in those networks.
You can now configure Netflow/IPFIX on managed FortiSwitch units on switch controller.
You can configure flow-tracking related parameters by using the default values:
# config switch-controller flow-tracking(flow-tracking) # getsample-mode : perimetersample-rate : 512format : netflow9 collector-ip : 0.0.0.0 ------> all-zero IP address implies disabledcollector-port : 0
FortiOS 6.2 New Features Guide 88Fortinet Inc.

Expanding Fabric Family
transport : udp level : ip filter : -------> complies with tcpdump/wireshark filter syntaxmax-export-pkt-size : 512timeout-general : 3600timeout-icmp : 300timeout-max : 604800timeout-tcp : 3600timeout-tcp-fin : 300timeout-tcp-rst : 120timeout-udp : 300aggregates:
Following are the sampling mode options:
l Perimeter sampling: RX sampling enabled on all non-fabric FortiSwitch ports, including access port and FortiLinkport, but not the FortiLink ISL port.
l Device-Ingress sampling: RX sampling enabled on all FortiSwitch ports.l Local sampling: Sampling must be enabled on specific FortiSwitch ports by using config switch-controllermanaged-switch and config ports.
QoS Assignment and Rate Limiting for Quarantined VLANs
When devices are quarantined, they are isolated from the rest of the network. However, they can still impact the networkif not controlled beyond isolation. A quarantined host, which offers heavy traffic, could congest the network and create aDOS-style reduction in service to authorized hosts.
Within the quarantined VLAN, two restrictions are available within the network:
l Traffic policing (also known as rate limiting)l QoS (Quality of Service) assignment (also known as priority assignment)
Each quarantined host's traffic can be subject to rate limiting and priority adjustment. This reduces the impact that anyquarantined host can have on authorized traffic on the network.
You can only configure this feature by using the CLI.
config switch-controller traffic-policy(traffic-policy) # get
== [ quarantine ] -----> newly added pre-defined traffic-policy forquarantine (not only for quarantine, can be applied to other switch vlan interface basedon configuration)
name: quarantine== [ sniffer ]name: sniffer
(traffic-policy) # edit quarantine(quarantine) # show
config switch-controller traffic-policyedit "quarantine"
set description "Rate control for quarantined traffic"set guaranteed-bandwidth 163840set guaranteed-burst 8192set maximum-burst 163840set cos-queue 0
nextend
FortiOS 6.2 New Features Guide 89Fortinet Inc.

Expanding Fabric Family
nextend
end
config system interfaceedit "qtn.aggr1"
set vdom "root"set ip 10.254.254.254 255.255.255.0set description "Quarantine VLAN"set security-mode captive-portalset replacemsg-override-group "auth-intf-qtn.aggr1"set device-identification enableset snmp-index 30set switch-controller-access-vlan enableset switch-controller-traffic-policy "quarantine" -----> By default,
switch-controller-traffic-policy is empty. Users need to apply the necessary traffic-policy, not only limited to "quarantine"
set color 6set interface "aggr1"set vlanid 4093
nextend
Persistent MAC Learning (Sticky MAC)
Persistent MAC learning or sticky MAC is a port security feature where dynamically learned MAC addresses are retainedwhen a switch or interface comes back online. The benefits of this feature include:
l Prevent traffic loss from trusted workstations and servers since there is no need to relearn MAC address after arestart.
l Protect the switch and the whole network when combined with MAC-learning-limit against security attacks such asLayer 2 DoS and overflow attacks.
Persistent MAC learning is configured in FortiGate and implemented in FortiSwitch.
This feature is disabled by default. You can use persistent MAC learning together with MAC limiting to restrict thenumber of persistent MAC addresses.
This feature is hardware and CPU intensive and can take several minutes depending on the number of entries.
You can only use CLI to configure this feature.
This feature is supported on all FortiSwitch models in FSW 6.0.This feature is supported on models in FSW 3.6 higher than the 124D series.
To enable sticky MAC on FortiGate:
config switch-controller managed-switchedit <switch-serial-number>
conf portsedit <port-number>
set sticky-mac enablenext
end
FortiOS 6.2 New Features Guide 90Fortinet Inc.

Expanding Fabric Family
nextend
Before saving sticky Mac entries into CMDB, you might want to delete the unsaved sticky MAC items so that only theitems you want are saved.
Saving sticky MAC items copies the sticky MAC items frommemory to CMDB on FortiSwitches and FortiGates.
To delete unsaved sticky MAC items:
execute switch-controller switch-action sticky-mac delete-unsaved <all | interface><switch-serial-number>
To save sticky MAC items into CMDB:
execute switch-controller switch-action sticky-mac save <all | interface><switch-serial-number>
Split Port Mode for QSFP ports
The quad small form-factor pluggable transceiver (QSFP/QSPF28) is a module that offers high-density 40/100 GigabitEthernet connectivity options for data center and high-performance computing networks. The QSFP transceiver moduleis a hot-swappable, parallel fiber-optic/copper module with four independent optical transmit and receive channels.These channels can terminate in another Ethernet QSFP transceiver, or the channels can be broken out to four separatephysical ports.
Configuration of which FortiSwitch ports are split is controlled directly on the FortiSwitch. An administrator needs tomanually log into the FortiSwitch and set the desired split port configuration. After a split port configuration change ismade on the FortiSwitch, it will automatically reboot. If the FortiSwitch was previously discovered or authorized, it shouldbe deleted to allow the switch to be newly discovery again.
This feature requires a FortiSwitch model with SFP+ 40G ports, and FortiSwitch must be inFortlink mode when changing the split configuration.
To use FortiSwitch with split ports with the switch controller (previously discovered):
1. On FortiSwitch, change the split mode:This change requires a reboot.
config switch phy-modeset port29-phy-mode 4x10Gset port30-phy-mode 4x10G
end
2. Delete the FortiSwitch from managed-switch stanza.3. Discover and authorize.
To use FortiSwitch with split ports with the switch controller (out of the box with factory defaults):
1. Discover and Authorize.This change requires a reboot.
FortiOS 6.2 New Features Guide 91Fortinet Inc.

Expanding Fabric Family
2. On FortiSwitch, change split mode.This change requires a reboot.
3. Delete switch from managed-switch stanza.4. Discover and authorize.
No CLI changes; however, FortiGate introduces a new FortiSwitch port index:
config switch-controller managed-switchedit S524DN4K15000008
config portsedit "port29.1"
set speed 10000set vlan "vsw.port11"set allowed-vlans "qtn.port11"set untagged-vlans "qtn.port11"set export-to "root"
next......edit "port29.4"
set speed 10000set vlan "vsw.port11"set allowed-vlans "qtn.port11"set untagged-vlans "qtn.port11"set export-to "root"
nextedit "port30.1"
set speed 10000set vlan "vsw.port11"set allowed-vlans "qtn.port11"set untagged-vlans "qtn.port11"set export-to "root"
next......edit "port30.4"
set speed 10000set vlan "vsw.port11"set allowed-vlans "qtn.port11"set untagged-vlans "qtn.port11"set export-to "root"
nextend
nextend
Virtual Switch Extensions
The Virtual Switch concept was introduced in previous releases. It provides a container for physical ports to be loanedout to other VDOMs, which allows local management of the resource. In the original feature, only a minimum of switchcapability was introduced, such as VLAN, allowed-vlan, status, speed, poe-status, and poe-reset.
This extends some of the port capabilities including:
l poe-pre-standard-detectionl learning-limitl qos-policy
FortiOS 6.2 New Features Guide 92Fortinet Inc.

Expanding Fabric Family
l port-security-policyl trunk ports (with some limitations)
Example
The following example shows how to export managed FortiSwitch ports to multi-tenant VDOMs. Some of the capabilitiesare available in previous releases of FortiOS, and the 6.2.0 release expands the functionality.
To export managed FortiSwitch ports to multi-tenant VDOMs:
1. Configure switch VLAN interfaces, and assign them to the tenant VDOM:In this example, the owner VDOM is root, and the tenant VDOM is vdom2.(root) # config system interface
edit "tenant-vlan1"set vdom "vdom2"set device-identification enableset fortiheart beat enableset role lanset snmp-index 34set interface "aggr1"set vlanid 101
nextend
2. In the tenant VDOM, designate default-virtual-switch-vlan, which is used to set the native VLAN of portsleased from the owner VDOM:(vdom2) # config switch-controller global
set default-virtual-switch-vlan "tenant-vlan1"end
3. Owner vdom admin can export managed fsw ports to tenant vdom, as below(root) # conf switch-controller managed-switch
(managed-switch) # edit S248EPTF1800XXXX (S248EPTF1800XXXX) # conf ports
(ports) # edit port1(port1) # set export-to ?<string> string please input string valueroot vdomvdom1 vdomvdom2 vdomvdom3 vdom(port1) # set export-to vdom2
(port1) # end
Alternatively, the admin of the owner VDOM can export managed FortiSwitch ports to shared virtual-switch pools forthe tenant VDOM to pick, for example:(root) # config switch-controller virtual-port-pooledit "pool1"next
end(root) # conf switch-controller managed-switch (managed-switch) # edit S248EPTF18001384 (S248EPTF18001384) # conf ports
(ports) # edit port8(port8) # set export-to-pool pool1 (port8) # next (ports) # edit port9
FortiOS 6.2 New Features Guide 93Fortinet Inc.

Expanding Fabric Family
(port9) # set export-to-pool pool1 (port9) # end
4. The admin of the tenant VDOM logs in, and configures the ports of the leased managed FortiSwitch, or the admincontinues to lease/release ports from virtual switch pool.Then in each tenant VDOM, the tenant admin can configure and leverage the FortiSwitch ports locally with limitedrange of operations based on the available CLI operations:login: vdom2Password: *****Welcome !$ show switch-controller managed-switch
config switch-controller managed-switchedit "S248EPTF1800XXXX"
set type virtualset owner-vdom "root"
config portsedit "port1"
set poe-capable 1set vlan "tenant-vlan1"
nextedit "port6"
set poe-capable 1set vlan "tenant-vlan1"
next$ conf switch-controller managed-switch
(managed-switch) $ edit S248EPTF1800XXXX (S248EPTF1800XXXX) $ config ports
(ports) $ edit port1 (port1) $ set port-owner Switch port name.speed Switch port speed; default and available settings depend on hardware.status Switch port admin status: up or down.poe-status Enable/disable PoE status.poe-pre-standard-detection Enable/disable PoE pre-standard detection. -->
expanded to tenant VDOM in FortiOS 6.2poe-capable PoE capable.vlan Assign switch ports to a VLAN.allowed-vlans Configure switch port tagged vlansuntagged-vlans Configure switch port untagged vlanstype Interface type: physical or trunk port.qos-policy Switch controller QoS policy from available options. -->
expanded to tenant VDOM in FortiOS 6.2storm-control-policy Switch controller storm control policy from available
options.port-security-policy Switch controller authentication policy to apply to
this managed switch from available options.--> expanded to tenantVDOM in FortiOS 6.2
learning-limit Limit the number of dynamic MAC addresses on this Port (1 -128, 0 = no limit, default).--> expanded to tenant VDOM in FortiOS 6.2
(ports) # edit trunk1(trunk) # set type trunk --> expanded to tenant VDOM in FortiOS 6.2$ exe switch-controller virtual-port-pool request S248EPTF1800XXXX port8$ exe switch-controller virtual-port-pool show
FortiOS 6.2 New Features Guide 94Fortinet Inc.

Expanding Fabric Family
MSTI Support
In 6.0, the switch controller maps all user VLANs into the MSTI-CST (common spanning tree) instance 0. Whilereserving MSTI-0 (CST) and MSTI-15 for FortiLink management VLAN=4094. In 6.2, the administrator can control MSTI1-14.
Each instance is a full and complete spanning tree. Any user VLANmay be mapped to any instance, allowing thespanning trees to have different topologies for each MSTI. Each instance allows the setting of various parameters suchas cost and priority.
You must configure this feature by using the CLI.
To configure MSTI support:
1. Create or modify stp-instance between 1 to 14:
(root) # conf switch-controller stp-instance (stp-instance) # edit 15please enter a value of 1 to 14.(stp-instance) # edit 1 ----> created stp instances will be applied to allmanaged fswsnew entry '1' added(1) # set vlan-range *vlan-name VLAN name.cam.aggr1 interfacesnf.aggr1 interfacetenant-vlan3 interfacetenant-vlan4 interfacevoi.aggr1 interfacevsw.aggr1 interface(1) # set vlan-range tenant-vlan3 vsw.aggr1 (1) # end
2. Configure specific stp priority on different managed FortiSwitch units:
(root) # conf switch-controller managed-switch (managed-switch) # edit S248EPTF1800XXXX
(S248EPTF1800XXXX) # conf stp-instance
(stp-instance) # edit 1
# getid : 1priority : 32768 ------> Default priority(1) # set priority 8192
(1) # end
FortiLink Auto Network Configuration Policy
In 6.0, FortiLink supports automatic network detection and configuration. As links can automatically appear anddisappear, this presents challenges for customization because administrators can only select the default QoS policywhich is applied to all FortiSwitch units in the network. In some cases, this is enough, but larger and more complextopologies require more flexibility.
FortiOS 6.2 New Features Guide 95Fortinet Inc.

Expanding Fabric Family
In 6.2, the Switch Controller introduces a network auto-config option, which contains configurable defaults, policycustomization, and an individual interface override. This gives administrators simple and flexible control.
Following is a description of these options:
auto-config default Provides the default actions for the first hop (fgt-policy) and lower-tier devices(isl-policy).
auto-config policy A database containing policies that can be applied as a system-wide default or toa specific interface.
auto-config custom Allows for the override of the auto-config default on a specific interface.This information is retained and is reapplied if an interface leaves and then isrediscovered.
To configure automatic network detection:
1. Create or modify an auto-config policy:
config switch-controller auto-config policyedit test123
getname : test123qos-policy : default <== leverage the default qos-policystorm-control-policy: auto-config <== leverage auto-config storm-control-
policy by defaultpoe-status : enable <== If target of auto-config is poe port,
keep poe-status enabled by defaultnext
end
2. Designate an auto-config policy to FortiLink, ISL, or ICL on Managed FortiSwitches.
config switch-controller auto-config defaultget
fgt-policy : test123isl-policy : test123icl-policy : test123
set ?fgt-policy Default FortiLink auto-config policy.isl-policy Default ISL auto-config policy.icl-policy Default ICL auto-config policy.
end
3. Customize an auto-config policy for a specific FGT, ICL, or ISL interface.
config switch-controller auto-config customedit ?
*name Auto-Config FortiLink or ISL/ICL interface name.edit G5H0E391790XXXX
new entry 'G5H0E391790XXXX' addedconfig switch-binding
edit ?*switch-id Switch name.
edit S524DN4K1500XXXXnew entry 'S524DN4K1500XXXX' addedget
FortiOS 6.2 New Features Guide 96Fortinet Inc.

Expanding Fabric Family
switch-id : S524DN4K1500XXXXpolicy : default
nextend
nextend
FortiLink MCLAG configuration in GUI
In this version, you can enable MCLAG in the GUI and view ports grouped by trunks. You need to configure ports fromtwo switches, that is, two MCLAG peer switches to be included in one MCLAG.
Sample configuration
InWiFi & Switch Controller > FortiSwitch Ports, there is a newMC-LAG option.
FortiOS 6.2 New Features Guide 97Fortinet Inc.

Expanding Fabric Family
InWiFi & Switch Controller > FortiSwitch Ports, there is a separate Trunk view.
FortiLink Network Sniffer Extension
In 6.0, the switch controller introduced traffic mirroring with a single switch. This provides a general capability, but canresult in large volumes of traffic being mirrored. In 6.2, the new switch controller option of traffic-sniffer provides atargeted approach: mirrored traffic is always directed towards the FortiGate on a dedicated VLAN. This allows for easysniffing by using the CLI or GUI. Additionally, the traffic can also be routed through the FortiGate using EncapsulatedRemote Switched Port Analyzer (ERSPAN) for external analysis and storage.
With the new option, you can define targeted sniffers by IP or MAC address. Traffic matching is replicated to theFortiGate, which is helpful when you know what device you are looking for, but you don't know where it is located.
FortiLink networks can have multiple switches, and traffic typically traverses several switches. If each switch mirrors anymatch, the sniffer would see multiple copies of traffic. To reduce this, the targets are applied at the perimeter of theFortiSwitch network. Traffic entering by a user port or traffic from FortiGate is considered eligible for mirroring.
You can also enable traditional port-based sniffers in the ingress or egress direction.
All sniffer traffic arrives at the FortiGate using ERSPAN and the traffic is encapsulated in generic routing encapsulation(GRE).
FortiOS 6.2 New Features Guide 98Fortinet Inc.

Expanding Fabric Family
You can only configure this feature using the CLI:
l Use pre-defined sniffer-used switch VLAN interface:config system interface
edit "snf.aggr1" ---> Newly added pre-defined switch vlan interface. Createdautomatically after the first FortiSwitch is discovered and authorized.
set vdom "root"set ip 10.254.253.254 255.255.254.0set allowaccess pingset description "Sniffer VLAN"set snmp-index 33set switch-controller-traffic-policy "sniffer"set color 6set interface "aggr1"set vlanid 4092
nextend
l Enable traffic sniffer based on target IP or MAC addresses on target ports of managed FortiSwitch units:config switch-controller traffic-sniffer ---> newly added>
set erspan-ip 2.2.2.2 ---> Designated ERSPAN collectorconfig target-mac
edit 11:11:11:11:11:11next
endconfig target-ip
edit 4.4.4.4next
endconfig target-port
edit "S524DN4K1500XXXX"
FortiOS 6.2 New Features Guide 99Fortinet Inc.

Expanding Fabric Family
set in-ports "port2" "port4" "port6"set out-ports "port3" "port5" "port7"
nextend
end
l Use troubleshooting tools:FortiGate-500E (root) # diag switch-controller switch-info mirror status
S524DN4K1500XXXX Managed Switch : S524DN4K1500XXXXflink.sniffer
Mode : ERSPAN-autoStatus : ActiveSource-Ports:
Ingress: port2, port4, port6Egress : port3, port5, port7
Used-by-ACLs : TrueAuto-config-state : Resolved/Running
Last-update : 1464 seconds agoIssues : NoneCollector-IP : 2.2.2.2Source-IP : 10.254.252.208Source-MAC : 08:5b:0e:ff:40:27Next-Hop :
IP : 10.254.253.254MAC : 00:09:0f:09:00:0cVia-System-Interface : snifferVLAN : 4092(tagged)Via-Switch-Interface : G5H0E391790XXXX
Leverage SAML to switch between Security Fabric FortiGates - 6.2.1
In the FortiGate GUI header, a dropdown menu is available for all FortiGates that are participating in the Security Fabric.You can use the dropdown menu to easily switch between all devices connected to the Security Fabric. Each item in thedropdown menu represents a FortiGate in the Security Fabric.
Following is a summary of the new feature:
l In both root and downstream FortiGates, the dropdown menu is available, and you can click the menu to navigate toany other FortiGate management IP/FQDN. See Switching between FortiGates in a Security Fabric using the GUIon page 101.
l In both root and downstream FortiGates, you can set both the management IP/FQDN and port options.If the management IP/FQDN is not set on a FortiGate, the IP it uses to connect to the Security Fabric is displayed asthe management IP, which may not be accessible by administrator browsers. When the management IP/FQDN isnot set on a FortiGate, a warning is displayed.See Setting the IP/FQDN using the GUI on page 102 and Setting the IP/FQDN using the CLI on page 104.
l In root FortiGate GUI, you can use the Customize option to change its hostname, management IP/FQDN, and port.See Customizing a root FortiGate using the GUI on page 104.
l In downstream FortiGates, a new diagnose sys csf global command is available to display a summary of allconnected FortiGates in the Security Fabric. See Viewing a summary of all connected FortiGates in a SecurityFabric using the CLI on page 105.
FortiOS 6.2 New Features Guide 100Fortinet Inc.

Expanding Fabric Family
Switching between FortiGates in a Security Fabric using the GUI
To switch between FortiGates in a Security Fabric:
1. Log in to a FortiGate in a Security Fabric by using SSO.2. In the banner, click the name of the FortiGate.
A dropdown menu is displayed. The dropdown menu displays the root FortiGate as well as the downstreamFortiGates in the Security Fabric.
3. Hover over the name of a FortiGate.A tooltip about the FortiGate is displayed.Following is an example of the tooltip for a downstream FortiGate:
Following is an example of the tooltip for another downstream FortiGate:
4. Click a FortiGate to navigate to its management IP/FQDN without further authentication.
FortiOS 6.2 New Features Guide 101Fortinet Inc.

Expanding Fabric Family
Setting the IP/FQDN using the GUI
To set the IP/FQDN using the GUI:
1. Log into the root FortiGate, and go to Security Fabric > Settings.Beside Security Fabric role, Serve as Fabric Root is selected.
2. Specify the management IP or FQDN:a. BesideManagement IP/FQDN, click Specify.
A box is displayed.
b. In the box, type the management IP or FQDN.c. BesideManagement Port, click Specify.
A box is displayed.d. In the box, type the port number, and click Apply.
3. On a downstream FortiGate, go to Security Fabric > Settings.Beside Security Fabric role, Join Existing Fabric is selected.
4. Specify the management IP or FQDN:a. BesideManagement IP/FQDN, click Specify.
A box is displayed.
FortiOS 6.2 New Features Guide 102Fortinet Inc.

Expanding Fabric Family
b. In the box, type the management IP or FQDN.c. BesideManagement Port, click Specify.
A box is displayed.d. In the box, type the port number, and click Apply.
If management IP/FQDN is not set on a FortiGate, the IP that it uses to connect to the Security Fabric is displayedas management IP, and a warning is displayed because administrators might be unable to access the IP by using abrowser.
FortiOS 6.2 New Features Guide 103Fortinet Inc.

Expanding Fabric Family
Setting the IP/FQDN using the CLI
To set the IP/FQDN using the CLI:
1. On the root FortiGate, run the follow commands:config system csf
set status enableset group-name "csf_script"set management-ip "172.17.48.225"set management-port 4431......
endconfig system csf
set status enableset upstream-ip 10.2.200.1set management-ip "robot.csf"set management-port 4432
end
Customizing a root FortiGate using the GUI
To customize a root FortiGate using the GUI:
1. On a root FortiGate, click the dropdown menu in the banner, and hover over the root FortiGate.A summary pane is displayed.
2. In the summary pane, click Customize.A Customize pane is displayed.
3. Edit the settings, and clickOK.
FortiOS 6.2 New Features Guide 104Fortinet Inc.

Expanding Fabric Family
Viewing a summary of all connected FortiGates in a Security Fabric using the CLI
To view a summary of all connected FortiGates in a Security Fabric using the CLI:
1. Go to a downstream FortiGate in the Security Fabric, and run the following command:FGTB-1 # diagnose sys csf globalCurrent vision:[
{"path":"FG3H1E5818900718","mgmt_ip_str":"","mgmt_port":0,"sync_mode":1,"saml_role":"disable","admin_port":443,"serial":"FG3H1E5818900718","host_name":"FGTA-1","firmware_version_major":6,"firmware_version_minor":2,"firmware_version_patch":0,"firmware_version_build":923,"subtree_members":[{"serial":"FG201ETK18902514"},{"serial":"FGT81ETK18002246"},{"serial":"FG101ETK18002187"}
]},
{"path":"FG3H1E5818900718:FG201ETK18902514","mgmt_ip_str":"robot.csf","mgmt_port":4432,"sync_mode":1,"saml_role":"service-provider","admin_port":443,"serial":"FG201ETK18902514","host_name":"FGTB-1","firmware_version_major":6,"firmware_version_minor":2,"firmware_version_patch":0,"firmware_version_build":923,"upstream_intf":"port2","upstream_serial":"FG3H1E5818900718","parent_serial":"FG3H1E5818900718","parent_hostname":"FGTA-1","upstream_status":"Authorized","upstream_ip":29884938,"upstream_ip_str":"10.2.200.1","subtree_members":[{"serial":"FGT81ETK18002246"
FortiOS 6.2 New Features Guide 105Fortinet Inc.

Expanding Fabric Family
},{"serial":"FG101ETK18002187"
}],"is_discovered":true,"ip_str":"10.2.200.2","downstream_intf":"wan1","idx":1},{
"path":"FG3H1E5818900718:FG201ETK18902514:FGT81ETK18002246","mgmt_ip_str":"172.17.48.225","mgmt_port":4434,"sync_mode":1,"saml_role":"service-provider","admin_port":443,"serial":"FGT81ETK18002246","host_name":"FGTD","firmware_version_major":6,"firmware_version_minor":2,"firmware_version_patch":0,"firmware_version_build":923,"upstream_intf":"vlan60","upstream_serial":"FG201ETK18902514","parent_serial":"FG201ETK18902514","parent_hostname":"FGTB-1","upstream_status":"Authorized","upstream_ip":33990848,"upstream_ip_str":"192.168.6.2","subtree_members":[],"is_discovered":true,"ip_str":"192.168.6.4","downstream_intf":"wan2","idx":2
},{
"path":"FG3H1E5818900718:FG201ETK18902514:FG101ETK18002187","mgmt_ip_str":"","mgmt_port":0,"sync_mode":1,"saml_role":"disable","admin_port":443,"serial":"FG101ETK18002187","host_name":"FGTC","firmware_version_major":6,"firmware_version_minor":2,"firmware_version_patch":0,"firmware_version_build":923,"upstream_intf":"vlan70","upstream_serial":"FG201ETK18902514","parent_serial":"FG201ETK18902514","parent_hostname":"FGTB-1","upstream_status":"Authorized","upstream_ip":34056384,"upstream_ip_str":"192.168.7.2",
FortiOS 6.2 New Features Guide 106Fortinet Inc.

Expanding Fabric Family
"subtree_members":[],"is_discovered":true,"ip_str":"192.168.7.3","downstream_intf":"wan1","idx":3
}]
Leverage LLDP to Simplify Security Fabric Negotiation
This feature enables LLDP reception onWAN interfaces, and prompts FortiGates that are joining the Security Fabric ifthe upstream FortiGate asks.
l If an interface's role is undefined, LLDP reception and transmission inherit settings from the VDOM.l If an interface's role is WAN, LLDP reception is enabled.l If an interface's role is LAN, LLDP transmission is enabled.
When a FortiGate B's WAN interface detects that FortiGate A's LAN interface is immediately upstream (through thedefault gateway), and FortiGate A has Security Fabric enabled, FortiGate B will show a notification on the GUI asking tojoin the Security Fabric.
To configure LLDP reception and join a Security Fabric:
1. Go To Network > Interfaces.2. Configure an interface:
l If the interface's role is undefined, under Administrative Access, set Receive LLDP and Transmit LLDP to UseVDOM Setting.
Using the CLI:
FortiOS 6.2 New Features Guide 107Fortinet Inc.

Expanding Fabric Family
config system interfaceedit "port3"
set lldp-reception vdomset lldp-transmission vdomset role undefined...
nextend
l If the interface's role is WAN, under Administrative Access, set Receive LLDP to Enable and Transmit LLDP toUse VDOM Setting.
Using the CLI:
config system interfaceedit "wan1"
set lldp-reception enableset lldp-transmission vdomset role wan...
nextend
l If the interface's role is LAN, under Administrative Access, set Receive LLDP to Use VDOM Setting andTransmit LLDP to Enable.
FortiOS 6.2 New Features Guide 108Fortinet Inc.

Expanding Fabric Family
Using the CLI:
config system interfaceedit "port2"
set lldp-reception vdomset lldp-transmission enableset role lan...
nextend
A notification will be shown on FortiGate B.
3. Click the notification. The Security Fabric Settings page opens with all the required settings automaticallyconfigured.
FortiOS 6.2 New Features Guide 109Fortinet Inc.

Expanding Fabric Family
4. Click Apply to apply the settings, or use the following CLI commands:
config system csfset status enableset upstream-ip 10.2.200.1
end
Configuring single-sign-on in the Security Fabric - 6.2.2
In FortiOS 6.2, you can configure single-sign-on settings in the Security FabricGUI menu. Prior to FortiOS 6.2, thesesettings were configured in the User & DeviceGUI menu.
Only the root FortiGate can be the identity provider (IdP). The downstream FortiGates can beconfigured as service providers (SP).
Configuring the root FortiGate
To configure the root FortiGate as the IdP:
1. Log in to the root FortiGate.2. Go to Security Fabric > Settings.3. In the FortiGate Telemetry section, enable SAML Single Sign-On. TheMode field is automatically populated as
Identity Provider (IdP).4. Enter an IP address in theManagement IP/FQDN box.5. Enter a management port in theManagement Port box.
TheManagement IP/FQDN will be used by the SPs to redirect the login request. TheManagement IP/FQDN andManagement Portmust be reachable from the user's device.
6. Select the IdP certificate.
FortiOS 6.2 New Features Guide 110Fortinet Inc.

Expanding Fabric Family
7. Click Apply.
Configuring a downstream FortiGate as an SP
An SPmust be a member of the Security Fabric before you configure it.
To configure the downstream FortiGate from the root FortiGate:
1. Log in to the root FortiGate.2. Go to Security Fabric > Settings and locate the Topology section.3. Hover over a FortiGate and click Configure.
The Configure pane opens.4. Enable SAML Single Sign-On. TheMode field is automatically populated as Service Provider (SP).5. Enter an IP address in theManagement IP/FQDN box.6. Enter a management port in theManagement Port box.
TheManagement IP/FQDN will be used by the IdP and so other SPs can redirect to each other. TheManagementPortmust be reachable from the user's device.
7. Select a Default login page option.
FortiOS 6.2 New Features Guide 111Fortinet Inc.

Expanding Fabric Family
8. Select one of the following Default admin profile types: prof_admin, super_admin, or super_admin_readonly. Theno_access_admin profile is set as the default.
9. ClickOK.
To configure the downstream FortiGate within the device:
1. Log in to the downstream FortiGate.2. Go to Security Fabric > Settings.3. In the FortiGate Telemetry section, enable SAML Single Sign-On. TheMode field is automatically populated as
Service Provider (SP).4. Enter an IP address in theManagement IP/FQDN box.5. Enter a management port in theManagement Port box.
TheManagement IP/FQDN will be used by the IdP and so other SPs can redirect to each other. TheManagementPortmust be reachable from the user's device.
6. Select a Default login page option.7. Select one of the following Default admin profile types: prof_admin, super_admin, or super_admin_readonly. The
no_access_admin profile is set as the default.8. ClickOK.
Verifying the single-sign-on configuration
After you have logged in to a Security Fabric member using SSO, you can navigate between any Security Fabricmember with SSO configured.
To navigate between Security Fabric members:
1. Log in to a Security Fabric member that is using SSO.2. In the top banner, click the name of the device you are logged in to. A list of Security Fabric members displays.
3. Click a Security Fabric member. The login page appears.
FortiOS 6.2 New Features Guide 112Fortinet Inc.

Expanding Fabric Family
4. Select the option to log in via Single-Sign-On.
You are now logged in to the Security Fabric member with SSO. The letters "SSO" also display beside the username in the top banner.
5. Go to System > Administrators > Single-Sign-On Administrator to view the list of SSO admins created.
FSSO dynamic address subtype - 6.2.2
This new feature introduces a subtype for dynamic firewall address objects called Fortinet Single Sign-On (FSSO). It canbe used in all policies that support dynamic address types.
The FSSO dynamic address subtype can be used with FSSO group information being forwarded by ClearPass PolicyManager (CPPM) via FortiManager. The FortiGate will update dynamic address used in firewall policies based on sourceIP information for authenticated FSSO users.
It also can be used with other FSSO groups provided by the FSSO collector agent or FortiNAC.
To configure FSSO dynamic addresses with CPPM and FortiManager in the GUI:
1. Create the dynamic address object:a. Go to Policy & Objects > Addresses > Create New > Address.b. For Type, select Dynamic.c. For Sub Type, select Fortinet Single Sign-On (FSSO). The Select Entries pane opens and displays all available
FSSO groups.d. Select one or more groups.e. ClickOK to save the configuration.
FortiOS 6.2 New Features Guide 113Fortinet Inc.

Expanding Fabric Family
When the address table appears, there will be an error message for the address you just created (Unresolveddynamic address: fsso). This is expected because there are currently no authenticated FSSO users (based onsource IP) in the local FSSO user list.
2. Add the dynamic address object to a firewall policy:a. Go to Policy & Objects > IPv4 Policy.b. Create a new policy or edit an existing policy.c. For Source, add the dynamic FSSO address object you just created.d. Configure the rest of the policy as needede. ClickOK to save your changes.
3. Test the authentication to add a source IP address to the FSSO user list:a. Log in as user and use CPPM for user authentication to connect to an external web server. After successful
authentication, CPPM forwards the user name, source IP address, and group membership to the FortiGate viaFortiManager.
b. Go toMonitor > Firewall User Monitor to view the user name (fsso1) and IP address.
c. Go to Policy & Objects > Addresses to view the updated address table. The error message no longer appears.
FortiOS 6.2 New Features Guide 114Fortinet Inc.

Expanding Fabric Family
d. Hover over the dynamic FSSO address to view the IP address (fsso resolves to: 10.1.100.185).
To verify user traffic in the GUI:
1. Go to Log & Report > Forward Traffic.Details for the user fsso1 are visible in the traffic log:
l If another user is authenticated by CPPM, then the dynamic address fsso entry in the address table will beupdated. The IP address for user fsso2 (10.1.100.188) is now visible:
FortiOS 6.2 New Features Guide 115Fortinet Inc.

Expanding Fabric Family
2. Go to FortiView > Sources to verify that the users were able to successfully pass the firewall policy.
If a user logs off and CPPM receives log off confirmation, then CPPS updates the FortiGateFSSO user list via FortiManager. The user IP address is deleted from the dynamic FSSOaddress, and the user is no longer be able to pass the firewall policy.
To configure FSSO dynamic addresses with CPPM and FortiManager in the CLI:
1. Create the dynamic address object:
config firewall addressedit "fsso"
set uuid 6f63c872-c90b-51e9-ebfd-16c18807c795set type dynamicset sub-type fssoset fsso-group "cp_test_FSSOROLE"
nextend
2. Add the dynamic address object to a policy:
config firewall policyedit 1
set name "pol1"set uuid 2b88ed8a-c906-51e9-fb25-8cb12172acd8set srcintf "port2"set dstintf "port3"set srcaddr "fsso"set dstaddr "all"set action acceptset schedule "always"set service "ALL"set logtraffic allset fsso disableset nat enable
nextend
FortiOS 6.2 New Features Guide 116Fortinet Inc.

Expanding Fabric Family
To verify user traffic in the CLI:
1. Check the FSSO user list:
diagnose debug authd fsso list----FSSO logons----IP: 10.1.100.185 User: fsso1 Groups: cp_test_FSSOROLE Workstation: MemberOf: FSSO-CPPM cp_test_FSSOROLETotal number of logons listed: 1, filtered: 0----end of FSSO logons----
2. Check the authenticated firewall users list:
diagnose firewall auth list10.1.100.185, fsso1type: fsso, id: 0, duration: 2928, idled: 2928server: FortiManagerpackets: in 0 out 0, bytes: in 0 out 0group_id: 2 33554433group_name: FSSO-CPPM cp_test_FSSOROLE----- 1 listed, 0 filtered ------
l After user traffic passes through the firewall, the number of packets in and out should increase:
diagnose firewall auth list10.1.100.185, fsso1type: fsso, id: 0, duration: 3802, idled: 143server: FortiManagerpackets: in 1629 out 1817, bytes: in 2203319 out 133312group_id: 2 33554433group_name: FSSO-CPPM cp_test_FSSOROLE----- 1 listed, 0 filtered ------
VMware NSX-T managed by FortiManager - 6.2.2
FortiGate-VM can receive dynamic FSSO addresses, along with address settings in firewall policies, pushed by theFortiManager.
The FortiManager retrieves groups from VMware NSX-T manager and stores them as dynamic firewall address objects.The FortiGate-VM that is deployed by the registered VMware NSX-T service then connects to the FortiManager toreceive the dynamic objects.
For more information, see VMware NSX-T connector in the FortiManager New Features Guide.
To configure a VMware NSX-T connector on a FortiManager and send dynamic FSSO firewall addressesto a managed FortiGate:
1. Enable read-write JSON API access on the FortiManager2. Create an NSX-T connector on the FortiManager3. Create a dynamic FSSO address on the FortiManager4. Create a firewall policy with the dynamic FSSO address on the FortiManager5. Install the firewall policy to the FortiGate from the FortiManager
FortiOS 6.2 New Features Guide 117Fortinet Inc.

Expanding Fabric Family
6. Confirm that the firewall policy with the address option was pushed to the FortiGate7. Confirm that the FortiGate received the dynamic FSSO address
To enable read-write JSON API access:
1. Go to System Settings > Admin > Administrators.2. Edit the administrator.3. For JSON API Access, select Read-Write.4. ClickOK.
To create an NSX-T connector on the FortiManager:
1. Go to Policy & Objects > Object Configurations > Fabric Connectors > SSO/Identity.2. Click Create New > NSX-T Connector.
Only one NSX-T connector can be created per ADOM.
3. Configure the NSX-T Manager Configurations settings.4. Configure the FortiManager Configurations settings.5. Click Apply & Refresh.6. Ensure that there is a password for FortiManager.7. Add a service:
a. Click Add Service.b. Enter a Service Name and select the Integration to identify the flow of trafficc. Set the Image Location to the URL where the preconfigured FortiGate VM deployment image is located.d. ClickOK.
8. Click Apply & Refresh.
FortiOS 6.2 New Features Guide 118Fortinet Inc.

Expanding Fabric Family
To create a dynamic FSSO address on the FortiManager:
1. Go to Policy & Objects > Object Configurations > Firewall Objects > Addresses.2. Click Create New > Address.
3. Set Type to Dynamic.4. Set Sub Type to FSSO.5. For the FSSOGroup, select the group defined on the NSX-T manager.6. ClickOK.
To create a firewall policy with the dynamic FSSO address on the FortiManager:
1. Go to Policy & Objects > Policy Packages.2. Select the policy package and go to IPv4 Policy.3. Click Create New.4. Set the Source Address to the dynamic FSSO address.5. Configure the remaining settings as needed, then clickOK.
To install the firewall policy to the FortiGate from the FortiManager:
1. Go to Policy & Objects > Policy Packages.2. Select the policy package and go to Installation Targets.3. Click Add and add the FortiGate as a target if it is not already listed as a target.
FortiOS 6.2 New Features Guide 119Fortinet Inc.

Expanding Fabric Family
4. Select the FortiGate and , in the toolbar, click Install > Install Wizard.
5. Make sure that Install Policy Package & Device Settings is selected, and that the correct Policy Package is selected.6. Follow the steps in the wizard to install the policy package to the FortiGate. For more information, see Using the
Install Wizard to install policy packages and device settings in the FortiManager Administration Guide.
To confirm that the firewall policy with the address option was pushed to the FortiGate:
1. On the FortiGate, go to Policy & Objects > IPv4 Policy and confirm that the policy is on the list.
To confirm that the FortiGate received the dynamic FSSO address:
1. Go to Policy & Objects > Addresses and confirm that the dynamic FSSO address in on the list.
FortiOS 6.2 New Features Guide 120Fortinet Inc.

Expanding Fabric Family
2. In the FortiGate CLI console, check the firewall addresses:
# show firewall addressconfig firewall address
...edit "FMG-addr-phonton-LS10-71"
set uuid 2d5c5a46-e965-51e9-c3aa-c74bf993ce83set type dynamicset sub-type fssoset fsso-group "nsx_FMG-deployed-NSX_default/groups/Photon-LS10-71"
next...
end
The address name is inserted automatically by the FortiManager.
Diagnose commands
The following commands can be used on the FortiGate to help with diagnostics.
To view a list of current FSSO logons:
# diagnose debug authd fsso list----FSSO logons----IP: 1.1.1.1-1.1.1.1 User: nsx Groups: nsx_FMG-deployed-NSX_default/groups/group1Workstation:IP: 1.1.1.2-1.1.1.2 User: nsx Groups: nsx_FMG-deployed-NSX_default/groups/group1Workstation:IP: 10.1.10.71-10.1.10.71 User: nsx Groups: nsx_FMG-deployed-NSX_default/groups/Photon-LS10-71 Workstation: MemberOf: nsx_FMG-deployed-NSX_default/groups/Photon-LS10-71IP: 10.1.10.72-10.1.10.72 User: nsx Groups: nsx_FMG-deployed-NSX_default/groups/Photon-LS10-72 Workstation:IP: 10.1.10.73-10.1.10.73 User: nsx Groups: nsx_FMG-deployed-NSX_default/groups/LS20-VMsWorkstation:IP: 10.1.20.73-10.1.20.73 User: nsx Groups: nsx_FMG-deployed-NSX_default/groups/LS20-VMsWorkstation:IP: 10.1.20.74-10.1.20.74 User: nsx Groups: nsx_FMG-deployed-NSX_default/groups/LS20-VMsWorkstation:Total number of logons listed: 7, filtered: 0----end of FSSO logons----
To turn on Auth daemon debug messages for 30 minutes:
# diagnose debug application authd -1
FortiOS 6.2 New Features Guide 121Fortinet Inc.

Fabric Connectors
This section lists the new features added to FortiOS for Security Fabric connectors.
Multiple Concurrent SDN/Cloud Connectors
This feature introduces support for multiple connectors of all SDN connector types to be defined. Previously, only asingle connector could be configured for most types, and the SDN connector had to be specified when creating adynamic firewall address. Now, multiple instances can be configured for every SDN connector, and the specificconnector instance must be specified when creating a dynamic firewall address.
This example shows two Microsoft Azure SDN connectors being created, and then being used in new dynamic firewalladdresses.
Multiple concurrent SDN/Cloud connectors are not supported yet for Cisco ACI or Nuage.
To create and use two new SDN connectors with the CLI:
1. Create two new SDN connectors:
config system sdn-connectoredit "azure1"
set type azureset tenant-id "942b80cd-bbbb-42a1-8888-4b21dece61ba"set subscription-id "2f96c44c-cccc-4621-bbbb-65ba45185e0c"set client-id "14dbd5cc-3333-4ea4-8888-68738141feb1"set client-secret xxxxxset update-interval 30
nextedit "azure2"
set type azureset tenant-id "942b80cd-bbbb-42a1-8888-4b21dece61ba"set client-id "3baa0acc-ffff-4444-b292-0777a2c36be6"set client-secret xxxxxset update-interval 30
nextend
2. Create new dynamic firewall addresses that use the new connectors:
config firewall addressedit "azure-address-location1"
set type dynamicset color 2set sdn azure1
FortiOS 6.2 New Features Guide 122Fortinet Inc.
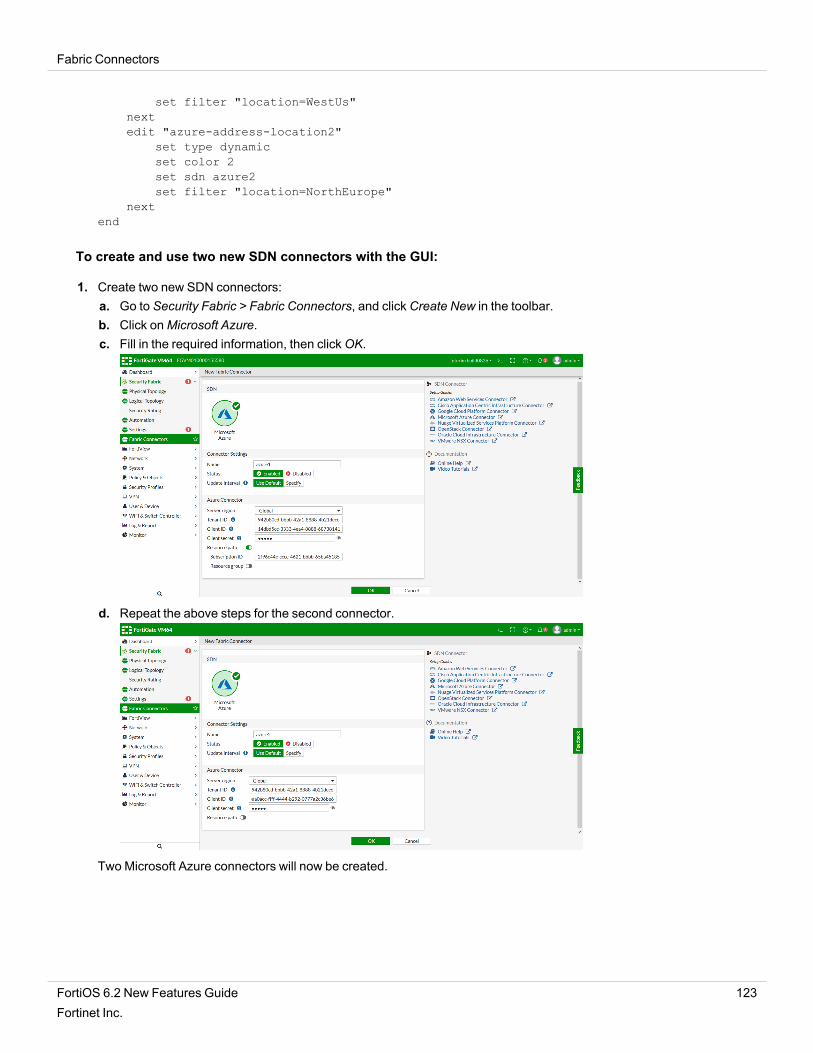
Fabric Connectors
set filter "location=WestUs"nextedit "azure-address-location2"
set type dynamicset color 2set sdn azure2set filter "location=NorthEurope"
nextend
To create and use two new SDN connectors with the GUI:
1. Create two new SDN connectors:a. Go to Security Fabric > Fabric Connectors, and click Create New in the toolbar.b. Click onMicrosoft Azure.c. Fill in the required information, then clickOK.
d. Repeat the above steps for the second connector.
Two Microsoft Azure connectors will now be created.
FortiOS 6.2 New Features Guide 123Fortinet Inc.

Fabric Connectors
2. Create new dynamic firewall addresses that use the new connectors:a. Go to Policy and Objects > Addresses and click Create New > Address in the toolbar.b. Enter a name for the address, and select Fabric Connector Address for the Type.c. Select one of the previously created SDN connectors from the SDN Connector drop down list.
d. Configure the rest of the required information, then clickOK to create the address.e. Repeat the above steps to create the second address, selecting the other Microsoft Azure SDN connector.
Filter Lookup Improvement for SDN Connectors
In 6.0, when configuring dynamic address mappings for filters in AWS, FortiGate can query the filters automatically,while for other clouds the configuration is a manual process. In 6.2, the same capability is expanded to SDN connectorsfor Azure, GCP, OpenStack, Kubernetes, and AliCloud.
To use the improved filter lookup:
1. Navigate to Policy & Objects > Addresses.2. Create or edit an SDN connector type dynamic IP address.
Supported SDN connector types include: AWS, Azure, GCP, OpenStack, Kubernetes, and AliCloud. The examplebelow is for an Azure SDN connector.
FortiOS 6.2 New Features Guide 124Fortinet Inc.

Fabric Connectors
3. In the address Filter field, users can:l List all available filters in Omniselect.
l Search the available filters in Omniselect.
FortiOS 6.2 New Features Guide 125Fortinet Inc.

Fabric Connectors
l Create custom filters in Omniselect.
FortiOS 6.2 New Features Guide 126Fortinet Inc.

Fabric Connectors
l Set filter logic [and|or] in multiple Omniselects.
Obtain full user information through the MS Exchange connector
FortiGate can collect additional information about authenticated users from corporate MS Exchange servers. After auser logs in, the additional information can be viewed in various parts of the GUI.
The Exchange connector must be mapped to the LDAP server that is used for authentication.
The following attributes are retrieved:
USER_INFO_FULL_NAME USER_INFO_COMPANY USER_INFO_CITYUSER_INFO_FIRST_NAME USER_INFO_DEPARTMENT USER_INFO_STATEUSER_INFO_LAST_NAME USER_INFO_GROUP USER_INFO_POSTAL_CODEUSER_INFO_LOGON_NAME USER_INFO_TITLE USER_INFO_COUNTRYUSER_INFO_TELEPHONE USER_INFO_MANAGER USER_INFO_ACCOUNT_EXPIRESUSER_INFO_EMAIL USER_INFO_STREETUSER_INFO_USER_PHOTO USER_INFO_POST_OFFICE_BOX
This example shows the configuration and verification in the CLI.
To configure and use an Exchange connector:
1. Configure the Exchange user:
config user exchangeedit "exchange140"
set server-name "W2K8-SERV1"set domain-name "FORTINET-FSSO.COM"set username "Administrator"set password **********
FortiOS 6.2 New Features Guide 127Fortinet Inc.

Fabric Connectors
set ip 10.1.100.140set kdc-ip "10.1.100.131"
nextend
Where:
server-name The hostname of the Exchange server.
domain-name The domain name of active directory.
username The username that FortiGate uses to connect to the Exchange server.
password The password that FortiGate uses to connect to the Exchange server.
ip The IP address of the Exchange server.
kdc-ip The IP address of the Global Catalog server.
For details about other commands, so the FortiOS CLI Reference.2. Set the exchange server in the LDAP user:
config user ldapedit "AD-ldap"
set server "10.1.100.131"set server-identity-check disableset cnid "cn"set dn "dc=fortinet-fsso,dc=com"set type regularset username "cn=Administrator,cn=users,dc=fortinet-fsso,dc=com"set password **********set secure ldapsset port 636set password-renewal enableset user-info-exchange-server "exchange140"
nextend
To check the collected information after the user has been authenticated:
1. In the GUI, go toMonitor > Firewall User Monitor and hover over the user name.
FortiOS 6.2 New Features Guide 128Fortinet Inc.

Fabric Connectors
2. In the CLI, run the following command:
# diagnose wad user info 20 test1'username' = 'test1''sourceip' = '10.1.100.185''vdom' = 'root''cn' = 'test1''givenName' = 'test1''sn' = 'test101''userPrincipalName' = '[email protected]''telephoneNumber' = '604-123456''mail' = '[email protected]''thumbnailPhoto' = '/tmp/wad/user_info/76665fff62ffffffffffffffffffff75ff68fffffffffa''company' = 'Fortinet''department' = 'Release QA''memberOf' = 'CN=group321,OU=Testing,DC=Fortinet-FSSO,DC=COM''memberOf' = 'CN=g1,OU=Testing,DC=Fortinet-FSSO,DC=COM''memberOf' = 'CN=group21,OU=Testing,DC=Fortinet-FSSO,DC=COM''memberOf' = 'CN=group1,OU=Testing,DC=Fortinet-FSSO,DC=COM''manager' = 'CN=test6,OU=Testing,DC=Fortinet-FSSO,DC=COM''streetAddress' = 'One Backend Street 1901''l' = 'Burnaby''st' = 'BC''postalCode' = '4711''co' = 'Canada''accountExpires' = '9223372036854
If the results are not as expected, use the following commands to verify what information FortiGate can collect fromthe Exchange server:
diagnose test application wad 2500diagnose test application wad 162
You can also enable debugging during user authentication:
diagnose wad debug enable level verbose
Cloud Connector - AliCloud
FortiOS now supports automatically updating dynamic addresses for AliCloud using an AliCloud SDN connector,including mapping the following attributes from AliCloud instances to dynamic address groups in FortiOS:
l ImageIdl InstanceIdl SecurityGroupIdl VpcIdl VSwitchIdl TagKeyl TagValue
FortiOS 6.2 New Features Guide 129Fortinet Inc.

Fabric Connectors
To configure AliCloud SDN connector using the GUI:
1. Configure the AliCloud SDN connector:a. Go to Security Fabric > Fabric Connectors.b. Click Create New, and select Alibaba Cloud.c. Configure as shown, substituting the access key, secret, and region ID for your deployment. The update
interval is in seconds.
2. Create a dynamic firewall address for the configured AliCloud SDN connector:a. Go to Policy & Objects > Addresses.b. Click Create New, then select Address.c. Configure the address as shown, selecting the desired filter in the Filter dropdown list. In this example, the
AliCloud SDN Connector will automatically populate and update IP addresses only for instances that belong tothe specified security group:
3. Ensure that the AliCloud SDN connector resolves dynamic firewall IP addresses:a. Go to Policy & Objects > Addresses.b. Hover over the address created in step 2 to see a list of IP addresses for instances that belong to the security
FortiOS 6.2 New Features Guide 130Fortinet Inc.

Fabric Connectors
group configured in step 2:
To configure AliCloud SDN connector using CLI commands:
1. Configure the AliCloud SDN connector:config system sdn-connector
edit "ali1"set type acsset access-key "LTAIKmERWEuEOChg"set secret-key xxxxxset region "us-west-1"set update-interval 30
nextend
2. Create a dynamic firewall address for the configured AliCloud SDN connector with the supported AliCloud filter. Inthis example, the AliCloud SDN Connector will automatically populate and update IP addresses only for instancesthat belong to the specified security group:config firewall address
edit "ali-address-security"set type dynamicset sdn "ali1"set filter "SecurityGroupId=sg-rj9bp5ax5kwy3gqdizqb"
nextend
3. Confirm that the AliCloud SDN connector resolves dynamic firewall IP addresses using the configured filter:config firewall address
edit "ali-address-security"set uuid 62a76df2-18f6-51e9-b555-360b18359ebeset type dynamicset sdn "ali1"set filter "SecurityGroupId=sg-rj9bp5ax5kwy3gqdizqb"config list
edit "10.0.0.16"nextedit "10.0.0.17"nextedit "10.0.0.20"next
endnext
end
FortiOS 6.2 New Features Guide 131Fortinet Inc.

Fabric Connectors
Cloud Connector - AWS - IAM Support
For instances running in AWS (on demand or BYOL), you can now set up the AWS connector by using AWS Identify andAccess Management (IAM) credentials.
IAM authentication is available only for FGT-AWS and FGT-AWSONDEMAND platforms.
To configure AWS SDN connector using the GUI:
1. Configure the AWS SDN connector:a. Go to Security Fabric > Fabric Connectors.b. Click Create New, and select AmazonWeb Services (AWS).c. Configure as shown:
2. Create a dynamic firewall address for the configured AWS SDN connector:a. Go to Policy & Objects > Addresses.b. Click Create New, then select Address.c. Configure the address as shown, selecting the desired filter in the Filter dropdown list.
Following is an example for a public SDN address type:
FortiOS 6.2 New Features Guide 132Fortinet Inc.

Fabric Connectors
Following is an example for a private SDN address type:
3. Ensure that the AWS SDN connector resolves dynamic firewall IP addresses:a. Go to Policy & Objects > Addresses.b. Hover over the address created in step 2 to see a list of IP addresses for instances that belong to the security
group configured in step 2.Following is an example for a public SDN address type:
FortiOS 6.2 New Features Guide 133Fortinet Inc.
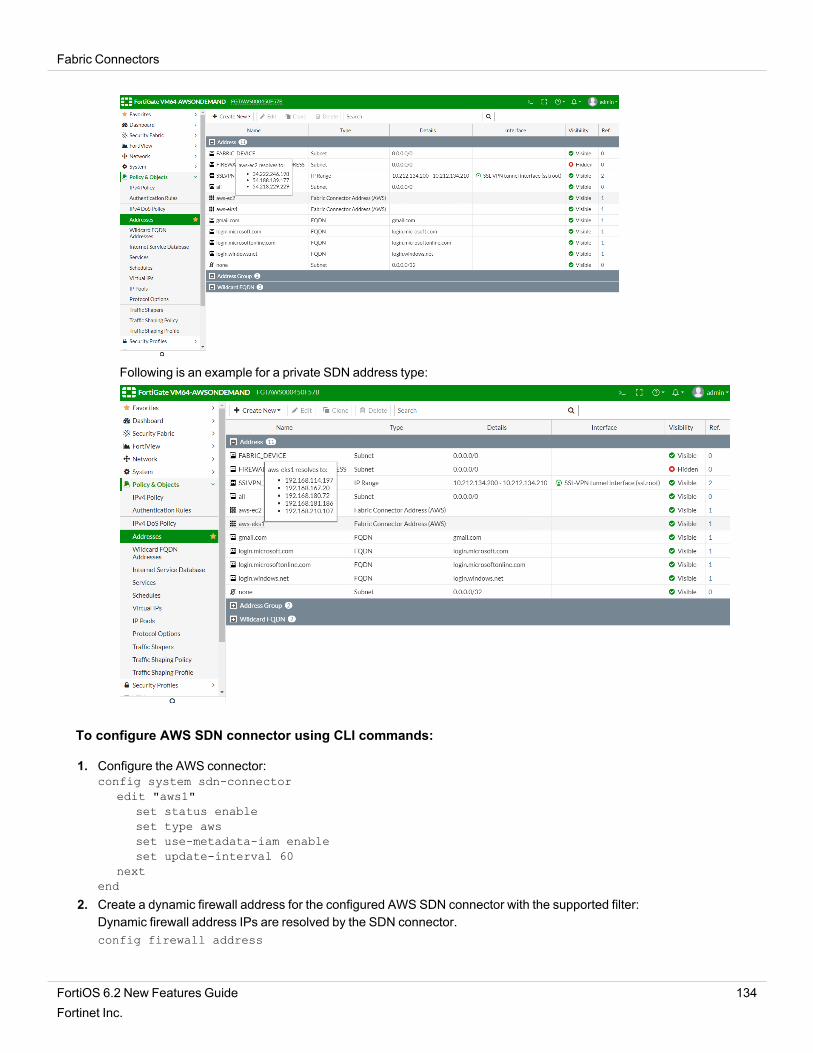
Fabric Connectors
Following is an example for a private SDN address type:
To configure AWS SDN connector using CLI commands:
1. Configure the AWS connector:config system sdn-connector
edit "aws1"set status enableset type awsset use-metadata-iam enableset update-interval 60
nextend
2. Create a dynamic firewall address for the configured AWS SDN connector with the supported filter:Dynamic firewall address IPs are resolved by the SDN connector.config firewall address
FortiOS 6.2 New Features Guide 134Fortinet Inc.

Fabric Connectors
edit "aws-ec2"set type dynamicset sdn "aws1"set filter "SecurityGroupId=sg-05f4749cf84267548"set sdn-addr-type public
nextedit "aws-eks1"
set type dynamicset sdn "aws1"set filter "K8S_Region=us-west-2"
nextend
3. Confirm that the AWS SDN connector resolves dynamic firewall IP addresses using the configured filter:config firewall address
edit "aws-ec2"set uuid e756e786-3a2e-51e9-9d40-9492098de42dset type dynamicset sdn "aws1"set filter "SecurityGroupId=sg-05f4749cf84267548"set sdn-addr-type publicconfig list
edit "34.222.246.198"nextedit "54.188.139.177"nextedit "54.218.229.229"next
endnextedit "aws-eks1"
set uuid d84589aa-3a10-51e9-b1ac-08145abce4d6set type dynamicset sdn "aws1"set filter "K8S_Region=us-west-2"config list
edit "192.168.114.197"nextedit "192.168.167.20"nextedit "192.168.180.72"nextedit "192.168.181.186"nextedit "192.168.210.107"next
endnext
end
SDN Connector - VMware ESXi
FortiOS now supports automatically updating dynamic addresses for VMware ESXi and vCenter servers using aVMware ESXi SDN connector, including mapping the following attributes from VMware ESXi and vCenter objects to
FortiOS 6.2 New Features Guide 135Fortinet Inc.

Fabric Connectors
dynamic address groups in FortiOS:
l vmidl hostl namel uuidl vmuuidl vmnetworkl guestidl guestnamel annotation
To configure VMware ESXi SDN connector using the GUI:
1. Configure the VMware ESXi SDN connector:a. Go to Security Fabric > Fabric Connectors.b. Click Create New, and select VMware ESXi.c. Configure as shown, substituting the server IP address, username, and password for your deployment. The
update interval is in seconds, and the password cannot contain single or double quotes.
2. Create a dynamic firewall address for the configured VMware ESXi SDN connector:a. Go to Policy & Objects > Addresses.b. Click Create New, then select Address.c. Configure the address as shown, selecting the desired filter in the Filter dropdown list. In this example, the
VMware ESXi SDN Connector will automatically populate and update IP addresses only for instances that
FortiOS 6.2 New Features Guide 136Fortinet Inc.

Fabric Connectors
belong to VLAN80:
3. Ensure that the VMware ESXi SDN connector resolves dynamic firewall IP addresses:a. Go to Policy & Objects > Addresses.b. Hover over the address created in step 2 to see a list of IP addresses for instances that belong to VLAN80 as
configured in step 2:
To configure VMware ESXi SDN connector using CLI commands:
1. Configure the VMware ESXi SDN connector:config system sdn-connector
edit "vmware1"set type vmwareset server "172.17.48.222"set username "example_username"set password xxxxxset update-interval 30
nextend
2. Create a dynamic firewall address for the configured VMware ESXi SDN connector with the supported VMwareESXi filter. In this example, the VMware ESXi SDN Connector will automatically populate and update IP addressesonly for instances that belong to the specified VLAN:config firewall address
FortiOS 6.2 New Features Guide 137Fortinet Inc.

Fabric Connectors
edit "vmware-network"set type dynamicset sdn "vmware1"set filter "vmnetwork=VLAN80"
nextend
3. Confirm that the VMware ESXi SDN connector resolves dynamic firewall IP addresses using the configured filter:config firewall address
edit "vmware-network"set uuid abfa1748-1b80-51e9-d0fd-ea322b3bba2dset type dynamicset sdn "vmware1"set filter "vmnetwork=VLAN80"config list
edit "192.168.8.240"next
endnext
end
Kubernetes (K8s)
This section lists the new features added to FortiOS for Kubernetes.
Private Cloud K8s Connector
FortiOS now supports automatically updating dynamic addresses for Kubernetes (K8S) using a K8S SDN connector,enabling FortiOS to manage K8S pods as global address objects, as with other connectors. This includes mapping thefollowing attributes from K8S instances to dynamic address groups in FortiOS:
Filter Description
Namespace Filter service IP addresses in a given namespace.
ServiceName Filter service IP addresses by the given service name.
NodeName Filter node IP addresses by the given node name.
Label.XXX Filter service or node IP addresses with the given label XXX.
To configure K8S SDN connector using the GUI:
1. Configure the K8S SDN connector:a. Go to Security Fabric > Fabric Connectors.b. Click Create New, and select Kubernetes.c. Configure as shown substituting the IP address, port number, and secret token for your deployment. The
FortiOS 6.2 New Features Guide 138Fortinet Inc.

Fabric Connectors
update interval is in seconds.
2. Create a dynamic firewall address for the configured K8S SDN connector:a. Go to Policy & Objects > Addresses.b. Click Create New, then select Address.c. Configure the address as shown, selecting the desired filter in the Filter dropdown list. In this example, the
K8S SDN connector will automatically populate and update IP addresses only for node instances that matchthe specified node name:
3. Ensure that the K8S SDN connector resolves dynamic firewall IP addresses:a. Go to Policy & Objects > Addresses.b. Hover over the address created in step 2 to see a list of IP addresses for node instances that match the node
FortiOS 6.2 New Features Guide 139Fortinet Inc.

Fabric Connectors
name configured in step 2:
To configure K8S SDN connector using CLI commands:
1. Configure the K8S SDN connector:config system sdn-connector
edit "kubernetes1"set type kubernetesset server "172.18.64.38"set server-port 6443set secret-token xxxxxset update-interval 30
nextend
2. Create a dynamic firewall address for the configured K8S SDN connector with the supported K8S filter. In thisexample, the K8S SDN connector will automatically populate and update IP addresses only for node instances thatmatch the specified node name:config firewall address
edit "k8s_nodename"set type dynamicset sdn "kubernetes1"set filter "K8S_NodeName=van-201669-pc1"
nextend
3. Confirm that the K8S SDN connector resolves dynamic firewall IP addresses using the configured filter:config firewall address
edit "k8s_nodename"set uuid 462112a2-1ab1-51e9-799c-652621ba8c0cset type dynamicset sdn "kubernetes1"set filter "K8S_NodeName=van-201669-pc1"config list
edit "172.16.65.227"next
endnext
end
FortiOS 6.2 New Features Guide 140Fortinet Inc.

Fabric Connectors
AWS Kubernetes (EKS) Connector
This feature extends the existing AWS SDN connector to support dynamic address groups based on AWS Kubernetes(EKS) filters.
To filter out the Kubernetes IP addresses, the following address filters have been introduced:
k8s_cluster Name of Kubernetes cluster.
k8s_namespace Namespace of a Kubernetes service or pod.
k8s_svcname Name of a Kubernetes service.
k8s_nodename Name of a Kubernetes node.
k8s_zone Zone of a Kubernetes node.
k8s_region Region of a Kubernetes node.
k8s_podname Name of a Kubernetes pod.
k8s_label.xxx Name of label of a Kubernetes resource (cluster/service/node/Pod).
To enable an AWS SDN connector to fetch IP addresses from AWS Kubernetes:
1. In Fabric Connectors, configure an SDN connector for AWS Kubernetes.
2. Go to Policies & Objects > Addresses and create a dynamic firewall address for the configured SDN connectorusing the supported Kubernetes filter.
FortiOS 6.2 New Features Guide 141Fortinet Inc.

Fabric Connectors
3. To filter out the Kubernetes IP addresses, select the address filter or filters.
4. Configure the rest of the settings, then clickOK.The dynamic firewall address IP is resolved by the SDN connector.
To configure an AWS Kubernetes connector through the CLI:
1. Configure an SDN connector for Kubernetes:config system sdn-connector
edit "aws1"set type awsset access-key "AKIAIJNKE75ANVN5AEQA"set secret-key xxxxxset region "us-west-2"set update-interval 30
nextend
2. Create a dynamic firewall address for the SDN connector with a supported Kubernetes filter:config firewall address
edit "aws-pod"set type dynamicset sdn "aws1"set filter "K8S_PodName=aws-node-g6zhx"
next
FortiOS 6.2 New Features Guide 142Fortinet Inc.

Fabric Connectors
end
The dynamic firewall address IP is resolved by the SDN connector:config firewall address
edit "aws-pod"set uuid a7a37298-19e6-51e9-851a-2c551ffc174dset type dynamicset sdn "aws1"set filter "K8S_PodName=aws-node-g6zhx"config list
edit "192.168.114.197"next
endnext
end
Azure Kubernetes (AKS) Connector
This feature extends the existing Azure SDN connector to support dynamic address groups based on Azure Kubernetes(AKS) filters.
To filter out the Kubernetes IP addresses, the following address filters have been introduced:
k8s_cluster Kubernetes cluster name.
k8s_namespace Namespace of a Kubernetes service or pod.
k8s_svcname Kubernetes service name.
k8s_nodename Kubernetes node name.
k8s_region Kubernetes node region.
k8s_podname Kubernetes pod name.
k8s_label.xxx Name of label of a Kubernetes resource (cluster/service/node/Pod).
To enable an Azure SDN connector to fetch IP addresses from Azure Kubernetes:
1. Configure the Azure SDN connector:a. Go to Security Fabric > Fabric Connectors.b. Click Create New, and select Azure.c. Configure as shown substituting the region, tenant and client IDs, and client secret for your deployment. The
FortiOS 6.2 New Features Guide 143Fortinet Inc.

Fabric Connectors
update interval is in seconds.
2. Create a dynamic firewall address for the configured K8S SDN connector:a. Go to Policy & Objects > Addresses.b. Click Create New, then select Address.c. Configure the address as shown, selecting the desired filter in the Filter dropdown list. In this example, the
Azure SDN connector will automatically populate and update IP addresses only for instances that belong to thezhmKC cluster:
3. Ensure that the K8S SDN connector resolves dynamic firewall IP addresses:a. Go to Policy & Objects > Addresses.b. Hover over the address created in step 2 to see a list of IP addresses for instances that belong to the
FortiOS 6.2 New Features Guide 144Fortinet Inc.
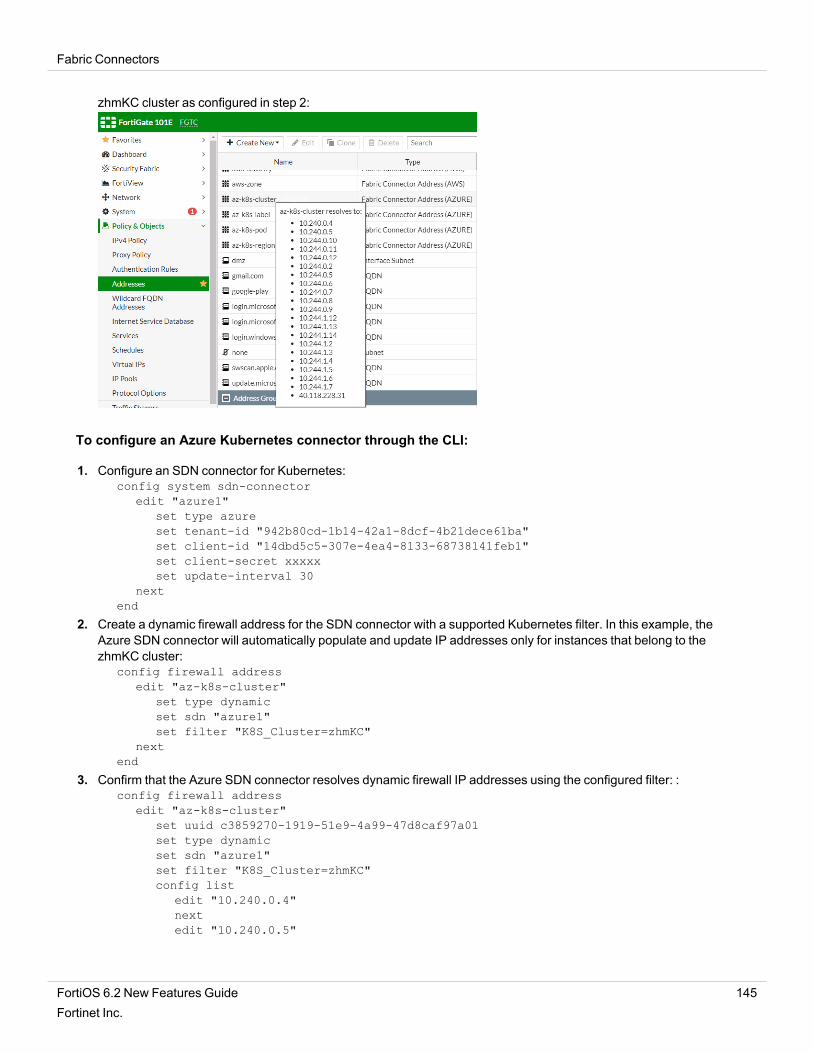
Fabric Connectors
zhmKC cluster as configured in step 2:
To configure an Azure Kubernetes connector through the CLI:
1. Configure an SDN connector for Kubernetes:config system sdn-connector
edit "azure1"set type azureset tenant-id "942b80cd-1b14-42a1-8dcf-4b21dece61ba"set client-id "14dbd5c5-307e-4ea4-8133-68738141feb1"set client-secret xxxxxset update-interval 30
nextend
2. Create a dynamic firewall address for the SDN connector with a supported Kubernetes filter. In this example, theAzure SDN connector will automatically populate and update IP addresses only for instances that belong to thezhmKC cluster:
config firewall addressedit "az-k8s-cluster"
set type dynamicset sdn "azure1"set filter "K8S_Cluster=zhmKC"
nextend
3. Confirm that the Azure SDN connector resolves dynamic firewall IP addresses using the configured filter: :config firewall address
edit "az-k8s-cluster"set uuid c3859270-1919-51e9-4a99-47d8caf97a01set type dynamicset sdn "azure1"set filter "K8S_Cluster=zhmKC"config list
edit "10.240.0.4"nextedit "10.240.0.5"
FortiOS 6.2 New Features Guide 145Fortinet Inc.

Fabric Connectors
nextedit "10.244.0.10"next
endnext
end
GCP Kubernetes (GKE) Connector
This feature extends the existing Google Cloud Platform (GCP) SDN connector to support dynamic address groupsbased on GCP Kubernetes Engine (GKE) filters.
To filter out the Kubernetes IP addresses, the following address filters have been introduced:
k8s_cluster Name of Kubernetes cluster.
k8s_nodepool Name of node pool for a Kubernetes cluster.
k8s_namespace Namespace of a Kubernetes service or pod.
k8s_servicename Name of a Kubernetes service.
k8s_nodename Name of a Kubernetes node.
k8s_zone Zone of a Kubernetes node.
k8s_region Region of a Kubernetes node.
k8s_podname Name of a Kubernetes pod.
k8s_label.xxx Name of label of a Kubernetes resource (cluster/service/node/Pod).
To enable a GCP SDN connector to fetch IP addresses from GKE:
1. In Fabric Connectors, configure an SDN connector for GCP.
2. Go to Policies & Objects > Addresses and create a dynamic firewall address for the configured SDN connectorusing the supported Kubernetes filter.
FortiOS 6.2 New Features Guide 146Fortinet Inc.

Fabric Connectors
3. To filter out the Kubernetes IP addresses, select the address filter or filters. In this example, the GCP SDNconnector will automatically populate and update IP addresses only for instances that belong to the zhm-kc3 cluster:
4. Configure the rest of the settings, then clickOK.The dynamic firewall address IP is resolved by the SDN connector.
To configure a GCP Kubernetes connector through the CLI:
1. Configure an SDN connector for Kubernetes:config system sdn-connector
edit "gcp1"set type gcpset gcp-project "dev-project-001-166400"set service-account "[email protected]"set update-interval 30
nextend
FortiOS 6.2 New Features Guide 147Fortinet Inc.

Fabric Connectors
2. Create a dynamic firewall address for the SDN connector with a supported Kubernetes filter:config firewall address
edit "gcp-k8s-cluster"set type dynamicset sdn "gcp1"set filter "K8S_Cluster=zhm-kc3"
nextend
The dynamic firewall address IP is resolved by the SDN connector:config firewall address
edit "gcp-k8s-cluster"set uuid e4a1aa3c-25be-51e9-e9af-78ab2eebe6eeset type dynamicset sdn "gcp1"set filter "K8S_Cluster=zhm-kc3"config list
edit "10.0.2.4"nextedit "10.0.2.7"nextedit "10.28.0.13"next
endnext
end
Oracle Kubernetes (OKE) Connector
This project extends the existing SDN connector for OCI to support dynamic address groups based on OracleKubernetes (OKE) filters.
To filter out the Kubernetes IP addresses, the following address filters have been introduced:
k8s_compartment Name of compartment that the Kubernetes cluster created in.
k8s_cluster Name of Kubernetes cluster.
k8s_namespace Namespace of a Kubernetes service or pod.
k8s_servicename Name of a Kubernetes service.
k8s_nodename Name of a Kubernetes node.
k8s_region Region of a Kubernetes node.
k8s_zone Zone of a Kubernetes node.
k8s_podname name of a Kubernetes pod.
k8s_label.xxx Name of label of a Kubernetes resource (cluster/service/node/Pod)
To enable an OCI SDN connector to fetch IP addresses from Oracle Kubernetes:
1. Configure the OCI SDN connector:a. Go to Security Fabric > Fabric Connectors.b. Click Create New, and selectOracle Cloud Infrastructure (OCI).
FortiOS 6.2 New Features Guide 148Fortinet Inc.

Fabric Connectors
c. Configure as shown substituting the region, tenant and client IDs, and client secret for your deployment. Theupdate interval is in seconds.
2. Create dynamic firewall addresses for the configured SDN connector with supported Kubernetes filter:a. Go to Policy & Objects > Addresses.b. Click Create New, then select Address.c. Configure the addresses.
FortiOS 6.2 New Features Guide 149Fortinet Inc.

Fabric Connectors
3. Confirm that the SDN connector resolves dynamic firewall IP addresses:a. Go to Policy & Objects > Addresses.b. Hover over the address created in step 2 to see a list of IP addresses for instances:
To configure an SDN connector through the CLI:
1. Configure the OCI SDN connector:config system sdn-connector
edit "oci1"set type ociset tenant-id
"ocid1.tenancy.oc1..aaaaaaaambr3uzztoyhweohbzqqdo775h7d3t54zpmzkp4b2cf35vs55cxxx"
set user-id"ocid1.user.oc1..aaaaaaaaq2lfspeo3uetzbzpiv2pqvzzevozccnys347stwssvizqlatfxxx"
set compartment-id"ocid1.compartment.oc1..aaaaaaaaelxxdjazqo7nzczpgypyiqcgkmytjry6nfq5345vw7eavpwnmxxx"
set oci-region ashburnset oci-cert "cert-sha2"set update-interval 30
nextend
2. Create dynamic firewall addresses for the configured SDN connector with supported Kubernetes filter:config firewall address
edit "k8s_nodename"set type dynamicset sdn "oci1"set filter "K8S_NodeName=129.213.120.172"
nextend
3. Confirm that the SDN connector resolves dynamic firewall IP addresses:config firewall address
edit "k8s_nodename"set uuid 052f1420-3ab8-51e9-0cf8-6db6bc3395c0
FortiOS 6.2 New Features Guide 150Fortinet Inc.

Fabric Connectors
set type dynamicset sdn "oci1"set filter "K8S_NodeName=129.213.120.172"config list
edit "10.0.32.2"nextedit "10.244.2.2"nextedit "10.244.2.3"nextedit "10.244.2.4"nextedit "10.244.2.5"next
endnext
end
SDN Connector - Azure Stack
FortiOS now supports automatically updating dynamic addresses for Azure Stack on-premises environments using anAzure Stack SDN connector, including mapping the following attributes from Azure Stack instances to dynamic addressgroups in FortiOS:
l vml tagl sizel securitygroupl vnetl subnetl resourcegroupl vmss
To configure Azure Stack SDN connector using the GUI:
1. Configure the Azure Stack SDN connector:a. Go to Security Fabric > Fabric Connectors.b. Click Create New, and selectMicrosoft Azure.c. Configure as shown, substituting the Azure Stack settings for your deployment. The update interval is in
FortiOS 6.2 New Features Guide 151Fortinet Inc.

Fabric Connectors
seconds.
2. Create a dynamic firewall address for the configured Azure Stack SDN connector:a. Go to Policy & Objects > Addresses.b. Click Create New, then select Address.c. Configure the address as shown, selecting the desired filter in the Filter dropdown list. In this example, the
Azure Stack SDN Connector will automatically populate and update IP addresses only for instances that arenamed tfgta:
3. Ensure that the Azure Stack SDN connector resolves dynamic firewall IP addresses:a. Go to Policy & Objects > Addresses.b. Hover over the address created in step 2 to see a list of IP addresses for instances that are named tftgta as
configured in step 2:
FortiOS 6.2 New Features Guide 152Fortinet Inc.

Fabric Connectors
To configure Azure Stack SDN connector using CLI commands:
1. Configure the Azure Stack SDN connector:config system sdn-connector
edit "azurestack1"set type azureset azure-region localset server "azurestack.external"set username "[email protected]"set password xxxxxset log-in endpoint "https://login.microsoftonline.com/942b80cd-1b14-42a1-8dcf-
4b21dece61ba"set resource-url
"https://management.azurestoreexamplecompany.onmicrosoft.com/12b6fedd-9364-4cf0-822b-080d70298323"
set update-interval 30next
end
2. Create a dynamic firewall address for the configured Azure Stack SDN connector with the supported Azure Stackfilter. In this example, the Azure Stack SDN Connector will automatically populate and update IP addresses only forinstances that are named tfgta:config firewall address
edit "azurestack-address-name1"set type dynamicset sdn "azurestack1"set filter "vm=tfgta"
nextend
3. Confirm that the Azure Stack SDN connector resolves dynamic firewall IP addresses using the configured filter:config firewall address
edit "azurestack-address-name1"set type dynamicset sdn "azurestack1"set filter "vm=tfgta"config list
edit "10.0.1.4"nextedit "10.0.2.4"nextedit "10.0.3.4"nextedit "10.0.4.4"nextedit "192.168.102.32"nextedit "192.168.102.35"next
endnext
end
FortiOS 6.2 New Features Guide 153Fortinet Inc.

Fabric Connectors
SDN Connector - OpenStack Domain Filter
A domain attribute is now available for selection when configuring an OpenStack SDN Connector in FortiOS. When adomain is configured for the OpenStack SDN Connector, FortiOS resolves OpenStack SDN dynamic firewall addressesfrom the specified OpenStack domain. If a domain is not specified, FortiOS resolves the dynamic firewall addressesusing the default OpenStack domain.
To configure OpenStack SDN connector with a domain using the GUI:
1. Configure the OpenStack SDN connector:a. Go to Security Fabric > Fabric Connectors.b. Click Create New, and selectOpenstack (Horizon).c. In the Domain field, enter the desired domain name from OpenStack. The SDN Connector will only resolve IP
addresses for instances that belong to the specified domain.d. Configure as shown, substituting the server IP address, username, and password for your deployment. The
update interval is in seconds.
2. Create a dynamic firewall address for the configured OpenStack SDN connector:a. Go to Policy & Objects > Addresses.b. Click Create New, then select Address.c. Configure the address as shown, selecting the desired filter in the Filter dropdown list. The OpenStack
SDN Connector will automatically populate and update IP addresses only for instances that belong to the
FortiOS 6.2 New Features Guide 154Fortinet Inc.

Fabric Connectors
specified domain and network:
3. Ensure that the OpenStack SDN connector resolves dynamic firewall IP addresses:a. Go to Policy & Objects > Addresses.b. Hover over the address created in step 2 to see a list of IP addresses for instances that belong to the specified
domain and specified network as configured in steps 1 and 2:
To configure OpenStack SDN connector with a domain using CLI commands:
1. Configure the OpenStack SDN connector. The SDN Connector will only resolve IP addresses for instances thatbelong to the specified domain:config system sdn-connector
edit "openstack-domain"set type openstackset server "http://172.16.165.86:5000"set username "example_username"set password xxxxxset domain "example_domain"set update-interval 30
nextend
FortiOS 6.2 New Features Guide 155Fortinet Inc.

Fabric Connectors
2. Create a dynamic firewall address for the configured OpenStack SDN connector with the supported OpenStackfilter. The OpenStack SDN Connector will automatically populate and update IP addresses only for instances thatbelong to the specified domain and the specified network:config firewall address
edit "openstack-domain-network"set type dynamicset sdn "openstack-domain"set filter "Network=example-net1"
nextend
3. Confirm that the OpenStack SDN connector resolves dynamic firewall IP addresses using the configured domainand filter:config firewall address
edit "openstack-domain-network"set uuid 02837298-234d-51e9-efda-559c6001438aset type dynamicset sdn "openstack-domain"set filter "Network=example-net1"config list
edit "10.0.0.13"nextedit "10.0.0.16"nextedit "10.0.0.3"nextedit "172.24.4.18"nextedit "172.24.4.24"nextedit "172.24.4.3"next
endnext
end
Endpoint Connector - Cisco pxGrid
FortiOS 6.2 now supports an endpoint connector to Cisco pxGrid via FortiManager. FortiManager dynamically collectsupdates from pxGrid and forwards them to FortiGate using the Fortinet Single Sign On (FSSO) protocol.
To create an endpoint connector for Cisco pxGrid:
1. On FortiManager, create an SSO Connector to Cisco ISE.Communication between FortiManager and Cisco ISE is secured by using TLS. FortiManager requires a clientcertificate issued by Cisco ISE. FortiManager uses the certificate to authenticate to Cisco ISE.
FortiOS 6.2 New Features Guide 156Fortinet Inc.

Fabric Connectors
2. On FortiManager, map Cisco ISE groups to a Fortinet FSSO group.Once a secured communication channel is established, Cisco sends all user groups to FortiManager.The FortiManager administrator can select specific groups and map them to Fortinet FSSO groups.
FortiOS 6.2 New Features Guide 157Fortinet Inc.

Fabric Connectors
3. On FortiManager, add Fortinet FSSO group to a firewall policy in a policy package.
4. On FortiManager, synchronize the policy package to the firewall for the managed FortiGate.
5. On FortiGate, verify that the synced firewall policy contains the correct FSSO group and that all FSSO-relatedinformation in user adgrp is correct.
FortiOS 6.2 New Features Guide 158Fortinet Inc.

Fabric Connectors
6. After successful user authentication on Cisco ISE, verify that information is forwarded to FortiManager.On FortiManager, the icon next to the authenticated user in pxGrid Monitor should be green.
FortiGate should have two entries: one in the firewall-authenticated user list and one in the FSSO logged-on userlist.In the FSSO logged-on user list, you can view both groups. You view the group that the user belongs to on CiscoISE and the Fortinet FSSO group.
FortiOS 6.2 New Features Guide 159Fortinet Inc.

Fabric Connectors
External Block List (Threat Feed) – Policy
This version extends the External Block List (Threat Feed). In addition to using the External Block List (Threat Feed) forweb filtering and DNS, you can use External Block List (Threat Feed) in firewall policies.
This version includes the following new features:
l Policy support for external IP list used as source/destination address.l Support for IPv4 and IPv6 firewall policy only. ACL, DoS, NAT64, NAT46, shaping, local-in policy are not supported.l Support for both CLI and GUI.
Sample configuration
In Security Fabric > Fabric Connectors > Threat Feeds > IP Address, create or edit an external IP list object.
Click View Entries to see the external IP list.
FortiOS 6.2 New Features Guide 160Fortinet Inc.

Fabric Connectors
To create an external iplist object using the CLI:
config system external-resource edit "test-external-iplist-1"
set status enableset type addressset username ''set password ENC set comments ''set resource "http://10.6.30.55/ip_list_test/test-external-iplist-2.txt"set refresh-rate 15
nextend
To apply an external iplist object to the firewall policy using the CLI:
config firewall policy edit 1
set name "policyid-1"set srcintf "wan2"set dstintf "wan1"set srcaddr "all"set dstaddr "test-external-iplist-1"set action acceptset schedule "always"set service "ALL"set logtraffic allset auto-asic-offload disableset nat enable
nextend
External Block List (Threat Feed) - File Hashes
This version adds a new type of Threat Feed connector that supports a list of file hashes which can be used as part ofVirus Outbreak Prevention.
FortiOS 6.2 New Features Guide 161Fortinet Inc.

Fabric Connectors
To configure Malware Hash:
1. Navigate to Security Fabric > Fabric Connectors and click Create New.2. In the Threat Feeds section, clickMalware Hash.
TheMalware Hash source objects are displayed.
FortiOS 6.2 New Features Guide 162Fortinet Inc.

Fabric Connectors
3. To configureMalware Hash, fill in the Connector Settings section.
4. Beside the Last Update field, click View Entries to display the external Malware Hash list contents.
New Malware value for external-resource parameter in CLI
FGT_PROXY (external-resource) # edit sha1_listnew entry 'sha1_list' added
FortiOS 6.2 New Features Guide 163Fortinet Inc.

Fabric Connectors
FGT_PROXY (sha1_list) # set type ?category FortiGuard category.address Firewall IP address.domain Domain Name.malware Malware hash.
To configure external Malware Hash list sources in CLI:
config global
config system external-resourceedit "md5_list"
set type malwareset comments "List of md5 hashes only"set resource "http://172.16.200.44/outbreak/md5_list"set refresh-rate 30
nextedit "sha1_list"
set type malwareset comments "List of sha1 hashes only"set resource "http://172.16.200.44/outbreak/sha1_list"set refresh-rate 30
nextedit "sha256_list"
set type malwareset comments "List of sha256 hashes only"set resource "http://172.16.200.44/outbreak/sha256_list"set refresh-rate 30
nextend
end
Update to AntiVirus Profile
In Security Profiles > AntiVirus, the Virus Outbreak Prevention section allows you to enable the following options:
l Use Fortinet outbreak Prevention Database.l Use External Malware Block List.
FortiOS 6.2 New Features Guide 164Fortinet Inc.

Fabric Connectors
To view Virus Outbreak Prevention options in CLI:
FGT_PROXY (vdom1) # config antivirus profileFGT_PROXY (profile) # edit avFGT_PROXY (av) # config outbreak-preventionFGT_PROXY (outbreak-prevention) # setftgd-service Enable/disable FortiGuard Virus outbreak prevention service.external-blocklist Enable/disable external malware blocklist.
FGT_PROXY (outbreak-prevention) # set
To configure Virus Outbreak Prevention options in CLI:
You must first enable outbreak-prevention in the protocol and then enable external-blocklist underoutbreak-prevention.
config antivirus profileedit "av"
set analytics-db enableconfig http
set options scanset outbreak-prevention full-archive
endconfig ftp
set options scanset outbreak-prevention files
endconfig imap
set options scanset outbreak-prevention full-archive
FortiOS 6.2 New Features Guide 165Fortinet Inc.

Fabric Connectors
endconfig pop3
set options scanset outbreak-prevention full-archive
endconfig smtp
set options scanset outbreak-prevention files
endconfig mapi
set options scanset outbreak-prevention full-archive
endconfig nntp
set options scanset outbreak-prevention full-archive
endconfig smb
set options scanset outbreak-prevention full-archive
endconfig outbreak-prevention
set ftgd-service enableset external-blocklist enable
endnext
end
Update to utm-virus category logs
This feature adds the fields filehash and filehashsrc to outbreak prevention detection events.
Example of the utm-virus log generated when a file is detected by FortiGuard queried outbreak prevention:
2: date=2018-07-30 time=13:57:59 logid="0204008202" type="utm" subtype="virus"eventtype="outbreak-prevention" level="warning" vd="root" evnttime=1532984279 msg="Blockedby Virus Outbreak Prevention service." action="blocked" service="HTTP" sessionid=174777srcip=192.168.101.20 dstip=172.16.67.148 srcport=37044 dstport=80 srcintf="lan"srcintfrole="lan" dstintf="wan1" dstintfrole="wan" policyid=1 proto=6 direction="incoming"filename="zhvo_test.com" checksum="583369a5" quarskip="No-skip"virus="503e99fe40ee120c45bc9a30835e7256fff3e46a" dtype="File Hash"filehash="503e99fe40ee120c45bc9a30835e7256fff3e46a" filehashsrc="fortiguard"url="http://172.16.67.148/zhvo_test.com" profile="mhash_test" agent="Firefox/43.0"analyticssubmit="false" crscore=30 crlevel="high“
Example of the utm-virus log generated when a file is detected by External Malware Hash List outbreak prevention:
1: date=2018-07-30 time=13:59:41 logid="0207008212" type="utm" subtype="virus"eventtype="malware-list" level="warning" vd="root" eventtime=1532984381 msg="Blocked bylocal malware list." action="blocked" service="HTTP" sessionid=174963 srcip=192.168.101.20dstip=172.16.67.148 srcport=37045 dstport=80 srcintf="lan" srcintfrole="lan" dstintf="wan1"dstintfrole="wan" policyid=1 proto=6 direction="incoming" filename="mhash_block.com"checksum="90f0cb57" quarskip="No-skip" virus="mhash_block.com" dtype="File Hash"filehash="93bdd30bd381b018b9d1b89e8e6d8753" filehashsrc="test_list"url="http://172.16.67.148/mhash_block.com" profile="mhash_test" agent="Firefox/43.0"analyticssubmit="false"
FortiOS 6.2 New Features Guide 166Fortinet Inc.

Fabric Connectors
External Block List (Threat Feed) - Authentication
In FortiOS 6.2, the external Threat Feed connector (block list retrieved by HTTPS) now supports username andpassword authentication.
To enable username and password authentication:
1. Navigate to Security Fabric > Fabric Connectors.2. Edit an existing Threat Feed or create a new one by selecting Create New.3. In Connector Settings, select the HTTP basic authentication toggle to enable the feature.4. Enter a username and password.
5. SelectOK to save your changes.
Connector GUI Organization
This version improves the GUI display and organization of cloud and SDN Fabric Connectors, grouping them into publicand private SDN Connectors.
When creating new SDN Connectors, they are sorted based on popularity and grouped into public and private SDNConnectors.
FortiOS 6.2 New Features Guide 167Fortinet Inc.

Fabric Connectors
After SDN Connectors are created, they are grouped into public and private SDN sections separately.
Use active directory objects directly in policy - 6.2.1
After Active Directory (AD) groups are retrieved from Active Directory, you can use them in identity-based firewallpolicies. You no longer need to add remote AD groups to local FSSO groups before using them in firewall policies.
The FortiGate administrator can define how often group information is automatically updated, which allows FortiGate toretrieve the latest information when groups are added or deleted on AD LDAP servers.
For this feature to work, you must set FSSO Collector Agent to Advanced AD access mode, which is not the defaultsetting for FSSO Collector Agent. If FSSO Collector Agent is running in default standard mode, FortiGate cannotcorrectly match group membership of users. Following is an example of the setting:
FortiOS 6.2 New Features Guide 168Fortinet Inc.

Fabric Connectors
To configure by using the GUI:
1. Create an FSSO connector that automatically retrieves and updates AD user groups.a. Go to User & Device > LDAP Servers, and click Create New.b. Set the options, and clickOK.
In this example, a basic LDAP connection over port 389 is configured. If you want to secure the communicationover TLS, you must ensure that it is supported by the remote AD LDAP server. Then activate Secureconnection, and select the certificate of the Certificate Authority (CA) that issued the AD LDAP servercertificate. The value for the port will automatically change to 636, which is the default LDAPS port.
2. Create a Fortinet Single Sign-On Agent:a. Go to Security Fabric > Fabric Connectors, and click Create New.b. Under SSO/Identity, click Fortinet Single Sign-On Agent.c. Click Local to display the needed options.
When Collector Agent is selected, the needed options are hidden.
FortiOS 6.2 New Features Guide 169Fortinet Inc.

Fabric Connectors
d. In the Primary FSSO Agent box, enter the IP address for the FSSO Collector Agent and the correct passwordfor communicating with FSSO Collector Agent.
e. In the LDAP Server list, select AD-ldap server.f. Complete the Search Filter option.
The default setting in the Search Filter box retrieves all groups, which also includes default Microsoft systemgroups. You'll likely want to customize the search filter.In this example, the customized Search Filter option is (&(objectClass=group)(cn=group*)), which isconfigured to retrieve groups group1, group2...., but not grp199. Ensure syntax for customized Search Filteroptions is correct because syntax is not checked for LDAP search filters. If the syntax is incorrect, FortiGatewon't retrieve any groups.
g. Set the Interval (minutes) option.The Interval (minutes) option defines how often FortiGate contacts the remote AD LDAP server to updategroup information. You can change this option to a more frequent update interval.
FortiOS 6.2 New Features Guide 170Fortinet Inc.

Fabric Connectors
h. ClickOK.
To configure by using the CLI:
config user fssoedit "ad-advanced"
set server "10.1.100.131"set password XXXXXXXXXXXXXXset ldap-server "AD-ldap"set ldap-poll enableset ldap-poll-interval 2set ldap-poll-filter "(&(objectClass=group)(cn=group*))"
nextend
Endpoint connector - FortiNAC - 6.2.1
Dynamic address definitions originating from FortiNAC can be imported to FortiGate as FSSO objects and used infirewall policies. Changes on the FortiNAC are dynamically reflected on the FortiGate.
This example assumes that the FortiGate and FortiNAC are in the same network segment. If layer 3 routers or firewallsare in between them, ensure that traffic on port 8000 is not blocked.
Configuring the FortiNAC
On FortiNAC, local groups and users can be created, and they can be imported from remote servers, such as AD LDAPand RADIUS servers. Local firewall tags, used in FortiNAC policies, are also supported.
FortiOS 6.2 New Features Guide 171Fortinet Inc.

Fabric Connectors
Before creating the FortiNAC connector on the FortiGate, FSSOmust be enabled:
Groups and firewall tags that will be monitored and accessed by the FortiGate must be added to a network access policyon the FortiNAC:
FortiOS 6.2 New Features Guide 172Fortinet Inc.

Fabric Connectors
Configuring the FortiGate
To configure the FortiNAC connector in the GUI:
1. Go to Security Fabric > Fabric Connectors and click Create New.2. In the SSO/Identity section, click FortiNAC.
3. Enter a name for the connector in the Name field, such as Fortinac-connector-1.4. Enter the FortiNAC device's IP address and password in the Primary Server IP fields.5. Click Apply & Refresh.
All host groups, firewall tags, and some default system groups will be pushed to the FortiGate from the FortiNAC.6. Click View.
The Collector Agent Group Filters pane opens, showing the information pushed from FortiNAC. These objects canbe used to create FSSO user groups.
7. ClickOK.
To configure the FortiNAC connector in the CLI:
config user fssoedit "Fortinac-connector-1"
set server "172.18.60.204"set password XXXXXXXXXXXXXXXXset type fortinac
nextend
FortiOS 6.2 New Features Guide 173Fortinet Inc.

Fabric Connectors
To create an FSSO user group using imported FortiNAC groups and tags as members in the GUI:
1. Go to User & Device > User Groups.2. Click Create New.3. In the Name field, enter a name for the group, such as Fortinac-fsso-group.4. For Type, select Fortinet Single Sign-On (FSSO).5. In theMembers field, click +. The Select Entries pane appears. The groups and tags pulled from the FortiNAC are
shown.6. Select the desired groups.
7. ClickOK.The group can now be used in identity based firewall policies.
To create an FSSO user group using imported FortiNAC groups and tags as members in the CLI:
config user groupedit "Fortinac-fsso-group"
set group-type fsso-serviceset authtimeout 0set http-digest-realm ''set member "GROUP1" "GROUP2" "TEST-TAG1"
nextend
FortiOS 6.2 New Features Guide 174Fortinet Inc.

Fabric Connectors
To use the user/group creation wizard to create a new SSO group with the FortiNAC groups and firewalltags:
1. Go to User & Device > User Definition and click Create New.
2. For the User Type, select FortiNAC User, then click Next.3. For the Fabric Device, select the FortiNAC connector , then select the Tags.
4. Click Next.
FortiOS 6.2 New Features Guide 175Fortinet Inc.

Fabric Connectors
5. Either add the selected groups/tags to an existing SSO group, or create a new group:l To add to an existing SSO group, click Choose Existing, and then select a group.
l To create a new group, click Create New, and then enter a name for the group.
6. Click Next.7. Go to User & Device > User Groups and verify that the created groups are listed with the correct members.
FortiOS 6.2 New Features Guide 176Fortinet Inc.

Fabric Connectors
LDAP connector to get more user information from user login IDs -6.2.1
This features collects additional information about authenticated FSSO users, and makes that information available onmultiple GUI pages, including:
l FortiView > Sourcesl FortiView > Policiesl Log & Report > Forward Trafficl User & Device > Device Inventoryl Monitor > Firewall User Monitor
This features requires that FSSO is configured on the FortiGate. To view the user information on pages other thanFirewall monitor, Device Detectionmust be enabled on the interface.
The user-info-server variable in user FSSO configuration is used to select the LDAP server that is used forretrieving user information. After a valid FSSO user is authenticated, the FortiGate will try to get additional userinformation from the LDAP server.
To configure the user:
1. Configure the LDAP user:
config user ldapedit "AD-LDAP"
set server "10.1.100.131"set server-identity-check disableset cnid "cn"set dn "dc=fortinet-fsso,dc=com"set type regularset username "cn=Administrator,cn=users,dc=fortinet-fsso,dc=com"set password **********set secure ldapsset ca-cert "CA_Cert_1"set port 636
nextend
2. Configure the FSSO user:
config user fssoedit "ad-214"
set server "10.1.100.142"set password **********set user-info-server "AD-LDAP"
nextend
To verify that information is being collected per user:
# diagnose wad user info 20 TEST1'username' = 'TEST1''sourceip' = '10.1.100.188''sourceip' = '32.1.0.0'
FortiOS 6.2 New Features Guide 177Fortinet Inc.

Fabric Connectors
'sourceip' = '10.1.100.185''vdom' = 'root''cn' = 'test1''givenName' = 'test1''sn' = 'test101''userPrincipalName' = '[email protected]''telephoneNumber' = '604-123456''mail' = '[email protected]''thumbnailPhoto' = '/tmp/wad/user_info/ff1bffff376dff29ffff24ff65ff42ffff09292d''company' = 'Fortinet''department' = 'Release QA''memberOf' = 'CN=group321,OU=Testing,DC=Fortinet-FSSO,DC=COM''memberOf' = 'CN=g1,OU=Testing,DC=Fortinet-FSSO,DC=COM''memberOf' = 'CN=group21,OU=Testing,DC=Fortinet-FSSO,DC=COM''memberOf' = 'CN=group1,OU=Testing,DC=Fortinet-FSSO,DC=COM''manager' = 'CN=test6,OU=Testing,DC=Fortinet-FSSO,DC=COM''streetAddress' = 'One Backend Street 1901''l' = 'Burnaby''st' = 'BC''postalCode' = '4711''co' = 'Canada''accountExpires' = '9223372036854775807'
total 1, count 1
OCI SDN connector - 6.2.1
Oracle Cloud Infrastructure (OCI) SDN connector configuration is updated to change the format of the Server region fieldto text, and to add a new Server region type field to identify commercial or government regions.
To configure an OCI SDN connector in the CLI:
1. Configure sn SDN connector:
config system sdn-connectoredit "oci1"
set status enableset type ociset tenant-id
"ocid1.tenancy.oc1..aaaaaaaambr3uzztoyhweohbzqqdo775h7d3t54zpmzkp4b2cf35vs55cxxx"set user-id
FortiOS 6.2 New Features Guide 178Fortinet Inc.

Fabric Connectors
"ocid1.user.oc1..aaaaaaaaq2lfspeo3uetzbzpiv2pqvzzevozccnys347stwssvizqlatfxxx"set compartment-id
"ocid1.compartment.oc1..aaaaaaaaelxxdjazqo7nzczpgypyiqcgkmytjry6nfq5345vw7eavpwnmxxx"set oci-region "us-ashburn-1"set oci-region-type commercialset oci-cert "cert-sha2"set update-interval 30
nextend
2. Create a dynamic firewall address for the SDN connector with a supported filter:
config firewall addressedit "oci-address-1"
set uuid 0b4a496e-8974-51e9-e223-fee75c935fb7set type dynamicset sdn "oci1"set filter "CompartmentName=DevelopmentEngineering"
nextend
To configure an OCI SDN connector in the CLI:
1. Go to Security Fabric > Fabric Connectors and click Create New.2. In the Public SDN section, selectOracle Cloud Infrastructure (OCI).3. Configuration the connector as needed.
4. ClickOK.5. Go to Policy & Objects > Addresses and click Create New > Address.
FortiOS 6.2 New Features Guide 179Fortinet Inc.
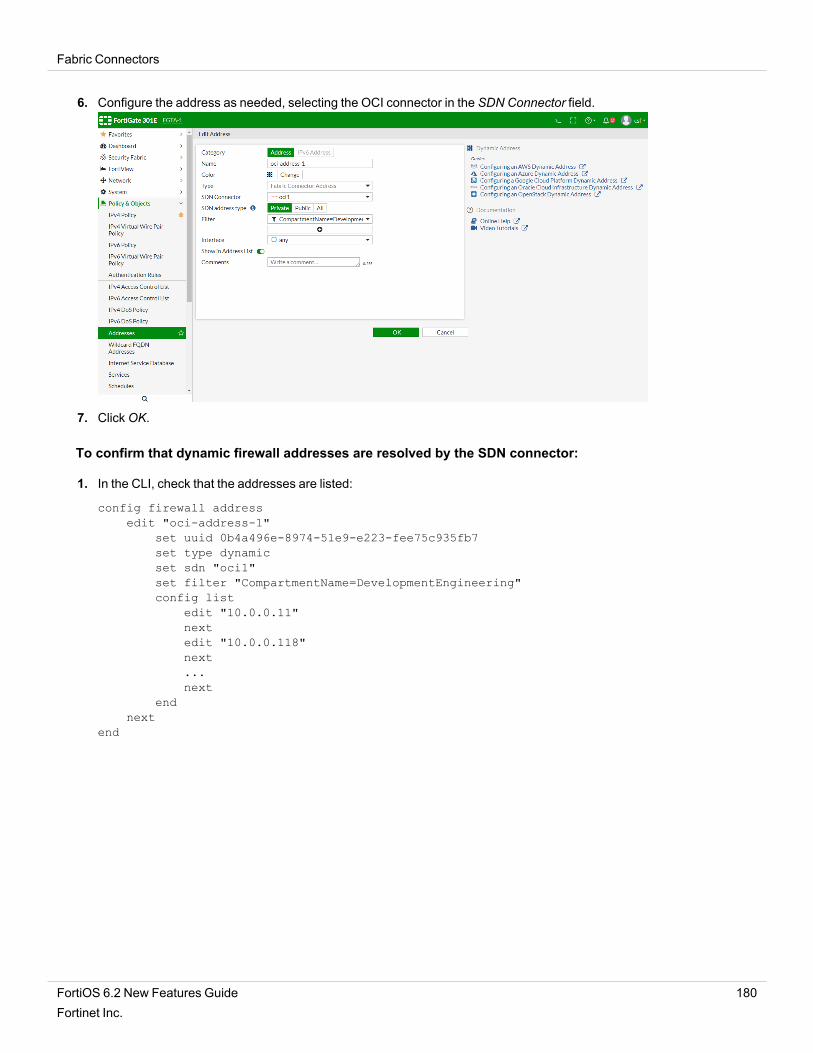
Fabric Connectors
6. Configure the address as needed, selecting the OCI connector in the SDN Connector field.
7. ClickOK.
To confirm that dynamic firewall addresses are resolved by the SDN connector:
1. In the CLI, check that the addresses are listed:
config firewall addressedit "oci-address-1"
set uuid 0b4a496e-8974-51e9-e223-fee75c935fb7set type dynamicset sdn "oci1"set filter "CompartmentName=DevelopmentEngineering"config list
edit "10.0.0.11"nextedit "10.0.0.118"next...next
endnext
end
FortiOS 6.2 New Features Guide 180Fortinet Inc.

Fabric Connectors
2. In the GUI, go to Policy & Objects > Addresses and hover the cursor over the address name.
ClearPass endpoint connector via FortiManager - 6.2.2
ClearPass Policy Manager (CPPM) is a network access system that can send information about authenticated users tothird party systems, such as a FortiGate or FortiManager.
In this example, communications are established between CPPM and FortiManager, and then the FortiManagerforwards information to a managed FortiGate. On the FortiGate, the user information can be used in firewall policies andadded to FSSO dynamic addresses.
Configure the FortiManager
Establish communications between FortiManager and CPPM so that FortiManager can synchronize CPPM user groups.See Creating a ClearPass connector in the FortiManager Administration Guide.
FortiOS 6.2 New Features Guide 181Fortinet Inc.

Fabric Connectors
FortiManager forwards the group information to managed FortiGates.
Add CPPM FSSO user groups to a local user group
To add CPPM user groups to a local user group in the GUI:
1. On the FortiGate, go to User & Device > User Groups.2. Click Create New.3. Enter a name for the group and set Type to Fortinet Single Sign-On (FSSO).4. Click theMembers field, and add one or more FSSO groups.
FSSO groups can come frommultiple sources; CPPM FSSO groups are prefixed with cp_ and are listed under theFortiManager heading.
FortiOS 6.2 New Features Guide 182Fortinet Inc.

Fabric Connectors
5. ClickOK.
To add CPPM user groups to a local user group in the CLI:
config user groupedit fsso-group
set group-type fsso-serviceset member "cp_test_[Employee]" "cp_test_FSSOROLE"
nextend
Use the local FSSO user group in a firewall policy
To add the local FSSO user group to a firewall policy in the GUI:
1. Go to Policy & Objects > IPv4 Policy.2. Create a new policy, or edit an existing one.
FortiOS 6.2 New Features Guide 183Fortinet Inc.

Fabric Connectors
3. Click in the Source field and add the fsso-group user group.
CPPM user groups can also be added directly to the policy.4. ClickOK.
To add the local FSSO user group to a firewall policy in the CLI:
config firewall policyedit 1
set name "pol1"set uuid 2b88ed8a-c906-51e9-fb25-8cb12172acd8set srcintf "port2"set dstintf "port3"set srcaddr "all"set dstaddr "all"set action acceptset schedule "always"set service "ALL"set logtraffic allset groups "fsso-group"set nat enable
nextend
Verification
To verify that a user was added to the FSSO list on the FortiGate:
1. Log on to the client and authenticate with CPPM.After successful authentication, the user is added to the FSSO list on the FortiGate.
FortiOS 6.2 New Features Guide 184Fortinet Inc.

Fabric Connectors
2. On the FortiGate, go toMonitor > Firewall User Monitor to verify that the user was added.
The user group cp_test_FSSOROLE is listed separately because the user is a member of that group on the CPPM.
To verify that traffic can pass the firewall:
1. Log on to the client and browse to an external website.2. On the FortiGate, go to FortiView > Sources.3. Double-click on the user and select the Destinations tab to verify that traffic is being passed by the firewall.
To verify the user address groups:
show user adgrpconfig user adgrp
edit "cp_test_FSSOROLE"set server-name "FortiManager"
nextedit "cp_test_[AirGroup v1]"
set server-name "FortiManager"nextedit "cp_test_[AirGroup v2]"
set server-name "FortiManager"nextedit "cp_test_[Aruba TACACS read-only Admin]"
set server-name "FortiManager"nextedit "cp_test_[Aruba TACACS root Admin]"
set server-name "FortiManager"nextedit "cp_test_[BYOD Operator]"
set server-name "FortiManager"nextedit "cp_test_[Contractor]"
set server-name "FortiManager"nextedit "cp_test_[Device Registration]"
set server-name "FortiManager"next...
FortiOS 6.2 New Features Guide 185Fortinet Inc.

Fabric Connectors
edit "CN=group1,OU=Testing,DC=Fortinet-FSSO,DC=COM"set server-name "Local FSSO Agent" <----- !!!
nextend
ClearPass integration for dynamic address objects - 6.2.2
ClearPass Policy Manager (CPPM) can gather information about the statuses of network hosts, for example, the latestpatches or virus infections. Based on this information, CPPM send the IP addresses and current states, such as Healthyor Infected, to the FortiGate.
On the FortiGate, the IP addresses received from CPPM are added to a dynamic firewall address with the clearpass-sptsubtype. This address can be used in any policy that supports dynamic addresses, such as Firewall or SSL-VPNpolicies.
In this example, you create two dynamic IP addresses that are used in two firewall policies (deny and allow). One policyallows traffic (host state = Healthy), and the other denies traffic (host state = Infected). When CPPM sends theinformation, the IP addresses are assigned according to their host state: Healthy or Infected.
You can then verify that traffic from the Infected host is denied access by the deny policy, and traffic from the Healthyhost is allowed access by the allow policy.
Create a REST API administrator
A RESET API administrator is required to generate an authorization token for REST API messages, and to limit hoststhat can send REST API messages to the FortiGate.
To create a REST API administrator in the GUI:
1. Go to System > Administrators.2. Click Create New > REST API Admin.3. Configure the Username and other information as needed.4. Disable PKI Group.5. In the Trusted Hosts field, enter 10.1.100.0/24.
For this example, an administrator profile called clearpass was created with full read/write access. SeeAdministrator profiles for details.
FortiOS 6.2 New Features Guide 186Fortinet Inc.

Fabric Connectors
6. ClickOK.The New API key pane opens.
The API key is the REST API authorization token that is used in REST API messages sent by CPPM to theFortiGate.
7. Copy the API key to a secure location. A new key can be generated if this one is lost or compromised.8. Click Close.
To create a REST API administrator in the CLI:
config system api-useredit "cpi-back"
set accprofile "clearpass"config trusthost
edit 1set ipv4-trusthost 10.1.100.0 255.255.255.0
nextend
nextend
execute api-user generate-key cp-apiNew API key: 0f1HxGHh9r9p74k7qgfHNH40p51bjsNOTE: The bearer of this API key will be granted all access privileges assigned to the
api-user cp-api.
Create dynamic IP addresses with the clearpass subtype
Two dynamic IP addresses are required, one for the allow policy, and the other for the deny policy.
To create the dynamic IP addresses:
config firewall addressedit "cppm"
set uuid 62a180c0-cb36-51e9-6e70-4a2034d82179set type dynamicset sub-type clearpass-sptset clearpass-spt healthyset comment ''set visibility enableset associated-interface ''set color 0
FortiOS 6.2 New Features Guide 187Fortinet Inc.

Fabric Connectors
nextedit "cppm-deny"
set uuid b318e962-cb36-51e9-7a34-74a34cf3bf0bset type dynamicset sub-type clearpass-sptset clearpass-spt infectedset comment ''set visibility enableset associated-interface ''set color 0
nextend
Create firewall policies
Two firewall policies are required, one to accept traffic (cppm-allow), and the other to deny traffic (cppm-deny).
To create the firewall policies in the GUI:
1. Go to Policy & Objects > IPv4 Policy.2. Configure the allow policy:
a. Click Create New.b. Enter a name for the policy.c. Set Source set to cppm.d. Set Action to ACCEPT.e. Configure the remaining settings as needed.
f. ClickOK.3. Configure the deny policy:
a. Click Create New.b. Enter a name for the policy.
FortiOS 6.2 New Features Guide 188Fortinet Inc.

Fabric Connectors
c. Set Source set to cppm-deny.d. Set Action to DENY.e. Configure the remaining settings as needed.
f. ClickOK.
To create the firewall policies in the CLI:
config firewall addressedit "cppm"
set uuid 62a180c0-cb36-51e9-6e70-4a2034d82179set type dynamicset sub-type clearpass-sptset clearpass-spt healthyset comment ''set visibility enableset associated-interface ''set color 0
nextedit "cppm-deny"
set uuid b318e962-cb36-51e9-7a34-74a34cf3bf0bset type dynamicset sub-type clearpass-sptset clearpass-spt infectedset comment ''set visibility enableset associated-interface ''set color 0
nextend
Verification
Go to Log & Report > Forward Traffic to review traffic logs and ensure that traffic is allowed or denied as expected.
To verify that FortiGate addresses are assigned correctly, enter the following CLI command:
FortiOS 6.2 New Features Guide 189Fortinet Inc.

Fabric Connectors
diagnose firewall dynamic listList all dynamic addresses:cppm-deny: ID(141)
ADDR(10.1.100.188)
cppm: ID(176)ADDR(10.1.100.185)ADDR(10.1.100.186)
Symantec endpoint connector - 6.2.2
With the Fabric connector for Symantec Endpoint Protection Manager (SEPM), you can use the client IP informationfrom SEPM to assign to dynamic IP addresses on FortiOS.
When communication between FortiGate and SEPM is established, FortiGate polls every minute for updates via TLSover port 8446. You can use the CLI to change the default one minute polling interval.
For example, you can create a dynamic Fabric Connector IP address subtype and use it in firewall policies as the sourceaddress. The dynamic IP address contains all IP addresses sent by SEPM.
This example shows a dynamic IP address with SEPM and one client PC managed by SEPM using FortiGate as thedefault gateway.
To configure SEPM on a managed client PC:
1. In SEPM, create client packages for client hosts and group them into SEPM groups.You can install packages locally on clients or download them directly from SEPM.
FortiOS 6.2 New Features Guide 190Fortinet Inc.

Fabric Connectors
2. When a package is installed on the client host, the host is considered managed by SEPM.Even if the host has multiple interfaces, only one IP per host is displayed.
To configure Symantec endpoint connector on FortiGate:
1. Go to Security Fabric > Fabric Connectors.2. Click Create New.
3. Click Symantec Endpoint Protection.l In the Connector Settings section, if options are left empty, then all SEPM domains and groups are monitored.l In the Symantec Connector section:
l In the Server field, enter the SEPM IP address.l Enter the Username and Password.l If you want to limit the domains or groups that are monitored, enter the information in Domain andGroupname.
FortiOS 6.2 New Features Guide 191Fortinet Inc.

Fabric Connectors
4. Click OK.When the connection is established, you can see a green up arrow in the bottom right of the tile. You might need torefresh your browser to see the established connection.
5. Go to Policy & Objects > Addresses.6. Click Create New > Address.
l Set Type to Dynamic.l Set Sub Type to Fabric Connector Address.l Set SDN Connector to the Fabric Connector that you just created.
7. ClickOK.
FortiOS 6.2 New Features Guide 192Fortinet Inc.

Fabric Connectors
8. Edit the address to see the configuration.l Filter shows the hostnames of the client PCs managed by SEPM. The GUI shows the ComputerName bydefault. You can change this using the CLI; see Specify filters for details.
Filter options are only available for active computers that are configured and registered inSEPM. Free-form filters can be created manually by clicking Create and entering the filter,in the format: filter_type=value.Possible manual filter types are: GroupName, GroupID, ComputerName,ComputerUUID, and OSName. For example: GroupName=MyGroup.
9. In Policy & Objects > Addresses, you can see all the IP addresses of the host.
FortiOS 6.2 New Features Guide 193Fortinet Inc.

Fabric Connectors
10. Go to Policy & Objects > IPv4 Policy, click Create New, and add the dynamic IP address to the firewall policy.
FortiOS 6.2 New Features Guide 194Fortinet Inc.

Fabric Connectors
To verify the configuration:
1. On the client PC, check that it is managed by SEPM to access the Internet.
2. In FortiGate, you can check in FortiView > Sources.
FortiOS 6.2 New Features Guide 195Fortinet Inc.

Fabric Connectors
3. In FortiGate, you can also check in Log & Report > Forward Traffic.
Since this traffic is not authenticated traffic but is based on source IP address only, thistraffic is not shown in the GUI firewall monitor or in the CLI diagnose firewall authlist command.
To configure Symantec endpoint connector on FortiGate in the CLI:
1. Create the fabric connector:
config system sdn-connectoredit "sepm-217"
set type sepmset server "172.18.60.217"set username "admin"set password **********set status enable
nextend
2. Create the dynamic IP address:
config firewall addressedit "sepm-ip"
set uuid 645552a0-d0c9-51e9-282d-c7ed6d7ee7deset type dynamicset sdn "sepm-217"set filter "ComputerName=win10-1"config list
edit "10.1.100.187"
FortiOS 6.2 New Features Guide 196Fortinet Inc.

Fabric Connectors
nextedit "10.6.30.187"nextedit "172.16.200.187"next
endnext
end
You can specify other filters and combine them with | and &, for example:
FGTH (sepm-ip) # set filter<key1=value1> [& <key2=value2>] [| <key3=value3>]Available filter keys are:
<ComputerName><ComputerUuid><GroupId><GroupName> <DomainId><DomainName><OsName>
3. Add the dynamic IP address to the firewall policy:
config firewall policyedit 1
set name "pol1"set uuid 9174563c-d0c9-51e9-1a32-4e14385239e9set srcintf "port2"set dstintf "port1"set srcaddr "sepm-ip"set dstaddr "all"set action acceptset schedule "always"set service "ALL"set utm-status enableset ssl-ssh-profile "certificate-inspection"set av-profile "default"set logtraffic allset fsso disableset nat enable
nextend
To troubleshoot Symantec SD connector in the CLI:
# diagnose debug application sepmd -1
Output is sent every minute (default). All IPv4 learned from SEPM. IPv6 also sent but notyet supported.
2019-09-09 12:01:09 sepmd sdn connector sepm-217 start updating IP addresses2019-09-09 12:01:09 sepmd checking firewall address object sepm-ip, vd 02019-09-09 12:01:09 sepmd sdn connector sepm-217 finish updating IP addresses2019-09-09 12:01:09 sepmd reap child pid: 180792019-09-09 12:02:09 sepmd sdn connector sepm-217 prepare to update2019-09-09 12:02:09 sepmd sdn connector sepm-217 start updating2019-09-09 12:02:09 sepm-217 sdn connector will retrieve token after 9526 secs2019-09-09 12:02:09 sym_new_ip_addr ComputerName win10-1
ComputerUuid AC894D56-BD86-A786-7DDB-7FD98B718AE0, OsName Windows 10IP 172.16.200.187GroupName My Company\Windows-desktops, GroupId E61FDEA2AC10C80E46D0B31BB58D7CB3DomainName Default, DomainId 6C507580AC10C80E5F3CAED5B1711A8E
2019-09-09 12:02:09 sym_new_ip_addr ComputerName win10-1
FortiOS 6.2 New Features Guide 197Fortinet Inc.

Fabric Connectors
ComputerUuid AC894D56-BD86-A786-7DDB-7FD98B718AE0, OsName Windows 10IP 10.6.30.187GroupName My Company\Windows-desktops, GroupId E61FDEA2AC10C80E46D0B31BB58D7CB3DomainName Default, DomainId 6C507580AC10C80E5F3CAED5B1711A8E
2019-09-09 12:02:09 sym_new_ip_addr ComputerName win10-1ComputerUuid AC894D56-BD86-A786-7DDB-7FD98B718AE0, OsName Windows 10IP 10.1.100.187GroupName My Company\Windows-desktops, GroupId E61FDEA2AC10C80E46D0B31BB58D7CB3DomainName Default, DomainId 6C507580AC10C80E5F3CAED5B1711A8E
2019-09-09 12:02:09 2001:0000:0000:0000:0000:0000:0000:0187 is not in IPv4 presentationformat
2019-09-09 12:02:09 sepmd sdn connector sepm-217 start updating IP addresses2019-09-09 12:02:09 sepmd checking firewall address object sepm-ip, vd 02019-09-09 12:02:09 sepmd sdn connector sepm-217 finish updating IP addresses2019-09-09 12:02:09 sepmd reap child pid: 180892019-09-09 12:03:09 sepmd sdn connector sepm-217 prepare to update2019-09-09 12:03:09 sepmd sdn connector sepm-217 start updating2019-09-09 12:03:09 sepm-217 sdn connector will retrieve token after 9466 secs2019-09-09 12:03:09 sym_new_ip_addr ComputerName win10-1
ComputerUuid AC894D56-BD86-A786-7DDB-7FD98B718AE0, OsName Windows 10IP 172.16.200.187GroupName My Company\Windows-desktops, GroupId E61FDEA2AC10C80E46D0B31BB58D7CB3DomainName Default, DomainId 6C507580AC10C80E5F3CAED5B1711A8E
2019-09-09 12:03:09 sym_new_ip_addr ComputerName win10-1ComputerUuid AC894D56-BD86-A786-7DDB-7FD98B718AE0, OsName Windows 10IP 10.6.30.187GroupName My Company\Windows-desktops, GroupId E61FDEA2AC10C80E46D0B31BB58D7CB3DomainName Default, DomainId 6C507580AC10C80E5F3CAED5B1711A8E
2019-09-09 12:03:09 sym_new_ip_addr ComputerName win10-1ComputerUuid AC894D56-BD86-A786-7DDB-7FD98B718AE0, OsName Windows 10IP 10.1.100.187GroupName My Company\Windows-desktops, GroupId E61FDEA2AC10C80E46D0B31BB58D7CB3DomainName Default, DomainId 6C507580AC10C80E5F3CAED5B1711A8E
2019-09-09 12:03:09 2001:0000:0000:0000:0000:0000:0000:0187 is not in IPv4 presentationformat
To list the SEPM daemon SDN connectors:
diagnose test application sepmd 1sepm SDN connector list:name: sepm-217, status: enabled, updater_interval: 60
To list the SEPM daemon SDN filters:
diagnose test application sepmd 2sepm SDN connector sepm-217 filter list:name: sepm-ip, vd 0, filter 'ComputerName=win10-1'
Support for wildcard SDN connectors in filter configurations - 6.2.3
Wildcards are now supported in FortiOS 6.2 for SDN connectors when configuring dynamic address filters.
FortiOS 6.2 New Features Guide 198Fortinet Inc.

Fabric Connectors
The following SDN connector types are currently supported:
l AWSl Azurel Google Cloud Platforml Kubernetesl OpenStackl Oracle Cloud Infrastructurel VMware ESXi
To configure a dynamic address filter for AWS in the GUI:
1. Configure the SDN connector:a. Go to Security Fabric > Fabric Connectors. Click Create New.b. In the Public SDN section, click AmazonWeb Services (AWS).c. Configure the settings as needed.d. ClickOK.
2. Create the dynamic firewall address:a. Go to Policy & Objects > Addresses.b. Click Create New > Address and enter a name.c. Configure the following settings:
i. For Type, select Dynamic.ii. For Sub Type, select Fabric Connector Address.iii. For SDN Connector, select aws1.iv. For SDN address type, select Private.v. For Filter, click Create.
The New Filter window opens.vi. Enter Tag.Name=aws*.vii. ClickOK.
d. ClickOK.
FortiOS 6.2 New Features Guide 199Fortinet Inc.

Fabric Connectors
3. In the address table, hover over the address to view what IPs it resolves to.
4. In AWS, verify to confirm the IP addresses match.
To configure a dynamic address filter for AWS in the CLI:
1. Configure the SDN connector:
config firewall addressedit "aws-address-1"
set type dynamicset sdn "aws1"set filter "Tag.Name=aws*"set sdn-addr-type public
nextend
2. Create the dynamic firewall address and verify where the IPs resolve to:
config firewall addressedit "aws-address-1"
set type dynamicset sdn "aws1"set filter "Tag.Name=aws*"set sdn-addr-type publicconfig list
edit "18.234.167.123"nextedit "3.81.41.167"nextedit "52.87.157.127"next
endnext
end
3. In AWS, verify to confirm the IP addresses match.
FortiClient EMS Cloud support - 6.2.3
FortiOS 6.2 New Features Guide 200Fortinet Inc.

Fabric Connectors
The FortiGate Security Fabric root device can link to FortiClient Cloud (a cloud-based EMS solution) for endpointconnectors and automation. Both cloud-based and on-premise EMS servers are supported.
To enable cloud-based EMS services, FortiGate must be registered to FortiCloud with an appropriate user account. Onlyone FortiClient EMS Cloud server can be configured.
To add a cloud-based and an on-premise EMS server in the GUI:
1. Go to Security Fabric > Settings.2. Enable FortiClient Endpoint Management System (EMS).3. Add an EMS server.4. Set EMS Type to EMS Cloud.5. Enter a name, such as cloud_ems.
6. Add another EMS server.7. Set EMS Type to EMS.8. Enter a name, such as ems136.9. Enter server's IP address, admin user name, and admin password. Optionally, you can also change the HTTPS
port.
10. Click Apply.
FortiOS 6.2 New Features Guide 201Fortinet Inc.

Fabric Connectors
11. FortiClient EMS fabric connectors are automatically created for the EMS servers.
12. Test connectivity with the EMS server:a. Go to Security Fabric > Settings and go to the FortiClient Endpoint Management System (EMS) section.b. In the Connection status field, click Test Connectivity.
To add a cloud-based EMS server in the CLI:
1. Enable authentication of FortiClient EMS Cloud through a FortiCloud account:
config endpoint-control fctemsedit <name>
set fortinetone-cloud-authentication enablenext
end
2. Configure a FortiClient EMS Cloud server connection:
config user fssoedit "cloud_ems_fsso_connector"
set type fortiems-cloudset password ******set source-ip <class_ip>
nextend
FortiOS 6.2 New Features Guide 202Fortinet Inc.

SD-WAN
This section lists the new features added to FortiOS for SD-WAN.
Overlay Controller VPN (OCVPN)
This section lists the new features added to FortiOS for OCVPN.
Hub-and-Spoke Support
This version extends OCVPN to support hub-and-spoke topology in addition to full mesh support.
This feature includes support for the following:
l OCVPN portal with FortiCare SSO.l Enforce limits for OCVPN free service.l Define multiple overlay network using OCVPN hub-and-spoke.l ADVPN for hub-and-spoke. The ADVPN shortcut is enabled by default.
Sample topology
OCVPN portal with FortiCare SSO
The OCVPN portal can display customer and portal information including:
FortiOS 6.2 New Features Guide 203Fortinet Inc.

SD-WAN
l The customer OCVPN license type: free or full.l Registered device information including:
l Device serial number.l OCVPN role.l Hostname.l WAN IP address.l Configured overlays.
You can display the OCVPN network topology in a diagram.
FortiOS 6.2 New Features Guide 204Fortinet Inc.

SD-WAN
You can unregister OCVPN devices on the portal.
OCVPN free license limit
The current OCVPN free license limit is three devices and full mesh only.
There is currently no limit to the free licenses on the OCVPN cloud side.
Warning messages appear when the free license limit is reached. For example:
"Primary-Hub role is not supported with OCVPN free license. Please upgrade tofull OCVPN license to use hub and spoke topology.object check operator error, -9999, discard the settingCommand fail. Return code -9999"
"OCVPN free license limit (3) has been reached. Please upgrade tofull OCVPN license to register additional devices.object check operator error, -9999, discard the settingCommand fail. Return code -9999"
To check the OCVPN license type, see Diagnostic commands on page 209.
FortiOS 6.2 New Features Guide 205Fortinet Inc.

SD-WAN
OCVPN hub-and-spoke with multiple overlays with ADVPN shortcut
To configure the Spoke in the GUI:
1. Go to VPN > Overlay Controller VPN and create or edit an overlay.2. For Role, select Spoke.
To configure Spoke1 OCVPN in the CLI:
config vpn ocvpnset status enableconfig overlays
edit 1set name "QA"config subnets
edit 1set subnet 10.1.100.0 255.255.255.0
nextend
nextedit 2
set name "PM"config subnets
edit 1set subnet 10.2.100.0 255.255.255.0
nextend
nextend
end
FortiOS 6.2 New Features Guide 206Fortinet Inc.

SD-WAN
To configure Spoke2 OCVPN in the CLI:
config vpn ocvpnset status enableconfig overlays
edit 1set name "QA"config subnets
edit 1set subnet 192.168.4.0 255.255.255.0
nextend
nextedit 2
set name "PM"config subnets
edit 1set subnet 192.168.5.0 255.255.255.0
nextend
nextend
end
To configure the Primary Hub in the GUI:
1. Go to VPN > Overlay Controller VPN and create or edit an overlay.2. For Role, select Primary Hub.
FortiOS 6.2 New Features Guide 207Fortinet Inc.

SD-WAN
To configure the Primary Hub in the CLI:
config vpn ocvpnset status enableset role primary-hubconfig overlays
edit 1set name "QA"config subnets
edit 1set subnet 172.16.101.0 255.255.255.0
nextend
nextedit 2
set name "PM"config subnets
edit 1set subnet 172.16.102.0 255.255.255.0
nextend
nextend
end
To configure the Secondary Hub in the GUI:
1. Go to VPN > Overlay Controller VPN and create or edit an overlay.2. For Role, select Secondary Hub.
To configure the Secondary Hub in the CLI:
config vpn ocvpnset status enableset role secondary-hub
end
FortiOS 6.2 New Features Guide 208Fortinet Inc.

SD-WAN
Diagnostic commands
To check the OCVPN license type:
# diagnose vpn ocvpn show-metaTopology :: autoLicense :: fullMembers :: 4Max-free :: 3
To check the OCVPN status:
# diagnose vpn ocvpn statusCurrent State : RegisteredTopology : Dual-Hub-SpokeRole : SpokeServer Status : UpRegistration time : Mon Mar 11 16:42:31 2019Poll time : Mon Mar 11 16:55:53 2019
# diagnose vpn ocvpn statusCurrent State : RegisteredTopology : Dual-Hub-SpokeRole : Primary-HubServer Status : UpRegistration time : Mon Mar 11 16:42:25 2019Update time : Mon Mar 11 15:10:28 2019Poll time : Mon Mar 11 16:55:35 2019
ADVPN Support
OCVPN hub-and-spoke includes support for ADVPN.
For information on hub-and-spoke support, see Hub-and-Spoke Support on page 203.
Multiple VPN Support
OCVPN hub-and-spoke includes support for multiple overlay VPNs..
For information on hub-and-spoke support, see Hub-and-Spoke Support on page 203.
OCVPN free license updates - 6.2.1
With OCVPN free licenses in FortiOS 6.2, you can now choose any VPN type (full mesh or hub-spoke topology). Amaximum of three free (unlicensed) devices can join the VPN. An OCVPN license is required per device.
You can view the current number of licenses in the GUI and CLI.
FortiOS 6.2 New Features Guide 209Fortinet Inc.

SD-WAN
To view the current number of licenses using the GUI:
1. Go to VPN > Overlay Controller VPN.2. Look at the right-side of theOverlay Controller VPN pane to view the License type andMembers summary.
For more information on device and license management, see OCVPN portal.
Sample free license VPN
The following example shows a free license VPN with the maximum three free members and two licensed members:
To view the current number of licenses using the CLI:
# diagnose vpn ocvpn show-metaTopology :: autoLicense :: freeMembers :: 5Licensed :: 2Free :: 3Max-free :: 3
Sample full license VPN
The following example shows a full license VPN with three free members and two licensed members:
FortiOS 6.2 New Features Guide 210Fortinet Inc.

SD-WAN
To view the current number of licenses using the CLI:
# diagnose vpn ocvpn show-metaTopology :: autoLicense :: fullMembers :: 5Licensed :: 2Free :: 3
SD-WAN Bandwidth Monitoring Service
This version adds a new bandwidth measuring tool to detect true upload and download speeds. Bandwidth tests can berun on demand or automated using a script, and can be useful when configuring SD-WAN SLA and rules to balance SD-WAN traffic.
The speed test tool requires a valid SD-WAN Bandwidth Monitoring Service license.
This speed test tool compatible with iperf3.6 with SSL support. This tool can send traffic to test uploading bandwidth tothe FortiCloud speed test service. It can initiate the connection with the server and initiate downloading requests to theserver.
This tool's daily running quota is limited to avoid abusing the usage for valid customers. The current daily quota is 10.FortiGate first downloads the speed test server list. The server list expires after 24 hours. Based on customer's input, itselects one of the servers to do the speed test. The speed test includes uploading speed test and downloading speedtest. After the test is done, the results are printed on the terminal.
To download the speed test server list:
# execute speed-test-server downloadDownload completed.
FortiOS 6.2 New Features Guide 211Fortinet Inc.

SD-WAN
To check the speed test server list:
FG3H0E5818904285 (root) # execute speed-test-server listAWS_West valid
Host: 34.210.67.183 5204 fortinetHost: 34.210.67.183 5205 fortinetHost: 34.210.67.183 5206 fortinetHost: 34.210.67.183 5207 fortinet
Google_West validHost: 35.197.55.210 5204 fortinetHost: 35.197.55.210 5205 fortinetHost: 35.197.55.210 5206 fortinetHost: 35.197.55.210 5207 fortinetHost: 35.230.2.124 5204 fortinetHost: 35.230.2.124 5205 fortinetHost: 35.230.2.124 5206 fortinetHost: 35.230.2.124 5207 fortinetHost: 35.197.18.234 5204 fortinetHost: 35.197.18.234 5205 fortinetHost: 35.197.18.234 5206 fortinetHost: 35.197.18.234 5207 fortinet
To run the speed test:
You can run the speed test without specifying a server. The system will automatically choose one server from the list andrun the speed test.
FG3H0E5818904285 (root) # execute speed-test autoThe license is valid to run speed test.Speed test quota for 2/1 is 9current vdom=rootRun in uploading mode.Connecting to host 35.230.2.124, port 5206[ 16] local 172.16.78.185 port 2475 connected to 35.230.2.124 port 5206[ ID] Interval Transfer Bitrate Retr Cwnd[ 16] 0.00-1.01 sec 11.0 MBytes 91.4 Mbits/sec 0 486 KBytes[ 16] 1.01-2.00 sec 11.6 MBytes 98.4 Mbits/sec 0 790 KBytes[ 16] 2.00-3.01 sec 11.0 MBytes 91.6 Mbits/sec 15 543 KBytes[ 16] 3.01-4.01 sec 11.2 MBytes 94.2 Mbits/sec 1 421 KBytes[ 16] 4.01-5.01 sec 11.2 MBytes 93.5 Mbits/sec 0 461 KBytes- - - - - - - - - - - - - - - - - - - - - - - - -[ ID] Interval Transfer Bitrate Retr[ 16] 0.00-5.01 sec 56.1 MBytes 93.8 Mbits/sec 16 sender[ 16] 0.00-5.06 sec 55.8 MBytes 92.6 Mbits/sec receiver
speed test Done.Run in reverse downloading mode!Connecting to host 35.230.2.124, port 5206Reverse mode, remote host 35.230.2.124 is sending[ 16] local 172.16.78.185 port 2477 connected to 35.230.2.124 port 5206[ ID] Interval Transfer Bitrate[ 16] 0.00-1.00 sec 10.9 MBytes 91.4 Mbits/sec[ 16] 1.00-2.00 sec 11.2 MBytes 93.9 Mbits/sec[ 16] 2.00-3.00 sec 11.2 MBytes 94.0 Mbits/sec[ 16] 3.00-4.00 sec 11.2 MBytes 93.9 Mbits/sec[ 16] 4.00-5.00 sec 10.9 MBytes 91.1 Mbits/sec
FortiOS 6.2 New Features Guide 212Fortinet Inc.

SD-WAN
- - - - - - - - - - - - - - - - - - - - - - - - -[ ID] Interval Transfer Bitrate Retr[ 16] 0.00-5.03 sec 57.5 MBytes 95.9 Mbits/sec 40 sender[ 16] 0.00-5.00 sec 55.4 MBytes 92.9 Mbits/sec receiver
speed test Done
To run the speed test on a server farm or data center:
FG3H0E5818904285 (root) # execute speed-test auto AWS_WestThe license is valid to run speed test.Speed test quota for 2/1 is 8current vdom=rootRun in uploading mode.Connecting to host 34.210.67.183, port 5205
To run the speed test on a local interface when there are multiple valid routes:
FG3H0E5818904285 (root) # execute speed-test port1 Google_WestThe license is valid to run speed test.Speed test quota for 2/1 is 6bind to local ip 172.16.78.202current vdom=rootSpecified interface port1 does not comply with default outgoing interface port2 in routingtable!Force to use the specified interface!Run in uploading mode.Connecting to host 35.197.18.234, port 5205[ 11] local 172.16.78.202 port 20852 connected to 35.197.18.234 port 5205[ ID] Interval Transfer Bitrate Retr Cwnd[ 11] 0.00-1.01 sec 10.7 MBytes 89.0 Mbits/sec 0 392 KBytes[ 11] 1.01-2.01 sec 10.5 MBytes 88.5 Mbits/sec 1 379 KBytes[ 11] 2.01-3.01 sec 11.3 MBytes 94.5 Mbits/sec 0 437 KBytes[ 11] 3.01-4.01 sec 11.2 MBytes 94.3 Mbits/sec 0 478 KBytes[ 11] 4.01-5.00 sec 11.3 MBytes 95.2 Mbits/sec 0 503 KBytes- - - - - - - - - - - - - - - - - - - - - - - - -[ ID] Interval Transfer Bitrate Retr[ 11] 0.00-5.00 sec 55.1 MBytes 92.3 Mbits/sec 1 sender[ 11] 0.00-5.04 sec 54.5 MBytes 90.7 Mbits/sec receiver
speed test Done.Run in reverse downloading mode!Connecting to host 35.197.18.234, port 5205Reverse mode, remote host 35.197.18.234 is sending[ 11] local 172.16.78.202 port 20853 connected to 35.197.18.234 port 5205[ ID] Interval Transfer Bitrate[ 11] 0.00-1.00 sec 10.9 MBytes 91.1 Mbits/sec[ 11] 1.00-2.00 sec 11.2 MBytes 94.0 Mbits/sec[ 11] 2.00-3.00 sec 11.2 MBytes 94.0 Mbits/sec[ 11] 3.00-4.00 sec 11.2 MBytes 94.0 Mbits/sec[ 11] 4.00-5.00 sec 11.2 MBytes 94.0 Mbits/sec- - - - - - - - - - - - - - - - - - - - - - - - -[ ID] Interval Transfer Bitrate Retr[ 11] 0.00-5.03 sec 57.4 MBytes 95.8 Mbits/sec 33 sender[ 11] 0.00-5.00 sec 55.7 MBytes 93.4 Mbits/sec receiver
FortiOS 6.2 New Features Guide 213Fortinet Inc.

SD-WAN
speed test Done.
Rule Definition Improvements
This section lists rule definition improvements added to FortiOS for SD-WAN.
Load Balancing Per-Rule
This feature introduces SD-WAN load balancing for all explicit rules. When a rule is hit, traffic is hashed based on thedefined load balancing algorithm among the selected SD-WANmembers that satisfy the defined SLA.
Previously, SD-WAN load balancing was only available on the last implicit rule. This covered all the SD-WAN interfacemembers, but when an explicit SD-WAN rule was created, it prevented load balancing from occurring for that protocol,and traffic was only routed over a single interface.
ADVPN is not supported in this mode.
To add load balancing to a rule with the GUI:
1. Go to Network > SD-WAN Rules.2. Edit a rule, or create a new one.
FortiOS 6.2 New Features Guide 214Fortinet Inc.

SD-WAN
3. UnderOutgoing Interfaces, select a Strategy, Interface preference, and Required SLA target orMeasured SLA.
4. ClickOK to apply your changes.
To add load balancing to a rule with the CLI:
config system virtual-wan-linkconfig service
edit 1set name "balance"set mode load-balanceset dst "10.100.20.0"config sla
edit "ping"set id 2
nextendset priority-members 1 2 3
nextend
end
To diagnose the load balancing status:
FGT_A (root) # diagnose sys virtual-wan-link health-checkHealth Check(ping):Seq(2): state(alive), packet-loss(40.000%) latency(0.049), jitter(0.017) sla_map=0x3Seq(1): state(alive), packet-loss(0.000%) latency(0.020), jitter(0.005) sla_map=0x3
FGT_A (root) # diagnose sys virtual-wan-link service
Service(22): Address Mode(IPV4) flags=0x0TOS(0x0/0x0), Protocol(0: 1->65535), Mode(load-balance)Members:1: Seq_num(1), alive, sla(0x1), num of pass(1), selected2: Seq_num(2), alive, sla(0x1), num of pass(1), selected
Dst fqdn: gmail.com(119)
Interface Cost
FortiOS 6.2 New Features Guide 215Fortinet Inc.

SD-WAN
This feature adds multiple extensions to various objects and rules, increasing the flexibility of how SD-WAN can be setup.
The cost parameter is added for SD-WANmembers, to support assigning a cost value to each interface. It can be usedin SLA mode rules to select the lowest cost link from the links that otherwise satisfy the SLA. The lowest possible cost fora link is 0. If the costs are the same, the Interface preference order is used to select a link.
Interface selection based on quality now balances across all matching links that satisfy the quality SLA. Traffic can alsobe restricted to a specific subset of interfaces.
To configure interface cost:
config system virtual-wan-linkconfig members
edit 1set cost 10
nextedit 2
set cost 5next... ...
endend
Example
In this example:
l The SD-WAN has four members:l Member 1 and member 2 can satisfy the SLA and are selected as candidates.l Member 3 and member 4 are slower and cannot satisfy the SLA.
l The cost parameter only applies to candidates, even though the interface cost of members 3 and 4 are lower thanthat of members 1 and 2.
The ISP of member 1 is more expensive, so the its cost is set higher than the member 2 cost. Consequently, member2, with the lower cost, is the first choice. If the cost parameters for all of the members were not set, or were all set to thesame value, the selection would be the highest priority member that satisfies the SLA.
To configure the SD-WAN:
config system virtual-wan-linkset status enableset load-balance-mode usage-basedconfig members
edit 1set interface "port13"set gateway 10.100.1.1set cost 10
nextedit 2
set interface "port12"set cost 5
nextedit 3
set interface "agg1"
FortiOS 6.2 New Features Guide 216Fortinet Inc.

SD-WAN
set gateway 172.16.203.2set cost 1
nextedit 4
set interface "vlan200"set gateway 172.16.216.2set cost 1
nextendconfig health-check
edit "ping"set server "10.100.2.22"set threshold-warning-latency 2set threshold-alert-latency 5set members 2 1 3 4config sla
edit 1set link-cost-factor latency
nextedit 2
set link-cost-factor latencyset latency-threshold 4
nextend
nextendconfig service
edit 2set name "google-dns"set mode slaset src "all"set internet-service enableset internet-service-id 65539config sla
edit "ping"set id 2
nextendset priority-members 3 4 1 2
nextend
end
To check the link status and sequence:
diagnose sys virtual-wan-link health-check <<<<<<<< check link status, pay attentionto state(alive or dead) and the link quality
Health Check(ping):Seq(2): state(alive), packet-loss(0.000%) latency(0.244), jitter(0.028) sla_map=0x2Seq(1): state(alive), packet-loss(0.000%) latency(0.697), jitter(0.094) sla_map=0x2Seq(3): state(alive), packet-loss(0.000%) latency(21.835), jitter(1.159) sla_map=0x0Seq(4): state(alive), packet-loss(3.333%) latency(21.975), jitter(1.271) sla_map=0x0
diagnose sys virtual-wan-link service <<<<<<<< check link sequence and pay attentionto "sla(0x)" value
Service(2): Address Mode(IPV4) flags=0x0
FortiOS 6.2 New Features Guide 217Fortinet Inc.

SD-WAN
TOS(0x0/0x0), Protocol(0: 1->65535), Mode(sla)Members:1: Seq_num(2), alive, sla(0x1),cfg_order(3), selected2: Seq_num(1), alive, sla(0x1),cfg_order(2), selected3: Seq_num(3), alive, sla(0x0),cfg_order(0), selected4: Seq_num(4), alive, sla(0x0),cfg_order(1), selected
Internet Service: Google-DNS(65539)Src address: 0.0.0.0-255.255.255.255
DSCP Matching (Shaping)
This feature has three parts:
l DSCPmatching in firewall policiesl DSCPmatching in firewall shaping policiesl DSCPmarking in firewall shaping policies
DSCP matching in firewall policies
Traffic is allowed or blocked according to the DSCP values in the incoming packets.
The following CLI variables are added to the config firewall policy command:
tos-mask <mask_value> Non-zero bit positions are used for comparison. Zero bit positions are ignored(default = 0x00).This variable replaces the dscp-match variable.
tos <tos_value> Type of Service (ToC) value that is used for comparison (default = 0x00). Thisvariable is only available when tos-mask is not zero.This variable replaces the dscp-value variable.
tos-negate {enable |disable}
Enable/disable negated ToS match (default = disable). This variable is onlyavailable when tos-mask is not zero.This variable replaces the dscp-negate variable.
DSCP matching in firewall shaping policies
Shaping is applied to the session or not according to the DSCP values in the incoming packets. The same logic andcommands as in firewall policies are used.
DSCP marking in firewall shaping policies
Traffic is allowed or blocked according to the DSCP values in the incoming packets. DSCPmarking in firewall shapingpolicies uses the same logic and commands as in firewall policy and traffic-shaper.
When DSCPmarking on firewall shaper traffic-shaper, firewall shaping-policy, and firewallpolicy all apply to the same session, shaping-policy overrides policy, and shaper traffic-shaperoverrides both shaping-policy and policy.
The following CLI variables in config firewall policy are used to mark the packets:
FortiOS 6.2 New Features Guide 218Fortinet Inc.

SD-WAN
diffserv-forward {enable| disable}
Enable/disable changing a packet's DiffServ values to the value specified indiffservcode-forward (default = disable).
diffservcode-forward<dscp_value>
The value that packet's DiffServ is set to (default = 000000). This variable is onlyavailable when diffserv-forward is enabled.
diffserv-reverse {enable| disable}
Enable/disable changing a packet's reverse (reply) DiffServ values to the valuespecified in diffservcode-rev (default = disable).
diffservcode-rev <dscp_value>
The value that packet's reverse (reply) DiffServ is set to (default = 000000). Thisvariable is only available when diffserv-rev is enabled.
Examples
Example 1
FortiGate A marks traffic from the sales and QA teams with different DSCP values. FortiGate B does DSCPmatching,allowing only the sales team to access the database.
1. Configure FortiGate A:
config firewall policyedit 1
set srcintf "port2"set dstintf "port3"set srcaddr "QA"set dstaddr "all"set action acceptset schedule "always"set service "ALL"set diffserv-forward enableset diffservcode-forward 110000set nat enable
next
edit 5set srcintf "port2"set dstintf "port3"set srcaddr "Sales"set dstaddr "all"set action acceptset schedule "always"set service "ALL"set diffserv-forward enableset diffservcode-forward 111011set nat enable
FortiOS 6.2 New Features Guide 219Fortinet Inc.

SD-WAN
nextend
2. Configure FortiGate B:
config firewall policyedit 2
set srcintf "port3"set dstintf "port1"set srcaddr "all"set dstaddr "Database"set action acceptset schedule "always"set service "ALL"set tos-mask 0xf0set tos 0xe0set fsso disableset nat enable
nextend
Example 2
FortiGate A marks traffic from the sales and QA teams with different DSCP values. FortiGate B uses a firewall shapingpolicy to do the DSCPmatching, limiting the connection speed of the sales team to the database to 10MB/s.
1. Configure FortiGate A:
config firewall policyedit 1
set srcintf "port2"set dstintf "port3"set srcaddr "QA"set dstaddr "all"set action acceptset schedule "always"set service "ALL"set diffserv-forward enableset diffservcode-forward 110000set nat enable
next
edit 5set srcintf "port2"set dstintf "port3"set srcaddr "Sales"set dstaddr "all"set action acceptset schedule "always"set service "ALL"set diffserv-forward enableset diffservcode-forward 111011set nat enable
nextend
FortiOS 6.2 New Features Guide 220Fortinet Inc.

SD-WAN
2. Configure FortiGate B:
config firewall policyedit 2
set srcintf "port3"set dstintf "port1"set srcaddr "all"set dstaddr "all"set action acceptset schedule "always"set service "ALL"set nat enable
nextend
config firewall shaper traffic-shaperedit "10MB/s"
set guaranteed-bandwidth 60000set maximum-bandwidth 80000
nextend
config firewall shaping-policyedit 1
set service "ALL"set dstintf "port1"set tos-mask 0xf0set tos 0xe0set traffic-shaper "10MB/s"set srcaddr "all"set dstaddr "all"
nextend
Example 3
FortiGate A has a traffic shaping policy to mark traffic from the QA team with a DSCP value of 100000, while reversetraffic is marked with 000011.
1. Configure FortiGate A:
config firewall shaping-policyedit 1
set name "QA Team 50MB"set service "ALL"set dstintf "port3"set traffic-shaper "50MB/s"set traffic-shaper-reverse "50MB/s"set diffserv-forward enableset diffserv-reverse enableset srcaddr "QA"set dstaddr "all"set diffservcode-forward 100000set diffservcode-rev 000011
nextend
FortiOS 6.2 New Features Guide 221Fortinet Inc.

SD-WAN
Traffic Shaping Schedules
In a shaping policy, there are many matching criteria available for administrators to match a specific traffic and apply atraffic shaper or shaping group to the traffic. This version adds a new matching criterion: Schedule. This feature givesshaping policy the ability to apply different shaping profiles at different times. Administrators can select a one-timeschedule, recurring schedule, or schedule group.
Schedule is not a mandatory setting. If it is not set, then the current date and time are not used to match the traffic.
To configure Traffic Shaping Policy in GUI:
1. Navigate to Policy & Objects > Traffic Shaping Policy.2. Create or edit a Traffic Shaping Policy.3. Enable Schedule and select a schedule option.
4. Configure other options and clickOK.
To configure Traffic Shaping Policy in CLI:
config firewall schedule recurringedit "work-hours"
set start 07:00set end 20:00set day monday tuesday wednesday thursday friday
nextend
config firewall shaping-policyedit 1
set name "demo"
FortiOS 6.2 New Features Guide 222Fortinet Inc.

SD-WAN
set service "ALL"set schedule "work-hours" <<< Can select schedule from one-time schedule, recurring
schedule or schedule groupset dstintf "port1"set traffic-shaper "high-priority"set traffic-shaper-reverse "high-priority"set srcaddr "all"set dstaddr "all"
nextend
To troubleshoot Traffic Shaping Policy in CLI:
The selected schedule is listed in the iprope.
dia firewall iprope list 100015
policy index=1 uuid_idx=0 action=acceptflag (0): schedule(work-hours)shapers: orig=high-priority(2/0/134217728) reply=high-priority(2/0/134217728)cos_fwd=0 cos_rev=0 group=00100015 av=00000000 au=00000000 split=00000000host=1 chk_client_info=0x0 app_list=0 ips_view=0misc=0 dd_type=0 dd_mode=0zone(1): 0 -> zone(1): 9 source(1): 0.0.0.0-255.255.255.255, uuid_idx=28, dest(1): 0.0.0.0-255.255.255.255, uuid_idx=28, service(1):
[0:0x0:0/(0,65535)->(0,65535)] helper:auto
Application Groups in Policies
This feature adds an application group command for firewall shaping policies.
The following CLI command is added:
config firewall shaping-policyedit 1
set app-group <application group>.........
nextend
Example
In this example, there are two traffic shaping policies:
l Policy 1 is for traffic related to cloud applications that has high priority.l Policy 2 is for other traffic and has low priority.
FortiOS 6.2 New Features Guide 223Fortinet Inc.

SD-WAN
To create the shaping policies using the GUI:
1. Configure an application group for cloud applications:a. Go to Security Profiles > Custom Signatures.b. Click Create New > Application Group. The New Application Group page opens.
c. Enter a name for the group, select the type, and then add the group the members.d. ClickOK.
2. Create the shaping policy for the high priority cloud application traffic:a. Go to Policy & Objects > Traffic Shaping Policy.b. Click Create New. The New Shaping Policy page opens.
c. Configure the shaping policy, selecting the previously created cloud application group, and setting both theShared shaper and Reverse shaper to high-priority.
d. ClickOK.
At least one firewall policy must have application control enabled for the applications tomatch any policy traffic.
FortiOS 6.2 New Features Guide 224Fortinet Inc.

SD-WAN
3. Create the shaping policy for all other traffic, setting both the Shared shaper and Reverse shaper to low-priority.
To create the shaping policies using the CLI:
1. Configure an application group for cloud applications:
config application groupedit "cloud app group"
set application 27210 36740 35944 24467 33048next
end
2. Create the shaping policies for the high priority cloud application traffic and the other, low priority traffic:
config firewall shaping-policyedit 1
set name "For Cloud Traffic"set service "ALL"set app-category 30set app-group "cloud app group"set dstintf "port1"set traffic-shaper "high-priority"set traffic-shaper-reverse "high-priority"set srcaddr "all"set dstaddr "all"
nextedit 2
set name "For Other Traffic"set service "ALL"set dstintf "port1"set traffic-shaper "low-priority"set traffic-shaper-reverse "low-priority"set srcaddr "all"set dstaddr "all"
nextend
FortiOS 6.2 New Features Guide 225Fortinet Inc.

SD-WAN
Internet Service Groups in Policies
This feature adds support for Internet Service Groups in traffic shaping and firewall policies. Service groups can be usedas the source and destination of the policy. Internet Service Groups are used as criteria to match traffic; the shaper willbe applied when the traffic matches.
To use a group as a destination, internet-servicemust be enabled. To use a group as a source, internet-service-srcmust be enabled.
The following CLI variables are added to the firewall policy and firewall shaping-policy commands:
Variable Description
internet-service-group <string> Internet Service group name.
internet-service-custom-group <string> Custom Internet Service group name.
internet-service-src-group <string> Internet Service source group name.
internet-service-src-custom-group <string> Custom Internet Service source group name.
Examples
The following examples use the below topology.
Example 1
In this example, the PC is allowed to access Google, so all Google services are put into an Internet Service Group.
To configure access to Google services using an Internet Service Group using the CLI:
1. Create a Service Group:
config firewall internet-service-groupedit "Google_Group"
set direction destinationset member 65537 65538 65539 65540 65542 65543 65544 65545 65550 65536 65646
nextend
2. Create a firewall policy to allow access to all Google Services from the PC:
config firewall policyedit 1
set name "PC to Google"set srcintf "port2"set dstintf "port1"
FortiOS 6.2 New Features Guide 226Fortinet Inc.

SD-WAN
set srcaddr "PC"set internet-service enableset internet-service-group "Google_Group"set action acceptset schedule "always"set fsso disableset nat enable
nextend
To configure access to Google services using an Internet Service Group in the GUI:
1. On the FortiGate, create a Service Group using the CLI.2. Go to Policy & Objects > IPv4 Policy, and create a new policy.3. Set the Destination as the just created Internet Service Group.
4. Configure the remaining options as shown, then clickOK.On the policy page, hover over the group to view a list of its members.
FortiOS 6.2 New Features Guide 227Fortinet Inc.

SD-WAN
Example 2
In this example, two office FTP servers are put into an Internet Custom Service Group, and the PC connection to the FTPservers is limited to 1Mbps.
To put two FTP servers into a custom service group and limit the PC connection speed to them usingthe CLI:
1. Create custom internet services for the internal FTP servers:
config firewall internet-service-customedit "FTP_PM"
config entryedit 1
config port-rangeedit 1
set start-port 21set end-port 21
nextendset dst "PM_Server"
nextend
nextedit "FTP_QA"
config entryedit 1
config port-rangeedit 1
set start-port 21set end-port 21
nextendset dst "QA_Server"
nextend
nextend
2. Create a custom internet server group and add the just created custom internet services to it:
config firewall internet-service-custom-groupedit "Internal_FTP"
set member "FTP_QA" "FTP_PM"next
end
3. Create a traffic shaper to limit the maximum bandwidth:
config firewall shaper traffic-shaperedit "Internal_FTP_Limit_1Mbps"
set guaranteed-bandwidth 500set maximum-bandwidth 1000set priority medium
nextend
FortiOS 6.2 New Features Guide 228Fortinet Inc.

SD-WAN
4. Create a firewall shaping policy to limit the speed from the PC to the internal FTP servers:
config firewall shaping-policyedit 1
set name "For Internal FTP"set internet-service enableset internet-service-custom-group "Internal_FTP"set dstintf "port1"set traffic-shaper "Internal_FTP_Limit_1Mbps"set traffic-shaper-reverse "Internal_FTP_Limit_1Mbps"set srcaddr "PC"
nextend
To put two FTP servers into a custom service group and limit the PC connection speed to the using theGUI:
1. Create custom internet services for the internal FTP servers using the CLI.2. Create a custom internet server group and add the just created custom internet services to it using the CLI.3. Create a traffic shaper to limit the maximum bandwidth:
a. Go to Policy & Objects > Traffic Shapers, and click Create New.b. Enter a Name for the shaper, such as Internal_FTP_Limit_1Mbps.c. Set the Traffic Priority toMedium.d. EnableMax Bandwidth and set it to 1000.e. EnableGuaranteed Bandwidth and set it to 500.f. ClickOK.
4. Create a firewall shaping policy to limit the speed from the PC to the internal FTP servers:a. Go to Policy & Objects > Traffic Shaping Policy, and click Create New.b. Set the Destination as the just created Custom Internet Service Group, and apply the just create traffic shaper.
c. Configure the remaining options as shown, then clickOK.
IPv6 Support (UI)
This version adds GUI support for SD-WAN setup, including:
FortiOS 6.2 New Features Guide 229Fortinet Inc.

SD-WAN
l SD-WAN Interfaces with IPv6 addressing (gateway).l IPv6 Mode for Performance SLA.l IPv6 SD-WAN Rules.
Sample configuration
In Network > SD-WAN, set Status to Enable and configure SD-WAN Interface Members in the IPv6 Gateway field.
In Network > Performance SLA, set IP Version to IPv6 and configure fields.
FortiOS 6.2 New Features Guide 230Fortinet Inc.

SD-WAN
The Performance SLA page displays the entry you configured.
In Network > SD-WAN Rules, set IP Version to IPv6 and configure SD-WAN IPv6 mode rules.
The Network > SD-WAN Rules page displays the rules you configured.
FortiOS 6.2 New Features Guide 231Fortinet Inc.

SD-WAN
Enable dynamic connector address used in policies - 6.2.1
Dynamic Fabric Connector addresses can be used in SD-WAN policies.
To add a dynamic connector address to an SD-WAN rule:
1. Go to Network > SD-WAN Rules.2. Click Create New.3. In the Name field, enter the rule name.4. In the Destination > Addresses field, click the +. The Select Entries pane will appear.5. In the Select Entries pane, select the dynamic connector (in the example, aws1).
FortiOS 6.2 New Features Guide 232Fortinet Inc.

SD-WAN
6. Configure the rest of the rule settings.7. ClickOK to save the rule.
Traffic shaping profile additional priorities - 6.2.1
This feature increases the shaping group from three priorities to five priorities. There are no changes to traffic shaper andglobal traffic priority levels. Only the traffic shaping profile priority levels are increased.
In the Traffic Shaping Profile, the Priority field now has a Top and Critical priority in addition to High, Medium, and Lowpriority.
To set shaping group priority in the GUI:
1. Go to Policy & Objects > Traffic Shaping Profile.2. Create or edit a traffic shaping profile.3. In the Default Shaping Group and Additional Shaping Groups sections , the Priority dropdown list has five priorities:
top, Critical, High, Medium, and Low.
FortiOS 6.2 New Features Guide 233Fortinet Inc.

SD-WAN
4. Select the Priority and clickOK.
To set shaping group priority in the CLI:
In shaping-profile, class-id 10 has High priority while class-id 20 has Top priority.
config firewall shaping-profileedit "ingress"
set default-class-id 10config shaping-entries
edit 1set class-id 10set guaranteed-bandwidth-percentage 10set maximum-bandwidth-percentage 10
nextedit 2
set class-id 20
FortiOS 6.2 New Features Guide 234Fortinet Inc.

SD-WAN
set priority topset guaranteed-bandwidth-percentage 20set maximum-bandwidth-percentage 20
nextend
nextend
Ingress traffic shaping - 6.2.1
This feature adds source interfaces as criteria for classifying traffic in a firewall shaping policy.
The following CLI command is added:
config firewall shaping-policyedit 1
set srcintf <interface_name>......
nextend
Example
In this example, there are two shaping policies:
l Policy 1 is for traffic from the Office to the Server, with the speed limited to 5MB/s.l Policy 2 is for traffic from the Lab to the Server, with the speed limited to 1MB/s.
Use the following CLI commands to configure the FortiGate:
config firewall shaping-policyedit 1
set name "Office_Speed_5MB"set service "ALL"set srcintf "port13"set dstintf "port9"set traffic-shaper "5MB/s"set traffic-shaper-reverse "5MB/s"set srcaddr "all"set dstaddr "all"
nextedit 2
set name "Lab_Speed_1MB"set service "ALL"
FortiOS 6.2 New Features Guide 235Fortinet Inc.

SD-WAN
set srcintf "port10"set dstintf "port9"set traffic-shaper "1MB/s"set traffic-shaper-reverse "1MB/s"set srcaddr "all"set dstaddr "all"
nextend
Forward Error Correction
Forward Error Correction (FEC) is used to lower the packet loss ratio by consuming more bandwidth. This features addsForward Error Correction (FEC) to IPsec VPN.
Six new parameters are added to the IPsec phase1-interface settings:
fec-ingress Enable/disable Forward Error Correction for ingress IPsec traffic (default = disable).
fec-egress Enable/disable Forward Error Correction for egress IPsec traffic (default = disable).
fec-base The number of base Forward Error Correction packets (1 - 100, default = 20).
fec-redundant The number of redundant Forward Error Correction packets (1 - 100, default = 10).
fec-send-timeout The time before sending Forward Error Correction packets, in milliseconds (1 - 1000,default = 8).
fec-receive-timeout The time before dropping Forward Error Correction packets, in milliseconds (1 - 10000,default = 5000).
FEC is disabled by default. FortiGate supports unidirectional and bidirectional FEC, and achieves the expected packetloss ration and latency by tuning the above parameters.
Two checkboxes are added to the IPsec phase1 settings in the GUI:
To configure FEC with the CLI:
config vpn ipsec phase1-interfaceedit "demo"
FortiOS 6.2 New Features Guide 236Fortinet Inc.

SD-WAN
........................set fec-egress enableset fec-ingress enableset fec-base 20set fec-redundant 10set fec-send-timeout 8set fec-receive-timeout 5000......................
nextend
To debug the VPN tunnel:
FGT-A # diagnose vpn tunnel listlist all ipsec tunnel in vd 0------------------------------------------------------name=demo ver=1 serial=1 172.16.200.1:0->172.16.200.2:0bound_if=11 lgwy=static/1 tun=intf/0 mode=auto/1 encap=none/3600 options[0e10]=create_devfrag-rfc fec-egress fec-ingress accept_traffic=1
proxyid_num=1 child_num=0 refcnt=11 ilast=8 olast=8 ad=/0stat: rxp=0 txp=0 rxb=0 txb=0dpd: mode=on-demand on=1 idle=20000ms retry=3 count=0 seqno=0natt: mode=none draft=0 interval=0 remote_port=0fec-egress: base=20 redundant=10 remote_port=50000 <<<<<<<<<<<<<<<<<<<<<<fec-ingress: base=20 redundant=10 <<<<<<<<<<<<<<<<<<<<<<proxyid=demo proto=0 sa=1 ref=2 serial=1src: 0:10.1.100.0/255.255.255.0:0dst: 0:173.1.1.0/255.255.255.0:0SA: ref=3 options=10226 type=00 soft=0 mtu=1390 expire=42897/0B replaywin=2048
seqno=1 esn=0 replaywin_lastseq=00000000 itn=0 qat=0life: type=01 bytes=0/0 timeout=42899/43200dec: spi=181f4f81 esp=aes key=16 6e8fedf2a77691ffdbf3270484cb2555
ah=sha1 key=20 f92bcf841239d15d30b36b695f78eaef3fad05c4enc: spi=0ce10190 esp=aes key=16 2d684fb19cbae533249c8b5683937329
ah=sha1 key=20 ba7333f89cd34cf75966bd9ffa72030115919213dec:pkts/bytes=0/0, enc:pkts/bytes=0/0
Represent Multiple IPsec Tunnels as a Single Interface
With this feature, you can create a static aggregate interface using IPsec tunnels as members, with traffic load balancedbetween the members. An IP address can be assigned to the aggregate interface, dynamic routing can run on theinterface, and the interface can be a member interface in SD-WAN.
The supported load balancing algorithms are: L3, L4, round-robin (default), and redundant.
FortiOS 6.2 New Features Guide 237Fortinet Inc.

SD-WAN
1. Create a site to site VPN phase1 interface with net-device disabled:
config vpn ipsec phase1-interfaceedit tunnel1
set interface port1set net-device disableset remote-gw 172.16.100.1set psksecret sample
nextedit tunnel2
set interface port2set net-device disableset remote-gw 172.31.1.1set psksecret sample
nextend
2. Configure IPsec aggregation:
config system ipsec-aggregateedit agg1
set member tunnel1 tunnel2next
end
3. Configure a firewall policy:
config firewall policyedit 0
set srcaddr allset srcintf port10set dstaddr allset dstintf agg1set schedule alwaysset action acceptset service ALL
nextend
4. Configure a static route:
config router staticedit 0
set device agg1next
end
FortiOS 6.2 New Features Guide 238Fortinet Inc.

SD-WAN
To debug the IPsec aggregation list:
#diagnose sys ipsec-aggregate listagg1 algo=RR member=2 run_tally=2members:
tunnel1tunnel2
Dual VPN Tunnel Wizard
This new wizard is used to automatically set up multiple VPN tunnels to the same destination over multiple outgoinginterfaces. This includes automatically configuring IPsec, Routing, and Firewall settings, avoiding cumbersome anderror-prone configuration steps.
To create a new SD-WAN VPN interface using the tunnel wizard:
1. Go to Network > SD-WAN.2. Add a new interface member.
FortiOS 6.2 New Features Guide 239Fortinet Inc.

SD-WAN
3. In the Interface drop-down, click +VPN. The Create IPsec VPN for SD-WANmembers pane opens.
4. Enter the required information, then click Create.
5. Click Close to return to the SD-WAN page.The newly created VPN interface will be highlighted in the Interface drop-down list.
FortiOS 6.2 New Features Guide 240Fortinet Inc.

SD-WAN
6. Select the VPN interface to add it as an SD-WANmember.7. Click Apply to save the SD-WAN settings.
BGP Additional Path Support
Currently, when deploying Auto-Discovery VPN (ADVPN) for Software-Defined Wide Area Networks (SD-WAN), aFortiGate deployed as the ADVPN hub is a route reflector. As such, it only advertises one path, which is the best path.Due to this, the branches receive different routes in their routing tables that point to the same next hop.
In 6.2, this is addressed by adding additional Border Gateway Protocol (BGP) path support, which allows the ADVPNhub to advertise multiple paths.
This feature allows BGP to extend and keep additional network paths according to RFC 7911.
FortiOS 6.2 New Features Guide 241Fortinet Inc.

SD-WAN
Example
In the following example topology, each spoke has four VPN tunnels connected to the Hub with ADVPN. The Spoke-Hubhas established four BGP neighbors on all four tunnels.
Spoke 1 and Spoke 2 can learn four different routes from each other.
Hub
config router bgpset as 65505set router-id 11.11.11.11set ibgp-multipath enableset additional-path enable <<<<<<<<<< newset additional-path-select 4 <<<<<<<<<< newconfig neighbor-group
edit "gr1"set capability-default-originate enableset remote-as 65505set additional-path both <<<<<<<<<< newset adv-additional-path 4 <<<<<<<<<< newset route-reflector-client enable
nextendconfig neighbor-range
edit 1set prefix 10.10.0.0 255.255.0.0set neighbor-group "gr1"
nextendconfig network
edit 12set prefix 11.11.11.11 255.255.255.255
FortiOS 6.2 New Features Guide 242Fortinet Inc.

SD-WAN
nextend
end
Spoke
config router bgpset as 65505set router-id 2.2.2.2set ibgp-multipath enableset additional-path enable <<<<<<<<<< newset additional-path-select 4 <<<<<<<<<< newconfig neighbor
edit "10.10.100.254"set soft-reconfiguration enableset remote-as 65505set additional-path both <<<<<<<<<< newset adv-additional-path 4 <<<<<<<<<< new
nextedit "10.10.200.254"
set soft-reconfiguration enableset remote-as 65505set additional-path bothset adv-additional-path 4
nextedit "10.10.203.254"
set soft-reconfiguration enableset remote-as 65505set additional-path bothset adv-additional-path 4
nextedit "10.10.204.254"
set soft-reconfiguration enableset remote-as 65505set additional-path bothset adv-additional-path 4
nextendconfig network
edit 3set prefix 22.1.1.0 255.255.255.0
nextend
endSpoke1 # get router info routing-table bgpRouting table for VRF=0B* 0.0.0.0/0 [200/0] via 10.10.200.254, vd2-2, 03:57:26
[200/0] via 10.10.203.254, vd2-3, 03:57:26[200/0] via 10.10.204.254, vd2-4, 03:57:26[200/0] via 10.10.100.254, vd2-1, 03:57:26
B 1.1.1.1/32 [200/0] via 11.1.1.1 (recursive via 12.1.1.1), 03:57:51[200/0] via 11.1.1.1 (recursive via 12.1.1.1), 03:57:51[200/0] via 11.1.1.1 (recursive via 12.1.1.1), 03:57:51[200/0] via 11.1.1.1 (recursive via 12.1.1.1), 03:57:51
B 11.11.11.11/32 [200/0] via 10.10.200.254, vd2-2, 03:57:51[200/0] via 10.10.203.254, vd2-3, 03:57:51[200/0] via 10.10.204.254, vd2-4, 03:57:51
FortiOS 6.2 New Features Guide 243Fortinet Inc.

SD-WAN
[200/0] via 10.10.100.254, vd2-1, 03:57:51B 33.1.1.0/24 [200/0] via 10.10.204.3, vd2-4, 03:57:26
[200/0] via 10.10.203.3, vd2-3, 03:57:26[200/0] via 10.10.200.3, vd2-2, 03:57:26[200/0] via 10.10.100.3, vd2-1, 03:57:26[200/0] via 10.10.204.3, vd2-4, 03:57:26[200/0] via 10.10.203.3, vd2-3, 03:57:26[200/0] via 10.10.200.3, vd2-2, 03:57:26[200/0] via 10.10.100.3, vd2-1, 03:57:26[200/0] via 10.10.204.3, vd2-4, 03:57:26[200/0] via 10.10.203.3, vd2-3, 03:57:26[200/0] via 10.10.200.3, vd2-2, 03:57:26[200/0] via 10.10.100.3, vd2-1, 03:57:26[200/0] via 10.10.204.3, vd2-4, 03:57:26[200/0] via 10.10.203.3, vd2-3, 03:57:26[200/0] via 10.10.200.3, vd2-2, 03:57:26[200/0] via 10.10.100.3, vd2-1, 03:57:26
Spoke1 #
SLA Logging
The features adds an SD-WAN daemon function to keep a short, 10 minute history of SLA that can be viewed in the CLI.
Performance SLA results related to interface selection, session failover, and other information, can be logged. Theselogs can then be used for long-term monitoring of traffic issues at remote sites, and for reports and views inFortiAnalyzer.
The time intervals that Performance SLA fail and pass logs are generated in can be configured.
To configure the fail and pass logs' generation time interval:
config system virtual-wan-linkconfig health-check
edit "ping"set sla-fail-log-period 30set sla-pass-log-period 60
nextend
end
To view the 10 minute Performance SLA link status history:
FGT_A (root) # diagnose sys virtual-wan-link sla-log ping 1Timestamp: Thu Feb 28 10:58:24 2019, vdom root, health-check ping, interface: R150, status:up, latency: 0.000, jitter: 0.000, packet loss: 0.000%.Timestamp: Thu Feb 28 10:58:24 2019, vdom root, health-check ping, interface: R150, status:up, latency: 0.097, jitter: 0.000, packet loss: 0.000%.Timestamp: Thu Feb 28 10:58:25 2019, vdom root, health-check ping, interface: R150, status:up, latency: 0.058, jitter: 0.040, packet loss: 0.000%.Timestamp: Thu Feb 28 10:58:25 2019, vdom root, health-check ping, interface: R150, status:up, latency: 0.044, jitter: 0.026, packet loss: 0.000%.... ...
FortiOS 6.2 New Features Guide 244Fortinet Inc.

SD-WAN
SLA pass logs
The FortiGate generates Performance SLA logs at the specified pass log interval (sla-pass-log-period) when SLApasses.
3: date=2019-02-28 time=11:53:26 logid="0100022925" type="event" subtype="system"level="information" vd="root" eventtime=1551383604 logdesc="Link monitor SLA information"name="ping" interface="R160" status="up" msg="Latency: 0.013, jitter: 0.001, packet loss:0.000%, inbandwidth: 0Mbps, outbandwidth: 0Mbps, bibandwidth: 0Mbps, sla_map: 0x1"7: date=2019-02-28 time=11:52:26 logid="0100022925" type="event" subtype="system"level="information" vd="root" eventtime=1551383545 logdesc="Link monitor SLA information"name="ping" interface="R160" status="up" msg="Latency: 0.013, jitter: 0.002, packet loss:0.000%, inbandwidth: 0Mbps, outbandwidth: 0Mbps, bibandwidth: 0Mbps, sla_map: 0x1"
In the FortiAnalyzer GUI:
SLA fail logs
The FortiGate generates Performance SLA logs at the specified fail log interval (sla-fail-log-period) when SLAfails.
6: date=2019-02-28 time=11:52:32 logid="0100022925" type="event" subtype="system"level="notice" vd="root" eventtime=1551383552 logdesc="Link monitor SLA information"name="ping" interface="R150" status="down" msg="Latency: 0.000, jitter: 0.000, packet loss:100.000%, inbandwidth: 0Mbps, outbandwidth: 200Mbps, bibandwidth: 200Mbps, sla_map: 0x0"8: date=2019-02-28 time=11:52:02 logid="0100022925" type="event" subtype="system"level="notice" vd="root" eventtime=1551383522 logdesc="Link monitor SLA information"name="ping" interface="R150" status="down" msg="Latency: 0.000, jitter: 0.000, packet loss:100.000%, inbandwidth: 0Mbps, outbandwidth: 200Mbps, bibandwidth: 200Mbps, sla_map: 0x0"
In the FortiAnalyzer GUI:
FortiOS 6.2 New Features Guide 245Fortinet Inc.

SD-WAN
Internet Service Customization
This version introduces new flexibility to tune Internet Service DB (ISDB) entries for their environments. A new CLI optionallows the admin to add custom port and port ranges into their predefined ISDB entries.
Use the new CLI config firewall internet-service-addition command in system global to tune ISDBfor your environment.
To add custom port range in global:
config firewall internet-service-addition edit 65646
set comment "Add custom port-range:tcp/8080-8090 into 65646" config entry edit 1
set protocol 6config port-range
edit 1set start-port 8080set end-port 8090
nextend
next end
nextend
To execute internet-service refresh to apply the change:
FGT-201E (65646) # end Warning: Configuration will only be applied after rebooting or using the 'execute internet-service refresh' command.
FGT-201E (global) # exec internet-service refresh Internet Service database is refreshed.
FortiOS 6.2 New Features Guide 246Fortinet Inc.

SD-WAN
To verify that the change was applied:
FGT-201E (global) # diagnose internet-service info FG-traffic 6 8080 2.20.183.160 Internet Service: 65646(Google.Gmail) FGT-201E (global) #
SLA Monitoring via REST API
This feature adds the ability to monitor the SLA log information and interface SLA information using the REST API. Thisfeature is also be used by FortiManager as part of its detailed SLA monitoring and drill-down features.
Interface log command example:
https://172.172.172.9/api/v2/monitor/virtual-wan/interface-log{"http_method":"GET","results":[{
"interface":"port13","logs":[{"timestamp":1547087168,"tx_bandwidth":3447,"rx_bandwidth":3457,"bi_bandwidth":6904,"tx_bytes":748875,"rx_bytes":708799,"egress_queue":[]
},{"timestamp":1547087178,"tx_bandwidth":3364,"rx_bandwidth":3400,"bi_bandwidth":6764,"tx_bytes":753789,"rx_bytes":712835,"egress_queue":[]
},........
SLA log command example:
https://172.172.172.9/api/v2/monitor/virtual-wan/sla-log{"http_method":"GET","results":[{
"name":"ping","interface":"port13",
FortiOS 6.2 New Features Guide 247Fortinet Inc.

SD-WAN
"logs":[{"timestamp":1547087204,"link":"up","latency":0.686433,"jitter":0.063400,"packetloss":0.000000
},{"timestamp":1547087205,"link":"up","latency":0.688433,"jitter":0.063133,"packetloss":0.000000
},{"timestamp":1547087206,"link":"up","latency":0.688300,"jitter":0.065267,"packetloss":0.000000
},........
CLI diagnose commands:
# diagnose sys virtual-wan-link sla-log ping 1Timestamp: Wed Jan 9 18:35:11 2019, vdom root, health-check ping, interface: port13,
status: up, latency: 0.698, jitter: 0.073, packet loss: 0.000%.Timestamp: Wed Jan 9 18:35:12 2019, vdom root, health-check ping, interface: port13,
status: up, latency: 0.704, jitter: 0.073, packet loss: 0.000%.Timestamp: Wed Jan 9 18:35:13 2019, vdom root, health-check ping, interface: port13,
status: up, latency: 0.709, jitter: 0.073, packet loss: 0.000%.Timestamp: Wed Jan 9 18:35:14 2019, vdom root, health-check ping, interface: port13,
status: up, latency: 0.707, jitter: 0.066, packet loss: 0.000%.Timestamp: Wed Jan 9 18:35:15 2019, vdom root, health-check ping, interface: port13,
status: up, latency: 0.710, jitter: 0.061, packet loss: 0.000%.Timestamp: Wed Jan 9 18:35:16 2019, vdom root, health-check ping, interface: port13,
status: up, latency: 0.707, jitter: 0.055, packet loss: 0.000%.Timestamp: Wed Jan 9 18:35:17 2019, vdom root, health-check ping, interface: port13,
status: up, latency: 0.703, jitter: 0.055, packet loss: 0.000%.
# diagnose sys virtual-wan-link intf-sla-log port13Timestamp: Wed Jan 9 18:33:49 2019, used inbandwidth: 3208bps, used outbandwidth:
3453bps, used bibandwidth: 6661bps, tx bytes: 947234bytes, rx bytes: 898622bytes.Timestamp: Wed Jan 9 18:33:59 2019, used inbandwidth: 3317bps, used outbandwidth:
3450bps, used bibandwidth: 6767bps, tx bytes: 951284bytes, rx bytes: 902937bytes.Timestamp: Wed Jan 9 18:34:09 2019, used inbandwidth: 3302bps, used outbandwidth:
3389bps, used bibandwidth: 6691bps, tx bytes: 956268bytes, rx bytes: 907114bytes.Timestamp: Wed Jan 9 18:34:19 2019, used inbandwidth: 3279bps, used outbandwidth:
3352bps, used bibandwidth: 6631bps, tx bytes: 958920bytes, rx bytes: 910793bytes.Timestamp: Wed Jan 9 18:34:29 2019, used inbandwidth: 3233bps, used outbandwidth:
3371bps, used bibandwidth: 6604bps, tx bytes: 964374bytes, rx bytes: 914854bytes.Timestamp: Wed Jan 9 18:34:39 2019, used inbandwidth: 3235bps, used outbandwidth:
3362bps, used bibandwidth: 6597bps, tx bytes: 968250bytes, rx bytes: 918846bytes.
FortiOS 6.2 New Features Guide 248Fortinet Inc.

SD-WAN
Timestamp: Wed Jan 9 18:34:49 2019, used inbandwidth: 3165bps, used outbandwidth:3362bps, used bibandwidth: 6527bps, tx bytes: 972298bytes, rx bytes: 922724bytes.
Timestamp: Wed Jan 9 18:34:59 2019, used inbandwidth: 3184bps, used outbandwidth:3362bps, used bibandwidth: 6546bps, tx bytes: 977282bytes, rx bytes: 927019bytes.
SD-WAN support for ADVPN - 6.2.1
With this feature, SD-WAN service rules can utilize the shortcut VPN to forward traffic between spokes. Previously,spoke to spoke traffic could only be forwarded by the hub, and could not take advantage of the ADVPN feature.
This user ADVPN with SD-WAN scenario uses two hubs, and each spoke connects to two ISPs and establishes VPNtunnels with each hub.
SD-WAN is configured on the spokes, and uses two VPN interfaces as members with rules to control traffic to otherspokes via the ADVPN shortcut VPN interfaces.
To configure a hub:
1. Configure the IPsec phase1 and phase2 interfaces:
config vpn ipsec phase1-interfaceedit "advpn-hub"
set type dynamicset interface "port9"set peertype anyset net-device disableset proposal aes128-sha256 aes256-sha256 3des-sha256 aes128-sha1 aes256-sha1
3des-sha1set add-route disableset dpd on-idleset auto-discovery-sender enableset tunnel-search nexthopset psksecret sampleset dpd-retryinterval 5
nextend
FortiOS 6.2 New Features Guide 249Fortinet Inc.

SD-WAN
config vpn ipsec phase2-interfaceedit "advpn-hub"
set phase1name "advpn-hub"set proposal aes128-sha1 aes256-sha1 3des-sha1 aes128-sha256 aes256-sha256 3des-
sha256next
end
2. Configure firewall policies:
config firewall policyedit 1
set name "spoke2hub"set srcintf "advpn-hub"set dstintf "port10"set srcaddr "all"set dstaddr "11.11.11.0"set action acceptset schedule "always"set service "ALL"
nextedit 2
set name "spoke2spoke"set srcintf "advpn-hub"set dstintf "advpn-hub"set srcaddr "all"set dstaddr "all"set action acceptset schedule "always"set service "ALL"
nextend
3. Configure the VPN interface:
config system interfaceedit "advpn-hub"
set ip 10.10.100.254 255.255.255.255set remote-ip 10.10.100.253 255.255.255.0
nextend
4. Configure BGP:
config router bgpset as 65412config neighbor-group
edit "advpn"set link-down-failover enableset remote-as 65412set route-reflector-client enable
nextendconfig neighbor-range
edit 1set prefix 10.10.100.0 255.255.255.0set neighbor-group "advpn"
next
FortiOS 6.2 New Features Guide 250Fortinet Inc.

SD-WAN
endconfig network
edit 1set prefix 172.16.101.0 255.255.255.0
nextend
end
To configure a spoke:
1. Configure the IPsec phase1 and phase2 interfaces:
config vpn ipsec phase1-interfaceedit "spoke1"
set interface "wan1"set peertype anyset net-device enableset proposal aes128-sha256 aes256-sha256 aes128-sha1 aes256-sha1set add-route disableset dpd on-idleset auto-discovery-receiver enableset remote-gw 11.1.1.11set psksecret sampleset dpd-retryinterval 5
nextedit "spoke1-2"
set interface "wan2"set peertype anyset net-device enableset proposal aes128-sha256 aes256-sha256 aes128-sha1 aes256-sha1set add-route disableset dpd on-idleset auto-discovery-receiver enableset remote-gw 11.1.2.11set monitor "spoke1"set psksecret sampleset dpd-retryinterval 5
nextendconfig vpn ipsec phase2-interface
edit "spoke1"set phase1name "spoke1"set proposal aes128-sha1 aes256-sha1 aes128-sha256 aes256-sha256 aes128gcm
aes256gcm chacha20poly1305set auto-negotiate enable
nextedit "spoke1-2"
set phase1name "spoke1_backup"set proposal aes128-sha1 aes256-sha1 aes128-sha256 aes256-sha256 aes128gcm
aes256gcm chacha20poly1305set auto-negotiate enable
nextend
FortiOS 6.2 New Features Guide 251Fortinet Inc.

SD-WAN
2. Configure firewall policies:
config firewall policyedit 1
set name "outbound_advpn"set srcintf "internal"set dstintf "spoke1" "spoke1-2"set srcaddr "all"set dstaddr "all"set action acceptset schedule "always"set service "ALL"
nextedit 2
set name "inbound_advpn"set srcintf "spoke1" "spoke1-2"set dstintf "internal"set srcaddr "all"set dstaddr "all"set action acceptset schedule "always"set service "ALL"
nextend
3. Configure the VPN interface:
config system interfaceedit "spoke1"
set ip 10.10.10.1 255.255.255.255set remote-ip 10.10.10.254 255.255.255.0
nextedit "spoke1-2"
set ip 10.10.10.2 255.255.255.255set remote-ip 10.10.10.254 255.255.255.0
nextend
4. Configure BGP:
config router bgpset as 65412config neighbor
edit "10.10.100.254"set advertisement-interval 1set link-down-failover enableset remote-as 65412
nextedit "10.10.200.254"
set advertisement-interval 1set link-down-failover enableset remote-as 65412
nextendconfig network
edit 1set prefix 10.1.100.0 255.255.255.0
next
FortiOS 6.2 New Features Guide 252Fortinet Inc.

SD-WAN
endend
5. Configure SD-WAN:
config system virtual-wan-linkset status enableconfig members
edit 1set interface "vd2-1"
nextedit 2
set interface "vd2-2"next
endconfig health-check
edit "ping"set server "11.11.11.11"set members 1 2end
nextendconfig service
edit 1set member 1set dst "001-100"
nextedit 2
set member 2set dst "100-200"
nextend
end
Factory default health checks - 6.2.1
This feature adds five predefined performance SLA profiles for newly created VDOMs or factory reset FortiGate devices:
l Office 365l AWSl Google Searchl Gmaill FortiGuard
To see and configure the SLA profiles, go to Network > Performance SLA.
FortiOS 6.2 New Features Guide 253Fortinet Inc.

SD-WAN
After configuring a health check, packet loss, latency, and jitter data will be shown. When a value is colored red, it meansthat it failed to meet the SLA requirements.
The performance SLA profiles can be configured in the CLI.
config system virtual-wan-linkconfig health-check
edit "Default_Office_365"set server "www.office.com"set protocol httpset interval 1000set recoverytime 10config sla
edit 1set latency-threshold 250set jitter-threshold 50set packetloss-threshold 5
nextend
next
FortiOS 6.2 New Features Guide 254Fortinet Inc.

SD-WAN
edit "Default_Gmail"set server "gmail.com"set interval 1000set recoverytime 10config sla
edit 1set latency-threshold 250set jitter-threshold 50set packetloss-threshold 2
nextend
nextedit "Default_AWS"
set server "aws.amazon.com"set protocol httpset interval 1000set recoverytime 10config sla
edit 1set latency-threshold 250set jitter-threshold 50set packetloss-threshold 5
nextend
nextedit "Default_Google Search"
set server "www.google.com"set protocol httpset interval 1000set recoverytime 10config sla
edit 1set latency-threshold 250set jitter-threshold 50set packetloss-threshold 5
nextend
nextedit "Default_FortiGuard"
set server "fortiguard.com"set protocol httpset interval 1000set recoverytime 10config sla
edit 1set latency-threshold 250set jitter-threshold 50set packetloss-threshold 5
nextend
nextend
end
FortiOS 6.2 New Features Guide 255Fortinet Inc.

SD-WAN
BGP route-map and selective rules - 6.2.1
BGP can adapt to changes in SD-WAN link SLAs:
l BGP in can send a different route-map to its BGP neighbor when IP SLA is not met.l Traffic can be selectively forwarded based on the status of the BGP neighbor. If the SD-WAN service's role matchesits selected role, the service is enabled. If the service role does not match the selected role, then the service isdisabled.
The following CLI commands are added:
config router bgpconfig neighbor
edit <ip_address>set route-map-out-preferable <route_map>
nextend
endconfig system virtual-wan-link
config neighboredit <ip_address>
set member <integer>set role {standalone | primary | secondary}set health-check <string>set sla-id <integer>
nextendconfig service
edit <rule_id>set role {standalone | primary | secondary}set standalone-action {enable | disable}
nextend
end
Command Description
edit <ip_address> IP address of the BGP neighbor.
route-map-out-preferable<route_map>
Outbound route map filter if the peer is preferred.
member <integer> Member sequence number.
role {standalone | primary |secondary}
Role of the neighbor.
health-check <string> SD-WAN health-check name.
sla-id <integer> SLA ID number.
role {standalone | primary |secondary}
Roles to work with the neighbor.
standalone-action {enable |disable}
Enable/disable service when the selected neighbor role is standalone and theservice role is not standalone.
FortiOS 6.2 New Features Guide 256Fortinet Inc.

SD-WAN
Examples
Example 1
Traffic is controlled when the SLA status changes by advertising a different community to the neighbor.
The customer is using two gateways, primary and secondary, that are located in different datacenters. The gatewayshave a full mesh network between them. Traffic flows to the primary SD-WAN gateway, unless the link is outside of theSLA, or completely down. When that happens, traffic routes to the secondary gateway. The SD-WAN neighbor isconfigured to let BGP advertise different communities when the SLA status changes. When the SLA becomes out ofcompliance, it triggers the route-map to send out a different community number to its BGP neighbor so that the neighborcan use the best path.
To configure the FortiGate device:
1. Configure BGP:
config router bgpset as 65412set router-id 1.1.1.1set ibgp-multipath enableconfig neighbor
edit "10.100.1.1"set soft-reconfiguration enableset remote-as 20set route-map-out "prim-fails"set route-map-out-preferable "comm1"
nextedit "10.100.1.5"
set soft-reconfiguration enableset remote-as 20set route-map-out "sec-fails"set route-map-out-preferable "comm2"
nextend
end
2. Configure the virtual WAN link:
config system virtual-wan-linkset status enableconfig members
edit 1set interface "port1"
nextedit 2
FortiOS 6.2 New Features Guide 257Fortinet Inc.

SD-WAN
set interface "port2"next
endconfig health-check
edit "ping"set server "10.100.2.22"set members 1config sla
edit 1next
endnextedit "ping2"
set server "10.100.2.23"set failtime 3000config sla
edit 2next
endnext
endconfig neighbor
edit "10.100.1.1"set member 1set role primaryset health-check "ping"set sla-id 1
nextedit "10.100.1.5"
set member 2set role secondaryset health-check "ping2"set sla-id 2
nextend
end
Example 2
Specific traffic is controlled using a service rule.
The customer wants only certain traffic to be forwarded to an SD-WANmember when both the primary BGP neighborand SLA statuses are good. Otherwise, the traffic is forwarded to a different SD-WANmember. If both the BGPneighbors' SLAs are out of compliance, SD-WAN will disable the service rules.
To configure the virtual WAN link:
config system virtual-wan-linkset status enableconfig members
edit 1set interface "port1"
nextedit 2
set interface "port2"
FortiOS 6.2 New Features Guide 258Fortinet Inc.

SD-WAN
nextendconfig health-check
edit "ping"set server "10.100.2.22"set members 1config sla
edit 1next
endnextedit "ping2"
set server "10.100.2.23"set failtime 3000config sla
edit 2next
endnext
endconfig neighbor
edit "10.100.1.1"set member 1set role primaryset health-check "ping"set sla-id 1
nextedit "10.100.1.5"
set member 2set role secondaryset health-check "ping2"set sla-id 2
nextendconfig service
edit 1set role primaryset member 1set dst "data-centerA"
nextedit 2
set role secondaryset member 2set dst "data-centerB"
nextend
end
Per-link controls for policy and SLA checks - 6.2.1
The following SD-WAN features are available for per-link controls for policy and SLA checks:
l Firewall policies can use SD-WANmembers as source and destination interfaces. This allows controlling traffic sothat certain types of traffic can only use certain SD-WANmembers.
FortiOS 6.2 New Features Guide 259Fortinet Inc.

SD-WAN
l Per link health-check parameters are supported in SLA configurations using the following CLI command:
config system virtual-wan-linkconfig service
edit <priority_rule>set sla-compare-method number
nextend
end
SLA values are compared based on the number of satisfied health-checks, and health-checks are limited toconfigured member interfaces only. The member with the most health-check passes is set as the priority member.This only applies to SLA mode and load-balance mode rules.
l The size of the virtual WAN link destination wildcard table in a policy route entry is increased to 32768 entries.
Example
In this example, a customer has four health checks and two SD-WANmembers:
l health-check1 and health-check2 check SD-WANmember1l health-check3 and health-check4 check SD-WANmember2
The customers wants traffic that is going to destination A to use the SD-WANmember that passes the most SLAs. Forexample, if health-check1 fails, then member1 only has one pass, while member2 has two passes, and traffic will usemember2 for forwarding. If both of member2's checks also failed, then traffic would use member1.
To configure the FortiGate device:
config system virtual-wan-linkconfig members
edit 1set interface "port1"
nextedit 2
set interface "port2"next
endconfig health-check
edit "ping1"set server "x.x.x.x"set members 1config sla
edit 1next
endnextedit "ping2"
set server "x.x.x.x"set members 1config sla
edit 1next
endnextedit "ping3"
FortiOS 6.2 New Features Guide 260Fortinet Inc.

SD-WAN
set server "x.x.x.x"set members 2config sla
edit 1next
endnextedit "ping4"
set server "x.x.x.x"set members 2config sla
edit 1next
endnext
endconfig service
edit 1set mode slaset dst "destination-A"config sla
edit "ping1"set id 1
nextedit "ping2"
set id 1nextedit "ping3"
set id 1nextedit "ping4"
set id 1next
endset priority-members 1 2set sla-compare-method number
nextend
end
Weighted random early detection support - 6.2.1
You can useWeighted Random Early Detection (WRED) queuing mechanism within traffic shaping.
This topic includes the following parts:
l Traffic shaping with queuingl Burst control in queuing model Multi-stage DSCPmarking and class-id in traffic shaper
You cannot configure or seeWRED in the GUI. You must use the CLI to configure WRED.
FortiOS 6.2 New Features Guide 261Fortinet Inc.

SD-WAN
WRED is not supported when traffic is offloaded to NPU.
Traffic shaping with queuing
Traffic shaping has a queuing option. Use this option to fine tune the queue by setting the profile queue size orperforming RED (Random Early Drop) according to queue usage.
The next example shows setting the profile queue size limit to 5 so that the queue can contain a maximum of five packetsand more packets are dropped.
To set the profile queue size limit:
config firewall shaping-profileedit "profile"
set type queuingset default-class-id 31config shaping-entries
edit 31set class-id 31set guaranteed-bandwidth-percentage 5set maximum-bandwidth-percentage 10set limit 5 <range from 5 to 10000; defult: 1000>
nextend
nextend
The next example shows performing RED (Random Early Drop) according to queue usage by setting red-probability, min, and max. Setting red-probability to 10means start to drop packets when queue usagereaches the min setting. When queue usage reaches the max setting, drop 10% of the packets.
l Level 1: when queue is less than min packets, drop 0% of packets.l Level 2: when queue reaches min packets, start to drop packets.l Level 3: when queue usage is between min and max packets, drop 0-10% of packets by proportion.l Level 4: when queue (average queue size) is more than max packets, drop 100% of packets.
To set RED according to queue usage:
config firewall shaping-profileedit "profile"
set type queuingset default-class-id 31config shaping-entries
edit 31set class-id 31set guaranteed-bandwidth-percentage 5set maximum-bandwidth-percentage 10set red-probability 10 <range from 0 to 20; default: 0 no drop>set min 100 <range from 3 to 3000>set max 300 <range from 3 to 3000>
next
FortiOS 6.2 New Features Guide 262Fortinet Inc.

SD-WAN
endnext
end
To troubleshoot this function, use the following diagnose commands:
diagnose netlink intf-class list <intf>diagnose netlink intf-qdisc list <intf>
Burst control in queuing mode
In HTB (Hierarchical Token Bucket) algorithm, each class of traffic has buckets to allow a burst of traffic. The maximumburst is determined by the buckets sizes burst (for guaranteed bandwidth) and cburst (for maximum bandwidth). Theshaping profile has burst-in-msec and cburst-in-msec parameters for each shaping entry (class id) to controlthe bucket size.
This example uses the outbandwidth of the interface as 1Mbps and the maximum bandwidth of class is 50%.
burst = burst-in-msec * guaranteed bandwidth = 100ms x 1Mbps x 50% = 50000b = 6250B
cburst = cburst-in-msec * maximum bandwidth = 200ms x 1Mbps x 50% = 100000b = 12500B
The following example sets burst-in-msec to 100 and cburst-in-msec to 200.
To set burst control in queuing mode:
config firewall shaping-profileedit "profile"
set type queuingset default-class-id 31config shaping-entries
edit 31set class-id 31set guaranteed-bandwidth-percentage 5set maximum-bandwidth-percentage 50set burst-in-msec 100 <range from 0 to 2000>set cburst-in-msec 200 <range from 0 to 2000>
nextend
nextend
Multi-stage DSCP marking and class-id in traffic shaper
Traffic shaper has a multi-stage method so that packets are marked with different DSCP and class id at differenttraffic speeds. Marking packets with different DSCP code is for the next hop to classify the packets. FortiGate benefits bymarking packets with a different class id. Combined with the egress interface shaping profile, FortiGate can handlethe traffic differently according to its class id.
Rule DSCP code Class ID
speed < guarantee bandwidth diffservcode class id in shaping policy
FortiOS 6.2 New Features Guide 263Fortinet Inc.

SD-WAN
Rule DSCP code Class ID
guarantee bandwidth < speed < exceed bandwidth exceed-dscp exceed-class-id
exceed bandwidth < speed maximum-dscp exceed-class-id
This example sets the following parameters:
l When current bandwidth is less than 50kbps, mark packets with diffservcode 100000 and set class id to 10.l When current bandwidth is between 50kbps and 100kbps, mark packets with exceed-dscp 111000 and setexceed-class-id to 20.
l When current bandwidth is more than 100kbps, mark packets with maximum-dscp 111111 and set exceed-class-id to 20.
To set multi-stage DSCP marking and class-id in traffic shaper:
config firewall shaper traffic-shaperedit "50k-100k-150k"
set guaranteed-bandwidth 50set maximum-bandwidth 150set diffserv enableset dscp-marking-method multi-stage <--- Newset exceed-bandwidth 100 <--- Newset exceed-dscp 111000 <--- New set exceed-class-id 20 <--- Newset maximum-dscp 111111 <--- Newset diffservcode 100000
nextendconfig firewall shaping-policy
edit 1set service "ALL"set dstintf PORT2set srcaddr "all"set dstaddr "all"set class-id 10
nextend
Traffic shaper also has an overhead option that defines the per-packet size overhead used in rate computation.
To set traffic shaper overhead option:
config firewall shaper traffic-shaperedit "testing"
set guaranteed-bandwidth 50set maximum-bandwidth 150set overhead 14 <range from 0 to 100>
nextend
FortiOS 6.2 New Features Guide 264Fortinet Inc.

SD-WAN
Examples
The first example shows how to enable RED for FTP traffic from QA. This example sets a maximum of 10% of thepackets to be dropped when queue usage reaches the maximum value.
To configure the firewall address:
config firewall addressedit QA_team
set subnet 10.1.100.0/24next
end
To set shaping policy to classify traffic into different class IDs:
config firewall shaping-policyedit 1
set service HTTPS HTTPset dstintf port1set srcaddr QA_teamset dstaddr allset class-id 10
nextedit 2
set service FTPset dstintf port1set srcaddr QA_teamset dstaddr allset class-id 20
nextend
To set shaping policy to define the speed of each class ID:
config firewall shaping-profile edit QA_team_profile set type queuing set default-class-id 30 config shaping-entries edit 1 set class-id 10 set guaranteed-bandwidth-percentage 50 set maximum-bandwidth-percentage 100 next edit 2 set class-id 20 set guaranteed-bandwidth-percentage 30 set maximum-bandwidth-percentage 60 set red-probability 10 next edit 3 set class-id 30 set guaranteed-bandwidth-percentage 20 set maximum-bandwidth-percentage 50 next
FortiOS 6.2 New Features Guide 265Fortinet Inc.

SD-WAN
end nextend
To apply the shaping policy to the interface:
config sys interfaceedit port1
set outbandwidth 10000set egress-shaping-profile QA_team_profile
nextend
To use diagnose commands to troubleshoot:
# dia netlink intf-class list port1class htb 1:1 root rate 1250000Bps ceil 1250000Bps burst 1600B/8 mpu 0B overhead 0B cburst1600B/8 mpu 0B overhead 0B level 7 buffer [00004e20] cbuffer [00004e20] Sent 11709 bytes 69 pkt (dropped 0, overlimits 0 requeues 0) rate 226Bps 2pps backlog 0B 0p lended: 3 borrowed: 0 giants: 0 tokens: 18500 ctokens: 18500class htb 1:10 parent 1:1 leaf 10: prio 1 quantum 62500 rate 625000Bps ceil 1250000Bps burst1600B/8 mpu 0B overhead 0B cburst 1600B/8 mpu 0B overhead 0B level 0 buffer [00009c40]cbuffer [00004e20] Sent 0 bytes 0 pkt (dropped 0, overlimits 0 requeues 0) rate 0Bps 0pps backlog 0B 0p lended: 0 borrowed: 0 giants: 0 tokens: 40000 ctokens: 20000class htb 1:20 parent 1:1 leaf 20: prio 1 quantum 37500 rate 375000Bps ceil 750000Bps burst1599B/8 mpu 0B overhead 0B cburst 1599B/8 mpu 0B overhead 0B level 0 buffer [0001046a]cbuffer [00008235] Sent 0 bytes 0 pkt (dropped 0, overlimits 0 requeues 0) rate 0Bps 0pps backlog 0B 0p lended: 0 borrowed: 0 giants: 0 tokens: 66666 ctokens: 33333class htb 1:30 parent 1:1 leaf 30: prio 1 quantum 25000 rate 250000Bps ceil 625000Bps burst1600B/8 mpu 0B overhead 0B cburst 1600B/8 mpu 0B overhead 0B level 0 buffer [000186a0]cbuffer [00009c40] Sent 11709 bytes 69 pkt (dropped 0, overlimits 0 requeues 0) rate 226Bps 2pps backlog 0B 0p lended: 66 borrowed: 3 giants: 0 tokens: 92500 ctokens: 37000class red 20:1 parent 20:0
# dia netlink intf-qdisc list port1qdisc htb 1: root refcnt 5 r2q 10 default 30 direct_packets_stat 0 ver 3.17 Sent 18874 bytes 109 pkt (dropped 0, overlimits 5 requeues 0) backlog 0B 0pqdisc pfifo 10: parent 1:10 refcnt 1 limit 1000p Sent 0 bytes 0 pkt (dropped 0, overlimits 0 requeues 0) backlog 0B 0pqdisc red 20: parent 1:20 refcnt 1 limit 4000000B min 300000B max 1000000B ewma 9 Plog 23Scell_log 20 flags 0 Sent 0 bytes 0 pkt (dropped 0, overlimits 0 requeues 0) backlog 0B 0p
FortiOS 6.2 New Features Guide 266Fortinet Inc.

SD-WAN
marked 0 early 0 pdrop 0 other 0qdisc pfifo 30: parent 1:30 refcnt 1 limit 1000p Sent 18874 bytes 109 pkt (dropped 0, overlimits 0 requeues 0) backlog 0B 0p
The second example shows how to mark QA traffic with different DSCP according to real-time traffic speed.
To configure the firewall address:
config firewall addressedit QA_team
set subnet 10.1.100.0/24next
end
To configure the firewall shaper traffic shaper:
config firewall shaper traffic-shaper edit "500k-1000k-1500k" set guaranteed-bandwidth 500 set maximum-bandwidth 1500 set diffserv enable set dscp-marking-method multi-stage set exceed-bandwidth 1000 set exceed-dscp 111000 set maximum-dscp 111111 set diffservcode 100000 nextendconfig firewall shaping-policy edit QA_team set service "ALL" set dstintf port1 set traffic-shaper "500k-1000k-1500k" set traffic-shaper-reverse "500k-1000k-1500k" set srcaddr "QA_team" set dstaddr "all" nextend
FortiOS 6.2 New Features Guide 267Fortinet Inc.

Multi-Cloud
This section lists the new features added to FortiOS for multi-cloud.
AWS Extensions
This section lists the new features added for AWS extensions.
Cross AZ High Availability support
FortiGate High Availability (Active/Passive) can be deployed in AWS across Availability Zones (AZs).
With FortiGates of an HA pair in separate AZs, one FortiGate can remain operational if the other AZ fails.
This configuration supports the following HA features:
l Config synchronizationl IP failoverl Route failover
The following HA features are not supported with this configuration:
l Session pickupl Session synchronization
Topology
FortiOS uses a normal HA configuration that uses unicast.
AWS uses the following configuration:
l 1 VPC 10.0.0.0/16 CIDRl 8 Subnets
l 4 in Availability Zone A - Primary FGTA has a NIC in each of these:l Public: 10.0.0.0/24 EIPl Internal: 10.0.1.0/24l Heartbeat: 10.0.2.0/24l Management: 10.0.3.0/24 EIP
l 4 in Availability Zone B - Secondary FGTB has a NIC in each of these:l Public 10.0.10.0/24l Internal 10.0.11.0/24l Heartbeat 10.0.12.0/24l Management 10.0.13.0/24 EIP
FortiOS 6.2 New Features Guide 268Fortinet Inc.

Multi-Cloud
l 3 AWS UDR Routing Tablesl For Public, add default route to Internet Gatewayl For Internal, add default to primary FortiGate internal NICl For all others, leave it default with AWS local address
Example
The configuration is the same as regular AWS HA unicast peering.
On the primary device:
config system interfaceedit "port1"
set vdom "root"set ip 10.0.0.11 255.255.255.0set allowaccess ping https ssh snmp http telnet fgfm radius-acct probe-response
capwap ftmset type physicalset snmp-index 1set mtu-override enableset mtu 9001
nextedit "port2"
set vdom "root"set ip 10.0.1.11 255.255.255.0set allowaccess ping https ssh snmp http telnet fgfm radius-acct probe-response
capwap ftmset type physicalset snmp-index 3set mtu-override enableset mtu 9001
nextedit "port3"
set ip 10.0.2.11 255.255.255.0set allowaccess ping https ssh snmp http telnet fgfm radius-acct probe-response
capwap ftmset type physicalset snmp-index 4
nextedit "port4"
set ip 10.0.3.11 255.255.255.0set allowaccess ping https ssh snmp http telnet fgfm radius-acct probe-response
capwap ftmset type physicalset snmp-index 5
nextedit "ssl.root"
set vdom "root"set type tunnelset alias "SSL VPN interface"set snmp-index 2
nextendconfig router static
edit 1set gateway 10.0.0.1
FortiOS 6.2 New Features Guide 269Fortinet Inc.

Multi-Cloud
set device "port1"nextedit 2
set dst 10.0.11.0 255.255.255.0set gateway 10.0.1.1set device "port2"
nextendconfig system ha
set group-name "test"set mode a-pset hbdev "port3" 50set session-pickup enableset ha-mgmt-status enableconfig ha-mgmt-interfaces
edit 1set interface "port4"set gateway 10.0.3.1
nextendset override disableset priority 255set unicast-hb enableset unicast-hb-peerip 10.0.12.11
end
On the secondary device:
config system interfaceedit "port1"
set vdom "root"set ip 10.0.10.11 255.255.255.0set allowaccess ping https ssh snmp http telnet fgfm radius-acct probe-response
capwap ftmset type physicalset snmp-index 1set mtu-override enableset mtu 9001
nextedit "port2"
set vdom "root"set ip 10.0.11.11 255.255.255.0set allowaccess ping https ssh snmp http telnet fgfm radius-acct probe-response
capwap ftmset type physicalset snmp-index 2set mtu-override enableset mtu 9001
nextedit "port3"
set ip 10.0.12.11 255.255.255.0set allowaccess ping https ssh snmp http telnet fgfm radius-acct probe-response
capwap ftmset type physicalset snmp-index 3set mtu-override enableset mtu 9001
FortiOS 6.2 New Features Guide 270Fortinet Inc.

Multi-Cloud
nextedit "port4"
set ip 10.0.13.11 255.255.255.0set allowaccess ping https ssh snmp http telnet fgfm radius-acct probe-response
capwap ftmset type physicalset snmp-index 4set mtu-override enableset mtu 9001
nextedit "ssl.root"
set vdom "root"set type tunnelset alias "SSL VPN interface"set snmp-index 5
nextendconfig router static
edit 1set gateway 10.0.10.1set device "port1"
nextedit 2
set dst 10.0.1.0 255.255.255.0set gateway 10.0.11.1set device "port2"
nextendconfig system ha
set group-name "test"set mode a-pset hbdev "port3" 50set session-pickup enableset ha-mgmt-status enableconfig ha-mgmt-interfaces
edit 1set interface "port4"set gateway 10.0.13.1
nextendset override disableset priority 1set unicast-hb enableset unicast-hb-peerip 10.0.2.11
end
When a failover is triggered, confirm that the secondary becomes the primary device:
# diagnose debug application awsd -1# diagnose debug enable
Autoscale with Transit GW support - 6.2.1
FortiGate autoscaling on AWS with Transit Gateway is supported. FortiGate autoscaling on AWS supports TransitGateway requirements. When a FortiGate is located at the VPN termination point in a Transit Gateway, it scales and
FortiOS 6.2 New Features Guide 271Fortinet Inc.

Multi-Cloud
dynamically changes the VPN and routing configurations as the Transit Gateway scales. At the same time, HAconfiguration synchronization is preserved.
The VPN and routing information can be configured by an administrator, or added by a Lambda function or other AWScomponent.
The following VDOM exception objects are now available:
config system vdom-exceptionedit <id>
vpn.ipsec.phase1-interfacevpn.ipsec.phase2-interfacerouter.bgprouter.route-maprouter.prefix-listfirewall.ippool
nextend
Autoscale must be enabled for the VDOM exceptions to be available:
config system auto-scaleset status enable
end
Autoscale cannot be disabled if the VDOM exceptions entries are in use.
To configure autoscaling on FortiGate devices in HA for AWS Transit Gateway:
1. Configure VDOM exceptions on the primary FortiGate. These settings will also be propagated to the secondary HAdevice.
config system vdom-exceptionedit 1
set object vpn.ipsec.phase1-interfacenextedit 2
set object vpn.ipsec.phase2-interfacenextedit 3
set object router.bgpnextedit 4
set object router.route-mapnextedit 5
set object router.prefix-listnextedit 6
set object firewall.ippoolnext
end
2. On the primary FortiGate, configure an item under the following CMDB paths:
config vpn ipsec phase1-interfaceedit "1"
FortiOS 6.2 New Features Guide 272Fortinet Inc.

Multi-Cloud
set interface "port1"set peertype anyset net-device disableset proposal aes128-sha256 aes256-sha256 aes128-sha1 aes256-sha1set remote-gw 2.2.2.2set psksecret ********
nextendconfig vpn ipsec phase2-interface
edit "1"set phase1name "1"set proposal aes128-sha1 aes256-sha1 aes128-sha256 aes256-sha256 aes128gcm
aes256gcm chacha20poly1305next
endconfig router bgp
config redistribute "connected"set status enable
endendconfig router route-map
edit "1"next
endconfig router prefix-list
edit "1"next
endconfig firewall ippool
edit "1"set startip 1.1.1.1set endip 1.1.1.10
nextend
3. On the secondary device, confirm that the PMDB paths are not synchronized:
show vpn ipsec phase1-interfaceconfig vpn ipsec phase1-interfaceend
show vpn ipsec phase2-interfaceconfig vpn ipsec phase2-interfaceend
show router bgpconfig router bgp
config redistribute "connected"end...
show router route-mapconfig router route-mapend
show router prefix-listconfig router prefix-listend
show firewall ippoolconfig firewall ippoolend
FortiOS 6.2 New Features Guide 273Fortinet Inc.

Multi-Cloud
4. Confirm that the HS cluster-checksum is the same on both the primary and secondary devices:
# diagnose sys ha checksum show
# diagnose sys ha checksum show
FortiCare-generated license adoption for AWS PAYG variant - 6.2.2
FortiGate pay as you go (PAYG) instances were using locally self-generated licenses, which posed limitations withinstalling other licenses, such as FortiToken. The new implementation uses FortiCare-generated licenses to resolvethese problems.
FortiGate-VM AWS PAYG instances can now obtain FortiCare-generated licenses and register to FortiCare.
The valid license allows you to register to FortiCare to use features including FortiToken with the FortiGate-VM instance.
The FortiGate-VMmust be able to reach FortiCare to receive a valid PAYG license. Ensure connectivity to FortiCare(https://directregistration.fortinet.com/) by checking all related setup on security groups, access control lists, Internetgateways, route tables, public IP addresses, and so on.
If the FortiGate-VM instance is created in a closed environment or unable to reach FortiCare, the FortiGate-VM self-generates a local license as in previous versions of FortiOS. You can obtain a FortiCare license, ensure that theFortiGate-VM is able to connect to FortiCare, then run the execute vm-license command to obtain the license fromFortiCare.
To deploy a FortiGate-VM 6.2 AWS PAYG instance:
When deploying a FortiGate-VM PAYG instance for AWS, you will use the FGT_VM64_AWS-v6-buildXXXX-FORTINET.out image. After deployment with this image, running get system status results in output that includesthe following lines:
Version: FortiGate-VM64-AWS v6.2.2,buildXXXX,XXXXXX (GA)Virus-DB: 71.00242(2019-08-30 08:19)Extended DB: 1.00000(2018-04-09 18:07)Extreme DB: 1.00000(2018-04-09 18:07)IPS-DB: 6.00741(2015-12-01 02:30)IPS-ETDB: 0.00000(2001-01-01 00:00)APP-DB: 6.00741(2015-12-01 02:30)INDUSTRIAL-DB: 6.00741(2015-12-01 02:30)Serial-Number: FGTAWS12345678
To upgrade a FortiGate-VM AWS PAYG instance from FortiOS 6.2.1 and earlier to 6.2:
Earlier versions used the FGT_VM64_AWSONDEMAND-v6-buildXXXX-FORTINET.out image to deploy a FortiGate-VM AWS PAYG instance. In 6.2, the FGT_VM64_AWS-v6-buildXXXX-FORTINET.out image is used to deploy aFortiGate-VM AWS PAYG instance.
FortiOS 6.2 New Features Guide 274Fortinet Inc.

Multi-Cloud
When upgrading from an earlier FortiOS version, you must first upgrade using the FGT_VM64_AWSONDEMANDimage, then use the FGT_VM64_AWS image.
1. In FortiOS, perform an upgrade using the FGT_VM64_AWSONDEMAND-v6-buildXXXX-FORTINET.out image.2. Perform another upgrade, this time using the FGT_VM64_AWS-v6-buildXXXX-FORTINET.out image. This process
is irreversible.
3. Run get system status results in output that includes the following lines:Version: FortiGate-VM64-AWS v6.2.2,buildXXXX,XXXXXX (GA)Virus-DB: 71.00246(2019-08-30 12:19)Extended DB: 1.00000(2018-04-09 18:07)Extreme DB: 1.00000(2018-04-09 18:07)IPS-DB: 14.00680(2019-08-30 02:29)IPS-ETDB: 0.00000(2001-01-01 00:00)APP-DB: 14.00680(2019-08-30 02:29)INDUSTRIAL-DB: 14.00680(2019-08-30 02:29)Serial-Number: FGTAWS1234567890
4. For future upgrades, use the FGT_VM64_AWS-v6-buildXXXX-FORTINET.out image to retain PAYG status. Youcannot directly upgrade a FortiGate-VM AWS PAYG instance from 6.2.1 or earlier to 6.2.3 and later versions. Youmust first follow the procedure detailed above.
Azure extensions
This section lists the new features added for Azure extensions.
SR-IOV support - 6.2.1
Azure supports SR-IOV, which accelerates networking by allowing VM NICs to bypass the hypervisor and go directly tothe PCIe card underneath. FortiOS must understand when it is using SR-IOV and change networking to accommodateSR-IOV.
Azure refers to SR-IOV as Accelerated Networking. You can check if it is enabled by checking the NIC attached to theVM through the GUI or CLI.
To configure accelerated networking:
1. You can enable accelerated networking when instantiating a new VM, or enable it after the VM has been created.Do one of the following:a. To enable accelerated networking using the GUI, create a new VM or select an existing VM. On the Networking
tab, for Accelerated networking, selectOn.
FortiOS 6.2 New Features Guide 275Fortinet Inc.

Multi-Cloud
b. To enable accelerated networking using the CLI:root@mail:/home/azure/images# az network nic update -g <VM name>-n <NIC name> --
accelerated-networking true{"dnsSettings": {"appliedDnsServers": [],"dnsServers": [],"internalDnsNameLabel": null,"internalDomainNameSuffix": "k41kcrl04yeezbyeswqimbxshb.fx.internal.cloudapp.net","internalFqdn": null},"enableAcceleratedNetworking": true,
On the FortiOS side, a virtual interface is created in the format of sriovslv(number) for each NIC that has acceleratednetworking enabled:<VM name> # fnsysctl ifconfigport1 Link encap:Ethernet HWaddr 00:0D:3A:B4:87:70
inet addr:172.29.0.4 Bcast:172.29.0.255 Mask:255.255.255.0UP BROADCAST RUNNING MULTICAST MTU:1500 Metric:1RX packets:5689 errors:0 dropped:0 overruns:0 frame:0TX packets:0 errors:0 dropped:0 overruns:0 carrier:0collisions:0 txqueuelen:1000RX bytes:1548978 (1.5 MB) TX bytes:0 (0 Bytes)
sriovslv0 Link encap:Ethernet HWaddr 00:0D:3A:B4:87:70UP BROADCAST RUNNING SLAVE MULTICAST MTU:1500 Metric:1RX packets:35007 errors:0 dropped:0 overruns:0 frame:0TX packets:33674 errors:0 dropped:0 overruns:0 carrier:0collisions:0 txqueuelen:1000RX bytes:34705194 (33.1 MB) TX bytes:10303956 (9.8 MB)
The NIC shows the driver as hv_netvsc with accelerated networking enabled or disabled:<VM name> # diagnose hardware deviceinfo nic port1Name: port1Driver: hv_netvsc
The FortiOS GUI does not display the virtual interface:
FortiOS 6.2 New Features Guide 276Fortinet Inc.

Multi-Cloud
To check if accelerated networking is enabled using the GUI:
1. In the Azure management console, go to the desired VM, then Networking.2. Select the desired NIC. In this example, accelerated networking is shown as enabled.
To check if accelerated networking is enabled using the GUI:
root@mail:/home/azure/images# az network nic show -g <VM name> -n <NIC name>
Check that the following displays as part of the output: "enableAcceleratedNetworking": true,
Support HA between AZs - 6.2.1
High availability (HA) between availability zones (AZs) on Azure is supported.
Azure HA solves the problem of availability when a FortiGate goes down. Azure HA across AZs solves the problem ofwhat happens when Azure goes down, which ensures the maximum amount of uptime for customers.
To configure HA between AZs:
1. Ensure FortiGate A and FortiGate B are in different availability zones in Azure.In the following example, FortiGate A is in availability zone 1:
FortiGate B is in availability zone 2:
FortiOS 6.2 New Features Guide 277Fortinet Inc.

Multi-Cloud
2. For each FortiGate, go to Identity > System assigned, and set Status toOn.
3. For each FortiGate, under Add role assignment, set Role to Contributor.
4. Set the public IP address:
a. For the SKU option, select Standard.b. In the Availability zone list, select Zone-redundant.
FortiOS 6.2 New Features Guide 278Fortinet Inc.

Multi-Cloud
When a failover is triggered, the secondary device becomes the primary device. Use the following diagnosecommand to confirm HA change:
# diagnose debug application awsd -1# diagnose debug enable
Azure SDN connector support for non-VM resources - 6.2.3
In FortiOS 6.2, support has been added for non-VM resources (load balancers and application gateways) to Azure SDNconnectors, which can be configured in the GUI or CLI.
Prior to FortiOS 6.2, only IP addresses of VMs were supported.
The tag filter now supports the VM, VMSS, application gateway (applicationgateway=<name>), and load balancer types(loadbalancer=<name>).
VPN gateways are currently not supported.
To configure an internet-facing load balancer address in the GUI:
1. Go to Policy & Objects > Addresses.2. Click Create New > Address and enter a name.3. Configure the following settings:
a. For Type, select Dynamic.b. For Sub Type, select Fabric Connector Address.c. For SDN Connector, select azure-dev.d. For SDN address type, select All.e. For Filter, enter Tag.devlb=lbkeyvalue.
4. ClickOK.
The corresponding IP addresses are dynamically updated and resolved after applying the tag filter.5. In the address table, hover over the address to view what IP it resolves to:
FortiOS 6.2 New Features Guide 279Fortinet Inc.

Multi-Cloud
6. In Azure, verify to confirm the IP address matches:
To configure an internet-facing load balancer in the CLI:
config firewall addressedit "taginternetfacinglb"
set type dynamicset sdn "azure-dev"set filter "Tag.devlb=lbkeyvalue"set sdn-addr-type all
nextend
Google Cloud Platform (GCP) Extensions
This section lists the new features added for GCP extensions.
HA Between Zones
6.2 supports auto-scaling HA (High Availability) between Zones in Google Cloud environments.
Example
Following is an overview of how the feature works:
1. Create FGT-A as a primary on one zone with metadata that has ha-primary configuration.2. Create FGT-B as a secondary on another zone with metadata that has ha-secondary configuration.3. Create a PC that can access the Internet via FGT-HA.4. Shut down FGT-A, and FGT-B become the primary to handle traffic. The public EIP will attach to FGT-B.
FortiOS 6.2 New Features Guide 280Fortinet Inc.

Multi-Cloud
To configure HA between zones:
1. Create 4 VPC networks in region, such as us-central1.
2. Create routes for each network.
3. Create firewall rules for each network.
4. Reserve three external IP addresses for convenience.
FortiOS 6.2 New Features Guide 281Fortinet Inc.

Multi-Cloud
5. Create both FGT-A and FGT-B in GCP:gcloud beta compute --project=dev-project-001-166400 instances create fhua-fgt-a --
zone=us-central1-c --machine-type=n1-standard-4 --network-tier=PREMIUM --can-ip-forward --maintenance-policy=MIGRATE --service-account=966517025500-compute@developer.gserviceaccount.com --scopes=https://www.googleapis.com/auth/cloud-platform --image=fhua-ond-0804 --image-project=dev-project-001-166400 --boot-disk-type=pd-standard --boot-disk-device-name=fhua-fgt-0804 --network-interface subnet=fhua-hapvc-port1external,private-network-ip=10.0.0.15,address=104.154.241.0 --network-interface subnet=fhua-hapvc-port2internal,private-network-ip=10.0.1.15,no-address --network-interface subnet=fhua-hapvc-port3heartbeat,private-network-ip=10.0.2.15,no-address --network-interface subnet=fhua-hapvc-port4mgmt,private-network-ip=10.0.3.15,address=104.154.25.116 --metadata-from-file user-data=/home/gcloud/config/master.conf
gcloud beta compute --project=dev-project-001-166400 instances create fhua-fgt-b --zone=us-central1-a --machine-type=n1-standard-4 --network-tier=PREMIUM --can-ip-forward --maintenance-policy=MIGRATE --service-account=966517025500-compute@developer.gserviceaccount.com --scopes=https://www.googleapis.com/auth/cloud-platform --image=fhua-ond-0804 --image-project=dev-project-001-166400 --boot-disk-type=pd-standard --boot-disk-device-name=fhua-fgt-0804 --network-interface subnet=fhua-hapvc-port1external,private-network-ip=10.0.0.16,no-address --network-interfacesubnet=fhua-hapvc-port2internal,private-network-ip=10.0.1.16,no-address --network-interface subnet=fhua-hapvc-port3heartbeat,private-network-ip=10.0.2.16,no-address--network-interface subnet=fhua-hapvc-port4mgmt,private-network-ip=10.0.3.16,address=35.226.235.236 --metadata-from-file user-data=/home/gcloud/config/slave.conf
After the FGT-VM-GCP is set up, you can view it in the FortiOS GUI:
6. Configure FGT-A:config system ha
set group-id 21set group-name "cluster1"set mode a-pset hbdev "port3" 50set session-pickup enableset session-pickup-connectionless enableset ha-mgmt-status enableconfig ha-mgmt-interfaces
edit 1set interface "port4"set gateway 10.0.3.1
nextendset override enableset priority 200set unicast-hb enable
FortiOS 6.2 New Features Guide 282Fortinet Inc.

Multi-Cloud
set unicast-hb-peerip 10.0.2.16set unicast-hb-netmask 255.255.255.0
endconfig system sdn-connector
edit "gcp_conn"set type gcpset ha-status enableconfig external-ip
edit "fhua-reserve-fgthapublic"next
endconfig route
edit "fhua-route-internal"next
endset use-metadata-iam disable
set gcp-project "..."set service-account "..."set private-key "..."
nextend
7. Configure FGT-B:config system ha
set group-id 21set group-name "cluster1"set mode a-p set hbdev "port3" 50set session-pickup enableset session-pickup-connectionless enableset ha-mgmt-status enableconfig ha-mgmt-interfaces
edit 1set interface "port4"set gateway 10.0.3.1
nextendset override enableset priority 20set unicast-hb enableset unicast-hb-peerip 10.0.2.15set unicast-hb-netmask 255.255.255.0
end
8. Create a PC that can access the Internet via FGT-HA.
Auto Scaling
This version supports auto scaling for Google Cloud environments.
Sample configuration
To set up auto scaling for a Google Cloud environment:
1. Create an instance template with Google Cloud Platform console.2. Create an instance group with Google Cloud Platform console.3. Set the first FortiGate VM in the auto scaling group as the primary member.
FortiOS 6.2 New Features Guide 283Fortinet Inc.

Multi-Cloud
4. Scale out another FortiGate VM and set it as a secondary member; and then synchronize configuration fromprimary to secondary.
To create an instance template with Google Cloud Platform console:
1. Go to Instance templates console and click CREATE INSTANCE TEMPLATE.
2. Configure the instance template.l Enter the instance template Name, for example instance-template-demo.l Select theMachine type.l Change Boot disk to your FortiGate VM image.l In the Firewall section, select Allow HTTP traffic and Allow HTTPS traffic.l Click Create.
FortiOS 6.2 New Features Guide 284Fortinet Inc.

Multi-Cloud
3. Go to Instance templates console and check that your instance template is created.
To create an instance group with Google Cloud Platform console:
1. Go to Instance groups console and click CREATE INSTANCE GROUP.
2. Configure the instance group.l Enter the instance group Name, for example instance-group-demo.l Select the Instance template you created.l For Autoscaling, selectOn.
l For Autoscaling policy, select CPU usage.l Enter the Target CPU usage percentage. For example, 60%.l Enter theMaximum number of instances that you want for this instance group.l If desired, enter theMinimum number of instances and Cool down period.The cool down period is the number of seconds auto scaling waits after a VM starts before collectinginformation from it. The time is typically the VM initialization time, when the collected usage is not reliable for
FortiOS 6.2 New Features Guide 285Fortinet Inc.

Multi-Cloud
auto scaling. The default cool down period is 60 seconds.l Click Create.
3. Go to Instance groups console and check that your instance group is created.
4. Wait a few moments and click the instance group to check if an instance was launched automatically, since theminimum number of instances is set to 1.In this example, the first FortiGate VM instance name is instance-group-demo-2kp9.
To set the first FortiGate VM in the auto scaling group as the primary member:
1. Log into the FortiGate VM as administrator and the instance ID as the default password.2. Use the CLI to enable auto scaling and set the role to primary:
config system auto-scaleset status enableset role master
FortiOS 6.2 New Features Guide 286Fortinet Inc.

Multi-Cloud
set sync-interface "port1"set psksecret xxxxxx
end
3. In the GUI, go to the Dashboard Virtual Machine widget to check that Auto Scaling is enabled and Role isMaster.
To scale out another FortiGate VM and set it as a secondary member; and then synchronizeconfiguration from primary to secondary:
1. Generate test traffic on the FortiGate VM where the CPU rate is higher than the instance group target CPU usage.For test purpose, you can also change the target CPU usage to a small value.The instance group will trigger to scale out an new FortiGate VM.In this example, the second FortiGate VM instance name is instance-group-demo-mq3v.
2. Log into the second FortiGate VM as administrator and the instance ID as the default password.Use the CLI to enable auto scaling and set the role to secondary.For the master-ip, use the IP of the primary member sync interface. The primary IP should be the primary sideprivate IP address.Check that the configuration can be synced from the primary member to the secondary member.
config system auto-scaleset status enableset role slaveset sync-interface "port1"set master-ip 10.128.0.41set psksecret xxxxxx
end
FortiOS 6.2 New Features Guide 287Fortinet Inc.

Multi-Cloud
3. Wait a few moments for the secondary member to sync with the primary member; and then the secondary membercan sync the FortiGate configuration from the primary member.
FortiGate-VM64-GCPON~AND # diag deb app hasync -1slave's configuration is not in sync with master's, sequence:0slave's configuration is not in sync with master's, sequence:1slave's configuration is not in sync with master's, sequence:2slave's configuration is not in sync with master's, sequence:3slave's configuration is not in sync with master's, sequence:4slave starts to sync with masterlogout all admin users
Oracle Cloud Extensions
This section lists the new features added for Oracle Cloud extensions.
IAM Authentication
This feature adds the ability to use IAM credentials for Oracle Cloud Infrastructure (OCI) SDN connector functionality,including HA and dynamic address updating.
Prior to enabling IAM credentials for an SDN connector, a dynamic group and policy must configured on OCI. The SDNconnector can then be configured using the FortiGate CLI or GUI.
To configure OCI:
1. Create a Dynamic Group that includes rules to allow an instance that matches the FortiGate HA device's instanceID. For example:
ALL {instance.id ='ocid1.instance.oc1.iad.abuwcljtkqllbq6yxgxtowybgc4ht6sxqpfccckjj23p6pbfmvbl52uttbiq'}
ALL {instance.id ='ocid1.instance.oc1.iad.abuwcljttcylhekauqy42jzpsnu2dkalbhnlulqxfe2az24fktcuhtj65vnq'}
FortiOS 6.2 New Features Guide 288Fortinet Inc.

Multi-Cloud
2. Create a policy that allows that group to manage all resources:Allow dynamic-group API to manage all-resources in TENANCY
To Configure the FortiGate using the CLI:
1. Configure the SDN connector:config system sdn-connector
edit "oci-sdn"set status enableset type ociset ha-status enableset tenant-id
"ocid1.tenancy.oc1..aaaaaaaambr3uzztoyhweohbzqqdo775h7d3t54zpmzkp4b2cf35vs55ck3a"
set user-id"ocid1.user.oc1..aaaaaaaaq2lfspeo3uetzbzpiv2pqvzzevozccnys347stwssvizqlatfv7q"
set compartment-id"ocid1.tenancy.oc1..aaaaaaaambr3uzztoyhweohbzqqdo775h7d3t54zpmzkp4b2cf35vs55ck3a"
FortiOS 6.2 New Features Guide 289Fortinet Inc.

Multi-Cloud
set oci-region ashburnset oci-cert ''set use-metadata-iam enableset update-interval 60
nextend
2. Confirm that the HA failover succeeds on the secondary HA device:
# diagnose debug application awsd -1# diagnose debug enable
To Configure the FortiGate using the GUI:
1. Go to Security Fabric > Fabric Connectors.2. Click Create New, then selectOracle Cloud Infrastructure (OCI) from the SDN category.3. Fill in the Name, User ID,OCI tenant ID, andOCI compartment ID.4. Enable Use metadata IAM.
5. Configure the Update Interval and Status, then clickOK.6. Go to Policy and Objects > Addresses to check that the dynamic address can update.
Paravirtualized Mode Support
FGT_VM64_OPC now supports the new paravirtualized mode on Oracle Cloud Infrastructure (OCI).
The below instructions assume that the user already has an OCI account.
To launch a FortiGate-VM instance with paravirtualized mode:
1. Obtain the deployment image file:a. Go to Customer Service & Support. Navigate to Download > VM Images in the top menu.b. In the Select Product dropdown list, select FortiGate.c. In the Select Platform dropdown list, selectOracle.d. Obtain the FGT_VM64_OPC-vX-buildXXXX-FORTINET.out.OpenXen.zip file. XXXX is the build number.
Ensure the file name includes OpenXen.e. After downloading, unzip the file. You will find the forties.qcow2 file, which is needed to deploy the FortiGate on
OCI. Rename the file to FGT_VM64_OPC-v6-build0805-FORTINET.out.OpenXen.qcow2.
FortiOS 6.2 New Features Guide 290Fortinet Inc.

Multi-Cloud
2. Upload the deployment image file:a. In OCI, go to Storage > Object Storage. Click an existing storage bucket or create a new bucket.b. Select the desired bucket, then upload the deployment image file FGT_VM64_OPC-v6-build0805-
FORTINET.out.OpenXen.qcow2.c. Click Upload Object. The dialog shows the upload progress.
3. Copy the qcow2 file URL:a. From the Storage > Object Storage > Bucket Details page, click Create Pre-Authenticated Requests.b. Copy the URL under PRE-AUTHENTICATED REQUEST URL.
4. Create a FortiGate-VM image in paravirtualized mode:a. In OCI, go to Compute > Custom Images, then click Import Image.b. In theOBJECT STORAGE URL field, paste the URL copied in step 3.c. Under IMAGE TYPE, selectQCOW2.d. Under LAUNCHMODE, select PARAVIRTUALIZEDMODE.e. Configure other fields as desired, then click Import Image.
FortiOS 6.2 New Features Guide 291Fortinet Inc.

Multi-Cloud
5. On the Image Details page, click Create Instance to create an instance with the newly created image.
The paravirtualized mode FortiGate-VM instance boots up and functions as expected.
Native Mode Support for OCI
FGT_VM64_OPC now supports native mode on Oracle Cloud Infrastructure (OCI), in addition to emulation mode andparavirtualized mode. This version also supports iSCSI type hard disks.
To create a native mode FGT_VM64_OPC custom image:
1. Download the FGT image for OCI. The naming convention is: FGT_VM64_OPC-v6-buildxxxx-FORTINET.out.OpenXen.zip.
2. Unzip the file to get fortios.qcow2.3. Upload fortios.qcow2 to the OCI object storage and copy the file URL path (URI), for example,
https://objectstorage.us-ashburn-1.oraclecloud.com/n/fortinetoraclecloud1/b/fhua-bucket002/o/fortios.qcow2.
4. Log into the Oracle Cloud web portal and go to Compute > Custom Images > Import Image.5. Enter the image NAME, in this example, fhua-temp-b0838-native.6. ForOPERATING SYSTEM, select Linux.7. For theOBJECT STORAGE URL, paste the URI you copied when you uploaded fortios.qcow2.8. For IMAGE TYPE, selectQCOW2.9. For LAUNCHMODE, select NATIVE MODE.
FortiOS 6.2 New Features Guide 292Fortinet Inc.

Multi-Cloud
10. Click Import Image.
When the import is complete, the FortiGate for OCI custom image is available. In this example, the custom imagename is fhua-temp-b0838-native.
To create a FGT_VM64_OPC instance with the native mode custom image:
1. Log into the Oracle Cloud web portal and go to Compute > Instances > Create Instance.2. In Name your instance, enter your FGT-VM instance name.3. Select an availability domain for your instance.4. Select the image source fhua-temp-b0838-native that you configured in the previous procedure.5. For Choose instance type, select Bare Metal Machine.
FortiOS 6.2 New Features Guide 293Fortinet Inc.

Multi-Cloud
6. Click Change Shape and select your instance shape, for example, BM.Standard2.52.
7. Leave Configure boot volume as default.8. If necessary, add your SSH key file.9. Select your Virtual cloud network and Subnet.10. Click Create.
11. Wait for the instance to run.You can access the FGT-VM using your SSH key or the default username/password of admin/ocid.
FortiOS 6.2 New Features Guide 294Fortinet Inc.

Multi-Cloud
12. Hover your pointer over the… to the right of the FGT-VM and click View Instance Details.The Instance Information tab shows that Launch Mode is NATIVE.
To attach a hard disk to the FGT_VM64_OPC with iSCSI mode:
1. On the Instance Details page navigation bar, click Attached Block Volumes and then click Attach Block Volume.2. In the Attach Block Volume dialog box, select ISCSI.3. Select the BLOCK VOLUME COMPARTMENT.4. Select the BLOCK VOLUME.5. Leave ACCESS as default.6. Click Attach.
7. Wait for the block volume to be attached.8. In the Instance Details page, hover your pointer over the… to the right of the block volume entry and click iSCSI
Commands & Information.This dialog box shows this iSCSI's IP address and IQN.
FortiOS 6.2 New Features Guide 295Fortinet Inc.

Multi-Cloud
To configure the iSCSI hard disk in FortiGate using CLI:
config system iscsiedit "i1"
set ip <class_ip> set iqn <string>
nextend
For example:
config system iscsiedit "Demo-iSCSI-HD"
set ip 169.254.2.4set iqn "iqn.2015-12.com.oracleiaas:debf5040-260a-4a28-a00e-da172baa6698"
nextend
To connect an iSCSI hard disk in FortiGate using CLI:
execute iscsi login <iscis-disk-name>
To disconnect an iSCSI hard disk in FortiGate using CLI:
execute iscsi logout <iscis-disk-name>
To check the hard disk in FortiGate and the second HD (50.0GiB) is attached:
fhua-native-Standard # d hardware deviceinfo disk
Disk SYSTEM(boot) 46.6GiB type: ISCSI [IET Controller] dev: /dev/sdapartition 123.0MiB, 62.0MiB free mounted: Y label: dev: /dev/sda1(boot)
start: 2048partition 1.7GiB, 1.7GiB free mounted: Y label: dev: /dev/sda2(boot)
start: 264192
FortiOS 6.2 New Features Guide 296Fortinet Inc.

Multi-Cloud
partition ref: 3 127.0MiB, 86.0MiB free mounted: N label: dev: /dev/sda3 start:3932160
Disk Virtual-Disk ref: 32 50.0GiB type: ISCSI [IET Controller] dev: /dev/sdcpartition ref: 33 49.2GiB, 48.9GiB free mounted: N label: LOGUSEDX6FFE3A65 dev:
/dev/sdc1 start: 2048
Total available disks: 2Max SSD disks: 8 Available storage disks: 1
High Availability between Availability Domains
Support for Active-Passive HA (High Availability) between Availability Domains (ADs) in Oracle Cloud.
This feature adds another layer of redundancy to ensure uptime if a catastrophic failure occurs to an entire availabilityzone. You can now deploy FortiGate units across Availability Domains in HA A-P configurations.
Following is an example structure:
l 1 VCN 10.0.0.0/16 CIDR:l 8 Subnets:
l 4 in Availability Domain 1 - Primary FGTA has a NIC in each of these:l Public - 10.0.0.0/24 EIPl Internal - 10.0.1.0/24l Heartbeat - 10.0.2.0/24l Management - 10.0.3.0/24 EIP
l 4 in Availability Domain 2 - Secondary FGTB has a NIC in each of these:l Public - 10.0.10.0/24l Internal - 10.0.11.0/24l Heartbeat - 10.0.12.0/24l Management - 10.0.13.0/24 EIP
l 3 OCI Routing Tables:l For Public, add default route to Internet Gatewayl For Internal, add default to Primary FGT internal NICl For all others, use a default route table with no rules, but a local peering gateway so traffic can traverse acrosssubnets in the same VCN
Following is a sample configuration:
config system haset group-name "test"set mode a-pset hbdev "port3" 50set ha-mgmt-status enableconfig ha-mgmt-interfaces
edit 1set interface "port4"set gateway 10.0.103.1
nextendset override disableset priority 1set unicast-hb enable
FortiOS 6.2 New Features Guide 297Fortinet Inc.

Multi-Cloud
set unicast-hb-peerip 10.0.2.11 <--- IP of other FortiGate for heartbeat and syncend
After HA has synchronized, shut down the primary to trigger a failover. The following example shows that the failoverwas successful. Note that the failover public IP moves from primary to secondary, and the routing table for internaladdresses are also moved.
AliCloud Extensions
This section lists the new features added for GCP extensions.
Auto Scaling
This version supports auto scaling for AliCloud or Aliyun environments.
Sample configuration
To set up auto scaling for a an AliCloud environment:
1. Create a scaling group in AliCloud console.2. Create a scaling configuration in AliCloud console.3. Create scaling rules in AliCloud console.4. Set the first FortiGate VM in the auto scaling group as the primary member.5. Scale out another FortiGate VM and set it as a secondary member; and then synchronize configuration from
primary to secondary.
To create a scaling group in AliCloud console:
1. In AliCloud, go to Auto Scaling > Scaling Groups, click Create Scaling Group.2. Configure the scaling group parameters:
Scaling Group Name Enter a name. In this example: FGT-ASG.
Maximum Instances In this example: 4.
FortiOS 6.2 New Features Guide 298Fortinet Inc.

Multi-Cloud
Minimum Instances In this example: 1.
Instance ConfigurationSource
Use the default.
Network Type Use the default of VPC.
VPC ID Select the VPC ID.
VSwitch Select the VSwitch.
To create a scaling configuration in AliCloud console:
1. In the scaling group pop-up window, click Create Now to create a new scaling configuration.2. Select the Instance Type and FortiGate image.3. Select Assign Public IP and the Security Group.
FortiOS 6.2 New Features Guide 299Fortinet Inc.

Multi-Cloud
4. Click Next: System Configurations.
5. If desired, select a Key Pair.6. Click Preview.
FortiOS 6.2 New Features Guide 300Fortinet Inc.

Multi-Cloud
7. If the configuration is correct, click Create and then click Enable Configuration.
8. Check that the auto scaling group is created and the first FortiGate VM is launched automatically.
To create scaling rules in AliCloud console:
1. In the Auto Scaling console Scaling Groups page, click FGT-ASG to edit it.2. In the left menu, click Scaling Rules.3. Configure the scaling rule parameters:
Name Enter a scaling rule name. In this example: FGT-ASG-ADD1.
Action Select the Action. In this example, 1.
Cooldown Time In this example: 300 seconds.
The scaling rule FGT-ASG-ADD1 is created and it can be executed to add one FGT-ASG instance.
FortiOS 6.2 New Features Guide 301Fortinet Inc.

Multi-Cloud
Use the same procedure to create another scaling rule named FGT-ASG-REMOVE1 to remove one FortiGate VMinstance.
To set the first FortiGate VM in the auto scaling group as the primary member:
1. Log into the FortiGate VM as administrator.2. Use the CLI to enable auto scaling and set the role to primary:
config system auto-scaleset status enableset role masterset sync-interface "port1"set psksecret xxxxxx
end
To scale out another FortiGate VM and set it as a secondary member; and then synchronizeconfiguration from primary to secondary:
1. In the Auto Scaling console FGT-ASG scaling rules page, execute the scaling rule policy FGT-ASG-ADD1.A new FortiGate VM instance is created.
2. Log into the new FortiGate VM as administrator and use the CLI to enable auto scaling and set the role tosecondary.For the master-ip, use the primary side private IP address.
config system auto-scaleset status enableset role slaveset sync-interface "port1"set master-ip 192.168.1.204set psksecret xxxxxx
end
3. Wait a few moments for the secondary member to sync with the primary member; and then the secondary membercan sync the FortiGate configuration from the primary member.
FortiGate-VM64-ALION~AND # diag deb app hasync -1slave's configuration is not in sync with master's, sequence:0slave's configuration is not in sync with master's, sequence:1slave's configuration is not in sync with master's, sequence:2slave's configuration is not in sync with master's, sequence:3slave's configuration is not in sync with master's, sequence:4slave starts to sync with masterlogout all admin users
Active-Passive HA support between Availability Zones - 6.2.1
This recipe shows how to set up FortiGate Active-Passive (A-P) High Availability (HA) between Availability Zones (AZ)on AliCloud.
Setting up HA in different AZs gives the ability to recover in a catastrophic failure. With FortiGates in different AZs, oneFortiGate can remain operational if the other AZ fails.
FortiOS 6.2 New Features Guide 302Fortinet Inc.

Multi-Cloud
Setup overview
The HA setup approach is the same for both same zone and cross zone scenarios.
1. Move elastic IP (EIP) address from old primary unit to the same port index in the new primary unit.2. Update all route table entries that pointed to the old primary unit and point them to the new primary unit.
The nexthop route table entry cannot be a private IP, it must be an ENI (elastic network interface) ID.3. If the HA is on AliCloud, AliCloud does not rely on any configuration in the AliCloud SDN connector. You must
associate a RAM role to a FortiGate instance. The RAM role must have at least the following policies:l AliyunECSFullAccessl AliyunVPCFullAccessl AliyunEIPFullAccess
Topology of failover event
Configuration
Configure an A-P HA cluster with four vNICs (port1 to port4) on each FortiGate VM.
Configure all network interfaces including AliCloud ENIs and FortiGate VM network interface. Select an AliCloudinstance that supports at least four vNICs.
Configure the security group in each subnet for ingress and egress interfaces. The management interfaces must haveegress internet access for API calls to the AliCloud metadata server.
FortiOS 6.2 New Features Guide 303Fortinet Inc.

Multi-Cloud
Ensure the four vNICs are attached to each FortiGate and the static private address is assigned.
Ensure EIP1 is bound with FGT-A port4 management interface.
Ensure EIP3 is bound with FGT-A port1 external interface.
To configure the AliCloud instances:
1. Create two FGT-ALI instances, each located at a different zone.
To configure the FortiGate HA setting:
1. Go to System > HA and set up the HA cluster. Then check the HA status.
To configure FGT-A in the CLI:
config system interface edit "port1" set mode static set ip 10.0.11.11 255.255.255.0 set allowaccess ping https ssh snmp http fgfm next edit "port2" set ip 10.0.12.11 255.255.255.0 set allowaccess ping https ssh snmp http telnet next edit "port3" set ip 10.0.13.11 255.255.255.0 set allowaccess ping https ssh snmp http telnet next edit "port4" set ip 10.0.14.11 255.255.255.0 set allowaccess ping https ssh snmp http telnet nextend
FortiOS 6.2 New Features Guide 304Fortinet Inc.

Multi-Cloud
To configure FGT-B in the CLI:
config system interface edit "port1" set mode static set ip 10.0.21.12 255.255.255.0 set allowaccess ping https ssh snmp http fgfm next edit "port2" set ip 10.0.22.12 255.255.255.0 set allowaccess ping https ssh snmp http telnet next edit "port3" set ip 10.0.23.12 255.255.255.0 set allowaccess ping https ssh snmp http telnet next edit "port4" set ip 10.0.24.12 255.255.255.0 set allowaccess ping https ssh snmp http telnet nextend
To configure the FGT-A and FGT-B router in the CLI:
config router static edit 1 set gateway 10.0.11.1 set device "port1" nextend
To configure the FGT-A and FGT-B firewall policy in the CLI:
config firewall policy edit 1 set srcintf "port2" set dstintf "port1" set srcaddr "all" set dstaddr "all" set action accept set schedule "always" set service "ALL" set nat enable nextend
To configure the FGT-A HA settings in the CLI:
config system ha set group-name "FGT-HA" set mode a-p set hbdev "port3" 50 set ha-mgmt-status enable config ha-mgmt-interfaces edit 1
FortiOS 6.2 New Features Guide 305Fortinet Inc.

Multi-Cloud
set interface "port4" set gateway 10.0.14.1 next end set priority 192 set unicast-hb enable set unicast-hb-peerip 10.0.23.12end
To configure the FGT-B HA settings in the CLI:
The FGT-B priority must be lower than the FGT-A priority. The node with the lower prioritylevel is the secondary node.
config system ha set group-name "FGT-HA" set mode a-p set hbdev "port3" 50 set ha-mgmt-status enable config ha-mgmt-interfaces edit 1 set interface "port4" set gateway 10.0.24.1 next end set priority 64 set unicast-hb enable set unicast-hb-peerip 10.0.13.11end
Active-Passive HA support on AliCloud - 6.2.1
This recipe shows how to set up FortiGate Active-Passive (A-P) High Availability (HA) on AliCloud.
Setup overview
The HA setup approach is similar to setting up HA on other cloud platforms such as AWS and is the same for both samezone and cross zone scenarios.
1. Move elastic IP (EIP) address from old primary unit to the same port index in the new primary unit.2. Update all route table entries that pointed to the old primary unit and point them to the new primary unit.
The nexthop route table entry cannot be a private IP, it must be an ENI (elastic network interface) ID.3. If the HA is on AliCloud, AliCloud does not rely on any configuration in the AliCloud SDN connector. You must
associate a RAM role to a FortiGate instance. The RAM role must have at least the following policies:l AliyunECSFullAccessl AliyunVPCFullAccessl AliyunEIPFullAccess
FortiOS 6.2 New Features Guide 306Fortinet Inc.

Multi-Cloud
Topology of failover event
Configuration
Configure an A-P HA cluster with four vNICs (port1 to port4) on each FortiGate VM.
Configure all network interfaces including AliCloud ENIs and FortiGate VM network interface. Select an AliCloudinstance that supports at least four vNICs.
Configure the security group in each subnet for ingress and egress interfaces. The management interfaces must haveegress internet access for API calls to the AliCloud metadata server.
Ensure the four vNICs are attached to each FortiGate and the static private address is assigned.
Ensure EIP1 is bound with FGT-A port4 management interface.
Ensure EIP3 is bound with FGT-A port1 external interface.
As an alternative, instead of binding an EIP address with the FortiGate primary side interface,another option is to create an HAVIP (HA virtual IP) address in the VPC. Bind this HAVIPaddress with both the FGT-A and FGT-B external interface.The benefit of this option is the HA doesn't need to call the VIP address to move the EIPaddress on the external interface so this shortens the failover time. For more information, seethe AliCloud documentation.
FortiOS 6.2 New Features Guide 307Fortinet Inc.

Multi-Cloud
To configure the FortiGate HA setting:
1. Go to System > HA and set up the HA cluster.
To configure FGT-A in the CLI:
config system interface edit "port1" set mode static set ip 10.0.1.11 255.255.255.0 set allowaccess ping https ssh snmp http fgfm next edit "port2" set ip 10.0.2.11 255.255.255.0 set allowaccess ping https ssh snmp http telnet next edit "port3" set ip 10.0.3.11 255.255.255.0 set allowaccess ping https ssh snmp http telnet next edit "port4" set ip 10.0.4.11 255.255.255.0 set allowaccess ping https ssh snmp http telnet nextend
To configure FGT-B in the CLI:
config system interface edit "port1" set mode static set ip 10.0.1.12 255.255.255.0 set allowaccess ping https ssh snmp http fgfm next edit "port2" set ip 10.0.2.12 255.255.255.0 set allowaccess ping https ssh snmp http telnet next edit "port3" set ip 10.0.3.12 255.255.255.0 set allowaccess ping https ssh snmp http telnet next edit "port4" set ip 10.0.4.12 255.255.255.0
FortiOS 6.2 New Features Guide 308Fortinet Inc.

Multi-Cloud
set allowaccess ping https ssh snmp http telnet nextend
To configure the FGT-A and FGT-B router in the CLI:
config router static edit 1 set gateway 10.0.1.1 set device "port1" nextend
To configure the FGT-A and FGT-B firewall policy in the CLI:
config firewall policy edit 1 set srcintf "port2" set dstintf "port1" set srcaddr "all" set dstaddr "all" set action accept set schedule "always" set service "ALL" set nat enable nextend
To configure the FGT-A HA settings in the CLI:
config system ha set group-name "FGT-HA" set mode a-p set hbdev "port3" 50 set ha-mgmt-status enable config ha-mgmt-interfaces edit 1 set interface "port4" set gateway 10.0.4.1 next end set priority 128 set unicast-hb enable set unicast-hb-peerip 10.0.3.12end
To configure the FGT-B HA settings in the CLI:
The FGT-B priority must be lower than the FGT-A priority. The node with the lower prioritylevel is the secondary node.
config system ha set group-name "FGT-HA"
FortiOS 6.2 New Features Guide 309Fortinet Inc.

Multi-Cloud
set mode a-p set hbdev "port3" 50 set ha-mgmt-status enable config ha-mgmt-interfaces edit 1 set interface "port4" set gateway 10.0.4.1 next end set priority 64 set unicast-hb enable set unicast-hb-peerip 10.0.3.21end
Support up to 18 Interfaces
The number of network interfaces that can be supported by FortiGate-VM has been increased. Currently, FortiGate-VMsupports up to a maximum of 10 interfaces. This new feature expands this support to a maximum of 18 interfaces (16traffic ports, 1 management port, 1 HA port).
This change applies to all FortiGate-VMmodels except VMX and SVM, as VMX does not useinterfaces to process traffic.
To configure the maximum number of interfaces:
1. In your hypervisor, create a new VM or open an existing VM.2. Create up to a maximum of 18 interfaces.
FortiOS 6.2 New Features Guide 310Fortinet Inc.
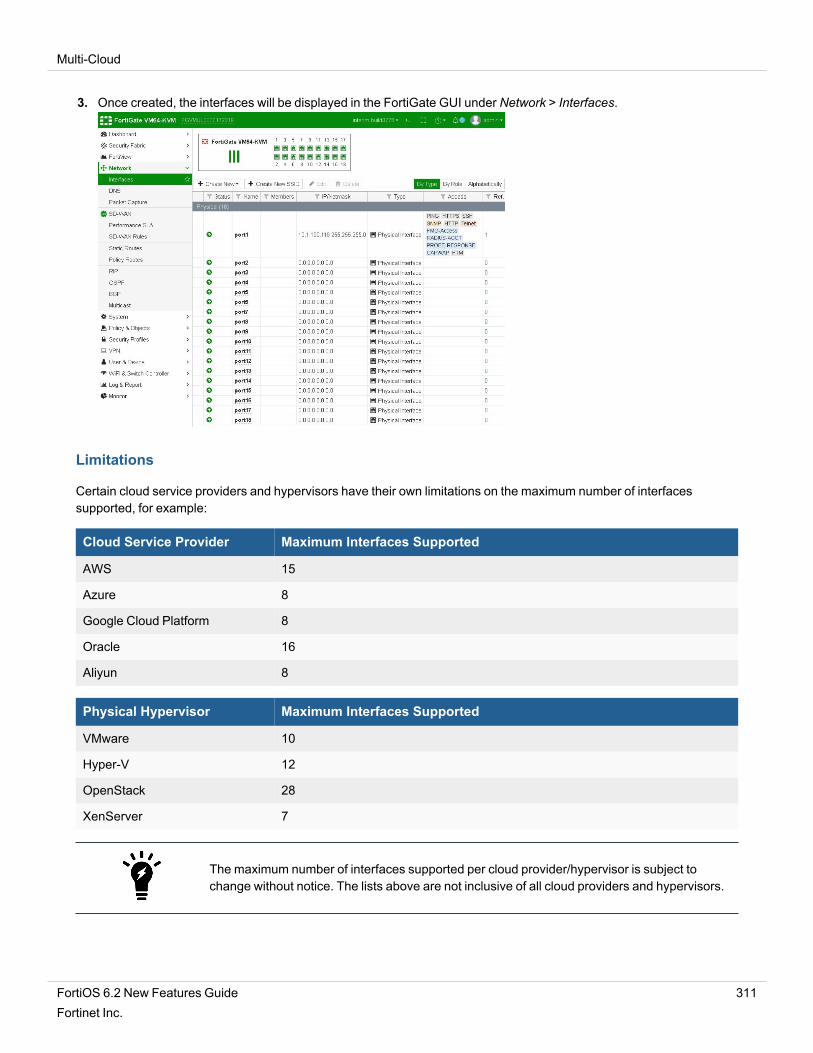
Multi-Cloud
3. Once created, the interfaces will be displayed in the FortiGate GUI under Network > Interfaces.
Limitations
Certain cloud service providers and hypervisors have their own limitations on the maximum number of interfacessupported, for example:
Cloud Service Provider Maximum Interfaces Supported
AWS 15
Azure 8
Google Cloud Platform 8
Oracle 16
Aliyun 8
Physical Hypervisor Maximum Interfaces Supported
VMware 10
Hyper-V 12
OpenStack 28
XenServer 7
The maximum number of interfaces supported per cloud provider/hypervisor is subject tochange without notice. The lists above are not inclusive of all cloud providers and hypervisors.
FortiOS 6.2 New Features Guide 311Fortinet Inc.

Multi-Cloud
OpenStack — Network Service Header (NSH) Chaining Support
This version provides NSH chaining support for virtual wire pair, TP mode networks. FortiOS receives and unwraps theNSH packets and re-encapsulates them before sending them out. The inner packet is processed by firewall policies.
NSH support in FortiGate is basically unwrapping the packet on Ingress and putting the NSH header back on beforesending it out. Other parts of NSH aren't supported yet (SI is currently left unchanged).
There's no CLI/GUI change. The only change is to show ext_header=nsh in NSH session info when listing sessions.
Sample configuration
To configure virtual wire pair and firewall policy using the CLI:
config system virtual-wire-pairedit "test-vw"
set member "port1" "mgmt2"next
endconfig firewall policy
edit 99set uuid 241710a0-3ac6-51e9-10e9-9dd3eb65e708set srcintf "mgmt2"set dstintf "port1"set srcaddr "all"set dstaddr "all"set action acceptset schedule "always"set service "ALL"set logtraffic all
nextend
Sample results of configuring a wire pair and policy between port1 and mgmt2. Packets with NSH are processed and thesession list shows ext_header=nsh.
A (vdom1) # diag sys session list
session info: proto=6 proto_state=01 duration=10 expire=3595 timeout=3600 flags=00000000sockflag=00000000 sockport=0 av_idx=0 use=4origin-shaper=reply-shaper=per_ip_shaper=class_id=0 ha_id=0 policy_dir=0 tunnel=/ vlan_cos=0/0state=log may_dirty br src-vis dst-vis f00statistic(bytes/packets/allow_err): org=112/2/1 reply=60/1/1 tuples=2tx speed(Bps/kbps): 10/0 rx speed(Bps/kbps): 5/0orgin->sink: org pre->post, reply pre->post dev=4->9/9->4 gwy=0.0.0.0/0.0.0.0hook=pre dir=org act=noop 172.16.200.11:46739->172.16.200.55:23(0.0.0.0:0)hook=post dir=reply act=noop 172.16.200.55:23->172.16.200.11:46739(0.0.0.0:0)pos/(before,after) 0/(0,0), 0/(0,0)src_mac=00:00:11:11:11:11 dst_mac=00:00:22:22:22:22misc=0 policy_id=99 auth_info=0 chk_client_info=0 vd=1serial=0000094d tos=ff/ff app_list=0 app=0 url_cat=0
FortiOS 6.2 New Features Guide 312Fortinet Inc.

Multi-Cloud
rpdb_link_id = 00000000dd_type=0 dd_mode=0npu_state=0x040001 no_offloadno_ofld_reason: mac-host-check disabled-by-policy non-npu-intfext_header_type=nshtotal session 1
Physical Function (PF) SR-IOV Driver Support
This feature adds Physical Function (PF) SR-IOV drivers for i40e and ixgbe interfaces in virtual environments.
PF adds the ability for PCI Passthrough, but requires an entire Network Interface Card (NIC) for a VM. It can usuallyachieve greater performance than a Virtual Function (VF) based SR-IOV. PF is also expensive; while VF allows one NICto be shared among multiple guests VMs, PF is allocated to one port on a VM.
The now supported driver versions are:
l ixgbe: 5.3.7l ixgbevf: 4.3.5l i40e: 2.4.10l i40evf: 3.5.13
All tools and software utilities for UEFI 1.X have been removed from this release. Update toUEFI 2.x to use the UEFI tools or software utilities.
Configuration to use PF or VF is done on the hypervisor, and is not configured on the FortiGate.
The following CLI command can be used to check what driver is being used on the FortiGate:
FGVM0800000000 # diagnose hardware deviceinfo nic port2Name: port2Driver: i40eVersion: 2.4.10Bus: 0000:03:00.0Hwaddr: 3c:fd:fe:1e:98:02Permanent Hwaddr:3c:fd:fe:1e:98:02State: upLink: upMtu: 1500Supported: auto 1000full 10000fullAdvertised: auto 1000full 10000fullAuto: disabledRx packets: 0Rx bytes: 0Rx compressed: 0...
FortiOS 6.2 New Features Guide 313Fortinet Inc.

Multi-Cloud
FortiMeter Extensions
This section lists the new features added for FortiMeter extensions.
FortiMeter - Microsoft Hyper-V Instances
FortiMeter now supports Microsoft Hyper-V in addition to support for VMware, KVM, and Xen.
The Microsoft Hyper-V FortiOS-VMmust be added to the FortiManager system before authorization. Once the MicrosoftHyper-V FortiOS-VM is authorized, it can receive updates from FortiManager and process traffic. An unauthorizedMicrosoft Hyper-V FortiOS-VM cannot receive updates from FortiManager or process traffic.
Microsoft Hyper-V FortiOS-VM support requires FortiManager 6.2.0 or a later version.
To authorize a Microsoft Hyper-V FortiOS-VM on FortiManager using the GUI:
1. Ensure that the VM is registered to the FortiManager. See the FortiManager 6.2.0 Administration Guide.2. Ensure that you are in the correct ADOM.3. Go to Device Manager > Device & Groups > Unauthorized Devices.
4. Select the Microsoft Hyper-V FortiOS-VM, then click Authorize in the toolbar, right-click on a device then selectAuthorize, or double-click on a device. The Authorize Device(s) dialog box opens. An unauthorized device can usefirewall services for up to 48 hours.
5. Select the License Type:
Trial Maximum of two devices can have a trial license at any one time.No traffic data are sent to FortiGuard, so no points are used.Can be used for up to 30 days.
Regular Regular license.Points used based on the service level and volume of traffic going toFortiGuard.
FortiOS 6.2 New Features Guide 314Fortinet Inc.

Multi-Cloud
6. Select the Services:
Firewall Firewall only. This option cannot be deselected.
IPS IPS services.
Web Filter Web filtering services.
AntiVirus Antivirus services.
App Control Application control services.
Full UTM All services are selected.
7. ClickOK to authorize the device. The device now shows as authorized on the FortiManager GUI.
To authorize a Microsoft Hyper-V FortiOS-VM on FortiManager using CLI commands:
In the example below, the FortiManager IP address is 172.18.3.72. Run the following commands in the FortiOS CLI :
config system central-managementset type fortimanagerset fmg "172.18.3.72"config server-list
edit 1set server-type update ratingset server-address 172.18.3.72
nextend
end
FortiMeter - Fallback to Public FortiGuard
In previous releases, FortiOS-VM (FortiMeter) instances needed to get services from FortiManager that facilitatedupdates by tracking service entitlements based on serial numbers starting with FOSVM1. However, if the FortiMeterinstance connected directly to Fortinet Distribution Network (FDN), updates were not available since FDN was not awareof serial numbers with prefix FOSVM1.
In the current release, the serial number prefix FOSVM2 was added to FortiOS-VM. When the FortiMeter instanceconnects directly to FDN, it is now able to receive the updates.
The same serial number will have two different prefixes depending on the situation:
l FortiOS-VM sends the serial numbers with prefix FOSVM2 to FortiManager or FortiGuard for updates and ratingservice. FOSVM2 is not visible on the FortiManager GUI.
FortiOS 6.2 New Features Guide 315Fortinet Inc.

Multi-Cloud
l FortiOS-VM sends the serial numbers with prefix FOSVM1 to FortiManager for management. FOSVM1 is shown onthe FortiManager GUI.
FortiGate Serial Numbers shown in FortiManager
l FortiOS-VM in FortiOS Unauthorized Devices list with the serial number prefix FOSVM1
l Authorized FortiOS-VM in FortiOS
l Authorize FortiGuard service to FortiOS-VM. FortiOS checks service license with serial number prefix FOSVM1while providing service to FOSVM2.
CPU only licensing for private clouds - 6.2.2
In FortiOS 6.2.2 and later, there is no maximummemory limitation for each type of FortiGate VM license on privateclouds.
In FortiOS 6.2.1, a FG-VM01 license is invalid on a FortiGate VM with more that 2GB of memory:
FGVM01 login: adminPassword:
License invalid due to exceeding allowed 1 CPUs and 2048 MB RAM.Welcome !
FGVM01 # get system statusVersion: FortiGate-VM64-KVM v6.2.1,build0932,190716 (GA)Virus-DB: 1.00000(2018-04-09 18:07)Extended DB: 1.00000(2018-04-09 18:07)Extreme DB: 1.00000(2018-04-09 18:07)IPS-DB: 6.00741(2015-12-01 02:30)
FortiOS 6.2 New Features Guide 316Fortinet Inc.

Multi-Cloud
IPS-ETDB: 0.00000(2001-01-01 00:00)APP-DB: 6.00741(2015-12-01 02:30)INDUSTRIAL-DB: 6.00741(2015-12-01 02:30)Serial-Number: FGVM00UNLICENSEDIPS Malicious URL Database: 1.00001(2015-01-01 01:01)Botnet DB: 1.00000(2012-05-28 22:51)License Status: InvalidLicense invalid due to exceeding allowed resources: 1 CPU, 2048 MB RAMLicense Expires: 2019-10-18Log hard disk: Not availableHostname: FGVM010000175216Operation Mode: NATCurrent virtual domain: rootMax number of virtual domains: 10Virtual domains status: 1 in NAT mode, 0 in TP modeVirtual domain configuration: disableFIPS-CC mode: disableCurrent HA mode: standaloneBranch point: 0932Release Version Information: GAFortiOS x86-64: YesSystem time: Wed Oct 9 17:25:37 2029
In FortiOS 6.2.2, a FG-VM01 license is valid on a FortiGate VM with more that 2GB of memory:
FGVM01 login: adminPassword:
FGVM01 # get system statusVersion: FortiGate-VM64-KVM v6.2.2,build1010,191008 (GA)Virus-DB: 72.00345(2019-10-15 07:19)Extended DB: 1.00000(2018-04-09 18:07)Extreme DB: 1.00000(2018-04-09 18:07)IPS-DB: 6.00741(2015-12-01 02:30)IPS-ETDB: 0.00000(2001-01-01 00:00)APP-DB: 6.00741(2015-12-01 02:30)INDUSTRIAL-DB: 6.00741(2015-12-01 02:30)Serial-Number: FGVM01XX11111111IPS Malicious URL Database: 2.00439(2019-10-14 12:38)Botnet DB: 1.00000(2012-05-28 22:51)License Status: ValidLicense Expires: 2020-10-12VM Resources: 1 CPU/1 allowed, 3967 MB RAMLog hard disk: AvailableHostname: FGVM01TM19007449Operation Mode: NATCurrent virtual domain: rootMax number of virtual domains: 10Virtual domains status: 1 in NAT mode, 0 in TP mode
FortiOS 6.2 New Features Guide 317Fortinet Inc.

Multi-Cloud
Virtual domain configuration: disableFIPS-CC mode: disableCurrent HA mode: standaloneBranch point: 1010Release Version Information: GAFortiOS x86-64: YesSystem time: Tue Oct 15 09:58:31 2029
SDN connector for NSX-T manager - 6.2.2
This feature provides SDN connector configuration for NSX-T manager. You can import specific groups or all groupsfrom NSX-T manager.
To configure SDN connector for NSX-T manager using the GUI:
1. Go to Security Fabric > Fabric Connectors and click Create New.2. In the Private SDN section, click VMware NSX.3. Enter the settings and clickOK.
To configure SDN connector for NSX-T manager using the CLI:
config system sdn-connectoredit "nsx_t24"
set type nsxset server "172.18.64.205"
FortiOS 6.2 New Features Guide 318Fortinet Inc.

Multi-Cloud
set username "admin"set password xxxxxx
nextend
To import a specific group from the NSX-T manager using the CLI:
You must use the CLI for this function.
Root-F-1 # execute nsx group import nsx_t24 root csf_ns_group[1] 336914ba-0660-4840-b0f1-9320f5c5ca5e csf_ns_group:Name:csf_ns_groupAddress:1.1.1.0Address:1.1.1.1Address:172.16.10.104Address:172.16.20.104Address:172.16.30.104Address:2.2.2.0Address:2.2.2.2Address:4.4.4.0Address:5.5.5.0Address:6.6.6.6Address:7.7.7.7
To import all groups from NSX-T manager using the CLI:
You must use the CLI for this function.
Root-F-1 # execute nsx group import nsx_t24 root[1] 663a7686-b9a3-4659-b06f-b45c908349a0 ServiceInsertion_NSGroup:Name:ServiceInsertion_NSGroupAddress:10.0.0.2
[2] 336914ba-0660-4840-b0f1-9320f5c5ca5e csf_ns_group:Name:csf_ns_groupAddress:1.1.1.0Address:1.1.1.1Address:172.16.10.104Address:172.16.20.104Address:172.16.30.104Address:2.2.2.0Address:2.2.2.2Address:4.4.4.0Address:5.5.5.0Address:6.6.6.6Address:7.7.7.7
[3] c462ec4d-d526-4ceb-aeb5-3f168cecd89d charlie_test:Name:charlie_testAddress:1.1.1.1Address:2.2.2.2Address:6.6.6.6Address:7.7.7.7
[4] ff4dcb08-53cf-46bd-bef4-f7aeda9c0ad9 fgt:Name:fgtAddress:172.16.10.101Address:172.16.10.102Address:172.16.20.102
FortiOS 6.2 New Features Guide 319Fortinet Inc.

Multi-Cloud
Address:172.16.30.103[5] 3dd7df0d-2baa-44e0-b88f-bd21a92eb2e5 yongyu_test:Name:yongyu_testAddress:1.1.1.0Address:2.2.2.0Address:4.4.4.0Address:5.5.5.0
To view the dynamic firewall IP addresses that are resolved by the SDN connector using the GUI:
1. Go to Policy & Objects > Addresses to view the IP addresses resolved by an SDN connector.
To view the dynamic firewall IP addresses that are resolved by the SDN connector using the CLI:
Root-F-1 # show firewall address csf_ns_groupconfig firewall address
edit "csf_ns_group"set uuid ee4a2696-bacd-51e9-f828-59457565b880set type dynamicset sdn "nsx_t24"set obj-id "336914ba-0660-4840-b0f1-9320f5c5ca5e"config list
edit "1.1.1.0"nextedit "1.1.1.1"nextedit "172.16.10.104"nextedit "172.16.20.104"nextedit "172.16.30.104"nextedit "2.2.2.0"nextedit "2.2.2.2"
FortiOS 6.2 New Features Guide 320Fortinet Inc.

Multi-Cloud
nextedit "4.4.4.0"nextedit "5.5.5.0"nextedit "6.6.6.6"nextedit "7.7.7.7"next
endnext
end
FortiOS 6.2 New Features Guide 321Fortinet Inc.

Automation and Dev-Ops
This section lists the new features added to FortiOS for automation and dev-ops.
Trigger - FortiAnalyzer Event Handler
This feature adds a FortiAnalyzer event handler as an automation stitch trigger. You can trigger automation rules basedon FortiAnalyzer event handlers, giving you the ability to define rules based on complex correlation across devices, logtypes, frequency, and other criteria.
When a FortiAnalyzer event handler is triggered, it sends a notification to the FortiGate automation framework, whichgenerates a log and triggers the automation stitch.
In FortiAnalyzer Event Manager > FortiGate Event Handlers, configure the FortiAnalyzer event handler that will betriggered when FortiGate logs in.
FortiOS 6.2 New Features Guide 322Fortinet Inc.

Automation and Dev-Ops
In FortiGate Security Fabric > Settings, configure FortiAnalyzer and get authorized.
To configure Security Fabric Settings using the CLI:
config log fortianalyzer settingset status enableset server "10.6.30.250"set serial "FL-4HET318900407"set upload-option realtimeset reliable enable
end
To configure Security Fabric Automation Stitch with trigger of FortiAnalyzer Event Handler in the GUI:
FortiOS 6.2 New Features Guide 323Fortinet Inc.

Automation and Dev-Ops
To configure Security Fabric Automation Stitch with trigger of FortiAnalyzer Event Handler in the CLI:
config system automation-actionedit "auto-faz-1_email"
set action-type emailset email-to "[email protected]"set email-subject "CSF stitch alert"set email-body "User login FortiGate successfully."
nextend
config system automation-triggeredit "auto-faz-1"
set event-type faz-eventset faz-event-name "system-log-handler2"set faz-event-severity "medium"set faz-event-tags "User login successfully"
nextend
config system automation-stitchedit "auto-faz-1"
set trigger "auto-faz-1"set action "auto-faz-1_email"
nextend
To see the trigger event log in the GUI:
1. Log in to the FortiGate to trigger the FortiAnalyzer event.The FortiAnalyzer sends notification to the FortiGate automation framework and generates an event log in FortiGateand triggers the automation stitch.
FortiOS 6.2 New Features Guide 324Fortinet Inc.

Automation and Dev-Ops
Sample of the trigger event log in the CLI
date=2019-02-05 time=14:16:17 logid="0100046600" type="event" subtype="system"level="notice" vd="root" eventtime=1549404977 logdesc="Automation stitch triggered"stitch="auto-faz-1" trigger="auto-faz-1" from="log" msg="stitch:auto-faz-1 istriggered."
Sample of email sent when automation stitch is triggered
Trigger - FortiCloud-based IOC
This feature expands topology, FortiView, and automation to support Indicators of Compromise (IOC) detection from theFortiCloud IOC service.
FortiGate can now list IOC entries on the FortiView pane and use the IOC event logs as a trigger for automationframework.
FortiGate requires an IOC license and aWebfilter license to use this feature. In addition, you must enabled FortiCloudlogging on the FortiGate.
To view compromised hosts, go to FortiView > Compromised Hosts. The IOC entries are displayed when the source isFortiCloud.
FortiOS 6.2 New Features Guide 325Fortinet Inc.

Automation and Dev-Ops
You can also view the IOC entries on FortiCloud portal:
Action - NSX Quarantine
This feature adds a new Security Fabric > Automation > Action: Assign VMware NSX Security Tag to the NSX endpointinstance. This action is only available when the Trigger is Compromised Host.
First configure NSX type SDN connector in FortiGate. Then FortiGate can retrieve security tags from VMware NSXserver through the NSX connector.
Configure an automation stitch with the trigger Compromised Host and the Action Assign VMware NSX Security Tag,then choose a Security tag in the security tags retrieved from VMware NSX server through NSX connector.
If an endpoint instance in the VMware NSX environment is compromised which triggers the automation stitch inFortiGate, FortiGate will then assign the configured security tag to the compromised NSX endpoint instance.
FortiOS 6.2 New Features Guide 326Fortinet Inc.

Automation and Dev-Ops
To configure a VMware NSX SDN connector in the GUI:
1. Go to Security Fabric > Fabric Connectors and click Create New.2. Select VMware NSX and configure its settings.
To configure a VMware NSX SDN connector in the CLI:
config system sdn-connectoredit "nsx"
set type nsxset server "172.18.64.32"set username "admin"set password xxxxx
nextend
To configure an automation stitch with a Trigger Compromised Host and Action Assign VMware NSXSecurity Tag using the GUI:
1. Go to Security Fabric > Automation and click Create New.2. In the Trigger section, select Compromised Host.
FortiOS 6.2 New Features Guide 327Fortinet Inc.

Automation and Dev-Ops
3. In the Action section, select Assign VMware NSX Security Tag and configure its settings.
To configure an automation stitch with a Trigger Compromised Host and Action Assign VMware NSXSecurity Tag using the CLI:
config system automation-actionedit "pcui-test_quarantine-nsx"
set action-type quarantine-nsxset security-tag "pcui-tag2"set sdn-connector "nsx"
nextend
config system automation-triggeredit "pcui-test"
set ioc-level highnext
end
config system automation-stitchedit "pcui-test"
set trigger "pcui-test"set action "pcui-test_quarantine-nsx"
nextend
FortiOS 6.2 New Features Guide 328Fortinet Inc.

Automation and Dev-Ops
To configure FortiAnalyzer in FortiGate which is used to send endpoint compromise notifications toFortiGate using the GUI:
1. Go to Security Fabric > Settings.2. Enable FortiAnalyzer Logging and configure its settings.
To configure FortiAnalyzer in FortiGate which is used to send endpoint compromise notifications toFortiGate using the CLI:
config log fortianalyzer settingset status enableset server "172.18.64.234"set serial "FL-8HFT718900132"set upload-option realtimeset reliable enable
end
When an endpoint instance is compromised
When an endpoint instance, for example, pcui-ubuntu2, in the VMware NSX environment is compromised, theautomation stitch in FortiGate is triggered. FortiGate then assigns the security tag, in this example, pcui-tag2, to thecompromised NSX endpoint instance.
FortiOS 6.2 New Features Guide 329Fortinet Inc.

Automation and Dev-Ops
Action - CLI Script
This feature adds support for calling a CLI script when an automation stitch is triggered. You can use this feature to addCLI script actions for Security Fabric automation.
CLI scripts can be manually entered, uploaded as a file, or recorded in CLI console. The CLI script output can be sent inan Automation Action email.
To configure a Security Fabric Automation Stitch using the GUI:
1. Go to Security Fabric > Automation.2. In the Action section, select CLI Script and Email.3. Configure a CLI script.
l To manually enter a CLI script, enter the script in the Script box.l To upload a script file, click Upload and specify the script file.
FortiOS 6.2 New Features Guide 330Fortinet Inc.

Automation and Dev-Ops
l To record a script in CLI console, click >_Record in CLI console and then save the script.
4. Enter the other fields as required and clickOK.
To configure a Security Fabric Automation Stitch using the CLI:
config system automation-triggeredit "auto-cli-1"
set trigger-type event-basedset event-type security-rating-summary
nextend
config system automation-actionedit "set admintimeout480"
set action-type cli-scriptset minimum-interval 0set delay 0set required enableset script "config system global
set admintimeout 480 end"
nextedit "auto-cli-1_email"
set action-type emailset email-to "[email protected]"set email-subject "CSF stitch alert"set email-body "%%results%%"set minimum-interval 0
nextend
config system automation-stitchedit "auto-cli-1"
set status enableset trigger "auto-cli-1"set action "set admintimeout480" "auto-cli-1_email"
FortiOS 6.2 New Features Guide 331Fortinet Inc.

Automation and Dev-Ops
nextend
To execute the CLI script automatically after the Automation Stitch is triggered:
To execute the CLI script automatically after the Automation Stitch is triggered:
FGTA-1 # show system globalconfig system global
set admintimeout 480...end
Sample of script output sent in automation action email
Action - Azure Function
This feature adds support for calling Azure functions when an automation stitch is triggered.
FortiOS 6.2 New Features Guide 332Fortinet Inc.

Automation and Dev-Ops
To configure an Azure function using the GUI:
1. Go to Security Fabric > Automation.2. Configure an Automation Stitch and set the Action to Azure-function.
When the automation stitch is triggered, FortiGate shows the stitch trigger time.
To configure an Azure function using the CLI:
config system automation-actionedit "azure_function"
set action-type azure-functionset azure-app "liang01-no-delete-jlum"set azure-function "headersResponse"set azure-function-authorization functionset azure-api-key xxxxxxset headers "header1:value1" "header2:value2"
FortiOS 6.2 New Features Guide 333Fortinet Inc.

Automation and Dev-Ops
nextendconfig system automation-trigger
edit "auto-azure"set event-type security-rating-summary
nextendconfig system automation-stitch
edit "auto-azure"set trigger "auto-azure"set action "azure_function"
nextend
To see the function log in Azure:
1. The function log shows that the configured function was called, executed, and finished.
Action - Google Cloud Function
This feature adds support for calling Google Cloud functions when an automation stitch is triggered.
FortiOS 6.2 New Features Guide 334Fortinet Inc.

Automation and Dev-Ops
To configure a Google Cloud function using the GUI:
1. Go to Security Fabric > Automation.2. Configure an Automation Stitch and set the Action toGoogle Cloud Function.
When the automation stitch is triggered, FortiGate shows the stitch trigger time.
To configure a Google Cloud function using the CLI:
config system automation-actionedit "google-echo"
set action-type google-cloud-functionset gcp-function-region "us-central1"set gcp-project "dev-project-001-166400" set gcp-function-domain "cloudfunctions.net"set gcp-function "jlum-echo"set headers "echo-header:echo-value"
nextendconfig system automation-trigger
edit "auto-google1"
FortiOS 6.2 New Features Guide 335Fortinet Inc.

Automation and Dev-Ops
set event-type security-rating-summarynext
endconfig system automation-stitch
edit "auto-google1"set trigger "auto-google1"set action "google-echo"
nextend
To see the function log in Google Cloud using the GUI:
1. Go toGoogle Cloud Platform > Logs.The function log shows that the configured function was called, executed, and finished.
Action - AliCloud Function
This feature adds support for calling AliCloud functions when an automation stitch is triggered.
FortiOS 6.2 New Features Guide 336Fortinet Inc.

Automation and Dev-Ops
To configure an AliCloud function automation stitch in the GUI:
1. Go to Security Fabric > Automation.2. Select AliCloud Function and configure its settings.
3. ClickOK.
To configure an AliCloud function automation stitch in the CLI:
config system automation-actionedit "Ali-Action-1"
set action-type alicloud-functionset alicloud-account-id "5594200612296301"set alicloud-region "us-east-1"set alicloud-version "2016-08-15"set alicloud-service "jlum-test-function"set alicloud-function "echoBodyAuth"set alicloud-function-authorization functionset alicloud-access-key-id "LTAIKmERWEuEOChg"set alicloud-access-key-secret xxxxxx
nextend
config system automation-triggeredit "auto-ali"
set event-type security-rating-summarynext
end
config system automation-stitchedit "auto-ali"
set trigger "auto-ali"set action "Ali-Action-1"
nextend
When the automation stitch is triggered, FortiGate shows the stitch trigger time.
FortiOS 6.2 New Features Guide 337Fortinet Inc.

Automation and Dev-Ops
In AliCloud, the function log shows that the function was called, executed, and finished.
Action - Webhook Extensions
This feature introduces the PATCH and DELETEmethods in theWebhook section in Security Fabric > Automation.
The following shows examples of PATCH and DELETEmethods using the GUI and CLI.
To set the Patch method using the GUI:
1. Go to Security Fabric > Automation and click Create New.2. In the Action section, clickWebhook to display theWebhook section.
FortiOS 6.2 New Features Guide 338Fortinet Inc.

Automation and Dev-Ops
3. For theMethod, select PATCH.
4. Fill in the other fields and clickOK.
On the server, check that FortiGate sends the header, body, and method correctly:
To set the Patch method using the CLI, see the following example:
In the CLI, set method patch is added.
config system automation-actionedit "demowebhook"
set action-type webhookset method patchset uri "10.6.30.44/v1/{tenant_id}/stacks/{stack_name}/{stack_id}"set http-body "testbody"set port 80set headers "headervalue:headercontentvalue"
nextend
To set the Delete method using the GUI:
1. Go to Security Fabric > Automation and click Create New.2. In the Action section, clickWebhook to display theWebhook section.
FortiOS 6.2 New Features Guide 339Fortinet Inc.

Automation and Dev-Ops
3. For theMethod, select DELETE.
4. Fill in the other fields and clickOK.
On the server, check that FortiGate sends the header, body, and method correctly:
To set the Delete method using the CLI, see the following example:
In the CLI, set method delete is added.
config system automation-actionedit "demowebhook"
set action-type webhookset method deleteset uri "10.6.30.44/v1/{tenant_id}/stacks/{stack_name}/{stack_id}"set http-body "/v1/{tenant_id}/stacks/{stack_name}/{stack_id}/preview"set port 80set headers "headervalue:headercontentvalue"
nextend
FortiOS 6.2 New Features Guide 340Fortinet Inc.

Advanced Threats
This section lists the new features added to FortiOS for advanced threats.
Flow-based Inspection
This section lists new flow-based inspection features added to FortiOS.
Web Filtering
Flow-based web filtering support has been extended to allow for the following options:
l Authenticate: Require authentication for specific website categories.l Warn: Display a warning message but allow users to continue to the website.l Override: Allow users with valid credentials to override their web filter profile.
To enable Authenticate and Warning web filters:
1. Go to Security Profiles >Web Filter in the FortiGate web GUI.2. Right-click on a selected category to view the context menu.
FortiOS 6.2 New Features Guide 341Fortinet Inc.

Advanced Threats
3. Select the Authenticate orWarning web filter.
4. Select Apply.
FortiOS 6.2 New Features Guide 342Fortinet Inc.

Advanced Threats
To allow users to override blocked categories:
1. Select Allow users to override blocked categories.
2. Enter the following information:l Groups that can overridel Profile can switch tol Switch applies tol Switch duration
3. Select Apply.
Inspection Mode Per Policy
In this version, in NGFWMode, the Inspection Mode is moved to per-policy, enabling more flexible setup for differentpolicies.
In System > VDOM, the NGFWMode option has been removed.
When you configure a policy, you can select a Flow-based or Proxy-based Inspection Mode. Default is Flow-based.
If you change to Proxy-based, the Proxy HTTP(S) traffic option displays.
FortiOS 6.2 New Features Guide 343Fortinet Inc.

Advanced Threats
In the Security Profiles section, if no security profiles are enabled, the default SSL Inspection is no-inspection.
In the Security Profiles section, if you enable any security profile, the SSL Inspection changes to certificate-inspection.
FortiOS 6.2 New Features Guide 344Fortinet Inc.

Advanced Threats
To see the inspection mode changes in the CLI:
FortiGate-101E (root) # config firewall policy
FortiGate-101E (policy) # edit 1
FortiGate-101E (1) # set utm-status disable
FortiGate-101E (1) # set inspection-modeproxy Proxy based inspection.flow Flow based inspection.
FortiGate-101E (1) # set inspection-mode proxy
FortiGate-101E (1) # end
FortiGate-101E (root) # sh firewall policyconfig firewall policy
edit 1set uuid 05d88354-4817-51e9-7494-06cb70accbf0set srcintf "wan2"set dstintf "wan1"set srcaddr "all"set dstaddr "all"set action acceptset schedule "always"set service "ALL"set inspection-mode proxyset nat enable
nextend
FortiOS 6.2 New Features Guide 345Fortinet Inc.

Advanced Threats
To see http-policy-redirect/ssh-policy-redirect setting when inspection mode is set to proxy:
FortiGate-101E (root) # config firewall policy
FortiGate-101E (policy) # end
FortiGate-101E (root) # config firewall policy
FortiGate-101E (policy) # edit 1
FortiGate-101E (1) # set inspection-mode proxy
FortiGate-101E (1) # set http-policy-redirectenable Enable HTTP(S) policy redirect.disable Disable HTTP(S) policy redirect.
FortiGate-101E (1) # set ssh-policy-redirectenable Enable SSH policy redirect.disable Disable SSH policy redirect.
FortiGate-101E (1) # set http-policy-redirect enable
FortiGate-101E (1) # set ssh-policy-redirect enable
FortiGate-101E (1) # end
FortiGate-101E (root) # sh firewall policy 1config firewall policy
edit 1set uuid 05d88354-4817-51e9-7494-06cb70accbf0set srcintf "wan2"set dstintf "wan1"set srcaddr "all"set dstaddr "all"set action acceptset schedule "always"set service "ALL"set inspection-mode proxyset http-policy-redirect enableset ssh-policy-redirect enableset nat enable
nextend
To see the default ssl-ssh-policy set to no inspection:
FortiGate-101E (root) # config firewall policy
FortiGate-101E (policy) # edit 1
FortiGate-101E (1) # shconfig firewall policy
edit 1set uuid 05d88354-4817-51e9-7494-06cb70accbf0set srcintf "wan2"set dstintf "wan1"
FortiOS 6.2 New Features Guide 346Fortinet Inc.

Advanced Threats
set srcaddr "all"set dstaddr "all"set action acceptset schedule "always"set service "ALL"set inspection-mode proxyset http-policy-redirect enableset ssh-policy-redirect enableset nat enable
nextend
FortiGate-101E (1) # sh fu | grep ssl-ssh-profileset ssl-ssh-profile "no-inspection"
FortiGate-101E (1) # end
Statistics
This feature adds a flow AV statistics check, and provides an API for SNMP to get AV statistics.
Two CLI commands are added to show and clear the AV statistics:
diagnose ips av stats showdiagnose ips av stats clear
This example uses the following topology:
To check flow AV statistics:
1. Create an AV profile:config antivirus profile
edit "av-test"config http
set options scan avmonitorendconfig ftp
set options scan quarantineend
nextend
2. Enable the profile on a firewall policy:config firewall policy
edit 1
FortiOS 6.2 New Features Guide 347Fortinet Inc.

Advanced Threats
set name "policy1"set srcintf "port2"set dstintf "port1"set srcaddr "all"set dstaddr "all"set action acceptset schedule "always"set service "ALL"set utm-status enableset fsso disableset av-profile "av-test"set ssl-ssh-profile "custom-deep-inspection"set nat enable
nextend
3. On the client PC, download the EICAR Standard Anti-Virus Test File via HTTP.4. Check the AV statistics on the FortiGate. As the action is set to monitor for HTTP, HTTP virus detected is
increased by 1:diagnose ips av stats show
AV stats:HTTP virus detected: 1HTTP virus blocked: 0SMTP virus detected: 0SMTP virus blocked: 0POP3 virus detected: 0POP3 virus blocked: 0IMAP virus detected: 0IMAP virus blocked: 0NNTP virus detected: 0NNTP virus blocked: 0FTP virus detected: 0FTP virus blocked: 0SMB virus detected: 0SMB virus blocked: 0
5. On the client PC, download the EICAR file via FTP.6. Check the AV statistics on the FortiGate. As the action is set to quarantine for FTP, FTP virus detected and
FTP virus blocked are both increased by 1:diagnose ips av stats show
AV stats:HTTP virus detected: 1HTTP virus blocked: 0SMTP virus detected: 0SMTP virus blocked: 0POP3 virus detected: 0POP3 virus blocked: 0IMAP virus detected: 0IMAP virus blocked: 0NNTP virus detected: 0NNTP virus blocked: 0FTP virus detected: 1FTP virus blocked: 1SMB virus detected: 0SMB virus blocked: 0
7. Check the AV statistics using snmpwalk:root:~# snmpwalk -c public -v 1 10.1.100.6 1.3.6.1.4.1.12356.101.8.2.1.1
FortiOS 6.2 New Features Guide 348Fortinet Inc.

Advanced Threats
iso.3.6.1.4.1.12356.101.8.2.1.1.1.1 = Counter32: 2 (fgAvVirusDetected)iso.3.6.1.4.1.12356.101.8.2.1.1.2.1 = Counter32: 1 (fgAvVirusBlocked)iso.3.6.1.4.1.12356.101.8.2.1.1.3.1 = Counter32: 1 (fgAvHTTPVirusDetected)iso.3.6.1.4.1.12356.101.8.2.1.1.4.1 = Counter32: 0iso.3.6.1.4.1.12356.101.8.2.1.1.5.1 = Counter32: 0iso.3.6.1.4.1.12356.101.8.2.1.1.6.1 = Counter32: 0iso.3.6.1.4.1.12356.101.8.2.1.1.7.1 = Counter32: 0iso.3.6.1.4.1.12356.101.8.2.1.1.8.1 = Counter32: 0iso.3.6.1.4.1.12356.101.8.2.1.1.9.1 = Counter32: 0iso.3.6.1.4.1.12356.101.8.2.1.1.10.1 = Counter32: 0iso.3.6.1.4.1.12356.101.8.2.1.1.11.1 = Counter32: 1 (fgAvFTPVirusDetected)iso.3.6.1.4.1.12356.101.8.2.1.1.12.1 = Counter32: 1 (fgAvFTPVirusBlocked)iso.3.6.1.4.1.12356.101.8.2.1.1.13.1 = Counter32: 0iso.3.6.1.4.1.12356.101.8.2.1.1.14.1 = Counter32: 0iso.3.6.1.4.1.12356.101.8.2.1.1.15.1 = Counter32: 0iso.3.6.1.4.1.12356.101.8.2.1.1.16.1 = Counter32: 0iso.3.6.1.4.1.12356.101.8.2.1.1.17.1 = Counter32: 0iso.3.6.1.4.1.12356.101.8.2.1.1.18.1 = Counter32: 0iso.3.6.1.4.1.12356.101.8.2.1.1.19.1 = Counter32: 0iso.3.6.1.4.1.12356.101.8.2.1.1.20.1 = Counter32: 0iso.3.6.1.4.1.12356.101.8.2.1.1.21.1 = Counter32: 0iso.3.6.1.4.1.12356.101.8.2.1.1.22.1 = Counter32: 0
8. Optionally, reset the AV statistics to zero:diagnose ips av stats clear
Protocol Port Enforcement
Protocol enforcement is added to the Application Control Profile, allowing the admin to configure network services (e.g.,FTP, HTTP, HTTPS) on known ports (e.g., 21, 80, 443), while blocking those services on other ports.
The feature takes action in the following scenarios:
l When one protocol dissector confirms the service of network traffic, protocol enforcement can check whether theconfirmed service is whitelisted under the server port. If it is not, then the traffic is considered a violation and IPS cantake action (e.g., block) specified in the configuration.
l There is no confirmed service for the network traffic. It would be considered a service violation if IPS dissectors ruleout all the services enforced under its server port.
FortiOS 6.2 New Features Guide 349Fortinet Inc.

Advanced Threats
In Security Profiles > Application Control, a new Network Protocol Enforcement pane lets you create and configurenetwork services on specific ports and set violation action.
To configure the application profile default network service list using CLI:
config application listedit "protocol-GUI"
set other-application-log enableset control-default-network-services enable # Enable enforcement of protocols
over select ports.config default-network-services # Default network service entries
edit 1set port 80 # Port number, port Enter an integer
FortiOS 6.2 New Features Guide 350Fortinet Inc.

Advanced Threats
value from <0> to <65535>set services http # Network protocols: http, ssh,
telnet, ftp, dns, smtp, pop3, imap, snmp, nntp and httpsnextedit 2
set port 53set services dnsset violation-action monitor # Set action for protocols not
whitelisted under select port: block/pass/monitornext
endnext
end
IP Reputation Filtering
This features adds support for reputation filtering in the firewall policies.
Currently, there are five reputation levels in the internet-service database (ISDB), and custom reputation levels can bedefined in a custom internet-service. This features allows firewall policies to filter traffic according to the configuredreputation level. If the reputation level of either the source or destination IP address is equal to or greater than the levelset in the policy, then the packet is forwarded, otherwise, the packet is dropped.
The five default reputation levels are:
1 Known malicious sites related to botnet servers, phishing sites, etc.
2 Sites providing high risk services, such as TOR, proxy, P2P, etc.
3 Unverified sites.
4 Reputable sites from social media, such as Facebook, Twitter, etc.
5 Known and verified safe sites, such as Gmail, Amazon, eBay, etc.
The default minimum reputation level in a policy is zero, meaning that the reputation filter is disabled.
For IP addresses that are not included in the ISDB, the default reputation level is three.
The default reputation direction is destination.
To set the reputation level and direction in a policy:
config firewall policyedit 1
set uuid dfcaec9c-e925-51e8-cf3e-fed9a1d42a1cset srcintf "wan2"set dstintf "wan1"set dstaddr "all"set reputation-minimum 3set reputation-direction sourceset action acceptset schedule "always"set service "ALL"
FortiOS 6.2 New Features Guide 351Fortinet Inc.

Advanced Threats
set logtraffic allset auto-asic-offload disableset nat enable
nextend
Packets from the source IP address with reputation levels three, four, or five will be forwarded by this policy.
In a policy, if reputation-minimum is set, and the reputation-direction isdestination, then the dstaddr, service, and internet-service options are removedfrom the policy.If reputation-minimum is set, and the reputation-direction is source, then thesrcaddr, and internet-service-src options are removed from the policy.
URL Certificate Blacklist
As increasing numbers of malware have started to use SSL to attempt to bypass IPS, maintaining a fingerprint-basedcertificate blacklist is useful to block botnet communication that relies on SSL.
This feature adds a dynamic package that is distributed by FortiGuard and is part of the Web Filtering service. It isenabled by default for SSL/SSH profiles, and can be configured using the following new CLI commands (highlighted inbold):
config vdomedit <vdom>
config firewall ssl-ssh-profileedit "certificate-inspection"
set comment "Read-only SSL handshake inspection profile."config ssl
set inspect-all disableendconfig https
set ports 443set status certificate-inspectionset invalid-server-cert blockset untrusted-server-cert allowset sni-server-cert-check enable
endconfig ftps
set status disableset invalid-server-cert blockset untrusted-server-cert allow
endconfig imaps
set status disableset invalid-server-cert blockset untrusted-server-cert allow
endconfig pop3s
set status disableset invalid-server-cert blockset untrusted-server-cert allow
FortiOS 6.2 New Features Guide 352Fortinet Inc.

Advanced Threats
endconfig smtps
set status disableset invalid-server-cert blockset untrusted-server-cert allow
endconfig ssh
set ports 22set status disableset inspect-all disableset unsupported-version bypassset ssh-tun-policy-check disableset ssh-algorithm compatible
endset block-blacklisted-certificates enableset caname "Fortinet_CA_SSL"set ssl-anomalies-log enable
nextedit "deep-inspection"
set comment "Read-only deep inspection profile."config ssl
set inspect-all disableendconfig https
set ports 443set status deep-inspectionset client-cert-request bypassset unsupported-ssl bypassset invalid-server-cert blockset untrusted-server-cert allowset sni-server-cert-check enable
endconfig ftps
set ports 990set status deep-inspectionset client-cert-request bypassset unsupported-ssl bypassset invalid-server-cert blockset untrusted-server-cert allow
endconfig imaps
set ports 993set status deep-inspectionset client-cert-request inspectset unsupported-ssl bypassset invalid-server-cert blockset untrusted-server-cert allow
endconfig pop3s
set ports 995set status deep-inspectionset client-cert-request inspectset unsupported-ssl bypassset invalid-server-cert blockset untrusted-server-cert allow
end
FortiOS 6.2 New Features Guide 353Fortinet Inc.

Advanced Threats
config smtpsset ports 465set status deep-inspectionset client-cert-request inspectset unsupported-ssl bypassset invalid-server-cert blockset untrusted-server-cert allow
endconfig ssh
set ports 22set status disableset inspect-all disableset unsupported-version bypassset ssh-tun-policy-check disableset ssh-algorithm compatible
endset whitelist disableset block-blacklisted-certificates enableconfig ssl-exempt
edit 1set type fortiguard-categoryset fortiguard-category 31
nextedit 2
set type fortiguard-categoryset fortiguard-category 33
nextedit 3
set type wildcard-fqdnset wildcard-fqdn "g-adobe"
nextedit 4
set type wildcard-fqdnset wildcard-fqdn "g-Adobe Login"
nextedit 5
set type wildcard-fqdnset wildcard-fqdn "g-android"
nextedit 6
set type wildcard-fqdnset wildcard-fqdn "g-apple"
nextedit 7
set type wildcard-fqdnset wildcard-fqdn "g-appstore"
nextedit 8
set type wildcard-fqdnset wildcard-fqdn "g-auth.gfx.ms"
nextedit 9
set type wildcard-fqdnset wildcard-fqdn "g-citrix"
nextedit 10
FortiOS 6.2 New Features Guide 354Fortinet Inc.

Advanced Threats
set type wildcard-fqdnset wildcard-fqdn "g-dropbox.com"
nextedit 11
set type wildcard-fqdnset wildcard-fqdn "g-eease"
nextedit 12
set type wildcard-fqdnset wildcard-fqdn "g-firefox update server"
nextedit 13
set type wildcard-fqdnset wildcard-fqdn "g-fortinet"
nextedit 14
set type wildcard-fqdnset wildcard-fqdn "g-googleapis.com"
nextedit 15
set type wildcard-fqdnset wildcard-fqdn "g-google-drive"
nextedit 16
set type wildcard-fqdnset wildcard-fqdn "g-google-play2"
nextedit 17
set type wildcard-fqdnset wildcard-fqdn "g-google-play3"
nextedit 18
set type wildcard-fqdnset wildcard-fqdn "g-Gotomeeting"
nextedit 19
set type wildcard-fqdnset wildcard-fqdn "g-icloud"
nextedit 20
set type wildcard-fqdnset wildcard-fqdn "g-itunes"
nextedit 21
set type wildcard-fqdnset wildcard-fqdn "g-microsoft"
nextedit 22
set type wildcard-fqdnset wildcard-fqdn "g-skype"
nextedit 23
set type wildcard-fqdnset wildcard-fqdn "g-softwareupdate.vmware.com"
nextedit 24
FortiOS 6.2 New Features Guide 355Fortinet Inc.

Advanced Threats
set type wildcard-fqdnset wildcard-fqdn "g-verisign"
nextedit 25
set type wildcard-fqdnset wildcard-fqdn "g-Windows update 2"
nextedit 26
set type wildcard-fqdnset wildcard-fqdn "g-live.com"
nextedit 27
set type wildcard-fqdnset wildcard-fqdn "g-google-play"
nextedit 28
set type wildcard-fqdnset wildcard-fqdn "g-update.microsoft.com"
nextedit 29
set type wildcard-fqdnset wildcard-fqdn "g-swscan.apple.com"
nextedit 30
set type wildcard-fqdnset wildcard-fqdn "g-autoupdate.opera.com"
nextendset server-cert-mode re-signset caname "Fortinet_CA_SSL"set untrusted-caname "Fortinet_CA_Untrusted"set ssl-anomalies-log enableset ssl-exemptions-log disableset rpc-over-https disableset mapi-over-https disableset use-ssl-server disable
nextend
nextend
Global IP Address Information Database
This feature adds extensions to Internet Service and IP Reputation to download more details about public IP addresses,including ownership, known services, geographic location, blacklisting information, etc. The new details are available indrilldown information, tooltips, and similar mechanisms in FortiView and other areas.
The global IP address database is an integrated database containing all public IP addresses and is implemented in theInternet-Service Database.
FortiOS 6.2 New Features Guide 356Fortinet Inc.

Advanced Threats
To view the owner of the IP address:
(global) # get firewall internet-service-owner ?id Internet Service owner ID.1 Google2 Facebook3 Apple4 Yahoo5 Microsoft......115 Cybozu116 VNC
To check for any known service running on an IP address:
(global) # diagnose internet-service info FG-traffic 6 80 8.8.8.8Internet Service: 65537(Google.Web)
To check GeoIP location and black list information:
(global) # diagnose internet-service id 65537 | grep 8.8.8.88.8.8.8-8.8.8.8 geo_id(11337) black list(0x0) proto(6) port(80 443)8.8.8.8-8.8.8.8 geo_id(11337) black list(0x0) proto(17) port(443)
To check a known malicious server:
(global) # diagnose internet-service id-summary 3080383Version: 0000600096Timestamp: 201902111802Total number of IP ranges: 444727Number of Groups: 7Group(0), Singularity(20), Number of IP ranges(142740)Group(1), Singularity(19), Number of IP ranges(1210)Group(2), Singularity(16), Number of IP ranges(241)Group(3), Singularity(15), Number of IP ranges(38723)Group(4), Singularity(10), Number of IP ranges(142586)Group(5), Singularity(8), Number of IP ranges(5336)Group(6), Singularity(6), Number of IP ranges(113891)Internet Service: 3080383(Botnet.C&C.Server)Number of IP range: 111486Number of IP numbers: 111486Singularity: 20Reputation: 1(Known malicious sites related to botnet servers, phishing sites, etc.)Icon Id: 591Second Level Domain: 1(other)Direction: dstData source: irdb
To check questionable usage:
(global) # diag internet-service id-summary 2818238Version: 0000600096Timestamp: 201902111802Total number of IP ranges: 444727Number of Groups: 7
FortiOS 6.2 New Features Guide 357Fortinet Inc.

Advanced Threats
Group(0), Singularity(20), Number of IP ranges(142740)Group(1), Singularity(19), Number of IP ranges(1210)Group(2), Singularity(16), Number of IP ranges(241)Group(3), Singularity(15), Number of IP ranges(38723)Group(4), Singularity(10), Number of IP ranges(142586)Group(5), Singularity(8), Number of IP ranges(5336)Group(6), Singularity(6), Number of IP ranges(113891)Internet Service: 2818238(Tor.Relay.Node)Number of IP range: 13718Number of IP numbers: 13718Singularity: 20Reputation: 2(Sites providing high risk services such as TOR, proxy, P2P, etc.)Icon Id: 43Second Level Domain: 1(other)Direction: dstData source: irdb
(global) # diagnose internet-service id-summary 2818243Version: 0000600096Timestamp: 201902111802Total number of IP ranges: 444727Number of Groups: 7Group(0), Singularity(20), Number of IP ranges(142740)Group(1), Singularity(19), Number of IP ranges(1210)Group(2), Singularity(16), Number of IP ranges(241)Group(3), Singularity(15), Number of IP ranges(38723)Group(4), Singularity(10), Number of IP ranges(142586)Group(5), Singularity(8), Number of IP ranges(5336)Group(6), Singularity(6), Number of IP ranges(113891)Internet Service: 2818243(Tor.Exit.Node)Number of IP range: 1210Number of IP numbers: 1210Singularity: 19Reputation: 2(Sites providing high risk services such as TOR, proxy, P2P, etc.)Icon Id: 43Second Level Domain: 1(other)Direction: srcData source: irdb
Antivirus Performance Improvements
This section lists new Antivirus performance improvements added to FortiOS.
CIFS Support
This version supports file-type filtering and antivirus scanning for proxy-based inspection on CIFS traffic.
File filter for CIFS is performed by inspecting the first 4 kB of the file to identify the file's magic number. If a match occurs,CIFS file-filtering prevents the CIFS command that contains that file from running.
This feature also introduces a new security profile called cifs-profile which handles the configuration for file-typefiltering on CIFS.
FortiOS 6.2 New Features Guide 358Fortinet Inc.

Advanced Threats
The antivirus profile still handles the antivirus configuration for CIFS scanning.
Requirements
The firewall policy must be set to Proxy inspection mode for CIFS profile to be available for assignment to the policy.
The following are not supported by CIFS scanning in proxy inspection mode:
l File types and infections within archive files cannot be detected.l Oversized files cannot be detected.l Special condition archive files (encrypted, corrupted, mailbomb, etc.) marked by AV engine are blockedautomatically.
l IPv6 CIFS traffic is not supported.
Sample configuration
You must use CLI to configure this feature.
CIFS domain controller configuration
The domain controller configuration is necessary when CIFS traffic is encrypted, such as used by SMB 3.0.
This configuration tells the FortiGate the location of the domain controller in the network and the superuser credentials.
This is all needed to decrypt SMB 3.0 traffic.
FGT_PROXY (vdom1) # config cifsdomain-controller Define known domain controller servers.profile Configure CIFS profile.
FGT_PROXY (vdom1) # config cifs domain-controller
FGT_PROXY (domain-controller) # edit DOMAINnew entry 'DOMAIN' added
FGT_PROXY (DOMAIN) # set ?*domain-name Fully qualified domain name (FQDN). E.g. 'EXAMPLE.COM'.*username User name to sign in with. Must have proper permissions for service.*password Password for specified username.port Port number of service. Port number 0 indicates automatic discovery.ip IPv4 server address.ip6 IPv6 server address.
FGT_PROXY (DOMAIN) # showconfig cifs domain-controller
edit "DOMAIN"set domain-name "EXAMPLE.COM"set username "admin-super"set password ENC
1mKKNo0z95t/+9B9IisyLsSfevTNRePp6mFk+dtDdZ7r2V8CYUrXp7kcxVauWpdHYlQsrY8g2Ypo+UYDsBUxELDpfLYC7C31rCm6WD0jYiRcQ/kZhWpwB5Dl3W7Z9865r/ntVu1YCsWex/+MnnMYyzFXaNJriXuPLYKEv2fe79NpmSuvouEMvc6zgPPBbXE+28SHzA==
set ip 172.16.201.40next
end
FortiOS 6.2 New Features Guide 359Fortinet Inc.

Advanced Threats
Sample profile configuration for deep CIFS inspection (for SMB 3.0)
FGT_PROXY (vdom1) # config cifs profile
FGT_PROXY (profile) # edit cifs
FGT_PROXY (cifs) # set ?*server-credential-type CIFS server credential type.
FGT_PROXY (cifs) # set server-credential-type ?none Credential derivation not set.credential-replication Credential derived using Replication account on Domain Controller.credential-keytab Credential derived using server keytab.
No-Encryption
none is the default for CIFS profile's server-credential-type parameter. When none is set, the CIFS profileassumes the CIFS traffic is unencrypted (used with SMB 2.0).
Account-Replication
This method of decrypting CIFS traffic involves FortiOS obtaining the session key from the domain controller by logginginto the superuser account.
When credential-replication is set, the parameter domain-controller becomes available and domaincontrollermust be specified.
For an example of the domain controller entry, see the CIFS domain controller configuration section above.
FGT_PROXY (vdom1) # config cifs profile
FGT_PROXY (profile) # edit cifs
FGT_PROXY (cifs) # set server-credential-type credential-replication
FGT_PROXY (cifs) # set ?*server-credential-type CIFS server credential type.*domain-controller Domain for which to decrypt CIFS traffic.
FGT_PROXY (cifs) # set domain-controller ?<string> please input string valueDOMAIN domain-controller
FGT_PROXY (cifs) # set domain-controller DOMAIN
FGT_PROXY (cifs) # showconfig cifs profile
edit "cifs"set server-credential-type credential-replicationconfig file-filter
config entriesend
endset domain-controller "DOMAIN"
nextend
FortiOS 6.2 New Features Guide 360Fortinet Inc.

Advanced Threats
Keytab
This method of decrypting CIFS traffic involves FortiOS using a series of keytab values to decrypt CIFS traffic.
Use this method when the SMB connection is authenticated by Kerberos.
When credential-keytab is set, the keytab table server-keytab becomes available and keytab entries can beconfigured.
Keytab values are stored in the FortiOS configuration in plain text.
FGT_PROXY (vdom1) # config cifs profile
FGT_PROXY (profile) # edit cifs
FGT_PROXY (cifs) # set server-credential-type credential-keytab
FGT_PROXY (cifs) # configfile-filter File filter.server-keytab Server keytab.
FGT_PROXY (cifs) # config server-keytab
FGT_PROXY (server-keytab) # edit keytab1
FGT_PROXY (keytab1) # set ?*keytab Base64 encoded keytab file containing credential of the server.
FGT_PROXY (keytab1) # set keytabBQIAAABFAAEAC0VYQU1QTEUuQ09NAAdleGFtcGxlAAAAAVUmAlwBABIAILdV5P6NXT8RrTvapcMJQxDYCjRQiD0BzxhwS9h0VgyM
FGT_PROXY (keytab1) # end
FGT_PROXY (cifs) # showconfig cifs profile
edit "cifs"set server-credential-type credential-keytabconfig file-filterendconfig server-keytab
edit "keytab1"set keytab
"BQIAAABFAAEAC0VYQU1QTEUuQ09NAAdleGFtcGxlAAAAAVUmAlwBABIAILdV5P6NXT8RrTvapcMJQxDYCjRQiD0BzxhwS9h0VgyM"
nextend
nextend
CIFS profile file filtering
This filter has two configurable parameters:
l status - Enables or disables the file filter. Default is enable.l log - Enables or disables CIFS event logs when a file is detected. Default is enable.
FortiOS 6.2 New Features Guide 361Fortinet Inc.

Advanced Threats
FGT_PROXY (vdom1) # config cifs profile
FGT_PROXY (profile) # edit cifs
FGT_PROXY (cifs) # config file-filter
FGT_PROXY (file-filter) # set ?status Enable/disable file filter.log Enable/disable file filter logging.
FGT_PROXY (file-filter) # set status ?enable Enable file filter.disable Disable file filter.
FGT_PROXY (file-filter) # set log ?enable Enable file filter logging.disable Disable file filter logging.
CIFS profile file filter entries
The configurable parameters for each entry are:
l action - Blocks or monitors the detected file type. Default is log.l direction - Sets the direction of traffic which the filter should be applied to. Default value is any.l file-type - The file type to be detected. Default is blank (unset).
FGT_PROXY (file-filter) # config entries
FGT_PROXY (entries) # edit 1
FGT_PROXY (1) # set ?comment Comment.action Action taken for matched file.direction Match files transmitted in the session's originating or reply direction.file-type Select file type.
FGT_PROXY (1) # set action ?log Allow the content and write a log message.block Block the content and write a log message.
FGT_PROXY (1) # set direction ?incoming Match files transmitted in the session's originating direction.outgoing Match files transmitted in the session's reply direction.any Match files transmitted in the session's originating and reply direction.
FGT_PROXY (1) # set file-type ?name File type name.7z Match 7-zip files.arj Match arj compressed files.cab Match Windows cab files.lzh Match lzh compressed files.rar Match rar archives.tar Match tar files.zip Match zip files.bzip Match bzip files.gzip Match gzip files.
FortiOS 6.2 New Features Guide 362Fortinet Inc.

Advanced Threats
bzip2 Match bzip2 files.xz Match xz files.bat Match Windows batch files.msc Match msc files.uue Match uue files.mime Match mime files.base64 Match base64 files.binhex Match binhex files.bin Match bin files.elf Match elf files.exe Match Windows executable files.hta Match hta files.html Match html files.jad Match jad files.class Match class files.cod Match cod files.javascript Match javascript files.msoffice Match MS-Office files. For example, doc, xls, ppt, and so on.msofficex Match MS-Office XML files. For example, docx, xlsx, pptx, and so on.fsg Match fsg files.upx Match upx files.petite Match petite files.aspack Match aspack files.prc Match prc files.sis Match sis files.hlp Match Windows help files.activemime Match activemime files.jpeg Match jpeg files.gif Match gif files.tiff Match tiff files.png Match png files.bmp Match bmp files.ignored Match ignored files.unknown Match unknown files.mpeg Match mpeg files.mov Match mov files.mp3 Match mp3 files.wma Match wma files.wav Match wav files.pdf Match Acrobat pdf files.avi Match avi files.rm Match rm files.torrent Match torrent files.msi Match Windows Installer msi files.mach-o Match Mach object files.dmg Match Apple disk image files..net Match .NET files.xar Match xar archive files.chm Match Windows compiled HTML help files.iso Match ISO archive files.crx Match Chrome extension files.
Change to antivirus profile
This version has a minor change to the antivirus profile.
The previous config smb is now changed to config cifs.
FortiOS 6.2 New Features Guide 363Fortinet Inc.

Advanced Threats
FGT_PROXY (av) # show full-configuration
config antivirus profileedit "av"
set comment ''set replacemsg-group ''set mobile-malware-db enable
...config cifs
set options scan quarantineunset archive-blockunset archive-logset emulator enableset outbreak-prevention full-archive
endnext
end
Logs & Report
This feature includes a new UTM log category type: utm-cifs which logs the file-type detection events generated bycifs-profile.
Antivirus detection over CIFS protocol still generate logs under the utm-virus category.
FGT_PROXY (vdom1) # execute log filter categoryAvailable categories: 0: traffic 1: event 2: utm-virus 3: utm-webfilter 4: utm-ips 5: utm-emailfilter 7: utm-anomaly 8: utm-voip 9: utm-dlp10: utm-app-ctrl12: utm-waf15: utm-dns16: utm-ssh17: utm-ssl18: utm-cifs
Logs generated by CIFS profile file filter:
date=2019-03-28 time=10:39:19 logid="1800063001" type="utm" subtype="cifs" eventtype="cifs-filefilter" level="notice" vd="vdom1" eventtime=1553794757 msg="File was detected by filefilter." direction="incoming" action="passthrough" service="CIFS" srcip=10.1.100.11dstip=172.16.200.44 srcport=33372 dstport=445 srcintf="wan2" srcintfrole="wan"dstintf="wan1" dstintfrole="wan" policyid=1 proto=16 profile="cifs" filesize="1154"filename="virus\\test.jpg" filtername="2" filetype="png"
date=2019-03-28 time=10:39:12 logid="1800063001" type="utm" subtype="cifs" eventtype="cifs-filefilter" level="notice" vd="vdom1" eventtime=1553794751 msg="File was detected by filefilter." direction="incoming" action="passthrough" service="CIFS" srcip=10.1.100.11dstip=172.16.200.44 srcport=33370 dstport=445 srcintf="wan2" srcintfrole="wan"
FortiOS 6.2 New Features Guide 364Fortinet Inc.

Advanced Threats
dstintf="wan1" dstintfrole="wan" policyid=1 proto=16 profile="cifs" filesize="81975"filename="virus\\screen.jpg" filtername="2" filetype="png"
date=2019-03-28 time=10:33:55 logid="1800063000" type="utm" subtype="cifs" eventtype="cifs-filefilter" level="warning" vd="vdom1" eventtime=1553794434 msg="File was blocked by filefilter." direction="incoming" action="blocked" service="CIFS" srcip=10.1.100.11dstip=172.16.200.44 srcport=33352 dstport=445 srcintf="wan2" srcintfrole="wan"dstintf="wan1" dstintfrole="wan" policyid=1 proto=16 profile="cifs" filesize="28432"filename="filetypes\\mpnotify.exe" filtername="3" filetype="exe"
date=2019-03-28 time=10:33:45 logid="1800063000" type="utm" subtype="cifs" eventtype="cifs-filefilter" level="warning" vd="vdom1" eventtime=1553794424 msg="File was blocked by filefilter." direction="incoming" action="blocked" service="CIFS" srcip=10.1.100.11dstip=172.16.200.44 srcport=33348 dstport=445 srcintf="wan2" srcintfrole="wan"dstintf="wan1" dstintfrole="wan" policyid=1 proto=16 profile="cifs" filesize="96528"filename="filetypes\\winmine.exe" filtername="3" filetype="exe"
Logs generated by AV profile for infections detected over CIFS:
date=2019-04-09 time=15:19:02 logid="0204008202" type="utm" subtype="virus"eventtype="outbreak-prevention" level="warning" vd="vdom1" eventtime=1554848342519005401msg="Blocked by Virus Outbreak Prevention service." action="blocked" service="SMB"sessionid=177 srcip=10.1.100.11 dstip=172.16.200.44 srcport=37444 dstport=445 srcintf="wan2"srcintfrole="wan" dstintf="wan1" dstintfrole="wan" policyid=1 proto=6 direction="incoming"filename="outbreak\\zhvo_test.com" quarskip="File-was-not-quarantined."virus="503e99fe40ee120c45bc9a30835e7256fff3e46a" dtype="File Hash"filehash="503e99fe40ee120c45bc9a30835e7256fff3e46a" filehashsrc="fortiguard" profile="av"analyticssubmit="false" crscore=50 craction=2 crlevel="critical"
date=2019-04-09 time=15:18:59 logid="0211008192" type="utm" subtype="virus"eventtype="infected" level="warning" vd="vdom1" eventtime=1554848339909808987 msg="File isinfected." action="blocked" service="SMB" sessionid=174 srcip=10.1.100.11dstip=172.16.200.44 srcport=37442 dstport=445 srcintf="wan2" srcintfrole="wan"dstintf="wan1" dstintfrole="wan" policyid=1 proto=6 direction="incoming"filename="sample\\eicar.com" quarskip="File-was-not-quarantined." virus="EICAR_TEST_FILE"dtype="Virus" ref="http://www.fortinet.com/ve?vn=EICAR_TEST_FILE" virusid=2172 profile="av"analyticscksum="275a021bbfb6489e54d471899f7db9d1663fc695ec2fe2a2c4538aabf651fd0f"analyticssubmit="false" crscore=50 craction=2 crlevel="critical"
IPv6
This section lists new IPv6 features added to FortiOS.
Combined IPv4 and IPv6 Policy
This feature introduces a new, consolidated policy mode. In this mode, IPv4 and IPv6 policies are combined into asingle, consolidated policy. This means that a single policy can be defined that includes both IPv4 and IPv6, instead ofdefining separate policies.
FortiOS 6.2 New Features Guide 365Fortinet Inc.

Advanced Threats
In consolidated policy mode, there is a single policy table for the GUI. The same source interface, destination interface,service, user, and schedule are shared for both IPv4 and IPv6, while there are different IP addresses and IP poolsettings.
Consolidated policy mode can be enabled with the following CLI command:
config system settingsset consolidated-firewall-mode enable
Enabling consolidated-firewall-mode will delete all firewall policy/policy6. Do youwant to continue? (y/n) y
end
Enabling consolidated policy mode will delete all existing IPv4 and IPv6 policies.
To configure a consolidated policy in the CLI:
config firewall consolidated policyedit 1
set uuid 754a86b6-2507-51e9-ef0d-13a6e4bf2e9dset srcintf "port18"set dstintf "port17"set srcaddr4 "10-1-100-0" <-------- IPv4 srcaddrset dstaddr4 "172-16-200-0" <-------- IPv4 dstaddrset srcaddr6 "2000-10-1-100-0" <-------- IPv6 srcaddrset dstaddr6 "2000-172-16-200-0" <-------- IPv6 dstaddrset action acceptset schedule "always"set service "ALL"set logtraffic allset ippool enableset poolname4 "test-ippool4-1" <-------- IPv4 poolnameset poolname6 "test-ippool6-1" <-------- IPv6 poolnameset nat enable
next
FortiOS 6.2 New Features Guide 366Fortinet Inc.

Advanced Threats
end
Limitations
The following features are not currently supported by consolidated policy mode:
l Policy-learning model Internet-services in policyl Address-negate and service-negatel DSCP-match/Tosl Traffic shaper in policyl Capture-packet in policyl External IP list in policyl schedule-timeout, block-notification, disclaimer, custom-log-fields, or reputation in policyl timeout-send-rst, tcp-session-without-syn, or anti-replay in policy;l Policy Interface Pair Viewl Policy lookup function on page.
The session/iprope tables for IPv4 and IPv6 are still displayed separately.
FortiGuard DNS Filter
This feature adds DNS profile inspection to IPv6 policies. This includes FortiGuard DNS filtering (with a web filteringlicense), and portal replacement message redirect.
To apply a DNS Filter profile to an IPv6 policy using the CLI:
config firewall policy6edit 1
set name "IPV6-DNSFilter"set uuid b1adb096-1919-51e9-05c7-87813d4e2b2aset srcintf "port10"set dstintf "port9"set srcaddr "all"set dstaddr "all"set action acceptset schedule "always"set service "ALL"set utm-status enableset dnsfilter-profile "default"set ssl-ssh-profile "protocols"set nat enable
FortiOS 6.2 New Features Guide 367Fortinet Inc.

Advanced Threats
nextend
A new CLI variable is added to the DNS filter profile for the IPv6 address of the SDNS redirect portal: redirect-portal6
config dnsfilter profileedit "default"
set comment "Default dns filtering."config domain-filter
unset domain-filter-tableendconfig ftgd-dns
unset optionsconfig filters
edit 1set category 2set action monitor
nextedit 2
set category 7set action monitor
next......
endset log-all-domain disableset sdns-ftgd-err-log enableset sdns-domain-log enableset block-action redirectset block-botnet enableset safe-search disableset redirect-portal 0.0.0.0set redirect-portal6 ::
nextend
After the FortiGate has successfully initialized communication with the SDNS server (for domain rating service), thefollowing CLI command will show the default redirect portal IPv6 address:
(global) # diag test app dnsproxy 3......FGD_REDIR_V4:208.91.112.55 FGD_REDIR_V6:[2001:cdba::3257:9652]
File Filtering for Web and Email Filter Profiles
This feature adds file filtering capabilities to web and email filter profiles. The web filters will cover the detection of HTTPand FTP traffic, while the email filters cover SMTP, POP3, and IMAP. New logs and replacement messages are alsoadded.
FortiOS 6.2 New Features Guide 368Fortinet Inc.

Advanced Threats
To add a file filter to a web filter profile in the GUI:
1. On the FortiGate, go to Security Profiles > Web Filter.2. Edit an existing profile, or create a new one.
3. Enable File Filter, if not already enabled, then click Create New in the filter table. The Create New File Filter Rulepane opens.
4. Configure the filter as required, then clickOK.
To add a file filter to a web filter profile using the CLI:
config webfilter profileedit "webfilter-file-filter"config file-filter
set status {enable | disable}set log {enable | disable}set scan-archive-contents {enable | disable}config entriesedit "filter1"set comment "Block files"set protocol [http | ftp]
FortiOS 6.2 New Features Guide 369Fortinet Inc.

Advanced Threats
set action {block | log}set direction {any | incoming | outgoing}set encryption {any | yes}set file-type "pdf" "msofficex"
nextend
endnext
end
Web filter profiles handle HTTP and FTP protocols, and can configure the traffic direction.
Variable Description
status {enable | disable} Enable/disable file filtering (default = enable).
log {enable | disable} Enable/disable file filter logging (default = enable).
scan-archive-contents {enable | disable} Enable/disable file filter archive contents scan (default =enable).
comment <string> Optional comments.
protocol [http | ftp] Protocols to use (default = http ftp).
action {block | log} The action taken for matched file (default = log).
direction {any | incoming | outgoing} Match files transmitted in the session's originatingdirection (incoming), reply direction (outgoing), or either(any) (default = any).
encryption {any | yes} Match encrypted files or not:l any - match any file (default).l yes - match only encrypted files.
file-type <string> Select the file types to match.
FortiOS 6.2 New Features Guide 370Fortinet Inc.

Advanced Threats
To add a file filter to an email filter profile in the GUI:
1. On the FortiGate, go to Security Profiles > Email Filter.2. Edit an existing profile, or create a new one.
3. Enable Enable Spam Detection and Filtering, if not already enabled.4. Enable File Filter, if not already enabled, then click Create New in the filter table. The Create New File Filter Rule
pane opens.
5. Configure the filter as required, then clickOK.
To add a file filter to an email filter profile with the CLI:
config emailfilter profileedit "emailfilter-file-filter"config file-filter
set status {enable | disable}set log {enable | disable}set scan-archive-contents {enable | disable}config entriesedit "filter1"set comment "Block files"
FortiOS 6.2 New Features Guide 371Fortinet Inc.

Advanced Threats
set protocol [smtp | imap | pop3]set action {block | log}set encryption {any | yes}set file-type "exe"
nextend
endnext
end
Email filter profiles handle SMTP, IMAP, and POP3 protocols. The traffic direction cannot beconfigured, as it is implied by the protocol.
Variable Description
status {enable | disable} Enable/disable file filtering (default = enable).
log {enable | disable} Enable/disable file filter logging (default = enable).
scan-archive-contents {enable | disable} Enable/disable file filter archive contents scan (default =enable).
comment <string> Optional comments.
protocol [smtp | imap | pop3] Protocols to use (default = smtp imap pop3).
action {block | log} The action taken for matched file (default = log).
encryption {any | yes} Match encrypted files or not:l any - match any file (default).l yes - match only encrypted files.
file-type <string> Select the file types to match.
New logs
A new file_filter event type is added to both web and email filter log categories.
Log samples
Web Filter File Filter action as Block:
1: date=2019-03-19 time=09:42:15 logid="0346012673" type="utm" subtype="webfilter"eventtype="file_filter" level="warning" vd="vd1" eventtime=1548438135 policyid=1sessionid=29449 srcip=10.1.100.22 srcport=52816 srcintf="dmz" srcintfrole="undefined"dstip=172.16.200.55 dstport=80 dstintf="wan1" dstintfrole="undefined" proto=6service="HTTP" hostname="172.16.200.55" profile="webfilter-filefilter" action="blocked"reqtype="direct" url="/app_data/test1.pdf" sentbyte=0 rcvdbyte=0 direction="incoming"filename="test1.pdf" filtername="filter1" filetype="pdf" msg="File was blocked by filefilter."
FortiOS 6.2 New Features Guide 372Fortinet Inc.

Advanced Threats
Web Filter File Filter action as Log:
2: date=2019-03-19 time=10:48:23 logid="0346012672" type="utm" subtype="webfilter"eventtype="file_filter" level="notice" vd="vd1" eventtime=1548442102 policyid=1sessionid=521 srcip=10.1.100.22 srcport=52894 srcintf="dmz" srcintfrole="undefined"dstip=172.16.200.55 dstport=80 dstintf="wan1" dstintfrole="undefined" proto=6service="HTTP" hostname="172.16.200.55" profile="webfilter-filefilter"action="passthrough" reqtype="direct" url="/app_data/park.jpg" sentbyte=0 rcvdbyte=0direction="incoming" filename="park.jpg" filtername="filter2" filetype="jpeg" msg="Filewas detected by file filter."
Email Filter File Filter action as Block:
1: date=2019-01-25 time=15:20:16 logid="0554020511" type="utm" subtype="emailfilter"eventtype="file_filter" level="warning" vd="vdom1" eventtime=1548458416 policyid=1sessionid=2881 srcip=10.1.100.12 srcport=45974 srcintf="port2" srcintfrole="undefined"dstip=172.16.200.56 dstport=143 dstintf="port1" dstintfrole="undefined" proto=6service="IMAP" action="blocked" from="[email protected]"to="[email protected]" recipient="emailuser2" direction="incoming" subject="EXEfile block" size="622346" attachment="yes" filename="putty.exe" filtername="filter1"filetype="exe"
Email Filter File Filter action as Log:
1: date=2019-01-25 time=15:23:16 logid="0554020510" type="utm" subtype="emailfilter"eventtype="file_filter" level="notice" vd="vdom1" eventtime=1548458596 policyid=1sessionid=3205 srcip=10.1.100.12 srcport=55664 srcintf="port2" srcintfrole="undefined"dstip=172.16.200.56 dstport=25 dstintf="port1" dstintfrole="undefined" proto=6service="SMTP" profile="emailfilter-file-filter" action="detected"from="[email protected]" to="[email protected]"sender="[email protected]" recipient="[email protected]"direction="outgoing" subject="PDF file log" size="390804" attachment="yes"filename="fortiauto.pdf" filtername="filter2" filetype="pdf"
New replacement messages
Web Filter File Filter blocking upload:
You are not permitted to upload the file "%%FILE%%".
Web Filter File Filter blocking download:
Your attempt to access the file "%%FILE%%" has been blocked by your system administrator.
Email Filter File Filter blocking emails:
This email has been blocked. The file %%FILE%%was blocked due to its file type or properties.
Move Botnet C&C into IPS Profile
Security Profiles > Intrusion Prevention has a new Botnet C&C option. This option consolidates multiple botnet optionsinto a single option in the IPS Profile so that in one place, you can enable botnet blocking across all traffic that match thepolicy.
FortiOS 6.2 New Features Guide 373Fortinet Inc.

Advanced Threats
The new Security Profiles > Intrusion Prevention > Botnet C&C option replaces and enhances the old Network Interfaces> Scan Outgoing Connections to Botnet Sites option.
To configure Botnet C&C IP blocking using the GUI:
1. Go to Security Profiles > Intrusion Prevention and enable Botnet C&C by setting Scan Outgoing Connections toBotnet Sites to Block orMonitor.
2. Add the above sensor to the firewall policy and the IPS engine will start to scan outgoing connections to botnet sites.For example, visit a botnet IP and an IPS log is generated for this attack.
To configure Botnet C&C IP blocking using the CLI:
config ips sensor now has a new scan-botnet-connections option.
config ips sensoredit "Demo"
set scan-botnet-connections <disable | block | monitor>next
end
The scan-botnet-connections command is no longer available in the following CLIcommands:l config firewall policyl config firewall interface-policyl config firewall proxy-policyl config firewall sniffer
Botnet IPs and Botnet Domains moved to Intrusion Prevention section
In System > FortiGuard , Botnet IPs and Botnet Domains are now in the Intrusion Prevention section.
FortiOS 6.2 New Features Guide 374Fortinet Inc.

Advanced Threats
Botnet C&C Domain Blocking
There are no changes from version 6.0.4 in configuring Security Profiles > DNS Filter > Redirect botnet C&C requests toBlock Portal. Add the profile to a firewall policy to block connections to Botnet domains.
Botnet C&C URL Blocking
There are no changes from version 6.0.4 in configuring Security Profiles > Intrusion Prevention > Block malicious URLs.Enable Block malicious URLs in IPS Sensor and then add the sensor to a firewall policy.
FortiOS 6.2 New Features Guide 375Fortinet Inc.

Advanced Threats
Botnet C&C Signature Blocking
In this version and version 6.0.4, there are IPS signatures for botnet attacks. Include these signatures in IPS Sensor andthen add the sensor to a firewall policy to detect or block attacks matching the IPS signatures.
NGFW policy mode - 6.2.1
NGFW policy-based mode allows applications and URL categories to be used directly in security policies, withoutrequiring web filter or application control profiles.
In policy-based mode:
l Central NAT is always enabled.l Pre-match rules are defined separately from security policies, and define broader rules, such as SSL inspection anduser authentication.
Security policies work with firewall (or consolidated) policies to inspect traffic. To allow traffic from a specific user or usergroup, both firewall and security policies must be configured. Traffic will match the firewall policy first. If the traffic isallowed, packets are sent to the IPS engine for application, URL category, user, and user group match, and then, ifenabled, UTM inspection (antivirus, IPS, DLP, and email filter) is performed.
Firewall policies are used to pre-match traffic before sending the packets to the IPS engine.
l There is no schedule or action options; traffic matching the policy is always redirected to the IPS engine.l SSL Inspection, formerly configured in the VDOM settings, is configured in a firewall policy.l Users and user groups that require authentication must be configured in a firewall policy.
FortiOS 6.2 New Features Guide 376Fortinet Inc.

Advanced Threats
Security policies work with firewall policies to inspect traffic.
l Applications and URL categories can be configured directly in the policy.l Users and user groups that require authentication must also be configured in a security policy.l The available actions are Accept or Deny.l The Service option can be used to enforce the standard port for the selected applications. See NGFW policy modeapplication default service 6.2.1 on page 379 for details.
l UTM inspection is configured in a security policy.
FortiOS 6.2 New Features Guide 377Fortinet Inc.

Advanced Threats
To configure policies for Facebook and Gmail access is the CLI:
1. Configure a firewall policy:
config firewall consolidated policyedit 1
set name "Policy-1"set uuid b740d418-8ed3-51e9-5a7b-114e99ab6370set srcintf "port18"set dstintf "port17"set srcaddr4 "all"set dstaddr4 "all"set service "ALL"set ssl-ssh-profile "new-deep-inspection"set groups "Dev" "HR" "QA" "SYS"
nextend
2. Configure security policies:
config firewall security-policyedit 2
set uuid 364594a2-8ef1-51e9-86f9-32db9c2634b6set name "allow-QA-Facebook"set srcintf "port18"set dstintf "port17"set srcaddr4 "all"set dstaddr4 "all"set action acceptset schedule "always"set application 15832set groups "Dev" "QA"
nextedit 4
set uuid a2035210-8ef1-51e9-8b28-5a87b2cabcfaset name "allow-QA-Email"set srcintf "port18"set dstintf "port17"set srcaddr4 "all"set dstaddr4 "all"set action acceptset schedule "always"set url-category 23set groups "QA"
nextend
Logs
In the application control and web filter logs, securityidmaps to the security policy ID.
Application control log:
date=2019-06-17 time=16:35:47 logid="1059028704" type="utm" subtype="app-ctrl"eventtype="signature" level="information" vd="vd1" eventtime=1560814547702405829 tz="-0700"appid=15832 user="Jack" group="QA" srcip=10.1.100.102 dstip=157.240.3.29 srcport=56572dstport=443 srcintf="port18" srcintfrole="undefined" dstintf="port17"
FortiOS 6.2 New Features Guide 378Fortinet Inc.

Advanced Threats
dstintfrole="undefined" proto=6 service="P2P" direction="incoming" policyid=1sessionid=42445 appcat="Social.Media" app="Facebook" action="pass" hostname="external-sea1-1.xx.fbcdn.net" incidentserialno=1419629662 url="/" securityid=2 msg="Social.Media:Facebook," apprisk="medium" scertcname="*.facebook.com" scertissuer="DigiCert SHA2 HighAssurance Server CA"
Web filter log:
date=2019-06-17 time=16:42:41 logid="0317013312" type="utm" subtype="webfilter"eventtype="ftgd_allow" level="notice" vd="vd1" eventtime=1560814961418114836 tz="-0700"policyid=4 sessionid=43201 user="Jack" group="QA" srcip=10.1.100.102 srcport=56668srcintf="port18" srcintfrole="undefined" dstip=172.217.3.165 dstport=443 dstintf="port17"dstintfrole="undefined" proto=6 service="HTTPS" hostname="mail.google.com"action="passthrough" reqtype="direct" url="/" sentbyte=709 rcvdbyte=0 direction="outgoing"msg="URL belongs to an allowed category in policy" method="domain" cat=23 catdesc="Web-basedEmail" securityid=4
Traffic logs:
date=2019-06-17 time=16:35:53 logid="0000000013" type="traffic" subtype="forward"level="notice" vd="vd1" eventtime=1560814553778525154 tz="-0700" srcip=10.1.100.102srcport=56572 srcintf="port18" srcintfrole="undefined" dstip=157.240.3.29 dstport=443dstintf="port17" dstintfrole="undefined" poluuid="b740d418-8ed3-51e9-5a7b-114e99ab6370"sessionid=42445 proto=6 action="server-rst" user="Jack" group="QA" policyid=1policytype="consolidated" centralnatid=1 service="HTTPS" dstcountry="United States"srccountry="Reserved" trandisp="snat" transip=172.16.200.2 transport=56572 duration=6sentbyte=276 rcvdbyte=745 sentpkt=5 rcvdpkt=11 appid=15832 app="Facebook"appcat="Social.Media" apprisk="medium" utmaction="allow" countapp=1 utmref=65531-294
2: date=2019-06-17 time=16:47:45 logid="0000000013" type="traffic" subtype="forward"level="notice" vd="vd1" eventtime=1560815265058557636 tz="-0700" srcip=10.1.100.102srcport=56668 srcintf="port18" srcintfrole="undefined" dstip=172.217.3.165 dstport=443dstintf="port17" dstintfrole="undefined" poluuid="b740d418-8ed3-51e9-5a7b-114e99ab6370"sessionid=43201 proto=6 action="timeout" user="Jack" group="QA" policyid=1policytype="consolidated" centralnatid=1 service="HTTPS" dstcountry="United States"srccountry="Reserved" trandisp="snat" transip=172.16.200.2 transport=56668 duration=303sentbyte=406 rcvdbyte=384 sentpkt=4 rcvdpkt=4 appcat="unscanned" utmaction="allow"countweb=1 utmref=65531-3486
NGFW policy mode application default service - 6.2.1
In NGFW policy-based mode, the application default service enforces applications running only on their default serviceport. The applications specified in the policy are monitored, and if traffic is detected from a nonstandard port, it isblocked, and a log entry is recorded with event type port-violation.
If you are not using the default ports, and instead need to pick specific services, select Specify to select the requiredservices.
Example
In this example, the standard port is enforced for HTTPS traffic using the HTTP.Audio application.
FortiOS 6.2 New Features Guide 379Fortinet Inc.

Advanced Threats
First, a firewall policy is created do to traffic pre-match, and then a security policy is created to allow the HTTP.Audioapplication when using the default port. Fetching an MP3 file from an HTTP server using port 443 is allowed, but isblocked when using a nonstandard port, such as 8443.
To enforce the HTTP.Audio application using the default port in the GUI:
1. Create a firewall policy. See NGFW policy mode 6.2.1 on page 376 for details.2. Go to Policy & Objects > Security Policy, and click Create New.
3. Enter a name for the policy, such as allow_HTTP.Audio.4. Configure the ports as needed.5. Set Service to App Default.6. In the Application field, select HTTP.Audio.7. Set Action to Accept.8. ClickOK.
To enforce the HTTP.Audio application using the default port in the CLI:
1. Create a firewall policy:
config firewall consolidated policyedit 1
set name "consolidated_all"set srcintf "port13"set dstintf "port14"set srcaddr4 "all"set dstaddr4 "all"set service "ALL"set ssl-ssh-profile "new-deep-inspection"
nextend
FortiOS 6.2 New Features Guide 380Fortinet Inc.

Advanced Threats
2. Create a security policy:
config firewall security-policyedit 1
set name "allow_HTTP.Audio"set srcintf "port13"set dstintf "port14"set srcaddr4 "all"set enforce-default-app-port enableset action acceptset schedule "always"set logtraffic allset application 15879
nextend
Logs
The application logs show logs with an event type of port-violation for traffic on port 8443 that is blocked, and anevent type of signature for traffic on port 443 that is allowed.
Blocked:
2: date=2019-06-18 time=16:15:40 logid="1060028736" type="utm" subtype="app-ctrl"eventtype="port-violation" level="warning" vd="vd1" eventtime=1560899740218875746 tz="-0700"appid=15879 srcip=10.1.100.22 dstip=172.16.200.216 srcport=52680 dstport=8443srcintf="port13" srcintfrole="undefined" dstintf="port14" dstintfrole="undefined" proto=6service="HTTPS" direction="incoming" policyid=1 sessionid=5041 appcat="Video/Audio"app="HTTP.Audio" action="block" hostname="172.16.200.216" incidentserialno=1906780850url="/app_data/story.mp3" securityid=2 msg="Video/Audio: HTTP.Audio," apprisk="elevated"
Allowed:
1: date=2019-06-18 time=16:15:49 logid="1059028704" type="utm" subtype="app-ctrl"eventtype="signature" level="information" vd="vd1" eventtime=1560899749258579372 tz="-0700"appid=15879 srcip=10.1.100.22 dstip=172.16.200.216 srcport=54527 dstport=443srcintf="port13" srcintfrole="undefined" dstintf="port14" dstintfrole="undefined" proto=6service="HTTPS" direction="incoming" policyid=1 sessionid=5064 appcat="Video/Audio"app="HTTP.Audio" action="pass" hostname="172.16.200.216" incidentserialno=1139663486url="/app_data/story.mp3" securityid=2 msg="Video/Audio: HTTP.Audio," apprisk="elevated"
Adding CPU affinity for URL filters - 6.2.1
On some high-end models, the CPU core number is quite big. For example, the FortiGate 3600E has 88 CPU cores. Forthis model, single-process URL filter daemons may cause a performance bottleneck for the FortiGuard URL rating.
This feature enhances URL filter daemon performance with two extensions:
1. Implementing a URL filter daemon as a multi-process daemon.2. Making CPU affinity configurable for a URL filter daemon. It is now possible to dedicate certain CPUs to run a URL
filter daemon.
Other changes include higher scheduling priority for URL filter daemons and cache processing algorithm optimization.
FortiOS 6.2 New Features Guide 381Fortinet Inc.

Advanced Threats
To configure the CPU affinity using the CLI:
config system globalset url-filter-affinity <0xstring> (hexadecimal value up to 256 bits in the format of
xxxxxxxxxxxxxxxx) set url-filter-count <integer,1-10>
end
The lowest bitmask is CPU0. If the bitmask is 1, this means the process can run on this CPUcore. For example, set url-filter-affinity 0x03 <0x03=00000011>means theURL filter will only run on core0 and core1.For the url-filter-count, the maximum URL filter process count is CPU num+9/10, upto 10. For example, for a FortiGate 1500D with 12 cores, you can set url-filter-count2. For a FortiGate with less than 11 CPU cores, you can only set url-filter-count 1,which is the default value.
SSL offload/sandwich mode - 6.2.1
In SSL offload/sandwich mode, a decode device receives SSL connections and decrypts the traffic, then sends HTTP(non SSL) traffic to the FortiGate for NGFW/UTM inspection. If the session needs to be blocked and a replacementsmessage displayed, the FortiGate delivers the message directly back to the client over HTTPS.
The following CLI command has been added per VDOM:
config authentication settingset rewrite-https-port <port>....
end
This example sets the HTTPS rewrite port to 8080:
config authentication settingset active-auth-scheme ''set sso-auth-scheme ''set captive-portal-type fqdnset captive-portal ''set captive-portal6 ''set captive-portal-port 7830set auth-https enableset captive-portal-ssl-port 7831
FortiOS 6.2 New Features Guide 382Fortinet Inc.

Advanced Threats
set rewrite-https-port 8080end
FortiOS 6.2 New Features Guide 383Fortinet Inc.

IOT & OT
This section lists the new features added to FortiOS for IOT & OT.
MAC Address-Based Policies
This version adds a new address type— range of MAC addresses for IPv4 policies, including:
l IPv4 Firewall Policy.l IPv4 Virtual Wire Pair Policy.l IPv4 ACL Policy.l IPv4 Central SNAT Policy.l IPv4 DoS Policy.
The MAC address is a link layer-based address type and the MAC address cannot be forwarded across different IPsegments.
For policies in NAT mode VDOM, we only support this new MAC address type as source address.
For policies in Transparent mode or Virtual Wire Pair interface, you can use this address type as source or destinationaddress.
When you use this address type in a policy as source address in NAT mode VDOM, IP address translation (NAT) is stillperformed according to the rules defined in the policy. This new address type only works for source address matching. Itdoes not have any association with NAT actions.
Sample configuration
To configure a MAC address range using the GUI:
1. Go to Policy & Objects > Addresses to create or edit an address.l For Category, select Address.l For Type, selectMAC Address Range and enter the address range.l Enter the other fields and clickOK.
FortiOS 6.2 New Features Guide 384Fortinet Inc.

IOT & OT
2. Go to Policy & Objects > IPv4 Policy to apply the address type to a policy in NAT mode VDOM.In NAT mode VDOM, this address type cannot be used as destination address.
To configure a MAC address range using the CLI:
1. Create a new MAC address range type.
config firewall address edit <object_name>
set type mac set start-mac <mac_address_start #> set end-mac <mac_address_end #>
nextend
2. Apply the address type to a policy. In Transparent mode or Virtual Wire Pair interface, this address type can bemixed with other address types in the policy.
config firewall addressedit "test-mac-addr1"
set type macset start-mac 00:0c:29:41:98:88set end-mac 00:0c:29:41:98:88
nextendconfig firewall policy
edit 1set srcintf "port2"set dstintf "port1"set srcaddr "test-mac-addr1" "10-1-100-42"set dstaddr "all"set action acceptset schedule "always"
FortiOS 6.2 New Features Guide 385Fortinet Inc.

IOT & OT
set service "ALL" set logtraffic all set nat enable
nextend
Device Summary and Filtering
New summary charts are introduced to Device Inventory for Device type, Status, Interfaces. These charts are click-ableto simplify filtering and searching the list. This framework is generic and will be added to other areas of the GUI in thefuture.
To use device summary and filtering:
1. Go to User & Device > Device Inventory.
2. On the Device Type chart, click Linux PC to filter all Linux devices.
FortiOS 6.2 New Features Guide 386Fortinet Inc.

IOT & OT
3. On the Status chart, click Status to filter all offline devices.
4. In the Interfaces chart, click port1 to filter all devices discovered from port1.
5. Click the Filter button to remove the filter.
Manage device objects - 6.2.1
Assets detected by device detection appears in the User & Device > Device Inventory. To remember the devices andmanage policies for those devices, right-click the device to create a new device object (MAC-based address) that can beused in address groups or directly in policies.
FortiOS 6.2 New Features Guide 387Fortinet Inc.

IOT & OT
To manage device objects:
1. In User & Device > Device Inventory, right-click a device and select Create Firewall Address.
2. In the New Address pane, specify the new address information.
FortiOS 6.2 New Features Guide 388Fortinet Inc.

IOT & OT
3. ClickOK and the updated information is displayed.
FortiOS 6.2 New Features Guide 389Fortinet Inc.

SOC Adoption
This section lists the new features added to FortiOS for SOC adoption.
Topology View — Consolidated Risk
The new Consolidated Risk View in the Security Fabric Topology displays different risks within the topology view. Thefilter considers threats originating from different components including:
l IOC Detectionsl Vulnerabilitiesl Threat Score
The topology shows endpoints based on their highest severity event. Details are available in the tooltips. Administratorscan also filter by risk type or severity.
This version adds two improvements for topology pages:
l Add the ability to highlight hosts with critical vulnerabilities along with compromised hosts as Critical Risks in thedefault topology view. You can also view Critical Risk devices in the right pane.
l Consolidate the Vulnerability, Threat Score, and 'IOC Score view into a new view mode called Risk view.
In Security Fabric > Physical Topology, the default topology view highlights hosts with critical vulnerabilities along withcompromised hosts as Critical Risks.
FortiOS 6.2 New Features Guide 390Fortinet Inc.

SOC Adoption
Click Critical Risks to view critical risk devices in the right pane.
Using View mode Risk with Risk Type All.
Using View mode Risk with Risk Type Compromised Hosts.
FortiOS 6.2 New Features Guide 391Fortinet Inc.

SOC Adoption
Using View mode Risk with Risk Type Vulnerability.
Using View mode Risk with Risk Type Threat Score.
FortiOS 6.2 New Features Guide 392Fortinet Inc.

SOC Adoption
FortiView — Subnet Filters
This version supports filtering source IPs or destination IPs with subnet mask in the format of x.x.x.x/x in both real-timeand historical modes. Both logging from disk and logging from FortiAnalyzer are supported.
Sample configuration
Sample results in the backend subnet filter
FG201E4Q17900791 # di de application miglogd 0x70000Debug messages will be on for unlimited time.
FortiOS 6.2 New Features Guide 393Fortinet Inc.

SOC Adoption
FG201E4Q17900791 # fortiview_add_filter_field_ex()-1559: fortiview add filterfield:"destination"=>"dstip" type:4 negate:0fortiview_add_filter_field_ex()-1560: values:fortiview_add_filter_field_ex()-1562: value[0]=91.189.0.0/16fortiview_add_filter_field_ex()-1559: fortiview add filterfield:"srcintfrole"=>"srcintfrole" type:4 negate:0fortiview_add_filter_field_ex()-1560: values:fortiview_add_filter_field_ex()-1562: value[0]=lanfortiview_add_filter_field_ex()-1562: value[1]=dmzfortiview_add_filter_field_ex()-1562: value[2]=undefined__params_from_filter()-583: filter field:dstip 91.189.0.0/16__params_from_filter()-583: filter field:srcintfrole lan__params_from_filter()-583: filter field:srcintfrole dmz__params_from_filter()-583: filter field:srcintfrole undefinedfortiview_request_data()-896: dataset:fv.dest.group tabid:0_dump_sql()-829: dataset=fv.dest.group, sql:select dstip, max(dstintf) dst_intf,max(dstdevtype) dst_devtype,max(dstmac) dst_mac,group_concat(distinct appid) appid,group_concat(distinct appservice||case when subapp is null then '' else '_'||subapp end) appname,sum(sessioncount) session_count, sum(case when passthrough<>'block' then sessioncount else 0end) session_allow, sum(case when passthrough='block' then sessioncount else 0 end) session_block, sum(rcvdbyte) r, sum(sentbyte) s, sum(rcvdbyte + sentbyte) bandwidth ,sum(crscore)score, sum(case when passthrough<>'block' then crscore else 0 end) score_allow, sum(casewhen passthrough='block' then crscore else 0 end) score_block from grp_traffic_all_dst where timestamp between 1551397800 and 1551484200 and 1=1 AND ( ft_ipmask(dstip, 0,'91.189.0.0/16') ) AND srcintfrole in ('lan','dmz','undefined') group by dstip order bybandwidth desc limit 100; takes 10(ms), agggr:0(ms)
fortiview_request_data()-933: total:12 start:1551397800 end:1551484200__params_from_filter()-583: filter field:dstip 91.189.0.0/16__params_from_filter()-583: filter field:srcintfrole lan__params_from_filter()-583: filter field:srcintfrole dmz__params_from_filter()-583: filter field:srcintfrole undefinedfortiview_request_data()-896: dataset:fv.general.chart tabid:0_dump_sql()-829: dataset=fv.general.chart, sql:select a.timestamp1,ses_al,ses_bk,r,s,ifnull(sc_l,0),ifnull(sc_m,0),ifnull(sc_h,0),ifnull(sc_c,0) from (select timestamp-(timestamp%600)timestamp1 ,sum(case when passthrough<>'block' then sessioncount else 0 end) ses_al,sum(casewhen passthrough='block' then sessioncount else 0 end) ses_bk,sum(rcvdbyte) r,sum(sentbyte)s from grp_traffic_all_dst where timestamp BETWEEN 1551397800 and 1551484199 and 1=1 AND ( ft_ipmask(dstip, 0, '91.189.0.0/16') ) AND srcintfrole in ('lan','dmz','undefined') groupby timestamp1 ) a left join (select timestamp-(timestamp%600) timestamp1 ,sum(case whenthreat_level=1 then crscore else 0 end) sc_l,sum(case when threat_level=2 then crscore else0 end) sc_m,sum(case when threat_level=3 then crscore else 0 end) sc_h,sum(case when threat_level=4 then crscore else 0 end) sc_c from grp_threat where timestamp BETWEEN 1551397800and 1551484199 and 1=1 AND ( ft_ipmask(dstip, 0, '91.189.0.0/16') ) AND srcintfrole in('lan','dmz','undefined') group by timestamp1 ) b on a.timestamp1 = b.timestamp1; takes 30(ms), agggr:0(ms)
fortiview_request_data()-933: total:47 start:1551397800 end:1551484199
FortiView Dashboards and Widgets
FortiView is now consolidated with the System Dashboards:
FortiOS 6.2 New Features Guide 394Fortinet Inc.

SOC Adoption
l All FortiView pages are now available as widgets that can be added to the flexible dashboards.l Dashboards are now available per VDOM.l New default dashboards were added.
Following is a summary of the changes:
l The name of theMain dashboard changed to Status:
l New default dashboards are now available:l New dashboard named Top Usage LAN/DMZ:
FortiOS 6.2 New Features Guide 395Fortinet Inc.

SOC Adoption
l New dashboard named Security:
l Only core FortiView pages remain in the FortiView section:
l All non-core FortiView pages have been removed from the left navigation and are now available as dashboardwidgets:
FortiOS 6.2 New Features Guide 396Fortinet Inc.

SOC Adoption
FortiOS 6.2 New Features Guide 397Fortinet Inc.

SOC Adoption
l The Threat Mapmoves to theMonitor section:
FortiOS 6.2 New Features Guide 398Fortinet Inc.

SOC Adoption
l After enabling VDOMs, dashboards are now created per VDOM.l For example, add a Sessions widget to the root VDOM:
l Notice that no Sessions widget is added to another VDOM:
FortiView Object Names
In this version, FortiView Top Sources and Top Destinations views leverage UUID to resolve Firewall Object (Address)names for improved usability.
FortiOS 6.2 New Features Guide 399Fortinet Inc.

SOC Adoption
Requirements
l Firewall Objects-based view is only available when the data source is disk.l To have historical Firewall Objects-based view, address objects UUID need to be logged. Enable log-uuid-address under system global:
config system global set log-uuid-address enableend
Sample configuration
In this example, firewall addresses have been configured using the commands in To configure firewall addresses in theCLI: on page 402 and each firewall address object is associated with an unique UUID.
In the GUI, Top Sources can display Firewall Objects-based chart in real time.
Top Destinations can display Firewall Objects-based chart in real time.
The Top Sources > Historical tab can display Firewall Objects-based chart.
FortiOS 6.2 New Features Guide 400Fortinet Inc.

SOC Adoption
You can drill down a source object. This example shows a drill down of PC2.
The Top Destinations > Historical tab can display Firewall Objects-based chart.
You can drill down a destination object. This example shows a drill down of 172-16-200-55-PC5.
FortiOS 6.2 New Features Guide 401Fortinet Inc.

SOC Adoption
To configure firewall addresses in the CLI:
config firewall address edit "PC2"
set uuid b3eba698-5c89-51e9-1af9-363b23a3fef8set subnet 10.1.100.22 255.255.255.255
nextedit "10.1.100.11-PC1"
set uuid 96bcbca2-5cb5-51e9-bc02-465c0aab5e2cset subnet 10.1.100.11 255.255.255.255
nextedit "172.16.200.55-PC5"
set uuid a2c368f2-5cb5-51e9-1c35-082a57898065set subnet 172.16.200.55 255.255.255.255
nextedit "PW2-172-16-200-254"
set uuid def64b6a-5d45-51e9-5ab0-b0d0a3128098set subnet 172.16.200.254 255.255.255.255
nextend
To configure the firewall policy with defined firewall addresses in the CLI:
config firewall policyedit 1
set name "v4-out"set uuid 4825ff5a-dc94-51e8-eeab-e138bc255e4aset srcintf "port10"set dstintf "port9"set srcaddr "PC2" "10.1.100.11-PC1"set dstaddr "172.16.200.55-PC5" "PW2-172-16-200-254"set action acceptset schedule "always"set service "ALL"set utm-status enableset inspection-mode proxyset logtraffic all
set av-profile "default"set ssl-ssh-profile "custom-deep-inspection"set nat enable
nextedit 2
set name "to-Internet"set uuid 28379372-5c8a-51e9-c765-cc755a07a200set srcintf "port10"set dstintf "port9"set srcaddr "all"set dstaddr "all"set action acceptset schedule "always"set service "ALL"set utm-status enableset inspection-mode proxyset logtraffic all
set av-profile "default"set nat enable
FortiOS 6.2 New Features Guide 402Fortinet Inc.

SOC Adoption
nextend
FortiView Top Sources Usability
This feature enhances Top Sources view by adding the following functions for both real-time and historical view:
l Improve Top Sources view with the avatar and device information.l Add support for using right-click to create/edit device definition in Top Sources view.l Add support for using right-click to create/edit address definition in Top Sources view.
Sample configuration
In the GUI, FortiView > Sources shows the avatar and device information at the top level.
On drill down, the Summary of box shows the avatar and device details.
In the top view, you can right-click to create or edit a custom device, or perform other actions.
FortiOS 6.2 New Features Guide 403Fortinet Inc.

SOC Adoption
In the drill down view Summary of box, you can select the Action button to edit a custom device, or perform other actions.
FortiManager Cloud Service
A new cloud-based SaaS management service is available based on FortiManager.
Once FortiGate has acquired a contract named FortiManager Cloud, FortinetOne creates a cloud-based FortiManagerinstance under the user account. You can launch the portal for the cloud-based FortiManager from FortinetOne, and itsURL starts with the User ID.
You can use a FortiGate with a contract for FortiManager Cloud to configure central management by using the FQDN offortimanager.forticloud.com. A FortiGate-FortiManager tunnel is established between FortiGate and the FortiManagerinstance.
After the tunnel is established, you can execute FortiManager functions from the cloud-based FortiManager portal.
To manage FortiGate with FortiManager Cloud:
1. In the FortiCare portal, ensure that you have a product entitlement for FortiManager Cloud, and note your userID number.
FortiOS 6.2 New Features Guide 404Fortinet Inc.

SOC Adoption
2. Click the FortinetOne icon in the upper-right corner to access the FortiManager Cloud instance.User ID on FortiManager portal represents the dedicated instance.
FortiOS 6.2 New Features Guide 405Fortinet Inc.

SOC Adoption
3. In FortiOS, enable FortiManager Cloud.a. Go to Security Fabric > Settings, and enable Central Management.b. Click FortiManager Cloud, and then Apply.
The FortiManager Cloud button is only available when you have a FortiManager Cloud product entitlement; theFortiManager Cloud button is not available without a FortiManager Cloud product entitlement.
4. In the FortiManager Cloud instance, go to Device Manager and authorize the FortiGate.When using FortiGate to enable FortiManager Cloud, the FortiGate device appears as an unauthorized device.
After authorizing the FortiGate, the FortiGate becomes a managed device.
FortiOS 6.2 New Features Guide 406Fortinet Inc.

SOC Adoption
In FortiOS, the central management status displays Registered on FortiManager.
FortiAnalyzer Cloud Service
FortiGate now supports FortiAnalyzer Cloud service for Event Logging.
Traffic and Security logs are not supported in the initial version of FortiAnalyzer Cloud.
When FortiAnalyzer Cloud is licensed and enabled, all Event logs are sent to FortiAnalyzer Cloud by default, and allTraffic logs, Security logs, and archive files are not sent to FortiAnalyzer Cloud.
Limitations:
l FortiAnalyzer Cloud cannot be enabled in vdom override-setting when global FortiAnalyzer Cloud isdisabled.
FortiOS 6.2 New Features Guide 407Fortinet Inc.

SOC Adoption
l You must use the CLI to retrieve and display logs sent to FortiAnalyzer Cloud. FortiOS GUI is not supported.l You cannot enable FortiAnalyzer Cloud and FortiGate Cloud at the same time.
On the Security Fabric > Settings pane in FortiOS, the FortiAnalyzer Cloud tab is grayed out when you do not have aFortiAnalyzer Cloud entitlement:
When you have a FortiAnalyzer Cloud entitlement, the FortiAnalyzer Cloud tab is available on the Security Fabric> Settings pane:
You can also view the FortiAnalyzer Cloud settings on the Log & Report > Log Settings pane:
FortiOS 6.2 New Features Guide 408Fortinet Inc.

SOC Adoption
In FortiAnalyzer Cloud, you can view logs from FortiOS:
FortiOS 6.2 New Features Guide 409Fortinet Inc.

SOC Adoption
To enable fortianalyzer-cloud using the CLI:
config log fortianalyzer-cloud settingset status enableset ips-archive disableset access-config enableset enc-algorithm highset ssl-min-proto-version defaultset conn-timeout 10set monitor-keepalive-period 5set monitor-failure-retry-period 5set certificate ''set source-ip ''set upload-option realtime
endconfig log fortianalyzer-cloud filter
set severity informationset forward-traffic disableset local-traffic disableset multicast-traffic disableset sniffer-traffic disableset anomaly disableset voip disableset dlp-archive disableset dns disableset ssh disableset ssl disableset cifs disableset filter ''set filter-type include
end
To disable fortianalyzer-cloud for a specific VDOM using the CLI:
config log settingset faz-override enable
endconfig log fortianalyzer-cloud override-setting
set status disableend
To set fortianalyzer-cloud filter for a specific vdom using the CLI:
config log settingset faz-override enable
endconfig log fortianalyzer-cloud override-setting
set status enableendconfig log fortianalyzer-cloud override-filter
set severity informationset forward-traffic disableset local-traffic disableset multicast-traffic disableset sniffer-traffic disableset anomaly disableset voip disable
FortiOS 6.2 New Features Guide 410Fortinet Inc.

SOC Adoption
set dlp-archive disableset dns disableset ssh disableset ssl disableset cifs disableset filter ''set filter-type include
end
To display fortianalyzer-cloud log using the CLI:
exe log filter device fortianalyzer-cloudexe log filter category eventexe log display
Sample log:
date=2019-05-01 time=17:57:45 idseq=60796052214644736 bid=100926 dvid=1027 itime="2019-05-0117:57:48" euid=3 epid=3 dsteuid=0 dstepid=3 logver=602000890 logid=0100032002type="event" subtype="system" level="alert" srcip=10.6.30.254 dstip=10.6.30.9action="login" msg="Administrator ddd login failed from https(10.6.30.254) because ofinvalid user name" logdesc="Admin login failed" sn="0" user="ddd" ui="https(10.6.30.254)" status="failed" reason="name_invalid" method="https"eventtime=1556758666274548325 devid="FG5H1E5818900076" vd="root" dtime="2019-05-0117:57:45" itime_t=1556758668 devname="FortiGate-501E"
date=2019-05-01 time=17:57:21 idseq=60796052214644736 bid=100926 dvid=1027 itime="2019-05-0117:57:23" euid=3 epid=3 dsteuid=0 dstepid=3 logver=602000890 logid=0100044546type="event" subtype="system" level="information" action="Edit" msg="Editlog.fortianalyzer-cloud.filter " logdesc="Attribute configured" user="admin" ui="ssh(10.6.30.254)" cfgtid=164757536 cfgpath="log.fortianalyzer-cloud.filter"cfgattr="severity[information->critical]" eventtime=1556758642413367644devid="FG5H1E5818900076" vd="root" dtime="2019-05-01 17:57:21" itime_t=1556758643devname="FortiGate-501E"
Extend log timestamp to nanoseconds - 6.2.1
This feature extends the log eventtime field from seconds to nanoseconds, making epoch timestamp more accurateand event sequencing more manageable.
Existing log data before this version is not converted and retain the timestamp in seconds.
When some logs have the timestamp in seconds and some in nanoseconds, the log range filter cannot display resultsbased on a calibrated unit. For example, the command execute log filter field eventtime nanosec1-nanosec2 does not include logs recorded in seconds even if they are within the time range.
FortiOS 6.2 New Features Guide 411Fortinet Inc.

SOC Adoption
The nanosecond epoch timestamp is displayed in the Log Details pane in theOther section in the Log event originaltimestamp field. See the sample traffic log and the sample UTM log below.
In the CLI, the eventtime field shows the nanosecond epoch timestamp. See the sample logs below.
1: date=2019-05-06 time=18:10:42 logid="0000000013" type="traffic"subtype="forward" level="notice" vd="root" eventtime=1557191442762142681 srcip=10.1.100.11identifier=19586 srcintf="port1" srcintfrole="lan" dstip=172.16.200.44 dstintf="to_Server"dstintfrole="undefined" poluuid="3eee2894-6ba6-51e9-701a-3e36040a7691" sessionid=18577proto=1 action="accept" policyid=5 policytype="policy" service="PING" dstcountry="Reserved"srccountry="Reserved" trandisp="noop" duration=132 sentbyte=6132 rcvdbyte=6132 sentpkt=73rcvdpkt=73 vpn="to_Server" vpntype="ipsec-static" appcat="unscanned" devtype="Linux PC"devcategory="None" osname="Linux" osversion="Debian" mastersrcmac="00:0c:29:8d:4b:85"srcmac="00:0c:29:8d:4b:85" srcserver=0
2: date=2019-05-06 time=17:59:54 logid="0000000013" type="traffic"subtype="forward" level="notice" vd="root" eventtime=1557190793962136380 srcip=10.1.100.11identifier=19504 srcintf="port1" srcintfrole="lan" dstip=172.16.200.55 dstintf="port2"dstintfrole="lan" poluuid="4756c21c-66d2-51e9-1813-5ac7998004b1" sessionid=17902 proto=1
FortiOS 6.2 New Features Guide 412Fortinet Inc.

SOC Adoption
action="accept" policyid=3 policytype="policy" service="PING" dstcountry="Reserved"srccountry="Reserved" trandisp="snat" transip=172.16.200.5 transport=0 duration=62sentbyte=168 rcvdbyte=168 sentpkt=2 rcvdpkt=2 appcat="unscanned" devtype="Linux PC"devcategory="None" osname="Linux" osversion="Debian" mastersrcmac="00:0c:29:8d:4b:85"srcmac="00:0c:29:8d:4b:85" srcserver=0
FortiOS 6.2 New Features Guide 413Fortinet Inc.

Compliance
This section lists the new features added to FortiOS for Compliance.
FortiSandbox Cloud Region Selection
In FortiOS 6.2, FortiSandbox Cloud services, also referred to as FortiCloud Sandbox services, are decoupled from theFortiCloud license, allowing users to specify a FortiSandbox Cloud region as well as take advantage of FortiSandboxfeatures without a FortiCloud account.
The topology below demonstrates how FortiCloud Logs and FortiSandbox Cloud are separated in FOS 6.2.
FortiCloud Log and Sandbox licenses shown in FortiOS
l FortiGate’sMain Dashboard displays separated FortiSandbox Cloud and FortiCloud Log license statuses within theFortiCloud widget.In the example below, the FortiCloud account is using a free license while FortiSandbox Cloud is using a paidlicense.
FortiOS 6.2 New Features Guide 414Fortinet Inc.

Compliance
l To obtain a FortiSandbox Cloud license, register the FortiGate with a paid FortiGuard AntiVirus license. As theFortiSandbox Cloud license is linked to the user's AntiVirus license, it will expire when the AntiVirus license expires.
l If the FortiGate is not registered with a paid AntiVirus license, the FortiGate will use the free FortiCloud license. Thislicense limits the FortiGate to 100 FortiSandbox Cloud submissions per day.
FortiOS 6.2 New Features Guide 415Fortinet Inc.

Compliance
FortiSandbox Cloud region selection
To set the FortiSandbox Cloud region in the GUI:
1. Go to Security Fabric > Settings.2. In the Sandbox Inspection section, select a region from the FortiSandbox cloud region dropdown.
The following regions are available:l Europel Globall Japanl US
3. Select Apply.
FortiOS 6.2 New Features Guide 416Fortinet Inc.

Compliance
To set the FortiSandbox Cloud region in the CLI:
l In the FortiOS CLI, enter the command: forticloud-sandbox region and select a region.
FGT_PROXY (global) # exec forticloud-sandbox region0 Europe1 Global2 Japan3 USPlease select cloud sandbox region[0-3]:3Cloud sandbox region is selected: US
FGT_PROXY (global) #
l The separation of the FortiCloud Log and Sandbox services can be seen in the example below:
FGT_PROXY (global) # diagnose test application forticldd 3Debug zone info:
Domain:FortiCloud ReleaseQA Global - 172.16.95.16Home log server: 172.16.95.93:514Alt log server: 172.16.95.27:514Active Server IP: 172.16.95.93Active Server status: upLog quota: 102400MBLog used: 0MBDaily volume: 20480MBfams archive pause: 0APTContract : 1APT server: 172.16.102.52:514APT Altserver: 172.16.102.51:514Active APTServer IP: 172.16.102.52Active APTServer status: up
FGT_PROXY (global) #
FortiGate-VM Unique Certificate
To safeguard against certificate compromise, FortiGate VM and FortiAnalyzer VM allow the same deployment model asFortiManager VM whereby the license file contains a unique certificate tied to the virtual device's serial number.
A hardware appliance usually comes with a BIOS certificate with a unify serial number that identifies the hardwareappliance. This built-in BIOS certificate is different from a firmware certificate. A firmware certificate is distributed in allappliances with the same firmware version.
Using a BIOS certificate with a built-in serial number provides a high trust level for the other side in X.509 authentication.
Since a VM appliance has no BIOS certificate, a signed VM license can provide an equivalent of a BIOS certificate. TheVM license assigns a serial number in the BIOS equivalent certificate, which gives the certificate with an abstract accessability, i.e., the same as a BIOS certificate with the same high trust level.
Only new, registered VM licenses support this feature.
FortiOS 6.2 New Features Guide 417Fortinet Inc.

Compliance
Sample configuration
Depending on the firmware version and VM license, check the following sample configurations.
If you are using new firmware (6.2.0) with a new VM license, verify VM license can be validated and the certificatesFortinet_Factory and Fortinet_Factory_Backup CN are changed to the FortiGate VM serial number.
If you are using new firmware (6.2.0) with an old VM license, verify VM license can be validated and the certificatesFortinet_Factory and Fortinet_Factory_Backup CN are kept as CN = FortiGate and not changed to theserial number.
If you are using old firmware (6.0.2) with a new VM license, verify VM license can be validated and the certificatesFortinet_Factory and Fortinet_Factory_Backup CN are kept as CN = FortiGate and not changed to theserial number.
FortiOS 6.2 New Features Guide 418Fortinet Inc.

Compliance
Run a File System Check Automatically
This feature adds the option to perform an automatic file system check if the FortiGate shuts down ungracefully.
By default, automatic file system check is disabled. When disabled, the next time an administrator logs in after anungraceful shutdown, a warning message will advise them to manually run a file system check.
GUI warning:
CLI warning:
WARNING: File System Check Recommended! Unsafe reboot may have caused inconsistency indisk drive.It is strongly recommended that you check file system consistency before proceeding.Please run 'execute disk scan 17'Note: The device will reboot and scan during startup. This may take up to an hour
Enable automatic file system checks
Automatic file system checking can be enabled using both the GUI and the CLI.
FortiOS 6.2 New Features Guide 419Fortinet Inc.

Compliance
To enable automatic file system checks in the GUI:
1. On the FortiGate, go to System > Settings.2. In the Start Up Settings section, enable Auto file system check.
3. Click Apply.
To enable automatic file system checks using the CLI:
config system globalset autorun-log-fsck enable
end
Password change prompt on first login - 6.2.1
This new feature forces a password change when the administrator logs in after a factory reset or new image installation.The administrator password remains empty for a new device.
To change the administrator password after a factory reset or new image installation:
1. In the login window, enter your user name.2. Click Login.
A prompt appears to change the password.3. Enter the following information:
a. The current password in theOld Password fieldb. The new password in the New Password fieldc. Re-enter the new password in the Confirmation Password field
FortiOS 6.2 New Features Guide 420Fortinet Inc.

Compliance
4. ClickOK.
The login window appears.5. Enter your user name and new password.6. Click Login.
Sample CLI
FortiWiFi-51E login: adminPassword:You are forced to change your password, please input a new password.New Password:******Confirm Password:******Welcome !
The administrator can unset the password to keep using the empty password.
To unset the password using the CLI:
config system admin edit admin
unset password <current_password> end
end
FortiOS 6.2 New Features Guide 421Fortinet Inc.

UX / Usability
This section lists the new features added to FortiOS for usability.
SAML SSO
SAML SSO enables a single FortiGate device to act as the Identify Provider (IdP), while other FortiGate devices act asService Providers (SP) and redirect log ins to the IdP.
All administrators must be actively added into each SP. When an administrator first logs in to an SP, a temporaryaccount is created with the no access profile, and the device administrator must enable access for each account on eachdevice.
Configure FGT_A as the IdP:
1. Log in to FGT_A with the device administrator account.2. Go to User & Device > SAML SSO.3. Set theMode to Identity Provider (IdP).4. Configure the IdP address and certificate.5. Add an SP:
a. In the Service Providers table, click Create New.b. Enter the SP name, prefix, type, and address. Copy the prefix, as it will be needed when configuring FGT_B.c. Configure other settings as needed.d. ClickOK.
6. Click Apply.
FortiOS 6.2 New Features Guide 422Fortinet Inc.

UX / Usability
Configure FGT_B as an SP:
1. Log in to FGT_B with the device administrator account.2. Go to User & Device > SAML SSO.3. Set theMode to Service Provider (SP).4. Configure the SP address.5. Configure the IdP settings:
a. Set IdP type to Fortinet Product.b. Enter the IdP address, as configured on FGT_A.c. Enter the prefix copied from FGT_A.d. Select the same certificate as used on FGT_A.
6. Click Apply.
Create a new system administrator on the IdP (FGT_A):
1. Log in to FGT_A with the device administrator account.2. Go to System > Administrators.3. Create a new administrator4. Set Type set to Local User.5. Configure other settings as needed.
6. ClickOK.
FortiOS 6.2 New Features Guide 423Fortinet Inc.

UX / Usability
Log in the FGT_B using Single Sign-On:
1. At the FGT_B log in prompt, click or via Single Sign-On.
The SSO log in prompt opens.2. Enter the log in information for the administrator that you just created on FGT_A.
3. Click Login.A GUI warning opens.
As the account is using a restricted access profile, additional permissions must be granted by the deviceadministrator.
4. Click Logout.
FortiOS 6.2 New Features Guide 424Fortinet Inc.

UX / Usability
Grant permissions to the new SSO administrator account:
1. Log in to FGT_B with the device administrator account.2. Go to System > Administrators.
The new Single Sign-On Administrator was automatically created when it logged in the first time.3. Edit the new SSO admin and change their Administrator Profile.
4. ClickOK.
FortiOS 6.2 New Features Guide 425Fortinet Inc.

UX / Usability
Log in the FGT_B using Single Sign-On again:
1. At the FGT_B log in prompt, click or via Single Sign-On. The SSO log in prompt opens.2. Enter the log in information for the SSO administrator.
3. Click Login.FGT_B is successfully logged into.
CLI commands
To configure the IdP:
config system samlset status enableset role IDPset cert "Fortinet_Factory"set server-address "172.16.106.74"config service-providers
edit "csf_172.16.106.74:12443"set prefix "csf_ngczjwqxujfsbhgr9ivhehwu37fml20"set sp-entity-id "http://172.16.106.74/metadata/"set sp-single-sign-on-url "https://172.16.106.74/saml/?acs"set sp-single-logout-url "https://172.16.106.74/saml/?sls"set sp-portal-url "https://172.16.106.74/saml/login/"config assertion-attributes
edit "username"next
FortiOS 6.2 New Features Guide 426Fortinet Inc.

UX / Usability
edit "[email protected]"set type email
nextend
nextend
end
To configure an SP:
config system samlset status enableset cert "Fortinet_Factory"set idp-entity-id "http://172.16.106.74/saml-idp/csf_
ngczjwqxujfsbhgr9ivhehwu37fml20/metadata/"set idp-single-sign-on-url "https://172.16.106.74/csf_
ngczjwqxujfsbhgr9ivhehwu37fml20/login/"set idp-single-logout-url "https://172.16.106.74/saml-idp/csf_
ngczjwqxujfsbhgr9ivhehwu37fml20/logout/"set idp-cert "REMOTE_Cert_1"set server-address "172.16.106.74:12443"
end
To configure an SSO administrator:
config system sso-adminedit "SSO-admin-name"
set accprofile <SSO admin user access profile>set vdom <Virtual domain(s) that the administrator can access>
nextend
Logging - Session versus Attack Direction
IPS logs have been updated to record source and destination information based on session direction instead of attackdirection. This update allows for better alignment between IPS and traffic logs, as traffic logs also record source anddestination information based on session direction. FortiOS can use this information to present a more accuratesummary and drill-down path.
IPS logs also include a new direction field to indicate attack direction when applicable.
The following scenarios show examples of traffic and IPS logs for server-side and client-side attacks. Both scenarios usethe topology illustrated below. The session direction is from the client to the server.
FortiOS 6.2 New Features Guide 427Fortinet Inc.

UX / Usability
In both scenarios, note that both the traffic and IPS log record the source and destination IP addresses using the sessiondirection, treating the client as the source and the server as the destination. The source fields (srcip, srcport, andsrcintf) use client data. The destination fields (dstip, dstport, and dstinf) use server data. The IPS logexamples also include the direction field to show the attack direction.
Server-side attack traffic and IPS logs
In this scenario, the client attempts to download malware from the server. The attack direction therefore is incoming(from the server to the client). The table below shows the traffic and IPS logs for this scenario:
Traffic log IPS log
date=2018-12-29 time=14:50:47logid="0000000013" type="traffic"subtype="forward" level="notice"vd="vdom1" eventtime=1540849847srcip=10.1.100.22 srcport=46552srcintf="dmz" srcintfrole="lan"dstip=172.16.200.55 dstport=80dstintf="wan1" dstintfrole="wan"poluuid="c939f294-d6ff-51e8-3988-c628cfa2a346" sessionid=2979 proto=6action="server-rst" policyid=1policytype="policy" service="HTTP"dstcountry="Reserved"srccountry="Reserved"trandisp="snat"transip=172.16.200.6 transport=46552duration=0 sentbyte=296 rcvdbyte=152sentpkt=4 rcvdpkt=3appcat="unscanned" utmaction="reset"countips=1 devtype="Linux PC"devcategory="None" osname="Linux"osversion="Debian"mastersrcmac="00:0c:29:6c:43:21"srcmac="00:0c:29:6c:43:21"srcserver=0 utmref=65522-42
date=2018-12-29 time=14:50:47logid="0419016384" type="utm"subtype="ips" eventtype="signature"level="alert" vd="vdom1"eventtime=1540849847 severity="info"srcip=10.1.100.22 srccountry="Reserved"dstip=172.16.200.55 srcintf="dmz"srcintfrole="lan" dstintf="wan1"dstintfrole="wan" sessionid=2979action="reset" proto=6 service="HTTP"policyid=1 attack="Virus.File"srcport=46552 dstport=80hostname="172.16.200.55"url="/virus/example.com"direction="incoming" attackid=29844profile="ips-test"ref="http://www.fortinet.com/ids/VID29844" incidentserialno=122164746 msg="file_transfer: Virus.File,"
Client-side attack traffic and IPS logs
In this scenario, the client attempts to post malware to the server. The attack direction therefore is outgoing (from theclient to the server). The table below shows the traffic and IPS logs for this scenario:
FortiOS 6.2 New Features Guide 428Fortinet Inc.

UX / Usability
Traffic log IPS log
date=2018-12-29 time=15:30:25logid="0000000013" type="traffic"subtype="forward" level="notice"vd="vdom1" eventtime=1540852225srcip=10.1.100.22 srcport=53330srcintf="dmz" srcintfrole="lan"dstip=172.16.200.55 dstport=80dstintf="wan1" dstintfrole="wan"poluuid="c939f294-d6ff-51e8-3988-c628cfa2a346" sessionid=4205 proto=6action="server-rst" policyid=1policytype="policy" service="HTTP"dstcountry="Reserved"srccountry="Reserved"trandisp="snat"transip=172.16.200.6 transport=53330duration=0 sentbyte=692 rcvdbyte=318sentpkt=6 rcvdpkt=5appcat="unscanned" utmaction="reset"countips=1 devtype="Linux PC"devcategory="None" osname="Linux"osversion="Debian"mastersrcmac="00:0c:29:6c:43:21"srcmac="00:0c:29:6c:43:21"srcserver=0 utmref=65522-96
date=2018-12-29 time=15:30:25logid="0419016384" type="utm"subtype="ips" eventtype="signature"level="alert" vd="vdom1"eventtime=1540852225 severity="info"srcip=10.1.100.22 srccountry="Reserved"dstip=172.16.200.55 srcintf="dmz"srcintfrole="lan" dstintf="wan1"dstintfrole="wan" sessionid=4205action="reset" proto=6 service="HTTP"policyid=1 attack="Virus.File"srcport=53330dstport=80hostname="172.16.200.55" url="/cgi-bin/upload.py?root" direction="outgoing"attackid=29844 profile="ips-test"ref="http://www.fortinet.com/ids/VID29844" incidentserialno=2111356281 msg="file_transfer: Virus.File,"
Internet Service Improvement
This feature improves the Internet Service display and configuration by supporting frequently-seen icons such asFacebook and LinkedIn icons on the Policy page and ISDB page.
Sample configuration
Go to Policy & Objects > Internet Service Database to see and use the icons for common Internet Services.
FortiOS 6.2 New Features Guide 429Fortinet Inc.

UX / Usability
Go to a Policy page in Policy & Objects to see and use the icons for common Internet Services.
Application Control Profile GUI Improvements
This version adds multiple GUI enhancements to the Application Control Profile including:
l A right-sided pane in the sensor page to display FortiGuard help links.l Individual application overrides and filter overrides tables are combined into one override table. The two types arecombined when adding a new override.
l Override entries in the table display sequence numbers and can be reordered by dragging and dropping.
Specific application overrides and filter overrides tables are combined into one override table, where signature and filterentries are mixed together. A right-sided gutter has been added to sensor page to display FortiGuard help links.
FortiOS 6.2 New Features Guide 430Fortinet Inc.
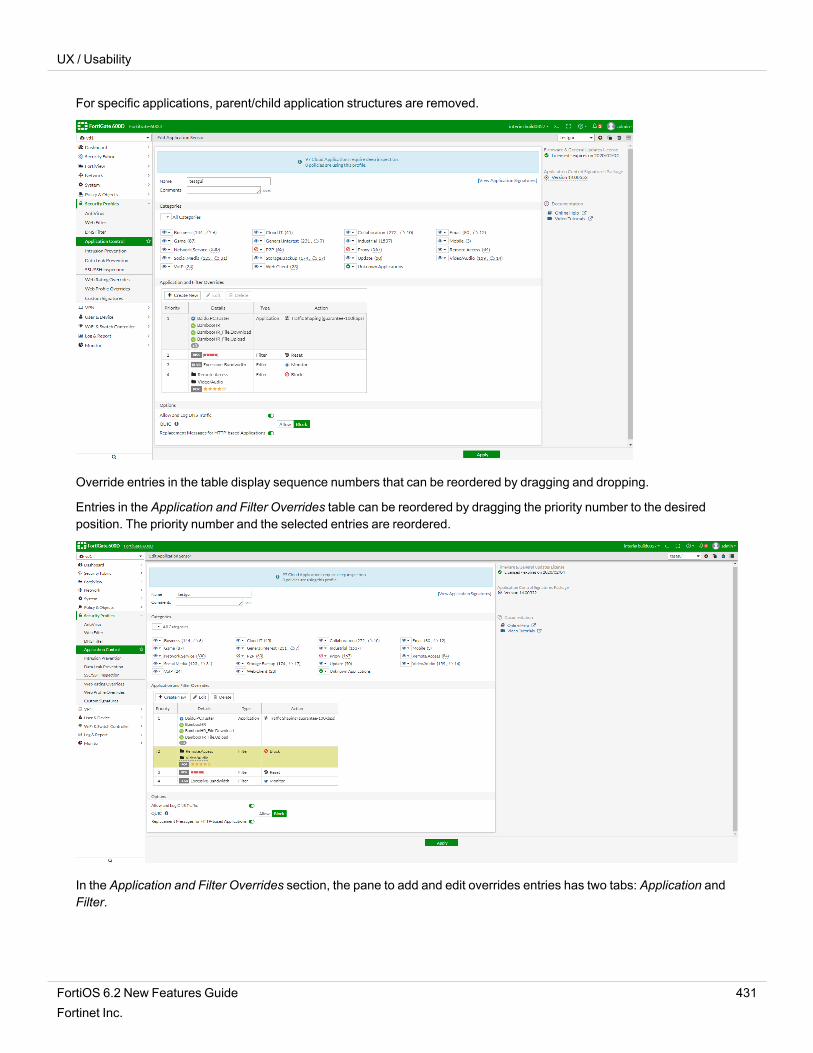
UX / Usability
For specific applications, parent/child application structures are removed.
Override entries in the table display sequence numbers that can be reordered by dragging and dropping.
Entries in the Application and Filter Overrides table can be reordered by dragging the priority number to the desiredposition. The priority number and the selected entries are reordered.
In the Application and Filter Overrides section, the pane to add and edit overrides entries has two tabs: Application andFilter.
FortiOS 6.2 New Features Guide 431Fortinet Inc.

UX / Usability
For each entry in the override table, you can only configure one type: for Application or Filter option.
Type Select Application for application override.Select Filter for filter override.
Action No change from previous version.Can be set toMonitor/Allow/Block/Quarantine.
Application Available if you select Application Type.Use the pane to add one or more application signatures for an entry. Use thesearch box to filter signatures.
Filter Available if you select Filter Type.You can select filters by behavior/applicationcategory/technology/popularity/protocol/risk/vendor subtypes. Filters can beaccumulated to filter a set of signatures that match all selected filters.The Search box can be use to find if input signature is included in selected filters,where matched applications are shown at the bottom.
To create a new Application Control Profile with the Application Type:
1. In Security Profiles > Application Control in the Application and Filter Overrides section, click Create New.2. For Type, select Application. For Action, select Block.3. For Application, click +.
All application signatures are listed.4. In the Search box, enter Facebook and select Facebook.
5. ClickOK to apply this entry.6. Click Create New to create another entry.7. For Type, select Filter. For Action, select Block.8. For Filter, click +.9. In the Select Entries list under BEHAVIOR, select Cloud.
All matching signatures are listed.
FortiOS 6.2 New Features Guide 432Fortinet Inc.

UX / Usability
10. ClickOK to apply this entry.The Application and Filter Overrides section shows two entries.
FortiOS 6.2 New Features Guide 433Fortinet Inc.

UX / Usability
11. Drag the second entry to the top, and clickOK to save this profile.
Authentication Policy Extensions
In 6.0, if you defined an authentication policy for specific traffic, then you might need to exclude the destination from thedefault implicit policy, otherwise, the implicit rule might allow unauthenticated users go to through. This new option forcesthe authentication to take precedence over subsequent rules without having to create additional policies.
By default, unauthenticated traffic is permitted to fall through to the next policy. FortiGate only forces unauthenticatedusers to authenticate against the authentication policy when there are no other matching policies. In this version,administrators can force the authentication to always take place.
To set authentication requirement:
config user settingset auth-on-demand <always|implicitly>
end
always Always trigger firewall authentication on demand.
implicitly (default) Implicitly trigger firewall authentication on demand. This is the default setting andthe original behavior.
You can only use CLI to configure this feature. See the following example.
config user settingset auth-on-demand always
end
config firewall policyedit 1
set name "QA to Database"
FortiOS 6.2 New Features Guide 434Fortinet Inc.

UX / Usability
set srcintf "port10"set dstintf "port9"set srcaddr "QA_subnet"set dstaddr "Database"set action acceptset schedule "always"set service "ALL"set fsso disableset groups "qa_group"set nat enable
nextedit 2
set name "QA to Internet"set srcintf "port10"set dstintf "port9"set srcaddr "QA_subnet"set dstaddr "all"set action acceptset schedule "always"set service "ALL"set fsso disableset nat enable
nextend
Workspace Mode
This feature adds a workspace mode to FortiOS, allowing administrators to make a batch of changes that are notimplemented until the transaction is committed. Prior to committing, the changes can be reverted or edited as neededwithout impacting current operations.
When an object is edited in workspace mode it is locked, preventing other administrators from editing that object. Awarning message will be shown to let the administrator know that the object is currently being configured in anothertransaction.
All administrators can use workspace mode; their permissions in workspace mode are the same as defined in theiraccount profile.
A workspace mode transaction times out in five minutes if there is no activity. When a transaction times out, all changesare discarded. A warning message will be shown to let the administrator know that a timeout is imminent, or has alreadyhappened:
config transaction id=1 will expire in 30 secondsconfig transaction id=1 will expire in 20 secondsconfig transaction id=1 will expire in 10 secondsconfig transaction id=1 has expired
The following configurations are not changeable in a workspace transaction:
system.consolesystem.resource-limitssystem.elbcconfig system global
set split-portset vdom-admin
FortiOS 6.2 New Features Guide 435Fortinet Inc.

UX / Usability
set management-vdomset wireless-modeset internal-switch-mode
endconfig system settings
set opmodeendsystem.npusystem.np6config system wireless
set modeendsystem.vdom-propertysystem.storage
The execute batch command cannot be used in or to start workspace mode.
To use workspace mode:
1. Start workspace mode:execute config-transaction start
Once in workspace mode, the administrator can make configuration changes, all of which are made in a local CLIprocess that is not viewable by other processes.
2. Commit configuration changes:execute config-transaction commit
After performing the commit, the changes are available for all other processes, and are also made in the kernel.3. Abort configuration changes:
execute config-transaction abort
If changes are aborted, no changes are made to the current configuration or the kernel.
Diagnose commands
diagnose sys config-transaction show txn-meta
Show config transaction meta information. For example:
# diagnose sys config-transaction show txn-metatxn_next_id=8, txn_nr=2
diagnose sys config-transaction show txn-info
Show config transaction information. For example:
# diagnose sys config-transaction show txn-infocurrent_jiffies=680372
txn_id=6, expire_jiffies=706104, clicmd_fpath='/dev/cmdb/txn/6_EiLl9G.conf'txn_id=7, expire_jiffies=707427, clicmd_fpath='/dev/cmdb/txn/7_UXK6wY.conf'
diagnose sys config-transaction show txn-entity
Show config transaction entity. For example:
# diagnose sys config-transaction show txn-entityvd='global', cli-node-oid=37(system.vdom), txn_id=7. location: fileid=0, storeid=0,
pgnr=0, pgidx=0vd='global', cli-node-oid=46(system.interface), txn_id=7. location: fileid=3,
storeid=0, pgnr=0, pgidx=0
FortiOS 6.2 New Features Guide 436Fortinet Inc.

UX / Usability
diagnose sys config-transaction show txn-lock
Show transaction lock status. For example:
# diagnose sys config-transaction show txn-locktype=-1, refcnt=0, value=256, pid=128
diagnose sys config-transaction status
Show the transaction status in the current CLI.
Extend Policy/Route Check to Policy Routing
The existing Policy Check and Route Check features in FortiOS 6.0 exclude checking against the Policy Routing engine.In 6.2, this is added, and new options are available in the GUI to support further testing scenarios.
This version adds policy route look up support and prioritizes it over static/dynamic (normal) routes when doing routelookup in the GUI.
InMonitor > Routing Monitor, click Route Lookup to look up an address. If it matches the policy route first, the policyroute is highlighted.
The result of the matching policy route is highlighted in the Route Monitor page. Below is an example of IPv4 lookup.
FortiOS 6.2 New Features Guide 437Fortinet Inc.

UX / Usability
Below is an example of IPv6 lookup.
The result of the matching IPv6 policy route is highlighted in the Route Monitor page.
FortiOS 6.2 New Features Guide 438Fortinet Inc.

UX / Usability
IPv4 policy route match CLI command:
diag ip proute match <IPv6 destination address> <IPv6 source address> <interface name><protocol> <destination port>
proute IPv6 policy routing.match Match IPv6 route to policy routes.xxxx:xxxx:xxxx:xxxx:xxxx:xxxx:xxxx:xxxx IPv6 destination address.xxxx:xxxx:xxxx:xxxx:xxxx:xxxx:xxxx:xxxx IPv6 source address.intf-name Interface Name.<1-255> Protocol.<0-65535> Destination port.
IPv6 policy route match CLI command:
diag ipv6 proute match <destination ip addres> <source ip address> <interface name><protocol> <destination port>
proute Policy routing.match Match policy routeXXX.XXX.XXX.XXX Destination IP address.XXX.XXX.XXX.XXX Source IP address.intf-name Interface Name.<1-255> Protocol.<0-65535> Destination port.
To configure IP policy route match using the CLI — example 1:
FGT (root) # diagnose ip proute match 10.100.21.44 2.2.2.2 port2 6 2dst=10.100.21.44 src=2.2.2.2 iif=24 protocol=6 dport=2id=7f00000c type=VWLseq-num=12
FortiOS 6.2 New Features Guide 439Fortinet Inc.

UX / Usability
To configure IP policy route match using the CLI — example 2:
FGT (root) # diagnose ip proute match 10.100.20.44 2.2.2.2 port2 6 2dst=10.100.20.44 src=2.2.2.2 iif=24 protocol=6 dport=2id=00000016 type=Policy Routeseq-num=22
Address Group - Exclusions
This feature introduces the Exclude Members setting in IPv4 address groups. The specified IP addresses or ranges aresubtracted from the address group.
This feature is only supported for IPv4 address groups, and only for addresses with a Type ofIP Range or Subnet.
To exclude an address or addresses from an address group using the GUI:
1. Go to Policy & Objects > Addresses.2. Create a new address group, or edit an existing group.
FortiOS 6.2 New Features Guide 440Fortinet Inc.

UX / Usability
3. Enable Exclude Members, and select the addresses that will be excluded from the group.
4. Click OK.The excluded members are listed in the Exclude Member column.
To exclude an address or addresses from an address group using CLI commands:
config firewall addrgrpedit <address group>
set exclude enableset exclude-member <address> <address> ... <address>
nextend
Automatic Address Creation for Attached Networks
For all interfaces set to a LAN or DMZ role, a new option is available to automatically create an address object for theconnected network.
The new Create address object matching subnet option is displayed in the GUI when Role is set to LAN or DMZ:
FortiOS 6.2 New Features Guide 441Fortinet Inc.

UX / Usability
l When Role is set to LAN, the Create address object matching subnet option is displayed:
l When Role is set to DMZ, the Create address object matching subnet option is displayed:
The Create address object matching subnet option is hidden in the GUI when Role is set toWAN or Undefined:
FortiOS 6.2 New Features Guide 442Fortinet Inc.

UX / Usability
l When Role is set toWAN, the Create address object matching subnet option is hidden:
l When Role is set to Undefined, the Create address object matching subnet option is hidden:
When the Create address object matching subnet option is enabled, the new address object displays on the Policy &Objects > Address page:
When using the CLI, the following options are available:
config firewall addressedit "port1 address"
set type interface-subnetset subnet 192.168.100.99 255.255.255.0
FortiOS 6.2 New Features Guide 443Fortinet Inc.

UX / Usability
set interface "port1"next
end
Centralized Web Filtering Statistics
Instead of individual counters, this version uses a centralized set of counters for the combined results for Explicit Proxy,Flow mode, and Proxy mode web filtering.
The CLI shows the global cumulative IPS engine daemon/workers statistics. For Proxy mode or Flow mode web filtering,you can now use these counters to check all the Proxy or Flow daemons/workers statistics. You don't have to check thestatistics for each daemon/worker or check the statistics from the URL filter daemon (FortiGuard rating daemon).
Sample usage
You must use the CLI to use this feature.
Use the Flow mode web filtering global statistics counter for the web filtering statistics of all accessible VDOMs for anIPS engine.
To display global Flow URL filter statistics counter:
(global)# diag test app ipsmonitor 29 Global URLF states:request: 116response: 116pending: 1request error: 0response timeout: 0blocked: 24allowed: 92
To reset the global Flow URL filter statistics counter:
(global)# diag test app ipsmonitor 30
Proxy mode web filter
The Proxy mode web filter counter is not new. This version adds the results from Flow mode.
Use the Proxy mode web filtering statistics counter for all the web filtering statistics of the WAD daemon, includingtransparent proxy policy and explicit webproxy policy scenarios. This is global and per-VDOM.
To use Proxy mode web filtering:
(vdom)# diag wad stats filter list......
filtering of all accessible vdoms <-- under VDOM dlp = 0
FortiOS 6.2 New Features Guide 444Fortinet Inc.

UX / Usability
content-type = 0 urls:
examined = 181allowed = 16blocked = 1logged = 95overridden = 6
(global)# diag wad stats filter list......
filtering of all accessible vdoms <-- under global dlp = 0 content-type = 0 urls:
examined = 181allowed = 16blocked = 1logged = 95overridden = 6
To define global or per-VDOM output statistics:
(global)# diagnose wad filter vd root <-- filter-out output for vdom root
(global)# diagnose wad stats filter list
filtering of vdom root <-- statistics for VDOM root (under global)
dlp = 0content-type = 0urls:examined = 0allowed = 0blocked = 0logged = 0overridden = 0
Traffic Shaping GUI Update
This feature adds GUI support for interface based traffic shaping.
FortiOS 6.2 New Features Guide 445Fortinet Inc.

UX / Usability
Example
In this example, QA traffic to the database is put into shaping group 10 and is guaranteed to have 60% of the interfacebandwidth, which is 6Mbps. Other QA traffic is put into shaping group 20 and is guaranteed to have 40% of the interfacebandwidth, which is 4Mbps.
To configure interface based traffic shaping in the GUI:
1. On the FortiGate, create a firewall policy for the traffic.2. Create the shaping policy for QA to access the database:
a. Go to Policy & Objects > Traffic Shaping Policy.b. Click Create New. The New Shaping Policy page opens.
c. Configure the settings as needed, setting the Destination to the database, theOutgoing interface to port9, andthe Shaping group to 10.
d. ClickOK.3. Create the shaping policy for all other QA traffic:
a. Go to Policy & Objects > Traffic Shaping Policy.b. Click Create New. The New Shaping Policy page opens.c. Configure the settings as needed, setting the Shaping group to 20.d. ClickOK.
FortiOS 6.2 New Features Guide 446Fortinet Inc.

UX / Usability
Traffic from QA to the database is put into shaping group 10, and all other QA traffic is put into shaping group 20.4. Configure a traffic shaping profile:
a. Go to Policy & Objects > Traffic Shaping Profile.b. Click Create New. The Create shaping profile page opens.c. Set the Default Shaping Group to Shaping group 20 with aGuaranteed bandwidth of 40.d. Add an Additional Shaping Group, and set the Shaping group to 10 andGuaranteed bandwidth to 60.
e. Configure the remaining settings as needed.f. ClickOK.
5. Enable interface based traffic shaping on an interface (port9 in this example):a. Go to Network > Interfaces and double-click on port9. The Edit Interface page opens.b. Set theOutbound Bandwidth to 10000 Kbps.
FortiOS 6.2 New Features Guide 447Fortinet Inc.

UX / Usability
c. Set theOutgoing Shaping Profile to the just created profile.
d. Configure the remaining settings as needed.e. ClickOK.
To configure interface based traffic shaping in the CLI:
1. On the FortiGate, create a firewall policy for the traffic:
config firewall policyedit 2
set name "QA to Internet"set srcintf "port10"set dstintf "port9"set srcaddr "QA_subnet"set dstaddr "all"set action acceptset schedule "always"set service "ALL"set auto-asic-offload disableset nat enable
nextend
2. Create shaping policies for QA to access the database and the Internet:
config firewall shaping-policyedit 1
set name "To_Database"set service "ALL"set dstintf "port9"set class-id 10set srcaddr "QA_subnet"set dstaddr "Database"
nextedit 2
set name "To_Internet"
FortiOS 6.2 New Features Guide 448Fortinet Inc.

UX / Usability
set service "ALL"set dstintf "port9"set class-id 20set srcaddr "QA_subnet"set dstaddr "all"
nextend
3. Configure a firewall shaping profile:
config firewall shaping-profileedit "QA_Profile"
set default-class-id 20config shaping-entries
edit 1set class-id 20set priority mediumset guaranteed-bandwidth-percentage 40set maximum-bandwidth-percentage 50
nextedit 2
set class-id 10set guaranteed-bandwidth-percentage 60set maximum-bandwidth-percentage 80
nextend
nextend
4. Enable interface based traffic shaping on an interface (port9 in this example):
config system interfaceedit "port9"
set vdom "qa_team"set ip 172.16.200.1 255.255.255.0set allowaccess ping https ssh http telnetset type physicalset outbandwidth 10000set egress-shaping-profile "QA_Profile"set snmp-index 11
nextend
Interface based traffic shaping cannot be used when traffic is offloaded.
Unified Login for FortiCare and FortiGate Cloud
With the availability of FortinetOne, FortiGate now supports a unified login between FortiCare and FortiGate Cloud.During initial setup, it's no longer required to authenticate with both separately - the FortiGate Cloud setup is now asubset of the FortiCare setup.
You now have the following options:
FortiOS 6.2 New Features Guide 449Fortinet Inc.

UX / Usability
l You can activate FortiGate Cloud with a FortinetOne account.l You can activate FortiGate Cloud with a Standalone account.l You can migrate from a Standalone account to a FortinetOne account.
From the FortiOS GUI, you can activate FortiGate Cloud with a FortinetOne account:
From the FortiOS GUI, you can activate FortiGate Cloud with a Standalone account:
To migrate from a Standalone account to a FortinetOne account using the GUI:
1. Go to Dashboard > Main, and ensure that you have logged into FortiCare with a FortinetOne account and haveactivated FortiGate Cloud with a Standalone account.
FortiOS 6.2 New Features Guide 450Fortinet Inc.

UX / Usability
2. Go to Security Fabric > Settings > Cloud Logging and/or Central Management, and clickMigrate Now.
FortiOS 6.2 New Features Guide 451Fortinet Inc.

UX / Usability
3. In the Password box, type the password for the FortinetOne account, and clickOK.
4. Confirm that the FortiCloud account was successfully migrated from a Standalone account to a FortinetOneaccount.
To migrate from a Standalone account to a FortinetOne account using the CLI:
1. Locate the migration command:FortiGate-300D # exec fortiguard-log ?migration Migrate standalone FortiGate Cloud account to FortinetOne.
2. Execute the migration:FortiGate-300D # exec fortiguard-log migration ?<password> Password.
FortiOS 6.2 New Features Guide 452Fortinet Inc.

UX / Usability
Split-Task VDOM Mode
Split-task VDOMmode simplifies deployments that require only one management VDOM and one traffic VDOM. Themanagement VDOM is used to manage the FortiGate, and cannot be used to process traffic. The traffic VDOM providesseparate security policies, and is used to process all network traffic.
Split-task VDOMmode is not available on all FortiGate models. The Fortinet Security Fabric supports split-task VDOMmode.
Enable split-task VDOM mode
Split-task VDOMmode can be enabled in the GUI or CLI. Enabling it does not require a reboot, but does log you out ofthe FortiGate.
When split-task VDOMmode is enabled, all current management configuration is assigned tothe root VDOM, and all non-management settings, such as firewall policies and securityprofiles, are deleted.
To enable split-task VDOM mode with the CLI:
config system globalset vdom-mode split-vdom
end
FortiOS 6.2 New Features Guide 453Fortinet Inc.

UX / Usability
To enable split-task VDOM mode in the GUI:
1. On the FortiGate, go to System > Settings.2. In the System Operation Settings section, enable Virtual Domains.
3. Select Split-Task VDOM for the VDOM mode.4. Select a Dedicated Management Interface from the Interface list. This interface is used to access the management
VDOM, and cannot be used in firewall policies.5. ClickOK.
System Events default dashboard - 6.2.2
The newly added System Events dashboard contains two widgets by default:
l Top System Events by Events (sorted by event count)l Top System Events by Level (sorted by event severity)
To view the System Events dashboard in the GUI:
1. Go to Dashboard > System Events. The default dashboard appears.
FortiOS 6.2 New Features Guide 454Fortinet Inc.

UX / Usability
2. Click the Expand to full screen icon within a widget to view additional details, such as historical trending charts.l Full screen view of Top System Events by Events widget:
l Full screen view of Top System Events by Level widget:
3. Double-click an event entry to view the specific event log.
Advanced policy options in the GUI - 6.2.2
Advanced policy options can be enabled so that they can be configured in the GUI.
To enable advanced policy options:
config system settingsset gui-advanced-policy enable
end
Advanced policy options are now available when creating or editing a policy in the GUI:
FortiOS 6.2 New Features Guide 455Fortinet Inc.

UX / Usability
To enable configuring TCP sessions without SYN:
config system settingsset tcp-session-without-syn enable
end
TCP sessions without SYN can now be configured when creating or editing a policy in the GUI:
Support for wildcard FQDN addresses in firewall policy - 6.2.2
You can use wildcard FQDN addresses in firewall policies.
Firewall policies that support wildcard FQDN addresses include IPv4, IPv6, ACL, local, shaping, NAT64, NAT46, andNGFW.
FortiOS 6.2 New Features Guide 456Fortinet Inc.

UX / Usability
When the wildcard FQDN gets the resolved IP addresses, FortiOS loads the addresses into the firewall policy for trafficmatching.
To create a wildcard FQDN using the GUI:
1. Go to Policy & Objects > Addresses and click Create New > Address.2. Specify a Name.3. For Type, select FQDN.4. For FQDN, enter a wildcard FQDN address, for example, *.fortinet.com.
5. ClickOK.
To use wildcard FQDN in a firewall policy using the GUI:
1. Go to Policy & Objects > IPv4 Policy to view the policy you created with the wildcard FQDN.In this example, policy ID 2 uses the wildcard FQDN.
To create a wildcard FQDN using the CLI:
config firewall addressedit "test-wildcardfqdn-1"
set uuid 7288ba26-ce92-51e9-04c0-39c707eb4519set type fqdnset fqdn "*.fortinet.com"
FortiOS 6.2 New Features Guide 457Fortinet Inc.

UX / Usability
nextend
To use wildcard FQDN in a firewall policy using the CLI:
config firewall policyedit 2
set uuid 2f5ffcc0-cddc-51e9-0642-ab9966b202ddset srcintf "port3"set dstintf "port1"set srcaddr "all"set dstaddr "test-wildcardfqdn-1"set action acceptset schedule "always"set service "ALL"set auto-asic-offload disableset nat enable
nextend
To use the diagnose command to list resolved IP addresses of wildcard FQDN objects:
B (vdom1) # diag firewall fqdn listList all FQDN:*.fortinet.com: ID(48) ADDR(208.91.114.104) ADDR(208.91.114.142) ADDR(173.243.137.143) ADDR(65.104.9.196) ADDR(96.45.36.210)*.google.com: ID(66) ADDR(172.217.14.238)login.microsoftonline.com: ID(15) ADDR(40.126.7.64) ADDR(40.126.7.65) ADDR(40.126.7.66) ADDR(40.126.7.97) ADDR(40.126.7.99) ADDR(40.126.7.100) ADDR(40.126.7.101) ADDR(40.126.7.103)
To use the diagnose command for firewall policies which use wildcard FQDN:
B (vdom1) # diag firewall iprope list 100004policy index=2 uuid_idx=46 action=acceptflag (8050108): redir nat master use_src pol_statsflag2 (4200): no_asic resolve_ssoflag3 (20):schedule(always)cos_fwd=255 cos_rev=255group=00100004 av=00004e20 au=00000000 split=00000000host=3 chk_client_info=0x0 app_list=0 ips_view=0misc=0 dd_type=0 dd_mode=0zone(1): 11 -> zone(1): 9source(1): 0.0.0.0-255.255.255.255, uuid_idx=0,destination fqdn or dynamic address (1):
*.fortinet.com ID(48) uuid_idx=57 ADDR(208.91.114.104) ADDR(208.91.114.142) ADDR(173.243.137.143) ADDR(65.104.9.196) ADDR(96.45.36.210)service(1):
[0:0x0:0/(0,0)->(0,0)] helper:auto
FortiOS 6.2 New Features Guide 458Fortinet Inc.

UX / Usability
Traffic class ID configuration updates - 6.2.2
These updates make the shaping feature more user-friendly, which can be configured per VDOM. You can configureeach traffic class ID with a descriptive name in three locations within the GUI or with the new firewall traffic-class CLI command. This will help you correlate traffic shaping policy and profile entries.
GUI updates
Within the GUI, there are three locations to configure the traffic class ID:
l Traffic shaping policyl Traffic shaping profilel Interface
To configure the traffic class ID in a traffic shaping policy:
1. Go to Policy & Objects > Traffic Shaping Policy.2. Edit an existing policy, or create a new one.3. In the Then: Action section, click Assign Shaping Class ID.4. In Traffic shaping class ID, click Create.5. Enter a value for the ID (integer) and a description for the Name.6. ClickOK to save the class ID.
7. Configure the rest of the policy as needed.8. ClickOK to save the policy.
To configure the traffic class ID in a traffic shaping profile:
1. Go to Policy & Objects > Traffic Shaping Profile.2. Edit an existing profile, or create a new one.3. In the Traffic Shaping Classes section, click Create New. The Select Traffic Shaping Class ID window opens.4. Click Create. The New Traffic Shaping Class ID window opens.
FortiOS 6.2 New Features Guide 459Fortinet Inc.
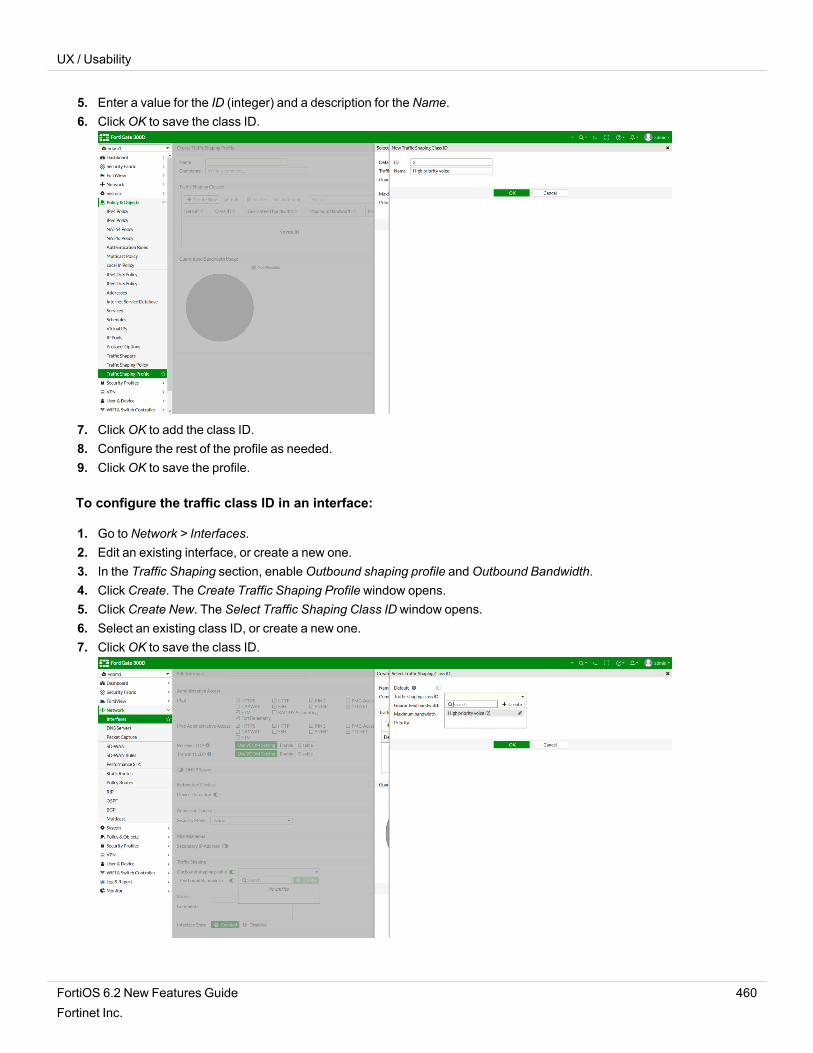
UX / Usability
5. Enter a value for the ID (integer) and a description for the Name.6. ClickOK to save the class ID.
7. ClickOK to add the class ID.8. Configure the rest of the profile as needed.9. ClickOK to save the profile.
To configure the traffic class ID in an interface:
1. Go to Network > Interfaces.2. Edit an existing interface, or create a new one.3. In the Traffic Shaping section, enableOutbound shaping profile andOutbound Bandwidth.4. Click Create. The Create Traffic Shaping Profile window opens.5. Click Create New. The Select Traffic Shaping Class ID window opens.6. Select an existing class ID, or create a new one.7. ClickOK to save the class ID.
FortiOS 6.2 New Features Guide 460Fortinet Inc.

UX / Usability
8. ClickOK to add the class ID .9. Configure the rest of the interface as needed.10. ClickOK to save the interface.
CLI update
To configure the traffic class ID in the CLI:
config firewall traffic-classedit 2
set class-name "High priority voice."next...
end
Security Fabric topology improvements - 6.2.2
The topology views have been enhanced to include:
l Broader visibility into SD-WAN link utilizationl Simplified filtering for AWS, Azure, SD-WAN, and Security Fabric devices
SD-WAN visibility
SD-WAN links are shown in the physical and logical topology views:
The SD-WAN utilization is shown in the tooltips:
FortiOS 6.2 New Features Guide 461Fortinet Inc.

UX / Usability
You can drill down to view performance SLA history and SD-WAN utilization:
FortiOS 6.2 New Features Guide 462Fortinet Inc.

UX / Usability
Fabric device filtering
SD-WAN, AWS, Azure, and fabric devices can be shown or hidden in the topology view by toggling their icons in the boxat the bottom of the topology view.
Adding IPsec aggregate members in the GUI - 6.2.3
The following support has been added to the GUI in FortiOS 6.2 for IPsec aggregate interfaces:
l You can configure the Device creation and Aggregate member settings in the VPN Creation Wizard so that a tunnelcan be an IPsec aggregate member candidate.
FortiOS 6.2 New Features Guide 463Fortinet Inc.

UX / Usability
Device creation and Aggregate member are disabled by default.
l You can create a new IPsec aggregate within the IPsec tunnels dropdown list.l You can monitor the traffic for each aggregate member.
To configure an IPsec tunnel with aggregate members in the GUI:
1. Create the IPsec aggregate tunnel candidate:a. Go to VPN > IPsecTunnels > Create New > IPsec Tunnel.b. Enter the tunnel name.c. Click Custom > Next. The New VPN Tunnel pane opens.d. In the Network section, expand the Advanced field.e. For Aggregate member, click Enabled.f. Configure the other settings as needed.g. ClickOK.
2. Repeat step 1 to create more tunnel candidates as needed.3. Create the IPsec aggregate:
a. Go to VPN > IPsecTunnels > Create New > IPsec Aggregate.b. Enter an aggregate name.c. Click inside theMembers field and add the tunnels you created in steps 1 and 2.d. In the Algorithm dropdown, select a load balancing algorithm. The supported load balancing algorithms are: L3,
L4, round-robin (default), and redundant.
FortiOS 6.2 New Features Guide 464Fortinet Inc.

UX / Usability
e. ClickOK.
4. Configure the static route:a. Go to Network > Static Routes > Create New.b. In the Interface dropdown, select the IPsec aggregate that you created in step 3.c. Configure the other settings as needed.d. ClickOK.
5. Configure the firewall policy:a. Go to Policy & Objects > IPv4 Policy.b. Create a new policy or edit an existing policy.c. In the Incoming Interface dropdown, select the IPsec aggregate that you created in step 3.d. Configure the other settings as needed.
FortiOS 6.2 New Features Guide 465Fortinet Inc.

UX / Usability
e. ClickOK.
6. Monitor the traffic:a. Go toMonitor > IPsec Monitor.b. Expand the IPsec aggregate (agg-tunnel) to view statistics for each aggregate member.
FortiOS 6.2 New Features Guide 466Fortinet Inc.

Other
This section lists other new features added to FortiOS.
Extend Interface Failure Detection to Aggregate Interfaces
This feature extends fail-detect to aggregate and redundant interfaces. When an aggregate or a redundant interfacegoes down, the corresponding fail-alert-interface will be changed to down. When the aggregate or redundant interfacecomes up, the corresponding fail-alert-interface will be changed to up.
Fail-detect on aggregate and redundant interfaces can be configured using the CLI.
To configure an aggregate interface so that port3 goes down with it:
config system interfaceedit "agg1"
set vdom "root"set fail-detect enableset fail-alert-method link-downset fail-alert-interfaces "port3"set type aggregateset member "port1" "port2"
nextend
To configure a redundant interface so that port4 goes down with it:
config system interfaceedit "red1"
set vdom "root"set fail-detect enableset fail-alert-method link-downset fail-alert-interfaces "port4"set type redundantset member "port1" "port2"
nextend
FortiOS 6.2 New Features Guide 467Fortinet Inc.

Other
Source & Destination UUID Logging
This feature has two parts:
l The log-uuid setting in system global is split into two settings: log-uuid-address and log-uuidpolicy.
l Two internet-service name fields are added to the traffic log: Source Internet Service (srcinetsvc) andDestination Internet Service (dstinetsvc).
Log UUIDs
This feature allows matching UUIDs for each source and destination that match a policy to be added to the traffic log.This allows the address objects to be referenced in log analysis and reporting.
As this may consume a significant amount of storage space, this feature is optional. By default, policy UUID insertion isenabled and address UUID insertion is disabled.
To enable insertion of address and policy UUIDs to traffic logs in the GUI:
1. Go to Log Settings.
2. Under UUIDs in Traffic Log, enable Policy and/or Address.3. Click Apply.
To enable insertion of address and policy UUIDs to traffic logs in the CLI:
Enter the following CLI commands:
config system globalset log-uuid-address enableset log-uuid-policy enable
end
Example forward traffic log:
# date=2019-01-25 time=11:32:55 logid="0000000013" type="traffic" subtype="forward"level="notice" vd="vdom1" eventtime=1528223575 srcip=192.168.1.183 srcname="PC24"srcport=33709 srcintf="lan" srcintfrole="lan" dstip=192.168.70.184 dstport=80dstintf="wan1" dstintfrole="wan" srcuuid="27dd503e-883c-51e7-ade1-7e015d46494f"dstuuid="27dd503e-883c-51e7-ade1-7e015d46494f"poluuid="9e0fe24c-1808-51e8-1257-68ce4245572c" sessionid=5181 proto=6action="client-rst" policyid=4 policytype="policy" service="HTTP" trandisp="snat"
FortiOS 6.2 New Features Guide 468Fortinet Inc.

Other
transip=192.168.70.228 transport=33709 appid=38783 app="Wget"appcat="General.Interest" apprisk="low" applist="default" duration=5 sentbyte=450rcvdbyte=2305 sentpkt=6 wanin=368 wanout=130 lanin=130 lanout=130 utmaction="block"countav=2 countapp=1 crscore=50 craction=2 devtype="Linux PC" devcategory="None"osname="Linux" mastersrcmac="00:0c:29:36:5c:c3" srcmac="00:0c:29:36:5c:c3"srcserver=0 utmref=65523-1018
Internet service name fields
The forward traffic log for internet-service has two new fields: Source Internet Service and Destination Internet Service.
Example internet-service name fields in forward traffic log:
# date=2019-01-25 time=14:17:04 logid="0000000013" type="traffic" subtype="forward"level="notice" vd="vdom1" eventtime=1548454622 srcip=10.1.100.11 srcport=51112srcintf="port3" srcintfrole="undefined" dstip=172.217.14.228 dstport=80dstintf="port1" dstintfrole="undefined" poluuid="af519380-2094-51e9-391c-b78e8edbddfc" srcinetsvc="isdb-875099" dstinetsvc="Google.Gmail" sessionid=6930proto=6 action="close" policyid=2 policytype="policy" service="HTTP"dstcountry="United States" srccountry="Reserved" trandisp="snat"transip=172.16.200.2 transport=51112 duration=11 sentbyte=398 rcvdbyte=756 sentpkt=6rcvdpkt=4 appcat="unscanned" devtype="Router/NAT Device" devcategory="FortinetDevice" mastersrcmac="90:6c:ac:41:7a:24" srcmac="90:6c:ac:41:7a:24" srcserver=0dstdevtype="Unknown" dstdevcategory="Fortinet Device"masterdstmac="08:5b:0e:1f:ed:ed" dstmac="08:5b:0e:1f:ed:ed" dstserver=0
DNS - Multiple Domain List
DNS settings have been expanded to support a list of up to eight domains. When a client requests a URL that does notinclude a FQDN, FortiOS resolves the URL by traversing through the DNS domain list and performing a query for eachdomain until the first match is found.
You can configure a DNS domain list using the GUI or the CLI.
CLI options have been added to allow customization of the DNS timeout and retry settings.
FortiOS 6.2 New Features Guide 469Fortinet Inc.

Other
To configure a DNS domain list using the GUI:
1. In FortiOS, go to Network > DNS.2. You can click the + button to add multiple domains. Configure up to eight domains as required. In the example
below, the DNS domain list is configured to include three domains: sample.com, example.com, anddomainname.com.
3. Configure additional DNS settings as required, then click Apply.
To configure a DNS domain list using the CLI:
The example below shows the CLI commands for setting the primary DNS server IP address to 172.16.200.1 andconfiguring multiple domains: sample.com, example.com, and domainname.com.
config system dnsset primary 172.16.200.1set domain "sample.com" "example.com" "domainname.com"
end
To configure the DNS timeout and retry settings using the CLI:
You may want to customize the DNS timeout and retry settings. For example, if you have eight domains configured, youmay want to decrease the DNS timeout value to avoid delays. The following table defines the timeout and retry settings:
CLI option Description
timeout DNS query timeout interval in seconds. Enter an integer value between 1 and 10.The default value is 5 seconds.
retry Number of times to retry the DNS query. Enter an integer value between 0 and 5.The default value is 2 tries.
The example below increases the timeout to 7 seconds and the number of retries to 3:
config system dnsset timeout 7set retry 3
end
FortiOS 6.2 New Features Guide 470Fortinet Inc.

Other
To confirm the DNS domain list was configured:
Once configuration is complete, you can verify that the DNS domain list was configured as desired.
In the example below, the local DNS server has the entry for host1 mapped to the FQDN of host1.sample.com, while theentry for host2 is mapped to the FQDN of host2.example.com. The example shows pinging host1 and host2 to verify thatthe domain list was configured as desired.
1. In Command Prompt, enter ping host1. The system returns the following response:PING host1.sample.com (1.1.1.1): 56 data bytes
Since the request does not include a FQDN, FortiOS traverses the configured DNS domain list to find a match.Since host1 is mapped to the host1.sample.com, FortiOS resolves host1 to sample.com, the first entry in thedomain list.
2. Enter ping host2. The system returns the following response:PING host2.example.com (2.2.2.2): 56 data bytes
Again, FortiOS traverses the domain list to find a match. It first queries sample.com, the first entry in the domain list,but does not find a match. It then queries the second entry in the domain list, example.com. Since host2 is mappedto the FQDN of host2.example.com, FortiOS resolves host2 to example.com.
DNS - Latency Info
When there is high latency in DNS traffic, it might result in sluggish overall experience for end users. This new featurehelps administrators quickly identify DNS latency issues in their configuration.
The Interfaces > DNS page shows additional details about DNS latency.
If you use FortiGuard DNS, the information includes latency for regular DNS, DNS filter servers, web filter server, andoutbreak prevention servers.
FortiOS 6.2 New Features Guide 471Fortinet Inc.

Other
Hover your pointer over a latency value to see the last updated time.
There are no new CLI commands for this feature. DNS latency information is extracted from the CLI data below. See thefollowing examples.
diagnose test application dnsproxy 2worker idx: 0worker: count=1 idx=0retry_interval=500 query_timeout=1495DNS latency info:vfid=0 server=2001::1 latency=1494 updated=73311vfid=0 server=208.91.112.52 latency=1405 updated=2547vfid=0 server=208.91.112.53 latency=19 updated=91SDNS latency info:vfid=0 server=173.243.138.221 latency=1 updated=707681DNS_CACHE: alloc=35, hit=26RATING_CACHE: alloc=1, hit=49DNS UDP: req=66769 res=63438 fwd=83526 alloc=0 cmp=0 retrans=16855 to=3233
cur=111 switched=8823467 num_switched=294 v6_cur=80 v6_switched=7689041 num_v6_switched=6ftg_res=8 ftg_fwd=8 ftg_retrans=0
DNS TCP: req=0, res=0, fwd=0, retrans=0 alloc=0, to=0FQDN: alloc=45 nl_write_cnt=9498 nl_send_cnt=21606 nl_cur_cnt=0Botnet: searched=57 hit=0 filtered=57 false_positive=0
To see the latency from web filter server and outbreak protection server, use the diagnose debug rating command,for example:
diagnose debug ratingLocale : english
Service : Web-filterStatus : EnableLicense : Contract
FortiOS 6.2 New Features Guide 472Fortinet Inc.

Other
Service : AntispamStatus : Disable
Service : Virus Outbreak PreventionStatus : Disable
-=- Server List (Tue Jan 22 08:03:14 2019) -=-
IP Weight RTT Flags TZ Packets Curr Lost Total Lost Updated Time173.243.138.194 10 0 DI -8 700 0 2 Tue Jan 22 08:02:44
2019173.243.138.195 10 0 -8 698 0 4 Tue Jan 22 08:02:44
2019173.243.138.198 10 0 -8 698 0 4 Tue Jan 22 08:02:44
2019173.243.138.196 10 0 -8 697 0 3 Tue Jan 22 08:02:44
2019173.243.138.197 10 1 -8 694 0 0 Tue Jan 22 08:02:44
201996.45.33.64 10 22 D -8 701 0 6 Tue Jan 22 08:02:44
201964.26.151.36 40 62 -5 704 0 10 Tue Jan 22 08:02:44
201964.26.151.35 40 62 -5 703 0 9 Tue Jan 22 08:02:44
2019209.222.147.43 40 70 D -5 696 0 1 Tue Jan 22 08:02:44
201966.117.56.42 40 70 -5 697 0 3 Tue Jan 22 08:02:44
201966.117.56.37 40 71 -5 702 0 9 Tue Jan 22 08:02:44
201965.210.95.239 40 74 -5 695 0 1 Tue Jan 22 08:02:44
201965.210.95.240 40 74 -5 695 0 1 Tue Jan 22 08:02:44
201945.75.200.88 90 142 0 706 0 12 Tue Jan 22 08:02:44
201945.75.200.87 90 155 0 714 0 20 Tue Jan 22 08:02:44
201945.75.200.85 90 156 0 711 0 17 Tue Jan 22 08:02:44
201945.75.200.86 90 159 0 704 0 10 Tue Jan 22 08:02:44
201962.209.40.72 100 157 1 701 0 7 Tue Jan 22 08:02:44
201962.209.40.74 100 173 1 705 0 11 Tue Jan 22 08:02:44
201962.209.40.73 100 173 1 699 0 5 Tue Jan 22 08:02:44
2019121.111.236.179 180 138 9 706 0 12 Tue Jan 22 08:02:44
2019121.111.236.180 180 138 9 704 0 10 Tue Jan 22 08:02:44
2019
FortiOS 6.2 New Features Guide 473Fortinet Inc.

Other
DNS - Add DNS Translation to DNS Profile
DNS translation has moved to the DNS profile configuration, allowing different translations to be applied on a per-policybasis. Prior to 6.2, this was a single table outside of the profile.
DNS filter dns-translation enforces what 'a record' (IP address) in a DNS reply will be translated into another IP address,which allows you to control the DNS resolve result.
To configure a DNS filter using the GUI:
1. Go to Security Profiles > DNS Filter.2. Enable DNS Translation, configure as follows, and click Appy:
3. Apply the DNS filter profile to the firewall policy.
To configure a DNS filter using the CLI:
1. Enable dns-translation:config dnsfilter profile
edit "<dns-filter-profile>"......
config dns-translationedit 1
set src 93.184.216.34set dst 10.1.100.99set netmask 255.255.255.255
nextend
end
FortiOS 6.2 New Features Guide 474Fortinet Inc.

Other
Multiple FortiAnalyzer (or Syslog) Per VDOM
Under VDOM, support has been added for multiple FortiAnalyzer and Syslog servers as follows:
l Support for up to three override FortiAnalyzer servers.l Support for up to four override Syslog servers.
If the VDOM faz-override and/or syslog-override setting is enabled or disabled (default) before upgrading, thesetting remains the same after upgrading.
In the GUI, if the override setting is disabled, the GUI displays the global FortiAnalyzer1 or syslog1 setting. If the overridesetting is enabled, the GUI displays the VDOM override FortiAnalyzer1 or syslog1 setting.
You can only use CLI to enable the override to support multiple log servers.
To enable FortiAnalyzer and Syslog server override under VDOM:
config log settingset faz-override enableset syslog-override enable
end
When faz-override and/or syslog-override is enabled, the following CLI commands are available to configVDOM override:
To configure VDOM override for FortiAnalyzer:
config log fortianalyzer/fortianalyzer2/fortianalyzer3 override-settingset status enableset server "123.12.123.123"set reliable enable
endconfig log fortianalyzer/fortianalyzer2/fortianalyzer3 override-filter
set severity informationset forward-traffic enableset local-traffic enableset multicast-traffic enableset sniffer-traffic enableset anomaly enableset voip enableset dlp-archive enableset dns enableset ssh enableset ssl enable
end
To configure VDOM override for Syslog server:
config log syslogd/syslogd2/syslogd3/syslogd4 override-settingset status enableset server "123.12.123.12"set facility local1
endconfig log syslogd/syslogd2/syslogd3/syslogd4 override-filter
set severity informationset forward-traffic enable
FortiOS 6.2 New Features Guide 475Fortinet Inc.

Other
set local-traffic enableset multicast-traffic enableset sniffer-traffic enableset anomaly enableset voip enableset dns enableset ssh enableset ssl enable
end
Web Proxy
This section lists other new features added to FortiOS related to web proxy.
Transparent Web Proxy Forwarding
This feature enables the proxy forwarding option for Transparent Web Proxy policies and Regular Firewall for HTTP andHTTPS.
In previous versions of FortiOS, explicit proxy allowed the user to forward proxy traffic to another proxy server (proxychaining). With this new implementation, web traffic can be forwarded to the upstream proxy without requiring the usersto reconfigure their browsers or publish a proxy auto-reconfiguration (PAC) file.
Once configured, traffic generated by a client is forwarded by the FortiGate to the upstream proxy, then the upstreamproxy forwards it to the server.
Example configuration:
1. Configure the web proxy forwarding server:
config web-proxy forward-serveredit "PC_03"
set ip 172.16.200.46set healthcheck enableset monitor "http://www.google.ca"
nextend
2. Append the web proxy forwarding server to a firewall policy:
config firewall policyedit 1
set name "LAN to WAN"set uuid b89f6184-2a6b-51e9-5e2d-9b877903a308set srcintf "port2"set dstintf "port1"set srcaddr "all"set dstaddr "all"set action acceptset schedule "always"set service "ALL"set utm-status enable
FortiOS 6.2 New Features Guide 476Fortinet Inc.

Other
set logtraffic allset webproxy-forward-server "PC_03"set fsso disableset av-profile "av"set ssl-ssh-profile "deep-custom"set nat enable
nextend
Multiple Dynamic Header Count
This feature adds support for dynamic headers for web proxy profiles, as well as base64 encoding and append/newoptions. Previously, web proxy profiles supported dynamic (or user defined) header content for filtering, but the formatwas fixed and could not support multiple patterns in one header. With this features, multiple patterns are supported.
With the implementation of dynamic headers, an administrator only has to select the dynamic header, and the FortiGatewill automatically display the corresponding static value. For example, if the administrator selects the $client-ip header inthe profile, the FortiGate will display the actual client IP address.
The supported headers are:
$client-ip Client IP address
$user Authentication user name
$domain User domain name
$local_grp Firewall group name
$remote_grp Group name from authentication server
$proxy_name Proxy realm name
Example configuration:
As authentication is required, FSSO NTLM authentication is configured for this example.
1. Configure LDAP:
config user ldapedit "ldap-kerberos"
set server "172.18.62.220"set cnid "cn"aset dn "dc=fortinetqa,dc=local"set type regularset username "CN=root,CN=Users,DC=fortinetqa,DC=local"set password **********
nextend
2. Configure FSSO:
config user fssoedit "1"
set server "172.18.62.220"set password **********
FortiOS 6.2 New Features Guide 477Fortinet Inc.

Other
nextend
3. Configure a user group:
config user groupedit "NTLM-FSSO"
set group-type fsso-serviceset member "FORTINETQA/FSSO"
nextend
4. Configure an authentication scheme:
config authentication schemeedit "au-sch-ntlm"
set method ntlmnext
end
5. Configure an authentication rule:
config authentication ruleedit "au-rule-fsso"
set srcaddr "all"set active-auth-method "au-sch-ntlm"
nextend
6. Create a web proxy profile, adding the new dynamic and custom via header
config web-proxy profileedit "test"
set log-header-change enableconfig headers
edit 1set name "client-ip"set content "$client-ip"
nextedit 2
set name "Proxy-Name"set content "$proxy_name"
nextedit 3
set name "user"set content "$user"
nextedit 4
set name "domain"set content "$domain"
nextedit 5
set name "local_grp"set content "$local_grp"
nextedit 6
set name "remote_grp"set content "$remote_grp"
next
FortiOS 6.2 New Features Guide 478Fortinet Inc.

Other
edit 7set name "Via"set content "Fortigate-Proxy"
nextend
nextend
7. In the proxy policy, append the web proxy profile created in the previous step:
config firewall proxy-policyedit 1
set uuid bb7488ee-2a6b-51e9-45c6-1715bdc271d8set proxy explicit-webset dstintf "port1"set srcaddr "all"set dstaddr "all"set service "web"set action acceptset schedule "always"set logtraffic allset groups "NTLM-FSSO"set webproxy-profile "test"set utm-status enableset av-profile "av"set webfilter-profile "content"set ssl-ssh-profile "deep-custom"
nextend
8. Once traffic is being generated from the client, look at the web filter logs to verify that it is working.All the added header fields display their corresponding value in the Change headers section at the bottom of the LogDetails screen.
1: date=2019-02-07 time=13:57:24 logid="0344013632" type="utm" subtype="webfilter"eventtype="http_header_change" level="notice" vd="vdom1" eventtime=1549576642 policyid=1transid=50331689 sessionid=1712788383 user="TEST21@FORTINETQA" group="NTLM-FSSO"profile="test" srcip=10.1.100.116 srcport=53278 dstip=172.16.200.46 dstport=80srcintf="port2" srcintfrole="undefined" dstintf="port1" dstintfrole="undefined" proto=6service="HTTP" url="http://172.16.200.46/" agent="curl/7.22.0" chgheaders="Added=client-ip: 10.1.100.116|Proxy-Name: 1.1 100D.qa|user: TEST21|domain: FORTINETQA|local_grp:NTLM-FSSO|remote_grp: FORTINETQA/FSSO|Via: Fortigate-Proxy"
FortiOS 6.2 New Features Guide 479Fortinet Inc.

Other
Restricted SaaS Access (0365, G-Suite, Dropbox)
This feature extends the web-proxy profile to allow for specifying access permissions for Microsoft Office 365, Google GSuite, and Dropbox. It works by inserting vendor defined headers that restrict access to the specific accounts. Customheaders for any destination can also be inserted.
The web-proxy profile can be configured with the required headers for the specific destinations, and then applied directlyinto a policy to control the header's insertion.
To implement Office 365 tenant restriction, Dropbox network access control, and Google G Suite account access controlon FortiGate, you need to:
1. Configure a web-proxy profile according to the vendors' specifications:a. Define the traffic destination (service provider).b. Define the header name, defined by the service provider.c. Define the value that will be inserted into the traffic, defined by your settings.
2. Apply the web-proxy profile to a policy.
The following example creates a web-proxy profile for Office 365, G Suite, and Dropbox access control. Note that, due tovendors' changing requirements, this example may no longer be in compliance with the vendors' official guidelines.
1. Configure the web-proxy profile:
config web-proxy profileedit "SaaS-Tenant-Restriction"
set header-client-ip passset header-via-request passset header-via-response passset header-x-forwarded-for passset header-front-end-https passset header-x-authenticated-user passset header-x-authenticated-groups passset strip-encoding disableset log-header-change disableconfig headers
edit 1
FortiOS 6.2 New Features Guide 480Fortinet Inc.

Other
set name "Restrict-Access-To-Tenants" <---header name defined byOffice365 spec. input EXACTLY as it is
set dstaddr "Microsoft Office 365" <----built-in destination address forOffice365
set action add-to-requestset base64-encoding disableset add-option newset protocol https httpset content "contoso.onmicrosoft.com,fabrikam.onmicrosoft.com" <----
your tenants restriction configurationnextedit 2
set name "Restrict-Access-Context" <----header name defined byOffice365 spec. input EXACTLY as it is
set dstaddr "Microsoft Office 365" <----build-in destination addressfor Office365
set action add-to-requestset base64-encoding disableset add-option newset protocol https httpset content "456ff232-35l2-5h23-b3b3-3236w0826f3d" <----your directory
ID can find in Azure portalnextedit 3
set name "X-GooGApps-Allowed-Domains" <----header name defined byGoogle G suite.
set dstaddr "G Suite" <---- built-in G Suite destination addressset action add-to-requestset base64-encoding disableset add-option newset protocol https httpset content "abcd.com" <----your domain restriction when you create G
Suite accountnext
edit 4set name "X-Dropbox-allowed-Team-Ids" <----header defined by Dropboxset dstaddr "wildcard.dropbox.com" <----build-in destination address
for Dropboxset action add-to-requestset base64-encoding disableset add-option newset protocol https httpset content "dbmid:FDFSVF-DFSDF" <----your team-Id in Dropbox
nextend
nextend
2. Apply the web-proxy profile to a firewall policy:
config firewall policyedit 1
set name "WF"set uuid 09928b08-ce46-51e7-bd95-422d8fe4f200set srcintf "port10" "wifi"set dstintf "port9"
FortiOS 6.2 New Features Guide 481Fortinet Inc.

Other
set srcaddr "all"set dstaddr "all"set action acceptset schedule "always"set service "ALL"set webproxy-profile "SaaS-Tenant-Restriction"set utm-status enableset utm-inspection-mode proxyset logtraffic allset webfilter-profile "blocktest2"
set application-list "g-default"set profile-protocol-options "protocol"set ssl-ssh-profile "protocols"set nat enable
nextend
References:
Office 365 - Use Tenant Restrictions to manage access to SaaS cloud applications
G Suite - Block access to consumer accounts
Dropbox - Network Control
Syntax update for Microsoft compatibility - 6.2.1
FortiGates deployed in an explicit proxy environment supports the syntax \domain\user to support Microsoftbackward compatibility authentication. In this version, both the syntax user@domain and \domain\user aresupported.
To configure LDAP user and groups:
show user ldap ldap-kerberosconfig user ldap
edit "ldap-kerberos"set server "172.18.62.177"set cnid "cn"set dn "dc=fortinetqa,dc=local"set type regularset username "CN=root,CN=Users,DC=fortinetqa,DC=local"set password ENC
MTAwNFfjyN9z/vpN/OIOIx+nH3XWOCEu37dfjDACEUuX/iHiKWLtg48dv8zfY5irbcl6/2j9Ti5+zuDQYLc2f/BSUAfjALZqbL4Z/CwvSg+kgExmG7RUfFoIoL+Ir11TKue2IissXuQKzjTuB5Hu8CtM9wrmqJwsVsTrksT8yFZz71JV6/M3SbezFof2yNNy2nBxGw==
nextend
config user groupedit "ldap-group"
set member "ldap-kerberos"next
end
FortiOS 6.2 New Features Guide 482Fortinet Inc.

Other
To configure authentication rule and scheme:
config authentication schemeedit "au-basic"
set method basicset user-database "ldap-kerberos"
nextend
config authentication ruleedit "all"
set srcaddr "all"set ip-based disableset active-auth-method "au-basic"
next
To configure a group in web proxy policy:
config firewall proxy-policyedit 1
set uuid 32a4ef88-7e7e-51e9-ccd3-9e979b2f25d1 set proxy explicit-webset dstintf "port1"set srcaddr "all"set dstaddr "all"set service "web"set action acceptset schedule "always"set logtraffic allset groups "ldap-group"set utm-status enableset ssl-ssh-profile "deep-custom"set av-profile "av"set replacemsg-override-group "auth-proxy-policy-1558741043926"set comments "Clone of 1"
nextend
When you send traffic, the browser prompts for authentication by username and domain.
To verify that the user is logged in:
diagnose wad user listID: 1, IP: 10.1.100.13, VDOM: vdom1user name : test1duration : 135auth_type : Sessionauth_method : Basicpol_id : 6g_id : 5user_based : 0expire : 575LAN:bytes_in=2070 bytes_out=6496
WAN:
FortiOS 6.2 New Features Guide 483Fortinet Inc.

Other
Support FortiSandbox Cloud - 6.2.1
Explicit proxy connections can leverage FortiSandbox Cloud for advanced threat scanning and updates.
The following options are available with config system fortiguard:
Option Description
proxy-server-ip IP address of the proxy server.
proxy-server-port Port used to communicate with the proxy server.
proxy-username Proxy user name.
proxy-password Proxy user password.
For example:
config system fortiguardset proxy-server-ip 172.16.200.44set proxy-server-port 3128set proxy-username "test1"set proxy-password ENC
Y0+KTg9UsILkv8+nDe+Pe3VlnlaHUMzLkfAXLATknW/xm/Xv7EdZHTnua1djM+waZA1vxCh8LV7Ci4sEhj/PABSTShStxskEn3E1+CjxviwVSljgF6AD+zJZF/+4jkspq+PogZT3LVO68+kqsPdU4rikuy1BbnsbZcPxC/MJyuIx7343bdKYqp+IUprQUR2wf8tiMg==
end
The following example shows an explicit proxy connection to FortiSandbox Cloud:
# diagnose debug application forticldd -1Debug messages will be on for 30 minutes.# diagnose debug enable[2942] fds_handle_request: Received cmd 23 from pid-2526, len 0[40] fds_queue_task: req-23 is added to Cloud-sandbox-controller[178] fds_svr_default_task_xmit: try to get IPs for Cloud-sandbox-controller[239] fds_resolv_addr: resolve aptctrl1.fortinet.com[169] fds_get_addr: name=aptctrl1.fortinet.com, id=32, cb=0x2bc089[101] dns_parse_resp: DNS aptctrl1.fortinet.com -> 172.16.102.21[227] fds_resolv_cb: IP-1: 172.16.102.21[665] fds_ctx_set_addr: server: 172.16.102.21:443[129] fds_svr_default_pickup_server: Cloud-sandbox-controller: 172.16.102.21:443[587] fds_https_start_server: server: 172.16.102.21:443[579] ssl_new: SSL object is created
FortiOS 6.2 New Features Guide 484Fortinet Inc.

Other
[117] https_create: proxy server 172.16.200.44 port:3128[519] fds_https_connect: https_connect(172.16.102.21) is established.[261] fds_svr_default_on_established: Cloud-sandbox-controller has connected to
ip=172.16.102.21[268] fds_svr_default_on_established: server-Cloud-sandbox-controller handles cmd-23[102] fds_pack_objects: number of objects: 1[75] fds_print_msg: FCPC: len=109[81] fds_print_msg: Protocol=2.0[81] fds_print_msg: Command=RegionList[81] fds_print_msg: Firmware=FG101E-FW-6.02-0917[81] fds_print_msg: SerialNumber=FG101E4Q17002429[81] fds_print_msg: TimeZone=-7[75] fds_print_msg: http req: len=248[81] fds_print_msg: POST https://172.16.102.21:443/FCPService HTTP/1.1[81] fds_print_msg: User-Agent: Mozilla/4.0 (compatible; MSIE 6.0; Windows NT 5.1)[81] fds_print_msg: Host: 172.16.102.21:443[81] fds_print_msg: Cache-Control: no-cache[81] fds_print_msg: Connection: close[81] fds_print_msg: Content-Type: application/octet-stream[81] fds_print_msg: Content-Length: 301[524] fds_https_connect: http request to 172.16.102.21: header=248, ext=301.[257] fds_https_send: sent 248 bytes: pos=0, len=248[265] fds_https_send: 172.16.102.21: sent 248 byte header, now send 301-byte body[257] fds_https_send: sent 301 bytes: pos=0, len=301[273] fds_https_send: sent the entire request to server: 172.16.102.21:443[309] fds_https_recv: read 413 bytes: pos=413, buf_len=2048[332] fds_https_recv: received the header from server: 172.16.102.21:443, [HTTP/1.1 200Content-Type: application/octet-streamContent-Length: 279Date: Thu, 20 Jun 2019 16:41:11 GMTConnection: close][396] fds_https_recv: Do memmove buf_len=279, pos=279[406] fds_https_recv: server: 172.16.102.21:443, buf_len=279, pos=279[453] fds_https_recv: received a packet from server-172.16.102.21:443: sz=279, objs=1[194] __ssl_data_ctx_free: Done[839] ssl_free: Done[830] ssl_disconnect: Shutdown[481] fds_https_recv: obj-0: type=FCPR, len=87[294] fds_svr_default_on_response: server-Cloud-sandbox-controller handles cmd-23[75] fds_print_msg: fcpr: len=83[81] fds_print_msg: Protocol=2.0[81] fds_print_msg: Response=202[81] fds_print_msg: ResponseItem=Region:Europe,Global,Japan,US[81] fds_print_msg: existing:Japan[3220] aptctrl_region_res: Got rsp: Region:Europe,Global,Japan,US[3222] aptctrl_region_res: Got rsp: Region existing:Japan[439] fds_send_reply: Sending 28 bytes data.[395] fds_free_tsk: cmd=23; req.noreply=1# [136] fds_on_sys_fds_change: trace[2942] fds_handle_request: Received cmd 22 from pid-170, len 0[40] fds_queue_task: req-22 is added to Cloud-sandbox-controller[587] fds_https_start_server: server: 172.16.102.21:443[579] ssl_new: SSL object is created[117] https_create: proxy server 172.16.200.44 port:3128[519] fds_https_connect: https_connect(172.16.102.21) is established.[261] fds_svr_default_on_established: Cloud-sandbox-controller has connected to
ip=172.16.102.21
FortiOS 6.2 New Features Guide 485Fortinet Inc.

Other
[268] fds_svr_default_on_established: server-Cloud-sandbox-controller handles cmd-22[102] fds_pack_objects: number of objects: 1[75] fds_print_msg: FCPC: len=146[81] fds_print_msg: Protocol=2.0[81] fds_print_msg: Command=UpdateAPT[81] fds_print_msg: Firmware=FG101E-FW-6.02-0917[81] fds_print_msg: SerialNumber=FG101E4Q17002429[81] fds_print_msg: TimeZone=-7[81] fds_print_msg: TimeZoneInMin=-420[81] fds_print_msg: DataItem=Region:US[75] fds_print_msg: http req: len=248[81] fds_print_msg: POST https://172.16.102.21:443/FCPService HTTP/1.1[81] fds_print_msg: User-Agent: Mozilla/4.0 (compatible; MSIE 6.0; Windows NT 5.1)[81] fds_print_msg: Host: 172.16.102.21:443[81] fds_print_msg: Cache-Control: no-cache[81] fds_print_msg: Connection: close[81] fds_print_msg: Content-Type: application/octet-stream[81] fds_print_msg: Content-Length: 338[524] fds_https_connect: http request to 172.16.102.21: header=248, ext=338.[257] fds_https_send: sent 248 bytes: pos=0, len=248[265] fds_https_send: 172.16.102.21: sent 248 byte header, now send 338-byte body[257] fds_https_send: sent 338 bytes: pos=0, len=338[273] fds_https_send: sent the entire request to server: 172.16.102.21:443[309] fds_https_recv: read 456 bytes: pos=456, buf_len=2048[332] fds_https_recv: received the header from server: 172.16.102.21:443, [HTTP/1.1 200Content-Type: application/octet-streamContent-Length: 322Date: Thu, 20 Jun 2019 16:41:16 GMTConnection: close][396] fds_https_recv: Do memmove buf_len=322, pos=322[406] fds_https_recv: server: 172.16.102.21:443, buf_len=322, pos=322[453] fds_https_recv: received a packet from server-172.16.102.21:443: sz=322, objs=1[194] __ssl_data_ctx_free: Done[839] ssl_free: Done[830] ssl_disconnect: Shutdown[481] fds_https_recv: obj-0: type=FCPR, len=130[294] fds_svr_default_on_response: server-Cloud-sandbox-controller handles cmd-22[75] fds_print_msg: fcpr: len=126[81] fds_print_msg: Protocol=2.0[81] fds_print_msg: Response=202[81] fds_print_msg: ResponseItem=Server1:172.16.102.51:514[81] fds_print_msg: Server2:172.16.102.52:514[81] fds_print_msg: Contract:20210215[81] fds_print_msg: NextRequest:86400[615] parse_apt_contract_time_str: The APTContract is valid to Mon Feb 15 23:59:59 2021[616] parse_apt_contract_time_str: FGT current local time is Thu Jun 20 09:41:16 2019[3289] aptctrl_update_res: Got rsp: APT=172.16.102.51:514 APTAlter=172.16.102.52:514 next-
upd=86400[395] fds_free_tsk: cmd=22; req.noreply=1
Protocols
This section lists other new features added to FortiOS related to protocols.
FortiOS 6.2 New Features Guide 486Fortinet Inc.

Other
TLS 1.3 Support
SSL VPN
TLS 1.3 support has been added for SSL VPN. The following steps are required for a client to establish an SSL VPNconnection with TLS 1.3 to the FortiGate:
1. Configure TLS 1.3 support using the FortiOS CLI.2. Configure the SSL VPN and firewall policy.3. For Linux clients, ensure OpenSSL 1.1.1a is installed.4. Use OpenSSL with the TLS 1.3 option to connect to SSL VPN.5. Ensure that the SSL VPN connection has been established with TLS 1.3.
This feature can only be used with endpoints that have FortiClient 6.2.0 or a later versioninstalled. Earlier FortiClient versions do not support TLS 1.3.
To configure TLS 1.3 support using the FortiOS CLI:
A new command for TLS 1.3 has been added under config vpn ssl setting. By default, TLS 1.3 support isenabled. You can enable TLS 1.3 support using the following FortiOS CLI command:
config vpn ssl settingset tlsv1-3 enable
end
To configure SSL VPN and the firewall policy:
Configure the SSL VPN settings and firewall policy as required.
To ensure OpenSSL 1.1.1a is installed on the Linux client:
Run the following commands in the terminal on the Linux client:
root@PC1:~/tools# opensslOpenSSL> version
If OpenSSL 1.1.1a is installed, the system displays a response like the following:
OpenSSL 1.1.1a 20 Nov 2018
To connect to SSL VPN using OpenSSL with TLS 1.3:
On the Linux client, use OpenSSL to connect to FortiGate SSL VPN with TLS 1.3 by running the following command:
#openssl s_client -connect 10.1.100.10:10443 -tls1_3
To ensure that SSL VPN connection is established with TLS 1.3:
Run the following commands in the FortiOS CLI to ensure that the SSL VPN connection has been established with TLS1.3:
# diagnose debug application sslvpn -1# diagnose debug enable
FortiOS 6.2 New Features Guide 487Fortinet Inc.

Other
The system should display a response like the following:
[207:root:1d]SSL established: TLSv1.3 TLS_AES_256_GCM_SHA384
Deep Inspection (Flow Based)
FortiOS now supports TLS 1.3 for policies that have the following security profiles applied:
l Web Filter profile with flow-based inspection mode enabledl Deep inspection SSL/SSH Inspection profile
Consider that a policy with the aboveWeb Filter and SSL/SSH Inspection profiles applied is enabled. A client attempts toaccess a website that supports TLS 1.3. FortiOS sends the traffic to the IPS engine. The IPS engine then decodesTLS 1.3, and the client is able to access the website.
TLS 1.3 support is only available for IPS engine 4.205 and later versions.
SMBv2 Support (SSL VPN)
On all FortiGate models, SMBv2 is enabled by default for SSL VPN.
Client PCs can access the SMBv2 server using SSL VPN web-only mode.
This version adds two new commands under config vpn ssl web portal.
Sample configuration
You must use the CLI to use this feature.
To configure SMBv2:
1. Run config vpn ssl web portal:
config vpn ssl web portal edit portal-name
set smb-min-version smbv2set smb-max-version smbv3
end
2. After running config vpn ssl web portal, configure SSL VPN and firewall policies as usual.3. Then connect to the SSL VPN web portal and create an SMB bookmark for the SMBv2 server.4. Click the bookmark to connect to the SMBv2 server.5. In the FortiGate, use package capture to verify that SMBv2 works:
FortiOS 6.2 New Features Guide 488Fortinet Inc.

Other
PTPv2
Precision Time Protocol (PTP) is used to synchronize network clocks. It is best suited to situations where time accuracyis of the utmost importance, as it supports accuracy in the sub-microsecond range. Conversely, NTP accuracy is in therange of milliseconds or tens of milliseconds.
The following CLI commands have been added:
config system ptpset status {enable | disable}set mode {multicast | hybrid}set delay-mechanism {E2E | P2P}set request-interval <integer>set interface <interface>
end
Command Description
status {enable | disable} Enable/disable setting the FortiGate system time by synchronizing with an PTPserver (default = disable).
mode {multicast | hybrid} Use multicast or hybrid transmission (default = multicast).
delay-mechanism {E2E | P2P} Use End to End (E2E) or Peer to Peer (P2P) delay detection (default = E2E).
request-interval <integer> The logarithmic mean interval between the delay request messages sent by theclient to the server, in seconds (default = 1).
interface <interface> The interface that the PTP client will reply through.
This example uses the following topology:
To configure a FortiGate to act as a PTP client that synchronizes itself with a Linux PTP server:
1. Enable debug messages:diagnose debug application ptpd -1
This command will provide details to debug the PTP communication with the server.2. Check the system date:
execute datecurrent date is: 2019-01-01
3. Configure PTP in global mode:config system ptp
set status enableset interface wan2
end
FortiOS 6.2 New Features Guide 489Fortinet Inc.

Other
4. Check the system date again after synchronization with the PTP serverexecute date
current date is: 2019-08-20
Telnet Disabled Option
A new CLI option has been added that completely disables Telnet, removing the GUI options per interface and disablingthe Telnet daemon.
When Telnet is disabled, the Telnet port cannot be configured and access cannot be enabled on interfaces.
Telnet is enabled by default.
To disable Telnet:
config system globalset admin-telnet disable
end
When disabled, the Telnet port is removed from the System > Settings page, and TELNET is no longer an administrativeaccess option on the Network > Interfaces page.
FortiOS 6.2 New Features Guide 490Fortinet Inc.

Other
To enable Telnet:
config system globalset admin-telnet enableset admin-telnet-port <port>
end
When Telnet is enabled, the port can be configured on the System > Settings page, and TELNET can be selected can beselected as an administrative access option on the Network > Interfaces page.
FortiOS 6.2 New Features Guide 491Fortinet Inc.
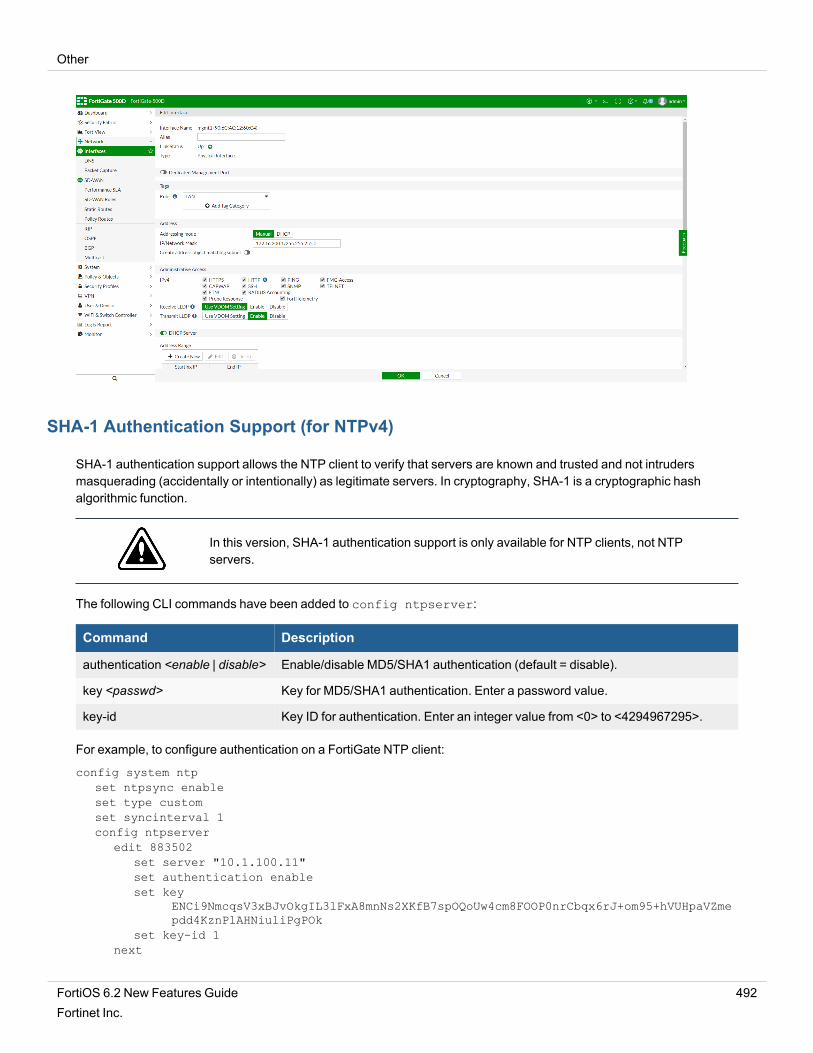
Other
SHA-1 Authentication Support (for NTPv4)
SHA-1 authentication support allows the NTP client to verify that servers are known and trusted and not intrudersmasquerading (accidentally or intentionally) as legitimate servers. In cryptography, SHA-1 is a cryptographic hashalgorithmic function.
In this version, SHA-1 authentication support is only available for NTP clients, not NTPservers.
The following CLI commands have been added to config ntpserver:
Command Description
authentication <enable | disable> Enable/disable MD5/SHA1 authentication (default = disable).
key <passwd> Key for MD5/SHA1 authentication. Enter a password value.
key-id Key ID for authentication. Enter an integer value from <0> to <4294967295>.
For example, to configure authentication on a FortiGate NTP client:
config system ntpset ntpsync enableset type customset syncinterval 1config ntpserver
edit 883502set server "10.1.100.11"set authentication enableset key
ENCi9NmcqsV3xBJvOkgIL3lFxA8mnNs2XKfB7spOQoUw4cm8FOOP0nrCbqx6rJ+om95+hVUHpaVZmepdd4KznPlAHNiuliPgPOk
set key-id 1next
FortiOS 6.2 New Features Guide 492Fortinet Inc.

Other
endend
If NTP authentication is set up correctly, diag sys ntp status shows server-version=4. For example:
diag sys ntp statussynchronized: yes, ntpsync: enabled, server-mode: disabledipv4 server(10.1.100.11) 10.1.100.11 -- reachable(0xff) S:4 T:6 selectedserver-version=4, stratum=3
DNS over TLS
A new option is added to DNS Profile, forcing DNS over TLS for added security.
DNS over TLS (DoT) is a security protocol for encrypting and wrapping Domain Name System (DNS) queries andanswers via the Transport Layer Security (TLS) protocol. The goal of the method is to increase user privacy and securityby preventing eavesdropping and manipulation of DNS data via man-in-the-middle attacks.
Below is a typical topology.
FortiGate (client/server)<-----(DNS over TLS)<-----------------> DNS server/client
To configure DNS over TLS using the GUI:
1. Go to Network > DNS.2. In DNS over TLS, select Enforce.
To configure DNS over TLS using the CLI:
FGT_A (global) # config system dns
FGT_A (dns) # showconfig system dns
set primary 8.8.8.8set dns-over-tls enforce
end
FGT_A (dns) # set dns-over-tls disable Disable DNS over TLS.enable Use TLS for DNS queries if TLS is available.enforce Use only TLS for DNS queries. Does not fall back to unencrypted DNS queries ifTLS is unavailable.
FGT_A (dns) # set dns-over-tls enforce <Enter>
FortiOS 6.2 New Features Guide 493Fortinet Inc.

Other
FGT_A (dns) # set dns-over-tls enforce
FGT_A (dns) # set ssl-certificate <string> please input string valueFortinet_CA_SSL localFortinet_CA_Untrusted localFortinet_Factory localFortinet_SSL localFortinet_SSL_DSA1024 localFortinet_SSL_DSA2048 localFortinet_SSL_ECDSA256 localFortinet_SSL_ECDSA384 localFortinet_SSL_RSA1024 localFortinet_SSL_RSA2048 localServer localtestercert local
FGT_A (dns) # set ssl-certificate
LLDP Reception
This feature receives and stores LLDP messages, and makes the LLDP information available via the CLI, REST API,and SNMP. The feature can be enabled on three levels: globally, per VDOM, or per interface.
In the GUI, go to User & Device > Device Inventory to view the information.
To configure LLDP reception globally:
config system globalset lldp-reception enable
end
To configure LLDP reception per VDOM:
config system settingset lldp-reception enable
end
FortiOS 6.2 New Features Guide 494Fortinet Inc.

Other
To configure LLDP reception per interface:
config system interfaceedit <port>
set lldp-reception enablenext
end
To view the received LLDP information in the CLI:
diagnose user device listhosts
vd root/0 44:0a:a0:0a:0a:0a gen 3 req S/2created 10290s gen 1 seen 0s port3 gen 1ip 172.22.22.22 src lldptype 20 'Other Network Device' src lldp id 155 gen 2os 'Artist EOS ' version '4.20.4' src lldp id 155host 'artist' src lldp
To view the received LLDP information in the REST API:
"http_method":"GET","results":[{
"mac":"90:9c:9c:c9:c9:90","chassis_id":"90:9C:9C:C9:C9:90","port":19,"port_id":"port12","port_desc":"port12","system_name":"S124DN3W00000000","system_desc":"FortiSwitch-124D v3.6.6,build0416,180515 (GA)","ttl":120,"addresses":[{"type":"ipv4","address":"192.168.1.99"
}]
}],"vdom":"root","path":"network","name":"lldp","action":"neighbors","status":"success","serial":"FG201E4Q00000000","version":"v6.2.0","build":866
}
{"http_method":"GET","results":[{
"name":"port1",
FortiOS 6.2 New Features Guide 495Fortinet Inc.

Other
"rx":320,"neighbors":1
}],"vdom":"root","path":"network","name":"lldp","action":"ports","mkey":"port1","status":"success","serial":"FG201E4Q00000000","version":"v6.2.0","build":866
}
Direct IP Support for LTE/4G
This project introduces Direct IP support when using LTE/4G modems.
Direct IP is a public IP address that is assigned to a computing device, which allows the device to directly access theInternet.
When an LTE modem is enabled for FortiGate, a DHCP interface is created. As a result, FortiGate can acquire direct IP,which includes IP, DNS, and gateway, from the carrier's LTE network.
Since some LTE modems require users to input the access point name for the LTE network, the LTE modemconfiguration allows Access Point Name (APN) to be set.
LTE modem can only be enabled by using the CLI.
To enable direct IP support using the CLI:
1. Enable LTE modem.config system lte-modem
set status enableend
2. Check that LTE interface is created.config system interface
edit "wwan"set vdom "root"set mode dhcpset status downset distance 1set type physicalset snmp-index 23
nextend
Shortly after LTE modem joins carriers's network, wwan will be enabled and granted direct IP:FortiGate-600D # config system interfaceFortiGate-600D (interface) # edit wwanFortiGate-600D (wwan) # getname : wwan....ip : 100.112.75.43 255.255.255.248....
FortiOS 6.2 New Features Guide 496Fortinet Inc.

Other
status : up....defaultgw : enableDHCP Gateway : 100.112.75.41Lease Expires : Thu Feb 21 19:33:27 2019dns-server-override : enableAcquired DNS1 : 184.151.118.254Acquired DNS2 : 70.28.245.227....
PC can reach internet via the following firewall policy:config firewall policy....
edit 5set name "LTE"set uuid 61880e9a-36ce-51e9-a4f4-15cc3ffc25f3set srcintf "port9"set dstintf "wwan"set srcaddr "all"set dstaddr "all"set action acceptset schedule "always"set service "ALL"set utm-status enableset fsso disableset nat enable
nextend
With LTE modem enabled, you can use the GUI to view the LTE interface and check the acquired IP, DNS, and gateway:
You can configure the firewall policy that utilizes this LTE interface:
FortiOS 6.2 New Features Guide 497Fortinet Inc.

Other
Limitations:
l Most LTE modems have a preset APN in the SIM card. As a result, the APN doesn't need to be set in FortiOSconfiguration. In cases where the Internet cannot be accessed, you can consult with your carrier about APN (forexample, inet.bell.ca) and set the APN in LTE modem configuration.config system lte-modem
set status enableset apn "inet.bell.ca"
end
l Some FortiGate units have built-in LTE modems, such as the FortiGate-30E-3G4G. This type of FortiGate has LTEmodem enabled by default. Firewall policy via LTE interface is also created by default. After the user plugs in a SIMcard, the user's network devices can reach the Internet.FWF-30E-3G4G default configuration:config system lte-modem
set status enableset extra-init ''set manual-handover disableset force-wireless-profile 0set authtype noneset apn ''set modem-port 255set network-type autoset auto-connect disableset gpsd-enabled disableset data-usage-tracking disableset gps-port 255
endconfig firewall policy....
edit 3set uuid f7c77cc6-36d1-51e9-2899-a7040791330cset srcintf "internal"
FortiOS 6.2 New Features Guide 498Fortinet Inc.

Other
set dstintf "wwan"set srcaddr "all"set dstaddr "all"set action acceptset schedule "always"set service "ALL"set nat enable
nextend
OSPFv3 neighbor authentication - 6.2.1
This feature adds OSPFv3 neighbor authentication for IPv6 enhanced security.
The following CLI commands are added for authentication for OSPF6 interface:
config router ospf6config ospf6-interface
edit <name>set authentication {none | ah | esp | area}set key-rollover-interval <integer>set ipsec-auth-alg {md5 | sha1 | sha256 | sha384 | sha512}set ipsec-enc-alg {null | des | 3des | aes128 | aes192 | aes256}config ipsec-keys
edit <spi>set auth-key <string>set enc-key <string>
nextend
nextend
end
The following CLI commands are added for authentication for OSPF6 virtual-link:
config router ospf6config area
edit <id>config virtual-link
edit <name>set authentication {none | ah | esp | area}set key-rollover-interval <integer>set ipsec-auth-alg {md5 | sha1 | sha256 | sha384 | sha512}set ipsec-enc-alg {null | des | 3des | aes128 | aes192 | aes256}config ipsec-keys
edit <spi>set auth-key <string>set enc-key <string>
nextend
nextend
nextend
end
The following CLI commands are added for authentication for OSPF6 area configuration:
FortiOS 6.2 New Features Guide 499Fortinet Inc.

Other
config router ospf6config area
edit <id>set authentication {none | ah | esp}set key-rollover-interval <integer>set ipsec-auth-alg {md5 | sha1 | sha256 | sha384 | sha512}set ipsec-enc-alg {null | des | 3des | aes128 | aes192 | aes256}config ipsec-keys
edit <spi>set auth-key <string>set enc-key <string>
nextend
nextend
end
CLI command descriptions
Command Description
<id> Area entry IP address.
authentication {none | ah | esp |area}
Authentication mode:l none: Disable authenticationl ah: Authentication Headerl esp: Encapsulating Security Payloadl area: Use the routing area's authentication configuration
key-rollover-interval <integer> Enter an integer value (300 - 216000, default = 300).
ipsec-auth-alg {md5 | sha1 |sha256 | sha384 | sha512}
Authentication algorithm.
ipsec-enc-alg {null | des | 3des |aes128 | aes192 | aes256}
Encryption algorithm.
<spi> Security Parameters Index.
auth-key <string> Authentication key should be hexadecimal numbers.Key length for each algorithm:l MD5: 16 bytesl SHA1: 20 bytesl SHA256: 32 bytesl SHA384:48 bytesl SHA512:84 bytes
If the key is shorter than the required length, it will be padded with zeroes.
enc-key <string> Encryption key should be hexadecimal numbers.Key length for each algorithm:l DES: 8 bytesl 3DES: 24 bytesl AES128: 16 bytes
FortiOS 6.2 New Features Guide 500Fortinet Inc.

Other
Command Description
l AES192: 24 bytesl AES256: 32 bytes
If the key is shorter than the required length, it will be padded with zeroes.
LACP support on entry-level E-series devices - 6.2.1
Link Aggregation Control Protocol (LACP) is now supported on FortiGate and FortiWiFi 90E, 80E, 60E, 50E, and 30Edevices.
To create a link aggregation interface in the GUI:
1. Go to Network > Interfaces.2. Click Create New > Interface.3. Set Type to 802.3ad Aggregate.4. Configure the other settings as required.
5. ClickOK.
To create a link aggregation interface in the CLI:
configure system interfaceedit "aggregateinterf"
set vdom "root"set type aggregateset member "internal1" "internal2"set device-identification enableset lldp-transmission enableset role lanset snmp-index 13
nextend
FortiOS 6.2 New Features Guide 501Fortinet Inc.

Other
To check the aggregate interface status:
diagnose netlink aggregate name <name of aggregate interface>
TLS 1.3 proxy support - 6.2.1
TLS 1.3 is now supported in proxy mode.
To add TLS 1.3 to a SSL server profile using the CLI:
config firewall ssl-serveredit "1"
set ip 172.16.200.99set port 443set ssl-mode halfset add-header-x-forwarded-proto enableset url-rewrite disableset mapped-port 80set ssl-cert "Fortinet_CA_SSL"set ssl-dh-bits 2048set ssl-algorithm highset ssl-client-renegotiation allowset ssl-min-version tls-1.3 <<<<<< add tls 1.3set ssl-max-version tls-1.3 <<<<<< add tls 1.3set ssl-send-empty-frags enable
nextend
To add TLS 1.3 to a virtual server profile using the CLI:
config firewall vipedit "1"
set id 0set uuid ba50ae56-8c64-51e9-956c-860a475e69c5set comment ''set type server-load-balanceset extip 0.0.0.0set extintf ''set arp-reply enableset server-type httpsset nat-source-vip disableset gratuitous-arp-interval 0set http-ip-header disableset ssl-client-rekey-count 0set ssl-hpkp disableset ssl-hsts disableset color 0set ldb-method staticset persistence noneset extport 443set http-multiplex disableset outlook-web-access disableset weblogic-server disableset websphere-server disable
FortiOS 6.2 New Features Guide 502Fortinet Inc.

Other
set ssl-mode halfset ssl-certificate ''set ssl-dh-bits 2048set ssl-algorithm highset ssl-pfs requireset ssl-min-version tls-1.3 <<<<<< add tls 1.3set ssl-max-version tls-1.3 <<<<<< add tls 1.3set ssl-send-empty-frags enableset ssl-client-fallback enableset ssl-client-renegotiation secureset ssl-client-session-state-type bothset ssl-client-session-state-timeout 30set ssl-client-session-state-max 1000set ssl-http-location-conversion disableset max-embryonic-connections 1000
nextend
GTPv2 in policy - 6.2.1
You can use GTPv2 in the policy section of GTP profile .
GTPv2 is available for the following advanced fields only:
l apnmember
l apn-sel-mode
l messages
l max-apn-restriction
l imsi-prefix
l msisdn-prefix
l rat-type
l mei
l uli
GTPv2 support includes the following changes for overall GTP support:
l rai is no longer supported in any GTP version.l uli can coexist with CGI/SAI/RAI/TAI/ECGI/LAI, each of which has the pattern MCC.MNC.ID or MCC.MNC.ID.ID2.l mei can take IMEI (15 digit) or IMEISV (16 digits). Previous versions only supported IMEISV (16 digits).
To configure the new policy-v2 for firewall gtp:
config firewall gtpedit "gtpv2"
config policy-v2edit 1
set messages create-ses-reqnext
endnext
end
FortiOS 6.2 New Features Guide 503Fortinet Inc.

Other
To configure the new uli format:
This example matches packet with TAI 510-519.01-09.d02a and ECGI 505.02.1409900-14099ff.
config firewall gtpedit "gtpv2"
config policy-v2edit 1
set messages create-ses-reqset uli "0" "0" "0" "51*.01-09.d02a" "505.02.14099*"
nextend
nextend
To configure the GTPv2 message type:
config firewall gtpedit "gtpv2"
config policy-v2edit 1
set messages create-ses-req create-ses-res modify-bearer-req modify-bearer-res
nextend
nextend
To configure the rat-type:
This example shows the type virtual and nbiot.
config firewall gtpedit "gtpv2"
config policy-v2edit 1
set messages create-ses-reqset rat-type virtual nbiot
nextend
nextend
FortiGate Cloud / FDN communication through an explicit proxy - 6.2.1
Explicit proxy communication to FortiGate Cloud and FortiGuard servers from FortiGate is enabled. A proxy server canbe configured in FortiGuard settings so that all FortiGuard connections under the forticldd process can beestablished through the proxy server.
Not all FortiGuard services are supported by these proxy settings. For example, web filterservice traffic to FortiGuard will not be directed to the configured proxy.
FortiOS 6.2 New Features Guide 504Fortinet Inc.

Other
To configure a proxy server and communicate with FortiGate Cloud though it:
1. Configure FortiGate B as a proxy server:
config firewall proxy-policyedit 1
set proxy explicit-webset dstintf "wan1"set srcaddr "all"set dstaddr "all"set service "webproxy"set action acceptset schedule "always"set logtraffic allset users "guest1"
nextendconfig user local
edit "guest1"set type passwordset passwd 123456
nextendconfig authentication scheme
edit "local-basic"set method basicset user-database "local-user-db"
nextendconfig authentication rule
edit "local-basic-rule"set srcaddr "all"set ip-based disableset active-auth-method "local-basic"
nextend
2. Configure a firewall policy on FortiGate B to allow FortiGate A to get DNS resolution:
config firewall policyedit 1
set name "dns"set uuid c55cd2fa-9486-51e9-fc0a-c17b296f9c72set srcintf "port18"set dstintf "wan1"set srcaddr "all"set dstaddr "all"set action acceptset schedule "always"set service "DNS"set fsso disableset nat enable
FortiOS 6.2 New Features Guide 505Fortinet Inc.

Other
nextend
3. On FortiGate A, configure the FortiGuard proxy settings:
config system fortiguardset proxy-server-ip 10.2.2.2set proxy-server-port 8080set proxy-username "guest1"set proxy-password 123456
end
4. On FortiGate A, log in to FortiGate Cloud to activate the logging service:
execute fortiguard-log login <username> <password>
5. On FortiGate A, view the forticldd debug message to see the connection to the log controller through the proxyserver:
#[136] fds_on_sys_fds_change: trace[40] fds_queue_task: req-111 is added to log-controller[596] fds_https_start_server: server: 172.16.95.168:443[654] ssl_new: SSL object is created[117] https_create: proxy server 10.2.2.2 port:8080[40] fds_queue_task: req-101 is added to message-controller[596] fds_https_start_server: server: 172.16.95.187:443[654] ssl_new: SSL object is created[117] https_create: proxy server 10.2.2.2 port:8080[124] fds_on_log_setting_change: trace[528] fds_https_connect: https_connect(172.16.95.168) is established.[265] fds_svr_default_on_established: log-controller has connected to ip=172.16.95.168
# diagnose test application forticldd 1
Transceiver information on FortiOS GUI - 6.2.1
This feature adds the Transceiver column in various tables in the GUI. The Transceiver column shows information abouttransceivers plugged into the FortiGate, including the vendor name and part number. You can hover over the transceiverto view additional information, such as the type, serial number, and port name.
To view the Transceiver column in the Interfaces table:
1. Go to Network > Interfaces. The Transceiver column is visible in the table, which displays the transceiver vendorname and part number.
2. Hover your mouse over a transceiver in the table. More information appears about the transceiver, including the:l Typel Vendor namel Part numberl Serial numberl Port name (Interface)
FortiOS 6.2 New Features Guide 506Fortinet Inc.

Other
To view the transceivers plugged into FortiSwitch:
1. Go toWiFi & Switch Controller > FortiSwitch Ports. The Transceiver column is visible in the table, which displays thetransceiver vendor name and part number.
2. Hover your mouse over a transceiver in the table. More information appears about the transceiver, including the:l Typel Vendor namel Part numberl Serial numberl FortiSwitch serial numberl Port name (Interface)
FortiOS 6.2 New Features Guide 507Fortinet Inc.

Other
To view the transceivers plugged in using the CLI:
(global) # get system interface transceiver Interface port9 - SFP/SFP+Vendor Name : FINISAR CORP.Part No. : FCLF-8521-3Serial No. : PMS36QH
Interface port10 - Transceiver is not detected.Interface port11 - SFP/SFP+Vendor Name : QNCPart No. : LCP-1250RJ3SRQNSerial No. : QNDT0008
Interface port12 - SFP/SFP+Vendor Name : QNCPart No. : LCP-1250RJ3SRQNSerial No. : QNDT0002
Interface s1 - SFP/SFP+Vendor Name : JDSUPart No. : PLRXPLSCS4322N Serial No. : CB26UF0MP
Interface s2 - SFP/SFP+Vendor Name : JDSUPart No. : PLRXPLSCS4321N Serial No. : C825UB18W
Interface vw1 - Transceiver is not detected.Interface vw2 - Transceiver is not detected.Interface x1 - SFP/SFP+Vendor Name : FortinetPart No. : LCP-10GRJ3SRFN Serial No. : 190909100003
Interface x2 - Transceiver is not detected.
Optical Optical OpticalSFP/SFP+ Temperature Voltage Tx Bias Tx Power Rx PowerInterface (Celsius) (Volts) (mA) (dBm) (dBm)------------ ------------ ------------ ------------ ------------ ------------port9 N/A N/A N/A N/A N/Aport11 N/A N/A N/A N/A N/Aport12 N/A N/A N/A N/A N/As1 38.3 3.35 6.80 -2.3 -3.2s2 42.1 3.34 7.21 -2.3 -3.0x1 N/A N/A N/A N/A N/A++ : high alarm, + : high warning, - : low warning, -- : low alarm, ? : suspect.
LACP support on entry-level devices - 6.2.2
Link Aggregation Control Protocol (LACP) is now supported on the following devices in FortiOS 6.2.2:
l FortiGate Rugged 30D and 35Dl FortiGate 30E-MI, 30E-MN, 51E, 52E, 60E-POE, 61E, 80D, 80E-POE, 81E, 81E-POE, 91E, and 92Dl FortiWiFi 30E-MI, 30E-MN, 50E-2R, 51E, and 61E
FortiOS 6.2 New Features Guide 508Fortinet Inc.

Other
To create a link aggregation interface in the GUI:
1. Go to Network > Interfaces.2. Click Create New > Interface.3. Set Type to 802.3ad Aggregate.4. Configure the other settings as required.
5. ClickOK.
To create a link aggregation interface in the CLI:
configure system interfaceedit "aggregateinterf"
set vdom "root"set type aggregateset member "internal1" "internal2"set device-identification enableset lldp-transmission enableset role lanset snmp-index 13
nextend
To check the aggregate interface status:
diagnose netlink aggregate name <name of aggregate interface>
Ignore AUTH TLS command for DLP - 6.2.2
If the FortiGate receives an AUTH TLS (PBSZ and PROT) command before receiving plain text traffic from a decrypteddevice, by default, it will expect encrypted traffic, determine that the traffic belongs to an abnormal protocol, and by-passthe traffic.
When the ssl-offloaded command is enabled, the AUTH TLS command is ignored, and the traffic is treated as plaintext rather than encrypted data.
FortiOS 6.2 New Features Guide 509Fortinet Inc.

Other
To ignore received AUTH TLS commands:
config firewall profile-protocol-optionsedit "test"
config ftpset ssl-offloaded yes
endconfig imap
set ssl-offloaded yesendconfig pop3
set ssl-offloaded yesendconfig smtp
set ssl-offloaded yesend
nextend
LACP support on entry-level devices - 6.2.4
Link Aggregation Control Protocol (LACP) is now supported on FortiGate and FortiWiFi 61F and 60F devices in FortiOS6.2.4.
To create a link aggregation interface in the GUI:
1. Go to Network > Interfaces.2. Click Create New > Interface.3. Set Type to 802.3ad Aggregate.4. Configure the other settings as required.5. ClickOK.
To create a link aggregation interface in the CLI:
configure system interfaceedit "aggregateinterf"
set vdom "root"set type aggregateset member "internal1" "internal2"set device-identification enableset lldp-transmission enableset role lanset snmp-index 13
nextend
To check the aggregate interface status:
diagnose netlink aggregate name <name of aggregate interface>
FortiOS 6.2 New Features Guide 510Fortinet Inc.

Other
Recognize AnyCast Address in Geo-IP Blocking
An AnyCast IP can be advertised frommultiple locations and the router selects a path based on latency, distance, cost,number of hops, etc. This technique is widely used by providers to route users to the closest server. Since the IP ishosted in multiple geographic locations, there is no way to specify one single location to that IP.
This version introduces an option to bypass AnyCast IP ranges in Geo-IP blocking. ISDB contains a list of confirmedAnyCast IP ranges that can be used for this purpose.
When source/destination is set to geoip, you can enable the geoip-anycast option. When enabled, IPs where theAnyCast option is set to 1 in geoip_db are bypassed in country matching and blocking.
You can only use CLI to configure this feature. See the following example.
To enable geoip-anycast setting in a policy:
config firewall policyedit 1
set name "policyid-1"set uuid dfcaec9c-e925-51e8-cf3e-fed9a1d42a1cset srcintf "wan2"set dstintf "wan1"set srcaddr "all"set dstaddr "test-geoip-CA_1"set action acceptset schedule "always"set service "ALL"set geoip-anycast enableset logtraffic allset nat enable
nextend
To check the geoip-anycast option for an IP address:
diag geoip ip2country 1.0.0.11.0.0.1 - Australia, is anycast ip
1.0.0.1 is the AnyCast IP.
GTP in Asymmetric Routing
FortiOS 6.2.0 improves communication for FortiGates acting as a GPRS Tunneling Protocol (GTP) firewall that isdeployed in asymmetric routing environments. Previously in asymmetric routing environments, the GTP-C reply might beprocessed before the GTP-C request was fully synchronized by FortiGate Session Life Support Protocol (FGSP), whichresulted in dropped sessions. With FortiOS 6.2.0, communication is improved by adding a new set gtp-asym-fgspcommand in system settings that allows two members in FGSP to synchronize the GTP-Cmessage.
FortiOS 6.2 New Features Guide 511Fortinet Inc.

Other
Example
FOC-A-171 and FOC-B-172 are two FGSPmembers.
SGSN Simulator (10.1.100.60) generates a GTP-C request that is passed through FGT-175 to reach FGSPmember FOC-A-171, but the response GTP-C from GGSN Simulator(172.16.200.61) is passed through FGT-176 toreach another FGSPmember FOC-B-172. Previously in this asymmetric topology, FOC can't help establish the GTPtunnel between SGSN Simulator and GGSN Simulator.
However with the set gtp-asym-fgsp command, two members in FGSP can synchronize the GTP-Cmessage. Inboth FOC-A-171 and FOC-B-172, when the set gtp-asym-fgsp command is enabled, the SGSN Simulator canobtain the correct tunnel private IP address(192.168.0.2) and establish the GTP tunnel with GGSN Simulator.
Check on the SGSN simulator:
root@mmsclient:~# sgsnemu -c /root/openggsn-0.84/examples/fgt_sgsnemu.conf &[1] 5592root@mmsclient:~# cmdline_parser_configfileremote: 172.16.200.61listen: 10.1.100.60conf: /root/openggsn-0.84/examples/fgt_sgsnemu.confdebug: 1imsi: 310150123456789qos: 0x0b921fcharging: 0x800apn: internetmsisdn: 6044301297uid: migpwd: hemmeligpidfile: ./sgsnemu.pidstatedir: ./contexts: 1timelimit: 0createif: 1ipup: /etc/sgsnemu/ip-upipdown: /etc/sgsnemu/ip-downdefaultroute: 1pingrate: 1pingsize: 56pingcount: 0pingquiet: 0Using default DNS serverLocal IP address is: 10.1.100.60 (10.1.100.60)Remote IP address is: 172.16.200.61 (172.16.200.61)IMSI is: 310150123456789 (0xf987654321051013)Using NSAPI: 0Using GTP version: 1Using APN: internetUsing selection mode: 1Using MSISDN: 6044301297Initialising GTP libraryopenggsn[5592]: GTP: gtp_newgsn() started
FortiOS 6.2 New Features Guide 512Fortinet Inc.

Other
Setting up interfaceDone initialising GTP librarySending off echo requestSetting up PDP context #0Waiting for response from ggsn........idletime.tv_sec 3, idleTime.tv_usec 0Received echo responseidletime.tv_sec 3, idleTime.tv_usec 0Received create PDP context response. IP address: 192.168.0.2 <--------NOTE
Check on FOC that the GTP tunnel was established successfully:
FOC-A-171(vdom1) # dia firewall gtp tunnel listlist gtp tunnels-----------prof=gtpp ref=6 imsi=310150123456789 msisdn=6044301297 mei=unknown ms_
addr=192.168.0.2 s11_s4 0----------------------index=00000001 life=2082(sec) idle=41(sec) vd=3 ver=1-----------c_pkt=4 c_bytes=506 u_pkt=0 u_bytes=0downlink cfteid:addr=10.1.100.60 teid=0x00000001 role=control vd=3 intf_type=gn-gp sgsn gtp-cuplink cfteid:addr=172.16.200.61 teid=0x00000001 role=control vd=3 intf_type=gn-gp ggsn gtp-c1/1 bearers:id=0 linked_id=0 type=regular dead=0 apn=internet selection=ms-provided-apn user_
addr=192.168.0.2 u_pkt=0 u_bytes=02 fteids:addr=10.1.100.60 teid=0x00000001 role=data vd=3 intf_type=gn-gp sgsn gtp-uaddr=172.16.200.61 teid=0x00000001 role=data vd=3 intf_type=gn-gp ggsn gtp-u
Firewall - Allow to Customize Default Service
This feature allows the default service port range to be customized using the following CLI command:
config system globalset default-service-source-port <port range>
end
Where <port range> is the new default service port range, that can have a minimum value down to 0 and a maximumvalue up to 65535. The default value is 1-65535.
This change takes effect on the TCP/UDP protocol.
Firewall - Anti-Replay Option Per-Policy
When the global anti-replay option is disabled, the FortiGate does not check TCP flags in packets. This feature adds aper policy anti-replay option that overrides the global setting. This allows you to control whether or not TCP flags arechecked per policy.
In this example, a policy is created with the anti-replay option enabled so that TCP flags are checked:
FortiOS 6.2 New Features Guide 513Fortinet Inc.

Other
config firewall policyedit 1
set name "policyid-1"set uuid dfcaec9c-e925-51e8-cf3e-fed9a1d42a1cset srcintf "wan2"set dstintf "wan1"set srcaddr "all"set dstaddr "all"set action acceptset schedule "always"set service "ALL"set anti-replay enableset logtraffic allset nat enable
nextend
NTLM Extensions
FortiOS 6.2 extends agentless Windows NT LAN Manager (NTLM) authentication to include support for the followingitems:
l Multiple serversl Individual users
Previously only one server and only group matching were supported.
You can now use multiple domain controller servers for the agentless NTLM for load balancing and high service stability.
You can also use user-based matching in groups for Kerberos and agentless NTLM. For Kerberos and agentless NTLM,FortiOS matches the user's group information from an LDAP server.
To support multiple domain controllers for agentless NTLM:
1. Configure an LDAP server:config user ldap
edit "ldap-kerberos"set server "172.18.62.177"set cnid "cn"set dn "dc=fortinetqa,dc=local"set type regularset username "CN=root,CN=Users,DC=fortinetqa,DC=local"set password **********
nextend
2. Configure multiple Domain Controllers:config user domain-controller
edit "dc1"set ip-address 172.18.62.177config extra-server
edit 1set ip-address 172.18.62.220
nextend
FortiOS 6.2 New Features Guide 514Fortinet Inc.

Other
set ldap-server "ldap-kerberos"next
end
3. Create an authenticate scheme and rule:config authentication scheme
edit "au-ntlm"set method ntlmset domain-controller "dc1"
nextendconfig authentication rule
edit "ru-ntlm"set srcaddr "all"set ip-based disableset active-auth-method "au-ntlm"
nextend
4. In the proxy policy, append the user group for authorization:config firewall proxy-policy
edit 1set uuid 6cfe58e4-2ff1-51e9-6b4c-a7d4a8db0f30set proxy explicit-webset dstintf "port1"set srcaddr "all"set dstaddr "all"set service "web"set action acceptset schedule "always"set groups "ldap-group"set utm-status enableset av-profile "av"set ssl-ssh-profile "deep-custom"
nextend
This configuration uses a round-robin method. When the first user logs in, FortiGate sends the authenticationrequest to the first domain controller. Later when another user logs in, FortiGate sends the authentication request toanother domain controller. After the user successfully logs in, you can verify the behavior by using the following CLI: FGT_A (vdom1) # diagnose wad user listID: 1825, IP: 10.1.100.71, VDOM: vdom1
user name : test1duration : 497auth_type : Sessionauth_method : NTLMpol_id : 1 g_id : 5user_based : 0 expire : 103LAN:
bytes_in=2167 bytes_out=7657WAN:
bytes_in=3718 bytes_out=270
To support individual users for agentless NTLM:
1. Configure an LDAP server:config user ldap
FortiOS 6.2 New Features Guide 515Fortinet Inc.

Other
edit "ldap-kerberos"set server "172.18.62.177"set cnid "cn"set dn "dc=fortinetqa,dc=local"set type regularset username "CN=root,CN=Users,DC=fortinetqa,DC=local"set password **********
nextend
2. Configure user group and allow user based matching in the group:config user group
edit "ldap-group"set member "ldap" "ldap-kerberos"config match
edit 1set server-name "ldap-kerberos"set group-name "test1"
nextend
nextend
3. Create an authentication scheme and rule:config authentication scheme
edit "au-ntlm"set method ntlmset domain-controller "dc1"
nextendconfig authentication rule
edit "ru-ntlm"set srcaddr "all"set ip-based disableset active-auth-method "au-ntlm"
nextend
4. In the proxy policy, append the user group for authorization:config firewall proxy-policy
edit 1set uuid 6cfe58e4-2ff1-51e9-6b4c-a7d4a8db0f30set proxy explicit-webset dstintf "port1"set srcaddr "all"set dstaddr "all"set service "web"set action acceptset schedule "always"set groups "ldap-group"set utm-status enableset av-profile "av"set ssl-ssh-profile "deep-custom"
nextend
This implementation lets you configure a single user instead of a whole group, and FortiGate will allow user namedtest1. You can verify the configuration by using the CLI:diagnose wad user list
ID: 1827, IP: 10.1.15.25, VDOM: vdom1
FortiOS 6.2 New Features Guide 516Fortinet Inc.

Other
user name : test1duration : 161auth_type : Sessionauth_method : NTLMpol_id : 1g_id : 5user_based : 0expire : 439LAN:
bytes_in=1309 bytes_out=4410WAN:
bytes_in=2145 bytes_out=544
Option to Disable Stateful SCTP Inspection
You now have the option to disable stateful SCTP inspection. This option is useful when FortiGates are deployed in aHigh Availability (HA) cluster that uses the FortiGate Clustering Protocol (FGCP) and virtual clustering in a multihomingtopology. In this configuration, the primary Stream Control Transmission Protocol (SCTP) path traverses the primaryFortiGate node by using its active VDOM (for example, VDOM1), and the backup SCTP path traverses the other passiveFortiGate node by using its active VDOM (for example VDOM2).
When stateful SCTP inspection is enabled, SCTP heartbeat traffic will fail via the backup path because the primary pathgoes through a different platform and VDOM. Since there is no state sharing between VDOMs, the passive FortiGate isnot aware of the original SCTP session and drops the heartbeats because of no associated sessions.
You can now use the following command to disable stateful inspection of SCTP, which allows the passive node to permitthe SCTP heartbeats to pass:
config sys settingsset sctp-session-without-init enable
end
When set to enable, SCTP session creation without SCTP INIT is enabled. When set to disable, SCTP sessioncreation without SCTP INIT is disabled. The default setting is disabled.
Following is an example topology and scenario:
FortiOS 6.2 New Features Guide 517Fortinet Inc.
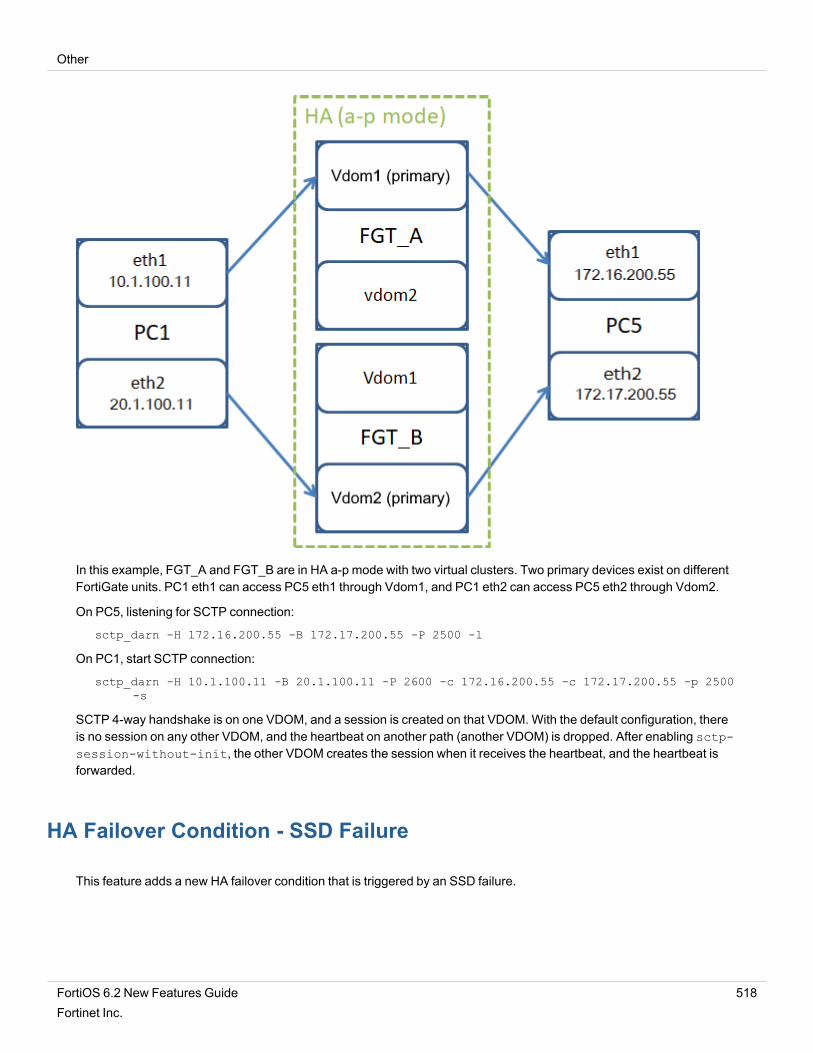
Other
In this example, FGT_A and FGT_B are in HA a-p mode with two virtual clusters. Two primary devices exist on differentFortiGate units. PC1 eth1 can access PC5 eth1 through Vdom1, and PC1 eth2 can access PC5 eth2 through Vdom2.
On PC5, listening for SCTP connection:
sctp_darn -H 172.16.200.55 -B 172.17.200.55 -P 2500 -l
On PC1, start SCTP connection:
sctp_darn -H 10.1.100.11 -B 20.1.100.11 -P 2600 -c 172.16.200.55 -c 172.17.200.55 -p 2500-s
SCTP 4-way handshake is on one VDOM, and a session is created on that VDOM. With the default configuration, thereis no session on any other VDOM, and the heartbeat on another path (another VDOM) is dropped. After enabling sctp-session-without-init, the other VDOM creates the session when it receives the heartbeat, and the heartbeat isforwarded.
HA Failover Condition - SSD Failure
This feature adds a new HA failover condition that is triggered by an SSD failure.
FortiOS 6.2 New Features Guide 518Fortinet Inc.

Other
To enable an SSD failure triggering HA failover:
config system haset ssd-failover enable
end
Option to Fragment IP Packets Before IPSec Encapsulation
A new ip-fragmentation option has been added to control fragmentation of packets before IPsec encapsulation,which can benefit packet loss in some environments.
The following options are available for the ip-fragmentation variable:
Option Description
pre-encapsulation Fragment before IPsec encapsulation.
post-encapsulation (defaultvalue)
Fragment after IPsec encapsulation (RFC compliant).
You can only control this option using the CLI:
config vpn ipsec phase1-interfaceedit "demo"
set interface "port1"set authmethod signatureset peertype anyset net-device enableset proposal aes128-sha256 aes256-sha256 aes128-sha1 aes256-sha1set ip-fragmentation pre-encapsulationset remote-gw 172.16.200.4set certificate "Fortinet_Factory"
nextend
DHCP Relay Agent Information Option
This feature adds DHCP option 82 (DHCP relay information option). It can help protect the FortiGate against attackssuch as spoofing (or forging) of IP and MAC addresses, and DHCP IP address starvation.
The following CLI variables are added to or modified in the config system dhcp server > config reserved-address command:
circuit-id-type {hex |string}
DHCP option type, hex or string (default).
circuit-id <value> Option 82 circuit ID of the client that will get the reserved IP address.Format: vlan-mod-portl vlan: VLAN ID (2 bytes)
FortiOS 6.2 New Features Guide 519Fortinet Inc.

Other
l mod: 1 = snoop, 0 = relay (1 byte)l port: port number (1 byte)
remote-id-type {hex |string}
DHCP option type, hex or string (default).
remote-id <value> Option 82 remote ID of the client that will get the reserved IP address.Format: the MAC address of the client.
type {mac | option82} The DHCP reserved-address type, either mac (default) or option82 (newlyadded).
To create an IP address assignment rule using option 82 in the GUI:
1. On the FortiGate, go to Network > Interfaces.2. Edit and existing port, or create a new one.3. Ensure that the Role is either LAN or Undefined.4. Enable DHCP Server.5. Configure address ranges and other settings as needed.
6. In the IP Address Assignment Rules table, click Create New. The Create New IP Address Assignment Rule paneopens.
FortiOS 6.2 New Features Guide 520Fortinet Inc.

Other
7. For the Type, select DHCP Relay Agent.
8. Enter the Circuit ID, Remote ID, and the IP address that will be reserved.9. ClickOK to create the rule.
To create an IP address assignment rule using option 82 with the CLI:
config system dhcp serveredit 1
set netmask 255.255.255.0set interface "port4"config ip-range
edit 1set start-ip 100.100.100.1set end-ip 100.100.100.99
nextedit 2
set start-ip 100.100.100.101set end-ip 100.100.100.254
nextendconfig reserved-address
edit 1set type option82set ip 100.100.100.12set circuit-id-type hexset circuit-id "00010102"set remote-id-type hexset remote-id "704ca5e477d6"
nextend
nextend
VLAN Inside VXLAN
In this version, VLANs can be assigned to VXLAN interfaces.
FortiOS 6.2 New Features Guide 521Fortinet Inc.

Other
In a data center network where VXLAN is used to create a L2 overlay network and for multi-tenant environment, acustomer VLAN tag needs to be kept on VXLAN tunnel. This version introduces a solution where the VLAN tag can beassigned to VXLAN interface.
You can only use CLI to configure this feature. See the following example.
To configure VLAN inside VXLAN:
1. Configure VXLAN.
config system vxlanedit vxlan1
set interface port1set vni 1000set remote-ip 172.16.200.3
nextend
2. Configure system interface.
config system interfaceedit vlan100
set vdom rootset vlanid 100set interface dmz
nextedit vxlan100
set type vlanset vlanid 100set vdom rootset interface vxlan1
nextend
3. Configure software-switch.
config system switch-interfaceedit sw1set vdom rootset member vlan100 vxlan100
nextend
FortiOS 6.2 New Features Guide 522Fortinet Inc.

Other
Controlling return path with auxiliary session
When multiple incoming or outgoing interfaces are used in SD-WAN or for load balancing, changes to routing orincoming or return traffic interfaces impacts how an existing sessions handles the traffic. In FortiOS 6.2.3 and later,auxiliary sessions can be used to handle these changes to traffic patterns.
l In FortiOS 6.0 and earlier, the auxiliary session feature is not supported.l In FortiOS 6.2.0 to 6.2.2, the auxiliary session feature is permanently enabled.l In FortiOS 6.2.3 and later, the auxiliary session feature is disabled by default, and can be enabled if required.
To enable the auxiliary session feature:
config system settingsset auxiliary-session {enable | disable*}
end
Scenarios
Incoming traffic is from the client to the server. Return traffic is from the server to the client.
Scenario 1 - Return traffic returns on the original outgoing interface
In this scenario, a session is established between port1 and port3. When the return traffic hits port3:
Auxiliary sessions disabled:
The reply to the client egresses on the original incoming interface, port1.
Auxiliary sessions enabled:
The reply to the client egresses on the best route in the routing table:
l If the best route is port1, then it will egress on port1.l If the best route is port2, then it will egress on port2.
Scenario 2 - Return traffic returns on an interfaces other than the original outgoinginterfaces
In this scenario, a session is established between port1 and port3. When the return traffic hits port4:
FortiOS 6.2 New Features Guide 523Fortinet Inc.

Other
Auxiliary sessions disabled:
l The session is dirtied and then gets refreshed, and interfaces on the session are updated.l If there is a high traffic volume or flapping between the interfaces, the CPU usage increases.
Auxiliary sessions enabled:
An auxiliary session is created for the existing session, and traffic returns to the client as normal on the auxiliary session.
Scenario 3 - Incoming traffic enters on an interfaces other than the original incominginterfaces
In this scenario, a session is established between port1 and port3. When the incoming traffic hits port2:
Auxiliary sessions disabled:
The session is dirtied and then gets refreshed, and interfaces on the session are updated.
Auxiliary sessions enabled:
An auxiliary session is created for the existing session, and traffic is forwarded to the server as normal on the auxiliarysession.
Scenario 4 - the routing table is changed
In this scenario, a session has been established between port1 and port3, when a new route on port4 is updated as theroute to the server.
Auxiliary sessions disabled:
As long as there is a route to the destination, the session will not be dirtied or refreshed. Even though there is a betterroute, traffic continues on the original path between port1 and port3.
Auxiliary sessions enabled:
The session is dirtied and then gets refreshed, and interfaces on the session are updated.
Effect on NPU offloading sessions
When the auxiliary session feature is disabled, there is always one session. If the incoming or return interface changes,the FortiGate marks the session as dirty and updates the session's interfaces. This cannot be done by the NPU, so thesession is not offloaded to the NPU, and is processed by the CPU instead. If Equal-Cost Multi-Path (ECMP) causes theinterface to keep changing, then it will use significant CPU resources.
When the auxiliary session feature is enabled and the incoming or return interface changes, it creates an auxiliarysession, and all traffic can continue to be processed by the NPU.
FortiOS 6.2 New Features Guide 524Fortinet Inc.

Other
Verification
When an auxiliary, or reflect, session is created, it will appear as a reflect session below the existing session:
# diagnose sys session listsession info: proto=17 proto_state=00 duration=111 expire=175 timeout=0 flags=00000000socktype=0 sockport=0 av_idx=0 use=4origin-shaper=reply-shaper=per_ip_shaper=class_id=0 ha_id=0 policy_dir=0 tunnel=/ vlan_cos=0/255state=may_dirty npustatistic(bytes/packets/allow_err): org=131/4/1 reply=0/0/0 tuples=2tx speed(Bps/kbps): 0/0 rx speed(Bps/kbps): 0/0orgin->sink: org pre->post, reply pre->post dev=36->38/38->36 gwy=10.1.2.3/0.0.0.0hook=pre dir=org act=noop 10.1.100.22:51926->172.16.204.44:5001(0.0.0.0:0)hook=post dir=reply act=noop 172.16.204.44:5001->10.1.100.22:51926(0.0.0.0:0)src_mac=90:6c:ac:19:19:58misc=0 policy_id=1 auth_info=0 chk_client_info=0 vd=2serial=00002b11 tos=ff/ff app_list=0 app=0 url_cat=0sdwan_mbr_seq=0 sdwan_service_id=0rpdb_link_id=00000000 rpdb_svc_id=0 ngfwid=n/anpu_state=0x000400npu info: flag=0x91/0x00, offload=8/0, ips_offload=0/0, epid=129/0, ipid=142/0,vlan=0x0016/0x0000vlifid=142/0, vtag_in=0x0016/0x0000 in_npu=1/0, out_npu=1/0, fwd_en=0/0, qid=4/0no_ofld_reason:reflect info 0:dev=37->38/38->37npu_state=0x000400npu info: flag=0x91/0x00, offload=8/0, ips_offload=0/0, epid=129/0, ipid=142/0,vlan=0x0017/0x0000vlifid=142/0, vtag_in=0x0017/0x0000 in_npu=1/0, out_npu=1/0, fwd_en=0/0, qid=4/0total reflect session num: 1total session 1
When a session is dirtied, a dirty flag is added to it:
# diagnose sys session listsession info: proto=17 proto_state=00 duration=28 expire=152 timeout=0 flags=00000000socktype=0 sockport=0 av_idx=0 use=3origin-shaper=reply-shaper=per_ip_shaper=class_id=0 ha_id=0 policy_dir=0 tunnel=/ vlan_cos=0/255state=dirty may_dirty npustatistic(bytes/packets/allow_err): org=68/2/1 reply=0/0/0 tuples=2tx speed(Bps/kbps): 2/0 rx speed(Bps/kbps): 0/0orgin->sink: org pre->post, reply pre->post dev=0->0/0->0 gwy=0.0.0.0/0.0.0.0hook=pre dir=org act=noop 10.1.100.22:51926->172.16.204.44:5001(0.0.0.0:0)hook=post dir=reply act=noop 172.16.204.44:5001->10.1.100.22:51926(0.0.0.0:0)src_mac=90:6c:ac:19:19:58 dst_mac=02:6c:ac:5c:c6:f9misc=0 policy_id=1 auth_info=0 chk_client_info=0 vd=2serial=00002b2c tos=ff/ff app_list=0 app=0 url_cat=0sdwan_mbr_seq=0 sdwan_service_id=0rpdb_link_id=00000000 rpdb_svc_id=0 ngfwid=n/anpu_state=0x000400
FortiOS 6.2 New Features Guide 525Fortinet Inc.
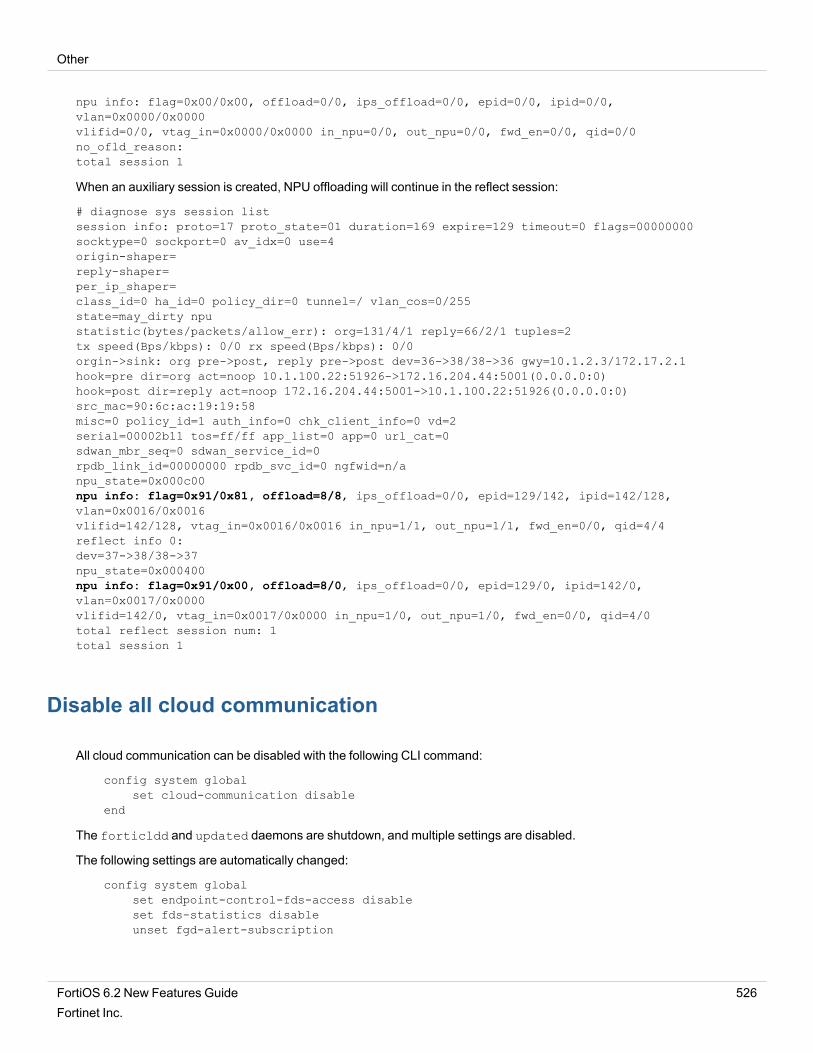
Other
npu info: flag=0x00/0x00, offload=0/0, ips_offload=0/0, epid=0/0, ipid=0/0,vlan=0x0000/0x0000vlifid=0/0, vtag_in=0x0000/0x0000 in_npu=0/0, out_npu=0/0, fwd_en=0/0, qid=0/0no_ofld_reason:total session 1
When an auxiliary session is created, NPU offloading will continue in the reflect session:
# diagnose sys session listsession info: proto=17 proto_state=01 duration=169 expire=129 timeout=0 flags=00000000socktype=0 sockport=0 av_idx=0 use=4origin-shaper=reply-shaper=per_ip_shaper=class_id=0 ha_id=0 policy_dir=0 tunnel=/ vlan_cos=0/255state=may_dirty npustatistic(bytes/packets/allow_err): org=131/4/1 reply=66/2/1 tuples=2tx speed(Bps/kbps): 0/0 rx speed(Bps/kbps): 0/0orgin->sink: org pre->post, reply pre->post dev=36->38/38->36 gwy=10.1.2.3/172.17.2.1hook=pre dir=org act=noop 10.1.100.22:51926->172.16.204.44:5001(0.0.0.0:0)hook=post dir=reply act=noop 172.16.204.44:5001->10.1.100.22:51926(0.0.0.0:0)src_mac=90:6c:ac:19:19:58misc=0 policy_id=1 auth_info=0 chk_client_info=0 vd=2serial=00002b11 tos=ff/ff app_list=0 app=0 url_cat=0sdwan_mbr_seq=0 sdwan_service_id=0rpdb_link_id=00000000 rpdb_svc_id=0 ngfwid=n/anpu_state=0x000c00npu info: flag=0x91/0x81, offload=8/8, ips_offload=0/0, epid=129/142, ipid=142/128,vlan=0x0016/0x0016vlifid=142/128, vtag_in=0x0016/0x0016 in_npu=1/1, out_npu=1/1, fwd_en=0/0, qid=4/4reflect info 0:dev=37->38/38->37npu_state=0x000400npu info: flag=0x91/0x00, offload=8/0, ips_offload=0/0, epid=129/0, ipid=142/0,vlan=0x0017/0x0000vlifid=142/0, vtag_in=0x0017/0x0000 in_npu=1/0, out_npu=1/0, fwd_en=0/0, qid=4/0total reflect session num: 1total session 1
Disable all cloud communication
All cloud communication can be disabled with the following CLI command:
config system globalset cloud-communication disable
end
The forticldd and updated daemons are shutdown, and multiple settings are disabled.
The following settings are automatically changed:
config system globalset endpoint-control-fds-access disableset fds-statistics disableunset fgd-alert-subscription
FortiOS 6.2 New Features Guide 526Fortinet Inc.

Other
set security-rating-result-submission disableendconfig system central-management
set type noneset include-default-servers disable
endconfig system fortiguard
set service-account-id ''set auto-join-forticloud disableset sandbox-region ''set antispam-force-off enableset outbreak-prevention-force-off enableset webfilter-force-off enable
endconfig system email-server
set server ''endconfig system ntp
set ntpsync disableendconfig system autoupdate push-update
set status disableendconfig system autoupdate schedule
set status disableendconfig system autoupdate tunneling
set status disableendconfig log fortiguard setting
set status disableendconfig vpn ocvpn
set status disableendconfig log fortiguard override-setting
set override disableend
To reenable cloud communications, each individual setting must be changed after running the following CLI command:
config system globalset cloud-communication enable
end
For example, to reenable automatically connecting and logging in to FortiCloud:
config system globalset cloud-communication enable
endconfig system fortiguard
set auto-join-forticloud enableend
FortiOS 6.2 New Features Guide 527Fortinet Inc.

Other
Custom SIP RTP Port Range Support
A new nat-port-range attribute can be used to specify a port range in the Voice Over Internet Protocol (VoIP) profileto restrict the Network Address Translation (NAT) port range for Real-Time Transport Protocol/Real-Time TransportControl Protocol (RTP/RTCP) packets in a Session Initiation Protocol (SIP) call session that is handled by the SIP ALG(Application Layer Gateway) in a FortiGate device.
When NAT is enabled or VIP is used in a firewall policy for SIP ALG to handle a SIP call session established through aFortiGate device, the SIP ALG can perform NAT to translate the ports used for the RTP/RTCP packets when they areflowing through the device between the external and internal networks.
Previously, you could not configure the translated port range, and the fixed port range was [5117-65533]. Now you cancontrol the translated port range for RTP/RTCP packets by using the CLI:
config voip profileedit <profile-name>
config sipset nat-port-range <start_port_number>-<end_port_number>
endnext
endFGT(sip) # set nat-port-range ?<start>-<end> NAT port range (default 5117-65533)A valid port range must be configured within [5117-65533]. For example: set nat-port-range
30000-30099 .
Example
This section provides an example for NAT where Phone1 is in subnet_1, and the SIP server and phone are in subnet_2.All SIP signaling messages and RTP/RTCP packets will go through the SIP Server. In this example, the RTP/RTCPports on Phone1 are configured as 17078/17079.
The FortiGate administrator wants to use NAT for the port 17078/17079 to 30000/30001. As a result, all RTP/RTCPpackets going out of port2 have source ports of 30000/30001, and all RTP/RTCP packets going into port2 havedestination ports of 30000/30001 too, which can be specified in the nat-port-range.
The topology is shown as follows:
FortiOS 6.2 New Features Guide 528Fortinet Inc.

Other
The configuration is as follows:
config voip profileedit "natPortRange"
config sipset nat-port-range 30000-30001 <--------------------------------
endnext
endconfigure firewall policy
edit 1set srcintf port1set dstintf port2set srcaddr allset dstaddr allset service SIPset action acceptset schedule alwaysset voip-profile natPortRange <---------------------set nat enable <---------------------
end
Now if phone1 and phone2 are registered to the SIP server, and they establish a call session between them through theFortiGate and the SIP server, then the RTP/RTCP ports 17078/17079 of phone1 will be NATed to 30000/30001 at theFortiGate unit based on the setting of nat-port-range. That is, the RTP/RTCP packets egressing port2 of the Fortigate willhave the source port as 30000/30001, and the RTP/RTCP packets ingressing port2 will have the destination port as30000/30001.
Custom Service Max Value Increase
In FortiOS 6.2.0, the number of custom services is increased on all FortiGate 100-series platforms and above. Thefollowing table identifies that maximum number of custom services supported for the different types of FortiGate modelseries:
FortiGate Model Maximum Number of Custom Services
FortiGate 100 series and lower 1024 (no change)
FortiGate 100 to 400 series 2048
FortiGate 500 - 1200 series 4096
Two rack units 10240
Three rack units and chassis 16348
FortiCarrier License Activation
In FortiOS 6.0.x, when applying the FortiCarrier license, the FortiCarrier configuration is reset to the factory defaultsettings. With FortiOS 6.2.0 and later, the basic system, interface, and routing settings are retained to avoid a full factory
FortiOS 6.2 New Features Guide 529Fortinet Inc.
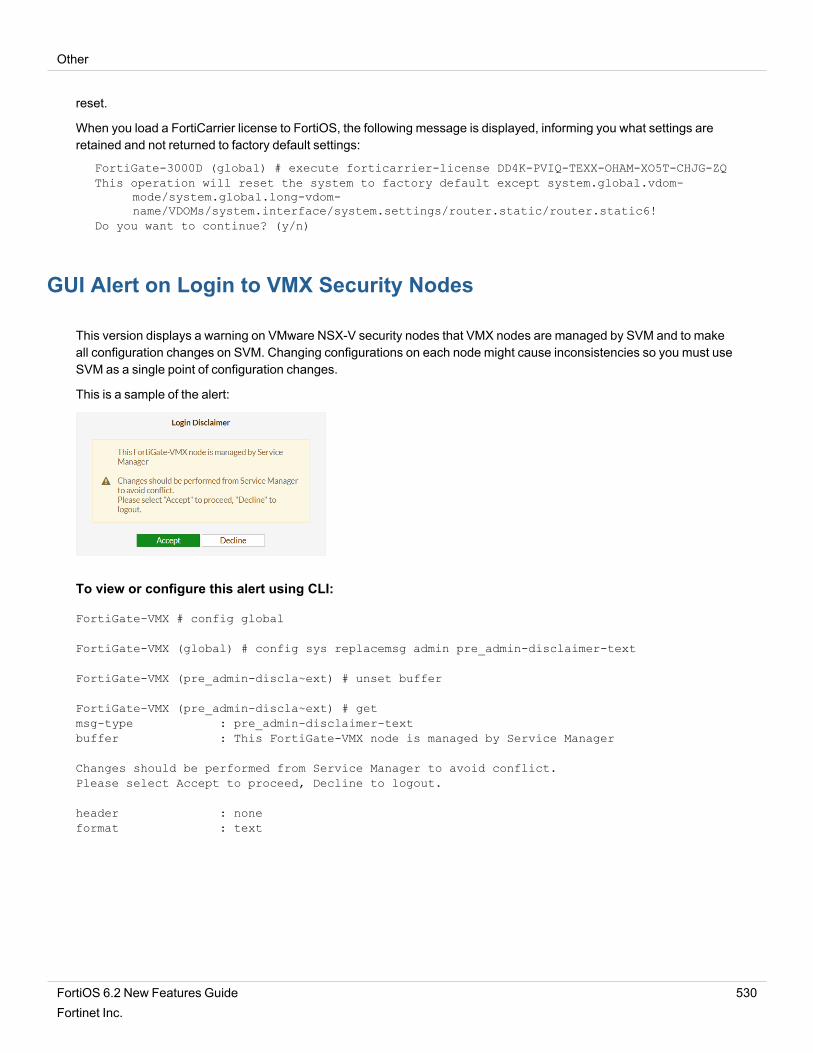
Other
reset.
When you load a FortiCarrier license to FortiOS, the following message is displayed, informing you what settings areretained and not returned to factory default settings:
FortiGate-3000D (global) # execute forticarrier-license DD4K-PVIQ-TEXX-OHAM-XO5T-CHJG-ZQThis operation will reset the system to factory default except system.global.vdom-
mode/system.global.long-vdom-name/VDOMs/system.interface/system.settings/router.static/router.static6!
Do you want to continue? (y/n)
GUI Alert on Login to VMX Security Nodes
This version displays a warning on VMware NSX-V security nodes that VMX nodes are managed by SVM and to makeall configuration changes on SVM. Changing configurations on each node might cause inconsistencies so you must useSVM as a single point of configuration changes.
This is a sample of the alert:
To view or configure this alert using CLI:
FortiGate-VMX # config global
FortiGate-VMX (global) # config sys replacemsg admin pre_admin-disclaimer-text
FortiGate-VMX (pre_admin-discla~ext) # unset buffer
FortiGate-VMX (pre_admin-discla~ext) # getmsg-type : pre_admin-disclaimer-textbuffer : This FortiGate-VMX node is managed by Service Manager
Changes should be performed from Service Manager to avoid conflict.Please select Accept to proceed, Decline to logout.
header : noneformat : text
FortiOS 6.2 New Features Guide 530Fortinet Inc.

Other
Event Log Subtype for FortiExtender
This version enhances FortiExtender logging and moves the FortiExtender logs from the subtype Event Log > SystemEvents to Event Log > FortiExtender Events.
In the CLI, logs have the following format:
logid="0111046409" type="event" subtype="fortiextender"
Each FortiExtender logging activity has a corresponding action description.
Logs can be written to a local device or FortiAnalyzer.
This is an example of a FortiExtender log:
** FortiExtender Authorizedaction: fex_authmeta data: SN
Event log: date=2019-02-20 time=09:57:22 logid="0111046400" type="event"subtype="fortiextender" level="notice" vd="root" eventtime=1550685442 logdesc="FortiExtendersystem activity" action="FortiExtender Authorized" msg="ext SN:FX04DN4N16002352authorized"
** FortiExtender DeAuthorizedaction: fex_deauthmeta data: SN
Event log: date=2019-02-20 time=09:51:42 logid="0111046401" type="event"subtype="fortiextender" level="notice" vd="root" eventtime=1550685102 logdesc="FortiExtendercontroller activity" sn="FX04DN4N16002352" ip=11.11.11.2 action="ext session-deauthed"msg="ext SN:FX04DN4N16002352 deauthorized"
** Cellular connectedaction: cellular_connectedmeta data: SN, IMEI, ICCID, IMSI, PhoneNumber, Carrier, plan,service
Event log: date=2019-02-20 time=10:02:26 logid="0111046409" type="event"subtype="fortiextender" level="information" vd="root" eventtime=1550685746 logdesc="RemoteFortiExtender info activity" sn="FX04DN4N16002352" ip=11.11.11.2 action="Cellular Connected"imei="359376060442770" imsi="302720502331361" iccid="89302720403038146410"
FortiOS 6.2 New Features Guide 531Fortinet Inc.

Other
phonenumber="+16045067526" carrier="Rogers" plan="Rogers-plan" apn="N/A" service="LTE"msg="FX04DN4N16002352 STATE: sim with imsi:302720502331361 in slot:2 on carrier:Rogersconnected"
** Cellular disconnectedaction: cellular_disconnectedmeta data: SN, IMEI, ICCID, IMSI, PhoneNumber, Carrier, plan,service
Event log: date=2019-02-20 time=10:33:57 logid="0111046407" type="event"subtype="fortiextender" level="warning" vd="root" eventtime=1550687636 logdesc="RemoteFortiExtender warning activity" sn="FX04DN4N16002352" ip=11.11.11.2 action="CellularDisconnected" imei="359376060442770" imsi="N/A" iccid="N/A" phonenumber="N/A" carrier="N/A"plan="N/A" apn="N/A" service="LTE" msg="FX04DN4N16002352 STATE: sim with imsi: in slot:2 oncarrier:N/A disconnected"
** Cellular connectingaction: cellular_connectingmeta data: SN, IMEI, ICCID, IMSI, PhoneNumber, Carrier, plan,service
Event log: date=2019-02-20 time=10:02:24 logid="0111046409" type="event"subtype="fortiextender" level="information" vd="root" eventtime=1550685744 logdesc="RemoteFortiExtender info activity" sn="FX04DN4N16002352" ip=11.11.11.2 action="CellularConnecting" imei="359376060442770" imsi="302720502331361" iccid="89302720403038146410"phonenumber="+16045067526" carrier="Rogers" plan="Rogers-plan" apn="N/A" service="N/A"msg="FX04DN4N16002352 STATE: sim with imsi:302720502331361 in slot:2 on carrier:Rogersconnecting
** SIM Insertaction: sim_insertmeta data: SN, IMEI, SIM_slot
Event log: date=2019-02-20 time=10:47:19 logid="0111046407" type="event"subtype="fortiextender" level="warning" vd="root" eventtime=1550688438 logdesc="RemoteFortiExtender warning activity" sn="FX04DN4N16002352" ip=11.11.11.2 action="SIM Change"imei="N/A" slot=2 msg="FX04DN4N16002352 SIM: SIM2 is inserted"
** SIM Plugoutaction: sim_plugoutmeta data: SN, IMEI, SIM_slot
Event log: date=2019-02-20 time=10:57:50 logid="0111046407" type="event"subtype="fortiextender" level="warning" vd="root" eventtime=1550689069 logdesc="RemoteFortiExtender warning activity" sn="FX04DN4N16002352" ip=11.11.11.2 action="SIM Change"imei="359376060442770" slot=1 msg="FX04DN4N16002352 SIM: SIM2 is plucked out"
** SIM Switchaction: sim_switchmeta data: SN, IMEI, ICCID, IMSI, PhoneNumber, Carrier,reason
Event log: date=2019-02-20 time=12:02:24 logid="0111046407" type="event"subtype="fortiextender" level="warning" vd="root" eventtime=1550692942 logdesc="RemoteFortiExtender warning activity" sn="FX04DN4N16002352" ip=11.11.11.2 action="SIM Switch"imei="359376060442770" reason="sim-switch can't take effect due to unavailability of 2 simcards" msg="FX04DN4N16002352 SIM: sim-switch can't take effect due to unavailability of 2sim cards"
** cellular signal stattisticsaction: cellualr_signal_statsmeta data: SN, IMEI, ICCID, IMSI, PhoneNumber, Carrier,plan,service,
RSSI, SINR, RSRP,RSRQ, signalstrengthEvent log: date=2019-02-19 time=18:08:46 logid="0111046409" type="event"
FortiOS 6.2 New Features Guide 532Fortinet Inc.
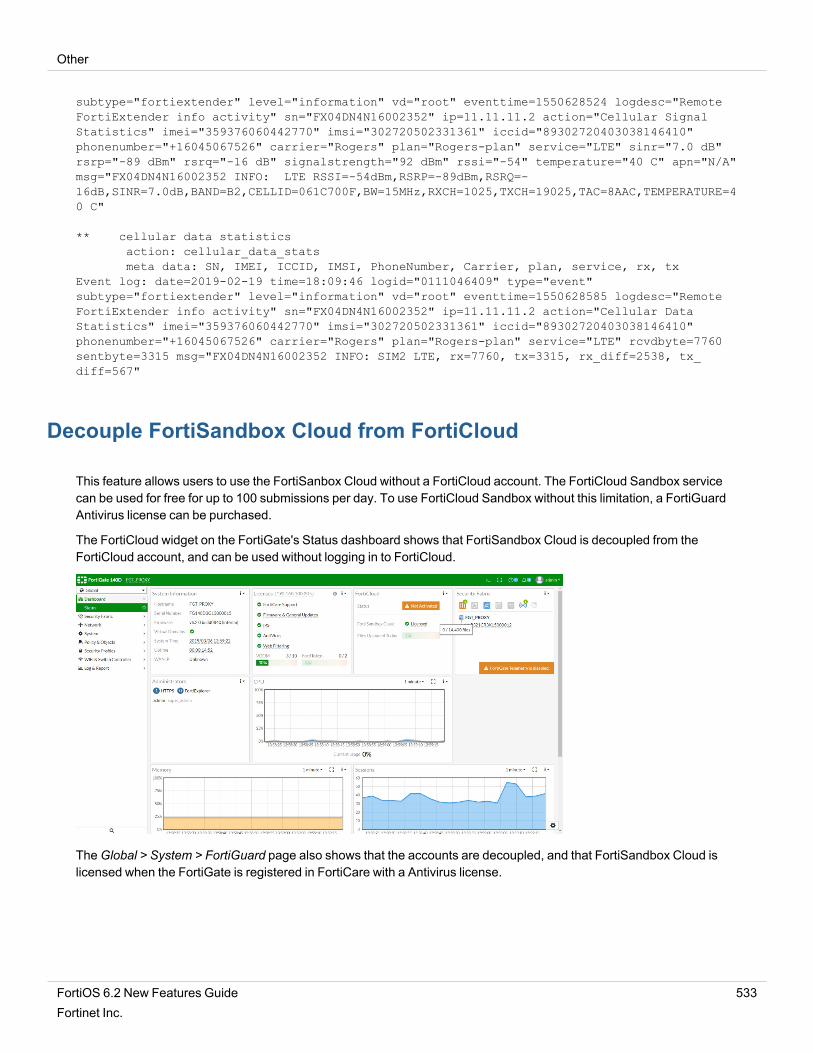
Other
subtype="fortiextender" level="information" vd="root" eventtime=1550628524 logdesc="RemoteFortiExtender info activity" sn="FX04DN4N16002352" ip=11.11.11.2 action="Cellular SignalStatistics" imei="359376060442770" imsi="302720502331361" iccid="89302720403038146410"phonenumber="+16045067526" carrier="Rogers" plan="Rogers-plan" service="LTE" sinr="7.0 dB"rsrp="-89 dBm" rsrq="-16 dB" signalstrength="92 dBm" rssi="-54" temperature="40 C" apn="N/A"msg="FX04DN4N16002352 INFO: LTE RSSI=-54dBm,RSRP=-89dBm,RSRQ=-16dB,SINR=7.0dB,BAND=B2,CELLID=061C700F,BW=15MHz,RXCH=1025,TXCH=19025,TAC=8AAC,TEMPERATURE=40 C"
** cellular data statisticsaction: cellular_data_statsmeta data: SN, IMEI, ICCID, IMSI, PhoneNumber, Carrier, plan, service, rx, tx
Event log: date=2019-02-19 time=18:09:46 logid="0111046409" type="event"subtype="fortiextender" level="information" vd="root" eventtime=1550628585 logdesc="RemoteFortiExtender info activity" sn="FX04DN4N16002352" ip=11.11.11.2 action="Cellular DataStatistics" imei="359376060442770" imsi="302720502331361" iccid="89302720403038146410"phonenumber="+16045067526" carrier="Rogers" plan="Rogers-plan" service="LTE" rcvdbyte=7760sentbyte=3315 msg="FX04DN4N16002352 INFO: SIM2 LTE, rx=7760, tx=3315, rx_diff=2538, tx_diff=567"
Decouple FortiSandbox Cloud from FortiCloud
This feature allows users to use the FortiSanbox Cloud without a FortiCloud account. The FortiCloud Sandbox servicecan be used for free for up to 100 submissions per day. To use FortiCloud Sandbox without this limitation, a FortiGuardAntivirus license can be purchased.
The FortiCloud widget on the FortiGate's Status dashboard shows that FortiSandbox Cloud is decoupled from theFortiCloud account, and can be used without logging in to FortiCloud.
TheGlobal > System > FortiGuard page also shows that the accounts are decoupled, and that FortiSandbox Cloud islicensed when the FortiGate is registered in FortiCare with a Antivirus license.
FortiOS 6.2 New Features Guide 533Fortinet Inc.

Other
If the FortiGate does not have an Antivirus license, it will be restricted to 100 sandbox submissions per day.
To configure FortiSandbox Cloud inspection in the GUI:
1. Go toGlobal > Security Fabric > Settings.2. Enable Sandbox Inspection.3. For the Sandbox type, select FortiSandbox Cloud.4. A FortiCloud account does not need to be logged in to. Instead, select the FortiSandbox cloud region from the drop-
down list.
FortiOS 6.2 New Features Guide 534Fortinet Inc.

Other
5. Click Apply.
To configure sandbox inspection with the CLI:
config globalexecute forticloud-sandbox region
0 Europe1 Global2 Japan3 USPlease select cloud sandbox region[0-3]:Cloud sandbox region is selected: ...
end
FortiGate Cloud
Starting in the second quarter of 2019, FortiCloud is renamed to FortiGate Cloud.
Because FortiCloud was renamed to FortiGate Cloud, the following items changed from FortiCloud to FortiGate Cloud inthe FortiOS GUI:
l Dashboard widgetl Security Fabric Settingsl System > Advanced > Run Scriptl Log & Report > Log Settingsl Log & Report > FortiCloud reports
Following is an example of FortiGate Cloud in the FortiOS 6.2 GUI:
FortiOS 6.2 New Features Guide 535Fortinet Inc.

Other
Following is an example of the old FortiCloud terminology in the FortiOS GUI prior to the 6.2.0 release:
SNMP OID for Log Failed to Send
A new SNMP counter is added for logs that fail to send out.
This feature is implemented only for SNMP query and not for SNMP trap.
When a syslog server encounters low-performance conditions and slows down to respond, the buffered syslog messagein kernel might overflow after a certain number of retransmissions, and then the overflowed message is lost. This featureintroduces new Object Identifiers (OIDs) to track the lost messages or failed logs.
New SNMPOIDs now include log statistics for global log devices.
l FORTINET-FORTIGATE-MIB:fortinet.fnFortiGateMib.fgLog.fgLogDeviceNumber 1.3.6.1.4.1.12356.101.21.1.1l FORTINET-FORTIGATE-MIB:fortinet.fnFortiGateMib.fgLog.fgLogDevices.fgLogDeviceTable.fgLogDeviceEntry.fgLogDeviceEntryIndex1.3.6.1.4.1.12356.101.21.2.1.1.1
l FORTINET-FORTIGATE-MIB:fortinet.fnFortiGateMib.fgLog.fgLogDevices.fgLogDeviceTable.fgLogDeviceEntry.fgLogDeviceEnabled1.3.6.1.4.1.12356.101.21.2.1.1.2
l FORTINET-FORTIGATE-MIB:fortinet.fnFortiGateMib.fgLog.fgLogDevices.fgLogDeviceTable.fgLogDeviceEntry.fgLogDeviceName1.3.6.1.4.1.12356.101.21.2.1.1.3
l FORTINET-FORTIGATE-MIB:fortinet.fnFortiGateMib.fgLog.fgLogDevices.fgLogDeviceTable.fgLogDeviceEntry.fgLogDeviceSentCount1.3.6.1.4.1.12356.101.21.2.1.1.4
FortiOS 6.2 New Features Guide 536Fortinet Inc.

Other
l FORTINET-FORTIGATE-MIB:fortinet.fnFortiGateMib.fgLog.fgLogDevices.fgLogDeviceTable.fgLogDeviceEntry.fgLogDeviceRelayedCount1.3.6.1.4.1.12356.101.21.2.1.1.5
l FORTINET-FORTIGATE-MIB:fortinet.fnFortiGateMib.fgLog.fgLogDevices.fgLogDeviceTable.fgLogDeviceEntry.fgLogDeviceCachedCount1.3.6.1.4.1.12356.101.21.2.1.1.6
l FORTINET-FORTIGATE-MIB:fortinet.fnFortiGateMib.fgLog.fgLogDevices.fgLogDeviceTable.fgLogDeviceEntry.fgLogDeviceFailedCount1.3.6.1.4.1.12356.101.21.2.1.1.7
l FORTINET-FORTIGATE-MIB:fortinet.fnFortiGateMib.fgLog.fgLogDevices.fgLogDeviceTable.fgLogDeviceEntry.fgLogDeviceDroppedCount1.3.6.1.4.1.12356.101.21.2.1.1.8
Where:
l fgLogDeviceNumber is the number of devices in the table.l fgLogDeviceEnabled is either 1 or 0, indicating whether the device is enabled.l fgLogDeviceName is the name of the device.
A FortiGate unit connected to a syslog server or a FortiAnalyzer unit would generate statistics that can be seen by thediagnostic test application named miglogd. Following are some examples.
You can also view the same statistics in snmpwalk/snmpget on theOID 1.3.6.1.4.1.12356.101.21.
FGT_A (global) # diagnose test application miglogd 6mem=404, disk=657, alert=0, alarm=0, sys=920, faz=555, webt=0, fds=0interface-missed=460Queues in all miglogds: cur:0 total-so-far:526global log dev statistics:syslog 0: sent=254, failed=139, relayed=0syslog 1: sent=220, failed=139, relayed=0syslog 2: sent=95, failed=73, relayed=0faz 0: sent=282, failed=0, cached=0, dropped=0 , relayed=0Num of REST URLs: 3/api/v2/monitor/system/csf/ : 0 : 300/api/v2/cmdb/system/interface/ : 394.0.673.15877729363538323653.1547149763 : 1200/api/v2/monitor/system/ha-checksums/ : 0 : 1200faz 1: sent=272, failed=0, cached=0, dropped=0 , relayed=0Num of REST URLs: 2/api/v2/monitor/system/csf/ : 0 : 300/api/v2/cmdb/system/interface/ : 394.0.673.15877729363538323653.1547149763 : 1200FGT_A (global) # snmpwalk -v2c -c REGR-SYS 172.16.200.1 1.3.6.1.4.1.12356.101.21FORTINET-FORTIGATE-MIB::fnFortiGateMib.21.1.1.0 = INTEGER: 9FORTINET-FORTIGATE-MIB::fnFortiGateMib.21.2.1.1.1.0 = INTEGER: 0FORTINET-FORTIGATE-MIB::fnFortiGateMib.21.2.1.1.1.1 = INTEGER: 1FORTINET-FORTIGATE-MIB::fnFortiGateMib.21.2.1.1.1.2 = INTEGER: 2FORTINET-FORTIGATE-MIB::fnFortiGateMib.21.2.1.1.1.3 = INTEGER: 3FORTINET-FORTIGATE-MIB::fnFortiGateMib.21.2.1.1.1.4 = INTEGER: 4FORTINET-FORTIGATE-MIB::fnFortiGateMib.21.2.1.1.1.5 = INTEGER: 5FORTINET-FORTIGATE-MIB::fnFortiGateMib.21.2.1.1.1.6 = INTEGER: 6FORTINET-FORTIGATE-MIB::fnFortiGateMib.21.2.1.1.1.7 = INTEGER: 7FORTINET-FORTIGATE-MIB::fnFortiGateMib.21.2.1.1.1.8 = INTEGER: 8
FortiOS 6.2 New Features Guide 537Fortinet Inc.

Other
FORTINET-FORTIGATE-MIB::fnFortiGateMib.21.2.1.1.2.0 = INTEGER: 1FORTINET-FORTIGATE-MIB::fnFortiGateMib.21.2.1.1.2.1 = INTEGER: 1FORTINET-FORTIGATE-MIB::fnFortiGateMib.21.2.1.1.2.2 = INTEGER: 1FORTINET-FORTIGATE-MIB::fnFortiGateMib.21.2.1.1.2.3 = INTEGER: 0FORTINET-FORTIGATE-MIB::fnFortiGateMib.21.2.1.1.2.4 = INTEGER: 1FORTINET-FORTIGATE-MIB::fnFortiGateMib.21.2.1.1.2.5 = INTEGER: 1FORTINET-FORTIGATE-MIB::fnFortiGateMib.21.2.1.1.2.6 = INTEGER: 0FORTINET-FORTIGATE-MIB::fnFortiGateMib.21.2.1.1.2.7 = INTEGER: 0FORTINET-FORTIGATE-MIB::fnFortiGateMib.21.2.1.1.2.8 = INTEGER: 0FORTINET-FORTIGATE-MIB::fnFortiGateMib.21.2.1.1.3.0 = STRING: "syslog"FORTINET-FORTIGATE-MIB::fnFortiGateMib.21.2.1.1.3.1 = STRING: "syslog2"FORTINET-FORTIGATE-MIB::fnFortiGateMib.21.2.1.1.3.2 = STRING: "syslog3"FORTINET-FORTIGATE-MIB::fnFortiGateMib.21.2.1.1.3.3 = STRING: "syslog4"FORTINET-FORTIGATE-MIB::fnFortiGateMib.21.2.1.1.3.4 = STRING: "faz"FORTINET-FORTIGATE-MIB::fnFortiGateMib.21.2.1.1.3.5 = STRING: "faz2"FORTINET-FORTIGATE-MIB::fnFortiGateMib.21.2.1.1.3.6 = STRING: "faz3"FORTINET-FORTIGATE-MIB::fnFortiGateMib.21.2.1.1.3.7 = STRING: "webtrends"FORTINET-FORTIGATE-MIB::fnFortiGateMib.21.2.1.1.3.8 = STRING: "fds"FORTINET-FORTIGATE-MIB::fnFortiGateMib.21.2.1.1.4.0 = Counter32: 254FORTINET-FORTIGATE-MIB::fnFortiGateMib.21.2.1.1.4.1 = Counter32: 220FORTINET-FORTIGATE-MIB::fnFortiGateMib.21.2.1.1.4.2 = Counter32: 95FORTINET-FORTIGATE-MIB::fnFortiGateMib.21.2.1.1.4.3 = Counter32: 0FORTINET-FORTIGATE-MIB::fnFortiGateMib.21.2.1.1.4.4 = Counter32: 282FORTINET-FORTIGATE-MIB::fnFortiGateMib.21.2.1.1.4.5 = Counter32: 272FORTINET-FORTIGATE-MIB::fnFortiGateMib.21.2.1.1.4.6 = Counter32: 0FORTINET-FORTIGATE-MIB::fnFortiGateMib.21.2.1.1.4.7 = Counter32: 0FORTINET-FORTIGATE-MIB::fnFortiGateMib.21.2.1.1.4.8 = Counter32: 0FORTINET-FORTIGATE-MIB::fnFortiGateMib.21.2.1.1.5.0 = Counter32: 0FORTINET-FORTIGATE-MIB::fnFortiGateMib.21.2.1.1.5.1 = Counter32: 0FORTINET-FORTIGATE-MIB::fnFortiGateMib.21.2.1.1.5.2 = Counter32: 0FORTINET-FORTIGATE-MIB::fnFortiGateMib.21.2.1.1.5.3 = Counter32: 0FORTINET-FORTIGATE-MIB::fnFortiGateMib.21.2.1.1.5.4 = Counter32: 0FORTINET-FORTIGATE-MIB::fnFortiGateMib.21.2.1.1.5.5 = Counter32: 0FORTINET-FORTIGATE-MIB::fnFortiGateMib.21.2.1.1.5.6 = Counter32: 0FORTINET-FORTIGATE-MIB::fnFortiGateMib.21.2.1.1.5.7 = Counter32: 0FORTINET-FORTIGATE-MIB::fnFortiGateMib.21.2.1.1.5.8 = Counter32: 0FORTINET-FORTIGATE-MIB::fnFortiGateMib.21.2.1.1.6.0 = Gauge32: 0FORTINET-FORTIGATE-MIB::fnFortiGateMib.21.2.1.1.6.1 = Gauge32: 0FORTINET-FORTIGATE-MIB::fnFortiGateMib.21.2.1.1.6.2 = Gauge32: 0FORTINET-FORTIGATE-MIB::fnFortiGateMib.21.2.1.1.6.3 = Gauge32: 0FORTINET-FORTIGATE-MIB::fnFortiGateMib.21.2.1.1.6.4 = Gauge32: 0FORTINET-FORTIGATE-MIB::fnFortiGateMib.21.2.1.1.6.5 = Gauge32: 0FORTINET-FORTIGATE-MIB::fnFortiGateMib.21.2.1.1.6.6 = Gauge32: 0FORTINET-FORTIGATE-MIB::fnFortiGateMib.21.2.1.1.6.7 = Gauge32: 0FORTINET-FORTIGATE-MIB::fnFortiGateMib.21.2.1.1.6.8 = Gauge32: 0FORTINET-FORTIGATE-MIB::fnFortiGateMib.21.2.1.1.7.0 = Counter32: 139FORTINET-FORTIGATE-MIB::fnFortiGateMib.21.2.1.1.7.1 = Counter32: 139FORTINET-FORTIGATE-MIB::fnFortiGateMib.21.2.1.1.7.2 = Counter32: 73FORTINET-FORTIGATE-MIB::fnFortiGateMib.21.2.1.1.7.3 = Counter32: 0FORTINET-FORTIGATE-MIB::fnFortiGateMib.21.2.1.1.7.4 = Counter32: 0FORTINET-FORTIGATE-MIB::fnFortiGateMib.21.2.1.1.7.5 = Counter32: 0FORTINET-FORTIGATE-MIB::fnFortiGateMib.21.2.1.1.7.6 = Counter32: 0FORTINET-FORTIGATE-MIB::fnFortiGateMib.21.2.1.1.7.7 = Counter32: 0FORTINET-FORTIGATE-MIB::fnFortiGateMib.21.2.1.1.7.8 = Counter32: 0FORTINET-FORTIGATE-MIB::fnFortiGateMib.21.2.1.1.8.0 = Counter32: 0FORTINET-FORTIGATE-MIB::fnFortiGateMib.21.2.1.1.8.1 = Counter32: 0FORTINET-FORTIGATE-MIB::fnFortiGateMib.21.2.1.1.8.2 = Counter32: 0
FortiOS 6.2 New Features Guide 538Fortinet Inc.

Other
FORTINET-FORTIGATE-MIB::fnFortiGateMib.21.2.1.1.8.3 = Counter32: 0FORTINET-FORTIGATE-MIB::fnFortiGateMib.21.2.1.1.8.4 = Counter32: 0FORTINET-FORTIGATE-MIB::fnFortiGateMib.21.2.1.1.8.5 = Counter32: 0FORTINET-FORTIGATE-MIB::fnFortiGateMib.21.2.1.1.8.6 = Counter32: 0FORTINET-FORTIGATE-MIB::fnFortiGateMib.21.2.1.1.8.7 = Counter32: 0FORTINET-FORTIGATE-MIB::fnFortiGateMib.21.2.1.1.8.8 = Counter32: 0
FortiGuard Distribution of Updated Apple Certificates (for tokenpush notifications)
Push notifications for iPhone (for the purpose of two-factor authentication) require a TLS server certificate toauthenticate to Apple. Since this certificate is only valid for one year, a new service extension allows FortiGuard todistribute updated TLS server certificates to FortiGate when needed.
FortiGuard update service will update local Apple push notification TLS server certificates when the local certificate isexpired. FortiGuard update service will also reinstall certificates when the certificates are lost.
You can verify that the feature works on the FortiGate by using the CLI shell.
To verify certificate updates:
1. Using FortiOS CLI shell, verify that all certificates are installed:/data/etc/apns # ls -aldrwxr-xr-x 2 0 0 Tue Jan 15 08:42:39 2019 1024 .drwxr-xr-x 12 0 0 Tue Jan 15 08:45:00 2019 2048 ..-rw-r--r-- 1 0 0 Sat Jan 12 00:06:30 2019 2377 apn-dev-
cert.pem-rw-r--r-- 1 0 0 Sat Jan 12 00:06:30 2019 1859 apn-dev-
key.pem-rw-r--r-- 1 0 0 Sat Jan 12 00:06:30 2019 8964 apn-dis-
cert.pem-rw-r--r-- 1 0 0 Sat Jan 12 00:06:30 2019 4482 apn-dis-
key.pem
2. Rename all current Apple certificates.Apple push notification no longer works after you rename the certificates./data/etc/apns # mv apn-dis-cert.pem apn-dis-cert.pem.save/data/etc/apns # mv apn-dev-key.pem apn-dev-key.pem.save/data/etc/apns # mv apn-dev-cert.pem apn-dev-cert.pem.save/data/etc/apns # mv apn-dis-key.pem apn-dis-key.pem.save/data/etc/apns # ls -aldrwxr-xr-x 2 0 0 Tue Jan 15 08:51:15 2019 1024 .drwxr-xr-x 12 0 0 Tue Jan 15 08:45:00 2019 2048 ..-rw-r--r-- 1 0 0 Sat Jan 12 00:06:30 2019 2377 apn-dev-
cert.pem.save-rw-r--r-- 1 0 0 Sat Jan 12 00:06:30 2019 1859 apn-dev-
key.pem.save-rw-r--r-- 1 0 0 Sat Jan 12 00:06:30 2019 8964 apn-dis-
cert.pem.save-rw-r--r-- 1 0 0 Sat Jan 12 00:06:30 2019 4482 apn-dis-
key.pem.save
FortiOS 6.2 New Features Guide 539Fortinet Inc.

Other
3. Run a FortiGuard update, and verify that all certificates are installed again:/data/etc/apns # ls -al drwxr-xr-x 2 0 0 Tue Jan 15 08:56:20 2019
1024 .drwxr-xr-x 12 0 0 Tue Jan 15 08:56:15 2019 2048 ..-rw-r--r-- 1 0 0 Sat Jan 12 00:06:30 2019 2377 apn-dev-
cert.pem.save-rw-r--r-- 1 0 0 Sat Jan 12 00:06:30 2019 1859 apn-dev-
key.pem.save-rw-r--r-- 1 0 0 Tue Jan 15 08:56:20 2019 2167 apn-dis-
cert.pem <--- downloaded from FortiGuard-rw-r--r-- 1 0 0 Sat Jan 12 00:06:30 2019 8964 apn-dis-
cert.pem.save-rw-r--r-- 1 0 0 Tue Jan 15 08:56:20 2019 1704 apn-dis-
key.pem <--- downloaded from FortiGuard-rw-r--r-- 1 0 0 Sat Jan 12 00:06:30 2019 4482 apn-dis-
key.pem.save-rw-r--r-- 1 0 0 Tue Jan 15 08:56:20 2019 41 apn-
version.dat <--- downloaded from FortiGuard/data/etc/apns #
Active Directory Recursive Search Option
This feature changes the default search behavior for user group memberships onWindows Active Directory (AD) LDAPservers. By default, nested groups (groups that are members or other groups) are not searched, as this can slow downthe group membership search. A new option is added to enable searching nested groups for user group membershipson AD LDAP servers. This option is not available for other LDAP servers, such as OpenLDAP based LDAP servers.
The default behavior does not include nested groups:
config user ldapedit "ldap-ad"
set server "10.1.100.131"set cnid "cn"set dn "dc=fortinet-fsso,dc=com"set type regularset username "cn=Administrator,cn=users,dc=fortinet-fsso,dc=com"set password XXXXXXXXXXXXXXXXXXXXXXXX
nextend
The default search results show only groups that have the user as member, and no groups that have groups asmembers:
diagnose test authserver ldap ldap-ad nuser nuserauthenticate 'nuser' against 'ldap-ad' succeeded!Group membership(s) - CN=nested3,OU=Testing,DC=Fortinet-FSSO,DC=COM
CN=Domain Users,CN=Users,DC=Fortinet-FSSO,DC=COM
Enable recursive search to include nested groups in the results:
config user ldapedit "ldap-ad"
set server "10.1.100.131"
FortiOS 6.2 New Features Guide 540Fortinet Inc.

Other
set cnid "cn"set dn "dc=fortinet-fsso,dc=com"set type regularset username "cn=Administrator,cn=users,dc=fortinet-fsso,dc=com"set password XXXXXXXXXXXXXXXXXXXXXXXXset search-type recursive
nextend
The search results include groups that have other groups as members:
diagnose test authserver ldap ldap-ad nuser nuserauthenticate 'nuser' against 'ldap-ad' succeeded!Group membership(s) - CN=nested3,OU=Testing,DC=Fortinet-FSSO,DC=COM
CN=Domain Users,CN=Users,DC=Fortinet-FSSO,DC=COMCN=nested2,OU=Testing,DC=Fortinet-FSSO,DC=COMCN=nested1,OU=Testing,DC=Fortinet-FSSO,DC=COM
The group nested3 is a member of the group nested2, which is itself a member of the group nested1.
Web proxy global settings
The config web-proxy global CLI command has settings that affect which certificate is used to sign block page inexplicit proxy.
config web-proxy globalset ssl-cert {string}set ssl-ca-cert {string}
Parameter Name Description Type Size
ssl-cert SSL certificate for SSL interception. string Maximum length: 35
ssl-ca-cert SSL CA certificate for SSL interception. string Maximum length: 35
Device detection label changes - 6.2.1
In FortiOS 6.2.1, the device detection-related labels have been modified. This affects control parts, such as device-based firewall policies, captive portals, and access lists. The device discovery system uses new tagging and types.
GUI changes
l When you create a firewall policy, the Device option is no longer available in the Source and Destination entry lists.The available options are: Address, User, and Internet Service.
FortiOS 6.2 New Features Guide 541Fortinet Inc.

Other
l In the User & Devicemenu, the Custom Devices & Groups option is no longer available.
Custom devices and device groups can now be configured as MAC addresses.
To configure a device or device group using the GUI:
1. Go to Policy & Objects > Addresses.2. Click Create New.3. Select Address or Address Group.
FortiOS 6.2 New Features Guide 542Fortinet Inc.

Other
4. For Type, select Device (MAC Address).
5. Configure the other fields as needed.6. ClickOK.
CLI changes
The following CLI commands have been removed:
config user device
config user device-access-list
config user device-category
config user device-group
config firewall policyedit 1
set devicesnext
end
config firewall policy6edit 1
set devicesnext
end
Device tagging and type
The device discovery system now uses the following tags and types:
l Hardware vendorl Hardware versionl Software OSl Software versionl Type
As a result, the user device list diagnostic command output has changed:
(root) # diag user device listhostsvd root/0 00:08:e3:ed:35:16 gen 12 req OUS/16created 2178s gen 11 seen 17s port1 gen 6
FortiOS 6.2 New Features Guide 543Fortinet Inc.

Other
ip 172.16.200.253 src cdphardware vendor 'Cisco' src cdp id 60type 'Networking' src cdp id 60family 'Catalyst' src cdp id 60os 'IOS' src cdp id 60hardware version 'C2950' src cdp id 60software version '12.1(12c)EA1' src cdp id 60host 'SW8' src cdp
Upgrading from FortiOS 6.0 to 6.2
All custom devices and device groups not being used in a firewall policy prior to upgrading willnot be retained after upgrading.
In certain circumstances, custom devices and device groups can be upgraded.
To configure a device or device group after upgrading using the CLI:
config firewall policyedit 1
set name "p1"set uuid 6eaeef92-7db1-51e9-4b73-6701d7749026set srcintf "port2"set dstintf "port1"set srcaddr "_upg_devgrp_grp1"set dstaddr "all"set action acceptset schedule "always"set service "ALL"set fsso disableset nat enable
nextend
config firewall addrgrpedit "_upg_devgrp_grp1"
set uuid 97274902-8887-51e9-ca99-732d3cb9adbeset member "_upg_dev_dev1@00:08:e3:ed:35:16"set visibility disable
nextend
config firewall addressedit "_upg_dev_dev1@00:08:e3:ed:35:16"
set uuid 97274b64-8887-51e9-7a02-2efee81068cbset type macset start-mac 00:08:e3:ed:35:16set end-mac 00:08:e3:ed:35:16set visibility disable
nextend
FortiOS 6.2 New Features Guide 544Fortinet Inc.

Other
Device detection changes when upgrading to 6.2 - 6.2.1
In FortiOS 6.0.x, the device detection feature contains multiple sub-components, which are independent:
l Visibility – Detected information is available for topology visibility and logging.l FortiClient endpoint compliance – Information learned from FortiClient can be used to enforce compliance of thoseendpoints.
l MAC-address-based device policies – Detected devices can be defined as custom devices, and then used indevice-based policies.
In FortiOS 6.2, these functionalities have changed:
l Visibility – Configuration of the feature remains the same as FortiOS 6.0, including FortiClient information.l FortiClient endpoint compliance – A new fabric connector replaces this, and aligns it with all other endpointconnectors for dynamic policies. For more information, see Dynamic Policy - FortiClient EMS (Connector) in theFortiOS 6.2.0 New Features Guide.
l MAC-address-based policies – A new address type is introduced (MAC address range), which can be used inregular policies. The previous device policy feature can be achieved by manually defining MAC addresses, and thenadding them to regular policy table in 6.2. For more information, see MAC Addressed-Based Policies in the FortiOS6.2.0 New Features Guide.
If you were using device policies in 6.0.x, you will need to migrate these policies to the regular policy table manually afterupgrading to 6.2.0.
To migrate the policies to the regular policy table:
1. Create MAC-based firewall addresses for each device.2. Apply the addresses to the regular IPv4 policy table.
Flow versus proxy policy improvement - 6.2.1
In FortiOS 6.0, inspection mode is per VDOM. In FortiOS 6.2, the inspection mode is per policy. A policy's inspectionmode is independent of the UTM profiles that are assigned to it. If UTM is disabled, or profiles are removed, the policy'sinspection mode does not change.
The following table shows the post-upgrade to FortiOS 6.2 states for the given FortiOS 6.0 states:
FortiOS 6.0 After upgrade to FortiOS 6.2
VDOMInspectionMode
AV ProfileInspectionMode
AV ScanMode
Policy UTMStatus
AV ScanMode
Policy Mode Policy UTMStatus
Proxy N/A N/A Disable N/A Flow Disable
Proxy Proxy N/A Enable Full Proxy Enable
Proxy AV: FlowWF: Proxy
Full Enable Full1 Proxy Enable
FortiOS 6.2 New Features Guide 545Fortinet Inc.

Other
FortiOS 6.0 After upgrade to FortiOS 6.2
VDOMInspectionMode
AV ProfileInspectionMode
AV ScanMode
Policy UTMStatus
AV ScanMode
Policy Mode Policy UTMStatus
Proxy Flow Full Enable Full1 Flow Enable
Proxy Flow Quick Enable Quick Flow Enable
Flow N/A N/A Disable N/A Flow Disable
Flow Flow Full Enable Full Flow Enable
Flow Flow Quick Enable Quick Flow Enable
1. WAD ignores this option.
Virtual switch support for FortiGate 300E series - 6.2.2
Support has been added for virtual switches in the FortiGate 300E series. This allows switch ports to be assigned todifferent VLANs.
To create a VLAN switch in the GUI:
1. Go to Network > Interfaces and enable VLAN Switch Mode.
2. Click Create New > Interface.3. Enter an interface name and configure the following:
a. For Type, select VLAN Switch.b. (Optional) Enter a VLAN ID (range is 3900–3999).c. If applicable, select a Virtual Domain.d. Add the Interface Members.e. Configure the Address and Administrative Access settings as needed.
FortiOS 6.2 New Features Guide 546Fortinet Inc.

Other
4. ClickOK.
The new VLAN switch is visible in the interface table:
To create a VLAN switch in the CLI:
1. Enable VLAN switch mode:
config system globalset virtual-switch-vlan enable
end
2. Create the VLAN switch. Optionally, you can assign an ID to the VLAN:The default ID is 0. You can use the default ID, or you can assign an ID to the VLAN (3900–3999).
config system virtual-switchedit "VLAN switch"
set physical-switch "sw0"set vlan 3900config port
edit "port1"next
FortiOS 6.2 New Features Guide 547Fortinet Inc.

Other
edit "port3"next
endnext
end
3. Configure the VLAN switch interface:
config system interfaceedit "VLAN switch"
set vdom "vdom1"set ip 6.6.6.1 255.255.255.0set allowaccess ping https ssh snmp http fgfmset type hard-switchset snmp-index 15
nextend
4. (Optional) Create a trunk interface:
config system interfaceedit port2
set trunk enablenext
end
IPsec VPN wizard hub-and-spoke ADVPN support - 6.2.2
The IPsec Wizard can be used to create hub-and-spoke VPNs, with ADVPN enabled to establish tunnels betweenspokes.
The following example shows the steps in the wizard for configuring a hub and a spoke.
To configure the hub:
1. On the hub FortiGate, go to VPN > IPsec Wizard.
2. Enter a name, set the Template Type to Hub-and-Spoke, and set the Role to Hub.
FortiOS 6.2 New Features Guide 548Fortinet Inc.

Other
3. Click Next.
4. Select the Incoming Interface and configure the Authentication method.5. Click Next.
6. Set the IP address and Remote IP/netmask.7. Click Next.
8. Configure the Local identifier, Local interface, and Local subnets, then configure the tunnel IP addresses andidentifiers for the spokes.
FortiOS 6.2 New Features Guide 549Fortinet Inc.

Other
9. Click Create.
10. Review the summary to ensure that everything looks as expected.11. Copy the spokes' easy configuration keys to a temporary location for use when configuring the spokes.
To configure a spoke:
1. On the spoke FortiGate, go to VPN > IPsec Wizard.
2. Enter a name, set the Template Type to Hub-and-Spoke, set the Role to Spoke, and paste in the requisite Easyconfiguration key that you saved when configuring the hub.
3. Click Next.
4. Set the Remote IP address, select the Incoming Interface, and configure the Authentication method.
FortiOS 6.2 New Features Guide 550Fortinet Inc.

Other
5. Click Next.
6. Set the IP address and Remote IP/netmask.7. Click Next.
8. Configure the Local identifier, Local interface, and Local subnets, then configure the IP address and identifier of thehub FortiGate.
9. Click Create.
10. Review the summary to ensure that everything looks as expected.
FortiOS 6.2 New Features Guide 551Fortinet Inc.

Other
To check the ADVPN shortcut with the IPsec monitor:
1. On either the hub or spoke FortiGate, go toMonitor > IPsec Monitor.
FortiGuard communication over port 443 with HTTPS - 6.2.2
In FortiOS 6.2, the FortiGuard server now supports HTTPS on port 443, which allows for FortiManager support.
FortiGuard filtering now supports the following protocol and port configurations:
l HTTPS: ports 443, 53, and 8888 (default port)l UDP: ports 53 and 8888l HTTP: port 80
To configure the FortiGuard filtering protocol for HTTPS in the GUI:
1. Go to System > FortiGuard and navigate to the Filtering section.2. For FortiGuard Filtering Protocol, select HTTPS.3. For FortiGuard Filtering Port, select a port (either 443, 53, or 8888).4. Click Apply to save your changes.
FortiOS 6.2 New Features Guide 552Fortinet Inc.

Other
To configure the FortiGuard filtering protocol for HTTPS in the CLI:
config system fortiguardset protocol httpsset port {8888 | 53 | 443}...
end
IPv6 FortiGuard connections - 6.2.2
The Fortinet DNS can resolve FortiGuard related servers to both IPv4 and IPv6 addresses. FortiOS daemons (update,forticldd, url) connect using either IPv4 or IPv6 addresses. The first available connection will be used for updates or therating service.
To configure an interface and route for IPv6:
config system interfaceedit "wan1"
set vdom "root"config ipv6
set ip6-address 2000:172:16:200::1/64end
nextend
config router static6edit 1
set gateway 2000:172:16:200::254set device "wan1"
nextend
To configure push updates:
config system autoupdate push-updateset status enableset override enableset address "2620:101:9005:3860::94"
end
SSH file scan - 6.2.2
File scanning over SSH traffic (SCP and SFTP) is part of firewall profile-protocol-options, ssh-filter profile, AV profile, andDLP sensor. FortiGate devices can buffer, scan, log, or block files sent over SCP and SFTP depending on its file-size,file-type, or file-contents (such as virus or sensitive contents).
This feature includes the following SSH settings in CLI:
l SSH protocol options in firewall protocol-profile options.l SCP block/log options in ssh-filter-profile.
FortiOS 6.2 New Features Guide 553Fortinet Inc.

Other
l file-filter feature added in ssh-filter-profile.l SCP/SFTP options in DLP sensor.l SSH scan options in AV profile.l SSH AV quarantine options.l Logs for SCP and SFTP traffic.l Replacement message for SCP and SFTP traffic.
To configure SSH protocol options in firewall protocol-profile options:
config firewall profile-protocol-optionsedit "protocol" config ssh
set options [oversize | clientcomfort | servercomfort] <-- Block oversized file |prevent client/server timeout.
set comfort-interval [1 - 900] <-- Frequency in secondsthat FGT periodically sends packet to client/server to prevent timeout.
set comfort-amount [1 - 65535] <-- Number of bytes to sendin each transmission to prevent timeout.
set oversize-limit [1 - 798] <-- Maximum in-memory filesize that can be scanned (MB).
set uncompressed-oversize-limit [0 - 798] <-- Maximum in-memoryuncompressed file size that can be scanned.
set uncompressed-nest-limit [2 - 100] <-- Maximum nested levels ofcompression that can be uncompressed and scanned.
set scan-bzip2 [enable | disable] <-- Enable/disable scanningof BZip2 compressed files.
end
To configure SCP block/log options in ssh-filter-profile:
config ssh-filter profile edit "ssh-test"
set block scp <-- Block scp traffic. set log scp <-- Log scp traffic.
nextend
To configure file-filter feature added in ssh-filter-profile:
config ssh-filter profile edit "ssh-test" config file-filter
set status [enable | disable] <-- Enable/disable disable file-filter.
set log [enable | disable] <-- Enable/disable file-filter log. set scan-archive-contents [enable | disable] <-- Allow FGT to scan contents of
archive file. config entries edit "1" set comment '' set action [block | log] <-- Block/only log the file transfer. set direction [incoming | outgoing | any] <-- Allow file-filter to take effect
on incoming/outgoing/any traffic. set password-protected [yes | any] <-- If 'yes', file-filter only matches
FortiOS 6.2 New Features Guide 554Fortinet Inc.

Other
password-protected archive files (encrypted zip). set file-type "msoffice" <-- Choose file-types for file-filter
to match. next
end end
nextend
To configure SCP/SFTP options in DLP sensor:
config dlp sensor edit "test"
set full-archive-proto ssh <-- Allow dlp sensor to archive scp and sftp traffic. set summary-proto ssh <-- Allow dlp sensor to summarize archive records
information for scp and sftp traffic. config filter
edit 1 set proto ssh <-- Allow dlp sensor to check files sent over scp and
sftp. next
end nextend
To configure SSH scan options in AV profile:
config antivirus profile edit "av"
config ssh <-- Allow FGT to scan scpand sftp traffic.
set options [scan | avmonitor | quarantine] set archive-block [encrypted | corrupted | partiallycorrupted | multipart | nested |
mailbomb | fileslimit | timeout | unhandled] <-- Choose archive file types to block. set archive-log [encrypted | corrupted | partiallycorrupted | multipart | nested |
mailbomb | fileslimit | timeout | unhandled] <-- Choose archive file types to log. set emulator [enable | disable] <-- Enable/disable virus
emulator. set outbreak-prevention [disabled | files | full-archive] <-- Analyze (or not
analyze) contents of archives for outbreak prevention. end
nextend
To configure SSH AV quarantine options:
config antivirus quarantineset drop-infected ssh <-- Drop and delete infected files sent over scp and sftp.set store-infected ssh <-- Quarantine infected files sent over scp and sftp.set drop-blocked ssh <-- Drop and delete blocked files sent over scp and sftp.set store-blocked ssh <-- Quarantine blocked files sent over scp and sftp.set drop-heuristic ssh <-- Drop and delete files detected by heuristics sent over scp
and sftp.set store-heuristic ssh <-- Quarantine files detected by heuristics sent over scp and
sftp.end
FortiOS 6.2 New Features Guide 555Fortinet Inc.

Other
To configure logs for SCP and SFTP traffic:
scp traffic blocked by ssh-filter profile: 1: date=2019-07-24 time=10:34:42 logid="1601061010" type="utm" subtype="ssh"
eventtype="ssh-channel" level="warning" vd="vdom1" eventtime=1563989682560488314 tz="-0700"policyid=1 sessionid=2693 profile="ssh-test" srcip=10.1.100.11 srcport=33044dstip=172.16.200.44 dstport=22 srcintf="port1" srcintfrole="undefined" dstintf="port3"dstintfrole="undefined" proto=6 action="blocked" direction="outgoing" login="root"channeltype="scp"
scp traffic blocked by file-filter: 1: date=2019-07-24 time=10:36:44 logid="1900064000" type="utm" subtype="file-filter"
eventtype="file-filter" level="warning" vd="vdom1" eventtime=1563989804387444023 tz="-0700"policyid=1 sessionid=2732 srcip=10.1.100.11 srcport=33048 srcintf="port1"srcintfrole="undefined" dstip=172.16.200.44 dstport=22 dstintf="port3"dstintfrole="undefined" proto=6 service="SSH" subservice="SCP" profile="ssh-test"direction="incoming" action="blocked" filtername="1" filename="test.xls" filesize=13824filetype="msoffice" msg="File was blocked by file filter."
sftp traffic blocked by file-filter: 1: date=2019-07-24 time=10:43:58 logid="1900064000" type="utm" subtype="file-filter"
eventtype="file-filter" level="warning" vd="vdom1" eventtime=1563990238339440605 tz="-0700"policyid=1 sessionid=2849 srcip=10.1.100.11 srcport=33056 srcintf="port1"srcintfrole="undefined" dstip=172.16.200.44 dstport=22 dstintf="port3"dstintfrole="undefined" proto=6 service="SSH" subservice="SFTP" profile="ssh-test"direction="incoming" action="blocked" filtername="1" filename="test.xls" filesize=13824filetype="msoffice" msg="File was blocked by file filter."
scp traffic blocked by dlp sensor: 1: date=2019-07-24 time=10:41:23 logid="0954024576" type="utm" subtype="dlp"
eventtype="dlp" level="warning" vd="vdom1" eventtime=1563990083875731367 tz="-0700"filteridx=1 filtername="test" dlpextra="builtin-patterns" filtertype="file-type"filtercat="file" severity="medium" policyid=1 sessionid=2809 epoch=1425775842 eventid=0srcip=10.1.100.11 srcport=33052 srcintf="port1" srcintfrole="undefined" dstip=172.16.200.44dstport=22 dstintf="port3" dstintfrole="undefined" proto=6 service="SSH" subservice="SCP"filetype="msoffice" direction="incoming" action="block" filename="test.xls" filesize=13824profile="test"
sftp traffic blocked by dlp sensor: 1: date=2019-07-24 time=10:42:42 logid="0954024576" type="utm" subtype="dlp"
eventtype="dlp" level="warning" vd="vdom1" eventtime=1563990162266253784 tz="-0700"filteridx=1 filtername="test" dlpextra="builtin-patterns" filtertype="file-type"filtercat="file" severity="medium" policyid=1 sessionid=2838 epoch=1425775843 eventid=0srcip=10.1.100.11 srcport=33054 srcintf="port1" srcintfrole="undefined" dstip=172.16.200.44dstport=22 dstintf="port3" dstintfrole="undefined" proto=6 service="SSH" subservice="SFTP"filetype="msoffice" direction="incoming" action="block" filename="test.xls" filesize=13824profile="test"
scp traffic blocked by av profile: 1: date=2019-07-24 time=10:45:57 logid="0211008192" type="utm" subtype="virus"
eventtype="infected" level="warning" vd="vdom1" eventtime=1563990357330463670 tz="-0700"msg="File is infected." action="blocked" service="SSH" subservice="SCP" sessionid=2875srcip=10.1.100.11 dstip=172.16.200.44 srcport=33064 dstport=22 srcintf="port1"srcintfrole="undefined" dstintf="port3" dstintfrole="undefined" policyid=1 proto=6direction="incoming" filename="eicar.exe" checksum="53badd68" quarskip="No-skip"virus="EICAR_TEST_FILE" dtype="Virus" ref="http://www.fortinet.com/ve?vn=EICAR_TEST_FILE"
FortiOS 6.2 New Features Guide 556Fortinet Inc.

Other
virusid=2172 profile="av"analyticscksum="7fc2dfc5a2247d743556ef59abe3e03569a6241e2b1e44b9614fc764847fb637"analyticssubmit="false" crscore=50 craction=2 crlevel="critical"
sftp traffic blocked by av profile: 2: date=2019-07-24 time=10:45:46 logid="0211008192" type="utm" subtype="virus"
eventtype="infected" level="warning" vd="vdom1" eventtime=1563990346334781409 tz="-0700"msg="File is infected." action="blocked" service="SSH" subservice="SFTP" sessionid=2874srcip=10.1.100.11 dstip=172.16.200.44 srcport=33062 dstport=22 srcintf="port1"srcintfrole="undefined" dstintf="port3" dstintfrole="undefined" policyid=1 proto=6direction="incoming" filename="eicar.exe" checksum="53badd68" quarskip="No-skip"virus="EICAR_TEST_FILE" dtype="Virus" ref="http://www.fortinet.com/ve?vn=EICAR_TEST_FILE"virusid=2172 profile="av"analyticscksum="7fc2dfc5a2247d743556ef59abe3e03569a6241e2b1e44b9614fc764847fb637"analyticssubmit="false" crscore=50 craction=2 crlevel="critical"
antivirus quarantine list that triggered by infected file sent over scp/sftp: CHECKSUM SIZE FIRST-TIMESTAMP LAST-TIMESTAMP SERVICE STATUS DC TTL FILENAME DESCRIPTION53badd68 12939 2019-07-24 10:45 2019-07-24 10:45 SSH Infected
1 FOREVER 'eicar.exe' 'EICAR_TEST_FILE'
Replacement messages for SCP and SFTP traffic
SFTP download/upload does not display replacement message due to client behavior.SCP download does not currently display replacement message.
Replacement message for scp upload blocked by av:
The file "eicar.exe" has been blocked because it contains the virus "EICAR_TEST_FILE".
Replacement message for scp upload blocked by file-filter:
The file "test.xls" has been blocked due to its file type or properties.
Replacement message for scp upload blocked by dlp:
The file "eicar.exe" has been blocked due to a detected data leak.
FortiGuard third Party SSL validation and Anycast support - 6.2.2
You can enable Anycast to optimize the routing performance to FortiGuard servers. Relying on Fortinet DNS servers, theFortiGate will get a single IP address for the domain name of each FortiGuard service. BGP routing optimization istransparent to the FortiGate. The domain name of each FortiGuard service is the common name in that service'scertificate. The certificate is signed by a third party intermediate CA. The FortiGuard server uses the Online CertificateStatus Protocol (OCSP) stapling technique, so that the FortiGate can always validate the FortiGuard server certificateefficiently.
FortiOS 6.2 New Features Guide 557Fortinet Inc.

Other
To enable Anycast in the FortiGuard settings:
config system fortiguardset protocol httpsset port 443set fortiguard-anycast enableset fortiguard-anycast-source fortinet
end
After Anycast is enabled, the FortiGuard settings will enforce a connection using HTTPS and port 443.
HTTPS/443 is only supported on Anycast servers. When fortiguard-anycast is disabled,use HTTPS/8888 or HTTPS/53.
Connection to FortiGuard
The FortiGate will only complete the TLS handshake with a FortiGuard that provides a goodOCSP status for itscertificate. Any other status will result in a failed SSL connection. OCSP stapling is reflected on the signature interval(currently, 24 hours) so that goodmeans that the certificate is not revoked at that timestamp. The FortiGuard serversquery the CA's OCSP responder every four hours and update its OCSP status. If the FortiGuard is unable to reach theOCSP responder, it will keep the last known OCSP status for seven days. This cached OCSP status will be sent outimmediately when a client connection request is made, thus optimizing the response time.
The following steps are taken to connect to FortiGuard:
1. The FortiGate embeds the CA_bundle certificate, that includes the root CA with CRL list and third party intermediateCA, in the root CA level.
2. The FortiGate finds the FortiGuard IP address from its domain name from DNS:
fds=qaupdate.fortinet.net-192.168.100.242
3. The FortiGate starts a TLS handshake with the FortiGuard IP address. The client Hello includes an extension of thestatus request.
4. The FortiGuard servers provide a certificate with its OCSP status: good, revoked, or unknown.5. The FortiGate verifies the CA chain against the root CA in CA_bundle.6. The FortiGate verifies the intermediate CA's revoke status against the root CA's CRL.7. The FortiGate verifies the FortiGuard certificate's OCSP status:
OCSP Response Data:OCSP Response Status: successful (0x0)Response Type: Basic OCSP ResponseVersion: 1 (0x0)Responder Id: 3DD350A5D6A0ADEEF34A600A65D321D4F8F8D60FProduced At: Aug 20 07:50:58 2019 GMTResponses:Certificate ID:
Hash Algorithm: sha1Issuer Name Hash: 49F4BD8A18BF760698C5DE402D683B716AE4E686Issuer Key Hash: 3DD350A5D6A0ADEEF34A600A65D321D4F8F8D60FSerial Number: 02555C9F3901B799DF1873402FA9392D
Cert Status: good
FortiOS 6.2 New Features Guide 558Fortinet Inc.

Other
This Update: Aug 20 07:50:58 2019 GMTNext Update: Aug 27 07:05:58 2019 GMT
Override FortiGuard servers
FortiManager can provide a local FortiGuard server with port 443 access.
Anycast FortiGuard settings force the rating process to use port 443, even with an override server. Using a uniqueaddress in the same subnet as the FortiManager access IP address, the FortiManager can provide local FortiGuardupdates and rating access with a dedicated IP address and port 443.
To use a FortiManager as a local FortiGuard server:
config system central-managementset type fortimanagerset fmg "172.18.37.148"config server-list
edit 1set server-type updateset server-address 172.18.37.150
nextedit 2
set server-type ratingset server-address 172.18.37.149
nextendset fmg-update-port 443set include-default-servers enable
end
When fmg-update-port is set to 443, the update process will use port 443 to connect to the override update server,which is the local FortiGuard server in the FortiManager. If this is not set, the update process will use port 8890, and theserver address setting has to be the FortiManager access IP address. Override FortiGuard services come from theserver list that is the local FortiGuard server in the FortiManager, and use the traditional, non-OCSP TLS handshake. Ifoverride servers in the FortiManager are not available, the default FortiGuard servers are connected, and the AnycastOCSP TLS handshake is used.
FortiClient EMS Cloud support - 6.2.2
Both cloud-based and on-premise EMS servers are supported.
To enable cloud-based EMS services, FortiGate must be registered to FortinetOne with an appropriate user account.Only one FortiClient EMS Cloud server can be configured.
To enable authentication of FortiClient EMS Cloud through a FortinetOne account:
config endpoint-control fctemsedit <name>
set fortinetone-cloud-authentication enablenext
end
FortiOS 6.2 New Features Guide 559Fortinet Inc.

Other
To configure a FortiClient EMS Cloud server connection:
config user fssoedit "cloud_ems_fsso_connector"
set type fortiems-cloudset password ******set source-ip <class_ip>
nextend
Remove FortiGate Cloud standalone reference - 6.2.3
If a FortiGate is registered in FortiCare using a FortiCloud account, then only that FortiCloud account can be used toactivate FortiGate Cloud. If a different FortiCloud account was already used to activate FortiGate Cloud, then anotification asking you to migrate to FortiCloud is shown in the GUI after upgrading FortiOS.
If the FortiGate is not registered, activating FortiGate Cloud will force you to register with FortiCare.
The CLI can be used to activate FortiGate Cloud without registration, or with a different FortiCloud account.
To activate FortiGate Cloud on an already registered FortiGate:
1. Go to Dashboard > Status.2. In the FortiGate Cloud widget, click Not Activated > Activate.
3. Enter the password for the account that was used to register the FortiGate.
4. ClickOK.The FortiGate Cloud widget now shows the FortiCloud account.
FortiOS 6.2 New Features Guide 560Fortinet Inc.

Other
To migrate from the activated FortiGate Cloud account to the registered FortiCloud account:
1. Go to Dashboard > Status.
2. In the FortiGate Cloud widget, clickMigrate to FortiCloud.
3. Enter the password for the account that was used to register the FortiGate, then clickOK.The FortiGate Cloud widget now shows the FortiCloud account.
FortiOS 6.2 New Features Guide 561Fortinet Inc.

Other
To activate FortiGate Cloud and register with FortiCare at the same time:
1. Go to Dashboard > Status.2. In the FortiGate Cloud widget, click Not Activated > Activate.
You must register with FortiCare before activating FortiGate Cloud.
3. Enter your FortiCare Email address and Password.4. Select your Country/Region and Reseller.5. Enable Sign in to FortiGate Cloud using the same account.6. ClickOK.
To activate FortiGate Cloud using an account that is not used for registration:
1. In the CLI, enter the following command:
execute fortiguard-log login <account_id> <password>
Where the <account_id> and <password> are the credentials for the account that you are using to activateFortiGate Cloud.
2. Check the account type with following command:
# diagnose fdsm contract-controller-updateProtocol=2.0|Response=202|Firmware=FAZ-4K-FW-2.50-100|SerialNumber=FAMS000000000000|Persistent=false|ResponseItem=HomeServer:172.16.95.151:443*AlterServer:172.16.95.151:443*Contract:20200408*NextRequest:86400*UploadConfig:False*ManagementMode:Local*ManagementID:737941253*AccountType:multitenancy
Result=Success
A FortiCloud account that is not used for the support portal account cannot be used to registerFortiGate. Attempting to activate FortiGate Cloud with this type of account will fail.
Dynamic address support for SSL VPN policies - 6.2.3
Dynamic SSO user groups can be used in place of address objects when configuring SSL VPN policies. This allowsdynamic IP addresses to be used in SSL VPN policies. A remote user group can be used for authentication while an
FortiOS 6.2 New Features Guide 562Fortinet Inc.

Other
FSSO group is separately used for authorization. Using a dummy policy for remote user authentication and a policy forFSSO group authorization, FSSO can be used with SSL VPN tunnels
This image shows the authentication and authorization flow:
In this example, FortiAuthenticator is used as a RADIUS server. It uses a remote AD/LDAP server for authentication,then returns the authentication results to the FortiGate. This allows the client to have a dynamic IP address aftersuccessful authentication.
FortiOS 6.2 New Features Guide 563Fortinet Inc.

Other
First, on the LDAP server, create two users each in their own group, user142 in group pc_group1, and user143 in grouppc_group2.
Configure the FortiAuthenticator
To add a remote LDAP server and users on the FortiAuthenticator:
1. Go to Authentication > Remote Auth. Servers > LDAP.2. Click Create New.3. Set the following:
l Name: ad_ldap_60l Primary server name/IP: 172.16.200.60l Base distinguished name: dc=fsso-qa,dc=coml Bind type: Regularl Username: cn=administrator,cn=Userl Password: <enter a password>
4. ClickOK.5. Edit the new LDAP server.6. Import the remote LDAP users.7. Edit each user to confirm that they have the RADIUS attribute Acct-Interim-Interval. This attribute is used by
FortiOS 6.2 New Features Guide 564Fortinet Inc.

Other
FortiGate to send interim update account messages to the RADIUS server.
To create a RADIUS client for FortiGate as a remote authentication server:
1. Go to Authentication > RADIUS Service > Clients.2. Click Create New.3. Set the following:
l Name: fsso_ldapl Client address: Range 172.16.200.1~172.16.200.10l Secret: <enter a password>
4. In the Realms table, set the realm to the LDAP server that was just added: ad_ldap_60.5. ClickOK.
FortiAuthenticator can now be used as a RADIUS server, and the authentication credentials all come from theDC/LDAP server.
Fortinet Single Sign-On Collector Agent
To configure the Fortinet Single Sign-On Collector Agent:
1. Select Require authenticated connection from FortiGate and enter a Password.2. Click Advanced Settings.3. Select the RADIUS Accounting tab.
FortiOS 6.2 New Features Guide 565Fortinet Inc.

Other
4. Select Enable RADIUS accounting server and set the Shared secret.
5. ClickOK, then click Save&close.The collector agent can now accept accounting requests from FortiGate, and retrieve the IP addresses andusernames of SSL VPN client from the FortiGate with accounting request messages.
Configure the FortiGate
To configure the FortiGate in the CLI:
1. Create a Fortinet Single Sign-On Agent fabric connector:
config user fssoedit "AD_CollectAgent"
set server "172.16.200.60"set password 123456
nextend
2. Add the RADIUS server:
config user radiusedit "rad150"
set server "172.16.200.150"set secret 123456set acct-interim-interval 600config accounting-server
edit 1set status enableset server "172.16.200.60"set secret 123456
nextend
nextend
3. Create a user group for the RADIUS server:
config user groupedit "rad_group"
set member "rad150"
FortiOS 6.2 New Features Guide 566Fortinet Inc.

Other
nextend
4. Create user groups for each of the FSSO groups:
config user groupedit "fsso_group1"
set group-type fsso-serviceset member "CN=PC_GROUP1,OU=TESTING,DC=FSSO-QA,DC=COM"
nextedit "fsso_group2"
set group-type fsso-serviceset member "CN=PC_GROUP2,OU=TESTING,DC=FSSO-QA,DC=COM"
nextend
5. Create an SSL VPN portal and assign the RADIUS user group to it:
config vpn ssl web portaledit "testportal"
set tunnel-mode enableset ipv6-tunnel-mode enableset web-mode enable...
nextendconfig vpn ssl settings
...set default-portal "full-access"config authentication-rule
edit 1set groups "rad_group"set portal "testportal"
nextend
end
6. Create firewall addresses:
config firewall addressedit "none"
set subnet 0.0.0.0 255.255.255.255nextedit "pc4"
set subnet 172.16.200.44 255.255.255.255nextedit "pc5"
set subnet 172.16.200.55 255.255.255.255next
end
7. Create one dummy policy for authentication only, and two normal policies for authorization:
config firewall policyedit 1
set name "sslvpn_authentication"set srcintf "ssl.vdom1"set dstintf "port1"set srcaddr "all"
FortiOS 6.2 New Features Guide 567Fortinet Inc.

Other
set dstaddr "none"set action acceptset schedule "always"set service "ALL"set logtraffic allset groups "rad_group"set nat enable
nextedit 3
set name "sslvpn_authorization1"set srcintf "ssl.vdom1"set dstintf "port1"set srcaddr "all"set dstaddr "pc4"set action acceptset schedule "always"set service "ALL"set logtraffic allset groups "fsso_group1"set nat enable
nextedit 4
set name "sslvpn_authorization2"set srcintf "ssl.vdom1"set dstintf "port1"set srcaddr "all"set dstaddr "pc5"set action acceptset schedule "always"set service "ALL"set logtraffic allset groups "fsso_group2"set nat enable
nextend
To create an FSSO agent fabric connector in the GUI:
1. Go to Security Fabric > Fabric Connectors.2. Click Create New.3. Click Fortinet Single Sign-On Agent.
FortiOS 6.2 New Features Guide 568Fortinet Inc.

Other
4. Enter the name and Primary FSSO agent information.
5. Click Apply & Refresh.The FSSO groups are retrieved from the collector agent.
To add the RADIUS server in the GUI:
1. Go to User & Device > RADIUS Servers.2. Click Create New.3. Enter a name for the server.4. Enter the IP/Name and Secret for the primary server.5. Click Test Connectivity to ensure that there is a successful connection.
6. ClickOK.7. Configure an accounting server with the following CLI command:
config user radiusedit rad150
set acct-interim-interval 600config accounting-server
edit 1set status enableset server 172.16.200.60
FortiOS 6.2 New Features Guide 569Fortinet Inc.
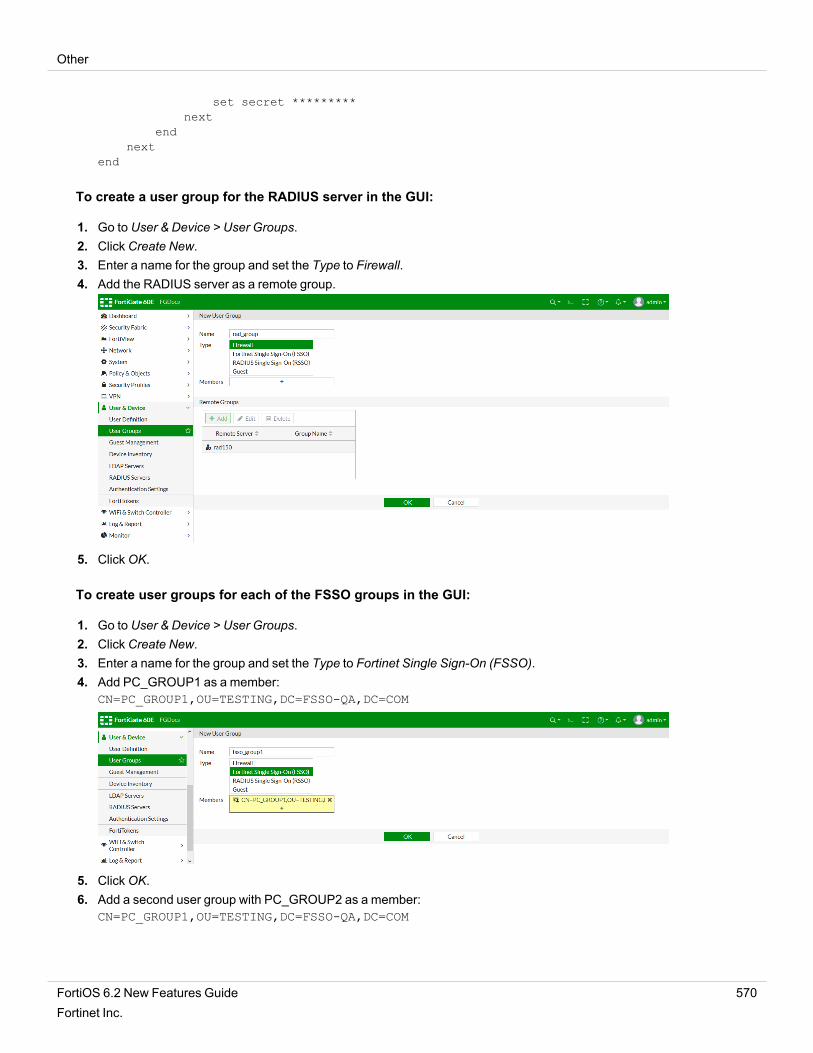
Other
set secret *********next
endnext
end
To create a user group for the RADIUS server in the GUI:
1. Go to User & Device > User Groups.2. Click Create New.3. Enter a name for the group and set the Type to Firewall.4. Add the RADIUS server as a remote group.
5. ClickOK.
To create user groups for each of the FSSO groups in the GUI:
1. Go to User & Device > User Groups.2. Click Create New.3. Enter a name for the group and set the Type to Fortinet Single Sign-On (FSSO).4. Add PC_GROUP1 as a member:
CN=PC_GROUP1,OU=TESTING,DC=FSSO-QA,DC=COM
5. ClickOK.6. Add a second user group with PC_GROUP2 as a member:
CN=PC_GROUP1,OU=TESTING,DC=FSSO-QA,DC=COM
FortiOS 6.2 New Features Guide 570Fortinet Inc.

Other
7. ClickOK.
To create an SSL VPN portal and assign the RADIUS user group to it in the GUI:
1. Go to VPN > SSL VPN Portals.2. Click Create New.3. Configure the portal, then clickOK.4. Go to VPN > SSL VPN Settings.5. Configure the required settings.6. Create an Authentication/Portal Mapping table entry:
a. Click Create New.b. Set User/Groups to rad_group.c. Set Portal to testportal.d. ClickOK.
7. ClickOK.
To create policies for authentication and authorization in the GUI:
1. Go to Policy & Object > IPv4 Policy.2. Configure a dummy policy for authentication. Set the destination to none so that traffic is not allowed through the
FortiGate, and add rad_group as a source.3. Configure two authorization policies, with the FSSO groups as sources.
Confirmation
On Client 1, log in to FortiClient using user142. Traffic can go to pc4 (172.16.200.44), but cannot go to pc5(172.16.200.55).
FortiOS 6.2 New Features Guide 571Fortinet Inc.

Other
On Client 2, log in to FortiClient using user143. Traffic can go to pc5 (172.16.200.55), but cannot go to pc4(172.16.200.44).
On the FortiGate, check the authenticated users list and the SSL VPN status:
# diagnose firewall auth list
10.212.134.200, USER142type: fsso, id: 0, duration: 173, idled: 173server: AD_CollectAgentpackets: in 0 out 0, bytes: in 0 out 0user_id: 16777229group_id: 3 33554434group_name: fsso_group1 CN=PC_GROUP1,OU=TESTING,DC=FSSO-QA,DC=COM
10.212.134.200, user142type: fw, id: 0, duration: 174, idled: 174expire: 259026, allow-idle: 259200flag(80): sslvpnserver: rad150packets: in 0 out 0, bytes: in 0 out 0group_id: 4group_name: rad_group
10.212.134.201, USER143type: fsso, id: 0, duration: 78, idled: 78server: AD_CollectAgentpackets: in 0 out 0, bytes: in 0 out 0group_id: 1 33554435group_name: fsso_group2 CN=PC_GROUP2,OU=TESTING,DC=FSSO-QA,DC=COM
10.212.134.201, user143type: fw, id: 0, duration: 79, idled: 79expire: 259121, allow-idle: 259200flag(80): sslvpnserver: rad150packets: in 0 out 0, bytes: in 0 out 0group_id: 4group_name: rad_group
----- 4 listed, 0 filtered ------
# get vpn ssl monitorSSL VPN Login Users:Index User Auth Type Timeout From HTTP in/out HTTPS in/out0 user142 2(1) 600 10.1.100.145 0/0 0/01 user143 2(1) 592 10.1.100.254 0/0 0/0
SSL VPN sessions:Index User Source IP Duration I/O Bytes Tunnel/Dest IP0 user142 10.1.100.145 104 32190/16480 10.212.134.2001 user143 10.1.100.254 11 4007/4966 10.212.134.201
FortiOS 6.2 New Features Guide 572Fortinet Inc.

Other
GUI support for FortiAP U431F and U433F - 6.2.3
The Platform mode field on the FortiAP Profiles page allows users to select either Dual 5G or Single 5G for tri-radiomodels (U431F and U433F). The dual and single modes provide greater flexibility for 5 GHz, 2.4 GHz, and dedicatedmonitoring. There is a 160 MHz bandwidth option in the Channel width field to support 802.11ax. For 5 GHz radios, 160MHz channel bonding is supported for 802.11ac and 802.11ax.
Platform mode Radio allocation
Dual 5G l Two radios at 5 GHzl One radio at 2.4 GHz or set to dedicated monitor mode
Single 5G l One radio at 5 GHzl One radio at 2.4 GHzl One radio set to dedicated monitor mode
To configure the platform mode:
1. Go toWiFi & Switch Controller > FortiAP Profiles and click Create New.2. In the Platform field, select a tri-radio model.3. For Platform mode, click either Dual 5G or Single 5G.4. Configure the remaining settings for each radio as needed.
Configuration for Dual 5G (radio 1 supports the lower 5 GHz channels and radio 2 supports the higher 5 GHzchannels):
Configuration for Single 5G (radio 3 is already set to Dedicated Monitormode):
FortiOS 6.2 New Features Guide 573Fortinet Inc.

Other
5. ClickOK.
Support for wtp profiles - 6.2.4
FortiOS 6.2.4 supports wtp profiles in FortiAP model FAP231E.
FortiOS 6.2 New Features Guide 574Fortinet Inc.

Other
To view the default wtp profile in the GUI:
1. Go toWiFi & Switch Controller > FortAP Profiles, and click Create New. The New FortiAP Profile window opens.2. From the Platform dropdown, select FAP231E.
l Platform mode is set to Single 5G by default.l Dedicated Scan is enabled by default.l Radio 1: The Band is 2.4G.Mode can be set to Disabled or Access Point.l Radio 2: The Band is 5G.Mode can be set to Disabled or Access Point.l Radio 3:Mode can be set to Disabled or Access Point.
3. With Platform Mode set to Single 5G, disable Dedicated Scan.l Radio 1: The Band is 2.4G.Mode can be set to Disabled, Access Point, or Dedicated Monitor.l Radio 2: The Band is 5G.Mode can be set to Disabled, Access Point, or Dedicated Monitor.l Radio 3:Mode can be set to Disabled or Dedicated Monitor.
FortiOS 6.2 New Features Guide 575Fortinet Inc.

Other
4. Set Platform Mode to Dual 5G, and disable Dedicated Scan.l Radio 1: Channels 149-165 are enabled.Mode can be set to Disabled, Access Point, or Dedicated Monitor.l Radio 2: Channels 36-48 are enabled.Mode can be set to Disabled, Access Point, or Dedicated Monitor.l Radio 3: The Band is 2.4GHz.Mode can be set to Disabled or Dedicated Monitor.
5. With Platform mode set to Dual 5Gmode, enable Dedicated scan.l Radio 1: Channels 149-165 are enabled.Mode can be set to Disabled, Access Point, or Dedicated Monitor.l Radio 2: Channels 36-48 are enabled.Mode can be set to Disabled, Access Point, or Dedicated Monitor.l Radio 3:Mode can be set to Disabled or Dedicated Monitor.
CLI
To configure the wtp profile in Single 5G mode:
config wireless-controller wtp-profileedit "FAP231E-default"
config platform
FortiOS 6.2 New Features Guide 576Fortinet Inc.

Other
set type 231Eset ddscan enable
endset handoff-sta-thresh 55config radio-1
set band 802.11n,g-onlyendconfig radio-2
set band 802.11acendconfig radio-3
set mode monitorend
nextend
To configure the wtp profile in Dual 5G mode:
config wireless-controller wtp-profileedit "231e-dual5g"
config platformset type 231Eset mode dual-5G
endset handoff-sta-thresh 55config radio-1
set band 802.11acset band-5g-type 5g-highset channel "149" "153" "157" "161" "165"
endconfig radio-2
set band 802.11acset band-5g-type 5g-low
endconfig radio-3
set band 802.11n,g-onlyend
nextend
Retrieve client OS information from FortiAP - 6.2.4
FortiGates in bridge mode can retrieve the client OS information from FortiAP devices running 6.2.3 and later.
GUI
To view the client OS information in the GUI go toMonitor >WiFi Client Monitor.
FortiOS 6.2 New Features Guide 577Fortinet Inc.

Other
CLI
Use the FortiAP command usta to retrieve all the client WiFi information, including the OS.
FortiAP-S423E # ustaWTP daemon STA info:1/5 34:14:5f:50:2d:3d 00:00:00:00:00:00 vId=0 type=wl----sta, vap=wlan00,FOS-QA-
MelodyZhou-bridge-1(0) mpsk=default ip=10.2.100.6/1 host=Galaxy-Tab-S2 vci=android-dhcp-7.0 os=Android7.0
ip6=fe80::3614:5fff:fe50:2d3d/3 rx=6replycount=0000000000000002
2/5 70:bc:10:7a:f5:03 00:00:00:00:00:00 vId=0 type=wl----sta, vap=wlan00,FOS-QA-MelodyZhou-bridge-1(0) mpsk=default ip=10.2.100.13/1 host=DESKTOP-BKEUVL6 vci=MSFT5.0 os=Windows
ip6=fe80::3992:cea9:3dd8:b79d/2 rx=145ip6=2001:10:2:100::1000/2 rx=1replycount=0000000000000002
3/5 7c:7a:91:1c:ce:b0 00:00:00:00:00:00 vId=0 type=wl----sta, vap=wlan00,FOS-QA-MelodyZhou-bridge-1(0) mpsk=default ip=10.2.100.7/1 host=ThinkPad-T440 vci= os=Linux
replycount=00000000000000024/5 80:a5:89:c7:c5:95 00:00:00:00:00:00 vId=0 type=wl----sta, vap=wlan00,FOS-QA-
MelodyZhou-bridge-1(0) mpsk=default ip=10.2.100.11/1 host= vci=android-dhcp-8.1.0os=Android8.1.0
ip6=fe80::82a5:89ff:fec7:c595/3 rx=4
replycount=00000000000000025/5 e0:33:8e:e9:65:01 00:00:00:00:00:00 vId=0 type=wl----sta, vap=wlan00,FOS-QA-
MelodyZhou-bridge-1(0) mpsk=default ip=10.2.100.9/1 host=iPhoneXS vci= os=iOS
FortiOS 6.2 New Features Guide 578Fortinet Inc.

Other
ip6=fe80::14bc:f4a7:97e0:9b27/3 rx=17replycount=0000000000000002
Total STAs: 5
FortinetOne renamed FortiCloud - 6.2.5
FortinetOne has been renamed FortiCloud in the FortiGate Cloud widget.
To activate FortiGate Cloud and register with FortiCloud at the same time:
1. Go to Dashboard > Status.2. In the FortiGate Cloud widget, click Not Activated > Activate.3. In the FortiCloud area, click Login.
You must register with FortiCare before activating FortiCloud.
4. Enter your FortiCloud account credentials, and clickOK.
FortiOS 6.2 New Features Guide 579Fortinet Inc.

Copyright© 2022 Fortinet, Inc. All rights reserved. Fortinet®, FortiGate®, FortiCare® and FortiGuard®, and certain other marks are registered trademarks of Fortinet, Inc., in theU.S. and other jurisdictions, and other Fortinet names herein may also be registered and/or common law trademarks of Fortinet. All other product or company names may betrademarks of their respective owners. Performance and other metrics contained herein were attained in internal lab tests under ideal conditions, and actual performance andother results may vary. Network variables, different network environments and other conditions may affect performance results. Nothing herein represents any bindingcommitment by Fortinet, and Fortinet disclaims all warranties, whether express or implied, except to the extent Fortinet enters a binding written contract, signed by Fortinet’sGeneral Counsel, with a purchaser that expressly warrants that the identified product will perform according to certain expressly-identified performance metrics and, in suchevent, only the specific performance metrics expressly identified in such binding written contract shall be binding on Fortinet. For absolute clarity, any such warranty will belimited to performance in the same ideal conditions as in Fortinet’s internal lab tests. In no event does Fortinet make any commitment related to future deliverables, features ordevelopment, and circumstances may change such that any forward-looking statements herein are not accurate. Fortinet disclaims in full any covenants, representations, andguarantees pursuant hereto, whether express or implied. Fortinet reserves the right to change, modify, transfer, or otherwise revise this publication without notice, and the mostcurrent version of the publication shall be applicable.