FMY99HSXS-Franke-User-Manual.pdf - Winning Appliances
164
EN User manual Steam Oven DE Bedienungsanleitung Dampfgarer FR Manuel de l’utilisateur Four à vapeur IT Manuale d’uso Forno a vapore ES Manual de usuario Horno de vapor PT Manual do utilizador Forno a vapor PL Podręcznik użytkownika Piekarnik elektryczny FMY 99 HS
-
Upload
khangminh22 -
Category
Documents
-
view
2 -
download
0
Transcript of FMY99HSXS-Franke-User-Manual.pdf - Winning Appliances

EN User manual Steam OvenDE Bedienungsanleitung DampfgarerFR Manuel de l’utilisateur Four à vapeurIT Manuale d’uso Forno a vaporeES Manual de usuario Horno de vaporPT Manual do utilizador Forno a vapor PL Podręcznik użytkownika Piekarnik elektryczny
FMY 99 HS

LANGUAGESSprachen / Langues / Lingue / Idiomas / Idiomas / Języki
EN USER MANUAL �������������������������������������������������������������������������������������������������������������������������������������������������������������������������������� 3
DE BEDIENUNGSANLEITUNG ���������������������������������������������������������������������������������������������������������������������������������������������������������26
FR MANUEL DE L'UTILISATEUR ������������������������������������������������������������������������������������������������������������������������������������������������������49
IT MANUALE D'USO ���������������������������������������������������������������������������������������������������������������������������������������������������������������������������72
ES MANUAL DE USUARIO ����������������������������������������������������������������������������������������������������������������������������������������������������������������95
PT MANUAL DO UTILIZADOR ������������������������������������������������������������������������������������������������������������������������������������������������������118
PL PODRĘCZNIK UŻYTKOWNIKA �����������������������������������������������������������������������������������������������������������������������������������������������141

EN
3
TABLE OF CONTENTS
OVERVIEW ���������������������������������������������������������������������������������������������������������������������������������������������������������������������������������� 4
CONTROL PANEL ���������������������������������������������������������������������������������������������������������������������������������������������������������������������� 4
ACCESSORIES ���������������������������������������������������������������������������������������������������������������������������������������������������������������������������� 5
FUNCTIONS ������������������������������������������������������������������������������������������������������������������������������������������������������������������������������� 6
HOW TO USE THE TOUCH DISPLAY ������������������������������������������������������������������������������������������������������������������������������������ 7
FIRST TIME USE ������������������������������������������������������������������������������������������������������������������������������������������������������������������������� 7
DAILY USE ����������������������������������������������������������������������������������������������������������������������������������������������������������������������������������� 9
USEFUL TIPS ���������������������������������������������������������������������������������������������������������������������������������������������������������������������������� 14
COOKASSIST COOKING TABLE �������������������������������������������������������������������������������������������������������������������������������������������20
CLEANING AND MAINTENANCE ����������������������������������������������������������������������������������������������������������������������������������������23
TROUBLESHOOTING �������������������������������������������������������������������������������������������������������������������������������������������������������������25
SUPPORT ����������������������������������������������������������������������������������������������������������������������������������������������������������������������������������25

4
1� Control panel2� Fan3� Circular heating element
(not visible)4� Shelf guides
(the level is indicated on the front of the oven)
5� Door6� Water drawer7� Upper heating element/grill8� Lamp9� Identification plate
(do not remove)10� Lower heating element
(not visible)
1. ON / OFFFor switching the oven on and off�2. HOMEFor gaining quick access to the main menu�
3. FAVORITEFor retrieving up the list of your favorite functions�4. DISPLAY5. TOOLSTo choose from several options and also change the oven settings and preferences�
6. CANCELTo stop any oven function except the Clock, Kitchen Timer and Control Lock�
1 2 3 4 5 6
OVERVIEW
USER GUIDE
CONTROL PANEL
5
4
3
2
1
5
4
3
2
1
1
2
3
4
8
9
10
5
7
6

EN
5
ACCESSORIESWIRE SHELF DRIP TRAY BAKING TRAY SLIDING RUNNERS*
Use to cook food or as a support for pans, cake tins and other ovenproof items of cookware
Use as an oven tray for cooking meat, fish, vegetables, focaccia, etc. or position underneath the wire shelf to collect cooking juices.
Use for cooking all bread and pastry products, but also for roasts, fish en papillotte, etc.
To facilitate inserting or removing accessories.
STEAM TRAY
* Availble only on certain modelsThe number and the type of accessories may vary depending on which model is purchased.Other accessories can be purchased separately from the After-sales Service.
This makes it easier for steam to circulate, which helps cook the food evenly. Place the drip tray on the level below to collect the cooking juices.
INSERTING THE WIRE SHELF AND OTHER ACCESSORIESInsert the wire shelf horizontally by sliding it across the shelf guides, making sure that the side with the raised edge is facing upwards�Other accessories, such as the drip tray and the baking tray, are inserted horizontally in the same way as the wire shelf�REMOVING AND REFITTING THE SHELF GUIDES• To remove the shelf guides, lift the guides up and
hen gently pull the lower part out of its seating: The shelf guides can now be removed�
• To refit the shelf guides, first fit them back into their upper seating� Keeping them held up, slide them into the cooking compartment, then lower them into position in the lower seating�
FITTING THE SLIDING RUNNERS (IF PRESENT)Remove the shelf guides from the oven and remove the protective plastic from the sliding runners�Fasten the upper clip of the runner to the shelf guide and slide it along as far as it will go� Lower the other clip into position� To secure the guide, press the lower portion of the clip firmly against the shelf guide�Make sure that the runners can move freely� Repeat these steps on the other shelf guide on the same level�
Please note: The sliding runners can be fitted on any level.

6
MANUAL FUNCTIONS
• CONVENTIONAL*For cooking any kind of dish on one shelf only�
• CONVECTION BAKEFor cooking meat, baking cakes with fillings on one shelf only�
• FORCED AIRFor cooking different foods that require the same cooking temperature on several shelves (maximum three) at the same time� This function can be used to cook different foods without odours being transferred from one food to another�
• GRILLFor grilling steaks, kebabs and sausages, cooking vegetables au gratin or toasting bread� When grilling meat, we recommend using a drip tray to collect the cooking juices: Position the tray on any of the levels below the wire shelf and add 500 ml of drinking water�
• TURBO GRILLFor roasting large joints of meat (legs, roast beef, chicken)� We recommend using a drip tray to collect the cooking juices: Position the pan on any of the levels below the wire shelf and add 500 ml of drinking water�
• FAST PREHEATINGFor preheating the oven quickly�
• MULTICOOKING FUNCTIONSFor cooking different foods that require the same cooking temperature on four levels at the same time� This function can be used to cook cookies, tarts, round pizzas (also frozen) and to prepare a complete meal� Follow the cooking table to obtain the best results�
• STEAM » PURE STEAM
For cooking natural and healthy dishes using steam to preserve the food’s natural nutritional value� This function is particularly suited to cooking vegetables, fish and fruit, and also for blanching� Unless otherwise indicated, remove all packaging and protective film before placing the food in the oven�
» FORCED AIR + STEAMCombining the properties of steam with those of the forced air, this function allows you to cook dishes pleasantly crispy and browned outside, but at the same time tender and succulent inside� To achieve the best cooking results, we recommend to select a HIGH steam level for fish cooking, MEDIUM for meat and LOW for bread and desserts�
• SPECIAL FUNCTIONS » DEFROST
To speed up defrosting of food� Place food on the middle shelf� Leave food in its packaging to prevent it from drying out on the outside�
» KEEP WARMFor keeping just-cooked food hot and crisp�
» RISINGFor optimal proving of sweet or savoury dough� To maintain the quality of proving, do not activate the function if the oven is still hot following a cooking cycle�
» CONVENIENCETo cook ready-made food, stored at room temperature or in the refrigerator (biscuits, cake mix, muffins, pasta dishes and bread-type products)� The function cooks all the dishes quickly and gently and can also be used to heat food already cooked� The oven does not need to be pre-heated� Follow the instructions on the packaging�
» MAXI COOKINGFor cooking large joints of meat (above 2�5 kg)�It is advisable to turn the meat over during cooking, to obtain even browning on both sides� It is best to baste the meat every now and again to prevent it from drying out�
» ECO FORCED AIR*For cooking stuffed roasting joints and fillets of meat on a single shelf� Food is prevented from drying out excessively by gentle, intermittent air circulation� When this ECO function is in use, the light will remain switched off during cooking� To use the ECO cycle and therefore optimise power consumption, the oven door should not be opened until the food is completely cooked�
• FROZEN COOKThe function automatically selects the ideal cooking temperature and mode for 5 different types of ready frozen food� The oven does not have to be preheated�
COOKASSIST
These enable all types of food to be cooked fully automatically� To use at best this function, follow the indications on the relative cooking table�The oven does not have to be preheated�
* Function used as reference for the energy efficiency declaration in accordance with Regulation (EU) No. 65/2014
FUNCTIONS

EN
7
HOW TO USE THE TOUCH DISPLAYTo scroll through a menu or a list:Simply swipe your finger across the display to scroll through the items or values�To select or confirm:Tap the screen to select the value or menu item you require�
To go back to the previous screen:Tap �To confirm a setting or go to the next screen:Tap “SET” or “NEXT”�
FIRST TIME USEYou will need to configure the product when you switch on the appliance for the first time�The settings can be changed subsequently by pressing to access the “Tools” menu.
1. SELECT THE LANGUAGEYou will need to set the language and the time when you switch on the appliance for the first time�• Swipe across the screen to scroll through the list of
available languages�
•
Čeština, Český Jazyk Czech
Dansk Danish
Deutsch German
Tap the language you require�
Ελλνικά Greek, Modern
English English
Español Spanish
Tapping will take you back to the previous screen.
2. SELECT SETTINGS MODEOnce you have selected the language, the display will prompt you to choose between “STORE DEMO” (useful for retailers, for display purposes only) or continue by tapping “NEXT”�
Thank you for your purchase!
Press Next to continue the setup for home use�
DEMO STORE MODE NEXT

8
. SETTING THE TIME AND DATEConnecting the oven to your home network will set the time and date automatically� Otherwise you will need to set them manually• Tap the relevant numbers to set the time�
•
0987654321
Set the system time.
Tap “SET” to confirm�
0987654321
12:3024-Hour Time
SET
Once you have set the time, you will need to set the date�• Tap the relevant numbers to set the date�• Tap “SET” to confirm�
4. SET THE POWER CONSUMPTIONThe oven is programmed to consume a level of electrical power that is compatible with a domestic network that has a rating of more than 3 kW (16 Ampere): If your household uses a lower power, you will need to decrease this value (13 Ampere)�• Tap the value on the right to select the power�
•
Power management
13 Ampere
16 Ampere
Tap “OKAY” to complete initial setup�
Setup Complete
Your appliance is now configured and ready for use!
OKAY
5. HEAT THE OVENA new oven may release odours that have been left behind during manufacturing: this is completely normal� Before starting to cook food, we therefore recommend heating the oven with it empty in order to remove any possible odours� Remove any protective cardboard or transparent film from the oven and remove any accessories from inside it� Heat the oven to 200 °C for around one hour�It is advisable to air the room after using the appliance for the first time.

EN
9
DAILY USE1. SELECT A FUNCTION• To switch on the oven, press or touch anywhere
on the screen�The display allows you to choose between Manual and CookAssist Functions�• Tap the main function you require to access the
corresponding menu�
•
20:00
MANUAL FUNCTIONS
COOKASSIST
Scroll up or down to explore the list�
•
Choose function
CONVENTIONAL
FORCED AIR GRILL
CONVECTION BAKE
Select the function you require by tapping it�
Choose function
CONVENTIONAL
FORCED AIR GRILL
CONVECTION BAKE
2. SET MANUAL FUNCTIONSAfter having selected the function you require, you can change its settings� The display will show the settings that can be changed�TEMPERATURE / GRILL LEVEL• Scroll through the suggested values and select the
one you require�Select
temperature
NEXT
If allowed by the function, you can tap to activate preheating�
Select temperature
NEXT
DURATIONYou do not have to set the cooking time if you want to manage cooking manually� In timed mode, the oven cooks for the length of time you select� At the end of the cooking time, the cooking is stopped automatically�• To start setting the duration, tap “Set Cook Time”�
•
Set Cook Time
Select temperature
NEXT
Tap the relevant numbers to set the cooking time you require�
•
0987654321
Enter time
NEXT
Tap “NEXT” to confirm�3. SET COOKASSIST FUNCTIONSThe COOKASSIST functions enable you to prepare a wide variety of dishes, choosing from those shown in the list� Most cooking settings are automatically selected by the appliance in order to achieve the best results�• Choose a recipe from the list�Functions are displayed by food categories in the “COOKASSIST FUNCTION” menu (see relative tables) and by recipe features in the “COOKASSIST PRO” menu.• Once you have selected a function, simply indicate
the characteristic of the food (quantity, weight, etc�) you want to cook to achieve the perfect result�
• Follow the on-screen prompts to guide you through the cooking process�

10
4. SET START TIME DELAYYou can delay cooking before starting a function: The function will start at the time you select in advance�• Tap “DELAY” to set the start time you require�
•
COOKING INSTRUCTION:
For cooking any kind of dish on one shelf only�
Insert the food on level 3�Use wire shelf with pan or tray�
DELAY
Conventional
START
Once you have set the required delay, tap “START DELAY” to start the waiting time�
• Place the food in the oven and close the door: The function will start automatically after the period of time that has been calculated�
If preheat is selected during cycle setting, delay option will be disabled.• To activate the function immediately and cancel
the programmed delay time, tap �5. START THE FUNCTION• Once you have configured the settings, tap
“START” to activate the function�You can change the values that have been set at any time during cooking by tapping the value you want to amend.If the oven is hot and the function requires a specific maximum temperature, a message will shown on the display.• Press to stop the active function at any time, or
tap the duration value and then select “STOP”�6. PREHEATINGIf previously activated, once the function has been started the display indicates the status of preheating phase�
00:00:15 since startedCONVENTIONALPreheating200° C
SETCOOK
TIME
Once this phase has been finished, an audible signal will sound and the display will indicate that the oven has reached the set temperature�
•
Preheat CompleteInsert the food now
DONE
Open the door�• Place the food in the oven�• Close the door and cooking will resume
automatically�
Placing the food in the oven before preheating has finished may have an adverse effect on the final cooking result.Opening the door during the preheating phase will pause it.The cooking time does not include a preheating phase.
7. PAUSING COOKINGSome of the COOKASSIST functions will require to turn the food during cooking� An audible signal will sound and the displays shows the action must to be done� • Open the door�• Carry out the action prompted by the display�• Close the door, then tap “DONE” to resume
cooking�Before cooking ends, the oven could prompt you to check the food in the same way�An audible signal will sound and the displays shows the action must to be done�• Check the food�• Close the door and cooking will resume
automatically�8. END OF COOKINGAn audible signal will sound and the display will indicate that cooking is complete�With some functions, once cooking has finished you can give your dish extra browning, extend the cooking time or save the function as a favorite�
•
00:01 since ready
CONVENTIONALCooking200° C
TIMERCOMPLETE
Tap to save it as a favorite�• Select “Extra Browning” to start a five-minute
browning cycle�• Tap to save prolong the cooking�

EN
11
9. FAVORITESThe Favourites feature stores the oven settings for your favorite recipe�The oven automatically recognizes the most used functions.After a certain number of uses, you will be prompted to add the function to your favorites.HOW TO SAVE A FUNCTIONOnce a function has finished, by tapping on you can save it as a favorite� This will enable you to use it quickly in the future, keeping the same settings�The display allows you to save the function by indicating up to 4 favorite meals time including breakfast, lunch, snack and dinner�• Tap the icons to select at least one�
•
1. Pizza thin
SAVE AS FAVORITE
EDIT
Tap “SAVE AS FAVORITE” to save the function�
1. Pizza thin
SAVE AS FAVORITE
EDIT
ONCE SAVEDTo view the favorite menu, press : the functions will be divided by different meal times and some suggestions will be offered�• Tap the meals icon To view the relevant lists
•
Lunch Favorites
PIZZA THIN
Looking for something else? Check out the suggestions below�
Scroll through the prompted list�• Tap the recipe or function you require�• Tap “START” to activate the cooking�CHANGING THE SETTINGSIn the favorite screen, you can add an image or name to each favourite to customize it to your preferences�• Select the function you want to change�• Tap “EDIT”�• Select the attribute you want to change�• Tap “NEXT”: The display will show the new
attributes�• Tap “SAVE” to confirm your changes�In the favorite screen you can also delete functions
you have saved:• Tap the on the function�• Tap “REMOVE IT”�You can also adjust the time when the various meals are shown:• Press �• Select “Preferences”�• Select “Times and Dates”� • Tap “Your Meal Times”�• Scroll through the list and tap the relevant time�• Tap the relevant meal to change it�It will be possible to combine a time slot only with a meal.
10. TOOLSPress to open the “Tools” menu at any time�This menu enables you to choose from several options and also change the settings or preferences for your product or the display�
Tools
Kitchen Timer
Light Self-Clean
KITCHEN TIMERThis function can be activated either when using a cooking function or alone for keeping time�Once started, the timer will continue to count down independently without interfering with the function itself�Once the timer has been activated, you can also select and activate a function�The timer will continue counting down at the top-right corner of the screen.To retrieve or change the kitchen timer:• Press �• Tap �An audible signal will sound and the display will indicate once the timer has finished counting down the selected time� • Tap “DISMISS” to cancel the timer�• Tap “SET NEW TIMER” to set the timer again�
LIGHTTo switch on or off the oven lamp�

12
CLEANINGActivate the “Self-Clean” function for optimum cleaning of the internal surfaces�It is recommended to do not open the oven door during the cleaning cycle to avoid a loss of water vapor that could get an adverse effect on the final cleaning result.• Remove all accessories from the oven before
activating the function�• Pour 200 ml of drinking water on the bottom of
the oven�• Tap “START” to activate the cleaning function�Once the cycle has been selected, you can delay the start of automatic cleaning. Tap “DELAY” to set the end time as indicated in the relevant section.
DRAINThe drain function allows the water to be drained in order to prevent stagnation in the tank� It is advisable to always carry out draining every time the oven has been used�
Anyway, after a certain number of cooking this action will be mandatory and it will not possible start a steam function before done it�Once selected the “Drain” function or when suggested from display,
start the function and follow the actions indicated: Open the door and place a large jug under the drain nozzle located at the bottom right of the panel� Once started the draining, keep the jug in position until the operation is completed�The display will indicate when the tank has to be completely drained�Please note: it is not possible to perform this activity before 4 hours have elapsed from the last cycle (or the last time the product was powered). During this wait time, the display will show the following feedback “water is TOO HOT wait until the temperature decreases. When it will be cold enough it will be possible to proceed by pressing CONTINUE”.The jug must be at least 2 liters large.The drain function allows the water to be drained in order to prevent stagnation in the tank� It is advisable to always carry out draining every time the oven has been used� Pour or drain water when requested through display message�
DESCALEThis special function, activated at regular intervals, allows you to keep the tank and the steam circuit in the best condition�The function is divided into several phases: draining, descaling, rinsing� Once the function is started, follow all the steps indicated on the display�The average duration of the full function is around 190 minutes�Please note: If the function is stopped at any time, the entire
descaling cycle must be repeated. » DRAINING
Before descaling, it will be necessary to drain tank: to perform the operation in the best way, proceed as described in the relative paragraph�Please note: it is not possible to perform this activity before 4 hours have elapsed from the last cycle (or the last time the product was powered). During this wait time, the display will show the following feedback “water is TOO HOT wait until the temperature decreases. When it will be cold enough it will be possible to proceed by pressing CONTINUE”. The jug must be at least 2 liters large.
» DESCALINGFor best results in descaling, we recommend filling the tank with the specific solution available at after sale Service�Once the descaling phase has been completed, the tank has to be drained�
» RINSINGTo clean the tank and the steam circuit, rinse cycle has to be done� Fill the tank with drinking water until the display shows “TANK FULL”, then start the rinsing� At the end, the display will prompt to repeat this phase by draining and rinsing again�Do not turn off the oven until all the steps required by the function have been completed�Cooking functions cannot be activated during the cleaning cycle�Please note: A message will be shown on display, to remind you to execute this operation regularly.Pour or drain water when requested through display message.
MUTETap the icon to mute or unmute all the sounds and alarms�
CONTROL LOCKThe “Control Lock” enables you to lock the buttons on the touch pad so they cannot be pressed accidently� To activate the lock:• Tap the icon�To deactivate the lock:• Tap the display�• Swipe up on the message shown�
Control LockThe product is locked�
Swipe up to unlock�

EN
13
MORE MODESFor selecting Sabath mode and accessing Power Management�Sabbath mode keeps the oven on in baking mode until disabled. Sabbath mode uses the conventional function. All other cooking and cleaning cycles are disabled. No tones will sound, and the displays will not indicate temperature changes. When the oven door is opened or closed, the oven light will not turn on or off, and the heating elements will not turn on or off immediately.To disable and exit Sabbath mode, press or then press and hold the display screen for 3 seconds.
PREFERENCESFor changing several oven settings�
INFOFor switching off “Store Demo Mode”, resetting the product and obtaining further information about the product�

14
USEFUL TIPSHOW TO READ THE COOKING TABLESThe tables list: recipes, if preheating is needed, temperature (°C), grill level, cooking time (minutes), accessories and level suggested for cooking�Cooking times start from the moment food is placed in the oven, excluding preheating (where required)�Cooking temperatures and times are approximate and depend on the amount of food and the type of accessory used� Use the lowest recommended values to begin with and, if the food is not cooked enough, move on to higher values�
Use the accessories supplied and preferably darkcoloured metal cake tins and oven trays� You can also use pans and accessories in pyrex or stoneware, but bear in mind that cooking times will be slightly longer� To obtain the best results, carefully follow the advice given in the cooking table for the choice of accessories (supplied) to be placed on the various shelves�
CONVENTIONALThe heating elements at the top and bottom of the oven cavity heat the inside of the oven evenly�Use the 3rd shelf� To cook pizza, savoury pies and sweets with liquid fillings, use the 1st or 2nd shelf�Preheat the oven before placing food inside�This function is the best cooking mode for cooking delicate desserts on one shelf only�Use dark-coloured metal cake tins and always position them on the wire shelf supplied� When using the supplied trays, remove any other accessories you are not using from the oven cavity to achieve optimal results and save energy�
To check whether a cake is cooked, insert a wooden toothpick into the centre of the cake� If the toothpick comes out clean, the cake is ready�If using non-stick cake tins, do not butter the edges as the cake may not rise evenly around the edges�If the cake “sinks” during cooking, set a lower temperature the next time, perhaps reducing the amount of liquid in the mixture and mixing more gently�The fish is cooked when the dorsal fin comes off easily� Begin by selecting the lowest indicated temperature, even when preparing larger fish� In general, the larger the fish, the lower the temperature must be and therefore the longer the cooking time�
Recipe Preheat Temperature (°C) Cook Time (Min.) Level and Accessories
Leavened cakes / Sponge cakes Yes 170 30 - 50 2
Cookies / Shortbread Yes 150 20 - 40 3
Small cakes / Muffin Yes 170 20 - 40 3
Choux buns Yes 180 - 200 30 - 40 3
Meringues Yes 90 110 - 150 3
Pizza / Bread / Focaccia Yes 190 - 250 15 - 50 2
Frozen pizza Yes 250 10 - 15 3
Vols-au-vent / Puff pastry crackers Yes 190 - 200 20 - 30 3
Lasagne / Flans / Baked pasta / Cannelloni Yes 190 - 200 45 - 65 3
Lamb / Veal / Beef / Pork 1 kg Yes 190 - 200 80 - 110 3
Chicken / Rabbit / Duck 1 kg Yes 200 - 230 50 - 100 3
Turkey / Goose 3 kg Yes 190 - 200 80 - 130 2
Baked fish / en papillote (fillets, whole) Yes 180 - 200 40 - 60 3
ACCESSORIESWire shelf Oven tray or cake tin
on wire shelf
Drip tray / Baking tray or oven tray on wire
shelfDrip tray / Baking tray Drip tray with
500 ml of water

EN
15
GRILLThe top heating element enables optimum results to be achieved when grilling Place food on the 4th or 5th shelf shelf� When grilling meat, use the drip tray to collect the cooking juices� Position it on the 3rd/4th shelf, adding approx 500 ml of drinking water� The oven does not have to be preheated�During cooking, the oven door must remain closed�If you want to grill meat, choose cuts with an even thickness all over in order to achieve uniform cooking results� Very thick pieces of meat require longer cooking times�
To prevent the meat from burning on the outside, lower the position of the wire shelf, keeping the food further away from the grill� Turn food halfway through cooking�To collect the cooking juices it is advisable to place a drip-tray with half a litre of drinking water directly under the grill on which the meat is placed� Top-up when necessary�
Recipe Preheat Grill Level Cook Time (Min.) Level and Accessories
Toast — 3 (High) 3 - 6 5
Fish fillets / Steaks — 2 (Mid) 20 - 30 4 3
Sausages / Kebabs / Spare ribs / Hamburgers — 2 - 3 (Mid - High) 15 - 30 5 4
TURBO GRILLIn this function, the top heating element and the fan are activated at the same time�Use the drip tray to collect the cooking juices�Position it on the 1st/2nd shelf, adding 500 ml of drinking water� The oven does not have to be preheated� During cooking the oven door must remain closed�Turn food two thirds of the way through cooking�
Use any kind of oven tray or pyrex dish suited to the size of the piece of meat being cooked� For roast joints, it is best to add some stock to the bottom of the pan, basting the meat during cooking for added flavour� When the roast is ready, let it rest in the oven for another 10-15 minutes, or wrap it in aluminium foil�
Recipe Preheat Grill Level Cook Time (Min.) Level and Accessories
Roast chicken 1-1�3 kg — 2 (Mid) 55 - 70 2 1
Leg of lamb / Shanks — 2 (Mid) 60 - 90 3
Roast potatoes — 2 (Mid) 35 - 55 3
Vegetable gratin — 3 (High) 10 - 25 3
ACCESSORIESWire shelf Oven tray or cake tin
on wire shelf
Drip tray / Baking tray or oven tray on wire
shelfDrip tray / Baking tray Drip tray with
500 ml of water

16
FORCED AIRThe round heating element and the fan are activated at the same time� The fan on the rear wall distributes the hot air evenly around the oven�Using the “Forced Air” function, you can cook different foods which require the same cooking emperature at the same time (for example fish or vegetables), using different shelves� Remove the food which requires less cooking time and leave food which requires longer cooking time in the oven�
Use the 4th shelf to cook on one shelf only, the 1st and 4th to cook on two shelves, and the 1st, 3rd and 5th to cook on three shelves� Always place cake tins on the wire shelf� Preheat the oven before cooking�To achieve uniform browning, make sure that all portions of dough are the same thickness�When cooking pizza, lightly grease the trays to ensure the pizza has a crispy base� Scatter the mozzarella over the pizza two thirds of the way through cooking�
Recipe Preheat Temperature (°C) Cook Time (Min.) Level and Accessories
Leavened cakes / Sponge cakesYes 170 30 - 50 2
Yes 160 30 - 50 4
1
Filled cakes (cheesecake, strudel, apple pie) Yes 160 – 200 35 - 90 4 1
Cookies / Shortbread
Yes 140 30 - 50 4
Yes 140 30 - 50 4
1
Yes 135 40 - 60 5
3 1
Small cakes / Muffin
Yes 150 30 - 50 4
Yes 150 30 - 50 4
1
Yes 150 40 - 60 5
3 1
Choux bunsYes 180 - 190 35 - 45 4
1
Yes 180 - 190 35 - 45 * 5
3 1
MeringuesYes 90 130 - 150 4
1
Yes 90 140 - 160 * 5 3 1
Pizza / Bread / Focaccia Yes 190 - 230 20 - 50 4 1
Pizza (Thin, thick, focaccia) Yes 220 - 240 25 - 50 * 5 3 1
Frozen pizzaYes 250 10 - 20 4 1
Yes 220 - 240 15 - 30 5 3 1
Savoury pies (vegetable pie, quiche)Yes 180 - 190 45 - 60 4 1
Yes 180 - 190 45 - 70 * 5 3 1
Vols-au-vent / Puff pastry crackersYes 180 - 190 20 - 40 4 1
Yes 180 - 190 20 - 40 * 5 3 1
Lasagna & Meat Yes 200 50 - 100 * 4 1
Meat & Potatoes Yes 200 45 - 100 * 4 1
Fish & Vegetebles Yes 180 30 - 50 * 4 1
* Estimated length of time: dishes can be removed from the oven at different times depending on personal preference.

EN
17
MULTICOOKINGRecipe Dish Preheat Temperature (°C) Cook Time (Min.) Level and Accessories
Cookies Cookies Yes 135 50 - 70 5 4 3 1
Tarts Tarts Yes 170 50 - 70 5 4 3 1
Round pizzas Round Pizza Yes 210 40 - 60 5 4 2 1
Complete meal: Fruit tart (level 5)roasted vegetables (level 4) lasagna (level 2) cuts of meat (level 1)
Cook 4 menu Yes 190 40 - 120 5 4 2 1
CONVECTION BAKEUse this function for quiches and vegetable tarts or desserts with moist fillings, such as or cheesecake and fruit pie�It is also ideal for cooking foods with a high water content� The fan distributes heat evenly throughout the oven� This helps to maintain a constant temperature and cook food more evenly, crisping
up the top while sealing in moisture and creating crustier breads�Use the 3rd or 2nd shelf� Wait for the end of preheating before placing food inside�If the pastry base is soggy, lower the shelf and sprinkle the bottom of the cake with biscuit crumbs before adding the filling�
Recipe Preheat Temperature (°C) Cook Time (Min.) Level and Accessories
Filled cakes (cheesecake, strudel, apple pie) Yes 160 – 200 30 - 85 3
Savoury pies (vegetable pie,quiche) Yes 180 - 190 45 - 55 3
Stuffed vegetables (tomatoes, courgettes, aubergines) Yes 180 - 200 50 - 60 2

18
ACCESSORIESWire shelf Oven tray or cake tin
on wire shelfDrip tray / Baking tray
or oven tray on wire shelf Drip tray / Baking tray Drip tray with 500 ml of water
PURE STEAMRecipe Preheat Temperature (°C) Cook Time (Min.) Level and Accessories
Fresh vegetables (Whole) - 100 30 - 80 2 1
Fresh vegetables (Pieces) - 100 15 - 40 2 1
Frozen vegetables - 100 20 - 40 2 1
Whole fish - 90 40 - 50 2 1
Fish fillets - 90 20 - 30 2 1
Chicken fillets - 100 15 - 50 2 1
Eggs - 100 10 - 30 2 1
Fruit (Whole) - 100 15 - 45 2 1
Fruit (Pieces) - 100 10 - 30 2 1
FORCED AIR + STEAMRecipe Steam Level Preheat Temperature (°C) Cook Time (Min.) Level and Accessories
Shortbread / Cookies
LOW - 140 - 150 35 - 55 3
LOW - 140 30 - 50 4
1
LOW - 140 40 - 60 5
3 1
Small cake / Muffin
LOW - 160 - 170 30 - 40 3
LOW - 150 30 - 50 4
1
LOW - 150 40 - 60 5
3 1
Leavened cakes LOW - 170 - 180 40 - 60 2
Sponge cakes LOW - 160 - 170 30 - 40 2
Focaccia LOW - 200 - 220 20 - 40 3
Bread loaf LOW - 170 - 180 70 - 100 3
Small bread LOW - 200 - 220 30 - 50 3
Baguette LOW - 200 - 220 30 - 50 3
Roast potatoes MID - 200 - 220 50 - 70 3
Veal / Beef / Pork 1 kg MID - 180 - 200 60 - 100 3
Veal / Beef / Pork (pieces) MID - 160 - 180 60 - 80 3
Roast Beef rare 1 kg MID - 200 - 220 40 - 50 3
Roast Beef rare 2 kg MID - 200 55 - 65 3
Leg of lamb MID - 180 - 200 65 - 75 3
Stew pork knuckles MID - 160 - 180 85 - 100 3
Chicken / guinea fowl / duck 1 - 1.5 kg MID - 200 - 220 50 - 70 3
Chicken / guinea fowl / duck (pieces) MID - 200 - 220 55 - 65 3
Stuffed vegetables (tomatoes, courgettes, aubergines) MID - 180 - 200 25 - 40 3
Fish fillet HIGH - 180 - 200 15 - 30 3
EN
19
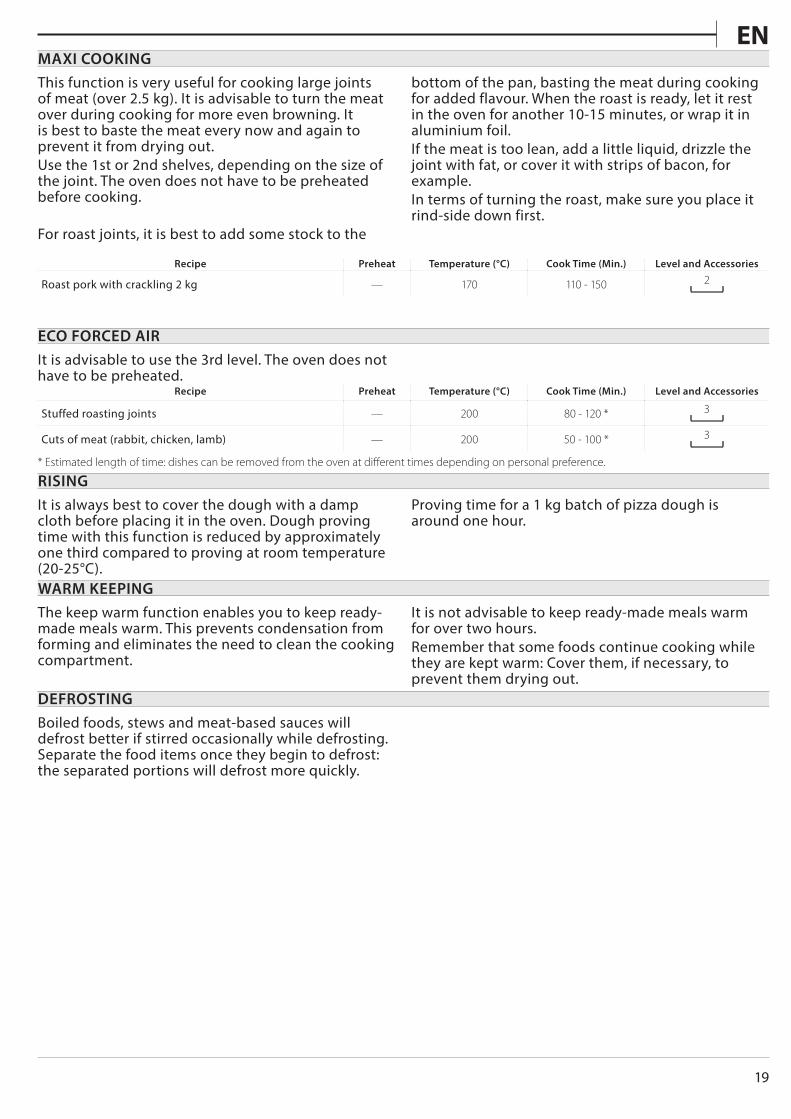
MAXI COOKINGThis function is very useful for cooking large joints of meat (over 2�5 kg)� It is advisable to turn the meat over during cooking for more even browning� It is best to baste the meat every now and again to prevent it from drying out�Use the 1st or 2nd shelves, depending on the size of the joint� The oven does not have to be preheated before cooking�
For roast joints, it is best to add some stock to the
bottom of the pan, basting the meat during cooking for added flavour� When the roast is ready, let it rest in the oven for another 10-15 minutes, or wrap it in aluminium foil�If the meat is too lean, add a little liquid, drizzle the joint with fat, or cover it with strips of bacon, for example�In terms of turning the roast, make sure you place it rind-side down first�
Recipe Preheat Temperature (°C) Cook Time (Min.) Level and Accessories
Roast pork with crackling 2 kg — 170 110 - 150 2
ECO FORCED AIRIt is advisable to use the 3rd level� The oven does not have to be preheated�
Recipe Preheat Temperature (°C) Cook Time (Min.) Level and Accessories
Stuffed roasting joints — 200 80 - 120 * 3
Cuts of meat (rabbit, chicken, lamb) — 200 50 - 100 * 3
* Estimated length of time: dishes can be removed from the oven at different times depending on personal preference.
RISINGIt is always best to cover the dough with a damp cloth before placing it in the oven� Dough proving time with this function is reduced by approximately one third compared to proving at room temperature (20-25°C)�
Proving time for a 1 kg batch of pizza dough is around one hour�
WARM KEEPINGThe keep warm function enables you to keep ready-made meals warm� This prevents condensation from forming and eliminates the need to clean the cooking compartment�
It is not advisable to keep ready-made meals warm for over two hours�Remember that some foods continue cooking while they are kept warm: Cover them, if necessary, to prevent them drying out�
DEFROSTINGBoiled foods, stews and meat-based sauces will defrost better if stirred occasionally while defrosting� Separate the food items once they begin to defrost: the separated portions will defrost more quickly�

20
COOKASSIST COOKING TABLE
Recipe Suggested quantity Turn (Of cook time) Level and Accessories
Casseroles/Baked Pasta
Fresh Lasagna 500 - 3000 g - 2
Frozen Lasagna 500 - 3000 g - 2
Rice & Cereals
Rice
White rice 100 - 500 g - 2 1
Brown rice 100 - 500 g - 2 1
Wholegrain rice 100 - 500 g - 2 1
Seeds & Cereals
Quinoa 100 - 300 g - 2 1
Millet 100 - 300 g - 2 1
Spelt 100 - 300 g - 2 1
Barley 100 - 300 g - 2 1
Meat
BeefRoast beef 600 - 2000 g - 3
Hamburger 1.5 - 3 cm 3/5 5
PorkPork 600 - 2500 g - 3
Pork ribs one grid 2/3 5 4
Roasted ChickenRoast chicken 600 - 3000 g - 2
Chicken fillet / Breast 1 - 5 cm 2/3 5
Steamed meat Chicken fillets 1 - 5 cm - 2 1
Turkey fillets 1 - 5 cm - 2 1
Meat DishesKebab one grid 1/2 5 4
Sausages & Wurstel 1.5 - 4 cm 2/3 5 4
ACCESSORIESWire shelf Oven tray or cake tin
on wire shelfDrip tray / Baking tray
or oven tray on wire shelf Drip tray / Baking tray Drip tray with 500 ml of water

EN
21
Recipe Suggested quantity Turn (Of cook time) Level and Accessories
Fish & Seafood
Roasted fillets & steaksFish fillets/slices 0.5 - 2.5 cm - 5
Frozen fillets 0.5 - 2.5 cm - 4
Steamed fillets & steaks Fish fillets/slices 0.5 - 2.5 cm - 2 1
Frozen fillets 0.5 - 2.5 cm - 2 1
Grilled seafood
Scallops gratin one tray - 4
Mussels gratin one tray - 4
Shrimps one tray - 4 3
Prawns one tray - 4 3
Steamed seafood
Gratin scallops 500 - 1000 g - 2 1
Mussels 500 - 3000 g - 2 1
Shrimps 100 - 1000 g - 2 1
Prawns 500 - 1500 g - 2 1
Squid 100 - 500 g - 2 1
Octopus 500 - 2000 g - 2 1
Vegetables
Roasted Vegetables
Potatoes - Fresh 500 - 1500 g - 3
Stuffed vegetables 100 - 500 g - 3
Other vegetables 500 - 1500 g - 3
Gratin Vegetables
Potatoes one tray - 3
Tomatoes one tray - 3
Peppers one tray - 3
Broccoli one tray - 3
Cauliflowers one tray - 3
Others one tray - 3
Steamed Fresh Vegetables
Potatoes Whole 50 - 500 g - 2 1
Potatoes small / pieces one tray - 2 1
Peas 200 - 2500 g - 2 1
Broccoli 200 - 3000 g - 2 1
Cauliflowers 200 - 3000 g - 2 1
Steamed Vegetables Frozen Peas 200 - 3000 g - 2 1
Fruits Steamed Fruits Whole 100 - 400 g - 2 1
Pieces 500 - 3000 g - 2 1
22
Recipe Suggested quantity Turn (Of cook time) Level and Accessories
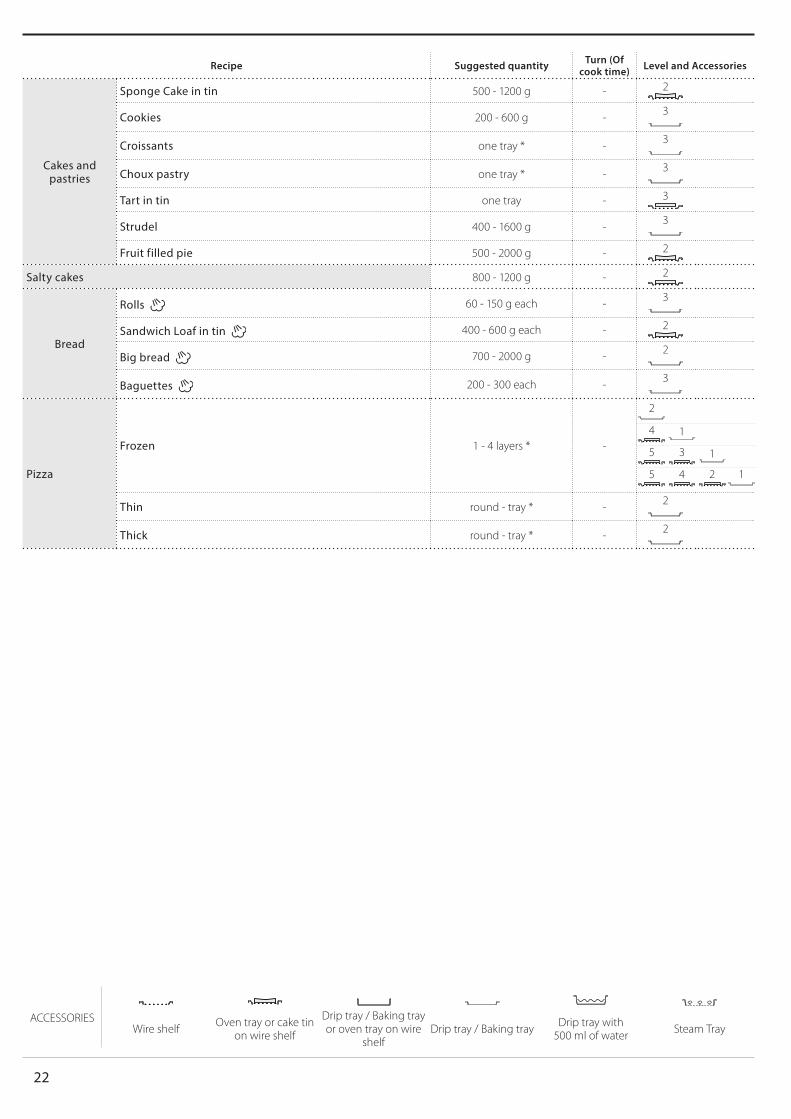
Cakes and pastries
Sponge Cake in tin 500 - 1200 g - 2
Cookies 200 - 600 g - 3
Croissants one tray * - 3
Choux pastry one tray * - 3
Tart in tin one tray - 3
Strudel 400 - 1600 g - 3
Fruit filled pie 500 - 2000 g - 2
Salty cakes 800 - 1200 g - 2
Bread
Rolls 60 - 150 g each - 3
Sandwich Loaf in tin 400 - 600 g each - 2
Big bread 700 - 2000 g - 2
Baguettes 200 - 300 each - 3
Pizza
Frozen 1 - 4 layers * -
2
4 1
5 3 1
5 4 2 1
Thin round - tray * - 2
Thick round - tray * - 2
ACCESSORIESWire shelf Oven tray or cake tin
on wire shelf
Drip tray / Baking tray or oven tray on wire
shelfDrip tray / Baking tray Drip tray with
500 ml of water Steam Tray

EN
23
CLEANING AND MAINTENANCEMake sure that the oven has cooled down before carrying out any maintenance or cleaning.Do not use steam cleaners.
Do not use wire wool, abrasive scourers or abrasive/corrosive cleaning agents, as these could damage the surfaces of the appliance.
Wear protective gloves.The oven must be disconnected from the mains before carrying out any kind of maintenance work.
EXTERIOR SURFACES• Clean the surfaces with a damp microfibre cloth�
If they are very dirty, add a few drops of pH-neutral detergent� Finish off with a dry cloth�
• Do not use corrosive or abrasive detergents� If any of these products inadvertently comes into contact with the surfaces of the appliance, clean immediately with a damp microfibre cloth�
INTERIOR SURFACES• After every use, leave the oven to cool and then
clean it, preferably while it is still warm, to remove any deposits or stains caused by food residues To dry any condensation that has formed as a result of cooking foods with a high water content, let the oven to cool completely and then wipe it with a cloth or sponge�
• Activate the “Self-Clean” function for optimum cleaning of the internal surfaces�
• Clean the glass in the door with a suitable liquid detergent�
• The oven door can be removed to facilitate cleaning�
ACCESSORIES• Soak the accessories in a washing-up liquid
solution after use, handling them with oven gloves if they are still hot� Food residues can be removed using a washing-up brush or a sponge�
TANKTo ensure that the oven always works at optimum performance and to help prevent the build-up of limescale deposits over time, we recommend using the “Drain” and “Descale” functions regularly�After a long period of non-use of the steam functions, it is higly suggested to activate a cooking cycle with the empty oven by filling completely the tank�
REMOVING AND REFITTING THE DOOR• To remove the door, open it fully and lower the
catches until they are in the unlock position�
•
b
a
Close the door as much as you can� Take a firm hold of the door with both hands – do not hold it by the handle� Simply remove the door by continuing to close it while pulling it upwards at the same time until it is released from its seating� Put the door to one side, resting it on a soft surface�
a
b
~15°
Refit the door by moving it towards the oven, aligning the hooks of the hinges with their seating and securing the upper part onto its seating�• Lower the door and then open it fully� Lower the
catches into their original position: Make sure that you lower them down completely�
b
a
Apply gentle pressure to check that the catches are in the correct position�
•
“CLICK”
Try closing the door and check to make sure that it lines up with the control panel� If it does not, repeat the steps above: The door could become damaged if it does not work properly�

24
REPLACING THE LAMP1� Disconnect the oven from the power supply�2� Remove the shelf guides�3� Remove the lamp cover�4� Replace the lamp�5� Reposition the lamp cover, pushing it on firmly
until it snaps into place�6� Refit the shelf guides�7� Reconnect the oven to the power supply�
Please note: Only use 20-40 W/230 ~ V type G9, T300°C halogen bulbs. The bulb used in the product is specifically designed for domestic appliances and is not suitable for general room lighting within the home (EC Regulation 244/2009). Light bulbs are available from our After-sales Service.
When using halogen bulbs, do not handle them with your bare hands as your fingerprints could cause damage. Do not use the oven until the light cover has been refitted.

EN
25
001
TROUBLESHOOTINGProblem Possible cause Solution
The oven is not working�
Power cut�Disconnection from the mains�
Check for the presence of mains electrical power and whether the oven is connected to the electricity supply�Turn off the oven and restart it to see if the fault persists�
The display shows the letter “F” followed by a number or letter�
Oven failure�
Contact you nearest Client After-sales Service Centre and state the number following the letter “F”�Press , tap and then select “Factory Reset”� All settings saved will be deleted�
The home power goes off� Power setting wrong�
Verify if your domestic network has at least a rating of more than 3 kW� If no, decrease the power to 13 Ampere� To change it, press , select “More Modes” and thenselect “Power Management”�
The function is not available in demo mode�
Demo mode is running� Press , tap “Info” and then select “Store DemoMode” to exit�
The door will not open� Cleaning cycle in progress� Wait for the function to finish and for the oven to cool
down�Steam leaves the drawer during cooking�
Low water level in the tank� Add a glass of drinking water�
SUPPORTIn the event of any operation problems, contact a Franke Technical Service Centre� Never use the services of unauthorized technicians� Specify: - the type of fault - the appliance model (art�/Code) - the serial number (S�N�) on the rating plate, located on the right hand edge of the oven cavity (visible when the oven door is open)�
When contacting our Service Centre, please state the codes provided on your product's identification plate�
XXXXXX XXXXXX XXXXX XXXXXXXModel: xxxXXXXxx XXXXXXXXXX
XXXXXX
XXXXXXXXXX
XXXXXXXXXXXXXXXXXXXXXXXXXXXXXX XXXXXXXXXX

26
INHALT
ÜBERSICHT ������������������������������������������������������������������������������������������������������������������������������������������������������������������������������� 27
BEDIENFELD ���������������������������������������������������������������������������������������������������������������������������������������������������������������������������� 27
ZUBEHÖR ���������������������������������������������������������������������������������������������������������������������������������������������������������������������������������28
FUNKTIONEN ��������������������������������������������������������������������������������������������������������������������������������������������������������������������������29
ANLEITUNG FÜR DAS TOUCH-DISPLAY ��������������������������������������������������������������������������������������������������������������������������30
ERSTER GEBRAUCH ���������������������������������������������������������������������������������������������������������������������������������������������������������������30
TÄGLICHER GEBRAUCH �������������������������������������������������������������������������������������������������������������������������������������������������������� 32
HILFREICHE TIPPS ������������������������������������������������������������������������������������������������������������������������������������������������������������������ 37
COOKASSIST GARTABELLE �������������������������������������������������������������������������������������������������������������������������������������������������� 43
REINIGUNG UND PFLEGE �����������������������������������������������������������������������������������������������������������������������������������������������������46
LÖSEN VON PROBLEMEN �����������������������������������������������������������������������������������������������������������������������������������������������������48
SUPPORT ����������������������������������������������������������������������������������������������������������������������������������������������������������������������������������48

DE
27
1� Bedienfeld2� Gebläse3� Rundes Heizelement
(nicht sichtbar)4� Seitengitter
(die Einschubebene wird auf der Vorderseite des Ofens angezeigt)
5� Tür6� Wasserschublade7� Oberes Heizelement/Grill8� Lampe9� Typenschild
(nicht entfernen)10� Unteres Heizelement
(nicht sichtbar)
1. EIN / AUSZum Ein- und Ausschalten des Ofens�2. HOMEFür den Schnellzugriff auf das Hauptmenü�
3. FAVORITZum Aufrufen der Liste der Ihrer Favoriten-Funktionen�4. DISPLAY5. EXTRASZum Auswählen aus verschiedenen Optionen und auch zum Ändern der Ofen-Einstellungen und -Voreinstellungen�
6. ABBRECHENZum Anhalten aller Ofen-Funktionen ausgenommen Uhr, Küchen-Timer und Bediensperre�
1 2 3 4 5 6
ÜBERSICHT
GEBRAUCHSANLEITUNG
BEDIENFELD
5
4
3
2
1
5
4
3
2
1
1
2
3
4
8
9
10
5
7
6

28
ZUBEHÖRROST FETTPFANNE BACKBLECH BACKAUSZÜGE *
Zum Garen von Speisen oder zum Abstellen von Töpfen, Kuchenformen und anderem ofenfesten Kochgeschirr
Für die Verwendung als Bräter zum Garen von Fleisch, Fisch, Gemüse, Fladenbrot oder zum Aufsammeln von Garflüssigkeiten bei Positionierung unter dem Rost.
Zum Backen von Bäckerei- und Konditoreierzeugnissen, aber auch für die Zubereitung von Braten, Fisch in der Folie usw.
Um das Einsetzen oder Entfernen von Zubehör zu erleichtern.
DAMPFEINSATZ
* nur für bestimmte Modelle erhältlichDie Anzahl und Art der Zubehörteile kann je nach gekauftem Modell variieren.Weitere Zubehörteile sind separat über den Kundenservice erhältlich.
Der Dampf kann leichter zirkulieren, wodurch ein gleichmäßiges Garen der Speise unterstützt wird. Den Tropfeinsatz auf die Ebene darunter stellen, um den beim Garen freigesetzten Saft aufzufangen.
DEN ROST UND ANDERE ZUBEHÖRTEILE EINSETZENDen Rost horizontal einsetzen, indem dieser durch die Seitengitter geschoben wird; sicherstellen, dass die Seite mit dem erhöhten Rand nach oben zeigt�Andere Zubehörteile, wie Fettpfanne oder Backblech, werden auf die gleiche Weise horizontal eingesetzt wie der Rost�ENTFERNEN UND ERNEUTES ANBRINGEN DER SEITENGITTER• Zur Entfernung der Seitengitter, diese anheben und
den unteren Teil vorsichtig aus seinem Sitz ziehen: Jetzt können die Seitengitter entfernt werden�
• Zum erneuten Anbringen der Seitengitter, diese wieder in ihrem oberen Sitz anbringen� Die Seitengitter halten, in den Garraum schieben und anschließend in die Position im unteren Sitz herablassen�
ANBRINGEN DER BACKAUSZÜGE (FALLS VORHANDEN)Die Seitengitter aus dem Ofen nehmen und den Kunststoffschutz von den Backauszügen entfernen�Den oberen Clip des Backauszugs am Seitengitter befestigen und ihn so weit wie möglich entlang gleiten lassen� Den anderen Clip in seine Position absenken� Um die Führungen zu sichern, den unteren Teil des Clips fest gegen das Seitengitter drücken�Sicherstellen, dass sich die Backauszüge frei bewegen können� Diese Schritte am anderen Seitengitter auf der gleichen Einschubebene wiederholen�
Bitte beachten: Die Backauszüge können auf einer beliebigen Einschubebene angebracht werden.

DE
29
MANUELLE FUNKTIONEN• OBER-/UNTERHITZE*
Zum Garen aller Arten von Gerichten auf nur einer Einschubebene�
• BACKEN MIT UMLUFTZum Kochen von Fleisch, Backen von Kuchen mit Füllungen auf nur einer Einschubebene�
• HEISSLUFTFür gleichzeitiges Garen verschiedener Speisen auf mehreren Ebenen (maximal 3) mit gleicher Gartemperatur� Die Funktion erlaubt das Garen ohne Geschmacksübertragung von einer Speise auf die anderen�
• GRILLZum Grillen von Steaks, Grillspießen und Bratwürsten, zum Überbacken von Gemüse oder Rösten von Brot� Beim Grillen von Fleisch wird die Verwendung einer Fettpfanne zum Aufsammeln der Garflüssigkeiten empfohlen: Die Fettpfanne unter eine beliebige Einschubebene unter den Rost stellen und 500 ml Trinkwasser zufügen�
• TURBOGRILLZum Garen großer Fleischstücke (Keulen, Roastbeef, Hähnchen)� Es wird die Verwendung einer Fettpfanne zum Aufsammeln der Garflüssigkeiten empfohlen: Das Backblech unter eine beliebige Einschubebene unter den Rost stellen und 500 ml Trinkwasser zufügen�
• SCHNELLES VORHEIZENZum schnellen Vorheizen des Ofens�
• MULTICOOKING FUNKTIONENZum Garen verschiedener Speisen, welche die gleiche Gartemperatur auf vier Ebenen zur gleichen Zeit benötigen� Mit dieser Funktion können Plätzchen, Törtchen, runde Pizzen (auch tiefgefroren) und eine komplette Mahlzeit zubereitet werden� Um die besten Ergebnisse zu erzielen, die Gartabelle beachten�
• DAMPFGAREN » PURE STEAM
Zum Zubereiten von natürlichen und gesunden Speisen mit Dampf, um den vollen Nährwert der Speise zu bewahren� Diese Funktion ist insbesondere zum Garen von Gemüse, Fisch und Früchten als auch zum Blanchieren geeignet� Falls nicht anderweitig angegeben, alle Verpackungen und Schutzfolien entfernen, bevor die Speise in den Ofen gestellt wird�
» HEISSLUFT + DAMPFDurch Kombination der Eigenschaften des Dampfes mit denen der Heißluft ermöglicht Ihnen diese Funktion, außen angenehm knusprige und gebräunte Speisen zu garen, die gleichzeitig innen zart und saftig sind� Um beste Garergebnisse zu erzielen, empfehlen wir, eine HOHE Dampfstufe zum Garen von Fisch, eine MITTLERE für Fleisch und eine NIEDRIGE für Brot und Desserts auszuwählen�
• SONDERFUNKTIONEN » AUFTAUEN
Zur Beschleunigung des Auftauens von Speisen� Es wird empfohlen, das Gargut auf die mittlere Einschubebene zu geben� Es wird empfohlen, die Lebensmittel in ihrer Verpackung aufzutauen, um dem Austrocknen der Oberfläche vorzubeugen�
» WARMHALTENDamit frisch gegarte Speisen heiß und knusprig bleiben�
» AUFGEHENFür optimales Gehenlassen von süßen oder herzhaften Hefeteigen� Damit die Qualität beim Gehenlassen gesichert ist, die Funktion keinesfalls aktivieren, wenn der Backofen nach einem Garzyklus noch heiß ist�
» CONVENIENCEZum Garen von Fertiggerichten, die bei Raumtemperatur oder im Kühlschrank gelagert werden (Gebäck, Backmischungen, Muffins, Nudelgerichte und Broterzeugnisse)� Bei dieser Funktion werden sämtliche Speisen schnell und schonend gegart� Sie lässt sich auch zum Aufwärmen bereits gegarter Speisen verwenden� Ein Vorheizen des Backofens ist nicht notwendig� Folgen Sie den Anweisungen auf der Verpackung�
» MAXI COOKINGZum Garen von großen Fleischstücken (über 2,5 kg)� WEs wird empfohlen, das Fleisch während des Garvorgangs zu wenden, um eine gleichmäßigere Bräunung auf beiden Seiten zu erreichen� Es wird empfohlen, das Fleisch ab und an zu begießen, damit es nicht austrocknet�
» HEISSLUFT ÖKO*Zum Garen von gefüllten Bratenstücken und Fleischfilets auf einer Einschubebene� Durch eine sanfte, zeitweilige Luftzirkulation wird ein übermäßiges Austrocknen der Speise vermieden� Bei der Verwendung dieser ECO-Funktion bleibt das Licht während des Garvorgangs ausgeschaltet� Zur Verwendung des ECO-Zyklus und somit zur Optimierung des Energieverbrauchs sollte die Ofentür nicht geöffnet werden, bis die Speise vollständig gegart ist�
• TIEFKÜHLKOST GARENDie Funktion wählt automatisch die ideale Gartemperatur sowie den Modus für 5 verschiedene tiefgekühlte Fertiggerichte aus� Ein Vorheizen des Backofens ist nicht notwendig�
COOKASSISTDiese ermöglichen alle Arten von Speisen vollkommen automatisch zu garen� Folgen Sie den Anweisungen auf der jeweiligen Gartabelle, um die Funktion bestmöglich zu nutzen� Ein Vorheizen des Backofens ist nicht notwendig�
* Die Funktion wird als Bezug für die Energieeffizienzerklärung in Übereinstimmung mit der Verordnung (EU) Nr. 65/2014 verwendet
FUNKTIONEN

30
ANLEITUNG FÜR DAS TOUCH-DISPLAYZum Durchlaufen eines Menüs oder einer Liste:Einfach mit Ihrem Finger über das Display wischen, um die Menüeinträge oder Werte zu durchlaufen�Zum Auswählen oder Bestätigen:Die Anzeige antippen, um den gewünschten Wert oder Menüeintrag auszuwählen�
Zum Rückkehren zur vorherigen Anzeige: antippen�
Um eine Einstellung zu bestätigen oder zum nächsten Bildschirm zu gehen:“EINSTELLEN” oder “WEITER” antippen�
ERSTER GEBRAUCHWenn das Gerät zum ersten Mal eingeschaltet wird, muss das Produkt konfiguriert werden�Die Einstellungen können später durch Drücken von zum Aufrufen des Menüeintrags “Extras” geändert werden.
1. SPRACHE AUSWÄHLENWenn das Gerät zum ersten Mal eingeschaltet wird, muss die Sprache und die Zeit eingestellt werden�• Wischen Sie über die Anzeige, um die Liste der
verfügbaren Sprachen zu durchlaufen�
•
Čeština, Český Jazyk Czech
Dansk Danish
Deutsch German
Tippen Sie die von Ihnen gewünschte Sprache an�
Ελλνικά Greek, Modern
English English
Español Spanish
Durch Antippen von kehren Sie zur vorhergehenden Ansicht zurück.
2. EINSTELLUNGSMODUS AUSWÄHLENNachdem Sie die Sprache ausgewählt haben, fordert Sie das Display auf, zwischen “LADEN-DEMO” (nützlich für Händler, nur für Ausstellungszwecke) oder Fortfahren durch Antippen von “WEITER” auszuwählen�
Danke für Ihren Einkauf!
Drücken Sie Weiter, um die Konfiguration für den Hausgebrauch fortzusetzen�
LADEN-DEMO-MODUS WEITER

DE
31
. EINSTELLEN VON UHRZEIT UND DATUMDurch die Verbindung des Ofens mit Ihrem Heimnetzwerk werden Uhrzeit und Datum automatisch eingestellt� Anderenfalls müssen Sie diese manuell einstellen• Tippen Sie auf die entsprechenden Ziffern, um die
Uhrzeit einzustellen�
•
0987654321
Systemzeit einstellen.
Tippen Sie zum Bestätigen auf “EINSTELLEN”�
0987654321
12:3024-Stunden-Format
EINSTELLEN
Nachdem Sie die Uhrzeit eingestellt haben, müssen Sie das Datum einstellen�• Tippen Sie auf die entsprechenden Ziffern, um das
Datum einzustellen�• Tippen Sie zum Bestätigen auf “EINSTELLEN”�
4. EINSTELLEN DES STROMVERBRAUCHSDer Ofen ist auf den Verbrauch einer elektrischen Leistung programmiert, die mit einem Hausnetz mit einer Leistung von mehr als 3 kW (16 Ampere) kompatibel ist: Wird in Ihrem Haushalt eine geringere Leistung verwendet, muss dieser Wert vermindert werden (13 Ampere)�• Tippen Sie den Wert rechts an, um die Leistung
auszuwählen�
•
Strommanagement
13 Ampere
16 Ampere
Tippen Sie auf “OK”, um die Grundeinstellung abzuschließen�
Konfiguration abgeschlossen
Das Gerät ist nun konfiguriert und einsatzbereit!
OK
5. AUFHEIZEN DES OFENSEin neuer Ofen kann Gerüche freisetzen, die bei der Herstellung zurückgeblieben sind: Das ist ganz normal� Vor dem Garen von Speisen wird daher empfohlen, den Ofen in leerem Zustand aufzuheizen, um mögliche Gerüche zu entfernen� Schutzkarton und Klarsichtfolie aus dem Ofen entfernen und die Zubehörteile entnehmen� Den Ofen auf 200 °C etwa eine Stunde lang aufheizen�Es wird empfohlen, den Raum nach dem ersten Gebrauch des Geräts zu lüften.

32
TÄGLICHER GEBRAUCH1. AUSWÄHLEN EINER FUNKTION• Zum Einschalten des Ofens drücken oder die
Anzeige an einer beliebigen Stelle berühren�Auf dem Display können Sie zwischen den Funktionen Manuell und CookAssist wählen�• Tippen Sie die von Ihnen gewünschte Hauptfunktion
an, um das entsprechende Menü aufzurufen�
•
20:00
MANUELLE FUNKTIONEN
COOKASSIST
Blättern Sie nach oben oder nach unten, um die Liste zu durchsuchen�
•
Wählen der Funktion
OBER-/UNTERHITZE
HEIßLUFT GRILL
BACKEN MIT UMLUFT
Wählen Sie die von Ihnen gewünschte Funktion durch Antippen aus�
Wählen der Funktion
OBER-/UNTERHITZE
HEIßLUFT GRILL
BACKEN MIT UMLUFT
2. EINSTELLEN DER MANUELLEN FUNKTIONENNach Auswahl der gewünschten Funktion, können Sie die Einstellungen ändern� Das Display zeigt die Einstellungen an, die geändert werden können�TEMPERATUR / GRILL LEISTUNGSSTUFE• Durchlaufen Sie die vorgeschlagenen Werte und
wählen Sie den von Ihnen benötigten aus�Temperatur
wählen
WEITER
Wenn von der Funktion vorgesehen, können Sie antippen, um das Vorheizen zu aktivieren�
Temperatur wählen
WEITER
DAUERDie Gardauer muss nicht eingestellt werden, wenn der Garvorgang manuell gehandhabt wird� Im zeitgesteuerten Modus gart der Ofen für die von Ihnen gewählte Dauer� Nach dem Ablauf der Gardauer wird der Garvorgang automatisch gestoppt�• Zum Einstellen der Dauer tippen Sie auf “Gardauer
einstellen”�
•
Gardauer einstellen
Temperatur wählen
WEITER
Tippen Sie auf die entsprechenden Ziffern, um die von Ihnen benötigte Gardauer einzustellen�
•
0987654321
Zeit eingeben
WEITER
Tippen Sie zum Bestätigen auf “WEITER”�
3. COOKASSIST FUNKTIONEN EINSTELLENMit den COOKASSIST Funktionen können Sie eine Vielzahl von Gerichten zubereiten, die Sie aus der Liste auswählen können� Die meisten Gareinstellungen werden automatisch vom Gerät gewählt, um beste Ergebnisse zu erreichen�• Wählen Sie ein Rezept aus der Liste aus�Die Funktionen werden nach Lebensmittelkategorien im Menü „COOKASSIST FUNKTION“ (siehe entsprechende Tabellen) und nach Rezeptfunktionen im Menü „COOKASSIST PRO“ angezeigt.• Nachdem Sie eine Funktion gewählt haben, geben
Sie einfach die Eigenschaften des Lebensmittels, das Sie garen möchten, an (Menge, Gewicht usw�), um ein perfektes Ergebnis zu erzielen�
• Folgen Sie den Aufforderungen auf dem Display, die Sie durch den Garvorgang führen�

DE
33
4. STARTZEITVERZÖGERUNG EINSTELLENSie können den Garvorgang verzögern, bevor Sie eine Funktion starten: Die Funktion startet dann zu der von Ihnen vorgewählten Zeit�• Auf „STARTVORWAHL“ tippen, um die gewünschte
Startzeit einzustellen�
•
GAR- ANWEISUNG:
Zum Garen aller Arten von Gerichten auf nur einer Einschubebene�
Gericht hineingeben auf Ebene 3�Den Rost mit Topf oder Blech verwenden�
STARTVORWAHL
Ober-/Unterhitze
START
Nachdem Sie die gewünschte Verzögerung eingestellt haben, tippen Sie auf “STARTVORWAHL”, um die Wartezeit zu starten�
• Die Speise in den Ofen stellen und die Tür schließen: Die Funktion startet automatisch nach der berechneten Zeit�
Wird Vorheizen während der Zykluseinstellung ausgewählt, wird die Startvorwahl-Option deaktiviert.• Zur unmittelbaren Aktivierung der Funktion und
zum Löschen der programmierten Zeitverzögerung löschen, tippen Sie auf �
5. DIE FUNKTION STARTEN• Nachdem Sie die Einstellungen konfiguriert haben,
tippen Sie auf “START”, um die Funktion zu aktivieren�Sie können die eingestellten Werte jederzeit während des Garens ändern. Dazu den Wert antippen, den sie berichtigen möchten.Wenn der Ofen heiß ist und die Funktion eine spezielle Höchsttemperatur erfordert, wird eine Meldung auf der Anzeige angezeigt.• Drücken Sie , um die aktive Funktion zu einem
beliebigen Zeitpunkt anzuhalten oder tippen Sie auf den Wert für die Dauer und wählen Sie dann “STOPP”�
6. VORHEIZENNach dem Start der Funktion zeigt das Display den Status der Vorheizphase an, wenn diese zuvor aktiviert wurde�
00:00:15 seit StartOBER-/UNTERHITZEVorheizen200 °C
EINSTELLENGAREN
UHRZEIT
Sobald diese Phase beendet wurde, ertönt ein akustisches Signal und das Display zeigt an, dass der Backofen die eingestellte Temperatur erreicht hat�
•
Vorheizen abgeschlossenLegen Sie nun das Essen
FERTIG
Öffnen Sie die Tür�• Stellen Sie die Speisen in den Ofen�• Tür schließen und das Garen wird automatisch
fortgesetzt�Wird die Speise in den Ofen gestellt, bevor das Vorheizen beendet ist, kann dies negative Auswirkungen auf das endgültige Garergebnis haben.Wird die Tür während der Vorheizphase geöffnet, wird diese unterbrochen.Die Garzeit beinhaltet keine Vorheizphase.
7. PAUSE DES GARVORGANGSEinige der COOKASSIST Funktionen erfordern, dass die Speise während des Garens gewendet wird� Ein akustisches Signal ertönt und das Display zeigt an, welche Tätigkeit auszuführen ist� • Öffnen Sie die Tür�• Führen Sie die auf dem Display geforderte Tätigkeit
aus�• Die Tür schließen, dann “FERTIG“ antippen, um
weiterzugaren�Vor dem Ende des Garvorgangs könnte Sie der Ofen in gleicher Weise auffordern, die Speise zu prüfen�Ein akustisches Signal ertönt und das Display zeigt an, welche Tätigkeit auszuführen ist�• Prüfen Sie die Speise�• Tür schließen und das Garen wird automatisch
fortgesetzt�
8. ENDE DES GARVORGANGSEs ertönt ein akustisches Signal und das Display zeigt an, dass der Garvorgang beendet ist�Bei einigen Funktionen können Sie Ihre Speise nach dem Ende des Garens Extra-Bräunen, die Gardauer verlängern oder die Funktion als Favorit speichern�
•
00:01 seit Fertig
OBER-/UNTERHITZEGaren200 °C
TIMERFERTIG
Tippen Sie auf , um diese als Favorit zu speichern�• Wählen Sie “Extra-Bräunen”, um einen fünfminütigen
Bräunungszyklus zu starten�• Tippen Sie auf , um den Garvorgang zu
verlängern�

34
9. FAVORITENDie Favoriten-Funktion speichert die Ofeneinstellungen für Ihr Lieblingsrezept�Der Ofen erkennt die am häufigsten verwendeten Funktionen automatisch. Nach einer bestimmten Anzahl an Verwendungen, werden Sie aufgefordert die Funktionen zu Ihren Favoriten hinzuzufügen.ANLEITUNG ZUM SPEICHERN EINER FUNKTIONNach Ende einer Funktion können Sie diese durch Antippen von als Favorit speichern� Dies ermöglicht Ihnen, diese zukünftig schnell, unter Beibehaltung der gleichen Einstellungen zu verwenden�Das Display ermöglicht Ihnen das Speichern der Funktion durch Angabe von 4 bevorzugten Mahlzeiten einschließlich Frühstück, Mittagessen, Snack und Abendessen�• Tippen Sie auf die Symbole, um mindestens eine
auszuwählen�
•
1. Pizza dünn
FAVORIT
BEARBEITEN
Tippen Sie auf “FAVORIT”, um die Funktion zu speichern�
1. Pizza dünn
FAVORIT
BEARBEITEN
NACH DEM SPEICHERNZum Anzeigen des Favoriten-Menüs drücken Sie : Die Funktionen werden nach verschiedenen Mahlzeiten unterteilt und einige Empfehlungen werden angeboten�• Tippen Sie auf das Speisensymbol, um die
entsprechenden Listen anzusehen
•
Favoriten Mittag
PIZZA DÜNN
Sie suchen etwas anderes? Vorschläge weiter unten beachten�
Durchlaufen Sie die erhaltene Liste�• Tippen Sie auf das Rezept oder die Funktion, das/die
Sie benötigen�• Tippen Sie auf “START”, um den Garvorgang zu
aktivieren�ÄNDERN DER EINSTELLUNGENAuf der Favoriten-Anzeige können Sie zu jedem Favoriten ein Bild oder einen Namen hinzufügen, um ihn nach Ihren Vorliegen anzupassen�• Wählen Sie die Funktion aus, die Sie ändern
möchten�
• Tippen Sie auf “BEARBEITEN”�• Wählen Sie die Eigenschaft aus, die Sie ändern
möchten�• Tippen Sie auf “WEITER”: Auf dem Display erscheinen
die neuen Eigenschaften�• Tippen Sie auf “SPEICHERN”, um Ihre Änderungen zu
bestätigen�Auf der Favoriten-Anzeige können Sie auch Funktionen löschen, die Sie gespeichert haben:• Tippen Sie auf bei der Funktion�• Tippen Sie auf “LÖSCHEN”�Sie können auch die Uhrzeit korrigieren, zu der die verschiedenen Speisen angezeigt werden:• Drücken Sie �• Wählen Sie “Voreinstellungen”�• Wählen Sie “Uhrzeiten und Daten”� • Tippen Sie auf “Zeiten für Mahlzeiten”�• Durchlaufen Sie die Liste und tippen Sie die
entsprechende Uhrzeit an�• Tippen Sie auf die entsprechende Speise, um diese
zu ändern�Es kann nur ein Zeitfenster mit einer Speise kombiniert werden.
10. EXTRASDrücken Sie , um das “Extras” Menü zu einem beliebigen Zeitpunkt zu öffnen� Dieses Menü ermöglicht Ihnen, aus verschiedenen Optionen zu wählen und auch die Einstellungen oder Voreinstellungen für Ihr Produkt oder das Display zu ändern�
Extras
Küchen-Timer
Beleuchtung Reinigung
KÜCHEN-TIMERDie Funktion kann entweder bei Verwendung einer Garfunktion oder allein zur Zeitanzeige aktiviert werden�Nachdem sie gestartet wurde, zählt der Timer weiter eigenständig zurück, ohne die Funktion selbst zu beeinflussen�Sobald der Timer aktiviert wurde, kann auch eine Funktion ausgewählt und aktiviert werden�Der Timer setzt das Rückzählen in der oberen rechten Ecke der Anzeige fort.Abfragen oder Ändern des Küchen-Timers:• Drücken Sie �• Tippen Sie auf �Es ertönt ein akustisches Signal und eine Anzeige auf dem Bildschirm erscheint, sobald der Timer das Rückzählen der ausgewählten Zeit beendet hat� • Auf „ABLEHNEN“ tippen, um die Timereinstellung
aufzuheben�• Tippen Sie auf “NEUEN TIMER EINSTELLEN”, um den
Timer erneut einzustellen�
LICHTZum Ein- und Ausschalten der Backofenlampe�

DE
35
REINIGUNGAktivieren Sie die „Selbstreinigungs”-Funktion für die optimale Reinigung der Innenflächen�Es wird empfohlen die Ofentür während des Reinigungszyklus nicht zu öffnen, um zu vermeiden, dass Wasserdampf austritt, der negative Auswirkungen auf das endgültige Reinigungsergebniss haben könnte.• Sämtliche Zubehörteile aus dem Ofen entfernen, bevor
die Funktion aktiviert wird�• Gießen Sie 200 ml Trinkwasser auf den Boden des
Ofens�• Tippen Sie auf “START”, um die Reinigungsfunktion zu
aktivieren�Nachdem der Zyklus ausgewählt wurde, können Sie den Start der automatischen Reinigung verzögern. Tippen Sie auf “STARTVORWAHL”, um die Endzeit einzustellen, wie im entsprechenden Abschnitt angegeben.
ABPUMPENMit der Entleerungsfunktion kann das Wasser entleert werden, um einer Stagnation im Behälter vorzubeugen� Es wird empfohlen, das “Abpumpen” nach jeder Verwendung des Ofens auszuführen�
In jedem Fall wird diese Maßnahme nach einer bestimmten Anzahl an Garvorgängen zwingend erforderlich und es kann keine Dampffunktion gestartet werden, bevor dies ausgeführt wurde�Nachdem die Funktion “Abpumpen” ausgewählt wurde oder dies vom
Display angezeigt wird, die Funktion starten und die angegebenen Maßnahmen befolgen: Die Tür öffnen und eine große Kanne unter die Abpumpdüse rechts unter dem Bedienfeld positionieren� Nachdem das Abpumpen gestartet wurden, den Krug in dieser Position halten, bis der Vorgang beendet ist�Das Display zeigt an, wenn der Behälter komplett entleert werden muss�Bitte beachten: bevor dieser Vorgang ausgeführt werden kann, müssen 4 Stunden nach dem letzten Zyklus (oder nachdem das Produkt eingelegt wurde) verstreichen. Während dieser Wartezeit zeigt das Display die Meldung „Wasser ist ZU HEISS. Warten, bis die Temperatur sinkt. Wenn es kalt genug ist, kann mit Drücken von WEITER fortgefahren werden”. Die Kanne muss ein Fassungsvermögen von mindestens 2 Litern aufweisen.Mit der Entleerungsfunktion kann das Wasser entleert werden, um einer Stagnation im Behälter vorzubeugen� Es wird empfohlen, das “Abpumpen” nach jeder Verwendung des Ofens auszuführen� Wasser einfüllen oder ablassen, wenn dies durch eine Meldung auf dem Display angefordert wird�
ENTKALKENDiese Sonderfunktion hilft Ihnen, bei regelmäßiger Aktivierung, den Behälter und den Dampfkreislauf in optimalem Zustand zu halten� Die Funktion wird in verschiedene Phasen unterteilt: Entleeren, Entkalken und Spülen� Nachdem die Funktion gestartet wurde, alle auf dem Display angezeigten Schritte befolgen�
Die durchschnittliche Dauer der Komplettfunktion beträgt etwa 190 Minuten�Bitte beachten: Wenn die Funktion zu irgendeinem Zeitpunkt gestoppt wird, muss der gesamte Entkalkungsvorgang wiederholt werden.
» ENTLEERENVor dem Entkalken muss der Behälter entleert werden: Für die bestmögliche Durchführung dieses Vorgangs wie im entsprechenden Absatz beschrieben vorgehen�Bitte beachten: bevor dieser Vorgang ausgeführt werden kann, müssen 4 Stunden nach dem letzten Zyklus (oder nachdem das Produkt eingelegt wurde) verstreichen. Während dieser Wartezeit zeigt das Display die Meldung „Wasser ist ZU HEISS. Warten, bis die Temperatur sinkt. Wenn es kalt genug ist, kann mit Drücken von WEITER fortgefahren werden”. Die Kanne muss ein Fassungsvermögen von mindestens 2 Litern aufweisen.
» ENTKALKENFür das bestmögliche Ergebnis beim Entkalken empfehlen wir, den Behälter mit der Speziallösung zu befüllen, die beim Kundendienst erhältlich ist� Nachdem die Entkalkungsphase beendet wurde, muss der Behälter abgepumpt werden�
» SPÜLENZum Reinigen des Behälters und des Dampfkreislaufs muss ein Spülzyklus durchgeführt werden� Füllen Sie den Behälter mit Trinkwasser, bis das Display “BEHÄLTER VOLL” zeigt und starten Sie dann den Spülvorgang� Am Ende fordert Sie das Display auf, diese Phase durch Abpumpen und erneutes Spülen zu wiederholen� Schalten Sie den Ofen nicht aus, bevor alle durch die Funktion geforderten Schritte abgeschlossen wurden� Garfunktionen können während dem Reinigungszyklus nicht aktiviert werden�Bitte beachten: Anhand einer auf dem Display angezeigten Meldung werden Sie daran erinnert, diesen Vorgang regelmäßig auszuführen. Wasser einfüllen oder ablassen, wenn dies durch eine Meldung auf dem Display angefordert wird.
TON AUSTippen Sie auf das Symbol, um den Ton aller akustischen Signale und Alarme ein- oder auszuschalten�
BEDIENSPERREDie "Bediensperre" ermöglicht Ihnen die Tasten auf dem Touch-Display zu sperren, damit diese nicht zufällig gedrückt werden können� Zum Aktivieren der Sperre:• Tippen Sie auf das Symbol�Zum Deaktivieren der Sperre:• Tippen Sie auf das Display�• Wischen Sie auf der gezeigten Meldung nach oben�
BediensperreGerät gesperrt�
Zum Entsperren wischen�

36
MEHR MODIZum Auswählen von Sabbatmodus und den Zugriff auf das Strommanagement�Im Sabbatmodus bleibt der Backofen im Backmodus eingeschaltet, bis er deaktiviert wird. Der Sabbatmodus verwendet die Ober-/Unterhitze-Funktion. Alle anderen Gar- und Reinigungszyklen sind deaktiviert. Es ertönen keine Signale und die Displays zeigen keine Temperaturänderungen. Wenn die Backofentür geöffnet oder geschlossen wird, schaltet sich das Licht nicht ein oder aus und die Heizelemente schalten sich auch nicht sofort ein oder aus.Zum Deaktivieren und Beenden des Sabbatmodus drücken Sie oder und dann halten Sie die Displayanzeige 3 Sekunden lang gedrückt.
VOREINSTELLUNGENZum Ändern verschiedener Ofeneinstellungen�
INFOZum Ausschalten des “Demomodus für Laden”, Rücksetzen des Produkts und den Erhalt weiterer Informationen über das Produkt�

DE
37
HILFREICHE TIPPSLESEN DER GARTABELLENIn den Tabellen sind aufgelistet: Rezepte, ob Vorheizen notwendig ist, Temperatur (°C), Grill Leistungsstufe, Gardauer (Minuten), Zubehörteile und empfohlene Garebene� Die Garzeiten gelten ab dem Moment, in dem Sie das Gargut in den Ofen geben, die (eventuell erforderliche) Vorheizzeit zählt nicht dazu�Die Gartemperaturen und -zeiten sind nur Richtwerte und sind von der Menge des Garguts und von den verwendeten Zubehörteilen abhängig� Verwenden Sie zunächst die niedrigeren der empfohlenen Werte und gehen Sie, falls das erzielte Garergebnis nicht ihren Wünschen entspricht, zu den höheren Werten über�
Die mitgelieferten Zubehörteile und vorzugsweise Kuchenformen und Backbleche aus dunklem Metall verwenden� Sie können auch Töpfe und Zubehörteile aus feuerfestem Glas oder Keramik verwenden, die Garzeiten verlängern sich dadurch etwas� Für ein optimales Ergebnis befolgen Sie bitte die Hinweise zur Positionierung der (mitgelieferten) Zubehörteile im Backofen genau wie in der Gartabelle angegeben�
OBER-/UNTERHITZEDie Heizelemente oben und unten im Backofeninnenraum heizen das Backofeninnere gleichmäßig auf� Verwenden Sie die 3� Einschubebene� Zum Backen von Pizza sowie herzhaften oder süßen Kuchen mit flüssiger Füllung verwenden Sie die 1� oder 2� Ebene� Heizen Sie den Backofen vor, bevor Sie die Speisen in den Garraum stellen�Diese Funktion ist der beste Garmodus zum Backen von feinen Süßspeisen auf nur einer Einschubebene�Verwenden Sie Kuchenformen aus dunklem Metall und stellen Sie diese immer auf den mitgelieferten Rost� Entfernen Sie, wenn Sie die mitgelieferten Bleche verwenden, alle anderen, nicht verwendeten Zubehörteile aus dem Backofeninnenraum, um optimale Ergebnisse zu erhalten und Energie zu sparen�
Machen Sie bei Kuchen mit einem Zahnstocher eine Garprobe in der Mitte des Kuchens� Wenn der Zahnstocher trocken bleibt, ist der Kuchen fertig�Falls Sie beschichtete Kuchenformen verwenden, fetten Sie die Ränder nicht ein, damit der Kuchen an den Rändern gleichmäßig aufgeht�Falls der Kuchen beim Backen wieder zusammenfällt, wählen Sie beim nächsten Mal eine niedrigere Temperatur, etwas weniger Flüssigkeit und rühren Sie den Teig vorsichtiger� Der Fisch ist fertig, wenn sich die Rückenflosse leicht löst� Beginnen Sie mit der Auswahl der niedrigsten angegebenen Temperatur, selbst wenn Sie größere Fische zubereiten� Im Allgemeinen gilt: Je größer der Fisch, desto niedriger muss die Temperatur sein und desto länger ist die Gardauer�
Rezept Vorheizen Temperatur (°C) Gardauer (Min.) Ebene und Zubehörteile
Hefekuchen / Biskuitkuchen Ja 170 30 - 50 2
Plätzchen / Buttergebäck Ja 150 20 - 40 3
Kleingebäck/Muffins Ja 170 20 - 40 3
Beignets Ja 180 - 200 30 - 40 3
Meringen Ja 90 110 - 150 3
Pizza / Brot / Fladenbrot Ja 190 - 250 15 - 50 2
Tiefkühlpizza Ja 250 10 - 15 3
Blätterteigtörtchen / Herzhaftes Blätterteiggebäck Ja 190 - 200 20 - 30 3
Lasagne / Flan / überbackene Nudeln / Cannelloni Ja 190 - 200 45 - 65 3
Lamm / Kalb / Rind / Schwein 1 kg Ja 190 - 200 80 - 110 3
Hähnchen / Kaninchen / Ente 1 kg Ja 200 - 230 50 - 100 3
Puter / Gans 3 kg Ja 190 - 200 80 - 130 2
Fisch gebacken / in Folie (Filets, ganz) Ja 180 - 200 40 - 60 3
ZUBEHÖRRost
Ofenform oder Kuchenform
auf Rost
Fettpfanne / Backblech
oder Bräter auf Rost
Fettpfanne / Backblech
Fettpfanne mit 500 ml Wasser
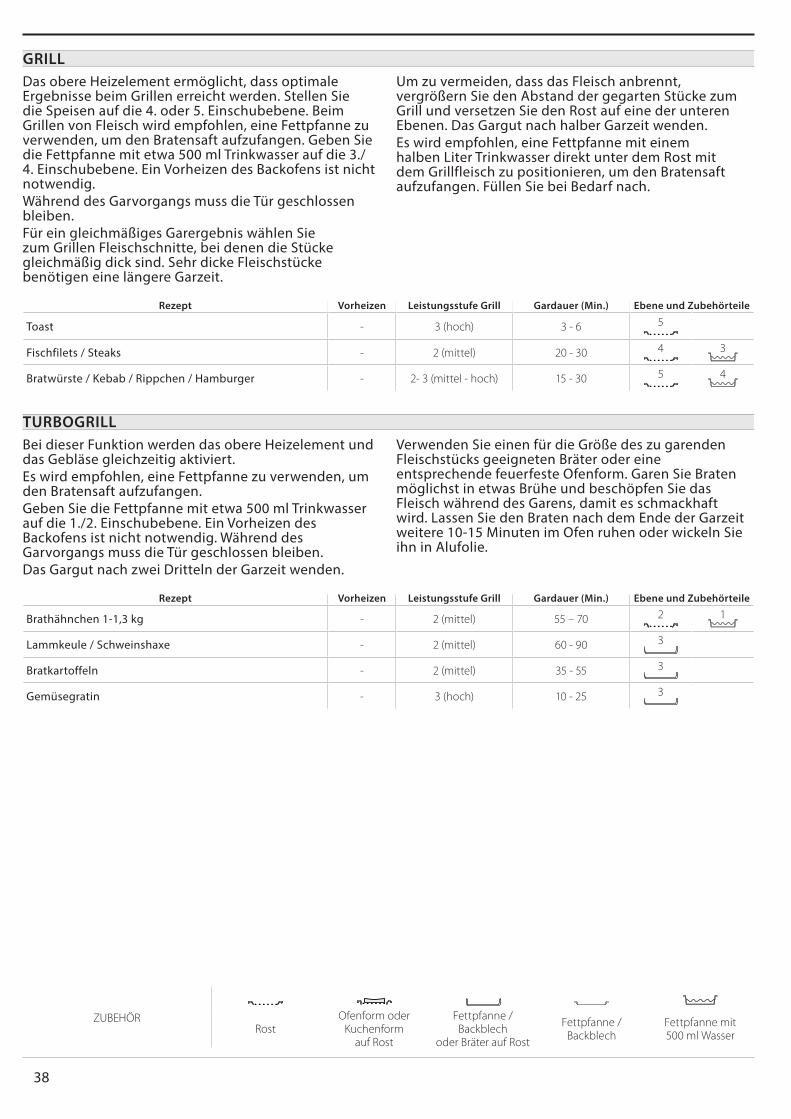
38
GRILLDas obere Heizelement ermöglicht, dass optimale Ergebnisse beim Grillen erreicht werden� Stellen Sie die Speisen auf die 4� oder 5� Einschubebene� Beim Grillen von Fleisch wird empfohlen, eine Fettpfanne zu verwenden, um den Bratensaft aufzufangen� Geben Sie die Fettpfanne mit etwa 500 ml Trinkwasser auf die 3�/ 4� Einschubebene� Ein Vorheizen des Backofens ist nicht notwendig�Während des Garvorgangs muss die Tür geschlossen bleiben�Für ein gleichmäßiges Garergebnis wählen Sie zum Grillen Fleischschnitte, bei denen die Stücke gleichmäßig dick sind� Sehr dicke Fleischstücke benötigen eine längere Garzeit�
Um zu vermeiden, dass das Fleisch anbrennt, vergrößern Sie den Abstand der gegarten Stücke zum Grill und versetzen Sie den Rost auf eine der unteren Ebenen� Das Gargut nach halber Garzeit wenden�Es wird empfohlen, eine Fettpfanne mit einem halben Liter Trinkwasser direkt unter dem Rost mit dem Grillfleisch zu positionieren, um den Bratensaft aufzufangen� Füllen Sie bei Bedarf nach�
Rezept Vorheizen Leistungsstufe Grill Gardauer (Min.) Ebene und Zubehörteile
Toast - 3 (hoch) 3 - 6 5
Fischfilets / Steaks - 2 (mittel) 20 - 30 4 3
Bratwürste / Kebab / Rippchen / Hamburger - 2- 3 (mittel - hoch) 15 - 30 5 4
TURBOGRILLBei dieser Funktion werden das obere Heizelement und das Gebläse gleichzeitig aktiviert�Es wird empfohlen, eine Fettpfanne zu verwenden, um den Bratensaft aufzufangen�Geben Sie die Fettpfanne mit etwa 500 ml Trinkwasser auf die 1�/2� Einschubebene� Ein Vorheizen des Backofens ist nicht notwendig� Während des Garvorgangs muss die Tür geschlossen bleiben�Das Gargut nach zwei Dritteln der Garzeit wenden�
Verwenden Sie einen für die Größe des zu garenden Fleischstücks geeigneten Bräter oder eine entsprechende feuerfeste Ofenform� Garen Sie Braten möglichst in etwas Brühe und beschöpfen Sie das Fleisch während des Garens, damit es schmackhaft wird� Lassen Sie den Braten nach dem Ende der Garzeit weitere 10-15 Minuten im Ofen ruhen oder wickeln Sie ihn in Alufolie�
Rezept Vorheizen Leistungsstufe Grill Gardauer (Min.) Ebene und Zubehörteile
Brathähnchen 1-1,3 kg - 2 (mittel) 55 – 70 2 1
Lammkeule / Schweinshaxe - 2 (mittel) 60 - 90 3
Bratkartoffeln - 2 (mittel) 35 - 55 3
Gemüsegratin - 3 (hoch) 10 - 25 3
ZUBEHÖRRost
Ofenform oder Kuchenform
auf Rost
Fettpfanne / Backblech
oder Bräter auf Rost
Fettpfanne / Backblech
Fettpfanne mit 500 ml Wasser

DE
39
HEISSLUFTDas Ringheizelement und das Gebläse werden gleichzeitig aktiviert� Das Gebläse an der Rückwand verteilt die Heißluft gleichmäßig im Backofen�Mit der Funktion „Heißluft“ lassen sich verschiedene Speisen (z� B� Fisch oder Gemüse) bei gleicher Temperatur auf verschiedenen Ebenen gleichzeitig garen� Nehmen Sie die Speise mit kürzerer Garzeit heraus und lassen Sie die Speisen mit längerer Garzeit weiter im Ofen�
Verwenden Sie die 4� Einschubebene zum Garen auf nur einer Ebene, die 1� und 4� Ebene zum Garen auf zwei Ebenen und die 1�, 3� und 5� zum Garen auf drei Ebenen� Stellen Sie Kuchenformen stets auf den Rost� Heizen Sie den Backofen vor dem Garen vor�Damit eine gleichmäßige Bräunung erzielt wird, sicherstellen, dass alle Teigportionen die gleiche Dicke aufweisen�Fetten Sie beim Backen von Pizza die Bleche leicht ein, damit auch der Pizzaboden knusprig wird� Verteilen Sie den Mozzarella nach zwei Dritteln der Garzeit auf der Pizza�
Rezept Vorheizen Temperatur (°C) Gardauer (Min.) Ebene und Zubehörteile
Hefekuchen / BiskuitkuchenJa 170 30 - 50 2
Ja 160 30 - 50 4
1
Gefüllter Kuchen (Käsekuchen, Strudel, Apfelkuchen) Ja 160 – 200 35 - 90 4 1
Plätzchen / Buttergebäck
Ja 140 30 - 50 4
Ja 140 30 - 50 4
1
Ja 135 40 - 60 5
3 1
Kleingebäck/Muffins
Ja 150 30 - 50 4
Ja 150 30 - 50 4
1
Ja 150 40 - 60 5
3 1
BeignetsJa 180 - 190 35 - 45 4
1
Ja 180 - 190 35 - 45 * 5
3 1
MeringenJa 90 130 - 150 4
1
Ja 90 140 - 160 * 5 3 1
Pizza / Brot / Fladenbrot Ja 190 - 230 20 - 50 4 1
Pizza (dünn, dick, Fladenbrot) Ja 220 - 240 25 - 50 * 5 3 1
TiefkühlpizzaJa 250 10 - 20 4 1
Ja 220 - 240 15 - 30 5 3 1
Salzige Kuchen (Gemüsekuchen, Quiche)Ja 180 - 190 45 - 60 4 1
Ja 180 - 190 45 - 70 * 5 3 1
Blätterteigtörtchen / Herzhaftes BlätterteiggebäckJa 180 - 190 20 - 40 4 1
Ja 180 - 190 20 - 40 * 5 3 1
Lasagne, Fleisch Ja 200 50 - 100 * 4 1
Fleisch & Kartoffeln Ja 200 45 - 100 * 4 1
Fisch & Gemüse Ja 180 30 - 50 * 4 1
* Voraussichtliche Zeitdauer: Je nach persönlichen Vorlieben können die Speisen zu verschiedenen Zeitpunkten aus dem Ofen genommen werden.

40
MULTICOOKINGRezept Gericht Vorheizen Temperatur (°C) Gardauer (Min.) Ebene und Zubehörteile
Kekse/Plätzchen Kekse/Plätz-chen Ja 135 50 - 70 5 4 3 1
Törtchen Törtchen Ja 170 50 - 70 5 4 3 1
Pizza rund Pizza rund Ja 210 40 - 60 5 4 2 1
Komplette Mahlzeit: Obstkuchen (Ebene 5)Gebratenes Gemüse (Ebene 4) Lasagne (Ebene 2) Fleischstücke (Ebene 1)
Cook 4 Menu Ja 190 40 - 120 5 4 2 1
BACKEN MIT UMLUFTVerwenden Sie diese Funktion für Quiche und Gemüsetorten mit saftiger Füllung wie Käse- oder Obstkuchen�Sie ist auch ideal zum Garen von Speisen mit hohem Wassergehalt� Das Gebläse verteilt die Hitze gleichmäßig im Ofen� Dies hilft, eine konstante Temperatur beizubehalten und die Speisen gleichmäßiger zu garen, die Oberseite knusprig werden
zu lassen, während das Innere saftig bleibt und krustige Brote zu backen�Verwenden Sie die 3� oder 2� Ebene� Warten Sie das Ende der Vorheizphase ab, bevor Sie das Gargut in den Ofen stellen�Ist der Kuchenboden zu feucht, verwenden Sie eine niedrigere Ebene und bestreuen Sie den Boden mit Kekskrümeln, bevor Sie die Füllung hineingeben�
Rezept Vorheizen Temperatur (°C) Gardauer (Min.) Ebene und Zubehörteile
Gefüllter Kuchen (Käsekuchen, Strudel, Apfelkuchen) Ja 160 – 200 30 - 85 3
Salzige Kuchen (Gemüsekuchen, Quiche) Ja 180 - 190 45 - 55 3
Gefülltes Gemüse (Tomaten, Zucchini, Auberginen) Ja 180 - 200 50 - 60 2

DE
41
ZUBEHÖRRost
Ofenform oder Kuchen-form
auf Rost
Fettpfanne / Backblech oder Bräter auf Rost Fettpfanne / Backblech Fettpfanne mit
500 ml Wasser
PURE STEAM
Rezept Vorhei-zen Temperatur (°C) Gardauer (Min.) Ebene und Zubehör-
teile
Frisches Gemüse (im Ganzen) - 100 30 - 80 2 1
Frisches Gemüse (in Stücken) - 100 15 - 40 2 1
Tiefgefr� Gemüse - 100 20 - 40 2 1
Ganzer Fisch - 90 40 - 50 2 1
Fischfilets - 90 20 - 30 2 1
Hähnchenfilets - 100 15 - 50 2 1
Eier - 100 10 - 30 2 1
Obst (im Ganzen) - 100 15 - 45 2 1
Obst (in Stücken) - 100 10 - 30 2 1
HEISSLUFT + DAMPF
Rezept Dampfstufe Vorhei-zen Temperatur (°C) Gardauer (Min.) Ebene und Zubehör-
teile
Buttergebäck / Kekse/Plätzchen
NIEDRIG - 140 - 150 35 - 55 3
NIEDRIG - 140 30 - 50 4
1
NIEDRIG - 140 40 - 60 5
3 1
Kleiner Kuchen / Muffins
NIEDRIG - 160 - 170 30 - 40 3
NIEDRIG - 150 30 - 50 4
1
NIEDRIG - 150 40 - 60 5
3 1
Hefekuchen NIEDRIG - 170 - 180 40 - 60 2
Biskuitkuchen NIEDRIG - 160 - 170 30 - 40 2
Fladenbrot NIEDRIG - 200 - 220 20 - 40 3
Brotlaib NIEDRIG - 170 - 180 70 - 100 3
Brötchen NIEDRIG - 200 - 220 30 - 50 3
Baguette NIEDRIG - 200 - 220 30 - 50 3
Bratkartoffeln MITTEL - 200 - 220 50 - 70 3
Kalb / Rind / Schwein 1 kg MITTEL - 180 - 200 60 - 100 3
Kalb / Rind / Schwein (in Stücken) MITTEL - 160 - 180 60 - 80 3
Roastbeef englisch 1 kg MITTEL - 200 - 220 40 - 50 3
Roastbeef englisch 2 kg MITTEL - 200 55 - 65 3
Lammkeule MITTEL - 180 - 200 65 - 75 3
Geschmorte Schweinshaxe MITTEL - 160 - 180 85 - 100 3
Hühnchen / Geflügel / Ente 1 – 1,5 kg MITTEL - 200 - 220 50 - 70 3
Hühnchen / Geflügel / Ente (in Stücken) MITTEL - 200 - 220 55 - 65 3
Gefülltes Gemüse (Tomaten, Zucchini, Aubergi-nen) MITTEL - 180 - 200 25 - 40 3
Fischfilet HOCH - 180 - 200 15 - 30 3

42
MAXI COOKINGDiese Funktion ist sehr nützlich zum Garen großer Fleischstücke (mehr als 2,5 kg)� Es wird empfohlen, das Fleisch während des Garvorgangs zu wenden, um eine gleichmäßigere Bräunung auf beiden Seiten zu erreichen� Es wird empfohlen, das Fleisch ab und an zu begießen, damit es nicht austrocknet�Verwenden Sie die 1� oder 2� Ebene, je nach Größe des Fleischstücks� Ein Vorheizen des Backofens vor dem Garen ist nicht notwendig�
Garen Sie Braten möglichst in etwas Brühe und beschöpfen Sie das Fleisch während des Garens, damit es schmackhaft wird� Lassen Sie den Braten nach dem Ende der Garzeit weitere 10-15 Minuten im Ofen ruhen oder wickeln Sie ihn in Alufolie�Wenn das Fleisch zu mager ist, fügen Sie etwas Flüssigkeit hinzu, beträufeln Sie das Stück mit Fett oder bedecken Sie es beispielsweise mit Speckstreifen�Stellen Sie beim Wenden des Bratens sicher, dass er zuerst mit der Schwarte nach unten gelegt wird�
Rezept Vorheizen Temperatur (°C) Gardauer (Min.) Ebene und Zubehörteile
Schweinebraten mit Kruste 2 kg - 170 110 - 150 2
ECO HEISSLUFTFür diese Funktion ist die 3� Einschubebene empfehlenswert� Ein Vorheizen des Backofens ist nicht
notwendig�
Rezept Vorheizen Temperatur (°C) Gardauer (Min.) Ebene und Zubehörteile
Gefüllte Bratenstücke - 200 80 - 120 * 3
Fleischstücke (Kaninchen, Hähnchen, Lamm) - 200 50 - 100 * 3
* Voraussichtliche Zeitdauer: Je nach persönlichen Vorlieben können die Speisen zu verschiedenen Zeitpunkten aus dem Ofen genommen werden.
AUFGEHENSie sollten den Teig immer mit einem feuchten Tuch abdecken, bevor Sie ihn in den Ofen stellen� Bei dieser Funktion verkürzt sich die Gehzeit gegenüber dem Aufgehen bei Raumtemperatur (20-25 °C) um etwa ein
Drittel�Die Gehzeit für 1 kg Pizzateig beträgt etwa eine Stunde�
WARMHALTENDie Warmhalten-Funktion ermöglicht Ihnen Fertiggerichte warmzuhalten� Dies verhindert die Bildung von Kondenswasser und der Garraum muss nicht gereinigt werden�
Es ist nicht empfehlenswert, Fertiggerichte länger als zwei Stunden warmzuhalten�Denken Sie daran, dass gewisse Speisen weitergaren, während sie warmgehalten werden: Decken Sie diese bei Bedarf ab, um sie vor dem Austrocknen zu schützen�
AUFTAUENGekochte Speisen, Geschmortes und Fleischsoßen tauen besser auf, wenn sie während des Auftauvorgangs bisweilen umgerührt werden� Trennen Sie einzelne Speisestücke, sobald diese antauen: die getrennten Portionen werden schneller abtauen�

DE
43
COOKASSIST GARTABELLE
Rezept Empfohlene MengeWenden
(nach Gar-dauer)
Ebene und Zubehör-teile
Aufläufe/Überback� Pasta
Frische Lasagne 500 - 3000 g - 2
Tiefkühl-Lasagne 500 - 3000 g - 2
Reis & Müsli
Reis
Weißer Reis 100 - 500 g - 2 1
Naturreis 100 - 500 g - 2 1
Vollkornreis 100 - 500 g - 2 1
Körner & Müsli
Quinoa 100 - 300 g - 2 1
Hirse 100 - 300 g - 2 1
Dinkel 100 - 300 g - 2 1
Gerste 100 - 300 g - 2 1
Fleisch
RindRoastbeef 600 - 2000 g - 3
Hamburger 1,5 - 3 cm 3/5 5
Schwein
Schwein 600 - 2500 g - 3
Schweinerippchen ein Rost 2/35 4
Brathähnchen
Brathähnchen 600 - 3000 g - 2
Hähnchenfilet/-brust 1 - 5 cm 2/35
Gedünstetes FleischHähnchenfilets 1 - 5 cm - 2 1
Putenfilets 1 - 5 cm - 2 1
FleischgerichteKebab ein Rost 1/2 5 4
Würste & Würstchen 1,5 - 4 cm 2/3 5 4
ZUBEHÖRRost
Ofenform oder Kuchen-form
auf Rost
Fettpfanne / Backblech oder Bräter auf Rost Fettpfanne / Backblech Fettpfanne mit
500 ml Wasser

44
Rezept Empfohlene MengeWenden
(nach Gar-dauer)
Ebene und Zubehör-teile
Fisch & Meeres-früchte
Gebratene Filets & SteaksFischfilets/Scheiben 0,5 - 2.5 cm - 5
Tiefgekühlte Filets 0,5 - 2.5 cm - 4
Gedünstete Filets & Steaks Fischfilets/Scheiben 0,5 - 2.5 cm - 2 1
Tiefgekühlte Filets 0,5 - 2.5 cm - 2 1
Fisch/Meeresfrüchte gegrillt
Jakobsmuscheln gratiniert ein Blech - 4
Muscheln gratiniert ein Blech - 4
Garnelen ein Blech - 4 3
Garnelen ein Blech - 4 3
gedünstete Meeresfrüchte
gratinierte Jakobs-muscheln 500 - 1000 g - 2 1
Muscheln 500 - 3000 g - 2 1
Garnelen 100 - 1000 g - 2 1
Garnelen 500 - 1500 g - 2 1
Kalmar 100 - 500 g - 2 1
Tintenfisch 500 - 2000 g - 2 1
Gemüse
Gebratenes Gemüse
Kartoffeln - Frisch 500 - 1500 g - 3
Gefülltes Gemüse 100 - 500 g - 3
Sonstiges Gemüse 500 - 1500 g - 3
Gemüsegratin
Kartoffeln ein Blech - 3
Tomaten ein Blech - 3
Paprika ein Blech - 3
Brokkoli ein Blech - 3
Blumenkohl ein Blech - 3
Andere ein Blech - 3
Gedünstetes frisches Gemüse
Kartoffeln im Ganzen 50 - 500 g - 2 1
Kartoffeln klein / in Stücken ein Blech - 2 1
Erbsen 200 - 2500 g - 2 1
Brokkoli 200 - 3000 g - 2 1
Blumenkohl 200 - 3000 g - 2 1
Gedünstetes tiefgekühltes Gemüse Erbsen 200 - 3000 g - 2 1
Obst Gedünstetes ObstGanz 100 - 400 g - 2 1
Stücke 500 - 3000 g - 2 1

DE
45
Rezept Empfohlene MengeWenden
(nach Gar-dauer)
Ebene und Zubehör-teile
Kuchen und Gebäck
Biskuit in Kuchenform 500 - 1200 g - 2
Kekse/Plätzchen 200 - 600 g - 3
Croissants ein Blech * - 3
Brandteig ein Blech * - 3
Torte in Form ein Blech - 3
Strudel 400 - 1600 g - 3
Obstkuchen 500 - 2000 g - 2
Herzhafte Kuchen 800 - 1200 g - 2
Brot
Brötchen jeweils 60- 150 g - 3
Sandwich-Laib in Backform jeweils 400- 600 g - 2
Großes Brot 700 - 2000 g - 2
Baguettes jeweils 200 - 300 g - 3
Pizza
Tiefgekühlte 1 - 4 Ebenen * -
2
4 1
5 3 1
5 4 2 1
Dünn Rund - Blech * - 2
Dick Rund - Blech * - 2
ZUBEHÖRRost
Ofenform oder Kuchenform
auf Rost
Fettpfanne / Backblech
oder Bräter auf Rost
Fettpfanne / Backblech
Fettpfanne mit 500 ml Wasser Dampfeinsatz

46
REINIGUNG UND PFLEGEVor dem Ausführen beliebiger Wartungs- oder Reinigungsarbeiten sicherstellen, dass der Ofen abgekühlt ist.Keine Dampfreiniger verwenden.
Keine Stahlwolle, Scheuermittel oder aggressive/ätzende Reinigungsmittel verwenden, da diese die Flächen des Gerätes beschädigen können.
Schutzhandschuhe tragen.Vor dem Ausführen beliebiger Wartungsarbeiten muss der Ofen von der Stromversorgung getrennt sein.
AUSSENFLÄCHEN• Reinigen Sie die Flächen mit einem feuchten
Mikrofasertuch� Sollten sie stark verschmutzt sein, einige Tropfen von pH-neutralem Reinigungsmittel verwenden� Reiben Sie mit einem trockenen Tuch nach�
• Verwenden Sie keine korrosiven oder scheuernden Reinigungsmittel� Falls ein solches Mittel versehentlich mit den Flächen des Geräts in Kontakt kommt, dieses sofort mit einem feuchten Mikrofasertuch reinigen�
INNENFLÄCHEN• Den Ofen nach jedem Gebrauch abkühlen lassen
und anschließend reinigen, vorzugsweise wenn er noch warm ist, um durch Speisereste entstandene Ablagerungen und Flecken zu entfernen� Um die beim Garen von Speisen mit hohem Wassergehalt entstandene Kondensation zu trocknen, den Ofen vollständig abkühlen lassen und anschließend mit einem Tuch oder Schwamm auswaschen�
• Aktivieren Sie die „Selbstreinigungs”-Funktion für die optimale Reinigung der Innenflächen�
• Das Glas der Backofentür mit einem geeigneten Flüssigreiniger reinigen�
• Die Backofentür kann zum Reinigen vollständig ausgehängt werden�
ZUBEHÖR• Weichen Sie das Zubehör nach Gebrauch in
einer Spülmittellösung ein und behandeln Sie es, falls es noch heiß ist, mit Ofenhandschuhen� Speiserückstände können dann mit einer Spülbürste oder einem Schwamm entfernt werden�
BEHÄLTERUm sicherzustellen, dass der Ofen stets mit optimaler Leistung arbeitet und hilft, die Bildung von Kalkablagerungen mit der Zeit zu verhindern, wird empfohlen, die Funktionen „Entleeren“ und „Entkalken“ regelmäßig zu verwenden�Wurde die Dampf-Funktionen länger nicht verwendet, ist es sehr empfehlenswert, bei leerem Ofen und komplett gefülltem Behälter einen Garzyklus durchzuführen�
AUSBAU UND ERNEUTES ANBRINGEN DER TÜR• Zur Entfernung der Tür, diese vollständig öffnen und
die Haken senken, bis sie sich in entriegelter Position befinden�
•
b
a
Die Tür so weit wie möglich schließen� Die Tür mit beiden Hände festhalten – diese nicht am Griff festhalten� Die Tür einfach entfernen, indem sie weiter geschlossen und gleichzeitig nach oben gezogen wird, bis sie sich aus ihrem Sitz löst� Die Tür seitlich abstellen und auf eine weiche Oberfläche legen�
a
b
~15°
Die Tür erneut anbringen, indem sie zum Ofen geschoben wird und die Haken der Scharniere auf ihre Sitze ausgerichtet werden, den oberen Teil auf seinem Sitz sichern�• Die Tür senken und anschließend vollständig öffnen� Die
Haken in ihre Ausgangsposition senken: Sicherstellen, dass die Haken vollständig gesenkt werden�
b
a
Einen leichten Druck ausüben, um zu überprüfen, dass sich die Haken in der korrekten Position befinden�
•
“CLICK”
Versuchen, die Tür zu schließen und sicherstellen, dass sie auf das Bedienfeld ausgerichtet ist� Ist dies nicht der Fall, die oben aufgeführten Schritte wiederholen: Die Tür könnte beschädigt werden, wenn dies nicht richtig funktioniert�

DE
47
AUSWECHSELN DER LAMPE1� Trennen Sie den Ofen von der Stromversorgung�2� Die Seitengitter aushängen�3� Nehmen Sie die Glühlampenabdeckung ab�4� Ersetzen Sie die Lampe�5� Setzen Sie die Lampenabdeckung wieder ein, indem
Sie diese fest aufdrücken, bis sie in Einbaulage einrastet�
6� Bringen Sie die Seitengitter wieder an�7� Schließen Sie den Ofen wieder an das Stromnetz an�
Bitte beachten: Nur Halogenlampen mit 20 bis 40 W/230 ~ V Typ G9, T300°C verwenden. Die im Gerät verwendete Lampe ist speziell für Elektrogeräte konzipiert und ist nicht für die Beleuchtung von Räumen geeignet (EU-Verordnung 244/2009). Die Glühlampen sind über unseren Kundendienst erhältlich.
Bei der Verwendung von Halogenlampen, diese nicht mit bloßen Händen berühren, da sie durch die Fingerabdrücke beschädigt werden könnten. Den Backofen erst benutzen, nachdem die Abdeckung der Beleuchtung wieder aufgesetzt wurde.

48
001
LÖSEN VON PROBLEMENProblem Mögliche Ursache Abhilfemaßnahme
Der Ofen funktioniert nicht�
Stromausfall�Trennung von der Stromversorgung�
Überprüfen, ob das Stromnetz Strom führt und der Backofen an das Netz angeschlossen ist�Schalten Sie den Backofen aus und wieder ein, um festzustellen, ob die Störung erneut auftritt�
Das Display zeigt ein „F“ gefolgt von einer Nummer oder einem Buchstaben an�
Störung�
Den nächsten Kundendienst kontaktieren und die Nummer angeben, die dem Buchstaben „F“ folgt�Drücken Sie , tippen Sie auf und wählen Sie dann “Werkseinstellung”� Alle gespeicherten Einstellungen werden gelöscht�
Die Hausstromversorgung schaltet sich aus�
Stromversorgungseinstellung falsch�
Prüfen, dass Ihr Hausnetz mit einer Leistung von mehr als 3 kW kompatibel ist� Andernfalls, die Leistung auf 13 Ampere verringern� Zum Ändern der Einstellung drücken Sie , wählen Sie “Mehr Modi” und wählenSie dann “Strommanagement”�
Die Funktion ist im Demomodus nicht verfügbar�
Der Demomodus läuft�Drücken Sie , tippen Sie auf ”Info” und wählen Sie dann “Laden-Demo-Modus” zum Beenden�
Die Tür lässt sich nicht öffnen� Der Reinigungszyklus läuft� Das Ende der Funktion abwarten und den Ofen abkühlen
lassen�
Der Dampf verlässt den Schub während des Kochens�
Niedriger Wasserstand im Tank� Fügen Sie ein Glas Trinkwasser hinzu�
SUPPORTBei Betriebsstörungen wenden Sie sich bitte an einen Franke Technischen Kundenservice� Nehmen Sie nie die Dienste nicht autorisierter Techniker in Anspruch� Machen Sie bitte folgende Angaben: - Art des Fehlers - Gerätemodell (Art�/Code) - Seriennummer (S�N�) auf dem Typenschild an der rechten Kante des Backofeninnenraums (bei offener Backofentür sichtbar)�
Wird unser Kundendienst kontaktiert, bitte die Codes auf dem Typenschild des Produkts angeben��
XXXXXX XXXXXX XXXXX XXXXXXXModel: xxxXXXXxx XXXXXXXXXX
XXXXXX
XXXXXXXXXX
XXXXXXXXXXXXXXXXXXXXXXXXXXXXXX XXXXXXXXXX

FR
49
SOMMAIRE
FR Manuel de l'utilisateur
APERÇU �������������������������������������������������������������������������������������������������������������������������������������������������������������������������������������50
PANNEAU DE COMMANDES �����������������������������������������������������������������������������������������������������������������������������������������������50
ACCESSOIRES �������������������������������������������������������������������������������������������������������������������������������������������������������������������������� 51
FONCTIONS ����������������������������������������������������������������������������������������������������������������������������������������������������������������������������� 52
COMMENT UTILISER L’ÉCRAN TACTILE ���������������������������������������������������������������������������������������������������������������������������� 53
PREMIÈRE UTILISATION �������������������������������������������������������������������������������������������������������������������������������������������������������� 53
UTILISATION QUOTIDIENNE ����������������������������������������������������������������������������������������������������������������������������������������������� 55
CONSEILS UTILES �������������������������������������������������������������������������������������������������������������������������������������������������������������������60
TABLEAU DE CUISSON COOKASSIST ��������������������������������������������������������������������������������������������������������������������������������66
NETTOYAGE ET ENTRETIEN �������������������������������������������������������������������������������������������������������������������������������������������������69
DÉPANNAGE ���������������������������������������������������������������������������������������������������������������������������������������������������������������������������� 71
ASSISTANCE ����������������������������������������������������������������������������������������������������������������������������������������������������������������������������� 71

50
1� Panneau de commandes2� Ventilateur3� Élément chauffant rond
(invisible)4� Supports de grille
(le niveau est indiqué à l'avant du four)
5� Porte6� Tiroir d’eau7� Élément de chauffage
supérieur/grill8� Ampoule9� Plaque signalétique
(ne pas enlever)10� Élément chauffant inférieur
(invisible)
1. ON / OFFPour allumer ou éteindre le four�2. ACCUEILPour accéder rapidement au menu principal�
3. FAVORIPour récupérer la liste de vos fonctions favorites�4. ÉCRAN5. OUTILSPour choisir parmi plusieurs options et également changer les réglages et les préférences du four�
6. ANNULATIONPour arrêter une fonction du four excepté l'Horloge, la Minuterie de cuisson et le Verrouillage des commandes�
1 2 3 4 5 6
APERÇU
GUIDE DE L'UTILISATEUR
PANNEAU DE COMMANDES
5
4
3
2
1
5
4
3
2
1
1
2
3
4
8
9
10
5
7
6

FR
51
ACCESSOIRESGRILLE MÉTALLIQUE LÈCHEFRITE PLAQUE DE CUISSON GRILLES COULISSANTES *
Utilisées pour la cuisson des aliments ou comme support pour les lèchefrites, moules à gâteau, et autres plats de cuisson résistants à la chaleur
Utiliser comme plat de cuisson pour la viande, le poisson, les légumes, la focaccia, etc., ou pour recueillir les jus de cuisson en la plaçant sous la grille métallique.
Pour la cuisson du pain et des pâtisseries, mais aussi pour cuire des rôtis, du poisson en papillotes, etc.
Pour insérer ou enlever les accessoires plus facilement.
PANIER VAPEUR
* Disponible sur certains modèles seulementLe nombre et type d’accessoires peuvent varier selon le modèle acheté.Il est possible d’acheter séparément d’autres accessoires auprès du Service après-vente.
Il facilite la circulation de la vapeur pour obtenir une cuisson uniforme. Placez la lèchefrite en dessous pour recueillir les jus de cuisson.
INSÉRER LA GRILLE MÉTALLIQUE ET LES AUTRES ACCESSOIRESInsérez la grille métallique horizontalement en la glissant sur les supports de grille, assurez-vous que le côté avec le bord relevé est placé vers le haut�Les autres accessoires, comme la lèchefrite et la plaque de cuisson, sont insérés à l’horizontal, de la même manière que la grille métallique�ENLEVER ET REPLACER LES SUPPORTS DE GRILLE• Pour enlever les supports de grille, soulevez les
supports et sortez délicatement la partie inférieure de leur appui : Les supports de grille peuvent maintenant être enlevés�
• Pour replacer les supports de grille, vous devez en premier les replacer dans leur appui supérieur� En les maintenant soulevés, glissez-les dans le compartiment de cuisson, abaissez-les ensuite dans leur appui inférieur�
INSTALLER LES GRILLES COULISSANTES (SELON LE MODÈLE)Enlevez les supports de grille du four et enlevez la protection de plastique des grilles coulissantes�Attachez l’agrafe supérieure de la grille coulissante au support de grille et glissez-la aussi loin que possible� Abaisser l’autre agrafe en place� Pour fixer le guide, pressez la partie inférieure de l’agrafe fermement sur le support de grille�Assurez-vous que les grilles ne bougent pas� Répétez ces étapes pour l'autre support de grille du même niveau�
Veuillez noter : les grilles coulissantes peuvent être installées sur le niveau de votre choix.

52
FONCTIONS MANUELLES
• CONVENTIONNELLE*Pour cuire tout type de plat sur une seule grille�
• CONVECTION FORCÉEPour cuire de la viande, des gâteaux avec garnitures sur une grille uniquement �
• AIR PULSÉPour la cuisson simultanée sur plusieurs niveaux (trois maximum) de différents aliments nécessitant la même température de cuisson� Cette fonction permet de cuire différents aliments sans transmettre les odeurs d'un aliment à l'autre�
• GRILLPour cuire des biftecks, des brochettes, et des saucisses, faire gratiner des légumes et griller du pain� Pour la cuisson de la viande, nous vous conseillons d'utiliser une lèchefrite pour recueillir les jus de cuisson : Placez la lèchefrite, contenant 500 ml d'eau, sur n'importe quel niveau sous la grille�
• TURBOGRILPour rôtir de grosses pièces de viande (cuisses, rosbif, poulet)� Nous vous conseillons d’utiliser une lèchefrite pour recueillir les jus de cuisson : Placez la lèchefrite, contenant 500 ml d’eau, sur n’importe quel niveau sous la grille�
• PRÉCHAUFFAGE RAPIDEPour préchauffer le four rapidement�
• FONCTIONS MULTICOOKING (MULTI-CUISSON)Pour cuire différents aliments qui nécessitent la même température de cuisson sur quatre niveaux en même temps� Cette fonction peut être utilisée pour cuire des biscuits, des gâteaux, des pizzas rondes (même congelées) et pour préparer un repas complet� Suivez le tableau de cuisson pour obtenir les meilleurs résultats�
• VAPEUR » VAPEUR PURE
Pour la cuisson de plats naturels et sains en utilisant la vapeur pour préserver les valeurs nutritives naturelles des aliments� Cette fonction est particulièrement adaptée pour la cuisson des légumes, du poisson, et des fruits, et aussi pour blanchir� À moins d’indication contraire, enlevez l’emballage et les pellicules de protection avant de placer les aliments dans le four�
» CHALEUR PULSÉE + VAPEUREn combinant les propriétés de la vapeur avec celles de l’air pulsé, cette fonction vous permet de cuire des plats agréablement croustillants et dorés à l’extérieur, tout en restant tendres et succulents à l’intérieur� Pour atteindre les meilleurs résultats de cuisson, nous recommandons de choisir un niveau de vapeur ÉLEVÉ pour la cuisson des poissons, MOYEN pour la viande et FAIBLE pour le pain et les desserts�
• FONCTIONS SPÉCIALES » DÉCONGELER
Pour accélérer la décongélation des aliments� Placez les aliments sur la grille du milieu� Laissez les aliments dans leur emballage pour éviter qu'il ne sèche sur l'extérieur�
» KEEP WARM (MAINTIEN AU CHAUD)Pour conserver les aliments cuits chauds et croustillants�
» LEVÉEPour un levage parfait des pâtes sucrées ou salées� Pour assurer la qualité de levage, n'activez pas la fonction si le four est encore chaud après un cycle de cuisson�
» COMMODITÉPour cuire des aliments prêts à l’emploi, stockés à la température ambiante ou au réfrigérateur (biscuits, mélange à gâteaux, muffins, plats de pâtes et produits de type pain)� Cette fonction cuit tous les aliments de manière rapide et délicate ; elle peut aussi être utilisée pour réchauffer des aliments cuits� Il n’est pas nécessaire de préchauffer le four� Suivez les instructions figurant sur l’emballage�
» MAXI COOKINGPour cuire de gros morceaux de viande (supérieurs à 2,5 kg)� Il est conseillé de retourner la viande pendant la cuisson pour obtenir un dorage homogène des deux côtés� Arrosez de temps à autre la viande avec son jus de cuisson pour éviter son dessèchement�
» ÉCO AIR PULSÉ*Pour cuire les rôtis farcis et les filets de viande sur une seule grille� Les aliments ne s’assèchent pas trop grâce à une légère circulation d’air intermittente� Lorsque cette fonction ÉCO est utilisée, le voyant reste éteint pendant la cuisson� Pour utiliser le cycle ÉCO et ainsi optimiser la consommation d'énergie, la porte du four ne devrait pas être ouverte avant la fin de la cuisson�
• FROZEN COOK (CUISSON DE PRODUITS CONGELÉS)La fonction sélectionne automatiquement la température et le mode de cuisson appropriés pour 5 types de plats préparés surgelés différents� Il n’est pas nécessaire de préchauffer le four�
COOKASSISTIls permettent de cuire tous les types d’aliments totalement automatiquement� Pour obtenir le meilleur de cette fonction, suivez les indications sur la table de cuisson correspondante�Il n'est pas nécessaire de préchauffer le four�
* Fonction utilisée comme référence pour la déclaration d'efficacité énergétique conformément au Règlement (UE) n° 65/2014
FONCTIONS

FR
53
COMMENT UTILISER L’ÉCRAN TACTILEPour défiler à travers un menu ou une liste :Faites simplement glisser votre doigt à travers l’écran pour passer à travers les articles ou les
valeurs�Pour sélectionner ou confirmer :Appuyez sur l’écran pour sélectionner la valeur ou l’élément de menu que vous souhaitez�
Pour revenir à l’écran précédent :Appuyez sur �Pour confirmer un réglage ou passer à l'écran suivant :Appuyez sur « RÉGLAGE » ou « SUIVANT »�
PREMIÈRE UTILISATIONVous devrez configurer le produit quand vous allumez l’appareil pour la première fois�Les réglages peuvent être modifiés par la suite en appuyant sur pour accéder au menu « Outils ».
1. SÉLECTIONNER LA LANGUEVous devez régler la langue et l’heure lorsque vous allumez l’appareil pour la première fois�• Faites glisser à travers l’écran pour défiler à travers
la liste de langues disponibles�
•
Čeština, Český Jazyk Czech
Dansk Danish
Deutsch German
Appuyez sur la langue que vous souhaitez�
Ελλνικά Greek, Modern
English English
Español Spanish
En appuyant sur vous reviendrez à l’écran précédent.
2. SÉLECTION DU MODE DE RÉGLAGESUne fois que vous avez sélectionné la langue, l’écran vous demandera de choisir entre « DÉMO MAGASIN » (utile pour les détaillants, dans un but d’affichage uniquement) ou de continuer en appuyant sur « SUIVANT »�
Merci de votre achat !
Appuyez sur SUIVANT pour poursuivre la configuration pour un usage à domicile�
CONSERVER LE MODE DÉMO SUIVANT

54
. RÉGLAGE DE L'HEURE ET DE LA DATELa connexion du four à votre réseau domestique réglera l'heure et la date automatiquement� Autrement, vous devrez les régler manuellement• Appuyez sur les nombres pertinents pour régler
l’heure�
•
0987654321
Régler l'heure du système.
Appuyez sur « RÉGLAGE » pour confirmer�
0987654321
12:3024 heures
RÉGLAGE
Une fois que vous avez réglé l'heure, vous aurez besoin de régler la date�• Appuyez sur les nombres pertinents pour régler la
date�• Appuyez sur « RÉGLAGE » pour confirmer�
4. RÉGLER LA CONSOMMATION ÉNERGÉTIQUELe four est programmé pour consommer un niveau d'énergie électrique compatible avec un réseau domestique supérieur à 3 kW (16 Ampères) : Si votre résidence utilise un niveau d'énergie plus bas, vous devrez diminuer la valeur (13 Ampères)�• Appuyez sur la valeur sur la droite pour
sélectionner la puissance�
•
Énergie
13 ampères
16 ampères
Appuyez sur « OK » pour compléter le paramétrage initial�
Configuration terminée
Votre appareil est configuré et prêt à être utilisé!
OK
5. CHAUFFER LE FOURUn nouveau four peut dégager des odeurs provenant de la fabrication : ceci est parfaitement normal� Avant de cuire des aliments, nous vous conseillons de chauffer le four à vide pour éliminer les odeurs� Enlevez les cartons de protection ou les pellicules transparentes du four, et enlevez les accessoires qui se trouvent à l'intérieur� Chauffez le four à 200°C pendant au moins une heure�Nous vous conseillons d’aérer la pièce après avoir utilisé l’appareil pour la première fois.

FR
55
UTILISATION QUOTIDIENNE1. SÉLECTIONNER UNE FONCTION• Pour allumer le four, appuyez sur ou appuyez
n’importe où sur l’écran�L'écran vous permet de choisir entre des Fonctions Manuelles et CookAssist�• Appuyez sur la fonction principale dont vous avez
besoin pour accéder au menu correspondant�
•
20:00
FONCTIONS MANUELLES
COOKASSIST
Faites défiler vers le haut ou vers le bas pour explorer la liste�
•
Choisissez la fonction
CONVENTIONNELLE
AIR PULSÉ GRILL
CONVECTION FORCÉE
Sélectionnez la fonction dont vous avez besoin en appuyant dessus�
Choisissez la fonction
CONVENTIONNELLE
AIR PULSÉ GRILL
CONVECTION FORCÉE
2. RÉGLAGE DES FONCTIONS MANUELLESAprès avoir sélectionné la fonction désirée, vous pouvez changer les réglages� L’écran indiquera les réglages qui peuvent être modifiés�NIVEAU DE TEMPÉRATURE / GRILL• Faites défiler à travers les valeurs suggérées et
sélectionnez celle dont vous avez besoin�Sélectionner température
SUIVANT
Si cela est autorisé par la fonction, vous pouvez appuyer sur pour activer le préchauffage�
Sélectionner température
SUIVANT
DURÉEVous n'avez pas à régler la durée de cuisson si vous avez l'intention de gérer la cuisson manuellement� En mode temporisé, le four cuit pendant la durée que vous sélectionnez� À la fin du temps de cuisson, la cuisson s'arrête automatiquement�• Pour commencer à régler la durée, appuyez sur
« Régler le temps de cuisson »�
•
Régler le temps de cuisson
Sélectionner température
SUIVANT
Appuyez sur les chiffres pertinents pour régler la durée de cuisson dont vous avez besoin�
•
0987654321
Entrer le temps
SUIVANT
Appuyez sur « SUIVANT » pour confirmer�3. RÉGLAGE DE FONCTIONS COOKASSISTLes fonctions COOKASSIST vous permettent de préparer une grande variété de plats, en choisissant parmi ceux de la liste� La plupart des réglages de cuisson sont automatiquement sélectionnées par l’appareil afin d’atteindre les meilleurs résultats�• Choisir une recette dans la liste�Les fonctions sont affichées par catégories alimentaires dans le menu « COOKASSIST FOOD LIST » (voir tableaux correspondants) et par caractéristiques des recettes dans le menu « COOKASSIST PRO ».• Une fois que vous avez sélectionné une fonction,
indiquez simplement la caractéristique de l’aliment (quantité, poids, etc�) que vous souhaitez cuire pour atteindre le résultat parfait�
• Suivez les invites à l'écran pour vous guider à travers le processus de cuisson�

56
4. RÉGLER DÉPART DIFFÉRÉVous pouvez retarder la cuisson avant de débuter une fonction : La fonction démarrera à l'heure que vous aurez sélectionnée au préalable�• Appuyez sur « RETARD » pour régler l'heure de
départ souhaitée�
•
INSTRUCTIONS DE CUISSON :
Pour cuire tout type de plat sur une seule grille�
Insérer les aliments au niveau 3�Utiliser la grille métallique avec un plat ou un plateau�
RETARD
Conventionnelle
DÉBUT
Une fois que vous avez réglé le temps différé requis, appuyez sur « ACTIVER MISE EN MARCHE DIFFÉRÉE » pour lancer le temps d’attente�
• Placez les aliments dans le four et fermer la porte : La fonction débutera automatiquement après la période de temps qui a été calculée�
Si le préchauffage est sélectionné pendant le réglage du cycle, l'option retardateur sera désactivée.• Pour activer la fonction immédiatement et annuler
le temps de départ différé programmé, appuyez sur �
5. DÉBUT LA FONCTION• Une fois que vous avez configuré les réglages,
appuyez sur « DÉBUT » pour activer la fonction�Vous pouvez changer les valeurs qui ont été réglées à tout moment pendant la cuisson en appuyant sur la valeur que vous voulez modifier.Si le four est chaud et que la fonction nécessite une température maximale spécifique, un message apparaîtra sur l’écran.• Appuyez sur pour arrêter la fonction active à
tout moment, ou appuyez sur la valeur de durée, puis sélectionnez « STOP »�
6. PRÉCHAUFFAGESi elle a été précédemment activée, une fois que la fonction a démarré, l’écran indique l’état de la phase de préchauffage�
00:00:15 depuis le démarrageCONVENTIONNELLEPréchauffage200°C
RÉGLAGETEMPS
DE CUISSON
Une fois que cette phase est terminée, un signal sonore retentira et l’écran indiquera que le four a atteint la température réglée�
•
Préchauffage terminéInsérez la nourriture maintenant
TERMINÉ
Ouvrez la porte�• Enfournez le plat�• Fermez la porte et la cuisson reprendra
automatiquement�Placer les aliments dans le four avant que le préchauffage soit terminé peut affecter la cuisson finale.La phase de préchauffage sera interrompue si vous ouvrez la porte durant le processus.Le temps de cuisson ne comprend pas la phase de préchauffage.
7. PAUSE DE LA CUISSONCertaines fonctions COOKASSIST nécessiteront de retourner les aliments pendant la cuisson� Un signal sonore retentira et l’écran affichera l’action à effectuer� • Ouvrez la porte�• Effectuez l’action demandée sur l’écran�• Fermez la porte, puis appuyez sur « TERMINÉ »
pour reprendre la cuisson�Avant la fin de la cuisson, le four pourrait vous demander de vérifier les aliments de la même façon�Un signal sonore retentira et l’écran affichera l’action à effectuer�• Vérifiez les aliments�• Fermez la porte et la cuisson reprendra
automatiquement�8. FIN DE CUISSONUn signal sonore et l'écran indiquent la fin de la cuisson�Avec certaines fonctions, une fois la cuisson terminée, vous pouvez donner à votre plat un brunissage supplémentaire, prolonger le temps de cuisson ou enregistrer la fonction dans les favoris�
•
00:01 depuis prêt
CONVENTIONNELLECuisson200°C
MINUTERIECOMPLET
Appuyez sur pour l'enregistrer comme favori�• Sélectionnez « Brunissage supplémentaire » pour
démarrer un cycle de brunissage de cinq minutes�• Appuyez sur pour enregistrer ou prolonger la
cuisson�

FR
57
9. FAVORISLa fonction Favoris stocke les réglages du four pour votre recette favorite�Le four reconnaît automatiquement les fonctions les plus utilisées.Après un certain nombre d’utilisations, il vous sera demandé d’ajouter la fonction à vos favoris.COMMENT ENREGISTRER UNE FONCTIONUne fois qu’une fonction est terminée, vous pouvez appuyer sur pour l’enregistrer en tant que favori� Cela vous permettra de l’utiliser rapidement à l’avenir, en conservant les mêmes réglages�L'écran vous permet d'enregistrer la fonction en indiquant jusqu'à 4 heures de repas favorites, y compris le petit-déjeuner, le déjeuner, le goûter et le dîner�• Appuyez sur les icônes pour en sélectionner au
moins une�
•
1. Pizza fine
FAVORI
ÉDITER
Appuyez sur « FAVORI » pour enregistrer la fonction�
1. Pizza fine
FAVORI
ÉDITER
UNE FOIS ENREGISTRÉEPour visualiser le menu favoris, appuyez sur : Les fonctions seront divisées par différentes heures de repas et certaines suggestions seront proposées�• Appuyez sur l'icône des repas pour visualiser les
listes correspondantes
•
Favoris déjeuners
PIZZA FINE
Vous cherchez autre chose ? Vérifiez les suggestions ci-dessous�
Faites défiler à travers la liste demandée�• Appuyez sur la recette ou la fonction dont vous
avez besoin�• Appuyez sur « DÉBUT » pour activer la cuisson�CHANGER LES RÉGLAGESSur l’écran Favoris, vous pouvez ajouter une image ou un nom à chaque favori pour le personnaliser selon vos préférences�• Sélectionnez la fonction que vous voulez changer�
• Appuyez sur « ÉDITER »�• Sélectionnez l'attribut que vous voulez modifier�• Appuyez sur « SUIVANT » : L'écran affichera les
nouveaux attributs�• Appuyez sur « SAUVEGARDER » pour confirmer vos
changements�Sur l'écran Favoris, vous pouvez également effacer des fonctions que vous avez enregistrées :• Appuyez sur la fonction�• Appuyez sur « L’ENLEVER »�Vous pouvez également changer l'heure quand les différents repas sont indiqués :• Appuyez sur �• Sélectionnez « Préférences»�• Sélectionnez « Heures et dates »� • Appuyez sur « Vos heures de repas »�• Défilez à travers la liste et appuyez sur l’heure
correspondante�• Appuyez sur le repas pertinent pour le modifier�Il ne sera possible de combiner un horaire qu’avec un seul repas.
10. OUTILSAppuyez sur pour ouvrir le menu « Outils » à tout moment� Ce menu vous permet de choisir parmi différentes options et également de changer les réglages ou préférences pour votre produit ou l’écran�
Outils
Minuterie de cuisson
Éclairage Auto-nettoyage
MINUTERIE DE CUISSONCette fonction peut être activée soit lors de l’utilisation d’une fonction de cuisson ou seule pour conserver l’heure� Une fois démarrée, la minuterie décomptera indépendamment sans interférer avec la fonction elle-même� Une fois que la minuterie a commencé le compte à rebours, vous pouvez aussi sélectionner et activer une fonction�La minuterie continuera de décompter dans l'angle supérieur droit de l'écran.Pour récupérer ou modifier la minuterie de cuisson :• Appuyez sur �• Appuyez sur �Un signal sonore se fait entendre et une indication apparaît à l’écran lorsque la minuterie a terminé le compte à rebours� • Appuyez sur « REJETER » pour annuler le minuteur�• Appuyez sur « RÉGLER NOUVELLE MINUTERIE » pour
régler à nouveau la minuterie�
ÉCLAIRAGEPour allumer ou éteindre l’ampoule du four�

58
NETTOYAGEActivez la fonction « Nettoyage » pour un nettoyage optimal des surfaces internes�Nous vous conseillons de ne pas ouvrir la porte du four durant le cycle de nettoyage pour éviter de perdre les vapeurs d'eau, le résultat de nettoyage final pourrait être négativement affecté.• Retirez tous les accessoires du four avant d’activer
la fonction�• Versez 200 ml d'eau potable dans le fond du four�• Appuyez sur « DÉBUT » pour activer la fonction de
nettoyage�Une fois le cycle sélectionné, vous pouvez différer le démarrage du nettoyage automatique. Appuyez sur « RETARD » pour régler l'heure de fin comme indiqué dans la section pertinente.
VIDANGELa fonction de vidange permet de vidanger l’eau afin de prévenir toute stagnation dans le réservoir� Il est conseillé de toujours réaliser la vidange à chaque fois que le four a été utilisé�
En tous cas, après un certain nombre de cuissons, cette action sera obligatoire et il ne sera pas possible de démarrer la fonction vapeur avant de l’avoir fait�Une fois la fonction « VIDANGE » sélectionnée ou lorsque cela est
suggéré sur l’écran, démarrez la fonction et suivez les actions indiquées : Ouvrez la porte et placez un grand récipient sous la buse de vidange située dans la partie inférieure droite du panneau� Une fois le vidange commencé, maintenez le récipient en position jusqu’à la fin de l’opération� L’écran indiquera quand le réservoir a été totalement vidangé�Veuillez noter : Il n'est pas possible d'effectuer cette activité avant que 4 heures ne se soient écoulées depuis le dernier cycle (ou la dernière fois que le produit a été alimenté). Pendant ce temps d'attente, l'écran indiquera la mention suivante « L'eau est TROP CHAUDE, attendre que la température diminue. Lorsqu'elle sera suffisamment froide, il sera possible de poursuivre en appuyant sur CONTINUER ».La carafe doit avoir une contenance minimale de 2 litres.La fonction de vidange permet de vidanger l’eau afin de prévenir toute stagnation dans le réservoir� Il est conseillé de toujours réaliser la vidange à chaque fois que le four a été utilisé� Verser ou vidanger l'eau si cela est demandé par un message à l'écran�
DÉTARTRERCette fonction spéciale, activée à intervalles réguliers, vous permet de maintenir le réservoir et le circuit de vapeur dans les meilleures conditions� La fonction est divisée en plusieurs phases : vidange, détartrage, rinçage� Une fois que la fonction a démarré, suivez toutes les étapes indiquées sur l'écran�La durée moyenne de la fonction totale est d’environ 190 minutes�
Veuillez noter : Si la fonction est arrêtée à quelque moment que ce soit, le cycle complet de détartrage doit être répété.
» VIDANGEAvant le détartrage, il sera nécessaire de vidanger le réservoir : pour effectuer l'opération de la meilleure façon possible, procédez comme décrit au paragraphe correspondant�Veuillez noter : Il n'est pas possible d'effectuer cette activité avant que 4 heures ne se soient écoulées depuis le dernier cycle (ou la dernière fois que le produit a été alimenté). Pendant ce temps d'attente, l'écran indiquera la mention suivante « L'eau est TROP CHAUDE, attendre que la température diminue. Lorsqu'elle sera suffisamment froide, il sera possible de poursuivre en appuyant sur CONTINUER ». La carafe doit avoir une contenance minimale de 2 litres.
» DÉTARTRAGEPour obtenir les meilleurs résultats du détartrage, nous vous recommandons de remplir le réservoir avec la solution spécifique disponible au service après-vente� Une fois que la phase de détartrage a été achevée, le réservoir doit être vidangé�
» RINÇAGEPour nettoyer le réservoir et le circuit de vapeur, il faut effectuer un cycle de rinçage� Remplissez le réservoir avec de l’eau potable jusqu’à ce que l’écran affiche « RÉSERVOIR PLEIN », puis commencez le rinçage� À la fin, l’écran demandera à répéter cette phase par une vidange et un nouveau rinçage�N’éteignez pas le four jusqu’à ce que toutes les étapes requises par la fonction aient été achevées� Les fonctions de cuisson ne peuvent pas être utilisées durant le cycle de nettoyage�Veuillez noter : Un message sera affiché à l’écran, pour vous rappeler d’exécuter cette opération régulièrement.Verser ou vidanger l'eau si cela est demandé par un message à l'écran.
SILENCEAppuyez sur l'icône pour couper le son ou rallumer le son de tous les sonorités et alarmes�
VERROUILLAGE DES COMMANDESLe « Verrouillage des commandes » vous permet de verrouiller les boutons sur le pavé tactile afin qu'ils ne puissent pas être enfoncés accidentellement� Pour activer le verrouillage :• Appuyez sur l'icône �Pour désactiver le verrouillage :• Appuyez sur l’écran�• Faites glisser le message indiqué vers le haut�
Verrouillage des commandesLe produit est verrouillé�
Faire glisser pour déverrouiller�

FR
59
PLUS DE MODESPour sélectionner le Mode Sabbat et accéder à l'Énergie�Le mode Sabbat maintient le four allumé en mode cuisson jusqu’à ce qu’il soit désactivé. Le mode Sabbat utilise la fonction conventionnelle. Tous les autres cycles de cuisson et de nettoyage sont désactivés. Aucune tonalité ne retentira, et les écrans n’indiqueront pas de changements de température. Lorsque la porte du four est ouverte ou fermée, l’éclairage du four ne s’allumera pas ou ne s’éteindra pas, et les éléments chauffants ne s’allumeront pas ou ne s’éteindront pas immédiatement.Pour désactiver et sortir du mode Sabbat, appuyez sur ou
puis appuyez sur l'écran d'affichage et maintenez-le enfoncé pendant 3 secondes.
PRÉFÉRENCESPour modifier plusieurs réglages du four�
INFOSPour éteindre « Conserver le mode Démo », réinitialiser le produit et obtenir d'autres informations sur le produit�

60
CONSEILS UTILESCOMMENT LIRE LE TABLEAU DE CUISSONLes tableaux énumèrent : les recettes, si un préchauffage est nécessaire, la température (°C), le niveau du grill, la durée de cuisson (minutes), les accessoires et le niveau suggéré pour la cuisson�Les temps de cuisson commencent au moment de l'introduction du plat dans le four et ne tiennent pas compte du préchauffage (s'il est nécessaire)�Les températures et temps de cuisson sont approximatifs et dépendent de la quantité d’aliments et du type d’accessoire� Utilisez d’abord les valeurs recommandées les plus basses et, si les aliments ne sont pas assez cuits, passez aux valeurs supérieures�
Utilisez les accessoires fournis et de préférence des moules à gâteaux et des plateaux de four en métal de couleur sombre� Vous pouvez aussi utiliser des plats et accessoires en pyrex ou en céramique ; les temps de cuisson seront néanmoins sensiblement plus longs� Afin d’obtenir de meilleurs résultats, observez attentivement les conseils fournis dans le tableau de cuisson pour le choix des accessoires (fournis) à placer sur les différents gradins�
CONVENTIONNELLELes éléments chauffants en haut et en bas de la cavité du four chauffent l'intérieur du four de manière uniforme� Utilisez le 3e niveau� Pour les pizzas, les tartes salées et les pâtisseries avec une garniture liquide, utilisez la 1ère ou 2ème grille� Préchauffez le four avant d'y introduire les aliments�Cette fonction est le meilleur mode de cuisson pour cuir des desserts délicats sur une seule grille�Utilisez des moules à gâteau en métal foncée et placez-les toujours sur la grille fournie� Lors de l'utilisation des plateaux fournis, enlevez les autres accessoires que vous n'utilisez pas de la cavité du four pour atteindre des résultats optimaux et économiser de l'énergie�
Pour vérifier si un gâteau est cuit, insérez un cure-dents en bois au centre du gâteau� Si le cure-dent en ressort sec, le gâteau est cuit� Si vous utilisez des moules antiadhésifs, ne beurrez pas les bords ; le gâteau pourrait ne pas lever de manière homogène sur les bords� Si le gâteau « s'affaisse» durant la cuisson, sélectionnez une température plus basse la prochaine fois� Vous pouvez également réduire la quantité de liquide et mélanger la pâte plus délicatement� Le poisson est cuit lorsque l'arête dorsale s'enlève facilement� Commencez par sélectionner la température la plus basse indiquée, même lors de la préparation de poissons plus gros� En général, plus le poisson est gros, plus la température doit être basse, et donc plus la durée de cuisson doit être longue�
Recette Préchauffage Température (°C) Durée de Cuisson (Min) Niveau et Accessoires
Gâteaux à pâte levée / Génoise Oui 170 30 - 50 2
Biscuits / Petit pain Oui 150 20 - 40 3
Petits gâteaux / Muffins Oui 170 20 - 40 3
Chouquettes Oui 180 - 200 30 - 40 3
Meringues Oui 90 110 - 150 3
Pizza / Pain / Fougasse Oui 190 - 250 15 - 50 2
Pizza surgelée Oui 250 10 - 15 3
Vol-au-vent / Feuilletés Oui 190 - 200 20 - 30 3
Lasagnes / pâtes cuites / cannellonis / tartes Oui 190 - 200 45 - 65 3
Agneau / Veau / Bœuf / Porc 1 kg Oui 190 - 200 80 - 110 3
Poulet / Lapin / Canard 1 kg Oui 200 - 230 50 - 100 3
Dinde / Oie 3 kg Oui 190 - 200 80 - 130 2
Poisson au four / en papillote (filet, entier) Oui 180 - 200 40 - 60 3
ACCESSOIRESGrille métallique
Plaque de cuisson ou moule à gâteau
sur la grille métallique
Lèchefrite/plaque de cuisson
ou plat de cuisson sur la grille métallique
Lèchefrite /plaque de cuisson
Lèchefrite contenant 500 ml d'eau

FR
61
GRILLL’élément chauffant supérieur permet d’atteindre des résultats optimaux lors de l’utilisation de la fonction gril� Placez des aliments sur la 4ème ou la 5ème grille� Pour griller la viande, utilisez une lèchefrite pour recueillir les jus de cuisson� Placez sur le 3e ou 4e niveau en ajoutant environ 500 ml d’eau potable� Il n’est pas nécessaire de préchauffer le four�Pendant la cuisson, la porte du four doit rester fermée�Si vous souhaitez griller de la viande, choisissez un morceau à épaisseur homogène de manière à obtenir une cuisson uniforme� Des pièces très épaisses de viande nécessitent des temps de cuisson plus longs�
Pour éviter de brûler la viande à l’extérieur, abaissez la position de la grille, éloignant ainsi les aliments du gril� Tournez les aliments à mi-cuisson�Il est conseillé d'utiliser une lèchefrite contenant un demi-litre d'eau, directement sous la grille sur laquelle la viande à griller a été placée, pour recueillir le jus de cuisson� Ajoutez de l'eau si nécessaire�
Recette Préchauffage Niveau du Gril Durée de Cuisson (Min) Niveau et Accessoires
Rôtie - 3 (Élevée) 3 - 6 5
Filets de poisson / Entrecôtes - 2 (Moy) 20 - 30 4 3
Saucisses / kebab / côtes levées / hamburgers - 2 - 3 (Moy – Haute) 15 - 30 5 4
TURBOGRILDans cette fonction, l'élément chauffant supérieur et le ventilateur sont activés en même temps�Utilisez une lèchefrite pour recueillir les jus de cuisson�Utilisez le 1er ou 2e niveau et ajoutez environ 500 ml d’eau potable� Il n’est pas nécessaire de préchauffer le four� Pendant la cuisson, la porte du four doit rester fermée�
Retournez les aliments aux deux tiers de la cuisson�Utilisez tout type de plat à four ou plat en pyrex adapté à la taille du morceau de viande à cuire� Pour les rôtis, ajoutez de préférence du bouillon au fond du plat et arrosez la viande durant la cuisson pour la rendre plus savoureuse� Lorsque le rôti est cuit, laissez-le reposer 10-15 minutes au four, ou enveloppez-le de papier aluminium�
Recette Préchauffage Niveau du Gril Durée de Cuisson (Min) Niveau et Accessoires
Poulet rôti 1-1,3 kg - 2 (Moy) 55 – 70 2 1
Gigot d’agneau / Jarrets - 2 (Moy) 60 - 90 3
Pommes de terre rôties - 2 (Moy) 35 - 55 3
Légumes gratinés - 3 (Élevée) 10 - 25 3
ACCESSOIRESGrille métallique
Plaque de cuisson ou moule à gâteau
sur la grille métallique
Lèchefrite/plaque de cuisson ou plat de cuisson sur la grille
métallique
Lèchefrite /plaque de cuisson
Lèchefrite contenant 500 ml d'eau

62
AIR PULSÉL'élément chauffant rond et le ventilateur sont activés en même temps� Le ventilateur sur la paroi arrière répartit l'air chaud uniformément autour du four�Grâce à la fonction « Air pulsé », vous pouvez cuire simultanément différents aliments nécessitant la même température de cuisson (par exemple le poisson et les légumes), en utilisant plusieurs grilles� Enlevez les aliments qui nécessitent moins de temps de cuisson et laissez les aliments qui nécessitent des temps de cuisson plus longs dans le four�
Utilisez la 4ème grille pour la cuisson sur une grille uniquement, la 1ère et 4ème pour la cuisson sur deux grilles, et la 1ère, 3ème et 5ème pour la cuisson sur trois grilles� Placez toujours les moules à gâteaux sur la grille métallique� Préchauffez le four avant la cuisson�Pour atteindre un brunissage uniforme, assurez-vous que toutes les portions de pâtes sont de la même épaisseur�Lors de la cuisson de pizza, graissez légèrement les plaques pour obtenir une pâte croustillante� Répartissez la mozzarella sur la pizza aux deux tiers de la cuisson�
Recette Préchauffage Température (°c) Durée de Cuisson (Min) Niveau et Accessoires
Gâteaux à pâte levée / GénoiseOui 170 30 - 50 2
Oui 160 30 - 50 4
1
Gâteaux fourrés (gâteau au fromage, strudel, tarte aux pommes) Oui 160 – 200 35 - 90 4
1
Biscuits / Petit pain
Oui 140 30 - 50 4
Oui 140 30 - 50 4
1
Oui 135 40 - 60 5
3 1
Petits gâteaux / Muffins
Oui 150 30 - 50 4
Oui 150 30 - 50 4
1
Oui 150 40 - 60 5
3 1
ChouquettesOui 180 - 190 35 - 45 4
1
Oui 180 - 190 35 - 45 * 5
3 1
MeringuesOui 90 130 - 150 4
1
Oui 90 140 - 160 * 5 3 1
Pizza / Pain / Fougasse Oui 190 - 230 20 - 50 4 1
Pizza (Mince, épaisse, focaccia) Oui 220 - 240 25 - 50 * 5 3 1
Pizza surgeléeOui 250 10 - 20 4 1
Oui 220 - 240 15 - 30 5 3 1
Tourtes (Tourtes aux légumes, quiches)Oui 180 - 190 45 - 60 4 1
Oui 180 - 190 45 - 70 * 5 3 1
Vol-au-vent / FeuilletésOui 180 - 190 20 - 40 4 1
Oui 180 - 190 20 - 40 * 5 3 1
Lasagnes & Viandes Oui 200 50 - 100 * 4 1
Viandes & pommes de terre Oui 200 45 - 100 * 4 1
Poisson & légumes Oui 180 30 - 50 * 4 1
* Durée approximative : les plats peuvent être retirés du four en tout temps, selon vos préférences personnelles.

FR
63
MULTI-CUISSONRecette Plat Préchauf-
fage Température (°C) Durée de Cuisson (Min) Niveau et Accessoires
Biscuits Biscuits Oui 135 50 - 70 5 4 3 1
Tartes Tartes Oui 170 50 - 70 5 4 3 1
Pizzas ronde Pizza ronde Oui 210 40 - 60 5 4 2 1
Repas complet : Tarte aux fruits (niveau 5)légumes rôtis (niveau 4) lasagnes (niveau 2) découpes de viande (niveau 1)
Cook 4 menu Oui 190 40 - 120 5 4 2 1
CONVECTION FORCÉEUtilisez cette fonction pour les quiches et tartes aux légumes ou pour les desserts avec une garniture moelleuse, comme les gâteaux au fromage et les tartes aux fruits�Cela est également idéal pour cuire des aliments ayant une teneur en eau élevée� Le ventilateur répartit la chaleur uniformément à travers le four� Cela aide à maintenir une température constante et à cuire les aliments de manière plus uniforme, en
obtenant une partie supérieure croustillante tout en gardant l'humidité à l'intérieur et en créant des pains plus croustillants�Utilisez le 3ème ou le 2ème niveau� Attendez la fin du préchauffage avant d’y placer des aliments�Si le fond de tarte est mou, abaisser la grille et parsemez le fond du gâteau de chapelure de biscuit avant d'ajouter la garniture�
Recette Préchauf-fage Température (°C) Durée de Cuisson
(Min) Niveau et Accessoires
Gâteaux fourrés (gâteau au fromage, strudel, tarte aux pommes) Oui 160 – 200 30 - 85 3
Tourtes (Tourtes aux légumes, quiches) Oui 180 - 190 45 - 55 3
Légumes farcis (tomates, courgettes, aubergines) Oui 180 - 200 50 - 60 2

64
ACCESSOIRESGrille métallique
Plaque de cuisson ou moule à gâteau
sur la grille métallique
Lèchefrite/plaque de cuisson ou plat de cuisson sur la grille
métallique
Lèchefrite /plaque de cuisson
Lèchefrite contenant 500 ml d'eau
VAPEUR PURE
Recette Préchauffage Température (°C) Durée de Cuisson (Min) Niveau et Accessoires
Légumes frais (Entier) - 100 30 - 80 2 1
Légumes frais (morceaux) - 100 15 - 40 2 1
Légumes surgelés - 100 20 - 40 2 1
Poisson entier - 90 40 - 50 2 1
Filet de poisson - 90 20 - 30 2 1
Escalopes de poulet - 100 15 - 50 2 1
Œufs - 100 10 - 30 2 1
Fruits (entiers) - 100 15 - 45 2 1
Fruits (Morceaux) - 100 10 - 30 2 1
CHALEUR PULSÉE + VAPEUR
Recette Niveau de vapeur Préchauffage Température (°C) Durée de Cuisson
(Min) Niveau et Accessoires
Petit pain/Biscuits
BASSE - 140 - 150 35 - 55 3
BASSE - 140 30 - 50 4
1
BASSE - 140 40 - 60 5
3 1
Petit gâteau/Muffins
BASSE - 160 - 170 30 - 40 3
BASSE - 150 30 - 50 4
1
BASSE - 150 40 - 60 5
3 1
Gâteaux à pâte levée BASSE - 170 - 180 40 - 60 2
Génoise BASSE - 160 - 170 30 - 40 2
Fougasse BASSE - 200 - 220 20 - 40 3
Pain (miche) BASSE - 170 - 180 70 - 100 3
Petit pain BASSE - 200 - 220 30 - 50 3
Baguettes BASSE - 200 - 220 30 - 50 3
Pommes de terre rôties MEDIUM - 200 - 220 50 - 70 3
Veau / Bœuf / Porc 1 kg MEDIUM - 180 - 200 60 - 100 3
Veau / Bœuf / Porc (morceaux) MEDIUM - 160 - 180 60 - 80 3
Rôti de bœuf saignant 1 kg MEDIUM - 200 - 220 40 - 50 3
Rôti de bœuf saignant 2 kg MEDIUM - 200 55 - 65 3
Gigot d’agneau MEDIUM - 180 - 200 65 - 75 3
Jarrets de porc en ragoût MEDIUM - 160 - 180 85 - 100 3
Poulet / pintade / canard 1 – 1,5 kg MEDIUM - 200 - 220 50 - 70 3
Morceaux de poulet / pintade / canard (mor-ceaux) MEDIUM - 200 - 220 55 - 65 3
Légumes farcis (tomates, courgettes, aubergines) MEDIUM - 180 - 200 25 - 40 3
Filet de poisson ÉLEVÉE - 180 - 200 15 - 30 3

FR
65
MAXI COOKINGCette fonction est très utile pour cuire de grandes portions de viande (plus de 2,5 kg)� Il est conseillé de retourner la viande pendant la cuisson pour obtenir un dorage uniforme� Arrosez de temps à autre la viande avec son jus de cuisson pour éviter son dessèchement�Utilisez le 1er ou le 2e gradin en fonction de la taille du morceau de viande� Il n'est pas nécessaire de préchauffer le four avant la cuisson�
Pour les rôtis, ajoutez de préférence du bouillon au
fond du plat et arrosez la viande durant la cuisson pour la rendre plus savoureuse� Lorsque le rôti est cuit, laissez-le reposer 10-15 minutes au four, ou enveloppez-le de papier aluminium�Si la viande est trop mince, ajoutez un peu de liquide, comblez la jonction avec de la graisse ou recouvrez-la avec des bandes de bacon, par exemple�En ce qui concerne le retournement du rôti, assurez-vous de le placer avec la croûte vers le bas en premier�
Recette Préchauf-fage Température (°C) Durée de Cuisson
(Min) Niveau et Accessoires
Rôti de porc avec grattons 2 kg - 170 110 - 150 2
ÉCO AIR PULSÉIl est conseillé d'utiliser la 3e grille� Il n’est pas nécessaire de préchauffer le four�
Recette Préchauf-fage Température (°C) Durée de Cuisson
(Min) Niveau et Accessoires
Rôtis farcis - 200 80 - 120 * 3
Morceaux de viande (lapin, poulet, agneau) - 200 50 - 100 * 3
* Durée approximative : les plats peuvent être retirés du four en tout temps, selon vos préférences personnelles.
LEVÉEIl est conseillé de couvrir la pâte avec un linge humide avant de la mettre au four� Avec cette fonction, le temps de levage de la pâte diminuent d'environ un tiers par rapport aux temps de levage à température ambiante (20-25°C)�
Le temps de fermentation pour 1 kg de pâte à pizza est d'environ une heure�
MAINTIEN AU CHAUDLa fonction de maintien au chaud vous permet de garder au chaud des repas prêts� Cela évite la formation de condensation et élimine la nécessité de nettoyer le compartiment de cuisson�
Il n'est pas conseillé de maintenir au chaud les repas prêts pendant plus de deux heures�Rappelez-vous que certains aliments continuent de cuire pendant qu'ils restent au chaud: Couvrez-les, si nécessaire, pour éviter qu'ils ne se dessèchent�
DÉCONGÉLATIONLes aliments bouillis, les ragoûts, et les sauces à base de viande se décongèlent mieux s'ils sont remués durant la décongélation� Séparez les morceaux dès qu'ils commencent à se décongeler : les portions séparées décongèlent plus rapidement�

66
TABLEAU DE CUISSON COOKASSIST
Recette Quantité suggérée
Retourne-ment (du temps de cuisson)
Niveau et Accessoires
Mets en sauce/Pâtes au four
Lasagnes fraîches 500 - 3000 g - 2
Lasagnes surgelées 500 - 3000 g - 2
Riz et céréales
Riz
Riz blanc 100 - 500 g - 2 1
Riz brun 100 - 500 g - 2 1
Riz complet 100 - 500 g - 2 1
Graines et céréales
Quinoa 100 - 300 g - 2 1
Millet 100 - 300 g - 2 1
Épeautre 100 - 300 g - 2 1
Orge 100 - 300 g - 2 1
Viandes
BœufRôti de bœuf 600 - 2000 g -
3
Hamburger 1,5 - 3 cm 3/5 5
PorcPorc 600 - 2500 g - 3
Côtes de porc une grille 2/3 5 4
Poulet rôtiPoulet rôti 600 - 3000 g - 2
Escalope / Blanc de poulet 1 - 5 cm 2/3 5
Viande cuite à la vapeurEscalopes de poulet 1 - 5 cm - 2 1
Escalopes de dinde 1 - 5 cm - 2 1
Plats de viandeKebab une grille 1/2 5 4
Saucisses et Würstel 1,5 - 4 cm 2/3 5 4
ACCESSOIRESGrille métallique
Plaque de cuisson ou moule à gâteau
sur la grille métallique
Lèchefrite/plaque de cuisson ou plat de cuisson sur la grille
métallique
Lèchefrite /plaque de cuisson
Lèchefrite contenant 500 ml d'eau

FR
67
Recette Quantité suggérée
Retourne-ment (du temps de cuisson)
Niveau et Accessoires
Poissons et fruits de mer
Escalopes et steaks rôtis
Filets/tranches de poisson 0,5 - 2,5 cm - 5
Filets surgelés 0,5 - 2,5 cm - 4
Escalopes et steaks cuits à la vapeur Filets/tranches de poisson 0,5 - 2,5 cm - 2 1
Filets surgelés 0,5 - 2,5 cm - 2 1
Fruits de mer grillés
Pétoncles gratinées un plateau - 4
Moules gratinées un plateau - 4
Crevettes un plateau - 4 3
Crevettes un plateau - 4 3
Fruits de mer cuits à la vapeur
Pétoncles gratinées 500 - 1000 g - 2 1
Moules 500 - 3000 g - 2 1
Crevettes 100 - 1000 g - 2 1
Crevettes 500 - 1500 g - 2 1
Calmar 100 - 500 g - 2 1
Poulpe 500 - 2000 g - 2 1
Légumes
Légumes rôtis
Pommes de terre - Fraîches 500 - 1500 g - 3
Légumes farcis 100 - 500 g - 3
Autres légumes 500 - 1500 g - 3
Légumes gratinés
Pommes de terre un plateau - 3
Tomates un plateau - 3
Piments un plateau - 3
Brocolis un plateau - 3
Chou-fleur un plateau - 3
Autres un plateau - 3
Légumes frais à la vapeur
Pommes de terre entières 50 - 500 g - 2 1
Pommes de terre petites/morceaux un plateau - 2 1
Petits pois 200 - 2500 g - 2 1
Brocolis 200 - 3000 g - 2 1
Chou-fleur 200 - 3000 g - 2 1
Légumes surgelés à la vapeur Petits pois 200 - 3000 g - 2 1
Fruits Fruits à la vapeurEntier 100 - 400 g - 2 1
En morceaux 500 - 3000 g - 2 1

68
Recette Quantité suggérée
Retourne-ment (du temps de cuisson)
Niveau et Accessoires
Gâteaux et pâtisseries
Génoise en moule 500 - 1200 g - 2
Biscuits 200 - 600 g - 3
Croissants un plateau * - 3
Desserts à base de pâte à choux un plateau * - 3
Tarte en moule un plateau - 3
Strudel 400 - 1600 g - 3
Tarte farcie aux fruits 500 - 2000 g - 2
Gâteaux salés 800 - 1200 g - 2
Pain
Petits pains 60 - 150 g chacun - 3
Pain de mie en moule 400 - 600 g chacun - 2
Gros pain 700 - 2000 g - 2
Baguettes 200 - 300 chacun - 3
Pizza
Produits surgelés 1 - 4 niveaux * -
2
4 1
5 3 1
5 4 2 1
Fine ronde - plateau * - 2
Épaisse ronde - plateau * - 2
ACCESSOIRESGrille métallique
Plaque de cuisson ou moule à gâteau
sur la grille métallique
Lèchefrite/plaque de cuisson ou plat de cuisson sur la grille
métallique
Lèchefrite /plaque de cuisson
Lèchefrite contenant 500 ml d'eau Panier vapeur
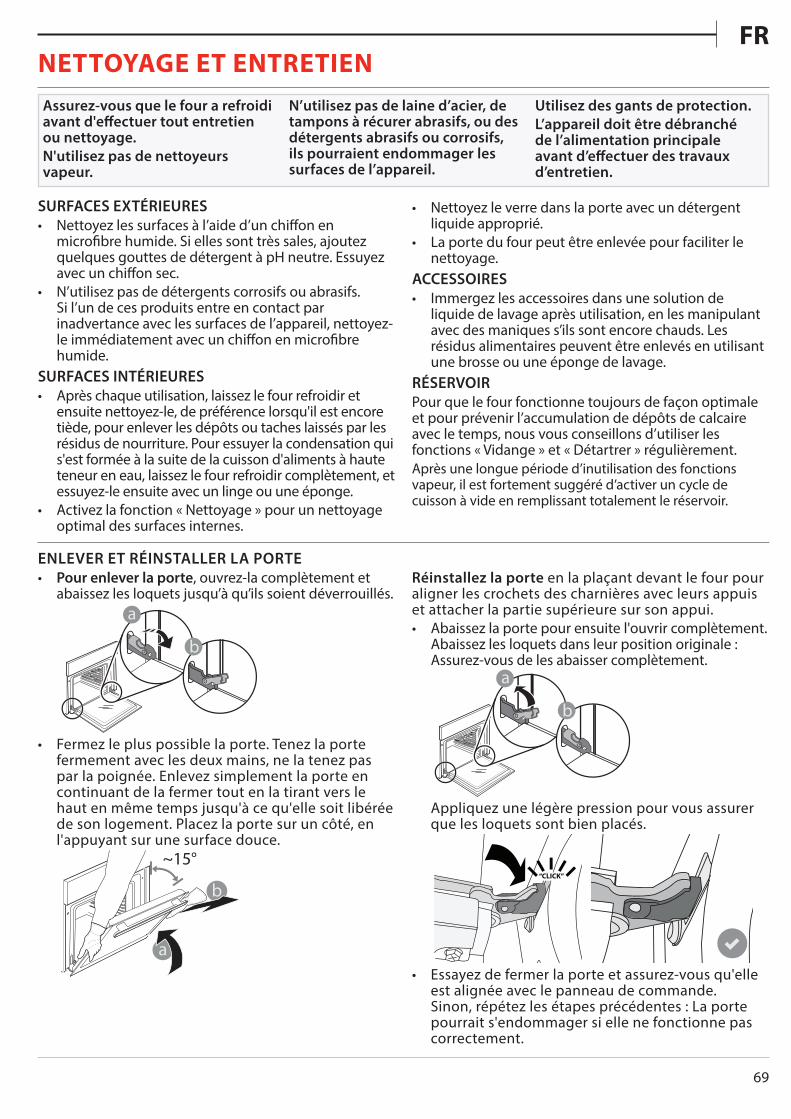
FR
69
NETTOYAGE ET ENTRETIENAssurez-vous que le four a refroidi avant d'effectuer tout entretien ou nettoyage.N'utilisez pas de nettoyeurs vapeur.
N’utilisez pas de laine d’acier, de tampons à récurer abrasifs, ou des détergents abrasifs ou corrosifs, ils pourraient endommager les surfaces de l’appareil.
Utilisez des gants de protection.L’appareil doit être débranché de l’alimentation principale avant d’effectuer des travaux d’entretien.
SURFACES EXTÉRIEURES• Nettoyez les surfaces à l’aide d’un chiffon en
microfibre humide� Si elles sont très sales, ajoutez quelques gouttes de détergent à pH neutre� Essuyez avec un chiffon sec�
• N’utilisez pas de détergents corrosifs ou abrasifs� Si l’un de ces produits entre en contact par inadvertance avec les surfaces de l’appareil, nettoyez-le immédiatement avec un chiffon en microfibre humide�
SURFACES INTÉRIEURES• Après chaque utilisation, laissez le four refroidir et
ensuite nettoyez-le, de préférence lorsqu'il est encore tiède, pour enlever les dépôts ou taches laissés par les résidus de nourriture� Pour essuyer la condensation qui s'est formée à la suite de la cuisson d'aliments à haute teneur en eau, laissez le four refroidir complètement, et essuyez-le ensuite avec un linge ou une éponge�
• Activez la fonction « Nettoyage » pour un nettoyage optimal des surfaces internes�
• Nettoyez le verre dans la porte avec un détergent liquide approprié�
• La porte du four peut être enlevée pour faciliter le nettoyage�
ACCESSOIRES• Immergez les accessoires dans une solution de
liquide de lavage après utilisation, en les manipulant avec des maniques s’ils sont encore chauds� Les résidus alimentaires peuvent être enlevés en utilisant une brosse ou une éponge de lavage�
RÉSERVOIRPour que le four fonctionne toujours de façon optimale et pour prévenir l’accumulation de dépôts de calcaire avec le temps, nous vous conseillons d’utiliser les fonctions « Vidange » et « Détartrer » régulièrement�Après une longue période d’inutilisation des fonctions vapeur, il est fortement suggéré d’activer un cycle de cuisson à vide en remplissant totalement le réservoir�
ENLEVER ET RÉINSTALLER LA PORTE• Pour enlever la porte, ouvrez-la complètement et
abaissez les loquets jusqu’à qu’ils soient déverrouillés�
•
b
a
Fermez le plus possible la porte� Tenez la porte fermement avec les deux mains, ne la tenez pas par la poignée� Enlevez simplement la porte en continuant de la fermer tout en la tirant vers le haut en même temps jusqu'à ce qu'elle soit libérée de son logement� Placez la porte sur un côté, en l'appuyant sur une surface douce�
a
b
~15°
Réinstallez la porte en la plaçant devant le four pour aligner les crochets des charnières avec leurs appuis et attacher la partie supérieure sur son appui�• Abaissez la porte pour ensuite l'ouvrir complètement�
Abaissez les loquets dans leur position originale : Assurez-vous de les abaisser complètement�
b
a
Appliquez une légère pression pour vous assurer que les loquets sont bien placés�
•
“CLICK”
Essayez de fermer la porte et assurez-vous qu'elle est alignée avec le panneau de commande� Sinon, répétez les étapes précédentes : La porte pourrait s'endommager si elle ne fonctionne pas correctement�

70
REMPLACEMENT DE L’AMPOULE1� Débranchez le four de l'alimentation électrique�2� Enlevez les supports de grille�3� Dégagez le capot de l'ampoule�4� Remplacez l’ampoule�5� Replacez le couvercle de la lampe en poussant
fermement jusqu’à ce qu’il soit bien en place�6� Replacez les supports de grille�7� Rebranchez le four à l'alimentation électrique�
Veuillez noter : Utilisez uniquement des ampoules halogènes de 20-40 W/230 V~, type G9, T300 °C. L'ampoule utilisée dans le produit est spécifiquement conçue pour des appareils domestiques et n'est pas adaptée pour un éclairage général de la pièce dans la maison (Réglementation CE 244/2009). Ces ampoules sont disponibles auprès de notre Service après-vente.
Ne manipulez pas les ampoules à halogène à mains nues, les traces laissées par vos empreintes pourraient les endommager. Avant d’utiliser le four, assurez-vous que le couvercle de l’ampoule a bien été remis en place.

FR
71
001
DÉPANNAGEProblème Cause possible Solution
Le four ne fonctionne pas�
Coupure de courant�Débranchez de l’alimentation principale�
Assurez-vous qu’il n’y a pas de panne de courant et que le four est bien branché�Éteignez puis rallumez le four pour voir si le problème persiste�
L’écran affiche la lettre « F » suivi d’un numéro ou d’une lettre�
Défaillance du four�
Prenez en note le numéro qui suit la lettre « F » et contactez le Service Après-vente le plus près�Appuyez sur , appuyez sur , puis sélectionnez « Réinitialisation d’usine »� Tous les réglages enregistrés seront effacés�
L'alimentation est coupée� Niveau de puissance erroné�
Vérifiez sur votre réseau domestique a au moins une valeur de plus de 3 kW� Dans le cas contraire, diminuez la puissance à 13 Ampères� Pour le changer, appuyez sur
, sélectionnez « Plus de Modes » puissélectionnez « Énergie »�
La fonction n'est pas disponible en mode de démonstration�
Mode démonstration en cours�
Appuyez sur , appuyez sur « Info » puis sélectionnez « Démo Magasin »pour quitter�
La porte ne s'ouvre pas�
Cycle de nettoyage en cours� Attendez la fin de la fonction et laissez le four refroidir�
La vapeur sort du tiroir pendant la cuisson�
Le niveau d'eau dans le réservoir est bas� Ajoutez un verre d'eau potable�
ASSISTANCEEn cas de problèmes de fonctionnement, contactez un Centre de maintenance technique Franke� Ne faites jamais appel aux services de techniciens non-agréés� Communiquez : - le type de panne - le modèle d'appareil (art�/Code) - le numéro de série (S�N�) la plaque signalétique), situé sur le bord droit de la cavité du four (visible quand la porte du four est ouverte)�
Lorsque vous contactez notre Centre de service, indiquez les codes fournis sur la plaque d'identification de votre produit�
XXXXXX XXXXXX XXXXX XXXXXXXModel: xxxXXXXxx XXXXXXXXXX
XXXXXX
XXXXXXXXXX
XXXXXXXXXXXXXXXXXXXXXXXXXXXXXX XXXXXXXXXX

72
SOMMARIO
DESCRIZIONE GENERALE�����������������������������������������������������������������������������������������������������������������������������������������������������73
PANNELLO DEI COMANDI ���������������������������������������������������������������������������������������������������������������������������������������������������73
ACCESSORI ������������������������������������������������������������������������������������������������������������������������������������������������������������������������������� 74
FUNZIONI ��������������������������������������������������������������������������������������������������������������������������������������������������������������������������������� 75
USO DEL DISPLAY TOUCH ��������������������������������������������������������������������������������������������������������������������������������������������������� 76
PRIMO UTILIZZO �������������������������������������������������������������������������������������������������������������������������������������������������������������������� 76
USO QUOTIDIANO ����������������������������������������������������������������������������������������������������������������������������������������������������������������� 78
CONSIGLI UTILI �����������������������������������������������������������������������������������������������������������������������������������������������������������������������83
TABELLA DI COTTURA COOKASSIST ��������������������������������������������������������������������������������������������������������������������������������89
PULIZIA E MANUTENZIONE ������������������������������������������������������������������������������������������������������������������������������������������������ 92
GUIDA ALLA RICERCA GUASTI �������������������������������������������������������������������������������������������������������������������������������������������94
ASSISTENZA ����������������������������������������������������������������������������������������������������������������������������������������������������������������������������94

IT
73
1� Pannello dei comandi2� Ventola3� Resistenza circolare
(non visibile)4� Griglie laterali
(il livello è indicato sulla parte frontale del forno)
5� Porta6� Cassetto per l'acqua7� Resistenza superiore / grill8� Luce9� Targhetta matricola
(da non rimuovere)10� Resistenza inferiore
(non visibile)
1. ON / OFFPer accendere e spegnere il forno�2. HOMEPer accedere rapidamente al menu principale�
3. PREFERITIPer richiamare la lista delle funzioni preferite�4. DISPLAY5. STRUMENTIPer scegliere tra le opzioni e modificare le impostazioni del forno e le preferenze�
6. ANNULLAPer disattivare tutte le funzioni del forno ad eccezione dell'orologio, del contaminuti e del blocco tasti�
1 2 3 4 5 6
DESCRIZIONE GENERALE
ISTRUZIONI PER L'USO
PANNELLO DEI COMANDI
5
4
3
2
1
5
4
3
2
1
1
2
3
4
8
9
10
5
7
6

74
ACCESSORIGRIGLIA LECCARDA TEGLIA GUIDE SCORREVOLI *
Da usare per la cottura degli alimenti o come supporto per pentole, tortiere e altri utensili da cucina
Da usare come piastra per cuocere carni, pesci, verdure, focacce, etc. o, posizionata sotto la griglia, per raccogliere i liquidi di cottura.
Da usare per cuocere prodotti di panetteria e pasticceria, ma anche carne arrosto, pesce al cartoccio, ecc.
Per facilitare l'inserimento o la rimozione degli accessori.
TEGLIA PER COTTURA A VAPORE
* Disponibile solo su alcuni modelliIl numero e il tipo di accessori possono variare a seconda del modello acquistato.È possibile acquistare separatamente altri accessori presso il Servizio Assistenza.
Agevola la circolazione del vapore, permettendo di cuocere uniformemente gli alimenti. Disporre la leccarda al livello inferiore per raccogliere i liquidi di cottura.
INSERIMENTO DELLA GRIGLIA E ALTRI ACCESSORIInserire la griglia orizzontalmente facendola scivolare sulle griglie laterali inserendo dapprima il lato rialzato orientato verso l’alto�Gli altri accessori, come la leccarda o la teglia, si inseriscono orizzontalmente come la griglia�SMONTAGGIO E RIMONTAGGIO DELLE GRIGLIE LATERALI• Per togliere le griglie, sollevarle e sganciare la
parte inferiore dalla sede tirandola leggermente: a questo punto è possibile rimuovere le griglie�
• Per rimontare le griglie, inserirle dapprima nelle sedi superiori� Avvicinarle alla cavità tenendo sollevato, quindi abbassarle in posizione nelle sedi inferiori�
MONTAGGIO DELLE GUIDE SCORREVOLI (SE PRESENTI)Togliere dal forno le griglie laterali e rimuovere la protezione in plastica dalle guide scorrevoli�Ancorare alla griglia laterale la clip superiore della guida e farla scivolare fino a fine corsa� Abbassare in posizione l’altra clip� Per fissare la guida, premere la parte inferiore della clip contro la griglia laterale�Assicurarsi che le guide possano scorrere liberamente� Ripetere questa operazione sull’altra griglia laterale, allo stesso livello�
Nota: le guide scorrevoli possono essere montate a qualsiasi livello.

IT
75
FUNZIONI MANUALI• STATICO*
Per cuocere qualsiasi tipo di pietanza su un solo ripiano�
• COTTURA VENTILATAPer cuocere carni o torte ripiene su un solo ripiano�
• TERMOVENTILATOPer cuocere insieme cibi diversi che richiedono la stessa temperatura di cottura su ripiani diversi (massimo tre)� La funzione permette di cuocere senza trasmissione di odori da un alimento all’altro�
• GRILLPer grigliare costate, spiedini e salsicce, gratinare verdure o dorare il pane� Per la grigliatura delle carni, si consiglia di utilizzare una leccarda per raccogliere il liquido di cottura: posizionarla un livello sotto la griglia e aggiungere 500 ml di acqua potabile�
• TURBO GRILLPer arrostire grossi tagli di carne (cosciotti, roast beef, polli)� Si consiglia di utilizzare una leccarda per raccogliere i liquidi di cottura: posizionarla un livello sotto la griglia e aggiungere 500 ml di acqua potabile�
• PRERISCALDAMENTO RAPIDOPer preriscaldare rapidamente il forno�
• FUNZIONI MULTICOOKINGPer cuocere contemporaneamente su quattro ripiani alimenti diversi che richiedono la medesima temperatura di cottura� Questa funzione può essere utilizzata per cuocere biscotti, torte, pizze (anche surgelate) e per preparare un pasto completo� Per ottenere risultati ottimali si raccomanda di seguire la tabella di cottura�
• VAPORE » VAPORE PURO
Il vapore permette di preparare piatti sani e naturali preservando le proprietà nutritive degli alimenti� Questa funzione è particolarmente indicata per la cottura di verdure, pesce, frutta o altri alimenti da sbollentare� Se non indicato diversamente, rimuovere tutti i materiali di imballaggio e le pellicole protettive prima di introdurre gli alimenti nel forno�
» TERMOVENTILATO + VAPORECombinando le proprietà del vapore con quelle della cottura termoventilata, questa funzione permette di ottenere una cottura piacevolmente croccante e dorata all'esterno mantenendo l'interno tenero e succoso� Per ottenere risultati ottimali, si consiglia di scegliere un livello di vapore ALTO per il pesce, MEDIO per la carne e BASSO per pane e dolci�
• FUNZIONI SPECIALI » SCONGELAMENTO
Per velocizzare lo scongelamento degli alimenti� Disporre gli alimenti sul ripiano intermedio� Si suggerisce di lasciare l'alimento nella sua confezione per impedire che si asciughi eccessivamente all'esterno�
» TIENI IN CALDOPer mantenere caldi e croccanti cibi appena cotti�
» LIEVITAZIONE IN CORSOPer ottenere una lievitazione ottimale di impasti dolci o salati� Per preservare la qualità della lievitazione, non attivare la funzione se il forno è ancora caldo dopo un ciclo di cottura�
» PIATTI PRONTIPer cuocere piatti pronti conservati a temperatura ambiente o in frigorifero (biscotti, miscele per torte, muffin, pasta e prodotti di panetteria)� Questa funzione cuoce tutte le pietanze in modo veloce e delicato; può essere utilizzata anche per riscaldare alimenti già cotti� Non occorre preriscaldare il forno� Seguire le istruzioni riportate sulla confezione�
» MAXI COOKINGPer cuocere tagli di carne di grosse dimensioni (superiori ai 2,5 kg)� Si suggerisce di girare la carne durante la cottura per ottenere una doratura omogenea su entrambi i lati� È preferibile irrorarla di tanto in tanto con il fondo di cottura per evitare che si asciughi eccessivamente�
» ECO TERMOVENTILATO*Per cuocere arrosti ripieni e carne in pezzi su un solo ripiano� La circolazione intermittente dell'aria impedisce un'eccessiva asciugatura degli alimenti� In questa funzione ECO la luce rimane spenta durante la cottura� Per utilizzare il ciclo ECO e ottimizzare quindi i consumi energetici, la porta del forno non deve essere aperta fino al completamento della cottura del cibo�
• COTTURA SURGELATIQuesta funzione seleziona automaticamente la temperatura e la modalità di cottura ottimali per 5 diverse categorie di alimenti pronti surgelati� Non è necessario preriscaldare il forno�
COOKASSISTQuesta funzione permette di cuocere tutti i tipi di alimenti in modo completamente automatico� Per utilizzare al meglio questa funzione si raccomanda di seguire le indicazioni della tabella di cottura�Non è necessario preriscaldare il forno�
* Funzione di riferimento per la dichiarazione di efficienza energetica in accordo con il Regolamento europeo 65/2014
FUNZIONI

76
USO DEL DISPLAY TOUCHPer scorrere lungo un menu o un elenco:Scorrere il dito sul display per visualizzare le voci o i valori elencati�Per selezionare o confermare:Toccare lo schermo per selezionare il valore o il menu desiderato�
Per tornare alla schermata precedente:Toccare �Per confermare un'impostazione o passare alla schermata successiva:Toccare “IMPOSTA” o “AVANTI”�
PRIMO UTILIZZOAlla prima accensione è necessario configurare l'apparecchio�Le impostazioni potranno essere modificate successivamente premendo per accedere al menu “Strumenti”.
1. SELEZIONE DELLA LINGUAAlla prima accensione è necessario impostare la lingua e l'ora�• Far scorrere il dito sullo schermo per visualizzare
l'elenco delle lingue disponibili�
•
Čeština, Český Jazyk Czech
Dansk Danish
Deutsch German
Toccare la lingua desiderata�
Ελλνικά Greek, Modern
English English
Español Spanish
Toccando si tornerà alla schermata precedente.
2. SELEZIONE DELLA MODALITÀ IMPOSTAZIONIDopo avere selezionato la lingua, viene chiesto di scegliere tra “DEMO NEGOZIO” (utile per l'esposizione del prodotto nei punti vendita) o “AVANTI” per continuare�
Grazie per il vostro acquisto!
Premi Avanti per continuare la configurazione per l'utilizzo domestico�
MODALITÀ DEMO NEGOZIO AVANTI

IT
77
. IMPOSTAZIONE DI DATA E ORASe il forno viene collegato alla rete domestica, la data e l'ora saranno impostate automaticamente� Diversamente sarà necessario impostarle manualmente• Impostare l'ora toccando i numeri corrispondenti�
•
0987654321
Imposta l'ora del sistema.
Toccare “IMPOSTA” per confermare�
0987654321
12:30Orologio 24 ore
IMPOSTA
Dopo avere impostato l'ora, occorrerà impostare la data�• Impostare la data toccando i numeri
corrispondenti�• Toccare “IMPOSTA” per confermare�
4. IMPOSTAZIONE DELL’ASSORBIMENTO DI POTENZAIl forno è programmato per assorbire una potenza elettrica compatibile con una rete domestica di potenza nominale superiore a 3 kW (16 Ampere): nel caso si disponga di una potenza inferiore, è necessario diminuire questo valore (13 Ampere)�• Toccare il valore sulla destra per selezionare la
potenza�
•
Potenza
13 Ampere
16 Ampere
Toccare “OK” per terminare la configurazione iniziale�
Configurazione completata
Il tuo elettrodomestico ora è configurato e pronto per l'uso!
OK
5. RISCALDAMENTO DEL FORNOUn nuovo forno può rilasciare degli odori dovuti alla lavorazione di fabbrica: questo è normale� Prima di cucinare gli alimenti è dunque raccomandato di riscaldare a vuoto il forno per rimuovere ogni odore� Rimuovere protezioni di cartone o pellicole trasparenti e togliere gli accessori dal forno� Riscaldare il forno alla temperatura di 200 °C per circa un'ora�È opportuno ventilare la stanza durante e dopo il primo utilizzo.

78
USO QUOTIDIANO1. SELEZIONE DI UNA FUNZIONE• Per accendere il forno, premere o toccare lo
schermo�Il display permette di scegliere tra funzioni manuali e funzioni CookAssist�• Toccare la funzione principale desiderata per
accedere al menu corrispondente�
•
20:00
FUNZIONI MANUALI
COOKASSIST
Scorrere in alto o in basso per visualizzare l'elenco delle opzioni�
•
Selezionare la funzione
STATICO
TERMOVENTILATO GRILL
COTTURA VENTILATA
Selezionare la funzione desiderata con un tocco�
Selezionare la funzione
STATICO
TERMOVENTILATO GRILL
COTTURA VENTILATA
2. IMPOSTAZIONE DELLE FUNZIONI MANUALIDopo avere selezionato la funzione desiderata è possibile modificarne le impostazioni� Il display mostrerà i valori che è possibile modificare�TEMPERATURA / LIVELLO GRILL• Scorrere tra i valori proposti e selezionare quello
desiderato�Seleziona una temperatura
AVANTI
Se la funzione lo consente, è possibile toccare per attivare il preriscaldamento�
Seleziona una temperatura
AVANTI
DURATANon è necessario impostare la durata, ad esempio se si desidera gestire la cottura manualmente� Se si imposta una durata, la cottura proseguirà per il tempo selezionato� Alla scadenza del tempo impostato, la cottura si interrompe automaticamente�• Per impostare la durata, toccare “Imposta tempo
cottura”�
•
Imposta tempo cottura
Seleziona una temperatura
AVANTI
Impostare la durata di cottura desiderata toccando i numeri corrispondenti�
•
0987654321
Inserisci la durata
AVANTI
Toccare “AVANTI” per confermare�3. IMPOSTAZIONE DELLE FUNZIONI COOKASSISTLe funzioni COOKASSIST permettono di preparare un'ampia varietà di pietanze scegliendo tra quelle presenti nell'elenco� L'apparecchio seleziona automaticamente la maggior parte delle impostazioni di cottura in modo da produrre un risultato ottimale�• Scegliere una ricetta dall'elenco�Le funzioni vengono visualizzate per categorie di alimenti nel menu " COOKASSIST FUNCTION" (vedere le relative tabelle) e per tipo di ricetta nel menu "COOKASSIST PRO".• Dopo avere selezionato una funzione, è sufficiente
indicare le caratteristiche dell'alimento da cuocere (quantità, peso, ecc�) per ottenere un risultato ottimale�
• Seguire le istruzioni che compaiono sul display per programmare il processo di cottura�

IT
79
4. IMPOSTARE L'AVVIO RITARDATOÈ possibile ritardare la cottura prima di avviare una funzione: La funzione si avvia al momento selezionato anticipatamente�• Toccare "RITARDO" per impostare l'ora di inizio
desiderata�
•
ISTRUZIONI DI COTTURA:
Per cuocere qualsiasi tipo di pietanza su un solo ripiano�
Inserire gli alimenti al livello 3�Usare la griglia con una teglia/leccarda�
RITARDO
Statico
AVVIO
Dopo avere impostato il ritardo desiderato, toccare “AVVIO RITARDATO” per dare inizio al tempo di attesa�
• Inserire il cibo nel forno e chiudere la porta: la funzione si avvierà automaticamente al termine del tempo calcolato�
Se si seleziona il preriscaldamento durante l'impostazione del ciclo, l'opzione di ritardo verrà disabilitata.• Per attivare la funzione subito e annullare il ritardo
programmato, toccare �5. AVVIO DELLA FUNZIONE• Dopo avere configurato le impostazioni, toccare
“AVVIO” per attivare la funzione�I valori impostati possono essere modificati in qualsiasi momento durante la cottura toccando il valore che si desidera cambiare.Se il forno è caldo e la funzione prevede una determinata temperatura massima, sul display compare un messaggio corrispondente.• Premere per arrestare la funzione attiva in
qualsiasi momento, oppure toccare il valore della durata e successivamente selezionare "STOP"�
6. PRERISCALDAMENTOSe era stato attivato il preriscaldamento, all'avvio della funzione il display indica che è in corso la fase di preriscaldamento�
00:00:15 dall'inizioSTATICOPreriscaldamento200° C
IMPOSTACOTTURA
ORA
Al termine di questa fase, un segnale acustico e il display indicheranno che il forno ha raggiunto la temperatura impostata�
•
Preriscaldamento CompletatoInserire il cibo ora
FATTO
Aprire la porta�• Introdurre la pietanza nel forno�• Chiudere la porta e la cottura riprenderà
automaticamente�Inserire gli alimenti nel forno prima della fine del preriscaldamento può compromettere i risultati di cottura.Aprendo la porta durante la fase di preriscaldamento, questa si interrompe temporaneamente.Il tempo di cottura non comprende la fase di preriscaldamento.
7. MESSA IN PAUSA DELLA COTTURAAlcune funzioni COOKASSIST prevedono che gli alimenti vengano girati durante la cottura� Questa richiesta sarà segnalata da un segnale acustico e da un messaggio corrispondente sul display� • Aprire la porta�• Eseguire l'operazione indicata sul display�• Chiudere la porta e toccare “FATTO” per riprendere
la cottura�Prima della fine della cottura, il forno potrebbe chiedere di controllare nuovamente gli alimenti�Questa richiesta sarà segnalata da un segnale acustico e da un messaggio corrispondente sul display�• Controllare gli alimenti�• Chiudere la porta e la cottura riprenderà
automaticamente�8. FINE COTTURAAllo scadere del tempo programmato, un segnale acustico e il display indicheranno che la cottura è terminata�Con alcune funzioni, una volta terminata la cottura sarà possibile conferire alla pietanza una doratura extra, prolungare il tempo di cottura o salvare la funzione tra i preferiti�
•
00:01 dallo stato di pronto
STATICOCottura200° C
TIMERCOMPLETATO
Toccare per salvare la funzione tra i preferiti�• Selezionare “Doratura extra” per avviare un ciclo di
doratura di cinque minuti�• Toccare per prolungare la cottura�

80
9. PREFERITILa funzione Preferiti permette di memorizzare le impostazioni del forno per le ricette preferite�Il forno riconosce automaticamente le funzioni più utilizzate.Dopo un certo numero di utilizzi, verrà richiesto di aggiungere la funzione ai preferiti.COME SALVARE UNA FUNZIONEQuando una funzione è terminata, è possibile toccare
per salvarla tra i preferiti� Sarà così possibile richiamarla velocemente in futuro mantenendo le stesse impostazioni�Il display permette di salvare la funzione indicando uno o più pasti preferiti tra i 4 disponibili: colazione, pranzo, spuntino e cena�• Scegliere almeno un pasto toccando l'icona
corrispondente�
•
1. Pizza sottile
SALVA PREFERITO
MODIFICA
Toccare “SALVA PREFERITO” per salvare la funzione�
1. Pizza sottile
SALVA PREFERITO
MODIFICA
DOPO AVERE SALVATO LA FUNZIONEPer visualizzare il menu dei preferiti, premere: le funzioni saranno presentate divise per pasto, accompagnate da alcuni consigli�• Toccando l'icona di un pasto viene visualizzato
l'elenco corrispondente
•
Favoriti: pranzo
PIZZA SOTTILE
Cerchi qualcos'altro? Guarda i suggerimenti qui sotto�
Scorrere le voci dell'elenco�• Toccare la ricetta o la funzione desiderata�• Toccare “AVVIO” per attivare la cottura�MODIFICA DELLE IMPOSTAZIONINella schermata Preferiti, è possibile aggiungere un'immagine o un nome a ogni ricetta per personalizzarla secondo le proprie preferenze�• Selezionare la funzione che si desidera modificare�• Toccare “MODIFICA”�• Selezionare l'attributo che si desidera modificare�
• Toccare “AVANTI”: il display mostrerà i nuovi attributi�
• Toccare “SALVA” per confermare le modifiche�È anche possibile cancellare le funzioni salvate nella schermata dei preferiti:• Toccare l'icona sulla funzione da eliminare�• Toccare “RIMUOVI”�È anche possibile cambiare gli orari associati ai vari pasti:• Premere �• Selezionare “Preferenze”�• Selezionare “Data e ora”� • Toccare “I tuoi orari dei pasti”�• Scorrere le voci dell'elenco e toccare l'orario
desiderato�• Toccare il pasto corrispondente per modificarlo�Ogni fascia oraria può essere associata a un solo pasto.
10. STRUMENTIL'icona permette di aprire in qualsiasi momento il menu “Strumenti”�Da questo menu è possibile scegliere tra varie opzioni e modificare le impostazioni o le preferenze relative al prodotto o al display�
Strumenti
Contaminuti Luce Auto Pulizia
TIMERQuesta funzione può essere attivata sia insieme a una funzione di cottura, sia in modo indipendente�Una volta avviato il contaminuti, il conto alla rovescia prosegue autonomamente senza interferire sulla funzione di cottura�Una volta attivato il timer, è possibile selezionare e attivare una funzione�Il conteggio viene visualizzato nell'angolo superiore destro del display.Per richiamare o modificare il contaminuti:• Premere �• Toccare �Un segnale acustico e il display avviseranno del termine del conto alla rovescia� • Toccare "IGNORA" per annullare il timer�• Toccare “IMPOSTA NUOVA DURATA” per impostare
nuovamente il contaminuti�
LAMPADAper accendere e spegnere la luce del forno�

IT
81
PULIZIAAttivare la funzione “Auto Pulizia” per una pulizia ottimale delle superfici interne�si raccomanda di non aprire la porta del forno durante il ciclo di pulizia, perché la fuoriuscita del vapore potrebbe avere un effetto negativo sul risultato finale.• Prima di attivare la funzione estrarre tutti gli
accessori dal forno�• Versare 200 ml di acqua potabile sul fondo del
forno�• Toccare “AVVIO” per attivare la funzione di pulizia�Dopo avere selezionato il ciclo, è possibile posticipare l'avvio della pulizia automatica. Toccare “RITARDO” per impostare l'ora di fine come indicato nella sezione corrispondente.
SCARICOQuesta funzione permette di scaricare l'acqua per impedire che ristagni nel serbatoio� Si raccomanda di eseguirla dopo ogni utilizzo del forno�
In ogni caso, questa operazione dovrà essere obbligatoriamente eseguita dopo un certo numero di cicli di cottura, diversamente non sarà possibile avviare una nuova funzione a vapore�Dopo avere selezionato la funzione
“Scarico acqua”, o quando richiesto dal messaggio corrispondente sul display, avviare la funzione ed eseguire le operazioni indicate: aprire la porta e appoggiare una caraffa capiente sotto l'ugello di scarico, situato nella parte in basso a destra del pannello� Una volta iniziato lo scarico, tenere la caraffa in posizione fino al termine del processo�Il display indicherà quando è necessario vuotare completamente il serbatoio�Nota: non è possibile eseguire questa attività prima di 4 ore dall’ultimo ciclo (o dall’ultima volta che il prodotto è stato alimentato ). Durante il tempo di attesa il display mostrerà il messaggio “L’acqua è TROPPO CALDA. Attendere che la temperatura si abbassi. Quando sarà sufficientemente fredda, sarà possibile procedere premendo CONTINUA”.La caraffa deve avere una capienza minima di 2 litri.Questa funzione permette di scaricare l'acqua per impedire che ristagni nel serbatoio� Si raccomanda di eseguirla dopo ogni utilizzo del forno� Versare o scaricare l'acqua quando richiesto attraverso il messaggio del display�
TRATT. DISINCROSTANTEQuesta funzione speciale, che viene attivata periodicamente, ha lo scopo di mantenere il serbatoio e il circuito del vapore in condizioni ottimali�La sua esecuzione è divisa in più fasi: scarico, tratt� disincrostante, risciacquo� Dopo avere avviato la funzione, eseguire le operazioni indicate sul display�La durata media della funzione è di circa 190 minuti�
Nota: se la funzione viene interrotta prima del termine, sarà necessario rieseguire l'intero ciclo di tratt. disincrostante.
» SCARICOPrima di eseguire il tratt� disincrostante sarà necessario vuotare il serbatoio: per eseguire questa operazione in modo ottimale, procedere come descritto nel relativo paragrafo�Nota: non è possibile eseguire questa attività prima di 4 ore dall’ultimo ciclo (o dall’ultima volta che il prodotto è stato alimentato ). Durante il tempo di attesa il display mostrerà il messaggio “L’acqua è TROPPO CALDA. Attendere che la temperatura si abbassi. Quando sarà sufficientemente fredda, sarà possibile procedere premendo CONTINUA”. La caraffa deve avere una capienza minima di 2 litri.
» TRATT. DISINCROSTANTEPer ottenere i migliori risultati nel tratt� disincrostante, si consiglia di riempire il serbatoio con la soluzione specifica disponibile presso il Servizio Assistenza Tecnica� Al termine della fase di tratt� disincrostante sarà necessario vuotare il serbatoio�
» RISCIACQUOIl ciclo di risciacquo ha la funzione di pulire il serbatoio e il circuito del vapore� Riempire il serbatoio con acqua potabile finché sul display compare il messaggio “SERBATOIO PIENO”, quindi iniziare il risciacquo� Al termine, un messaggio sul display chiederà di ripetere questa fase con un nuovo ciclo di scarico e risciacquo� Non spegnere il forno prima di avere completato tutte le operazioni richieste dalla funzione� Durante il ciclo di pulizia non è possibile attivare nessuna funzione di cottura�Nota: sul display comparirà un messaggio per ricordare di eseguire questa operazione regolarmente.Versare o scaricare l'acqua quando richiesto attraverso il messaggio del display.
SILENZIOSOToccare questa icona per disabilitare o abilitare i suoni e gli allarmi�
BLOCCO TASTILa funzione "Blocco tasti" permette di bloccare i tasti del pannello a sfioramento per evitare che vengano premuti accidentalmente� Per attivare il blocco:• Toccare l'icona �Per disattivare il blocco:• Toccare il display�• Scorrere verso l'alto sul messaggio visualizzato�
Blocco tastiIl prodotto è bloccato�
Scorri in alto per sbloccarlo�

82
ALTRE MODALITÀPer selezionare la modalità Sabbath e accedere alla funzione Potenza�La modalità Sabbath tiene il forno acceso in modalità di cottura finché non viene disabilitata. La modalità Sabbath utilizza la funzione di cottura statica. Tutti gli altri cicli di cottura e pulizia sono disabilitati. Non saranno emessi segnali acustici, e il display non indicherà variazioni di temperatura. All'apertura o alla chiusura della porta del forno, la luce del forno non si accenderà o spegnerà e gli elementi scaldanti non si attiveranno o disattiveranno.Per disabilitare e interrompere la modalità Sabbath, premere
o , quindi premere sullo schermo del display per 3 secondi.
PREFERENZEPermettono di modificare diverse impostazioni del forno�
INFOPer disattivare la “Modalità Demo Negozio”, resettare il prodotto e ottenere maggiori informazioni sull'apparecchio�

IT
83
CONSIGLI UTILICOME LEGGERE LE TABELLE DI COTTURALa tabella contiene: ricetta, preriscaldamento, temperatura (°C), livello grill, tempo di cottura (in minuti), accessori e livello/i consigliati per la cottura�I tempi di cottura si intendono dall’introduzione degli alimenti nel forno, escluso il preriscaldamento (dove richiesto)�Le temperature e i tempi di cottura sono indicativi e dipendono dalla quantità di cibo e dal tipo di accessori� Utilizzare inizialmente i valori più bassi consigliati e, se la cottura non fosse sufficiente, passare a quelli più alti�
Si consiglia di utilizzare gli accessori in dotazione e di scegliere possibilmente tortiere o teglie in metallo scuro� È possibile utilizzare anche tegami e accessori in pyrex o in ceramica, ma occorre considerare che i tempi di cottura si allungheranno leggermente� Per ottenere risultati ottimali, seguire attentamente i consigli riportati nella tabella di cottura per la scelta degli accessori da posizionare sui diversi ripiani�
STATICOGli elementi riscaldanti superiore e inferiore riscaldano l'interno del forno in modo uniforme�Utilizzare il 3° livello� Per cuocere pizza, torte salate e dolci con farcitura liquida, utilizzare il 1° o il 2° livello�Preriscaldare il forno prima di introdurre le pietanze�Questa funzione è la scelta ottimale per cuocere dessert delicati su un solo ripiano�Utilizzare tortiere in metallo scuro e posizionarle sempre sulla griglia in dotazione� Se si utilizzano le piastre in dotazione, si raccomanda di rimuovere dal forno gli altri accessori non utilizzati per ottenere risultati ottimali e ridurre il consumo di energia�
Per capire se una torta è cotta, inserire uno stuzzicadenti nella parte centrale del dolce� Se lo stuzzicadenti rimane asciutto, il dolce è pronto�Se si utilizzano tortiere antiaderenti, non imburrare i bordi: il dolce potrebbe non crescere uniformemente su tutti i lati� Se il dolce “si sgonfia” durante la cottura, la volta successiva utilizzare una temperatura inferiore, eventualmente preparando un impasto meno liquido e mescolandolo più delicatamente�Il pesce è cotto quando la pinna dorsale si stacca facilmente� Selezionare inizialmente la temperatura più bassa tra quelle indicate, anche quando si preparano pesci di grandi dimensioni� In generale, quanto più grande è il pesce, tanto minore dovrà essere la temperatura di cottura, con un conseguente prolungamento dei tempi�
Ricetta Preriscaldamento Temperatura (°C) Tempo di cottura (min.) Livello e accessori
Torte lievitate / Pan di Spagna Sì 170 30 - 50 2
Biscotti / Pasta frolla Sì 150 20 - 40 3
Tortine / Muffin Sì 170 20 - 40 3
Bigné Sì 180 - 200 30 - 40 3
Meringhe Sì 90 110 - 150 3
Pane / Pizza / Focaccia Sì 190 - 250 15 - 50 2
Pizza surgelata Sì 250 10 - 15 3
Vols-au-vent / Salatini di pasta sfoglia Sì 190 - 200 20 - 30 3
Lasagne / Flan / Cannelloni / Sformati Sì 190 - 200 45 - 65 3
Agnello / Vitello / Manzo / Maiale 1 kg Sì 190 - 200 80 - 110 3
Pollo / Coniglio / Anatra 1 kg Sì 200 - 230 50 - 100 3
Tacchino / Oca 3 kg Sì 190 - 200 80 - 130 2
Pesce al forno / al cartoccio (filetti, intero) Sì 180 - 200 40 - 60 3
ACCESSORIGriglia Pirofila o tortiera
su griglia
Leccarda / piastra dolci
o teglia su grigliaLeccarda / teglia Leccarda con
500 ml di acqua

84
GRILLL'elemento riscaldante superiore permette di ottenere risultati ottimali con la cottura al grill� Disporre gli alimenti sul 4° o 5° ripiano� Per la carne, si consiglia di utilizzare una leccarda per raccogliere i liquidi di cottura� Sistemare la leccarda sul 3° o 4° ripiano, aggiungendo circa 500 ml di acqua potabile� Non è necessario preriscaldare il forno�Durante la cottura, la porta del forno deve restare chiusa�Per preparare la carne alla griglia, scegliere tagli dello stesso spessore per ottenere una cottura uniforme� I pezzi di carne molto spessi richiedono un tempo di cottura maggiore�
Per evitare che si brucino in superficie, tenerli a una certa distanza dal grill posizionando la griglia a un livello medio-basso� Girare gli alimenti a metà cottura�Si consiglia di posizionare una leccarda con mezzo litro d'acqua potabile direttamente sotto la griglia sulla quale si trova la carne da grigliare, in modo da raccogliere il liquido di cottura� Rabboccare se necessario�
Ricetta Preriscaldamento Potenza grill Tempo di cottura (min.) Livello e accessori
Pane tostato - 3 (Alta) 3 - 6 5
Filetti / Tranci di pesce - 2 (media) 20 - 30 4 3
Salsicce / Spiedini / Costine / Hamburger - 2 - 3 (media – alto) 15 - 30 5 4
TURBO GRILLQuesta funzione attiva simultaneamente l'elemento riscaldante superiore e la ventola�Si consiglia di utilizzare una leccarda per raccogliere i liquidi di cottura�Sistemarla al 1° o al 2° livello, aggiungendo circa 500 ml di acqua potabile� Non è necessario preriscaldare il forno� Durante la cottura, la porta del forno deve restare chiusa�
Girare gli alimenti a due terzi della cottura�Utilizzare qualunque tipo di teglia o pirofila adatta alle dimensioni della carne da cuocere� Per gli arrosti, si consiglia di aggiungere del brodo sul fondo della pentola e di irrorare la carne durante la cottura per insaporirla� Quando l’arrosto è pronto, lasciarlo riposare in forno per altri 10-15 minuti oppure avvolgerlo in un foglio di alluminio�
Ricetta Preriscaldamento Potenza grill Tempo di cottura (min.) Livello e accessori
Pollo arrosto (1-1,3 kg) - 2 (media) 55 – 70 2 1
Coscio d'agnello / Stinco - 2 (media) 60 - 90 3
Patate arrosto - 2 (media) 35 - 55 3
Verdure gratinate - 3 (Alta) 10 - 25 3
ACCESSORIGriglia Pirofila o tortiera
su griglia
Leccarda / piastra dolci
o teglia su grigliaLeccarda / teglia Leccarda con
500 ml di acqua
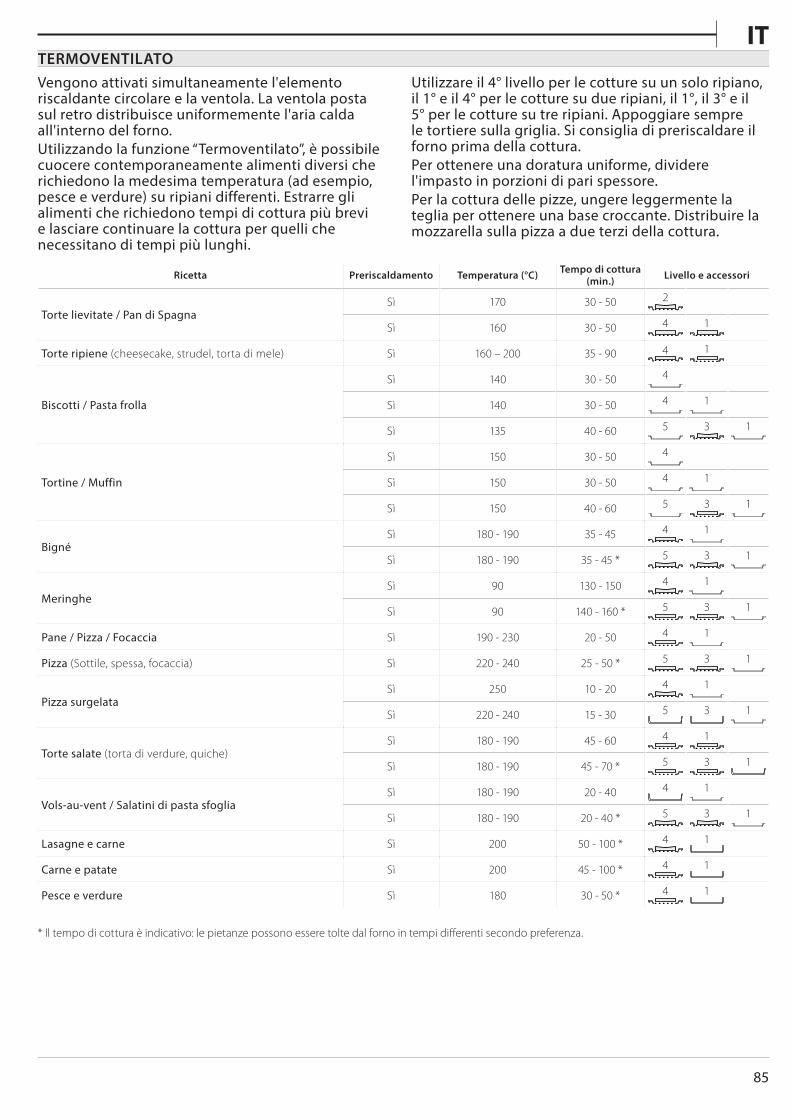
IT
85
TERMOVENTILATOVengono attivati simultaneamente l'elemento riscaldante circolare e la ventola� La ventola posta sul retro distribuisce uniformemente l'aria calda all'interno del forno�Utilizzando la funzione “Termoventilato”, è possibile cuocere contemporaneamente alimenti diversi che richiedono la medesima temperatura (ad esempio, pesce e verdure) su ripiani differenti� Estrarre gli alimenti che richiedono tempi di cottura più brevi e lasciare continuare la cottura per quelli che necessitano di tempi più lunghi�
Utilizzare il 4° livello per le cotture su un solo ripiano, il 1° e il 4° per le cotture su due ripiani, il 1°, il 3° e il 5° per le cotture su tre ripiani� Appoggiare sempre le tortiere sulla griglia� Si consiglia di preriscaldare il forno prima della cottura�Per ottenere una doratura uniforme, dividere l'impasto in porzioni di pari spessore�Per la cottura delle pizze, ungere leggermente la teglia per ottenere una base croccante� Distribuire la mozzarella sulla pizza a due terzi della cottura�
Ricetta Preriscaldamento Temperatura (°C) Tempo di cottura (min.) Livello e accessori
Torte lievitate / Pan di SpagnaSì 170 30 - 50 2
Sì 160 30 - 50 4
1
Torte ripiene (cheesecake, strudel, torta di mele) Sì 160 – 200 35 - 90 4 1
Biscotti / Pasta frolla
Sì 140 30 - 50 4
Sì 140 30 - 50 4
1
Sì 135 40 - 60 5
3 1
Tortine / Muffin
Sì 150 30 - 50 4
Sì 150 30 - 50 4
1
Sì 150 40 - 60 5
3 1
BignéSì 180 - 190 35 - 45 4
1
Sì 180 - 190 35 - 45 * 5
3 1
MeringheSì 90 130 - 150 4
1
Sì 90 140 - 160 * 5 3 1
Pane / Pizza / Focaccia Sì 190 - 230 20 - 50 4 1
Pizza (Sottile, spessa, focaccia) Sì 220 - 240 25 - 50 * 5 3 1
Pizza surgelataSì 250 10 - 20 4 1
Sì 220 - 240 15 - 30 5 3 1
Torte salate (torta di verdure, quiche)Sì 180 - 190 45 - 60 4 1
Sì 180 - 190 45 - 70 * 5 3 1
Vols-au-vent / Salatini di pasta sfogliaSì 180 - 190 20 - 40 4 1
Sì 180 - 190 20 - 40 * 5 3 1
Lasagne e carne Sì 200 50 - 100 * 4 1
Carne e patate Sì 200 45 - 100 * 4 1
Pesce e verdure Sì 180 30 - 50 * 4 1
* Il tempo di cottura è indicativo: le pietanze possono essere tolte dal forno in tempi differenti secondo preferenza.

86
MULTICOOKINGRicetta Piatto Preriscalda-
mento Temperatura (°C) Tempo di cottura (min.) Livello e accessori
Biscotti Biscotti Sì 135 50 - 70 5 4 3 1
Crostate Crostate Sì 170 50 - 70 5 4 3 1
Pizze al piatto Pizza al piatto Sì 210 40 - 60 5 4 2 1
Pasto completo: Crostata (livello 5)Verdure arrostite (livello 4) Lasagne (livello 2) Tagli di carne (livello 1)
Cook 4 menu Sì 190 40 - 120 5 4 2 1
COTTURA VENTILATAQuesta funzione è indicata per quiche, sformati di verdura o dessert con farcitura morbida, come i cheesecake e le torte ripiene alla frutta�È anche ideale per la cottura di alimenti con un alto contenuto d'acqua� La ventola distribuisce il calore uniformemente all'interno del forno� Questo consente di mantenere una temperatura costante e di ottenere una cottura più uniforme, con l'esterno croccante e
l'interno morbido�Utilizzare il 2° o il 3° ripiano� Prima di introdurre gli alimenti, attendere la fine del preriscaldamento�Se il fondo della torta risulta poco cotto, disporla su un ripiano più basso e cospargere la base del dolce di pan grattato o biscotti sbriciolati prima di aggiungere il ripieno�
Ricetta Preriscalda-mento Temperatura (°C) Tempo di cottura
(min.) Livello e accessori
Torte ripiene (cheesecake, strudel, torta di mele) Sì 160 – 200 30 - 85 3
Torte salate (torta di verdure, quiche) Sì 180 - 190 45 - 55 3
Verdure ripiene (pomodori, zucchine, melanzane) Sì 180 - 200 50 - 60 2

IT
87
ACCESSORIGriglia Pirofila o tortiera
su grigliaLeccarda / piastra dolci
o teglia su griglia Leccarda / teglia Leccarda con 500 ml di acqua
VAPORE PURO
Ricetta Preriscal-damento Temperatura (°C) Tempo di cottura
(min.) Livello e accessori
Verdure fresche (intere) - 100 30 - 80 2 1
Verdure fresche (pezzi) - 100 15 - 40 2 1
Verdure surgelate - 100 20 - 40 2 1
Pesce intero - 90 40 - 50 2 1
Filetti di pesce - 90 20 - 30 2 1
Filetti di pollo - 100 15 - 50 2 1
Uova - 100 10 - 30 2 1
Frutta (intera) - 100 15 - 45 2 1
Frutta (pezzi) - 100 10 - 30 2 1
TERMOVENTILATO + VAPORE
Ricetta Livello del vapore Preriscal-damento Temperatura (°C) Tempo di cottura
(min.) Livello e accessori
Pasta frolla / Biscotti
BASSO - 140 - 150 35 - 55 3
BASSO - 140 30 - 50 4
1
BASSO - 140 40 - 60 5
3 1
Tortine / Muffin
BASSO - 160 - 170 30 - 40 3
BASSO - 150 30 - 50 4
1
BASSO - 150 40 - 60 5
3 1
Torte lievitate BASSO - 170 - 180 40 - 60 2
Torte lievitate BASSO - 160 - 170 30 - 40 2
Focaccia BASSO - 200 - 220 20 - 40 3
Pane BASSO - 170 - 180 70 - 100 3
Panini BASSO - 200 - 220 30 - 50 3
Baguette BASSO - 200 - 220 30 - 50 3
Patate arrosto MEDIO - 200 - 220 50 - 70 3
Agnello / Manzo / Maiale 1 kg MEDIO - 180 - 200 60 - 100 3
Vitello / Manzo / Maiale (spezzatino) MEDIO - 160 - 180 60 - 80 3
Roast beef al sangue 1 kg MEDIO - 200 - 220 40 - 50 3
Roast beef al sangue 2 kg MEDIO - 200 55 - 65 3
Coscia d'agnello MEDIO - 180 - 200 65 - 75 3
Stinco di maiale stufato MEDIO - 160 - 180 85 - 100 3
Pollo / Faraona / Anatra (1-1,5 kg) MEDIO - 200 - 220 50 - 70 3
Pollo / Faraona / Anatra (in pezzi) MEDIO - 200 - 220 55 - 65 3
Verdure ripiene (pomodori, zucchine, melanzane) MEDIO - 180 - 200 25 - 40 3
Filetti di pesce ALTO - 180 - 200 15 - 30 3

88
MAXI COOKINGQuesta funzione è particolarmente indicata per cuocere tagli di carne di grandi dimensioni (oltre 2,5 kg)� Si consiglia di girare la carne durante la cottura per ottenere una doratura uniforme� È preferibile irrorarla di tanto in tanto con il fondo di cottura per evitare che si asciughi eccessivamente�Utilizzare il 1° o il 2° livello in base alle dimensioni della carne� Non occorre preriscaldare il forno�
Per gli arrosti, si consiglia di aggiungere del brodo
sul fondo della pentola e di irrorare la carne durante la cottura per insaporirla� Quando l’arrosto è pronto, lasciarlo riposare in forno per altri 10-15 minuti oppure avvolgerlo in un foglio di alluminio�Se la carne è troppo magra, aggiungere un po' di liquido, urgerla con olio o burro oppure avvolgerla in fette di bacon�Iniziare la cottura con l'arrosto appoggiato sul lato della pelle�
Ricetta Preriscalda-mento Temperatura (°C) Tempo di cottura
(min.) Livello e accessori
Maiale arrosto con cotenna 2 kg - 170 110 - 150 2
ECO TERMOVENTILATOSi consiglia di utilizzare il 3° livello� Non è necessario preriscaldare il forno�
Ricetta Preriscalda-mento Temperatura (°C) Tempo di cottura
(min.) Livello e accessori
Arrosti ripieni - 200 80 - 120 * 3
Carne in pezzi (coniglio, pollo, agnello) - 200 50 - 100 * 3
* Il tempo di cottura è indicativo: le pietanze possono essere tolte dal forno in tempi differenti secondo preferenza.
LIEVITAZIONE IN CORSOSi consiglia di coprire l’impasto con un panno umido prima di introdurlo nel forno� Con questa funzione, i tempi di lievitazione si riducono di circa un terzo rispetto ai tempi di lievitazione a temperatura ambiente (20-25°C)�
Il tempo di lievitazione per un impasto da pizza da 1 kg è di circa un'ora�
MANTENERE IN CALDOQuesta funzione permette di mantenere in caldo le pietanze già cotte� È studiata per impedire la formazione di condensa ed eliminare la necessità di pulire il comparto di cottura�
Si sconsiglia di tenere in caldo le pietanze già cotte per oltre due ore�Si ricordi che alcuni alimenti continuano a cuocere quando vengono mantenuti in caldo: se necessario, coprirli per evitare che si asciughino eccessivamente�
SCONGELAMENTOGli alimenti lessati, gli stufati e i ragù di carne si scongelano meglio se vengono mescolati di tanto in tanto durante il processo� Separare gli alimenti quando iniziano a scongelarsi: le porzioni separate si scongelano più rapidamente�

IT
89
TABELLA DI COTTURA COOKASSIST
Ricetta Quantità consigliataGirare (del tempo di cottura)
Livello e accessori
Stufati / Pasta al forno
Lasagna fresca 500 - 3000 g - 2
Lasagna surgelata 500 - 3000 g - 2
Riso e cereali
Riso
Riso bianco 100 - 500 g - 2 1
Riso integrale 100 - 500 g - 2 1
Riso integrale 100 - 500 g - 2 1
Semi e cereali
Quinoa 100 - 300 g - 2 1
Miglio 100 - 300 g - 2 1
Farro 100 - 300 g - 2 1
Orzo 100 - 300 g - 2 1
Carne
ManzoRoast beef 600 - 2000 g - 3
Hamburger 1,5 - 3 cm 3/5 5
MaialeMaiale 600 - 2500 g - 3
Costine di maiale una griglia 2/3 5 4
Pollo arrostoPollo arrosto 600 - 3000 g - 2
Filetti/petto di pollo 1 - 5 cm 2/3 5
Carne a vaporeFiletti di pollo 1 - 5 cm - 2 1
Filetti di tacchino 1 - 5 cm - 2 1
Piatti di carneKebab una griglia 1/2 5 4
Salsicce e wurstel 1,5 - 4 cm 2/3 5 4
ACCESSORIGriglia Pirofila o tortiera
su grigliaLeccarda / piastra dolci
o teglia su griglia Leccarda / teglia Leccarda con 500 ml di acqua

90
Ricetta Quantità consigliataGirare (del tempo di cottura)
Livello e accessori
Pesce e frutti di mare
Filetti e bistecche arrosto
Filetti di pesce / tranci 0,5 - 2,5 cm - 5
Filetti surgelati 0,5 - 2,5 cm - 4
Filetti e bistecche a vapore
Filetti di pesce / tranci 0,5 - 2,5 cm - 2 1
Filetti surgelati 0,5 - 2,5 cm - 2 1
Pesce alla griglia
Capesante gratinate una teglia - 4
Cozze gratinate una teglia - 4
Gamberetti una teglia - 4 3
Gamberi una teglia - 4 3
Pesce a vapore
Capesante gratinate 500 - 1000 g - 2 1
Cozze 500 - 3000 g - 2 1
Gamberetti 100 - 1000 g - 2 1
Gamberi 500 - 1500 g - 2 1
Calamaro 100 - 500 g - 2 1
Polipo 500 - 2000 g - 2 1
Verdure
Verdure arrostite
Patate - Fresche 500 - 1500 g - 3
Verdure ripiene 100 - 500 g - 3
Altre verdure 500 - 1500 g - 3
Verdure gratinate
Patate una teglia - 3
Pomodori una teglia - 3
Peperoni una teglia - 3
Broccoli una teglia - 3
Cavolfiori una teglia - 3
Altro una teglia - 3
Verdure fresche a vapore
Patate intere 50 - 500 g - 2 1
Patate piccole / in pezzi una teglia - 2 1
Piselli 200 - 2500 g - 2 1
Broccoli 200 - 3000 g - 2 1
Cavolfiori 200 - 3000 g - 2 1
Verdure surgelate a vapore Piselli 200 - 3000 g - 2 1
Frutta Frutta al vaporeIntero 100 - 400 g - 2 1
A pezzi 500 - 3000 g - 2 1

IT
91
Ricetta Quantità consigliataGirare (del tempo di cottura)
Livello e accessori
Torte e dolci
Pan di Spagna 500 - 1200 g - 2
Biscotti 200 - 600 g - 3
Croissant una teglia * - 3
Bigné una teglia * -3
Crostata una teglia - 3
Strudel 400 - 1600 g - 3
Torta ripiena alla frutta 500 - 2000 g - 2
Torte salate 800 - 1200 g - 2
Pane
Panini 60 - 150 g l'uno - 3
Pancarrè 400 - 600 g l'uno - 2
Pagnotta 700 - 2000 g - 2
Baguette 200 - 300 g l'uno - 3
Pizza
Surgelati Livelli 1 - 4 * -
2
4 1
5 3 1
5 4 2 1
Sottile Teglia rotonda * - 2
Alta Teglia rotonda * - 2
ACCESSORIGriglia Pirofila o tortiera
su griglia
Leccarda / piastra dolci
o teglia su grigliaLeccarda / teglia Leccarda con
500 ml di acquaTeglia per cottura a
vapore
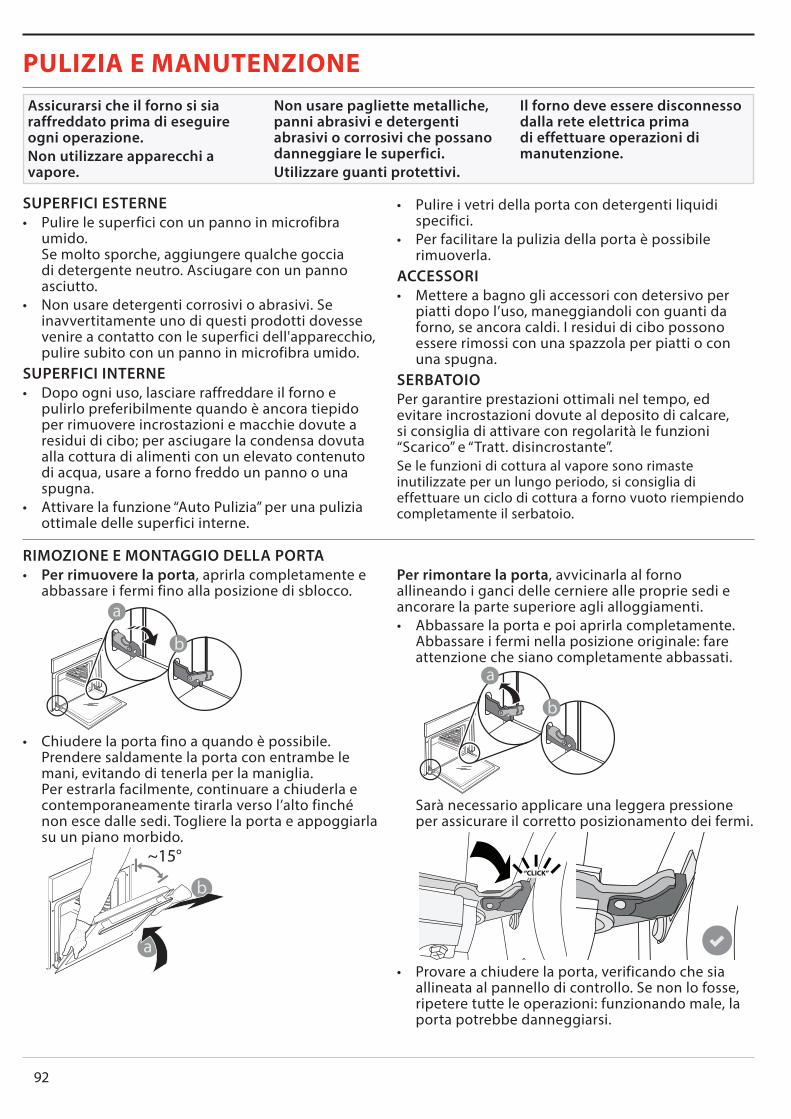
92
PULIZIA E MANUTENZIONEAssicurarsi che il forno si sia raffreddato prima di eseguire ogni operazione.Non utilizzare apparecchi a vapore.
Non usare pagliette metalliche, panni abrasivi e detergenti abrasivi o corrosivi che possano danneggiare le superfici.Utilizzare guanti protettivi.
Il forno deve essere disconnesso dalla rete elettrica prima di effettuare operazioni di manutenzione.
SUPERFICI ESTERNE• Pulire le superfici con un panno in microfibra
umido� Se molto sporche, aggiungere qualche goccia di detergente neutro� Asciugare con un panno asciutto�
• Non usare detergenti corrosivi o abrasivi� Se inavvertitamente uno di questi prodotti dovesse venire a contatto con le superfici dell'apparecchio, pulire subito con un panno in microfibra umido�
SUPERFICI INTERNE• Dopo ogni uso, lasciare raffreddare il forno e
pulirlo preferibilmente quando è ancora tiepido per rimuovere incrostazioni e macchie dovute a residui di cibo; per asciugare la condensa dovuta alla cottura di alimenti con un elevato contenuto di acqua, usare a forno freddo un panno o una spugna�
• Attivare la funzione “Auto Pulizia” per una pulizia ottimale delle superfici interne�
• Pulire i vetri della porta con detergenti liquidi specifici�
• Per facilitare la pulizia della porta è possibile rimuoverla�
ACCESSORI• Mettere a bagno gli accessori con detersivo per
piatti dopo l’uso, maneggiandoli con guanti da forno, se ancora caldi� I residui di cibo possono essere rimossi con una spazzola per piatti o con una spugna�
SERBATOIOPer garantire prestazioni ottimali nel tempo, ed evitare incrostazioni dovute al deposito di calcare, si consiglia di attivare con regolarità le funzioni “Scarico” e “Tratt� disincrostante”�Se le funzioni di cottura al vapore sono rimaste inutilizzate per un lungo periodo, si consiglia di effettuare un ciclo di cottura a forno vuoto riempiendo completamente il serbatoio�
RIMOZIONE E MONTAGGIO DELLA PORTA• Per rimuovere la porta, aprirla completamente e
abbassare i fermi fino alla posizione di sblocco�
•
b
a
Chiudere la porta fino a quando è possibile� Prendere saldamente la porta con entrambe le mani, evitando di tenerla per la maniglia� Per estrarla facilmente, continuare a chiuderla e contemporaneamente tirarla verso l’alto finché non esce dalle sedi� Togliere la porta e appoggiarla su un piano morbido�
a
b
~15°
Per rimontare la porta, avvicinarla al forno allineando i ganci delle cerniere alle proprie sedi e ancorare la parte superiore agli alloggiamenti�• Abbassare la porta e poi aprirla completamente�
Abbassare i fermi nella posizione originale: fare attenzione che siano completamente abbassati�
b
a
Sarà necessario applicare una leggera pressione per assicurare il corretto posizionamento dei fermi�
•
“CLICK”
Provare a chiudere la porta, verificando che sia allineata al pannello di controllo� Se non lo fosse, ripetere tutte le operazioni: funzionando male, la porta potrebbe danneggiarsi�

IT
93
SOSTITUZIONE DELLA LAMPADINA1� Scollegare il forno dalla rete elettrica�2� Rimuovere le griglie laterali�3� Estrarre la protezione della lampadina�4� Sostituire la lampadina�5� Riposizionare il coprilampada e premerlo con
fermezza fino a quando scatta in posizione�6� Riapplicare le griglie laterali�7� Ricollegare il forno alla rete elettrica�
Nota: usare solo lampade alogene da 20-40 W/230 ~ V tipo G9, T 300 °C. La lampada utilizzata nel prodotto è specifica per elettrodomestici e non è adatta per l’illuminazione di ambienti domestici (Regolamento (CE) 244/2009). Le lampadine sono disponibili presso il Servizio Assistenza Tecnica.
Non maneggiare le lampadine a mani nude per evitare che vengano danneggiate dalle impronte digitali. Non far funzionare il forno senza prima aver riposizionato il coperchio.

94
001
GUIDA ALLA RICERCA GUASTIProblema Possibile causa Soluzione
Il forno non funziona�
Interruzione della corrente elettrica�Disconnessione dalla rete elettrica�
Verificare che ci sia tensione in rete e che il forno sia collegato all’alimentazione elettrica�Spegnere e riaccendere il forno per verificare se il problema persiste�
Il display mostra la lettera “F” seguita da un numero o una lettera�
Il forno è guasto�
Contattare il più vicino Servizio Assistenza Clienti e specificare il numero che segue la lettera “F”�Premere , toccare e selezionare “Reset”� Tutte le impostazioni salvate saranno cancellate�
L'interruttore generale dell'impianto domestico si spegne�
La potenza dell'apparecchio non è regolata correttamente�
Verificare che la rete domestica abbia una portata nominale di almeno 3 kW� In caso contrario, ridurre la potenza a 13 Ampere� Per modificarla, premere , selezionare “Altre Modalità” e quindiscegliere “Potenza”�
La funzione non è disponibile in modalità demo�
È attiva la modalità demo�Premere , toccare “Info” e selezionare “Modalità demonegozio” per uscire�
La porta non si apre� Ciclo di pulizia in corso� Attendere il termine della funzione e lasciare raffreddare il forno�
Esce del vapore dal cassetto durante la cottura�
Il livello dell'acqua nel serbatoio è basso� Aggiungere un bicchiere d'acqua potabile�
ASSISTENZAIn caso di problemi operativi, contattare un Centro Assistenza Tecnica Franke� Non rivolgersi a tecnici non autorizzati� Comunicare: - il tipo di difetto - il modello di apparecchio (codice art�) - il numero di serie (S�N� sulla targhetta matricola), posto sul bordo interno destro della cavità del forno (visibile a porta aperta)�
Quando si contatta il Centro Assistenza, comunicare i codici presenti sulla targhetta matricola del prodotto�
XXXXXX XXXXXX XXXXX XXXXXXXModel: xxxXXXXxx XXXXXXXXXX
XXXXXX
XXXXXXXXXX
XXXXXXXXXXXXXXXXXXXXXXXXXXXXXX XXXXXXXXXX

ES
95
ÍNDICE
DESCRIPCIÓN GENERAL ������������������������������������������������������������������������������������������������������������������������������������������������������96
PANEL DE CONTROL �������������������������������������������������������������������������������������������������������������������������������������������������������������96
ACCESORIOS���������������������������������������������������������������������������������������������������������������������������������������������������������������������������� 97
FUNCIONES �����������������������������������������������������������������������������������������������������������������������������������������������������������������������������98
CÓMO UTILIZAR LA PANTALLA TÁCTIL ���������������������������������������������������������������������������������������������������������������������������99
PRIMER USO ����������������������������������������������������������������������������������������������������������������������������������������������������������������������������99
USO DIARIO ��������������������������������������������������������������������������������������������������������������������������������������������������������������������������� 101
CONSEJOS ÚTILES ���������������������������������������������������������������������������������������������������������������������������������������������������������������106
TABLA DE COCCIÓN COOKASSIST ���������������������������������������������������������������������������������������������������������������������������������� 112
LIMPIEZA Y MANTENIMIENTO ����������������������������������������������������������������������������������������������������������������������������������������� 115
SOLUCIÓN DE PROBLEMAS ���������������������������������������������������������������������������������������������������������������������������������������������� 117
ASISTENCIA ��������������������������������������������������������������������������������������������������������������������������������������������������������������������������� 117

96
1� Panel de control2� Ventilador3� Resistencia circular
(no visible)4� Guías para estantes
(el nivel está indicado en la parte frontal del horno)
5� Puerta6� Cajón de agua7� Resistencia superior / grill8� Lámpara9� Identification plate
(do not remove)10� Resistencia inferior
(no visible)
1. ENCENDIDO/APAGADOPara encender y apagar el horno�2. INICIOSirve para obtener acceso rápido al menú principal�
3. FAVORITOSPara recuperar la lista de sus funciones favoritas�4. PANTALLA5. HERRAMIENTASPara escoger entre varias opciones y para cambiar los ajustes y preferencias del horno�
6. CANCELARPara detener cualquier función del horno excepto el Reloj, el Temporizador de cocina y el Bloqueo control�
1 2 3 4 5 6
DESCRIPCIÓN GENERAL
GUÍA DEL USUARIO
PANEL DE CONTROL
5
4
3
2
1
5
4
3
2
1
1
2
3
4
8
9
10
5
7
6

ES
97
ACCESORIOSREJILLA GRASERA BANDEJA PASTELERA GUÍAS DESLIZANTES *
Para cocinar alimentos o como soporte de cazuelas, moldes de tartas y otros recipientes de cocción aptos para horno
Para utilizar como bandeja de horno para cocinar carne, pescado, verduras, focaccia, etc. o para recoger los jugos de la cocción debajo de la rejilla.
Se utiliza para pan y pasteles, pero también para asados, pescado en papillote, etc.
Para facilitar la inserción y extracción de accesorios.
BANDEJA VAPOR
* Disponible en determinados modelos solamenteEl número y el tipo de accesorios puede variar dependiendo del modelo comprado.Se pueden adquirir otros accesorios por separado en el Servicio Postventa.
Facilita la circulación del vapor, de manera que los alimentos se cuecen de forma más uniforme. Coloque la grasera un nivel por debajo para recoger los jugos de cocción.
INTRODUCCIÓN DE LA REJILLA Y OTROS ACCESORIOSIntroduzca la rejilla horizontalmente deslizándola a través de las guías y asegúrese de que el lado con el borde en relieve queda mirando hacia arriba�Otros accesorios, como la grasera y la bandeja pastelera, se introducen horizontalmente igual que la rejilla�CÓMO EXTRAER Y VOLVER A COLOCAR LAS GUÍAS PARA ESTANTES• Para extraer las guías para estantes, levántelas
y saque la parte inferior con cuidado de su alojamiento: Ahora puede extraer las guías�
• Para volver a colocar las guías para estantes, primero colóquelas en su alojamiento superior� Manteniéndolas en alto, deslícelas en el compartimento de cocción, y luego bájelas hasta colocarlas en el alojamiento inferior�
MONTAJE DE LAS GUÍAS DESLIZANTES (SI PROCEDE)Extraiga las guías para los estantes del horno y quite el plástico de protección de las guías deslizantes�Fije el cierre superior de la corredera a la guía para los estantes y deslícela hasta el tope� Baje el otro clip a su posición� Para fijar la guía, empuje la parte inferior del cierre contra la guía para estantes�Asegúrese de que las correderas se pueden mover libremente� Repita estos pasos en la otra guía para estantes del mismo nivel�
Nota: Las guías deslizantes se pueden montar en cualquier nivel.
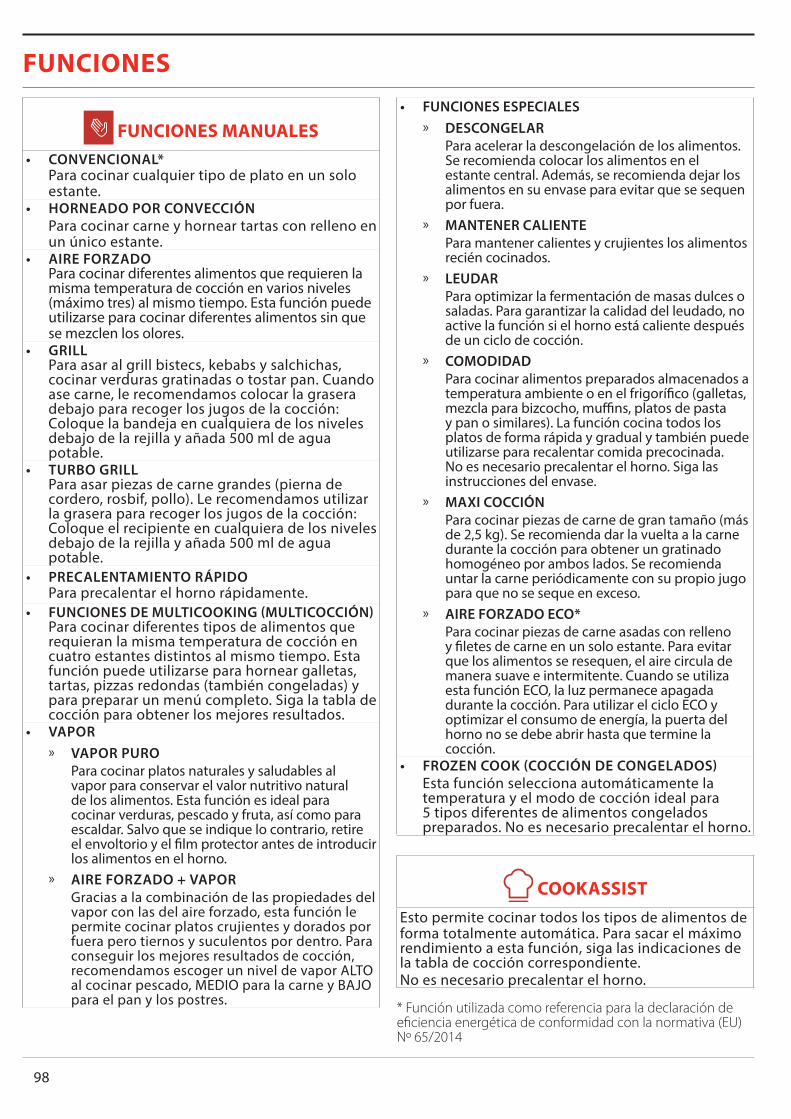
98
FUNCIONES MANUALES• CONVENCIONAL*
Para cocinar cualquier tipo de plato en un solo estante�
• HORNEADO POR CONVECCIÓNPara cocinar carne y hornear tartas con relleno en un único estante�
• AIRE FORZADOPara cocinar diferentes alimentos que requieren la misma temperatura de cocción en varios niveles (máximo tres) al mismo tiempo� Esta función puede utilizarse para cocinar diferentes alimentos sin que se mezclen los olores�
• GRILLPara asar al grill bistecs, kebabs y salchichas, cocinar verduras gratinadas o tostar pan� Cuando ase carne, le recomendamos colocar la grasera debajo para recoger los jugos de la cocción: Coloque la bandeja en cualquiera de los niveles debajo de la rejilla y añada 500 ml de agua potable�
• TURBO GRILLPara asar piezas de carne grandes (pierna de cordero, rosbif, pollo)� Le recomendamos utilizar la grasera para recoger los jugos de la cocción: Coloque el recipiente en cualquiera de los niveles debajo de la rejilla y añada 500 ml de agua potable�
• PRECALENTAMIENTO RÁPIDOPara precalentar el horno rápidamente�
• FUNCIONES DE MULTICOOKING (MULTICOCCIÓN)Para cocinar diferentes tipos de alimentos que requieran la misma temperatura de cocción en cuatro estantes distintos al mismo tiempo� Esta función puede utilizarse para hornear galletas, tartas, pizzas redondas (también congeladas) y para preparar un menú completo� Siga la tabla de cocción para obtener los mejores resultados�
• VAPOR » VAPOR PURO
Para cocinar platos naturales y saludables al vapor para conservar el valor nutritivo natural de los alimentos� Esta función es ideal para cocinar verduras, pescado y fruta, así como para escaldar� Salvo que se indique lo contrario, retire el envoltorio y el film protector antes de introducir los alimentos en el horno�
» AIRE FORZADO + VAPORGracias a la combinación de las propiedades del vapor con las del aire forzado, esta función le permite cocinar platos crujientes y dorados por fuera pero tiernos y suculentos por dentro� Para conseguir los mejores resultados de cocción, recomendamos escoger un nivel de vapor ALTO al cocinar pescado, MEDIO para la carne y BAJO para el pan y los postres�
• FUNCIONES ESPECIALES » DESCONGELAR
Para acelerar la descongelación de los alimentos� Se recomienda colocar los alimentos en el estante central� Además, se recomienda dejar los alimentos en su envase para evitar que se sequen por fuera�
» MANTENER CALIENTEPara mantener calientes y crujientes los alimentos recién cocinados�
» LEUDARPara optimizar la fermentación de masas dulces o saladas� Para garantizar la calidad del leudado, no active la función si el horno está caliente después de un ciclo de cocción�
» COMODIDADPara cocinar alimentos preparados almacenados a temperatura ambiente o en el frigorífico (galletas, mezcla para bizcocho, muffins, platos de pasta y pan o similares)� La función cocina todos los platos de forma rápida y gradual y también puede utilizarse para recalentar comida precocinada� No es necesario precalentar el horno� Siga las instrucciones del envase�
» MAXI COCCIÓNPara cocinar piezas de carne de gran tamaño (más de 2,5 kg)� Se recomienda dar la vuelta a la carne durante la cocción para obtener un gratinado homogéneo por ambos lados� Se recomienda untar la carne periódicamente con su propio jugo para que no se seque en exceso�
» AIRE FORZADO ECO*Para cocinar piezas de carne asadas con relleno y filetes de carne en un solo estante� Para evitar que los alimentos se resequen, el aire circula de manera suave e intermitente� Cuando se utiliza esta función ECO, la luz permanece apagada durante la cocción� Para utilizar el ciclo ECO y optimizar el consumo de energía, la puerta del horno no se debe abrir hasta que termine la cocción�
• FROZEN COOK (COCCIÓN DE CONGELADOS)Esta función selecciona automáticamente la temperatura y el modo de cocción ideal para 5 tipos diferentes de alimentos congelados preparados� No es necesario precalentar el horno�
COOKASSISTEsto permite cocinar todos los tipos de alimentos de forma totalmente automática� Para sacar el máximo rendimiento a esta función, siga las indicaciones de la tabla de cocción correspondiente�No es necesario precalentar el horno�
* Función utilizada como referencia para la declaración de eficiencia energética de conformidad con la normativa (EU) Nº 65/2014
FUNCIONES

ES
99
CÓMO UTILIZAR LA PANTALLA TÁCTILPara desplazarse por un menú o una lista:Deslice el dedo por la pantalla para desplazarse por los elementos o valores�Para seleccionar o confirmar:Toque la pantalla para seleccionar el valor o el elemento del menú que desee�
Para volver a la pantalla anterior:Toque �Para confirmar un ajuste o ir a la siguiente pantalla:Toque «AJUSTAR» o «SIGUIENTE»�
PRIMER USOLa primera vez que encienda el aparato, tendrá que configurar el producto�Los ajustes pueden cambiarse pulsando para acceder al menú «Herramientas».
1. SELECCIONE EL IDIOMALa primera vez que encienda el aparato, tendrá que seleccionar el idioma y ajustar la hora�• Deslice el dedo pantalla para desplazarse por la
lista de idiomas disponibles�
•
Čeština, Český Jazyk Czech
Dansk Danish
Deutsch German
Toque el idioma que desea�
Ελλνικά Greek, Modern
English English
Español Spanish
Al tocar volverá a la ventana anterior.
2. SELECCIONAR MODO DE AJUSTESUna vez seleccionado el idioma, la pantalla le indicará que escoja entre «GUARDAR DEMO» (útil para vendedores, solo para muestras) o continúe tocando «SIGUIENTE»�
¡Gracias por su compra!
Presione Siguiente para continuar la configuración para uso en el hogar�
MODO DEMO EN TIENDA SIGUIENTE

100
. AJUSTE DE LA HORA Y LA FECHAAl conectar el horno a su red doméstica, la hora y la fecha se ajustarán automáticamente� De lo contrario, deberá configurarlos de forma manual• Toque los números correspondientes para ajustar
la hora�
•
0987654321
Ajuste la hora del sistema.
Toque «AJUSTAR» para confirmar�
0987654321
12:30Sistema de 24 h
AJUSTAR
Una vez ajustada la hora, deberá fijar la fecha�• Toque los números correspondientes para fijar la
fecha�• Toque «AJUSTAR» para confirmar�
4. CONFIGURACIÓN DEL CONSUMO DE POTENCIAEl horno está programado para consumir un nivel de potencia eléctrica compatible con el de una red doméstica que tenga una potencia superior a 3 kW (16 amperios): Si su hogar tiene menos potencia, deberá reducir este valor (13 amperios)�• Pulse el valor de la derecha para seleccionar la
potencia�
•
Energía
13 amperios
16 amperios
Pulse «ACEPTAR» para completar la configuración inicial�
Programación terminada
Su aparato está ahora configurado y listo para el uso!
CORRECTO
5. CALENTAR EL HORNOUn horno nuevo puede liberar olores que se han quedado impregnados durante la fabricación: es completamente normal� Antes de empezar a cocinar, le recomendamos calentar el horno en vacío para eliminar cualquier olor� Quite todos los cartones de protección o el film transparente del horno y saque todos los accesorios de su interior� Caliente el horno a 200 °C durante aproximadamente una hora�Es aconsejable ventilar la habitación después de usar el aparato por primera vez.

ES
101
USO DIARIO1. SELECCIONAR UNA FUNCIÓN• Para encender el horno, pulse o toque en
cualquier punto de la pantalla�La pantalla le permite escoger entre las funciones Manual y CookAssist�• Toque la función principal que desee para acceder
al menú correspondiente�
•
20:00
FUNCIONES MANUALES
COOKASSIST
Desplácese hacia arriba o hacia abajo para explorar la lista�
•
Selección de función
CONVENCIONAL
AIRE FORZADO GRILL
HORNEADO POR CONVECCIÓN
Seleccione la función que desee tocándola�
Selección de función
CONVENCIONAL
AIRE FORZADO GRILL
HORNEADO POR CONVECCIÓN
2. AJUSTAR FUNCIONES MANUALESCuando haya seleccionado la función que desee, puede cambiar la configuración correspondiente� En la pantalla aparecerá la configuración que se puede cambiar�TEMPERATURA / NIVEL DEL GRILL• Desplácese por los valores sugeridos y seleccione
el que desee�Seleccionar
temperatura
SIGUIENTE
Si la función lo permite, puede pulsar para activar el precalentamiento�
Seleccionar temperatura
SIGUIENTE
DURACIÓNSi quiere cocinar de forma manual no es necesario configurar el tiempo de cocción� En el modo temporizado, el horno cocina durante el tiempo que haya seleccionado� Al final del tiempo de cocción, la cocción se detiene automáticamente�• Para empezar a ajustar la duración, toque «Ajustar
tiempo de cocción»�
•
Ajustar tiempo de cocción
Seleccionar temperatura
SIGUIENTE
Toque los números correspondientes para ajustar el tiempo de cocción requerido�
•
0987654321
Introducir el tiempo
SIGUIENTE
Toque «SIGUIENTE» para confirmar�3. AJUSTAR LAS FUNCIONES COOKASSISTLas funciones COOKASSIST le permiten preparar una amplia variedad de platos escogiéndolos entre los que se muestran en la lista� El aparato selecciona la mayor parte de ajustes de cocción automáticamente para obtener los mejores resultados�• Escoja una receta de la lista�Las funciones se muestran por categorías de alimentos en el menú COOKASSIST FUNCTION (FUNCIÓN COOKASSIST) (consulte las tablas correspondientes) y por funciones de receta en el menú COOKASSIST PRO.• Una vez seleccionada una función, indique las
características de los alimentos (cantidad, peso, etc�) que desea cocinar para obtener los resultados perfectos�
• Siga los mensajes en pantalla que le guiarán a lo largo del proceso de cocción�

102
4. AJUSTAR HORA DE INICIO DIFERIDOPuede aplazar la cocción antes de iniciar una función: La función se iniciará en el momento que seleccione por adelantado�• Toque “DELAY” para definir la hora de inicio
deseada��
•
INSTRUCCIONES DE COCCIÓN:
Para cocinar cualquier tipo de plato en un solo estante�
Introduzca el alimento en el nivel 3�Use una rejilla si usa una sartén o una bandeja�
DELAY
Convencional
INICIO
Una vez ajustado el retraso requerido, toque «COMENZAR EL RETRASO» para iniciar el tiempo de espera�
• Coloque los alimentos en el horno y cierre la puerta: Esta función se iniciará automáticamente cuando haya transcurrido el periodo de tiempo calculado�
Si se selecciona el precalentamiento durante el ajuste del ciclo, la opción de delay estará desactivada.• Para activar la función inmediatamente y cancelar
el inicio diferido programado, toque �5. INICIO DE LA FUNCIÓN• Una vez configurados los ajustes, toque «INICIO»
para activar la función�Puede cambiar los valores configurados en cualquier momento durante la cocción tocando el valor que desea modificar.Si el horno está caliente y la función requiere una temperatura máxima específica, se mostrará un mensaje en la pantalla.• Pulse para detener la función activa en
cualquier momento, o toque el valor de la duración y seleccione «DETENER»�
6. PRECALENTAMIENTOSi se ha activado previamente, una vez iniciada la función la pantalla indica el estado de la fase de precalentamiento�
00:00:15 desde el inicioCONVENCIONALPrecalentamiento200 °C
AJUSTARCOCINAR
TIEMPO
Cuando el precalentamiento haya terminado, sonará una señal acústica y la pantalla indicará que el horno ha alcanzado la temperatura establecida�
•
Precalentamiento terminadoInserte la comida ahora
HECHO
Abra la puerta�• Introduzca el alimento�• Cierre la puerta y la cocción se reanudará
automáticamente�Colocar los alimentos en el horno antes de que haya finalizado el precalentado puede tener efectos adversos en el resultado final de la cocción.Abrir la puerta durante la fase de precalentamiento pondrá en pausa el proceso.El tiempo de cocción no incluye la fase de precalentamiento.
7. PONER EN PAUSA LA COCCIÓNAlgunas funciones COOKASSIST requieren dar la vuelta a la comida durante la cocción� Se emitirá una señal acústica y las pantallas indicarán las acciones que deberá realizar� • Abra la puerta�• Realice la acción indicada por la pantalla�• cierre la puerta y toque «HECHO» para reanudar la
cocción�Antes de finalizar la cocción, el horno podría indicarle que compruebe la comida del mismo modo�Se emitirá una señal acústica y las pantallas indicarán las acciones que deberá realizar�• Compruebe la comida�• Cierre la puerta y la cocción se reanudará
automáticamente�8. FINAL DE COCCIÓNSonará una señal acústica y la pantalla indicará que la cocción ha terminado�Con algunas funciones, una vez finalizada la cocción puede dorar más un plato, ampliar el tiempo de cocción o guardar la función como favorita�
•
desde 00:01 listo
CONVENCIONALCocción200 °C
TEMPORIZADORTERMINADO
Toque para guardarla como favorita�• Seleccione «Dorado extra» para iniciar un ciclo de
dorado de cinco minutos�• Toque para prolongar la cocción�

ES
103
9. FAVORITOSLa función de Favoritos almacena los ajustes del horno para su receta favorita�El horno reconoce automáticamente las funciones más utilizadas.Después de varios usos, se le aconsejará que añada la función a sus favoritos.CÓMO GUARDAR UNA FUNCIÓNUna vez terminada una función, puede tocar para guardarla como favorita� Esto le permitirá utilizarla rápidamente en el futuro conservando los mismos ajustes�La pantalla le permite guardar la función indicando hasta cuatro comidas favoritas, como el desayuno, el almuerzo, un snack y la cena�• Toque los iconos para seleccionar al menos uno�
•
1. Pizza fina
GUARDAR
EDITAR
Toque «GUARDAR» para guardar la función�
1. Pizza fina
GUARDAR
EDITAR
UNA VEZ GUARDADAPara ver el menú de favoritos, pulse : las funciones se dividirán por comidas distintas y se ofrecerán algunas sugerencias�• Toque el icono de cada comida para ver las listas
correspondientes
•
Almuerzos favoritos
PIZZA FINA
¿Busca algo más? Vea las siguientes sugerencias�
Desplácese por la lista que se ha abierto�• Toque la receta o función requerida�• Toque «INICIO» para activar la cocción�CAMBIO DE LA CONFIGURACIÓNEn la pantalla de Favoritos, puede añadir una imagen o un nombre a cada favorito para adaptarlo a sus preferencias�• Seleccione la función que desea cambiar�• Toque «EDITAR»�• Seleccione el atributo que desea cambiar�
• Toque «SIGUIENTE»: La pantalla mostrará los nuevos atributos�
• Toque «GUARDAR» para confirmar sus cambios�En la pantalla de favoritos también puede eliminar funciones guardadas:• Toque en la función�• Toque «ELIMINAR»�También puede ajustar la hora a la que se muestra cada comida:• Pulse �• Seleccione «Preferencias»�• Seleccione «Horas y fechas»� • Toque «Sus horarios de comidas»�• Desplácese por la lista y toque la hora
correspondiente�• Toque la comida correspondiente para cambiarla�Solo es posible combinar un hueco de tiempo con una comida.
10. HERRAMIENTASPulse para abrir el menú «Herramientas» en cualquier momento�Este menú permite escoger entre varias opciones y cambiar los ajustes o preferencias de su producto o de la pantalla�
Herramientas
Temporizador de cocina
Luz Autolimpieza
TEMPORIZADOR DE COCINAEsta función puede activarse utilizando una función de cocción o de forma independiente para llevar la cuenta del tiempo�Una vez iniciada, el temporizador continuará la cuenta atrás de forma independiente sin interferir en la función�Cuando se haya activado el temporizador, también podrá seleccionar y activar una función�El temporizador continuará la cuenta atrás en la esquina superior derecha de la pantalla.Para recuperar o cambiar el temporizador de cocina:• Pulse �• Toque �Una vez que haya finalizado la cuenta atrás del tiempo seleccionado sonará una señal acústica y la pantalla lo indicará� • Toque “RECHAZAR” para cancelar el temporizador�• Toque «PROGRAMAR NUEVO TEMPORIZADOR»
para volver a ajustar el temporizador�
LUZPara encender o apagar la lámpara del horno�
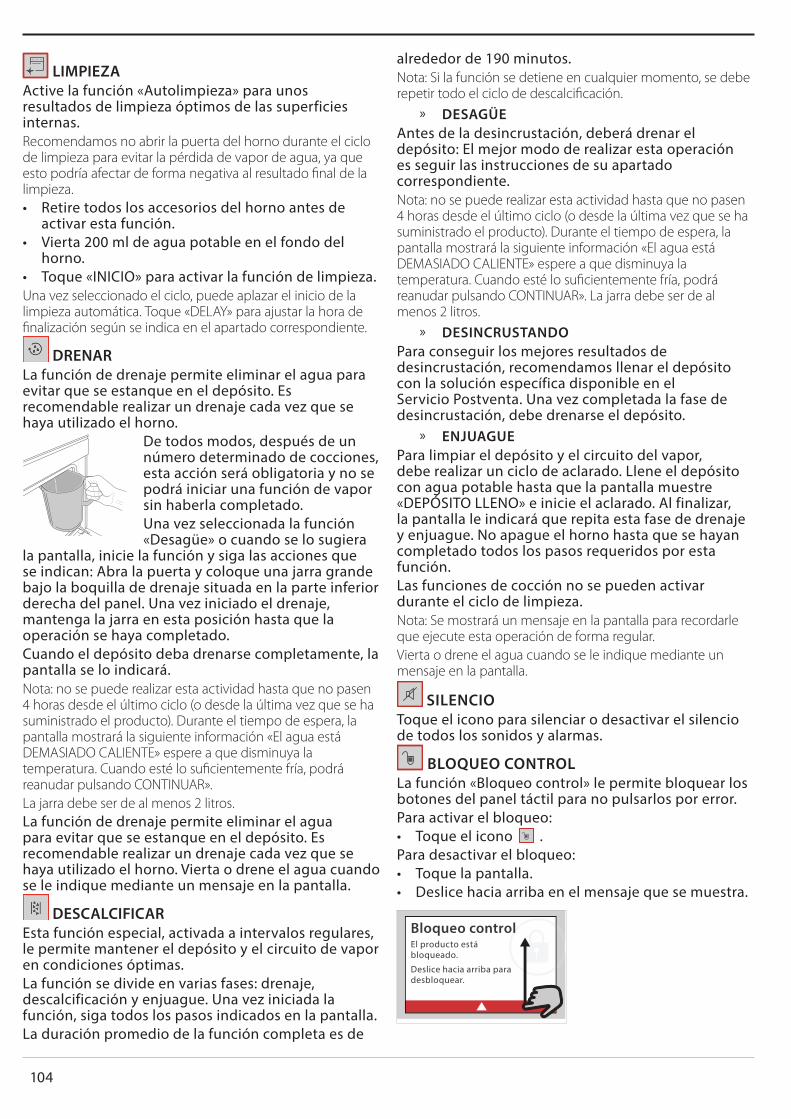
104
LIMPIEZAActive la función «Autolimpieza» para unos resultados de limpieza óptimos de las superficies internas�Recomendamos no abrir la puerta del horno durante el ciclo de limpieza para evitar la pérdida de vapor de agua, ya que esto podría afectar de forma negativa al resultado final de la limpieza.• Retire todos los accesorios del horno antes de
activar esta función�• Vierta 200 ml de agua potable en el fondo del
horno�• Toque «INICIO» para activar la función de limpieza�Una vez seleccionado el ciclo, puede aplazar el inicio de la limpieza automática. Toque «DELAY» para ajustar la hora de finalización según se indica en el apartado correspondiente.
DRENARLa función de drenaje permite eliminar el agua para evitar que se estanque en el depósito� Es recomendable realizar un drenaje cada vez que se haya utilizado el horno�
De todos modos, después de un número determinado de cocciones, esta acción será obligatoria y no se podrá iniciar una función de vapor sin haberla completado�Una vez seleccionada la función «Desagüe» o cuando se lo sugiera
la pantalla, inicie la función y siga las acciones que se indican: Abra la puerta y coloque una jarra grande bajo la boquilla de drenaje situada en la parte inferior derecha del panel� Una vez iniciado el drenaje, mantenga la jarra en esta posición hasta que la operación se haya completado�Cuando el depósito deba drenarse completamente, la pantalla se lo indicará�Nota: no se puede realizar esta actividad hasta que no pasen 4 horas desde el último ciclo (o desde la última vez que se ha suministrado el producto). Durante el tiempo de espera, la pantalla mostrará la siguiente información «El agua está DEMASIADO CALIENTE» espere a que disminuya la temperatura. Cuando esté lo suficientemente fría, podrá reanudar pulsando CONTINUAR».La jarra debe ser de al menos 2 litros.La función de drenaje permite eliminar el agua para evitar que se estanque en el depósito� Es recomendable realizar un drenaje cada vez que se haya utilizado el horno� Vierta o drene el agua cuando se le indique mediante un mensaje en la pantalla�
DESCALCIFICAREsta función especial, activada a intervalos regulares, le permite mantener el depósito y el circuito de vapor en condiciones óptimas�La función se divide en varias fases: drenaje, descalcificación y enjuague� Una vez iniciada la función, siga todos los pasos indicados en la pantalla�La duración promedio de la función completa es de
alrededor de 190 minutos�Nota: Si la función se detiene en cualquier momento, se debe repetir todo el ciclo de descalcificación.
» DESAGÜEAntes de la desincrustación, deberá drenar el depósito: El mejor modo de realizar esta operación es seguir las instrucciones de su apartado correspondiente�Nota: no se puede realizar esta actividad hasta que no pasen 4 horas desde el último ciclo (o desde la última vez que se ha suministrado el producto). Durante el tiempo de espera, la pantalla mostrará la siguiente información «El agua está DEMASIADO CALIENTE» espere a que disminuya la temperatura. Cuando esté lo suficientemente fría, podrá reanudar pulsando CONTINUAR». La jarra debe ser de al menos 2 litros.
» DESINCRUSTANDOPara conseguir los mejores resultados de desincrustación, recomendamos llenar el depósito con la solución específica disponible en el Servicio Postventa� Una vez completada la fase de desincrustación, debe drenarse el depósito�
» ENJUAGUEPara limpiar el depósito y el circuito del vapor, debe realizar un ciclo de aclarado� Llene el depósito con agua potable hasta que la pantalla muestre «DEPÓSITO LLENO» e inicie el aclarado� Al finalizar, la pantalla le indicará que repita esta fase de drenaje y enjuague� No apague el horno hasta que se hayan completado todos los pasos requeridos por esta función�Las funciones de cocción no se pueden activar durante el ciclo de limpieza�Nota: Se mostrará un mensaje en la pantalla para recordarle que ejecute esta operación de forma regular.Vierta o drene el agua cuando se le indique mediante un mensaje en la pantalla.
SILENCIOToque el icono para silenciar o desactivar el silencio de todos los sonidos y alarmas�
BLOQUEO CONTROLLa función «Bloqueo control» le permite bloquear los botones del panel táctil para no pulsarlos por error� Para activar el bloqueo:• Toque el icono �Para desactivar el bloqueo:• Toque la pantalla�• Deslice hacia arriba en el mensaje que se muestra�
Bloqueo controlEl producto está bloqueado�
Deslice hacia arriba para desbloquear�

ES
105
MÁS MODOSPara seleccionar el modo sabático y acceder a Energía�El modo sabático mantiene el horno encendido en modo de horneado hasta que se desactiva. El modo sabático utiliza la función convencional. El resto de ciclos de cocción y limpieza están desactivados. No sonará ningún tono y las pantallas no indicarán los cambios de temperatura. Cuando la puerta del horno se abra o se cierre, la luz del horno no se encenderá ni se apagará, y las resistencias no se encenderán ni se apagarán inmediatamente.Para desactivar el modo sabático y salir de él, pulse o y mantenga pulsada la pantalla durante 3 segundos.
PREFERENCIASPara cambiar algunos ajustes del horno�
INFORMACIÓNPara apagar el «Modo demo en tienda», restablecer el producto y obtener más información sobre el producto�

106
CONSEJOS ÚTILESCÓMO UTILIZAR LAS TABLAS DE COCCIÓNLa lista de las tablas: recetas, si es necesario precalentar , temperatura (°C), nivel del grill, tiempo de cocción (minutos), accesorios y nivel sugerido para la cocción� Los tiempos de cocción inician en el momento en que se coloca el alimento en el horno, excluyendo el precalentamiento (cuando sea necesario)� Las temperaturas y los tiempos de cocción son orientativos y dependen de la cantidad de alimentos y del tipo de accesorio utilizado� Al principio, aplique los valores recomendados más bajos y, si la cocción no es suficiente, auméntelos�
Utilice los accesorios suministrados y, si es posible, moldes y bandejas metálicos oscuros� También puede utilizar recipientes y accesorios tipo Pyrex o de cerámica, pero tenga en cuenta que los tiempos de cocción serán ligeramente mayores� Para obtener resultados óptimos, siga atentamente las recomendaciones de la tabla de cocción respecto al uso de accesorios (suministrados) y su colocación en los distintos niveles�
CONVENCIONALLas resistencias de la parte superior e inferior del horno calientan el interior uniformemente�Utilice el 3�er estante� Para cocinar pizza, así como tartas saladas y dulces con relleno líquido, utilice el 1�er o el 2�° estante� Precaliente el horno antes de colocar los alimentos en su interior�Esta función es el mejor modo de cocción para preparar postres delicados en un único estante�Utilice moldes metálicos de color oscuro y colóquelos siempre sobre la rejilla suministrada� Cuando use las bandejas suministradas, extraiga cualquier accesorio que no utilice del interior del horno para conseguir un resultado óptimo y ahorrar energía�
Para saber si un bizcocho está listo, introduzca un palillo en el centro� Si el palillo aparece limpio al retirarlo, el bizcocho está listo� Si utiliza moldes antiadherentes, no unte con manteca los bordes, ya que el bizcocho podría no subir de manera homogénea en torno a los bordes� Si el bizcocho se «hunde» durante la cocción, utilice una temperatura más baja en la siguiente ocasión� También puede reducir la cantidad de líquido de la masa y mezclarla con mayor suavidad� El pescado está cocinado cuando la espina dorsal se desprende fácilmente� Empiece seleccionando la temperatura indicada más baja, incluso cuando prepare pescado más grande� Como norma general, cuanto más grande sea el pescado, más baja debe ser la temperatura y, por consiguiente, el tiempo de cocción debe ser más largo�
Receta Precalentamiento Temperatura (°C) Tiempo de cocción (Min.) Nivel y accesorios
Bizcochos esponjosos Sí 170 30 - 50 2
Galletas / Galletas de pastaflora Sí 150 20 - 40 3
Pastelitos / Magdalenas Sí 170 20 - 40 3
Lionesas Sí 180 - 200 30 - 40 3
Merengues Sí 90 110 - 150 3
Pizza / Pan / Focaccia Sí 190 - 250 15 - 50 2
Pizza congelada Sí 250 10-15 3
Volovanes / Canapés de hojaldre Sí 190 - 200 20 - 30 3
Lasaña / flanes / pasta al horno / canelones Sí 190 - 200 45 - 65 3
Cordero / Ternera / Buey / Cerdo 1 kg Sí 190 - 200 80-110 3
Pollo, conejo, pato 1 kg Sí 200-230 50-100 3
Pavo / oca 3 kg Sí 190 - 200 80 - 130 2
Pescado al horno / en papillote (filetes, entero) Sí 180 - 200 40 - 60 3
GRILL
ACCESORIOSRejilla
Bandeja de horno o molde
sobre rejilla
Grasera / bandeja pastelera
o bandeja de horno sobre rejilla
Grasera / Bandeja pastelera
Grasera con 500 ml de agua

ES
107
La resistencia superior permite conseguir un resultado óptimo al asar al grill� Coloque los alimentos en el 4�º o 5�º estante� Para asados al grill, se recomienda utilizar una grasera que recoja los jugos de la cocción� Colóquela en el 3�er o el 4�° estante, añadiendo 500 ml de agua potable aproximadamente� No es necesario precalentar el horno�Durante la cocción, la puerta del horno debe permanecer cerrada�Si desea gratinar carne, elija cortes de carne de igual grosor para obtener un resultado de cocción uniforme� Las piezas de carne muy gruesas requieren tiempos de cocción más prolongados�
Para evitar que la carne se queme por fuera, coloque la rejilla en un nivel inferior para alejarla del grill� Dé la vuelta al alimento a mitad de la cocción�Para recoger los jugos de la cocción, es conveniente colocar una grasera con medio litro de agua directamente debajo de la parrilla en la que se coloca la carne� Reponga el líquido cuando sea necesario�
Receta Precalentamiento Nivel del grill Tiempo de cocción (Min.) Nivel y accesorios
Tostada - 3 (Alta) 3 - 6 5
Filetes de pescado / Bistecs - 2 (Media) 20 - 30 4 3
Salchichas / Kebabs / Costillas / Hamburguesas - 2 - 3 (Medio - Alto) 15 - 30 5 4
TURBO GRILLEn esta función, la resistencia superior y el ventilador se activan a la vez�Se recomienda utilizar la grasera para recoger los jugos de la cocción�Colóquela en el 1�er o el 2�° estante, añadiendo 500 ml de agua aproximadamente� No es necesario precalentar el horno� Durante la cocción, la puerta del horno debe permanecer cerrada�Dé la vuelta al alimento en el segundo tercio de la
cocción�Utilice cualquier tipo de bandeja de horno o fuente de Pyrex adecuada al tamaño de la pieza de carne que va a cocinar� En el caso de los asados, es conveniente añadir caldo en la base de la bandeja y rociar la carne durante la cocción para realzar el sabor� Cuando el asado esté listo, déjelo reposar en el horno durante 10 o 15 minutos, o envuélvalo en papel de aluminio�
Receta Precalentamiento Nivel del grill Tiempo de cocción (Min.) Nivel y accesorios
Pollo asado 1-1,3 kg - 2 (Media) 55-70 2 1
Pierna de cordero / Jarretes - 2 (Media) 60 - 90 3
Patatas asadas - 2 (Media) 35 - 55 3
Verduras gratinadas - 3 (Alta) 10 - 25 3
ACCESORIOSRejilla
Bandeja de horno o molde
sobre rejilla
Grasera / bandeja pastelera
o bandeja de horno sobre rejilla
Grasera / Bandeja pastelera
Grasera con 500 ml de agua

108
AIRE FORZADOLa resistencia circular y el ventilador se activan a la vez� El ventilador de la pared trasera distribuye el aire caliente uniformemente por el horno�El uso de la función «Aire forzado» permite cocinar al mismo tiempo distintos alimentos que requieran la misma temperatura (por ejemplo pescado o verduras) utilizando diferentes estantes� Retire del horno los alimentos que requieran menor tiempo y deje los que necesiten una cocción más prolongada�
Utilice el 4�° estante para cocinar en un solo estante, el 1�° y el 4�° para cocinar en dos estantes y el 1�°, el 3�° y el 5�° para cocinar en tres estantes� Coloque los moldes de pastel siempre en la rejilla� Se recomienda precalentar el horno antes de cocinar�Para conseguir un dorado uniforme, procure que todas las porciones de masa tengan el mismo grosor�Engrase ligeramente las bandejas para que la pizza tenga una base crujiente� Esparza la mozzarella sobre la pizza en el segundo tercio del tiempo de cocción�
Receta Precalentamiento Temperatura (°C) Tiempo de cocción (Min.) Nivel y accesorios
Bizcochos esponjososSí 170 30 - 50 2
Sí 160 30 - 50 4
1
Tartas rellenas (tarta de queso, strudel, tarta de manzana) Sí 160 – 200 35-90 4 1
Galletas / Galletas de pastaflora
Sí 140 30 - 50 4
Sí 140 30 - 50 4
1
Sí 135 40 - 60 5
3 1
Pastelitos / Magdalenas
Sí 150 30 - 50 4
Sí 150 30 - 50 4
1
Sí 150 40 - 60 5
3 1
LionesasSí 180 - 190 35 - 45 4
1
Sí 180 - 190 35 - 45 * 5
3 1
MerenguesSí 90 130 - 150 4
1
Sí 90 140 - 160 * 5 3 1
Pizza / Pan / Focaccia Sí 190 - 230 20 - 50 4 1
Pizza (fina, gruesa, focaccia) Sí 220 - 240 25 - 50 * 5 3 1
Pizza congeladaSí 250 10 - 20 4 1
Sí 220 - 240 15 - 30 5 3 1
Tartas saladas (tarta de verdura, quiche)Sí 180 - 190 45-60 4 1
Sí 180 - 190 45 - 70 * 5 3 1
Volovanes / Canapés de hojaldreSí 180 - 190 20 - 40 4 1
Sí 180 - 190 20 - 40 * 5 3 1
Lasañas y carnes Sí 200 50 - 100 * 4 1
Carnes y patatas Sí 200 45 - 100 * 4 1
Pescado y verduras Sí 180 30 - 50 * 4 1
* Tiempo de cocción estimado: Los platos se pueden extraer del horno antes o después según los gustos personales.

ES
109
MULTICOOKING (MULTICOCCIÓN)Receta Recipiente Precalenta-
miento Temperatura (°C) Tiempo de cocción (Min.) Nivel y accesorios
Galletas Galletas Sí 135 50 - 70 5 4 3 1
Tartas Tartas Sí 170 50 - 70 5 4 3 1
Pizza redonda Pizza redon-da Sí 210 40 - 60 5 4 2 1
Menú completo: Tarta de frutas (nivel 5) /Verduras asadas (nivel 4) lasaña (nivel 2) cortes de carne (nivel 1)
Menú Cook 4 Sí 190 40 - 120 5 4 2 1
HORNEADO POR CONVECCIÓNPara quiches y tartas de verduras o postres con relleno húmedo, como tartas de queso o de frutas, utilice esta función�También es ideal para cocinar alimentos con un alto contenido de agua� El ventilador distribuye el aire caliente uniformemente por el horno� Esto ayuda a mantener una temperatura constante y a cocinar los alimentos de una forma más homogénea, dorando la parte superior y manteniendo la humedad en el
interior, con lo que se consiguen unos panes más crujientes�Utilice el 2º o el 3er nivel� Espere a que termine el precalentado antes de introducir los alimentos�Si la base del bizcocho o tarta está demasiado líquida, coloque la bandeja en un nivel más bajo y esparza galletas trituradas sobre la base antes de añadir el relleno�
Receta Precalenta-miento Temperatura (°C) Tiempo de cocción
(Min.) Nivel y accesorios
Tartas rellenas (tarta de queso, strudel, tarta de manzana) Sí 160 – 200 30 - 85 3
Tartas saladas (tarta de verdura, quiche) Sí 180 - 190 45 - 55 3
Hortalizas rellenas (tomates, calabacines, berenjenas) Sí 180 - 200 50 - 60 2
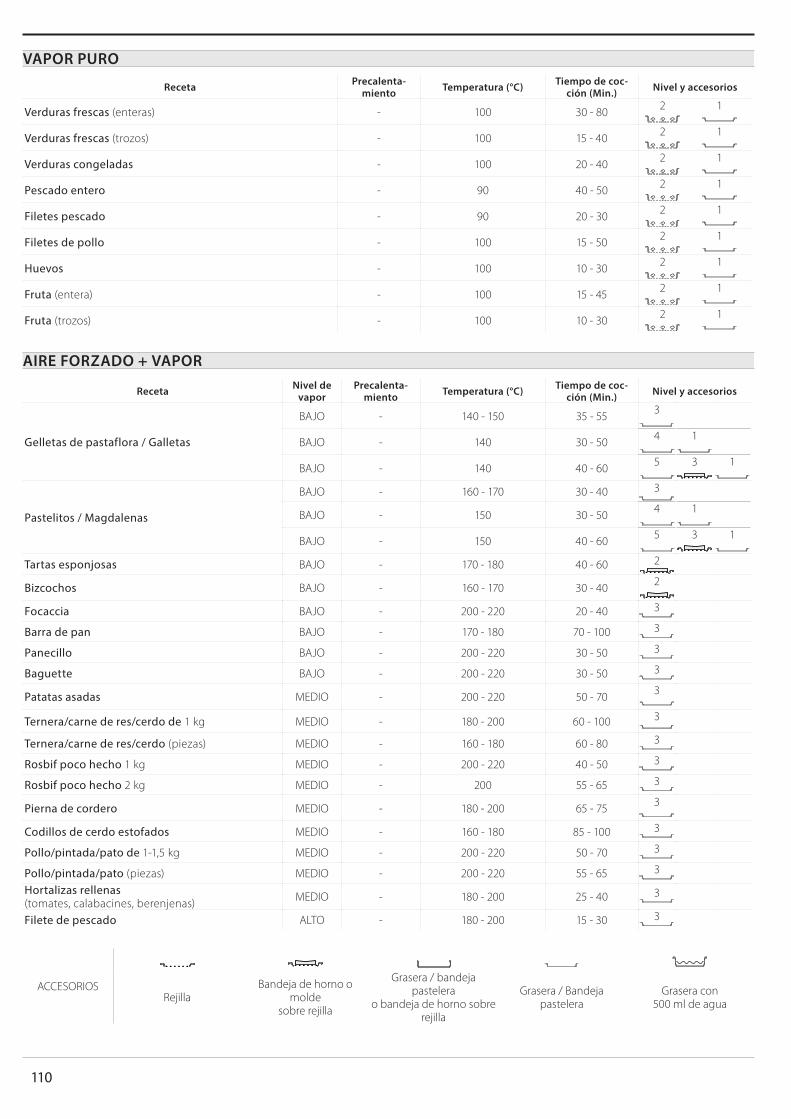
110
ACCESORIOSRejilla
Bandeja de horno o molde
sobre rejilla
Grasera / bandeja pastelera
o bandeja de horno sobre rejilla
Grasera / Bandeja pastelera
Grasera con 500 ml de agua
VAPOR PURO
Receta Precalenta-miento Temperatura (°C) Tiempo de coc-
ción (Min.) Nivel y accesorios
Verduras frescas (enteras) - 100 30 - 80 2 1
Verduras frescas (trozos) - 100 15 - 40 2 1
Verduras congeladas - 100 20 - 40 2 1
Pescado entero - 90 40 - 50 2 1
Filetes pescado - 90 20 - 30 2 1
Filetes de pollo - 100 15 - 50 2 1
Huevos - 100 10 - 30 2 1
Fruta (entera) - 100 15 - 45 2 1
Fruta (trozos) - 100 10 - 30 2 1
AIRE FORZADO + VAPOR
Receta Nivel de vapor
Precalenta-miento Temperatura (°C) Tiempo de coc-
ción (Min.) Nivel y accesorios
Gelletas de pastaflora / Galletas
BAJO - 140 - 150 35 - 55 3
BAJO - 140 30 - 50 4
1
BAJO - 140 40 - 60 5
3 1
Pastelitos / Magdalenas
BAJO - 160 - 170 30 - 40 3
BAJO - 150 30 - 50 4
1
BAJO - 150 40 - 60 5
3 1
Tartas esponjosas BAJO - 170 - 180 40 - 60 2
Bizcochos BAJO - 160 - 170 30 - 40 2
Focaccia BAJO - 200 - 220 20 - 40 3
Barra de pan BAJO - 170 - 180 70 - 100 3
Panecillo BAJO - 200 - 220 30 - 50 3
Baguette BAJO - 200 - 220 30 - 50 3
Patatas asadas MEDIO - 200 - 220 50 - 70 3
Ternera/carne de res/cerdo de 1 kg MEDIO - 180 - 200 60 - 100 3
Ternera/carne de res/cerdo (piezas) MEDIO - 160 - 180 60 - 80 3
Rosbif poco hecho 1 kg MEDIO - 200 - 220 40 - 50 3
Rosbif poco hecho 2 kg MEDIO - 200 55 - 65 3
Pierna de cordero MEDIO - 180 - 200 65 - 75 3
Codillos de cerdo estofados MEDIO - 160 - 180 85 - 100 3
Pollo/pintada/pato de 1-1,5 kg MEDIO - 200 - 220 50 - 70 3
Pollo/pintada/pato (piezas) MEDIO - 200 - 220 55 - 65 3
Hortalizas rellenas (tomates, calabacines, berenjenas) MEDIO - 180 - 200 25 - 40 3
Filete de pescado ALTO - 180 - 200 15 - 30 3

ES
111
MAXI COCCIÓNEsta función es muy útil para cocinar piezas de carne grandes (de más de 2,5 kg)� Se recomienda dar la vuelta a los alimentos durante la cocción para obtener un resultado homogéneo por ambos lados� Se recomienda untar la carne periódicamente con su propio jugo para que no se seque en exceso�Utilice el 1�er o el 2�° estante según las dimensiones de la pieza de carne� No es necesario precalentar el horno�
En el caso de los asados, es conveniente añadir caldo en la base de la bandeja y rociar la carne durante la cocción para realzar el sabor� Cuando el asado esté listo, déjelo reposar en el horno durante 10 o 15 minutos, o envuélvalo en papel de aluminio�Si la carne es demasiado magra, añada un poco de líquido, mójela con un poco de grasa o cúbrala con lonchas de tocino, por ejemplo�Si hay que dar la vuelta al asado, ponga primero la parte con la piel hacia abajo�
Receta Precalenta-miento Temperatura (°C) Tiempo de cocción
(Min.) Nivel y accesorios
Cerdo asado con piel 2 kg - 170 110 - 150 2
AIRE FORZADO ECOSe recomienda utilizar el 3�er nivel� No es necesario precalentar el horno�
Receta Precalenta-miento Temperatura (°C) Tiempo de cocción
(Min.) Nivel y accesorios
Piezas de carne rellenas asadas - 200 80 - 120 * 3
Trozos de carne (conejo, pollo, cordero) - 200 50 - 100 * 3
* Tiempo de cocción estimado: Los platos se pueden extraer del horno antes o después según los gustos personales.
LEUDAREs conveniente cubrir siempre la masa con un paño húmedo antes de introducirla en el horno� Al utilizar esta función, el tiempo de fermentación de la masa se reduce en un tercio con respecto al tiempo de fermentación a temperatura ambiente (20-25º C)�
El tiempo de leudado de una pizza de 1 kg es aproximadamente de una hora�
GUARDAR CALIENTELa función Mantener caliente le permite mantener caliente la comida preparada� Esto evita que se formen condensaciones y elimina la necesidad de limpiar el compartimento de cocción�
No se aconseja mantener caliente la comida preparada durante más de dos horas�Recuerde que algunos alimentos se siguen cociendo mientras se mantienen calientes: Tápelos, si es necesario, para impedir que se sequen�
DESCONGELACIÓNLos alimentos hervidos, guisos y salsas para carne se descongelan mejor si se remueven durante la descongelación� Separe en trozos cuando empiecen a descongelarse: las porciones separadas se descongelarán más rápidamente�

112
TABLA DE COCCIÓN COOKASSIST
Receta Cantidad recomendada
Dar la vuelta (del tiempo de
cocción)
Nivel y accesorios
Estofados/Pasta al horno
Lasaña fresca 500- 3000 g - 2
Lasaña congelada 500- 3000 g - 2
Arroz y cereales
Arroz
Arroz blanco 100-500 g - 2 1
Arroz integral 100-500 g - 2 1
Arroz integral 100-500 g - 2 1
Semillas y cereales
Quinoa 100- 300 g - 2 1
Mijo 100- 300 g - 2 1
Espelta 100- 300 g - 2 1
Cebada 100- 300 g - 2 1
Carne
BueyRoast Beef 600- 2000 g — 3
Hamburguesa 1,5-3 cm 3/5 5
Cerdo
Cerdo 600- 2500 g — 3
Costillas de cerdo una rejilla 2/35 4
Pollo asado
Pollo asado 600- 3000 g - 2
Filete / pechuga de pollo 1-5 cm 2/3
5
Carne al vapor Filetes de pollo 1-5 cm - 2 1
Filetes de pavo 1-5 cm - 2 1
Platos carneKebab una rejilla 1/2 5 4
Embutidos y salchichas vienesas 1,5-4 cm 2/3 5 4
ACCESORIOSRejilla
Bandeja de horno o molde
sobre rejilla
Grasera / bandeja pastelera o bandeja de
horno sobre rejilla
Grasera / Bandeja pastelera
Grasera con 500 ml de agua

ES
113
Receta Cantidad recomendada
Dar la vuelta (del tiempo de
cocción)
Nivel y accesorios
Pescado y marisco
Filetes y bistecs asados
Filetes de pescado/porciones 0,5-2,5 cm — 5
Filetes congelados 0,5-2,5 cm — 4
Filetes y bistecs al vapor
Filetes de pescado/porciones 0,5-2,5 cm - 2 1
Filetes congelados 0,5-2,5 cm - 2 1
Marisco al grill
Vieiras gratinadas una bandeja - 4
Mejillones gratina-dos una bandeja - 4
Camarones una bandeja - 4 3
Langostinos una bandeja - 4 3
Marisco al vapor
Vieiras gratinadas 500-1000 g - 2 1
Mejillones 500- 3000 g - 2 1
Camarones 100- 1000 g - 2 1
Langostinos 500- 1500 g - 2 1
Calamar 100-500 g - 2 1
Pulpo 500- 2000 g - 2 1
Verduras y hortalizas
Verduras asadas
Papas - Frescas 500- 1500 g - 3
Hortalizas rellenas 100-500 g - 3
Otras verduras 500- 1500 g — 3
Verduras gratinadas
Papas una bandeja - 3
Tomates una bandeja - 3
Pimientos una bandeja - 3
Brócoli una bandeja - 3
Coliflor una bandeja - 3
Otros una bandeja - 3
Verduras frescas al vapor
Papas enteras 50-500 g - 2 1
Papas pequeñas / piezas una bandeja - 2 1
Arvejas 200-2500 g - 2 1
Brócoli 200- 3000 g — 2 1
Coliflor 200- 3000 g — 2 1
Verduras congeladas al vapor Arvejas 200- 3000 g - 2 1
Frutas Frutas al vaporEntero 100 - 400 g - 2 1
Piezas 500- 3000 g - 2 1

114
Receta Cantidad recomendada
Dar la vuelta (del tiempo de
cocción)
Nivel y accesorios
Repostería
Bizcocho en molde 500-1200 g - 2
Galletas 200-600 g — 3
Medialunas una bandeja * — 3
Pasta choux una bandeja * - 3
Tarta en molde una bandeja - 3
Strudel 400- 1600 g - 3
Tarta rellena de fruta 500- 2000 g - 2
Tartas saladas 800- 1200 g - 2
Pan
Panecillos 60-150 g cada uno - 3
Barra de pan de molde Pan de sándwich en molde 400-600 g cada uno - 2
Pan grande 700- 2000 g - 2
Baguettes 200 - 300 cada una - 3
Pizza
Congelado 1-4 capas * -
2
4 1
5 3 1
5 4 2 1
Fina bandeja redonda * - 2
Gruesa bandeja redonda * - 2
ACCESORIOSRejilla
Bandeja de horno o molde
sobre rejilla
Grasera / bandeja pastelera o bandeja
de horno sobre rejilla
Grasera / Bandeja pastelera
Grasera con 500 ml de agua Bandeja Vapor

ES
115
LIMPIEZA Y MANTENIMIENTOAsegúrese de que el horno se haya enfriado antes de llevar a cabo las tareas de mantenimiento o limpieza.No utilice productos de lavado con vapor.
No utilice estropajos de acero, estropajos abrasivos ni productos de limpieza abrasivos/corrosivos, ya que podrían dañar las superficies del aparato.Utilice guantes de protección.
El horno debe desconectarse de la red eléctrica antes de llevar a cabo cualquier trabajo de mantenimiento.
SUPERFICIES EXTERIORES• Limpie las superficies con un paño húmedo de
microfibra� Si están muy sucias, añada unas gotas de detergente neutro al agua� Seque con un paño seco�
• No utilice detergentes corrosivos ni abrasivos� Si uno de esos productos entra accidentalmente en contacto con la superficie del aparato, límpielo de inmediato con un paño húmedo de microfibra�
SUPERFICIES INTERIORES• Después de cada uso, deje que el horno se enfríe y,
a continuación, límpielo, preferiblemente cuando aún esté tibio, para quitar los restos o las manchas causados por los residuos de los alimentos� Para secar la condensación que se haya podido formar debido a la cocción de alimentos con un alto contenido en agua, deje que el horno se enfríe por completo y límpielo con un paño o esponja�
• Active la función «Autolimpieza» para unos resultados
de limpieza óptimos de las superficies internas� • Limpie el cristal de la puerta con un detergente
líquido adecuado�• Para limpiar el horno con facilidad, quite la puerta�ACCESORIOS• Después del uso, sumerja los accesorios en una
solución líquida con detergente, utilizando guantes si aún están calientes� Los residuos de alimentos pueden quitarse con un cepillo o esponja�
DEPÓSITOPara garantizar el funcionamiento óptimo del horno y ayudar a prevenir las incrustaciones de cal, le recomendamos que utilice las funciones «Drenar» y «Desincrustar» con regularidad�Tras un largo tiempo sin utilizar las funciones de vapor, se recomienda activar un ciclo de cocción por vapor con el horno vacío y el depósito completamente lleno�
EXTRACCIÓN E INSTALACIÓN DE LA PUERTA• Para quitar la puerta , ábrala por completo y
baje los pestillos hasta que estén en posición desbloqueada�
•
b
a
Cierre la puerta tanto como pueda� Sujete bien la puerta con las dos manos –no la sujete por el asa� Simplemente extraiga la puerta continuando cerrándola y a la vez levantándola hasta que se salga de su alojamiento� Ponga la puerta en un lado, apoyada sobre una superficie blanda�
a
b
~15°
Vuelva a instalar la puerta llevándola hacia el horno, alineando los ganchos de las bisagras con sus alojamientos y fijando la parte superior en su alojamiento�• Baje la puerta y ábrala por completo� Baje los
pestillos a su posición original: Asegúrese de haberlos bajado por completo�
b
a
Presione suavemente para comprobar que los pestillos están en la posición correcta�
•
“CLICK”
Intente cerrar la puerta y compruebe que esté alineada con el panel de control� Si no lo está, repita los pasos de arriba: La puerta podría dañarse si no funciona correctamente�

116
SUSTITUCIÓN DE LA LÁMPARA1� Desconecte el horno de la red eléctrica�2� Extraiga las guías para estantes�3� Retire la tapa de la bombilla�4� Sustituya la bombilla�5� Vuelva a poner la tapa y empuje contra la pared
para encajarla bien�6� Vuelva a colocar las guías de estantes�7� Vuelva a conectar el horno a la red eléctrica�
Nota: Utilice sólo bombillas halógenas de 20-40W/230 ~ V tipo G9, T300 °C. La bombilla que se usa en el aparato está diseñada específicamente para electrodomésticos y no es adecuada para la iluminación general de estancias de una vivienda (Normativa CE 244/2009). Las bombillas están disponibles en nuestro Servicio Postventa.
Al utilizar bombillas halógenas, no las toque con las manos desnudas ya que las huellas dactilares podrían dañarlas. No utilice el horno hasta que no haya vuelto a colocar la tapa de la lámpara.

ES
117
001
SOLUCIÓN DE PROBLEMASProblema Posible causa Solución
El horno no funciona�Corte de suministro�Desconexión de la red eléctrica�
Compruebe que haya corriente eléctrica en la red y que el horno esté enchufado a la toma de electricidad�Apague el horno y vuelva a encenderlo para comprobar si se ha solucionado el problema�
En la pantalla aparecerá la letra «F» seguida de un número o letra�
Fallo del horno�
Póngase en contacto con el Servicio Postventa más cercano e indique el número que aparece detrás de la letra «F»�Pulse , toque y seleccione «Factory Reset»� Se borrarán todos los ajustes guardados�
El suministro eléctrico de la casa se desconecta�
Configuración de potencia incorrecta�
Compruebe que la red doméstica tenga una potencia superior a 3 kW� Si o es así, reduzca la potencia a 13 amperios� Para cambiarlo, pulse , seleccione «Más modos» yseleccione «Energía»�
La función no está disponible en el modo de demostración�
El modo de demostración está activado�
Pulse , toque «Información» y seleccione «GUARDARDEMO» para salir�
La puerta no se abre� Ciclo de limpieza en curso� Espere a que termine la función y a que se enfríe el horno�
Durante la cocción saldrá vapor del cajón�
Nivel de agua bajo en el depósito� Añada un vaso de agua potable�
ASISTENCIAEn caso de problemas de funcionamiento, póngase en contacto con un Centro de Asistencia Técnica de Franke� No solicite nunca los servicios de técnicos no autorizados� Indique: - el tipo de fallo - el modelo del aparato (art�/código) - el número de serie (S/N), indicado en la placa de características, que se encuentra en el borde derecho del interior del horno (visible con la puerta del horno abierta)�
Cuando se ponga en contacto con nuestro Centro de Asistencia, deberá indicar los códigos que figuran en la placa de características de su producto�
XXXXXX XXXXXX XXXXX XXXXXXXModel: xxxXXXXxx XXXXXXXXXX
XXXXXX
XXXXXXXXXX
XXXXXXXXXXXXXXXXXXXXXXXXXXXXXX XXXXXXXXXX

118
ÍNDICE
VISÃO GERAL ������������������������������������������������������������������������������������������������������������������������������������������������������������������������� 119
PAINEL DE CONTROLO ������������������������������������������������������������������������������������������������������������������������������������������������������� 119
ACESSÓRIOS �������������������������������������������������������������������������������������������������������������������������������������������������������������������������� 120
FUNÇÕES �������������������������������������������������������������������������������������������������������������������������������������������������������������������������������� 121
COMO UTILIZAR O ECRà TÁTIL ����������������������������������������������������������������������������������������������������������������������������������������122
UTILIZAR PELA PRIMEIRA VEZ �����������������������������������������������������������������������������������������������������������������������������������������122
UTILIZAÇÃO DIÁRIA ������������������������������������������������������������������������������������������������������������������������������������������������������������ 124
CONSELHOS ÚTEIS ��������������������������������������������������������������������������������������������������������������������������������������������������������������129
TABELA DE COZEDURA COOKASSIST ���������������������������������������������������������������������������������������������������������������������������� 135
LIMPEZA E MANUTENÇÃO ������������������������������������������������������������������������������������������������������������������������������������������������138
RESOLUÇÃO DE PROBLEMAS �������������������������������������������������������������������������������������������������������������������������������������������140
SUPORTE ��������������������������������������������������������������������������������������������������������������������������������������������������������������������������������140

PT
119
1� Painel de controlo2� Ventoinha3� Resistência circular
(não visível)4� Guias de nível
(o nível está indicado na parte frontal do forno)
5� Porta6� Gaveta da água7� Resistência superior/grill8� Lâmpada9� Placa de identificação
(não remover)10� Resistência inferior
(não visível)
1. LIG./ DESL.Para ligar e desligar o forno�2. HOMEPara aceder rapidamente ao menu principal�
3. FAVORITOSPara aceder à lista das suas funções favoritas�4. VISOR5. FERRAMENTASPara escolher de entre diversas opções e também para alterar as definições do forno e as preferências�
6. CANCELARPara interromper qualquer função do forno, exceto Relógio, Temporizador de cozinha e Bloqueio de teclas�
1 2 3 4 5 6
VISÃO GERAL
GUIA DO UTILIZADOR
PAINEL DE CONTROLO
5
4
3
2
1
5
4
3
2
1
1
2
3
4
8
9
10
5
7
6
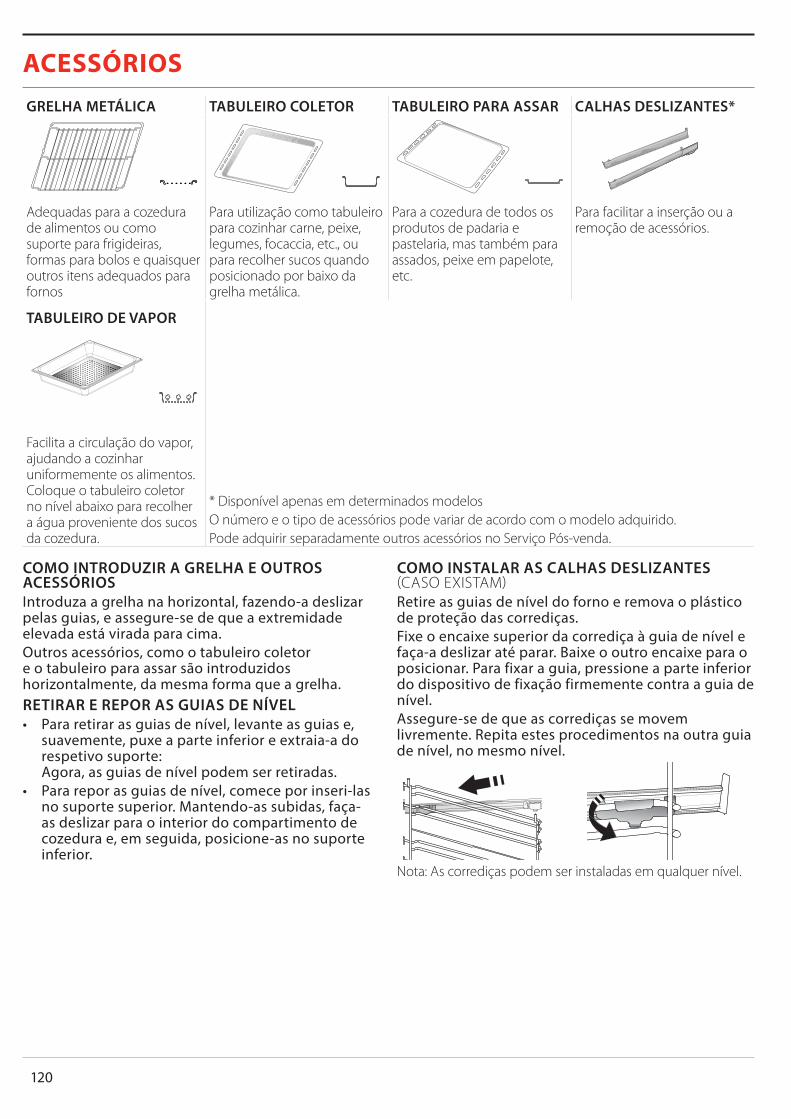
120
ACESSÓRIOSGRELHA METÁLICA TABULEIRO COLETOR TABULEIRO PARA ASSAR CALHAS DESLIZANTES*
Adequadas para a cozedura de alimentos ou como suporte para frigideiras, formas para bolos e quaisquer outros itens adequados para fornos
Para utilização como tabuleiro para cozinhar carne, peixe, legumes, focaccia, etc., ou para recolher sucos quando posicionado por baixo da grelha metálica.
Para a cozedura de todos os produtos de padaria e pastelaria, mas também para assados, peixe em papelote, etc.
Para facilitar a inserção ou a remoção de acessórios.
TABULEIRO DE VAPOR
* Disponível apenas em determinados modelosO número e o tipo de acessórios pode variar de acordo com o modelo adquirido.Pode adquirir separadamente outros acessórios no Serviço Pós-venda.
Facilita a circulação do vapor, ajudando a cozinhar uniformemente os alimentos. Coloque o tabuleiro coletor no nível abaixo para recolher a água proveniente dos sucos da cozedura.
COMO INTRODUZIR A GRELHA E OUTROS ACESSÓRIOSIntroduza a grelha na horizontal, fazendo-a deslizar pelas guias, e assegure-se de que a extremidade elevada está virada para cima�Outros acessórios, como o tabuleiro coletor e o tabuleiro para assar são introduzidos horizontalmente, da mesma forma que a grelha�RETIRAR E REPOR AS GUIAS DE NÍVEL• Para retirar as guias de nível, levante as guias e,
suavemente, puxe a parte inferior e extraia-a do respetivo suporte: Agora, as guias de nível podem ser retiradas�
• Para repor as guias de nível, comece por inseri-las no suporte superior� Mantendo-as subidas, faça-as deslizar para o interior do compartimento de cozedura e, em seguida, posicione-as no suporte inferior�
COMO INSTALAR AS CALHAS DESLIZANTES (CASO EXISTAM)Retire as guias de nível do forno e remova o plástico de proteção das corrediças�Fixe o encaixe superior da corrediça à guia de nível e faça-a deslizar até parar� Baixe o outro encaixe para o posicionar� Para fixar a guia, pressione a parte inferior do dispositivo de fixação firmemente contra a guia de nível�Assegure-se de que as corrediças se movem livremente� Repita estes procedimentos na outra guia de nível, no mesmo nível�
Nota: As corrediças podem ser instaladas em qualquer nível.

PT
121
FUNÇÕES MANUAIS• CONVENCIONAL*
Para cozinhar qualquer tipo de prato utilizando apenas um nível�
• COZEDURA POR CONVECÇÃOPara cozinhar carne, bolos com recheio apenas num tabuleiro�
• AR FORÇADOPara cozinhar alimentos diferentes que requerem a mesma temperatura de cozedura em diferentes prateleiras (máximo três) ao mesmo tempo� Esta função permite cozinhar alimentos diferentes sem transmitir odores de uns alimentos para os outros�
• GRILLPara grelhar bifes, kebabs, salsichas, gratinar legumes ou tostar pão� Ao grelhar carne, recomendamos a utilização de um tabuleiro coletor, para recolher os sucos da cozedura: posicione o tabuleiro em qualquer um dos níveis que se encontram abaixo da grelha e adicione 500 ml de água potável�
• TURBO GRILLPara assar peças de carne grandes (pernil, carne assada, frango)� Recomendamos a utilização de um tabuleiro coletor, para recolher os sucos da cozedura: Posicione o tabuleiro em qualquer um dos níveis que se encontram por baixo da grelha e adicione 500 ml de água potável�
• PRÉ-AQUECIMENTO RÁPIDOPara efetuar o preaquecimento rápido do forno�
• FUNÇÕES MULTICOOKINGPara cozinhar diferentes alimentos que necessitem da mesma temperatura de cozedura em quatro níveis ao mesmo tempo� Esta função pode ser utilizada para cozinhar biscoitos, tartes, pizzas redondas (também congeladas) e para preparar uma refeição completa� Siga a tabela de cozedura para obter os melhores resultados�
• VAPOR » VAPOR PURO
Para cozinhar pratos naturais e saudáveis usando a função de vapor para preservar o valor nutricional dos alimentos� Esta função é particularmente adequada para cozinhar legumes, peixe, fruta e também para pelar� Salvo indicação em contrário, remova quaisquer embalagens e películas protetoras antes de colocar os alimentos no forno�
» AR FORÇADO + VAPORCombinando as propriedades do vapor com as propriedades do ar forçado, esta função permite-lhe cozinhar pratos agradavelmente crocantes e dourados no exterior mas, ao mesmo tempo, tenros e suculentos no interior� Para obter os melhores resultados de cozedura, recomendamos que selecione o nível de vapor ALTO para cozinhar peixe, o nível MÉDIO para cozinhar carne e o nível BAIXO para cozinhar pão e sobremesas�
• FUNÇÕES ESPECIAIS » DESCONGELAR
Para descongelar mais rapidamente os alimentos� É aconselhável posicionar os alimentos no nível intermédio� Sugerimos que deixe o alimento na embalagem para não secar�
» MANTER QUENTEPara manter os alimentos acabados de cozinhar quentes e estaladiços�
» FERMENTARPara obter a fermentação ideal de massas doces ou salgadas� Para manter a qualidade da levedação, não ativar a função se o forno ainda estiver quente após um ciclo de cozedura�
» CONVENIÊNCIAPara cozinhar alimentos pré-cozinhados, armazenados a um a temperatura ambiente ou no frigorífico (biscoitos, mistura para bolo, queques, pratos de massa e produtos à base de pão)� função cozinha rápida e delicadamente todos os pratos e pode também ser utilizada para aquecer comida já cozinhada� Não é necessário preaquecer o forno� Siga as indicações na embalagem do alimento�
» MAXI COZEDURAPara cozinhar pedaços grandes de carne (acima de 2,5 kg)� Recomendamos que vire a carne durante a cozedura para que fique tostado de forma homogénea de ambos os lados� Recomenda-se ir regando a carne com molho para que não seque demasiado�
» AR FORÇADO ECO*Para cozinhar peças de carne recheadas e bifes num único nível� Evita-se que os alimentos sequem excessivamente, através de uma circulação de ar suave e intermitente� Quando esta função está a ser utilizada, a luz mantém-se apagada ao longo da cozedura� Para usar o ciclo ECO e, assim, otimizar o consumo de energia, a porta do forno não deve ser aberta até que os alimentos estejam completamente cozinhados�
• COZINHAR CONGELADOSEsta função seleciona automaticamente a temperatura e o modo ideal para cozinhar 5 tipos diferentes de alimentos congelados já preparados� Não é necessário preaquecer o forno�
COOKASSISTEstas permitem cozinhar todos os tipos de alimentos de forma totalmente automática� Para tirar o melhor partido desta função, siga as indicações na respetiva tabela de cozedura�Não é necessário pré-aquecer o forno�
* Função utilizada como referência para a declaração de eficiência energética, de acordo com o Regulamento (UE) n.º 65/2014
FUNÇÕES

122
COMO UTILIZAR O ECRÃ TÁTILPara percorrer um menu ou uma lista:Deslize simplesmente o dedo pelo visor para percorrer as opções ou os valores�Para selecionar ou confirmar:Toque no ecrã para selecionar o valor ou a opção de menu pretendido(a)�
Para regressar ao ecrã anterior:toque em �Para confirmar uma definição ou avançar para o ecrã seguinte:toque em "DEFINIR" ou "PRÓXIMO"�
UTILIZAR PELA PRIMEIRA VEZAo ligar o aparelho pela primeira vez, terá de configurar o produto�As definições podem ser alteradas posteriormente, premindo para aceder ao menu "Ferramentas".
1. SELECIONAR O IDIOMAAo ligar o aparelho pela primeira vez, terá de definir o idioma e a hora�• Deslize o dedo pelo ecrã para percorrer a lista de
idiomas disponíveis�
•
Čeština, Český Jazyk Czech
Dansk Danish
Deutsch German
Toque no idioma pretendido�
Ελλνικά Greek, Modern
English English
Español Spanish
Ao tocar em , regressa ao ecrã anterior.
2. SELECIONAR O MODO DE DEFINIÇÕESUma vez selecionado o idioma, o visor solicitar-lhe-á que escolha entre "DEMONSTRAÇÃO DE LOJA" (útil para retalhistas, apenas para fins de exibição) ou continuar, tocando em "PRÓXIMO"�
Obrigado pela sua compra!
Prima Seguinte para continuar a configuração para utilização doméstica�
MODO DE DEMONSTRAÇÃO DE LOJAPRÓXIMO

PT
123
. DEFINIR A HORA E A DATAAo ligar o forno à sua rede doméstica, a hora e a data serão definidas automaticamente� Caso contrário, terá de defini-las manualmente• Toque nos números relevantes para definir a hora�
•
0987654321
Defina a hora do sistema.
Toque em "DEFINIR" para confirmar�
0987654321
12:30Horário de 24 horas
DEFINIR
Uma vez definida a hora, terá de definir a data�• Toque nos números relevantes para definir a data�• Toque em "DEFINIR" para confirmar�
4. DEFINIR O CONSUMO DE ENERGIAO forno está programado para consumir um nível de energia elétrica compatível com uma rede doméstica de potência superior a 3 kW (16 amperes): Se a potência que utiliza em sua casa for inferior, terá de reduzir este valor (13 amperes)�• Toque no valor no lado direito para selecionar a
potência�
•
Gestão
13 Amperes
16 Amperes
Clique em "OK" para terminar a configuração inicial�
Configuração concluída
O aparelho está agora configurado e pronto a usar!
OK
5. AQUECER O FORNOUm forno novo pode libertar odores residuais, resultantes do processo de fabrico: isto é perfeitamente normal� Assim, antes de começar a cozinhar alimentos, recomendamos que aqueça o forno, vazio, para eliminar eventuais odores� Remova do forno qualquer elemento de proteção em cartão ou película transparente e retire quaisquer acessórios do respetivo interior� Aqueça o forno até aos 200 °C durante uma hora, aproximadamente�É aconselhável arejar a cozinha após a primeira utilização do aparelho.

124
UTILIZAÇÃO DIÁRIA1. SELECIONAR UMA FUNÇÃO• Para ligar o forno, prima ou toque em qualquer
ponto do ecrã�O visor permite-lhe selecionar entre as funções "Manual" e "CookAssist"�• Toque na função principal necessária para aceder ao
menu correspondente�
•
20:00
FUNÇÕES MANUAIS
COOKASSIST
Para explorar a lista, percorra-a para cima ou para baixo�
•
Selecione a função
CONVENCIONAL
AR FORÇADO GRILL
COZEDURA POR CONVECÇÃO
Toque na função necessária para a selecionar�
Selecione a função
CONVENCIONAL
AR FORÇADO GRILL
COZEDURA POR CONVECÇÃO
2. DEFINIR FUNÇÕES MANUAISApós selecionar uma função, é possível alterar as suas definições� O visor irá apresentar as definições que podem ser alteradas�TEMPERATURA / NÍVEL DO GRILL• Percorra os valores sugeridos e selecione o valor
necessário�Selecionar
temperatura
PRÓXIMO
Se a função o permitir, pode tocar em para ativar o preaquecimento�
Selecionar temperatura
PRÓXIMO
DURAÇÃONão precisa de definir o tempo de cozedura, caso pretenda gerir a cozedura manualmente� No modo com temporizador, o forno cozinha durante o tempo que selecionar� No fim do tempo de cozedura, a cozedura é interrompida automaticamente�• Para começar a definir a duração, toque em "Definir
tempo de cozedura"�
•
Definir tempo de cozedura
Selecionar temperatura
PRÓXIMO
Toque nos números relevantes para definir o tempo de cozedura pretendido�
•
0987654321
Introduzir hora
PRÓXIMO
Toque em "PRÓXIMO" para confirmar�3. DEFINIR FUNÇÕES COOKASSISTAs funções COOKASSIST permitem-lhe preparar uma ampla variedade de pratos, de entre os indicados na lista� A maior parte das definições de cozedura são selecionadas automaticamente pelo aparelho, com vista à obtenção dos melhores resultados�• Escolha uma receita da lista�As funções são apresentadas por categorias de alimentos no menu “FUNÇÃO COOKASSIST” (ver tabelas correspondentes) e por características das receitas no menu "COOKASSIST PRO".• Depois de selecionar uma função, indique simplesmente
as características dos alimentos (quantidade, peso, etc�) que pretende cozinhar, para obter resultados perfeitos�
• Siga as indicações apresentadas no ecrã para o orientar ao longo do processo de cozedura�

PT
125
4. COMO DEFINIR UM INÍCIO DIFERIDOPode atrasar a cozedura antes de iniciar uma função: A função irá iniciar-se à hora previamente selecionada�• Toque em "ATRASO" para definir a hora de início
pretendida�
•
INSTRUÇÃO PARA COZINHAR:
Para cozinhar qualquer tipo de prato utilizando apenas um nível�
Introduzir os alimentos no nível 3�Utilize a grelha com uma panela ou um tabuleiro�
ATRASO
Convencional
INICIAR
Depois de definir o atraso pretendido, toque em "INÍCIO DIFERIDO" para iniciar o tempo de espera�
• Coloque os alimentos no forno e feche a porta: a função inicia-se automaticamente após o período de tempo calculado�
Caso tenha selecionado a função de preaquecimento durante a configuração do ciclo, a opção de início diferido será desativada.• Para ativar a função de imediato e cancelar o tempo de
atraso programado, toque em �5. INICIAR A FUNÇÃO• Uma vez configuradas as definições, toque em "INÍCIO"
para ativar a função�Pode alterar os valores definidos a qualquer altura durante a cozedura, tocando no valor que pretende corrigir.Se o forno estiver quente e a função necessitar de uma temperatura máxima específica, surgirá uma mensagem no visor.• Prima para interromper a função em qualquer altura
ou toque no valor da duração e, em seguida, selecione "STOP"�
6. PREAQUECIMENTOSe tiver sido previamente ativada, o visor indica o estado da fase de preaquecimento, depois de iniciada a função�
00:00:15 desde o inícioCONVENCIONALPreaquecimento200°C
DEFINIRCOZEDURA
HORA
Quando esta fase estiver concluída, será emitido um sinal sonoro e o visor indicará que o forno atingiu a temperatura definida�
•
Preaquecimento concluídoInsira a comida agora
CONCLUÍDO
Abra a porta�• Coloque os alimentos no forno�• Ao fechar a porta a cozedura é retomada
automaticamente�Colocar os alimentos no forno, antes do pré-aquecimento estar concluído, pode ter um efeito adverso no resultado final da cozedura.Abrir a porta durante a fase de preaquecimento fará com que esta seja interrompida.O tempo de cozedura não inclui uma fase de preaquecimento.
7. INTERROMPER A COZEDURAAlgumas funções "COOKASSIST" necessitam que os alimentos sejam virados durante a cozedura� Será emitido um sinal sonoro e o visor indicará que ação deverá realizar� • Abra a porta�• Execute a ação solicitada pelo visor�• Feche a porta e, em seguida, toque em "CONCLUÍDO"
para retomar a cozedura�Antes do fim da cozedura, o forno irá solicitar-lhe que verifique os alimentos da mesma forma�Será emitido um sinal sonoro e o visor indicará que ação deverá realizar�• Verifique os alimentos�• Ao fechar a porta a cozedura é retomada
automaticamente�8. FIM DA COZEDURASerá emitido um sinal sonoro e o visor indicará que a cozedura está concluída�Com algumas funções, uma vez concluída a cozedura, pode dar ao seu prato uma tostagem extra, prolongar o tempo de cozedura ou guardar a função como favorito�
•
00:01 desde pronto
CONVENCIONALCozinhar200°C
TEMPORIZADORCOMPLETO
Toque em para guardá-la como favorito�• Selecione “Tostagem Extra” para iniciar um ciclo de 5
minutos de tostagem�• Toque em para guardar o prolongamento da
cozedura�

126
9. FAVORITOSA função Favoritos guarda as definições do forno para a sua receita favorita�O forno reconhece automaticamente as funções mais utilizadas.Após um determinado número de utilizações, ser-lhe-á solicitado que adicione a função aos seus favoritos.COMO GUARDAR UMA FUNÇÃOUma vez terminada uma função, ao clicar em poderá guardá-la nos favoritos� Isto permitir-lhe-á usá-la rapidamente no futuro, mantendo as mesmas definições�O visor permite-lhe guardar a função, indicando até 4 refeições favoritas, incluindo pequeno-almoço, almoço, snack e jantar�• Toque nos ícones para selecionar pelo menos uma�
•
1. Pizza fina
FAVORITO
EDITAR
Toque em "GUARDAR COMO FAVORITO" para guardar a função�
1. Pizza fina
FAVORITO
EDITAR
GUARDADASPara visualizar o menu de favoritos, prima : as funções serão divididas pelas diferentes horas das refeições e serão disponibilizadas algumas sugestões�• Toque no ícone das refeições para exibir as listas
correspondentes
•
Favoritos de almoço
PIZZA FINA
Procura outra coisa? Veja as sugestões em baixo�
Percorra a lista apresentada�• Toque na receita ou na função pretendida�• Toque em "INÍCIO" para ativar a cozedura�ALTERAR AS DEFINIÇÕESNo ecrã Favoritos, pode adicionar uma imagem ou um nome a cada item dos seus favoritos, personalizando-o de acordo com as suas preferências�• Selecione a função que pretende alterar�• Toque em "EDITAR"�• Selecione o atributo que pretende alterar�
• Toque em "PRÓXIMO": O visor apresentará os novos atributos�
• Toque em "GUARDAR" para confirmar as suas alterações�No ecrã de favoritos, pode também eliminar funções guardadas:• toque em na função�• Toque em "REMOVER"�Pode também ajustar a hora quando são apresentadas as várias refeições:• Prima �• Selecione "Preferências"�• Selecione "Horas e datas"� • Toque em "As suas horas de refeição"�• Percorra a lista e toque na hora correspondente�• Toque na respetiva refeição para alterá-la�Será possível combinar um intervalo de tempo apenas com uma refeição.
10. FERRAMENTASPrima para abrir o menu "Ferramentas" a qualquer altura�Este menu permite-lhe escolher de entre várias opções e também alterar as definições ou preferências do seu produto ou do visor�
Ferramentas
Temporizador de cozinha
Luz Limpeza automática
TEMPORIZADOR DE COZINHAEsta função pode ser ativada aquando da utilização de uma função de cozedura ou, de forma independente, para controlar o tempo� Uma vez iniciado, o temporizador continuará a sua contagem decrescente de forma independente, sem interferir com a função em si� Uma vez ativado o temporizador, poderá também selecionar e ativar uma função�O temporizador continuará a contagem decrescente no canto superior direito do ecrã.Para recuperar ou alterar o temporizador de cozinha:• Prima �• Toque em �Quando o temporizador terminar a contagem decrescente do tempo programado, ouvir-se-á um sinal sonoro e esta informação será apresentada no visor� • Toque em "DISPENSAR" para cancelar o temporizador�• Toque em "DEF� TEMPOR� NOVO" para definir novamente
o temporizador�
LEVEPara acender ou apagar a luz do forno�

PT
127
LIMPEZAAtive a função "Limpeza automática" para obter os melhores resultados de limpeza das superfícies internas do forno�Recomendamos que não abra a porta do forno durante o ciclo de limpeza de modo a evitar a perda de vapor de água que poderá ter um efeito negativo no resultado final da limpeza.• Retire os acessórios do forno antes de ativar esta função�• Deite 200 ml de água potável no fundo do forno�• Toque em "INÍCIO" para ativar a função de limpeza�Uma vez selecionado o ciclo, poderá diferir o início da limpeza automática. Toque em “ATRASO” para definir o tempo de terminação, conforme indicado na secção relevante.
DRENAGEMA função de escoamento permite que a água seja escoada de forma a evitar que fique estagnada no depósito� É recomendável efetuar o escoamento após cada utilização do forno�
De qualquer modo, após um determinado número de utilizações, esta ação torna-se obrigatória, não sendo possível ativar uma função que utilize vapor sem antes efetuar o escoamento�Uma vez selecionada a função
"Drenagem" ou quando sugerido através de uma mensagem no visor, inicie esta função e siga as instruções indicadas: Abra a porta e coloque um recipiente grande por baixo do bico de escoamento localizado na parte inferior direita do painel� Uma vez iniciado o escoamento, mantenha o recipiente em posição até que o escoamento esteja concluído�O visor apresentará uma mensagem indicando quando o depósito deverá ser totalmente escoado�Lembre-se: não é possível efetuar esta atividade antes de decorridas as 4 horas do último ciclo (ou da última vez que o produto foi alimentado). Durante este tempo de espera, o visor irá apresentar a seguinte mensagem "A água está DEMASIADO QUENTE. Aguarde até que a temperatura desça". Após arrefecer o suficiente, será possível proceder premindo "CONTINUAR".O jarro deve ter capacidade para, pelo menos, 2 litros.A função de escoamento permite que a água seja escoada de forma a evitar que fique estagnada no depósito� É recomendável efetuar o escoamento após cada utilização do forno� Despeje ou drene a água quando tal lhe for solicitado através de uma mensagem no visor�
DESCALCIFICAREsta função especial, ativada em intervalos regulares, permite-lhe manter o circuito do depósito e do vapor nas melhores condições�Esta função divide-se em várias fases: drenagem, desincrustação e enxaguamento� Uma vez iniciada a função, siga todos os passos indicados no visor�A duração média da função completa é de cerca de 190 minutos�Lembre-se: Caso a função seja interrompida a qualquer momento, será necessário repetir todo o ciclo de descalcificação.
» ESCOARAntes de proceder à desincrustação do aparelho, é necessário escoar o depósito: para efetuar esta operação corretamente, siga as instruções contidas no parágrafo relevante�Lembre-se: não é possível efetuar esta atividade antes de decorridas as 4 horas do último ciclo (ou da última vez que o produto foi alimentado). Durante este tempo de espera, o visor irá apresentar a seguinte mensagem "A água está DEMASIADO QUENTE. Aguarde até que a temperatura desça". Após arrefecer o suficiente, será possível proceder premindo "CONTINUAR". O jarro deve ter capacidade para, pelo menos, 2 litros.
» DESINCRUSTAÇÃOPara obter os melhores resultados de descalcificação, recomendamos que encha o depósito com uma solução específica, que se encontra disponível no Serviço Pós-Venda�Uma vez concluída a fase de desincrustação, o depósito deve ser escoado�
» ENXAGUARPara limpar o depósito e o circuito de vapor, é necessário realizar um ciclo de enxaguamento� Encha o depósito com água potável até que o visor apresente a mensagem "TANK FULL" (DEPÓSITO CHEIO) e, em seguida, inicie o processo de enxaguamento� No final, o visor irá apresentar um mensagem solicitando-lhe que repita o processo de escoamento e enxaguamento�Não desligue o forno até que todos os passos requeridos pela função tenham sido concluídos�As funções de cozedura não podem ser ativadas durante o ciclo de limpeza�Lembre-se: Será apresentada uma mensagem no visor, alertando-o para a necessidade de efetuar esta operação regularmente.Despeje ou drene a água quando tal lhe for solicitado através de uma mensagem no visor.
SILENCIARToque no ícone para silenciar ou não silenciar todos os sons e alarmes�
BLOQUEIO DE TECLASO "Bloqueio de teclas" permite-lhe bloquear os botões no touchpad, para que os mesmos não possam ser premidos inadvertidamente� Para ativar o bloqueio:• Toque no ícone �Para desativar o bloqueio:• Toque no visor�• Deslize o dedo para cima na mensagem exibida�
Bloqueio de teclasO produto está bloqueado�
Deslizar para cima para desbloquear�

128
MAIS MODOSPara selecionar o modo Sabath e aceder à Gestão de Energia�O modo Sabbath mantém o forno no modo de cozedura até que seja desativado. O modo Sabbath utiliza a função convencional. Todos os restantes ciclos de cozedura e de limpeza são desativados. Não serão emitidos quaisquer sons e os visores não indicarão as alterações de temperatura. Quando a porta do forno é aberta ou fechada, a luz do forno não se acende ou apaga e os elementos de resistência não se ligam ou desligam de imediato.Para desativar e sair do modo Sabbath, prima ou e, em seguida, prima e mantenha premido o ecrã de visualização durante 3 segundos.
PREFERÊNCIASPara alterar várias definições do forno�
INFOPara desativar o "Modo de demonstração loja", repor o produto e obter informação adicional acerca do mesmo�

PT
129
CONSELHOS ÚTEISCOMO EFETUAR A LEITURA DAS TABELAS DE COZEDURAAs tabelas indicam: as receitas, se for necessário preaquecimento, temperatura (°C), nível do grelhador, tempo de cozedura (minutos), acessórios e nível sugeridos para a cozedura� Os tempos de cozedura começam a partir do momento em que o alimento é colocado no forno, excluindo o preaquecimento (sempre que necessário)�As temperaturas e os tempos de cozedura são aproximados e dependem da quantidade de alimento e do tipo de acessório utilizado� Comece por utilizar os valores mais baixos recomendados e, se o alimento não ficar bem cozinhado, aumente progressivamente para valores mais altos�
Utilize os acessórios fornecidos e, de preferência, formas para bolos e tabuleiros metálicos para fornos e de cor escura� Poderá utilizar igualmente caçarolas e acessórios em pirex ou em cerâmica, mas lembre-se de que os tempos de cozedura serão ligeiramente superiores� Para obter os melhores resultados, siga as recomendações indicadas na tabela de cozedura relativamente à seleção dos acessórios (fornecidos) a colocar nos diferentes níveis�
CONVENCIONALAs resistências na parte superior e inferior da cavidade do forno aquecem o interior do forno uniformemente�Utilize o 3�° nível� Para cozinhar pizza, tartes e sobremesas com recheio líquido, utilize o 1�º ou 2�º nível� Aqueça previamente o forno antes de introduzir os alimentos� Esta função é o modo de cozedura ideal para cozinhar sobremesas delicadas num único nível� Utilize formas para bolos metálicas de cor escura e coloque-as sempre na grelha fornecida� Quando utilizar os tabuleiros fornecidos, remova quaisquer outros acessórios que não esteja a utilizar da cavidade do forno para obter melhores resultados e economizar energia�
Para verificar se um bolo está cozido, insira um palito de madeira no centro do mesmo� Se o palito sair limpo, significará que o bolo está pronto� Se utilizar uma forma para bolos antiaderente, não unte as extremidades da mesma com manteiga pois poderá impedir o crescimento uniforme do bolo nas extremidades� Se o bolo "afundar" durante a cozedura, defina uma temperatura mais baixa na cozedura seguinte, eventualmente reduzindo a quantidade de líquidos na mistura e efetuando uma mistura mais cuidadosa� O peixe está cozinhado quando a barbatana dorsal sai facilmente� Comece por selecionar a temperatura mais baixa indicada, mesmo ao preparar peixes maiores� Geralmente, quanto maior o peixe, menor a temperatura e, portanto, maior o tempo de cozedura�
Receita Preaquecimento Temperatura (°C) Tempo de cozedura (min) Nível e acessórios
Bolos levedados / Pães de ló Sim 170 30 - 50 2
Cookies / Biscoitos Sim 150 20 - 40 3
Bolos pequenos / queques Sim 170 20 - 40 3
Massa "choux" Sim 180 - 200 30 - 40 3
Merengues Sim 90 110 - 150 3
Pizza / Pão / Focaccia Sim 190 - 250 15 - 50 2
Pizza congelada Sim 250 10 - 15 3
Vols-au-vent / Salgadinhos de massa folhada Sim 190 - 200 20 - 30 3
Lasanha / Flans / Massa cozida / Cannelloni Sim 190 - 200 45 - 65 3
Borrego / vitela / vaca / porco 1 kg Sim 190 - 200 80 - 110 3
Frango/coelho/pato 1 kg Sim 200 - 230 50 - 100 3
Peru / ganso 3 kg Sim 190 - 200 80 - 130 2
Peixe no forno / em papelote (filetes, inteiro) Sim 180 - 200 40 - 60 3
ACESSÓRIOSGrelha metálica
Tabuleiro de assar ou forma de bolos
na grelha
Tabuleiro coletor/tabuleiro para bolos
ou tabuleiro para assar na grelha
Tabuleiro coletor / tabuleiro para assar
Tabuleiro coletor com 500 ml de água

130
GRILLA resistência superior da grelha permite obter os melhores resultados para grelhados� Coloque os alimentos no 4º ou 5º nível� Para grelhar carne, é aconselhável utilizar o tabuleiro coletor para recolher o líquido da cozedura� Coloque-o no 3�º/4�º nível, adicionando cerca de 500 ml de água potável� Não é necessário preaquecer o forno�Durante a cozedura, a porta do forno deve permanecer fechada�Se pretender grelhar carne, selecione cortes de carne de espessura uniforme, para obter resultados de cozedura uniformes� Peças de carne muito grossas necessitam de tempos de cozedura mais prolongados�
Para evitar que a carne fique queimada no exterior, baixe a posição da grelha, afastando o alimento do grelhador� Vire os alimentos a meio da cozedura�Para recolher os sucos da cozedura é aconselhável colocar um tabuleiro coletor com meio litro de água potável diretamente por baixo da grelha onde está posicionada a carne� Encha totalmente sempre que necessário�
Receita Preaquecimento Nível do grill Tempo de cozedura (min) Nível e acessórios
Pão torrado — 3 (alto) 3 - 6 5
Filetes de peixe / Bifes — 2 (médio) 20 - 30 4 3
Salsichas / Kebabs / Costeletas / Hambúrgueres — 2 - 3 (médio-alto) 15 - 30 5 4
TURBO GRILLNesta função, a resistência superior da grelha e a ventoinha são ativadas ao mesmo tempo�É aconselhável utilizar o tabuleiro coletor para recolher os sucos da cozedura�Coloque-o no 1�º/2�º nível, adicionando 500 ml de água potável� Não é necessário preaquecer o forno� Durante a cozedura, a porta do forno deve permanecer fechada�Vire os alimentos quando atingir dois terços do tempo
de cozedura�Utilize qualquer tipo de tabuleiro para assar ou pirex adequado ao tamanho da peça de carne a cozinhar� No caso de carne assada, coloque caldo no fundo do recipiente e regue a carne durante a cozedura para obter um melhor sabor� Quando o assado estiver pronto, deixe-o repousar no forno durante 10-15 minutos adicionais ou envolva-o em folha de alumínio�
Receita Preaquecimento Nível do grill Tempo de cozedura (min) Nível e acessórios
Frango assado 1-1,3 kg — 2 (médio) 55 - 70 2 1
Perna de borrego / pernis — 2 (médio) 60 - 90 3
Batatas assadas — 2 (médio) 35 - 55 3
Gratinado de legumes — 3 (alto) 10 - 25 3
ACESSÓRIOSGrelha metálica
Tabuleiro de assar ou forma de bolos
na grelha
Tabuleiro coletor/tabuleiro para bolos
ou tabuleiro para assar na grelha
Tabuleiro coletor / tabuleiro para assar
Tabuleiro coletor com 500 ml de água

PT
131
AR FORÇADOA resistência redonda do grelhador e a ventoinha são ativadas ao mesmo tempo� A ventoinha no painel traseiro distribui o ar quente uniformemente no forno�A função "AR FORÇADO" permite-lhe cozinhar em simultâneo, em diferentes níveis, alimentos variados que exijam a mesma temperatura de cozedura (por exemplo: peixe ou legumes)� Retire os alimentos que necessitam de menos tempo de cozedura e deixe no forno os alimentos que necessitam de um tempo de cozedura mais prolongado�
Utilize o 3° nível para cozinhar numa única grelha, o 1° e 4° níveis para cozinhar em duas grelhas e o 1°, 3°, 5° níveis para cozinhar em três grelhas� Coloque sempre as formas do bolo na grelha� Preaqueça o forno antes de introduzir os alimentos�Para obter um tostado uniforme, certifique-se de que todas as porções da massa têm a mesma espessura�Ao cozinhar pizza, unte ligeiramente o tabuleiro para se certificar de que a pizza vai ficar com uma base estaladiça� Espalhe o queijo mozarela sobre a pizza quando atingir dois terços do tempo de cozedura�
Receita Preaquecimento Temperatura (°C) Tempo de cozedura (min) Nível e acessórios
Bolos levedados / Pães de lóSim 170 30 - 50 2
Sim 160 30 - 50 4
1
Bolos recheados (cheesecake, strudel, tarte de maçã) Sim 160 – 200 35 - 90 4 1
Cookies / Biscoitos
Sim 140 30 - 50 4
Sim 140 30 - 50 4
1
Sim 135 40 - 60 5
3 1
Bolos pequenos / queques
Sim 150 30 - 50 4
Sim 150 30 - 50 4
1
Sim 150 40 - 60 5
3 1
Massa "choux"Sim 180 - 190 35 - 45 4
1
Sim 180 - 190 35 - 45 * 5
3 1
MerenguesSim 90 130 - 150 4
1
Sim 90 140 - 160 * 5 3 1
Pizza / Pão / Focaccia Sim 190 - 230 20 - 50 4 1
Pizza (massa fina, massa grossa, focaccia) Sim 220 - 240 25 - 50 * 5 3 1
Pizza congeladaSim 250 10 - 20 4 1
Sim 220 - 240 15 - 30 5 3 1
Tartes salgadas (tarte de legumes, quiche)Sim 180 - 190 45 - 60 4 1
Sim 180 - 190 45 - 70 * 5 3 1
Vols-au-vent / Salgadinhos de massa folhadaSim 180 - 190 20 - 40 4 1
Sim 180 - 190 20 - 40 * 5 3 1
Lasanha e Carne Sim 200 50 - 100 * 4 1
Carne e Batatas Sim 200 45 - 100 * 4 1
Peixe e legumes Sim 180 30 - 50 * 4 1
* Período de tempo estimado: Os alimentos podem ser retirados do forno quando o desejar, dependendo da preferência de cada um.

132
MULTICOOKINGReceita Prato Preaqueci-
mento Temperatura (°C) Tempo de cozedura (min) Nível e acessórios
Biscoitos Biscoitos Sim 135 50 - 70 5 4 3 1
Tartes Tartes Sim 170 50 - 70 5 4 3 1
Pizzas redonda Pizza redon-da Sim 210 40 - 60 5 4 2 1
Refeição completa: Tarte de frutas (nível 5)legumes assados (nível 4) lasanha (nível 2) cortes de carne (nível 1)
Menu Cook 4 Sim 190 40 - 120 5 4 2 1
COZEDURA POR CONVECÇÃOUtilize esta função para quiches e tartes de legumes ou sobremesas com recheios húmidos, como cheesecakes ou tartes de fruta�Também é ideal para cozinhar alimentos com um alto teor de água� A ventoinha distribui o calor uniformemente pelo forno� Isto ajuda a manter uma temperatura constante e obter uma cozedura mais
homogénea, gratinando a parte superior, selando a humidade e criando pães mais crocantes�Utilize o 2�º ou 3�º nível� Aguarde que o preaquecimento termine, antes de colocar alimentos no interior�Se a base da sobremesa ficar mal cozida, baixe o nível e polvilhe o fundo do bolo com biscoito ralado antes de adicionar o recheio�
Receita Preaqueci-mento Temperatura (°C) Tempo de cozedura
(min) Nível e acessórios
Bolos recheados (cheesecake, strudel, tarte de maçã) Sim 160 – 200 30 - 85 3
Tartes salgadas (tarte de legumes, quiche) Sim 180 - 190 45 - 55 3
Legumes recheados (tomates, courgettes, beringelas) Sim 180 - 200 50 - 60 2

PT
133
ACESSÓRIOSGrelha metálica
Tabuleiro de assar ou forma de bolos
na grelha
Tabuleiro coletor/tabuleiro para bolos
ou tabuleiro para assar na grelha
Tabuleiro coletor / tabuleiro para assar
Tabuleiro coletor com 500 ml de água
VAPOR PURO
Receita Preaqueci-mento Temperatura (°C) Tempo de cozedu-
ra (min) Nível e acessórios
Legumes frescos (Inteiros) — 100 30 - 80 2 1
Legumes frescos (Pedaços) — 100 15 - 40 2 1
Legumes congelados - 100 20 - 40 2 1
Peixe inteiro - 90 40 - 50 2 1
Filetes de peixe - 90 20 - 30 2 1
Filetes de frango - 100 15 - 50 2 1
Ovos - 100 10 - 30 2 1
Fruta (Inteira) — 100 15 - 45 2 1
Fruta (Pedaços) — 100 10 - 30 2 1
AR FORÇADO + VAPOR
Receita Nível de vapor Preaqueci-mento Temperatura (°C) Tempo de cozedu-
ra (min) Nível e acessórios
Biscoitos / Cookies
BAIXO - 140 - 150 35 - 55 3
BAIXO - 140 30 - 50 4
1
BAIXO - 140 40 - 60 5
3 1
Bolos pequenos / queques
BAIXO - 160 - 170 30 - 40 3
BAIXO - 150 30 - 50 4
1
BAIXO - 150 40 - 60 5
3 1
Bolos com levedura BAIXO - 170 - 180 40 - 60 2
Pães de ló BAIXO - 160 - 170 30 - 40 2
Focaccia BAIXO - 200 - 220 20 - 40 3
Pão de forma BAIXO — 170 - 180 70 - 100 3
Pão pequeno BAIXO - 200 - 220 30 - 50 3
Baguetes BAIXO - 200 - 220 30 - 50 3
Batatas assadas MÉDIO - 200 - 220 50 - 70 3
Vitela / Vaca / Porco 1 kg MÉDIO — 180 - 200 60 - 100 3
Vitela / Vaca / Porco (pedaços) MÉDIO — 160 - 180 60 - 80 3
Rosbife mal passado 1 kg MÉDIO — 200 - 220 40 - 50 3
Rosbife mal passado 2 kg MÉDIO — 200 55 - 65 3
Perna de borrego MÉDIO - 180 - 200 65 - 75 3
Chispe guisado MÉDIO - 160 - 180 85 - 100 3
Frango / galinha-d´angola / pato 1 - 1,5 kg MÉDIO — 200 - 220 50 - 70 3
Frango / galinha-d´angola / pato (pedaços) MÉDIO — 200 - 220 55 - 65 3
Legumes recheados (tomates, curgetes, beringelas) MÉDIO — 180 - 200 25 - 40 3
Filete de peixe ALTO - 180 - 200 15 - 30 3

134
MAXI COZEDURAEsta função é muito útil para cozinhar grandes peças de carne (acima de 2,5 kg)� Sugerimos que vire a carne durante a cozedura para que fique tostado de forma homogénea de ambos os lados� Recomenda-se ir regando a carne com molho para que não seque demasiado�Utilize o 1�º ou o 2�º nível dependendo do tamanho da peça de carne� Não é necessário pré-aquecer o forno antes da cozedura�
No caso de carne assada, coloque caldo no fundo
do recipiente e regue a carne durante a cozedura para obter um melhor sabor� Quando o assado estiver pronto, deixe-o repousar no forno durante 10-15 minutos adicionais ou envolva-o em folha de alumínio�Se a carne for muito magra, adicione um pouco de líquido, regue a peça com gordura ou cubra-a com tiras de bacon, por exemplo�Para virar a carne, certifique-se de que a coloca com a pele para baixo primeiro�
Receita Preaqueci-mento Temperatura (°C) Tempo de cozedura
(min) Nível e acessórios
Porco assado estaladiço 2 kg - 170 110 - 150 2
AR FORÇADO ECORecomenda-se a utilização do 3�º nível� Não é necessário preaquecer o forno�
Receita Preaqueci-mento Temperatura (°C) Tempo de cozedura
(min) Nível e acessórios
Peças de carne recheadas - 200 80 - 120 * 3
Cortes de carne (coelho, frango, borrego) — 200 50 - 100 * 3
* Período de tempo estimado: Os alimentos podem ser retirados do forno quando o desejar, dependendo da preferência de cada um.
FERMENTARÉ sempre melhor cobrir a massa com um pano húmido antes de a colocar no forno� O tempo de levedação com esta função é reduzido em cerca de um terço em comparação com uma levedação à temperatura ambiente (20-25 °C)�
O tempo de levedura para uma fornada de 1 kg de massa para pizza é de cerca de uma hora�
MANUTENÇÃO DE CALORA função de manutenção do calor permite-lhe manter as refeições prontas quentes� Tal evita a formação de condensação e elimina a necessidade de limpar o compartimento de cozedura�
Não recomendamos que mantenha as refeições prontas quentes durante mais de duas horas�Lembre-se de que alguns alimentos continuam a cozinhar enquanto são mantidos quentes: tape-os, se necessário, para evitar que estes sequem�
DESCONGELAÇÃOOs alimentos cozidos, guisados e os molhos de carne descongelam melhor se mexidos ocasionalmente durante o processo de descongelação� Separe os pedaços à medida que começarem a descongelar: as porções separadas irão descongelar mais rapidamente�

PT
135
TABELA DE COZEDURA COOKASSIST
Receita Quantidade sugeridaVirar (do
tempo de cozedura)
Nível e acessórios
Guisados/Massa cozida
Lasanha fresca 500 - 3000 g — 2
Lasanha congelada 500 - 3000 g — 2
Arroz e Cereais
Arroz
Arroz branco 100 - 500 g - 2 1
Arroz integral 100 - 500 g - 2 1
Arroz integral 100 - 500 g - 2 1
Sementes e cereais
Quinoa 100 - 300 g — 2 1
Milhete 100 - 300 g — 2 1
Espelta 100 - 300 g — 2 1
Cevada 100 - 300 g — 2 1
Carne
Carne de vacaRosbife 600 - 2000 g — 3
Hambúrguer 1,5 - 3 cm 3/5 5
Lombo de porcoLombo de porco 600 - 2500 g — 3
Costeletas de porco uma grelha 2/3 5 4
Frango assadoFrango assado 600 - 3000 g — 2
Filete/Peito de frango 1 - 5 cm 2/3 5
Carne ao vapor Filetes de frango 1 - 5 cm — 2 1
Filetes peru 1 - 5 cm — 2 1
Pratos de carneEspetadas uma grelha 1/2 5 4
Salsichas e wurstel 1,5 - 4 cm 2/3 5 4
ACESSÓRIOSGrelha metálica
Tabuleiro de assar ou forma de bolos
na grelha
Tabuleiro coletor/tabuleiro para bolos
ou tabuleiro para assar na grelha
Tabuleiro coletor / tabuleiro para assar
Tabuleiro coletor com 500 ml de água

136
Receita Quantidade sugeridaVirar (do
tempo de cozedura)
Nível e acessórios
Peixe e marisco
Filetes e bifes assados
Filetes/postas de peixe 0,5 - 2,5 cm — 5
Filetes congelados 0,5 - 2,5 cm — 4
Filetes e bifes ao vapor
Filetes/postas de peixe 0,5 - 2,5 cm — 2 1
Filetes congelados 0,5 - 2,5 cm — 2 1
Marisco grelhado
Vieiras gratinadas um tabuleiro — 4
Mexilhão gratinado um tabuleiro — 4
Camarões um tabuleiro - 4 3
Gambas um tabuleiro - 4 3
Marisco ao vapor
Vieiras gratinadas 500 - 1000 g — 2 1
Mexilhão 500 - 3000 g — 2 1
Camarões 100 - 1000 g — 2 1
Gambas 500 - 1500 g — 2 1
Lula 100 - 500 g - 2 1
Polvo 500 - 2000 g - 2 1
Legumes
Legumes assados
Batatas - Frescas 500 - 1500 g - 3
Legumes recheados 100 - 500 g — 3
Outros legumes 500 - 1500 g — 3
Legumes gratinados
Batatas um tabuleiro - 3
Tomates um tabuleiro - 3
Pimentos um tabuleiro - 3
Brócolos um tabuleiro - 3
Couve-flor um tabuleiro - 3
Outros um tabuleiro - 3
Legumes frescos ao vapor
Batatas inteiras 50 - 500 g — 2 1
Batatas pequenas / pedaços um tabuleiro — 2 1
Ervilhas 200 - 2500 g — 2 1
Brócolos 200 - 3000 g — 2 1
Couve-flor 200 - 3000 g — 2 1
Vegetais congelados ao vapor Ervilhas 200 - 3000 g - 2 1
Frutas Fruta ao vaporInteiro 100 - 400 g — 2 1
Pedaços 500 - 3000 g — 2 1

PT
137
Receita Quantidade sugeridaVirar (do
tempo de cozedura)
Nível e acessórios
Bolos e bolinhos
Pão de ló em forma 500 - 1200 g - 2
Biscoitos 200 - 600 g — 3
Croissants um tabuleiro * — 3
Massa choux um tabuleiro * - 3
Tarte em forma um tabuleiro — 3
Strudel 400 - 1600 g - 3
Tarte recheada com fruta 500 - 2000 g - 2
Bolos salgados 800 - 1200 g — 2
Pão
Rolls 60 - 150 g cada — 3
Pão de forma 400 - 600 g cada - 2
Pão grande 700 - 2000 g - 2
Baguetes 200 - 300 cada - 3
Pizza
Congelados 1 - 4 fatias * —
2
4 1
5 3 1
5 4 2 1
Fina redondo - tabuleiro * — 2
Grossa redondo - tabuleiro * - 2
ACESSÓRIOSGrelha metálica
Tabuleiro de assar ou forma de bolos
na grelha
Tabuleiro coletor/tabuleiro para bolos
ou tabuleiro para assar na grelha
Tabuleiro coletor / tabuleiro para assar
Tabuleiro coletor com 500 ml de água Tabuleiro de vapor

138
LIMPEZA E MANUTENÇÃOAssegure-se de que o forno arrefece antes de executar qualquer operação de manutenção ou limpeza.Não utilize produtos de limpeza ao vapor.
Não utilize palha de aço, esfregões abrasivos ou produtos de limpeza abrasivos/corrosivos, uma vez que estes podem danificar as superfícies do aparelho.
Use luvas de proteção.O forno tem de ser desligado da rede elétrica antes da realização de qualquer tipo de trabalho de manutenção.
SUPERFÍCIES EXTERIORES• Limpe as superfícies com um pano de microfibra
húmido� Se estiverem muito sujas, acrescente algumas gotas de detergente com um pH neutro� Termine a limpeza com um pano seco�
• Não utilize detergentes corrosivos ou abrasivos� Se algum destes produtos entrar inadvertidamente em contacto com as superfícies do aparelho, limpe-as imediatamente com um pano de microfibra húmido�
SUPERFÍCIES INTERIORES• Depois de cada utilização, deixe o forno arrefecer e,
depois, limpe-o, preferencialmente enquanto ainda está morno, para remover quaisquer depósitos ou manchas causadas por restos de alimentos� Para secar qualquer condensação que se tenha formado em resultado da cozedura de alimentos com um elevado teor de água, deixe o forno arrefecer completamente e, depois, limpe-o com um pano ou uma esponja�
• Ative a função "Limpeza automática" para obter os melhores resultados de limpeza das superfícies internas do forno�
• Limpe o vidro da porta com um detergente líquido adequado�
• A porta do forno pode ser removida para facilitar a limpeza�
ACESSÓRIOS• Após a utilização, coloque os acessórios numa solução
líquida de limpeza, pegando nos mesmos com luvas de forno, caso ainda estejam quentes� Os resíduos de alimentos podem ser retirados com uma esponja ou escova de limpeza�
DEPÓSITOPara garantir sempre o melhor desempenho do forno e ajudar a evitar a acumulação de depósitos de calcário ao longo do tempo, recomendamos a utilização das funções “Drenar” e “Desincrustar” regularmente�Após um longo período de inatividade das funções de vapor, é altamente recomendável que ative um ciclo de cozedura a vapor com o forno vazio e o depósito totalmente cheio de água�
REMOVER E REPOR A PORTA• Para remover a porta, abra-a totalmente e baixe as
linguetas até ficarem na posição de desbloqueio�
•
b
a
Feche a porta tanto quanto possível� Segure firmemente a porta com ambas as mãos – não a segure pela pega� Remova, simplesmente, a porta, continuando a fechá-la enquanto a puxa, simultaneamente, para cima, até se libertar do respetivo suporte� Coloque a porta de parte, apoiando-a sobre uma superfície suave�
a
b
~15°
Reponha a porta, deslocando-a na direção do forno e
alinhando os ganchos das dobradiças com os respetivos suportes, fixando a parte superior aos suportes�• Baixe a porta e, em seguida, abra-a totalmente� Baixe
as linguetas para a respetiva posição original: Assegure-se de que as baixa totalmente�
b
a
Aplique uma pressão suave, para se assegurar de que as linguetas estão na posição correta�
•
“CLICK”
Tente fechar a porta e assegure-se de que está alinhada com o painel de controlo� Se não estiver, repita os procedimentos acima: A porta poderá ficar danificada se não funcionar corretamente�

PT
139
SUBSTITUIR A LÂMPADA1� Desligue o forno da corrente elétrica�2� Remova as guias de nível�3� Remova a cobertura da lâmpada�4� Substitua a lâmpada�5� Volte a colocar a cobertura da lâmpada,
empurrando-a contra a parede para que encaixe corretamente�
6� Reponha as guias de nível�7� Ligue o forno novamente à corrente elétrica�
Lembre-se: Use apenas lâmpadas de halogéneo de 20-40 W/230 ~ V do tipo G9, T300 °C. A lâmpada utilizada no produto foi especificamente concebida para eletrodomésticos e não é adequada para a iluminação geral de divisões da casa (Regulamento CE 244/2009). As lâmpadas estão disponíveis no nosso Serviço Pós-Venda.
Quando utilizar lâmpadas de halogéneo, não as manuseie com as mãos nuas, uma vez que as suas impressões digitais podem provocar danos. Não utilize o forno até que a cobertura da lâmpada tenha sido reposta.

140
001
RESOLUÇÃO DE PROBLEMASProblema Causa possível Solução
O forno não está a funcionar�
Corte de energia�Desativação da rede elétrica�
Verifique se existe energia elétrica proveniente da rede e se o forno está ligado à tomada elétrica�Desligue e volte a ligar o forno, para verificar se o problema ficou resolvido�
O visor apresenta a letra "F", seguida de um número ou uma letra�
Falha do forno�
Contacte o seu Serviço Técnico de Pós-Venda mais próximo e indique o número que acompanha a letra "F"�Prima , toque em e depois selecione “Reposição das Definições de fábrica”� Todas as definições guardadas serão eliminadas�
Houve uma falha de eletricidade�
Regulação da potência incorreta�
Certifique-se de que a sua rede doméstica possui uma potência de, pelo menos, 3 kW� Se não for o caso, reduza a potência para 13 amperes� Para alterar, prima , selecione “Mais modos” e, em seguida,selecione "Gestão da energia"�
A função não está disponível no modo de demonstração�
O modo de demonstração está ativo�
Prima , toque em "Info" e, em seguida, selecione "Modo demonstraçãode loja" para sair�
A porta não abre� Ciclo de limpeza em curso� Aguarde que a função termine e que o forno arrefeça�O vapor sai da gaveta durante a cozedura�
O depósito de água tem um nível baixo� Adicione um copo de água potável�
SUPORTENa eventualidade de quaisquer problemas de funcionamento, contacte o Centro de Assistência Técnica Franke� Nunca recorra aos serviços de técnicos não autorizados� Indique: - o tipo de avaria; - o modelo do aparelho (art�/código); - o número de série (S�N�) indicado na placa de caraterísticas, localizada na extremidade do lado direito da cavidade do forno (visível com a porta do forno aberta)�
Quando contactar o Centro de Assistência, forneça os códigos contidos na placa de caraterísticas do seu produto�
XXXXXX XXXXXX XXXXX XXXXXXXModel: xxxXXXXxx XXXXXXXXXX
XXXXXX
XXXXXXXXXX
XXXXXXXXXXXXXXXXXXXXXXXXXXXXXX XXXXXXXXXX

PL
141
SPIS TREŚCI
INFORMACJE OGÓLNE ������������������������������������������������������������������������������������������������������������������������������������������������������� 142
PULPIT STERUJĄCY �������������������������������������������������������������������������������������������������������������������������������������������������������������� 142
AKCESORIA ����������������������������������������������������������������������������������������������������������������������������������������������������������������������������143
FUNKCJE ���������������������������������������������������������������������������������������������������������������������������������������������������������������������������������144
JAK KORZYSTAĆ Z DOTYKOWEGO WYŚWIETLACZA ������������������������������������������������������������������������������������������������145
PIERWSZE UŻYCIE ����������������������������������������������������������������������������������������������������������������������������������������������������������������145
CODZIENNA EKSPLOATACJA��������������������������������������������������������������������������������������������������������������������������������������������� 147
PRAKTYCZNE PORADY ������������������������������������������������������������������������������������������������������������������������������������������������������� 152
TABELA GOTOWANIA COOKASSIST ��������������������������������������������������������������������������������������������������������������������������������158
CZYSZCZENIE I KONSERWACJA ��������������������������������������������������������������������������������������������������������������������������������������� 161
USUWANIE USTEREK �����������������������������������������������������������������������������������������������������������������������������������������������������������163
WSPARCIE TECHNICZNE ����������������������������������������������������������������������������������������������������������������������������������������������������163

142
1� Pulpit sterujący2� Wentylator3� Grzałka okrągła
(niewidoczna)4� Prowadnice półek
(poziom jest zaznaczony na froncie piekarnika)
5� Drzwiczki6� Szuflada na wodę7� Grzałka górna / grill8� Oświetlenie9� Tabliczka znamionowa
(nie usuwać)10� Dolna grzałka
(niewidoczna)
1. WŁĄCZANIE/WYŁĄCZANIEWłączanie i wyłączanie piekarnika�2. MENU GŁÓWNESzybki dostęp do głównego menu�
3. ULUBIONEOdtworzenie listy ulubionych funkcji�4. WYŚWIETLACZ5. NARZĘDZIADo wybierania spośród kilku opcji piekarnika oraz do zmiany ustawień i preferencji�
6. ANULUJPrzerwanie działania danej funkcji urządzenia poza zegarem, minutnikiem kuchennym oraz blokadą elementów sterujących�
1 2 3 4 5 6
INFORMACJE OGÓLNE
INSTRUKCJA OBSŁUGI
PULPIT STERUJĄCY
5
4
3
2
1
5
4
3
2
1
1
2
3
4
8
9
10
5
7
6

PL
143
AKCESORIA
RUSZT BLACHA NA ŚCIEKAJĄCY TŁUSZCZ BLACHA DO PIECZENIA WYSUWANE
PROWADNICE *
Służy do pieczenia potraw lub jako miejsce do położenia patelni, form do pieczenia i innych naczyń żaroodpornych
Do stosowania jako blacha do pieczenia mięsa, ryb, warzyw, focaccii itp. lub w przypadku umieszczenia pod rusztem, do zbierania ociekającego tłuszczu i soków.
Służy do pieczenia wszelkiego rodzaju ciast i chleba oraz mięsa, ryb w folii itd.
Ułatwiają wkładanie i wyjmowanie akcesoriów.
TACA DO GOTOWANIA NA PARZE
* Dostępne tylko w wybranych modelachLiczba i rodzaj akcesoriów może różnić się w zależności od zakupionego modelu.Dodatkowe akcesoria można nabyć oddzielnie w serwisie.
Ułatwia prawidłową cyrkulację pary, zapewniając równomiernie gotowanie się potraw. Aby zebrać płyny powstające podczas gotowania/pieczenia, umieścić blachę na ociekający tłuszcz poziom niżej.
UMIESZCZANIE RUSZTU I INNYCH AKCESORIÓWUmieścić ruszt poziomo, przesuwając go wzdłuż prowadnic i upewniając się, że strona z uniesioną krawędzią jest skierowana ku górze�Inne akcesoria, takie jak blacha na ściekający tłuszcz czy blacha do pieczenia, są wsuwane poziomo, w taki sam sposób, jak ruszt�WYJMOWANIE I PONOWNY MONTAŻ PROWADNIC• Aby wyjąć prowadnice półek, należy je podnieść
i następnie delikatnie wyciągnąć dolną część z miejsca zamocowania: Teraz można wyjąć prowadnice�
• Aby z powrotem włożyć prowadnice półek, najpierw trzeba je umieścić w górnym miejscu zamocowania� Trzymając prowadnice uniesione ku górze, wsunąć je do piekarnika, a następnie opuścić do dolnego miejsca zamocowania�
MONTOWANIE PRZESUWNYCH PROWADNIC (JEŚLI TA OPCJA JEST DOSTĘPNA)Wyjąć prowadnice półki z piekarnika i zdjąć plastikowe zabezpieczenie z przesuwnych prowadnic�Zamocować górny zacisk szyny do prowadnicy półki i przesunąć ją wzdłuż tak daleko, jak to możliwe� Opuścić drugi zacisk tak, aby znalazł się w odpowiednim miejscu� Aby zabezpieczyć prowadnicę, należy docisnąć mocno dolną część zacisku do prowadnicy�Sprawdzić, czy szyny przesuwają się swobodnie� Powtórzyć powyższe czynności dla drugiej prowadnicy półki na tym samym poziomie�
Uwaga: Przesuwne prowadnice można montować na dowolnym poziomie.
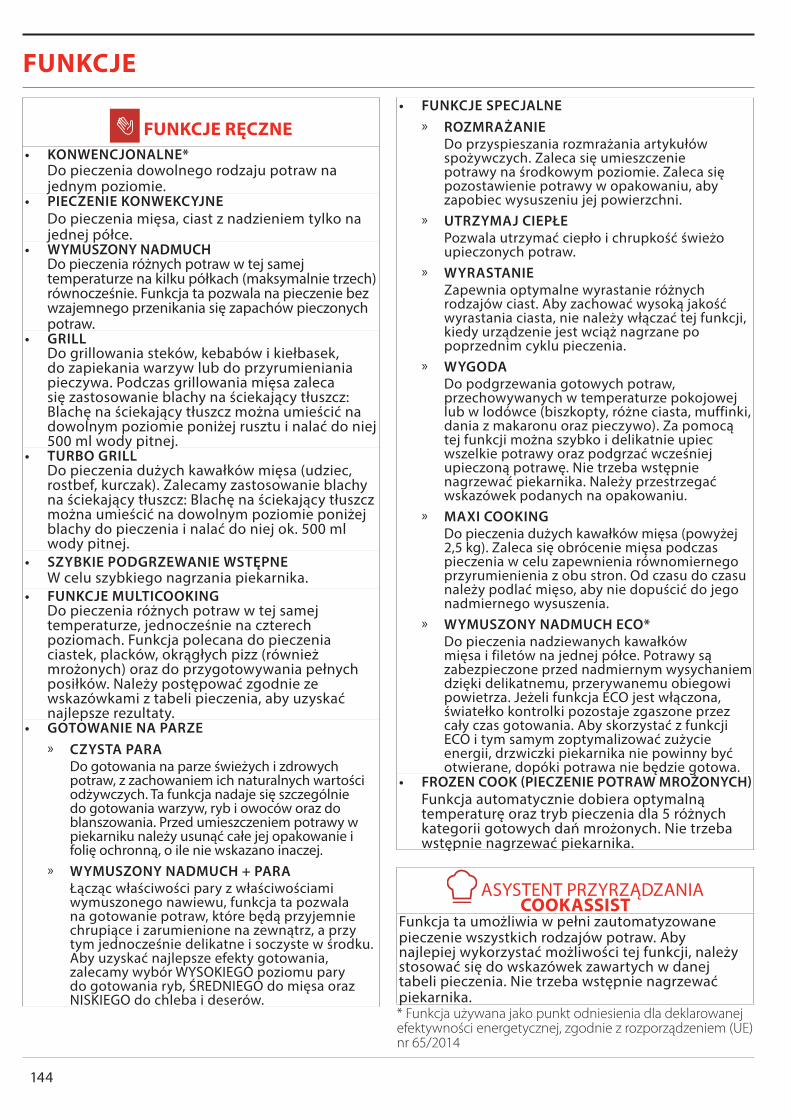
144
FUNKCJE RĘCZNE• KONWENCJONALNE*
Do pieczenia dowolnego rodzaju potraw na jednym poziomie�
• PIECZENIE KONWEKCYJNEDo pieczenia mięsa, ciast z nadzieniem tylko na jednej półce�
• WYMUSZONY NADMUCHDo pieczenia różnych potraw w tej samej temperaturze na kilku półkach (maksymalnie trzech) równocześnie� Funkcja ta pozwala na pieczenie bez wzajemnego przenikania się zapachów pieczonych potraw�
• GRILLDo grillowania steków, kebabów i kiełbasek, do zapiekania warzyw lub do przyrumieniania pieczywa� Podczas grillowania mięsa zaleca się zastosowanie blachy na ściekający tłuszcz: Blachę na ściekający tłuszcz można umieścić na dowolnym poziomie poniżej rusztu i nalać do niej 500 ml wody pitnej�
• TURBO GRILLDo pieczenia dużych kawałków mięsa (udziec, rostbef, kurczak)� Zalecamy zastosowanie blachy na ściekający tłuszcz: Blachę na ściekający tłuszcz można umieścić na dowolnym poziomie poniżej blachy do pieczenia i nalać do niej ok� 500 ml wody pitnej�
• SZYBKIE PODGRZEWANIE WSTĘPNEW celu szybkiego nagrzania piekarnika�
• FUNKCJE MULTICOOKINGDo pieczenia różnych potraw w tej samej temperaturze, jednocześnie na czterech poziomach� Funkcja polecana do pieczenia ciastek, placków, okrągłych pizz (również mrożonych) oraz do przygotowywania pełnych posiłków� Należy postępować zgodnie ze wskazówkami z tabeli pieczenia, aby uzyskać najlepsze rezultaty�
• GOTOWANIE NA PARZE » CZYSTA PARA
Do gotowania na parze świeżych i zdrowych potraw, z zachowaniem ich naturalnych wartości odżywczych� Ta funkcja nadaje się szczególnie do gotowania warzyw, ryb i owoców oraz do blanszowania� Przed umieszczeniem potrawy w piekarniku należy usunąć całe jej opakowanie i folię ochronną, o ile nie wskazano inaczej�
» WYMUSZONY NADMUCH + PARAŁącząc właściwości pary z właściwościami wymuszonego nawiewu, funkcja ta pozwala na gotowanie potraw, które będą przyjemnie chrupiące i zarumienione na zewnątrz, a przy tym jednocześnie delikatne i soczyste w środku� Aby uzyskać najlepsze efekty gotowania, zalecamy wybór WYSOKIEGO poziomu pary do gotowania ryb, ŚREDNIEGO do mięsa oraz NISKIEGO do chleba i deserów�
• FUNKCJE SPECJALNE » ROZMRAŻANIE
Do przyspieszania rozmrażania artykułów spożywczych� Zaleca się umieszczenie potrawy na środkowym poziomie� Zaleca się pozostawienie potrawy w opakowaniu, aby zapobiec wysuszeniu jej powierzchni�
» UTRZYMAJ CIEPŁEPozwala utrzymać ciepło i chrupkość świeżo upieczonych potraw�
» WYRASTANIEZapewnia optymalne wyrastanie różnych rodzajów ciast� Aby zachować wysoką jakość wyrastania ciasta, nie należy włączać tej funkcji, kiedy urządzenie jest wciąż nagrzane po poprzednim cyklu pieczenia�
» WYGODADo podgrzewania gotowych potraw, przechowywanych w temperaturze pokojowej lub w lodówce (biszkopty, różne ciasta, muffinki, dania z makaronu oraz pieczywo)� Za pomocą tej funkcji można szybko i delikatnie upiec wszelkie potrawy oraz podgrzać wcześniej upieczoną potrawę� Nie trzeba wstępnie nagrzewać piekarnika� Należy przestrzegać wskazówek podanych na opakowaniu�
» MAXI COOKINGDo pieczenia dużych kawałków mięsa (powyżej 2,5 kg)� Zaleca się obrócenie mięsa podczas pieczenia w celu zapewnienia równomiernego przyrumienienia z obu stron� Od czasu do czasu należy podlać mięso, aby nie dopuścić do jego nadmiernego wysuszenia�
» WYMUSZONY NADMUCH ECO*Do pieczenia nadziewanych kawałków mięsa i filetów na jednej półce� Potrawy są zabezpieczone przed nadmiernym wysychaniem dzięki delikatnemu, przerywanemu obiegowi powietrza� Jeżeli funkcja ECO jest włączona, światełko kontrolki pozostaje zgaszone przez cały czas gotowania� Aby skorzystać z funkcji ECO i tym samym zoptymalizować zużycie energii, drzwiczki piekarnika nie powinny być otwierane, dopóki potrawa nie będzie gotowa�
• FROZEN COOK (PIECZENIE POTRAW MROŻONYCH)Funkcja automatycznie dobiera optymalną temperaturę oraz tryb pieczenia dla 5 różnych kategorii gotowych dań mrożonych� Nie trzeba wstępnie nagrzewać piekarnika�
ASYSTENT PRZYRZĄDZANIA COOKASSIST
Funkcja ta umożliwia w pełni zautomatyzowane pieczenie wszystkich rodzajów potraw� Aby najlepiej wykorzystać możliwości tej funkcji, należy stosować się do wskazówek zawartych w danej tabeli pieczenia� Nie trzeba wstępnie nagrzewać piekarnika�* Funkcja używana jako punkt odniesienia dla deklarowanej efektywności energetycznej, zgodnie z rozporządzeniem (UE) nr 65/2014
FUNKCJE

PL
145
JAK KORZYSTAĆ Z DOTYKOWEGO WYŚWIETLACZAAby przewinąć menu lub listę:Wystarczy przeciągnąć palcem wzdłuż wyświetlacza, aby przewinąć pozycje lub
wartości�Aby wybrać lub zatwierdzić:Dotknąć ekranu, aby wybrać wymaganą wartość lub pozycję z menu�
Aby powrócić do poprzedniego ekranu:dotknąć �Aby zatwierdzić ustawienie lub przejść do następnego ekranu:Dotknąć „USTAW” lub „DALEJ”�
PIERWSZE UŻYCIEPrzy pierwszym uruchomieniu urządzenia należy je skonfigurować�Ustawienia można ponownie zmienić poprzez naciśnięcie
, aby wejść do menu „Narzędzia”.
1. WYBÓR JĘZYKAPrzy pierwszym uruchomieniu urządzenia należy wybrać język i czas�• Przeciągnąć palcem wzdłuż ekranu, aby przewinąć
listę dostępnych języków�
•
Čeština, Český Jazyk Czech
Dansk Danish
Deutsch German
Dotknąć wybranego języka�
Ελλνικά Greek, Modern
English English
Español Spanish
Dotknięcie umożliwi powrót do poprzedniego ekranu.
2. WYBÓR TRYBU USTAWIEŃPo wybraniu języka na wyświetlaczu pokaże się polecenie dokonania wyboru w „DEMO SKLEPOWE” (przydatne dla sprzedawców detalicznych, jedynie w celu wyświetlania) lub kontynuowania poprzez dotknięcie „DALEJ”�
Dziękujemy za zakup!
Naciśnij Dalej, aby kontynuować konfigurowanie użytkowania domowego�
TRYB DEMONSTRACYJNY ZAPISYWANIADALEJ
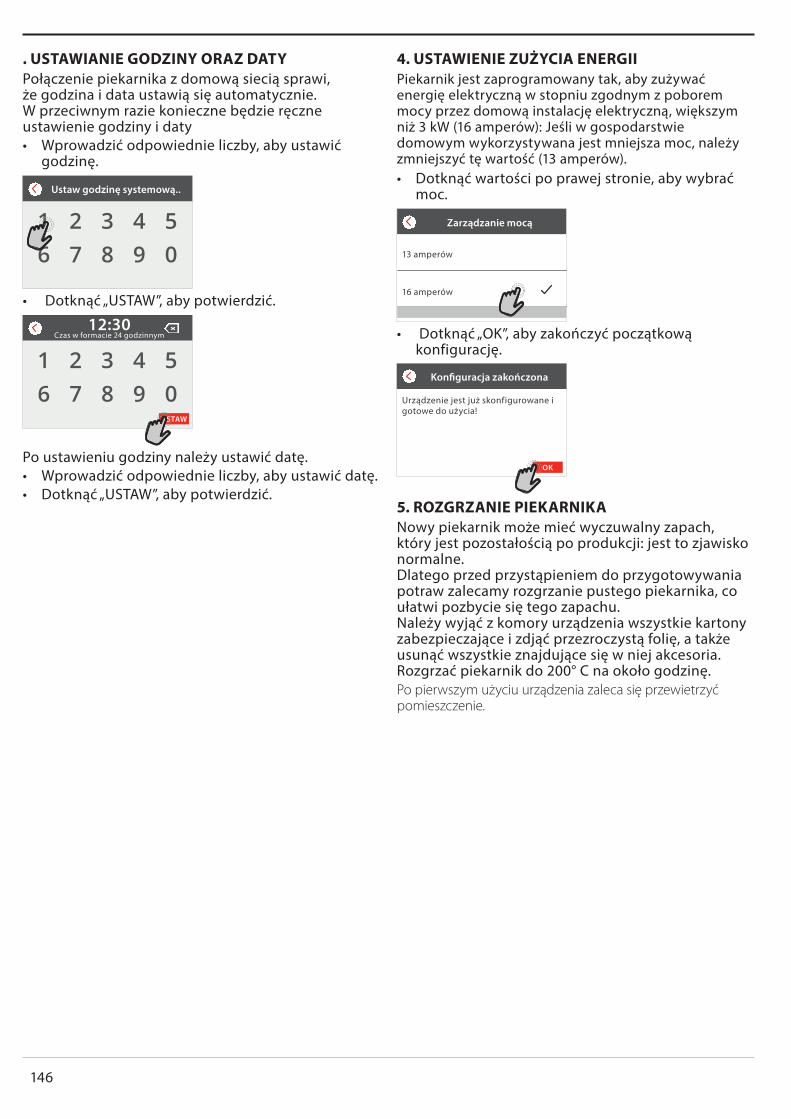
146
. USTAWIANIE GODZINY ORAZ DATYPołączenie piekarnika z domową siecią sprawi, że godzina i data ustawią się automatycznie� W przeciwnym razie konieczne będzie ręczne ustawienie godziny i daty• Wprowadzić odpowiednie liczby, aby ustawić
godzinę�
•
0987654321
Ustaw godzinę systemową..
Dotknąć „USTAW”, aby potwierdzić�
0987654321
12:30Czas w formacie 24 godzinnym
USTAW
Po ustawieniu godziny należy ustawić datę�• Wprowadzić odpowiednie liczby, aby ustawić datę�• Dotknąć „USTAW”, aby potwierdzić�
4. USTAWIENIE ZUŻYCIA ENERGIIPiekarnik jest zaprogramowany tak, aby zużywać energię elektryczną w stopniu zgodnym z poborem mocy przez domową instalację elektryczną, większym niż 3 kW (16 amperów): Jeśli w gospodarstwie domowym wykorzystywana jest mniejsza moc, należy zmniejszyć tę wartość (13 amperów)�• Dotknąć wartości po prawej stronie, aby wybrać
moc�
•
Zarządzanie mocą
13 amperów
16 amperów
Dotknąć „OK”, aby zakończyć początkową konfigurację�
Konfiguracja zakończona
Urządzenie jest już skonfigurowane i gotowe do użycia!
OK
5. ROZGRZANIE PIEKARNIKANowy piekarnik może mieć wyczuwalny zapach, który jest pozostałością po produkcji: jest to zjawisko normalne� Dlatego przed przystąpieniem do przygotowywania potraw zalecamy rozgrzanie pustego piekarnika, co ułatwi pozbycie się tego zapachu� Należy wyjąć z komory urządzenia wszystkie kartony zabezpieczające i zdjąć przezroczystą folię, a także usunąć wszystkie znajdujące się w niej akcesoria� Rozgrzać piekarnik do 200° C na około godzinę�Po pierwszym użyciu urządzenia zaleca się przewietrzyć pomieszczenie.

PL
147
CODZIENNA EKSPLOATACJA1. WYBRAĆ FUNKCJĘ• Aby włączyć piekarnik, nacisnąć lub dotknąć
ekranu w dowolnym miejscu�Wyświetlacz pozwala na wybór pomiędzy funkcją Ręczne a funkcjami CookAssist�• Dotknąć głównej żądanej funkcji, aby przejść do
odpowiedniego menu�
•
20:00
FUNKCJE USTAWIANE RĘCZNIE
FUNKCJA COOKASSIST
Przewijać do góry lub w dół, aby zapoznać się z listą�
•
Wybrać funkcję
KONWENCJONALNE
WYMUSZONY NADMUCH
GRILL
PIECZENIE KONWEKCYJNE
Wybrać żądaną funkcję, dotykając jej�
Wybrać funkcję
KONWENCJONALNE
WYMUSZONY NADMUCH
GRILL
PIECZENIE KONWEKCYJNE
2. USTAWIANIE FUNKCJI RĘCZNYCHPo wybraniu żądanej funkcji istnieje możliwość zmiany jej ustawień� Na wyświetlaczu będą pojawiać się ustawienia, które można zmieniać�TEMPERATURA / POZIOM GRILLA• Przewinąć sugerowane wartości i wybrać żądaną
wartość�Wybrać
temperaturę
DALEJ
Jeśli pozwala na to dana funkcja można dotknąć , aby aktywować nagrzewanie wstępne�
Wybrać temperaturę
DALEJ
CZAS TRWANIANie trzeba ustawiać czasu pieczenia, jeśli ma być używany tryb ręczny� W trybie ograniczonym czasowo piekarnik piecze potrawę przez ustawiony wcześniej okres� Po zakończeniu czasu pieczenia kończy się ono automatycznie�• Aby uruchomić czas trwania pieczenia, dotknąć
„Ustaw czas gotowania”�
•
Ustaw czas gotowania
Wybrać temperaturę
DALEJ
Wprowadzić odpowiednie liczby, aby ustawić żądany czas pieczenia�
•
0987654321
Ustawianie godziny
DALEJ
Dotknąć „DALEJ”, aby potwierdzić�3. USTAWIANIE FUNKCJI COOKASSISTFunkcje COOKASSIST umożliwiają przygotowywanie szerokiej gamy potraw poprzez wybranie potrawy z listy� Większość ustawień pieczenia jest wybierana automatycznie przez urządzenie w celu osiągnięcia najlepszych rezultatów�• Wybrać przepis z listy�Funkcje wyświetlają się według kategorii jedzenia w menu „ASYSTENT PRZYRZĄDZANIA COOKASSIST” (patrz odpowiednie tabele) oraz według właściwości przepisu w menu „COOKASSIST PRO”.• Po wybraniu funkcji należy po prostu wskazać
cechy potrawy (ilość, waga itp�), która ma być pieczona, aby uzyskać idealny efekt�
• Postępować zgodnie z instrukcjami wyświetlanymi na ekranie, aby przejść przez proces gotowania�

148
4. USTAWIANIE OPÓŹNIENIA STARTU PIECZENIAMożna opóźnić pieczenie przed rozpoczęciem działania funkcji: Funkcja rozpocznie działanie o godzinie, która zostanie wcześniej ustawiona�• Naciśnij „OPÓŹNIENIE”, aby ustawić wymaganą
godzinę�
•
INSTRUKCJA GOTOWANIA:
Do pieczenia dowolnego rodzaju potraw na jednym poziomie�
Umieścić jedzenie na poziomie 3�Użyć rusztu z blachą lub tacą na ściekający tłuszcz�
OPÓŹNIENIE
Konwencjonalne
ROZPOCZNIJ
Po ustawieniu żądanego opóźnienia, dotknąć „OPÓŹNIENIE ROZPOCZĘCIA”, aby rozpocząć czas oczekiwania�
• Włożyć potrawę do piekarnika i zamknąć drzwiczki: Funkcja rozpocznie działanie automatycznie po okresie, który został obliczony�
Jeżeli wybrano nagrzewanie podczas ustawiania cyklu, opcja opóźnienia zostanie wyłączona.• Aby natychmiast włączyć funkcję i anulować
zaprogramowany czas opóźnienia, dotknąć �5. WŁĄCZANIE FUNKCJI• Po skonfigurowaniu ustawień, dotknąć
„ROZPOCZNIJ”, aby aktywować funkcję�W każdym momencie podczas pieczenia można zmienić wartości, które zostały ustawione, dotykając wartości, która ma być zmieniona.Jeśli piekarnik jest gorący, a funkcja wymaga konkretnej temperatury maksymalnej, na wyświetlaczu pojawi się komunikat.• Nacisnąć , aby wyłączyć aktywną funkcję
w każdym momencie lub dotknąć wartości i następnie wybrać „STOP”�
6. NAGRZEWANIE WSTĘPNEJeśli wcześniej została aktywowana, po włączeniu funkcji wyświetlacz pokazuje status fazy wstępnego nagrzewania�
00:00:15 od rozpoczęciaKONWENCJONALNENagrzewanie wstępne200°C
USTAWGOTOWANIE
CZAS
Po zakończeniu tej fazy zostanie wyemitowany sygnał dźwiękowy, a na wyświetlaczu pojawi się komunikat, że piekarnik osiągnął ustawioną temperaturę�
•
Podgrzewanie wstępne zakończoneWłóż jedzenie teraz
WYKONANO
Otworzyć drzwiczki�• Włożyć danie�• Zamknąć drzwiczki - pieczenie zostanie
automatycznie wznowione�Umieszczenie potraw w piekarniku przed końcem procesu nagrzewania może mieć wpływ na jakość pieczonych potraw.Otwarcie drzwiczek w trakcie fazy wstępnego nagrzewania wstrzyma nagrzewanie piekarnika.Czas pieczenia nie zawiera fazy wstępnego nagrzewania.
7. WSTRZYMYWANIE PIECZENIANiektóre funkcje COOKASSIST wymagają obracania potrawy podczas pieczenia� Urządzenie wyda sygnał dźwiękowy, a na wyświetlaczu pojawi się wskazówka mówiąca o konieczności wykonania czynności� • Otworzyć drzwiczki�• Przeprowadzić czynność wskazaną na
wyświetlaczu�• Zamknąć drzwiczki, następnie dotknąć
„WYKONANO”, aby wznowić pieczenie�Przed zakończeniem pieczenia piekarnik może wyświetlić polecenie sprawdzenia potrawy w ten sam sposób�Urządzenie wyda sygnał dźwiękowy, a na wyświetlaczu pojawi się wskazówka mówiąca o konieczności wykonania czynności�• Sprawdzić potrawę�• Zamknąć drzwiczki - pieczenie zostanie
automatycznie wznowione�8. KONIEC PIECZENIASygnał dźwiękowy i wskazanie na wyświetlaczu oznaczają, że pieczenie zostało zakończone�Przy niektórych funkcjach, po zakończeniu pieczenia można dodatkowo przyrumienić potrawę, wydłużyć czas pieczenia lub zapisać funkcję jako ulubioną�
•
00:01 od gotowości
KONWENCJONALNEGotowanie200°C
MINUTNIKZAKOŃCZONO
Dotknąć , aby zapisać w Ulubionych�• Wybrać „Dodatkowe przyrumienienie”, aby
rozpocząć pięciominutowy cykl przyrumieniania�• Dotknąć , aby zapisać wydłużenie pieczenia�

PL
149
9. ULUBIONEFunkcja Ulubione przechowuje ustawienia piekarnika dla ulubionych przepisów użytkownika�Piekarnik automatycznie rozpoznaje najczęściej używane funkcje.Po kilku użyciach danego przepisu urządzenie zaproponuje dodanie funkcji do Ulubionych.JAK ZAPISAĆ FUNKCJĘPo zakończeniu funkcji można dotknąć , aby zapisać ją jako ulubioną� Umożliwi to szybkie używanie danej funkcji w przyszłości przy zachowaniu tych samych ustawień�Wyświetlacz umożliwia zapisanie funkcji wskazując maksymalnie 4 pory ulubionych posiłków, w tym śniadania, obiadu, przekąski i kolacji�• Dotknąć ikony, aby wybrać przynajmniej jeden
posiłek�
•
1. Pizza na cienkim cieście
ULUBIONY
EDYCJA
Dotknąć „ULUBIONY”, aby zapisać funkcję�
1. Pizza na cienkim cieście
ULUBIONY
EDYCJA
WCZEŚNIEJ ZAPISANEAby zobaczyć menu Ulubione nacisnąć : funkcje będą podzielone według pory posiłku i podane będą pewne sugestie�• Dotknąć ikony posiłków, aby zobaczyć
odpowiednie listy
•
Ulubione obiady
PIZZA NA CIENKIM CIEŚCIE
Szukasz czegoś innego? Poniżej znajduje się kilka sugestii�
Przewinąć zaproponowaną listę�• Dotknąć żądanego przepisu lub funkcji�• Dotknąć „ROZPOCZNIJ”, aby rozpocząć pieczenie�ZMIANA USTAWIEŃNa ekranie Ulubionych można dodać obraz lub nazwę, aby dostosować funkcję do swoich preferencji�• Wybrać funkcję, która ma być zmieniona�• Dotknąć „EDYCJA”�
• Wybrać właściwość, która ma być zmieniona�• Dotknąć „DALEJ”: Wyświetlacz pokaże nowe
właściwości�• Dotknąć „ZAPISZ”, aby zatwierdzić zmiany�Na ekranie Ulubionych można również usuwać funkcje, które zostały zapisane:• Dotknąć na danej funkcji�• Dotknąć „USUŃ TO”�Można również dostosować godzinę, o której są wyświetlane różne posiłki:• Nacisnąć �• Wybrać „Preferencje”�• Wybrać „Godziny i daty”� • Dotknąć „Twoje godziny posiłków”�• Przewinąć listę i dotknąć odpowiedniej godziny�• Dotknąć nazwy odpowiedniego posiłku, aby go
zmienić�Możliwe będzie połączenie przedziału czasowego jedynie z posiłkiem.
10. NARZĘDZIANacisnąć , aby otworzyć menu „Narzędzia” w dowolnym momencie�To menu umożliwia wybór spośród kilku opcji oraz zmianę ustawień lub preferencji dla urządzenia lub wyświetlacza�
Narzędzia
Minutnik kuchenny
Oświetlenie Samoczyszczenie
MINUTNIK KUCHENNYTę funkcję można aktywować podczas używania jakiejś funkcji pieczenia lub jedynie do zachowania czasu�Po włączeniu funkcji minutnik kuchenny będzie nadal niezależnie odliczać czas, nie zakłócając działania funkcji�Gdy minutnik kuchenny jest aktywny, można także wybrać i włączyć funkcję�Minutnik będzie nadal odliczał czas w prawym górnym rogu ekranu.Aby przywrócić lub zmienić minutnik kuchenny:• Nacisnąć �• Dotknąć �Gdy tylko zakończy się odliczanie wybranego czasu, pojawi się komunikat na wyświetlaczu i rozlegnie się sygnał dźwiękowy� • Naciśnij „USUŃ TO”, aby wyłączyć minutnik�• Dotknąć „USTAW NOWY MINUTNIK”, aby ponownie
ustawić minutnik�
OŚWIETLENIEAby włączyć/wyłączyć lampę piekarnika�

150
CZYSZCZENIEUruchomić funkcję „Samoczyszczenie” w celu optymalnego oczyszczenia wewnętrznych powierzchni urządzenia�W trakcie cyklu czyszczenia zaleca się nie otwierać drzwiczek piekarnika. W przeciwnym razie wydostająca się z komory piekarnika para wodna może negatywnie wpłynąć na rezultat czyszczenia.• Przed włączeniem tej funkcji wyjąć wszystkie
akcesoria z piekarnika�• Wlać 200 ml wody pitnej na dno piekarnika�• Dotknąć „ROZPOCZNIJ”, aby uruchomić funkcję
czyszczenia�Po wybraniu cyklu można opóźnić rozpoczęcie automatycznego czyszczenia. Dotknąć „OPÓŹNIENIE”, aby ustawić czas zakończenia czyszczenia tak, jak zostało to opisane w odpowiedniej sekcji.
OPRÓŻNIANIEFunkcja opróżniania umożliwia taki odpływ wody, aby nie pozostawała w zbiorniku� Zaleca się przeprowadzenie opróżniania po każdym użyciu piekarnika�
W każdym razie, po kilku razach używania działanie to będzie obowiązkowe i bez opróżnienia nie będzie można uruchomić funkcji gotowania na parze, przed jej wykonaniem�Po wybraniu funkcji „Opróżnianie”
lub gdy zostanie ona zasugerowana na wyświetlaczu, należy rozpocząć funkcję i wykonać wskazane czynności: Otworzyć drzwiczki i umieścić duży dzbanek pod dyszą odpływu zlokalizowaną na panelu na dole po prawej stronie� Po rozpoczęciu opróżniania pozostawić dzbanek na miejscu aż do ukończenia procesu�Wyświetlacz pokaże, kiedy pojemnik musi zostać całkowicie opróżniony�Uwaga: nie można wykonać tej czynności przed upływem 4 godzin od zakończenia ostatniego cyklu (lub od ostatniego napełnienia produktu). W czasie oczekiwania na wyświetlaczu pojawi się następujący komunikat „woda jest ZA GORĄCA, poczekaj, aż temperatura obniży się". Kiedy woda będzie wystarczająco zimna, można kontynuować, przyciskając „KONTYNUUJ".Naczynie musi mieć pojemność 2 litrów.Funkcja opróżniania umożliwia taki odpływ wody, aby nie pozostawała w zbiorniku� Zaleca się przeprowadzenie opróżniania po każdym użyciu piekarnika� Nalać wody lub opróżnić zbiornik, gdy pojawi się komunikat na wyświetlaczu�
ODKAMIENIAJTa specjalna funkcja, włączana w regularnych odstępach czasu, umożliwia utrzymanie zbiornika i przepływu pary w najlepszym stanie� Funkcja jest wykonywana w kilku etapach: opróżnianie, odkamienianie, płukanie� Po uruchomieniu funkcji należy wykonać wszystkie kroki wskazane na wyświetlaczu�
Przeciętny czas trwania całej funkcji to około 190 minut�Uwaga: Jeżeli funkcja zostanie zatrzymana w jakimkolwiek momencie, cały cykl usuwania kamienia musi zostać powtórzony.
» OPRÓŻNIANIEPrzed odkamienianiem konieczne będzie opróżnienie wody ze zbiornika: aby wykonać tę operację w najlepszy sposób, postępować zgodnie z opisem w odpowiednim akapicie�Uwaga: nie można wykonać tej czynności przed upływem 4 godzin od zakończenia ostatniego cyklu (lub od ostatniego napełnienia produktu). W czasie oczekiwania na wyświetlaczu pojawi się następujący komunikat „woda jest ZA GORĄCA, poczekaj, aż temperatura obniży się". Kiedy woda będzie wystarczająco zimna, można kontynuować, przyciskając „KONTYNUUJ". Naczynie musi mieć pojemność 2 litrów.
» ODKAMIENIANIEAby odkamienianie było skuteczniejsze, zaleca się napełnienie zbiornika specjalnym roztworem, dostępnym w salonach obsługi posprzedażowej�Po zakończeniu fazy odkamieniania należy opróżnić zbiornik�
» PŁUKANIEAby wyczyścić zbiornik i obwód przepływu pary, należy wykonać cykl płukania� Napełnić zbiornik wodą pitną do momentu, aż wyświetlacz pokaże komunikat „ZBIORNIK PEŁNY”, a następnie rozpocząć płukanie� Pod koniec na wyświetlaczu pojawi się prośba o powtórzenie tej fazy przez ponowne opróżnianie i płukanie� Nie wyłączać piekarnika, dopóki wszystkie czynności wymagane przez funkcję nie zostaną zakończone� Funkcje pieczenia nie mogą być aktywowane podczas cyklu czyszczenia�Uwaga: Na wyświetlaczu będzie pojawiać się komunikat przypominający o konieczności regularnego wykonywania tej operacji. Nalać wody lub opróżnić zbiornik, gdy pojawi się komunikat na wyświetlaczu.
WYCISZDotknąć ikony, aby wyciszyć lub anulować wyciszenie wszystkich dźwięków i alarmów�
BLOKADA ELEMENTÓW STERUJĄCYCHBlokada elementów sterujących umożliwia zablokowanie przycisków na ekranie dotykowym, tak aby nie można było ich nacisnąć przez przypadek� Aby aktywować blokadę:• Dotknąć ikony �Aby dezaktywować blokadę:• Dotknąć wyświetlacza�• Przeciągnąć palcem w górę po wyświetlonym
komunikacie�
Blokada elementów sterującychProdukt jest zablokowany�
Przesuń w górę, aby odblokować�

PL
151
WIĘCEJ TRYBÓWAby wybrać tryb szabatu lub uzyskać dostęp do pozycji Moc�Tryb szabatu umożliwia działanie piekarnika w trybie pieczenia do momentu jego wyłączenia. Tryb szabatu wykorzystuje działanie konwencjonalne. Wszystkie pozostałe cykle pieczenia i czyszczenia są wyłączone. Nie są emitowane ostrzeżenia dźwiękowe, a na wyświetlaczu nie pokazują się zmiany temperatury. W przypadku otwarcia lub zamknięcia drzwiczek piekarnika oświetlenie piekarnika nie włączy się ani nie wyłączy, a elementy grzewcze nie włączą się natychmiast ani nie wyłączą się.W celu wyłączenia i wyjścia z trybu szabatu nacisnąć lub
, a następnie nacisnąć i przytrzymać ekran wyświetlacza przez 3 sekundy.
PREFERENCJEDo zmiany kilku ustawień piekarnika�
INFODo wyłączania „Zapamiętaj tryb demonstracyjny”, resetowania urządzenia oraz pozyskiwania dalszych informacji o urządzeniu�
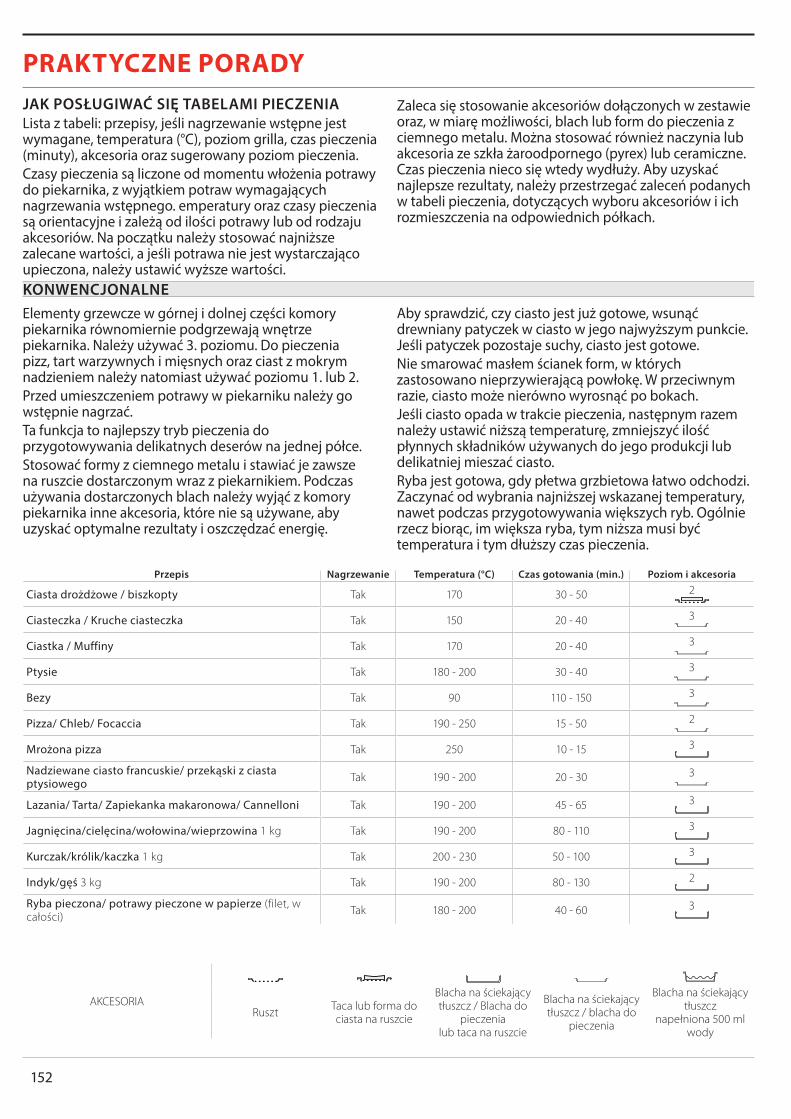
152
PRAKTYCZNE PORADYJAK POSŁUGIWAĆ SIĘ TABELAMI PIECZENIALista z tabeli: przepisy, jeśli nagrzewanie wstępne jest wymagane, temperatura (°C), poziom grilla, czas pieczenia (minuty), akcesoria oraz sugerowany poziom pieczenia�Czasy pieczenia są liczone od momentu włożenia potrawy do piekarnika, z wyjątkiem potraw wymagających nagrzewania wstępnego� emperatury oraz czasy pieczenia są orientacyjne i zależą od ilości potrawy lub od rodzaju akcesoriów� Na początku należy stosować najniższe zalecane wartości, a jeśli potrawa nie jest wystarczająco upieczona, należy ustawić wyższe wartości�
Zaleca się stosowanie akcesoriów dołączonych w zestawie oraz, w miarę możliwości, blach lub form do pieczenia z ciemnego metalu� Można stosować również naczynia lub akcesoria ze szkła żaroodpornego (pyrex) lub ceramiczne� Czas pieczenia nieco się wtedy wydłuży� Aby uzyskać najlepsze rezultaty, należy przestrzegać zaleceń podanych w tabeli pieczenia, dotyczących wyboru akcesoriów i ich rozmieszczenia na odpowiednich półkach�
KONWENCJONALNEElementy grzewcze w górnej i dolnej części komory piekarnika równomiernie podgrzewają wnętrze piekarnika� Należy używać 3� poziomu� Do pieczenia pizz, tart warzywnych i mięsnych oraz ciast z mokrym nadzieniem należy natomiast używać poziomu 1� lub 2�Przed umieszczeniem potrawy w piekarniku należy go wstępnie nagrzać�Ta funkcja to najlepszy tryb pieczenia do przygotowywania delikatnych deserów na jednej półce�Stosować formy z ciemnego metalu i stawiać je zawsze na ruszcie dostarczonym wraz z piekarnikiem� Podczas używania dostarczonych blach należy wyjąć z komory piekarnika inne akcesoria, które nie są używane, aby uzyskać optymalne rezultaty i oszczędzać energię�
Aby sprawdzić, czy ciasto jest już gotowe, wsunąć drewniany patyczek w ciasto w jego najwyższym punkcie� Jeśli patyczek pozostaje suchy, ciasto jest gotowe�Nie smarować masłem ścianek form, w których zastosowano nieprzywierającą powłokę� W przeciwnym razie, ciasto może nierówno wyrosnąć po bokach�Jeśli ciasto opada w trakcie pieczenia, następnym razem należy ustawić niższą temperaturę, zmniejszyć ilość płynnych składników używanych do jego produkcji lub delikatniej mieszać ciasto�Ryba jest gotowa, gdy płetwa grzbietowa łatwo odchodzi� Zaczynać od wybrania najniższej wskazanej temperatury, nawet podczas przygotowywania większych ryb� Ogólnie rzecz biorąc, im większa ryba, tym niższa musi być temperatura i tym dłuższy czas pieczenia�
Przepis Nagrzewanie Temperatura (°C) Czas gotowania (min.) Poziom i akcesoria
Ciasta drożdżowe / biszkopty Tak 170 30 - 50 2
Ciasteczka / Kruche ciasteczka Tak 150 20 - 40 3
Ciastka / Muffiny Tak 170 20 - 40 3
Ptysie Tak 180 - 200 30 - 40 3
Bezy Tak 90 110 - 150 3
Pizza/ Chleb/ Focaccia Tak 190 - 250 15 - 50 2
Mrożona pizza Tak 250 10 - 15 3
Nadziewane ciasto francuskie/ przekąski z ciasta ptysiowego Tak 190 - 200 20 - 30 3
Lazania/ Tarta/ Zapiekanka makaronowa/ Cannelloni Tak 190 - 200 45 - 65 3
Jagnięcina/cielęcina/wołowina/wieprzowina 1 kg Tak 190 - 200 80 - 110 3
Kurczak/królik/kaczka 1 kg Tak 200 - 230 50 - 100 3
Indyk/gęś 3 kg Tak 190 - 200 80 - 130 2
Ryba pieczona/ potrawy pieczone w papierze (filet, w całości) Tak 180 - 200 40 - 60 3
AKCESORIARuszt Taca lub forma do
ciasta na ruszcie
Blacha na ściekający tłuszcz / Blacha do
pieczenia lub taca na ruszcie
Blacha na ściekający tłuszcz / blacha do
pieczenia
Blacha na ściekający tłuszcz
napełniona 500 ml wody

PL
153
GRILLGórna grzałka umożliwia osiągnięcie optymalnych efektów grillowania� Podczas grillowania należy umieścić potrawę na 4� lub 5� półce� Podczas grillowania mięs zaleca się używanie blachy-ociekacza, na której będzie się zbierał skapujący tłuszcz� Umieścić blachę na 3� lub 4� poziomie i wlać do niej około 500 ml wody pitnej� Nie trzeba wstępnie nagrzewać piekarnika�Podczas pieczenia drzwi piekarnika muszą być zamknięte�Przygotowując mięso do grillowania należy pamiętać, że najlepsze wyniki uzyskuje się, gdy kawałki mają tę samą grubość� Bardzo grube kawałki mięsa wymagają dłuższego czasu pieczenia�
Aby zapobiec przypaleniu powierzchni mięsa, należy je odsunąć od grzałki grilla i umieścić ruszt na niższym poziomie� Obrócić potrawę w połowie czasu pieczenia�Zaleca się stosowanie blachy na ściekający tłuszcz, która będzie zbierała ściekające soki - należy do niej wlać pół litra wody i umieścić bezpośrednio pod rusztem, na którym ułożone jest mięso do grillowania� W razie potrzeby uzupełniać wodę�
Przepis Nagrzewanie Poziom grillowania Czas gotowania (min.) Poziom i akcesoria
Tost - 3 (Wysoka) 3 - 6 5
Filety / kawałki ryb - 2 (Środkowa) 20 - 30 4 3
Kiełbaski/ szaszłyki/ żeberka/ hamburgery - 2 - 3 (Środkowa – Wysoka) 15 - 30 5 4
TURBO GRILLW przypadku tej funkcji jednocześnie uruchomiony jest górny element grzejny i wentylator�Zaleca się stosowanie blachy, która będzie zbierała ociekający tłuszcz�Umieścić blachę na 1� lub 2� poziomie i wlać do niej 500 ml wody pitnej� Nie trzeba wstępnie nagrzewać piekarnika� Podczas pieczenia drzwi piekarnika muszą być zamknięte�Obrócić potrawę po upływie dwóch trzecich czasu
pieczenia�Można stosować dowolne blachy lub naczynia żaroodporne, dopasowane do rozmiarów pieczonego mięsa� W przypadku pieczeni zaleca się wlanie na dno naczynia niewielkiej ilości bulionu, aby nieco zwilżyć mięso i dodać mu smaku� Gdy pieczeń jest już gotowa, zostawić ją w piekarniku na ok� 10–15 min lub zawinąć w folię aluminiową�
Przepis Nagrzewanie Poziom grillowania Czas gotowania (min.) Poziom i akcesoria
Pieczony kurczak 1-1,3 kg - 2 (Środkowa) 55 - 70 2 1
Udziec jagnięcy/ golonka - 2 (Środkowa) 60 - 90 3
Pieczone ziemniaki - 2 (Środkowa) 35 - 55 3
Zapiekane warzywa - 3 (Wysoka) 10 - 25 3
AKCESORIARuszt Taca lub forma do
ciasta na ruszcie
Blacha na ściekający tłuszcz / Blacha do
pieczenia lub taca na ruszcie
Blacha na ściekający tłuszcz / blacha do
pieczenia
Blacha na ściekający tłuszcz
napełniona 500 ml wody

154
WYMUSZONY NADMUCHOkrągły element grzejny i wentylator są uruchamiane jednocześnie� Wentylator na tylnej ścianie równomiernie rozprowadza gorące powietrze w piekarniku�Funkcja „Termoobieg” umożliwia jednoczesne pieczenie różnych potraw wymagających tej samej temperatury (np� ryb lub warzyw) na różnych półkach� Wyjąć potrawę, która wymaga krótszego czasu gotowania i pozostawić w piekarniku tę, która wymaga dłuższego czasu gotowania�
Użyć 4� poziomu do pieczenia tylko na jednym poziomie, 1� i 4� poziomu do pieczenia na dwóch, a 1�, 3� i 5� poziomu do pieczenia na trzech� Zawsze umieszczać formy do pieczenia na ruszcie� Podgrzać piekarnik przed pieczeniem�Aby uzyskać równomierne zarumienienie, należy upewnić się, że wszystkie porcje ciasta są tej samej grubości�Podczas pieczenia pizzy, nasmarować blachy niewielką ilością tłuszczu, aby spód pizzy był bardziej chrupiący� Po upływie dwóch trzecich czasu pieczenia ułożyć na pizzy mozzarellę�
Przepis Nagrzewanie Temperatura (°C) Czas gotowania (min.) Poziom i akcesoria
Ciasta drożdżowe / biszkoptyTak 170 30 - 50 2
Tak 160 30 - 50 4
1
Ciasta z nadzieniem (sernik, strucla, szarlotka) Tak 160 – 200 35 - 90 4 1
Ciasteczka / Kruche ciasteczka
Tak 140 30 - 50 4
Tak 140 30 - 50 4
1
Tak 135 40 - 60 5
3 1
Ciastka / Muffiny
Tak 150 30 - 50 4
Tak 150 30 - 50 4
1
Tak 150 40 - 60 5
3 1
PtysieTak 180 - 190 35 - 45 4
1
Tak 180 - 190 35 - 45 * 5
3 1
BezyTak 90 130 - 150 4
1
Tak 90 140 - 160 * 5 3 1
Pizza/ Chleb/ Focaccia Tak 190 - 230 20 - 50 4 1
Pizza (na cienkim lub grubym cieście, focaccia) Tak 220 - 240 25 - 50 * 5 3 1
Mrożona pizzaTak 250 10 - 20 4 1
Tak 220 - 240 15 - 30 5 3 1
Tarty słone (warzywna, quiche)Tak 180 - 190 45 - 60 4 1
Tak 180 - 190 45 - 70 * 5 3 1
Nadziewane ciasto francuskie/ przekąski z ciasta ptysiowego
Tak 180 - 190 20 - 40 4 1
Tak 180 - 190 20 - 40 * 5 3 1
Lazania i mięso Tak 200 50 - 100 * 4 1
Mięso i ziemniaki Tak 200 45 - 100 * 4 1
Ryby i warzywa Tak 180 30 - 50 * 4 1
* Szacowany czas: Potrawy można wyjmować z piekarnika w różnym czasie, w zależności od indywidualnych preferencji.
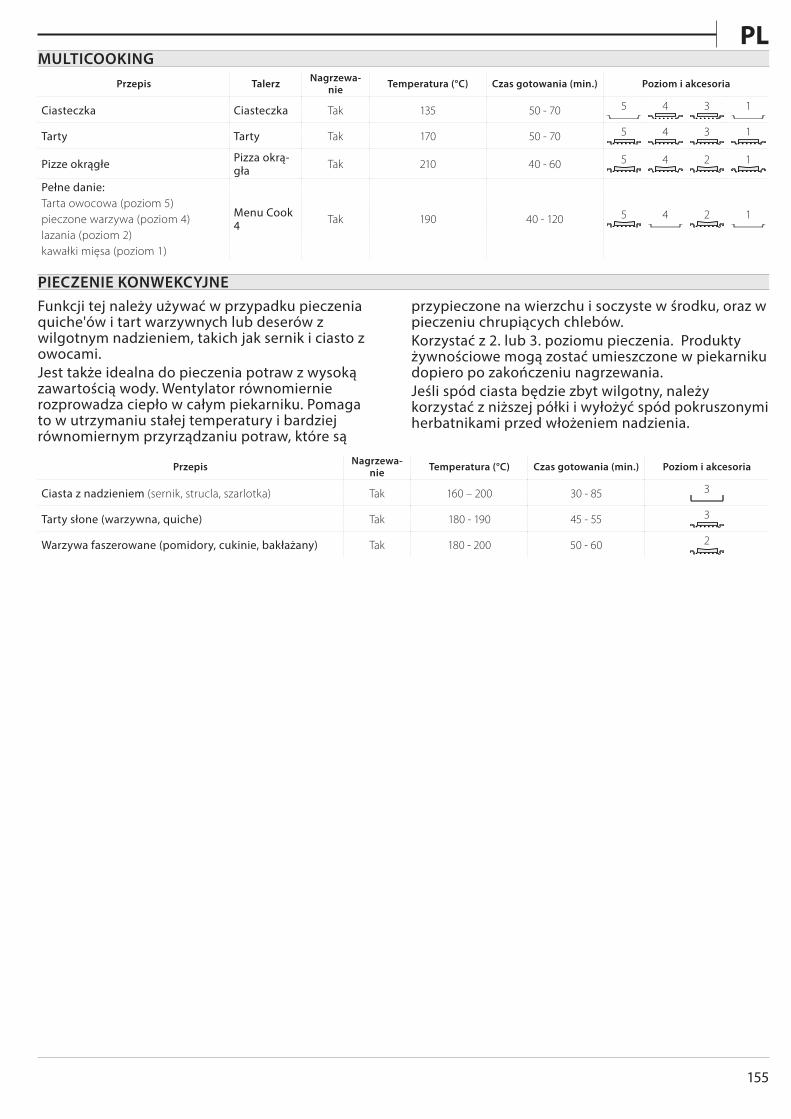
PL
155
MULTICOOKINGPrzepis Talerz Nagrzewa-
nie Temperatura (°C) Czas gotowania (min.) Poziom i akcesoria
Ciasteczka Ciasteczka Tak 135 50 - 70 5 4 3 1
Tarty Tarty Tak 170 50 - 70 5 4 3 1
Pizze okrągłe Pizza okrą-gła Tak 210 40 - 60 5 4 2 1
Pełne danie: Tarta owocowa (poziom 5)pieczone warzywa (poziom 4) lazania (poziom 2) kawałki mięsa (poziom 1)
Menu Cook 4 Tak 190 40 - 120 5 4 2 1
PIECZENIE KONWEKCYJNEFunkcji tej należy używać w przypadku pieczenia quiche'ów i tart warzywnych lub deserów z wilgotnym nadzieniem, takich jak sernik i ciasto z owocami�Jest także idealna do pieczenia potraw z wysoką zawartością wody� Wentylator równomiernie rozprowadza ciepło w całym piekarniku� Pomaga to w utrzymaniu stałej temperatury i bardziej równomiernym przyrządzaniu potraw, które są
przypieczone na wierzchu i soczyste w środku, oraz w pieczeniu chrupiących chlebów�Korzystać z 2� lub 3� poziomu pieczenia� Produkty żywnościowe mogą zostać umieszczone w piekarniku dopiero po zakończeniu nagrzewania�Jeśli spód ciasta będzie zbyt wilgotny, należy korzystać z niższej półki i wyłożyć spód pokruszonymi herbatnikami przed włożeniem nadzienia�
Przepis Nagrzewa-nie Temperatura (°C) Czas gotowania (min.) Poziom i akcesoria
Ciasta z nadzieniem (sernik, strucla, szarlotka) Tak 160 – 200 30 - 85 3
Tarty słone (warzywna, quiche) Tak 180 - 190 45 - 55 3
Warzywa faszerowane (pomidory, cukinie, bakłażany) Tak 180 - 200 50 - 60 2

156
AKCESORIARuszt Taca lub forma do ciasta
na ruszcie
Blacha na ściekający tłuszcz / Blacha do
pieczenia lub taca na ruszcie
Blacha na ściekający tłuszcz / blacha do
pieczenia
Blacha na ściekający tłuszcz
napełniona 500 ml wody
CZYSTA PARA
Przepis Nagrze-wanie Temperatura (°C) Czas gotowania
(min.) Poziom i akcesoria
Świeże warzywa (całe) - 100 30 - 80 2 1
Świeże warzywa (kawałki) - 100 15 - 40 2 1
Mrożone warzywa - 100 20 - 40 2 1
Ryba w całości - 90 40 - 50 2 1
Filety rybne - 90 20 - 30 2 1
Filety z kurczaka - 100 15 - 50 2 1
Jajka - 100 10 - 30 2 1
Owoce (całe) - 100 15 - 45 2 1
Owoce (kawałki) - 100 10 - 30 2 1
WYMUSZONY NADMUCH + PARA
Przepis Poziom pary Nagrze-wanie Temperatura (°C) Czas gotowania
(min.) Poziom i akcesoria
Ciasteczka / herbatniki
NISKIE - 140 - 150 35 - 55 3
NISKIE - 140 30 - 50 4
1
NISKIE - 140 40 - 60 5
3 1
Małe ciasta / mufIinka
NISKIE - 160 - 170 30 - 40 3
NISKIE - 150 30 - 50 4
1
NISKIE - 150 40 - 60 5
3 1
Ciasta drożdżowe NISKIE - 170 - 180 40 - 60 2
Biszkopty NISKIE - 160 - 170 30 - 40 2
Focaccia NISKIE - 200 - 220 20 - 40 3
Bochenek chleba NISKIE - 170 - 180 70 - 100 3
Mały chleb NISKIE - 200 - 220 30 - 50 3
Bagietka NISKIE - 200 - 220 30 - 50 3
Pieczone ziemniaki ŚREDNIE - 200 - 220 50 - 70 3
Cielęcina / wołowina / wieprzowina 1 kg ŚREDNIE - 180 - 200 60 - 100 3
Cielęcina / wołowina / wieprzowina (kawałki) ŚREDNIE - 160 - 180 60 - 80 3
Befsztyk krwisty 1 kg ŚREDNIE - 200 - 220 40 - 50 3
Befsztyk krwisty 2 kg ŚREDNIE - 200 55 - 65 3
Udziec jagnięcy ŚREDNIE - 180 - 200 65 - 75 3
Duszona golonka wieprzowa ŚREDNIE - 160 - 180 85 - 100 3
Kurczak / perliczka / kaczka 1 - 1,5 kg ŚREDNIE - 200 - 220 50 - 70 3
Kurczak / perliczka / kaczka (kawałki) ŚREDNIE - 200 - 220 55 - 65 3
Warzywa faszerowane (pomidory, cukinie, bakłażany) ŚREDNIE - 180 - 200 25 - 40 3
Filet rybny WYSOKI - 180 - 200 15 - 30 3

PL
157
MAXI COOKINGTa funkcja jest bardzo przydatna do pieczenia dużych kawałków mięsa (powyżej 2,5 kg)� Zaleca się obracanie mięsa podczas pieczenia, aby uzyskać równomierne przyrumienienie po obu stronach� Od czasu do czasu należy podlać mięso, aby nie dopuścić do jego nadmiernego wysuszenia�Korzystać z 1� lub 2� poziomu w zależności od wielkości potrawy� Piekarnik nie musi być wstępnie nagrzewany�
W przypadku pieczeni zaleca się wlanie na dno naczynia niewielkiej ilości bulionu, aby nieco zwilżyć mięso i dodać mu smaku� Gdy pieczeń jest już gotowa, zostawić ją w piekarniku na ok� 10–15 min lub zawinąć w folię aluminiową�Jeśli mięso jest zbyt chude, należy dodać trochę płynu, skropić je tłuszczem lub przykryć go paskami boczku, na przykład�Jeśli chodzi o obracanie pieczeni, należy upewnić się, że umieszczona jest najpierw skórką do dołu�
Przepis Nagrzewa-nie Temperatura (°C) Czas gotowania (min.) Poziom i akcesoria
Kotlety wieprzowe z chrupiącą skórką 2 kg - 170 110 - 150 2
TERMOOBIEG ECOZaleca się korzystanie z poziomu 3� Nie trzeba wstępnie nagrzewać piekarnika�
Przepis Nagrzewa-nie Temperatura (°C) Czas gotowania (min.) Poziom i akcesoria
Nadziewane i pieczone kawałki mięsa - 200 80 - 120 * 3
Plastry mięsa (królik, kurczak, jagnięcina) - 200 50 - 100 * 3
* Szacowany czas: Potrawy można wyjmować z piekarnika w różnym czasie, w zależności od indywidualnych preferencji.
WYRASTANIEZleca się przykrycie ciasta wilgotną ściereczką przed umieszczeniem w piekarniku� Czas wyrastania przy użyciu tej funkcji jest krótszy o ok� jedną trzecią w porównaniu z czasem wyrastania w temperaturze pokojowej (20–25°C)�
Czas wyrastania 1 kg ciasta na pizzę to ok� jedna godzina�
UTRZYMANIE CIEPŁAFunkcja utrzymania ciepła pozwala na utrzymanie ciepła gotowych posiłków� Zapobiega to tworzeniu się wilgoci i eliminuje potrzebę czyszczenia komory gotowania�
Zaleca się utrzymywanie w cieple gotowych potraw przez ponad 2 godziny�Należy pamiętać, że niektóre potrawy nadal gotują się, gdy są utrzymywane w cieple: w razie potrzeby należy je przykryć, aby zapobiec wysuszeniu�
ROZMRAŻANIEPotrawy gotowane, gulasze i sosy mięsne rozmrożą się lepiej, gdy je czasami zamieszamy� Należy oddzielać kawałki potraw, gdy zaczynają się rozmrażać: rozdzielone części rozmrożą się szybciej�

158
TABELA GOTOWANIA COOKASSIST
Przepis Sugerowana ilośćWyłączyć
(czas goto-wania)
Poziom i akcesoria
Zapiekanki/Makarony pieczone
Świeża Lazania 500 - 3000 g - 2
Mrożona lazania 500 - 3000 g - 2
Ryż i zboża
Ryż
Ryż biały 100 - 500 g - 2 1
Ryż brązowy 100 - 500 g - 2 1
Ryż pełnoziarnisty 100 - 500 g — 2 1
Ziarna i zboża
Quinoa 100 - 300 g - 2 1
Proso 100 - 300 g - 2 1
Pszenica orkisz 100 - 300 g - 2 1
Jęczmień 100 - 300 g - 2 1
Mięso
WołowinaPieczeń wołowa 600 - 2000 g - 3
Hamburger 1,5 - 3 cm 3/5 5
WieprzowinaWieprzowina 600 - 2500 g - 3
Żeberka wieprzowe jeden ruszt 2/3 5 4
Pieczony kurczakPieczony kurczak 600 - 3000 g - 2
Filet / Pierś z kurczaka 1 - 5 cm 2/3 5
Mięso gotowane na parze Filety z kurczaka 1 - 5 cm - 2 1
Filety z indyka 1 - 5 cm - 2 1
Dania mięsneKebab jeden ruszt 1/2 5 4
Kiełbasy i parówki 1,5 - 4 cm 2/3 5 4
AKCESORIARuszt Taca lub forma do ciasta
na ruszcie
Blacha na ściekający tłuszcz / Blacha do
pieczenia lub taca na ruszcie
Blacha na ściekający tłuszcz / blacha do
pieczenia
Blacha na ściekający tłuszcz
napełniona 500 ml wody

PL
159
Przepis Sugerowana ilośćWyłączyć
(czas goto-wania)
Poziom i akcesoria
Ryby i owoce morza
Pieczone filety i stekiFilety rybne/kawałki 0,5 - 2,5 cm - 5
Mrożone filety 0,5 - 2,5 cm - 4
Filety i steki gotowane na parze Filety rybne/kawałki 0,5 - 2,5 cm - 2 1
Mrożone filety 0,5 - 2,5 cm - 2 1
Owoce morza grillowane
Zapiekanka z przegrzebkami jedna taca - 4
Zapiekana z małżami jedna taca - 4
Krewetki jedna taca - 4 3
Krewetki koktajlowe jedna taca - 4 3
Owoce morza gotowane na parze
Zapiekane prze-grzebki 500 - 1000 g - 2 1
Małże 500 - 3000 g - 2 1
Krewetki 100-1000 g - 2 1
Krewetki koktajlowe 500 - 1500 g - 2 1
Kalmary 100 - 500 g — 2 1
Ośmiorniczki 500 - 2000 g - 2 1
Warzywa
Pieczone warzywa
Ziemniaki - świeże 500 - 1500 g - 3
Warzywa faszerowa-ne 100 - 500 g - 3
Inne warzywa 500 - 1500 g - 3
Zapiekane warzywa
Ziemniaki jedna taca - 3
Pomidory jedna taca - 3
Papryka jedna taca - 3
Brokuły jedna taca - 3
Kalafior jedna taca - 3
Inne jedna taca - 3
Świeże warzywa gotowane na parze
Ziemniaki całe 50 - 500 g - 2 1
Ziemniaki małe / kawałki jedna taca - 2 1
Groszek 200 - 2500 g - 2 1
Brokuły 200 - 3000 g - 2 1
Kalafior 200 - 3000 g - 2 1
Mrożone warzywa gotowane na parze Groszek 200 - 3000 g - 2 1
Owoce Owoce gotowane na parzeW całości 100 - 400 g - 2 1
Kawałki 500 - 3000 g - 2 1

160
Przepis Sugerowana ilośćWyłączyć
(czas goto-wania)
Poziom i akcesoria
Ciasta i pieczy-wo słodkie
Biszkopt w blasze 500 - 1200 g - 2
Ciasteczka 200 - 600 g - 3
Rogaliki jedna taca * - 3
Ciasto ptysiowe jedna taca * - 3
Tarta w blasze jedna taca - 3
Strudel 400 - 1600 g - 3
Ciasto z owocami 500 - 2000 g - 2
Słone ciasta 800 - 1200 g - 2
Chleb
Bułki 60 - 150 g na sztukę - 3
Bochenek kanapkowy w formie 400 - 600 g na każde - 2
Chleb duży 700 - 2000 g - 2
Bagietki 200 - 300 g na sztukę — 3
Pizza
Mrożone 1 - 4 poziomy * -
2
4 1
5 3 1
5 4 2 1
Cienkie ciasto okrągła - taca * - 2
Grube ciasto okrągła - taca * - 2
AKCESORIARuszt
Taca lub forma do ciasta
na ruszcie
Blacha na ściekający tłuszcz / Blacha do
pieczenia lub taca na ruszcie
Blacha na ściekający tłuszcz / Blacha do
pieczenia
Blacha na ściekający tłuszcz
napełniona 500 ml wody
Taca do gotowania na parze

PL
161
CZYSZCZENIE I KONSERWACJAPrzed przystąpieniem do jakichkolwiek czynności serwisowych lub czyszczenia upewnić się, że piekarnik ostygł.Nie stosować urządzeń czyszczących parą.
Nie stosować wełny szklanej, szorstkich gąbek lub ściernych/żrących środków do czyszczenia, ponieważ mogą one uszkodzić powierzchnie urządzenia.Używać rękawic ochronnych.
Przed przystąpieniem do jakichkolwiek czynności serwisowych upewnić się, że piekarnik został odłączony od zasilania.
POWIERZCHNIE ZEWNĘTRZNE• Powierzchnie należy czyścić wilgotną ściereczką z
mikrofibry� Jeśli są silnie zabrudzone, dodać kilka kropel detergentu o neutralnym pH� Wytrzeć do sucha ściereczką�
• Nie stosować żrących ani ściernych detergentów� Jeśli tego rodzaju substancje zostały przypadkowo rozprowadzone po powierzchni urządzenia, należy natychmiast je usunąć za pomocą wilgotnej ściereczki z mikrofibry�
POWIERZCHNIE WEWNĘTRZNE• Po każdym użyciu pozostawić piekarnik do schłodzenia, a
następnie oczyścić, najlepiej jeżeli urządzenie jest jeszcze ciepłe i usunąć resztki jedzenia lub plamy� Aby usunąć wilgoć zgromadzoną podczas pieczenia produktów o dużej zawartości wody, pozostawić piekarnik do całkowitego schłodzenia, a następnie osuszyć szmatką lub gąbką�
• Uruchomić funkcję „Samoczyszczenie” w celu optymalnego oczyszczenia wewnętrznych powierzchni urządzenia�
• Wyczyścić szybę drzwiczek odpowiednim płynem do mycia�
• Aby ułatwić sobie czyszczenie piekarnika, można zdemontować drzwiczki�
AKCESORIA• Po każdym użyciu zanurzyć akcesoria w wodzie z
dodatkiem płynu do mycia naczyń� Jeśli akcesoria są jeszcze gorące, do przenoszenia założyć rękawice kuchenne� Resztki żywności można usunąć za pomocą szczotki do mycia naczyń lub gąbki�
ZBIORNIKAby piekarnik zawsze pracował z optymalną wydajnością i aby zapobiegać nagromadzaniu się osadów kamienia, zaleca się regularne stosowanie funkcji „Opróżnianie” i „Odkamienianie”� Po długim okresie nieużywania funkcji przyrządzania na parze Steam, zaleca się włączenie cyklu przyrządzania na parze przy pustym piekarniku, przy całkowitym napełnieniu zbiornika�
ZDEJMOWANIE I ZAKŁADANIE DRZWICZEK• Aby zdjąć drzwiczki, należy je całkowicie otworzyć i
odblokować, opuszczając zaczepy�
•
b
a
Przymknąć drzwiczki, tak dokładnie, jak to możliwe� Mocno przytrzymać drzwiczki obiema rękami – nie trzymać ich za uchwyt� Można teraz łatwo zdjąć drzwiczki, dociskając je przez cały czas i jednocześnie wyciągając do góry, aż wysuną się z miejsc zamocowania� Odłożyć drzwiczki na bok, umieszczając je na miękkim podłożu�
a
b
~15°
Założyć drzwiczki , przysuwając je w stronę piekarnika, wyrównując haki zawiasów z miejscami ich zamocowania i blokując górną część na swoim miejscu�• Opuścić drzwiczki, a następnie całkowicie je otworzyć�
Opuścić zaczepy do ich pierwotnego położenia: Upewnić się, czy zostały opuszczone do końca�
b
a
Delikatnie nacisnąć, aby sprawdzić, czy położenie zaczepów jest prawidłowe�
•
“CLICK”
Spróbować zamknąć drzwiczki i sprawdzić, czy ich położenie jest wyrównane z panelem sterowania� W przeciwnym wypadku powtórzyć wyżej opisane czynności: Drzwiczki mogą ulec zniszczeniu, jeśli nie działają prawidłowo�

162
WYMIANA LAMPY1� Odłączyć piekarnik od zasilania�2� Wyjąć prowadnice półek�3� Zdjąć osłonę lampy�4� Wymienić lampę�5� Zamontować osłonę lampy, dociskając ją mocno,
aż zatrzaśnie się na miejscu�6� Włożyć z powrotem prowadnice półek�7� Ponownie podłączyć piekarnik do zasilania�
Uwaga: Stosować tylko żarówki halogenowe o mocy 20-40 W/230 V typ G9, T300°C. Żarówka stosowana w tym piekarniku jest przeznaczona do urządzeń domowych i nie nadaje się do ogólnego oświetlania pomieszczeń w gospodarstwie domowym (dyrektywa WE 244/2009). Żarówki można kupić w autoryzowanym serwisie.
Jeśli używa się żarówek halogenowych, nie wolno dotykać ich gołymi rękoma – ślady palców pozostawione na powierzchni mogą doprowadzić do uszkodzenia żarówek. Nie używać piekarnika, dopóki osłona lampy nie zostanie ponownie zamontowana.

PL
163
001
USUWANIE USTEREKProblem Możliwa przyczyna Rozwiązanie
Piekarnik nie działa�Awaria zasilania�Urządzenie odłączone od zasilania�
Sprawdzić, czy działa zasilanie sieci elektrycznej i czy piekarnik jest prawidłowo podłączony do sieci elektrycznej�Wyłączyć piekarnik i uruchomić go ponownie, aby sprawdzić czy usterka nadal występuje�
Wyświetlacz pokazuje literę „F”, po której następuje liczba lub litera�
Awaria piekarnika�
Skontaktować się z najbliższym Biurem Obsługi Klienta i podać numer następujący po literze „F”�Nacisnąć , dotknąć , a następnie wybrać „Factory Reset”� Wszystkie zapisane ustawienia użytkownika zostają anulowane�
Zasilanie w domu zostaje wyłączone� Błąd ustawień poboru mocy�
Sprawdzić, czy pobór mocy domowej sieć elektrycznej ma wartość nie mniejszą niż 3 kW� W przeciwnym wypadku zmniejszyć moc do 13 amperów� Aby to zmienić, nacisnąć , wybrać “Więcej trybów” i następnieWybrać “Moc”�
Ta funkcja nie jest dostępna w tryb demonstracyjny�
Tryb demonstracyjny jest uruchomiony�
Nacisnąć , dotknąć „Info” i wybrać „DEMO SKLEPOWE”,aby wyjść�
Nie można otworzyć drzwiczek�
Wykonywany jest cykl czyszczenia�
Poczekać, aż wykonywanie funkcji zostanie zakończone i piekarnik ostygnie�
Para wydostaje się z szuflady podczas gotowania�
Niski poziom wody w zbiorniku� Dodać szklankę wody pitnej�
WSPARCIE TECHNICZNEW przypadku wszelkich problemów z działaniem należy skontaktować się z Centrum Obsługi Technicznej Franke� Nigdy nie należy korzystać z usług nieautoryzowanych techników� Należy podać: - typ usterki - model urządzenia (art�/kod) - numer seryjny (S�N�) na tabliczce znamionowej, umieszczonej na prawej krawędzi komory piekarnika (widoczny po otwarciu drzwiczek piekarnika)�
Kontaktując się z naszym Centrum Serwisowym, prosimy o podanie kodów znajdujących się na tabliczce znamionowej Państwa produktu�
XXXXXX XXXXXX XXXXX XXXXXXXModel: xxxXXXXxx XXXXXXXXXX
XXXXXX
XXXXXXXXXX
XXXXXXXXXXXXXXXXXXXXXXXXXXXXXX XXXXXXXXXX

400011453087/B
www.franke.com
EN DE FR IT ES PT PL