manual.pdf - Document Creator
174
Document Creator Document Creator is an add-on for developing report layouts in Microsoft Dynamics 365 Business Central. It makes report layouts easy to edit, saving a lot of time on report development. By the intuitive report designer and separation of code and layout, also end-users without technical knowledge can make changes to report layouts. Document Creator includes an easy-to-use standalone report designer (based on proven technology, used since 1998, in >50 countries, by >20K users) enhanced with various features tailored to support natural and efficient report development for Dynamics 365 Business Central. The report designer is rich in functionality, think of the following features: Easily add fields and controls via drag & drop, Generate barcodes from a field/expression, with support for a large number of barcode types (including, but not limited to, Code39/93/128, EAN-8/13/128, UPC-A/E0/E1 and QR codes) Preview changes directly with data from Dynamics 365 Business Central, Export to various output file formats (including PDF, Word, Excel), Render HTML embedded in Text-objects, Use advanced controls, including Scalable Vector Graphics (SVG), Subreports, Shapes, Charts and Rich Text. With the Document Creator Dataset Extensions feature it is possible to add columns, labels and data items directly from the client. No need to develop any report(extension) objects just to add fields to existing reports. Document Creator includes a Report Translations feature which supports the development of multilingual reports adding translations as data. Running reports that utilize this feature will automatically populate the translation table with new records for missing translations. Report translations can be flexibly edited by end-users on the Document Creator Translations page. On top of that, Document Creator Export Profiles can be used to fine-tune export settings for reports with a Document Creator layout. Export reports as interactive PDF forms, change the quality of images and vector graphics, or apply PDF stationeries or appendices to your PDF documents. Watch the video and discover all the benefits of Document Creator in just 10 minutes! Learn more about how to install and use Document Creator: Installation Manual User Manual • • • • • • • • Installation & User Manual Document Creator
-
Upload
khangminh22 -
Category
Documents
-
view
3 -
download
0
Transcript of manual.pdf - Document Creator
Document Creator
Document Creator is an add-on for developing report layouts in Microsoft Dynamics 365 Business Central. It
makes report layouts easy to edit, saving a lot of time on report development. By the intuitive report designer and
separation of code and layout, also end-users without technical knowledge can make changes to report layouts.
Document Creator includes an easy-to-use standalone report designer (based on proven technology, used since
1998, in >50 countries, by >20K users) enhanced with various features tailored to support natural and efficient
report development for Dynamics 365 Business Central. The report designer is rich in functionality, think of the
following features:
Easily add fields and controls via drag & drop,
Generate barcodes from a field/expression, with support for a large number of barcode types (including, but
not limited to, Code39/93/128, EAN-8/13/128, UPC-A/E0/E1 and QR codes)
Preview changes directly with data from Dynamics 365 Business Central,
Export to various output file formats (including PDF, Word, Excel),
Render HTML embedded in Text-objects,
Use advanced controls, including Scalable Vector Graphics (SVG), Subreports, Shapes, Charts and Rich Text.
With the Document Creator Dataset Extensions feature it is possible to add columns, labels and data items
directly from the client. No need to develop any report(extension) objects just to add fields to existing reports.
Document Creator includes a Report Translations feature which supports the development of multilingual reports
adding translations as data. Running reports that utilize this feature will automatically populate the translation
table with new records for missing translations. Report translations can be flexibly edited by end-users on the
Document Creator Translations page.
On top of that, Document Creator Export Profiles can be used to fine-tune export settings for reports with a
Document Creator layout. Export reports as interactive PDF forms, change the quality of images and vector
graphics, or apply PDF stationeries or appendices to your PDF documents.
Watch the video and discover all the benefits of Document Creator in just 10 minutes!
Learn more about how to install and use Document Creator:
Installation Manual
User Manual
•
•
•
•
•
•
•
•
Installation & User Manual Document Creator

Installation & User Manual
Changelog
"Document Creator" App
2.0.0 (2022-03-25) - App
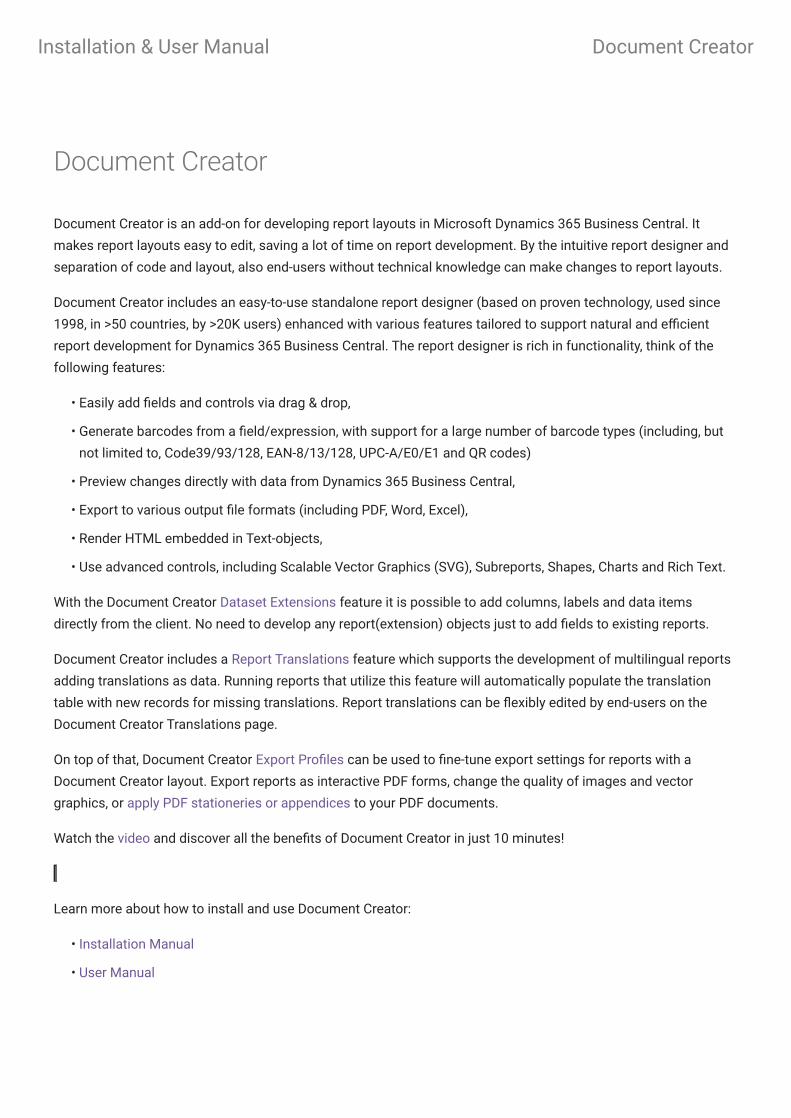
Major release compatible with the major revisions to reporting in the Microsoft Dynamics 365 Business
Central 2022 release wave 1 release (April 1st, 2022, version 20.0)
All features are now available on the new Report Layouts page.
Document Creator report layouts have "Layout Format" External and "MIME Type" reportlayout/dcrx .
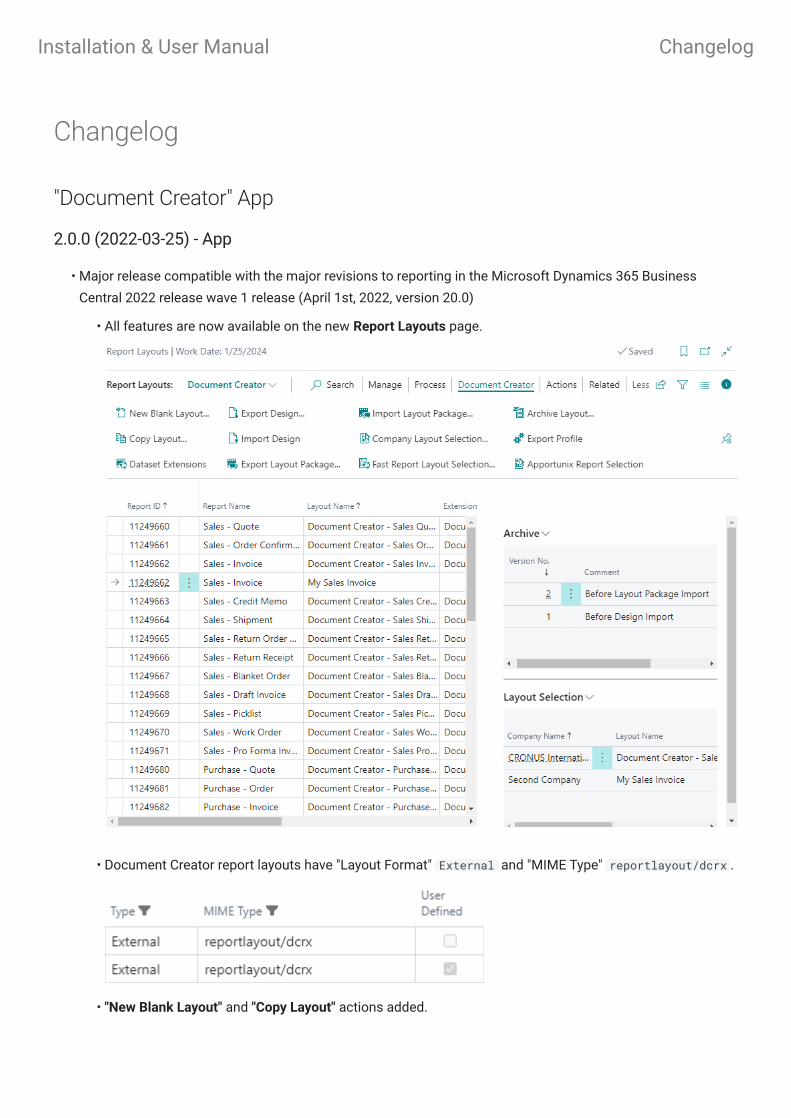
"New Blank Layout" and "Copy Layout" actions added.
•
•
•
•
Installation & User Manual Changelog
Layout packages support the new system report layout tables, but also allow export and import to/from
older BC/Document Creator versions.
Conversion from Custom Report Layouts to Tenant Report Layouts (manually from the Custom Report
Layouts page and automatically when upgrading from a previous version of Document Creator)
Legacy features hidden by default, can be made visible again with setting Show Legacy Controls on the
Document Creator Setup, but note that these are useless as the platform does not support the old events
anymore unless the EnableReportLegacyWordRender setting is enabled on the BC server instance (which
is only possible in an on-premise installation)
Updated permission sets
Updated translations of the Document Creator app
Updated manual
Included document report objects in the Document Creator app including built-in/extension-provided, default
(Document Creator) layouts.
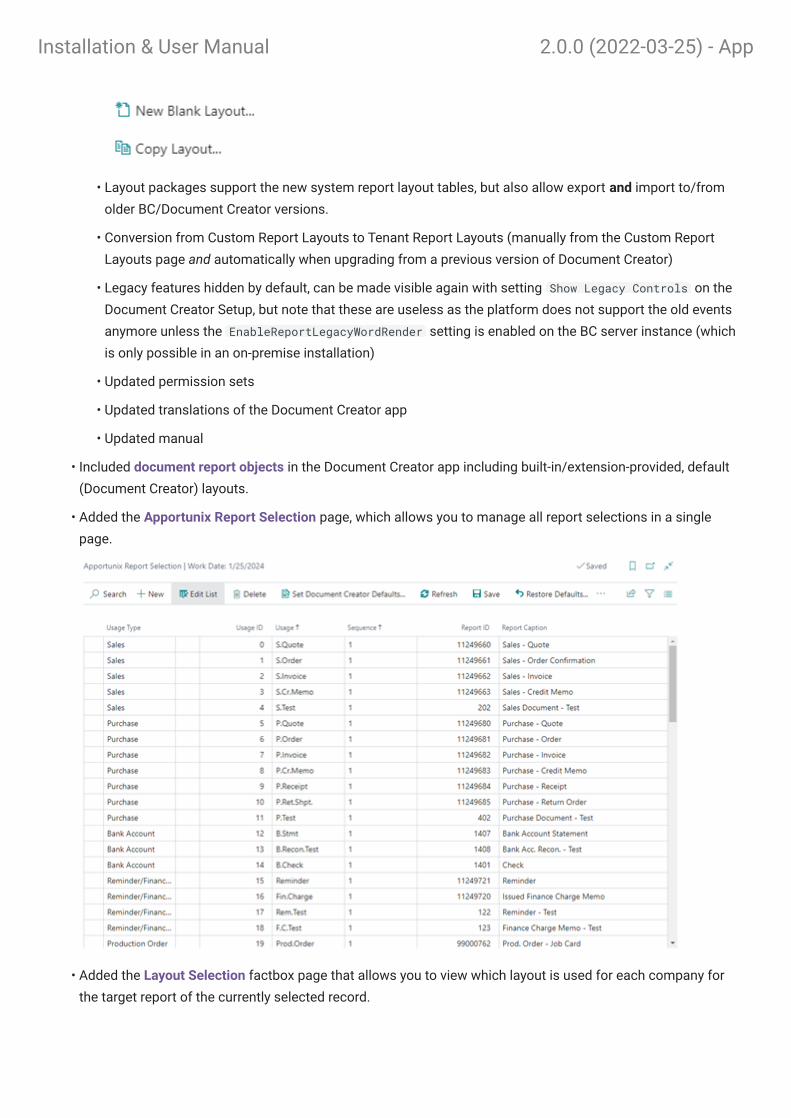
Added the Apportunix Report Selection page, which allows you to manage all report selections in a single
page.
Added the Layout Selection factbox page that allows you to view which layout is used for each company for
the target report of the currently selected record.
•
•
•
•
•
•
•
•
•
Installation & User Manual 2.0.0 (2022-03-25) - App
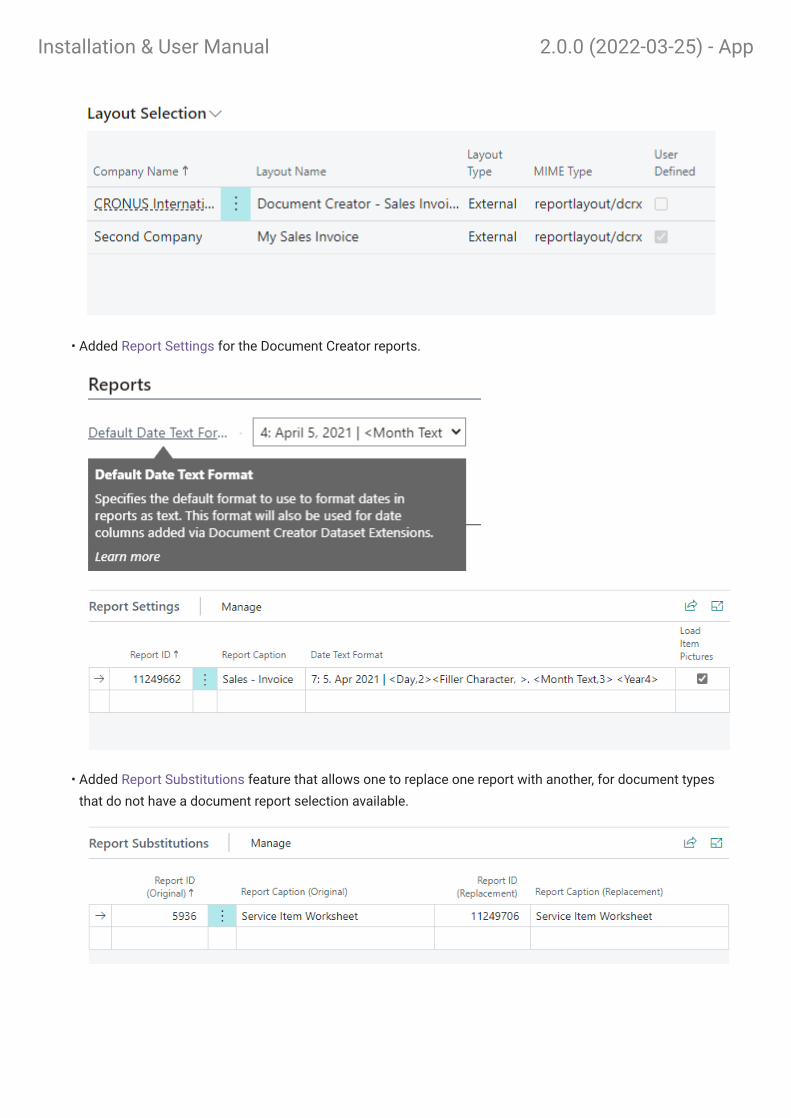
Added Report Settings for the Document Creator reports.
Added Report Substitutions feature that allows one to replace one report with another, for document types
that do not have a document report selection available.
•
•
Installation & User Manual 2.0.0 (2022-03-25) - App

1.44.0 (2022-02-18) - App
Added support for company-specific PDF merges (e.g., stationeries, attachments per company)
Added Include Individual Layout Files setting to the Document Creator Setup page. When enabled exported
layout packages will also include the individual .dcrx Document Creator layout files in the archive. (Disabled
by default)
Added confirmation dialog for overwriting dataset extension on import.
Different default file name for dataset extension XML export if only 1 dataset extension is selected (include
report ID + caption).
Resolved infinite recursion if node name in dataset extension was empty (which could only happen through
an (erronous) export/import).
Skip dataset extensions in export/import if essential fields are missing.
Generate different default file name for Layout Packages if only 1 report layout is selected (include report ID +
caption).
Added Document Creator Setup Wizard to search.
Added Open Setup Wizard action to the Document Creator Setup page.
Changed image for the Download Designer action.
•
•
•
•
•
•
•
•
•
•
Installation & User Manual 1.44.0 (2022-02-18) - App

Fixed video link in Assisted Setup to use an embed video link.
1.42.0 (2022-01-14) - App
Added Export Dataset... action to all Dataset Extensions pages to generate a report dataset and export it to
an XML file.
Added a Custom Report Layouts action to Custom Columns/Labels/Data Items pages to view or edit the
Document Creator layouts for the report.
Added an Enum Inspector action to the Dataset Extensions "Filter Set" page to lookup members for enum
table fields and view their ordinals, names and captions.
i. Invoke the Enum Inspector action:
ii. Select the enum table field for which you want to view the members and choose OK.
•
•
•
•
Installation & User Manual 1.42.0 (2022-01-14) - App

iii. The members of the enum will be shown in a list page.
Added Run Report action to the Document Creator Report Dataset Extensions page.
Added an Export Profile action to the Custom Report Layouts page.
Set Scope = Repeater for various page actions.
Fixed issue in Dataset Extension feature where a thousands separator was used for decimals which is not
handled well for some user regions.
Fix: Made sure that the PDF Merge feature also works in combination with the "Document Creator On-
Premise" app.
•
•
•
•
•
Installation & User Manual 1.42.0 (2022-01-14) - App
1.40.0 (2022-01-11) - App
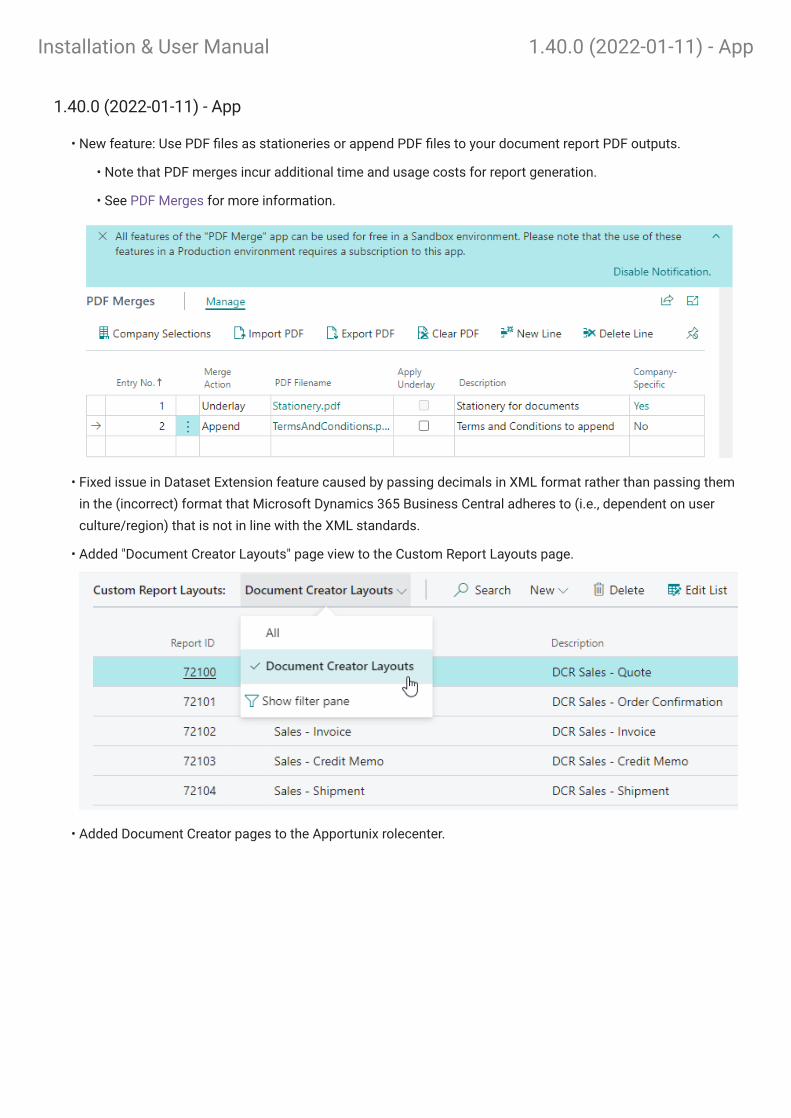
New feature: Use PDF files as stationeries or append PDF files to your document report PDF outputs.
Note that PDF merges incur additional time and usage costs for report generation.
See PDF Merges for more information.
Fixed issue in Dataset Extension feature caused by passing decimals in XML format rather than passing them
in the (incorrect) format that Microsoft Dynamics 365 Business Central adheres to (i.e., dependent on user
culture/region) that is not in line with the XML standards.
Added "Document Creator Layouts" page view to the Custom Report Layouts page.
Added Document Creator pages to the Apportunix rolecenter.
•
•
•
•
•
•
Installation & User Manual 1.40.0 (2022-01-11) - App
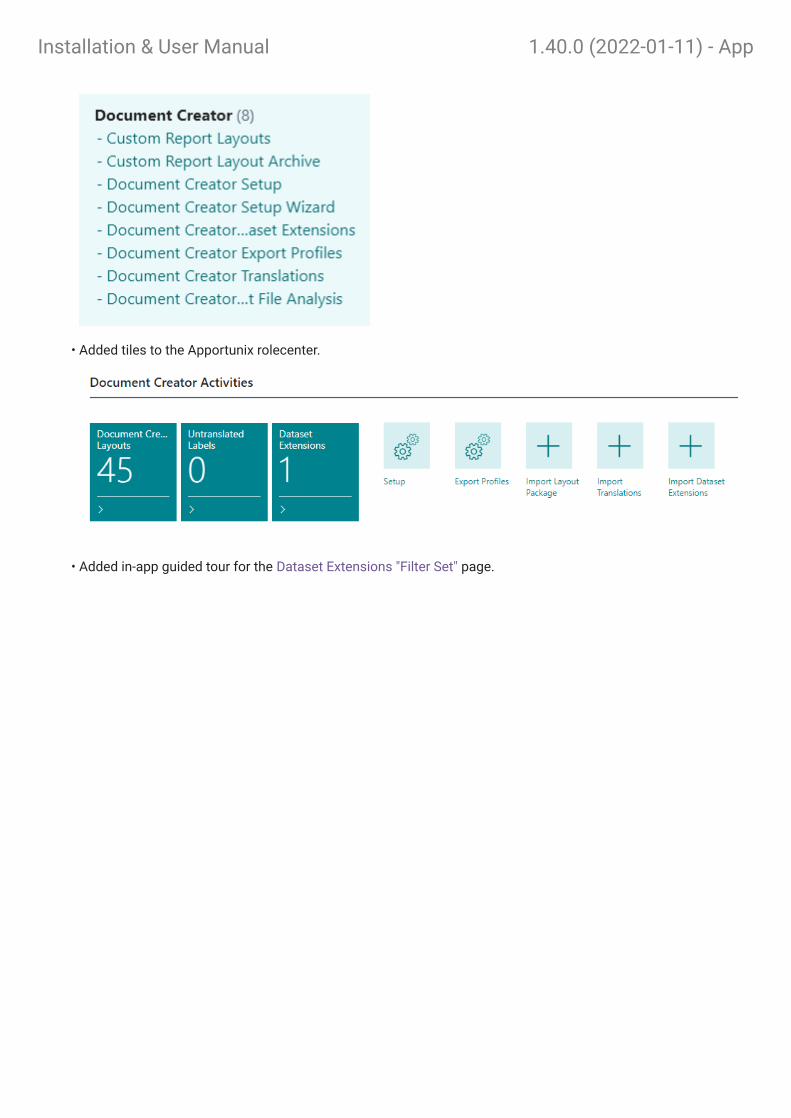
Added tiles to the Apportunix rolecenter.
Added in-app guided tour for the Dataset Extensions "Filter Set" page.
•
•
Installation & User Manual 1.40.0 (2022-01-11) - App

Use new AL-defined permission set WSB_DCR (with automatic data upgrade/migration).
Updated code for Dynamics 365 Business Central 2021 wave 2 (e.g., resolved deprecation warnings).
The app now takes a dependency on the "System Library", "Monet" and "PDF Merge" app to offer the
newly added features.
•
•
•
Installation & User Manual 1.40.0 (2022-01-11) - App
1.36.0 (2021-11-18) - App
Added parameter pCduTempBlobOutputDoc: Codeunit "Temp Blob" to event
wgEvpReportExecution_OnAfterSendReportRequest that allows one to get the output document from
Document Creator.
1.34.0 (2021-11-03) - App
Added various new event publishers to the app to hook into report execution (found in codeunit
wDCR_Publishers ).
Added various new event publishers to customize file names, hook into the custom report layout archive
functions and fast report layout selection.
Marked various objects and procedures with ObsoleteState=Pending .
1.30.0 (2021-08-23) - App
New feature: Linking custom data items/columns to other custom columns in report dataset extensions. You
can now go multiple levels deep with adding new columns and data items, now allowing you to include
custom columns in filters.
Shifted Document Creator Report Dataset Extensions to DataPerCompany=false . An upgrade option is
available from a notification in the role center and the Document Creator Report Dataset Extensions page.
Added Assisted Setup entry with Document Creator Setup Wizard.
Added field "Custom Node Count" to Filter Sets to allow you to check the number of custom nodes the filter
set is being used by.
Added "Test Filters" action that checks if your filters are incomplete or otherwise invalid. This same check is
now also performed when reports are run, and if any errors are detected in the filters, then report execution
will be aborted.
Implemented Restrictions in filter sets.
It is now possible to Cast boolean-, date- and option-/enum-fields for custom columns to different datatypes,
e.g., use the caption of an option/enum or its numeric (integer) value. The translation for the column is based
on the language specified through the "Language Code" column (which applies to all custom columns of the
data item).
The lookup for a filter's "Value Column" is now filtered on data type (by default).
Fix for "Export Design" (without data) not working when dataset extensions exist for the report.
Added "Remove Missing Datasources" setup field, to specify whether datasources and their relations should
be removed automatically when the corresponding data items are removed from the report (Default: true).
Updated XmlPort for importing/exporting translations to allow for note and context tags in trans-units.
Updated telemetry for full + device user count.
•
•
•
•
•
•
•
•
•
•
•
•
•
•
•
•
Installation & User Manual 1.36.0 (2021-11-18) - App

1.28.0 (2021-05-14) - App
New feature: Export / Import Document Creator translations to/from XLIFF translation files.
Fixes for Document Creator Report Dataset Extensions features:
Blob fields should be calculated.
Boolean fields should be formatted in XML format.
Apportunix logo
1.26.0 (2021-03-22) - App
New feature: Document Creator Report Dataset Extensions!
Add your own columns, translatable labels and data items to reports from within your Business Central client
without any report(extension) development!
For more information, see: Dataset Extensions
Changed permission set description to "Apportunix Document Creator".
1.24.0 (2021-02-01) - App
The Document Creator Setup now includes a new Fall Back on Default Language setting. When this setting is
enabled, Document Creator will fall back on the translation for the configured default language code if a
translation for a language could not be found.
The Export Design action now remembers report request page settings.
The Document Creator extension can now also be used in Sandbox Docker containers without a product key.
The Document Creator app now has a transparent logo.
•
•
•
•
•
•
•
•
•
•
•
Installation & User Manual 1.28.0 (2021-05-14) - App

Fix: Show warning about Translation Update Usage setting only once.
1.20.0 (2020-08-28) - App
Rebranding to Apportunix
Enable Cloud Printers
1.18.0 (2020-05-28) - App
Added new Document Creator Export Profile settings:
PDF - New PDF-Compliance option: PDF/A-1a
Word - Print Optimized; Do not expand shift return
Excel - Print Optimized; Split Pages; Font Scale; Print Scaling
1.16.0 (2020-03-23) - App
Updates to target application 16.0 (Dynamics 365 Business Central 2020 release Wave 1)
Added action "Check License" to Document Creator Setup page for Production environments
On-premise only: License check now also reports mismatch of the active and licensed BC Serial No.
1.12.0 (2020-02-14) - App
The demo/trial version is now active in Sandbox environments, also without a product key. Reports generated
from a Sandbox environment will have a DEMO watermark.
A new setting "Format Locale" is available on the Document Creator Setup page. With this setting you can
specify regional settings, such as date and numeric format, that Document Creator should use.
Show a message to on-premise users to inform about the requirement to install the additional "Document
Creator On-Premise" extension for on-premise usage.
1.10.0 (2019-12-13) - App
When a Product Key is entered on the Document Creator Setup page, new-lines and spaces are stripped from
the entered string.
Overriding report actions via a Document Creator Export Profile has been deprecated and removed.
1.8.0 (2019-11-28) - App
Initial public release.
•
•
•
•
•
•
•
•
•
•
•
•
•
•
•
•
Installation & User Manual 1.20.0 (2020-08-28) - App

"Document Creator On-Premise" App
1.40.0 (2022-02-18) - OnPrem
Dataset extensions are also applied for direct printing.
1.38.0 (2022-01-14) - OnPrem
Added "Export Design" action to RDLC Report Layout Conversion page.
Added add-in installation notification to the Custom Report Layouts page as well.
Moved to permission set extension for WSB_DCR AL-defined permission set.
Apportunix rolecenter extensions:
"Document Creator Redirect Printer List"
"RDLC Report Layout Conversion"
1.36.0 (2021-11-18) - OnPrem
Added new event wgEvpReportExecutionOnPrem_OnBeforeHandlePrintReport to "Document Creator On-
Premise" to hook into direct printing.
Updated permission set for "Document Creator On-Premise"
Updated message for failed license check for "Document Creator On-Premise"
1.34.0 (2021-11-03) - OnPrem
Change how Database Name is retrieved for on-premise to address issue with importing/exporting layout
packages when working with an AzureSQL server database.
Fixed online license check for on-premise installations.
1.32.0 (2021-10-11) - OnPrem
New enhancement/feature for on-premise direct printing: Redirect Printers
1.30.0 (2021-08-23) - OnPrem
A notification is displayed if the Document Creator Control Add-In still needs to be installed. You can invoke
the installation from the notification.
•
•
•
•
•
•
•
•
•
•
•
•
•
•
Installation & User Manual "Document Creator On-Premise" App

1.24.0 (2021-02-01) - OnPrem
The columns in the dataset (e.g., Date-columns) use the culture that corresponds with the user's region that is
configured in his/her Business Central settings. When a report is generated we are now passing this data
culture along.
The way fields are formatted (e.g., using "," vs. ".") on layouts is determined by the culture of the server. The
Format Locale setting is now also available/visible and used for On-Premise so this can also be set to a
different culture without changing the server's culture settings.
Fix: "E-mail Product Updates" not sent to the API in Document Creator On-Premise for BC15 and up.
1.20.0 (2020-08-28) - OnPrem
Rebranding to Apportunix
Enable On-Premise Direct Printing
On-premise demo version: Do not show BC license mismatch warning
1.16.0 (2020-03-23) - OnPrem
License check now also reports mismatch of the active and licensed BC Serial No.
1.12.0 (2020-02-14) - OnPrem
Show a notification to on-premise users to inform about the requirement to install the additional "Document
Creator On-Premise" extension for on-premise usage.
1.8.0 (2019-11-28) - OnPrem
Initial public release.
Report Engine / Designer
1.31.0 (2022-04-05) - Engine
Added support for HTML-exports to the API
Improved report rendering error messages by including the expression text in the message.
Uprade to ASP.NET 6 and EF6
1.30.0 (2021-11-16) - Engine
On-Premise: By default use the default printer settings instead of the printer settings as defined in the layout.
•
•
•
•
•
•
•
•
•
•
•
•
•
Installation & User Manual 1.24.0 (2021-02-01) - OnPrem

1.29.0 (2021-07-28) - Engine
Automatically remove missing datasources by default
Make file-access errors more user-friendly
Show Design File Name in the window title bar
Data View Form: Subscribe to SizeChanged event at the end of the constructor to prevent potential resize
issue.
1.28.0 (2021-05-14) - Engine
Apportunix Logo
1.27.0 (2021-03-22) - Engine
Document Creator Design (.dcrd) files are updated immediately after the user hits 'Save' (Save button, or Ctrl +
S).
1.26.0 (2021-02-26) - Engine
Time out has been increased to 60 seconds.
1.25.0 (2021-02-15) - Engine
Data Culture and Formatting Culture added as properties for On-Premise.
1.24.0 (2021-02-11) - Engine
Rebranding to Apportunix.
1.23.0 (2021-01-14) - Engine
The standalone designer now has the option to start a free (14-day) trial:
•
•
•
•
•
•
•
•
•
•
Installation & User Manual 1.29.0 (2021-07-28) - Engine
1.22.0 (2020-12-11) - Engine
The standalone designer now offers the following two commands:
Save As... - Save the design file (.dcrd) to a different location.
Export Layout As... - Save the layout file, as .dcrx (default) or .frx file, to a different location.
Cosmetic fix: The open file dialog now shows *.dcrd as the default file name.
The 'Watermark' class is marked as Serializable to prevent issues when it is used in codebehind.
•
•
•
•
•
Installation & User Manual 1.22.0 (2020-12-11) - Engine

1.20.0 (2020-08-28) - Engine
Updated base report engine to 2020.3.0
Fixed issue with changing color of object via dropdown
1.19.0 (2020-06-04) - Engine
Fixed issue with VisibleExpression not always working due to serialization issue (SaaS)
1.18.0 (2020-05-28) - Engine
Updated base report engine to 2020.2.13
Support for new PDF/Word/Excel export-settings
1.17.0 (2020-02-13) - Engine
Added a demo/trial version of the report engine that will produce reports with a DEMO watermark.
Added option to change the format culture that will be used by the report engine.
Fixed issue with the PrintOnBottom property not working as expected in some cases, e.g., in combination
with RepeatOnEveryPage property.
The standalone designer now properly refreshes datasources, relations and parameters and also sorts the
columns in alphabetical order again.
1.16.0 (2020-01-20) - Engine
Fixed an issue with decimals not being parsed correctly when reports were printed under a region with
decimal formatting different from the report engine server.
1.15.0 (2019-11-20) - Engine
Initial public release (for BC SaaS).
Templates
1.28.0 (2022-02-18) - Reports
Added Tracking Specification information of source documents to Warehouse Document reports, accounting
for partial shipments.
Added ItemLedgerEntryNo , QtyToHandleBase and QuantityHandledBase columns to reports
accordingly.
•
•
•
•
•
•
•
•
•
•
•
•
•
Installation & User Manual 1.20.0 (2020-08-28) - Engine

Added TotAmountInclVAT column to reports.
Added translated CompanyCountryRegionName column to reports.
Added PromisedDeliveryDate , RequestedDeliveryDate header columns to reports.
Added translated ItemDescription column to reports.
Fix for resetting ReverseChargeVATExists column.
Removed obsoleted procedures.
Sort columns, procedures and variables.
1.24.0 (2021-11-26) - Reports
Added primary key fields for all data items.
Updated for Business Central 2021 wave 2 (19.x)
Removed deprecated and deleted CrossReferenceNo columns.
Added CurrencyCode and CurrencySymbol columns to reports.
Added ReverseChargeVATExists column to Total dataitem in reports.
Added VATCalculationType as text and integer to various reports.
Obsoleted wlFncCalcVATAmountLines that had wrong scope.
1.22.0 (2021-10-11) - Reports
Added Tracking Specification for Header and Lines to Assembly Order and Posted Assembly Order report.
Changed DataPerCompany to false for "Document Creator Report Templates Setup" table. Schema Sync.
Mode "Force" required when updating from 1.20.0.
Updated setup manual.
1.20.0 (2021-09-23) - Reports
New report:
Job Quote
Added Custom Selections for "Job Quote" and "Service Item Worksheet" in "Document Creator Report
Templates Setup" page.
Show Lot/Serial No. defaults to true if no request page is used.
New columns added to reports related to VAT-handling (Positive, VATBusPostingGroup, VATCalculationType,
VATProdPostingGroup, lblIntraCommDeliveryText)
Always add VAT Amount Lines even if total VAT Amount is zero. Update filters and visible expressions in
layouts accordingly.
•
•
•
•
•
•
•
•
•
•
•
•
•
•
•
•
•
•
•
•
•
•
•
Installation & User Manual 1.24.0 (2021-11-26) - Reports

Add Tracking Spec. to Posted Warehouse Shipment report.
Date Text Format as enum with descriptive captions
Added "Document Creator Report Templates Setup" as Manual Setup entry.
1.18.0 (2021-08-23) - Reports
New report:
Sales Pro Forma Invoice
Draft Invoice without Document Type filter ( DocumentTypeNo added)
Company fields ((VAT) Registration No.) through dedicated procedures
VATPerc and VATClauseCode added to Lines
QtyToInvoice added to Lines
Removed unused variables
SourceDocumentAsNo + SourceSubtypeNo added to Whse. Docs
1.16.0 (2021-06-14) - Reports
New report:
Sales Work Order
Added new formatted Line Date text columns to all reports
Added LanguageId column to all reports
Added (Sales/Purch./Blanket) Order (Line) No. as column to reports
Added (Order) Quantity Shipped + Outstanding Quantity to Sales Shipment report
Added TrackingSpec dataitem (i.e., Serial + Lot Nos.) on Sales Return Order Confirmation and Sales Credit
Memo
1.14.0 (2021-04-06) - Reports
New reports:
Issued Fin. Charge Memo
Sales Blanket Order
Purchase Blanket Order
Transfer Order
Transfer Shipment
Transfer Receipt
•
•
•
•
•
•
•
•
•
•
•
•
•
•
•
•
•
•
•
•
•
•
•
•
•
Installation & User Manual 1.18.0 (2021-08-23) - Reports

Sales Order Pick Instruction (Sales Picklist)
Fix Purch. reports using Sales Comment Line
Fields Item Tariff No. and Country of Origin added to Shipment and Receipt reports
Fields Prepayment Order No. and Prepayment Invoice added
Moved PageFooter contents to CopyLoop_Footer in layouts
Updated translations
Changed to Apportunix logo
Added "Document Creator Report Templates Setup" page, which includes:
Action "Update Report Selections" to set all report selections to the Document Creator Template Reports.
Setting to enable loading item pictures in the reports.
Setting to change the header dates to a different format.
1.12.0 (2021-02-11) - Reports
Added Warehouse and Assembly Report Templates.
Added Contact Fields on all reports.
Misc. implementation enhancements.
1.10.0 (2020-11-06) - Reports
Added Service Report Templates.
Use a global procedure to determine the Date text-formatting that should be used for the date-columns in the
reports.
Resolved warnings from the latest AL compiler.
1.8.0 (2020-08-28) - Reports
Rebranding to Apportunix.
1.6.0 (2020-02-13) - Reports
Added a variety of columns and labels to the report objects.
Fixed an issue with the Format-property of the TotalAmountInclVAT TextObject.
Applied the LineHeightAuto property to a majority of the layout TextObjects.
•
•
•
•
•
•
•
•
•
•
•
•
•
•
•
•
•
•
•
•
•
Installation & User Manual 1.12.0 (2021-02-11) - Reports

1.4.0 (2019-10-22) - Reports
Initial public release.•
Installation & User Manual 1.4.0 (2019-10-22) - Reports
Installing the Extension
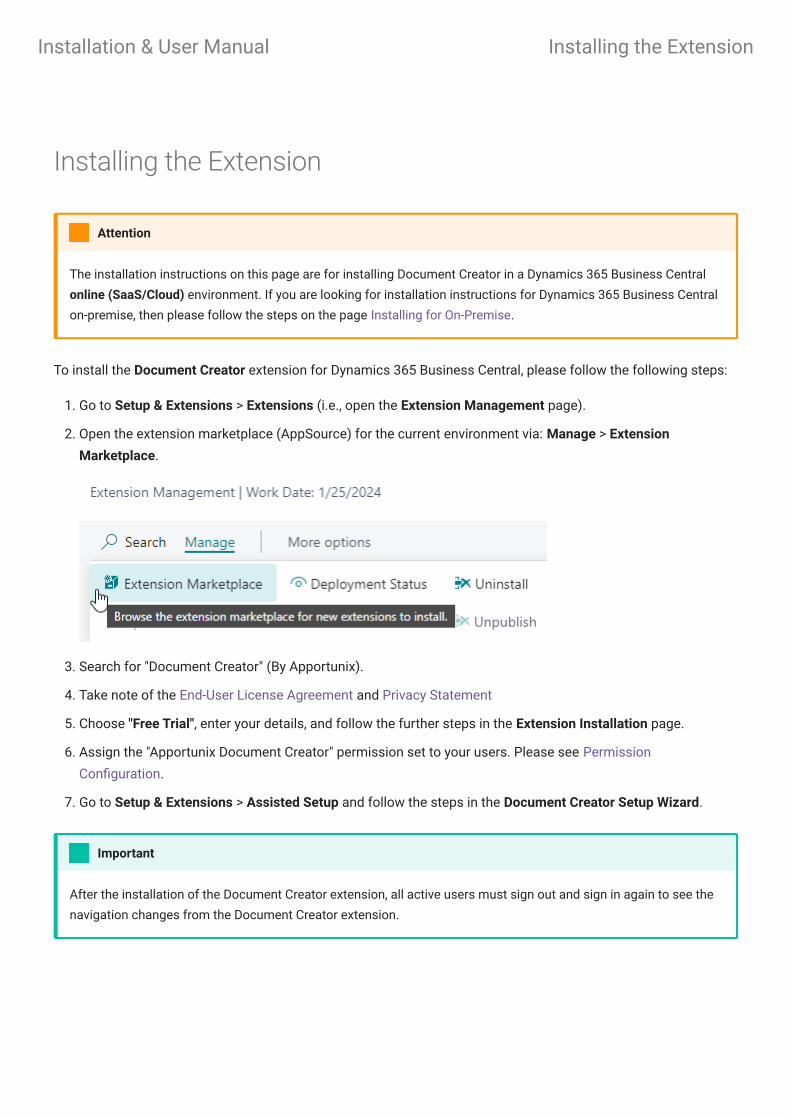
To install the Document Creator extension for Dynamics 365 Business Central, please follow the following steps:
Go to Setup & Extensions > Extensions (i.e., open the Extension Management page).
Open the extension marketplace (AppSource) for the current environment via: Manage > Extension
Marketplace.
Search for "Document Creator" (By Apportunix).
Take note of the End-User License Agreement and Privacy Statement
Choose "Free Trial", enter your details, and follow the further steps in the Extension Installation page.
Assign the "Apportunix Document Creator" permission set to your users. Please see Permission
Configuration.
Go to Setup & Extensions > Assisted Setup and follow the steps in the Document Creator Setup Wizard.
The installation instructions on this page are for installing Document Creator in a Dynamics 365 Business Central
online (SaaS/Cloud) environment. If you are looking for installation instructions for Dynamics 365 Business Central
on-premise, then please follow the steps on the page Installing for On-Premise.
Attention
1.
2.
3.
4.
5.
6.
7.
After the installation of the Document Creator extension, all active users must sign out and sign in again to see the
navigation changes from the Document Creator extension.
Important
Installation & User Manual Installing the Extension

Permission Configuration
Once the Document Creator extension has been installed, a Apportunix Document Creator permission set will
have been added automatically. This permission set (or a customized/derived one) should be assigned to the
relevant users or user groups.
To assign the Apportunix Document Creator permission set to users:
Use the Tell Me search feature ('magnifier-button in the top-right') to search for and open up the Users page.
Select the user that you want to assign permissions to. Any permission sets that are already assigned to the
user are displayed in the Permission Sets factbox.
Invoke the Edit action to open the User Card page.
On the User Permission Sets FastTab, add a new record with Permission Set set to Apportunix Document
Creator .
For more information on how to configure permissions, please refer to the Dynamics 365 Business Central
documentation - Managing Users and Permissions.
1.
2.
3.
4.
Installation & User Manual Permission Configuration

Installation & User Manual

Setting up your Product Key
Before you can run reports with a Document Creator layout in a Production environment of your tenant, you will
need to configure your product key in the Document Creator Setup page.
You can enter the product key that you received for your tenant in the Product Key field of the Authentication
group:
If you do not have a product key for your tenant, then you can use the free Demo version of Document Creator in a
Sandbox environment. For Sandbox environments, you can skip the instructions in this section of the installation
manual. Please find more information on the licensing and pricing on our website.
To order a product key for the full version of Document Creator, for Production environments, please fill in the Order
Form on our website.
Attention
You can also follow the Document Creator Setup Wizard under Setup & Extensions > Assisted Setup, where you will
be guided through the setup for the app, including setting up your product key.
Tip
You can find the Document Creator Setup page under Setup & Extensions > Manual Setup, or you can search for
the page using the Tell Me search feature in Dynamics 365 Business Central.
Note
Installation & User Manual Setting up your Product Key

Installation & User Manual Setting up your Product Key

Installation & User Manual

Installing for On-Premise
Prerequisites
Before installing Document Creator in your Dynamics 365 Business Central or NAV environment, please make sure
the prerequisites listed in this section are met. Please note that there is a "Demo" version (for evaluation
purposes) and a "Release" version (for production environments) of Document Creator, which each have their own
prerequisites. Downloads for both versions can be accessed through the Download link on our website.
For additional support, please visit our Support page to get in contact with our support engineers.
Demo Version
The "Demo" version is a version of Document Creator that you can use without having access to the Apportunix
Suite ISV module in your Business Central. The identifiers in the application objects have been renumbered to a
range that is available with a Microsoft Partner license or other customer Business Central license to which the
IDs concerned are assigned.
Before installing the "Demo" version, please check if the following prerequisites are met:
The Business Central license should have access to the 70000..72999 object ID range (e.g., a Microsoft
Partner Business Central Developer License).
The latest available Demo product key should be used for activating the Business Central extension, which
can be accessed through the Download link on our website together with the Demo version.
The Document Creator Designer has a 14-day, unrestricted, free trial. Please see Installing the Designer for
more information.
For a demo of all the possibilities of the Document Creator Designer, please check out the Document Creator
Designer Demo. The Designer Demo can be accessed through the Download link on our website as well.
The installation instructions on this page are for installing Document Creator in an on-premise Dynamics NAV or
Dynamics 365 Business Central environment. If you are looking for installation instructions for Dynamics 365
Business Central online (SaaS/Cloud), then please follow the steps on the page Installing the Extension.
Attention
•
•
•
•
Installation & User Manual Installing for On-Premise

Release Version
Before installing the "Release" version, please check if the following prerequisites are met:
The Business Central/NAV license should have access to the Apportunix Suite ISV module. If you encounter
any issues with missing permissions, please ensure you have downloaded a new Business Central/NAV
license from Microsoft PartnerSource Business Center and that you have restarted your server instance(s)
after uploading your license to the database.
A Document Creator product key registered for your Business Central/NAV license's Serial No./VOICE ID/
PSBCID should be used.
For installation and activation instructions of the Document Creator stand-alone Designer for Dynamics 365
Business Central, please consult the Installing the Designer documentation page.
Supported Versions
With the latest Document Creator release the following minimum target versions are officially supported:
•
•
•
Folder Dynamics NAV/BC Version
NAV 8.0.0.0 (CU01) 2015: W1 8.00 Build 38457 (Cumulative Update 1)
NAV 9.0.0.0 2016: W1 9.00 Build 42815
NAV 10.0.0.0 2017: W1 10.0 Build 13682
NAV 11.0.0.0 2018: W1 11.0 Build 19394
NAV 13.0.0.0 BC13: W1 13.0 Build 24623 (Fall '18)
NAV 14.3.0.0 BC14: W1 14.3 Build 34444 (Spring '19, Cumulative Update 2)
BC 15.0.0.0 BC15: W1 15.0 Build 36510 ('19 release Wave 2)
BC 16.2.0.0 BC16: W1 16.2 Build 13779 ('20 release Wave 1)
BC 17.0.0.0 BC17: W1 17.0 Build 16993 ('20 release Wave 2)
BC 18.0.0.0 BC18: W1 18.0 Build 23795 ('21 release Wave 1)
BC 19.0.0.0 BC19: W1 19.0 Build 30693 ('21 release Wave 2)
Installation & User Manual Release Version

Installation
This chapter describes the installation procedure for the following NAV/BC target versions:
Dynamics 365 Business Central 2019 release Wave 2 and up (BC15+)
Dynamics 365 Business Central Spring '19 Release (BC14)
Dynamics NAV 2015 – 2018 and Dynamics 365 Business Central Fall '18 Release (BC13)
Dynamics 365 Business Central 2019 release Wave 2 and up (BC15+)
The installation files are grouped into a directory for each target version (e.g., BC 15.0.0.0 corresponds to
Dynamics 365 Business Central 2019 release Wave 2). Make sure to use the files from the directory that matches
your target. You will need to install both the Document Creator and Document Creator On-Premise app.
The Document Creator app contains all the features available for both On-Premise and SaaS installations, i.e.,
creating/editing/importing/exporting/archiving layouts, export profiles, reports, etc.
The Document Creator On-Premise app is an extension on the Document Creator app which makes it use an
on-premise installation of the report engine. It also includes the features that are only available on-premise,
e.g., the RDLC layout converter and direct printing to printers installed on the server. (Optional, starting from
Document Creator, version 2.0)
For Microsoft Dynamics 365 Business Central on-premise the extension can be installed using the Business
Central Administration Shell. Please follow the instructions that can be found on the How to: Publish and Install an
Extension v2.0 - Business Central | Microsoft Docs page. If you are upgrading from a previous version, then please
see Upgrading Extensions - Business Central | Microsoft Docs for instructions on how to perform an upgrade with
the cmdlets of the Business Central Administration Shell.
To install Document Creator, please follow these steps:
Publishing and installing the dependencies
Download and install the dependencies: "System Library", "Monet" and "PDF Merge".
Folder Dynamics NAV/BC Version
BC 20.0.0.0 BC20: W1 20.0 ('22 release Wave 1)
Missing runtime packages (.app files) for a new, specific minor release? Reach out to our Support team, and we will
add the required packages.
Attention
•
•
•
•
•
1.
Installation & User Manual Installation
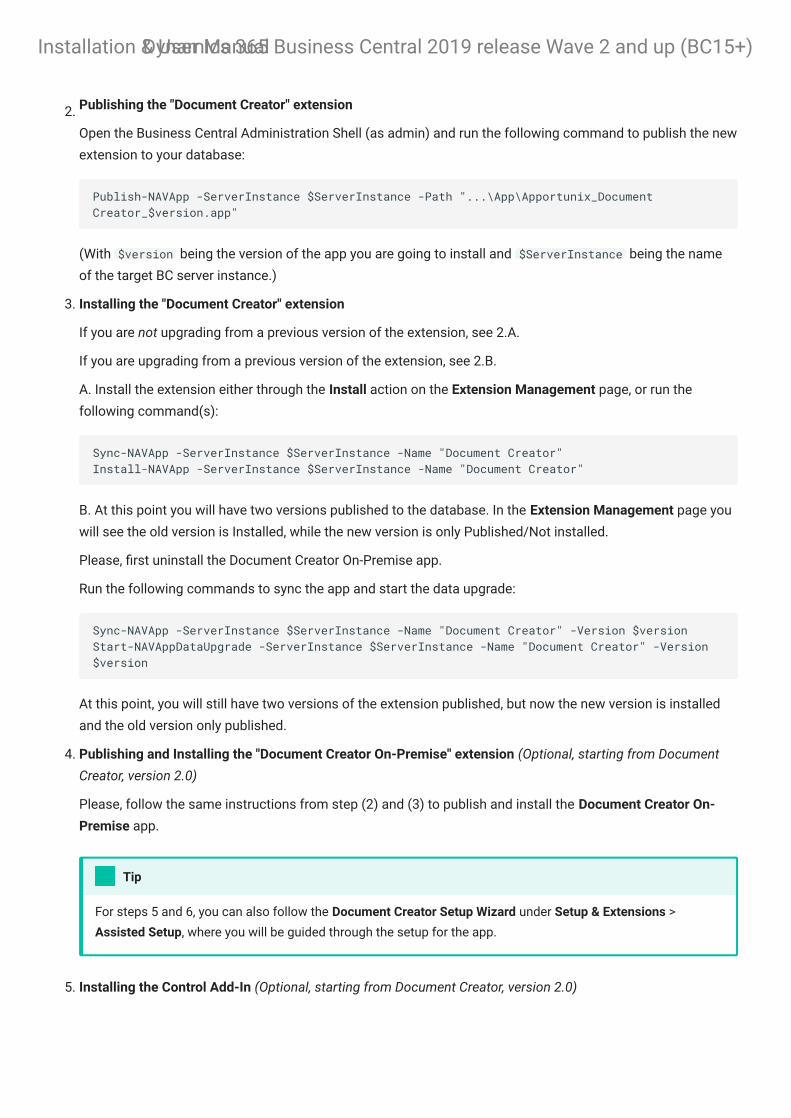
Publishing the "Document Creator" extension
Open the Business Central Administration Shell (as admin) and run the following command to publish the new
extension to your database:
(With $version being the version of the app you are going to install and $ServerInstance being the name
of the target BC server instance.)
Installing the "Document Creator" extension
If you are not upgrading from a previous version of the extension, see 2.A.
If you are upgrading from a previous version of the extension, see 2.B.
A. Install the extension either through the Install action on the Extension Management page, or run the
following command(s):
B. At this point you will have two versions published to the database. In the Extension Management page you
will see the old version is Installed, while the new version is only Published/Not installed.
Please, first uninstall the Document Creator On-Premise app.
Run the following commands to sync the app and start the data upgrade:
At this point, you will still have two versions of the extension published, but now the new version is installed
and the old version only published.
Publishing and Installing the "Document Creator On-Premise" extension (Optional, starting from Document
Creator, version 2.0)
Please, follow the same instructions from step (2) and (3) to publish and install the Document Creator On-
Premise app.
Installing the Control Add-In (Optional, starting from Document Creator, version 2.0)
2.
Publish-NAVApp -ServerInstance $ServerInstance -Path "...\App\Apportunix_Document Creator_$version.app"
3.
Sync-NAVApp -ServerInstance $ServerInstance -Name "Document Creator"Install-NAVApp -ServerInstance $ServerInstance -Name "Document Creator"
Sync-NAVApp -ServerInstance $ServerInstance -Name "Document Creator" -Version $versionStart-NAVAppDataUpgrade -ServerInstance $ServerInstance -Name "Document Creator" -Version $version
4.
For steps 5 and 6, you can also follow the Document Creator Setup Wizard under Setup & Extensions >
Assisted Setup, where you will be guided through the setup for the app.
Tip
5.
Installation & User ManualDynamics 365 Business Central 2019 release Wave 2 and up (BC15+)
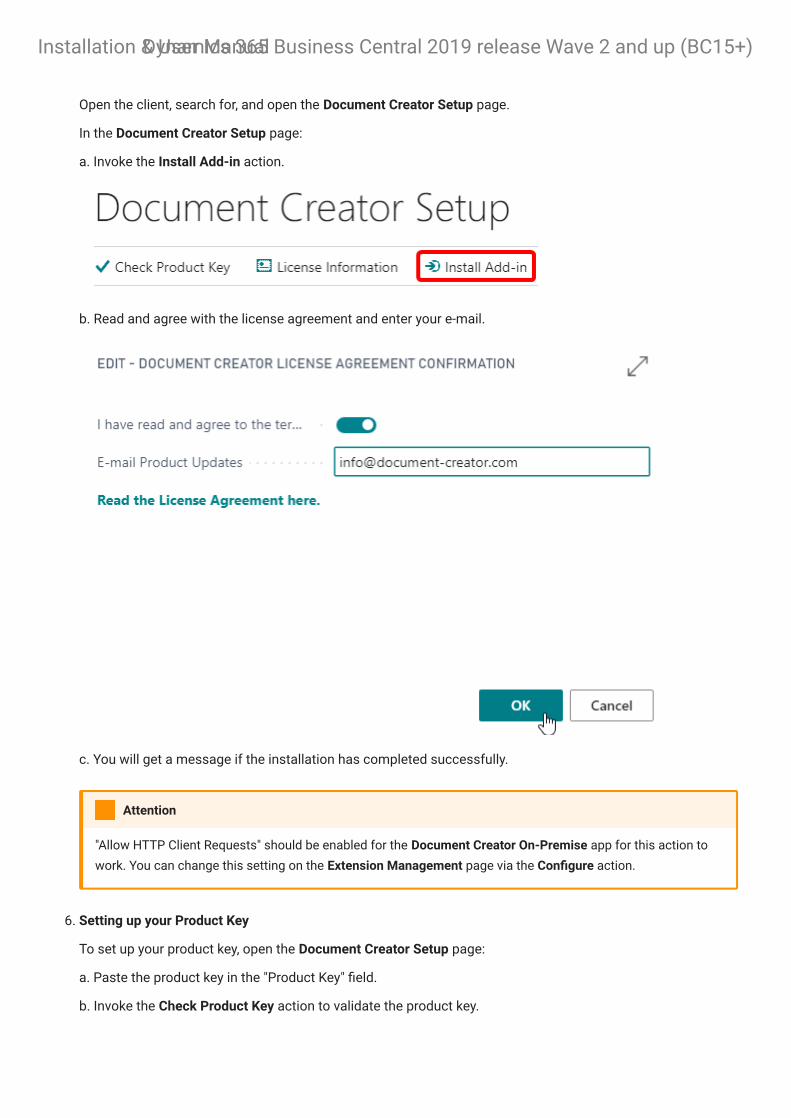
Open the client, search for, and open the Document Creator Setup page.
In the Document Creator Setup page:
a. Invoke the Install Add-in action.
b. Read and agree with the license agreement and enter your e-mail.
c. You will get a message if the installation has completed successfully.
Setting up your Product Key
To set up your product key, open the Document Creator Setup page:
a. Paste the product key in the "Product Key" field.
b. Invoke the Check Product Key action to validate the product key.
"Allow HTTP Client Requests" should be enabled for the Document Creator On-Premise app for this action to
work. You can change this setting on the Extension Management page via the Configure action.
Attention
6.
Installation & User ManualDynamics 365 Business Central 2019 release Wave 2 and up (BC15+)
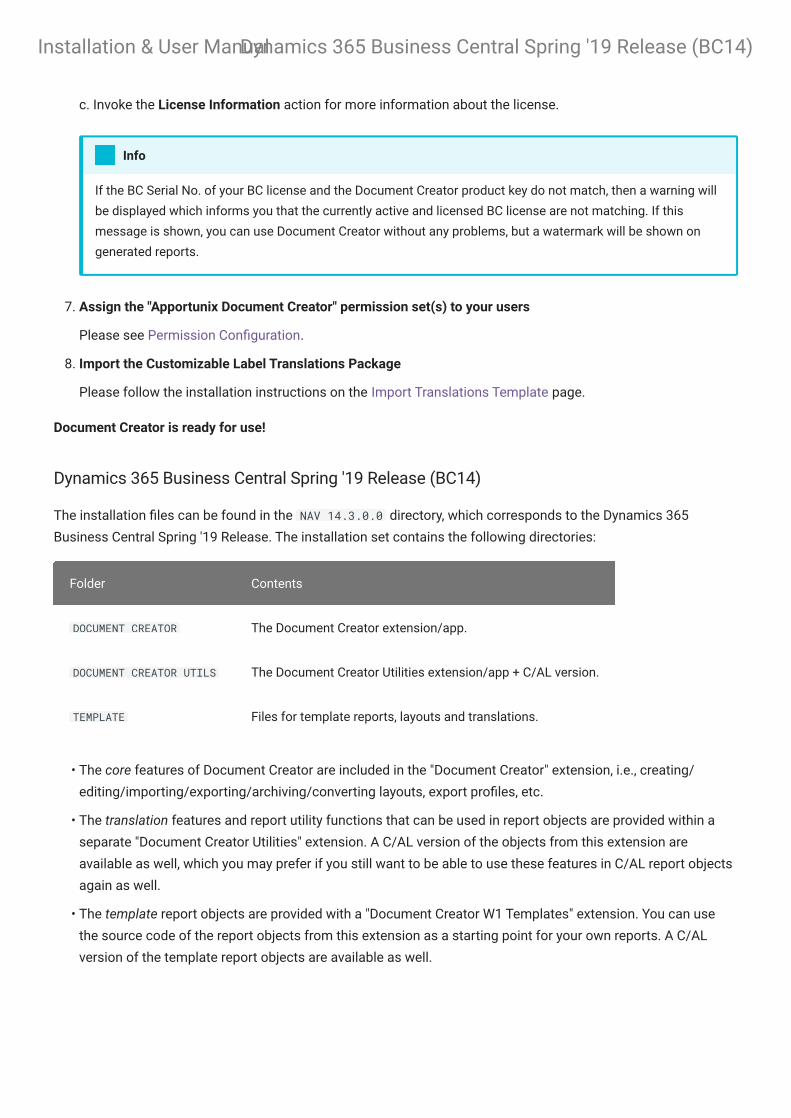
c. Invoke the License Information action for more information about the license.
Assign the "Apportunix Document Creator" permission set(s) to your users
Please see Permission Configuration.
Import the Customizable Label Translations Package
Please follow the installation instructions on the Import Translations Template page.
Document Creator is ready for use!
Dynamics 365 Business Central Spring '19 Release (BC14)
The installation files can be found in the NAV 14.3.0.0 directory, which corresponds to the Dynamics 365
Business Central Spring '19 Release. The installation set contains the following directories:
The core features of Document Creator are included in the "Document Creator" extension, i.e., creating/
editing/importing/exporting/archiving/converting layouts, export profiles, etc.
The translation features and report utility functions that can be used in report objects are provided within a
separate "Document Creator Utilities" extension. A C/AL version of the objects from this extension are
available as well, which you may prefer if you still want to be able to use these features in C/AL report objects
again as well.
The template report objects are provided with a "Document Creator W1 Templates" extension. You can use
the source code of the report objects from this extension as a starting point for your own reports. A C/AL
version of the template report objects are available as well.
If the BC Serial No. of your BC license and the Document Creator product key do not match, then a warning will
be displayed which informs you that the currently active and licensed BC license are not matching. If this
message is shown, you can use Document Creator without any problems, but a watermark will be shown on
generated reports.
Info
7.
8.
Folder Contents
DOCUMENT CREATOR The Document Creator extension/app.
DOCUMENT CREATOR UTILS The Document Creator Utilities extension/app + C/AL version.
TEMPLATE Files for template reports, layouts and translations.
•
•
•
Installation & User ManualDynamics 365 Business Central Spring '19 Release (BC14)

To install Document Creator, please follow these steps:
Publishing the "Document Creator" extension
Open the Business Central Administration Shell (as admin) and run the following command to publish the new
extension to your database:
(With $version being the version of the app you are going to install and $ServerInstance being the name
of the target BC server instance.)
Installing the "Document Creator" extension
If you are not upgrading from a previous version of the extension, see 2.A. If you are upgrading from a
previous version of the extension, see 2.B.
A. Install the extension either through the Install action on the Extension Management page, or run the
following command(s):
B. At this point you will have two versions published to the database. In the Extension Management page you
will see the old version is Installed, while the new version is only Published/Not installed.
Run the following commands to sync the app and start the data upgrade:
At this point, you will still have two versions of the extension published, but now the new version is installed
and the old version only published.
Publishing and Installing the "Document Creator Utilities" extension
If you want to use translation features and report utility functions from AL only, see 3.A. If you want to use
translation features and report utility functions also from C/AL, see 3.B.
A. Open the Business Central Administration Shell (as admin) and run the following command to publish the
extension to your database:
Then, install the extension either through the Install action on the Extension Management page, or run the
following commands:
1.
Publish-NAVApp -ServerInstance $ServerInstance -Path "...\DOCUMENT CREATOR\Apportunix_Document Creator_$version.app"
2.
Sync-NAVApp -ServerInstance $ServerInstance -Name "Document Creator"Install-NAVApp -ServerInstance $ServerInstance -Name "Document Creator"
Sync-NAVApp -ServerInstance $ServerInstance -Name "Document Creator" -Version $versionStart-NAVAppDataUpgrade -ServerInstance $ServerInstance -Name "Document Creator" -Version $version
3.
Publish-NAVApp -ServerInstance $ServerInstance -Path "...\DOCUMENT CREATOR\Apportunix_Document Creator Utilities_$version.app"
Installation & User ManualDynamics 365 Business Central Spring '19 Release (BC14)

If you are upgrading from a previous version of the extension, follow the instructions as described in the
previous step to run the data upgrade in the same way for this extension.
B. Start the Dynamics NAV development environment and import the NAV<version>_NewObjects.fob file.
Import the menu-suite from the NAV<version>_MenuSuite1056.fob file or edit the menu-suite object ID in the
NAV<version>_MenuSuite1056.txt file.
Installing the Control Add-In
Open the client, the first time you will get this message:
Choose "Yes"; Read and agree with the license agreement and enter your e-mail.
Sync-NAVApp -ServerInstance $ServerInstance -Name "Document Creator Utilities"Install-NAVApp -ServerInstance $ServerInstance -Name "Document Creator Utilities"
4.
Installation & User ManualDynamics 365 Business Central Spring '19 Release (BC14)

You will see a message once the installation has completed successfully.
Setting up your Product Key
To set up your product key, open the Document Creator Setup page:
a. Paste the product key in the "Product Key" field.
b. Invoke the Check Product Key action to validate the product key.
c. Invoke the License Information action for more information about the license.
Assign the "Apportunix Document Creator" permission set to your users.
Installing the W1 Template Reports
If you want to use the AL version of the W1 template reports, see 6.A. If you want to use the C/AL version of
the W1 template reports, see 6.B.
A. First publish and then install the extension from the following file:
Then, search for and open the Report Layouts page, choose 'Import Report Package' and import the following
file:
B. Search for and open the Custom Report Layouts page in the Windows client, choose 'Import Report
Package' and import the following file:
5.
6.
7.
Apportunix_Document Creator W1 Templates_<version>.app
LayoutPackage - W1 – DCR_<Release/Demo>_<version>.dcr
Installation & User ManualDynamics 365 Business Central Spring '19 Release (BC14)
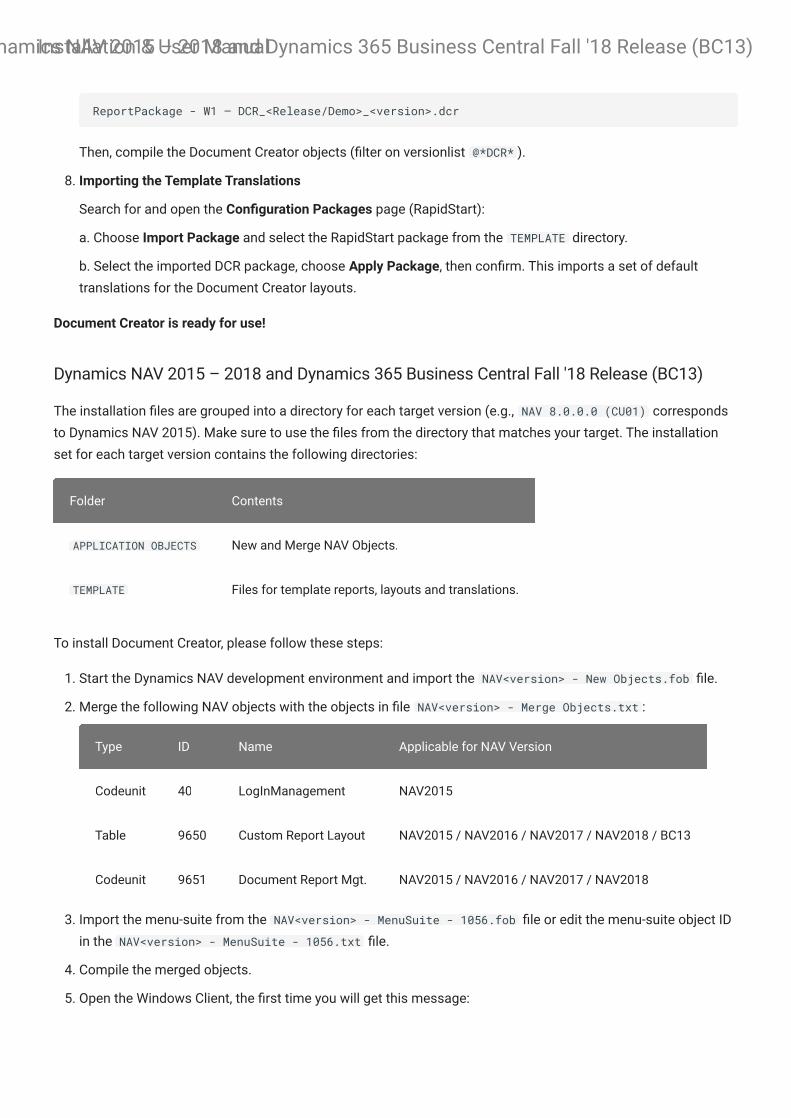
Then, compile the Document Creator objects (filter on versionlist @*DCR* ).
Importing the Template Translations
Search for and open the Configuration Packages page (RapidStart):
a. Choose Import Package and select the RapidStart package from the TEMPLATE directory.
b. Select the imported DCR package, choose Apply Package, then confirm. This imports a set of default
translations for the Document Creator layouts.
Document Creator is ready for use!
Dynamics NAV 2015 – 2018 and Dynamics 365 Business Central Fall '18 Release (BC13)
The installation files are grouped into a directory for each target version (e.g., NAV 8.0.0.0 (CU01) corresponds
to Dynamics NAV 2015). Make sure to use the files from the directory that matches your target. The installation
set for each target version contains the following directories:
To install Document Creator, please follow these steps:
Start the Dynamics NAV development environment and import the NAV<version> - New Objects.fob file.
Merge the following NAV objects with the objects in file NAV<version> - Merge Objects.txt :
Import the menu-suite from the NAV<version> - MenuSuite - 1056.fob file or edit the menu-suite object ID
in the NAV<version> - MenuSuite - 1056.txt file.
Compile the merged objects.
Open the Windows Client, the first time you will get this message:
ReportPackage - W1 – DCR_<Release/Demo>_<version>.dcr
8.
Folder Contents
APPLICATION OBJECTS New and Merge NAV Objects.
TEMPLATE Files for template reports, layouts and translations.
1.
2.
Type ID Name Applicable for NAV Version
Codeunit 40 LogInManagement NAV2015
Table 9650 Custom Report Layout NAV2015 / NAV2016 / NAV2017 / NAV2018 / BC13
Codeunit 9651 Document Report Mgt. NAV2015 / NAV2016 / NAV2017 / NAV2018
3.
4.
5.
Installation & User ManualDynamics NAV 2015 – 2018 and Dynamics 365 Business Central Fall '18 Release (BC13)
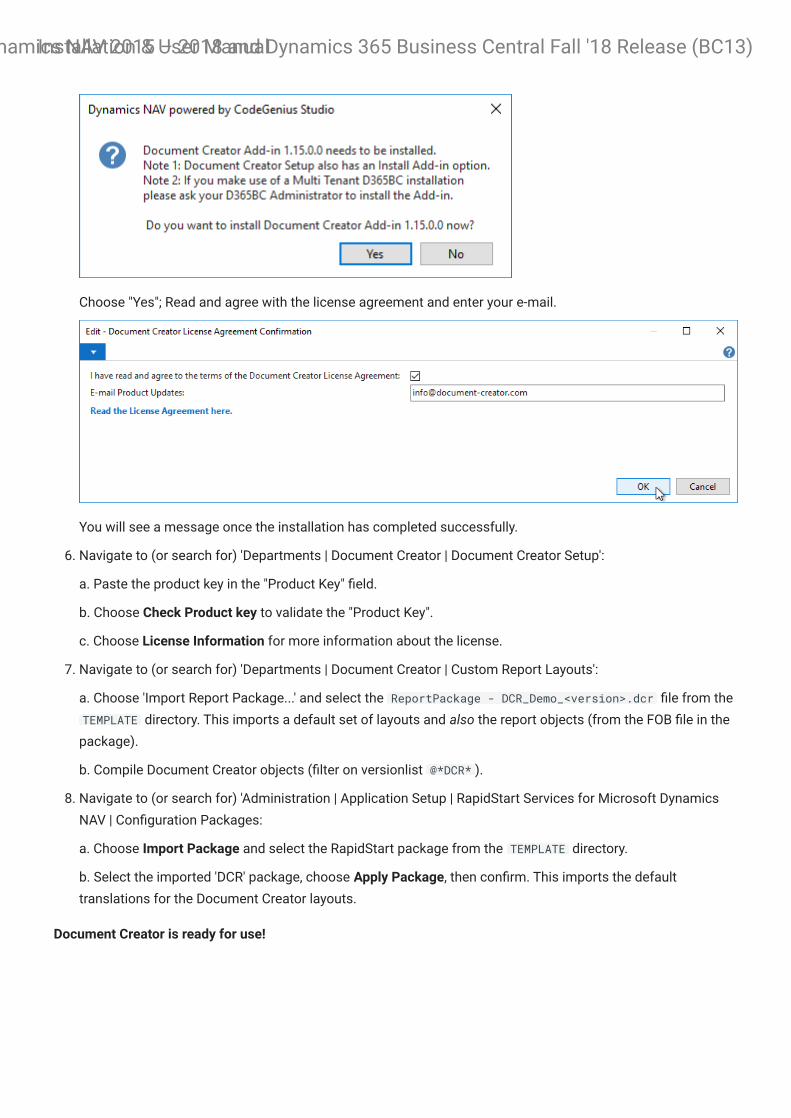
Choose "Yes"; Read and agree with the license agreement and enter your e-mail.
You will see a message once the installation has completed successfully.
Navigate to (or search for) 'Departments | Document Creator | Document Creator Setup':
a. Paste the product key in the "Product Key" field.
b. Choose Check Product key to validate the "Product Key".
c. Choose License Information for more information about the license.
Navigate to (or search for) 'Departments | Document Creator | Custom Report Layouts':
a. Choose 'Import Report Package...' and select the ReportPackage - DCR_Demo_<version>.dcr file from the
TEMPLATE directory. This imports a default set of layouts and also the report objects (from the FOB file in the
package).
b. Compile Document Creator objects (filter on versionlist @*DCR* ).
Navigate to (or search for) 'Administration | Application Setup | RapidStart Services for Microsoft Dynamics
NAV | Configuration Packages:
a. Choose Import Package and select the RapidStart package from the TEMPLATE directory.
b. Select the imported 'DCR' package, choose Apply Package, then confirm. This imports the default
translations for the Document Creator layouts.
Document Creator is ready for use!
6.
7.
8.
Installation & User ManualDynamics NAV 2015 – 2018 and Dynamics 365 Business Central Fall '18 Release (BC13)

Data Upgrades during BC Upgrades
This chapter describes how you can migrate data stored by Document Creator while upgrading to a newer version
of Dynamics 365 Business Central.
From BC15 and up to the latest BC version
From BC14 to BC15 and up
To newer Dynamics NAV versions
From BC15 and up to the latest BC version
When upgrading to a new major or minor update of Business Central, make sure to publish the latest available
runtime package for your platform. Also, make sure to sync the extension ( Sync-NAVApp ), and run a data-upgrade
( Start-NAVAppDataUpgrade ) if necessary (i.e., in case you install a newer version of Document Creator than the
version that was installed in your current environment). For more information, please consult the Publishing,
Upgrading, and Installing Extensions During Upgrade page.
From BC14 to BC15 and up
To migrate Document Creator table data during an upgrade from Business Central 14.x to newer Business Central
versions (15.x and up), please follow these steps:
In the Current Environment (Before the BC Upgrade)
Have the latest version of the "Document Creator" (and "Document Creator Utilities") app installed.
Publish, sync and install the "Document Creator Upgrade Data" app.
Publish, sync and install the "Document Creator Source Data Migration" app. Code for migrating data will be
run automatically.
Uninstall the "Document Creator Source Data Migration" and "Document Creator" (and "Document Creator
Utilities") app.
Finally, upgrade the environment to the new Business Central release.
•
•
•
Instead of following this data migration guide, you can also choose to only export the data you need (i.e., typically
only the translations), uninstall and purge the data from the old app, and install the new app after the upgrade.
Considering a Business Central upgrade is not easy to follow/execute for just anyone, this is also a recommended
upgrade path.
Tip
1.
2.
3.
4.
5.
Installation & User Manual Data Upgrades during BC Upgrades

In the Upgraded Environment (After the BC Upgrade)
Publish, sync and install the "Document Creator" and "Document Creator On-Premise" app.
Publish, sync and install the "Document Creator Target Data Migration" app. Code for migrating data will be
run automatically.
Uninstall the "Document Creator Target Data Migration" and "Document Creator Upgrade Data" app. You can
run a Sync-NavApp with -Mode Clean to purge all upgrade extension data from the database.
Follow the further installation instructions from the Dynamics 365 Business Central 2019 release Wave 2 and
up (BC15+) section.
You can download the (source code of the) Data Upgrade Extensions from the Apportunix Downloads Drive.
To newer Dynamics NAV versions
The table schemas of Document Creator for Dynamics NAV are upwards compatible, meaning that if you want to
upgrade to a newer NAV version you can simply use the existing table definitions in the upgrade process. Please
make sure that you install the latest version of Document Creator for the applicable target version as described in
the Dynamics NAV 2015 – 2018 and Dynamics 365 Business Central Fall '18 Release (BC13) installation
instructions.
1.
2.
3.
4.
Installation & User Manual To newer Dynamics NAV versions

Installation & User Manual
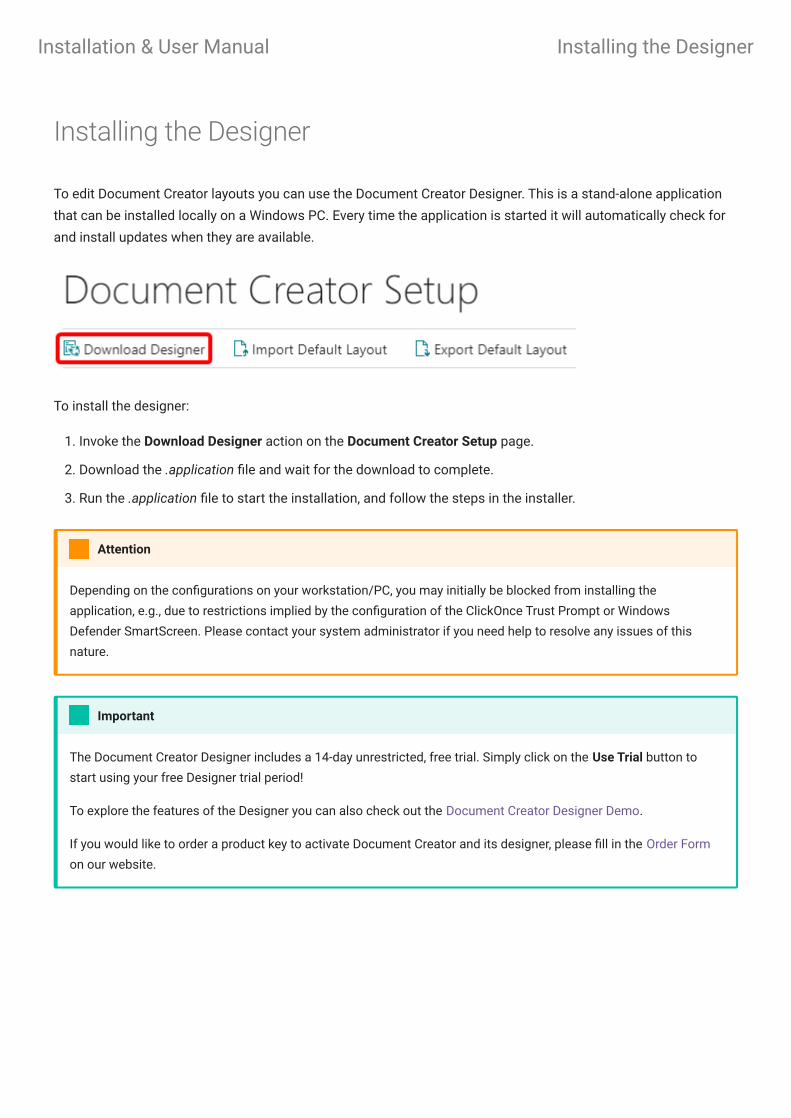
Installing the Designer
To edit Document Creator layouts you can use the Document Creator Designer. This is a stand-alone application
that can be installed locally on a Windows PC. Every time the application is started it will automatically check for
and install updates when they are available.
To install the designer:
Invoke the Download Designer action on the Document Creator Setup page.
Download the .application file and wait for the download to complete.
Run the .application file to start the installation, and follow the steps in the installer.
1.
2.
3.
Depending on the configurations on your workstation/PC, you may initially be blocked from installing the
application, e.g., due to restrictions implied by the configuration of the ClickOnce Trust Prompt or Windows
Defender SmartScreen. Please contact your system administrator if you need help to resolve any issues of this
nature.
Attention
The Document Creator Designer includes a 14-day unrestricted, free trial. Simply click on the Use Trial button to
start using your free Designer trial period!
To explore the features of the Designer you can also check out the Document Creator Designer Demo.
If you would like to order a product key to activate Document Creator and its designer, please fill in the Order Form
on our website.
Important
Installation & User Manual Installing the Designer
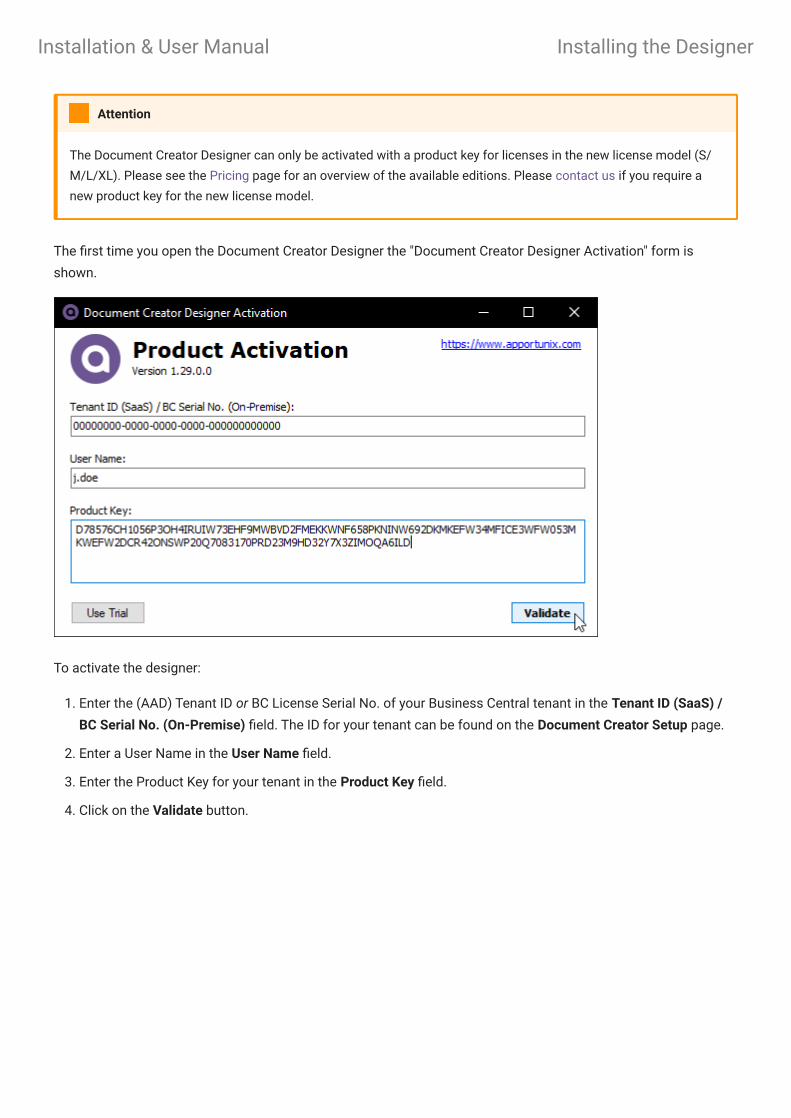
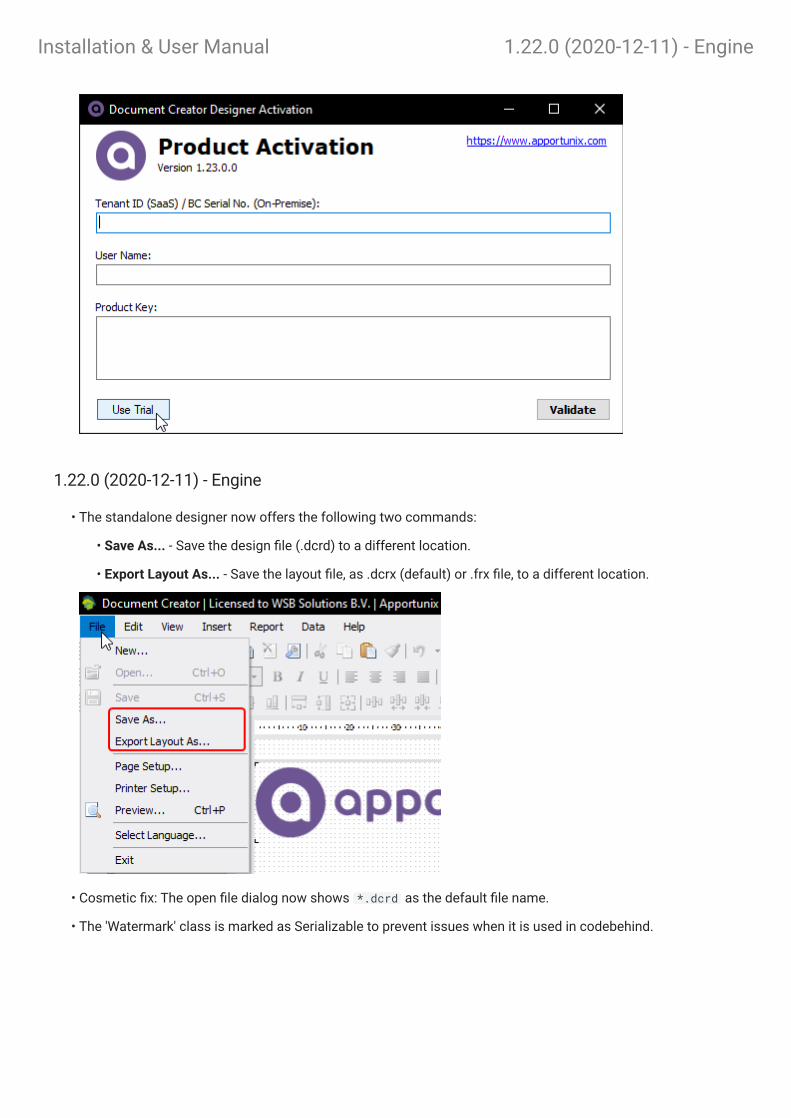
The first time you open the Document Creator Designer the "Document Creator Designer Activation" form is
shown.
To activate the designer:
Enter the (AAD) Tenant ID or BC License Serial No. of your Business Central tenant in the Tenant ID (SaaS) /
BC Serial No. (On-Premise) field. The ID for your tenant can be found on the Document Creator Setup page.
Enter a User Name in the User Name field.
Enter the Product Key for your tenant in the Product Key field.
Click on the Validate button.
The Document Creator Designer can only be activated with a product key for licenses in the new license model (S/
M/L/XL). Please see the Pricing page for an overview of the available editions. Please contact us if you require a
new product key for the new license model.
Attention
1.
2.
3.
4.
Installation & User Manual Installing the Designer
Default Layout
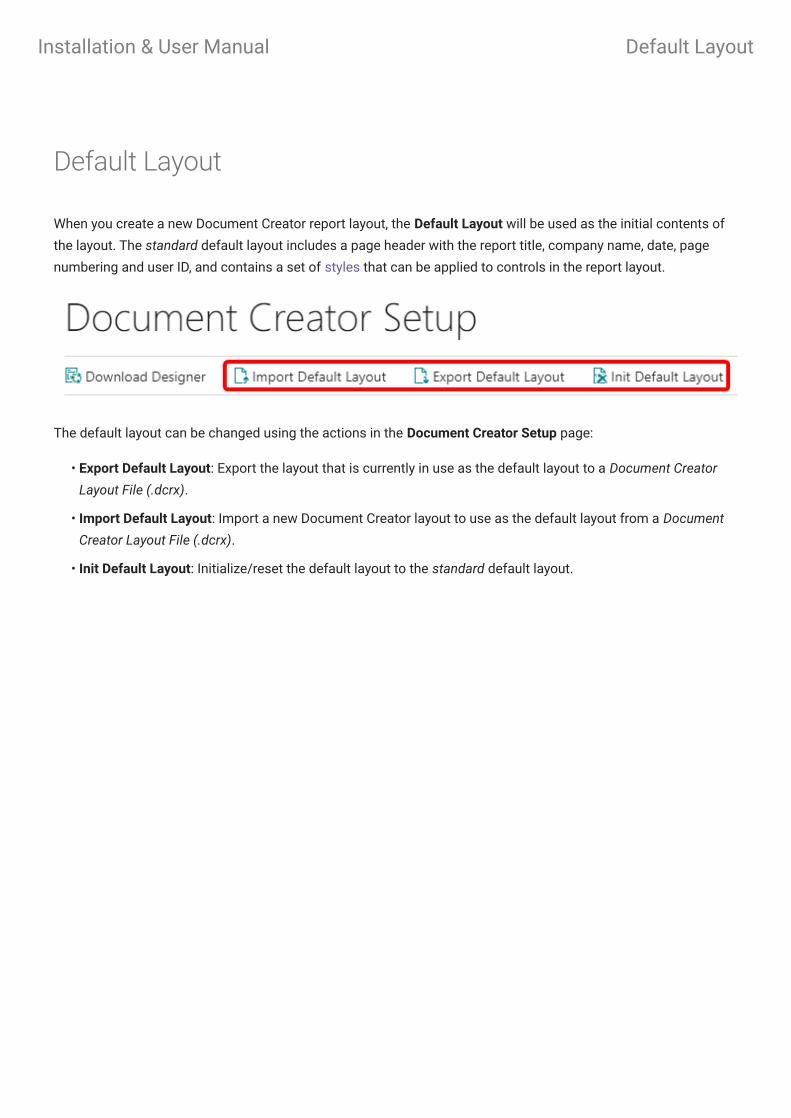
When you create a new Document Creator report layout, the Default Layout will be used as the initial contents of
the layout. The standard default layout includes a page header with the report title, company name, date, page
numbering and user ID, and contains a set of styles that can be applied to controls in the report layout.
The default layout can be changed using the actions in the Document Creator Setup page:
Export Default Layout: Export the layout that is currently in use as the default layout to a Document Creator
Layout File (.dcrx).
Import Default Layout: Import a new Document Creator layout to use as the default layout from a Document
Creator Layout File (.dcrx).
Init Default Layout: Initialize/reset the default layout to the standard default layout.
•
•
•
Installation & User Manual Default Layout

Installation & User Manual

Translation Settings
Document Creator offers its own Report Translations feature, which helps to create multi-language reports and
customizable labels. It ensures that labels can be customized by the end-user/customer and not just Dynamics
365 Business Central extension developers. That is, the translations are stored in a table and can be edited in the
Document Creator Translations page.
The behaviour of the Document Creator translation feature can be configured in the Document Creator Setup
page through the settings available in the Translations group. The following settings are currently available to
adjust how tags are translated:
Default Translation Language
The Default Translation Language Code field specifies which language will be treated as the default language.
This means that if the default language is set to a language X <> '' , then if a Default Translation is provided for
a Tag, then this translation will also be used as the translation for the language with code X .
The default translation will be used for documents with an empty language code '' .
The Fall Back on Default Language setting can be used to change how to act when a translation could not be
found. When this setting is enabled, Document Creator will fall back on the translation for the configured default
language code if a translation for a language could not be found. That is, when there is no translation record or
when the To-Do checkmark is enabled for the translation record.
Update Usage Method
The Translation Update Usage field specifies whether the Last Used and Last Used by Report ID fields are
updated. The following options can be selected for this setting:
Installation & User Manual Translation Settings

Show Tags
When the Translation Show Tags setting is checked, the Document Creator Translations module will return tag
names (surrounded by angle brackets, e.g., <Amount> ) instead of translations when they are requested. This can
be particularly useful for debugging.
Option Explanation
None The "Last Used" field of translation records is NOT updated.
Last Used Only the "Last Used" field of a translation record is updated when the translation of its tag
is requested.
Last Used & Last
ReportId
Both the "Last Used" and "Last Used by Report ID" field of a translation record is updated
when the translation of its tag is requested.
Setting the Translation Update Usage field to anything other than "None" may affect performance. By default you
will receive a warning message when a translation is requested and codeunit wDCR_TranslationMgt still needs to
be initialized, which can be surpressed by enabling the Suppress Update Usage Warnings setting.
Caution
Installation & User Manual Show Tags

Installation & User Manual

Getting Started: Report Layouts
In the Dynamics 365 Business Central client use the Tell Me search feature to navigate to the Report Layouts page
as follows:
The Report Layouts page shows a list of all the report layouts in your Dynamics 365 Business Central
environment, both User-Defined ('Tenant') and extension-provided report layouts. By default, the page shows the
following columns for each report layout record:
Before you start using Document Creator, please make sure you have completed the steps in the Installation
Manual. The Product Key needs to be set up to run reports with a Document Creator layout in a Production
environment.
Attention
Column Description
Report ID The ID of the target report object. The report object defines how the report dataset is generated
in code.
Report Name The caption of the target report object.
Layout Name The name of the report layout.
Description A description of the report layout.
Extension The extension that provides the report layout. Only applies to extension-provided report
layouts. For user-defined/tenant report layouts this field will be blank.
Installation & User Manual Getting Started: Report Layouts

Column Description
Type The type/layout format of the report layout which can be either "RDLC", "Word", "Excel", or
"External". "Document Creator" layouts have type/layout format "External" and MIME type
reportlayout/dcrx .
User Defined Whether the report layout is a user-defined one, i.e., a tenant report layout created by a
Dynamics 365 Business Central user.
Export Profile
Code
The Document Creator Export Profile that will be used when the report is run with this report
layout. Only applies to Document Creator report layouts. See Export Profiles.
Installation & User Manual Getting Started: Report Layouts
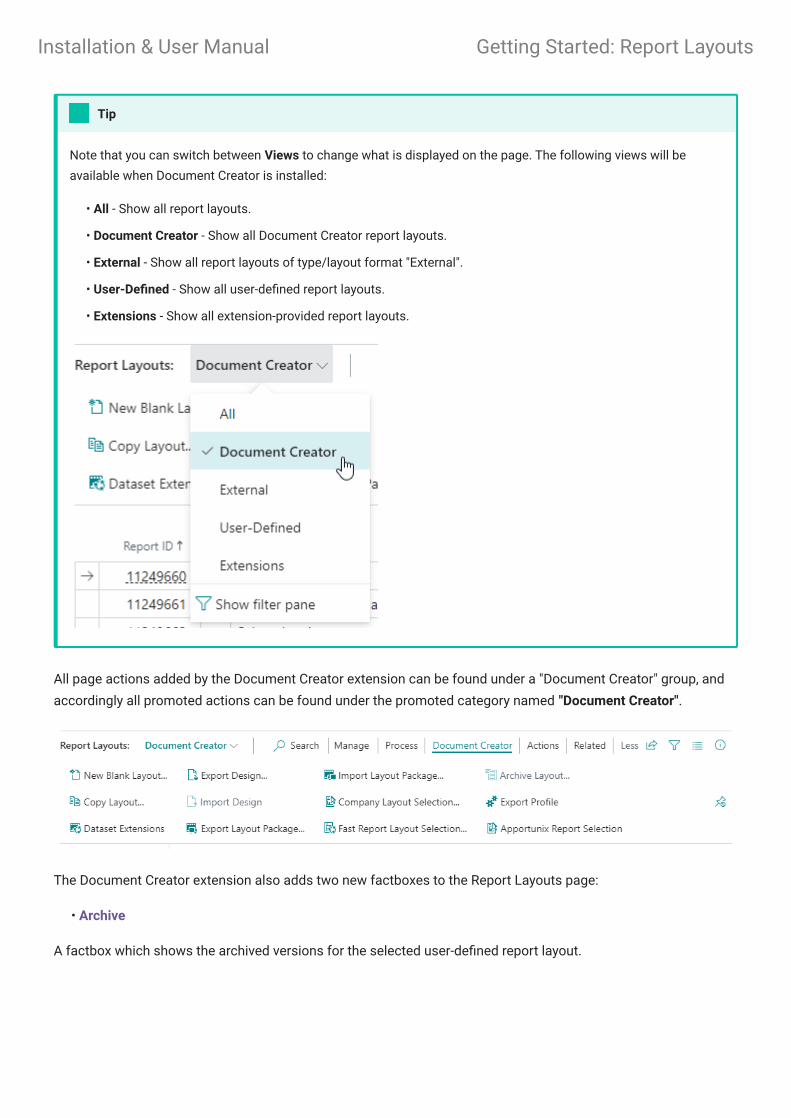
All page actions added by the Document Creator extension can be found under a "Document Creator" group, and
accordingly all promoted actions can be found under the promoted category named "Document Creator".
The Document Creator extension also adds two new factboxes to the Report Layouts page:
Archive
A factbox which shows the archived versions for the selected user-defined report layout.
Note that you can switch between Views to change what is displayed on the page. The following views will be
available when Document Creator is installed:
All - Show all report layouts.
Document Creator - Show all Document Creator report layouts.
External - Show all report layouts of type/layout format "External".
User-Defined - Show all user-defined report layouts.
Extensions - Show all extension-provided report layouts.
Tip
•
•
•
•
•
•
Installation & User Manual Getting Started: Report Layouts
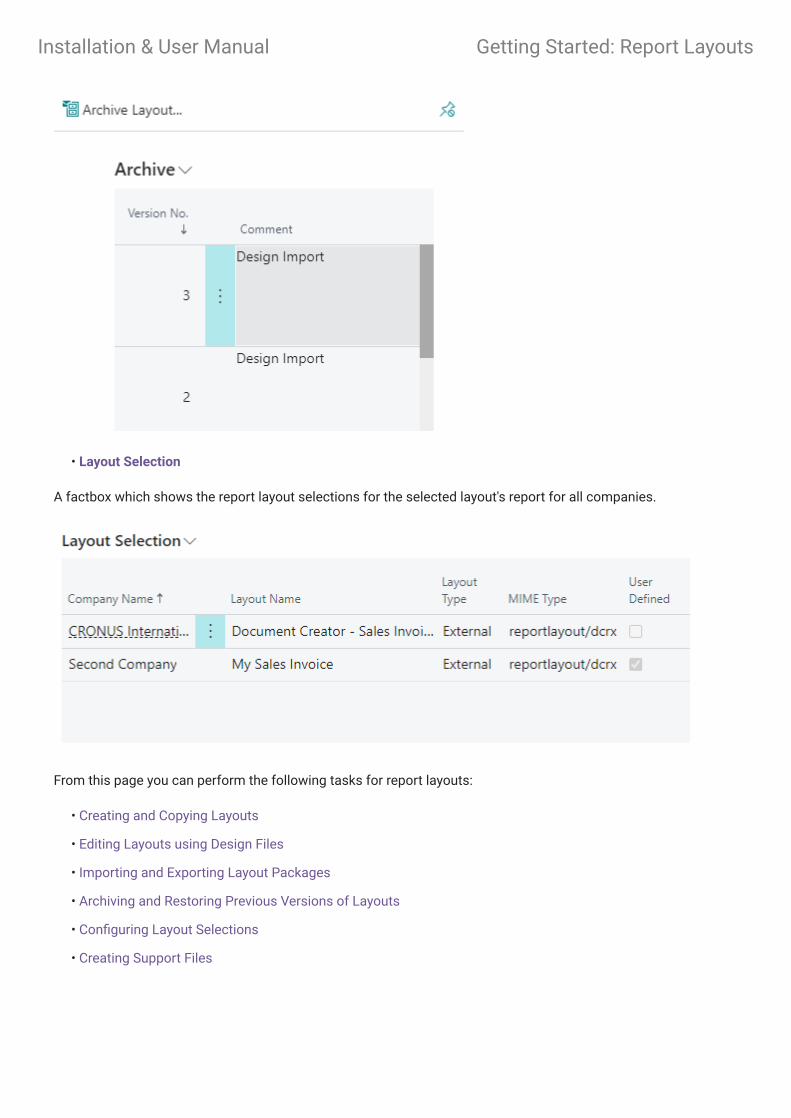
Layout Selection
A factbox which shows the report layout selections for the selected layout's report for all companies.
From this page you can perform the following tasks for report layouts:
Creating and Copying Layouts
Editing Layouts using Design Files
Importing and Exporting Layout Packages
Archiving and Restoring Previous Versions of Layouts
Configuring Layout Selections
Creating Support Files
•
•
•
•
•
•
•
Installation & User Manual Getting Started: Report Layouts

Installation & User Manual

Reports and Report Selection
Document Creator ships with various document reports, built-in/extension-provided layouts and a template label
translations package. These reports can be easily set up using the Apportunix Report Selection page.
Apportunix Report Selection
The Apportunix Report Selection page allows you to manage all report selections in a single page:
Note that you can sort on the Usage Type field on this page to group everything from the same category together
(e.g., Sales, Purchase, ...). The report usages that are added by extensions get the "Extension" usage type (at least,
by default).
Installation & User Manual Reports and Report Selection
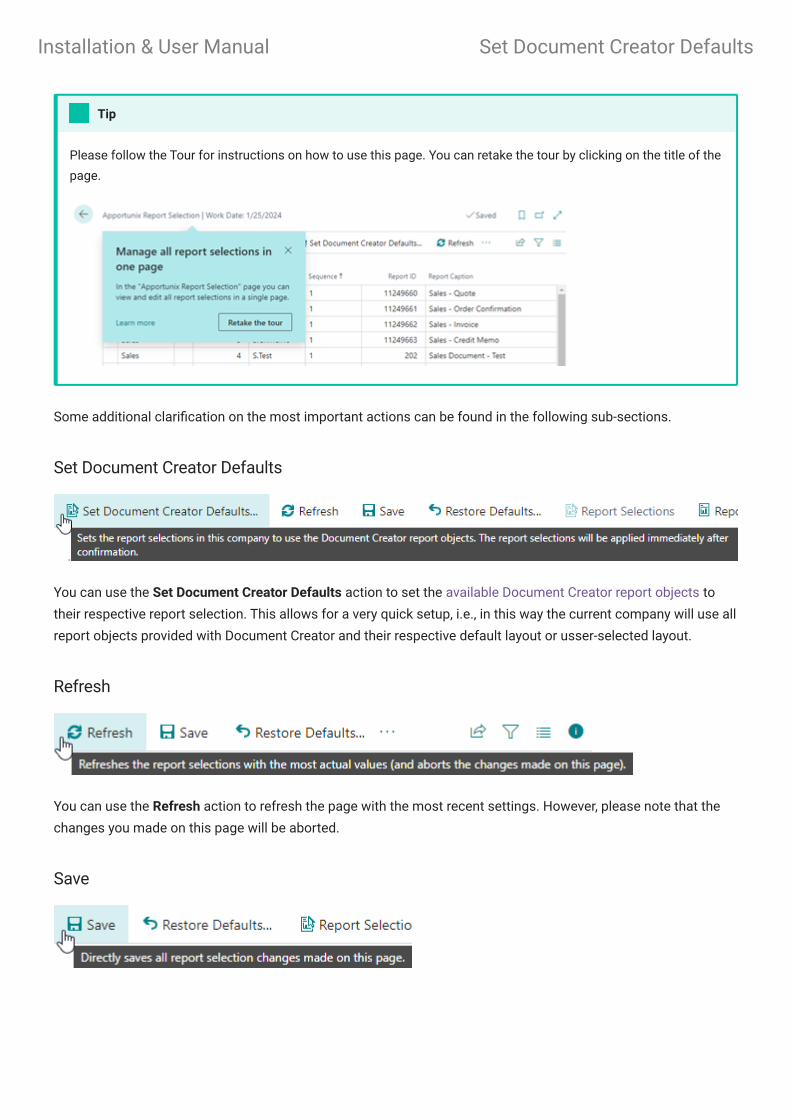
Some additional clarification on the most important actions can be found in the following sub-sections.
Set Document Creator Defaults
You can use the Set Document Creator Defaults action to set the available Document Creator report objects to
their respective report selection. This allows for a very quick setup, i.e., in this way the current company will use all
report objects provided with Document Creator and their respective default layout or usser-selected layout.
Refresh
You can use the Refresh action to refresh the page with the most recent settings. However, please note that the
changes you made on this page will be aborted.
Save
Please follow the Tour for instructions on how to use this page. You can retake the tour by clicking on the title of the
page.
Tip
Installation & User Manual Set Document Creator Defaults
You can use the Save action to save your changes manually. Your changes will be saved automatically when you
close this page.
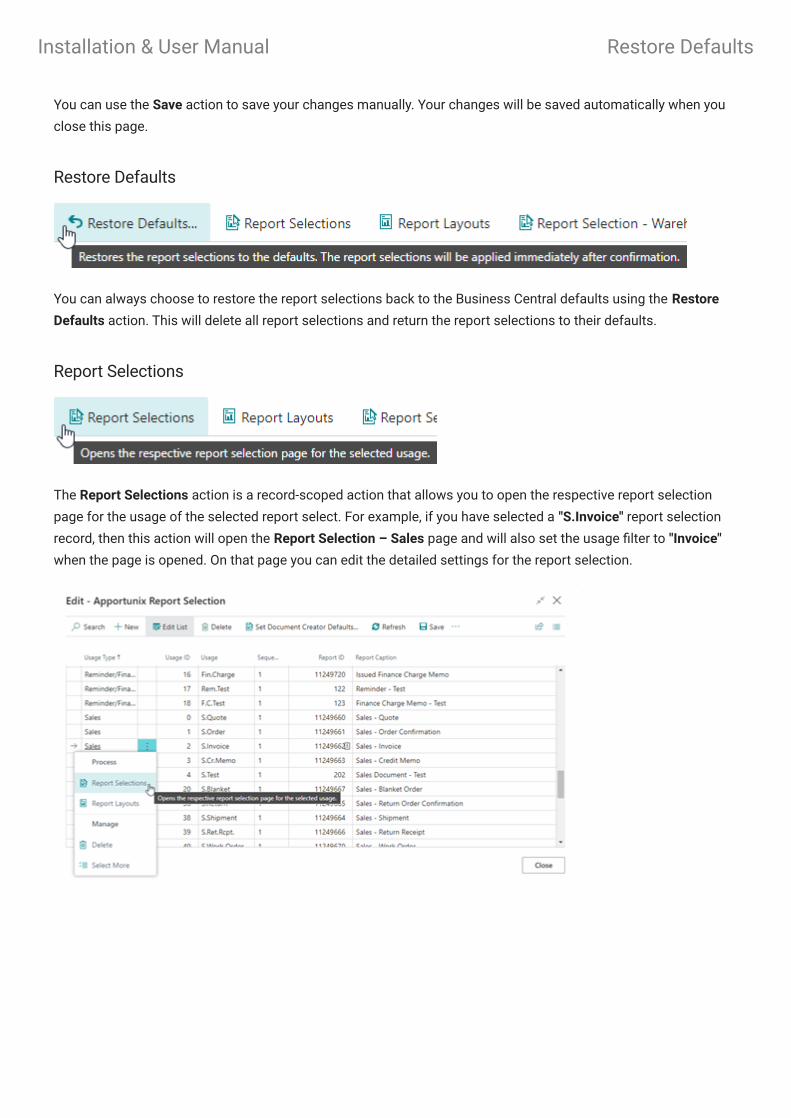
Restore Defaults
You can always choose to restore the report selections back to the Business Central defaults using the Restore
Defaults action. This will delete all report selections and return the report selections to their defaults.
Report Selections
The Report Selections action is a record-scoped action that allows you to open the respective report selection
page for the usage of the selected report select. For example, if you have selected a "S.Invoice" report selection
record, then this action will open the Report Selection – Sales page and will also set the usage filter to "Invoice"
when the page is opened. On that page you can edit the detailed settings for the report selection.
Installation & User Manual Restore Defaults

Report Layouts
This is a record-scoped action that opens the Report Layouts page filtered to the report object of the selected
report selection record. For example, if the report selection record specifies that report 11249662 “Sales –
Invoice” should be used, then this action will open the Report Layouts page only showing the layouts for this
report object:
This Report Selections action will open the respective page, initialized with/filtered on the selected usage, only if
the page supports this.
Also, the action can only open the respective report selection page for extension-provided usages when this is
implemented by the extension publisher.
Note
Installation & User Manual Report Layouts

Reports
Document Creator provides a set of reports and layouts which cover the requirements of Small- to Midsized
Businesses significantly better than the standard reports. These include reports for sales, purchase, reminders/
finance charge, transfer, service, assembly, warehouse, and many more documents.
The reports already offer a complete dataset that cover the needs for most users and even then, you can use the
Dataset Extensions feature to add new columns, data items and translatable labels, all by yourself, directly from
the Business Central web client, using data from any table, without developing additional report or reportextension
objects.
The extensions provides reports for the following documents/usages in Microsoft Dynamics 365 Business
Central:
Usage Type Document Usage
ID
Usage Report ID Report Caption
Sales Sales - Quote 0 S.Quote 11249660 Sales - Quote
Sales Sales - Order
Confirmation
1 S.Order 11249661 Sales - Order
Confirmation
Sales Sales - Invoice 2 S.Invoice 11249662 Sales - Invoice
Sales Sales - Credit Memo 3 S.Cr.Memo 11249663 Sales - Credit Memo
Installation & User Manual Reports

Usage Type Document Usage
ID
Usage Report ID Report Caption
Sales Sales - Blanket
Order
20 S.Blanket 11249667 Sales - Blanket
Order
Sales Sales - Return Order
Confirmation
36 S.Return 11249665 Sales - Return Order
Confirmation
Sales Sales - Shipment 38 S.Shipment 11249664 Sales - Shipment
Sales Sales - Return
Receipt
39 S.Ret.Rcpt. 11249666 Sales - Return
Receipt
Sales Sales - Work Order 40 S.Work Order 11249670 Sales - Work Order
Sales Sales - Picklist 53 S.Order Pick
Instruction
11249669 Sales - Picklist
Sales Sales - Draft Invoice 88 S.Invoice Draft 11249668 Sales - Draft Invoice
Sales Sales - Pro Forma
Invoice
89 Pro Forma S.
Invoice
11249671 Sales - Pro Forma
Invoice
Purchase Purchase - Quote 5 P.Quote 11249680 Purchase - Quote
Purchase Purchase - Order 6 P.Order 11249681 Purchase - Order
Purchase Purchase - Invoice 7 P.Invoice 11249682 Purchase - Invoice
Purchase Purchase - Credit
Memo
8 P.Cr.Memo 11249683 Purchase - Credit
Memo
Purchase Purchase - Receipt 9 P.Receipt 11249684 Purchase - Receipt
Purchase Purchase - Return
Shipment
10 P.Ret.Shpt. 11249686 Purchase - Return
Shipment
Purchase Purchase - Blanket
Order
21 P.Blanket 11249687 Purchase - Blanket
Order
Installation & User Manual Reports

Usage Type Document Usage
ID
Usage Report ID Report Caption
Purchase Purchase - Return
Order
37 P.Return 11249685 Purchase - Return
Order
Reminder/
Finance
Charge
Reminder 15 Reminder 11249721 Reminder
Reminder/
Finance
Charge
Issued Finance
Charge Memo
16 Fin.Charge 11249720 Issued Finance
Charge Memo
Inventory Transfer Order 26 Inv1 11249740 Transfer Order
Inventory Transfer Shipment 27 Inv2 11249742 Transfer Shipment
Inventory Transfer Receipt 28 Inv3 11249741 Transfer Receipt
Inventory Assembly Order 51 Asm.Order 11249730 Assembly Order
Inventory Posted Assembly
Order
52 P.Asm.Order 11249731 Posted Assembly
Order
Job Job Quote 87 Job Quote 11249750 Job Quote
Service Service - Quote 29 SM.Quote 11249700 Service - Quote
Service Service - Order
Confirmation
30 SM.Order 11249701 Service - Order
Confirmation
Service Service - Invoice 31 SM.Invoice 11249702 Service - Invoice
Service Service - Credit
Memo
32 SM.Credit
Memo
11249703 Service - Credit
Memo
Service Service - Contract 34 SM.Contract 11249707 Service - Contract
Service Service - Shipment 42 SM.Shipment 11249704 Service - Shipment
Installation & User Manual Reports
Usage Type Document Usage
ID
Usage Report ID Report Caption
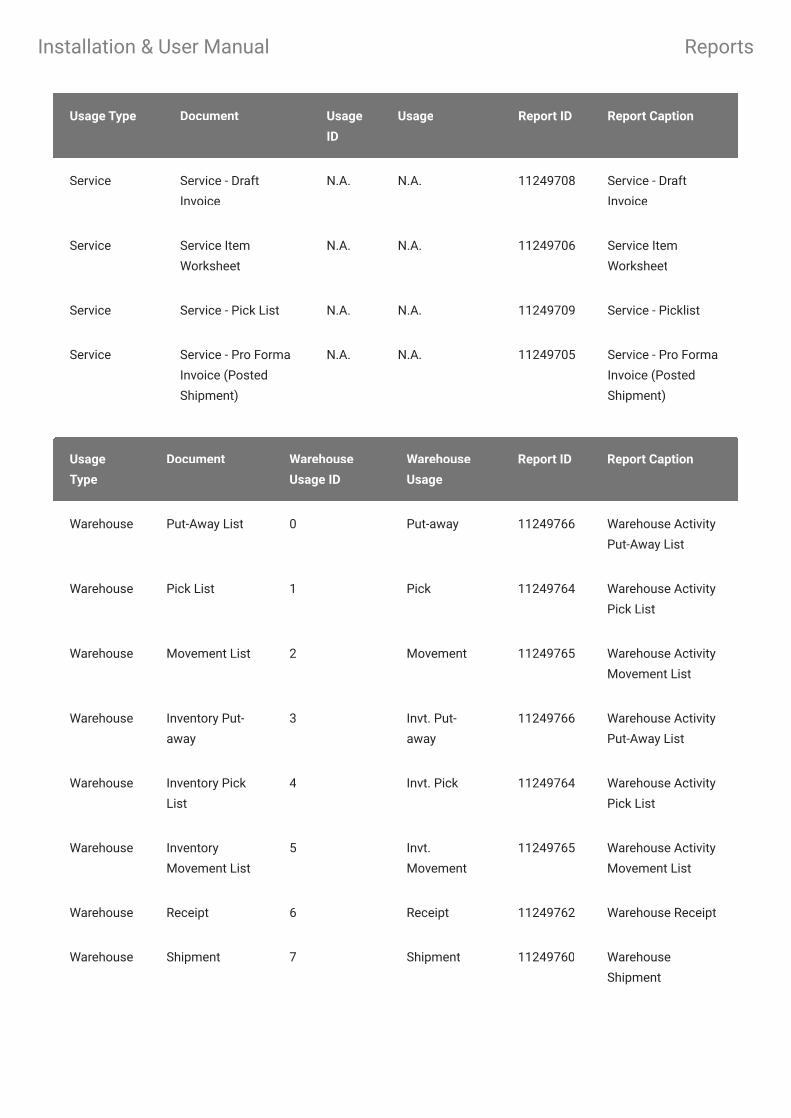
Service Service - Draft
Invoice
N.A. N.A. 11249708 Service - Draft
Invoice
Service Service Item
Worksheet
N.A. N.A. 11249706 Service Item
Worksheet
Service Service - Pick List N.A. N.A. 11249709 Service - Picklist
Service Service - Pro Forma
Invoice (Posted
Shipment)
N.A. N.A. 11249705 Service - Pro Forma
Invoice (Posted
Shipment)
Usage
Type
Document Warehouse
Usage ID
Warehouse
Usage
Report ID Report Caption
Warehouse Put-Away List 0 Put-away 11249766 Warehouse Activity
Put-Away List
Warehouse Pick List 1 Pick 11249764 Warehouse Activity
Pick List
Warehouse Movement List 2 Movement 11249765 Warehouse Activity
Movement List
Warehouse Inventory Put-
away
3 Invt. Put-
away
11249766 Warehouse Activity
Put-Away List
Warehouse Inventory Pick
List
4 Invt. Pick 11249764 Warehouse Activity
Pick List
Warehouse Inventory
Movement List
5 Invt.
Movement
11249765 Warehouse Activity
Movement List
Warehouse Receipt 6 Receipt 11249762 Warehouse Receipt
Warehouse Shipment 7 Shipment 11249760 Warehouse
Shipment
Installation & User Manual Reports
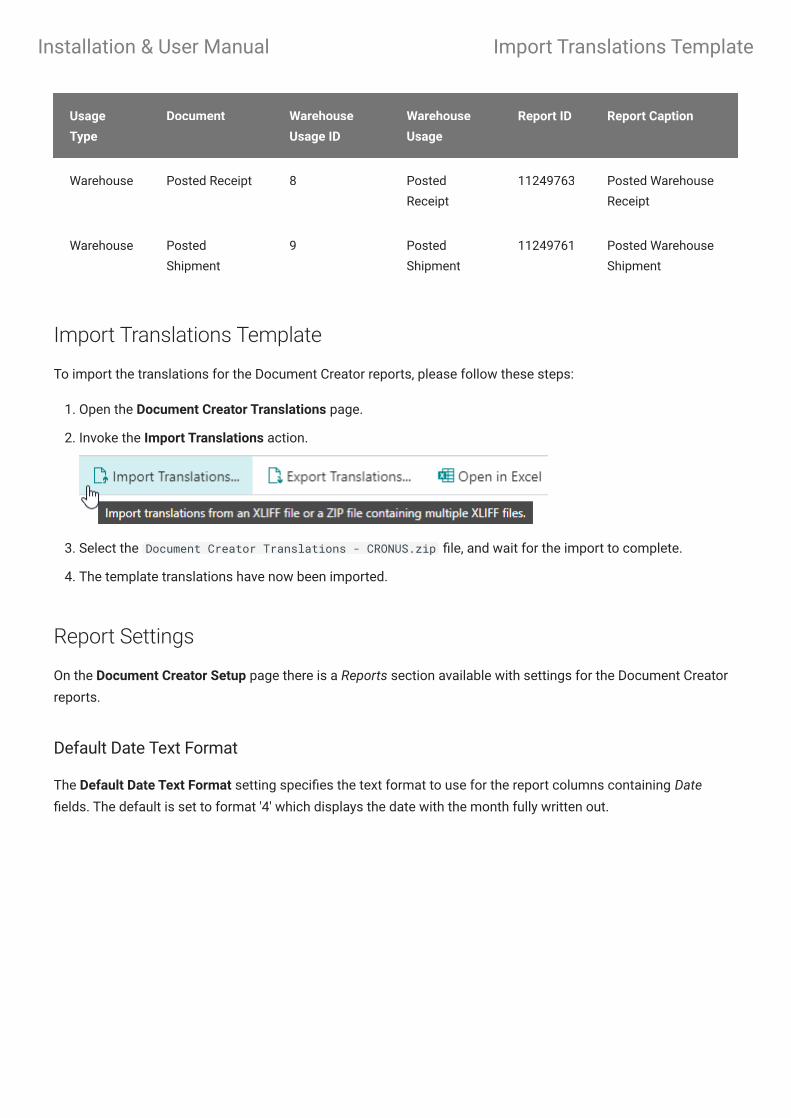
Import Translations Template
To import the translations for the Document Creator reports, please follow these steps:
Open the Document Creator Translations page.
Invoke the Import Translations action.
Select the Document Creator Translations - CRONUS.zip file, and wait for the import to complete.
The template translations have now been imported.
Report Settings
On the Document Creator Setup page there is a Reports section available with settings for the Document Creator
reports.
Default Date Text Format
The Default Date Text Format setting specifies the text format to use for the report columns containing Date
fields. The default is set to format '4' which displays the date with the month fully written out.
Usage
Type
Document Warehouse
Usage ID
Warehouse
Usage
Report ID Report Caption
Warehouse Posted Receipt 8 Posted
Receipt
11249763 Posted Warehouse
Receipt
Warehouse Posted
Shipment
9 Posted
Shipment
11249761 Posted Warehouse
Shipment
1.
2.
3.
4.
Installation & User Manual Import Translations Template
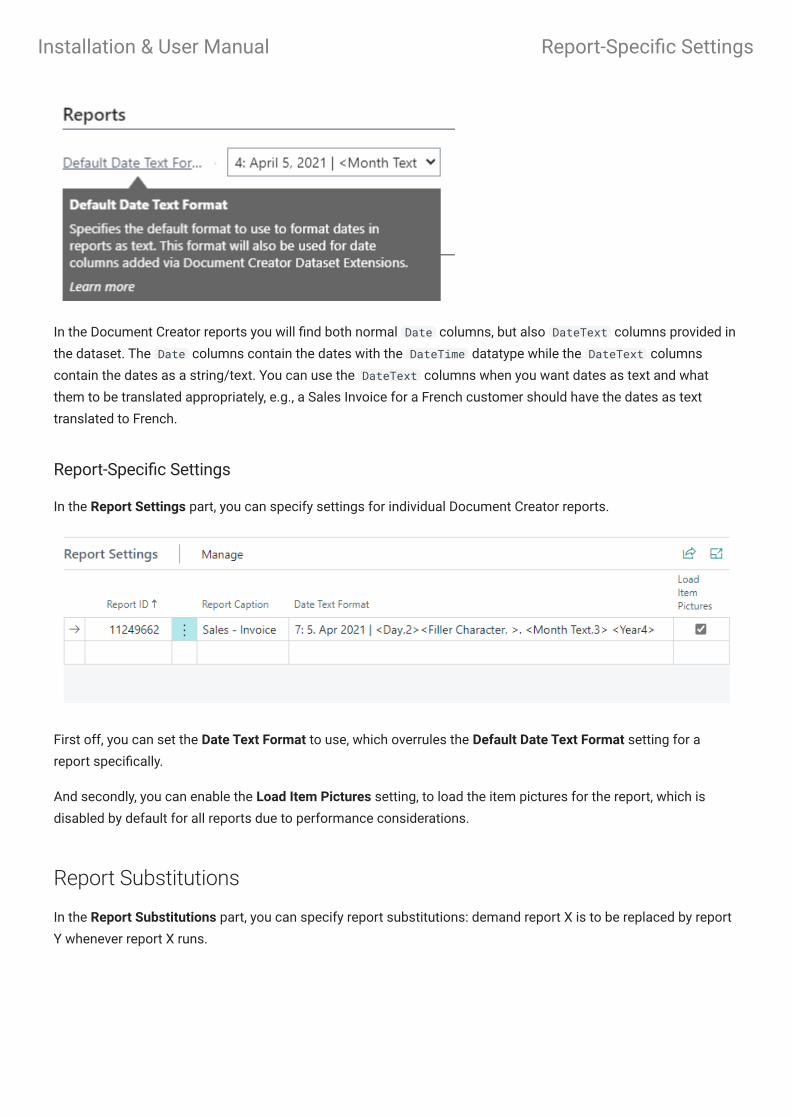
In the Document Creator reports you will find both normal Date columns, but also DateText columns provided in
the dataset. The Date columns contain the dates with the DateTime datatype while the DateText columns
contain the dates as a string/text. You can use the DateText columns when you want dates as text and what
them to be translated appropriately, e.g., a Sales Invoice for a French customer should have the dates as text
translated to French.
Report-Specific Settings
In the Report Settings part, you can specify settings for individual Document Creator reports.
First off, you can set the Date Text Format to use, which overrules the Default Date Text Format setting for a
report specifically.
And secondly, you can enable the Load Item Pictures setting, to load the item pictures for the report, which is
disabled by default for all reports due to performance considerations.
Report Substitutions
In the Report Substitutions part, you can specify report substitutions: demand report X is to be replaced by report
Y whenever report X runs.
Installation & User Manual Report-Specific Settings
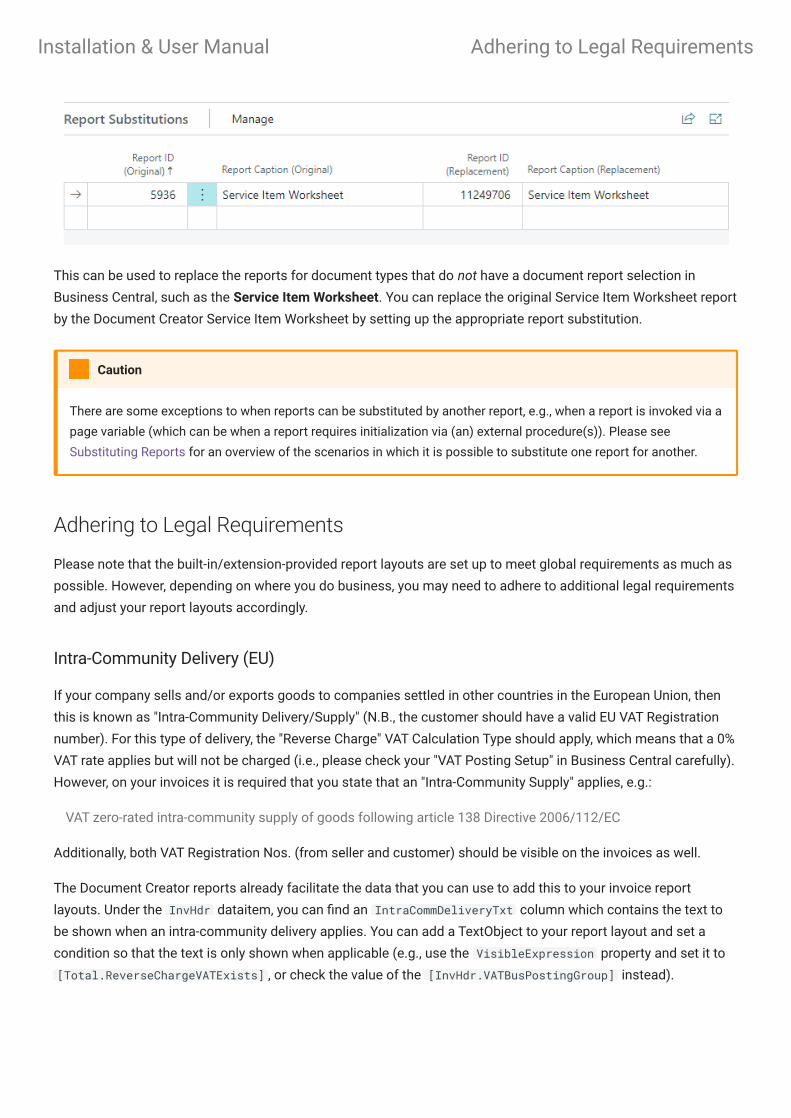
This can be used to replace the reports for document types that do not have a document report selection in
Business Central, such as the Service Item Worksheet. You can replace the original Service Item Worksheet report
by the Document Creator Service Item Worksheet by setting up the appropriate report substitution.
Adhering to Legal Requirements
Please note that the built-in/extension-provided report layouts are set up to meet global requirements as much as
possible. However, depending on where you do business, you may need to adhere to additional legal requirements
and adjust your report layouts accordingly.
Intra-Community Delivery (EU)
If your company sells and/or exports goods to companies settled in other countries in the European Union, then
this is known as "Intra-Community Delivery/Supply" (N.B., the customer should have a valid EU VAT Registration
number). For this type of delivery, the "Reverse Charge" VAT Calculation Type should apply, which means that a 0%
VAT rate applies but will not be charged (i.e., please check your "VAT Posting Setup" in Business Central carefully).
However, on your invoices it is required that you state that an "Intra-Community Supply" applies, e.g.:
VAT zero-rated intra-community supply of goods following article 138 Directive 2006/112/EC
Additionally, both VAT Registration Nos. (from seller and customer) should be visible on the invoices as well.
The Document Creator reports already facilitate the data that you can use to add this to your invoice report
layouts. Under the InvHdr dataitem, you can find an IntraCommDeliveryTxt column which contains the text to
be shown when an intra-community delivery applies. You can add a TextObject to your report layout and set a
condition so that the text is only shown when applicable (e.g., use the VisibleExpression property and set it to
[Total.ReverseChargeVATExists] , or check the value of the [InvHdr.VATBusPostingGroup] instead).
There are some exceptions to when reports can be substituted by another report, e.g., when a report is invoked via a
page variable (which can be when a report requires initialization via (an) external procedure(s)). Please see
Substituting Reports for an overview of the scenarios in which it is possible to substitute one report for another.
Caution
Installation & User Manual Adhering to Legal Requirements

VAT Rates on Invoices
Even if a 0% VAT rate applies when exporting your goods, your company may still need to show the VAT rate(s)
even if a VAT amount of "0" is being charged. The Document Creator reports already facilitate this, i.e., if VAT
applies, then the VAT rate(s) (N.B. one or multiple) will always be shown (together with their corresponding
amounts). Of course, if you wish to change this, then you can edit the report layouts accordingly.
Installation & User Manual VAT Rates on Invoices

Installation & User Manual

Creating and Copying Layouts
A Dynamics 365 Business Central report is made up of the following two components:
Report Object: A report object defines the report dataset (i.e., based on the report schema, which include the
dataitems, fields/columns and parameters) and request page. Its definition is found in the code of a
Dynamics 365 Business Central (AL) extension.
Layout: A layout defines how the report dataset should be presented when printed or exported to a file. You
can use a report designer to edit the layout of a report.
If you want to design a layout for one of your document reports, then it is best to get started by creating a copy of
an existing, extension-provided report layout to create a new user-defined report layout that you can edit. However,
if you want to, you can also choose to create an entirely new, blank Document Creator layout for your document
reports.
Creating a New Blank Layout
To create a new, blank report layout, you first need to have a report object that the layout will target. You can use
one of the report objects from the Microsoft Base Application, use a report object from the Document Creator
extension, or from any other extension.
If you have a report object, then you can create a new Document Creator report layout for the report on the Report
Layouts page as follows:
Invoke the New Blank Layout... action.
Enter/Select the Report ID of the target report object.
Enable Insert Document Creator Layout.
Select OK.
The figure below shows the inputs on the Add New Blank Document Creator Layout dialog page to create a new,
blank Document Creator layout for report 11249662 "Sales – Invoice":
•
•
1.
2.
3.
4.
Installation & User Manual Creating and Copying Layouts
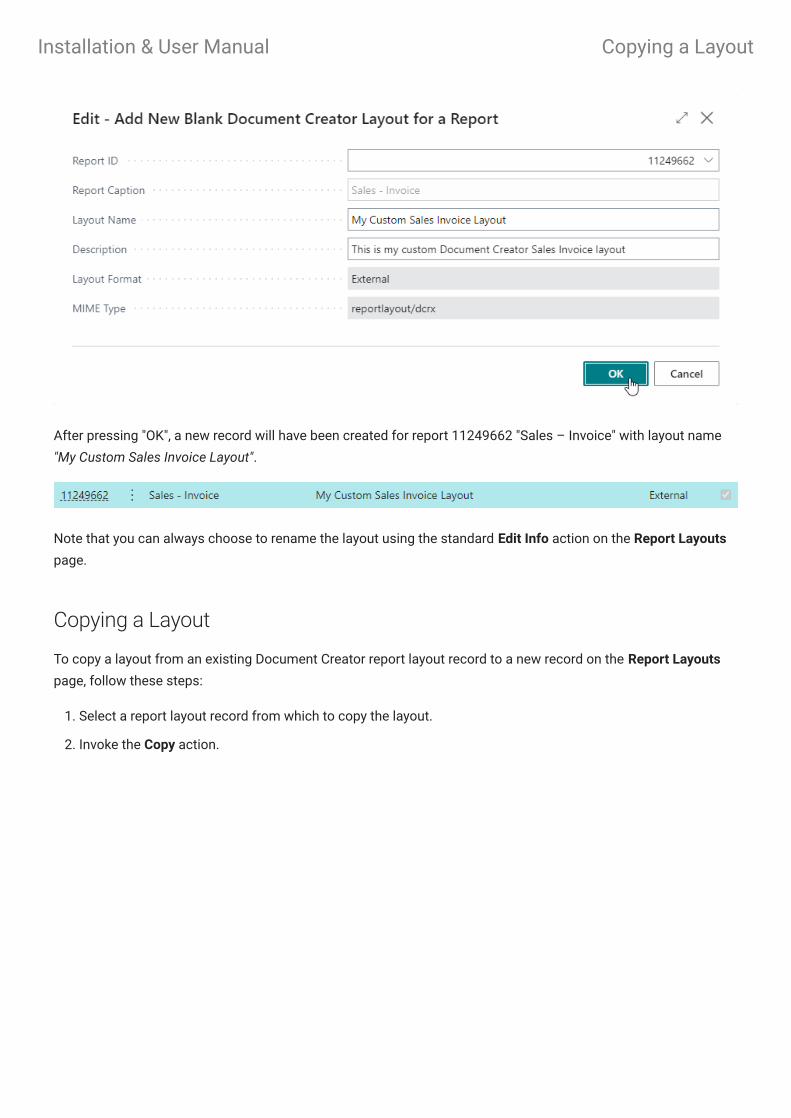
After pressing "OK", a new record will have been created for report 11249662 "Sales – Invoice" with layout name
"My Custom Sales Invoice Layout".
Note that you can always choose to rename the layout using the standard Edit Info action on the Report Layouts
page.
Copying a Layout
To copy a layout from an existing Document Creator report layout record to a new record on the Report Layouts
page, follow these steps:
Select a report layout record from which to copy the layout.
Invoke the Copy action.
1.
2.
Installation & User Manual Copying a Layout

By default the Layout Name will be set to "Copy of <Original Name>". You can freely change this name.
(Optional)
You can also change the target report object for the new layout if you enable the Change Report (Dataset)
option. If this option is enabled, you can enter/select the Report ID of the new target report object. (Optional)
Select OK.
3.
4.
5.
Installation & User Manual Copying a Layout
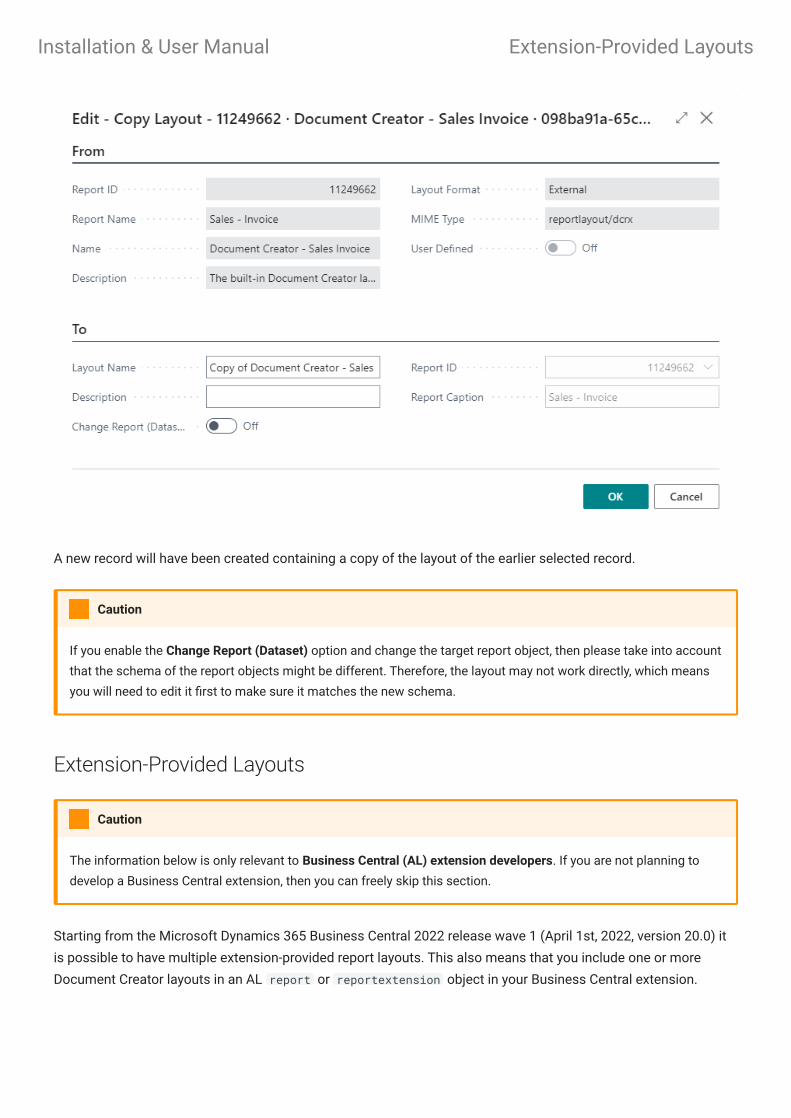
A new record will have been created containing a copy of the layout of the earlier selected record.
Extension-Provided Layouts
Starting from the Microsoft Dynamics 365 Business Central 2022 release wave 1 (April 1st, 2022, version 20.0) it
is possible to have multiple extension-provided report layouts. This also means that you include one or more
Document Creator layouts in an AL report or reportextension object in your Business Central extension.
If you enable the Change Report (Dataset) option and change the target report object, then please take into account
that the schema of the report objects might be different. Therefore, the layout may not work directly, which means
you will need to edit it first to make sure it matches the new schema.
Caution
The information below is only relevant to Business Central (AL) extension developers. If you are not planning to
develop a Business Central extension, then you can freely skip this section.
Caution
Installation & User Manual Extension-Provided Layouts

In the report object definition or in a reportextension object it is possible to define the layouts that should be
shipped with the app(s) that (collectively) define the report object that produces the dataset in a new rendering
section of the object. A reportextension can add additional layouts for the report, but note that it cannot modify
or remove the existing layouts provided by the original report object or other reportextension objects for the
report.
Document Creator report layouts are defined as External (in AL rendering sections, this layout type is named
Custom ) layouts with the MimeType set to reportlayout/dcrx .
You can include a Document Creator layout for a report in your app by adding a layout section with the
properties set as follows:
When the app is installed, the newly added, extension-provided report layouts can all be found on the Report
Layouts page.
rendering{ layout("EXT - Document Creator Sales Invoice Layout - RED") { Caption = 'EXT - Document Creator Sales Invoice Layout - RED'; LayoutFile = 'Source/Reports/Sales/EXTSalesInvoiceRed.Layout.dcrx'; MimeType = 'reportlayout/dcrx'; Summary = 'The EXT RED Document Creator layout for the Posted Sales Invoice'; Type = Custom; }
layout("EXT - Document Creator Sales Invoice Layout - BLUE") { Caption = 'EXT - Document Creator Sales Invoice Layout - BLUE'; LayoutFile = 'Source/Reports/Sales/EXTSalesInvoiceBlue.Layout.dcrx'; MimeType = 'reportlayout/dcrx'; Summary = 'The EXT BLUE Document Creator layout for the Posted Sales Invoice'; Type = Custom; }}
Installation & User Manual Extension-Provided Layouts

Installation & User Manual

Editing Layouts
Watch the Editing Layouts (Report Layouts) section of our demo video to learn more about how to start editing
your layouts!
Editing Layouts using Design Files
On the Report Layouts page you will find an Export Design and Import Design action (within the Document Creator
promoted category). These actions can be used to export and import a "Document Creator Design File (.dcrd)" for
the record selected on the page.
Note that you can only edit user-defined report layout records! It is not possible to edit extension-provided layout
records; to make changes to an extension-provided layout, you will need to make a copy of the layout to create a
new user-defined/tenant report layout.
Important
Installation & User Manual Editing Layouts

Please note that these actions are only supported for Document Creator layouts (i.e., layout format "External" and
MIME Type "reportlayout/dcrx"). If you attempt to use these actions for any other layout type, such as RDLC, Word
or Excel, an error message will be shown.
Export Design
To start editing a layout, you will need to export the layout in a Design file that you will open in the Document
Creator standalone report designer. If you do not have the designer installed yet, then please follow the
installations instructions at the Installing the Designer page.
To export a layout to edit it in the designer, follow these steps:
Select the Report Layout record.
Invoke the Export Design... action.
The Export Design dialog page opens.
On this dialog page you will find the option Edit with Data (which is enabled by default). If you enable this
option, the Design file will be exported with a dataset, which can be filtered using the report's request page
that will be shown.
1.
2.
3.
Installation & User Manual Export Design

Choose OK.
If you made the choice to Edit with Data earlier, the report's request page will open, where you can define
filters and further options for the dataset to be included in the Design file.
4.
5.
Installation & User Manual Export Design

After configuring the options and filters, choose OK and wait for the report to complete.
Save the Design file to a location of your choice.
You can now open the file and use the Document Creator Designer to edit the layout.
6.
Installation & User Manual Export Design

After you are satisfied with the changes to the layout, you can save and close the designer.
Import Design
When you are done editing the layout in an earlier exported Design file, you need to import the Design file to apply
the changes to the layout in your Dynamics 365 Business Central database. The Import Design action allows you
to select a Design file and import the contained layout into the selected, user-defined Document Creator report
layout record on the Report Layouts page.
To import a layout from a Design file, follow these steps:
Select the target report layout record.
Invoke the Import Design... action.
Click Choose... and select the Design file in the Open File dialog that appears.
In case you enabled the Edit with Data option earlier, you can Preview (Ctrl+P) your layout from the report designer
with the data from your Dynamics 365 Business Central database. In case you disabled the option earlier, the
preview will use a sample dataset with a single record per data source containing the label-/column-names and/or
default values for the columns.
Note
1.
2.
3.
This action is only enabled for user-defined Document Creator report layout records. It is not possible to edit
extension-provided layout records; to make changes to an extension-provided layout, you will need to make a copy
of the layout to create a new user-defined/tenant report layout.
Attention
During the import of a Design file, the previous version of the layout is automatically added to the Tenant Report
Layout Archive, along with a comment that reads "Before Design Import". This allows you to restore the previous
version of the layout, e.g., in case you made a mistake and want to revert your changes.
Info
Installation & User Manual Import Design

Installation & User Manual

Layout Selection
Layout Selection Factbox
You can view which layout is used for each company on the Report Layout Selection page, provided standard by
Business Central. To make checking the layout selections a bit more convenient, the Document Creator extension
also adds a new Layout Selection factbox to the Report Layouts page (and also to the Apportunix Report
Selection page).
In this factbox you can view which layout is used for each company for the target report of the currently selected
record.
Configuring Layout Selections
To make sure your report uses the correct report layout for each company (and does not use a different layout or
print a blank page) you will need to configure the Layout Selections for your company. One way of doing this is
going to the Report Layout Selections page and configuring the layout selections as described in Change the
Current Report Layout.
You can also (more easily) change the layout selections using the Document Creator actions directly from the
Report Layouts page.
Installation & User Manual Layout Selection

Company Layout Selection Action
The Company Layout Selection... action can be used to specify per company whether the report should use the
layout selected in the Report Layouts page.
On the Report Layouts page, select the report layout record to configure the report layout selections for.
Invoke the Report Layout Selection... action.
The Report Layout Selection page will open for the selected report layout record.
Select the companies where you wish to use the layout when the report is executed. You can do this by
marking the checkbox in the Selected column for those companies.
1.
2.
3.
Installation & User Manual Company Layout Selection Action

At the bottom of the page you will see which layout the report is currently using in the selected company (in
group Current Report Layout) and which layout it will use after closing the page (in group New Report
Layout).
Companies that are displayed in bold-green are already using the layout for the report.
Close the page.
The layout selections for the report will be updated after closing the page. If you run the report, it will now use the
layout in the companies you selected.
4.
In the example below a checkmark is set for the company "CRONUS International Ltd." which means the report
layout selection for report 11249662 "Sales - Invoice" will change from the extension-provided Document Creator
layout to the selected layout (i.e., "My Sales Invoice", a user-defined Document Creator report layout).
The company "Second Company" is displayed in bold/green and the Selection Exists mark is checked which
indicates that the report layout selection was already configured to use the selected layout ("My Sales Invoice")
earlier.
Example
Installation & User Manual Company Layout Selection Action
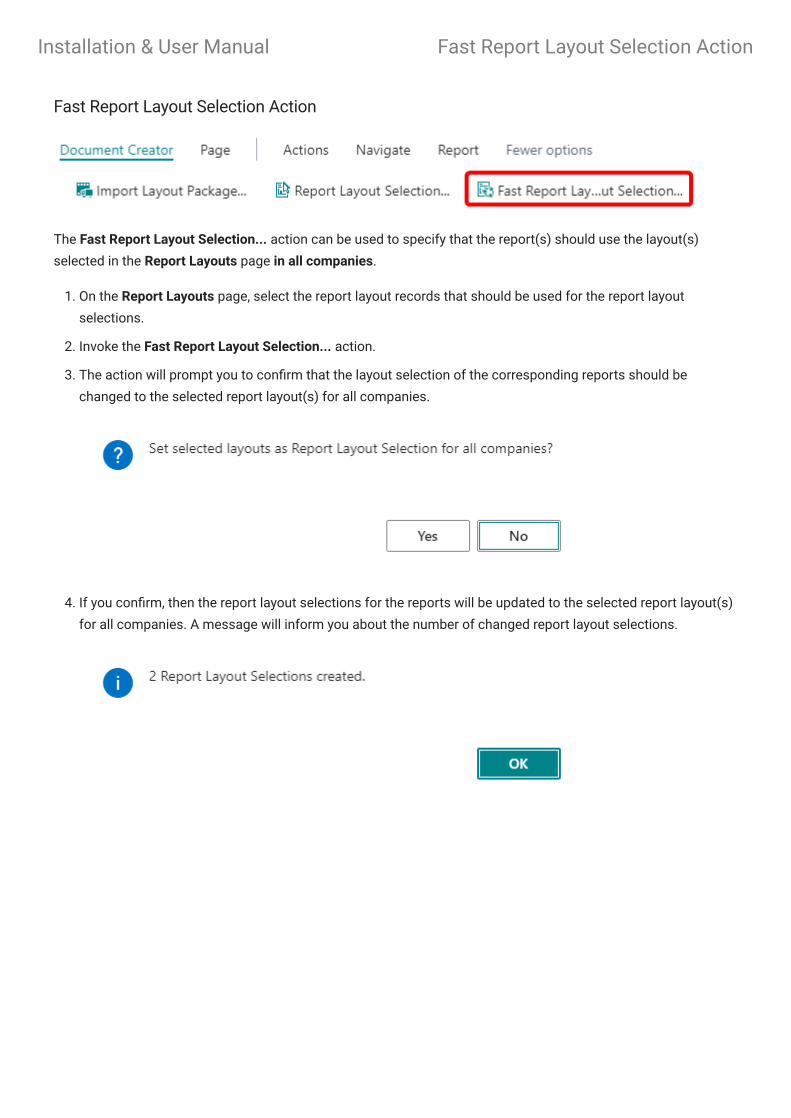
Fast Report Layout Selection Action
The Fast Report Layout Selection... action can be used to specify that the report(s) should use the layout(s)
selected in the Report Layouts page in all companies.
On the Report Layouts page, select the report layout records that should be used for the report layout
selections.
Invoke the Fast Report Layout Selection... action.
The action will prompt you to confirm that the layout selection of the corresponding reports should be
changed to the selected report layout(s) for all companies.
If you confirm, then the report layout selections for the reports will be updated to the selected report layout(s)
for all companies. A message will inform you about the number of changed report layout selections.
1.
2.
3.
4.
Installation & User Manual Fast Report Layout Selection Action

Installation & User Manual

Tenant Report Layout Archive
After modifying a user-defined/tenant report layout, there is always the possibility to revert your changes to a
previous version of your report layout. On the Report Layouts page you will find an Archive factbox that shows the
archived versions of the selected layout. Every time a report layout is changed by an import, an archive version is
automatically created.
It is also possible to view all archived tenant report layouts by opening the Tenant Report Layout Archive page.
The Tenant Report Layout Archive page can be opened using the Tell Me search feature, or invoking the Navigate >
Document Creator > Archive action on the Report Layouts page.
Note
Installation & User Manual Tenant Report Layout Archive
Archiving Layouts
You can manually archive the current version of a tenant/user-defined report layout using the Archive Layout...
action on the Report Layouts page. A new archive record will be created with the current version of the selected
layout record. By default, the archive commment will be empty, but you can enter your own comment using the
Edit Comment action in the Archive factbox/page.
Restoring Layouts
You can restore a previous version of a layout using the Restore Layout action on the Archive factbox of the
Report Layouts page, or the like-named action on the Tenant Report Layout Archive page.
Tenant Report Layouts are archived automatically before the following events take place on the record:
Layout Package Import - Importing a layout package can overwrite existing layouts. The version before the
import is automatically archived.
Layout Restore - Restoring a previous version will overwrite the current version. The version before the restore
is automatically archived.
Design Import - Importing a design file overwrites the current version of the layout. The version before the
import is automatically archived.
Description Update - One can edit the description of a layout. The version with the original description is
automatically archived.
MIME Type Change - One can change the MIME type of a layout by uploading a new layout with a different file
format. The version before the upload is automatically archived.
When are layouts archived automatically?
•
•
•
•
•
Installation & User Manual Archiving Layouts
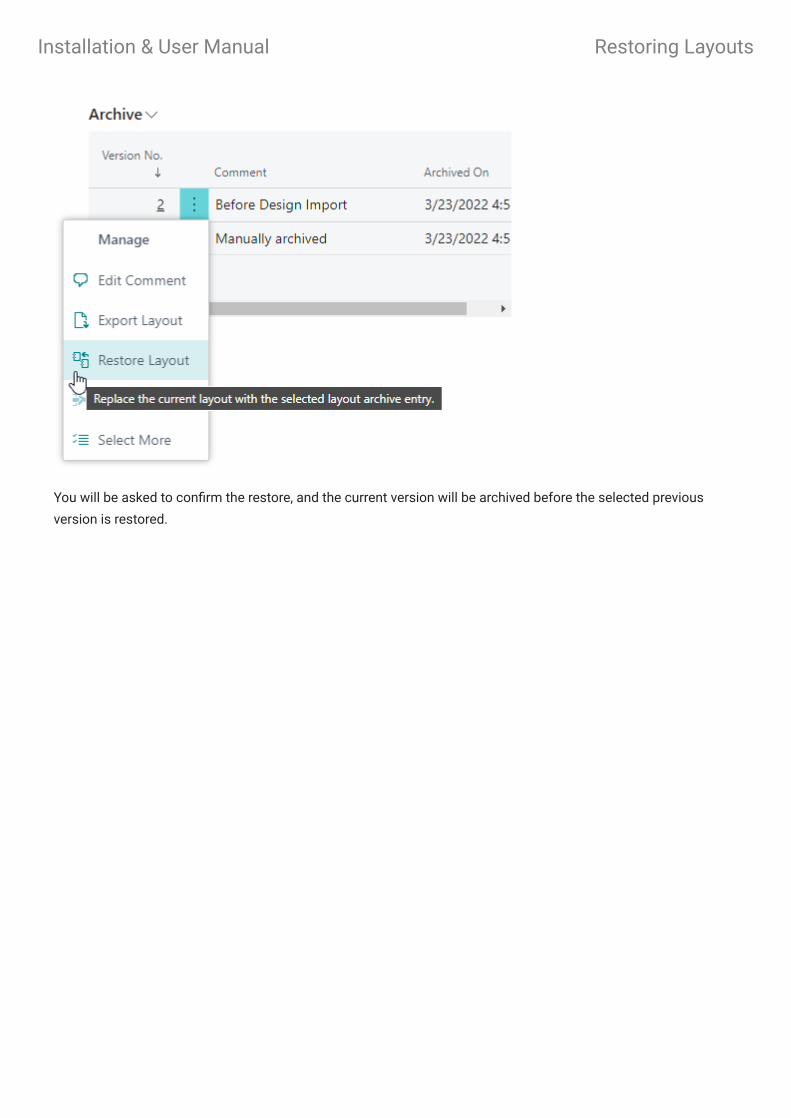
You will be asked to confirm the restore, and the current version will be archived before the selected previous
version is restored.
Installation & User Manual Restoring Layouts

Installation & User Manual
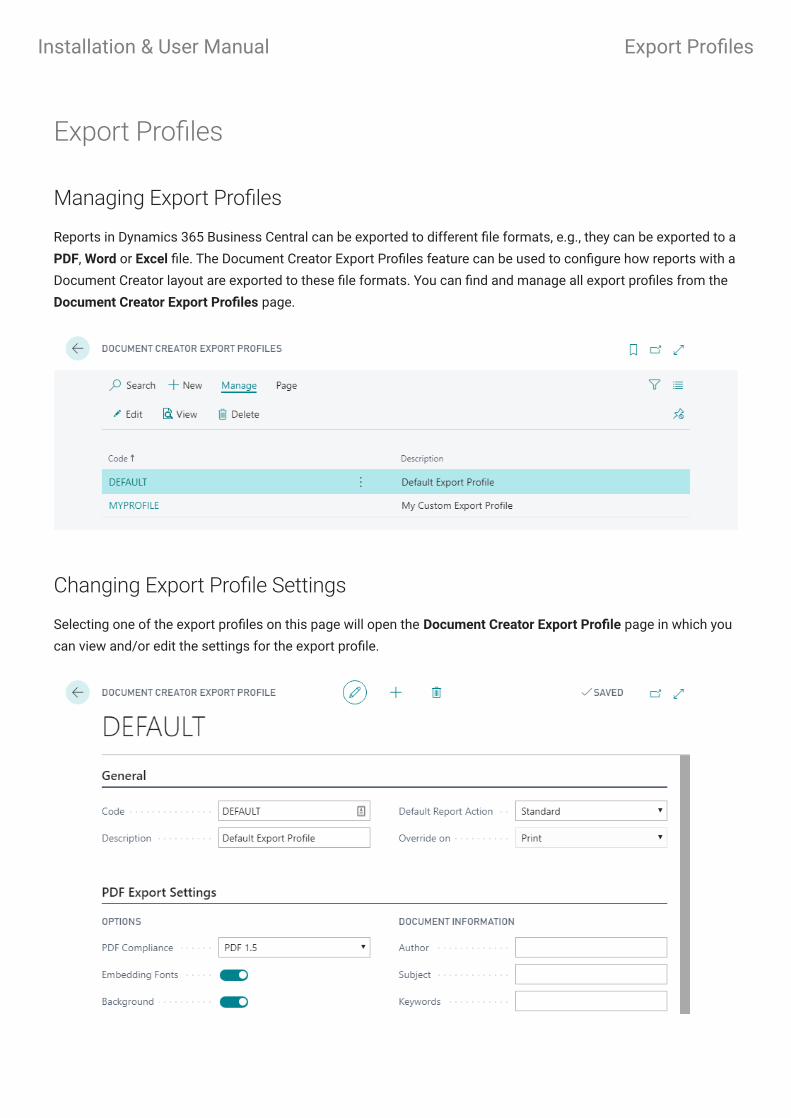
Export Profiles
Managing Export Profiles
Reports in Dynamics 365 Business Central can be exported to different file formats, e.g., they can be exported to a
PDF, Word or Excel file. The Document Creator Export Profiles feature can be used to configure how reports with a
Document Creator layout are exported to these file formats. You can find and manage all export profiles from the
Document Creator Export Profiles page.
Changing Export Profile Settings
Selecting one of the export profiles on this page will open the Document Creator Export Profile page in which you
can view and/or edit the settings for the export profile.
Installation & User Manual Export Profiles
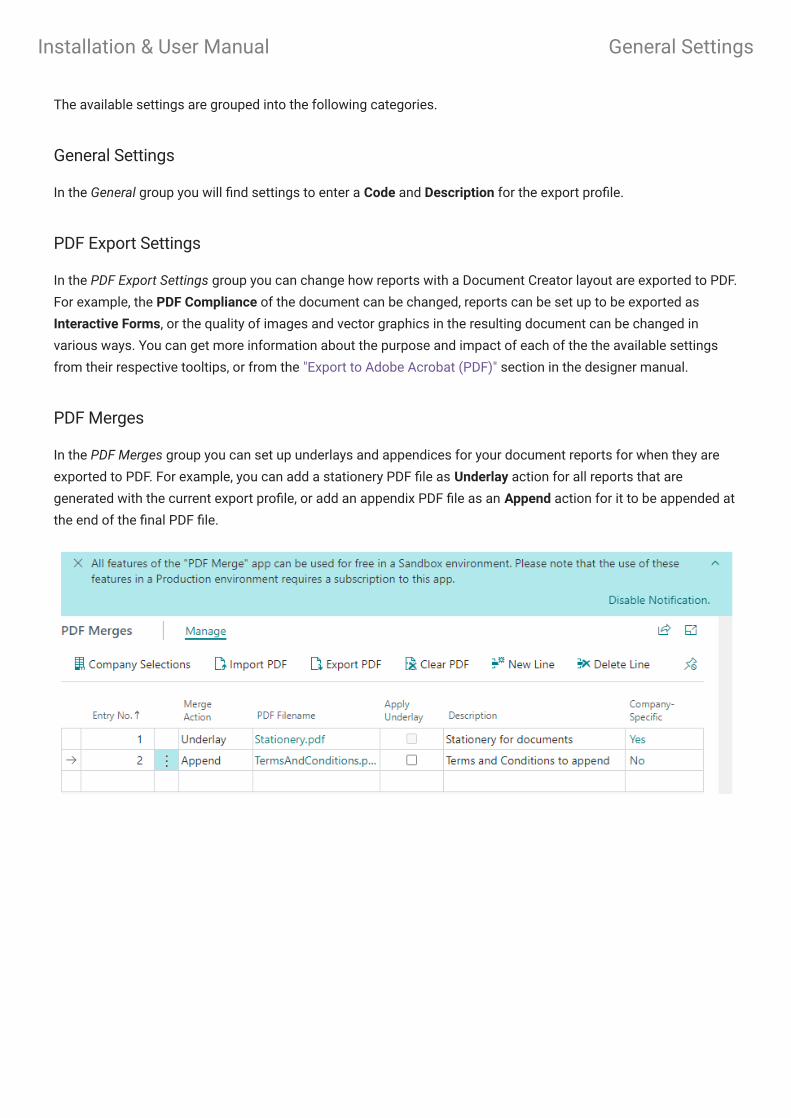
The available settings are grouped into the following categories.
General Settings
In the General group you will find settings to enter a Code and Description for the export profile.
PDF Export Settings
In the PDF Export Settings group you can change how reports with a Document Creator layout are exported to PDF.
For example, the PDF Compliance of the document can be changed, reports can be set up to be exported as
Interactive Forms, or the quality of images and vector graphics in the resulting document can be changed in
various ways. You can get more information about the purpose and impact of each of the the available settings
from their respective tooltips, or from the "Export to Adobe Acrobat (PDF)" section in the designer manual.
PDF Merges
In the PDF Merges group you can set up underlays and appendices for your document reports for when they are
exported to PDF. For example, you can add a stationery PDF file as Underlay action for all reports that are
generated with the current export profile, or add an appendix PDF file as an Append action for it to be appended at
the end of the final PDF file.
Installation & User Manual General Settings

PDF merges incur additional time and usage costs for report generation. To use this feature you must activate your
subscription to the "PDF Merge" product in the Apportunix Subscriptions page. The usage will be reported to the
external API that is invoked and will be invoiced periodically. Please see the Prices page on the Apportunix website
for more information.
You can use the "PDF Merge" features for free, without any charges or restrictions, in a Business Central Sandbox
environment. In a Sandbox environment, the Demo API will be used and a watermark will be applied to the reports
accordingly.
Attention
You can use the Apply Underlay field to specify whether the underlay should be applied to appended PDF files as
well. By default, underlays will not be applied to appended PDF files.
Tip
Installation & User Manual PDF Merges

Word Export Settings
In the Word Export Settings group you can change how reports with a Document Creator layout are exported to
Word. For example, you can change the export method, or use the Wysiwyg setting to make the output as close to
You can use the Company Selections action to view and edit the companies to which the selected PDF Merge
applies.
If no companies are specified, then the PDF Merge will be applied in all companies.
You can use the Company-Specific field to see whether or not a PDF Merge only applies to specific companies.
Tip
Installation & User Manual Word Export Settings
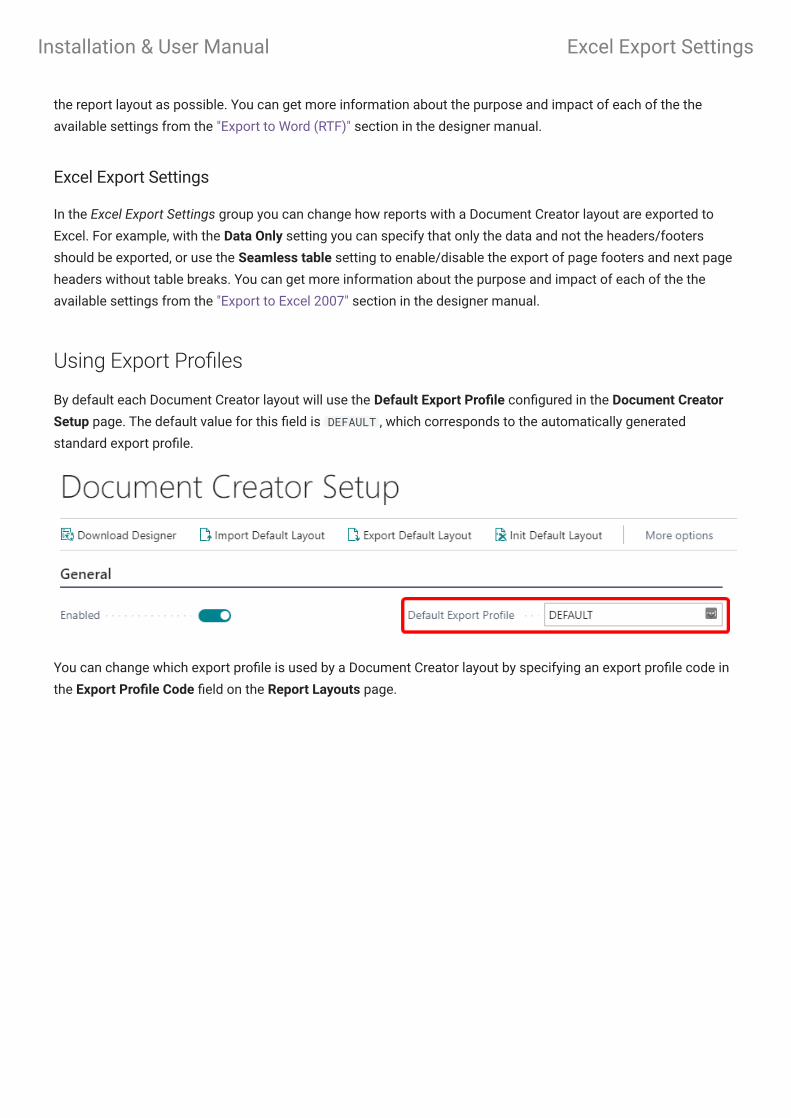
the report layout as possible. You can get more information about the purpose and impact of each of the the
available settings from the "Export to Word (RTF)" section in the designer manual.
Excel Export Settings
In the Excel Export Settings group you can change how reports with a Document Creator layout are exported to
Excel. For example, with the Data Only setting you can specify that only the data and not the headers/footers
should be exported, or use the Seamless table setting to enable/disable the export of page footers and next page
headers without table breaks. You can get more information about the purpose and impact of each of the the
available settings from the "Export to Excel 2007" section in the designer manual.
Using Export Profiles
By default each Document Creator layout will use the Default Export Profile configured in the Document Creator
Setup page. The default value for this field is DEFAULT , which corresponds to the automatically generated
standard export profile.
You can change which export profile is used by a Document Creator layout by specifying an export profile code in
the Export Profile Code field on the Report Layouts page.
Installation & User Manual Excel Export Settings
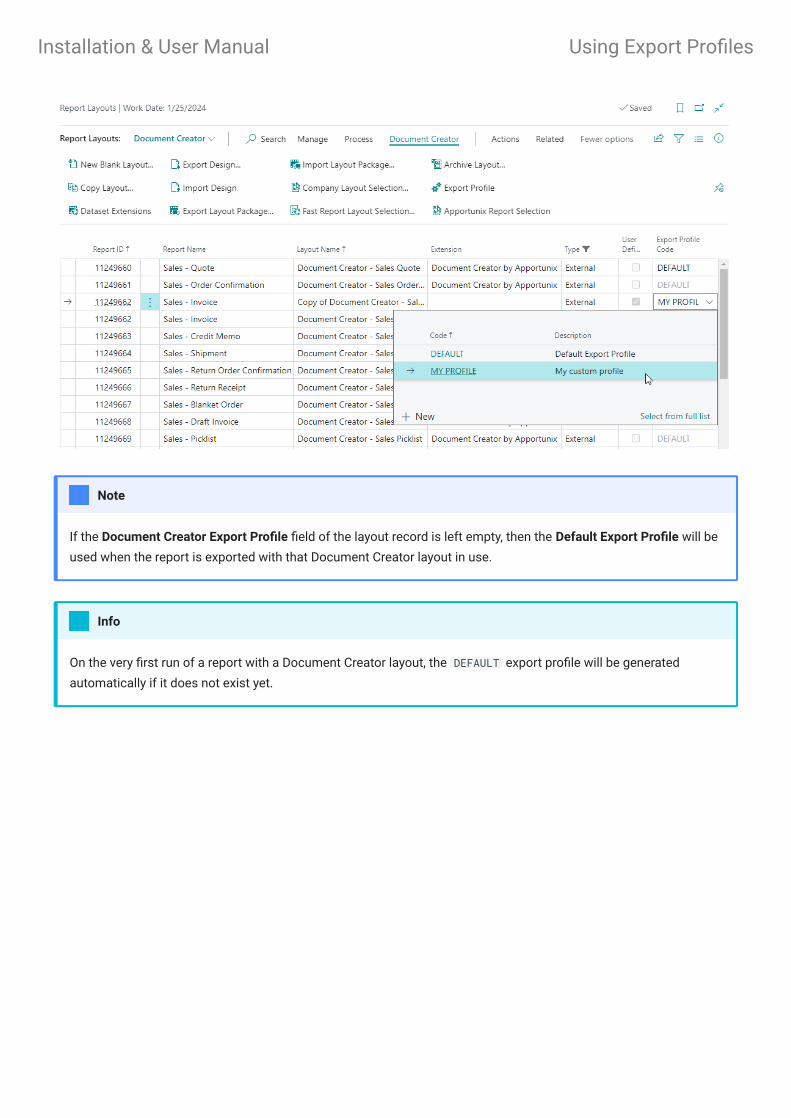
If the Document Creator Export Profile field of the layout record is left empty, then the Default Export Profile will be
used when the report is exported with that Document Creator layout in use.
Note
On the very first run of a report with a Document Creator layout, the DEFAULT export profile will be generated
automatically if it does not exist yet.
Info
Installation & User Manual Using Export Profiles

Installation & User Manual
Report Translations
Document Creator includes a Report Translations feature which helps to create multilingual reports adding
translations as data. The report developer can simply add label placeholders in the report object which
automatically populate the Document Creator Translation table. You can configure the settings of the Report
Translations feature in the Translations group of the Document Creator Setup page, see Translation Settings.
Benefits:
Translations are no longer in code, but have become data
Non-existing translation records will automatically be created
Translation is no longer restricted to the (AL) extension developer
Translations can be created or modified by the end-user as well
Watch the Report Translations (Customize translations yourself) section of our demo video to learn more about
the benefits of the Report Translations feature!
Editing Translations
On the Document Creator Translations page you can view, create and edit translations that can be used by
reports. By default, the page shows the following columns in the main page:
•
•
•
•
Column Description
Tag The source text/label placeholder to translate.
Default
Translation
The translation for language code '' .
To-do Specifies whether the Tag still needs a Default Translation.
To-do exists Specifies whether there is a translation record with a To-do for any language for the Tag. The
translations of the Tag can be found in the Document Creator Translations subpage.
Report ID If empty, the translations will be used by all reports. If not empty, the translations will be used
as report-specific translations for the report object with the specified ID.
Report Caption The report caption of the report to which the translations apply.
Installation & User Manual Report Translations

Column Description
Last Used Specifies when the translation was last used. Whether or not this field is updated depends on
the Update Usage setting.
Last Used by
Report ID
Specifies the ID of the report that last used the translation. Whether or not this field is
updated depends on the Update Usage setting.
Installation & User Manual Editing Translations

The subpage can be used to enter translations for any language you wish to support.
Export to / Import from XLIFF Translation Files
The Document Creator Translations page includes convenient actions for exporting/importing your report
translations to/from XLIFF translation files.
With the Export Translations... action, it is possible to export all translations for one language to an .xlf file, or for
multiple languages to a .zip containing multiple .xlf files for each language code. It is also possible to export the
report-specific translations by specifying the report to export the specific translations for.
The Document Creator Translations page also features a Copy... action that can be used to copy translations as
report-specific translations or copy translations for one language code to translations for another language code.
Info
Document Creator ships with a RapidStart package that already provides you with a set of translations for multiple
languages. This package also provides the translations for the W1 Report Templates. See Templates.
Tip
Installation & User Manual Export to / Import from XLIFF Translation Files

With the Import Translations... action, you can select an .xlf file to import the translations for one language, or
select a .zip file containing multiple .xlf files to import the translations for multiple languages at once.
Adding Translatable Labels to Report Objects
Many document types in Dynamics 365 Business Central have a "Language Code" in the document header. To
translate report labels to the document language and automatically retrieve the translations and/or populate the
Document Creator Translation table with To-do's you can use the wDCR_TranslationMgt codeunit in your report
object. For an example, please see the report objects in the W1 Report Templates extension.
First add the following needed global variables:
Add the following code in the OnAfterGetRecord trigger of the document header dataitem, which updates the
current report language and passes the "Language Code" of the document to the wDCR_TranslationMgt codeunit:
Add the following local procedure that can be used to retrieve translations for the report:
The following section provides details on how an (AL) extension could utilize the Report Translations feature in the
report object definition. Some prior knowledge on extension development is expected.
Warning
It is also possible to add translatable labels more conveniently with the Dataset Extensions feature!
Tip
var Language: Codeunit Language; wDCR_TranslationMgt: Codeunit wDCR_TranslationMgt; ReportId: Integer;
trigger OnAfterGetRecord()begin CurrReport.Language := Language.GetLanguageIdOrDefault("Language Code"); wDCR_TranslationMgt.wgFncSetLanguageCode("Language Code"); // ...end;
local procedure Trl(pLblName: Text[50]): Textbegin if ReportId = 0 then begin Evaluate(ReportId, DelChr(CurrReport.ObjectId(false), '=', DelChr(CurrReport.ObjectId(false), '=', '1234567890'))); wDCR_TranslationMgt.wgFncSetReportId(ReportId);
Installation & User Manual Adding Translatable Labels to Report Objects

You can then use the Trl local procedure in the expression of a report column to add a translatable label to the
dataset, e.g.:
end; exit(wDCR_TranslationMgt.wgFncTranslate(pLblName));end;
column(lblAllowInvDisc; Trl('AllowInvDisc')) { }column(lblAmount; Trl('Amount')) { }column(lblBankAccNo; Trl('BankAccNo')) { }column(lblBankName; Trl('BankName')) { }// ...
Installation & User Manual Adding Translatable Labels to Report Objects

Installation & User Manual
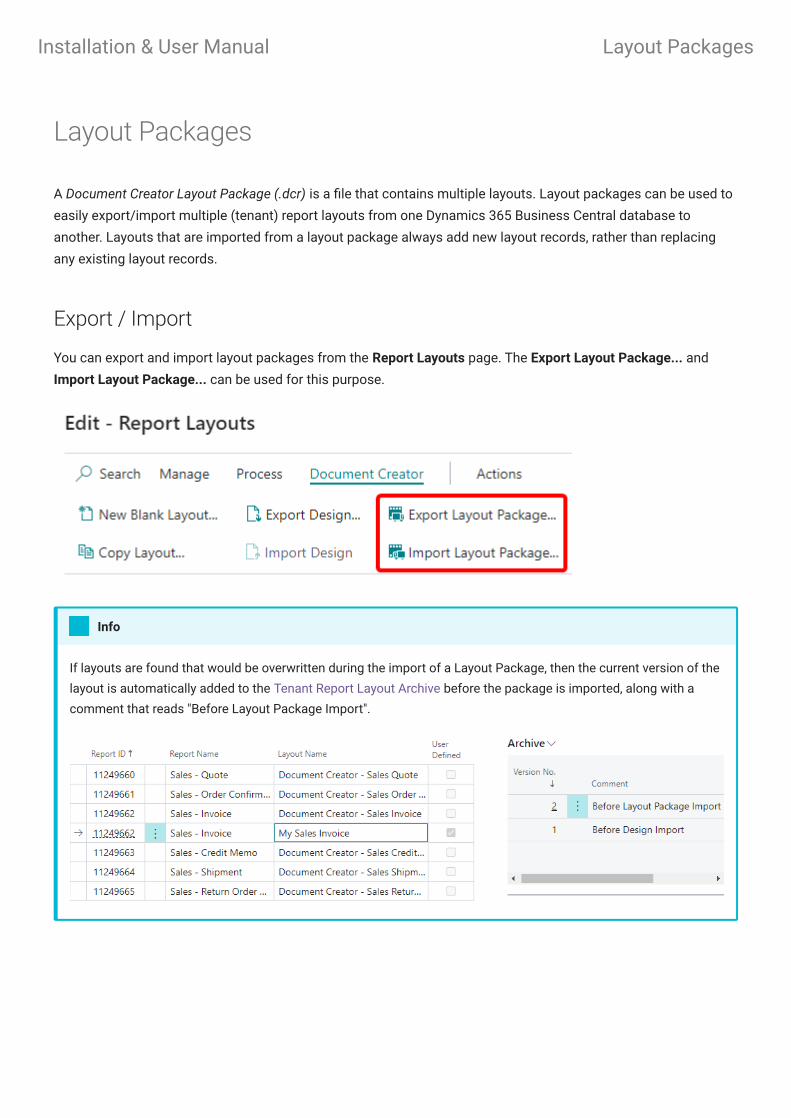
Layout Packages
A Document Creator Layout Package (.dcr) is a file that contains multiple layouts. Layout packages can be used to
easily export/import multiple (tenant) report layouts from one Dynamics 365 Business Central database to
another. Layouts that are imported from a layout package always add new layout records, rather than replacing
any existing layout records.
Export / Import
You can export and import layout packages from the Report Layouts page. The Export Layout Package... and
Import Layout Package... can be used for this purpose.
If layouts are found that would be overwritten during the import of a Layout Package, then the current version of the
layout is automatically added to the Tenant Report Layout Archive before the package is imported, along with a
comment that reads "Before Layout Package Import".
Info
Installation & User Manual Layout Packages

Dataset Extensions
By default, layout packages also include Dataset Extensions for the reports that the layouts apply to. If you import
dataset extensions from a layout package, then any existing dataset extensions for the same report will be
overwritten.
To change whether or not Dataset Extensions should be included, you can change the value of the Layout
Package Contents field in the Document Creator Setup page.
Installation & User Manual Dataset Extensions

Installation & User Manual
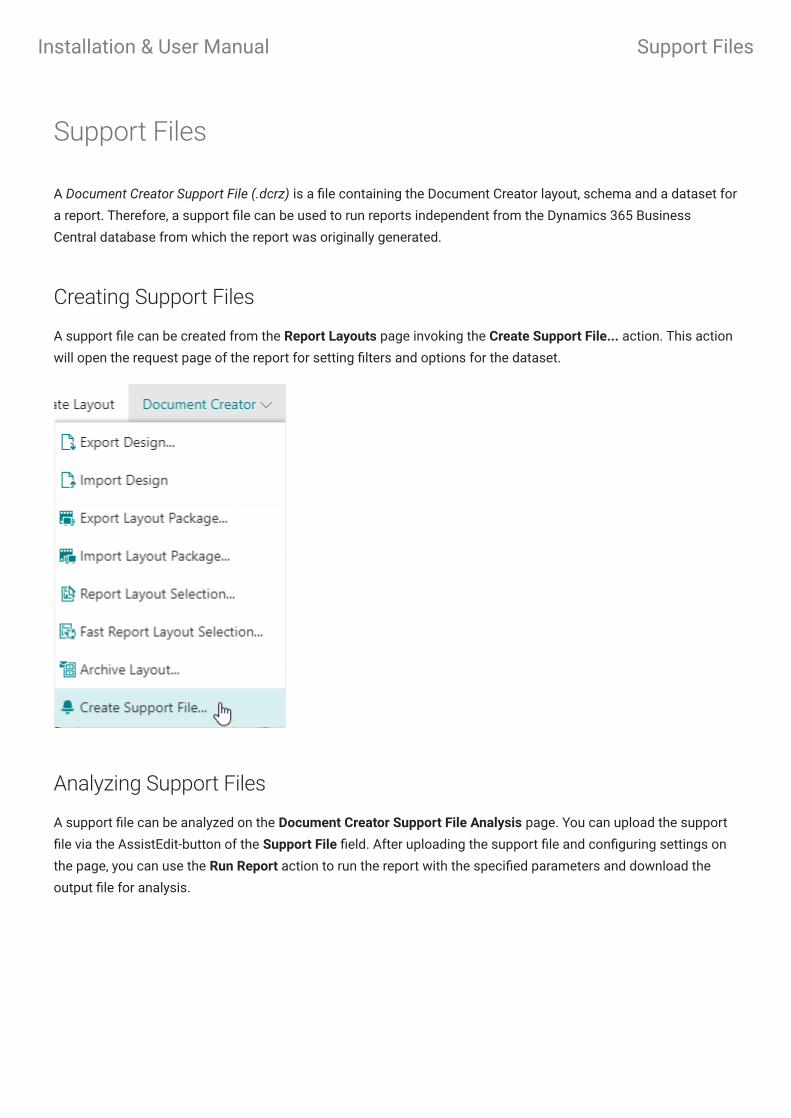
Support Files
A Document Creator Support File (.dcrz) is a file containing the Document Creator layout, schema and a dataset for
a report. Therefore, a support file can be used to run reports independent from the Dynamics 365 Business
Central database from which the report was originally generated.
Creating Support Files
A support file can be created from the Report Layouts page invoking the Create Support File... action. This action
will open the request page of the report for setting filters and options for the dataset.
Analyzing Support Files
A support file can be analyzed on the Document Creator Support File Analysis page. You can upload the support
file via the AssistEdit-button of the Support File field. After uploading the support file and configuring settings on
the page, you can use the Run Report action to run the report with the specified parameters and download the
output file for analysis.
Installation & User Manual Support Files

Installation & User Manual Analyzing Support Files

Installation & User Manual

Dataset Extensions
Document Creator Dataset Extensions allow you to add your own columns, dataitems and translatable labels to
your reports, completely from within your Business Central client, i.e., no need for any report(extension)
development!
Watch the Extending Datasets (Adding new columns) section of our demo video to learn more about how to
extend your report datasets!
Report Dataset Extensions
Report Dataset Extensions can be set up in the Document Creator Report Dataset Extensions page. In this page
you can specify reports to which you want to add new columns, dataitems and/or translatable labels to use them
in your Document Creator report layouts. With the Enabled field you also have the option to either enable or
disable the customizations that you defined for the report.
The page offers the following actions:
Custom Columns - View or edit the custom columns for the selected report.
Custom Labels - View or edit the custom labels for the selected report.
Custom Data Items - View or edit the custom data items for the selected report.
Export - Export the dataset extensions for the selected report(s) to an XML file.
This feature is only enabled when reports are run with a Document Creator layout. For RDLC and Word layouts this
feature is disabled.
Important
•
•
•
•
Installation & User Manual Dataset Extensions
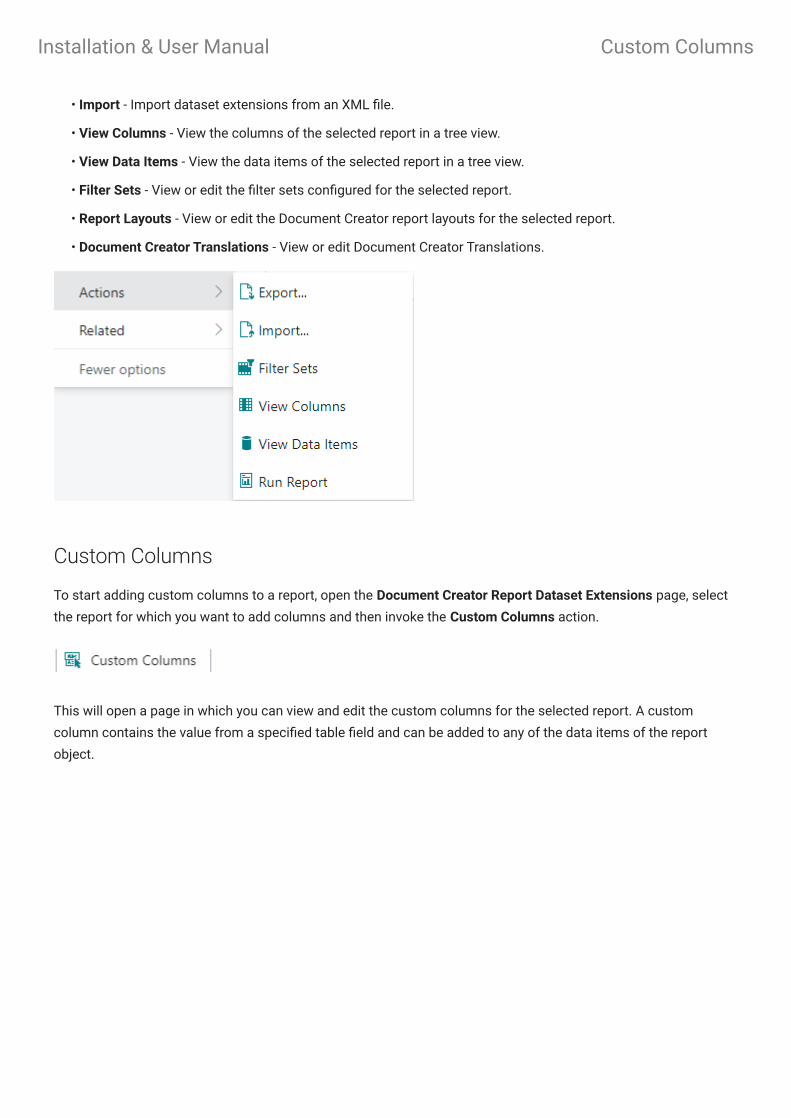
Import - Import dataset extensions from an XML file.
View Columns - View the columns of the selected report in a tree view.
View Data Items - View the data items of the selected report in a tree view.
Filter Sets - View or edit the filter sets configured for the selected report.
Report Layouts - View or edit the Document Creator report layouts for the selected report.
Document Creator Translations - View or edit Document Creator Translations.
Custom Columns
To start adding custom columns to a report, open the Document Creator Report Dataset Extensions page, select
the report for which you want to add columns and then invoke the Custom Columns action.
This will open a page in which you can view and edit the custom columns for the selected report. A custom
column contains the value from a specified table field and can be added to any of the data items of the report
object.
•
•
•
•
•
•
Installation & User Manual Custom Columns

Some examples of custom columns you could add:
Add the Bill-to Customer's "City" to header data item of the Sales Invoice report.
Add the Item's "Vendor No." to the line data item of the Sales Invoice report.
Parent Data Item
In the Parent Data Item Name field you can enter the data item to which you want to add the new column. You can
use the lookup available from the field to look up and select a parent from the data items available in the report.
•
•
Installation & User Manual Parent Data Item

Field
In the Table ID field you can specify the table containing the field for the custom column. Accordingly, in the Field
No. field you can specify the field where the value for the custom column is taken from.
In the Column Name field you can enter the name for the custom column. A name will be suggested automatically
after you entered a table and field for the column. The suggested name will be <FieldName>_<TableName> , but
you can freely change this to your liking.
Custom columns can be added to existing data items or custom data items. If the parent data item is a custom
data item then the Custom Parent field will have a checkmark to signify this. In this case the custom column will
automatically use the table and the filters of the parent data item.
Note
Installation & User Manual Field

Filters
In the Filter Set field you can enter the filter set that should be used for the column. A "filter set" is a set of filters
that define the link between the parent data item and the table that the field for the custom column is taken from.
To create a filter set for a custom column, open the dropdown of the Filter Set field and choose New to create a
filter set for the parent data item and table combination of the column.
This will open the Filter Set card page with parent data item and table already filled in and a code automatically
suggested.
You cannot use names that are already used by other columns or data items in the report.
Warning
Installation & User Manual Filters
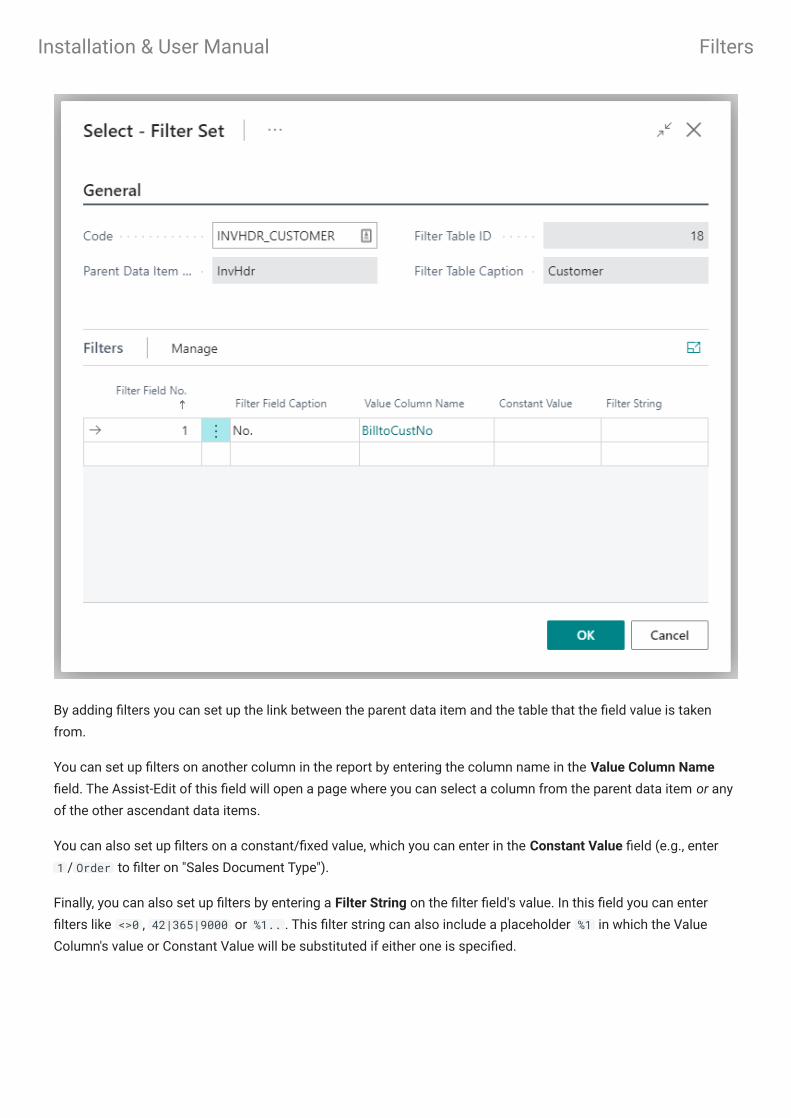
By adding filters you can set up the link between the parent data item and the table that the field value is taken
from.
You can set up filters on another column in the report by entering the column name in the Value Column Name
field. The Assist-Edit of this field will open a page where you can select a column from the parent data item or any
of the other ascendant data items.
You can also set up filters on a constant/fixed value, which you can enter in the Constant Value field (e.g., enter
1 / Order to filter on "Sales Document Type").
Finally, you can also set up filters by entering a Filter String on the filter field's value. In this field you can enter
filters like <>0 , 42|365|9000 or %1.. . This filter string can also include a placeholder %1 in which the Value
Column's value or Constant Value will be substituted if either one is specified.
Installation & User Manual Filters
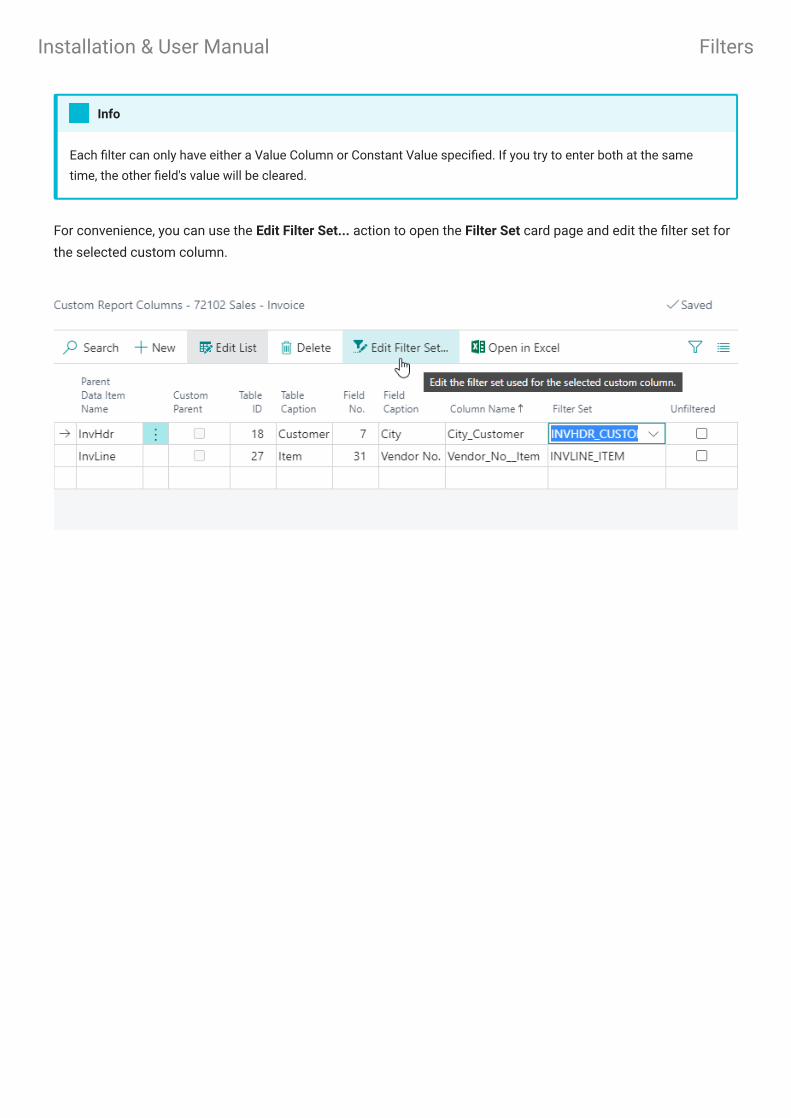
For convenience, you can use the Edit Filter Set... action to open the Filter Set card page and edit the filter set for
the selected custom column.
Each filter can only have either a Value Column or Constant Value specified. If you try to enter both at the same
time, the other field's value will be cleared.
Info
Installation & User Manual Filters
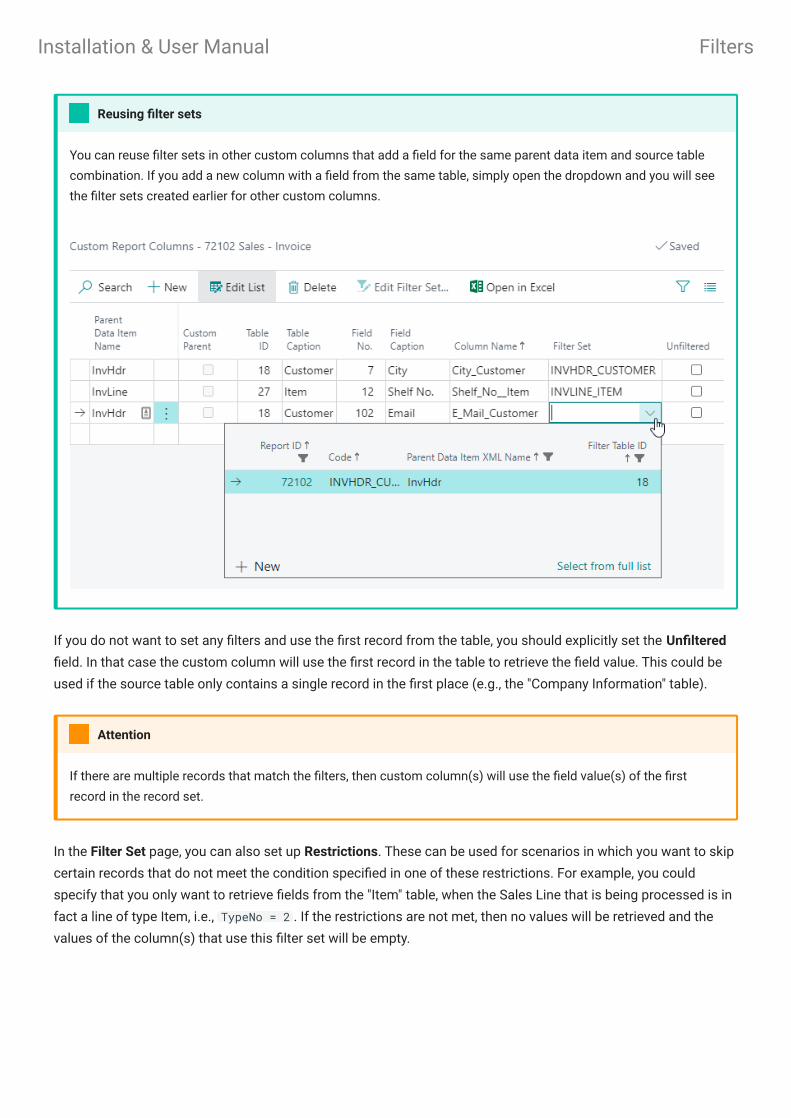
If you do not want to set any filters and use the first record from the table, you should explicitly set the Unfiltered
field. In that case the custom column will use the first record in the table to retrieve the field value. This could be
used if the source table only contains a single record in the first place (e.g., the "Company Information" table).
In the Filter Set page, you can also set up Restrictions. These can be used for scenarios in which you want to skip
certain records that do not meet the condition specified in one of these restrictions. For example, you could
specify that you only want to retrieve fields from the "Item" table, when the Sales Line that is being processed is in
fact a line of type Item, i.e., TypeNo = 2 . If the restrictions are not met, then no values will be retrieved and the
values of the column(s) that use this filter set will be empty.
You can reuse filter sets in other custom columns that add a field for the same parent data item and source table
combination. If you add a new column with a field from the same table, simply open the dropdown and you will see
the filter sets created earlier for other custom columns.
Reusing filter sets
If there are multiple records that match the filters, then custom column(s) will use the field value(s) of the first
record in the record set.
Attention
Installation & User Manual Filters
Example
Installation & User Manual Example
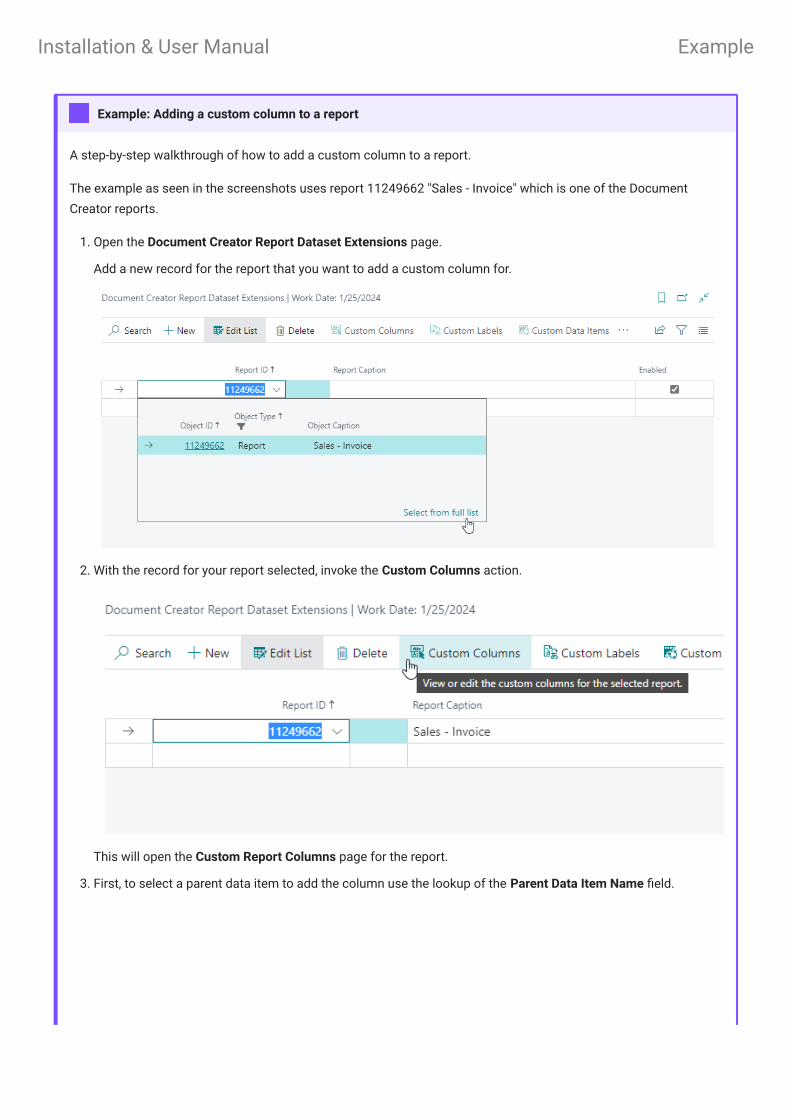
A step-by-step walkthrough of how to add a custom column to a report.
The example as seen in the screenshots uses report 11249662 "Sales - Invoice" which is one of the Document
Creator reports.
Open the Document Creator Report Dataset Extensions page.
Add a new record for the report that you want to add a custom column for.
With the record for your report selected, invoke the Custom Columns action.
This will open the Custom Report Columns page for the report.
First, to select a parent data item to add the column use the lookup of the Parent Data Item Name field.
Example: Adding a custom column to a report
1.
2.
3.
Installation & User Manual Example

Select the data item to which you want to add a custom column.
Next, select a table and the field you want to use for the custom column's value.
A column name will be suggested automatically based on the values you selected.
Then, create a new filter set. For this, open the dropdown of the Filter Set field and choose New.
4.
5.
6.
Installation & User Manual Example

This will create a filter set for you.
To add a filter, first enter the field from the table to filter on using the lookup of the Filter Field No. field.
Then, set a filter value on another column of the report by clicking on the Value Column Name field to start
selecting a column.
7.
Installation & User Manual Example
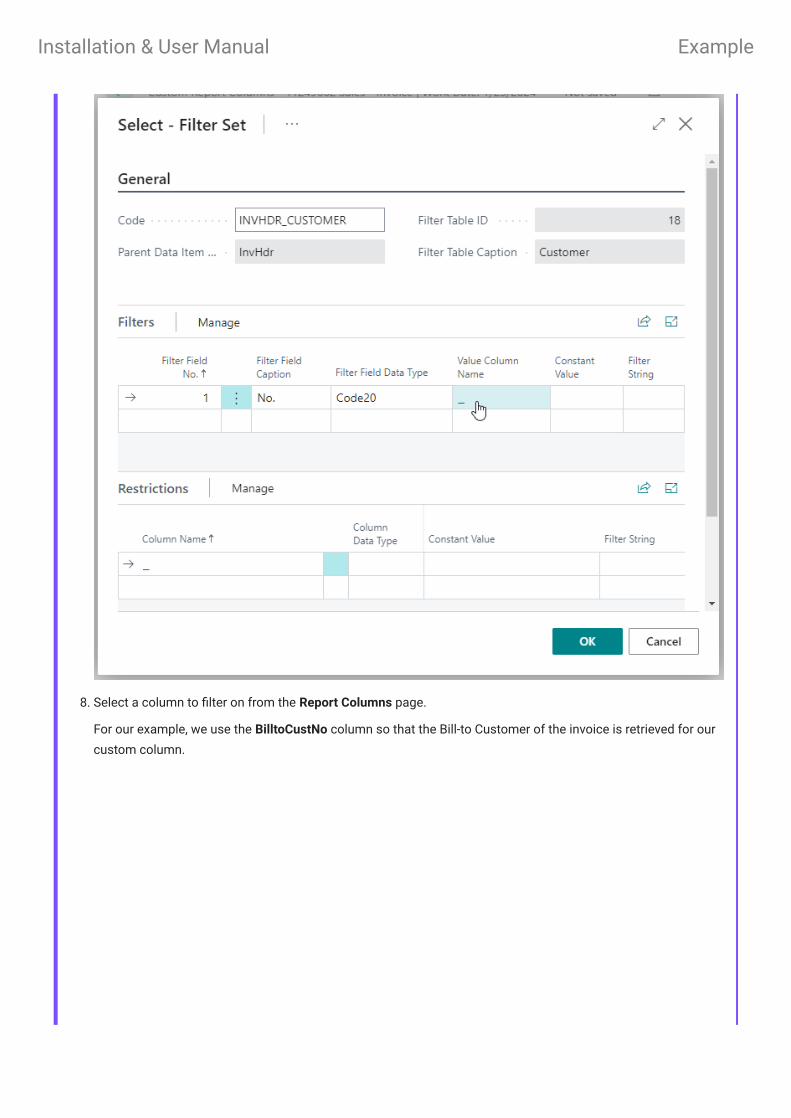
Select a column to filter on from the Report Columns page.
For our example, we use the BilltoCustNo column so that the Bill-to Customer of the invoice is retrieved for our
custom column.
8.
Installation & User Manual Example

Select a column and choose OK.
Add any more filters if applicable for your column and when done choose OK to close the Filter Set card page.
The custom column is now ready to use in your report.
Now go back to the Document Creator Report Dataset Extensions page.
With the record for your report selected invoke the Report Layouts action.
9.
Installation & User Manual Example
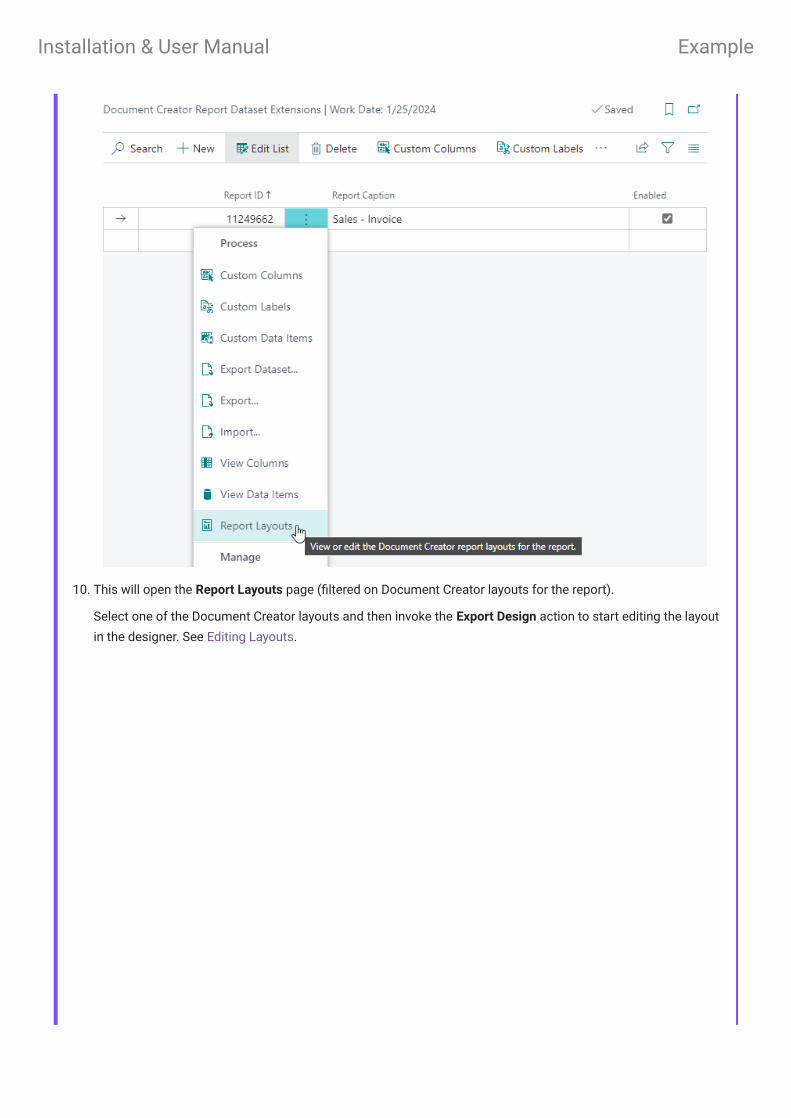
This will open the Report Layouts page (filtered on Document Creator layouts for the report).
Select one of the Document Creator layouts and then invoke the Export Design action to start editing the layout
in the designer. See Editing Layouts.
10.
Installation & User Manual Example

In the Data window, you will now see the custom column that was just added.
Custom columns are added at the end of the data item, after all the other columns of the data item.
11.
Installation & User Manual Example
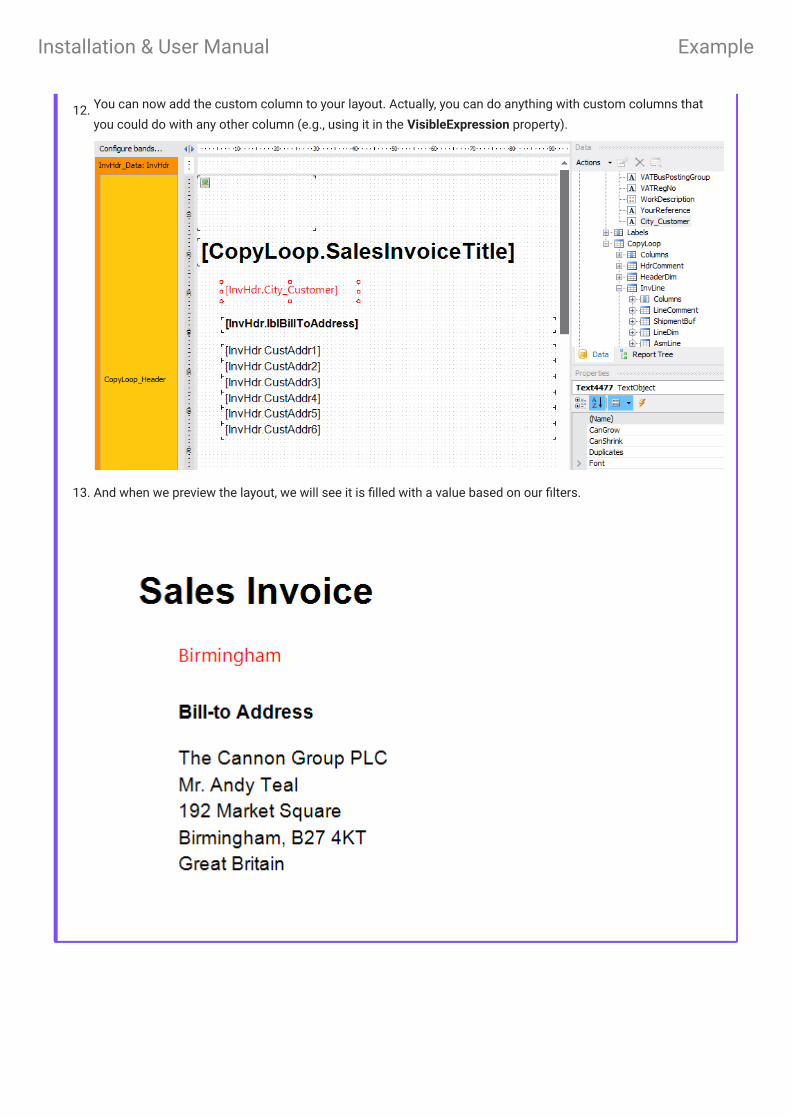
You can now add the custom column to your layout. Actually, you can do anything with custom columns that
you could do with any other column (e.g., using it in the VisibleExpression property).
And when we preview the layout, we will see it is filled with a value based on our filters.
12.
13.
Installation & User Manual Example
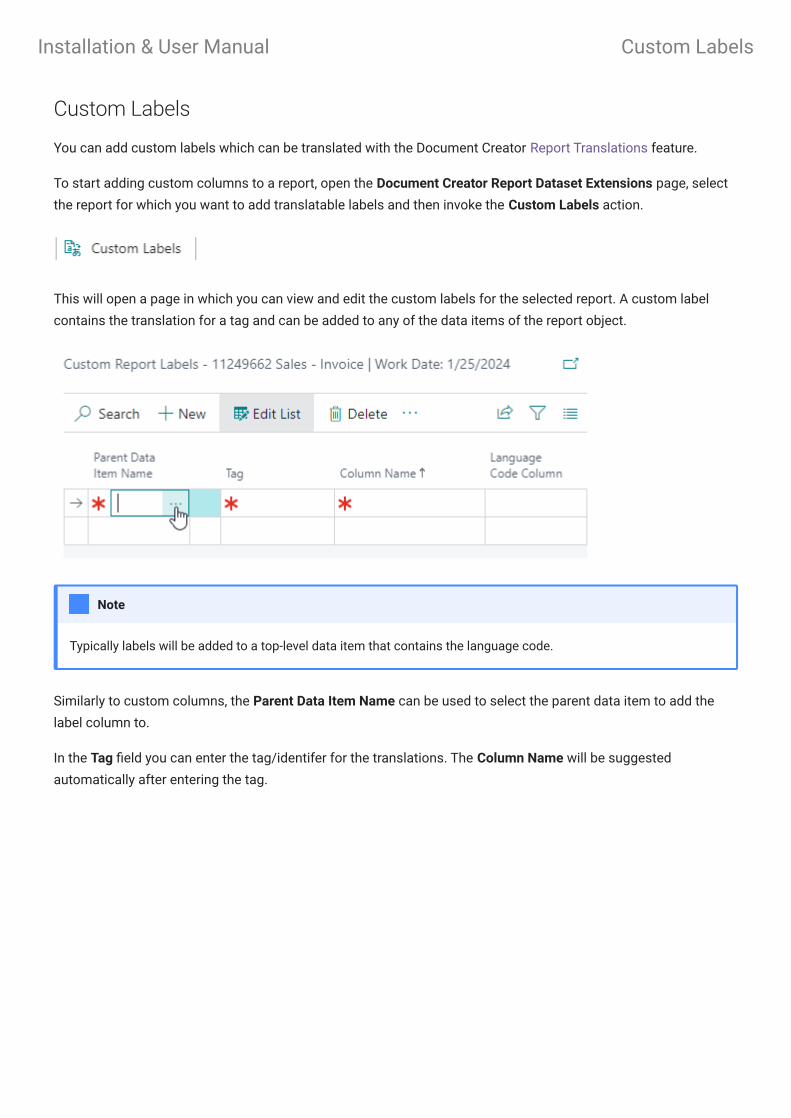
Custom Labels
You can add custom labels which can be translated with the Document Creator Report Translations feature.
To start adding custom columns to a report, open the Document Creator Report Dataset Extensions page, select
the report for which you want to add translatable labels and then invoke the Custom Labels action.
This will open a page in which you can view and edit the custom labels for the selected report. A custom label
contains the translation for a tag and can be added to any of the data items of the report object.
Similarly to custom columns, the Parent Data Item Name can be used to select the parent data item to add the
label column to.
In the Tag field you can enter the tag/identifer for the translations. The Column Name will be suggested
automatically after entering the tag.
Typically labels will be added to a top-level data item that contains the language code.
Note
Installation & User Manual Custom Labels
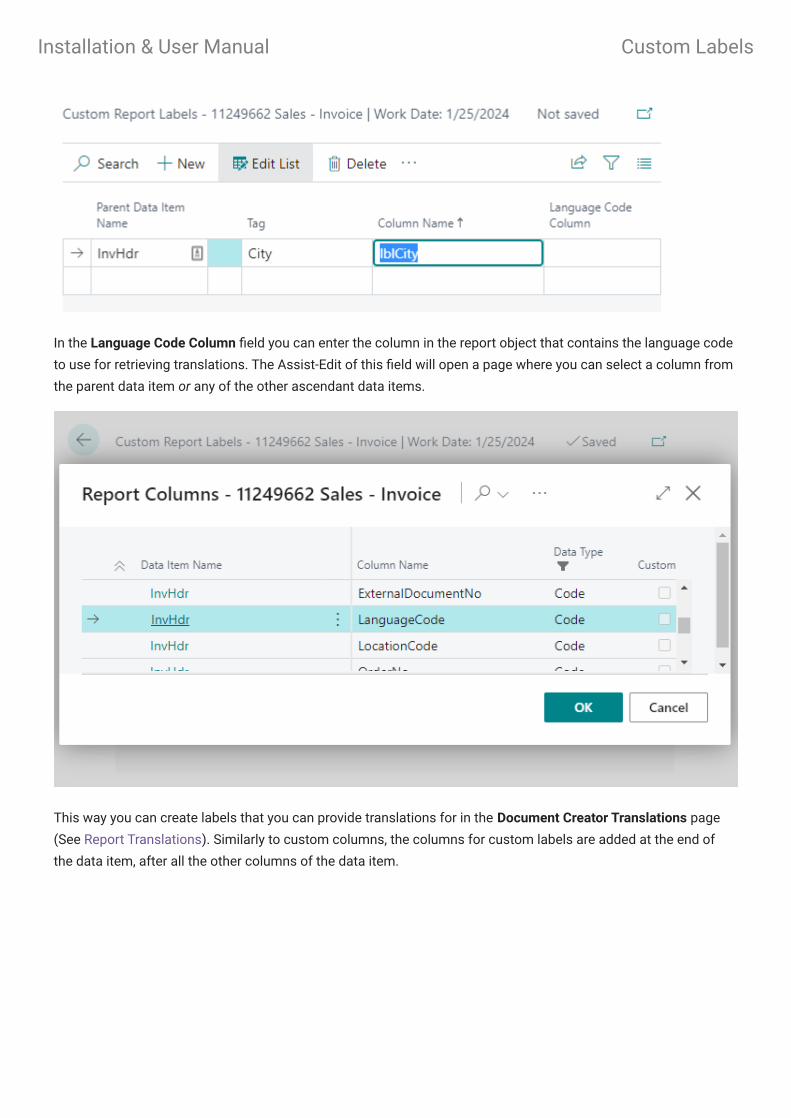
In the Language Code Column field you can enter the column in the report object that contains the language code
to use for retrieving translations. The Assist-Edit of this field will open a page where you can select a column from
the parent data item or any of the other ascendant data items.
This way you can create labels that you can provide translations for in the Document Creator Translations page
(See Report Translations). Similarly to custom columns, the columns for custom labels are added at the end of
the data item, after all the other columns of the data item.
Installation & User Manual Custom Labels
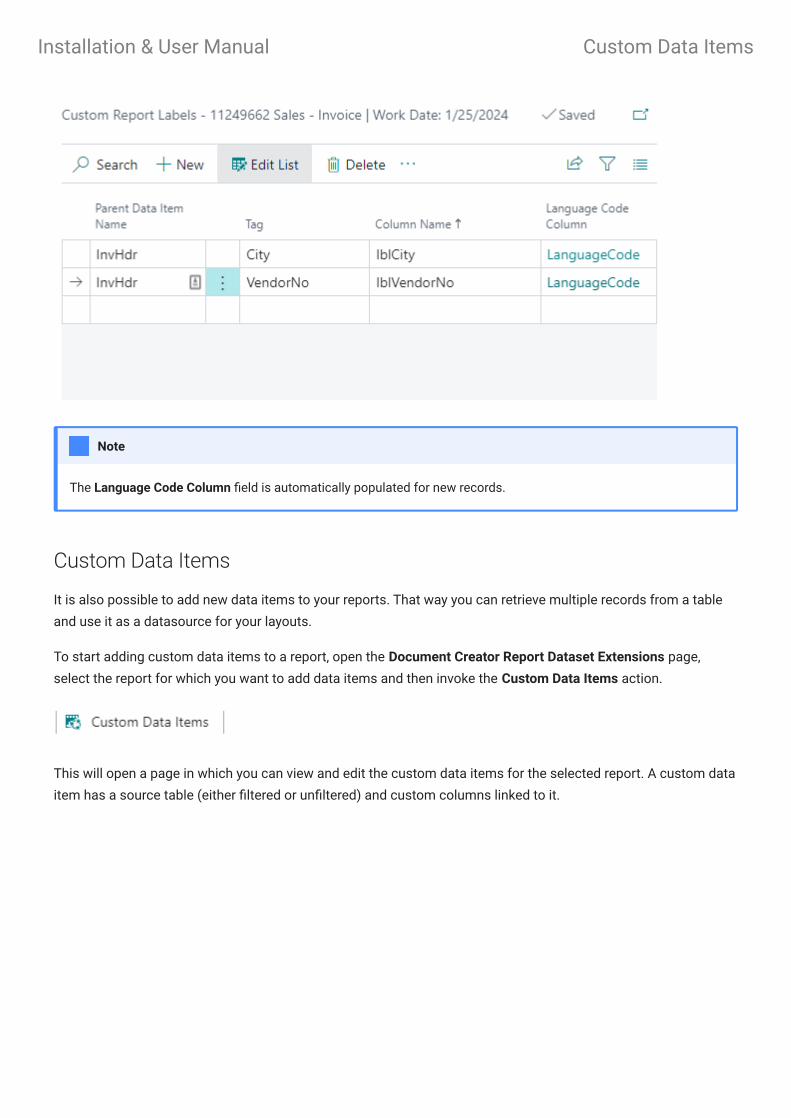
Custom Data Items
It is also possible to add new data items to your reports. That way you can retrieve multiple records from a table
and use it as a datasource for your layouts.
To start adding custom data items to a report, open the Document Creator Report Dataset Extensions page,
select the report for which you want to add data items and then invoke the Custom Data Items action.
This will open a page in which you can view and edit the custom data items for the selected report. A custom data
item has a source table (either filtered or unfiltered) and custom columns linked to it.
The Language Code Column field is automatically populated for new records.
Note
Installation & User Manual Custom Data Items
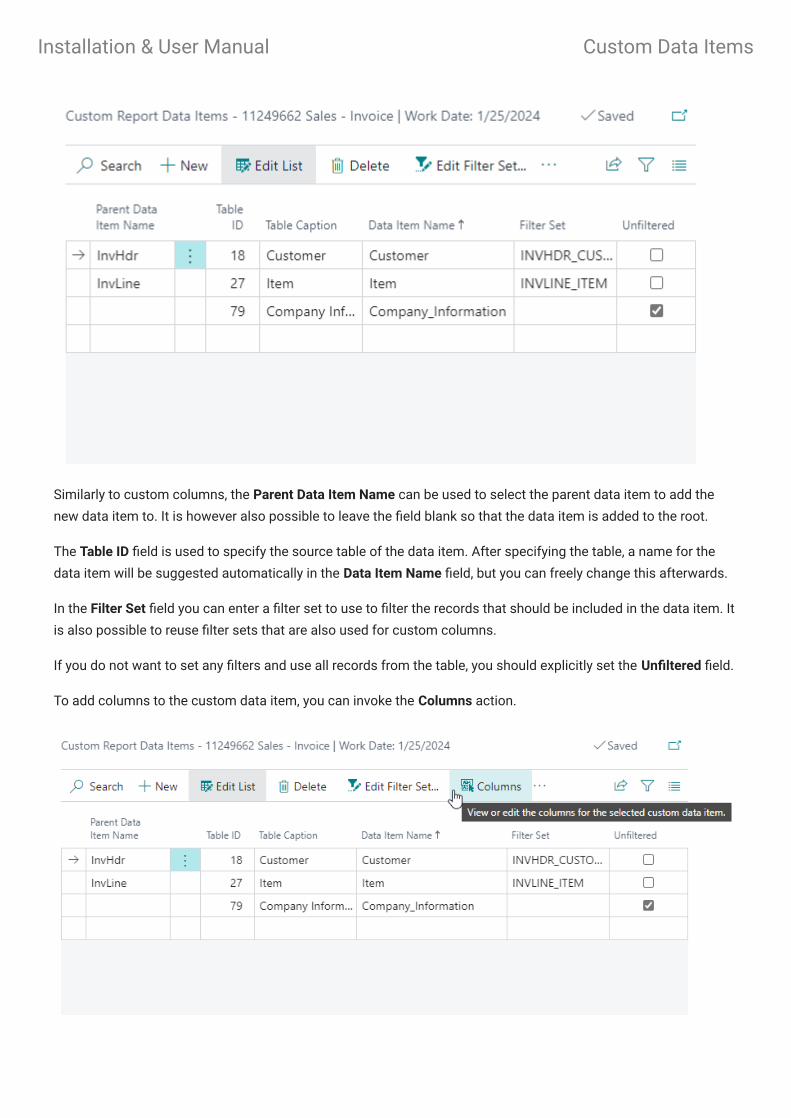
Similarly to custom columns, the Parent Data Item Name can be used to select the parent data item to add the
new data item to. It is however also possible to leave the field blank so that the data item is added to the root.
The Table ID field is used to specify the source table of the data item. After specifying the table, a name for the
data item will be suggested automatically in the Data Item Name field, but you can freely change this afterwards.
In the Filter Set field you can enter a filter set to use to filter the records that should be included in the data item. It
is also possible to reuse filter sets that are also used for custom columns.
If you do not want to set any filters and use all records from the table, you should explicitly set the Unfiltered field.
To add columns to the custom data item, you can invoke the Columns action.
Installation & User Manual Custom Data Items

This will open a page in which you can view and edit the columns of the custom data items. The names of the
columns are suggested automatically, but you can freely change them afterwards.
Similarly to custom columns, the custom data items are added at the end of the parent data item, after all the
other child data items of the parent.
Installation & User Manual Custom Data Items
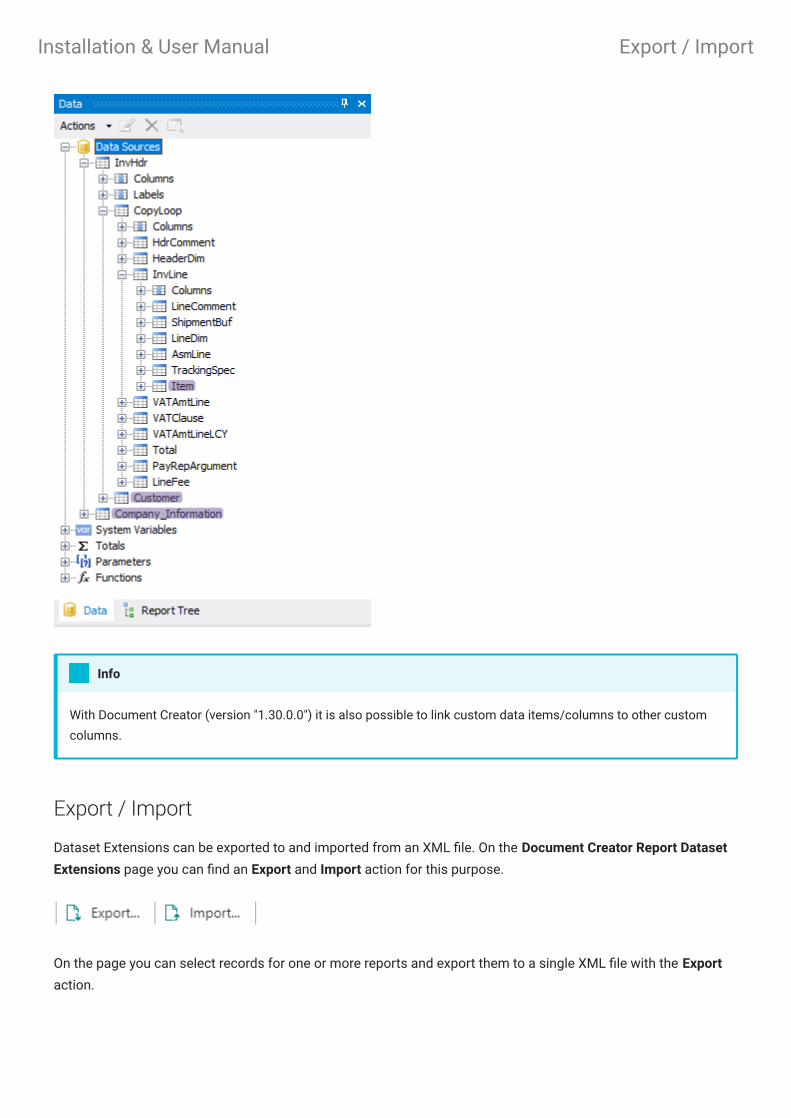
Export / Import
Dataset Extensions can be exported to and imported from an XML file. On the Document Creator Report Dataset
Extensions page you can find an Export and Import action for this purpose.
On the page you can select records for one or more reports and export them to a single XML file with the Export
action.
With Document Creator (version "1.30.0.0") it is also possible to link custom data items/columns to other custom
columns.
Info
Installation & User Manual Export / Import

When you use the Import action to import dataset extensions, then please note that this could overwrite any
dataset extensions that may already exist for the included reports.
View Columns and Data Items
On the Document Creator Report Dataset Extensions page you can find a View Columns and View Data Items
action, which can be used to view all the columns or all data items of a report respectively.
The View Columns action opens a page that shows all the columns of a report, the parent data item they each
belong to and the data type of the value they contain.
Custom columns are found at the end of their parent data item. For custom columns the Custom field is checked
and shown in "Bold + Green".
Installation & User Manual View Columns and Data Items
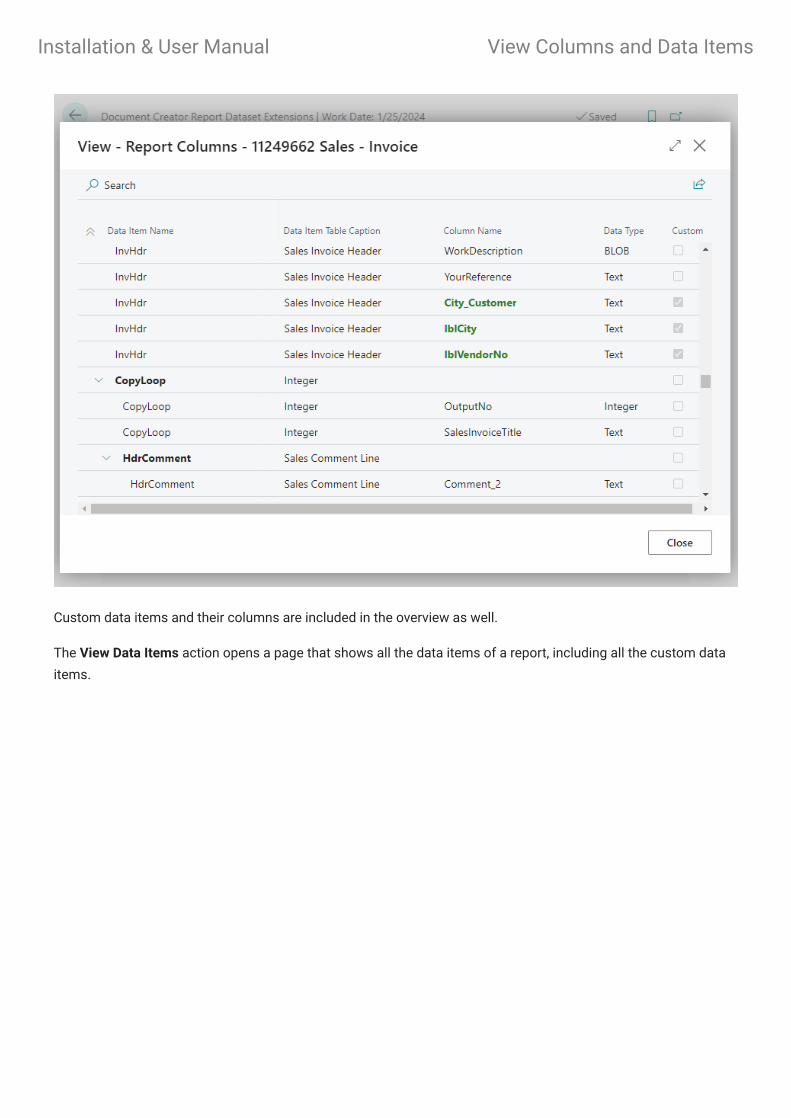
Custom data items and their columns are included in the overview as well.
The View Data Items action opens a page that shows all the data items of a report, including all the custom data
items.
Installation & User Manual View Columns and Data Items

Installation & User Manual View Columns and Data Items

Installation & User Manual
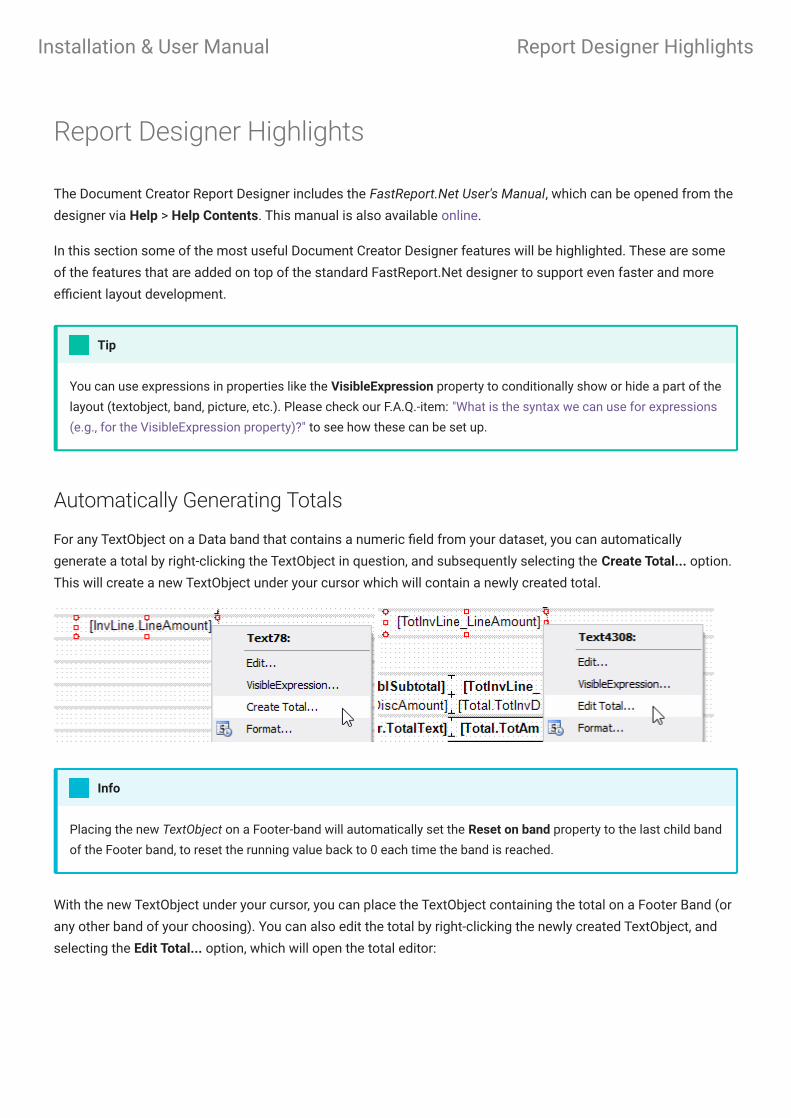
Report Designer Highlights
The Document Creator Report Designer includes the FastReport.Net User's Manual, which can be opened from the
designer via Help > Help Contents. This manual is also available online.
In this section some of the most useful Document Creator Designer features will be highlighted. These are some
of the features that are added on top of the standard FastReport.Net designer to support even faster and more
efficient layout development.
Automatically Generating Totals
For any TextObject on a Data band that contains a numeric field from your dataset, you can automatically
generate a total by right-clicking the TextObject in question, and subsequently selecting the Create Total... option.
This will create a new TextObject under your cursor which will contain a newly created total.
With the new TextObject under your cursor, you can place the TextObject containing the total on a Footer Band (or
any other band of your choosing). You can also edit the total by right-clicking the newly created TextObject, and
selecting the Edit Total... option, which will open the total editor:
You can use expressions in properties like the VisibleExpression property to conditionally show or hide a part of the
layout (textobject, band, picture, etc.). Please check our F.A.Q.-item: "What is the syntax we can use for expressions
(e.g., for the VisibleExpression property)?" to see how these can be set up.
Tip
Placing the new TextObject on a Footer-band will automatically set the Reset on band property to the last child band
of the Footer band, to reset the running value back to 0 each time the band is reached.
Info
Installation & User Manual Report Designer Highlights
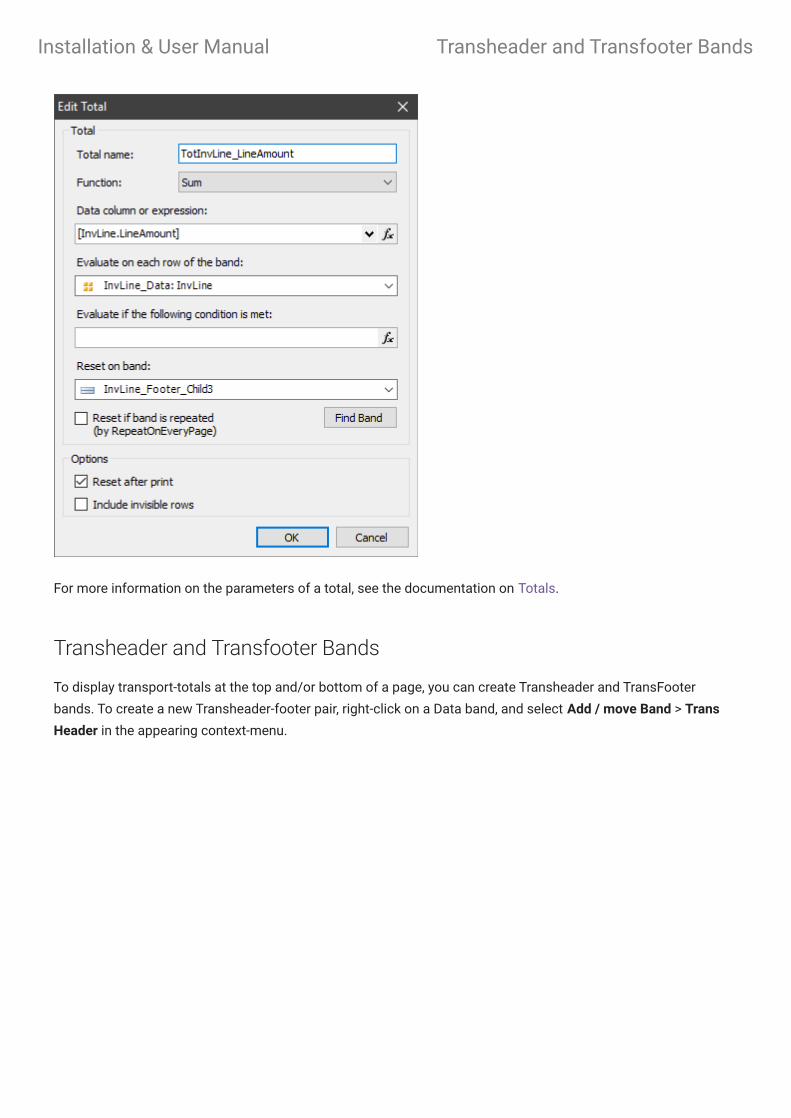
For more information on the parameters of a total, see the documentation on Totals.
Transheader and Transfooter Bands
To display transport-totals at the top and/or bottom of a page, you can create Transheader and TransFooter
bands. To create a new Transheader-footer pair, right-click on a Data band, and select Add / move Band > Trans
Header in the appearing context-menu.
Installation & User Manual Transheader and Transfooter Bands
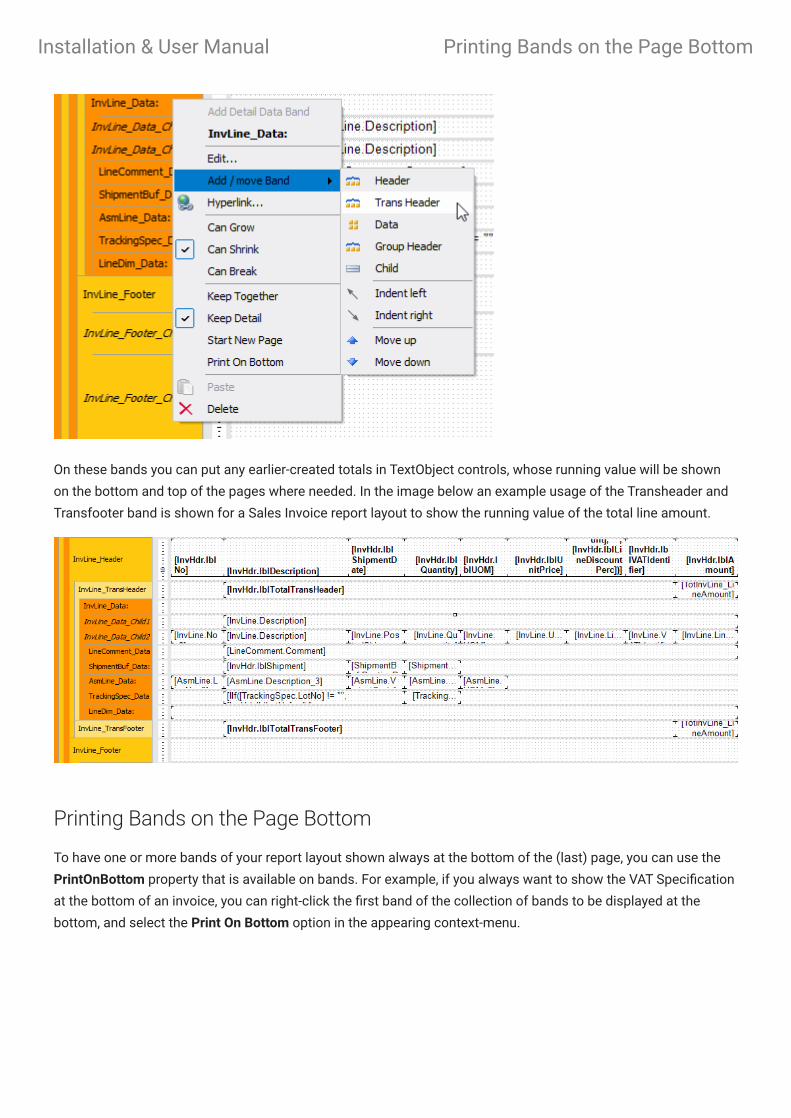
On these bands you can put any earlier-created totals in TextObject controls, whose running value will be shown
on the bottom and top of the pages where needed. In the image below an example usage of the Transheader and
Transfooter band is shown for a Sales Invoice report layout to show the running value of the total line amount.
Printing Bands on the Page Bottom
To have one or more bands of your report layout shown always at the bottom of the (last) page, you can use the
PrintOnBottom property that is available on bands. For example, if you always want to show the VAT Specification
at the bottom of an invoice, you can right-click the first band of the collection of bands to be displayed at the
bottom, and select the Print On Bottom option in the appearing context-menu.
Installation & User Manual Printing Bands on the Page Bottom

Automatic Text Line Height
In a report layout a TextObject control may contain multiple lines of text. To change the height of a single line of
text in a TextObject, you can use the LineHeight property. The default value of this property is 0, which means that
the line height will be the same as that of the font used. To make the line height equal to the height of the
TextObject you can set the LineHeightAuto property to True.
Enabling the PrintOnBottom property for a band will also enable the property for any bands that are displayed
below. Similarly, disabling the property will disable it for any bands that are displayed above.
Note
The PrintOnBottom property might not work when used in combination with the RepeatOnEveryPage property on a
band. That is, if the band contents do not fit in the remaining free space of the page.
Caution
Installation & User Manual Automatic Text Line Height
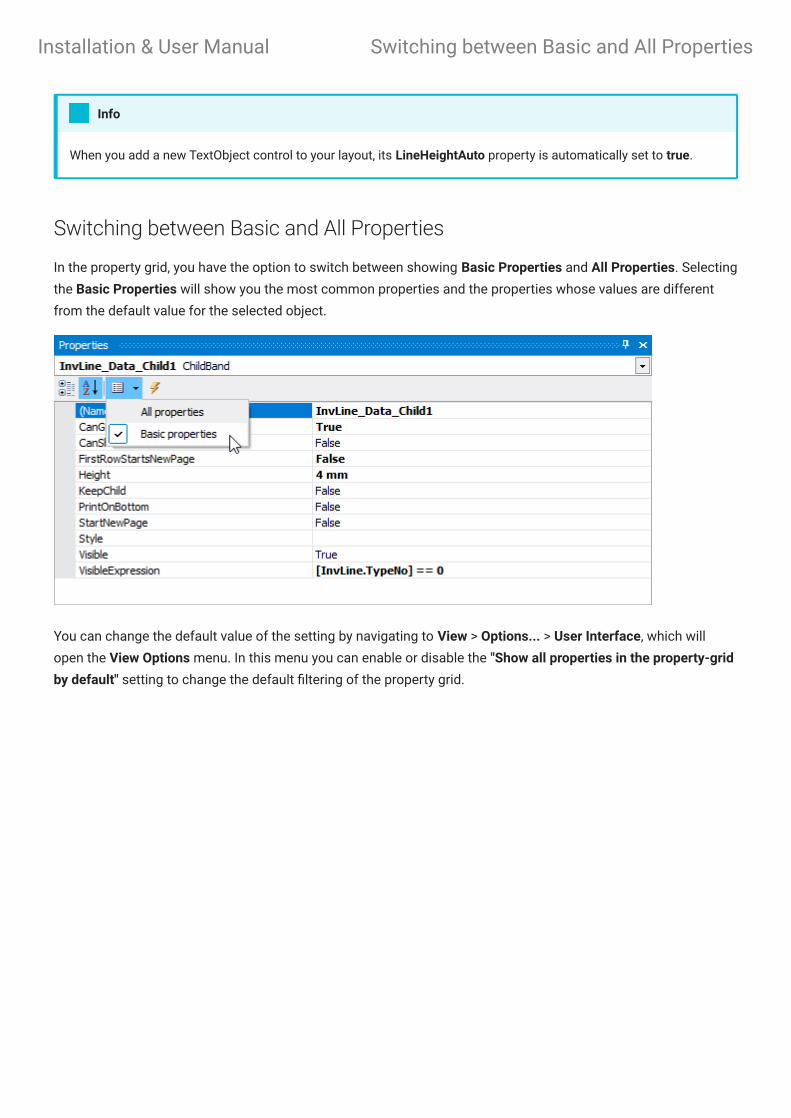
Switching between Basic and All Properties
In the property grid, you have the option to switch between showing Basic Properties and All Properties. Selecting
the Basic Properties will show you the most common properties and the properties whose values are different
from the default value for the selected object.
You can change the default value of the setting by navigating to View > Options... > User Interface, which will
open the View Options menu. In this menu you can enable or disable the "Show all properties in the property-grid
by default" setting to change the default filtering of the property grid.
When you add a new TextObject control to your layout, its LineHeightAuto property is automatically set to true.
Info
Installation & User Manual Switching between Basic and All Properties
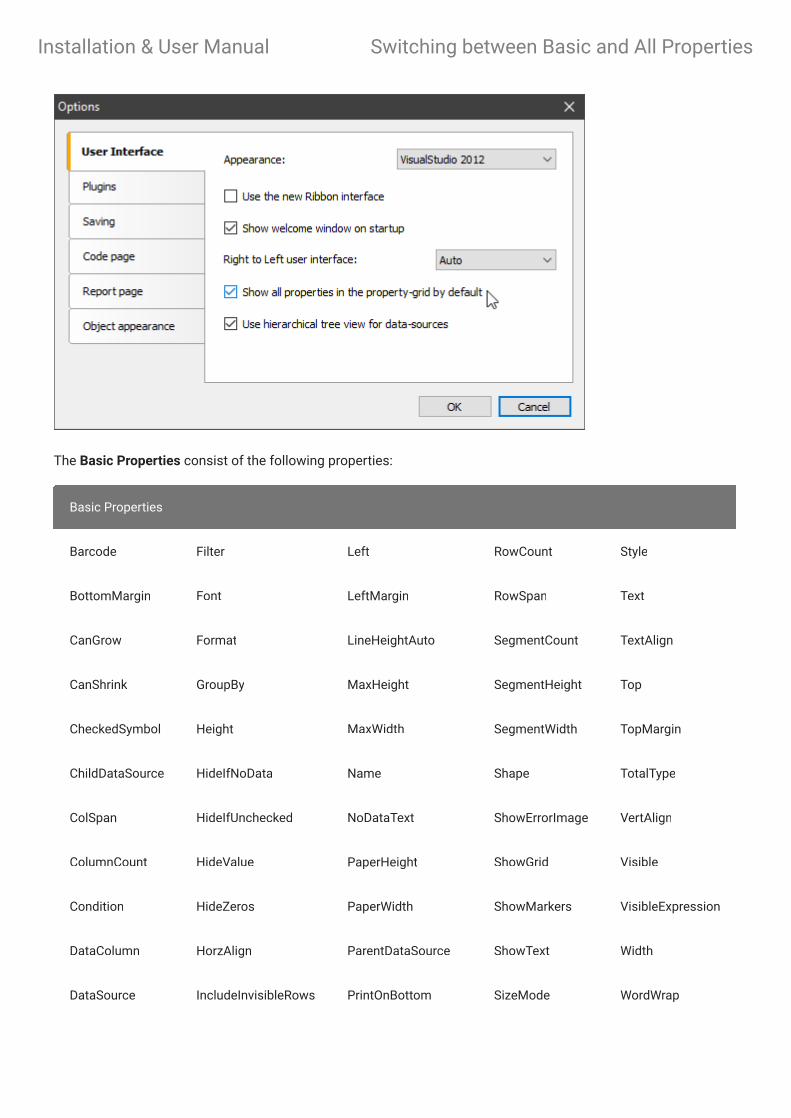
The Basic Properties consist of the following properties:
Basic Properties
Barcode Filter Left RowCount Style
BottomMargin Font LeftMargin RowSpan Text
CanGrow Format LineHeightAuto SegmentCount TextAlign
CanShrink GroupBy MaxHeight SegmentHeight Top
CheckedSymbol Height MaxWidth SegmentWidth TopMargin
ChildDataSource HideIfNoData Name Shape TotalType
ColSpan HideIfUnchecked NoDataText ShowErrorImage VertAlign
ColumnCount HideValue PaperHeight ShowGrid Visible
Condition HideZeros PaperWidth ShowMarkers VisibleExpression
DataColumn HorzAlign ParentDataSource ShowText Width
DataSource IncludeInvisibleRows PrintOnBottom SizeMode WordWrap
Installation & User Manual Switching between Basic and All Properties
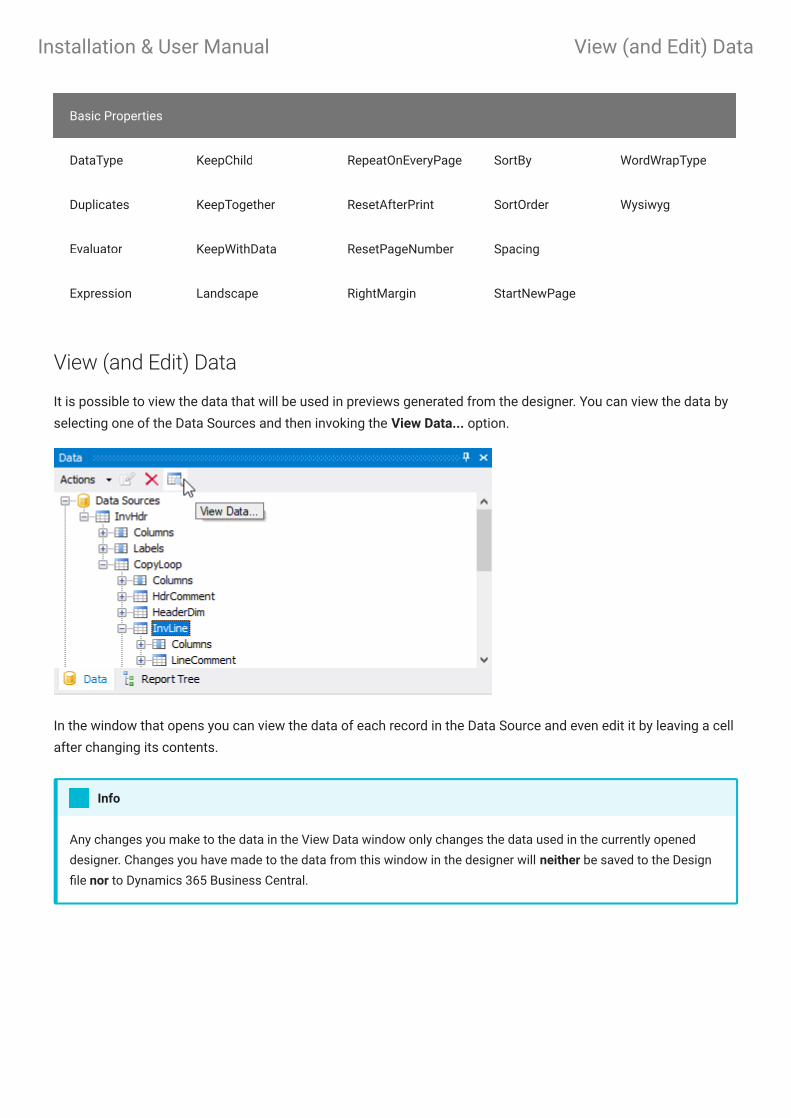
View (and Edit) Data
It is possible to view the data that will be used in previews generated from the designer. You can view the data by
selecting one of the Data Sources and then invoking the View Data... option.
In the window that opens you can view the data of each record in the Data Source and even edit it by leaving a cell
after changing its contents.
Basic Properties
DataType KeepChild RepeatOnEveryPage SortBy WordWrapType
Duplicates KeepTogether ResetAfterPrint SortOrder Wysiwyg
Evaluator KeepWithData ResetPageNumber Spacing
Expression Landscape RightMargin StartNewPage
Any changes you make to the data in the View Data window only changes the data used in the currently opened
designer. Changes you have made to the data from this window in the designer will neither be saved to the Design
file nor to Dynamics 365 Business Central.
Info
Installation & User Manual View (and Edit) Data

Advanced HTML Rendering
The support for HTML in the TextObject has considerably been extended in the Document Creator Report
Designer. You can enable Advanced HTML rendering by setting the TextRenderType property of a TextObject to
HtmlAdvanced.
The extended functionalities comprise a larger set of HTML tags being supported, such as paragraphs, divisions,
headers and lists, and support for the most-used CSS style attributes, which can be embedded in the supported
HTML tags.
Supported HTML Tags
The table below presents a complete overview of the tags supported by the advanced renderer:
Tag Description Supported Attributes
<p>...</p> Paragraph with a default bottom-margin of 1 em and top-
margin of 0.
align – left, right, center,
justify
style – (see below)
Installation & User Manual Advanced HTML Rendering

Tag Description Supported Attributes
<div>...</div> Division/Section without any default margins or
paddings.
align – left, right, center,
justify
style – (see below)
<h1>...</h1>
...
<h6>...</h6>
Headings with default font-size of 2 em, 1.5 em, 1.17 em,
1 em, 0.83 em and 0.67 em respectively.
align – left, right, center,
justify
style – (see below)
<ol>...</ol> Ordered lists, default bottom margin of 1 em and left-
padding of 40 px.
type – 1, A, a
start – [integer]
style – (see below)
<ul>...</ul> Unordered lists, default bottom margin of 1 em and left-
padding of 40 px.
type – disc, circle,
square
style – (see below)
<li>...</li> List item. style – (see below)
<span>...</span> Span (group of in-line elements). style – (see below)
<font>...</font> Group of in-line elements with custom font face, color
and size.
color – [name]/#xxxxxx
face – [font_family]
size – [dimension]
style – (see below)
<br> , <br /> Line break. -
<img> Image. src ="...;base64,..."
alt – [text]
<body>...</body> Container with default margin of 8 px. style – (see below)
<b>...</b>
<strong>...</
strong>
Bold text. style – (see below)
<i>...</i>
<em>...</em>
Cursive text. style – (see below)
<u>...</u> Underlined text. style – (see below)
Installation & User Manual Supported HTML Tags
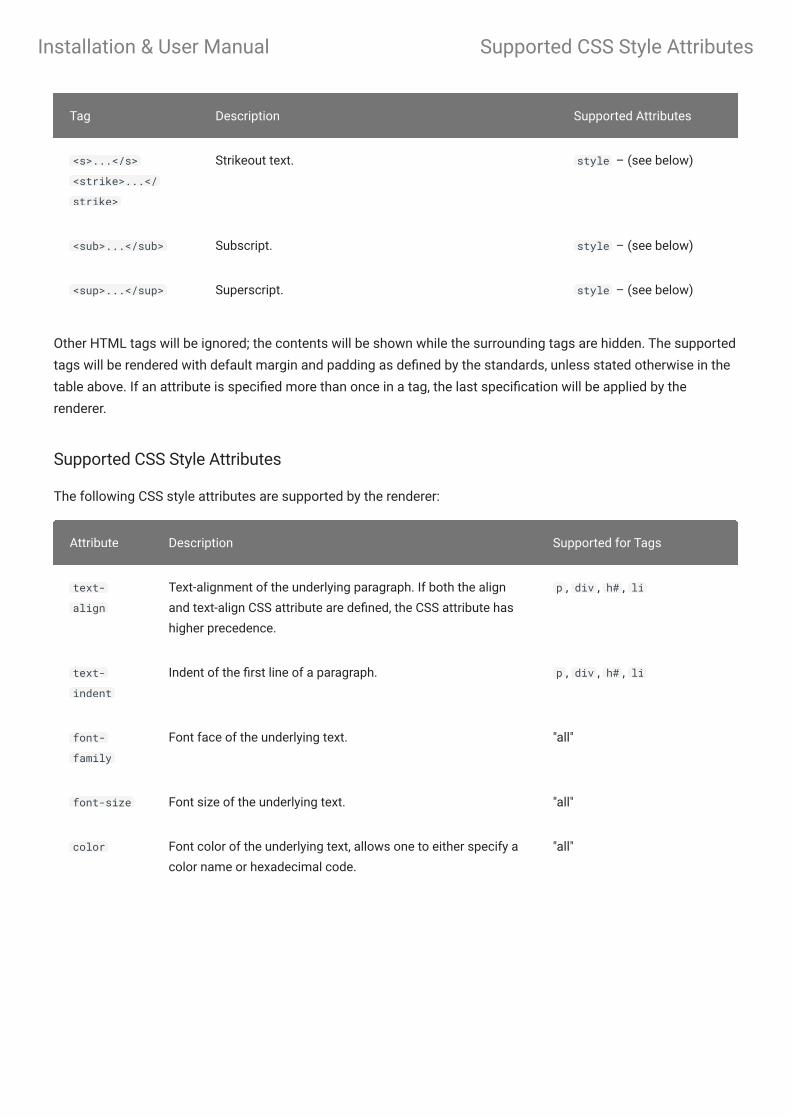
Other HTML tags will be ignored; the contents will be shown while the surrounding tags are hidden. The supported
tags will be rendered with default margin and padding as defined by the standards, unless stated otherwise in the
table above. If an attribute is specified more than once in a tag, the last specification will be applied by the
renderer.
Supported CSS Style Attributes
The following CSS style attributes are supported by the renderer:
Tag Description Supported Attributes
<s>...</s>
<strike>...</
strike>
Strikeout text. style – (see below)
<sub>...</sub> Subscript. style – (see below)
<sup>...</sup> Superscript. style – (see below)
Attribute Description Supported for Tags
text-
align
Text-alignment of the underlying paragraph. If both the align
and text-align CSS attribute are defined, the CSS attribute has
higher precedence.
p , div , h# , li
text-
indent
Indent of the first line of a paragraph. p , div , h# , li
font-
family
Font face of the underlying text. "all"
font-size Font size of the underlying text. "all"
color Font color of the underlying text, allows one to either specify a
color name or hexadecimal code.
"all"
Installation & User Manual Supported CSS Style Attributes

Example
The following example shows some of the capabilities of the extended HTML renderer.
Attribute Description Supported for Tags
padding
padding-
bottom
padding-
top
padding-
right
padding-
left
Padding of the container or paragraph. p , div , h# , li , ul , ol ,
body
margin
margin-
bottom
margin-
top
margin-
right
margin-
left
Margin of the container or paragraph, treated the same as
padding.
p , div , h# , li , ul , ol ,
body
font-
weight
Font-weight of the underlying text, restricted to the following
options: bold , normal , initial
"all"
<p style="padding-left: 1cm"> Document Creator is a fully functional .NET report designer for Microsoft Dynamics NAV, compatible with <strong>NAV2015</strong> and up. It is rich in functionality, e.g., Drag & Drop fields in reports, choose your own code per report (VB.NET | C#) and barcode usage, including various <i>QR codes</i>.</p><p style="padding-left: 1.5 cm">Your benefits:</p><ul style="padding-left: 2 cm"> <li>Saves a <span style="font-weight: bold">hugh amount</span> of time</li> <li>Easy to use</li> <li>Rich in functionality<ul type="square"> <li>An easy-to-use report designer with endless possibilities</li> <li>Conversion of <i>Classic</i> and <i>RDLC</i> report layouts</li> <li>Fully integrated in Dynamics NAV</li> </ul></li> <li style="padding-top: 6pt"><em>Fantastic reports as outcome!</em></li></ul>
Installation & User Manual Example
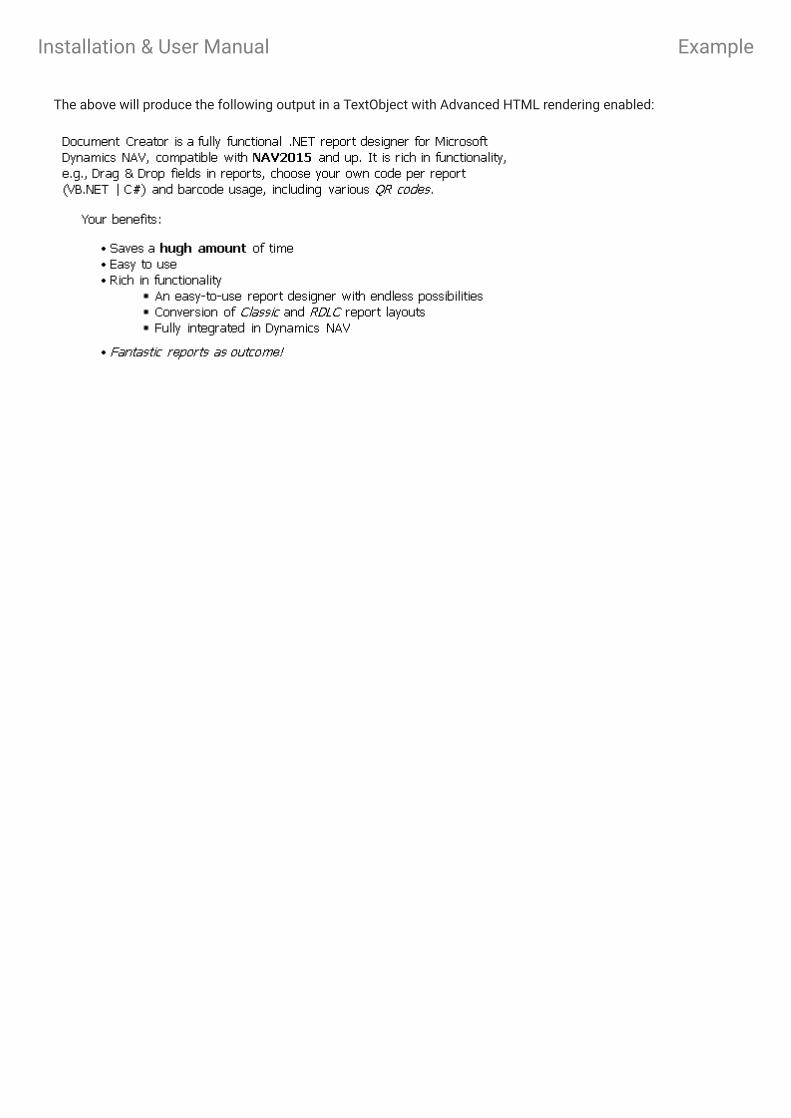
The above will produce the following output in a TextObject with Advanced HTML rendering enabled:
Installation & User Manual Example

Installation & User Manual
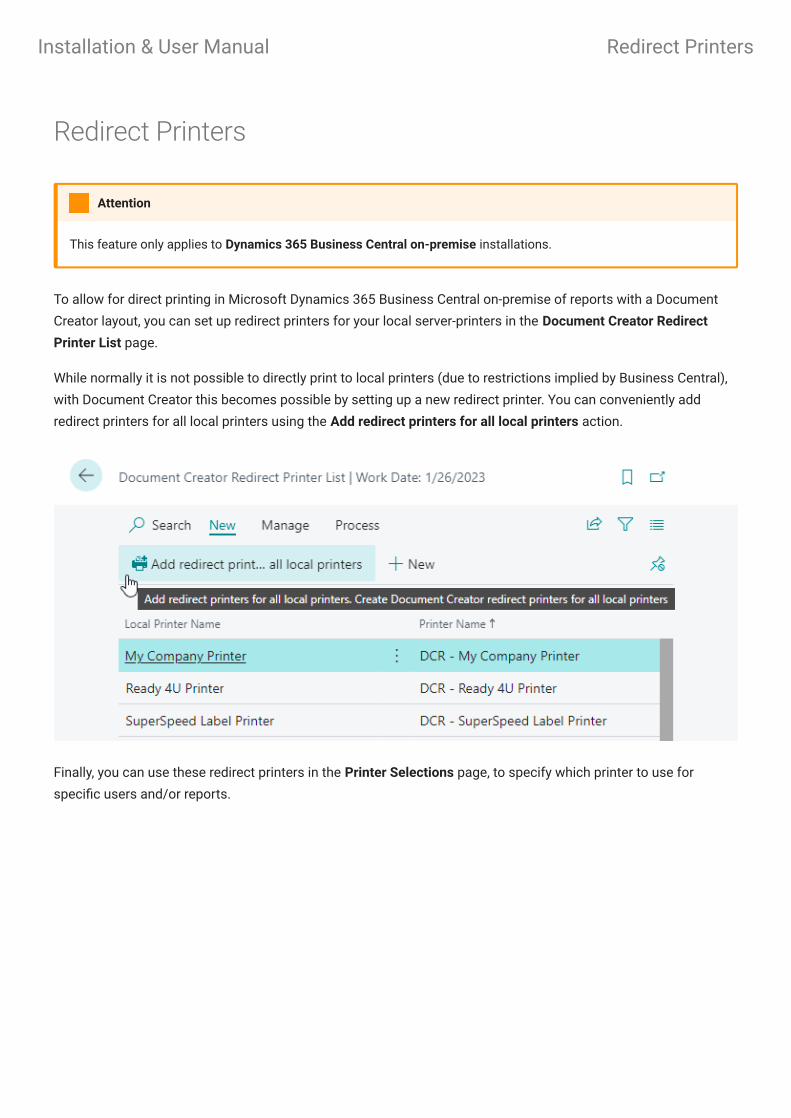
Redirect Printers
To allow for direct printing in Microsoft Dynamics 365 Business Central on-premise of reports with a Document
Creator layout, you can set up redirect printers for your local server-printers in the Document Creator Redirect
Printer List page.
While normally it is not possible to directly print to local printers (due to restrictions implied by Business Central),
with Document Creator this becomes possible by setting up a new redirect printer. You can conveniently add
redirect printers for all local printers using the Add redirect printers for all local printers action.
Finally, you can use these redirect printers in the Printer Selections page, to specify which printer to use for
specific users and/or reports.
This feature only applies to Dynamics 365 Business Central on-premise installations.
Attention
Installation & User Manual Redirect Printers
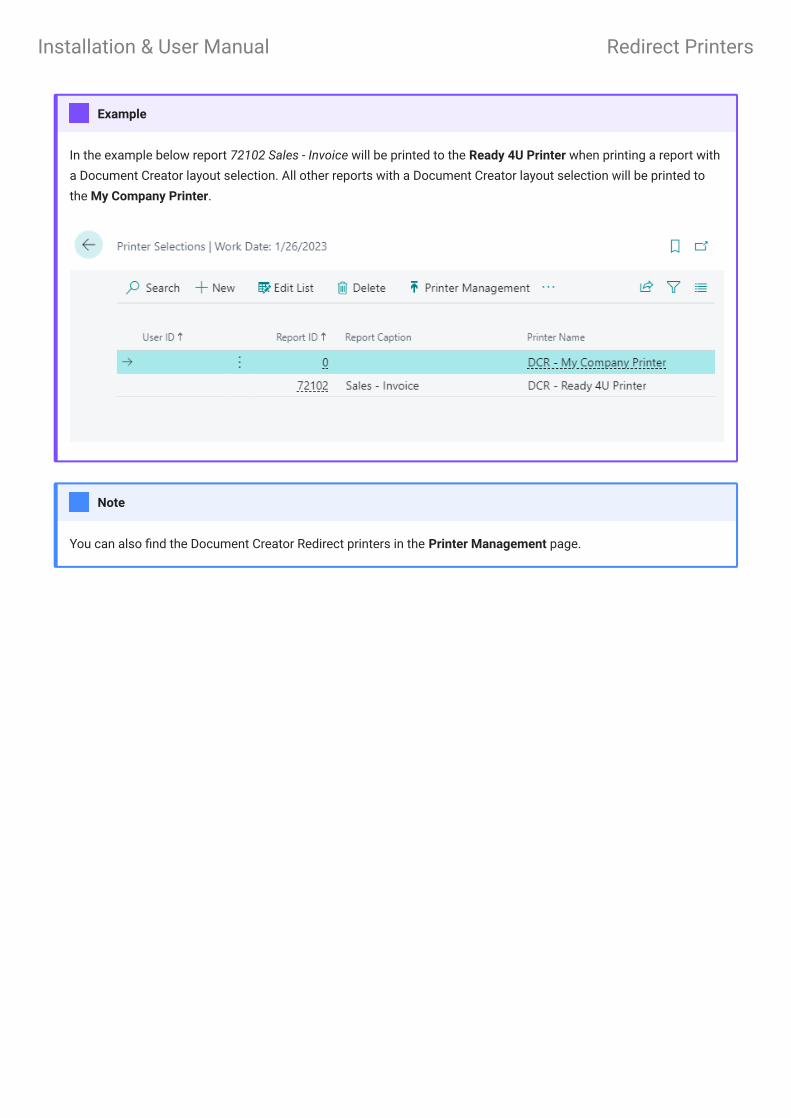
In the example below report 72102 Sales - Invoice will be printed to the Ready 4U Printer when printing a report with
a Document Creator layout selection. All other reports with a Document Creator layout selection will be printed to
the My Company Printer.
Example
You can also find the Document Creator Redirect printers in the Printer Management page.
Note
Installation & User Manual Redirect Printers

Installation & User Manual
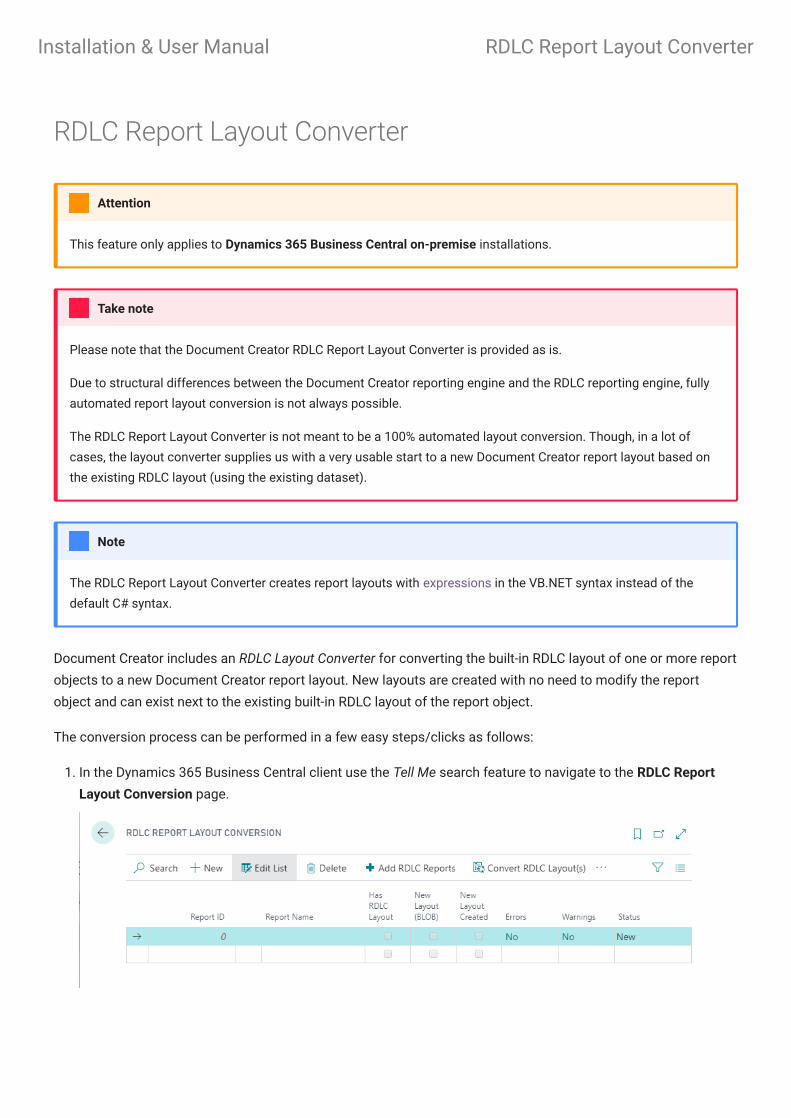
RDLC Report Layout Converter
Document Creator includes an RDLC Layout Converter for converting the built-in RDLC layout of one or more report
objects to a new Document Creator report layout. New layouts are created with no need to modify the report
object and can exist next to the existing built-in RDLC layout of the report object.
The conversion process can be performed in a few easy steps/clicks as follows:
In the Dynamics 365 Business Central client use the Tell Me search feature to navigate to the RDLC Report
Layout Conversion page.
This feature only applies to Dynamics 365 Business Central on-premise installations.
Attention
Please note that the Document Creator RDLC Report Layout Converter is provided as is.
Due to structural differences between the Document Creator reporting engine and the RDLC reporting engine, fully
automated report layout conversion is not always possible.
The RDLC Report Layout Converter is not meant to be a 100% automated layout conversion. Though, in a lot of
cases, the layout converter supplies us with a very usable start to a new Document Creator report layout based on
the existing RDLC layout (using the existing dataset).
Take note
The RDLC Report Layout Converter creates report layouts with expressions in the VB.NET syntax instead of the
default C# syntax.
Note
1.
Installation & User Manual RDLC Report Layout Converter
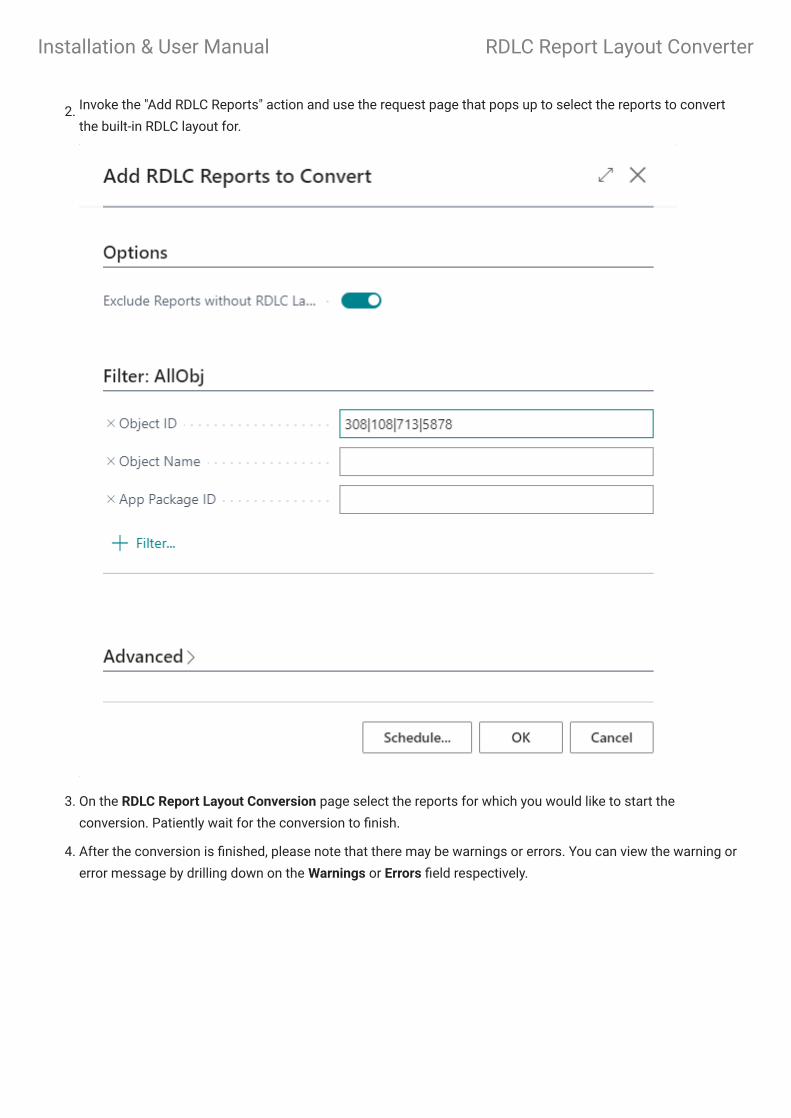
Invoke the "Add RDLC Reports" action and use the request page that pops up to select the reports to convert
the built-in RDLC layout for.
On the RDLC Report Layout Conversion page select the reports for which you would like to start the
conversion. Patiently wait for the conversion to finish.
After the conversion is finished, please note that there may be warnings or errors. You can view the warning or
error message by drilling down on the Warnings or Errors field respectively.
2.
3.
4.
Installation & User Manual RDLC Report Layout Converter
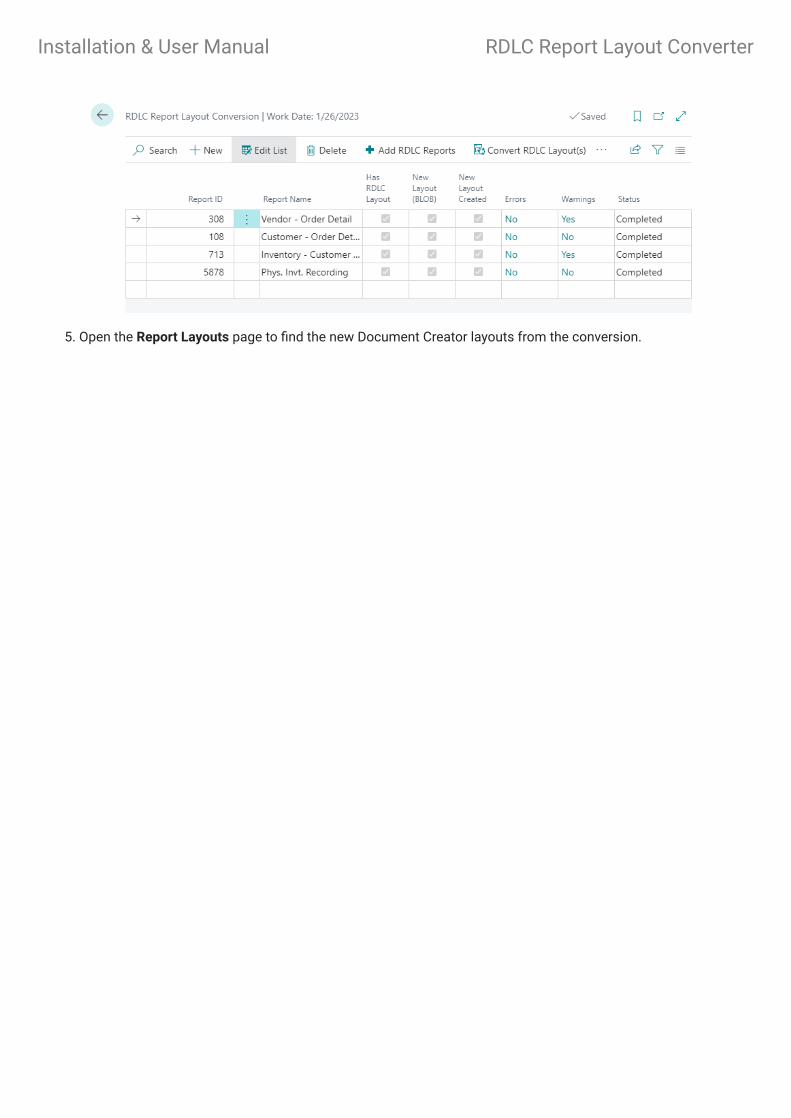
Open the Report Layouts page to find the new Document Creator layouts from the conversion.5.
Installation & User Manual RDLC Report Layout Converter

Installation & User Manual

Getting Started
In the Dynamics 365 Business Central client use the Tell Me search feature to navigate to the Custom Report
Layouts page as follows:
The Custom Report Layouts page shows a list of all the custom report layouts in your Dynamics 365 Business
Central environment. By default, the page shows the following columns for the layout records:
Before you start using Document Creator, please make sure you have completed the steps in the Installation
Manual. The Product Key needs to be set up to run reports with a Document Creator layout.
Attention
The features on the Custom Report Layouts page are all marked as deprecated in the Document Creator extension,
from version 2.0 onwards / for the Microsoft Dynamics 365 Business Central 2022 release wave 2 (April 1st, 2022;
Version 20.0). The feature has been replaced by the features on the Report Layouts page.
Attention
Column Description
Report ID The ID of the target report object. The report object defines how the report dataset is
generated in code.
Report Name The name of the target report object.
Installation & User Manual Getting Started
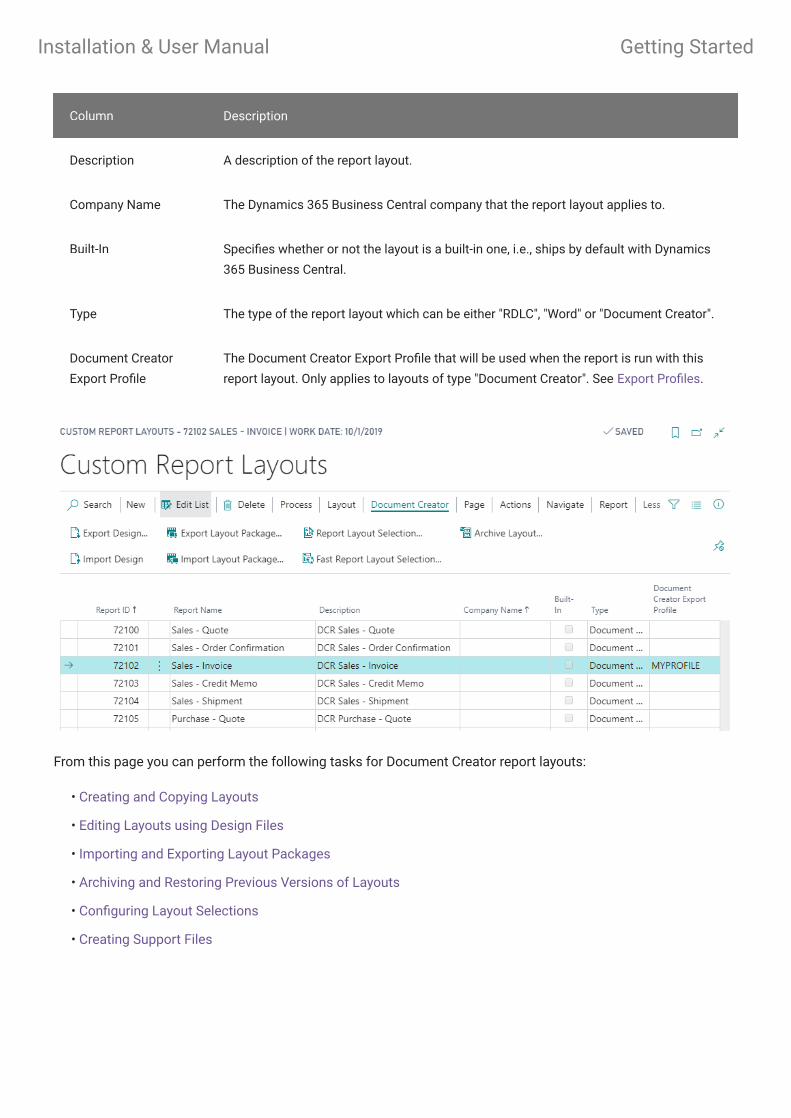
From this page you can perform the following tasks for Document Creator report layouts:
Creating and Copying Layouts
Editing Layouts using Design Files
Importing and Exporting Layout Packages
Archiving and Restoring Previous Versions of Layouts
Configuring Layout Selections
Creating Support Files
Column Description
Description A description of the report layout.
Company Name The Dynamics 365 Business Central company that the report layout applies to.
Built-In Specifies whether or not the layout is a built-in one, i.e., ships by default with Dynamics
365 Business Central.
Type The type of the report layout which can be either "RDLC", "Word" or "Document Creator".
Document Creator
Export Profile
The Document Creator Export Profile that will be used when the report is run with this
report layout. Only applies to layouts of type "Document Creator". See Export Profiles.
•
•
•
•
•
•
Installation & User Manual Getting Started

Installation & User Manual

Creating and Copying Layouts
Creating a New Layout
A Dynamics 365 Business Central report is made up of the following two components:
Report Object: A report object defines the report dataset (i.e., based on the report schema, which include the
dataitems, fields/columns and parameters) and request page. Its definition is found in the code of a
Dynamics 365 Business Central (AL) extension.
Layout: A layout defines how the report dataset should be presented when printed or exported to a file. You
can use a report designer to edit the layout of a report.
To create a new report layout, you first need to have a report object that the layout will target. You can use one of
the report objects from the Microsoft Base Application, use a report object from our W1 Report Templates
extension (see Templates), or from any other extension.
If you have a report object, then you can create a new Document Creator layout for the report on the Custom
Report Layouts page as follows:
Invoke the New... action.
Enter/Select the Report ID of the target report object.
Enable Insert Document Creator Layout.
Select OK.
The features on the Custom Report Layouts page are all marked as deprecated in the Document Creator extension,
from version 2.0 onwards / for the Microsoft Dynamics 365 Business Central 2022 release wave 2 (April 1st, 2022;
Version 20.0). The feature has been replaced by the features on the Report Layouts page.
Attention
•
•
1.
2.
3.
4.
Installation & User Manual Creating and Copying Layouts
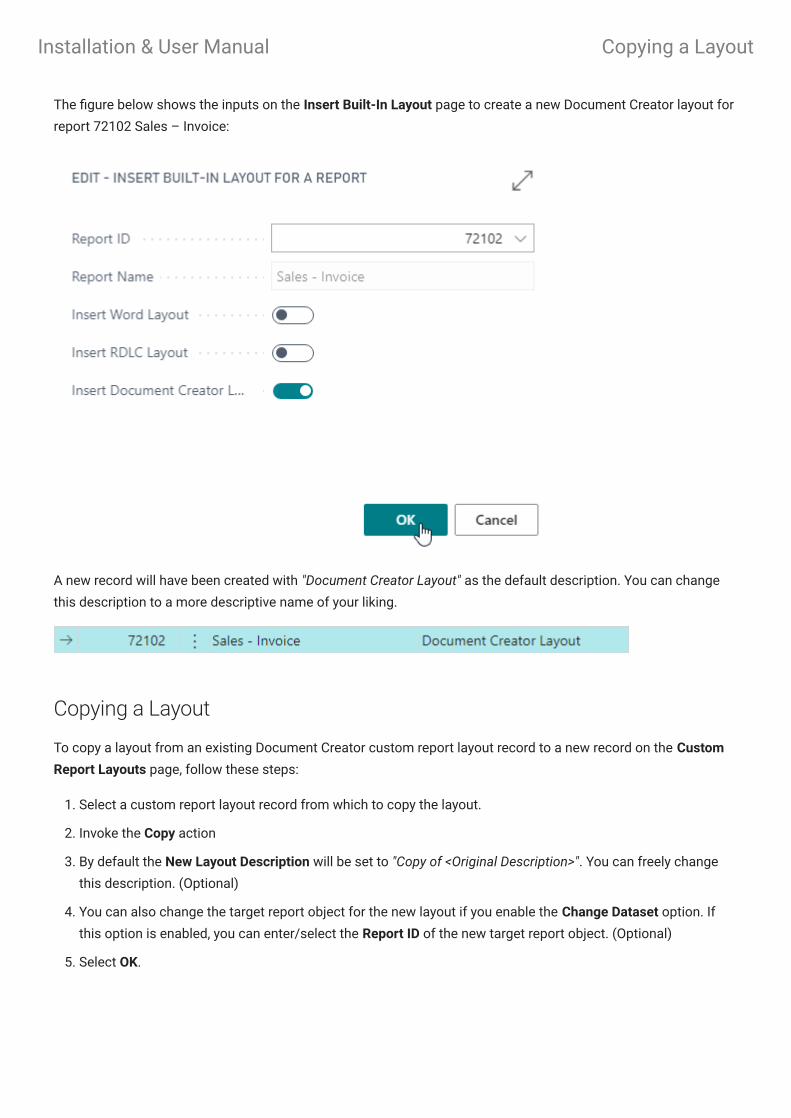
The figure below shows the inputs on the Insert Built-In Layout page to create a new Document Creator layout for
report 72102 Sales – Invoice:
A new record will have been created with "Document Creator Layout" as the default description. You can change
this description to a more descriptive name of your liking.
Copying a Layout
To copy a layout from an existing Document Creator custom report layout record to a new record on the Custom
Report Layouts page, follow these steps:
Select a custom report layout record from which to copy the layout.
Invoke the Copy action
By default the New Layout Description will be set to "Copy of <Original Description>". You can freely change
this description. (Optional)
You can also change the target report object for the new layout if you enable the Change Dataset option. If
this option is enabled, you can enter/select the Report ID of the new target report object. (Optional)
Select OK.
1.
2.
3.
4.
5.
Installation & User Manual Copying a Layout

A new record will have been created containing a copy of the layout of the earlier selected record.
If you enable the Change Dataset option and change the target report object, then please take into account that the
schema of the report objects might be different. Therefore, the layout may not work directly, which means you will
need to edit it first to make sure it matches the new schema.
Caution
Installation & User Manual Copying a Layout

Installation & User Manual

Custom Report Layout Archive
After modifying a Document Creator layout, there is always the possibility to revert your changes to a previous
version of your report layout. On the Custom Report Layouts page you will find an Archive factbox that shows the
archived versions of the selected layout. Every time a report layout is changed by an import, an archive version is
automatically created.
It is also possible to view all archived custom report layouts by opening the Custom Report Layout Archive page.
This feature is marked as deprecated in the Document Creator extension, from version 2.0 onwards / for the
Microsoft Dynamics 365 Business Central 2022 release wave 2 (April 1st, 2022; Version 20.0). The feature has been
replaced by the Tenant Report Layout Archive feature.
Attention
Installation & User Manual Custom Report Layout Archive

Archiving Layouts
You can manually archive the current version of a layout using the Archive Layout... action on the Custom Report
Layouts page. A new archive record will be created with the current version of the selected layout record. By
default, the archive commment will be empty, but you can enter your own comment using the Edit Comment
action in the Archive factbox/page.
Restoring Layouts
You can restore a previous version of a layout using the Restore Layout action on the Archive factbox of the
Custom Report Layouts page, or the like-named action on the Custom Report Layout Archive page.
The Custom Report Layout Archive page can be opened using the Tell Me search feature, or invoking the Navigate >
Document Creator > Archive action on the Custom Report Layouts page.
Note
Custom Report Layouts are archived automatically when the following events take place on the record: Layout
Import, Layout Package Import, Layout Restore, Design Import
When are layouts archived automatically?
Installation & User Manual Archiving Layouts
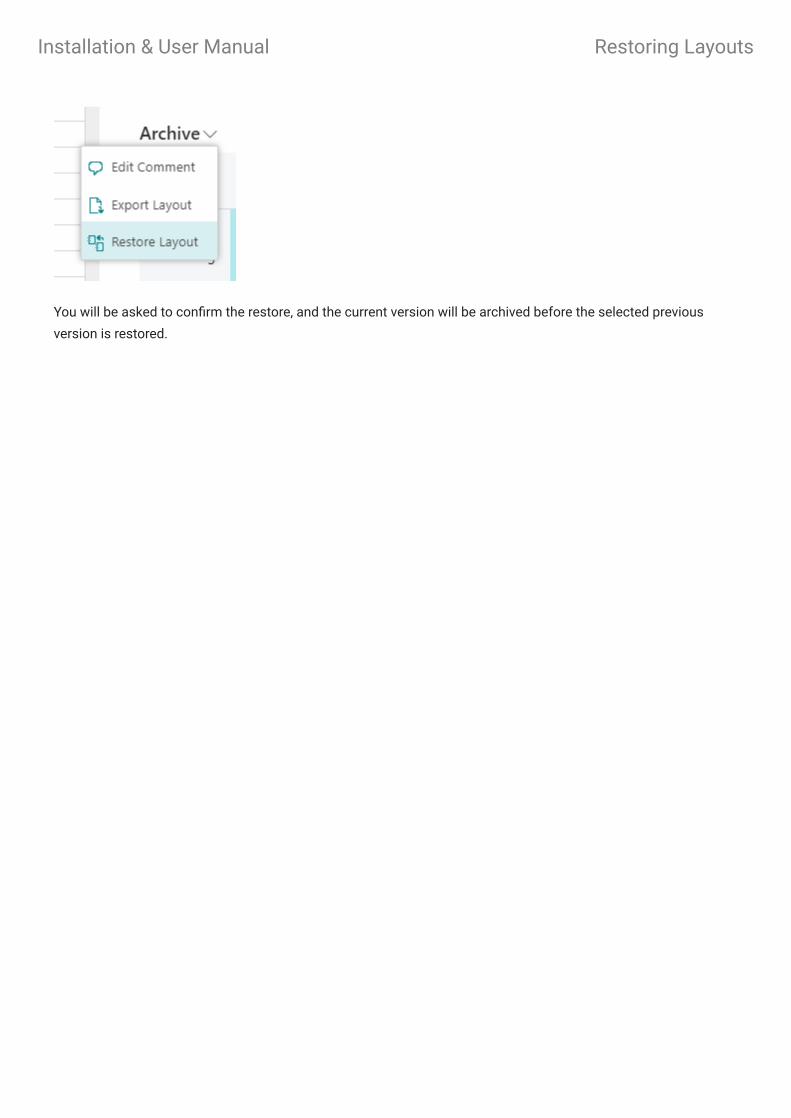
You will be asked to confirm the restore, and the current version will be archived before the selected previous
version is restored.
Installation & User Manual Restoring Layouts

Installation & User Manual

Templates
Document Creator provides a set of templates for reports, layouts and translations which can be accessed
through the Download link on our website.
The Document Creator Templates package includes the following files:
The reports in the Document Creator W1 Templates extension are going to be replaced by the reports in the
Document Creator extension, from version 2.0 onwards / for the Microsoft Dynamics 365 Business Central 2022
release wave 2 (April 1st, 2022; Version 20.0). The reports offer the same (and more(!)) functionality, and are
directly available from the Document Creator extension itself, with extension-provided, default report layouts that
you do not have to import manually.
It is recommended to use the reports from the Document Creator extension, which will receive automatic updates
(with no breaking changes being made to the report datasets).
Attention
Filename Description
Document Creator Translations -
CRONUS.zip
A ZIP file with report label translations for the W1-based report templates
for language codes DEU , ENG , ENU , FRA , NLD .
Document Creator W1
Templates.Source.zip
A ZIP file containing the source code of the Document Creator W1
Templates extension.
LayoutPackage_W1.dcr A Document Creator Layout Package for the reports in the Document
Creator W1 Templates extension.
Apportunix_Document Creator W1
Templates.app
The Document Creator W1 Templates extension.
Installation & User Manual Templates
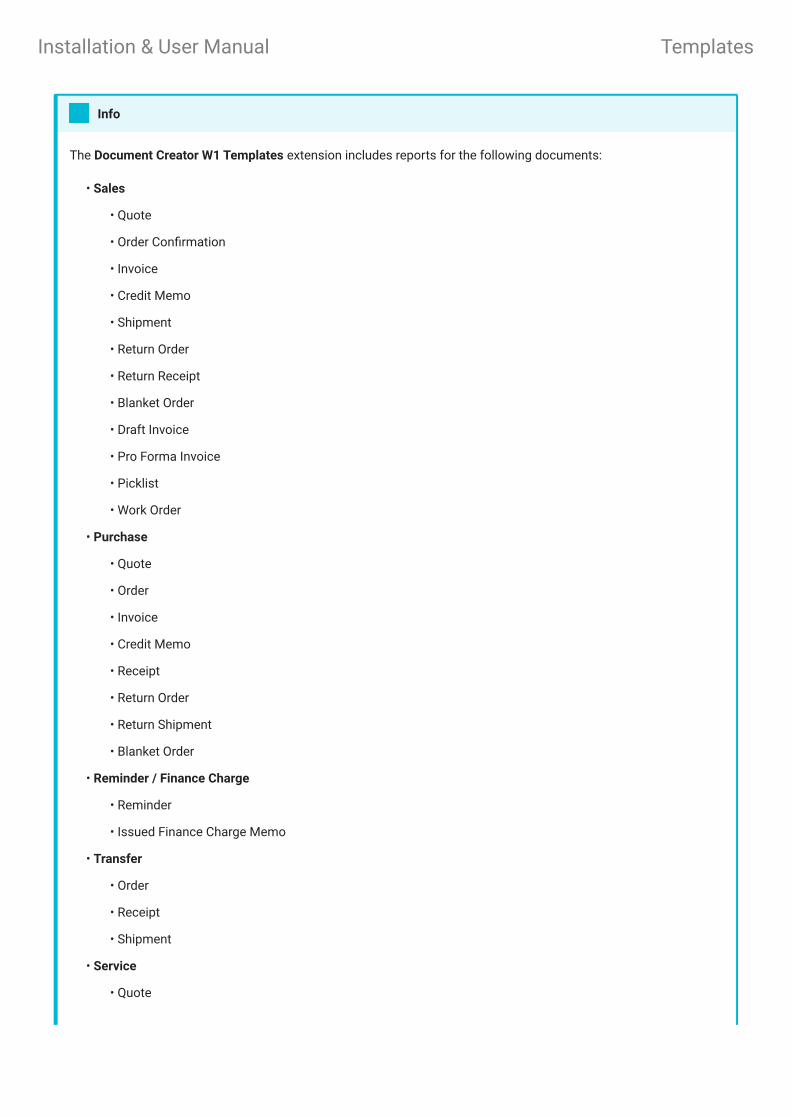
The Document Creator W1 Templates extension includes reports for the following documents:
Sales
Quote
Order Confirmation
Invoice
Credit Memo
Shipment
Return Order
Return Receipt
Blanket Order
Draft Invoice
Pro Forma Invoice
Picklist
Work Order
Purchase
Quote
Order
Invoice
Credit Memo
Receipt
Return Order
Return Shipment
Blanket Order
Reminder / Finance Charge
Reminder
Issued Finance Charge Memo
Transfer
Order
Receipt
Shipment
Service
Quote
Info
•
•
•
•
•
•
•
•
•
•
•
•
•
•
•
•
•
•
•
•
•
•
•
•
•
•
•
•
•
•
•
Installation & User Manual Templates

W1 Templates Installation
To install the W1 Template reports and corresponding layouts, please follow these steps:
Order
Invoice
Credit Memo
Shipment
Pro Forma Invoice (Posted Shipment)
Draft Invoice
Picklist
Contract
Service Item Worksheet
Assembly
Order
Posted Order
Job
Quote
Warehouse
Shipment
Posted Shipment
Receipt
Posted Receipt
Pick List
Inventory Pick List
Movement List
Inventory Movement List
Put-Away List
Inventory Put-Away List
•
•
•
•
•
•
•
•
•
•
•
•
•
•
•
•
•
•
•
•
•
•
•
•
•
Installation & User Manual W1 Templates Installation

On the Home Page, select the Setup & Extensions dropdown
Select Extensions, this will open the Extension Management page.
Invoke the Manage > Upload Extensions action, this will open the Upload and Deploy Extension page.
Select the Apportunix_Document Creator W1 Templates_<version>.app file via the AssistEdit-button of the
Select .app file field.
Enable the Accept toggle.
Select Deploy.
Wait for the extension to be deployed. A message should show up to inform you that the extension
deployment is in progress.
For on-premise environments, you can use the Admin PowerShell cmdlets to publish the app in case External
Deployment is not enabled.
Info
1.
2.
3.
4.
5.
6.
7.
Installation & User Manual W1 Templates Installation

Once the deployment has finished, the Document Creator W1 Templates extension will show up in the
Extension Management page. If a previous version was installed, you will see the previous version has been
uninstalled and the new version is now installed.
Assign the permission set to the appropriate users.
Use the Tell Me search feature to search for and open up the Report Layouts page.
Invoke the Document Creator > Import Layout Package... action and select the LayoutPackage_W1.dcr file to
import the layouts. See Layout Packages.
Select the newly imported layouts and use the Fast Report Layout Selections... action to configure the layout
selections for the reports. See Fast Report Layout Selection Action.
8.
9.
10.
11.
12.
Installation & User Manual W1 Templates Installation

To have the W1 Template reports used when your documents are printed, you need to configure Report
Selections for each document type. You can configure report selections in the Report Selection - * pages in
Dynamics 365 Business Central.
13.
To set up report 72102 Sales - Invoice to be used when a Posted Sales Invoice is printed, search and open the
Report Selection - Sales page, choose Usage = Invoice and select this report in the Report ID field of the
record.
Example
Installation & User Manual W1 Templates Installation
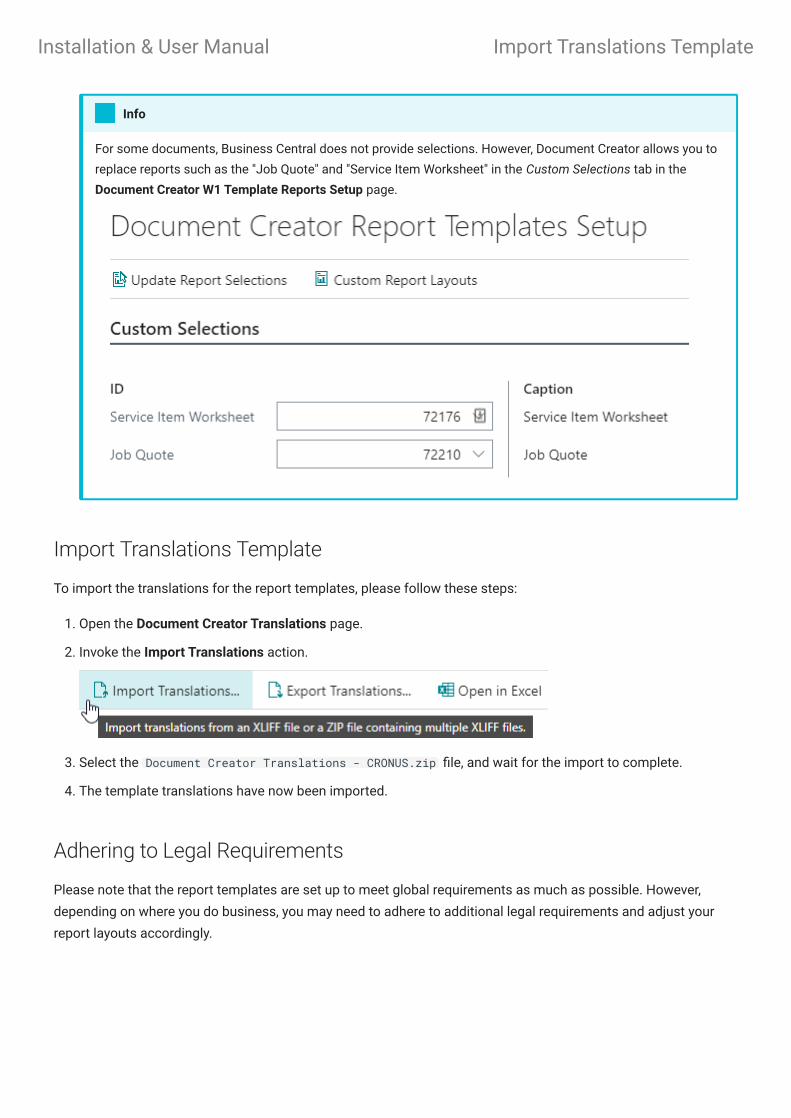
Import Translations Template
To import the translations for the report templates, please follow these steps:
Open the Document Creator Translations page.
Invoke the Import Translations action.
Select the Document Creator Translations - CRONUS.zip file, and wait for the import to complete.
The template translations have now been imported.
Adhering to Legal Requirements
Please note that the report templates are set up to meet global requirements as much as possible. However,
depending on where you do business, you may need to adhere to additional legal requirements and adjust your
report layouts accordingly.
For some documents, Business Central does not provide selections. However, Document Creator allows you to
replace reports such as the "Job Quote" and "Service Item Worksheet" in the Custom Selections tab in the
Document Creator W1 Template Reports Setup page.
Info
1.
2.
3.
4.
Installation & User Manual Import Translations Template

Intra-Community Delivery (EU)
If your company sells and/or exports goods to companies settled in other countries in the European Union, then
this is known as "Intra-Community Delivery/Supply" (N.B., the customer should have a valid EU VAT Registration
number). For this type of delivery, the "Reverse Charge" VAT Calculation Type should apply, which means that a 0%
VAT rate applies but will not be charged (i.e., please check your "VAT Posting Setup" in Business Central carefully).
However, on your invoices it is required that you state that an "Intra-Community Supply" applies, e.g.:
VAT zero-rated intra-community supply of goods following article 138 Directive 2006/112/EC
Additionally, both VAT Registration Nos. (from seller and customer) should be visible on the invoices as well.
The Document Creator W1 Template reports already facilitate the data that you can use to add this to your invoice
report layouts. Under the InvHdr dataitem, you can find a IntraCommDeliveryTxt column which contains the
text to be shown when an intra-community delivery applies. You can add a TextObject to your report layout and set
a condition so that the text is only shown when applicable (e.g., use the VisibleExpression property and set it to
[Total.ReverseChargeVATExists] , or check the value of the [InvHdr.VATBusPostingGroup] instead).
VAT Rates on Invoices
Even if a 0% VAT rate applies when exporting your goods, your company may still need to show the VAT rate(s)
even if a VAT amount of "0" is being charged. The Document Creator W1 Template reports already facilitate this,
i.e., if VAT applies, then the VAT rate(s) (N.B. one or multiple) will always be shown (together with their
corresponding amounts). Of course, if you wish to change this, then you can edit the report layouts accordingly.
Installation & User Manual Intra-Community Delivery (EU)