
Ezra-Coat-Pattern-DIY-Kit-Instructions-The-School-of-Making ...
10
For use with DIY Ezra Cropped Jacket/Blazer/Short Coat/Long Coat Kits from e School of Making theschoolofmaking.alabamachanin.com © e School of Making™ 2019 DIY EZRA COAT INSTRUCTIONS for cropped jacket, blazer, short coat and long coat lengths
-
Upload
khangminh22 -
Category
Documents
-
view
3 -
download
0
Transcript of Ezra-Coat-Pattern-DIY-Kit-Instructions-The-School-of-Making ...

For use with DIY Ezra Cropped Jacket/Blazer/Short Coat/Long Coat Kitsfrom The School of Making
theschoolofmaking.alabamachanin.com© The School of Making™ 2019
DIY EZRA COAT INSTRUCTIONSfor cropped jacket, blazer, short coat and long coat lengths

2
1. ADD EMBROIDERY (OPTIONAL)If you choose to embroider your project, add this to the right side of the cut top-layer pieces. Add embellishment as desired using one of our Alabama Studio Series books for inspiration. If you’re adding beads, avoid beading in the 1/4” seam allowance.
2. PREPARE FOR CONSTRUCTIONAfter completing embellishment, choose Inside or Outside Floating or Felled Seams (see our Alabama Studio Book Series) for your garment. You will pin with fabric’s wrong sides together for seams visible on the outside of the garment or with fabric’s right sides together for seams that are finished on the inside of the garment. If you choose to make your coat with Outside Floating or Felled Seams, trim off all exposed notches before felling your garment’s seams.
When pinning knit seams for construction, it is important to follow a method we call “pinning the middle.” With right sides together for inside seams and wrong sides together for outside seams, start by pinning the top of your seam, and follow by pinning the bottom of your seam. After pinning both top and bottom, place one pin in the middle, between the two initial pins. Continue by pinning in the middle of each set of pins, until your seam is securely pinned and ready to sew.
Unless otherwise noted, all of our garment patterns use a 1/4” (6mm) seam allowance.
3 A. SEW POCKETS (FOR COAT AND BLAZER VERSIONS ONLY) (SKIP TO STEP 3B IF YOU ARE MAKING COAT OR BLAZER WITH NO POCKETS) (SKIP TO 4 IF YOU ARE MAKING A CROPPED JACKET)See page 7 of this document for basic sewing instructions or reference our Alabama Studio Book Series for more in-depth instruction. The Blazer and the Short and Long Coats can be made with or without pockets.
With right sides together, pin into place one pocket bag piece across the bottom of one Side Front Top piece. Thread your needle, love your thread, and knot off. Using a straight stitch, sew the pinned Pocket Bag into place starting at the lower edge of the raw seam and stitching 1/4” (6mm) from the fabric’s cut edges and across until the Pocket Bag is joined to the Side Front Piece. Begin and end your seam by wrap-stitching its edges to secure.
Repeat this for the second Side Front Top piece. Fell seams down toward bottom of pocket bag.
With right sides together, line up the other Pocket Bag at the bottom of the Side Front Bottom and pin into place. Sew the pinned Pocket Bag into place starting at the lower edge of the seam and stitching 1/4” (6mm) from the fabric’s cut edges and across until the Pocket Bag is joined to the Side Front Bottom piece. Flip the Pocket Bag so that wrong sides are together on the Side Front Bottom piece and topstitch the Pocket Bag 1/8’’ away from the clean finished edge.
SFTop
Fell Seam
PocketBag 1
Sew constructed pocketflaps to Side Front top with
1/4” seam allowance through all layers
Open Pocket Flap
SFTop
SFTop
Top of Pocket Flap
Top Stitch 1/8”through all layers
SFBottom
SFTop
CenterFront
Fell Stitchfor step 9 Top Stitch
from step 8
Clean Finish Edgefrom step 8SF
Bottom
Clean Finished Edge
Top StitchPocket Bag 2
PocketBags
SFBottom
SFTop
Basting stitch
Stitches from step 7a
Sew pocket bags together at bottom
(Inside Coat)
Bottom layer of collar
Pin the red dotted linesso that they overlap and
stitch with a 1/4” allowance.
Attatch bottom layer of collarONLY to neckline of coat.
Notches for edges of collar
Top layer of collar
Top Stitch
Notch for CB
CB
CFCF
SFTop
Fell Seam
PocketBag 1
Sew constructed pocketflaps to Side Front top with
1/4” seam allowance through all layers
Open Pocket Flap
SFTop
SFTop
Top of Pocket Flap
Top Stitch 1/8”through all layers
SFBottom
SFTop
CenterFront
Fell Stitchfor step 9 Top Stitch
from step 8
Clean Finish Edgefrom step 8SF
Bottom
Clean Finished Edge
Top StitchPocket Bag 2
PocketBags
SFBottom
SFTop
Basting stitch
Stitches from step 7a
Sew pocket bags together at bottom
(Inside Coat)
Bottom layer of collar
Pin the red dotted linesso that they overlap and
stitch with a 1/4” allowance.
Attatch bottom layer of collarONLY to neckline of coat.
Notches for edges of collar
Top layer of collar
Top Stitch
Notch for CB
CB
CFCF

3
Take one completed Side Front Top piece and the matching Side Front Bottom piece and line up the pocket bags with right sides together at the bottom of the bag and pin into place. Thread your needle, love your thread, and knot off. Using a straight stitch and stitching 1/4” (6mm) from the fabric’s cut edges, sew the pinned pocket bottoms together and knot off.
Now pin the pocket sides down to the Side Front Bottom and using an all-purpose thread, baste both sides of the pocket down to the Side Front Bottom.
Repeat this process for the second Side Front Top and Bottom pieces.
You will now have two complete Side Front Pieces with pockets. Skip to step 4.
3 B. STITCH COAT SIDE FRONT (START HERE IF YOU ARE MAKING BLAZER OR COAT WITH NO POCKETS)See page 7 of this document for basic sewing instructions or reference our Alabama Studio Book Series for more in-depth instruction.
With right sides together for inside seams (or wrong sides together for outside seams), pin Side Front Top and Side Front Bottom pieces together. Thread your needle, love your thread, and knot off. Using a straight stitch, sew the pinned Side Front pieces together starting at the lower edge of the raw seam and stitching 1/4” (6mm) from the fabric’s cut edges and across until they are joined. Begin and end your seam by wrap-stitching its edges to secure.
Fell each seam (if desired) down towards the hem of your garment by folding over the seam allowances and topstitching them 1/8” (3mm) from the cut edges, down the center of the seam allowances, using a straight stitch and wrap-stitching the seam.
Repeat this process for the second set of Side Front pieces.
4. STITCH CENTER FRONT (START HERE IF YOU ARE MAKING A CROPPED JACKET)See page 7 of this document for basic sewing instructions or reference our Alabama Studio Book Series for more in-depth instruction.
With right sides together and raw edges aligned (or wrong sides together for outside seams), pin two Center Front pieces together. Thread your needle, love your thread, and knot off. Using a straight stitch and stitching 1/4” (6mm) from the fabric’s cut edges, sew the pinned Center Front pieces together starting at the notch on the Center Front neckline and working towards the center front. At 1/4” from the center front, turn and work your way down to the hem of the Center Front panel keeping the 1/4” seam allowance and checking your thread tension as you work. Trim away the corner at collar edge, turn right side out, and press with a pressing cloth.
Repeat for other set of Center Front pieces.
5. STITCH CENTER FRONT TO SIDE FRONTWith right sides together for inside seams (or wrong sides together for outside seams), pin the Center Front piece to the Side Front piece(s), catching the pocket bag with your stitches. Match up the notches at the bustline and the notch at the waist with the seam on the Side Front. Disregard the notch at the waist if doing a Cropped Jacket. Using a straight stitch and 1/4” seam allowance, join the Center Front piece to the Side Front piece(s), making sure to catch the pocket bag. Begin and end your seam by wrap-stitching its edges to secure them.

4
Fell each seam (if desired) towards the center front of your garment by folding over the seam allowances and topstitching them 1/8” (3mm) from the cut edges, down the center of the seam allowances, using a straight stitch and wrap-stitching the seam. If you choose to make your coat with Outside Floating or Felled Seams, trim off all exposed notches before felling your garment’s seams.
Repeat this process for the other set of Center and Side Fronts.
6. STITCH BACK PANELSWith right sides together for inside seams (or wrong sides together for outside seams), pin your Center Back pieces at the Center Back seam. Thread your needle, love your thread, and knot off. Using a straight stitch, sew the pinned pieces together, starting at the top edge of the seam and stitching 1/4” (6mm) from the fabric’s cut edges down to the bottom edge. Be sure to begin and end your seam by wrap-stitching its edges to secure them. Fell this seam (if desired) toward either side of your garment by folding over the seam allowances to one side and
topstitching them 1/8” (3mm) from the cut edges, down the center of the seam allowances, using a straight stitch and wrap-stitching the seam. If you choose to make your coat with Outside Floating or Felled Seams, trim off all exposed notches before felling your garment’s seams.
Pin your side back panels to the newly-constructed center back panel. Thread your needle, love your thread, and knot off. Using a straight stitch, sew the pinned pieces together, starting at the top edge of the seam and stitching 1/4” (6mm) from the fabric’s cut edges down to the bottom edge. Be sure to begin and end your seam by wrap-stitching its edges to secure them.
Repeat this process with the other side back panels.
Fell each seam (if desired) towards the sides of your garment by folding over the seam allowances to one side and topstitching them 1/8” (3mm) from the cut edges, down the center of the seam allowances, using a straight stitch and wrap-stitching the seam. If you choose to make your coat with Outside Floating or Felled Seams, trim off all exposed notches before felling your garment’s seams.
7. SEW SHOULDER SEAMSWith right sides together for inside seams (or wrong sides together for outside seams), pin the shoulder seams, with raw edges aligned, and sew the seams, starting at the top edge of the armhole and stitching 1/4” (6mm) from the fabric’s cut edges across to the neckline. Begin and end each seam by wrap-stitching its edges to secure. Fell your seams, if desired, towards the back of your garment down the middle of the seam allowance.
8. CONSTRUCT SLEEVESWith right sides together for inside seams (or wrong sides together for outside seams), pin your Top and Under Sleeve together at Sleeve Center,
SFTop
Fell Seam
PocketBag 1
Sew constructed pocketflaps to Side Front top with
1/4” seam allowance through all layers
Open Pocket Flap
SFTop
SFTop
Top of Pocket Flap
Top Stitch 1/8”through all layers
SFBottom
SFTop
CenterFront
Fell Stitchfor step 9 Top Stitch
from step 8
Clean Finish Edgefrom step 8SF
Bottom
Clean Finished Edge
Top StitchPocket Bag 2
PocketBags
SFBottom
SFTop
Basting stitch
Stitches from step 7a
Sew pocket bags together at bottom
(Inside Coat)
Bottom layer of collar
Pin the red dotted linesso that they overlap and
stitch with a 1/4” allowance.
Attatch bottom layer of collarONLY to neckline of coat.
Notches for edges of collar
Top layer of collar
Top Stitch
Notch for CB
CB
CFCF
4
4
5
5
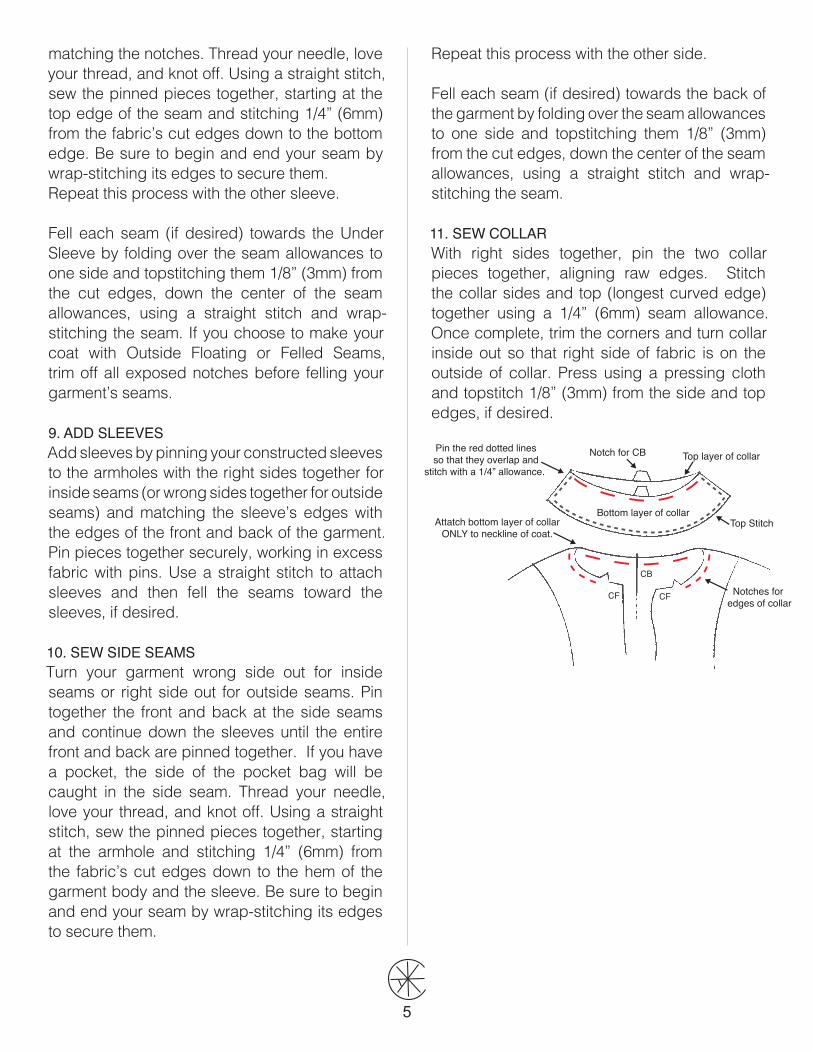
matching the notches. Thread your needle, love your thread, and knot off. Using a straight stitch, sew the pinned pieces together, starting at the top edge of the seam and stitching 1/4” (6mm) from the fabric’s cut edges down to the bottom edge. Be sure to begin and end your seam by wrap-stitching its edges to secure them. Repeat this process with the other sleeve.
Fell each seam (if desired) towards the Under Sleeve by folding over the seam allowances to one side and topstitching them 1/8” (3mm) from the cut edges, down the center of the seam allowances, using a straight stitch and wrap-stitching the seam. If you choose to make your coat with Outside Floating or Felled Seams, trim off all exposed notches before felling your garment’s seams.
9. ADD SLEEVESAdd sleeves by pinning your constructed sleeves to the armholes with the right sides together for inside seams (or wrong sides together for outside seams) and matching the sleeve’s edges with the edges of the front and back of the garment. Pin pieces together securely, working in excess fabric with pins. Use a straight stitch to attach sleeves and then fell the seams toward the sleeves, if desired.
10. SEW SIDE SEAMSTurn your garment wrong side out for inside seams or right side out for outside seams. Pin together the front and back at the side seams and continue down the sleeves until the entire front and back are pinned together. If you have a pocket, the side of the pocket bag will be caught in the side seam. Thread your needle, love your thread, and knot off. Using a straight stitch, sew the pinned pieces together, starting at the armhole and stitching 1/4” (6mm) from the fabric’s cut edges down to the hem of the garment body and the sleeve. Be sure to begin and end your seam by wrap-stitching its edges to secure them.
Repeat this process with the other side.
Fell each seam (if desired) towards the back of the garment by folding over the seam allowances to one side and topstitching them 1/8” (3mm) from the cut edges, down the center of the seam allowances, using a straight stitch and wrap-stitching the seam.
11. SEW COLLARWith right sides together, pin the two collar pieces together, aligning raw edges. Stitch the collar sides and top (longest curved edge) together using a 1/4” (6mm) seam allowance. Once complete, trim the corners and turn collar inside out so that right side of fabric is on the outside of collar. Press using a pressing cloth and topstitch 1/8” (3mm) from the side and top edges, if desired.
SFTop
Fell Seam
PocketBag 1
Sew constructed pocketflaps to Side Front top with
1/4” seam allowance through all layers
Open Pocket Flap
SFTop
SFTop
Top of Pocket Flap
Top Stitch 1/8”through all layers
SFBottom
SFTop
CenterFront
Fell Stitchfor step 9 Top Stitch
from step 8
Clean Finish Edgefrom step 8SF
Bottom
Clean Finished Edge
Top StitchPocket Bag 2
PocketBags
SFBottom
SFTop
Basting stitch
Stitches from step 7a
Sew pocket bags together at bottom
(Inside Coat)
Bottom layer of collar
Pin the red dotted linesso that they overlap and
stitch with a 1/4” allowance.
Attatch bottom layer of collarONLY to neckline of coat.
Notches for edges of collar
Top layer of collar
Top Stitch
Notch for CB
CB
CFCF

6
Pin a single layer of the collar into the back neck, going from notch to notch and making sure that the Center Back of the garment is aligned with the Center Back of the collar. Thread your needle, love your thread, and knot off. Using a straight stitch, sew the pinned pieces together, stitching 1/4” (6mm) from the fabric’s cut edges.
Turn the top layer of the collar up 1/4’’ (6mm) and baste into place, easing in any excess fabric. Thread your needle, love your thread, and knot off. Using a straight stitch, sew 1/8’’ (3mm) from the edge of both the inner and outer layers, sewing all the way through, and securing both sides of the collar in place.
12. SEW POCKET FLAPWith right sides together, pin your two Pocket Flaps together. Using a 1/4” (6mm) seam
Top layer of collar (will fold down)
Raw edge is folded under. Sew 1/8” top stitch all the way through all layers, catching raw edge
and creating a clean finish along neckline
(LOOKING AT INSIDE OF OPEN COAT)
CF C
F
CB
(LOOKING AT OUTSIDE OF OPEN COAT)
CF C
F
CB
Top layer of collar
Inside bottom layer of collar
allowance, stitch around the sides and bottom of each Pocket Flap. Once complete, trim the corners and turn the flaps inside out, so that the right side of fabric is on the outside of the flap. Press with a pressing cloth and topstitch 1/8” (3mm) from the side and top edges, if desired.
Pin Pocket Flap into place 1/4’’ (6mm) above the pocket seam on the Top Side Front and stitch down using a 1/4” (6mm) seam allowance. Turn Pocket Flap down and topstitch at 1/8’’ (3mm), beginning and ending your seam with two wrap stitches, as this will be a high-use area of the garment and will need the additional reinforcement.
13. APPLY SNAPSLine your first snap 1/2’’ (12mm) from snap center from the top and side edge of the garment’s center front. Place the male snap on the right side and the female snap on the left side when looking at your garment.
Place additional snaps 3 1/2’’ away from each other, center-to-center.
You will need 10 snaps for both Coat variations, 7 snaps for the Blazer, and 6 snaps for the Cropped Jacket.
SFTop
Fell Seam
PocketBag 1
Sew constructed pocketflaps to Side Front top with
1/4” seam allowance through all layers
Open Pocket Flap
SFTop
SFTop
Top of Pocket Flap
Top Stitch 1/8”through all layers
SFBottom
SFTop
CenterFront
Fell Stitchfor step 9 Top Stitch
from step 8
Clean Finish Edgefrom step 8SF
Bottom
Clean Finished Edge
Top StitchPocket Bag 2
PocketBags
SFBottom
SFTop
Basting stitch
Stitches from step 7a
Sew pocket bags together at bottom
(Inside Coat)
Bottom layer of collar
Pin the red dotted linesso that they overlap and
stitch with a 1/4” allowance.
Attatch bottom layer of collarONLY to neckline of coat.
Notches for edges of collar
Top layer of collar
Top Stitch
Notch for CB
CB
CFCF
SFTop
Fell Seam
PocketBag 1
Sew constructed pocketflaps to Side Front top with
1/4” seam allowance through all layers
Open Pocket Flap
SFTop
SFTop
Top of Pocket Flap
Top Stitch 1/8”through all layers
SFBottom
SFTop
CenterFront
Fell Stitchfor step 9 Top Stitch
from step 8
Clean Finish Edgefrom step 8SF
Bottom
Clean Finished Edge
Top StitchPocket Bag 2
PocketBags
SFBottom
SFTop
Basting stitch
Stitches from step 7a
Sew pocket bags together at bottom
(Inside Coat)
Bottom layer of collar
Pin the red dotted linesso that they overlap and
stitch with a 1/4” allowance.
Attatch bottom layer of collarONLY to neckline of coat.
Notches for edges of collar
Top layer of collar
Top Stitch
Notch for CB
CB
CFCF

7
BASIC SEWING INSTRUCTIONSProvided below are notes on our basic con-struction and sewing techniques. For more thorough instructions on stenciling, embellish-ment, and construction, reference one of our Alabama Studio books, shown on page 9.
LOVE YOUR THREADTo love your thread, cut a piece twice as long as the distance from your fingertips to your elbow. Thread your needle, pulling the thread through the needle until the two ends of the thread are the same length.Hold the doubled thread between your thumb and index finger, and run your fingers along it from the needle to the end of the loose tails. Repeat this several times to release the tension in the thread, and then double-knot your thread.
KNOTTING OFF After bringing the needle up through the fabric, make a loop with the thread, then pull your needle through that loop, using your forefinger or thumb to nudge the knot in place, flush with the fabric. Then repeat this process to make a double knot. After making a second knot, cut the thread, leaving a 1/2” (12mm) tail.
In hand-sewing, your knot anchors and holds your entire seam. One important design decision we make when starting any project is how to handle the knots. There are two options: knots that show on the project’s right side (outside) and knots that show on the wrong side (inside). Either of these knots can be used throughout an entire project.
EXAMPLES OF STRETCH AND NON-STRETCH STITCHESWe use three categories of stitches in our work: stitches that do not stretch, for construction, reverse appliqué, and other embellishments; stitches that do stretch, for sewing necklines, armholes, and other areas in a project that require “give”; and stitches that are purely decorative, for embellishment. Following are examples of non-stretch and stretch:
NON-STRETCH STITCHStraight (Running) Stitch: Bring needle up at A, go back down at B, and come up at C, making stitches and spaces between them the same length (about 1/8” (3mm) to 1/4” (6mm) long).
BACKSTITCHBring needle up to A, go back down at B, and come up at C. Then insert needle just ahead of B, and come up at D. Next insert needle just ahead of C, and come up at E. Continue this overall pattern.

8
STRETCH STITCHCRETAN STITCH: Bring needle up at A, go down at B, and come back up at C, making a downward vertical stitch while bringing needle over thread. Insert needle again at D, and come back up at E, making an upward vertical stitch while bringing needle over thread. Continue to repeat stitch pattern.
ZIGZAG STITCH: Bring needles up at A, go down at B, and come back up at C. Insert needle again at A, and come back up at D. Insert needle again at C, and come back up at E. Continue to repeat stitch pattern.
SEAMSTo start a seam, make a double knot, and insert the needle at point A. Wrap your thread around side of the fabric to the front, insert the needle back in at B, then come up at C, and stitch the seam. Also wrap-stitch the end of your seam before knotting off.

9
Alabama Stitch Book Alabama Stitch Book is a collection of stitching, beading, and embroidery instructions, stories, and projects from Alabama Chanin. Projects include our best-selling Corset, Swing Skirt, “boa” scarf, bandana,and more.
Photography by Robert Rausch
From the Author of Alabama Stitch Book
More Projects, Recipes & Stories Celebrating Sustainable Fashion & Living
Alabama Studio Style Alabama Studio Style expands upon the stitching, stenciling, and beading techniques introduced in Alabama Stitch Book and introduces twenty new clothing and home decor projects. This book also includes recipes and stories.
Alabama Studio Sewing + Design An encyclopedic compilation of techniques used to create the Alabama Chanin line of organic cotton clothing. Included are dresses, skirts, tops,and accessories.
Alabama Studio Sewing Patterns Alabama Studio Sewing Patterns explores fit, patternmaking, and how to create a garment to fit your unique shape. It includes three new patterns with several variations as well as previous open-sourced patterns on a disc at the back of the book.
THE SCHOOL OF MAKING BOOK SERIES AT A GLANCE
The Geometry of Hand-Sewing The Geometry of Hand-Sewing: A Romance in Stitches and Embroidery from Alabama Chanin and The School of Making by Natalie Chanin is a comprehensive guide to hand-stitching and embroidery. This book focuses solely on the stitches themselves, taking embroidery stitches and breaking them down into different geometric grid systems that make learning even seemingly elaborate stitches as easy as child’s play.

10
TERMS OF USEAll designs © The School of Making™ 2019, Alabama Chanin, Inc. These patterns are for personal home use. Patterns and projects are not to be produced for commercial purposes, nor are they to be made into items for sale. These patterns are copyright protected and reproduction of them is not permitted. Intended for use with Alabama Stitch Book, Alabama Studio Style, Alabama Studio Sewing + Design, Alabama Studio Sewing Patterns, and The Geometry ofHand-Sewing.
ABOUT THE SCHOOL OF MAKINGAlabama Chanin as a concept and a company began as a DIY enterprise. Workshop programming was a natural outgrowth of the emerging DIY initiative growing around us. Our experiences showed us that face-to-face and hand-to-hand contact helped our customers better understand the what, why, and how of our making processes and the importance of an organic supply chain. And our business continued to grow. DIY offerings expanded, our workshop offerings became more diverse, and our Journal content added additional DIY instruction, stories, and ideas.
Educational programming is one of the fastest growing and most exciting aspects of our business model. So, as the opportunities to educate our team and our customers began to multiply, we realized that we should create a specific home for this knowledge.
To fully embrace our growing model, we have developed an overseeing body that will direct and innovate learning initiatives and educational programs: The School of Making. All of our current and developing educational and training initiatives fall under the umbrella of The School of Making. This arm of the Alabama Chanin Family of Businesses oversees DIY and workshop programming, format, and content; it acts as a researching body for new subjects and new ways of disseminating information. Our hope is that The School of Making can be an active voice in our local community, our state, and the making community, at large.
VISIT THE SCHOOL OF MAKING:theschoolofmaking.alabamachanin.com
SHARE WITH US ON:Instagram – www.instagram.com/theschoolofmakingFacebook – www.facebook.com/theschoolofmaking
Use the hashtag #theschoolofmaking to join the conversation.


![Ezra Pound e il "canto" del 1815 napoleonico [Ezra Pound and the Napoleonic 1815 Canto]](https://static.fdokumen.com/doc/165x107/631afa4a80cc3e9440059dad/ezra-pound-e-il-canto-del-1815-napoleonico-ezra-pound-and-the-napoleonic-1815.jpg)


