ExpressionEngine (EE) Website Management
48
ExpressionEngine (EE) Website Management
-
Upload
khangminh22 -
Category
Documents
-
view
3 -
download
0
Transcript of ExpressionEngine (EE) Website Management

ExpressionEngine (EE) Website Management
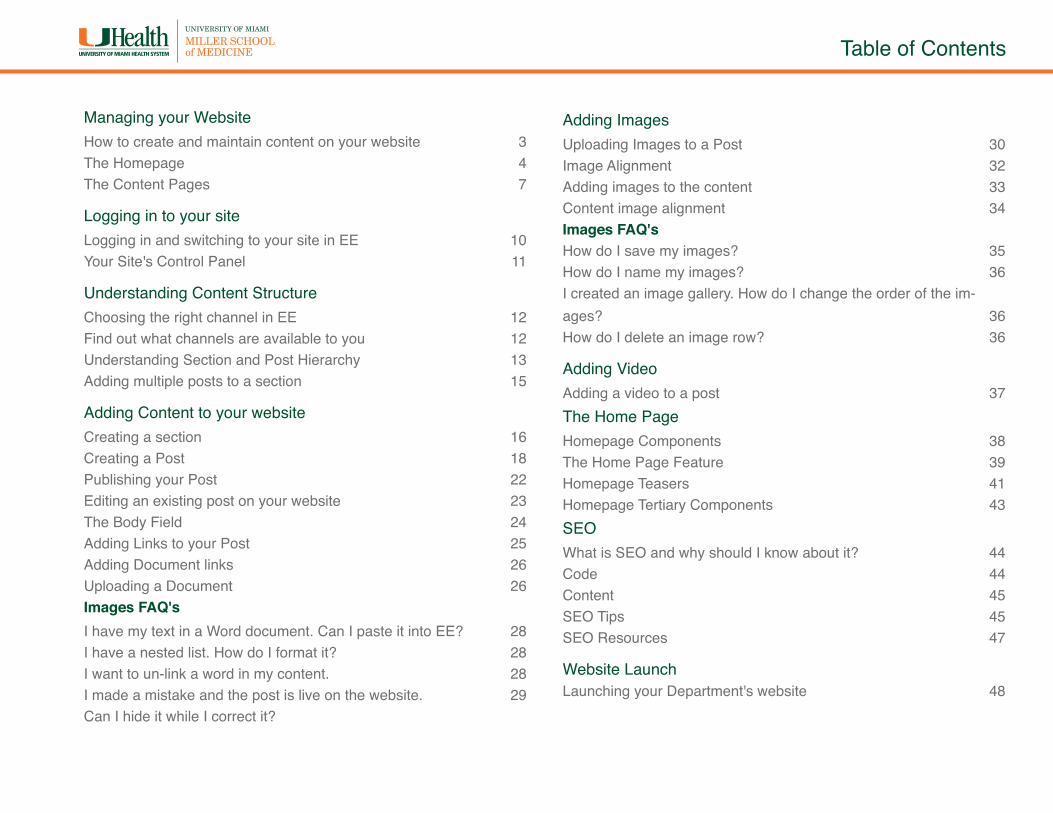
Managing your Website How to create and maintain content on your website 3The Homepage 4The Content Pages 7
Logging in to your site Logging in and switching to your site in EE 10Your Site's Control Panel 11
Understanding Content StructureChoosing the right channel in EE 12Find out what channels are available to you 12Understanding Section and Post Hierarchy 13Adding multiple posts to a section 15
Adding Content to your websiteCreating a section 16Creating a Post 18Publishing your Post 22Editing an existing post on your website 23The Body Field 24Adding Links to your Post 25Adding Document links 26Uploading a Document 26Images FAQ'sI have my text in a Word document. Can I paste it into EE? 28I have a nested list. How do I format it? 28I want to un-link a word in my content. 28I made a mistake and the post is live on the website. 29Can I hide it while I correct it?
Adding Images Uploading Images to a Post 30Image Alignment 32Adding images to the content 33Content image alignment 34Images FAQ'sHow do I save my images? 35How do I name my images? 36I created an image gallery. How do I change the order of the im-ages? 36How do I delete an image row? 36
Adding VideoAdding a video to a post 37The Home PageHomepage Components 38The Home Page Feature 39Homepage Teasers 41Homepage Tertiary Components 43SEOWhat is SEO and why should I know about it? 44Code 44Content 45SEO Tips 45SEO Resources 47
Website LaunchLaunching your Department's website 48
Table of Contents
Chapter: Managing your website • Page 3Questions? [email protected]
How to create and maintain content on your website
The website templates are driven by a CMS called ExpressionEngine.
A CMS (Content Management System) is a web application designed to make it easy for non-technical users to add, edit and manage content on a website. There are various CMSes available. The one chosen for our purposes is called ExpressionEngine (EE). You will not have to know or apply HTML code (the behind-the-scenes code of websites); everything is already set up for you. Simply add or edit an article, click submit and you’re done.
This manual will explain how to log in with the login/password information provided to you, add to the navigation of your site, edit content and much more.
Before adding and editing content on your website you need to familiarize yourself with the different components of the website. The web-sites have a pre-designed template with modular elements. These elements allow for a wider range of complexity on the design on the Homepage where you will be able to highlight different areas of your department or center.
The following pages will acquaint you with the different options and point out the varied sections of the templates.
You can download the latest version of this document at http://identity.med.miami.edu/documentation/ee2-department-sites-manual.pdf
Managing your website
Chapter: Managing your website • Page 4Questions? [email protected]
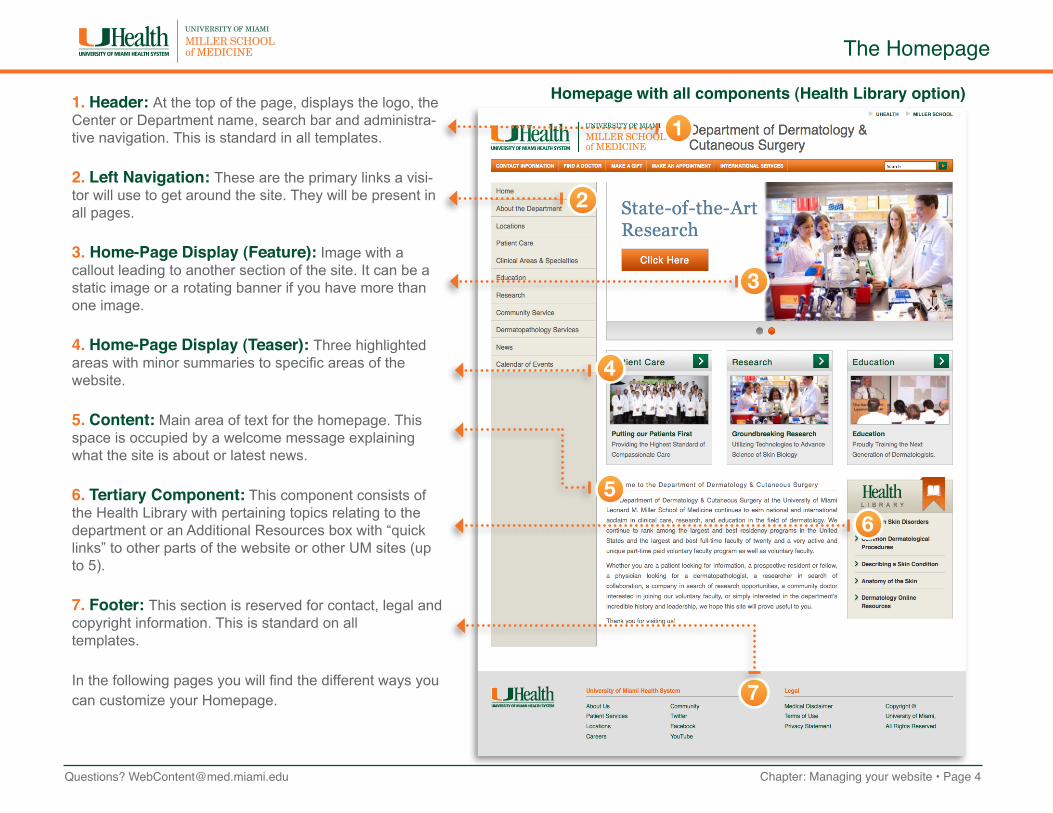
The Homepage
Homepage with all components (Health Library option)
1
2
3
4
5
6
7
1. Header: At the top of the page, displays the logo, the Center or Department name, search bar and administra-tive navigation. This is standard in all templates.
2. Left Navigation: These are the primary links a visi-tor will use to get around the site. They will be present in all pages.
3. Home-Page Display (Feature): Image with a callout leading to another section of the site. It can be a static image or a rotating banner if you have more than one image.
4. Home-Page Display (Teaser): Three highlighted areas with minor summaries to specific areas of the website.
5. Content: Main area of text for the homepage. This space is occupied by a welcome message explaining what the site is about or latest news.
6. Tertiary Component: This component consists of the Health Library with pertaining topics relating to the department or an Additional Resources box with “quick links” to other parts of the website or other UM sites (up to 5).
7. Footer: This section is reserved for contact, legal and copyright information. This is standard on all templates.
In the following pages you will find the different ways you can customize your Homepage.
Chapter: Managing your website • Page 5Questions? [email protected]
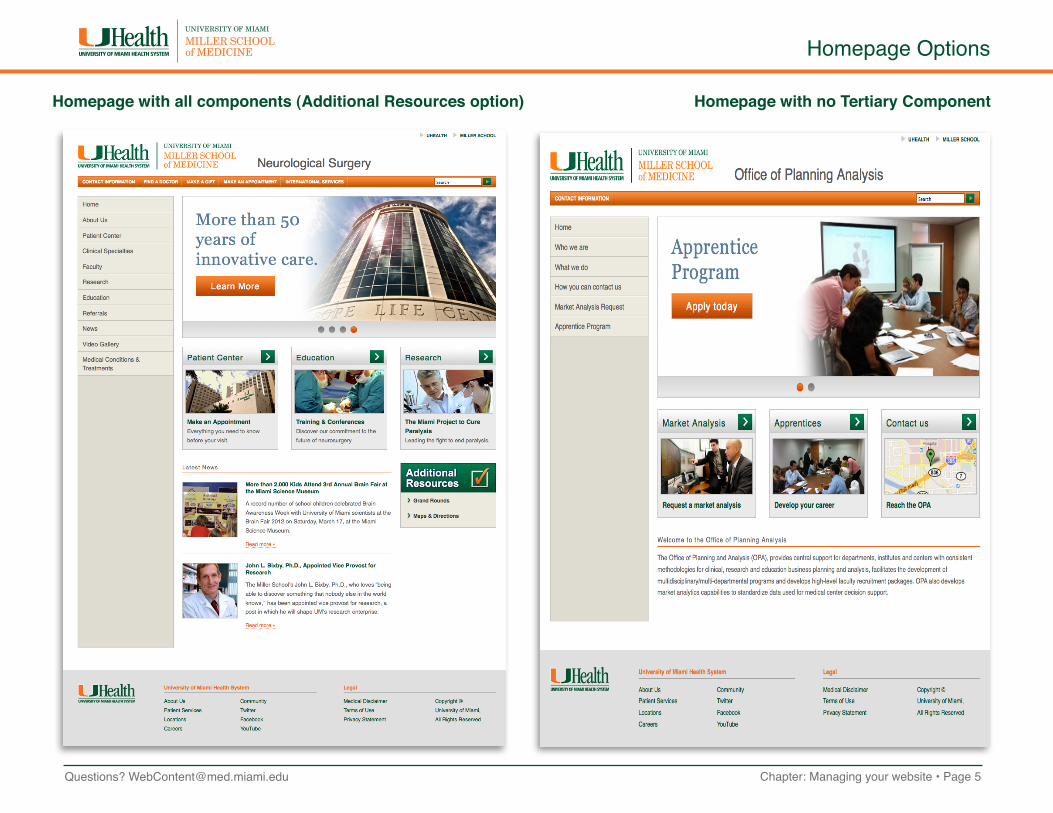
Homepage Options
Homepage with all components (Additional Resources option) Homepage with no Tertiary Component

Chapter: Managing your website • Page 6Questions? [email protected]
Homepage Options
Homepage with a Tertiary Compopnent and no Teasers Homepage with no Teasers or Tertiary Components
Chapter: Managing your website • Page 7Questions? [email protected]
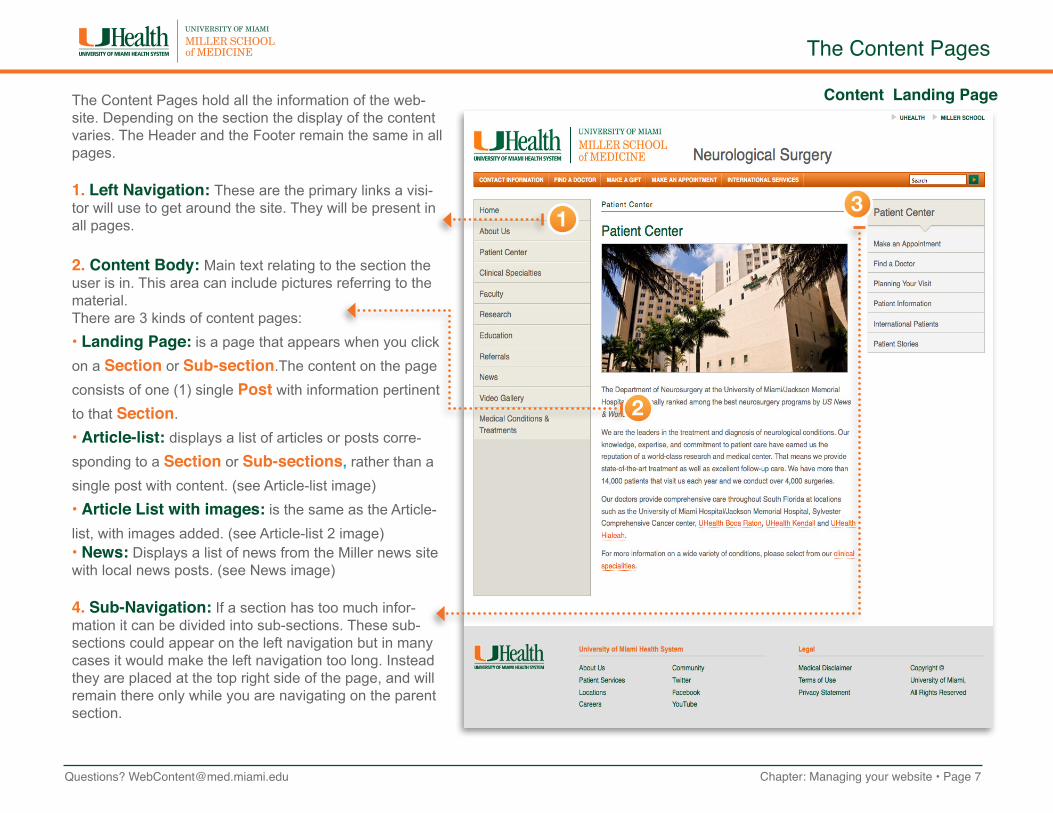
The Content Pages
The Content Pages hold all the information of the web-site. Depending on the section the display of the content varies. The Header and the Footer remain the same in all pages. 1. Left Navigation: These are the primary links a visi-tor will use to get around the site. They will be present in all pages.
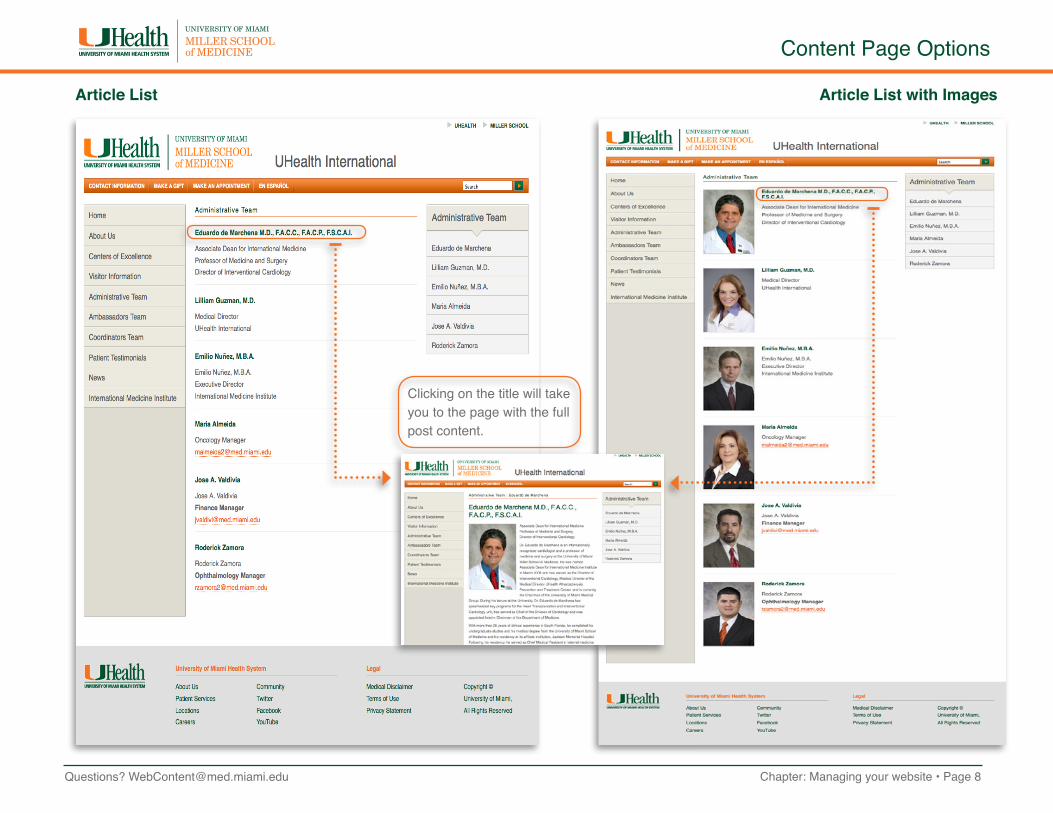
2. Content Body: Main text relating to the section the user is in. This area can include pictures referring to the material.There are 3 kinds of content pages:• Landing Page: is a page that appears when you click on a Section or Sub-section.The content on the page consists of one (1) single Post with information pertinent to that Section.• Article-list: displays a list of articles or posts corre-sponding to a Section or Sub-sections, rather than a single post with content. (see Article-list image)• Article List with images: is the same as the Article-list, with images added. (see Article-list 2 image)• News: Displays a list of news from the Miller news site with local news posts. (see News image)
4. Sub-Navigation: If a section has too much infor-mation it can be divided into sub-sections. These sub-sections could appear on the left navigation but in many cases it would make the left navigation too long. Instead they are placed at the top right side of the page, and will remain there only while you are navigating on the parent section.
1
2
3
Content Landing Page
Chapter: Managing your website • Page 8Questions? [email protected]
Content Page Options
Article List with ImagesArticle List
Clicking on the title will take you to the page with the full post content.

Chapter: Managing your website • Page 9Questions? [email protected]
Content Page Options
Content page with no sub-navigationNews Page

Chapter: Logging in to your site • Page 10Questions? [email protected]
1. Go to the web address provided by the IT department in your browser and enter the username and password you were given. This step is known as “logging in.”
This address is only accesible on campus. You can connect to the Medical campus network externally by using the Secure Gateway VPN
The first time you log in to EE and any time you clear the history in your browser, you will start in the EE Main Control Panel.
2. Look for the EE Main Control Panel button in the top-right corner, and click it.If you have access to more than one site, the button in the top-right corner will always indicate the site you are currently editing.If you are not in your site, click on the Site Button and select your site from the list.
In order to add or edit posts, you must switch to the correct site.
Logging in and switching to your site in EE
Site Button:This button will always indicate the site you are currently editing.

Chapter: Logging in to your site • Page 11Questions? [email protected]
Your site’s Control Panel
The Control Panel is where most of your interaction will take place. Here are a few things you should know:
Getting around EE
12
34 5
1. If you have access to more than one site, check that your site’s name is in the Site But-ton.
2. The Content Menu is where you will create, edit and upload content.
4. The Modify tab is a shortcut to Edit posts. You can select Entry to see a complete list of available posts or select Most Recent Entry.
5. The links in the View tab should be ignored.
3. The Entry button in the Create Tab is just a shortcut to publish new Posts. It is the same as going through the Content - Publish menu (see No. 2)

Chapter: Understanding content structure • Page 12
In EE, to organize the information more efficiently, the content is divided into channels.
Each channel has a particular set of fields that correspond with the type of information being entered. Let’s think of channels as containers where you store all the information of a particular section.
Choosing the right channel in EEMost sites will have these three basic channels: • Section • Post • Home Displays
Depending on the complexity of the site, there could be additional channels like News, Events, Research, etc. Take note of what section on the site you are updating. If you are in the Research section, check to see if there is a “Research” channel. If there is, you should enter your information there. If there is no Research channel, you should select the Posts channel. (This chan-nel is the general category, where all the posts that do not belong to a particular section are contained).
There will be times when sections in your site have been highly customized and will therefore use a completely customized channel and method. If that is the case for one of the sections you will administrate, you will receive a separate set of instruc-tions.
Find out what channels are available to you1. Click on the Content button in the top-left corner.
2. Hover over Publish and you will see the list of available channels to you.
If you need to edit a section or subsection and do not have access to do so, contact your site administrator to make those changes.
Questions? [email protected]
Understanding content structure

Chapter: Understanding content structure • Page 13
Understanding Section and Post HierarchyNow that we know that the information is divided into channels, we need to understand where the content goes. Posts contain all of the content found in the center of a page. Sections are the containers that hold posts together and create navigation.
Let’s draw it out. Let’s say you need to create a new Section for the Orthopaedics site.
1. We would Publish (or create) an entry in our Sections Channel on the Content Menu and name the Title Miami CORE (Research & Educational Foundation). That is the name that will appear on the left side menu. We would select Landing Page on the Layout menu.
2. Now we need to Publish the Post in the Posts Channel that will act as our landing page for that section. We assign it to our Section and mark it Sticky.
Top NavigationLeft Navigation
Questions? [email protected]
Understanding Sections
sticky
POst
1
2
sectiOn
sectiOn
The section is what makes a post visible on the navigation
The post is the information displayed on the page when you click on that section

In addition to having the submenu on the right column, you can also display it on the main menu on the left.This is optional.
Chapter: Understanding content structure • Page 14
3. If we want to add more content, we would create another entry in our Sections Channel, which will act as our Sub-section. Those entries will be on the Submenu at the right or left side of the page. We assign that Subsection to our Section.
(e.g. We create a new section called Residency Program and we assign it to the Education section in the Neurological Surgery website).
4. You will then create a post or multiple posts for each subsection.
This is the Section
This is the Sub-sectionmenu
These are the Sub-Sections
Questions? [email protected]
Understanding Sections
sectiOn
subsection
subsection
subsection
subsection
POst
POst
POst
POst
3
sticky
POst
Chapter: Understanding content structure • Page 15
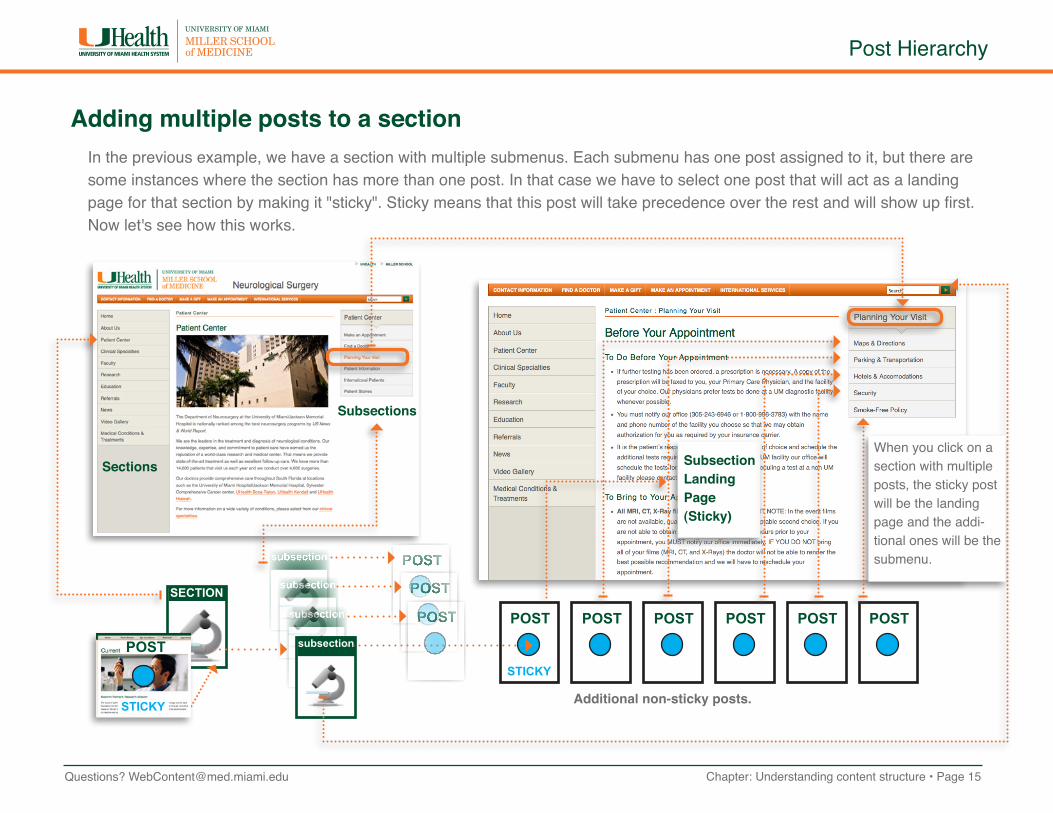
Adding multiple posts to a sectionIn the previous example, we have a section with multiple submenus. Each submenu has one post assigned to it, but there are some instances where the section has more than one post. In that case we have to select one post that will act as a landing page for that section by making it "sticky". Sticky means that this post will take precedence over the rest and will show up first.Now let's see how this works.
Questions? [email protected]
Post Hierarchy
sectiOn
subsection
subsection
subsection
subsection
POst
POst
POstPOst POst POst POst POst
sticky
POst
sticky
POst
Subsections
Subsection Landing Page(Sticky)
SectionsWhen you click on a section with multiple posts, the sticky post will be the landing page and the addi-tional ones will be the submenu.
Additional non-sticky posts.
Chapter: Adding content to your website • Page 16Questions? [email protected]
Creating a Section
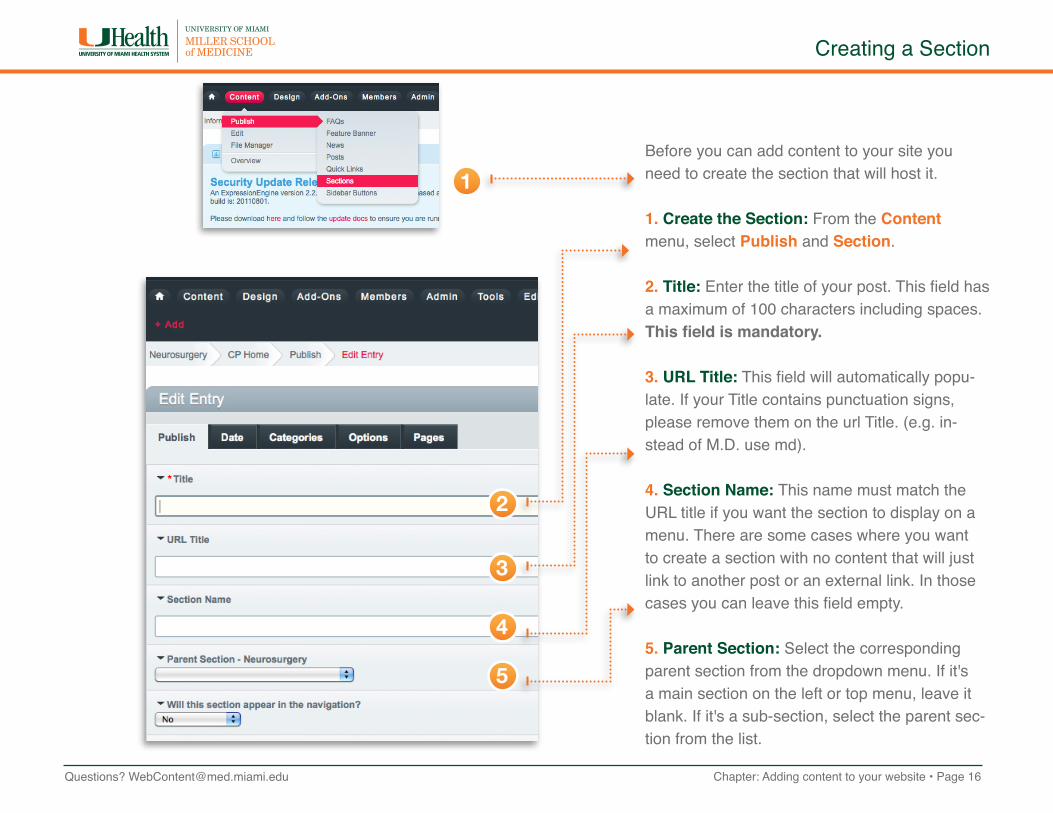
Before you can add content to your site you need to create the section that will host it.
1. Create the Section: From the Content menu, select Publish and Section.
2. Title: Enter the title of your post. This field has a maximum of 100 characters including spaces. This field is mandatory.
3. URL Title: This field will automatically popu-late. If your Title contains punctuation signs, please remove them on the url Title. (e.g. in-stead of M.D. use md). 4. Section Name: This name must match the URL title if you want the section to display on a menu. There are some cases where you want to create a section with no content that will just link to another post or an external link. In those cases you can leave this field empty.
5. Parent Section: Select the corresponding parent section from the dropdown menu. If it's a main section on the left or top menu, leave it blank. If it's a sub-section, select the parent sec-tion from the list.
1
2
3
4
5

Chapter: Adding content to your website • Page 17Questions? [email protected]
Creating a Section
6. Navigation: Here you can select if you want the menu item to display on the left or top navi-gation. If it's a subsection you can choose to display it on the left menu, but if you don't select anything, the subsection will be displayed at the right side menu only.
7. Template: Most content pages will use Land-ing Page, but if you have a series of posts and you want to display a summary of all of them on the main page, you can select Article-list with or without images. If it is a news section, select the news template.
8. Description: Leave this field blank. 9. Page to link: If the section is just a place-holder that has no content but will link to an external website or to an internal page, you will place the link here. If it's an external link, copy the complete URL. (e.g. http://med.miami.edu). If the link is to another page inside your site, copy the section and page name (e.g. /section-name/page-name).
10. Submit: Once you are done click Submit to create your section.
6
7
8
9
10
Chapter: Adding content to your website • Page 18Questions? [email protected]
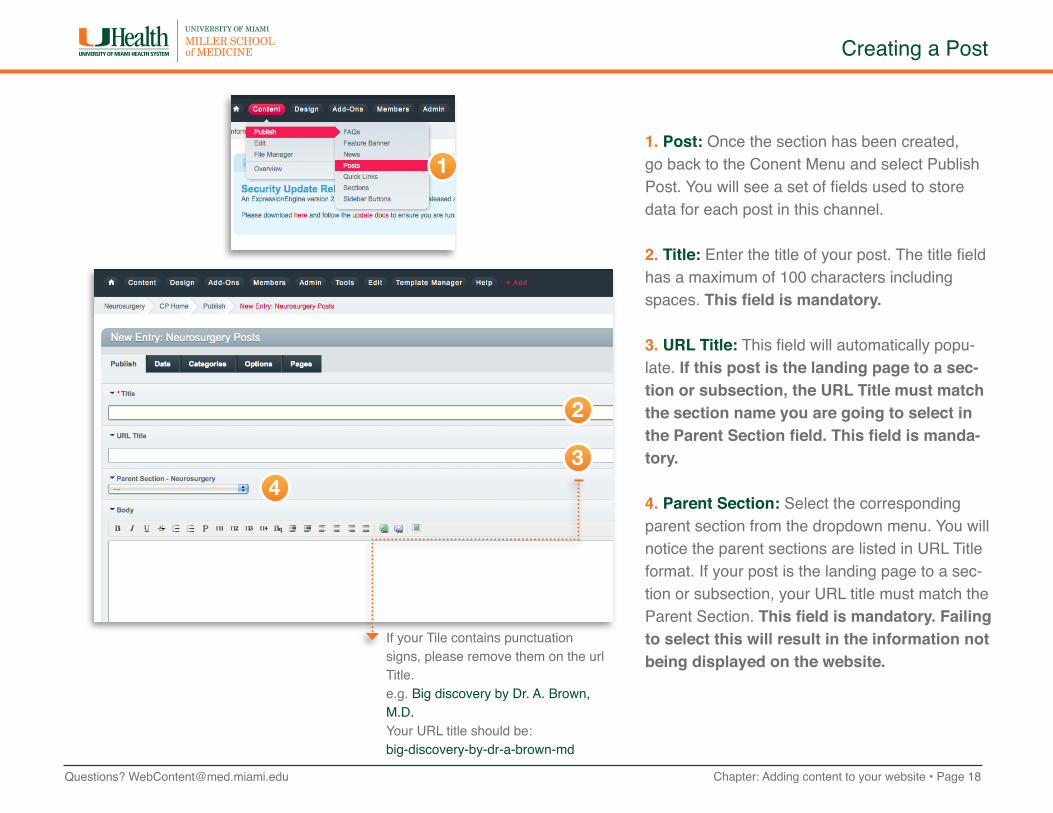
1. Post: Once the section has been created, go back to the Conent Menu and select Publish Post. You will see a set of fields used to store data for each post in this channel. 2. Title: Enter the title of your post. The title field has a maximum of 100 characters including spaces. This field is mandatory.
3. URL Title: This field will automatically popu-late. If this post is the landing page to a sec-tion or subsection, the URL Title must match the section name you are going to select in the Parent Section field. This field is manda-tory.
4. Parent Section: Select the corresponding parent section from the dropdown menu. You will notice the parent sections are listed in URL Title format. If your post is the landing page to a sec-tion or subsection, your URL title must match the Parent Section. This field is mandatory. Failing to select this will result in the information not being displayed on the website.
If your Tile contains punctuation signs, please remove them on the url Title.e.g. Big discovery by Dr. A. Brown, M.D.Your URL title should be:big-discovery-by-dr-a-brown-md
Creating a Post
1
2
34

Chapter: Adding content to your website • Page 19Questions? [email protected]
5. Landing page or submenu? If your post is a landing page to a section or subsection, you have to make the entry sticky to make sure it will always display first.
Go to the Options Tab and select Make Entry Sticky. Mandatory for landing pages.
6. Body: This field will hold all of the information for your post. This field is mandatory. (For de-tailed instructions refer to the Body field section)
Creating a Post
5
6

Chapter: Adding content to your website • Page 20Questions? [email protected]
6. Summary: The summary field should contain a summary of the post. The information in this field will be shown when your post is in a content list. It should be no more than two or three sentences. If your post is part of a list of posts, this field is mandatory. If this field is not part of a list of posts, this field is not necessary.
7. Image Gallery: Click on the Add Image button to add a new image. You can upload new images or select an existing image from a folder. Make sure to follow the image guidelines when upload-ing new images. You can add multiple images by clicking on the + button just below the first row. While this field as a whole is not mandatory, every image you upload is required to have an Alt Tag/Description and it is suggested that you add a caption.
8. Image Position: This will dictate where your image or image gallery will appear on the page.
9. Video ID: All videos added to the website must be YouTube videos. The ID for a YouTube video is the string of numbers and letters fol-lowing the “v=” in the URL. So, for example, if the video link is http://www.youtube.com/watch?v=iarN7BCSjiw, you would enter iarN-7BCSjiw into the Video ID field. If you need a video added to YouTube, contact your site admin-istrator. This field is not mandatory.
6
(for detailed instructions refer to Uploading images to
a post section)
(for detailed instructions refer to Uploading videos to a post section)
Creating a Post
7
8 9
Chapter: Adding content to your website • Page 21Questions? [email protected]
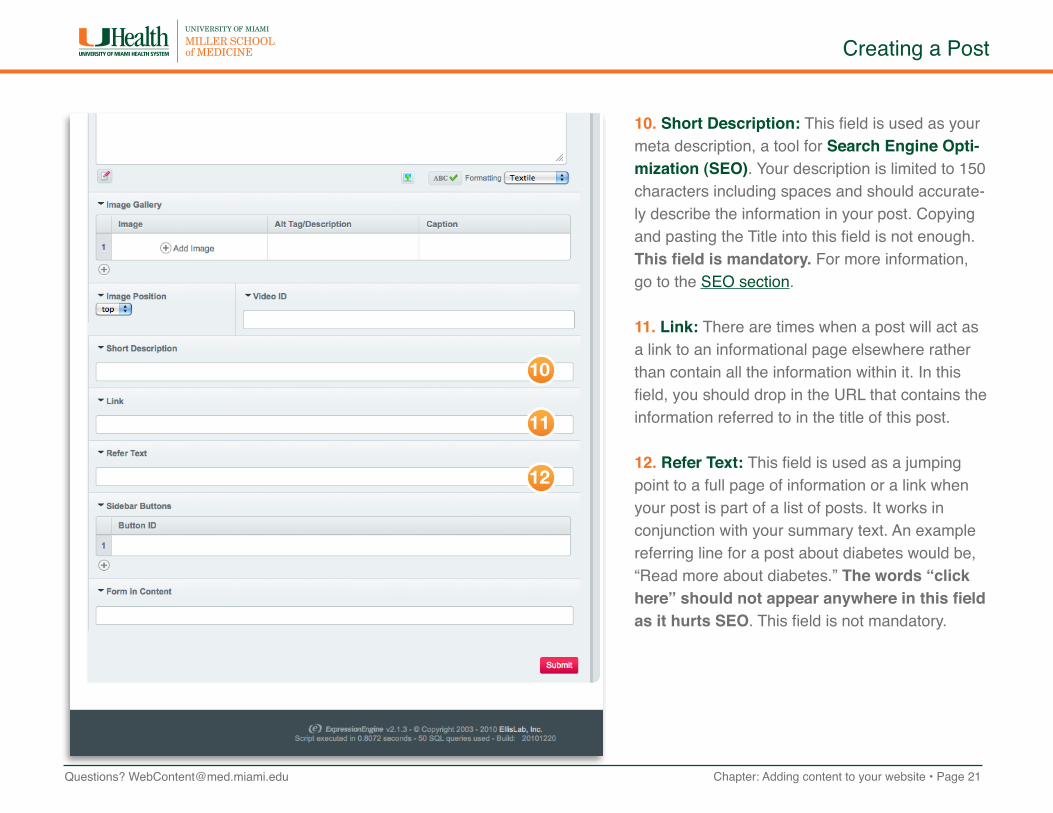
10. Short Description: This field is used as your meta description, a tool for Search Engine Opti-mization (SEO). Your description is limited to 150 characters including spaces and should accurate-ly describe the information in your post. Copying and pasting the Title into this field is not enough. This field is mandatory. For more information, go to the SEO section.
11. Link: There are times when a post will act as a link to an informational page elsewhere rather than contain all the information within it. In this field, you should drop in the URL that contains the information referred to in the title of this post.
12. Refer Text: This field is used as a jumping point to a full page of information or a link when your post is part of a list of posts. It works in conjunction with your summary text. An example referring line for a post about diabetes would be, “Read more about diabetes.” The words “click here” should not appear anywhere in this field as it hurts SEO. This field is not mandatory.
Creating a Post
11
10
12

Chapter: Adding content to your website • Page 22Questions? [email protected]
13. Publishing your post at a later date: This step is optional: If you’d like to publish your post at a later time, go to the Date tab and edit the Entry Date to the date and time you’d like your post’s information to be available publicly.
This feature is mainly for new posts. If you change the date on an existing post it will re-move it from the website until the new date. 14. Publishing your Post: Click Submit, and your post will appear on your website. The Submit button can be accessed at the bottom of any of the publish form’s tabs (Publish, Date, Options).
Make sure you review your post for errors be-fore you click Submit because the post will be published on the website.
Publishing your Post
13
14

Chapter: Adding content to your website • Page 23Questions? [email protected]
There are times when you will have to make updates to existing posts. You will have access to altering posts you’ve created as well as those cre-ated by others.
1. Log in to EE and switch to your site if you are not already there.
2. Click on the Content button in the top-left cor-ner. Hover over and select Edit. Or select Entry from the Modify tab. You will be taken to the Edit Channel Entries page, which contains all of the posts you can acccess.
3. Filter through posts: 3a. Filter by Channel: If you know in what channel your post lives, select it from the drop-down menu. 3b. Keywords: Enter all or part of the title of the post. The list will automatically filter as you type.
4. Click on the title of the post you’d like to edit.
5. Edit and submit the post.
Editing an existing post on your website
2
3
3a
3b
Tip: The Edit Page is where you will spend most of the time.If you click on the +Add button when you are on that page it will be added to the top navigation giving you another way to quicky access the Edit section.

Chapter: Adding content to your website • Page 24Questions? [email protected]
Adding Content to your PostThe following is an overview of the tags and style used throughout the websites.
The Body field
EmphasisText can be bolded or italicized. Italics are meant for emphasis while bold is meant as a stronger emphasis.
Unordered or Bulleted ListsUnordered lists are meant for lists in which the order is not impor-tant—for example, the ingredients to a recipe.
The elements in this section should be ignored.
ParagraphsParagraphs are created automatically by adding a hard return between lines.
H1 and H2 Heading Tags The H1 and H2 head-ings should never be used on a page. The H1 and H2 have already been declared.
H3 TagH3 is the Title of the page and should not be used for sub-titles.
H4 TagUse it for titles inside the content.
Ordered or Numbered ListsOrdered lists are meant for lists
in which the order is important—for example, the
directions for a recipe.
Headings (H3, H4)Headings are meant to divide a page into outline format and follow a logical struc-ture and should not be used to style text. They not only provide structure, but also help screen readers determine the hierar-chy of the information.
Make sure you have a line break before and after the h4 tags, or they will not be formatted

Chapter: Adding content to your website • Page 25Questions? [email protected]
Adding Links to your PostYou can add links to other pages, email addresses or documents in your content.
Linking to other websites
Links
When you are linking to other websites it is better to write the name of the site in-stead of the web address in the content. Let’s say you want to link to UHealth International.
1. Select the text
2. Click on the Link button and type or paste the full web address in the pop-up window. In this case it would be: http://www.uhealthinternational.com
Making internal links is the same as linking to ex-ternal websites, but in this case you do not have to include the main website address.
Let’s say you are working on the UHealth site and want to link to the Find a Doctor page. The full address to that page is: http://uhealthsystem.com/patients/Because you are in the uhealthsystem.com web-site you don’t neet to repeat that information.
Enter /patients/ in the URL field. Email links work just like website links. Select the Mail button and type the email ad-dress.
The link will look like this on the website.
1
2
Linking to other pages in your website Email links

Chapter: Adding content to your website • Page 26Questions? [email protected]
Adding Documents to your postAdding documents is a two-step process. First you have to upload the document using the File Manager, and then you have to add the link to the document location in the post.
Step 1. Uploading a Document1. Click on the Content button in the top-left cor-ner and select File Manager. You will be taken to the File Manager page, which contains all of the images and documents in your website.
2. Select The File Upload section and Select Documents in the Upload directory list.
3. Use the Browse button and select the docu-ment in your computer.
4. Once you have selected the document click on the Upload button.
5. Take note of the full document name (e.g. YourDocumentName.pdf). You will need it on the next step.
Document Links
1
2
34

Chapter: Adding content to your website • Page 27Questions? [email protected]
Step 2. Link the Document in your post.Now that the document is uploaded you have to go back to the post where the link will be embed-ded, or if you have not created the post yet, follow the steps to create a new one.
1. Select the name of the document in your post.
2. Click on the Link button.
3. type /documents/ and the full document name.e.g. /documents/YourDocumentName.pdf
Please note that the name you use to reference the document in the content can be different from the full document name. It’s a good practice to use descriptive names about the document topic.
1
2
Documents Links
3
The document link will look like a regular link on the website.
Chapter: Adding content to your website • Page 28Questions? [email protected]
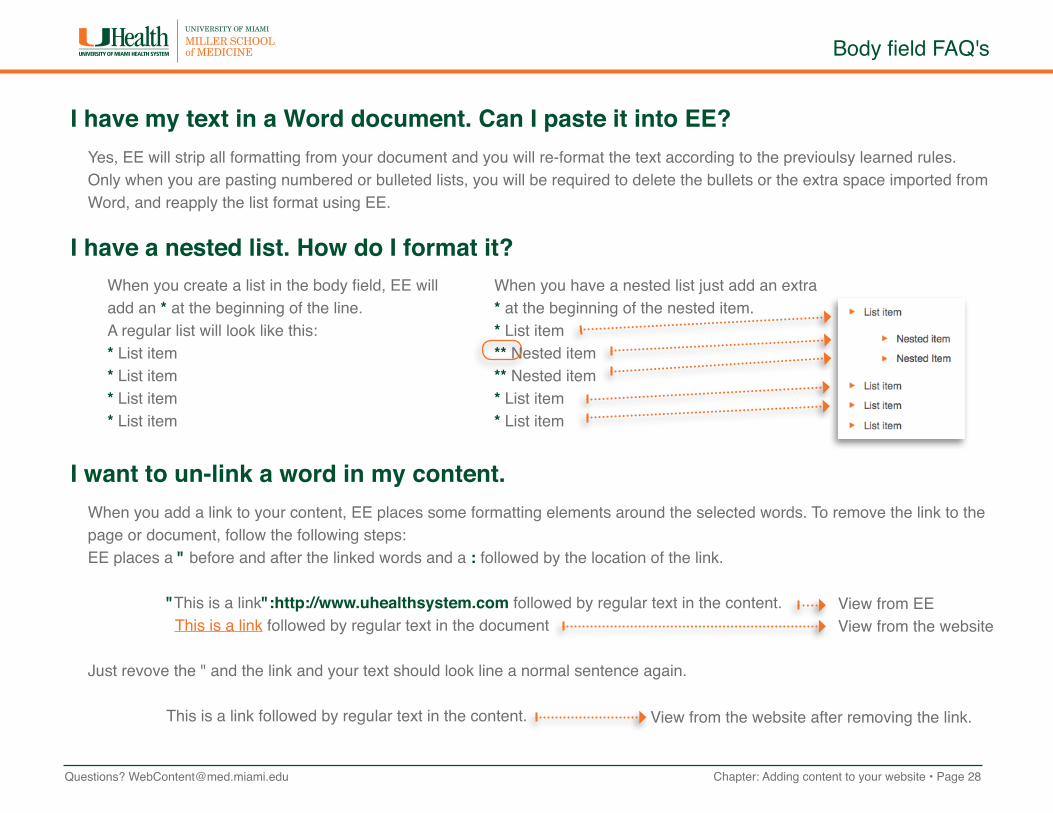
I have my text in a Word document. Can I paste it into EE?Yes, EE will strip all formatting from your document and you will re-format the text according to the previoulsy learned rules. Only when you are pasting numbered or bulleted lists, you will be required to delete the bullets or the extra space imported from Word, and reapply the list format using EE.
I have a nested list. How do I format it?
I want to un-link a word in my content.When you add a link to your content, EE places some formatting elements around the selected words. To remove the link to the page or document, follow the following steps:EE places a " before and after the linked words and a : followed by the location of the link.
"This is a link":http://www.uhealthsystem.com followed by regular text in the content. This is a link followed by regular text in the document
Just revove the " and the link and your text should look line a normal sentence again.
This is a link followed by regular text in the content.
When you create a list in the body field, EE will add an * at the beginning of the line. A regular list will look like this:* List item* List item* List item* List item
When you have a nested list just add an extra * at the beginning of the nested item.* List item** Nested item** Nested item* List item* List item
Body field FAQ's
View from EEView from the website
View from the website after removing the link.

Chapter: Adding content to your website • Page 29Questions? [email protected]
I made a mistake and the post is live on the website. Can I hide it while I correct it?
There are times where you need to hide a post from view without deleting it. EE allows you to Close it and have the op-tion to reopen it at a later time. This option is useful when you have incorrect information on your website and need to make some changes but don't want to create the post again, or when you have a recurring post that you will reuse at a later time.
1. Select the post you want to close.
2. Go to the Options tab.
3. On the Status menu select Close or Open.
Body field FAQ's

Chapter: Uploading images to a post • Page 30
1. Image Gallery: Once you click on the Add Image button, you have the option to upload a new image from your computer or select an exist-ing image from the Content images (or Images-Main) folder.
2. Upload an image: In most cases all the im-ages are in the Content Images Folder. Click on the Upload File button.
2a. Select file: Using the Browse button, select the image on your hard drive. Make sure that you have the Images folder selected on the Upload Directory. Click Upload File.
2b. Use Image: When the image is uploaded, a screen with the image details will show up. If ev-erything is correct, click the Use Uploaded image button.
Questions? [email protected]
Uploading images to a post
2a
2b
1
2
Make sure the Images folder is selected here
Chapter: Uploading images to a post • Page 31
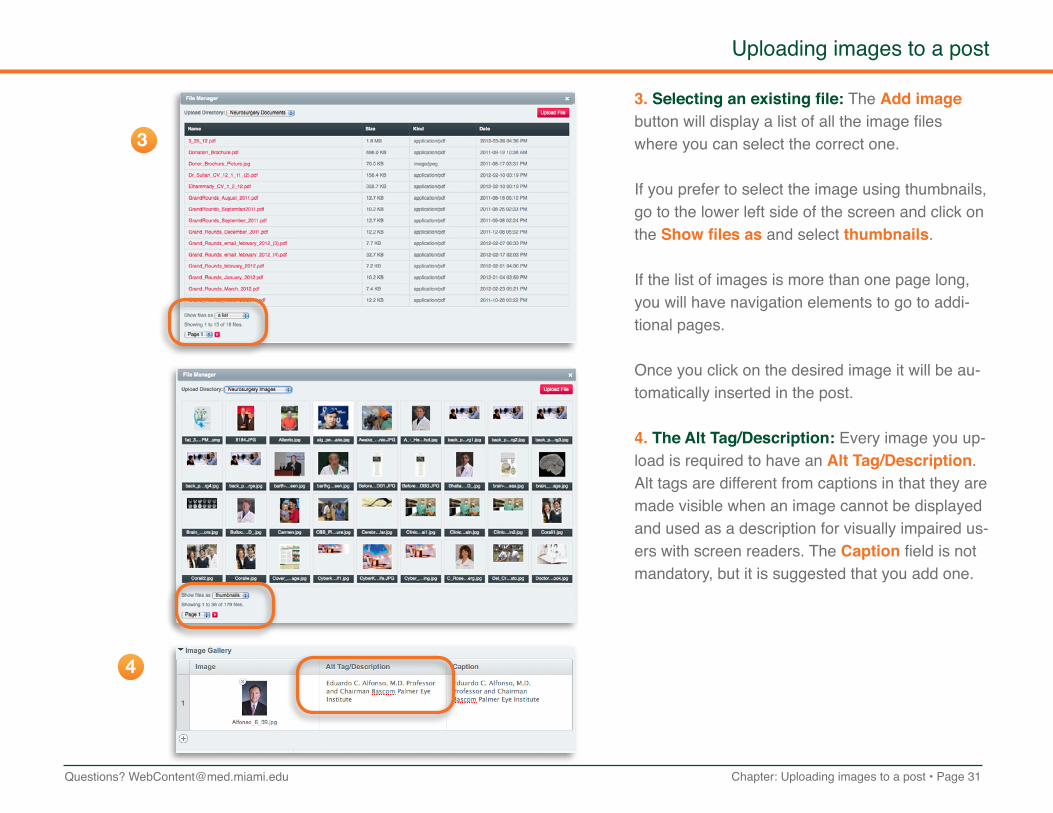
3. Selecting an existing file: The Add image button will display a list of all the image files where you can select the correct one.
If you prefer to select the image using thumbnails, go to the lower left side of the screen and click on the Show files as and select thumbnails.
If the list of images is more than one page long, you will have navigation elements to go to addi-tional pages.
Once you click on the desired image it will be au-tomatically inserted in the post.
4. The Alt Tag/Description: Every image you up-load is required to have an Alt Tag/Description. Alt tags are different from captions in that they are made visible when an image cannot be displayed and used as a description for visually impaired us-ers with screen readers. The Caption field is not mandatory, but it is suggested that you add one.
Questions? [email protected]
Uploading images to a post
3
4

Chapter: Uploading images to a post • Page 32
Image Alignment
Image Galleries
Top Left Right
You will use the Image gallery to upload the main image in the post.Depending on what you select on the Image Position menu, it will be placed on the top, left or right. The top image will span across the top of the page. It is good for section banners. The left and right will be placed at the left or right of the text.
You can add an Image Gallery to the main image of any post by clicking on the + button. This will add more image fields.Add those images the same way you added the first. EE will automatically create the gallery when there is more than one image.
This is how the gallery will look on the webpage. You can add up to 12 additional images.
Questions? [email protected]
Aligning images to a post
Chapter: Uploading images to a post • Page 33
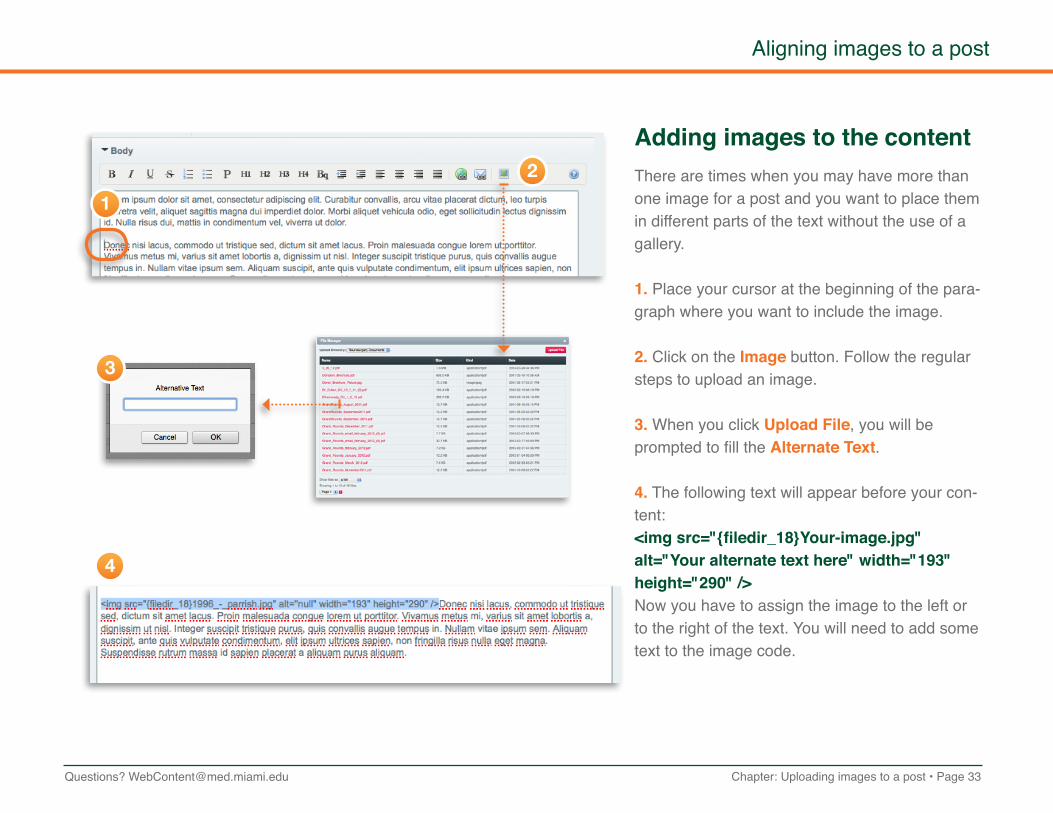
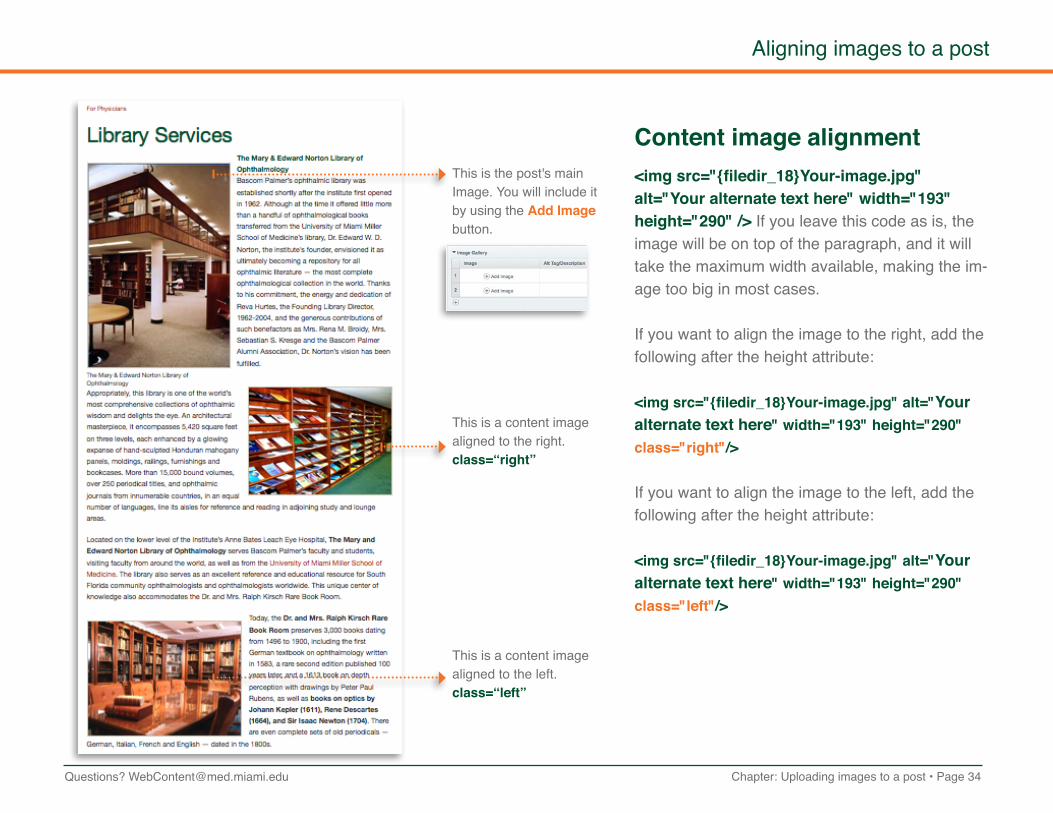
Adding images to the contentThere are times when you may have more than one image for a post and you want to place them in different parts of the text without the use of a gallery.
1. Place your cursor at the beginning of the para-graph where you want to include the image.
2. Click on the Image button. Follow the regular steps to upload an image.
3. When you click Upload File, you will be prompted to fill the Alternate Text.
4. The following text will appear before your con-tent:<img src="{filedir_18}Your-image.jpg" alt="Your alternate text here" width="193" height="290" />Now you have to assign the image to the left or to the right of the text. You will need to add some text to the image code.
Questions? [email protected]
Aligning images to a post
1
2
3
4
Chapter: Uploading images to a post • Page 34
Content image alignment<img src="{filedir_18}Your-image.jpg" alt="Your alternate text here" width="193" height="290" /> If you leave this code as is, the image will be on top of the paragraph, and it will take the maximum width available, making the im-age too big in most cases.
If you want to align the image to the right, add the following after the height attribute: <img src="{filedir_18}Your-image.jpg" alt="Your alternate text here" width="193" height="290" class="right"/>
If you want to align the image to the left, add the following after the height attribute:
<img src="{filedir_18}Your-image.jpg" alt="Your alternate text here" width="193" height="290" class="left"/>
This is the post's main Image. You will include it by using the Add Image button.
This is a content image aligned to the right. class=“right”
This is a content image aligned to the left. class=“left”
Questions? [email protected]
Aligning images to a post

Chapter: Uploading images to a post • Page 35
How do I save my images?Before uploading images to your post please follow the following guidelines:
1. Main image size: The image you upload will need to be in low resolution: 72 dpi with a maximum width of 750 pixels and maximum height of 500 pixels, meaning the image cannot be bigger than 750 x 500 pixels but can be a smaller size (i.e. 689 x 433 pixels).The image will be resized according to the assigned position (Top, left, right).
If you have a vertical image that is 750px wide but ex-ceeds the 500px height limit, use the 500px maximum height as a reference.
2. Content Images: For the images included on the left or right of the content, you have to save the image at the exact size it will appear on the post. This im-age will not be resized.
It is a good practice to make all your edits to your image before uploading it to avoid having dupli-cates on the images folder.
No more than 750 px wide
Between 250 and 300 px wide
No more than 500 px high
Questions? [email protected]
Images FAQ's
1
2

Chapter: Uploading images to a post • Page 36
How do I name my images?When saving an image, it is a good practice to use a descriptive title. That makes it easy for search engines to locate your image and display it on an image search. Separate words with a dash (-) or underscore (_). Some servers have difficulty in-terepreting blank spaces on files and the image is not displayed.
I created an image gallery. How do I change the order of the images?
Just grab the image field by the number at the left and drag and drop to the desired place.
How do I delete an image row?Place your cursor on the number row and click on the arrow. A drop-down with the options will pop-up.
DC879989_03.jpg
The name has no meaning and it will be harder to find if you need it later.
Campus Map.jpg
Much better, but it has a blank space between the two words.
Miller-Campus-Map.jpgMiller_campus_map.jpg
More specific and with the words separated by a dash or underscore.
Questions? [email protected]
Images FAQ's
Chapter: Uploading videos to a post • Page 37
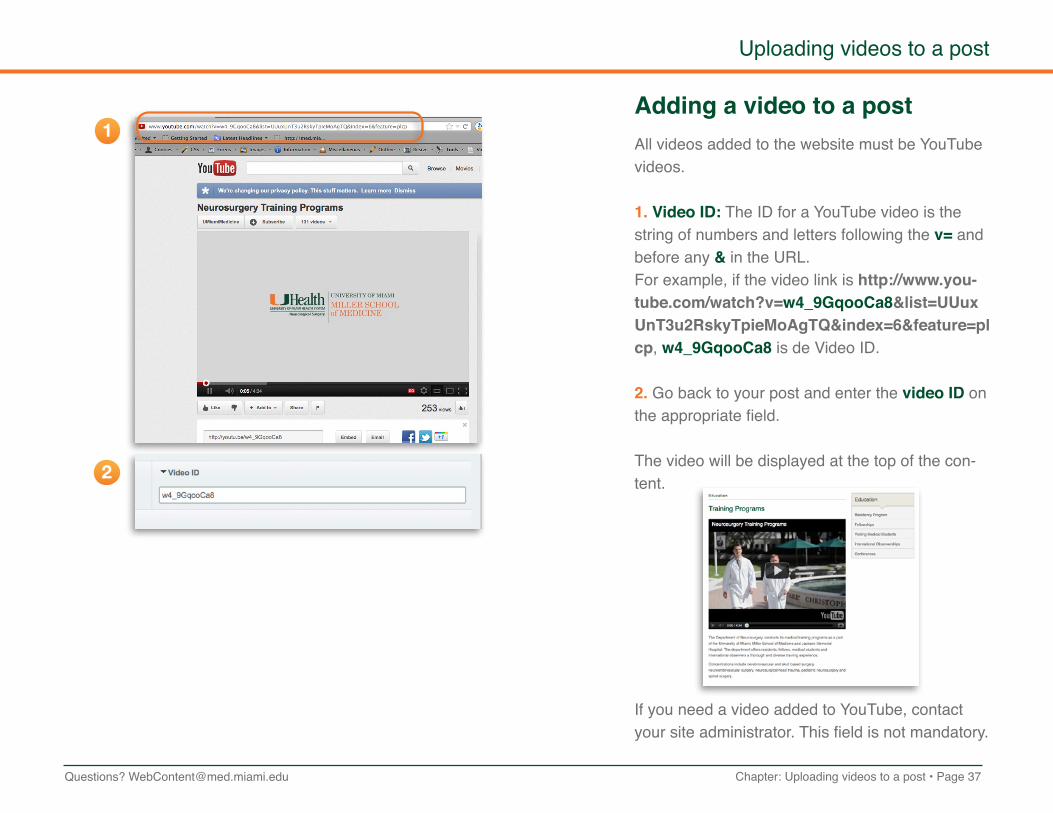
Adding a video to a postAll videos added to the website must be YouTube videos.
1. Video ID: The ID for a YouTube video is the string of numbers and letters following the v= and before any & in the URL. For example, if the video link is http://www.you-tube.com/watch?v=w4_9GqooCa8&list=UUuxUnT3u2RskyTpieMoAgTQ&index=6&feature=plcp, w4_9GqooCa8 is de Video ID. 2. Go back to your post and enter the video ID on the appropriate field.
The video will be displayed at the top of the con-tent.
If you need a video added to YouTube, contact your site administrator. This field is not mandatory.
Questions? [email protected]
Uploading videos to a post
1
2

Chapter: The Home Page • Page 38Questions? [email protected]
The Home Page
Homepage Components
As mentioned before, the Home Page has a dif-ferent structure than the content pages and has 3 distinct elements:
1. Home-Page Display (Feature): Image with a callout leading to another section of the site. It can be a static image or a rotating banner if you have more than one image.
2. Home-Page Display (Teaser): Three high-lighted areas with minor summaries to specific areas of the website.
3. Tertiary Component: This component consists of the Health Library with pertaining topics relating to the department or an Additional Resources box with “quick links” to other parts of the website or other UM sites (up to 5).
The steps to create these elements are explained below:
1
2
3

Chapter: The Home Page • Page 39Questions? [email protected]
The Home Page Feature
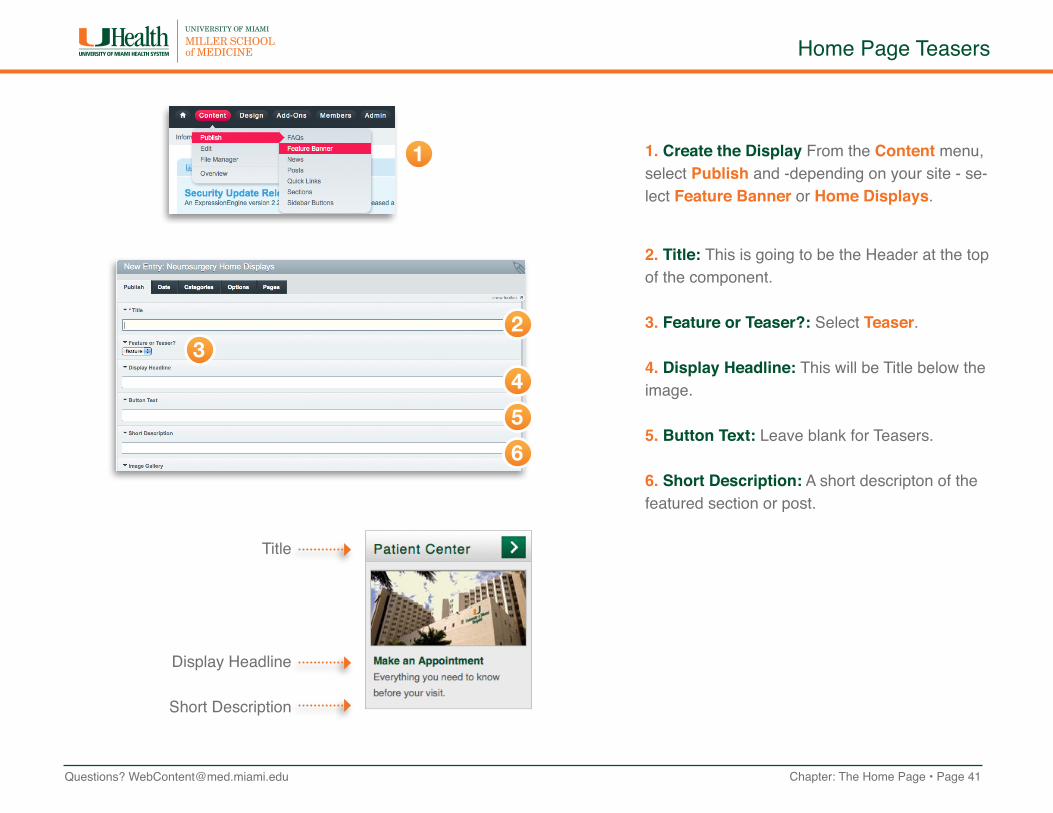
1. Create the Display From the Content menu, select Publish and -depending on your site - se-lect Feature Banner or Home Displays.
2. Title: Enter the title of your post, this title will not be displayed and in many cases is the same as the Display Headline. This filed has a maximum of 100 characters including and is mandatory.
3. Feature or Teaser?: Select Feature.
4. Display Headline: This will be the Main text on the Homepage banner. It can be the same as the Title.
5. Button Text: This field has a limit of 14 char-acteres.
6. Short Description: This option is used on the Teaser only. Leave blank for Feature.
1
2
43
56
Display Headline
Button Text
Chapter: The Home Page • Page 40Questions? [email protected]
The Home Page Feature
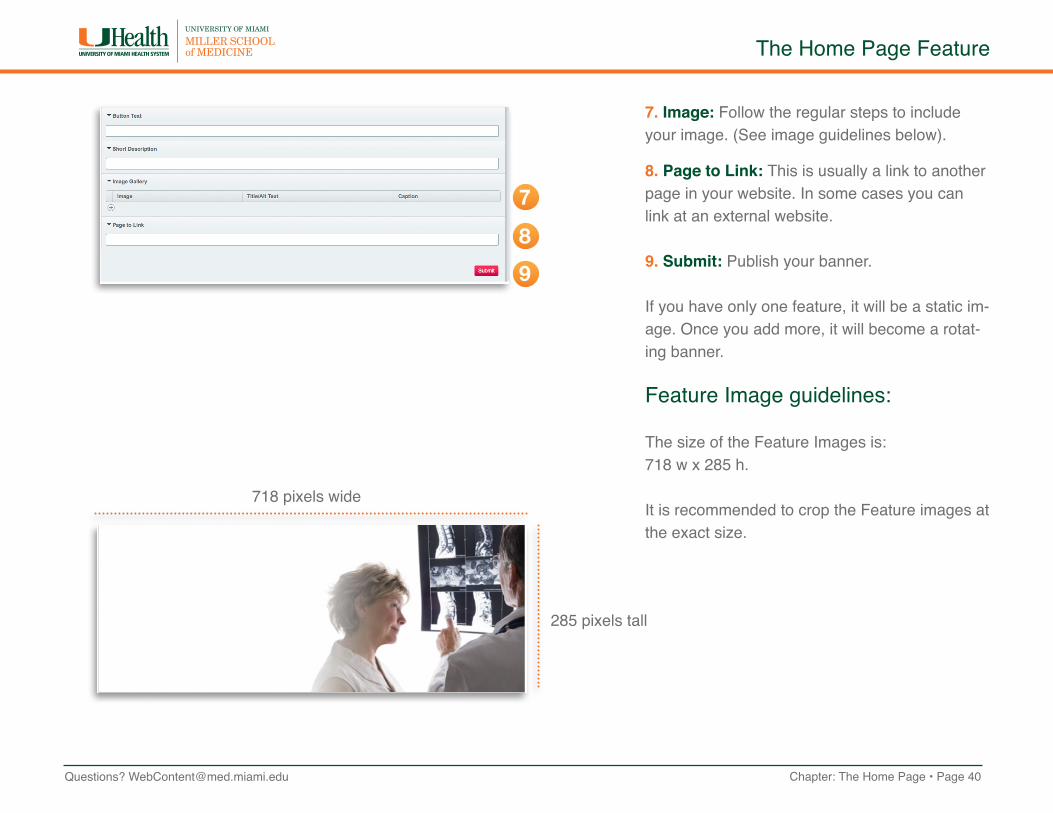
7. Image: Follow the regular steps to include your image. (See image guidelines below).
8. Page to Link: This is usually a link to another page in your website. In some cases you can link at an external website.
9. Submit: Publish your banner.
If you have only one feature, it will be a static im-age. Once you add more, it will become a rotat-ing banner.
Feature Image guidelines:
The size of the Feature Images is:718 w x 285 h.
It is recommended to crop the Feature images at the exact size.
7
8
9
718 pixels wide
285 pixels tall
Chapter: The Home Page • Page 41Questions? [email protected]
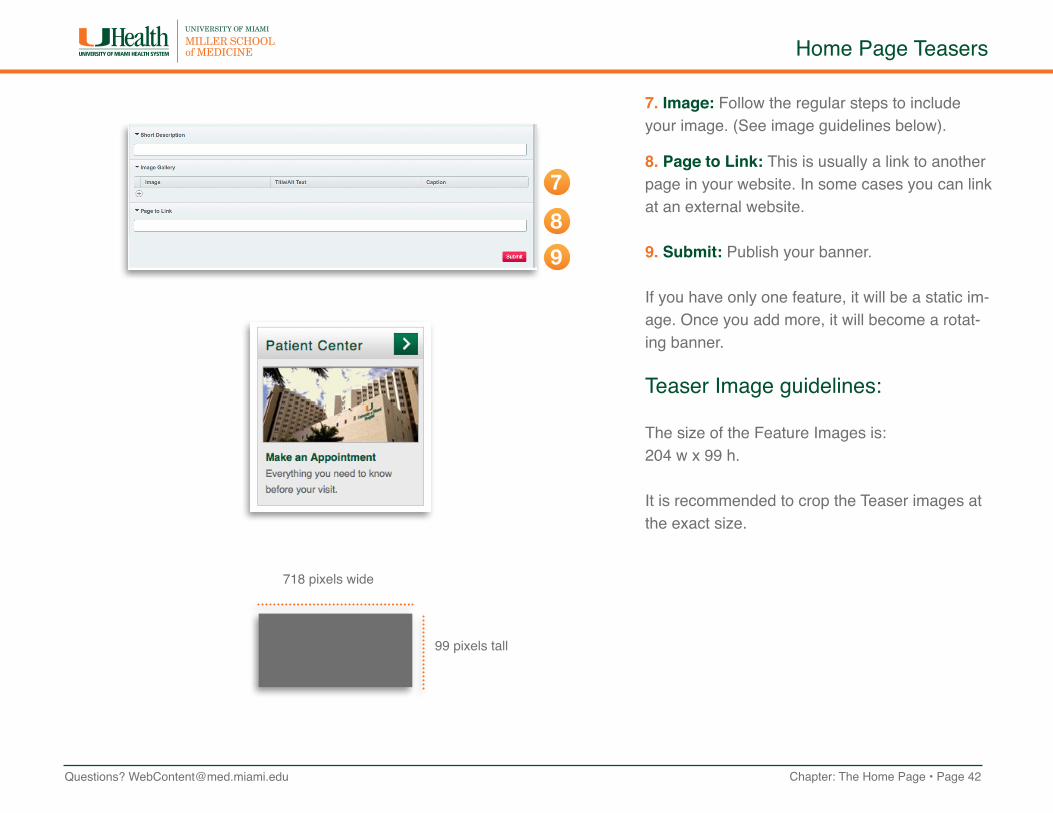
Home Page Teasers
1
23
4
5
6
1. Create the Display From the Content menu, select Publish and -depending on your site - se-lect Feature Banner or Home Displays.
2. Title: This is going to be the Header at the top of the component.
3. Feature or Teaser?: Select Teaser.
4. Display Headline: This will be Title below the image.
5. Button Text: Leave blank for Teasers.
6. Short Description: A short descripton of the featured section or post.
Title
Display Headline
Short Description
Chapter: The Home Page • Page 42Questions? [email protected]
7. Image: Follow the regular steps to include your image. (See image guidelines below).
8. Page to Link: This is usually a link to another page in your website. In some cases you can link at an external website.
9. Submit: Publish your banner.
If you have only one feature, it will be a static im-age. Once you add more, it will become a rotat-ing banner.
Teaser Image guidelines:
The size of the Feature Images is:204 w x 99 h.
It is recommended to crop the Teaser images at the exact size.
Home Page Teasers
718 pixels wide
99 pixels tall
7
8
9
Chapter: The Home Page • Page 43Questions? [email protected]
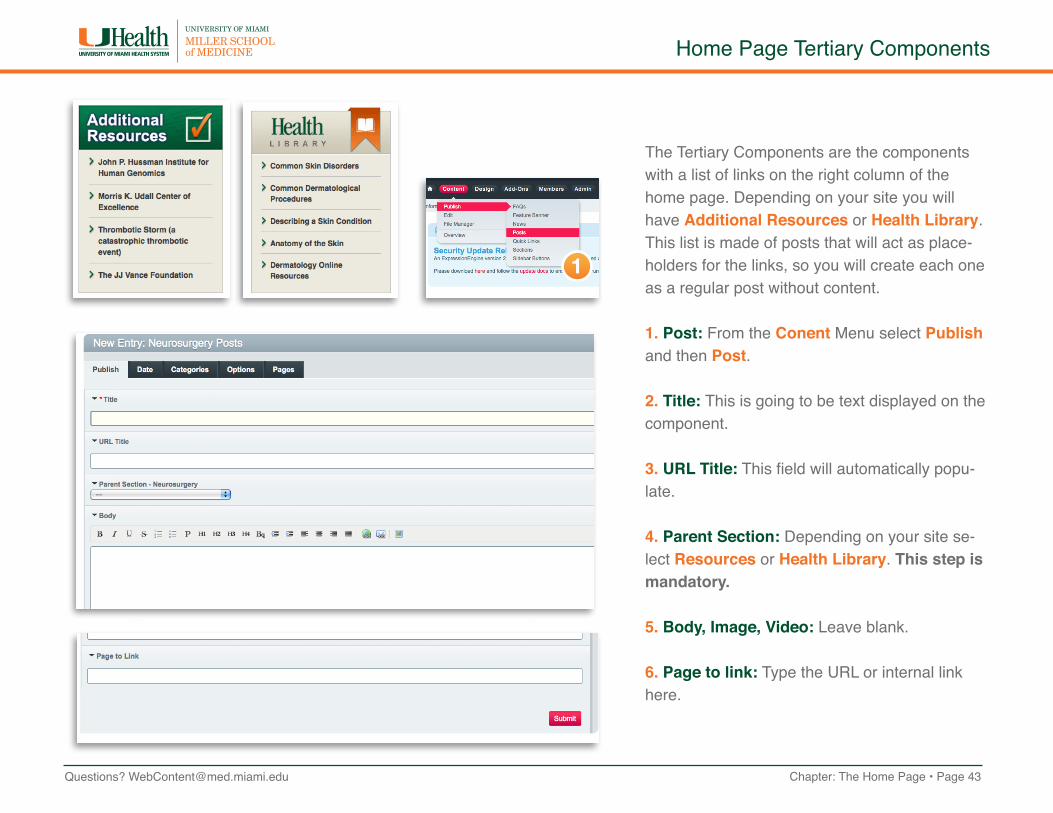
Home Page Tertiary Components
The Tertiary Components are the components with a list of links on the right column of the home page. Depending on your site you will have Additional Resources or Health Library. This list is made of posts that will act as place-holders for the links, so you will create each one as a regular post without content.
1. Post: From the Conent Menu select Publish and then Post.
2. Title: This is going to be text displayed on the component.
3. URL Title: This field will automatically popu-late.
4. Parent Section: Depending on your site se-lect Resources or Health Library. This step is mandatory.
5. Body, Image, Video: Leave blank.
6. Page to link: Type the URL or internal link here.
1

Chapter: Search Engine Optimization • Page 44Questions? [email protected]
Search Engine Optimization
What is SEO and why should I know about it?
Search Engine Optimization is the process of improving the position of a website in the search results when you use Google, Yahoo, Bing, etc. The better optimized your site is, the higher it will appear on the results.
If you have a unique name like Miller School of Medicine, you have a better chance to rank in a high position, but if you are searching for Pediatrics Miami, the chances of your site appearing on the first page decrease because you are sharing the same search terms with many other pediatric sites.
Code
When we created this new set of templates, we took care to code the site in such a way that search engines like Google would easily be able to run through the information on the site and carry it back to their database of search results.The department sites are held to the highest standards of accessibility and fully 508 compliant.
The other side of SEO is content, and that is up to you.
How does SEO works?
There are many factors that affect the search results, but the most important are:
• Code and • Content. This is the part you
have to work on.

Chapter: Search Engine Optimization • Page 45Questions? [email protected]
Content
Search engines scan your site to determine which search terms they will assign to your site. They go through all the titles, text and images in each of your pages. So if you want to appear in a particular search, you need to use those words in your con-tent. Here are some guidelines to keep in mind when writing your content:
• Text for the Web should be written clearly and concisely. When possible, break away from paragraph format and use lists that are easy to scan.
• All content should be checked for grammar and spelling before being published.
• In order to get specific search phrases like "pediatric audiology South Florida" or "pediatric audiology Miami" to show your site first, you should create a page specifically about pediatric audiology and mention how you have the best pediatric audiolo-gists in Miami and the rest of South Florida.
The search engines will pick up on those phrases in the content and start returning your results.
Tips
Here are some tips for making sure your site is search engine optimized:
Give the page/post a descriptive titleInstead of naming your page “About us,” name it “About the Department of Pediatrics.”
Say the most important thing on the page in the first 150 to 200 charactersYou should write using the inverted pyramid style.
Search Engine Optimization
Most Newsworthy InfoWho? What? When? Where?
Why? How?
Important Details
General or Background
info

Chapter: Search Engine Optimization • Page 46Questions? [email protected]
Be descriptive while using words you know your audience will useIf you know your target audience uses the term “doctor” rather than “physician,” use the word “doctor.”
Also, if you audience is looking for “eye care” instead of “ophthalmology,” use that as well.
Be descriptive with your link textMinimize the use of phrases like "click here" or “learn more” for links. For example, instead of saying, “Click here to download the document,” or “learn more,” say “Download the 2012 Status Report.”
Create a solid content structureA solid content structure is important on both the page level (start with h3—the page title—then h4 and h5) and the navigation-al level (navigation should read like an outline).
Page Title h3
Sub-section menu
Main Menu
Subitle h4
Search Engine Optimization

Chapter: Search Engine Optimization • Page 47Questions? [email protected]
Add alt tags and captions to the photos when possibleThere are multiple avenues for reaching your site. When images contain alt tags, you greatly increase the possibility of some-one reaching your site when conducting an image search.
Consider SEO when naming your imagesInstead of naming your images with letters and numbers - DS09876.jpg - use a descriptive name - hospital-entrance.jpg -. It helps search engines identifying your images and it also helps you locating the image in case you need to reuse it in your site.
Resources
• How Users Read on the Web by Jakob Nielson• Writing for the Web by Jakob Nielson• Writing for the Web by Yahoo!• Don’t Use “Click Here” for Link Text by W3C Quality Assurance• Section 508 by U.S. Government• Inverted Pyramid Checklist by JPROF
Search Engine Optimization

Chapter: Launching your Department's website Page 48Questions? [email protected]
Launching your department’s website
Website Launch
1 2 3
4
Once your website is ready for launch, it will be sent for review.
Web Services will run a quick check for functionality to ensure no broken pages make it through the go-live pro-cess.
Websites are launched Mondays, Tuesdays and Wednesdays and require notice at least three business days in advance.
The site’s content will be reviewed more thoroughly by the Office of Mar-keting.
Once the Office of Marketing has given its approval, the website will be slated for launch. For questions about the criteria used during the review, e-mail the Office of Marketing at [email protected].
Place request
Webiste Launches