Ecosystem Consequences of Exotic Earthworm Invasion of North Temperate Forests
Upload
khangminh22Category
view
0download
0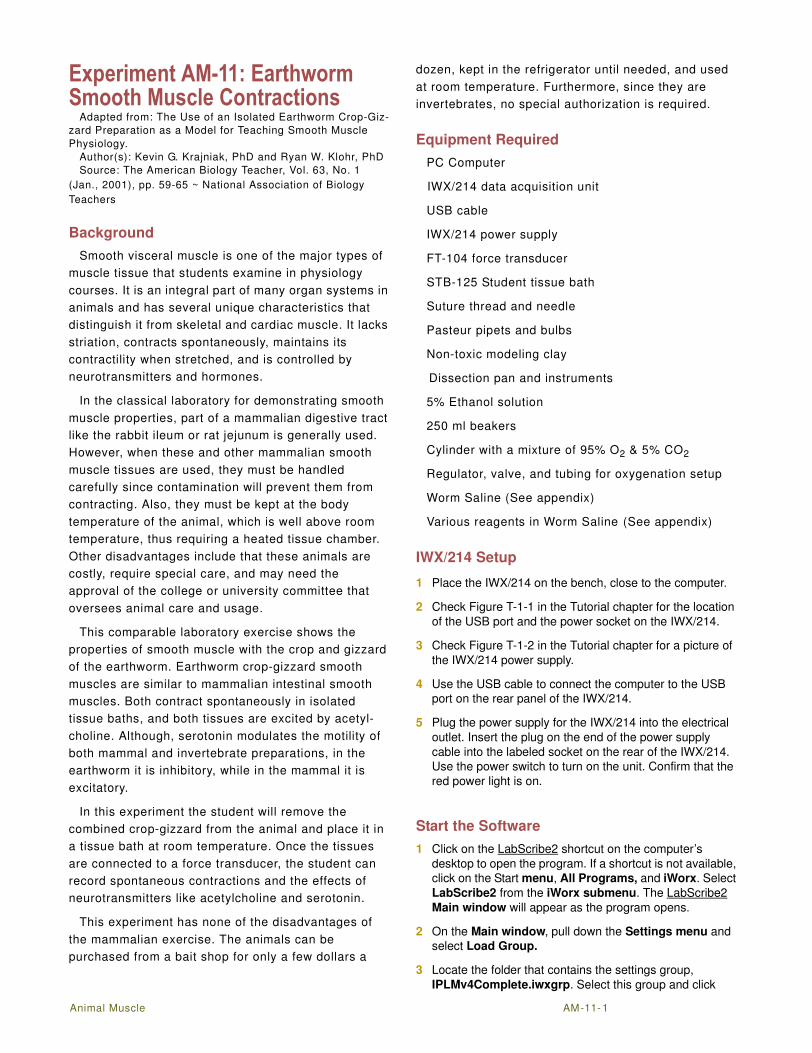
Animal Muscle AM-11- 1
Experiment AM-11: Earthworm Smooth Muscle Contractions
Adapted from: The Use of an Isolated Earthworm Crop-Giz-
zard Preparation as a Model for Teaching Smooth Muscle
Physiology.
Author(s): Kevin G. Krajniak, PhD and Ryan W. Klohr, PhD
Source: The American Biology Teacher, Vol. 63, No. 1
(Jan., 2001), pp. 59-65 ~ National Association of Biology
Teachers
Background
Smooth visceral muscle is one of the major types of
muscle tissue that students examine in physiology
courses. It is an integral part of many organ systems in
animals and has several unique characteristics that
distinguish it from skeletal and cardiac muscle. It lacks
striation, contracts spontaneously, maintains its
contractility when stretched, and is controlled by
neurotransmitters and hormones.
In the classical laboratory for demonstrating smooth
muscle properties, part of a mammalian digestive tract
like the rabbit ileum or rat jejunum is generally used.
However, when these and other mammalian smooth
muscle tissues are used, they must be handled
carefully since contamination will prevent them from
contracting. Also, they must be kept at the body
temperature of the animal, which is well above room
temperature, thus requiring a heated tissue chamber.
Other disadvantages include that these animals are
costly, require special care, and may need the
approval of the college or university committee that
oversees animal care and usage.
This comparable laboratory exercise shows the
properties of smooth muscle with the crop and gizzard
of the earthworm. Earthworm crop-gizzard smooth
muscles are similar to mammalian intestinal smooth
muscles. Both contract spontaneously in isolated
tissue baths, and both tissues are excited by acetyl-
choline. Although, serotonin modulates the motility of
both mammal and invertebrate preparations, in the
earthworm it is inhibitory, while in the mammal it is
excitatory.
In this experiment the student will remove the
combined crop-gizzard from the animal and place it in
a tissue bath at room temperature. Once the tissues
are connected to a force transducer, the student can
record spontaneous contractions and the effects of
neurotransmitters like acetylcholine and serotonin.
This experiment has none of the disadvantages of
the mammalian exercise. The animals can be
purchased from a bait shop for only a few dollars a
dozen, kept in the refrigerator until needed, and used
at room temperature. Furthermore, since they are
invertebrates, no special authorization is required.
Equipment Required
PC Computer
IWX/214 data acquisition unit
USB cable
IWX/214 power supply
FT-104 force transducer
STB-125 Student tissue bath
Suture thread and needle
Pasteur pipets and bulbs
Non-toxic modeling clay
Dissection pan and instruments
5% Ethanol solution
250 ml beakers
Cylinder with a mixture of 95% O2 & 5% CO2
Regulator, valve, and tubing for oxygenation setup
Worm Saline (See appendix)
Various reagents in Worm Saline (See appendix)
IWX/214 Setup
1 Place the IWX/214 on the bench, close to the computer.
2 Check Figure T-1-1 in the Tutorial chapter for the location
of the USB port and the power socket on the IWX/214.
3 Check Figure T-1-2 in the Tutorial chapter for a picture of
the IWX/214 power supply.
4 Use the USB cable to connect the computer to the USB
port on the rear panel of the IWX/214.
5 Plug the power supply for the IWX/214 into the electrical
outlet. Insert the plug on the end of the power supply
cable into the labeled socket on the rear of the IWX/214.
Use the power switch to turn on the unit. Confirm that the
red power light is on.
Start the Software
1 Click on the LabScribe2 shortcut on the computer’s
desktop to open the program. If a shortcut is not available,
click on the Start menu, All Programs, and iWorx. Select
LabScribe2 from the iWorx submenu. The LabScribe2
Main window will appear as the program opens.
2 On the Main window, pull down the Settings menu and
select Load Group.
3 Locate the folder that contains the settings group,
IPLMv4Complete.iwxgrp. Select this group and click
Animal Muscle AM-11-2
Open.
4 Pull down the Settings menu again. Select Animal Muscle
and the EarthwormSmoothMuscle-LS2 settings file.
5 After a short time, LabScribe2 will appear on the computer
screen as configured by the EarthwormSmoothMuscle-
LS2 settings.
6 For your information, the settings used to configure the
recording channels in the LabScribe2 software and IWX/214
for this experiment are listed in Table AM-11-1 on page AM-
11-2. These settings are programmed on the Preferences
Dialog window which can be viewed by selecting Prefer-
ences from the Edit menu on the LabScribe Main window.
Transducer Setup
1 Locate the FT-104 force transducer (Figure AM-11-1 on
page AM-11-2) in the iWorx kit.
Figure AM-11-1: The FT-104 force transducer.
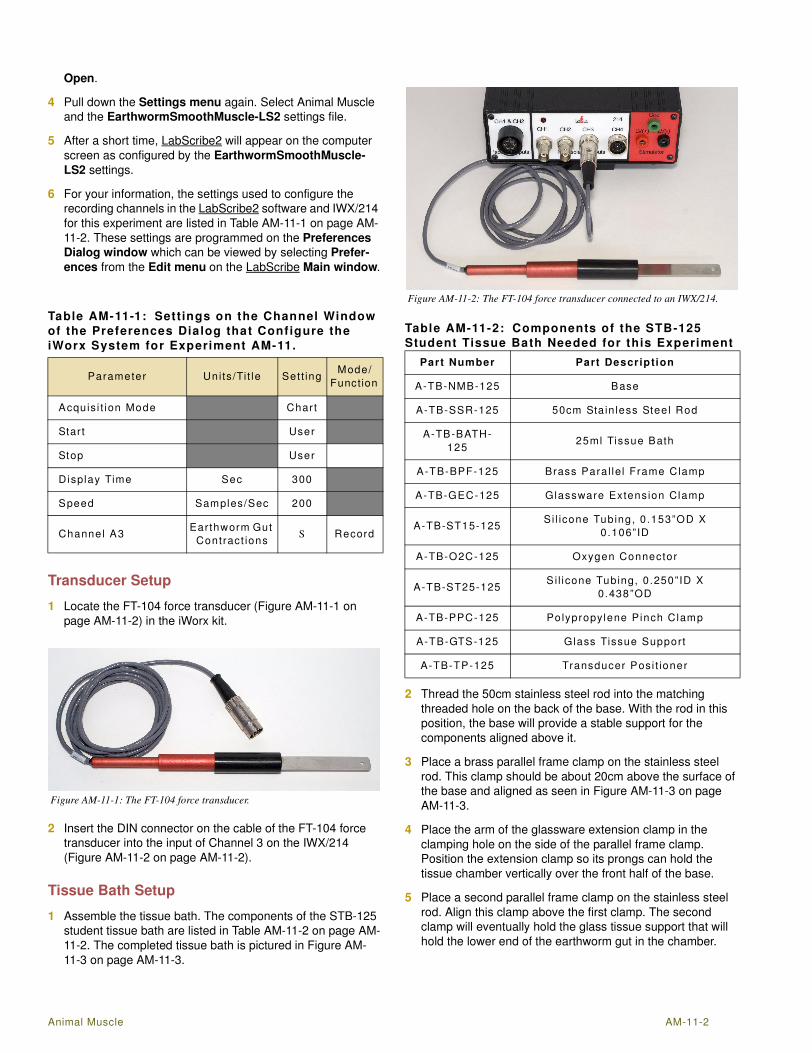
2 Insert the DIN connector on the cable of the FT-104 force
transducer into the input of Channel 3 on the IWX/214
(Figure AM-11-2 on page AM-11-2).
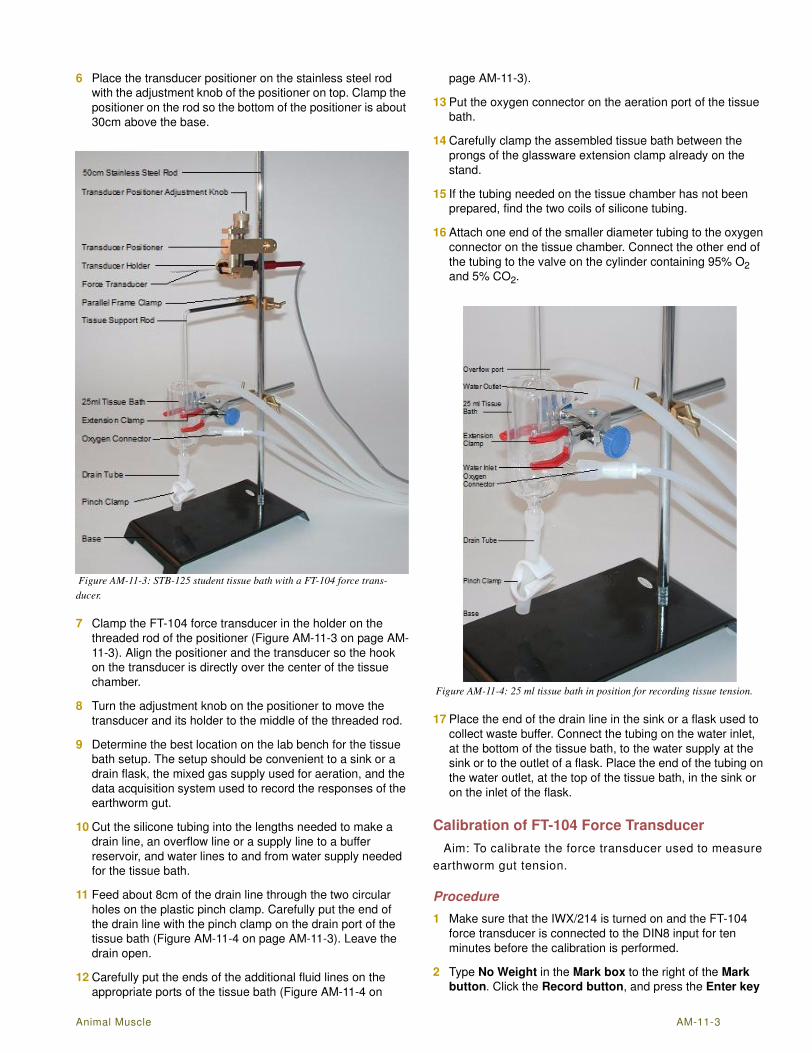
Tissue Bath Setup
1 Assemble the tissue bath. The components of the STB-125
student tissue bath are listed in Table AM-11-2 on page AM-
11-2. The completed tissue bath is pictured in Figure AM-
11-3 on page AM-11-3.
Figure AM-11-2: The FT-104 force transducer connected to an IWX/214.
Table AM-11-2: Components of the STB-125
Student Tissue Bath Needed for this Experiment
2 Thread the 50cm stainless steel rod into the matching
threaded hole on the back of the base. With the rod in this
position, the base will provide a stable support for the
components aligned above it.
3 Place a brass parallel frame clamp on the stainless steel
rod. This clamp should be about 20cm above the surface of
the base and aligned as seen in Figure AM-11-3 on page
AM-11-3.
4 Place the arm of the glassware extension clamp in the
clamping hole on the side of the parallel frame clamp.
Position the extension clamp so its prongs can hold the
tissue chamber vertically over the front half of the base.
5 Place a second parallel frame clamp on the stainless steel
rod. Align this clamp above the first clamp. The second
clamp will eventually hold the glass tissue support that will
hold the lower end of the earthworm gut in the chamber.
Table AM-11-1: Settings on the Channel Window
of the Preferences Dialog that Configure the
iWorx System for Experiment AM-11.
Parameter Units /Ti t le Sett ingMode/
Function
Acquis i t ion Mode Chart
Star t User
Stop User
Display Time Sec 300
Speed Samples/Sec 200
Channel A3Earthworm Gut
Contract ionsS Record
Part Number Part Description
A-TB-NMB-125 Base
A-TB-SSR-125 50cm Sta in less Stee l Rod
A-TB-BATH-
12525ml Tissue Bath
A-TB-BPF-125 Brass Para l lel Frame Clamp
A-TB-GEC-125 Glassware Extension Clamp
A-TB-ST15-125Si l icone Tubing, 0 .153”OD X
0.106” ID
A-TB-O2C-125 Oxygen Connector
A-TB-ST25-125Si l icone Tubing, 0 .250” ID X
0.438”OD
A-TB-PPC-125 Polypropylene Pinch Clamp
A-TB-GTS-125 Glass Tissue Support
A-TB-TP-125 Transducer Posi t ioner
Animal Muscle AM-11-3
6 Place the transducer positioner on the stainless steel rod
with the adjustment knob of the positioner on top. Clamp the
positioner on the rod so the bottom of the positioner is about
30cm above the base.
Figure AM-11-3: STB-125 student tissue bath with a FT-104 force trans-
ducer.
7 Clamp the FT-104 force transducer in the holder on the
threaded rod of the positioner (Figure AM-11-3 on page AM-
11-3). Align the positioner and the transducer so the hook
on the transducer is directly over the center of the tissue
chamber.
8 Turn the adjustment knob on the positioner to move the
transducer and its holder to the middle of the threaded rod.
9 Determine the best location on the lab bench for the tissue
bath setup. The setup should be convenient to a sink or a
drain flask, the mixed gas supply used for aeration, and the
data acquisition system used to record the responses of the
earthworm gut.
10 Cut the silicone tubing into the lengths needed to make a
drain line, an overflow line or a supply line to a buffer
reservoir, and water lines to and from water supply needed
for the tissue bath.
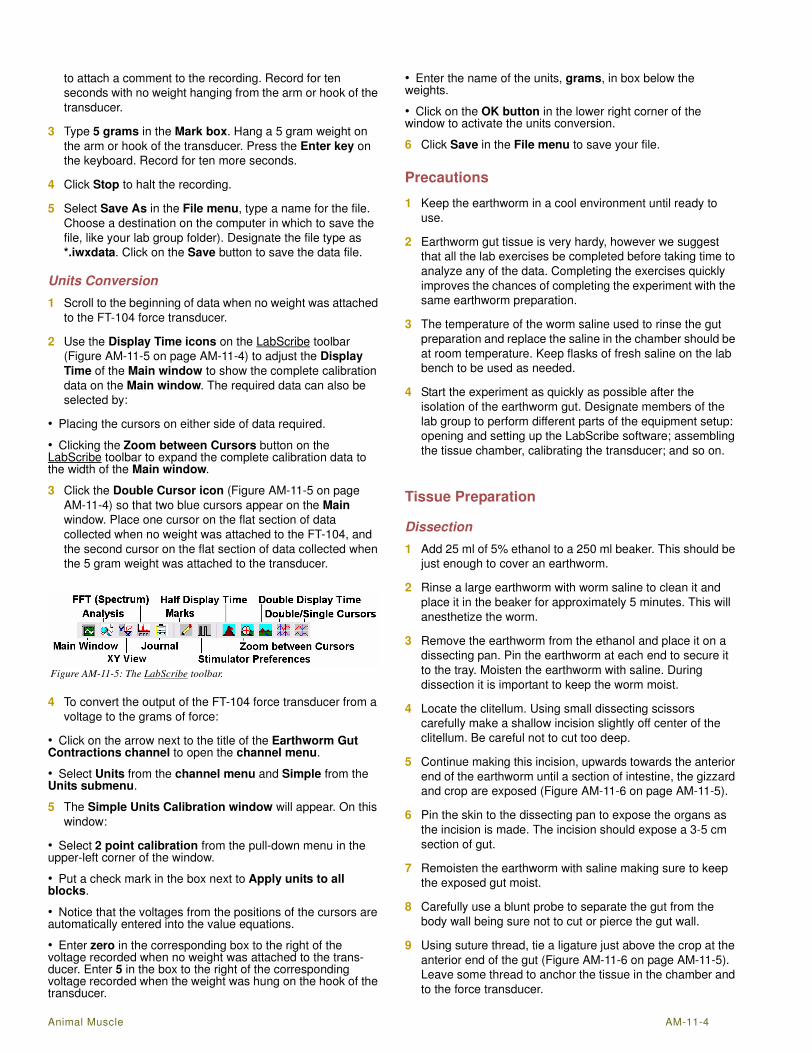
11 Feed about 8cm of the drain line through the two circular
holes on the plastic pinch clamp. Carefully put the end of
the drain line with the pinch clamp on the drain port of the
tissue bath (Figure AM-11-4 on page AM-11-3). Leave the
drain open.
12 Carefully put the ends of the additional fluid lines on the
appropriate ports of the tissue bath (Figure AM-11-4 on
page AM-11-3).
13 Put the oxygen connector on the aeration port of the tissue
bath.
14 Carefully clamp the assembled tissue bath between the
prongs of the glassware extension clamp already on the
stand.
15 If the tubing needed on the tissue chamber has not been
prepared, find the two coils of silicone tubing.
16 Attach one end of the smaller diameter tubing to the oxygen
connector on the tissue chamber. Connect the other end of
the tubing to the valve on the cylinder containing 95% O2
and 5% CO2.
Figure AM-11-4: 25 ml tissue bath in position for recording tissue tension.
17 Place the end of the drain line in the sink or a flask used to
collect waste buffer. Connect the tubing on the water inlet,
at the bottom of the tissue bath, to the water supply at the
sink or to the outlet of a flask. Place the end of the tubing on
the water outlet, at the top of the tissue bath, in the sink or
on the inlet of the flask.
Calibration of FT-104 Force Transducer
Aim: To calibrate the force transducer used to measure
earthworm gut tension.
Procedure
1 Make sure that the IWX/214 is turned on and the FT-104
force transducer is connected to the DIN8 input for ten
minutes before the calibration is performed.
2 Type No Weight in the Mark box to the right of the Mark
button. Click the Record button, and press the Enter key
Animal Muscle AM-11-4
to attach a comment to the recording. Record for ten
seconds with no weight hanging from the arm or hook of the
transducer.
3 Type 5 grams in the Mark box. Hang a 5 gram weight on
the arm or hook of the transducer. Press the Enter key on
the keyboard. Record for ten more seconds.
4 Click Stop to halt the recording.
5 Select Save As in the File menu, type a name for the file.
Choose a destination on the computer in which to save the
file, like your lab group folder). Designate the file type as
*.iwxdata. Click on the Save button to save the data file.
Units Conversion
1 Scroll to the beginning of data when no weight was attached
to the FT-104 force transducer.
2 Use the Display Time icons on the LabScribe toolbar
(Figure AM-11-5 on page AM-11-4) to adjust the Display
Time of the Main window to show the complete calibration
data on the Main window. The required data can also be
selected by:
• Placing the cursors on either side of data required.
• Clicking the Zoom between Cursors button on the LabScribe toolbar to expand the complete calibration data to the width of the Main window.
3 Click the Double Cursor icon (Figure AM-11-5 on page
AM-11-4) so that two blue cursors appear on the Main
window. Place one cursor on the flat section of data
collected when no weight was attached to the FT-104, and
the second cursor on the flat section of data collected when
the 5 gram weight was attached to the transducer.
Figure AM-11-5: The LabScribe toolbar.
4 To convert the output of the FT-104 force transducer from a
voltage to the grams of force:
• Click on the arrow next to the title of the Earthworm Gut Contractions channel to open the channel menu.
• Select Units from the channel menu and Simple from the Units submenu.
5 The Simple Units Calibration window will appear. On this
window:
• Select 2 point calibration from the pull-down menu in the upper-left corner of the window.
• Put a check mark in the box next to Apply units to all blocks.
• Notice that the voltages from the positions of the cursors are automatically entered into the value equations.
• Enter zero in the corresponding box to the right of the voltage recorded when no weight was attached to the trans-ducer. Enter 5 in the box to the right of the corresponding voltage recorded when the weight was hung on the hook of the transducer.
• Enter the name of the units, grams, in box below the weights.
• Click on the OK button in the lower right corner of the window to activate the units conversion.
6 Click Save in the File menu to save your file.
Precautions
1 Keep the earthworm in a cool environment until ready to
use.
2 Earthworm gut tissue is very hardy, however we suggest
that all the lab exercises be completed before taking time to
analyze any of the data. Completing the exercises quickly
improves the chances of completing the experiment with the
same earthworm preparation.
3 The temperature of the worm saline used to rinse the gut
preparation and replace the saline in the chamber should be
at room temperature. Keep flasks of fresh saline on the lab
bench to be used as needed.
4 Start the experiment as quickly as possible after the
isolation of the earthworm gut. Designate members of the
lab group to perform different parts of the equipment setup:
opening and setting up the LabScribe software; assembling
the tissue chamber, calibrating the transducer; and so on.
Tissue Preparation
Dissection
1 Add 25 ml of 5% ethanol to a 250 ml beaker. This should be
just enough to cover an earthworm.
2 Rinse a large earthworm with worm saline to clean it and
place it in the beaker for approximately 5 minutes. This will
anesthetize the worm.
3 Remove the earthworm from the ethanol and place it on a
dissecting pan. Pin the earthworm at each end to secure it
to the tray. Moisten the earthworm with saline. During
dissection it is important to keep the worm moist.
4 Locate the clitellum. Using small dissecting scissors
carefully make a shallow incision slightly off center of the
clitellum. Be careful not to cut too deep.
5 Continue making this incision, upwards towards the anterior
end of the earthworm until a section of intestine, the gizzard
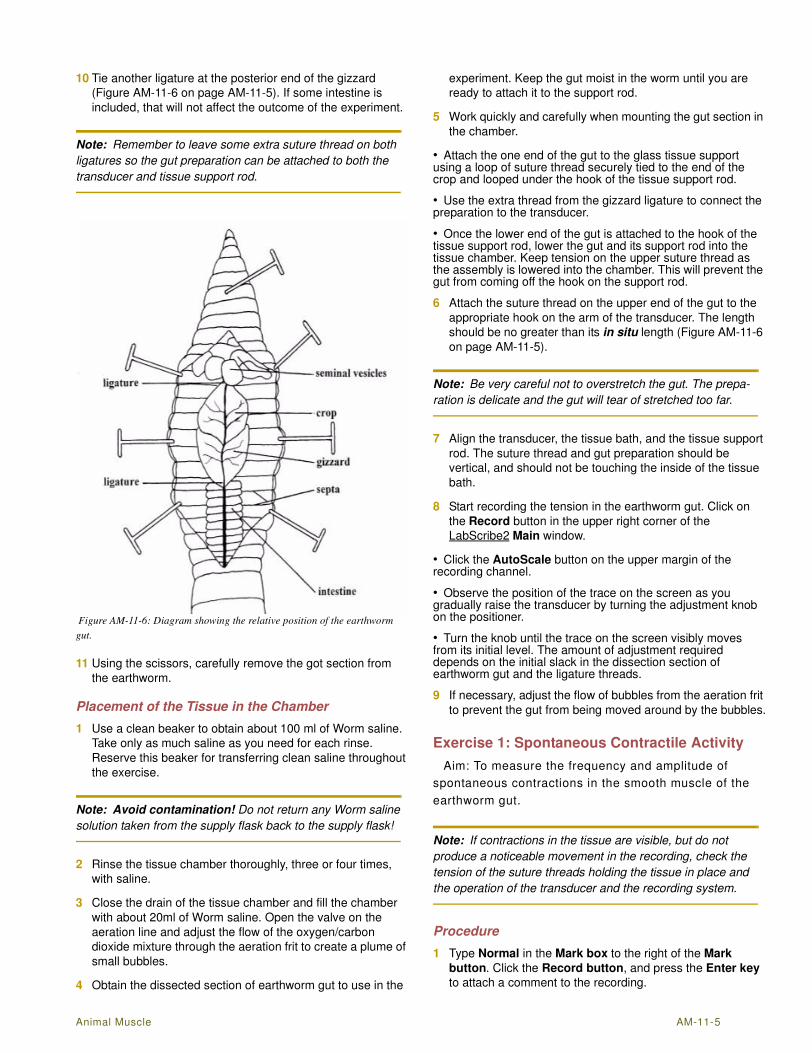
and crop are exposed (Figure AM-11-6 on page AM-11-5).
6 Pin the skin to the dissecting pan to expose the organs as
the incision is made. The incision should expose a 3-5 cm
section of gut.
7 Remoisten the earthworm with saline making sure to keep
the exposed gut moist.
8 Carefully use a blunt probe to separate the gut from the
body wall being sure not to cut or pierce the gut wall.
9 Using suture thread, tie a ligature just above the crop at the
anterior end of the gut (Figure AM-11-6 on page AM-11-5).
Leave some thread to anchor the tissue in the chamber and
to the force transducer.
Animal Muscle AM-11-5
10 Tie another ligature at the posterior end of the gizzard
(Figure AM-11-6 on page AM-11-5). If some intestine is
included, that will not affect the outcome of the experiment.
Note: Remember to leave some extra suture thread on both
ligatures so the gut preparation can be attached to both the
transducer and tissue support rod.
Figure AM-11-6: Diagram showing the relative position of the earthworm
gut.
11 Using the scissors, carefully remove the got section from
the earthworm.
Placement of the Tissue in the Chamber
1 Use a clean beaker to obtain about 100 ml of Worm saline.
Take only as much saline as you need for each rinse.
Reserve this beaker for transferring clean saline throughout
the exercise.
Note: Avoid contamination! Do not return any Worm saline
solution taken from the supply flask back to the supply flask!
2 Rinse the tissue chamber thoroughly, three or four times,
with saline.
3 Close the drain of the tissue chamber and fill the chamber
with about 20ml of Worm saline. Open the valve on the
aeration line and adjust the flow of the oxygen/carbon
dioxide mixture through the aeration frit to create a plume of
small bubbles.
4 Obtain the dissected section of earthworm gut to use in the
experiment. Keep the gut moist in the worm until you are
ready to attach it to the support rod.
5 Work quickly and carefully when mounting the gut section in
the chamber.
• Attach the one end of the gut to the glass tissue support using a loop of suture thread securely tied to the end of the crop and looped under the hook of the tissue support rod.
• Use the extra thread from the gizzard ligature to connect the preparation to the transducer.
• Once the lower end of the gut is attached to the hook of the tissue support rod, lower the gut and its support rod into the tissue chamber. Keep tension on the upper suture thread as the assembly is lowered into the chamber. This will prevent the gut from coming off the hook on the support rod.
6 Attach the suture thread on the upper end of the gut to the
appropriate hook on the arm of the transducer. The length
should be no greater than its in situ length (Figure AM-11-6
on page AM-11-5).
Note: Be very careful not to overstretch the gut. The prepa-
ration is delicate and the gut will tear of stretched too far.
7 Align the transducer, the tissue bath, and the tissue support
rod. The suture thread and gut preparation should be
vertical, and should not be touching the inside of the tissue
bath.
8 Start recording the tension in the earthworm gut. Click on
the Record button in the upper right corner of the
LabScribe2 Main window.
• Click the AutoScale button on the upper margin of the recording channel.
• Observe the position of the trace on the screen as you gradually raise the transducer by turning the adjustment knob on the positioner.
• Turn the knob until the trace on the screen visibly moves from its initial level. The amount of adjustment required depends on the initial slack in the dissection section of earthworm gut and the ligature threads.
9 If necessary, adjust the flow of bubbles from the aeration frit
to prevent the gut from being moved around by the bubbles.
Exercise 1: Spontaneous Contractile Activity
Aim: To measure the frequency and amplitude of
spontaneous contractions in the smooth muscle of the
earthworm gut.
Note: If contractions in the tissue are visible, but do not
produce a noticeable movement in the recording, check the
tension of the suture threads holding the tissue in place and
the operation of the transducer and the recording system.
Procedure
1 Type Normal in the Mark box to the right of the Mark
button. Click the Record button, and press the Enter key
to attach a comment to the recording.
Animal Muscle AM-11-6
2 Record until the contraction cycles are consistent and
predictable. It may take a few minutes for the gut to have a
consistent rhythm as the anesthesia wears off.
3 Record for 5 minutes once the contraction rate and
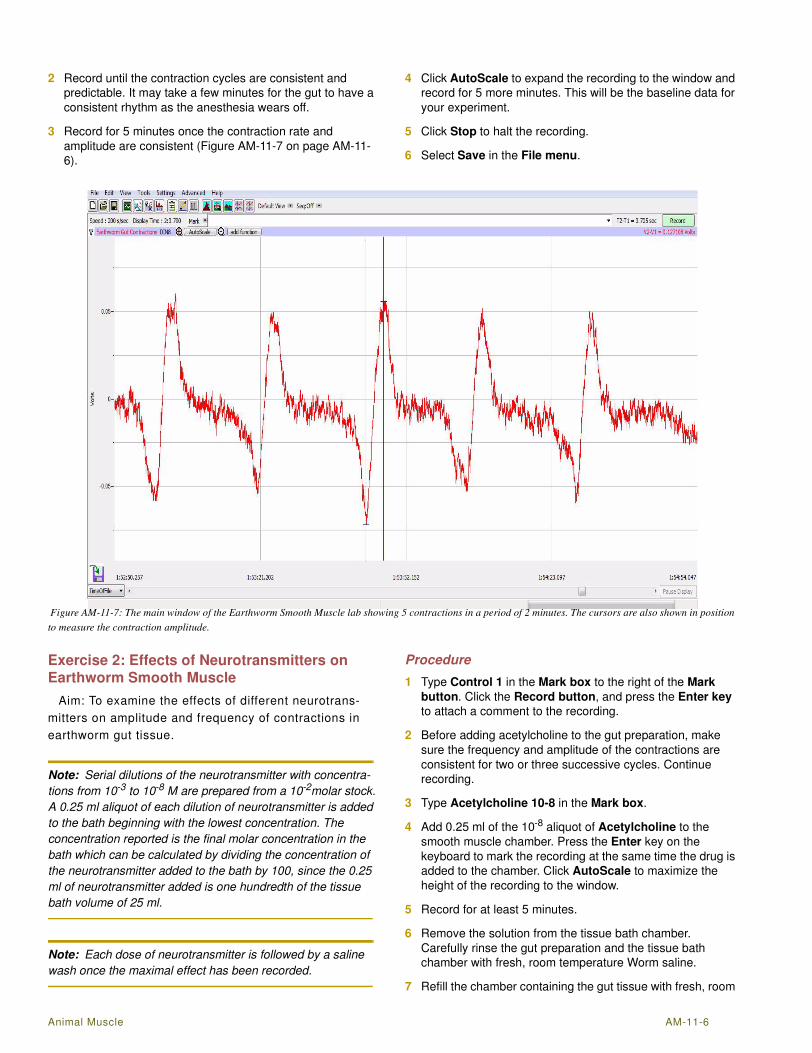
amplitude are consistent (Figure AM-11-7 on page AM-11-
6).
4 Click AutoScale to expand the recording to the window and
record for 5 more minutes. This will be the baseline data for
your experiment.
5 Click Stop to halt the recording.
6 Select Save in the File menu.
Figure AM-11-7: The main window of the Earthworm Smooth Muscle lab showing 5 contractions in a period of 2 minutes. The cursors are also shown in position
to measure the contraction amplitude.
Exercise 2: Effects of Neurotransmitters on Earthworm Smooth Muscle
Aim: To examine the effects of different neurotrans-
mitters on amplitude and frequency of contractions in
earthworm gut tissue.
Note: Serial dilutions of the neurotransmitter with concentra-
tions from 10-3 to 10-8 M are prepared from a 10-2molar stock.
A 0.25 ml aliquot of each dilution of neurotransmitter is added
to the bath beginning with the lowest concentration. The
concentration reported is the final molar concentration in the
bath which can be calculated by dividing the concentration of
the neurotransmitter added to the bath by 100, since the 0.25
ml of neurotransmitter added is one hundredth of the tissue
bath volume of 25 ml.
Note: Each dose of neurotransmitter is followed by a saline
wash once the maximal effect has been recorded.
Procedure
1 Type Control 1 in the Mark box to the right of the Mark
button. Click the Record button, and press the Enter key
to attach a comment to the recording.
2 Before adding acetylcholine to the gut preparation, make
sure the frequency and amplitude of the contractions are
consistent for two or three successive cycles. Continue
recording.
3 Type Acetylcholine 10-8 in the Mark box.
4 Add 0.25 ml of the 10-8 aliquot of Acetylcholine to the
smooth muscle chamber. Press the Enter key on the
keyboard to mark the recording at the same time the drug is
added to the chamber. Click AutoScale to maximize the
height of the recording to the window.
5 Record for at least 5 minutes.
6 Remove the solution from the tissue bath chamber.
Carefully rinse the gut preparation and the tissue bath
chamber with fresh, room temperature Worm saline.
7 Refill the chamber containing the gut tissue with fresh, room
Animal Muscle AM-11-7
temperature Worm saline.
8 Record for 5 minutes while the gut preparation returns to
near baseline levels.
9 Type Acetylcholine 10-7 in the Mark box.
10 Add 0.25 ml of the 10-7 aliquot of Acetylcholine to the
smooth muscle chamber. Press the Enter key on the
keyboard to mark the recording at the same time the drug is
added to the chamber. Click AutoScale to maximize the
height of the recording to the window.
11 Record for at least 5 minutes.
12 Remove the solution from the tissue bath chamber.
Carefully rinse the gut preparation and the tissue bath
chamber with fresh, room temperature Worm saline.
13 Refill the chamber containing the gut tissue with fresh Worm
saline.
14 Record for 5 minutes while the gut preparation returns to
near baseline levels.
15 Repeat steps 9 through 13 with the remaining aliquots of
Acetylcholine: 10-6, 10-5, 10-4, and 10-3.
16 Click Stop to halt the recording when the gut response to
the drug appears consistent and predictable.
17 Select Save in the File menu.
18 Remove the solution from the tissue bath chamber.
Carefully rinse the gut preparation and the tissue bath
chamber with fresh, room temperature Worm saline.
19 Continue rinsing of the tissue preparation and the chamber
with fresh saline to remove any remnants of acetylcholine
from the tissue. Any residue on the tissue or in the chamber
could cause multiple drug effects.
Serotonin
1 Refill the chamber containing the gut tissue with fresh Worm
saline.
2 Type Control 2 in the Mark box. Click the Record button.
Record the contractions of the gut preparation as it equili-
brates to the fresh saline in the chamber.
• When the contractions of the preparation are consistent and predictable, press the Enter key on the keyboard to mark the recording.
• This may take as long as 5 minutes.
3 Type Serotonin 10-8 in the Mark box. Click the Record
button. Press the Enter key as the dose of the new drug is
added to the smooth muscle chamber. Record for at least 5
minutes.
4 Click AutoScale to maximize the height of the recording to
the window.
5 Follow the same procedure as outlined for Acetylcholine.
6 When all aliquots of Serotonin have been added, click Stop
to halt the recording.
7 Select Save in the File menu.
8 Remove the solution from the tissue bath chamber.
Carefully rinse the gut preparation and the tissue bath
chamber with fresh, room temperature Worm saline.
9 Continue rinsing of the tissue preparation and the chamber
with fresh saline to remove any remnants of serotonin from
the tissue.
Epinephrine
1 Refill the chamber containing the gut tissue with fresh Worm
saline.
2 Type Control 3 in the Mark box. Click the Record button.
Record the contractions of the gut preparation as it equili-
brates to the fresh saline in the chamber.
• When the contractions of the preparation are consistent and predictable, press the Enter key on the keyboard to mark the recording.
• This may take as long as 5 minutes.
3 Type Epinephrine 10-8 in the Mark box. Click the Record
button. Press the Enter key as the dose of the new drug is
added to the smooth muscle chamber. Record for at least 5
minutes.
4 Click AutoScale to maximize the height of the recording to
the window.
5 Follow the same procedures as outlined for Acetylcholine
and Serotonin.
6 When all aliquots of Epinephrine have been added, click
Stop to halt the recording.
7 Select Save in the File menu.
Recovery
1 Refill the chamber containing the gut tissue with fresh Worm
saline.
2 Type Recovery in the Mark box to the right of the Mark
button. Click the Record button, and press the Enter key
to attach the comment to the recording.
3 Record the contractions of the preparation for 10 minutes to
make sure the earthworm smooth muscle has recovered.
Click AutoScale as needed during recording.
4 Click Stop to halt the recording and Save to save your file.
Data Analysis
Exercise 1-Spontaneous Contractile Activity
1 Scroll through the data file and locate a section near the
beginning of the recording where the amplitude and period
of the gut contraction cycle is consistent after the
anesthesia has worn off.

Animal Muscle AM-11-8
2 Use the Display Time icons to adjust the Display Time of
the Main window so that five gut contraction cycles are
displayed on the Main window. This section of data can also
be selected by:
• Placing the cursors on either side of five gut contraction cycles of the recording, and
• Clicking the Zoom between Cursors button on the LabScribe toolbar (Figure AM-11-5 on page AM-11-4) to expand or contract the five earthworm gut contraction cycles to the width of the Main window.
3 Click on the Analysis window icon in the toolbar (Figure
AM-11-5 on page AM-11-4) or select Analysis from the
Windows menu to transfer the data displayed in the Main
window to the Analysis window.
4 Look at the Function Table that is above the Earthworm
Gut Contractions in the Analysis window. The mathe-
matical functions, Value1, Value2, V2-V1, and T2-T1,
should appear in this table. The values for these parameters
are displayed in the table across the top margin of the
Earthworm Gut Contractions channel.
5 Maximize the height of the trace on the Earthworm Gut
Contractions channel by clicking on the arrow to the left of
the channel’s title to open the channel menu. Select Scale
from the menu and AutoScale from the Scale submenu to
increase the height of the data on that channel.
6 Once the cursors are placed in the correct positions for
determining the amplitude and period of each muscle twitch,
the values of the parameters in the Function Table can be
recorded in the on-line notebook of LabScribe by typing
their names and values directly into the Journal, or on a
separate data table.
7 The functions in the channel pull-down menus of the
Analysis window can also be used to enter the names and
values of the parameters from the recording to the Journal.
To use these functions:
• Place the cursors at the locations used to measure the amplitude and times of each of the 5 muscle twitches.
• Transfer the names of the mathematical functions used to determine the amplitude and times to the Journal using the Add Title to Journal function in the Earthworm Gut Contrac-tions channel pull-down menu.
• Transfer the values for the amplitude and times to the Journal using the Add Ch. Data to Journal function in the Earthworm Gut Contractions channel pull-down menu.
8 On the Earthworm Gut Contractions channel, use the
mouse to click on and drag the cursors to specific points on
the recording to measure the following parameters:
• Contraction Amplitude, which is the active tension, or phasic response, developed in the earthworm gut during its contraction. To measure this parameter, place one cursor at the beginning of the contraction, and the second cursor on its peak. The value for the V2-V1 function on the Earthworm Gut Contractions channel is the contraction amplitude.
• Contraction Time, which is the time between the beginning
and the peak of the contraction. To measure this parameter, keep the cursors in the same positions used to measure the contraction amplitude. The value for the T2-T1 function on the Earthworm Gut Contractions channel is the contraction time.
• Relaxation Time, which is the time between the peak and the end of the contraction. To measure this parameter, keep the cursor on the peak of the contraction and place the other cursor at the end of the contraction. The value for the T2-T1 function on the Earthworm Gut Contractions channel is the relaxation time.
• Contraction Period, which is the time between the begin-nings of adjacent contractions. To measure this parameter, place one cursor at the beginning of one contraction and the other cursor at the beginning of the adjacent contraction. The value for the T2-T1 function on the Earthworm Gut Contrac-tions channel is the contraction period.
• Muscle Tone, which is the passive tension, or tonic response, present in the gut tissue before or after the contraction. To measure this parameter, keep the cursors in the same positions used to measure the contraction period. Value1 on the Earthworm Gut Contractions channel is the tone of the gut at the beginning of a contraction, and Value2 is the tone at the beginning of the adjacent contraction.
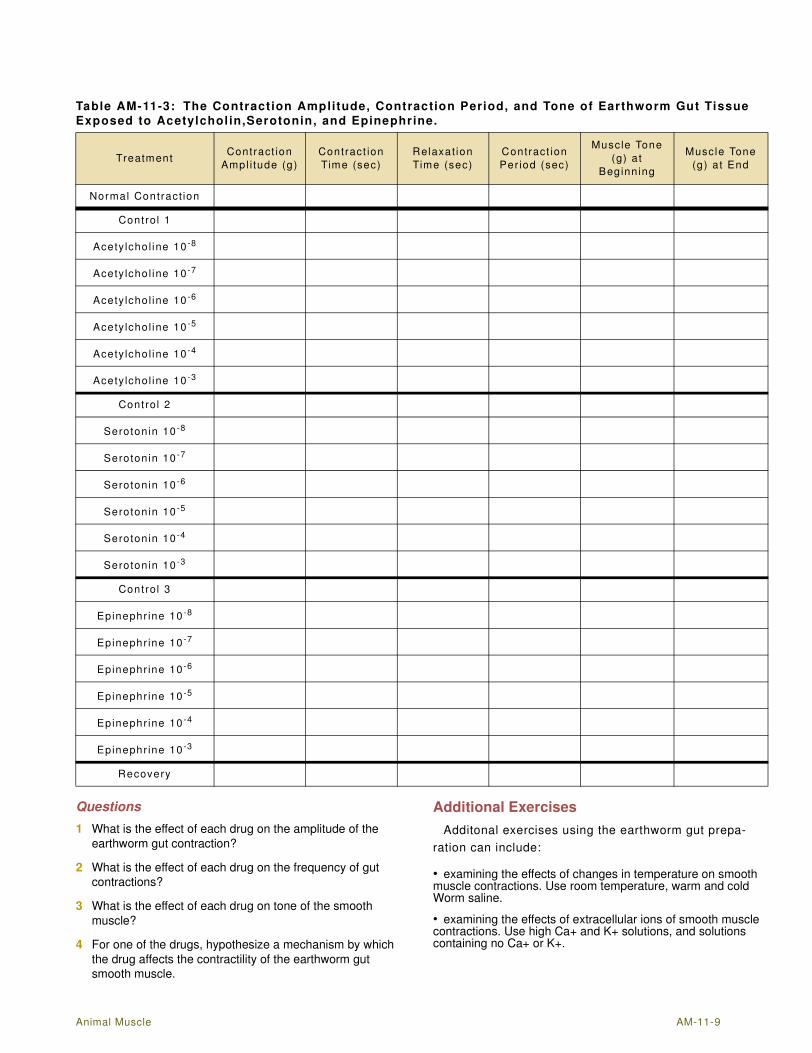
9 Record the mean values in the Journal using the one of the
techniques described in Steps 6 or 7, and on Table AM-11-3
on page AM-11-9.
10 Repeat Steps 2 through 9 to find the contraction amplitude,
contraction time, relaxation time, contraction period, and
muscle tone of five other gut contractions recorded in this
exercise. Record the values in the Journal and on
Table AM-11-3 on page AM-11-9.
11 Select Save in the File menu.
12 Determine the average contraction period of the five gut
contractions measured. Determine the average frequency
of contraction by finding the inverse of the contraction
period.
Exercise 2-Effects of Neurotransmitters
1 Scroll to the section of data recorded for the control and the
activity of each drug at each aliquot dosage.
2 Use the techniques explained in the data analysis section of
Exercise 1 to measure the contraction amplitude,
contraction time, relaxation time, contraction period, and
muscle tone for each drug and aliquot.
3 Enter the mean data in the Journal using one of the
techniques explained in the data analysis section of
Exercise 1, and on Table AM-11-3 on page AM-11-9.
4 Follow the same procedures for the Recovery period.
Animal Muscle AM-11-9
Questions
1 What is the effect of each drug on the amplitude of the
earthworm gut contraction?
2 What is the effect of each drug on the frequency of gut
contractions?
3 What is the effect of each drug on tone of the smooth
muscle?
4 For one of the drugs, hypothesize a mechanism by which
the drug affects the contractility of the earthworm gut
smooth muscle.
Additional Exercises
Additonal exercises using the earthworm gut prepa-
ration can include:
• examining the effects of changes in temperature on smooth muscle contractions. Use room temperature, warm and cold Worm saline.
• examining the effects of extracellular ions of smooth muscle contractions. Use high Ca+ and K+ solutions, and solutions containing no Ca+ or K+.
Table AM-11-3: The Contract ion Amplitude, Contraction Period, and Tone of Earthworm Gut Tissue
Exposed to Acetylchol in,Serotonin, and Epinephrine.
TreatmentContract ion
Ampl i tude (g)
Contract ion
Time (sec)
Relaxat ion
Time (sec)
Contract ion
Per iod (sec)
Muscle Tone
(g) a t
Beginn ing
Muscle Tone
(g) a t End
Normal Contract ion
Control 1
Acety lcho l ine 10 -8
Acety lcho l ine 10 -7
Acety lcho l ine 10 -6
Acety lcho l ine 10 -5
Acety lcho l ine 10 -4
Acety lcho l ine 10 -3
Control 2
Seroton in 10 -8
Seroton in 10 -7
Seroton in 10 -6
Seroton in 10 -5
Seroton in 10 -4
Seroton in 10 -3
Control 3
Epinephr ine 10 -8
Epinephr ine 10 -7
Epinephr ine 10 -6
Epinephr ine 10 -5
Epinephr ine 10 -4
Epinephr ine 10 -3
Recovery

Animal Muscle AM-11-10
Appendix
Table AM-11-4: Recipe for Worm Sal ine Solut ion.
Sal tGrams per 2 L i ter
DI H20
Sodium Chlor ide (NaCl) 14.26
Potassium Chlor ide (KCl) 0.59
Sodium Bicarbonate (NaHCO3) 3.02
Sodium Phosphate (NaH2PO4) 1 .104
Calc ium Chlor ide (CaCl2) 0 .444
Magnesium Chlor ide (MgCl2) 0 .406
Adjusted to a pH of 7 .3 with NaOH and HCl
Table AM-11-5: Concentrations of Drugs in
Worm Saline.
Concentrat ion
(Molar)Reagent mg/ml
10 -2 Acetychol ine Chlor ide 1.817
10 -2 Serotonin Creat inine
Phosphate 3.874
10 -2 Epinephrine 1.83
Copyright © 2022 FDOKUMEN