e U G PAR ser uide - Howard University Enterprise ...
131
e U G PAR ser uide Version 3 20130603
-
Upload
khangminh22 -
Category
Documents
-
view
0 -
download
0
Transcript of e U G PAR ser uide - Howard University Enterprise ...

e U GPAR ser uide
Version 3
20130603
ETS ePAR User Guide v3_20130603 Page 2
ETS Electronic Personnel Action Request (ePAR) User Guide Howard University June 2013
Note: This is a user guide for processing transactions in the PeopleSoft HCMS (Human Capital Management System) only and not meant to replace policy or business practice requirements which are determined by the Office of Human Resources (OHR). Enterprise Technology Services (ETS) is not responsible for HR policies, procedures or business rules.

ETS ePAR User Guide v3_20130603 Page 3
Contents
1 ePAR Overview ................................................................................................6
1.1 ePAR Process ______________________________________________ 6 Life Cycle ...........................................................................................6 1.1.1 ePAR Roles ........................................................................................8 1.1.2 ePAR Business Process Flow ..............................................................9 1.1.3 Automated Workflow and Notifications ..........................................10 1.1.4
1.2 ePAR Request Center ______________________________________ 13 Tabs ................................................................................................13 1.2.1 ePAR Transaction Types ..................................................................14 1.2.2 ePAR Consoles .................................................................................15 1.2.3
1.3 Viewing ePAR Transactions _________________________________ 17 ePAR Transaction Components........................................................17 1.3.1 ePAR States and Sub-states .............................................................19 1.3.2
2 ePAR Gadgets ................................................................................................21
2.1 Attach __________________________________________________ 21 To Add Attachments to an ePAR Transaction:..................................22 2.1.1 To Attach Additional Documents: ....................................................22 2.1.2 To View an Attachment to an ePAR Transaction: .............................23 2.1.3 To Delete an Attachment from an ePAR Transaction: ......................23 2.1.4
2.2 Collaborate ______________________________________________ 24 To View Collaborate Comments: .....................................................24 2.2.1 To Insert a Collaborate Comment: ...................................................25 2.2.2 To Reply to, Edit, or Delete an Existing Collaborate Comment: ........26 2.2.3 To Insert a New Comment Thread: ..................................................27 2.2.4 To Search through Collaborate Comments: .....................................28 2.2.5
2.3 Lifecycle Viewer___________________________________________ 29
2.4 Print ____________________________________________________ 30
2.5 Save ____________________________________________________ 31
2.6 Workflow ________________________________________________ 32 View Approval Map / Preview .........................................................33 2.6.1 Add an Approver or a Reviewer .......................................................35 2.6.2 Delete an Approver or a Reviewer ...................................................37 2.6.3 Reassign the Approval Routing ........................................................37 2.6.4
3 Initiator Actions .............................................................................................38
3.1 Initiating the Transaction ___________________________________ 38 Creating a Job Change ePAR ............................................................39 3.1.1 Creating a Discipline ePAR (HR Only) ...............................................44 3.1.2
ETS ePAR User Guide v3_20130603 Page 4
Creating a Hire ePAR .......................................................................45 3.1.3 Creating a Leave ePAR .....................................................................54 3.1.4 Creating a Terminate ePAR ..............................................................61 3.1.5 Creating a Transfer ePAR .................................................................65 3.1.6 Creating an Additional Pay ePAR .....................................................73 3.1.7 Creating a Department Budget ePAR ...............................................77 3.1.8 Creating a Pay Change ePAR ............................................................81 3.1.9
Creating a POI ePAR ......................................................................87 3.1.10 Creating a Position ePAR ...............................................................94 3.1.11
3.2 Modifying an ePAR Transaction ______________________________ 98 Modify Non-Transfer ePARs ............................................................98 3.2.1 Modify Transfer ePARs .................................................................. 100 3.2.2
3.3 Submitting or Resubmitting an ePAR _________________________ 104 Submitting an ePAR ....................................................................... 104 3.3.1 Resubmitting an ePAR ................................................................... 105 3.3.2
3.4 Withdrawing an ePAR _____________________________________ 106
3.5 Viewing ePAR Transaction/Approval Status ___________________ 107 4 Approver/Reviewer Actions ........................................................................ 109
4.1 Locating ePARs for Approval/Review_________________________ 109 Approval Inbox .............................................................................. 109 4.1.1 Inquire Consoles ............................................................................ 110 4.1.2 View/Review ePAR Transaction ..................................................... 110 4.1.3 Check Supporting Documentation (Attachments) .......................... 111 4.1.4
4.2 Approver Actions_________________________________________ 112 Transfer Release ............................................................................ 112 4.2.1 Approve an ePAR ........................................................................... 117 4.2.2 Pushback or Deny an ePAR ............................................................ 118 4.2.3 Hold an ePAR................................................................................. 119 4.2.4 Edit an ePAR Transaction as an Approver ...................................... 119 4.2.5
4.3 Approver/Reviewer Comments _____________________________ 120
4.4 Final Approver ___________________________________________ 121
4.5 Lifecycle After Final Approval _______________________________ 123
4.6 Assign a Proxy Approver ___________________________________ 124 5 Appendices .................................................................................................. 125
5.1 UPK Modules Reference List ________________________________ 125
5.2 Glossary of Terms ________________________________________ 127
5.3 Action/Reason Table ______________________________________ 129
5.4 FAQ _______________________________ Error! Bookmark not defined.

ePAR Overview
ETS ePAR User Guide v3_20130603 Page 5
About this Guide This guide introduces users to the electronic Personnel Action Request (ePAR) system and provides instructions on how to use the ePAR pages for initiating, approving, updating and auditing Human Resources (HR) actions. The following topics are included in this guide: § ePAR Overview § ePAR Process § ePAR Gadgets § Initiator Actions § Approver/Reviewer Actions § Auditor Actions
This guide assumes the following prerequisites: § A general understanding of creating and approving Personnel Actions as currently
deployed using paper and manual processes. This includes having familiarity with Actions and Reasons and how they are used in the existing Personnel Action process.
§ A familiarity with PeopleSoft, including login, navigation, user interface, and transactions within PeopleSoft applications.
Audience This document is intended for end users who want to learn how to use the electronic Personnel Action Request (ePAR) solution developed for Oracle/PeopleSoft HR applications.
Notation Guide
Format Referenced Content
page elements fields, buttons, icons, boxed areas, bars, etc.
pages or tabs PeopleSoft component pages, ePAR pages, tabs, menu
highlighted areas of graphics
labels labels on graphics
ePAR Overview
ETS ePAR User Guide v3_20130603 Page 6
1 ePAR Overview
The Electronic Personnel Action Request (ePAR) solution works within the PeopleSoft Human Capital Management (HCM) environment and enables Users to create, modify, and monitor their Human Resources (HR) actions using:
§ On-line Transactions § Clearly-defined Business Rules
§ Electronic Signature Capabilities § Automated Workflow and Approvals
§ Integration with Key Business Systems
§ Automated PeopleSoft Employee Data Updates § Electronic Record Retention
§ Clear Audit Trail
1.1 ePAR Process ePAR moves processing of HR transactions from paper forms and manual approval processing to an on-line process from initiation to completion in the PeopleSoft HCM database. Each stage of the ePAR transaction can be tracked on-line and the approval routing automated through ePAR Workflow, a configurable feature for capturing the specific approval routing for Howard University’s business processes.
Life Cycle 1.1.1
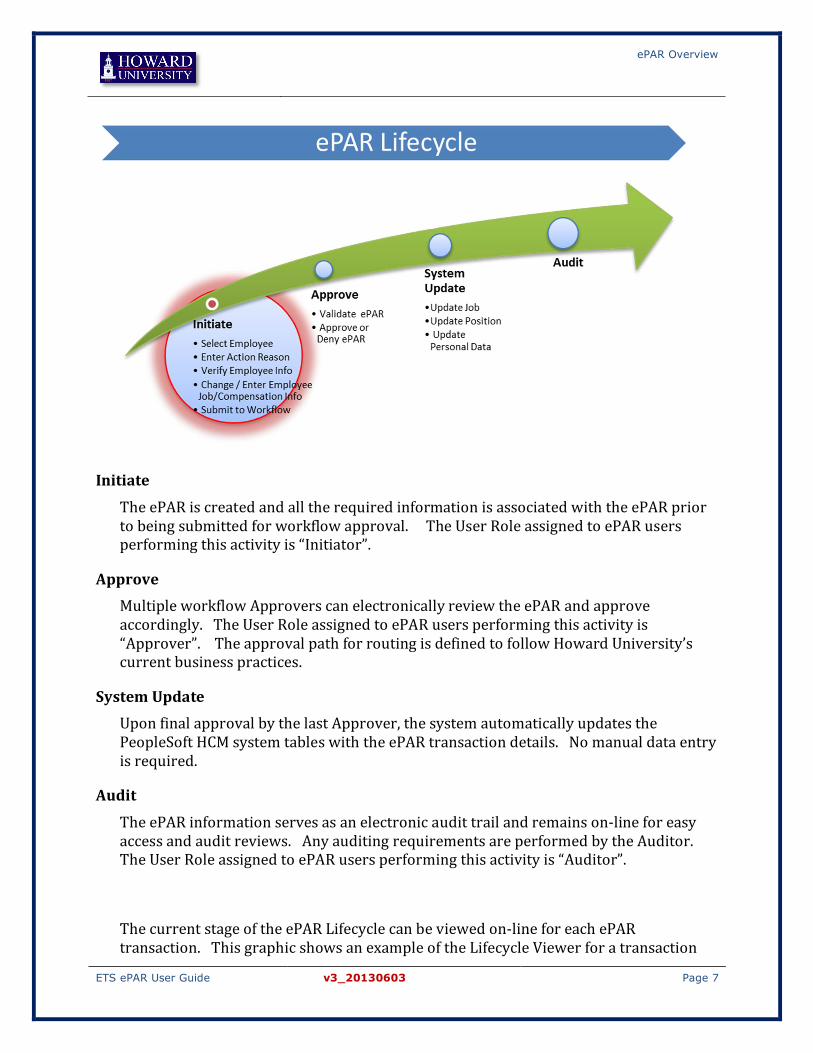
The Lifecycle of an ePAR begins with the initiation process and completes with the Audit process, if applicable. This ePAR Lifecycle applies to all ePAR Categories. The Lifecycle of an ePAR transaction from initiation to audit completion is shown in the following diagram:
ePAR Overview
ETS ePAR User Guide v3_20130603 Page 7
Initiate
The ePAR is created and all the required information is associated with the ePAR prior to being submitted for workflow approval. The User Role assigned to ePAR users performing this activity is “Initiator”.
Approve Multiple workflow Approvers can electronically review the ePAR and approve accordingly. The User Role assigned to ePAR users performing this activity is “Approver”. The approval path for routing is defined to follow Howard University’s current business practices.
System Update Upon final approval by the last Approver, the system automatically updates the PeopleSoft HCM system tables with the ePAR transaction details. No manual data entry is required.
Audit The ePAR information serves as an electronic audit trail and remains on-line for easy access and audit reviews. Any auditing requirements are performed by the Auditor. The User Role assigned to ePAR users performing this activity is “Auditor”.
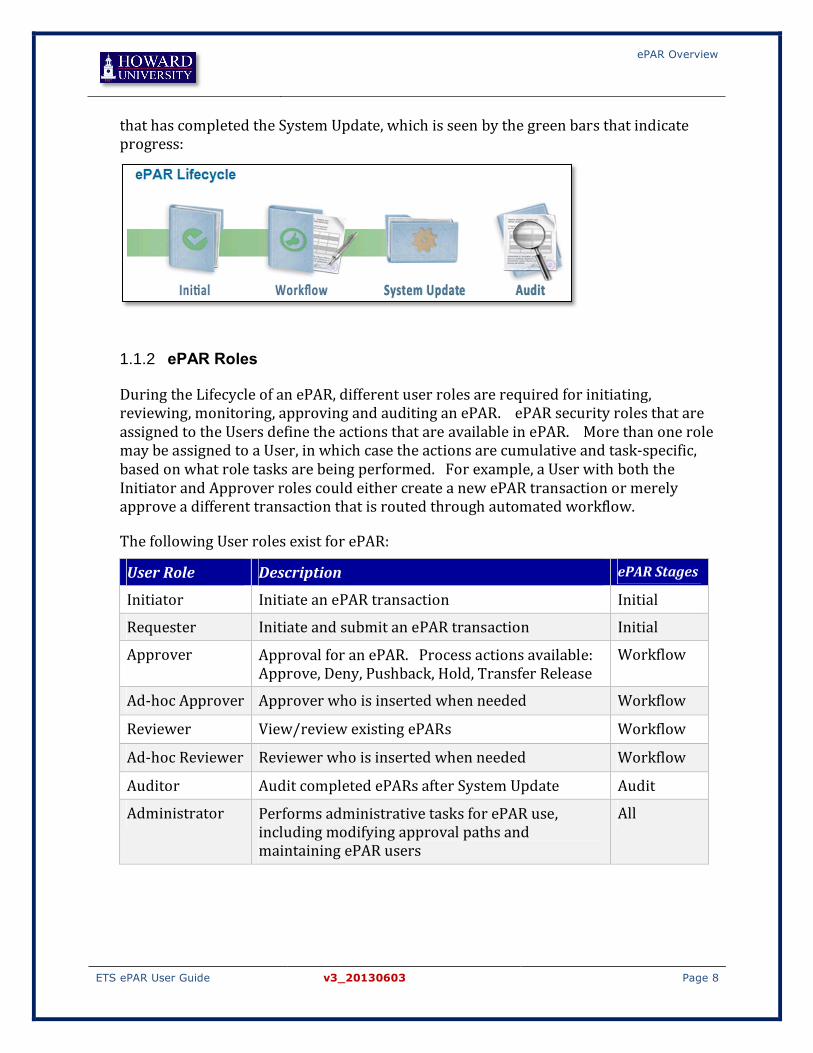
The current stage of the ePAR Lifecycle can be viewed on-line for each ePAR transaction. This graphic shows an example of the Lifecycle Viewer for a transaction
ePAR Overview
ETS ePAR User Guide v3_20130603 Page 8
that has completed the System Update, which is seen by the green bars that indicate progress:
ePAR Roles 1.1.2
During the Lifecycle of an ePAR, different user roles are required for initiating, reviewing, monitoring, approving and auditing an ePAR. ePAR security roles that are assigned to the Users define the actions that are available in ePAR. More than one role may be assigned to a User, in which case the actions are cumulative and task-specific, based on what role tasks are being performed. For example, a User with both the Initiator and Approver roles could either create a new ePAR transaction or merely approve a different transaction that is routed through automated workflow.
The following User roles exist for ePAR:
User Role Description ePAR Stages
Initiator Initiate an ePAR transaction Initial
Requester Initiate and submit an ePAR transaction Initial
Approver Approval for an ePAR. Process actions available: Approve, Deny, Pushback, Hold, Transfer Release
Workflow
Ad-hoc Approver Approver who is inserted when needed Workflow
Reviewer View/review existing ePARs Workflow
Ad-hoc Reviewer Reviewer who is inserted when needed Workflow
Auditor Audit completed ePARs after System Update Audit
Administrator Performs administrative tasks for ePAR use, including modifying approval paths and maintaining ePAR users
All
ePAR Overview
ETS ePAR User Guide v3_20130603 Page 9
Each role is associated with the actions that are required for ePAR tasks to be completed. All ePAR Users are able to view transactions in their various stages of the Lifecycle. However, specific actions are allowed for each of the following roles:
User Role Actions
Initiator Add, Modify
Requester Add, Modify, Submit
Approver Approve, Deny, Pushback, Hold
Reviewer Read-only
Auditor Audit
ePAR Business Process Flow 1.1.3
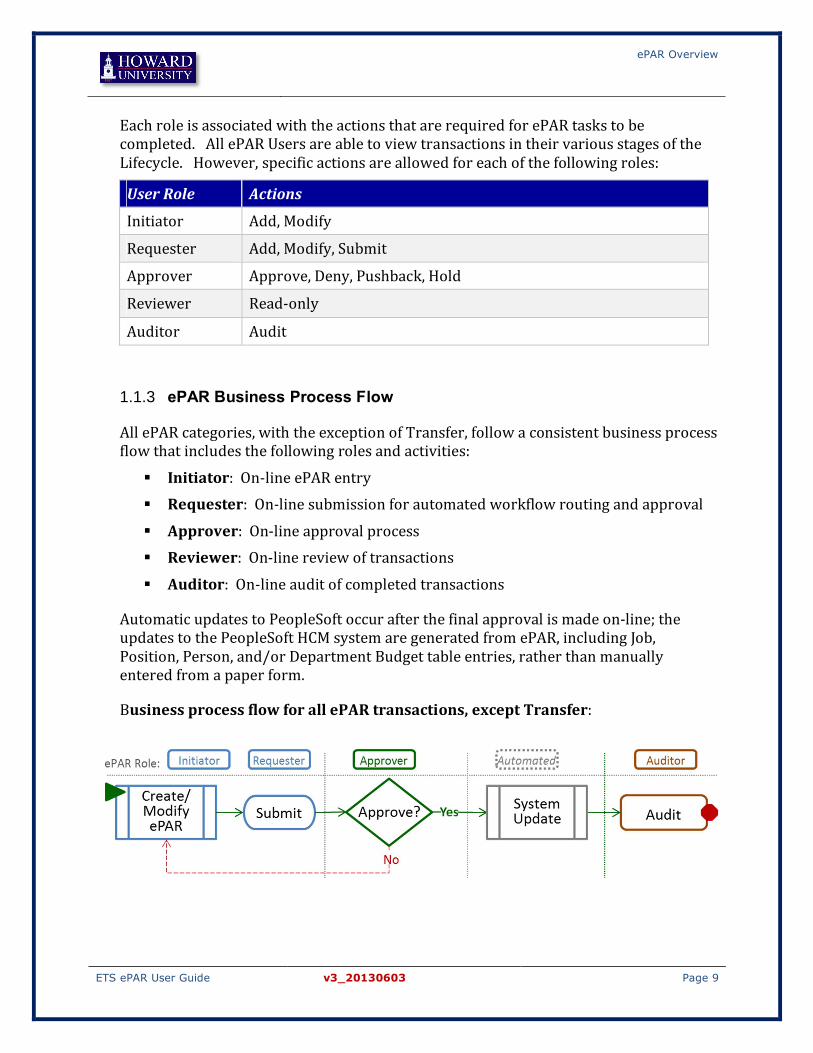
All ePAR categories, with the exception of Transfer, follow a consistent business process flow that includes the following roles and activities:
§ Initiator: On-line ePAR entry § Requester: On-line submission for automated workflow routing and approval
§ Approver: On-line approval process § Reviewer: On-line review of transactions
§ Auditor: On-line audit of completed transactions
Automatic updates to PeopleSoft occur after the final approval is made on-line; the updates to the PeopleSoft HCM system are generated from ePAR, including Job, Position, Person, and/or Department Budget table entries, rather than manually entered from a paper form.
Business process flow for all ePAR transactions, except Transfer:

ePAR Overview
ETS ePAR User Guide v3_20130603 Page 10
For the Transfer Category, which only allows transfers between Departments, an additional role exists to release the Employee from the current Department. The following business process flow applies for the roles and activities within Transfer:
§ Initiator: Initiates a Transfer ePAR by requesting a Transfer Release from the Employee’s current Department; modifies the request after release is approved
§ Transfer Approver: On-line approval process for the transfer from the Employee’s current Department
§ Requester: On-line submission for automated workflow routing and approval
§ Approver: On-line approval process § Auditor: On-line audit of transactions
Transfer process flow:
Automated Workflow and Notifications 1.1.4
Smart Workflow empowers individual business users to define and alter routing rules electronically with visual status of approvals, thus eliminating the circulation of manual paper to various departments for approvals and signatures. The dynamic transaction approval process can be configured by roles to follow the organization’s business rules. The flexible configuration can support multiple parallel paths and can easily accommodate multiple levels of approval.
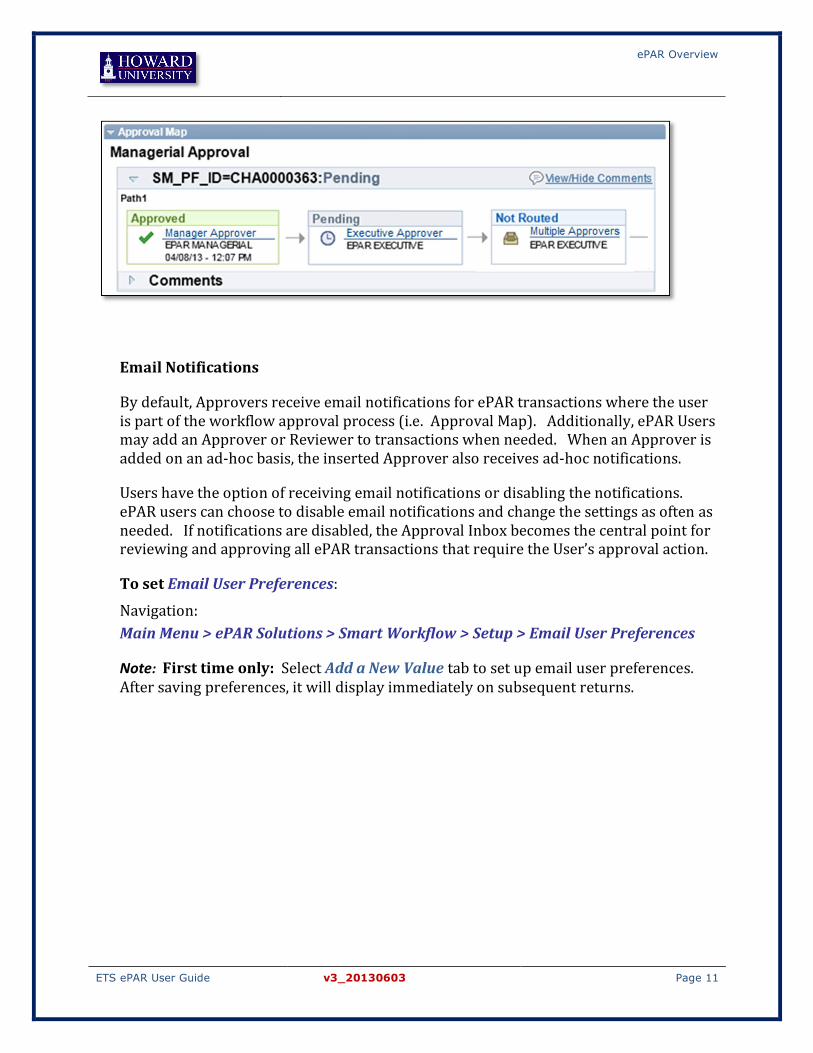
An Approval Map is available to view for each ePAR to indicate its approval routing, as well as the current status of approvals. Ad-hoc Approvers and/or Reviewers may be added to the approval path for flexibility in supporting business needs. Electronic date and time stamps, along with comments, are captured on-line and retained for Audit and information purposes.
ePAR Overview
ETS ePAR User Guide v3_20130603 Page 11
Email Notifications
By default, Approvers receive email notifications for ePAR transactions where the user is part of the workflow approval process (i.e. Approval Map). Additionally, ePAR Users may add an Approver or Reviewer to transactions when needed. When an Approver is added on an ad-hoc basis, the inserted Approver also receives ad-hoc notifications.
Users have the option of receiving email notifications or disabling the notifications. ePAR users can choose to disable email notifications and change the settings as often as needed. If notifications are disabled, the Approval Inbox becomes the central point for reviewing and approving all ePAR transactions that require the User’s approval action.
To set Email User Preferences:
Navigation: Main Menu > ePAR Solutions > Smart Workflow > Setup > Email User Preferences
Note: First time only: Select Add a New Value tab to set up email user preferences. After saving preferences, it will display immediately on subsequent returns.

ePAR Overview
ETS ePAR User Guide v3_20130603 Page 12
To setup or change Email User Preferences at any time: 1. Navigate to Email User Preferences. 2. Click the Disable Email for all transactions? checkbox to disable email notification
for ALL roles listed in the Transaction Details box below. OR Click the Disable Email checkbox in the Transaction Details box for a specific role when multiple roles are listed.
3. Click Save.

ePAR Overview
ETS ePAR User Guide v3_20130603 Page 13
1.2 ePAR Request Center ePAR components are centralized in the ePAR Request Center, which is organized into work areas that separate ePAR transactions by task type. The ePAR Request Center is accessed by navigation from the PeopleSoft HCM 9.1 Home Page:
Main Menu > ePAR Solutions > Document Framework > Document Collection
Tabs 1.2.1
All ePAR transactions are grouped into transactional categories, referred to as “ePAR Category” or “ePAR Categories” from here on, that appear on various tabs in the ePAR Request Center. Multiple ePAR Categories may be presented on each tab. Based on a User’s security role assigned, not all tabs and categories may show. Tabs for Howard University’s ePAR Request Center include: § ePAR Actions: Change, Discipline, Hire, Leave, Separation, Transfer § ePAR Additional Pay § ePAR Department Budget § ePAR POI (Person of Interest) § ePAR Pay Change § ePAR Position

ePAR Overview
ETS ePAR User Guide v3_20130603 Page 14
ePAR Transaction Types 1.2.2
Specific transaction types are represented on each of the tabs in the ePAR Request Center, each with its associated actions available as hyperlinks. Each ePAR Category supports a distinct HR action requirement that is consistent with current processes.
Within each ePAR Category are predefined Action/Reason combinations, when applicable. Actions within an ePAR Category are associated with a list of predefined reasons appropriate for use with each action. These predefined Action/Reason combinations are available for selection when creating or maintaining an ePAR. Data entry and workflow approval requirements may be different for each ePAR category, as defined by Howard University business practices.
The following ePAR Categories are available:
ePAR Category Description of Actions Examples of Transactions Change Job data changes Job Information Change
Discipline Discipline-related personnel actions for an Employee
Suspension, Reinstatement, Data Changes (working suspension, penalty, etc.)
Hire Hire a new Employee, rehire a former Employee, or add job for existing Employee
Hire, Rehire, Additional Job
Leave Leave-related personnel actions for an Employee
Leave of Absence, Seasonal Leaves, Return from Leave
Separation Separation-related actions for an existing Employee
Retirement, Resignation, Termination
Transfer Transfer of an Employee between Departments
Transfer between Departments
Additional Pay Pay actions outside of regular compensation
Bonus, commission, moving expenses, etc.
Department Budget Funding changes only Change or end grant funding
Pay Change Pay-related changes Merit increase, cost-of-living adjustment
POI Add a new Person of Interest Person of Interest ID does not exist in PeopleSoft HCM
Position Changes to existing Position Reports To change, Position Title change
ePAR Overview
ETS ePAR User Guide v3_20130603 Page 15
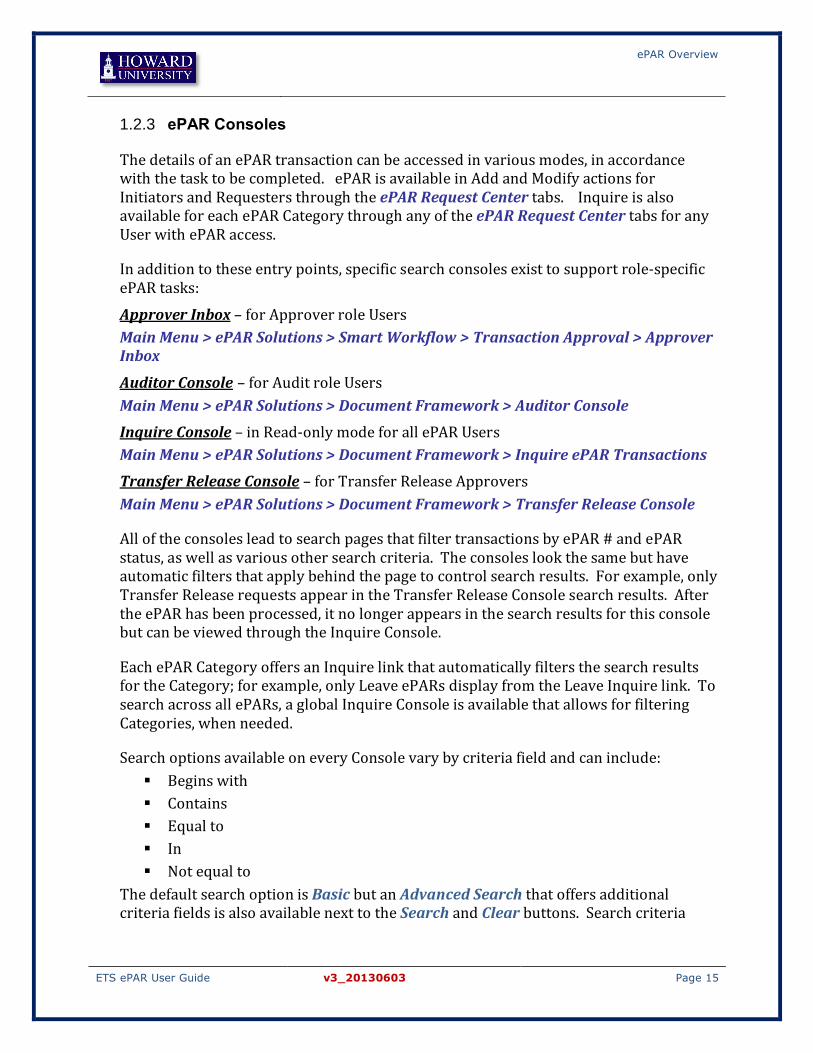
ePAR Consoles 1.2.3
The details of an ePAR transaction can be accessed in various modes, in accordance with the task to be completed. ePAR is available in Add and Modify actions for Initiators and Requesters through the ePAR Request Center tabs. Inquire is also available for each ePAR Category through any of the ePAR Request Center tabs for any User with ePAR access.
In addition to these entry points, specific search consoles exist to support role-specific ePAR tasks:
Approver Inbox – for Approver role Users Main Menu > ePAR Solutions > Smart Workflow > Transaction Approval > Approver Inbox
Auditor Console – for Audit role Users Main Menu > ePAR Solutions > Document Framework > Auditor Console Inquire Console – in Read-only mode for all ePAR Users Main Menu > ePAR Solutions > Document Framework > Inquire ePAR Transactions Transfer Release Console – for Transfer Release Approvers Main Menu > ePAR Solutions > Document Framework > Transfer Release Console
All of the consoles lead to search pages that filter transactions by ePAR # and ePAR status, as well as various other search criteria. The consoles look the same but have automatic filters that apply behind the page to control search results. For example, only Transfer Release requests appear in the Transfer Release Console search results. After the ePAR has been processed, it no longer appears in the search results for this console but can be viewed through the Inquire Console.
Each ePAR Category offers an Inquire link that automatically filters the search results for the Category; for example, only Leave ePARs display from the Leave Inquire link. To search across all ePARs, a global Inquire Console is available that allows for filtering Categories, when needed.
Search options available on every Console vary by criteria field and can include: § Begins with § Contains § Equal to § In § Not equal to
The default search option is Basic but an Advanced Search that offers additional criteria fields is also available next to the Search and Clear buttons. Search criteria

ePAR Overview
ETS ePAR User Guide v3_20130603 Page 16
combinations that are used often can be saved using the Save Search Criteria link then activated through the use of the Use Saved Search drop-down for each ePAR console.
Search results are returned below the Search and Clear buttons. An ePAR can be selected for viewing by clicking on the ePAR # that shows on the screen as a hyperlink after choosing a view option, when available.
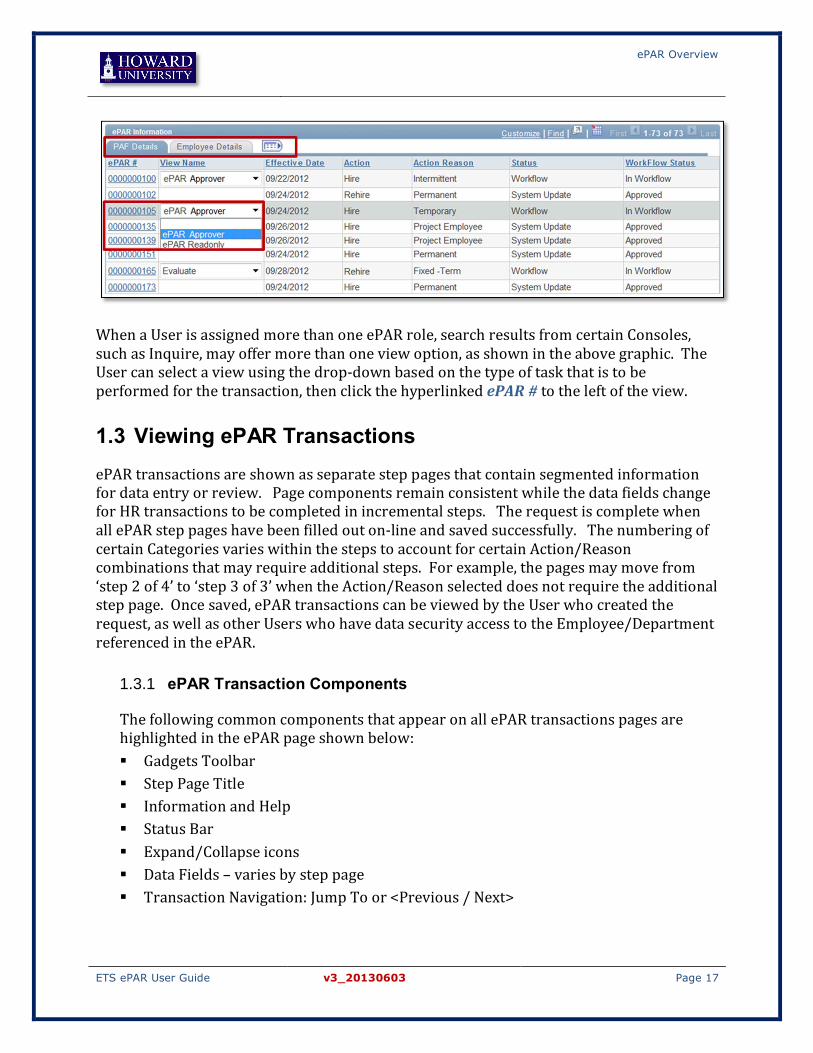
Search results display below the criteria fields and typically display two tabs of information about the ePARs. In the graphic following, there are two tabs, PAF Details and Employee Details, which pertain to the same ePAR #. The tabs can be viewed one at a time or in a wide single view by using the toggle icon beside the tabs to expand or to contract the results tabs.
ePAR Overview
ETS ePAR User Guide v3_20130603 Page 17
When a User is assigned more than one ePAR role, search results from certain Consoles, such as Inquire, may offer more than one view option, as shown in the above graphic. The User can select a view using the drop-down based on the type of task that is to be performed for the transaction, then click the hyperlinked ePAR # to the left of the view.
1.3 Viewing ePAR Transactions ePAR transactions are shown as separate step pages that contain segmented information for data entry or review. Page components remain consistent while the data fields change for HR transactions to be completed in incremental steps. The request is complete when all ePAR step pages have been filled out on-line and saved successfully. The numbering of certain Categories varies within the steps to account for certain Action/Reason combinations that may require additional steps. For example, the pages may move from ‘step 2 of 4’ to ‘step 3 of 3’ when the Action/Reason selected does not require the additional step page. Once saved, ePAR transactions can be viewed by the User who created the request, as well as other Users who have data security access to the Employee/Department referenced in the ePAR.
ePAR Transaction Components 1.3.1
The following common components that appear on all ePAR transactions pages are highlighted in the ePAR page shown below: § Gadgets Toolbar § Step Page Title § Information and Help § Status Bar § Expand/Collapse icons § Data Fields – varies by step page § Transaction Navigation: Jump To or <Previous / Next>

ePAR Overview
ETS ePAR User Guide v3_20130603 Page 18
ePAR Component Description Gadget Toolbar Displays available ePAR Gadgets in the upper left portion of
each ePAR page; Gadgets displayed vary based on the status of the ePAR, the User’s role, and the mode in which the ePAR is viewed
Page Title Identifies clearly each step page of an ePAR transaction for quick reference while working with or viewing ePARs
Information/Help Offers information about and help related to the ePAR page that is being completed or viewed

ePAR Overview
ETS ePAR User Guide v3_20130603 Page 19
Status Bar Displays the current ePAR State and Sub-state for each transaction (see description in following section)
Expand/Collapse Toggles between expanded or collapsed views, allowing for the User to select how much of the screen is populated and which data sections are displayed or contracted
Data Fields Varies by step page and by ePAR Category to show what is needed to complete certain ePAR transactions
Current Column Data currently on the active row in Employee/Position/or Department Budget record
New Column Data for the new row to be created using ePAR – reflects modified field values in blue italics after ePAR is saved
Transaction Navigation Offers options for how to view or move about an ePAR transaction – sequentially using <Previous / Next> or skipping to a page using Jump To option with the Go button
ePAR States and Sub-states 1.3.2
Each ePAR transaction displays its current status in the pink Status Bar below the page title. The status is conveyed in two parts: the ePAR State and Sub-state. The ePAR States represent the four stages of the ePAR Lifecycle: Initiate, Workflow, System Update, and Audit. Each of these stages is further separated into Sub-states that provide greater detail about the transaction in its progress toward completion. The State and Sub-state of an ePAR dictate its availability to Users by role, the view that is offered for the ePAR, and the actions available on the pages and within the Gadget Toolbar. The ePAR process applies business rules to the transactions so that only appropriate actions and types of views are available at each of its Sub-states. For example, once the ePAR has completed the System Update (State: System Update, Sub-state: Completed), it can only be accessed in the Inquire mode (display-only) for most Users. Only Audit-role Users will be able to take any action on the ePAR as part of the Audit process.
ePAR State Sub-state Description Initial Add Add entry
Initiated Transfer Release requested
Ready Ready (saved but not submitted)
Released Transfer Release approved
Withdraw Withdrawn

ePAR Overview
ETS ePAR User Guide v3_20130603 Page 20
Workflow Completed Workflow completed
Denied Workflow approval denied
ePAR Requester Pending ePAR Requester approval
ePAR Grants Pending Grants approval
ePAR Managerial Pending Managerial approval
ePAR Executive Pending Executive approval
ePAR President Pending President’s approval
ePAR HR Pending HR approval
ePAR Budget Pending Budget approval
ePAR Finance Pending Finance approval
ePAR Benefits Pending Benefits approval
System Update Completed System Update successfully completed
Error Error during update – system not updated; requires attention to complete update
Pending Pending System Update – system not updated; requires attention to complete update
Audited Completed Audit completed
Pending Pending audit – audit started but not completed

ePAR Gadgets
ETS ePAR User Guide v3_20130603 Page 21
2 ePAR Gadgets
ePAR Gadgets Toolbar appears in the upper left screen of each ePAR page. The toolbar remains in place as the User scrolls down the page so that the Gadget functions/options are always available. The ePAR Gadgets that appear on the toolbar are in synch with the state of the ePAR transaction; not all icons display on every page. The function related to the Gadget can be used from any page where the icon is visible.
ePAR Toolbar options include: § Attach – any attachments for scanned documents, digital files, etc. § Collaborate – for threaded comments, if needed § Lifecycle Viewer – displays current status and details of each ePAR transaction § Print– printout of the information included in the ePAR § Save – appears on the final step page for saving any changes § Workflow – options for approval routing and viewing of Approval Map
Certain icons appear on the Gadget Toolbar for specific role-related tasks: § Withdraw – for Initiator role Users § Audit – for Auditor role Users
2.1 Attach The Attach icon is available throughout the ePAR transaction. Attachments can be made at any time during the Lifecycle of an ePAR, even during the approval process, for Users with the appropriate ePAR role assignment.
Features of Attach include: § Ability to add multiple/unlimited attachments. § Attachments can be of various file types. § Attachments can be uploaded or deleted anytime during the ePAR Lifecycle.

ePAR Gadgets
ETS ePAR User Guide v3_20130603 Page 22
A confirmation message displays the successful attachment of one or more documents uploaded after OK is clicked to complete the attach process. After saving the ePAR with an attachment, the Attach icon shows a visual indication of the ePAR having attachment(s).
To Add Attachments to an ePAR Transaction: 2.1.1Click the Attach icon from any page where it is displayed. Click the Paper Clip icon to the right of the Attachment row. Click Browse and locate the document to attach. Click Upload. Click OK to return to the transaction when finished attaching.
To Attach Additional Documents: 2.1.2Click the + button on any existing row. Repeat above steps to attach the next supporting document.

ePAR Gadgets
ETS ePAR User Guide v3_20130603 Page 23
To View an Attachment to an ePAR Transaction: 2.1.3
Click on the Attach icon when it indicates an attachment is present.
Click the View icon.
To Delete an Attachment from an ePAR Transaction: 2.1.4Click on the Attach icon from the ePAR transaction page.
Click the – button on the row for the attachment to be deleted. Click the OK button on the Delete Confirmation box. Click the OK on the attachment page to return to the ePAR step page. Click the Save icon on the Gadgets Toolbar.
ePAR Gadgets
ETS ePAR User Guide v3_20130603 Page 24
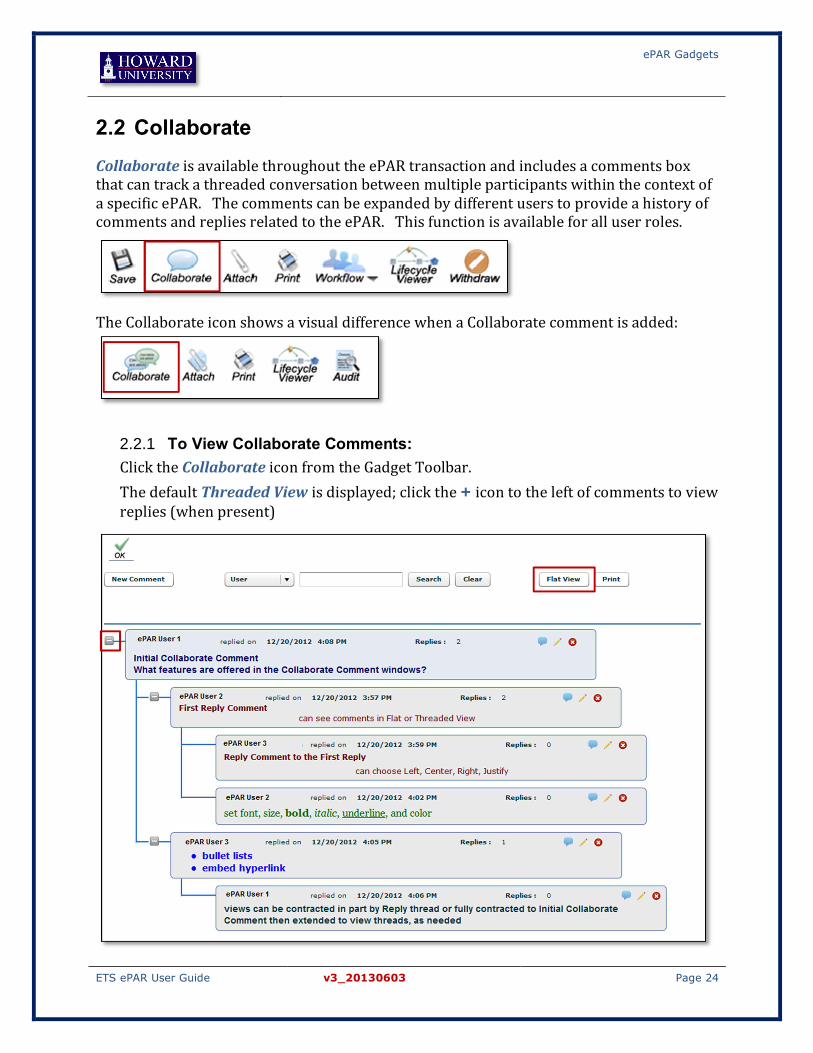
2.2 Collaborate Collaborate is available throughout the ePAR transaction and includes a comments box that can track a threaded conversation between multiple participants within the context of a specific ePAR. The comments can be expanded by different users to provide a history of comments and replies related to the ePAR. This function is available for all user roles.
The Collaborate icon shows a visual difference when a Collaborate comment is added:
To View Collaborate Comments: 2.2.1Click the Collaborate icon from the Gadget Toolbar. The default Threaded View is displayed; click the + icon to the left of comments to view replies (when present)
ePAR Gadgets
ETS ePAR User Guide v3_20130603 Page 25
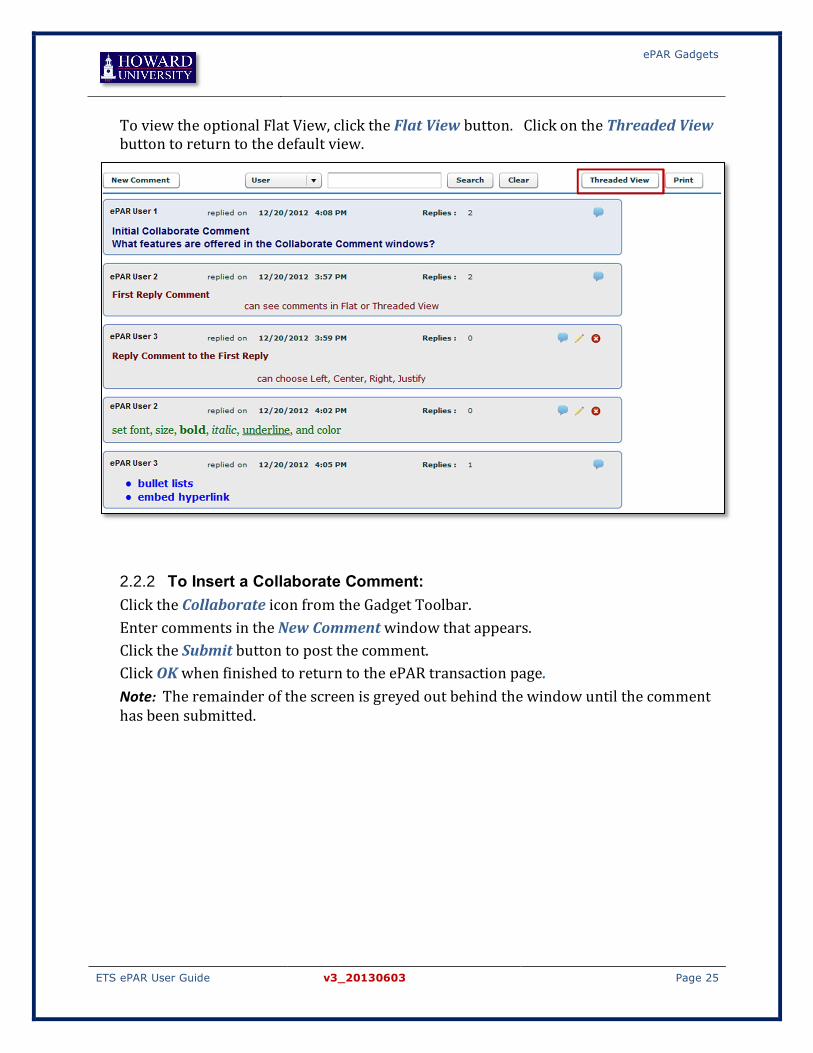
To view the optional Flat View, click the Flat View button. Click on the Threaded View button to return to the default view.
To Insert a Collaborate Comment: 2.2.2Click the Collaborate icon from the Gadget Toolbar. Enter comments in the New Comment window that appears. Click the Submit button to post the comment. Click OK when finished to return to the ePAR transaction page. Note: The remainder of the screen is greyed out behind the window until the comment has been submitted.

ePAR Gadgets
ETS ePAR User Guide v3_20130603 Page 26
To Reply to, Edit, or Delete an Existing Collaborate Comment: 2.2.3Each inserted Collaborate comment shows three icons in the upper right of the display:
Reply to a Comment
Click the Reply icon in the window of the comment that the reply addresses. Enter reply comments in the Comments box. Click Submit.
Click OK to return to the ePAR transaction page.
Edit a Comment A comment can only be edited by the User who created it – all other Users use Reply.
Click the Edit icon in the window of the comment to be modified. Enter changes to the comment, as needed. Click Submit. Click OK to return to the ePAR transaction page.

ePAR Gadgets
ETS ePAR User Guide v3_20130603 Page 27
Delete a Comment
If a posted reply exists for the comment being deleted, the User will be prompted to accept deletion of the comment and its related reply.
Click the Delete icon. Click OK to delete the comment.
To Insert a New Comment Thread: 2.2.4
A New Comment appears in threaded view in parallel with the first comment on the page, unlike a reply that displays as indented and connected to the comment for which the reply was created.

ePAR Gadgets
ETS ePAR User Guide v3_20130603 Page 28
To Search through Collaborate Comments: 2.2.5
Collaborate comment threads may get long, making it necessary to search for a previously seen comment or reply. Three options for searching Collaborate comments are provided: § User § Date § Comment
After selecting the search option, enter search text into the blank field on the right, then click the Search button.

ePAR Gadgets
ETS ePAR User Guide v3_20130603 Page 29
2.3 Lifecycle Viewer The Lifecycle Viewer icon displays in the Gadget Toolbar when the function is available for an ePAR transaction. Clicking on the icon leads to a page that presents the current status information and the details of the transaction stages that have been completed for a particular ePAR transaction.
The Lifecycle Viewer can also be accessed through direct navigation:
Main Menu > ePAR Solutions > Document Framework > Document Life Cycle Viewer The Search by criteria can be changed to Document ID to locate an ePAR transaction by its ePAR Number, if known.
The Lifecycle Viewer displays the four stages of the ePAR Lifecycle with the status of the ePAR transaction indicated by the green progress bars that lead up to its current stage. Transaction and data details are provided below the stages.
Initial: The creation of an ePAR transaction through the Save action indicates the Initial stage. The ePAR remains in Initial stage until it is submitted for approval.
Workflow: Once an ePAR is submitted, the ePAR is routed electronically for approval in the Workflow stage. All Approvers defined must approve the ePAR before it proceeds to the System Update stage. Approvers date/time stamp along with comments are captured for audit and informational purposes.
System Update: Upon final approval, the PeopleSoft system is automatically updated with the ePAR transaction details. Manual data entry for the transaction is no longer required.

ePAR Gadgets
ETS ePAR User Guide v3_20130603 Page 30
An ePAR that displays System Update as its current stage has been completed in the PeopleSoft system from a data perspective.
Audit: An audit function is available that allows ePARs to be electronically audited. Audit notes can be captured and stored with the ePAR. Once an audit has been performed, the Lifecycle of the ePAR is complete.
2.4 Print The Print icon appears when viewing an ePAR transaction after it has been saved. Clicking the icon leads to a preview page that shows the ePAR data in print format. In addition to sending a paper version of the ePAR data to a printer, the Print function also includes an option to save the ePAR in PDF format.
The ePAR print only includes a snapshot of comments and data at the time of printing. It can become outdated if the printout is made while the ePAR is still open for changes.

ePAR Gadgets
ETS ePAR User Guide v3_20130603 Page 31
To Print an ePAR: Click the Print icon from the Gadget Toolbar. Click the print options from the Adobe PDF preview pane. Select a printer. Click OK to print (Not present in the screenshot. This is standard browser print function).
Note: A small confirmation message displays on the Gadget Toolbar upon returning to the ePAR that a successful print has processed.
2.5 Save The Save icon is not always visible in the Gadget Toolbar. During the initial create process, the Save icon only displays on the final step page since all prior page information is needed before saving the ePAR. During the Modify process, the Save icon is visible from any of the pages to preserve changes that may have been made. All data entry is validated in the PeopleSoft system during the Save process to ensure accuracy for the ePAR transaction.

ePAR Gadgets
ETS ePAR User Guide v3_20130603 Page 32
2.6 Workflow ePAR transactions display the Workflow icon in the Gadget Toolbar; the options that are presented when a User hovers over the icon vary based on the status of the transaction and User’s ePAR role for available Workflow actions. For example, Requesters will see the Submit option through the Workflow icon until the ePAR transaction has been submitted into Workflow while Approvers would see approval actions, such as Approve or Deny.
The Approval Map displays the intended approval routing for an ePAR transaction. Users can view or make changes to the approval routing for an ePAR transaction by accessing the Approval Map from the Workflow icon. Changes to the Approval Map may be made prior to a Requester submitting or prior to an Approver taking action, such as Approve or Deny.
ePAR Gadgets
ETS ePAR User Guide v3_20130603 Page 33
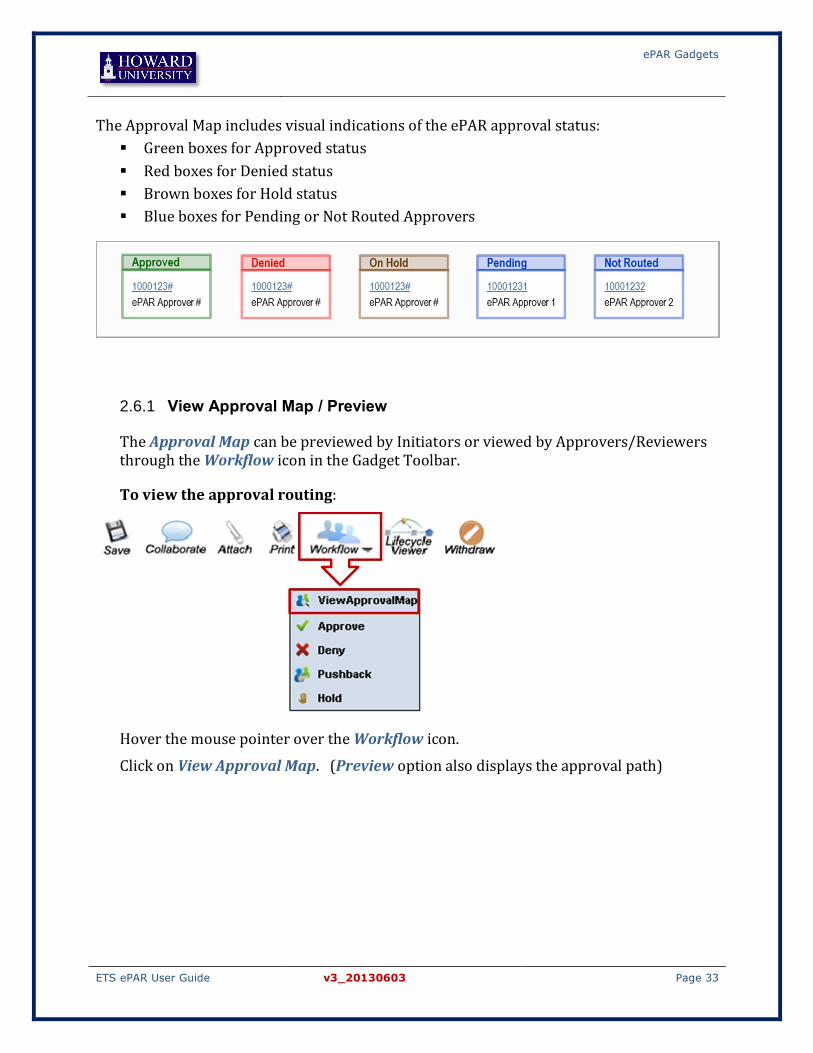
The Approval Map includes visual indications of the ePAR approval status: § Green boxes for Approved status § Red boxes for Denied status § Brown boxes for Hold status § Blue boxes for Pending or Not Routed Approvers
View Approval Map / Preview 2.6.1
The Approval Map can be previewed by Initiators or viewed by Approvers/Reviewers through the Workflow icon in the Gadget Toolbar.
To view the approval routing:
Hover the mouse pointer over the Workflow icon.
Click on View Approval Map. (Preview option also displays the approval path)

ePAR Gadgets
ETS ePAR User Guide v3_20130603 Page 34
Within the Approval Map, there may be multiple levels of approval shown; for example, Managerial Approval may be followed by HR Approval that indicates further action being required by HR following the round of managerial approvals. The name of the Approver appears within each Approver box. Clicking on the name displays additional information about the User. If the display reads “Multiple Approvers”, clicking on the link will pop up a window with a list of Approvers who can act on this transaction. Only one approval is required from the list of multiple Approvers to move beyond this level.
Click the icon to return to the ePAR when done viewing the map.

ePAR Gadgets
ETS ePAR User Guide v3_20130603 Page 35
Add an Approver or a Reviewer 2.6.2
An Ad-hoc Approver or Reviewer is an ePAR User who can be inserted into an existing Approval Map when needed. The User must already have the Ad-hoc Approver or Ad-hoc Reviewer ePAR role assigned to be visible during the insert process that occurs from within the Approval Map. The inserted Approver or Reviewer box will have a label indicating that it was inserted into the routing and a – icon in the upper corner designating the ability to remove, if needed.
ePAR Gadgets
ETS ePAR User Guide v3_20130603 Page 36
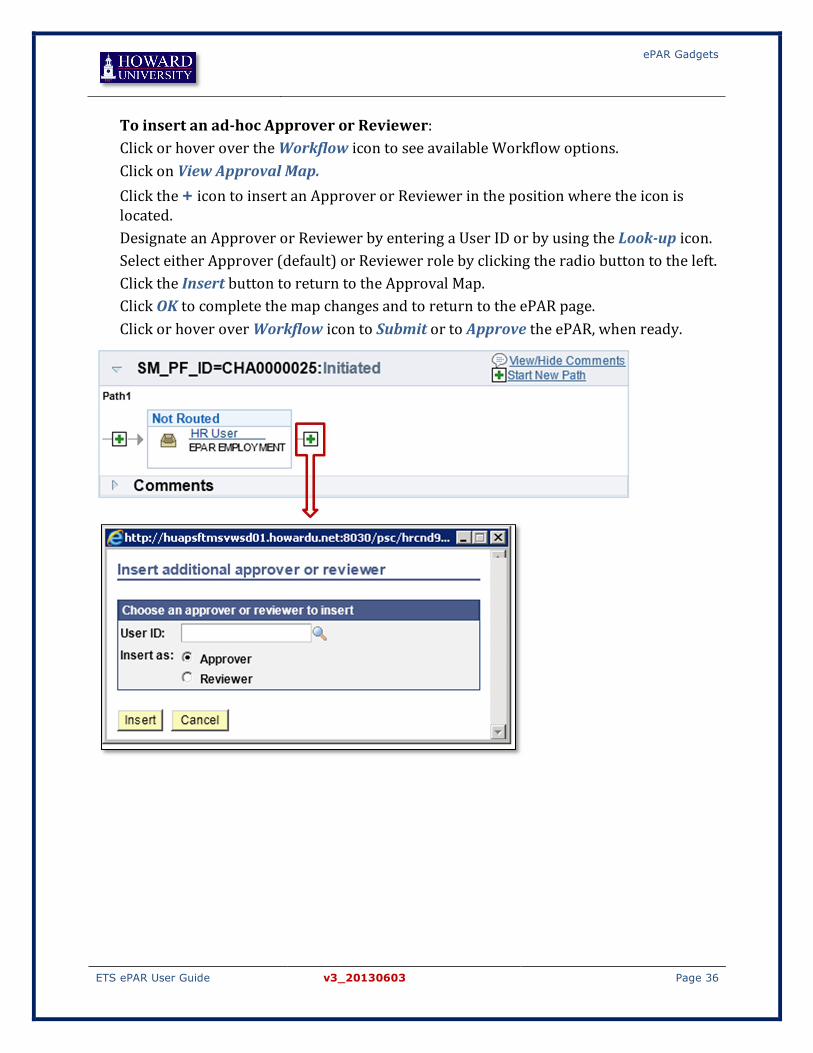
To insert an ad-hoc Approver or Reviewer: Click or hover over the Workflow icon to see available Workflow options. Click on View Approval Map. Click the + icon to insert an Approver or Reviewer in the position where the icon is located. Designate an Approver or Reviewer by entering a User ID or by using the Look-up icon. Select either Approver (default) or Reviewer role by clicking the radio button to the left. Click the Insert button to return to the Approval Map. Click OK to complete the map changes and to return to the ePAR page. Click or hover over Workflow icon to Submit or to Approve the ePAR, when ready.
ePAR Gadgets
ETS ePAR User Guide v3_20130603 Page 37
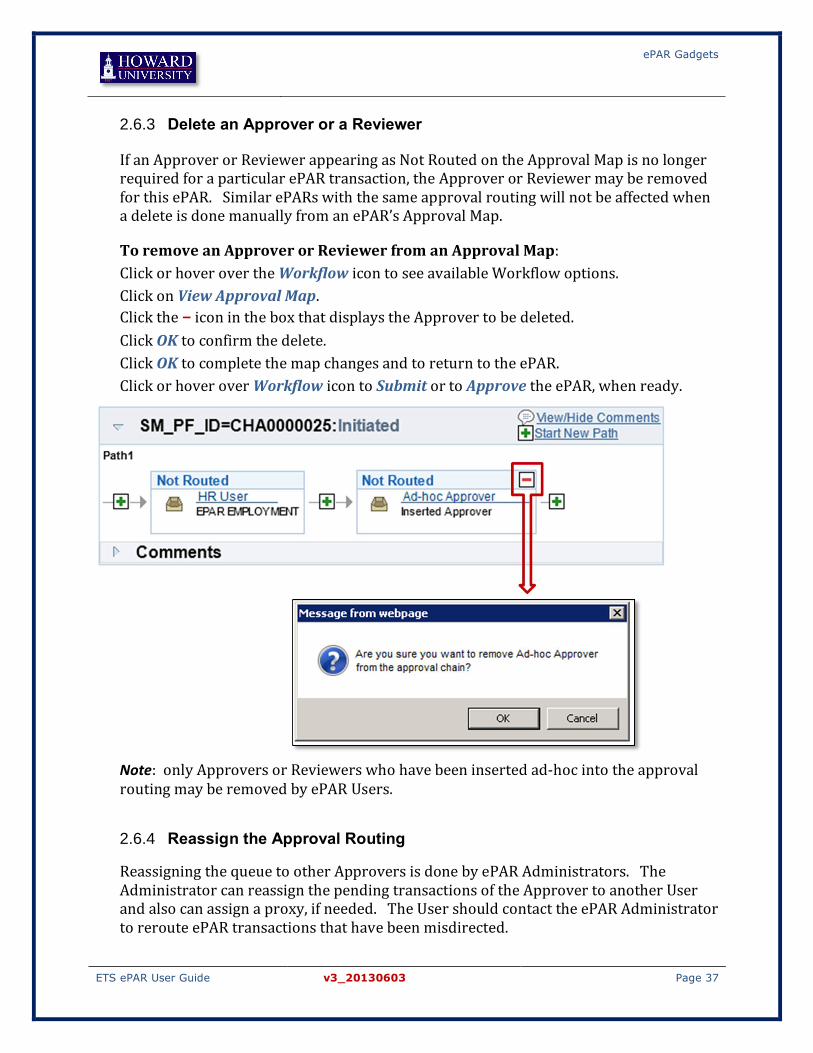
Delete an Approver or a Reviewer 2.6.3
If an Approver or Reviewer appearing as Not Routed on the Approval Map is no longer required for a particular ePAR transaction, the Approver or Reviewer may be removed for this ePAR. Similar ePARs with the same approval routing will not be affected when a delete is done manually from an ePAR’s Approval Map.
To remove an Approver or Reviewer from an Approval Map: Click or hover over the Workflow icon to see available Workflow options. Click on View Approval Map. Click the – icon in the box that displays the Approver to be deleted. Click OK to confirm the delete. Click OK to complete the map changes and to return to the ePAR. Click or hover over Workflow icon to Submit or to Approve the ePAR, when ready.
Note: only Approvers or Reviewers who have been inserted ad-hoc into the approval routing may be removed by ePAR Users.
Reassign the Approval Routing 2.6.4
Reassigning the queue to other Approvers is done by ePAR Administrators. The Administrator can reassign the pending transactions of the Approver to another User and also can assign a proxy, if needed. The User should contact the ePAR Administrator to reroute ePAR transactions that have been misdirected.

Initiator Actions
ETS ePAR User Guide v3_20130603 Page 38
3 Initiator Actions
This chapter provides information about the actions performed by a User assigned the ePAR “Initiator” role. The Lifecycle of an ePAR transaction begins with the creation of a transaction from any of the ePAR Categories represented on the various tabs of the ePAR Request Center. After the ePAR is saved with all of the required information associated with the transaction, it is submitted for approval through automated workflow.
The transactional flow of creating a new ePAR or maintaining an existing ePAR follows a simplified approach that guides the Initiator through each step. The transaction is divided into easy-to-manage steps that display sequentially for the User to enter or view data.
When adding, modifying, or viewing ePARs, the number of steps within the transaction will vary depending on the ePAR Category and status of the transaction. For example, there are seven steps required for adding a Hire ePAR, including a Confirmation step used exclusively in Hire; however, a saved Hire ePAR displays only six steps, skipping the initial POI/Employee selection step that is only required when creating a new ePAR. By contrast, a Position ePAR requires five steps to create while viewing a saved transaction displays three steps, omitting the two steps only required during the Add process.
3.1 Initiating the Transaction The creation of an ePAR transaction begins with the ADD action from an ePAR Category on an ePAR Request Center tab. Each of the distinct ePAR Categories are detailed in the following sections arranged by tab order.
Initiator Actions
ETS ePAR User Guide v3_20130603 Page 39
Creating a Job Change ePAR 3.1.1
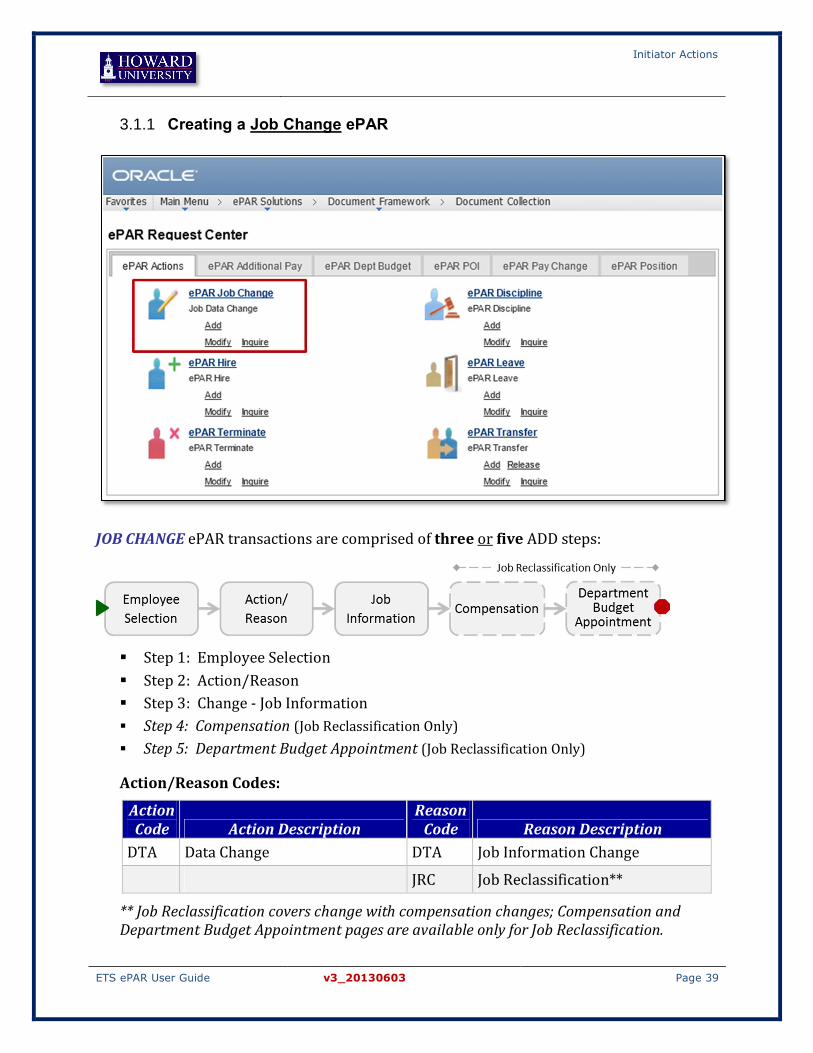
JOB CHANGE ePAR transactions are comprised of three or five ADD steps:
§ Step 1: Employee Selection § Step 2: Action/Reason § Step 3: Change - Job Information § Step 4: Compensation (Job Reclassification Only) § Step 5: Department Budget Appointment (Job Reclassification Only)
Action/Reason Codes:
Action Code Action Description
Reason Code Reason Description
DTA Data Change DTA Job Information Change
JRC Job Reclassification**
** Job Reclassification covers change with compensation changes; Compensation and Department Budget Appointment pages are available only for Job Reclassification.
Initiator Actions
ETS ePAR User Guide v3_20130603 Page 40
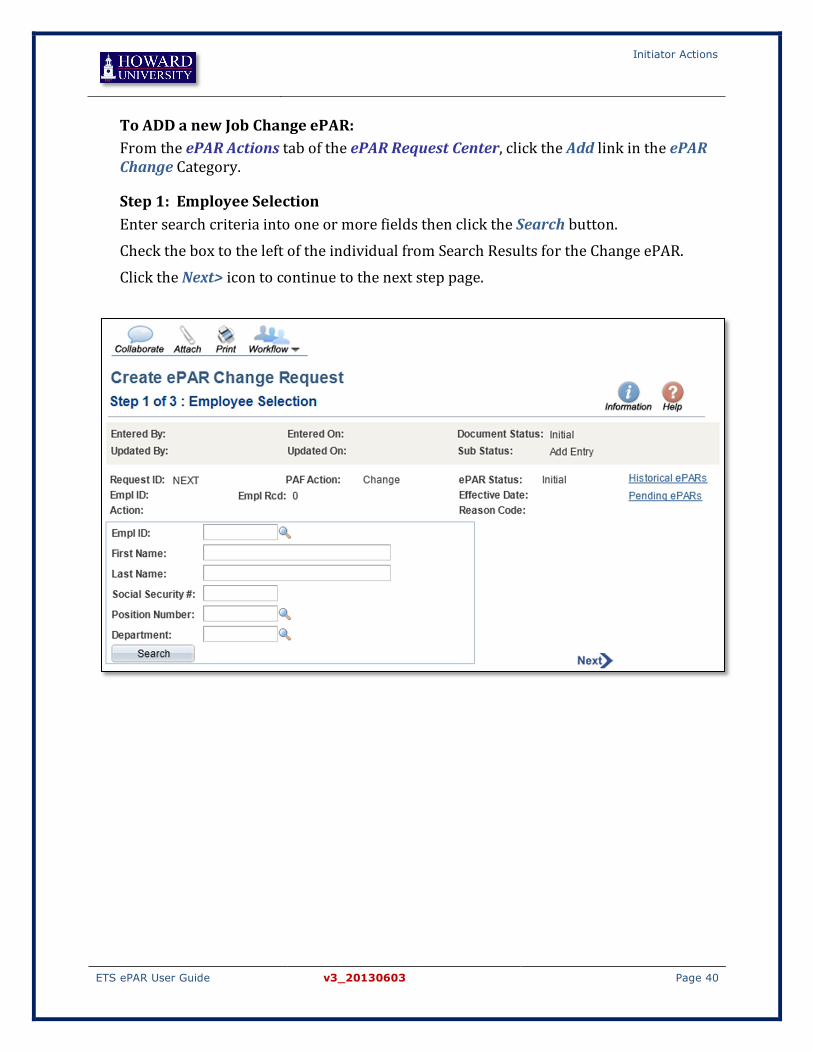
To ADD a new Job Change ePAR: From the ePAR Actions tab of the ePAR Request Center, click the Add link in the ePAR Change Category.
Step 1: Employee Selection Enter search criteria into one or more fields then click the Search button. Check the box to the left of the individual from Search Results for the Change ePAR. Click the Next> icon to continue to the next step page.

Initiator Actions
ETS ePAR User Guide v3_20130603 Page 41
Step 2: Action/Reason Select an Action and a Reason using the drop-down for each field. Enter the Effective Date for the transaction. Enter any comments related to this action.
Click the Next> icon to continue to the next step page.

Initiator Actions
ETS ePAR User Guide v3_20130603 Page 42
Step 3: Job Information
Edit fields, as needed, in the New column where fields are open.
For Data Change ePARs: (final steps) Click the Save icon from the Gadget Toolbar.
Click OK to the save confirmation message to return to the ePAR.
OR
For Job Reclassification ePARs: (continue to Compensation step)
Click the Next> icon to continue to the next step page.

Initiator Actions
ETS ePAR User Guide v3_20130603 Page 43
Step 4: Department Budget Appointment
Enter Department funding information, if different from current funding.
If the funding is the same as current funding, check the box for New funding same as current funding to have the fields populated.
Enter Budget Amount equal to the Overall Budget Cap amount shown in the New Funding area.
Click the Save icon in the Gadget Toolbar.
Click OK to the save confirmation message to return to the ePAR.
Initiator Actions
ETS ePAR User Guide v3_20130603 Page 44
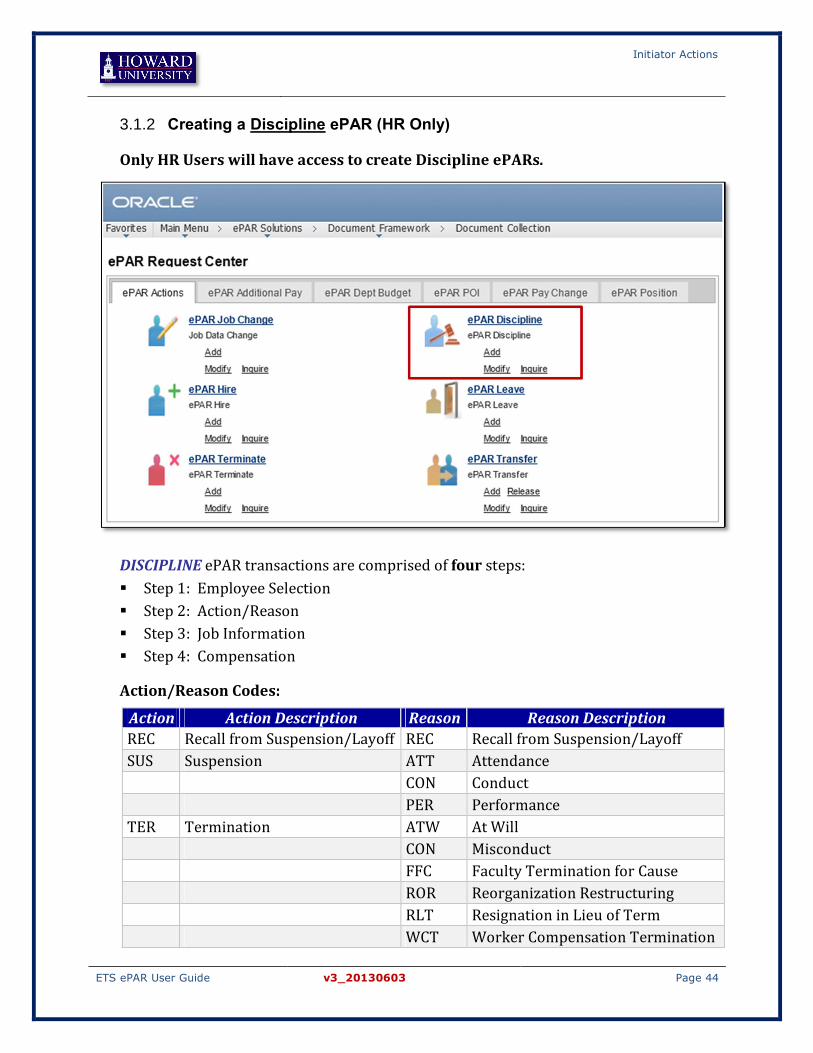
Creating a Discipline ePAR (HR Only) 3.1.2
Only HR Users will have access to create Discipline ePARs.
DISCIPLINE ePAR transactions are comprised of four steps: § Step 1: Employee Selection § Step 2: Action/Reason § Step 3: Job Information § Step 4: Compensation
Action/Reason Codes:
Action Action Description Reason Reason Description REC Recall from Suspension/Layoff REC Recall from Suspension/Layoff SUS Suspension ATT Attendance CON Conduct PER Performance TER Termination ATW At Will CON Misconduct FFC Faculty Termination for Cause ROR Reorganization Restructuring RLT Resignation in Lieu of Term WCT Worker Compensation Termination

Initiator Actions
ETS ePAR User Guide v3_20130603 Page 45
Creating a Hire ePAR 3.1.3
HIRE ePAR transactions are comprised of seven ADD steps to hire a new Employee, to rehire a former Employee, or to hire an existing Employee into an additional job:
§ Step 1: Employee Selection § Step 2: Action/Reason § Step 3: Personal Information § Step 4: Job Information § Step 5: Compensation § Step 6: Department Budget Appointment § Step 7: Confirmation

Initiator Actions
ETS ePAR User Guide v3_20130603 Page 46
Action/Reason Codes:
Action Code Action Description
Reason Code Reason Description
ADL Additional Job***
AFP Additional Faculty Position
AST Additional Summer Teaching Position
ASR Additional Summer Research Position
HIR Hire INH Initial Hire
INP Initial Hire in PeopleSoft
REH Rehire REH Rehire
***Additional Job Actions are only available for faculty members.
To ADD a new Hire/Rehire/Additional Job ePAR: From the ePAR Actions tab of the ePAR Request Center, click the Add link in the ePAR Hire Category.
Step 1: Employee Selection There are two search boxes on this page – both searches are required before proceeding to the next step page when hiring an Employee whose ID does not exist in PeopleSoft HCM.
Enter available data into the fields in the first Search Criteria box. This box searches for existing and former Employees; the National ID field is required.
Click on the tab key on the keyboard to activate the Search button.
Check the box to the left of the individual from Search Results for the Hire ePAR. Click the Next> icon to continue to the next step page for an Additional Job or Rehire.

Initiator Actions
ETS ePAR User Guide v3_20130603 Page 47
Note: if no results are found, the New Employee button will be available to create a new Employee ID. If no matching results are found, click OK to the no search results returned message to continue. Click the Next> icon to continue to the next step page.

Initiator Actions
ETS ePAR User Guide v3_20130603 Page 48
Step 2: Action/Reason Actions displayed on this step page are controlled by the type of Employee selected on the first step page: § Hire = not in the system § Rehire = in the system without an active job § Additional Job = in the system with currently active job(s)
(The Action code defaults from the type of person selected in Step 1)
Select a Reason code using the drop-down for each field.
Enter the Effective Date for the transaction. (Fiscal Year will populate based on the date that is entered)
Enter the ePAR Position Request and/or Applicant ID, if applicable.
Enter any comments related to this action in the Comments field. Click the Next> icon to continue to the next step page.

Initiator Actions
ETS ePAR User Guide v3_20130603 Page 49
Step 3: Personal Information Enter or modify personal information in the appropriate fields.
Click the Next> icon to continue to the next step page.
Note: The appearance of step pages varies for a new person being entered in PeopleSoft for the first time versus the page for a former or current Employee. The fields remain the same but the former or current Employee page displays a Current column that is read-only and a New column that is open for any necessary edits.
Initiator Actions
ETS ePAR User Guide v3_20130603 Page 50
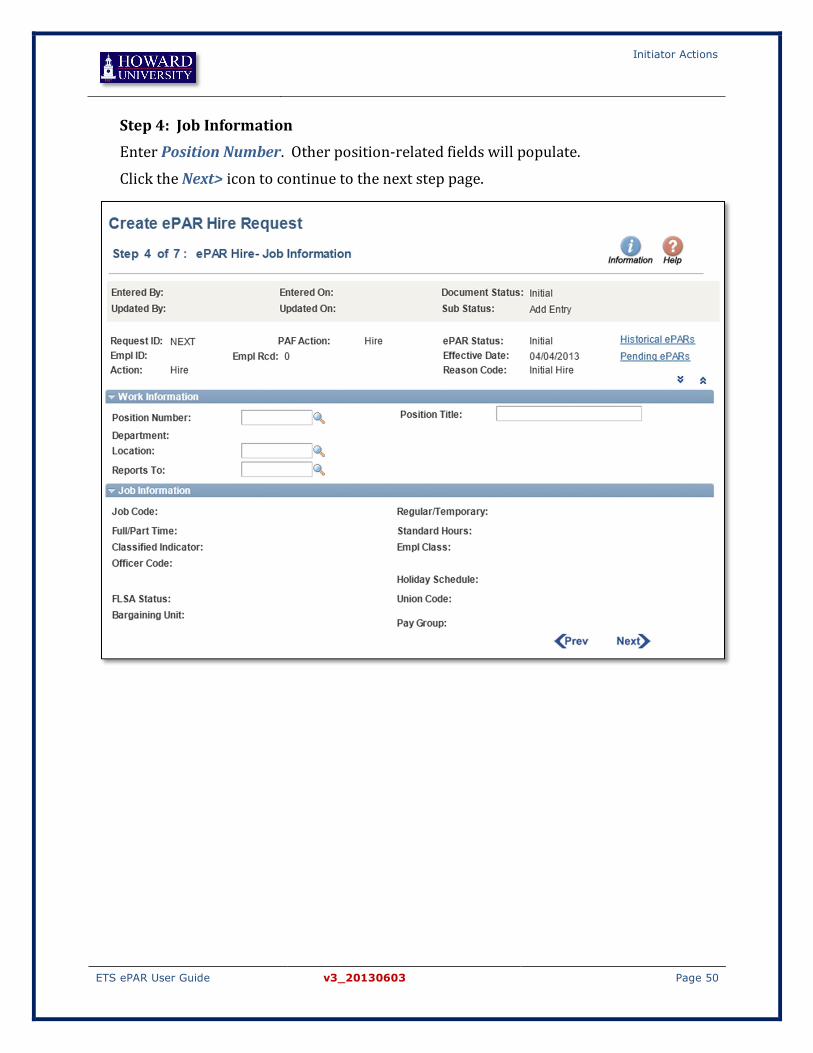
Step 4: Job Information Enter Position Number. Other position-related fields will populate.
Click the Next> icon to continue to the next step page.

Initiator Actions
ETS ePAR User Guide v3_20130603 Page 51
Step 5: Compensation Enter Rate Code and Comp Rate. Insert additional lines using the + icon if there are multiple components of pay. Click the Next> icon to continue to the next step page.

Initiator Actions
ETS ePAR User Guide v3_20130603 Page 52
Step 6: Department Budget Appointment
If the funding is the same as the current, check the box to the left of New Funding Same as Current Funding?.
If funding is different, enter Overall Budget Cap, Budget Amount, Department, and Combination Code. Insert additional lines using the + icon if there are multiple lines of budget distribution, including any project or grant funding. Click the Next> icon to continue to the next step page.

Initiator Actions
ETS ePAR User Guide v3_20130603 Page 53
Step 7: Confirmation Check the box above the Confirm button to endorse the accuracy of the data entered.
Click the Confirm button.
A confirmation message will replace the checkbox and Confirm button on the page.
Click the Save icon from the Gadget Toolbar.
Click OK to the save confirmation message to return to the ePAR.

Initiator Actions
ETS ePAR User Guide v3_20130603 Page 54
Creating a Leave ePAR 3.1.4
LEAVE ePAR transactions for non-paid leaves are comprised of three* ADD steps:
§ Step 1: Employee Selection § Step 2: Action/Reason § Step 3: Leave Confirmation
LEAVE ePAR transactions for paid leaves are comprised of five* ADD steps:
§ Step 1: Employee Selection § Step 2: Action/Reason § Step 3: Job Information § Step 4: Compensation § Step 5: Department Budget Appointment
Note: The number* of step pages adjusts automatically based on the Action type selected on the Step 2: Action/Reason page.

Initiator Actions
ETS ePAR User Guide v3_20130603 Page 55
Action/Reason Codes:
Action Code Action Description
Reason Code Reason Description
LOA Leave of Absence EDU Education
FML Family & Medical Leave Act
HEA Health Reasons
MAT Maternity/Paternity
MIL Military Service
SAB Sabbatical Leave
LTO Long Term Disability LTO Long Term Disability
PLA Paid Leave of Absence LTD Long Term Disability
MAT Maternity/Paternity
MIL Military Service
PSB Paid Sabbatical Leave
STD Short Term Disability
RFD Return from Disability RFD Return from Disability
RFL Return from Leave RFL Return from Leave
STO Short Term Disability STD Short-Term Disability

Initiator Actions
ETS ePAR User Guide v3_20130603 Page 56
To ADD a new Leave ePAR: From the ePAR Actions tab of the ePAR Request Center, click the Add link in the ePAR Leave Category.
Step 1: Employee Selection
Enter search criteria into one or more fields then click the Search button. Check the box to the left of the individual from Search Results for the Leave ePAR.
Click the Next> icon to continue to the next step page.

Initiator Actions
ETS ePAR User Guide v3_20130603 Page 57
Step 2: Action/Reason Select an Action and a Reason using the drop-down for each field. Enter the Effective Date for the transaction. Enter any comments related to this action.
Click the Next> icon to continue to the next step page.

Initiator Actions
ETS ePAR User Guide v3_20130603 Page 58
Step 3: Leave Confirmation (for unpaid LOA) For an unpaid Leave of Absence, the Leave Confirmation is the final page but the number at the top of the page may read “Step 3 of 4”. The Save icon appears on this page for unpaid Leave of Absence actions.
Check the box to indicate completeness of the transaction. Click the Confirm button to achieve the screenshot shown here.
Click the Save icon to finish. Click the OK from the save confirmation to return to the ePAR step pages.
OR Step 3: Job Information (for paid LOA only) For a paid Leave of Absence, the Leave Confirmation is not shown but the process continues with the Job Information page, which is read-only for review.
Click the Next> icon to continue to the next step page.

Initiator Actions
ETS ePAR User Guide v3_20130603 Page 59
Step 4: Compensation (for paid LOA only) The Compensation page only displays for an Action of Paid Leave of Absence. The Comp Rate field in the New column will be open for edit, if changes are needed for the pay rate while Employee is on leave.
Click the Next> icon to continue to the next step page.

Initiator Actions
ETS ePAR User Guide v3_20130603 Page 60
Step 5: Department Budget Appointment (for paid LOA only) Enter the budget information for this paid leave or use the checkbox to indicate the leave funding is the same as current funding.
Enter the Budget Amount, which should equal the Overall Budget Cap showing directly above the budget line in the New Funding area.
Insert additional funding lines using the + icon if the first line does not represent 100% of the funding. When multiple lines are present, the total for the Budget Amount fields should equal the Overall Budget Cap showing in the New Funding area. Click the Save icon from the Gadget Toolbar.
Click OK to the save confirmation message to return to the ePAR.

Initiator Actions
ETS ePAR User Guide v3_20130603 Page 61
Creating a Separation ePAR 3.1.5
SEPARATION ePAR transactions are comprised of three ADD steps:
§ Step 1: Employee Selection § Step 2: Action/Reason § Step 3: Confirmation
Note: for Termination/Death combination of Action/Reason Codes, the Date of Death will be recorded as the date before the Effective Date entered on the ePAR when the System Update creates the row in the Employee’s PeopleSoft record. Particular attention is required for the Effective Date entered to ensure the Date of Death is reflected correctly.
Action/Reason Codes:
Action Code Action Description
Reason Code Reason Description
RET Retirement ERT Early Retirement
Initiator Actions
ETS ePAR User Guide v3_20130603 Page 62
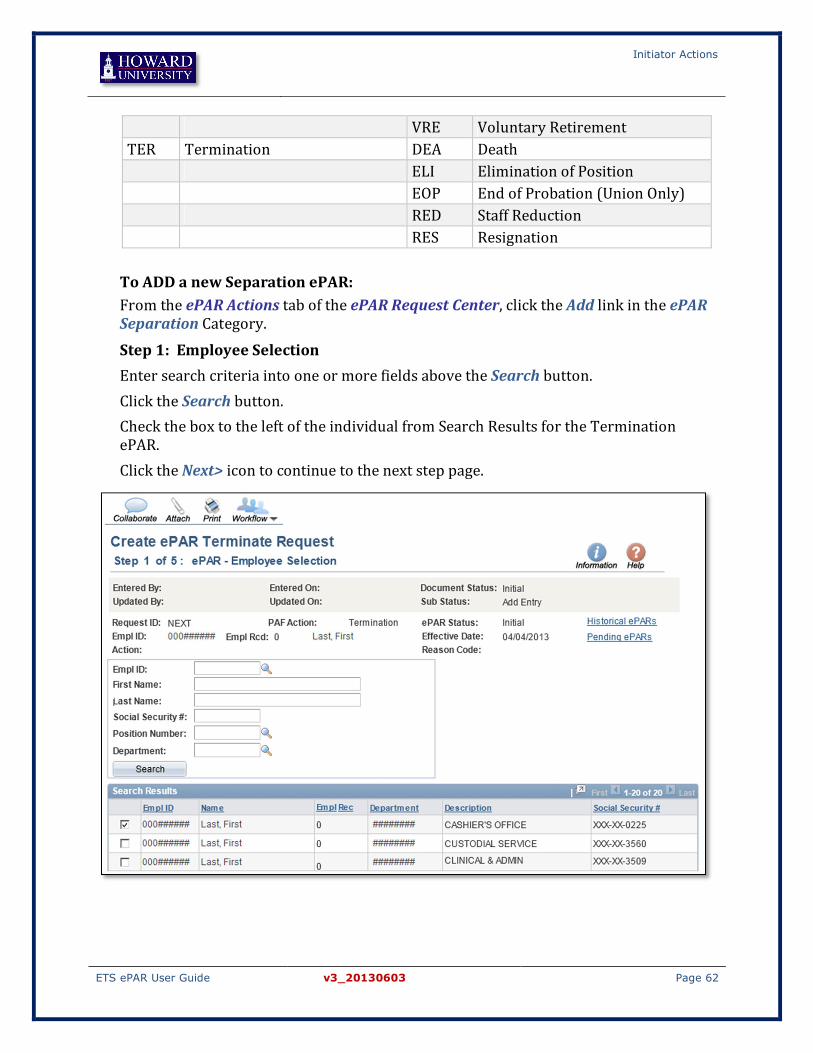
VRE Voluntary Retirement TER Termination DEA Death ELI Elimination of Position EOP End of Probation (Union Only) RED Staff Reduction RES Resignation
To ADD a new Separation ePAR: From the ePAR Actions tab of the ePAR Request Center, click the Add link in the ePAR Separation Category. Step 1: Employee Selection Enter search criteria into one or more fields above the Search button. Click the Search button. Check the box to the left of the individual from Search Results for the Termination ePAR. Click the Next> icon to continue to the next step page.

Initiator Actions
ETS ePAR User Guide v3_20130603 Page 63
Step 2: Action/Reason Select Action then Reason from respective drop-down fields.
Enter Effective Date for the termination or retirement (the Fiscal Year will populate based on the date entered). Enter any comments needed.
Click the Next> icon to continue to the next step page.
Note: for Termination/Death combination, the Date of Death will default to the date before the Effective Date entered on the ePAR.

Initiator Actions
ETS ePAR User Guide v3_20130603 Page 64
Step 3: Confirmation Check the box above the Confirm button to endorse the accuracy of the data entered.
Click the Confirm button.
A confirmation message will replace the checkbox and Confirm button on the page.
Attach the required documentation using the Attach icon in the Gadget Toolbar.
Click the Save icon from the Gadget Toolbar.
Click OK to the save confirmation message to return to the ePAR step page.

Initiator Actions
ETS ePAR User Guide v3_20130603 Page 65
Creating a Transfer ePAR 3.1.6Transfer ePAR transactions between Departments differ in business process flow from other ePAR Actions by the inclusion of the Transfer Release, a distinct type of approval that is automated through ePAR Workflow. The new Department creates a Transfer Release request, which is routed to the Employee’s current Department. After the current Department releases the Employee, the new Department completes the additional step pages available for Job Information and Compensation to complete the ePAR Transfer request. Transfer ePARs within a Department automatically process without the Transfer Release; the new Department entered during the initial creation of an ePAR determines the steps that are presented to the ePAR User.
TRANSFER ePAR transactions within a Department are comprised of: § ADD Transfer Release Request (New Department – Initiator)
- Step 1: Employee Selection - Step 2: Action/Reason - Step 3: Job Information - Step 4: Compensation - Step 5: Department Budget Appointment
§ APPROVE Transfer
Initiator Actions
ETS ePAR User Guide v3_20130603 Page 66
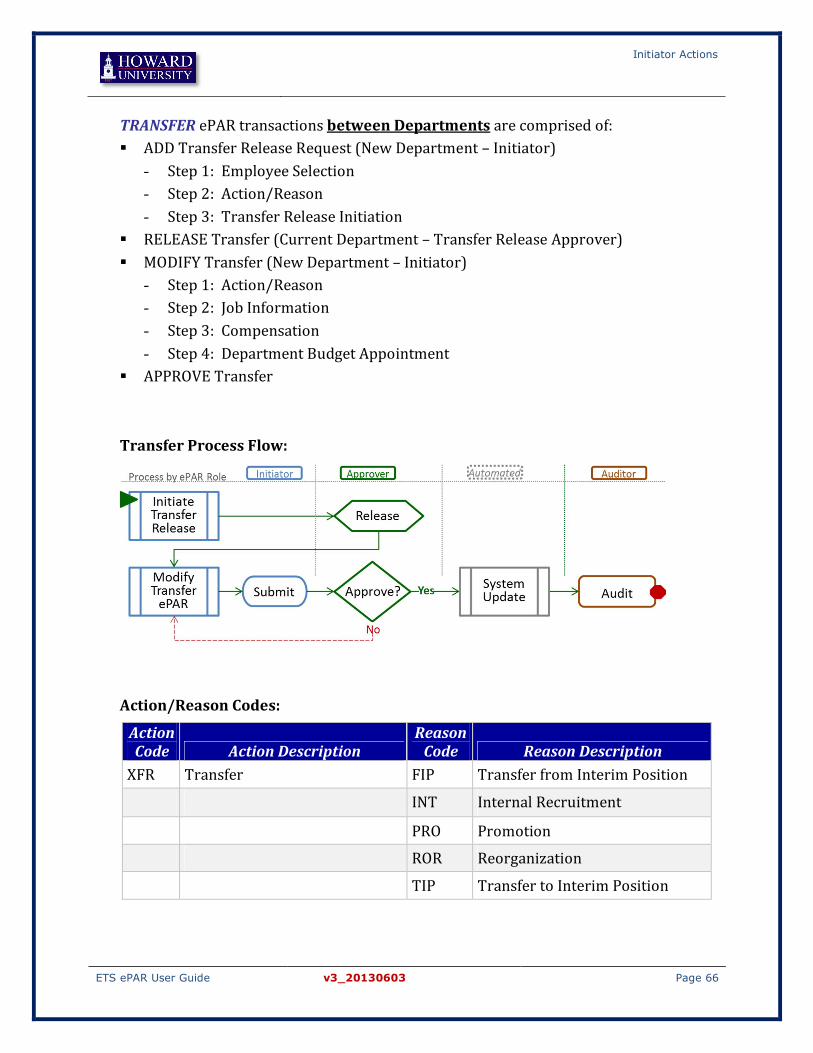
TRANSFER ePAR transactions between Departments are comprised of: § ADD Transfer Release Request (New Department – Initiator)
- Step 1: Employee Selection - Step 2: Action/Reason - Step 3: Transfer Release Initiation
§ RELEASE Transfer (Current Department – Transfer Release Approver) § MODIFY Transfer (New Department – Initiator)
- Step 1: Action/Reason - Step 2: Job Information - Step 3: Compensation - Step 4: Department Budget Appointment
§ APPROVE Transfer
Transfer Process Flow:
Action/Reason Codes:
Action Code Action Description
Reason Code Reason Description
XFR Transfer FIP Transfer from Interim Position
INT Internal Recruitment
PRO Promotion
ROR Reorganization
TIP Transfer to Interim Position

Initiator Actions
ETS ePAR User Guide v3_20130603 Page 67
To ADD a new Transfer ePAR: From the ePAR Actions tab of the ePAR Request Center, click the Add link in the ePAR Transfer Category. Note: Step 1 and Step 2 are the same for transfers between Departments and for transfers within a Department. Based on the Employee’s current Department and the new Department entered, Step 3 will vary. The two alternative paths are both presented in the following section. Step 1: Employee Selection Enter search criteria into one or more fields above the Search button.
Click the Search button. Check the box to the left of the individual from Search Results for the Transfer ePAR.
Click the Next> icon to continue to the next step page.

Initiator Actions
ETS ePAR User Guide v3_20130603 Page 68
Step 2: Action/Reason Select the appropriate Action and Reason codes using the drop-down for each field. Enter the Effective Date, which would be the first day the Employee is to work in the new Department. Enter Initiator’s/Requester’s Department code in the Requester’s Department field. Enter the new Department in the Employee’s New Department field. Include any comments related to this transfer request. Click the Next> icon when ready to move to the next step page.
At this point, one of two alternative paths is presented to the User based on the security access of the Requester:
For Employees who are part of the Requester’s current security, Step 3 through Step 5 prompts the User to complete the new Position and Compensation information. For Employees outside of the Requester’s row-level security, Step 3 is the final confirmation page, which automatically routes the Transfer Release Request to the Employee’s current Department.
Initiator Actions
ETS ePAR User Guide v3_20130603 Page 69
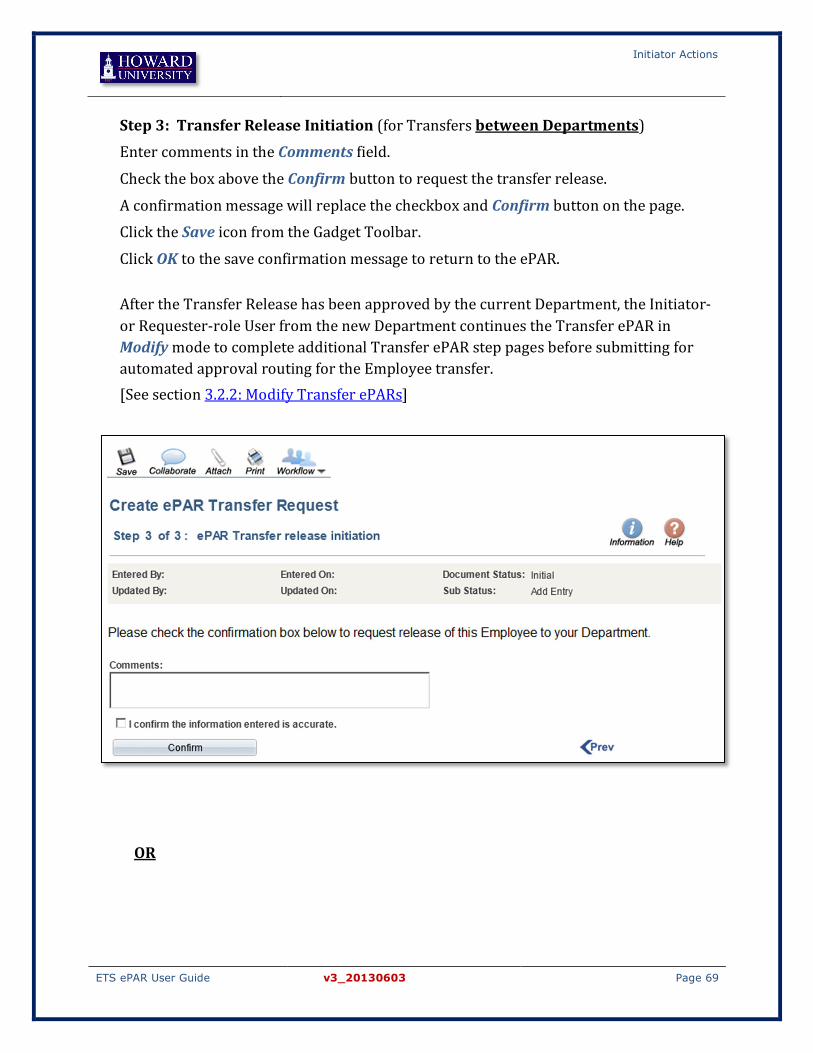
Step 3: Transfer Release Initiation (for Transfers between Departments) Enter comments in the Comments field.
Check the box above the Confirm button to request the transfer release.
A confirmation message will replace the checkbox and Confirm button on the page. Click the Save icon from the Gadget Toolbar.
Click OK to the save confirmation message to return to the ePAR. After the Transfer Release has been approved by the current Department, the Initiator- or Requester-role User from the new Department continues the Transfer ePAR in Modify mode to complete additional Transfer ePAR step pages before submitting for automated approval routing for the Employee transfer. [See section 3.2.2: Modify Transfer ePARs]
OR
Initiator Actions
ETS ePAR User Guide v3_20130603 Page 70
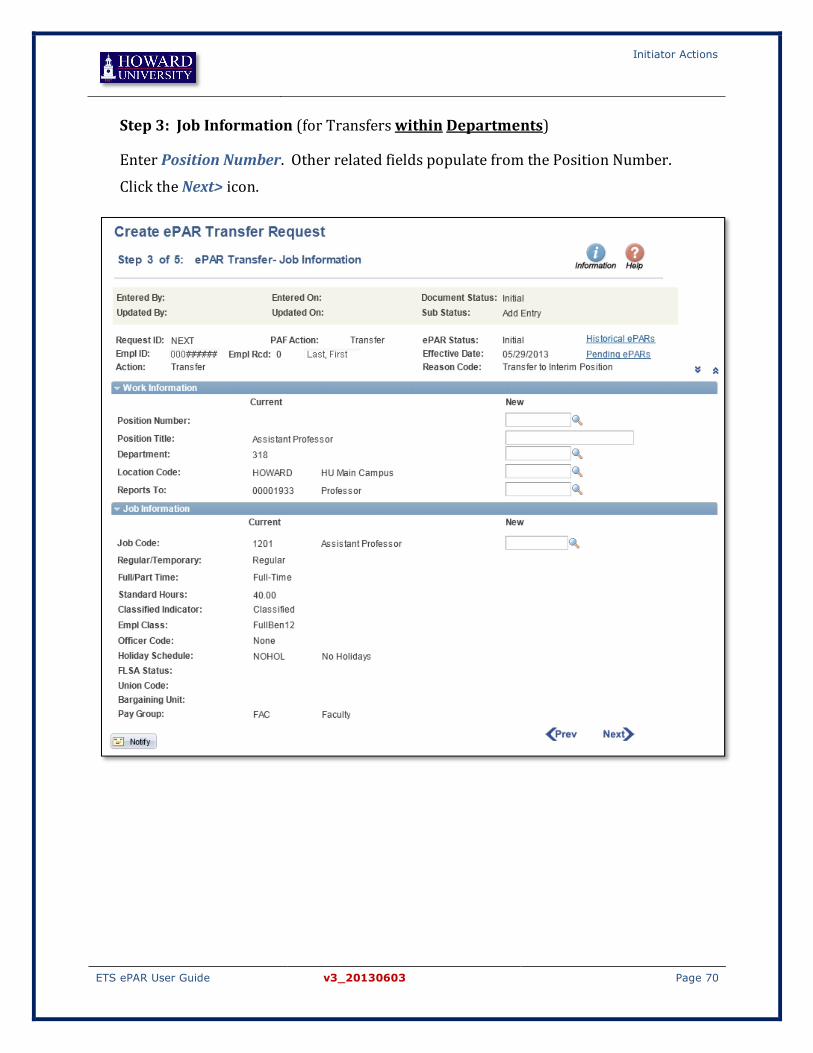
Step 3: Job Information (for Transfers within Departments)
Enter Position Number. Other related fields populate from the Position Number.
Click the Next> icon.

Initiator Actions
ETS ePAR User Guide v3_20130603 Page 71
Step 4: Compensation (for Transfers within Departments)
Enter Rate Code and Comp Rate.
Insert additional rows for multiple components of pay, if needed.
Click the Next> icon.

Initiator Actions
ETS ePAR User Guide v3_20130603 Page 72
Step 5: Department Budget Appointment (for Transfers within Departments)
Enter values into the Budget Amount, Department, or Project/Grant, and Combination Code fields.
Insert additional rows for split funding, if needed, using the Add a new row + button.
Click the Save icon from the Gadget Toolbar.
Click OK to the save confirmation message to return to the ePAR.
Initiator Actions
ETS ePAR User Guide v3_20130603 Page 73
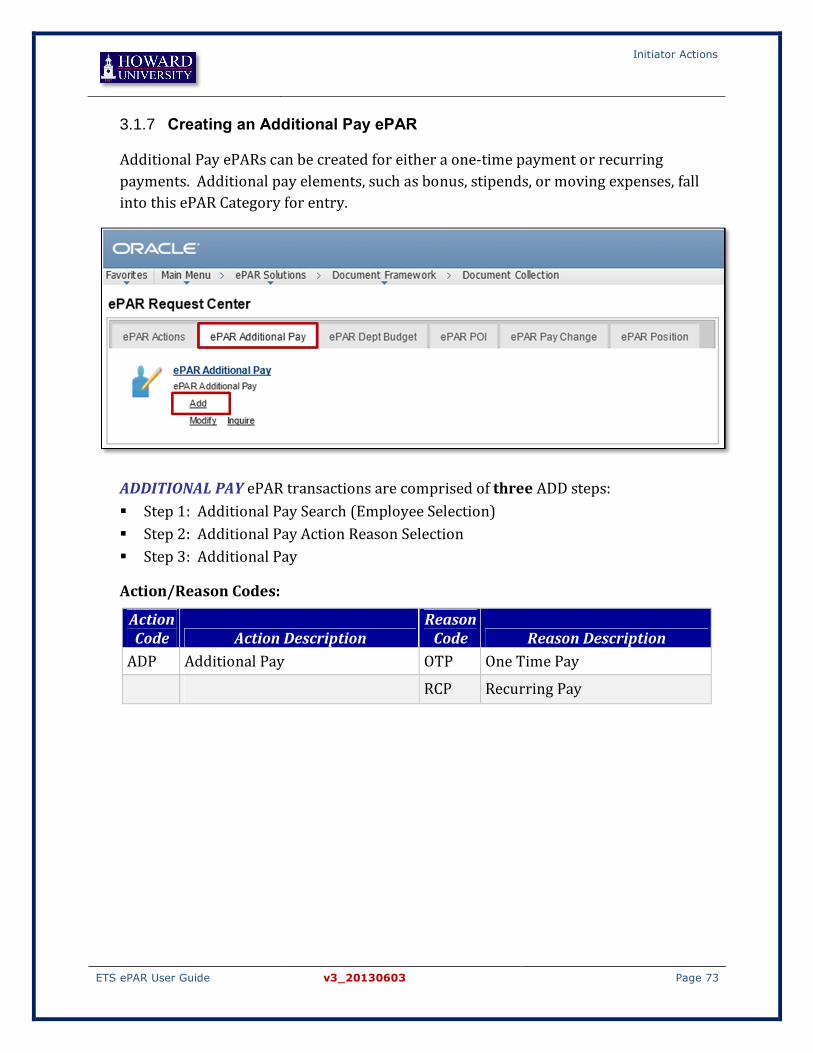
Creating an Additional Pay ePAR 3.1.7
Additional Pay ePARs can be created for either a one-time payment or recurring payments. Additional pay elements, such as bonus, stipends, or moving expenses, fall into this ePAR Category for entry.
ADDITIONAL PAY ePAR transactions are comprised of three ADD steps: § Step 1: Additional Pay Search (Employee Selection) § Step 2: Additional Pay Action Reason Selection § Step 3: Additional Pay
Action/Reason Codes:
Action Code Action Description
Reason Code Reason Description
ADP Additional Pay OTP One Time Pay
RCP Recurring Pay
Initiator Actions
ETS ePAR User Guide v3_20130603 Page 74
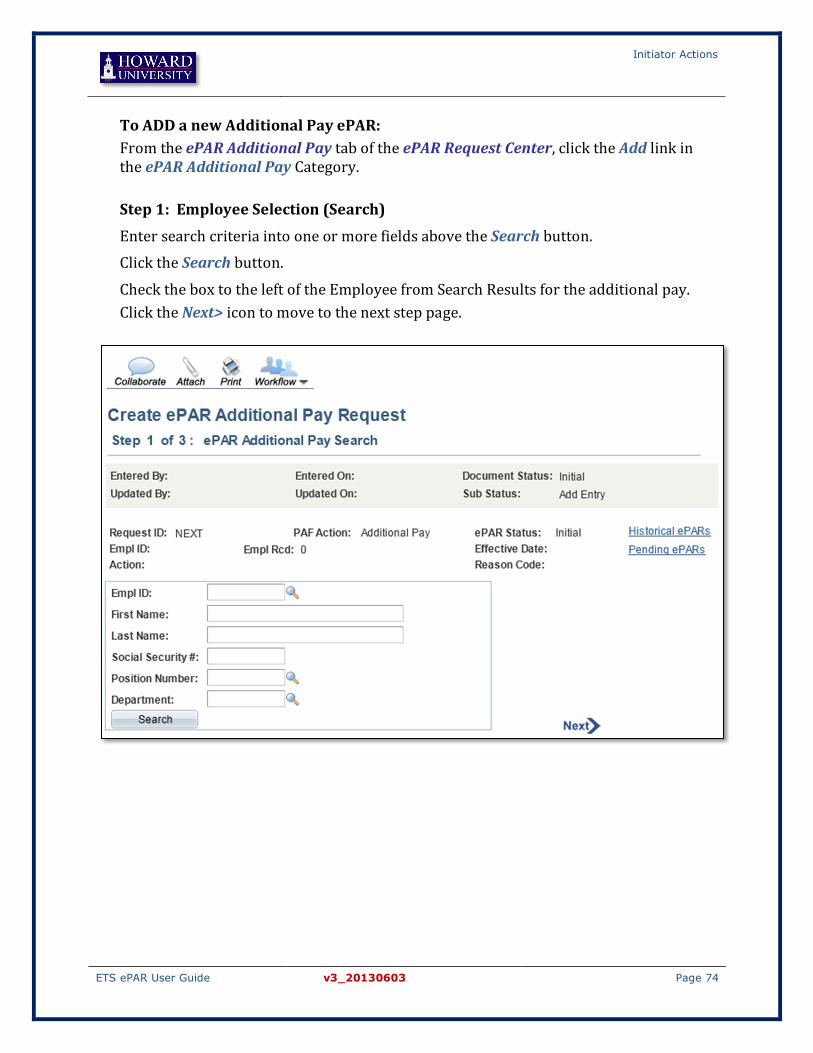
To ADD a new Additional Pay ePAR: From the ePAR Additional Pay tab of the ePAR Request Center, click the Add link in the ePAR Additional Pay Category.
Step 1: Employee Selection (Search)
Enter search criteria into one or more fields above the Search button. Click the Search button.
Check the box to the left of the Employee from Search Results for the additional pay. Click the Next> icon to move to the next step page.

Initiator Actions
ETS ePAR User Guide v3_20130603 Page 75
Step 2: Action Reason Select the Action and Reason codes using the drop-down for each field.
Note: selecting One Time Pay as Reason code takes away the data entry options for End Date and Goal Amount fields. Recurring Pay leaves the fields open and requires data in both fields.
Select the Pay Run ID using the Look-up icon. (Effective Date field will populate based on the Pay Run selected)
Enter the Earnings Code or use the Look-up icon to locate the code. Enter the Earnings for the actual amount of payment(s). Enter End Date and Goal Amount for a Recurring Pay ePAR.
Enter any comments related to this Additional Pay ePAR.
Click the Next> icon when ready to move to the next step page.

Initiator Actions
ETS ePAR User Guide v3_20130603 Page 76
Step 3: Additional Pay Enter the Department or Project Grant and Combination Code, as needed, to define the budget information for the additional pay (only one line is allowed on this page).
Click the Save icon from the Gadget Toolbar. Click OK to the save confirmation message to return to the ePAR.
Initiator Actions
ETS ePAR User Guide v3_20130603 Page 77
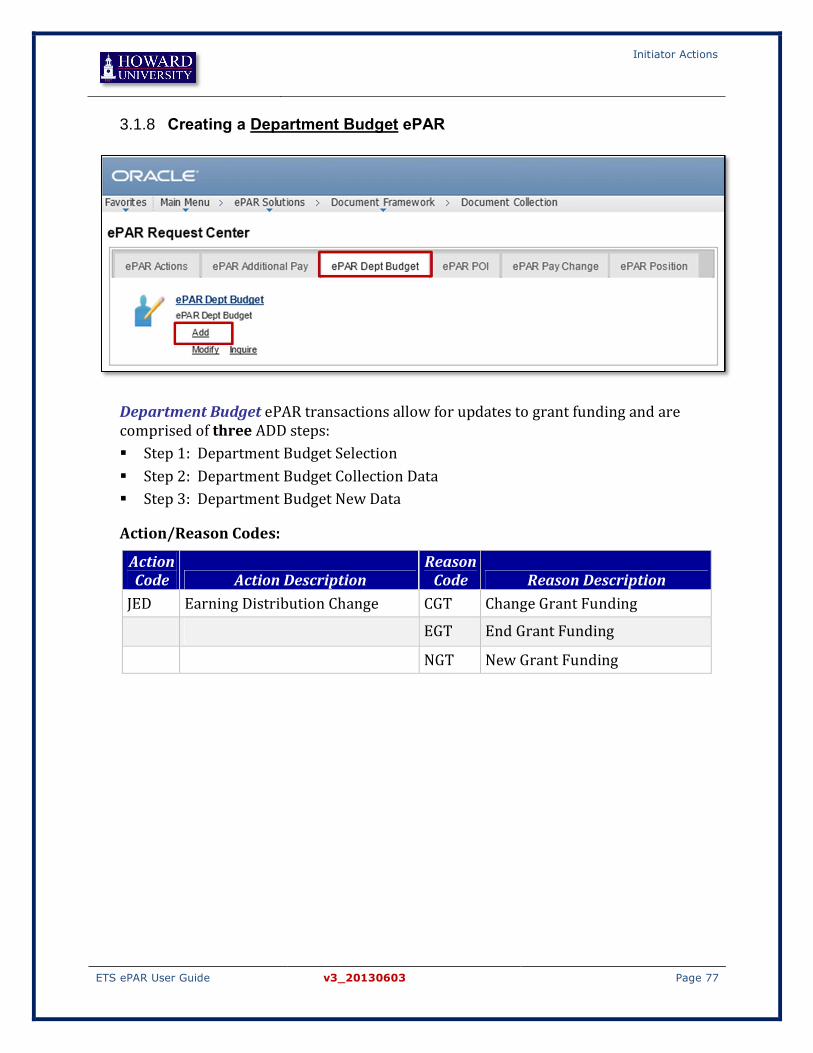
Creating a Department Budget ePAR 3.1.8
Department Budget ePAR transactions allow for updates to grant funding and are comprised of three ADD steps: § Step 1: Department Budget Selection § Step 2: Department Budget Collection Data § Step 3: Department Budget New Data
Action/Reason Codes:
Action Code Action Description
Reason Code Reason Description
JED Earning Distribution Change CGT Change Grant Funding
EGT End Grant Funding
NGT New Grant Funding

Initiator Actions
ETS ePAR User Guide v3_20130603 Page 78
To ADD a new Department Budget ePAR: From the ePAR Department Budget tab of the ePAR Request Center, click the Add link in the ePAR Department Budget Category. Step 1: Department Budget Selection Select Position or Appointment in the Search by Department Budget box. Enter search criteria into one or more fields above the Search button.
Click the Search button.
Check the box to the left of the Position/Employee from Search Results for the ePAR. Click the Next> icon to continue to the next step page.
Initiator Actions
ETS ePAR User Guide v3_20130603 Page 79
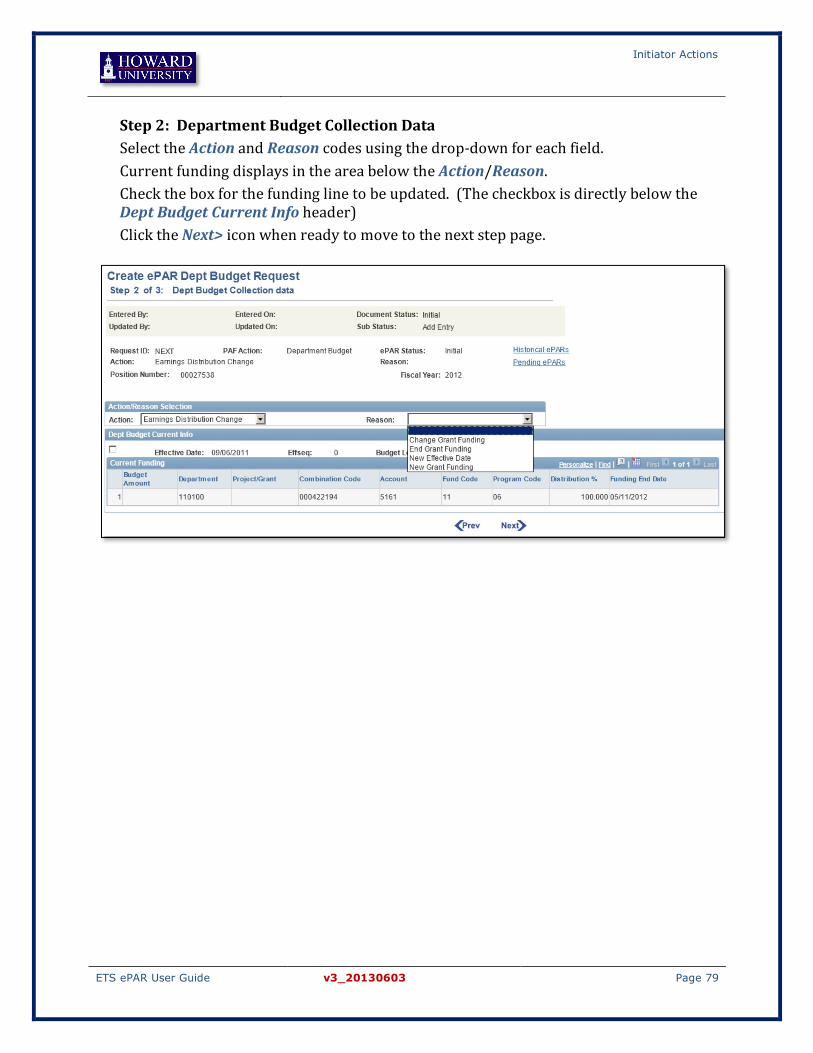
Step 2: Department Budget Collection Data Select the Action and Reason codes using the drop-down for each field. Current funding displays in the area below the Action/Reason. Check the box for the funding line to be updated. (The checkbox is directly below the Dept Budget Current Info header) Click the Next> icon when ready to move to the next step page.

Initiator Actions
ETS ePAR User Guide v3_20130603 Page 80
Step 3: Department Budget New Data Enter the Budget Amount, Department, Project Grant, and Combination Code, as needed, to define the new grant information. Insert additional rows using the + icon at the end of the row for multiple grant lines.
OR If the Reason is New Effective Date, Step 3 presents the following view:
Click the Add New Effective Date Funding button; enter new date into the open field.
Click the Save icon from the Gadget Toolbar. Click OK to the save confirmation message to return to the ePAR.

Initiator Actions
ETS ePAR User Guide v3_20130603 Page 81
Creating a Pay Change ePAR 3.1.9
PAY CHANGE ePAR transactions are comprised of five ADD steps: § Step 1: Employee Selection § Step 2: Action/Reason § Step 3: Job Information § Step 4: Compensation § Step 5: Department Budget Appointment
Action/Reason Codes:
Action Code Action Description
Reason Code Reason Description
PAY Pay Rate Change ADJ Adjustment
ATB Across-the-Board
COL Cost-of-Living Adjustment
MER Merit
PPI Performance Pay Increase
PRO Promotion
REC Job Reclassification
RWL Reduced Workload
PRO Promotion ACP Acting (Provisional)
NCP Normal Career Progression
OPR Outstanding Performance

Initiator Actions
ETS ePAR User Guide v3_20130603 Page 82
To ADD a new Pay Change ePAR: From the ePAR Additional Pay tab of the ePAR Request Center, click the Add link in the ePAR Pay Change Category.
Step 1: Employee Selection Enter search criteria into one or more fields in the Search Criteria box then click the Search button to locate the individual for the Pay Change request.
Select an Employee by checking the box to the left, if multiple search results are returned. The first Employee is always checked by default.
Click the Next> icon to continue to the next step page.
Initiator Actions
ETS ePAR User Guide v3_20130603 Page 83
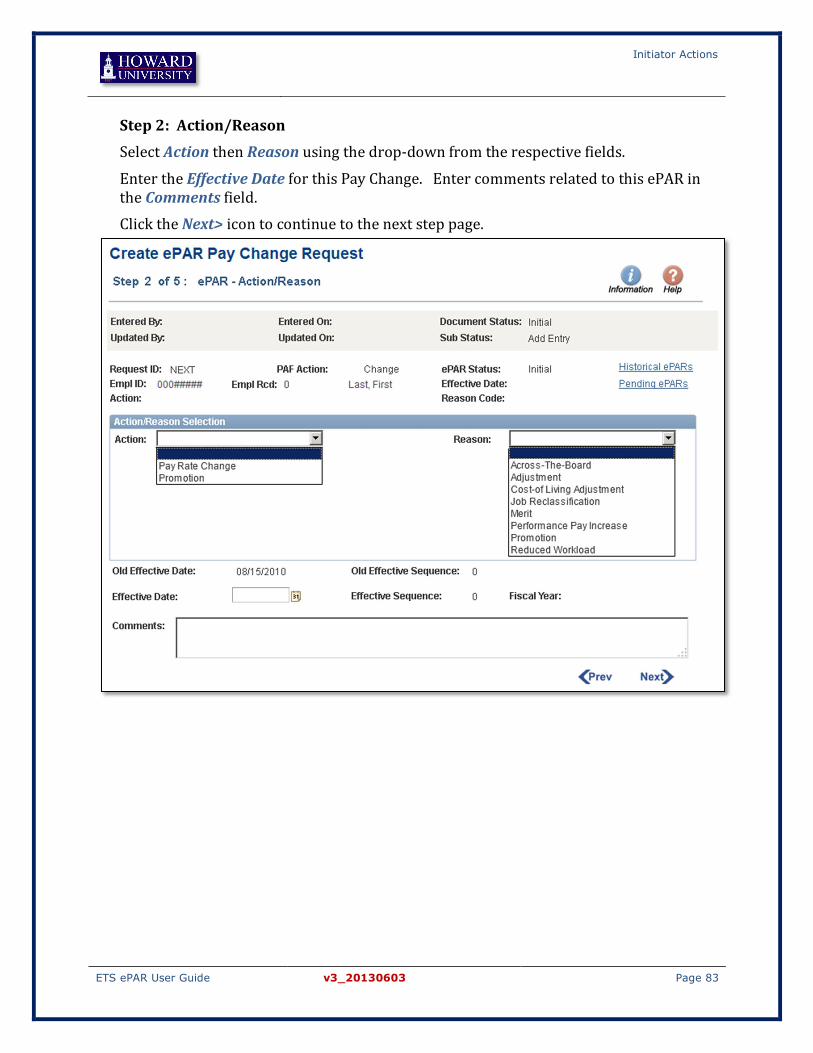
Step 2: Action/Reason Select Action then Reason using the drop-down from the respective fields.
Enter the Effective Date for this Pay Change. Enter comments related to this ePAR in the Comments field. Click the Next> icon to continue to the next step page.
Initiator Actions
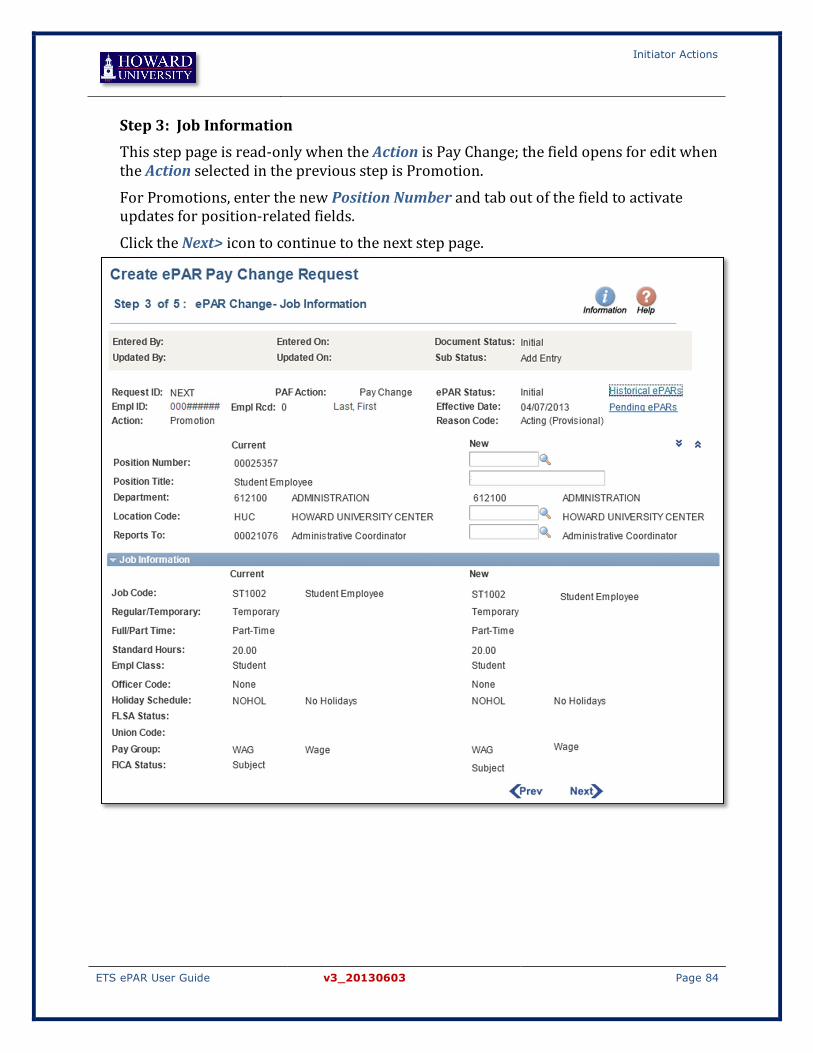
ETS ePAR User Guide v3_20130603 Page 84
Step 3: Job Information This step page is read-only when the Action is Pay Change; the field opens for edit when the Action selected in the previous step is Promotion.
For Promotions, enter the new Position Number and tab out of the field to activate updates for position-related fields.
Click the Next> icon to continue to the next step page.
Initiator Actions
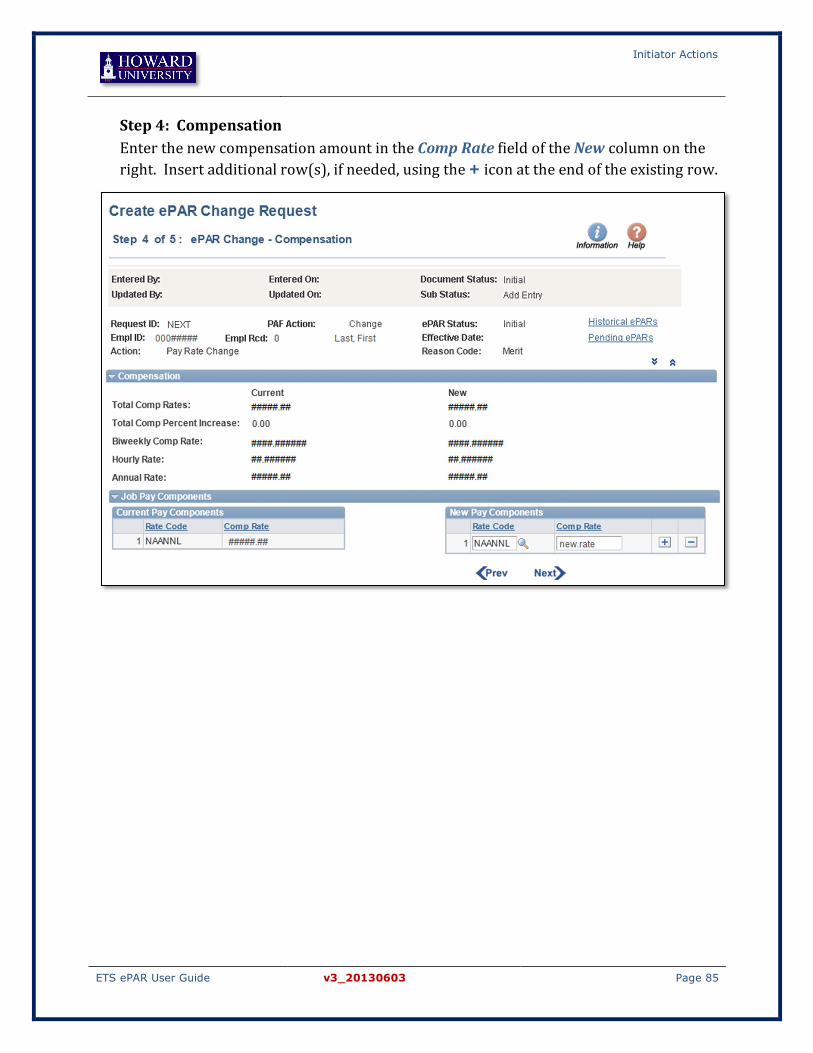
ETS ePAR User Guide v3_20130603 Page 85
Step 4: Compensation Enter the new compensation amount in the Comp Rate field of the New column on the right. Insert additional row(s), if needed, using the + icon at the end of the existing row.
Initiator Actions
ETS ePAR User Guide v3_20130603 Page 86
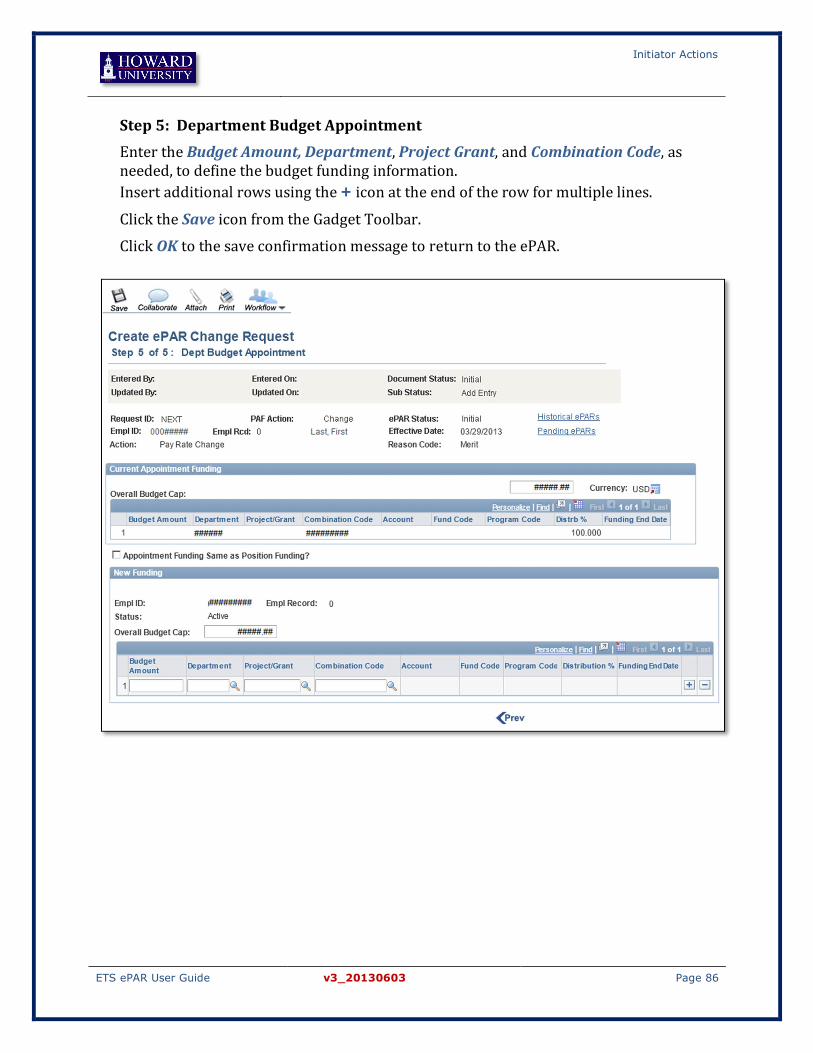
Step 5: Department Budget Appointment Enter the Budget Amount, Department, Project Grant, and Combination Code, as needed, to define the budget funding information. Insert additional rows using the + icon at the end of the row for multiple lines.
Click the Save icon from the Gadget Toolbar.
Click OK to the save confirmation message to return to the ePAR.

Initiator Actions
ETS ePAR User Guide v3_20130603 Page 87
Creating a POI ePAR 3.1.10
POI ePAR transactions are comprised of three ADD steps:
Maintain POI § Step 1: POI Search
§ Step 2: Maintain POI – Personal Data
§ Step 3: Add Person of Interest
Add New POI § Step 1: POI Search
§ Step 2: Create Person of Interest
§ Step 3: Create New POI
POI (Person of Interest) Category allows for the creation of new Persons of Interest and updates to existing POIs. Based on the selection made on the first step page, subsequent step pages will display the appropriate view for the intended type of transaction – update fields for Maintain POI or blank data entry fields for Add New POI.
Action/Reason Codes:
Action Code Action Description
Reason Code Reason Description
POI Add Person of Interest 006 Non HR Administered Employee

Initiator Actions
ETS ePAR User Guide v3_20130603 Page 88
To ADD a Maintain POI ePAR: From the ePAR POI tab of the ePAR Request Center, click the Add link in the ePAR POI Category.
Step 1: POI Search With the radio button on Maintain POI in the Select POI Areas section, enter Employee ID into Empl ID field and click the Search button.
Select the Employee from search results by checking the box on the left of the Employee’s name, if multiple results are returned. Click the Next> icon to continue to the next step page.
Initiator Actions
ETS ePAR User Guide v3_20130603 Page 89
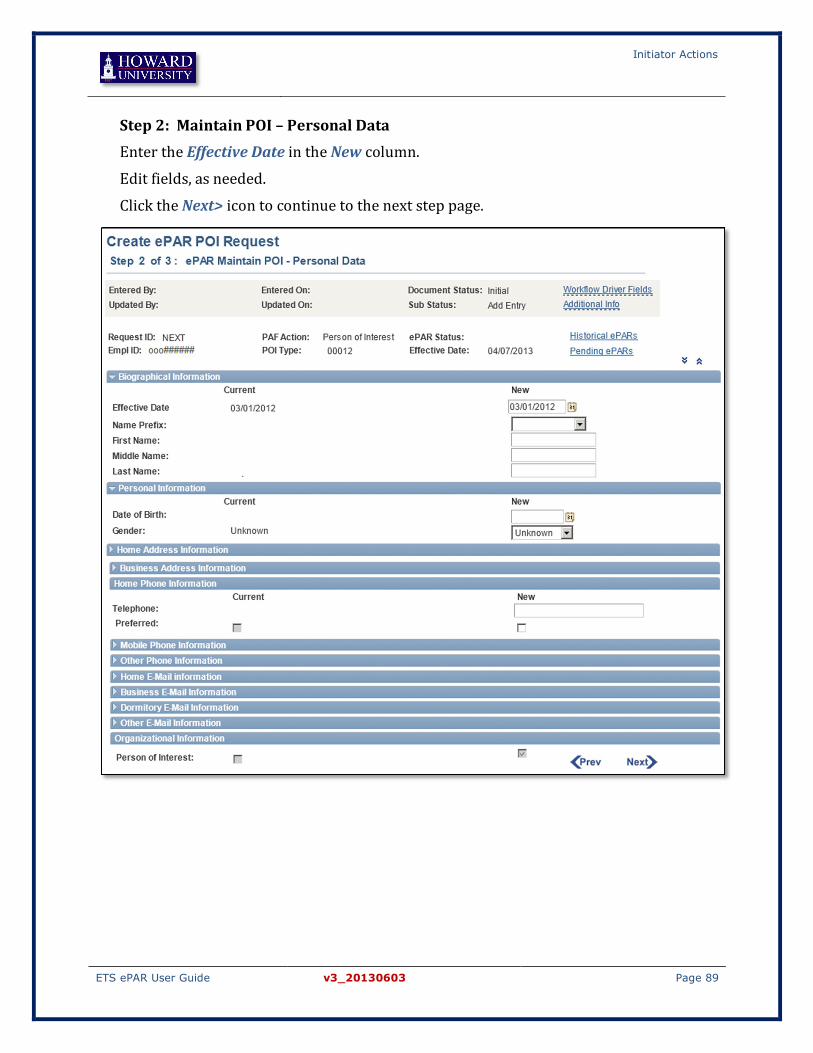
Step 2: Maintain POI – Personal Data Enter the Effective Date in the New column.
Edit fields, as needed.
Click the Next> icon to continue to the next step page.

Initiator Actions
ETS ePAR User Guide v3_20130603 Page 90
Step 3: Add Person of Interest Edit fields in the New POI Data box, as needed. Click the Save button to preserve the data entered on all step pages and to have an ePAR # assigned to the transaction. Click OK from the save confirmation page to return to the ePAR step page.

Initiator Actions
ETS ePAR User Guide v3_20130603 Page 91
To ADD an Add New POI ePAR: From the ePAR POI tab of the ePAR Request Center, click the Add link in the ePAR POI Category.
Step 1: POI Search With the radio button on Add New POI in the Select POI Areas section, click the Next> icon to continue to the next step page.
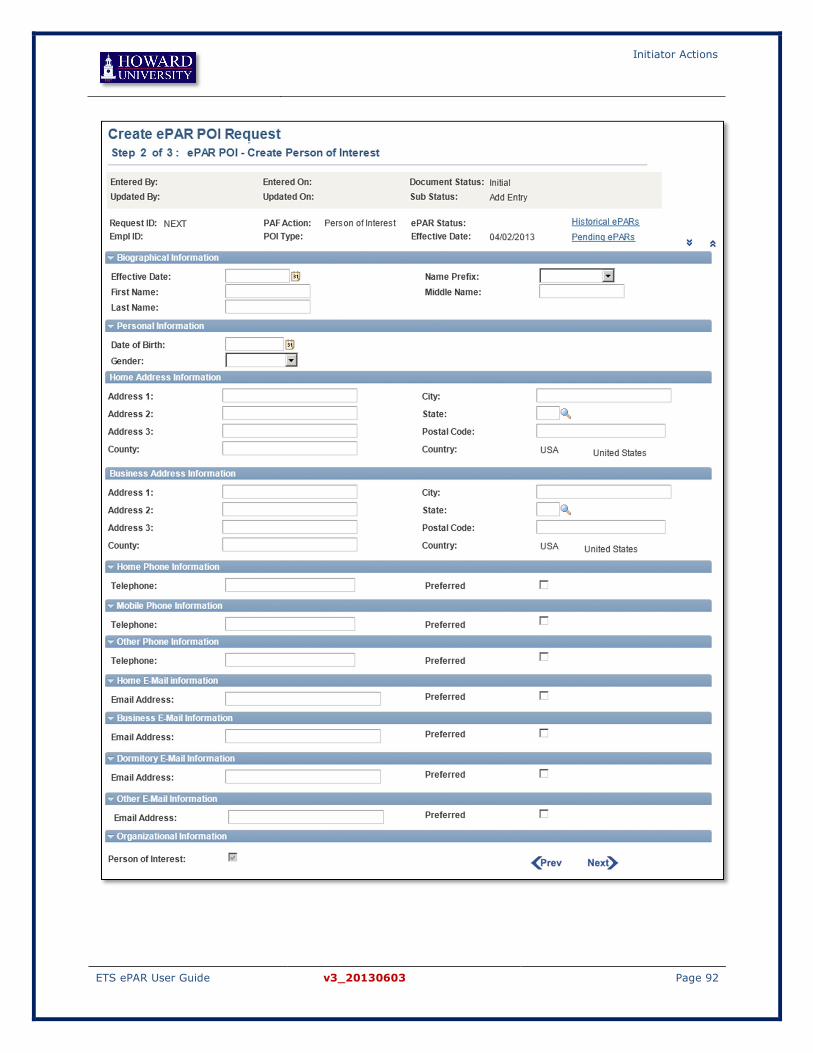
Step 2: Create Person of Interest Enter the Effective Date for this POI to be active in PeopleSoft HCM. (required) Enter the First Name and Last Name into the respective fields. (required) Enter as much of the data as available for the Person of Interest being created.
Click the Next> icon to continue to the next step page.
Initiator Actions
ETS ePAR User Guide v3_20130603 Page 92

Initiator Actions
ETS ePAR User Guide v3_20130603 Page 93
Step 3: Create New POI Use the drop-down to select the Person of Interest Type.
Enter the Planned Exit date. (required)
Enter the Location and Department codes, if applicable. Click the Save button to preserve the data entered on all step pages and to have an ePAR # assigned to the transaction.
Click OK from the save confirmation page to return to the ePAR step page.
Initiator Actions
ETS ePAR User Guide v3_20130603 Page 94
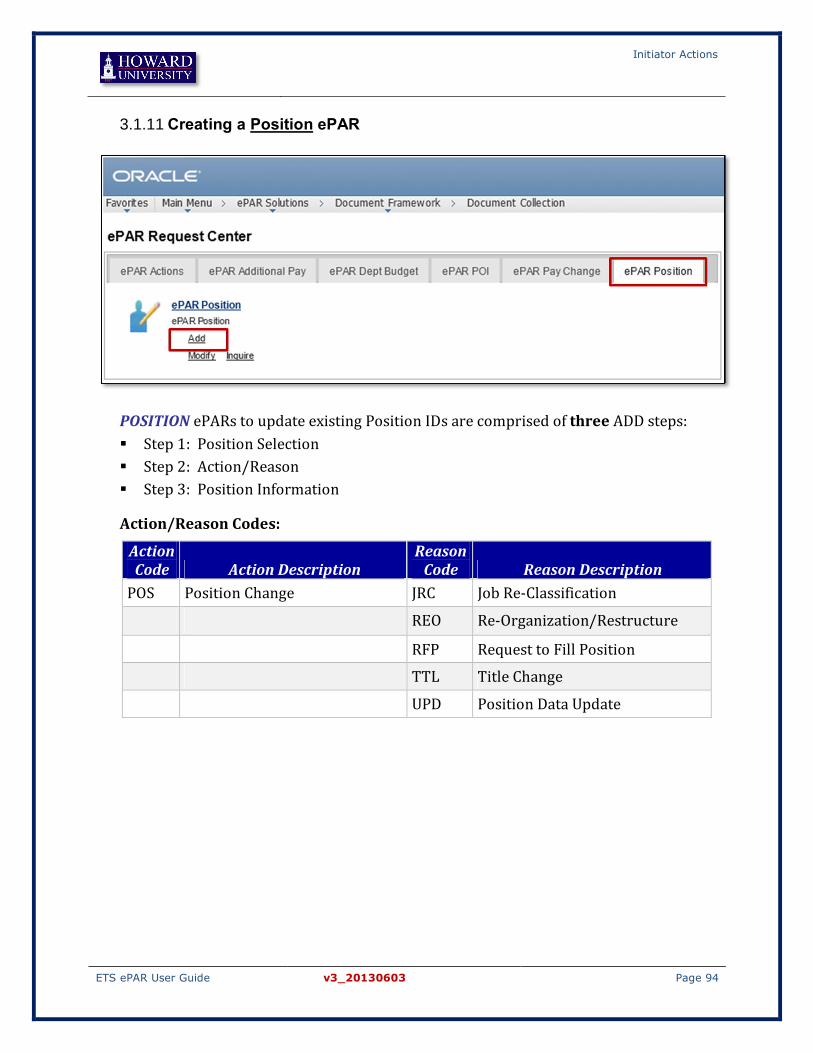
Creating a Position ePAR 3.1.11
POSITION ePARs to update existing Position IDs are comprised of three ADD steps: § Step 1: Position Selection § Step 2: Action/Reason § Step 3: Position Information
Action/Reason Codes:
Action Code Action Description
Reason Code Reason Description
POS Position Change JRC Job Re-Classification
REO Re-Organization/Restructure
RFP Request to Fill Position
TTL Title Change
UPD Position Data Update
Initiator Actions
ETS ePAR User Guide v3_20130603 Page 95
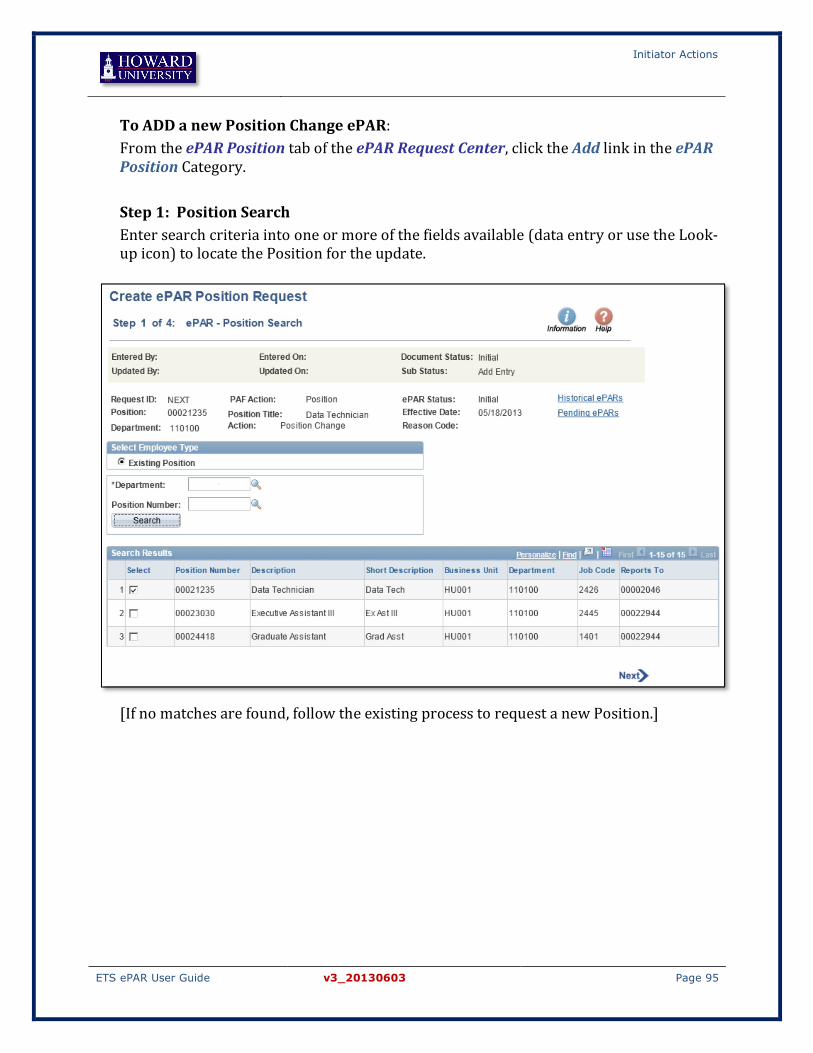
To ADD a new Position Change ePAR: From the ePAR Position tab of the ePAR Request Center, click the Add link in the ePAR Position Category. Step 1: Position Search Enter search criteria into one or more of the fields available (data entry or use the Look-up icon) to locate the Position for the update.
[If no matches are found, follow the existing process to request a new Position.]

Initiator Actions
ETS ePAR User Guide v3_20130603 Page 96
Step 2: Action/Reason Select Action then Reason using the drop-down from the respective fields.
Enter the Effective Date for this Position update. Enter comments related to this ePAR in the Comments field. Click the Next> icon to continue to the next step page.

Initiator Actions
ETS ePAR User Guide v3_20130603 Page 97
Step 3: Change Change field values where needed in the right New column.
Click the Next> icon to continue to the next step page.

Initiator Actions
ETS ePAR User Guide v3_20130603 Page 98
3.2 Modifying an ePAR Transaction Initiators who have saved an ePAR and need to make edits or submit/withdraw an existing ePAR can use Modify. Changes made using Modify can include data correction, maintaining attachments, or providing additional comments through the Collaboration Gadget Toolbar function. Any initiated and saved ePARs are available for updates through Modify for Initiators who have access to the Employee data. Data security is enforced through the existing PeopleSoft HCM row-level security. Only existing ePARs that have not been submitted for approval will display in the search results of the Modify Console.
Key data changes made in Modify are displayed in blue italics in the New column to make it easier to locate the changes when viewing the ePAR.
To locate an ePAR to modify through the ePAR Request Center:
Main Menu > ePAR Solutions > Document Framework > Document Collection
Modify Non-Transfer ePARs 3.2.1
The Modify action is available for all non-Transfer ePARs in Initial status. Click Modify from any ePAR Category except Transfer to access the Modify Console. The Modify Console offers search options that assist in locating a specific ePAR for updates or changes, if the ePAR # is not readily available. Only ePARs that are in the appropriate status for Modify actions will display in the search results of the Modify Console.
Once an ePAR transaction has been identified, clicking on the ePAR # hyperlink opens the ePAR. The ePAR accessed in Modify mode typically displays a different number of steps than in the Add mode used for creating new requests. Step pages that are unnecessary for the saved ePAR are omitted so the title pages will reflect a different number of total steps than in the initial Add. For example, the Hire ePAR Category displays Step 1 of 7 when adding but changes to display Step 1 of 6, omitting the Employee Selection step, when opened for updates through the Modify Console.
The Save Gadget is available on each of the step pages when modifying so changes can be saved from any of the pages that have been updated. Requesters will access ePARs in Modify mode then use the Workflow icon Submit option to submit the transaction, when ready.

Initiator Actions
ETS ePAR User Guide v3_20130603 Page 99
Enter search criteria into any field to narrow down the search. Click the Search button.
Select an ePAR by clicking on the ePAR # hyperlink. All viewable ePAR numbers display as an active hyperlink – click directly on the numbers to view the ePAR. Navigate through the step pages to update data, as needed. Click on the Save icon to preserve changes made to the ePAR.

Initiator Actions
ETS ePAR User Guide v3_20130603 Page 100
Modify Transfer ePARs 3.2.2
As described in the earlier Transfer section, the process of transferring an Employee between Departments includes a Transfer Release step, which is a specific approval for this process when the Employee involved is not within the row-level security access for the Initiator/Requester. For a transfer where the Employee is within the Requester’s row-level security, the Add process of creating the transfer request automatically skips the release process and the Modify steps are included in the initial ePAR. [see section 4.2.1: Transfer Release on transfer release request]
The addition of this step results in a distinct process flow for the Transfer ePAR Category:
TRANSFER ePAR transactions between Departments are comprised of: § ADD Transfer Release Request (New Department – Initiator) § RELEASE Transfer (Current Department – Transfer Release Approver) § MODIFY Transfer (New Department – Initiator)
- Step 1: Action/Reason - Step 2: Job Information - Step 3: Compensation
§ APPROVE Transfer
Two ePAR Sub-states, Initiated and Released, are specifically defined for the Transfer process. The Initial/Initiated ePAR is a Transfer Release request awaiting approval from the current Department and cannot be modified in this Sub-status. When the release is approved with a “Released” Sub-status, the Transfer ePAR process continues through the Modify link for the Transfer request to be completed by the new Department then submitted for Transfer approval routing through automated workflow.

Initiator Actions
ETS ePAR User Guide v3_20130603 Page 101
To Modify a Transfer ePAR:
To locate a Transfer ePAR to modify, connect using the link in the email notification of the Transfer Release or through the ePAR Request Center:
From the ePAR Actions tab of the ePAR Request Center, click the Modify link in the ePAR Transfer Category. Use one or more of the search criteria fields to narrow down the search results. Select the ePAR to be modified by clicking on the ePAR # hyperlink. Step 1: Action/Reason This page should not require edits; it is the same as the Action/Reason page from the initial Transfer Release Request. Enter additional comments, if applicable. Click the Next> icon to continue to the next step page.

Initiator Actions
ETS ePAR User Guide v3_20130603 Page 102
Step 2: Job Information Enter Position Number. Other position-related fields will populate.
Click the Next> icon to continue to the next step page.
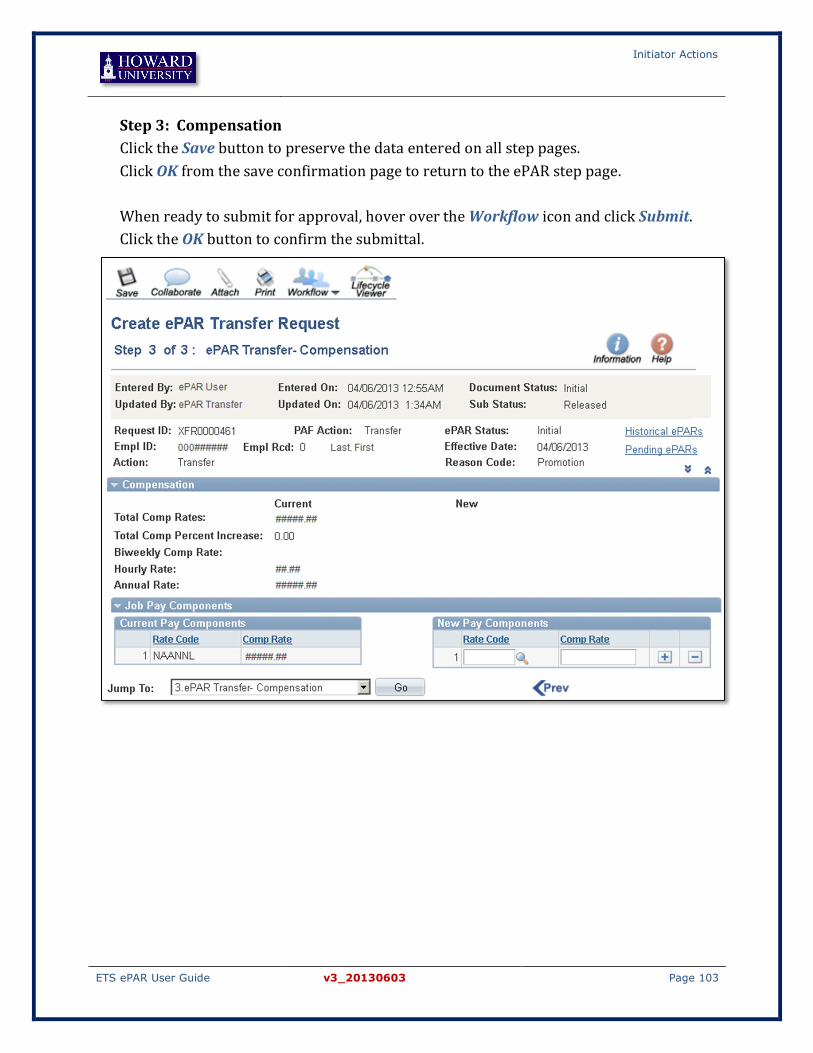
Initiator Actions
ETS ePAR User Guide v3_20130603 Page 103
Step 3: Compensation Click the Save button to preserve the data entered on all step pages. Click OK from the save confirmation page to return to the ePAR step page. When ready to submit for approval, hover over the Workflow icon and click Submit. Click the OK button to confirm the submittal.

Initiator Actions
ETS ePAR User Guide v3_20130603 Page 104
3.3 Submitting or Resubmitting an ePAR
Submitting an ePAR 3.3.1
The ePAR remains in Initial status until a Requester submits the transaction for approval. When the Submit option is confirmed, the ePAR is routed to the first Approver on its Approval Map, which can be previewed prior to submitting the ePAR. After the ePAR is submitted, the ePAR status updates to Workflow and the ePAR can no longer be modified by the Initiator or the Requester. Users can track the progress of the ePAR by using the Inquire Console and by viewing the Approval Map and/or the Lifecycle Viewer for the transaction.
To submit an ePAR:
From any ePAR step page in either Add or Modify mode, hover the mouse over the Workflow icon when ready to submit the saved ePAR.

Initiator Actions
ETS ePAR User Guide v3_20130603 Page 105
Click the Submit option then click OK to confirm submitting the ePAR to automated approval routing.
Resubmitting an ePAR 3.3.2
The Deny option pushes the ePAR back to the original Initiator, who can choose to make changes and then resubmit or to withdraw the ePAR. If the Initiator wishes to continue with the denied ePAR, the transaction can be modified then resubmitted. The ePAR will again process through the Approval Map routing for approval of the modified transaction. The steps to resubmit are the same as the steps to submit the ePAR.
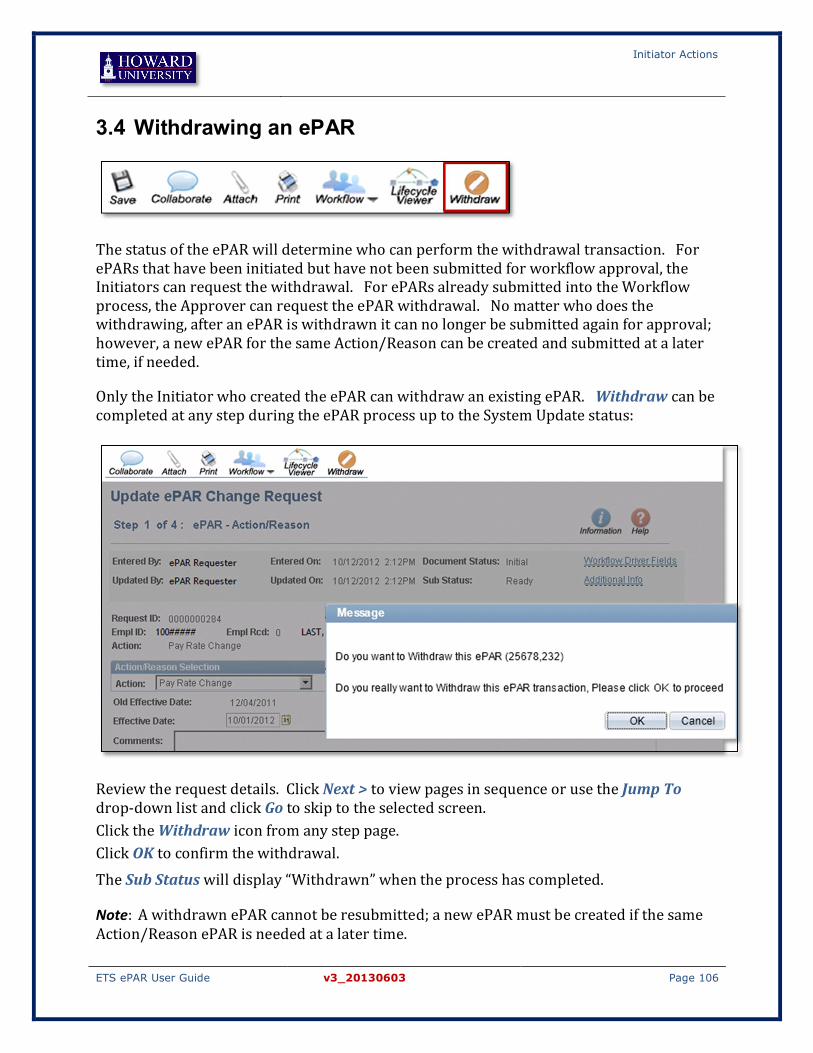
Initiator Actions
ETS ePAR User Guide v3_20130603 Page 106
3.4 Withdrawing an ePAR
The status of the ePAR will determine who can perform the withdrawal transaction. For ePARs that have been initiated but have not been submitted for workflow approval, the Initiators can request the withdrawal. For ePARs already submitted into the Workflow process, the Approver can request the ePAR withdrawal. No matter who does the withdrawing, after an ePAR is withdrawn it can no longer be submitted again for approval; however, a new ePAR for the same Action/Reason can be created and submitted at a later time, if needed.
Only the Initiator who created the ePAR can withdraw an existing ePAR. Withdraw can be completed at any step during the ePAR process up to the System Update status:
Review the request details. Click Next > to view pages in sequence or use the Jump To drop-down list and click Go to skip to the selected screen. Click the Withdraw icon from any step page. Click OK to confirm the withdrawal. The Sub Status will display “Withdrawn” when the process has completed.
Note: A withdrawn ePAR cannot be resubmitted; a new ePAR must be created if the same Action/Reason ePAR is needed at a later time.
Initiator Actions
ETS ePAR User Guide v3_20130603 Page 107
3.5 Viewing ePAR Transaction/Approval Status All ePARs can be viewed/reviewed by locating the ePAR transaction through the Inquire Console. There are two Inquire Console options that provide the same function but with different filters:
1) To locate an ePAR from the ePAR Request Center: Main Menu > ePAR Solutions > Document Framework > Document Collection From the ePAR Request Center: each Category has an Inquire link that applies a search filter for the transactions; for example, only HIRE ePARs are shown through the HIRE Inquire link. Click the link from the the ePAR Category of the ePAR to be viewed.
Click Inquire from an ePAR Category to begin then select an ePAR to view.
OR
2) To locate an ePAR using the global Inquire Console: Main Menu > ePAR Solutions > Document Framework > Inquire ePAR Transactions
ePAR Inquire Transactions is a centralized location where the User can search for any existing ePAR, regardless of its State or Sub-status. It allows searching across all categories but also offers filters for ePAR Categories, when needed. This console can be particularly useful when searching across all ePARs for all transactions for an Employee who may have multiple ePARs in progress.

Approver/Reviewer Actions
ETS ePAR User Guide v3_20130603 Page 108
Viewing the transaction status: Document Status and Sub-status fields on each ePAR indicate its current transaction status. [Refer to Chapter 1 for State and Sub-state table]
Viewing the approval status: Approval status can be viewed through the View Approval Map option using the Workflow Gadget. The Approval Map displays the up-to-date status of the transaction, including any approvals, holds, denied status boxes. The “Pending” box indicates the current Approver whose action is required to move the transaction further toward System Update.
Approver/Reviewer Actions
ETS ePAR User Guide v3_20130603 Page 109
4 Approver/Reviewer Actions
This chapter provides information about the actions performed by a User assigned the role of ePAR “Approver”. Approver options detailed in this chapter include:
- Transfer Release - Approve the transaction - Pushback the transaction to previous Approver - Deny the transaction to the requester - Hold the transaction until ready to take further action - Edit the transaction as an Approver - Insert an ad-hoc Approver or Reviewer - Delete an Approver or Reviewer - Assign a proxy Approver - Final Approver
4.1 Locating ePARs for Approval/Review
Approval Inbox 4.1.1
Approver-role Users have access to the Approval Inbox, a centralized location for ePAR transactions that require their attention. E-mail notification is sent to the Approver when an ePAR transaction includes the User in the Approval Map, in the sequence in which the Approver is situated on the approval path.
Navigation: Main Menu > ePAR Solutions > Smart Workflow > Transaction Approval > Approval Inbox
Enter search criteria into one or more fields then click the Search button. Search results will display below the Search button. Click on any of the active ePAR # hyperlinks to view the transaction.

Approver/Reviewer Actions
ETS ePAR User Guide v3_20130603 Page 110
Inquire Consoles 4.1.2
ePAR transactions can be located directly through any of the Inquire links from each ePAR Category or through the ePAR Inquire Console. [See section 1.2.3: ePAR Consoles]
View/Review ePAR Transaction 4.1.3
The ePAR can be reviewed in sequence by step pages using the <Prev and Next > icons. These icons take the User one page back or one page forward in the step sequence. Another way to move about the step pages is offered in the Jump To option where each step page is presented on the drop-down. Users can select a specific page then click the Go button to skip to any of the listed pages. Both options are located at the bottom of each ePAR step page.

Approver/Reviewer Actions
ETS ePAR User Guide v3_20130603 Page 111
Check Supporting Documentation (Attachments) 4.1.4
To view an attachment associated with an ePAR: Click the Attach icon when it displays a document within the paper clip, indicating that an attachment is present.
Click the View icon to the right of the document to launch. A separate line with its own View icon will display for each attachment.
[See also section 2.1: Attach]

Approver/Reviewer Actions
ETS ePAR User Guide v3_20130603 Page 112
4.2 Approver Actions Approvers have a range of actions available for ePAR transactions. Each ePAR can be approved immediately, returned for further information/input, or held for consideration based on the business situation. Each type of action is presented as an option in the box that displays when the User’s mouse is hovered over the Workflow icon. Additionally, Approvers have the option of including or removing other Approvers or Reviewers on an as-needed basis.
Transfer Release 4.2.1
A Transfer Release is a specific type of approval that is required early in the process when an Employee is being transferred from one Department to another. This type of transaction requires the approval of the current Department before the ePAR can be completed to process the move to a new Department.
The new Department initiates the ePAR, which is routed to the current Department’s designated Transfer Release Approver for the release. Each Department assigns the role that determines the Approver who is responsible for Transfer Releases. Once the Transfer Release is granted, the initiating Department is notified so that the ePAR can be completed for the actual transfer and the associated Approval Map.
Transfer Release is comprised of three step pages: § Action/Reason (display only) § Transfer Release Initiation § Transfer Release
To Release an Employee for Transfer:
Begin by locating the Transfer Release request from the email notification link or through the Transfer Release Console, which can be found through direct navigation.
Navigation: Main Menu > ePAR Solutions > Document Framework > Transfer Release Console
OR Main Menu > ePAR Solutions > Document Framework > Document Collection
[ePAR Request Center, Release link from Transfer Category on Action tab]
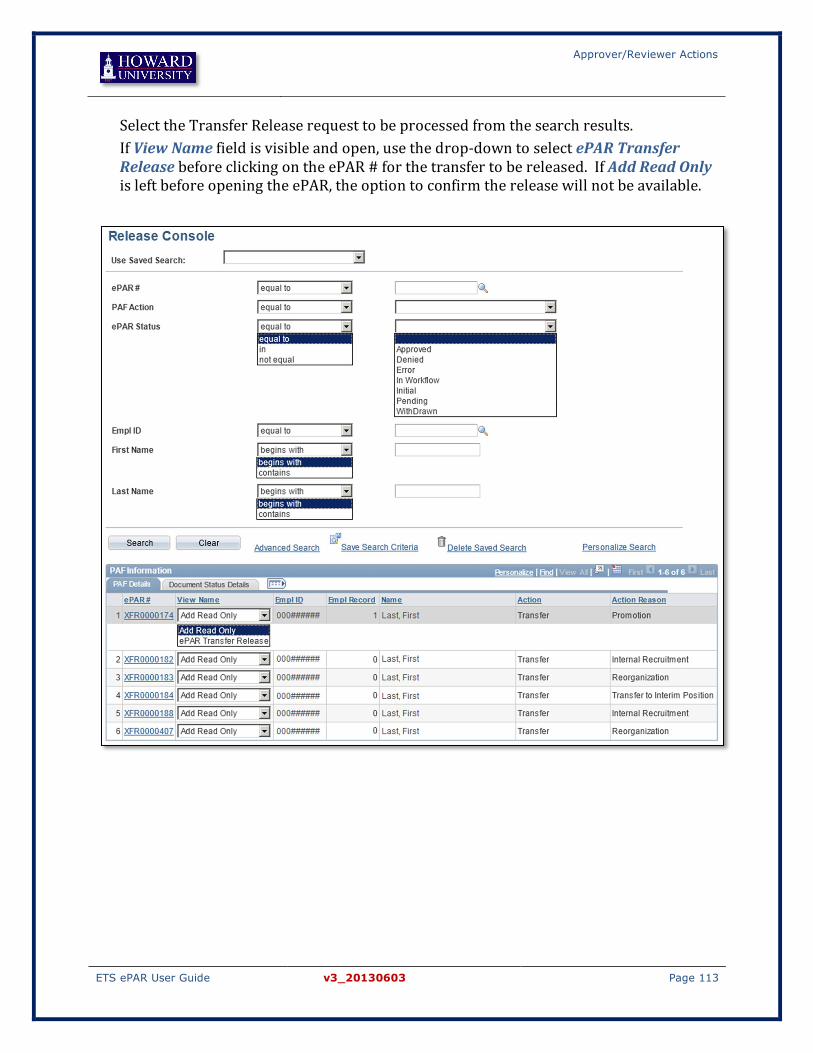
Approver/Reviewer Actions
ETS ePAR User Guide v3_20130603 Page 113
Select the Transfer Release request to be processed from the search results. If View Name field is visible and open, use the drop-down to select ePAR Transfer Release before clicking on the ePAR # for the transfer to be released. If Add Read Only is left before opening the ePAR, the option to confirm the release will not be available.
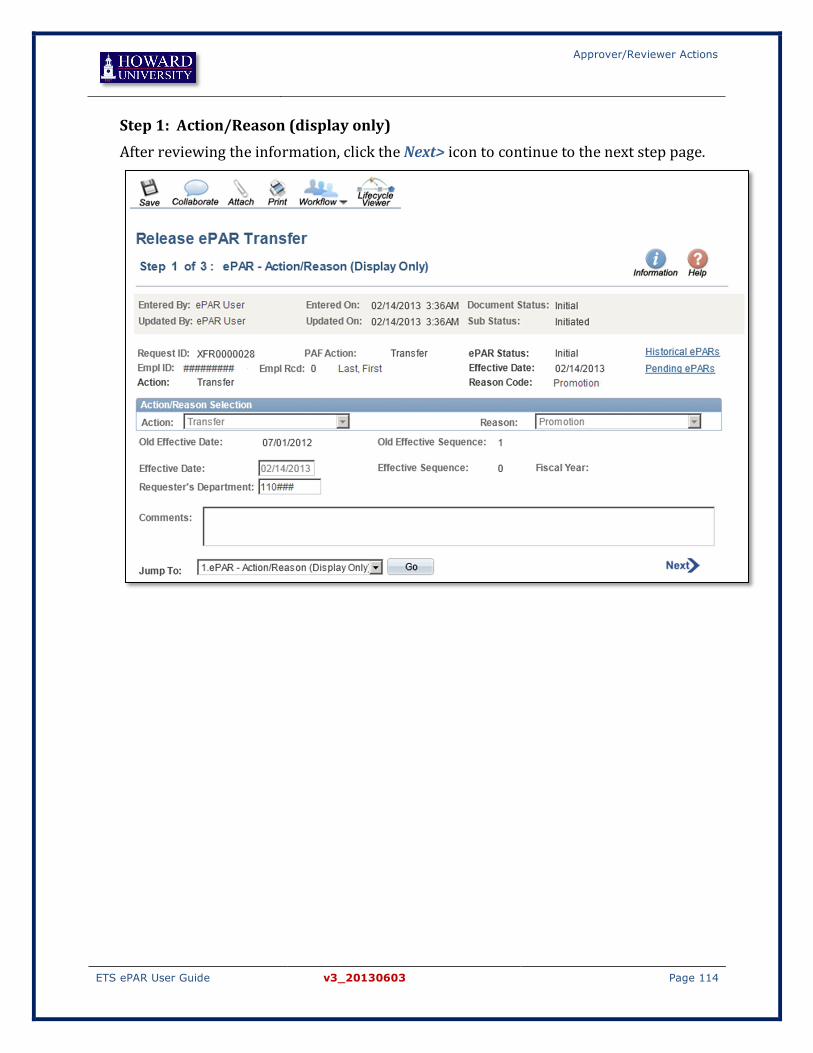
Approver/Reviewer Actions
ETS ePAR User Guide v3_20130603 Page 114
Step 1: Action/Reason (display only) After reviewing the information, click the Next> icon to continue to the next step page.
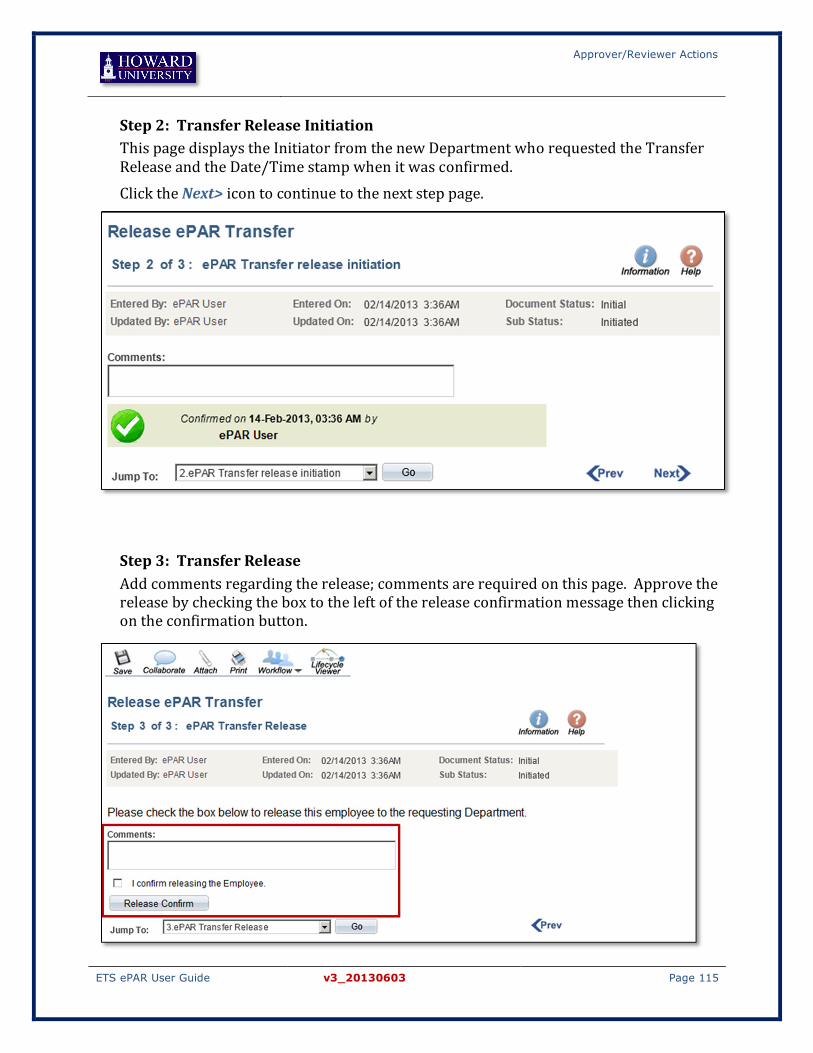
Approver/Reviewer Actions
ETS ePAR User Guide v3_20130603 Page 115
Step 2: Transfer Release Initiation This page displays the Initiator from the new Department who requested the Transfer Release and the Date/Time stamp when it was confirmed. Click the Next> icon to continue to the next step page.
Step 3: Transfer Release Add comments regarding the release; comments are required on this page. Approve the release by checking the box to the left of the release confirmation message then clicking on the confirmation button.

Approver/Reviewer Actions
ETS ePAR User Guide v3_20130603 Page 116
The following message will display:
Click Save to complete the Transfer Release. The Transfer process now shifts back to the requesting Department where additional ePAR pages are completed in Modify then submitted for transfer approval routing.

Approver/Reviewer Actions
ETS ePAR User Guide v3_20130603 Page 117
Approve an ePAR 4.2.2
An approval can be initiated from any of the step pages where the Workflow icon is displayed in the ePAR toolbar. An approval is equivalent to signing a paper form and will forward the ePAR to the next Approver in the approval path or to System Update if it is the final approval in the path.
To Approve an ePAR: Click or hover over the Workflow icon to see available workflow options. Click Approve. Enter any comments relating to the approval in the Comments box. Click the Approve button to complete the approval and to return to Approval Map. Click OK when finished to return to the ePAR pages.
After the ePAR has been approved, select View Approval Map from Workflow icon to review, if needed. The Approver who completed the most recent Approve will display as Approved while the next Approver in the path will now display Pending; any additional Approvers to the right will display a status of Not Routed.
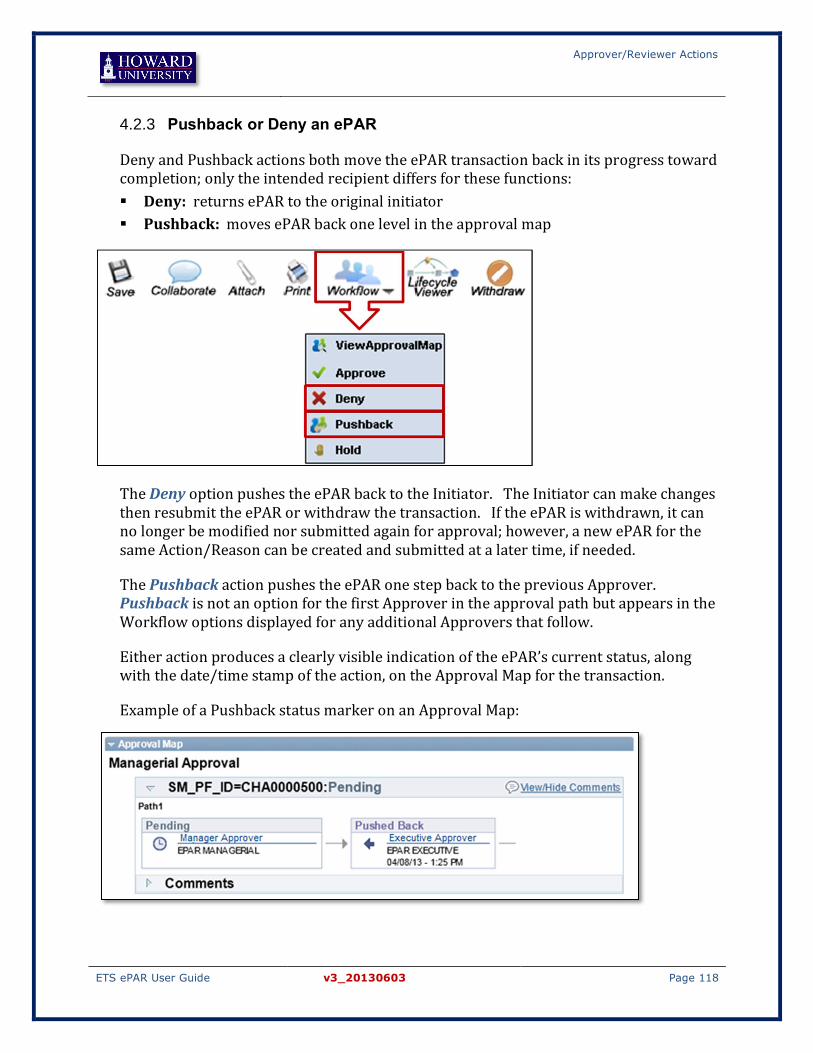
Approver/Reviewer Actions
ETS ePAR User Guide v3_20130603 Page 118
Pushback or Deny an ePAR 4.2.3
Deny and Pushback actions both move the ePAR transaction back in its progress toward completion; only the intended recipient differs for these functions: § Deny: returns ePAR to the original initiator § Pushback: moves ePAR back one level in the approval map
The Deny option pushes the ePAR back to the Initiator. The Initiator can make changes then resubmit the ePAR or withdraw the transaction. If the ePAR is withdrawn, it can no longer be modified nor submitted again for approval; however, a new ePAR for the same Action/Reason can be created and submitted at a later time, if needed.
The Pushback action pushes the ePAR one step back to the previous Approver. Pushback is not an option for the first Approver in the approval path but appears in the Workflow options displayed for any additional Approvers that follow.
Either action produces a clearly visible indication of the ePAR’s current status, along with the date/time stamp of the action, on the Approval Map for the transaction.
Example of a Pushback status marker on an Approval Map:
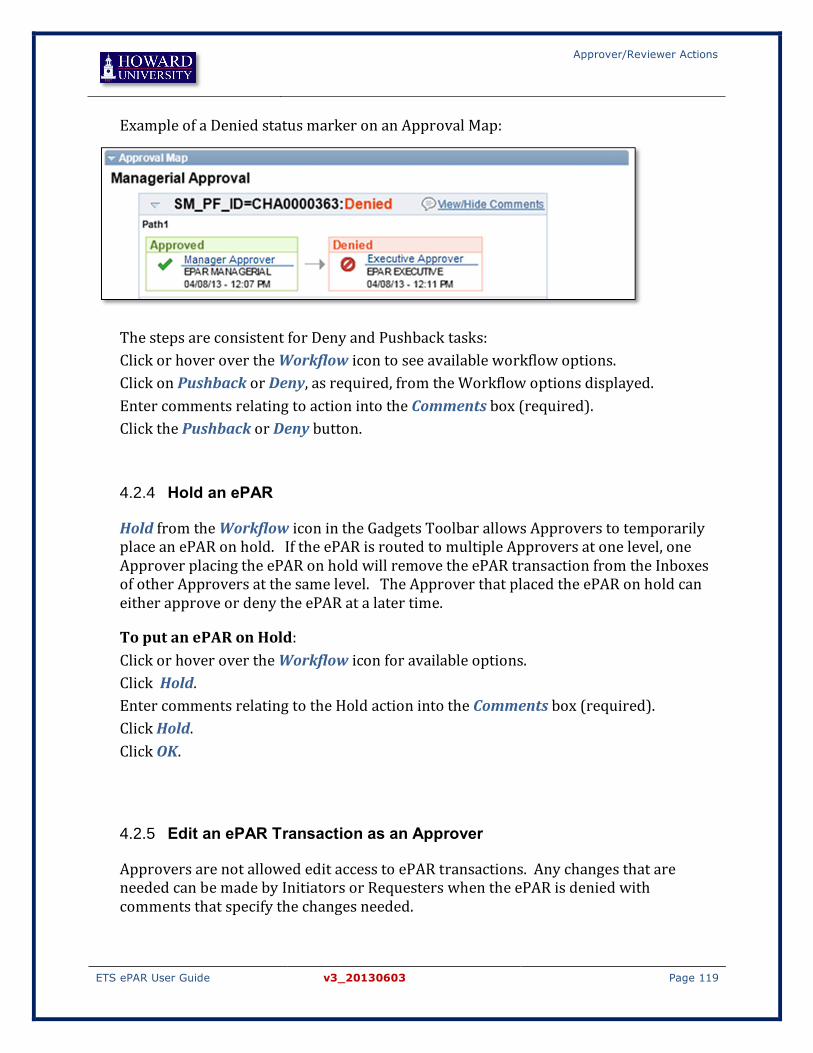
Approver/Reviewer Actions
ETS ePAR User Guide v3_20130603 Page 119
Example of a Denied status marker on an Approval Map:
The steps are consistent for Deny and Pushback tasks: Click or hover over the Workflow icon to see available workflow options. Click on Pushback or Deny, as required, from the Workflow options displayed. Enter comments relating to action into the Comments box (required). Click the Pushback or Deny button.
Hold an ePAR 4.2.4
Hold from the Workflow icon in the Gadgets Toolbar allows Approvers to temporarily place an ePAR on hold. If the ePAR is routed to multiple Approvers at one level, one Approver placing the ePAR on hold will remove the ePAR transaction from the Inboxes of other Approvers at the same level. The Approver that placed the ePAR on hold can either approve or deny the ePAR at a later time.
To put an ePAR on Hold: Click or hover over the Workflow icon for available options. Click Hold. Enter comments relating to the Hold action into the Comments box (required). Click Hold. Click OK.
Edit an ePAR Transaction as an Approver 4.2.5
Approvers are not allowed edit access to ePAR transactions. Any changes that are needed can be made by Initiators or Requesters when the ePAR is denied with comments that specify the changes needed.

Approver/Reviewer Actions
ETS ePAR User Guide v3_20130603 Page 120
4.3 Approver/Reviewer Comments Comments are required when Approvers are denying or pushing back an ePAR transaction but are optional when approving. These Approver or Reviewer comments are separate from the original Comments area at the start of the ePAR, as well as any Collaborate comment threads.
The Comments bar for Approver/Reviewer comments is below the Approval Map and is contracted by default. The Comments area of the Approval Map must be expanded by clicking on the small triangle icon on the left of the bar to view comments that were added during the Workflow approval process.
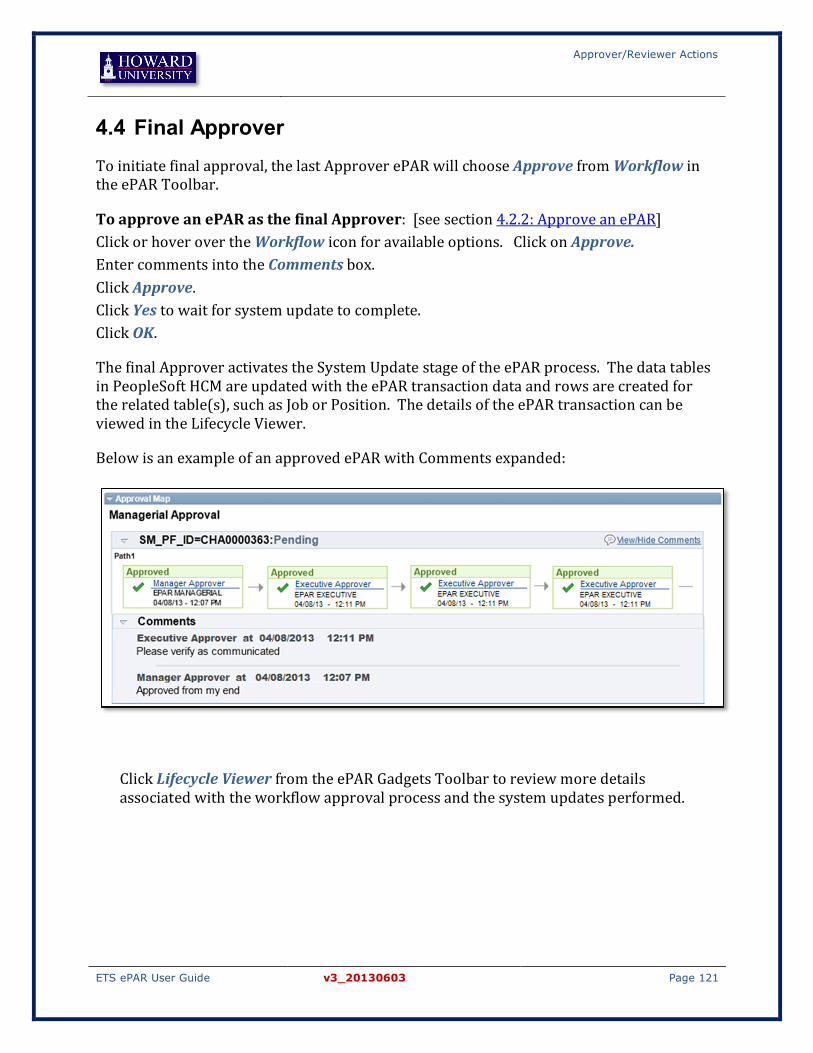
Approver/Reviewer Actions
ETS ePAR User Guide v3_20130603 Page 121
4.4 Final Approver To initiate final approval, the last Approver ePAR will choose Approve from Workflow in the ePAR Toolbar.
To approve an ePAR as the final Approver: [see section 4.2.2: Approve an ePAR] Click or hover over the Workflow icon for available options. Click on Approve. Enter comments into the Comments box. Click Approve. Click Yes to wait for system update to complete. Click OK.
The final Approver activates the System Update stage of the ePAR process. The data tables in PeopleSoft HCM are updated with the ePAR transaction data and rows are created for the related table(s), such as Job or Position. The details of the ePAR transaction can be viewed in the Lifecycle Viewer.
Below is an example of an approved ePAR with Comments expanded:
Click Lifecycle Viewer from the ePAR Gadgets Toolbar to review more details associated with the workflow approval process and the system updates performed.
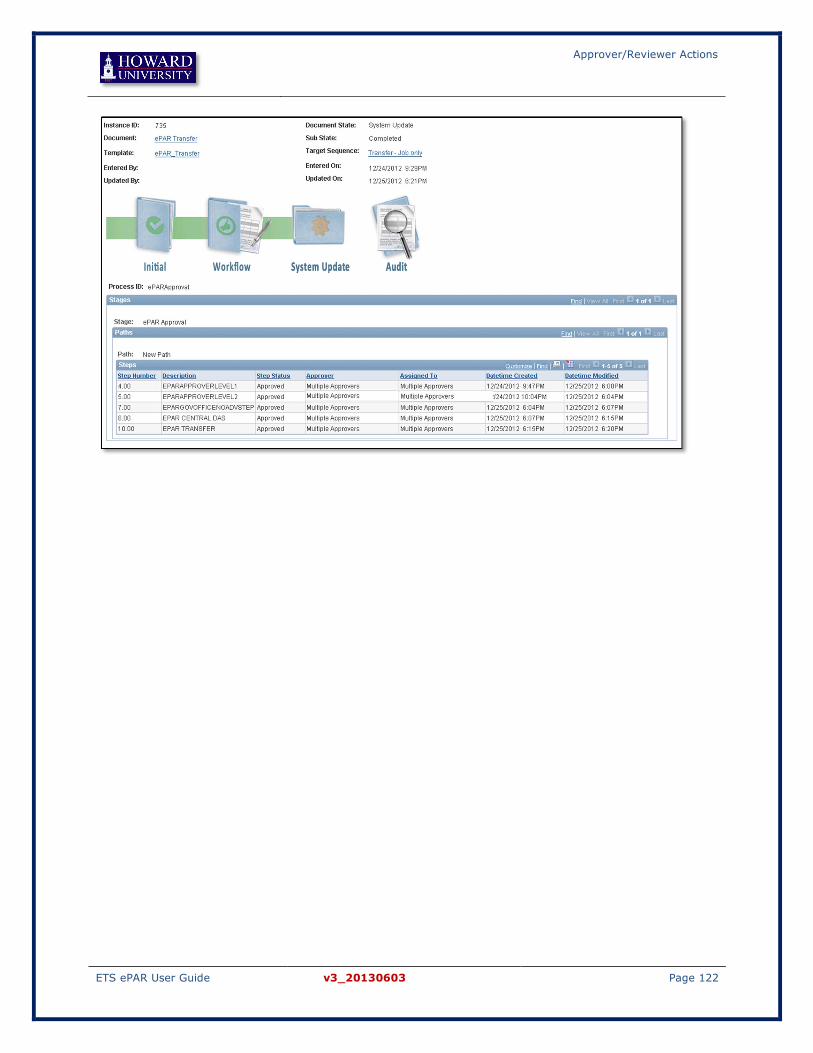
Approver/Reviewer Actions
ETS ePAR User Guide v3_20130603 Page 122
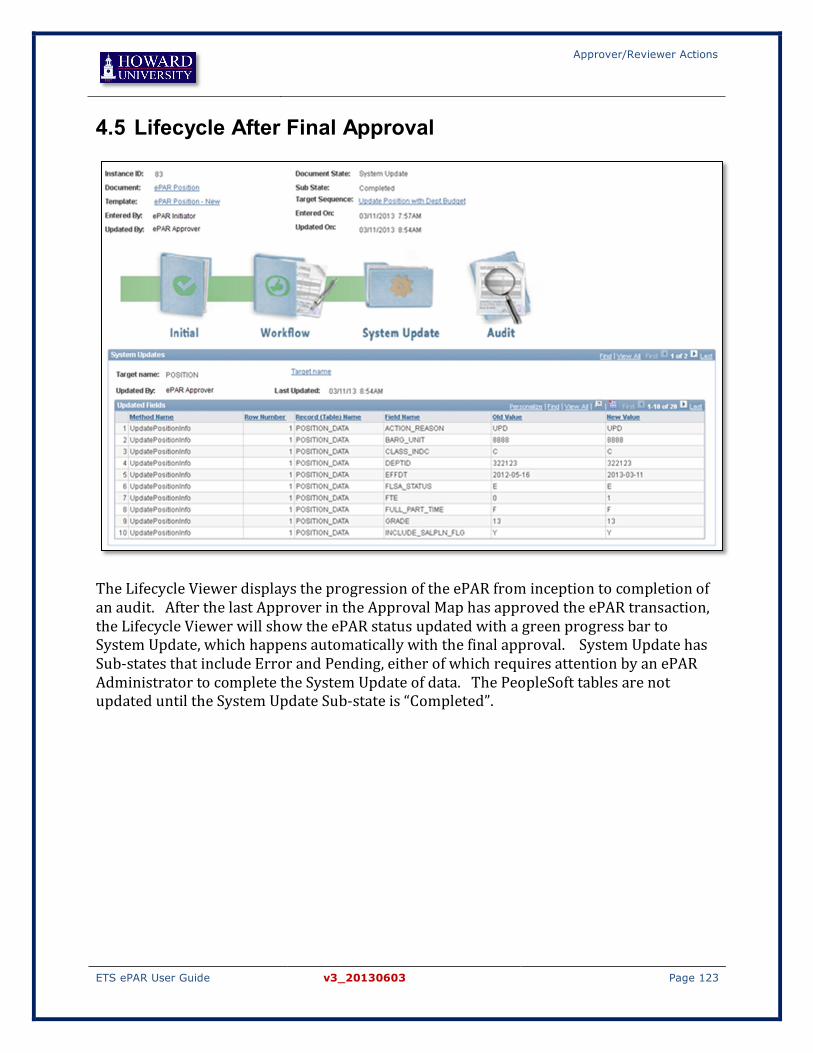
Approver/Reviewer Actions
ETS ePAR User Guide v3_20130603 Page 123
4.5 Lifecycle After Final Approval
The Lifecycle Viewer displays the progression of the ePAR from inception to completion of an audit. After the last Approver in the Approval Map has approved the ePAR transaction, the Lifecycle Viewer will show the ePAR status updated with a green progress bar to System Update, which happens automatically with the final approval. System Update has Sub-states that include Error and Pending, either of which requires attention by an ePAR Administrator to complete the System Update of data. The PeopleSoft tables are not updated until the System Update Sub-state is “Completed”.

Approver/Reviewer Actions
ETS ePAR User Guide v3_20130603 Page 124
4.6 Assign a Proxy Approver A proxy user is another user assigned to approve ePARs on behalf of an ePAR Approver. Examples of where a proxy could be assigned include when the ePAR User is out of the office or when an assistant reviews and approves ePARs on behalf of the Approver.
To assign a proxy Approver:
Note: First time only: Click on the Add a New Value tab to access the page.
After completing the steps on the proxy assignment page (below), this content page will display immediately on subsequent returns to Assign Proxy User.
Proxy assignments can be disabled at any time during the period leading up to the Effective Date To for one or more assignment lines displayed. The proxy will terminate automatically based on the date entered in the Effective Date To field so no action is necessary for proxies that have expired.
To setup, modify or to discontinue proxy assignment, navigate to Assign Proxy User: Enter a new Effective Date To value to set up or modify the existing assignment.
OR Click the Disable Proxy box to discontinue the proxy assignment by row. Click Save.

Appendices
ETS ePAR User Guide v3_20130603 Page 125
5 Appendices
5.1 UPK Modules Reference List
ePAR Role UPK Module All Users View/Review ePAR Transactions
E-mail Preferences
All Users: ePAR Gadgets Attach Collaborate Lifecycle Viewer Withdraw Workflow –Approval Map Initiators Add – Job Change
Add – Hire/Rehire
Add – Leave (Non-paid)
Add – Leave (Paid)
Add – Terminate
Add – Transfer Release Request
Add – Additional Pay
Add – Department Budget
Add – POI
Add – Pay Changes
Add – Position
Modify – Non-Transfer ePARs
Modify – Transfer

Appendices
ETS ePAR User Guide v3_20130603 Page 126
Requesters Submit ePAR
Approvers Approval Inbox
Workflow – Approve/Deny/Pushback/Hold
Assign Proxy Approver
Transfer Release

Appendices
ETS ePAR User Guide v3_20130603 Page 127
5.2 Glossary of Terms ePAR-specific terms used in this User Guide:
Term Description Ad-hoc Approver An approver who is inserted into approval routing when needed –
requires approval action for transaction to continue
Ad-hoc Reviewer A reviewer who is inserted into approval routing when needed – requires no action for transaction to continue
Approver An approver who is part of the automated approval routing as part of the business process rules that support each type of ePAR transaction
Auditor A User who audits completed ePAR transactions for accuracy and adherence to established policies
Collaborate A comments area that can track threaded conversations between multiple participants within the context of a specific ePAR transaction
Console Search pages that allow filtering by various criteria to locate an ePAR transaction to view, modify, approve, etc.
ePAR Electronic Personnel Action Request: add-on system for PeopleSoft HCM that supports on-line creation and automated approval routing for common HR transactions to replace paper forms and manual approvals
ePAR # Unique identifier assigned to each transaction (also called Request ID on ePAR step pages)
ePAR Category Organizational feature of ePAR that separates transactions by type of Action/Reason; example = ePAR POI, ePAR Position…
ePAR Gadget Functions available for each ePAR based on its state/sub-state and the role assigned to the User; represented as icons that display in a toolbar in the upper left of each ePAR screen
ePAR Lifecycle The process of completing an ePAR transaction from creation through data updates in PeopleSoft HCM tables
ePAR State Represent the four stages of the ePAR Lifecycle: Initiate, Workflow, System Update, and Audit
ePAR Sub-state Break-down points within an ePAR State that provide greater detail about the transaction in its progress toward completion
Initiator EPAR User who can create and save transactions using the Add option for each ePAR Category
POI Person of Interest: someone who is not an Employee but being
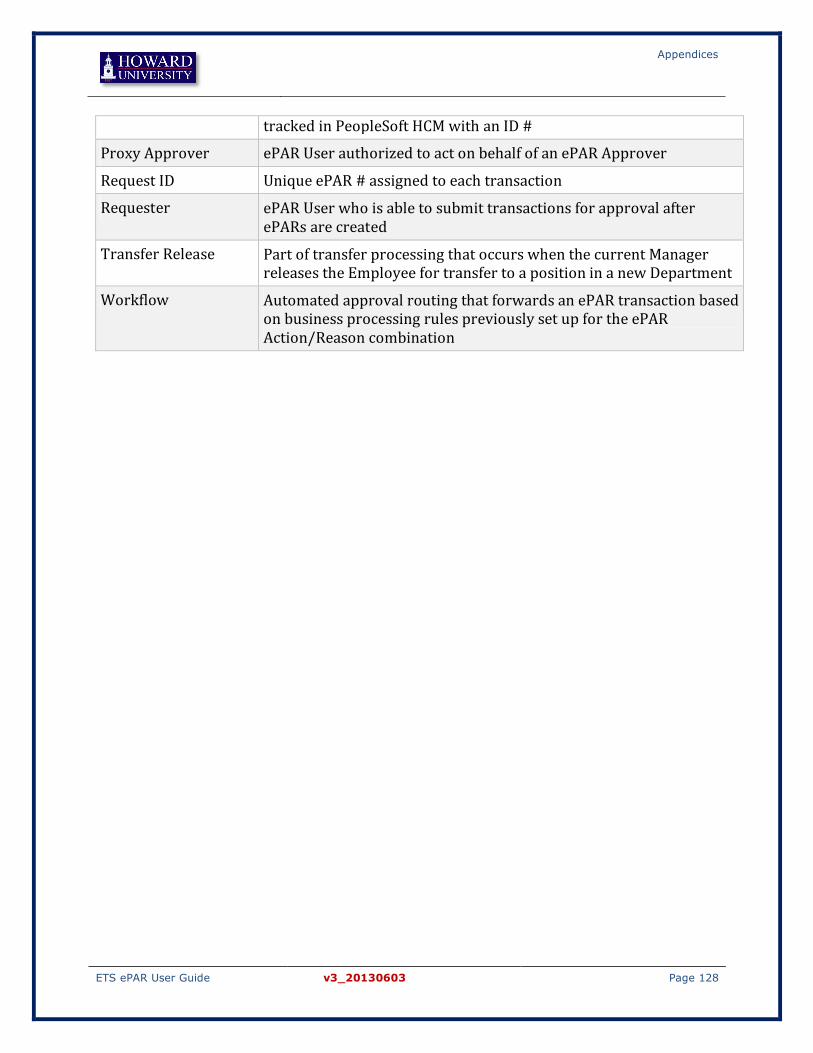
Appendices
ETS ePAR User Guide v3_20130603 Page 128
tracked in PeopleSoft HCM with an ID #
Proxy Approver ePAR User authorized to act on behalf of an ePAR Approver
Request ID Unique ePAR # assigned to each transaction
Requester ePAR User who is able to submit transactions for approval after ePARs are created
Transfer Release Part of transfer processing that occurs when the current Manager releases the Employee for transfer to a position in a new Department
Workflow Automated approval routing that forwards an ePAR transaction based on business processing rules previously set up for the ePAR Action/Reason combination

Appendices
ETS ePAR User Guide v3_20130603 Page 129
5.3 Action/Reason Table Actions and Reasons used in ePAR, listed in order of tab placement in ePAR Request Center:
Action Code Action Description
Reason Code Reason Description
Job Change DTA Data Change DTA Job Information Change
JRC Job Reclassification**
Discipline REC Recall from Suspension/Layoff REC Recall from Suspension/Layoff SUS Suspension ATT Attendance CON Conduct PER Performance TER Termination ATW At Will CON Misconduct FFC Faculty Termination for Cause ROR Reorganization Restructuring RLT Resignation in Lieu of Term WCT Worker Compensation Termination Hire ADL Additional Job
AFP Additional Faculty Position
AST Additional Summer Teaching Position
ASR Additional Summer Research Position
HIR Hire INH Initial Hire
INP Initial Hire in PeopleSoft
REH Rehire REH Rehire
Leave LOA Leave of Absence EDU Education
FML Family & Medical Leave Act
HEA Health Reasons
MAT Maternity/Paternity
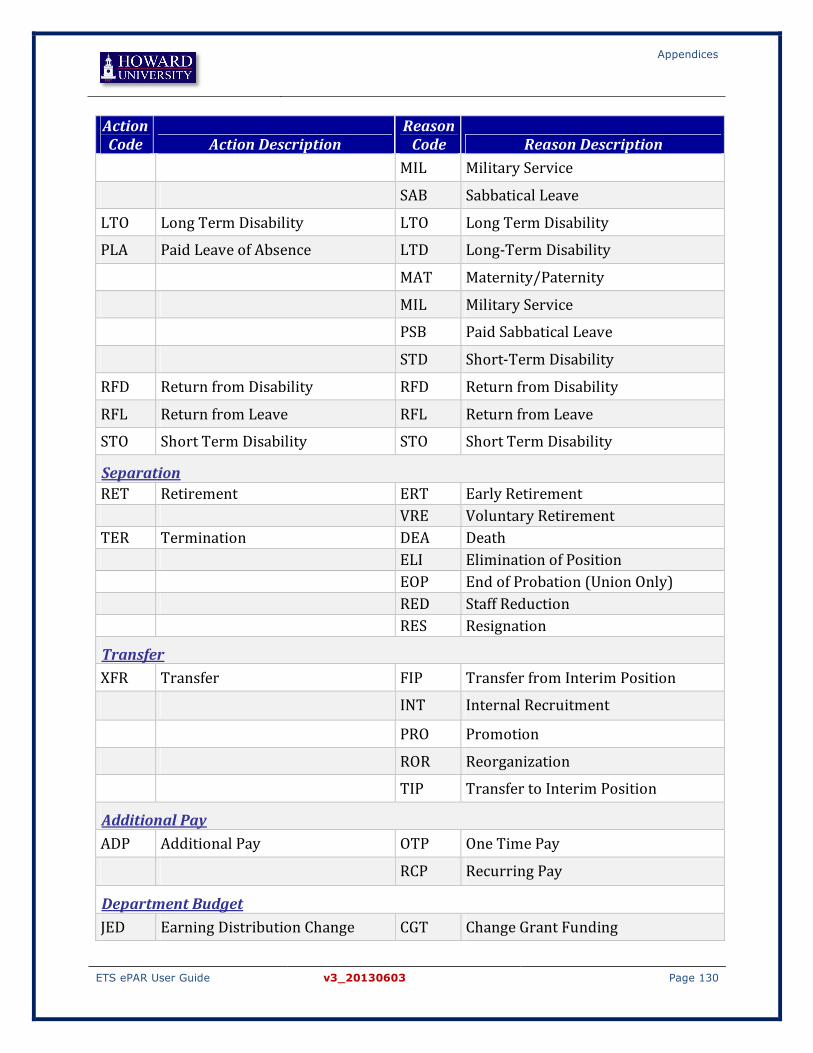
Appendices
ETS ePAR User Guide v3_20130603 Page 130
Action Code Action Description
Reason Code Reason Description
MIL Military Service
SAB Sabbatical Leave
LTO Long Term Disability LTO Long Term Disability
PLA Paid Leave of Absence LTD Long-Term Disability
MAT Maternity/Paternity
MIL Military Service
PSB Paid Sabbatical Leave
STD Short-Term Disability
RFD Return from Disability RFD Return from Disability
RFL Return from Leave RFL Return from Leave
STO Short Term Disability STO Short Term Disability
Separation RET Retirement ERT Early Retirement VRE Voluntary Retirement TER Termination DEA Death ELI Elimination of Position EOP End of Probation (Union Only) RED Staff Reduction RES Resignation
Transfer XFR Transfer FIP Transfer from Interim Position
INT Internal Recruitment
PRO Promotion
ROR Reorganization
TIP Transfer to Interim Position
Additional Pay ADP Additional Pay OTP One Time Pay
RCP Recurring Pay
Department Budget JED Earning Distribution Change CGT Change Grant Funding

Appendices
ETS ePAR User Guide v3_20130603 Page 131
Action Code Action Description
Reason Code Reason Description
EGT End Grant Funding
NGT New Grant Funding
Pay Change PAY Pay Rate Change ADJ Adjustment
ATB Across-the-Board
COL Cost-of-Living Adjustment
MER Merit
PPI Performance Pay Increase
PRO Promotion
REC Job Reclassification
RWL Reduced Workload
PRO Promotion ACP Acting (Provisional)
NCP Normal Career Progression
OPR Outstanding Performance
POI POI 00012
CON Consultant/Contractor
00013 HUH
HU Hospital Employee
00014 NEA
Non-Employee Security Access
00015 VST
Visiting Student (Summer)
Position POS Position Change JRC Job Re-Classification
REO Re-Organization/Restructure
RFP Request to Fill Position
TTL Title Change
UPD Position Data Update