e-QIP User's Manual - Marine Forces Reserve
102
e-QIP Electronic Questionnaires for Investigations Processing User’s Manual HEADQUARTERS U.S. MARINE CORPS SECURITY DIVISION (PS)
-
Upload
khangminh22 -
Category
Documents
-
view
2 -
download
0
Transcript of e-QIP User's Manual - Marine Forces Reserve

e-QIP
Electronic Questionnaires for Investigations Processing
User’s Manual
HEADQUARTERS U.S. MARINE CORPS
SECURITY DIVISION (PS)

1
Sources
This user’s guide was prepared using U.S. Office of Personnel Management (OPM) Draft Agency User’s Guide for Electronic Questionnaires for Investigations Processing System version 2.00.15 of June 2009; and with OPM e-QIP training materials available to e-QIP users at website https://opmis.xsp.org/. Other sources used or consulted include OPM document Requesting OPM Personnel Investigations (IS-15) available open source at website www.opm.gov/extra/investigate/IS-15.pdf, e-QIP Document Scanning and Attachments Criteria, Condensed Agency Users Manual for Electronic Questionnaires for Investigations Processing System version 2.00.02 – e-QIP Essentials for Agency User, and the e-QIP Quick Reference Guide for Users and Administrators.
Scope
This guide contains general information, purpose, and use information for U.S. Marine Corps users of e-QIP, the Electronic Questionnaires for Investigations Processing system.
How to Use this Manual
The guide is organized by paragraph and contains an appendix. Pages are numbered sequentially starting at page one. Paragraphs and figures are numbered by paragraph number and sequential sub-number. For example the second sub-paragraph of paragraph four is labeled 4.2; the first subordinate paragraph to 4.2 is labeled 4.2.1, the second subordinate is labeled 4.2.2, additional layers of subordinate paragraphs are labeled 4.2.2.1, 4.2.2.2, and so on. Figures are numbered in a similar manner. The fifth figure of paragraph 3 is labeled Figure 3-5. Throughout the guide certain font styles are used to improve readability.
• Windows, panels and sub-panels are bolded and italicized
• Hyperlinks are bolded and underlined
*
• Buttons are bolded only
* These are hyperlinks that function in e-QIP. They do not function in this guide. There are however functional hyperlinks in the user’s guide to assist the user in navigating quickly within the document. These hyperlinks have blue font
In paragraph 2 note hyperlinks to various parts of paragraph 4. Paragraph 4 is where procedures for performing the functions of the eight user roles of e-QIP are located. Users may note that some procedures are listed multiple times under more than one user role. This is because many identical or similar functions can be performed by more than one user role. Consider the Initiator role (paragraph 2.1.3). Note the Cancel Request procedure; it hyperlinks to paragraph 4.3.4. Hyperlinks to paragraph 4.3.4 can also be found under the Reviewer (paragraph 2.1.4) and the Approver (paragraph 2.1.5). This is because Initiators, Reviewers, and Approvers all have

2
authority to cancel requests, but the procedure appears in this guide only once to reduce confusion by eliminating duplication of exact or near-exact procedures that can be performed by multiple users. Functions that apply to more than one user role will be located in the procedures of the “junior” role. Note also that some user roles contain functions that are unique. For instance, note the functions under Agency Administrator (paragraph 2.1.1), User Administrator (2.1.2), and Business Manager (2.1.7); no other e-QIP user roles have authority to perform the functions of any of these 3 user roles.
3
TABLE OF CONTENTS
Paragraph Page 1 What is e-QIP? ....................................................................................... 7 2 Who Uses e-QIP? ....................................................................................... 9 2.1 Agency User Roles and Functions ................................................... 9
2.1.1 Agency Administrator ........................................................................... 10 2.1.2 User Administrator ............................................................................ 10 2.1.3 Initiator ........................................................................................ 10 2.1.4 Reviewer ........................................................................................ 11 2.1.5 Approver ……................................................................................ 12 2.1.6 Program Manager ............................................................................ 13 2.1.7 Business Manager ............................................................................ 14 2.1.8 Agency Help Desk ............................................................................ 14
3 Getting Started in e-QIP ............................................................................ 15
3.1 Access the OPM Portal – First Time User ........................................ 15 3.2 Access e-QIP – First Time User .................................................... 16 3.3 Access the OPM Portal –Returning Marine Corps User ................ 18 3.4 Access e-QIP – Returning Marine Corps User ............................ 19
4 Using e-QIP ................................................................................................... 23
4.1 Agency Administrator Functions ................................................... 23 4.1.1 Manage a Group ........................................................................... 23 4.1.1.1 Creating a Group ........................................................................... 23 4.1.1.2 Renaming a Group ........................................................................... 24 4.1.1.3 Deleting a Group ........................................................................... 24 4.1.2 Manage an Agency ........................................................................... 24 4.1.2.1 Creating an Agency ........................................................................... 24 4.1.2.2 Editing an Agency ........................................................................... 29 4.1.2.3 Edit (Manage) Agency Use Block (AUB) Templates ............... 32
4.2 User Administrator Functions ................................................... 35 4.2.1 Create/Edit a User ........................................................................... 35 4.2.2 List Agency Users ........................................................................... 37
4.3 Initiator Functions ........................................................................... 41 4.3.1 Initiate a Request ........................................................................... 41 4.3.2 Edit/View the Agency Use Block (AUB) ....................................... 43 4.3.3 View a Request ........................................................................... 46 4.3.4 Cancel a Request ........................................................................... 48

4
TABLE OF CONTENTS (cont)
Paragraph Page
4.3.5 Edit Comments ........................................................................... 50 4.3.6 Attach a Document to a Request ................................................... 52 4.3.7 Perform a Mass Initiation ............................................................... 59 4.3.8 Remove a Mass Initiation ............................................................... 64 4.3.9 Remove a Mass Initiation and Delete Requests ........................... 66 4.3.10 Review a Mass Initiation ............................................................... 67 4.3.11 Request an Authentication Reset ................................................... 67 4.3.12 Delete an Applicant ........................................................................... 68
4.4 Reviewer Functions ........................................................................... 71 4.4.1 Review a Request ........................................................................... 71 4.4.2 Download a Certified Request Submission Data Form (Archival Copy) 76
4.5 Approver Functions .............................................................................. 79 4.5.1 View a Request – Case Status Messages from the Investigative
Service Provider (ISP) .................................................................. 80 4.5.2 View a Request – Cases Returned Unacceptable (OPM Specific) ...... 81 4.6 Program Manager Functions .................................................................. 83 4.6.1 Assign or Unassign a Request.................................................................. 84 4.6.2 Change Assigned Group for a Request .......................................... 84 4.6.3 Uncancel a Request .............................................................................. 85 4.6.4 Locating Requests Currently in Another Agency .............................. 86 4.6.5 Approve Authentication Reset ...................................................... 86 4.7 Business Manager Functions .................................................................. 89 4.7.1 View Reports .......................................................................................... 89 4.8 Agency Help Desk Functions .................................................................. 93 4.8.1 Reset Golden Questions and Golden Answers for an Applicant ...... 94 4.8.2 Advanced Search .............................................................................. 95 4.8.2.1 Create Comma-Separated Values File for Advanced Search Data ...... 98 Appendix A Pass Through Agencies ................................................................... 99

5
LIST OF ILLUSTRATIONS Number Title Page Figure 1-1 e-QIP Investigation Initiation Process .......................... 7 Figure 2-1 Two Sides of e-QIP ............................................................. 9 Figure 2-2 e-QIP User Roles ............................................................. 9 Figure 3-1 OPM Portal Log-In Page ................................................. 15 Figure 3-2 e-QIP Main Page ............................................................. 16 Figure 3-3 First-Time User e-QIP Agency Log-In Screen ............. 17 Figure 3-4 First Log-In – Golden Question and Answer Creation . 18 Figure 3-5 OPM Portal Log-In Page ................................................. 19 Figure 3-6 e-QIP Main Page ............................................................. 20 Figure 3-7 Agency e-QIP Log-In Window ..................................... 20 Figure 3-8 e-QIP Log-In ......................................................................... 21 Figure 4-1 Agency Administrator Main Menu ..................................... 23 Figure 4-2 Agency Management Hyperlink on Main Menu Page . 25 Figure 4-3 Expanding the Agency Hierarchy ..................................... 26 Figure 4-4 Selecting an Agency to Add a Subordinate Child Agency 27 Figure 4-5 Create Agency Screen ................................................. 29 Figure 4-6 Edit Agency Window (Top Half) ..................................... 30 Figure 4-7 Edit Agency Window (Form Selection/Activation - Bottom Half) 30 Figure 4-8 Form Selection Drop Down List ..................................... 31 Figure 4-9 Forms Authorized in an Agency ..................................... 32 Figure 4-10 Manage AUB Templates Window ..................................... 33 Figure 4-11 User Administrator Main Menu ..................................... 35 Figure 4-12 Create/Edit User Window ................................................. 37 Figure 4-13 List Agency User Window ................................................. 38 Figure 4-14 Initiator Main Menu ............................................................. 41 Figure 4-15 Initiate Request Window ................................................. 43 Figure 4-16 Agency Use Block – Top Portion ..................................... 45 Figure 4-17 AUB – Bottom Portion ................................................. 46 Figure 4-18 Initiators’ Investigation Request Summary Window ............. 48 Figure 4-19 Select Requests to Cancel Window ..................................... 49 Figure 4-20 Comments Window ............................................................. 51 Figure 4-21 Attachments Window (Initiator) ..................................... 53 Figure 4-22 Attachments Window (Initiator) – Upper Half – Forms
Hyperlink and Attachments Requirements Sub-Panel .. 54 Figure 4-23 Attachments Window (Initiator) – Lower Half – Expected
Attachments and Currently Attached Documents Sub-Panels . 58 Figure 4-24 Attachments Window (Initiator) – Lower Half – Create
Cover Sheet, Add New Attachments and Fingerprint Submission Details Sub-Panels ....................................... 59
Figure 4-25 Mass Initiation Excel™ Spreadsheet ....................................... 61 Figure 4-26 Mass Initiation Summary Window ....................................... 62 Figure 4-27 Mass Initiation Applicants Window ....................................... 63

6
LIST OF ILLUSTRATIONS (cont) Number Title Page Figure 4-28 Mass Initiation Confirmation Window ........................ 64 Figure 4-29 Completed Mass Initiation Window .................................... 65 Figure 4-30 Mass Initiation Summary Window .................................... 65 Figure 4-31 Request Authentication Reset Window ........................ 68 Figure 4-32 Delete Applicant Window ................................................ 69 Figure 4-33 Reviewer Main Menu ............................................................ 71 Figure 4-34 Review Request Window and Panel .................................... 72 Figure 4-35 Rejection Comments Panel ................................................ 76 Figure 4-36 Approver Main Menu ............................................................ 79 Figure 4-37 Notices Panel ........................................................................ 81 Figure 4-38 Notices Panel (Returned Unacceptable) ........................ 82 Figure 4-39 Program Manager Main Menu .................................... 83 Figure 4-40 Select Requests Window ................................................ 86 Figure 4-41 Business Manager Main Menu .................................... 89 Figure 4-42 View Reports Selection Window .................................... 90 Figure 4-43 Request Status Counts Report .................................... 90 Figure 4-44 Agency User Role Counts ................................................ 91 Figure 4-45 Request Event Counts ................................................ 91 Figure 4-46 Help Desk Main Menu ................................................ 93 Figure 4-47 Authentication Reset Window .................................... 94 Figure 4-48 Advanced Search Window ................................................ 95 Figure 4-49 Advanced Search Results Window .................................... 97 Figure 4-50 Comma-Separated Values Spreadsheet ........................ 98 Figure A-1 Sample Hierarchy ............................................................. 99

7
1. What is e-QIP? e-QIP is a secure website environment that is designed to house all personnel investigative forms used to collect background information on people requiring security clearances. e-QIP is also used to manage user agencies (U.S. Marine Corps Headquarters and all subordinate activities in the operating forces and the supporting establishment) that initiate background investigations. e-QIP is also used to manage e-QIP agency users who initiate, review, approve, and administer investigation requests for Marine Corps agencies. With e-QIP, applicants can electronically enter, update, and release their personal investigative data over a secure internet connection to their sponsoring Marine Corps agency. Once released to the agency, agency users with the appropriate permissions within the e-QIP system can review, approve, and submit properly completed questionnaires to an Investigative Service Provider (ISP).
Figure 1-1. e-QIP Investigation Initiation Process
Yes
No
Yes No
Questionnaire is Complete and Correct?
Questionnaire is Complete and Correct?

8
This Page Blank
9
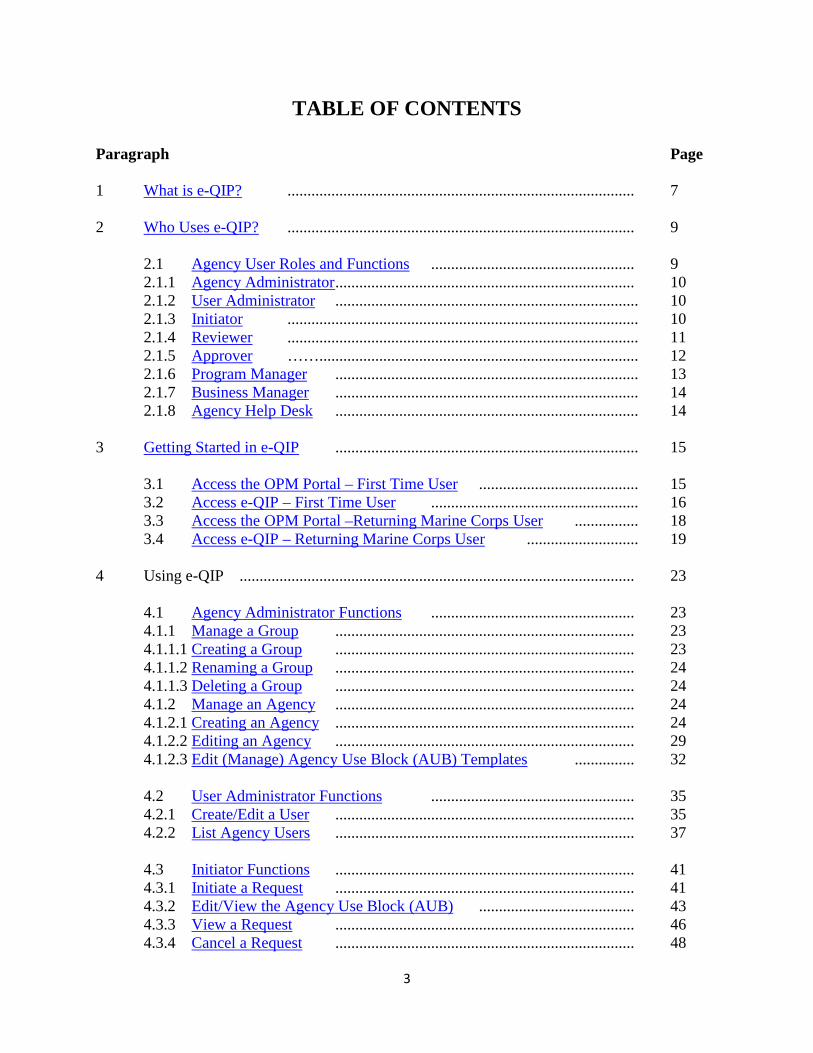
2. Who uses e-QIP? e-QIP consists of two main parts that are separate and distinct from one another. The Secure Applicant Website is where applicants complete questionnaires. The website and link are shown on the left of Figure 2-1. The other part is the OPM Portal where agency users access e-QIP to initiate and manage investigations and/or to manage the agency and agency users. The link to that part of e-QIP is on the right. This guide addresses that part of e-QIP.
Figure 2-1. Two Sides of e-QIP
2.1 Agency User Roles and Functions. This section identifies the primary functions that are supported by e-QIP and the user roles that have access to those functions. Certain roles have the ability to perform certain functions within the application. Figure 2-2 below lists the user roles. The assigned or authorized role of agency users allows the function of the role to be performed within the scope of the agency. Group level roles, if established, can only perform the function for requests assigned to a specific group within an agency. Most Marine Corps agencies will not use or need groups, but are not prohibited from establishing them. Think of roles as billets that have certain authority, responsibility, and functions within e-QIP. Note that a single Marine Corps user may have more than one role within an agency and could have them all.
Agency Administrator Approver
User Administrator Program Manager
Initiator Business Manager
Reviewer Agency Help Desk
Figure 2-2. e-QIP User Roles
Secure Applicant Website OPM Portal Link to Agency
www.opm.gov/e-qip https://opmis.xsp.org

10
2.1.1 Agency Administrator. Agency Administrators are found throughout the operating forces and supporting establishment, usually down to the battalion (and equivalent) level, but in some cases have been established at lower levels. The Agency Administrator is an agency user who is responsible for managing groups within a Marine Corps agency, managing agency attributes, creating agencies, and editing Agency Use Block templates. Most Marine Corps Agency Administrator’s main responsibilities are to perform Manage the Agency tasks. Agency Administrators perform the following functions:
• Managing Groups. Paragraph 4.1.1.
o Create a Group. Paragraph 4.1.1.1.
o Rename a Group. Paragraph 4.1.1.2.
o Delete a Group. Paragraph 4.1.1.3
• Managing the Agency. Paragraph 4.1.2.
o Create an Agency. Paragraph 4.1.2.1.
o Edit an Agency. Paragraph 4.1.2.2.
o Edit Agency Use Block (AUB) Templates. Paragraph 4.1.2.3.
2.1.2 User Administrator. An agency user who is responsible for adding and managing users within a Marine Corps agency. User Administrators can perform the following functions:
• Create and Edit Agency Users. Paragraph 4.2.1.
• List Agency Users. Paragraph 4.2.2
2.1.3 Initiator. An agency user that starts the applicant investigation, selects form(s) to be completed by an applicant, completes the Agency Usage Block (AUB), contacts applicants/employees to inform them that they should complete the investigation form(s) using e-QIP, requests a reset of Golden Questions, and cancels requests. Most Marine Corps Initiators main responsibilities are to perform initiate a request, edit AUB data, attach documents, mass initiations, and request authentication reset tasks. Initiators perform the following functions:
• Initiate a Request. Paragraph 4.3.1
• Edit/View Agency Use Block (AUB) data. Paragraph 4.3.2.

11
• View Requests. Paragraph 4.3.3.
• Cancel a Request. Paragraph 4.3.4.
• Edit Comments. Paragraph 4.3.5.
• Attach Document(s) to a Request. Paragraph 4.3.6.
• Perform Mass Initiation. Paragraph 4.3.7.
• Remove Mass Initiation. Paragraph 4.3.8.
• Remove Mass Initiation and Delete Requests. Paragraph 4.3.9.
• Review Mass Initiation. Paragraph 4.3.10.
• Request Authentication Reset. Paragraph 4.3.11.
• Delete an Applicant. Paragraph 4.3.12.
• Print Applicant Data. See Initiator – Attach Document(s) to a Request. Paragraph 4.3.6.
• Use Advanced Search. See Help Desk User – Advanced Search. Paragraph 4.8.2.
2.1.4 Reviewer. An agency user that reviews applicant data, accepts/rejects applicant answer(s), enters comments for rejected answer(s), and attaches documents. Most Marine Corps Reviewers main responsibilities are to perform review requests and attach documents tasks. Reviewers perform the following functions:
• Review Request. Paragraph 4.4.1.
o View Request - Attached Documents Metadata. See Review Request – Paragraph 4.4.1.
o Release Request to Agency Approver. See Review Request – Paragraph 4.4.1.
o Reject Request Directly to Applicant. See Review Request – Paragraph 4.4.1.
o Generating, Reviewing, and Sending a Rejection Letter. See Review Request – Paragraph 4.4.1.
o Return Request to Child Agency. See Review Request – Paragraph 4.4.1.

12
o Edit Rejection Comments. See Review Request – Paragraph 4.4.1.
• Download Certified Request Submission Data Forms (Archival Copy). Paragraph 4.4.2.
• Edit/View Agency Use Block (AUB) data. See Initiator - Edit/Review Agency Use Block (AUB) data. Paragraph 4.3.2.
• View Request Summary. See Initiator - View Requests. Paragraph 4.3.3.
• Cancel a Request. See Initiator - Cancel a Request. Paragraph 4.3.4.
• Edit/View Comments for Request. See Initiator - Edit Comments. Paragraph 4.3.5.
• Attach Document(s) to a Request. See Initiator – Attach Document(s) to a Request. Paragraph 4.3.6.
• Download Certified Request Signature Forms. See Initiator – Attach Document(s) to a Request. Paragraph 4.3.6.
• Use Advanced Search. See Help Desk User – Advanced Search. Paragraph 4.8.2.
2.1.5 Approver. An agency user that reviews applicant data, approves/rejects answer(s), enters comments for rejected answer(s), and submits form(s) to ISP or next higher agency. Most Marine Corps Approvers main responsibilities are to perform approve or review a request tasks. Approvers perform the following functions:
• Approve or Review Request. See Reviewer – Review Request. Paragraph 4.4.1.
o View Request – Attached Documents Metadata. See Reviewer – Review Request. Paragraph 4.4.1.
o Release Request from this Agency. See Reviewer – Review Request. Paragraph 4.4.1.
o Reject Request Directly to Applicant. See Reviewer – Review Request. Paragraph 4.4.1.
o Generating, Reviewing, and Sending a Rejection Letter. See Reviewer – Review Request. Paragraph 4.4.1.
o Return Request to Child Agency. See Reviewer – Review Request. Paragraph 4.4.1.
o Edit Rejection Comments. See Reviewer – Review Request. Paragraph 4.4.1.

13
• Download Certified Request Signature Forms. See Initiator – Attach Document(s) to a Request. Paragraph 4.3.6.
• Edit/View Agency Use Block (AUB) Data. . See Initiator - Edit/Review Agency Use Block (AUB) data. Paragraph 4.3.2.
• View Request Summary. See Initiator - View Requests. Paragraph 4.3.3.
• Cancel a Request. See Initiator - Cancel a Request. Paragraph 4.3.4.
• Edit/View Comments for Request. See Initiator - Edit Comments. Paragraph 4.3.5.
• Attach Document(s) to a Request. See Initiator – Attach Document(s) to a Request. Paragraph 4.3.6.
• Download Certified Request Submission Data Forms (Archival Copy). See Reviewer - Download Certified Request Submission Data Forms (Archival Copy). Paragraph 4.4.2.
• View Request – Case Status Messages from ISP. Paragraph 4.5.1.
• View Request – Cases Returned Unacceptable (OPM Specific). Paragraph 4.5.2.
• Using Advanced Search. See Help Desk User – Advanced Search. Paragraph 4.8.2.
2.1.6 Program Manager. An agency user who performs supervisory tasks including viewing the status of work for his or her agency, assigning/unassigning requests, approving/ rejecting Golden Question resets, and canceling requests. Most Marine Corps Program Managers main responsibilities are to perform assign/unassign request tasks, uncancel requests, approve authentication resets, and to view requests case status/returned as unacceptable. Program Managers perform the following functions:
• Assign and/or Unassign Request. Paragraph 4.6.1.
• Change Assigned Group for Request. Paragraph 4.6.2.
• Uncancel Request. Paragraph 4.6.3.
• Locating Request Currently in Another Agency. Paragraph 4.6.4.
• Approve Authentication Reset for Agency. Paragraph 4.6.5.
• View Request Summary. See Initiator - View Requests. Paragraph 4.3.3.

14
• Cancel Request. See Initiator - Cancel a Request. Paragraph 4.3.4.
• Edit/View Comments for a Request. See Initiator - Edit Comments. Paragraph 4.3.5.
• View Request – Attached Documents Metadata. See Reviewer – Review Request. Paragraph 4.4.1.
• View Request – Case Status Messages from ISP. See Approver - View Request – Case Status Messages from ISP. Paragraph 4.5.1.
• View Request – Cases Returned Unacceptable (OPM Specific). See Approver - View Request – Case Status Messages from ISP. Paragraph 4.5.2.
• Using Advanced Search. See Help Desk User – Advanced Search. Paragraph 4.8.2.
2.1.7 Business Manager. An agency user who is capable of generating statistical reports containing request data within the e-QIP system. Business Managers perform the following functions:
• View Reports. Paragraph 4.7.1.
2.1.8 Agency Help Desk. The Agency Help Desk user can check a request or user status, and reset Golden Questions without the concurrence of a second person. Users with help desk authority perform the following functions:
• Reset Golden Questions and Golden Answers for Applicant. Paragraph 4.8.1
• Advanced Search. Paragraph 4.8.2.
• View Request Summary. See Initiator - View Requests. Paragraph 4.3.3.
• Locating Requests Currently in Another Agency. See Program Manager – Locating Requests Currently in Another Agency. Paragraph 4.6.4.

15
3. Getting Started in e-QIP. Accessing e-QIP is a 2 step process. First, users must access OPM’s secure portal. From the secure portal Marine Corps e-QIP agencies can be accessed. Users must also complete a one-time registration when logging in to the system for the first time. Procedures for first-timers and returning Marine Corps agency users are provided below: 3.1 Access the OPM Portal - First-Time User
1. You must be invited to the OPM Portal in order to register and log in. If you have not been
invited via email, see your Agency Administrator.
2. Navigate to the OPM Portal login page, https://opmis.xsp.org/. Select “If you were invited to join, click Here
to register.” Figure 3-1.
Figure 3-1. OPM Portal Log-In Page 3. Follow the instructions on the next series of screens to register as an Extranet Secure Portal
(ESP) user. When prompted, type in the organizational ID
provided in the invitation email. When prompted, provide the username and password you intend to use when accessing the OPM Portal. Note the requirements listed on the page for creating a secure password.
4. A second e-mail message will be sent to notify you that the request for an account on the portal has been approved. The message will include the text: “Your registration into the
First time users, click Here to register

16
OPM Secure Portal has been approved and you are now able to log into the portal with the username and password you created during the registration process.”
5. Access the OPM Portal by typing in the username and password in the spaces provided.
Click Log In. Figure 3-1.
3.2 Access e-QIP – First-Time User When the e-QIP main page displays, click the Link to e-QIP Agency button under Custom Tools. Figure 3-2.
Figure 3-2. e-QIP Main Page
1. Enter your Social Security Number twice in the two spaces provided. Check “No” to the management rights only question. Click the Submit Request button. Figure 3-3.
Link to eQIP
Agency

17
Figure 3-3. First-Time User e-QIP Agency Log-In Screen
2. Enter the responses to your three default Golden Questions.
Note: To see what you are typing in, select the checkbox next to “Allow me to see my Golden Answers as I type them.” Capitalization does not matter, but spelling, spacing and punctuation do.
3. You will be prompted to create three new Golden Questions and Answers. Figure 3-4.
Note: Type in new questions and answers, keeping in mind the following:
• You cannot repeat any of the defaults. • Questions can be phrases. • Answers must have at least three characters. • Each answer must be unique.

18
Figure 3-4. First Log-In - Golden Question and Answer Creation
4. Click Submit. 5. Upon successful login authentication the Main Menu displays. Main menus will only
display the functions authorized by your user role(s), therefore all user main screens may not look identical.
3.3 Access the OPM Portal – Returning Marine Corps User
1. Navigate to the OPM Portal login page, https://opmis.xsp.org/. Figure 3-5
2. Type your Username and Password into the appropriate fields. 3. Click Log In.

19
Figure 3-5. OPM Portal Log-In Page
3.4 Access e-QIP – Returning Marine Corps User 1. When the e-QIP main page displays, click Link to e-QIP Agency under Custom Tools.
Figure 3-6.

20
Figure 3-6. e-QIP Main Page
2. When the e-QIP Login window displays, select your agency from the drop down list and click the Establish eQIP Agency connection button. Figure 3-7.
Figure 3-7. Agency e-QIP Login Window
Agency Drop Down List
Establish Agency Connection
Link to eQIP
Agency

21
3. On the next screen click the Logon to eQIP-Agency
hyperlink.
4. Enter your social security number in the fields provided and click the Login button. Figure 3-8.
Figure 3-8. e-QIP Log-In 5. Enter the responses to your three Golden Questions.
Note: To see what you are typing in, select the checkbox next to “Allow me to see my Golden Answers as I type them.” Capitalization does not matter, but spelling, spacing and punctuation do.
6. Click Submit. 7. Upon successful login authentication the Main Menu displays. Main menus will only display
the functions authorized by your user role(s), therefore all user main screens may not look identical.
SSN Blocks
Login Button

22
This Page Blank

23
4. Using e-QIP 4.1 Agency Administrator Functions This section explains each option available from the Agency Administrator’s Main Menu: Manage Group and Manage Agency. These functions are unique to the Agency Administrator. No other user can perform these functions. 4.1.1 Manage a Group. The purpose of this set of functions is to allow the user to:
• Create a group in the Agency. • Rename the group. This action does not affect the assignment of Requests or user roles
within the renamed Group—only the name of the group. • Delete group. There can be no requests associated with the group that is to be deleted.
4.1.1.1 Creating a Group:
1. From the Agency Administrator Main Menu, locate the Manage Group panel (Figure 4-1). Note the
instructions displayed on the screen: “Select a group from the table, then select an action from below.”
2. Enter the desired group name in the New Group Name text entry box, and click the Add button.
3. The window will re-display with a message that the group was successfully added.
Figure 4-1. Agency Administrator Main Menu
New Group Name Text Box
Add Button
Manage Group Panel
Rename Button
Existing Group Drop Down List

24
4.1.1.2 Renaming a Group: 1. From the Agency Administrator Main Menu, locate the Manage Group panel (Figure 4-1).
2. Click the pull-down menu arrow to view all existing group(s).
3. Select the Group Name you wish to rename.
4. Type the new name in the New Group Name text entry box and click the Rename button.
5. The page will re-display with a message that the group was successfully renamed.
4.1.1.3 Deleting a Group: 1. From the Agency Administrator Main Menu, locate the Manage Group panel (Figure 4-1).
2. Click the drop down menu to view all existing group(s).
3. Locate the Group name you wish to delete and click it once with the left mouse button so that
it is displayed in the pull-down menu.
4. Click the Delete button.
5. The window will re-display with a message that the group was successfully deleted.
6. Note that you cannot delete a group which is currently associated with a request.
4.1.2 Manage an Agency
The purpose of these functions is to allow the user to add an agency or edit agency information. 4.1.2.1 Creating an Agency: 1. For users with multiple user roles, when the Main Menu window appears, click the Agency
Management hyperlink. Figure 4-2.
Note that once added a child agency cannot be deleted.

25
Figure 4-2. Agency Management Hyperlink on Main Menu Page 2. From the Manage Agency panel, click an agency marked with a plus (+) sign to expand the
agency hierarchy. Figure 4-3. Note: The agency administrator will only be able to see hierarchy at their level and below. For example, the agency administrator at 1st Marine Division will see only 1st Marine Division and subordinate agency structure, but not I MEF, MarForPac, other higher headquarters, or adjacent headquarters hierarchy. Agency hierarchy will be available to expand as described in step 2 above only if subordinate agencies have previously been created.
Agency Management hyperlink

26
Figure 4-3. Expanding the Agency Hierarchy
3. Click the radio button of the agency under which to create a new subordinate agency. Figure 4-4.
Note that in e-QIP a subordinate agency is referred to as a “child” agency.
4. Click the Create Child Agency button. Figure 4-4.
Click an Agency to Expand the Hierarchy
Manage Agency Panel

27
4-4. Selecting an Agency to Add a Subordinate Child Agency
5. The Create Agency screen will appear. This screen features a main panel with three sub-panels: Agency Information, Agency Permissions, and Inactivity Settings. Figure 4-5.
6. Agency Information. Fill in the name of the new agency. If the agency is to be a pass through
agency, the name should include the letters “PT” to indicate pass through. For example, in Figure 4-5, 1st Battalion 2d Marines (1/2) is being created under parent Mock 2d Marines PT, note that the agency name is “1/2 PT” indicating that this will be a pass through agency. See Appendix A for more on pass through agencies. Complete the agency information section by providing an email address for a point of contact.
7. Agency Permissions. Select the desired permissions of the child agency. a. Can Create Sub-Agencies – Default setting is “Yes”. Leave at “Yes” if subordinate
agencies will have a need to create subordinate agencies. Otherwise select “No”. Typically, agencies designated as pass through should be set to “Yes”; those that are not should be set to “No”.
b. Is a Contractor Agency – Default setting is “No”. Few if any Marine Corps activities
should need to change this setting. If the agency is a contractor, select “Yes.” Answering “Yes” to this setting gives employees of the contractor company the ability to elect to hide their Part 2 answers of an older version of SF 86 from their immediate (contractor) employer. Reviewers and approvers at the next higher agency can see all the answers.
Then Click the
Create Child
Agency Button
First, Select the Unit under Which the Child
Agency is to be Created by Clicking the
Radio Button
To Edit an Agency, Select the Unit by Clicking the Radio Button. Then Click
the Edit Agency Button

28
c. Is a “Pass Through” Agency – Default setting is “No”. Set to “Yes” if the agency is
designated as a pass through agency and has been named as a pass through agency (has “PT” after the agency) in the agency name block of the agency information section.
d. e-QIP Help Desk can access - Default setting is "Yes", however this feature is not yet
functional. Eventually, this feature will enable the e-QIP Help Desk to check on the status of the agency’s requests in e-QIP in order to assist with questions.
e. Approver and Program Manager permissions to view case status updates from the ISP. If
set to “Yes”, child agencies have this option available. If set to “No”, visibility of this option in the child agency (and any lower-level child agencies) is removed.
8. Inactivity Settings – The Agency Administrator may set values to determine when agency
users and applicant requests should be terminated.
a. Days Until Agency Roles Time Out – This setting determines how long the roles of agency users are effective for the selected agency. Default setting is 90. Before the end of this time, the Agency Administrator must renew the role on an individual basis or the agency user cannot perform the functions of the assigned role. Recommend this setting be changed to 365.
b. Days Until Requests Untouched by Applicant Terminate - This setting determines the
maximum number of days that the individual applicant has to login and take the first step in completing the request (i.e., acknowledge reading the instructions) after the Initiator creates the request. Default setting is 30.
c. Days Until Requests Rejected to Applicant and not Resubmitted Terminate – This setting
determines the maximum number of days that the applicant has to correct the problem and re-release back to the agency. Default setting is 60. If the request is not re-released within that time period, the request is terminated. After the request is terminated, if the agency user still wants the applicant to complete the form, a new request must be initiated.
d. Days Until Requests Touched By Applicant But Not Finished Terminate – This setting
determines the maximum number of days (after the applicant has started editing his or her data) the applicant has to complete the request and release to the agency. Default setting is 90. If the request is not completed and released in that time period, the request is terminated. After the request is terminated, if the agency user still wants the applicant to complete the form, a new request must be initiated.
e. Days Until Requests Awaiting Agency Action Terminate – the maximum number of days
that agency users have to assign the request for review after the applicant releases the request to the agency. Default setting is 90. If the request is not assigned within this time period, the request is terminated. After the request is terminated, if the agency still wants the applicant to complete the form, a new request must be initiated.

29
f. Days from Subject Certification Date Until Returned Unacceptable Terminates– This
setting determines the maximum number of days (starting from the date the applicant certifies the request) that agency users have to make corrections and re-release to the ISP a request that has been returned from the ISP as unacceptable. After the request is terminated, if the agency still wants the applicant to complete the form, a new request must be initiated. The default is 120. Note that 120 is the maximum number of days allowed in this field. Note also that if parent agencies change this setting, it changes all their subordinate child agencies too.
Warning, the following action cannot be undone. Once added a child agency cannot be deleted.
9. Click the Create Agency Button. The Edit Agency window will appear.
Figure 4-5. Create Agency Screen
4.1.2.2 Editing an Agency: Editing an agency is continuation of creating an agency, but agencies can also be edited at any time. When an agency is created, e-QIP automatically takes the user to the Edit Agency window. Note the message in the yellow Messages block that informs you that the new agency was successfully created. Figure 4-6. Scroll down to reveal the sub-panels Forms Not Yet Authorized For Use In Agency and Form Use Authorizations In This Agency. Figure 4-7. The Edit Agency
Provide Child Agency Name and
POC
Select Child Agency Permissions
Select Child Agency Inactivity Settings
Click Create Agency Button

30
window allows you to select Standard Form (SF) questionnaires that the agency uses. Note that the child agency will only have options to select and activate forms that the parent or ancestor has authorized. If the ancestor has not activated any forms, this option will not be available to the child agency.
Figure 4-6. Edit Agency Window (Top Half)
Figure 4-7. Edit Agency Window (Form Selection/Activation – Bottom Half)
Edit Agency Screen Message Block
Forms Not Yet Authorized For Use In
Agency
Form Use Authorizations In This Agency

31
The Edit Agency function can also be accessed from the Agency Administrators Main Menu. 1. From the Agency Administrator’s Main Menu, locate the desired agency to edit in the
Manage Agency panel. Figures 4-3 and 4-4.
2. Click the radio button to the left of the agency name and click the Edit Agency button. 3. The Edit Agency window (Figures 4-6 and 4-7) will appear. The Edit Agency window
displays three separate panels: Edit Agency, Forms Not Yet Authorized For Use In Agency, and Form Use Authorizations In This Agency.
4. In the Edit Agency panel, modify the values of each sub-panel as desired following the
instructions provided in paragraph 4.1.2.1 (steps 6, 7, and 8), and click the Save Changes button.
5. In the Forms Not Yet Authorized For Use In Agency panel, any available ISP/Form
combinations will be displayed in the drop down list. Make your selection then click the Authorize Form button. Figure 4-8.
6. Any selections made in Step 5 above will be displayed in the Form Use Authorizations In
This Agency panel. Figure 4-9. Repeat step 5 if the agency uses/needs multiple standard forms. If you have activated a form, it may be deactivated by clicking the Deactivate button in the “Action” column. Any existing AUB templates may also be edited from this panel.
Figure 4-8. Form Selection Drop Down List
Then, Click the
Authorize Form
Button
First, Select a Standard Form from the Drop
Down List

32
4.1.2.3 Edit (Manage) Agency Use Block (AUB) Templates Once displayed in the Form Use Authorizations In This Agency panel, form(s) are available for use in the agency. Figure 4-9. Options for forms are deactivation and AUB (Agency Use Block) Template editing. Select the Deactivation button if at some future time form(s) are no longer needed in the agency. Select the AUB Template Edit
hyperlink to customize the Agency Use Block to your agency (Step 2 below).
The Edit (Manage) AUB Template function can also be accessed from the Agency Administrators Main Menu. 1. From the Edit Agency window (Figure 4-9), locate the desired ISP/Form in the Form Use
Authorizations In This Agency panel.
Figure 4-9. Forms Authorized in an Agency 2. Click the Edit
hyperlink in the appropriate row of the table under the “AUB Templates” column.
3. The system will display the Manage AUB Templates window, shown in Figure 4-10. The Manage AUB Templates window allows the Agency Administrator to create, edit, or delete AUB templates.
Deactivate Form
Button
AUB Template
Edit Hyperlink
Forms Available
to this Agency

33
a. To edit, select an existing template from the “Existing AUB Templates” drop down list and press the Edit button to load the template. Make desired changes and click the Save Changes button. Consult OPM publication “Requesting OPM Personnel Investigations”, July 2008 for required AUB data.
b. To rename a template, select a template from the “Existing AUB Templates” drop down list, enter a new name in the “New AUB Template Name” text box, and press the Rename button.
c. To create a new template, enter a name in the “New AUB Template Name” text box and
press the Create button. You will then get a blank screen to enter AUB template information. Consult OPM publication “Requesting OPM Personnel Investigations”, July 2008 for required AUB data.
d. To create a new template by starting with an existing template as a baseline, select the
template you wish to use, enter a name for the new template, and click the Copy From Existing button. This will create a new template and load the contents of the selected template into the new template.
e. To delete a template, select a template from the “Existing AUB Templates” drop down
list and press the Delete button.
Figure 4-10. Manage AUB Templates Window

34
This Page Blank

35
4.2 User Administrator Functions This section explains each option available from the User Administrator’s Main Menu. After a successful login, the system will display the Manage User panel to a user who has been assigned the User Administrator role. The primary functions are create/edit users and list agency users. At any time, the user may click the Help
hyperlinks which are provided for each individual panel. Figure 4-11 below illustrates the User Administrator’s Main Menu window before any selection has been made.
Figure 4-11. User Administrator Main Menu
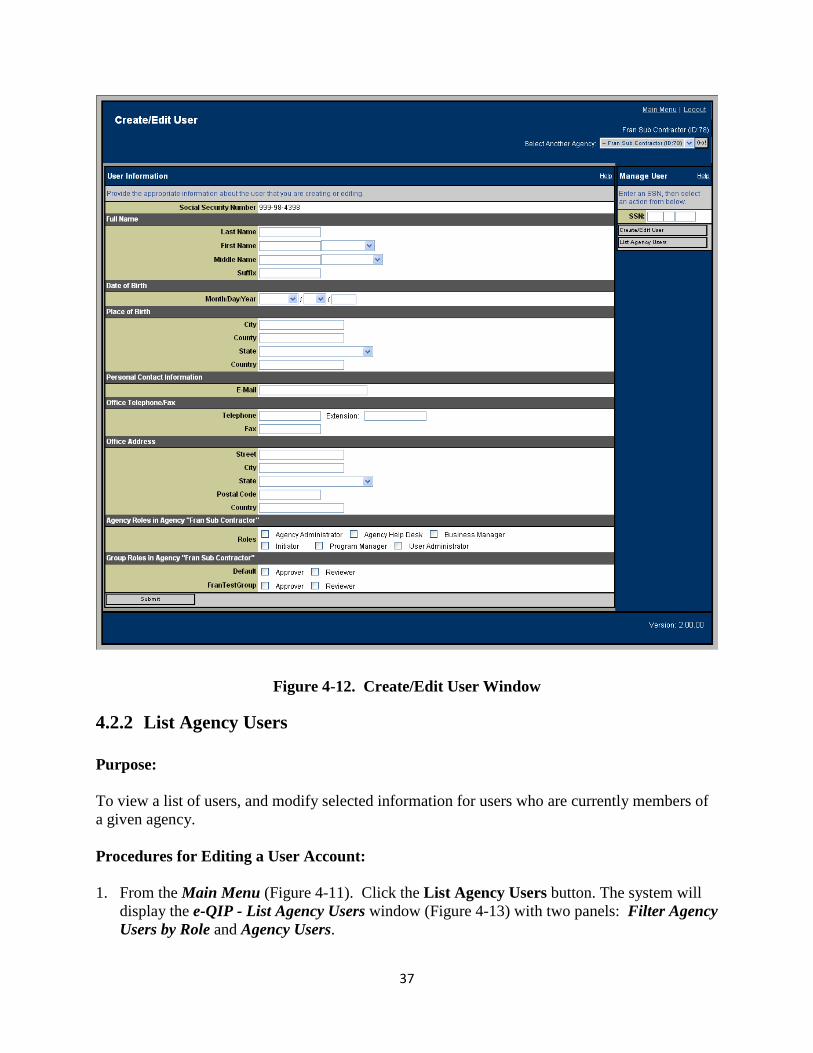
4.2.1 Create/Edit a User Purpose: Establish and modify user accounts in the e-QIP system.
Note that the user created will only have the user roles associated with the agency that appears in the “Select Another Agency” drop down list (Figure 4-11). Note that a user may have multiple roles. If required, a user may be assigned every single e-QIP user role.
Procedures for Creating or Editing a User: In the Manage User sidebar panel, enter the desired social security number (SSN) in the text input boxes provided. The SSN is entered and displayed in three separate boxes. Figure 4-11. Press the <Tab> key to advance from one portion of the number to the next and click the Create/Edit User button. If the user already exists, the system will display the Create/Edit User
Select Another Agency Drop Down

36
window (Figure 4-12) with the Create/Edit User window displayed, and any data previously entered for that user will also appear. 1. If the user does not already exist, the system will display the Create/Edit User window and
panels with the SSN entered, but the text input boxes will be blank.
2. Enter the individual’s demographic data in the Full Name, Date of Birth, and Place of Birth sub-panels. The demographic data will be the basis for the user’s initial Golden Questions.
3. Enter the individual’s contact information in the Personal Contact, Office Telephone/Fax,
and Office Address sub-panels.
4. Check the box(es) in the Agency Roles in Agency “XXXXXX” panel that correspond to the duties or functions required for the user.
Note: The agency roles for the user are for the agency into which created. For instance, a user created in the 2d MAW headquarters will not automatically have access to or user permissions in subordinate MAGs and squadrons. If the user needs one or more user roles in a subordinate agency, the User Administrator must assign them individually. Select the agency from the “Select Another Agency” drop down list (Figure 4-11), enter the users SSN in the Manage User sidebar panel and click the Create/Edit User button. The data fields should auto-populate. Select the roles for the new agency. This must be done for every user and in every agency for users who require access across a chain of command.
5. Check the box(es) in the Group Roles in Agency “XXXXXX” panel for users who are
Reviewers and/or Approvers. If groups have been established by the Agency Administrator, agency users can be assigned to Reviewer and/or Approver roles in groups, otherwise use “Default”.
6. Click the Submit button.
37
Figure 4-12. Create/Edit User Window
4.2.2 List Agency Users Purpose: To view a list of users, and modify selected information for users who are currently members of a given agency. Procedures for Editing a User Account: 1. From the Main Menu (Figure 4-11). Click the List Agency Users button. The system will
display the e-QIP - List Agency Users window (Figure 4-13) with two panels: Filter Agency Users by Role and Agency Users.

38
Figure 4-13. List Agency Users Window
2. The Filter Agency Users by Role panel allows the user to narrow the current listing of
agency users by agency role and/or group. Select a role and/or a group to refine the listing from the drop down lists titled "Roles" and "Groups,” respectively. Then, click the Apply Filter button. If you do not select a filter, all roles for the agency and all agency users will be listed.
3. The Agency Users panel allows the User Administrator to view a listing of current users within the agency, as well as their assigned user roles; and to modify their access. The “Expiry Date” column displays the user/agency relationship expiration date. When the relationship expires, the user will no longer have access to this agency within the system. If the user has been disabled, the word “Disabled” is displayed in this column. If the role has expired, “Expired” is displayed in this column. The Agency Users panel allows the User Administrator to enable, disable, terminate and renew users in the agency.
a. To enable a currently disabled agency user, select "Enable" from the drop down list in the
"Action" column of the table. Then, click the Submit button.
b. To disable a currently enabled agency user, select "Disable" from the drop down list in the "Action" column of the table. Then, click the Submit button.

39
c. To renew an agency user's expiration date to the maximum allowed by the agency, select "Renew" from the drop down list in the "Action" column of the table. Then, click the Submit button. Note that relationships for expired and unexpired users may be renewed.
d. Terminate an agency user from this agency by selecting "Terminate" from the drop down list in the "Action" column of the table. Then, click the Submit button.
Note that the Agency Users Panel displays only 25 users at a time by default. In order to view additional ones, click the Expanded List
To display the total number of agency users, click the
hyperlink
Show Total Count hyperlink in the Agency Users Panel.

40
This Page Blank

41
4.3 Initiator Functions
The primary functions accessible via three separate panels on the Initiator’s Main Menu include: My Active Request Initiations, My Latest Requests for Authentication Reset, and Mass Initiations. Command buttons are available on the right side of the page, and include Request GQ Reset, Delete Applicant, Initiate Request, View Request, Cancel Request, Edit Comments, Print Applicant Data, Edit/View AUB, Advanced Search, and Mass Initiation. Figure 4-14 below illustrates the Initiator’s Main Menu when there are active request initiations present.
Figure 4-14. Initiator Main Menu
4.3.1 Initiate a Request
Purpose:
To establish an investigation request within e-QIP. Request initiation identifies the applicant, provides demographic data for the applicant, assigns the request to a group (if applicable), and identifies the type of investigation and other pertinent data in the Agency Usage Block (AUB). Only Initiators have system authority for this function.
Manage Request Sidebar Panel
Enter SSN
Initiate Request Button
Mass Initiation Button
Mass Initiation
Panel
My Active Initiations
Panel
Authenti-cation Reset Panel
Manage User
Sidebar Panel

42
Procedures for Initiating an Individual Applicant: 1. From the Initiator’s Main Menu window, enter the applicant’s SSN in the text entry boxes of
the Manage Requests sidebar panel. (Figure 4-14: Right Side)
2. Click the Initiate Request button.
3. The Initiate Request window (Figure 4-15) will appear.
Note that if the applicant’s SSN is in the system (due to a reinvestigation or a reapplication due to a previous cancellation or rejection; or for another reason), e-QIP fields will auto-populate with previously entered information. Check it for accuracy.
4. Enter personal information of the Full Name panel in the following fields: Applicant’s Last
Name, First Name (make selections from the first name drop down list, if applicable), Middle Name (make selections from the middle name drop down list, if applicable), and suffix if applicable.
5. Enter personal information in the Date of Birth panel. 6. Enter personal information of the Place of Birth panel in the following fields: city, county,
state, country (if country of birth is the U.S., leave blank, otherwise type in the country of birth. A country List
hyperlink is available).
7. Enter information in the Personal Contact Information panel. Enter the applicant’s the e-mail address, if applicable. Note that there are no automatic email notifications in e-QIP at this time.
8. Form Information panel. Use the drop down list to select the correct ISP/Form: e.g., SF 85,
SF 85P, or SF 86. Use the drop down list to select an applicant group. Groups will only be available if an Agency Administrator established them. Note that assignment to groups is not typical for the Marine Corps; most investigation request applicants will not be assigned to groups nor have groups available to select.
9. Import from e-QIP Offline Edition panel. Default setting is for drop down list is “No”.
Leave at “No”. This functionality is not yet enabled in e-QIP. 10. Instructions for Applicant panel. Use this field to provide additional instructions such as,
where to mail signature pages (certification that information is true form and information release approval form), the applicant’s deadline for completing the investigation questionnaire, your (the initiator’s) contact information. Note that this information will display for the applicant in e-QIP when they successfully log in. The instructions will also print on the archival copy of the completed questionnaire.

43
11. When the user and request information is complete, click the Submit button. The Agency
Use Block window appears. See paragraph 4.3.2 for Agency Use Block window instructions.
Figure 4-15. Initiate Request Window
4.3.2 Edit/View the Agency Use Block (AUB) Purpose: To view and edit data in the Agency Use Block. Initiators, Reviewers, and Approvers have system authority for this function. AUB data is displayed on the Agency Use Block window. There are several paths to get there. Initiators see the AUB window as soon as they click the Submit button when initiating an investigation request or when performing mass initiation. If this is the case, skip below to the instructions “Procedures for Editing/Viewing AUB” below. Otherwise, select the desired request from the main menu using the appropriate panel. Initiators use the My Active Request Initiations panel. Reviewers and Approvers use the Assigned to Me panel. Requests may also be accessed by entering the SSN or Request ID in the Manage Request sidebar panel, and click the
Full Name Panel
Place of Birth Panel
Form and Group Drop Down lists
Submit Button
Person-al
Contact Panel
Date of
Birth Panel
Instructions to Applicant
Field
44
Edit/View AUB button. In either case, once the request has been selected, the Agency Use Block window will appear. Locate the Request: 1. From the Main Menu, in the appropriate panel (Figure 4-14) click the radio button under the
“Select” column at the right of desired request.
Note: Figure 4-14 is the Initiator’s Main Menu. Other users use the same process, but in different panels from their respective Main Menus. See Figure 4-33 for the Reviewer’s main menu and Figure 4-36 for the Approver’s main menu.
2. Click the Edit/View AUB button. The Agency Use Block window will appear (Figures 4-16
and 4-17). 3. Alternatively, click the appropriate Request ID hyperlink. The Investigation Request
Summary window appears. Click the AUB tab. The Agency Use Block window will appear (Figures 4-16 and 4-17).
4. A third method is to enter the SSN or Request ID in the Manage Request sidebar panel. If
there are multiple requests for the SSN provided, select the desired request. 5. Click the Edit/View AUB button. The Agency Use Block window will appear as in Figures
4-16 and 4-17. Procedures for Editing/Viewing AUB: 1. The AUB data may be cleared or populated by using a predefined template. If desired, from
the Choose Agency Use Block Template panel, select an AUB template from the drop down list, then click the Use Selected Template button. This action will replace all existing AUB responses with those defined in the template. Consult OPM publication “Requesting OPM Personnel Investigations”, July 2008 for required AUB data.
2. If using a template, modify data as required and click Submit. If not using a template, enter
the required AUB data and click Submit. The system will display a message “e-QIP successfully saved the Agency Use Block for request ID …” The message will include the appropriate request ID for the AUB saved; or the system will display error messages alerting the user to the fields that require attention.

45
Figure 4-16. Agency Use Block – Top Portion

46
Figure 4-17. AUB - Bottom Portion
4.3.3 View a Request Purpose: To view requests. Initiators, Reviewers, Approvers, Program Managers, and Agency Help Desk users have system authority for this function. Reviews are displayed on the Investigation Request Summary window. There are several paths to get there. Select the desired request to review from the main menu using the appropriate panel. Initiators use the My Active Request Initiations panel. Reviewers, Approvers, and Program Managers can use multiple panels. Requests may also be accessed by entering the SSN or Request ID in the Manage Request sidebar panel, and click the Review Request button. Note that the Manage Request sidebar panel is the primary method for the Agency Help Desk user to view a request. In either case, once the request has been selected, the Investigation Request Summary window will appear.

47
Procedures for Locating and Viewing Requests: 1. From the Main Menu window, in the appropriate panel (Figure 4-14); click the Request ID
hyperlink of the request to view. The Investigation Request Summary window appears. (Figure 4-18).
2. Alternatively, enter the SSN or Request ID in the Manage Request sidebar panel. If there are multiple requests for the SSN provided, select the desired request.
3. Click the View Request button. The Investigation Request Summary window appears.
Figure 4-18. The user may see and select from a number of tabs across the top of the window: Summary, AUB, Review, Attachments, Comments, and Notice are among the options.
Note that depending on the agency role(s) assigned, all users may not see all the tab options. The Investigation Request Summary window displays the information seen under the summary tab. The summary tab contains panels that display the Review Request Summary header information, a Settings panel, an Events panel, and a Rejection History panel.

48
Figure 4-18. Initiator's Investigation Request Summary Window
4.3.4 Cancel a Request Purpose: To cancel an active request. Initiators, Reviewers, Approvers, and Program Managers have system authority for this function.
Tab selections: Summary, AUB, Attachments, or
Comments.
System Events Panel

49
There are several alternative methods to cancel a request. Cancel from the main menu using the appropriate panel. Initiators cancel from the My Active Request Initiations panel. Reviewers and Approvers cancel from the Assigned to Me panel. Program Managers cancel from the Request Assignments I Have Made panel. Requests may also be canceled from the Investigation Request Summary window, the Agency Use Block window, and the Review window. Procedures for Locating and Canceling a Request: 1. From the Main Menu window, click the radio button in the “Select” column of the applicant
request to delete. Click the Cancel Request button.
2. Alternatively, from the Main Menu window, enter the SSN or Request ID in the Manage Requests sidebar panel.
3. Click the Cancel Request button on the right of the screen. The Select Requests window (Figure 4-19) will appear.
Figure 4-19. Select Requests to Cancel Window
4. From the Select Requests window, click the checkbox next to the desired request to cancel
and click the Submit button.
5. A third method is, from the Main Menu window, in the appropriate panel (Figure 4-14); click the Request ID hyperlink of the request to cancel. The Investigation Request Summary window appears. Figure 4-18

50
6. Click the Cancel Request button. The system will display a message that the request was
cancelled. 4.3.5 Edit Comments Purpose: To view, insert, or edit comments on active requests. Initiators, Reviewers, Approvers, and Program Managers have system authority for this function. Comments are displayed on the Comments window. There are several paths to get there. Select the desired request from the main menu using the appropriate panel. Initiators use the My Active Request Initiations panel. Reviewers and Approvers use the Assigned to Me panel. Program Managers use the Request Assignments I Have Made panel. Requests may also be accessed by entering the SSN or Request ID in the Manage Request sidebar panel, and click the Edit Comments button. In either case, once the request has been selected, the Comments window will appear. Locate the Request: 1. From the Main Menu window, in the appropriate panel (Figure 4-14) click the radio button
under the “Select” column at the right of the desired request.
Note: Fig, 4-14 is the Initiator’s Main Menu. Other Users use the same process, but in different panels from their respective Main Menus. See Figure 4-33 for the Reviewer’s main menu, Figure 4-36 for the Approver’s main menu, and Figure 4-39 for the Program Manager’s main menu.
2. Click the Edit Comments button. The Comments window will appear (Figure 4-20).

51
Figure 4-20. Comments Window
3. Alternatively, click the appropriate Request ID
hyperlink. The Investigation Request Summary window appears. Click the Comments tab. The Comments window will appear (Figure 4-20).
4. A third method is to enter the SSN or Request ID in the Manage Request sidebar panel.
5. Click the View Request button. If there are multiple requests for the SSN provided, select the desired request.
6. Click the Edit Comments button. The Comments window will appear as in Figure 4-20. Procedures for Editing Comments: 1. As required, enter Cover Letter Comments, Internal Agency Comments, and/or Instructions
for the applicant. When complete, click Submit. Instructions for the applicant will be displayed to the applicant on the Form Instructions page when he/she logs in to the e-QIP applicant site. The system will re-display the Comments window with a message that “e-QIP successfully saved the comments for request ID ……” ending with the appropriate request ID of the request just edited.

52
4.3.6 Attach a Document to a Request Purpose: To identify the documents associated with an investigation request and to indicate how required documents will be sent to the ISP/OPM. At a minimum, each request shall contain a certification document (CER) and a release document (REL
) (also known as Certified Request Signature Forms) which may be uploaded, faxed or mailed. Every request shall also contain an indication of the type of fingerprint submission required. If fingerprints are required, indicate the method by which they will be submitted. Initiators, Reviewers, and Approvers, have system authority for this function.
Attachments are displayed on the Attachment window. There are several paths to get there. Select the desired request to review from the main menu using the appropriate panel. Initiators use the My Active Request Initiations panel. Reviewers use the Assigned to Me or the Awaiting Review panel. Approvers use the Assigned to Me or the Awaiting Approval panel. Requests may also be accessed by entering the SSN or Request ID in the Manage Request sidebar panel, and click the Review Request button. Locate the Request: 1. From the Main Menu, in the appropriate panel (Figure 4-14) click the radio button under the
“Select” column at the right of desired request.
Note: Figure 4-14 is the Initiator’s Main Menu. Other Users use the same process, but in different panels from their respective Main Menus. See Figure 4-33 for the Reviewer’s main menu and Figure 4-36 for the Approver’s main menu.
2. Click the Print Applicant Data button.
3. The Attachments window will appear. (Figure 4-21). 4. Alternatively, click the appropriate Request ID hyperlink. The Investigation Request
Summary window appears. Click the “Attachments” tab. The Attachments window will appear.
5. A third method is to enter the SSN or Request ID in the Manage Request sidebar panel.
Click the View Request button. 6. Navigate to the Attachments window.

53
Figure 4-21. Attachments Window (Initiator) Procedures for Attaching a Document to a Request: 1. Look in the Attachment Requirements sub-panel of the Attachments panel (Figure 4-22) and
note the minimum required attachments: the Certification Page (CER) and the General Release (REL). These documents are collected from the applicant or may be printed from the Attachments panel.

54
Figure 4-22. Attachments Window (Initiator) – Upper Half - Forms Hyperlink and Attachment Requirements Sub-Panel
2. Click the Signature Forms [PDF]
hyperlink, (the other hyperlinks provide redundant capability, but have no functionality for attaching documents) then print the documents. Ensure the forms are complete and that the applicant has signed and dated them. The ISP/OPM will not accept the investigation request without these documents.
3. Note that the applicant may have listed expected attachments when he or she certified and released the request. If so, they will be displayed in the Expected Attachments as Indicated by Applicant sub-panel of the Attachments panel (Figure 4-23). Collect these documents from the applicant. The Currently Attached Documents sub-panel of the Attachments panel displays documents already attached to the request. There are several ways to handle attachments:
a. SCAN: The preferred method for attaching documents is to upload a scanned, electronic
document. e-QIP only accepts attachments in Tag Image File (.tif or .tiff), Portable Document Format (.pdf), or Portable Network Graphics (.png) format. Also, the maximum file size allowed is 5 MB. The recommended scanning specifications include a
Attachments Panel
Signature Forms Hyperlink for Certification Form
(CER) and General Release Form (REL)
Attachment Requirement
Sub-Panel Lists Minimum Requirements

55
resolution of 300 dpi and bi-tonal, not color scanning. Scan or electronically image the document, creating an electronic file that is within the parameters described above.
i. In the Add New Attachments sub-panel (Figure 4-24); select the Document Type
from the drop down list.
ii. Click the Browse button to find the desired file.
iii. Skip the Method of Transmission drop down list.
iv. Add a description in the Description field. v. Click the Submit button at the bottom of the page.
vi. The system will display a message that a new attachment was successfully attached
to the request. You can view your attachment by clicking the View
hyperlink when the attachment appears in the Currently Attached Documents sub-panel. Repeat for each scanned attachment.
b. FAX SERVER: Faxing is a 3 step process. First, select the document to be faxed. Second, create a cover sheet. Third, fax the document.
i. In the Add New Attachments sub-panel, select the Document Type from the drop
down list. (Figure 4-24) ii. Skip the Uploaded Attachment browse field. iii. From the Method of Transmission drop down list select “Faxed – Attachment will be
faxed”. iv. Add a description in the Description field. v. Click the Submit button at the bottom of the page. vi. The system will display a message that a new attachment was successfully added to
the request. The attachment will display in the Currently Attached Documents sub-panel.
vii. In the Create Cover Sheet for Fax Attachment sub-panel, select the Document Type
from the drop down list (same document type as step i above). viii. Enter the number of pages to be attached. Do not include the cover sheet in the
page count.
ix. Enter your phone number in the Sender’s Contact # field.

56
x. Click the Create Fax Cover Sheet button. A new window will pop up with the cover sheet. Print the cover sheet.
xi. Add the cover sheet to the top of the document to be faxed and send to the fax
number on the cover sheet. If the fax has been processed correctly, e-QIP will attach your fax to the request.
xii. When the attachment appears in the Currently Attached Documents sub-panel, you
can view your attachment by clicking the View
hyperlink. Repeat for each faxed attachment.
Note that the Event History on the Summary tab will include an event that indicates if the faxed attachment was successful or not. If the document is very large (> 5MB), the attachment will be split into multiple files (each file < 5MB).
c. MAIL:
i. In the Add New Attachments sub-panel, select the Document Type from the drop
down list. (Figure 4-24) ii. Skip the Uploaded Attachment browse field. iii. From the Method of Transmission drop down list select “Other – Attachment will be
mailed”. iv. Add a description in the Description field. v. Click the Submit button at the bottom of the page. vi. The system will display a message that a new attachment was successfully added to
the request. The attachment will display in the Currently Attached Documents sub-panel.
vii. Repeat for each mailed document.
Mail the attachment to: Attn: e-QIP Rapid Response Team OPM-FPIC PO Box 618 Boyers, PA 16020-0618

57
For deliveries methods requiring a street address mail the attachment to: Attn: e-QIP Rapid Response Team OPM-FPIC 1137 Branchton Rd Boyers, PA 16020-0618
d. OTHER: If you do not want to electronically upload, fax, or mail your document.
i. In the Add New Attachments sub-panel, select the Document Type from the drop
down list. (Figure 4-24) ii. Skip the Uploaded Attachment browse field. iii. From the Method of Transmission drop down list select “Other – The method of
delivery does not match the other options”. iv. Add a description in the Description field. v. Click the Submit button at the bottom of the page. vi. The system will display a message that a new attachment was successfully added to
the request. The attachment will display in the Currently Attached Documents sub-panel.
vii. Repeat for each document not scanned, faxed, or mailed. viii. Submit the documents to OPM.
e. DELETE. If necessary, attachments may be deleted. In the Currently Attached
Documents sub-panel click the “Delete” checkbox of the appropriate attachment then click the Submit button. (Figure 4-23)
Procedures for Fingerprint Submissions.
Before a request is released to OPM, an agency user (initiator, reviewer, or approver) MUST provide fingerprint submission information.
1. From the Submission Details sub-panel of the Attachments panel (Figure 4-24) make a
selection from the “Submission Type” drop down list. If the Submission Type is “Not Required—Reinvestigation or SF 86 Submission that meets requirements as outlined in FIN 94-6”, skip step 2 and proceed to step 3.
2. Make a selection from the “Method of Transmission” drop down list. 3. Click the Submit button at the bottom of the page.

58
Figure 4-23. Attachments Window (Initiator) – Lower Half– Expected Attachments and
Currently Attached Documents Sub-Panels
Expected Attachments as Indicated By
Applicant Sub-Panel
Currently Attached Documents Sub-Panel

59
Figure 4-24. Attachments Window (Initiator) – Lower Half – Create Cover Sheet, Add
New Attachments and Fingerprint Submission Details Sub-Panels 4.3.7 Perform a Mass Initiation Purpose: Mass initiation allows a large number of applicants to be initiated at the same time provided they all share the same AUB data. The Mass Initiation is a process that requires several steps. It begins with creating an Excel™ spreadsheet that contains each applicant’s personal data. Procedures for Creating an Excel™ Spreadsheet 1. Open a new Microsoft Excel™ spreadsheet. The spreadsheet must/will contain 11 columns.
The columns should not be labeled, however the data must conform to the order listed and where prescribed, the format. See Figure 4-25 for a sample spreadsheet:
Add New Attachment Sub-Panel
Create Cover Sheet for Fax Attachment Sub-Panel
Fingerprint Submission Details
Sub-Panel
Submit Button
Create Cover Sheet
Button

60
a. Column A: Social Security Number. No specified format. Hyphens, dashes, or blank spaces are not required. 123456789 format is preferred.
b. Column B: Last name. Normal capitalization.
c. Column C: First Name. Normal capitalization.
d. Column D: Middle Name. Normal capitalization. If no middle name – leave blank.
e. Column E: Suffix. Normal capitalization. Abbreviations OK. No punctuation required.
f. Column F: Date of Birth. MM/DD/YYYY format only
.
g. Column G: City of Birth. Normal Capitalization.
h. Column H: County of Birth. Normal Capitalization. Leave blank if unknown.
i. Column I: State of Birth. Standard 2 character abbreviation, both capitalized.
j. Column J: Country of Birth. Leave blank if US. Normal capitalization if other than US.
k. Column K: E-Mail Address. Leave blank if unknown.
l. Column L: Telephone Number. Leave blank if unknown, however the first row must contain at least 2 blank spaces in order for the spreadsheet to upload into e-QIP correctly.
Note that if you must delete a row from the spreadsheet file; ensure that you use Excel’s™ Delete function from the Edit Menu. Pressing the Delete key while the cursor is on the row will NOT delete the delimiters, and e-QIP will interpret the file as having empty fields. Default column widths may need to be increased in order to see data in the adjacent column.
2. Save the file as a standard spreadsheet.
3. Create a duplicate file with a CSV file extension. Click or roll the cursor over “Save As”. Click “Other Formats”. In the “Save As” dialogue box, use the “Save as type” drop down list to scroll down until the option, “CSV (comma delimited) (*.csv)” is visible. Click this option and click the Save button.
4. Close the spreadsheet.

61
Figure 4-25. Mass Initiation Excel™ Spreadsheet Procedures for Mass Initiation: 1. From the Initiator Main Menu, click the Mass Initiation button in the General sidebar
panel. Figure 4-14. The Mass Initiation Summary window will appear (Figure 4-26).
2. Enter a unique batch name in the text entry box.
3. Click the Browse button. Locate the Excel™ spreadsheet file created for the mass initiation. Note that the proper file will have a “CSV” file extension (*.csv).
4. Adjust the maximum number of file errors, if desired. Default setting is set to 50.
5. Use the drop down list to select an applicant group. Groups will only be available if an Agency Administrator established them.
Note that assignment to groups is not typical for the Marine Corps; most investigation request applicants will not be assigned to groups. Initiators may not have groups available to select.
6. Select an ISP/Form from the drop down list.

62
7. “Required to Import from Offline”. Default setting is No (unchecked). Leave unchecked. This functionality is not yet enabled in e-QIP.
8. Click the Submit button.
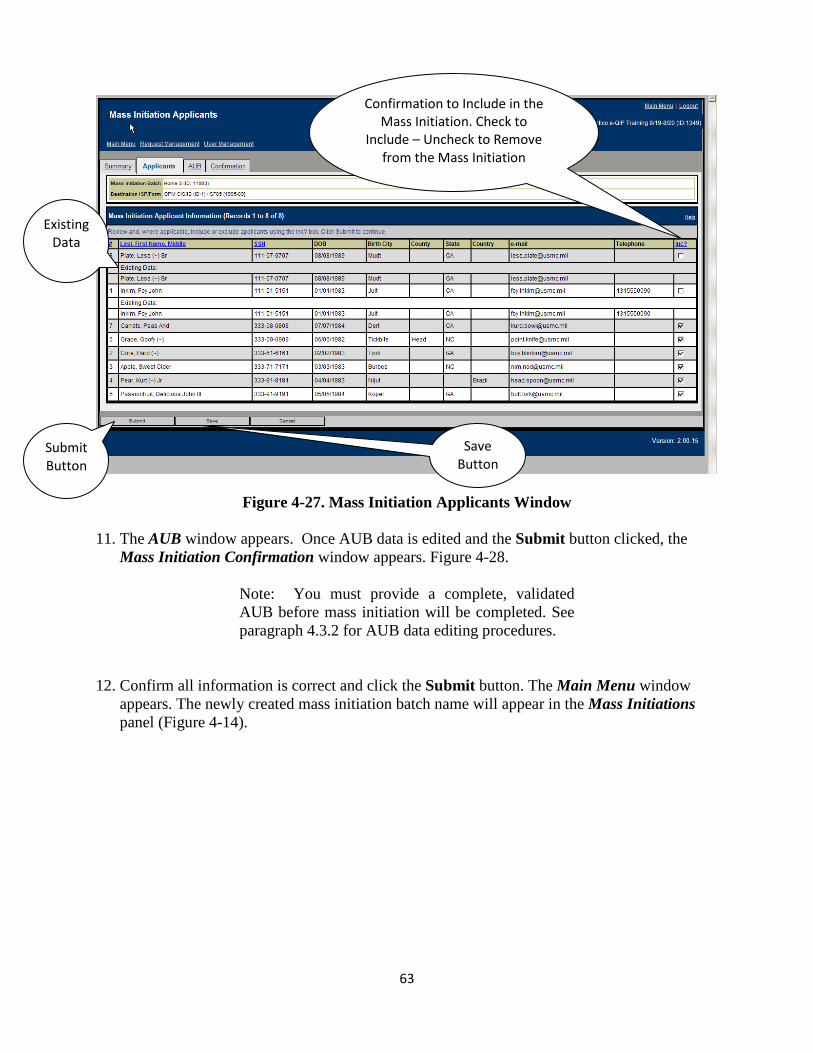
Figure 4-26. Mass Initiation Summary Window 9. The system will display the Mass Initiation Applicants window (Figure 4-27). This step
allows confirmation of the records to be added to e-QIP. If a particular applicant has already been initiated in the system, note that he or she will be listed as “Existing Data”.
10. Verify which applicants to include in the initiation by selecting the “Inc?” checkbox. Note that applicants annotated with existing data are not selected as the default setting. If changes are made, click the Save button. Then, click the Submit button.
Batch Name Text Box
Import Offline Check Box
Batch File Browse Button
ISP/Form Drop Down List
Group Drop Down
List
File Errors
to Report
Submit Button
63
Figure 4-27. Mass Initiation Applicants Window
11. The AUB window appears. Once AUB data is edited and the Submit button clicked, the Mass Initiation Confirmation window appears. Figure 4-28.
Note: You must provide a complete, validated AUB before mass initiation will be completed. See paragraph 4.3.2 for AUB data editing procedures.
12. Confirm all information is correct and click the Submit button. The Main Menu window
appears. The newly created mass initiation batch name will appear in the Mass Initiations panel (Figure 4-14).
Confirmation to Include in the Mass Initiation. Check to
Include – Uncheck to Remove from the Mass Initiation
Existing Data
Submit Button
Save Button

64
Figure 4-28. Mass Initiation Confirmation Window
4.3.8 Remove a Mass Initiation Purpose: This function is an “administrative housekeeping” capability that removes a mass initiation from the mass initiation list within a given agency, but will not affect any requests associated with it. Only initiators have system authority for this function. Procedures for Locating and Removing a Mass Initiation: 1. From the Main Menu, in the Mass Initiations panel (Figure 4-14) locate the name of the mass
initiation to remove. 2. Click the hyperlink under the “Name” column that corresponds to the desired mass initiation. 3. If the status of the mass initiation is "Completed," the system will display the Completed
Mass Initiation window (Figure 4-29) with information relative to the mass initiation. 4. If the status of the mass initiation is "In Progress," the system will display the Mass
Initiation Summary window (Figure 4-30) with the following tabs: Summary, Applicants, AUB, and Confirmation.
Mass Initiation Data to be Confirmed
Submit Button

65
5. Click the Remove from List button to remove it from the list.
Figure 4-29. Completed Mass Initiation Window
Figure 4-30. Mass Initiation Summary Window
Remove From List Button
Remove From List
Button

66
6. The system will display a dialog window with the message: "This will remove this mass initiation from the list for your agency, but will not affect any requests associated with the mass initiation. Are you sure you want to do this?"
7. If you are sure you want to remove the mass initiation, click the OK button.
8. The system will re-display the Main Menu with the message: "e-QIP successfully removed
the mass initiation "XXXXX" from the list."
4.3.9 Remove a Mass Initiation and Delete Requests Purpose: This function will delete the mass initiation, and delete any associated requests, as long as none of the requests have been touched by any applicant. Only initiators have system authority for this function. Procedures for Locating and Removing Mass Initiations and Deleting Requests: 1. From the Main Menu, in the Mass Initiations panel (Figure 4-14) locate the name of the mass
initiation to remove. 2. Click the hyperlink under the “Name” column that corresponds to the desired mass initiation. 3. If the status of the mass initiation is "Completed," the system will display the Completed
Mass Initiation window with information relative to the mass initiation.
4. If the status of the mass initiation is "In Progress," the system will display the Mass Initiation Summary window with the following tabs: Summary, Applicants, AUB, and Confirmation.
5. Click the Delete button to remove the mass initiation from the list and delete all the associated requests.
6. The system will display a dialog window with the message: "This will delete the mass initiation, and delete any associated requests, as long as none have been touched by the applicant. Are you sure you want to do this?"
7. If you want to delete the mass initiation and its associated requests, click the OK button.
8. The system will re-display the Main Menu with the message: “e-QIP successfully deleted mass initiation "XXXX".”
9. The mass initiation will no longer be listed in the Mass Initiations panel.
67
10. If you decide to not delete the mass initiation and its requests, click the Cancel button. Data
in the system will remain unchanged.
4.3.10 Review a Mass Initiation
Purpose: This function will allow changes to the mass initiation provided the status is “In Progress”. If the status is “Completed”, the data may be viewed only. Only initiators have system authority for this function. Procedures for Locating and Reviewing Mass Initiations: 1. From the Main Menu, in the Mass Initiations panel (Figure 4-14) locate the name of the
mass initiation to remove. 2. Click the hyperlink under the “Name” column that corresponds to the desired mass initiation. 3. If the status of the mass initiation is "Completed," the system will display the Completed
Mass Initiation window with information relative to the mass initiation. In this case, you can only view the summary information and cannot change any of the mass initiation data.
4. If the status of the mass initiation is "In Progress," the system will display the Mass Initiation Summary window with the following tabs: Summary, Applicants, AUB, and Confirmation. In this case, data associated with the requests and the mass initiation may be changed prior to submitting it to the system.
5. Review and/or modify data as required.
4.3.11 Request an Authentication Reset Purpose: To request a reset of authentication questions and answers (Golden Questions and Answers) to the system defaults (last name, four-digit year of birth, and city of birth). Program Managers must approve before reset occurs. Initiators have system authority for this function. Help Desk Users have authority to reset applicants only. See paragraph 4.8.1 for Help Desk User procedures. Procedures for Requesting Authentication Reset: 1. Enter the SSN of the user or applicant who is requesting the authentication reset into the
Manage User sidebar panel (Figure 4-14).
2. Click the Request GQ Reset button.

68
3. The Request Authentication Reset window (Figure 4-31) will appear.
4. Review the information on this window to ensure you are requesting an authentication reset
for the correct person.
5. Provide any applicable comments about the request for authentication reset
6. Click the Submit button. Your request will be saved, awaiting Program Manager approval.
Note that if the Initiator also holds Program Manager permissions the system will not allow him/her to approve themselves. Another Program Manager user in the agency must approve the reset request.
Figure 4-31. Request Authentication Reset Window
4.3.12 Delete an Applicant
Purpose:
Removes an applicant from the e-QIP system. Any requests that the applicant has in the current agency will be listed. Review the data provided to ensure that this is the appropriate person. Only

69
Initiators have system authority for this function. Note that the applicant's social security number may NOT be deleted by you if he/she:
• Has any system or agency roles in the system, • Has worked on any request in the e-QIP system before, or • Currently has a request in any other agency in e-QIP.
Procedures for Deleting an Applicant: 1. Enter the SSN of the applicant to be deleted into the Manage User sidebar panel (Figure 4-
14).
2. Click the Delete Applicant button.
3. The Delete Applicant window will appear as shown in Figure 4-32. Review the information on this window to ensure you are deleting the correct person.
4. To delete the applicant, enter the social security number in the confirmation box labeled "Confirm Delete User SSN", and then press the Delete button.
5. A final confirmation message will appear for confirmation that deleting the user is the desired action. To proceed with deleting the applicant, press "OK", otherwise press "Cancel".
Figure 4-32. Delete Applicant Window

70
This Page Blank

71
4.4 Reviewer Functions
This section explains options (excluding Reviewer roles shared by Initiators already explained in the previous section under the Initiator’s functions) available from the Reviewer’s Main Menu. After a user who has the reviewer role successfully logs in, the system will display a window as shown in Figure 4-33. The figure illustrates the Reviewer’s Main Menu when there are active requests assigned. The Reviewer has access to functions including Agency Use Block Management, Request Management, and Review and Print.
Figure 4-33. Reviewer Main Menu 4.4.1 Review a Request Purpose: Reviewing the investigation request is an oversight function to ensure that the applicant’s data is complete, that required additional documents are attached to the request, and that Agency Use Block (AUB) data is correct. The review function allows an e-QIP user to reject or return the request to a subordinate agency or the applicant; or depending upon role, to endorse the request for release to an approver or to higher headquarters for additional oversight; or to the Investigative Service Provider (ISP). Reviewers and Approvers have system authority for this function. Reviews are performed in the Review window. There are several paths to get there. Select the desired request to review from the main menu using the appropriate panel. Reviewers use the
Awaiting Review Panel
Assigned to Me Panel
Manage Request Sidebar Panel

72
Assigned to Me or the Awaiting Review panel. Approvers also use the Assigned to Me or the Awaiting Review panel. Requests may also be accessed by entering the SSN or Request ID in the Manage Request sidebar panel, and click the Review Request button. Locate the Request: 1. From the Main Menu, in the appropriate panel (Figure 4-33) click the radio button under the
“Select” column at the right of desired request.
Note: Figure 4-33 is the Reviewer’s Main Menu. Other users use the same process, but in different panels from their respective Main Menus. See Figure 4-36 for the Approver’s main menu.
2. Click the Review Request button.
3. The Review window will appear. (Figure 4-34)
4. Alternatively, click the appropriate Request ID hyperlink. The Investigation Request Summary window appears. Click the Review tab. The Review window will appear.
5. A third method is to enter the SSN or Request ID in the Manage Request sidebar panel. Click the View Request button.
6. The Review window appears.
Figure 4-34. Review Request Window and Panel
Review Request
Panel Hyperlinks

73
Procedures for Reviewing Request: 1. In the Review Request panel, select one of the following hyperlinks: Compact Copy [Web
Page], Review Copy [Web Page], or Archival Copy [PDF]
. Each hyperlink displays applicant information in a different format. The compact copy format is recommended.
a. Compact Copy is the validated form, but in a format that is easier to read than the Archival Copy. It looks similar to the form itself and opens in an Internet Explorer™ Window.
b. Review Copy is the version the applicant viewed prior to validating his/her responses. It also opens in an Internet Explorer™ window.
c. Archival Copy is the official version which displays in PDF format. 2. Review the request to be sure it contains:
a. Correct, complete, and current information, with details provided where applicable
b. Street addresses, not PO Boxes, for all required addresses
c. Zip codes for each activity
d. No time gaps
e. Correct and complete AUB (agency use block) data. Note the questionaire type located near the top of the request document. Click the AUB Tab to ensure the agency use block for the questionaire type is complete and accurate. See paragraph 4.3.2 for procedures to edit AUB data.
f. Correct and complete attachments and fingerprint submission data. Note attachments
indicated in the Expected Attachments section located near the end of the request document. Click the Attachments Tab. Ensure those attachments are listed in the Currently Attached Documents sub-panel. Ensure any other required attachments are listed, especially the minumum required attachments. Ensure the fingerprint submission details are indicated. See paragraph 4.3.6 for procedures to attach or delete documents and to change or add fingerprint submission details (aka attached documents metadata).
Rejection of the request at OPM can be reduced by ensuring:
• All accompanying documents are received by OPM within 30 days of the request
being submitted. This includes attachments and fingerprint cards. If fingerprints are submitted via FTS, they will be at OPM already.
• A fingerprint SAC is created for electronic fingerprint submissions and the results of
the SAC are added to a case within 120 days. The agency should include the “I”

74
code in the FIPC codes of the AUB to notify OPM of the electronic submission and PIPS will pull the SAC results into the case. Note: Do not
mail accompanying documents until you click Release from Agency in e-QIP. OPM must be able to match received documents with a request.
• Subject information, such as SSN, DOB, and Place of Birth are entered accurately. If there is a previous investigation record in PIPS and this information differs from the information provided on the new request, it will be rejected.
• The forms match the request ID. If the signature pages have a different request ID, it
will be returned. This usually occurs when a case has been rejected and there are new signature pages. Also, if a case is generated in e-QIP, OPM must have the e-QIP-generated signature pages, not the generic signature pages.
• The request is complete, particularly that all applicant identifying information is
complete and accurate (name, address, SSN, etc), and that there are no gaps where dates are requested (employment, previous addresses).
• For questions where the applicant responds YES, more information must be provided.
Examples of this include Selective Service Registration Number for males, US military history, use or possession of drugs.
• Requests are submitted within 120 days of the forms being signed. If more than 120
days have passed, the forms will be delayed or returned, and the request must be re-initiated.
• Any scanned documents, such as attachments, are legible and in the proper format.
3. If correct and complete, click the Save Changes button (if any comments exist) then click
the Release to Approver (if the user does not have Approver authority) or the Release from this Agency button (if the user has Approver authority and releases into a pass through hierarchy directly to OPM or the users agency hierarchy requires additional reviews) to endorse the request and forward it.
4. If incorrect or incomplete there are 2 potential options. If the request came to the user from a
child agency (subordinate agency in the hierarchy), the Reject to Child Agency button is available. If not from a child agency, the only other option is to select the Reject to Applicant button.
a. Reject to Applicant.
i. Complete the “Reject to Applicant Comments” text box in the Rejection Comments
sub-panel. Comments should be specific so the applicant knows what to correct.
ii. Click the Save Changes button. Click the Rejection Letter [Web Page] hyperlink located above the Rejection Comments sub-panel to view the rejection letter. A

75
separate window appears with a pre-populated letter that contains the date, applicant’s name, Request ID, and the rejection comments. The letter also includes a link to the e-QIP applicant page and instructions for resubmitting the request.
iii. Once the rejection letter has been generated, it may be copied to a Microsoft Word document or sent via e-mail through Outlook.
To send the letter by mail:
• Copy and paste the contents of the letter into a Word™ document.
• Add any additional instruction if necessary. Then print and send the letter by
mail.
To send the letter by e-mail (Outlook™ users only):
• With the letter open in the e-QIP web page view, select the Page drop down list. Click Page by E-mail. The contents of the letter automatically display in an Outlook message.
• Add any additional instructions if necessary.
• Enter the applicant’s email address and send the message.
• Close the web page pop-up window by clicking the Close button.
iv. Click the Reject to Applicant button to send the request back to the applicant.
b. Reject to Child Agency.
i. Complete the “Agency Comments” text box in the Rejection Comments sub-panel.
Comments should be specific so the subordinate agency knows what the problems are.
ii. Click the Save Changes button. iii. Click the Reject to Child Agency button to send the request back to the submitting
agency.
Note: If the request was initiated by the rejection of a prior request, then the previous rejection comments will be displayed to the Reviewer who has been assigned to the request (Figure 4-35).

76
Figure 4-35. Rejection Comments Panel
4.4.2 Download a Certified Request Submission Data Form (Archival Copy) Purpose: To view or print the Archival Copy of the investigation request. The Archival Copy is the official version of the investigation request. Archival copies are often printed and retained for local records. Reviewers and Approvers have system authority for this function. The Archival Copy
hyperlink is found on the Attachments and the Review windows. There are several paths to get there. Select the desired request to review from the main menu using the appropriate panel. Initiators use the My Active Request Initiations panel. Reviewers use the Assigned to Me or the Awaiting Review panel. Approvers use the Assigned to Me or the Awaiting Approval panel. Requests may also be accessed by entering the SSN or Request ID in the Manage Request sidebar panel, and click the Review Request button.
Locate the Request: 1. From the Main Menu, in the appropriate panel (Figure 4-33) click the radio button under the
“Select” column at the right of desired request.
Note: Figure 4-33 is the Reviewer’s Main Menu. Other users use the same process, but in different panels from their respective Main Menus. See Figure 4-36 for the Approvers main menu.

77
2. Click the Print Applicant Data or the Review Request button.
The Attachments or the Review window will appear.
3. Alternatively, click the appropriate Request ID hyperlink. The Investigation Request Summary window appears. Click the Attachments or the Review tab. The Attachments or the Review window will appear.
4. A third method is to enter the SSN or Request ID in the Manage Request sidebar panel. Click the View Request button.
5. Navigate to the Attachments or the Review window.
Procedures for Download Certified Request Submission Data Forms (Archival Copy):
1. Click the Archival Copy [PDF]
hyperlink. The system will display the Archival Copy in a separate browser window.
2. View, save, or print the Archival Copy.

78
This Page Blank

79
4.5 Approver Functions This section explains options (excluding Approver roles shared by Reviewers and Initiators already explained in previous sections) available from the Approver’s Main Menu. After a user who has the Approver role successfully logs in the system will display a window as shown in Figure 4-36, the Approver’s Main Menu. The Approver has access to functions including Agency Use Block Management (edit and view), Request Management, and Review and Print. Case status information for scheduled, closed and unacceptable requests is also accessible from the main menu.
Figure 4-36. Approver Main Menu
Cases Returned
Unacceptable Panel
Case Status Messages from ISP
Panel
Manage Request Sidebar Panel

80
4.5.1 View a Request – Case Status Messages from the Investigative Service Provider (ISP)
Purpose: To review request statuses and notes/messages from the ISP regarding investigation requests. Approvers and Program Managers have system authority for this function.
Procedures for Locating and Viewing /Editing/Printing Information about Case Status Messages from ISP:
1. From the Approver Main Menu (Figure 4-36) in the Case Status Messages from ISP panel:
a. Click the radio button in the “Select” column of the request to be viewed. Then click the View Notices button. Note that requests in this panel may be listed again at the top of the list as agency user’s act on the request and the Last Action Date is changed. The Notices window will appear (Figure 4-37).
b. Alternatively click the Request Number
hyperlink under the “Request ID” column. Note: The maximum number of records displayed in this panel is set by the DBA. The default value is 250. For larger sets of data, use the Advanced Search function. The Investigation Request Summary window will appear. Click the “Notices” tab. The Notices window will appear.
2. From the Manage Request sidebar panel, a third method to locate the request is to enter the SSN and click the View Notices button.
3. If the case has been scheduled, the “Event” column will have an active link to detailed
information about the request, including the AUB that was submitted to the ISP, the attachments to the request, and fingerprint submission information.

81
Figure 4-37. Notices Panel
4.5.2 View a Request – Cases Returned Unacceptable (OPM Specific) Purpose: To review statuses of requests returned as unacceptable. Approvers and Program Managers have system authority for this function. Procedures for Locating and Viewing /Editing/Printing Information about Cases Returned Unacceptable: 1. From the Approver Main Menu (Figure 4-36) in the Cases Returned Unacceptable panel:
a. Click the radio button in the “Select” column of the request to be viewed. Then click the View Notices button. Note that requests in this panel may be listed again at the top of the list as agency user’s act on the request and the Last Action Date is changed. The Notices window will appear (Figure 4-38).
b. Alternatively click the Request Number
hyperlink under the “Request ID” column. Note: The maximum number of records displayed in this panel is set by the DBA. The default value is 250. For larger sets of data, use the Advanced Search function. The Investigation Request Summary window will appear. Click the “Notices” tab. The Notices window will appear.
2. From the Manage Request sidebar panel, a third method to locate the request is to enter the SSN and click the View Notices button.

82
3. The Figure 4-38 Notices panel has an additional comment line to provide the unacceptable code(s) and the related descriptive text. Each unacceptable event in the panel is an active link to detailed information about the request, including the AUB that was submitted to the ISP, the attachments to the request, and fingerprint submission information.
4. For each request returned unacceptable, the system will check the days since applicant
certification against the parameter set for termination (Days from Subject Certification Date Until Returned Unacceptable Terminates). If the date is less than the days to termination, the system will assign the request to the previous Approver (if the Approver is no longer authorized, then to the previous group), and the request can again be returned to a child agency, rejected to the applicant, the AUB can be modified, and/or the request can be re-released to the ISP.
Figure 4-38. Notices Panel (Returned Unacceptable)

83
4.6 Program Manager Functions
This section explains options (excluding Program Manager roles shared by Reviewers, Initiators, and Approvers already explained in previous sections) available from the agency user who has been assigned the role of Program Manager. After a user who has the Program Manager role successfully logs in, the system will display a window as shown in Figure 4-39, the Program Manager’s Main Menu. A Program Manager may view agency use block data, approve authentication reset for agency users, cancel/uncancel requests, view a request’s summary information, assign and/or unassign requests to reviewers and/or approvers, change the assigned group for requests, and edit/view request comments. Case status information for scheduled, closed and unacceptable requests is also accessible from the main menu.
Figure 4-39. Program Manager Main Menu

84
4.6.1 Assign or Unassign a Request
Purpose: To allocate unassigned investigation requests to Reviewers and Approvers, or to unassigned a previously assigned investigation request. Only Program Managers have system authority for this function. Procedures for Locating and Assigning/Unassigning Requests (Figure 4-39):
1. Assign Request.
a. Locate the investigation request to assign from the Program Manager’s Main Menu
window, in the Oldest Unassigned Requests panel.
b. Make an assignment by clicking the drop down list in the “Assignee” column. The oldest unassigned requests will be displayed at the top of the window.
c. Click the Assign Request button. The request will move to the Request Assignments I
Have Made panel. 2. Unassign Request.
a. Locate the investigation request to unassign from the Program Manager’s Main Menu window, in the Request Assignments I Have Made panel.
b. Click the radio button in the “Select” column.
c. Click the Unassign Request button. The request will move to the Oldest Unassigned
Requests panel.
4.6.2 Change Assigned Group for a Request
Purpose: To move an investigation request out of one group and into another. Only Program Manager’s have system authority for this function. Note that this function is only available if the request has been assigned to a group other than “Default”. Procedures for Locating and Changing the Assigned Group for a Request: 1. Locate the investigation request requiring group reassignment from the Program Manager’s
Main Menu window, in the Request Assignments I Have Made panel.

85
2. Click the Request Number
hyperlink under the “Request ID” column. The Investigation Request Summary window will appear.
3. Scroll down the screen until the Assignment Information area of the Settings panel comes into view.
4. From the “Applicant Group” drop down list, select the desired group to which the request
should be assigned. 5. Click the Save Changes button. The system will display a confirmation message that the
data has been successfully modified. 4.6.3 Uncancel a Request Purpose: To uncancel a previously initiated and then cancelled request. Only Program Manager’s have system authority for this function. Procedures for Locating and Uncancelling a Request: 1. From the Manage Request sidebar panel, enter the request ID.
2. Click the Uncancel button.
3. The Select Requests window (Figure 4-40) will appear.
4. Click the “Select” checkbox and then click the Submit button.
5. The system will re-display the Main Menu with a message that the request was successfully
uncancelled.
6. Alternatively, if the request ID is not known, use the Advanced Search feature to locate any and all requests that have previously been cancelled.

86
Figure 4-40. Select Requests Window
4.6.4 Locating Requests Currently in Another Agency Purpose: To locate and view request data outside the agency. Program Managers and Help Desk Users have system authority for this function. Procedures for Locating Requests Currently in Another Agency: 1. Locate the desired request by entering the SSN or Request ID in the Manage Request sidebar
panel. Click the View Request button. 2. The system will display the desired request even if it is outside the Program Manager’s
agency.
4.6.5 Approve Authentication Reset
Purpose:
To approve resetting of a user’s or applicant’s golden questions and answers to system defaults. Only Program Manager’s have system authority for this function. Procedures for Approving Authentication Reset: 1. From the Main Menu, locate the Pending Authentication Resets panel.

87
2. Enter comments as appropriate in the “Approver Comment” text entry box and click the “Select” checkbox.
3. Click the Approve Reset button or the Reject Reset button as needed. 4. The system will display a message that the approval or rejection of the authentication reset
has been successful.

88
This Page Blank
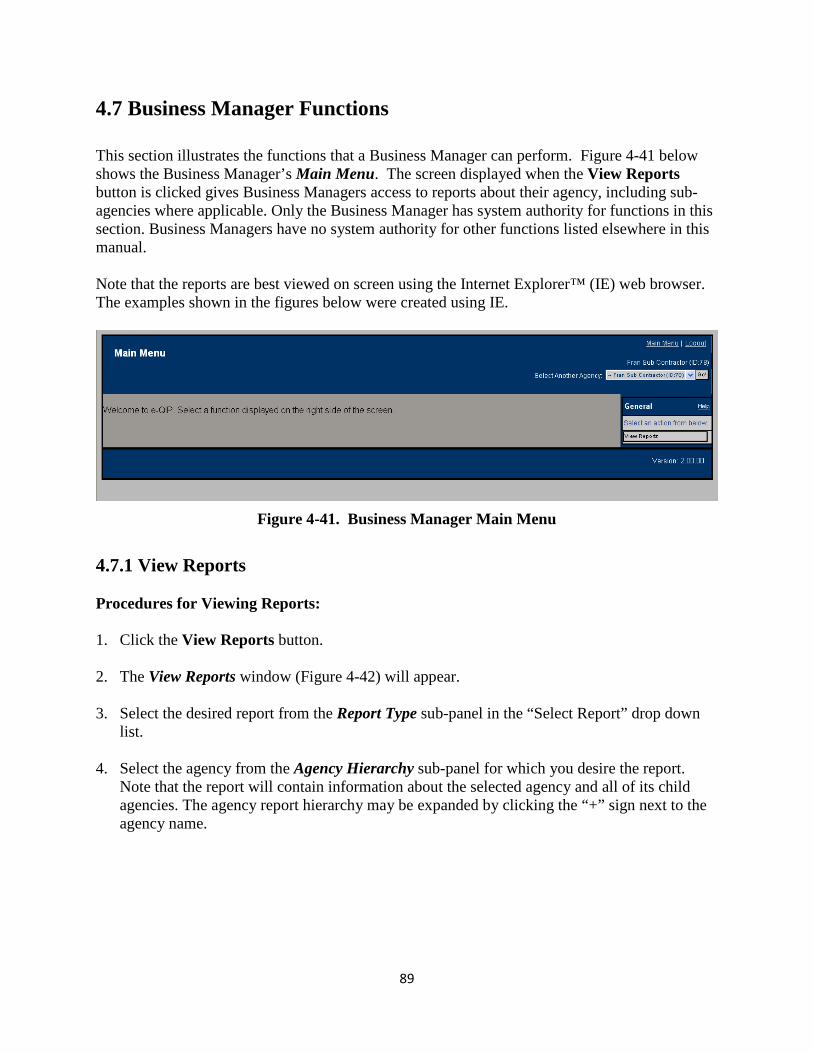
89
4.7 Business Manager Functions This section illustrates the functions that a Business Manager can perform. Figure 4-41 below shows the Business Manager’s Main Menu. The screen displayed when the View Reports button is clicked gives Business Managers access to reports about their agency, including sub-agencies where applicable. Only the Business Manager has system authority for functions in this section. Business Managers have no system authority for other functions listed elsewhere in this manual. Note that the reports are best viewed on screen using the Internet Explorer™ (IE) web browser. The examples shown in the figures below were created using IE.
Figure 4-41. Business Manager Main Menu
4.7.1 View Reports
Procedures for Viewing Reports:
1. Click the View Reports button.
2. The View Reports window (Figure 4-42) will appear. 3. Select the desired report from the Report Type sub-panel in the “Select Report” drop down
list. 4. Select the agency from the Agency Hierarchy sub-panel for which you desire the report.
Note that the report will contain information about the selected agency and all of its child agencies. The agency report hierarchy may be expanded by clicking the “+” sign next to the agency name.

90
Figure 4-42. View Reports Selection Window
5. When you are finished and ready to proceed, click the Submit button. The report will appear
in a new window. Note that the agency hierarchy reflected on each of the standard reports illustrated below may be expanded or collapsed by clicking the Show All or Hide All
hyperlinks, as desired.
6. If the “Agency Request Status Counts” report is selected, the output will appear as in Figure 4-43 below.
Figure 4-43. Request Status Counts Report
7. If the “Agency User Role Counts” report is selected, the output will appear as in Figure 4-44.

91
Figure 4-44. Agency User Role Counts
8. If the “Request Event Counts” report is selected, the output will appear as in Figure 4-45.
Figure 4-45. Request Event Counts

92
This Page Blank

93
4.8 Agency Help Desk Functions
This section explains options (excluding help desk roles shared by Initiators and Program Managers already explained in previous sections) available to the Agency Help Desk. After a user who has the Agency Help Desk role successfully logs in, the system will display a window as shown in Figure 4-46, the Help Desk Main Menu. Users who have the Agency Help Desk role have the following capabilities:
• Perform one-person Golden Question resets for an applicant who has an active request in the agency the Agency Help Desk individual is assigned to or a subordinate agency.
Note that Agency Help Desk users CANNOT reset Golden Questions for agency users; nor can they reset Golden Questions for an agency user who also happens to be an applicant.
• Use the Advanced Search feature to locate specific requests.
• Can view the status (Investigation Request Summary) for requests in the agency they are assigned
to (see paragraph 4.3.3) or a subordinate agency (see paragraph 4.6.4).
Figure 4-46. Help Desk Main Menu

94
4.8.1 Reset Golden Questions and Golden Answers for an Applicant Purpose: Reset applicants’ Golden Questions and Answers to the original default values (last name, city of birth, and four-digit birth year). Procedures for Resetting Golden Questions and Golden Answers: 1. From the Main Menu, enter the SSN for the applicant who needs the reset. The applicant
must have a request that has not been released to the agency to which you are assigned, or the applicant must have an active request in any subordinate agency to yours.
2. The system will display the Authentication Reset window (Figure 4-47). Review the data in
the User Information sub-panel of the Confirm Authentication Reset panel to ensure that the correct applicant’s data is displayed.
3. Enter comments in the Authentication Reset Comments sub-panel of the Confirm Authentication
Reset panel, as required. 4. Click the Submit button.
Figure 4-47. Authentication Reset Window

95
4.8.2 Advanced Search Purpose: The Advanced Search feature allows users to locate a particular investigation request when the specific SSN is not known. This feature is particularly useful for the Agency Help Desk, but is also available to Initiators, Reviewers, Approvers, and Program Managers. 1. Click the Advanced Search button in the General sidebar panel.
2. The system will display the Advanced Search window (Figure 4-48). This window will
allow you to search for investigation requests using specific criteria.
Figure 4-48. Advanced Search Window

96
3. Select search criteria :
a. Groups – To select multiple groups, hold down the “Ctrl” key and select the desired groups. Multiple groups can also be selected by holding down the “Shift” key and selecting consecutive groups.
b. Request Status – Select one or more states from the selection list titled “Request Status.” To select multiple states, hold down the “Ctrl” key and select the desired states. Multiple states can also be selected by holding down the “Shift” key and selecting consecutive states. For "Released to ISP" status, only a single request state may be selected. Multiple selections are not allowed.
c. Activity Date Ranges – Provide responses for the “With Last Activity On or After” and “With Last Activity Before” fields.
d. Form(s) – Select one or more forms from the selection list titled “Form(s).” To select multiple forms, hold down the “Ctrl” key and select the desired forms. Multiple forms can also be selected by holding down the “Shift” key and selecting consecutive forms.
e. Investigation Provider(s) – Select one or more ISPs from the selection list titled “Investigation Provider(s).” To select multiple ISPs, hold down the “Ctrl” key and select the desired multiple ISPs.
f. Assignment and Cancellation Properties – Select the desired radio buttons for the fields titled “Assignment Status” and “Cancellation Status,” respectively.
g. Applicant Name – Provide just the last name in the field called “Applicant Name.” You can also narrow your search by first name by either inputting first name in addition to last name or just typing in the first name. Note that “%” and “*” are treated as wildcards. For example, to search for all Applicants whose names start with “Jo”, enter “Jo%” or “Jo*” in the text field.
h. Miscellaneous Request Properties – Select the desired radio button by the field titled “Initiation Status.” Narrow your search by last name by providing just the last name in the field called “Assignee Name.” Narrow your search by first name by either inputting first name in addition to last name or just typing in the first name.
i. Sort Order – Select the desired sort order of the search results by choosing the first, second and third level sort preferences in the section titled “Sort Order.”
j. Results Per Page – Select the desired number of requests to display per page. 4. Click the Submit button.
5. The system will display the Advanced Search Results window, shown in Figure 4-49.

97
6. Select the desired request to view.
Figure 4-49. Advanced Search Results Window

98
4.8.2.1 Create Comma-Separated Values File for Advanced Search Data Purpose: The CSV (comma-separated values) file function allows users to save the results of an advanced search as a data table. Procedure for Creating and Saving a CSV File:
1. Click the CSV
2. Respond to the “File Download” dialogue box by clicking the Open or the Save button.
hyperlink on the Advanced Search Results window (Figure 4-49).
a. Select Open to display a spreadsheet (Figure 4-50).
b. Select Save to save the spreadsheet to a file.
The system is set with a maximum number of records for each CSV file. If the search returns more than the designated maximum number of records per file, the system will display links to multiple files containing the data.
Figure 4-50. Comma-Separated Values Spreadsheet

99
Appendix A. Pass Through Agencies For many Marine Corps agencies, all or most of the required hierarchy has already been established. For structure that has not been established, the following is provided to assist units in determining pass through agency requirements. When creating or adding to an agency’s hierarchy the Agency Administrator will be asked whether to designate the new agency as a “pass through” agency. A pass through agency does not perform review and approval of requests. Designating an agency as a pass through agency allows higher headquarters to have visibility of subordinate unit’s investigations, but does not impede or delay submission and processing. Pass through agencies allow for decentralized command and control of the investigation initiation process. Note that any investigation submitted into a structure that routes the investigation into a non-pass through agency will stop at the non-pass through agency until reviewer or approver action is taken at the agency. A typical hierarchy is set up so that the lowest level of any organization can initiate, review, and approve requests directly to ISP/OPM without being delayed at a higher headquarters. Figure A-1 depicts the hierarchy, including pass through agencies, for infantry battalions of 2d Marine Regiment and limited partial hierarchies for adjacent commands. (Some organizations omitted for clarity).
Figure A-1. Sample Hierarchy In the figure, infantry battalions 1/2, 2/2, and 3/2 are child agencies of 1/2 pass through, 2/2 pass through, and 3/2 pass through respectively. Concurrently, 2d Marines, 1/2 pass through, 2/2 pass through, and 3/2 pass through are child agencies of 2d Marines pass through. This pattern replicates through the chain of command and in adjacent organizations. Note that the pass through agency is always the “parent” of the agency of the same name. Under this structure an

100
investigation initiated, reviewed, and approved at 3/2, as long as correct, would go directly to OPM without delay. This is so because 3/2 feeds into 3/2 pass through, which feeds into 2d Marines pass through, which feeds into 2d Marine Division pass through, which feeds into II MEF pass through, which feeds into the Marine Forces Command and then HQMC pass through which then goes directly to OPM. Developing hierarchy in this manner gives every intervening command the ability to view investigations, but does not delay processing. Note that the same is true no matter where in the hierarchy the investigation is initiated. Investigations initiated at 2d Marines, 2d Marine Division or II MEF all feed into parent pass through agencies. This is the preferred structure, but it is not mandatory that structure be developed this way. Don’t forget that once added a child agency cannot be deleted.