E-Mail Admin Guide to Exchange 2013 and Exchange On-Line
53
Division of Enterprise Technology E-Mail Admin Guide to Exchange 2013 and Exchange On-Line
-
Upload
khangminh22 -
Category
Documents
-
view
0 -
download
0
Transcript of E-Mail Admin Guide to Exchange 2013 and Exchange On-Line
Division of Enterprise Technology
E-Mail Admin Guide to Exchange 2013 and
Exchange On-Line
State of Wisconsin, Division of Enterprise Technology
E-Mail Admin Guide to Exchange 2013 and Exchange OnLine v_2.2.docx 2 | P a g e
State of Wisconsin, Division of Enterprise Technology
E-Mail Admin Guide to Exchange 2013 and Exchange OnLine v_2.2.docx 3 | P a g e
Table of Contents
A. Enterprise E-mail Management General Information and Definitions .................................................... 4
A.1 Using This Guide .................................................................................................................... 5
A.2 Definitions ............................................................................................................................. 5
A.3 Administrator Roles and Permissions ................................................................................... 6
B. Enterprise E-Mail Naming Conventions .................................................................................................... 7
B.1 Resource Names ................................................................................................................... 8
B.2 Distribution List Names ......................................................................................................... 9
B.3 Shared Mailbox Names ......................................................................................................... 9
C. Accessing Exchange 2013 On-Premise and Exchange On-Line Environments ....................................... 10
C.1 Connect via Web Browser ................................................................................................... 11
C.2 Connect via Remote PowerShell: ........................................................................................ 11
C.3 Connect via Outlook: ........................................................................................................... 13
D. Agency Administrator Functions ............................................................................................................ 17
D.1 Navigating the Microsoft Exchange Admin Center (EAC) ................................................... 18
D.2 Distribution Groups – Exchange 2013 On Premises ........................................................... 20
D.2.1 Distribution Groups – Exchange OnLine (O365) ............................................................. 23
D.3 Resource Mailboxes ............................................................................................................ 24
D.4 Shared Mailboxes ................................................................................................................ 26
D.5 Contacts .............................................................................................................................. 28
D.6 Managing Staff Mailbox Properties .................................................................................... 29
Exchange PowerShell and The Agency Powerbook .................................................................................... 30
E.1 Exchange PowerBook Information...................................................................................... 31
E.2 Exchange Remote Powershell ............................................................................................. 31
E.3 Common PowerShell One Line Commands ........................................................................ 32
F. Additional Exchange Client and Server Features .................................................................................... 37
F.1 MailTips ............................................................................................................................... 38
F.2 Mailbox Quota Warning Messages ..................................................................................... 39
F.3 Open Distribution Groups ................................................................................................... 40
F.4 Mailbox Search and E-Discovery Options ........................................................................... 44
APPENDIX: SPF Verification Failure Procedure .............................................................................. 51

State of Wisconsin, Division of Enterprise Technology
E-Mail Admin Guide to Exchange 2013 and Exchange OnLine v_2.2.docx 4 | P a g e
Division of Enterprise Technology
A. Enterprise E-mail Management General Information
and Definitions
Exchange Server 2013 and Exchange On-Line
State of Wisconsin, Division of Enterprise Technology
E-Mail Admin Guide to Exchange 2013 and Exchange OnLine v_2.2.docx 5 | P a g e
Enterprise E-mail Management General Information, Definitions,
Administrator Roles and Permissions
A.1 Using This Guide
A.2 Definitions
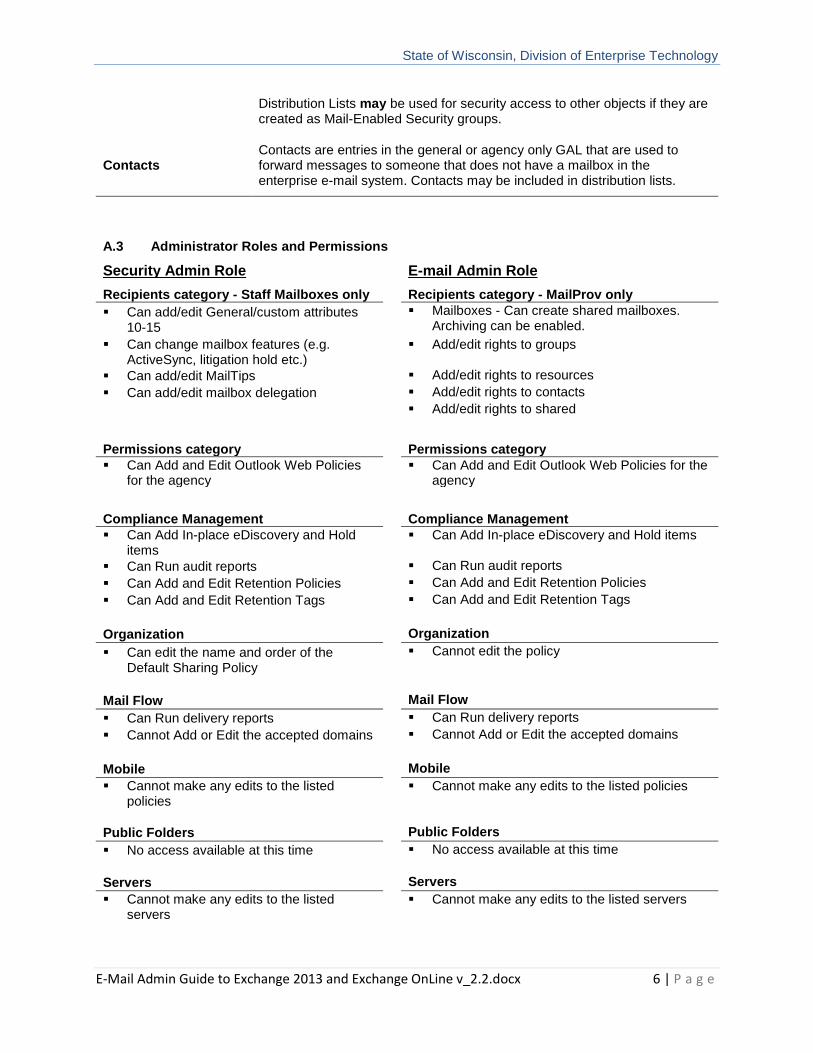
E-mail Administrators E-mail Administrators will be able to manage the e-mail accounts and settings for e-mail specific entities, such as Distribution Lists, Resources, Shared Mailboxes, and Contacts.
Security Administrators
Security Administrators will be able to manage some e-mail related settings on staff mailboxes. IAM will continue to provide the functions it does today for Staff mailbox creation and management. Some additional management functionality will now be available to Security Administrators through the EAC and Exchange PowerShell.
Mailbox (Staff user accounts)
In this system, a “Staff user” is an account that is associated with one physical person. These accounts must be created using the IAM tool following the IAM manual. The Agency Security Admin is now delegated to use the Exchange native tools to make some changes to “staff” accounts.
Shared Mailbox
A Shared Mailbox is a mailbox that is primarily used to send or receive messages but is not associated directly to a single individual. These mailboxes are associated with disabled AD accounts and cannot be logged into directly. Commonly these are public facing addresses that may be listed on websites, brochures, or other communications to allow the general public or other agencies to communicate on a specific subject. One or more individuals may monitor shared mailboxes. Individuals or groups can be given the rights to “Send-As” or “Send on Behalf of” the mailbox.
In some cases, shared mailboxes may require the AD account to be enabled and a password assigned so that a person or an application can ‘log in’ to the mailbox. For those situations, the delegated administrator must contact DET to enable the account and create a password.
Resource Mailbox
A Resource Mailbox is one that is used primarily for calendaring, and can be set to automatically accept appointments, or can have appointment requests sent to a delegate that has to manually accept or reject the requests. Resource Mailboxes that are set to automatically accept appointments will not receive e-mail messages.
Distribution List A Distribution List is a grouping of e-mail accounts with a display name that can appear in the GAL. Messages can be sent to a Distribution List.
Audience This Enterprise E-mail Administration Guide is written for Agency E-mail Administrators and Agency Security Administrators who will use the Microsoft Exchange Admin Center (EAC), and/or Exchange Power Shell applications. Agencies will assign staff to the role of Agency E-mail Administrator and/or Agency Security Administrator.
State of Wisconsin, Division of Enterprise Technology
E-Mail Admin Guide to Exchange 2013 and Exchange OnLine v_2.2.docx 6 | P a g e
Distribution Lists may be used for security access to other objects if they are created as Mail-Enabled Security groups.
Contacts Contacts are entries in the general or agency only GAL that are used to forward messages to someone that does not have a mailbox in the enterprise e-mail system. Contacts may be included in distribution lists.
A.3 Administrator Roles and Permissions
Security Admin Role
E-mail Admin Role
Recipients category - Staff Mailboxes only Recipients category - MailProv only
▪ Can add/edit General/custom attributes 10-15
▪ Mailboxes - Can create shared mailboxes. Archiving can be enabled.
▪ Can change mailbox features (e.g. ActiveSync, litigation hold etc.)
▪ Add/edit rights to groups
▪ Can add/edit MailTips ▪ Add/edit rights to resources
▪ Can add/edit mailbox delegation ▪ Add/edit rights to contacts ▪ Add/edit rights to shared
Permissions category Permissions category
▪ Can Add and Edit Outlook Web Policies for the agency
▪ Can Add and Edit Outlook Web Policies for the agency
Compliance Management Compliance Management
▪ Can Add In-place eDiscovery and Hold items
▪ Can Add In-place eDiscovery and Hold items
▪ Can Run audit reports ▪ Can Run audit reports
▪ Can Add and Edit Retention Policies ▪ Can Add and Edit Retention Policies
▪ Can Add and Edit Retention Tags ▪ Can Add and Edit Retention Tags
Organization Organization
▪ Can edit the name and order of the Default Sharing Policy
▪ Cannot edit the policy
Mail Flow Mail Flow
▪ Can Run delivery reports ▪ Can Run delivery reports
▪ Cannot Add or Edit the accepted domains ▪ Cannot Add or Edit the accepted domains
Mobile Mobile
▪ Cannot make any edits to the listed policies
▪ Cannot make any edits to the listed policies
Public Folders Public Folders
▪ No access available at this time ▪ No access available at this time
Servers Servers
▪ Cannot make any edits to the listed servers
▪ Cannot make any edits to the listed servers
State of Wisconsin, Division of Enterprise Technology
E-Mail Admin Guide to Exchange 2013 and Exchange OnLine v_2.2.docx 7 | P a g e
Division of Enterprise Technology
B. Enterprise E-Mail Naming Conventions
State of Wisconsin, Division of Enterprise Technology
E-Mail Admin Guide to Exchange 2013 and Exchange OnLine v_2.2.docx 8 | P a g e
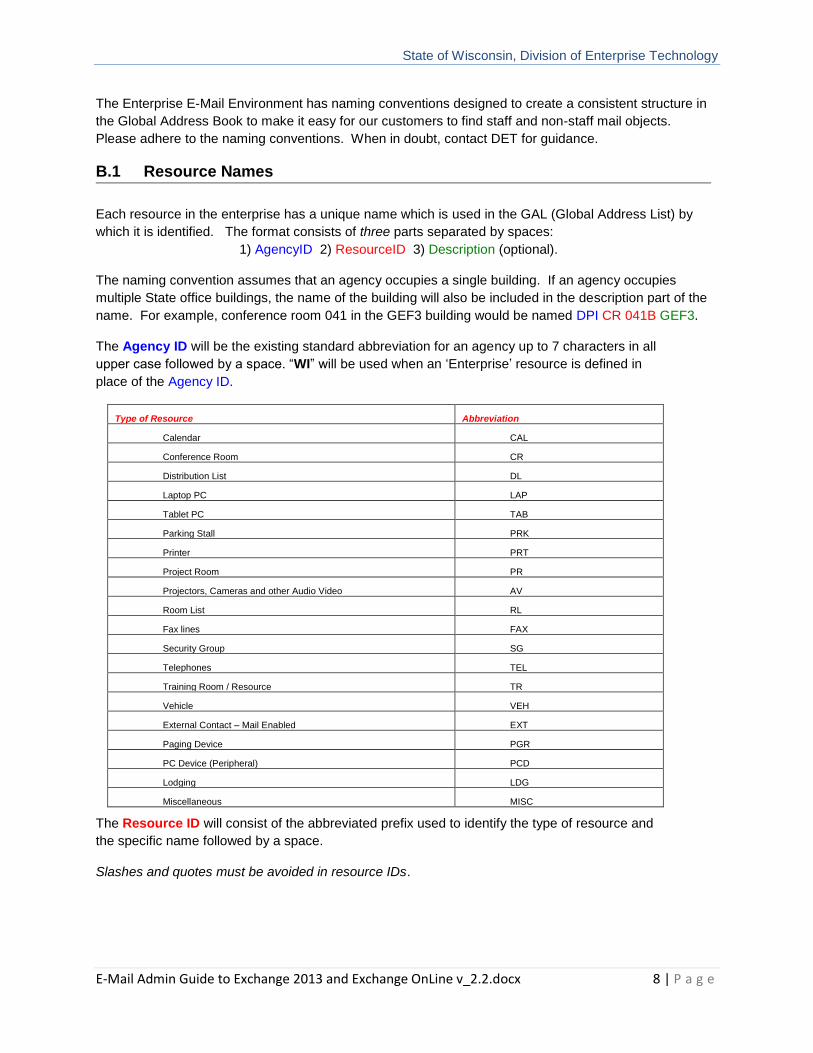
The Enterprise E-Mail Environment has naming conventions designed to create a consistent structure in
the Global Address Book to make it easy for our customers to find staff and non-staff mail objects.
Please adhere to the naming conventions. When in doubt, contact DET for guidance.
B.1 Resource Names
Each resource in the enterprise has a unique name which is used in the GAL (Global Address List) by
which it is identified. The format consists of three parts separated by spaces:
1) AgencyID 2) ResourceID 3) Description (optional).
The naming convention assumes that an agency occupies a single building. If an agency occupies
multiple State office buildings, the name of the building will also be included in the description part of the
name. For example, conference room 041 in the GEF3 building would be named DPI CR 041B GEF3.
The Agency ID will be the existing standard abbreviation for an agency up to 7 characters in all
upper case followed by a space. “WI” will be used when an ‘Enterprise’ resource is defined in
place of the Agency ID.
Type of Resource Abbreviation
Calendar CAL
Conference Room CR
Distribution List DL
Laptop PC LAP
Tablet PC TAB
Parking Stall PRK
Printer PRT
Project Room PR
Projectors, Cameras and other Audio Video AV
Room List RL
Fax lines FAX
Security Group SG
Telephones TEL
Training Room / Resource TR
Vehicle VEH
External Contact – Mail Enabled EXT
Paging Device PGR
PC Device (Peripheral) PCD
Lodging LDG
Miscellaneous MISC
The Resource ID will consist of the abbreviated prefix used to identify the type of resource and
the specific name followed by a space.
Slashes and quotes must be avoided in resource IDs.
State of Wisconsin, Division of Enterprise Technology
E-Mail Admin Guide to Exchange 2013 and Exchange OnLine v_2.2.docx 9 | P a g e
The Description (optional) is up to the owner of the resource and is used to clarify the Resource
ID.
NOTE: A contact person must be identified in the resource properties for each resource. For a
conference room resource, it is also helpful to list the number of people the room accommodates, the
phone number if the room has a live phone jack, any AV equipment, whiteboards, etc. If the “owner” is
different from the “contact”, list them both.
RESOURCE E-MAIL ADDRESSES
The e-mail address for a resource will be: AgencyIDResourceIDDescription (optional)@Wisconsin.gov.
(ex. [email protected])
NOTE: The use of a Description is optional only for Resources.
B.2 Distribution List Names
Distribution List names will be AgencyID DL Description. The description part can include a Division ID to help organize the information and make it easy for staff to locate but remember to keep the name short so it will be viewable in the Outlook Global Address List window. Some examples are:
DOA DL DAIT Waukesha Attorneys DOC DL DAI Wardens DOC DL All DOC Staff WI DL Email Administrators SECURITY GROUPS Distribution Lists that are also Security Groups can be AgencyID SG Description DISTRIBUTION LIST E-MAIL ADDRESSES The e-mail address for a distribution list will be [email protected] (ex. [email protected]) PUBLIC FOLDERS Public Folder display names are to begin with the AgencyID PF Description.
B.3 Shared Mailbox Names
The name for a shared mailbox will be AgencyIDDescription
(ex. DOA HELPDESK with an e-mail address of [email protected] or DOA PRINT CENTER with an e-mail address of [email protected])
NOTE: Agencies can, after migration, provide a friendlier, shorter e-mail address (called a secondary proxy) via Service Request or self-management, but it must still begin with the Agency ID.
State of Wisconsin, Division of Enterprise Technology
E-Mail Admin Guide to Exchange 2013 and Exchange OnLine v_2.2.docx 10 | P a g e
Division of Enterprise Technology
C. Accessing Exchange 2013 On-Premise and
Exchange On-Line Environments
State of Wisconsin, Division of Enterprise Technology
E-Mail Admin Guide to Exchange 2013 and Exchange OnLine v_2.2.docx 11 | P a g e
Accessing Exchange 2013 and Exchange On-Line
There are two methods of accessing an Exchange environment to perform administrative functions; the Exchange Admin Center (EAC) and Remote PowerShell. The EAC is a web based GUI interface that is accessible over port 443 and is open to Statenet IP addresses. Remote PowerShell is also accessible over port 80 from within Statenet IP ranges.
C.1 Connect via Web Browser
To access the EAC for Exchange 2013 on premise management functions use the following links:
Production: https://mail.wisconsin.gov/ecp use (accounts\e-mail admin account)
Dev: https://devmail.wi.gov/ecp use (accountsdev\e-mail admin account)
Due to how many browsers cache credentials, you should not attempt to login as a different account using the same browser – for example, you should not use Internet Explorer to open the EAC as your admin user and another Internet Explorer session as your mailbox user (unless you open the 2nd one as “InPrivate” browsing in the Tools menu of your IE browser. Most other browsers have a similar feature to separate the permissions.
To access the EAC for Exchange OnLine management functions use the following links:
Production or Dev: https://outlook.office365.com/ecp This link will redirect you to a Microsoft login page where you will be prompted to pick an account to use. To manage Exchange OnLine, you will use your regular user account, not your admin account! Use the appropriate e-mail account email address ([email protected] or [email protected]). You will be redirected again to the ADFS login page where you can enter your password.
That may seem like a lot of redirection, but it is the easiest way to get directly to the EAC in Exchange Online.
C.2 Connect via Remote PowerShell:
Always open Windows PowerShell using “Run as Administrator”. To connect to one of the
environments, copy all of the Login commands from one of the groups below at once and paste them
into PowerShell.
On Premise Exchange 2013 Production:
$UserCredential = Get-Credential
$Session = New-PSSession -ConfigurationName Microsoft.Exchange -
ConnectionUri https://mail.wisconsin.gov/PowerShell/ -Authentication
Basic -Credential $UserCredential
Import-PSSession $Session -DisableNameChecking
$FormatEnumerationLimit = -1
Set-AdServerSettings -ViewEntireForest $True
State of Wisconsin, Division of Enterprise Technology
E-Mail Admin Guide to Exchange 2013 and Exchange OnLine v_2.2.docx 12 | P a g e
On Premise Exchange 2013 DEV:
$UserCredential = Get-Credential
$Session = New-PSSession -ConfigurationName Microsoft.Exchange -
ConnectionUri https://devmail.wi.gov/PowerShell/ -Authentication
Basic -Credential $UserCredential
Import-PSSession $Session -DisableNameChecking
$FormatEnumerationLimit = -1
Set-AdServerSettings -ViewEntireForest $True
Exchange On-Line
$UserCredential = Get-Credential
$Session = New-PSSession -ConfigurationName Microsoft.Exchange -
ConnectionUri https://ps.outlook.com/PowerShell/ -Authentication
Basic -AllowRedirection -Credential $UserCredential
Import-PSSession $Session -DisableNameChecking
$FormatEnumerationLimit = -1
NOTE: You might find it useful to create a local transcript of everything that occurs in your
PowerShell sessions. If do, you can add the following lines at the end of you commands
shown above changing the path and file name to a location you want the transcript stored:
$date1 =(get-date).ToString('yyyy-MM-dd-hhmm')
Start-Transcript -Path
"c:\exchange\transcripts\$($date1)_O365_transcript.txt" -NoClobber
CLS
State of Wisconsin, Division of Enterprise Technology
E-Mail Admin Guide to Exchange 2013 and Exchange OnLine v_2.2.docx 13 | P a g e
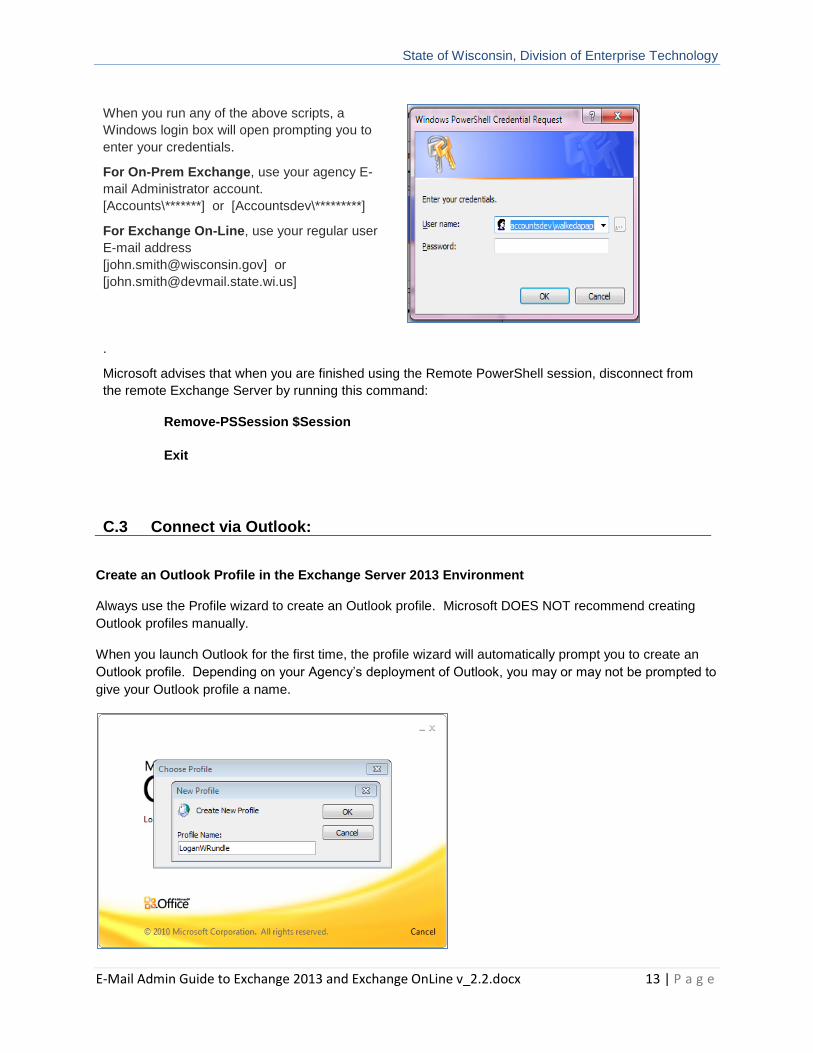
When you run any of the above scripts, a
Windows login box will open prompting you to
enter your credentials.
For On-Prem Exchange, use your agency E-
mail Administrator account.
[Accounts\*******] or [Accountsdev\*********]
For Exchange On-Line, use your regular user
E-mail address
[[email protected]] or
.
Microsoft advises that when you are finished using the Remote PowerShell session, disconnect from
the remote Exchange Server by running this command:
Remove-PSSession $Session
Exit
C.3 Connect via Outlook:
Create an Outlook Profile in the Exchange Server 2013 Environment
Always use the Profile wizard to create an Outlook profile. Microsoft DOES NOT recommend creating
Outlook profiles manually.
When you launch Outlook for the first time, the profile wizard will automatically prompt you to create an
Outlook profile. Depending on your Agency’s deployment of Outlook, you may or may not be prompted to
give your Outlook profile a name.
State of Wisconsin, Division of Enterprise Technology
E-Mail Admin Guide to Exchange 2013 and Exchange OnLine v_2.2.docx 14 | P a g e
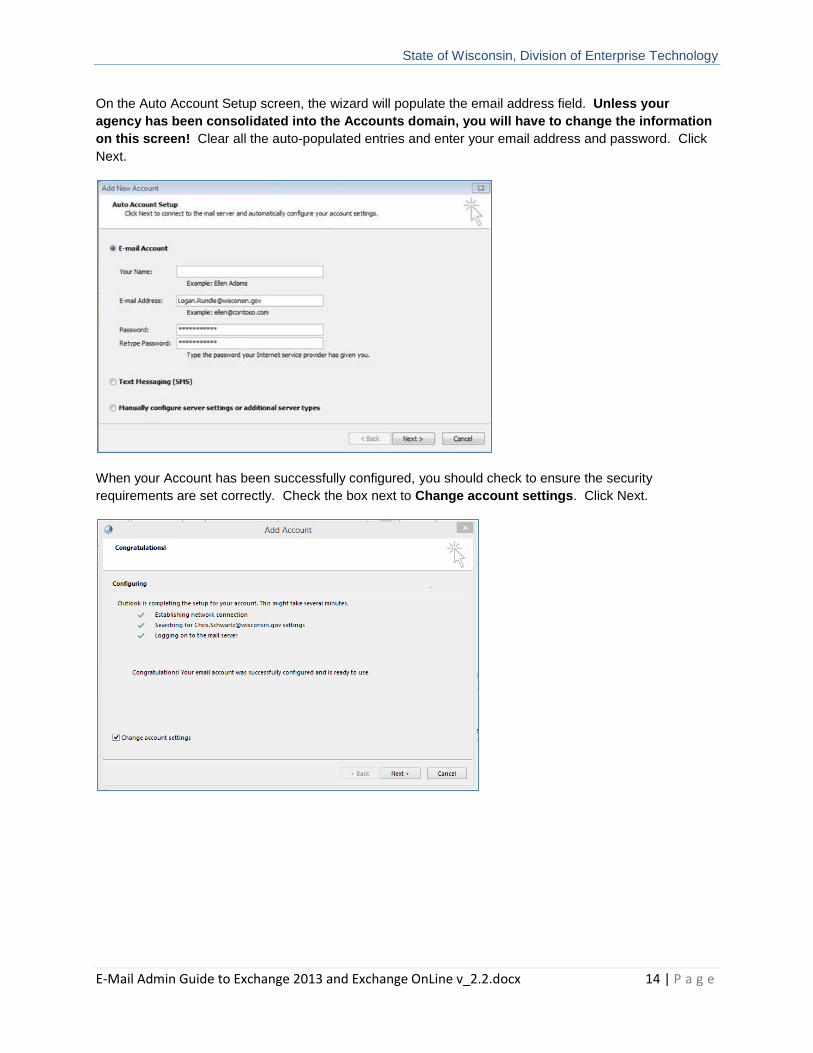
On the Auto Account Setup screen, the wizard will populate the email address field. Unless your
agency has been consolidated into the Accounts domain, you will have to change the information
on this screen! Clear all the auto-populated entries and enter your email address and password. Click
Next.
When your Account has been successfully configured, you should check to ensure the security
requirements are set correctly. Check the box next to Change account settings. Click Next.
State of Wisconsin, Division of Enterprise Technology
E-Mail Admin Guide to Exchange 2013 and Exchange OnLine v_2.2.docx 15 | P a g e
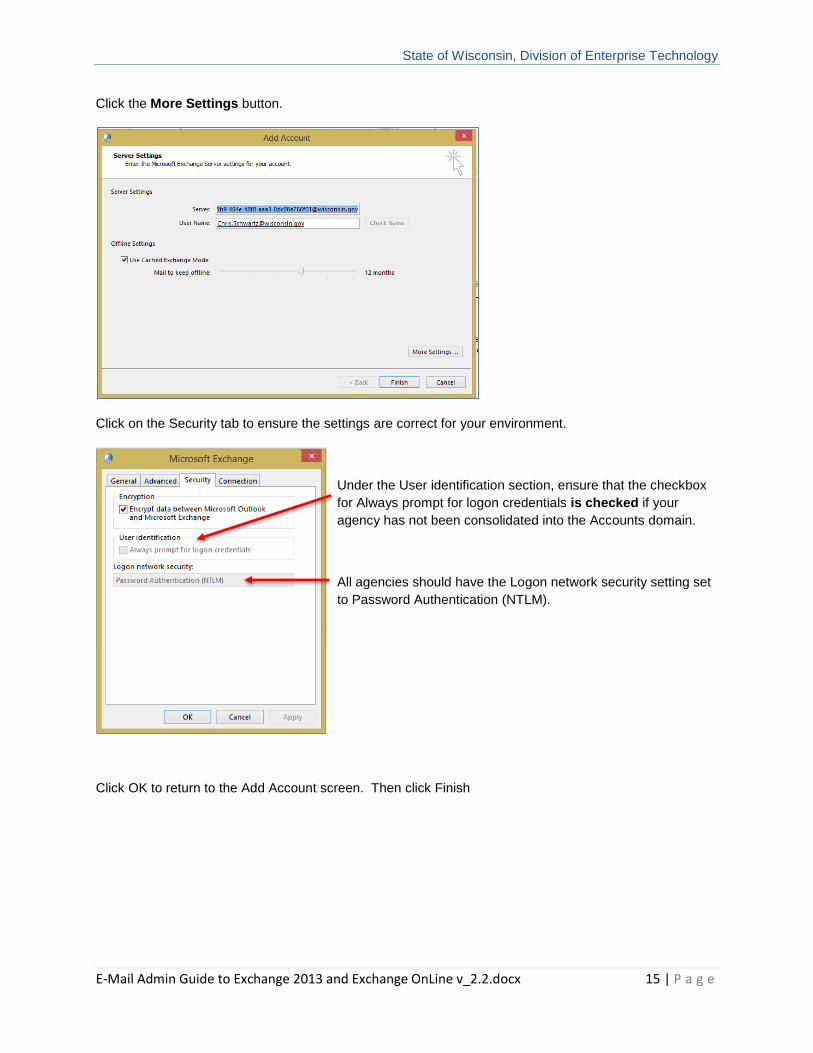
Click the More Settings button.
Click on the Security tab to ensure the settings are correct for your environment.
Under the User identification section, ensure that the checkbox
for Always prompt for logon credentials is checked if your
agency has not been consolidated into the Accounts domain.
All agencies should have the Logon network security setting set
to Password Authentication (NTLM).
Click OK to return to the Add Account screen. Then click Finish
State of Wisconsin, Division of Enterprise Technology
E-Mail Admin Guide to Exchange 2013 and Exchange OnLine v_2.2.docx 16 | P a g e
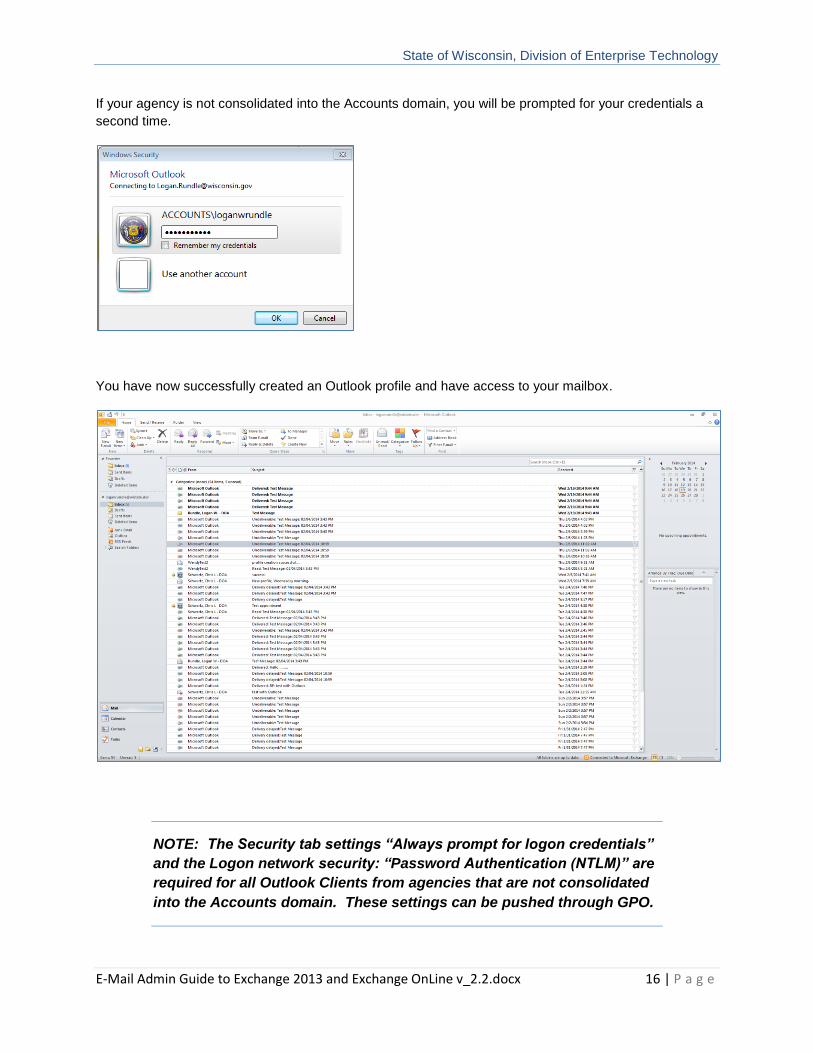
If your agency is not consolidated into the Accounts domain, you will be prompted for your credentials a
second time.
You have now successfully created an Outlook profile and have access to your mailbox.
NOTE: The Security tab settings “Always prompt for logon credentials”
and the Logon network security: “Password Authentication (NTLM)” are
required for all Outlook Clients from agencies that are not consolidated
into the Accounts domain. These settings can be pushed through GPO.
State of Wisconsin, Division of Enterprise Technology
E-Mail Admin Guide to Exchange 2013 and Exchange OnLine v_2.2.docx 17 | P a g e
Division of Enterprise Technology
D. Agency Administrator Functions
State of Wisconsin, Division of Enterprise Technology
E-Mail Admin Guide to Exchange 2013 and Exchange OnLine v_2.2.docx 18 | P a g e
Agency Administrator Functions
Agency delegated Administrators are responsible for managing the agency Staff and non-Staff, or
MailProv, Exchange objects. Delegation is set up so that the agency administrators can fully manage
agency accounts through the Exchange Control Panel (EAC) or through Exchange Remote PowerShell.
D.1 Navigating the Microsoft Exchange Admin Center (EAC)
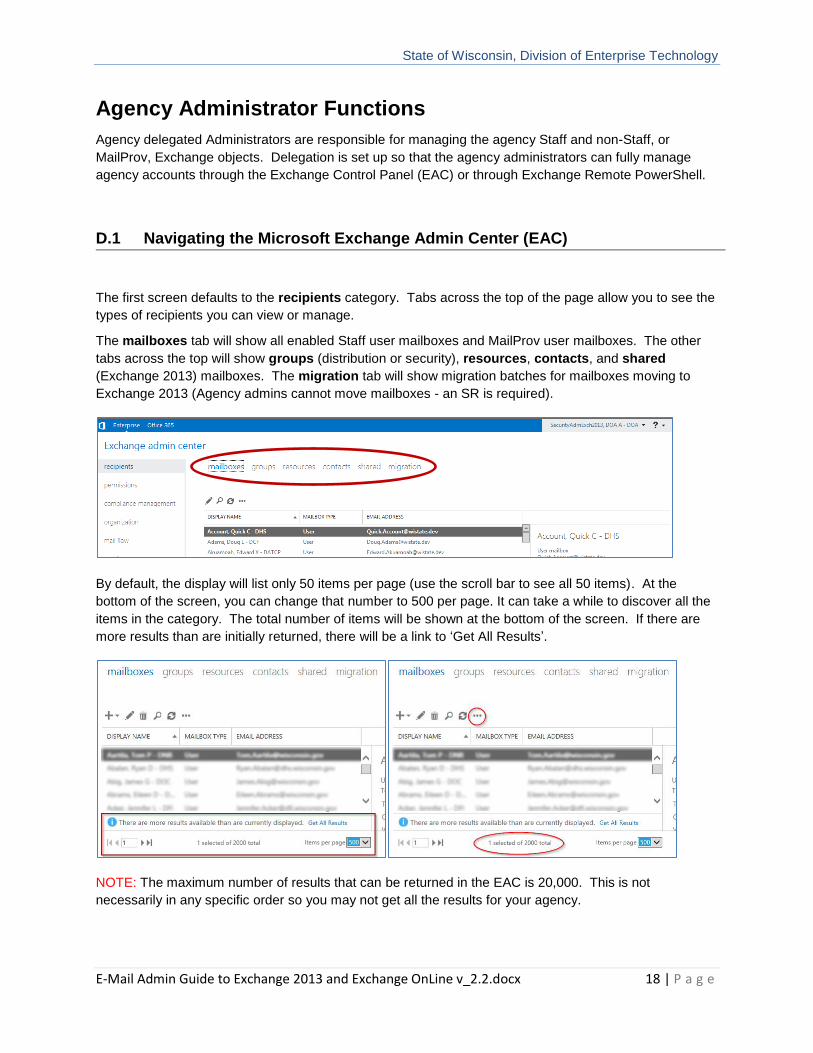
The first screen defaults to the recipients category. Tabs across the top of the page allow you to see the
types of recipients you can view or manage.
The mailboxes tab will show all enabled Staff user mailboxes and MailProv user mailboxes. The other
tabs across the top will show groups (distribution or security), resources, contacts, and shared
(Exchange 2013) mailboxes. The migration tab will show migration batches for mailboxes moving to
Exchange 2013 (Agency admins cannot move mailboxes - an SR is required).
By default, the display will list only 50 items per page (use the scroll bar to see all 50 items). At the
bottom of the screen, you can change that number to 500 per page. It can take a while to discover all the
items in the category. The total number of items will be shown at the bottom of the screen. If there are
more results than are initially returned, there will be a link to ‘Get All Results’.
NOTE: The maximum number of results that can be returned in the EAC is 20,000. This is not
necessarily in any specific order so you may not get all the results for your agency.
State of Wisconsin, Division of Enterprise Technology
E-Mail Admin Guide to Exchange 2013 and Exchange OnLine v_2.2.docx 19 | P a g e
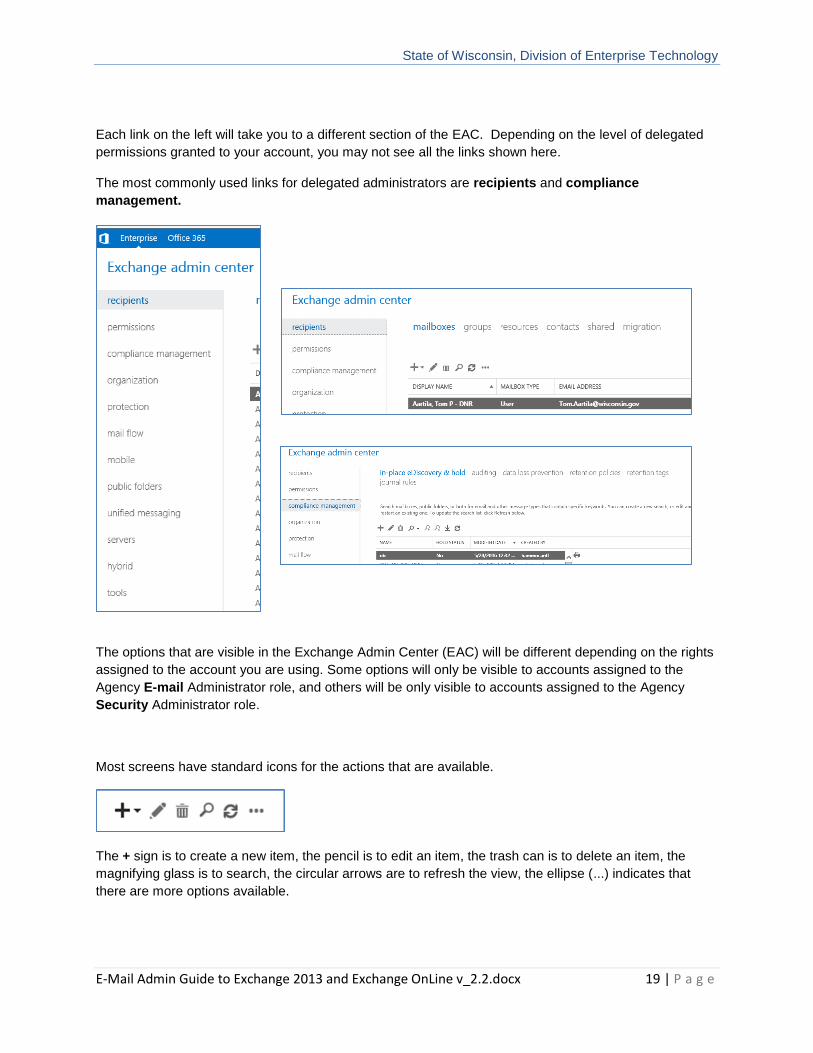
Each link on the left will take you to a different section of the EAC. Depending on the level of delegated
permissions granted to your account, you may not see all the links shown here.
The most commonly used links for delegated administrators are recipients and compliance
management.
The options that are visible in the Exchange Admin Center (EAC) will be different depending on the rights
assigned to the account you are using. Some options will only be visible to accounts assigned to the
Agency E-mail Administrator role, and others will be only visible to accounts assigned to the Agency
Security Administrator role.
Most screens have standard icons for the actions that are available.
The + sign is to create a new item, the pencil is to edit an item, the trash can is to delete an item, the
magnifying glass is to search, the circular arrows are to refresh the view, the ellipse (...) indicates that
there are more options available.
State of Wisconsin, Division of Enterprise Technology
E-Mail Admin Guide to Exchange 2013 and Exchange OnLine v_2.2.docx 20 | P a g e
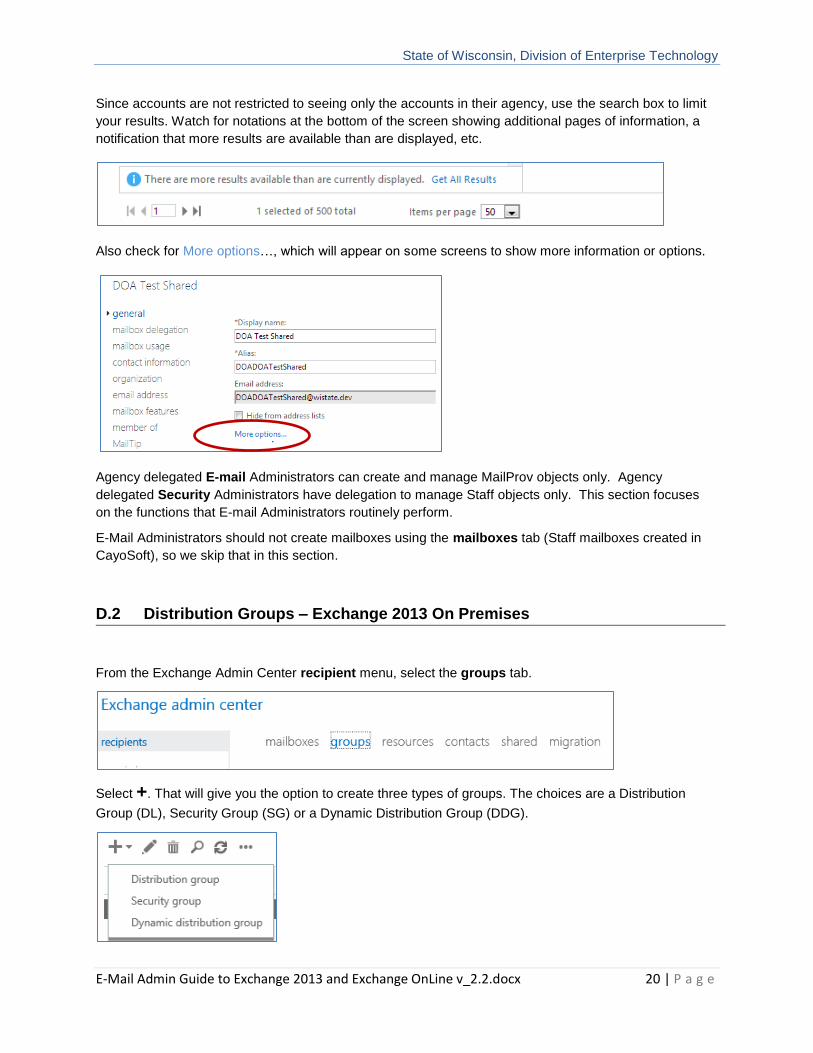
Since accounts are not restricted to seeing only the accounts in their agency, use the search box to limit
your results. Watch for notations at the bottom of the screen showing additional pages of information, a
notification that more results are available than are displayed, etc.
Also check for More options…, which will appear on some screens to show more information or options.
Agency delegated E-mail Administrators can create and manage MailProv objects only. Agency
delegated Security Administrators have delegation to manage Staff objects only. This section focuses
on the functions that E-mail Administrators routinely perform.
E-Mail Administrators should not create mailboxes using the mailboxes tab (Staff mailboxes created in
CayoSoft), so we skip that in this section.
D.2 Distribution Groups – Exchange 2013 On Premises
From the Exchange Admin Center recipient menu, select the groups tab.
Select +. That will give you the option to create three types of groups. The choices are a Distribution
Group (DL), Security Group (SG) or a Dynamic Distribution Group (DDG).
State of Wisconsin, Division of Enterprise Technology
E-Mail Admin Guide to Exchange 2013 and Exchange OnLine v_2.2.docx 21 | P a g e
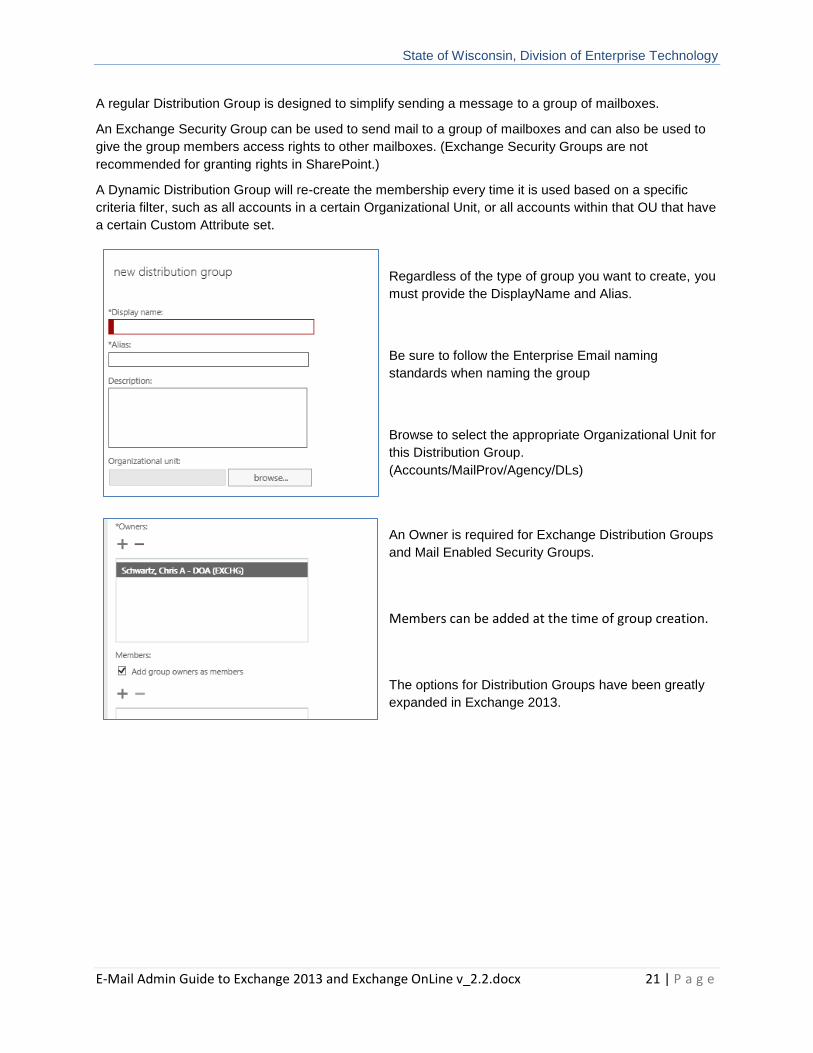
A regular Distribution Group is designed to simplify sending a message to a group of mailboxes.
An Exchange Security Group can be used to send mail to a group of mailboxes and can also be used to
give the group members access rights to other mailboxes. (Exchange Security Groups are not
recommended for granting rights in SharePoint.)
A Dynamic Distribution Group will re-create the membership every time it is used based on a specific
criteria filter, such as all accounts in a certain Organizational Unit, or all accounts within that OU that have
a certain Custom Attribute set.
Regardless of the type of group you want to create, you
must provide the DisplayName and Alias.
Be sure to follow the Enterprise Email naming
standards when naming the group
Browse to select the appropriate Organizational Unit for
this Distribution Group.
(Accounts/MailProv/Agency/DLs)
An Owner is required for Exchange Distribution Groups
and Mail Enabled Security Groups.
Members can be added at the time of group creation.
The options for Distribution Groups have been greatly
expanded in Exchange 2013.
State of Wisconsin, Division of Enterprise Technology
E-Mail Admin Guide to Exchange 2013 and Exchange OnLine v_2.2.docx 22 | P a g e
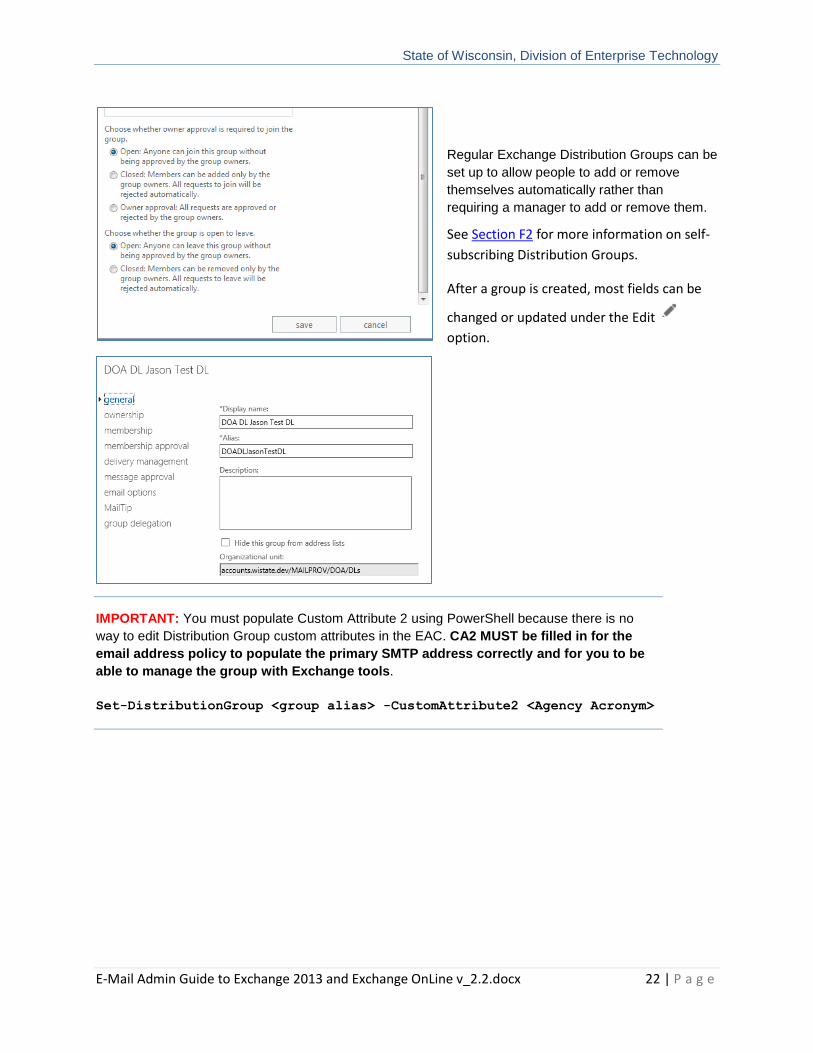
Regular Exchange Distribution Groups can be
set up to allow people to add or remove
themselves automatically rather than
requiring a manager to add or remove them.
See Section F2 for more information on self-
subscribing Distribution Groups.
After a group is created, most fields can be
changed or updated under the Edit
option.
IMPORTANT: You must populate Custom Attribute 2 using PowerShell because there is no
way to edit Distribution Group custom attributes in the EAC. CA2 MUST be filled in for the
email address policy to populate the primary SMTP address correctly and for you to be
able to manage the group with Exchange tools.
Set-DistributionGroup <group alias> -CustomAttribute2 <Agency Acronym>
State of Wisconsin, Division of Enterprise Technology
E-Mail Admin Guide to Exchange 2013 and Exchange OnLine v_2.2.docx 23 | P a g e
D.2.1 Distribution Groups – Exchange OnLine (O365)
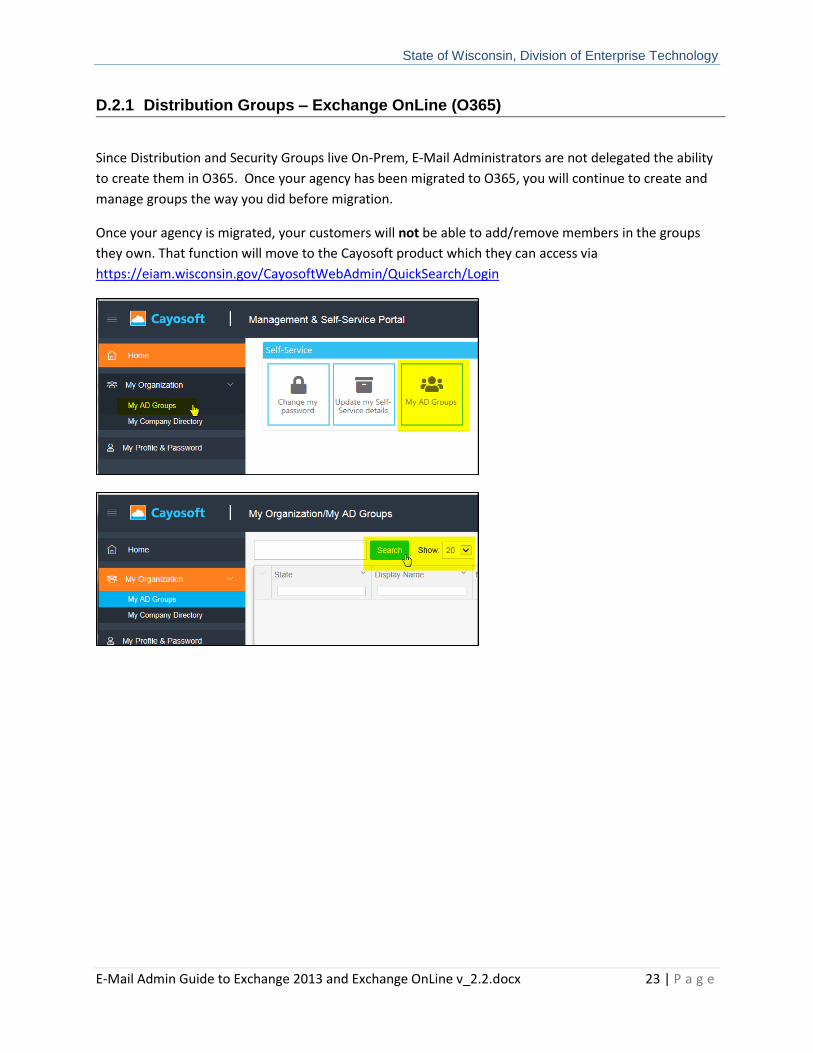
Since Distribution and Security Groups live On-Prem, E-Mail Administrators are not delegated the ability
to create them in O365. Once your agency has been migrated to O365, you will continue to create and
manage groups the way you did before migration.
Once your agency is migrated, your customers will not be able to add/remove members in the groups
they own. That function will move to the Cayosoft product which they can access via
https://eiam.wisconsin.gov/CayosoftWebAdmin/QuickSearch/Login
State of Wisconsin, Division of Enterprise Technology
E-Mail Admin Guide to Exchange 2013 and Exchange OnLine v_2.2.docx 24 | P a g e
D.3 Resource Mailboxes
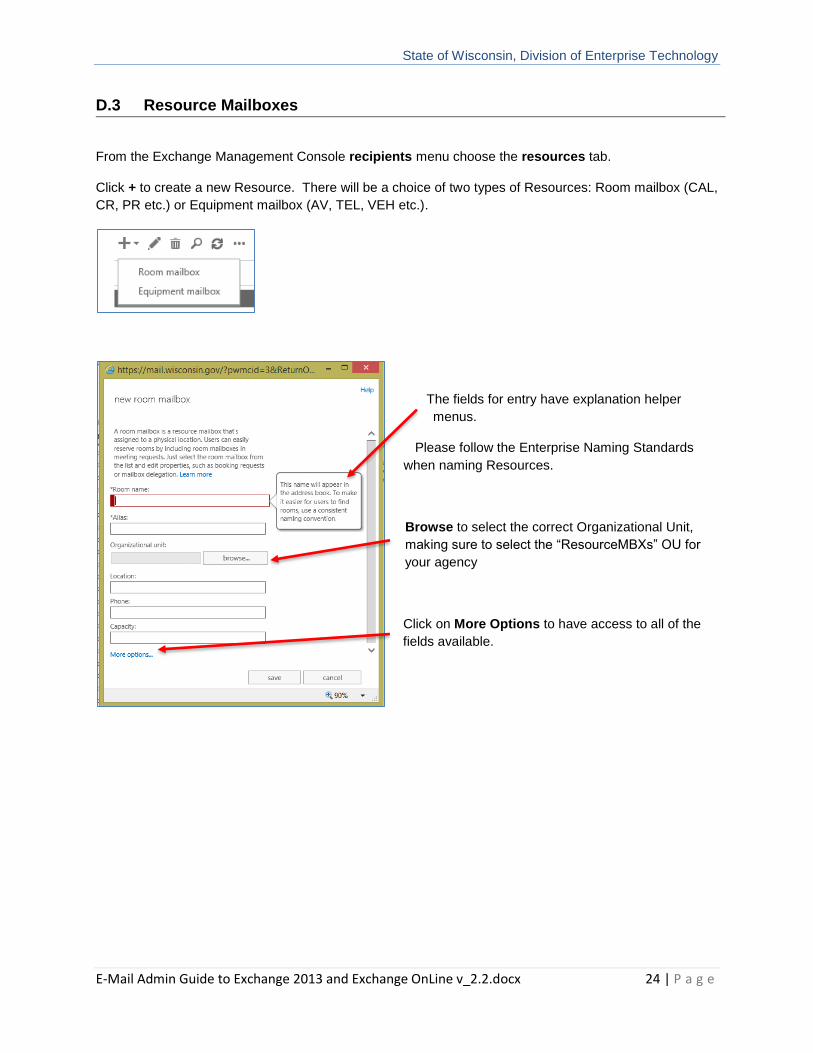
From the Exchange Management Console recipients menu choose the resources tab.
Click + to create a new Resource. There will be a choice of two types of Resources: Room mailbox (CAL,
CR, PR etc.) or Equipment mailbox (AV, TEL, VEH etc.).
The fields for entry have explanation helper
menus.
Please follow the Enterprise Naming Standards
when naming Resources.
Browse to select the correct Organizational Unit,
making sure to select the “ResourceMBXs” OU for
your agency
Click on More Options to have access to all of the
fields available.
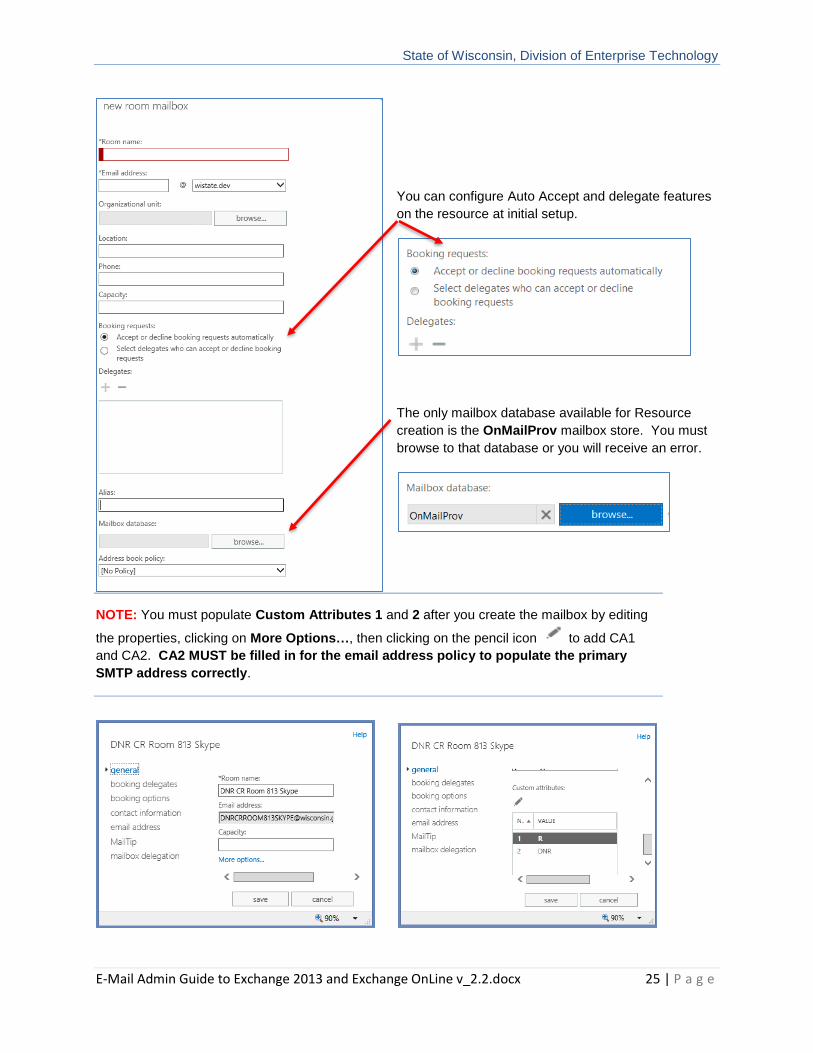
State of Wisconsin, Division of Enterprise Technology
E-Mail Admin Guide to Exchange 2013 and Exchange OnLine v_2.2.docx 25 | P a g e
You can configure Auto Accept and delegate features
on the resource at initial setup.
The only mailbox database available for Resource
creation is the OnMailProv mailbox store. You must
browse to that database or you will receive an error.
NOTE: You must populate Custom Attributes 1 and 2 after you create the mailbox by editing
the properties, clicking on More Options…, then clicking on the pencil icon to add CA1
and CA2. CA2 MUST be filled in for the email address policy to populate the primary
SMTP address correctly.
State of Wisconsin, Division of Enterprise Technology
E-Mail Admin Guide to Exchange 2013 and Exchange OnLine v_2.2.docx 26 | P a g e
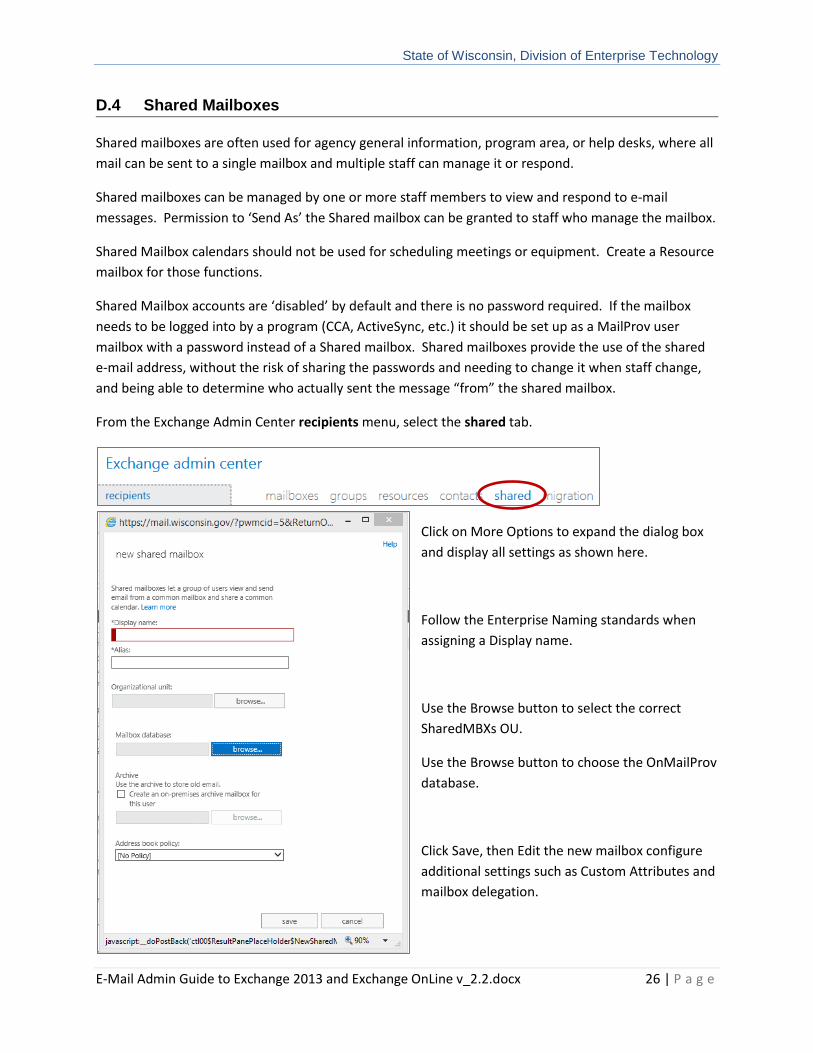
D.4 Shared Mailboxes
Shared mailboxes are often used for agency general information, program area, or help desks, where all
mail can be sent to a single mailbox and multiple staff can manage it or respond.
Shared mailboxes can be managed by one or more staff members to view and respond to e-mail
messages. Permission to ‘Send As’ the Shared mailbox can be granted to staff who manage the mailbox.
Shared Mailbox calendars should not be used for scheduling meetings or equipment. Create a Resource
mailbox for those functions.
Shared Mailbox accounts are ‘disabled’ by default and there is no password required. If the mailbox
needs to be logged into by a program (CCA, ActiveSync, etc.) it should be set up as a MailProv user
mailbox with a password instead of a Shared mailbox. Shared mailboxes provide the use of the shared
e-mail address, without the risk of sharing the passwords and needing to change it when staff change,
and being able to determine who actually sent the message “from” the shared mailbox.
From the Exchange Admin Center recipients menu, select the shared tab.
Click on More Options to expand the dialog box
and display all settings as shown here.
Follow the Enterprise Naming standards when
assigning a Display name.
Use the Browse button to select the correct
SharedMBXs OU.
Use the Browse button to choose the OnMailProv
database.
Click Save, then Edit the new mailbox configure
additional settings such as Custom Attributes and
mailbox delegation.
State of Wisconsin, Division of Enterprise Technology
E-Mail Admin Guide to Exchange 2013 and Exchange OnLine v_2.2.docx 27 | P a g e
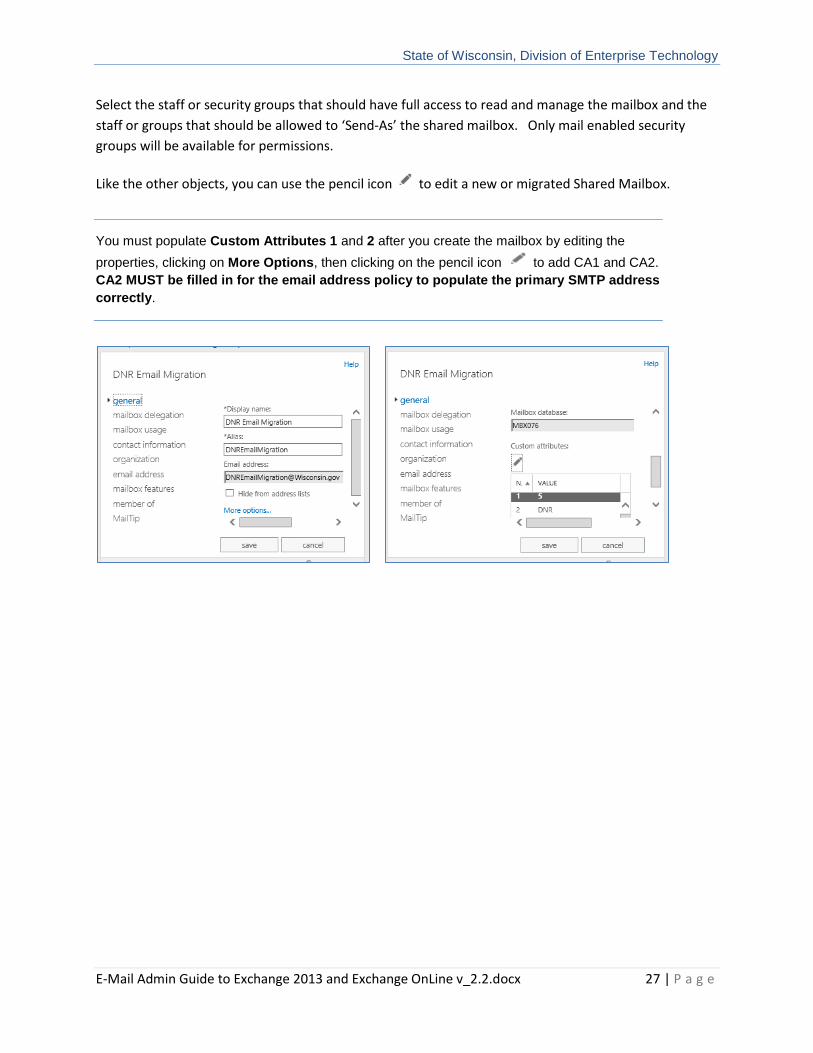
Select the staff or security groups that should have full access to read and manage the mailbox and the
staff or groups that should be allowed to ‘Send-As’ the shared mailbox. Only mail enabled security
groups will be available for permissions.
Like the other objects, you can use the pencil icon to edit a new or migrated Shared Mailbox.
You must populate Custom Attributes 1 and 2 after you create the mailbox by editing the
properties, clicking on More Options, then clicking on the pencil icon to add CA1 and CA2.
CA2 MUST be filled in for the email address policy to populate the primary SMTP address
correctly.
State of Wisconsin, Division of Enterprise Technology
E-Mail Admin Guide to Exchange 2013 and Exchange OnLine v_2.2.docx 28 | P a g e
D.5 Contacts
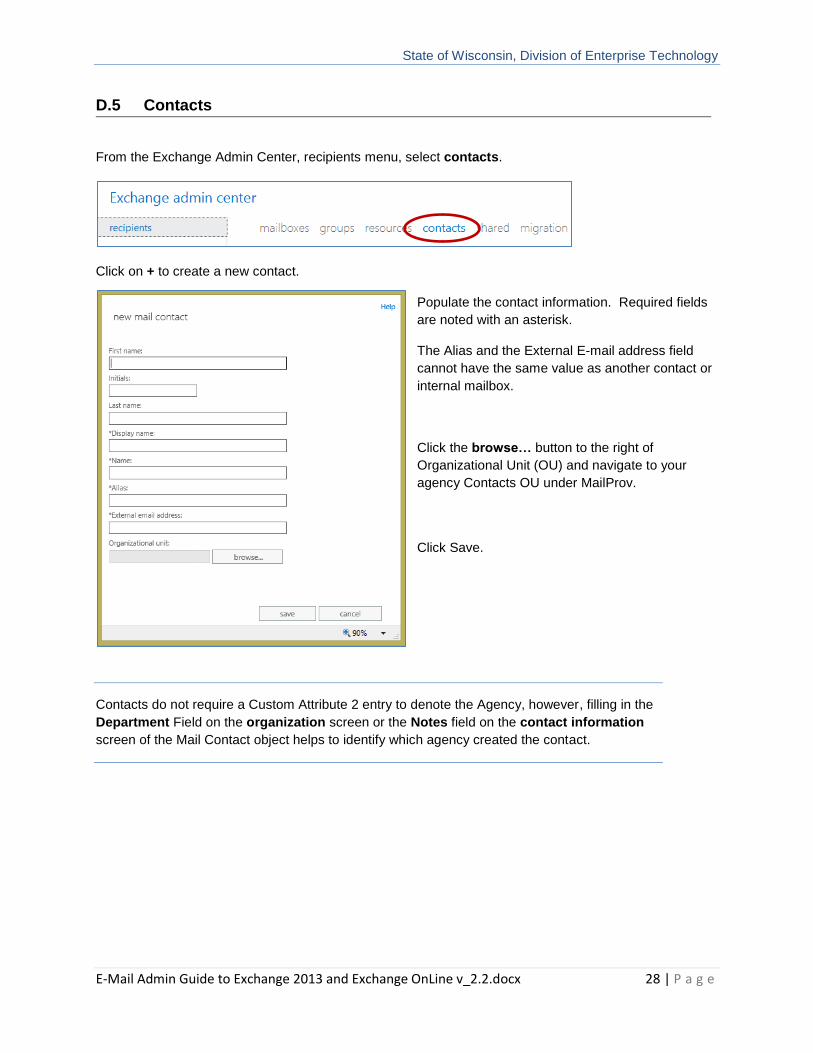
From the Exchange Admin Center, recipients menu, select contacts.
Click on + to create a new contact.
Populate the contact information. Required fields
are noted with an asterisk.
The Alias and the External E-mail address field
cannot have the same value as another contact or
internal mailbox.
Click the browse… button to the right of
Organizational Unit (OU) and navigate to your
agency Contacts OU under MailProv.
Click Save.
Contacts do not require a Custom Attribute 2 entry to denote the Agency, however, filling in the
Department Field on the organization screen or the Notes field on the contact information
screen of the Mail Contact object helps to identify which agency created the contact.

State of Wisconsin, Division of Enterprise Technology
E-Mail Admin Guide to Exchange 2013 and Exchange OnLine v_2.2.docx 29 | P a g e
D.6 Managing Staff Mailbox Properties
Most of the properties of Staff mailboxes are managed through the IAM admin tool – Cayosoft and are
blocked from editing in Exchange. Through the Exchange Control Panel (EAC) and using PowerShell
commands you can change a subset of mailbox properties.
• Add/Modify/Remove Custom Attributes 10 – 15 (Custom Attributes 1-9 are reserved)
• Select Retention Policy from available choices
• Enable/Disable ActiveSync
• Select Mobile device mailbox policy from available choices
• Add/Modify/Remove Mobile device pairings
• Enable/Disable Outlook Web App
• Enable/Disable IMAP
• Enable/Disable POP3
• Enable/Disable MAPI**
• Enable/Disable Litigation hold
• Manage Delivery Options (mail forwarding)
• Manage Message Delivery Restrictions
• Add/Modify/Remove MailTips
• Set Mailbox Delegation (Full Access, SendAs, SendOnBehalfOf)
**Disabling MAPI will prevent a user from accessing their e-mail through the Outlook Client. Be
careful that you do not disable this feature by accident.
State of Wisconsin, Division of Enterprise Technology
E-Mail Admin Guide to Exchange 2013 and Exchange OnLine v_2.2.docx 30 | P a g e
Division of Enterprise Technology
Exchange PowerShell
and The Agency Powerbook
State of Wisconsin, Division of Enterprise Technology
E-Mail Admin Guide to Exchange 2013 and Exchange OnLine v_2.2.docx 31 | P a g e
E.1 Exchange PowerBook Information
Some administrative functions cannot be performed in the Exchange Admin Center (EAC) and therefore
must be completed with PowerShell. In addition, some functions are more efficient to run in PowerShell.
To help get you started, we have created the Agency PowerBook. The PowerBook is an Excel workbook
with some of the common PowerShell commands set up to accept input from the agency administrator
and create the PowerShell command. These are basic commands and other commands or parameters
for these commands may be required to meet your business needs.
The current Agency Exchange 2013 PowerBook can be found on the E-mail Governance SharePoint site
https://agency.wisconsin.gov/sites/doadet/Enterprise/emailgovernance/default.aspx in Shared
Documents. The document will be updated periodically, so always check for the latest version.
The first tab has an index of the available commands, with a brief explanation for what they will be used
for. Each description links to a tab that has the command with one or more parameters to input, then just
copy the resulting script and run it in an Exchange 2013 (OnPrem) Remote PowerShell.
In some cases, there will be additional options available in the Exchange Admin Center (EAC) that are
not in the PowerBook, such as setting the ability for staff to join and remove themselves from Distribution
Lists. These settings can be included in the PowerShell command line, but don’t fit the format of the
PowerBook for easy input. You can also get an incredible amount of information by using any search
engine such as www.yippy.com www.DuckDuckGo.com or www.google.com .
https://docs.microsoft.com/en-us/exchange/exchange-management-shell-quick-reference-for-
exchange-2013-exchange-2013-help
E.2 Exchange Remote Powershell
Exchange 2013 management provides robust management tools via the PowerShell command line
interface. The Exchange Admin Center (EAC) is a web interface that performs PowerShell commands in
the background.
The Exchange Admin Center is convenient for some commands and simple daily tasks, but PowerShell is
more convenient, and sometimes essential, for more advanced commands or bulk processes.
The PowerShell language is comprised of nouns and verbs at the simplest level, arranged into cmdlets.
One convenient conventions of PowerShell is the ‘pipe’. "|" being the pipe character is normally located
above the "\" on the keyboard. It can be used to send the output of one command to another command.
For example (this works in any command shell, not just PowerShell), “| more” will pause the output after
each screen to let you see it before it scrolls off.
Other convenient conventions are > which will redirect the output to a text file and >> which will append
the output to the file. In PowerShell, you can use | ft to send selected output to a table, or | fl to send
output to a list view. Export-csv -NT is also a very useful command to get an Excel file of the results.
Tab completion reduces the number of keystrokes that are required to complete a cmdlet. Just press the
TAB key to complete the cmdlet you are typing. Tab completion kicks in whenever there is hyphen (-) in
the input. For example: Get-Send

State of Wisconsin, Division of Enterprise Technology
E-Mail Admin Guide to Exchange 2013 and Exchange OnLine v_2.2.docx 32 | P a g e
should complete to Get-SendConnector after you press the Tab key. You can even use regular
expressions, such as:
Get-U*P* Pressing the TAB key when you enter this command cycles through all cmdlets that match the
expression, such as the Unified Messaging Mailbox policy cmdlets. When cycling through a list of
commands, SHIFT+TAB will go back one.
One other useful parameter is "-resultsize unlimited". The ResultSize parameter specifies the
maximum number of results to return. If you want to return all mailboxes that match the query, use
"unlimited" for the value of this parameter. The default value is 1000. You would want to include “-
resultsize unlimited” if your query could result in more than 1000 answers and you need all matching
answers. In addition, the first 1000 responses are not in an alphabetical or hierarchical manner, so you
may only see 3 of the results you expect if you do not increase the number of results to return. For
example, if you only have access to see objects in the DOA Mailprov OU, but of the first 1000 objects it
displays, 997 of them are in OUs that you do not have rights to see, your result would only be 3, although
you know there are many more results you expected.
Fortunately, there is much information available on the Internet concerning PowerShell. We have listed
only a few basic commands you might need on a regular basis. This is not an exhaustive list, and the real
power of PowerShell is the ability to script routine functions and perform bulk commands.
WARNING: PowerShell is a very powerful tool and therefore caution should be exercised when running
command that are not ‘Get-‘ commands.
E.3 Common PowerShell One Line Commands
Reminder: The E-mail Admin Role can only run commands that modify MailProv objects. The Security Admin Role can only run commands that modify Staff Objects.
General Commands
List all parameters for a cmdlet
Get a list of all commands executed during the PowerShell session and send to a file
Displays information about Windows PowerShell cmdlets and concepts
Get-Command <cmdlet-name> | Format-List Definition
Get-history | fl > <path name.txt>
Get-help
State of Wisconsin, Division of Enterprise Technology
E-Mail Admin Guide to Exchange 2013 and Exchange OnLine v_2.2.docx 33 | P a g e
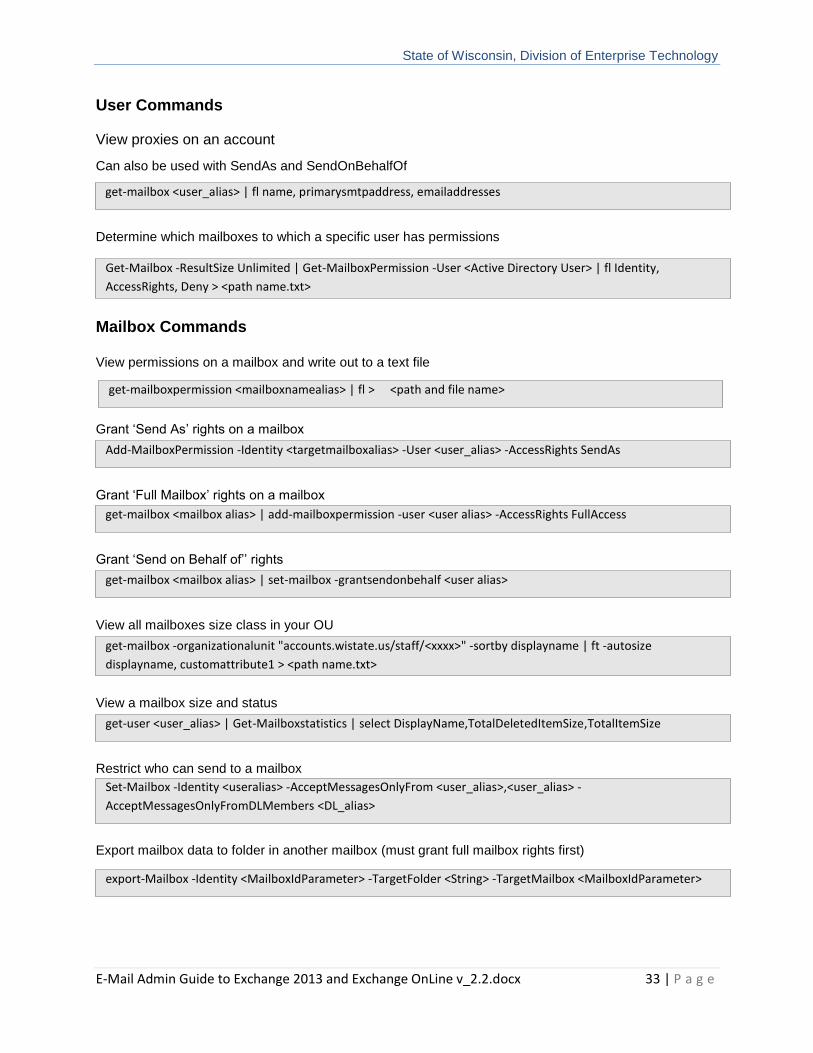
User Commands View proxies on an account
Can also be used with SendAs and SendOnBehalfOf
Determine which mailboxes to which a specific user has permissions
Mailbox Commands View permissions on a mailbox and write out to a text file
Grant ‘Send As’ rights on a mailbox
Grant ‘Full Mailbox’ rights on a mailbox
Grant ‘Send on Behalf of’’ rights
View all mailboxes size class in your OU
View a mailbox size and status
Restrict who can send to a mailbox
Export mailbox data to folder in another mailbox (must grant full mailbox rights first)
get-mailbox <user_alias> | fl name, primarysmtpaddress, emailaddresses
Get-Mailbox -ResultSize Unlimited | Get-MailboxPermission -User <Active Directory User> | fl Identity,
AccessRights, Deny > <path name.txt>
get-mailboxpermission <mailboxnamealias> | fl > <path and file name>
Add-MailboxPermission -Identity <targetmailboxalias> -User <user_alias> -AccessRights SendAs
get-mailbox <mailbox alias> | add-mailboxpermission -user <user alias> -AccessRights FullAccess
get-mailbox -organizationalunit "accounts.wistate.us/staff/<xxxx>" -sortby displayname | ft -autosize
displayname, customattribute1 > <path name.txt>
get-user <user_alias> | Get-Mailboxstatistics | select DisplayName,TotalDeletedItemSize,TotalItemSize
get-mailbox <mailbox alias> | set-mailbox -grantsendonbehalf <user alias>
Set-Mailbox -Identity <useralias> -AcceptMessagesOnlyFrom <user_alias>,<user_alias> -
AcceptMessagesOnlyFromDLMembers <DL_alias>
export-Mailbox -Identity <MailboxIdParameter> -TargetFolder <String> -TargetMailbox <MailboxIdParameter>

State of Wisconsin, Division of Enterprise Technology
E-Mail Admin Guide to Exchange 2013 and Exchange OnLine v_2.2.docx 34 | P a g e
View statistics for a mailbox (DisplayName, ItemCount, LastLoggedOnUserAccount, LastLogoffTime,
LastLogonTime, StorageLimitStatus, TotalDeletedItemSize, TotalItemSize, database, server, etc.)
Hide a mailbox from the GAL
Un-hide a mailbox in the GAL
View security permissions for all on a particular mailbox
View all users who have ‘Full Access’ to a particular mailbox
Determine what permissions a user account has on a specific mailbox
Retrieve information about the folders in a specified mailbox
View full details on a user’s mailbox
Find all mailboxes in your OU over their quota
Get-user <mailboxalias> | set-mailbox -hiddenfromaddresslistsenabled $true
Get-user <mailboxalias> | set-mailbox -hiddenfromaddresslistsenabled $false
get-mailbox <user_alias> | get-adpermission | fl
Get-MailboxPermission <mailboxalias> | where {$_.AccessRights -like "*FullAccess*"} | fl
Get-Mailbox <mailboxalias> | Get-MailboxPermission -User <user_alias>
Get-MailboxFolderStatistics <user_alias> | ft -wrap
Get-mailbox <user_alias> | fl
get-mailbox -resultsize unlimited -organizationalunit <your_OU_name> | get-MailboxStatistics | where
{"IssueWarning","ProhibitSend","MailboxDisabled" -contains $_.StorageLimitStatus} | format-Table
DisplayName,TotalItemSize > <path name.txt>
Get-mailboxstatistics <mailboxalias> | fl
State of Wisconsin, Division of Enterprise Technology
E-Mail Admin Guide to Exchange 2013 and Exchange OnLine v_2.2.docx 35 | P a g e
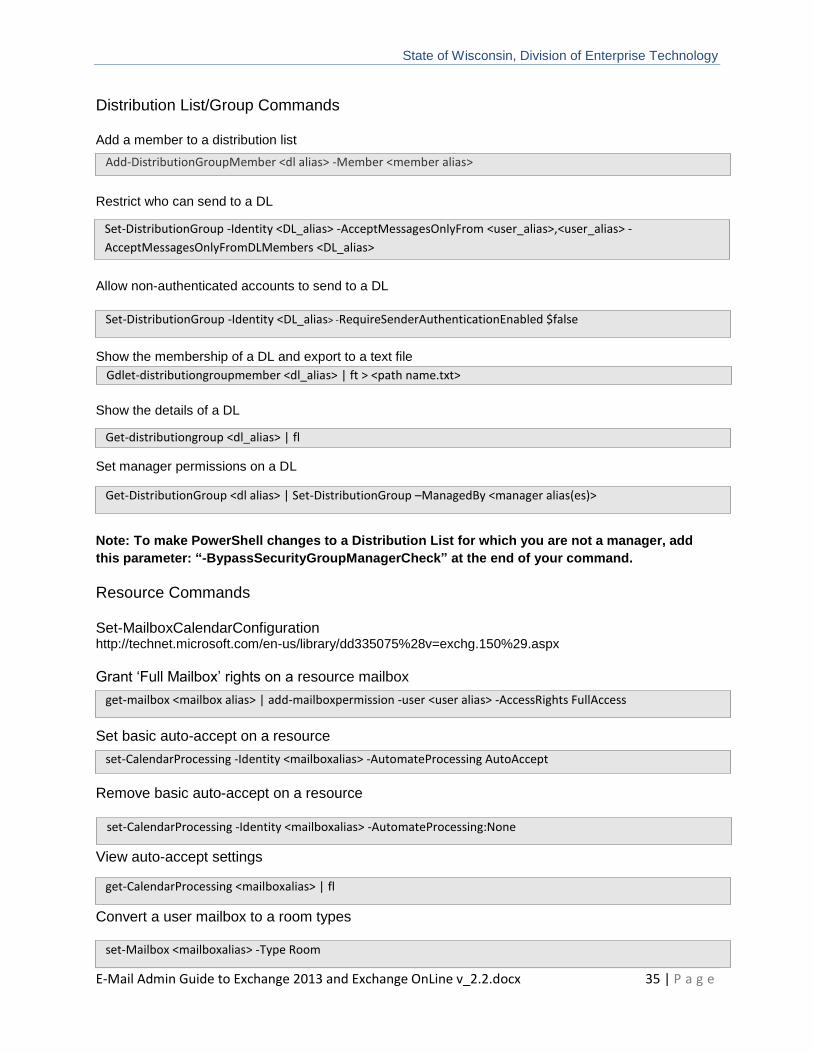
Distribution List/Group Commands Add a member to a distribution list
Restrict who can send to a DL
Allow non-authenticated accounts to send to a DL
Show the membership of a DL and export to a text file
Show the details of a DL
Set manager permissions on a DL
Note: To make PowerShell changes to a Distribution List for which you are not a manager, add
this parameter: “-BypassSecurityGroupManagerCheck” at the end of your command.
Resource Commands Set-MailboxCalendarConfiguration http://technet.microsoft.com/en-us/library/dd335075%28v=exchg.150%29.aspx Grant ‘Full Mailbox’ rights on a resource mailbox
Set basic auto-accept on a resource
Remove basic auto-accept on a resource
View auto-accept settings
Convert a user mailbox to a room types
Add-DistributionGroupMember <dl alias> -Member <member alias>
Set-DistributionGroup -Identity <DL_alias> -AcceptMessagesOnlyFrom <user_alias>,<user_alias> -
AcceptMessagesOnlyFromDLMembers <DL_alias>
Set-DistributionGroup -Identity <DL_alias> -RequireSenderAuthenticationEnabled $false
Gdlet-distributiongroupmember <dl_alias> | ft > <path name.txt>
Get-DistributionGroup <dl alias> | Set-DistributionGroup –ManagedBy <manager alias(es)>
set-CalendarProcessing -Identity <mailboxalias> -AutomateProcessing AutoAccept
get-CalendarProcessing <mailboxalias> | fl
set-Mailbox <mailboxalias> -Type Room
set-CalendarProcessing -Identity <mailboxalias> -AutomateProcessing:None
get-mailbox <mailbox alias> | add-mailboxpermission -user <user alias> -AccessRights FullAccess
Get-distributiongroup <dl_alias> | fl
State of Wisconsin, Division of Enterprise Technology
E-Mail Admin Guide to Exchange 2013 and Exchange OnLine v_2.2.docx 36 | P a g e
Piping your get- data to format-table or ft will create a table format showing limited data. Piping it
to format-list or fl will list all the get- results. Quite often, there is more data than will stay in the
window buffer. Piping that to more will stop the display when a screen if full. Then use the
space bar to see the next screen or the enter key to see the next line.
For instance:
get-mailbox <user alias> | fl | more
Many times, it is more beneficial to export in CSV format. That can be accomplished by piping
your data to export-csv command and a file location.
For instance:
get-mailbox <user alias> | export-csv “c:\temp\sample.csv” –nt
You can display the data in a browser window and filter that data using the window. You can
also select all data and paste into an Excel spreadsheet by using Out-Gridview.
For instance:
get-mailbox -resultsize unlimited -organizationalunit <your_OU_name> | Select * | Out-
Gridview
State of Wisconsin, Division of Enterprise Technology
E-Mail Admin Guide to Exchange 2013 and Exchange OnLine v_2.2.docx 37 | P a g e
Division of Enterprise Technology
F. Additional Exchange Client and Server Features
State of Wisconsin, Division of Enterprise Technology
E-Mail Admin Guide to Exchange 2013 and Exchange OnLine v_2.2.docx 38 | P a g e
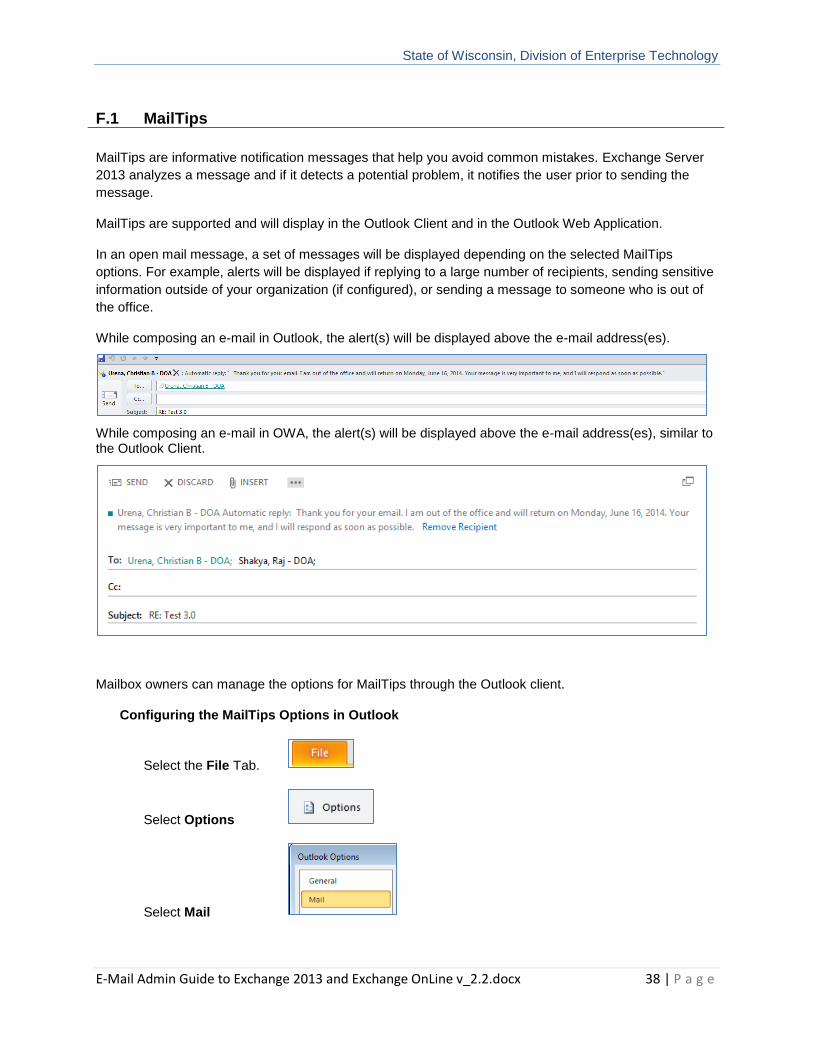
F.1 MailTips
MailTips are informative notification messages that help you avoid common mistakes. Exchange Server
2013 analyzes a message and if it detects a potential problem, it notifies the user prior to sending the
message.
MailTips are supported and will display in the Outlook Client and in the Outlook Web Application.
In an open mail message, a set of messages will be displayed depending on the selected MailTips
options. For example, alerts will be displayed if replying to a large number of recipients, sending sensitive
information outside of your organization (if configured), or sending a message to someone who is out of
the office.
While composing an e-mail in Outlook, the alert(s) will be displayed above the e-mail address(es).
While composing an e-mail in OWA, the alert(s) will be displayed above the e-mail address(es), similar to the Outlook Client.
Mailbox owners can manage the options for MailTips through the Outlook client.
Configuring the MailTips Options in Outlook
Select the File Tab.
Select Options
Select Mail
State of Wisconsin, Division of Enterprise Technology
E-Mail Admin Guide to Exchange 2013 and Exchange OnLine v_2.2.docx 39 | P a g e
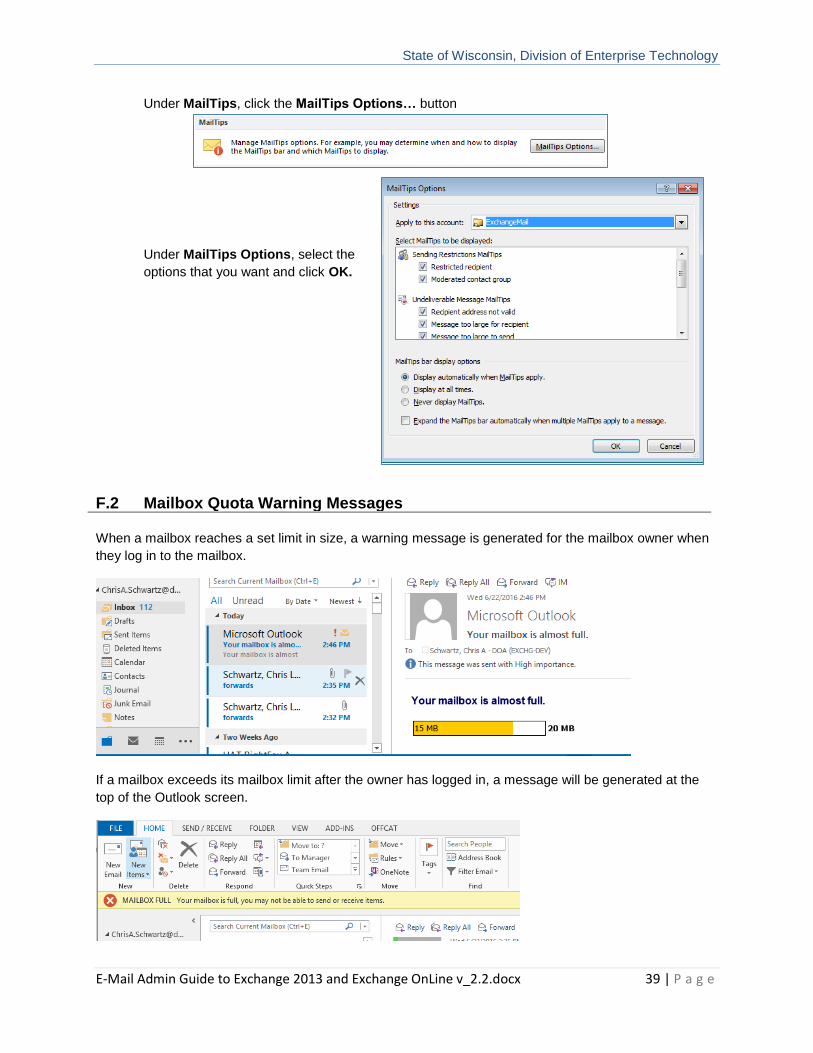
Under MailTips, click the MailTips Options… button
Under MailTips Options, select the
options that you want and click OK.
F.2 Mailbox Quota Warning Messages
When a mailbox reaches a set limit in size, a warning message is generated for the mailbox owner when
they log in to the mailbox.
If a mailbox exceeds its mailbox limit after the owner has logged in, a message will be generated at the
top of the Outlook screen.
State of Wisconsin, Division of Enterprise Technology
E-Mail Admin Guide to Exchange 2013 and Exchange OnLine v_2.2.docx 40 | P a g e
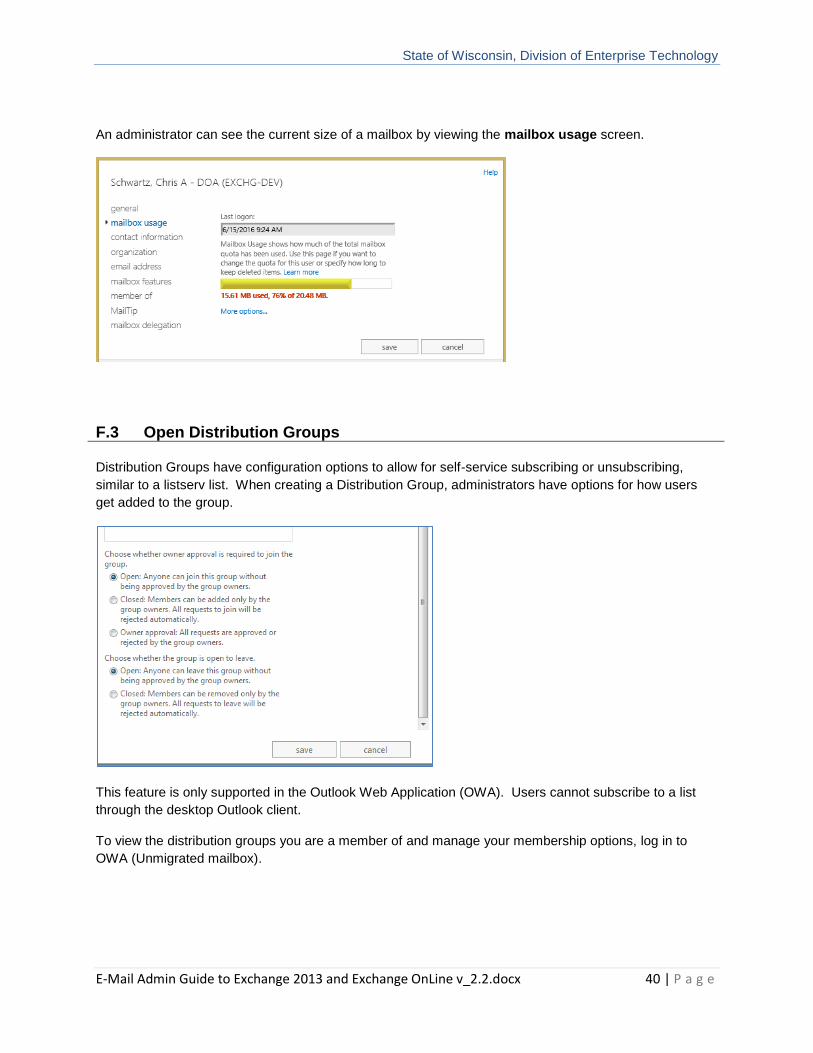
An administrator can see the current size of a mailbox by viewing the mailbox usage screen.
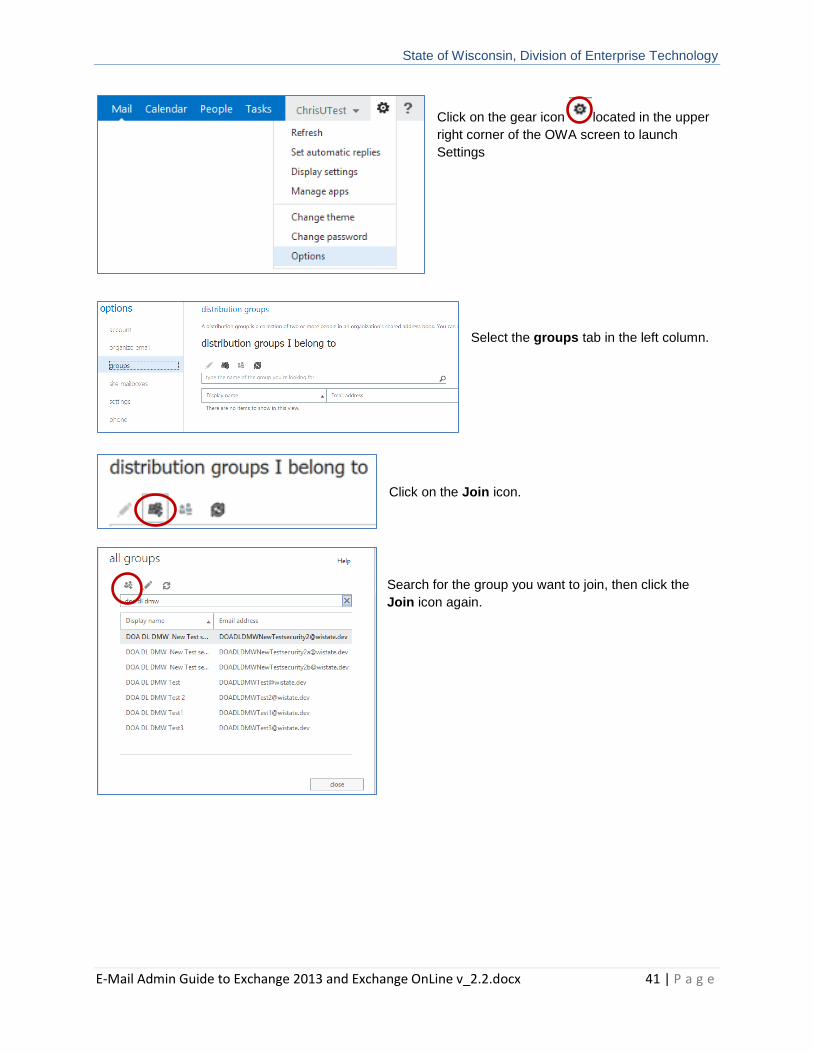
F.3 Open Distribution Groups
Distribution Groups have configuration options to allow for self-service subscribing or unsubscribing,
similar to a listserv list. When creating a Distribution Group, administrators have options for how users
get added to the group.
This feature is only supported in the Outlook Web Application (OWA). Users cannot subscribe to a list
through the desktop Outlook client.
To view the distribution groups you are a member of and manage your membership options, log in to
OWA (Unmigrated mailbox).
State of Wisconsin, Division of Enterprise Technology
E-Mail Admin Guide to Exchange 2013 and Exchange OnLine v_2.2.docx 41 | P a g e
Click on the gear icon located in the upper
right corner of the OWA screen to launch
Settings
Select the groups tab in the left column.
Click on the Join icon.
Search for the group you want to join, then click the
Join icon again.
State of Wisconsin, Division of Enterprise Technology
E-Mail Admin Guide to Exchange 2013 and Exchange OnLine v_2.2.docx 42 | P a g e
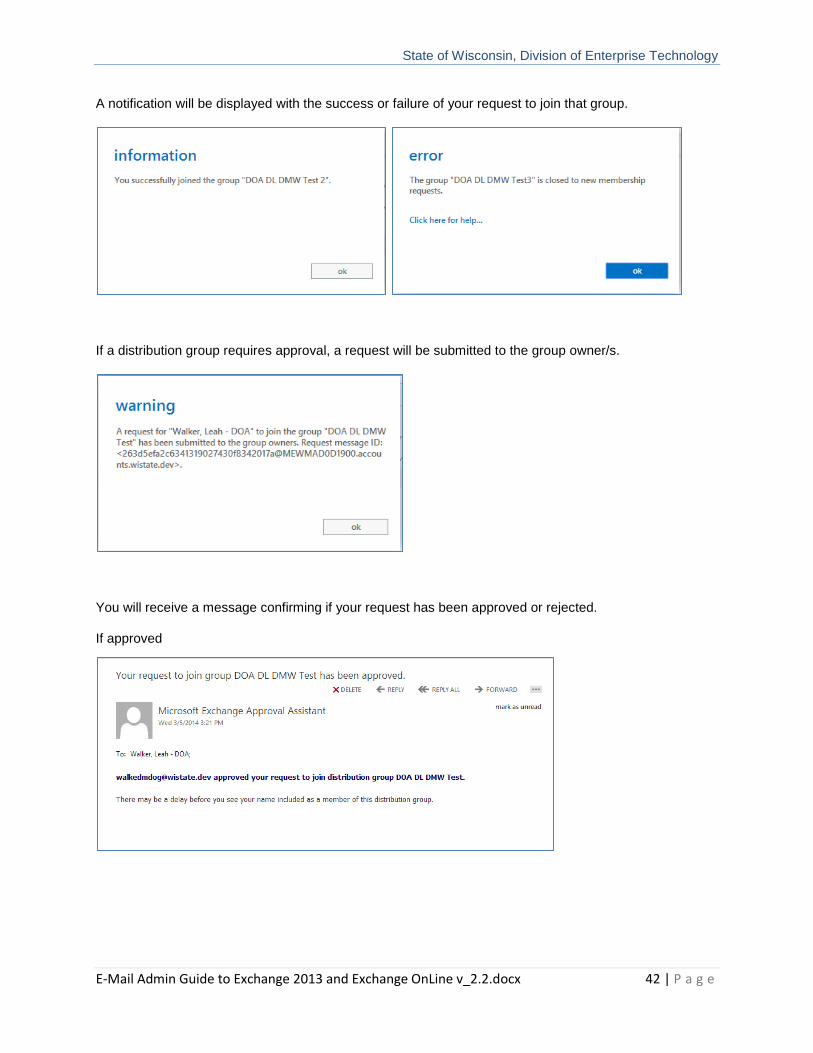
A notification will be displayed with the success or failure of your request to join that group.
If a distribution group requires approval, a request will be submitted to the group owner/s.
You will receive a message confirming if your request has been approved or rejected.
If approved
State of Wisconsin, Division of Enterprise Technology
E-Mail Admin Guide to Exchange 2013 and Exchange OnLine v_2.2.docx 43 | P a g e
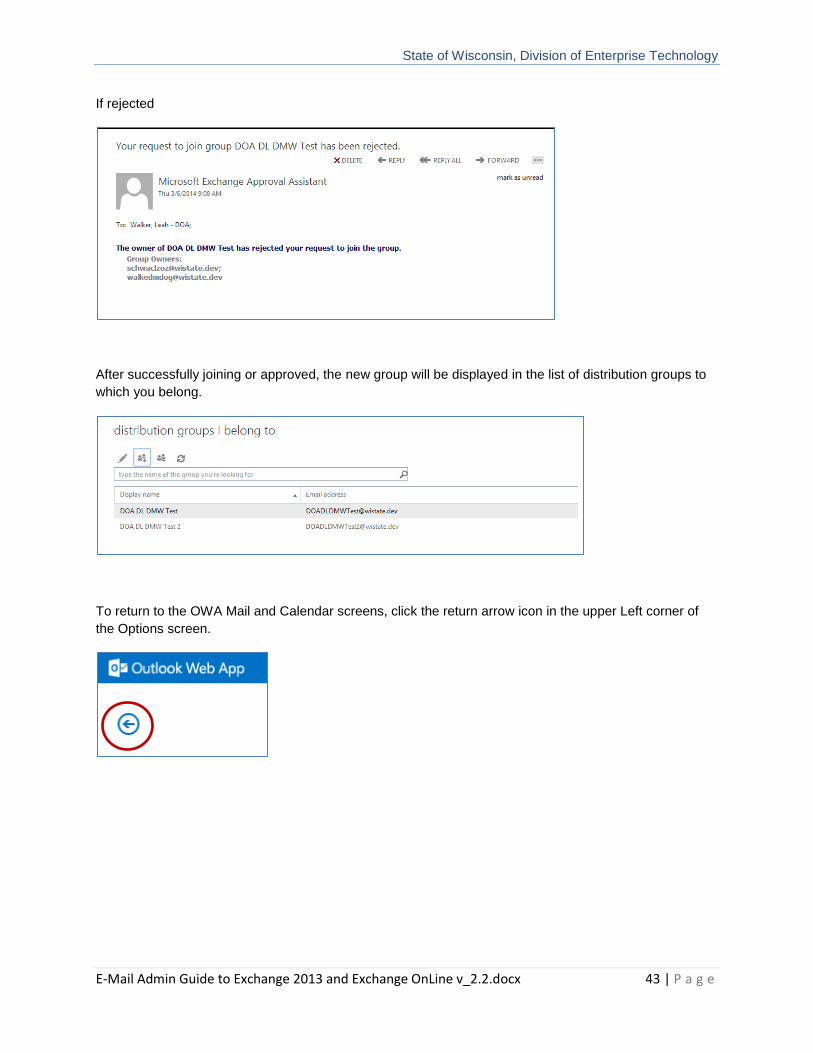
If rejected
After successfully joining or approved, the new group will be displayed in the list of distribution groups to
which you belong.
To return to the OWA Mail and Calendar screens, click the return arrow icon in the upper Left corner of
the Options screen.
State of Wisconsin, Division of Enterprise Technology
E-Mail Admin Guide to Exchange 2013 and Exchange OnLine v_2.2.docx 44 | P a g e
F.4 Mailbox Search and E-Discovery Options
Agency Email Administrators and Security Officers who perform Email-related tasks have been
delegated the permissions necessary to perform Mailbox searches and exports from mailboxes in their
agency’s MailProv and Staff Organizational Units. Upon request, the person will be added to another
delegation group called XXX_E-DiscoveryAdmin. This delegation group is designed to allow Agency Legal
and investigative staff to perform Mailbox searches without having all the elevated rights held by Email
and Security Administrators.
Agency Email, Security, and E-Discovery Admins can:
• Perform full mailbox searches to return all content or specific items by using filters or keywords.
• Preview searches from within the EAC.
• Export search results to a .pst file.
• See the list of searches in the EAC and the search criteria, regardless of which agency initiated
the search, but cannot access the search results for searches of mailboxes that are not within
their scope.
• Configure Single-Item Recovery, In-Place Hold, and Litigation Hold on mailboxes within their
scope.
Basic instructions for these functions are shown below. For more detailed information see the links to the
Microsoft TechNet articles here.
Search-Mailbox
Perform Single Item Recovery
Create an In-Place eDiscovery Search
Recoverable Items Folder
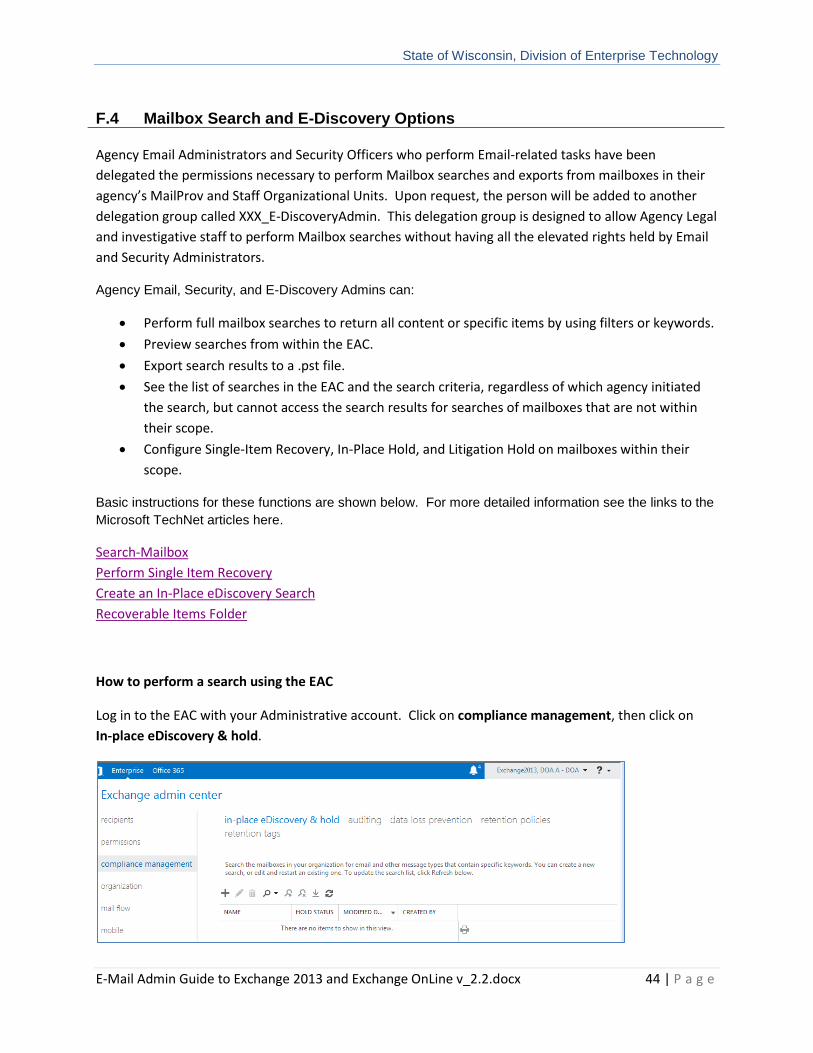
How to perform a search using the EAC
Log in to the EAC with your Administrative account. Click on compliance management, then click on
In-place eDiscovery & hold.
State of Wisconsin, Division of Enterprise Technology
E-Mail Admin Guide to Exchange 2013 and Exchange OnLine v_2.2.docx 45 | P a g e
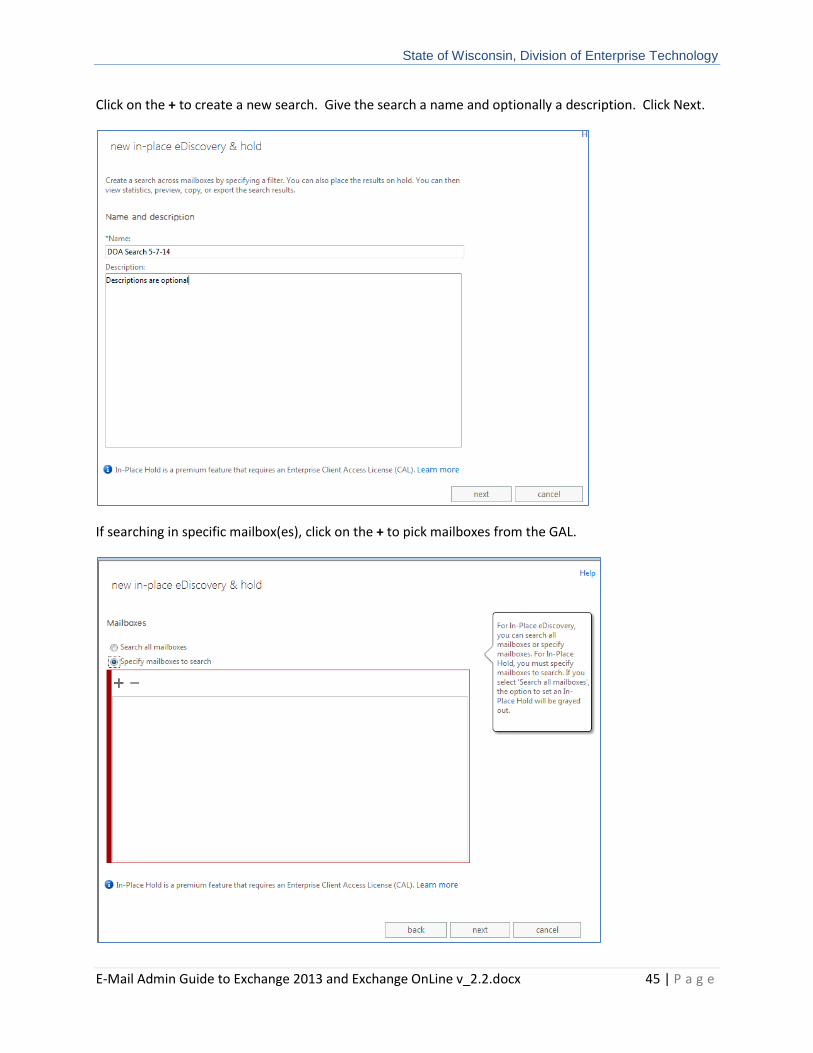
Click on the + to create a new search. Give the search a name and optionally a description. Click Next.
If searching in specific mailbox(es), click on the + to pick mailboxes from the GAL.

State of Wisconsin, Division of Enterprise Technology
E-Mail Admin Guide to Exchange 2013 and Exchange OnLine v_2.2.docx 46 | P a g e
Select the appropriat account, double-click or click Add, then click Ok.
Click Next
State of Wisconsin, Division of Enterprise Technology
E-Mail Admin Guide to Exchange 2013 and Exchange OnLine v_2.2.docx 47 | P a g e
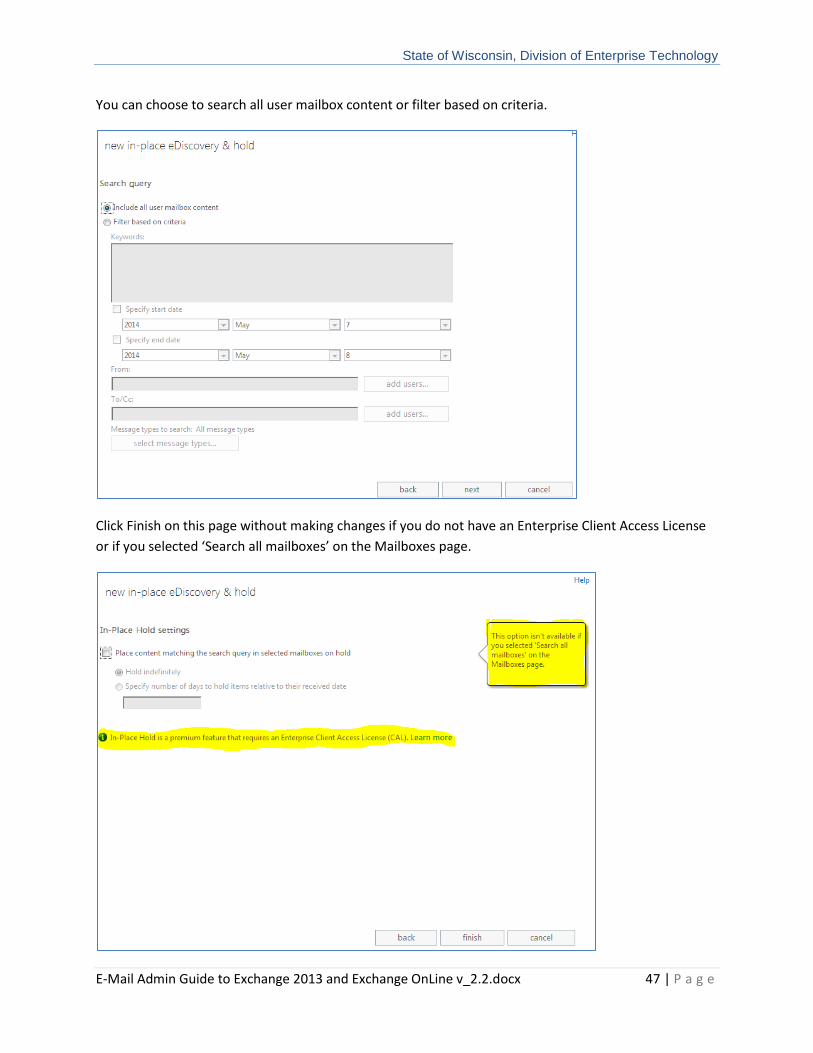
You can choose to search all user mailbox content or filter based on criteria.
Click Finish on this page without making changes if you do not have an Enterprise Client Access License
or if you selected ‘Search all mailboxes’ on the Mailboxes page.
State of Wisconsin, Division of Enterprise Technology
E-Mail Admin Guide to Exchange 2013 and Exchange OnLine v_2.2.docx 48 | P a g e
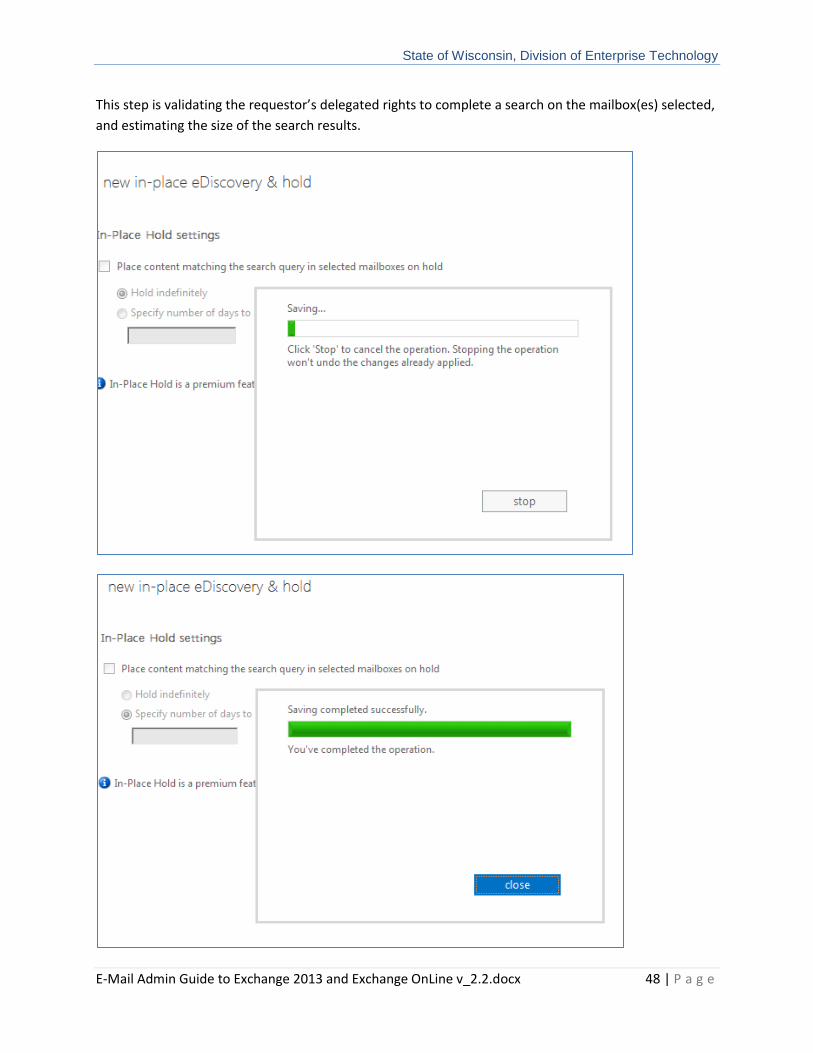
This step is validating the requestor’s delegated rights to complete a search on the mailbox(es) selected,
and estimating the size of the search results.
State of Wisconsin, Division of Enterprise Technology
E-Mail Admin Guide to Exchange 2013 and Exchange OnLine v_2.2.docx 49 | P a g e
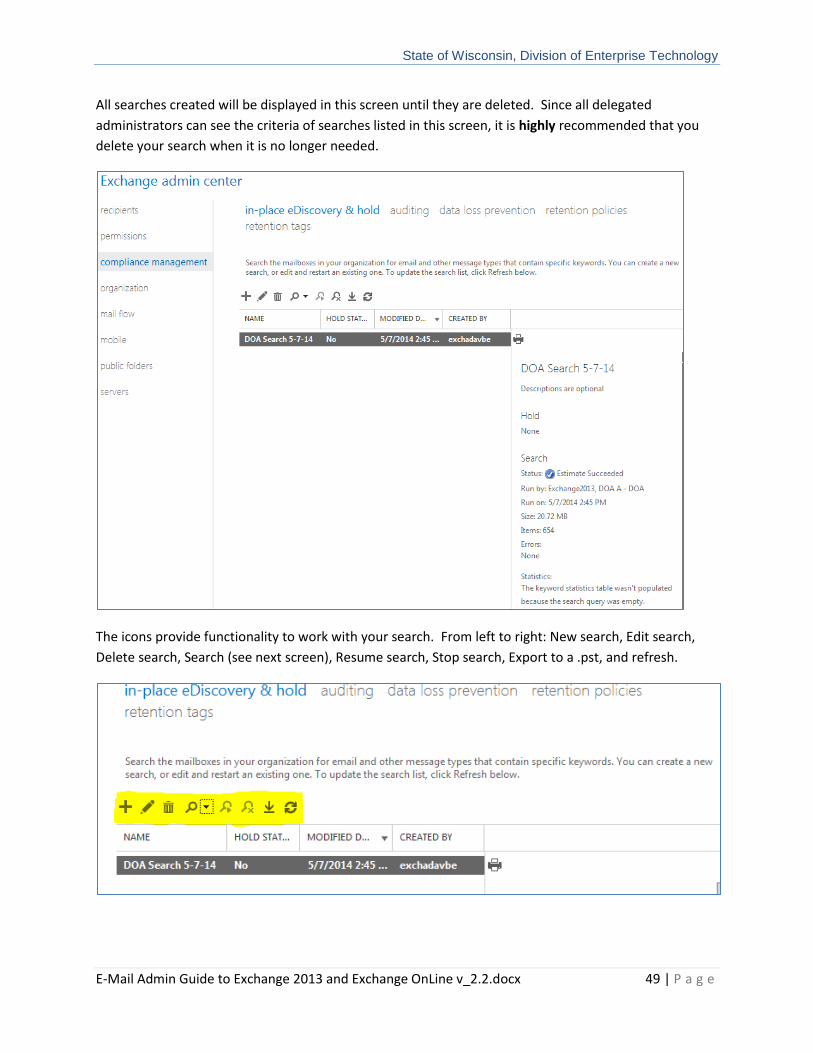
All searches created will be displayed in this screen until they are deleted. Since all delegated
administrators can see the criteria of searches listed in this screen, it is highly recommended that you
delete your search when it is no longer needed.
The icons provide functionality to work with your search. From left to right: New search, Edit search,
Delete search, Search (see next screen), Resume search, Stop search, Export to a .pst, and refresh.

State of Wisconsin, Division of Enterprise Technology
E-Mail Admin Guide to Exchange 2013 and Exchange OnLine v_2.2.docx 50 | P a g e
If you click on the Search icon dropdown immediately after the initial notice that the search estimate
was successful, you will only be able to select Preview search results from this dropdown. When the
search has completed you will be able to select the other options. Preview search results will show you
a list of the items in the mailbox(es) but not the actual content. This is not particularly useful.
Selecting Copy search results will allow you to copy the search results to a Discovery mailbox so that you
can view the actual content of items. In order to do this, your account must have access to a Discovery
mailbox assigned to your agency otherwise the copy will fail.
Discovery mailboxes do not exist by default but you can request that DET create one for your agency.
Note: Once a search is deleted from the list shown above, the search results that have been copied to
a Discovery mailbox are purged, too.
To keep the copy of the search results even after the search has been deleted, copy them from the
Discovery Mailbox to another mailbox or use the Export to .pst option. Either option allows you to
delete the search from the list without losing the results of the search.
State of Wisconsin, Division of Enterprise Technology
E-Mail Admin Guide to Exchange 2013 and Exchange OnLine v_2.2.docx 51 | P a g e
APPENDIX: SPF Verification Failure Procedure
What To Do If A Message Is Quarantined Due To Failing An SPF Verification Check
An advanced query of the IronPort message tracking logs is required to identify messages that have
failed an SPF check.
The management appliance allows email administrators to search for an email message or group of
messages matching criteria specified, such as Subject, Date/Time range, Envelope Sender/Recipient,
Event (virus positive, hard bounced, delivered, etc.) and more. Tracking gives email administrators
increased visibility into the flow of email. Administrators can see message details, such as envelope and
header summary, sending host, and processing details. While the message tracking logs provide detailed
information about specific emails, it does not provide the ability to read a particular email.
Please Note: If you do not have an account to access the management appliance to query the message
tracking logs, please contact the Enterprise Service Desk at 608-264-9383 or [email protected].
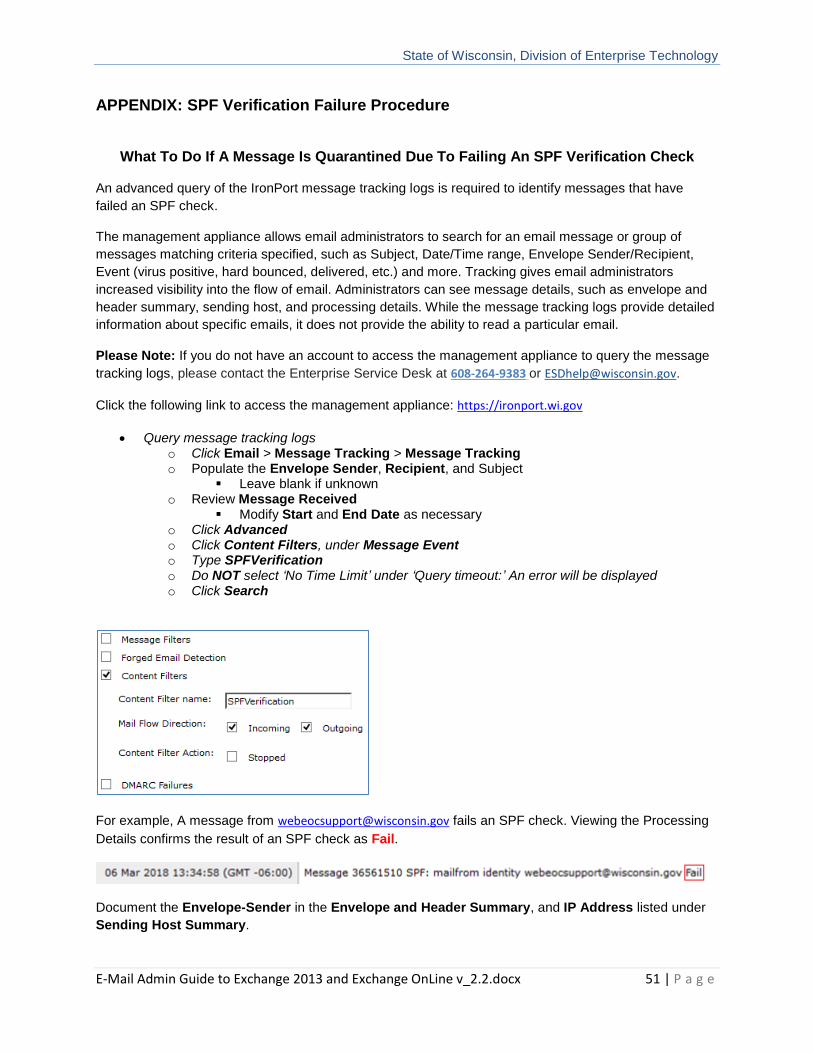
Click the following link to access the management appliance: https://ironport.wi.gov
• Query message tracking logs o Click Email > Message Tracking > Message Tracking o Populate the Envelope Sender, Recipient, and Subject
▪ Leave blank if unknown o Review Message Received
▪ Modify Start and End Date as necessary o Click Advanced o Click Content Filters, under Message Event o Type SPFVerification o Do NOT select ‘No Time Limit’ under ‘Query timeout:’ An error will be displayed o Click Search
For example, A message from [email protected] fails an SPF check. Viewing the Processing
Details confirms the result of an SPF check as Fail.
Document the Envelope-Sender in the Envelope and Header Summary, and IP Address listed under
Sending Host Summary.

State of Wisconsin, Division of Enterprise Technology
E-Mail Admin Guide to Exchange 2013 and Exchange OnLine v_2.2.docx 52 | P a g e
Use that information to perform an SPF check: https://www.kitterman.com/spf/validate.html
The results will be provided as shown below, which you can pass along to the sender:
Interpreting the Result
None A result of "None" means that no records were published by the domain or that no checkable sender domain could be determined from the given identity. The software cannot ascertain whether or not the client host is authorized. Neutral The domain owner has explicitly stated that he cannot or does not want to assert whether or not the IP address is authorized.

State of Wisconsin, Division of Enterprise Technology
E-Mail Admin Guide to Exchange 2013 and Exchange OnLine v_2.2.docx 53 | P a g e
The State of Wisconsin is reviewing an implementation of Sender Policy Framework (SPF). This is a
simple email-validation system designed to detect email spoofing by providing a mechanism to verify
incoming mail was sent from an authorized host.
A message from ([email protected]) sent by the server (mail.co.marathon.wi.us [24.196.79.228])
was identified in our logs. Performing an SPF record test confirms the result of an SPF check as Fail.
An SPF record is part of your mail system’s DNS records, so you’ll need your DNS administrator to
make corrections to your SPF record. Using the website linked below, in the “Test and SPF record”
email from:
https://www.kitterman.com/spf/validate.html
If changes are not made to how you’re sending these messages, they won’t be delivered when SPF is
enabled. Messages that Fail an SPF validation check will be rejected.
Pass A "Pass" result means that the client is authorized to inject mail with the given identity. The domain can now, in the sense of reputation, be considered responsible for sending the message. Further policy checks can now proceed with confidence in the legitimate use of the identity.
Fail A "Fail" result is an explicit statement that the client is not authorized to use the domain in the given identity.
SoftFail A "SoftFail" result should be treated as somewhere between a "Fail" and a "Neutral". The domain believes the host is not authorized but is not willing to make that strong of a statement.
TempError A "TempError" result means that the SPF client encountered a transient error while performing the check.
PermError A "PermError" result means that the domain's published records could not be correctly interpreted. This signals an error condition that requires manual intervention to be resolved.
Resources
https://www.kitterman.com/spf/validate.html
Sender Policy Framework (SPF) for Authorizing Use of Domains in Email, Version 1
https://tools.ietf.org/html/rfc7208
You can use the following template to inform the sender that action must be taken to ensure email
delivery.