DS96F-B2/M Installation Manual - LiquidSpring
76
D11205 Rev J 4/17
-
Upload
khangminh22 -
Category
Documents
-
view
6 -
download
0
Transcript of DS96F-B2/M Installation Manual - LiquidSpring

D11205 Rev J 4/17

DS150FR-S
2
Contents
CONTENTS ........................................................................... 2
INTRODUCTION ................................................................. 3 SUSPENSION APPLICATION ................................................... 3 SUSPENSION RATING ............................................................ 3 SERIAL NUMBER TAG INFORMATION .................................... 3 VEHICLE TOWING AND JACKING INFORMATION ................... 4
ABBREVIATIONS ................................................................ 4
SPECIAL TOOLS ................................................................. 4
HYDRAULIC FITTING ASSEMBLY ................................ 5 SAE O-Ring Adjustable Fittings ...................................... 5 SAE O-Ring Non-Adjustable Fitting ................................ 5 JIC 37° Fitting ................................................................. 5
PRE-INSTALLATION.......................................................... 5
FRAME PREPARATION ..................................................... 5
AXLE PREPARATION [-S, -SS, -SF, SEP ONLY] ............ 6
INSTALLATION ................................................................... 8 FRONT HANGERS .................................................................. 8 AXLE CONNECTION .............................................................. 9 CONTROL ARMS ................................................................. 10 UPPER STRUT MOUNTS ....................................................... 11 TRACK ROD [DS150FR-S, -SS, -SF, -SEP] ........................ 13 TRACK ROD [DS150FR-SEPB] .......................................... 14 TRACK ROD MOUNT AXLE PREPARATION [-SEPB] ............ 15 STRUTS ............................................................................... 16 JOUNCE STOPS .................................................................... 17 SECONDARY VOLUMES [DS150FR-S] ................................ 18 SECONDARY VOLUMES [DS150FR-SF] .............................. 20 SECONDARY VOLUMES [DS150FR-SS] .............................. 22 SECONDARY VOLUMES [DS150FR-SEP/SEPB] ................. 24 POWER MODULE [DS150FR-S, -SF, -SS] ........................... 26 POWER MODULE [DS150FR-SEP/SEPB] ........................... 28 HOSE ATTACHMENT & ROUTING [DS150FR-S] ................. 29 HOSE ATTACHMENT & ROUTING [DS150FR-SF] ............... 31 HOSE ATTACHMENT & ROUTING [DS150FR-SS] ............... 33 HOSE ATTACHMENT & ROUTING [DS150FR-SEP/SEPB] .. 35 HEIGHT SENSORS ................................................................ 37 STEERING SENSORS [DS150FR-SEPB] .............................. 38 STEERING SENSORS [DS150FR-S, -SS, -SF, -SEP]............. 40 WIRING ............................................................................... 42
Optional Door Electrical Harness Installation: ............ 46
SYSTEM PREPARATION ................................................. 47 Initial System Fill ........................................................... 47 Bleeding the System ....................................................... 47 Calibrating the System ................................................... 47
POST INSTALLATION WELDING ........................................... 48
SYSTEM OPERATION ...................................................... 49 System Start Up: ............................................................ 49 ON/OFF Button: ............................................................ 49 Warning Light: ............................................................... 49 Ride Mode Adjustment: .................................................. 49
Ride Height Adjustment: ................................................ 49 Depressurizing the System ............................................. 50 Calibrating the Steering Sensor Only ............................ 51
TROUBLESHOOTING ...................................................... 52 Issues with Vehicle Raising/Pump ................................. 52 Issues with Vehicle Lowering/Dump Valve .................... 52 Issues with One Corner Not Leveling Properly ............. 53 Issues with Height Sensors ............................................ 53 Issues with Ride/Handling ............................................. 53 Issues with Steering Sensor ........................................... 53 Issues with Vehicle Speed Signal ................................... 54 Issues with Vehicle Brake Signal ................................... 54 Issues with Door Switch................................................. 54 Issues with Vehicle Ignition Signal ................................ 54 Issues with Vehicle Park Signal ..................................... 54 Issues with Driver Interface ........................................... 54 Issues with Power Module ............................................. 55 Issues with Strut Assembly ............................................. 55 Issues with Secondary Volume Assembly ....................... 56
PART IDENTIFICATION: ................................................ 57 DS150FR-S ........................................................................ 57 DS150FR-SF ..................................................................... 59 DS150FR-SS ..................................................................... 61 DS150FR-SEP ................................................................... 63 DS150FR-SEPB ................................................................ 65
ELECTRICAL SCHEMATICS ......................................... 67
APPENDIX A: DRILL LOCATIONS .............................. 70
APPENDIX B: ELECTRICAL TERMINALS ................ 74
INSTALLATION CHECK LIST ....................................... 75

DS150FR-S
3
Introduction
This manual provides installation information for the
LiquidSpring CLASS® DS150FR series of rear axle
suspension systems for the Freightliner M2 106, S2, and S2C
series of chassis.
Before you begin installation of the suspension system:
1. Read and understand all instructions and procedures
prior to installation of components.
2. Read and observe all Warning and Caution hazard
alert messages in this publication. They provide
information that can help prevent serious personal
injury, damage to components, or both.
3. Follow your company’s maintenance and service,
installation, and diagnostics guidelines.
4. Use special tools when required to help avoid serious
personal injury and damage to components.
Throughout this manual, important product information is
preceded by the terms “NOTE”, “IMPORTANT”,
“CAUTION”, and “WARNING”. These terms are defined as
follows:
NOTE: Includes additional information to enable accurate
and easy performance of procedures.
IMPORTANT: Includes additional information that if not
followed could lead to hindered product performance
and/or product failure.
CAUTION: A caution indicates procedures that must be
followed exactly. Damage to equipment or suspension
components and personal injury can occur if the procedure is
not followed.
WARNING: A warning indicates procedures that must be
followed exactly. Serious personal injury can occur if the
procedure is not followed.
LiquidSpring LLC reserves the right to modify the suspension
and/or procedures and to change specifications at any time
without notice and without incurring obligation.
Suspension Application
LiquidSpring offers four (5) versions of the DS150FR line of
suspensions:
Suspension Application
DS150FR-S Conversion of Leaf Spring version with
under/behind cab mounted fuel tank.
DS150FR-SF Conversion of Leaf Spring version with
under/behind cab mounted fuel tank and shortened
rear overhang.
DS150FR-SS Conversion of Leaf Spring version with under cab
mounted fuel tank.
DS150FR-SEP Conversion of Leaf Spring with rear mounted fuel
tanks.
DS150FR-SEPB Conversion of Leaf Spring with rear mounted fuel
tanks. (S2 & S2C Only)
Suspension Rating
The LiquidSpring line of DS150FR suspensions can be used
on the hydraulic brake versions of Freightliner M2 106
chassis. Suspension ratings are based on the OEM rear axle
rating of each chassis:
Model Freightliner M2 106, S2, S2C
DS150FR-S 15,000 lbs
DS150FR-SF 15,000 lbs
DS150FR-SS 15,000 lbs
DS150FR-SEP 15,000 lbs
DS15FR-SEPB 15,000 lbs (S2 & S2C Only)
The rear axle GAWR with LiquidSpring DS150FR installed is
the lessor of either the OEM original rear rating (as published)
or the above suspension rating.
WARNING: Overloading suspension system may result in
abnormal handling characteristics and premature wear of
components.
Serial Number Tag Information
The serial number is found on an aluminum tag (Figure 1) that
is riveted to the Left Hand Suspension Hanger as shown in
Figure 2. This information will aid you when contacting the
chassis manufacturer or LiquidSpring LLC.
Figure 1. Serial Tag
Figure 2. Serial Number Tag Location
DS150FR-S
4
Vehicle Towing and Jacking Information
Before attempting any type of towing procedures, the vehicle
manufacturer must be referred to for the recommended towing
methods.
NOTE: Before towing vehicle, check with local authorities,
such as Department of Transportation, for permissible towing
methods. Some states do not permit towing vehicles by chains
or towing straps.
Do not attach tow apparatus (hooks, chains, straps, etc.) to the
suspension components.
WARNING: Attaching towing equipment to improper
locations and failure to utilize OEM/Coach Builder
recommended towing methods could result in one or more
of the following:
Damage to the suspension and/or vehicle,
Loss of vehicle control,
Possible disconnect from the vehicle.
WARNING: Do not apply jack to bottom of front hanger
or other suspension components. Appling a jack to
improper locations can result in damage to the suspension
and/or vehicle and severe personal injury.
Abbreviations
The following abbreviations will be used throughout the
manual.
HCS Hex Cap Screw
HFB Hex Flange Bolt
SHCS Socket Head Cap Screw
SFHS Serrated Flange Hex Screw
STS Self Tapping Screw
HN Hex Nut, Non-locking
LHN Locking Hex Nut
LFN Locking Flange Nut
CHN Castle Hex Nut
HTCN Hex Thin Castle Nut
HFW Hardened Flat Washer
SLW Spring Lock Washer
FW Flat Washer
SAE SAE O-Ring Fitting
37° SAE or JIC 37° Flare Fitting (F – Female)
LH Left Handed Part
RH Right Handed Part
UCA Upper Control Arm
LCA Lower Control Arm
Special Tools
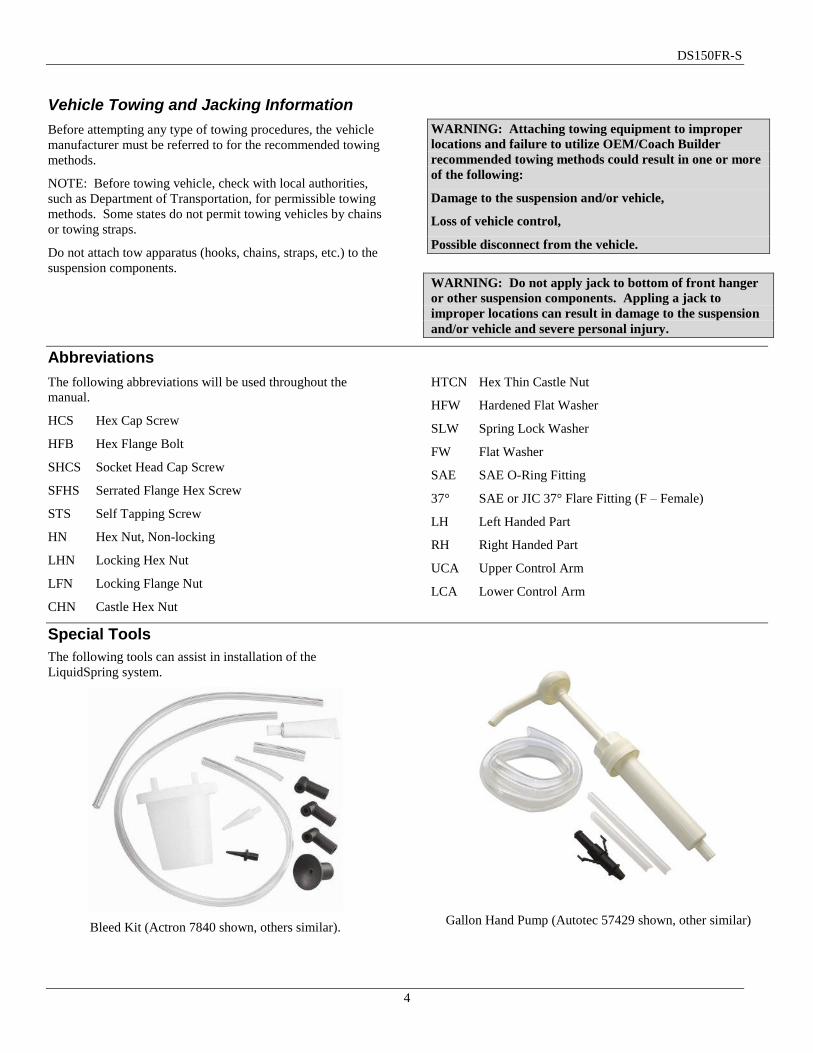
The following tools can assist in installation of the
LiquidSpring system.
Bleed Kit (Actron 7840 shown, others similar).
Gallon Hand Pump (Autotec 57429 shown, other similar)

DS150FR-S
5
Hydraulic Fitting Assembly
SAE O-Ring Adjustable Fittings
Figure 3. Adjustable SAE fitting
1. Inspect components to ensure that male and female
port threads and sealing surfaces are free of burrs,
nicks and scratches, or any foreign material.
2. If O-ring or seal is not pre-installed to fitting male
port end, install proper size O-ring or seal, taking
care not to damage it.
3. Lubricate O-ring with light coat of the system fluid or
a compatible lubricant to help the O-ring slide
smoothly into the port and avoid damage.
Figure 4. Locknut completely backed off.
4. Back off lock nut as far as possible. Make sure back-
up washer is not loose and is pushed up as far as
possible.
5. Screw fitting into port until the back-up washer or the
retaining ring contacts face of the port. Light
wrenching may be necessary. Over tightening may
damage washer.
6. To align the tube end of the fitting to accept
incoming hose assembly, unscrew the fitting by the
required amount, but not more than one full turn.
7. Using two wrenches, hold fitting in desired position
and tighten locknut to the proper torque value:
-4 fitting: 14-16 ft-lbs (168-192 in-lbs)
-12 fitting: 75-83 ft-lbs.
8. Inspect to ensure that O-ring is not pinched and that
washer is seated flat on face of port.
SAE O-Ring Non-Adjustable Fitting
1. Inspect components to ensure that male and female
port threads and sealing surfaces are free of burrs,
nicks and scratches, or any foreign material.
2. If O-ring or seal is not pre-installed to fitting male
port end, install proper size O-ring or seal, taking
care not to damage it.
3. Lubricate O-ring with light coat of the system fluid or
a compatible lubricant to help the O-ring slide
smoothly into the port and avoid damage.
4. Screw fitting into port and tighten to proper torque:
-4 fitting: 26-28 ft-lbs (310-341 in-lbs)
-12 fitting: 75-83 ft-lbs.
JIC 37° Fitting
1. Inspect components to ensure that male and female
threads and sealing surfaces are free of burrs, nicks
and scratches, or any foreign material. Annular tool
marks of 100µin with the thread are permissible.
2. Lubricate the threads and the entire surface of the
cone with system fluid.
3. Align mating components for hand connection and
turn flare nut until sealing surfaces make full contact.
4. Using two wrenches, hold fitting in desired position
and tighten to the proper torque:
-4 fitting: 9-12 ft-lbs -10 fitting: 36-63 ft-lbs
-8 fitting: 27-39 ft-lbs -12 fitting: 65-88 ft-lbs
Pre-Installation
1. Check the vehicle rear wheel alignment prior to
installation to insure pre-existing conditions do not
exist.
2. It is suggested, but not required, to remove the
attached body to ease installation.
3. A chassis lift can be used in assistance of the
installation of the suspension system.
4. Measure and record the wheelbase and rear tire-to-
frame dimensions on each side prior to disassembly.
Frame Preparation
1. Chock the front tires.
2. Disconnect battery.
3. Jack up the rear frame of the vehicle to remove load
from the rear suspension.
4. Place jack stands under the frame and block the rear
tires from moving.
Note: Jack stands can be placed under the axle and the
tires removed for ease of access. It is recommended to

DS150FR-S
6
place an additional jack stand under the pinion to prevent
the axle from rotating.
5. Remove the air leveling valves and air tanks.
6. Remove the OEM shock absorbers and mounts.
7. Remove the leaf springs and shackles, if present.
8. Remove any bump stop bolted on the outboard side
of the frame, directly above the axle.
9. Remove the front spring hangers. Do not remove
upper (2) bolts per side attaching the cross member to
the frame. Do not remove cross members.
10. The rear shackle hanger or rear spring mounts can
either be removed or left installed.
11. Remove any overload pads mounted outside the
frame rail.
12. Locate the 10811-014 template.
13. Attach the frame as indicated in Appendix A: Drill
Locations, Page 70.
14. Mark and drill (5) Ø21/32” holes as indicated.
15. Repeat with the passenger side.
16. Mark and drill (5) Ø21/32” hole as indicated.
17. See Secondary Volume Sections for additional frame
drill locations.
Axle Preparation [-S, -SS, -SF, SEP Only]
Note: Freightliner M2 106’s are equipped with either Meritor
or Detroit rear axles. Mounts and templates for both axles are
included in the kit and marked “Meritor” and “Detroit” for use
with the respective axles.
1. Move any Parking Brake Cables and wiring from top
of axle and position away from the the axle.
2. Remove the two axle differential bolts as shown in
Figure 5.
Figure 5. Removal of Axle Bolts.
Figure 6, Position Axle Mount using Template
3. Temporarily attach the template to the axle using the
two differential bolts. Using 5/8” hardware, fasten
the Axle Mount to the template in the position shown
in Figure 6.
4. Outline the axle mount with a visible paint marker.
5. Remove the axle mount from the axle and grind away
the outlined area to bare metal.
Note: Make sure axle housing is free of paint 1/2” beyond the
perimeter of the axle mount.
Note: Make sure the axle mount is free of powder coat 1/2”
up from bottom edge around the perimeter.
6. Reattach the axle mount to the template after axle
tube is clean and prepped for welding.
7. Tack weld all 4 sides of the axle mount to the axle
housing as shown in Figure 7
Figure 7. Tack Welding Axle Mount
8. Remove the template from the axle.
9. Position axle for a flat weld. The axle must be
pivoted fore and aft for welding front and rear faces.
Figure 8. Final Welding on Axle Mount

DS150FR-S
7
10. Beginning at the indicated location, back step the
start of the weld from 0.315-0.512” to prevent a cold
start.
11. Lay a full fillet in a single pass: Fillet size 0.375-
0.50”.
12. Back fill the end of the weld 0.315-0.512” to
eliminate craters.
13. Complete the welding on all sides of the bracket
using Steps 9-12.
14. Once the axle has cooled, reinstall the two M16
differential bolts to the axle using sealant and torque
to 140 ft/lbs.
15. Apply touch up paint to any bare metal showing on
the axle mount and housing.
IMPORTANT: If welding equipment is not capable of
welding a single pass as specified, multiple passes will be
required.
Note: When welding multiple passes, the first pass should be
centered over the fit-up line. The second pass should be
placed slightly above the first. Blend the weld smoothly with
the axle mount and the first pass. The third pass should
penetrate the lower half of the second pass to the edge of the
axle housing. When making the second and third passes the
direction should be reversed. Refer to steps above for back
start and back fill. Clean weld before each pass.

DS150FR-S
8
Installation
Front Hangers
ITEM QTY PART NUMBER DESCRIPTION ITEM QTY PART NUMBER DESCRIPTION
1 12 10012-008 LFN 5/8-11 Gr G 3 1 11104-002 Left Hand Hanger
2 12 10874-200 HFB 5/8-11 x 2” Gr 8 4 1 11105-002 Right Hand Hanger
1. Install the Left Hand Hanger (with serial tag) to the
driver side of the frame using the (6) 5/8”-11 x 2”
Hex Flange Bolts and 5/8”-11 Locking Flange Nuts.
2. Verify that the hanger is level to the frame rail.
3. Torque to 172-210 ft-lbs.
4. Repeat with Right Hand Hanger to the passenger side
of the frame.

DS150FR-S
9
Axle Connection
ITEM QTY PART NUMBER DESCRIPTION ITEM QTY PART NUMBER DESCRIPTION
1 8 10012-012 LFN 3/4-16, Gr. G 3 2 10947-005 Lower Control Arm Mount
2 4 10064-005 U-Bolt 3/4-16 x 9.03 Tri-8 4 2 10949-003 Upper Control Arm Mount
1. Loosely install the Upper Control Arm Mount on to
the axle with the UCA clevis forward. The mount
should be flush with the top of the axle with the
locating stud in the center hole. Refer to Figure 9 for
correct orientation.
Figure 9. Control Arm Mount orientation.
2. Slip the Lower Control Arm Mount under the axle.
3. Slip the 3/4” U-Bolts under the LCA mount and
secure using the 3/4” Locking Flange Nuts.
4. Snug down 3/4” Locking Flange Nuts.
IMPORTANT: To aid control arm installation,
do not torque until after control arms are
installed.
5. Repeat for other side.

DS150FR-S
10
Control Arms
ITEM QTY PART NUMBER DESCRIPTION ITEM QTY PART NUMBER DESCRIPTION
1 2 10003-003 HCS 1-8 x 6.00 Gr 8 6 2 10570-006 Upper Control Arm
2 2 10003-004 HCS 1-8 x 6.50 Gr 8 7 2 10874-375 HFB 5/8-11 x 3.750 Gr 8
3 4 10006-004 HFW 1 8 2 10874-600 HFB 5/8-11 x 6” Gr. 8
4 4 10012-003 LFN 1-8 Gr G 9 2 10953-005 Lower Control Arm
5 4 10012-008 LFN 5/8-11 Gr G
1. Loosely install the Upper and Lower Control Arms as
shown above.
Note: Orientate Lower Control Arms with height
sensor linkage tabs pointing upward.
IMPORTANT: Fasteners inserted into the axle
mount must be orientated towards the outboard
as shown. Fasteners inserted into the front hanger
can be orientated either direction.
IMPORTANT: Verify that the 1”-8 x 6-1/2” Hex
Cap Screw is used to attach the Lower Control
Arm to the LCA mount at the axle and that the
1”-8 x 6” Hex Cap Screw is used to attach the
LCA to the Hanger.
2. Torque U-Bolts as specified in Axle Connection
Section.
3. Do not tighten control arm fasteners until track rod is
in place and axle is raised to ride height.
Note: The axle must be held at ride height before
applying the final torque to the control arm bolts to
prevent preloading the bushings.

DS150FR-S
11
Upper Strut Mounts
ITEM QTY PART NUMBER DESCRIPTION ITEM QTY PART NUMBER DESCRIPTION
1 8 10012-007 LFN 1/2-13 Gr G 6 1 10795-011 Cross-member Mount, RH
2 12 10012-008 LFN 5/8-11 Gr G 7 1
10796-007 Cross-member Channel (-S, -SS, -SF, -SEP)
3 1 10790-020 Upper Strut Mount, LH 10796-014 Crossmember Channel (-SEPB Only)
4 1 10790-021 Upper Strut Mount, RH 8 12 10874-200 HFB 5/8-11 x 2” Gr 8
5 1 10795-008 Cross-member Mount, LH 9 8 10885-150 HFB 1/2-13 x 1-1/2” Gr 8
1. Loosely attach the Left Hand Upper Strut Mount and
Left Hand Cross-member Mount to the frame located
just behind and above the rear axle using (6) 5/8”-11
x 2” Hex Flange Bolts and (6) 5/8”-11 Locking
Flange Nuts. Refer to Figure 10.
2. Loosely attach the Right Hand Upper Strut Mount
and Right Hand Cross-member Mount to the frame
using (6) 5/8”-11 x 2” Hex Flange Bolts and (6) 5/8”-
11 Locking Flange Nuts. Refer to Figure 11.
Figure 10. Driver Side (LH) Upper Strut Mount
Installation.

DS150FR-S
12
Figure 11. Passenger Side (RH) Upper Strut Mount
Installation.
3. Install the Cross-member Channel inside of the
mounts using the 1/2”-13 x 1-1/2” Hex Flange Bolts
and 1/2”-13 Locking Flange Nuts.
4. Torque all 5/8” fasteners to 172-210 ft-lbs.
5. Torque all 1/2” fasteners to 86-105 ft-lbs.

DS150FR-S
13
Track Rod [DS150FR-S, -SS, -SF, -SEP]
ITEM QTY PART NUMBER DESCRIPTION ITEM QTY PART NUMBER DESCRIPTION 1 2 10002-550 HB 7/8”-9 x 5-1/2” Gr. 8 5 1 10811-012 Mount Template, Meritor 2 2 10006-003 HFW 7/8” 6 1 10951-004 Track Rod Mount, Detroit 3 2 10012-017 LFN 7/8”-9 Gr G 7 1 10951-005 Track Rod Mount, Meritor 4 1 10811-011 Mount Template, Detroit 8 1 11198-001 Track Rod Assembly
1. Loosely attach the Track Rod Assembly to the Track
Rod Axle Mount and to the Frame Mount.
2. Jack each side of the axle until approximately design
ride height position. See Figure 13.
Figure 12. Lift to Design Ride Height.
3. Torque the two (2) 7/8” Track Rod mounting bolts to
491-600 ft-lbs.
4. Torque the eight (4) 1” Control Arm mounting bolts
to 600 ft-lbs.
5. Torque the four (4) 5/8” Control Arm mounting bolts
to 172-210 ft-lbs.
IMPORTANT: Torque all control arm fasteners while
axle is at approximate ride height.

DS150FR-S
14
Track Rod [DS150FR-SEPB]
/
ITEM QTY PART NUMBER DESCRIPTION ITEM QTY PART NUMBER DESCRIPTION 1 2 10002-550 HB 7/8”-9 x 5-1/2” Gr. 8 4 1 10951-006 Track Rod Mount 2 2 10006-003 HFW 7/8” 5 1 11198-001 Track Rod Assembly 3 2 10012-017 LFN 7/8”-9 Gr G
6. Loosely attach the Track Rod Assembly to the Track
Rod Axle Mount and to the Frame Mount.
7. Jack each side of the axle until approximately design
ride height position. See Figure 13.
Figure 13. Lift to Design Ride Height.
8. Torque the two (2) 7/8” Track Rod mounting bolts to
491-600 ft-lbs.
9. Torque the eight (4) 1” Control Arm mounting bolts
to 600 ft-lbs.
10. Torque the four (4) 5/8” Control Arm mounting bolts
to 172-210 ft-lbs.
IMPORTANT: Torque all control arm fasteners while
axle is at approximate ride height.
DS150FR-S
15
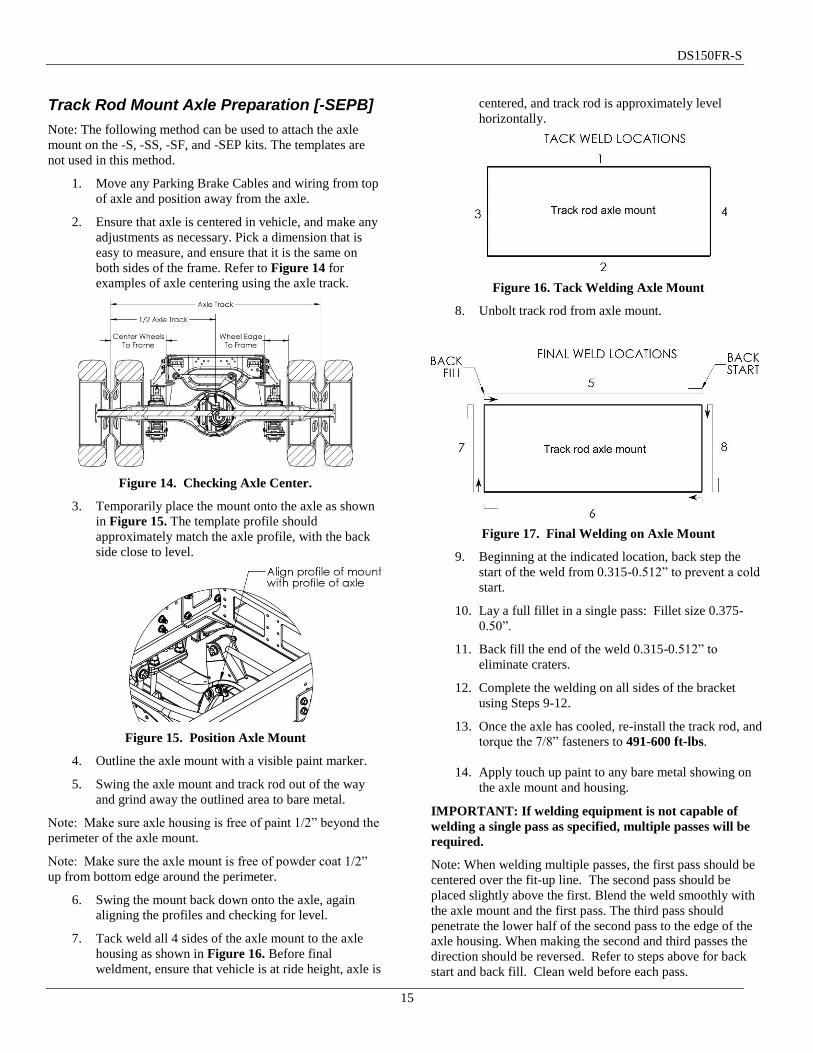
Track Rod Mount Axle Preparation [-SEPB]
Note: The following method can be used to attach the axle
mount on the -S, -SS, -SF, and -SEP kits. The templates are
not used in this method.
1. Move any Parking Brake Cables and wiring from top
of axle and position away from the axle.
2. Ensure that axle is centered in vehicle, and make any
adjustments as necessary. Pick a dimension that is
easy to measure, and ensure that it is the same on
both sides of the frame. Refer to Figure 14 for
examples of axle centering using the axle track.
Figure 14. Checking Axle Center.
3. Temporarily place the mount onto the axle as shown
in Figure 15. The template profile should
approximately match the axle profile, with the back
side close to level.
Figure 15. Position Axle Mount
4. Outline the axle mount with a visible paint marker.
5. Swing the axle mount and track rod out of the way
and grind away the outlined area to bare metal.
Note: Make sure axle housing is free of paint 1/2” beyond the
perimeter of the axle mount.
Note: Make sure the axle mount is free of powder coat 1/2”
up from bottom edge around the perimeter.
6. Swing the mount back down onto the axle, again
aligning the profiles and checking for level.
7. Tack weld all 4 sides of the axle mount to the axle
housing as shown in Figure 16. Before final
weldment, ensure that vehicle is at ride height, axle is
centered, and track rod is approximately level
horizontally.
Figure 16. Tack Welding Axle Mount
8. Unbolt track rod from axle mount.
Figure 17. Final Welding on Axle Mount
9. Beginning at the indicated location, back step the
start of the weld from 0.315-0.512” to prevent a cold
start.
10. Lay a full fillet in a single pass: Fillet size 0.375-
0.50”.
11. Back fill the end of the weld 0.315-0.512” to
eliminate craters.
12. Complete the welding on all sides of the bracket
using Steps 9-12.
13. Once the axle has cooled, re-install the track rod, and
torque the 7/8” fasteners to 491-600 ft-lbs.
14. Apply touch up paint to any bare metal showing on
the axle mount and housing.
IMPORTANT: If welding equipment is not capable of
welding a single pass as specified, multiple passes will be
required.
Note: When welding multiple passes, the first pass should be
centered over the fit-up line. The second pass should be
placed slightly above the first. Blend the weld smoothly with
the axle mount and the first pass. The third pass should
penetrate the lower half of the second pass to the edge of the
axle housing. When making the second and third passes the
direction should be reversed. Refer to steps above for back
start and back fill. Clean weld before each pass.

DS150FR-S
16
Struts
DS150FR-S Strut Installation
DS150FR-SF Strut Installation
DS150FR-SS Strut Installation
DS150FR-SEP Strut Installation
DS150FR-SEPB Strut Installation
ITEM QTY PART NUMBER DESCRIPTION ITEM QTY PART NUMBER DESCRIPTION
1 4 10012-014 LFN 3/4-10 Gr G 4 2 11102-650 HFB 3/4-10 x 6-1/2 Gr 8
2 8 10640-005 Bearing Spacer 1.24x.812x.318 5 1 11057-003 Asy, Strut (Port pointing right)
3 2 11102-400 HFB 3/4-10 x 4 Gr 8 6 1 11057-004 Asy, Strut (Port pointing left)
1. Install the Left Hand Strut assembly as shown
making sure to install bearing spacers on both upper
and lower mounts.
Note: Verify Hydraulic port is pointed rearward on
DS150FR-S and forward on the DS150FR-SF,
DS150FR-SS, and DS150FR-SEP.
2. Repeat for installation of Right Hand Strut assembly.
3. Torque upper and lower strut mounts to 275-300 ft-
lbs.

DS150FR-S
17
Jounce Stops
ITEM QTY PART NUMBER DESCRIPTION ITEM QTY PART NUMBER DESCRIPTION
1 2 10502-001 HFB M10-1.5 x 30 CL 10.9 1 2 10867-003 Jounce Bumper 2.375” OD x 3.00” T
1. Install Jounce Bumpers, as shown, to the Upper Strut
Mounts.
2. Torque M10 fasteners to 35 ft-lbs.

DS150FR-S
18
Secondary Volumes [DS150FR-S]
ITEM QTY PART NUMBER DESCRIPTION ITEM QTY PART NUMBER DESCRIPTION
1 8 10012-007 LFN 1/2-13 Gr G 8 4 10843-003 T-Bolt Clamp
2 4 10012-010 LFN 5/16-18 Gr G 9 4 10855-003 Vinyl Coated Loop 5/8” ID
3 2 10322-010 Hyd. Fitting 90 -10 37 x -10 37 F 10 8 10885-150 HFB 1/2”-13 x 1-1/2” Gr 8
4 2 10597-047 Volume Asy 11 4 10886-125 HFB 5/16”-18 x 1-1/4” Gr 8
5 1 10614-001 Cap, Filler/Breather 12 1 11287-004 Power Module Asy M2
6 2 10810-014 Asy, Hose -10 x 18-13/16” 13 1 11109 Kit, Power Module Mounting
7 4 10830-017 Volume Mount
1. Using the dimensions given in Figure 68, drill (4)
Ø9/16” holes per side for the volume mounts.
2. Locate (2) Volume Mounts.
3. Attach Volume Mounts to the inside of the frame
rails, behind the rear axle, using the 3/8”-16 x 1” Hex
Flange Bolts and 3/8”-16 Locking Flange Nuts.

DS150FR-S
19
Figure 18. Installation of Volume Mounts.
4. Torque the 1/2”-13 fasteners to 85-105 ft-lbs.
5. Locate (2) T-Bolt Clamps, open the mounts, and
place them in the mounts, around the two pegs.
WARNING: Each Volume Assembly is heavy (in excess of
100 lbs). Use of a portable lift, crane, or suitable jack is
recommended to support the Volume Assembly during
installation.
6. Lift the tank into the tank mounts.
Figure 19. Rear view of volumes installed.
7. Secure both clamps around the volume and torque the
T-Bolt nut to 240 in-lbs.
8. Repeat with the other side.

DS150FR-S
20
Secondary Volumes [DS150FR-SF]
ITEM QTY PART NUMBER DESCRIPTION ITEM QTY PART NUMBER DESCRIPTION
1 4 10012-007 LFN 1/2”-13 Gr G 8 5 10855-002 Vinyl Coated Loop Clamp, 1” ID
2 8 10012-010 LFN 5/16”-18 Gr G 9 7 10855-003 Vinyl Coated Loop Clamp, 5/8” ID
3 1 10597-069 Volume Assembly, LH 10 4 10885-150 HFB 1/2”-13 x 1-1/2” Gr. 8
4 1 10597-070 Volume Assembly, RH 11 8 10886-125 HFB 5/16”-18 x 1-1/4” Gr 8
5 1 10614-001 Cap, Filler/Breather 12 1 11287-004 Power Module Asy M2
6 2 10830-019 Volume Mount 13 1 11109 Power Module Mount Kit
7 4 10843-003 T-Bolt Clamp
1. Locate the (2) Volume Mounts.
2. Place the mounts against the driver side frame,
forward of the front hanger. Figure 69, in Appendix
A: Drill Locations, shows the suggested locations
Important: Locate the mounts such that the distance
between two mounts as wide as possible. Avoid
partially drilling through existing frame holes and
inside fuel line mounts.
3. Verifying the mounts are held flush to the bottom of
the frame and utilizing the mount hole pattern, mark
the locations of the mounting holes and drill (2)
Ø9/16” holes per mount.
4. Attach the two mounts with 1/2” Flange Bolts and
Nuts. Torque to 86-105 ft-lbs.
5. Locate the Right Hand Volume Assembly, which
includes the shorter -10 hydraulic hose attached.
WARNING: Each Volume Assembly is heavy (in excess of
100 lbs). Use of a portable lift, crane, or suitable jack is
recommended to support the Volume Assembly during
installation.

DS150FR-S
21
6. Raise the volume assembly until the volume contacts
both mounts, in the top-most location. Rotate the
volume assembly until the bleed screws are located to
the top and as vertical as possible.
7. Locate (2) T-Bolt Clamps, open the clamps, and
place them in the mounts around the two pegs.
8. Secure both clamps around the volume and torque the
T-Bolt nut to 240 in-lbs.
9. Locate the Left Hand Volume Assembly, which
includes the longer -10 hydraulic hose.
10. Raise the volume assembly until the volume contacts
both mounts. Rotate the volume until the bleed
screws are located to the top and as vertical as
possible.
11. Locate (2) T-Bolt Clamps, open the clamps, and
place them in the mounts around the two pegs.
12. Secure both clamps around the volume and torque the
T-Bolt nut to 240 in-lbs.

DS150FR-S
22
Secondary Volumes [DS150FR-SS]
ITEM QTY PART NUMBER DESCRIPTION ITEM QTY PART NUMBER DESCRIPTION
1 8 10012-005 LFN 3/8”-16 Gr G, Z 8 4 10843-003 T-Bolt Clamp, Range 4.88-5.5
2 10 10012-010 LFN 5/16”-18 Gr G 9 4 10855-002 Vinyl-Coated Loop Clamp, 1” ID
3 8 10501-002 HFB 3/8-16 x 1.250, Gr 8, BO 10 4 10855-003 Vinyl-Coated Loop Clamp, 5/8” ID
4 1 10597-071 Volume Assembly, LH 11 6 10886-125 HFB 5/16”-18 x 1-1/4” Gr 8
5 1 10597-072 Volume Assembly, RH 12 10 11287-004 Power Module Asy M2
6 1 10614-001 Cap, Filler/Breather 13 1 11109 Power Module Mount Kit
7 1 10830-015 Wldmnt, Volume Mount
1. Locate (4) Volume Mounts.
2. Place the mounts against the driver side frame,
forward of the front hanger. Figure 70, in Appendix
A: Drill Locations, shows the suggested locations
Important: Locate the mounts such that the distance
between two mounts as wide as possible. Avoid
partially drilling through existing frame holes and
inside fuel line mounts.
3. Verifying the mounts are held flush to the bottom of
the frame and utilizing the mount hole pattern, mark
the locations of the mounting holes and drill (2)
Ø7/16” holes per mount.
4. Attach the two mounts with 3/8” Flange Bolts and
Nuts. Torque to 35-43 ft-lbs. Note: Orientate nuts
outboard.
5. Repeat with Volume Mounts on the passenger side of
the frame. Figure 70, in Appendix A: Drill
Locations, shows the suggested locations.
6. Locate the Left Hand Volume Assembly.

DS150FR-S
23
WARNING: Each Volume Assembly is heavy (in excess of
100 lbs). Use of a portable lift, crane, or suitable jack is
recommended to support the Volume Assembly during
installation.
7. Raise the volume assembly until the volume contacts
both mounts. Rotate the volume assembly until the
bleed screws are located to the top and as vertical as
possible.
8. Locate (2) T-Bolt Clamps, open the clamps, and
place them in the mounts around the two pegs.
9. Secure both clamps around the volume and torque the
T-Bolt nut to 240 in-lbs.
10. Locate the Right Hand Volume Assembly.
11. Raise the volume assembly until the volume contacts
both mounts. Rotate the volume until the bleed
screws are located to the top and as vertical as
possible.
12. Locate (2) T-Bolt Clamps, open the clamps, and
place them in the mounts around the two pegs.
13. Secure both clamps around the volume and torque the
T-Bolt nut to 240 in-lbs.

DS150FR-S
24
Secondary Volumes [DS150FR-SEP/SEPB]
ITEM QTY PART NUMBER DESCRIPTION ITEM QTY PART NUMBER DESCRIPTION
1 8 10012-005 LFN 3/8”-16 Gr G, Z 8 4 10843-003 T-Bolt Clamp, Range 4.88-5.5
2 6 10012-010 LFN 5/16”-18 Gr G 9 4 10855-002 Vinyl-Coated Loop Clamp, 1” ID
3 8 10501-002 HFB 3/8-16 x 1.250, Gr 8, BO 10 2 10855-003 Vinyl-Coated Loop Clamp, 5/8” ID
4 1 10597-105 Volume Assembly, LH 11 6 10886-125 HFB 5/16”-18 x 1-1/4” Gr 8
5 1 10597-106 Volume Assembly, RH 12 1 11129 Kit, Power Module Mount
6 1 10614-001 Cap, Filler/Breather 13 1
11287-004 Power Module Asy -SEP
7 4 10830-015 Wldmnt, Volume Mount 11287-005 Power Module, Asy, -SEPB
1. Locate (4) Volume Mounts.
2. Place the mounts against the driver side frame,
forward of the front hanger. Figure 70, in Appendix
A: Drill Locations, shows the suggested locations
Important: Locate the mounts such that the distance
between two mounts as wide as possible. Avoid
partially drilling through existing frame holes and
inside fuel line mounts.
3. Verifying the mounts are held flush to the bottom of
the frame and utilizing the mount hole pattern, mark
the locations of the mounting holes and drill (2)
Ø7/16” holes per mount.
4. Attach the two mounts with 3/8” Flange Bolts and
Nuts. Torque to 35-43 ft-lbs. Note: Orientate nuts
outboard.
5. Repeat with Volume Mounts on the passenger side of
the frame. Figure 70, in Appendix A: Drill
Locations, shows the suggested locations.
6. Locate the Left Hand Volume Assembly.
WARNING: Each Volume Assembly is heavy (in excess of
100 lbs). Use of a portable lift, crane, or suitable jack is
recommended to support the Volume Assembly during
installation.
7. Raise the volume assembly until the volume contacts
both mounts. Rotate the volume assembly until the
bleed screws are located to the top and as vertical as
possible.
8. Locate (2) T-Bolt Clamps, open the clamps, and
place them in the mounts around the two pegs.
9. Secure both clamps around the volume and torque the
T-Bolt nut to 240 in-lbs.
DS150FR-S
25
10. Locate the Right Hand Volume Assembly.
11. Raise the volume assembly until the volume contacts
both mounts. Rotate the volume until the bleed
screws are located to the top and as vertical as
possible.
12. Locate (2) T-Bolt Clamps, open the clamps, and
place them in the mounts around the two pegs.
13. Secure both clamps around the volume and torque the
T-Bolt nut to 240 in-lbs.

DS150FR-S
26
Power Module [DS150FR-S, -SF, -SS]
ITEM QTY PART NUMBER DESCRIPTION ITEM QTY PART NUMBER DESCRIPTION
1 1 10799-015 Power Module Manifold Mount 6 1 10798-015 Power Module Reservoir Mount
2 2 10252-003 SFHS 3/8”-16 x 5/8” Gr 8 7 2 10805-007 Grommet
3 4 10012-011 LFN 3/8”-16 Gr G 8 4 10501-002 HFB 3/8”-16 x 1-1/4” Gr 8
4 2 10088-001 FW #10 9 2 10322-021 Hyd. Fit. 90, -4 37 x -4 37 F
5 2 10510-002 STS #10-16 x 3/4” Hex Head 10* 1 10614-001 Cap, Filler/Breather
*P/N 10614-001 is included in the main kit.

DS150FR-S
27
1. Locate the Power Module Assembly and the Power
Module Mounting Kit.
2. Attach the Manifold Mount to the Power Module as
shown above using the 3/8”-16 x 5/8” Serrated
Flange Hex Screws. Torque to 39 ft-lbs.
3. Insert the grommets into the Reservoir Mount and
attach it to the back of the plastic reservoir as shown
above using the #10 Flat Washers and #10-16 x 3/4”
Self Tapping Screws. Do not over tighten to where
the grommets deform.
4. Attach the Power Module to the Cross-member
Channel as shown above using 3/8”-16 x 1-1/4” Hex
Flange Bolts and 3/8”-16 Locking Flange Nuts.
Torque to 39 ft-lbs.
5. Remove the red plug from the top of the reservoir
and install the Filler/Breather Cap.

DS150FR-S
28
Power Module [DS150FR-SEP/SEPB]
ITEM QTY PART NUMBER DESCRIPTION ITEM QTY PART NUMBER DESCRIPTION
1 3 10012-007 LFN 1/2”-13 Gr G 6 1 10798-016 Power Module Reservoir Mount
2 2 10088-001 FW #10 7 1 10799-016 Power Module Manifold Mount
3 2 10252-003 SFHS 3/8”-16 x 5/8” Gr 8 8 2 10805-007 Grommet
4 2 10322-021 Hyd. Fit. 90, -4 37 x -4 37 F 9 3 10885-150 HFB 1/2”-13 x 1-1/2” Gr 8
5 2 10510-002 STS #10-16 x 3/4” Hex Head 10* 1 10614-001 Cap, Filler/Breather
*P/N 10614-001 is included in the main kit.

DS150FR-S
29
1. On the driver side, mark and drill Ø9/16” hole as per
Figure 71, located in Appendix A: Drill Locations.
2. Locate the Power Module Assembly and the Power
Module Mounting Kit.
3. Attach the Manifold Mount to the Power Module as
shown above using the 3/8”-16 x 5/8” Serrated
Flange Hex Screws. Torque to 39 ft-lbs.
4. Insert the grommets into the Reservoir Mount and
attach it to the back of the plastic reservoir as shown
above using the #10 Flat Washers and #10-16 x 3/4”
Self Tapping Screws. Do not over tighten to where
the grommets deform.
5. Attach the Power Module to the frame as shown
above using 1/2”-13 x 1-1/2” Hex Flange Bolts and
1/2”-13 Locking Flange Nuts. Torque to 39 ft-lbs.
6. Remove the red plug from the top of the reservoir
and install the Filler/Breather Cap.
Hose Attachment & Routing [DS150FR-S]
Figure 20. DS150FR-A -4 Hose Routing (Top View)
Figure 21. DS150FR-A -10 Hose Routing (Bottom View)

DS150FR-S
30
CAUTION: Attachment of the hydraulic hoses may result in
some spillage of fluid. Use of oil absorbent mats is
recommended.
1. Locate 3/16” ID PVC Tubing (not included with kit).
Note: Alternatively, a bleed kit similar to the Actron
7840 Bleed Kit can be used.
2. Attach the PVC tubing to the bleed screw on the -10
hose side of the Left Hand Secondary Volume
Assembly and place the other end in a bucket.
Figure 22. Bleed screw locations.
3. Open the bleed screw slightly to relieve any residual
pressure.
4. After pressure is relieved, close the bleed screw and
torque to 13-18 ft-lbs.
5. Locate -10 hose and -10 JIC 90° Elbow Hydraulic
Fitting.
6. Remove the cap from the elbow fitting on the strut.
7. Loosely attach the elbow hose end (90° -10 JIC
fitting) to the strut port.
8. Loosely attach the 90° elbow fitting to the opposite
end of the hose (with the straight -10 JIC fitting).
9. Place a bucket or oil absorbent mat under the capped
end of the secondary volume.
10. Remove the -10 cap from the volume and attach the -
10 elbow.
11. Tighten all the -10 fittings to 36-63 ft-lbs.
12. Repeat with the opposite side.
CAUTION: Make sure the hose is not chafing or in
contact with any sharp edges.
13. Attach the PVC tubing to the bleed screw on the -4
hose side of the Left Hand Secondary Volume
Assembly and place the other end in a bucket.
14. Open the bleed screw slightly to relieve any residual
pressure.
15. After pressure is relieved, close the bleed screw and
torque to 13-18 ft-lbs.
16. Route the Left Hand (Driver side) -4 (1/4”) hydraulic
hose, attached to the volume assembly, to the Power
Module. Use of hose clamps is recommended to
secure the hose from movement or chafing.
CAUTION: Make sure the hose is not chafing or in
contact with any sharp edges.
17. Remove the plug from the hose end.
18. Attach the hose end to the fitting in the port marked
“L”. Torque to 12 ft-lbs. Do not over tighten.
19. Repeat with the opposite side.
20. Attach the hose end to the fitting in the port marked
“R”. Torque to 12 ft-lbs. Do not over tighten.
21. Clean up any fluid spillage.

DS150FR-S
31
Hose Attachment & Routing [DS150FR-SF]
ITEM QTY PART NUMBER DESCRIPTION ITEM QTY PART NUMBER DESCRIPTION
1 2 10012-010 LFN 5/16”-18 Gr G 3 3 10855-003 Vinyl Coated Loop Clamp, 5/8” ID
2 4 10855-002 Vinyl Coated Loop Clamp, 1”ID 4 2 10886-100 HFB 5/16-18 x 1.000” Grade 8
CAUTION: Attachment of the hydraulic hoses may result in
some spillage of fluid. Use of oil absorbent mats is
recommended.
1. Locate -10 hose on Left Hand (driver side)
Secondary Volume.
2. Route hose to Left Hand strut area, as shown above.
3. Locate 3/16” ID PVC Tubing (not included with kit).
Note: Alternatively, a bleed kit similar to the Actron
7840 Bleed Kit can be used.
4. Attach the PVC tubing to the bleed screw on the -10
hose side of the Left Hand Secondary Volume
Assembly and place the other end in a bucket.
Figure 23. Bleed screw locations.
5. Open the bleed screw slightly to relieve any residual
pressure.
6. After pressure is relieved, close the bleed screw and
torque to 13-18 ft-lbs.
7. Remove the cap from the strut port.

DS150FR-S
32
8. Raise the end of the -10 (5/8”) hose, attached to the
volume assembly, above the secondary volume to
prevent fluid loss.
9. Remove the plug from the end of the hose.
10. Attach the hose end (-10 JIC fitting) to the strut port.
11. Torque to 36-63 ft-lbs.
12. Secure hose with clamps as shown above. Drill
attaching Ø3/8” holes as necessary.
13. Repeat with the opposite side.
Figure 24. Passenger Side -10 hose routing.
14. Use hose clamps to secure hoses from movement and
chafing.
CAUTION: Make sure the hose is not chafing or in
contact with any sharp edges.
15. Attach the PVC tubing to the bleed screw on the -4
hose side of the Left Hand Secondary Volume
Assembly and place the other end in a bucket.
16. Open the bleed screw slightly to relieve any residual
pressure.
17. After pressure is relieved, close the bleed screw and
torque to 13-18 ft-lbs.
18. Route the Left Hand (Driver side) -4 (1/4”) hydraulic
hose, attached to the volume assembly, to the Power
Module. Use of hose clamps is recommended to
secure the hose from movement or chafing.
CAUTION: Make sure the hose is not chafing or in
contact with any sharp edges.
Figure 25. Driver side and Passenger side -4 Hose routing.
19. Remove the plug from the hose end.
20. Attach the hose end to the fitting in the port marked
“L”. Torque to 12 ft-lbs. Do not over tighten.
21. Repeat with the opposite side.
22. Attach the hose end to the fitting in the port marked
“R”. Torque to 12 ft-lbs. Do not over tighten.
23. Clean up any fluid spillage.

DS150FR-S
33
Hose Attachment & Routing [DS150FR-SS]
ITEM QTY PART NUMBER DESCRIPTION ITEM QTY PART NUMBER DESCRIPTION
1 10 10012-010 LFN 5/16”-18 Gr G 3 6 10855-003 Vinyl Coated Loop Clamp, 5/8” ID
2 4 10855-002 Vinyl Coated Loop Clamp, 1”ID 4 10 10886-100 HFB 5/16-18 x 1.000” Grade 8
CAUTION: Attachment of the hydraulic hoses may result in
some spillage of fluid. Use of oil absorbent mats is
recommended.
1. Locate -10 hose on Left Hand (driver side)
Secondary Volume.
2. Route hose to strut area, over front hanger and axle.
3. Locate 3/16” ID PVC Tubing (not included with kit).
Note: Alternatively, a bleed kit similar to the Actron
7840 Bleed Kit can be used.
4. Attach the PVC tubing to the bleed screw on the -10
hose side of the Left Hand Secondary Volume
Assembly and place the other end in a bucket.
Figure 26. Bleed screw locations
5. Open the bleed screw slightly to relieve any residual
pressure.
6. After pressure is relieved, close the bleed screw and
torque to 13-18 ft-lbs.
7. Remove the cap from the strut port.

DS150FR-S
34
8. Raise the end of the -10 (5/8”) hose, attached to the
volume assembly, above the secondary volume to
prevent fluid loss.
9. Remove the plug from the end of the hose.
10. Attach the hose end (-10 JIC fitting) to the strut port.
11. Torque to 36-63 ft-lbs.
12. Secure hose with clamps as shown below. Drill
attaching Ø3/8” holes as necessary.
13. Repeat with the opposite side.
Figure 27. Driver Side -10 hose routing.
14. Use hose clamps to secure hoses from movement and
chafing.
CAUTION: Make sure the hose is not chafing or in
contact with any sharp edges.
15. Attach the PVC tubing to the bleed screw on the -4
hose side of the Left Hand Secondary Volume
Assembly and place the other end in a bucket.
16. Open the bleed screw slightly to relieve any residual
pressure.
17. After pressure is relieved, close the bleed screw and
torque to 13-18 ft-lbs.
18. Route the Left Hand (Driver side) -4 (1/4”) hydraulic
hose, attached to the volume assembly, to the Power
Module. Use of hose clamps is recommended to
secure the hose from movement or chafing.
CAUTION: Make sure the hose is not chafing or in
contact with any sharp edges.
Figure 28. Driver side and Passenger side -4 Hose routing.
19. Remove the plug from the hose end.
20. Attach the hose end to the fitting in the port marked
“L”. Torque to 12 ft-lbs. Do not over tighten.
21. Repeat with the opposite side.
22. Attach the hose end to the fitting in the port marked
“R”. Torque to 12 ft-lbs. Do not over tighten.
23. Clean up any fluid spillage.

DS150FR-S
35
Hose Attachment & Routing [DS150FR-SEP/SEPB]
ITEM QTY PART NUMBER DESCRIPTION ITEM QTY PART NUMBER DESCRIPTION
1 6 10012-010 LFN 5/16”-18 Gr G 3 2 10855-003 Vinyl Coated Loop Clamp, 5/8” ID
2 4 10855-002 Vinyl Coated Loop Clamp, 1”ID 4 6 10886-125 HFB 5/16-18 x 1.250” Grade 8
CAUTION: Attachment of the hydraulic hoses may result in
some spillage of fluid. Use of oil absorbent mats is
recommended.
1. Locate -10 hose on Left Hand (driver side)
Secondary Volume.
2. Route hose to strut area, over front hanger and axle.
3. Locate 3/16” ID PVC Tubing (not included with kit).
Note: Alternatively, a bleed kit similar to the Actron
7840 Bleed Kit can be used.
4. Attach the PVC tubing to the bleed screw on the -10
hose side of the Left Hand Secondary Volume
Assembly and place the other end in a bucket.
Figure 29. Bleed screw locations
5. Open the bleed screw slightly to relieve any residual
pressure.
6. After pressure is relieved, close the bleed screw and
torque to 13-18 ft-lbs.
7. Remove the cap from the strut port.
8. Raise the end of the -10 (5/8”) hose, attached to the
volume assembly, above the secondary volume to
prevent fluid loss.
9. Remove the plug from the end of the hose.
10. Attach the hose end (-10 JIC fitting) to the strut port.
11. Torque to 36-63 ft-lbs.
12. Secure hose with clamps as shown below. Drill
attaching Ø3/8” holes as necessary.
13. Repeat with the opposite side.
Figure 30. Driver Side -10 hose routing.
14. Use hose clamps to secure hoses from movement and
chafing.
CAUTION: Make sure the hose is not chafing or in
contact with any sharp edges.

DS150FR-S
36
15. Attach the PVC tubing to the bleed screw on the -4
hose side of the Left Hand Secondary Volume
Assembly and place the other end in a bucket.
16. Open the bleed screw slightly to relieve any residual
pressure.
17. After pressure is relieved, close the bleed screw and
torque to 13-18 ft-lbs.
18. Route the Left Hand (Driver side) -4 (1/4”) hydraulic
hose, attached to the volume assembly, to the Power
Module. Use of hose clamps is recommended to
secure the hose from movement or chafing.
CAUTION: Make sure the hose is not chafing or in
contact with any sharp edges.
Figure 31. Driver side and Passenger side -4 Hose routing.
19. Remove the plug from the hose end.
20. Attach the hose end to the fitting in the port marked
“L”. Torque to 12 ft-lbs. Do not over tighten.
21. Repeat with the opposite side.
22. Attach the hose end to the fitting in the port marked
“R”. Torque to 12 ft-lbs. Do not over tighten.
23. Clean up any fluid spillage.
DS150FR-S
37
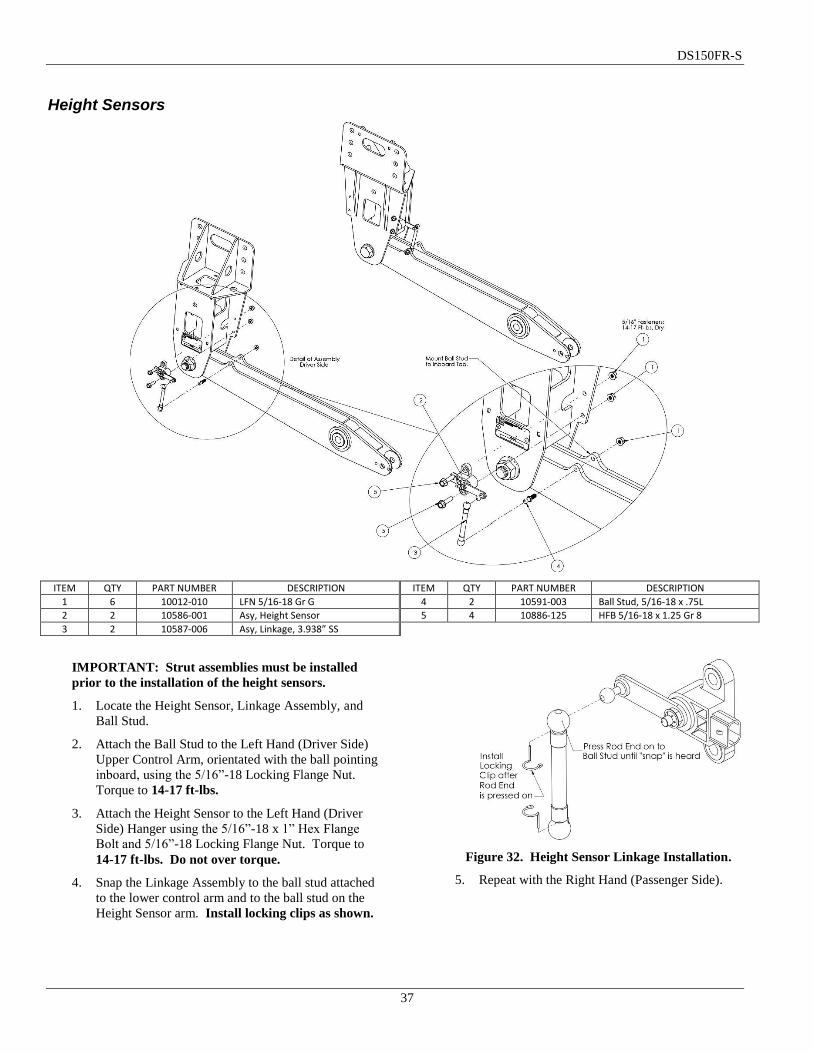
Height Sensors
ITEM QTY PART NUMBER DESCRIPTION ITEM QTY PART NUMBER DESCRIPTION
1 6 10012-010 LFN 5/16-18 Gr G 4 2 10591-003 Ball Stud, 5/16-18 x .75L
2 2 10586-001 Asy, Height Sensor 5 4 10886-125 HFB 5/16-18 x 1.25 Gr 8
3 2 10587-006 Asy, Linkage, 3.938” SS
IMPORTANT: Strut assemblies must be installed
prior to the installation of the height sensors.
1. Locate the Height Sensor, Linkage Assembly, and
Ball Stud.
2. Attach the Ball Stud to the Left Hand (Driver Side)
Upper Control Arm, orientated with the ball pointing
inboard, using the 5/16”-18 Locking Flange Nut.
Torque to 14-17 ft-lbs.
3. Attach the Height Sensor to the Left Hand (Driver
Side) Hanger using the 5/16”-18 x 1” Hex Flange
Bolt and 5/16”-18 Locking Flange Nut. Torque to
14-17 ft-lbs. Do not over torque.
4. Snap the Linkage Assembly to the ball stud attached
to the lower control arm and to the ball stud on the
Height Sensor arm. Install locking clips as shown.
Figure 32. Height Sensor Linkage Installation.
5. Repeat with the Right Hand (Passenger Side).

DS150FR-S
38
Steering Sensors [DS150FR-SEPB]
ITEM QTY PART NUMBER DESCRIPTION ITEM QTY PART NUMBER DESCRIPTION
1 4 10012-010 LFN 5/16”-18, Gr. G 5 4 10886-125 HFB 5/16”-18 x 1.25, Gr. 8
2 1 10586-002 Steering Sensor 6 1 11138-004 Steering Mount
3 1 10587-006 Asy, Linkage 3.938” SS 7 1 11138-006 Steering Sensor Mount
4 1 10733-007 Steering Linkage Mount
1. Remove the hex bolt, lock nut, and washer from the
pitman arm.
2. Install the Steering Linkage Mount re-using the OEM
5/8” fastener. Torque to 138-168 ft-lbs.
Figure 33. Steering Linkage Mount installation.
3. Remove the two (2) 7/8” nuts holding the back of the
steering gearbox. Slide the Steering Mount over the
7/8” bolts and re-attach the 7/8” nuts, as shown in
Figure 34. Torque to 278-352 ft-lbs.
Figure 34. Steering Linkage Mount installation.
4. Install the Steering Sensor Mount using the 5/16”
fasteners. Refer to Figure 35 for an example.

DS150FR-S
39
Figure 35. Steering Sensor Installation.
1. Install the Steering Sensor as shown in Figure 35
using the 5/16” fasteners.
2. Check that the Steering Sensor ball stud and Steering
Linkage Mount ball stud are approximately lined up.
Adjust positioning of Steering Sensor Mount as
necessary.
3. Torque all 5/16” fasteners to 14-17 ft-lbs.
4. Snap the Linkage Assembly to the ball stud attached
to the lower control arm and to the ball stud on the
Sensor arm. Install locking clip as shown.
Figure 36. Sensor Linkage Installation.

DS150FR-S
40
Steering Sensors [DS150FR-S, -SS, -SF, -SEP]
ITEM QTY PART NUMBER DESCRIPTION ITEM QTY PART NUMBER DESCRIPTION
1 1 10001-005 HB 3/4”-16x4-1/2” Gr 8 5 1 10587-006 Asy, Linkage 3.938” SS
2 4 10012-010 LFN 5/16”-18 Gr G 6 1 10733-004 Steering Linkage Mount
3 1 10012-012 LFN 3/4”-16 Gr G 7 1 10741-002 Steering Sensor Mount
4 1 10586-001 Height /Steering Sensor 8 4 10886-125 HFB 5/16”-18 x 1-1/4” Gr8
Note: Steering sensor and height sensors are the same part
number.
5. Remove the hex bolt, lock nut, and washer from the
pitman arm.
6. Install the Steering Linkage Mount using the
provided 3/4”-16 x 4-1/2” Hex Bolt and Locking
Flange Nut. Torque to 215-245 ft-lbs. Note: If
OEM bolt is 7/8”, reuse bolt and nut in place of
provided 3/4” bolt and nut.
Figure 37. Steering Linkage Mount installation.
7. Remove the bolt attaching the filter mount to the
frame, as shown in Figure 38. Retain bolt and nut for
reuse.
Figure 38. Steering Sensor Mount Installation.
8. Install the Steering Sensor Bracket reusing the OEM
fasteners and the 5/16”-18 fasteners as shown in
Figure 38.
9. Torque the OEM fastener to 90 ft-lbs.
10. Torque the 5/16”-18 fasteners to 14-17 ft-lbs.

DS150FR-S
41
Figure 39. Installation of Steering Sensor Mount.
11. Install the Steering Sensor as shown in Figure 40
using the 5/16” fasteners.
12. Torque to 14-17 ft-lbs.
Figure 40. Steering Sensor Installation.
13. Snap the Linkage Assembly to the ball stud attached
to the lower control arm and to the ball stud on the
Sensor arm. Install locking clip as shown.
Figure 41. Sensor Linkage Installation.

DS150FR-S
42
Wiring
1. Locate the External Electrical Harness attached to the
power module.
2. Unroll the wiring harness and use the Electrical
Schematics wiring diagram to identify the connection
ends.
3. Locate the trunk containing the Height Sensor (J21
and J22) and the Rate Valve (J23 and J24)
connections.
4. Route the trunk towards the height sensors and rate
valves. Note: The power module is mounted behind
the axle, but ahead of the volumes, therefore the
trunk may need to be routed first towards the height
sensors, and then back towards the rate valves.
Figure 42. DS150FR-S Sensor connections.
Figure 43. DS150FR-SF Sensor connections.
Figure 44. DS150FR-SS Sensor connections
Figure 45. DS150FR-SEP/SEPB Sensor connections.
5. Connect the height sensor and rate valve connections.
6. Secure the harness to OEM harness on the driver
side. Use of plastic clips is recommended.
7. Locate the Black 8ga. wire ground ring terminal, J30,
branch near the power module.
8. Locate and drill Ø1/4” hole in frame. Remove frame
coating(s) as needed to ensure metal-to-metal contact
between the ring terminal and frame.
9. Attach the ground ring terminal, J30, to the chassis
frame for grounding. Sealant should be applied after
ring terminal is secured.
10. Route the remaining trunk (containing the blunt wires
and steering sensor blunt wires) towards the cab.
Secure to OEM wiring harness.
11. Locate the Dash Harnes.
12. Inside the cab, under the dash, locate the firewall
rubber pass through grommets.
Figure 46. Firewall pass through.

DS150FR-S
43
13. Punch out two holes for the two dash harness
branches.
14. Push the dash harness branch labeled “Vehicle
Connections” and the branch labeled “External
Harness” through the firewall pass through.
15. Attach the Ground Ring Terminal, J32, from the dash
harness to the firewall ground post.
Figure 47. Under dash ground connections.
16. Secure the dash harness.
TABLE 1 The following wire connections to the vehicle are required. Name Harness Color-Size Required Signal Recommended Location Battery Dash Red-18ga 12 VDC Hot all the time Power Net Distribution Box
Ignition Dash Yellow-18ga 12 VDC with ignition ON
0 VDC with ignition OFF
Transmission Interface Connector (Pin
1)
Speed External Violet/White-18ga
-S, -SF, -SS, -SEP units:
Frequency based signal (11.3Hz/mph):
Freightliner Circuit - 497k
Allison Trans Circuit - 125
Transmission Interface Connector (Pin
5)
Or From TCM on transmission
(Allison Circuit 125)
-SEPB units:
Frequency based signal (2.2Hz/mph):
Provided by Body Builder. See Body
Builder for location.
Brake External Pink/Black-18ga 12 VDC with brake ON
0 VDC with brake OFF
Body Builder Lighting Interface (Pin
4)
Ground Dash Black With Ring
Terminal Chassis Ground Chassis ground in cab
Battery Fused Battery
Lead Red-8ga
12 VDC hot all the time
(up to 80 Amps) Chassis battery
Ground External Black-8ga Chassis Ground (up to 80 Amps) Chassis ground
Note: Recommended locations are based on Freightliner M2 106. (See table 2 for list of codes). Other suitable signal location
may be used on other chasses configurations. Instruction steps 17-45 refer to M2 106. Other vehicles may require different
sources.
17. Locate the following Vehicle Electrical
Modules/Connectors (refer to Freightliner Body
Builder Reference Guide OBD 2013/GHG 14
Electrical):
TABLE 2
Connector: Location:
PNDB (Power Net
Distribution Box)
Under hood, on firewall, driver
side.
TIC (Transmission
Interface Connector)
Multiple possible locations:
*Under hood, on firewall, driver
side (34C-001),
*Under Cab (34C-002), or
*End of Frame (34C-003)
BBLI (Body Builder
Lighting Interface)
Multiple possible locations:
*Back of cab (353-022)
*End of frame (353-023)
*Back of cab w/PDM (353-026)
*End of frame w/PDM (353-027)
Maybe under cab on crew cab
versions.
Depending on the location of these connectors and
the configuration of the vehicle, extra length of wire
may need to be spliced in.
Also see Appendix B: Electrical Terminals.

DS150FR-S
44
18. At the PNBD, disconnect the ATC Fuse Output
connector.
Figure 48. ATC Fuse Output connector.
19. Pull out, but do not remove the TPA.
Figure 49. Resetting the TPA.
20. Locate the red “BAT” wire from the dash harness in
the bundle labeled “Vehicle Connections”.
21. Attach an APEX 2.8mm Female terminal to the wire.
See Appendix B: Electrical Terminals
22. .Remove the plug from the “D” or pin 4 location.
Figure 50. Inserting the BAT power wire.
23. Insert the wire into the “D” or pin 4 position of the
connector.
Figure 51. TPA in lock position.
24. Press the TPA back into the lock position.
25. Reconnect the connector to the PNBD.
26. Locate the Transmission Interface Connector.
Figure 52. Transmission Interface Connector when
located under hood.
27. Unplug the connector.
28. Pull out, but do not remove the white TPA.
Figure 53. Unlocking the connector.
29. Attach an APEX 1.5mm male terminal to both the
Yellow (Ignition) wire from the dash harness (located
in the branch labeled “Vehicle Connections”) and the
Violet/White (Speed) wire from the main electrical
harness. Splice additional wire to either wire if
necessary to reach the Transmission Interface
Connector.

DS150FR-S
45
30. Remove plugs from pin 1 and pin 5.
31. Insert the Violet/White wire into Pin 5 of the
connector.
Figure 54. Inserting Violet/White wire.
32. Insert the Yellow wire into Pin 1 of the connector.
33. Push and lock the TPA.
Figure 55. Locking the TPA.
34. Reconnect the connector.
35. Secure the wires.
36. Locate the Body Builder Lightning Interface. The
connector should have an orange ribbon tape within
2” for identification.
37. Inside the main suspension harness, locate the
Pink/Black wire. Pull wire from loom and rewrap
junction with electrical tape.
38. Disconnect the connector.
39. Pull out, but do not remove the red TPA.
Figure 56. Unlocking the connector.
40. Attach an APEX 2.8mm male terminal to the
Pink/Black (Brake) wire.
41. Remove the plug from pin 4.
42. Insert the Pink/Black wire into Pin 4.
Figure 57. Inserting Pink/Black wire.
43. Press and lock the TPA.
Figure 58. Body Builder Lighting Interface connector with
TPA locked in position.
44. Reconnect the Body Builder Lighting Interface
connector.
45. Secure all wiring.
Note: The rest of the wiring section refers to all vehicles.

DS150FR-S
46
46. Locate the remaining Dash harness wires labeled
“External Harness”:
Red (Battery Power)
Yellow (Ignition)
White (CAN-H)
White/Black (CAN-L)
Black (Ground)
Yellow/Black (Park)
47. Crimp each wire to the corresponding blunt wire in
the External Harness. Match wire colors, crimp
using butt splices, and install heat shrink.
48. Secure all wires.
49. Locate the branch containing connector J35.
50. Route branch to the steering sensor and connect. If
necessary splice additional length to the three wires.
Make sure the correct connections are made.
Figure 59. Steering Sensor electrical connection.
51. Secure the harness.
52. Locate the Red 8ga battery connection branch.
53. Route branch to the auxiliary battery positive
terminal.
54. Locate the Battery Fuse Lead containing the 80 amp
fuse.
55. Remove the 80 amp fuse.
56. Crimp the fuse lead to the 8ga battery connection
branch blunt end.
57. Melt the heat shrink on the crimped connection to
seal the splice.
58. Connect to the positive terminal post.
59. Replace the 80 amp fuse.
Optional Door Electrical Harness Installation:
The optional door harness can be used to remotely activate the
system “kneeling” feature in which the suspension
automatically lowers to a point slightly less than maximum
jounce travel. The door harness can be utilized in two
actuation methods.
IMPORTANT: Do not connect positive (12VDC) signal to
either the W98 Tan/Blk or W93 Brown wires. Applying
positive (12VDC) to either of these wires can result in ECU
failure.
A. Single Wire - Ground Signal From Source
Ground is provided to the door harness Brown
(W93) wire from a grounding source (e.g.
multiplex signal, switch, etc.). If a remote switch
is used, it is recommended to use a normally
closed (NC) door switch which remains open
when the door is closed (or closed when the door
is opened). One side of the switch must be
connected to a ground source and the other side
routed to the door harness. If multiple switches
are used, they should be wired in a parallel
arrangement with the door harness. Requires
single wire routed from source to door harness.
B: Dual Wire – Ground Signal From System
Ground is provided by the suspension system
when the Brown (W93) wire is connected to the
Tan/Black (W98) wire of the door harness. This
arrangement requires a remote switch that is a
normally closed (NC) door switch which remains
open when the door is closed (or closed when the
door is opened). One side of the switch needs to
be connected to the door harness Brown (W93)
wire and the other side to the door harness
Tan/Black (W98) wire. Requires two wires
routed from switch to door harness.
1. Door harness wires are located on the main external
wiring harness as a branch near the power module.
2. Unwrap the door harness wires.
3. Based on the selected actuation method above, strip
the end(s) of the door harness blunt wire(s) and
connect the end(s) to the signal source using a heat
shrinkable butt-splice. Crimp the connection(s)
accordingly and apply heat to the insulator to seal the
connection(s).

DS150FR-S
47
System Preparation
Initial System Fill
1. Install the wheels and tires. Torque wheel nuts to
OEM specifications.
2. Verify that the front wheels are steered straight
ahead.
3. Lower the vehicle to the ground and remove any jack
stands from under the vehicle. The suspension
should be in the kneeled position.
4. Locate the container of Silicone Fluid.
5. Remove the breather cap from the Power Module
reservoir.
6. Fill the reservoir approximately 2/3 full.
7. Turn the ignition key to “Run” and ensure that the
LiquidSpring driver display LEDs light up and that
the red “Warning” LED is not lit. If the red
“Warning” LED is lit, proceed to the Trouble
Shooting Section.
WARNING: Do not run vehicle in an enclosed
building without adequate ventilation or without
ducting exhaust fumes outside. Operation of a vehicle
inside an enclosed building can lead to serious injury
or death.
8. Press and release the Red ON/OFF button on the
driver display. All LEDs on the driver display should
go out.
9. Press and release the Red ON/OFF button again. The
LEDs on the driver display should all flash and then
only the four yellow arrow LEDs, one green ride
mode indicator LED, and one green ride height
indicator LED should remain lit.
10. The green ride height indicator LED should indicate
“Low” and begin flashing as the pump/motor starts.
If pump/motor does not start, check Trouble Shooting
Electrical Section.
11. Monitor the fluid level in the reservoir. If the level
drops below 1/4 of the tank, press and release the Red
ON/OFF button to shut off the system, refill the
reservoir, and turn the system back on by pressing the
Red ON/OFF button.
12. If the suspension system does not begin to rise to a
preset ride height after 3 minutes, stop the system and
check the following first and then repeat this step:
a. Check for any fluid leaks.
b. Check that the hoses are properly connected.
c. Completely depressurize the system. See
Depressurizing the System section, under System
Operation
13. After the suspension system stops leveling, check the
fluid level in the reservoir. If low, fill to the
indicated line.
Figure 60. Final fill fluid level.
Bleeding the System
1. Verify system is turned OFF by either pressing the
ON/OFF button on the driver interface until the lights
are turned off or turning the ignition off.
2. Locate 3/16” ID PVC Tubing (not included with kit).
Note: Alternatively, a bleed kit similar to the Actron
7840 Bleed Kit can be used.
3. Attach the PVC tubing to one of the upper bleed
screws on the Left Hand Secondary Volume
Assembly and place the other end in a bucket.
Figure 61. Bleed screw locations.
4. Open the bleed screw slightly.
5. After air bubbles are no longer present, close the
bleed screw and torque to 13-18 ft-lbs.
6. Repeat with remaining bleed screws. Note: the
system may need to powered on and allowed to re-
pressurize .
7. Repeat with other side.
Calibrating the System
IMPORTANT: Proper calibration of the system must be
conducted with the vehicle loaded to the as delivered

DS150FR-S
48
condition with body installed. For calibration on an empty
chassis cab, LiquidSpring recommends weight be added to
the frame approximately equal to the planned body to
allow for proper bushing deflections.
Note: The LiquidSpring Calibration routine will automatically
determine maximum and minimum suspension ride height.
Based on those ride heights, the system will determine the
correct normal design ride height. The calibration system will
also calibrate the steering sensor.
1. Verify that the front wheels are steered straight
ahead.
2. Lower the vehicle to the ground and remove any jack
stands and any other obstructions from under the
vehicle.
3. To begin the calibration, turn the ignition key to
“Run” and ensure that the LiquidSpring driver
display lights up and that the red Error light is not
blinking.
WARNING: Do not run vehicle in an enclosed building
without adequate ventilation or without ducting exhaust
fumes outside. Operation of a vehicle inside an enclosed
building can lead to serious injury or death.
4. Press and release the Red ON/OFF button on the
driver display. All lights on the driver display should
go out.
5. Press and release the Red ON/OFF button a second
time. The lights on the driver display should all flash
then only show the four yellow arrow lights, one
green ride mode indicator, and one green ride height
indicator.
6. Press and hold both Ride Height Adjustment Buttons
simultaneously until the SPORT, COMFORT, HIGH,
and LOW green LED’s begin to flash. The
suspension system will begin to rise to the full high
position, and then lower to the full lowered position.
7. After the system completes the calibration routine,
the suspension will return to the original ride height.
8. Turn off the ignition for at least 3 minutes. Note:
The suspension system will not use the calibrated
ride height settings until power has been cycled.
Note: Pressing the red ON/OFF button on the driver
display does not cycle power to the LiquidSpring
suspension system, but only will enable/disable the
system.
9. Turn the ignition back to Run, then press the Red
ON/OFF button twice and verify the suspension
system moves to the new and correct ride height.
10. Calibration is now completed.
Post Installation Welding
WARNING: Prior to any chassis welding conducted after
the installation of the LiquidSpring suspension system,
disconnect cables from battery, disconnect ECU Header
connectors (see below), and Power Module ground
connection (see below).
Figure 62. ECU disconnects prior to welding on chassis.

DS150FR-S
49
System Operation
System Start Up:
In most instances, the suspension system can be left
alone to operate automatically.
After startup, all the indicator lights will flash on for
1-2 seconds, and then the Green Ride Height
Indication LED and Green Ride Mode Indication
LED will light to show the current Ride Mode and
Ride Height.
The four yellow LED’s will light up if the steering
wheel is approximately 10°-20° each side of straight
ahead, but will not light up when steering wheel
exceeds 20° from center. If the vehicle is steered
straight ahead and the four yellow LED’s are not lit
(and the red warning LED is not lit) see Calibrating
the Steering Sensor Only.
When the steering wheel is turned more than 20° off
center, the four Yellow Steering Centering Indication
LED will not be lit.
ON/OFF Button:
Pressing the ON/OFF button will enable/disable the
suspension. When the suspension is ON, relevant LED’s
are lit up. When the suspension is OFF, none of the
LED’s are lit. It is recommended to leave the suspension
ON at all times unless the vehicle or suspension is being
serviced.
IMPORTANT: After turning the vehicle ignition off,
the suspension system will remain powered for 1 hour
before shutting off.
Warning Light:
If the Red LED warning light is continuously illuminated
along with one or more of the other indicator lights,
please refer to the Troubleshooting Section on page 52.
Ride Mode Adjustment:
Press the UP/DOWN arrow buttons to change the ride
mode between SPORT, NORMAL, and COMFORT. The
Green indicator light will show the set mode.
Comfort Mode provides a smooth, soft ride. Use for
normal city and highway driving.
Sport Mode provides more “feel” or response to the
road conditions. Use where road conditions or
personal preference demand more control.
Normal Mode is a balance between Comfort and
Sport. Use where more control than Comfort is
desired, but better ride than Sport.
The setting can be changed at any time. Based on road
conditions, steering wheel angle, and the vehicle speed,
the system automatically adjusts to provide the best
handling while providing a smooth ride. All three settings
will feel similar on a smooth road.
Ride Height Adjustment:
Press the UP/DOWN arrow buttons to change ride height
from NORMAL to HIGH (body up) or LOW (body
down).
A solid green LED will indicate the selected
height. A flashing green LED will indicate the
current height and that height adjustment is
occurring. When a single solid green LED is lit,
the selected height has been achieved.

DS150FR-S
50
Two solid green LEDs will be lit if the current
height is not the selected height and height
adjustment is not occurring.
If LOW or HIGH heights are selected while the
vehicle is traveling at less than 10 mph or
stopped, the suspension height is either lowered
or raised.
If LOW or HIGH heights are selected while the
vehicle is traveling at greater than 10 mph, the
suspension will ignore the selected height and
remain in NORMAL height unless the vehicle
speed goes below 10 mph within 2 minutes of
selecting the height. In this instance, the
NORMAL height green LED will flash and the
selected height green LED will be lit solid until
the speed goes below 10 mph within 2 minutes
of selecting the height. If the vehicle speed
doesn’t go below 10mph within the 2 minute
period, the suspension will remain in NORMAL
height indicated by only the NORMAL height
green LED lit solid.
If LOW height is selected and the ignition is
turned off before LOW height is achieved, the
system will continue to lower to LOW height.
When LOW height is selected the system will
monitor and maintain the kneeled position by
only lowering as needed for 1 hour after the
ignition is turned off.
If HIGH height is selected and the ignition is
turned off before HIGH height is achieved, the
system will stop adjusting ride height. When
HIGH height is selected the system will monitor
and maintain the current position by only
lowering as needed for 1 hour after the ignition is
turned off.
The door switch function (if equipped) is
disabled when the driver display LOW or HIGH
height is selected before the door is opened on
vehicles equipped with a door switch for
kneeling.
IMPORTANT: While parked for an extended time
with the vehicle and/or suspension system turned off,
suspension ride will change with temperature change.
Increases in ambient temperature or parking in direct
sunlight can cause the suspension ride height to
increase. As temperature lowers, the suspension ride
height can decrease.
Depressurizing the System
1. Turn the ignition key to “Run” and ensure that the
LiquidSpring driver display LEDs light up and that
the red “Warning” LED is not lit. If the red
“Warning” LED is lit, proceed to the Trouble
Shooting Section.
WARNING: Do not run vehicle in an enclosed
building without adequate ventilation or without
ducting exhaust fumes outside. Operation of a vehicle
inside an enclosed building can lead to serious injury
or death.
1. Press and release the Red ON/OFF button on the
driver display. All LEDs on the driver display should
go out.
2. Press and release the Red ON/OFF button again. The
LEDs on the driver display should all flash and then
only the four yellow arrow LEDs, one green ride
mode indicator LED, and one green ride height
indicator LED should remain lit.
3. Press and release the HEIGHT DOWN arrow button
to lower the vehicle to the LOW height.
4. Press and hold the HEIGHT DOWN arrow button for
approximately 2 minutes.
5. Release the HEIGHT DOWN arrow button.
6. Press and release the ON/OFF button to disable the
system.
7. Turn off the vehicle ignition.
If any of the hydraulic connected components is to be
removed and serviced, it is recommended to also follow
the following steps:
8. Locate 3/16” ID PVC Tubing. Note: Alternatively, a
bleed kit similar to the Actron 7840 Bleed Kit can be
used.
9. Attach the PVC tubing to one of the upper bleed
screws on the Left Hand Secondary Volume
Assembly and place the other end in a bucket.
Figure 63. Bleed screw locations.
10. Open the bleed screw slightly to relieve any residual
pressure.

DS150FR-S
51
11. After pressure is relieved, close the bleed screw and
torque to 13-18 ft-lbs.
Notes:
Jacking up the chassis of a lowered, depressurized
chassis will cause a slight vacuum in the system and
minimize fluid loss while disconnecting hoses.
For service of non-hydraulic connected suspension
components, the suspension system can be first raised
to the HIGH height, appropriate jack stands placed
under the chassis, then depressurized as listed above
lowering the chassis onto the jack stands.
Calibrating the Steering Sensor Only
Note: The yellow lights only light up when the steering sensor
indicates the center location. They will not be lit outside of
10°-20° off center.
IMPORTANT: The LiquidSpring CLASS® system
includes an automatic self-centering routine. In conditions
such as driving on highway with significant side wind, the
yellow lights may temporarily not be lit when the steering
wheel is exactly centered. Rotate slowly from center to full
steering stop, then repeat the opposite direction. If the
yellow lights momentarily light up during the travel in one
or the other direction, the system is operating normally
and the steering sensor does not need to be manually re-
centered. Continue operating normally.
If the yellow lights do not light up at all during turning the
steering wheel, following the instructions below.
1. Verify that the front wheels are steered straight
ahead.
2. To begin the calibration, turn the ignition key to
“Run” and ensure that the LiquidSpring driver
display lights up and that the red “Warning” LED is
not lit or flashing.
WARNING: Do not run vehicle in an enclosed building
without adequate ventilation or without ducting exhaust
fumes outside. Operation of a vehicle inside an enclosed
building can lead to serious injury or death.
3. Press and release the Red ON/OFF button on the
driver display. All LEDs on the driver display should
go out.
4. Press and release the Red ON/OFF button again. The
LEDs on the driver display should all flash and then
only the four yellow arrow LEDs, one green ride
mode indicator LED, and one green ride height
indicator LED should remain lit.
5. Press and hold both Ride Height Adjustment Buttons
simultaneously until the SPORT, COMFORT, HIGH,
and LOW green LED’s begin to flash.
6. As soon as the four green LED’s begin to flash, press
the ON/OFF button to stop the process.
7. Verify that the four yellow arrow LED’s are lit.
8. Steering calibration is completed.
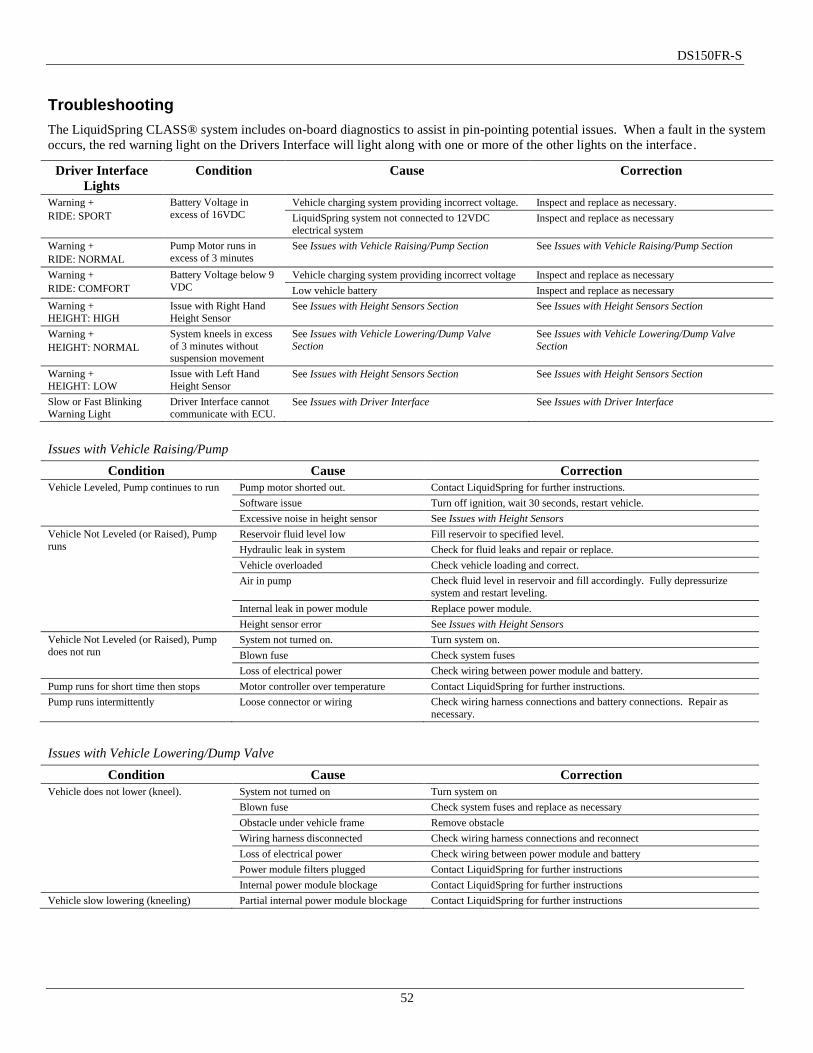
DS150FR-S
52
Troubleshooting
The LiquidSpring CLASS® system includes on-board diagnostics to assist in pin-pointing potential issues. When a fault in the system
occurs, the red warning light on the Drivers Interface will light along with one or more of the other lights on the interface.
Driver Interface
Lights
Condition Cause Correction
Warning +
RIDE: SPORT
Battery Voltage in
excess of 16VDC Vehicle charging system providing incorrect voltage. Inspect and replace as necessary.
LiquidSpring system not connected to 12VDC
electrical system Inspect and replace as necessary
Warning +
RIDE: NORMAL
Pump Motor runs in
excess of 3 minutes See Issues with Vehicle Raising/Pump Section See Issues with Vehicle Raising/Pump Section
Warning +
RIDE: COMFORT
Battery Voltage below 9
VDC Vehicle charging system providing incorrect voltage Inspect and replace as necessary
Low vehicle battery Inspect and replace as necessary
Warning +
HEIGHT: HIGH
Issue with Right Hand
Height Sensor See Issues with Height Sensors Section See Issues with Height Sensors Section
Warning +
HEIGHT: NORMAL
System kneels in excess
of 3 minutes without suspension movement
See Issues with Vehicle Lowering/Dump Valve
Section
See Issues with Vehicle Lowering/Dump Valve
Section
Warning +
HEIGHT: LOW
Issue with Left Hand
Height Sensor See Issues with Height Sensors Section See Issues with Height Sensors Section
Slow or Fast Blinking
Warning Light
Driver Interface cannot
communicate with ECU. See Issues with Driver Interface See Issues with Driver Interface
Issues with Vehicle Raising/Pump
Condition Cause Correction
Vehicle Leveled, Pump continues to run Pump motor shorted out. Contact LiquidSpring for further instructions.
Software issue Turn off ignition, wait 30 seconds, restart vehicle.
Excessive noise in height sensor See Issues with Height Sensors
Vehicle Not Leveled (or Raised), Pump
runs Reservoir fluid level low Fill reservoir to specified level.
Hydraulic leak in system Check for fluid leaks and repair or replace.
Vehicle overloaded Check vehicle loading and correct.
Air in pump Check fluid level in reservoir and fill accordingly. Fully depressurize
system and restart leveling.
Internal leak in power module Replace power module.
Height sensor error See Issues with Height Sensors
Vehicle Not Leveled (or Raised), Pump
does not run System not turned on. Turn system on.
Blown fuse Check system fuses
Loss of electrical power Check wiring between power module and battery.
Pump runs for short time then stops Motor controller over temperature Contact LiquidSpring for further instructions.
Pump runs intermittently Loose connector or wiring Check wiring harness connections and battery connections. Repair as
necessary.
Issues with Vehicle Lowering/Dump Valve
Condition Cause Correction
Vehicle does not lower (kneel). System not turned on Turn system on
Blown fuse Check system fuses and replace as necessary
Obstacle under vehicle frame Remove obstacle
Wiring harness disconnected Check wiring harness connections and reconnect
Loss of electrical power Check wiring between power module and battery
Power module filters plugged Contact LiquidSpring for further instructions
Internal power module blockage Contact LiquidSpring for further instructions
Vehicle slow lowering (kneeling) Partial internal power module blockage Contact LiquidSpring for further instructions

DS150FR-S
53
Issues with One Corner Not Leveling Properly
Condition Cause Correction
One side will not raise or lower Internal power module blockage Contact LiquidSpring for further instructions
Low voltage Check battery voltage.
Wiring harness disconnected Check wiring harness connections and reconnect
Obstacle under vehicle frame Remove obstacle
Power module filters plugged Contact LiquidSpring for further instructions
Height sensor error See Issues with Height Sensors
One corner raises and lowers slower than
other corners Internal power module blockage Contact LiquidSpring for further instructions
Filter partially clogged Contact LiquidSpring for further instructions
Issues with Height Sensors
Condition Cause Correction
Vehicle or corner stops leveling at
incorrect height Damaged height sensor and/or linkage Inspect height sensor components. Replace as necessary.
Incorrect calibration Recalibrate vehicle – see System Operation section.
Incorrect height sensor installation Inspect height sensor components and correct.
Corner height where leveling stops is
inconsistent Sensor or Linkage loose Inspect installation of height sensor and linkages and tighten if necessary
Loose connector / wire Inspect wiring between sensor and power module for loose connection
Vehicle will not level - no height sensor
signal
Height Sensor wiring shorted, broken, or
disconnected Inspect wiring between sensor and power module.
Malfunction in Sensor Replace sensor.
No Height Sensor Signal change while
driving Linkage broken/disconnected Inspect installation of height sensor and linkages. Correct and/or replace.
Issues with Ride/Handling
Condition Cause Correction
Vehicle rolls side to side excessively System inactive (Drivers interface dark) Turn system on (press On/Off button)
No electrical power to system Inspect and replace as necessary
Strut bushings worn Inspect and replace as necessary
Control arm bushings worn Inspect and replace as necessary
Sway bar bushings worn Inspect and replace as necessary
Strut mounting loose Inspect and replace as necessary
Rate Valve wiring shorted, broken, or
disconnected Inspect wiring and correct/replace as necessary.
Voltage to Rate Valve solenoid too low Check battery voltage.
Rate Valve Poppet Jammed open Contact LiquidSpring for further instructions
No vehicle speed signal See Issues with Vehicle Speed Signal section.
Excessive stiffness when on flat, straight
road Short to Rate Valve Check wiring between rate valve (on secondary volume) and power
module for signs of shorts. Replace as necessary.
Wiring to Rate Valve incorrect Inspect wiring and correct as necessary
Issues with Steering Sensor
Condition Cause Correction
No steering signal ( reduced roll control
when cornering)
Steering sensor wiring broke or
incorrect. Inspect wiring to steering sensor and correct as necessary.
Steering sensor malfunction Replace sensor
Steering sensor not installed correctly Inspect installation and correct as necessary
Yellow lights on driver display not lit
when steered straight ahead. Zero point of steering sensor incorrect. See Calibrating the Steering Sensor Only.
Intermittent steering sensor signal Loose connector / wire Check wiring between Steering sensor and Power module for loose
connection.

DS150FR-S
54
Issues with Vehicle Speed Signal
Condition Cause Correction
System leveling excessively while
driving.
Speed Sensor wiring shorted, broken, or
disconnected Inspect wiring and repair/replace as necessary
Speed signal malfunction Replace OEM speed sensor. See OEM service manual.
Intermittent speed sensor signal Loose connector / wire Check wiring between Speed sensor and Power module for loose
connection.
Issues with Vehicle Brake Signal
Condition Cause Correction
Vehicle will not level Brake signal wire not correctly tapped. Inspect wiring and repair/replace as necessary.
Brake switch malfunction Replace OEM speed sensor. See OEM service manual.
Intermittent leveling Loose connector / wire Inspect wiring and repair/replace as necessary.
Issues with Door Switch
Condition Cause Correction
Vehicle will not kneel when rear door
opened
Short or break in wiring between door
switch and power module. Inspect wiring and repair/replace as necessary.
Door switch malfunction Inspect door switch and repair/replace as necessary
Vehicle kneels whenever speed below
5mph
Short or break in wiring between door
switch and power module. Inspect wiring and repair/replace as necessary.
Door Switch out of adjustment Check installation of door switch and adjust as necessary
Door switch malfunction Inspect and replace per body builder instructions.
Intermittent door switch signal Loose connector / wire Inspect wiring and repair/replace as necessary.
Issues with Vehicle Ignition Signal
Condition Cause Correction
System does not turn on (no leveling or
stiffness control)
No ignition signal to controller or driver
interface Inspect wiring and repair/replace as necessary.
Ignition "sensor" malfunction Inspect and replace per OEM service manual.
System does not turn off once ignition
switched off Signal side short to battery Inspect wiring and repair/replace as necessary.
Ignition "sensor" malfunction Inspect and replace per OEM service manual.
System intermittently works Loose connector / wire Inspect wiring and repair/replace as necessary.
Issues with Vehicle Park Signal
Condition Cause Correction
System will start up but won't level when
parked No park signal to controller Inspect wiring and repair/replace as necessary.
Park sensor malfunction Inspect and replace per OEM service manual.
System levels when stopped and not in
park Park signal always on Inspect wiring and repair/replace as necessary.
Park sensor malfunction Inspect and replace per OEM service manual.
Intermittent leveling when stopped in or
out of park Loose connector / wire Inspect wiring and repair/replace as necessary.
Issues with Driver Interface
Condition Cause Correction
Warning light blinks, system appears to
level. CAN wires crossed or not connected. Inspect wiring and repair/replace as necessary.
Malfunctioning Driver Interface Inspect and replace as necessary.
Warning light blinks, system does not
appear to operate (level) No power to ECU (5A 18ga Red Wire) Inspect wiring and repair/replace as necessary.
No ignition signal to ECU (Yellow Wire) Inspect wiring and repair/replace as necessary.
CAN wires crossed or not connected. Inspect wiring and repair/replace as necessary.

DS150FR-S
55
Issues with Power Module
Condition Cause Correction
Pump exhibits high pitch whine
immediately after pump stops or when vehicle lowering
The Check Valve is stuck open Replace Power Module
Pump running under heavy load and
leveling slow The Check Valve is only partially open Replace Power Module
Pump running under heavy load and no
leveling The Check valve is stuck closed Replace Power Module
Hydraulic fluid leaking from Power
Module O-ring failure Replace O-ring
Manifold cracked Replace Power Module
Fitting loose Tighten fittings
Valve loose Tighten valves to correct torque
Bolts between manifolds loose/broken Replace and /or tighten bolts to correct torque
Hydraulic line loose Tighten hydraulic line correctly
Bolts between reservoir and manifold
loose/broken
Replace and/or tighten bolts to required torque
Broken / cracked reservoir Replace reservoir
Issues with Strut Assembly
Condition Cause Correction
Hydraulic Leak Weld failure between cylinder and end Replace strut
Cylinder fracture Replace strut
Threads stripped between cylinder and
gland Replace strut
Seals worn out Replace strut
Rod severely scratched or dented Replace strut
Fitting loose Tighten or replace fittings
Hose failure Replace failed hose
Hose cut Replace failed hose
Rod broken at bushing housing Weld failure Replace strut
Rod doesn't move freely in/out cylinder Piston jammed in cylinder Replace strut
Rod moves very easily in/out cylinder Piston broken therefore no damping Replace strut
Reduced damping level Damping components broken/worn out Replace strut
Strut upper mount not securely attached
to frame or Strut
Bolts attaching bracket to frame broken /
came out Replace bolts and tighten to required torque
Bolt attaching strut to bracket broke /
came out Replace bolts and tighten to required torque
Weld Failure Replace strut upper mount
Structural failure Replace strut upper mount
Strut lower mount not securely attached
to axle or strut
Bolts attaching bracket to axle broken /
came out Replace bolts and tighten to required torque
Bolt attaching strut to bracket broke /
came out Replace bolts and tighten to required torque
Weld Failure Replace strut lower mount
Structural failure Replace strut lower mount

DS150FR-S
56
Issues with Secondary Volume Assembly
Condition Cause Correction
Hydraulic Leak Weld failure between tube and end Replace secondary volume welded assembly
Weld failure between tube and manifold Replace secondary volume welded assembly
Cylinder fracture Replace secondary volume welded assembly
Bleed screw loose Tighten bleed screws to appropriate torque
Fitting loose Tighten all fittings
Hose failure Replace failed hose
Hose cut Replace failed hose
loose or no longer attached Bolts attaching bracket to frame broken /
came out Replace bolts and tighten to required torque
Bolt attaching volumes to bracket broke /
came out Replace bolts and tighten to required torque
Weld Failure Replace brackets
Structural failure Replace brackets

DS150FR-S
57
Part Identification:
DS150FR-S

DS150FR-S
58
DS150FR-S
ITEM QTY PART NUMBER DESCRIPTION ITEM QTY PART NUMBER DESCRIPTION
1 1 10001-005 HCS 3/4-16 x 4-1/2 Gr 8 32 1 10795-011 Mount, Cross member, RH
2 2 10002-550 HCS 7/8”-9 x 5-1/2” Gr 8 33 1 10796-007 Cross member Channel
3 2 10003-003 HCS 1”-8 x 6”, Gr. 8 34 2 10810-014 Asy, Hose, -10 x 18-13/16" L
4 2 10003-004 HCS 1”-8 x 6-1/2” Gr. 8 35 1 10811-011 Mount Template, Detroit Axle
5 2 10006-003 HFW 7/8” 36 1 10811-012 Mount Template, Meritor Axle
6 4 10006-004 HFW 1” 37 1 10811-014 Frame Drilling Template
7 4 10012-003 LFN 1”-8, Gr G Top Lock 38 1 10815-001 Wiring Harness, Fused Battery Lead
8 16 10012-007 LFN 1/2”-13, Gr. G 39 4 10830-017 Volume Mount
9 28 10012-008 LFN 5/8”-11 Gr G 40 4 10843-003 T-Bolt Clamp, Range 4.88-5.5
10 14 10012-010 LFN 5/16”-18, Gr. G 41 4 10855-003 Vinyl-Coated Loop Clamp, 5/8" ID
11 9 10012-012 LFN 3/4”-16, Gr. G 42 2 10867-003 Jounce Bumper, 2.375"Dia x 3.00"T
12 4 10012-014 LFN 3/4”-10 Gr G 43 24 10874-200 HFB 5/8-11x2.000, Gr. 8
13 2 10012-017 LFN 7/8”-9, Gr G 44 2 10874-375 HFB 5/8-11x3.750, Gr. 8
14 4 10064-005 U-Bolt 3/4-16 x 9.03 Tri-8 45 2 10874-600 HFB 5/8-11 x 6", Gr. 8
15 2 10322-010 Hyd Fit 90, -10 37 x -10 37 F 46 16 10885-150 HFB 1/2-13x1.500, Gr. 8
16 2 10474-001 Silicone Oil, 16 oz. Bottle 47 12 10886-125 HFB 5/16-18 x 1.25, Gr. 8
17 2 10502-001 HFB M10-1.5 x 30 CL 10.9 48 2 10947-005 Lower Axle Clamp
18 2 10570-006 UCA (21.080”) 49 2 10949-003 Upper Axle Clamp
19 3 10586-001 Sensor 50 1 10951-004 Track Rod Axle Mount, Detroit
20 3 10587-006 Linkage, 3.938" SS 51 1 10951-005 Track Rod Axle Mount, Meritor
21 2 10591-003 Ball Stud 5/16”-18 x 3/4” L 52 2 10953-004 Lower Control Arm
22 2 10597-047 2nd Vol 50 x 450, LH 53 1 11287-004 Asy, Power Supply, Side Mount
23 1 10614-001 Cap, Filler/Breather 54 2 11102-400 HFB 3/4-10 x 4 Gr 8
24 8 10640-005 Bearing Spacer, 1.24 x .812 x .318 55 2 11102-650 HFB 3/4-10 x 6-1/2 Gr 8
25 1 10680-001 Driver Interface 56 1 11104-002 LH Front Hanger
26 1 10704-009 Wiring Harness, Dash, M2 57 1 11105-002 RH Front Hanger
27 1 10733-004 Steering Linkage Mnt 58 1 11109 Kit, Power Module Mounting
28 1 10741-002 Steering Sensor Mnt 59 1 11057-003 Strut, Port Right
29 1 10790-020 Upper Strut Mount, LH 60 1 11057-004 Strut, Port Left
30 1 10790-021 Upper Strut Mount, RH 61 1 11198-001 Track Rod
31 1 10795-008 Mount, Cross member, LH 62 1 11204 Kit, Drawing, Freightliner M2-S

DS150FR-S
59
DS150FR-SF

DS150FR-S
60
DS150FR-SF
ITEM QTY PART NUMBER DESCRIPTION ITEM QTY PART NUMBER DESCRIPTION
1 1 10001-005 HCS 3/4-16 x 4-1/2 Gr 8 32 1 10795-011 Mount, Cross member, RH
2 2 10002-550 HCS 7/8”-9 x 5-1/2” Gr 8 33 1 10796-007 Cross member Channel
3 2 10003-003 HCS 1”-8 x 6”, Gr. 8 34 1 10811-011 Mount Template, Detroit Axle
4 2 10003-004 HCS 1”-8 x 6-1/2” Gr. 8 35 1 10811-012 Mount Template, Meritor Axle
5 2 10006-003 HFW 7/8” 36 1 10811-014 Frame Drilling Template
6 4 10006-004 HFW 1” 37 1 10815-001 Wiring Harness, Fused Battery Lead
7 4 10012-003 LFN 1”-8, Gr G Top Lock 38 2 10830-019 Volume Mount, Double Tank
8 12 10012-007 LFN 1/2”-13, Gr. G 39 4 10843-003 T-Bolt Clamp, Range 4.88-5.5
9 28 10012-008 LFN 5/8”-11 Gr G 40 5 10855-002 Vinyl-Coated Loop Clamp, 1” ID
10 18 10012-010 LFN 5/16”-18, Gr. G 41 7 10855-003 Vinyl-Coated Loop Clamp, 5/8" ID
11 9 10012-012 LFN 3/4”-16, Gr. G 42 2 10867-003 Jounce Bumper, 2.375"Dia x 3.00"T
12 4 10012-014 LFN 3/4”-10 Gr G 43 24 10874-200 HFB 5/8-11x2.000, Gr. 8
13 2 10012-017 LFN 7/8”-9, Gr G 44 2 10874-375 HFB 5/8-11x3.750, Gr. 8
14 4 10064-005 U-Bolt 3/4-16 x 9.03 Tri-8 45 2 10874-600 HFB 5/8-11 x 6", Gr. 8
15 1 10474-001 Silicone Oil, 16 oz. Bottle 46 12 10885-150 HFB 1/2-13x1.500, Gr. 8
16 2 10502-001 HFB M10-1.5 x 30 CL 10.9 47 16 10886-125 HFB 5/16-18 x 1.25, Gr. 8
17 2 10570-006 UCA (21.080”) 48 2 10947-005 Lower Axle Clamp
18 3 10586-001 Sensor 49 2 10949-003 Upper Axle Clamp
19 3 10587-006 Linkage, 3.938" SS 50 1 10951-004 Track Rod Axle Mount, Detroit
20 2 10591-003 Ball Stud 5/16”-18 x 3/4” L 51 1 10951-005 Track Rod Axle Mount, Meritor
21 1 10597-069 2nd Vol 50 x 450, LH 52 2 10953-004 Lower Control Arm
22 1 10597-070 2nd Vol 50 x 450, RH 53 1 11287-004 Asy, Power Supply, Side Mount
23 1 10614-001 Cap, Filler/Breather 54 2 11102-400 HFB 3/4-10 x 4 Gr 8
24 8 10640-005 Bearing Spacer, 1.24 x .812 x .318 55 2 11102-650 HFB 3/4-10 x 6-1/2 Gr 8
25 1 10680-001 Driver Interface 56 1 11104-002 LH Front Hanger
26 1 10704-009 Wiring Harness, Dash, M2 57 1 11105-002 RH Front Hanger
27 1 10733-004 Steering Linkage Mnt 58 1 11109 Kit, Power Module Mounting
28 1 10741-002 Steering Sensor Mnt 59 1 11057-003 Strut, Port Right
29 1 10790-020 Upper Strut Mount, LH 60 1 11057-004 Strut, Port Left
30 1 10790-021 Upper Strut Mount, RH 61 1 11198-001 Track Rod
31 1 10795-008 Mount, Cross member, LH 62 1 11204 Kit, Drawing, Freightliner M2-S

DS150FR-S
61
DS150FR-SS

DS150FR-S
62
DS150FR-SS
ITEM QTY PART NUMBER DESCRIPTION ITEM QTY PART NUMBER DESCRIPTION
1 1 10001-005 HCS 3/4-16 x 4-1/2 Gr 8 33 1 10795-008 Mount, Cross member, LH
2 2 10002-550 HCS 7/8”-9 x 5-1/2” Gr 8 34 1 10795-011 Mount, Cross member, RH
3 2 10003-003 HCS 1”-8 x 6”, Gr. 8 35 1 10796-007 Cross member Channel
4 2 10003-004 HCS 1”-8 x 6-1/2” Gr. 8 36 1 10811-011 Mount Template, Detroit Axle
5 2 10006-003 HFW 7/8” 37 1 10811-012 Mount Template, Meritor Axle
6 4 10006-004 HFW 1” 38 1 10811-014 Frame Drilling Template
7 4 10012-003 LFN 1”-8, Gr G Top Lock 39 1 10815-001 Wiring Harness, Fused Battery Lead
8 8 10012-005 LFN 3/8-16, Gr G, Z 40 4 10830-015 Volume Mount, Double Tank
9 8 10012-007 LFN 1/2”-13, Gr. G 41 4 10843-003 T-Bolt Clamp, Range 4.88-5.5
10 28 10012-008 LFN 5/8”-11 Gr G 42 4 10855-002 Vinyl-Coated Loop Clamp, 1” ID
11 20 10012-010 LFN 5/16”-18, Gr. G 43 6 10855-003 Vinyl-Coated Loop Clamp, 5/8" ID
12 9 10012-012 LFN 3/4”-16, Gr. G 44 2 10867-003 Jounce Bumper, 2.375"Dia x 3.00"T
13 4 10012-014 LFN 3/4”-10 Gr G 45 24 10874-200 HFB 5/8-11x2.000, Gr. 8
14 2 10012-017 LFN 7/8”-9, Gr G 46 2 10874-375 HFB 5/8-11x3.750, Gr. 8
15 4 10064-005 U-Bolt 3/4-16 x 9.03 Tri-8 47 2 10874-600 HFB 5/8-11 x 6", Gr. 8
16 1 10474-001 Silicone Oil, 16 oz. Bottle 48 8 10885-150 HFB 1/2-13x1.500, Gr. 8
17 8 10501-002 HFB 3/8-16 x 1.250, Gr 8, BO 49 18 10886-125 HFB 5/16-18 x 1.25, Gr. 8
18 2 10502-001 HFB M10-1.5 x 30 CL 10.9 50 2 10947-005 Lower Axle Clamp
19 2 10570-006 UCA (21.080”) 51 2 10949-003 Upper Axle Clamp
20 3 10586-001 Sensor 52 1 10951-004 Track Rod Axle Mount, Detroit
21 3 10587-006 Linkage, 3.938" SS 53 1 10951-005 Track Rod Axle Mount, Meritor
22 2 10591-003 Ball Stud 5/16”-18 x 3/4” L 54 2 10953-005 Lower Control Arm
23 1 10597-071 2nd Vol 50 x 450, LH 55 1 11287-004 Asy, Power Supply, Side Mount
24 1 10597-072 2nd Vol 50 x 450, RH 56 2 11102-400 HFB 3/4-10 x 4 Gr 8
25 1 10614-001 Cap, Filler/Breather 57 2 11102-650 HFB 3/4-10 x 6-1/2 Gr 8
26 8 10640-005 Bearing Spacer, 1.24 x .812 x .318 58 1 11104-002 LH Front Hanger
27 1 10680-001 Driver Interface 59 1 11105-002 RH Front Hanger
28 1 10704-009 Wiring Harness, Dash, M2 60 1 11109 Kit, Power Module Mounting
29 1 10733-004 Steering Linkage Mnt 61 1 11057-003 Strut, Port Right
30 1 10741-002 Steering Sensor Mnt 62 1 11057-004 Strut, Port Left
31 1 10790-020 Upper Strut Mount, LH 63 1 11198-001 Track Rod
32 1 10790-021 Upper Strut Mount, RH 64 1 11204 Kit, Drawing, Freightliner M2-S

DS150FR-S
63
DS150FR-SEP

DS150FR-S
64
DS150FR-SEP
ITEM QTY PART NUMBER DESCRIPTION ITEM QTY PART NUMBER DESCRIPTION
1 1 10001-005 HCS 3/4-16 x 4-1/2 Gr 8 33 1 10795-008 Mount, Cross member, LH
2 2 10002-550 HCS 7/8”-9 x 5-1/2” Gr 8 34 1 10795-011 Mount, Cross member, RH
3 2 10003-003 HCS 1”-8 x 6”, Gr. 8 35 1 10796-007 Cross member Channel
4 2 10003-004 HCS 1”-8 x 6-1/2” Gr. 8 36 1 10811-011 Mount Template, Detroit Axle
5 2 10006-003 HFW 7/8” 37 1 10811-012 Mount Template, Meritor Axle
6 4 10006-004 HFW 1” 38 1 10811-014 Frame Drilling Template
7 4 10012-003 LFN 1”-8, Gr G Top Lock 39 1 10815-001 Wiring Harness, Fused Battery Lead
8 8 10012-005 LFN 3/8-16, Gr G, Z 40 4 10830-015 Volume Mount, Double Tank
9 8 10012-007 LFN 1/2”-13, Gr. G 41 4 10843-003 T-Bolt Clamp, Range 4.88-5.5
10 28 10012-008 LFN 5/8”-11 Gr G 42 4 10855-002 Vinyl-Coated Loop Clamp, 1” ID
11 16 10012-010 LFN 5/16”-18, Gr. G 43 2 10855-003 Vinyl-Coated Loop Clamp, 5/8" ID
12 9 10012-012 LFN 3/4”-16, Gr. G 44 2 10867-003 Jounce Bumper, 2.375"Dia x 3.00"T
13 4 10012-014 LFN 3/4”-10 Gr G 45 24 10874-200 HFB 5/8-11x2.000, Gr. 8
14 2 10012-017 LFN 7/8”-9, Gr G 46 2 10874-375 HFB 5/8-11x3.750, Gr. 8
15 4 10064-005 U-Bolt 3/4-16 x 9.03 Tri-8 47 2 10874-600 HFB 5/8-11 x 6", Gr. 8
16 1 10474-001 Silicone Oil, 16 oz. Bottle 48 8 10885-150 HFB 1/2-13x1.500, Gr. 8
17 8 10501-002 HFB 3/8-16 x 1.250, Gr 8, BO 49 14 10886-125 HFB 5/16-18 x 1.25, Gr. 8
18 2 10502-001 HFB M10-1.5 x 30 CL 10.9 50 2 10947-005 Lower Axle Clamp
19 2 10570-006 UCA (21.080”) 51 2 10949-003 Upper Axle Clamp
20 3 10586-001 Sensor 52 1 10951-004 Track Rod Axle Mount, Detroit
21 3 10587-006 Linkage, 3.938" SS 53 1 10951-005 Track Rod Axle Mount, Meritor
22 2 10591-003 Ball Stud 5/16”-18 x 3/4” L 54 2 10953-005 Lower Control Arm
23 1 10597-105 2nd Vol 50 x 450, LH 55 1 11057-003 Strut, LH
24 1 10597-106 2nd Vol 50 x 450, RH 56 1 11057-004 Strut, RH
25 1 10614-001 Cap, Filler/Breather 57 2 11102-400 HFB 3/4-10 x 4 Gr 8
26 8 10640-005 Bearing Spacer, 1.24 x .812 x .318 58 2 11102-650 HFB 3/4-10 x 6-1/2 Gr 8
27 1 10680-001 Driver Interface 59 1 11104-002 LH Front Hanger
28 1 10704-009 Wiring Harness, Dash, M2 60 1 11105-002 RH Front Hanger
29 1 10733-004 Steering Linkage Mnt 61 1 11129 Kit, Power Module Mounting
30 1 10741-002 Steering Sensor Mnt 62 1 11198-001 Track Rod
31 1 10790-020 Upper Strut Mount, LH 63 1 11204 Kit, Drawing, Freightliner M2-S
32 1 10790-021 Upper Strut Mount, RH 64 1 11287-004 Asy, Power Module, -SEP

DS150FR-S
65
DS150FR-SEPB

DS150FR-S
66
DS150FR-SEPB
ITEM QTY PART NUMBER DESCRIPTION ITEM QTY PART NUMBER DESCRIPTION
1 2 10002-550 HCS 7/8”-9 x 5-1/2” Gr 8 32 1 10795-008 Mount, Crossmember, LH
2 2 10003-003 HCS 1”-8 x 6”, Gr. 8 33 1 10795-011 Mount, Crossmember, RH
3 2 10003-004 HCS 1”-8 x 6-1/2” Gr. 8 34 1 10796-014 Crossmember Channel
4 2 10006-003 HFW 7/8” 35 1 10811-014 Frame Drilling Template
5 4 10006-004 HFW 1” 36 1 10815-001 Wiring Harness, Fused Battery Lead
6 4 10012-003 LFN 1”-8, Gr G Top Lock 37 4 10830-015 Volume Mount
7 8 10012-005 LFN 3/8-16, Gr G, Z 38 4 10843-003 T-Bolt Clamp, Range 4.88-5.5
8 8 10012-007 LFN 1/2”-13, Gr. G 39 4 10855-002 Vinyl-Coated Loop Clamp, 1” ID
9 28 10012-008 LFN 5/8”-11 Gr G 40 2 10855-003 Vinyl-Coated Loop Clamp, 5/8" ID
10 16 10012-010 LFN 5/16”-18, Gr. G 41 2 10867-003 Jounce Bumper, 2.375"Dia x 3.00"T
11 8 10012-012 LFN 3/4”-16, Gr. G 42 24 10874-200 HFB 5/8-11x2.000, Gr. 8
12 4 10012-014 LFN 3/4”-10 Gr G 43 2 10874-375 HFB 5/8-11x3.750, Gr. 8
13 2 10012-017 LFN 7/8”-9, Gr G 44 2 10874-600 HFB 5/8-11 x 6", Gr. 8
14 4 10064-005 U-Bolt 3/4-16 x 9.03 Tri-8 45 8 10885-150 HFB 1/2-13x1.500, Gr. 8
15 1 10474-001 Silicone Oil, 16 oz. Bottle 46 14 10886-125 HFB 5/16-18 x 1.25, Gr. 8
16 8 10501-002 HFB 3/8-16 x 1.250, Gr 8, BO 47 2 10947-005 Lower Axle Clamp
17 2 10502-001 HFB M10-1.5 x 30 CL 10.9 48 2 10949-003 Upper Axle Clamp
18 2 10570-006 UCA (21.080”) 49 1 10951-006 Track Rod Axle Mount
19 2 10586-001 Height Sensor 50 2 10953-005 Lower Control Arm
20 1 10586-002 Steering Sensor 51 1 11057-003 Strut, LH
21 2 10587-006 Linkage, 3.938" SS 52 1 11057-004 Strut, RH
22 2 10591-003 Ball Stud 5/16”-18 x 3/4” L 53 2 11102-400 HFB 3/4-10 x 4 Gr 8
23 1 10597-105 2nd Vol 50 x 450, LH 54 2 11102-650 HFB 3/4-10 x 6-1/2 Gr 8
24 1 10597-106 2nd Vol 50 x 450, RH 55 1 11104-002 LH Front Hanger
25 1 10614-001 Cap, Filler/Breather 56 1 11105-002 RH Front Hanger
26 8 10640-005 Bearing Spacer, 1.24 x .812 x .318 57 1 11129 Kit, Power Module Mounting
27 1 10680-001 Driver Interface 58 1 11138-004 Steering Mount
28 1 10704-009 Wiring Harness, Dash, M2 59 1 11138-006 Steering Sensor Mount
29 1 10733-007 Steering Linkage Mount 60 1 11198-001 Track Rod
30 1 10790-020 Upper Strut Mount, LH 61 1 11204 Kit, Drawing, Freightliner M2-S
31 1 10790-021 Upper Strut Mount, RH 62 1 11287-005 Asy, Power Module, -SEPB

DS150FR-S
67
Electrical Schematics

DS150FR-S
68

DS150FR-S
69

DS150FR-S
70
Appendix A: Drill Locations
Figure 64. Driver Side Upper Strut Mount Frame Drilling (DS150FR-S, -SS, -SF, -SEP).
Figure 65. Passenger Side Upper Strut Mount Frame Drilling (DS150FR-S, -SS, -SF, -SEP).

DS150FR-S
71
Figure 66. Driver Side Upper Strut Mount Frame Drilling, DS150FR-SEPB Only.
Figure 67. Passenger Side Upper Strut Mount Frame Drilling, DS150FR-SEPB Only.

DS150FR-S
72
Figure 68. Volume Mount Drill Locations, DS150FR-S Only.
Figure 69. Volume Mount Drilling Location, DS150FR-SF Passenger Side.
Figure 70. Volume Mount Drilling Location, DS150FR-SS/SEP/SEPB Passenger and Driver Side.

DS150FR-S
73
Figure 71. Power Module Mount Drill Location, DS150FR-SEP/SEPB

DS150FR-S
74
Appendix B: Electrical Terminals
Signal OEM Connector
Body Builder
Reference Guide
Page
Pin Terminal P/N LiquidSpring
Harness LiquidSpring Wire Color
Power Power Net Distribution Box (PNDB) 6
D
or
4
APEX 2.8mm Female
FTL: 23-13211-000 (to -004)
Delphi/FCI: 10810375
Dash Red (in “Vehicle
Connections” bundle)
Ignition Transmission Interface Connector 32 1
APEX 1.5mm Male
FTL: 23-13211-031
Delphi: 54001626 or 13630404
Dash Yellow (in “Vehicle
Connections” bundle)
Speed* Transmission Interface Connector 32 5 APEX 1.5mm Male FTL: 23-13211-031
Delphi: 54001626 or 13630404
Violet/White External Harness
Brake Body Builder Lighting Interface 23 4
APEX 2.8mm Male
FTL: 23-13211-010
Delphi: 54001801RWC
Pink/Black External Harness
FTL: Freightliner service part number
*For -S, -SF, -SS, and -SEP units only. See Body Builder provided signal for -SEPB units.

DS150FR-S
75
INSTALLATION CHECK LIST
Installer: Installation Date:
Inspector: Inspection Date:
Suspension S/N: VIN:
FRAME PREPARATION:
☐Battery Disconnected
☐Upper Strut Mount, and Secondary Volume Asy holes drilled.
AXLE PREPARATION:
☐Weld Track Rod Mount to Axle
☐OEM M16 bolts reinstalled and torqued to 140 ft-lbs.
FRONT HANGER INSTALLATION:
☐Front Hangers are level with framerail.
☐5/8”-11 Nuts torqued to 172-210 ft-lbs.
UPPER STRUT MOUNT/UPPER CROSSMEMBER/CROSS MEMBER REINFORCEMENT:
☐Upper Strut Mounts level with top of frame.
☐Upper Cross member orientated correctly.
☐Bolts oriented per Installation Manual Views.
☐5/8”-11 Nuts torqued to 172-210 ft-lbs.
☐1/2”-13 Nuts torqued to 86-105 ft-lbs.
AXLE CLAMP INSTALLATION:
☐3/4”-16 U-Bolts torqued in stages up to 300 ft-lbs.
CONTROL ARMS INSTALLATION:
☐Lower Control Arms correctly orientated.
☐1”-8 Nuts torqued to 600 ft-lbs, at ride height.
☐5/8”-11 Nuts torqued to 172-210 ft-lbs at ride height.
TRACK ROD INSTALLATION:
☐7/8”-14 Nuts torqued in stages up to 491-600 ft-lbs.
STRUT INSTALLATION:
☐Struts ports orientated correctly.
☐3/4”-10 Lower Nuts torqued to 275-300 ft-lbs.
JOUNCE BUMPER INSTALLATION:
☐M10-1.5 Bolts torqued to 35 ft-lbs.
HEIGHT SENSOR INSTALLATION:
☐5/16”-18 Nuts torqued to 14-17 ft-lbs.
☐Locking Clips installed.
POWER MODULE/SECONDARY VOLUME INSTALLATION:
☐1/2”-13 Nuts torqued to 86-105 ft-lbs.
☐3/8”-16 Screws torqued to 39 ft-lbs.
☐Reservoir Mount Self Tapping Screws tightened to snug only.
☐5/16”-24 T-Clamp Fasteners torqued to 240 in-lbs.
☐Replaced Top Plug with Breather Cap.

DS150FR-S
76
HOSE INSTALLATION:
☐-4 Hose Fittings torqued to 12 ft-lbs.
☐-10 Hose Fittings torqued to 36-63 ft-lbs.
☐Bleed Screws closed and torqued to 13-18 ft-lbs.
☐Hoses secured with loop clamps.
☐5/16”-18 Nuts torqued to 14-17 ft-lbs.
STEERING SENSOR INSTALLATION:
☐3/4”-16 Nut torqued to 215-245 ft-lbs.
☐OEM Nut torqued to 90 ft-lbs.
☐5/16”-18 screws tightened to 14-17 in-lbs.
☐Locking Clip installed.
WIRING HARNESS INSTALLATION:
☐Dash harness installed
☐All appropriate wiring splices made.
☐Driver Interface installed and connected to Dash Harness.
☐External harness routed and secured.
☐External harness connected to Rate Valves, Height Sensors.
☐Brake signal from external harness inserted into pin 4 of the Body Builder Lighting Interface.
☐Speed signal from external harness inserted into pin 5 of Transmission Interface Connector.(-S, -SF, -SS, -SEP units)
☐Speed signal from Body Builder provided signal (2.2 Hz/mph).(-SEPB units)
☐Ignition signal from dash harness inserted into pin 1 of Transmission Interface Connector.
☐Power from dash harness inserted into pin 4 of the Power Net Distribution Box ATC Fuse Output Connector.
☐Battery harness installed with Fuse Lead and connected to Battery and Power Module.
☐Door harness installed (if equipped with rear door switch).
☐All connections sealed.
☐All harnesses properly secured from chaffing, heat, and located away from moving parts..
INTIAL FILL/CALIBRATION:
☐Battery connected.
☐Suspension rose to ride height.
☐Reservoir at proper level.
☐Calibration completed.