Donut Robot Mark VI - Belshaw Adamatic
49
Donut Robot Mark VI – Mark VI Deep Operator’s Manual Belshaw Adamatic Bakery Group 814 44 th Street Northwest, Suite 103 Auburn, WA 98001 USA Phone: (206) 322-5474 • E-mail: [email protected] www.belshaw-adamatic.com
-
Upload
khangminh22 -
Category
Documents
-
view
0 -
download
0
Transcript of Donut Robot Mark VI - Belshaw Adamatic
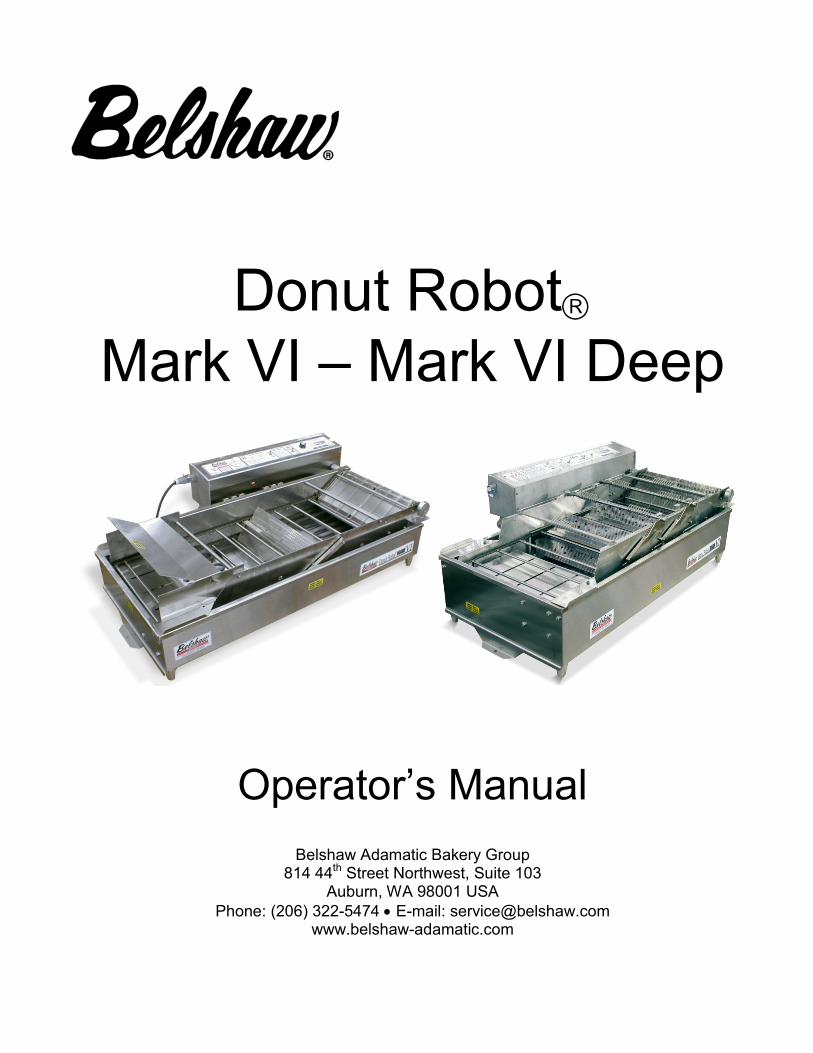
Donut Robot Mark VI – Mark VI Deep
Operator’s Manual
Belshaw Adamatic Bakery Group 814 44th Street Northwest, Suite 103
Auburn, WA 98001 USA Phone: (206) 322-5474 • E-mail: [email protected]
www.belshaw-adamatic.com

Belshaw Adamatic Bakery Group • www.belshaw-adamatic.com • 206-322-5474 •[email protected] 2 MN-1032EN Donut Robot® Mark VI Operator’s Manual
EQUIPMENT RECORD
Please provide the information below when you correspond with Belshaw about your machine.
Purchased by _____________________________________________________________________
Installed by ______________________________________________________________________
Date of Installation ________________________________________________________________
Model number ____________________________________________________________________
Serial number
IN CASE OF DAMAGE TO EQUIPMENT In case of damage to the equipment upon delivery, follow these steps immediately. 1. Inform the freight carrier. The phone number will be on the shipping receipt or label. 2. Take photographs of the equipment, both inside and outside the box or crate. 3. Do not thrMarow away any packaging. 4. Report the damage to the distributor (or other party) from whom you bought the equipment. 5. Email your photos to the distributor (or other party) AND to Belshaw Customer Service at
[email protected]. Include a Belshaw Order Number in your communications. Your Order Number will begin with “CO…, followed by 6 digits) and should be marked on the box or crate.
IN CASE OF MISSING ITEMS 1. If possible, note the missing items on the delivery receipt of the freight carrier. 2. Take photographs of the entire shipment. 3. Follow steps 2 – 5 above.
022316 MN-1032EN
Belshaw Adamatic Bakery Group 814 44th Street Northwest, Suite 103
Auburn, WA 98001 USA Phone: (206) 322-5474 • Fax: (206) 322-5425
E-mail: [email protected] • http://www.belshaw-adamatic.com
Belshaw Adamatic Bakery Group • www.belshaw-adamatic.com • 206-322-5474 •[email protected] Donut Robot® Mark VI Operator’s Manual MN-1032EN 3
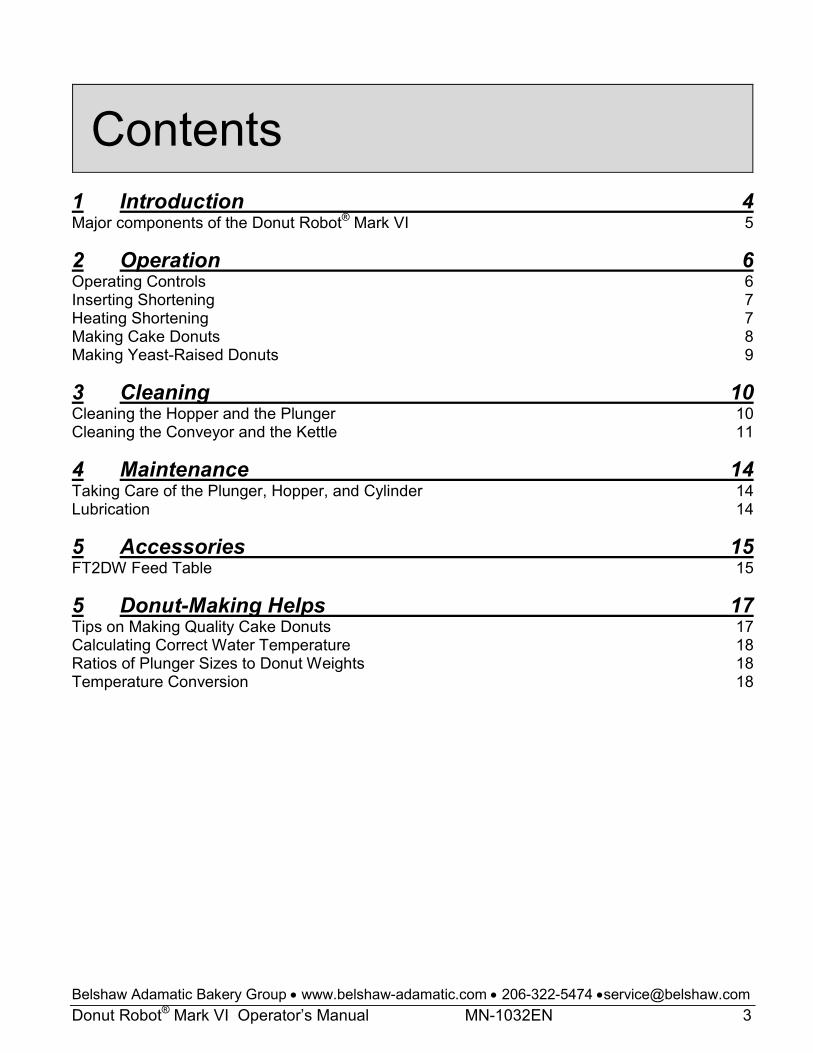
Contents 1 Introduction 4 Major components of the Donut Robot® Mark VI 5
2 Operation 6 Operating Controls 6 Inserting Shortening 7 Heating Shortening 7 Making Cake Donuts 8 Making Yeast-Raised Donuts 9
3 Cleaning 10 Cleaning the Hopper and the Plunger 10 Cleaning the Conveyor and the Kettle 11
4 Maintenance 14 Taking Care of the Plunger, Hopper, and Cylinder 14 Lubrication 14
5 Accessories 15 FT2DW Feed Table 15
5 Donut-Making Helps 17 Tips on Making Quality Cake Donuts 17 Calculating Correct Water Temperature 18 Ratios of Plunger Sizes to Donut Weights 18 Temperature Conversion 18

Belshaw Adamatic Bakery Group • www.belshaw-adamatic.com • 206-322-5474 •[email protected] 4 MN-1032EN Donut Robot® Mark VI Operator’s Manual
1 Introduction The Donut Robot® Mark VI is designed to produce donut products. It is not designed to deposit or fry any other products.
The Donut Robot is designed to be used on a flat, stationary table or countertop, with the operator standing opposite the heater head of the machine. The operator must work safely at all times and read this manual and follow its instructions and warnings.
The Donut Robot® Mark VI produces only 71.5 dB(A) of equivalent A-weighted sound pressure at workstations. This has been determined during a dry run of the machine, using a Bruel & Kjaer sound level meter, type 2236.
Study the instructions and warnings in this manual carefully. A thorough understanding of how to install, maintain, and safely operate the Donut Robot® will prevent production delays and injuries.
To use the Donut Robot® safely, heed the following warnings and all other warnings that appear in this manual:
• Make sure the machine is secured to the work surface. Doing so will prevent the machine from moving or falling, which could cause serious injury.
• Never let water and hot shortening come in contact with each other. Moisture causes hot shortening to spatter, which may cause serious burns.
• Do not overfill the kettle with shortening. If shortening overflows the kettle, it could cause serious burns or could cause someone to slip on the floor and be seriously injured.
• Hot shortening can cause serious burns. Make sure that the system and the shortening are cool before attempting
any adjustment, repair, disassembly, or cleaning.
• To avoid electrocution or other injury, unplug the machine before attempting any adjustment, repair, disassembly, or cleaning.
• To avoid damaging the machine, never use force to assemble, disassemble, operate, clean, or maintain it.
• Be careful never to get shortening, water, or other materials on the floor. If anything does get spilled on the floor, clean the area immediately. Materials on the floor can cause people to slip or fall, resulting in serious injury or loss of life.
• To prevent unintentional startup and possible fire, unplug the machine if there is a local power outage. When the power is restored, it is safe to plug the machine in again.
• To avoid electrocution, make sure that all electrical cords are not frayed or cracked and that they do not pass through any water or shortening.
• Make sure that all electrical cords are routed so that no one will trip over them.
• Always turn the thermostat knob below 200°F/93°C before filtering shortening, draining the fryer, or cleaning the fryer. Draining shortening with the heating element on may cause fire, serious injury, or even death.
• Before attempting to remove the conveyor assembly from the fryer, always allow the shortening to cool and drain the shortening out of the fryer. If you do not, shortening may splash on you and on the floor, creating a safety hazard. If the shortening is hot, you may suffer serious burns.

Belshaw Adamatic Bakery Group • www.belshaw-adamatic.com • 206-322-5474 •[email protected] Donut Robot® Mark VI Operator’s Manual MN-1032EN 5
Major components of the Donut Robot® Mark VI The photo below shows the major visible components in a Donut Robot Mark VI (and Mark VI Deep).
Figure 1.1. Donut Robot Mark VI
Belshaw Adamatic Bakery Group • www.belshaw-adamatic.com • 206-322-5474 •[email protected] 6 MN-1032EN Donut Robot® Mark VI Operator’s Manual
2 Operation
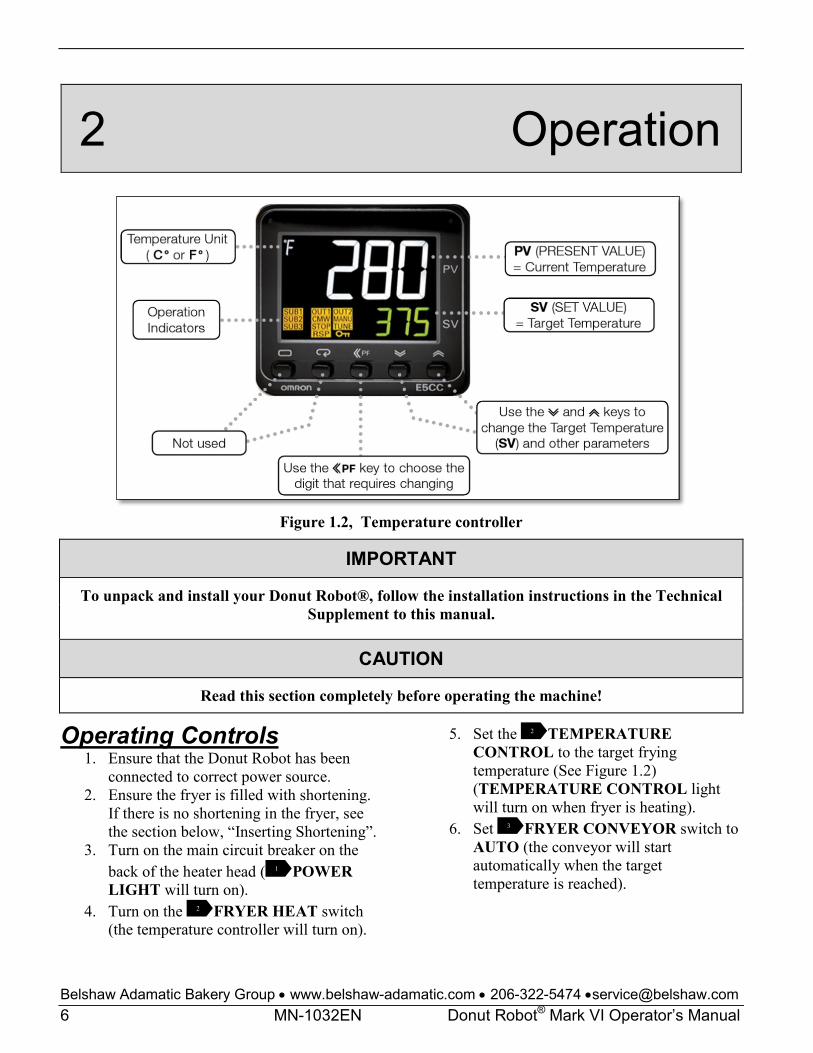
Figure 1.2, Temperature controller
IMPORTANT
To unpack and install your Donut Robot®, follow the installation instructions in the Technical Supplement to this manual.
CAUTION
Read this section completely before operating the machine!
Operating Controls 1. Ensure that the Donut Robot has been
connected to correct power source. 2. Ensure the fryer is filled with shortening.
If there is no shortening in the fryer, see the section below, “Inserting Shortening”.
3. Turn on the main circuit breaker on the back of the heater head ( POWER LIGHT will turn on).
4. Turn on the FRYER HEAT switch (the temperature controller will turn on).
5. Set the TEMPERATURE CONTROL to the target frying temperature (See Figure 1.2) (TEMPERATURE CONTROL light will turn on when fryer is heating).
6. Set FRYER CONVEYOR switch to AUTO (the conveyor will start automatically when the target temperature is reached).
1
2
2
3
Belshaw Adamatic Bakery Group • www.belshaw-adamatic.com • 206-322-5474 •[email protected] Donut Robot® Mark VI Operator’s Manual MN-1032EN 7
NOTE
The FRYER CONVEYOR switch can also be turned to ON (The conveyor will
run immediately, make sure the shortening is completely melted before using ON
position).
7. Turn the FRY TIME dial to adjust the fry time to the desired speed. As the fry time goes down the speed of the conveyor increases.
8. Set the Feed table/Cake Donut depositor switch to FEED TABLE for yeast-raised donuts or CAKE DONUT DEPOSITOR for cake donuts or mini donuts.
9. Connect the Cake Donut Depositor or Feed Table to the electrical connector socket located at the left end of the control panel.
Inserting Shortening WARNING
Hot shortening is much hotter than boiling water! It will cause severe burns if it touches your skin. Never touch hot
shortening. Always exercise extreme caution with hot shortening. Use oven
gloves when working near hot shortening.
1. When the shortening reaches the correct frying temperature, it should reach the top of the flight bars or chains.
2. If your fryer has a drain, close the drain valve.
3. Put shortening in the kettle using one of these methods: a. Pre-melt shortening in a pan on the stove
and carefully pour it into the kettle. b. Use the optional EZ Melt to melt
shortening and transfer it to the kettle. See your EZ Melt manual.
c. Put solid shortening into the kettle, packing it tightly around the elements and bulbs without air spaces.
WARNING
Air spaces can cause the shortening to overheat and catch on fire. Pack the shortening tightly without air spaces.
WARNING
Shortening expands as it increases in temperature. Do not fill shortening all the way up to the flight bars or chains, if it is
cold. The shortening level will rise by up to 1 inch (25 mm) when it is fully heated.
Heating Shortening 1. Turn on the FRYER HEAT switch (the
temperature controller will turn on). a. If you are heating solid shortening using
method 2c above, turn the heat switch on and off every 10 seconds, until the solid shortening has melted and no air pockets remain.
IMPORTANT
If you are heating solid shortening, turn the heat switch on and off every 10 seconds,
until shortening has melted around the elements and no air pockets remain.
2. Wait for the shortening to reach the desired temperature. When it does, the Temperature Control light on the front of the heater head will turn off and the conveyor will start. DO NOT run the conveyor until all the shortening has melted.
3. If you are using the optional Shortening Reserve Tank, fill it with shortening. Then position it on the conveyor side panels either ahead of or behind the turner, but not above it. The heat of the fryer will melt the shortening in the tank.
3
4
5
6
2
Belshaw Adamatic Bakery Group • www.belshaw-adamatic.com • 206-322-5474 •[email protected] 8 MN-1032EN Donut Robot® Mark VI Operator’s Manual
NOTE
If the Power light is on but the Temperature Controller fails to turn on,
the high temperature limit control could be tripped. Push the red reset button on the
back bottom of the heater head.
Making Cake Donuts These instructions apply if you are using a Donut Robot depositor (or Dual Automatic Depositor). If you are using a Type F depositor, refer to the Type F depositor manual. The Type F operates independently of the Donut Robot Mark VI. 1. If not already in place, install the swing
column, install the depositor’s cutter head, and install the hopper and the plunger.
2. Swing the hopper away from the fryer so it is not directly above the fryer. a. It may be necessary to disengage the
swing connecting rod from the swing column throw arm.
3. Adjust the size selector dial on the depositor’s crankshaft assembly. This dial regulates the donut weight. The higher the setting, the larger the donuts will be. Adjust the dial setting as follows:
a. Unscrew the dial lock nut 1/2 turn. b. Turn the dial to the desired position, as
indicated by the marks on the crank plate.
c. Tighten the dial in place with the lock nut. Tighten it using your fingers only.
4. Put batter into the hopper. ‘PRIME’ the hopper to expel any air that may be trapped in the bottom of hopper. To prime the hopper:
a. Hold a mixing bowl or other receptacle under the depositor hopper.
b. Hold DOWN the switch on the depositor until it has dropped two or three donuts into the bowl.
NOTE
Holding down the prime switch causes the depositor to run continuously without the
normal delay between cuts.
c. Put the batter in the bowl back into the hopper.
5. Return the hopper into position over the fryer and reconnect the swing connecting rod to the swing column throw arm.
6. Turn the FRY TIME dial to adjust the fry time to the desired speed.
7. For 2 donuts (or 4 mini donuts) per row, set the Feed table/Cake Donut depositor switch to CAKE DONUT DEPOSITOR. For 1 donut (or 2 mini donuts) per row, set the switch to FEED TABLE.
8. Turn on the cake donut depositor by pushing UP the switch on the depositor.
9. Set FRYER CONVEYOR switch to AUTO.
NOTE
If the conveyor becomes jammed, a warning buzzer will sound about a minute later and stop when the conveyor is turned off. The conveyor drive motor is impedance-
protected so it will not burn out due to jamming.
WARNING
If the conveyor becomes jammed: 1. Turn off the conveyor drive and the heater. 2. Allow the system to cool down. HOT SHORTENING IS DANGEROUS. 3. Determine the cause of the jamming. 4. Clear it. 5. Restart the system.
4
5
3

Belshaw Adamatic Bakery Group • www.belshaw-adamatic.com • 206-322-5474 •[email protected] Donut Robot® Mark VI Operator’s Manual MN-1032EN 9
1. Continue adding shortening to the kettle to maintain the proper shortening level (level chain).
2. Continue adding batter to the hopper as needed. a. You can add batter to the hopper
without priming it again as long as it does not become empty.
b. If the hopper does become empty, you must prime it again.
c. When you fill the hopper for the last time, you will want to use all of the batter in the hopper. To do so, push the dough to the bottom of the hopper using a rubber scraper or spatula.
WARNING
To avoid injury, never put your hand in or under the hopper while the machine is on.
If the conveyor becomes jammed: 1. Turn off the conveyor drive and the heater. 2. Allow the system to cool down. HOT
SHORTENING IS DANGEROUS. 3. Determine the cause of the jamming. 4. Clear it. 5. Restart the system.
Making Yeast-Raised Donuts Instructions 1 - 4 below apply only to the Donut Robot cake donut depositor (or Dual Automatic Depositor). Otherwise start at Instruction 5 below (“Install your Feed Table, etc…”)
1. Unplug the depositor power cord of your Donut Robot.
2. Release the plunger from the depositor. 3. Unscrew and lift off the hopper. 4. Lift off the depositor and swing column. 5. Install your Feed Table and plug into the
fryer. 6. Refer to Section 5 of this manual for
instructions how to use the Feed Table.
7. Ensure there is sufficient shortening in the fryer. The shortening should come up to the level of the chains.
8. Turn the FRY TIME dial to adjust the fry time to the desired speed.
9. Set FRYER CONVEYOR switch to AUTO.
10. Turn on the Feed Table switch to activate the Feed Table.
11. Load proof cloths with donuts onto the Feed Table as needed.
4
3

Belshaw Adamatic Bakery Group • www.belshaw-adamatic.com • 206-322-5474 •[email protected] 10 MN-1032EN Donut Robot® Mark VI Operator’s Manual
3 Cleaning
WARNING
Thoroughly clean and dry the floor if shortening, water, or other materials are spilled. Materials spilled on the floor can
cause serious injury or loss of life.
WARNING
To avoid electric shock or damage to the machine, never allow water, steam,
shortening, cleaning solution, or any other liquid to enter the heater head or the
depositor.
Cleaning the Hopper and the Plunger The instructions below apply only to the Donut Robot cake donut depositor (or Dual Automatic Depositor). For Type F cleaning instructions, refer to the Type F manual. You must clean the hopper and the plunger daily, or after each use. Follow these general guidelines:
• Use household dishwashing detergent. Do not use strong alkali cleaners such as lye, soda ash, or trisodium phosphate, as these discolor and corrode aluminum.
• Wash, dry, and lubricate parts thoroughly to prevent rusting.
• When washing parts by hand, wash each part separately; do not put any other utensil or dish in the sink with the part being washed.
Cleaning method 1. Unplug the depositor power cord. 2. Remove the plunger and the hopper.
a. Pull the plunger connecting rod up and away from the plunger to release the top of the plunger.
b. Lift out the plunger and set aside c. Loosen the two mounting studs holding
the top of the hopper d. Remove the hopper
3. Wash the hopper and the plunger thoroughly in hot water and mild detergent.
4. Rinse the hopper and the plunger separately in clear, hot water.
5. Dry each part completely. 6. Dip the plunger and the hopper cylinder in
vegetable oil or shortening to prevent rust and sticking.
7. Wipe the depositor assembly with a soft cloth dampened with hot water and an appropriate cleaner. Wipe it with another damp cloth to remove the cleaner. Wipe it dry.
CAUTION
Never immerse the depositor’s cutter head in water. This may cause an electric shock
and/or damage to the machine.

Belshaw Adamatic Bakery Group • www.belshaw-adamatic.com • 206-322-5474 •[email protected] Donut Robot® Mark VI Operator’s Manual MN-1032EN 11
Cleaning the Conveyor and the Kettle The conveyor and fryer kettle should be well cleaned once per week for normal usage. After cleaning, dry the conveyor, then return the conveyor to the fryer and cover with shortening. If left open to the air overnight, water trapped in the chain may cause staining.
Step 1: Drain the shortening
WARNING
To avoid being burned or electrocuted, disconnect the machine from the power
source before cleaning the fryer.
1. Disconnect the machine from the power source.
2. If using the Donut Robot depositor (or Dual Automatic Depostitor)
3. Unplug the depositor’s power cord. a. Let the shortening cool to 100°F/38°C. b. Lift the depositor off the swing column,
and set to one side.Lift off the swing connecting rod that extends to the base of the column supporting the depositor.
4. Drain the shortening, using the drain valve under the fryer.
Step 2: Wash the kettle and conveyor 1. Pour hot water into the kettle, up to the level
of the chains. Add about 2 oz/59 ml of trisodium phosphate (TSP) or other appropriate cleaner.
2. Connect the machine to the power source. Using the temperature controller, heat the solution to 200°F/93°C. Turn on the conveyor and keep running for 15-20 minutes.
3. Scrub the soiled parts of the kettle and conveyor while the solution is under heat. Use oven gloves for protection.
4. Turn off the heater and disconnect the machine from the power source.
5. Clean the control panel with a damp cloth only. DO NOT clean the control panel while power is connected.DO NOT allow cleaning solution or water onto the control panel.
Step 3: Drain the cleaning solution 1. Allow the cleaning solution to cool to
100°F/38°C. 2. Drain the cleaning solution from the kettle
into a large bucket. DO NOT drain the cleaning solution into the EZMelt. a. If left alone, the shortening will probably
overflow the bucket and cause a spill. Be ready to shut off the drain when the bucket is full.
3. Pour out the solution down a drain.
WARNING
Clean and dry and floor spills immediately. Liquid on the floor can cause serious injury
or loss of life.
Step 4: Rinse with water 1. Pour clean water into the kettle, up to the
normal level of the shortening. 2. Connect the machine to the power source.
Heat the water to 200°F/93°C. 3. Run the conveyor for 5-10 minutes. 4. Turn off the heater and disconnect the
machine from the power source. Allow the water to cool to 100°F/38°C.
5. Drain the rinse water from the kettle using the same method as Step 4
Step 5: Remove the conveyor 1. Ensure that the conveyor is cool to the
touch. If possible, ask another person to help you lift it. Use oven gloves.
2. Obtain two clean pieces of wood, at least 1” x 1” x 15” (2.5 cm x 2.5 cm x 38 cm).
3. Remove the conveyor from the fryer as explained below: a. Lift the infeed side of the conveyor UP
by 2” (5 cm), to rise above the locator pins on the infeed side.
Belshaw Adamatic Bakery Group • www.belshaw-adamatic.com • 206-322-5474 •[email protected] 12 MN-1032EN Donut Robot® Mark VI Operator’s Manual
b. Lift the front of the conveyor (the side closest to you) UP by 4” (10 cm)
c. Pull the entire conveyor toward you, and away from the control panel .
d. The conveyor should now be free from the rest of the fryer
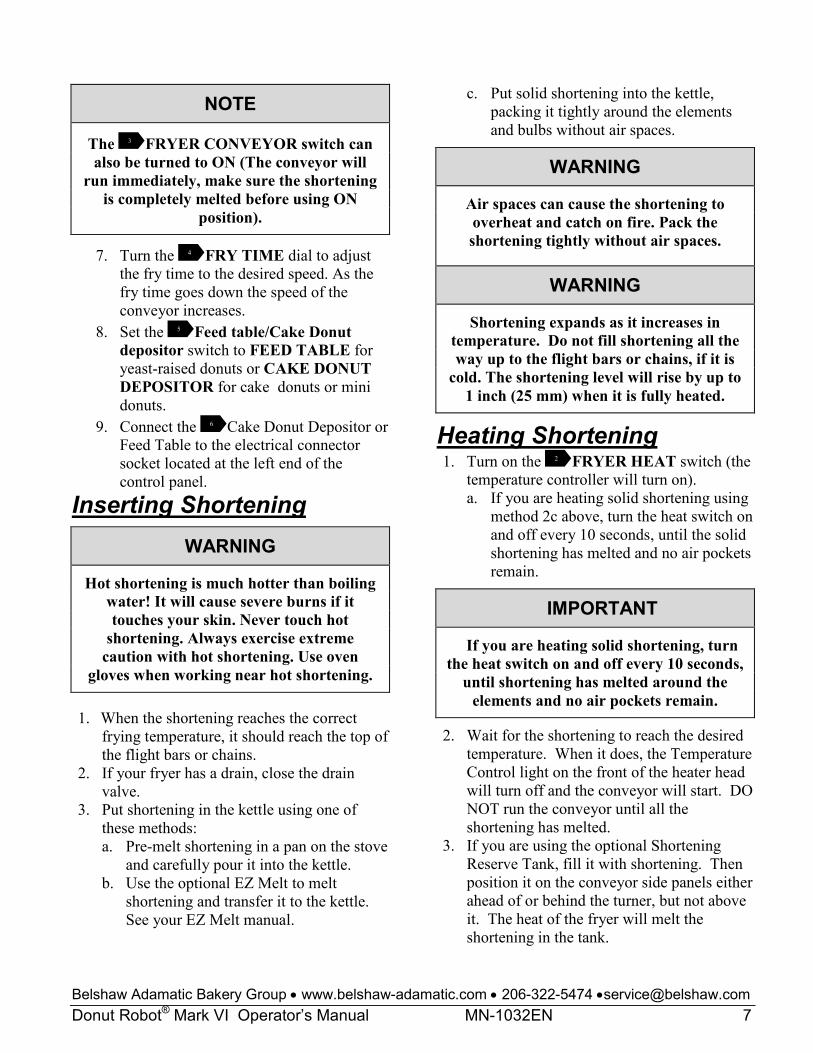
4. Place the conveyor on a clean surface, using the two wood pieces to lift the bottom clear of the surface.
5. OR, rest the conveyor on top of the fryer kettle, using the two pieces of wood as shown in Figure 2 below.
Figure 2: Rest the conveyor on the fryer.
Step 6: Dry all parts
WARNING
All parts must be dried thoroughly. Failure to dry the kettle, conveyor, and all parts of the Donut Robot completely will
cause spattering or an eruption. Shortening will spatter or overflow the fryer and may result in fire, injury, or
death.
Thoroughly dry all parts, including the conveyor, the heating element(s), the inside of the kettle, and the drain.
1. There should be no water drops anywhere on the Donut Robot.
2. Make sure no water is in the drain or drain tube. 3. Dry the conveyor, then return the conveyor to the fryer and cover with shortening. If left open to the air overnight, water trapped in the chain may cause staining.
Step 7: Cleaning the turner, heating element, and kettle 1. If the turner requires extra cleaning, remove
and clean it as follows. 2. Set the conveyor on a clean surface.
a. Use the same pieces of wood as in Step 6 to raise the conveyor 1” (25 mm) from the surface. This will enable the turner to turn freely.
3. Move the flight bars of the conveyor until the turner is in the middle of a flight pocket. Do this by turning the round motor coupling on the outfeed end of the conveyor.
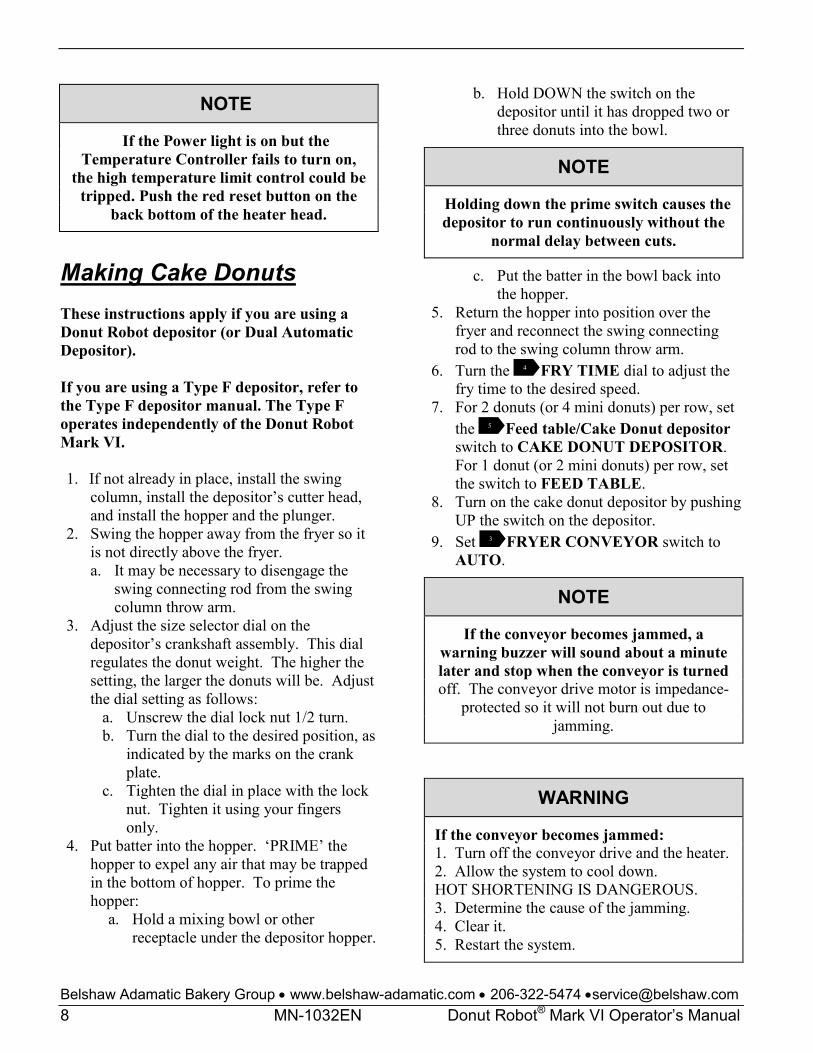
4. Swing the turner cam weight up out of position. (See Figure 3).
5. Holding the turner in one hand, lift up and pull out the turner cam with the other hand.
Figure 3 Removing the Turner Cam
6. Lift out the turner. See Figure 4.

Belshaw Adamatic Bakery Group • www.belshaw-adamatic.com • 206-322-5474 •[email protected] Donut Robot® Mark VI Operator’s Manual MN-1032EN 13
Figure 4 Removing the Turner
7. Wash the turner cam and turner using mild
detergent and warm water. 12. Rinse the turner cam and turner in clear
water. 13. Dry thoroughly.
WARNING
Dry all parts thoroughly. Failure to dry all parts of the Mark VI completely will
cause spattering or an eruption. Shortening will overflow the sides of the fryer and may result in fire, injury, or
death.
14. To clean the drop plate, remove it by lifting its forward end and sliding it toward the rear of the conveyor. (See Figure 5) Wipe the drop plate with a damp cloth.
CAUTION
If the drop plate is scratched, donuts will stick to it. To prevent this from happening, always wipe the drop plate in the direction
of the grain in the metal, which runs parallel to the length of the conveyor, and
never use abrasive cleaners.
Figure 5 Removing the Drop Plate
15. Brush off any carbon that has accumulated
on the Donut Robot’s heating element. Accumulated carbon can cause corrosion and ineffective heating. a. Tilt the heater head assembly back,
raising the heating element out of the kettle.
16. Lift the kettle out of the fryer case. 17. Clean all parts of the kettle if needed, inside
and out. 18. Ensure all parts are dry 19. Replace the kettle and lower the heater head. 20. Put the drop plate, turner cam, and turner
back on the conveyor. 21. Replace the conveyor
a. When you replace the conveyor, line up the notch in the drive coupling with the large bolt in the motor drive (at the right end of the heater head).
Belshaw Adamatic Bakery Group • www.belshaw-adamatic.com • 206-322-5474 •[email protected] 14 MN-1032EN Donut Robot® Mark VI Operator’s Manual
4 Maintenance
WARNING
To avoid being burned, electrocuted, or otherwise injured, always unplug the
machine and allow it to cool down before making adjustments, clearing obstructions,
lubricating, cleaning, or disassembling.
Taking Care of the Plunger, Hopper, and Cylinder These instructions apply to the Donut Robot cake donut depositor (or Dual Automatic Depositor). For instructions on maintaining a Type F cake donut depositor, refer to the Type F manual. The plunger, hopper, and cylinder of your Donut Robot are precision instruments. With proper care, they will perform well for years. Follow these guidelines:
* Clean these parts only in the manner explained in this manual.
* Handle these parts with care. Avoid dropping them on hard surfaces.
* Do not force the machine if it becomes jammed. To avoid damaging the plunger, disassemble the machine and remove any obstructions.
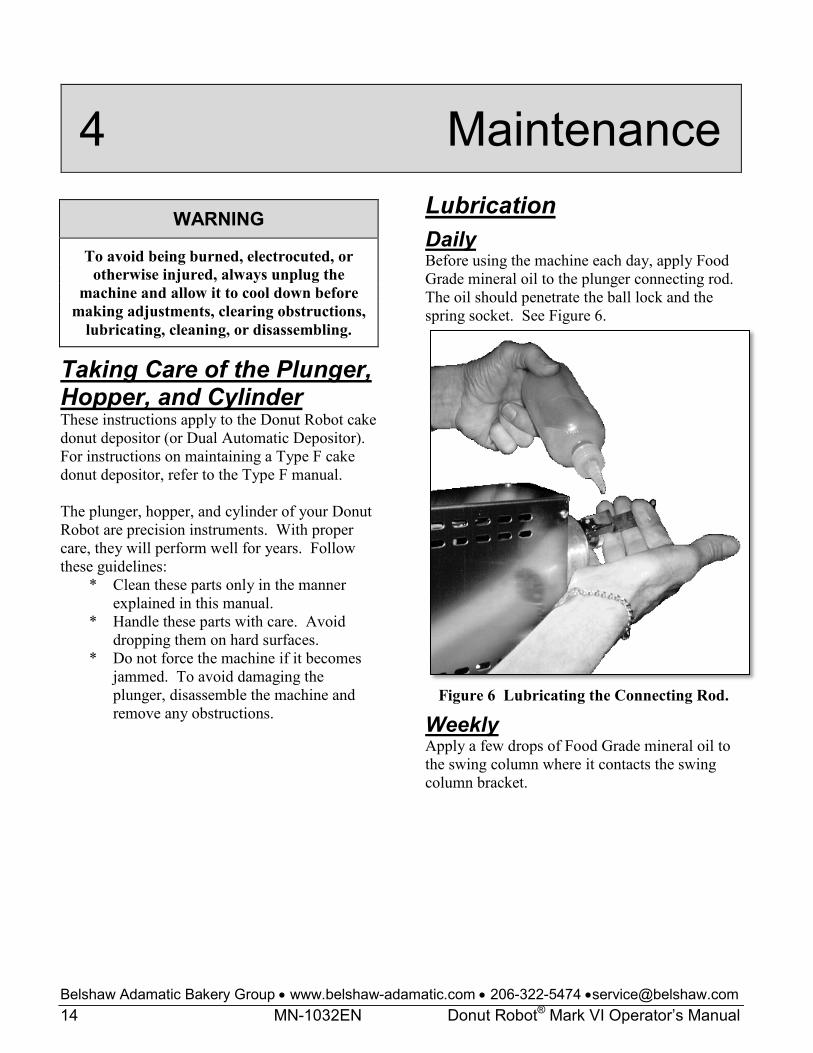
Lubrication Daily Before using the machine each day, apply Food Grade mineral oil to the plunger connecting rod. The oil should penetrate the ball lock and the spring socket. See Figure 6.
Figure 6 Lubricating the Connecting Rod.
Weekly Apply a few drops of Food Grade mineral oil to the swing column where it contacts the swing column bracket.

Belshaw Adamatic Bakery Group • www.belshaw-adamatic.com • 206-322-5474 •[email protected] Donut Robot® Mark VI Operator’s Manual MN-1032EN 15
5 Accessories This section contains information about accessories which can be used with your Donut Robot:
FT2DW Feed Table
Figure 7 FT2DW Feed Table, with Feed Table cloth.
The FT2-DW Feed Table is designed to supply proofed yeast-raised donuts to the Mark VI.
The Feed Table produces less than 70 dB(A) of equivalent continuous A-weighted sound pressure at work stations. This has been determined while the machine has been running, using a Bruel & Kjaer Sound level meter, type 2236.
The Feed Table is meant to be used on a flat, stationary table or countertop, positioned end-to-end with the Donut Robot. The operator is expected to read and follow these instructions and warnings.
Installation 1. Unplug the depositor power cord of your
Donut Robot. 2. Release the plunger from the depositor.
3. Unscrew and lift off the hopper assembly. 4. Lift off the depositor and swing column. 5. Lift the outfeed end of the Feed Table and
set the brace under the trip shelf over the edge of the kettle.
WARNING
To avoid injury, make sure that the Feed Table is turned off before proceeding.
6. Plug the Feed Table power cord into the outlet on the end of the heater head.
7. Set the switch on the control panel to “Feed Table”.

Belshaw Adamatic Bakery Group • www.belshaw-adamatic.com • 206-322-5474 •[email protected] 16 MN-1032EN Donut Robot® Mark VI Operator’s Manual
Operation 1. Test to make sure that the automatic timing
for the Feed Table is working. To do this: a. Turn on the Donut Robot’s conveyor
drive. b. Turn on the Feed Table’s conveyor
drive. The Feed Table should receive a signal
from the Donut Robot, move forward the distance needed to supply one pocket of donuts, and then stop until it receives the next signal.
2. Proof your donuts on the proofing cloths from the Feed Table.
3. Put a proofing tray, with a proofing cloth on it, on the Feed Table.
4. Press the prime switch on the power head assembly. The hooks on the Feed Table will grab the proofing cloth off of the proofing board. Allow the cloth to advance to the front of the Feed Table.
5. Release the prime switch and turn on the main power. Remove the proofing board.
When the Feed Table is on, the Feed Table automatically advances donuts when the Donut Robot is ready to accept them. After the donuts go into the fryer, the proofing cloths are carried underneath the Feed Table and fall onto the work surface.
6. Continue putting proofing cloths on the Feed Table.
CAUTION
To avoid damaging the machine, never use force to assemble or operate the Feed
Table.
Maintenance and Cleaning After Each Use Use a soft, damp cloth for cleaning.
WARNING
To avoid electrocuting yourself or damaging the machine, never allow any
liquid to enter the power head.
As Needed If you ever need to adjust the tension of the conveyor chains, follow these steps: 1. Loosen the hex head bolts that hold the
roller shaft at the outfeed end of the conveyor.
2. Pull the shaft until the chains reach the correct tension. The tension is correct when you can lift the chains about 1”/2.5 cm above the surface of the Feed Table. Each chain should have the same tension.
3. Tighten the hex head bolts that hold the roller shaft.

Belshaw Adamatic Bakery Group • www.belshaw-adamatic.com • 206-322-5474 •[email protected] Donut Robot® Mark VI Operator’s Manual MN-1032EN 17
5 Donut-Making Helps Tips on Making Quality Cake Donuts • Use the correct batter temperature. In general, the correct batter temperature is
75°-80°F/24°-27°C. Check the mix manufacturer’s instructions, as the recommended temperature range may vary.
If the batter is too warm, the donuts will lack volume and may “ring out” or be misshapen. If the batter is too cold, the donuts will stay under the shortening too long, fry too slowly, and crack open or ball up. They may also absorb excess shortening and lose volume.
• Use the correct floor time. A floor time of 10 minutes between mixing
and cutting allows the baking powder to react with the water. This helps the donuts attain the proper volume and absorb the proper amount of shortening.
If the floor time exceeds 30 minutes, the mix will gas off, the donuts will lose volume and shape and will absorb too much shortening.
• Use the correct frying temperature. The correct shortening temperature for
frying is 370°-380°F/188°-193°C. If the shortening is too hot, the donuts will
fry too quickly on the outside and will lose volume. The donuts may also become dense inside.
If the shortening is too cold, the donuts will spread too rapidly, will form large rings, will tend to crack open, will be too light in appearance, and will absorb too much shortening.
• Maintain the proper shortening level. We recommend a distance of 1 1/4” between the depositor and the shortening.
If the shortening is too deep, the donuts may not turn over when they reach the turner, causing them to cook unevenly.
If the shortening is too shallow (too far below the depositor), the donuts may not drop flat, may turn over while submerging and surfacing, and may become irregular, cracked, or rough-crusted.
• Ensure that the donuts absorb the right amount of shortening.
Donuts should absorb 1-1/2 to 3 oz/42 to 85 g of shortening per dozen, depending on their weight. You can achieve proper absorption by following tips 1-3.
• If the donuts do not absorb enough shortening, they will not keep well.
If they absorb too much shortening, they will lose volume and may become misshapen. If this happens, follow tips 1-3, mix the batter a little longer than usual, turn the donuts as soon as they become golden brown, and turn the donuts only once.

Belshaw Adamatic Bakery Group • www.belshaw-adamatic.com • 206-322-5474 •[email protected] 18 MN-1032EN Donut Robot® Mark VI Operator’s Manual
Calculating Correct Water Temperature The following is an example of how to calculate the correct water temperature to use. You must
use your own room temperature, dry mix temperature, desired batter temperature, and, if you are making yeast-raised donuts, estimated temperature increase during mixing.
Cake Donuts Yeast-Raised Donuts °F °C °F °C
Room temperature 72 22.2 72 22.2 Dry mix temperature +70 +21.1 +70 +21.1
Total A 142 43.3 142 43.3
Desired batter temperature 75 23.9 80 26.7 x3 x3 x3 x3
Total B 225 71.7 240 80.1
Total B 225 71.7 240 80.1 -Total A -142 -43.3 -142 -43.3
Desired water temp. for cake donuts 83°F 28.4°C 98 36.8 ↓ ↓
Figure from above 98 36.8 Temperature increase during mixing (average: 30°F/17°C) -30 -17
Desired water temperature for yeast-raised donuts 68°F 19.8°C
Ratios of Plunger Sizes to Donut Weights Applies to Donut Robot depositor or Dual Automatic depositor only. The weights given are for donuts without icings or other toppings. They are provided for reference only, as weights vary according to the density of the batter.
Plunger Size Donut Weight per Dozen
1” 5-8 oz/142-227 g 1 9/16” 14-21 oz/397-595 g
Temperature Conversion To convert temperatures from Fahrenheit to Celsius, subtract 32 from °F and divide the result by 1.8. For example, 212°F-32/1.8 = 100°C. To convert temperatures from Celsius to Fahrenheit, multiply °C by 1.8 and add 32 to the result. For example, (100°C x 1.8) + 32 = 212°F.
°F °C °F °C 55 12.8 340 171.1 60 15.6 345 173.9 65 18.3 350 176.7 70 21.2 355 179.4 75 23.9 360 182.2 80 26.7 365 185.0 325 162.8 370 187.8 330 165.6 375 190.6 335 168.3 380 193.3

Donut Robot Mark VI – Mark VI Deep
Technical Supplement
Belshaw Adamatic Bakery Group 814 44th Street Northwest, Suite 103
Auburn, WA 98001 USA Phone: (206) 322-5474 • E-mail: [email protected]
www.belshaw-adamatic.com

Contents
1 About the Technical Supplement iii
2 Installation 4 Unpacking the Fryer 5 Initial Cleaning 5 Assembling the Fryer 6 Assembling the Depositor 8 Adjusting the Hopper 9 Leveling and Securing the Fryer 10 Moving the Fryer 10
3 Maintenance 11 Lubricating 11 Taking Care of the Plunger, Hopper, and Cylinder 12 Feed Table FT2DW 12
4 Troubleshooting 13 FT2DW Feed Table 23
5 Temperature Controller 26 Changing Parameters on the Electronic Temperature Controller 26
6 Diagrams and Parts Lists 30

1 About the Technical Supplement
This technical supplement to the Donut Robot Mark VI Operator’s Manual contains much information that users and service persons may find helpful, including the following:
• Detailed maintenance and trouble-shooting guides
• Parts lists and assembly drawings of the Mark VI and related products
• Wiring diagrams of related products
• Instructions on the testing and calibration of electrical components
• Information to make your donut production easier
Remember that this is a supplement, not the official operator’s manual. Use this supplement at your own risk. While we have made every effort to inform you of how to behave safely, Belshaw denies any liability for the use of the information contained herein.
Belshaw Adamatic Bakery Group • www.belshaw-adamatic.com • 206-322-5474 •[email protected] 4 MN-1033EN Donut Robot Mark VI Technical Supplement
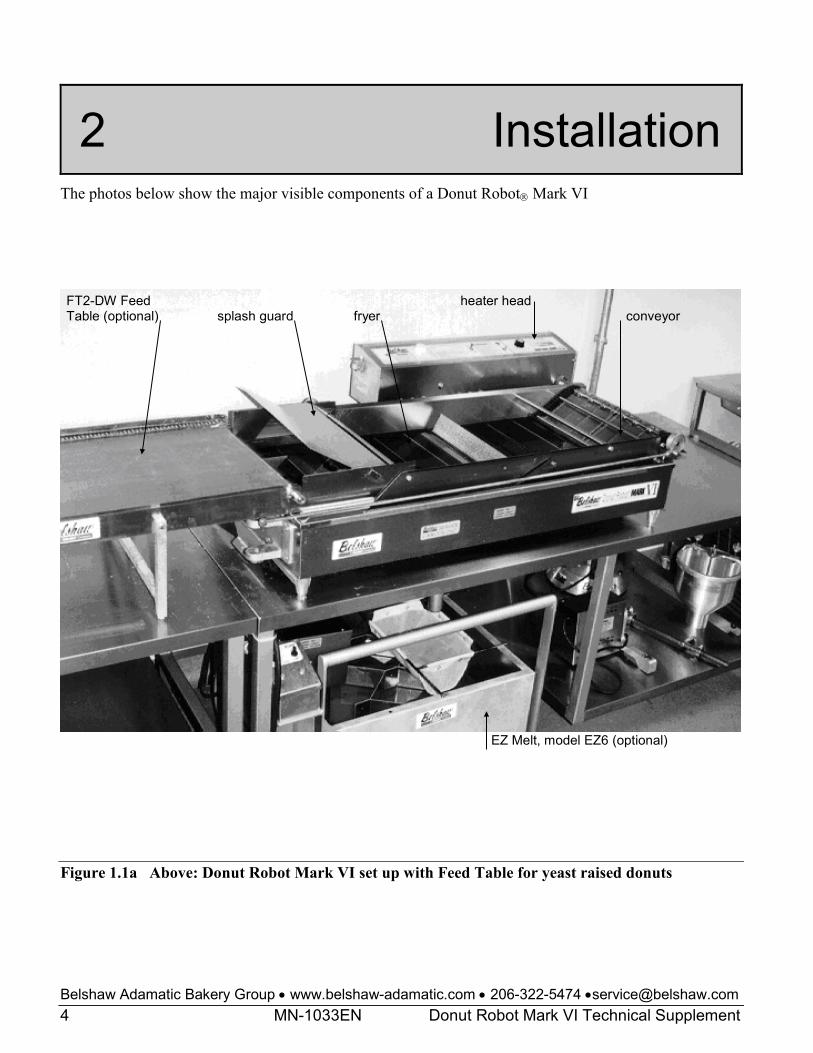
2 Installation The photos below show the major visible components of a Donut Robot Mark VI
EZ Melt, model EZ6 (optional)
Figure 1.1a Above: Donut Robot Mark VI set up with Feed Table for yeast raised donuts
FT2-DW Feed heater head Table (optional) splash guard fryer conveyor
Belshaw Adamatic Bakery Group • www.belshaw-adamatic.com • 206-322-5474 •[email protected] Donut Robot Mark VI Technical Supplement MN-1033EN 5
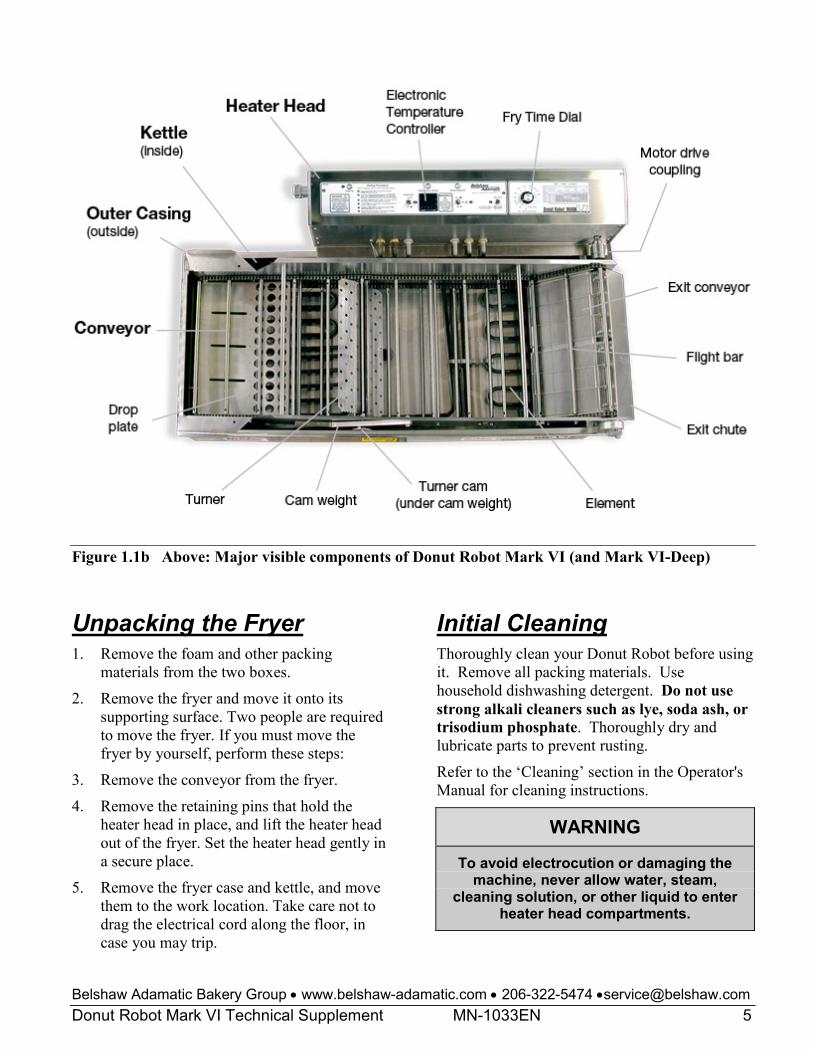
Figure 1.1b Above: Major visible components of Donut Robot Mark VI (and Mark VI-Deep)
Unpacking the Fryer 1. Remove the foam and other packing
materials from the two boxes.
2. Remove the fryer and move it onto its supporting surface. Two people are required to move the fryer. If you must move the fryer by yourself, perform these steps:
3. Remove the conveyor from the fryer.
4. Remove the retaining pins that hold the heater head in place, and lift the heater head out of the fryer. Set the heater head gently in a secure place.
5. Remove the fryer case and kettle, and move them to the work location. Take care not to drag the electrical cord along the floor, in case you may trip.
Initial Cleaning Thoroughly clean your Donut Robot before using it. Remove all packing materials. Use household dishwashing detergent. Do not use strong alkali cleaners such as lye, soda ash, or trisodium phosphate. Thoroughly dry and lubricate parts to prevent rusting.
Refer to the ‘Cleaning’ section in the Operator's Manual for cleaning instructions.
WARNING
To avoid electrocution or damaging the machine, never allow water, steam,
cleaning solution, or other liquid to enter heater head compartments.
Belshaw Adamatic Bakery Group • www.belshaw-adamatic.com • 206-322-5474 •[email protected] 6 MN-1033EN Donut Robot Mark VI Technical Supplement
WARNING
Never let water and hot shortening come in contact with each other. Moisture
causes hot shortening to spatter, which may cause serious injury. Prior to use, make sure that the kettle and any other
parts you have washed are dry.
After cleaning, assemble the fryer and depositor as explained below.
Assembling the Fryer 1. Place the fryer case on a flat, stationary
surface.
2. Screw the fryer’s legs in as far as they will go.
3. Set the kettle into the fryer case. The end of the kettle that has the locating pin must be placed at the outfeed end of the fryer case. The lip of the kettle should fit securely over the edge of the case.
4. Install the heater head assembly as follows:
a. Align the holes in the heater head end caps with the holes in the heater head mounting brackets.
b. Slide the retaining pins through the holes so that the pinheads are on the outside.
c. Insert the hairpin clips into the holes in the retaining pins.
5. Lower the heater head assembly into position. The thermostat bulb bracket should rest on or very near the bottom of the kettle.
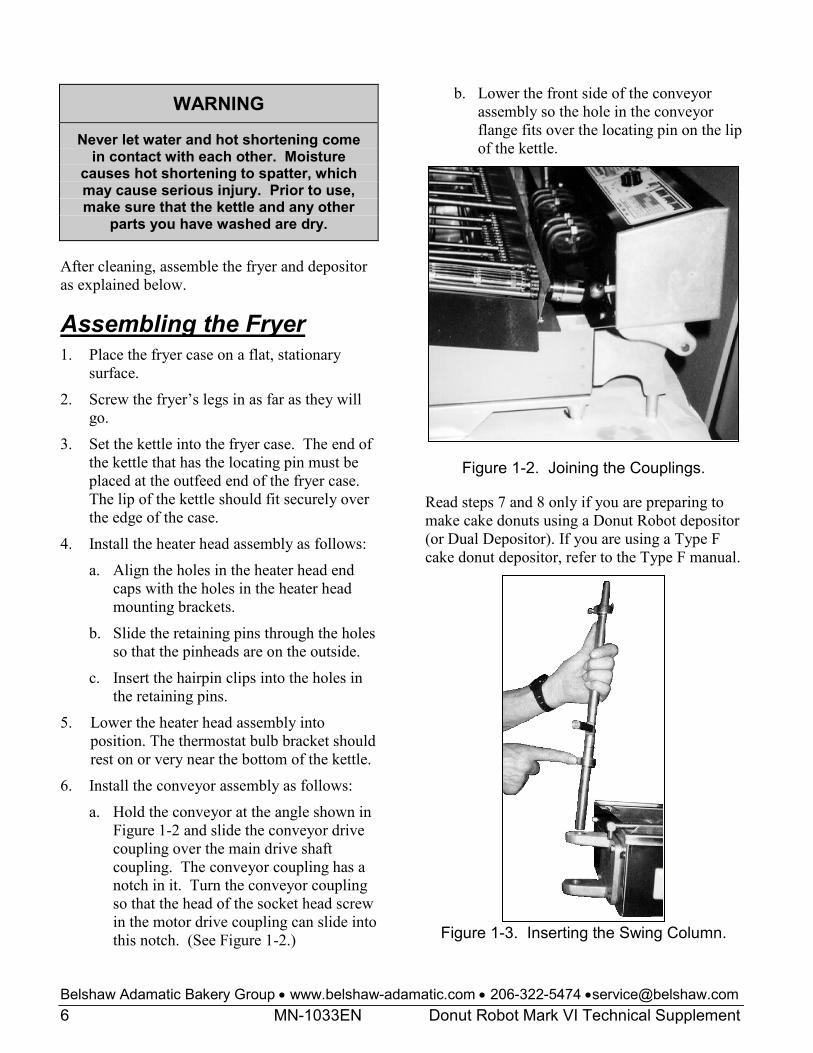
6. Install the conveyor assembly as follows:
a. Hold the conveyor at the angle shown in Figure 1-2 and slide the conveyor drive coupling over the main drive shaft coupling. The conveyor coupling has a notch in it. Turn the conveyor coupling so that the head of the socket head screw in the motor drive coupling can slide into this notch. (See Figure 1-2.)
b. Lower the front side of the conveyor assembly so the hole in the conveyor flange fits over the locating pin on the lip of the kettle.
Figure 1-2. Joining the Couplings.
Read steps 7 and 8 only if you are preparing to make cake donuts using a Donut Robot depositor (or Dual Depositor). If you are using a Type F cake donut depositor, refer to the Type F manual.
Figure 1-3. Inserting the Swing Column.
Belshaw Adamatic Bakery Group • www.belshaw-adamatic.com • 206-322-5474 •[email protected] Donut Robot Mark VI Technical Supplement MN-1033EN 7
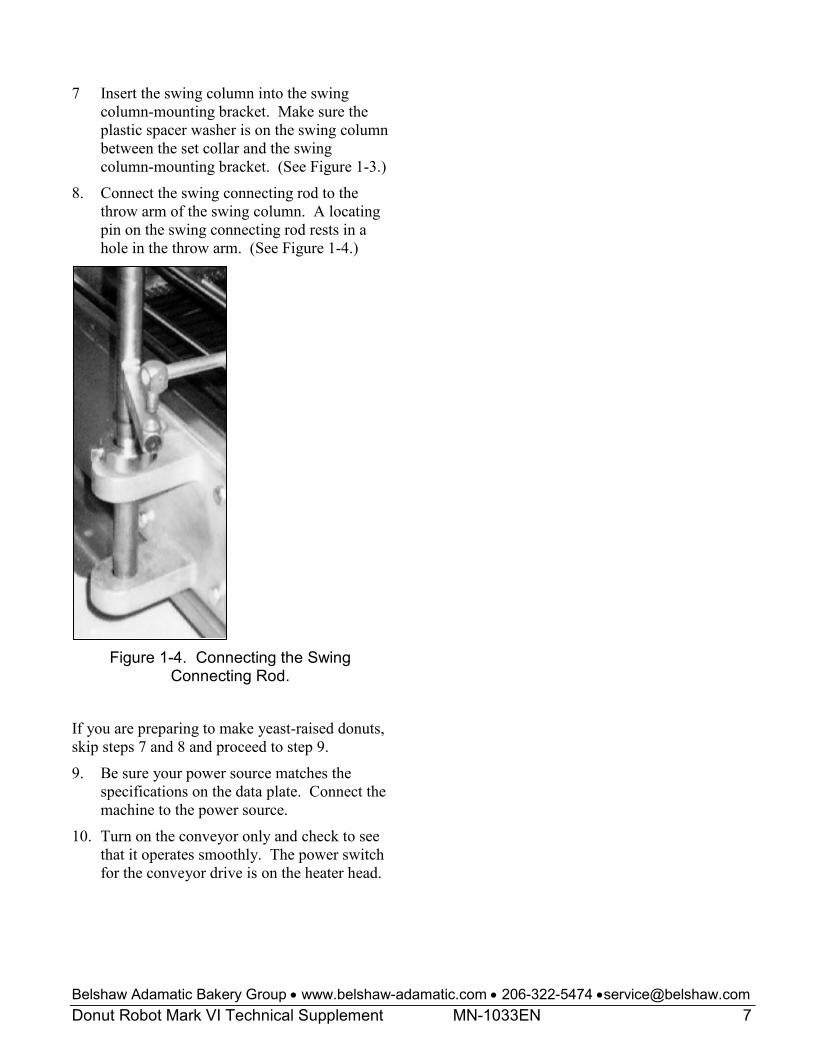
7 Insert the swing column into the swing column-mounting bracket. Make sure the plastic spacer washer is on the swing column between the set collar and the swing column-mounting bracket. (See Figure 1-3.)
8. Connect the swing connecting rod to the throw arm of the swing column. A locating pin on the swing connecting rod rests in a hole in the throw arm. (See Figure 1-4.)
Figure 1-4. Connecting the Swing
Connecting Rod.
If you are preparing to make yeast-raised donuts, skip steps 7 and 8 and proceed to step 9.
9. Be sure your power source matches the specifications on the data plate. Connect the machine to the power source.
10. Turn on the conveyor only and check to see that it operates smoothly. The power switch for the conveyor drive is on the heater head.
Belshaw Adamatic Bakery Group • www.belshaw-adamatic.com • 206-322-5474 •[email protected] 8 MN-1033EN Donut Robot Mark VI Technical Supplement
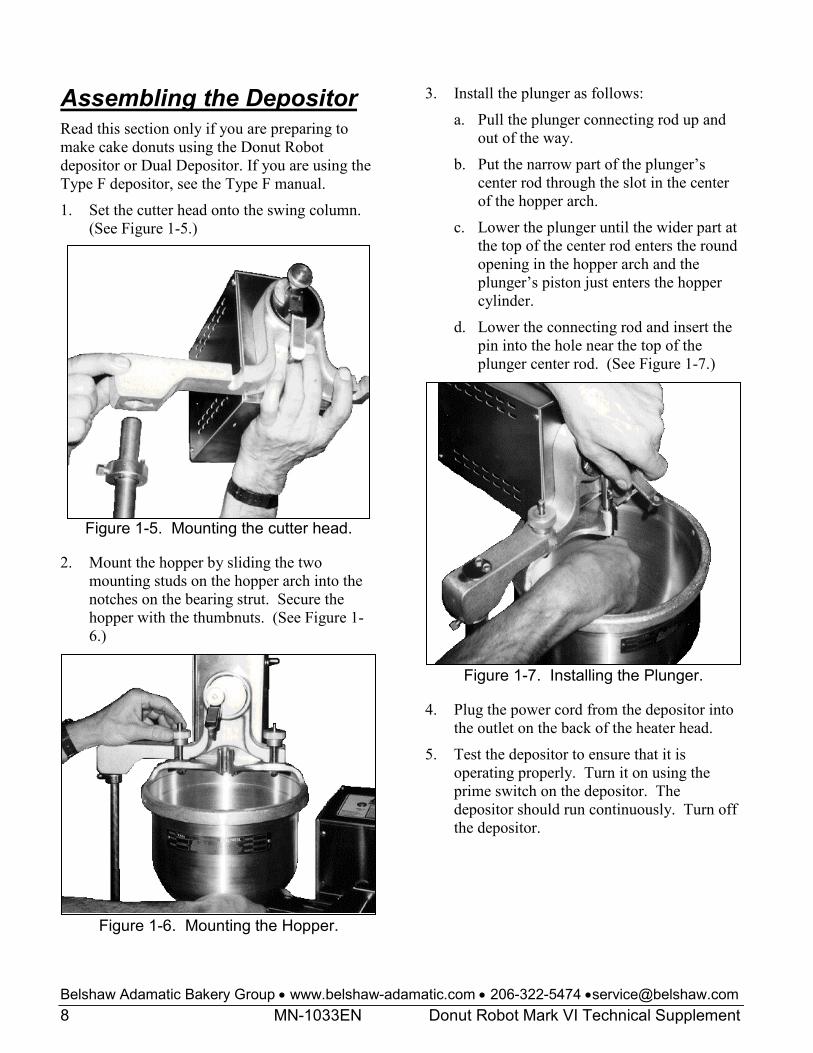
Assembling the Depositor Read this section only if you are preparing to make cake donuts using the Donut Robot depositor or Dual Depositor. If you are using the Type F depositor, see the Type F manual.
1. Set the cutter head onto the swing column. (See Figure 1-5.)
Figure 1-5. Mounting the cutter head.
2. Mount the hopper by sliding the two mounting studs on the hopper arch into the notches on the bearing strut. Secure the hopper with the thumbnuts. (See Figure 1-6.)
Figure 1-6. Mounting the Hopper.
3. Install the plunger as follows:
a. Pull the plunger connecting rod up and out of the way.
b. Put the narrow part of the plunger’s center rod through the slot in the center of the hopper arch.
c. Lower the plunger until the wider part at the top of the center rod enters the round opening in the hopper arch and the plunger’s piston just enters the hopper cylinder.
d. Lower the connecting rod and insert the pin into the hole near the top of the plunger center rod. (See Figure 1-7.)
Figure 1-7. Installing the Plunger.
4. Plug the power cord from the depositor into the outlet on the back of the heater head.
5. Test the depositor to ensure that it is operating properly. Turn it on using the prime switch on the depositor. The depositor should run continuously. Turn off the depositor.

Belshaw Adamatic Bakery Group • www.belshaw-adamatic.com • 206-322-5474 •[email protected] Donut Robot Mark VI Technical Supplement MN-1033EN 9
Adjusting the Hopper Read this section only if you are preparing to make cake donuts using the Donut Robot depositor (or Dual Depositor system). If you are using the Type F depositor, refer to the Type F manual.
WARNING
To avoid injury, always disconnect the machine from the power source before
making adjustments.
1. The bottom of the hopper should be 1”/ 2.5 cm above the flight bars. To set the height of the hopper:
a. Hold the depositor from below to prevent from dropping suddenly.
b. Loosen the set screw in the lower set collar on the swing column.
c. Raise or lower the swing column as needed.
d. Tighten the setscrew. (See Figure 1-8.)
Figure 1-8. Adjusting the Height of the Hopper.
2. As the hopper swings back and forth over the kettle, the hopper cylinder should stop the same distance away from either side of the kettle at each end of the swing.
To check the swing of the hopper, turn on the conveyor. If you need to center the swing of the hopper, follow these steps:
a. Turn off the conveyor.
b. Loosen the setscrews in the upper set collar.
c. Swivel the depositor as needed.
d. Tighten the setscrews. See Figure 1-9.
Figure 1-9. Adjusting the Swing of the Hopper.
e. Double-check the swing of the hopper by turning on the conveyor. Then turn off the conveyor.

Belshaw Adamatic Bakery Group • www.belshaw-adamatic.com • 206-322-5474 •[email protected] 10 MN-1033EN Donut Robot Mark VI Technical Supplement
Leveling and Securing the Fryer Check to see if the fryer is level. If it is not, adjust the heights of the legs. Be sure that all six legs rest on the work surface when the fryer is level.
Bolt the fryer to the work surface as follows:
1. There are brackets on the ends of the fryer case. Each has a hole in it. Mark the locations of the holes on the work surface.
2. Drill holes through the work surface.
3. Insert bolts through the holes.
4. Tighten nuts onto the bolts to ensure that the Donut Robot will not move.
Moving the Fryer If you ever want to move the fryer to a different workstation, follow this procedure:
1. Turn off the machine and disconnect it from the power source. Unplug the depositor power cord.
2. Allow the machine and the shortening to cool.
WARNING
Do not touch hot shortening. It can cause serious burns.
3. Remove and set aside the plunger, the hopper, and the cutter head, in that order.
4. Disconnect the swing connecting rod.
5. Remove the shortening from the fryer as explained in “Removing the Shortening” in Section 3.
6. To avoid dropping the machine or getting shortening on the floor wipe excess shortening off of the fryer and the conveyor.
WARNING
Thoroughly clean and dry the floor if shortening is spilled. Materials on the floor can cause people to slip or fall,
resulting in serious injury or loss of life.
7. Set aside the conveyor.
8. Remove the clevis pins that hold the heater head in place. Remove the heater head from the fryer.
9. To prevent tripping, coil the power cord. Move the heater head to the new workstation.
10. Move the fryer to its new location.
11. Install the heater head.
12. Move and install the conveyor.
13 Move and install the swing column. Connect the swing connecting rod.
14. Move and install the depositor’s cutter head (the motor and electrical compartment).
15. Move and install the hopper and the plunger.
16. Level and secure the fryer.

Belshaw Adamatic Bakery Group • www.belshaw-adamatic.com • 206-322-5474 •[email protected] Donut Robot Mark VI Technical Supplement MN-1033EN 11
3 Maintenance
WARNING
To avoid being burned, electrocuted, or otherwise injured, always unplug the
machine and allow it to cool down before making adjustments, clearing
obstructions, lubricating, cleaning, or disassembling.
Lubricating Daily (This section applies to the Donut Robot depositor or Dual Automatic Depositor system only. For maintenance on a Type F depositor, refer to the Type F manual)
Before using the machine each day, apply food grade lubricating oil to the plunger connecting rod. The oil should penetrate the ball lock and the spring socket. See Figure 2-1.
Figure 2-1. Lubricating the Connecting Rod.
Weekly (This section applies to the Donut Robot depositor or Dual Automatic Depositor system only. For maintenance on a Type F depositor, refer to the Type F manual)
1. Apply a few drops of food grade lubricating oil to the swing column where it contacts the swing column bracket. See arrow on Figure 2-2.
Figure 2-2. Lubricating the swing column.
Yearly (This section applies to all Donut Robots)
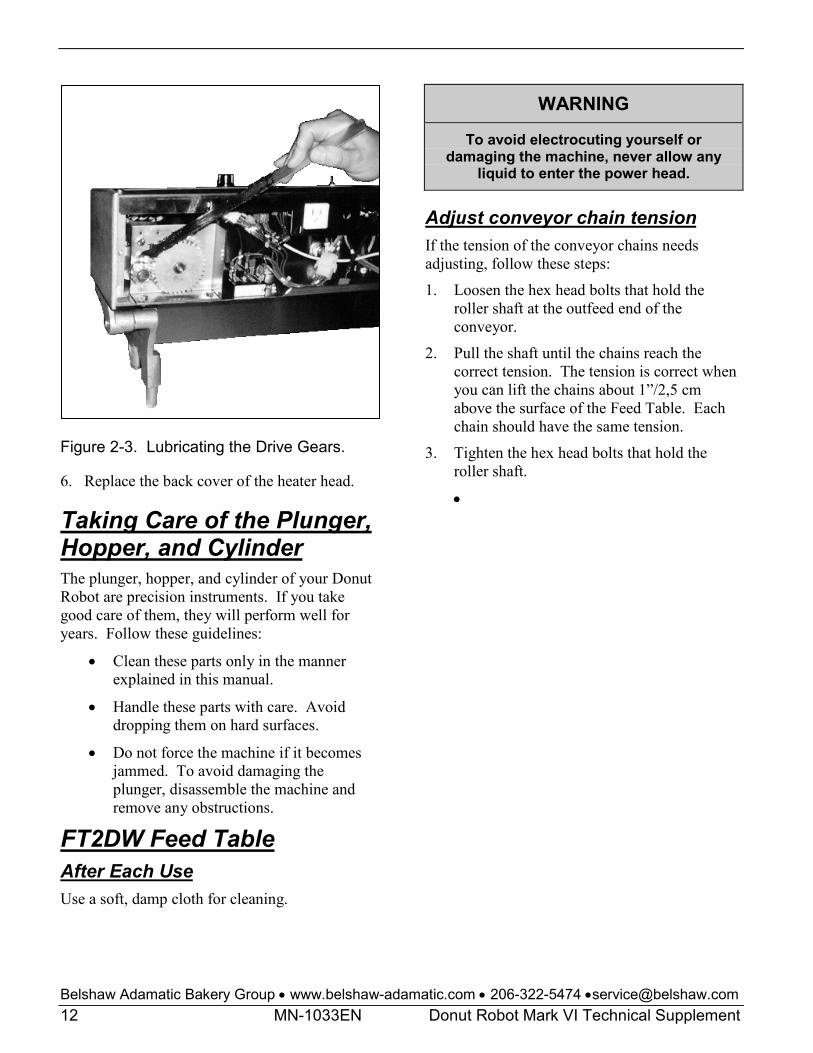
Lubricate the conveyor drive gears, as explained below.
1. Disconnect the machine from the power source.
2. Remove the back cover of the heater head.
3. Lightly coat the gear teeth with food grade grease. See Figure 2-3.
Belshaw Adamatic Bakery Group • www.belshaw-adamatic.com • 206-322-5474 •[email protected] 12 MN-1033EN Donut Robot Mark VI Technical Supplement
Figure 2-3. Lubricating the Drive Gears.
6. Replace the back cover of the heater head.
Taking Care of the Plunger, Hopper, and Cylinder The plunger, hopper, and cylinder of your Donut Robot are precision instruments. If you take good care of them, they will perform well for years. Follow these guidelines:
• Clean these parts only in the manner explained in this manual.
• Handle these parts with care. Avoid dropping them on hard surfaces.
• Do not force the machine if it becomes jammed. To avoid damaging the plunger, disassemble the machine and remove any obstructions.
FT2DW Feed Table After Each Use Use a soft, damp cloth for cleaning.
WARNING
To avoid electrocuting yourself or damaging the machine, never allow any
liquid to enter the power head.
Adjust conveyor chain tension If the tension of the conveyor chains needs adjusting, follow these steps:
1. Loosen the hex head bolts that hold the roller shaft at the outfeed end of the conveyor.
2. Pull the shaft until the chains reach the correct tension. The tension is correct when you can lift the chains about 1”/2,5 cm above the surface of the Feed Table. Each chain should have the same tension.
3. Tighten the hex head bolts that hold the roller shaft.
•

Belshaw Adamatic Bakery Group • www.belshaw-adamatic.com • 206-322-5474 •[email protected] Donut Robot Mark VI Technical Supplement MN-1033EN 13
4 Troubleshooting
CAUTION
If you perform repairs yourself or have them performed by anyone other than a
service technician authorized by Belshaw Adamatic Bakery Group, you do so at your
own risk.
This section is designed as an aid in troubleshooting with the Donut Robot Mark VI and FT2-DW Feed Table. It is not a substitute for a qualified technician. You may encounter a problem with your machine that is not covered in this section, or you may try the remedies suggested here and find that they do not solve the problem. If this happens, call your dealer or another qualified technician. Also, call your dealer if you need a replacement part.
If you need assistance in identifying a part, you can contact Belshaw Adamatic Service Dept at 800-578-2547 or email [email protected]. You will need to state:
• The model name of the machine.
• The serial number of the machine.
• The voltage, phase, and cycle of the machine.
Following is a troubleshooting chart to help identify and solve problems with the Mark VI. See also “Donut-Making Helps.”
WARNING
To avoid being burned, electrocuted, or otherwise injured, unplug the machine and
allow it to cool before disassembling, repairing, or wiring.

Belshaw Adamatic Bakery Group • www.belshaw-adamatic.com • 206-322-5474 •[email protected] 14 MN-1033EN Donut Robot Mark VI Technical Supplement
THE DONUTS BALL OR BLISTER.
Possible Causes What To Do
The dough is too cold. See Section 6, “Donut-Making Helps.”
The shortening is too hot. Decrease the temperature setting.
The dough is overmixed. Review the mixing procedure.
The donuts are too large. Adjust the dial on the cutter head to produce smaller donuts.
The shortening is old or contaminated. WARNING
To avoid being burned, turn off the machine and allow the shortening to cool.
Replace the bad shortening with fresh shortening.
THE DONUTS ARE SHAPED IMPERFECTLY.
Possible Causes What To Do
The shortening level is too low. Add shortening to reach the proper level.
The drop plate is out of position. WARNING
To avoid being burned, turn off the machine and allow the shortening to cool.
Reposition the drop plate.
The tip of the cylinder is dirty. WARNING
To avoid injury, turn off the machine and remove the hopper.
Clean the cylinder.
The tip of the cylinder is nicked. Replace the hopper.
The size-selection dial is not tightened. Tighten the thumb nut.
The dough is overmixed. Review the mixing procedure.

Belshaw Adamatic Bakery Group • www.belshaw-adamatic.com • 206-322-5474 •[email protected] Donut Robot Mark VI Technical Supplement MN-1033EN 15
THE DONUTS ARE UNDERCOOKED.
Possible Causes What To Do
The shortening is not hot enough. Increase the temperature setting.
The conveyor is moving too quickly. Decrease the speed of the conveyor, using the knob labeled “Fry Time in Seconds.”
The dough is too cold. See Section 6, “Donut-Making Helps.”
The dough has not had enough floor time. See Section 6, “Donut-Making Helps.”
The thermostat reads inaccurately. Calibrate the thermostat.
THE DONUTS ARE OVERCOOKED.
Possible Causes What To Do
The shortening is too hot. Decrease the temperature setting. The temperature setting should never exceed 375°F (191°C).
The conveyor is moving too slowly. Increase the speed of the conveyor, using the knob labeled “Fry Time in Seconds.”
The thermostat reads inaccurately. Calibrate the thermostat.
THE CUTTER SWING COLUMN CHATTERS.
Possible Causes What To Do
WARNING
To avoid injury, before doing either of the following, turn off the machine.
The nylon thrust washer is missing. Install the nylon thrust washer between the swing column bracket and the set collar.
There is not enough lubrication between the swing column and the swing column mounting bracket.
Lubricate the upper and lower legs of the bracket with SAE 30-weight machine oil.

Belshaw Adamatic Bakery Group • www.belshaw-adamatic.com • 206-322-5474 •[email protected] 16 MN-1033EN Donut Robot Mark VI Technical Supplement
THE CONVEYOR BITES THE DONUTS.
Possible Causes What To Do
The donuts are not cooking enough. See “The donuts are undercooked” below.
The shortening level is too low. Add shortening to reach the proper level.
WARNING
Before doing any of the following, turn off the machine and allow the shortening to cool.
The turner is bent or packed with cooked food particles.
Straighten and/or clean the turner.
The cam weight is sticking due to the accumulation of varnish.
Clean to remove the cooked-on varnish.
The fryer is not level. Level the fryer.
THE CUTTER OPERATES CONTINUOUSLY.
Possible Causes What To Do
WARNING
To avoid being burned, electrocuted, or otherwise injured, before doing any of the following, turn off the machine, allow the shortening to cool, and disconnect the machine from the power source.
One of the microswitches is defective. (There are three microswitches in the conveyor drive assembly and one microswitch in the cutter head.)
For help in testing the microswitches, refer to Section 5, “Electrical Components.” Replace any defective microswitches.
Something is interfering with the nylon brake dog in the cutter head.
Clear away the cause of the interference.
The brake spring in the cutter head is weak or broken.
Replace the spring.

Belshaw Adamatic Bakery Group • www.belshaw-adamatic.com • 206-322-5474 •[email protected] Donut Robot Mark VI Technical Supplement MN-1033EN 17
THE HEATING ELEMENT FAILS TO MAINTAIN THE PROPER TEMPERATURE.
Possible Causes What To Do
The input voltage is incorrect. Supply the correct power as specified on the data plate.
Sediment has accumulated around the thermostat bulb.
WARNING
To avoid being burned, turn off the machine and allow the shortening to cool.
Clean to remove the sediment. (You should clean the Donut Robot regularly and thoroughly.)
The thermostat has been calibrated incorrectly. Recalibrate the thermostat.
The thermostat is defective. WARNING
To avoid being burned or electrocuted, turn off the machine, allow the shortening to cool, and disconnect the machine from the power source.
Replace the thermostat.
THE DONUTS DROP AT THE WRONG TIME.
Possible Cause What To Do
The hopper swing is adjusted incorrectly. WARNING
To avoid injury, turn off the machine.
Adjust the hopper swing. See “Adjusting the Hopper” in Section 1, “Installation,” of the operator’s manual.

Belshaw Adamatic Bakery Group • www.belshaw-adamatic.com • 206-322-5474 •[email protected] 18 MN-1033EN Donut Robot Mark VI Technical Supplement
THE CONVEYOR IS JAMMED.
Possible Causes What To Do
WARNING
To avoid injury, before doing any of the following, turn off the machine and allow the shortening to cool.
Cooked food particles are wedged between a chain opening and a sprocket tooth.
Clean to remove the food particles. Clean the Donut Robot regularly and thoroughly.
The turner slot is packed with cooked food particles.
Clean to remove the food particles.
The drop plate is out of position and is interfering with the conveyor.
Reposition the drop plate.
Something is interfering with the free movement of the turner cam and cam weight.
Remove the obstruction.
The heating element is bent and is interfering with the turner.
Straighten the heating element.
The turner is out of position and is catching on a flight bar below.
Lift and move the outfeed end of the conveyor to disengage the conveyor coupling from the conveyor drive shaft. Turn the conveyor back 2-3 pockets. The turner will return to the correct position.
The conveyor drive shaft and the drive motor shaft are out of alignment.
Remove the cover of the drive assembly. Loosen the four mounting spacers so the drive assembly can be moved. Align the motor shaft with the conveyor shaft. When they are aligned, tighten the mounting spacers. Replace the cover.

Belshaw Adamatic Bakery Group • www.belshaw-adamatic.com • 206-322-5474 •[email protected] Donut Robot Mark VI Technical Supplement MN-1033EN 19
THE MOTOR OVERHEATS.
Possible Causes What To Do
The power requirements of the machine do not match the power source.
Supply the correct power as specified on the data plate.
WARNING
To avoid being burned or electrocuted, before doing the following, turn off the machine, allow the shortening to cool, and disconnect the machine from the power source.
The motor is binding. Repair or replace the motor.
The motor is defective. Repair or replace the motor.
THE CUTTER CUTS DOUBLE WHEN YOU HAVE SELECTED ONE CUT PER POCKET.
Possible Causes What To Do
WARNING
To avoid being burned or electrocuted, before doing any of the following, turn off the machine, allow the shortening to cool, and disconnect the machine from the power source.
The nylon brake dog is binding on the cutter brake motor.
Loosen the brake dog. If the spring is missing or weak, replace it. If the brake dog is worn, replace it.
An internal wire is interfering with the nylon brake dog.
Move the wire.
The arm on the cutter head microswitch is bent. Bend the arm back into position or replace the microswitch.
The wires on the cutter head microswitch are reversed.
Make the correct connections.

Belshaw Adamatic Bakery Group • www.belshaw-adamatic.com • 206-322-5474 •[email protected] 20 MN-1033EN Donut Robot Mark VI Technical Supplement
THE CUTTER WILL NOT OPERATE, BUT THE CONVEYOR RUNS.
Possible Causes What To Do
The cutter head power cord is not plugged in to the outlet on the back of the heater head.
Connect the cutter head power cord to the correct outlet.
WARNING
To avoid being burned, electrocuted, or otherwise injured, before doing any of the following, turn off the machine, allow the shortening to cool, and disconnect the machine from the power source.
The set screws in the cutter head cam are loose. Tighten the set screws.
The cutter head power cord is broken. Repair or replace the cutter head power cord.
The cutter motor is defective. Replace the cutter motor.
One of the microswitches is defective. (There are three microswitches in the conveyor drive assembly and one microswitch in the cutter head.)
For help in testing the microswitches, refer to Section 5, “Electrical Components.” Replace any defective microswitches.
The cutter head power switch is defective. Replace the cutter head power switch.
The circuit breaker on the back of the heater head is defective.
Replace the circuit breaker.
The cutter head assembly wiring harness is not connected.
Check the connection between the pin housing in the conveyor drive assembly and the socket housing in the heater head. Also, make sure that the pins are securely seated in the pin housing.
The cuts-per-pocket switch is defective. Replace the cuts-per-pocket switch.

Belshaw Adamatic Bakery Group • www.belshaw-adamatic.com • 206-322-5474 •[email protected] Donut Robot Mark VI Technical Supplement MN-1033EN 21
THE ELEMENT WILL NOT HEAT, AND THE CONVEYOR WILL NOT RUN.
Possible Causes What To Do
The power cord is not plugged in, or the outlet has no power.
Connect the machine to a good power source.
WARNING
To avoid being burned or electrocuted, before doing any of the following, turn off the machine, allow the shortening to cool, and disconnect the machine from the power source.
The power cord is defective. Replace the power cord.
The transformer is defective. Replace the transformer.
The connections to the transformer are bad. Rewire the connections to the transformer.
THE ELEMENT WILL NOT HEAT, BUT THE CONVEYOR RUNS.
Possible Causes What To Do
The high temperature limit control switch has been tripped.
Push the red reset button on the back panel of the heater head.
The thermostat has been calibrated incorrectly. Recalibrate the thermostat.
WARNING
To avoid being burned or electrocuted, before doing any of the following, turn off the machine, allow the shortening to cool, and disconnect the machine from the power source.
The high temperature limit control is defective. Replace the high temperature limit control.
The thermostat is defective. Replace the thermostat.
The contactor for the transistor is defective. Replace the contactor.
The connections to the contactor are bad. Rewire the connections to the contactor.
Belshaw Adamatic Bakery Group • www.belshaw-adamatic.com • 206-322-5474 •[email protected] 22 MN-1033EN Donut Robot Mark VI Technical Supplement
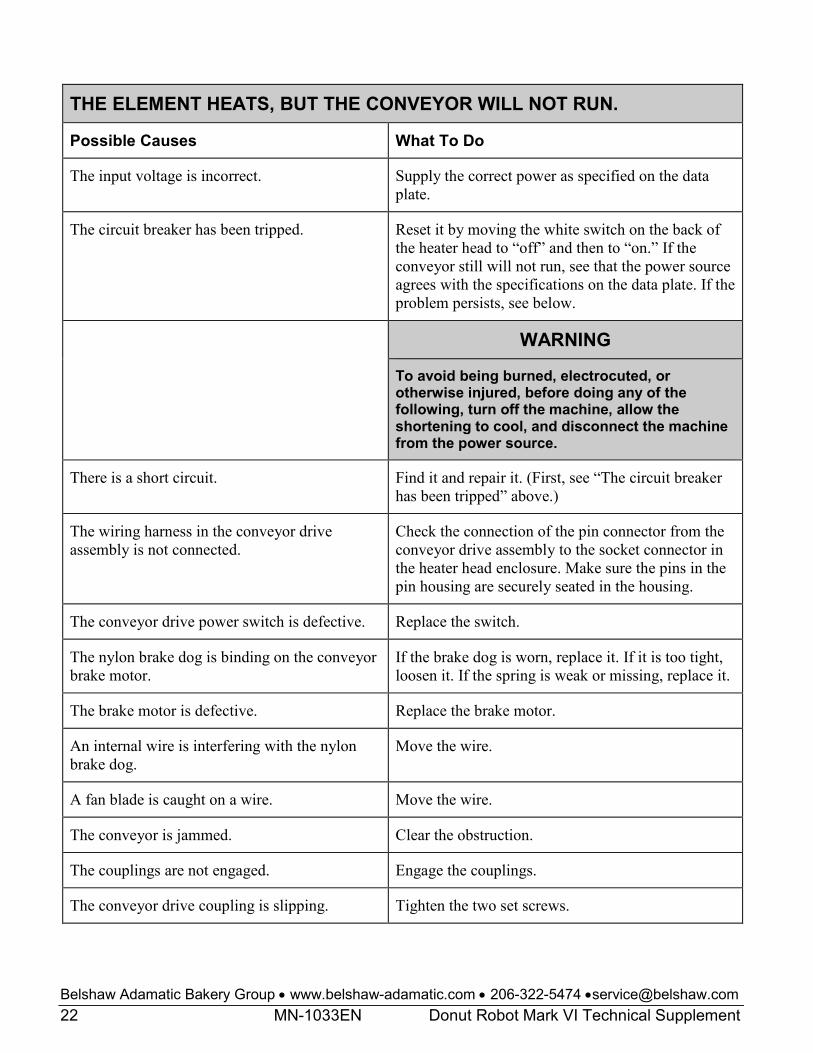
THE ELEMENT HEATS, BUT THE CONVEYOR WILL NOT RUN.
Possible Causes What To Do
The input voltage is incorrect. Supply the correct power as specified on the data plate.
The circuit breaker has been tripped. Reset it by moving the white switch on the back of the heater head to “off” and then to “on.” If the conveyor still will not run, see that the power source agrees with the specifications on the data plate. If the problem persists, see below.
WARNING
To avoid being burned, electrocuted, or otherwise injured, before doing any of the following, turn off the machine, allow the shortening to cool, and disconnect the machine from the power source.
There is a short circuit. Find it and repair it. (First, see “The circuit breaker has been tripped” above.)
The wiring harness in the conveyor drive assembly is not connected.
Check the connection of the pin connector from the conveyor drive assembly to the socket connector in the heater head enclosure. Make sure the pins in the pin housing are securely seated in the housing.
The conveyor drive power switch is defective. Replace the switch.
The nylon brake dog is binding on the conveyor brake motor.
If the brake dog is worn, replace it. If it is too tight, loosen it. If the spring is weak or missing, replace it.
The brake motor is defective. Replace the brake motor.
An internal wire is interfering with the nylon brake dog.
Move the wire.
A fan blade is caught on a wire. Move the wire.
The conveyor is jammed. Clear the obstruction.
The couplings are not engaged. Engage the couplings.
The conveyor drive coupling is slipping. Tighten the two set screws.
Belshaw Adamatic Bakery Group • www.belshaw-adamatic.com • 206-322-5474 •[email protected] Donut Robot Mark VI Technical Supplement MN-1033EN 23
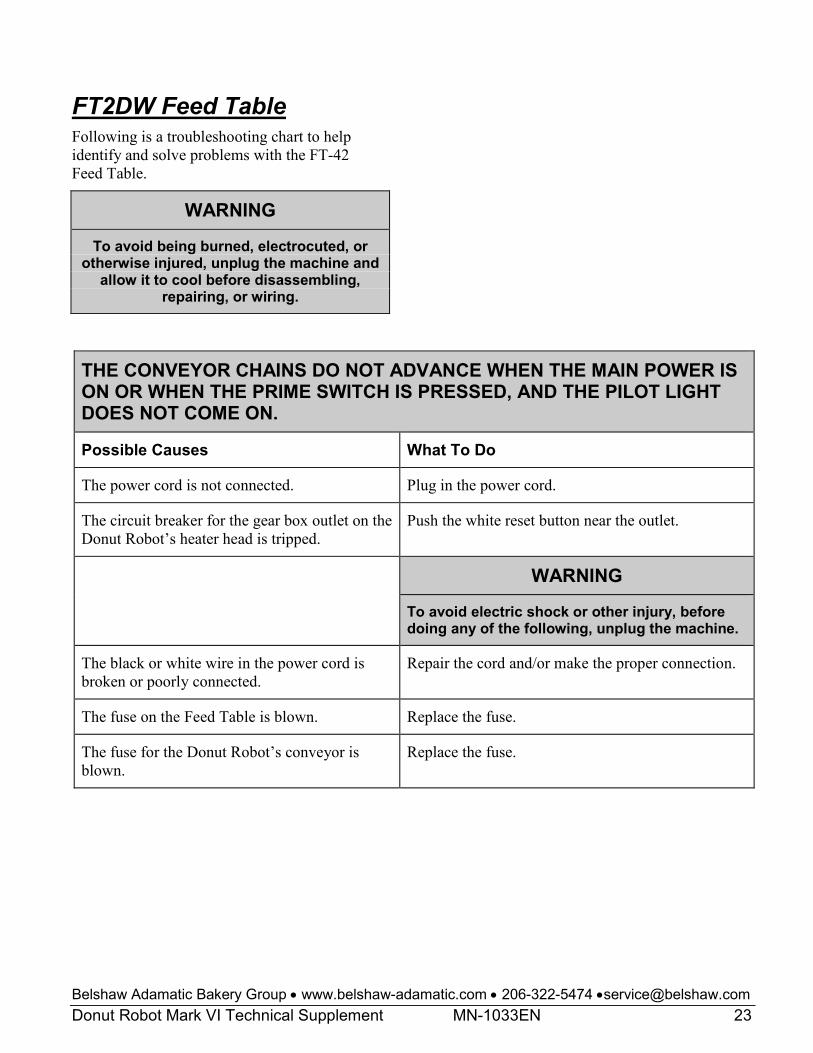
FT2DW Feed Table Following is a troubleshooting chart to help identify and solve problems with the FT-42 Feed Table.
WARNING
To avoid being burned, electrocuted, or otherwise injured, unplug the machine and
allow it to cool before disassembling, repairing, or wiring.
THE CONVEYOR CHAINS DO NOT ADVANCE WHEN THE MAIN POWER IS ON OR WHEN THE PRIME SWITCH IS PRESSED, AND THE PILOT LIGHT DOES NOT COME ON.
Possible Causes What To Do
The power cord is not connected. Plug in the power cord.
The circuit breaker for the gear box outlet on the Donut Robot’s heater head is tripped.
Push the white reset button near the outlet.
WARNING
To avoid electric shock or other injury, before doing any of the following, unplug the machine.
The black or white wire in the power cord is broken or poorly connected.
Repair the cord and/or make the proper connection.
The fuse on the Feed Table is blown. Replace the fuse.
The fuse for the Donut Robot’s conveyor is blown.
Replace the fuse.
Belshaw Bros., Inc. • www.belshaw.com • Phone 206-322-5474 • Fax 206-322-5425 24 MN-1013EN Donut Robot MarkVI Technical Supplement
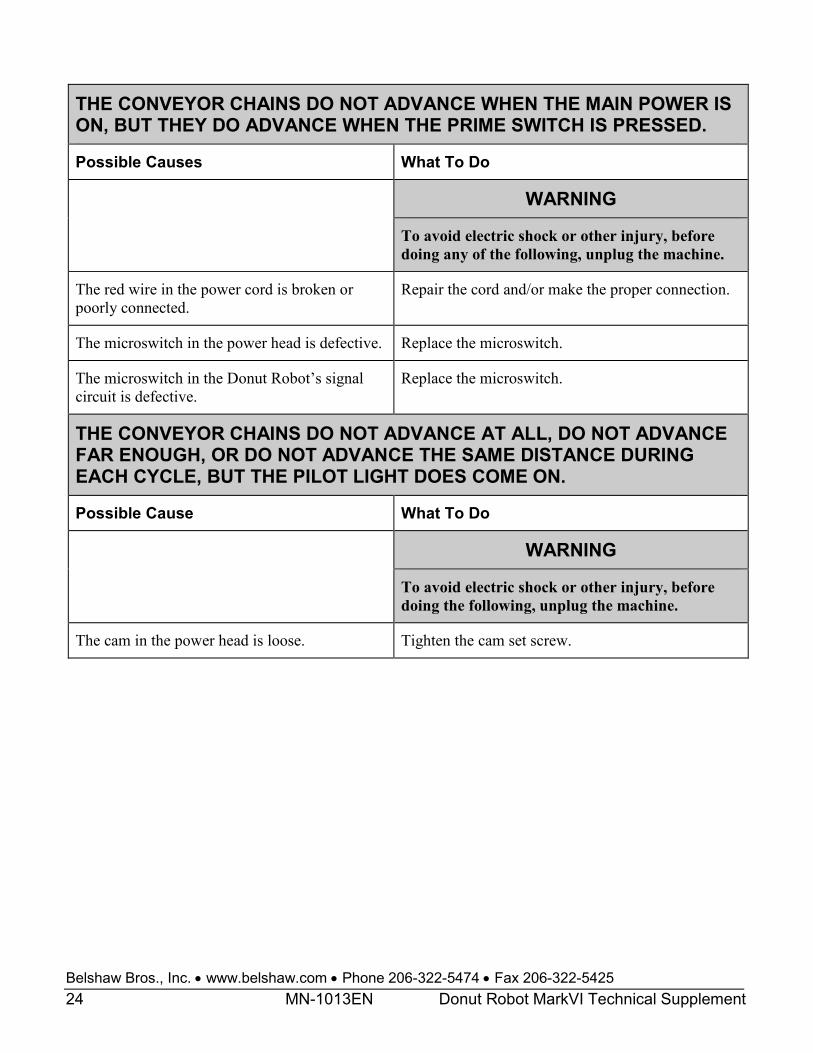
THE CONVEYOR CHAINS DO NOT ADVANCE WHEN THE MAIN POWER IS ON, BUT THEY DO ADVANCE WHEN THE PRIME SWITCH IS PRESSED.
Possible Causes What To Do
WARNING
To avoid electric shock or other injury, before doing any of the following, unplug the machine.
The red wire in the power cord is broken or poorly connected.
Repair the cord and/or make the proper connection.
The microswitch in the power head is defective. Replace the microswitch.
The microswitch in the Donut Robot’s signal circuit is defective.
Replace the microswitch.
THE CONVEYOR CHAINS DO NOT ADVANCE AT ALL, DO NOT ADVANCE FAR ENOUGH, OR DO NOT ADVANCE THE SAME DISTANCE DURING EACH CYCLE, BUT THE PILOT LIGHT DOES COME ON.
Possible Cause What To Do
WARNING
To avoid electric shock or other injury, before doing the following, unplug the machine.
The cam in the power head is loose. Tighten the cam set screw.
Belshaw Bros., Inc. • www.belshaw.com • Phone 206-322-5474 • Fax 206-322-5425 Donut Robot Mark II TS MN-1013EN 25
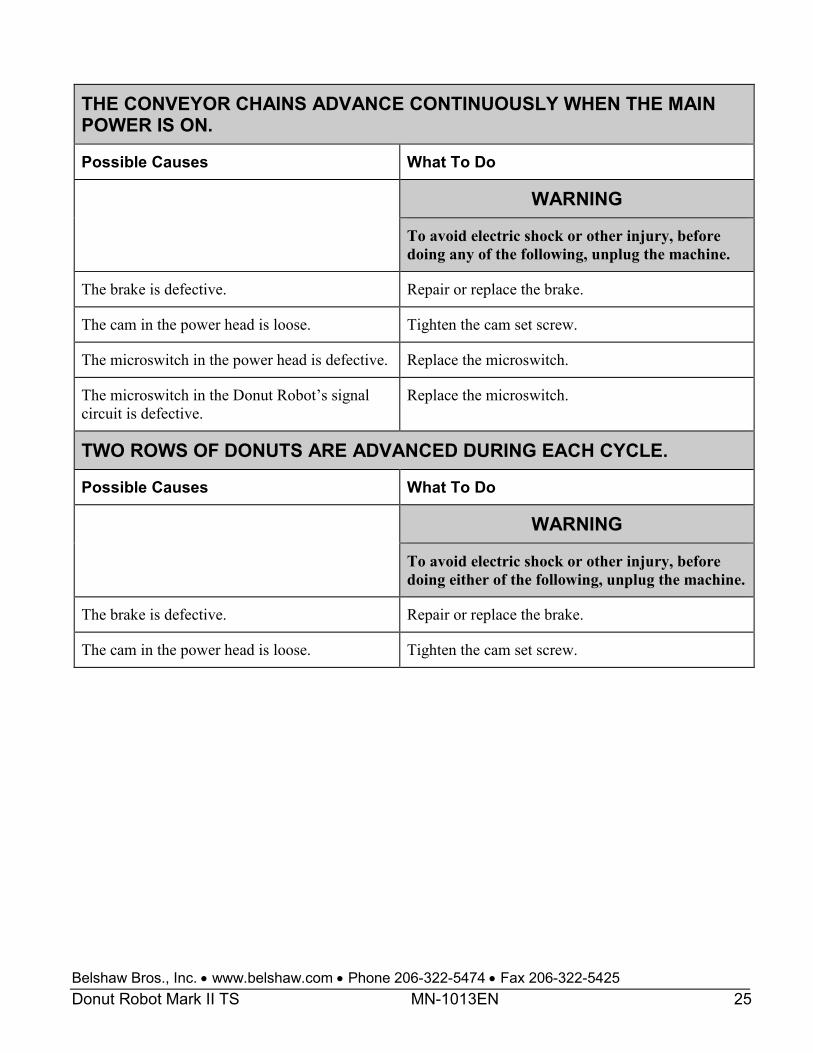
THE CONVEYOR CHAINS ADVANCE CONTINUOUSLY WHEN THE MAIN POWER IS ON.
Possible Causes What To Do
WARNING
To avoid electric shock or other injury, before doing any of the following, unplug the machine.
The brake is defective. Repair or replace the brake.
The cam in the power head is loose. Tighten the cam set screw.
The microswitch in the power head is defective. Replace the microswitch.
The microswitch in the Donut Robot’s signal circuit is defective.
Replace the microswitch.
TWO ROWS OF DONUTS ARE ADVANCED DURING EACH CYCLE.
Possible Causes What To Do
WARNING
To avoid electric shock or other injury, before doing either of the following, unplug the machine.
The brake is defective. Repair or replace the brake.
The cam in the power head is loose. Tighten the cam set screw.

Belshaw Bros., Inc. • www.belshaw.com • Phone 206-322-5474 • Fax 206-322-5425 26 MN-1013EN Donut Robot MarkVI Technical Supplement
5 Temperature Controller Changing Parameters on the Electronic Temperature Controller To change parameters on the temperature controller, see the Service Bulletin SB-0446 on the following pages.
Belshaw Bros., Inc. • www.belshaw.com • Phone 206-322-5474 • Fax 206-322-5425 Donut Robot Mark II TS MN-1013EN 27
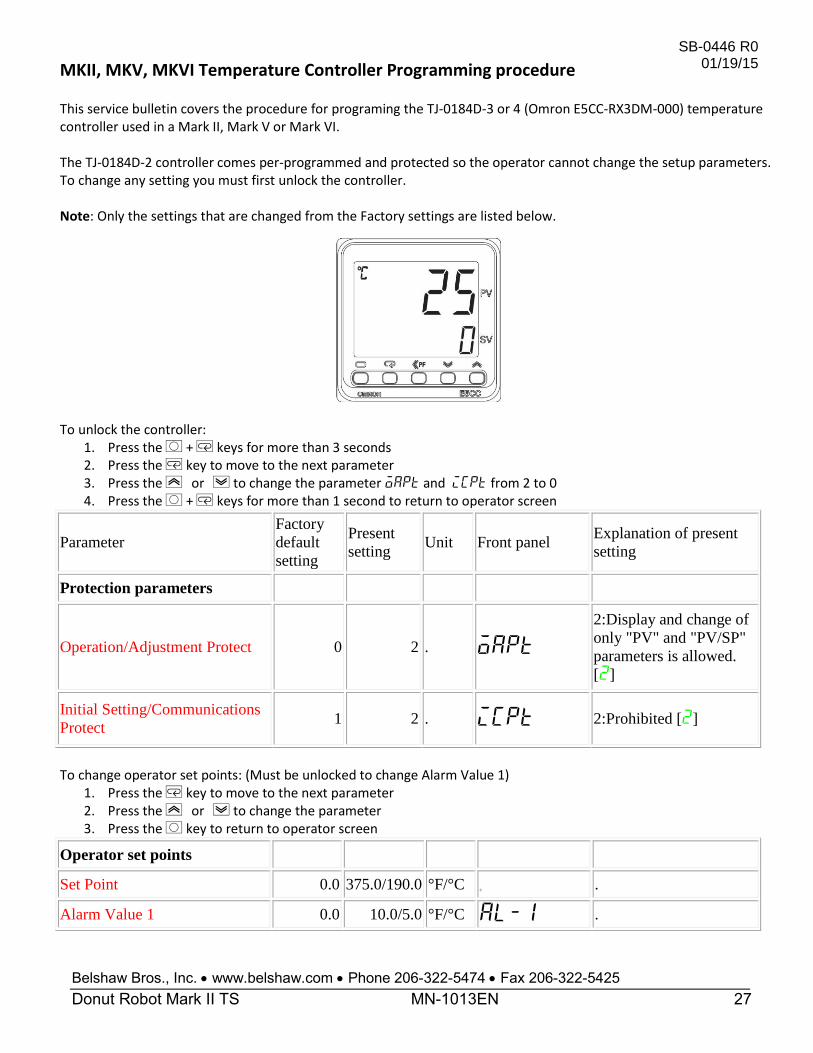
MKII, MKV, MKVI Temperature Controller Programming procedure This service bulletin covers the procedure for programing the TJ-0184D-3 or 4 (Omron E5CC-RX3DM-000) temperature controller used in a Mark II, Mark V or Mark VI. The TJ-0184D-2 controller comes per-programmed and protected so the operator cannot change the setup parameters. To change any setting you must first unlock the controller. Note: Only the settings that are changed from the Factory settings are listed below.
To unlock the controller:
1. Press the O + M keys for more than 3 seconds 2. Press the M key to move to the next parameter 3. Press the U or D to change the parameter oapt and icpt from 2 to 0 4. Press the O + M keys for more than 1 second to return to operator screen
Parameter
Factory
default
setting
Present
setting Unit Front panel
Explanation of present
setting
Protection parameters
Operation/Adjustment Protect 0 2 . oapt
2:Display and change of
only "PV" and "PV/SP"
parameters is allowed.
[2]
Initial Setting/Communications
Protect 1 2 . icpt 2:Prohibited [2]
To change operator set points: (Must be unlocked to change Alarm Value 1)
1. Press the M key to move to the next parameter 2. Press the U or D to change the parameter 3. Press the O key to return to operator screen
Operator set points
Set Point 0.0 375.0/190.0 °F/°C . .
Alarm Value 1 0.0 10.0/5.0 °F/°C al-1 .
SB-0446 R0 01/19/15

Belshaw Bros., Inc. • www.belshaw.com • Phone 206-322-5474 • Fax 206-322-5425 28 MN-1013EN Donut Robot MarkVI Technical Supplement
To change operator level parameters: (Must be unlocked)
1. Press the O key for less than 1 second 2. Press the M key to move to the next parameter 3. Press the U or D to change the parameter 4. Press the O key to return to operator screen
Operator level parameters
Process Value Input Shift 0.0 0.0 °F/°C ins This is the offset setting
for calibration
Hysteresis (Heating) 1.0 0.5 °F/°C hys .
To change initial level parameters: (Must be unlocked)
1. Press the O key for move than 1 second to adjust intial parameters 2. Press the M key to move to the next parameter 3. Press the U or D to change the parameter 4. Press the O key for more than 1 second return to operator screen
Initial level parameters
Input Type 5 8 . in-t
8:Thermocouple[J] (-
20.0 to 400.0°C or 0.0 to
750.0°F) [8]
Temperature Unit 0 1 . d-u °F [f]
SP Upper Limit 130.0 400.0/200.0 °F/°C sl-h .
SP Lower Limit -20.0 0.0 °F/°C sl-l .
Alarm 2 Type 2 0 . alt2 0:Alarm function OFF
[0]
Alarm 3 Type 2 0 . alt3 0:Alarm function OFF
[0]
Alarm 4 Type 2 0 . alt4 0:Alarm function OFF
[0]
To change advanced level parameters: (Must be unlocked)
1. Unlock the controller 2. Press the O key for more than 1 second to adjust intial parameters 3. Press the M key until you get to parameter amov 4. Press the U or D to change amov parameter to -169
Advanced level parameters
Alarm 1 Latch 0 1 . a1lt Enabled [on]
PV/SP No. 1 Display Selection 4 1 . spd1 1:"PV/SP/No display"
[1]
PV Decimal Point Display 1 0 . pVdp OFF [off]
SB-0446 R0 01/19/15
Belshaw Bros., Inc. • www.belshaw.com • Phone 206-322-5474 • Fax 206-322-5425 Donut Robot Mark II TS MN-1013EN 29
SB-0446 R0 01/19/15
After programming: To lock the controller: 1. Press the O + M keys for more than 3 seconds 2. Press the M key to move to the next parameter 3. Press the U or D to change the parameter oapt and icpt from 0 to 2 4. Press the O + M keys for more than 1 second to return to operator screen
To set the controller back to factory default settings: (Must be unlocked, see page 1)
1. Press the O key for more than 1 second to adjust intial parameters 2. Press the M key until you get to parameter amov 3. Press the U or D to change amov parameter to -169 4. Change parameter init from off to fact 5. Press the O key for more than 1 second return to intial screen 6. Press the O key for more than 1 second return to operator screen
Please do not hesitate to contact Belshaw Adamatic Bakery Group for additional assistance at (206) 322-5474, (800) 578-2547or e-mail at [email protected].
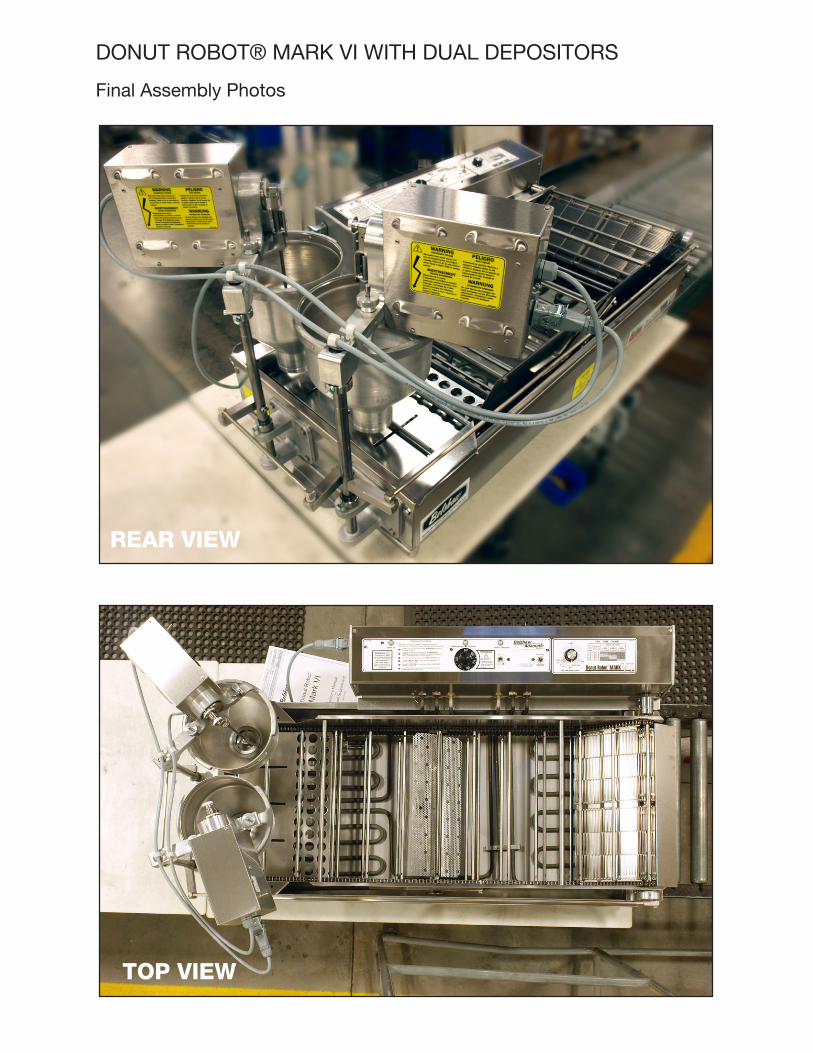
DONUT ROBOT® MARK VI WITH DUAL DEPOSITORS
Final Assembly Photos
REAR VIEW
TOP VIEW
Belshaw Bros., Inc. • www.belshaw.com • Phone 206-322-5474 • Fax 206-322-5425 30 MN-1013EN Donut Robot MarkVI Technical Supplement
6 Diagrams and Parts Lists
See the following pages for diagrams and parts lists for your Donut Robot.